Embed Size (px)
Citation preview
united shadeshades of excellence
PROGRAMMINGFORMOTORIZEDSHADES
PROGRAMMING INSTRUCTIONS FOR MOTORIZED SHADES WITH 12-VOLT SWITCHED MOTORMECHANICAL SET
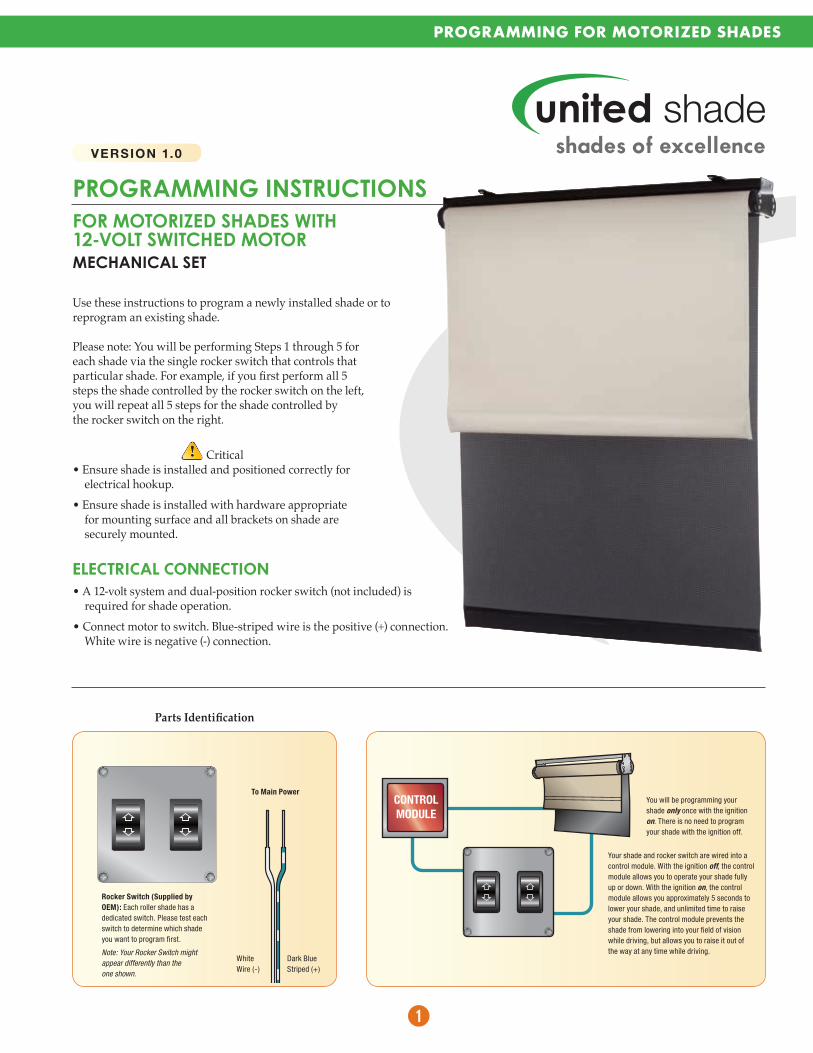
Use these instructions to program a newly installed shade or to reprogram an existing shade.
Please note: You will be performing Steps 1 through 5 for each shade via the single rocker switch that controls that particular shade. For example, if you first perform all 5 steps the shade controlled by the rocker switch on the left, you will repeat all 5 steps for the shade controlled by the rocker switch on the right.
Critical• Ensure shade is installed and positioned correctly for
electrical hookup.• Ensure shade is installed with hardware appropriate
for mounting surface and all brackets on shade are securely mounted.
ELECTRICAL CONNECTION• A 12-volt system and dual-position rocker switch (not included) is
required for shade operation.• Connect motor to switch. Blue-striped wire is the positive (+) connection.
White wire is negative (-) connection.
q
VERSION 1.0
Dark Blue Striped (+)
White Wire (-)
Rocker Switch (Supplied by OEM): Each roller shade has a dedicated switch. Please test each switch to determine which shade you want to program first.
Note: Your Rocker Switch might appear differently than the one shown.
To Main PowerCONTROLMODULE
You will be programming your shade only once with the ignition on. There is no need to program your shade with the ignition off.
Your shade and rocker switch are wired into a control module. With the ignition off, the control module allows you to operate your shade fully up or down. With the ignition on, the control module allows you approximately 5 seconds to lower your shade, and unlimited time to raise your shade. The control module prevents the shade from lowering into your field of vision while driving, but allows you to raise it out of the way at any time while driving.
Parts Identification

Fig 1. Fig 2. Fig 3.
Fig 4. Fig 5.
Fig 6. Fig 7.
SETTING THE LOWER LIMIT
3. Press the DOWN button on the keypad. (Fig 1.)
4A. If the blind moves BELOW your desired setting, press the up button. (Fig 2.)
• Rotate the bottom adjusting knob counterclockwise until the blind reaches your desired setting. (Fig 3.)
• Press the DOWN button on the keypad. (Fig 4.)• Rotate the bottom adjusting knob clockwise until
the blind reaches your desired setting. (Fig 5.)• The LOWER limit position is now set.
4B. If the blind moves ABOVE your desired setting, press the down button. (Fig 6.)
• Rotate the adjusting knob clockwise until the blind reaches your desired setting. (Fig 6.)
• The LOWER limit position is now set
Fig 1. Fig 2.
Fig 3. Fig 4. Fig 5.
Fig 6. Fig 7.
MOTORIZED SHADESPROGRAMMING AND OPERATING INSTRUCTIONS
SETTING THE UPPER LIMIT1. Press the UP button on the keypad. (Fig 1.)
2A. If the blind moves above your desired setting, press the down button. (Fig 2.)
• Rotate the top adjusting knob counterclockwise until the blind reaches your desired setting. (Fig 3.)
• Press the UP button on the keypad. (Fig 4.)• Rotate the top adjusting knob clockwise until
the blind reaches your desired setting. (Fig 5.)• The UPPER limit position is now set.
2B. If the blind moves BELOW your desired setting, press the up button. (Fig 6.)
• Rotate the top adjusting knob clockwise until the blind reaches your desired setting. (Fig 7.)
• The UPPER limit position is now set.
w
Printed in U.S.A. ©2014 Dicor Corporation US-55 TM/06-14
a dicor company
united shade52878 Airport Parkway • Elkhart IN 46514 574-262-0954 • www.unitedshade.com
United Shade reserves the right to change shade products, fabrics, colors, patterns, hardware and shade componentry without notice, and is not responsible for printing errors or omissions. United Shade is not responsible for damages to shade or vehicle caused by improper wiring.
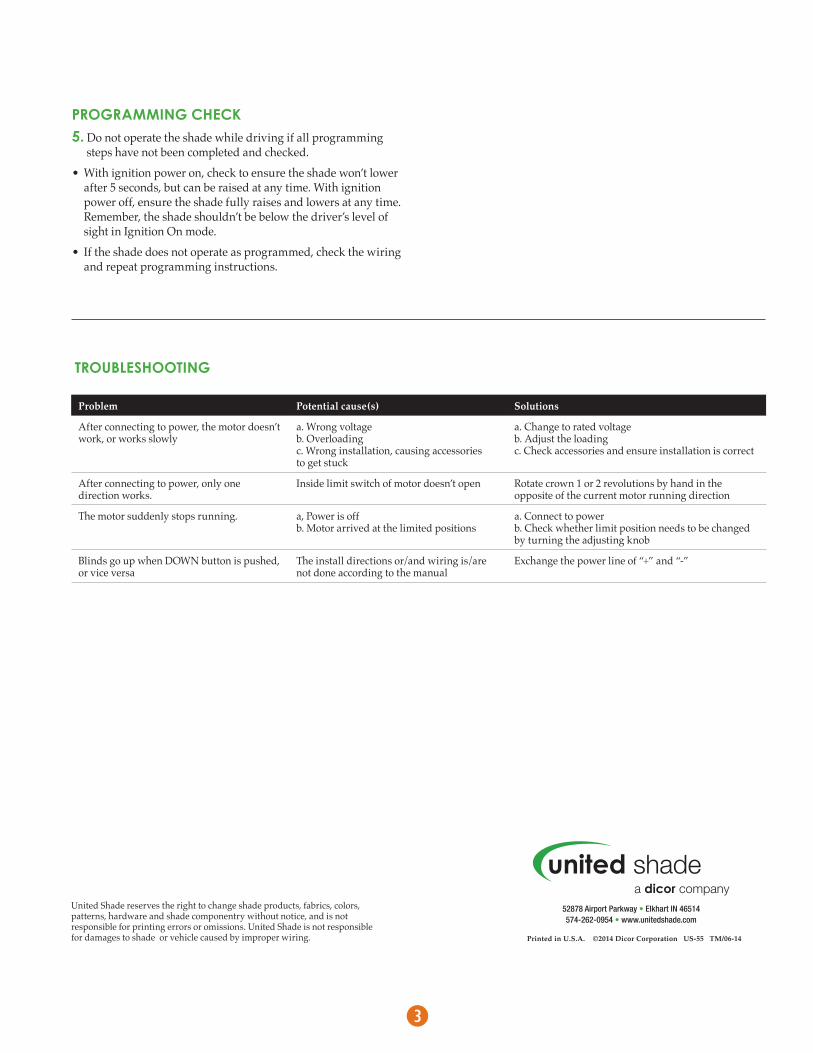
TROUBLESHOOTING
Problem Potential cause(s) Solutions
After connecting to power, the motor doesn’t work, or works slowly
a. Wrong voltageb. Overloadingc. Wrong installation, causing accessories to get stuck
a. Change to rated voltageb. Adjust the loadingc. Check accessories and ensure installation is correct
After connecting to power, only one direction works.
Inside limit switch of motor doesn’t open Rotate crown 1 or 2 revolutions by hand in the opposite of the current motor running direction
The motor suddenly stops running. a, Power is offb. Motor arrived at the limited positions
a. Connect to powerb. Check whether limit position needs to be changed by turning the adjusting knob
Blinds go up when DOWN button is pushed, or vice versa
The install directions or/and wiring is/are not done according to the manual
Exchange the power line of “+” and “-”
PROGRAMMING CHECK5. Do not operate the shade while driving if all programming
steps have not been completed and checked.• With ignition power on, check to ensure the shade won’t lower
after 5 seconds, but can be raised at any time. With ignition power off, ensure the shade fully raises and lowers at any time. Remember, the shade shouldn’t be below the driver’s level of sight in Ignition On mode.
• If the shade does not operate as programmed, check the wiring and repeat programming instructions.
e