Embed Size (px)
Citation preview
Version 2012 Release 1 Release Notes
Revision Date: May 1, 2012 PDF File Version: v16
This document summarizes the changes to NetSuite between Version 2012 Release 1 and the previous release.
These release notes are subject to change. Please review the Documentation Revision History help topic in the Version 2012 Release 1 Help Center for a list of the changes made in this build of the release notes.
The Version 2012 Release 1 enhancements and changes listed in this document are not available to NetSuite customers until they are upgraded to Version 2012 Release 1. Please check the version number at the bottom of your Home page if you are unsure which NetSuite version you are using.
ReleaseNotes2012.1.0_v16.pdf - Subject to Change
Version 2012 Release 1 Release Notes 2
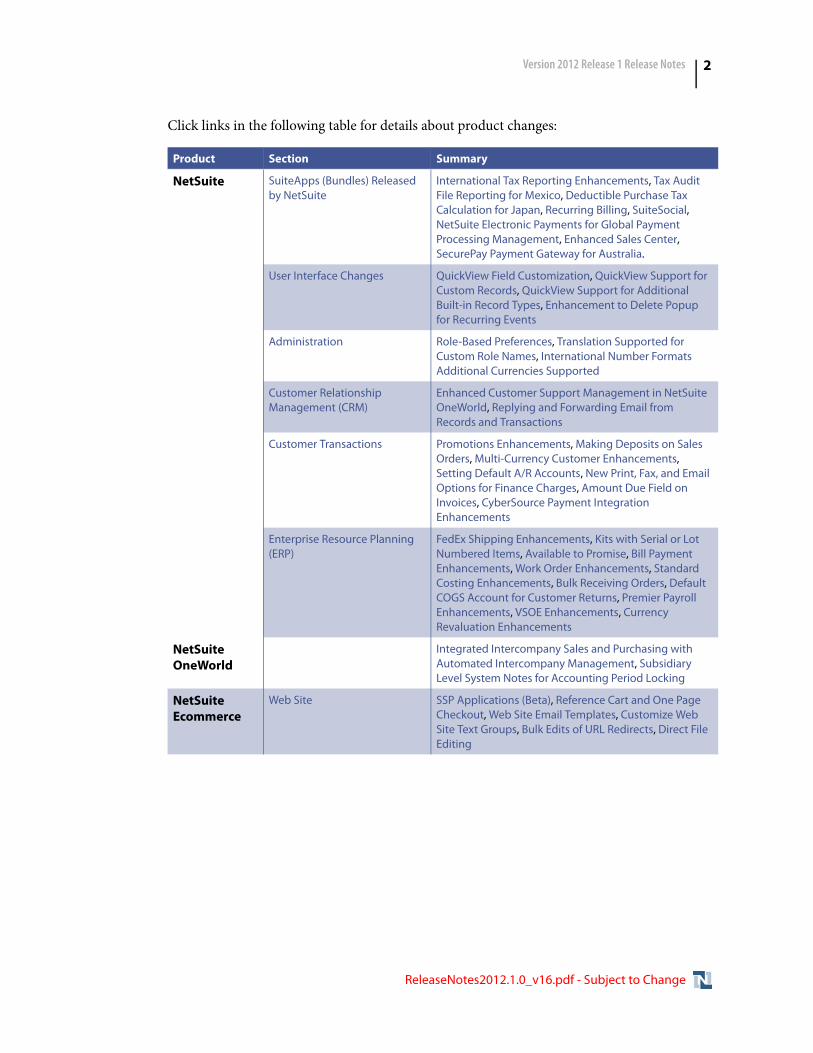
Click links in the following table for details about product changes:
Product Section Summary
NetSuite SuiteApps (Bundles) Released by NetSuite
International Tax Reporting Enhancements, Tax Audit File Reporting for Mexico, Deductible Purchase Tax Calculation for Japan, Recurring Billing, SuiteSocial, NetSuite Electronic Payments for Global Payment Processing Management, Enhanced Sales Center, SecurePay Payment Gateway for Australia.
User Interface Changes QuickView Field Customization, QuickView Support for Custom Records, QuickView Support for Additional Built-in Record Types, Enhancement to Delete Popup for Recurring Events
Administration Role-Based Preferences, Translation Supported for Custom Role Names, International Number Formats Additional Currencies Supported
Customer Relationship Management (CRM)
Enhanced Customer Support Management in NetSuite OneWorld, Replying and Forwarding Email from Records and Transactions
Customer Transactions Promotions Enhancements, Making Deposits on Sales Orders, Multi-Currency Customer Enhancements, Setting Default A/R Accounts, New Print, Fax, and Email Options for Finance Charges, Amount Due Field on Invoices, CyberSource Payment Integration Enhancements
Enterprise Resource Planning (ERP)
FedEx Shipping Enhancements, Kits with Serial or Lot Numbered Items, Available to Promise, Bill Payment Enhancements, Work Order Enhancements, Standard Costing Enhancements, Bulk Receiving Orders, Default COGS Account for Customer Returns, Premier Payroll Enhancements, VSOE Enhancements, Currency Revaluation Enhancements
NetSuite OneWorld
Integrated Intercompany Sales and Purchasing with Automated Intercompany Management, Subsidiary Level System Notes for Accounting Period Locking
NetSuite Ecommerce
Web Site SSP Applications (Beta), Reference Cart and One Page Checkout, Web Site Email Templates, Customize Web Site Text Groups, Bulk Edits of URL Redirects, Direct File Editing
ReleaseNotes2012.1.0_v16.pdf - Subject to Change

Version 2012 Release 1 Release Notes 3
SuiteCloud Platform
SuiteBundler Terms of Service Supported for Bundles, Ability to Hide Bundle Components in Target Accounts, From Bundle Filter on List Pages, Merge Data Option for Custom Lists and Records, Bundle Update Preference for Dashboards
SuiteBuilder - Customization Translation Supported for Custom Centers, Tabs, Categories, and Links, Enhanced Permissions Definition for Custom Records, Ability to Associate Related Fields on Custom Forms, Time Record Supported as a List/Record Field, Web Site Record Supported as a List/Record Field, QuickView Enhancements, Subrecord Form Customization Now Supported, Built-In Custom Record Icons, Apply Formatting Preference for Number Custom Fields, Custom Transaction Column Fields Support Inline HTML Type, Field Placement on “Other Record” Type Entry Forms
SuiteAnalytics (Dashboards, Reporting and Search)
Customization of Report Footer Filters, Translation Supported for Searches, KPI Scorecard Highlighting, Key Performance Indicator Headlines, When Ordered By Field Option for Searches, Extending Report Permissions
CSV Import Import of Item Demand Plans Supported, Multi-Threading and Multiple Queues for Import Jobs, Translation Supported for Import Map Name and Description, Import of Transaction Currency for Multi-Currency Customers, Import of URL Redirects Supported
SuiteFlow (Workflow Manager) Logging Supported When Workflow is Released, Attaching Transactions and Statements Using the Send Email Action, New Confirm and Show Message Actions, Record Transforms Supported, Actions Visible on Hover of Workflow State
SuiteScript New API for Scheduled Script Stabilization, New Search API, Item Demand Plan Record Exposed to SuiteScript, SuiteScript Server Pages (Beta), Custom Plug-ins for SuiteScript, Subrecord Enhancements, Return Value Change for getField APIs in User Event Bulk Billing Scripts, User Event Governance Enhancements, Changed Number Field Formats for RESTlet JSON Objects, Change to Field Internal ID, API Additions and Enhancements
SuiteTalk (Web Services) Integration
Item Demand Plan Record Type Supported in SuiteTalk, Change to replaceAll Behavior for Item Pricing Matrix, Change to Country Values in Shipping and Billing Addresses, New CyberSource Decision Manager Fields for Sales Order Records, Additional Record Changes in 2012.1 Endpoint, Change to Parent Matrix Item Delete, 2012.1 WSDL Now Generally Available, Araxis Merge Diff File for the 2012.1 Endpoint, 2012.1 Schema Browser
Product Section Summary
ReleaseNotes2012.1.0_v16.pdf - Subject to Change
Version 2012 Release 1 Release Notes SuiteApps (Bundles) Released by NetSuite
4
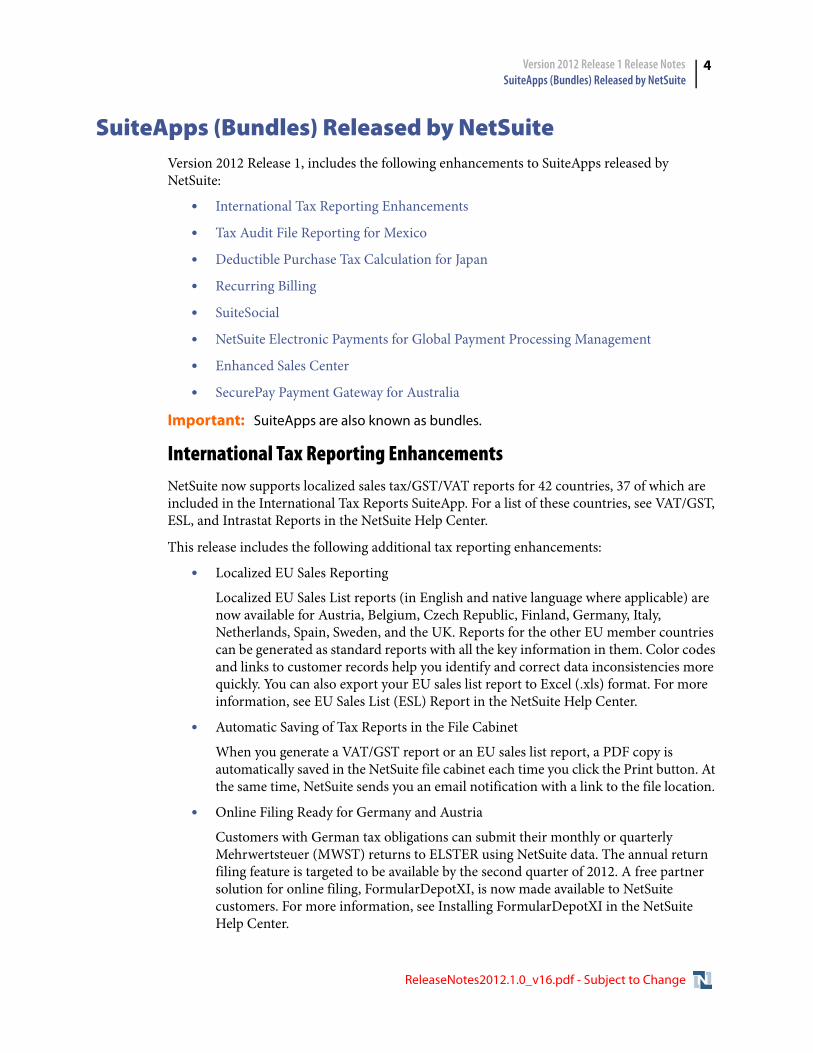
SuiteApps (Bundles) Released by NetSuiteVersion 2012 Release 1, includes the following enhancements to SuiteApps released by NetSuite:
• International Tax Reporting Enhancements
• Tax Audit File Reporting for Mexico
• Deductible Purchase Tax Calculation for Japan
• Recurring Billing
• SuiteSocial
• NetSuite Electronic Payments for Global Payment Processing Management
• Enhanced Sales Center
• SecurePay Payment Gateway for Australia
Important: SuiteApps are also known as bundles.
International Tax Reporting EnhancementsNetSuite now supports localized sales tax/GST/VAT reports for 42 countries, 37 of which are included in the International Tax Reports SuiteApp. For a list of these countries, see VAT/GST, ESL, and Intrastat Reports in the NetSuite Help Center.
This release includes the following additional tax reporting enhancements:
• Localized EU Sales Reporting
Localized EU Sales List reports (in English and native language where applicable) are now available for Austria, Belgium, Czech Republic, Finland, Germany, Italy, Netherlands, Spain, Sweden, and the UK. Reports for the other EU member countries can be generated as standard reports with all the key information in them. Color codes and links to customer records help you identify and correct data inconsistencies more quickly. You can also export your EU sales list report to Excel (.xls) format. For more information, see EU Sales List (ESL) Report in the NetSuite Help Center.
• Automatic Saving of Tax Reports in the File Cabinet
When you generate a VAT/GST report or an EU sales list report, a PDF copy is automatically saved in the NetSuite file cabinet each time you click the Print button. At the same time, NetSuite sends you an email notification with a link to the file location.
• Online Filing Ready for Germany and Austria
Customers with German tax obligations can submit their monthly or quarterly Mehrwertsteuer (MWST) returns to ELSTER using NetSuite data. The annual return filing feature is targeted to be available by the second quarter of 2012. A free partner solution for online filing, FormularDepotXI, is now made available to NetSuite customers. For more information, see Installing FormularDepotXI in the NetSuite Help Center.
ReleaseNotes2012.1.0_v16.pdf - Subject to Change
Version 2012 Release 1 Release Notes SuiteApps (Bundles) Released by NetSuite
5
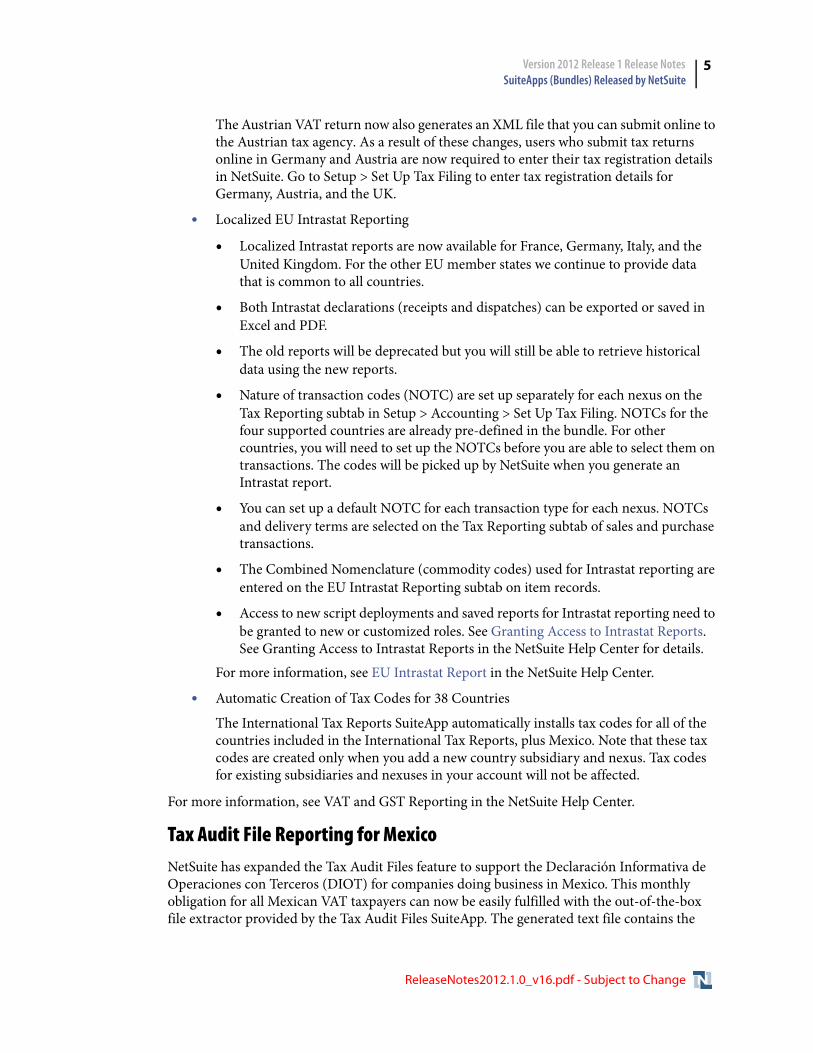
The Austrian VAT return now also generates an XML file that you can submit online to the Austrian tax agency. As a result of these changes, users who submit tax returns online in Germany and Austria are now required to enter their tax registration details in NetSuite. Go to Setup > Set Up Tax Filing to enter tax registration details for Germany, Austria, and the UK.
• Localized EU Intrastat Reporting
• Localized Intrastat reports are now available for France, Germany, Italy, and the United Kingdom. For the other EU member states we continue to provide data that is common to all countries.
• Both Intrastat declarations (receipts and dispatches) can be exported or saved in Excel and PDF.
• The old reports will be deprecated but you will still be able to retrieve historical data using the new reports.
• Nature of transaction codes (NOTC) are set up separately for each nexus on the Tax Reporting subtab in Setup > Accounting > Set Up Tax Filing. NOTCs for the four supported countries are already pre-defined in the bundle. For other countries, you will need to set up the NOTCs before you are able to select them on transactions. The codes will be picked up by NetSuite when you generate an Intrastat report.
• You can set up a default NOTC for each transaction type for each nexus. NOTCs and delivery terms are selected on the Tax Reporting subtab of sales and purchase transactions.
• The Combined Nomenclature (commodity codes) used for Intrastat reporting are entered on the EU Intrastat Reporting subtab on item records.
• Access to new script deployments and saved reports for Intrastat reporting need to be granted to new or customized roles. See Granting Access to Intrastat Reports. See Granting Access to Intrastat Reports in the NetSuite Help Center for details.
For more information, see EU Intrastat Report in the NetSuite Help Center.
• Automatic Creation of Tax Codes for 38 Countries
The International Tax Reports SuiteApp automatically installs tax codes for all of the countries included in the International Tax Reports, plus Mexico. Note that these tax codes are created only when you add a new country subsidiary and nexus. Tax codes for existing subsidiaries and nexuses in your account will not be affected.
For more information, see VAT and GST Reporting in the NetSuite Help Center.
Tax Audit File Reporting for MexicoNetSuite has expanded the Tax Audit Files feature to support the Declaración Informativa de Operaciones con Terceros (DIOT) for companies doing business in Mexico. This monthly obligation for all Mexican VAT taxpayers can now be easily fulfilled with the out-of-the-box file extractor provided by the Tax Audit Files SuiteApp. The generated text file contains the
ReleaseNotes2012.1.0_v16.pdf - Subject to Change
Version 2012 Release 1 Release Notes SuiteApps (Bundles) Released by NetSuite
6
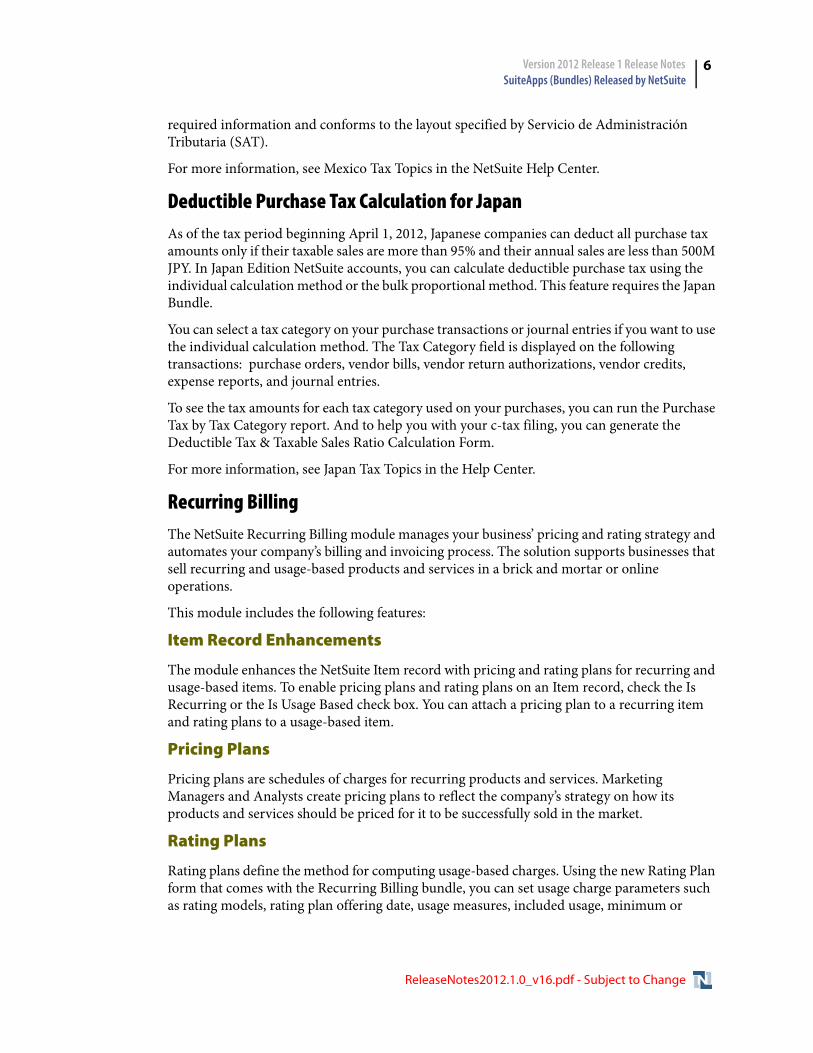
required information and conforms to the layout specified by Servicio de Administración Tributaria (SAT).
For more information, see Mexico Tax Topics in the NetSuite Help Center.
Deductible Purchase Tax Calculation for Japan As of the tax period beginning April 1, 2012, Japanese companies can deduct all purchase tax amounts only if their taxable sales are more than 95% and their annual sales are less than 500M JPY. In Japan Edition NetSuite accounts, you can calculate deductible purchase tax using the individual calculation method or the bulk proportional method. This feature requires the Japan Bundle.
You can select a tax category on your purchase transactions or journal entries if you want to use the individual calculation method. The Tax Category field is displayed on the following transactions: purchase orders, vendor bills, vendor return authorizations, vendor credits, expense reports, and journal entries.
To see the tax amounts for each tax category used on your purchases, you can run the Purchase Tax by Tax Category report. And to help you with your c-tax filing, you can generate the Deductible Tax & Taxable Sales Ratio Calculation Form.
For more information, see Japan Tax Topics in the Help Center.
Recurring BillingThe NetSuite Recurring Billing module manages your business’ pricing and rating strategy and automates your company’s billing and invoicing process. The solution supports businesses that sell recurring and usage-based products and services in a brick and mortar or online operations.
This module includes the following features:
Item Record Enhancements
The module enhances the NetSuite Item record with pricing and rating plans for recurring and usage-based items. To enable pricing plans and rating plans on an Item record, check the Is Recurring or the Is Usage Based check box. You can attach a pricing plan to a recurring item and rating plans to a usage-based item.
Pricing Plans
Pricing plans are schedules of charges for recurring products and services. Marketing Managers and Analysts create pricing plans to reflect the company’s strategy on how its products and services should be priced for it to be successfully sold in the market.
Rating Plans
Rating plans define the method for computing usage-based charges. Using the new Rating Plan form that comes with the Recurring Billing bundle, you can set usage charge parameters such as rating models, rating plan offering date, usage measures, included usage, minimum or
ReleaseNotes2012.1.0_v16.pdf - Subject to Change
Version 2012 Release 1 Release Notes SuiteApps (Bundles) Released by NetSuite
7
maximum charges, and pricing tiers. The module allows importing of usage data that is used as basis for computing charges for usage-based items.
Subscription Sales Orders
The Recurring Billing module enhances the NetSuite sales order record with a subscription sales order form that contains custom fields to enter information for recurring items. A subscription sales order is a transaction that records a commitment to sell recurring items to a customer.
Subscriptions
Subscriptions are records used to track sales and transaction histories of recurring items.
Subscriptions are created once a subscription sales order is approved. You can also add recurring items to an existing subscription through the sales order.
Importing of Usage Data
Usage is the amount of ratable usage measure (RUM) that is used by a customer during a billing cycle. A rate is applied to usage to come up with the resulting usage charge. You can import the usage data of your customers to calculate the charges for their usage-based subscriptions. The Recurring billing module allows you to import usage data using the Import Assistant. You can also use preset usage data for usage amounts that do not change from billing period to billing period.
Partial Payments, Over payments, and Invoice Aging
A customer can make a partial payment of the total the outstanding invoice. A customer can also make payments in excess of the invoice amount (over payments). If the customer has outstanding invoices, the overpayment is applied starting with the oldest outstanding invoices up to the latest outstanding invoice. Invoice aging is a functionality that tracks your customer's payment history, organized by invoice, and shows how those payments were applied to invoices.
Usage Data Filtering
Usage filters are saved searched-based user rules that are applied to usage data before they are uploaded to the billing database for processing. Usage filters transforms usage data based on the user rules of the filter type selected on the rating plan.
Invoicing Rules
You can select whether you want to issue invoices for the recurring items before (Advance) or after (Arrears) the billing cycle.
Anniversary and Day of Month Billing Modes
Select Anniversary if you want the item to be billed on the day the customer signs-up for the subscription (Anniversary) or on a specific day of the month (Day of Month).
For more information, see the Recurring Billing topic on the Help Center.
ReleaseNotes2012.1.0_v16.pdf - Subject to Change
Version 2012 Release 1 Release Notes SuiteApps (Bundles) Released by NetSuite
8
SuiteSocial
Important: This beta feature is still under development. Some planned functionality is not yet available and the feature is subject to change.
SuiteSocial is NetSuite's social collaboration tool that enables you to more tightly connect social interactions to your NetSuite data and track important changes to that data. You can see updates posted by your colleagues, and real-time posts when relevant NetSuite records are created or edited.
With SuiteSocial, you can:
• “Follow” updates to NetSuite records like you would follow a person on Twitter
• Get real-time updates on key business events
• Integrate with 3rd party social networking applications like Yammer for enhanced social collaboration
• Get social collaboration features natively in NetSuite
SuiteSocial is a SuiteApp that is built on the SuiteCloud platform—made up primarily of custom records and client/server SuiteScripts.
Administrator Setup
Configuration is done by running the SuiteSocial Admin Setup Assistant. From the Admin Setup Assistant, you can:
• Create SuiteSocial profiles for users
• Grant permissions to roles
• Set up channels to categorize SuiteSocial posts
• Enable record types for SuiteSocial use
• Set up dynamic record subscriptions based on the record type and association with a role
• Set up email sender preferences for SuiteSocial post notifications
Advanced setup options such as creating metrics based on saved searches with a custom message and creating complex and customized posting rules is done using saved searches and a workflow manager.
User Setup
As a user, you only need to add the SuiteSocial News Feed and/or the SuiteSocial Status portlets to use SuiteSocial. Optionally, you can customize your SuiteSocial profile by:
• Adding an image that will appear on your posts
• Subscribing to channels, colleagues, records, and related records
• Setting up email notification options
ReleaseNotes2012.1.0_v16.pdf - Subject to Change
Version 2012 Release 1 Release Notes SuiteApps (Bundles) Released by NetSuite
9
For more information, see SuiteSocial in the NetSuite Help Center.
NetSuite Electronic Payments for Global Payment Processing ManagementNetSuite Electronic Payments for Global Payment Processing Management enables you to pay your vendor bills and employee expenses across the globe directly from NetSuite, and to take payments directly from customers.
This SuiteApp puts the payments or direct debits into each bank’s predefined file format. This format is ready to import into banking software or to be submitted to the bank online, lowering payment processing expenses by eliminating checks, postage and envelopes, and saving time. In addition, this feature supports management of large payment runs, such as reversals, partial credits, and reprocessing.
With user-defined payment notification, payees can get immediate email notification of a payment. Flexible payment aggregation makes it possible to define one payment per vendor or employee, per bill or expense, or per a user-defined grouping per vendor.
NetSuite Electronic Payments is globalized to support international bank formats and routing, including the following formats:
• US: ACH CCD/PPD and CTX
• Canada: Spec 005
• UK: BACS Standard 18
• Germany: DTAUS
• France: CFONB
• Belgium: CIRI-FBF
• Netherlands: CLIEOP
• Italy: CBI BON-001
• Spain: AEB 34
• Australia: ABA
• New Zealand: BNZ
• Japan: Zengin
• Singapore: DBS and UoB
Vendor bill and employee expense payments are available for all the formats above. Customer direct debit support varies by country and format.
NetSuite Electronic Payments provides additional functionality for customers by providing a list of issued checks in each bank's predefined format. This feature is available in countries where Positive Pay systems are in operation.
ReleaseNotes2012.1.0_v16.pdf - Subject to Change
Version 2012 Release 1 Release Notes User Interface Changes
10
Enhanced Sales Center The Enhanced Sales Center provides an easier to use and more intuitive experience for sales users. Designed based on feedback from sales professionals, this SuiteApp provides a new layout for tabs, dashboards, and search and entry forms, in order to help salespeople navigate, search, and enter data faster and more efficiently.
After deploying the Enhanced Sales Center, administrators can assign four new enhanced roles including Enhanced Sales Center Sales Rep, Enhanced Sales Center Sales Manager, Enhanced Sales Center Sales Admin, and Enhanced Sales Center Publisher. Assigning sales users to the enhanced sales roles provides them with a new, easy tab structure more aligned with daily sales tasks. For example, tabs have labels such as Leads, Opportunities, Customers, Contacts, and Forecasts. In addition, sales forms have an improved layout with only the necessary fields on them, while field names are easier to recognize and more informational, in order to aid sales productivity.
SecurePay Payment Gateway for AustraliaNetSuite now integrates with SecurePay for credit card processing and merchant services in Australia and New Zealand. SecurePay, a business of Australia Post, is a regional payment gateway providing payment processing services in the Australian market.
Integration with the SecurePay payment gateway is available with the SecurePay Plugin, a NetSuite managed SuiteApp. This SuiteApp is most suitable for use with NetSuite Australia editions and NetSuite OneWorld accounts with an Australian or New Zealand subsidiary. Once installed in your account, you can set up as many credit card processing profiles for SecurePay as needed.
For more information, see the help topic SecurePay.
User Interface ChangesVersion 2012 Release 1 includes the following enhancements to the NetSuite user interface (UI):
• QuickView Field Customization
• QuickView Support for Custom Records
• QuickView Support for Additional Built-in Record Types
• Enhancement to Delete Popup for Recurring Events
QuickView Field CustomizationThrough form customization, administrators can now customize the fields that appear in QuickViews.
QuickView customization is easy if you have upgraded the forms in your account to include field groups and all other look-and-feel enhancements introduced in Version 2010 Release 2.
ReleaseNotes2012.1.0_v16.pdf - Subject to Change
Version 2012 Release 1 Release Notes User Interface Changes
11
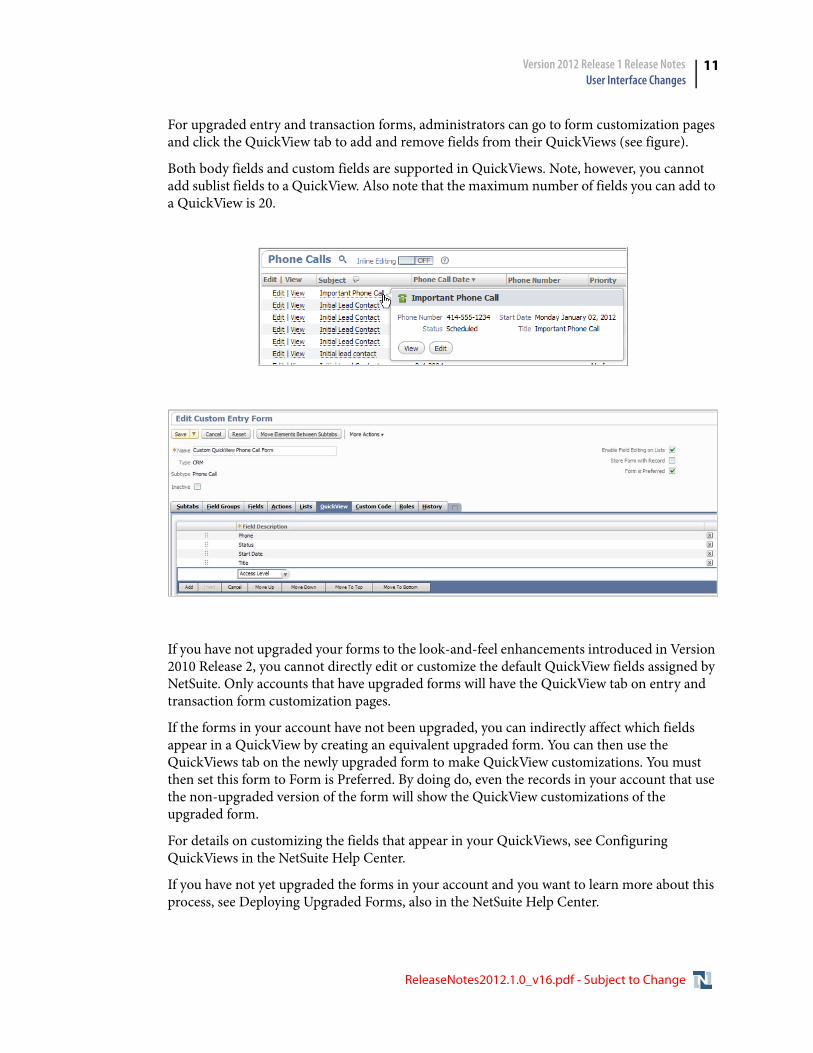
For upgraded entry and transaction forms, administrators can go to form customization pages and click the QuickView tab to add and remove fields from their QuickViews (see figure).
Both body fields and custom fields are supported in QuickViews. Note, however, you cannot add sublist fields to a QuickView. Also note that the maximum number of fields you can add to a QuickView is 20.
If you have not upgraded your forms to the look-and-feel enhancements introduced in Version 2010 Release 2, you cannot directly edit or customize the default QuickView fields assigned by NetSuite. Only accounts that have upgraded forms will have the QuickView tab on entry and transaction form customization pages.
If the forms in your account have not been upgraded, you can indirectly affect which fields appear in a QuickView by creating an equivalent upgraded form. You can then use the QuickViews tab on the newly upgraded form to make QuickView customizations. You must then set this form to Form is Preferred. By doing do, even the records in your account that use the non-upgraded version of the form will show the QuickView customizations of the upgraded form.
For details on customizing the fields that appear in your QuickViews, see Configuring QuickViews in the NetSuite Help Center.
If you have not yet upgraded the forms in your account and you want to learn more about this process, see Deploying Upgraded Forms, also in the NetSuite Help Center.
ReleaseNotes2012.1.0_v16.pdf - Subject to Change
Version 2012 Release 1 Release Notes User Interface Changes
12
QuickView Support for Custom RecordsNetSuite administrators can now configure QuickViews for custom records. The ability to add QuickViews to custom records extends the same benefits to the custom records you have created in NetSuite.
For more details, see Configuring QuickViews for Custom Records in the NetSuite Help Center.
QuickView Support for Additional Built-in Record TypesNetSuite has expanded the list of built-in records that support QuickViews. These records include:
• Issue
• Support Case
• Assembly/Bill of Materials Item
• Description Item
• Discount Item
• Inventory Item
• Item Group
• Kit/Package Item
• Markup Item
• Non-Inventory Item
• Other Charge Item
• Payment Item
• Service Item
• Subtotal Item
Note that certain item types in NetSuite contain images. To change the image that appears in a QuickView, you must do so on the actual item record and not on the form customization page where you configure QuickViews.
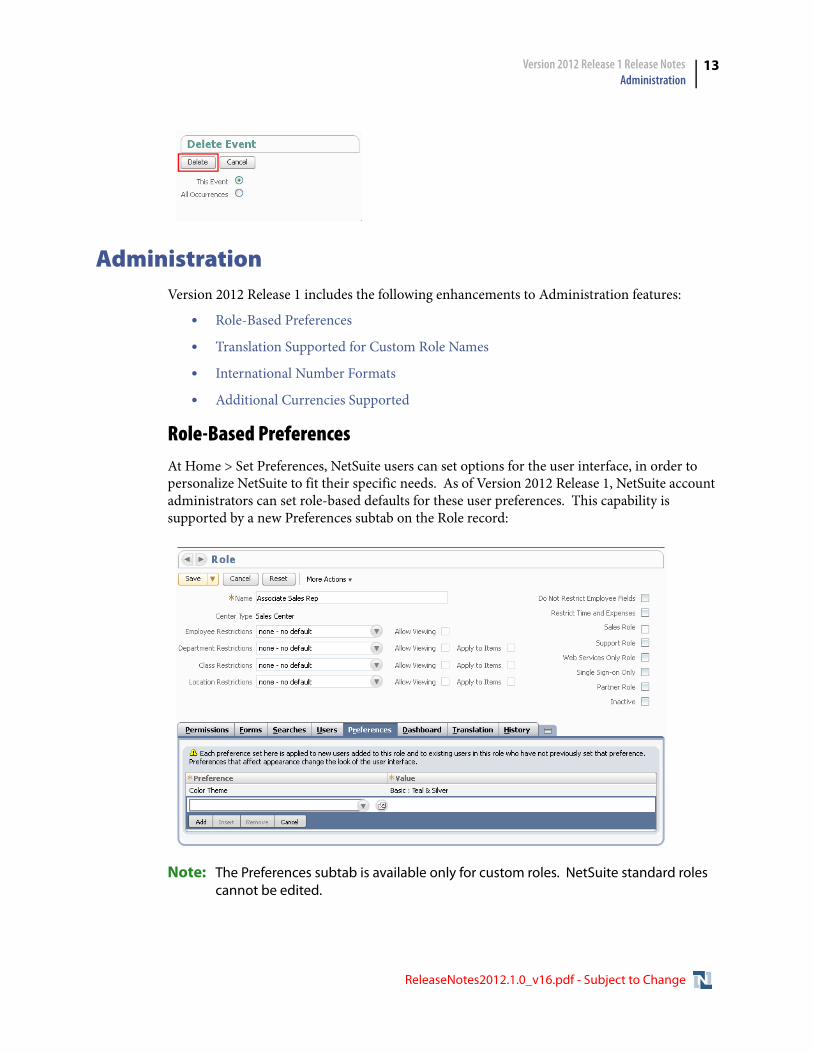
Enhancement to Delete Popup for Recurring EventsWhen you click the Delete button for a single occurrence of a recurring event, a Delete popup displays where you can indicate whether to delete the single occurrence or all occurrences of the event.
Prior to this release, this Delete popup included a More Actions button and you had to scroll down to click Delete. Now, this popup includes a Delete button.
ReleaseNotes2012.1.0_v16.pdf - Subject to Change
Version 2012 Release 1 Release Notes Administration
13
AdministrationVersion 2012 Release 1 includes the following enhancements to Administration features:
• Role-Based Preferences
• Translation Supported for Custom Role Names
• International Number Formats
• Additional Currencies Supported
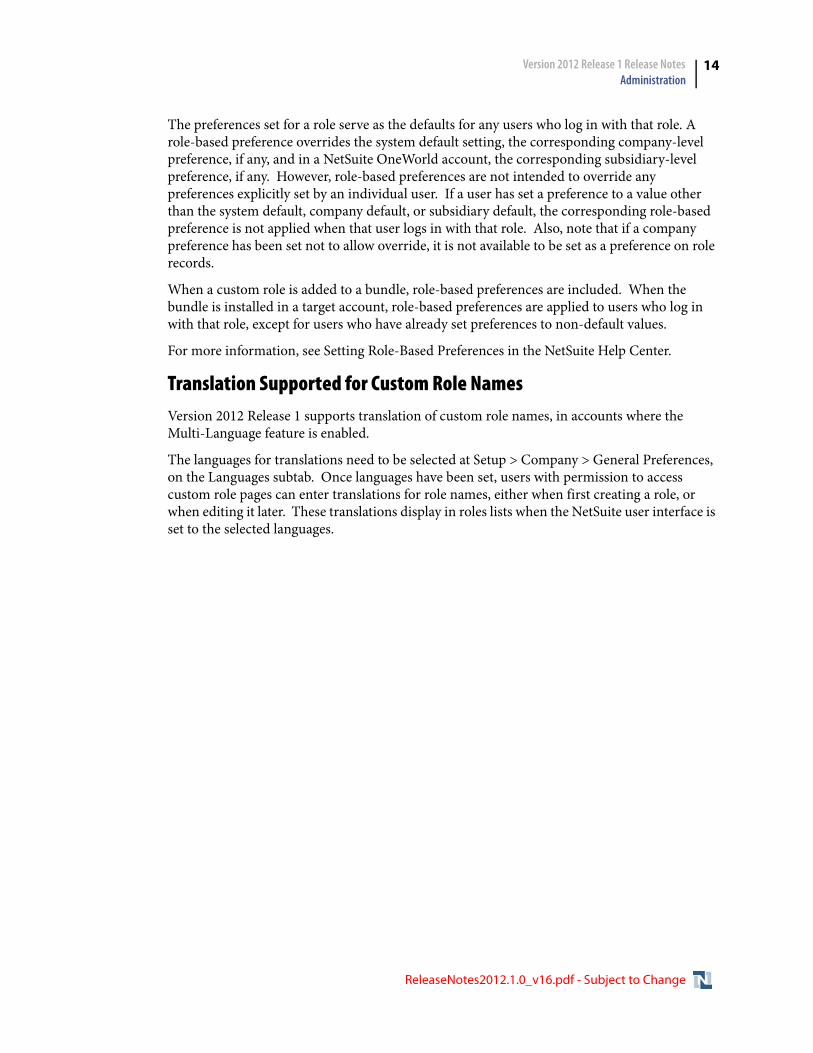
Role-Based PreferencesAt Home > Set Preferences, NetSuite users can set options for the user interface, in order to personalize NetSuite to fit their specific needs. As of Version 2012 Release 1, NetSuite account administrators can set role-based defaults for these user preferences. This capability is supported by a new Preferences subtab on the Role record:
Note: The Preferences subtab is available only for custom roles. NetSuite standard roles cannot be edited.
ReleaseNotes2012.1.0_v16.pdf - Subject to Change
Version 2012 Release 1 Release Notes Administration
14
The preferences set for a role serve as the defaults for any users who log in with that role. A role-based preference overrides the system default setting, the corresponding company-level preference, if any, and in a NetSuite OneWorld account, the corresponding subsidiary-level preference, if any. However, role-based preferences are not intended to override any preferences explicitly set by an individual user. If a user has set a preference to a value other than the system default, company default, or subsidiary default, the corresponding role-based preference is not applied when that user logs in with that role. Also, note that if a company preference has been set not to allow override, it is not available to be set as a preference on role records.
When a custom role is added to a bundle, role-based preferences are included. When the bundle is installed in a target account, role-based preferences are applied to users who log in with that role, except for users who have already set preferences to non-default values.
For more information, see Setting Role-Based Preferences in the NetSuite Help Center.
Translation Supported for Custom Role NamesVersion 2012 Release 1 supports translation of custom role names, in accounts where the Multi-Language feature is enabled.
The languages for translations need to be selected at Setup > Company > General Preferences, on the Languages subtab. Once languages have been set, users with permission to access custom role pages can enter translations for role names, either when first creating a role, or when editing it later. These translations display in roles lists when the NetSuite user interface is set to the selected languages.
ReleaseNotes2012.1.0_v16.pdf - Subject to Change
Version 2012 Release 1 Release Notes Administration
15
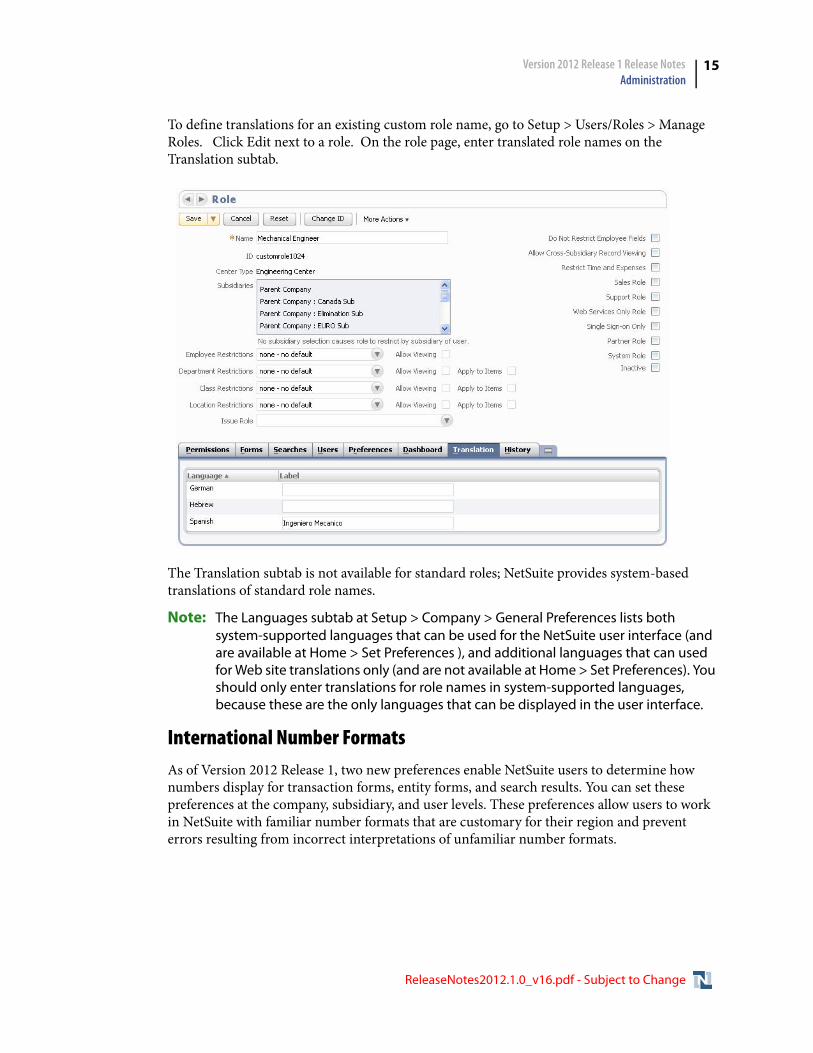
To define translations for an existing custom role name, go to Setup > Users/Roles > Manage Roles. Click Edit next to a role. On the role page, enter translated role names on the Translation subtab.
The Translation subtab is not available for standard roles; NetSuite provides system-based translations of standard role names.
Note: The Languages subtab at Setup > Company > General Preferences lists both system-supported languages that can be used for the NetSuite user interface (and are available at Home > Set Preferences ), and additional languages that can used for Web site translations only (and are not available at Home > Set Preferences). You should only enter translations for role names in system-supported languages, because these are the only languages that can be displayed in the user interface.
International Number FormatsAs of Version 2012 Release 1, two new preferences enable NetSuite users to determine how numbers display for transaction forms, entity forms, and search results. You can set these preferences at the company, subsidiary, and user levels. These preferences allow users to work in NetSuite with familiar number formats that are customary for their region and prevent errors resulting from incorrect interpretations of unfamiliar number formats.
ReleaseNotes2012.1.0_v16.pdf - Subject to Change

Version 2012 Release 1 Release Notes Administration
16
The Number Format preference provides the following format options for thousands separators and decimal places:
• thousands separator: comma, period, space, reverse comma
• decimal places: comma, period
Users do not have to type in numbers with separators. When a user tabs out of a number field, the entered value displays with a format matching the selected number format preference.
The Negative Number Format preference provides two options to display negative numbers:
• minus sign: -100
• parentheses: (100)
The default formats are comma separators for thousands, period for decimal places and minus sign for negative numbers: 1,000,000.00 and -100. To set the Number Format and Negative Number Format preferences:
• Company - go tSetup > Company > General Preferences. For instructions, see the help topic General Account Preferences.
• Subsidiary - go to Setup > Company > Subsidiaries. Select a subsidiary and edit the preferences.For instructions, seethe help topic Editing Subsidiary Records.
• User - go to Home > Set Preferences. Setting the preferences at the user level affects all roles associated with that user. For instructions, see the help topic Setting Preferences for Appearance.
A subsidiary number format preference overrides a company preference, and a user preference overrides both subsidiary and company preferences.
Note: By default, settings for the Number Format and Negative Number Format preferences are not applied to custom fields created prior to Version 2012 Release 1. For details about how to apply formatting to these fields, see Apply Formatting Preference for Number Custom Fields.
ReleaseNotes2012.1.0_v16.pdf - Subject to Change
Version 2012 Release 1 Release Notes Customer Relationship Management (CRM)
17
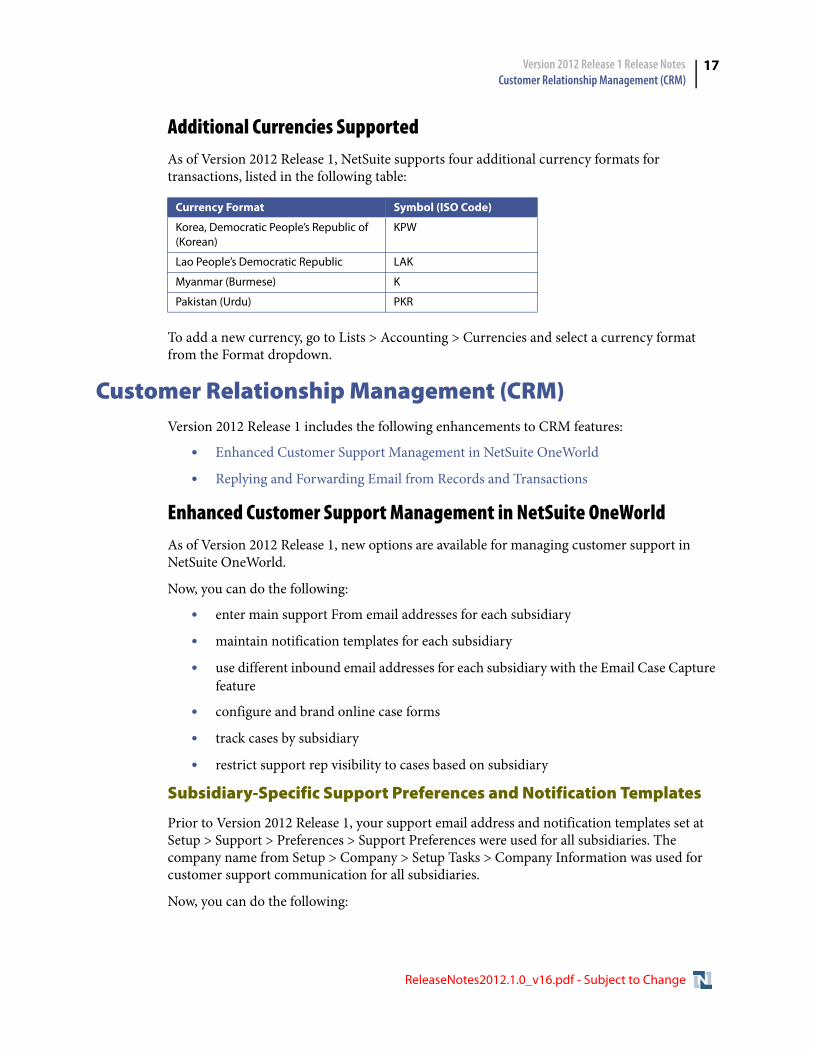
Additional Currencies SupportedAs of Version 2012 Release 1, NetSuite supports four additional currency formats for transactions, listed in the following table:
To add a new currency, go to Lists > Accounting > Currencies and select a currency format from the Format dropdown.
Customer Relationship Management (CRM)Version 2012 Release 1 includes the following enhancements to CRM features:
• Enhanced Customer Support Management in NetSuite OneWorld
• Replying and Forwarding Email from Records and Transactions
Enhanced Customer Support Management in NetSuite OneWorldAs of Version 2012 Release 1, new options are available for managing customer support in NetSuite OneWorld.
Now, you can do the following:
• enter main support From email addresses for each subsidiary
• maintain notification templates for each subsidiary
• use different inbound email addresses for each subsidiary with the Email Case Capture feature
• configure and brand online case forms
• track cases by subsidiary
• restrict support rep visibility to cases based on subsidiary
Subsidiary-Specific Support Preferences and Notification Templates
Prior to Version 2012 Release 1, your support email address and notification templates set at Setup > Support > Preferences > Support Preferences were used for all subsidiaries. The company name from Setup > Company > Setup Tasks > Company Information was used for customer support communication for all subsidiaries.
Now, you can do the following:
Currency Format Symbol (ISO Code)
Korea, Democratic People’s Republic of (Korean)
KPW
Lao People’s Democratic Republic LAK
Myanmar (Burmese) K
Pakistan (Urdu) PKR
ReleaseNotes2012.1.0_v16.pdf - Subject to Change
Version 2012 Release 1 Release Notes Customer Relationship Management (CRM)
18
• Enter a company name and support address for each subsidiary to display in the From field in support email communication.
• Set up support notification email templates for each subsidiary. When a customer or employee is sent automatic notification related to a case, the templates you have set up for that customer’s subsidiary are used.
• Associate online case forms with specific subsidiaries so that all cases created through those forms are associated with a subsidiary and attached to customers in that subsidiary.
To set support preferences for a subsidiary, go to Setup > Company > Classifications > Subsidiaries. Click Edit next to the subsidiary for which you want to set preferences, and then click the Preferences subtab. Click the Support subtab, set the preferences, and click Save.
Note: These subsidiary-level preferences override the preferences you set at Setup > Support > Preferences > Support Preferences. If you do not set a preference for a subsidiary, the company-level preference is used for that subsidiary by default. Like other preferences, as long as the preferences in a given subsidiary match the company preferences, when you change a company preference, the subsidiary preference is updated as well.
Email Case Capture Enhancements
Prior to Version 2012 Release 1, the Email Case Capture feature used the same inbound email address, regardless of subsidiary.
Now, an inbound email address is generated for each subsidiary. You can find the inbound email address for a subsidiary by opening the subsidiary record and clicking the Preferences subtab. Then, click the Support subtab. The inbound email address is under the Case Email Setup heading in the NetSuite Inbound Email Address field.
When a customer sends email to an inbound email address, a case is created and associated with that customer’s subsidiary. If the sender cannot be identified as an existing customer, the new case is associated with the anonymous customer placeholder for that subsidiary.
You must set up your Exchange server to receive email sent to each subsidiary-specific address. For more information, see the help topic Using Email Case Capture.
Setting Up Case Forms
As of Version 2012 Release 1, the Subsidiary field appears on the Standard Case Form and the Standard Help Desk Form by default. You must add the Subsidiary field to the Standard External Case Form and to other custom case forms you use.
To add the Subsidiary field to a form, go to Setup > Customization > Forms > Entry Forms, and click Customize next to the form to which you want to add the field. On the custom form page, click the Fields subtab, check the box in the Show column next to Subsidiary, and click Save.
ReleaseNotes2012.1.0_v16.pdf - Subject to Change
Version 2012 Release 1 Release Notes Customer Relationship Management (CRM)
19
Setting Up Online Case Forms
By default, the Subsidiary field is also included on online case forms as a hidden, search field. You can set the value of the subsidiary field on the form by including the subsidiary parameter in the URL or by choosing a default subsidiary on the Set Up Workflow subtab of the online case form.
As long as the field remains hidden on the form, the subsidiary will not be seen by the customer submitting the form.
The Default Subsidiary preference is used to set the proper subsidiary when no subsidiary is explicitly set on the form. This preference determines the following:
• Which customers are considered when NetSuite searches to determine if there is an existing record for the person submitting the form.
NetSuite only considers the customers associated with the subsidiary set on the form when determining if there is an existing record.
If you set the Handle Duplicate Records preference to create a new customer record when no match is found, the record is created and associated with the subsidiary set on the form. If no subsidiary is set on the form, and no default subsidiary is set, the new customer record is associated with your top-level parent subsidiary.
If there is no matching record, and the Handle Duplicate Records preference is not set to create a new record, NetSuite associates the new case with an anonymous customer record. If a subsidiary is set, the case is associated with that subsidiary’s anonymous customer placeholder.
• The subsidiary set on the case record that is created.
If a subsidiary is not set through the form or through a URL parameter, the default subsidiary is applied. If a matching customer is not found for the case, the anonymous customer placeholder for that subsidiary is used.
To set up an online case form:
1. Go to Setup > Support > Case Management > Online Case Forms > New.
2. On the Select Field subtab, select either the Company Name field or the First and Last Name fields and mark them mandatory.
3. Click the Set Up Workflow subtab.
4. In the Default Subsidiary field, select the subsidiary you want to associate with cases submitted through this form.
5. Set other options on the form. For example, you might put a logo on the form that is specific to a subsidiary.
6. Click Save.
ReleaseNotes2012.1.0_v16.pdf - Subject to Change
Version 2012 Release 1 Release Notes Customer Relationship Management (CRM)
20
Tracking Cases by Subsidiary
The new Subsidiary field on the case record allows you to track cases by subsidiary. After a case is created, the customer’s subsidiary is shown in a read-only field on the case.
This allows you to restrict support reps’ access to those cases in their subsidiaries and also to brand your email communication to each customer’s subsidiary.
Restricting Access to Cases by Subsidiary
As of Version 2012 Release 1, if you want to restrict support rep access to cases based on subsidiary, you can set the Restrict Cases Based on Subsidiary preference.
To do this, go to Setup > Support > Preferences > Support Preferences, and check the Restrict Cases Based on Subsidiaries box.
Then, customize the support rep role and select the subsidiaries for which the rep is responsible. If you do not select subsidiaries on the role, any support rep assigned that role is restricted to the subsidiary on the rep’s employee record.
Finally, create case rules and territories that route cases to the support reps in each subsidiary.
Important: If you do not create case rules and territories based on subsidiary, support reps could be assigned cases to which they do not have access. These cases would not appear in lists, saved searches, reports, or KPIs.
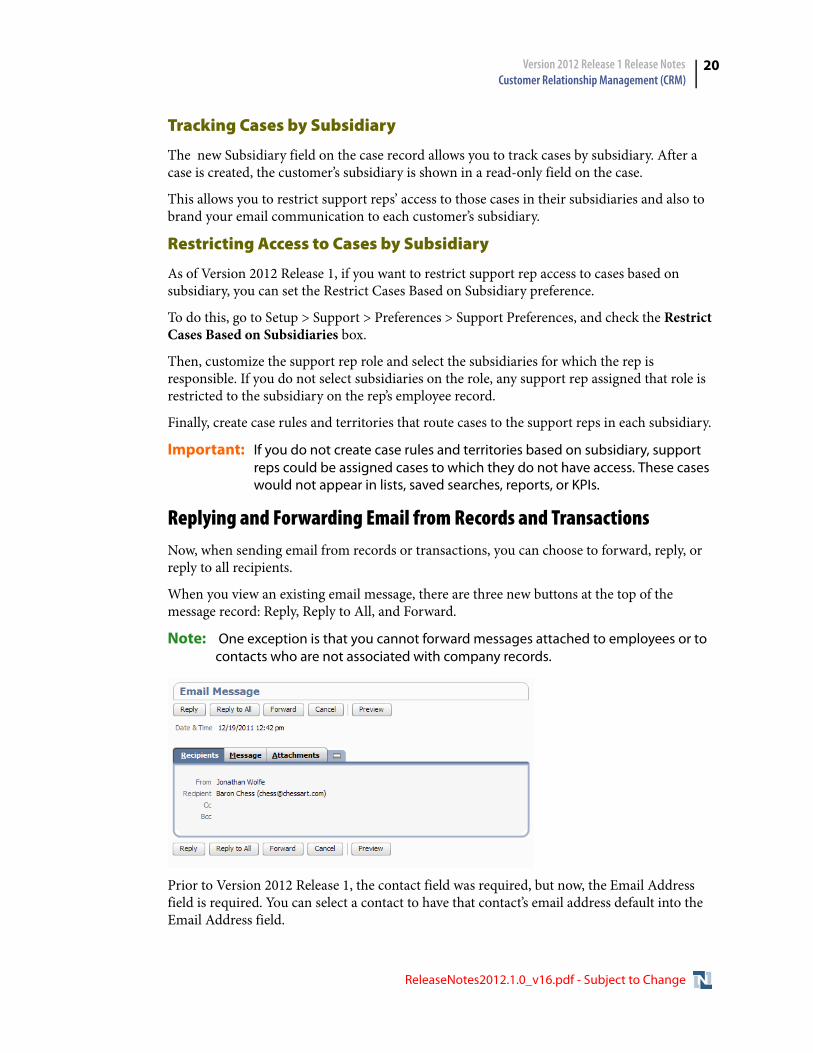
Replying and Forwarding Email from Records and Transactions Now, when sending email from records or transactions, you can choose to forward, reply, or reply to all recipients.
When you view an existing email message, there are three new buttons at the top of the message record: Reply, Reply to All, and Forward.
Note: One exception is that you cannot forward messages attached to employees or to contacts who are not associated with company records.
Prior to Version 2012 Release 1, the contact field was required, but now, the Email Address field is required. You can select a contact to have that contact’s email address default into the Email Address field.
ReleaseNotes2012.1.0_v16.pdf - Subject to Change
Version 2012 Release 1 Release Notes Customer Transactions
21
The subject of email replies are prefixed with RE:. Forwarded message subjects are prefixed with FW:.
If the original message includes an attachment, forwarded messages include the attachment by default. Replies do not include the attachment unless you select it on the Attachment subtab.
Customer TransactionsVersion 2012 Release 1 includes the following enhancements to customer transactions:
• Promotions Enhancements
• Making Deposits on Sales Orders
• Multi-Currency Customer Enhancements
• Setting Default A/R Accounts
• New Print, Fax, and Email Options for Finance Charges
• Amount Due Field on Invoices
• CyberSource Payment Integration Enhancements
Promotions EnhancementsVersion 2012 Release 1 includes the following changes to promotion codes:
Changes to Promotion Code Records
Promotion codes have been renamed “Promotions” to clarify that the record itself represents a promotion effort.
The term promotion code is still used when associating promotions with transactions and marketing campaigns.
The following fields have been added to the promotion search: Apply Discount To, Description, and Free Shipping Method.
Displaying Line Discounts
Promotions defined for specific items now allow you to show the discount as a line item on the transaction beneath the qualifying item. Prior to Version 2012 Release 1, promotion discounts were always reflected only in the transaction-level total.
Warning: Line discount promotions are not compatible with Web services 2009.2 and earlier endpoints. If you plan to use Version 2012 Release 1 promotion enhancements, it is strongly recommended that you upgrade to a later Web services endpoint.
To include promotion discounts as line items, check the Display Line Discounts box on the promotion record. If you clear this box, the promotion discount will be show only in the transaction-level total.
ReleaseNotes2012.1.0_v16.pdf - Subject to Change
Version 2012 Release 1 Release Notes Customer Transactions
22
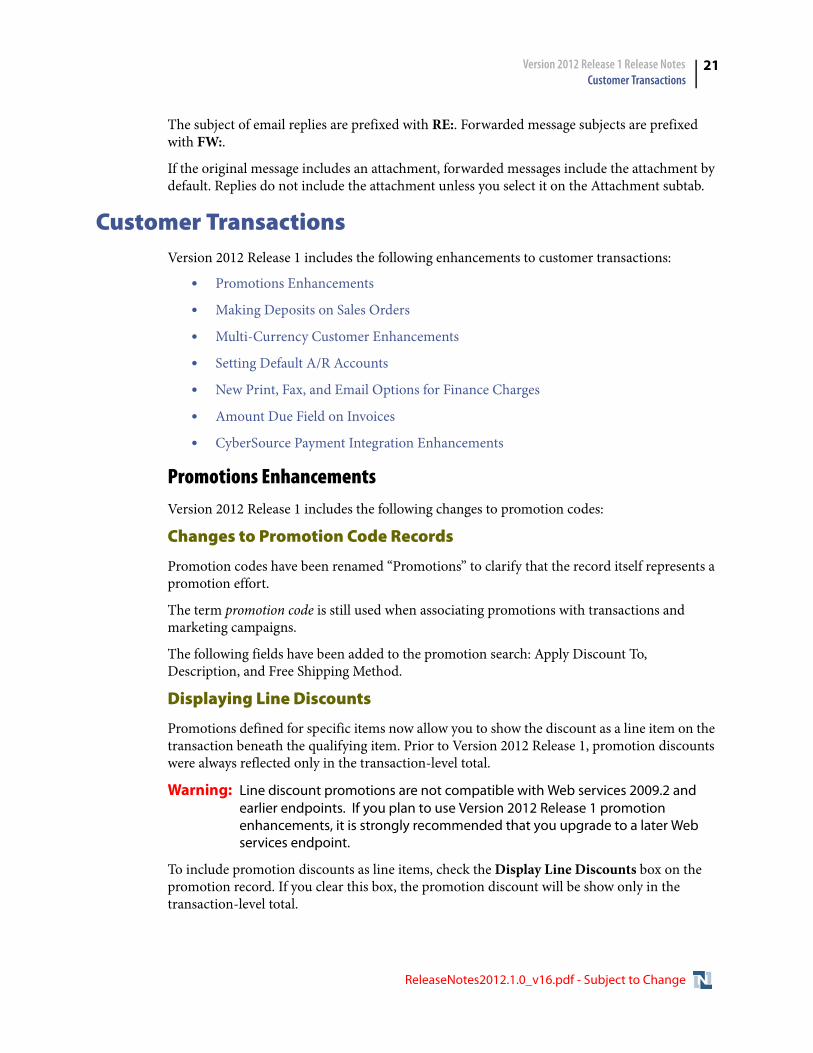
When you apply item-specific inline discount promotions to sales transactions, select a promotion code, and add your items. After you have added or changed the items on the order or changed the shipping item, click Calculate to apply promotions and create your discount lines before saving the order.
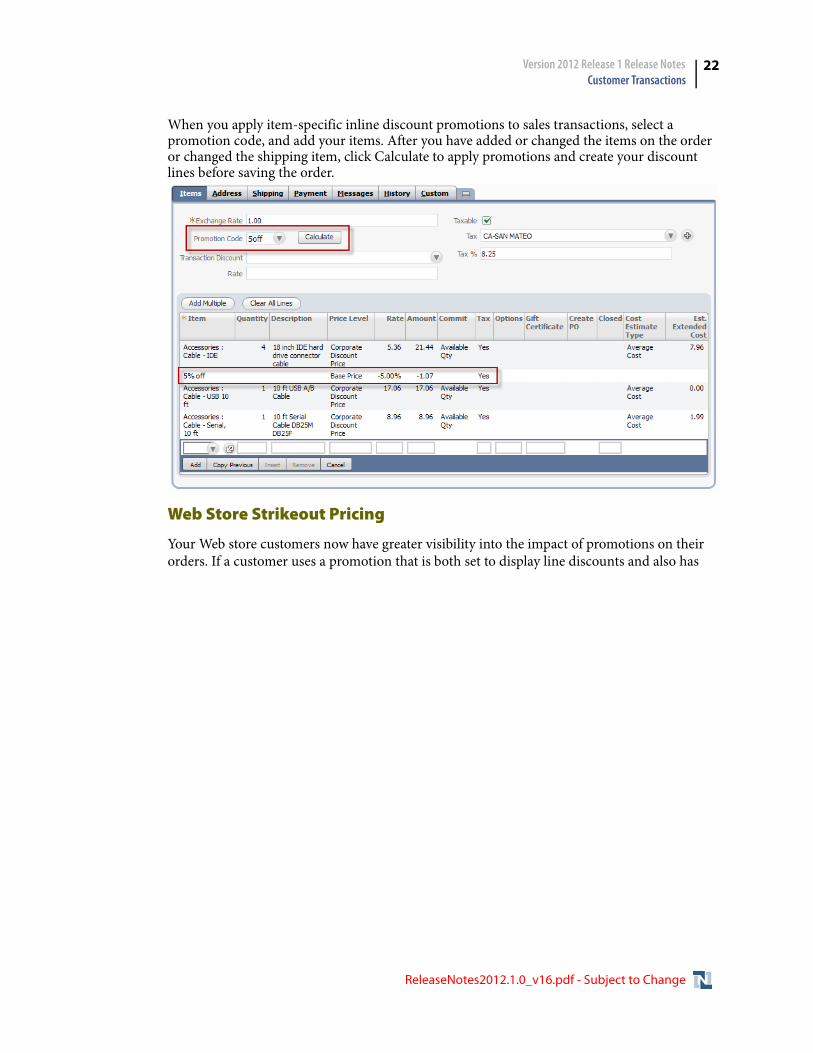
Web Store Strikeout Pricing
Your Web store customers now have greater visibility into the impact of promotions on their orders. If a customer uses a promotion that is both set to display line discounts and also has
ReleaseNotes2012.1.0_v16.pdf - Subject to Change
Version 2012 Release 1 Release Notes Customer Transactions
23
items listed on the Items subtab, the shopping cart displays the the original price as well as the discounted price.
Making Deposits on Sales OrdersNow, you can accept deposits directly from the sales orders to which they are to be applied.
Sales orders created with a Sales Order-Invoice transaction form (or orders that use other forms but do not have terms or payment method specified) have an Create Deposit button that allows sales people to record a deposit immediately upon saving a new sales order.
This deposit is reserved for the originating sales order and cannot be applied to other invoices. A read-only Sales Order field on the deposit shows this linked transaction.
When you invoice the sales order, the reserved deposit is automatically applied.
Note: You can only use this button for sales orders that have not been billed.
You can apply multiple deposits to a single order. If the deposit total exceeds the order amount, the excess deposit amount is not linked to the original order and can be applied to any invoice.
Multi-Currency Customer EnhancementsThe following changes have been made to the Multi-Currency Customers feature in Version 2012 Release 1:
ReleaseNotes2012.1.0_v16.pdf - Subject to Change
Version 2012 Release 1 Release Notes Customer Transactions
24
Changing Primary Currency on Customer Records
You can now change the primary currency on a customer record at any time. This ability allows you to change the currency used as the default on transactions, to define credit limits, and to aggregate balance information.
When you change a customer’s primary currency, you must re-enter the credit limit defined for that customer in the new primary currency.
While you can change the primary currency for a customer, you cannot remove a currency from the list of transaction currencies if you have entered a transaction for that currency.
If a customer record is also a vendor, partner, or other name record, and you have entered transactions for any of these non-customer records, you cannot change the primary currency on the customer record.
Multi-Currency Customers and Consolidated Payments
Now, if you use the Consolidated Payments feature, it is no longer a requirement that all customers and subcustomers in a hierarchy use the same primary currency.
When you accept payments through a top-level customer, you choose the currency of the invoices you want to accept payment toward. The list of invoices, credits, and deposits is filtered to the show only those transactions in the selected currency.
Setting Customer-Specific Prices in Multiple Currencies
Prior to Version 2012 Release 1, if you used Multi-Currency Customers, you could only enter item pricing in a customer’s primary currency.
Now, you can enter custom item prices in any of a customer’s transaction currencies.
To set a customer-specific item price, edit the customer record, and click the Financial subtab. On the Item Pricing subtab, select an item and the price level, and choose the currency for the price. If you are setting a custom price level, enter the price in the Unit Price column.
Multi-Currency Search Enhancements
Now, you can get balance information for each of a customer’s transaction currencies with search. To do this, create a customer search, and on the Results subtab, select Customer Currency Balance Fields. In the popup dialog in the Customer Currency Balance Field field, select from of the following:
• Balance (Foreign Currency) – This field shows the transaction currency balance amount for the currency in a line on the search results.
• Currency – Adding this field creates a line for each transaction currency for each customer in the search results.
• Deposit Balance (Foreign Currency) – This field displays the total deposit balance for each of a customer’s transaction currencies.
• Last Financial Charge Date (Foreign Currency) – This field shows the date of the last finance charge in each of a customer’s transaction currencies.
ReleaseNotes2012.1.0_v16.pdf - Subject to Change
Version 2012 Release 1 Release Notes Customer Transactions
25
• Unbilled Orders (Foreign Currency) – This field shows the unbilled sales order total in each of a customer’s transaction currencies.
Note: Any fields you add to the results from the customer record are repeated on each row of your search results, so if you want to include only the balance in each currency for a customer, do not include customer record fields.
Setting Default A/R AccountsNow, you can set default A/R accounts for your company and for individual customers.
To set the company default A/R account, go to Setup > Accounting > Accounting Preferences > Item/Transactions. In the Default Receivables Account field, select the A/R account you want selected by default on receivables transactions.
To set a default A/R account for a customer, edit the record, and click the Financial subtab. In the Default Receivables Account field, select the account you want to use. Select Use System Preference to use the company default account.
When you create a receivables transaction, the default A/R account from the customer record is used. If you have not chosen a default account for the customer, the account from the company preference is used.
When bulk invoicing customers at Transactions > Customers > Invoice Billable Customers, you can choose which A/R account to set on the invoices generated. You can choose an A/R account to use on all of the invoices generated, you can use your company deafult, or you can choose to use the default account from each customer record.
New Print, Fax, and Email Options for Finance Charges
With Version 2012 Release 1, you can choose to print, fax, and email finance charge invoices from the Finance Charge page.
To do this, go to Transactions > Customers > Assess Finance Charges. In the To Be Printed, To Be Emailed, and To Be Faxed fields, choose whether you want to print, email, or fax the invoices created. Choose Respect Customer Preference if you want to send the invoices according to the Send Transactions Via preference on each customer record.
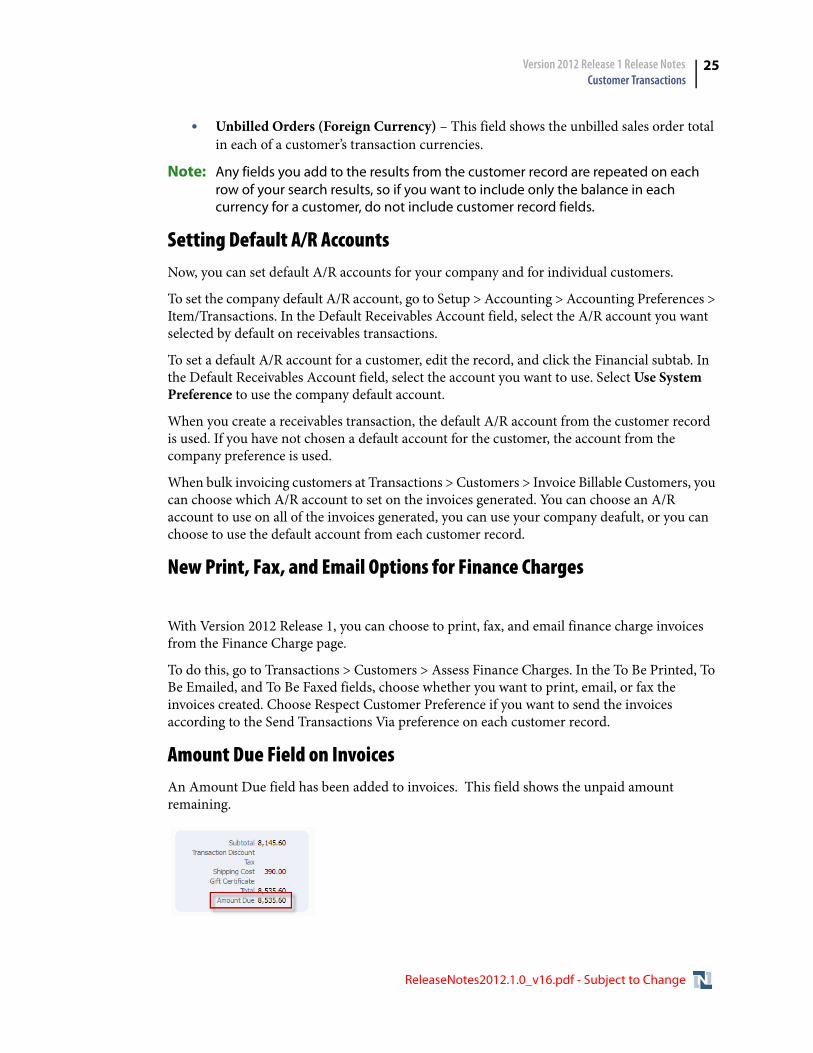
Amount Due Field on InvoicesAn Amount Due field has been added to invoices. This field shows the unpaid amount remaining.
ReleaseNotes2012.1.0_v16.pdf - Subject to Change
Version 2012 Release 1 Release Notes Customer Transactions
26
CyberSource Payment Integration EnhancementsNetSuite's integration with CyberSource Decision Manager has been extended to support third party Web store orders created using Web services. The following fields have been added to the Sales Order record in the 2012.1 endpoint and can only be set using Web services:
• shopperipaddress
• saveonauthdecline
Shopper IP address is captured in the third party Web store and set in the Web services request to create a new sales order. The shopper IP address is then sent to CyberSource in the authorization request and used in fraud screening rules.
Note: Often, the shopper IP address is compared to the IP address obtained through Device Fingerprinting functionality. In order to take advantage of Device Fingerprinting, embed tags into the third party Web store and generate a unique ID for the fingerprint. Send the device fingerprint ID in a customer field in the same sales order Web service request that initiates the authorization and fraud screening. This custom field can then be mapped using the Merchant Defined Data Mapping.
The saveonauthdecline field is used to determine the handling of the order in the case of authorization decline. If your integration is synchronous, the saveonauthdecline field may be set to False to prevent the order from being saved and facilitate shopper feedback to retry with a different payment method. Prior to this change, all orders originating from Web services were saved and put on Payment Hold in the case of an exception.
To use Decision Manager with Web services orders:
1. Enable Decision Manager in your CyberSource payment processing profile.
a. Go to Setup > Accounting > Payment Processing > Credit Card Processing.
b. Select your CyberSource profile.
c. On the CyberSource Decision Manager subtab, check the Web Store Orders (E-Commerce) box.
This setting now applies to orders placed through the native NetSuite Web store as well as those received using Web services.
2. Define rules in Decision Manager to evaluate fraud risk based on the shopper IP address.
3. Set up your Web store to capture the shopper IP address using the shopperipaddress field.
4. Implement Device Fingerprinting on your Web store, create a custom transaction field, and configure mapping. (optional)
5. Set all necessary field values in the Sales Order Web services request.
ReleaseNotes2012.1.0_v16.pdf - Subject to Change
Version 2012 Release 1 Release Notes Enterprise Resource Planning (ERP)
27
Enterprise Resource Planning (ERP)Version 2012 Release 1 includes the following enhancements to ERP features:
• FedEx Shipping Enhancements
• Kits with Serial or Lot Numbered Items
• Available to Promise
• Bill Payment Enhancements
• Work Order Enhancements
• Standard Costing Enhancements
• Bulk Receiving Orders
• Default COGS Account for Customer Returns
• Premier Payroll Enhancements
• VSOE Enhancements
• Currency Revaluation Enhancements
• Integrated Intercompany Sales and Purchasing with Automated Intercompany Management
• Subsidiary Level System Notes for Accounting Period Locking
FedEx Shipping EnhancementsVersion 2012 Release 1provides the following enhancements for FedEx shipping services:
• FedEx Customer Return Labels
• FedEx SmartPost®
• FedEx Web Services Upgrade
• Other FedEx Enhancements
FedEx Customer Return Labels
You can now print return labels for FedEx customer returns. This ability makes it easier for customers to return orders. You print FedEx customer return labels at the same time you print shipping labels.
To use this service, you need to provide a return address for each location from which you ship, or alternately, a return address at the subsidiary level or company level. You can then update shipping items for customer return labels. On the Shipping Item pages, check the Return Label Integration box and select the FedEx service for the return. When you fulfill an order with a FedEx shipping item enabled for customer returns, the return label prints when you print the shipping label for the package. The return tracking number is available, along with the shipment tracking number, on the Item Fulfillment, Cash Sale, and Return Authorization
ReleaseNotes2012.1.0_v16.pdf - Subject to Change
Version 2012 Release 1 Release Notes Enterprise Resource Planning (ERP)
28
pages. When a customer returns an order, follow your workflow for customer returns to process the return.
This service is available only with FedEx integration for domestic shipments.
For more information, see Using FedEx Customer Returns in the NetSuite Help Center.
FedEx SmartPost®
FedEx SmartPost® is an efficient, economical service for low weight packages that utilizes USPS for final delivery. You can use SmartPost to deliver to all US addresses, including post office boxes and military destinations. It provides a solution for online retailers, cataloguers, fulfillment services, and direct marketers looking for a cost effective shipping method. SmartPost can be used for standard mail, bound printed matter, media mail, and parcel select.
Contact your FedEx account representative to sign up for SmartPost services. In NetSuite, update your FedEx registration in NetSuite to include the FedEx SmartPost shipping hub ID. You must register an additional FedEx account in NetSuite if you plan to use FedEx SmartPost returns. Then you can add shipping items for the new SmartPost services. When you fulfill orders using FedEx SmartPost shipping items, the shipping label displays a tracking number for both FedEx and USPS.
For more information, see Using FedEx SmartPost Services in the NetSuite Help Center.
FedEx Web Services Upgrade
As a result of the FedEx upgrades in this release, all NetSuite customers using FedEx integration will have their FedEx account credentials migrated to FedEx’s latest Web services version. NetSuite will process the required migration for you at the time of your upgrade to Version 2012 Release 1.
To prepare for a seamless migration, verify that the address in your FedEx account registration in NetSuite is correct and up to date.
After your upgrade to Version 2012 Release 1, to verify that your FedEx account is working properly, simply request a FedEx rate quote. This is particularly important to do as soon as possible after the upgrade if you use FedEx integrated shipping items in a NetSuite Web store.
In the unlikely event that the migration fails in your account, you can manually reregister your credentials through NetSuite in order to be able to request rates and ship using FedEx.
To reregister your account credentials, resubmit your FedEx registration in NetSuite:
1. Go to Setup > Accounting > Setup Tasks > Shipping.
2. On the Carrier Registration subtab, click the FedEx account number to open the FedEx Registration page.
3. Verify that all of your account information is correct.
4. Review the terms and conditions of the agreement and then select the I Accept radio button
5. Click Submit.
ReleaseNotes2012.1.0_v16.pdf - Subject to Change
Version 2012 Release 1 Release Notes Enterprise Resource Planning (ERP)
29
Note: If you have multiple FedEx accounts or multiple NetSuite accounts, be sure to submit all FedEx registrations in each of your NetSuite accounts.
NetSuite Support staff can assist you if you encounter any difficulties reentering your registration information in NetSuite. FedEx support can help you if you have a problem with your FedEx account. Contact FedEx Technical Help Desk at 1-877-339-2774 (FDX ASSIST). Use keyword API or web services at the voice prompt to reach the correct support team.
Other FedEx Enhancements
• Address Validation - Now for each fulfillment, FedEx validates the shipping address for the order, to ensure that you are shipping to a valid address. Address validation is available for U.S. and Canadian addresses only.
• Shipping Rates Exclusive of Tax - When calculating shipping rates for orders shipped from a Canadian location, the FedEx rates displayed do not include Canadian tax. This feature applies to Web store orders and sales orders.
• Additional FedEx Services - Real-time rates and shipping labels for FedEx Economy® and FedEx 2day® A.M. shipping services are now available.
• Delivery Instructions for FedEx Home Delivery - When fulfilling an order with a FedEx Home Delivery shipping method, you can now include delivery instructions for the driver. The Delivery Instructions box is available on the Carrier subtab of the Order Fulfillment page, if you check the FedEx Signature Home Delivery box, and you select either Appointment or Date Certain for the home delivery type. You can enter up to 64 characters.
ReleaseNotes2012.1.0_v16.pdf - Subject to Change
Version 2012 Release 1 Release Notes Enterprise Resource Planning (ERP)
30
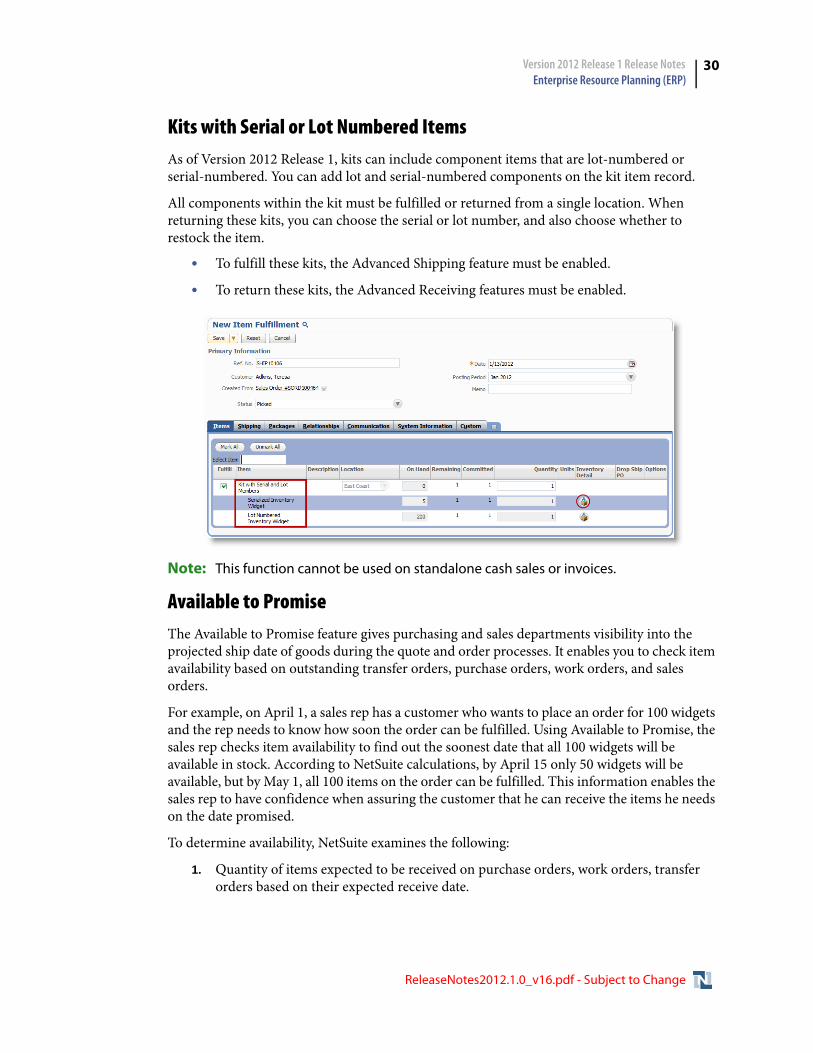
Kits with Serial or Lot Numbered ItemsAs of Version 2012 Release 1, kits can include component items that are lot-numbered or serial-numbered. You can add lot and serial-numbered components on the kit item record.
All components within the kit must be fulfilled or returned from a single location. When returning these kits, you can choose the serial or lot number, and also choose whether to restock the item.
• To fulfill these kits, the Advanced Shipping feature must be enabled.
• To return these kits, the Advanced Receiving features must be enabled.
Note: This function cannot be used on standalone cash sales or invoices.
Available to PromiseThe Available to Promise feature gives purchasing and sales departments visibility into the projected ship date of goods during the quote and order processes. It enables you to check item availability based on outstanding transfer orders, purchase orders, work orders, and sales orders.
For example, on April 1, a sales rep has a customer who wants to place an order for 100 widgets and the rep needs to know how soon the order can be fulfilled. Using Available to Promise, the sales rep checks item availability to find out the soonest date that all 100 widgets will be available in stock. According to NetSuite calculations, by April 15 only 50 widgets will be available, but by May 1, all 100 items on the order can be fulfilled. This information enables the sales rep to have confidence when assuring the customer that he can receive the items he needs on the date promised.
To determine availability, NetSuite examines the following:
1. Quantity of items expected to be received on purchase orders, work orders, transfer orders based on their expected receive date.
ReleaseNotes2012.1.0_v16.pdf - Subject to Change
Version 2012 Release 1 Release Notes Enterprise Resource Planning (ERP)
31
2. Quantity of items expected to be fulfilled on sales orders and transfer orders based on their expected ship date.
Knowing how many items will be removed and added to inventory on each day allows the calculation of a virtual “bucket” quantity that describes the amount available to be applied to orders for that day. These calculations track the quantity available for any given date and allow you to find a date when the quantity to fill an order will be available.
For details on these calculations, click Help and read Available to Promise Methods.
Note that Available to Promise differs from Demand Planning in the following way:
• Demand Planning provides supply recommendations based on a forecast or actual sales orders in a Build to Order or a Build to Stock environment.
• Available to Promise provides demand date recommendations based on available firmed supply.
The Available to Promise feature is accessible only when you have enabled the Demand Planning feature.For details, Click Help and read Enabling Available to Promise.
Important: A user must have the Check Item Availability permission for their role in order to use the Available to Promise feature. The View setting is the default for this permission. . For details, Click Help and read Managing NetSuite Roles.
Once you have enabled the Available to Promise feature, you can set up item records to use the feature. On the item record, click the Inventory subtab.
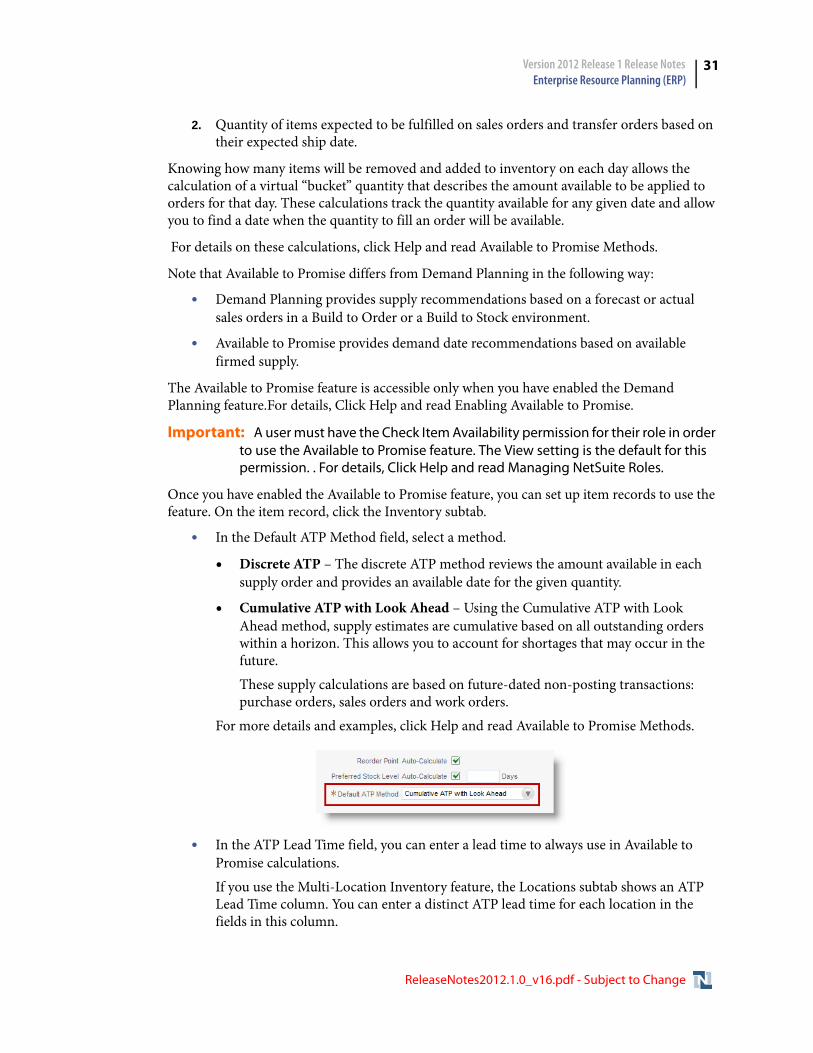
• In the Default ATP Method field, select a method.
• Discrete ATP – The discrete ATP method reviews the amount available in each supply order and provides an available date for the given quantity.
• Cumulative ATP with Look Ahead – Using the Cumulative ATP with Look Ahead method, supply estimates are cumulative based on all outstanding orders within a horizon. This allows you to account for shortages that may occur in the future.
These supply calculations are based on future-dated non-posting transactions: purchase orders, sales orders and work orders.
For more details and examples, click Help and read Available to Promise Methods.
• In the ATP Lead Time field, you can enter a lead time to always use in Available to Promise calculations.
If you use the Multi-Location Inventory feature, the Locations subtab shows an ATP Lead Time column. You can enter a distinct ATP lead time for each location in the fields in this column.
ReleaseNotes2012.1.0_v16.pdf - Subject to Change
Version 2012 Release 1 Release Notes Enterprise Resource Planning (ERP)
32
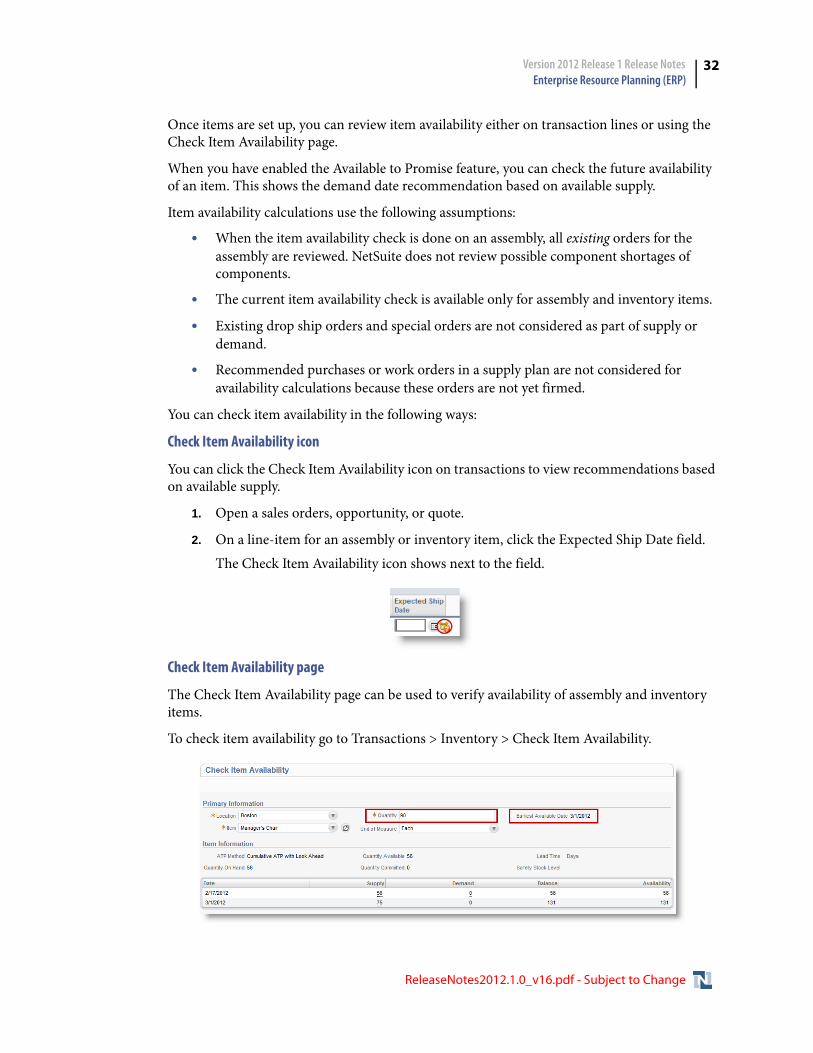
Once items are set up, you can review item availability either on transaction lines or using the Check Item Availability page.
When you have enabled the Available to Promise feature, you can check the future availability of an item. This shows the demand date recommendation based on available supply.
Item availability calculations use the following assumptions:
• When the item availability check is done on an assembly, all existing orders for the assembly are reviewed. NetSuite does not review possible component shortages of components.
• The current item availability check is available only for assembly and inventory items.
• Existing drop ship orders and special orders are not considered as part of supply or demand.
• Recommended purchases or work orders in a supply plan are not considered for availability calculations because these orders are not yet firmed.
You can check item availability in the following ways:
Check Item Availability icon
You can click the Check Item Availability icon on transactions to view recommendations based on available supply.
1. Open a sales orders, opportunity, or quote.
2. On a line-item for an assembly or inventory item, click the Expected Ship Date field.
The Check Item Availability icon shows next to the field.
Check Item Availability page
The Check Item Availability page can be used to verify availability of assembly and inventory items.
To check item availability go to Transactions > Inventory > Check Item Availability.
ReleaseNotes2012.1.0_v16.pdf - Subject to Change

Version 2012 Release 1 Release Notes Enterprise Resource Planning (ERP)
33
For more details, click Help and read Checking Item Availability.
Bill Payment EnhancementsPreviously, the Pay Bills page had a limit of 500 bills that could be marked at one time, and required all 500 to be marked on the same page for submission.
Now, when you use the Pay Bills page, you can select bills to pay from multiple pages before submitting them for payment.
You can click click Mark All to select all bills that show on the page you are viewing. If the list of bills extends beyond one page, you must view the next page of results to select those bills. On additional pages, you can select individual bills or click Mark All to select all the bills that are showing. Once you have marked the bills to pay in the list, they are all submitted for payment when you click Save.
To pay bills, go to Transactions > Purchases/Vendors > Pay Bills.
Work Order EnhancementsPreviously, for a partially built work order, items could be added but not removed.
As of Version 2012 Release 1, you can more easily change the component items on work orders. This ability is useful for orders with requirements that differ from the standard Bill of Materials (BOM) for an assembly.
You can edit components on a work order when the work order status is Pending Build. If no assembly is logged against a work order, you can add or remove items from the work order.
If any assembly build has been performed against a work order, you may only add a new component. An existing component cannot be deleted.
However, if you delete the build associated with the work order, the status returns to Pending Build and the work order can be edited to either add or remove items.
SuiteScript Support for Mass Work Order Creation
Also in Version 2012 Release 1, new scripting capabilities allow for the customization of work orders. SuiteScript can now be executed based on the default work order form during the work order creation process from a special order, or during the mass create work order process.
For more details, see User Event Scripts Now Execute on Work Orders Created Through Transform Process in the Release Notes.
Standard Costing EnhancementsAs of Version 2012 Release 1, the Standard Costing feature provides more control and visibility into cost accounting. Enhancements include new management, reporting, and rollup capabilities.
On the Cost Version page, you can select one of the following in the new Inventory Standard Cost field to define how the standard cost of inventory items is automatically calculated:
ReleaseNotes2012.1.0_v16.pdf - Subject to Change
Version 2012 Release 1 Release Notes Enterprise Resource Planning (ERP)
34
• Average Cost – The average cost of the inventory
• Item Default – The cost set in the Standard Cost field on the item record. When the cost version uses the Item Default setting, NetSuite generates planned standard cost records based on the Standard Cost field on the Inventory subtab on the item record.
• Last Purchase Price – The calculated last purchase price.Then, based on this setting, you can then check the Update Inventory Cost box to automatically generate the planned standard cost of inventory items as part of the rollup process.
When the cost version uses the Item Default setting, NetSuite generates planned standard cost records based on the Standard Cost field in the Standard Cost column on the Inventory subtab on the item record. You can enter a standard cost per location.
Check the Update Inventory Cost box on the Standard Cost Rollup page to set the standard cost of all planned standard cost records at the same time. When this box is checked, the planned standard cost records created will reflect the cost in the Standard Cost field on the item record for each item selected. Also, the planned standard cost of inventory items is automatically generated as part of the rollup process.
Standard Costing Reports
Version 2012 Release 1 includes new Standard Costing reports that you can use to analyze cost versions and variances:
• Production Variances by Item – Enables variances to be viewed by cost categories as well as cost components. This information makes it easy to identify areas where too much scrapping may occur due to significant quantity variances.
• Purchase Price Variances by Item – Shows the purchase price variance on an item-by-item basis, enabling you to identify opportunities to manage inventory costs and negotiate with suppliers.
• Planned Standard Costs by Cost Version Report – Provides a quick and easy side-by-side comparison of items and assemblies based on each cost version.
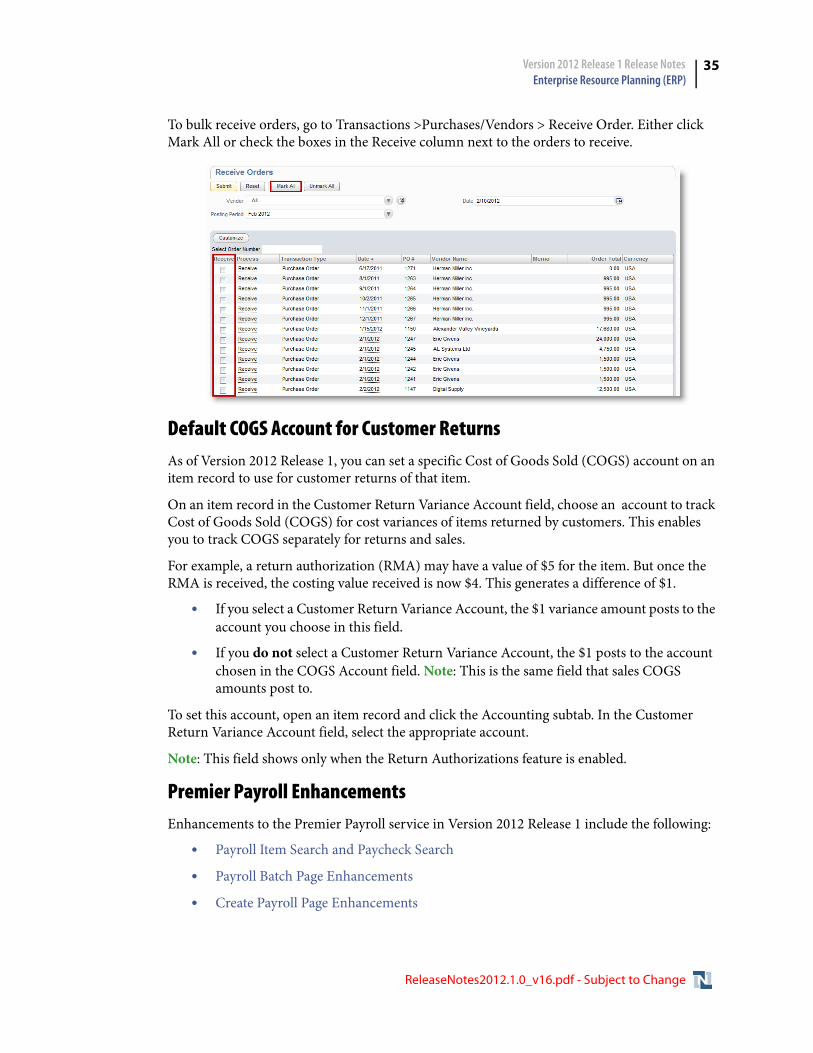
Bulk Receiving OrdersAs of Version 2012 Release 1, you can bulk process orders that you need to receive, instead of receiving one order at a time.
Note: The Advanced Receiving feature must be enabled and the Drop Shipments and Special Orders feature must be disabled in order to bulk receive orders.
ReleaseNotes2012.1.0_v16.pdf - Subject to Change
Version 2012 Release 1 Release Notes Enterprise Resource Planning (ERP)
35
To bulk receive orders, go to Transactions >Purchases/Vendors > Receive Order. Either click Mark All or check the boxes in the Receive column next to the orders to receive.
Default COGS Account for Customer ReturnsAs of Version 2012 Release 1, you can set a specific Cost of Goods Sold (COGS) account on an item record to use for customer returns of that item.
On an item record in the Customer Return Variance Account field, choose an account to track Cost of Goods Sold (COGS) for cost variances of items returned by customers. This enables you to track COGS separately for returns and sales.
For example, a return authorization (RMA) may have a value of $5 for the item. But once the RMA is received, the costing value received is now $4. This generates a difference of $1.
• If you select a Customer Return Variance Account, the $1 variance amount posts to the account you choose in this field.
• If you do not select a Customer Return Variance Account, the $1 posts to the account chosen in the COGS Account field. Note: This is the same field that sales COGS amounts post to.
To set this account, open an item record and click the Accounting subtab. In the Customer Return Variance Account field, select the appropriate account.
Note: This field shows only when the Return Authorizations feature is enabled.
Premier Payroll EnhancementsEnhancements to the Premier Payroll service in Version 2012 Release 1 include the following:
• Payroll Item Search and Paycheck Search
• Payroll Batch Page Enhancements
• Create Payroll Page Enhancements
ReleaseNotes2012.1.0_v16.pdf - Subject to Change
Version 2012 Release 1 Release Notes Enterprise Resource Planning (ERP)
36
• Payroll Item Record Enhancements
Payroll Item Search and Paycheck Search
Previously, it was difficult to list all payroll item assignments to employees. As of Version 2012 Release 1, a new payroll item search is available. The Employee Payroll Item search lists payroll items assigned to employees with corresponding pay, deduction, contribution or accrual rates.
Employee Payroll Item search shows the type of payroll item that is mapped for taxability and payroll specific codes that are attached to the specific item. It also lists what account is mapped to a payroll item. This search provides employee and payroll item assignment with rate, such as salary or hourly rate, any hours accrued on time off codes, and their accrual rates.
Additionally, a paycheck search lists all data available when a payroll is run. Data includes employee, date, batch number, payroll item, account affected, and hours or amounts associated per line item. If the check is taxed, the search shows taxable wages. The search indicates if the amount has any General Ledger (GL) impact. You are also now able to search calculated payroll numbers.
Payroll Batch Page Enhancements
Previously, to see net pay details, you had to look at each individual check. As of Version 2012 Release 1, the Payroll Batch page has a new Net Pay subtab that shows all net pay details for each employee.
Information on the Net Pay subtab includes the following:
• earnings (including hours for salary and for paid time off)
• deductions
• taxes
Once a batch is calculated, the Payroll Batch page displays all fields that can be edited. Changes you make in any of these fields are reflected immediately in the Net Pay column.
Create Payroll Page Enhancements
As of Version 2012 Release 1, the Create Payroll page allows you to disable auto earnings/deductions, direct deposit, and service printed checks. Also, you now can add deductions directly on this page.
Special Payrolls
These enhancements make it easier to process special payrolls. For example, you may need to process a check for one of the following scenarios:
• A bonus payroll run may not need calculated salary or wages and deductions.
Before, you needed to open each individual check, then calculate taxes and commit the payroll.
Now, you can enter the bonus amount at the batch level.
• A same-day payment is required, for example, when an employee is terminated.
ReleaseNotes2012.1.0_v16.pdf - Subject to Change
Version 2012 Release 1 Release Notes Enterprise Resource Planning (ERP)
37
Before, you needed to create a batch, then edit the check to disable the direct deposit and service printed check options before creating the payroll.
Now, you can disable the direct deposits and service printed checks at batch level.
Deductions
Previously, only additional earnings types, such as bonus or other supplemental types, could be entered on the Create Payroll Batch page. As of this release, deductions can be entered on the Create Payroll Batch page.
New Check Box Controls
The following functions can now be found on the Create Payroll Batch page.
• No Service Printed Checks – Check this box to process paychecks through the Premier Payroll service for this batch of checks. Clear this box to skip checks that require the payroll service.
This option shows only if you have enabled the Service Printed Checks option.
• No Auto Earnings/Deductions – When this box is checked, the regular salary and deductions from the salary are not calculated. Clear this box to calculate regular salary and deductions on this batch of checks.
• No Direct Deposits – Check this box to process checks even if an employee has the Use Direct Deposit option enabled on their employee record. This option overrides individual options. All employees are paid by a check.
Clear this box to process paychecks using direct deposit.
If you check this box and also check the No Service Printed Checks box, then all checks in the batch are processed as employer printed checks.
Additionally, the buttons for Mark All and Unmark All are now located just above the list of paychecks. Also, the Batch Progress page has been removed. Now the Payroll Batch page displays a progress bar at the top of the page.
Payroll Item Record Enhancements
The following changes have been made to the process for creating payroll item records.
Item Type field
Previously, when you went to Lists > Employees >Payroll Items > New, you saw a list of links for types of payroll items and clicked the type you wanted to create. Now, when you navigate to this page, a payroll item record opens and you select the payroll item type in the Item Type dropdown. Once you make a selection in this field, the other appropriate fields appear on the screen to complete the item.
Note: When you choose Deduction in the Item Type field, you now have an option to Allow Entry from Create Payroll. Check this box to have this deduction be available for entry from the Create Payroll Batch page.
ReleaseNotes2012.1.0_v16.pdf - Subject to Change
Version 2012 Release 1 Release Notes Enterprise Resource Planning (ERP)
38
Customization
You now can add custom fields to the payroll item record. This fields can be useful for payroll reporting purposes.
VSOE EnhancementsNetSuite has modified its Vendor Specific Objective Evidence (VSOE) feature for Version 2012 Release 1 in preparation for the enhancements for the EITF 08-01 Revenue Recognition managed bundle, scheduled to be available in March 2012.
A new field, Allocation Type, has been added to the Revenue Recognition/Amortization section of the Accounting subtab of the Item record and displays on the VSOE column popup on sales orders. The values for this field are:
• Normal - indicates that revenue recognition for the item follows VSOE rules.
• Exclude - indicates the item is exempt from revenue allocation based on its VSOE price information. The item selling price is used for revenue recognition.
• Software - indicates the item is software and the EITF 08-01 revenue recognition rules apply for allocating revenue. Do not set Allocation Type to Software if you use the VSOE feature without EITF 08-01 managed bundle.
Allocation Type is set to Normal by default. In most cases, for the VSOE feature, set this field to Normal. The values Exclude and Software are intended for use with the EITF 08-01 Revenue Recognition managed bundle. For the VSOE feature, you can set Allocation Type to Exclude if you want to exclude an item from price allocation.
A new check box, Estimate, has been added to the VSOE column on the Item subtab of the sales order. This check box for use with EITF 08-01 Revenue Recognition managed bundle and scripting solutions. By default, this box is unchecked. For the VSOE feature, always leave this box unchecked.
Currency Revaluation EnhancementsVersion 2012.1 Release 1 includes the following enhancements to Currency Revaluation:
• Currency Revaluation Processing Enhancements
• Automatic Residual Base Currency Adjustments
ReleaseNotes2012.1.0_v16.pdf - Subject to Change
Version 2012 Release 1 Release Notes Enterprise Resource Planning (ERP)
39
Currency Revaluation Processing Enhancements
With Version 2012 Release 1, NetSuite now processes currency revaluation for transaction lines in groups of 500 lines. It creates one currency revaluation transaction for every 500 lines. The total variance amount for each currency revaluation transaction created posts to the Unrealized Gain/Loss account.
In addition, subtabs for Status, Results, and Notes have been added to the Task: Revalue Open Foreign Currency Balances page, available from the Period Close Checklist.
On the Status subtab you can view the status of the currency revaluation. The Percent Complete column shows you how much of the process has run. The Transactions column shows the number of currency revaluations created for the run.
The Results subtab shows the currency revaluations created for each run along with the currency and the total variance amount for the transaction. If a revaluation run produces 4 currency revaluation transactions, you will see 4 lines for that run number, each with a link to the revaluation results details. Click the transaction number to drill down to the Currency Revaluation (Unrealized Gain/Loss) page.
The Notes subtab provides the history of actions for the page.
Automatic Residual Base Currency Adjustments
With Release 2012 Version 1, NetSuite introduces base currency adjustments for the Multiple Currencies feature. Running currency revaluation during your period close process now automatically clears residual base currency balances for accounts subject to revaluation. Residual account balances occur when the exchange rate at the time of the payment or zeroing the account differs from the exchange rate of the initial transaction. Accounts with open base currency balances must be revalued at the end of a period.
Base currency adjustments equalize foreign currency and base currency account balances, and eliminate the continuous revaluation and reversal of residual base currency balances. Base currency adjustments apply to balance sheet accounts other than Accounts Receivable, Accounts Payable, and Unbilled Receivable accounts.
With this enhancement, when you run currency revaluation at the end of a period, the revaluation engine first compares the foreign currency balance for an account subject to
ReleaseNotes2012.1.0_v16.pdf - Subject to Change
Version 2012 Release 1 Release Notes Enterprise Resource Planning (ERP)
40
revaluation to its base currency balance. If the foreign currency balance for an account is 0 but the base currency balance is not 0, the new revaluation engine creates a currency revaluation adjustment to clear the base currency amount. The adjustment posts to UnrealizedMatching Gain/Loss account. Because the foreign currency balance and base currency balances are 0, additional revaluation is not triggered for the account.
For more information, see the Help topic, Clearing Residual Base Currency Balances.
Integrated Intercompany Sales and Purchasing with Automated Intercompany Management Version 2012 Release 1 expands NetSuite’s intercompany elimination feature to support integrated intercompany sales and billing transactions across subsidiaries. You can now generate intercompany sales orders automatically from intercompany purchase orders. New reports for reconciling intercompany transactions and an audit trail for intercompany eliminations are also available. The Intercompany Auto Elimination feature, introduced in the previous release, has a new name, Automated Intercompany Management, to reflect these enhanced capabilities.
To enable this feature, go to Setup > Company > Enable Features. On the Accounting subtab, check the Automated Intercompany Management box. If you enabled the earlier feature version, Intercompany Auto Elimination, no action is required. You are ready to take advantage of the latest enhancements.
Automated Intercompany Management provides the following enhancements for processing transactions between subsidiaries:
• Intercompany transactions - Enter purchase orders, sales orders, return authorizations, and vendor return authorizations for transactions between subsidiaries.
Note: The Automated Intercompany Management feature does not support transactions for inventory transfers in this release.
• Pairing of related intercompany transactions - Generate intercompany sales orders from intercompany purchase orders that automatically create the required information for the second subsidiary and pair the transactions. This relationship is maintained throughout the sales and billing cycle to identify intercompany transactions to be eliminated at month end. A new page, Manage Intercompany Sales Orders, is available at Transactions > Sales > Manage Intercompany Sales Orders. You can also generate return authorizations from vendor return authorizations.
• Intercompany Reconciliation report -Catch any unmatched or mismatched intercompany transactions. The report has four sections:
• Unlinked orders and returns - intercompany transactions not paired with a corresponding intercompany transaction in another subsidiary
• Mismatched amounts - paired intercompany transactions with amounts that do not match
ReleaseNotes2012.1.0_v16.pdf - Subject to Change
Version 2012 Release 1 Release Notes Web Site
41
• Mismatched billing - paired intercompany transactions with billed amounts that do not match
• Stand-alone transactions - billing and payment transactions not associated with a purchase order or sales order
Run this report as part of your period end process to identify any problems associated intercompany transactions, before you execute the Eliminate Intercompany Transactions task. To run this report, go to Report > Financials > Intercompany Reconciliation Report.
• Elimination of billed sales and purchasing transactions - Billed transactions from purchase orders and sales orders marked for elimination are eliminated during the period close process when you complete the Eliminate Intercompany Transactions task.
• Intercompany Elimination report - Provides a detailed audit trail report of the results of running the Eliminate Intercompany Transactions task for a period. You can run this report after posting eliminations JEs for a period. It shows the source intercompany transactions and the resulting elimination journal entries. To run this report, go to Report > Financials > Intercompany Elimination Report.
Subsidiary Level System Notes for Accounting Period LockingAs of Version 2012 Release 1, system notes for the Locking tasks on the Period Close Checklist now include subsidiary information. You can view the changes made to the lock status of accounting modules or accounting periods by subsidiary. This information is available in OneWorld accounts only.
To view subsidiary locking history for an accounting period, open a Period Close Checklist from the Manage Accounting Periods page. Select a locking task from the Period Close Checklist - Lock AR, Lock AP, Lock Payroll, or Lock All. On the Notes subtab, the System Notes subtab displays the subsidiary for each locking and unlocking task performed.
In addition, you now can include subsidiary information in any searches that include system notes information from locking accounting periods. This ability allows you to search and report period locking history information by subsidiary.
Web SiteVersion 2012 Release 1 includes the following enhancements to Web Site features:
• SSP Applications (Beta)
• Reference Cart and One Page Checkout
• Web Site Email Templates
• Customize Web Site Text Groups
• Bulk Edits of URL Redirects
ReleaseNotes2012.1.0_v16.pdf - Subject to Change
Version 2012 Release 1 Release Notes Web Site
42
• Direct File Editing
SSP Applications (Beta)Version 2012 Release 1 includes the SuiteScript Server Pages (Beta) feature. This feature supports the packaging of Web store customizations into SSP applications that allow you to fully customize your customers’ shopping experience. You can replace existing NetSuite applications such as the shopping cart, checkout, or customer center, with your own custom assets. You can use familiar HTML and SuiteScript, and even other E-Commerce platforms, to create these customizations.
All files in an SSP application are grouped together in a folder in the NetSuite file cabinet and hosted from this location. This grouping facilitates testing and deployment to your own site, as well as distribution to other NetSuite accounts for use in their sites. You can package all assets for an SSP application into a NetSuite bundle that can be installed in target accounts, and users in these accounts can deploy customizations to their Web stores as desired.
NetSuite provides the following tools to create SSP applications:
• SSP Application Record - NetSuite object that stores details about an SSP application
• File Types for SSP Applications - new .ssp front-end and .ss request handler file types
• Commerce API - SuiteScript shopping objects and methods
Warning: This release note describes a beta feature. The contents of this feature are preliminary and may be changed or discontinued without prior notice. Any changes may impact the feature’s operation with the NetSuite application. NetSuite warranties and product service levels shall not apply to the feature or the impact of the feature on other portions of the NetSuite application. NetSuite may review and monitor the performance and use of this feature.
Required Features for SSP Applications
The following features must be enabled in your account to support the creation and viewing of SSP Application records, and the deployment of SSP applications to your site:
• In the SuiteFlex area: Client SuiteScript, Server SuiteScript, SuiteScript Server Pages
• In the Web Presence area: Web Site, Host HTML Files
Required Permission for SSP Applications
A user must have the SuiteScript permission to access SSP Application records.
ReleaseNotes2012.1.0_v16.pdf - Subject to Change
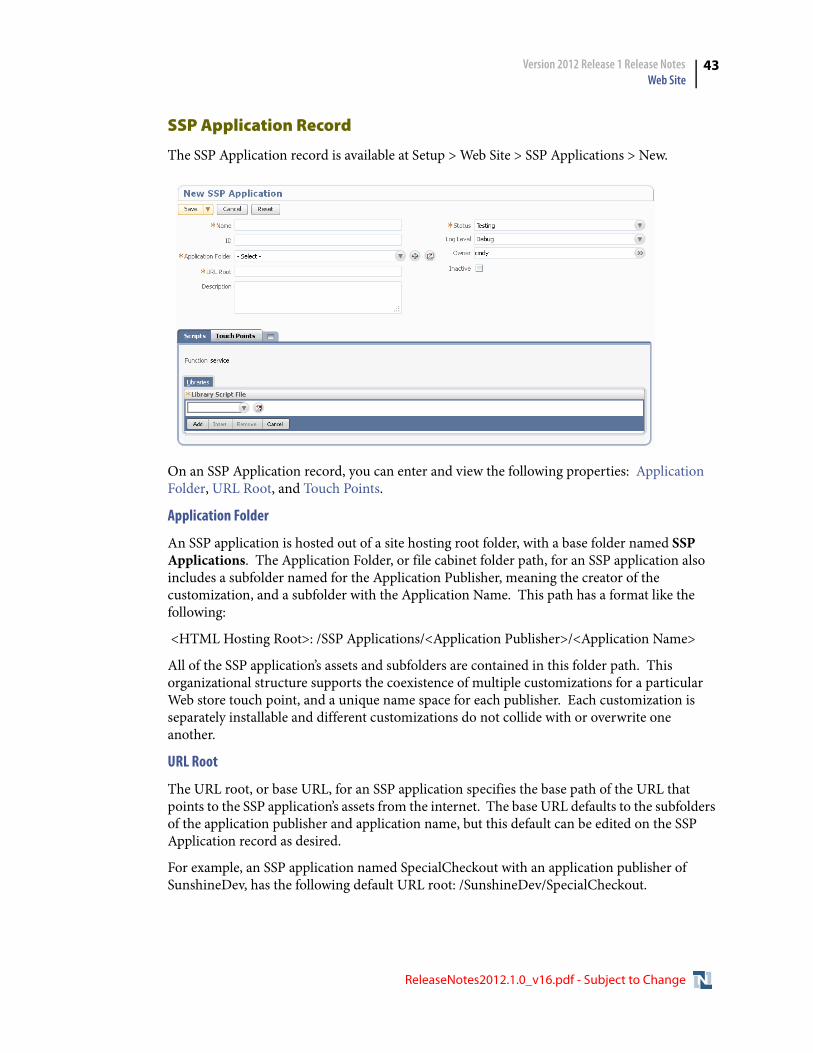
Version 2012 Release 1 Release Notes Web Site
43
SSP Application Record
The SSP Application record is available at Setup > Web Site > SSP Applications > New.
On an SSP Application record, you can enter and view the following properties: Application Folder, URL Root, and Touch Points.
Application Folder
An SSP application is hosted out of a site hosting root folder, with a base folder named SSP Applications. The Application Folder, or file cabinet folder path, for an SSP application also includes a subfolder named for the Application Publisher, meaning the creator of the customization, and a subfolder with the Application Name. This path has a format like the following:
<HTML Hosting Root>: /SSP Applications/<Application Publisher>/<Application Name>
All of the SSP application’s assets and subfolders are contained in this folder path. This organizational structure supports the coexistence of multiple customizations for a particular Web store touch point, and a unique name space for each publisher. Each customization is separately installable and different customizations do not collide with or overwrite one another.
URL Root
The URL root, or base URL, for an SSP application specifies the base path of the URL that points to the SSP application’s assets from the internet. The base URL defaults to the subfolders of the application publisher and application name, but this default can be edited on the SSP Application record as desired.
For example, an SSP application named SpecialCheckout with an application publisher of SunshineDev, has the following default URL root: /SunshineDev/SpecialCheckout.
ReleaseNotes2012.1.0_v16.pdf - Subject to Change
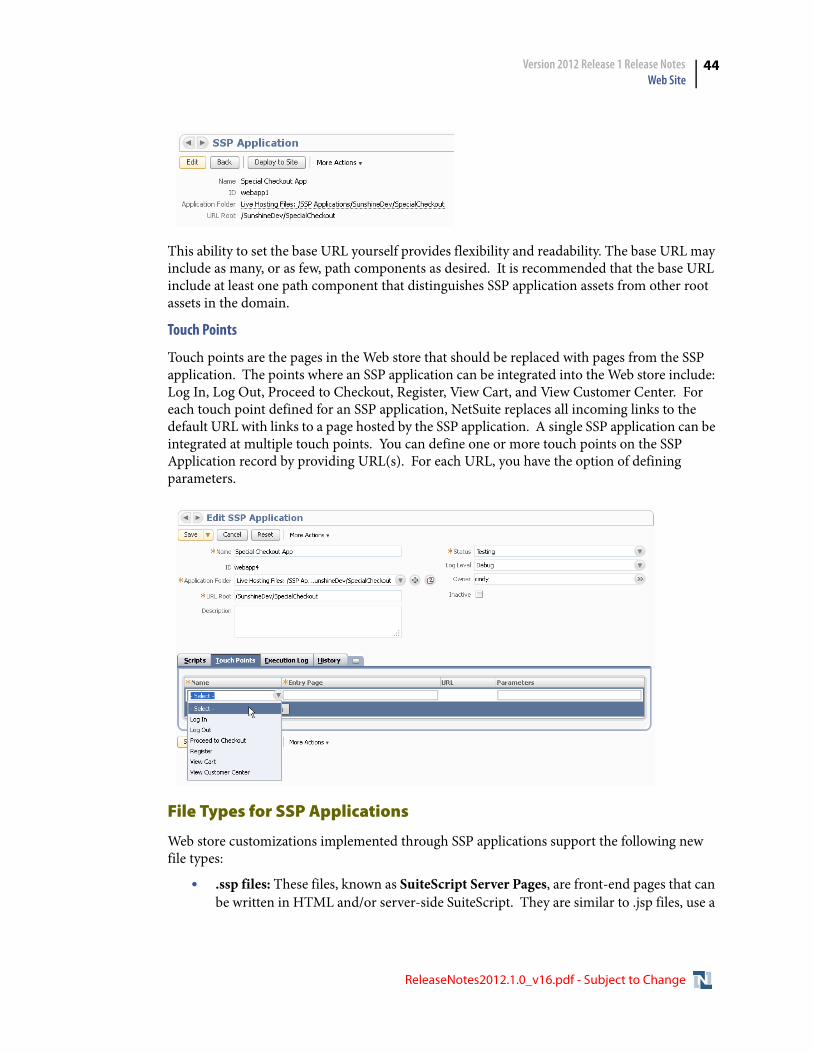
Version 2012 Release 1 Release Notes Web Site
44
This ability to set the base URL yourself provides flexibility and readability. The base URL may include as many, or as few, path components as desired. It is recommended that the base URL include at least one path component that distinguishes SSP application assets from other root assets in the domain.
Touch Points
Touch points are the pages in the Web store that should be replaced with pages from the SSP application. The points where an SSP application can be integrated into the Web store include: Log In, Log Out, Proceed to Checkout, Register, View Cart, and View Customer Center. For each touch point defined for an SSP application, NetSuite replaces all incoming links to the default URL with links to a page hosted by the SSP application. A single SSP application can be integrated at multiple touch points. You can define one or more touch points on the SSP Application record by providing URL(s). For each URL, you have the option of defining parameters.
File Types for SSP Applications
Web store customizations implemented through SSP applications support the following new file types:
• .ssp files: These files, known as SuiteScript Server Pages, are front-end pages that can be written in HTML and/or server-side SuiteScript. They are similar to .jsp files, use a
ReleaseNotes2012.1.0_v16.pdf - Subject to Change
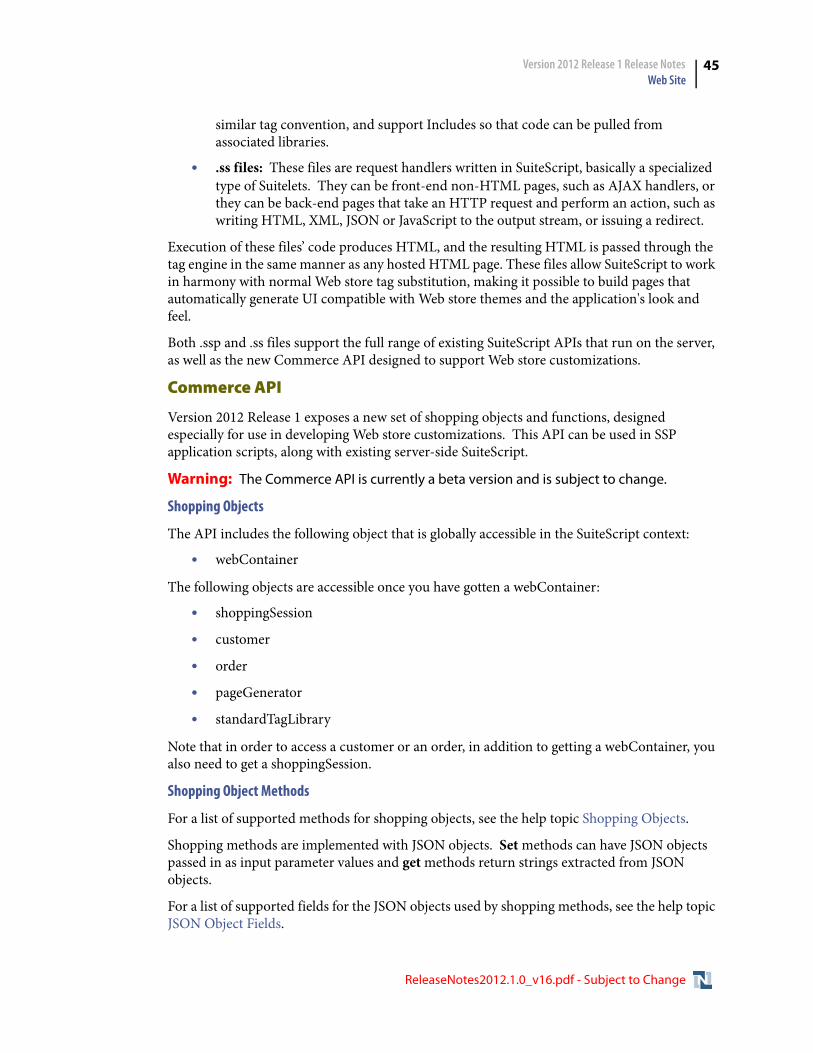
Version 2012 Release 1 Release Notes Web Site
45
similar tag convention, and support Includes so that code can be pulled from associated libraries.
• .ss files: These files are request handlers written in SuiteScript, basically a specialized type of Suitelets. They can be front-end non-HTML pages, such as AJAX handlers, or they can be back-end pages that take an HTTP request and perform an action, such as writing HTML, XML, JSON or JavaScript to the output stream, or issuing a redirect.
Execution of these files’ code produces HTML, and the resulting HTML is passed through the tag engine in the same manner as any hosted HTML page. These files allow SuiteScript to work in harmony with normal Web store tag substitution, making it possible to build pages that automatically generate UI compatible with Web store themes and the application's look and feel.
Both .ssp and .ss files support the full range of existing SuiteScript APIs that run on the server, as well as the new Commerce API designed to support Web store customizations.
Commerce API
Version 2012 Release 1 exposes a new set of shopping objects and functions, designed especially for use in developing Web store customizations. This API can be used in SSP application scripts, along with existing server-side SuiteScript.
Warning: The Commerce API is currently a beta version and is subject to change.
Shopping Objects
The API includes the following object that is globally accessible in the SuiteScript context:
• webContainer
The following objects are accessible once you have gotten a webContainer:
• shoppingSession
• customer
• order
• pageGenerator
• standardTagLibrary
Note that in order to access a customer or an order, in addition to getting a webContainer, you also need to get a shoppingSession.
Shopping Object Methods
For a list of supported methods for shopping objects, see the help topic Shopping Objects.
Shopping methods are implemented with JSON objects. Set methods can have JSON objects passed in as input parameter values and get methods return strings extracted from JSON objects.
For a list of supported fields for the JSON objects used by shopping methods, see the help topic JSON Object Fields.
ReleaseNotes2012.1.0_v16.pdf - Subject to Change
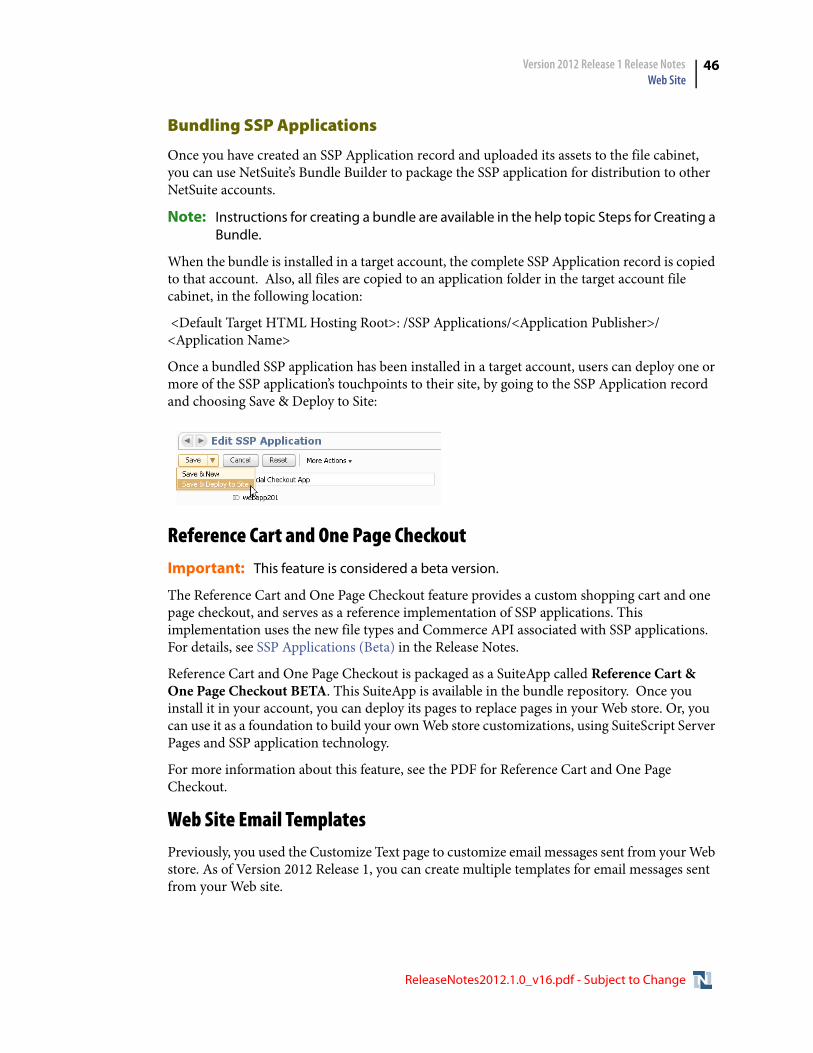
Version 2012 Release 1 Release Notes Web Site
46
Bundling SSP Applications
Once you have created an SSP Application record and uploaded its assets to the file cabinet, you can use NetSuite’s Bundle Builder to package the SSP application for distribution to other NetSuite accounts.
Note: Instructions for creating a bundle are available in the help topic Steps for Creating a Bundle.
When the bundle is installed in a target account, the complete SSP Application record is copied to that account. Also, all files are copied to an application folder in the target account file cabinet, in the following location:
<Default Target HTML Hosting Root>: /SSP Applications/<Application Publisher>/<Application Name>
Once a bundled SSP application has been installed in a target account, users can deploy one or more of the SSP application’s touchpoints to their site, by going to the SSP Application record and choosing Save & Deploy to Site:
Reference Cart and One Page Checkout
Important: This feature is considered a beta version.
The Reference Cart and One Page Checkout feature provides a custom shopping cart and one page checkout, and serves as a reference implementation of SSP applications. This implementation uses the new file types and Commerce API associated with SSP applications. For details, see SSP Applications (Beta) in the Release Notes.
Reference Cart and One Page Checkout is packaged as a SuiteApp called Reference Cart & One Page Checkout BETA. This SuiteApp is available in the bundle repository. Once you install it in your account, you can deploy its pages to replace pages in your Web store. Or, you can use it as a foundation to build your own Web store customizations, using SuiteScript Server Pages and SSP application technology.
For more information about this feature, see the PDF for Reference Cart and One Page Checkout.
Web Site Email TemplatesPreviously, you used the Customize Text page to customize email messages sent from your Web store. As of Version 2012 Release 1, you can create multiple templates for email messages sent from your Web site.
ReleaseNotes2012.1.0_v16.pdf - Subject to Change
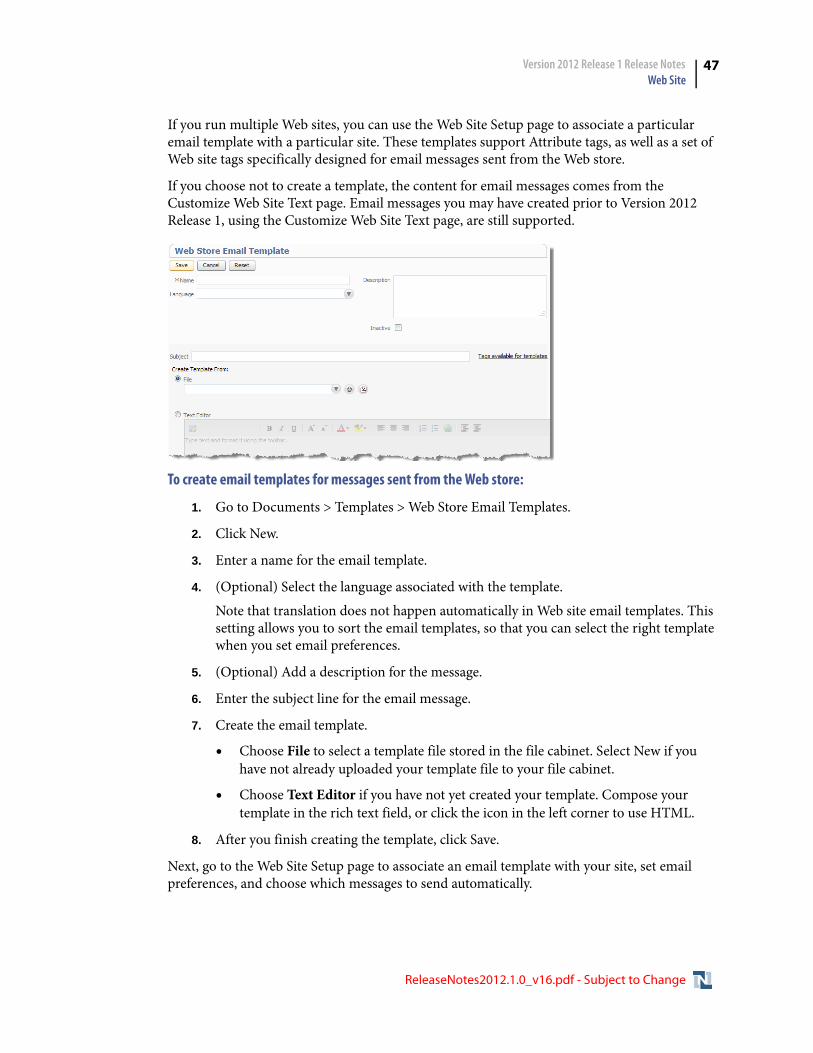
Version 2012 Release 1 Release Notes Web Site
47
If you run multiple Web sites, you can use the Web Site Setup page to associate a particular email template with a particular site. These templates support Attribute tags, as well as a set of Web site tags specifically designed for email messages sent from the Web store.
If you choose not to create a template, the content for email messages comes from the Customize Web Site Text page. Email messages you may have created prior to Version 2012 Release 1, using the Customize Web Site Text page, are still supported.
To create email templates for messages sent from the Web store:
1. Go to Documents > Templates > Web Store Email Templates.
2. Click New.
3. Enter a name for the email template.
4. (Optional) Select the language associated with the template.
Note that translation does not happen automatically in Web site email templates. This setting allows you to sort the email templates, so that you can select the right template when you set email preferences.
5. (Optional) Add a description for the message.
6. Enter the subject line for the email message.
7. Create the email template.
• Choose File to select a template file stored in the file cabinet. Select New if you have not already uploaded your template file to your file cabinet.
• Choose Text Editor if you have not yet created your template. Compose your template in the rich text field, or click the icon in the left corner to use HTML.
8. After you finish creating the template, click Save.
Next, go to the Web Site Setup page to associate an email template with your site, set email preferences, and choose which messages to send automatically.
ReleaseNotes2012.1.0_v16.pdf - Subject to Change
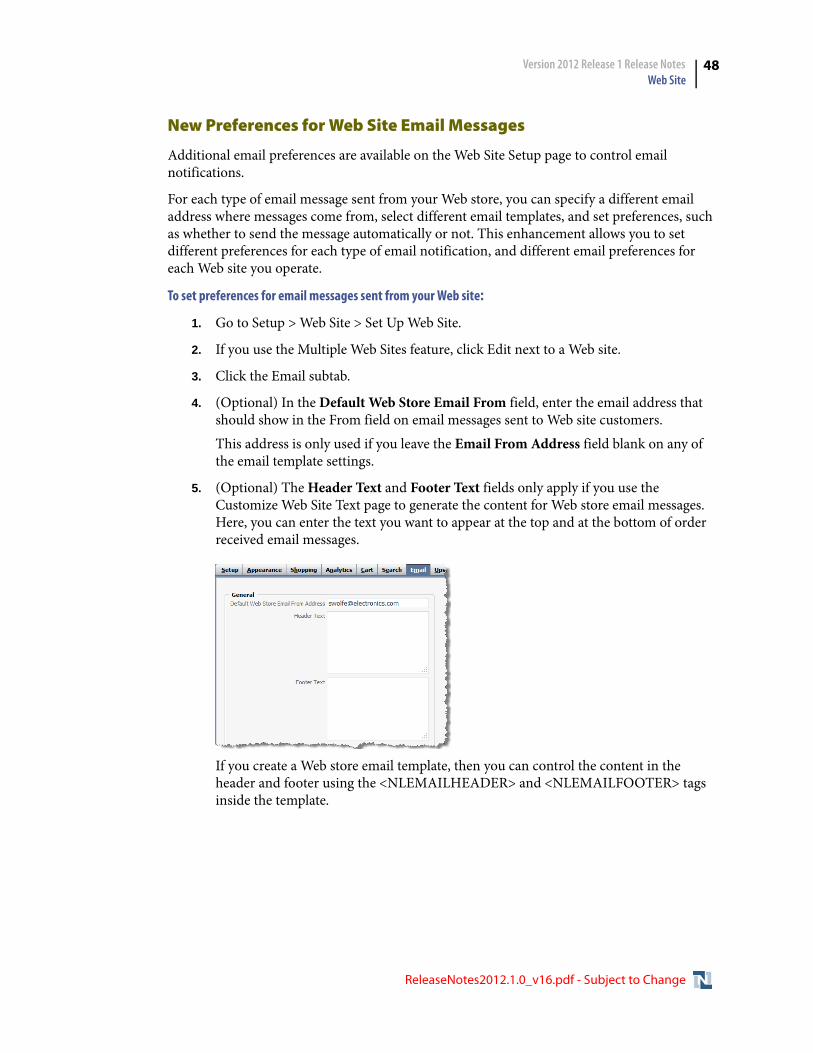
Version 2012 Release 1 Release Notes Web Site
48
New Preferences for Web Site Email Messages
Additional email preferences are available on the Web Site Setup page to control email notifications.
For each type of email message sent from your Web store, you can specify a different email address where messages come from, select different email templates, and set preferences, such as whether to send the message automatically or not. This enhancement allows you to set different preferences for each type of email notification, and different email preferences for each Web site you operate.
To set preferences for email messages sent from your Web site:
1. Go to Setup > Web Site > Set Up Web Site.
2. If you use the Multiple Web Sites feature, click Edit next to a Web site.
3. Click the Email subtab.
4. (Optional) In the Default Web Store Email From field, enter the email address that should show in the From field on email messages sent to Web site customers.
This address is only used if you leave the Email From Address field blank on any of the email template settings.
5. (Optional) The Header Text and Footer Text fields only apply if you use the Customize Web Site Text page to generate the content for Web store email messages. Here, you can enter the text you want to appear at the top and at the bottom of order received email messages.
If you create a Web store email template, then you can control the content in the header and footer using the <NLEMAILHEADER> and <NLEMAILFOOTER> tags inside the template.
ReleaseNotes2012.1.0_v16.pdf - Subject to Change
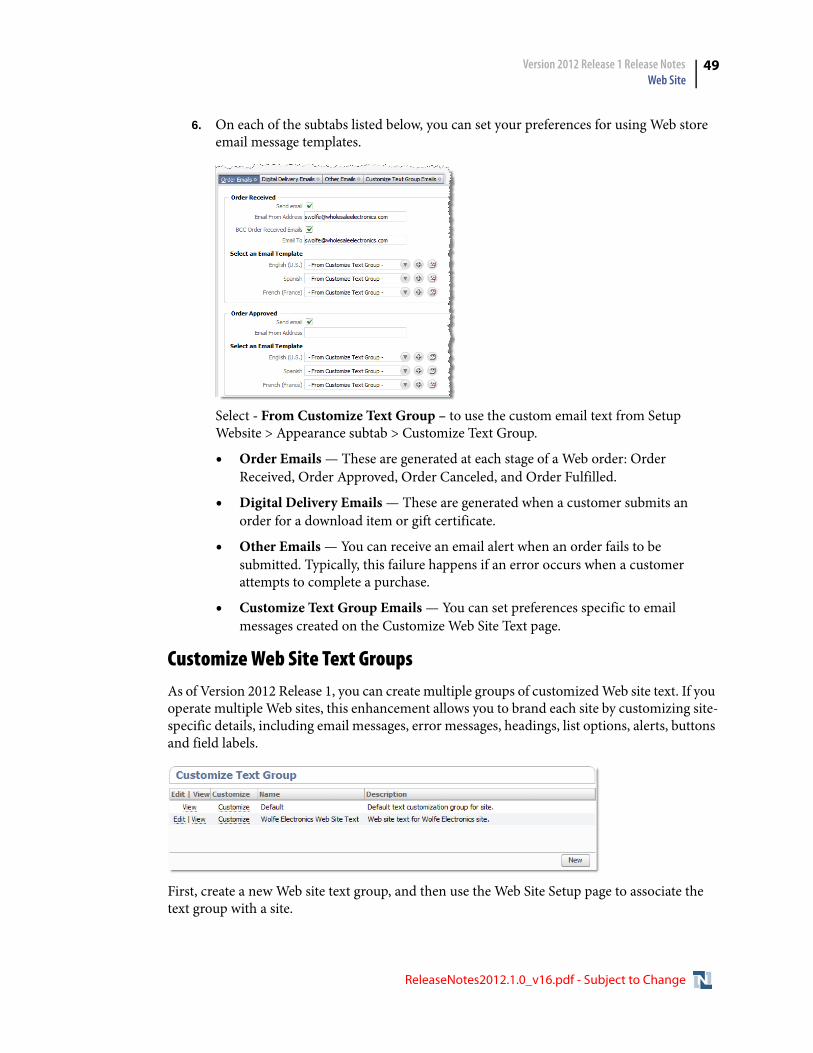
Version 2012 Release 1 Release Notes Web Site
49
6. On each of the subtabs listed below, you can set your preferences for using Web store email message templates.
Select - From Customize Text Group – to use the custom email text from Setup Website > Appearance subtab > Customize Text Group.
• Order Emails — These are generated at each stage of a Web order: Order Received, Order Approved, Order Canceled, and Order Fulfilled.
• Digital Delivery Emails — These are generated when a customer submits an order for a download item or gift certificate.
• Other Emails — You can receive an email alert when an order fails to be submitted. Typically, this failure happens if an error occurs when a customer attempts to complete a purchase.
• Customize Text Group Emails — You can set preferences specific to email messages created on the Customize Web Site Text page.
Customize Web Site Text GroupsAs of Version 2012 Release 1, you can create multiple groups of customized Web site text. If you operate multiple Web sites, this enhancement allows you to brand each site by customizing site-specific details, including email messages, error messages, headings, list options, alerts, buttons and field labels.
First, create a new Web site text group, and then use the Web Site Setup page to associate the text group with a site.
ReleaseNotes2012.1.0_v16.pdf - Subject to Change
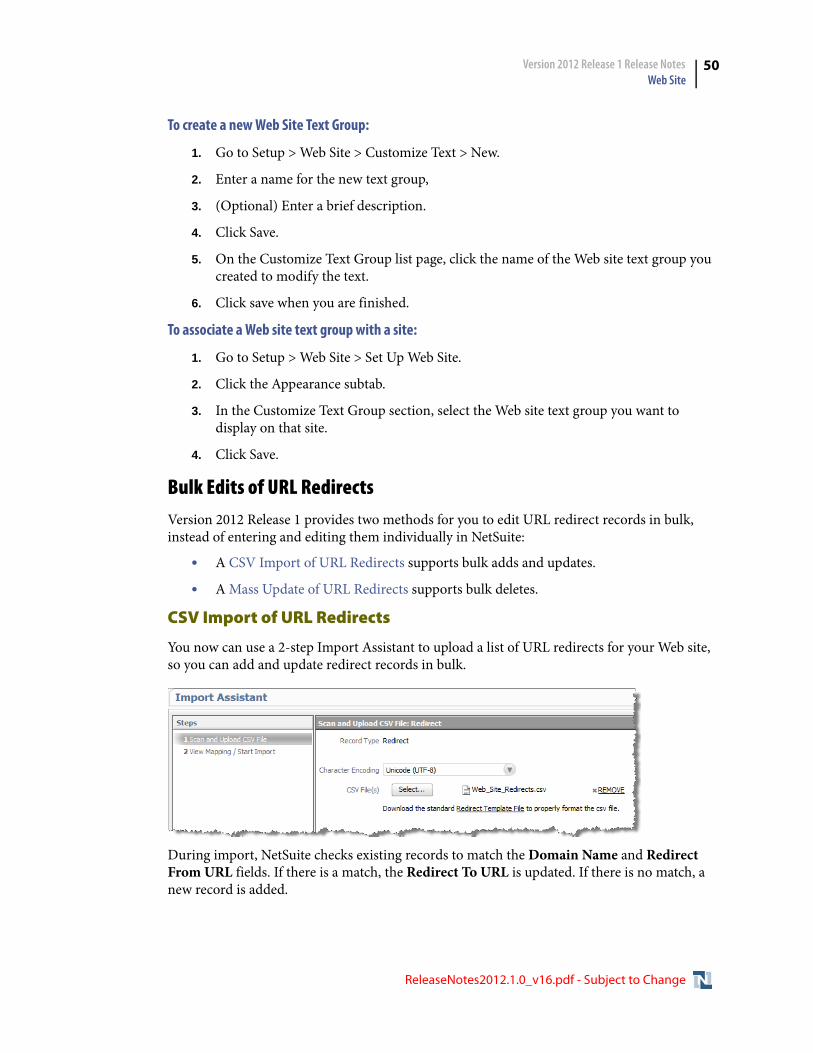
Version 2012 Release 1 Release Notes Web Site
50
To create a new Web Site Text Group:
1. Go to Setup > Web Site > Customize Text > New.
2. Enter a name for the new text group,
3. (Optional) Enter a brief description.
4. Click Save.
5. On the Customize Text Group list page, click the name of the Web site text group you created to modify the text.
6. Click save when you are finished.
To associate a Web site text group with a site:
1. Go to Setup > Web Site > Set Up Web Site.
2. Click the Appearance subtab.
3. In the Customize Text Group section, select the Web site text group you want to display on that site.
4. Click Save.
Bulk Edits of URL RedirectsVersion 2012 Release 1 provides two methods for you to edit URL redirect records in bulk, instead of entering and editing them individually in NetSuite:
• A CSV Import of URL Redirects supports bulk adds and updates.
• A Mass Update of URL Redirects supports bulk deletes.
CSV Import of URL Redirects
You now can use a 2-step Import Assistant to upload a list of URL redirects for your Web site, so you can add and update redirect records in bulk.
During import, NetSuite checks existing records to match the Domain Name and Redirect From URL fields. If there is a match, the Redirect To URL is updated. If there is no match, a new record is added.
ReleaseNotes2012.1.0_v16.pdf - Subject to Change
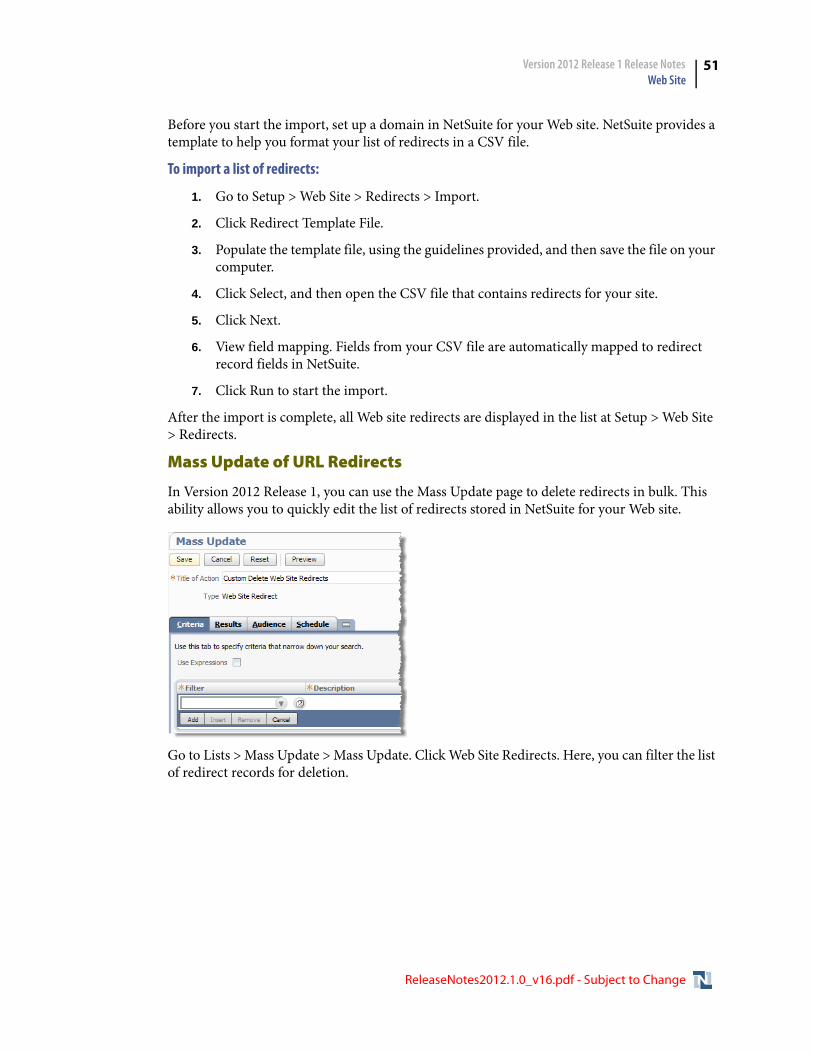
Version 2012 Release 1 Release Notes Web Site
51
Before you start the import, set up a domain in NetSuite for your Web site. NetSuite provides a template to help you format your list of redirects in a CSV file.
To import a list of redirects:
1. Go to Setup > Web Site > Redirects > Import.
2. Click Redirect Template File.
3. Populate the template file, using the guidelines provided, and then save the file on your computer.
4. Click Select, and then open the CSV file that contains redirects for your site.
5. Click Next.
6. View field mapping. Fields from your CSV file are automatically mapped to redirect record fields in NetSuite.
7. Click Run to start the import.
After the import is complete, all Web site redirects are displayed in the list at Setup > Web Site > Redirects.
Mass Update of URL Redirects
In Version 2012 Release 1, you can use the Mass Update page to delete redirects in bulk. This ability allows you to quickly edit the list of redirects stored in NetSuite for your Web site.
Go to Lists > Mass Update > Mass Update. Click Web Site Redirects. Here, you can filter the list of redirect records for deletion.
ReleaseNotes2012.1.0_v16.pdf - Subject to Change
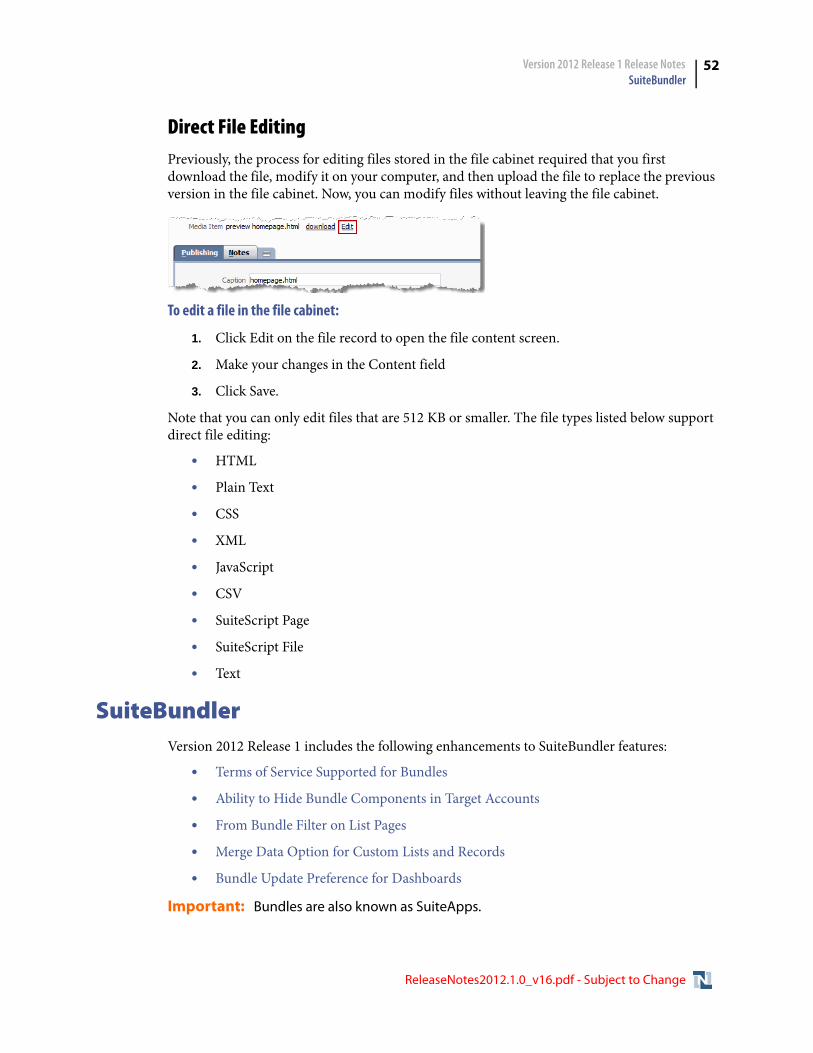
Version 2012 Release 1 Release Notes SuiteBundler
52
Direct File EditingPreviously, the process for editing files stored in the file cabinet required that you first download the file, modify it on your computer, and then upload the file to replace the previous version in the file cabinet. Now, you can modify files without leaving the file cabinet.
To edit a file in the file cabinet:
1. Click Edit on the file record to open the file content screen.
2. Make your changes in the Content field
3. Click Save.
Note that you can only edit files that are 512 KB or smaller. The file types listed below support direct file editing:
• HTML
• Plain Text
• CSS
• XML
• JavaScript
• CSV
• SuiteScript Page
• SuiteScript File
• Text
SuiteBundlerVersion 2012 Release 1 includes the following enhancements to SuiteBundler features:
• Terms of Service Supported for Bundles
• Ability to Hide Bundle Components in Target Accounts
• From Bundle Filter on List Pages
• Merge Data Option for Custom Lists and Records
• Bundle Update Preference for Dashboards
Important: Bundles are also known as SuiteApps.
ReleaseNotes2012.1.0_v16.pdf - Subject to Change
Version 2012 Release 1 Release Notes SuiteBundler
53
Bundle Support During Release PhasingBundle support during phasing of Version 2012 Release 1 is consistent with the support provided during previous releases. Review the description below for a reminder of how bundles from different versions are handled during release phasing.
During phasing of Version 2012 Release 1, some accounts are still using Version 2011 Release 2, while other accounts have been upgraded to Version 2012 Release 1, so you may be using a different version than some of the accounts where your bundles are installed.
• Bundles developed with Version 2011 Release 2 can be installed into accounts that are already using Version 2012 Release 1.
• Bundles developed with Version 2012 Release 1 can be installed into accounts that are still using Version 2011 Release 2, but note the following limitations:
• When a user in a Version 2011 Release 2 account installs a bundle from a Version 2012 Release 1 account, any object types in the bundle that are not supported in Version 2011 Release 2 are not installed, resulting in potentially serious impact to bundle function.
• A bundle with a SuiteScript that uses a new API available only in Version 2012 Release 1 can be installed into a Version 2011 Release 2 account, but the script may not function correctly because Version 2011 Release 2 does not support the API.
Warning: The only bundles that can be installed into a Release Preview account are those created in another Release Preview account. A bundle originally installed from a production account or the production repository can be updated in a Release Preview account, as long as the original account or the repository are also available in Release Preview. A bundle originally installed from a Sandbox account cannot be accessed or updated in a Release Preview account. Also, any bundle created in a Release Preview account cannot be installed into a Production or Sandbox environment, even if it has been copied to the bundle repository.
Terms of Service Supported for BundlesAs of Version 2012 Release 1, bundle authors can associate terms of service with their bundles and require target account users to accept these terms before installing or updating a bundle. Note that these terms do not replace general SuiteBundler terms of service. The newly supported terms of service can be defined per individual bundle.
ReleaseNotes2012.1.0_v16.pdf - Subject to Change

Version 2012 Release 1 Release Notes SuiteBundler
54
Defining Bundle Terms of Service
A bundle author defines bundle-specific terms of service on the Bundle Properties page of the Bundle Builder.
• Lengthy text can be edited externally and pasted into the box on this page.
• Text formatting tools are available on this page (when the Enable Rich Text Editing option is enabled at Home > Set Preferences).
If the Requires Acceptance box is checked, terms of service text is displayed during bundle installation and update, and the user must agree to the terms before proceeding. Note that a standard NetSuite disclaimer is always included along with your text:
ReleaseNotes2012.1.0_v16.pdf - Subject to Change
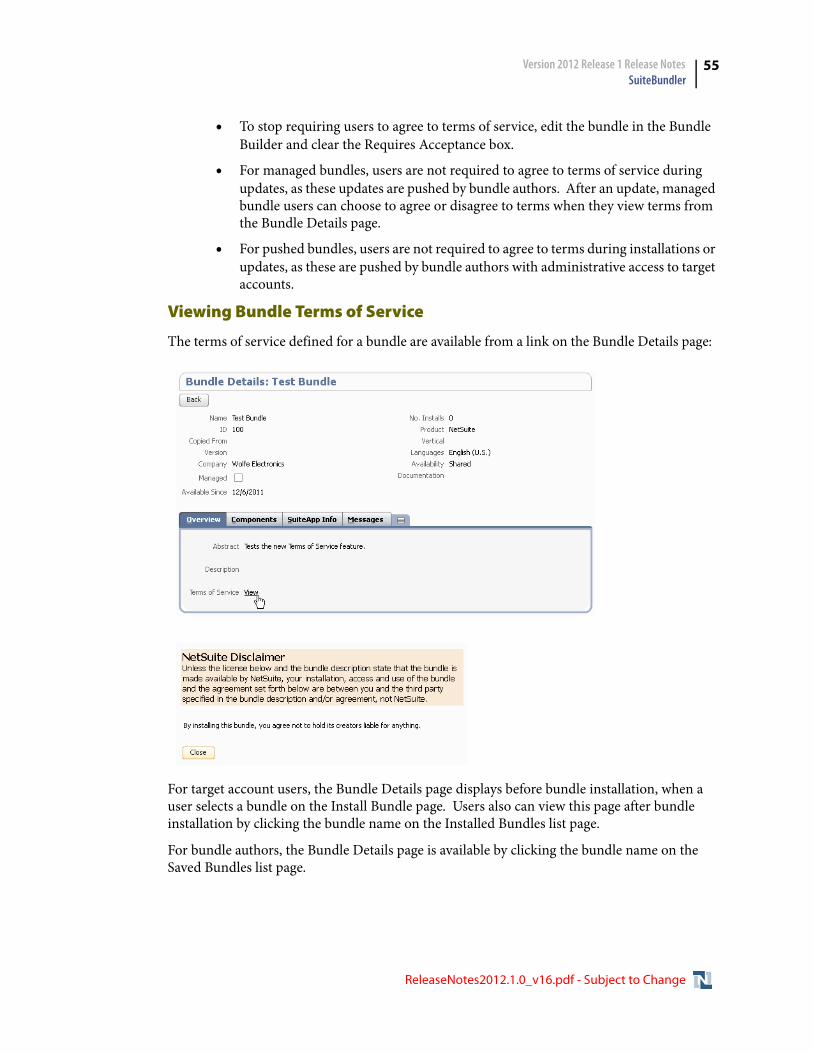
Version 2012 Release 1 Release Notes SuiteBundler
55
• To stop requiring users to agree to terms of service, edit the bundle in the Bundle Builder and clear the Requires Acceptance box.
• For managed bundles, users are not required to agree to terms of service during updates, as these updates are pushed by bundle authors. After an update, managed bundle users can choose to agree or disagree to terms when they view terms from the Bundle Details page.
• For pushed bundles, users are not required to agree to terms during installations or updates, as these are pushed by bundle authors with administrative access to target accounts.
Viewing Bundle Terms of Service
The terms of service defined for a bundle are available from a link on the Bundle Details page:
For target account users, the Bundle Details page displays before bundle installation, when a user selects a bundle on the Install Bundle page. Users also can view this page after bundle installation by clicking the bundle name on the Installed Bundles list page.
For bundle authors, the Bundle Details page is available by clicking the bundle name on the Saved Bundles list page.
ReleaseNotes2012.1.0_v16.pdf - Subject to Change
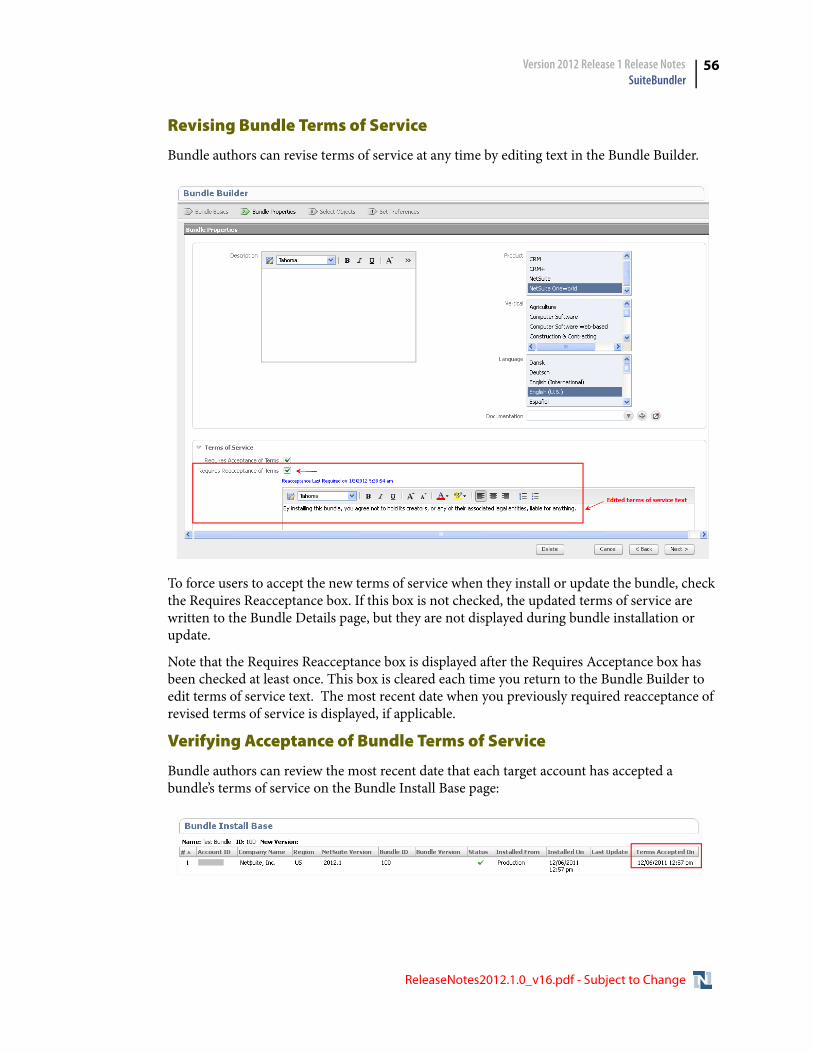
Version 2012 Release 1 Release Notes SuiteBundler
56
Revising Bundle Terms of Service
Bundle authors can revise terms of service at any time by editing text in the Bundle Builder.
To force users to accept the new terms of service when they install or update the bundle, check the Requires Reacceptance box. If this box is not checked, the updated terms of service are written to the Bundle Details page, but they are not displayed during bundle installation or update.
Note that the Requires Reacceptance box is displayed after the Requires Acceptance box has been checked at least once. This box is cleared each time you return to the Bundle Builder to edit terms of service text. The most recent date when you previously required reacceptance of revised terms of service is displayed, if applicable.
Verifying Acceptance of Bundle Terms of Service
Bundle authors can review the most recent date that each target account has accepted a bundle’s terms of service on the Bundle Install Base page:
ReleaseNotes2012.1.0_v16.pdf - Subject to Change
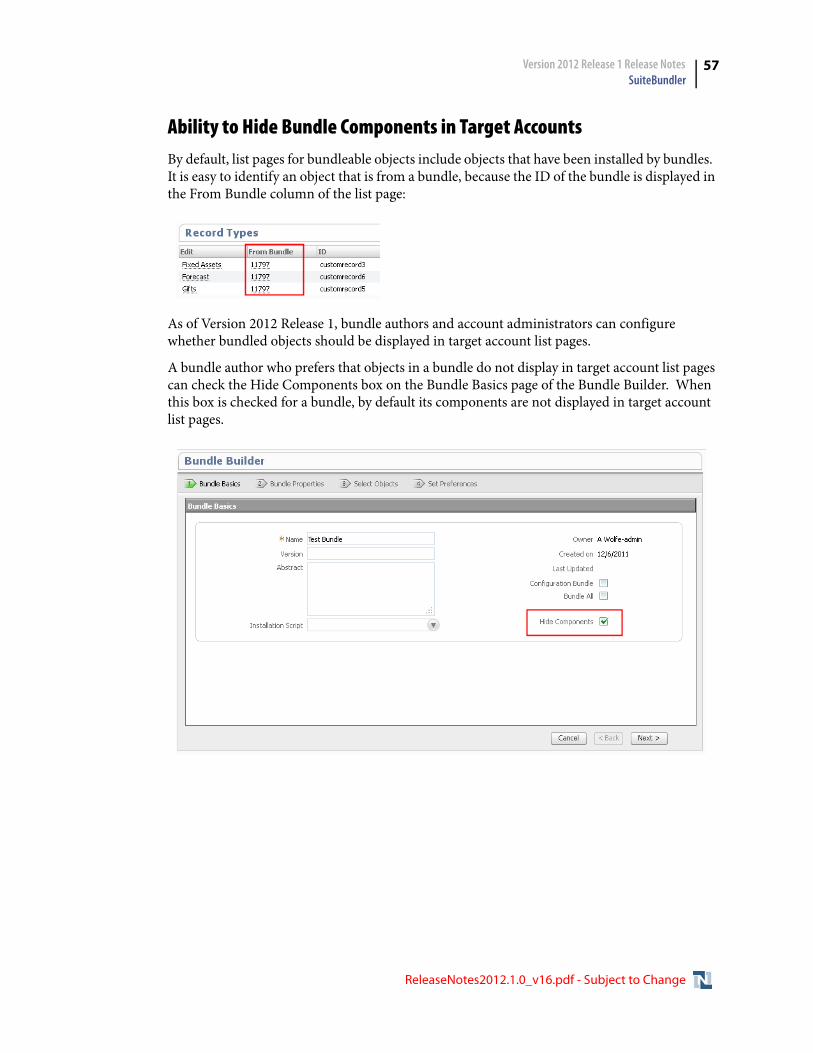
Version 2012 Release 1 Release Notes SuiteBundler
57
Ability to Hide Bundle Components in Target AccountsBy default, list pages for bundleable objects include objects that have been installed by bundles. It is easy to identify an object that is from a bundle, because the ID of the bundle is displayed in the From Bundle column of the list page:
As of Version 2012 Release 1, bundle authors and account administrators can configure whether bundled objects should be displayed in target account list pages.
A bundle author who prefers that objects in a bundle do not display in target account list pages can check the Hide Components box on the Bundle Basics page of the Bundle Builder. When this box is checked for a bundle, by default its components are not displayed in target account list pages.
ReleaseNotes2012.1.0_v16.pdf - Subject to Change
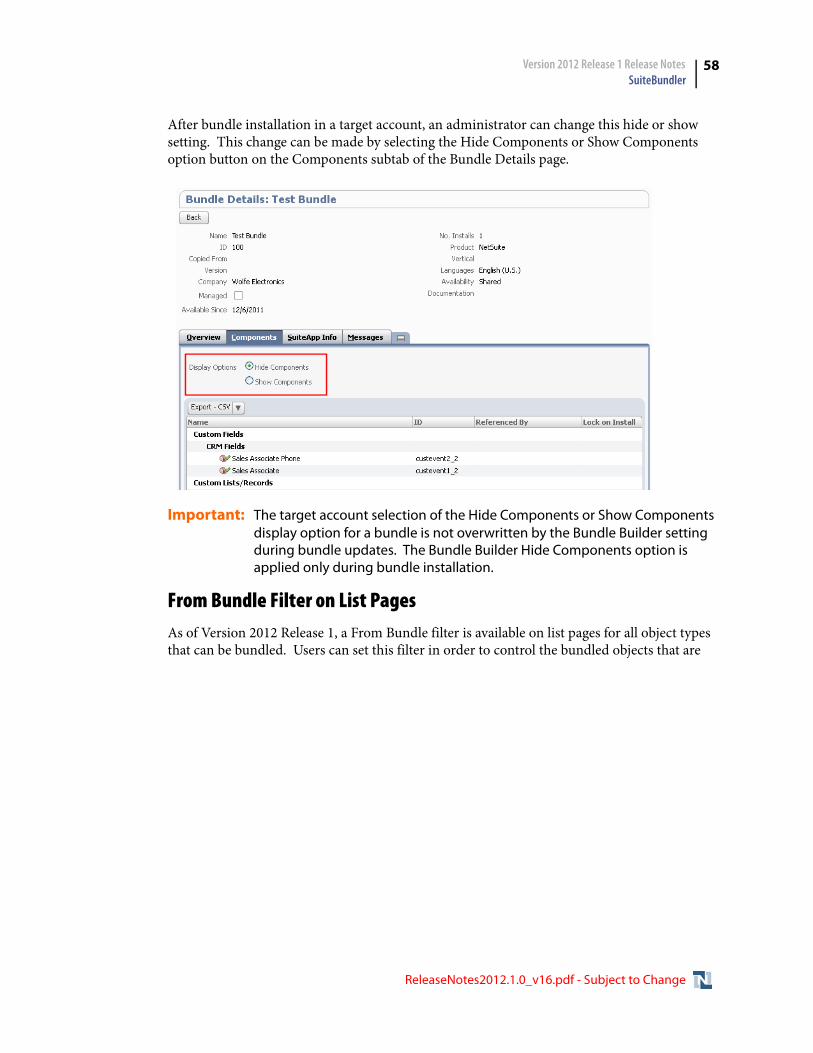
Version 2012 Release 1 Release Notes SuiteBundler
58
After bundle installation in a target account, an administrator can change this hide or show setting. This change can be made by selecting the Hide Components or Show Components option button on the Components subtab of the Bundle Details page.
Important: The target account selection of the Hide Components or Show Components display option for a bundle is not overwritten by the Bundle Builder setting during bundle updates. The Bundle Builder Hide Components option is applied only during bundle installation.
From Bundle Filter on List PagesAs of Version 2012 Release 1, a From Bundle filter is available on list pages for all object types that can be bundled. Users can set this filter in order to control the bundled objects that are
ReleaseNotes2012.1.0_v16.pdf - Subject to Change
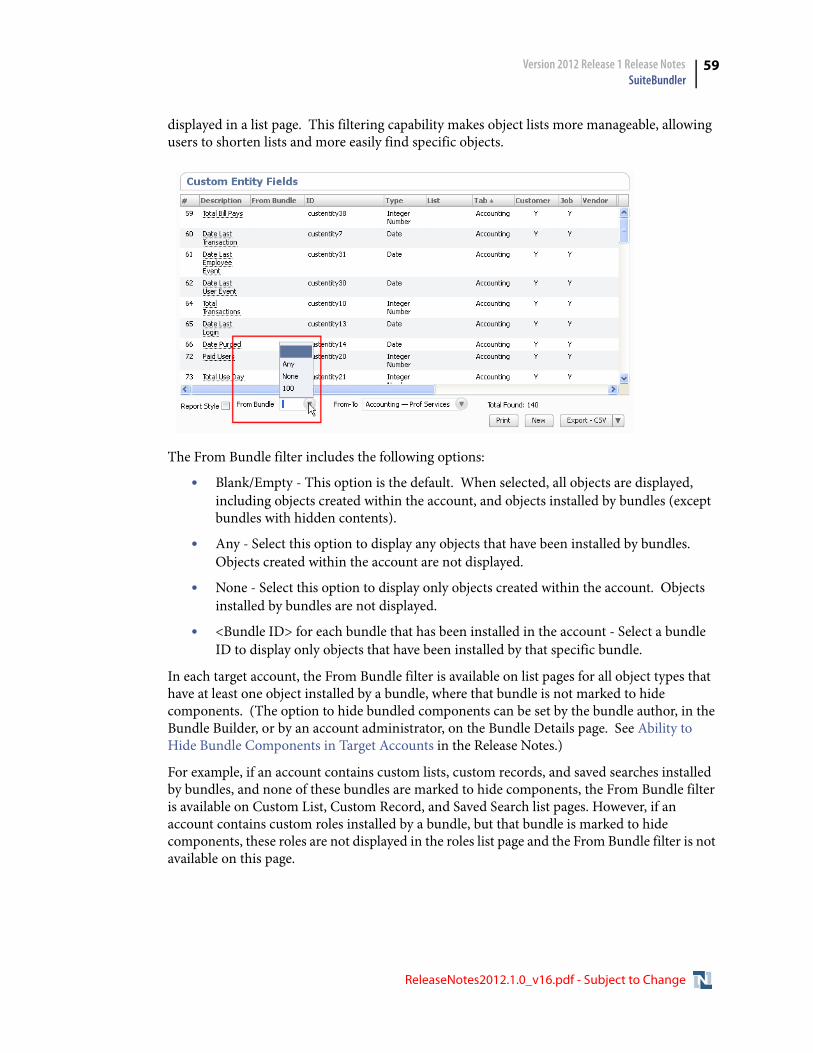
Version 2012 Release 1 Release Notes SuiteBundler
59
displayed in a list page. This filtering capability makes object lists more manageable, allowing users to shorten lists and more easily find specific objects.
The From Bundle filter includes the following options:
• Blank/Empty - This option is the default. When selected, all objects are displayed, including objects created within the account, and objects installed by bundles (except bundles with hidden contents).
• Any - Select this option to display any objects that have been installed by bundles. Objects created within the account are not displayed.
• None - Select this option to display only objects created within the account. Objects installed by bundles are not displayed.
• <Bundle ID> for each bundle that has been installed in the account - Select a bundle ID to display only objects that have been installed by that specific bundle.
In each target account, the From Bundle filter is available on list pages for all object types that have at least one object installed by a bundle, where that bundle is not marked to hide components. (The option to hide bundled components can be set by the bundle author, in the Bundle Builder, or by an account administrator, on the Bundle Details page. See Ability to Hide Bundle Components in Target Accounts in the Release Notes.)
For example, if an account contains custom lists, custom records, and saved searches installed by bundles, and none of these bundles are marked to hide components, the From Bundle filter is available on Custom List, Custom Record, and Saved Search list pages. However, if an account contains custom roles installed by a bundle, but that bundle is marked to hide components, these roles are not displayed in the roles list page and the From Bundle filter is not available on this page.
ReleaseNotes2012.1.0_v16.pdf - Subject to Change
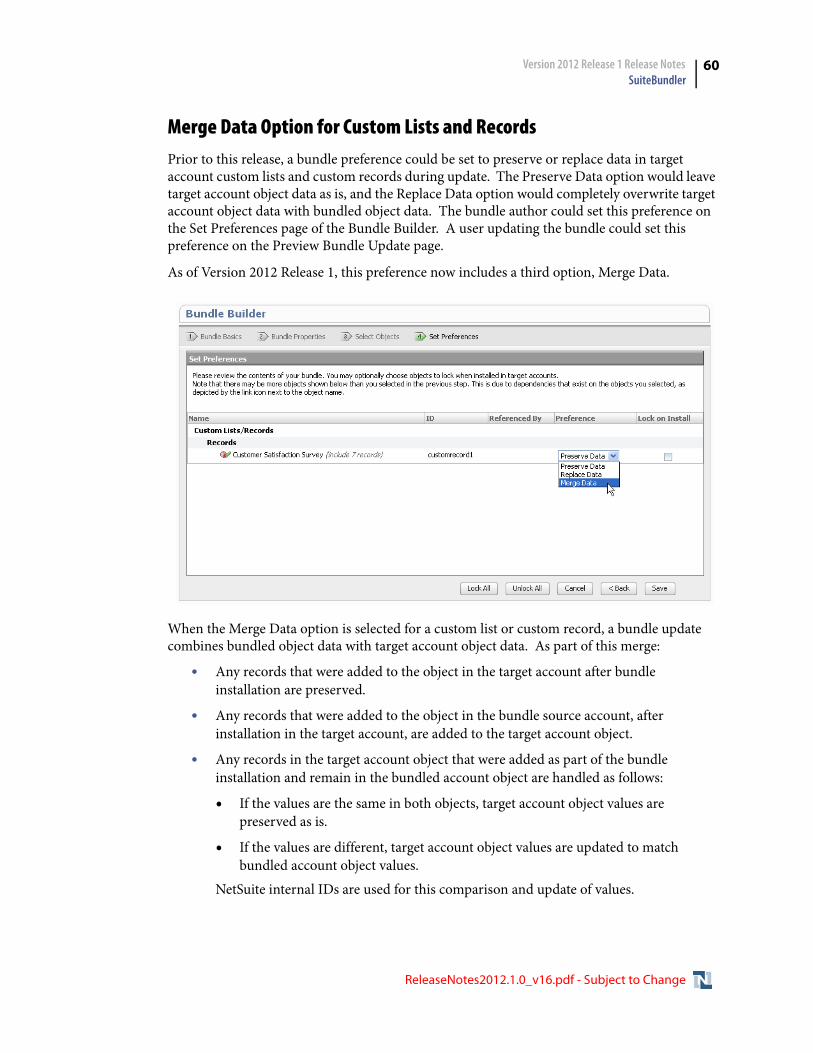
Version 2012 Release 1 Release Notes SuiteBundler
60
Merge Data Option for Custom Lists and RecordsPrior to this release, a bundle preference could be set to preserve or replace data in target account custom lists and custom records during update. The Preserve Data option would leave target account object data as is, and the Replace Data option would completely overwrite target account object data with bundled object data. The bundle author could set this preference on the Set Preferences page of the Bundle Builder. A user updating the bundle could set this preference on the Preview Bundle Update page.
As of Version 2012 Release 1, this preference now includes a third option, Merge Data.
When the Merge Data option is selected for a custom list or custom record, a bundle update combines bundled object data with target account object data. As part of this merge:
• Any records that were added to the object in the target account after bundle installation are preserved.
• Any records that were added to the object in the bundle source account, after installation in the target account, are added to the target account object.
• Any records in the target account object that were added as part of the bundle installation and remain in the bundled account object are handled as follows:
• If the values are the same in both objects, target account object values are preserved as is.
• If the values are different, target account object values are updated to match bundled account object values.
NetSuite internal IDs are used for this comparison and update of values.
ReleaseNotes2012.1.0_v16.pdf - Subject to Change
Version 2012 Release 1 Release Notes SuiteBundler
61
Important: The Merge Data option is not available for bundle updates in accounts running Version 2011 Release 2. If the Merge Data option is selected for a bundle object update to this type of target account, the Preserve Data option is used instead.
Merge Data Example
To better understand the Merge Data option, consider the following example:
A custom list called Colors has been installed as part of a bundle in a target account. At the point in the time when a bundle update is to occur, this list has different data in the target account and the bundle.
• The values in the existing target account Colors list are: red, orange, yellow, green, blue, and purple (installed by the bundle), and white (added in the target account after bundle installation).
• The values in the bundled Colors list are: red, orange, yellow, green, blue, indigo, violet (changed from previous value of purple), black, and gray.
Results of updating the bundle would vary according to the option chosen for the custom list data preference, as shown in the following table:
Bundle Update Preference for DashboardsVersion 2012 Release 1 includes a new bundle update preference for dashboards. This preference includes the following options:
• Do Not Update Users
This option is the default. Its selection for a bundle update causes updates from the bundled dashboard to be applied ONLY to the published dashboard definition in the target account. These dashboard updates are not applied to the dashboards of target account users to whom the dashboard has been published.
Option Chosen Target Account Colors List Data After Bundle Update
Preserve Data(Do not change target account object data.)
red, orange, yellow, green, blue, purple, white
Replace Data(Overwrite target account object data with bundled object data.)
red, orange, yellow, green, blue, indigo, violet, black, gray
Merge Data(Add bundled object data to target account object data, eliminating any duplicates.)
red, orange, yellow, green, blue, indigo, violet, white, black, gray
Note merge handling of data values:
• red, orange, yellow, green, blue remain as is
• purple is updated to violet
• white is preserved
• indigo, black, and gray are added
ReleaseNotes2012.1.0_v16.pdf - Subject to Change
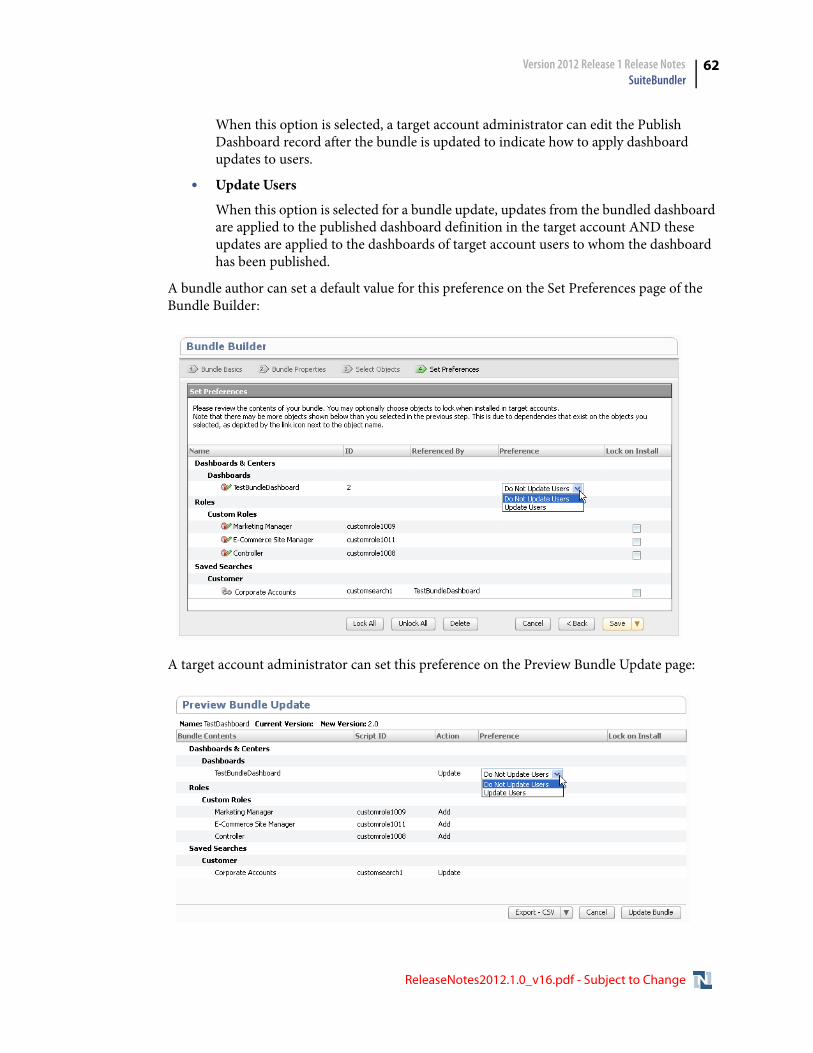
Version 2012 Release 1 Release Notes SuiteBundler
62
When this option is selected, a target account administrator can edit the Publish Dashboard record after the bundle is updated to indicate how to apply dashboard updates to users.
• Update Users
When this option is selected for a bundle update, updates from the bundled dashboard are applied to the published dashboard definition in the target account AND these updates are applied to the dashboards of target account users to whom the dashboard has been published.
A bundle author can set a default value for this preference on the Set Preferences page of the Bundle Builder:
A target account administrator can set this preference on the Preview Bundle Update page:
ReleaseNotes2012.1.0_v16.pdf - Subject to Change

Version 2012 Release 1 Release Notes SuiteBuilder - Customization
63
Warning: This preference does not apply to bundled dashboards installed in accounts using Version 2011 Release 2. If you set the preference to Update Users for a bundle and install it in a Version 2011 Release 2 account, users’ dashboards are not updated.
Applying Bundled Dashboard Updates to Target Account Users
If the Do Not Update Users option is chosen for a bundled dashboard update, each target account administrator can determine how to apply dashboard updates to users after the bundle update occurs.
To apply bundled dashboard updates to users:
1. Go to your home page, and in the Settings portlet, click the List link next to Publish Dashboard.
2. Click Edit next to the dashboard you that has just been updated during the bundle update.
3. On the Apply To Roles subtab of the Publish Dashboard page, you can apply your changed dashboard to users’ dashboards, based on their roles.
For each role to which you want to apply the changed dashboard, check the box in the Override existing user's settings column.
4. Click the Save and Update Content button.
SuiteBuilder - CustomizationVersion 2012 Release 1 includes the following enhancements to SuiteBuilder features:
• Translation Supported for Custom Centers, Tabs, Categories, and Links
• Enhanced Permissions Definition for Custom Records
• Ability to Associate Related Fields on Custom Forms
• Time Record Supported as a List/Record Field
• Web Site Record Supported as a List/Record Field
• QuickView Enhancements
• Subrecord Form Customization Now Supported
• Built-In Custom Record Icons
• Apply Formatting Preference for Number Custom Fields
• Custom Transaction Column Fields Support Inline HTML Type
• Field Placement on “Other Record” Type Entry Forms
ReleaseNotes2012.1.0_v16.pdf - Subject to Change
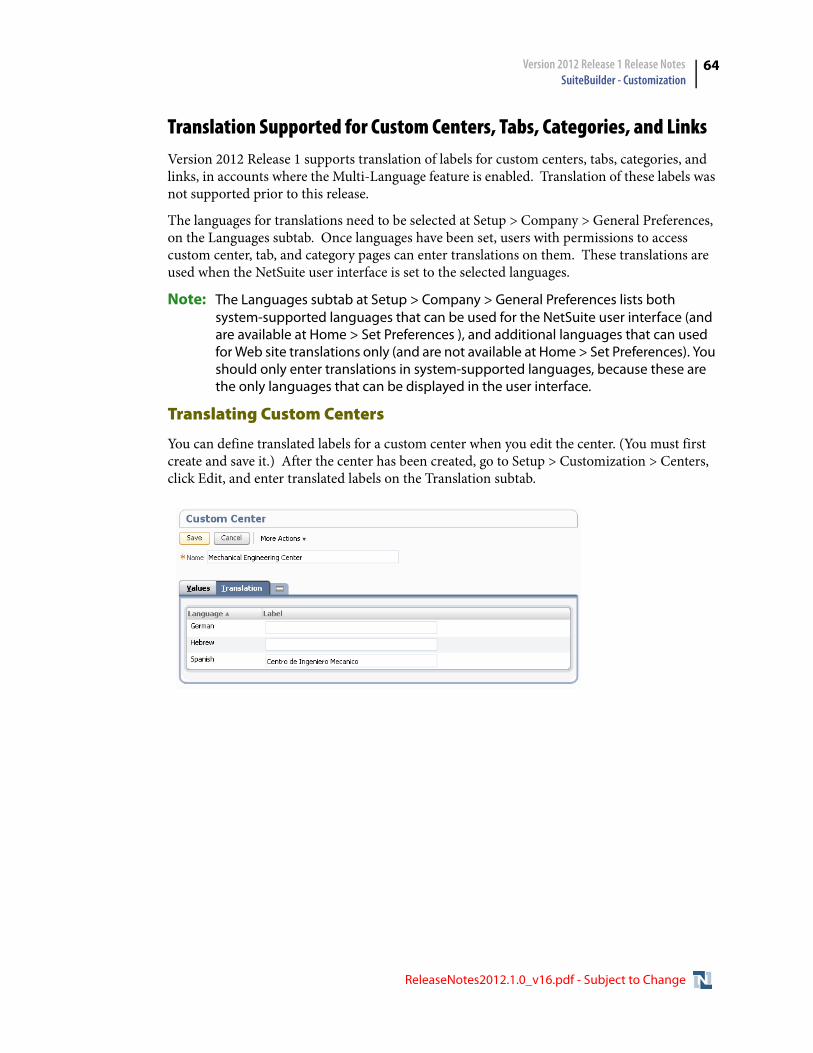
Version 2012 Release 1 Release Notes SuiteBuilder - Customization
64
Translation Supported for Custom Centers, Tabs, Categories, and LinksVersion 2012 Release 1 supports translation of labels for custom centers, tabs, categories, and links, in accounts where the Multi-Language feature is enabled. Translation of these labels was not supported prior to this release.
The languages for translations need to be selected at Setup > Company > General Preferences, on the Languages subtab. Once languages have been set, users with permissions to access custom center, tab, and category pages can enter translations on them. These translations are used when the NetSuite user interface is set to the selected languages.
Note: The Languages subtab at Setup > Company > General Preferences lists both system-supported languages that can be used for the NetSuite user interface (and are available at Home > Set Preferences ), and additional languages that can used for Web site translations only (and are not available at Home > Set Preferences). You should only enter translations in system-supported languages, because these are the only languages that can be displayed in the user interface.
Translating Custom Centers
You can define translated labels for a custom center when you edit the center. (You must first create and save it.) After the center has been created, go to Setup > Customization > Centers, click Edit, and enter translated labels on the Translation subtab.
ReleaseNotes2012.1.0_v16.pdf - Subject to Change
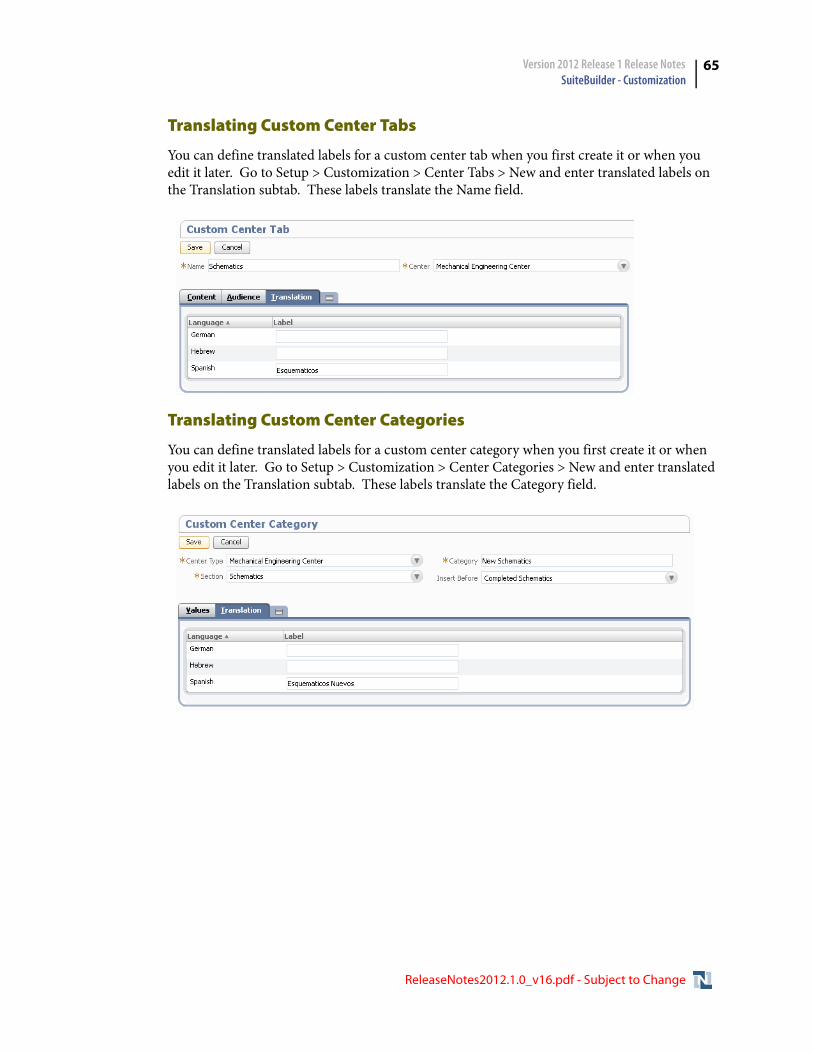
Version 2012 Release 1 Release Notes SuiteBuilder - Customization
65
Translating Custom Center Tabs
You can define translated labels for a custom center tab when you first create it or when you edit it later. Go to Setup > Customization > Center Tabs > New and enter translated labels on the Translation subtab. These labels translate the Name field.
Translating Custom Center Categories
You can define translated labels for a custom center category when you first create it or when you edit it later. Go to Setup > Customization > Center Categories > New and enter translated labels on the Translation subtab. These labels translate the Category field.
ReleaseNotes2012.1.0_v16.pdf - Subject to Change
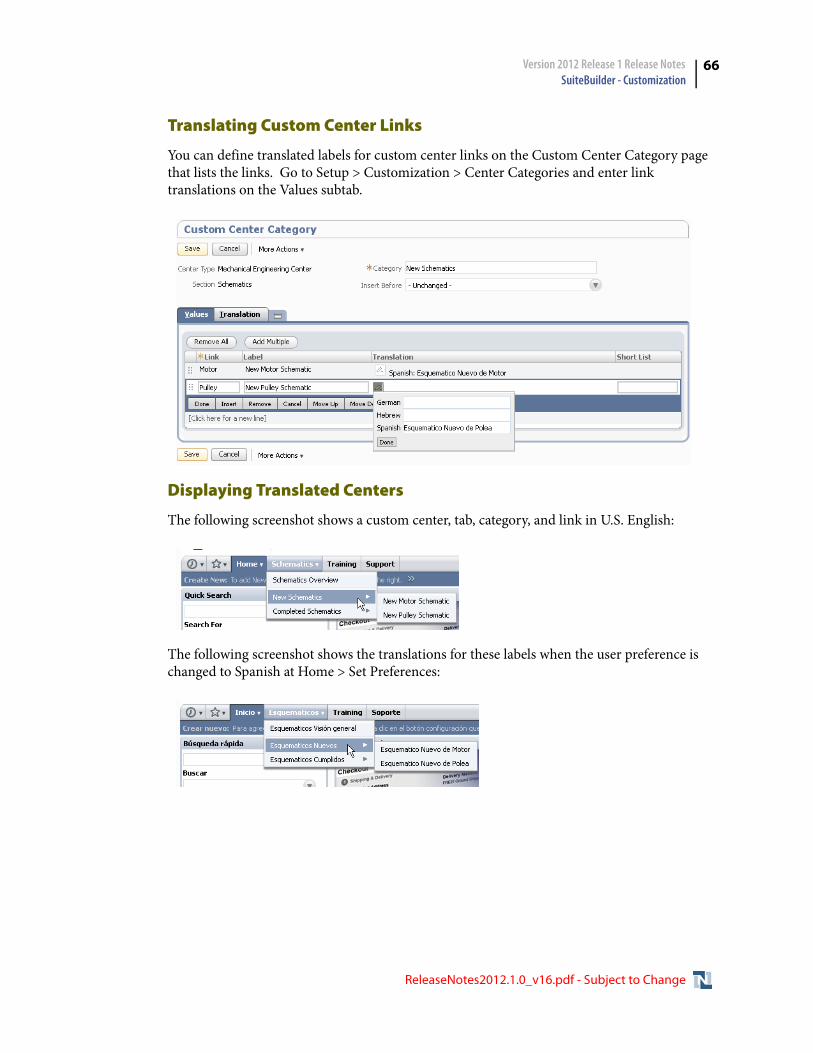
Version 2012 Release 1 Release Notes SuiteBuilder - Customization
66
Translating Custom Center Links
You can define translated labels for custom center links on the Custom Center Category page that lists the links. Go to Setup > Customization > Center Categories and enter link translations on the Values subtab.
Displaying Translated Centers
The following screenshot shows a custom center, tab, category, and link in U.S. English:
The following screenshot shows the translations for these labels when the user preference is changed to Spanish at Home > Set Preferences:
ReleaseNotes2012.1.0_v16.pdf - Subject to Change
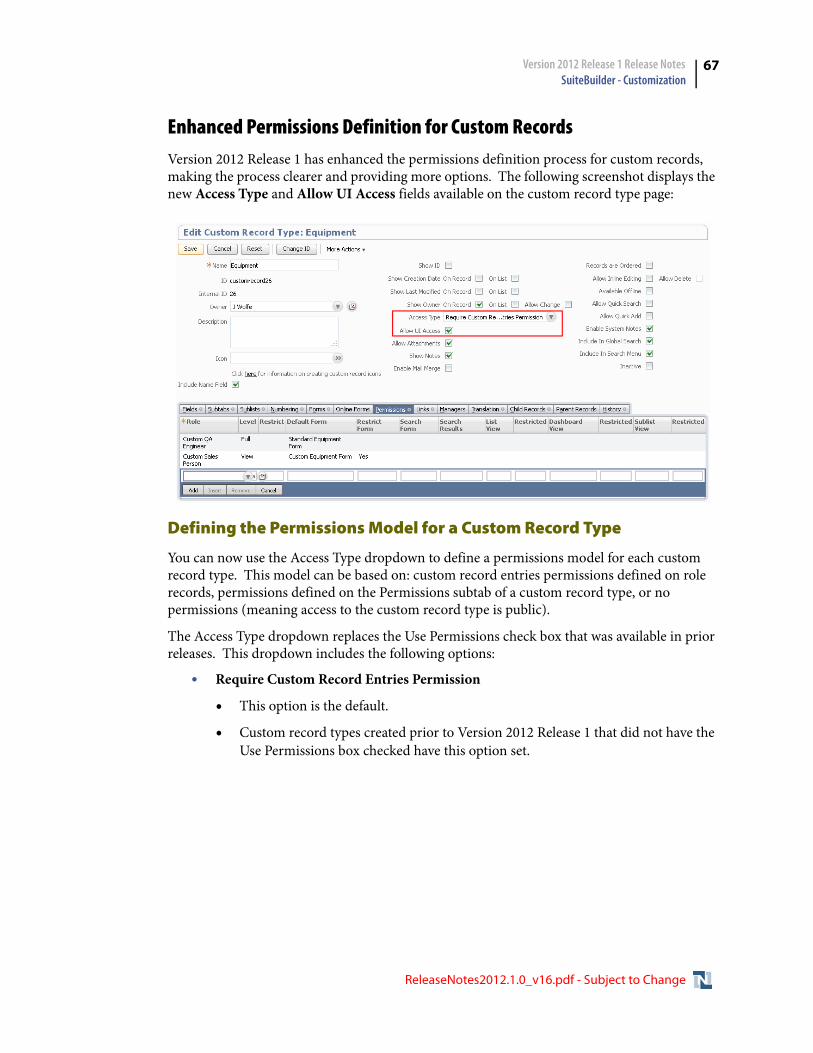
Version 2012 Release 1 Release Notes SuiteBuilder - Customization
67
Enhanced Permissions Definition for Custom RecordsVersion 2012 Release 1 has enhanced the permissions definition process for custom records, making the process clearer and providing more options. The following screenshot displays the new Access Type and Allow UI Access fields available on the custom record type page:
Defining the Permissions Model for a Custom Record Type
You can now use the Access Type dropdown to define a permissions model for each custom record type. This model can be based on: custom record entries permissions defined on role records, permissions defined on the Permissions subtab of a custom record type, or no permissions (meaning access to the custom record type is public).
The Access Type dropdown replaces the Use Permissions check box that was available in prior releases. This dropdown includes the following options:
• Require Custom Record Entries Permission
• This option is the default.
• Custom record types created prior to Version 2012 Release 1 that did not have the Use Permissions box checked have this option set.
ReleaseNotes2012.1.0_v16.pdf - Subject to Change
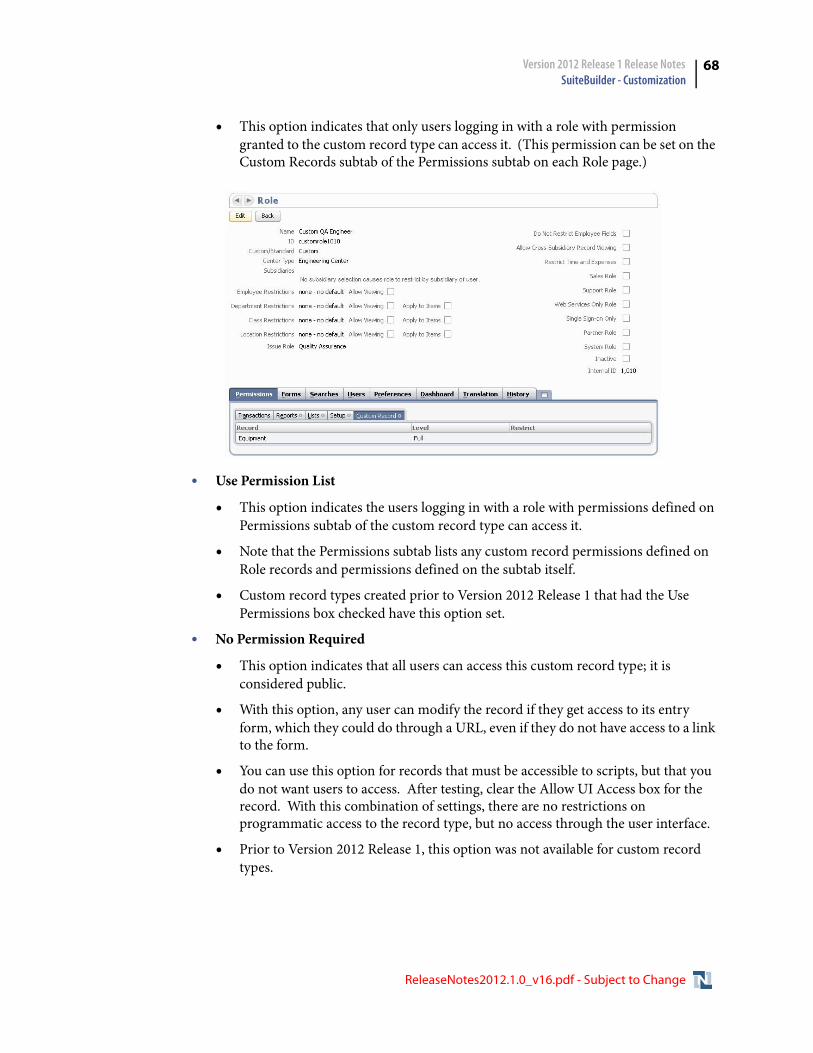
Version 2012 Release 1 Release Notes SuiteBuilder - Customization
68
• This option indicates that only users logging in with a role with permission granted to the custom record type can access it. (This permission can be set on the Custom Records subtab of the Permissions subtab on each Role page.)
• Use Permission List
• This option indicates the users logging in with a role with permissions defined on Permissions subtab of the custom record type can access it.
• Note that the Permissions subtab lists any custom record permissions defined on Role records and permissions defined on the subtab itself.
• Custom record types created prior to Version 2012 Release 1 that had the Use Permissions box checked have this option set.
• No Permission Required
• This option indicates that all users can access this custom record type; it is considered public.
• With this option, any user can modify the record if they get access to its entry form, which they could do through a URL, even if they do not have access to a link to the form.
• You can use this option for records that must be accessible to scripts, but that you do not want users to access. After testing, clear the Allow UI Access box for the record. With this combination of settings, there are no restrictions on programmatic access to the record type, but no access through the user interface.
• Prior to Version 2012 Release 1, this option was not available for custom record types.
ReleaseNotes2012.1.0_v16.pdf - Subject to Change
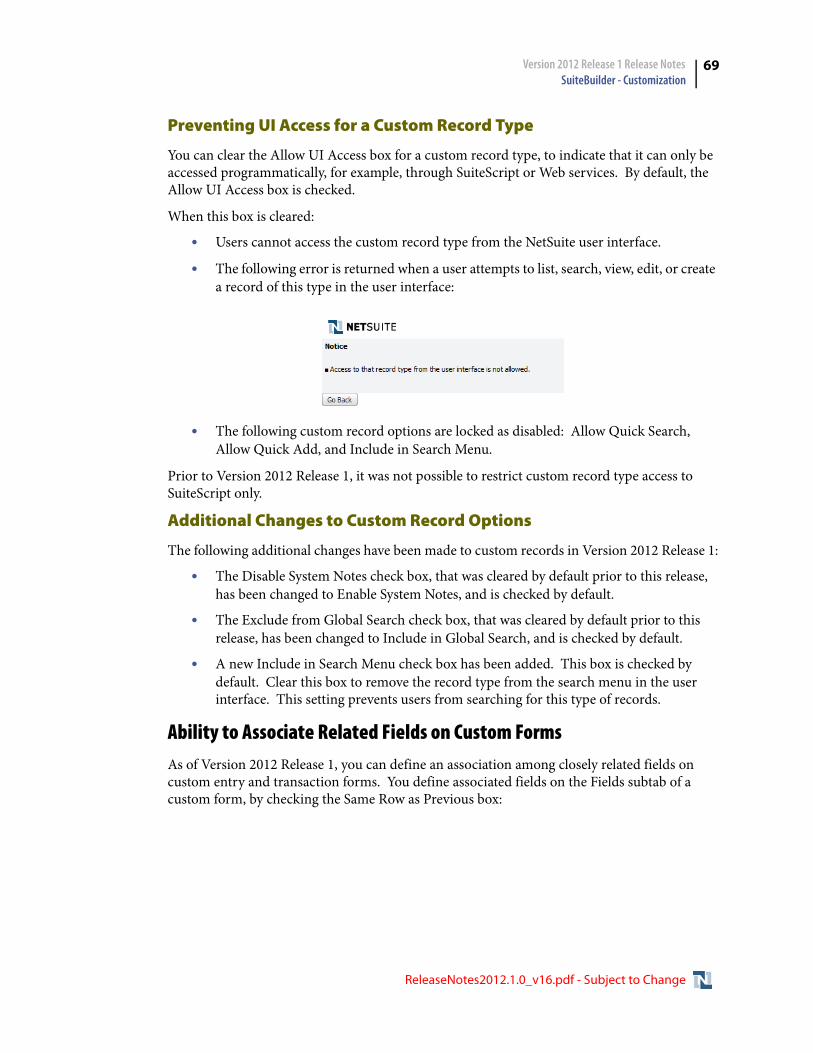
Version 2012 Release 1 Release Notes SuiteBuilder - Customization
69
Preventing UI Access for a Custom Record Type
You can clear the Allow UI Access box for a custom record type, to indicate that it can only be accessed programmatically, for example, through SuiteScript or Web services. By default, the Allow UI Access box is checked.
When this box is cleared:
• Users cannot access the custom record type from the NetSuite user interface.
• The following error is returned when a user attempts to list, search, view, edit, or create a record of this type in the user interface:
• The following custom record options are locked as disabled: Allow Quick Search, Allow Quick Add, and Include in Search Menu.
Prior to Version 2012 Release 1, it was not possible to restrict custom record type access to SuiteScript only.
Additional Changes to Custom Record Options
The following additional changes have been made to custom records in Version 2012 Release 1:
• The Disable System Notes check box, that was cleared by default prior to this release, has been changed to Enable System Notes, and is checked by default.
• The Exclude from Global Search check box, that was cleared by default prior to this release, has been changed to Include in Global Search, and is checked by default.
• A new Include in Search Menu check box has been added. This box is checked by default. Clear this box to remove the record type from the search menu in the user interface. This setting prevents users from searching for this type of records.
Ability to Associate Related Fields on Custom FormsAs of Version 2012 Release 1, you can define an association among closely related fields on custom entry and transaction forms. You define associated fields on the Fields subtab of a custom form, by checking the Same Row as Previous box:
ReleaseNotes2012.1.0_v16.pdf - Subject to Change
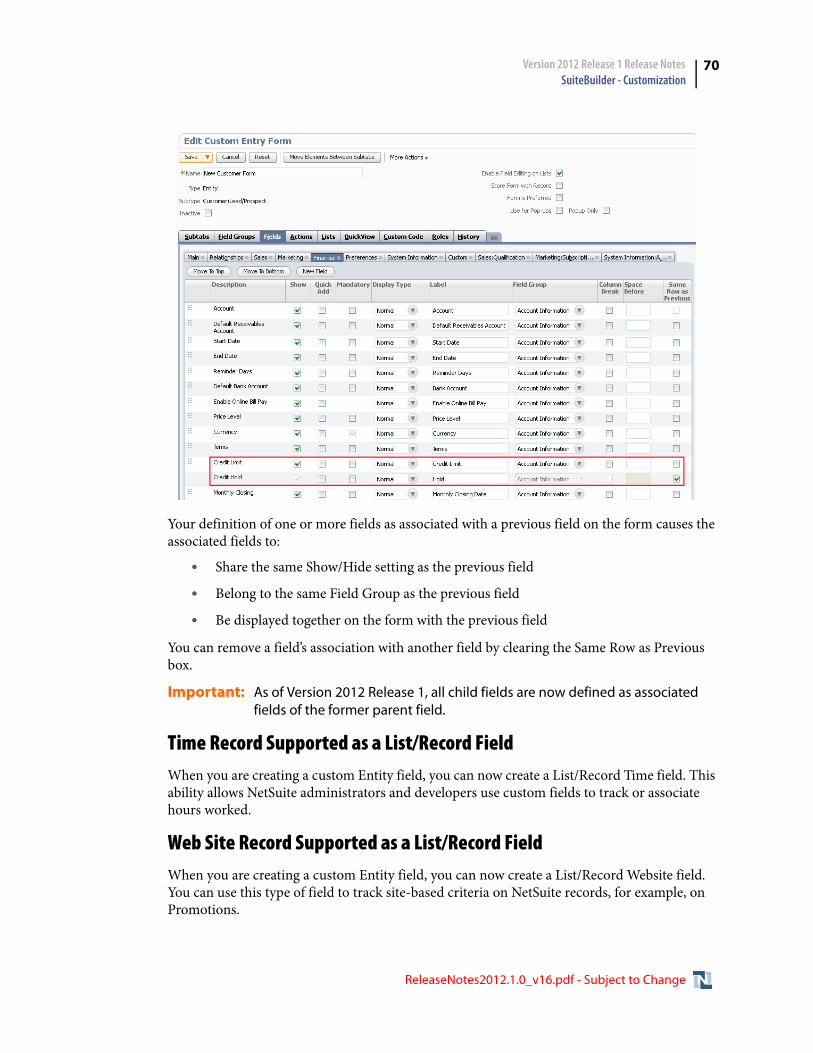
Version 2012 Release 1 Release Notes SuiteBuilder - Customization
70
Your definition of one or more fields as associated with a previous field on the form causes the associated fields to:
• Share the same Show/Hide setting as the previous field
• Belong to the same Field Group as the previous field
• Be displayed together on the form with the previous field
You can remove a field’s association with another field by clearing the Same Row as Previous box.
Important: As of Version 2012 Release 1, all child fields are now defined as associated fields of the former parent field.
Time Record Supported as a List/Record FieldWhen you are creating a custom Entity field, you can now create a List/Record Time field. This ability allows NetSuite administrators and developers use custom fields to track or associate hours worked.
Web Site Record Supported as a List/Record FieldWhen you are creating a custom Entity field, you can now create a List/Record Website field. You can use this type of field to track site-based criteria on NetSuite records, for example, on Promotions.
ReleaseNotes2012.1.0_v16.pdf - Subject to Change
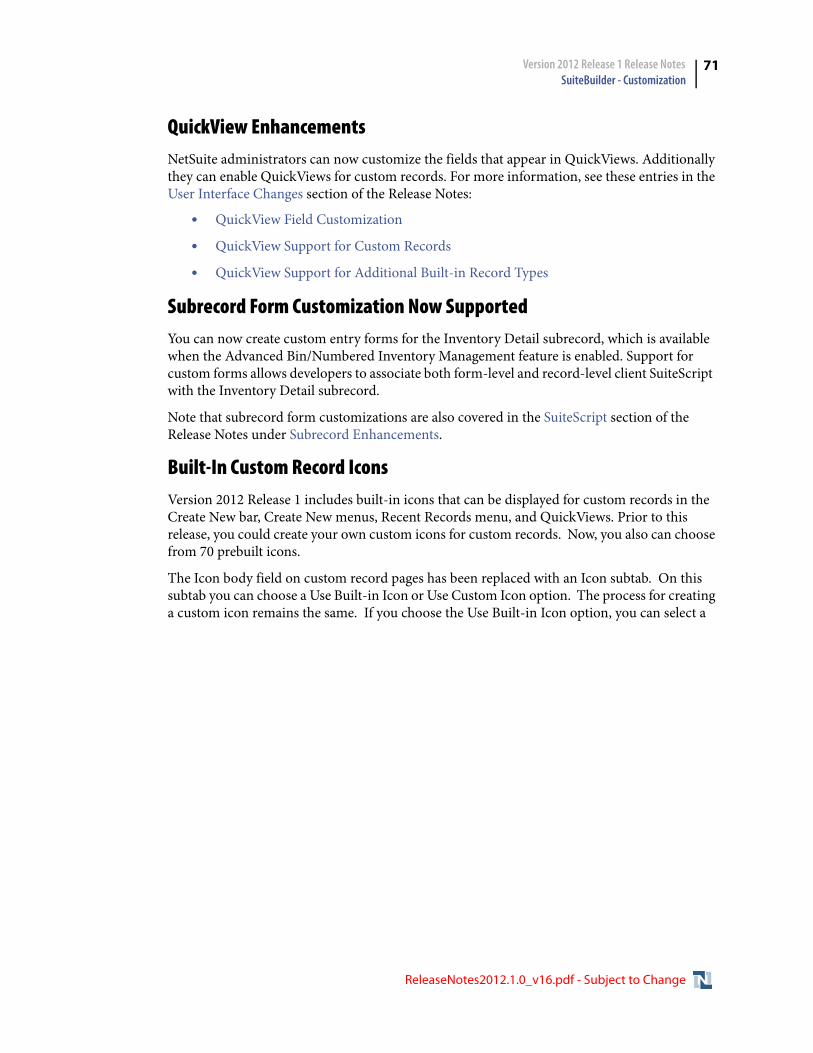
Version 2012 Release 1 Release Notes SuiteBuilder - Customization
71
QuickView EnhancementsNetSuite administrators can now customize the fields that appear in QuickViews. Additionally they can enable QuickViews for custom records. For more information, see these entries in the User Interface Changes section of the Release Notes:
• QuickView Field Customization
• QuickView Support for Custom Records
• QuickView Support for Additional Built-in Record Types
Subrecord Form Customization Now SupportedYou can now create custom entry forms for the Inventory Detail subrecord, which is available when the Advanced Bin/Numbered Inventory Management feature is enabled. Support for custom forms allows developers to associate both form-level and record-level client SuiteScript with the Inventory Detail subrecord.
Note that subrecord form customizations are also covered in the SuiteScript section of the Release Notes under Subrecord Enhancements.
Built-In Custom Record IconsVersion 2012 Release 1 includes built-in icons that can be displayed for custom records in the Create New bar, Create New menus, Recent Records menu, and QuickViews. Prior to this release, you could create your own custom icons for custom records. Now, you also can choose from 70 prebuilt icons.
The Icon body field on custom record pages has been replaced with an Icon subtab. On this subtab you can choose a Use Built-in Icon or Use Custom Icon option. The process for creating a custom icon remains the same. If you choose the Use Built-in Icon option, you can select a
ReleaseNotes2012.1.0_v16.pdf - Subject to Change
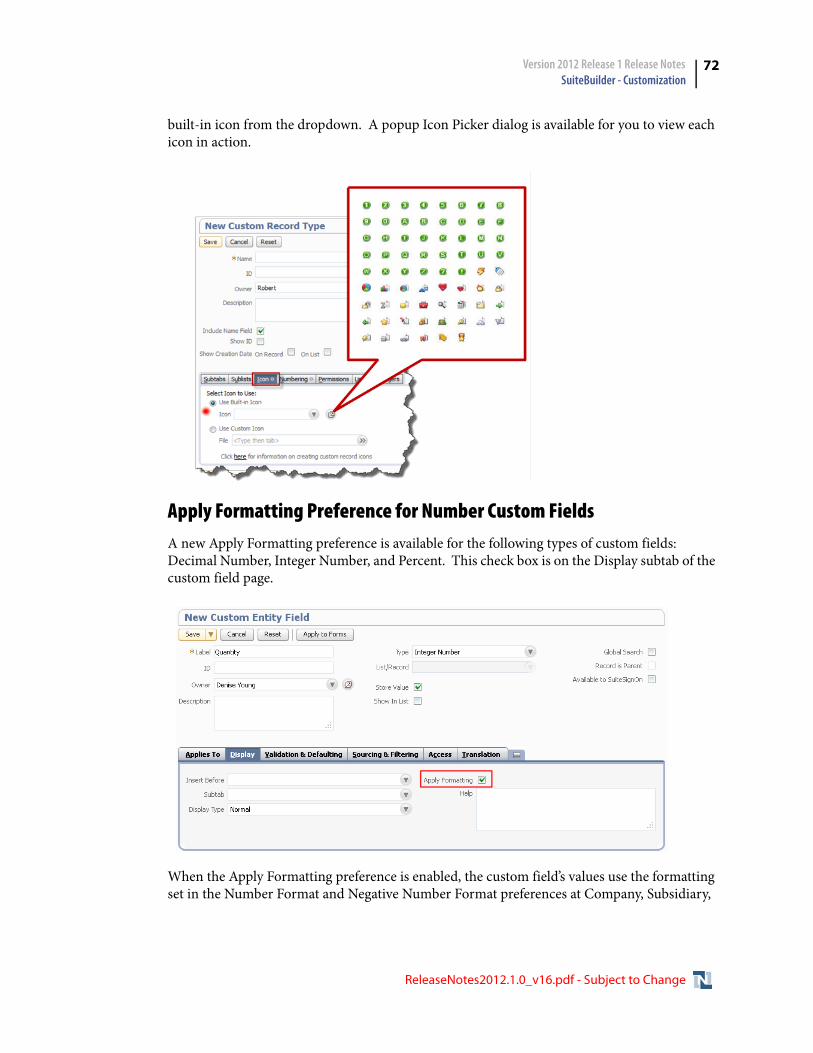
Version 2012 Release 1 Release Notes SuiteBuilder - Customization
72
built-in icon from the dropdown. A popup Icon Picker dialog is available for you to view each icon in action.
Apply Formatting Preference for Number Custom FieldsA new Apply Formatting preference is available for the following types of custom fields: Decimal Number, Integer Number, and Percent. This check box is on the Display subtab of the custom field page.
When the Apply Formatting preference is enabled, the custom field’s values use the formatting set in the Number Format and Negative Number Format preferences at Company, Subsidiary,
ReleaseNotes2012.1.0_v16.pdf - Subject to Change
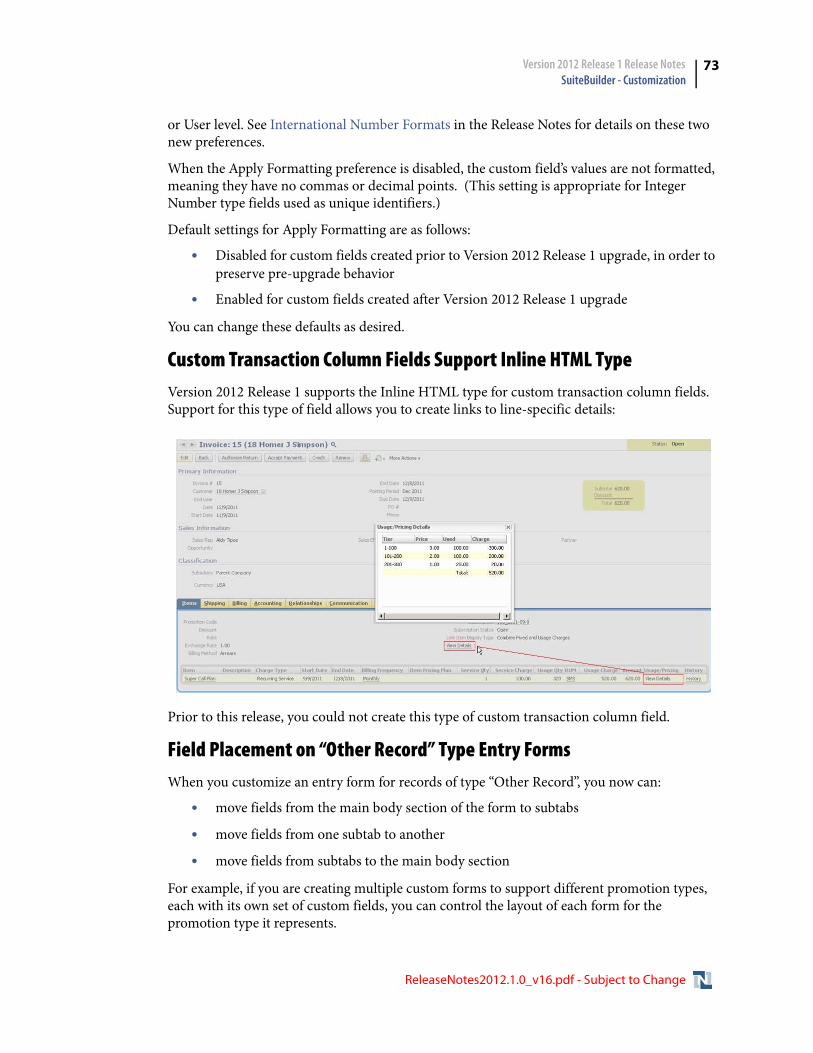
Version 2012 Release 1 Release Notes SuiteBuilder - Customization
73
or User level. See International Number Formats in the Release Notes for details on these two new preferences.
When the Apply Formatting preference is disabled, the custom field’s values are not formatted, meaning they have no commas or decimal points. (This setting is appropriate for Integer Number type fields used as unique identifiers.)
Default settings for Apply Formatting are as follows:
• Disabled for custom fields created prior to Version 2012 Release 1 upgrade, in order to preserve pre-upgrade behavior
• Enabled for custom fields created after Version 2012 Release 1 upgrade
You can change these defaults as desired.
Custom Transaction Column Fields Support Inline HTML TypeVersion 2012 Release 1 supports the Inline HTML type for custom transaction column fields. Support for this type of field allows you to create links to line-specific details:
Prior to this release, you could not create this type of custom transaction column field.
Field Placement on “Other Record” Type Entry FormsWhen you customize an entry form for records of type “Other Record”, you now can:
• move fields from the main body section of the form to subtabs
• move fields from one subtab to another
• move fields from subtabs to the main body section
For example, if you are creating multiple custom forms to support different promotion types, each with its own set of custom fields, you can control the layout of each form for the promotion type it represents.
ReleaseNotes2012.1.0_v16.pdf - Subject to Change
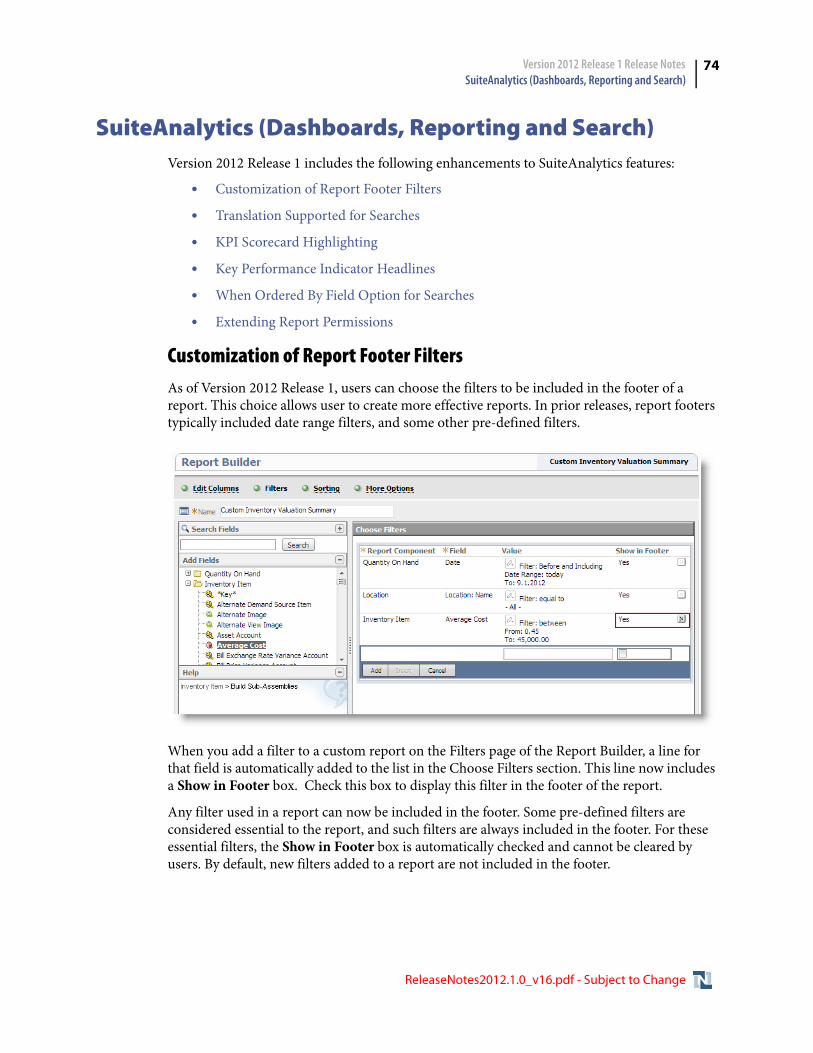
Version 2012 Release 1 Release Notes SuiteAnalytics (Dashboards, Reporting and Search)
74
SuiteAnalytics (Dashboards, Reporting and Search)Version 2012 Release 1 includes the following enhancements to SuiteAnalytics features:
• Customization of Report Footer Filters
• Translation Supported for Searches
• KPI Scorecard Highlighting
• Key Performance Indicator Headlines
• When Ordered By Field Option for Searches
• Extending Report Permissions
Customization of Report Footer FiltersAs of Version 2012 Release 1, users can choose the filters to be included in the footer of a report. This choice allows user to create more effective reports. In prior releases, report footers typically included date range filters, and some other pre-defined filters.
When you add a filter to a custom report on the Filters page of the Report Builder, a line for that field is automatically added to the list in the Choose Filters section. This line now includes a Show in Footer box. Check this box to display this filter in the footer of the report.
Any filter used in a report can now be included in the footer. Some pre-defined filters are considered essential to the report, and such filters are always included in the footer. For these essential filters, the Show in Footer box is automatically checked and cannot be cleared by users. By default, new filters added to a report are not included in the footer.
ReleaseNotes2012.1.0_v16.pdf - Subject to Change
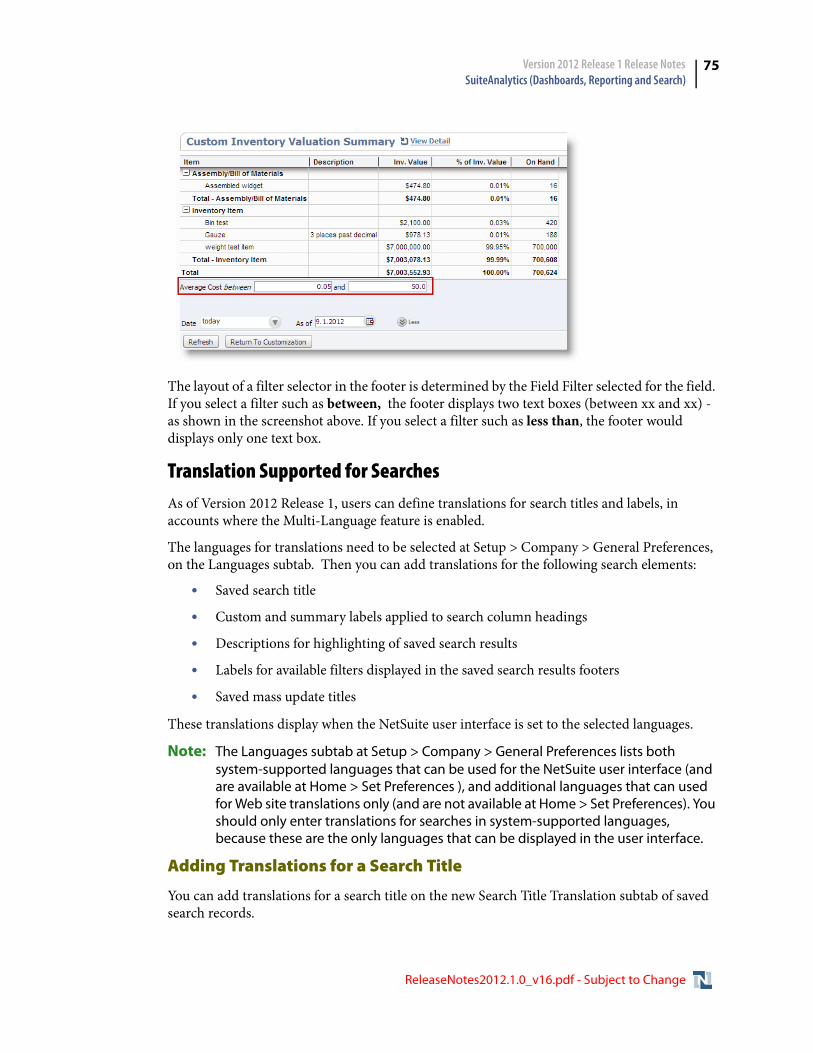
Version 2012 Release 1 Release Notes SuiteAnalytics (Dashboards, Reporting and Search)
75
The layout of a filter selector in the footer is determined by the Field Filter selected for the field. If you select a filter such as between, the footer displays two text boxes (between xx and xx) - as shown in the screenshot above. If you select a filter such as less than, the footer would displays only one text box.
Translation Supported for SearchesAs of Version 2012 Release 1, users can define translations for search titles and labels, in accounts where the Multi-Language feature is enabled.
The languages for translations need to be selected at Setup > Company > General Preferences, on the Languages subtab. Then you can add translations for the following search elements:
• Saved search title
• Custom and summary labels applied to search column headings
• Descriptions for highlighting of saved search results
• Labels for available filters displayed in the saved search results footers
• Saved mass update titles
These translations display when the NetSuite user interface is set to the selected languages.
Note: The Languages subtab at Setup > Company > General Preferences lists both system-supported languages that can be used for the NetSuite user interface (and are available at Home > Set Preferences ), and additional languages that can used for Web site translations only (and are not available at Home > Set Preferences). You should only enter translations for searches in system-supported languages, because these are the only languages that can be displayed in the user interface.
Adding Translations for a Search Title
You can add translations for a search title on the new Search Title Translation subtab of saved search records.
ReleaseNotes2012.1.0_v16.pdf - Subject to Change
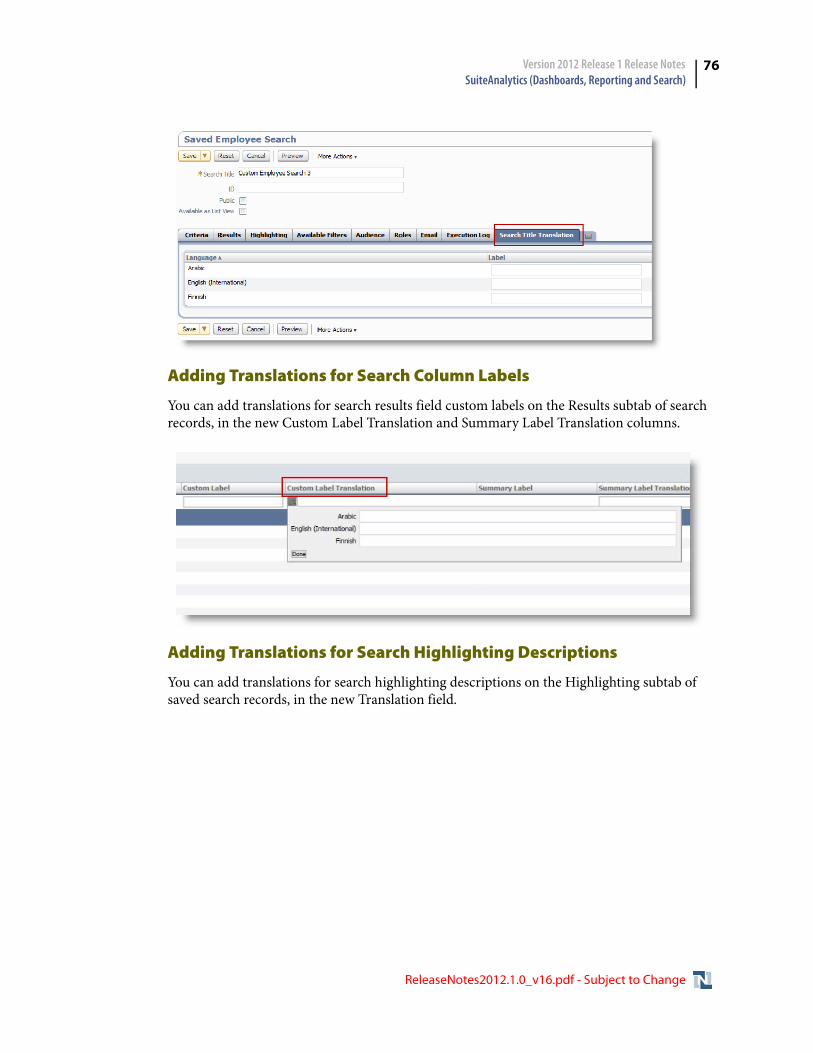
Version 2012 Release 1 Release Notes SuiteAnalytics (Dashboards, Reporting and Search)
76
Adding Translations for Search Column Labels
You can add translations for search results field custom labels on the Results subtab of search records, in the new Custom Label Translation and Summary Label Translation columns.
Adding Translations for Search Highlighting Descriptions
You can add translations for search highlighting descriptions on the Highlighting subtab of saved search records, in the new Translation field.
ReleaseNotes2012.1.0_v16.pdf - Subject to Change
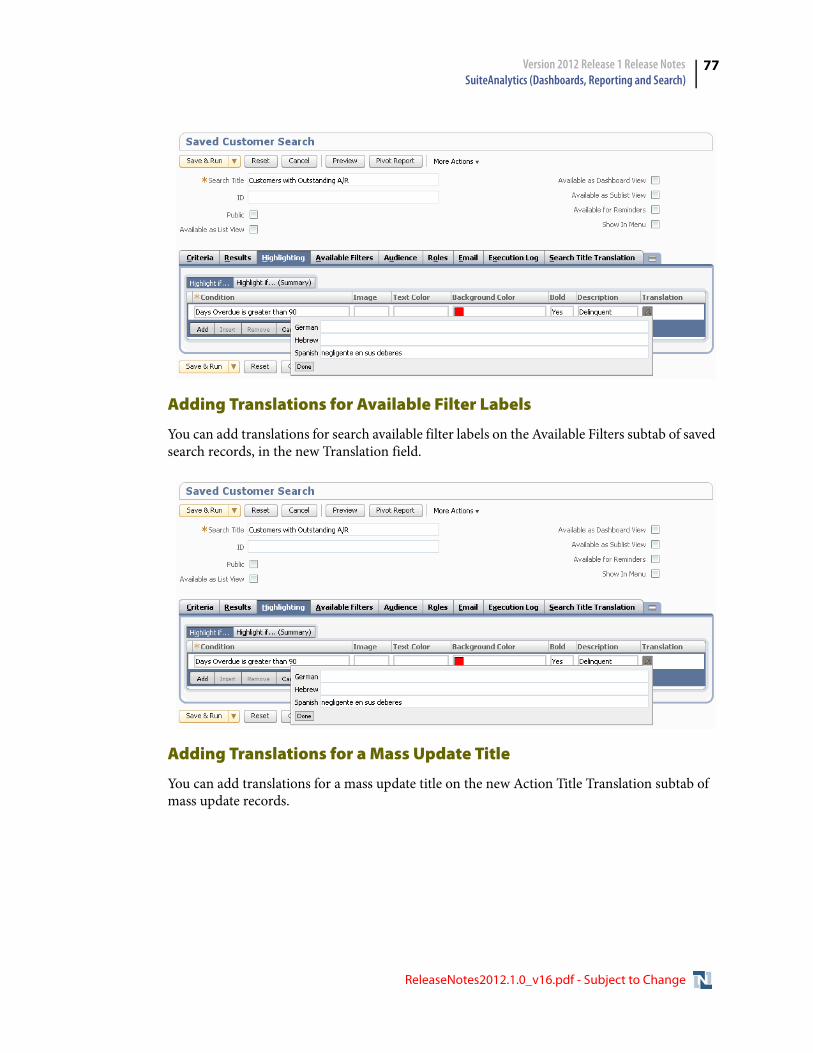
Version 2012 Release 1 Release Notes SuiteAnalytics (Dashboards, Reporting and Search)
77
Adding Translations for Available Filter Labels
You can add translations for search available filter labels on the Available Filters subtab of saved search records, in the new Translation field.
Adding Translations for a Mass Update Title
You can add translations for a mass update title on the new Action Title Translation subtab of mass update records.
ReleaseNotes2012.1.0_v16.pdf - Subject to Change
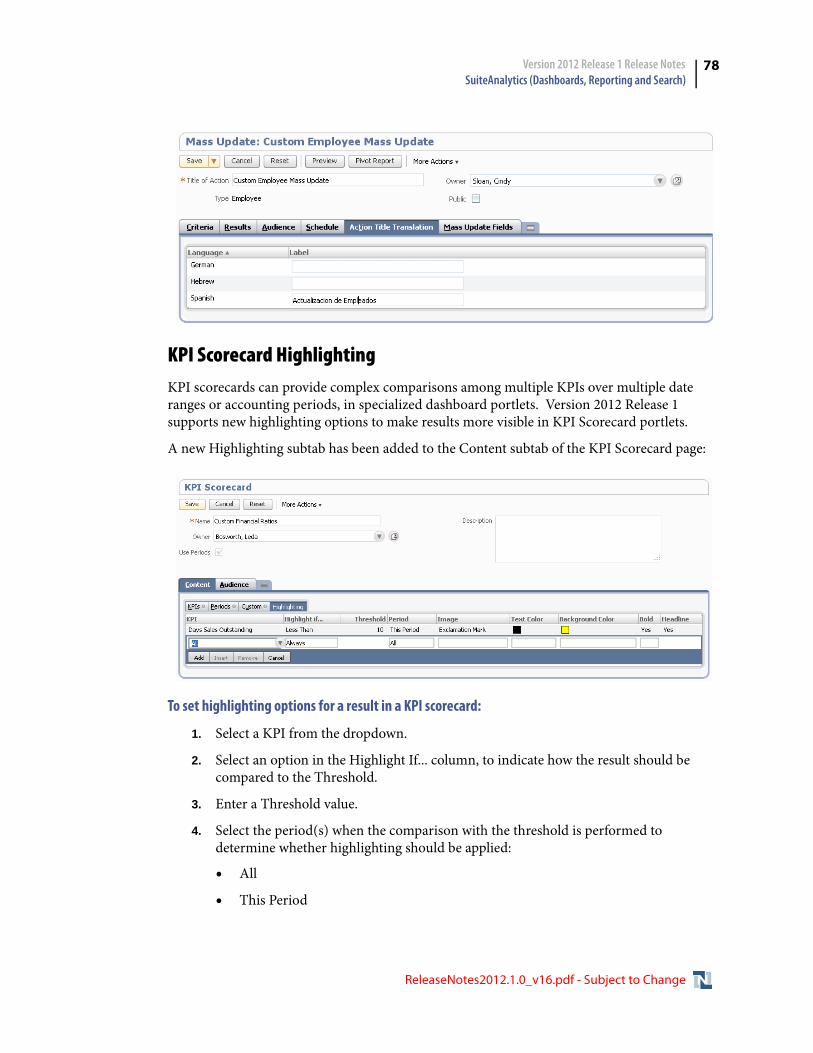
Version 2012 Release 1 Release Notes SuiteAnalytics (Dashboards, Reporting and Search)
78
KPI Scorecard HighlightingKPI scorecards can provide complex comparisons among multiple KPIs over multiple date ranges or accounting periods, in specialized dashboard portlets. Version 2012 Release 1 supports new highlighting options to make results more visible in KPI Scorecard portlets.
A new Highlighting subtab has been added to the Content subtab of the KPI Scorecard page:
To set highlighting options for a result in a KPI scorecard:
1. Select a KPI from the dropdown.
2. Select an option in the Highlight If... column, to indicate how the result should be compared to the Threshold.
3. Enter a Threshold value.
4. Select the period(s) when the comparison with the threshold is performed to determine whether highlighting should be applied:
• All
• This Period
ReleaseNotes2012.1.0_v16.pdf - Subject to Change
Version 2012 Release 1 Release Notes SuiteAnalytics (Dashboards, Reporting and Search)
79
• Last Period
• Change
5. Optionally, select an image to be displayed with the highlighted result in the KPI scorecard portlet.
6. Optionally, select a text color other than the default for the highlighted result.
7. Optionally, select a background color other than the default for the highlighted result.
8. Optionally, check the Bold box to display the highlighted result in bolded text.
9. Optionally, check the Headline box to display the highlighted result as a headline, in large, bold text at the top of the KPI Scorecard portlet.
Note: Up to 4 scorecard results can be displayed as headlines.
Key Performance Indicator HeadlinesThe Key Performance Indicators portlet now includes an additional setup option that you can use to bring more attention to results. If you elect to highlight a KPI that surpasses a specific threshold value, you can also designate that KPI as a headline, to appear at the top of the portlet in large, bold text.
A Headline column with a check box is now available in the Set Up Key Performance Indicators dialog:
When the Headline box is checked, the KPI is displayed as a portlet headline, in addition to being highlighted, when it surpasses the threshold:
ReleaseNotes2012.1.0_v16.pdf - Subject to Change
Version 2012 Release 1 Release Notes SuiteAnalytics (Dashboards, Reporting and Search)
80
Note: Up to 4 KPIs can be displayed as headlines.
When Ordered By Field Option for SearchesVersion 2012 Release 1 includes a new When Ordered By Field option for search results. Use this option to return the value for a field when the value for another field is minimal or maximal. You can set When Ordered By Field in conjunction with setting a Summary Type of Minimum or Maximum, on the Results subtab of a search record.
For example:
• To return the amount for the most recent transaction by each customer, in a Customer search, set a Field of Transaction: Amount, a Maximum Summary Type and a When Ordered By Field of Transaction: Date.
ReleaseNotes2012.1.0_v16.pdf - Subject to Change
Version 2012 Release 1 Release Notes SuiteAnalytics (Dashboards, Reporting and Search)
81
• To return the sales rep for the first transaction for each customer, in a Customer search, set a Field of Transaction: Sales Rep, set a Minimum Summary Type and a When Ordered By Field of Transaction: Date.
• To return the item with largest transaction amount per customer, in a Customer search, set a Field of Transaction: Item, a Maximum Summary Type and a When Ordered By Field of Transaction: Amount.
ReleaseNotes2012.1.0_v16.pdf - Subject to Change
Version 2012 Release 1 Release Notes CSV Import
82
The When Ordered By Field option is also supported in SuiteScript, by the new setWhenOrderedBy method for nlobjSearchColumn. See API Additions and Enhancements in the Release Notes.
Extending Report PermissionsAs of Version 2012 Release 1, administrators can extend custom report access to users whose roles would normally not grant them access.
To extend report permissions:
1. Click Customize in the footer of the report you want to share.
2. In the Report Builder (or Financial Report Builder), click More Options.
3. Click the Audience subtab and choose an audience for your report.
4. Click the Access subtab (which is only available to administrators), and choose the users and/or groups to whom you would like to extend access.
Important: This action may grant access for some users whose access to report data would normally be restricted. Before you extend access, ensure that no sensitive or restricted data is included in the custom report.
CSV ImportVersion 2012 Release 1 includes the following changes to CSV Import:
• Import of Item Demand Plans Supported
• Multi-Threading and Multiple Queues for Import Jobs
• Translation Supported for Import Map Name and Description
• Import of Transaction Currency for Multi-Currency Customers
• Import of URL Redirects Supported
Import of Item Demand Plans SupportedAs of Version 2012 Release 1, CSV import is supported for Item Demand Plan data. An item demand plan transaction stores the quantity expected to be needed, during specified time periods, for an item. NetSuite supports three types of demand plans: monthly, weekly, and daily.
Each demand plan includes values for body fields used to uniquely identify the record, such as Item, Plan Start Date, Plan End Date, Location (when Multi-Location Inventory is enabled), and Subsidiary (for NetSuite OneWorld). A View body field indicates the time period used in the demand plan: monthly, weekly, or daily.
Demand plan sublist data varies according to the demand plan type, as represented by the monthly, weekly, and daily views at Transactions > Demand Planning > Item Demand Plans > New. The Import Assistant maps one sublist instance per row. For a monthly plan, each row/
ReleaseNotes2012.1.0_v16.pdf - Subject to Change
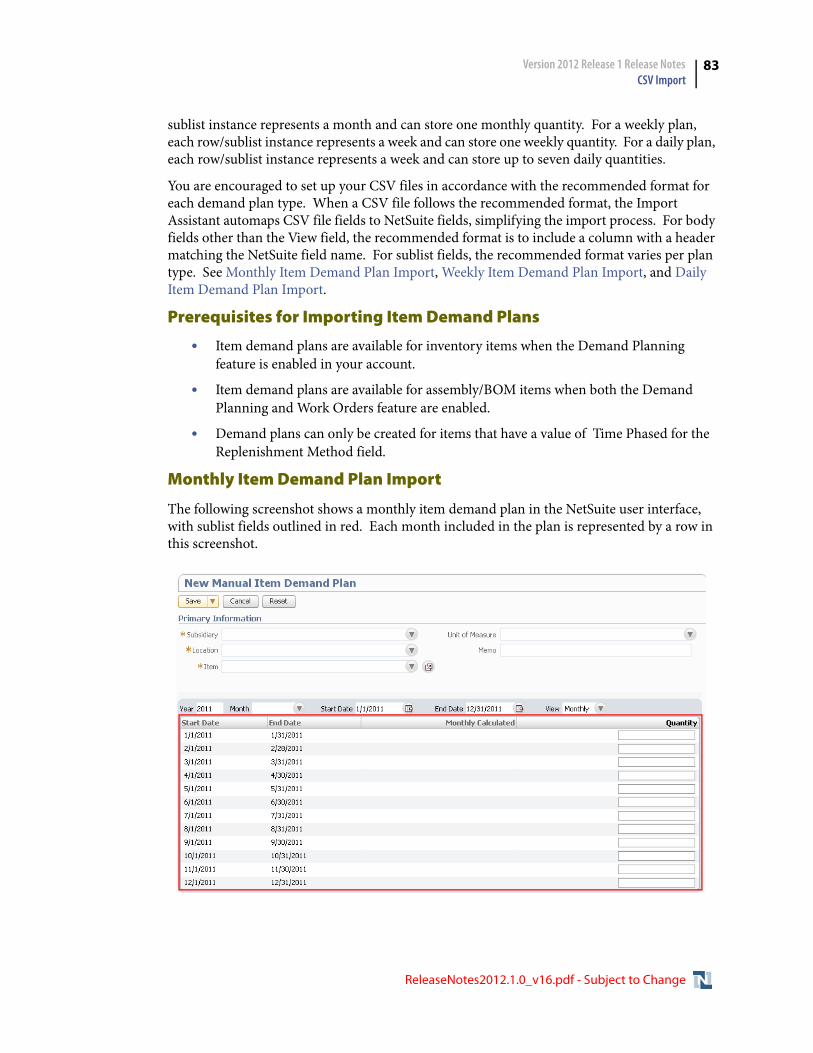
Version 2012 Release 1 Release Notes CSV Import
83
sublist instance represents a month and can store one monthly quantity. For a weekly plan, each row/sublist instance represents a week and can store one weekly quantity. For a daily plan, each row/sublist instance represents a week and can store up to seven daily quantities.
You are encouraged to set up your CSV files in accordance with the recommended format for each demand plan type. When a CSV file follows the recommended format, the Import Assistant automaps CSV file fields to NetSuite fields, simplifying the import process. For body fields other than the View field, the recommended format is to include a column with a header matching the NetSuite field name. For sublist fields, the recommended format varies per plan type. See Monthly Item Demand Plan Import, Weekly Item Demand Plan Import, and Daily Item Demand Plan Import.
Prerequisites for Importing Item Demand Plans
• Item demand plans are available for inventory items when the Demand Planning feature is enabled in your account.
• Item demand plans are available for assembly/BOM items when both the Demand Planning and Work Orders feature are enabled.
• Demand plans can only be created for items that have a value of Time Phased for the Replenishment Method field.
Monthly Item Demand Plan Import
The following screenshot shows a monthly item demand plan in the NetSuite user interface, with sublist fields outlined in red. Each month included in the plan is represented by a row in this screenshot.
ReleaseNotes2012.1.0_v16.pdf - Subject to Change
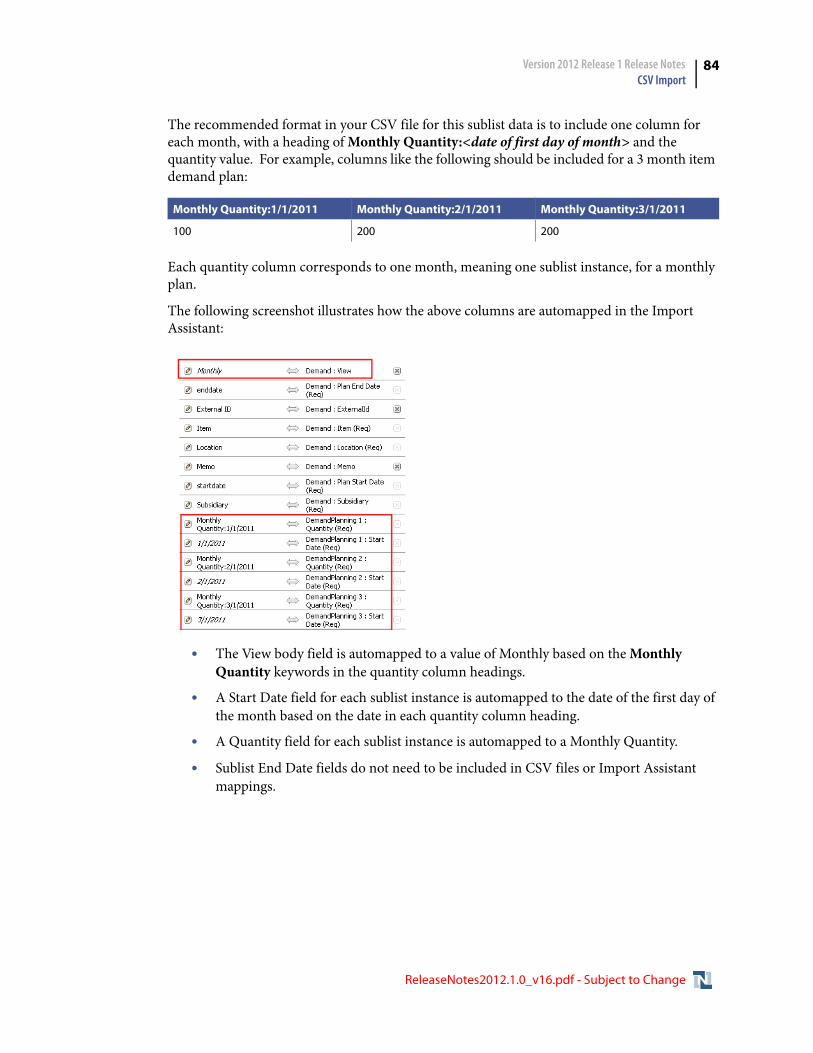
Version 2012 Release 1 Release Notes CSV Import
84
The recommended format in your CSV file for this sublist data is to include one column for each month, with a heading of Monthly Quantity:<date of first day of month> and the quantity value. For example, columns like the following should be included for a 3 month item demand plan:
Each quantity column corresponds to one month, meaning one sublist instance, for a monthly plan.
The following screenshot illustrates how the above columns are automapped in the Import Assistant:
• The View body field is automapped to a value of Monthly based on the Monthly Quantity keywords in the quantity column headings.
• A Start Date field for each sublist instance is automapped to the date of the first day of the month based on the date in each quantity column heading.
• A Quantity field for each sublist instance is automapped to a Monthly Quantity.
• Sublist End Date fields do not need to be included in CSV files or Import Assistant mappings.
Monthly Quantity:1/1/2011 Monthly Quantity:2/1/2011 Monthly Quantity:3/1/2011
100 200 200
ReleaseNotes2012.1.0_v16.pdf - Subject to Change
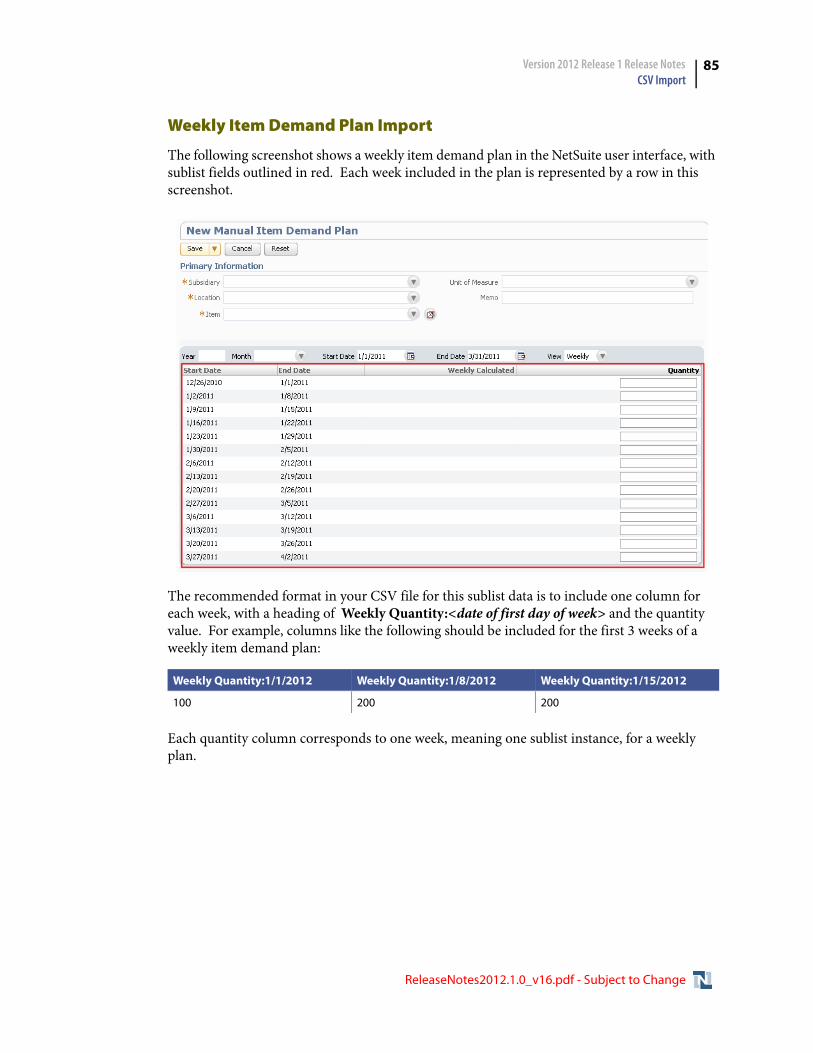
Version 2012 Release 1 Release Notes CSV Import
85
Weekly Item Demand Plan Import
The following screenshot shows a weekly item demand plan in the NetSuite user interface, with sublist fields outlined in red. Each week included in the plan is represented by a row in this screenshot.
The recommended format in your CSV file for this sublist data is to include one column for each week, with a heading of Weekly Quantity:<date of first day of week> and the quantity value. For example, columns like the following should be included for the first 3 weeks of a weekly item demand plan:
Each quantity column corresponds to one week, meaning one sublist instance, for a weekly plan.
Weekly Quantity:1/1/2012 Weekly Quantity:1/8/2012 Weekly Quantity:1/15/2012
100 200 200
ReleaseNotes2012.1.0_v16.pdf - Subject to Change
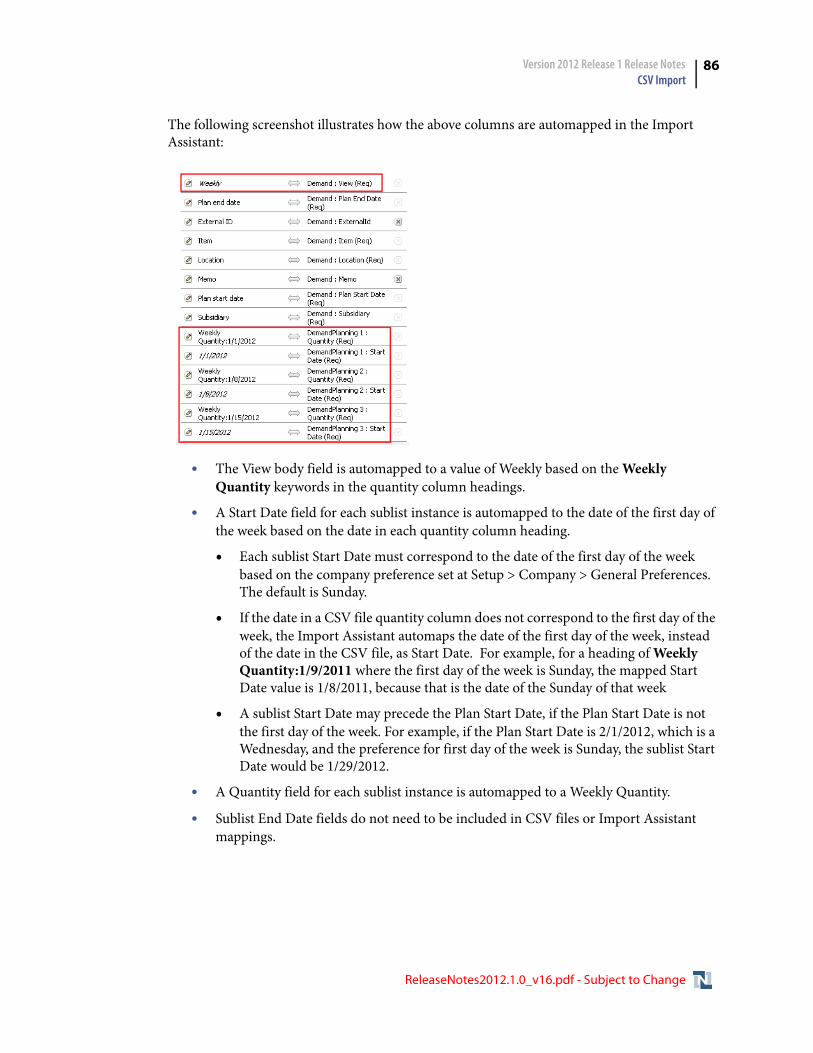
Version 2012 Release 1 Release Notes CSV Import
86
The following screenshot illustrates how the above columns are automapped in the Import Assistant:
• The View body field is automapped to a value of Weekly based on the Weekly Quantity keywords in the quantity column headings.
• A Start Date field for each sublist instance is automapped to the date of the first day of the week based on the date in each quantity column heading.
• Each sublist Start Date must correspond to the date of the first day of the week based on the company preference set at Setup > Company > General Preferences. The default is Sunday.
• If the date in a CSV file quantity column does not correspond to the first day of the week, the Import Assistant automaps the date of the first day of the week, instead of the date in the CSV file, as Start Date. For example, for a heading of Weekly Quantity:1/9/2011 where the first day of the week is Sunday, the mapped Start Date value is 1/8/2011, because that is the date of the Sunday of that week
• A sublist Start Date may precede the Plan Start Date, if the Plan Start Date is not the first day of the week. For example, if the Plan Start Date is 2/1/2012, which is a Wednesday, and the preference for first day of the week is Sunday, the sublist Start Date would be 1/29/2012.
• A Quantity field for each sublist instance is automapped to a Weekly Quantity.
• Sublist End Date fields do not need to be included in CSV files or Import Assistant mappings.
ReleaseNotes2012.1.0_v16.pdf - Subject to Change
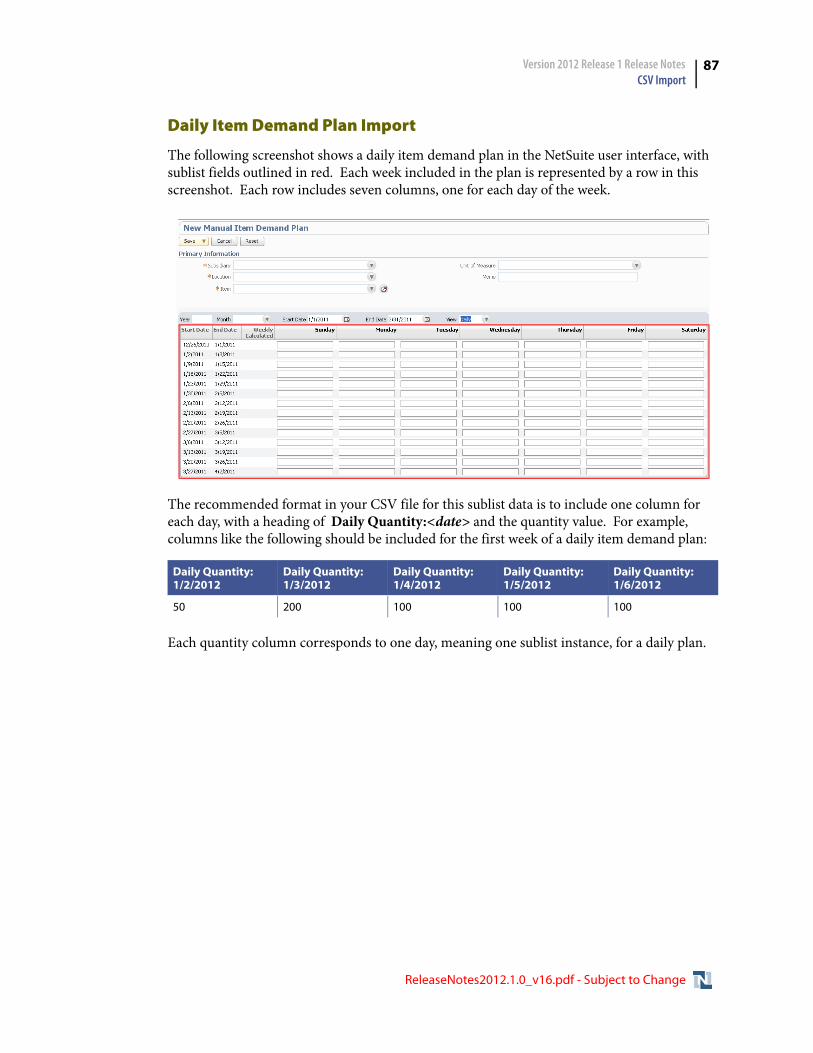
Version 2012 Release 1 Release Notes CSV Import
87
Daily Item Demand Plan Import
The following screenshot shows a daily item demand plan in the NetSuite user interface, with sublist fields outlined in red. Each week included in the plan is represented by a row in this screenshot. Each row includes seven columns, one for each day of the week.
The recommended format in your CSV file for this sublist data is to include one column for each day, with a heading of Daily Quantity:<date> and the quantity value. For example, columns like the following should be included for the first week of a daily item demand plan:
Each quantity column corresponds to one day, meaning one sublist instance, for a daily plan.
Daily Quantity:1/2/2012
Daily Quantity:1/3/2012
Daily Quantity:1/4/2012
Daily Quantity:1/5/2012
Daily Quantity:1/6/2012
50 200 100 100 100
ReleaseNotes2012.1.0_v16.pdf - Subject to Change
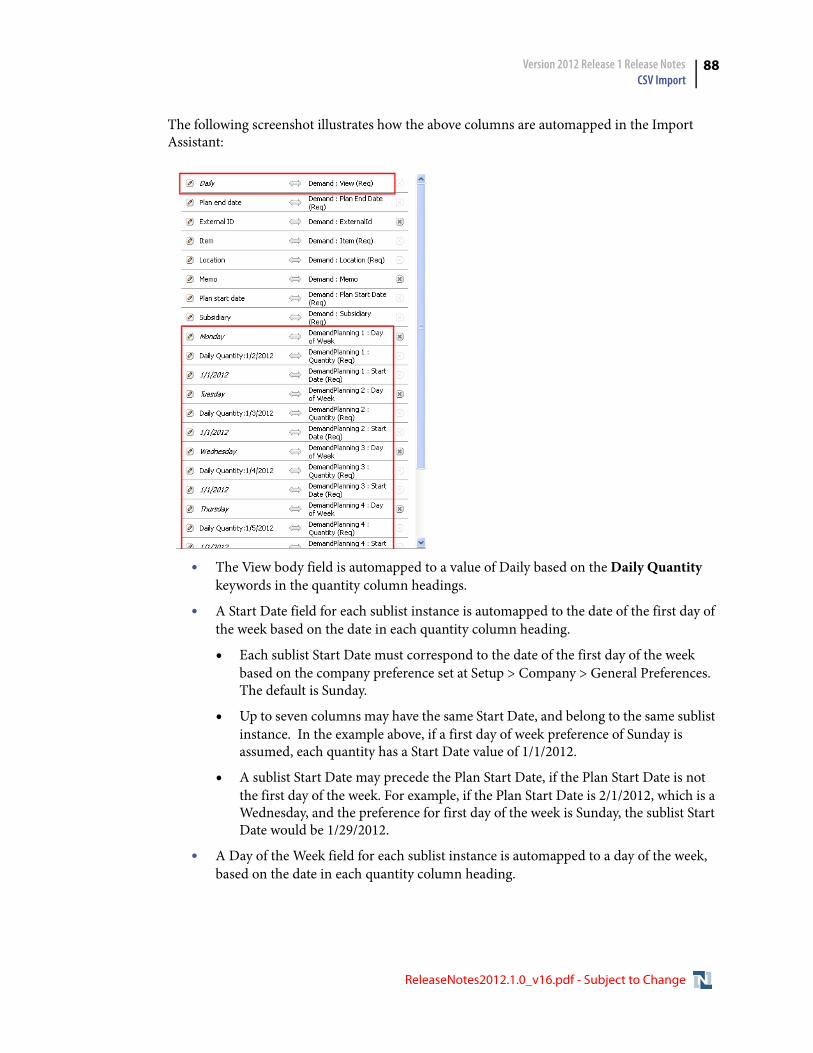
Version 2012 Release 1 Release Notes CSV Import
88
The following screenshot illustrates how the above columns are automapped in the Import Assistant:
• The View body field is automapped to a value of Daily based on the Daily Quantity keywords in the quantity column headings.
• A Start Date field for each sublist instance is automapped to the date of the first day of the week based on the date in each quantity column heading.
• Each sublist Start Date must correspond to the date of the first day of the week based on the company preference set at Setup > Company > General Preferences. The default is Sunday.
• Up to seven columns may have the same Start Date, and belong to the same sublist instance. In the example above, if a first day of week preference of Sunday is assumed, each quantity has a Start Date value of 1/1/2012.
• A sublist Start Date may precede the Plan Start Date, if the Plan Start Date is not the first day of the week. For example, if the Plan Start Date is 2/1/2012, which is a Wednesday, and the preference for first day of the week is Sunday, the sublist Start Date would be 1/29/2012.
• A Day of the Week field for each sublist instance is automapped to a day of the week, based on the date in each quantity column heading.
ReleaseNotes2012.1.0_v16.pdf - Subject to Change
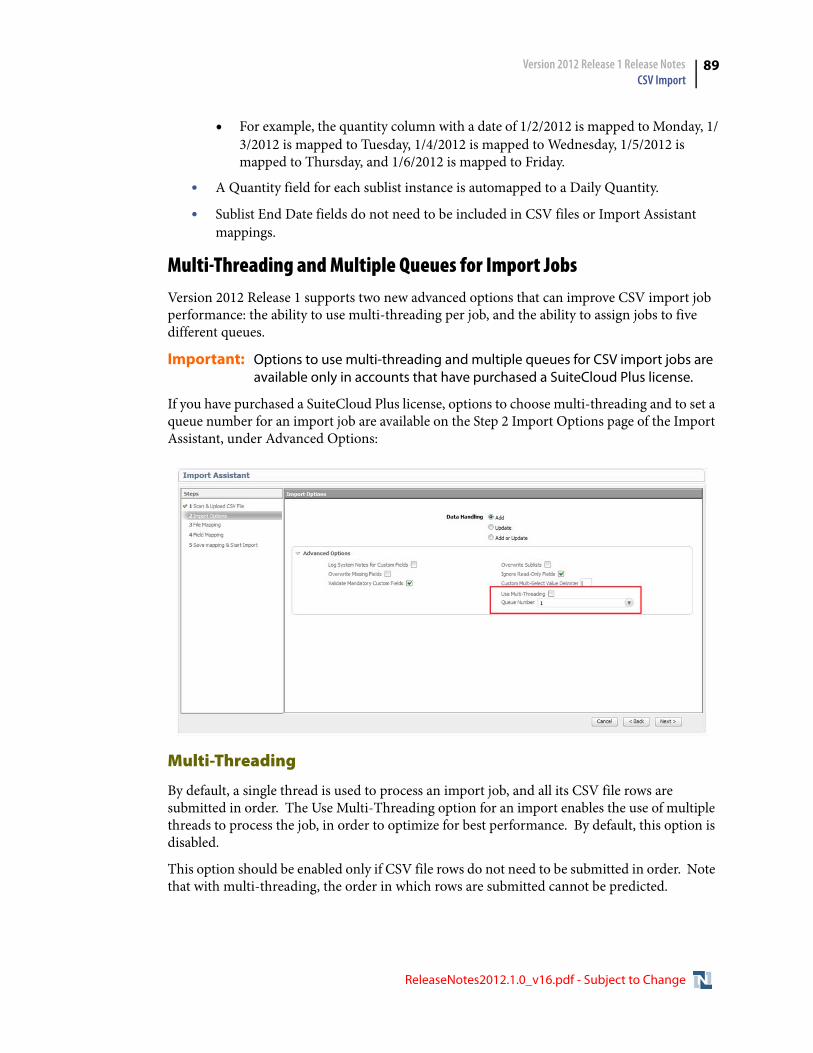
Version 2012 Release 1 Release Notes CSV Import
89
• For example, the quantity column with a date of 1/2/2012 is mapped to Monday, 1/3/2012 is mapped to Tuesday, 1/4/2012 is mapped to Wednesday, 1/5/2012 is mapped to Thursday, and 1/6/2012 is mapped to Friday.
• A Quantity field for each sublist instance is automapped to a Daily Quantity.
• Sublist End Date fields do not need to be included in CSV files or Import Assistant mappings.
Multi-Threading and Multiple Queues for Import JobsVersion 2012 Release 1 supports two new advanced options that can improve CSV import job performance: the ability to use multi-threading per job, and the ability to assign jobs to five different queues.
Important: Options to use multi-threading and multiple queues for CSV import jobs are available only in accounts that have purchased a SuiteCloud Plus license.
If you have purchased a SuiteCloud Plus license, options to choose multi-threading and to set a queue number for an import job are available on the Step 2 Import Options page of the Import Assistant, under Advanced Options:
Multi-Threading
By default, a single thread is used to process an import job, and all its CSV file rows are submitted in order. The Use Multi-Threading option for an import enables the use of multiple threads to process the job, in order to optimize for best performance. By default, this option is disabled.
This option should be enabled only if CSV file rows do not need to be submitted in order. Note that with multi-threading, the order in which rows are submitted cannot be predicted.
ReleaseNotes2012.1.0_v16.pdf - Subject to Change
Version 2012 Release 1 Release Notes CSV Import
90
The selection for this option is preserved if the import is saved, both when the import is reused in the same account and when it is bundled and reused in a different account.
Multiple Queues
By default, every import job is assigned to a single queue, queue 1. If the Queue Number option is available in the Import Assistant, users can select other queues from 2 to 5 for imports, to spread processing across multiple queues.
Important: There are never more than five import job queues regardless of how many SuiteCloud Plus licenses are purchased.
The queue number selected for an import displays in the Queue column on the import Job Status page.
The selection for queue is preserved if the import is saved and rerun in the same account. The queue number is always defaulted back to 1 for a saved CSV import that is bundled, so that users in a target account where the bundle is installed can make their own queue selection.
Import jobs in each queue execute serially. For example, if there are two import jobs in queue 1, the first import job must complete before the second import job begins. Across all five queues, the import jobs execute concurrently. For example, if there is one import job in each of the five queues, all import jobs run at the same time.
For more information, see Using Multiple Threads and Multiple Queues to Run CSV Import Jobs in the NetSuite Help Center.
Translation Supported for Import Map Name and DescriptionVersion 2012 Release 1 supports translation of saved csv import maps’ names and descriptions, in accounts where the Multi-Language feature is enabled. This translation was not supported prior to this release.
The languages for translations need to be selected at Setup > Company > General Preferences, on the Languages subtab. Once languages have been set, the owner of a saved import map, or an account administrator, can enter translations for a saved import. These translations are used when the NetSuite user interface is set to the selected languages.
Note: The Languages subtab at Setup > Company > General Preferences lists both system-supported languages that can be used for the NetSuite user interface (and are available at Home > Set Preferences ), and additional languages that can used for Web site translations only (and are not available at Home > Set Preferences). You should only enter translations for import maps in system-supported languages, because these are the only languages that can be displayed in the user interface.
ReleaseNotes2012.1.0_v16.pdf - Subject to Change
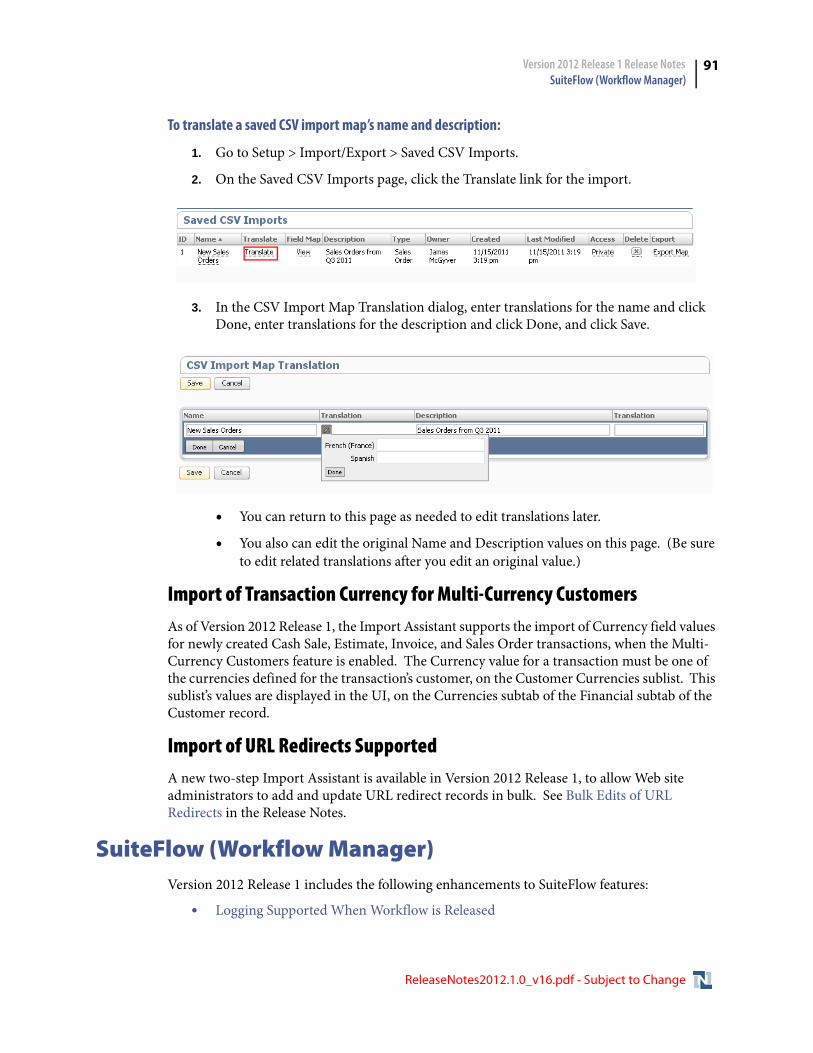
Version 2012 Release 1 Release Notes SuiteFlow (Workflow Manager)
91
To translate a saved CSV import map’s name and description:
1. Go to Setup > Import/Export > Saved CSV Imports.
2. On the Saved CSV Imports page, click the Translate link for the import.
3. In the CSV Import Map Translation dialog, enter translations for the name and click Done, enter translations for the description and click Done, and click Save.
• You can return to this page as needed to edit translations later.
• You also can edit the original Name and Description values on this page. (Be sure to edit related translations after you edit an original value.)
Import of Transaction Currency for Multi-Currency CustomersAs of Version 2012 Release 1, the Import Assistant supports the import of Currency field values for newly created Cash Sale, Estimate, Invoice, and Sales Order transactions, when the Multi-Currency Customers feature is enabled. The Currency value for a transaction must be one of the currencies defined for the transaction’s customer, on the Customer Currencies sublist. This sublist’s values are displayed in the UI, on the Currencies subtab of the Financial subtab of the Customer record.
Import of URL Redirects SupportedA new two-step Import Assistant is available in Version 2012 Release 1, to allow Web site administrators to add and update URL redirect records in bulk. See Bulk Edits of URL Redirects in the Release Notes.
SuiteFlow (Workflow Manager)Version 2012 Release 1 includes the following enhancements to SuiteFlow features:
• Logging Supported When Workflow is Released
ReleaseNotes2012.1.0_v16.pdf - Subject to Change
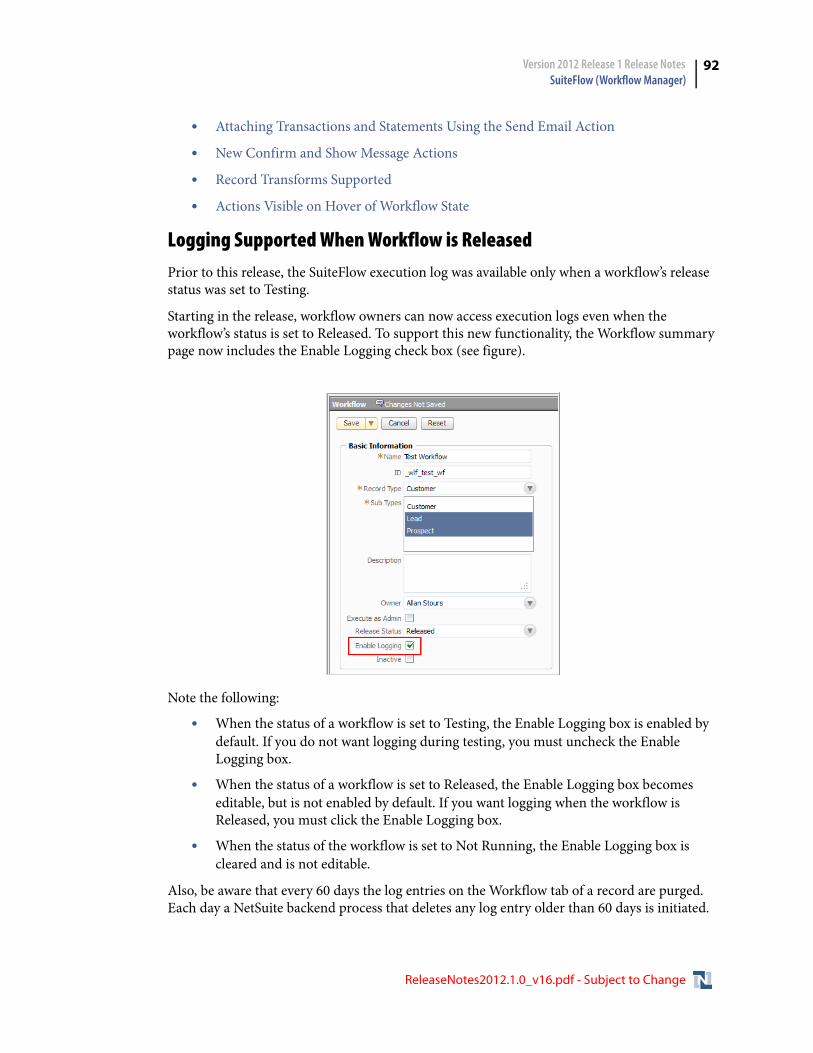
Version 2012 Release 1 Release Notes SuiteFlow (Workflow Manager)
92
• Attaching Transactions and Statements Using the Send Email Action
• New Confirm and Show Message Actions
• Record Transforms Supported
• Actions Visible on Hover of Workflow State
Logging Supported When Workflow is ReleasedPrior to this release, the SuiteFlow execution log was available only when a workflow’s release status was set to Testing.
Starting in the release, workflow owners can now access execution logs even when the workflow’s status is set to Released. To support this new functionality, the Workflow summary page now includes the Enable Logging check box (see figure).
Note the following:
• When the status of a workflow is set to Testing, the Enable Logging box is enabled by default. If you do not want logging during testing, you must uncheck the Enable Logging box.
• When the status of a workflow is set to Released, the Enable Logging box becomes editable, but is not enabled by default. If you want logging when the workflow is Released, you must click the Enable Logging box.
• When the status of the workflow is set to Not Running, the Enable Logging box is cleared and is not editable.
Also, be aware that every 60 days the log entries on the Workflow tab of a record are purged. Each day a NetSuite backend process that deletes any log entry older than 60 days is initiated.
ReleaseNotes2012.1.0_v16.pdf - Subject to Change
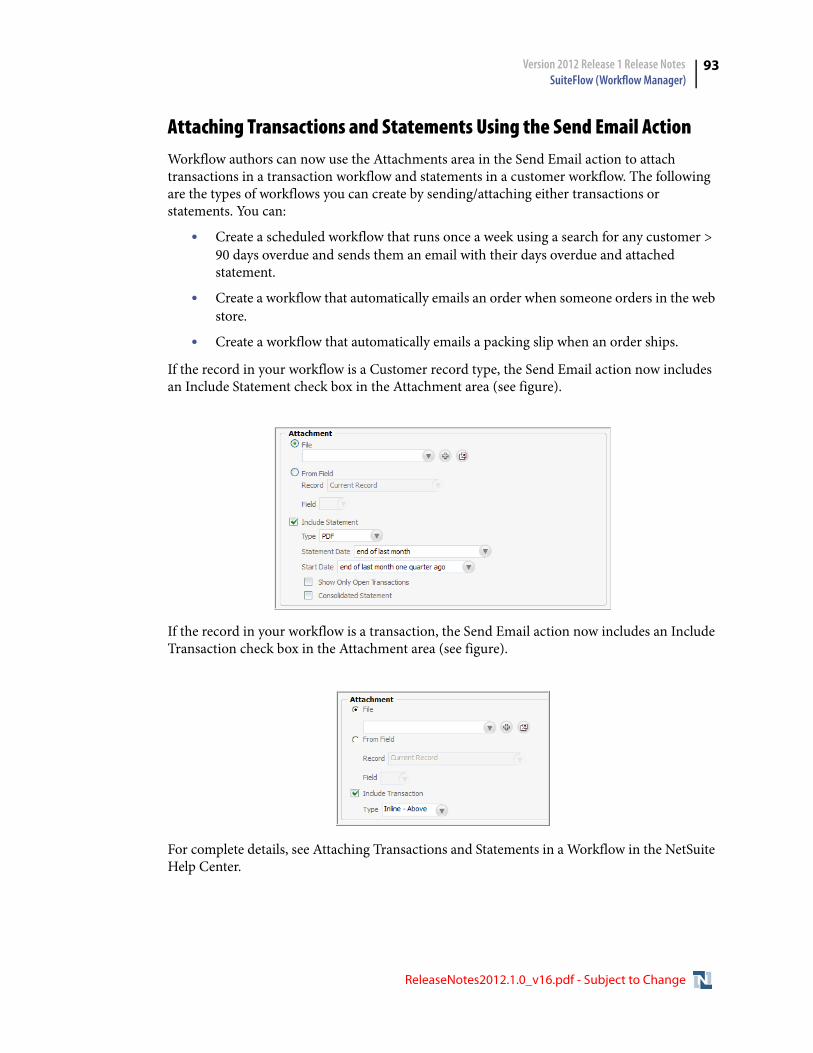
Version 2012 Release 1 Release Notes SuiteFlow (Workflow Manager)
93
Attaching Transactions and Statements Using the Send Email ActionWorkflow authors can now use the Attachments area in the Send Email action to attach transactions in a transaction workflow and statements in a customer workflow. The following are the types of workflows you can create by sending/attaching either transactions or statements. You can:
• Create a scheduled workflow that runs once a week using a search for any customer > 90 days overdue and sends them an email with their days overdue and attached statement.
• Create a workflow that automatically emails an order when someone orders in the web store.
• Create a workflow that automatically emails a packing slip when an order ships.
If the record in your workflow is a Customer record type, the Send Email action now includes an Include Statement check box in the Attachment area (see figure).
If the record in your workflow is a transaction, the Send Email action now includes an Include Transaction check box in the Attachment area (see figure).
For complete details, see Attaching Transactions and Statements in a Workflow in the NetSuite Help Center.
ReleaseNotes2012.1.0_v16.pdf - Subject to Change

Version 2012 Release 1 Release Notes SuiteFlow (Workflow Manager)
94
New Confirm and Show Message ActionsTwo new “display message” actions have been added to SuiteFlow in this release. The first action is called Confirm; the second is called Show Message.
Workflow authors can use the Show Message action to display an alert that includes an OK message. The end user can read the message, click OK, and continue working. Unlike the Return User Error action, the Show Message action does not prevent users from clearing the message, and then continuing on with their work. It also does not prevent the record from being submitted. The Show Message action can be executed on any client trigger.
Workflow authors can also use the new Confirm action to display a message to users to verify if they want to proceed with their current task. The Confirm action can be executed on client triggers Before Field Edit, when using any of the “set field” actions, and on Before User Submit, when the user attempts to save the form. Displaying a Confirm message on these triggers allows the edit or submit to be aborted if the user presses Cancel.
In the figures below, the Confirm action executes when the user clicks Save on the record.
If the user clicks OK, the record is saved. If the user clicks Cancel, the record is not saved, and the user can continue editing the record.
ReleaseNotes2012.1.0_v16.pdf - Subject to Change
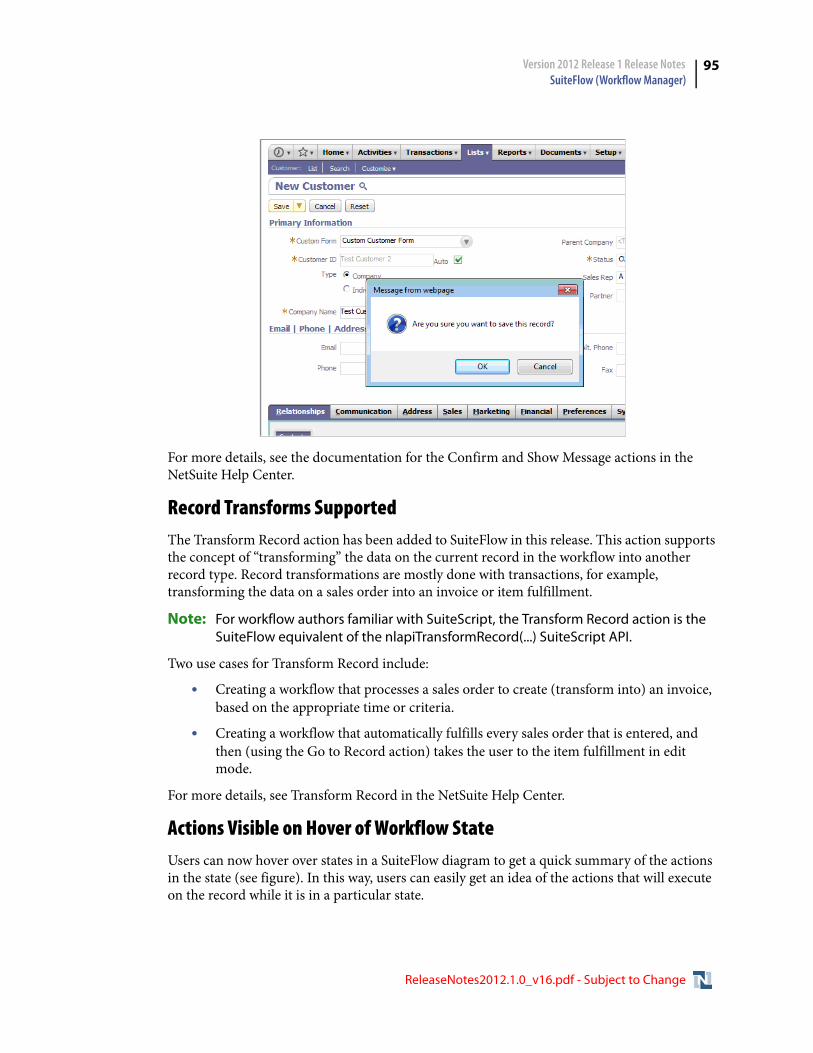
Version 2012 Release 1 Release Notes SuiteFlow (Workflow Manager)
95
For more details, see the documentation for the Confirm and Show Message actions in the NetSuite Help Center.
Record Transforms SupportedThe Transform Record action has been added to SuiteFlow in this release. This action supports the concept of “transforming” the data on the current record in the workflow into another record type. Record transformations are mostly done with transactions, for example, transforming the data on a sales order into an invoice or item fulfillment.
Note: For workflow authors familiar with SuiteScript, the Transform Record action is the SuiteFlow equivalent of the nlapiTransformRecord(...) SuiteScript API.
Two use cases for Transform Record include:
• Creating a workflow that processes a sales order to create (transform into) an invoice, based on the appropriate time or criteria.
• Creating a workflow that automatically fulfills every sales order that is entered, and then (using the Go to Record action) takes the user to the item fulfillment in edit mode.
For more details, see Transform Record in the NetSuite Help Center.
Actions Visible on Hover of Workflow StateUsers can now hover over states in a SuiteFlow diagram to get a quick summary of the actions in the state (see figure). In this way, users can easily get an idea of the actions that will execute on the record while it is in a particular state.
ReleaseNotes2012.1.0_v16.pdf - Subject to Change
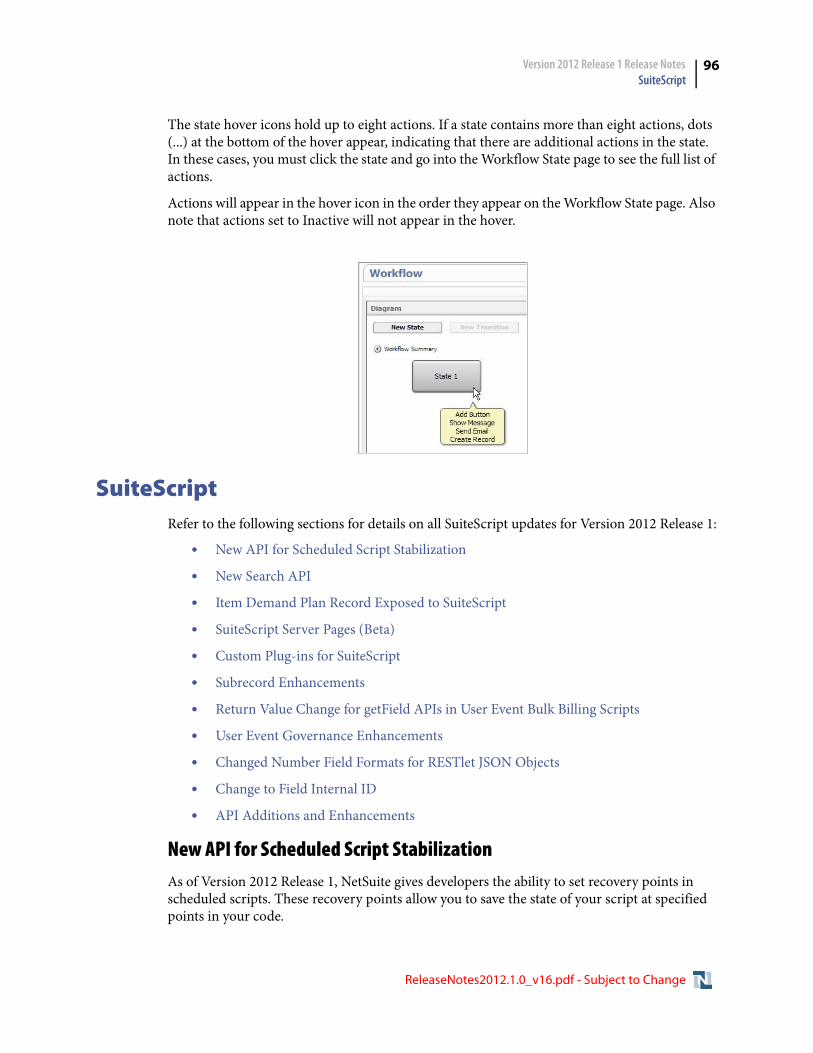
Version 2012 Release 1 Release Notes SuiteScript
96
The state hover icons hold up to eight actions. If a state contains more than eight actions, dots (...) at the bottom of the hover appear, indicating that there are additional actions in the state. In these cases, you must click the state and go into the Workflow State page to see the full list of actions.
Actions will appear in the hover icon in the order they appear on the Workflow State page. Also note that actions set to Inactive will not appear in the hover.
SuiteScriptRefer to the following sections for details on all SuiteScript updates for Version 2012 Release 1:
• New API for Scheduled Script Stabilization
• New Search API
• Item Demand Plan Record Exposed to SuiteScript
• SuiteScript Server Pages (Beta)
• Custom Plug-ins for SuiteScript
• Subrecord Enhancements
• Return Value Change for getField APIs in User Event Bulk Billing Scripts
• User Event Governance Enhancements
• Changed Number Field Formats for RESTlet JSON Objects
• Change to Field Internal ID
• API Additions and Enhancements
New API for Scheduled Script StabilizationAs of Version 2012 Release 1, NetSuite gives developers the ability to set recovery points in scheduled scripts. These recovery points allow you to save the state of your script at specified points in your code.
ReleaseNotes2012.1.0_v16.pdf - Subject to Change
Version 2012 Release 1 Release Notes SuiteScript
97
To set a recovery point, use nlapiSetRecoveryPoint(). Note that this API consumes 100 usage units, so use it only at key points in your script. For additional details on this API, see nlapiSetRecoveryPoint() in the NetSuite Help Center.
Also new with this release is nlapiYieldScript(). Like nlapiSetRecoveryPoint(), this new function allows you to set recovery points in your script. In addition, this function yields then reschedules the script, putting it at the back of the scheduled script queue. For additional details on this API, see nlapiYieldScript() in the NetSuite Help Center.
For more general information on setting recovery points in your scheduled scripts, see Setting Recovery Points in Scheduled Scripts in the NetSuite Help Center.
New Search APIStarting in this release, a new search API is available for developers to create both saved searches and ad-hoc (non-saved) searches. Developers can use the new nlapiCreateSearch(type, filters, columns) function to build their search. This function returns an nlobjSearch object, which is also new in the release.
Developers can then use the nlobjSearch.runSearch() method to execute an ad-hoc search or nlobjSearch.saveSearch(title, scriptId) to save the search. If the search is saved, it can then be reloaded using the new nlapiLoadSearch(type, id) function.
Note that when you execute an ad-hoc search using nlobjSearch.runSearch(), an nlobjSearchResultSet object is returned. This is a new object that encapsulates a set of search results. The nlobjSearchResultSet object provides an iterator interface, which gives developers more flexibility when processing or iterating through the results. The benefits of this new object include:
• an increase to 4000 search results returned when using the new nlobjSearchResultSet.forEachResult() method (up from 1000 in previous versions of NetSuite using the existing API)
• the ability to slice the search results
• the ability to use pagination within the results
For a list of all objects and methods associated with the new search API, see API Additions and Enhancements in the Release Notes.
In the NetSuite Help Center, see nlobjSearch and nlobjSearchResultSet for API documentation. Also see nlapiCreateSearch(type, filters, columns) and nlapiLoadSearch(type, id).
Item Demand Plan Record Exposed to SuiteScriptVersion 2012 Release 1 exposes the Item Demand Plan record to SuiteScript. The internal ID for this record is itemdemandplan. This record is available for inventory items when the Demand Planning feature is enabled, and for assembly/BOM items when both the Demand Planning and Work Orders features are enabled. Item demand plans can be added for items where the supplyreplenishmethod field is set to Time Phased.
ReleaseNotes2012.1.0_v16.pdf - Subject to Change
Version 2012 Release 1 Release Notes SuiteScript
98
Demand Plan Body Fields
Demand plan body fields include fields such as item, location, and subsidiary that are used to uniquely identify the demand plan, start date and end date fields that define the time period coverd, and a demandplancalendartype field that indicate the time interval used for the plan (MONTHLY, WEEKLY, or DAILY).
Demand Plan Detail Sublist
Each demand plan record includes a matrix of projected quantities per time interval, similar to the matrix used for item pricing. The internal ID for this sublist is demandplandetail.
• In a monthly demand plan, this matrix includes a row for each month in the time period, and one column with the projected quantity demand for each month.
• In a weekly demand plan, this matrix includes a row for each week in the time period, and one column with the projected quantity demand for each week.
• In a daily demand plan, this matrix includes a row for each week in the time period and seven columns with the projected quantity demand for each day of each week.
You should use matrix APIs to access demand plan quantity values on a per-row, per-column basis, similar to the way that item pricing values are accessed.
For more details about the item demand plan record, see Item Demand Plan in the NetSuite Help Center. For more details about this record’s matrix, see Demand Plan Detail Sublist.
SuiteScript Server Pages (Beta)Version 2012 Release 1 includes a beta version of the SuiteScript Server Pages feature. This feature provides a new technology to create customized applications hosted by NetSuite. This technology supports the use of SuiteScript to embed dynamic content within static HTML pages, and to create custom script assets for RESTful and AJAX applications.
The SuiteScript Server Pages feature can be enabled on the SuiteFlex subtab at Setup > Company > Enable Features.
When this feature is enabled, Web developers have a new way to fully customize their customers’ shopping experience, by creating and deploying SSP applications. Users with the SuiteScript permission have access to the following tools for this process: the SSP Application record, new front-end and request-handler file types, and a new Commerce API for SuiteScript. For more information, see SSP Applications (Beta) in the Release Notes.
Custom Plug-ins for SuiteScriptSolution providers can now provide a programmatic interface to a SuiteApp. The interface defines aspects of the SuiteApp that the author would like implementers (end-customers installing the SuiteApp) to be able to customize.
Once they install the SuiteApp, implementers can then develop one or more alternative plug-in implementations for the SuiteApp.
ReleaseNotes2012.1.0_v16.pdf - Subject to Change
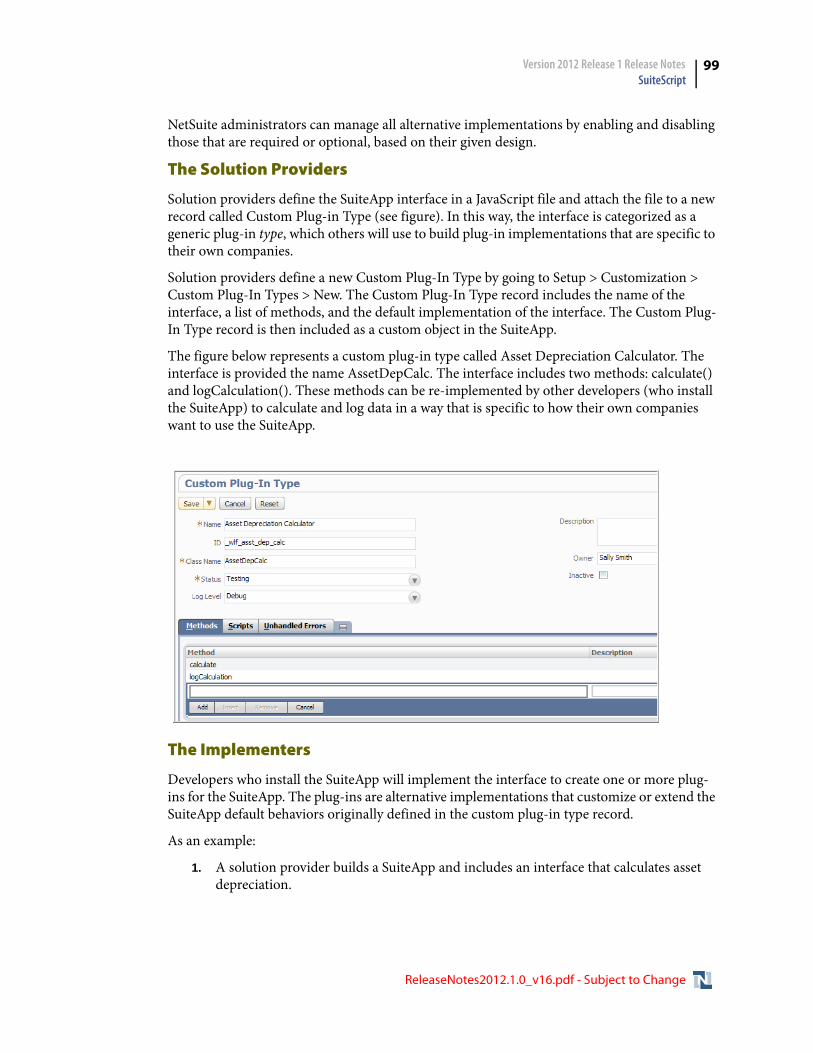
Version 2012 Release 1 Release Notes SuiteScript
99
NetSuite administrators can manage all alternative implementations by enabling and disabling those that are required or optional, based on their given design.
The Solution Providers
Solution providers define the SuiteApp interface in a JavaScript file and attach the file to a new record called Custom Plug-in Type (see figure). In this way, the interface is categorized as a generic plug-in type, which others will use to build plug-in implementations that are specific to their own companies.
Solution providers define a new Custom Plug-In Type by going to Setup > Customization > Custom Plug-In Types > New. The Custom Plug-In Type record includes the name of the interface, a list of methods, and the default implementation of the interface. The Custom Plug-In Type record is then included as a custom object in the SuiteApp.
The figure below represents a custom plug-in type called Asset Depreciation Calculator. The interface is provided the name AssetDepCalc. The interface includes two methods: calculate() and logCalculation(). These methods can be re-implemented by other developers (who install the SuiteApp) to calculate and log data in a way that is specific to how their own companies want to use the SuiteApp.
The Implementers
Developers who install the SuiteApp will implement the interface to create one or more plug-ins for the SuiteApp. The plug-ins are alternative implementations that customize or extend the SuiteApp default behaviors originally defined in the custom plug-in type record.
As an example:
1. A solution provider builds a SuiteApp and includes an interface that calculates asset depreciation.
ReleaseNotes2012.1.0_v16.pdf - Subject to Change
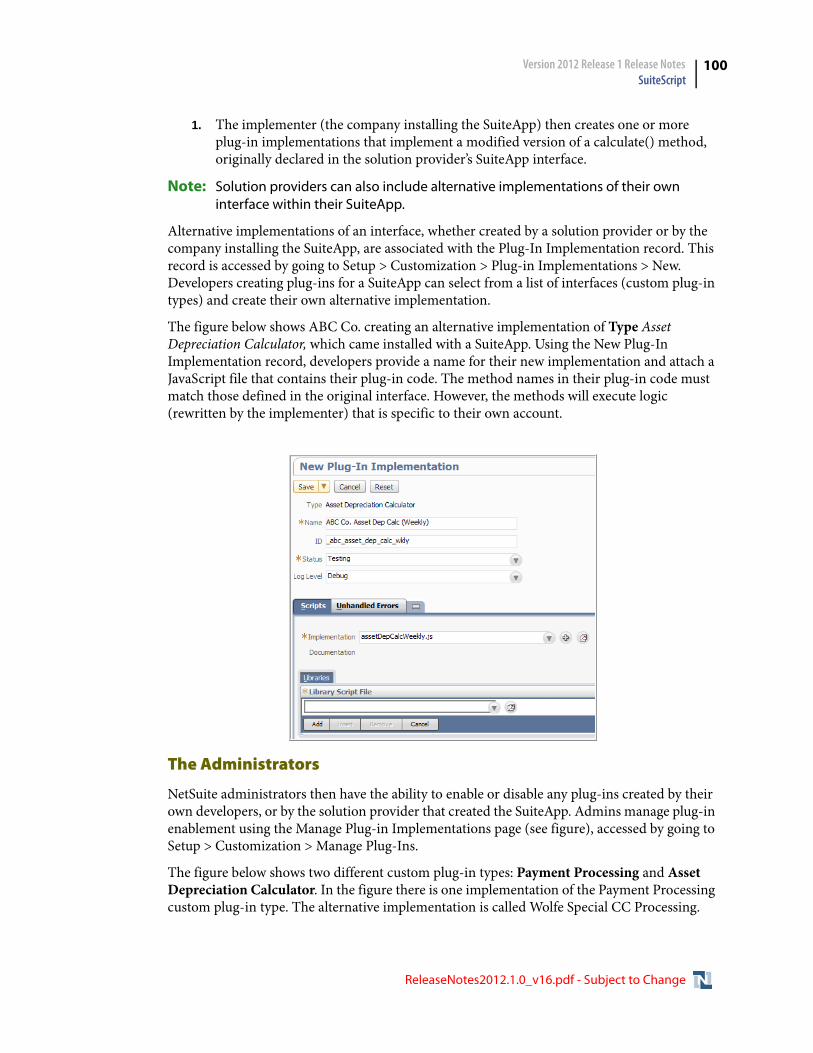
Version 2012 Release 1 Release Notes SuiteScript
100
1. The implementer (the company installing the SuiteApp) then creates one or more plug-in implementations that implement a modified version of a calculate() method, originally declared in the solution provider’s SuiteApp interface.
Note: Solution providers can also include alternative implementations of their own interface within their SuiteApp.
Alternative implementations of an interface, whether created by a solution provider or by the company installing the SuiteApp, are associated with the Plug-In Implementation record. This record is accessed by going to Setup > Customization > Plug-in Implementations > New. Developers creating plug-ins for a SuiteApp can select from a list of interfaces (custom plug-in types) and create their own alternative implementation.
The figure below shows ABC Co. creating an alternative implementation of Type Asset Depreciation Calculator, which came installed with a SuiteApp. Using the New Plug-In Implementation record, developers provide a name for their new implementation and attach a JavaScript file that contains their plug-in code. The method names in their plug-in code must match those defined in the original interface. However, the methods will execute logic (rewritten by the implementer) that is specific to their own account.
The Administrators
NetSuite administrators then have the ability to enable or disable any plug-ins created by their own developers, or by the solution provider that created the SuiteApp. Admins manage plug-in enablement using the Manage Plug-in Implementations page (see figure), accessed by going to Setup > Customization > Manage Plug-Ins.
The figure below shows two different custom plug-in types: Payment Processing and Asset Depreciation Calculator. In the figure there is one implementation of the Payment Processing custom plug-in type. The alternative implementation is called Wolfe Special CC Processing.
ReleaseNotes2012.1.0_v16.pdf - Subject to Change
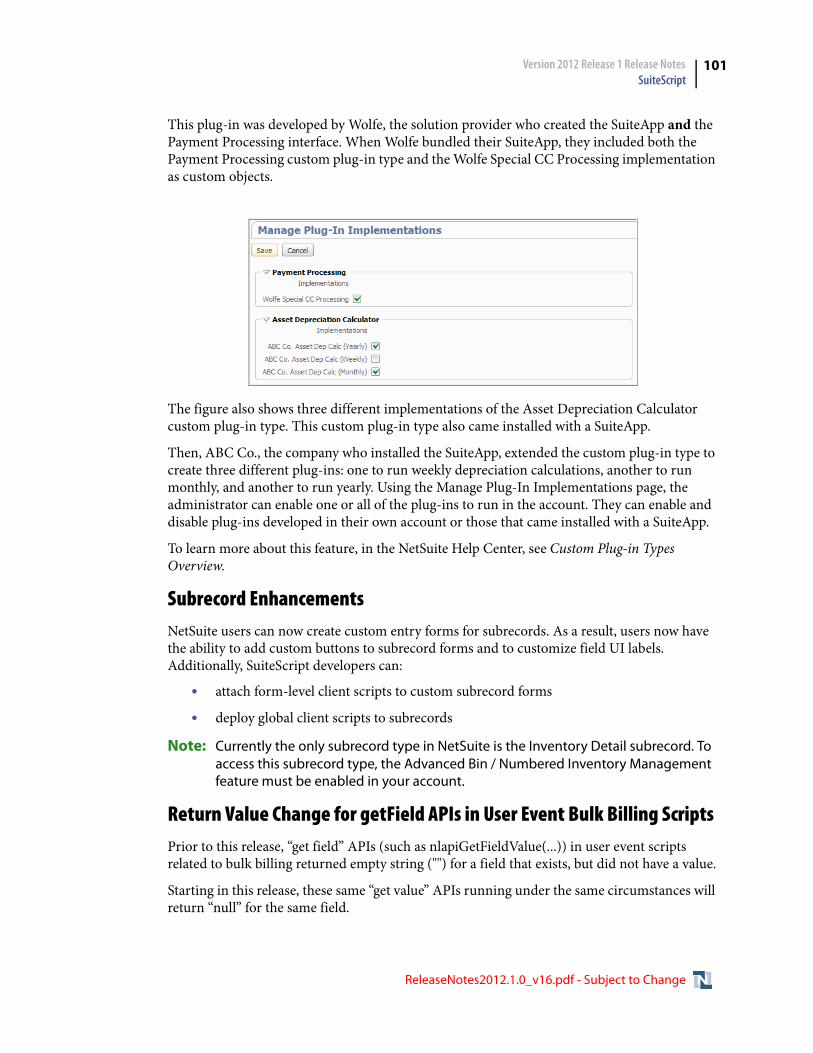
Version 2012 Release 1 Release Notes SuiteScript
101
This plug-in was developed by Wolfe, the solution provider who created the SuiteApp and the Payment Processing interface. When Wolfe bundled their SuiteApp, they included both the Payment Processing custom plug-in type and the Wolfe Special CC Processing implementation as custom objects.
The figure also shows three different implementations of the Asset Depreciation Calculator custom plug-in type. This custom plug-in type also came installed with a SuiteApp.
Then, ABC Co., the company who installed the SuiteApp, extended the custom plug-in type to create three different plug-ins: one to run weekly depreciation calculations, another to run monthly, and another to run yearly. Using the Manage Plug-In Implementations page, the administrator can enable one or all of the plug-ins to run in the account. They can enable and disable plug-ins developed in their own account or those that came installed with a SuiteApp.
To learn more about this feature, in the NetSuite Help Center, see Custom Plug-in Types Overview.
Subrecord EnhancementsNetSuite users can now create custom entry forms for subrecords. As a result, users now have the ability to add custom buttons to subrecord forms and to customize field UI labels. Additionally, SuiteScript developers can:
• attach form-level client scripts to custom subrecord forms
• deploy global client scripts to subrecords
Note: Currently the only subrecord type in NetSuite is the Inventory Detail subrecord. To access this subrecord type, the Advanced Bin / Numbered Inventory Management feature must be enabled in your account.
Return Value Change for getField APIs in User Event Bulk Billing ScriptsPrior to this release, “get field” APIs (such as nlapiGetFieldValue(...)) in user event scripts related to bulk billing returned empty string ("") for a field that exists, but did not have a value.
Starting in this release, these same “get value” APIs running under the same circumstances will return “null” for the same field.
ReleaseNotes2012.1.0_v16.pdf - Subject to Change
Version 2012 Release 1 Release Notes SuiteScript
102
This type of change is applicable in the following scenario:
User event script (such as a before submit script) is run on an invoice that is created through bulk billing. The change will be that a field that is not populated would have returned an empty string (‘""), but will now return a “null” value.
This new behavior is the same behavior experienced in the context of a suitelet, scheduled script, or other server-side contexts, so the change is a move toward consistency with other areas of scripting.
In your existing code, if you want to determine when a field is un-set, it is recommended that you check for both “null” and empty string ("").
User Event Governance EnhancementsPrior to this release, there was a limit of 10 user event functions (per trigger type) that could be executed on a record. For example, you could have up to 10 beforeLoad, 10 beforeSubmit, and 10 afterSubmit executing functions on a Customer record.
In this release, the 10 function (per trigger type) limit has been removed.
The removal of this limit is important for developers who are writing scripts that will be bundled. For example, prior to this release, if 10 beforeLoad user event scripts were already deployed to the Sales Order record in the target account, then none of the new bundled beforeLoad user event scripts would execute on this record type. (This is assuming that all existing beforeLoad scripts and all of the bundled beforeLoad scripts were set to the same audience and share all other deployment parameters such as deployment status and audience.) With the 10 user event trigger type limit removed, developers and administrators who are managing bundles in their accounts no longer have to wonder if all user event scripts deployed to a specific record type are executing. Now they will all execute.
Note: This enhancement does not remove the 1,000 usage unit governance limit applied to user event scripts.
Note that developers are still discouraged from running multiple user event scripts (of the same trigger type) on the same record. Doing so will negatively impact the end user’s experience with the record. For example, if there are 10+ beforeLoad user event scripts deployed to a Sales Order, then all 10+ scripts will run before the record loads into the browser. This will delay the loading of the record, forcing the end user to wait until all beforeLoad scripts have completed their execution.
For this reason, it is still best practice to optimize the scripts in your account to ensure that you do not have an excessive number of scripts all running on the same record type at the same time.
Be aware that as a result of this enhancement, user event scripts that previously did not execute on a certain record type may start executing. To see all user event scripts deployed to a specific record type:
1. Go to Setup > Customization > Scripted Records.
2. On the Script Records list page, select View next to a record type.
ReleaseNotes2012.1.0_v16.pdf - Subject to Change
Version 2012 Release 1 Release Notes SuiteScript
103
3. On the page that appears, click the User Event Scripts tab. All user events deployed to this record type will be listed (on a per-trigger type basis).
Changed Number Field Formats for RESTlet JSON ObjectsPrior to this release, RESTlet JSON objects formatted number field values as strings. As of Version 2012 Release 1, formatting has changed as follows:
• A value for an integer field is formatted as an integer.
• A value for a float, currency, currency2, and or rate field is formatted as a decimal.
• A value for a percent field is formatted as a string with a % symbol, for example “0.00%”.
Important: Review any RESTlet code written before Version 2012 Release 1 to ensure that it properly handles number field formatting.
The following example from a JSON sales order record illustrates the formatting supported for this release. The total, taxtotal, and discounttotal fields are formatted as numbers, while the contribution field, a percent field, is formatted as a string.
{ "total":11.41, "taxtotal":0, "paypalprocess":false, "tranid":"1", "orderstatus":{ "name":"Pending Approval", "internalid":"A" }, "shipcomplete":false, "tranisvsoebundle":false, "discounttotal":0, "salesteam":[ { "contribution":"100.0%", "employee":{ "name":"EU Sales Rep Germany", "internalid":"88" },
Change to Field Internal IDOn Customer and Vendor records, the internal ID for the Represents Subsidiary field has been changed from subsidiary2 to representingsubsidiary. If you have any existing SuiteScripts that reference the subsidiary2 internal ID, you will need to update the ID to representingsubsidiary.
ReleaseNotes2012.1.0_v16.pdf - Subject to Change
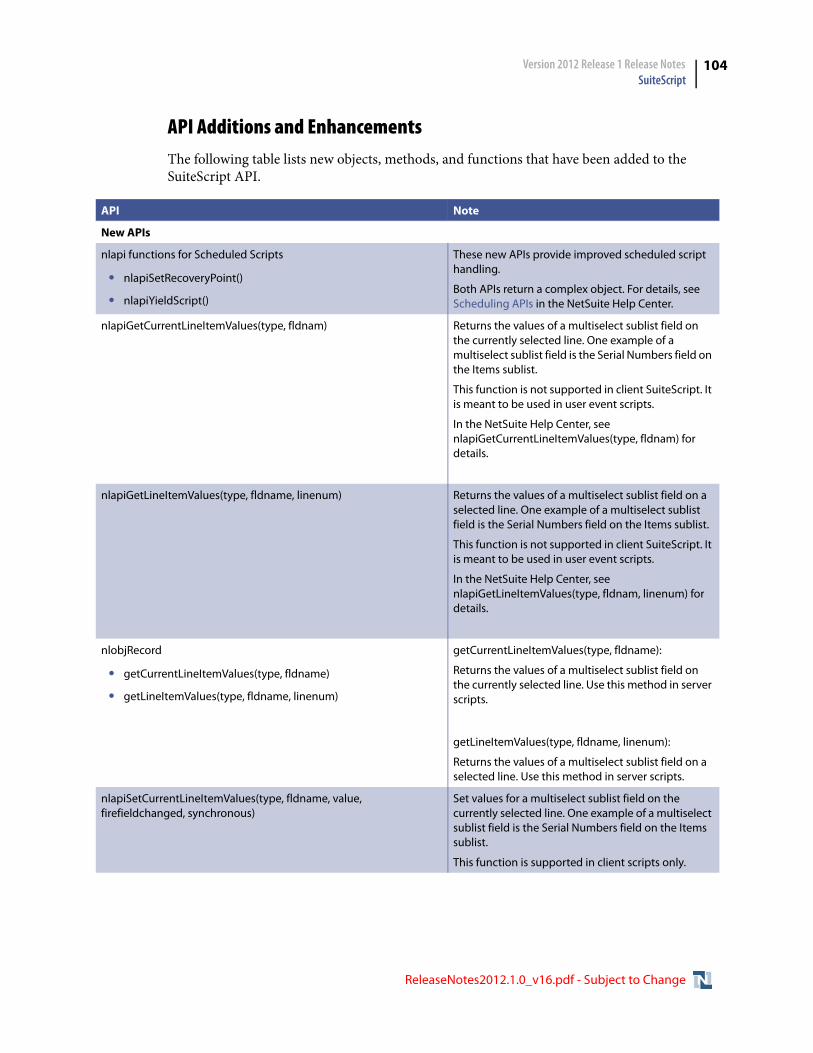
Version 2012 Release 1 Release Notes SuiteScript
104
API Additions and EnhancementsThe following table lists new objects, methods, and functions that have been added to the SuiteScript API.
API Note
New APIs
nlapi functions for Scheduled Scripts
• nlapiSetRecoveryPoint()
• nlapiYieldScript()
These new APIs provide improved scheduled script handling.
Both APIs return a complex object. For details, see Scheduling APIs in the NetSuite Help Center.
nlapiGetCurrentLineItemValues(type, fldnam) Returns the values of a multiselect sublist field on the currently selected line. One example of a multiselect sublist field is the Serial Numbers field on the Items sublist.
This function is not supported in client SuiteScript. It is meant to be used in user event scripts.
In the NetSuite Help Center, see nlapiGetCurrentLineItemValues(type, fldnam) for details.
nlapiGetLineItemValues(type, fldname, linenum) Returns the values of a multiselect sublist field on a selected line. One example of a multiselect sublist field is the Serial Numbers field on the Items sublist.
This function is not supported in client SuiteScript. It is meant to be used in user event scripts.
In the NetSuite Help Center, see nlapiGetLineItemValues(type, fldnam, linenum) for details.
nlobjRecord
• getCurrentLineItemValues(type, fldname)
• getLineItemValues(type, fldname, linenum)
getCurrentLineItemValues(type, fldname):
Returns the values of a multiselect sublist field on the currently selected line. Use this method in server scripts.
getLineItemValues(type, fldname, linenum):
Returns the values of a multiselect sublist field on a selected line. Use this method in server scripts.
nlapiSetCurrentLineItemValues(type, fldname, value, firefieldchanged, synchronous)
Set values for a multiselect sublist field on the currently selected line. One example of a multiselect sublist field is the Serial Numbers field on the Items sublist.
This function is supported in client scripts only.
ReleaseNotes2012.1.0_v16.pdf - Subject to Change
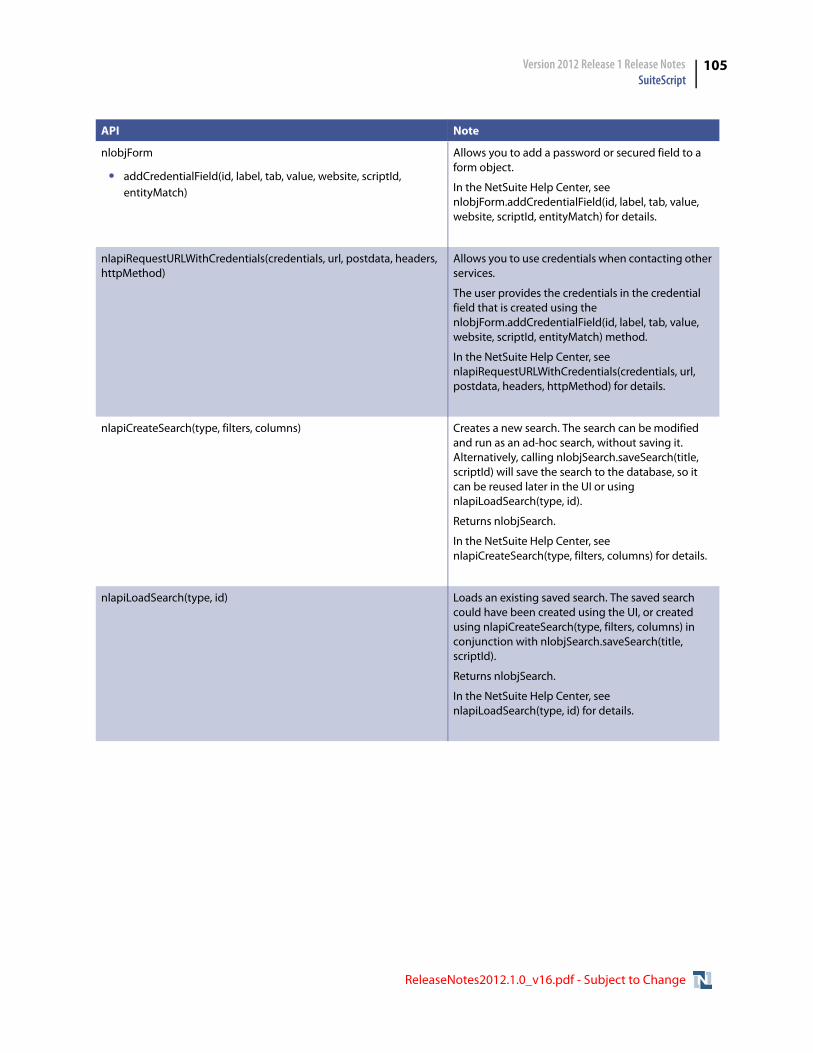
Version 2012 Release 1 Release Notes SuiteScript
105
nlobjForm
• addCredentialField(id, label, tab, value, website, scriptId, entityMatch)
Allows you to add a password or secured field to a form object.
In the NetSuite Help Center, see nlobjForm.addCredentialField(id, label, tab, value, website, scriptId, entityMatch) for details.
nlapiRequestURLWithCredentials(credentials, url, postdata, headers, httpMethod)
Allows you to use credentials when contacting other services.
The user provides the credentials in the credential field that is created using the nlobjForm.addCredentialField(id, label, tab, value, website, scriptId, entityMatch) method.
In the NetSuite Help Center, see nlapiRequestURLWithCredentials(credentials, url, postdata, headers, httpMethod) for details.
nlapiCreateSearch(type, filters, columns) Creates a new search. The search can be modified and run as an ad-hoc search, without saving it. Alternatively, calling nlobjSearch.saveSearch(title, scriptId) will save the search to the database, so it can be reused later in the UI or using nlapiLoadSearch(type, id).
Returns nlobjSearch.
In the NetSuite Help Center, see nlapiCreateSearch(type, filters, columns) for details.
nlapiLoadSearch(type, id) Loads an existing saved search. The saved search could have been created using the UI, or created using nlapiCreateSearch(type, filters, columns) in conjunction with nlobjSearch.saveSearch(title, scriptId).
Returns nlobjSearch.
In the NetSuite Help Center, see nlapiLoadSearch(type, id) for details.
API Note
ReleaseNotes2012.1.0_v16.pdf - Subject to Change
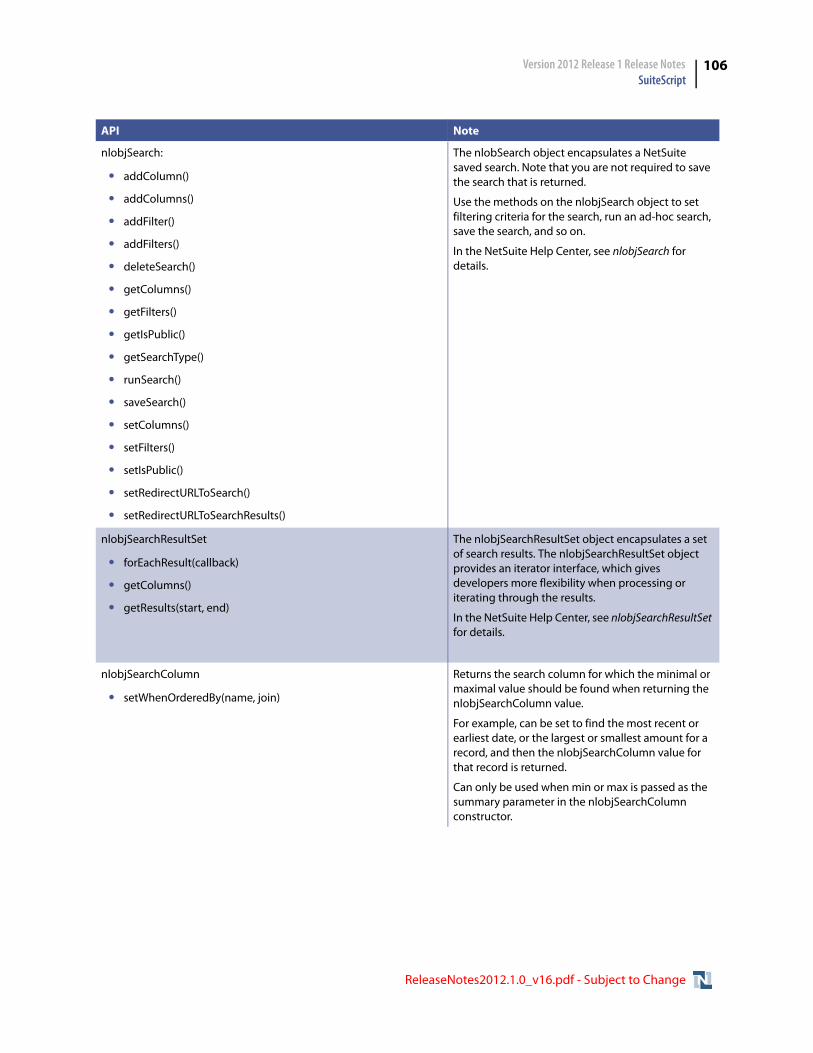
Version 2012 Release 1 Release Notes SuiteScript
106
nlobjSearch:
• addColumn()
• addColumns()
• addFilter()
• addFilters()
• deleteSearch()
• getColumns()
• getFilters()
• getIsPublic()
• getSearchType()
• runSearch()
• saveSearch()
• setColumns()
• setFilters()
• setIsPublic()
• setRedirectURLToSearch()
• setRedirectURLToSearchResults()
The nlobSearch object encapsulates a NetSuite saved search. Note that you are not required to save the search that is returned.
Use the methods on the nlobjSearch object to set filtering criteria for the search, run an ad-hoc search, save the search, and so on.
In the NetSuite Help Center, see nlobjSearch for details.
nlobjSearchResultSet
• forEachResult(callback)
• getColumns()
• getResults(start, end)
The nlobjSearchResultSet object encapsulates a set of search results. The nlobjSearchResultSet object provides an iterator interface, which gives developers more flexibility when processing or iterating through the results.
In the NetSuite Help Center, see nlobjSearchResultSet for details.
nlobjSearchColumn
• setWhenOrderedBy(name, join)
Returns the search column for which the minimal or maximal value should be found when returning the nlobjSearchColumn value.
For example, can be set to find the most recent or earliest date, or the largest or smallest amount for a record, and then the nlobjSearchColumn value for that record is returned.
Can only be used when min or max is passed as the summary parameter in the nlobjSearchColumn constructor.
API Note
ReleaseNotes2012.1.0_v16.pdf - Subject to Change
Version 2012 Release 1 Release Notes SuiteTalk (Web Services) Integration
107
SuiteTalk (Web Services) IntegrationRefer to the following sections for details on all SuiteTalk Web services updates for Version 2012 Release 1:
• Item Demand Plan Record Type Supported in SuiteTalk
• Change to replaceAll Behavior for Item Pricing Matrix
• Change to Country Values in Shipping and Billing Addresses
• New CyberSource Decision Manager Fields for Sales Order Records
• Additional Record Changes in 2012.1 Endpoint
• Change to Parent Matrix Item Delete
• 2012.1 WSDL Now Generally Available
• Araxis Merge Diff File for the 2012.1 Endpoint
• 2012.1 Schema Browser
Item Demand Plan Record Type Supported in SuiteTalkThe 2012.1 endpoint supports the Item Demand Plan record type. As of this endpoint, this record is available for inventory items when the Demand Planning feature is enabled, and for assembly/BOM items when both the Demand Planning and Work Orders features are enabled. Item demand plans can be added for items where the supplyReplenishMethod field is set to Time Phased.
An item demand plan transaction stores the quantity expected to be needed, during specified time periods, for an item. NetSuite supports three types of demand plans: monthly, weekly, and daily.
Each demand plan includes values for body fields used to uniquely identify the record, such as item, startDate, endDate, location (when Multi-Location Inventory is enabled), and subsidiary (for NetSuite OneWorld). A demandPlanCalendarType body field indicates the time period used in the demand plan: monthly, weekly, or daily.
Demand plan sublist data is represented by a PeriodDemandPlan matrix list. This data varies according to the demand plan type.
• For a monthly plan, each sublist instance represents a month and requires a startDate and a quantity.
• For a weekly plan, each sublist instance represents a week and requires a startDate and a quantity.
• For a daily plan, each sublist instance also represents a week, and requires a startDate, at least one quantity, and at least one dayOfTheWeek. Note that it can have up to 7 values for quantity and for dayOfTheWeek.
ReleaseNotes2012.1.0_v16.pdf - Subject to Change
Version 2012 Release 1 Release Notes SuiteTalk (Web Services) Integration
108
Details of the ItemDemandPlan schema will be available in the transactions demandplanning.xsd section of the 2012.1 Schema Browser.
Change to replaceAll Behavior for Item Pricing MatrixIn endpoints prior to 2012.1, updates to the Pricing Matrix List ignore the replaceAll attribute, and all requests behave as if replaceAll is set to TRUE. For the 2012.1 and later endpoints, replaceAll is respected. If you upgrade to one of these later endpoints, you need to carefully evaluate which replaceAll setting to use for pricing updates.
For details about how replaceAll works with matrix sublists, see the help topic Matrix Sublists and replaceAll.
Change to Country Values in Shipping and Billing AddressesIn the 2011.2 and earlier endpoints, country field values in shipping and billing addresses are abbreviated upon save and saved as country codes. As of the 2012.1 endpoint, country field values are not abbreviated and are saved with the full country name.
New CyberSource Decision Manager Fields for Sales Order RecordsThe 2012.1 endpoint includes two new Sales Order fields that are only available for Web services: shopperipaddress and saveonauthdecline. These fields are only to be used in conjunction with CyberSource Decision Manager for third party Web store orders made through Web services.
For more information, see CyberSource Payment Integration Enhancements in the Release Notes.
ReleaseNotes2012.1.0_v16.pdf - Subject to Change
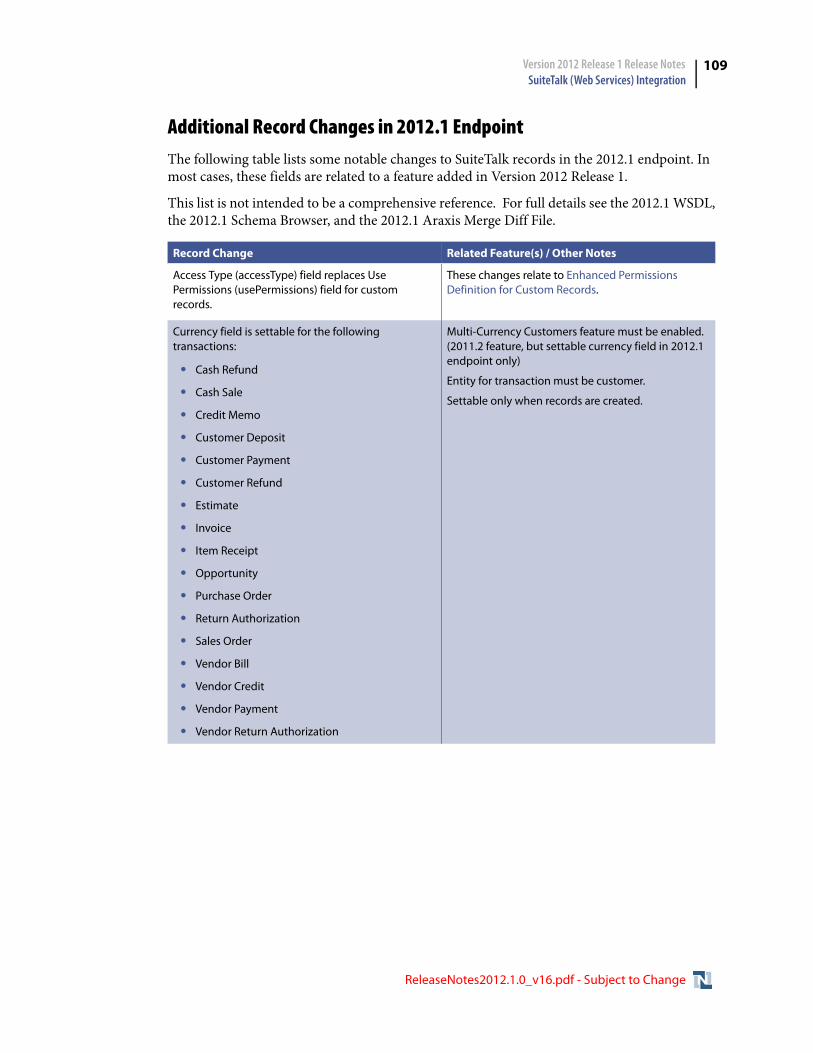
Version 2012 Release 1 Release Notes SuiteTalk (Web Services) Integration
109
Additional Record Changes in 2012.1 EndpointThe following table lists some notable changes to SuiteTalk records in the 2012.1 endpoint. In most cases, these fields are related to a feature added in Version 2012 Release 1.
This list is not intended to be a comprehensive reference. For full details see the 2012.1 WSDL, the 2012.1 Schema Browser, and the 2012.1 Araxis Merge Diff File.
Record Change Related Feature(s) / Other Notes
Access Type (accessType) field replaces Use Permissions (usePermissions) field for custom records.
These changes relate to Enhanced Permissions Definition for Custom Records.
Currency field is settable for the following transactions:
• Cash Refund
• Cash Sale
• Credit Memo
• Customer Deposit
• Customer Payment
• Customer Refund
• Estimate
• Invoice
• Item Receipt
• Opportunity
• Purchase Order
• Return Authorization
• Sales Order
• Vendor Bill
• Vendor Credit
• Vendor Payment
• Vendor Return Authorization
Multi-Currency Customers feature must be enabled. (2011.2 feature, but settable currency field in 2012.1 endpoint only)
Entity for transaction must be customer.
Settable only when records are created.
ReleaseNotes2012.1.0_v16.pdf - Subject to Change
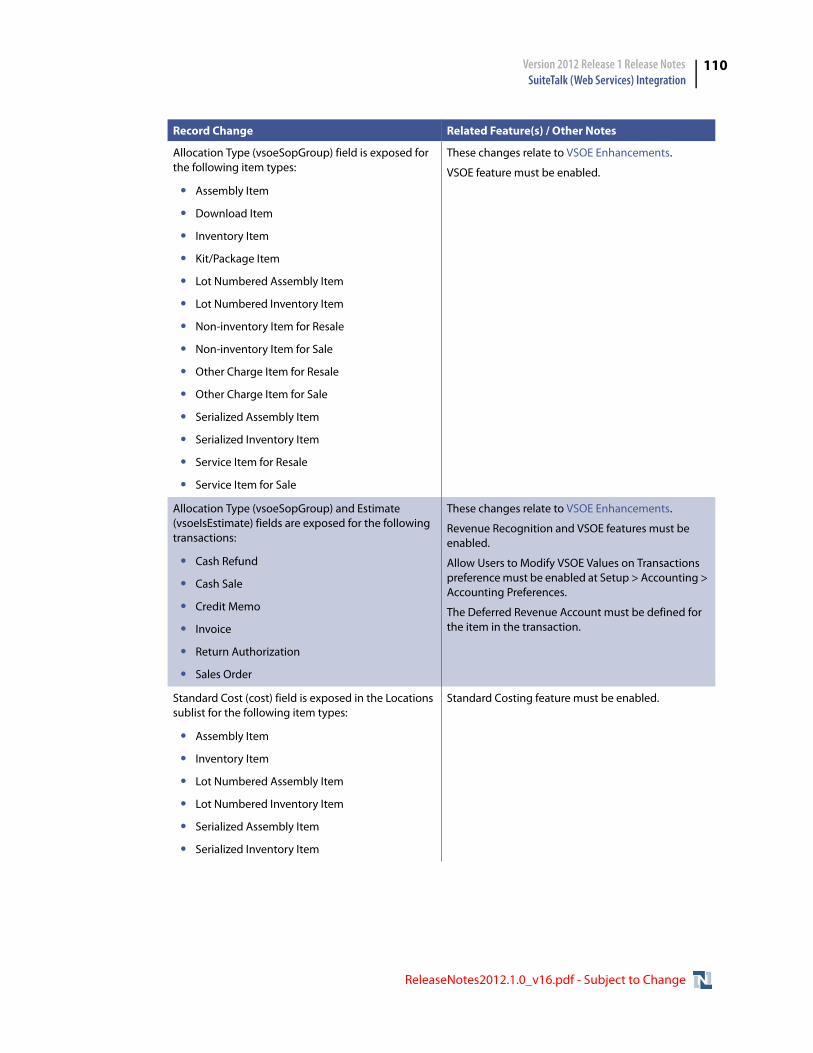
Version 2012 Release 1 Release Notes SuiteTalk (Web Services) Integration
110
Allocation Type (vsoeSopGroup) field is exposed for the following item types:
• Assembly Item
• Download Item
• Inventory Item
• Kit/Package Item
• Lot Numbered Assembly Item
• Lot Numbered Inventory Item
• Non-inventory Item for Resale
• Non-inventory Item for Sale
• Other Charge Item for Resale
• Other Charge Item for Sale
• Serialized Assembly Item
• Serialized Inventory Item
• Service Item for Resale
• Service Item for Sale
These changes relate to VSOE Enhancements.
VSOE feature must be enabled.
Allocation Type (vsoeSopGroup) and Estimate (vsoeIsEstimate) fields are exposed for the following transactions:
• Cash Refund
• Cash Sale
• Credit Memo
• Invoice
• Return Authorization
• Sales Order
These changes relate to VSOE Enhancements.
Revenue Recognition and VSOE features must be enabled.
Allow Users to Modify VSOE Values on Transactions preference must be enabled at Setup > Accounting > Accounting Preferences.
The Deferred Revenue Account must be defined for the item in the transaction.
Standard Cost (cost) field is exposed in the Locations sublist for the following item types:
• Assembly Item
• Inventory Item
• Lot Numbered Assembly Item
• Lot Numbered Inventory Item
• Serialized Assembly Item
• Serialized Inventory Item
Standard Costing feature must be enabled.
Record Change Related Feature(s) / Other Notes
ReleaseNotes2012.1.0_v16.pdf - Subject to Change
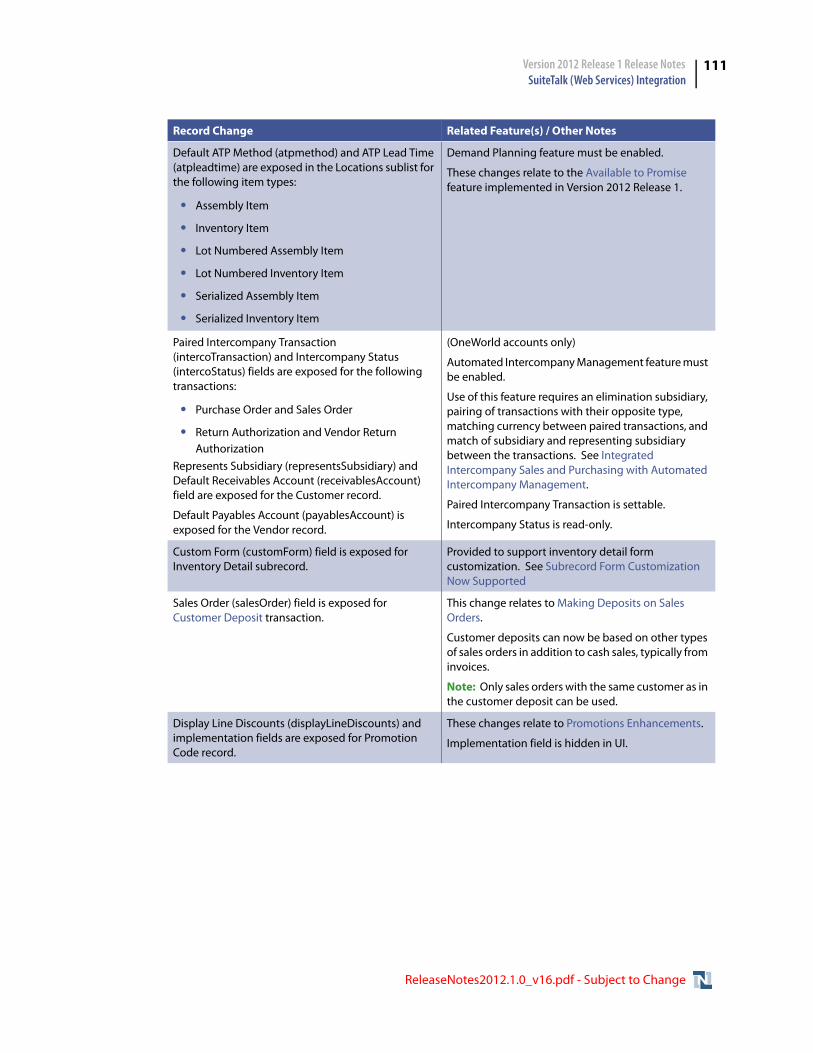
Version 2012 Release 1 Release Notes SuiteTalk (Web Services) Integration
111
Default ATP Method (atpmethod) and ATP Lead Time (atpleadtime) are exposed in the Locations sublist for the following item types:
• Assembly Item
• Inventory Item
• Lot Numbered Assembly Item
• Lot Numbered Inventory Item
• Serialized Assembly Item
• Serialized Inventory Item
Demand Planning feature must be enabled.
These changes relate to the Available to Promise feature implemented in Version 2012 Release 1.
Paired Intercompany Transaction (intercoTransaction) and Intercompany Status (intercoStatus) fields are exposed for the following transactions:
• Purchase Order and Sales Order
• Return Authorization and Vendor Return Authorization
Represents Subsidiary (representsSubsidiary) and Default Receivables Account (receivablesAccount) field are exposed for the Customer record.
Default Payables Account (payablesAccount) is exposed for the Vendor record.
(OneWorld accounts only)
Automated Intercompany Management feature must be enabled.
Use of this feature requires an elimination subsidiary, pairing of transactions with their opposite type, matching currency between paired transactions, and match of subsidiary and representing subsidiary between the transactions. See Integrated Intercompany Sales and Purchasing with Automated Intercompany Management.
Paired Intercompany Transaction is settable.
Intercompany Status is read-only.
Custom Form (customForm) field is exposed for Inventory Detail subrecord.
Provided to support inventory detail form customization. See Subrecord Form Customization Now Supported
Sales Order (salesOrder) field is exposed for Customer Deposit transaction.
This change relates to Making Deposits on Sales Orders.
Customer deposits can now be based on other types of sales orders in addition to cash sales, typically from invoices.
Note: Only sales orders with the same customer as in the customer deposit can be used.
Display Line Discounts (displayLineDiscounts) and implementation fields are exposed for Promotion Code record.
These changes relate to Promotions Enhancements.
Implementation field is hidden in UI.
Record Change Related Feature(s) / Other Notes
ReleaseNotes2012.1.0_v16.pdf - Subject to Change
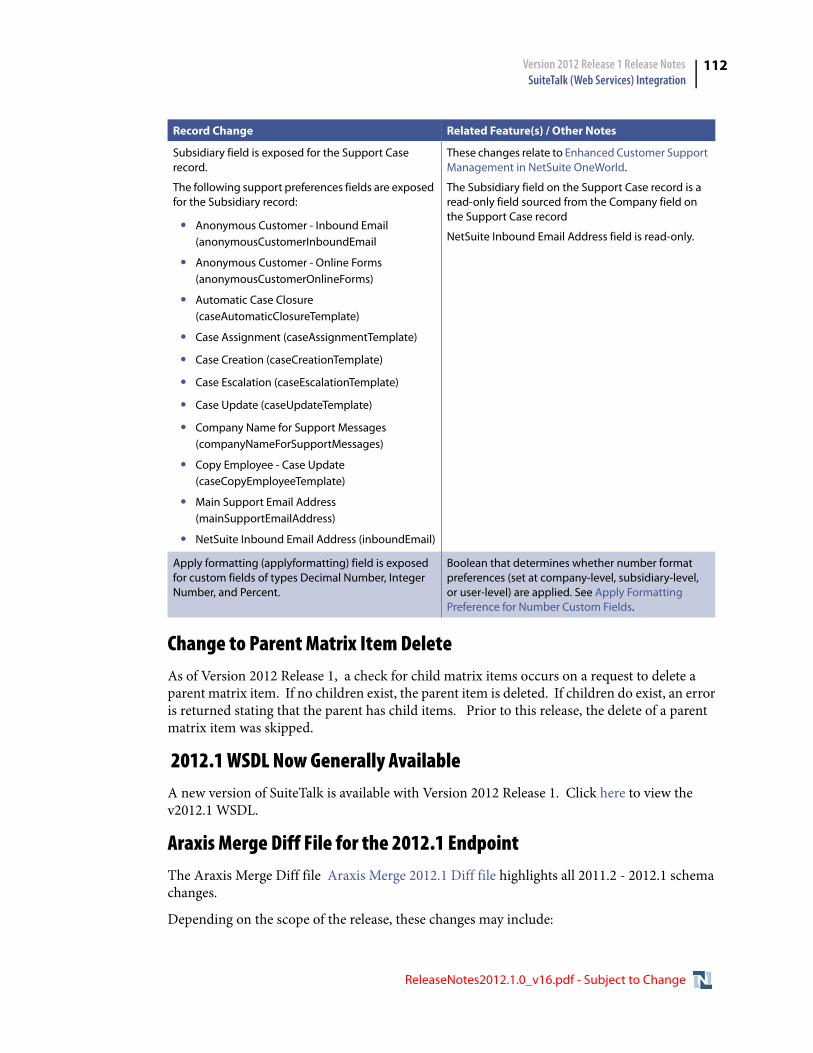
Version 2012 Release 1 Release Notes SuiteTalk (Web Services) Integration
112
Change to Parent Matrix Item DeleteAs of Version 2012 Release 1, a check for child matrix items occurs on a request to delete a parent matrix item. If no children exist, the parent item is deleted. If children do exist, an error is returned stating that the parent has child items. Prior to this release, the delete of a parent matrix item was skipped.
2012.1 WSDL Now Generally AvailableA new version of SuiteTalk is available with Version 2012 Release 1. Click here to view the v2012.1 WSDL.
Araxis Merge Diff File for the 2012.1 EndpointThe Araxis Merge Diff file Araxis Merge 2012.1 Diff file highlights all 2011.2 - 2012.1 schema changes.
Depending on the scope of the release, these changes may include:
Subsidiary field is exposed for the Support Case record.
The following support preferences fields are exposed for the Subsidiary record:
• Anonymous Customer - Inbound Email (anonymousCustomerInboundEmail
• Anonymous Customer - Online Forms (anonymousCustomerOnlineForms)
• Automatic Case Closure (caseAutomaticClosureTemplate)
• Case Assignment (caseAssignmentTemplate)
• Case Creation (caseCreationTemplate)
• Case Escalation (caseEscalationTemplate)
• Case Update (caseUpdateTemplate)
• Company Name for Support Messages (companyNameForSupportMessages)
• Copy Employee - Case Update (caseCopyEmployeeTemplate)
• Main Support Email Address (mainSupportEmailAddress)
• NetSuite Inbound Email Address (inboundEmail)
These changes relate to Enhanced Customer Support Management in NetSuite OneWorld.
The Subsidiary field on the Support Case record is a read-only field sourced from the Company field on the Support Case record
NetSuite Inbound Email Address field is read-only.
Apply formatting (applyformatting) field is exposed for custom fields of types Decimal Number, Integer Number, and Percent.
Boolean that determines whether number format preferences (set at company-level, subsidiary-level, or user-level) are applied. See Apply Formatting Preference for Number Custom Fields.
Record Change Related Feature(s) / Other Notes
ReleaseNotes2012.1.0_v16.pdf - Subject to Change
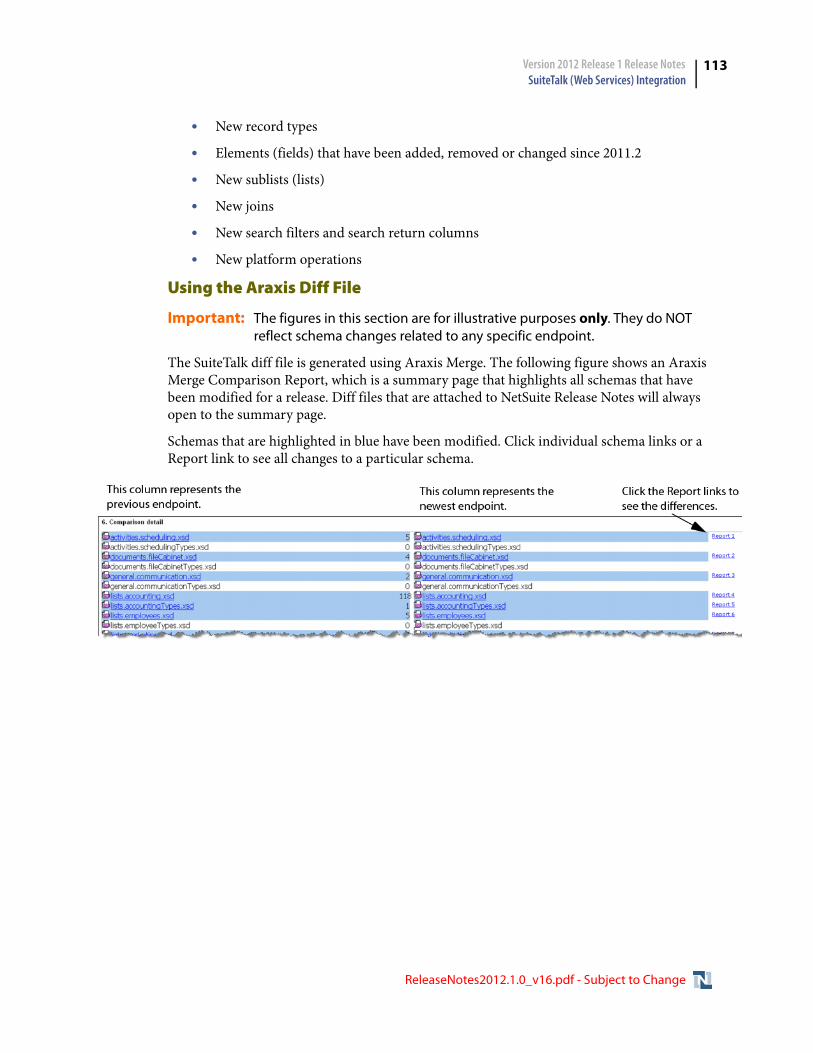
Version 2012 Release 1 Release Notes SuiteTalk (Web Services) Integration
113
• New record types
• Elements (fields) that have been added, removed or changed since 2011.2
• New sublists (lists)
• New joins
• New search filters and search return columns
• New platform operations
Using the Araxis Diff File
Important: The figures in this section are for illustrative purposes only. They do NOT reflect schema changes related to any specific endpoint.
The SuiteTalk diff file is generated using Araxis Merge. The following figure shows an Araxis Merge Comparison Report, which is a summary page that highlights all schemas that have been modified for a release. Diff files that are attached to NetSuite Release Notes will always open to the summary page.
Schemas that are highlighted in blue have been modified. Click individual schema links or a Report link to see all changes to a particular schema.
ReleaseNotes2012.1.0_v16.pdf - Subject to Change
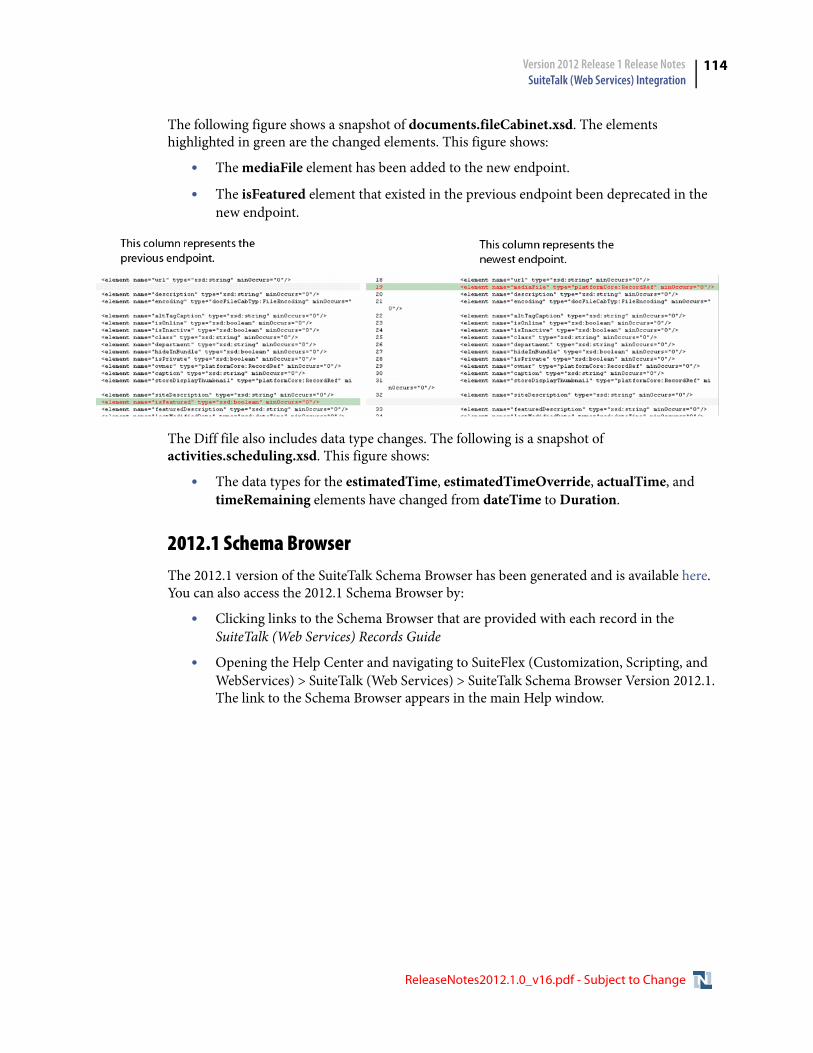
Version 2012 Release 1 Release Notes SuiteTalk (Web Services) Integration
114
The following figure shows a snapshot of documents.fileCabinet.xsd. The elements highlighted in green are the changed elements. This figure shows:
• The mediaFile element has been added to the new endpoint.
• The isFeatured element that existed in the previous endpoint been deprecated in the new endpoint.
The Diff file also includes data type changes. The following is a snapshot of activities.scheduling.xsd. This figure shows:
• The data types for the estimatedTime, estimatedTimeOverride, actualTime, and timeRemaining elements have changed from dateTime to Duration.
2012.1 Schema BrowserThe 2012.1 version of the SuiteTalk Schema Browser has been generated and is available here. You can also access the 2012.1 Schema Browser by:
• Clicking links to the Schema Browser that are provided with each record in the SuiteTalk (Web Services) Records Guide
• Opening the Help Center and navigating to SuiteFlex (Customization, Scripting, and WebServices) > SuiteTalk (Web Services) > SuiteTalk Schema Browser Version 2012.1. The link to the Schema Browser appears in the main Help window.
ReleaseNotes2012.1.0_v16.pdf - Subject to Change