Embed Size (px)
Citation preview

gg
Transmission incept…………
Greetings Scum, and may the light of Holy Logic banish the darkness of your bestial desires. You will address me as Most Reverend Technomagos Galateo. I am your new patron, advisor and Master.
In its fathomless wisdom, the Adeptus Mechanicus has foreseen the potential for True Discovery in the lower depths of this Hive. A certain artifact has come into our hands, the existence of which had long been vouchsafed as a Theoretical Certainty and which has been traced to an unsanctioned trader from Necromunda. In consequence, I have been sent to perform a Search General of each of the Necromundan Hives. You are among my tools in this search; rejoice!
Deep-structure auguries have indicated the presence of dormant technology of anomalous signature not 6000m from where you now sit drinking. (And yes, I can observe your iniquities at any time.) 6000m vertical displacement, that is, far into those sub-levels you call the ‘Bad Zones’. Outlawed Hive Scum like yourselves are the most appropriate instruments for more detailed investigation.
Response to query…………..
Credits? Ah, you require reward! Firstly, entering my service will ensure you far richer pickings than you could ever locate unaided. Secondly, perform this function effectively and I have the authority to remove you from this planet. You may take my word for it; there are better places to be. So arm yourselves and follow the tracking signal. A staff briefing file will be downloaded en route.
Transmission terminus.
Introduction
‘Bad Zones’ is a game supplement which combines the basic gaming systems from ‘Warhammer Quest’, the background and miniatures from ‘Necromunda’ and the card floorplans from ‘Space Hulk’. Players take the role of motley Hive scum - lone adventurers living beyond the pale of normal Hiver society. In the game, two or three of these mercenaries join forces in order to explore, loot and collect bounty from
1

the nightmare territories of the Hive bottom, the best of them carving out a career and a reputation among the outlaw strongholds which lie scattered across the area.
The usual fate of any so reckless is to disappear without a trace in the Badlands; unlamented victims of scavvies, plague zombies, sump rats or worse. But stories persist of scum who have found the motherlode, made their stash and bought their way Uphive - even Offworld.
Such are the pathetic dreams of our heroes.
Game play
The tract of ancient and dilapidated Hive structure to be explored by the adventurers is generated by using a card deck - the Emperor’s Tarot – which is used just as the Dungeon Deck in WHQ. Cards are numbered 1-16 and each number relates to a particular board section given in the list for that adventure. Closed doors are placed at each exit from newly placed board sections.
Play follows the strict sequence given in WHQ as the adventurers progress through the darkness, making discoveries and fighting off the inevitable enemies. At the start of each turn players make an Event Roll. An Event occurs if the result is a 1 and no enemies are currently on the board. An Event also occurs each time a new room is entered. In either case Events are described by drawing a card from the Fate Deck (also numbered 1-16) and reading from the Events list for the adventure.
The adventurers and their enemies have profiles very similar to those in WHQ and the combat system is virtually identical, if with more ranged attacks.
So far, so like WHQ but there are some differences to note:
• The confines of the ‘Space Hulk’ board sections are awkward when moving more
than three characters so limit party size to three. • Place enemies with ranged weapons of any sort under the rules for ‘ranged
weapon monsters’ in WHQ. As all adventurers will also have ranged weapons it will often be up to them whether to go for a shoot out or move in for close combat.
• In close combat fighters are frequently using pistols rather than bladed weapons
etc. Instead of a ‘Deathblow’ which tracks the sweep of a blade from one opponent to the next, pistol armed adventurers can go ‘Kill Crazy’ and may make a follow up attack against any target adjacent to themselves.
• Some specialised close combat weapons e.g. chainswords are as effective as
pistols in hand to hand fighting but, generally, the knives and mauls assumed to be carried by all adventurers are strictly for emergencies. These sorts of weapon inflict only D6+1 damage (Note, however, that enemy models always attack with the strength value given on their profile whether in hand to hand or at range – the more detailed characteristics of weaponry are for adventurers only.)
• There is no treasure card deck and warriors do not get immediate credits simply
by slaughtering their enemies. In the Underhive the Guilders have long underwritten a system of bounties paid for the killing of prescribed creatures and
2

dangerous individuals. Even in the stinking Outlaw trading posts this venerable piece of Hivelaw is usually honoured. Each character carries a genesampler to enumerate his kills; the bounty payable on each kind of enemy is included on their profile. Recorded kills can be exchanged for credits in settlements.
• As well as sampling defeated enemies, characters can search their bodies for
anything valuable. Roll on the relevant table. • Healing of wounds is usually done through the use of Stimms; a unique part of
the Necromunda background – see the Trading section for details. • In keeping with the scavenger mentality of this game, players can search and strip
the bodies of fallen comrades as well as enemies after they have been killed in combat. No roll on the table is needed to do this, just add any of the dead character’s equipment to your own pack. (Only items normally traded out of an Underhive settlement may be taken. Anything else is too specialised for other characters to use.) Naturally, players will need to choose their friends carefully in the light of this rule change. The Underhive is no place for misplaced trust.
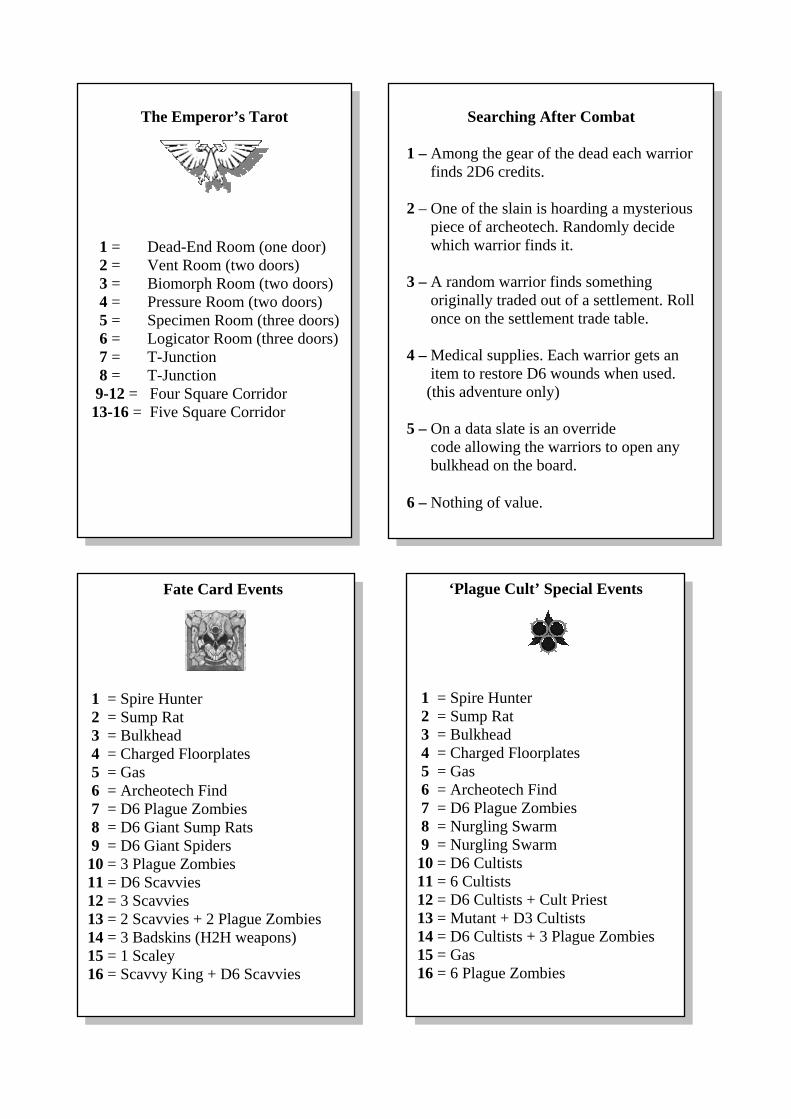
The Emperor’s Tarot 1 = Dead-End Room (one door) 2 = Vent Room (two doors) 3 = Biomorph Room (two doors) 4 = Pressure Room (two doors) 5 = Specimen Room (three doors) 6 = Logicator Room (three doors) 7 = T-Junction 8 = T-Junction 9-12 = Four Square Corridor 13-16 = Five Square Corridor
1. Spire Hunter – The party is being trackeddecadent few who inhabit the Hive Spire anddangerous environs of the Underhive. Spyrerstheir mark. Place the hunter on the first squar
3
Fate Card Events
1 = Spire Hunter 2 = Sump Rat 3 = Bulkhead 4 = Charged Floorplates 5 = Gas 6 = Archeotech Find 7 = D6 Plague Zombies 8 = D6 Giant Sump Rats 9 = D6 Giant Spiders 10 = 3 Plague Zombies 11 = D6 Scavvies 12 = 3 Scavvies 13 = 2 Scavvies + 2 Plague Zombies 14 = 3 Badskins (H2H weapons) 15 = 1 Scaley 16 = Scavvy King + D6 Scavvies
by a Spyrer; one of the ultra-rich and hunt human prey in the entertainingly are superbly equipped and rarely miss e of the tunnel complex. At the start of

each turn from now on he will move and attempt to gun down one of the party as a trophy. Move the Spyrer D6 squares by the shortest route towards his prey and stop as soon as he has line of fire. The Spyrer uses a seeker round which hits on a 2+ and causes D6 wounds with no modifiers. The hunter has toughness 3 and 6 wounds. He will immediately teleport out of danger if attacked in hand to hand combat or at the end of a warrior phase in which he took damage. Reshuffle his card back into the Event Deck. If the warriors manage to gun down the Spyrer they loot the body, finding 2D6 rounds of seeker ammunition suitable for any projectile weapon plus his teleport homer. The homer may be used by its new owner to exit one adventure at any time. After that it may be sold in a settlement as archeotech. Note that the Spire Hunter does not count as an ‘enemy on the board’ for event roll purposes. 2. Sump Rat – The warriors encounter a small, deformed rodent that inexplicably takes a liking for a random member of the party, scuttling inside their clothes. The warrior can try to grab and kill the creature, in which case it manages to do him D6 unmodified wounds before it dies, or he can accept the loyalty of his new pet. The rat must be given a name and will thereafter join in its master’s hand to hand combats, adding +1 to strength when resolving the effect of hits. However, a rat must be fed. In each settlement the warrior must spend 2D6 credits on gorging the rat before any other business. An unfed rat will bite the hand that fails to feed it; deducting 1 wound from the warrior’s profile permanently, and will try to befriend another member of the party. If refused by all, the creature dies of a broken heart. There can only be one Sump Rat in each party. If another arrives they will fight to the death. Roll a D6: 1-2 both rats die 3-4 the resident rat survives 5-6 new rat on the block.
3. Bulkhead – One of the party has triggered an ancient security device which brings a bulkhead door slamming into position behind them. Place the bulkhead as near to the entrance as possible so as to cut off any exit by that route. 4. Charged Floorplates – Decayed power conduits may have caused parts of the most recently entered board section to become live. When moving to a new square in this section roll a D6. 1-4 = no effect, 5-6 = an electric shock causing 1 unmodified wound. This area remains hazardous for the rest of the game. 5. Gas – A random warrior has accidentally broken a corroded gas line, filling his section with greenish vapour. Each warrior takes an initiative test; if passed they hold their breath until the gas clears, if failed they inhale and suffer D6 unmodified wounds. 6. Archeotech Find – A random warrior spots a complicated looking piece of gadgetry that can easily be removed. The warrior can attempt to sell the piece to an illegal trader in the next settlement he visits. When selling roll a D6: 1 = ‘a paperweight’ 2 credits
2-3 = ‘oh, another one’ 2D6 credits 4-5 = ‘nice quality work’ 25 credits 6 = ‘eureka!’ 100 credits
4

Enemy Profiles
Name W M WS BS S T I A Cr. Arm. Dam. Scavvy 3 4 3 5+ 3 3 4 1 5 0 1D6 Special Rules None
Name W M WS BS S T I A Cr. Arm. Dam. Scavvy King 9 4 4 4+ 4 3\4 5 2 50 1 1D6 Special Rules Scavvy Bodyguard – always placed with a number of guards. Place the King as for ranged combat but place D6 guards in close combat.
Name W M WS BS S T I A Cr. Arm. Dam. Scaley 13 6 3 2+ 4 5 3 2 35 0 1\2D6 Special Rules Scaley Weapon – a huge Scrapcannon which can hardly miss at short range (2+ to hit). Scaley Strength – 2D6 damage if he hits with a 5+ in close combat. Bestial – no point looting the body; no possessions worth having.
Name W M WS BS S T I A Cr. Arm. Dam. Plague Zombie 5 3 2 0 3 3 1 1 2 0 1D6 Special Rules Fear – warriors must roll equal to or under their WP or suffer a –1 to hit penalty (ranged or hand-to-hand) against Zombies this turn and must test again at the start of the next turn. Once a fear test is passed, no further tests are taken during this combat. Bestial – no point looting the bodies; you wouldn’t want what Zombies have got in their pockets.
Name W M WS BS S T I A Cr. Arm. Dam. Badskin 3 4 3 5+ 3 3 4 1 10 0 1D6 Special Rules Ambush – though degraded through addiction to Wildsnake and Hiver drugs, these renegade Ratskins still retain their native stealth and tracking skills, attacking as soon as they are placed.
5

Name W M WS BS S T I A Cr. Arm. Dam. Sump Rat 1 6 2 0 2 3 4 1 0 0 Special Special Rules Deathleap – 2D6+2 for damage but immediately killed on a warrior roll of 3+. Bestial – no point looting the body.
Name W M WS BS S T I A Cr. Arm. Dam. Giant Spider 1 6 2 0 - 2 - 1 0 0 1 Special Rules Web Attack – victims automatically webbed if attack hits. Attacks on already webbed victims automatically hit and cause 1 unmodified wound. Warriors break free at the start of their turn if D6+Strength = 7+. Bestial – no point looting the body.
6

Searching After Combat
With their enemies dead the adventurers can search their bodies. A single D6 roll is made to represent the efforts of the whole party.
Searching After Combat
1 – Among the gear of the dead each warrior finds 2D6 credits. 2 – One of the slain is hoarding a mysterious piece of archeotech. Randomly decide which warrior finds it. 3 – A random warrior finds something originally traded out of a settlement. Roll once on the settlement trade table. 4 – Medical supplies. Each warrior gets an item to restore D6 wounds when used. (this adventure only) 5 – On a data slate is an override code allowing the warriors to open any bulkhead on the board. 6 – Nothing of value.
Post Adventure Checks
After leaving the tunnels the adventurers check their weapons, armour and other equipment.
Ammo Clips – Roll for each projectile weapon. On a roll of 1-2 that weapon
has run out of ammunition and fresh clips must be bought in a settlement before it can be used again.
Power Packs – Roll for each energy weapon. On a roll of 1 that weapon's
pack is discharged for good and must be replaced. Body Armour – Military quality armour is a rarity in the Underhive and what
little may be available in an Outlaw trading post has often had several (deceased) owners. Other armour is sometimes improvised by native craftsmen. In either case a warrior’s body armour has a limited life and becomes useless on a roll of 1.
7
Entering a Settlement
Rules for trading in an Outlaw settlement are given below but simply getting inside one of these fortified encampments can be a hazardous and expensive business. The party must roll a D6 each time they want to enter a settlement: 1 – ‘We don’t like his face’ The heavies on the gate take a personal dislike to one of your warriors (random choice) and will not allow him access. The party’s trading transactions will be reduced accordingly and no bounty can be claimed on that warrior’s kills in this settlement. 2 – ‘Hey, I like the look of that’ The well-armed gate guards surround your party in the entryway and demand a ‘gift’ for having let you in. The warriors can offer an item of archeotech or a rare trade item as a bribe, rolling a D6 at the same time. On a score of 2-6 they can pass, on a 1 they must give up something else and roll again. If the party cannot produce these items then they cannot enter this settlement. 3 – ‘New rates apply’ Seeing how few of you there are, the Boss of this particular rat’s nest decides to half the normal rate of bounty payable on your kills. 4-6 – ‘No problem’ The warriors pass with no more than a surly glance.
Once inside a settlement the warriors can cash in the bounty they are owed and trade. They can also choose to gamble in any of the countless Underhive gaming dens. The house game is usually ‘Split Lip’, a dice wager so simple that it can be played even when drunk on Wildsnake.
The player puts up his stake then rolls 2D6. On 6 or below he recovers his stake plus half again. On 7 or above he loses.
These places never close so warriors can gamble whenever and as often as they like.
Trading
A party can make one trading transaction for each warrior they have inside a settlement. Each transaction can be either a common trade or a rare trade.
A common trade transaction is for any number of the items on the common trade list – the obvious gear and supplies offered for sale in any Underhive settlement. Simply choose one or more of the starred items and part with the total price.
Trading for rare items is a much less certain process. The warrior may be putting himself in the hands of conmen or the item he really wants may be impossible to find in that particular settlement. To engage in rare trade, roll a D20. The result is the only item offered to the warrior. In some cases this may be a common item anyway or may be something he can’t use. He is under no obligation to buy the item but he has used up his trading chance in that settlement.
8

Trading Table
D20 Item (* = Common) Credits - Stimms free 1* Ammo Clip 30 2* Power Pack 30 3* D3 Frag Grenades 35 each 4* D3 Photon Grenades 35 each 5* D3 Smoke Grenades 35 each 6* Body Armour 45 7 Hot Shot Pack 50 8 Red Dot Gunsight 50 9 Rapid Fire Modification 45 10 Bio-Booster 45 11 Blindsnake Pouch 30 12 Filter Plugs 30 13 Grapnel 45 14 Photo-Contacts 30 15 Skull Chip 50 16 Ratskin Map 40 17 Bottle of Wildsnake 30 18 Stinger Mould 35 19 Icrotic Slime 60 20 ‘Slaught 45
Stimms – Stimms are ubiquitous in Hiver society. They get billions of workers through fourteen-hour shifts, minimise the effects of minor injuries for greater productivity and help the weary get the most from precious recreational time. There are dispensers in every factory washroom and a bowlfull on every bar, including those in the deepest Underhive.
Adventurers are assumed to have a supply from the outset of their first adventure and can automatically pick up more in any settlement they enter. In combat Stimms can help to keep a man on his feet but are far from reliable. If your adventurer has lost wounds then taking Stimms can restore them, but for each wound restored roll a D8. On a roll of ‘1’ the current supply is exhausted or has ceased to have any further effect on the physiology of the adventurers. Stimms can be carried over from game to game so long as they have not been used up and can be used at any point during the turn, rolling for each wound as it is restored. Ammo Clips – Check after each adventure. On a 1-2 the current clip has run out. Power Packs – As for ammo clips but only discharge on a 1. Frag Grenades – Only D3 frag grenades are available in each settlement and are carried by the party leader. Before he moves into a room for the first time he can toss
9

one of these ahead of him, blasting anything inside. If the room Event produces enemy models then each has already lost D3 wounds (one roll for all). Photon Flash Grenades – As for frag grenades but in this case any enemy models placed are not physically harmed but are too dazzled to attack during their first turn. Smoke Grenades – Carried by the leader who can throw one down in his own section at the start of any warrior phase. No warrior is now pinned within the section and may move from combat freely. During the subsequent monster phase no enemy model may move within the section although they will attack if adjacent to a warrior. The smoke clears at the start of the next warrior phase. Body Armour – Increases the wearer’s toughness by +1. Test after each adventure, having been damaged on a 1. Hot Shot Laser Pack – Increases the strength of shots with a laser weapon by +1. (Will eventually discharge just like any other power pack.) Red Dot Gunsight – Cannot be used with pistol weapons. Roll to hit for a weapon fitted with this sight is reduced by –1. Rapid Fire Modification – Cannot be used with pistol weapons. The settlement gunsmith adapts your weapon to pump out a high-speed burst of shells/energy blasts. Roll two dice each time it is fired at a ranged target and choose the highest to hit. If either dice turns up a 1 then the burst has been noisy but inaccurate and misses the target. Bio-Booster – A chemical cocktail built into a bonded skin dispenser, the bio-booster kicks in if the wearer is badly injured. As soon as a warrior’s wounds reach zero roll a D6: 6 = restored to full wounds, 2-5 = restored to D6 wounds, 1 = immediate death from metabolic shock. Once fitted, the device cannot be removed until it has discharged its load. Blindsnake Pouch – This mysterious Ratskin fetish gives the wearer something of the wariness of the Blindsnake as well as its speed in avoiding danger. If hit by enemy shooting, the wearer can dodge the shot on a D6 roll of 6. Filter Plugs – Useful in the polluted environments of the Underhive but far from complete protection. If the warrior is effected by gas of any sort, the effect is negated on a D6 roll of 4+. Grapnel – A micro-magnetic grapnel and powered winch, small enough to be worn against the wrist but powerful enough to pull the warrior clear of danger. Grapnels can also be used to swing across otherwise impassible or hazardous areas. Using a grapnel, the warrior may pass over up to three unoccupied squares. Photo-Contacts – Protect from drastic changes in light levels. On a D6 roll of 2+ the warrior is uneffected by photon flash explosions, enabling him to use a grenade of this type in his own section e.g. during close combat.
10

Skull Chip - This stud-like implant produces a permanent enhancement to a warrior’s reaction time and combat alertness. Dice throws to escape pinning and any initiative tests may be rerolled. Ratskin Map – If a warrior buys the map roll a D6: 1-3 the map is a convincing fake, 4-6 the map really does describe a previously undiscovered area of the Hive Bottom. On the warrior’s next adventure generate the whole board layout in advance. Bottle of Wildsnake – Any warrior offered this rare vintage must buy it and share it with his companions. During any single, subsequent adventure the entire party is immune to the effects of Fear. Stinger Mould – When formed into a compress the mould has remarkable curative properties on open wounds. One use, restores one wound per turn for the next D6+2 turns. Can only be applied above zero wounds. Icrotic Slime - An insanely dangerous narcotic, symbiotic colony creature in the form of an algae, almost certainly of alien origin. The colony taints stagnant water and enters its host through drinking. Once inside it boosts the host’s physical powers and sense of wellbeing just long enough to complete its life cycle and multiply, feeding on the brain of the host as it does so.
Unscrupulous traders gather and sell the slime together with an antidote ‘guaranteed’ to wipe out the colony just in time to save the user. Mostly it is traded Uphive as a recreational drug and is often used by Spyrers.
The slime can be injected into a warrior’s neck at any time and from that moment on is at +3 to all characteristics – a virtual superman. At the end of the adventure the warrior dies unless the antidote is administered. Roll a D6: on a 1 the warrior dies anyway.
Note that the psychological effects of Icrotic Slime mean that an effected warrior will never administer the antidote to himself, his friends must do this for him. ‘Slaught – or ‘Onslaught’ is a combat drug sometimes used in the Imperial Guard (although many commanders consider the consequent discipline and morale problems too severe to countenance). The drug is produced in industrial quantities and hence it has become endemic in the gang cultures of virtually all Imperial Hiveworlds. A warrior can ‘get slaughtered’ at any point in an adventure, instantly increasing both WS and I by D3 points depending on the quality of his supply (one roll covers both characteristics). After any adventure in which the drug has been used roll 2D6: On a 4+ all is well but on a 2-3 the warrior has become addicted. A ‘Slaught addict gets no benefit from the drug but needs it just to maintain normal levels of operation. If he begins any adventure without his fix he will be at –D3 to WS and I. A warrior who buys ‘Slaught from a settlement fixer has made a contact he can call upon whenever he visits a settlement from now on (in addition to any other trading). Roll a D6: On a 2-6 he finds a supplier and can obtain the drug at the standard price.
11

Experience and Skills As warriors gain more experience in these weird and deadly surroundings they begin to master their trade and gain a reputation among the various Outlaw settlements. To reflect this each warrior may roll a D6 after each adventure successfully completed. On a 4+ he may roll again:
1 – ‘Don’t Mess with Me!’ The warrior may add + or –1 to the settlement entry roll of any party of which he is a member. 2 – ‘Luck of the Hive’ The warrior seems to have gained the favour of the ancient Hive Spirits. He may reroll any single dice once per adventure. 3 – ‘Scar Tissue’ The warrior’s physique is getting used to the punishment it takes. Add +1 to Toughness. 4 – ‘Looter’ The warrior is expert at finding anything of value on the bodies of his enemies. He may add + or –1 to the party’s ‘Searching after Combat’ roll. 5 – ‘Up Close and Personal’ The warrior has developed a taste for hand to hand fighting. Add +1 to Strength. 6 – ‘That’ll do Nicely, Sir’ The warrior is regarded as what passes for an old and valued customer in the trading holes of the Underhive. He may add + or –1 to his Rare Trade rolls.
If a warrior rolls a skill he already has then he rerolls until he finds one he does not yet possess.
In addition to skills a warrior also becomes generally harder to kill as he gains
in experience. For each successfully completed adventure a warrior may add one wound to his profile, up to the maximum for his warrior type.
12

++DataFile Download++ Technomagos Galateo Staff Com.233/6a The Hive sector under investigation consists of intact structures / archeolevel 5. Probability of recoverable technology 79%. Collect sample artefacts and contact AdMech. operative in location ‘Lost Hope’ (local designation). WARNING: Probability of renegade / sub-humanoid hostiles at 95%. ++ CrossRef file Necromunda/HivePrimus/Scavvies/++
Adventures and Adventurers
The tables given in the main rules for generating the board layout and events are just examples from the extensive variety possible in a game of Bad Zones. In this case the tables relate to the adventure included in this book, ‘Technomagos’. Other adventures might require different tables or use existing ones in a slightly different way. It really is up to players to take the game where they want it to go within the sprawling Necromunda background. A degree of ‘gamesmastering’ is entirely appropriate here as characters and scenarios develop a life of their own. Players will, at the very least, need to come up with profiles for new characters and enemies. A clear background story as part of the game design also adds greatly to the enjoyment and is useful in linking adventures together into a genuine Underhive saga. The odd handout, map or brief communiqué (as with the Bad Zones title page) really helps to make the imaginary world of the game come to life.
Design and detail of the characters they wish to play is also up to players. To a great extent this should be suggested by the miniatures they intend to use; almost any Necromunda figure can be adapted as a Bad Zones adventurer and players will notice that the game has been designed so that models need not be altered in any way, even as they become more developed and successful characters, so the possession of particular weapons and equipment can be built into their profile from the start. The baseline statistics for a typical human is as follows:
W M WS BS S T I A Wp Pin Luck D6+7 4 3 5+ 3 3 3 1 3 5+ 0
This profile can be altered to fit the appearance and abilities of the character players wish to create for themselves together with a modest special rule or two to illuminate any unique aspects of their warrior. Weapons and armour also need description and these too have a standard range of values. Any piece of equipment that can be bought in an Underhive trading post is fully described in the relevant section of the rules. Other weapons are described below:
13

Knife, Sword, Club etc. – D6+1 damage. Chainsword – D6+(strength of user) damage. Power Weapon – 2D6+(strength of user) damage. Hand Flamer – D6+3 damage (close combat only), Sets on fire.
On fire : any target that takes a wound from a hand flamer is also set on fire. A character that is on fire suffers an additional, automatic wound at the start of his turn until the end of the current combat. Flamer reloads are tested and available as for projectile weapons.
Firearm (autogun/pistol, lasgun/pistol) – D6+3 damage.
Note that pistol weapons can be used in both ranged firing (use BS) and close combat (use WS) with equal effect. Gun weapons can only be used to make ranged attacks (although guns can be upgraded to make them more deadly than pistols in this role).
Boltgun/pistol – D6+3 damage, Ignores 1 point of armour. Plasma gun/pistol – 2D6+3 damage, Must recharge, Overheats.
Recharge : during combat, roll a D6 at the start of the character’s turn. On the first turn of combat the weapon charges up on a 5+, on the second turn on 4+ etc. Once charged the weapon remains effective for the whole of that combat. Overheats : on a recharge roll of 1 the unstable weapon causes an automatic wound to its owner and the recharge sequence must begin again. While a plasma weapon is charging up the character may use any of his other weapons in the normal way.
Heavy Weapon – 2D6+3 damage, Ignores armour, Move or fire.
Non-player Characters - Bad Zones is designed for three players, each controlling a single character but it is possible to play the game with two or only a single player. In these cases the party numbers can be made up of non-player characters – hirelings or henchmen of the real characters – provided as part of the background story or recruited in settlements.
Hired gun – When player character numbers fall below the usual three they can agree to hire a mercenary. (Hiring takes place in any settlement and is in addition to normal trading.) Mercenaries use the standard human profile given above, have the maximum 13 wounds and should be armed with a basic lasgun or autogun. The fee for a fighter like this is a third share of any bounty from sampled kills realised by the adventurers the next time they visit a settlement.
Depending on the model used to represent him, a mercenary can have extra equipment: he may carry a pistol, wear body armour, have his gun fitted with a red
14

dot sight or converted to rapid fire. For each of these upgrades he will charge an extra 5 credits.
Once contracted, the mercenary is best thought of almost as a piece of equipment rather than a character. He suffers any randomly allocated damage like a character but does not search for or find anything and any kills he makes are sampled by the player characters as their own. He does not act on his own initiative but follows orders. This means he can move and fight at any place in the turn and is assumed to be under the direction of a player character of appropriate initiative.
The mercenary looks after his own equipment and does not need to roll any after-adventure checks. When visiting a settlement he is assumed to enter separately and use his own contacts.
In the Underhive, mercenaries belong to their own Guild and should players try to cheat one they will quickly become hunted men. Even a mercenary who has been killed is still regarded as being under contract until the adventurers register his death at a settlement and pay the third-share of any bounty realised there. Failure to do so means that the adventurers will not be able to enter into any further settlements. ‘Technomagos’ The warriors receive an encrypted transmission from a senior but shadowy member of the Adeptus Mechanicus who identifies himself as Technomagos Galateo. He offers to guide them to an unexplored area of the Underhive where there are plenty of opportunities for loot and bounty. In return the adventurers are to deliver to his agents any examples of archeotech they may come across. This is not a particularly attractive proposition but Galateo suggests that if the adventurers serve him well then he may be able to use their services again, perhaps arranging for them to accompany him Offworld. Unknown to anyone, the artifact for which Galateo is searching is being worn around the neck of a Scavvy King as an amulet. His clan has found the ancient, buried catacomb to which the adventurers are now directed and will not welcome intruders except as a source of protein. Use the deck of all sixteen Tarot cards. Shuffle the Fate cards making sure number 16 is not among the top four cards. The party must explore this tract of the Scavvy infested tunnels and take on anything that they find. If the Scavvy King is encountered and killed then searching his body automatically reveals his archeotech amulet. On returning to ‘Lost Hope’ (the outlaw settlement named as their contact point) the party must hand over any archeotech to Galateo’s agent rather than offer it to a trader. If their haul includes the amulet then the Technomagos seems sufficiently impressed to make good on his promise, offering the warriors passage as part of his entourage. If the amulet has not been recovered, then the party can set out to search another location and so on until they finally track down the Scavvy King and his valuable bauble. If the adventurers need a non-player character for this scenario then they can choose one of Galateo’s Servitor cyborgs rather than the usual hired gun.
15
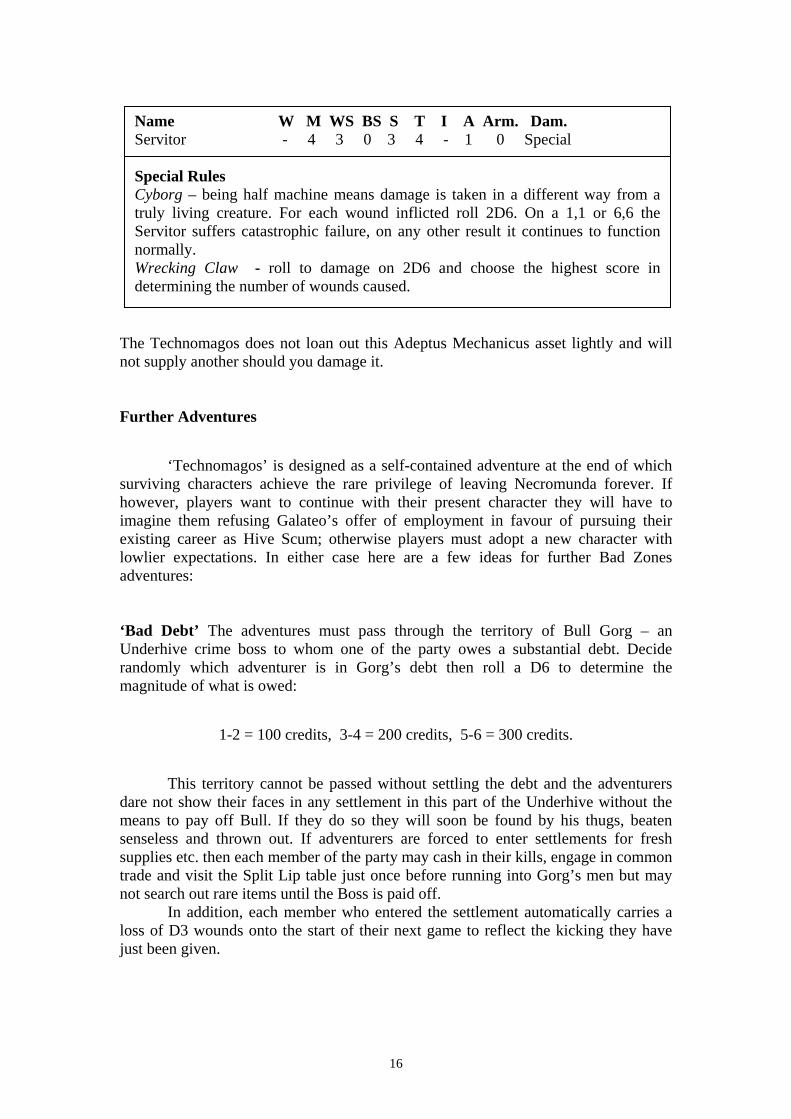
Name W M WS BS S T I A Arm. Dam. Servitor - 4 3 0 3 4 - 1 0 Special Special Rules Cyborg – being half machine means damage is taken in a different way from a truly living creature. For each wound inflicted roll 2D6. On a 1,1 or 6,6 the Servitor suffers catastrophic failure, on any other result it continues to function normally. Wrecking Claw - roll to damage on 2D6 and choose the highest score in determining the number of wounds caused.
The Technomagos does not loan out this Adeptus Mechanicus asset lightly and will not supply another should you damage it. Further Adventures ‘Technomagos’ is designed as a self-contained adventure at the end of which surviving characters achieve the rare privilege of leaving Necromunda forever. If however, players want to continue with their present character they will have to imagine them refusing Galateo’s offer of employment in favour of pursuing their existing career as Hive Scum; otherwise players must adopt a new character with lowlier expectations. In either case here are a few ideas for further Bad Zones adventures: ‘Bad Debt’ The adventures must pass through the territory of Bull Gorg – an Underhive crime boss to whom one of the party owes a substantial debt. Decide randomly which adventurer is in Gorg’s debt then roll a D6 to determine the magnitude of what is owed:
1-2 = 100 credits, 3-4 = 200 credits, 5-6 = 300 credits. This territory cannot be passed without settling the debt and the adventurers dare not show their faces in any settlement in this part of the Underhive without the means to pay off Bull. If they do so they will soon be found by his thugs, beaten senseless and thrown out. If adventurers are forced to enter settlements for fresh supplies etc. then each member of the party may cash in their kills, engage in common trade and visit the Split Lip table just once before running into Gorg’s men but may not search out rare items until the Boss is paid off.
In addition, each member who entered the settlement automatically carries a loss of D3 wounds onto the start of their next game to reflect the kicking they have just been given.
16

‘Plague Cult’ In the remote luxury of the Upper Hive, Imperial Inquisitors have rooted out and broken a secret cult of the Chaos God, Nurgle – Lord of Decay. But the inner circle of the cult has evaded the bonfires of the Ecclesiarchy and fled Downhive. A bounty has been declared for the head of the cult leader – a renegade Adept Superior of the Medicae establishment on Hive Primus.
Following a trail of disease outbreaks and isolated deaths from novel forms of pox, the adventurers have tracked the cult to a section of the Underhive known as ‘the E-Vac’ – a region already notorious for skin diseases and monstrous births among those that live on its fringes. In one such miserable settlement, hopefully named ‘Quarantine’ in times long past, they have made their base. The inhabitants of Quarantine constantly battle against ill-health and the Stimms available here are unusually potent. Players can ignore the first roll of ‘1’ and continue to use them until a second ‘1’ is rolled. The Cult Leader is found in the Vent Room. Shuffle this card into into the bottom half of each deck during this adventure. When laid out, block the exit of this room with dead-end tiles and when entering treat as for the ‘Gas’ hazard. During this adventure any medical supplies found are suspect. If taken roll a D6 as normal but then roll again to find out if the D6 wounds are restored as normal (on a 1-5) or deducted (on a 6). If the adventurers manage to overcome the Cult Leader and escape then each of them may choose D3 items from the trade table for free as their share of the bounty. This adventure uses a special Fate Card Events table:
‘Plague Cult’ Special Events
1 = Spire Hunter 2 = Sump Rat 3 = Bulkhead 4 = Charged Floorplates 5 = Gas 6 = Archeotech Find 7 = D6 Plague Zombies 8 = Nurgling Swarm 9 = Nurgling Swarm 10 = D6 Cultists 11 = 6 Cultists 12 = D6 Cultists + Cult Priest 13 = Mutant + D3 Cultists 14 = D6 Cultists + 3 Plague Zombies 15 = Gas 16 = 6 Plague Zombies
17

You will also need to refer to five new Enemy Profiles.
Name W M WS BS S T I A Cr. Arm. Dam. Cultist 3 4 3 5+ 3 3 4 1 10 0 1D6 Special Rules Insane Zeal – roll a D6 for each model to be placed. On a 4+ that model is placed in close combat and attacks immediately, as for an ambush.
Name W M WS BS S T I A Cr. Arm. Dam. Cult Priest 9 4 4 4+ 3 3/4 5 2 50 1 1D6 Special Rules Guarded – place with D6 Cultists. Cultists must roll for Insane Zeal. The Priest is always placed for a shooting attack.
Name W M WS BS S T I A Cr. Arm. Dam. Mutant of Nurgle D6+10 4 3 3 4 3/4 3 1 35 1 2D6 Special Rules Warped Flesh – a boated and necrotic body, already too far gone to feel much pain and able to take terrible damage (D6+10 Wounds). Warped Weapons – counts as a heavy weapon (see weapons table) and incorporates a cursed blade for brutal close assaults (2D6 damage).
Name W M WS BS S T I A Cr. Arm. Dam. Nurgling Swarm 12 - 2 0 2 3 4 3 0 0 1D6 Special Rules Swarm – although represented by a single base, the swarm may attack/be attacked hand-to-hand by any model on the same board section and pins all models on the same section. It continues to infest the section if not killed and regenerates any lost wounds if not attacked for one turn.
Name W M WS BS S T I A Cr. Arm. Dam. Cult Leader 10 4 3 4+ 3 3/4 5 2 - 1 1D6/2D6 Special Rules Guarded – place with D6 Cultists. Cultists must roll for Insane Zeal. The Cult Leader is placed to make a shooting attack. Rebreather – carries an iron lung on his back containing noxious stimulants. If reduced to 0 wounds or below, roll a D6. He immediately regains that many wounds. If now above 0 he fights on. Plague Sword – as a cursed blade this inflicts 2D6 damage.
18

‘Ork Hunt’ Once a world has been invaded by Orks it is almost impossible to get rid of them. It is not just a case of defeating the overwhelming enemy horde and somehow driving them off the planet. Unique Orkoid physiology means that they continually seed the environment with their own reproductive spores and new Orks spring up for years afterwards, especially in environments too hostile for much else to survive.
Isolated, self-sufficient communities of these feral Orks are quickly established at a pre-technological level of culture, but the ancient gene-programming of the Orkoid race soon kicks in to start any tribe that survives a few generations on a rapid curve towards the stars. Individuals with specialist but instinctive skills are born; most importantly Mekboys who can direct the natural, competitive scavenging of the tribe and begin to build up the characteristicly crude, chaotic and inspired technical base needed for conquest – the Ork’s only purpose.
Where this process happens amid the ruins of an advanced world like Necromunda, it can be incredibly fast. Firearms, combustion engines, cybernetics, power-field technology, space flight – the sequence is always the same and, given the correct resources on the host world, can be accomplished in as little as a hundred years.(By this time, of course, there would be no other intelligent life on that world.)
For this reason Imperial Governors have learned to seek out and occasionally cull any feral Orks in their territories. Necromunda has suffered major invasions in the past and so takes the problem seriously enough to have a standing bounty on ferals. Normally small groups live and die out in the post-indusrial wastes between Hives preying mainly on each other, but sometimes a tribe of Orks finds its way through into the abandoned sub-structure of one of the mountain-sized Hives and begins to thrive.
When this is discovered, bounties are doubled and the hunt is on. The adventurers are part of the hunt and their aim is to wipe out the tribe.
Three extraordinary, individuals are responsible for organizing the power of these primitives; the Boss, the Slaver and the Mek. The Boss is the biggest of the rank and file warrior-Orks and head of the tribe. The Slaver gathers together the runty Grots and forces them to work and fight. The Mek makes all the guns and armour for the tribe and generally drives its technological development through his insane dreams. Only when these three are dead will the tribe break down and scatter back into the wastes.
This adventure uses its own ‘Events’ and ‘Searching after Combat’ tables as well as a selection of new enemy profiles for greenskins (see below). You will also need to use the Fate Card deck in a different way. For the first game of this adventure shuffle all the cards thoroughly and play through the deck as normal. However, once each of the main characters has been found and killed, things change a little:
When the Slaver is killed, remove his card permanently from the deck. From
now on, whenever a Grot event is drawn and successfully dealt with, its card is permanently removed from the deck as well.
When the Mek is killed, remove his card permanently from the deck. From
now on, whenever a Cybork event is drawn and successfully dealt with, its card is permanently removed from the deck as well.
19
When the Boss is killed, remove his card permanently from the deck. From now on, whenever an Ork Boyz event is drawn and successfully dealt with, its card is permanently removed from the deck as well.
Only cards remaining in the deck at the end of a game are re-shuffled to form
the deck for the next game. In this way the adventures can progressively hunt the Orks to extinction.
The high bounty paid for Orks is its own reward in this adventure, but in acknowledgement of the unique experience that taking on these aliens brings, players may freely choose any single experience upgrade once the last greenskin is dead.
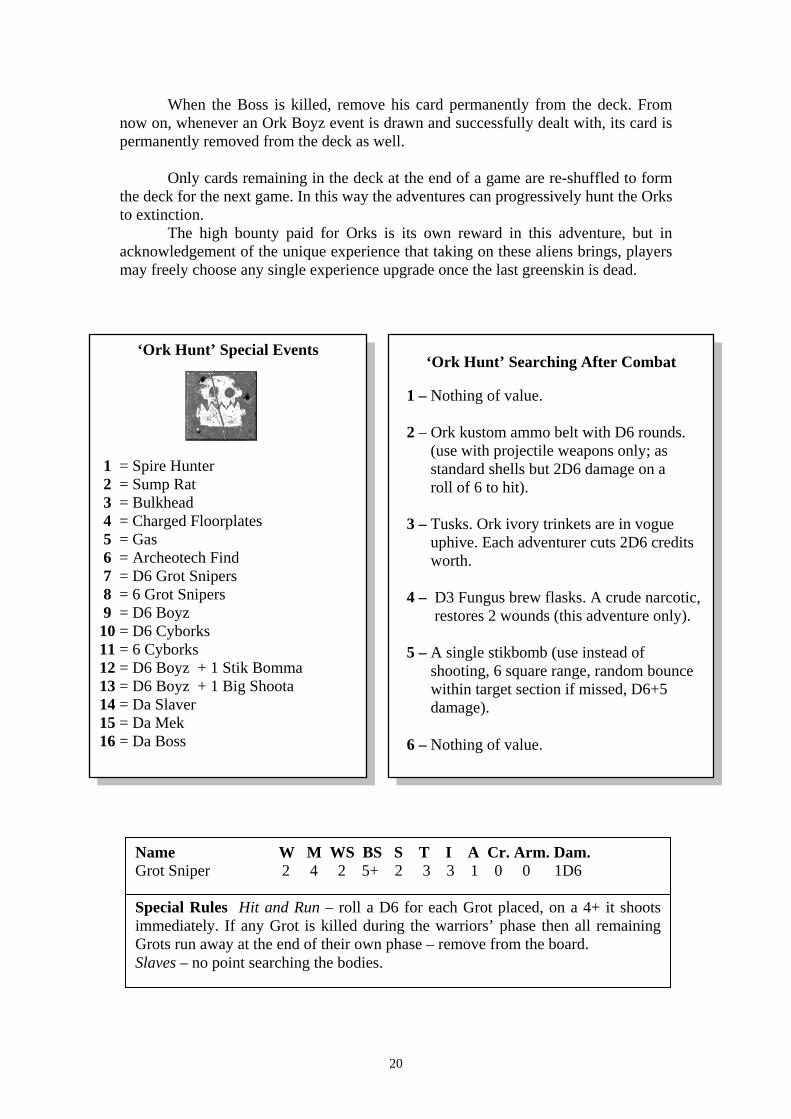
‘Ork Hunt’ Special Events
1 = Spire Hunter 2 = Sump Rat 3 = Bulkhead 4 = Charged Floorplates 5 = Gas 6 = Archeotech Find 7 = D6 Grot Snipers 8 = 6 Grot Snipers 9 = D6 Boyz 10 = D6 Cyborks 11 = 6 Cyborks 12 = D6 Boyz + 1 Stik Bomma 13 = D6 Boyz + 1 Big Shoota 14 = Da Slaver 15 = Da Mek 16 = Da Boss
‘Ork Hunt’ Searching After Combat
1 – Nothing of value. 2 – Ork kustom ammo belt with D6 rounds. (use with projectile weapons only; as standard shells but 2D6 damage on a roll of 6 to hit). 3 – Tusks. Ork ivory trinkets are in vogue uphive. Each adventurer cuts 2D6 credits worth. 4 – D3 Fungus brew flasks. A crude narcotic, restores 2 wounds (this adventure only).
5 – A single stikbomb (use instead of shooting, 6 square range, random bounce within target section if missed, D6+5 damage). 6 – Nothing of value.
Name W M WS BS S T I A Cr. Arm. Dam. Grot Sniper 2 4 2 5+ 2 3 3 1 0 0 1D6 Special Rules Hit and Run – roll a D6 for each Grot placed, on a 4+ it shoots immediately. If any Grot is killed during the warriors’ phase then all remaining Grots run away at the end of their own phase – remove from the board. Slaves – no point searching the bodies.
20

Name W M WS BS S T I A Cr. Arm. Dam. Ork Boyz 4 4 3 5+ 3 4 3 1 20 0 1D6 Special Rules Stik Bomma – some Orks may be armed with an additional ‘stikbomb’. Use in ranged attack, 6 square maximum range, random bounce within target section if missed, D6+5 damage. Place first in any group that includes these troops, use at the first opportunity. Big Shoota – some Orks may be armed with an additional heavy weapon. Place first in any group that includes these troops. Cyborks – some Orks may have mechanical implants or replacement parts. Roll a D6 to decide on the effect of these ‘improvements’ (one roll for each group placed): 1 = reduced BS (6+), 2 = reduced Move (3), 3 = no effect, 4 = increased Wounds (5), 5 = increased Toughness (5), 6 = increased Attacks (2).
Name W M WS BS S T I A Cr. Arm. Dam. Slaver 4 4 3 5+ 3 4 3 2 30 0 1D6 Special Rules Grabba Stik and Whip – these are long-reach weapons and can make a hand-to-hand attack over an intervening square even if occupied by another model. Bodyguard – always placed behind a crowd of 6 Grotz who do not run away as long as the Slaver is alive.
Name W M WS BS S T I A Cr. Arm. Dam. Mek 8 4 4 5+ 3 4 3 1 40 0 1D6 Special Rules Power Claw – roll 2D6 and choose the highest for damage in hand-to-hand attacks. Bodyguard – always placed with 6 Cyborks. Ork Leader – place at the forefront of the mob.
Name W M WS BS S T I A Cr. Arm. Dam. Boss 12 4 5 5+ 5 5 4 2 100 0 1D6\2D6 Special Rules Big Choppa – ignores 1 point of armour. Kustom Slugga – 2D6 damage on a 6 to hit (ranged attack only). Bodyguard – always placed with 6 Boyz. Ork Leader – place at the forefront of the mob.
21
Searching After Combat
1 – Among the gear of the dead each warrior finds 2D6 credits. 2 – One of the slain is hoarding a mysterious piece of archeotech. Randomly decide which warrior finds it. 3 – A random warrior finds something originally traded out of a settlement. Roll once on the settlement trade table. 4 – Medical supplies. Each warrior gets an item to restore D6 wounds when used. (this adventure only) 5 – On a data slate is an override code allowing the warriors to open any bulkhead on the board. 6 – Nothing of value.
The Emperor’s Tarot
1 = Dead-End Room (one door) 2 = Vent Room (two doors) 3 = Biomorph Room (two doors) 4 = Pressure Room (two doors) 5 = Specimen Room (three doors) 6 = Logicator Room (three doors) 7 = T-Junction 8 = T-Junction 9-12 = Four Square Corridor 13-16 = Five Square Corridor
1 = 2 = 3 = 4 = 5 = 6 = 7 = 8 = 9 =10 =11 =12 =13 =14 = 15 =16 =
Fate Card Events
1 = Spire Hunter 2 = Sump Rat 3 = Bulkhead 4 = Charged Floorplates 5 = Gas 6 = Archeotech Find 7 = D6 Plague Zombies 8 = D6 Giant Sump Rats 9 = D6 Giant Spiders 10 = 3 Plague Zombies 11 = D6 Scavvies 12 = 3 Scavvies 13 = 2 Scavvies + 2 Plague Zombies 14 = 3 Badskins (H2H weapons) 15 = 1 Scaley 16 = Scavvy King + D6 Scavvies
‘Plague Cult’ Special Events
Spire Hunter Sump Rat Bulkhead Charged Floorplates Gas Archeotech Find D6 Plague Zombies Nurgling Swarm Nurgling Swarm D6 Cultists 6 Cultists D6 Cultists + Cult Priest Mutant + D3 Cultists D6 Cultists + 3 Plague Zombies Gas 6 Plague Zombies

‘Ork Hunt’ Special Events
1 = Spire Hunter 2 = Sump Rat 3 = Bulkhead 4 = Charged Floorplates 5 = Gas 6 = Archeotech Find 7 = D6 Grot Snipers 8 = 6 Grot Snipers 9 = D6 Boyz 10 = D6 Cyborks 11 = 6 Cyborks 12 = D6 Boyz + 1 Stik Bomma 13 = D6 Boyz + 1 Big Shoota 14 = Da Slaver 15 = Da Mek 16 = Da Boss
‘Ork Hunt’ Searching After Combat
1 – Nothing of value. 2 – Ork kustom ammo belt with D6 rounds. (use with projectile weapons only; as standard shells but 2D6 damage on a roll of 6 to hit). 3 – Tusks. Ork ivory trinkets are in vogue uphive. Each adventurer cuts 2D6 credits worth. 4 – D3 Fungus brew flasks. A crude narcotic, restores 2 wounds (this adventure only).
5 – A single stikbomb (use instead of shooting, 6 square range, random bounce within target section if missed, D6+5 damage). 6 – Nothing of value.
Trading Table
D20 Item (* = Common) Credits - Stimms free 1* Ammo Clip 30 2* Power Pack 30 3* D3 Frag Grenades 35 each 4* D3 Photon Grenades 35 each 5* D3 Smoke Grenades 35 each 6* Body Armour 45 7 Hot Shot Pack 50 8 Red Dot Gunsight 50 9 Rapid Fire Modification 45 10 Bio-Booster 45 11 Blindsnake Pouch 30 12 Filter Plugs 30 13 Grapnel 45 14 Photo-Contacts 30 15 Skull Chip 50 16 Ratskin Map 40 17 Bottle of Wildsnake 30 18 Stinger Mould 35 19 Icrotic Slime 60 20 ‘Slaught 45
T
W
EN TO
NO
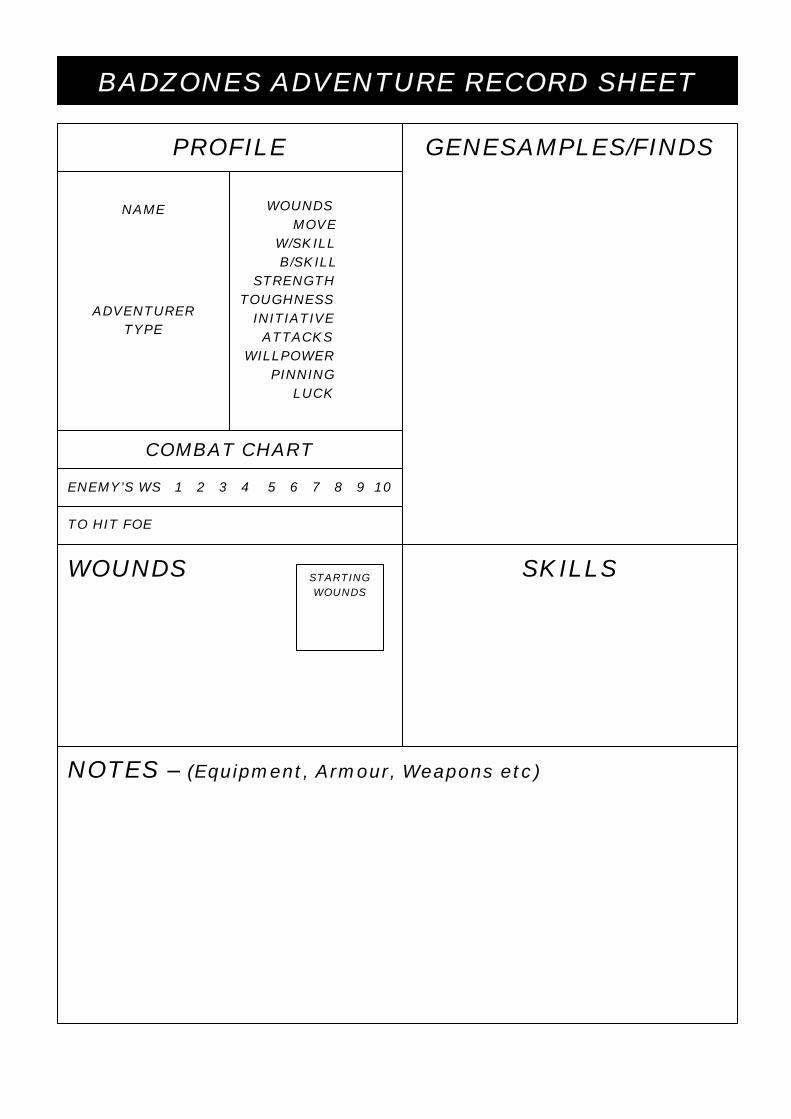
BADZONES ADVENTURE RECORD SHEE
PROFILE
NAME
ADVENTURER TYPE
WOUNDS MOVE W/SKILL B/SKILL STRENGTH TOUGHNESS INITIATIVE ATTACKS WILLPOWER PINNING LUCK
OUNDS
COMBAT CHART
EMY’S WS 1 2 3 4 5 6 7 8 9 10
HIT FOE
STARTING WOUNDS
TES – (Equipment, Armour, Weapons etc)
SKILLS
GENESAMPLES/FINDS