Embed Size (px)
Citation preview

Viega pre-wall systemsSystems for creative bathroom design.

2

3
Family tradition
The name Viega stands for a family-owned company that has always set the highest standards in terms of product quality, customer proximity, delivery reliability and excellent service. Above all, this means demanding the highest standards of itself. Because one thing is certain: it takes more than just a good idea to write an international success story. So it is no accident that courage, an innovative spirit and passion have characterised the company for more than 100 years.
Competency combined with diversity
The Viega portfolio has grown to encompass 16,000 products, which not only represent a uniquely diverse range within our sector of industry, but also meet the highest standards of quality. The reason behind this is that Viega combines the best of everything: highly skilled employees, premium raw materials, state-of-the-art production facilities – at all of its five production plants in Germany and the USA.
Systematic and precise
Added to which, 16,000 products are permanently in stock and are consigned, coded, packed and despatched using a seamless logistics system. This systematic process is typical of Viega, since it is our products themselves that mesh with one another as well as the processes themselves. Pre-wall systems – one of many Viega innovations – form the basis. The Steptec system presented in this brochure is a prime example of this: a tried and tested system which opens up undreamt-of opportunities in plumbing and installation. Totally in keeping with our motto: Viega. A better idea!
Viega. A better idea!

4
Viega pre-wall systems.There are no limits to our diversity.
Colours, tiles, fittings – as far as the aesthetic design of a bathroom is concerned, it all comes down to the individual taste of your customer. However, specialist knowledge is required behind the scenes. For the safety, reliability and neat fit of the sanitary facilities ultimately depend on the quality of your installation work. The quality of the processing components plays a crucial role in this respect.You need to be able to rely on them – in terms of material, fitting and how they combine to form an overall system. Again, this is something that we see as our duty: to meet the toughest requirements in everything we do. That means no compromises in product quality and comprehensive system expertise.
Viega system technology
Our core skills, and in particular our wide range of metal and plastic pipe installations as well as our pre-wall solutions, have enabled us to become one of the most successful brand manu-facturers in the industry. For decades, Viega has been synonymous with inno-vative domestic installations and guar-anteed system safety.

5
Steptec Page 6Two basic components – that’s all you
need to allow your ide-as free reign, and they are: a profile and some connectors. There is no end to the combina-tions that are possible.
Visign 2 concealed cistern
and Visign actuating panels
Page 46With their visionary design and high quality materials, Visign actuating pan -els set new standards. The Viega Visign range cannot fail to impress thanks to the sheer variety and scope of its potential applica-tions.
Viega Eco Plus Page 14The pre-wall solution with the optimum price/performance ratio. The classic choice for con-tractual fitting projects.
Viega Mono Page 26The robust pre-wall block for easy walling in and around. Viega Mono offers a high level of flexibility thanks to its variable size.
Viega planning: Sound -
proofing, fire protection,
damp proofing Page 38Benefit from Viega’s expertise in the fields of soundproofing, fire protection and damp proofing. Soundproofing for all pre-wall systems certified to DIN 4109 in accordance with the requirements of the Fraunhofer Institute for Building Physics, a multivendor dec laration of compliance for the Viegaswift and Steptec fire pro-tection shafts, and important damp seal-ing information.

6
No matter what you have in mind, Steptec lets you implement it easily. Two elements form the basis for assembly: profiles and connectors. This is all you need to put exceptional ideas and plans into practice yourself.Steptec means flexible bathroom design with a high level of installation comfort.
Steptec. Total freedom for bathroom design.

7
Steptec. It doesn’t get any more varied than this. Of that you can be sure.

8
Individuality is the all-important word when it comes to bath-room planning. Therefore, the solution you need is Steptec – the best the market has to offer in terms of creating individual or barrier-free (suitable for disabled users) pre-wall and sepa-rating structures (whether half-height, full-height or freestand-ing). The system consists of just two basic elements (a profile and connectors), yet it provides an astounding level of design freedom.
The principle: innovative trapezoidal connectors are used to join the system profiles together with 90° or 45° angle-butted edges. This means pure flexibility. When the Allen bolts are tightened, the connectors dig their claws into the system profiles so that all tensile and compressive forces can be absorbed easily. This guarantees an extremely high degree of stability. Costing on a square-metre basis is time-saving and uncomplicated. Depending on the dimensions, with the help of the Steptec profile punching machine you can shorten the profiles quickly and without burrs. And since only two compo-nents are required, you can reduce your storage costs at the same time. This means that your calculations always come out even! In short: Steptec is the optimum installation solution regardless of where your sanitary facilities are located.
The profile punching machines which are part of the system result in a clean burr-free manual cut, which needs no fur-ther finishing – This method is quicker, quieter and cleaner than slitting or sawing.
The Steptec com-plete kit includes everything you will need to connect and fasten the pro-files. Once this has been done, all you need do is finish off the relevant blocks.

9

1
2
3
4
5
10
Steptec. Enjoy unlimited flexibility.
1 The system con-sists of 2 compo-nents: Steptec con-nectors and Steptec profiles. The connec-tors can be mounted at a 45° or 90° angle on both the closed and the open profile side. For all other angles, the Steptec articulation is used.
2 With dimensions of 40 mm x 40 mm, the Steptec profile offers a large sup-porting surface for the cladding – it is open on one side and pre-drilled every 30 cm for mounting on floors and walls. The Steptec system only requires a single covering (1 x 12.5 mm) of GKFI boards or Aqua plas-tic cladding boards (1 x 12 mm).
3 Steptec WC and bidet blocks have been developed for Steptec structures. For all other applica-tions, the Viegaswift blocks/fitting holders are available.
4 The Steptec sys-tem is equipped with the water-saving Viega Visign 2 con-cealed cistern, which adds even more ben-efits.
5 Fire protection and soundproofing: Steptec has the fire protection declaration of compliance in accordance with the German Wiring Sys-tems Directive, and its soundproofing has been tested for con-formity to DIN 4109 by the Fraunhofer Institute for Building Physics in Stuttgart.

11
Steptec WC block 8461.3 H x W x D:
1130/980 x 430 x 145 mm
Steptec WC block 8438.3 H x W x D:
840 x 430 x 200 mm
Steptec WC block 8437.3 H x W x D:
840 x 430 x 200 mm
Steptec Bidet block 8467.3 Width: 430 mm
ViegaswiftWashbasin block 8055.4
Width: 430 mm
Steptec profile 8401
ViegaswiftWashbasin block 8133.3
(barrier-free) Width: 430 mm
ViegaswiftWaste sink block 8131.3
Width: 430 mm
ViegaswiftUrinal block 8119.3 for
surface pressure flusher Width: 430 mm
Viegaswift Urinal block 8128.33 with Viega concealed flush
system, Width: 430 mm
Viegaswift Urinal block 8127.3 for “Joly” and “Visit” urinals (Keramag), Width: 430 mm
Viegaswift Urinal block 8121.3
siphon sensor electronics 230 V Width: 430 mm
Viegaswift Fixing element 8011.9 Width: 275 mm
Viegaswift/Steptec Plywood panel 8096
507 x 280 mm
Viegaswift/Steptec Aqua plastic covering 1500 x 1000 x 12 mm
8040.20
Viegaswift/Steptec GKFI covering
1500 x 1000 x 12.5 mm 8055.10
See catalogue for further blocks.
Steptec wall elbow 8415 Steptec articulation 8411
Steptec built-in box block 8470
Width: 314 mm
Steptec profile punching machine 8420
Viegaswift Universal holder 8062.5
ViegaswiftFitting holder 8268.3
Width: 430 mm
ViegaswiftFitting holder
Width: 430 mm Model 8062.1
Viegaswift Fitting holder 8068.3 for
washing machine connections Width: 77 mm
Viegaswift Concealed fitting
holder 8063.0 Width: 430 mm
Steptec complete packet 8400

1 2 3 4 5 6
12
Steptec. Both simple to calculate and easy to fit.
Viega Steptec is available in complete ready-to-use kits of size 1, 3, 5 and 10 m2. These kits contain the graded quantities of all the required connectors and fastening materials such as plugs, screws, rapid fit screws and shims. Selecting the right amount of material required depends on the area to be cov-ered. Simply calculate the profile length using the profile factor, order the appropriate bathroom block from the Viega catalogue, and you can start installing.
Use the simple formula Width x Height to determine the surface area of the installation and thus the size of the complete kit required. To find out the profile length required, just multiply this value by the profile factor (5.5), and you’re done.Example:2.4 m x 1.1 m = 2.64 m2 => a 3 m2 complete kit2.64 m2 x 5.5 (profile factor) = 14.52 m2 => three 5 m profilesThis calculation applies for all surfaces to be clad.
Assembly of the connector on the open
profile side
1 The short side can be placed directly onto the profile.
2 When using the long profile side, a blocking element is required on the short side.
Assembly of the connector on the
closed side
3 When using the short side the blocking element must be removed.
4 The long side of the connector can be placed directly onto the profile.
5 Tighten the connector with the Allen key provided. Finished!
6 The maximum permitted distance between two rails being connected is 10 mm.
W x H

1 4
2
5
3
6
13
1 Measure the length and depth of the pre-wall.
2 Position the floor and wall profiles and screw tight.
3 Now position and fix the side Steptec profiles.
4 Position vertical profiles with the block at a dis-tance of 430 mm. If there is no block, the maximum distance is 500 mm. Now insert the key blocks. Insert into the profile, turn 90°, and tighten with a size 17 ring spanner.
5 Chamfer the butted edges to 45° and use the rapid fit screws provided to fix the covering surface at 180 mm intervals. Then coat the butted edges with filler. Then inject filler into the gaps between pre-wall and floor, and pre-wall and fixed wall.
6 In general, ensure that room-height pre-walls are supported at the back at a height of 1200 mm. Similar support is required every 2000 mm.

14
Viega Eco Plus. Make your contractual fitting projects stand out.
Viega Eco Plus stands for tried and tested engi-neering, efficient fitting and intelligent detailed solutions. This makes it a practical system which is able to deal with any kind of pre-wall instal-lation, and it is one of the preferred solutions for contractual fitting purposes. Viega Eco Plus is available at an attractive, all-inclusive price. Truly a system you can count on.

15

16
Viega Eco Plus. Attractive price, amazing performance.
Viega Eco Plus signals the way forward for contractual fitt -ing with its unbeatable price/performance ratio. The simple reason for this is that everything is just right: its sturdy work-manship, its robust quality and its enormous versatility. Whatever the fitting method (single, profile or framework) – Viega Eco Plus guarantees trouble-free and economical installation. Clever solutions and innovative details such as the alignment aid save you time during fitting. In addition, the vertically adjustable WC connection elbow ensures convenient connection to the sewerage system. It doesn’t get any more practical than this.Cost-effectiveness, ease of fitting and a wide range of services make Viega Eco Plus the ideal dry wall construction system for contractual fitting purposes.

17

1
3
8
2
6
5
4
7
18
Viega Eco Plus. An all-rounder you can count on.
1 The sturdy, free-standing elements con-sist of powder coated frames, thus guaran-teeing absolute torsion resistance as well as static safety. The ele-ments are clad in two layers (2 x 12.5 mm).
2 The mounting kit can be fitted directly to the wall, on the mounting profile or in the corner at an angle of 45°. It allows con -tinuous depth adjust-ment of the elements up to 200 mm.
3 The ceramic attach-ment can be custom adjusted and set to a height suitable for dis-abled users.
4 The vertically adjust-able elbow made of PP makes connection to the sewerage sys-tem significantly easier.
5 The extendable feet can be integrated in 50 mm as well as in 75 mm frames.
6 Viega Eco Plus is equipped with the water-saving Viega Visign 2 concealed cistern, which adds even more benefits.
7 The alignment aid integrated in all Viega Eco Plus ele-ments guarantees fast and simple installation.
8 Viega Eco Plus has soundproofing which has been certified in accordance with DIN 4109 by the Fraunhofer Institute for Building Physics in Stuttgart.

19
Viega Eco PlusWashbasin Element 8164
H x W x D: 1130 x 490 x 100-200 mm
Viega Eco PlusWC Element 8138.2
H x W x D: 830 x 490 x 200 mm
Viega Eco PlusWC Element 8137.2
H x W x D: 830 x 490 x 200 mm
Viega EcoWC Element 8180.25/8180.26
H x W x D: 1130 x 490 x 130-200 mm
Viega Eco PlusWC Element 8161.2
H x W x D: 1130 x 490 x 130-200 mm
Viega Eco PlusWashbasin Element 8156
H x W x D: 1300 x 490 x 100-200 mm
Viega Eco PlusWashbasin Element 8158
H x W x D: 860/1130 x 490 x 90-200 mm
Viega Eco PlusWashbasin Element 8155
With concealed meter, H x W x D:
1130 x 490 x 115-200 mm
Viega Eco PlusWashbasin Element 8162
H x W x D: 860 x 490 x 100-200 mm
Viega Eco PlusWashbasin Element 8156.1
H x W x D: 1300 x 490 x 85-200 mm
Viega EcoWashbasin Element 8180.61
H x W x D: 1130 x 490 x 100-200 mm
Viega Eco PlusBidet Element 8167.5
H x W x D: 1130 x 490 x 100-200 mm
For more accessories, see catalogue.
Viega Eco PlusWaste sink Element 8159
H x W x D: 1300 x 490 x 100-200 mm
Viega Eco PlusUrinal Element 8164.5
H x W x D: 1130/1300 x 490 x 100-200 mm
Viega Eco PlusFixing Element 8169
H x W x D: 1130 x 330 x 30-200 mm
Viega Eco PlusUrinal Element 8152.3
Siphon sensor technology H x W x D:
1130 x 490 x 125-200 mm
Assembly profile 8001 H x T: 40 x 22 mm Length 3000 mm
Viega Eco PlusFixing set 8173
Viega Eco PlusWashbasin Element 8154
With concealed meter, H x W x D:
1130 x 490 x 115-200 mm

31 2 1
2
31 2 3
20
Viega Eco Plus: Child’s play to install.
Pre-wall serial installation – height 1130 mm
1 The mounting profile is fixed to the wall at 500 mm intervals with screw anchor plugs at a height of 1110 mm. The mounting kit is then mounted observing a distance of 440 mm.
2 When mounting the two elements, use a spirit level to adjust exactly. Now apply at the sides the wall profiles to which the plasterboards will later be fixed.
3 Finally, apply a double covering of GKFI boards (2 x 12.5 mm) to the element.
Pre-wall single fitting – height 1130 mm
1 The mounting kit is fixed to the wall with screw anchor plugs at a height of 1110 mm. The distance between the two fixing points should be 440 mm.
2 Mount the Viega Eco Plus WC element and adjust with a spirit level. Then bolt the “extendable” feet to the floor with screw anchor plugs. Apply the wall profiles, to which the plasterboards will later be fixed, to the side and top of the element.
3 Finally, apply a double covering of GKFI boards (2 x 12.5 mm) to the element.
Corner mounting – height 1130 mm
1 Apply the mounting kit at a height of 1110 mm.
2 The WC element is now fitted, adjusted, and fixed to the floor with screw anchor plugs. The 45° corner profiles are then fitted at the side. These subsequently serve as mounts or fixing points for the GKFI boards. A 90° wall connection profile is now fitted above the WC element for the same purpose.
3 It is then only necessary to apply a double covering of GKFI boards (2 x 12.5 mm).

1 2
21
Pre-wall fitting, support
frame built on site
1 Even different Viega Eco Plus WC ele-ments can be integrated without any problem into support frames built on-site.
2 It is then only neces -sary to apply a double covering of GKFI boards (2 x 12.5 mm) to the pre-wall structure.
Barrier-free bathroom concept
The diagram illustrates the struc-ture of a “barrier-free WC”. For this purpose, fixing elements have been integrated into the frame-work to the left and right of the Viega Eco Plus WC element. The folding support arms will be attached to these later. The mag-nified section on the left shows how the various elements are fixed together in the framework. A technical note: Not only can the WC’s flush system be acti-vated by the actuating panel, but also via a radio transmitter in the folding support arm.

1
7
8
9
4
2
3
5
6
22
Viega Eco Plus corner elements.When true flexibility is required.
1 The compact design of Viega Eco Plus corner elements results in minimal installed dimensions. The frame is made of powder-coated steel and is also used to support the sheeting.
2 The robust plastic cistern is equipped with a water-saving dual volume flushing mechanism (factory preset full flush of approx. 6 l, can be changed to 7.5 l/short flush volume of approx. 3 l).
3 Individually adjusta-ble mounting height for the WC ceramics (330 mm, 350 mm and 370 mm).
4 Viega Eco Plus cor-ner element alignment is made easier thanks to the “alignment aid” integrated in the frame.
5 The Viega Eco Plus corner element offers numerous fastening options. For example, it can be hung on its outboard shackle plates. It is even pos-sible to install this unit in non-90° corners.
6 When installing the Viega Eco Plus corner element, one of the two feet can be removed if it is in the way of the drain-pipe’s route.
7 The metre mark on the frame simplifies installation.
8 Compatible with all Visign actuating panels.
9 The specially formed cistern in the upper section simpli-fies connection of the supply water pipe. The supply water pipe can be routed entirely within the space occu-pied by the element.

23
Viega Eco Plus WC corner element, model 8141.2
Height 980 mm
Viega Eco Plus WC corner element, model 8141.2
Height 1130 mm
Viega Eco Plus Washbasin corner element, model 8142
Height 980-1130 mm
Viega Eco Plus Bidet corner element, model 8143
Height 980-1130 mm
Viega Eco Plus Urinal corner element, model 8144
Height 1130/1300 mm
Viega Eco Plus Urinal corner element “Joly” + “Visit”, model 8145
Height 1130 mm

A
1
23
4
B
4
1
3
2
5
A
24
Situation 1:
Viega Eco Plus WC
corner element
height 1130 mm or
980 mm
1 First place the corner element in the
corner at the appropriate installa-tion height (1130 mm or 980 mm, measured from the finished floor’s upper surface) and align it. Then mark the fastening points (A + B and 1-4).
2 Drill holes at the marked fas-tening points. After horizontal and vertical alignment, fix the corner element in place with the fastening materials provided. Subsequently panel the element with a single layer of GKFI board.
Situation 2:
Viega Eco Plus WC
corner element
height 1130 mm or
980 mm, drain
routed in foot sup-
port area
1 The procedure is the same as for Situation 1. However, in this case fastening points A and 1-5 are marked.
2 Same procedure as for Situa-tion 1: Drill holes for fastening points (A and 1-5), align and fix the corner element in place. Subsequently, panel the element with GKFI board.
Viega Eco Plus corner elements.Cleverly designed, easily installed.

1
A
2
4
3
B
25
Situation 4:
Viega Eco Plus WC
corner element in
a non-90° corner,
height 1130 mm or
980 mm
The Viega Eco Plus corner element can
even be installed in non-90° cor-ners. All you need do is bend the outboard fastening shackles as appropriate. The remaining instal-lation procedure for the corner element is the same as described in the assembly steps above.
Situation 3:
Viega Eco Plus
WC corner
element (single-
sided fastening),
height 1130 mm
or 980 mm
1 The procedure is the same as for Situation 1. How-ever, in this case fastening points A and B as well as 1-4 are marked.
2 Same procedure as for Situa -tion 1: Drill holes for fastening points (A and B, as well as 1-4), align and fix the corner element, panel the element with GKFI board.
Situation 5:
A combination
of any two
Viega Eco Plus
corner elements
When necessary, any two Viega Eco Plus corner ele-
ments can be installed as a combi-nation. In this case, the two corner elements are fastened together at four fastening points. Each cor-ner element is also fixed in place by both foot supports as well as at four other fastening points.
Please note: the corner elements’ dimensions may be different. Accordingly, they are not symmet-rical.

26
Viega Mono.One block for any application.
If you are looking for wet construction solutions in the pre-wall, Viega Mono is a tried and tested classic. Its particular advantage: its variable size, which makes it especially flexible in terms of installation. Material quality and installation com-fort are exactly as you would expect from Viega: the best.

27

28
Viega Mono. You choose the height – it will fit just right.
Viega Mono is available in two heights. This means that the classic wet construction system is flexible in terms of instal-lation: whether single or serial mounting – simply shorten the pre-wall block, which has been preset to 1130 mm, to fit the marking and you have a 980 mm high housing. The flexible depth adjustment, the height-adjustable block and the low WC elements provide yet more evidence of the system’s exemplary versatility. But that’s not all. Integrated wall pock-ets allow a perfect fit to the wall. In addition, its expanded polystyrene housing, which is also soundproofed, makes an ideal base for plastering. Viega Mono stands for a large number of advantages, all of which make installation as easy as possible for you. What’s more, Viega Mono gives you the confidence to face any challenging fitting circumstances involving wet construction.

2929

1
6
7
8
5
3
4
2
30
Viega Mono. Professional wet construction with that special something.
1 The robust and soundproofed expanded polysty -rene housing offers an ideal base for plastering.
2 Weldable connec-tion elbow in PE.
3 The expanded polystyrene housing can be shortened from 1130 mm to 980 mm, thus provid-ing flexibility and reducing your storage costs.
4 Multiple Viega Mono pre-wall blocks can be fitted rapidly and efficiently on a single profile without time-consuming alignment.
5 The pre-mounted water ducting and the wall connection made of high-quality, corro-sion-resistant gunmetal facilitate connection to the drinking water supply.
6 Viega Mono is equipped with the water-saving Viega Visign 2 con-cealed cistern, which adds even more benefits.
7 The depth of the pre-wall blocks can be freely adjusted.
8 Tested soundproof-ing in accordance with DIN 4109, certified by the Fraunhofer Institute for Building Physics, Stuttgart.

31
Mounting profile 8001 H x D: 40 x 22 mm Length: 3000 mm
For serial mounting of models 8310.2, 8337.2, 8338.2, 8317
Viega Mono foot props 8310.5 Fitting aid for models
8310.2, 8337.2, 8338.2, 8317
Viega Mono footed bracket 8310.45 Mounting aid for self-supporting mounting of models 8310.2, 8337.2, 8338.2, 8317
Viega Mono Urinal flushing system installation set 8328
universally applicable
Viega Mono Washbasin pre-wall block 8313
W x D: 295 x 90-150 mm
Viega Mono surface-mounted fittings pre-wall block 8313.5
W x D: 295 x 90-150 mm
Viega Mono WC pre-wall block 8310.2
H x W x D: 1130/980 x 510 x 130-190 mm
Viega Mono WC pre-wall block 8337.2
H x W x D: 820 x 510 x 172-230 mm
Viega Mono WC pre-wall block 8338.2
H x W x D: 820 x 510 x 172-230 mm
Viega Mono Bidet pre-wall block 8317 W x D: 400 x 130-190 mm

1
2 3 4
2 3 4
32
Viega Mono. Fitting – so easy, so precise.
3 Important: The cistern must be plastered to a depth of at least 15 mm.
4 And: Brick up the pre-wall block on both sides!
Pre-wall single fitting –
height 820 mm
1 Fix the mounting rail to the wall at a height of 320 mm using screw anchor plugs. Then screw on the WC clip (see above).
2 Now place the Viega Mono WC pre-wall block on the WC clip and adjust it with a spirit level. Now all you need to do is fix it at the top end with a screw and a wall plug.
3 Important: The cistern must be plastered to a depth of at least 15 mm. For operation from above, a 25 mm gap must be observed between the finished wall and the inspection chamber.
4 Brick up the pre-wall block on both sides.
Pre-wall single fitting – height 1130 mm
1 Fix the mounting profile to the wall at a height of 320 mm using screw anchor plugs. Then screw on the WC clip.
2 The Viega Mono WC pre-wall block is now positioned on the WC clip and is then adjusted with a spirit level. Now just fix at the top end with a screw and a wall plug.

1 2
1 2
3
33
Pre-wall recessed single fitting – height 1130 mm
1 Fix the mounting rail to the wall at a height of 320 mm using screw anchor plugs. Then screw on the WC clip.
2 Position the Viega Mono WC pre-wall block on the WC clip and adjust with a spirit level. Now just fix at the top end with a screw and a wall plug. Important: It is necessary to install a concrete supporting beam above the cistern.
3 Finally, brick in the recess.
Pre-wall line mounting – WC pre-wall block – height 1130 mm
1 Fix the mounting profile to the wall at a height of 320 mm using screw anchor plugs. Then screw on the WC clips.
2 Position the Viega Mono WC pre-wall blocks on the WC clips and align with a spirit level. Now just fix at the top end with a screw and a wall plug.
Shorten the pre-wall block from 1130 mm
to 980 mm
First release the upper and lower parts of the pre-wall block, and remove the flush pipe elbow from its connection piece. Now both elements can be shortened at the marked point using a normal saw. Shorten the flush pipe elbow by 150 mm as well, and after deburring, simply reposition on the connection piece. Caution: It is essential to ensure that the two O-ring seals sit correctly! Finally, just connect the upper and lower parts, and you’re done.

3
7
1
6
5
8
4
2
34
Viega Mono Tec and Viega Mono Slim: The fitting solution for every Situation.
1 Factory fitted pro-tective woven material (not shown in graphic)
2 Viega Visign 1F concealed cistern with a depth of 8 cm and a flushing volume of 9 litres
3 Cistern with water-saving dual flush technology (Long flush volume 6 litres/short flush volume 3 litres)
4 Can be used in combination with any of the actuating panels from the Visign for More, Visign for Style and Visign for Life series
5 Revision duct with cover is one-piece, so that no dirt can enter the cistern during cladding and plastering work
6 Flush pipe can be shortened
7 Drain valve is integrated in the drain valve seat, this simpli-fies installation and removal
8 Water supply: Rp ½ on the top of the cistern, plus pre-assembled water pipe in the cistern

35
Model 8308.1 Viega Mono Slim WC cistern,
Dimensions 540 x 545 x 80 mm
Model 8308 Viega Mono Tec WC Element,
Dimensions: 545 x 1105 x 80 mm
Model 8308.8 Viega Mono Tec WC Element (with aerator connection),
Dimensions: 545 x 1105 x 80 mm
Model 8367 Viega Mono Tec Bidet Element, Dimensions 450 x 300 x 80 mm
Model 8310.79 Flush pipe connection set for floor-standing WC
(Viega Mono Slim)

1 32
2
3
1
36
Viega Mono Slim. Compactly built technology.
Assembly of the Mono Slim WC cistern
Concealed installation:
1 The Viega Mono Slim cistern is aligned and assembled in the wall niche using the joining material supplied.
2 The Viega Mono Slim WC cistern must be completely clad and walled in. It must be com-pletely plastered over. It should be observed that the protective woven material is positioned on the wall.
3 Minimum assembly height of the Viega Mono Slim WC cistern: 17 mm (Wall covering including tile)
Shortening of the flush bend
(Viega Mono Slim WC cistern)
1 Remove the flush pipe from the cistern
2 The flush pipe can be shortened by a maximum of 150 mm. It must be de-burred after shortening.
3 Replace the flush pipe. Make sure to observe the proper positioning of the two seals on the flush pipe supports!

1
1 3
32
2
4
37
Viega Mono Tec. Fast assembly, perfect design.
Assembly of the Viega Mono Tec WC Element
Pre-wall installation:
1 The four plates on the side are folded into place.
2 Align the Viega Mono Tec WC element and attach it with the joining material supplied.
3 The Viega Mono Tec WC element must be completely clad and walled in. It must be com-pletely plastered over. It should be observed that the protective woven material is positioned on the wall.
4 Minimum assembly height of the Viega Mono Tec WC element: 17 mm (Wall covering including tile)
Concealed installation:
1 The Viega Mono Tec WC element is aligned and secured in the wall niche using mortar.
2 The Viega Mono Tec WC element must be completely clad and walled in. It must be com-pletely plastered over. It should be observed that the protective woven material is positioned on the wall.
3 Minimum assembly height of the Viega Mono Tec WC element: 17 mm (Wall covering including tile)

38
Make your plans something to build upon.

39
end all from a personal safety perspec-tive. Viega pre-wall systems meet all three criteria to the highest standards.Viega pre-wall systems are certified to DIN 4109 by the Fraunhofer Institute for Building Physics, Stuttgart. What’s more, the Steptec and Viegaswift sys-tems boast a declaration of compliance for the fire protection shaft in accord -ance with the German Wiring Systems Directive.
Soundproofing, fire protection and
damp protection
The perfect design can only be achieved if intelligent and architecturally attractive solutions are available: A sophisticated soundproofing concept can protect the privacy of your customers and signi -ficantly improve quality of life. Damp proofing has a key role to play in terms of ensuring healthy conditions. And fire protection is, of course, the be all and

7
3
4
5
2
1
6
3
5
4
2
1
6
40
Steptec soundproofing.
Installation wall: 11.5 cm sand-lime brick wallwith a surface mass of m”w = 220 kg/m2
Insulation in accordance with EnEV and DIN 1988Measured values based on flush/stop function
1 Steptec pre-wall system with washbasin and WC blocks
2 HT wastewater collecting pipe
3 Cast iron wastewater downpipe
4 Pexfit Pro drinking water line (floor)
5 Sanpress drinking water riser pipe
6 Plasterboard 1 x 12.5 mm
Installation wall: Steptec installation separating wallInsulation in accordance with EnEV and DIN 1988Measured values based on flush/stop function
1 Steptec pre-wall system with washbasin and WC blocks
2 HT wastewater collecting pipe
3 Cast iron wastewater downpipe
4 Pexfit Pro drinking water line (floor)
5 Sanpress drinking water riser pipe
6 Plasterboard 1 x 12.5 mm
7 Mineral-fibre insulating material 50 mm
Steptec installation separating wall
Steptec installation on solid masonry
DIN 4109 requirement:
Min. soundproofing ≤ 30 [dB(A)]
Diagonal transmission path/m”w = 220 kg/m2/R’w = 47 [dB]
Installation sound level Lln 19 [dB(A)]
DIN 4109 requirement:
Min. soundproofing ≤ 30 [dB(A)]
Diagonal transmission path/R’w = 52 [dB]
Installation sound level Lln 16 [dB(A)]

3
4
5
7
8
12
6
3
5
4
2
1
6
41
Viegaswift soundproofing.
Viegaswift pre-wall installation on solid masonry
Viegaswift pre-wall installation on lightweight partition wall
Installation wall: 11.5 cm sand-lime brick wallwith a surface mass of m”w = 220 kg/m2
Insulation in accordance with EnEV and DIN 1988Measured values based on flush/stop function
1 Viegaswift pre-wall system with washbasin and WC elements
2 HT wastewater collecting pipe
3 Cast iron wastewater downpipe
4 Pexfit Pro drinking water line (floor)
5 Sanpress drinking water riser pipe
6 Plasterboard 1 x 12.5 mm
Installation wall: Knauf W 112 metal frame wallInsulation in accordance with EnEV and DIN 1988Measured values based on flush/stop function
1 Viegaswift pre-wall system with washbasin and WC elements plus room-height Viegaswift consoles
2 HT wastewater collecting pipe
3 Cast iron wastewater downpipe
4 Pexfit Pro drinking water line (floor)
5 Sanpress drinking water riser pipe
6 Plasterboard 2 x 12.5 mm
7 Plasterboard 1 x 12.5 mm
8 Mineral-fibre insulating material 50 mm
DIN 4109 requirement:
Min. soundproofing ≤ 30 [dB(A)]
Diagonal transmission path/m”w = 220 kg/m2/R’w = 47 [dB]
Installation sound level Lln 19 [dB(A)]
DIN 4109 requirement:
Min. soundproofing ≤ 30 [dB(A)]
Diagonal transmission path/R’w = 49 [dB]
Installation sound level Lln 19 [dB(A)]Additional Viegaswift “In-wall installation in a lightweight partition wall” soundproofing report available.

35
2
4
1
3
4
5
7
2
1
6
42
Soundproofing: Viega Eco Plus and Viega Mono.
Viega Eco Plus in-wall installation in a lightweight partition wall
Viega Mono pre-wall installation on solid masonry
Installation wall: Knauf W 116 metal frame wallInsulation in accordance with EnEV and DIN 1988Measured values based on flush/stop function
1 Viega Eco Plus pre-wall system with washbasin and WC elements
2 HT wastewater collecting pipe
3 Cast iron wastewater downpipe
4 Pexfit Pro drinking water line (floor)
5 Sanpress drinking water riser pipe
6 Plasterboard 2 x 12.5 mm
7 Mineral-fibre insulating material 50 mm
Installation wall: 11.5 cm sand-lime brick wallwith a surface mass of m”w = 220 kg/m2
Insulation in accordance with EnEV and DIN 1988Measured values based on flush/stop function
1 Viega Mono pre-wall system with washbasin and WC pre-wall blocks
2 HT wastewater collecting pipe with damping of structure-borne noise
3 Cast iron wastewater downpipe with damping of structure-borne noise
4 Pexfit Pro drinking water line (floor)
5 Sanpress drinking water riser pipe
DIN 4109 requirement:
Min. soundproofing ≤ 30 [dB(A)]
Diagonal transmission path/R’w = 54 [dB]
Installation sound level Lln 21 [dB(A)]Additional Viega Eco Plus “Pre-wall installation on solid masonry” soundproofing report available.
DIN 4109 requirement:
Min. soundproofing ≤ 30 [dB(A)]
Diagonal transmission path/m”w = 220 kg/m2/R’w = 47 [dB]
Installation sound level Lln 27 [dB(A)]

1
5
2
6
3
7
4
8
43
Damp proofing.
Viega pre-wall systems are suitable for use in all damp and wet areas. It is simply a question of selecting the right covering. In domestic bathrooms, Viega pre-wall systems should be covered with GKFI boards. Information on seal-ing the individual connections against damp is provided in the relevant assem-bly steps. In extremely wet areas, the Aqua plastic board should be used for covering the pre-wall systems. This is a covering made from calcium silicate, which has been specially designed for such areas.
1 Sealing the cut edges with penetrating primer.
2 Sealing the mounting rings for water connections.
3 Coating the cut edges with filler.
4 Injection of permanently elastic sealant into the gap between pre-wall and floor.
5 Injection of permanently elastic sealant into the gap between pre-wall and fixed wall.
6 Coating the cut edges with filler.
7 Application of a surface coat-ing, e.g. bitumen-based.
8 Sealing via a sealing flange.

44
EI 90 fire protection with Steptec.
Sectional view of possible configurations
1 Steptec pre-wall system
2 GKFI board 2 x 12.5 mm
3 GKFI board 1 x 12.5 mm
4 Mineral-fibre insulating material 50 mm
5 Mineral wool
Bare configuration (separating wall only)
Dual-sided configuration One-sided configuration
With the pre-wall systems Steptec and Viega Eco Plus, Viega offers the possi-bility to create a separating wall con-struction with installation components with a certified fire resistance time of 90 and 120 minutes respectively (EI 90 and EI 120).
Dual-sided separating wall configuration with Steptec elements

45
EI 120 fire protection with Viega Eco Plus.
Dual-sided standing wall configuration with Viega Eco Plus elements
Sectional view of possible configurations
1 Viega Eco Plus pre-wall system on metal support frame
2 GKFI board 2 x 12.5 mm
3 GKFI board 1 x 12.5 mm
4 Mineral-fibre insulating material 50 mm
5 Mineral wool
Bare configuration (separating wall only)
Dual-sided configuration One-sided configuration

46
Perfect technology meets visionary design.Viega Visign.
1
2
3
47
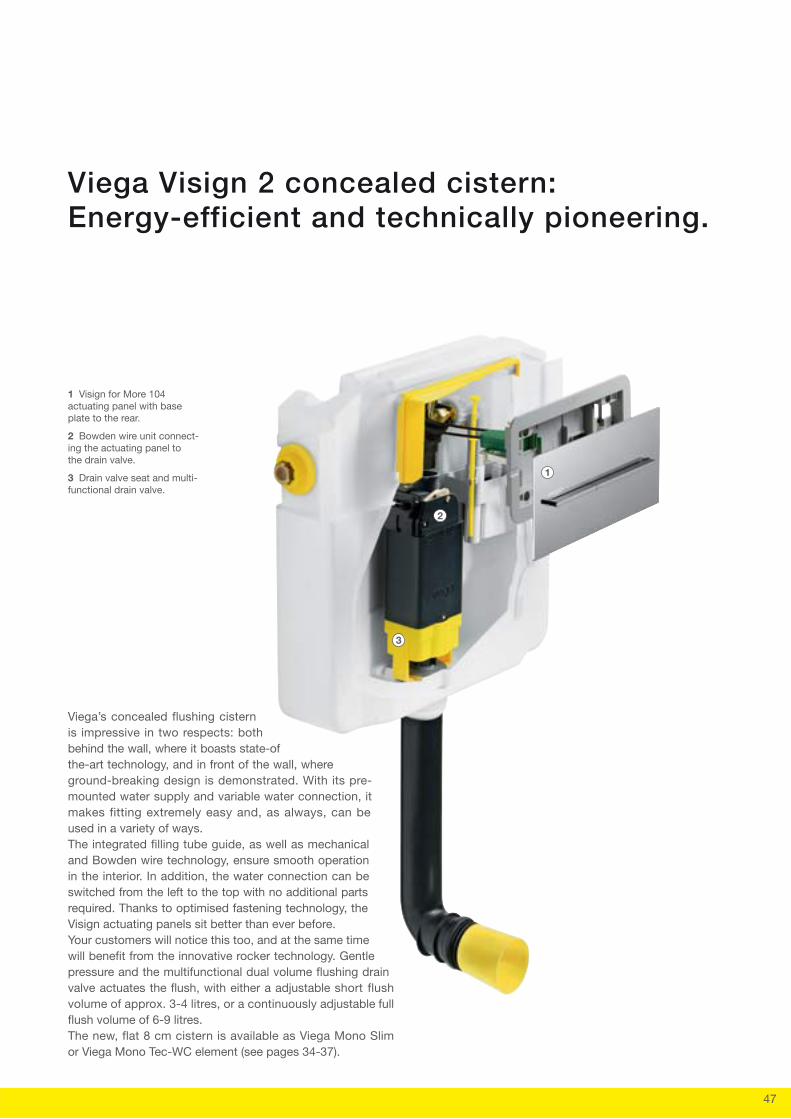
Viega Visign 2 concealed cistern: Energy-efficient and technically pioneering.
1 Visign for More 104 actuating panel with base plate to the rear.
2 Bowden wire unit connect-ing the actuating panel to the drain valve.
3 Drain valve seat and multi-functional drain valve.
Viega’s concealed flushing cistern is impressive in two respects: both behind the wall, where it boasts state-of the-art technology, and in front of the wall, where ground-breaking design is demonstrated. With its pre-mounted water supply and variable water connection, it makes fitting extremely easy and, as always, can be used in a variety of ways.The integrated filling tube guide, as well as mechanical and Bowden wire technology, ensure smooth operation in the interior. In addition, the water connection can be switched from the left to the top with no additional parts required. Thanks to optimised fastening technology, the Visign actuating panels sit better than ever before.Your customers will notice this too, and at the same time will benefit from the innovative rocker technology. Gentle pressure and the multifunctional dual volume flushing drain valve actuates the flush, with either a adjustable short flush volume of approx. 3-4 litres, or a continuously adjustable full flush volume of 6-9 litres.The new, flat 8 cm cistern is available as Viega Mono Slim or Viega Mono Tec-WC element (see pages 34-37).

48
The new Viega Visign flush actuating panels: They don’t need to be concealed.
Actuation in elegant style: tile-level
Good design is being further developed. Viega presents a new type of actuat -ing panel – the tile-level version. The basis for this is being made up by the built-in frames for WC and urinal actua-tion. The ca. 4.5 mm deep built-in frame allows the actuating panel from the Visign for More series to be fitted and the ca. 7 mm built-in frames allow the
actuating panel from the Visign for Style series to be fitted. The extra advantage: during fitting, the built-in frames can be individually adjusted in the wall by 5-18 mm to suit various tile thicknesses.The actuating panels create an abso-lutely level plain with the wall. The tile-level frame is compatible with the Viegaswift, Steptec and Viega Eco Plus systems.
Visign for Style 12 TSG clear/light grey, TSG parsol/black and TSG clear/mint green are exclusively supplied with the tile-level built-in frames. But there’s more: A complete construction set ena-bles the flush mounting e.g. of tiles as actuating panels, because these can be cut to integrate into the frame. Indivi-duality for bathroom design.
Tile-level built-in frame for WC and urinal
Function unit for natural stone panels
Visign for Style 12 TSG*, tile-level
*Toughened safety glass

49
Viega Hygiene+ ensures the drinking water quality and lowers the running costs.
Flushes as often as necessary,
as little as possible
Especially in public buildings with interruptions in use, such as schools or hotels, the demand for flushing sys-tems is rising. When interruptions in use occur, Viega Hygiene+ guarantees intended use using decentralised, indi-vidual flushing technology, which con-trols the flushing process both in terms of time and volume.
Viega Hygiene+
Intelligent, simple, perfect
An electronic control of the Hygiene+ flushing system notices the lack of use of the drinking water extraction points, and ensures the required operation, pre-venting microbial contamination due to stagnation. An actuating panel triggers the flush with Hygiene+ flushing func-tion, like e.g. the Visign for Care actuat-ing panel and/or Visign for More Urinal
complete set with infrared technology. In addition, on request, the sensitive actuating panels from the Visign for More series.

50
Visign for More 103 sensitive**
TSG*, clear/light grey
Visign for More 100
Metal, stainless steel coloured
Visign for More 104
Metal, chrome-plated
Visign for More 103
TSG*, parsol/black
Visign for More 102
TSG*, clear/light grey
Visign for More 101**
TSG*, clear/mint green
Characteristics from architecture and the modern design world are unmistak-able. Alongside the look, the technology is also impressive, with extremely soft and short stroke lengths with maximum reliability.
A strictly graphical and intentionally puristic aesthetic is the trademark of the Visign for More series. It addresses trend-conscious individualists. The flat panel appears to be floating in front of the wall. This conveys a sense of relaxa-tion and elegance.High quality materials, such as glass and metal in various colours, ensure unmistakable design accentuation. The system fulfils its promise: relaxation. The lightest of touches actuates a flush. The flush volume is chosen via the new rocker technology and allows resource saving use thanks to integrated dual volume flushing technology: adjustable short flush volume of ca. 3-4 litres or freely adjustable full flush volume of 6-9 litres.
The actuation of the new Visign for More sensitive is entirely without contact: a gentle glide of the hand suffices to actu-ate the flush in either small or large flush volumes.
Visign for More – Actuating panels.

51
See catalogue for more colours.
* Toughened safety glass
** For the use of the actuating panels Visign for More 101 and Visign for More 100 and 103 sensitive with battery operation in combination with the 8 cm cistern, it is necessary that at least 5 cm of plaster is applied to the front of the cistern.
Metal, s
tainles
s stee
l coloured
Metal, c
hrome-plat
ed
Metal, f
ine matt
/velour c
hrome
TSG*, pars
ol/blac
k
TSG*, clea
r/mint g
reen
TSG*, clea
r/light g
rey
8355.1/8355.2
8352.1
8351.2
8351.5/8351.6
8354.1
8354.2
8351.1
8355.1
8355.2
8353.1
8353.2
8355.5/8355.6

52
Visign for Style blends harmoniously and tastefully into the look of the family bath-room. The clear aesthetics compliment the perfect technology. Visign for Style impresses and can be easily operated.
Modern ceramic and contemporary fittings have now become part of the family bath-room. Visign for Style harmoniously rounds-off the picture with its simple, clear lines. The design line makes an elegantly reserved approach at emphasizing the interface be-tween people and technology.Their technical competence is revealed by the new, extremely soft form of actuation. A short, soft press, and the flush is actuated in the required dosage.
Visign for Style – Actuating panels.
Visign for Style 13
Visign for Style 14
Plastic, white/alpine
Plastic, pergamon
Visign for Style 11
Plastic, chrome-plated
Visign for Style 12
Plastic, fine matt/velour chrome
Visign for Style 10
Palstic, stainless steel coloured
The Viega Visign for Life actuating panels create a combination of vision and design, they look great and successfully correlate to create the design of an individual bath-room.
Visign for Life – Actuating panels.
Visign for Life 1
Metal, chrome-plated
*Toughened safety glass

53
Plastic
, stai
nless s
teel c
oloured
Plastic
, chrome p
lated
Plastic
, fine m
att/ve
lour chrome
Plastic
, alpine w
hite
Plastic
, perg
amon/ca
mee
TSG*, clea
r/light g
rey (ti
le-lev
el)
8315.1
8332.1 8332.4
8332.2
8333.1
8333.2
8331.2
8331.1
8334.1
8334.2
Visign for Life 2
8312.1
Visign for Life 1
8310.1
8128.1
Visign for Life 3
8313.1
Visign for Life 4
8324.1
See catalogue for more colours.

Viega GmbH & Co. KGPlumbing and heating systemsViega Platz 1DE-57439 AttendornGermanyPhone +49 2722 61-1297Fax +49 2722 [email protected]
T 66
8 76
1-93
2.01
-12/
09-2
667
· We
rese
rve
the
right
to e
ffect
cha
nges
.