Embed Size (px)
Citation preview

Installation guide

Axiell ALM Netherlands BVCopyright © 2018 Axiell ALM Netherlands BV® All rights reserved. Adlib® is a product of Axiell ALM Netherlands BV®
The information in this document is subject to change without notice and should not be construed as a commitment by Axiell ALM Nether-lands BV. Axiell assumes no responsibility for any errors that may ap-pear in this document. The software described in this document is fur-nished under a licence and may be used or copied only in accordance with the terms of such a licence. While making every effort to ensure the accuracy of this document, products are continually being im-proved. As a result of continuous improvements, later versions of the products may vary from those described here. Under no circum-stances may this document be regarded as a part of any contractual obligation to supply software, or as a definitive product description.

CONTENTS
1 Introduction 11.1 Unified 2
Character sets 2Converting your databases 3Writing from right to left 3
2 Installing Adlib 52.1 The Installation wizard 52.2 Adlib Designer 15
Requirement: the MS .NET 4.5 Framework 15Compatibility 16More documentation 17Working in Designer: only edit copy of your application17
2.3 Re-installing or installing an upgrade 173 Setting up SQL Server for Adlib 21
3.1 Creating a new database 213.2 Setting up user authentication 22
Setting up SQL authentication 24Windows authentication with Active Directory 32
3.3 Accessing the SQL database outside the server 393.4 Making your data available (conversion) 39
4 Setting up Oracle for Adlib 435 Converting CBF databases to SQL 476 Important information 57
6.1 Icons and Shortcuts 576.2 Subfolders and their contents in the Adlib folder 616.3 File types in Adlib 636.4 Access rights 696.5 Limiting the access to Adlib definition files 696.6 Securing your data: backups and logging 71
Requirement 1: regularly back up your data. 71Requirement 2: keep an automatic logging file. 73Adlib recovery (repair with Adlib’s proprietary log file) 75SQL Server database restore (repair with .ldf log) 77Managing the logging file 78Securing changes in applications 79
6.7 License checking 80The license monitor 80
6.8 Windows Event viewer 826.9 Error messages 83
7 Moving files 857.1 Moving your Adlib application and databases 857.2 Moving images, bulk replacement of paths 88
Model applications 3.4 or older 89Model applications 4.2 or newer 94

Appx 1: installing Adlib for SQL Express 97Appx 2: configuring SQL Server for workgroups 111Appx 3: testing a SQL connection 115Appx 4: creating a printer-specific label template 119
Creating an .lbl template 120Creating an .lbr template 127Visibility of .lbl, lbr. and .lbx files in Adlib 128The .lbx configuration file 129Adapl data preprocessing in combination with .lbx 133

1 Introduction Adlib software and applications are supplied on a CD-ROM, USB flash drive or via download. It contains the Adlib software and, depending on your license, also Adlib Museum, Adlib Library and/or Adlib Archive and possible extra modules and tools such as Adlib Designer.For using Adlib core software 7 or higher it is strongly recommended to have Windows Windows 7 (or higher) installed on all (client) sys-tems on which you mean to execute Adlib. Windows XP and Vista are no longer supported. If you install Adlib on a server, Windows Server 2008 R2 or higher is preferred as the server operating system.From Adlib 6.5.1 it is required for you to have MSXML 6.0 (or higher) installed on your computer. On the Windows 10 this is the case by de-fault. If MSXML 6.0 is not present on your computer yet, you can download it for free from www.microsoft.com (search the site for “msxml 6.0”).The Adlib core software (the executables and dlls) and Adlib applica-tions (your data sources, screens, fields and other settings) must be installed via separate installation procedures, the core software first. The distinction between core software and applications allows for the possibility to upgrade your core software with new functionality while your application remains unchanged.All data entered in Adlib applications 4.5.1 and higher will be stored in a SQL database: therefore you are required to install Microsoft SQL Server (2008 R2 or higher) or SQL Server Express on the server prior to starting your Adlib installation. See Appx 1: installing Adlib for SQL Express, for more information about that. In SQL Server you won’t need to create any database: the installation procedure of your Adlib application will take care of that.Do reserve enough hard disk space on your computer or network server for your growing database(s) and for the storage of digital im-ages. The Adlib software itself occupies little space.The manual before you initially describes the standard installation of Adlib. After that, you’ll find two chapters about the installation and setup of your system for the use of Adlib in combination with an Adlib SQL Server. Subsequently you’ll find other information which can be relevant to application management. For example: creating backups, and the use of logging & recovery for both Adlib SQL Server data-bases and CBF (the old Adlib database format), is discussed exten-sively.
1
1.1 UnifiedFrom core software version 6.0, Adlib is only released as the so-called Unified version, although the name of the executable files is not dif-ferent from before. With the Unified version you can use CBF data-bases that still use the DOS character set, the ANSI (WinLatin1) char-acter set, or Unicode character sets.
If you update an existing Adlib installation with an upgrade of the software, the type of your existing Adlib databases will be recognized automatically, and it won’t be changed: if you have never been able to enter Chinese characters in your database, then you still won’t be able to, when using the Unified version of adlwin.exe. Currently, most Adlib users have ANSI databases. But you can use these in Adlib 6.0 or higher without having to make adjustments.
Character setsThe standard character set in all Windows versions up to Windows 2000 is WinLatin1 (CP1252), and that is what Adlib applications (and the accompanying databases) up to and including version 3.3 are us-ing as well; from applications version 3.4 everything is Unicode though, and this also applies to the text files used by the Adlib core software version 6.2 and higher under Windows XP and higher. (Note that Adlib applications/modules have a different version numbering from Adlib core software.) WinLatin1 is a superset of ISO-Latin1, except that the first 32 charac-ters from character 0128 (hex 80) have become printable, such as the euro character €. Every time the Adlib documentation refers to ISO-Latin1 we actually mean WinLatin1, since Adlib has allowed the use of e.g. the euro character for a long time now. But the number of char-acters you can use is very limited.
Unicode is a collection of Windows character groups which is avail-able for Windows 2000 and higher (and also for completely different operating systems). The main benefit of these collections is that an almost unlimited number of characters and symbols can be coded (as opposed to the 256 characters in WinLatin1 or comparable character sets). This makes it possible to mix characters from different lan-guages in Windows and Adlib Unicode databases, such as Chinese, Arabic, and English. New languages are continuously being added to Unicode itself, and the aim is to code all the world’s languages into Unicode, from Braille to Cherokee.
2

Converting your databasesIf the data in existing Adlib CBF databases is stored in the WinLatin1 format, but you would like to be able to enter Unicode characters, then a conversion of your databases to Unicode is necessary. We would like to guide the customers who want this conversion to Uni-code. That way we are able to recognize and solve possible problems early on. This service is included in the normal maintenance contract. Please contact our helpdesk for more information.Writing from right to leftWith the Unified version of adlwin and adloan (these are the most rel-evant core software executables), from 5.0.2 it is possible to mirror screens and menus in Adlib applications and to enter text from right to left automatically in the entry fields. This is necessary for lan-guages such as Arabic and Hebrew, for instance.To be able to enter text from right to left, first it is necessary that Windows and your keyboard are setup for such a language. Under Windows 10 you make or check these settings via the Change input methods option on the Control panel. Click Add a language to add a language and use the Options link next to a language to select an in-put method. Also see the Advanced settings on the Language screen to set a display language other than the default.Next, you can switch the mirroring of the application interface on by starting the Adlib application with the command-line option –rtl (short for: right to left). The Target of a shortcut to an Adlib applica-tion will look something like the following: c:\Adlib\bin\adl-win.exe –rtl. (See chapter 6.1 for more information on shortcuts and command-line options.) In normal Adlib fields, you can now only enter text from right to left. Only in Richt Text fields you can mix texts from right-to-left lan-guages with texts from left-to-right languages, regardless of whether you started the application in rtl mode or not. To mix languages, you’ll have to switch keyboard languages (as explained above) before entering text of the other language type in a Rich Text field.Moreover, rtl mode swaps the functionality of the record navigation buttons: this is because rtl mode users associatie “forward” with an arrow pointing left and “backward” with an arrow pointing to the right.
3

2 Installing Adlib
2.1 The Installation wizardFor Adlib, the installation procedure has been split up into two parts, one for the core software (the executables) and one for the applica-tion. The core software must be installed first. Proceed as follows:
1. Connect the Adlib USB flash drive to your computer and open its contents in Windows Explorer or right-click the Windows icon in the left corner of the task bar, click Run in the pop-up menu and search the USB drive (by clicking the Browse button) for the two available .msi files: AdlibSetup#.msi (AdlibSetup74.msi for exam-ple) and Model Application #.msi. (Model Application 4.5.1.msi for example). Start AdlibSetup#.msi, to install the core software first. (The Model Application #.msi will be discussed from step 9.)The most recent version of AdlibSetup#.msi can also be down-loaded from http://my.adlibsoft.com/, underneath the My mes-sages header. That installer can be used for either a first-time in-stallation of the Adlib core software or to upgrade an existing in-stallation.
5
Installation Installing Adlib applications
2. The Setup wizard opens. Select the desired language for this in-stallation procedure. (Your choice won’t affect the languages in which the user interface of Adlib will be available later on.) Then click Next to continue, or Cancel to abort the installation proced-ure.After installation, you can always choose a different interface lan-guage in the Adlib application itself. That language selection will be remembered until you choose another language.
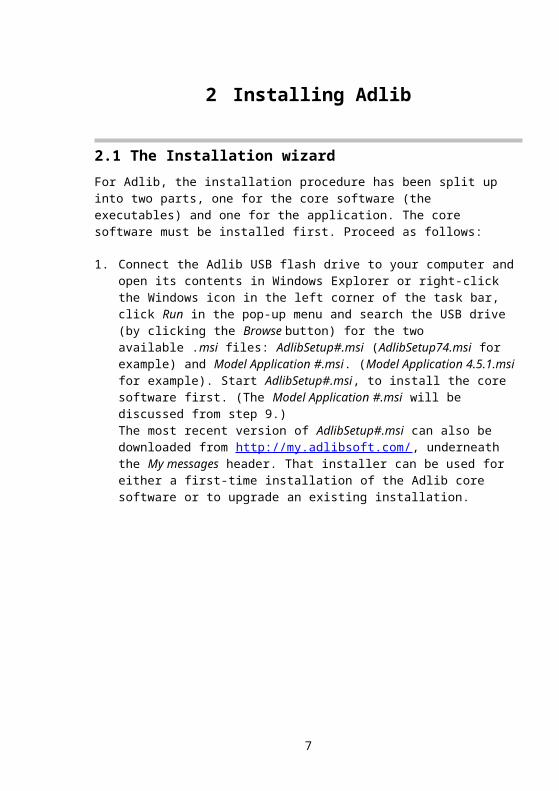
3. A (second) welcome page opens. Click Next to proceed to the next step in the installation procedure.
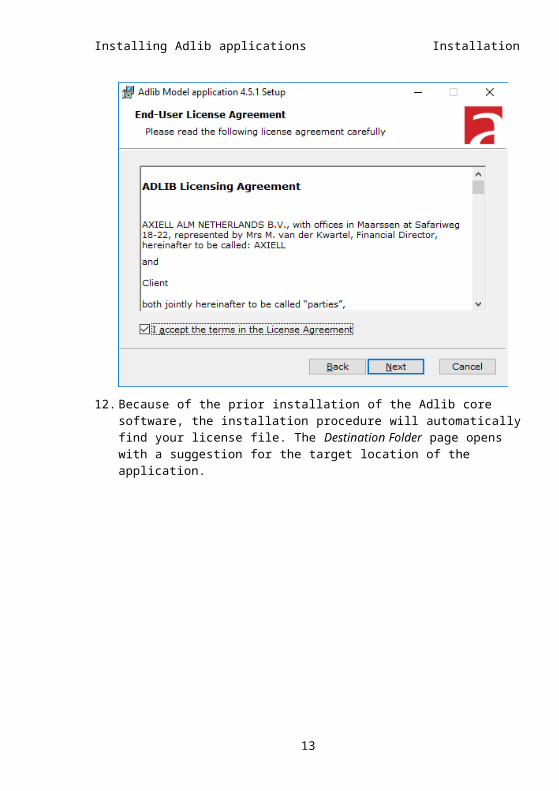
4. The license agreement is displayed. You have to accept it before you may continue. Mark the I accept… option and click Next.
6
Installing Adlib applications Installation
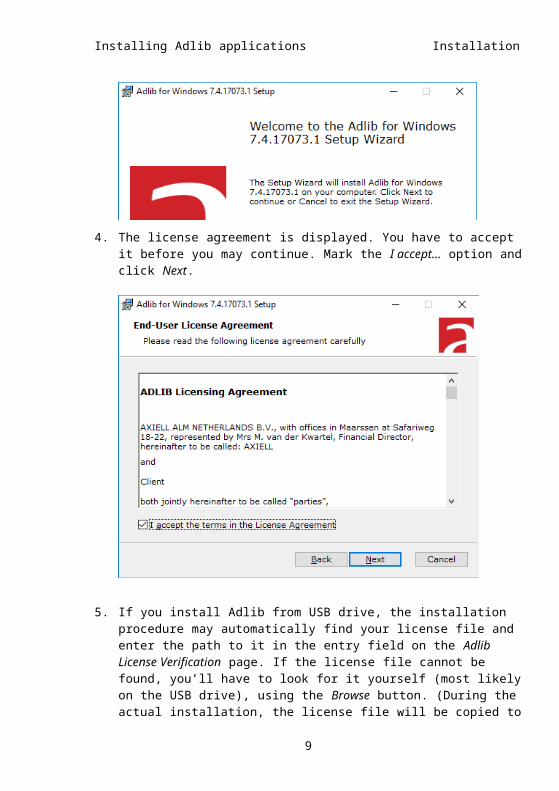
5. If you install Adlib from USB drive, the installation procedure may automatically find your license file and enter the path to it in the entry field on the Adlib License Verification page. If the license file cannot be found, you’ll have to look for it yourself (most likely on the USB drive), using the Browse button. (During the actual in-stallation, the license file will be copied to the folder into which you’ll be installing the Adlib core software now.) Contrary to the instruction at the top of this window, you don’t need to enter any serial number. Click Next to proceed.
6. The Destination Folder page opens. The core software is installed in C:\Program Files (x86)\Axiell\Adlib for Windows\ by default. You can select a different location if you want, but this is the recom-mended location. Click Next.
7
Installation Installing Adlib applications
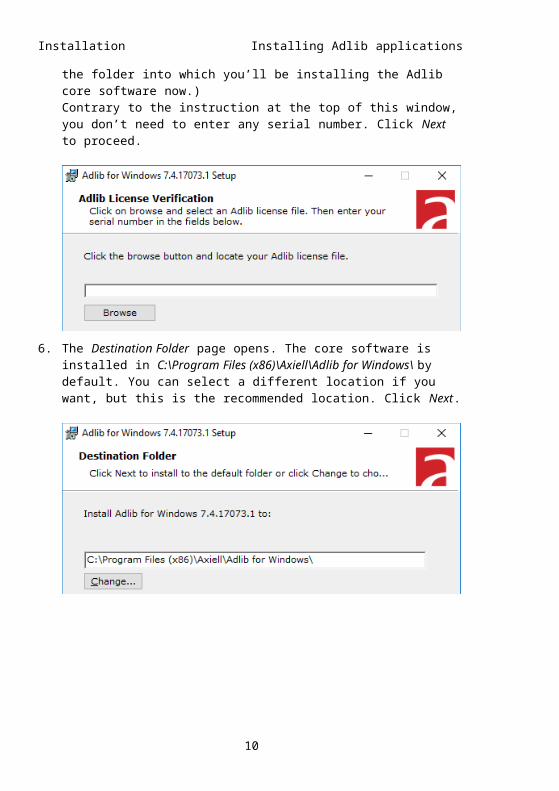
7. Click Install to start the actual installation of the Adlib core soft-ware.
8. When the installation proces has finished, click the Finish button to close the Setup window.
9. Now start the other installation procedure from the Adlib flash drive: Model Application 4.5.1.msi in our example. This will install the Adlib application. You can only start this installation if some version of SQL Server is present on your system: see Appx 1: in-stalling Adlib for SQL Express, for more information. Since the procedure will try to create a database for you, you must have a (SQL) server role with permission to create a database in SQL Server.Again, a Setup wizard opens asking you to select the desired lan-guage for this installation procedure. Click Next to continue, or Cancel to abort the installation procedure.
8
Installing Adlib applications Installation
After installation, you can always choose a different interface lan-guage in the Adlib application itself. That language selection will be remembered until you choose another language.
10. A (second) welcome page opens. Click Next.11. The license agreement is displayed. You have to accept it before
you may continue. Mark the I accept… option and click Next.
9

Installation Installing Adlib applications
12. Because of the prior installation of the Adlib core software, the in-stallation procedure will automatically find your license file. The Destination Folder page opens with a suggestion for the target location of the application.
The application and database definition files will be installed in C:\ProgramData\Axiell \Adlib Model Application 4.5.1\ by default. You can select a different location, but take into account that it is not allowed to store the application underneath the Windows \Pro-gram Files folder (especially the Adlib \data subfolder, because it needs to have write access): the \Program Files folder can only contain executable files.
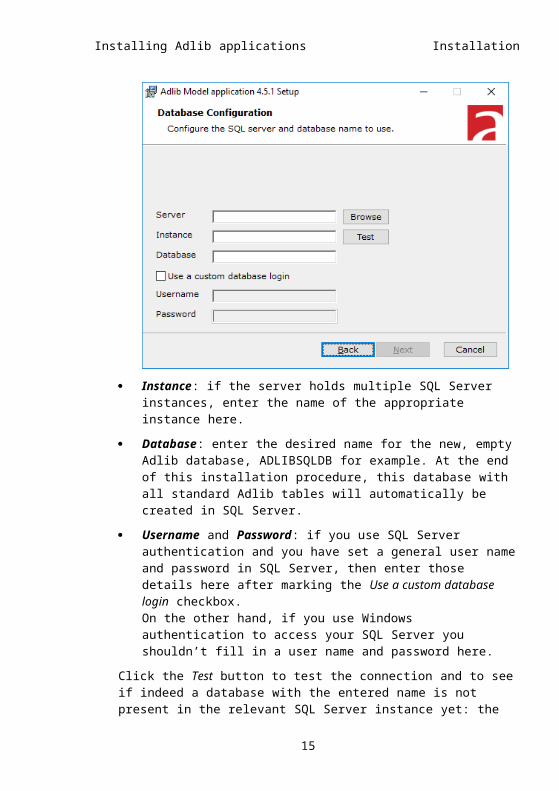
13. On the following page, you must refer to the SQL Server instance and the database you’d like to use: Server: the name of the (SQL) server. You may click the
Browse button to select the appropriate server from a list. If a selected SQL Server name is written in the <server>\<SQL Server instance> syntax, then the second part is written to the Instance field.
10
Installing Adlib applications Installation
Instance: if the server holds multiple SQL Server instances, enter the name of the appropriate instance here.
Database: enter the desired name for the new, empty Adlib database, ADLIBSQLDB for example. At the end of this installa-tion procedure, this database with all standard Adlib tables will automatically be created in SQL Server.
Username and Password: if you use SQL Server authentica-tion and you have set a general user name and password in SQL Server, then enter those details here after marking the Use a custom database login checkbox.On the other hand, if you use Windows authentication to ac-cess your SQL Server you shouldn’t fill in a user name and password here.
Click the Test button to test the connection and to see if indeed a database with the entered name is not present in the relevant SQL Server instance yet: the installation procedure cannot over-write an existing database. If the test fails, the database may already exist, you may have entered the wrong details or the server is not accessible for other reasons. The test must be suc-cessful before you can proceed with the installation procedure by clicking Next. During the actual installation, the SQL installation details you entered here, will automatically be written to the Adlib database definition (.inf) files in the \data subfolder of your new
11
Installation Installing Adlib applications
Adlib application folder, so you won’t have to do that yourself: once Adlib has been installed completely (both the application and the core software), you can start working in the relevant database immediately.
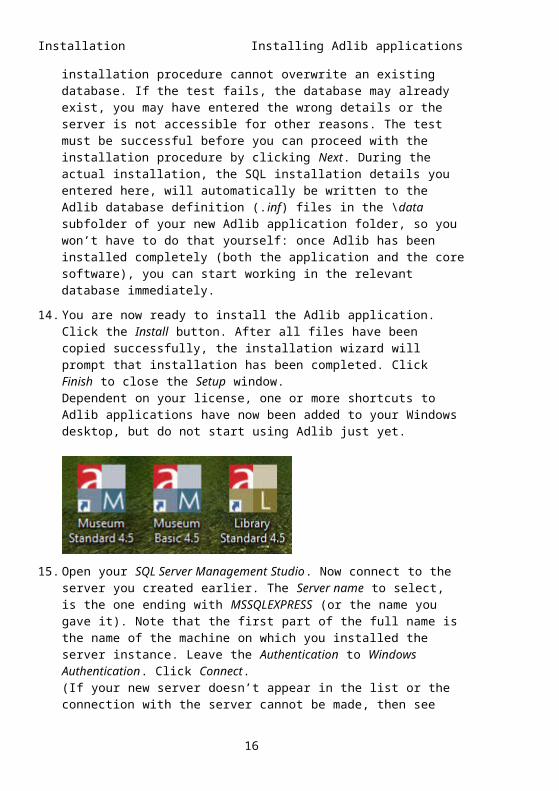
14. You are now ready to install the Adlib application. Click the Install button. After all files have been copied successfully, the installa-tion wizard will prompt that installation has been completed. Click Finish to close the Setup window.Dependent on your license, one or more shortcuts to Adlib applic-ations have now been added to your Windows desktop, but do not start using Adlib just yet.
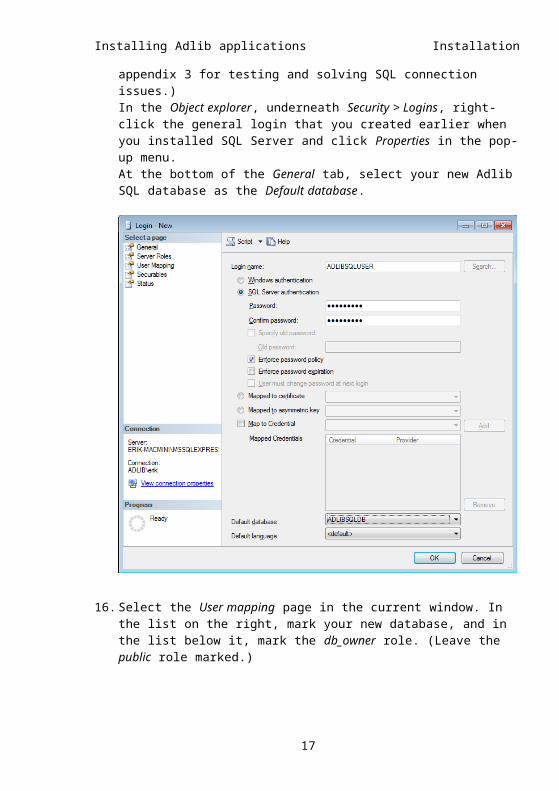
15. Open your SQL Server Management Studio. Now connect to the server you created earlier. The Server name to select, is the one ending with MSSQLEXPRESS (or the name you gave it). Note that the first part of the full name is the name of the machine on which you installed the server instance. Leave the Authentication to Windows Authentication. Click Connect.(If your new server doesn’t appear in the list or the connection with the server cannot be made, then see appendix 3 for testing and solving SQL connection issues.)In the Object explorer, underneath Security > Logins, right-click the general login that you created earlier when you installed SQL Server and click Properties in the pop-up menu. At the bottom of the General tab, select your new Adlib SQL data-base as the Default database.
12
Installing Adlib applications Installation
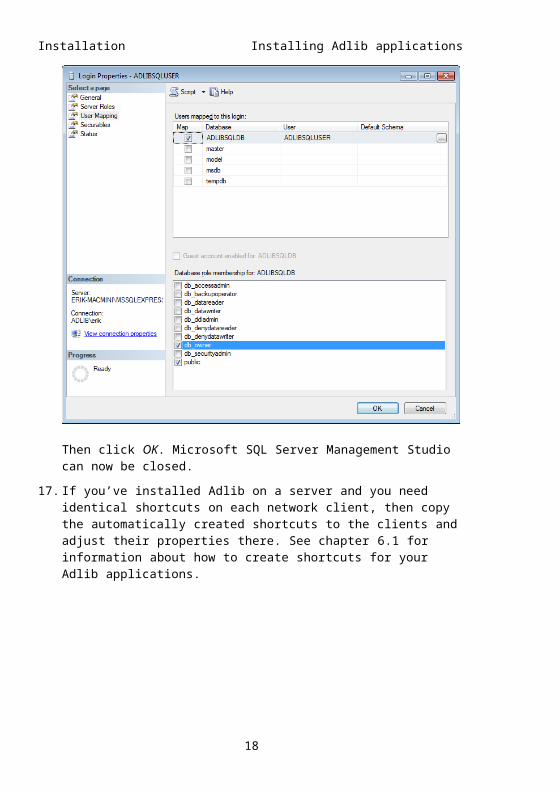
16. Select the User mapping page in the current window. In the list on the right, mark your new database, and in the list below it, mark the db_owner role. (Leave the public role marked.)
13
Installation Installing Adlib applications
Then click OK. Microsoft SQL Server Management Studio can now be closed.
17. If you’ve installed Adlib on a server and you need identical short-cuts on each network client, then copy the automatically created shortcuts to the clients and adjust their properties there. See chapter 6.1 for information about how to create shortcuts for your Adlib applications.
14
Installing Adlib applications Installation
2.2 Adlib DesignerMost Adlib packages, except those for Museum Basis and the Lite ver-sions, also entitle you to Adlib Designer. This is the main manage-ment tool for your Adlib applications and databases. However, Adlib Designer won’t be installed automatically: in MyAdlib (http://my.adlib-soft.com/) you’ll find a link to a click-once installation and/or down-load page. The click-once installation runs automatically after clicking the installation button once and will also create a desktop shortcut for you, while the downloadably package (with identical contents) only needs to be unpacked in a location of your choice, after which you’ll still need to create a desktop shortcut to ADLIBDesigner.exe yourself. Note that a click-once installation will always be kept up-to-date auto-matically, while the downloaded package won’t be.
Requirement: the MS .NET 4.5 FrameworkAdlib Designer was made in the programming language C# (pro-nounced as see sharp), based on Microsoft’s .NET platform. For Adlib Designer 7.4 to function on your computer, you will therefore need the .NET Framework, version 4.5 in this case, the Extended or Full version: the .NET 4.5 Client alone is not enough. If the proper .NET framework is not present on your computer yet, you’ll be prompted to install it, during installation of Adlib. To be sure about the presence of .NET 4.5 before trying to install it, you can check for it manually. Open the Windows Control Panel and choose Programs > Programs and Features. In the window that
15

Installation Installing Adlib applications
opens, scroll through the list of applications. If you see Microsoft .NET Framework 4.5, then that version is already installed and you do not need to install it again.Go to: https://www.microsoft.com/net/download/framework to down-load and install .NET if it isn’t already installed on your computer. Usually, you should leave older versions of .NET on your computer, unless indicated otherwise by Microsoft.
Compatibility Adlib Designer runs under Windows versions from 7 up. You can always edit old applications with the current version of
Adlib Designer, and run them afterwards using the latest Adlib core software (adlwin.exe and such).
In general, when you modify your application in the latest version of Designer, you won’t be able to edit that application anymore, or parts thereof, in older versions of Adlib Designer.
Adlib Designer is largely also compatible with all previous ver-sions of the Adlib core software executables. This means you can edit your old application, like version 3.4, in Adlib Designer 7.4 and run it afterwards using your old Adlib core software, like ver-sion 6.0 for example. However, new versions of Adlib Designer offer more options and settings than previous versions, while the Adlib core software which will run your application can only deal with settings that existed when that core software was released. And when you’re editing your application, chances are you’ll sooner or later be applying settings which can only be handled by the latest version of the Adlib core software, not by the older ver-sion you are still using - Adlib Designer does not warn you when you use such a newer option. Therefore, we recommend to always upgrade your core software executables to the most recent ver-sion, to be able to apply the full range of settings that Adlib De-signer offers, and to enjoy all the new functionality added in the newer executables.
See http://documentation.axiell.com/alm/en/index.html?ds_in-troadlibdesignercompatibility.html for an overview of all compat-ibility issues in recent versions of Designer.
More documentationAdlib Designer contains a number of tools. In each tool window that you open there is contextual Help available through the Help menu or by clicking the Help or ? button. This is an extensive online Help sys-tem similar to the Help systems in Microsoft Office products.
16
Installing Adlib applications Installation
Working in Designer: only edit a copy of your applicationTo ensure the safety of your current Adlib application and data, al-ways make a copy of your application and maybe of your data too (the latter only if no-one will be working on it while you edit the ap-plication), and then only edit that copy. When you are certain your edited copy is working okay – test it! – you can replace the original with it. Also make regular backups of your original Adlib folder, so you can always go back to a previous state of the application.
2.3 Re-installing or installing an upgrade
The installation procedure for the Adlib core software or an Adlib application will only allow for a new installation if no older installation of this installer type can be found, and the application installation will always create a new, empty SQL database. The next time you run the same installer (for the same version), you can only choose to Repair or Remove the existing installation: Repair: only with AdlibSetup#.msi you can use Repair to repair
the original installation if you accidentally deleted files from the \Adlib for Windows folder or edited those files incorrectly.
Remove: if you’d like to stop using Adlib completely or if you have second thoughts about the location where you installed Adlib just now, you can use Remove to delete the core software (use Adlib-Setup#.msi) or application plus shotcuts (use Model application #.msi). The SQL database won’t ever be deleted automatically. After removal you can start a fresh installation. Note that prior to upgrading your core software you must never de-install anything: an upgrade installation automatically updates all relevant files.
When you enter into a service agreement, upgrades of the core soft-ware will be made available to you regularly via http://my.adlibsoft.-com/. When you install such service releases and major releases, only the core software (executables like adlwin.exe, dlls and certain sys-tem texts and Help-texts) will be replaced. Your data and applications remain unchanged. Start the downloaded AdlibSetup#.msi installa-tion procedure, follow the on-screen instructions and select the de-sired, existing Adlib folder* with executable files to be updated. Such an upgrade can only be executed once, so if you’d like to update mul-tiple folders with Adlib executable files, then after installation of the upgrade you’ll have to copy all files from the updated folder to the other relevant folders.
17
Installation Installing Adlib applications
Please do always make a backup of your SQL database and the Adlib folders before you install an upgrade, just to be safe. After installation, Windows 7 and Windows 8 users may be confronted with a Windows message stating that the software may not have been installed correctly. This message is incorrect. Click "This pro-gram has been installed correctly" to close the message. You will be able to start Adlib normally.* The installer will check the Windows registry for the location of your last installed Adlib software (installed with an installer that is, manual copies of Adlib folders and files won't be found) and will suggest to upgrade that installation. If the suggested location is not to your lik-ing, you can select any other Adlib executables folder to upgrade.
Sdi.exe and wwwopac.exeIf you are using SDI, then the files for this functionality are usually located in a separate \sdi folder in your Adlib system. However, after you’ve executed an upgrade, the installer has placed the most recent versions of the required files in your \Adlib for Windows or \execut-ables folder with the other executable Adlib files because the installer knows nothing of the separate sdi folder. That is why you’ll have to copy the files relevant to SDI from the \Adlib for Windows or \execut-ables folder to your sdi folder (note you’ll have to copy them, not move them, because some used files also provide functionality to other Adlib software). The existing files in the sdi folder can be over-written, but do not empty the folder beforehand. The following 10 files must be copied: adliblic.dll, adlibu.dll, detailIsbd.xsl, evalsmtp.dll, mfc90.dll, msvcp90.dll, msvcr90.dll, MSVCRT.DLL, readme.docx, sdi.exe. (By the way, the number 90 in some of these file names may differ from the installed files in your system.) The current default.sdi file must be left intact and should not be overwritten: this file con-tains some custom settings. Your adlib.lic file, sdi.bat, sdiadmin.html, sdiadmin.txt, sdiadmin.xsl and sdilog.xml must also be left as they are.For wwwopac.exe, we can tell a similar story (not applicable to wwwo-pac.ashx, the API): if you are using a web application running on ww-wopac.exe, you’ll have to make sure that before you execute the up-grade procedure, the wwwopac.exe file is also present in your \Adlib for Windows or \executables folder (copy it if necessary): only then will the upgrade also place the latest version of wwwopac.exe in that folder. After the upgrade, you’ll have to copy (not move) all files rel-evant to wwwopac from your \Adlib for Windows or \executables folder to the folder in which your wwwopac executable files are loc-ated normally. This applies to the following six files: wwwopac.exe, adlibu.dll, adlibimg.dll, adlibweb.dll, adliblic.dll and rtf2xml.dll.
18
Installing Adlib applications Installation
Upgrading from versions older than 6.5.0 or 6.5.1If your application runs on an Adlib SQL database and you are cur-rently using Adlib version 6.4.0.644 or older, you'll have to convert your databases to the new table structures implemented in 6.5.0 be-fore you can start using the new Adlib version. If your application runs on an Adlib Oracle database and you are currently using Adlib version 6.5.0 or older, you'll have to convert your databases to the new table structures implemented in 6.5.1 before you can start using the new Adlib version. This conversion can be performed with the Adlib Up-date64 tool. Please contact our helpdesk for more information about this tool.
Upgrading from versions older than 5.0From Adlib 5.0 a new license file is used: adlib.lic. If you are already using 5.0 or higher, you can use upgrades to newer versions immedi-ately after installing; your license file has already been renewed, is in the right place and will not be overwritten by the upgrade. Only when you install a 5.0 or higher version upgrade over an Adlib version that is older than 5.0, then for you the following applies: if you have re-ceived the release on CD or USB flash drive, then on it you’ll find the proper license file; if you have downloaded the release, then e-mail our helpdesk for the required license file. Place this file (you can make copies of it) after installation of the upgrade in your \Adlib for Windows subfolder (or in \executables or in the \bin and \tools folders). (The point is that the license file should be located in the same folders as your Adlib .exe files. How these folders are named is not important.)
19
3 Setting up SQL Server for AdlibTo prepare your Adlib system for SQL Server, the following steps have to be taken.
3.1 Creating a new databaseIf you are not using the installation procedure for model application 4.5.1 (which automatically creates a SQL database), then you’ll need to create an empty database manually:1. For use with Adlib 7.4 or higher, install Microsoft SQL Server 2008
R2 or higher on a server, if that hasn’t been done yet. See the ac-companying documentation with that product for more informa-tion or see Appx 1: installing Adlib for SQL Express, in this man-ual.
2. Start SQL Server Management Studio Express (for SQL Server 2008 R2) or a comparable tool, from the server.
21

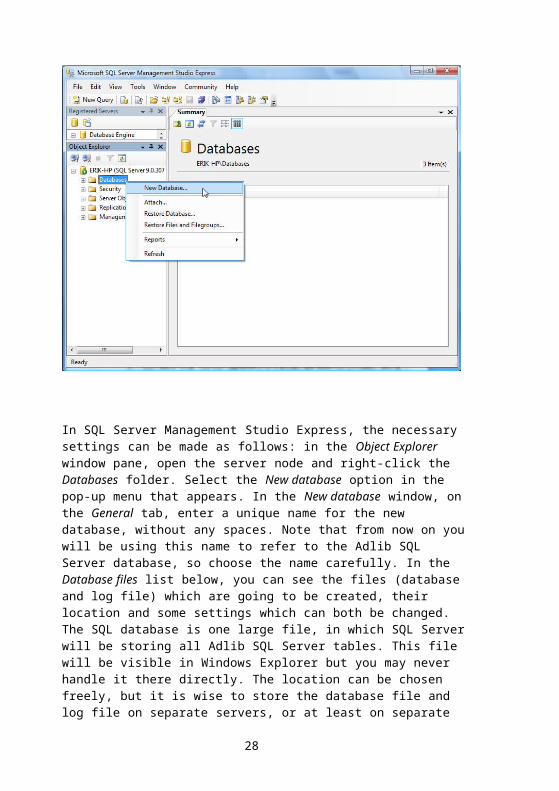
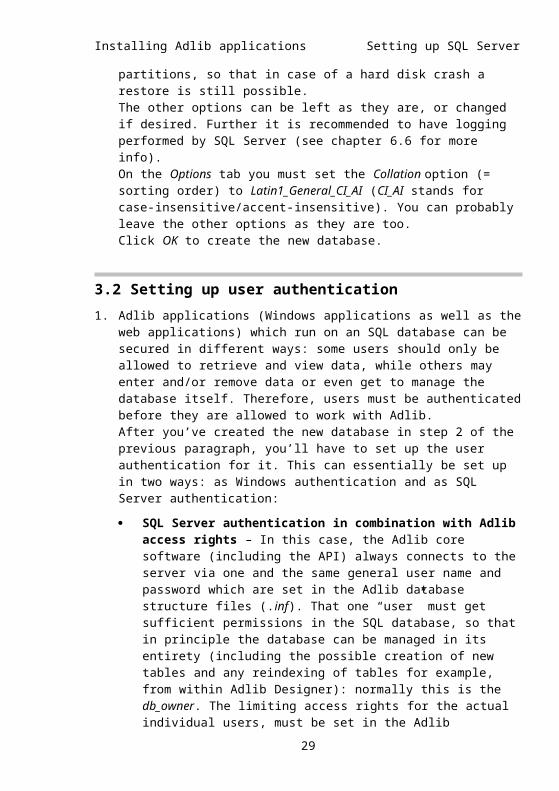
In SQL Server Management Studio Express, the necessary set-tings can be made as follows: in the Object Explorer window pane, open the server node and right-click the Databases folder. Select the New database option in the pop-up menu that appears. In the New database window, on the General tab, enter a unique name for the new database, without any spaces. Note that from now on you will be using this name to refer to the Adlib SQL Server database, so choose the name carefully. In the Database files list below, you can see the files (database and log file) which are going to be created, their location and some settings which can both be changed. The SQL database is one large file, in which SQL Server will be storing all Adlib SQL Server tables. This file will be visible in Windows Explorer but you may never handle it there directly. The location can be chosen freely, but it is wise to store the database file and log file on separate servers, or at least on separate partitions, so that in case of a hard disk crash a restore is still possible. The other options can be left as they are, or changed if desired. Further it is recommended to have logging performed by SQL Server (see chapter 6.6 for more info). On the Options tab you must set the Collation option (= sorting order) to Latin1_General_CI_AI (CI_AI stands for case-insensitive/accent-insensitive). You can probably leave the other options as they are too.Click OK to create the new database.
3.2 Setting up user authentication1. Adlib applications (Windows applications as well as the web ap-
plications) which run on an SQL database can be secured in differ-ent ways: some users should only be allowed to retrieve and view data, while others may enter and/or remove data or even get to manage the database itself. Therefore, users must be authentic-ated before they are allowed to work with Adlib. After you’ve created the new database in step 2 of the previous paragraph, you’ll have to set up the user authentication for it. This can essentially be set up in two ways: as Windows authentic-ation and as SQL Server authentication: SQL Server authentication in combination with Adlib
access rights – In this case, the Adlib core software (includ-ing the API) always connects to the server via one and the same general user name and password which are set in the Adlib database structure files (.inf). That one “user” must get sufficient permissions in the SQL database, so that in princi-ple the database can be managed in its entirety (including the possible creation of new tables and any reindexing of tables
22
Installing Adlib applications Setting up SQL Server
for example, from within Adlib Designer): normally this is the db_owner. The limiting access rights for the actual individual users, must be set in the Adlib application structure files (.pbk); see the Adlib Designer Help for more information about this. In this setup, those .pbk files do need to be located in a secured, e.g. virtual, Adlib folder, to prevent them from being modified by unauthorized persons; see elsewhere in this manual for information about setting up a virtual folder for Adlib structure files.The advantage of this authentication method is that the ac-cess rights management mainly takes place in Adlib, and can be done by an Adlib application manager. This authentication method is also the easiest method for solving any individual problems with establishing a connection to the SQL database in a multi-server environment; this is because the other au-thentication method (see below) uses Active Directory, which may sometimes complicate user authentication in a multi-server environment.Also, any adjustments to tables in the database (through De-signer) will always be performed under the required db_owner role.A disadvantage may be that user names and passwords are located in an Adlib .pbk file which needs to be secured well. Also,all Adlib users must actually be registered and managed in the .pbk file.
Windows authentication by means of Active Directory, possibly in combination with Adlib access rights – With this method, you use the Windows login data (user names and passwords) which has already been registered in Active Directory for your local network. For the benefit of Adlib, those users must, as much as possible, be divided into groups which should be assigned different access rights in SQL Server. So, access of the individual user to the SQL database depends on the name and the password with wich the user is logged onto the local network. Any further refinement of the access rights can be taken care of in Adlib.An advantage of this method is that user names and pass-words are well secured in Active Directory, and that all users of the network are already registered; only for the benefit of Adlib you’ll still have to divide the users into groups which can then be assigned certain access rights per group.A possible disadvantage in a multi-server environment is that each server has its own Active Directory (server 1 could have a separate domain), and because of this it may sometimes be difficult to streamline user authentication; in that case, the first authentication method (see above) is probably a better
23
Setting up SQL Server Installing Adlib applications
solution.Another disadvantage is that adjustments to the database through Adlib Designer, like the reindexing or creation of ta-bles, might be handled by users who are not a db_owner, with the consequence that tables will be created which do not have the dbo prefix but the login name of the user instead. This produces an erroneous database and must always be avoided.
Which authentication methode is to be preferred, depends on the way in which your Adlib system has been installed, on the setup of your local network, and on your own preferences and security policy. We usually prefer SQL Server authentication.Below, you’ll find a step-by-step procedure for setting up either authentication method properly.
Setting up SQL authentication1. In Microsoft SQL Server Management Studio (Express), open the
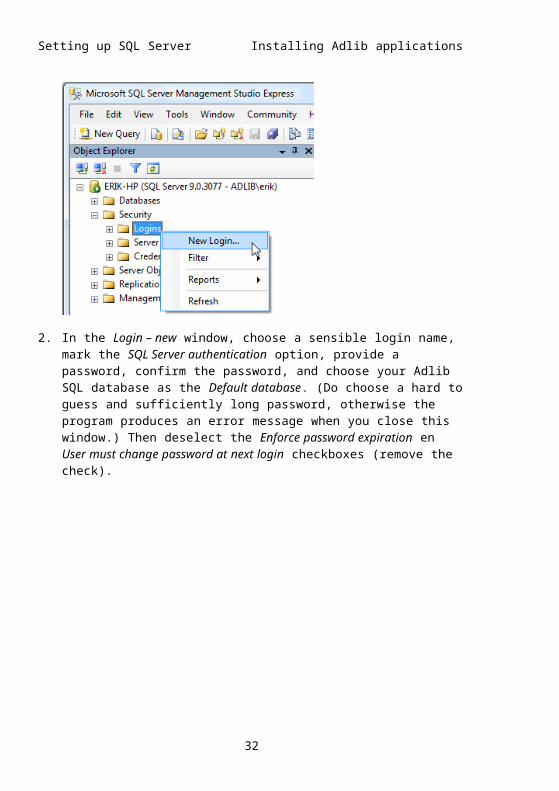
Security folder underneath the SQL Server folder and right-click Logins. In the pop-up menu which opens, click the New Login… option to create a login for all users together.
2. In the Login – new window, choose a sensible login name, mark the SQL Server authentication option, provide a password, con-firm the password, and choose your Adlib SQL database as the Default database. (Do choose a hard to guess and sufficiently long password, otherwise the program produces an error mes-sage when you close this window.) Then deselect the Enforce password expiration en User must change password at next login checkboxes (remove the check).
24

Installing Adlib applications Setting up SQL Server
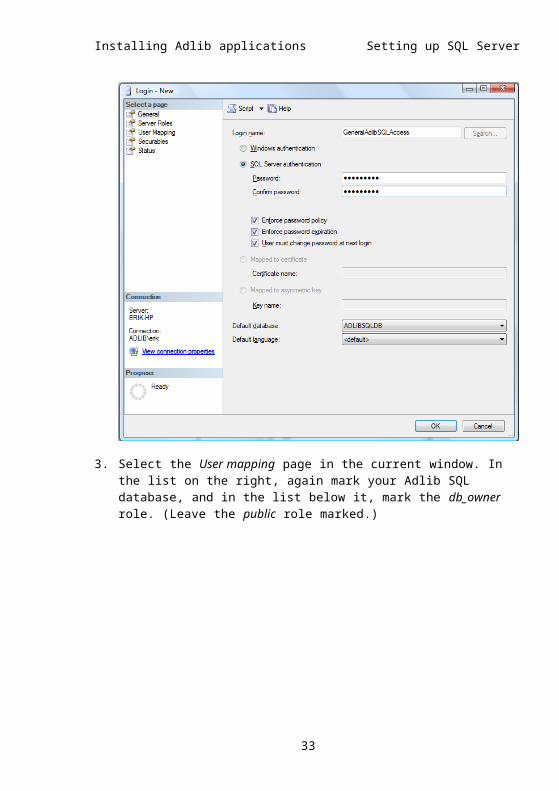
3. Select the User mapping page in the current window. In the list on the right, again mark your Adlib SQL database, and in the list be-low it, mark the db_owner role. (Leave the public role marked.)
25

Setting up SQL Server Installing Adlib applications
Then click OK. The new login is now present in the list.
26
Installing Adlib applications Setting up SQL Server
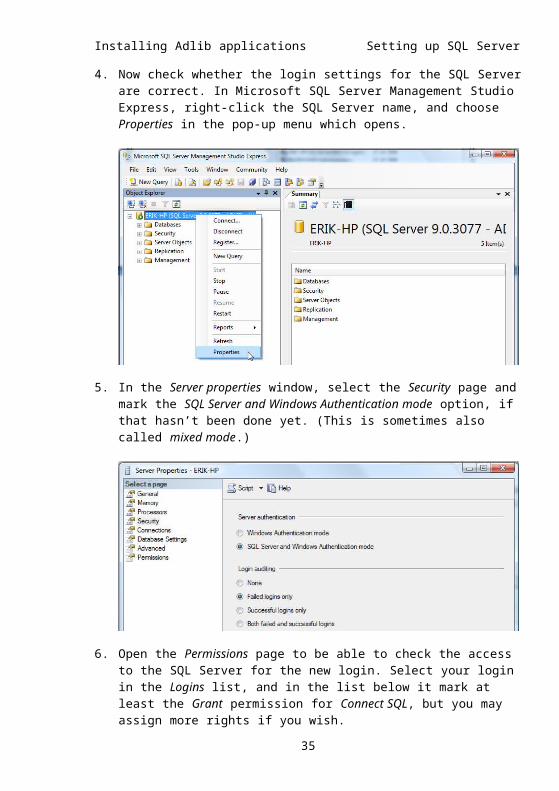
4. Now check whether the login settings for the SQL Server are cor-rect. In Microsoft SQL Server Management Studio Express, right-click the SQL Server name, and choose Properties in the pop-up menu which opens.
5. In the Server properties window, select the Security page and mark the SQL Server and Windows Authentication mode option, if that hasn’t been done yet. (This is sometimes also called mixed mode.)
6. Open the Permissions page to be able to check the access to the SQL Server for the new login. Select your login in the Logins list, and in the list below it mark at least the Grant permission for Con-nect SQL, but you may assign more rights if you wish.
27

Setting up SQL Server Installing Adlib applications
If you click the Effective permissions button, you can see which rights users with this login actually have.
Click OK to close this window, and click OK again in the Server Properties window to store the changes.
28

Installing Adlib applications Setting up SQL Server
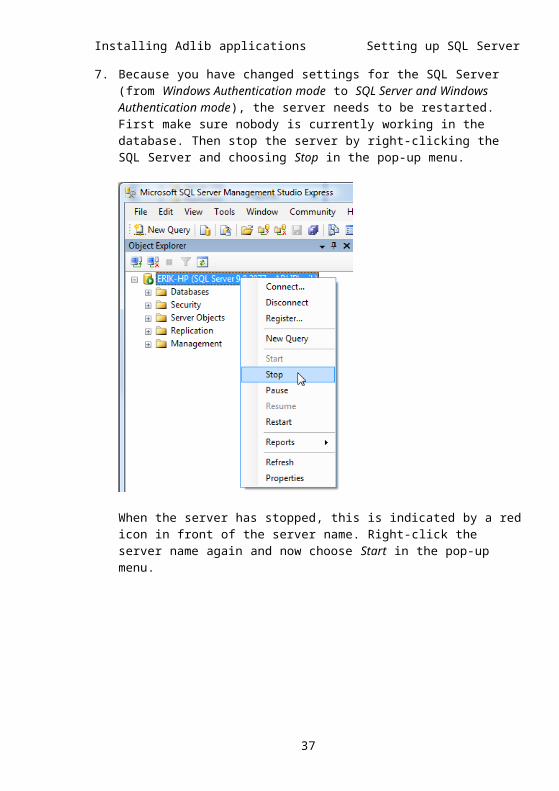
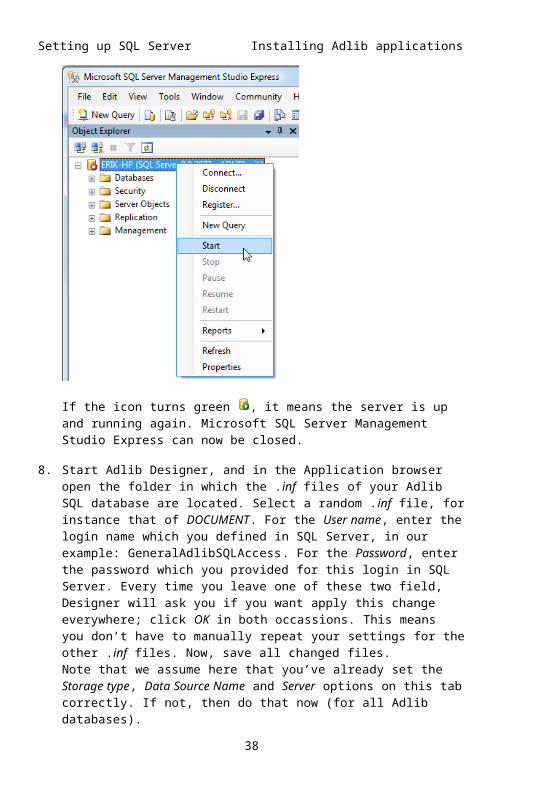
7. Because you have changed settings for the SQL Server (from Win-dows Authentication mode to SQL Server and Windows Authenti-cation mode), the server needs to be restarted. First make sure nobody is currently working in the database. Then stop the server by right-clicking the SQL Server and choosing Stop in the pop-up menu.
When the server has stopped, this is indicated by a red icon in front of the server name. Right-click the server name again and now choose Start in the pop-up menu.
29
Setting up SQL Server Installing Adlib applications
If the icon turns green , it means the server is up and running again. Microsoft SQL Server Management Studio Express can now be closed.
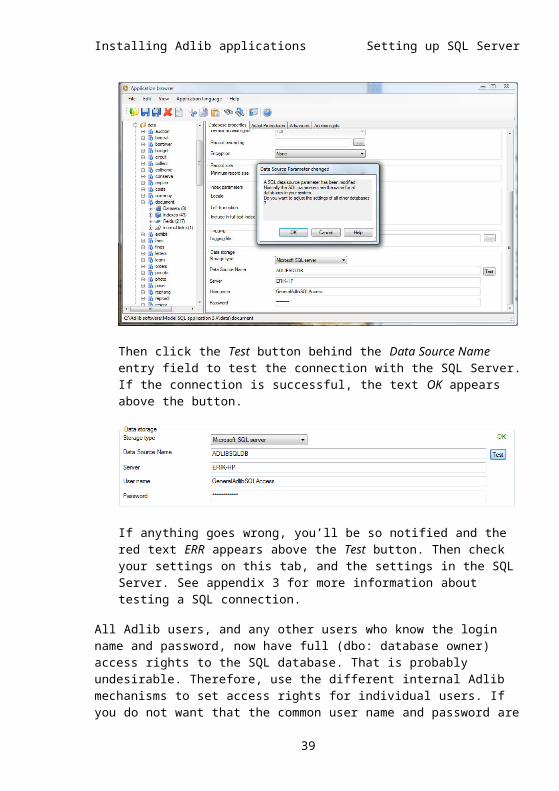
8. Start Adlib Designer, and in the Application browser open the folder in which the .inf files of your Adlib SQL database are lo-cated. Select a random .inf file, for instance that of DOCUMENT. For the User name, enter the login name which you defined in SQL Server, in our example: GeneralAdlibSQLAccess. For the Password, enter the password which you provided for this login in SQL Server. Every time you leave one of these two field, Designer will ask you if you want apply this change everywhere; click OK in both occassions. This means you don’t have to manually repeat your settings for the other .inf files. Now, save all changed files. Note that we assume here that you’ve already set the Storage type, Data Source Name and Server options on this tab correctly. If not, then do that now (for all Adlib databases).
30
Installing Adlib applications Setting up SQL Server
Then click the Test button behind the Data Source Name entry field to test the connection with the SQL Server. If the connection is successful, the text OK appears above the button.
If anything goes wrong, you’ll be so notified and the red text ERR appears above the Test button. Then check your settings on this tab, and the settings in the SQL Server. See appendix 3 for more information about testing a SQL connection.
All Adlib users, and any other users who know the login name and password, now have full (dbo: database owner) access rights to the SQL database. That is probably undesirable. Therefore, use the differ-ent internal Adlib mechanisms to set access rights for individual users. If you do not want that the common user name and password are visible in Designer, or if you do not want to use a common user name and password, then for User name you may also literally enter the following string: <mustAuthenticate>, and leave Password empty, to use the pbk authetication, database authentication, or Ac-tive Directory authentication that you activated elsewhere (see the Designer Help for more information about this).
31
Setting up SQL Server Installing Adlib applications
Windows authentication with Active Directory1. Divide all Adlib users in Active Directory into groups, so that in
SQL Server only groups need to be entered and assigned access rights, instead of having to do that for each individual user. For example, you can put together groups for users who are only al-lowed to view data (e.g. trainees and visitors), for users who are allowed to view, edit, enter and delete (e.g. registrars and librari-ans), and for users allowed to manage the database (structure) (db_owner role required for those last users).
2. Start Microsoft SQL Server Management Studio Express, if that hasn’t been done yet, open the Security folder underneath the SQL Server folder and right-click Logins. In the pop-up menu which opens, click the New Login… option.
32

Installing Adlib applications Setting up SQL Server
3. In the Login – new window, click the Search button to be able to select an Active Directory user group. First, the Select a user or group window opens. In it, click the Locations button and select the network the Adlib users are part of, adlibsoft.com in our ex-ample. In the Enter the names of the objects field, enter the par-tial or whole name of a user group which you would like to set as login, and click the Check names button. The Identical names found window opens if the entered name is not yet correct. In this window, select the desired user group and click OK. Also click OK in the Select a user or group window.
33
Setting up SQL Server Installing Adlib applications
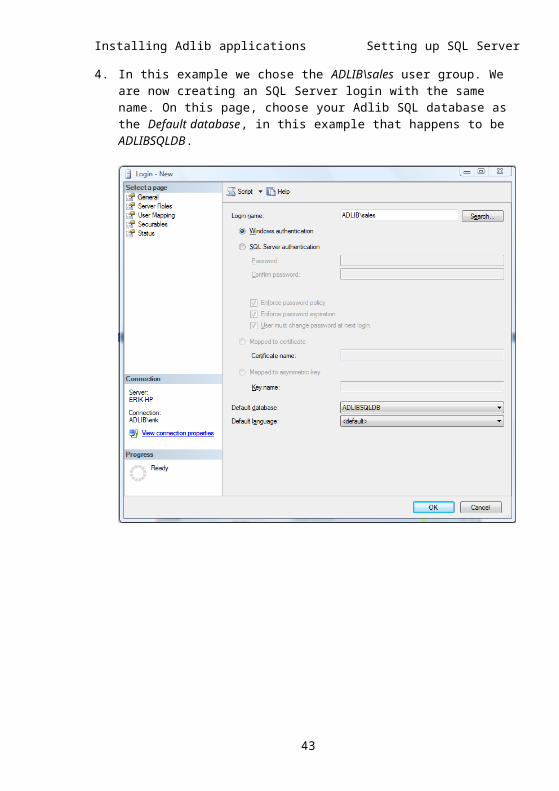
4. In this example we chose the ADLIB\sales user group. We are now creating an SQL Server login with the same name. On this page, choose your Adlib SQL database as the Default database, in this example that happens to be ADLIBSQLDB.
34
Installing Adlib applications Setting up SQL Server
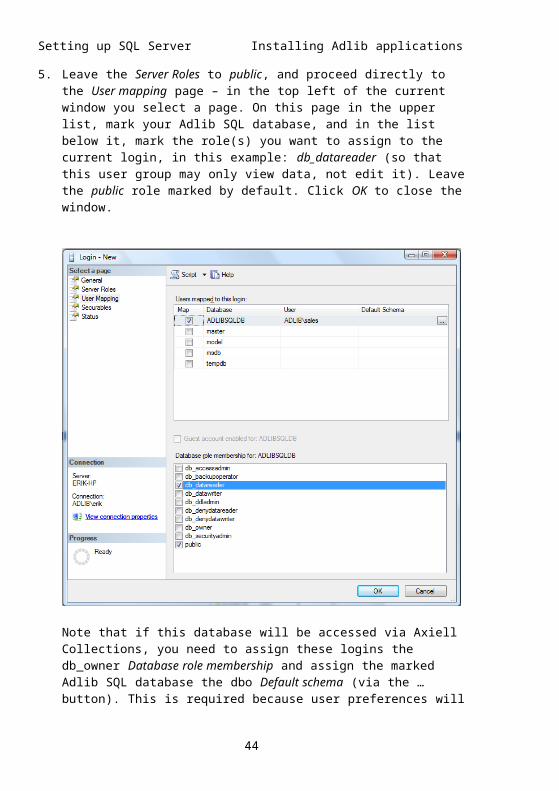
5. Leave the Server Roles to public, and proceed directly to the User mapping page – in the top left of the current window you select a page. On this page in the upper list, mark your Adlib SQL data-base, and in the list below it, mark the role(s) you want to assign to the current login, in this example: db_datareader (so that this user group may only view data, not edit it). Leave the public role marked by default. Click OK to close the window.
Note that if this database will be accessed via Axiell Collections, you need to assign these logins the db_owner Database role membership and assign the marked Adlib SQL database the dbo Default schema (via the … button). This is required because user preferences will be stored in their own SQL table which Collec-tions must be able to create within the dbo schema.
35

Setting up SQL Server Installing Adlib applications
6. In the Object Explorer, now open your Adlib SQL database, with in it the Security folder and subsequently the Users folder. Right-click the user group you just added, ADLIB\sales in this example, and choose Properties in the pop-up menu which opens.
36
Installing Adlib applications Setting up SQL Server
7. Here, mark the desired schema for this user: it should be the same as the database role(s) marked in the list below it: db_datareader in this example. The Active Directory user group has now been added as an SQL Server user, with read-only access rights.
8. Repeat this procedure (the steps 2 up to and including 7) for the other Active Directory users or user groups and assign the de-sired access rights to everyone of them. Note that if you assign the db_datawriter role, you should also assign the db_datareader role.
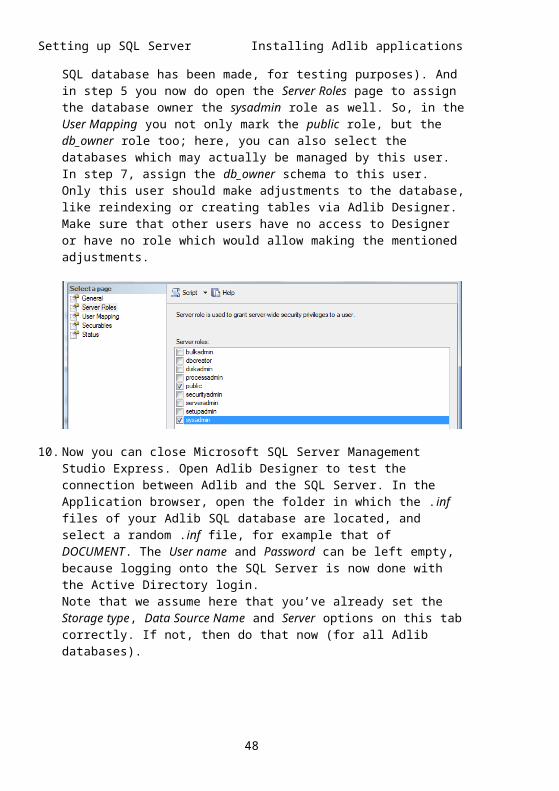
9. Also add at least one Active Directory user, probably yourself, who gets the db_owner role as SQL Server user. For this user, set the Default database in step 4 to master (all database together): this in case there is more than one SQL database which you should be allowed to manage (for instance when a copy of your live Adlib SQL database has been made, for testing purposes). And in step 5 you now do open the Server Roles page to assign the database owner the sysadmin role as well. So, in the User Mapping you not only mark the public role, but the db_owner role
37

Setting up SQL Server Installing Adlib applications
too; here, you can also select the databases which may actually be managed by this user. In step 7, assign the db_owner schema to this user.Only this user should make adjustments to the database, like reindexing or creating tables via Adlib Designer. Make sure that other users have no access to Designer or have no role which would allow making the mentioned adjustments.
10. Now you can close Microsoft SQL Server Management Studio Ex-press. Open Adlib Designer to test the connection between Adlib and the SQL Server. In the Application browser, open the folder in which the .inf files of your Adlib SQL database are located, and se-lect a random .inf file, for example that of DOCUMENT. The User name and Password can be left empty, because logging onto the SQL Server is now done with the Active Directory login.Note that we assume here that you’ve already set the Storage type, Data Source Name and Server options on this tab correctly. If not, then do that now (for all Adlib databases).
Then click the Test button behind the Data Source Name entry field to test the connection with the SQL Server. If the connection is successful, the text OK appears above the button. If anything goes wrong, you’ll be so notified and the red text ERR appears above the Test button. Then check your settings on this tab, and the settings in the SQL Server. See appendix 3 for more informa-tion about testing a SQL connection.
38
Installing Adlib applications Setting up SQL Server
All Adlib users can now access the SQL database with their Active Di-rectory user name and their own Windows password, with the access rights as defined for their login in SQL Server. This probably protects your database enough, but you can always still use the different inter-nal Adlib mechanisms to refine the access rights for individual users. Do make sure that no conflicting access rights are set this way: this can of course lead to unexpected situations and confusion. You could keep an overview of SQL Server rights and Adlib access rights as-signed to users. See the Designer Help for more information about ac-cess rights on Adlib level
3.3 Accessing the SQL database outside the serverIf you want to approach your SQL database with an Adlib application which is not located on the server where the SQL database resides, then sqlservr.exe must be added to the Windows firewall of the server (if that hasn’t been done before). You must do this even if the firewall isn’t being used.1. From the Windows Control Panel, open the Windows Firewall un-
der System and Security. Then choose Allow a program or feature through Windows Firewall. (The options might be called differ-ently in your Windows version.)
2. Click the Allow another program button and search for sqlservr.exe to add it. This may be located at: C:\Program Files (x86)\Microsoft SQL Server\MSSQL10_50.MSSQLSERVER\MSSQL \Binn\sqlservr.exe. If the Allow another program button is greyed out, please click the Change settings button first: the button will become active. Now the program will appear in the list of Allowed programs and features. The program must be marked and only be available in the Domain.
3.4 Making your data available (conversion)If for an earlier installation of Adlib you chose to use CBF databases (the old, proprietary Adlib database format) while now you want to migrate to SQL, then those databases must be converted to tables in the new SQL Server database that you created earlier in this chapter, using the Adlib CBF2SQL tool (dowloadable from http://my.adlibsoft.-com/).1. Create a backup of your Adlib \data folder.2. Use CBF2SQL to execute the conversion. You can do it yourself or
have it done by Axiell ALM Netherlands: see chapter 5 for a de-scription of the conversion procedure.
39
Setting up SQL Server Installing Adlib applications
After the conversion you have an SQL Server database in which the original Adlib databases are included as tables. All indexes are present too, except for the priref index.Of the files in your \data folder, only the .inf files will still be used actively, any other files won’t. Now you may set your Adlib \data folder to read-only, if you wish to do so, because of security con-siderations: then your database structure files (.inf files) can no longer be adjusted without your consent. (The relevant server will handle the safety of your SQL Server database.)
3. Since your data is now being stored in a different way, you’ll have to reconsider how to secure it by means of backups and logging. If the system on which the SQL Server is located is ever lost, it is important to have stored a recent backup elsewhere, as is an up to date logging file containing all changes since the last backup. To start with, you’ll have to use SQL logging from now on. There-fore use Adlib Designer to check if you had ever set a Logging file in your .inf files: if so, then empty that option in all .inf files (also see the screenshot below). Subsequently see chapter 6.6 for ex-tensive information about setting up the new way of logging and making backups.
4. You don’t need to adjust your application or your desktop short-cuts. The necessary new references have been inserted automat-ically in your database structure files (.inf). In your Adlib application you can now approach the new database like you were used to. In the interface of Adlib you’ll see almost no difference: in the status bar only the other type of the data-base is indicated, for instance ANSI – Microsoft SQL Server, but that is all.
40
Installing Adlib applications Setting up SQL Server
After setting up SQL Server for Adlib, you can see the difference with CBF by opening a database in the Application browser of Adlib De-signer. At the bottom of the first properties tab you’ll see four options for Data storage. Only if the current database is part of an SQL Server or Oracle database, its name will be filled in here (see the screenshot above).Note that because Adlib databases are entered as tables in one SQL Server database, each database in Designer uses the same data-source name.If you use SQL Server authentication, then underneath the Data Source Name and Server you’ll also find the user name and password for all users together, that you set earlier when you created the new database.
41

4 Setting up Oracle for AdlibThis chapter is only relevant to you if you want to use the Oracle database platform instead of Adlib’s proprietary CBF.1. Create a backup of your Adlib \data folder.2. To begin with, Oracle Server has to be installed on the server.3. Then you’ll have to create a new Oracle database on that server
(if none exist yet, otherwise you only have to create a new Ta-blespace in the existing Oracle database, see step 5) and make the new database available to the entire network by using the Database Configuration Assistant tool from Oracle; in this config-uration you can keep the default settings. Choose the name that you also want to use for the TNS Service name when setting the ODBC connection. The SID can be the same as the TNS name. Store the new database in the File system.A shortcut to the new database will be added under Start > Pro-grams > Oracle (or something similar). If no shortcut is created it’s possible to visit the web interface (Enterprise manager) e.g. at http://localhost:5501/em on the server. The port number (5501 in this example) is the unique key for each database.
4. Click the shortcut for the new database to open the database structure in the Oracle Enterprise Manager. By default you’ll find a number of accounts, including sys and system. Possibly, the database has not started up yet. Then do so with your Windows user name and password in the Host Credentials field.
5. On the Administration tab you must create a new Tablespace for your data. Choose Create Tablespace to do so. Give it a name and set Extent Management to Locally Managed, Type to Permanent, and Status to Read/Write.Via Add data file you assign the physical file to store the data in. Let the default size be 100 MB and be sure to let the file grow automatically when it exceeds 100 MB (mark the relevant option).
6. Now create a user via Create User. As Authentication, choose Password. As Default Tablespace, enter the name of the Ta-blespace you just created. The temporary Tablespace can be set to Temp.
7. Select Roles. By default you have only the Connect role. You should add roles with privileges as follows:
Connect: is needed to connect to the Oracle database including
43

read/write/delete privileges (default). So Adlib users have to have this role.DBA: is required to implement the converted CBF database into the Oracle database, so this role is necessary when converting with the CBF2SQL tool (see step 12).You may add a new one, as long as it has at least connect rights (database administrator) for normal users, or dba rights for ad-ministrators.
8. An Oracle client (of the Administrator type, other settings default) has to be installed on the computer from which you want to run the conversion. (The Oracle client will take care of the connection with the database on the server.)Adlib versions 6.5.0 and 6.5.1 need the Microsoft Oracle client, while older en future versions use the ODAC client from Oracle.
9. With the aid of the Net Manager you’ll have to configure each Oracle client and create a TSN Service. Open the Service naming folder on the left and for Service name, add the name of the data-base on the server, and for the Host name enter the server name including the domain name. Make the actual connection.
10. When using Adlib 6.0, you’ll also have to create a DSN for each new database, on every client, for all exchange of data through ODBC. Through this name you’ll always approach the database. From 6.1.0 it is no longer necessary to create a DSN though: so if you’ll use an Adlib Oracle database in 6.1.0 or higher, for the first time, then you do still have to create TNS Services, but no DSNs anymore. In that case you can skip this step 6; but then you do have to enter a Server name for the relevant database in the database properties of the .inf file. If you don’t want to store a server name in the .inf, then you do have to create a DSN (plus TNS). (By the way: this principle applies to approaching an Oracle database through adlwin, adserver, wwwopac as well as through adloan.)
In Windows 10 you create a DSN as follows: 10.1 - In Windows, open the Control panel, double-click System and security, System management and then ODBC Data sources (32 bit). (If you can’t find these options, then start the ODB-CAD32.EXE program from your system or system32 subfolder.) 10.2 - Open the System DSN or User DSN tab, depending on whether you want to make your database available to all users of this client or just for the current user, and click Add.
10.3 - Choose Microsoft ODBC for Oracle from the list and click Finish. For TNS Service name fill in the service name that you spe-cified earlier in the Net Manager.
44

Installing Adlib applications Setting up Oracle
11. For the security you have to use Oracle authentication. But the list with user names and passwords (as has been set in Oracle) must also be available in Adlib. Use the Adlib authentication mod-els for this purpose. Each of the three available methods may be applied, in principle, although saving said information in a pbk file is not very secure.So the User ID option may be left empty.
12. If for an earlier installation of Adlib you chose to use CBF data-bases while now you want to migrate to Oracle, then those data-bases must be converted to the Oracle format. Most likely, this conversion has to be done by Axiell ALM Netherlands, but you can do it yourself as well: see chapter 5 for a description of the con-version procedure.After the conversion you have an Oracle database in which the original Adlib databases are included as tables. All indexes are present too, except for the priref index. (You’ll need dba rights to make any changes in this database structure via Designer.)Now you may set your Adlib \data folder to read-only if you wish to do so because of security considerations and if you are not planning to make changes to the database structure right now: then your database structure files (.inf files) can no longer be ad-justed without your consent. (The relevant server will handle the safety of your Oracle database.)
13. You don’t need to adjust your application or your desktop short-cuts. The necessary new references have been inserted automat-ically in your database structure files (.inf).In your Adlib application you can now approach the new database like you were used to. In the interface of Adlib you’ll see almost no difference: in the status bar only the other type of the data-base is indicated, that is all.
After setting up Oracle for Adlib, you can see the difference with CBF by opening a database in the Application browser of Adlib Designer. At the bottom of the first properties tab you’ll see four options for Data storage. Only if the current database is part of an SQL Server or Oracle database, its name will be filled in here. So this is the same name that you assigned to the DSN or TNS Service for it.Note that because Adlib databases are entered as tables in one SQL Server or Oracle database, each database in Designer uses the same DSN/TNS.
If you do not use Windows verification for Oracle, then underneath the DSN you’ll also find the user name and password that you set ear-lier when you created the DSN: this means that all users together have one user name and password. If you do not use Windows verifi-
45
Setting up Oracle Installing Adlib applications
cation, but do not want that the common user name and password are visible in Designer, or if you do not want to use a common user name and password, then for User id you may also literally enter the following string: <mustAuthenticate>, and leave Password empty, to use the pbk authetication, database authentication, or Active Direc-tory authentication that you activated elsewhere (see the Designer Help for more information about this).
46
5 Converting CBF databases to SQLAdlib model application 4.5.1 has been installed for SQL directly: then the installation procedure will have created your new SQL database with all required Adlib tables, so that you can start working with it right away.However, if you ever installed Adlib with CBF databases and you are currently migrating to the SQL Server or Oracle database platform (also see the previous chapters), then at some point you’ll have to convert your Adlib CBF databases (filled with data or still empty) to the new format. This chapter describes how to do this conversion yourself.
Just to be safe: create a backup
If you are about to convert pre-existing (filled) Adlib databases to a single SQL or Oracle database, it’s good to make a backup of your Adlib \data folder first. Store the copy to a safe destination, like an ex-ternal drive or CD-ROM.
After you have created an empty SQL Server database or Oracle data-base (without Adlib tables yet), you must execute this conversion us-ing the Adlib .NET tool cbf2sql.exe (so the .NET framework must be in-stalled), which can be obtained from the Adlib Helpdesk if you have an Adlib SQL license: simply double-click cbf2sql.exe in Windows Ex-plorer to start it. This tool takes the structure and data of Adlib databases and converts it to SQL Server or Oracle format, creating the tables for you and then populating them with the existing data (if present). Make sure you have enough (full dba or at least db_ddladmin) access rights (Permit in database role for your personal login for the concerning database) to the SQL Server or Oracle database, before starting the conversion.
Saving time when converting large databases
When using Adlib for SQL, individual actions, such as updating a key in an index, are bundled in transactions. If any of the actions within a transaction fail, the transaction as a whole is “rolled back”; if all suc-ceed, the total ‘batch’ of individual actions is “committed”. A single record write in a museum object database, for example, contains many individual actions within a single transaction. The exact amount of actions depends on the number of indexes that have been defined for a database. SQL server stores the individual ac-
47

tions in the log file (.ldf) until they are commited. If the recovery model is set to “simple”, the individual actions are cleared from the .ldf file afterwards; if the recovery model is set to “bulk logged” or “full” then each action is retained in the log file.
Tip 1: when working with CBF2SQL, set the recovery model to “simple” to prevent an ever growing .ldf file; once you are done with the CBF2SQL conversion and want to enter production mode, set the recovery model to “full” to allow for recovery from any point in time.
Once a transaction is complete, the actions in the .ldf file are written to the “real” data file, the .mdf file. This happens in “bursts”: once the cache has collected sufficient work, the .mdf file is updated. If the .mdf file and the .ldf file are on the same physical drive then up-dating the .mdf file will interfere with new actions that are written to the .ldf file, causing a WAIT situation for the CBF2SQL program. This shows in the SQL Server activity monitor as spikes in the Database I/O and corresponding “holes” in the ‘Batch requests per second’ graph. Once you separate the .ldf file from the .mdf file and store each of them on a separate physical drive then updating the .mdf file will no longer interfere with the .ldf file. You will still see the spikes in the Database I/O graph, but the holes in the ‘Batch requests per second’ graph are gone. The throughput of CBF2SQL is much more like a flat line.
Tip 2: Place your log and data files on separate physical drives when possible.
The .ldf and .mdf files are extended in “chunks”; this is set to a de-fault growth of 10% once they get full. You can also set the growth to a fixed value, e.g. 250MB. This is much more sensible for an Adlib database. You know that during the CBF2SQL conversion the data-base will grow quickly, so doing it in “big” steps will prevent spending too much time on expanding the files.
Tip 3: Set the growth of the files to a sensible (large) fixed number to prevent unnecessary growing actions.
48

Installing Adlib applications CBF to SQL conversion
1. After clicking Next in the introduction screen, click the Browse but-ton to select the \data folder on the network server or drive from which you want to convert Adlib databases. From the 6.1.0 version of the conversion tool, the \data folder may be local, pointer files will also be converted, and you can set the entire Adlib folder (in-cluding its subfolders) to read-only after the conversion procedure, since from then on no data or information needs to be written there anymore (except of course if you wish to change the database structures at some time). Click Next.
49

CBF to SQL conversion Installing Adlib applications
2. Be sure to select all databases available, otherwise the new SQL database won’t function. (The ability to deselect databases here, only serves a diagnostic purpose.) Click Next.
3. First choose the type of server you will be using: SQL Server or Oracle.
50
Installing Adlib applications CBF to SQL conversion
From 6.1.0 there are two ways of instructing the ODBC clients where to look for the database: with DSNs on every ODBC client (as was mandatory in 6.0, and optional in 6.1.0 and higher), or without DSNs (recommended from 6.1.0, for new conversions).In this step you determine which method will be used by how you fill in the dialog:
SQL Server Without DSNs: in the Server / TNS entry field, fill in the server
name preceded by the relevant machine name and a back-slash. This name will be saved in the relevant .inf files.In the DSN / database entry field, fill in the name of the SQL Server database that you chose when you created that data-base.User ID and Password only need to be filled in if SQL Server au-thentication is used, otherwise leave them empty. These de-tails will be saved in the relevant .inf files as well.Note that the conversion can be executed from any computer in the network, in this case.(You don’t need to create a DSN on clients.)
With DSNs: leave the Server / TNS entry field empty.In the DSN / database entry field, fill in the DSN.User ID and Password only need to be filled in if SQL Server au-thentication is used, otherwise leave them empty.Note that the conversion can only be executed on the server it-self, in this case.(You need to create a DSN on every client.)
Oracle Without DSNs: in the Server / TNS entry field, fill in the TNS
name. This name will be saved in the relevant .inf files.Leave the DSN / database entry field empty.User ID and Password always need to be filled in.(You only need to create a TNS on every client.)
With DSNs: leave the Server / TNS entry field empty.In the DSN / database entry field, fill in the DSN.User ID and Password always need to be filled in.(You need to create a DSN and TNS on every client.)
Click the Connect button to test the connection to the server. (The connection type used is OLEDB. This connects to the server, without using ODBC.) In the bottom of the window you’ll be notified if the connection is successful, and the Next button will become active. Click Next.
51

CBF to SQL conversion Installing Adlib applications
4. First select whether record data must be stored in Binary or XML format in the new database: for Oracle always select Binary, while for SQL Server 2008 R2 and higher always select XML. Mark the Clear wordlist checkbox if your new SQL database is still empty (which will usually be the case). On the other hand, if your SQL database is already filled and you just want to add an extra table, you must leave the checkbox unmarked.
5. Then convert the Adlib data structures by clicking the Convert but-ton: this will create all tables and indexes. Click Next.
52

Installing Adlib applications CBF to SQL conversion
6. In this step, click Convert again to convert any existing data in the Adlib database.
This will populate the tables with data (if present). Note that this process can take a while. An empty database, on the other hand, is converted quickly.
53
CBF to SQL conversion Installing Adlib applications
Any error messages are reported in a text box, from which you can copy and paste. However, it is better to open the entire log file and check it. Click the Show log button to do so: the CBF2SQL conver-sion log window opens. In it, click the Save conversion log file but-ton to save the entire log; the log won’t be saved automatically. This is important if errors have occurred which you’ll have to cor-rect manually later on, or to be able to provide the Adlib helpdesk with all relevant information about any occurring errors, if neces-sary. By default, the file will then be stored under the name Cb-f2sqllog.rtf, but you can choose any name.
7. Click Next and in the last step mark the Remove old files checkbox if you want to remove the Adlib .cbf files (your old databases), the indexes, the wordlist and other files that have now been converted into the new database format, as soon as you leave the conversion tool. However, you may as well leave the old files where they are, if you wish, as an extra backup. The .inf files are not converted (only one settings group in them will change), and they will (and must) remain present in your \data folder.) Click Finish to end the procedure.
54

Installing Adlib applications CBF to SQL conversion
55
6 Important information
6.1 Icons and ShortcutsThe installation procedure for an Adlib application (not the core soft-ware) will add shortcuts to the Start menu and the Windows Desktop, so you won’t have to do that manually.
If you are using Adlib via a network (Adlib will probably have been in-stalled on a server), then those shortcuts must still be copied and ad-justed to the Desktop of all network stations to allow all users easy access to the Adlib applications. You can easily create those extra shortcuts from scratch too.You can make a new shortcut by clicking the right mouse button over an empty spot on your Windows desktop, and selecting New Short-cut from the pop-up menu. In the wizard that opens next, enter the location of the item (the executable file, or target; more on this later) and the name you want the shortcut to have. The shortcut is created and displayed on the desktop. For Adlib applications such a shortcut is not yet functional, because you also have to specify a work folder in which the application is stored (a .pbk file). This is because the ex-ecutable file that starts Adlib is used for several applications, and so you have to specify a different work folder for each application short-cut. Right-click a new Adlib shortcut (icon) and from the pop-up menu se-lect the Properties option to view or change the settings for starting the appropriate application. In the Properties window open the Short-cut tab (with the Target and Start in fields), or the Program tab (with the analogous Cmd line and Working fields), to display the relevant properties of this shortcut. For the many different types of installation that are possible - depending on your license you are entitled to one or more modules - these shortcut options should refer to the folders* listed in the next paragraph. For an example, see the figure below.To copy shotcuts, open Windows Explorer and in it the Desktop. In there, select all desired shortcuts (keep Ctrl pressed and click each desired icon), and then simply copy them to the other workstations to
57

move them from there to their respective desktops. You’ll probably still have to adjust the Target and Start in to the new location of the shortcut.
* During the installation of Adlib 7.4, the \Adlib for Windows subfolder (previously \Adlib or \executables) from the following list is automatic-ally installed in C:\Program Files (x86)\Axiell\ by default, while the other Adlib subfolders will be installed in C:\ProgramData\Axiell\Adlib Model application 4.5.1\ by default. Or they may have been placed elsewhere, as that is not relevant to the functioning of the program. Just always enter the complete path to the desired subfolder in the shortcut: the basic path on your own hard disk or a path to the net-work server, followed by a subfolder for the concerning application as specified below.Depending on your installation, the subfolders sometimes have differ-ent names. The alternatives are indicated in the list below. If your in-stallation contains none of the alternatives, while you did purchase that module or application, then use Windows Explorer to search your
58
Installing Adlib applications Important information
Adlib folder(s) for a subfolder that may hold the module or application you are looking for, and just test a shortcut.If in your application more than one of the mentioned alternatives oc-cur, you have to make a shortcut for each of those subfolders be-cause it concerns different applications or software.
Also take into account that when the subfolder in which the Adlib ap-plication can be found (e.g. \library or \museum) is not located under-neath the same main folder as the subfolder in which adlwin.exe is located (e.g. \Adlib for Windows), the main folder in which the sub-folder for adlwin.exe is located cannot have its own Adlib application subfolders (like \library, \screens, \adapls etc.). The reason for this is that adlwin.exe always searches its own main folder first (one level up from its own \Adlib for Windows or \executables subfolder) for local \screens and \adapls subfolders etc. for a screen or adapl and such, and only if it can’t find a file, it looks for the file in the \screens and \adapls (etc.) subfolders located in the same main folder as the sub-folder that contains the application itself. This is only relevant if you have multiple versions or your complete Adlib system and you want to start the applications in them with a single copy of adlwin.exe (this is an exceptional situation though): then make sure that no other Adlib subfolders are present directly next to the subfolder which holds that copy of adlwin.exe.
Adlib Library (Basis, Standard and Plus)Target: \Adlib for Windows\adlwin.exe (alt: \executables or \Adlib)Start in: \library (alt: \wincat)Adlib Museum BasisTarget: \Adlib for Windows\adlwin.exe (alt: \executables or \Adlib)Start in: \museum basis (alt: \basic)Adlib Museum (Standard)Target: \Adlib for Windows\adlwin.exe (alt: \executables or \Adlib)Start in: \museum (alt: \standard)Adlib Museum PlusTarget: \Adlib for Windows\adlwin.exe (alt: \executables or \Adlib)Start in: \museum plus (alt: \standard)
Adlib Library+MuseumTarget: \Adlib for Windows\adlwin.exe (alt: \executables or \Adlib)Start in: \library+museum
Adlib XPlus (Library+Museum +Archive)
59

Important information Installing Adlib applications
Target: \Adlib for Windows\adlwin.exe (alt: \executables or \Adlib)Start in: \xplus
Adlib ArchiveTarget: \Adlib for Windows\adlwin.exe (alt: \executables or \Adlib)Start in: \archive
Adlib Archive+LibraryTarget: \Adlib for Windows\adlwin.exe (alt: \executables or \Adlib)Start in: \archive+library
Adlib Archive+MuseumTarget: \Adlib for Windows\adlwin.exe (alt: \executables or \Adlib)Start in: \archive+museum
Adlib Museum Reproduction ordersTarget: \Adlib for Windows\adlwin.exe (alt: \executables or \Adlib)Start in: \museum repro orders
Adlib Adloan Circulation (loans transactions)Target: \Adlib for Windows\adloan.exe –s –c 1 (alt: \executables or \Adlib)Start in: \library loans management (alt: \wadcirc)(Do not enter the argument -s if Adloan is running on a network ser-ver.)
Enter the desired language number behind –c, namely 0 (English), 1 (Dutch), 2 (French), or 3 (German). This sets the start-up language for the user interface of Adloan Circulation.The –c option is not manda-tory.When you start Adloan Circulation, the tabs in the application window are displayed maximized (they fill the entire window). The –noscale option can be used in the “DOS” command-line and in the shortcut for this application to display those tabs non-maximized in the left upper corner. For example, use this option as in the following Target of a shortcut:Target: \Adlib for Windows\adloan.exe –noscale –s –c 0
Adlib Circulation ManagementTarget: \Adlib for Windows\adlwin.exe (alt: \executables or \Adlib)Start in: \library loans management (alt: \wadcirc)Adlib AcquisitionsTarget: \Adlib for Windows\adlwin.exe (alt: \executables or \Adlib)Start in: \library acquisitions (alt: \worders)
60
Installing Adlib applications Important information
Adlib SerialsTarget: \Adlib for Windows\adlwin.exe (alt: \executables or \Adlib)Start in:\library serials (alt: \winser)Adlib Library OPACTarget: \Adlib for Windows\adlwin.exe (alt: \executables or \Adlib)Start in:\library opac (alt: \winopac)Adlib Museum OPACTarget: \Adlib for Windows\adlwin.exe (alt: \executables or \Adlib)Start in: \museum opac
Adlib startup option for data language
To have a multilingual Adlib application always start up in a preset data language, Adlib 7.2 and higher allow you to use the –d <data language> command-line option. For example, insert –d en-GB be-hind the path to adlwin.exe in the Target of your Adlib shortcut to have the application always start up in the English data language. For example:
F: \Adlib for Windows\executables\adlwin.exe –d en-GB
6.2 Subfolders and their contents in the Adlib folderDepending on your license, you have more or fewer modules. Some of the subfolders mentioned underneath will probably not be on your system after installation. The subfolders are valid from application version 2.2.0, unless stated otherwise. From 2.1.0 those folder names are being changed gradually. In the Contents column of the table be-low, the most used older folder names are mentioned.
61
Important information Installing Adlib applications
Subfolder Contents
adapls From application version 4.2, this folder contains all ADAPL source text files with the .ada or .inc extension, and all general, compiled adapls with the .bin extension. Adapls no longer appear in other folders. (Adapls are small, customizable programs which take care of certain secondary tasks, like printing in a particular format or the financial processing of an order.)In older application versions, the source files can be found in the \adapl sources folder and all gen-eral, compiled adapls are located in \adaplbin. Application specific compiled adapls are also present in folders with an application name.
Adlib for Windows Adlib executables and DLLs, with their own sys-tem texts (.txt) and Help files (.hlp/.adh), and also your license file. Previously, this was the \Adlib or \executables subfolder. Even further in the past these files were subdivided into the main Adlib programs (in a \bin folder) and the tools ADSETUP, DBSETUP, ACSETUP and ADAPL (in a \tools folder). ADSETUP, DBSETUP and AC-SETUP are no longer in use, and have been re-placed by Adlib Designer.
dashboard From core software version 6.5.0 up to version 6.6.0, Adlib can display an alternative startup screen in which the user chooses a data source to work with. In application version 4.2, this folder can be present, and contains the customiz-able stylesheets (.xsl and .css), images and fixed texts (.xml) to lay out the startup screens (aka dashboards).
data Contains at least all database structures (.inf files). If you are not using SQL or Oracle, then the folder also contains the databases (.cbf files), in-dex files (.00#), .cnt files (which are used for automatically numbered fields), .lck files (for locked records), possibly some adapls, and sub-folders in which pointer files are saved.If your applications run on the SQL Server or Oracle database platform, the cbf files won’t be used by Adlib. In this case, indexes, lock details
62
Installing Adlib applications Important information
and pointer files are saved in the Adlib SQL Server or Oracle database as well; only the .inf files in this folder will remain in use. The location of the Adlib SQL Server or Adlib Oracle database is set in the relevant server management soft-ware. And via the database setup in Adlib De-signer, Adlib knows where to look for the data-base server.
images Your images.
Library, Archive and/or Museum
Application and/or module definitions (.pbk files), an Adlib application logo, and (in application ver-sions older than 4.2) print adapls.
screens All screens that are used in your Adlib applica-tions, are located in this folder. Previously, ap-plication specific screens resided in the applica-tion folders, zoom screens in \data\zoom, and link screens in \links.
texts Language-specific text files which are used by adapls.
Worddoc Per subfolder the letters you generate with Word templates.
worddoc\templates By default installed Word templates in different languages.
6.3 File types in Adlib You will find several types of files in Adlib folders. Some of these are proprietary to Adlib, other types you may also encounter elsewhere on your system. To be able to modify the Adlib applications and/or database, for installing software upgrades or for making backups and to limit the risk of losing data, it is useful to know what kind of inform-ation is stored in each type of file. Underneath is an alphabetized list of all types of files in an Adlib application.
000, 001, etc.: index files. Every cbf database has its own index files, stored in the subfolder data. An index of a key field contains the values from all the records that refer to the same types of records, and is used by Adlib to quickly search through the database. The 000 file contains all record numbers (primary reference: priref) followed by a memory address for the location of that record inside the data-
63

Important information Installing Adlib applications
base (the cbf file). From 001 the indexes have been defined and can be changed in Designer. The content of index files is generated auto-matically when a database is filled. Indexes for Adlib SQL Server and Adlib Oracle databases are saved as tables in the relevant database itself, and are therefore not available as separate files.
ADA: ADAPL source files. These text files contain the program code for external bits of programs that for instance check user input or generate print-outs. These source files can be modified, and new source files can be made. The compiled versions of these source files can be used by Adlib if this is specified in Adlib Designer.
BIN: compiled adapls. Compiled ada files get the extension .bin.
BMP: image files (bitmaps). The Adlib-logo in older applications for instance, is stored in a bmp file.
CBF: database files. A cbf file holds the complete contents of all re-cords from one database. You may for instance find COLLECT.cbf, EX-HIBIT.cbf, THESAU.cbf and PEOPLE.cbf. The records are stored se-quentially, so that indexes are necessary to find the correct record quickly. However, these cbf files won’t be used by Adlib if your applications run on the SQL Server or Oracle database platform.
CHM: HTML Help for Adloan in one particular language. Not only can you open this Help from within the software itself, but also from within Windows Explorer by double-clicking a chm file; this al-lows you to quickly switch between software and Help. This type of Help offers complete manuals.
CSV: exported data in the Comma Separated Values format. When you export records in the CSV format (see the Adlib User Guide for information about export formats), the target file should have the.csv extension. Such a file is a snapshot of a (part of a) database, and will no longer contain the same information as the database after records have been changed.DAT: exported data in the Adlib tagged format. When you ex-port records in the Adlib tagged format (see the Adlib User Guide for information about export formats), the target file should have the.dat extension. Such a file is a snapshot of a (part of a) database, and will no longer contain the same information as the database after records have been changed.
64
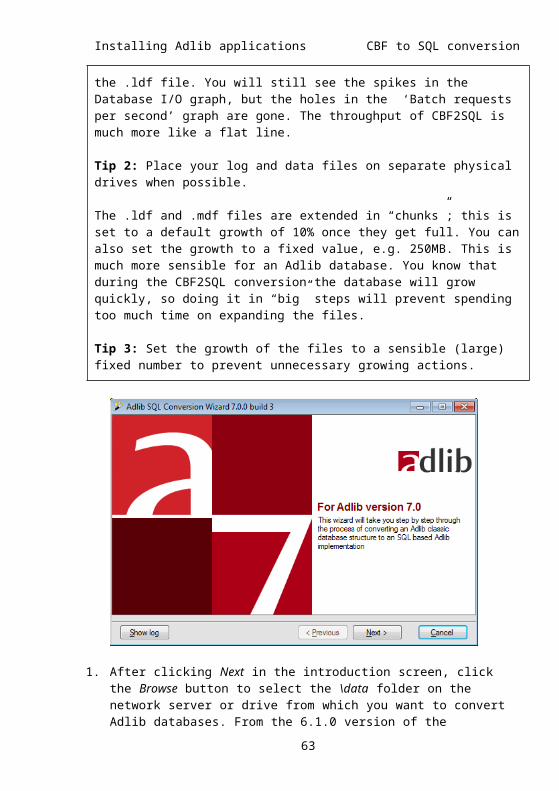
Installing Adlib applications Important information
DLL: Dynamic Link Libray-files. A collection of small programs that are only opened by a larger program when they are necessary, to save memory space. DLLs are part of the Adlib core software.
ERR: log file for an import job. When errors occur during an im-port, they are registered in an err file in the \data folder. This file can be viewed with a text editor.
EXE: executables. Exe files contain executable code. Adlwin.exe for instance, is the Adlib software necessary to search through a data-base and to enter new data. (The user interface from which you ac-cess the software is called the application; which application you are using depends on the Start in folder where the software searches for the application files. Also see chapter 6.1).
EXP: export job. You can define export jobs in Designer. Such files get the extension exp.
EXP.XML: parameter file for export job. Export tasks from within Adlib applications may be saved. Such files get the extension ex-p.xml.
FMT: forms (screens, or screen tabs). Every screen is defined in its own fmt file (format). Such a file represents the record structure inside a type of template, in which tags represent the field names. Not just the tab sheets in the list and detailed presentation are defined as fmt files, but some search forms as well.
HLP/ADH: Help files. The help files that are available for each field in an Adlib application have been stored both in the hlp files: applic0.hlp, applic1.hlp, applic2.hlp etc., as well as in identical files with the .adh extension: new versions of Windows only accept the .adh files by default. There is a help file for each language (0 = English, 1 = Dutch, 2 = French, and 3 = German). These rtf files can be viewed or modified with a text editor. Adlib uses the hlp/adh files to offer help in picking the right file, for access points and on the tab sheets for each field. The \bin, \executables or \Adlib subfolder also contains Adlib#.hlp/.adh files. These files hold help information that is the same for every module; you should not change these files, be-cause they are overwritten during an upgrade.
IDX: word index. Wordlist.idx contains every word from all word-in-dexed fields from all Adlib cbf databases. Every word is assigned its own unique number (in sequence of input). There is a separate index (see 001, 002, etc.) for all word-indexed fields (such as Title and De-scription) which only contains word numbers from wordlst.idx and a reference to the records in which the 'translation' for these word num-
65
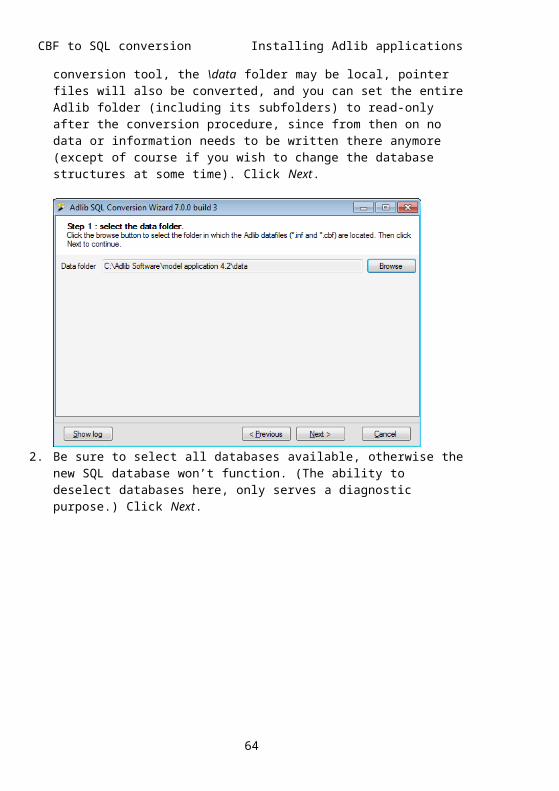
Important information Installing Adlib applications
bers appears.The word index for Adlib SQL Server and Adlib Oracle databases is saved as a table in the relevant database itself, and is therefore not available as a separate file.
INC: general ADAPL source files. ADAPL source code that can be used in several adapls can be put into a separate source file (an inc file) which can be included during the compilation of an ada file.
IMP: import job. You can define import jobs In Designer. Such files get the extension imp. An import job is necessary for importing data during e.g. conversions.
IMP.XML: parameter file for import job. Import tasks from within Adlib applications may be saved. Such files get the extension im-p.xml.
INF: information files. These files store a specification of the struc-ture of a cbf database (or of a record table in an Adlib SQL Server/Oracle database) ,without the actual data: which data sets there are (which types, length, and which tags), whether there are linked fields and, if any, to which databases and index they are linked. This struc-ture is defined via Designer.
ISU: de-installation data. The changes made to the system by an Adlib installation, such as placing program files and shortcuts, and changes in the Windows-registry are coded and saved in an isu file. Windows uses this file if you want to de-install Adlib.
Please remember that when you de-install Adlib, all previ-ously entered data can be lost! For an upgrade of your in-stallation with a service release or completely new version, you must not de-install Adlib first.
Only those files that do not hold data, namely executables, system texts and system help texts, are automatically replaced during the in-stallation of an upgrade; data, your own code and settings are saved. De-installation takes place from within the Windows Control panel or via the original installer.
LCK: lock files. When you change a record in Adlib, it is locked so that it is impossible for two persons to work on the same record at the same time. This information is temporarily stored in a lock file be-longing to the cbf database. Once an lck file is made, it is not auto-matically removed once the record is released again. This was de-signed that way, because constantly making and removing lck files
66
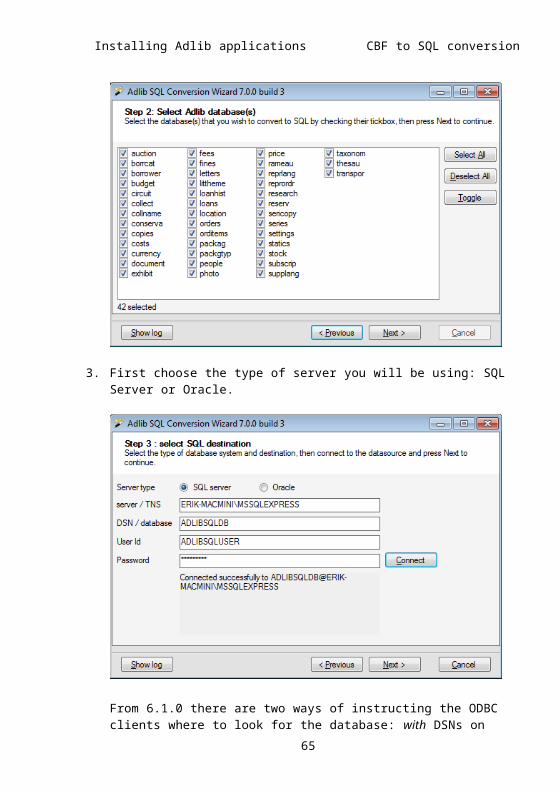
Installing Adlib applications Important information
takes time. You can use Designer or the separate Record lock man-ager tool to check whether any records are locked.Locks for Adlib SQL Server and Adlib Oracle databases are saved in a table in the relevant database itself, and are therefore not available in a separate file, but can still be removed using said tools if needed.
LIC: license file. You own an adlib.lic license file, specific for your contract with Axiell. To be able to use the Adlib software, this file (or copies of it) and the associated adliblic.dll, must be present in all folders that contain Adlib .exe files, normally this is the \Adlib for Win-dows, \Adlib, \executables or \bin (and possibly tools) subfolder. (See the separate chapter in this installation guide for more information about licenses.)
LST: listing of an inf-file. You can make a database listing in DB-SETUP (which is no longer released): a text file that offers an over-view of the database structure. A lst file is always a snapshot.
OUT: print files. When you print to a file instead of to a printer, this text file is given the extension .out. The file can be opened in a text editor.
PBK: application definition files (parameter blocks). A pbk file registers which data sources (databases and datasets) are accessible in an Adlib application, and inside it which indexes, which screens and which output formats; in other words: the application definition which can be made, viewed and modified with Designer. When Adlib starts, the pbk file in the work folder indicated in the shortcut is used (see chapter 6.1). If you start Adlib without selecting a pbk file, Adlib
67

Important information Installing Adlib applications
does not know which application you want to start, and you are prompted to select a parameter file (a pbk file).
PNG: image files. The Adlib-logo in 4.2 applications and higher for instance, is stored in a png file.
PTR: pointer files. In a pointer file, the user can save a selection of (pointers to) records or a search statement, so that those records may be retrieved quickly later on, or so that the search statement can be executed again quickly at a later time. Per cbf database, a pointer file is saved in a database subfolder underneath \data. Pointer files for Adlib SQL Server and Adlib Oracle databases are spread over four tables in the relevant database itself, and are therefore not available as separate files.
roles-files. roles text files (without extension) for DBSETUP (which is no longer released) contain the distribution of access rights of user groups per module, and determine who can access what. In Designer, this file is not used anymore.
RTF: Rich Text Files, for several purposes. In Adlib, rtf files are mainly used as templates for loan slips.
txt: (system) text files. Texts and labels in Adlib-screens. In the name of the file, the number represents the language in which the file was written (see hlp/adh files).
XML: files with different uses: When you export records in the Adlib XML format (see the Adlib
User Guide for information about export formats), the target file should have the.xml extension. Such a file is a snapshot of a (part of a) database, and will no longer contain the same information as the database after records have been changed.
Adlibweb.xml is a configuration file for Adlib Internet Server. It de-pends on your license whether you have this module or not.
XSL: XSLT stylesheets to transform XML. These files can be ap-plied as output formats or for display of record contents in web browser boxes. With those files, Adlib transforms internal XML to an HTML page.
6.4 Access rightsIf you install Adlib for Windows on a network, you can assign access rights as follows:
68
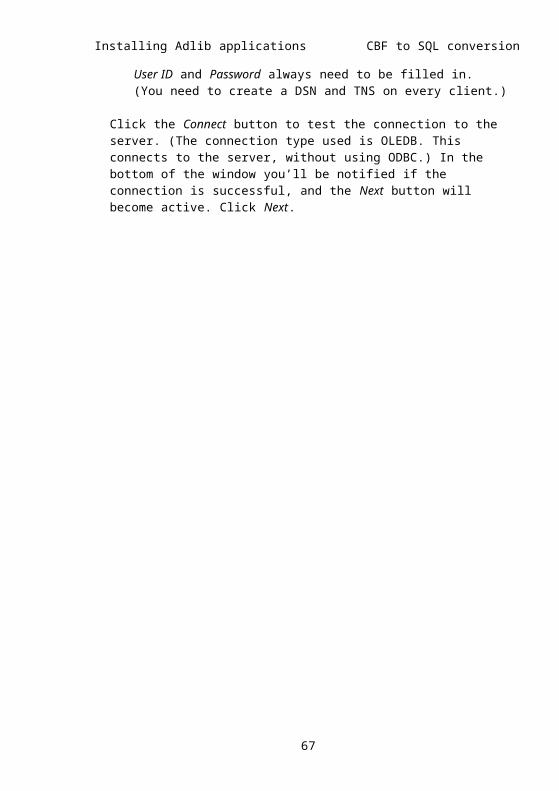
Installing Adlib applications Important information
The subfolder \Adlib for Windows, \Adlib, \executables or \bin must have read-only and execute rights.
The subfolder \data may have read and write rights for employ-ees that have to input (also import*) or change data, etc. or read-only rights for those who are not allowed to change anything.
The subfolder \Worddoc must have read and write access for co-workers who will want to generate letters from within Adlib, using Word templates.
For normal users**, all other directories should have read-only ac-cess rights. Application managers, on the other hand, should have write access to all Adlib folders.* To import data via import.exe or Adlib Designer, a user must have write access rights to the \data folder. This is because the import pro-cedure temporarily saves some information in the relevant .inf files to be able to index the appropriate indexes. This causes the modification date of those .inf files to become the import date, even though after the import these files are no different from before.** Users of the Loans module who are allowed to send reminders, should have write access to the folder in which the reminder.log file can be written (probably \wadcirc or \library loans management), if error messages are not being e-mailed. See the Loans Module Guide, chapter “System settings for reminders”, for more information.
6.5 Limiting the access to Adlib definition filesIn Adlib SQL/Oracle databases, your data is safe because users can-not access it without the proper access rights. However, application and database structure files, in which all settings for your application and databases are defined, and your screen definition files and ADAPL bin files, are not stored in the Adlib SQL/Oracle database and are therefore in principle accessible via the network share. This could be conceived as a security issue.That’s why from Adlib 6.5.0, it is possible to class all mentioned struc-ture and definition files in a virtual folder. The address of a virtual folder is a URL set up by you. A virtual folder cloaks and secures the Windows folder that contains files, making it inaccessible to users.Such a URL to the folder in which the adlib.pbk file (the application structure) is located, can then be included in all shortcuts to Adlib as a command-line option for adlwin.exe. The syntax of the command-line option is: -base <URL>.
69

Important information Installing Adlib applications
Note that this functionality only applies to Adlib SQL and Adlib Oracle databases.
Global setup, step by step
1. In your Adlib .pbk, .inf, .fmt and .bin files, paths to other Adlib files should be relative to the folder to which the URL will point. This is probably already the case. If not, you’ll have to change those paths by means of Adlib Designer. Note that this concerns the paths to other Adlib files: the Path property of a database or appli-cation, on the Database properties and Application properties tabs for example, point to the file itself. This absolute path is just the path where Designer has found this .inf or .pbk file.
2. Make sure that the Adlib subfolder with the executable files (\Adlib for Windows, \Adlib or \executables) is not located in the same main folder as the other Adlib subfolders. This is because adlwin.exe in the \Adlib for Windows folder has to remain reach-able via the network share as usual, while the other subfolders must be addressed through one virtual folder.
3. In IIS, create a virtual folder for the Adlib software main folder (which does not contain the \Adlib for Windows or \executables subfolder):
a. Open IIS via by clicking Start > Settings > Control panel > Administrative tools > Internet Information Services.
b. Now, right-click Default Web Sites in the left part of the window; you may have to unfold some list elements first. In the pop-up menu that opens, select New > Virtual Directory or Add virtual directory. The Virtual Directory Creation Wiz-ard opens. You are free to choose a base URL (Alias). The access permissions should at least be set to Read. For in-formation about the other settings which may be relevant to your situation, please see the IIS Help.
c. After creating the virtual folder, you can assign access rights to the Windows folders as you like. (You can do this in IIS as well.) This way, you can limit access to users who know the location of the Adlib software main folder.
4. Configure mime types for the server. In IIS management, open the server on which the virtual folder is located and go to the mime types: under Vista for example, you double-click the MIME types icon on the introduction page, to do so. Then subsequently select the .inf, .fmt and .bin extensions, and check whether the mime type is application/octet-stream. If not, then edit the extension, or add the extension.
70

Installing Adlib applications Important information
5. Adjust the shortcuts to Adlib on all clients:a. Right-click a shortcut and choose Properties in the pop-up
menu that opens.b. Remove the path from the Start in: entry field.c. Replace the old path to adlwin.exe by the new path in the
Target: entry field: this is only necessary if you have moved the \Adlib for Windows or \executables folder.
d. Behind the path to adlwin.exe, fill in the command-line op-tion in the format: –base <URL>. Instead of <URL> you pro-vide the actual URL of the virtual folder in which the adlib .pbk file is located. Leave the brackets out, and insert a space between –base and the URL. Note that more than one command-line option may be present. An example of a fully entered Target: entry field is the following:
G:\AdlibSoftware\executables\adlwin.exe -base http://our-adlibapp/museum
6.6 Securing your data: backups and loggingIn case something goes wrong with your computer, network, or soft-ware, it is very important that you do not lose your Adlib application and all the data in your Adlib databases. It is only a small effort to protect this data, so that when necessary you can retrieve it up to the last record that was added or modified. You can do this through backups and through Logging & Recovery.Requirement 1: regularly back up your data.A backup is a (sometimes compressed, e.g. by zip) copy of your data. Depending on the frequency with which your data is changed, we ad-vise you to make a backup of your data once a day, once a week or once a month. Always make a backup before you start re-indexing or importing, or when you intend to make changes to the application or restart a logging file.
CBF - In case your applications run on the Adlib proprietary CBF data-base platform, you can make a backup by copying Adlib files to e.g. a CD-ROM, a ZIP-drive or a tape. (If necessary, you can compress the data for storage, so that it will take up less space.) It is sensible to copy all Adlib-files (all Adlib folders, not just the databases), so you can be sure that you are securing all your data. If you do not use Adlib Designer (or the no longer distributed ADSETUP and DBSETUP), and your application has never been changed, it will suffice to copy the \data subfolder.
71
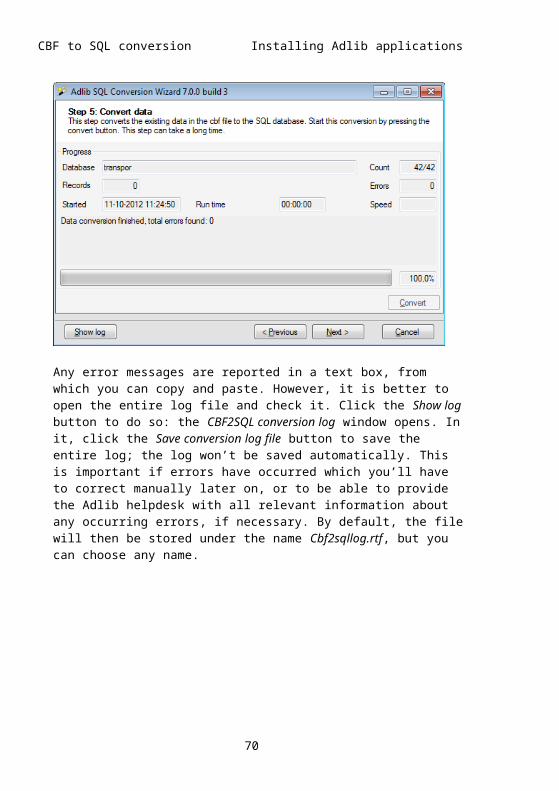
Important information Installing Adlib applications
SQL – In the case of an Adlib SQL Server or Adlib Oracle database, you’ll have to use the relevant server management software to create backups of the database. Changes in your application can be secured by copying your main Adlib folder(s) to e.g. a CD-ROM, a ZIP-drive or a tape. A database backup could be created as follows:1. In Microsoft SQL Server Management Studio Express, right-click
the database, and in the pop-up menu choose Tasks > Back up.
2. Set the Backup type to Full. This will save the entire database, in-cluding transaction log, in a back-up.
3. Set other options (also see the Options tab) as desired4. Click OK to generate a backup.
Images - It is also important to make backups of your digital images. The Adlib database normally only holds a reference to a digital image, the image itself should also be kept safe; when you store the images in an Images folder inside an Adlib folder, the images will automatic-ally be backed up during a complete back up of all Adlib folders.
For all backups goes: test the backups you make from time to time, and save them separately somewhere, away from your original files.
You can test a backup of Adlib (using cbf databases) by placing the (uncompressed) backup Adlib directory somewhere in a temporary directory on your computer, making shortcuts to this directory like you did for your main system, and simply starting and trying out ap-plications. Delete the temporary folder and the temporary shortcuts after testing, to prevent confusion.
72
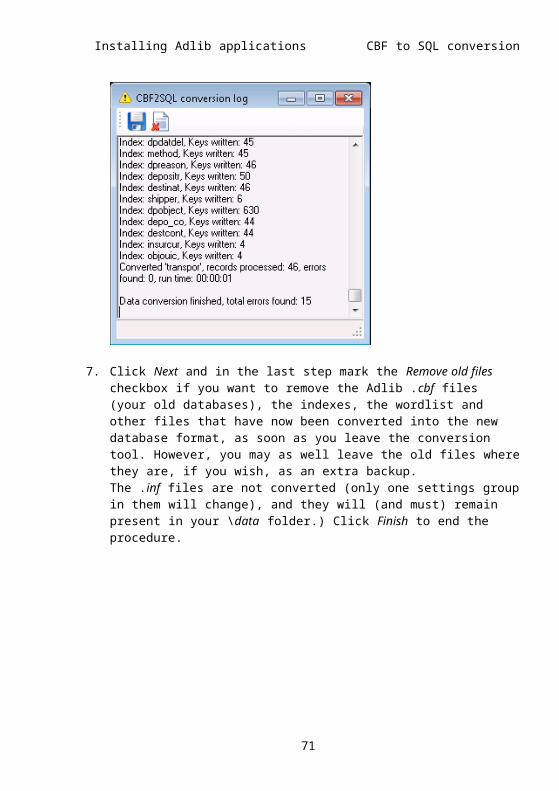
Installing Adlib applications Important information
Requirement 2: keep an automatic logging file.On loss of application information, you will have your application(s) backby copying and pasting a backup. This applies to databases as well, in case your applications run on the Adlib proprietary CBF database platform, and you wish to restore a corrupt database. However, re-cords that were added or modified after that last backup, will not be retrieved by this safety measure alone. To solve this problem – to make sure that you can retrieve even the latest modified record without having to make backups continuously – you must use Adlib logging & recovery (automatic registration and retrieval of modifica-tions). After placing the databases back, you then complete a further restore procedure on the basis of the Adlib logging file, to bring the databases up-to-date.In the case of a corrupt SQL/Oracle database, the database must be restored via the relevant server management software: this will auto-matically bring the backup up-to-date with the aid of the transaction log which has been kept by the server. The Adlib software can take care of logging and recovery, regardless of the database platform on which your Adlib applications run, but SQL Server and Oracle have their own logging & recovery system which offers advantages over that of Adlib. You will mostly want to use Adlib’s logging & recovery for cbf databases; for Adlib SQL and Adlib Oracle databases we recommend you switch it off and use the platform’s proprietary procedures.
Adlib logging - For Adlib’s own logging & recovery, logging means that all the records that are added to the database, changed or re-moved, are stored in an extra logging file: in this case, a logging file is an Adlib-tagged file in ASCII format. (So changes in applications or in database structures are not registered.)You can set this automatic registering per cbf database in Designer (see figure below). For every database definition, enter the same name for the logging file, e.g. F:\security\log In this file, Adlib re-gisters for every record that is changed from which file it came, so that multiple databases can be logged in one logging file.A logging file name may be preceded by a drive letter; it is also sens-ible to save a logging file to another disk than the one that holds Adlib, so that if the Adlib-disk were to become inaccessible, the log-ging file would still be usable. Do save the logging file on a disk that is accessible while you are working with Adlib, so that every change can be registered.To ensure a correct recovery, it is essential that all databases refer to the same logging file. You will then be able to start a recovery for any database, automatically restoring any other databases as well. (If you were to use a different logging file for every database, you would
73
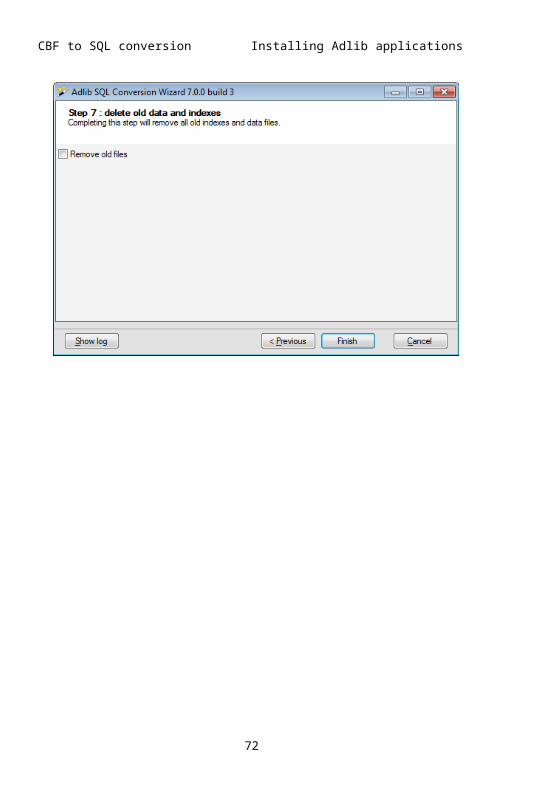
Important information Installing Adlib applications
have to restore all these databases separately and in a particular or-der.)
SQL logging – In Adlib for SQL, the basic operations which comprise write actions, are bundled in so-called transactions. The SQL recovery model makes sure that transactions are saved only if all basic opera-tions of which they consist, have been completed successfully. Microsoft SQL Server supports three different recovery models: Simple, the default and most basic recovery model, in which each
successful transaction is removed immediately. Therefore, the log remains very small. This won’t allow you to restore a database to an earlier point in time.
Bulk logged, in which all transactions will be logged, except bulk operations. (In this context, Adlib import and export are no bulk operations.)
Full, in which all transactions will be logged. Adlib advises to use this model.
The recovery model could be set as follows:1. In Microsoft SQL Server Management Studio Express, right-click
the database, and choose Properties in the pop-up menu.2. Select the Options tab and set the Recovery model to Full.
74
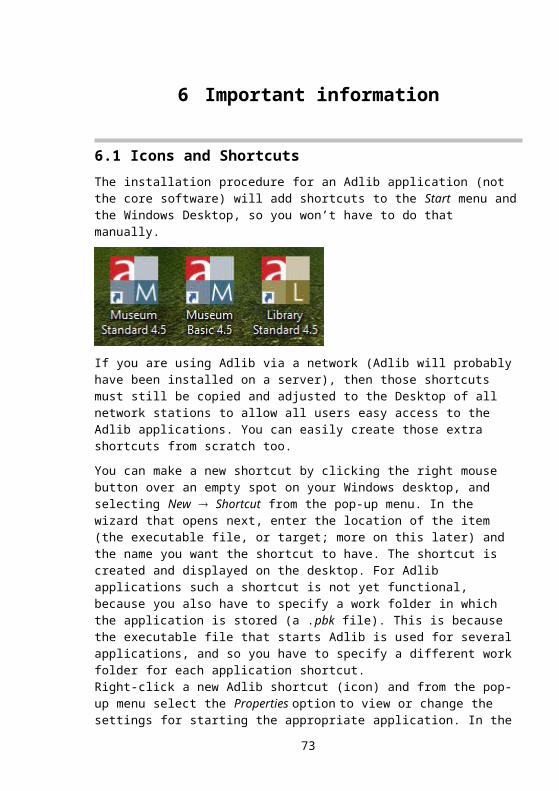
Installing Adlib applications Important information
3. Open the Files tab and set a path to the logging file: behind the logging file in the Database files list, click the button (just left of the Path column). Make sure that the logging file (and backups) are not stored on the same disk as the database itself.
Adlib recovery (repair with Adlib’s proprietary logging file)With Adlib logging, you save changes in your data from the moment you set it. When a file has become corrupted, and you wish to repair your Adlib system, first put back a functioning backup. You can re-store the changes made after the backup, by reading and executing the logging file through the Recovery tool in Adlib Designer. To start this tool, choose View > Recovery in the main Designer menu.1. First make sure you have selected the right work folder (see the
status bar of the tool window). This should be the folder in which you have just placed a backup file to recover, to make it your new live Adlib application. If necessary, choose File > Working folder or click the button for it, to select another folder.
2. On the General tab for the Recovery file option, you select the logging file you need to import. For Meta data tag you can provide a tag in your Adlib system in which you want to import the metadata that is present in the logging file (this is information about dates of modification, and so on). The meta data tag is not mandatory.
3. On the Run tab, you can start your recovery, if you have selected a logging file. Statistics about the recovery are presented in real-time.
Every action in the logging file that was executed before you made the backup that you are now restoring, is automatically executed too, even though these changes are unnecessary. In principle this shouldn’t cause any errors, but it is recommended to rename the log-
75
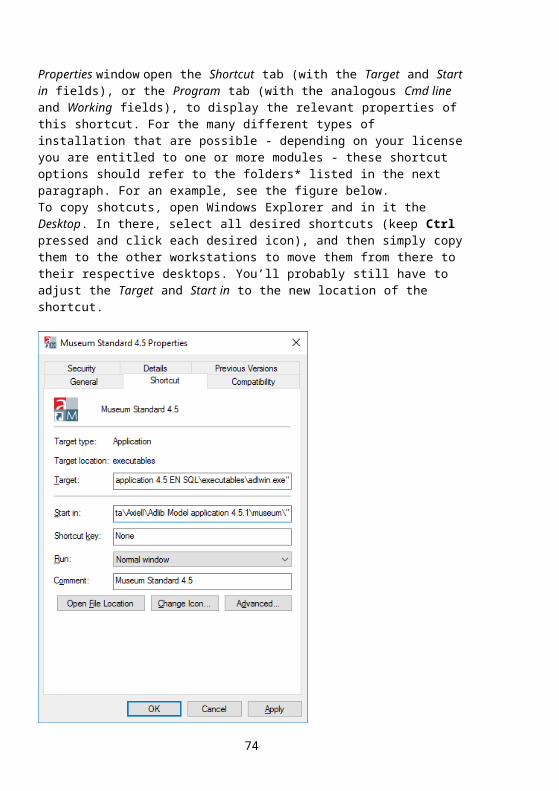
Important information Installing Adlib applications
ging file in Windows Explorer each time you make a backup (add for instance the date); this causes Adlib to create a new logging file auto-matically (each time with the same name, because you didn’t change that name in the database setup). This way you always have the smallest logging file available when you need it for recovery, that has been kept up-to-date since the last backup; this can save you a lot of time during recovery, and prevents possible errors due to redundant recovery changes. Should you want to do a recovery from a date prior to the moment of renaming the old logging file (e.g. because the backup you want to use is older too), then you will have to run a recovery twice (or as much times as there are logging files up to that date). In the first re-covery, you enter for the import file the name you gave to the old log-ging file when you renamed it. Then you run a second recovery, and use the current logging file as the import file. The repair is now com-pleted from the backup you put back up, up to and including the last change that was made to your data. With multiple logging files you first recover the oldest logging file (from the date of the backup), then the second oldest, and so on, up to and including the most recent log-ging file.
So, reading a logging file and executing the data modifications is done with the Recovery tool in Designer. When errors occur during a recovery, the error report is displayed in the main Designer window - it is no longer saved to a file with the extension .err, and the name of the logging file. It is important to check for any errors after a recov-ery.
Recovery should always be tried first in case of a database cor-ruption. To establish whether you have a database corruption, you can call our help desk. And again: it is important to use a backup that was made at a time when all appeared to be func-tioning normally (this is not necessarily the last backup, it can also be an earlier one).
N.B. In principle, recovery is meant to repeat actions from the past, not to undo them. But if you wish to use recovery to retrieve records that were removed accidentally, you can change history by making some changes in the logging file (with a text editor): every deleted file is marked with a '-' (minus sign) in the logging file. By removing these minus signs before a recovery, you are fooling the program and the records are placed back.SQL Server database restore (repair with .ldf log)A corrupt Adlib SQL Server database can be repaired with the Restore function. By default, the most recent backup of the backup and the
76
Installing Adlib applications Important information
active transaction logging file are used to bring the database up-to-date again, but you may restore to an earlier time as well. Before you can start restoring the database, you’ll have to make a backup of the transaction log, for instance as follows:1. In Microsoft SQL Server Management Studio Express, right-click
the database, and in the pop-up menu choose Tasks > Back up. 2. Set the Backup type to Transaction log. This will only save the
transaction log in a back-up.3. On the Options tab, mark the Back up the tail of the log… option.
Set other options as desired4. Click OK to generate the backup.After that, you could use Restore as follows:1. In Microsoft SQL Server Management Studio Express, right-click
the database you wish to repair, and in the pop-up menu choose Tasks > Restore > Database.
2. In From database, select the backup which should be used, or, in From device, select the logical or physical backup device (for in-stance a tape drive or files) which contains the backup.
3. In the Select the backup sets to restore list, mark the components of the backup which you want to use for restoring (the recovery plan suggested by default - the already marked components - is probably advisable).
4. On the Options tab you may set other options. You’ll have to mark the option Overwrite the existing database. Further, it’s very im-portant here to select the proper .mdf and .ldf target files to over-write. The Help function on each tab offers information about all functions.
5. Click OK to execute the restore procedure.Managing the logging fileAdlib logging file - In principle, an expanding logging file (mostly used for cbf databases) is no problem. Should this file get too large though (more than 600 MB), you can decide to close the current file by re-naming it (e.g. with Windows Explorer); you could use today's date in the file name, for instance. However, do not change the name of the logging file in the database setup! Adlib will automatically create a new logging file with the old name, which will register the changes made from that moment on. The old, renamed logging file can then be stored somewhere else, if you wish, on a CD-ROM for example.
77

Important information Installing Adlib applications
SQL Server logging file – The logging file of an Adlib SQL Server data-base keeps on growing if you use the Recovery model: Full (as recom-mended). If the transaction log is getting too big, you’ll have to purge it. The best way of doing that is by creating a Full backup of your SQL database first (via the server management software), then setting the Recovery model to Simple, followed by reducing the transaction log via the Shrink option, after which you reset the Recovery model to Full, for example as follows:1. In Microsoft SQL Server Management Studio Express, right-click
the database, and in the pop-up menu choose Tasks > Back up. Set the Backup type to Full and set other options as desired, to generate a backup.
2. Right-click the database, and in the pop-up menu choose Proper-ties > Options. Set the Recovery model to Simple.
3. Right-click the database, and in the pop-up menu choose Tasks > Shrink > Files. Set the File type to Log. Check the Available free space, select Reorganize pages… as the Shrink action, and set an accompanying file size (e.g. 1 MB) before you click OK to shrink the logging file.
78

Installing Adlib applications Important information
4. Right-click the database, and in the pop-up menu choose Proper-ties > Options. Set the Recovery model to Full.
Securing changes in applicationsModifications in your applications cannot be registered in a logging file. But every time you make a backup of the entire Adlib folder, you also backup any changes you have made to the application yourself. So ensure that you make a backup before you make any changes to the application, and make another backup afterwards. You can use the first backup in case the new application does not work properly, and the second backup if the new application disappears from your system or gets corrupted. You can also retrieve separate screens (fmt-files) from a backup.Note that Adlib logging & recovery only works well if the backup you are using contains exactly the same databases for which the logging file has registered changes. This means: if you have made any changes to a database structure since you ran the backup you now in-tend to use, then recovery with the logging file will cause problems, because it may refer to database fields that were not present in the database structure of the backup. So please be careful with this.
6.7 License checkingAdlib licenses are always sold for a number of users that is allowed to work with an Adlib application simultaneously. Each user may have opened more than one Adlib application or window at the same time.To offer application managers the possibility to better check the use of Adlib software, so your license is in accordance with the number of users and you can keep working with Adlib legally, from Adlib 5.0 automatic license checking has been built in.When on your local network at any moment the number of licenses is exceeded for more than ten minutes, a warning will appear in screen notifying you so. Click OK to close the warning. One or more users now have to close Adlib, otherwise after ten minutes the warning will appear again.If more users want to work in Adlib simultaneously than your current license allows, you will have to upgrade your license. Contact our sales department for more information about this.Your license is specified in the adlib.lic file. After installation, this file and the associated adliblic.dll file, have to be located in the same folder as the Adlib executables (such as adlwin.exe). If you wish, you can open the adlib.lic file in a text editor like Note-pad, to see what’s in there. However, you can’t make any changes to this file! The so called Fingerprint in the file makes that impossible. When you change so much as one character in the license, you won’t be able to start Adlib again. As soon as you buy more licenses, you’ll
79
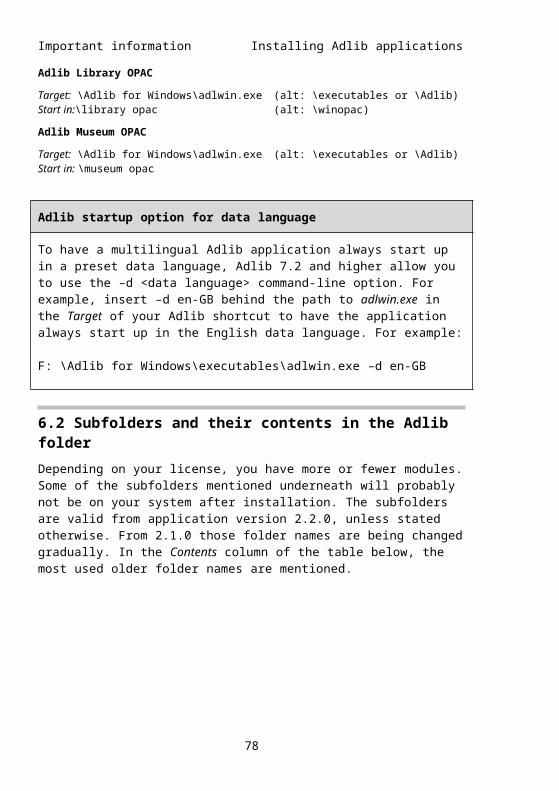
Important information Installing Adlib applications
receive a new license file from Adlib. The license text is in readable format though, and in it you can find the number of licenses you are allowed to use, for example. It will look somewhat similar to the example below:[General]Created at=1/29/2003 1:19 PMCreated by=AdlibCustomer name=Your LibraryVersion=1.0[Library Basic Module]adlwin.exe=5Licenses=5[Validation]Fingerprint=4c3b7d478c628ad872621ca3fcbaece
The license monitorTogether with this license system you get a license monitor, in the shape of the adlibmon.exe executable. This license monitor is a small tool for the system administrator with which he or she can see at a glance how many Adlib executables are in use on the local network at that moment. All Adlib executables transmit their presence on the local network, the license monitor searches for these signals and presents them in an overview.Just double-click this file in Windows Explorer to start it, or create a shortcut for it (you don’t have to provide an application folder).In the main window you’ll see ten columns with information that is updated each minute. The coloured icons in the first column need some explanation. Active executables are presented with a black dia-mond. When a program is closed (or really after the executable is not “visible” anymore, which might have a different cause), the little black diamond at the beginning of that line in the main list will be re-moved. And as the monitor receives no more messages from the closed executable, the whole line will fade from dark grey to light grey, and will finally disappear.
80
Installing Adlib applications Important information
Beneath the list with separately started executables, a second win-dow pane is present, in which you can see how many unique users per Adlib license (so per program) are working with that program (see the Current count column).In the Peak count column you can see the largest number of users that were working with Adlib simultaneously, during the time you had the license monitor opened; if you close the monitor, this data will be deleted.In the Entitlement column you can see your current license rights. The Peak count for a program may not exceed the Entitlement value for that program, if you want to keep working with it legally.
By the way, a licensed user that has opened Adlib is only counted when he or she has opened a database.
To be able to count unique users in all (network) situations, Adlib li-cense checking uses the unique combination of systemname+user-name+session-ID. The session variable is necessary because via thin client (Windows Terminal Server or Citrix Server) multiple users could, in principle, log on under the same name; the session variable then gets a value greater than zero and is unique for each session
81
Important information Installing Adlib applications
(from individual logging on to logging off). In a normal network situ-ation in which users log on to a network station, the session ID is al-ways zero, but here the combination systemname+username is already unique.In the Adlib Network License Monitor, the Session ID column displays the value of this variable for all users of Adlib 5.0.0 hot fix 1 and higher, but only if the value is greater than zero.
Double-click a list item to open the Enter message window. Here you can type a message and directly send it to the relevant user by click-ing OK. This way you can quickly ask your co-workers for example to close all Adlib applications to be able to upgrade the software. But any message is possible of course.In the Help > About menu, you’ll find the version number of adlib-mon.exe, and through the File menu you can close the monitor or, via File > Save store the entire overview in a CSV file. Then you can open this file in MS Excel for example, and edit or print it.
6.8 Windows Event viewerFrom version 6.0, warnings and errors that Adlib generates, which usually appear in the screen of the user, are logged in the Windows Event viewer (Control panel > Administrative tools/System manage-ment > Event viewer). The advantage of this is that if you have clicked an error message away, but want to look it up later once more, for instance because you need to provide the exact message to the Adlib Helpdesk, then in the Event viewer you can get an overview of errors that occurred in the past. By double-clicking an event, you open the full warning or error message. Note that a warning usually does not indicate problems.
6.9 Error messagesFor some tasks the Adlib software utilises third-party software, espe-cially Microsoft Windows and Office. This prevents the Adlib software from becoming unnecessarily large and complex, while Microsoft pro-grams are so wide spread that compatibility and ease of use are often ensured. Because of this and other reasons it’s wise to keep your MS Windows operating system up-to-date at all times, through Mi-crosoft’s service packs and hot fixes. But when you are using an out-of-date Windows version and/or don’t have MS Office installed, this may have consequences for certain functionality in Adlib. These prob-lems can easily be solved, though.
82
Installing Adlib applications Important information
Error message: ODBC32.dll not foundFrom Adlib 5.0 and WWWOPAC 4.7, an Adlib ODBC driver is automat-ically installed and registered in Windows. For the functioning of ODBC in Adlib it is necessary that MDAC (Microsoft Data Access Com-ponents) is installed on your computer, even when you're not plan-ning to use ODBC. If, on opening Adlib, you receive the error message that ODBC32.dll cannot be found, this means that MDAC is missing on your computer; this might be the case when you do not have MS Of-fice installed.The solution is to download and install MDAC from Microsoft's web site. Go to http://www.microsoft.com/downloads/, click the Develop-ment Resources option and choose the most recent MDAC version that you find in the list. Further, follow the instructions on the down-load page.
Printing text with diacritical characters to a file, using an out-put adapl, may produce incorrect diacritical charactersIf you ever print to a file, using an output adapl, then from Adlib 6.0 it’s possible that diacritical characters are displayed incorrectly. This only happens in the special case where the ADAPL function CVT$$(‘…’, 32) is used to convert text to be printed to the ANSI/IsoLatin character set. This is because Adlib Unified internally works with Uni-code in UTF-8 encoding (even though your databases may still be stored in the DOS/OEM or ANSI/IsoLatin character set).The solution is to remove the CVT$$(‘…’, 32) command from the rele-vant adapl, and recompile it. When printing to a file now, Unicode text in UTF-8 encoding will be produced. Most modern text editors can open such a file.Aside from choosing to print to a file in the Windows Print dialog, you may also choose MS-DOS text to generate a DOS file that can only be opened in suitable text editors or other (older) Windows applications.
83
7 Moving files
7.1 Moving your Adlib application and databasesThere may be different reasons why you would want to move an Adlib system (installed in the past), or parts thereof, for example because you acquired new hardware, or because of a change in your security policy or a restructuring of the local network.In general, it is not difficult to move your Adlib application and data-bases to another location, for instance to a different pc or server; however, if your Adlib application runs on an Adlib SQL or Adlib Oracle database, some background knowledge about the relevant database platform is required for moving the database. Moreover, if you are using Adlib Internet Server, you’ll have to adjust its configura-tion where necessary and reconsider and set up the security and ac-cessibility of the new servers: see the installation guide for Adlib In-ternet Server.To start with, for a move you must definitely not install Adlib again, because a new install has empty databases. To preserve your filled databases and any changes you made to your application, moving an Adlib application and databases mostly is a matter of copying and pasting and modifying some settings and/or shortcuts. For a move, there are roughly two possibilities:1. Adlib is not located on a server and you wish to move the applica-
tion and databases from one pc to another pc.2. You want to move Adlib from one server to another. How the
move should be executed, depends on the database platform on which your Adlib system is running: the Adlib proprietary CBF for-mat or Adlib SQL/Adlib Oracle.
Make a backup
Before you start, create a backup of your Adlib application, database(s) and folders containing linked images and documents. Save the backup on a secure medium.
ad 1 – CBF: If your Adlib application runs on CBF databases (which was the custom in the past), and application and database files (and images) are located in subfolders underneath one or two main Adlib folders, then you may simply move those main folders elsewhere, and afterwards you only need to create all Adlib shortcuts on the new
85
computer. Under Windows Vista, 7 and 8 you can find the Adlib core software in C:\Program Files (x86)\Adlib Information Systems\Adlib\ by default, while the other Adlib files (the application and databases/database structure file) have been installed in C:\ProgramData\Adlib Information Systems\ by default. Under Windows XP, the whole Adlib system will probably be located in C:\Program Files. In all cases it is possible too that other folders were chosen when the software was first installed.
Showing the C:\ProgramData folder
Under Windows Vista, 7 or 8, if you open the Windows Explorer and select the C:\ drive, you’ll always see the Program Files and/or Pro-gram Files (x86) folders. Directly underneath, you should also see the ProgramData folder. However, sometimes that is not the case be-cause Windows hides certain folders by default, to prevent users from accidentally deleting important files. That setting can be changed easily though, so that all hidden folders and files become visible. Proceed as follows:1. Select the C:\ drive in Windows Explorer.2. In the menu bar, click Tools > Folder options.3. In the windows that opens, open the View tab.4. You’ll probably find the Don’t show hidden files, folders or drives
option currently selected. Instead, select the option underneath it: Show hidden files, folders and drives.
5. Click OK. The C:\ProgramData folder is now visible and accessible in Windows Explorer.
The actual move can be done by first copying the folders to some ex-changeable storage device, like an external hard disk, after which you can copy the folders from there to the new location. Choose a location that makes sense. If you copied from a CD-ROM, check whether the properties of the new Adlib folders haven’t been set to read-only by Windows: in Windows Explorer, right-click the folder, choose Proper-ties in the pop-up menu, remove the check (if present) in front of Read-only, and click OK; also click OK when Windows subsequently asks you if want to do this for the subfolders as well. If the new com-puter has Windows 7, 8 or 10 you’ll have the limitation that you can-not place the subfolder with the databasese underneath the Windows folder \Program files, but otherwise you are free to choose a location. Subsequently you’ll have to create shortcuts to the Adlib application(s) in the new location; see elsewhere in this installation guide for more information about that. On your old pc you can see
86
Installing Adlib applications Moving files
which Adlib shortcuts you will have to create. After this, you should be able to work with Adlib as usual.ad 2 - CBF: If your Adlib application runs on CBF databases and ap-plication and database files (and images) are located in subfolders underneath one main Adlib folder, then you can move that main folder elsewhere (for instance via copying and pasting over the net-work), and afterwards you only need to adjust all Adlib shortcuts on all workstations. In the properties of each shortcut, you’ll find the Tar-get and Start in entry fields: the first must hold the path to an exe-cutable Adlbi file, like adlwin.exe, the second the path to the folder in which the desired application structure file (.pbk) is located. Else-where in this installation guide you’ll find more information about this.ad 2 – SQL/Oracle: If your Adlib application runs on an Adlib SQL or Adlib Oracle database, then your application and database are proba-bly not in the same location.
1. To move the database to another server, you’ll first have to make a backup of your database. From this moment on, users should not be allowed to enter of edit data until the move has been com-pleted. A backup can be created from within the SQL Server or Oracle management program, not in Windows Explorer (see else-where in this installation guide or the documentation accompany-ing the relevant software, for more information about this).
2. Now, moving the SQL database is possible by e.g. restoring the database in the other location, using the Restore function with the backup you just created: in effect, this copies the database from the backup. With this method you do not need to create a new database; any backup devices do need to be set up first, and the target server must use the same code page, sort order, Unicode sorting and Unicode location as the source server.
3. Then you must change the Server name to the new name (in the database properties in Adlib Designer), so that the application knows where to look for the data now. The Data Source Name re-mains the same.
Your application files are probably located on a different server, but you can move these as well if you want. This is simply a matter of cut-ting and pasting the relevant Adlib folder to the other location. The reference to the SQL database remains valid even after moving these files, so all that’s left to do is change all Adlib shortcuts on the work-stations, like indicated above for CBF.
Disclaimer: moving Adlib applications and databases is done at your own risk. Knowledge of the relevant Windows operating system and
87
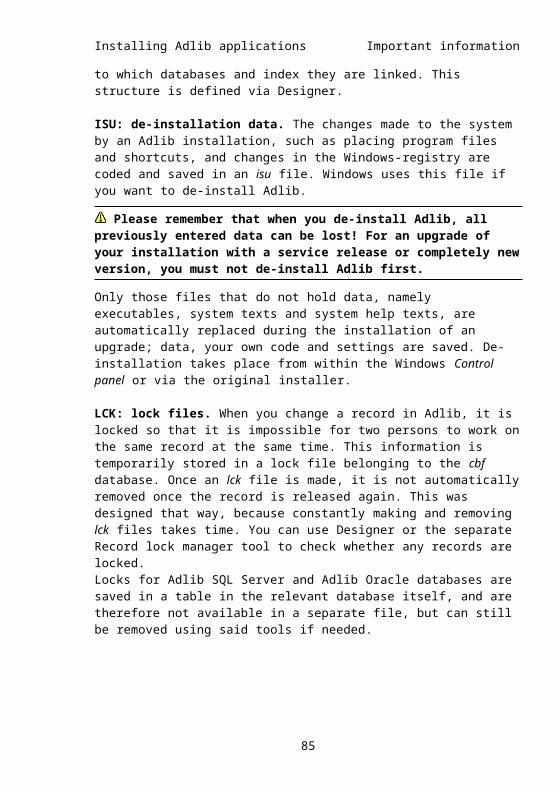
Moving files Installing Adlib applications
the Oracle or SQL server database platform (if applicable) are re-quired.
7.2 Moving images, bulk replacement of pathsOne day, you or your system administrator may decide to move the Adlib application or the folder with all images linked-to in Adlib records, to a different server (without moving the other Adlib folders as well). In your Adlib records, the links (paths) to the images may no longer be correct after this move; in that case, the linked images are no longer visible in your Adlib records (contrary to the normal situa-tion, as shown in the screenshot below). After such a move, you can often adjust these paths for all images at once, with the Search and replace function.
Make a backup
Before you start, create a backup of your Adlib application, database(s) and folders containing linked images and documents. Save the backup on a secure medium.
In Adlib, paths to images are usually saved in the Identifier (URL) field in the Visual documentation data source. In model application 3.5 and higher, the path or just the file name (which is also the image refer-ence now) is present in the Reproduction reference field.
88
Installing Adlib applications Moving files
Model applications 3.4 or olderThe path that you find in an object record in the Internal object cata-logue data source in 3.4 and older applications, has been merged in from the Identifier (URL) field in Visual documentation.
Although you can change a path in this field from within the Internal object catalogue (if the cursor is in the Reference field) via the Make/edit linked record option in the Edit menu, it’s better to do this in the Visual documentation data source if you have to modify a great number of records. A change of the image path in a record in Visual documentation will automatically become visible in object records pointing to it.)So in this case, a search-and-replace must be done from within the Visual documentation (aka Reproductions) data source. Only start searching and replacing after the relocation of the application or im-age folder.
1. Search for all image records as follows: select Visual documenta-tion in Step 1 of the Search wizard; click the Next button; click Next again; leave the Reproduction reference access point empty; click Next, and then click All keys. The brief display opens with all found image records.
89
Moving files Installing Adlib applications
2. In the brief display, mark all records in which you want to adjust the path to the image. Press F4 to mark (or unmark) all records at once. However, it’s probably best to try out your search and re-place on one or two records first: that way, you can test your action and see what happens. If the results are okay, you can repeat the procedure for all other records.
3. Shortly, you’ll have to provide the name of the field of which the content must be adjusted. This is not always the name as displayed on the screen. To find out what the internal (data dictionary) name of the image path field is, open a random record from the list. Right-click the content of the field with the image path and choose Properties in the pop-up menu; this field is usually labeled Identi-fier (URL). In the Field properties window, open the Data dictionary tab. The drop-down list contains translations of the field name in the data dictionary. Remember the English field name (the lan-guage in which you are working); usually this is image_reference.
90
Installing Adlib applications Moving files
4. To find out what the correct new path to images is, you may pro-ceed as follows: open a record and put it in edit mode (F11). Then click the Identifier (URL) field to activate the Find image file button in the Edit menu. Click this button.
The Find image window opens in which you have to look for the currently linked image on the new server (the image which is cur-rently no longer visible in the record because Adlib can’t find it). Double-click the image file to link it to the record – so, choose the same image! Now save the record. In the Identifier (URL) field you can see the new path to the image. Copy the path to the Windows Clipboard or write it down somewhere.
91

Moving files Installing Adlib applications
5. Now go back to your marked records (F7). Choose Replace in record in the Edit menu.
6. In the Search and replace window, in the list on the left, select the image_reference field (or the field you found in step 3) and copy it to the still empty Selected fields list using the blue arrow button in this window. Also select the Match substrings option, and unmark Confirm replacement because you do not want to have to click OK for every replacement.
92
Installing Adlib applications Moving files
7. In the Replace field, enter the part of the path which has to be re-placed, in our example that would be ../images/. In the By field, en-ter the new path (without the file name), for example \\io\Train-Doc\Images\. In your case, the paths will be different.For the new path, you may possibly choose between an absolute path, a UNC-path and a relative path (relative to the Adlib applica-tion folder). An absolute path to a local hard disk only applies to this computer and should therefore not be used if the computer is part of a network. If Adlib has been installed on a server, it is better to use a UNC path (if the images are located on a different server from the application) or a relative path (if the images reside on the same server). The new path in this example is a UNC path which will probable be accessible to all computers in the network, but if the Adlib applica-tion is located on the same server, in this case underneath Train-Doc\, let’s say in \\io\TrainDoc\Adlib\Adlib Museum\, then you may very well choose to enter the relative path ..\..\Images\ in the By field.
8. Click OK to start the search and replace. The processed number of records and the number of replacements will be shown in a dialog window.
After the procedure has finished, you should be able to see the change in every record in Visual documentation. A linked image must of course again be visible in the Media Viewer. Object records linking to an image record will display the new path too.
93

Moving files Installing Adlib applications
Model applications 4.2 or newerIn model applications 4.2 or newer, only the file name of a linked im-age is present in the Reference field. The path to the images folder has been set in Adlib Designer.
If you’ve only moved your images folder, the file names haven’t changed and therefore you don’t have to change anything in repro-duction or catalogue records either: it’s just the path setting in De-signer that must be edited.
94
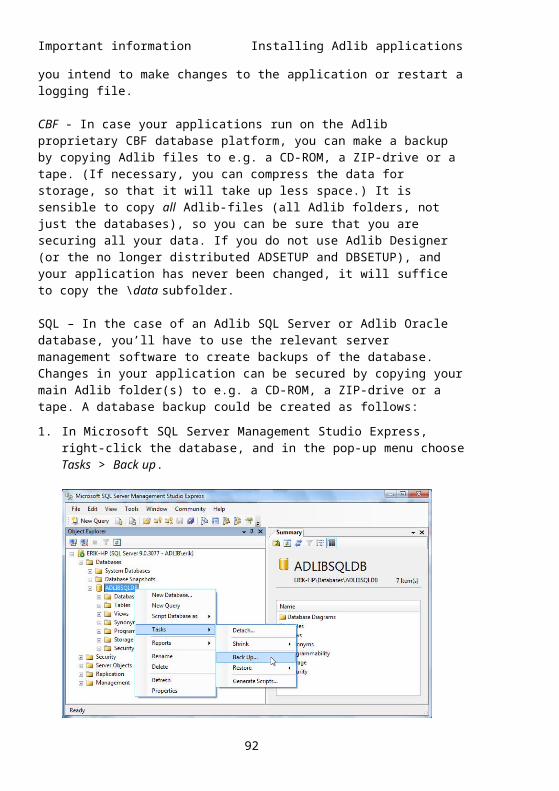
Installing Adlib applications Moving files
Open the Adlib \data folder in the Application browser of Designer. In the database structure files collect, conserva, document and photo, repeat the following steps:
1. Select the reference_number (FN) field and open the Image proper-ties tab.
2. Storage path holds the current relative path (with respect to the application folders) where Adlib stores linked images and retrieves them from as well. Enter the new UNC path or the relative path and end the path with \%data%, e.g.: \\our_server3\images\%data%
3. Save the changes in this database structure.
95
Appx 1: installing Adlib for SQL ExpressMicrosoft SQL Server Express is a free edition of SQL Server. It is an ideal way to cheaply upgrade your new or existing Adlib installation to SQL Server and enjoy its advantages over the Adlib CBF database format (which is being phased out).If you just purchased an Adlib application for SQL Express and you are about to install everything for the first time, there is a three-part in-stallation process to complete, namely: Part 1: installing SQL Server Express Part 2: creating a general login Part 3 (alt.1): installing your Adlib software and applicationIf you’ve installed Adlib for CBF some time earlier, then skip step 3 (alternative 1) and instead proceed with step 3 (alternative 2) to pre-serve your data: Part 3 (alt.2): converting your existing CBF databases Please proceed as follows:
Part 1: installing SQL Server Express
1. Download the current version of SQL Express from Microsoft: https://www.microsoft.com/en-gb/sql-server/sql-server-editions-express. Select the SQL Server 2016 Express LocalDB download. Wait until the download is finished and then execute the downloaded SQLServer2016-SSEI-Expr.exe file (from within the browser or from within your Downloads folder in Windows Explorer).
97
2. In the installer, choose the Custom installation. Then, in the next step, accept the suggested target location for more required files to be downloaded and click the Install button.
3. Wait for the download and unpacking to be finished and for the SQL Server Installation Center to open by itself. Click the New SQL Server stand-alone installation or add features to an existing in-stallation option.
98
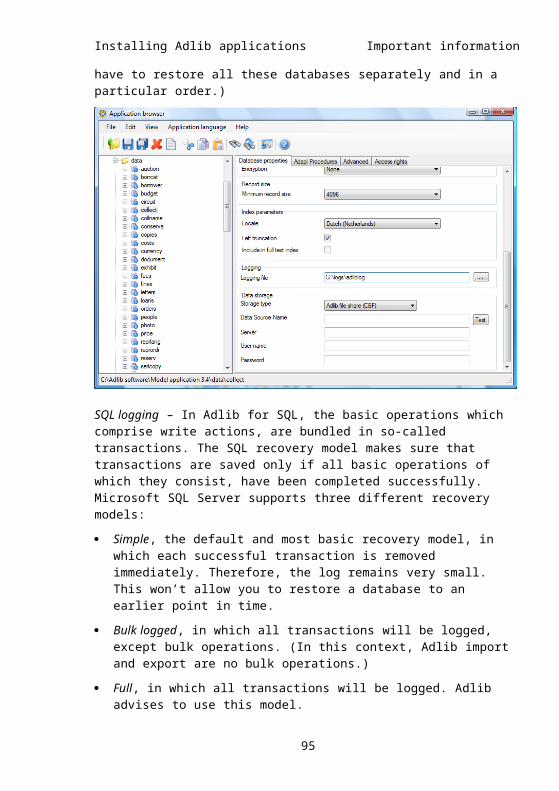
Installing Adlib applications SQL Express
4. Wait for the installation procedure to show you the SQL Server 2016 Setup window. Accept the license terms and click Next. The installer will perform a number of checks. Warnings are not fatal. During this step, you may be notified that you can’t continue with the setup until you’ve updated some other software on your sys-tem: then update or install the relevant software and Re-run the Install rules to be able to continue the SQL Server setup. You may even need to save your work, cancel the SQL Server setup for now, restart your computer and then restart the SQL Server setup from the folder you downloaded it to.Click Next when the essential rules have passed the test.
99
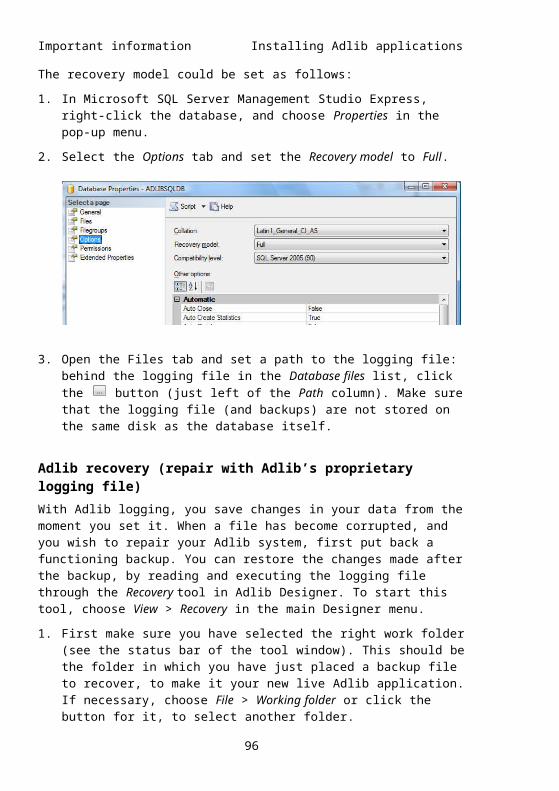
SQL Express Installing Adlib applications
5. In the Feature selection you can accept the default settings. Click Next.
6. If you have no other version/instance of SQL Server installed on your computer, you can accept the Default instance and other de-fault settings on the Instance configuration page. If you do have other instances of SQL Server, then type a unique and descriptive Named instance, like MSSQLEXPRESS or SQLEXPRESS2016. Don’t use spaces or special characters. Click the Help button for more information. The Instance ID will be filled with the same value.
100

Installing Adlib applications SQL Express
7. On the Service Accounts tab of the Server Configuration page, you can probably leave the settings to their default. The SQL Server Database Engine service should have been set to Auto-matic, while the SQL Server Browser service can be left to its de-fault Disabled if this is the only SQL Server instance on your com-puter or local network, but should be set to Automatic as well if there are more SQL Server instances present on your network.
101

SQL Express Installing Adlib applications
On the Collation tab, click the Customize button, mark the Win-dows collation designator and sort order option, select Latin1_General in the Collation designator drop-down list and leave all checkboxes deselected.
This sets the Latin1_General_CI_AI collation type when you click OK (CI_AI stands for case-insensitive/ accent-insensitive). Adlib re-quires this collation type. Click Next.
8. On the Server Configuration tab of the Database Engine Configu-ration page, you select your authentication mode for the database engine. You are free to choose either mode, but we recommend using Mixed mode because its setup is easiest (see the introduc-tion of chapter 3.2 for a full explanation of the advantages and disadvantages of each mode).For Mixed mode, set a password for the currently selected SQL Server administrator. The password must be sufficiently complex: you’ll be warned if it isn’t. Be sure to write down this password somewhere else too. There should be at least one SQL Server administrator, but you can add more co-workers as administrator if your company’s management structure requires it. Do note that SQL Server ad-ministrators have unrestricted access to the database engine (via software like SQL Server Management Studio) so it’s best to keep the list short. Each administrator should have his or her own password.On the Data Directories tab, preferably (although no requirement)
102

Installing Adlib applications SQL Express
set the location for the logging files and the backup to a different server or disk than the database directory, if available.You can leave the settings on the other tabs as they are.
9. On the following pages, click Next, Accept and Next to start the actual installation. Wait for the procedure to complete. This may take awhile. The Complete page notifies you of the installation re-sults. Click Close to end the SQL Server 2016 Setup. You may have to restart your computer to complete the installation.
10. From the SQL Server Installation Center window you can now in-stall SQL Server Management Studio, a required tool for your SQL database management, via the Install SQL Server Management tools option.
A web page opens. Choose Download SQL Server Management
103
SQL Express Installing Adlib applications
Studio and execute the relevant installer after download.
Optional: creating a new SQL database
11. SQL Server Express has now been installed so that we can create a SQL Server database if required. You only need to do this if you are migrating existing CBF databases to SQL. If you are installing a new 4.5 model application directly to SQL, you don’t need to create a database manually.From the Windows Start menu, open SQL Server Management Studio from underneath Microsoft SQL Server 2016. Now connect to the server you created earlier in this installation. The Server name to select, is the one ending with SQLEXPRESS2016 (or the name you gave it). Note that the first part of the full name is the name of the machine on which you installed the server instance. You’ll need this complete Server name later on, so write it down
104

Installing Adlib applications SQL Express
somewhere. Leave the Authentication to Windows Authentication. Click Connect.(If your new server doesn’t appear in the list or the connection with the server cannot be made, then see appendix 3 for testing and solving SQL connection issues.)
12. Open the server node in the Object explorer by clicking the + in front of it. Right-click the Database node and choose New Data-base in the pop-up menu.
In the New database window, on the General tab, enter a unique
105
SQL Express Installing Adlib applications
name for the new database, without any spaces. Note that from now on you will be using this name to refer to the Adlib SQL Server database, so choose the name carefully, e.g.: ADLIBSQLDB. Write the name down somewhere. In the Database files list below, you can see the files (database and log file) which are going to be created, their location and some settings which can both be changed. The SQL database is one large file, in which SQL Server will be storing all Adlib SQL Server tables. This file will be visible in Windows Explorer but you may never handle it there directly. The location can be chosen freely, but it is wise to store the data-base file and log file on separate servers, or at least on separate partitions, so that in case of a hard disk crash a restore is still possible. The other options can be left as they are or changed if desired. Further it is recommended to have logging performed by SQL Server (see chapter 6.6 for more info). It’s best to set the Recov-ery model on the Options tab to Full.On the Options tab you must leave the Collation option (= sorting order) to <default> (since we already set it in the installation pro-cedure) or set it explicitly to Latin1_General_CI_AI again (CI_AI stands for case-insensitive/accent-insensitive). You can probably leave the other options as they are too. Click OK to create the new database.
Part 2: creating a general login
13. In the Object explorer of SQL Server Management Studio (see step 11 if you hadn’t opened that program yet), open the server node and underneath Security, right-click the Logins node. Choose New login in the pop-up menu to create a new login name for all database users.
On the General tab, enter a new name under which all your Adlib applications will approach the server, e.g.: ADLIBSQLUSER. Mark
106

Installing Adlib applications SQL Express
the SQL Server authentication checkbox and enter a new general password (twice). (Do choose a hard to guess and sufficiently long password, otherwise the program produces an error message when you close this window.) Write the password down some-where. Deselect the Enforce password expiration and User must change password at next login options: for our purpose we need the password to remain what it is now. If you just created a new SQL database, then select it here as the Default database. If not, this should still be done after installing the Adlib application: click OK, close Microsoft SQL Server Man-agement Studio and also skip step 14.
107
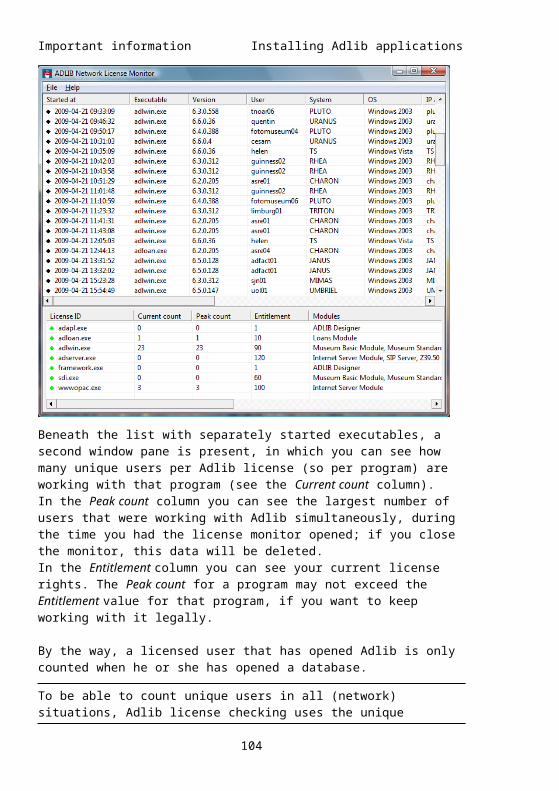
SQL Express Installing Adlib applications
14. Select the User mapping page in the current window. In the list on the right, mark your new database, and in the list below it, mark the db_owner role. (Leave the public role marked.)
Click OK. Microsoft SQL Server Management Studio can now be closed.
Part 3 (alt. 1): installing your Adlib software and application
15. See chapter 2.1 in this guide for a full explanation of the current two-stage installation procedure for the Adlib core software and a new model application 4.5.1. A new, empty SQL database with Adlib tables will also be created during the installation of the model application and will then be linked to that application.
Part 3 (alt. 2): converting your existing CBF databases
16. If you want to migrate existing Adlib applications with CBF data-bases to SQL, you’ll have to convert your current databases to the SQL Server format (even if they’re empty) and a connection must be made between the Adlib application and the new, filled SQL
108
Installing Adlib applications SQL Express
database. Perform this conversion now by means of the Adlib Cbf2Sql.exe* tool (which you can download from MyAdlib). See chapter 5 for a full description of the conversion procedure: use the name of your new SQL Server (MSSQLEXPRESS or SQLEXPRESS2016 in our exam-ple, preceded by the relevant machine name and a backslash), your new SQL database (ADLIBSQLDB in our example) as the tar-get database and the general login name (ADLIBSQLUSER in our example) and the accompanying password as the login details (User Id and Password).
* The .NET 4.0 Framework (Extended or Full) needs to be present on your computer for Cbf2Sql.exe to work. To be sure about the presence of .NET 4.0 before trying to install it, you can check for it manually. To be sure about the presence of .NET 4.0 before trying to install it, you can check for it manually. Open the Windows Control Panel and choose Programs > Programs and Features. In the window that opens, scroll through the list of applications. If you see Microsoft .NET Framework 4.0, then that version is already in-stalled and you do not need to install it again.Go to: https://www.microsoft.com/net/download/framework to download and install .NET if it isn’t already installed on your com-puter. Usually, you should leave older versions of .NET on your computer, unless indicated otherwise by Microsoft.
109

SQL Express Installing Adlib applications
17. In Windows Explorer, you may set your Adlib \data folder to read-only if you wish to do so after the conversion, because of security considerations: then your database structure files (.inf files) can no longer be adjusted without your consent. (The relevant server will handle the safety of your SQL Server database.)
18. You don’t need to adjust your application or your desktop short-cuts. The necessary new references which establish the connec-tion between the Adlib application and the Adlib SQL database, have been inserted automatically into your database structure files (.inf). The installation is now complete and you can open your Adlib ap-plication and start working in it.
All Adlib users now have full (dbo: database owner) access rights to the SQL database. For Adlib Basis users this shouldn’t be a problem though. If you have a more extensive Adlib application and your Adlib license entitles you to use Adlib Designer, you can use the different internal Adlib mechanisms to set specific access rights for individual users. See the Designer Help for more information about that.
110
Appx 2: configuring SQL Server for workgroups
For all relevant Windows pc’s in a network which are part of a work-group (instead of a domain) you’ll have to check whether certain SQL Server network protocols have been switched on, using the SQL Server Configuration Manager, before a user will be able to access the SQL Server from such a workstation. In Adlib you can expect an error 189 – ERROR: unable to read from file, error number = 189 (Connect() failed to connect to server, SQLStatus = -1, error text = [Microsoft][ODBC SQL Server Driver][DBNETLIB] The SQL Server doesn’t exist or access to the server has been denied.) – if the rele-vant protocols haven’t been switched on.1. Start the SQL Server Configuration Manager 2016 and in the
left window pane select the sub node Protocols for SQLEX-PRESS2016 or Protocols for MSSQLSERVER (dependent on which version you have) underneath the SQL Server Network Configura-tion node.
2. Both the Named Pipes and TCP/IP protocols must be switched on (enabled). If that is not the case yet, then right-click the relevant protocol in the right window pane and select Enable in the pop-up menu.
111

3. You’ll be warned that the SQL Server Service must be restarted before the new settings can take effect. We’ll do this in the last step.
4. Named pipes are required to find the desired SQL Server on the network via a Server Name, as used by Adlib (via the Server set-ting for the database in Designer) or in SQL Server Management Studio.TCP/IP is required to actually make a connection to the SQL Server via IP addresses when that server is located elsewhere on the network. Right-click TCP/IP Enabled and select Properties in the pop-up menu. In the TCP/IP Properties window, open the IP Addresses tab and set the TCP Port to 1433 for each desired IP ad-dress on which the SQL Server must be approachable (or for all IP addresses at once via IPAll). (Note that you can only use port 1433 if it isn’t in use by another instance of SQL Server yet.)
5. Click the SQL Server Services node in the left window pane of the SQL Server Configuration Manager and restart the relevant ser-vice (the one with the same instance name) by right-clicking it in the right window pane and selecting Restart in the pop-up menu.
112

Installing Adlib applications Testing a SQL connection
6. In the Windows firewall of the machine on which SQL Server is lo-cated, the same port (1433 in this case) must be opened for TCP. You do this via the Windows Control panel > System and Security > Windows Firewall > Advanced settings. In the left window pane, select the Inbound Rules and click the New rule… option in the right window pane. In the New Inbound Rule Wizard now subse-quently mark the settings Port (click Next), TCP and Specific local ports behind which you enter 1433 (again click Next), Allow the connection (Next), Domain, Private and Public (Next) and in the last step enter a Name: SQL Server access for example. Click Finish to save the new rule.
113

Installing Adlib applications Testing a SQL connection
Appx 3: testing a SQL connectionA quick way to test the connection to a SQL Server database from a random workstation in the network is the following (you don't need to use SQL Server Management Studio or Adlib Designer to do so):
1. Open Windows Notepad and save the new empty document somewhere on your computer, using the file extension .udl, in C:\Temp for example. You could name the file test.udl. In the Save as type drop-down list, select the All files option (instead of Text documents), to prevent Notepad from still adding .txt to the end of the file name.
2. Open Windows Explorer, go to the folder you chose earlier, C:\Temp for example, and double-click your udl file. The Data Link Properties window opens.
115
3. On the Connection tab, under section 1, first enter your SQL Server name. Simply open the drop-down list and pick your SQL Server instance*. The name may consist of one or two parts, OURSQLSERVER or OURSERVER\SQLEXPRESS2016 for example.
4. Under section 2, specify the login details. Choose Use Win-dows NT Integrated security if your SQL Server database uses Windows authentication: then the user name and password with which you are currently logged in to Windows will be used to at-tempt to log in to the database.On the other hand, choose Use a specific user name and pass-word, after which you have to enter both, if your database has been secured through SQL authentication.
5. Under section 3, mark the first option and in the drop-down list below it select the name of the database with which you want to test the connection.
6. Click the Test connection button. If the connection test suc-ceeds, you'll be notified so in a separate message. Close the mes-sage.
7. If you then click OK in the Data Link Properties window, these settings will be stored in the udl file, so that you can repeat the test quickly later on. Or click Cancel to not save these settings; afterwards you can remove the udl file if you don't need it any-more.
* The names of SQL Server instances need to be broadcast over the local network in order to be able to connect to them, be it from Adlib or the test described here. When you are working within a domain, this broadcast (of so-called SRV records for SQL services) is automati-cally provided by the domain DNS. However, if you're not working within a Windows domain, for instance when you've installed your SQL application in a workgroup environ-ment, an additional service is needed to broadcast the correct SQL in-stance names over the network and allow Adlib to connect to any one of them. The SQL Browser service, which is a supplemental service for SQL installations, is specifically designed for that purpose. By default, this service is disabled. To get it to work, you need to configure it as an automatically starting service on the server or pc on which SQL Server has been installed. You can do that with the SQL Server Con-figuration Manager tool in your Microsoft SQL Server 2016 Start menu folder or in the Windows Services. For example:
1. From the Windows Start menu, open the Control Panel.
2. Go to System and Security > Administrative Tools > Services116
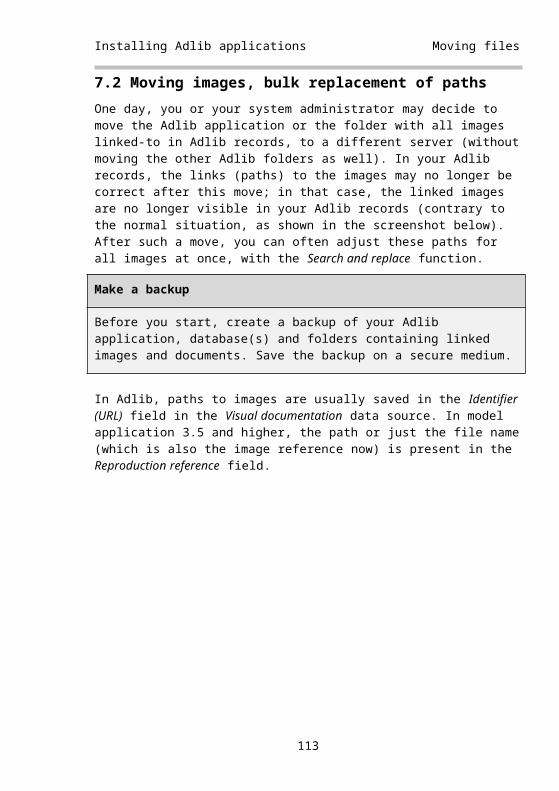
Installing Adlib applications Testing a SQL connection
3. Look up SQL Server Browser in the list and check if the ser-vice has been started already.
4. If not, right-click the service and choose Properties in the pop-up menu.
5. Set the Startup type to Automatic.
6. Click OK and close the Services window and Control Panel.To solve other SQL Server connection issues, see the following article by Microsoft: How to troubleshoot connecting to the SQL Server data-base.
117

Appx 4: creating a printer-specific label templateIn Adlib there are two ways of printing records to labels: as an output format or via the Print label button in the Start menu. For an output format you must create a Word template (see the relevant chapter in the Adlib User Guide) while for the Print label button you must make printer-specific templates (as described below). The two types of tem-plates are not interchangeable.Within the printerspecific templates you can still choose between the following two configurations: With the .lbl variety you’ll always print the marked records to the
template selected in Adlib. Per label type you’ll create a single .lbl template. Record data to be printed may optionally still be pre-processed by a custom adapl of your own making. In the .lbl tem-plate you’ll then refer to that adapl.
For the more advanced .lbx variety (available from Adlib 7.4) you’ll have to create an .lbx XML configuration file in which you refer to one or more label templates (similar to the .lbl variety). In the most basic configuration, this allows you to obtain more con-trol over for which databases/datasets a label template will be visible in Adlib and you may provide template titles in multiple in-terface languages. In a more extensive configuration however, you will add a custom adapl with which you can truly lift label printing to a higher level: you could have the adapl change your initial record selection conditionally by adding or removing records to or from that selection, for instance because you don’t want the marked parent record to be printed but all its child records instead. Moreover, you can let such an adapl dynamically select an appropriate template to print to, based on the contents of the currently processed record: for example, you could have the adapl automatically use a template with a smaller font to print a long text, or let the adapl split up a long title in two parts to print that record to a label template which has actually been set up to print long titles over two lines.If you have multiple versions of the same label template, to be able to deal with small differences in record contents, you could also use the adapl to configure whether those variations should be visible in the Adlib Print label submenu or not.
119

Creating an .lbl templateThe .lbl label template must be created specific to a particular label printer and to specific fields. The English field names (although not necessarily readable) will be present in the template amidst a num-ber of printer-specific control codes. So the label template is not a Word template, it is a text file containing commands for a specific printer, and those commands can be different for each printer brand. A Zebra printer for example, can use the ZPL II programming lan-guage, while an Intermec printer uses IPL. It lies beyond the scope of this manual to describe these programming languages: the relevant documentation can be requested from the manufacturer of your printer. However, with the aid of some examples you’ll hopefully get a quick start. Moreover, printer manufacturers sometimes supply their printer with software to design your labels interactively, although that is not the entire solution either because the template format required by Adlib is actually a print file using special Adlib variables.Let’s just look at an example to clarify the creation of a label tem-plate. Below you can see a complete label template, programmed in ZPL II.
This is a normal text file with the .lbl extension, addresslabel.lbl for example, although you can make up any name. (Take into account that the order in which multiple templates will appear underneath the Print label button, is the alphabetical order of the file names of the templates.)In principle you can edit or create such a file in any simple text editor like Window Notepad.The name (behind title:) with which this template is listed in Adlib and the Adlib-specific variables which retrieve data from the fields from the record, can be found in the following lines:^FX%title:Address label 9pt%^FS^FT39,316^A0N,25,24^FH\^FD%field:postal_addr_street%^FS^FT39,281^A0N,25,24^FH\^FDt.a.v. %field:salutation% %field:initials% %field:last_name%^FS^FT39,246^A0N,25,24^FH\^FD%field:name%^FS^FT40,350^A0N,25,26^FH\^FD%field:postal_addr_postcode% %field:postal_addr_place%^FS^FT39,385^A0N,25,26^FH\^FD%field:postal_addr_country%^FS
120
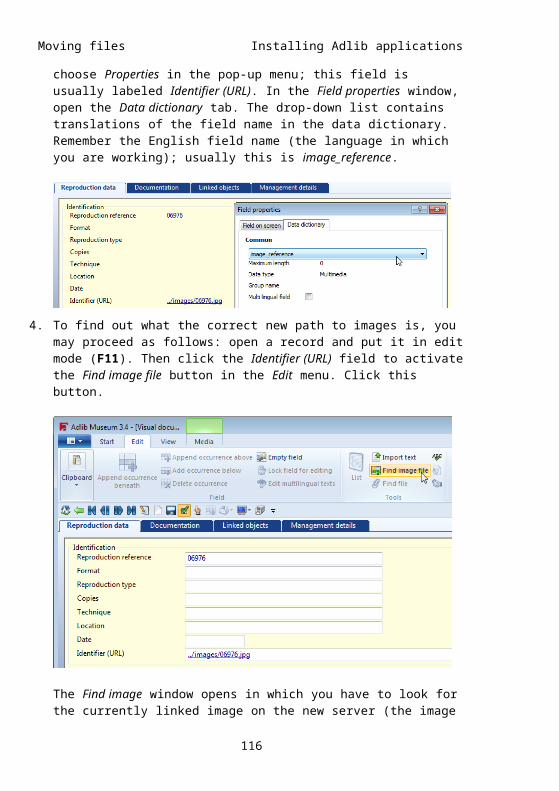
Installing Adlib applications Creating a label template
Behind each occurrence of field: the English name of a field is present, optionally followed by an occurrence number in between straight brackets (postal_addr_street[2] for example), as it is defined in an Adlib database. Normally only occurrence 1 will be printed, but if you provide a specific occurrence number then only that occurrence will be printed.Instead of English field names you can also use field tags if you find that to be more clear, but you can’t use tags starting with a percent character.Unless you are familiar with the programming language, it is of course pretty hard to get the desired layout this way. Therefore, try to use the design program accompanying your printer.For Zebra printers for example, there is the ZebraDesigner software. Even though the program for your own printer might be very differ-ent, it is still useful to see here how a label template can be made with ZebraDesigner. You’ll probably be able to perform a similar pro-cedure in your own printer’s software more easily, having seen how it works in ZebraDesigner.When you start ZebraDesigner, the wizard allows you to create a new label. You’ll have to select the proper printer, enter or check the di-mensions of your labels, and indicate the orientation of the labels on the role. A new label opens.
With the Text and Bar code buttons in the left column you must add Adlib fields now. Underneath Text, always choose Fixed text and on
121

Creating a label template Installing Adlib applications
the label click the spot where the value must appear. The Text wizard opens.
In the entry field, enter a text comparable to the following: %field:postal_addr_street% or Title: %field:title%. In the second case, the fixed text Title: will appear in front of the actual ti-tle on the label. In the first case only the street name will be printed, not preceded by any fixed text.You cannot choose font types different from Zebra fonts.Click Finish to exit the wizard.
If you wish you can drag this field to a different location on the label, or resize the field by dragging a corner marker. If you resize it, you’ll
122

Installing Adlib applications Creating a label template
also resize the used font automatically. This way you can add all de-sired fields to the label.A barcode can be added with Bar Code > Fixed Bar Code.
Choose the desired barcode type through the Define button (you al-ways use fonts defined in the printer). In the entry box above it, type a random string of some capitals and click Finish. Drag the barcode to the proper location.
123

Creating a label template Installing Adlib applications
Save the template in the Adlib application folder of the application in which the template must be available, the \museum subfolder for in-stance. Accept the extension proposed by the program: .lbl in this case. If you want to adjust the label later on, you’ll have to reopen this file in the ZebraDesigner. However, this file is not suited for use as a template in Adlib yet! We’ll first have to turn it into a a print file. Therefor, choose File > Print in the menu of ZebraDesigner, mark the Print to file checkbox in the Print window and click the Print button.
Select the same application folder and save this print file with a dif-ferent name and again the .lbl extension, Adlibtest.lbl for exam-ple.This print file will now be recognized by Adlib as a label template, but we still have to make a final adjustment. Open the file in a text editor.
Now replace the random barcode string (AABBCCN in the second to last line, in this example) by the Adlib variable with the desired field. Suppose you want the object number to be transformed to a barcode, then instead of the string AABBCCN enter the following: %field:ob-ject_number% and save the file. If we don’t change anything else about this template, then the file name will be visible as the name of the template in Adlib. That wouldn’t look very nice so we’ll add a title by inserting the following line underneath the first line:^FX%title:Title and barcode%^FS
124
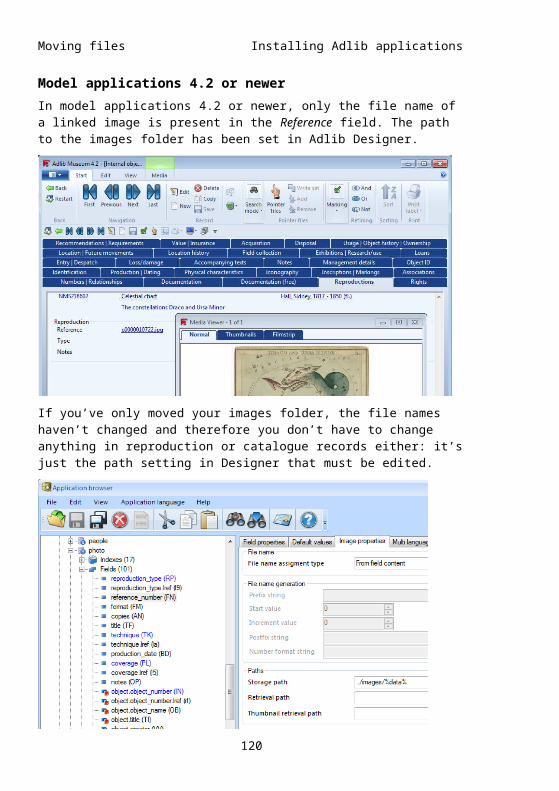
Installing Adlib applications Creating a label template
Of course you can choose any title you like. The title is available in only one language, so it won’t change when you change the interface language in Adlib. (Consider using the .lbx variety of label printing if you do want to provide label titles in multiple languages.)
Adapl data preprocessing for label printing
You also have the possibility to have a custom adapl preprocess any record data before a label is printed, similar to how you can use an adapl to preprocess data before printing to a Word template (al-though you never explicitly call the label template nor set the label template as an output format). You could use this functionality to have more control over how names of persons or institutions will be printed on your labels, for instance by dynamically limiting the length of data to be printed or to rearrange the order of printed de-tails depending on what data is actually present in the record. All functionality of ADAPL is at your disposal, but do not use ERRORM or PRINT commands: only use this type of adapl to temporarily change certain data and/or to fill temporary fields with new data, preceding the automatic print process. For more explanation about that and a simple example, click here.
Adding an adapl reference to the label templateSuppose you have the following Zebra printer label template to print an address:^CT~~CD,~CC^~CT~^FX%title:Address label 12pt%^FS^XA~TA-5274310~JSN^LT10^MN^MTD^PON^PMN^LH0,0^JMA^PR268447781,268447781 ~SD12^JUS^LRN^CI0^XZ^XA^MMC^PW812^LL0529^LS0^FT63,413^A0N,34,28^FH\^FD%field:postal_addr_street%.^FS^FT63,374^A0N,34,33^FH\^FDt.a.v. %field:salutation% %field:ini-tials% %field:last_name%^FS^FT63,334^A0N,34,31^FH\^FD%field:name%^FS^FT63,453^A0N,34,33^FH\^FD%field:postal_addr_postcode% %field:postal_addr_place%^FS^FT63,492^A0N,34,33^FH\^FD%field:postal_addr_country%^FS^PQ1,1,1,Y^XZ
Now if you’d like to have some adapl you wrote executed before each label is printed, you’ll have to include a reference to it in the tem-plate. You can do that in two ways: You can add a line like the following anywhere in the template
125
Creating a label template Installing Adlib applications
(although inserted as the third line would be nice here): ^FX%adapl:..\\adapls\\myadapl.bin%^FS
Or insert the part between ^FX and ^FS in the already present comments section, like so: ^FX%title:Address label 12pt%%adapl:..\\adapls\\myadapl.bin%^FS
Do of course change the name of the adapl to the name of your own adapl and note that the path must be relative to the Adlib application folder containing the adlib.pbk file. Also observe that every backslash in the path must be escaped by doubling it.Save your edited label template and restart Adlib when you are ready to test your work.Note that if for printing the adapl cannot be found, an error message will be displayed and no labels will be printed.
Depending on the printer and the label type in use, the control code for the media type might be relevant for the print quality. By default, ZebraDesigner uses the ^MTT control code with which ink from a rib-bon is printed onto the label, but if you use heat sensitive labels, the ^MTT control code results in meagre print quality. In that case you must use ^MTD instead to obtain deep black characters. In the tem-plate below, the original control code can be found in line three.The template is ready now and is located in the right folder. The re-sult should be as follows:^CT~~CD,~CC^~CT~
^FX%title:Title and barcode%^FS
^XA~TA-5274310~JSN^LT10^MN^MTT^PON^PMN^LH0,0^JMA^PR2,2~SD12^JUS^LRN^CI0^XZ
^XA
^MMC
^PW812
^LL0527
^LS0
^FT92,119^A0N,28,28^FH\^FDTitel: %field:title%^FS
^BY4,3,160^FT95,376^B3N,N,,Y,N
^FD%field:object_number%^FS
^PQ1,1,1,Y^XZ
Note that dependent on the selected barcode type, still other charac-ters may be present in between ^FD and %field…, for example: ^FD>:%field:object_number%^FS.
126
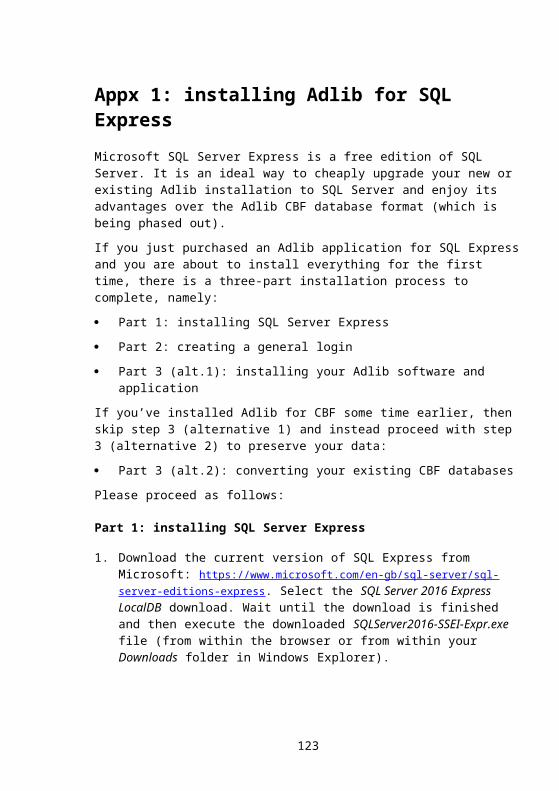
Installing Adlib applications Creating a label template
Although this file has the .lbl extension too, it is actually a print file and you cannot open it in ZebraDesigner anymore. Only the original file with the other name can be opened in there, but after adjusting it in ZebraDesigner you’ll have to print it to a print file again and re-edit it in the text editor as explained above.
Creating an .lbr templateFor the .lbx variety of label printing you require an .lbx XML configura-tion file and one or more actual label templates similar to .lbl label templates (see the previous paragraph for more information about how to create one). Although the extension of the label templates re-ferred to in an .lbx file is not important – you can make it .txt, .dat, even .lbl or something else – it is less confusing if we just agree on some extension, let’s say .lbr, because there are some differences with the .lbl format: .lbr doesn’t do anything with the %title: and %adapl: data tags: it doesn’t stumble over them, it just ignores them if they are present. So in principle you can refer to existing .lbl label templates in an .lbx configuration, but if you are no longer interested in the .lbl-variety of printing (without .lbx configuration), it’s recom-mendable to remove those data tags from the .lbl file. In ZPL for instance, you would simply remove lines like ^FX%title:My Title%^FS and ^FX%adapl:..\\adapls\\myadapl.bin%^FS (if present).Moreover, only the .lbr variety allows the %rtagv data tag with which you can print any value from system variables provided by the adapl. Where you would use %field:priref% or %field:IN% for example, you can also use %rtagv:X[4]% for example to get the fourth occur-rence of the &X system variable (a variable data array). To be precise, the format of both data tags in .lbr templates is:%field:<tag_or_field_name[occurrence]>%
%rtagv:<variable_name[index number]>%
As mentioned, you can leave the extension as is (.lbl) or assign it the new .lbr extension (or something else) in Windows Explorer, but you’re choice will have consequences for the visibility of the template in Adlib: see next paragraph.
Visibility of .lbl, lbr. and .lbx files in Adlib.lbl templatesIn Adlib, label templates with the .lbl extension appear active in the submenu of the bottom half of the Print label button in the current data source, if at least one of the field names used in the template
127
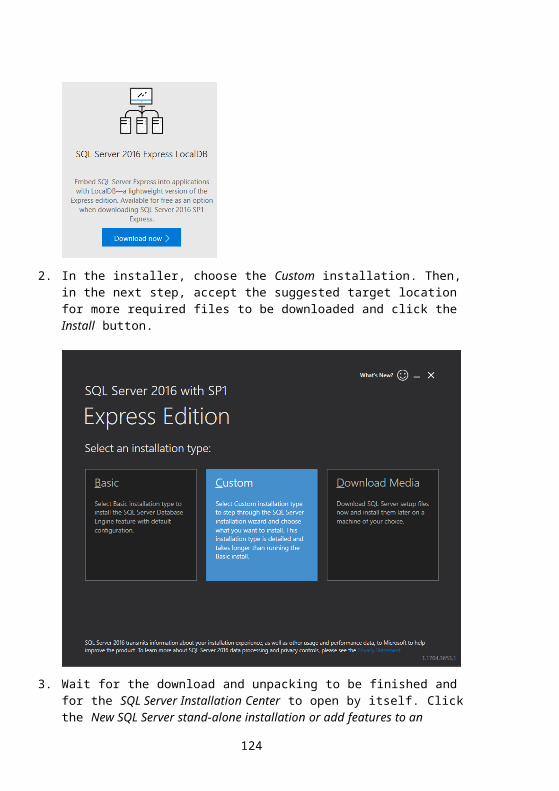
Creating a label template Installing Adlib applications
has been defined in the database associated with the current data source, as an English field name: so it might happen that a label tem-plate is active as well for data sources it wasn’t designed for: in that case, the print result won’t be very useful.
.lbr templates and the .lbx config fileAn .lbx configuration file allows specification of a single title in mul-tiple interface languages, which will appear in the Print label button submenu in data sources which are associated with the databases/datasets as specified in the .lbx file only. So the configuration title won’t be active in inappropriate data sources. Since an .lbx configura-tion may refer to one or more actual label templates, the single title should cover the functionality of all of them. By default, the refer-enced label template(s) in the .lbx file will appear in a separate dialog (see second screenshot below) after selecting the .lbx title from the Print label submenu, but if you wish you can switch the Select tem-plate variation dialog off using the preprocessing adapl: then the ad-apl should pick the appropriate one automatically.
128
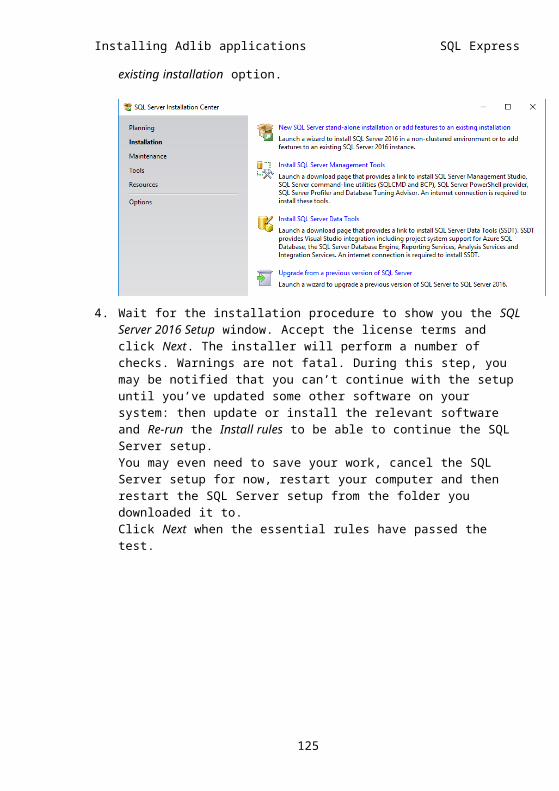
Installing Adlib applications Creating a label template
The .lbx configuration fileAn .lbx file is an XML configuration file (editable in any basic text edi-tor) with which you set up the .lbx variety of printing to a specific la-bel printer.Here’s a simple example of an .lbx file which serves up three label templates after selecting their group title (the .lbx title) in the Print label button submenu, in English or Dutch and specifically for some address data source.<?xml version="1.0" encoding="utf-8"?><adlibXML> <options> <database><![CDATA[address>customer]]></database> <adapl></adapl> <title> <value lang='0'>Address label (with variable font size)</value> <value lang='1'>Adresetiket (met variabele lettergrootte)</value> </title> </options> <template> <template.file>AddressLabel09pt.lbr</template.file>
<template.id>address9pt</template.id><template.name>
<value lang="0">Address label 9pt</value><value lang="1">Adresetiket 9pt</value>
</template.name> </template> <template> <template.file>AddressLabel12pt.lbr</template.file> <template.id>address12pt</template.id>
129

Creating a label template Installing Adlib applications
<template.name><value lang="0">Address label 12pt</value><value lang="1">Adresetiket 12pt</value>
</template.name> </template> <template>
<template.file>AddressLabel14pt.lbr</template.file><template.id>address14pt</template.id><template.name>
<value lang="0">Address label 14pt</value><value lang="1">Adresetiket 14pt</value>
</template.name> </template></adlibXML> Let’s see which settings are at our disposal in this file (Rep. means re-peatable, Opt. means optional).Element Rep. Opt. Parent Children<adlibXML> No No - <options>,
<template>
<options> No Yes <adlibXML> <database>, <adapl>, <title>
<database> Yes Yes <options> -
<adapl> No Yes <options> -
<title> No Yes <options> <value>
<template> Yes No <adlibXML> <template.file>, <template.data>, <template.id>, <template.name>
<template.data> No Yes <template> -
<template.file> No Yes <template> -
<template.id> No No <template> -
<template.name> No Yes <template> <value>
<value> Yes No <template.-name>
-
Element Description<adlibXML> This the standard Adlib XML root element.<options> Contains the configuration options for this label
group. An .lbx file may only contain a single <op-
130
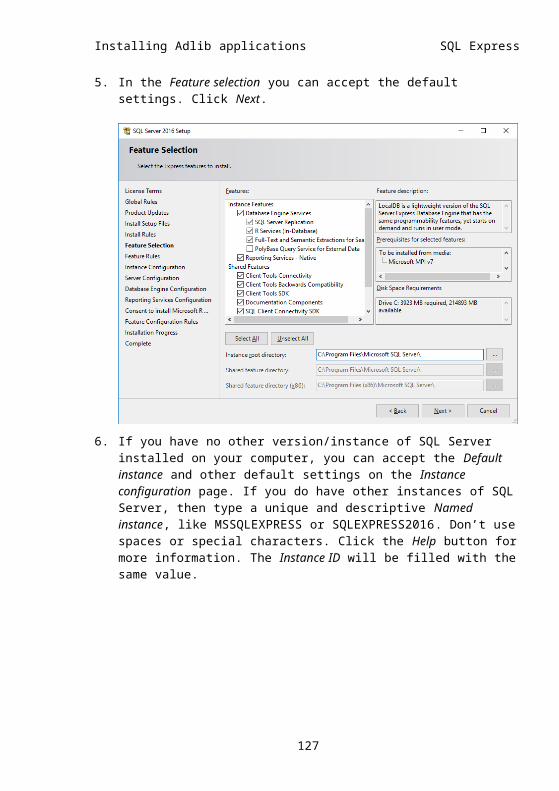
Installing Adlib applications Creating a label template
tions> element.<database> Specifies which database (and dataset possibly)
this label group applies to. Adlib for Windows uses this information to filter out the group title from the Print label button submenu if the current data source has not been associated with any of the <database>s specified here in the configuration. Repeat the element only if the label group can be used in several databases/datasets. It’s recom-mended that the database/dataset combination is wrapped in a CDATA section (due to the greater-than separator):<database><![CDATA[address>customer]]></database>
If <database> is not specified, the label group will be visible in all data sources.
<adapl> A filesystem path referencing a label processing adapl specific to the .lbx variety of label printing. This can be an absolute path or a relative path. The relative path is relative to the application directory.The element can be left out if you aren’t using an adapl.
<title> Describes the label group title as it will appear in the Print label button submenu in Adlib for Win-dows. To support multilingual titles, all translations need to be specified in one or more <value> ele-ments nested inside of the <title> element. If the <title> is not specified, then the label group menu item will display the file name of the .lbx file.
<template> Defines a reference to a label template file, to-gether with an internal ID and a human readable name. The element can be repeated.
<template.data> May contain the actual code of a single label tem-plate, inlined in the .lbx file, in a format understood by the selected label printer (ZPL, PCL, Postscript, etc). This element is deprecated though: it’s recom-mended to not use it. Instead use <template.-file> to reference the template file directly. If used anyway, be sure to wrap the label data in a CDATA section. The element is mutually exclusive with the <template.file> element.
131
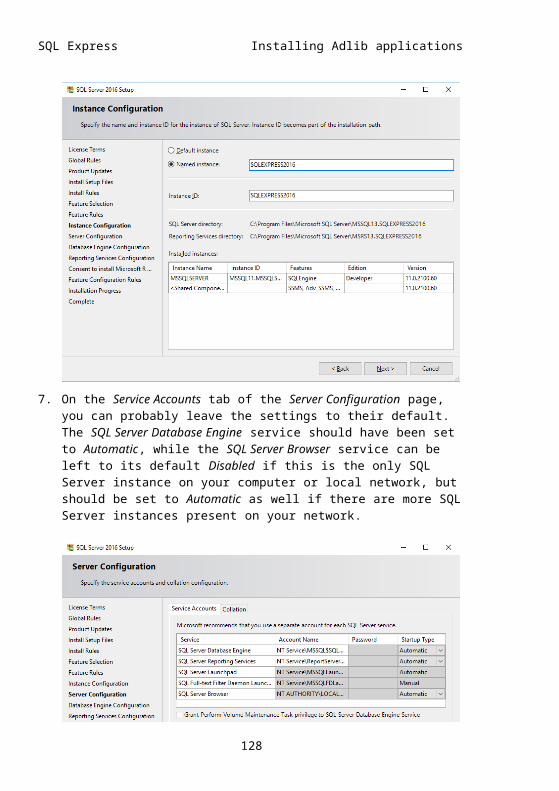
Creating a label template Installing Adlib applications
<template.file> Contains a reference to a file containing the actual label template code (an .lbr file for example). This can be an absolute or a relative path. The relative path is relative to the application directory. File-name and extension does not matter.The element can be left out only if a <template.-data> element has been specified. A <template> section must contain either a <template.file> or a <template.data> element, but not both (nor none).
<template.id> A simple textual ID you give to the template. It should not contain spaces. This ID is used internally to identify this template, but is also accessible to the preprocessing adapl to allow it to set the tem-plate to print to.
<template.name> A title given to the individual template. To support multilingual label titles, all translations need to be specified in one or more <value> elements nested inside of the <template.name> element.You only need to specify this title if the display of template variations in the Select template variation dialog is not disabled by a preprocessing adapl. If no titles have been specified in the <template.-name> element while the Select template variation dialog is visible, then the template IDs will be used as titles.
<value> Specifies a translation of a title or template name. The <value> element has a lang attribute which should correspond to an Adlib interface language text number (0 = English, 1 = Dutch, etc), for ex-ample:<title> <value lang='0'>Address label</value> <value lang='1'>Adresetiket</value></title>
132
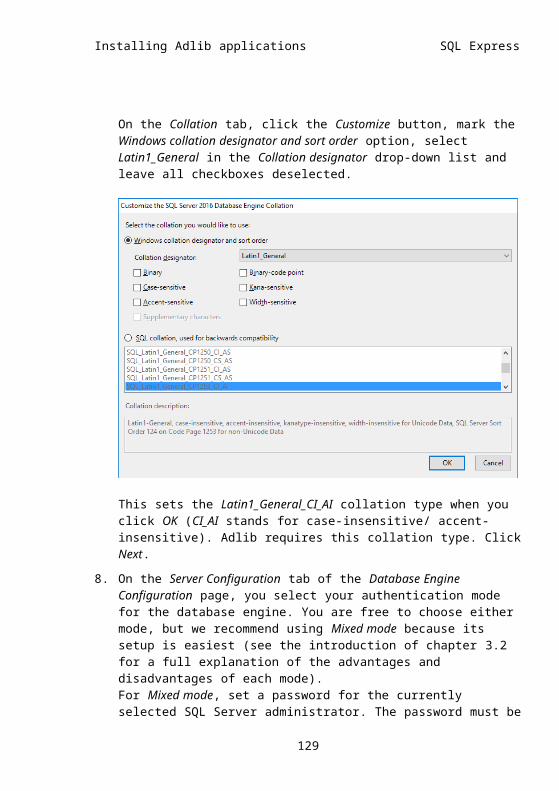
Installing Adlib applications Creating a label template
Adapl data preprocessing in combination with .lbxIn your .lbx configuration file you can optionally refer to a data pre-processing adapl. Such an adapl will be executed once for the intial record selection as a whole and subsequently once for every record in the final record selection. You could use this to have the adapl change your initial record selection automatically by adding or removing records to or from that selection, for instance because you don’t want the marked parent record to be printed but all its child records in-stead. Moreover, you can let such an adapl dynamically select an ap-propriate template to print to, based on the contents of the currently processed record: for example, you could have the adapl automati-cally use a template with a smaller font to print a long text, or let the adapl split up a long object title in two parts to print that record to a label template which has actually been prepared to print long titles over two lines.All functionality of ADAPL is at your disposal, plus a number of dedi-cated system variables. For more explanation about that and some examples, click here (http://documentation.axiell.com/alm/en/in-dex.html?ds_adaprogramminglabelpreprocessing.html).
133