Embed Size (px)
Citation preview
Vikings North America
Member Handbook


Table of Contents
1- Mission Statement
2- Making Your Kit
17- Combat
38- Knot Tying
46- Chopping Wood
48- Fire Safety
55- Starting a Fire
60- Food Sanitation
62- Security
64- First Aid
74- Basic Tools
78- Constructing a Wedge Tent
81- Constructing a Geteld Tent
87- Constructing a Lean-To
89- Constructing a Shelter
91- Constructing a Fire Box
92- Constructing a Cooking Tripod
94- Constructing a Cooking Pot
98- Constructing a Skillet
99- Constructing a Stool
100- Constructing a Bench
101- Constructing a Table
102- Constructing a Chest
104- Making a Leather Water-
Bucket
i
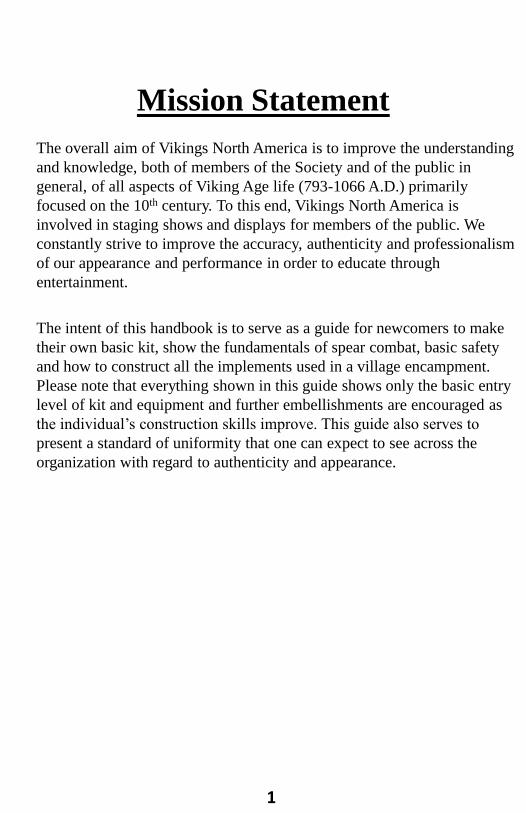
Mission Statement
The overall aim of Vikings North America is to improve the understanding
and knowledge, both of members of the Society and of the public in
general, of all aspects of Viking Age life (793-1066 A.D.) primarily
focused on the 10th century. To this end, Vikings North America is
involved in staging shows and displays for members of the public. We
constantly strive to improve the accuracy, authenticity and professionalism
of our appearance and performance in order to educate through
entertainment.
The intent of this handbook is to serve as a guide for newcomers to make
their own basic kit, show the fundamentals of spear combat, basic safety
and how to construct all the implements used in a village encampment.
Please note that everything shown in this guide shows only the basic entry
level of kit and equipment and further embellishments are encouraged as
the individual‘s construction skills improve. This guide also serves to
present a standard of uniformity that one can expect to see across the
organization with regard to authenticity and appearance.
1

Making Your Kit
Kit refers to the clothing and accessories worn that help the reenactor to portray their persona as either a Viking or Saxon (Gaelic and Norman are not covered in this guide as they are advanced kits and you should see your group Authenticity Officer for more information).
Below is a checklist of what a basic Viking and Saxon male kit should include:
Viking Saxon
Wool Kyrtle X X
Linen Under Kyrtle X X
Linen or Wool Trousers X X
Winnigas X
Low Ankle Boot X X
Belt X X
Pouch X X
Four Panel Hat X
Phrygian Hat X
Knife or Seax X X
Cloak X X
This checklist is for a person portraying a freeman of either Ceorl or Karl class and a person wishing to portray a Thrall requires only a knee length linen tunic, a waist tie and may be barefooted.
Female clothing requires two ankle length kirtles one linen, one wool; shoes, a waist tie of either tablet woven braid or braided yarn and a kerchief to cover the head.
2
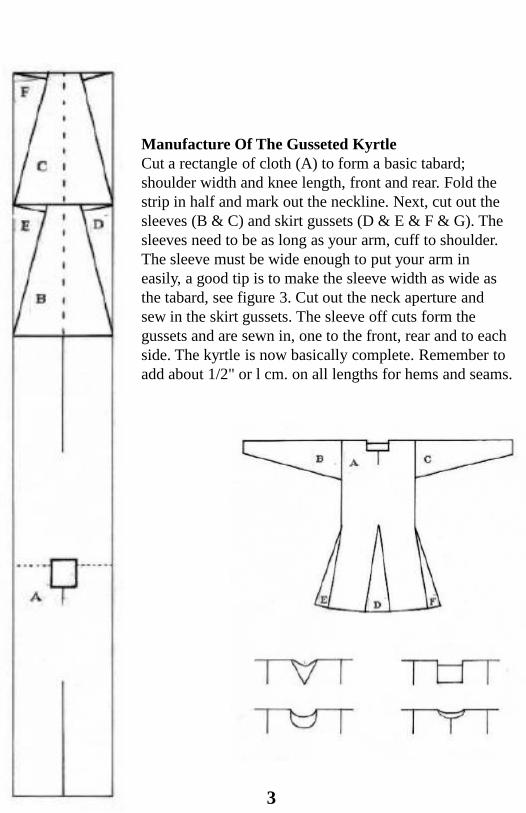
Manufacture Of The Gusseted Kyrtle
Cut a rectangle of cloth (A) to form a basic tabard;
shoulder width and knee length, front and rear. Fold the
strip in half and mark out the neckline. Next, cut out the
sleeves (B & C) and skirt gussets (D & E & F & G). The
sleeves need to be as long as your arm, cuff to shoulder.
The sleeve must be wide enough to put your arm in
easily, a good tip is to make the sleeve width as wide as
the tabard, see figure 3. Cut out the neck aperture and
sew in the skirt gussets. The sleeve off cuts form the
gussets and are sewn in, one to the front, rear and to each
side. The kyrtle is now basically complete. Remember to
add about 1/2" or l cm. on all lengths for hems and seams.
3

Manufacture Of Trousers
Trousers are best made from a pattern, and the best way to make a pattern
is to use an old pair of trousers that still fit you. Cut the trousers into two
halves round the crotch, then cut the two legs up the inside and lay out flat.
You should now have two large panels similar to those in figure below. If
you don‘t have old trousers for an example then modify pattern below to fit
your own measurements. (A) to (B) is half your waist measurement, (G) to
(H) is your outside leg (waist to heel), (B) to (C) is half your crotch
measurement and (C) to (E) is your inside leg dimension. Add about ½" or
l cm. all round for seams and hems. Sew the two panels together, the two
edges (B-C) for the back of the crotch, and (A-D) to complete the crotch.
Otherwise this seam can be left open or a flap inserted. Sew up the insides
of the legs, seams (C-E) to (D-F). The trousers are now nearly complete,
see figure 4b. Belt loops can be added, or else a cord passed through the
hem at the waist. Remember to use linen or wool fabric and earth tones are
recommended.
4

Winnagas or Puttees
The are leg bindings wrapped around the leg from the ankle to the knee
and are worn to draw in loose trousers and to provide additional warmth
and protection to the leg. An easy way to make winnigas is to take a 8‘ X
7‖ strip of wool and fold it so that it is now 3-1/2‖ wide. Then sew the two
8‘ long sides together to form a long tube. Next turn the tube right side out
and fold in the ends to finish off the hem. Your winnigas are now complete
and ready for wear.
5

Shoes
Shoes were worn by most anyone who could afford them, although the
poorer people or thralls would go bare foot. The shoe shown on the next
page is a low ankle boot and of a type that was common throughout both
Viking and Saxon lands.
Begin by tracing the pattern on the next page onto 10 ounce vegetable
tanned leather, adjusting the pattern so points C,D and E correspond to the
size of your foot and increase the pattern by about ½‖ to account for the
seams. Ensure that the open ended side of points B and C are long enough
so that they too have a ½‖ overlap. Once your pattern is traced cut it out
and turn it over , mirror image, to use as the pattern for the other foot. Next
punch a hole every ½‖ on all sides that are to be sewn and stitch together
using a saddle stitch as shown below. Now that all seams have been sewn
turn the shoe right side out so that the seams are no on the inside. Now cut
six sets of slits around the top edge of the shoe as shown on the next page
and insert a leather thong to serve as a shoe lace.
6

7

Belts
Viking Age belts ranged from ½‖ – 2‖ in width and had throat, buckle and
strap end . To make your belt begin by taking a metal ―D‖ ring
appropriately sized to the width of your belt . Next take a nail, cut off the
head and bend onto the ―D‖ ring to make the buckle and catch pin. For
your belt throat take a 4‖ long piece of metal the width of your belt and
bend it in two, drill a hole ½‖ in from the folded end and using tin snips
cut out the slot for the catch pin. Once completed insert the buckle and
catch pin into the belt throat and slide the belt throat onto the leather belt.
Next drill three hole s in the belt throat and rivet it to the belt. For the
strap end take a piece of metal the same size as the belt throat and bend it
in two, insert the leather belt and drill and rivet the two together. Using tin
snips trim the corners of the strap end so that they are rounded off, then
take a file and smooth out any rough edges.
8

Pouches
The circular pouch was common throughout Europe during the Viking Age
and is simple to make. Begin by cutting a 10‖ diameter circle of 2 -3 ounce
leather. Next punch sixteen holes around the edge and insert a leather
thong to serve as a drawstring. Tie the leather thong off with a double
overhand knot and draw the pouch closed to complete. Ensure that the
drawstring is long enough to tie onto the belt.
9

Shoulder Bag
A shoulder bag is often used to carry miscellaneous items such as combs,
bowls, spoons, and drinking vessels. To make a should bag start off with a
piece of linen measuring 12‖ X 28‖, fold the bottom 12‖ up so that you
have what will be a 12‖ 12‖ pocket and a remaining 4‖ X 12‖ flap. Sew up
the seams and hem the edge of the flap and the lip of the pocket then turn
the bag right side out. Next take a piece of linen measuring 4‖ X 54‖ and
fold it in two so that it measures 2‖ X 54‖ and sew up the seam then turn it
out so that the seam is on the inside forming a long tube. Now fold the
ends of the tube into the tube and stitch tube to the top of the bag
attaching the strap to the side where the seams are. Now sew a button hole
centered on the flap and take a 12‖ piece of leather cord or jute twine and
sew it to the lip of the pouch to secure the flap of the bag by passing the
tie through the button hole and then tie it off to fasten the flap.
10

Four Panel Hat
Trace the pattern and cut out four copies from a newspaper. Lay these out
on the suede side of your sheepskin. Be as economical as possible, with
careful laying out you can get three or four caps from one skin. Draw
round the patterns with a pen then cut inside the marking out lines.
Sew the pieces together starting at the pointed end of the pattern and
working down to the brim. Ideally you should sew it from the woolly side
then turn it inside out, but you may find that the
wool tends to catch in the thread, so you may need
to sew from the suede side of the skin.
Trim off the excess on the bottom turn
up the brim so that the wool shows on
the brow.
11
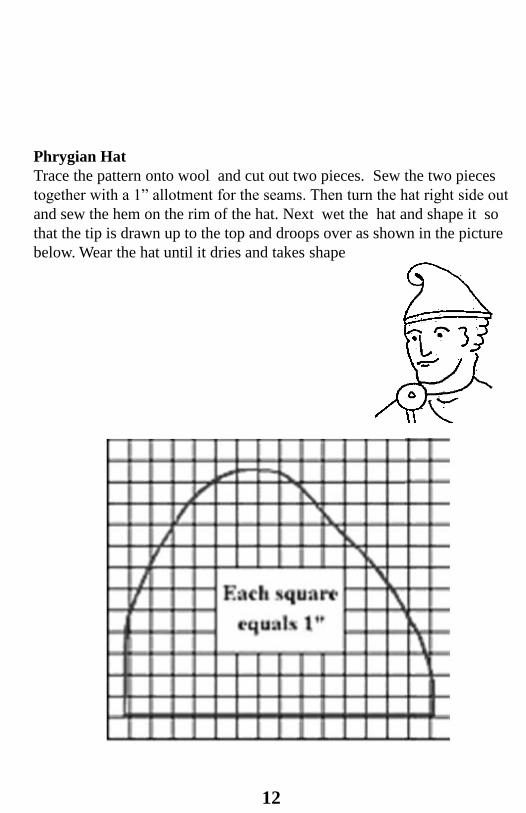
Phrygian Hat
Trace the pattern onto wool and cut out two pieces. Sew the two pieces
together with a 1‖ allotment for the seams. Then turn the hat right side out
and sew the hem on the rim of the hat. Next wet the hat and shape it so
that the tip is drawn up to the top and droops over as shown in the picture
below. Wear the hat until it dries and takes shape
12

Knife or Seax
The Knife or Seax was a common tool used by man and woman alike.
Step 1. Take 1/8‖ X 1‖ flat stock steel and cut out the shape of your knife,
top pattern for Vikings, bottom for Saxons using a jigsaw with a metal
cutting blade. The tang should be 4‖ long and taper to a point.
Step 2. Using a grinder or metal file to put a 15 degree beveled edge on
the knife blank.
Step 3. Using coal fire with air supply or a welding torch heat the blade
until it glows red or about 1400 degrees Fahrenheit. Remove it using
metal tongs or pliers and quench it in motor oil (this will catch on fire ,
have a lid for the container to smother out the fire). This adds carbon
content to the blade. Do this 2-3 times.
Step 4. Wash your blade blank with soap and water, then reheat the blade
to 1400 degrees and quench in water; this hardens the blade.
Step 5. Heat the blade until blue or about 600 degrees and let air cool; this
tempers the blade.
Step 6. Take a 5‖ straight piece of deer or elk antler that has cured and
dried out. Boil it in water until the porous center becomes spongy push it
onto the tang and let air cool.
Step 7. Use a sharpening stone to hone the blade and put on the final edge.
13

Knife or Seax Sheath
The Knife or Seax was worn suspended either horizontally from the waist
with two straps or suspended vertically with a single strap.
Step 1. Take vegetable tanned leather and cut out a piece 2-1/4 times the
width of the blade and long enough to reach from half way down the
handle to 1‖ past the tip and soak the leather in water.
Step 2. Cut two ½‖ strips of 16 gauge sheet metal the same length as the
leather and drill a hole at one end the size of the rivets you will be using.
Step 3. Wrap the wet leather around the blade and half way up the handle
and pull until the leather forms to the shape of the blade.
Step 4. Clamp the two metal strips onto the leather and drill through the
hole in the end of the splint and leather and rivet together. Cut two ¾‖ X
10‖ strips of leather to use as suspension straps and drill and rivet the two
straps in the middle of the splints and finish it off with one more rivet at
the tip of the sheath joining the metal splints to the leather.
Step 5. Using a razor knife cut off any excess leather protruding beyond
the splints.
*Note: Make the Seax Sheath so that the blade rests upside down, blade
towards the top to prevent excess wear on the sheath.
14

Cloak
The cloak came in various design but the rectangular cloak was the most
common and was used by man and woman alike for protection from the
cold.
Take two pieces of wool fabric measuring in width the distance between
both hands when arms are fully extended and the length measuring from
your shoulder to somewhere between below the knee to the calf and sew
three sides together. Then turn the cloak right side out like a pillow case
and fold in the open seam and sew it up using g wool yarn. Next place
the cloak around your shoulders and pinch it close so that it is not too
tight around the neck and mark the pinch point with chalk. Cut six 20‖
lengths of yarn and tie knot on one end and using a needle run three
lengths of yarn through the cloak at each pinch point and braid the three
strands together and tie off with an overhand knot. These ties will be used
to fasten the cloak around the shoulders.
15
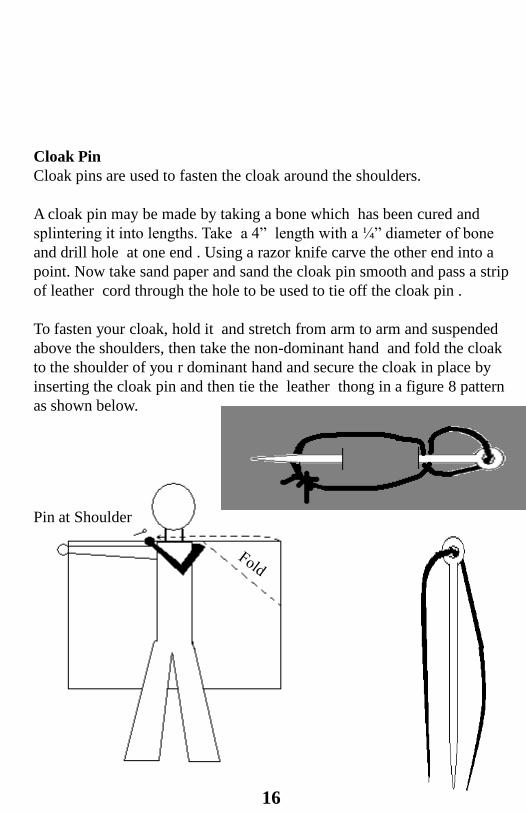
Cloak Pin
Cloak pins are used to fasten the cloak around the shoulders.
A cloak pin may be made by taking a bone which has been cured and
splintering it into lengths. Take a 4‖ length with a ¼‖ diameter of bone
and drill hole at one end . Using a razor knife carve the other end into a
point. Now take sand paper and sand the cloak pin smooth and pass a strip
of leather cord through the hole to be used to tie off the cloak pin .
To fasten your cloak, hold it and stretch from arm to arm and suspended
above the shoulders, then take the non-dominant hand and fold the cloak
to the shoulder of you r dominant hand and secure the cloak in place by
inserting the cloak pin and then tie the leather thong in a figure 8 pattern
as shown below.
16
Pin at Shoulder

Combat
The basic Germanic warrior, whether Viking or Saxon, fought with the
Spear. It was considered to be a noble weapon for it was the weapon of
choice by Odin and it was used by rich and poor alike. But most important
of all, it was the mark of a freeman and was the method by which he
maintained his freedom.
The basic warrior beginning combat in Vikings North America is highly
encouraged for the above reason to learn to fight with a spear first.
The basic items of a warrior are as follows:
- Helm, either a period accurate helmet or a leather or steel
hard hat concealed by a hat.
- Armored Gloves
- Seax or Knife, blunted for combat.
- Round Shield
- Spear or other weapon such as axe, sword or bow.
17
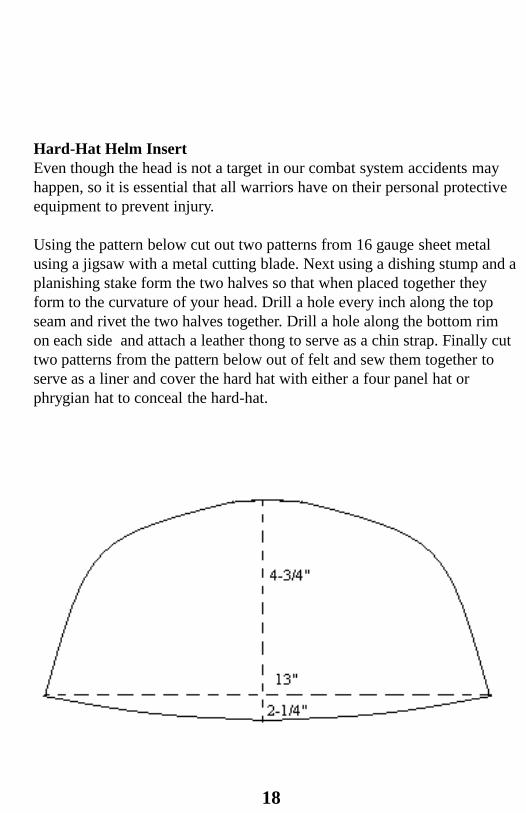
Hard-Hat Helm Insert
Even though the head is not a target in our combat system accidents may
happen, so it is essential that all warriors have on their personal protective
equipment to prevent injury.
Using the pattern below cut out two patterns from 16 gauge sheet metal
using a jigsaw with a metal cutting blade. Next using a dishing stump and a
planishing stake form the two halves so that when placed together they
form to the curvature of your head. Drill a hole every inch along the top
seam and rivet the two halves together. Drill a hole along the bottom rim
on each side and attach a leather thong to serve as a chin strap. Finally cut
two patterns from the pattern below out of felt and sew them together to
serve as a liner and cover the hard hat with either a four panel hat or
phrygian hat to conceal the hard-hat.
18

19

Combat Gloves
Gloves are necessary because the hand will get hit from time to time,
without the armored padding bones could be broken.
Armored Glove - begin by taking a pair of leather work gloves without an
elastic band or draw string. Then cut 1‖ wide strips of 10-15 ounce leather
measured to the corresponding length for the following areas:
-Wrist - Four Fingers
-Thumb - Inside of Thumb
Now using a leather punch, punch holes in your strips of leather and sew
them onto the glove as shown below. Repeat process for the other glove.
Padded Glove - begin by taking a pair of leather work gloves without an
elastic band or draw string. Then take two neoprene mouse pads and draw
the pattern of your hand onto the mouse pad and cut it out. Then insert the
mouse pad into the glove
and sew the insert to the
glove along the wrist
portion. Be sure to place
the fabric side of the
neoprene insert face down
so that it will rest against
the skin. This will aid in
putting the glove on and
taking them off.
20

Round Shield
The round shield was the dominant shield type used throughout the Viking
Age and served as the primary defense for a warrior.
Begin by cutting a 30‖ diameter shield blank out of ½‖ thick plywood,
then cut a hole out of the center of the shield the diameter of the width of
your fist in combat gloves. Next to make your shield boss cut out an 8‖
disc from 16 gauge sheet metal using a jigsaw with metal cutting blade.
Then using a dishing stump form a bowl in the metal disc and then turn it
over and hammer out a ½‖ flange around the shield boss. Use the
planishing stake to smooth out any dimples and drill four evenly spaced
holes in the flange of the shield boss. Place the shield boss over the hole in
the center of your shield blank and drill four holes in the shield blank
based off of the shield boss. Cut a 8‖ piece of 1‖ X 1/8‖ flat stock steel to
serve as the handle and drill two holes corresponding to the shield boss
into the handle. Now rivet the shield boss, shield blank and handle
together. Wrap the handle with leather cord and tie it off to cushion the
handle. Finish the shield off by adding a rawhide rim which can be done by
soaking rawhide dog chews in water to soften them up, cutting them into
3‖ wide strips and using ½‖ tacks secure the rawhide to the rim of the
shield and paint the face of your shield accordingly.
21

Spear
The Spear is a weapon common to all warriors and is simple and
inexpensive to produce.
Begin by taking a piece of 1/8‖ X 3‖ flat stock steel and trace and cut out
the pattern shown below using a jigsaw with a fine tooth metal cutting
blade. Then take a ball peen hammer and hammer the spear socket, butting
it together so that you should have a one inch opening. Next file the
spearhead so that the edges of the blade are rounded off and free of burrs.
Take a 1‖ diameter by 5‘ hardwood broom handle (this will be made of
either hickory or ash) and shape the threaded end so that it can be inserted
into the spearhead. Once fitted, drill a hole through the spearhead and shaft
and rivet them together. Measure the spear and ensure that it does not
exceed 5‘ 6‖ in length, then trim the pole
accordingly.
22
Combat Safety
When participating in live steel combat within Vikings North America, one
must always remember that safety is a must and that everyone has the
responsibility to enforce safety standards in order that combat displays
may be safe and fun for all.
Target Areas
Warriors are allowed to aim for any part of the body and legs. Which
include below the neck (i.e. from below the collar bone) to above the knee;
excluding hands, elbows, forearms, upper arms and groin. The chest is a
legitimate target for both sexes. Shots and hits to the shoulder are within
the Target Area and should always be taken to discourage opponents from
aiming closer to the head. Hits from Arrows and Shot to the upper legs
are Valid Hits and should be taken to discourage the Archer/Slinger from
aiming higher, which will reduce the risk of the Target Warrior being
injured in the face.
Off Target Areas
It is forbidden to deliberately land a blow to the Off Target Area, i.e.:
the knees, shins, calves, feet, elbows, hands, forearms, upper arms, groin,
neck or head. Any blow to the head or neck, however well-controlled or
how good the opponents protection maybe, results in the offending Warrior
being defeated. He/she should then allow themselves to be ―killed‖ by their
opponent. Hits to other Off Target Areas maybe ignored, but if taken in
view of the audience, should be acted out as a wound before continuing
with the fight. When involved in combat with mounted warriors, the legs
of the rider are off-target areas, because of the very high risk of injury to
the horse.
Note: any hits to the upper arm should be acted out. Such as losing use of
the arm, but the hit does not count as a valid hit for a kill. Such hits to the
upper arm if used in a show should be limited to cuts only.
23

24
Forbidden blows
Thrusts - Thrusts to any part of the leg or Off Target Areas are forbidden.
Thrusts to the Target Areas are Valid Hits but must be strictly Controlled,
the Thrusting arm must not be locked.
Attacks to the Head - Hits to the head are normally forbidden. Attacks to
the head should, however, be taught and may be used in a Scripted
performance between two experienced Warriors. Such attacks should be
well Telegraphed and may only contact with the helmet provided the shot
has been rehearsed and approved of by both Warriors‘ Training Thegns.
Hooking - The Hooking of any part of a warrior‘s limbs or body with a
Spear, Hand Axe or Long Axe is forbidden.

Weapons Specifications
Helmet - The minimum requirement is a steel or hardened
leather skull cap which may be concealed within an authentic hat.
This must be safe for the wearer and their opponent, and must be
well secured to prevent its loss during combat.
Gloves - The minimum requirement is stiff leather-backed gloves or
appropriately padded gloves that give protection to the hands and fingers.
These must be safe for the wearer and their opponent.
Shield - Shields should be no bigger than three inches past the
elbow when held against the arm by a centre grip. Shields with a
metal rim should be kept free from burrs and have rounded edges.
All other Shields must have a leather or rawhide rim.
Sword and Knife - edges should have a minimum thickness of 2mm and
be blunted. In section this should be an arc of 180 or shallower at 2mm
diameter. An arc more elliptical than a semi-circle will be deemed sharp.
Points should taper down to no less than 180 arc (or shallower) with a
diameter of 18mm diameter i.e. the size of a U.S. currency dime. A knife of
25.4 cm (10‖) blade length or less may have a point comprising of a
diameter of 10mm (0.394²) with an arc of 180 or shallower.
Spears - of a 3mm thickness should have a 180 or shallower arc of a
2.45cm diameter i.e. the size of a U.S. currency quarter or have a bulbous
point. Spear length for a single handed spear is limited 5‘ 6‖ and 7‘ 6‖ for a
two handed long spear.
Hand axes -should have an edge of 3mm thickness with a 180 arc (in
section) or shallower.
Long Axes -two handed axes should have an edge of 4mm thickness with a
180 arc (in section) or shallower and not longer than 5‘ 6‖.
25

SPEAR COMBAT TUTORIAL
Combat Stance - begin with the fighter with his feet shoulder width apart.
Shield should be held firmly about 13‖-18‖ from the body and canted
slightly forward. The spear should be held poised for attack in either the
under-arm or over-arm position.
Attack Stance – like the combat stance above, but the foot of the weapon
hand is about a half step forward and the foot of the shield hand is about a
half step backwards.
Defense Stance – again like the combat stance, but the foot of the weapon
hand about a half step backwards and the foot of the shield hand about a
half step forward.
26
Advancing - when advancing in combat, the warrior may move in one of
two ways: first there is passing thru in which the trail foot passes the lead
foot as in normal walking; the other method is the foot shuffle in which the
trail foot is slid across the ground until it reaches the heel of the lead foot,
then the lead foot steps forward completing the advancement. The first
technique provides the fastest advance with the danger of being easily
knocked off balance mid-stride; the second technique is slower but
provides greater stability and is best used when grappling.
Spear Grip – the spear is to be gripped firmly with the fingers wrapped
around the spear shaft and the thumb placed along the shaft for control
purposes. The spear should be held somewhere between half-way to the
last two-thirds of the spear shaft and positioned so that the spear blade is
vertical.
Under-arm – like the spear grip listed above, however the arm and elbow
are bent at a 90 degree angle and the spear held at waist height. The spear
shaft should be held so that it is wedged between the elbow and the torso to
act as a contact point to increase stability and accuracy.
Over- arm - as listed with spear grip, but with the arm raised overhead
with the elbow in 90 degree angle poised to strike.
Control – a spear thrust creates a large amount of energy all focused on
the tip of the spear. It is for this reason the warrior must exhibit control in
the force of all thrusts; which is done by extending the arm and spear as
one unit until you feel it make contact with the opponent then quickly
withdraw the spear rather than pushing through. It is critical to remember
to never lock the arm when executing a thrust because this will cause your
thrust to generate too much force and potentially injure your opponent.
27

Attack # 1- begin the attack in the over-arm position by first thrusting the
spear to the left side of the opponent‘s chest aiming for the pectoral
muscle. Then withdraw the thrust once the spear makes contact with the
opponent as in Control. Once the attack is executed reset yourself so that
you are positioned to attack again.
28

Attack # 2- begin the attack in the over-arm position by first by thrusting
the spear to the right side of the opponent‘s chest aiming for the pectoral
muscle. Then withdraw the thrust once the spear makes contact with the
opponent as in Control. Once the attack is executed reset yourself so that
you are positioned to attack again.
29

Attack # 3- begin the attack in the under-arm position by first by thrusting
the spear to the left side of the opponent‘s mid-section, withdrawing the
thrust once the spear makes contact with the opponent as in Control. The
thrust should be aimed toward the edge of the torso so that any over
extended thrusts may glance off to the opponent‘s side thus preventing
injury.
Attack # 4- begin the attack in the under-arm position by first by thrusting
the spear to the right side of the opponent‘s mid-section, withdrawing the
thrust once the spear makes contact with the opponent as in Control. The
thrust should be aimed toward the edge of the torso so that any over
extended thrusts may glance off to the opponent‘s side thus preventing
injury.
30
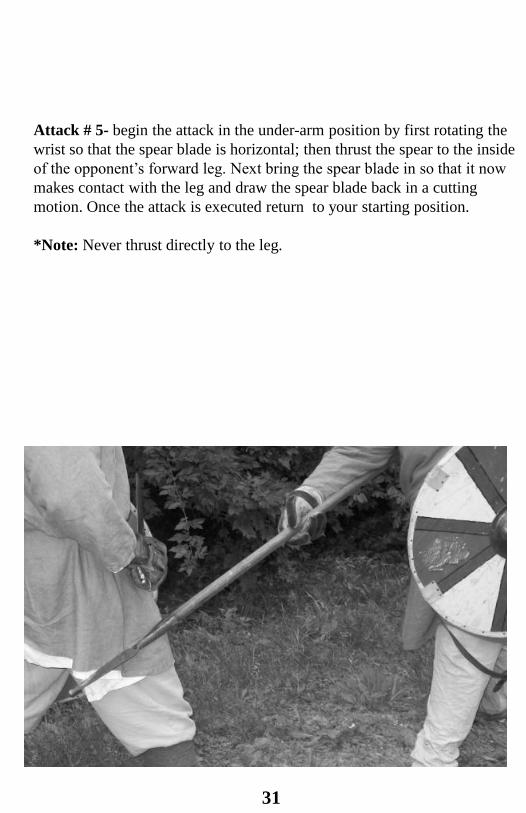
Attack # 5- begin the attack in the under-arm position by first rotating the
wrist so that the spear blade is horizontal; then thrust the spear to the inside
of the opponent‘s forward leg. Next bring the spear blade in so that it now
makes contact with the leg and draw the spear blade back in a cutting
motion. Once the attack is executed return to your starting position.
*Note: Never thrust directly to the leg.
31

Attack # 6- begin the attack in the under-arm position by first by rotating
the wrist so that the spear blade is horizontal; then thrust the spear to the
outside of the opponent‘s forward leg. Next bring the spear blade in so that
it now makes contact with the leg and draw the spear blade back in a
cutting motion. Once the attack is executed return to your starting
position.
*Note: Never thrust directly into the leg.
32

Blocking Attacks to the Head – to block attacks to the head, bring the
spear overhead with the spear shaft aligned parallel with the shoulders and
extend the spear shaft toward the opponent‘s blade so that the two meet at
a perpendicular angle to block your opponent‘s attack.
Block # 1- to block attack # 1 or attacks to your upper right side, reposition
your shield to the right side of your body with the shield positioned so the
shield rim is above shoulder level and cant the shield slightly downward to
block your opponent‘s attack.
.
33

Block # 2- to block attack # 2 or attacks to your upper left side, reposition
your shield to the left side of your body with the shield positioned so the
shield rim is above shoulder level and cant the shield slightly downward to
block your opponent‘s attack.
34

Block # 3 - to block attack # 3 or attacks to your middle right side,
reposition your shield to the middle of your right side and cant the shield
slightly downward to block your opponent‘s attack.
Block # 4 - to block attack # 4 or attacks to your middle left side,
reposition your shield to the middle of your left side and cant the shield
slightly downward to block your opponent‘s attack.
35

Block # 5 – to block attacks to the outside of your forward leg or to your
right side leg, rotate your wrist and spear so that the spear head is pointed
down and the shaft is vertical. Then quickly move the spear toward the
outside to intercept your opponent‘s blade.
36
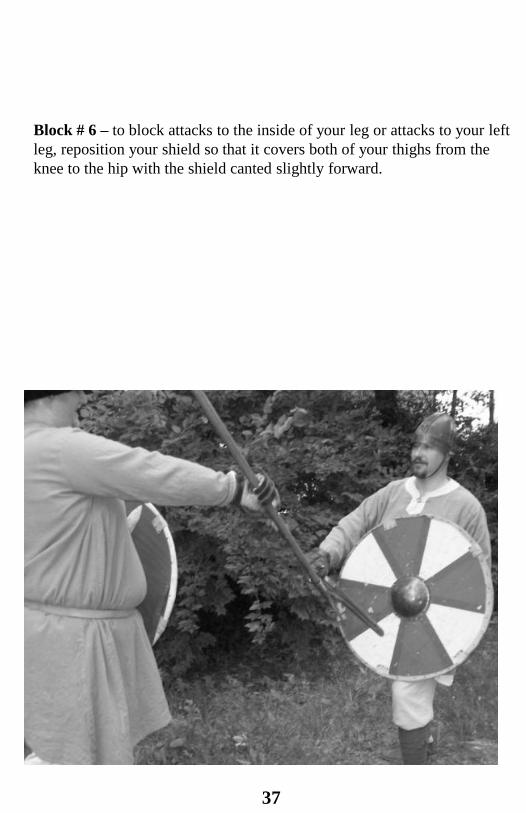
Block # 6 – to block attacks to the inside of your leg or attacks to your left
leg, reposition your shield so that it covers both of your thighs from the
knee to the hip with the shield canted slightly forward.
37
Knot Tying
BASIC KNOTS
All knots are divided into four classes: Class I—joining knots, Class II—
anchor knots, Class III—middle rope knots, and Class IV—special knots.
The variety of knots, bends, bights, and hitches is almost endless. These
classes of knots are intended only as a general guide since some of the
knots discussed may be appropriate in more than one class. The skill of
knot tying can perish if not used and practiced. With experience and
practice, knot tying becomes instinctive and helps the reenactor in many
situations. This section does not cover all known knots but just the most
common knots that you are likely to use.
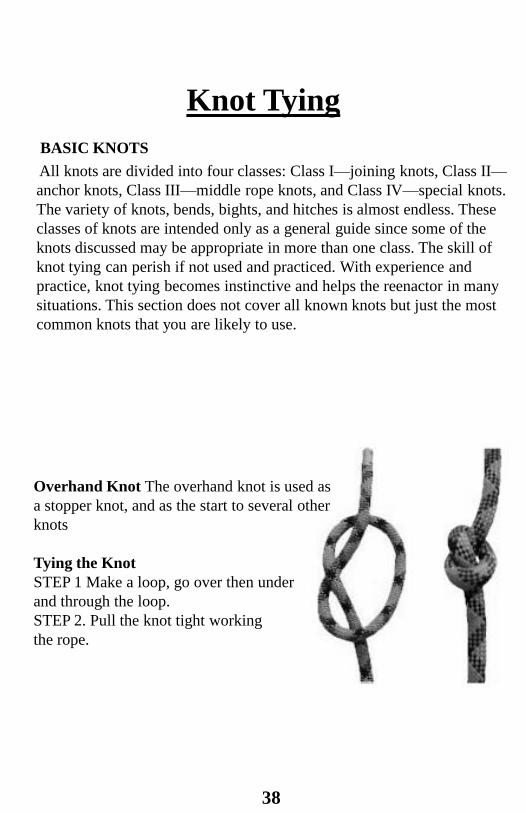
Overhand Knot The overhand knot is used as
a stopper knot, and as the start to several other
knots
Tying the Knot
STEP 1 Make a loop, go over then under
and through the loop.
STEP 2. Pull the knot tight working
the rope.
38

Square Knot– The square knot is used to tie the ends of two ropes of
equal diameter. It is a joining knot.
Tying the Knot
STEP 1. Holding one working end in each hand, place the working end in
the right hand over the one in the left hand.
STEP 2. Pull it under and back over the top of the rope in the left
hand.
STEP 3. Place the working end in the left hand over the one in the right
hand and repeat STEP 2.
STEP 4. Dress the knot down and secure it with an overhand knot on each
side of the square knot.
39

Bowline Knot– The bowline is used to tie the end of a rope around an
anchor. It may also be used to tie a single fixed loop in the end of a rope. It
is an anchor knot.
Tying the Knot
STEP 1Start by making a loop as shown.
STEP 2. Pass the end of the rope through the loop-over then under.
STEP 3. Pass the end around then back through the loop original loop.
Tighten the knot evenly by hand and secure the end using a overhand knot.
40
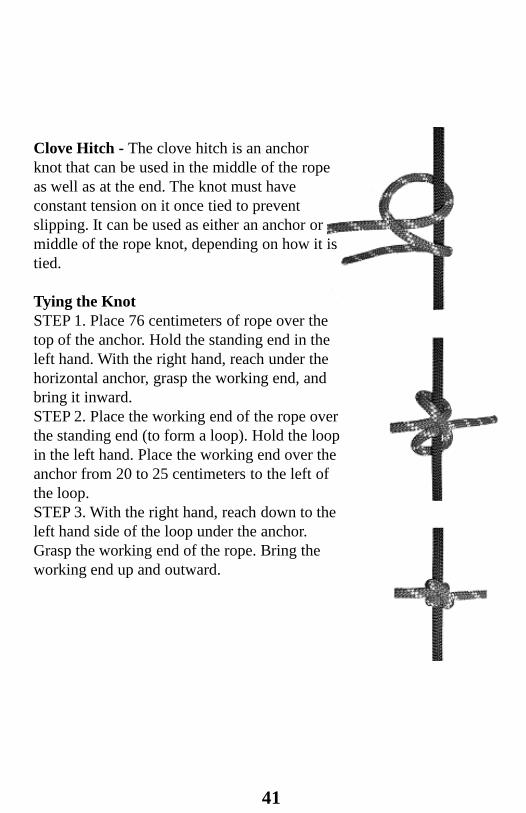
Clove Hitch - The clove hitch is an anchor
knot that can be used in the middle of the rope
as well as at the end. The knot must have
constant tension on it once tied to prevent
slipping. It can be used as either an anchor or
middle of the rope knot, depending on how it is
tied.
Tying the Knot
STEP 1. Place 76 centimeters of rope over the
top of the anchor. Hold the standing end in the
left hand. With the right hand, reach under the
horizontal anchor, grasp the working end, and
bring it inward.
STEP 2. Place the working end of the rope over
the standing end (to form a loop). Hold the loop
in the left hand. Place the working end over the
anchor from 20 to 25 centimeters to the left of
the loop.
STEP 3. With the right hand, reach down to the
left hand side of the loop under the anchor.
Grasp the working end of the rope. Bring the
working end up and outward.
41

Round Turn Two Half Hitches– This knot is used to tie the end of a rope
to an anchor, and it must have constant tension. It is an anchor knot.
Tying the Knot
STEP 1. Route the rope around the anchor from right to left and wrap
down (must have two wraps in the rear of the anchor, and one in the front).
Run the loop around the object to provide 360-degree contact, distributing
the load over the anchor.
STEP 2. Bring the working end of the rope left to right and over the
standing part, forming a half hitch (first half hitch).
STEP 3. Repeat STEP 2 (last half hitch has a 4 inch pigtail).
STEP 4. Dress the knot down.
42
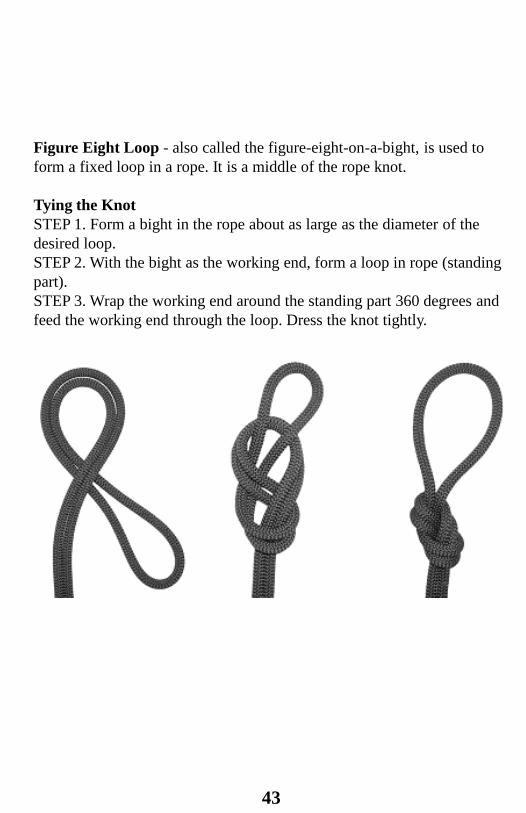
Figure Eight Loop - also called the figure-eight-on-a-bight, is used to
form a fixed loop in a rope. It is a middle of the rope knot.
Tying the Knot
STEP 1. Form a bight in the rope about as large as the diameter of the
desired loop.
STEP 2. With the bight as the working end, form a loop in rope (standing
part).
STEP 3. Wrap the working end around the standing part 360 degrees and
feed the working end through the loop. Dress the knot tightly.
43
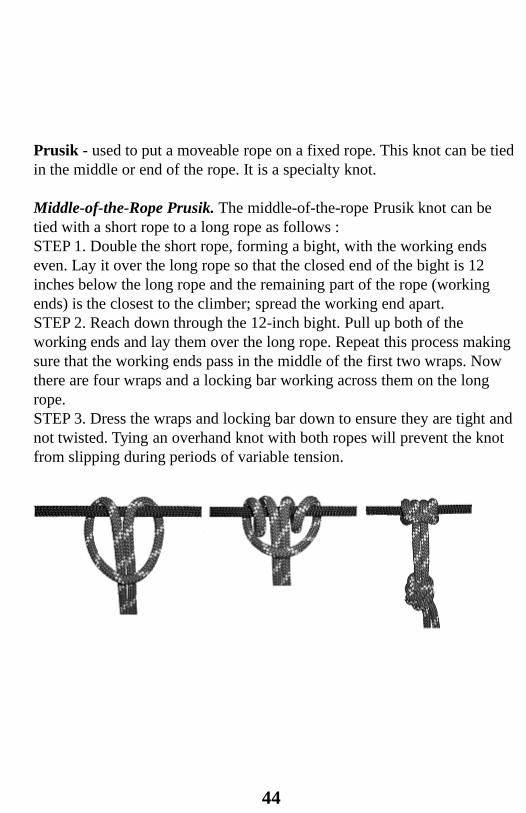
Prusik - used to put a moveable rope on a fixed rope. This knot can be tied
in the middle or end of the rope. It is a specialty knot.
Middle-of-the-Rope Prusik. The middle-of-the-rope Prusik knot can be
tied with a short rope to a long rope as follows :
STEP 1. Double the short rope, forming a bight, with the working ends
even. Lay it over the long rope so that the closed end of the bight is 12
inches below the long rope and the remaining part of the rope (working
ends) is the closest to the climber; spread the working end apart.
STEP 2. Reach down through the 12-inch bight. Pull up both of the
working ends and lay them over the long rope. Repeat this process making
sure that the working ends pass in the middle of the first two wraps. Now
there are four wraps and a locking bar working across them on the long
rope.
STEP 3. Dress the wraps and locking bar down to ensure they are tight and
not twisted. Tying an overhand knot with both ropes will prevent the knot
from slipping during periods of variable tension.
44
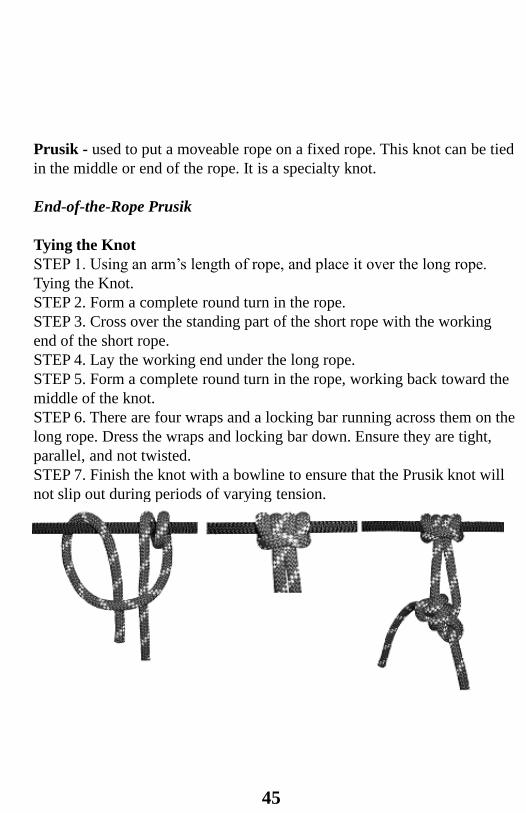
Prusik - used to put a moveable rope on a fixed rope. This knot can be tied
in the middle or end of the rope. It is a specialty knot.
End-of-the-Rope Prusik
Tying the Knot
STEP 1. Using an arm‘s length of rope, and place it over the long rope.
Tying the Knot.
STEP 2. Form a complete round turn in the rope.
STEP 3. Cross over the standing part of the short rope with the working
end of the short rope.
STEP 4. Lay the working end under the long rope.
STEP 5. Form a complete round turn in the rope, working back toward the
middle of the knot.
STEP 6. There are four wraps and a locking bar running across them on the
long rope. Dress the wraps and locking bar down. Ensure they are tight,
parallel, and not twisted.
STEP 7. Finish the knot with a bowline to ensure that the Prusik knot will
not slip out during periods of varying tension.
45

Chopping Wood
One activity that everyone in the village will invariably end up doing at
some point is chopping fire wood. A stockpile of wood should be collected
for individual fires from the show communal woodpile as soon as the camp
is set up, and stored under cover where possible. This avoids the need to
carry large logs around with the public present.
At most shows the supplied fire wood is damp. Take care when chopping
damp logs as they can ‗grab‘ the axe and tend to be very variable in the
ease to split. It is good practice to dry out logs by placing them next to the
fire before they are needed to be burnt (or chopped)but periodically check
that such logs do not ignite. It is also a good idea to take some dry wood to
shows in order to get the fire started.
Before starting to chop wood, choose an axe which you are comfortable
with and can physically handle safely. Always check that the axe head is
firmly fixed and never use an axe with a loose or suspect head.
Periodically check the axe head during use. Also check that the blade and
the axe butt or hammer striking point does not have any loose flakes or
chips of metal which may come loose.
Always cut wood on a sound and secure chopping block away from the
public to avoid injury from flying sticks. If you do not have a dedicated
chopping block try to make a temporary block using a large log split and
dressed to suite. Wherever possible use a small hand axe and a hammer
rather than having to swing a larger axe. This is much more controlled,
uses less effort and is much safer.
46

Try not to hold a log whilst you swing an axe at it, as if you miss or the log
slips or the axe bounces you will easily lose fingers; balance a log on end,
or if necessary hold the log upright with a stick held at a distance like
tongs and get someone to help if considered safer. If larger baulks of wood
need chopping and you need to use a large axe then position the wood and
yourself so that should you miss then the axe will strike ground before it
strikes you. Always check behind you before swinging an axe, and where
possible have a second person ensure that no-one walks behind the axe
man.
Sharp axes should be stored towards the back of the living history exhibit
away from the public and not stuck in the ground. (there is a risk of tetanus
if cut with a dirty axe). Laid flat under a table or stored in a box
(preferably locked) are good options. Having an axe buried in a log is also
common practice but ensure that the handle is not a trip hazard as the axe
may flip out of the log if struck by someone walking into it.
47
Fire Safety
FIRE PRECAUTIONS
The use of open fires to cook and or undertake crafts such as dyeing and
smithing inherently gives an increased risk of fire within the village. The
fact that the village is comprised of fabric and wood tents increases the
risk. We must therefore always be on our guard in respect of fire
prevention. This is in reality the only option as authentic tents can burn so
quickly that once alight it would be rare that the fire can be extinguished
before the entire structure had been lost.
Consequently adherence to the health and safety rules in respect of setting
out the village and in respect of fire control are paramount. Special
attention should be given to open fires and considering their importance
they are covered separately in their own section of this document.
The following setting out and fire precaution rules apply :
A 2.0M/6FT GAP MUST BE MAINTAINED BETWEEN LHE UNITS,
WHERE A UNIT IS EITHER A SINGLE TENT OR A GROUP OF
TENTS BELONGING TO ONE ‘FAMILY’ OR
GROUP/LETHANG/HERRED.
IN SETTING OUT ALL MEASUREMENTS ARE TO CLOTH AND
DO NOT INCLUDE GUYROPES, AND/OR ROPES USED TO
CONTROL PUBLIC ACCESS. FIRE BREAK ZONES MUST
BE KEPT CLEAR OF ALL COMBUSTIBLE MATERIALS.
ANY OPEN FLAME MUST BE A MIMIMUM 1.25M/4FT AWAY
FROM ANY TENT FABRIC MEASURED IN ANY DIRECTION,
INCLUDING VERTICALLY.
COMBUSTIBLE MATERIALS MUST NOT BE STORED WITHIN
1.25M/4FT OF ANY OPEN FIRE.
48

FIRE PRECAUTIONS
ALL ACCESS AND EGRESS ROUTES MUST BE KEPT CLEAR OF
OBSTRUCTIONS AT ALL TIMES
ALL CANDLES OR OTHER NAKED FLAMES MUST BE
PROPERLY MOUNTED IN A STABLE HOLDER. IF SUSPENDED
THEN THE SUPPORT MUST BE NON-COMBUSTIBLE AND ANY
SECURING HOOK MUST BE MORE THAN A SEMI-CIRCLE IN
PROFILE.
COOKING WITH LARGE QUANTITIES OF OIL IS PROHIBITED.
STORAGE OF FLAMABLE CHEMICALS (EG METHS) WITHIN
THE LHE IS LIMITED TO SMALL QUANTITIES (UNDER 500ML)
WHICH MUST BE KEPT IN APPROPRIATE CONTAINERS AWAY
FROM OPEN FLAMES, AND OUTSIDE OF SLEEPING TENTS
SUITABLE DISGUISED. THE LHE CO-ORDINATOR IS TO BE
MADE AWARE OF THE PRESENCE OF SUCH CHEMICALS.
STORAGE OF GASOLINE WITHIN THE LHE IS PROHIBITED.
GAS CYLINDERS FOR STOVES SHOULD BE SMALL SCALE
ITEMS ; LARGE BULK GAS CYLINDERS ARE NOT ALLOWED
IN THE LHE. ALL CYLINDERS SHOULD BE STORED
AWAY FROM OPEN FLAMES, OUTSIDE OF SLEEPING TENTS
AND SUITABLE DUSGUISED.
THE LHE CO-ORDINATOR IS TO BE MADE AWARE OF THE
PRESENCE OF ALL GAS CYLINDERS.
49

FIRE FIGHTING EQUIPMENT
Under normal camp site H&S regulations, and in order to protect ourselves
and the public we must provide adequate fire fighting equipment within
the LHE so that should an incident occur then it can be dealt with
appropriately.
The following rules apply :-
EVERY OPEN FIRE MUST HAVE A WATER STORE OF APPROX
10 LITRES (2 GALLONS), SPECIFICALLY DESIGNATED FOR
FIRE CONTROL AND STORED NOT MORE THAN 2.0M/6FT
FROM THE FIRE, IN AN IMMEDIATELY ACCESIBLE PLACE.
FIRE-FIGHTING WATER MUST NOT BE USED FOR OTHER
PURPOSES. SHOULD THIS WATER SOURCE NEED TO BE
REPLENISHED USE ANOTHER BUCKET OR WWATER
CONTAINER. DO NOT REMOVE THE FIRE BUCKET FROM
THE FIRE!
A SMALL BOWL OR CUP IS TO BE KEPT WITH THE WATER TO
ADMINISTER SMALL QUANTITIES OF WATER LOCALLY AND
ACCURATELY TO SMALL FIRES.
It is strongly recommended that every LHE unit whether they have a fire
or not have a store of fire fighting water. Group members should be made
aware of the fire fighting water so that they do not use it for other
purposes. Note that water is required per fire – if you have two fires you
need 4 gallons of water etc.
Fires within tents have special consideration. For the purposes of the
regulations a differentiation is made between enclosed tents and awnings.
An awning (or sail) is defined as any structure which is open on at least
three sides and is a minimum 1.8m/6ft high. Tents with opening sides are
classed as tents when closed and awnings when 3 sides are open.
50
FIRE FIGHTING EQUIPMENT CONT.
AN OPEN FIRE MUST NOT BE SET WITHIN ANY TENT UNLESS
IT IS A SAIL OR AWNING TYPE STRUCTURE WITH AT LEAST
THREE OPEN SIDES.
WHERE CANDLES OR OTHER NAKED FLAMES ARE USED
WITHIN ENCLOSED TENTS (BUT NOT SAIL TENTS OR
AWNINGS WITH THREE OR MORE OPEN SIDES) THEN A 2KG
DRY POWDER EXTINGUISHER MUST BE KEPT WITHIN THE
TENT AT ALL TIMES, AND ONE DOORWAY MUST BE KEPT
CLEAR AND UNSECURED AT ALL TIMES.
NO NAKED FLAMES ARE ALLOWED WITHIN ANY TENT
OCCUPIED BY A CHILD.
It is strongly recommended that any fabric structure of any style or kind
and which is to be used with any fire, candle or naked flame under or
within it has the material treated with fire retardant chemicals. These are
commercially available but it should be noted that they may
compromise the waterproofing of the fabric ; if waterproofing is important
it is suggested that a test piece is treated first.
FIRE FIGHTING
If a fire breaks out we need to know what to do about it. Every member
should learn what their group uses as the fire-fighting water and where it is
normally kept. Also learn where your Herred stores any other fire fighting
equipment BUT NOTE –
NO ONE IS ALLOWED TO USE ANY FIRE FIGHTING
EQUIPMENT UNLESS THEY ARE TRAINED IN ITS USE. THIS
APPLIES TO FIRE BLANKETS AND EXTINGUISHERS.
An incorrectly used fire extinguisher can spread a small contained fire over
a large area. Basic fire fighting rules must also be appreciated ; a water
extinguisher must not be used on fat fires (from cooking), a CO2
extinguisher should not be used on fabric or wood fires.
51

FIRE FIGHTING
Herreds are therefore strongly recommended to have a person trained in
general fire fighting using the equipment as described above. In the event
of a fire common sense must prevail as appropriate action will ultimately
depend upon individual circumstances. Raise the alarm by shouting ―FIRE,
FIRE, FIRE‖. Upon the fire alarm someone from each fire within the LHE
should take their fire control water to the scene of the incident and stand
by to assist with fire fighting ; but remember that if you have a fire set then
someone must stay with that fire, or else put it out before leaving. Anyone
not taking water to the incident should retire to a safe distance and help
clear the area of public as quickly as possible ; once again remembering to
tend your own fire appropriately. It should be considered that the general
public will not appreciate that the fire may be real and will assume that it
is a part of the show. Even if they do think its real they will most likely
want to watch. Be firm and forceful (but not rude or offensive) in getting
the public to clear the area.
When fighting a fire use a fire extinguisher on fat/oil fires, water on
any fire not electrical or oil based, and use either a fire blanket or a
shovel and dirt to smother a fire. If the fire has spread to a tent then
adjacent tents should be quickly collapsed so as to form a fire break,
providing always that it is safe to do so. In all events prevention or
mitigation of personal injury take precedence over loss of goods and
equipment.
AT NO TIME SHOULD ANYONE BE PUT AT RISK TO
SAFEGUARD PROPERTY. PERSONAL SAFETY IS PARAMOUNT.
Once a fire is out assess damages and damp down as necessary. Attend to
injuries first and ensure that the incident is reported to the society health
and safety officer.
52

OPEN FIRES
The use of open fires at our events is governed by normal health and safety
regulations which are generally common sense. Fires generally must be set
on purpose made fire boxes to prevent heat damage to the ground ;
remember that many of our shows are on historic sites and, even where
they are not, clients don‘t like us digging up their lawns.
THE RULE OF THUMB IS THEREFORE TO USE A FIRE BOX
UNLESS SPECIFIC PERMISSION HAS BEEN GRANTED TO DIG
PITS. IF IN ANY DOUBT THEN USE A FIRE BOX.
These come in two forms ; either a raised box structure in either wood or
steel which lifts the fire a reasonable distance from the ground, or a metal
water insulated fire tray type which can be disguised with sand and/or turf
to represent a fire pit. If pits are allowed then the show broadsheet or the
Runestaff will give specific permission.
Fire pits must be carefully dug, first remove the turf in large sections and
set aside to recover the pit when the show is over. (If it is a dry day then
water the turf to keep it alive). Line the perimeter of the pit with large logs
or rocks if available. Fully extinguish the fire when finished and remove
all rocks and logs before recovering with the original turf, which once
replaced should be watered.
Position fires so that they do not constitute a hazard taking regard of how
the public will approach your camp. Ensure a minimum 2m/6ft gap to all
tents and structures, except for any designated cooking shelter, but in all
cases an absolute minimum f 1m/3ft must be maintained. Where possible
keep a ‗natural‘ 2m/6ft gap between the public and the fire.
If necessary rope off the fire to prevent the public gaining access. Before a
fire is set the required fire precautions must be in place and the fire
fighting equipment must be present as described above.
53

Cooking shelters such as sail tents and awnings should be treated with
flame retardant and any fire under a shelter must be carefully controlled so
that the flames do not reach the fabric, which should be periodically
checked for temperature. Remove the shelter if it becomes too hot.
The shelter must be properly erected and remain stable whenever a fire is
set under it. If high winds give cause for concern then either the fire must
be extinguished or the shelter taken down. The person in charge of the fire
should periodically check that the shelter is secure. Once the fire is
properly positioned, the shelter over it secure, and the fire fighting
equipment and control water etc. is all in place then the fire can be lit.
ONCE ALIGHT FIRES MUST NOT BE LEFT UN-ATTENDED.
ANY UN-ATTENDED FIRE MAY BE EXTINGUISHED BY THE
VILLAGE COORDINATOR OR ANY OTHER SOCIETY OFFICER.
Make suitable arrangements to have at least one person in charge of the
fire at all times. This person must be an adult member.
IF LEAVING THE LHE CAMP FOR ANY LENGTH OF TIME, OR
AT THE END OF THE DAY WHEN THE FIRE IS FINISHED WITH,
ENSURE THAT ALL FIRES ARE PROPERLY EXTINGUISHED ;
THOROUGHLY DOUSE FIRES TO BE EXTINGUISHED WITH
WATER, REMOVE ALL UNBURNT FUEL, AND SPREAD THE
ASHES AND ALLOW TO COOL BEFORE YOU VACATE THE
CAMP. FIRES MUST NOT BE LEFT TO BURN THEMSELVES
OUT.
When the public are present be on guard for children (or even adults)
getting too close to the fire or anything which may have become hot such
as cooking utensils and suspension chains etc. Keep fabrics and other
flammable materials away from fires. Constantly check for cinders
especially when the firewood causes spitting. Check your own clothing
and hair as well ! Note that natural wool is inherently self extinguishing to
a degree and subsequently wearing a wool kyrtle around the fire is safer
than linen.
54

Starting a Fire
Striking fire with flint and steel is not a difficult skill to master, but some
basics of the method will make developing it easier. Five essential
elements will be discussed, the flint and the steel, char, tinder and wood.
After that, the method can be described.
MATERIALS
Flint - any piece of flint can be used, but flint of a good quality will make
the job easier. The same clear black or gray flint used for gunflints is very
good. It needs to be of a large enough size to be gripped tightly in the
fingers so as to maintain control while striking the steel. Flakes of flint
broken off a spall in making flint artifacts are excellent, as they usually
already have a sharp edge and are of good size. The edge does not need to
be razor sharp, but should be at least as sharp as a gunflint. The edge can
be sharpened using either pressure or percussion flaking.
Steel -any piece of good hard steel can be used, but the traditional steel is
in the shape of a "C" with variations. It needs to be large enough to stick
some fingers in for a good grip, again for control. Any correctly tempered
high-carbon steel will work. Old files make excellent steels, and are
frequently used for such.
55
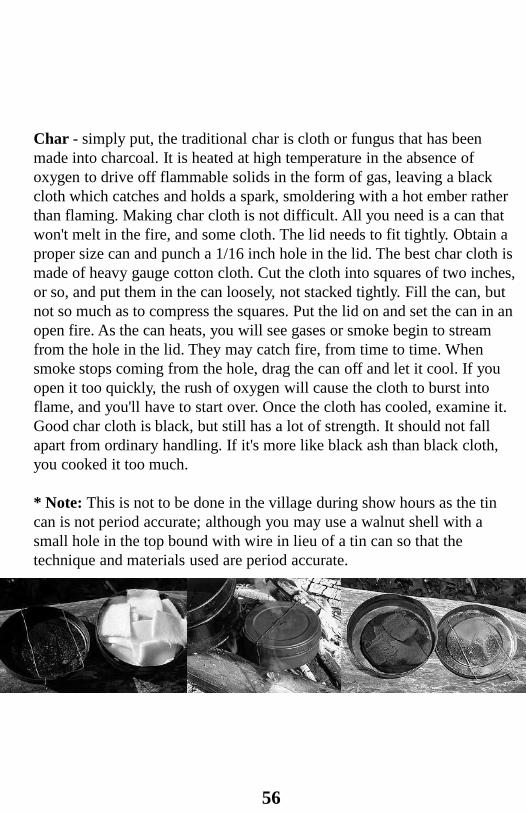
Char - simply put, the traditional char is cloth or fungus that has been
made into charcoal. It is heated at high temperature in the absence of
oxygen to drive off flammable solids in the form of gas, leaving a black
cloth which catches and holds a spark, smoldering with a hot ember rather
than flaming. Making char cloth is not difficult. All you need is a can that
won't melt in the fire, and some cloth. The lid needs to fit tightly. Obtain a
proper size can and punch a 1/16 inch hole in the lid. The best char cloth is
made of heavy gauge cotton cloth. Cut the cloth into squares of two inches,
or so, and put them in the can loosely, not stacked tightly. Fill the can, but
not so much as to compress the squares. Put the lid on and set the can in an
open fire. As the can heats, you will see gases or smoke begin to stream
from the hole in the lid. They may catch fire, from time to time. When
smoke stops coming from the hole, drag the can off and let it cool. If you
open it too quickly, the rush of oxygen will cause the cloth to burst into
flame, and you'll have to start over. Once the cloth has cooled, examine it.
Good char cloth is black, but still has a lot of strength. It should not fall
apart from ordinary handling. If it's more like black ash than black cloth,
you cooked it too much.
* Note: This is not to be done in the village during show hours as the tin
can is not period accurate; although you may use a walnut shell with a
small hole in the top bound with wire in lieu of a tin can so that the
technique and materials used are period accurate.
56

Tinder - anything which will easily catch fire when exposed to the
glowing char can be used as tinder, and many different things are used.
Twigs, shredded jute twine, wood shaving and tree bark works well. When
using tree bark strip it off the tree in thin sheets one-half to one inch in
width. Rubbing a bunch of this between the hands shreds it into a mess of
very fine fibers, excellent for tinder
Wood - to catch the flame you worked hard to start, any small dry wood
will work. Stacking small dry wood so it has plenty of breathing space, and
in such a way that I can easily shove my flaming ball of tinder under it.
Don't forget that on those wet days, dry kindling can frequently be found
on standing dead trees
57

Laying a Fire - there are several methods for laying a fire for quick fire
making
Tepee - arrange tinder and a few sticks of kindling in the shape of a cone.
Fire the center. As the cone burns away, the outside logs will fall inward,
feeding the heart of the fire. This type of fire burns well even with wet
wood.
Lean-to - push a green stick into the ground at a 30 degree angle.
Point the end of the stick in the direction of the wind. Place some tinder (at
least a handful) deep inside this lean-to stick. Light the tinder. As the
kindling catches fire from the tinder, add more kindling.
Cross-ditch - scratch a cross about 1 foot in size in the ground.
Dig the cross 3 inches deep. Put a large wad of tinder in the middle of the
cross. Build a kindling pyramid above the tinder. The shallow ditch allows
air to sweep under the fire to provide a draft.
58
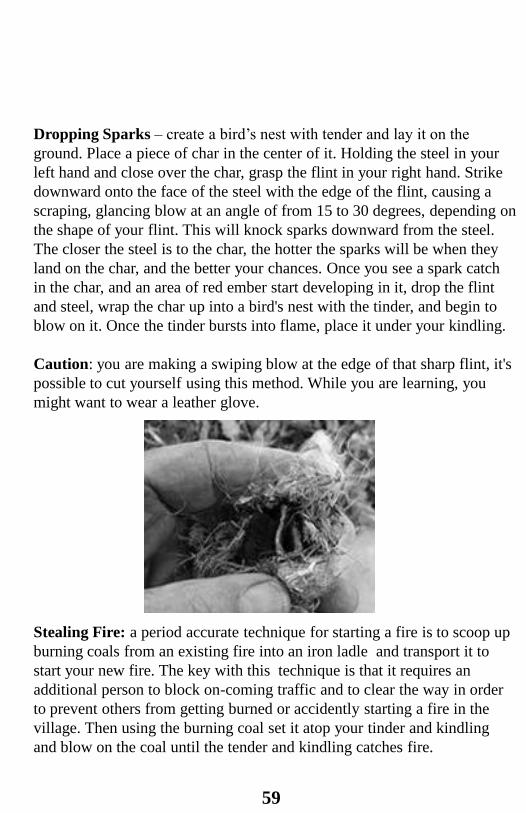
Dropping Sparks – create a bird‘s nest with tender and lay it on the
ground. Place a piece of char in the center of it. Holding the steel in your
left hand and close over the char, grasp the flint in your right hand. Strike
downward onto the face of the steel with the edge of the flint, causing a
scraping, glancing blow at an angle of from 15 to 30 degrees, depending on
the shape of your flint. This will knock sparks downward from the steel.
The closer the steel is to the char, the hotter the sparks will be when they
land on the char, and the better your chances. Once you see a spark catch
in the char, and an area of red ember start developing in it, drop the flint
and steel, wrap the char up into a bird's nest with the tinder, and begin to
blow on it. Once the tinder bursts into flame, place it under your kindling.
Caution: you are making a swiping blow at the edge of that sharp flint, it's
possible to cut yourself using this method. While you are learning, you
might want to wear a leather glove.
Stealing Fire: a period accurate technique for starting a fire is to scoop up
burning coals from an existing fire into an iron ladle and transport it to
start your new fire. The key with this technique is that it requires an
additional person to block on-coming traffic and to clear the way in order
to prevent others from getting burned or accidently starting a fire in the
village. Then using the burning coal set it atop your tinder and kindling
and blow on the coal until the tender and kindling catches fire.
59

Food Sanitation
FOOD STORAGE
Food storage at a show can be a problem considering that we are away
from home, camping, and sometimes there for several days, although such
adversities can easily be overcome with the appliance of common sense.
Basic food hygiene convention is to keep risk foods cool (below 4oc) and
in order to do this within the LHE all that is required is a hiding place for a
modern ice chest. If bought frozen, food can be kept sufficiently cool
within an ice chest and a block of ice for several days.
Alternatively if food is bought on a day to day basis it can be stored in
wooden boxes or lidded buckets. Wood is a reasonable insulator and
providing that the box/bucket is kept away from the fire and in the shade
then food will readily keep ok for at least a day.
Always follow the standard safety conventions for food as anywhere else.
Never store cooked meat in the same cool box and under raw meat, and
similarly keep dairy produce away from meats etc. Keeping foods in their
sealed packaging as long as possible prevents some cross contamination
and can help preserve food for longer. Once food is set out on display
before being prepared for consumption keep different food types apart in
separate dishes and where practical cover them either with other upturned
bowls or cloths kept clean for the purpose. Having color coded embroidery
on such cloths will help identify them for specific foodstuffs. Liquids can
be decanted into jugs or the like and covered with an upturned bowl.
If in any doubt about any foodstuffs fitness for consumption then err on the
side of caution and do not use it. Remember that you are away from home
and sometimes at a distance from full medical assistance.
60

FOOD PREPARATION
Food preparation follows the same basic day to day modern hygiene rules
for handling foodstuffs. Basically keep your hands clean and prepare
individual food types separately. Cook everything thoroughly and discard
anything which is suspect before, during and after cooking.
Wash your hands before preparing any food and between different food
types to prevent cross contamination. Ensure that knives and chopping
boards are clean ; ensure that knives are sharp enough for the job at hand.
Be careful when handling sharp knives especially with the public and/or
children present. Store sharps away from the public and wash/clean after
use.
Use separate cutting boards for meats and vegetables, or else wash the
board between food types, and sterilize by scalding with boiling water.
Always cut up the meat last. If you don‘t have a chopping board then a
makeshift board can be fashioned from firewood; remember to scald the
wood before use. If different chopping boards are used on a regular basis
then they can be marked or even color coded (with a small paint mark –
using non toxic paint) to the relevant use.
Wash vegetables before cutting them up even if they don‘t appear dirty.
Use separate knives to do the cutting, or else again sterilize the blade
between food types. This can be done with boiling water from the cauldron
or else by running the blade over an open flame, but do not get the blade
too hot as this can ruin the temper of the metal. Discard anything that is
dropped even if this means no dinner.. Check that cooking pots and
cauldrons etc are clean before starting to cook. Once food is cut up and/or
prepared it should be placed straight into the cooking pot. If to be stored a
short while ensure it is covered and treat as any other stored food as above.
When cooking ensure that meats, especially chicken etc, is properly
cooked through before serving. Once ready serve hot and do not re-heat
anything that has gone cold.
61

Security
One issue which is often overlooked in the living history villages is
security. For example making sure that our equipment doesn‘t go missing
etc. This applies to the actual show as well as the overnight stay. Shows do
vary in respect of security risks, and generally the risk is less if we are
camped in a secure location such as a museum. Such shows, where the
public pays to see us are also less likely to have thieves operating within
the public during the day, and experience will in time give you a general
feeling about how much ―active‖ security is needed at a show.
We invariably have a good deal of equipment with us in the village; both
our modern day to day equipment and our authentic tools and weaponry.
Weapons are especially at risk; we know where to get them and how much
they cost, whereas the average person has no idea of either. A potential
thief may well be tempted in such circumstances to take risks to steal such
otherwise unobtainable goods. Subsequently special precautions need to be
taken to ensure that things don‘t go missing. When setting up the camp
think defensive and arrange tents so as to channel people down routes that
you face onto. Where possible rope or fence off spaces between tents to
naturally prevent the public from gaining access to the rear of tents. In this
way you can try to keep the public to one side of you which makes
controlling things much simpler.
During a show ensure that all tools, weapons, jewellery and other valuables
are under constant supervision. When you need to go and do other things,
such as take part in the battle or simply go to the latrine, get another re-
enactor to look after your kit, or else at least cover displays or if practical
remove them to a safe place. Put tools, especially sharps into tool boxes
and place next to or in tents generally away from public thoroughfares.
Do not at any time leave a living history camp with either a fire or sharps
unmanned. Ask your neighbors to keep an eye on things if necessary and
return the favor if asked.
62

After a show has finished for the day wherever practical lock valuables in
your car. Vehicles can be moved to the LHE campsite for most shows
making this task easy, but at certain shows vehicles may not be allowed on
site, and/or the car parks may be at a prohibitive distance to readily lock
everything away. In such circumstances keep as many valuables with you.
Otherwise check who is intending to stay in the village rather than going to
the pub (there is usually someone) and ask them to keep an eye on things
generally. Put all easily carried LHE kit away in tents. If your group has a
lot of equipment and nowhere to store it overnight then perhaps you could
consider making a small storage tent for group use. Authentic boxes can
have authentic locks to better secure valuables; the size of the box
obviously determines the size of the valuables. Remember that most
thieves are opportunists and will not bother to risk the time to search
properly. Subsequently the risk of theft is significantly reduced if things are
out of sight, concealed if no-where else under your bedding. Larger items
which may have to be left outside of tents could be roped together to make
theft more difficult, or perhaps noisy if attempted without knowing that
things are roped up. This is a good ploy for shields that can readily be
roped through the handles.
63

First Aid
Every group is required to appoint a First Aid Thegn, who is responsible for advising their group on Society first aid issues and other Health and Safety requirements and the appointed person should wherever possible hold a current approved first aid certificate from a recognized testing body such as the Red Cross or other approved bodies. Each group is required to own a first aid kit suitable for their membership numbers and such kit is usually within the ownership of their first aid thegn. The appointed first aid thegn should maintain the kit as appropriate. Out of date bandages and dressing must not be used. Out of date and used materials etc should be replaced as soon as practicable. First Aid kits must not contain drugs, pills and/or medicines. The first aid thegn must not administer any drugs or medicines in any circumstances, and should not administer any treatment for which he is not qualified. The first aid kit must contain a treatment record book in accordance with prevailing legislation and every treated incident must be recorded in the book. All incidents must be
reported to the Society Health and Safety Officer. In respect of combat injuries the Society Training Thegn must also be advised of the incident causing the injury.
AT NO TIME SHOULD A MEMBER OF VIKINGS NORTH AMERICA RENDER FIRST AID TO A MEMBER OF THE PUBLIC UNLESS IT IS A MATTER OF LIFE, LIMB OR EYESIGHT.
A standard first aid kit should contain but is not limited to the following:
Quantity Description
10 EA Cravats (40‖ X 40‖ muslin cloth)
1 EA 1‖ X 8‖ Wooden Dowel
10 EA 4‖ X 4‖ Gauze
1 Box Butterfly Stitches
1 Roll Medical Tape
1 Box Assorted Bandages
1 Bottle Rehydration Fluid (Pedialite)
4 Rolls Gauze Wrap
64
As life happens people will injure themselves from time to time or pre-
existing medical conditions may arise requiring immediate medical care.
This is a guide to basic life saving procedures to care for the casualty until
he/she can receive advanced medical treatment by a medical staff.
Assessing the Casualty
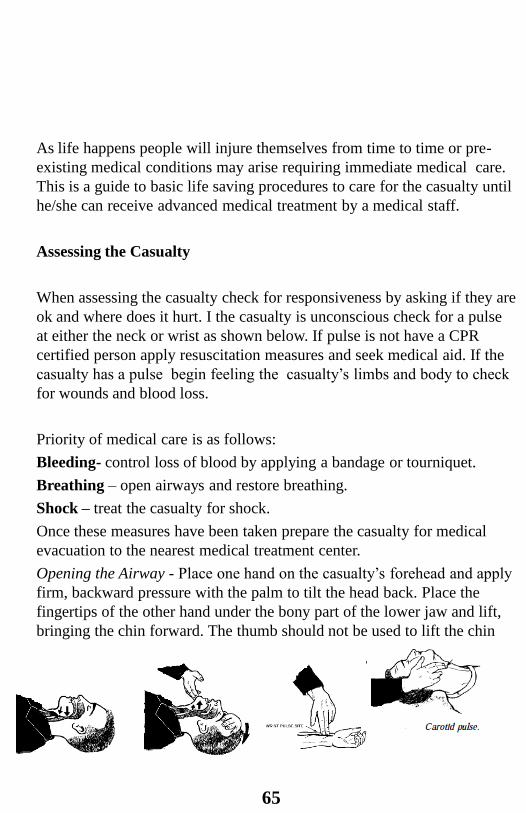
When assessing the casualty check for responsiveness by asking if they are
ok and where does it hurt. I the casualty is unconscious check for a pulse
at either the neck or wrist as shown below. If pulse is not have a CPR
certified person apply resuscitation measures and seek medical aid. If the
casualty has a pulse begin feeling the casualty‘s limbs and body to check
for wounds and blood loss.
Priority of medical care is as follows:
Bleeding- control loss of blood by applying a bandage or tourniquet.
Breathing – open airways and restore breathing.
Shock – treat the casualty for shock.
Once these measures have been taken prepare the casualty for medical
evacuation to the nearest medical treatment center.
Opening the Airway - Place one hand on the casualty‘s forehead and apply
firm, backward pressure with the palm to tilt the head back. Place the
fingertips of the other hand under the bony part of the lower jaw and lift,
bringing the chin forward. The thumb should not be used to lift the chin
65
Hot Weather Injuries
Heat injuries are environmental injuries. They may result when a group
member is exposed to extreme heat, such as from the sun or from
high temperatures. Sign and symptoms include:
Excessive sweating with pale, moist, cool skin.
Headache. Cramping.
Weakness. Nausea (with or without vomiting).
Dizziness. Urge to defecate.
Loss of appetite. Chills (gooseflesh).
Rapid breathing. Confusion.
Tingling of hands and/or feet. Red skin/ hot to touch.
First aid measures.
Move the casualty to a cool, shady area or improvise shade if none is
available.
Loosen or remove his clothing and shoes; pour water on him and fan him.
Have him slowly drink at least one bottle of water or other rehydration
fluid.
Elevate his legs.
If possible, the casualty should not participate in strenuous activity for the
remainder of the day.
Monitor the casualty until the symptoms are gone, or medical assistance
arrives.
66

Cold Weather Injuries
Cold injuries are most likely to occur when conditions are moderately
cold, but accompanied by wet or windy conditions. Cold injuries can
usually be prevented. Well-disciplined and well-trained group members
can be protected even in the most adverse circumstances. They and their
leaders must know the hazards of exposure to the cold. They must know
the importance of personal hygiene, exercise, care of the feet and hands,
and the use of protective clothing. Outward signs of cold injury include
discoloration of the skin at the site of injury. In light-skinned persons, the
skin first reddens and then becomes pale or waxy white. In dark-skinned
persons, grayness in the skin is usually evident. An injured foot or hand
feels cold to the touch. Swelling may be an indication of deep injury. Also
note that blisters may occur after rewarming the affected parts. Group
members should work in pairs (buddy teams) to check each other for signs
of discoloration and other symptoms.
First Aid Measures. First aid for cold injuries depends on -
whether they are superficial or deep. Rewarming the affected part using
body heat can adequately treat cases of superficial cold injury. (For
example, this can be done by covering cheeks with hands, putting
fingertips in armpits, or placing the casualty‘s feet under the clothing of a
buddy [next to his belly].) The injured part should NOT be massaged,
exposed to a fire or stove, rubbed with snow, slapped, chafed, or soaked
in cold water. Walking on injured feet should be avoided. Deep cold injury
(frostbite) is very serious and requires prompt first aid to avoid or to
minimize the loss of parts or all of the fingers, toes, hands, or feet. The
sequence for treating cold injuries depends on whether the condition is
life-threatening. The first priority in managing cold injuries is to remove
the casualty from the cold environment (such as building an improvised
shelter).
67
Treating Lacerations
A laceration is simply a cut to the skin or other tissue and treatment consist
of stopping the bleeding and bandaging the wound to prevent infection.
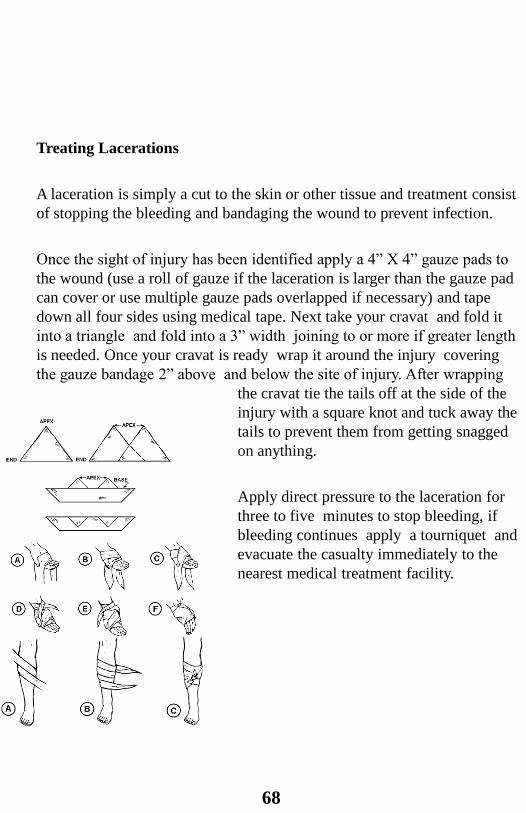
Once the sight of injury has been identified apply a 4‖ X 4‖ gauze pads to
the wound (use a roll of gauze if the laceration is larger than the gauze pad
can cover or use multiple gauze pads overlapped if necessary) and tape
down all four sides using medical tape. Next take your cravat and fold it
into a triangle and fold into a 3‖ width joining to or more if greater length
is needed. Once your cravat is ready wrap it around the injury covering
the gauze bandage 2‖ above and below the site of injury. After wrapping
the cravat tie the tails off at the side of the
injury with a square knot and tuck away the
tails to prevent them from getting snagged
on anything.
Apply direct pressure to the laceration for
three to five minutes to stop bleeding, if
bleeding continues apply a tourniquet and
evacuate the casualty immediately to the
nearest medical treatment facility.
68

Application of a Tourniquet
A tourniquet is a constricting band is only placed around an arm or leg to control severe bleeding.
Improvising a Tourniquet. In the absence of a specially designed tourniquet, a tourniquet may be made from a strong, pliable material, such as gauze or muslin bandages, clothing, or cravats. An improvised tourniquet is used with a rigid stick-like object. To minimize skin damage, ensure that the improvised tourniquet is at least 2 inches wide.
Placing the Improvised Tourniquet.
Place the tourniquet around the limb, between the wound and the body trunk (or between the wound and the heart). Never place it directly over a wound, a fracture, or joint. Tourniquets, for maximum effectiveness, should be placed on the upper arm or above the knee on the thigh.
Applying the Tourniquet.
Step1. Tie a half-knot. (A half-knot is the same as the first part of tying a shoe lace.)
Step 2.Place a stick (or 1‖ X 8‖wooden dowel) on top of the half knot.
Step 3. Tie a square knot over the stick.
Step 4. Twist the stick until the tourniquet is tight around the limb and/or the bright red bleeding has stopped.
Step 5. Fasten the tourniquet to the limb by looping the free ends of the tourniquet over the ends of the stick. Then bring the ends around the limb to prevent the stick from loosening. Tie them together on the side oft he limb.
Step 6. Mark the casualty‘s forehead with a ―T‖ and the time of tourniquet application. And evacuate immediately to a medical treatment facility.
69

Treating Fractures
A fracture is any break in the continuity of a bone. First aid includes immobilizing the fractured part. The basic splinting principle is to immobilize the joints above and below the fracture.
Closed Fracture. A closed fracture is a broken bone that does not break the overlying skin. The tissue beneath the skin maybe damaged. A dislocation is when a joint, such as a knee, ankle, or shoulder, is not in the proper position. A sprain is when the connecting tissues of the joints have been torn. Dislocations and sprains (swelling, possible deformity, and discoloration) should be treated as closed fractures.
Open Fracture. An open fracture is a broken bone that breaks (pierces) the overlying skin. The broken bone may come through the skin or a missile such as a bullet or shell fragment may go through the flesh and break the bone.
NOTE: An open fracture is contaminated and subject to infection.
Indications of a fracture are deformity, tenderness, swelling, pain, inability
to move the injured part, protruding bone, bleeding, or discolored skin at the injury site. A sharp pain when the group member attempts to move the part is also a sign of a fracture.
A fracture is immobilized to prevent the sharp edges of the bone from
moving and cutting tissue, muscle, blood vessels, and nerves. This reduces
pain and helps prevent or control shock. In a closed fracture, immobilization keeps bone fragments from causing an open wound, which can become contaminated and subject to infection.
70

Procedures for Splinting Suspected Fractures
Before beginning first aid procedures for a fracture, gather whatever
splinting materials are available. Ensure that splints are long enough to
immobilize the joint above and below the suspected fracture. If possible,
use at least four ties (two above and two below the fracture) to secure the
splints. The ties should be square knots and should be tied away from the
body on the splint. Distal pulses of the affected extremity should be
checked before and after the application of the splint.
NOTE: When splinting a limb splint it as it lies, do not try to straighten or
realign the limb.
Step 1. If you are splinting an open facture begin by dressing the wound
with a roll of gauze and covering it with a cravat.
Step 2. Get two boards or sticks the length of the limb and pad them by
wrapping cravats or clothing around the splint. Next take four cravats
and fold them into 2-3‖ widths and tie them onto the splints with a half
knot.
Step 3. Tie the splints to the limb by wrapping the cravat around the limb
and tie a square knot on top of the splint. The cravat should be tightly
wrapped so as to immobilize the limb but not so tight as to create a
tourniquet like effect. Check the pulse below the splint sight and adjust
the cravats accordingly.
Step 4. Now that the limb is splinted elevate the limb above the heart to
reduce swelling .
Step 5. Seek medical attention at your nearest medical treatment facility.
71

Treating Burns
Burns often cause extreme pain and scarring.
First Aid for Burns
Eliminate the Source of the Burn. The source of the burn must be
eliminated before any evaluation of the casualty can occur and first aid
administered.
Step 1.Quickly remove the casualty from danger and cover the
thermal burn with any large non-synthetic material, such as a wool blanket.
the casualty‘s clothing is still on fire, roll the casualty on the ground to
smother (put out) the flames.
Step 2. Expose the Burn. Cut and gently lift away any clothing covering
the burned area, without pulling clothing over the burns. Leave in place
any clothing that is stuck to the burn. If the casualty‘s hands or wrists have
been burned, remove jewelry if possible without causing further injury
(rings, watches, and so forth) and place in his pockets. This prevents the
necessity to cut off jewelry since swelling usually occurs as a result of a
burn.
Step 3. Apply a bandage using a roll of gauze and cover the burn area to
prevent infection.
Step 4. Treat the casualty for shock.
Step 5. Evacuate the casualty to a medical treatment center.
72

Treatment for Shock
When treating a casualty, assume that shock is present or will occur
shortly. By waiting until actual signs and symptoms of shock are
noticeable, the rescuer may jeopardize the casualty‘s life.
Position the Casualty. (DO NOT move the casualty or his limbs if
suspected fractures have not been splinted.)
Step 1. Move the casualty to shade, if shade is available and the situation
permits (Do not move the casualty if neck or back injuries are suspected.)
Step 2. Lay the casualty on his back.
NOTE:A casualty in shock who is experiencing breathing difficulty, may
breathe easier in a sitting position. If this is the case, allow him to sit
upright, but monitor carefully in case his condition worsens.
Step 3. Elevate the casualty‘s feet higher than the level of his heart. Use a
stable object (log or rolled up clothing) so that his feet will not slip off.
Step 4. Loosen clothing at the neck, waist, or wherever it may be binding.
Step 5. Prevent chilling or overheating. The key is to maintain body
temperature. In cold weather, place a blanket or other like item over him to
keep him warm and under him to prevent chilling. In hot weather, place
the casualty in the shade and protect him from becoming chilled; however,
avoid the excessive use of blankets or other coverings.
Step 6. Calm the casualty. Throughout the entire procedure of providing
first aid for a casualty, the rescuer should reassure the casualty and keep
him calm. This can be done by being authoritative (taking charge) and by
showing self-confidence.
Step 7. Seek medical aid.
NOTE: Food and/or Drink. When providing first aid for shock, DO NOT
give the casualty any food or drink. If you must leave the casualty or if he
is unconscious, turn his head to the side to prevent him from choking if he
vomits.
73
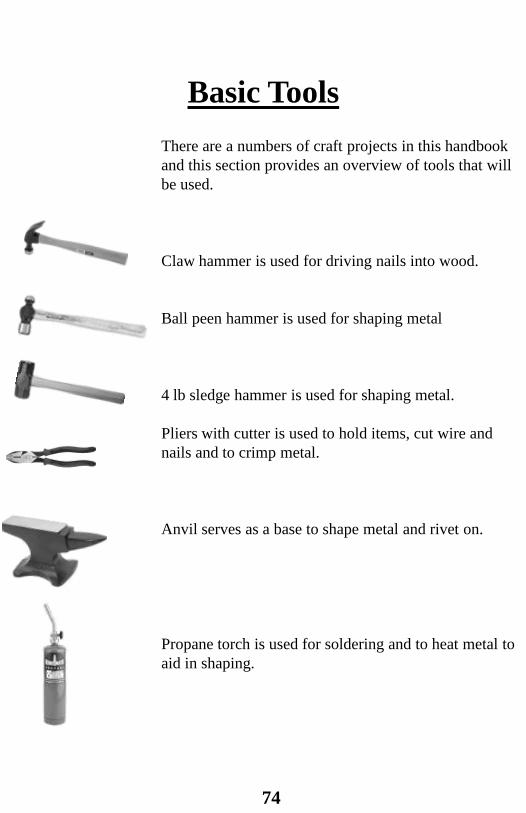
Basic Tools
There are a numbers of craft projects in this handbook
and this section provides an overview of tools that will
be used.
Claw hammer is used for driving nails into wood.
Ball peen hammer is used for shaping metal
4 lb sledge hammer is used for shaping metal.
Pliers with cutter is used to hold items, cut wire and
nails and to crimp metal.
Anvil serves as a base to shape metal and rivet on.
Propane torch is used for soldering and to heat metal to
aid in shaping.
74

Hole saw with mandrel is used for cutting circular
holes in wood.
A paddle bit or spade bit is used to drill larger diameter
holes into wood.
There are two common types of files: metal files and
wood rasp and both are used to remove stock from the
project.
Drill are used bore holes in wood and metal.
Jigsaws are used to cut curves and rounded shapes.
Circular saws are used to make straight cuts.
75

Dishing Stump and Planishing Stake
A dishing stump is used to curve and shape steel by hammering sheet
metal into the depression which will give it a curved shape but leaves
dimples in the surface. A planishing stake is a stake with a rounded top
that is used to smooth out the surface and remove the dimples left behind
from dishing the metal.
A dishing stump is made by taking an elbow height tree stump and
using a chisel to make a 4‖ diameter by 2‖ deep concave depression. A
planishing stake can be made by taking a trailer ball hitch and mounting it
onto your sump by first drilling a hole for it into the stump and then
screwing into place.
76

Riveting
Step 1 Supplies
Lets start with what you'll need.:
5 pound anvil , metal punch/ drill, side cutting pliers,
ball peen hammer, two pieces of metal to rivet together
and a roofing nail.
You don't need to use these tools specifically. a drill
works as good as a punch, and the anvil can be
replaced with a brick.
Step 2 Preparing to Rivet
Take the two pieces of metal and drill or punch a hole
the same size as your nail where you want to rivet the
two pieces of metal together. Now insert the nail
through both holes.
Once your nail is through both pieces of metal you'll
need to cut off the extra, you'll want to have about 1/2
the width of the nail sticking out of the hole. See the
picture an example and cut off the excess with the side
cutting pliers.
Step 3 Peening the Rivet
Begin by lightly hammering around the edge of the
nail, mushrooming out the edge and creating a point in
the center. Next hammer down the point in the center
of the nail and your rivet head is formed.
77
Constructing a Wedge Tent
The wedge tent is your typical Viking tent and is fairly easy to
make 1-2 person tent.
Constructing the Frame
Step 1. Cut four 6‘ length 2‖ X 4‖ boards for parts A, two 64‖
length 2‖ X 4‖ boards for parts B and three 92‖ length 2‖ X 4‖
boards for parts C.
Step 2. Using a 2‖ hole saw drill a hole 2‖ in from the end on
parts B at both ends. On parts A mark and drill holes with the 2‖
hole saw at 2‖ and 62‖.
Step 3. On parts C mark and cut with a circular saw 1‖ in from the
sides for the last 4‖ at each end of the board which should leave 1-
1/2‖ X 1-1/2‖ X 4‖ peg protruding at each end of the board.
Step 4. Mark ¾‖ in from the end of each peg on part C and drill a 1‖
deep by ½‖ diameter hole. Next take ½‖ diameter wooden dowel and cut
six 2‖ lengths.
78

Sewing the Tent
Step 1. Start with seven yards of 60‖ wide a heavy canvas or linen and cut
two 84‖ X 60‖ panels, followed by four right angle triangles with a base of
30‖ and a height of 52‖. The cut two 14‖ X 60‖ panels.
Step 2. Sew your two 84‖ X 60‖ panels together so that you have an 84‖ X
120‖ panel.
Step 3. Hem the 52‖ and 30‖ sides of the triangle panels. Then sew the
triangle panels to your 84‖ X 120 panel so that when complete it forms an
equilateral triangle.
79
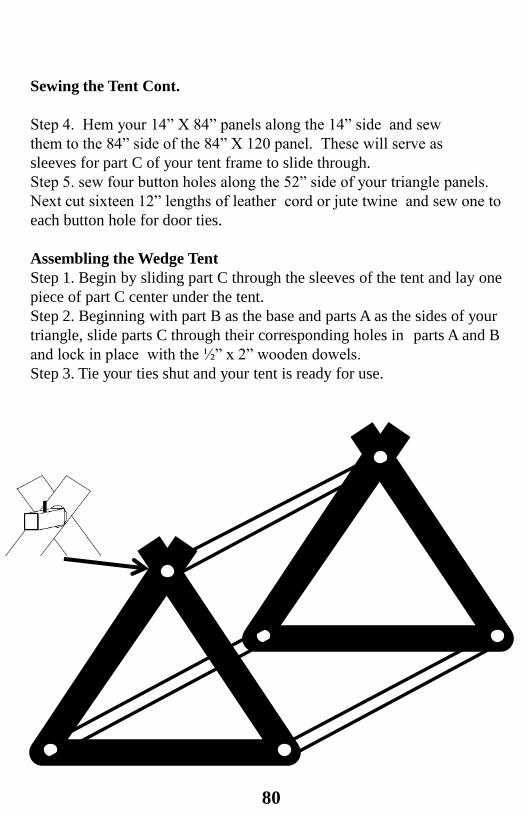
Sewing the Tent Cont.
Step 4. Hem your 14‖ X 84‖ panels along the 14‖ side and sew
them to the 84‖ side of the 84‖ X 120 panel. These will serve as
sleeves for part C of your tent frame to slide through.
Step 5. sew four button holes along the 52‖ side of your triangle panels.
Next cut sixteen 12‖ lengths of leather cord or jute twine and sew one to
each button hole for door ties.
Assembling the Wedge Tent
Step 1. Begin by sliding part C through the sleeves of the tent and lay one
piece of part C center under the tent.
Step 2. Beginning with part B as the base and parts A as the sides of your
triangle, slide parts C through their corresponding holes in parts A and B
and lock in place with the ½‖ x 2‖ wooden dowels.
Step 3. Tie your ties shut and your tent is ready for use.
80
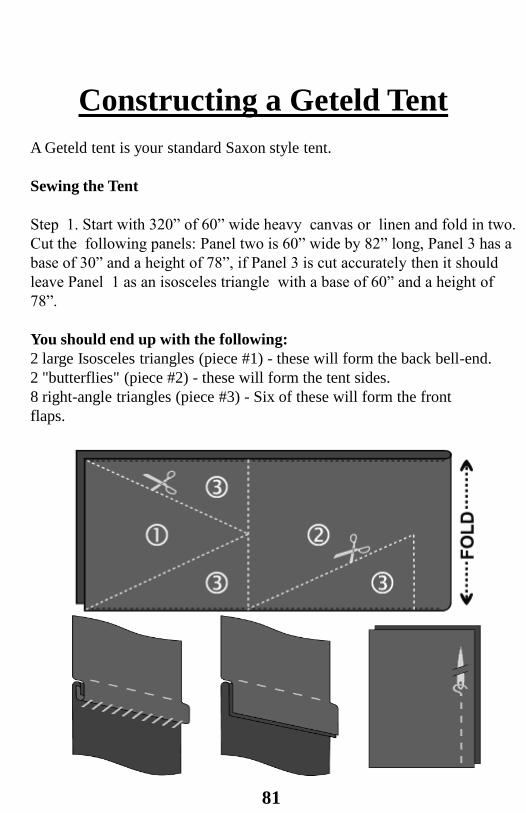
Constructing a Geteld Tent
A Geteld tent is your standard Saxon style tent.
Sewing the Tent
Step 1. Start with 320‖ of 60‖ wide heavy canvas or linen and fold in two.
Cut the following panels: Panel two is 60‖ wide by 82‖ long, Panel 3 has a
base of 30‖ and a height of 78‖, if Panel 3 is cut accurately then it should
leave Panel 1 as an isosceles triangle with a base of 60‖ and a height of
78‖.
You should end up with the following:
2 large Isosceles triangles (piece #1) - these will form the back bell-end.
2 "butterflies" (piece #2) - these will form the tent sides.
8 right-angle triangles (piece #3) - Six of these will form the front
flaps.
81
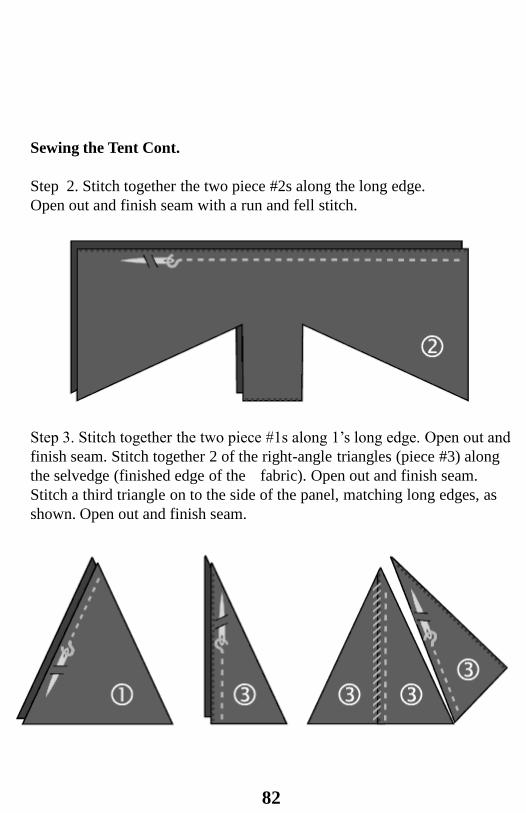
Sewing the Tent Cont.
Step 2. Stitch together the two piece #2s along the long edge.
Open out and finish seam with a run and fell stitch.
Step 3. Stitch together the two piece #1s along 1‘s long edge. Open out and
finish seam. Stitch together 2 of the right-angle triangles (piece #3) along
the selvedge (finished edge of the fabric). Open out and finish seam.
Stitch a third triangle on to the side of the panel, matching long edges, as
shown. Open out and finish seam.
82

Sewing the Tent Cont.
Step 4. Repeat the last two steps with three more right-angle
triangles (piece #3), taking care to "mirror" them so you have a
right side and a left side. The two selvedge pieces will form the
overlaps of the entrance flaps.
83

Sewing the Tent Cont.
Step 5. Insert the bell-end (#1) into one end of the tent body (#2).
Stitch, matching bottom corners. There will be a gap at the top,
which will need to be hemmed. Take one of the front flaps (Three
piece #3s). Making sure all the seams are on the same side, attach it to the
front end of the tent body. Repeat with the other flap, taking care to
"mirror" the two sides so the selvedges form a neat overlap.
Lay the pieces out before you begin to sew, to be sure you've
positioned them correctly!
Step 6. Turn the tent the right way out and stitch carefully along the line
shown to form the ridge pole casing, leaving 2 gaps for the upright poles.
Mark the line with chalk first, and make sure the casing isn't too tight.
Step 7. Hem the ridge pole sleeve edges, and the bottom edge of the tent.
84
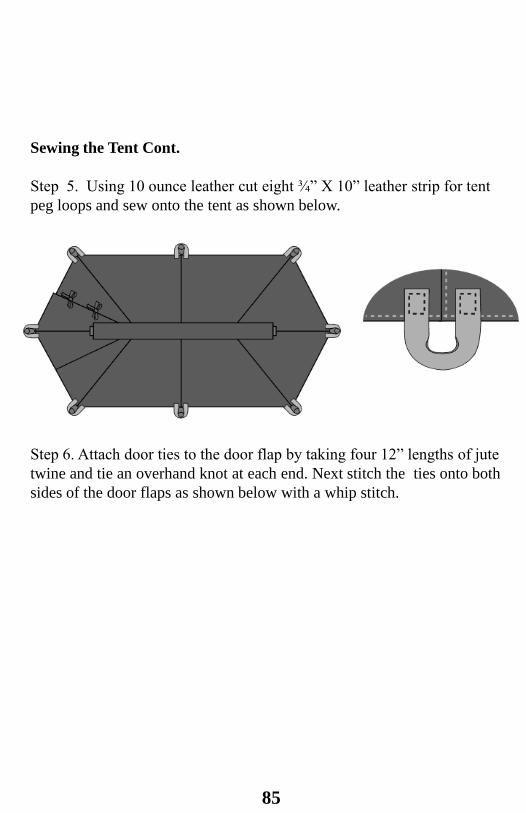
Sewing the Tent Cont.
Step 5. Using 10 ounce leather cut eight ¾‖ X 10‖ leather strip for tent
peg loops and sew onto the tent as shown below.
Step 6. Attach door ties to the door flap by taking four 12‖ lengths of jute
twine and tie an overhand knot at each end. Next stitch the ties onto both
sides of the door flaps as shown below with a whip stitch.
85

Constructing the tent Frame
Step 1. Using a 1-1/4‖ X 10‘ pole for the ridge pole, insert it into the ridge
pole sleeve, and using tent pegs secure the base of the tent . Next have two
people one at each end stand the tent up and mark where the gap in the
ridge pole sleeve occurs on the ridge. Also at this time measure the height
of the ridge pole to the ground and cut your supporting legs out of 1-1/4‖
dowel according to your measurement.
Step 2. Drill a 3/8‖ diameter hole through
the ridge pole . Next drill a 3/8‖ diameter
hole 1‖ deep into both supporting legs and
glue a 3/8‖ X 2‖ wooden dowel into your
supporting legs. Once the glue has dried
insert the supporting legs into the ridge
pole and your tent should be ready for use.
86

Constructing a Lean-To
Step 1. Start with a 84‖ X 60‖ piece of linen, followed by four right Then
cut a 14‖ X 60‖ panels.
Step 2. Hem the sides of your 84‖ X 60‖ piece of linen and hem the two
14‖ side of your 14‖ X 60‖ panel.
Step 3. Fold in the 60‖ long side of you r 14‖ X 60‖ panel and sew it onto
your 84‖ X 60‖ panel to create a sleeve.
Step 4. Using 10 ounce leather cut four¾‖ X 10‖ leather strip for tent peg
loops and sew onto the tent as shown below.
87

Step 5. Cut a 92‖ length of a 1-1/4‖ wooden closet rod.
Step 6. Cut two 54‖ branches with a ―Y‖ shaped fork at one end to serve as
shelter-half support poles.
Step 7. Cut eight 2‖ X 1‖ X 10‖ pieces of wood. The cut a notch at the
top and cut the bottom into a ―V‖ shape to serve as tent stakes.
Lean-To Setup.
Step 1. Using a wooden mallet hammer four tent stakes into the four tent
peg loops on the shelter-half.
Step 2. Insert the 92‖ X 1-1/4‖ wooden pole through the shelter-half
sleeve and rest it on your two shelter-half support poles.
Step 3. Using ¼‖ sisal rope tie one end around the 92‖ X 1-1/4‖ pole and
―Y‖ shaped fork of the shelter-half support pole with an end-of-the-line
bowline knot and tie the other end to a tent stake as shown below. Repeat
process for all four front tent stakes. Your Lean-To is now ready for use.
88

Constructing a Shelter
Step 1. Select a good spot to build your
shelter. Build in a fringe area, neither in the
center of a field nor in a dense thicket, but
somewhere between these areas. Choose an
area at least 50 yards from a body of water, as
evaporating water tends to add extra chill to
the air.
Step 2. Find a fallen tree or a large or a long
rock to build your shelter against. You can
also tie a branch horizontally between two
trees a few feet off the ground. There are
many ways to make a shelter; the important
thing is that you have a sturdy brace to lean
your structure against.
Step 3. Lean stout sticks along the horizontal
brace of your shelter. Crawl beneath them to
make sure there is enough room to sleep
under. There shouldn't be too much extra
room, but it should be long enough to cover
you completely.
89

Step 4. Pile smaller branches on top of your
stout branches, leaving only an opening at
either end exposed.
Step 5. Pile vegetation - moss, leaves, pine
needles, dried fern or whatever nature makes
available on top of your structure to water
proof it.
Step 6. Create a bed of dry vegetation on the
ground for insulation. To lay on using pine
needle and dry ferns. Avoid green/wet
vegetation as the moisture from the
vegetation will rise up and make you damp.
90

Constructing a Fire Box
A fire box is a must have for any Living History Exhibit and is a
simple piece of furniture to produce.
Step 1. Cut two 12‖ X 1‖ X 36‖ boards, two 12‖ X 1‖ X 34‖
boards from 12‖ X 1‖ boards and one 36‖ X 36‖ piece of wood
from a 1‖ thick plywood sheet.
Step 2. Using drywall nails, nail the four boards together to form a box.
Step 3. Nail the 36‖ X 36‖ piece of plywood to the bottom of the box.
Step 4. Line the inside boards with 26 gauge sheet metal that is cut
into 11‖ wide strips and nailed to the boards to prevent them catching on
fire.
Step 5 . Cut two 36‖ long 4‖ X 4‖ boards to set underneath your
fire box to raise it off the ground.
Step 6. Fill the box with 1-2‖ of sand or other soil before laying
your fire.
* Note: boards may be either 1‖ or ¾‖ in width, adjust plans
accordingly.
91

Constructing a Cooking Tripod
Tripods are a camp necessity for cooking and below is a simple design
that is easy to make.
Step 1. Take 3/8‖ X 48‖ round steel stock piece and using an anvil and
sledge hammer bend the top 14‖ as shown below.
Step 2. Using a sledge hammer and anvil flatten the last inch at both
ends of the tripod leg. Then drill a hole in the top end and using a cold
chisel and a hammer split the bottom of the tripod leg so that it has a
three forked foot. Using pliers bend each toe of the forked foot into a
different direction. Repeat this process until you have three such tripod
legs.
Step 3. Take 3/8‖ round stock steel and cut an 8‖ length. Then use a
metal file, file away the top 2‖ until it is 1/8‖ diameter and bend the
bottom 4‖ into a hook.
Step 4. Take ¼‖ round steel stock and using a jigsaw with a fine tooth
metal cutting blade cut four 8‖ lengths of steel. Then using an anvil and
ball peen hammer bend the 8‖ length of steel into an ―S‖ shape starting
with the middle bends first. Repeat this process until you have four S
hooks.
92

Step 5. Insert the 1/8‖ diameter portion of the suspension hook through
the hole at the end of the three tripod legs. Then cut off the excess
portion of the suspension hook protruding out of the top of the tripod leg
and using a ball peen hammer to rivet the suspension hook to all three
tripod legs.
Step 6. Connect your S hooks so that they make a chain then attach your
chain to the suspension hook on the legs.
93

Constructing a Cooking Pot
Cooking pots are a camp necessity for cooking and below is a simple
design that is easy to make.
Step 1. Take 24 gauge steel sheet metal and using a jigsaw with a metal
cutting blade cut out four panels as shown on the pattern on the following
page measuring 7‖ across at the base and 9-1/2‖ in length. Then cut a 2‖
X 28‖ strip of sheet metal.
Step 2. Using a ball peen hammer and a dishing stump form the four
panels to shape and use a ball peen hammer and planishing stake to
smooth out the surface of the panels.
Step 3. Drill a hole every 1‖ along the side of the first panel then lay your
second panel on the inside with a 1‖ overlap and mark and drill your
holes based off of the measurements of the first panel. Repeat process for
all four panels.
Step 4. Lay the second panel on the inside of the first panel with a 1‖
overlap so that the holes align and rivet the two panels together. Repeat
the process for all four panels.
Step 5. Take your 2‖ X 28‖ strip of sheet metal and bend it to shape so
that it will form a top band around the cooking pot. Mark and drill a hole
every 1‖ along the top rim of the cooking pot, then wrap your 2‖ X 28‖
top band around the rim of the cooking pot and mark and drill your holes
based off of the holes in the cooking pot rim. Once all holes have been
drilled rivet the top band to the cooking pot.
Step 6. Using a lead free solder and a blow torch to solder over all seams
and rivet holes. Be sure to apply soldering flux first as this will give you a
better bond. Fill with water, inspect for leaks and repeat soldering as
necessary.
94

95

Step 7. Cut two 4‖ lengths of ¼‖ round stock steel and bend it
into a ―V‖ shape. Take a ball peen hammer and anvil and flatten
the last 1‖ of the two ―V‖ shaped pieces then drill a hole at each
end and rivet the two ―V‖ shaped pieces to the rim of the cooking
pot.
Step 8. Cut 30‖ length of ¼‖ steel rod and bend it into a ―U‖
shape. Then bend the ends back into a ―U‖ and insert into the
two ―V‖ shaped pieces on the rim of the cooking pot to serve as a
handle.
96

97

Constructing a Skillet
Skillets are useful cooking a number dishes enjoyed in a village as
well as for baking bread.
Step 1. Our skillet is constructed by cutting out a 10‖ diameter disc
from 16 gauge sheet metal using a jigsaw with a fine tooth metal
blade.
Step 2. Use a ball peen hammer and a dishing stump to raise a ½‖ lip on
the outside of the disc. Once you have completed raising your lip file away
any rough or high spots on the rim.
Step 3. Drill a hole in the center of your disc. Then take a 1/8‖ X 1‖ X 30‖
piece of steel flat stock and drill that line up with the first two holes in the
disc.
Step 4. Use a single rivet to attach the disc to the piece of flat stock.
Step 5. Drill a 1‖ hole at the end of the handle and tie a loop of jute
twine or leather cord through the hole so that you can hang your skillet
when not in use.
Step 6. Sand the inside of the skillet to remove any factory coating off of
the metal, wash and oil and your skillet is ready for use.
*Note: A second rivet may be added if the first is unstable.
98
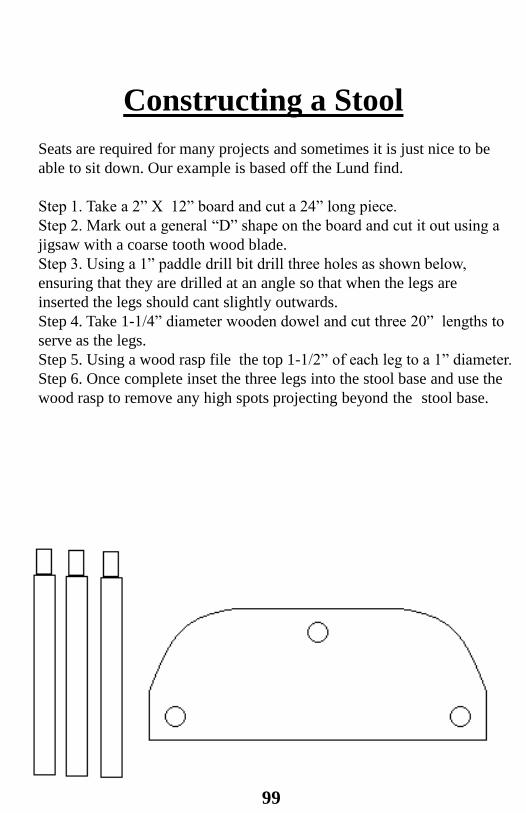
Constructing a Stool
Seats are required for many projects and sometimes it is just nice to be
able to sit down. Our example is based off the Lund find.
Step 1. Take a 2‖ X 12‖ board and cut a 24‖ long piece.
Step 2. Mark out a general ―D‖ shape on the board and cut it out using a
jigsaw with a coarse tooth wood blade.
Step 3. Using a 1‖ paddle drill bit drill three holes as shown below,
ensuring that they are drilled at an angle so that when the legs are
inserted the legs should cant slightly outwards.
Step 4. Take 1-1/4‖ diameter wooden dowel and cut three 20‖ lengths to
serve as the legs.
Step 5. Using a wood rasp file the top 1-1/2‖ of each leg to a 1‖ diameter.
Step 6. Once complete inset the three legs into the stool base and use the
wood rasp to remove any high spots projecting beyond the stool base.
99

Constructing a Bench
Benches are nice to have so that you can sit down as a group and
enjoy a proper feast.
Step 1. Take a 2‖ X 12‖ board and cut a 72‖ long piece.
Step 2. Using a 1‖ paddle drill bit drill three holes at each end as shown
below, ensuring that they are drilled at an angle so that when the legs are
inserted they should cant slightly outwards.
Step 3. Take 1-1/4‖ diameter wooden dowel and cut six 20‖ lengths to
serve as the legs.
Step 4. Using a wood rasp file the top 1-1/2‖ of each leg to a 1‖ diameter.
Step 5. Once complete inset the legs into the bench and use the wood rasp
to remove any high spots of the legs projecting beyond the bench base.
100

Constructing a Table
Tables are nice to have so that you can sit down as a group and enjoy a
proper feast.
Step 1. Take a 1‖ X 12‖ board and cut a three 72‖ long pieces.
Step 2. Take a 2‖ X 4‖ board and cut two 36‖ long pieces.
Step 3. Using a 1‖ paddle drill bit drill a hole 2‖ from each end of the
2‖ X 4‖ board as shown below. Drill the holes so that when the legs are
inserted they will cant outward slightly so that the table will be more
stable on uneven surfaces.
Step 4. Using a ¼‖ drill bit drill holes at 6‖, 18‖ and 30‖ on the
two 2‖ X 4‖ boards. Then drill ¼‖ holes centered and 2‖ from the end of
each 1‖ X 12‖ board.
Step 5. Take a ¼‖ wooden dowel and cut six 2-1/4‖ lengths to serve as
tree nails and using wood glue and the tree nails attach the three 1‖ X 12‖
boards to the two 2‖ X 4‖ boards as shown below.
Step 6. Take 1-1/4‖ diameter wooden dowel and cut four 30‖ lengths to
serve as the legs.
Step 7. Using a wood rasp file the top 1-1/2‖ of each leg to a 1‖ diameter.
Step 8. Once complete inset the legs into the table.
101

Constructing a Chest
Storage is always needed at any LHE often times to hide modern items in order to keep them close at hand and what better way than a chest that can double as seating.
Step 1. Begin by cutting one 12‖ X 1‖ X 34‖ board for part A, one 10‖ X 1‖ X 32‖ board for part B, two 12‖ X 1‖ X 34‖ boards for parts C and two 12‖ X 1‖ X 10 ― boards for parts D.
Step 2. Take a ¼‖ dowel and forty-two 2‖ long pieces to serve as tree nails.
Step 3. Drill four ¼‖ holes ½‖ from the bottom edge of parts D. Drill four ¼‖ holes ½‖ from the side and nine ¼‖ holes ½‖ from the bottom edge of parts C.
* Note: boards may be either 1‖ or ¾‖ in width, adjust plans accordingly.
102

TopBottom
Step 4. Take parts C and D and set them together so that the corner form a
right angle with part D to the inside. Next using the four holes on the side
of part C as a guide mark and drill four 1‖ deep by ¼‖ diameter holes at
the end of the board on part D. Then join parts C and D together with four
tree nails and wood glue. Repeat this process for all four corners.
Step 5. Take part B and insert into the bottom of your box and mark
and drill 1‖ deep by ¼‖ diameter holes based off of the holes in parts C
and D. Next take your remaining twenty-six tree nails and some wood
glue and part B to parts C and D.
Step 6 A. Take a 1‖ wide strip of 10 ounce weight leather and cut two
12‖ lengths to serve as leather strap hinges. Next use six to ten tacks
and attach your two strap hinges to parts A and B 6‖ from each end for a
poorer chest.
Step 6 B. To make a higher class chest use a set of Mastermyr hinges
instead of leather hinges. To make Mastermyr hinges cut two 1‖ X 7‖
pieces of flat steel stock using a jigsaw. Then using a jigsaw cut out a
3‖ X ½‖long tail for the top part of the hinge, then cut out the circular
portion for the eyelet on the bottom part of the hinge. Drill a ½‖ hole into
the eyelet of the bottom hinge. Insert the tail of the top hinge into the
eyelet of the bottom hinge and using pliers bend the tail of the top hinge
back onto itself . Drill four holes into both the top and bottom hinges the
same size as the nail that you will be using. Next use
eight nails mount each Mastermyr hinge .
Repeat process for second hinge.
103
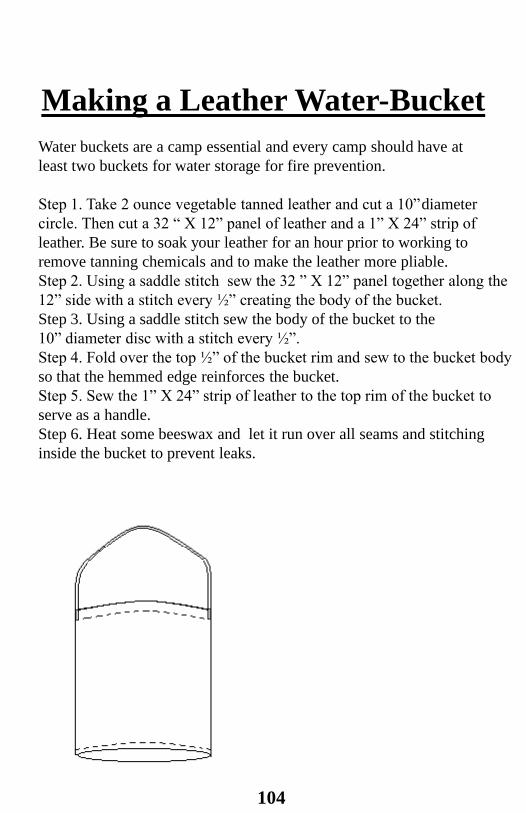
Making a Leather Water-Bucket
Water buckets are a camp essential and every camp should have at
least two buckets for water storage for fire prevention.
Step 1. Take 2 ounce vegetable tanned leather and cut a 10‖diameter
circle. Then cut a 32 ― X 12‖ panel of leather and a 1‖ X 24‖ strip of
leather. Be sure to soak your leather for an hour prior to working to
remove tanning chemicals and to make the leather more pliable.
Step 2. Using a saddle stitch sew the 32 ‖ X 12‖ panel together along the
12‖ side with a stitch every ½‖ creating the body of the bucket.
Step 3. Using a saddle stitch sew the body of the bucket to the
10‖ diameter disc with a stitch every ½‖.
Step 4. Fold over the top ½‖ of the bucket rim and sew to the bucket body
so that the hemmed edge reinforces the bucket.
Step 5. Sew the 1‖ X 24‖ strip of leather to the top rim of the bucket to
serve as a handle.
Step 6. Heat some beeswax and let it run over all seams and stitching
inside the bucket to prevent leaks.
104


A Vikings North America Product
All Rights Reserved ®