Embed Size (px)
Citation preview
vMX
Getting Started Guide
Release
14.1R6
Modified: 2015-10-29
Copyright © 2015, Juniper Networks, Inc.
Juniper Networks, Inc.1133 InnovationWaySunnyvale, California 94089USA408-745-2000www.juniper.net
Copyright © 2015, Juniper Networks, Inc. All rights reserved.
Juniper Networks, Junos, Steel-Belted Radius, NetScreen, and ScreenOS are registered trademarks of Juniper Networks, Inc. in the UnitedStates and other countries. The Juniper Networks Logo, the Junos logo, and JunosE are trademarks of Juniper Networks, Inc. All othertrademarks, service marks, registered trademarks, or registered service marks are the property of their respective owners.
Juniper Networks assumes no responsibility for any inaccuracies in this document. Juniper Networks reserves the right to change, modify,transfer, or otherwise revise this publication without notice.
vMX Getting Started Guide14.1R6Copyright © 2015, Juniper Networks, Inc.All rights reserved.
The information in this document is current as of the date on the title page.
YEAR 2000 NOTICE
Juniper Networks hardware and software products are Year 2000 compliant. Junos OS has no known time-related limitations through theyear 2038. However, the NTP application is known to have some difficulty in the year 2036.
ENDUSER LICENSE AGREEMENT
The Juniper Networks product that is the subject of this technical documentation consists of (or is intended for use with) Juniper Networkssoftware. Use of such software is subject to the terms and conditions of the End User License Agreement (“EULA”) posted athttp://www.juniper.net/support/eula.html. By downloading, installing or using such software, you agree to the terms and conditions ofthat EULA.
Copyright © 2015, Juniper Networks, Inc.ii
Table of Contents
About the Documentation . . . . . . . . . . . . . . . . . . . . . . . . . . . . . . . . . . . . . . . . . . . . ix
Documentation and Release Notes . . . . . . . . . . . . . . . . . . . . . . . . . . . . . . . . . . ix
Documentation Conventions . . . . . . . . . . . . . . . . . . . . . . . . . . . . . . . . . . . . . . . ix
Documentation Feedback . . . . . . . . . . . . . . . . . . . . . . . . . . . . . . . . . . . . . . . . . xi
Requesting Technical Support . . . . . . . . . . . . . . . . . . . . . . . . . . . . . . . . . . . . . xii
Self-Help Online Tools and Resources . . . . . . . . . . . . . . . . . . . . . . . . . . . xii
Opening a Case with JTAC . . . . . . . . . . . . . . . . . . . . . . . . . . . . . . . . . . . . . xii
Chapter 1 vMX Overview . . . . . . . . . . . . . . . . . . . . . . . . . . . . . . . . . . . . . . . . . . . . . . . . . . . . . 15
vMX Overview . . . . . . . . . . . . . . . . . . . . . . . . . . . . . . . . . . . . . . . . . . . . . . . . . . . . . . 15
Benefits and Uses of vMX Routers . . . . . . . . . . . . . . . . . . . . . . . . . . . . . . . . . . . . . . 16
Architecture of a vMX Instance . . . . . . . . . . . . . . . . . . . . . . . . . . . . . . . . . . . . . . . . . 17
Virtualization Techniques for the vMX VFP . . . . . . . . . . . . . . . . . . . . . . . . . . . . . . . 18
Paravirtualization . . . . . . . . . . . . . . . . . . . . . . . . . . . . . . . . . . . . . . . . . . . . . . . . 19
PCI Passthrough with SR-IOV . . . . . . . . . . . . . . . . . . . . . . . . . . . . . . . . . . . . . . 19
Automation for vMX Routers . . . . . . . . . . . . . . . . . . . . . . . . . . . . . . . . . . . . . . . . . . 20
Licensing . . . . . . . . . . . . . . . . . . . . . . . . . . . . . . . . . . . . . . . . . . . . . . . . . . . . . . . . . . 20
Chapter 2 Setting Up vMX . . . . . . . . . . . . . . . . . . . . . . . . . . . . . . . . . . . . . . . . . . . . . . . . . . . 23
Minimum Hardware and Software Requirements . . . . . . . . . . . . . . . . . . . . . . . . . 23
vMX Package Contents . . . . . . . . . . . . . . . . . . . . . . . . . . . . . . . . . . . . . . . . . . . . . . 24
Chapter 3 Installing vMX . . . . . . . . . . . . . . . . . . . . . . . . . . . . . . . . . . . . . . . . . . . . . . . . . . . . 27
Preparing the System to Install vMX . . . . . . . . . . . . . . . . . . . . . . . . . . . . . . . . . . . . 27
Upgrading the Kernel . . . . . . . . . . . . . . . . . . . . . . . . . . . . . . . . . . . . . . . . . . . . 28
Upgrading to libvirt 1.2.8 . . . . . . . . . . . . . . . . . . . . . . . . . . . . . . . . . . . . . . . . . . 28
Installing vMX for Different Use Cases . . . . . . . . . . . . . . . . . . . . . . . . . . . . . . . . . . 29
Installing vMX for Lab Simulation . . . . . . . . . . . . . . . . . . . . . . . . . . . . . . . . . . 30
Installing vMX for Low-Bandwidth Applications . . . . . . . . . . . . . . . . . . . . . . . 31
Installing vMX for High-Bandwidth Applications . . . . . . . . . . . . . . . . . . . . . . . 33
Configuring the vMX Instance . . . . . . . . . . . . . . . . . . . . . . . . . . . . . . . . . . . . . . . . . 35
Configuring the Host . . . . . . . . . . . . . . . . . . . . . . . . . . . . . . . . . . . . . . . . . . . . . 35
Configuring the VCP VM . . . . . . . . . . . . . . . . . . . . . . . . . . . . . . . . . . . . . . . . . . 35
Configuring the VFP VM . . . . . . . . . . . . . . . . . . . . . . . . . . . . . . . . . . . . . . . . . . 36
Configuring Interfaces . . . . . . . . . . . . . . . . . . . . . . . . . . . . . . . . . . . . . . . . . . . . 36
Deploying vMX . . . . . . . . . . . . . . . . . . . . . . . . . . . . . . . . . . . . . . . . . . . . . . . . . . . . . 37
Connecting to VMs . . . . . . . . . . . . . . . . . . . . . . . . . . . . . . . . . . . . . . . . . . . . . . . . . . 38
Logging In to VCP . . . . . . . . . . . . . . . . . . . . . . . . . . . . . . . . . . . . . . . . . . . . . . . 38
Logging In to VFP . . . . . . . . . . . . . . . . . . . . . . . . . . . . . . . . . . . . . . . . . . . . . . . 38
iiiCopyright © 2015, Juniper Networks, Inc.
Managing vMX Licenses . . . . . . . . . . . . . . . . . . . . . . . . . . . . . . . . . . . . . . . . . . . . . 39
Adding a License . . . . . . . . . . . . . . . . . . . . . . . . . . . . . . . . . . . . . . . . . . . . . . . . 39
Deleting a License . . . . . . . . . . . . . . . . . . . . . . . . . . . . . . . . . . . . . . . . . . . . . . . 40
Viewing the Chassis Serial ID for vMX . . . . . . . . . . . . . . . . . . . . . . . . . . . . . . . . . . . 40
Chapter 4 Managing vMX . . . . . . . . . . . . . . . . . . . . . . . . . . . . . . . . . . . . . . . . . . . . . . . . . . . . 43
Managing vMX . . . . . . . . . . . . . . . . . . . . . . . . . . . . . . . . . . . . . . . . . . . . . . . . . . . . . 43
Controlling vMX . . . . . . . . . . . . . . . . . . . . . . . . . . . . . . . . . . . . . . . . . . . . . . . . . 43
Deploying vMX . . . . . . . . . . . . . . . . . . . . . . . . . . . . . . . . . . . . . . . . . . . . . . 43
Managing vMX Deployments . . . . . . . . . . . . . . . . . . . . . . . . . . . . . . . . . . 44
Specifying the Temporary File Directory . . . . . . . . . . . . . . . . . . . . . . . . . . 44
Specifying the Environment File . . . . . . . . . . . . . . . . . . . . . . . . . . . . . . . . 45
Configuring Logging Options for vMX . . . . . . . . . . . . . . . . . . . . . . . . . . . . . . . 45
Connecting to Console Port for the VMs . . . . . . . . . . . . . . . . . . . . . . . . . . . . . 45
Getting Help for the Script Options . . . . . . . . . . . . . . . . . . . . . . . . . . . . . . . . . 45
Binding virtio Devices . . . . . . . . . . . . . . . . . . . . . . . . . . . . . . . . . . . . . . . . . . . . . . . . 46
Setting Up the Device Bindings . . . . . . . . . . . . . . . . . . . . . . . . . . . . . . . . . . . . 47
Creating Device Bindings . . . . . . . . . . . . . . . . . . . . . . . . . . . . . . . . . . . . . . . . . 48
Deleting Device Bindings . . . . . . . . . . . . . . . . . . . . . . . . . . . . . . . . . . . . . . . . . 49
Verifying Device Bindings . . . . . . . . . . . . . . . . . . . . . . . . . . . . . . . . . . . . . . . . . 49
Chapter 5 Troubleshooting vMX . . . . . . . . . . . . . . . . . . . . . . . . . . . . . . . . . . . . . . . . . . . . . . 51
Viewing VFP Statistics . . . . . . . . . . . . . . . . . . . . . . . . . . . . . . . . . . . . . . . . . . . . . . . 51
Viewing VFP Log Files . . . . . . . . . . . . . . . . . . . . . . . . . . . . . . . . . . . . . . . . . . . . . . . 52
Troubleshooting VFP and VCP Connection Establishment . . . . . . . . . . . . . . . . . . 53
Verifying Whether VMs Are Running . . . . . . . . . . . . . . . . . . . . . . . . . . . . . . . . . . . . 53
Viewing CPU Information . . . . . . . . . . . . . . . . . . . . . . . . . . . . . . . . . . . . . . . . . . . . 54
Verifying BIOS Settings for SR-IOV . . . . . . . . . . . . . . . . . . . . . . . . . . . . . . . . . . . . . 54
Copyright © 2015, Juniper Networks, Inc.iv
Getting Started Guide
List of Figures
Chapter 1 vMX Overview . . . . . . . . . . . . . . . . . . . . . . . . . . . . . . . . . . . . . . . . . . . . . . . . . . . . . 15
Figure 1: Architecture of a vMX Instance . . . . . . . . . . . . . . . . . . . . . . . . . . . . . . . . . . 17
Chapter 4 Managing vMX . . . . . . . . . . . . . . . . . . . . . . . . . . . . . . . . . . . . . . . . . . . . . . . . . . . . 43
Figure 2: Binding Devices . . . . . . . . . . . . . . . . . . . . . . . . . . . . . . . . . . . . . . . . . . . . . 46
vCopyright © 2015, Juniper Networks, Inc.

Copyright © 2015, Juniper Networks, Inc.vi
Getting Started Guide
List of Tables
About the Documentation . . . . . . . . . . . . . . . . . . . . . . . . . . . . . . . . . . . . . . . . . . ix
Table 1: Notice Icons . . . . . . . . . . . . . . . . . . . . . . . . . . . . . . . . . . . . . . . . . . . . . . . . . . x
Table 2: Text and Syntax Conventions . . . . . . . . . . . . . . . . . . . . . . . . . . . . . . . . . . . . x
Chapter 1 vMX Overview . . . . . . . . . . . . . . . . . . . . . . . . . . . . . . . . . . . . . . . . . . . . . . . . . . . . . 15
Table 3: Considerations for Choosing a Virtualization Technique . . . . . . . . . . . . . . 18
Table 4: Application Packages for Licenses . . . . . . . . . . . . . . . . . . . . . . . . . . . . . . 20
Chapter 2 Setting Up vMX . . . . . . . . . . . . . . . . . . . . . . . . . . . . . . . . . . . . . . . . . . . . . . . . . . . 23
Table 5: Minimum Hardware Requirements for vMX . . . . . . . . . . . . . . . . . . . . . . . 23
Table 6: Minimum Software Requirements for vMX . . . . . . . . . . . . . . . . . . . . . . . . 24
Table 7: vMX Package Contents . . . . . . . . . . . . . . . . . . . . . . . . . . . . . . . . . . . . . . . 24
Chapter 3 Installing vMX . . . . . . . . . . . . . . . . . . . . . . . . . . . . . . . . . . . . . . . . . . . . . . . . . . . . 27
Table 8: Sample Configurations for Use Cases . . . . . . . . . . . . . . . . . . . . . . . . . . . . 29
viiCopyright © 2015, Juniper Networks, Inc.

Copyright © 2015, Juniper Networks, Inc.viii
Getting Started Guide
About the Documentation
• Documentation and Release Notes on page ix
• Documentation Conventions on page ix
• Documentation Feedback on page xi
• Requesting Technical Support on page xii
Documentation and Release Notes
To obtain the most current version of all Juniper Networks®technical documentation,
see the product documentation page on the Juniper Networks website at
http://www.juniper.net/techpubs/.
If the information in the latest release notes differs from the information in the
documentation, follow the product Release Notes.
Juniper Networks Books publishes books by Juniper Networks engineers and subject
matter experts. These books go beyond the technical documentation to explore the
nuances of network architecture, deployment, and administration. The current list can
be viewed at http://www.juniper.net/books.
Documentation Conventions
Table 1 on page x defines notice icons used in this guide.
ixCopyright © 2015, Juniper Networks, Inc.
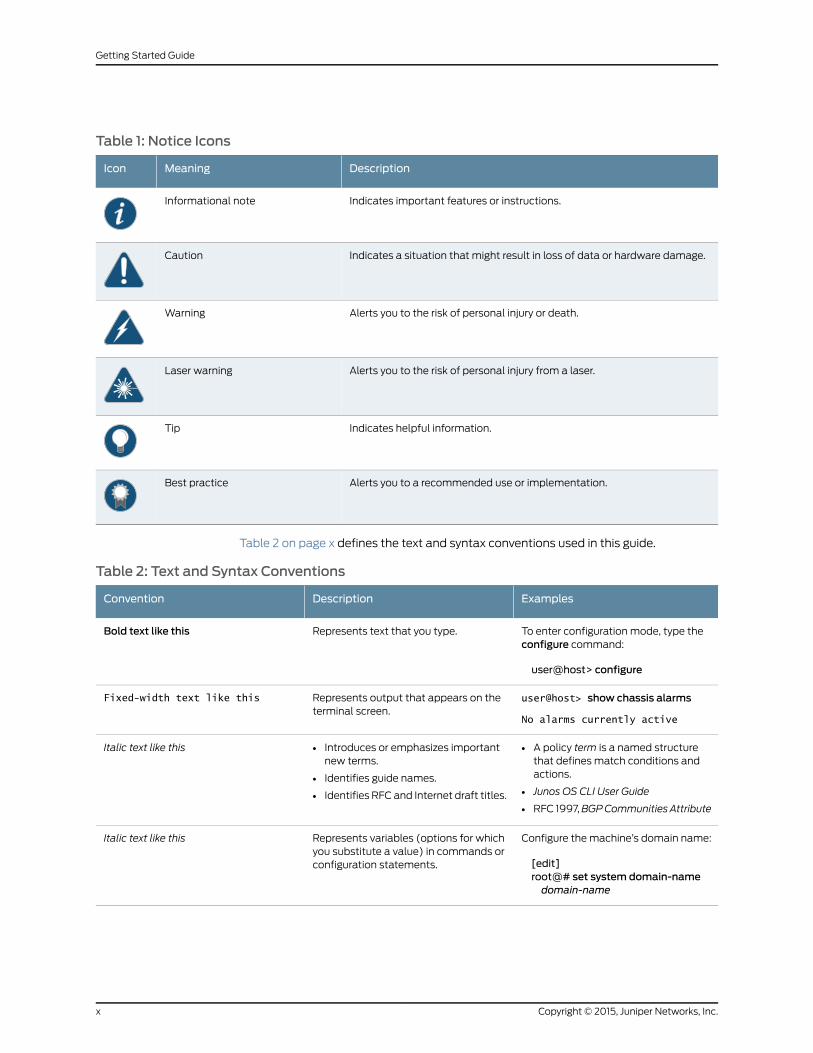
Table 1: Notice Icons
DescriptionMeaningIcon
Indicates important features or instructions.Informational note
Indicates a situation that might result in loss of data or hardware damage.Caution
Alerts you to the risk of personal injury or death.Warning
Alerts you to the risk of personal injury from a laser.Laser warning
Indicates helpful information.Tip
Alerts you to a recommended use or implementation.Best practice
Table 2 on page x defines the text and syntax conventions used in this guide.
Table 2: Text and Syntax Conventions
ExamplesDescriptionConvention
To enter configuration mode, type theconfigure command:
user@host> configure
Represents text that you type.Bold text like this
user@host> show chassis alarms
No alarms currently active
Represents output that appears on theterminal screen.
Fixed-width text like this
• A policy term is a named structurethat defines match conditions andactions.
• Junos OS CLI User Guide
• RFC 1997,BGPCommunities Attribute
• Introduces or emphasizes importantnew terms.
• Identifies guide names.
• Identifies RFC and Internet draft titles.
Italic text like this
Configure themachine’s domain name:
[edit]root@# set system domain-namedomain-name
Represents variables (options for whichyou substitute a value) in commands orconfiguration statements.
Italic text like this
Copyright © 2015, Juniper Networks, Inc.x
Getting Started Guide
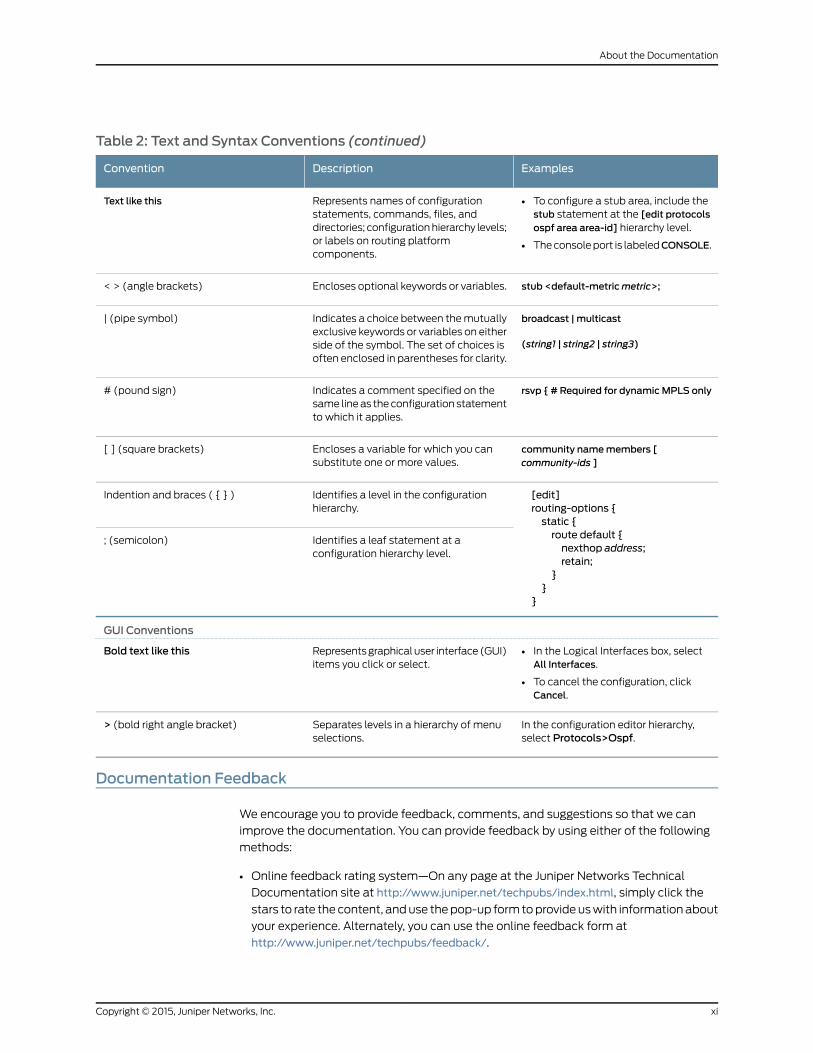
Table 2: Text and Syntax Conventions (continued)
ExamplesDescriptionConvention
• To configure a stub area, include thestub statement at the [edit protocolsospf area area-id] hierarchy level.
• Theconsoleport is labeledCONSOLE.
Represents names of configurationstatements, commands, files, anddirectories; configurationhierarchy levels;or labels on routing platformcomponents.
Text like this
stub <default-metricmetric>;Encloses optional keywords or variables.< > (angle brackets)
broadcast | multicast
(string1 | string2 | string3)
Indicates a choice between themutuallyexclusive keywords or variables on eitherside of the symbol. The set of choices isoften enclosed in parentheses for clarity.
| (pipe symbol)
rsvp { # Required for dynamicMPLS onlyIndicates a comment specified on thesame lineas theconfiguration statementto which it applies.
# (pound sign)
community namemembers [community-ids ]
Encloses a variable for which you cansubstitute one or more values.
[ ] (square brackets)
[edit]routing-options {static {route default {nexthop address;retain;
}}
}
Identifies a level in the configurationhierarchy.
Indention and braces ( { } )
Identifies a leaf statement at aconfiguration hierarchy level.
; (semicolon)
GUI Conventions
• In the Logical Interfaces box, selectAll Interfaces.
• To cancel the configuration, clickCancel.
Representsgraphicaluser interface(GUI)items you click or select.
Bold text like this
In the configuration editor hierarchy,select Protocols>Ospf.
Separates levels in a hierarchy of menuselections.
> (bold right angle bracket)
Documentation Feedback
We encourage you to provide feedback, comments, and suggestions so that we can
improve the documentation. You can provide feedback by using either of the following
methods:
• Online feedback rating system—On any page at the Juniper Networks Technical
Documentation site at http://www.juniper.net/techpubs/index.html, simply click the
stars to rate the content, anduse thepop-up form toprovideuswith informationabout
your experience. Alternately, you can use the online feedback form at
http://www.juniper.net/techpubs/feedback/.
xiCopyright © 2015, Juniper Networks, Inc.
About the Documentation

• E-mail—Sendyourcommentsto [email protected]. Includethedocument
or topic name, URL or page number, and software version (if applicable).
Requesting Technical Support
Technical product support is available through the JuniperNetworksTechnicalAssistance
Center (JTAC). If you are a customer with an active J-Care or Partner Support Service
support contract, or are covered under warranty, and need post-sales technical support,
you can access our tools and resources online or open a case with JTAC.
• JTAC policies—For a complete understanding of our JTAC procedures and policies,
review the JTAC User Guide located at
http://www.juniper.net/us/en/local/pdf/resource-guides/7100059-en.pdf.
• Product warranties—For product warranty information, visit
http://www.juniper.net/support/warranty/.
• JTAC hours of operation—The JTAC centers have resources available 24 hours a day,
7 days a week, 365 days a year.
Self-Help Online Tools and Resources
For quick and easy problem resolution, Juniper Networks has designed an online
self-service portal called the Customer Support Center (CSC) that provides youwith the
following features:
• Find CSC offerings: http://www.juniper.net/customers/support/
• Search for known bugs: http://www2.juniper.net/kb/
• Find product documentation: http://www.juniper.net/techpubs/
• Find solutions and answer questions using our Knowledge Base: http://kb.juniper.net/
• Download the latest versions of software and review release notes:
http://www.juniper.net/customers/csc/software/
• Search technical bulletins for relevant hardware and software notifications:
http://kb.juniper.net/InfoCenter/
• Join and participate in the Juniper Networks Community Forum:
http://www.juniper.net/company/communities/
• Open a case online in the CSC Case Management tool: http://www.juniper.net/cm/
Toverify serviceentitlementbyproduct serial number, useourSerialNumberEntitlement
(SNE) Tool: https://tools.juniper.net/SerialNumberEntitlementSearch/
Opening a Casewith JTAC
You can open a case with JTAC on theWeb or by telephone.
• Use the Case Management tool in the CSC at http://www.juniper.net/cm/.
• Call 1-888-314-JTAC (1-888-314-5822 toll-free in the USA, Canada, and Mexico).
Copyright © 2015, Juniper Networks, Inc.xii
Getting Started Guide

For international or direct-dial options in countries without toll-free numbers, see
http://www.juniper.net/support/requesting-support.html.
xiiiCopyright © 2015, Juniper Networks, Inc.
About the Documentation

Copyright © 2015, Juniper Networks, Inc.xiv
Getting Started Guide

CHAPTER 1
vMX Overview
• vMX Overview on page 15
• Benefits and Uses of vMX Routers on page 16
• Architecture of a vMX Instance on page 17
• Virtualization Techniques for the vMX VFP on page 18
• Automation for vMX Routers on page 20
• Licensing on page 20
vMXOverview
The vMX router is a virtual version of the MX Series 3D Universal Edge Router. Like the
MX Series router, the vMX router runs the Junos Operating System (Junos OS) and
supports Junos OS packet handling and forwarding modeled after the Trio chipset.
Configuration andmanagement of vMX routers are the same as for physical MX Series
routers, allowing you to add the vMX router to a network without having to update your
operations support systems (OSS).
You install vMXsoftwarecomponentsonan industry-standardx86server runningaLinux
operating system, applicable third-party software, and theKernel-basedVirtualMachine
(KVM) hypervisor. vMX software components come in one software package that you
install by running an orchestration script included with the package. The orchestration
script uses a configuration file that you customize for your vMX deployment. You can
install multiple vMX instances on one server.
RelatedDocumentation
Architecture of a vMX Instance on page 17•
• MinimumHardware and Software Requirements on page 23
15Copyright © 2015, Juniper Networks, Inc.
Benefits and Uses of vMX Routers
You can use virtual devices to lower your capital expenditure and operating costs,
sometimes through automating network operations. Even without automation, use of
the vMX application on standard x86 servers enables you to:
• Quickly introduce new services
• More easily deliver customized and personalized services to customers
• Scale operations to push IP services closer to customers or tomanage network growth
when growth forecasts are low or uncertain
• Quickly expand service offerings into new sites
A well designed automation strategy decreases costs as well as increasing network
efficiency. By automating network tasks with the vMX router, you can:
• Simplify network operations
• Quickly deploy new vMX instances
• Efficiently install a default Junos OS configuration on all or selected vMX instances
• Quickly reconfigure existing vMX routers
You can deploy the vMX router to meet some specific network edge requirements, such
as:
• Network simulation
• Temporary deployment until a physical MX Series router is available
RelatedDocumentation
Automation for vMX Routers on page 20•
Copyright © 2015, Juniper Networks, Inc.16
Getting Started Guide
Architecture of a vMX Instance
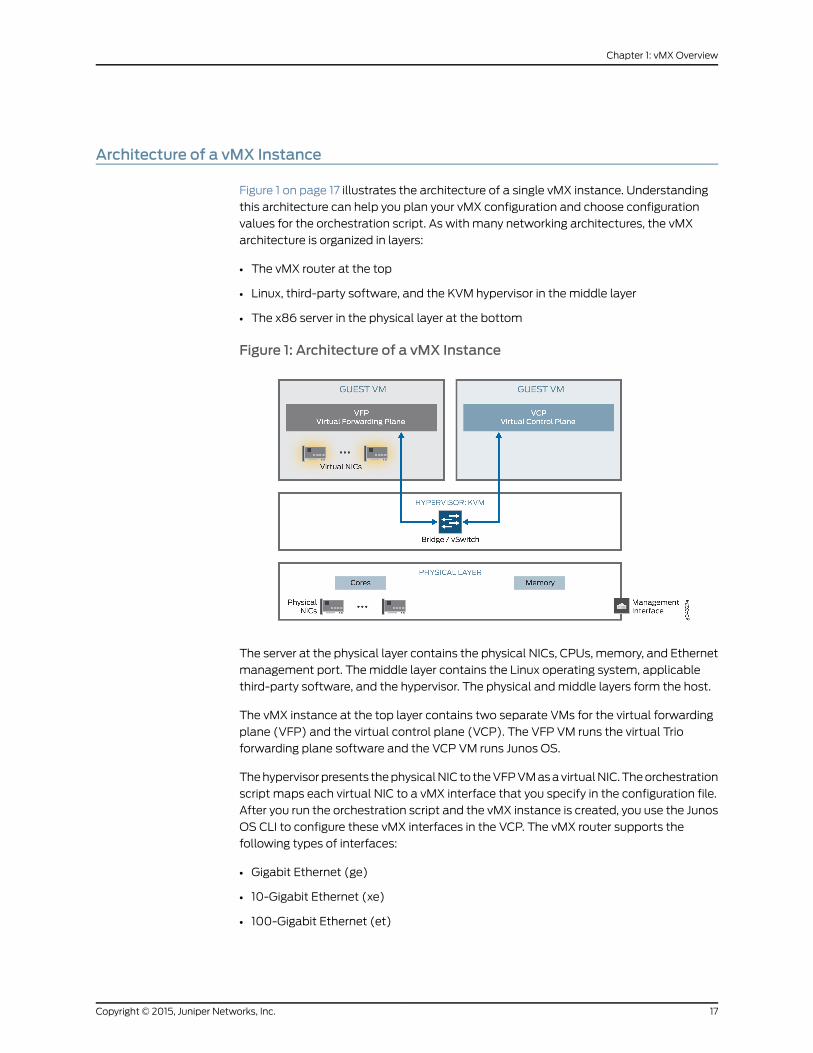
Figure 1 on page 17 illustrates the architecture of a single vMX instance. Understanding
this architecture can help you plan your vMX configuration and choose configuration
values for the orchestration script. As with many networking architectures, the vMX
architecture is organized in layers:
• The vMX router at the top
• Linux, third-party software, and the KVM hypervisor in the middle layer
• The x86 server in the physical layer at the bottom
Figure 1: Architecture of a vMX Instance
The server at the physical layer contains the physical NICs, CPUs, memory, and Ethernet
management port. Themiddle layer contains the Linux operating system, applicable
third-party software, and the hypervisor. The physical andmiddle layers form the host.
The vMX instance at the top layer contains two separate VMs for the virtual forwarding
plane (VFP) and the virtual control plane (VCP). The VFP VM runs the virtual Trio
forwarding plane software and the VCP VM runs Junos OS.
Thehypervisorpresents thephysicalNIC to theVFPVMasavirtualNIC.Theorchestration
script maps each virtual NIC to a vMX interface that you specify in the configuration file.
After you run the orchestration script and the vMX instance is created, you use the Junos
OS CLI to configure these vMX interfaces in the VCP. The vMX router supports the
following types of interfaces:
• Gigabit Ethernet (ge)
• 10-Gigabit Ethernet (xe)
• 100-Gigabit Ethernet (et)
17Copyright © 2015, Juniper Networks, Inc.
Chapter 1: vMX Overview
The VCP VM and VFP VM require Layer 2 connectivity to communicate with each other.
The vMX orchestration script automatically configures an internal bridge for each vMX
instance to enable this communication. Because the internal bridge is local to the server,
you do not need to specify any configuration values, such as IP addresses.
The VCP VM and VFP VM also require Layer 2 connectivity to communicate with the
Ethernet management port on the server. Youmust specify virtual Ethernet interfaces
with unique IP addresses and MAC addresses for both the VFP and VCP in the
configuration file to enable the orchestration script to set up an external bridge for a vMX
instance. Ethernet management traffic for all vMX instances enters the server through
the Ethernet management port.
The way network traffic passes from the physical NIC to the virtual NIC depends on the
virtualization technique that you configure.
RelatedDocumentation
Virtualization Techniques for the vMX VFP on page 18•
Virtualization Techniques for the vMXVFP
In a virtual environment, the hypervisor emulates the physical components in the host,
enabling the application in the VM to operate independently from the host. For a routing
application, full emulation of the underlying host is not optimal for packet throughput,
because thehypervisormust createat least twocopiesof apacketbefore theapplication
in the VM receives it. Two techniques are available to improve packet I/O performance
in a virtual environment:
• Paravirtualization—Virtualization technique in which a software component similar to
theunderlyinghardwarecomponent resides in theVMand interactswith thehypervisor
to execute many operations. In contrast to full virtualization, this technique reduces
the overhead of virtualization in the VM.
• PCI passthrough—Virtualization technique in which a physical PCI device is directly
connected to a VM, bypassing the hypervisor. Drivers in the VM can directly access the
PCI device, resulting in a high rate of data transfer.
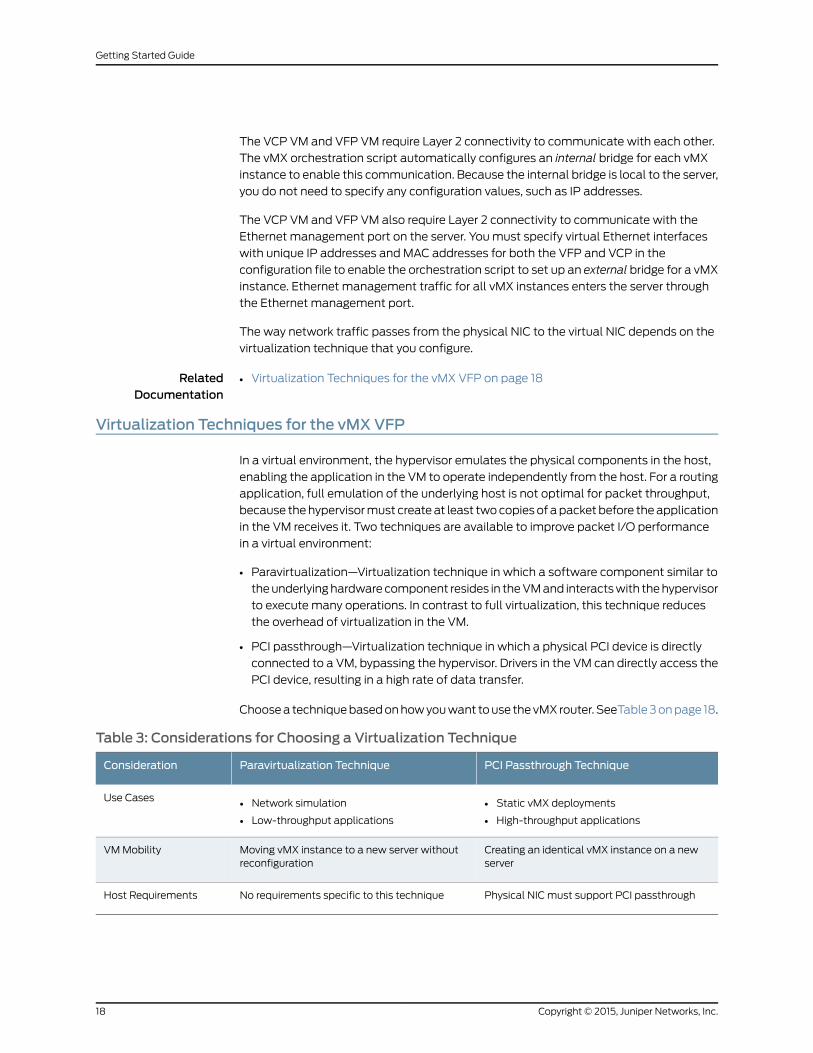
Choosea techniquebasedonhowyouwant touse thevMX router. SeeTable3onpage 18.
Table 3: Considerations for Choosing a Virtualization Technique
PCI Passthrough TechniqueParavirtualization TechniqueConsideration
• Static vMX deployments
• High-throughput applications
• Network simulation
• Low-throughput applications
Use Cases
Creating an identical vMX instance on a newserver
Moving vMX instance to a new server withoutreconfiguration
VMMobility
Physical NICmust support PCI passthroughNo requirements specific to this techniqueHost Requirements
Copyright © 2015, Juniper Networks, Inc.18
Getting Started Guide
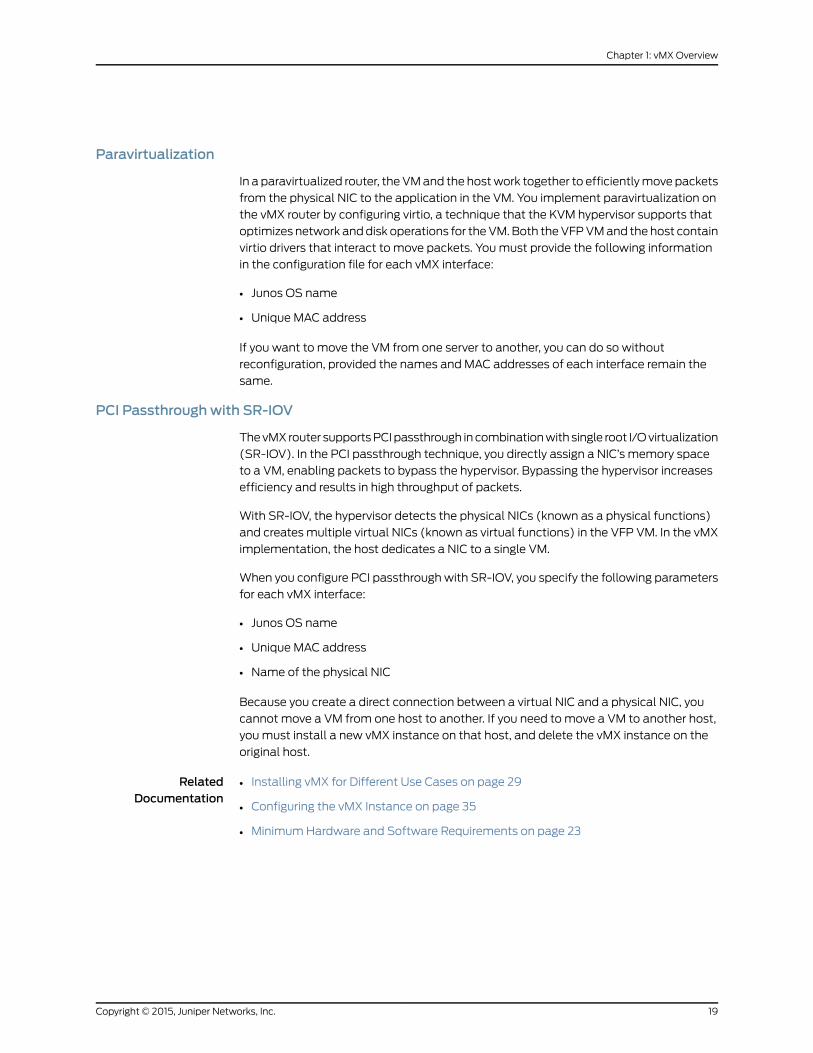
Paravirtualization
In a paravirtualized router, the VMand the hostwork together to efficientlymove packets
from the physical NIC to the application in the VM. You implement paravirtualization on
the vMX router by configuring virtio, a technique that the KVM hypervisor supports that
optimizes network anddisk operations for theVM. Both theVFPVMand the host contain
virtio drivers that interact to move packets. Youmust provide the following information
in the configuration file for each vMX interface:
• Junos OS name
• Unique MAC address
If you want to move the VM from one server to another, you can do so without
reconfiguration, provided the names and MAC addresses of each interface remain the
same.
PCI Passthroughwith SR-IOV
ThevMXrouter supportsPCIpassthrough incombinationwith single root I/Ovirtualization
(SR-IOV). In the PCI passthrough technique, you directly assign a NIC’s memory space
to a VM, enabling packets to bypass the hypervisor. Bypassing the hypervisor increases
efficiency and results in high throughput of packets.
With SR-IOV, the hypervisor detects the physical NICs (known as a physical functions)
and creates multiple virtual NICs (known as virtual functions) in the VFP VM. In the vMX
implementation, the host dedicates a NIC to a single VM.
When you configure PCI passthroughwith SR-IOV, you specify the following parameters
for each vMX interface:
• Junos OS name
• Unique MAC address
• Name of the physical NIC
Because you create a direct connection between a virtual NIC and a physical NIC, you
cannot move a VM from one host to another. If you need to move a VM to another host,
youmust install a new vMX instance on that host, and delete the vMX instance on the
original host.
RelatedDocumentation
Installing vMX for Different Use Cases on page 29•
• Configuring the vMX Instance on page 35
• MinimumHardware and Software Requirements on page 23
19Copyright © 2015, Juniper Networks, Inc.
Chapter 1: vMX Overview

Automation for vMX Routers
Automating network tasks simplifies network configuration, provisioning, and
maintenance. Because the vMXsoftware uses the same JunosOS software asMXSeries
routers, and other Juniper Networks routing devices, vMX supports the sameautomation
tools as JunosOS. In addition, you can use standard automation tools to deploy the vMX,
as you do other virtualized software.
RelatedDocumentation
Benefits and Uses of vMX Routers on page 16•
Licensing
Licenses are required for using vMX features. When you order licenses, this information
is bound to a customer ID. If you did not order the licenses, contact your account team
or Juniper Networks Customer Care for assistance.When you order a license, you receive
instructions for generating license activation keys on the Juniper Networks License
Management System.
The vMX licenses are based on application packages and processing capacity.
Table 4 on page 20 describes the features available with application packages.
Table 4: Application Packages for Licenses
FeaturesApplication Package
IP routing with 32,000 routes in the forwarding table
Basic Layer 2 functionality, Layer 2 bridging and switching
BASE
Features in the BASE application package
IP routing with routes up to platform scale in the forwarding table
IP and MPLS switching for unicast andmulticast applications
Layer 2 features include Layer 2 VPN, VPLS, EVPN, and Layer 2 Circuit
VXLAN
ADVANCE
Features in the BASE and ADVANCE application packages
Layer 3 VPN for IP andmulticast
PREMIUM
Anapplication package is associatedwith a bandwidth license. vMXprovides full-duplex
bandwidth in the following capacities: 100 Mbps, 250 Mbps, 500Mbps, 1 Gbps, 5 Gbps,
10 Gbps, and 40 Gbps. Bandwidth licenses that are not associated with a specific
application package apply to all application packages.
Copyright © 2015, Juniper Networks, Inc.20
Getting Started Guide
You can download the vMX software BASE application package with 1 Mbps bandwidth
and evaluate it for 30 days without a license. To use additional features beyond the 30
days, youmust order the appropriate license.
If you need to move your vMX installation to another host, youmust remove vMX from
the current host before installing vMX and adding the license on the new host.
RelatedDocumentation
• Managing vMX Licenses on page 39
21Copyright © 2015, Juniper Networks, Inc.
Chapter 1: vMX Overview

Copyright © 2015, Juniper Networks, Inc.22
Getting Started Guide
CHAPTER 2
Setting Up vMX
• MinimumHardware and Software Requirements on page 23
• vMX Package Contents on page 24
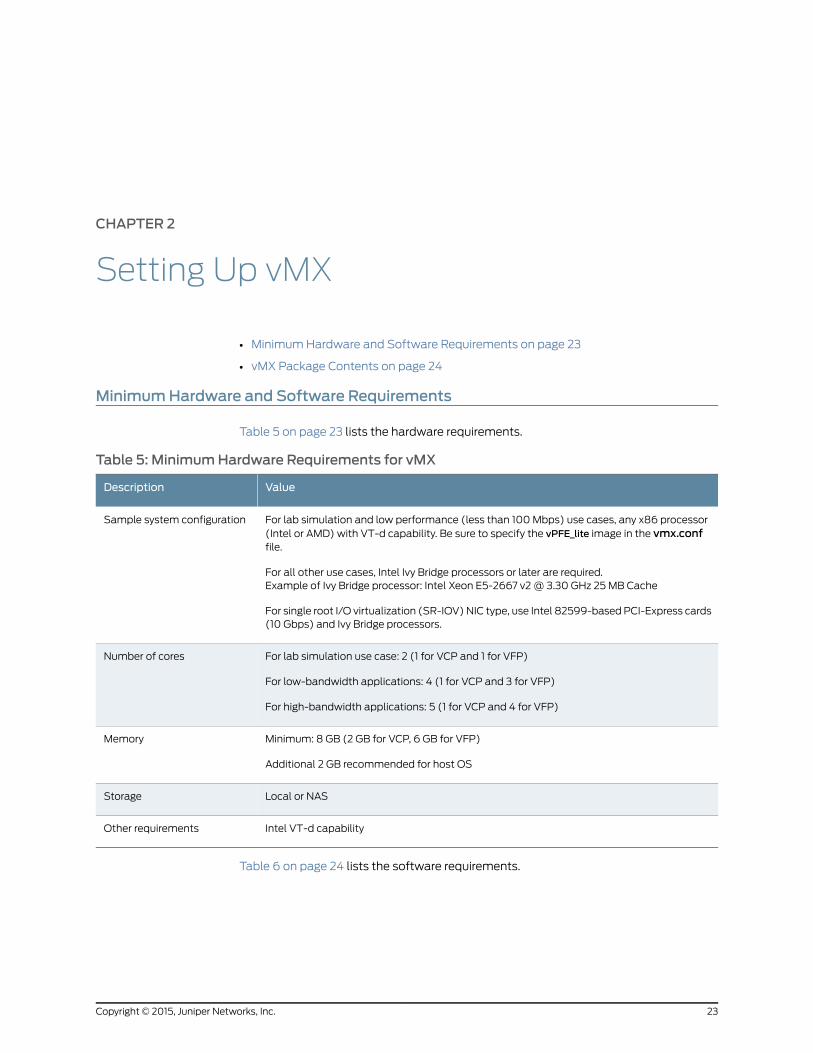
MinimumHardware and Software Requirements
Table 5 on page 23 lists the hardware requirements.
Table 5: MinimumHardware Requirements for vMX
ValueDescription
For lab simulation and low performance (less than 100Mbps) use cases, any x86 processor(Intel or AMD) with VT-d capability. Be sure to specify the vPFE_lite image in the vmx.conffile.
For all other use cases, Intel Ivy Bridge processors or later are required.Example of Ivy Bridge processor: Intel Xeon E5-2667 v2@ 3.30 GHz 25 MB Cache
For single root I/O virtualization (SR-IOV) NIC type, use Intel 82599-based PCI-Express cards(10 Gbps) and Ivy Bridge processors.
Sample system configuration
For lab simulation use case: 2 (1 for VCP and 1 for VFP)
For low-bandwidth applications: 4 (1 for VCP and 3 for VFP)
For high-bandwidth applications: 5 (1 for VCP and 4 for VFP)
Number of cores
Minimum: 8 GB (2 GB for VCP, 6 GB for VFP)
Additional 2 GB recommended for host OS
Memory
Local or NASStorage
Intel VT-d capabilityOther requirements
Table 6 on page 24 lists the software requirements.
23Copyright © 2015, Juniper Networks, Inc.
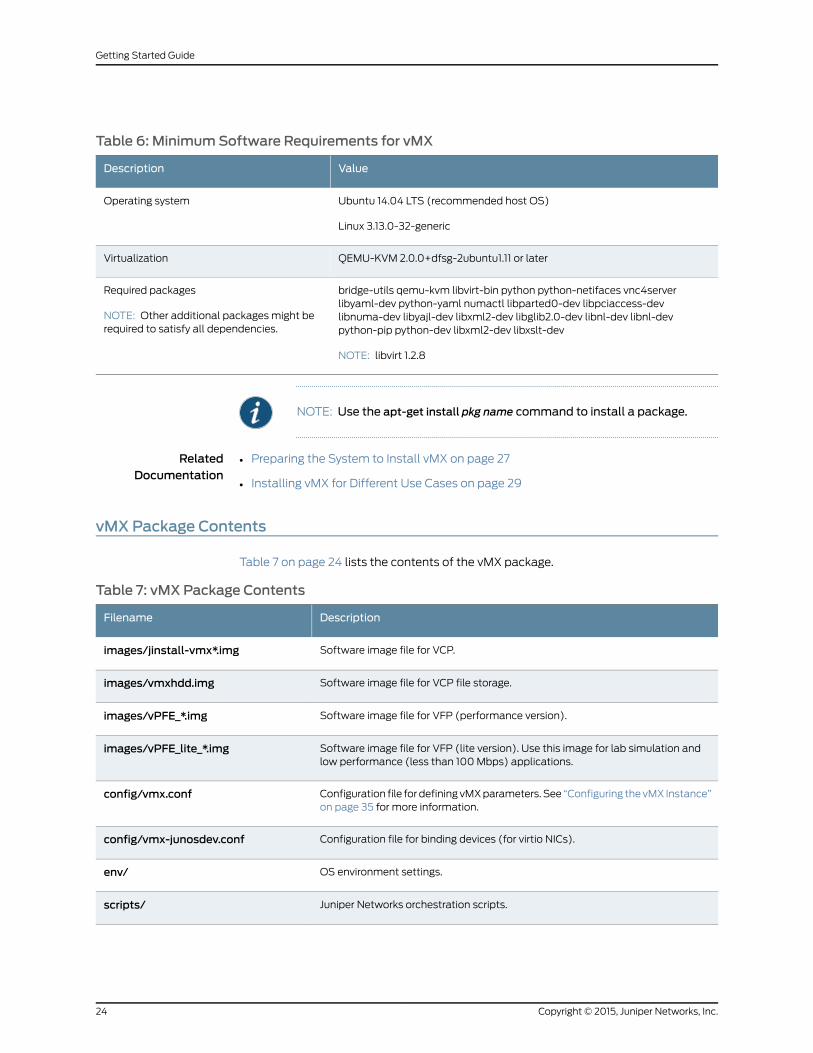
Table 6: MinimumSoftware Requirements for vMX
ValueDescription
Ubuntu 14.04 LTS (recommended host OS)
Linux 3.13.0-32-generic
Operating system
QEMU-KVM 2.0.0+dfsg-2ubuntu1.11 or laterVirtualization
bridge-utils qemu-kvm libvirt-bin python python-netifaces vnc4serverlibyaml-dev python-yaml numactl libparted0-dev libpciaccess-devlibnuma-dev libyajl-dev libxml2-dev libglib2.0-dev libnl-dev libnl-devpython-pip python-dev libxml2-dev libxslt-dev
NOTE: libvirt 1.2.8
Required packages
NOTE: Other additional packages might berequired to satisfy all dependencies.
NOTE: Use the apt-get install pkg name command to install a package.
RelatedDocumentation
Preparing the System to Install vMX on page 27•
• Installing vMX for Different Use Cases on page 29
vMX Package Contents
Table 7 on page 24 lists the contents of the vMX package.
Table 7: vMX Package Contents
DescriptionFilename
Software image file for VCP.images/jinstall-vmx*.img
Software image file for VCP file storage.images/vmxhdd.img
Software image file for VFP (performance version).images/vPFE_*.img
Software image file for VFP (lite version). Use this image for lab simulation andlow performance (less than 100Mbps) applications.
images/vPFE_lite_*.img
Configuration file fordefiningvMXparameters. See “Configuring thevMX Instance”on page 35 for more information.
config/vmx.conf
Configuration file for binding devices (for virtio NICs).config/vmx-junosdev.conf
OS environment settings.env/
Juniper Networks orchestration scripts.scripts/
Copyright © 2015, Juniper Networks, Inc.24
Getting Started Guide
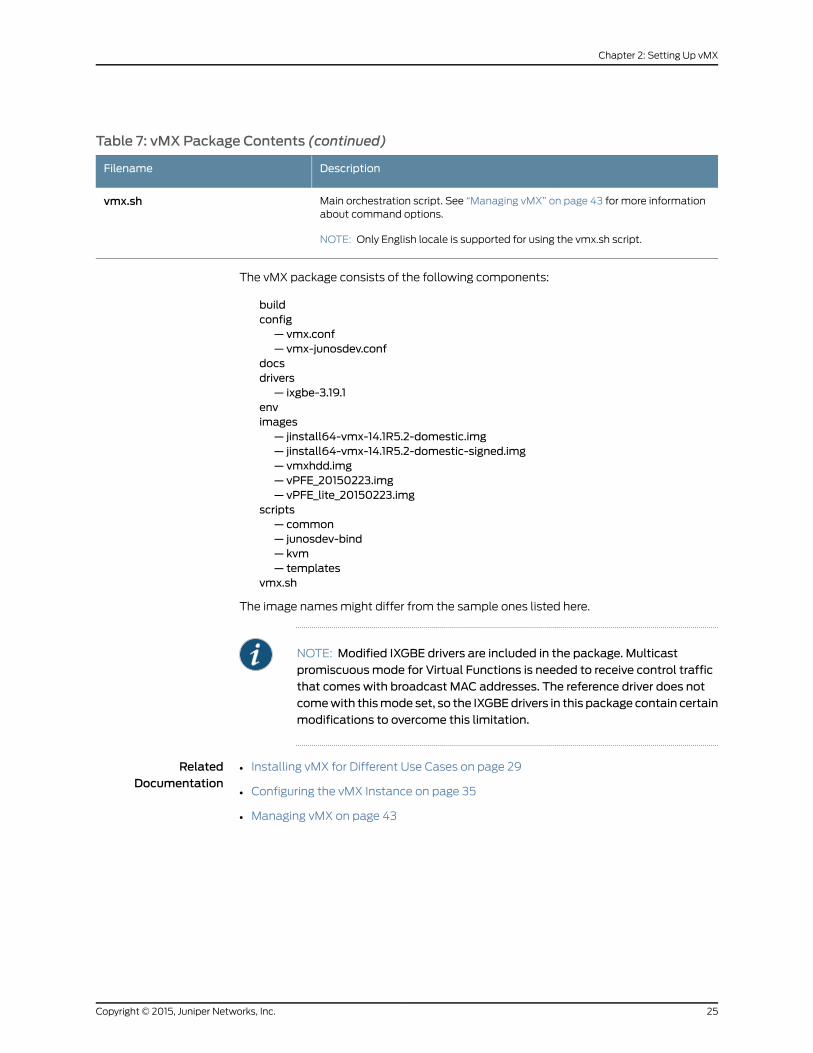
Table 7: vMX Package Contents (continued)
DescriptionFilename
Main orchestration script. See “Managing vMX” on page 43 for more informationabout command options.
NOTE: Only English locale is supported for using the vmx.sh script.
vmx.sh
The vMX package consists of the following components:
buildconfig
— vmx.conf— vmx-junosdev.conf
docsdrivers
— ixgbe-3.19.1envimages
— jinstall64-vmx-14.1R5.2-domestic.img— jinstall64-vmx-14.1R5.2-domestic-signed.img— vmxhdd.img— vPFE_20150223.img— vPFE_lite_20150223.img
scripts— common— junosdev-bind— kvm— templates
vmx.sh
The image namesmight differ from the sample ones listed here.
NOTE: Modified IXGBE drivers are included in the package. Multicastpromiscuousmode for Virtual Functions is needed to receive control trafficthat comes with broadcast MAC addresses. The reference driver does notcomewith thismode set, so the IXGBEdrivers in this package contain certainmodifications to overcome this limitation.
RelatedDocumentation
• Installing vMX for Different Use Cases on page 29
• Configuring the vMX Instance on page 35
• Managing vMX on page 43
25Copyright © 2015, Juniper Networks, Inc.
Chapter 2: Setting Up vMX

Copyright © 2015, Juniper Networks, Inc.26
Getting Started Guide
CHAPTER 3
Installing vMX
• Preparing the System to Install vMX on page 27
• Installing vMX for Different Use Cases on page 29
• Configuring the vMX Instance on page 35
• Deploying vMX on page 37
• Connecting to VMs on page 38
• Managing vMX Licenses on page 39
• Viewing the Chassis Serial ID for vMX on page 40
Preparing the System to Install vMX
To prepare the host system for installing vMX:
1. Meet the minimum software and OS requirements described in Table 6 on page 24.
See “Upgrading the Kernel” on page 28 and “Upgrading to libvirt 1.2.8” on page 28.
2. Enable IntelVT-d inBIOS. (We recommend that youverify theprocesswith thevendor
because different systems have different methods to enable VT-d.)
Refer to the procedure to enable VT-d available on the Intel Website.
3. If you are using SR-IOV, youmust perform this step.
NOTE: Youmust remove any previous installationwith an external bridgein /etc/network/interfaces and revert to using the original management
interface.Make sure that the ifconfig -a commanddoes not showexternal
bridges before you proceed with the installation.
To determine whether an external bridge is displayed, use the ifconfig
commandtosee themanagement interface.Toconfirmthat this interfaceis used for an external bridge group, use the brctl show command to see
whether themanagement interface is listed as an external bridge.
Enable SR-IOV capability by turning on intel_iommu=on in the /etc/default/grub
directory.
GRUB_CMDLINE_LINUX_DEFAULT="intel_iommu=on"
27Copyright © 2015, Juniper Networks, Inc.
Append the intel_iommu=on string to any existing text for the
GRUB_CMDLINE_LINUX_DEFAULT parameter.
Run the update-grub command followed by the reboot command.
4. Run themodprobe kvm-intel command before you install vMX.
Tomeet the minimum software and OS requirements, youmight need to perform these
tasks:
• Upgrading the Kernel on page 28
• Upgrading to libvirt 1.2.8 on page 28
Upgrading the Kernel
To upgrade the kernel:
1. Run the following commands:
apt-get install linux-firmwareapt-get install linux-image-3.13.0.32-genericapt-get install linux-image-extra-3.13.0.32-genericapt-get install linux-headers-3.13.0.32-generic
2. Restart the system.
NOTE: If you are using Ubuntu 14.04.1 LTS, which comes with3.13.0-32-generic, you can skip this step. Ubuntu 14.04 comes with a lowerversion of kernel (Linux 3.13.0-24-generic) than the recommended version(Linux 3.13.0-32-generic).
Upgrading to libvirt 1.2.8
Ubuntu 14.04 supports libvirt 1.2.2 (which works for VFP lite version). If you are using the
VFP performance version, youmust upgrade to libvirt 1.2.8.
To upgrade libvirt:
1. Make sure that you install all the packages listed in Table 6 on page 24.
2. Navigate to the /tmp directory using the cd /tmp command.
3. Get the libvirt-1.2.8 source code by using the command
wget http://libvirt.org/sources/libvirt-1.2.8.tar.gz.
4. Uncompress and untar the file using the tar xzvf libvirt-1.2.8.tar.gz command.
5. Navigate to the libvirt-1.2.8 directory using the cd libvirt-1.2.8 command.
6. Stop libvirtd with the service libvirt-bin stop command.
7. Run the ./configure --prefix=/usr --localstatedir=/ --with-numactl command.
8. Run themake command.
9. Run themake install command.
Copyright © 2015, Juniper Networks, Inc.28
Getting Started Guide
10. Makesure that the libvirtddaemon is running. (Use theservice libvirt-binstartcommand
to start it again. If it does not start, use the /usr/sbin/libvirtd -d command.)
root@vmx-server:~# ps aux | grep libvirtdroot 1509 0.0 0.0 372564 16452 ? Sl 10:25 0:00 /usr/sbin/libvirtd -d
11. Verify that the versions of libvirtd and virsh are 1.2.8.
root@vmx-server:~# /usr/sbin/libvirtd --versionlibvirtd (libvirt) 1.2.8root@ vmx-server:~# /usr/bin/virsh --version1.2.8root@ vmx-server:~#
The system displays the code compilation log.
NOTE: If youcannotdeployvMXafterupgrading libvirt, bringdownthevirbr0bridgewith the ifconfig virbr0 down command and delete the bridgewith the
brctl delbr virbr0 command.
RelatedDocumentation
Installing vMX for Different Use Cases on page 29•
Installing vMX for Different Use Cases
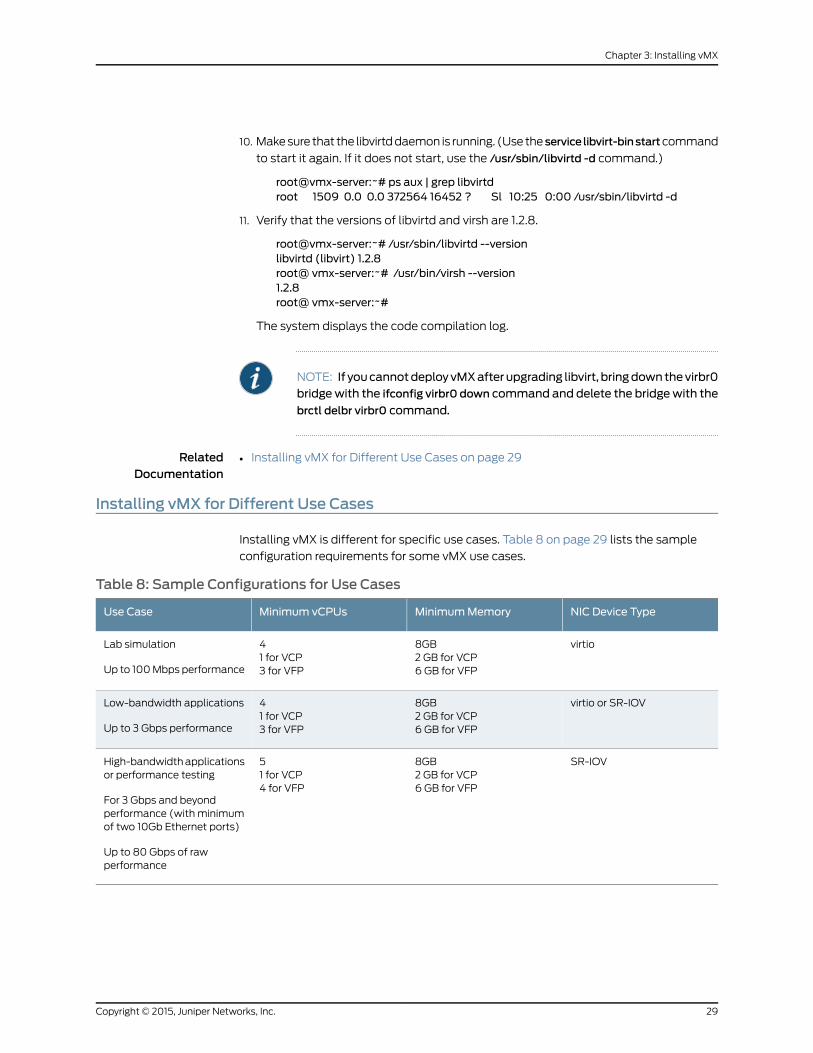
Installing vMX is different for specific use cases. Table 8 on page 29 lists the sample
configuration requirements for some vMX use cases.
Table 8: Sample Configurations for Use Cases
NIC Device TypeMinimumMemoryMinimum vCPUsUse Case
virtio8GB2 GB for VCP6 GB for VFP
41 for VCP3 for VFP
Lab simulation
Up to 100Mbps performance
virtio or SR-IOV8GB2 GB for VCP6 GB for VFP
41 for VCP3 for VFP
Low-bandwidth applications
Up to 3 Gbps performance
SR-IOV8GB2 GB for VCP6 GB for VFP
51 for VCP4 for VFP
High-bandwidthapplicationsor performance testing
For 3 Gbps and beyondperformance (with minimumof two 10Gb Ethernet ports)
Up to 80 Gbps of rawperformance
29Copyright © 2015, Juniper Networks, Inc.
Chapter 3: Installing vMX
To install vMX for a particular use case, perform one of the following tasks:
• Installing vMX for Lab Simulation on page 30
• Installing vMX for Low-Bandwidth Applications on page 31
• Installing vMX for High-Bandwidth Applications on page 33
Installing vMX for Lab Simulation
The use case for lab simulation uses the virtio NIC.
To install vMX for the lab simulation (less than 100Mbps) application use case:
1. Download the vMX software package as root and uncompress the package using tar
xzvf package-name command. For example:
tar xzvf vmx_20150625.0.tgz
2. Change directory to the location of the uncompressed vMX package. For example:
cd vmx_20150625.0
3. Edit the config/vmx.conf text file with a text editor to configure a single vMX instance.
Ensure the following parameters are set properly in the vMX configuration file:
• device-type : virtio
• forwarding-engine-image : vPFE_lite_* (lite version)
See “Configuring the vMX Instance” on page 35.
4. Run the ./vmx.sh -lv --install script to deploy the vMX instance specified by the
config/vmx.conf startup configuration file and provide verbose-level logging to a file.
See “Deploying vMX” on page 37.
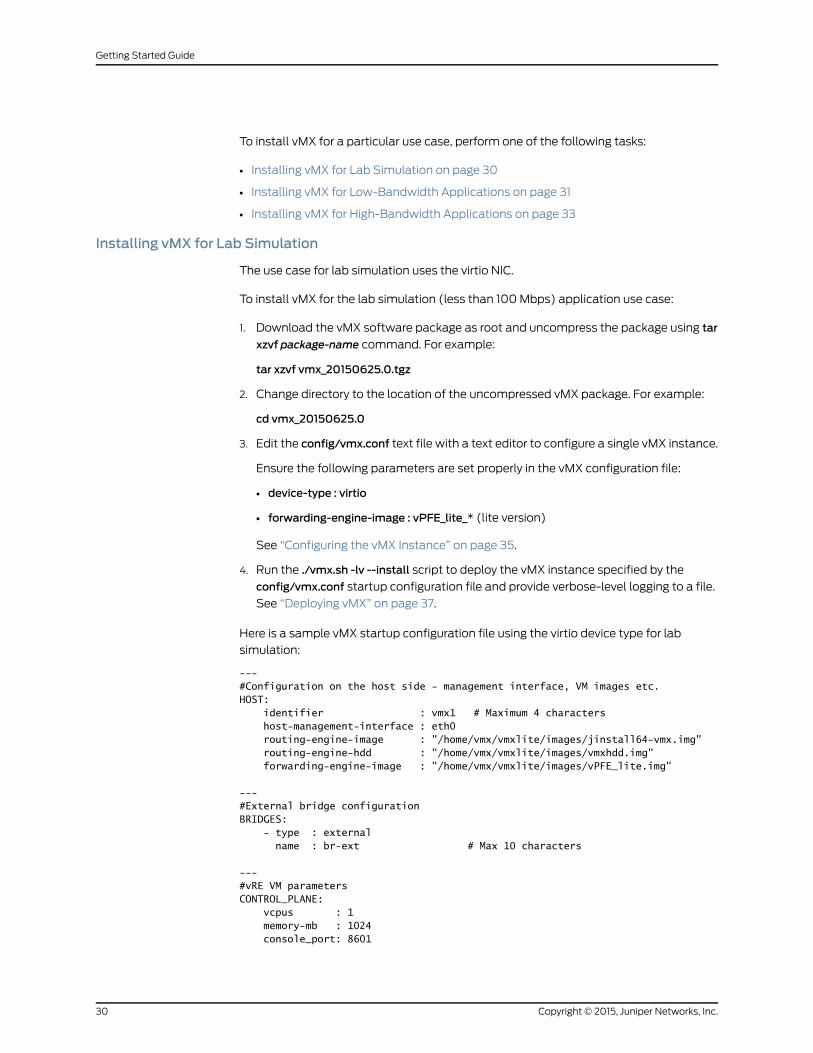
Here is a sample vMX startup configuration file using the virtio device type for lab
simulation:
--- #Configuration on the host side - management interface, VM images etc.HOST: identifier : vmx1 # Maximum 4 characters host-management-interface : eth0 routing-engine-image : "/home/vmx/vmxlite/images/jinstall64-vmx.img" routing-engine-hdd : "/home/vmx/vmxlite/images/vmxhdd.img" forwarding-engine-image : "/home/vmx/vmxlite/images/vPFE_lite.img"
---#External bridge configurationBRIDGES: - type : external name : br-ext # Max 10 characters
--- #vRE VM parametersCONTROL_PLANE: vcpus : 1 memory-mb : 1024 console_port: 8601
Copyright © 2015, Juniper Networks, Inc.30
Getting Started Guide
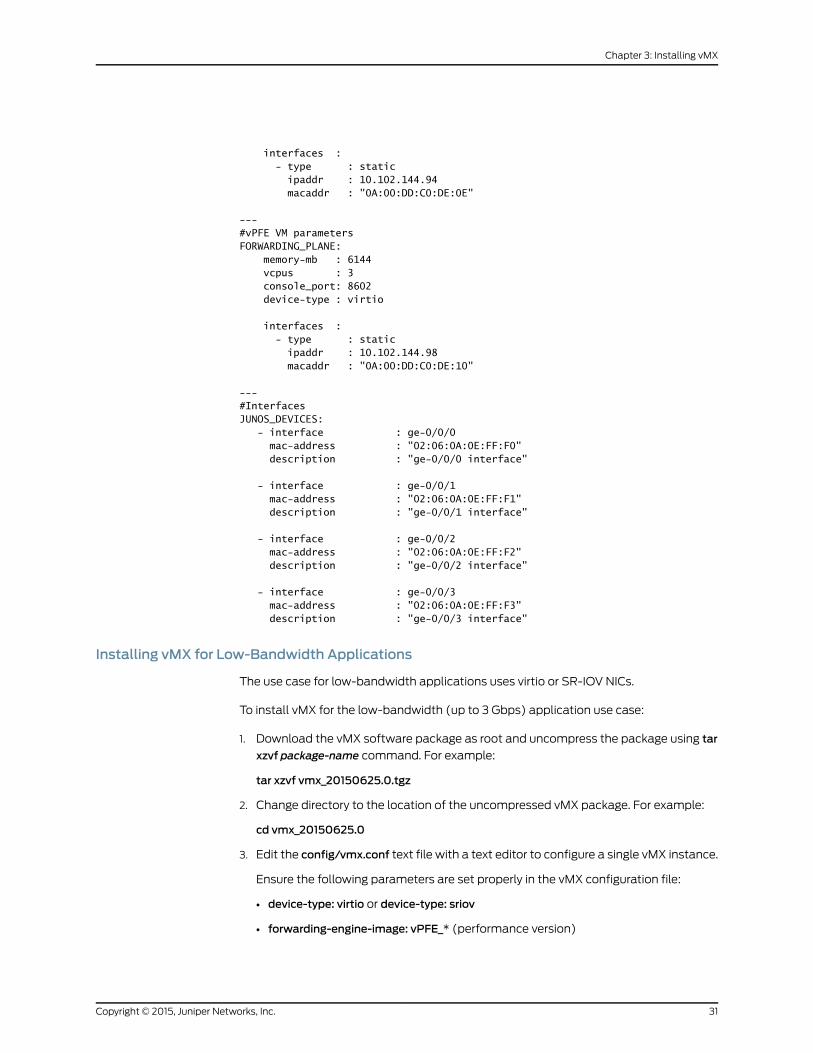
interfaces : - type : static ipaddr : 10.102.144.94 macaddr : "0A:00:DD:C0:DE:0E"
--- #vPFE VM parametersFORWARDING_PLANE: memory-mb : 6144 vcpus : 3 console_port: 8602 device-type : virtio
interfaces : - type : static ipaddr : 10.102.144.98 macaddr : "0A:00:DD:C0:DE:10"
--- #InterfacesJUNOS_DEVICES: - interface : ge-0/0/0 mac-address : "02:06:0A:0E:FF:F0" description : "ge-0/0/0 interface"
- interface : ge-0/0/1 mac-address : "02:06:0A:0E:FF:F1" description : "ge-0/0/1 interface"
- interface : ge-0/0/2 mac-address : "02:06:0A:0E:FF:F2" description : "ge-0/0/2 interface"
- interface : ge-0/0/3 mac-address : "02:06:0A:0E:FF:F3" description : "ge-0/0/3 interface"
Installing vMX for Low-Bandwidth Applications
The use case for low-bandwidth applications uses virtio or SR-IOV NICs.
To install vMX for the low-bandwidth (up to 3 Gbps) application use case:
1. Download the vMX software package as root and uncompress the package using tar
xzvf package-name command. For example:
tar xzvf vmx_20150625.0.tgz
2. Change directory to the location of the uncompressed vMX package. For example:
cd vmx_20150625.0
3. Edit the config/vmx.conf text file with a text editor to configure a single vMX instance.
Ensure the following parameters are set properly in the vMX configuration file:
• device-type: virtio or device-type: sriov
• forwarding-engine-image: vPFE_* (performance version)
31Copyright © 2015, Juniper Networks, Inc.
Chapter 3: Installing vMX
See “Configuring the vMX Instance” on page 35.
4. Run the ./vmx.sh -lv --install script to deploy the vMX instance specified by the
config/vmx.conf startup configuration file and provide verbose-level logging to a file.
See “Deploying vMX” on page 37.
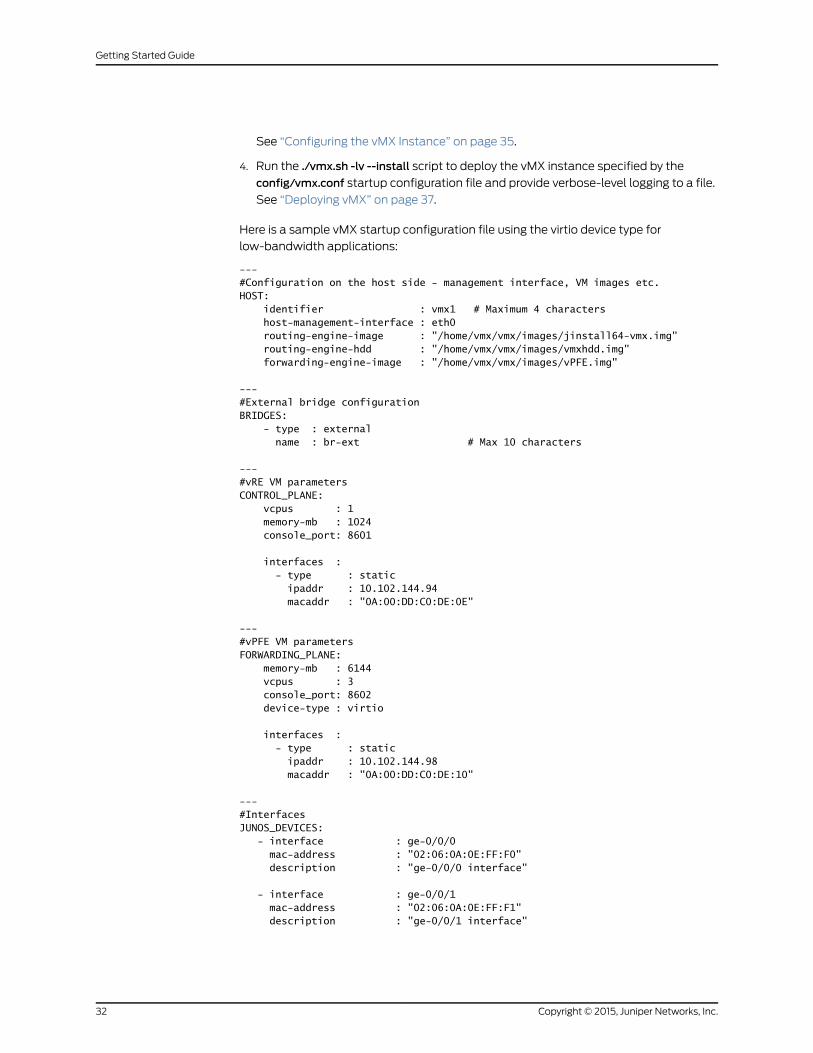
Here is a sample vMX startup configuration file using the virtio device type for
low-bandwidth applications:
--- #Configuration on the host side - management interface, VM images etc.HOST: identifier : vmx1 # Maximum 4 characters host-management-interface : eth0 routing-engine-image : "/home/vmx/vmx/images/jinstall64-vmx.img" routing-engine-hdd : "/home/vmx/vmx/images/vmxhdd.img" forwarding-engine-image : "/home/vmx/vmx/images/vPFE.img"
---#External bridge configurationBRIDGES: - type : external name : br-ext # Max 10 characters
--- #vRE VM parametersCONTROL_PLANE: vcpus : 1 memory-mb : 1024 console_port: 8601
interfaces : - type : static ipaddr : 10.102.144.94 macaddr : "0A:00:DD:C0:DE:0E"
--- #vPFE VM parametersFORWARDING_PLANE: memory-mb : 6144 vcpus : 3 console_port: 8602 device-type : virtio
interfaces : - type : static ipaddr : 10.102.144.98 macaddr : "0A:00:DD:C0:DE:10"
--- #InterfacesJUNOS_DEVICES: - interface : ge-0/0/0 mac-address : "02:06:0A:0E:FF:F0" description : "ge-0/0/0 interface"
- interface : ge-0/0/1 mac-address : "02:06:0A:0E:FF:F1" description : "ge-0/0/1 interface"
Copyright © 2015, Juniper Networks, Inc.32
Getting Started Guide

- interface : ge-0/0/2 mac-address : "02:06:0A:0E:FF:F2" description : "ge-0/0/2 interface"
- interface : ge-0/0/3 mac-address : "02:06:0A:0E:FF:F3" description : "ge-0/0/3 interface"
Installing vMX for High-Bandwidth Applications
The use case for high-bandwidth applications uses the SR-IOV NICs.
To install vMX for the high-bandwidth (above 3 Gbps) application use case:
1. Download the vMX software package as root and uncompress the package using tar
xzvf package-name command. For example:
tar xzvf vmx_20150625.0.tgz
2. Change directory to the location of the uncompressed vMX package. For example:
cd vmx_20150625.0
3. Edit the config/vmx.conf text file with a text editor to configure a single vMX instance.
Ensure the following parameters are set properly in the vMX configuration file:
• device-type: sriov
• forwarding-engine-image: vPFE_* (performance version)
See “Configuring the vMX Instance” on page 35.
4. Run the ./vmx.sh -lv --install script to deploy the vMX instance specified by the
config/vmx.conf startup configuration file and provide verbose-level logging to a file.
See “Deploying vMX” on page 37.
Here is a sample vMX startup configuration file using the SR-IOV device type:
--- #Configuration on the host side - management interface, VM images etc.HOST: identifier : vmx1 # Maximum 4 characters host-management-interface : eth0 routing-engine-image : "/home/vmx/images/jinstall64-vmx.img" routing-engine-hdd : "/home/vmx/images/vmxhdd.img" forwarding-engine-image : "/home/vmx/images/vPFE.img"
---#External bridge configurationBRIDGES: - type : external name : br-ext # Max 10 characters
--- #VCP VM parametersCONTROL_PLANE: vcpus : 1 memory-mb : 4096 console_port: 8601
33Copyright © 2015, Juniper Networks, Inc.
Chapter 3: Installing vMX
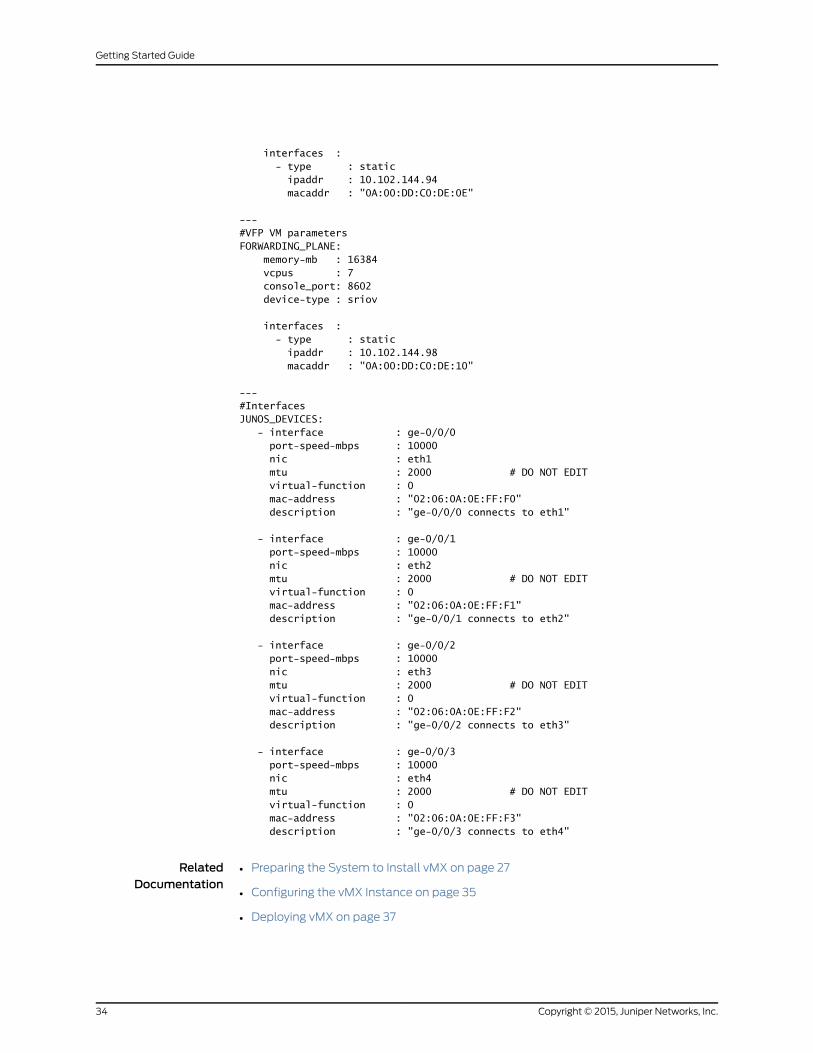
interfaces : - type : static ipaddr : 10.102.144.94 macaddr : "0A:00:DD:C0:DE:0E"
--- #VFP VM parametersFORWARDING_PLANE: memory-mb : 16384 vcpus : 7 console_port: 8602 device-type : sriov
interfaces : - type : static ipaddr : 10.102.144.98 macaddr : "0A:00:DD:C0:DE:10"
--- #InterfacesJUNOS_DEVICES: - interface : ge-0/0/0 port-speed-mbps : 10000 nic : eth1 mtu : 2000 # DO NOT EDIT virtual-function : 0 mac-address : "02:06:0A:0E:FF:F0" description : "ge-0/0/0 connects to eth1"
- interface : ge-0/0/1 port-speed-mbps : 10000 nic : eth2 mtu : 2000 # DO NOT EDIT virtual-function : 0 mac-address : "02:06:0A:0E:FF:F1" description : "ge-0/0/1 connects to eth2"
- interface : ge-0/0/2 port-speed-mbps : 10000 nic : eth3 mtu : 2000 # DO NOT EDIT virtual-function : 0 mac-address : "02:06:0A:0E:FF:F2" description : "ge-0/0/2 connects to eth3"
- interface : ge-0/0/3 port-speed-mbps : 10000 nic : eth4 mtu : 2000 # DO NOT EDIT virtual-function : 0 mac-address : "02:06:0A:0E:FF:F3" description : "ge-0/0/3 connects to eth4"
RelatedDocumentation
Preparing the System to Install vMX on page 27•
• Configuring the vMX Instance on page 35
• Deploying vMX on page 37
Copyright © 2015, Juniper Networks, Inc.34
Getting Started Guide
Configuring the vMX Instance
The parameters required to configure vMX are defined in the startup configuration file.
The configuration file is in YAML format. The default file is config/vmx.conf. You can save
your configuration file to a different name for different instances.
To customize the configuration, perform these tasks:
• Configuring the Host on page 35
• Configuring the VCP VM on page 35
• Configuring the VFP VM on page 36
• Configuring Interfaces on page 36
Configuring the Host
To configure the host environment, youmust change the identifier for each vMX instance
and youmust provide the correct path for the images.
To configure the host, navigate to Host and specify the following parameters:
• identifier—Name of the vMX instance, maximum of four alphanumeric characters.
• host-management-interface—Nameof the physical NIC on the host device that is used
for management access (eth0).
NOTE: The interfaces for HOST:host-management-interface,CONTROL_PLANE,andFORWARDING_PLANEmustbeonthesamesubnet.
• routing-engine-image—Absolute path to the jinstall64-vmx.img file for launching VCP.
• routing-engine-hdd—Absolute path to the vmxhdd.img file for VCP storage.
• forwarding-engine-image—Absolute path to the vPFE.img file for launching VFP. The
image file can be the performance image or the lite image.
• make-local-copy-of-images—(Optional)Makesa local copyof theVCPandVFP images
and uses the local copy to launch vMX. Default value is yes.
• make-local-copy-of-vmxhdd—(Optional)Makesa local copyof theVCPstorage image
and uses the local copy to launch vMX. Default value is yes.
Configuring the VCP VM
To configure the VCP VM, youmust change the IP address and youmust make sure the
console port is not being used by another vMX instance or another server.
To configure the VCP VM, navigate to CONTROL_PLANE and specify the following
parameters:
35Copyright © 2015, Juniper Networks, Inc.
Chapter 3: Installing vMX
• vcpus—Number of vCPUs for the VCP, default is 1.
• memory-mb—Amount of memory for the VCP, default is 2 GB.
• console_port—KVM TCP-based console port. It must be a unique number.
• ipaddr—Management IP address for the VCP VM (fxp0). Navigate to interfaces > type
(static) > ipaddr to modify this parameter.
NOTE: The interfaces for HOST:host-management-interface,CONTROL_PLANE,andFORWARDING_PLANEmustbeonthesamesubnet.
Configuring the VFP VM
Before you configure the VFP VM, consider the following:
• Youmust make sure the console port is not being used by another vMX instance or
another server.
• To disable network access to the VFP console, do not configure an IP address.
• Basedonyour requirements, youmightwant to change thememory, numberof vCPUs,
and the device type. See Table 8 on page 29 for some sample configuration
requirements.
To configure the VFP VM, navigate to FORWARDING_PLANE and specify the following
parameters:
• memory-mb—Amount of memory for the VFP, default is 6 GB.
• vcpus—Number of vCPUs for the VFP, default is 3.
• console_port—KVM TCP-based console port. It must be a unique number.
• device-type—NIC interface type, either sriov or virtio.
• ipaddr—Management IP address for the VFP VM (eth0). Navigate to interfaces > type
(static) > ipaddr to modify this parameter.
NOTE: The interfaces for HOST:host-management-interface,CONTROL_PLANE,andFORWARDING_PLANEmustbeonthesamesubnet.
Configuring Interfaces
The JUNOS_DEVICES interface names correspond to the Linux physical NIC names on
the host. Bring up the Linux physical NIC ports that are defined in this section before
proceeding. For example, use the ifconfig eth9 up command to bring up the NIC ports on
the eth9 interface.
To configure interfaces for virtio device types, youmust specify the interface and the
MAC address.
Copyright © 2015, Juniper Networks, Inc.36
Getting Started Guide

To configure interfaces for SR-IOV device types, youmust specify the interface, the NIC,
and the MAC address.
To configure the routed interfaces, navigate to JUNOS_DEVICESand specify the following
parameters:
• interface—Name of the interface on the vMX.
NOTE: The interface names that are defined in the vmx.conf file must be
contiguous starting from ge-0/0/0. The total number of interfacessupported is 10, up to ge-0/0/9.
• port-speed-mbps—(SR-IOV only) Port speed for the physical NIC, default is 10000
Mbps.
• nic—(SR-IOV only) Name of the physical NIC.
NOTE: Dependingon the versionof udev, you can rename the classic Linuxstandard ethXX names. See Predictable Network Interface Names for more
information.
• mtu—(SR-IOV only) MTU value, default is 2000 andmaximum is 9500.
To change the MTU configuration for virtio device types, modify themtu parameter in
the device binding file (vmx-junosdev.conf).
• virtual-function—(SR-IOV only) Child unit of the physical NIC, default is 0.
• mac-address—MAC address for the physical NIC.
• description—Description of the mapping.
RelatedDocumentation
Preparing the System to Install vMX on page 27•
• Installing vMX for Different Use Cases on page 29
Deploying vMX
Running the ./vmx.sh --install script to deploy vMX sets up:
• Host NICs
• SR-IOV or virtio device types
• External and internal bridges (br-ext and br-int)
NOTE: When br-ext is being created, access to themanagement port may
be frozen temporarily when it gets attached to the br-ext bridge.
37Copyright © 2015, Juniper Networks, Inc.
Chapter 3: Installing vMX
Using the --install option also launches the VCP and VFP VMs.
We recommend you deploy the vMX by running the ./vmx.sh -lv --install script to provide
verbose-level logging to a file for the deployment of the vMX instance.
NOTE: Only English locale is supported for using the vmx.sh script.
RelatedDocumentation
Configuring the vMX Instance on page 35•
• Managing vMX on page 43
Connecting to VMs
Perform these tasks to connect to the virtual machines for first-time configuration, to
enable access by other means (like Telnet or SSH):
• Logging In to VCP on page 38
• Logging In to VFP on page 38
Logging In to VCP
You can access the serial console using the ./vmx.sh --console vcp vmx-id command,
where vmx-id is the vMX identifier specified in the startup configuration file, and log in
with the username root and no password.
To disconnect from the console, log out of the session and press Ctrl + ]. At the telnet>
prompt, type close and press Enter.
Logging In to VFP
You can access the serial console using the ./vmx.sh --console vfp vmx-id command,
where vmx-id is the vMX identifier specified in the startup configuration file, and log in
with the username root and password root.
You can connect to VFP using the SSH protocol. Use the IP address defined under
FORWARDING_PLANE in the vmx.conf file. For security reasons, you cannot connect to
VFP using the Telnet protocol.
NOTE: Configure themanagement IP address on eth0 and routing forreachability by using the Linux commands ifconfig and route add on VFP VM.
To disconnect from the console, log out of the session and press Ctrl + ]. At the telnet>
prompt, type close and press Enter.
RelatedDocumentation
Deploying vMX on page 37•
• Managing vMX on page 43
Copyright © 2015, Juniper Networks, Inc.38
Getting Started Guide
Managing vMX Licenses
Youmust add a license to use vMX features. The licensed features are enforced based
on the license you purchased.
If you need to move your vMX installation to another host, youmust remove vMX from
the current host before installing vMX and adding the license on the new host.
• Adding a License on page 39
• Deleting a License on page 40
Adding a License
To add a license key to the vMX:
1. Copy the license activation key file to the VCP and add the license key by specifying
the filename.
user@vmx> request system license add filename
Or, you can copy and paste the license activation key directly to add the license key.
For example:
user@vmx> request system license add terminalE408408918 aeaqib qcsbja okbuqe rcmxnq vjocwf uxfsta
z5ufjb kdrmt6 57bimv 2f3ddp qttcdn 627q4ajx4s5x hiri
2. Verify that the license is installed.VMX-BANDWIDTH indicates the licensedbandwidth
and VMX-SCALE indicates the application package (VMX-SCALE 1 is the BASE
package, VMX-SCALE2 is theADVANCEpackage, andVMX-SCALE3 is thePREMIUM
package). This information is also listed as Features in the Licenses installed section.
For example, this output indicates that the 40G perpetual license for the PREMIUM
application package is installed.
user@vmx> show system licenseLicense usage: Licenses Licenses Licenses Expiry Feature name used installed needed scale-subscriber 0 1000 0 permanent scale-l2tp 0 1000 0 permanent scale-mobile-ip 0 1000 0 permanent VMX-BANDWIDTH 40000 40000 0 permanent VMX-SCALE 3 3 0 permanent
Licenses installed: License identifier: JUNOS640113 License version: 4 Software Serial Number: 1012620150123J Customer ID: vMX-Juniper Features: vmx-bandwidth-40g - vmx-bandwidth-40g permanent vmx-feature-premium - vmx-feature-premium permanent
39Copyright © 2015, Juniper Networks, Inc.
Chapter 3: Installing vMX
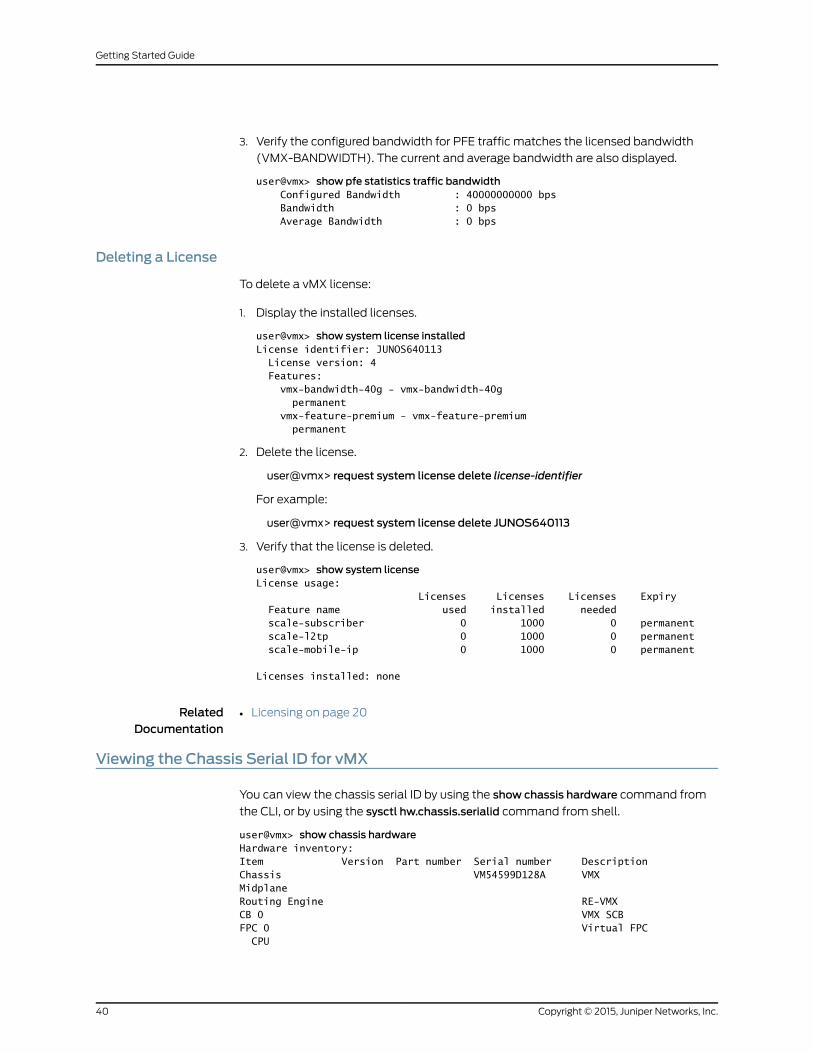
3. Verify the configured bandwidth for PFE traffic matches the licensed bandwidth
(VMX-BANDWIDTH). The current and average bandwidth are also displayed.
user@vmx> show pfe statistics traffic bandwidth Configured Bandwidth : 40000000000 bps Bandwidth : 0 bps Average Bandwidth : 0 bps
Deleting a License
To delete a vMX license:
1. Display the installed licenses.
user@vmx> show system license installedLicense identifier: JUNOS640113 License version: 4 Features: vmx-bandwidth-40g - vmx-bandwidth-40g permanent vmx-feature-premium - vmx-feature-premium permanent
2. Delete the license.
user@vmx> request system license delete license-identifier
For example:
user@vmx> request system license delete JUNOS640113
3. Verify that the license is deleted.
user@vmx> show system licenseLicense usage: Licenses Licenses Licenses Expiry Feature name used installed needed scale-subscriber 0 1000 0 permanent scale-l2tp 0 1000 0 permanent scale-mobile-ip 0 1000 0 permanent
Licenses installed: none
RelatedDocumentation
Licensing on page 20•
Viewing the Chassis Serial ID for vMX
You can view the chassis serial ID by using the show chassis hardware command from
the CLI, or by using the sysctl hw.chassis.serialid command from shell.
user@vmx> show chassis hardwareHardware inventory:Item Version Part number Serial number DescriptionChassis VM54599D128A VMXMidplane Routing Engine RE-VMXCB 0 VMX SCBFPC 0 Virtual FPC CPU
Copyright © 2015, Juniper Networks, Inc.40
Getting Started Guide

41Copyright © 2015, Juniper Networks, Inc.
Chapter 3: Installing vMX

Copyright © 2015, Juniper Networks, Inc.42
Getting Started Guide
CHAPTER 4
Managing vMX
• Managing vMX on page 43
• Binding virtio Devices on page 46
Managing vMX
NOTE: Only English locale is supported for using the vmx.sh script.
After you install and deploy vMX, you can use the vmx.sh script with different options to
perform these tasks:
• Controlling vMX on page 43
• Configuring Logging Options for vMX on page 45
• Connecting to Console Port for the VMs on page 45
• Getting Help for the Script Options on page 45
Controlling vMX
When you are controlling vMXwith the vmx.sh script, you can perform these tasks:
• Deploying vMX on page 43
• Managing vMX Deployments on page 44
• Specifying the Temporary File Directory on page 44
• Specifying the Environment File on page 45
Deploying vMX
NOTE: Youmust be logged in as root to use the control options.
To deploy vMX, use these options with the vmx.sh script:
--cfg file—Use the specified vMX startup configuration file. The default file is
config/vmx.conf.
43Copyright © 2015, Juniper Networks, Inc.
--install—Start vMX by setting up the environment, driver dependencies, andmemory
requirements and deploying the vMX. If you do not specify a startup configuration
file with the --cfg option, the default file is used.
This example deploys a new vMX instance specified by themy-vmx.cfg configuration file
and provides verbose-level logging to a file:
./vmx.sh -lv --install --cfg config/my-vmx.cfg
Managing vMXDeployments
NOTE: Youmust be logged in as root to use the control options.
Use these options with the vmx.sh script to stop, start, restart, verify, and clean up an
existing vMX:
--cfg file—Use the specified vMX startup configuration file. The default file is
config/vmx.conf.
--cleanup—Stop vMX and clean up relevant information about the vMX instance. It also
tears down the Linux bridges and other dependencies. If you do not specify a startup
configuration file with the --cfg option, the default file is used.
--restart—Stop and start a running vMX. This option is useful for redeploying a vMX that
hasparameter changes in the startupconfiguration file. If youdonot specify a startup
configuration file with the --cfg option, the default file is used.
--start—Start the vMX that was running and stopped. If you do not specify a startup
configuration file with the --cfg option, the default file is used.
--status—Verify the statusof adeployedvMX. If youdonot specify a startupconfiguration
file with the --cfg option, the default file is used.
--stop—Stop vMXwithout cleaning up build files so that the vMX can be started quickly
without setup performed by the --install option.
This example tears down an existing vMX instance specified by themy-vmx.cfg
configuration file:
./vmx.sh --cleanup --cfg config/my-vmx.cfg
Specifying the Temporary File Directory
NOTE: Youmust be logged in as root to use the control options.
To specify the directory used for temporary files, run the ./vmx.sh build directory script.
The default directory is build/vmx-id, where vmx-id is the vMX identifier specified in the
startup configuration file.
Copyright © 2015, Juniper Networks, Inc.44
Getting Started Guide
Specifying the Environment File
NOTE: Youmust be logged in as root to use the control options.
To specify the environment file (.env), run the ./vmx.sh env file script. The default file is
env/ubuntu_sriov.env.
Configuring Logging Options for vMX
Youcanenable loggingoptions. It is especially usefulwhenusedwith the control options,
such as --install.
Use these options to configure logging:
-l—Enable logging to a file in the specified build directory. The default directory is
build/vmx-id/logs, where vmx-id is the vMX identifier specified in the startup
configuration file. By default, logging is disabled.
-lv—Enable logging with verbose details.
-lvf—Enable logging with verbose details to the foreground (standard output).
This example deploys a new vMX instance specified by themy-vmx.cfg configuration file
and provides verbose-level logging to a file:
./vmx.sh -lv --install --cfg config/my-vmx.cfg
Connecting to Console Port for the VMs
Use these options with the vmx.sh script to connect to the console of the VCP or VFP of
the specified vMX:
--console vcp [vmx-id]—Connect to the console of the VCP for the specified vMX. The
vMX identifier is specified in the startup configuration file.
--console vfp [vmx-id]—Connect to the console of the VFP for the specified vMX. The
vMX identifier is specified in the startup configuration file.
This example connects to the console of the VCP for the vMX instance specified by the
vmx1 identifier:
./vmx.sh --console vcp vmx1
Getting Help for the Script Options
To obtain on-line help for the vmx.sh script options, run the ./vmx.sh --help script.
RelatedDocumentation
Deploying vMX on page 37•
• Connecting to VMs on page 38
45Copyright © 2015, Juniper Networks, Inc.
Chapter 4: Managing vMX
Binding virtio Devices
For configurationsusing virtio device types, youcanbindmultiple vMX instances together
on the same system if the host has enough CPU andmemory to support the vMX
instances. You configure each vMX instance with a different startup configuration file.
If you are deploying multiple vMX instances, make sure:
• The VM identifiers are unique across all instances.
• The console ports of the VCP and the VFP are unique across all instances.
• The external static IP address of the VCP and the VFP are unique across all instances.
• TheMAC addresses of the VCP and the VFP are unique across all instances, whenever
specified.
NOTE: All VMs share the samemanagement domain. The physicalmanagement interface (for example, eth0) is alsopart of this global externalbridge.
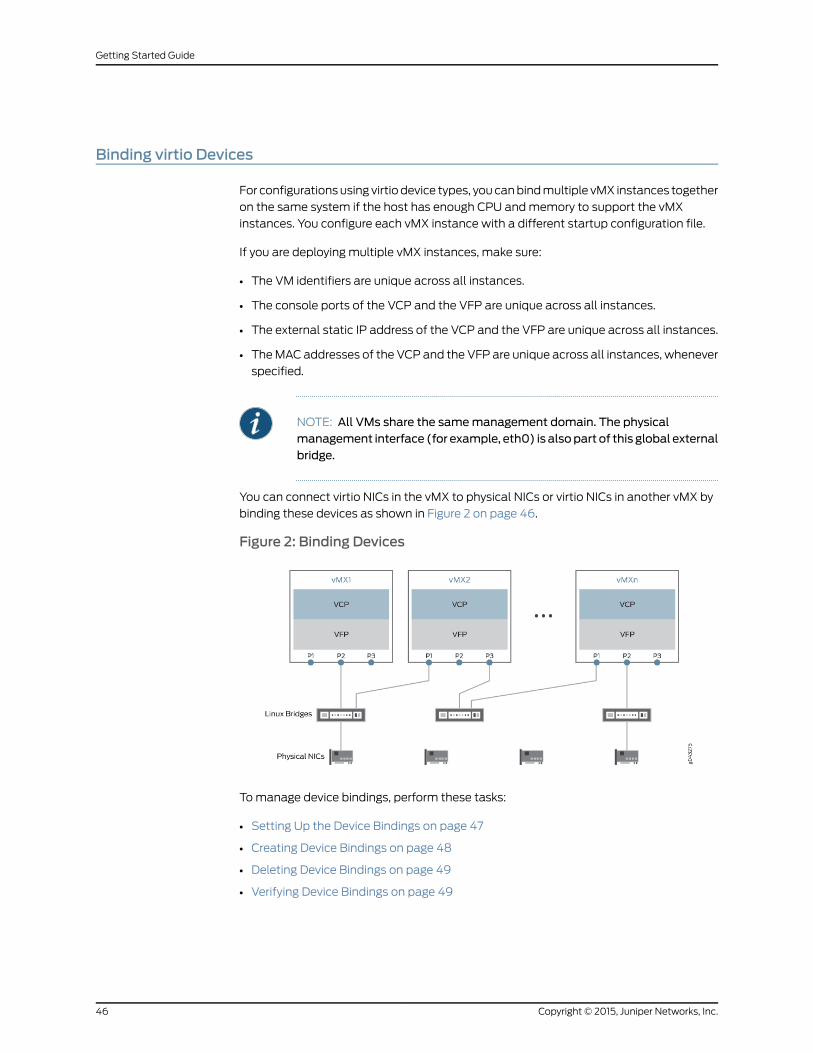
You can connect virtio NICs in the vMX to physical NICs or virtio NICs in another vMX by
binding these devices as shown in Figure 2 on page 46.
Figure 2: Binding Devices
Tomanage device bindings, perform these tasks:
• Setting Up the Device Bindings on page 47
• Creating Device Bindings on page 48
• Deleting Device Bindings on page 49
• Verifying Device Bindings on page 49
Copyright © 2015, Juniper Networks, Inc.46
Getting Started Guide
Setting Up the Device Bindings
Theparameters required toconfigurevMXtobinddevicesaredefined in thedevice-binding
file. Thedevice-binding file is inYAML format. Thedefault file is config/vmx-junosdev.conf.
The device-binding file defines the endpoints of each link originating from the VFP of a
vMX.OneendpointmustbeadeviceusingvirtioNICs.Theotherendpoint canbeaphysical
NIC, a virtio NIC in another vMX instance, or a Linux bridge.
To bind the vMX instances together:
1. Edit the config/vmx-junosdev.conf file to set up the communication between the vMX
instances.
2. Modify the link_name to the name of the Linux bridge (as shown by the brctl show
command).The linknamecanbe 15characters long. Itmustbeunique for eachbridge.
If more than two interfaces (virtual or physical) are connected by a Linux bridge, then
the bridge name is derived from the dev_name of the common endpoint for the
connected devices.
3. Specify themtu to change the MTU value for virtio device types from the default of
1500. Themaximum value is 9500.
To change theMTU configuration for SR-IOV device types,modify themtu parameter
in the startup configuration file (vmx.conf).
4. Specify the endpoints for vMX devices (junos_dev type) by customizing these
parameters:
• type—Type of device is junos_dev.
• vm-name—Name of the vMX identifier specified in the startup configuration file for
that vMX instance.
• dev-name—Name of the interface on vMX as specified in the startup configuration
file.
5. Specify the endpoints for physical NICs (host_dev type) by customizing these
parameters:
• type—Type of device is host_dev.
• dev-name—Name of the physical NIC on the host.
6. Specify the endpoints for bridges (bridge_dev type) by customizing these parameters:
• type—Type of device is bridge_dev.
• dev-name—Name of the Linux bridge.
7. If you havemultiple device-binding files, save themwith different names.
Here is a sample vMX device-binding file:
interfaces :
- link_name : link_host
47Copyright © 2015, Juniper Networks, Inc.
Chapter 4: Managing vMX
mtu : 1500 endpoint_1 : - type : junos_dev vm_name : vmx1 dev_name : ge-0/0/0 endpoint_2 : - type : host_dev dev_name : int2
- link_name : link_vmx_12 mtu : 1500 endpoint_1 : - type : junos_dev vm_name : vmx1 dev_name : ge-0/0/1 endpoint_2 : - type : junos_dev vm_name : vmx2 dev_name : ge-0/0/0
- link_name : bridge_vmx_123 endpoint_1 : - type : junos_dev vm_name : vmx1 dev_name : ge-0/0/2 endpoint_2 : - type : bridge_dev dev_name : bridge1
- link_name : bridge_vmx_123 endpoint_1 : - type : junos_dev vm_name : vmx2 dev_name : ge-0/0/1 endpoint_2 : - type : bridge_dev dev_name : bridge1
- link_name : bridge_vmx_123 endpoint_1 : - type : junos_dev vm_name : vmx3 dev_name : ge-0/0/0 endpoint_2 : - type : bridge_dev dev_name : bridge1
Creating Device Bindings
NOTE: Youmust be logged in as root to bind devices.
To bind devices with virtio NICs to other devices, define your devices in the vMX
device-binding file and run the ./vmx.sh--bind-dev–-cfgdevice-binding-file script to create
the device binding. If youdonot specify a file, the default file is config/vmx-junosdev.conf.
This example creates device bindings with the specified device-binding file:
Copyright © 2015, Juniper Networks, Inc.48
Getting Started Guide
./vmx.sh --bind-dev –-cfg config/vmx1-junosdev.conf
Deleting Device Bindings
NOTE: Youmust be logged in as root to unbind devices.
To unbind devices, run the ./vmx.sh --unbind-dev–-cfgdevice-binding-file script to delete
the device bindings created with the --bind-dev option. If you do not specify a file, the
default file is config/vmx-junosdev.conf.
This example deletes device bindings with the specified device-binding file:
./vmx.sh --unbind-dev –-cfg config/vmx1-junosdev.conf
Verifying Device Bindings
NOTE: Youmust be logged in as root to bind devices.
Toverify the statusofdevicebindings createdwith the --bind-devoption, run the ./vmx.sh
--bind-check –-cfg device-binding-file script. If you do not specify a file, the default file is
config/vmx-junosdev.conf.
This example verifies the status of the device bindings for the specified device-binding
file:
./vmx.sh --bind-check –-cfg config/vmx1-junosdev.conf
RelatedDocumentation
• Installing vMX for Different Use Cases on page 29
• Configuring the vMX Instance on page 35
49Copyright © 2015, Juniper Networks, Inc.
Chapter 4: Managing vMX

Copyright © 2015, Juniper Networks, Inc.50
Getting Started Guide
CHAPTER 5
Troubleshooting vMX
• Viewing VFP Statistics on page 51
• Viewing VFP Log Files on page 52
• Troubleshooting VFP and VCP Connection Establishment on page 53
• VerifyingWhether VMs Are Running on page 53
• Viewing CPU Information on page 54
• Verifying BIOS Settings for SR-IOV on page 54
Viewing VFP Statistics
You can view the VFP statistics from aWeb browser. The statistics are the relative
counters from the start of the HTTP connection.
The RPIO Stats and Hostif Stats sections provide statistics about the internal
communication between the VCP and the VFP. The RPIO session uses port 3000 and
the HostIF session uses port 3200.
The Port Stats section provides statistics about the packets received and transmitted
to the NIC interfaces.
• There is a receive (rx) and transmit (tx) line for each port. Port 0maps to the ge-0/0/0
interface, port 1 maps to the ge-0/0/1 interface, and so forth. rx0 displays statistics for
packets received fromport 0 and tx1 displays statistics for packets transmitted to port
1.
• Errors are miscellaneous errors reported by the physical layer NIC.
The Ring Stats section provides statistics about packet processing.
• There is an I/O thread (io) for packets received from a port.
• There is a worker thread (wk) for each CPU core.
51Copyright © 2015, Juniper Networks, Inc.
• The host interface (host) sends protocol packets to the VCP.
• The queue processes the packets. The columns provide this information about the
queues:
• The Producer and Consumer columns display the source and destination that
generate packets for this queue. The values can be io,wk, tx, or host.
• The Priority column displays the priority of the queue. The values can be Normal or
High (only for control packets).
• The Free and Used columns display the queue occupancy. The queue has 1024
entries.
• The Enqueues and Dequeues columns display the number of queue operations.
• The Drops column indicates whether the queue is being drained fast enough.
To view the statistics:
1. Navigate to http://vfp-mgmt-ip:8080/, where vfp-mgmt-ip is the management IP
address for the VFP VM. For example:
http://172.16.0.2:8080/
2. When prompted, enter pfe as the username and pfe as the password.
3. View the statistics displayed in the browser window.
RelatedDocumentation
Connecting to VMs on page 38•
Viewing VFP Log Files
The VFP saves the following files:
• VFP log files are saved in the /var/log directory.
• VFP crash files are saved in the /var/crash directory.
To view the VFP log or crash files:
1. Log in to the VFP console by using the ./vmx.sh --console vfp vmx-id command,where
vmx-id is the vMX identifier specified in the startup configuration file.
2. Navigate to the appropriate directory to determinewhether there are any files to view.
# cd /var/crash# ls -l-rwxr-xr-x 1 root root 864678 Jan 4 02:14 core.riot.1420366466.8271.gz
3. (Optional) If necessary, unzip the file and view it using GDB.
# gunzip core.riot.1420366466.8271.gz# gdb /build/app core.riot.1420366466.8271
RelatedDocumentation
Connecting to VMs on page 38•
Copyright © 2015, Juniper Networks, Inc.52
Getting Started Guide
Troubleshooting VFP and VCP Connection Establishment
Purpose When the VCP and VFP connection is established, the show interfaces terse command
in the VCP CLI displays the ge-0/0/x interfaces and the following messages appear in
the VFP syslog file:
RPIO: Accepted connection from 172.16.0.1:50896 <-> vPFE:3000 RPIO: Accepted connection from 172.16.0.1:56098 <-> vPFE:3000HOSTIF: Accepted connection
If the VCP cannot connect to the VFP, the VFP syslog file does not display the RPIO and
HOSTIFmessages.
Action Run the request chassis fpc slot 0 restart command from the VCP CLI. If an FPC is in
transition error message is displayed, then run restart chassis-control.
If these commands do not correct the problem, verify whether the VCP can ping the VFP
from the routing-instance __juniper_private1__. The threemanagement interfaces (for the
host, VCP VM, and VFP VM) connected to the internal bridge should be able to reach
each other. For example:
root> ping 172.16.0.2 routing-instance __juniper_private1__PING 172.16.0.2 (172.16.0.2): 56 data bytes64 bytes from 172.16.0.2: icmp_seq=0 ttl=64 time=0.273 ms64 bytes from 172.16.0.2: icmp_seq=1 ttl=64 time=0.606 ms
If the VCP cannot ping the VFP, perform these tasks:
1. Use the brctl show command to verify the bridge configuration and connected
interfaces.
2. Verify that the startup configuration file is correct.
3. Verify that theVFPand theVCPVMsare upand the correct IP addresses are assigned.
4. Restart the FPC from the VCP VM.
5. Restart the chassis management process from VCP VM.
6. Stop and start the VFP VM.
7. Stop and start the VCP VM.
8. Restart the host.
If theproblempersists, contact the JuniperNetworksTechnicalAssistanceCenter (JTAC).
RelatedDocumentation
Connecting to VMs on page 38•
VerifyingWhether VMs Are Running
To verify that the VMs are running after vMX is installed, use the virsh list command. The
virsh list command displays the name and state of the VM. The state can be: running,
idle, paused, shutdown, crashed, or dying.
53Copyright © 2015, Juniper Networks, Inc.
Chapter 5: Troubleshooting vMX
You can stop and start VMs with the following virsh commands.
• virsh destroy—Forcefully stop a VMwhile leaving its resources intact.
• virsh start—Start an inactive VM that was defined previously.
RelatedDocumentation
Connecting to VMs on page 38•
Viewing CPU Information
On the host server, use the lscpu command to display CPU information. The output
displays such information as the total number of CPUs, the number of cores per socket,
and the number of CPU sockets. For example:
root@vmx-host:~# lscpuArchitecture: x86_64CPU op-mode(s): 32-bit, 64-bitByte Order: Little EndianCPU(s): 40On-line CPU(s) list: 0-39Thread(s) per core: 1Core(s) per socket: 10Socket(s): 4NUMA node(s): 4Vendor ID: GenuineIntelCPU family: 6Model: 62Stepping: 7CPU MHz: 3191.766BogoMIPS: 6385.87Virtualization: VT-xL1d cache: 32KL1i cache: 32KL2 cache: 256KL3 cache: 38400KNUMA node0 CPU(s): 0,4,8,12,16,20,24,28,32,36NUMA node1 CPU(s): 1,5,9,13,17,21,25,29,33,37NUMA node2 CPU(s): 2,6,10,14,18,22,26,30,34,38NUMA node3 CPU(s): 3,7,11,15,19,23,27,31,35,39
RelatedDocumentation
MinimumHardware and Software Requirements on page 23•
Verifying BIOS Settings for SR-IOV
If you are having problems with the SR-IOV ports, make sure BIOS has the following
settings:
• SR-IOV is enabled.
• VT-d is enabled.
• Hyperthreading is disabled.
Copyright © 2015, Juniper Networks, Inc.54
Getting Started Guide

We recommend that you verify the process with the vendor because different systems
have different methods to access and change BIOS settings.
RelatedDocumentation
• Preparing the System to Install vMX on page 27
55Copyright © 2015, Juniper Networks, Inc.
Chapter 5: Troubleshooting vMX

Copyright © 2015, Juniper Networks, Inc.56
Getting Started Guide


![vMX Getting Started Guide for KVM - Juniper Networks · Table2:TextandSyntaxConventions(continued) Convention Description Examples Configurethemachine’sdomain name: [edit] root@#setsystemdomain-name](https://img.pdfslide.net/doc/110x75/5f63544cd569985159475374/vmx-getting-started-guide-for-kvm-juniper-networks-table2textandsyntaxconventionscontinued.jpg)


![vMX Getting Started Guide for VMware · 2020-03-23 · Table2:TextandSyntaxConventions(continued) Convention Description Examples Configurethemachine’sdomain name: [edit] root@#setsystemdomain-name](https://img.pdfslide.net/doc/110x75/5f0bc7ac7e708231d4322d5e/vmx-getting-started-guide-for-vmware-2020-03-23-table2textandsyntaxconventionscontinued.jpg)


![Skaffold - storage.googleapis.com · [getting-started getting-started] Hello world! [getting-started getting-started] Hello world! [getting-started getting-started] Hello world! 5](https://img.pdfslide.net/doc/110x75/5ec939f2a76a033f091c5ac7/skaffold-getting-started-getting-started-hello-world-getting-started-getting-started.jpg)