Embed Size (px)
Citation preview

User Manual
Control unit for an Electric Height-Adjustable Desk
SMART Firmware-Version 1.9
Document Rev1
LOGIC office

2
Contents
1 Preface .................................................................................................................................................. 4 1.1 Intended Use ................................................................................................................................ 4 1.2 SMART control unit functionality .................................................................................................. 4 1.3 Target group and previous knowledge ......................................................................................... 5 1.4 Symbols used in safety instructions ............................................................................................. 5 1.5 Package contents ......................................................................................................................... 6 1.6 Unpacking .................................................................................................................................... 6 1.7 Safety instructions ........................................................................................................................ 6
1.7.1 General safety instructions ...................................................................................................... 6
1.7.2 Important notes for OEMs ........................................................................................................ 9
1.7.3 Important note for service ........................................................................................................ 9
2 SMART installation instructions .......................................................................................................... 10
3 Commissioning ................................................................................................................................... 12 3.1 SMART sockets ......................................................................................................................... 12 3.2 Commissioning procedure ......................................................................................................... 13
3.2.1 Connect drives ....................................................................................................................... 13
3.2.2 Connect handswitch .............................................................................................................. 13
3.2.3 Connect Clip-On Handswitch SmartTOUCH-OD-2-LD ......................................................... 13
3.2.4 Connect mains supply ........................................................................................................... 14
3.2.5 System configuration (example) ............................................................................................ 14
3.2.6 Disconnect Clip-On Handswitch SmartTOUCH-OD-2-LD ..................................................... 15
4 Operating the SMART control unit ...................................................................................................... 16 4.1 Basic functions ........................................................................................................................... 16
4.1.1 Upward desktop movement ................................................................................................... 16
4.1.2 Downward desktop movement .............................................................................................. 16 4.2 Advanced functions .................................................................................................................... 16
4.2.1 Saving a desktop position ...................................................................................................... 17
4.2.2 Adjusting the desktop to a saved position ............................................................................. 18
4.2.3 Changing the desktop height displayed ................................................................................. 19
4.2.4 Manual Reset ......................................................................................................................... 19
4.2.5 Enabling limit position calibration........................................................................................... 20
4.2.6 Limit position calibration ........................................................................................................ 20 4.3 Software dependent functions ................................................................................................... 22
4.3.1 Slow speed ranges ................................................................................................................ 22
4.3.2 Safety area ............................................................................................................................. 22
4.3.3 Container- and Shelf-Stop positions ...................................................................................... 22
4.3.4 Plug detection ........................................................................................................................ 23
4.3.5 Auto Detect Number of Drives ............................................................................................... 24
4.3.6 Duty cycle monitoring ............................................................................................................ 24
4.3.7 Change the displayed desktop position (cm or inch) ............................................................. 24
4.3.8 Change number of drives ...................................................................................................... 25
4.3.9 Reset control unit to factory settings...................................................................................... 26
5 Collision protection.............................................................................................................................. 27 5.1 Intelligent System Protection (ISP) ............................................................................................ 27 5.2 Drive back .................................................................................................................................. 28
6 Appendix ............................................................................................................................................. 29 6.1 Possible faults and remedies ..................................................................................................... 29 6.2 Error messages on the handswitch display ............................................................................... 30 6.3 Click codes ................................................................................................................................. 31 6.4 Drill template .............................................................................................................................. 31
7 Further information.............................................................................................................................. 33 7.1 End of life disposal ..................................................................................................................... 33
Bedienungsanleitung
Motorsteuerung für einen elektrisch höhenverstellbaren Arbeitsplatz
SMART Für die Firmware-Version 1.8
Rev0

3
7.2 Technical data ............................................................................................................................ 33 7.3 Optional products ....................................................................................................................... 33 7.4 Manufacturer .............................................................................................................................. 33
4
1 Preface
Dear Customer,
Thank you for choosing a SMART control unit for electric height-adjustable desks from LOGICDATA
Electronic & Software Entwicklungs GmbH. You are now in possession of a state-of-the-art product
that complies with all the relevant safety requirements.
1.1 Intended Use
SMART control units may only be used for the intended purpose, i.e. to control electric height-adjustable
desks. Only motors that meet LOGICDATA specifications (e.g. duty cycle, current consumption) may be
used to drive the lifting devices. The control units must be installed, put into operation and their function
checked by qualified personnel. Using them to control other motors or installing them in products other
than electric height-adjustable desks is only permissible with the prior written consent of LOGICDATA.
Their basic function is upward and downward adjustment of the desktop, which can be controlled with all
the handswitches available.
1.2 SMART control unit functionality
The SMART control units incorporate the following features (the availability of some of the features
depends on the handswitch used):
High efficient switch mode power supply (SMPS)
Low standby power consumption, low field emission
Control units with US and EU input voltage available
Table height display with configurable offset
Up to 6 memory positions (depending on handset)
ISP (Intelligent System Protection)
Enhanced Drive Comfort
Safety area
Low speed area
Plug detection and automatic detection of the number of connected drives (depending on u
Configurable reset conditions
Configurable stop conditions (overtemperature, overcurrent, timeout, limit switches)
InBox Diagnosis
LogicConnector DATA for sensors and cascading
Additional functions are available, depending on the handswitch model used
(e.g. saving desktop positions, adjusting the desktop to saved positions, etc.)
A wide selection of LOGICDATA handswitches is available for the control units

5
1.3 Target group and previous knowledge
This user manual addresses the following people:
Technicians who assemble and put electric height-adjustable desks into operation (by installing
motors and control units, configuring control units, etc.)
Furniture assembly, service and maintenance personnel who put electric height-adjustable desks
into operation in showrooms or at the customer’s
The following is required for installing, operating and configuring electric height-adjustable desks with
SMART control units:
Basic mechanical and electrical skills (with suitable qualifications)
Reading the user manual
1.4 Symbols used in safety instructions
This user manual contains safety instructions with symbols drawing your attention to possible dangers
and residual risks. They indicate the following:
Danger: this warning symbol advises you of imminent danger to people’s lives and health.
Failure to observe this warning may result in health problems, serious injuries and damage to
property.
Caution: this warning advises you of possible dangers from electric current.
Failure to observe this warning may cause injuries and damage to property.
Note: this symbol advises you of important information that must be noted for operating the
SMART control unit safely.
Danger: this warning advises you of a possible risk of body parts being trapped or pinched in
exceptional cases.
Failure to observe this warning may result in health problems, serious injuries and damage to
property.
Note: You must read the user manual.
6
1.5 Package contents
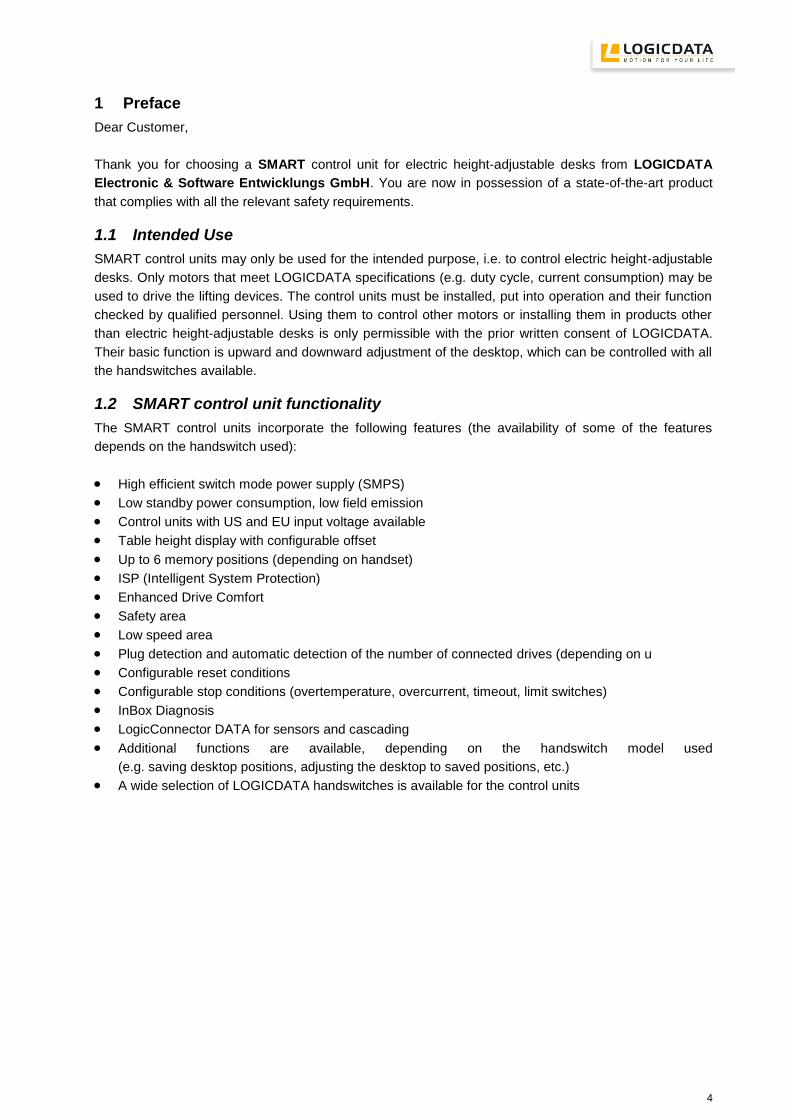
The SMART control unit is supplied together with the following components as standard:
Figure 1: Package contents
SMART control unit
Note: power cords can be ordered separately.
1.6 Unpacking
The SMART control unit comes packed in a cardboard box. Some components are also sealed in plastic
film. To unpack, proceed as follows:
1. Remove the cardboard and plastic film from the control unit components.
2. Check the package contents.
3. Dispose of the packaging materials.
4. Keep the user manual at hand for the operators.
Note: ensure eco-friendly disposal of the packaging materials (separate the plastic parts and
cardboard for collection).
1.7 Safety instructions
This user manual contains safety instructions that draw your attention to any possible risks, thus enabling
safe operation of the SMART control unit. Please observe these warnings and instructions at all times.
In this section you will find general safety instructions that do not refer to any particular steps or
procedures. You will find the work-specific safety instructions in the relevant section of the manual.
Additional warnings are given on the SMART control unit itself.
1.7.1 General safety instructions
Note: you must read the user manual carefully before installing or operating the SMART
control unit.
Caution: do not open the SMART control unit under any circumstances. There is a danger of
electric shock.
7
Caution: the SMART control unit is not designed for continuous operation. Changing the
desktop position without interruption must not exceed the duty cycle indicated on the
nameplate.
Caution: the SMART control unit may only be operated with mains voltage as specified on
the type plate.
SMART control units are also available for the mains voltages used in other countries.
Detailed information is provided in the corresponding datasheet!
Caution: only use the power cord supplied with the control unit. Check that it is not damaged.
Do not ever operate the SMART control unit if the power cord is damaged.
Danger: it is not allowed to connect self-constructed products to LOGICDATA motor controls.
To prevent damage of the unit, use only components suitable for LOGICDATA motor controls.
Caution: before connecting and disconnecting handswitches, you must unplug the power
cord.
Danger: in the event of a malfunction (e.g. if the control unit keeps adjusting the desk
because a movement key has jammed), please unplug the unit immediately.
Danger: do not expose the SMART control unit to moisture, drips or splashes.
Danger: You have to replace the Clip-On Handswitch SmartTOUCH-OD-2-LD when exposed
to liquids (e.g. lemonade).
Danger: when changing the desktop position (especially without using pinch protection),
there is a risk of pinching. You must therefore ensure that no people or objects are located in
the hazardous area or can reach into it.
Danger: when changing the desktop position, there may in exceptional cases be a risk of
pinching in spite of the safety features. You must therefore always ensure that no people or
objects are located in the hazardous area or reach into it.
Danger: do not modify or make any changes to the control unit, the controls themselves or
handswitches.
Danger: do not operate the SMART control unit in a potentially explosive atmosphere.
Danger: in the event of a fault (motor or component), whenever the desktop attempts to
adjust the height it may move slightly before the safety cut-out is triggered. Please note that
there is a potential risk of pinching in this case.
8
Danger: intelligent system protection (ISP) is not enabled during all resets (see chapter 4.2.4)
and limit position calibration (see chapter 4.2.6). Please note that there is a potential risk of
pinching in this case.
Danger: this device is not intended for use by individuals (including children) with limited
physical, sensory or mental abilities or with a lack of experience and/or lack of expertise,
unless they are supervised by a person responsible for their safety or have received
instructions from that person on how to use the control unit.
Danger: this control unit can be used by children aged from 8 years and above and persons
with reduced physical, sensory or mental capabilities or lack of experience and knowledge if
they have been given supervision or instruction concerning use of the control unit in a safe
way and understand the hazards involved.
Danger: children must be supervised at all times to ensure that they do not play with the
control unit.
Danger: children shall not play with the appliance.
Caution: if the control unit’s power cord is damaged, it must be replaced by the manufacturer
or customer service or similarly qualified person in order to prevent any risks.
Caution: only clean the SMART control unit with a dry or slightly moist cloth. Before cleaning,
you must always unplug the power cord.
Danger: cleaning and user maintenance shall not be made by children without supervision.

9
1.7.2 Important notes for OEMs
What we mean by OEMs are companies that purchase SMART control units from LOGICDATA and
install them in their own products (e.g. electric height-adjustable desks).
Note: for reasons of EU conformity and product safety, we advise you to provide users of
your products with a manual in the relevant EU language.
Note: when you ship your finished products, enclose a user manual containing all the safety
instructions that consumers need to handle your product safely.
Note: the user manual for your finished product must contain the following note: you must
read the user manual before you operate the product (electric height-adjustable desk).
Advise your customers that the user manual must be kept at hand in close proximity to the
product (electric height-adjustable desk).
Danger: conduct a risk analysis of your product (electric height-adjustable desk) so that you
can respond to any potential residual risks (e.g. by changing design features or adding notes
to the user manual and/or placing warnings on your product).
Note: ensure that no unauthorized individuals (e.g. small children, people under the influence
of drugs, etc.) can tamper with your product or the control unit.
1.7.3 Important note for service
Danger: only use original accessories. Parts may only be replaced by qualified service
technicians, otherwise the warranty/guarantee shall be null and void.
Danger: in the event of a fault, please contact customer service immediately. Only original
spare parts may be used for repairing the control units. Parts may only be replaced by
qualified service technicians, otherwise the warranty/guarantee shall be null and void.
10
2 SMART installation instructions
Mount the SMART control unit on the underside of the desktop. You will need the following tools for
mounting:
Cross-tip screwdriver
Pencil
Drill (for drilling holes)
Caution: the power cord must be unplugged while the SMART control unit is being mounted.
Caution: When installing the SMART and putting it into operation, be sure that the SMART is
acclimatized to the temperature and humidity values for operation, shown in the datasheet!
To mount the SMART control unit, proceed as follows:
Note: we recommend using the drill template to help with mounting. You will find the template
in section 6.4. If you do not wish to use it, please follow the mounting instructions carefully.
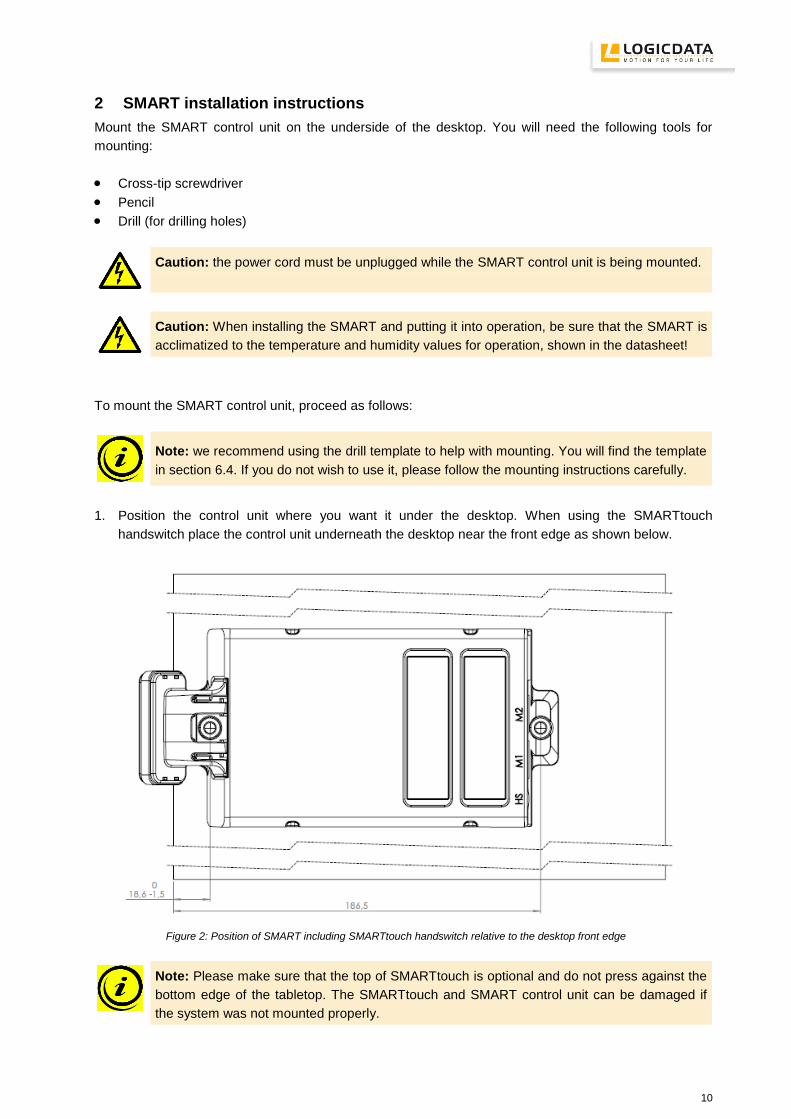
1. Position the control unit where you want it under the desktop. When using the SMARTtouch
handswitch place the control unit underneath the desktop near the front edge as shown below.
Figure 2: Position of SMART including SMARTtouch handswitch relative to the desktop front edge
Note: Please make sure that the top of SMARTtouch is optional and do not press against the
bottom edge of the tabletop. The SMARTtouch and SMART control unit can be damaged if
the system was not mounted properly.

11
2. Mark the drill holes with a pencil.
Figure 3: Installation step 2
3. Pre-drill these two holes.
4. Attach the control unit with 2 screws by using these two holes.
5. Tighten the two screws properly.
Note: LOGICDATA recommends lens head screws DIN7981C 4,8xL with a lens head
diameter of 9,5mm. The length L of the screw should fit to the used desktop. The tightening
torque depends on the wood, but 2Nm shall not be exceeded.

12
3 Commissioning
Commissioning involves the procedures required to ensure that the height of an electric height-
adjustable desk can be adjusted with the SMART control unit. Requirements for commissioning:
The SMART control unit must be mounted (as described in section 0)
The table legs for adjusting the desktop must be mounted
Danger: only qualified technicians may commission the control unit. Qualified technicians
have the necessary electrical engineering training and are familiar with this user manual.
Caution: When installing the SMART and putting it into operation, be sure that the SMART is
acclimatized to the temperature and humidity values for operation, shown in the datasheet!
3.1 SMART sockets
The SMART control unit has the following sockets:
Figure 4: Sockets
Motor socket 1 (M1)
Motor socket 2 (M2)
S Handswitch socket (HS)
P Mains socket
HS Clip-On Handswitch (optional)
Note: if your motors are equipped with connectors of the type DIN 41524 (8-pin with 262°
angled pin alignment) and if your control box has MOLEX motor sockets, you need for each
motor the adapter cable LOG-CBL-ADAP-DIN-MOLEX (shown with the letter A in Figure 4)
Caution: Use 3-pole mains cables only!
Note: the clamp next to the mains socket is used as a connector for a functional earth. This
clamp is used for example to deflect electrostatic charge from the electric height-adjustable
desk. The connector cannot carry out the function of a protective conductor!
This clamp is also marked with the symbol on top of the housing.
① ②
P S HS

13
3.2 Commissioning procedure
Caution: the power cord must be unplugged while the SMART control unit is being
commissioned.
To commission a SMART control unit, proceed as follows.
3.2.1 Connect drives
Plug the motor cables into the relevant 8-pin motor sockets (M1, M2).
Note: when connecting the motor cables, you must strictly adhere to the sequence
M1 and M2.
Danger: during commissioning a system with single-end-limit switches (connection of upper
and lower signal limit switches in series) or when changing a motor on such a system, the
motors must not be extended to their highest position. (upper limit switch active)
3.2.2 Connect handswitch
Plug the handswitch into the 7-pin socket (HS).
Note: you can choose from a wide range of LOGICDATA handswitches for the SMART
control unit. Information about available handswitches can be found in the latest product
catalogue and on the website www.logicdata.at .
3.2.3 Connect Clip-On Handswitch SmartTOUCH-OD-2-LD
Connect the Clip-On Handswitch SmartTOUCH-OD-2-LD to the control unit (as shown below).
Figure 5: Connect Clip-On Handswitch

14
3.2.4 Connect mains supply
Caution: before you plug in the power cord, check the following again:
The mains supply voltage must be as specified on the type plate
All the components must be plugged into the right sockets
When the power cord is plugged in, the SMART control unit is operational.
Note: According to the parameters of the SMART a reset or calibration might be necessary
after plugging in the power cord for the first time.
3.2.5 System configuration (example)
The figure below shows the socket assignment for a configuration example. This configuration consists
of:
Figure 6: Configuration example
1 SMART control unit
2 motors (hidden in the table legs)
1 Clip-On handswitch: SmartTOUCH-OD-2-LD
1 mains cable 3-pole
③
①
15
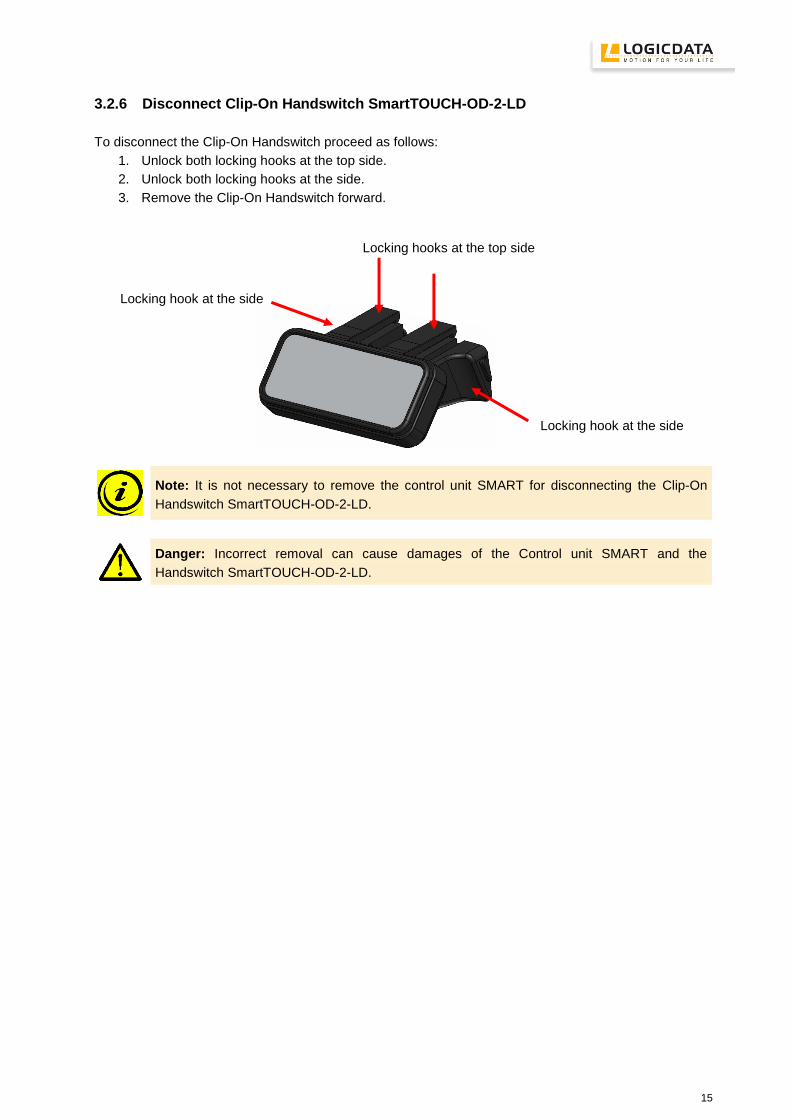
3.2.6 Disconnect Clip-On Handswitch SmartTOUCH-OD-2-LD
To disconnect the Clip-On Handswitch proceed as follows:
1. Unlock both locking hooks at the top side.
2. Unlock both locking hooks at the side.
3. Remove the Clip-On Handswitch forward.
Note: It is not necessary to remove the control unit SMART for disconnecting the Clip-On
Handswitch SmartTOUCH-OD-2-LD.
Danger: Incorrect removal can cause damages of the Control unit SMART and the
Handswitch SmartTOUCH-OD-2-LD.
Locking hooks at the top side
Locking hook at the side
Locking hook at the side

16
4 Operating the SMART control unit
To ensure safe operation of the SMART control unit, please observe the following safety instructions:
Caution: keep children away from electric height-adjustable desks, control units and
handswitches. There is risk of injury and electric shock.
Caution: unplug the power cord during a thunderstorm or if you do not intend to use the desk
for a longer period. The control unit might otherwise be damaged by power surges.
4.1 Basic functions
Note: the SMART control unit offers an extensive range of functions. The availability of some
functions depends however on the handswitch used.
This section describes the basic functions available with every handswitch designed for use
with SMART control units.
4.1.1 Upward desktop movement
This function enables you to adjust the desktop upwards. To change its position, proceed as follows:
Press the desktop up key.
Keep pressing the key until the required desktop height is reached.
Note: the desktop will continue moving upwards until you release the key or the maximum
height is reached.
4.1.2 Downward desktop movement
This function enables you to adjust the desktop downwards. To change its position, proceed as follows:
Press the desktop down key.
Keep pressing the key until the required desktop height is reached.
Note: the desktop will continue moving downwards until you release the key or the minimum
height is reached.
4.2 Advanced functions
Note: you can only use the following functions of the SMART control unit if you have a
handswitch with memory position keys and a memory key.

17
4.2.1 Saving a desktop position
This function allows you to save a defined desktop height .One desktop height can be saved per memory
position key. To save a position, proceed as follows:
Note: if you are switching on the SMART control unit for the first time, all the saved positions
are set to the lowest desktop height (minimum desktop position).
1. Adjust the desktop to the position you want to save.
The display will show the desktop height (e.g. 73cm).
2. Press the memory key.
The display will read S –.
3. Press the required memory position key (e.g. 2).
The display will read S 2.
4. The set desktop position will now be saved tot he selected memory
position key.
You will hear an audible double click and after about 2 seconds the
saved desktop position will be displayed.
Note: using saved desktop positions is only available for handswitches with memory keys.
The design of the memory position keys varies, depending on the handswitch model used.
Note: using saved desktop positions is only available for handswitches with memory keys.
The design of the memory position keys varies, depending on the handswitch model used.
18
4.2.2 Adjusting the desktop to a saved position
You can use this function to adjust the desktop to a saved height. To change to a saved position,
proceed as follows:
Note: availability of the double click function depends on the software configuration of the
control unit.
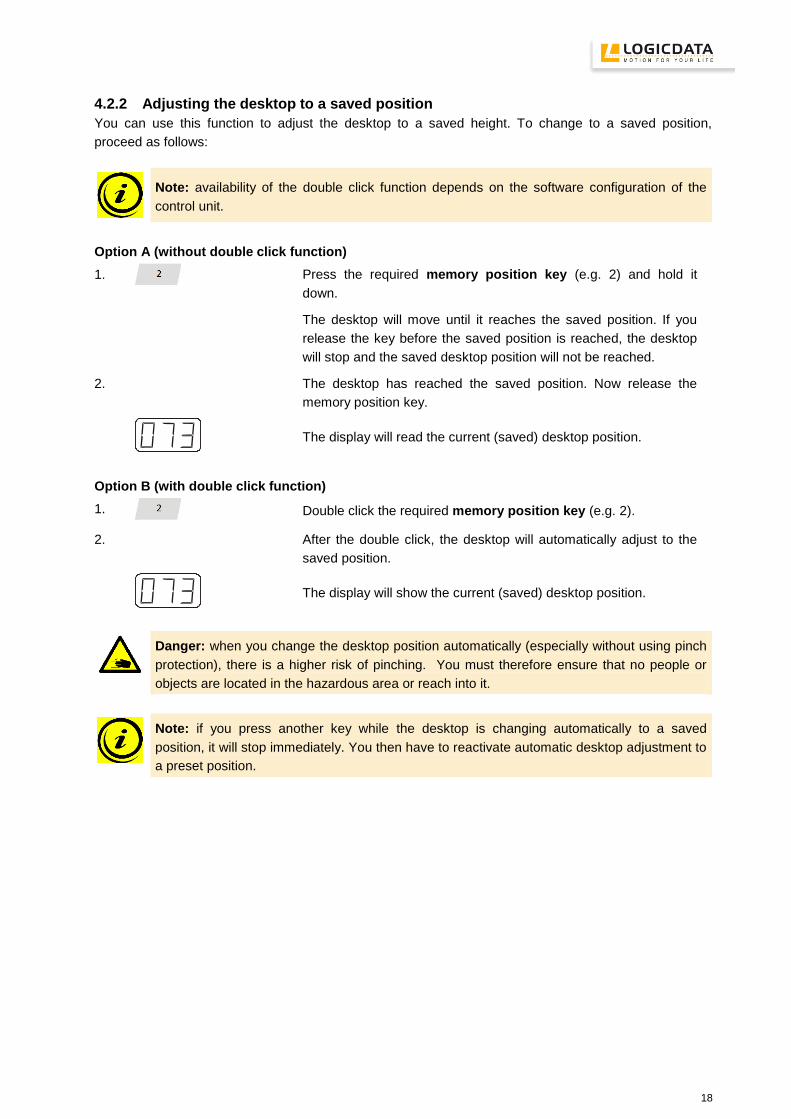
Option A (without double click function)
1.
Press the required memory position key (e.g. 2) and hold it
down.
The desktop will move until it reaches the saved position. If you
release the key before the saved position is reached, the desktop
will stop and the saved desktop position will not be reached.
2. The desktop has reached the saved position. Now release the
memory position key.
The display will read the current (saved) desktop position.
Option B (with double click function)
1. Double click the required memory position key (e.g. 2).
2. After the double click, the desktop will automatically adjust to the
saved position.
The display will show the current (saved) desktop position.
Danger: when you change the desktop position automatically (especially without using pinch
protection), there is a higher risk of pinching. You must therefore ensure that no people or
objects are located in the hazardous area or reach into it.
Note: if you press another key while the desktop is changing automatically to a saved
position, it will stop immediately. You then have to reactivate automatic desktop adjustment to
a preset position.
19
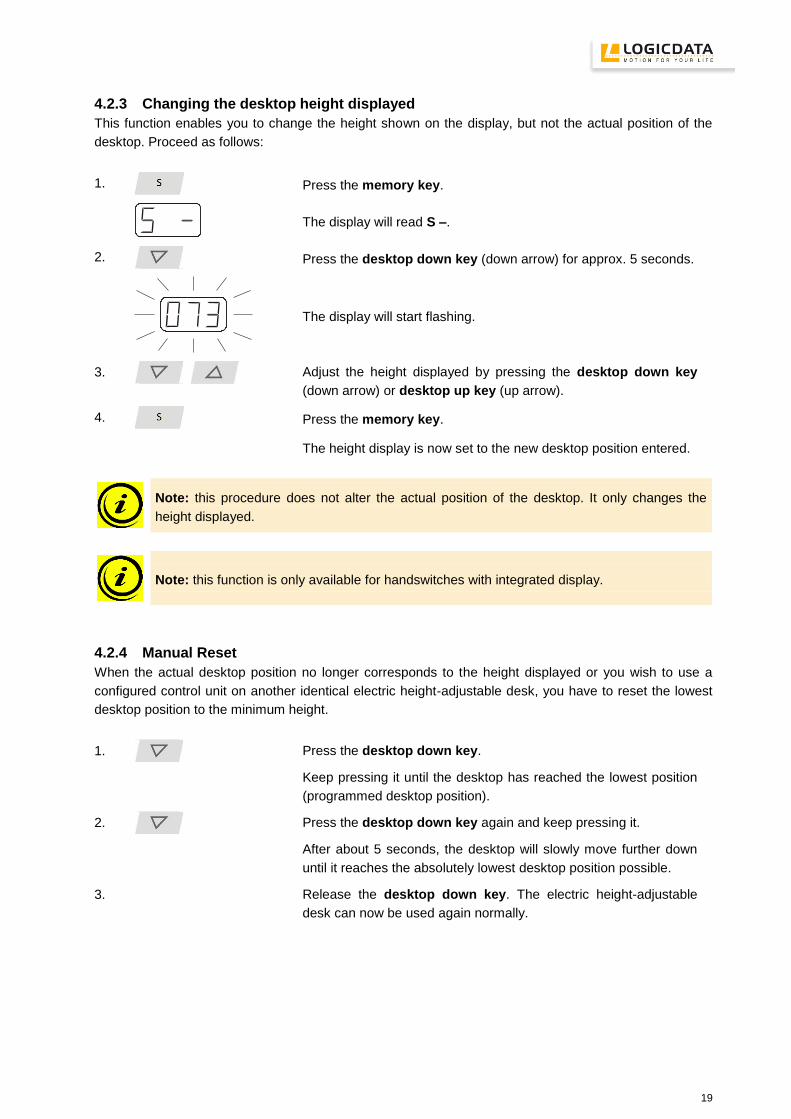
4.2.3 Changing the desktop height displayed
This function enables you to change the height shown on the display, but not the actual position of the
desktop. Proceed as follows:
1. Press the memory key.
The display will read S –.
2. Press the desktop down key (down arrow) for approx. 5 seconds.
The display will start flashing.
3.
Adjust the height displayed by pressing the desktop down key
(down arrow) or desktop up key (up arrow).
4. Press the memory key.
The height display is now set to the new desktop position entered.
Note: this procedure does not alter the actual position of the desktop. It only changes the
height displayed.
Note: this function is only available for handswitches with integrated display.
4.2.4 Manual Reset
When the actual desktop position no longer corresponds to the height displayed or you wish to use a
configured control unit on another identical electric height-adjustable desk, you have to reset the lowest
desktop position to the minimum height.
1.
Press the desktop down key.
Keep pressing it until the desktop has reached the lowest position
(programmed desktop position).
2.
Press the desktop down key again and keep pressing it.
After about 5 seconds, the desktop will slowly move further down
until it reaches the absolutely lowest desktop position possible.
3. Release the desktop down key. The electric height-adjustable
desk can now be used again normally.
20
Danger: intelligent system protection (ISP) is not enabled during all resets and limit position
calibration. Please note that there is a potential risk of pinching in this case.
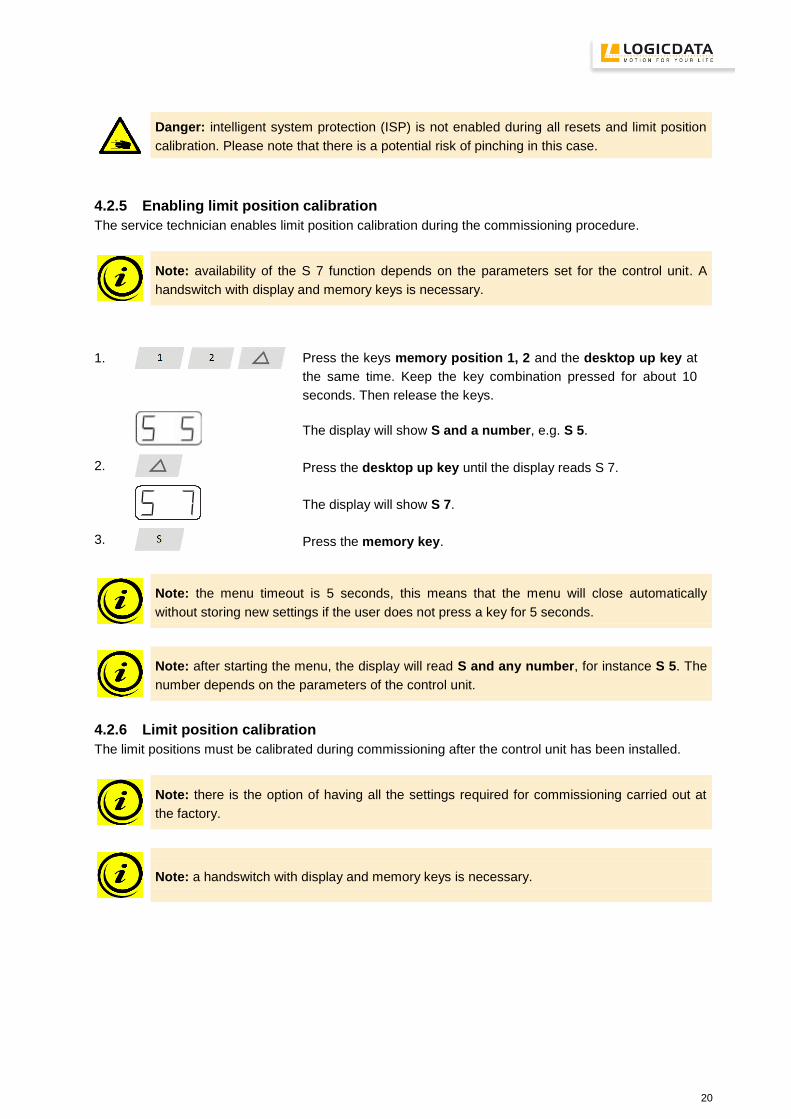
4.2.5 Enabling limit position calibration
The service technician enables limit position calibration during the commissioning procedure.
Note: availability of the S 7 function depends on the parameters set for the control unit. A
handswitch with display and memory keys is necessary.
1.
Press the keys memory position 1, 2 and the desktop up key at
the same time. Keep the key combination pressed for about 10
seconds. Then release the keys.
The display will show S and a number, e.g. S 5.
2. Press the desktop up key until the display reads S 7.
The display will show S 7.
3. Press the memory key.
Note: the menu timeout is 5 seconds, this means that the menu will close automatically
without storing new settings if the user does not press a key for 5 seconds.
Note: after starting the menu, the display will read S and any number, for instance S 5. The
number depends on the parameters of the control unit.
4.2.6 Limit position calibration
The limit positions must be calibrated during commissioning after the control unit has been installed.
Note: there is the option of having all the settings required for commissioning carried out at
the factory.
Note: a handswitch with display and memory keys is necessary.

21
To calibrate the limit positions, proceed as follows:
1.
068 flashes on the display.
Note:
068 is shown if the handswitch display is set up to show the height
in centimeters.
If the display is set up to show the height in inch, the display shows
027 in this step!
2.
Press the desktop down key until the desktop reaches the lowest
position.
3. Set the current desktop height on the display.
Press memory position key 1 to increase the desktop position
displayed (movement locked in every direction)
Press memory position key 2 to decrease the desktop position
displayed (movement locked in every direction)
4. Press the memory key.
088 flashes on the display.
Note:
088 is shown if the handswitch display is set up to show the height
in centimeters.
If the display is set up to show the height in inch, the display shows
035 in this step!
5.
Press the desktop up key until the desktop reaches the highest
position.
6. Set the current desktop height on the display.
Press memory position key 1 to increase the desktop position
displayed (movement locked in every direction)
Press memory position key 2 to decrease the desktop position
displayed (movement locked in every direction)
7. Press the memory key.
Danger: intelligent system protection (ISP) is not enabled during all resets and limit position
calibration. Please note that there is a potential risk of pinching in this case.

22
4.3 Software dependent functions
Note: prior to shipping, the SMART control unit is parameterized with the software. The
following functions are only available if the control unit has been configured accordingly.
4.3.1 Slow speed ranges
This function (low speed area) automatically slows down the desktop during adjustment before it reaches
the following positions:
Highest and lowest desktop positions
All saved positions (for example: memory-positions, container-stop-position)
4.3.2 Safety area
This function triggers a safety stop at a defined desktop position (configured with the software). The
safety stop functions as follows:
1.
Press the desktop down key (and hold it down). The desktop will
move to the start of the safety area.
2. The desktop movement will stop just before the safety area.
3.
Press the desktop down key again. The desktop will then move
to the lowest position.
Note: you cannot save desktop positions in safety areas.
4.3.3 Container- and Shelf-Stop positions
These 2 features can be used to limit the movement area of the desktop (e.g. if a container is placed
underneath the desktop). A container stop position can be defined in the lower half of the movement
area, a shelf stop position in the upper half. If a container stop position is set, this position will be the
lower limit position. If a shelf stop position is set, this position will be the new upper limit position. To
store a container stop / shelf stop position, go on as shown below:
1. or
Move the desktop to the position where the container stop/ shelf
stop position shall be stored. Do so by pressing the desktop down
or desktop up key until you reach the desired position.
Note:
A container stop position can only be stored in the lower half of the
movement area and a shelf stop in the upper half.
2.
Press S for 10 seconds. The SMART will click twice when the
container stop position is stored.
Note: These steps have to be done for a container stop and a shelf stop position separately!
To deactivate the container stop/ shelf stop position go on as shown below:

23
1. or
Move the desktop to any position in the lower half to deactivate the
container stop. / Move the desktop to any position in the upper half
to deactivate the shelf stop.
Do so by pressing the desktop down or desktop up key until you
reach the desired position.
2.
Press S for 10 seconds. The SMART will click once when the
container stop position is deactivated.
Note: These steps have to be done for a container stop and a shelf stop position separately!
4.3.4 Plug detection
The SMART control unit can detect whether a motor is plugged into the relevant motor socket. In
addition, the control unit detects whether a motor has been replaced (the availability of this function
depends on the type of the control and the used motors). If a motor is missing or if it is replaced, the
SMART will click three times. Additionally the corresponding error code will be displayed if the
handswitch is equipped with a display (For the error code list, see chapter 0). To rectify the error,
proceed as follows:
1. Possible situations:
A motor is disconnected from the SMART when the control
box is connected to mains.
The error code E36, E37 or E38 is shown on the display,
depending on the disconnected motor.
2. Disconnect the mains supply of the SMART and wait at least 5
seconds.
3. Re-connect the missing motor.
4. Connect the mains supply of the SMART again.
5. Make a manual reset (see chapter 4.2.4).

24
4.3.5 Auto Detect Number of Drives
The SMART is able to auto-detect the number of drives, this enables you to decide during the
commissioning process of the electric height-adjustable desk if for instance a 1 or 2 motors shall be
controlled without changing the parameters. To operate the SMART after changing the motor group
configuration again, proceed as follows:
1. Possible situations:
Commissioning/first usage of SMART
After a reset to factory settings (S0 menu)
The error code E70 is shown on the display.
2. Disconnect the mains supply of the SMART and wait at least 5
seconds.
3. Connect the desired number of motors to the SMART.
4. Connect the mains supply of the SMART again.
5. Make a manual reset (see chapter 4.2.4).
4.3.6 Duty cycle monitoring
Duty cycle monitoring means that when the control unit has been operating for a defined period, it is
switched off for a set time (e.g. after 2 minute of continuous operation, the control unit is automatically
disabled for the next 18 minutes).
4.3.7 Change the displayed desktop position (cm or inch)
With this function it is possible to change the displayed desktop position from centimeters to inches or
the other way around. The desktop position itself is not affected by this function.
1.
Press the keys memory position 1, 2 and the desktop up key at
the same time. Keep the key combination pressed for about 10
seconds. Then release the keys.
The display will show S and a number, e.g. S 7.
2. Press the desktop up key until the display reads S 5.
The display will show S 5.
3. Press the memory key.
If the display was set to centimeters, it will be changed to inches
now.
If the display was set to inches, it will be changed to centimeters
now.
Note: the menu timeout is 5 seconds, this means that the menu will close automatically
without storing new settings if the user does not press a key for 5 seconds.

25
Note: after starting the menu, the display will read S and any number, for instance S 7. The
number depends on the parameters of the control unit.
4.3.8 Change number of drives
It is possible to adjust the number of drives which can be controlled by a SMART. A SMART can be
controlled by one or two motors according to the chosen settings.
Note: factory provided settings are 2 drives
for SMART.
Danger: only qualified technicians may use this function! An incorrect number of drives can
cause damages of the table!
Note: a handswitch with display and memory keys is necessary.
To change the settings, proceed as follows:
1.
Press the keys memory position 1, 2 and the desktop up key at
the same time. Keep the key combination pressed for about 10
seconds. Then release the keys.
The display will show S and a number, e.g. S 5.
2. Press the desktop up key until the display reads S 8.
The display will show S 8.
3. Press the memory key.
The display will show the current number of drives
(1 or 2)
4. or
Press the desktop down key to decrease the number of drives.
The minimum number is 1 drive.
Press the desktop up key to increase the number of drives. The
maximum number is 2 drives.
The display will show the chosen number of drives.
26
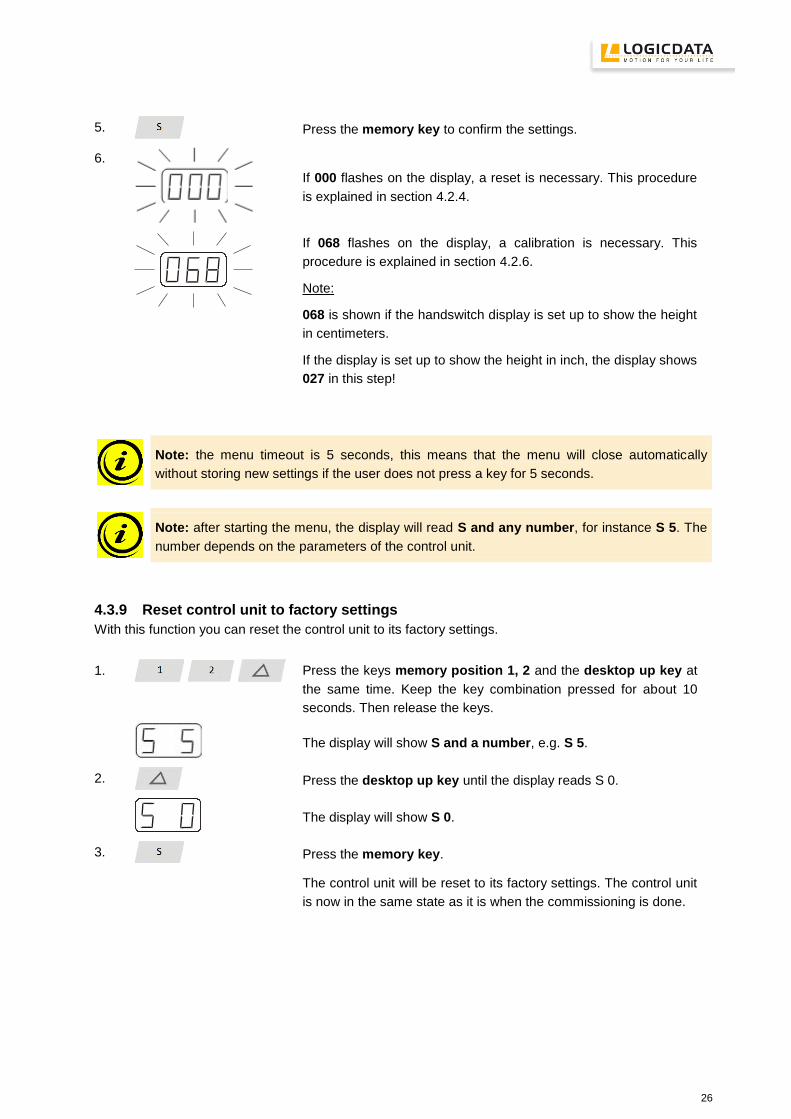
5. Press the memory key to confirm the settings.
6.
If 000 flashes on the display, a reset is necessary. This procedure
is explained in section 4.2.4.
If 068 flashes on the display, a calibration is necessary. This
procedure is explained in section 4.2.6.
Note:
068 is shown if the handswitch display is set up to show the height
in centimeters.
If the display is set up to show the height in inch, the display shows
027 in this step!
Note: the menu timeout is 5 seconds, this means that the menu will close automatically
without storing new settings if the user does not press a key for 5 seconds.
Note: after starting the menu, the display will read S and any number, for instance S 5. The
number depends on the parameters of the control unit.
4.3.9 Reset control unit to factory settings
With this function you can reset the control unit to its factory settings.
1.
Press the keys memory position 1, 2 and the desktop up key at
the same time. Keep the key combination pressed for about 10
seconds. Then release the keys.
The display will show S and a number, e.g. S 5.
2. Press the desktop up key until the display reads S 0.
The display will show S 0.
3. Press the memory key.
The control unit will be reset to its factory settings. The control unit
is now in the same state as it is when the commissioning is done.

27
Note: the menu timeout is 5 seconds, this means that the menu will close automatically
without storing new settings if the user does not press a key for 5 seconds.
Note: after starting the menu, the display will read S and any number, for instance S 5. The
number depends on the parameters of the control unit.
Danger: if one or more motors are changed in a system, the control box must be reset to
factory settings and a manual reset has to be performed!
5 Collision protection
5.1 Intelligent System Protection (ISP)
ISP is an electronic state-of-the-art protection system developed by LOGICDATA. It also substantially
reduces the risk of fingers being trapped or pinched.
Danger: in spite of ISP being in place, there may still be a risk of pinching in exceptional
cases, as it is not only the control unit, but also the interaction between the mechanical and
electronic systems that is responsible for cutting out the motor. In addition, the mechanical
components, motor and ambient conditions all affect cut-out sensitivity.
As the control unit manufacturer, LOGICDATA cannot therefore eliminate this residual risk
completely or accept any liability.
Note: the ISP-sensitivity and the ISP-cutoff value depend on the whole system (mechanical
and electrical components). To evaluate the ISP-capability of a height adjustable table,
please contact LOGICDATA!
Note: please note the following for maximizing ISP functionality:
To ensure the best possible pinch protection, a mechanical brake must be fitted that is
applied when the electric height-adjustable desk moves down.
Note: without a mechanical brake, cut-out sensitivity may be reduced under load. However, if
there is no load on the desktop, ISP will function properly even without a brake.
Note: as soon as ISP has stopped the electric height-adjustable desk from moving, you can
then only adjust the desktop in the opposite direction (the safety feature initially prevents you
from adjusting the desk in the same direction as triggered it).
Note: the ISP-cutoff can be adjusted by control unit parameters.

28
5.2 Drive back
Note: drive back is only active if collision protection (ISP, external sensors) is activated by
parameters.
After a safety function is triggered by ISP, the desktop automatically moves a defined distance in the
opposite direction. This immediately prevents any possible risk of pinching.
Danger: in spite of collision protection being in place, there may still be a risk of pinching in
exceptional cases, as it is not only the control unit, but also the interaction between the
mechanical and electronic systems that is responsible for cutting out the motor. In addition,
the mechanical components, motor and ambient conditions all affect cut-out sensitivity.
As the control unit manufacturer, LOGICDATA cannot therefore eliminate this residual risk
completely or accept any liability.

29
6 Appendix
In this section you will find detailed information on the following topics:
Possible faults and remedies
Error messages on the handswitch display
Click codes
Drill template
6.1 Possible faults and remedies
Drives not working
Possible cause Remedy
Power cord is not connected Plug the power cord into the control unit
Drives are not connected Plug the motor cables into the control unit
Poor plug contact Plug the motor cables, power cord and handswitch in
properly
Control unit is defective Contact customer service
Handswitch is defective Replace the handswitch
Drives only operating in one direction
Possible cause Remedy
Mains power breakdown or mains power is
plugged off during movement
Manual Reset *)
Control unit is defective Contact customer service
Handswitch is defective Replace the handswitch
Drive is defective Contact customer service
*) if movement is only possible downwards
Control unit or handswitch is not working
Possible cause Remedy
Power cord is not connected Plug the power cord into the control unit
Handswitch is not connected Plug in the handswitch
Control unit is defective Contact customer service
Power cord is defective Contact customer service
Handswitch is defective Replace the handswitch
Poor plug contact Plug the motor cables, power cord and handswitch in
properly
Exposed to liquids Replace the handswitch

30
6.2 Error messages on the handswitch display
The display reads HOT.
Cause Remedy
The SMART control unit is fitted with
overheating protection. Overheating has
caused it to stop the control unit.
Wait until the control unit has cooled down and HOT is
no longer displayed. The SMART control unit is then
operational again.
The display reads E + an error code.
Cause Remedy
There is an internal fault in the SMART
control unit.
Proceed as indicated in the following list.
Code Description Remedy
00 Internal Error Channel 1 Unplug the power cord and contact the customer service.
01 Internal Error Channel 2
12 Defect Channel 1
Unplug the control unit.
Fix the external short circuit.
Or
Plug in the correct motor to the motor socket that shows
the error.
Start the control unit again.
13 Defect Channel 2
24 Overcurrent Motor M1 Remove jammed objects from the driving area.
Desk might be overloaded Remove load from desk.
Contact customer service
25 Overcurrent Motor M2
48 Overcurrent Motor Group 1
60 Collision protection
62 Overcurrent Control Unit
36 Plug detection in Motor socket M1 Plug in the correct motor to the motor socket that shows
the error.
Reset all motors.
37 Plug detection in Motor socket M2
61 Actuator changed
55 Synchronization lost motor group 1 Remove load from desktop.
Reset all motors.
If error occurs after reset again, contact customer service.
67 High voltage Unplug the power cord and contact the customer service
70 Motor configuration changed See chapter 4.3.5
81 Internal error Make a manual reset
Unplug the power cord and plug it in again after a few
seconds.
If this error occurs frequently, unplug the power cord and
contact the customer service.
31
Note: the PowerFail detection identifies mains power breakdowns and saves all relevant
data before the voltage falls below a critical threshold.
In some exceptional cases, this storage is not possible and the error E81 is shown on the
handswitch display (if available) and the SMART clicks three times.
To rectify this error, a manual reset is necessary (see chapter 4.2.4)
Note: if the mains power breaks down or is disconnected from the control unit during
movement of the drives, a manual reset might be necessary.
6.3 Click codes
When the control unit is switched on the SMART uses its relays to inform the user acoustically about the
system state and the reason why the control unit was switched off before. The table below shows which
number of clicks corresponds to certain information.
Number of clicks State information
2x Normal operation: No problems detected
1x Emergency operation:
The system is in Safe-State, movement is not possible. Check LED
indication and/or error codes on the display of the handswitch.
3x – 6x Last shutdown incomplete / forced reset:
Check LED indication and/or error codes on the display of the
handswitch.
6.4 Drill template
Cut out the drill template and mark the drill holes on the desktop.
Note: place this drill template with the depicted side up on the position where the SMART
shall be mounted!

32

33
7 Further information
7.1 End of life disposal
When you no longer require the SMART control unit, please note the following for disposal:
Note: The SMART control unit is electrical or electronic equipment according to directive
2002/96/EC and therefore marked with the symbol depicted on the left.
Note: ensure eco-friendly disposal of all the control unit components (separate the plastic and
electronic parts for collection).
Also ensure eco-friendly disposal of all the other components (drives, cables, etc.).
Note: this product is RoHS compliant according to directive 2002/95/EC!
Note: this product is REACH compliant according to directive 2006/121/EC (Edict 1907/2006)
7.2 Technical data
Note: you can find the technical data of your control unit in the appropriate datasheet.
7.3 Optional products
Note: information about available optional products can be found in the latest product
catalogue and on the website www.logicdata.at
7.4 Manufacturer
LOGICDATA
Electronic & Software Entwicklungs GmbH
Wirtschaftspark 18
A-8530 Deutschlandsberg - Austria
Tel.: +43 (0)3462 5198 0
Fax: +43 (0)3462 5198 530
Email: [email protected]
URL: www.logicdata.at