Embed Size (px)
Citation preview

INDEX PAGE
Certification and Warning
Rigging Information
How to fit soft links
How to fit toggles
Check your equipment on a regular basis
Reserve packing tools
Reserve canopy packaging
How to insert your parachute into the VORTEX Harness Container
1-5
5
6
7
8
9
10-22
23-32

CERTIFICATION AND WARNING
2
PARACHUTING IS DANGEROUS!
Parachuting equipment/ systems and their components sometimes fail to function properly, even when correctly assembled, packed and operated. Before you use this parachuting equipment and assembly, you must fully understand and accept that you risk serious, permanent injury and death each time you use this parachuting equipment.
Hard openings can cause equipment damage, severe injury or death. You risk serious injury or death each time you use this or any parachuting equipment and by doing so you will be deemed to have expressly and impliedly assumed this risk.
Proper training and/or experience are required to lower the risk of serious injury or death.
Prior to using this equipment, you must:
Read and fully understand this warning and the owners' manual, supplemental information and packing instructions. You must follow all the manufacturers' recommendations, including wing loading recommendations, and ensure that you have completed an appropriate 'supervised/controlled instruction course' in the use of the parachuting equipment and each of its components.
OR
Read and fully understand this warning and the owners' manual, supplemental information and packing instructions. You must follow all the manufacturers' recommendations, including wing loading recommendations, and have completed at least 100 ram air parachute jumps.
The risk of death, serious injury, canopy damage and hard openings may be lowered by strictly complying with all manufacturers' recommendations and safe parachuting practices and by never exceeding the limits of your experience level and the maximum equipment limits, including the maximum limits for the Vortex container/harness of :
Maximum Exit weight (jumper + clothing + equipment) : 125 kg or 275 poundsMaximum Opening Velocity: 150 knots (172 mph)
PRIOR TO ASSEMBLY, PACKING OR USE OF THIS PRODUCT, READ AND FULLY UNDERSTAND THE CONTENT AND ALL WARNINGS CONTAINED IN THIS MANUAL, AND CAREFULLY FOLLOW ALL INSTRUCTIONS BEFORE AND DURING PACKING AND USING THE PARACHUTE SYSTEM

43
DISCLAIMER; LIMITATION OF WARRANTY ON PARACHUTE; LIMITATION OF REMEDIES;WAIVER AND RELEASE OF WARRANTIES
BY ACCEPTING AND USING THIS PARACHUTE, OR BY ALLOWING OTHERS TO USE IT, YOU CONFIRM THAT YOU UNDERSTAND THAT BECAUSE OF THE UNAVOIDABLE DANGER ASSOCIATED WITH THE USE OF THIS PARACHUTE, THE MANUFACTURER MAKES NO WARRANTY WHATSOEVER, EXPRESS OR IMPLIED, ARISING BY LAW OR OTHERWISE, EXCEPT A WARRANTY THAT A PARACHUTE OF SIMILAR DESIGN HAS BEEN PREVIOUSLY USED FOR PARACHUTE JUMPING. THE PARACHUTE IS SOLD, CONVEYED, LOANED, GIFTED, OR OTHERWISE DELIVERED, FURNISHED OR PROVIDED TO YOU BY THE MANUFACTURER, OR ON ITS BEHALF, AS IS, WITH ALL FAULTS, AND WITHOUT ANY WARRANTY OF MERCHANTABILITY OR FITNESS FOR USE.
THE MANUFACTURER EXPRESSLY DISCLAIMS ANY LIABILITY UNDER THE LAW, IN TORT OR OTHERWISE, FOR DAMAGES, DIRECT OR CONSEQUENTIAL, INCLUDING BUT NOT LIMITEDTO DAMAGES FOR PERSONAL INJURIES, WRONGFUL DEATH, PROPERTY DAMAGE AND LOSSOF USE OF THE PARACHUTE, RESULTING FROM ANY MALFUNCTION OF THE PARACHUTE, ORFROM ANY DEFECT IN DESIGN, MATERIAL, WORKMANSHIP OR MANUFACTURE OF THE PARACHUTE, WHETHER CAUSED BY NEGLIGENCE ON THE PART OF THE MANUFACTURER,AND/OR BY ANY AND ALL MANUFACTURERS OF ANY AND ALL PARTS, ACCESSORIES,COMPONENTS, OR APPLIANCES MADE A PART OF, OR APPURTENANT TO, THE PARACHUTE.
YOU, BY YOUR USE OF THE PARACHUTE, AND/OR BY ALLOWING IT TO BE USED BY OTHERS, SPECIFICALLY WAIVE ANY LIABILITY ON THE PART OF THE MANUFACTURER FOR PERSONAL INJURIES, WRONGFUL DEATH, LOSS OF CONSORTIUM, PROPERTY DAMAGE AND LOSS OF USE OF THE PARACHUTE. YOU AGREE, AND HAVE MATERIALLY REPRESENTED TO THE MANUFACTURER, THAT YOU ARE A "HIGHLY SOPHISTICATED AND EXPERIENCED CONSUMER"WITH RESPECT TO THE PARACHUTE, AND THAT YOU ARE THOROUGHLY AWARE OF, ANDEXPRESSLY ACCEPT, ANY AND ALL OF THE RISKS OF PHYSICAL INJURY, DEATH AND/ORPROPERTY DAMAGE WHICH MAY OCCUR AS A RESULT OF YOUR USE AND/OR MISUSE OF THE PARACHUTE DESIGNED BY, MANUFACTURED BY AND/OR RECEIVED FROM THEMANUFACTURER. AS A "HIGHLY SOPHISTICATED AND EXPERIENCED CONSUMER," YOUEXPRESSLY WAIVE ANY CLAIM YOU MIGHT OTHERWISE HAVE OF STRICT LIABILITY AGAINSTTHE MANUFACTURER.
PRIOR TO ASSEMBLY, PACKING OR USE OF THIS PRODUCT, READ AND FULLY UNDERSTAND THE CONTENT AND ALL WARNINGS CONTAINED IN THIS MANUAL, AND CAREFULLY FOLLOW ALL INSTRUCTIONS BEFORE AND DURING PACKING AND USING THE PARACHUTE SYSTEM
THE WARRANTIES SET FORTH ABOVE, AND THE OBLIGATIONS AND LIABILITIES OF THE MANUFACTURER, AND YOUR REMEDIES THEREUNDER, ARE EXPRESSLY IN LIEU OF, AND YOU HEREBY WAIVE AND RELEASE THE MANUFACTURER FROM, ANY AND ALL OTHER WARRANTIES, AGREEMENTS, GUARANTEES, CONDITIONS, DUTIES, OBLIGATIONS, REMEDIES OR LIABILITIES, EXPRESS OR IMPLIED, ARISING BY LAW OR OTHERWISE, INCLUDING, WITHOUT LIMITATION, ANY WARRANTY OF MERCHANTABILITY AND FITNESS FOR PARTICULAR PURPOSE, AND IMPLIED WARRANTIES, INCLUDING BUT NOT LIMITED TO THOSE ARISING FROM COURSE OF PERFORMANCE, DEALING, USAGE OR TRADE, WITH RESPECT TO THE MANUFACTURER'S PERFORMANCE HEREUNDER, AND YOU AGREE THAT THE MANUFACTURER SHALL NOT BE LIABLE FOR ANY DAMAGE OR LOSS (INCLUDING BUT NOT LIMITED TO CONSEQUENTIAL DAMAGES) SUFFERED BY YOU, DIRECTLY OR INDIRECTLY, BECAUSE OF ANY DEFECT IN THE PARACHUTE. NO AGREEMENT OR UNDERSTANDING VARYING, ALTERING OR EXTENDING THE MANUFACTURER'S LIABILITY HEREUNDER SHALL BE BINDING ON THE MANUFACTURER, UNLESS IN WRITING AND SIGNED BY A DULY AUTHORIZED REPRESENTATIVE OF THE MANUFACTURER, AND BY YOU OR YOUR DULY AUTHORIZED REPRESENTATIVE.
IF YOU DECLINE TO WAIVE LIABILITY ON THE PART OF THE MANUFACTURER, OR IF YOU DECLINE TO AGREE TO ALL OF THE TERMS OF THIS "DISCLAIMER – LIMITATION OF WARRANTY ON PARACHUTE; LIMITATION OF REMEDIES; WAIVER AND RELEASE OF WARRANTIES," YOU MAY OBTAIN A FULL REFUND OF THE PURCHASE PRICE BY RETURNING THE PARACHUTE, BEFORE IT IS USED, TO THE MANUFACTURER, WITHIN 15 DAYS FROM THE DATE OF YOUR RECEIPT OF THE PARACHUTE, WITH A LETTER STATING WHY IT WAS RETURNED.
PRIOR TO ASSEMBLY, PACKING OR USE OF THIS PRODUCT, READ AND FULLY UNDERSTAND THE CONTENT AND ALL WARNINGS CONTAINED IN THIS MANUAL, AND CAREFULLY FOLLOW ALL INSTRUCTIONS BEFORE AND DURING PACKING AND USING THE PARACHUTE SYSTEM

6
RIGGING INFORMATION
PAY CAREFUL ATTENTION TO THE FOLLOWING ITEMS FOR THE SAFE OPERATION AND USE OF YOUR EQUIPMENT.
3-RING SYSTEM
Thread the 3 rings through each other in the correct sequence. Pass the soft white nylonloop through the small ring only.
Insert it through the riser grommet then through the housing grommet and lock in place with the yellow cutaway cable. (repeat on the other side)
Check both sides to make sure the white loop passes through the small ring only
NB Make sure the cutaway cable is trimed and burned to the correct length.
Make sure the risers are not twisted. Do a proper line continuity check on the main parachute. The brake lines must run clear all the way down through the slider grommets and the riser guide ring.
Attach the toggles in the correct manner. Put the loop (at the end of the steering line) through the zero grommet on the toggle. Loop the bottom end of the toggle through the steering line loop and pull it tight.
The rapide link must be finger tight, then tweaked by no more than one quarter turn with a spanner.
Pull the bumper stops securely down over the rapide links. Keep a constant check on the bumper stops, making sure that they do not move off the links and check for wear and tear on the lines and line bar tacks.
RISERS AND TOGGLES
RAPIDE LINKS AND BUMPER STOPS
5
HOW TO FIT SOFT LINKS
1.Lay canopy out, nose down. Clear lines down to risers. Thread soft link as shown.
2.Back through the riser
3.Thread through the line loops. CHECK that no line loop has been missed!
4.Thread through the loop that holds the locking tab.
5.Pass the lock tab through the loop at the end of the soft link. Hold the riser and pull on the line set to tighten the loop below the lock tab
6.Turn the link to get the lock tab inside the riser end. Move the line loops on the link. Pull tension on the line group and the riser to set the link.
7.A hand tack through the tab will stop the link from turning until it takes a set.
CAUTIONMAIN AND RESERVE CANOPIES USE DIFFERENT STRENGTH LINKS
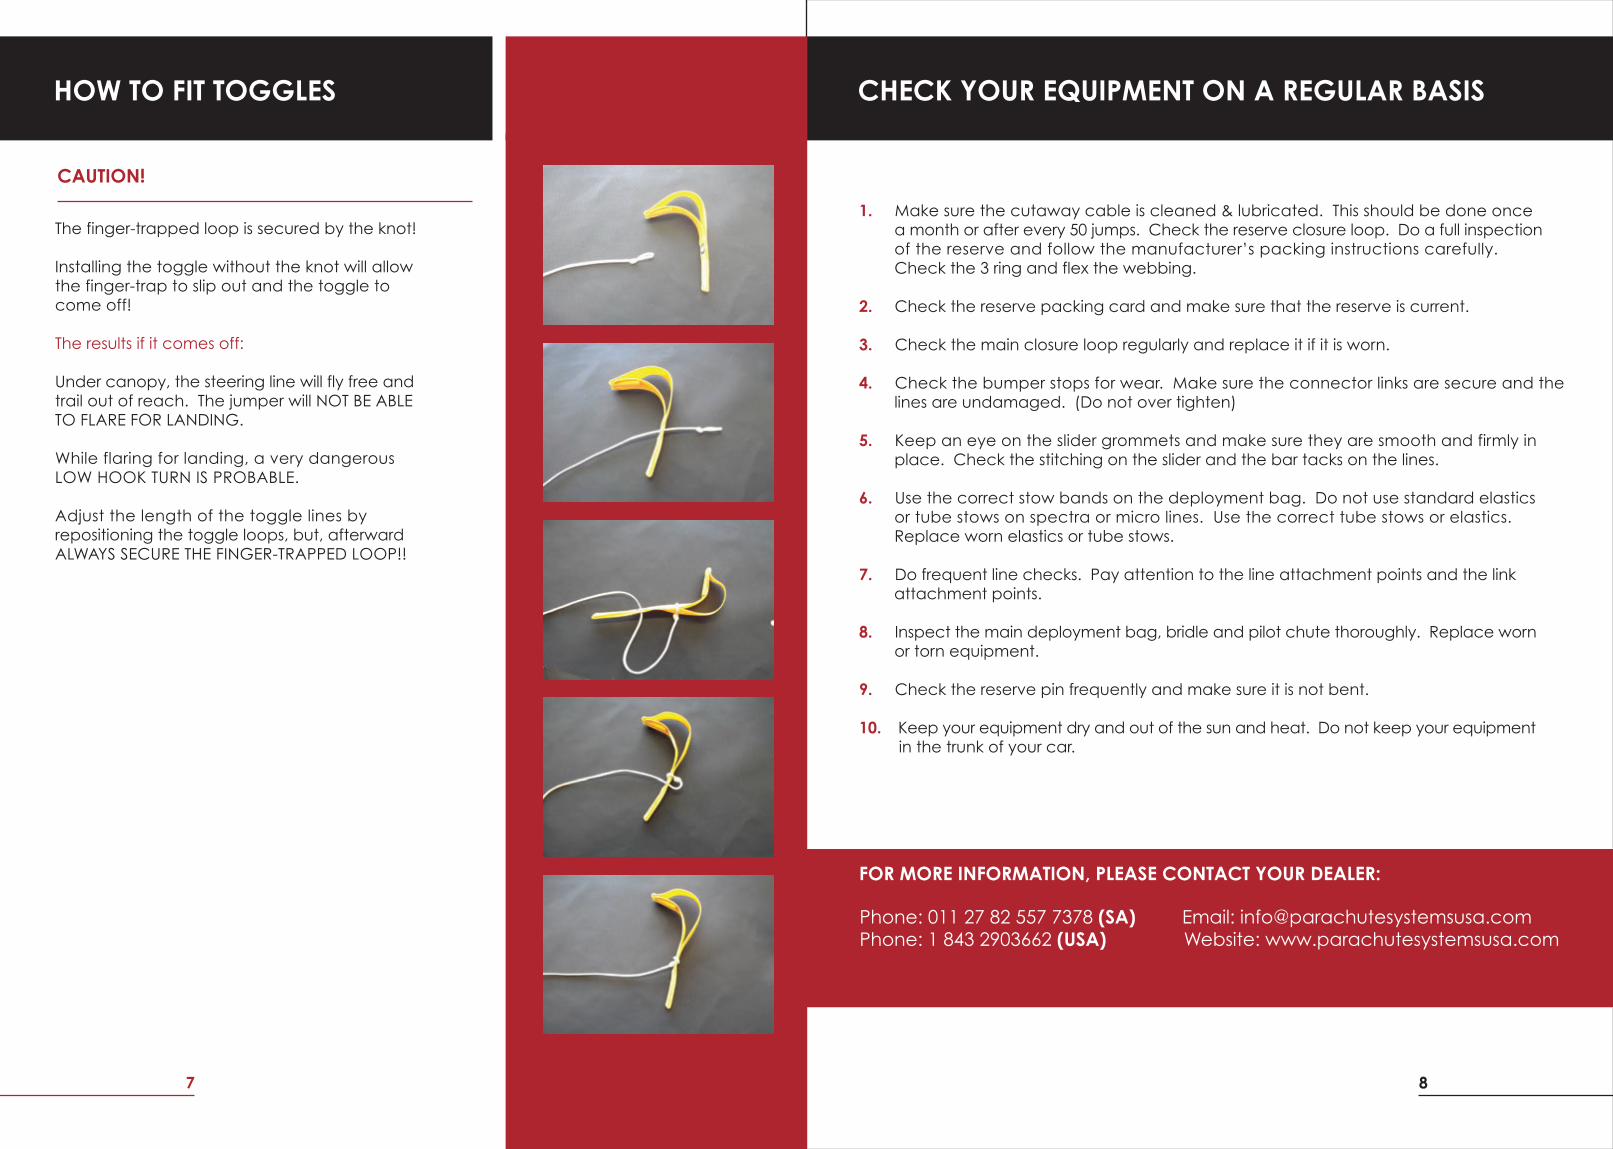
HOW TO FIT TOGGLES
CAUTION!
The finger-trapped loop is secured by the knot!
Installing the toggle without the knot will allow the finger-trap to slip out and the toggle to come off!
The results if it comes off:
Under canopy, the steering line will fly free and trail out of reach. The jumper will NOT BE ABLE TO FLARE FOR LANDING.
While flaring for landing, a very dangerous LOW HOOK TURN IS PROBABLE.
Adjust the length of the toggle lines by repositioning the toggle loops, but, afterward ALWAYS SECURE THE FINGER-TRAPPED LOOP!!
87
CHECK YOUR EQUIPMENT ON A REGULAR BASIS
1. Make sure the cutaway cable is cleaned & lubricated. This should be done once a month or after every 50 jumps. Check the reserve closure loop. Do a full inspection of the reserve and follow the manufacturer’s packing instructions carefully. Check the 3 ring and flex the webbing.
2. Check the reserve packing card and make sure that the reserve is current.
3. Check the main closure loop regularly and replace it if it is worn.
4. Check the bumper stops for wear. Make sure the connector links are secure and the lines are undamaged. (Do not over tighten)
5. Keep an eye on the slider grommets and make sure they are smooth and firmly in place. Check the stitching on the slider and the bar tacks on the lines.
6. Use the correct stow bands on the deployment bag. Do not use standard elastics or tube stows on spectra or micro lines. Use the correct tube stows or elastics. Replace worn elastics or tube stows.
7. Do frequent line checks. Pay attention to the line attachment points and the link attachment points.
8. Inspect the main deployment bag, bridle and pilot chute thoroughly. Replace worn or torn equipment.
9. Check the reserve pin frequently and make sure it is not bent.
10. Keep your equipment dry and out of the sun and heat. Do not keep your equipment in the trunk of your car.
FOR MORE INFORMATION, PLEASE CONTACT YOUR DEALER:
Phone: 011 27 82 557 7378 (SA) Email: [email protected]: 1 843 2903662 (USA) Website: www.parachutesystemsusa.com

RESERVE PACKING TOOLS
1. Approx. 1.5m pull up cord.
2. Packing pin attached to a bright ribbon
3. Packing Paddle
4. Small Twister Bar and Plate
5. Approx. 40cm, 1” Loop Velcro
6. Data Card with weight, speed and ADD info
7. Rifle Rod
RESERVE CLOSURE LOOP INFOMATION:
Vortex 100 - 65 mmVortex 120 - 65 mmVortex 135 - 65 mmVortex 150 - 65 mmVortex 170 - 70 mmVortex 185 - 80 mmVortex 215 - 80 mmVortex 285 - 80 mm
NOTE:All measurement are taken from the top of the Cypres washer to the top of a pre-streched closure loop.
Start by tying the base rings together with a pull - up cord.
Make sure that the steering lines are not twisted.
Stow the brakes and stow away the excess brake lines.
NB. Don’t push the toggles too far into the brake line loops.
Place a weight on the container and hang the canopy on a packing hook, separating the left and right line groups.
HOW TO PACK A DECELERATOR RESERVE INTO A VORTEX
Always inspect the canopy before you start packingHang the reserve on the inspection bar and do a thorough inspection. Make sure the soft links are routed and fitted properly. If you have metal links make sure they are tight with a quarter spanner turn. Fit silicone bumpers and hand tack in place. Make sure the toggles are attached correctly and that the steering lines are running clear. Do a line continuity check. Clean and fit the cutaway cables before packing the reserve parachute.NB. When packing with a Skyhook, make sure to pass thelong yellow cutaway cable through the YELLOW lanyardONLY, and then back into the hard housing that goes tothe left hand 3 – Ring. Make sure to fit a new reserve closure loop, that’s made from the correct material and that is the correct length.
109

Find the middle of the canopy.
Work on one side by pulling tension between the A and B line groups and pushing the fabric back to form a loop. Repeat between B and C, C and D. Now repeat the whole process on the other side.
Start by gathering all seven cells, shake out the canopy.
Clear all 3 stabilizers on both sides.
Place your forearm across the nose of the canopy and gently lay it down while keeping tension on the lines.
11
Take the stabilizer and pull it up at 45 degree angle. (The rear section of the stabiliser where it attaches to the tail.)
Start with the nose and pull out 3 cells, there after flake your 3 loop shaped folds. (The loops of the canopy between A & B, B & C, C & D.)
Pull the slider back out of the way.
Flake the tail keeping tension on the lines. Repeat on other side of the canopy, starting again with the nose. (As above.)
Pull up the slider against the slider stops and quarter it.
12

Do the same on the other side.
Fold up the tail section and fold all 3 stabilizers over the slider.
Neaten the slider placement and the folded tail and by using your forearm push out all the air.
Pull down the trailing edge just covering the grommets and keep the tail centred. Grommets must be separated left and right and splayed slightly.
Fold the tail under the canopy on both sides and make it the width of the free bag. Prepare the free bag. At this stage make sure the label on the canopy has been filled in.
13
Place your knees on the folded part.
Fold the canopy back and over again.
Place your hand +- 10cm from the bottom.
Split the canopy and expose the centre cell only.
Dress the bunny ears equally on both sides.
14

15
Pull down the free bag underneath the “S” folded canopy.
Place the bunny ears into the free bag.
Make one more fold on top of the first fold and the same width with each bunny ear. (This will vary with the different size reserves you pack.)
Do not fold the front ends underneath as this creates too much bulk for the main riser cover to close nicely.
Spread the slider grommets and equalize the pack job on both sides of the free bag.
Now close the mouth of the free bag using 30mm bites through the shock cord elastic on each side. (Make sure the shock cord is still in good condition and its elasticity is still good.)
Leave +- 30cm of line from the soft links un-stowed. Carefully remove your Velcro packing aid and match theVelcro on the free bag pouch. (Make sure no lines are snagged in between the two Velcro pieces.)
Stow the remainder of the lines by Zig- zagging them into the line stowage pocket. Starting at the bottom of the pocket (left or right side), then work the lines neatly from side to side up towards the top of the pocket, make sure not to snag or trap the lines in or on the Velcro.
Place a +- 40cm looped Velcro tape with a warning tag attached in the opened line stowage pocket and fit the Velcro together. This is done to protect the lines while been stowed.
When packing a Vortex WITHOUT a Skyhook take the Skyhook sub flap and tuck it under the closure loop base plate. Place a pull up cord through the closure loop.
NB If flap can’t tuck in, just place it on top.
With a Skyhook leave the flap out and place a pull - up through the closure loop.
16

17
Route the pull up through the free bag and lock in place with your temporary locking pin.
Place the risers neatly into the pack tray. Make sure the risers are not twisted and pulled up tight over the shoulders. Try to place the rear risers slightly up on the wall of the reserve container. (Side Flaps.)
Prepare the reserve container tray by making sure thatthe cutaway cable has been cleaned and fitted. (This makes it easier before the reserve container has been closed.) Pass the long yellow cable through the yellow loop only of the Collin’s Lanyard then back into the split hard housing going to the wearer’s left three ring.
Push the free bag bottom well into the bottom corners of the container, to fill as much as possible, make sure not to disturb the splayed risers. Check again you have routed the closure loop through the cutter of the AAD!!
Keep most of the bulk down in both lower corners of thecontainer, create a channel in the middle of the free bag by pushing the reserve ears to the left and right sides.
Place the green tab into the green binding tape keeper on the sub flap.
Close the Skyhook sub flap and lock it with the temporarylocking pin. The bridal must come out to the wearer’s lefthand side from exiting under the sub flap.
S- Fold the bridle between the bunny ears to +- 15cm from the green tuck in loop for the Skyhook.
Bring over the Skyhook assembly.
Fit the red line on to the metal Skyhook under the clear Plastic and seal with one turn red riggers thread throughthe small hole in the plastic.
18

19
Fold back the bridle and close the right flap.
Make sure that the red line is still connected to the Skyhook and that the riggers thread is still in place. Check the orientation of the metal Skyhook and the arrow pointing to the reserve pilot chute.
Make a S - fold in the red line as close as possible to the Skyhook and place the loop into the red keeper. (Red Binding tape channel on the sub flap.)
Close the left flap.
Lock in place with temporary locking pin.
Compress the pilot chute at the same time keep the material and mesh clear of the spring coils. Roll / foldin the mesh and fabric straight across the top of the pilotchute cap, tuck it under and then pull it down and aroundthe left and right sides of the cap towards the bottom as shown.
Insert a rifle rod and pull the pull up through the reserve pilot chute.
Locate the binding tape join and spring swage and position that under the top flap.
S- fold the bridle with short folds up and down between the pilot chute cap and reserve container wall.
(Under the Starburst flap)
Place in the cavity created in the free bag.
20

21
Close the bottom starburst flap and lock in place with temporary locking pin. Take the excess red line and fold it under the top flap.
Make sure it’s not too high as that will make the starburst flap stand up, when closed.
Roll / Fold the material of the pilot chute neatly and fold it on top of the S - folded bridle.
Close top flap with temporary pin. (Flap 3)
Put the reserve pin through the reserve cable or blue reserve line and insert it into the closure loop.
(Do not push the pin all the way in.) Mate the Velcro on the flap to the Velcro on the pin lanyard. Reserve flap 3.
Check and count your tools and fill in all documentation.
NB: Check Routing of cutaway cable must pass through the yellow Collin’s lanyard ONLY in the case of fitting a SkyHook and RSL. SkyHook ->
Remove the pull up cord carefully and seal with riggersthread and lead seal.
22
NB: In case of fitting RSL ONLY check routing of cutaway cable must pass through the yellow Collin’s lanyard ONLY.
RSL ->

23
PACK THE CANOPY ACCORDING TO MANUFACTURER’S INSTRUCTIONS.
Dress the canopy two inches wider than the deployment bag.
Insert toggles and stow away excess steering line inelastic keeper.
Set brakes as shown.
Place knees where the first fold would be.
Lift the parachute tightly over your knees towards your chest. Start rolling the parachute tightly.
HOW TO INSERT THE PARACHUTE INTO VORTEX HARNESS CONTAINER
Get both knees on the roll.
Clear the bridle as you roll the parachute and roll to the floor.Release left knee and push your left hand under the fold as shown. Rotate the roll towards you keeping pressure from the top.
Pull the mouth of bag under the rolled canopy
Insert one corner of the pack job, then the other
24
Prep the bag with no twists in the bridle and kill line.

Close the centre stow with a +/- 30mm bite of line. Continue closing the mouth of the D-Bag using +/- 30mmof line.
Stow the remaining lines leaving +/- 30cm excess to therisers as shown.
Prep the container.
25
Rotate the bag into the container, with the lines towards the bottom of the container.
Push the top down and the corners one at a time,making sure the D-Bag lies flat as shown!!
Bring the bag over.
Stack the risers side by side and stow the lines neatly down the sides of the container as shown.
Bring the bag over the container and place on the floorwith the lines towards the container.
Place in the container with, lines at the bottom of the container up against flap 1 (bottom flap)
Keep the closure loop clear while placing the bag intothe container as shown.
Roll the parchute down and pull the mouth of the bag out as shown.
Equalize the canopy in the bag.
26

Route the bridle to right bottom and close right flap.
Close the top flap (starburst flap)
Route the bridle out to the bottom right and close the bottom flap.
Pull it up and hit the flap with your other hand into place,and use your knees to assist.
Close left flap.
27
Repeat on the other side.
Fold the sides of the pilot chute in half towards the centre.
Do not push the pin in more than 3/4 of the way as shown.
Make sure the closure loop is the correct leanght.
Each side flap should be a couple of mm belowe the tuck tab pocket as shown.
Close with the pin from bottom right side.
Note: The position of the pilot chute relative to the container
Lay the pilot chute out as shown.
Route the bridal as shown.
28

Route the bridle as shown. Tuck in about one and a half inches under right hand flap.
Fold pilot chute as shown.
Fold pilot chute as shown.
29
Tuck the excess bridle away. Close the bottom flap.
Route the bridle as shown, and center the tuck flap.
Tuck away the excess RLS lanyard into its pocket underthe base ring.
Insert pilot chute into the BOC pocket, and massage it flat into the pocket, filling the whole pocket.
Incase the case of FreeFly Hackie or Puff insert tuck tabs into position.
30

31
FOR MORE INFORMATION, PLEASE CONTACT YOUR DEALER OR CHUTE SHOP:
32
Phone: 011 27 82 557 7378 (SA) Email: [email protected]: 1 843 2903662 (USA) Website: www.parachutesystemsusa.com

FAA TSO Approved C23d
VORTEXOwners’ Manual


![Simulation of Ram-Air Parachute Systems with the Panel ...Spanish parachute manufacturer (see [27]). The developments focus mainly on the simulation of ram-air parachute systems and](https://img.pdfslide.net/doc/110x75/5f6bf5bcf5a740367d64d0cd/simulation-of-ram-air-parachute-systems-with-the-panel-spanish-parachute-manufacturer.jpg)