Embed Size (px)
Citation preview
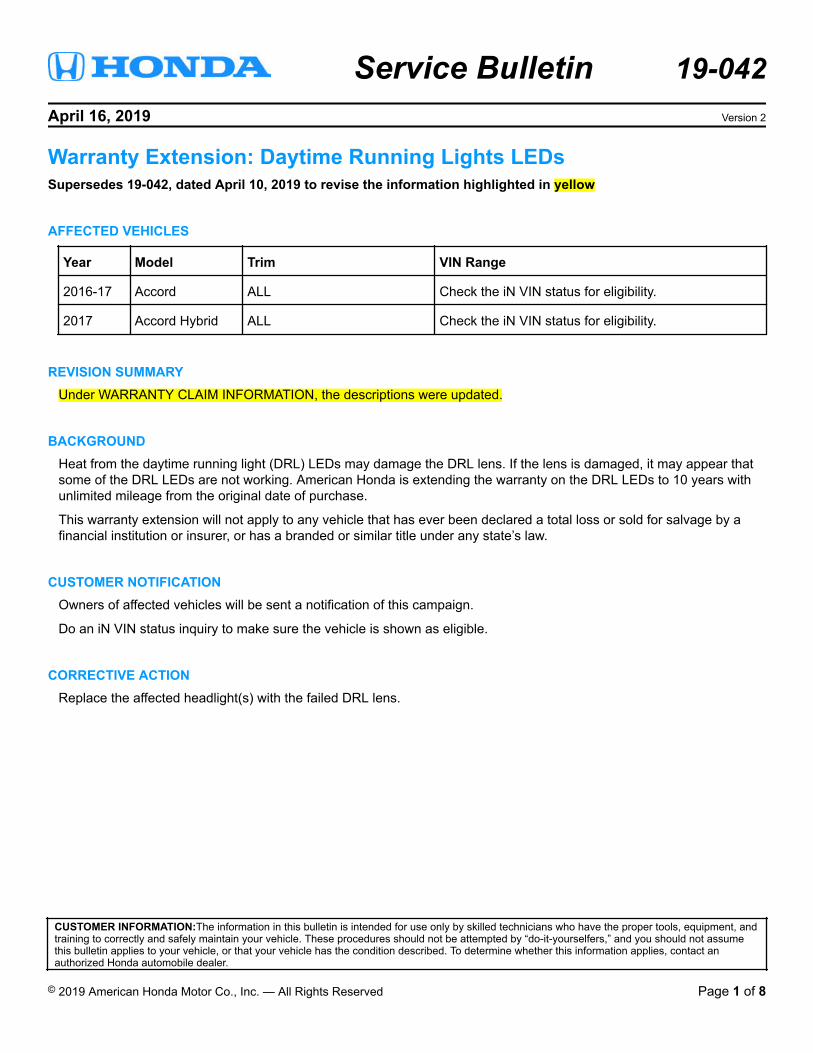
Service Bulletin 19-042April 16, 2019 Version 2
Warranty Extension: Daytime Running Lights LEDsSupersedes 19-042, dated April 10, 2019 to revise the information highlighted in yellow
AFFECTED VEHICLES
Year Model Trim VIN Range
2016-17 Accord ALL Check the iN VIN status for eligibility.
2017 Accord Hybrid ALL Check the iN VIN status for eligibility.
REVISION SUMMARYUnder WARRANTY CLAIM INFORMATION, the descriptions were updated.
BACKGROUNDHeat from the daytime running light (DRL) LEDs may damage the DRL lens. If the lens is damaged, it may appear thatsome of the DRL LEDs are not working. American Honda is extending the warranty on the DRL LEDs to 10 years withunlimited mileage from the original date of purchase.
This warranty extension will not apply to any vehicle that has ever been declared a total loss or sold for salvage by afinancial institution or insurer, or has a branded or similar title under any state’s law.
CUSTOMER NOTIFICATIONOwners of affected vehicles will be sent a notification of this campaign.
Do an iN VIN status inquiry to make sure the vehicle is shown as eligible.
CORRECTIVE ACTIONReplace the affected headlight(s) with the failed DRL lens.
CUSTOMER INFORMATION:The information in this bulletin is intended for use only by skilled technicians who have the proper tools, equipment, andtraining to correctly and safely maintain your vehicle. These procedures should not be attempted by “do-it-yourselfers,” and you should not assumethis bulletin applies to your vehicle, or that your vehicle has the condition described. To determine whether this information applies, contact anauthorized Honda automobile dealer.
© 2019 American Honda Motor Co., Inc. — All Rights Reserved Page 1 of 8
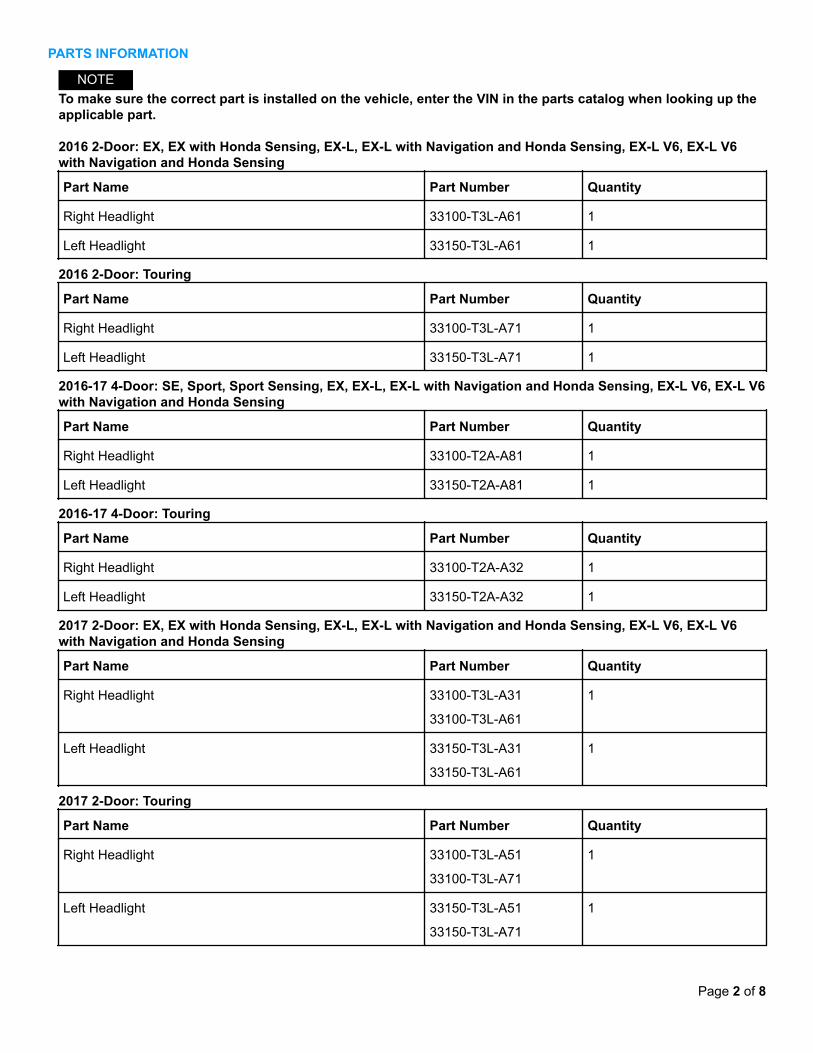
PARTS INFORMATION
NOTETo make sure the correct part is installed on the vehicle, enter the VIN in the parts catalog when looking up theapplicable part.
2016 2-Door: EX, EX with Honda Sensing, EX-L, EX-L with Navigation and Honda Sensing, EX-L V6, EX-L V6with Navigation and Honda Sensing
Part Name Part Number Quantity
Right Headlight 33100-T3L-A61 1
Left Headlight 33150-T3L-A61 1
2016 2-Door: Touring
Part Name Part Number Quantity
Right Headlight 33100-T3L-A71 1
Left Headlight 33150-T3L-A71 1
2016-17 4-Door: SE, Sport, Sport Sensing, EX, EX-L, EX-L with Navigation and Honda Sensing, EX-L V6, EX-L V6with Navigation and Honda Sensing
Part Name Part Number Quantity
Right Headlight 33100-T2A-A81 1
Left Headlight 33150-T2A-A81 1
2016-17 4-Door: Touring
Part Name Part Number Quantity
Right Headlight 33100-T2A-A32 1
Left Headlight 33150-T2A-A32 1
2017 2-Door: EX, EX with Honda Sensing, EX-L, EX-L with Navigation and Honda Sensing, EX-L V6, EX-L V6with Navigation and Honda Sensing
Part Name Part Number Quantity
Right Headlight 33100-T3L-A31
33100-T3L-A61
1
Left Headlight 33150-T3L-A31
33150-T3L-A61
1
2017 2-Door: Touring
Part Name Part Number Quantity
Right Headlight 33100-T3L-A51
33100-T3L-A71
1
Left Headlight 33150-T3L-A51
33150-T3L-A71
1
Page 2 of 8
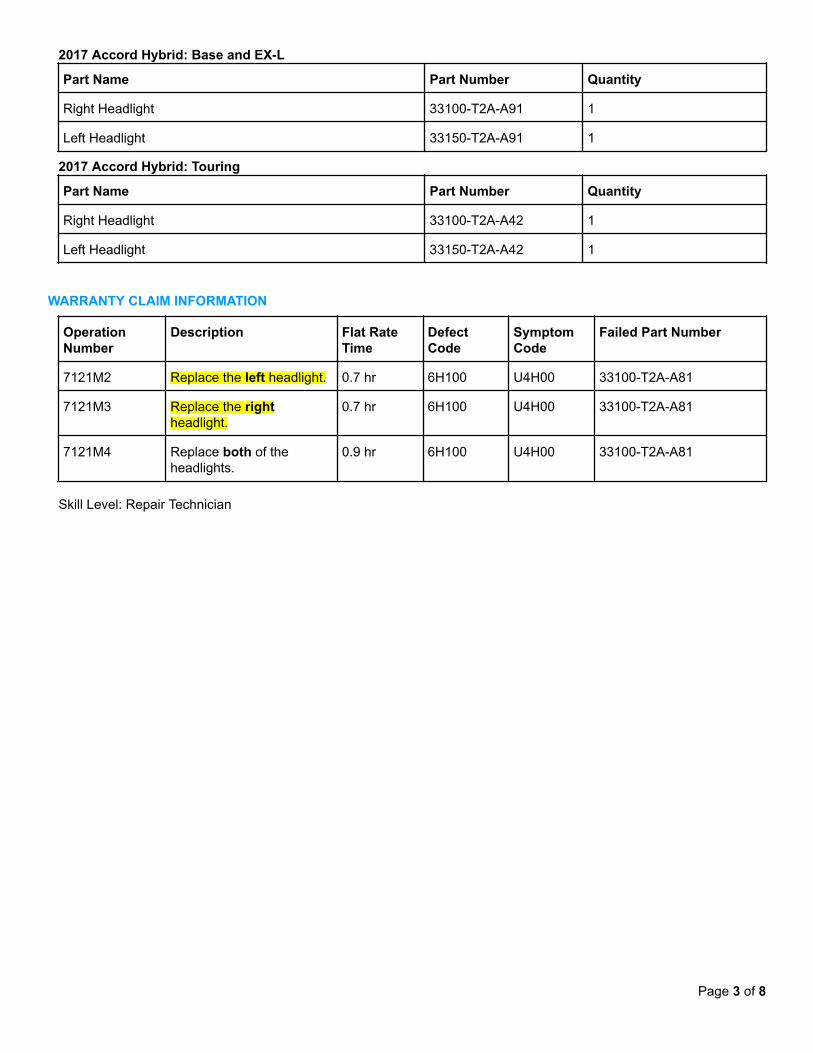
2017 Accord Hybrid: Base and EX-L
Part Name Part Number Quantity
Right Headlight 33100-T2A-A91 1
Left Headlight 33150-T2A-A91 1
2017 Accord Hybrid: Touring
Part Name Part Number Quantity
Right Headlight 33100-T2A-A42 1
Left Headlight 33150-T2A-A42 1
WARRANTY CLAIM INFORMATION
OperationNumber
Description Flat RateTime
DefectCode
SymptomCode
Failed Part Number
7121M2 Replace the left headlight. 0.7 hr 6H100 U4H00 33100-T2A-A81
7121M3 Replace the rightheadlight.
0.7 hr 6H100 U4H00 33100-T2A-A81
7121M4 Replace both of theheadlights.
0.9 hr 6H100 U4H00 33100-T2A-A81
Skill Level: Repair Technician
Page 3 of 8
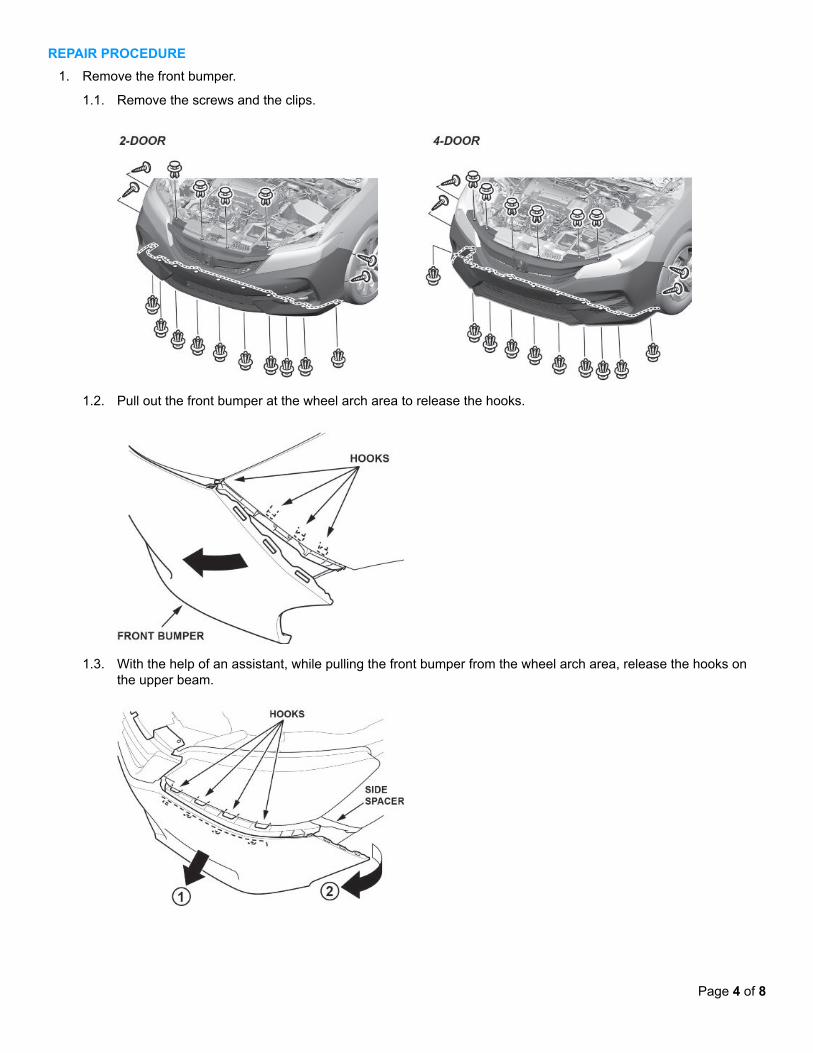
REPAIR PROCEDURE1. Remove the front bumper.
1.1. Remove the screws and the clips.
1.2. Pull out the front bumper at the wheel arch area to release the hooks.
1.3. With the help of an assistant, while pulling the front bumper from the wheel arch area, release the hooks onthe upper beam.
Page 4 of 8
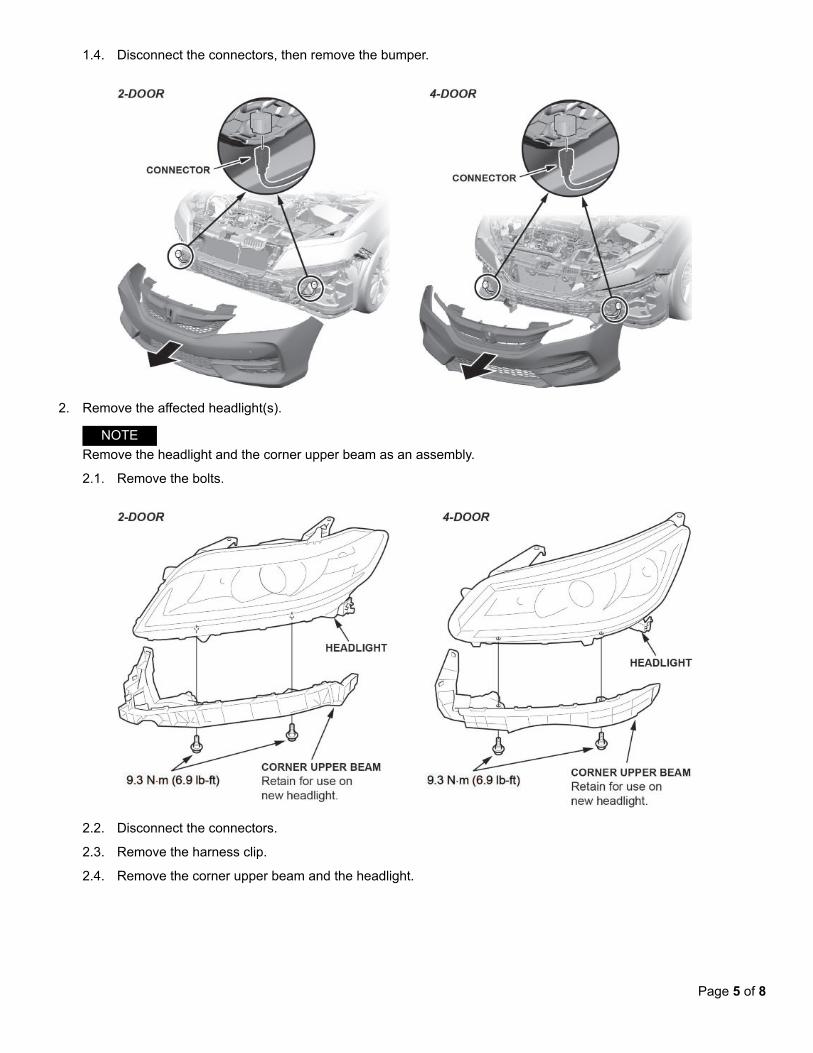
1.4. Disconnect the connectors, then remove the bumper.
2. Remove the affected headlight(s).
NOTERemove the headlight and the corner upper beam as an assembly.
2.1. Remove the bolts.
2.2. Disconnect the connectors.
2.3. Remove the harness clip.
2.4. Remove the corner upper beam and the headlight.
Page 5 of 8
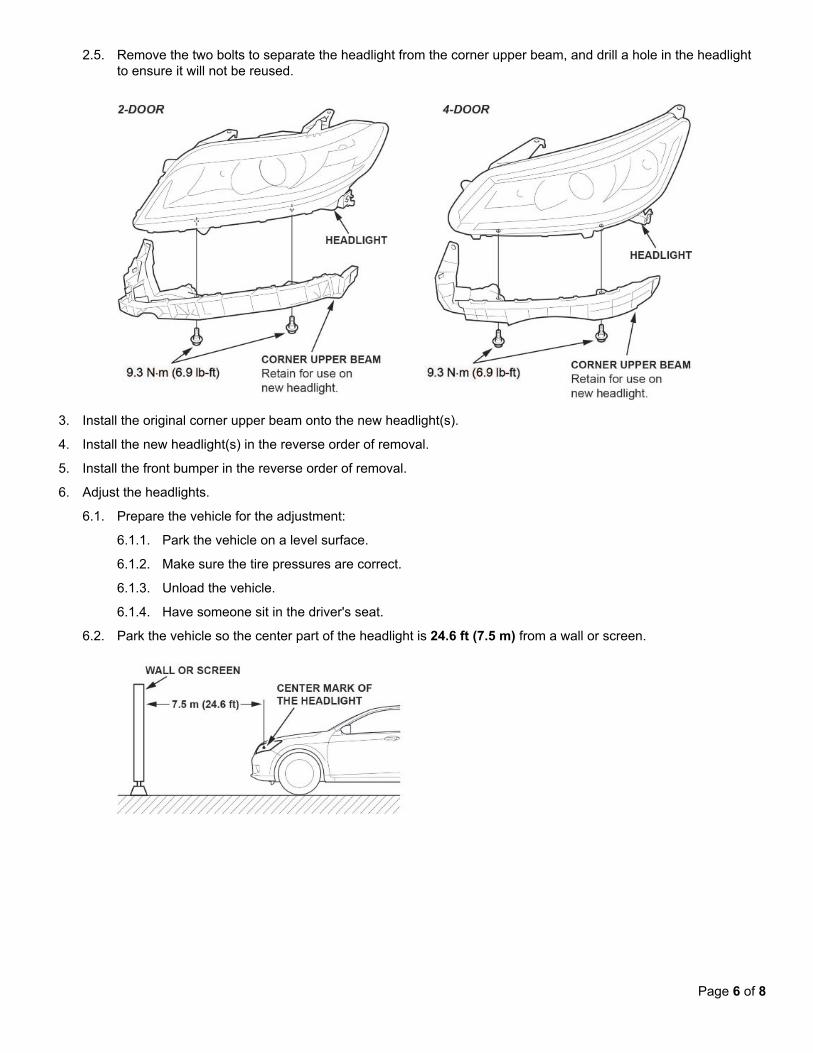
2.5. Remove the two bolts to separate the headlight from the corner upper beam, and drill a hole in the headlightto ensure it will not be reused.
3. Install the original corner upper beam onto the new headlight(s).
4. Install the new headlight(s) in the reverse order of removal.
5. Install the front bumper in the reverse order of removal.
6. Adjust the headlights.
6.1. Prepare the vehicle for the adjustment:
6.1.1. Park the vehicle on a level surface.
6.1.2. Make sure the tire pressures are correct.
6.1.3. Unload the vehicle.
6.1.4. Have someone sit in the driver's seat.
6.2. Park the vehicle so the center part of the headlight is 24.6 ft (7.5 m) from a wall or screen.
Page 6 of 8
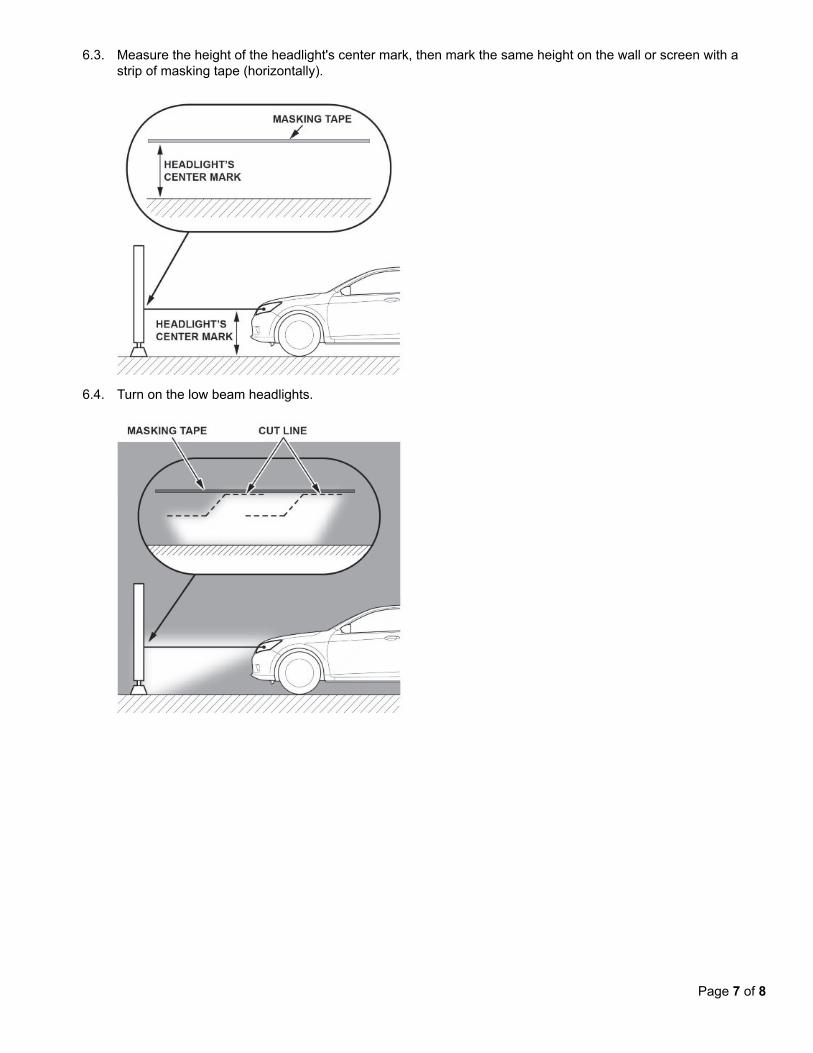
6.3. Measure the height of the headlight's center mark, then mark the same height on the wall or screen with astrip of masking tape (horizontally).
6.4. Turn on the low beam headlights.
Page 7 of 8
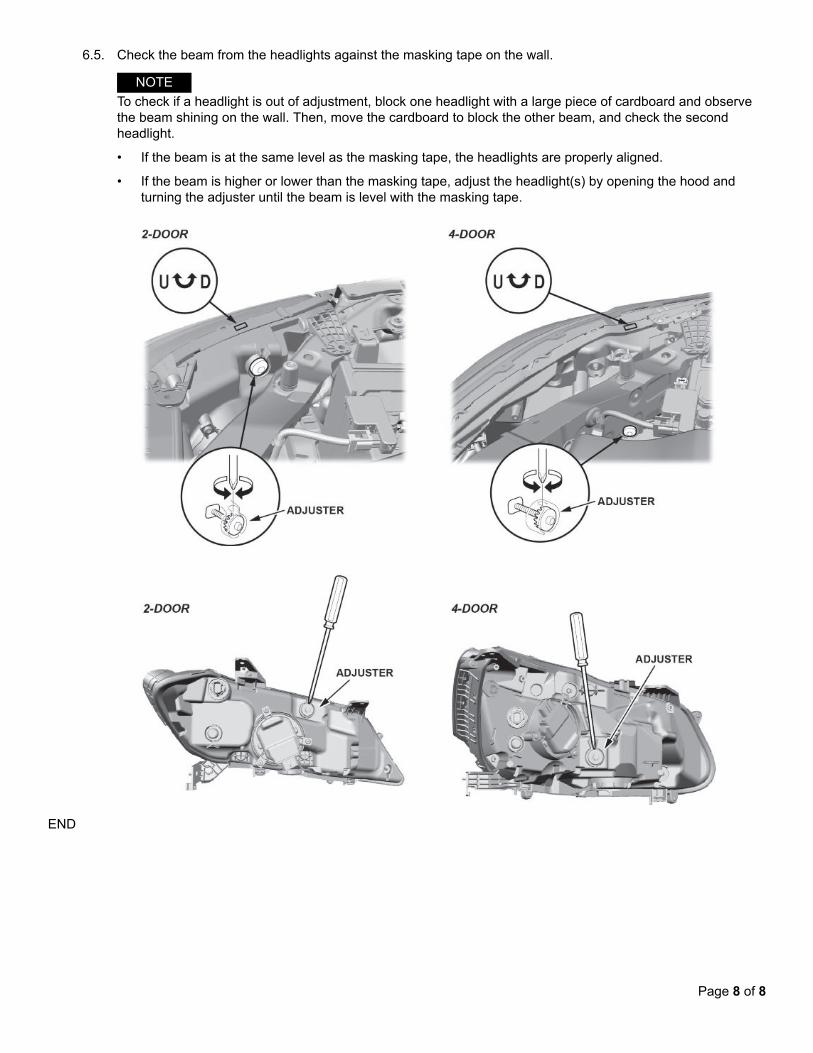
6.5. Check the beam from the headlights against the masking tape on the wall.
NOTETo check if a headlight is out of adjustment, block one headlight with a large piece of cardboard and observethe beam shining on the wall. Then, move the cardboard to block the other beam, and check the secondheadlight.
• If the beam is at the same level as the masking tape, the headlights are properly aligned.
• If the beam is higher or lower than the masking tape, adjust the headlight(s) by opening the hood andturning the adjuster until the beam is level with the masking tape.
END
Page 8 of 8