Embed Size (px)
Citation preview

We recommend that you watch the “How to Build a Pond” DVD prior to building the final pond.
•• 20 Easy-to-F20 Easy-to-FolloollowwSteps to a BeautifulSteps to a BeautifulWater FeatureWater Feature
•• Tips,Tips, TTricks,ricks, andandTechniques for aTechniques for aFlawless InstallationFlawless Installation
•• DozDozens of Picturens of Picturesesand Diagrams toand Diagrams toHelp you VisualizeHelp you Visualizethe Processthe Process
InstallationBuilding Your OwnWater Feature
They say there are many different waysto skin a cat or, to quote Paul Simon’slyrics, “There must be 50 ways to leaveyour lover.” But in the world of water gar-dening, on the front end of things anyway,you quickly come to a fork in the road andyou really have to finally decide betweentwo distinct possibilities.The first decisionyou’re going to have to make then iswhether you’re going to do it yourself, orhire a professional to get it done.
In many cases, installing a water gardenis best left up to a pro, unless you actuallyfeel you’ll personally enjoy doing the work.But before you choose the do-it-yourselfoption, check out the following step-by-step product installation road map. It’s asimple, proven, systematic plan that pro-fessionals and well-conditioned hobbyistscan follow to create beautiful water gar-dens. Now ponder this info.
TOOLS NEEDED TO INSTALLTHE POND:
2 Shovel 2 Wheelbarrow 2 Large Wrench 2 Awl
2 Phillips Screwdriver 2 Two-foot Level2 Knife or Pipe Cutter2 Hand Tamper2 Recommended: Transit
or Sight Level
INSTALLING ALINER WATERGARDEN
1. LOCATE AND MARK OUT YOUR POND AREA:
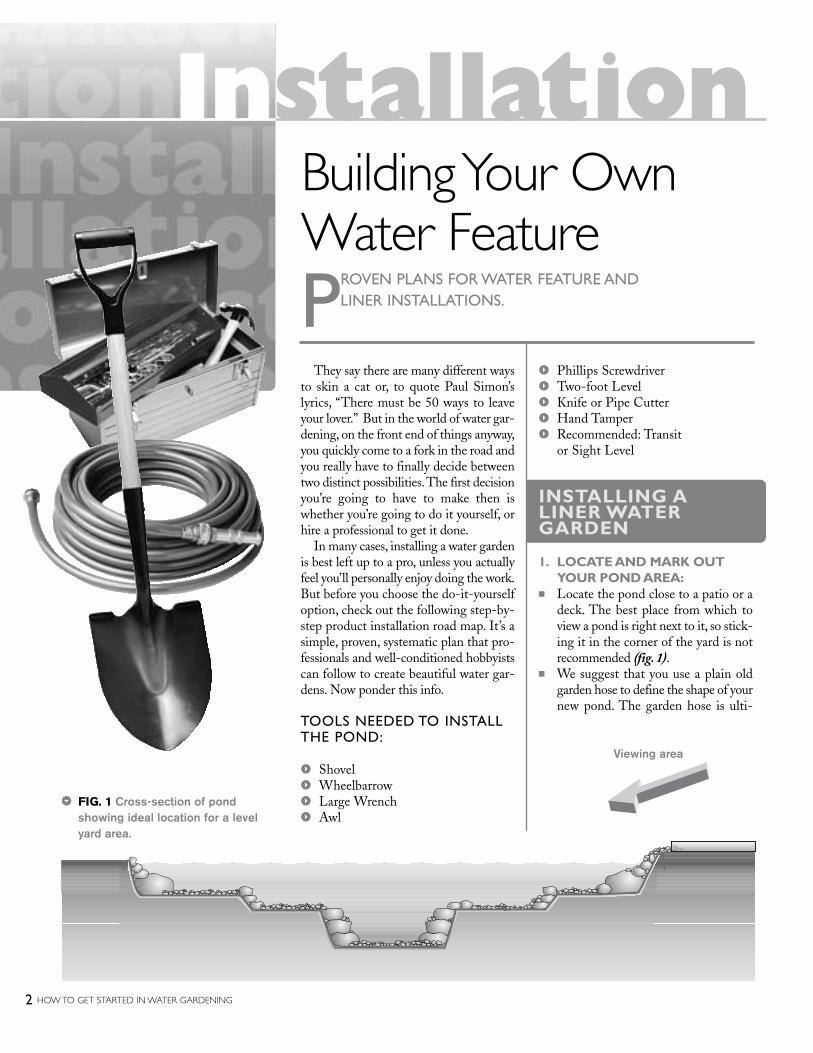
■ Locate the pond close to a patio or adeck. The best place from which toview a pond is right next to it, so stick-ing it in the corner of the yard is notrecommended (fig. 1).
■ We suggest that you use a plain oldgarden hose to define the shape of yournew pond. The garden hose is ulti-
PROVEN PLANS FOR WATER FEATURE AND LINER INSTALLATIONS.
2 HOW TO GET STARTED IN WATER GARDENING
3 FIG. 1 Cross-section of pondshowing ideal location for a levelyard area.
Viewing area

Installation
mately flexibleand can bepushed and pulledinto various shapes,allowing you to viewand evaluate thedesign of the pro-posed pond.
■ Once you have theshape defined withyour garden hose,take a can ofbrightly-colored,highly-visible spraypaint and outlinethe shape (aroundthe hose) on the grass, making it semi-permanent.
2. PLACE THE BIOFALLS® FILTER AND SKIMMER INTO POSITION:
■ Since the BIOFALLS® filter is typically the mainwaterfall, it should be positioned so it’s facing theviewing area, visible from both home and patio.
■ Make sure it is placed close to the pond so you can
use the pond liner for the waterfalls – unless you’readding a stream (fig. 2).
■ If you’re adding a stream, you’ll need to purchasean extra section of liner and extra PVC pipe. Forexample, a 10’ long stream would require a 10’ x15’ section of stream liner and an extra 25’ ofPVC pipe.
■ In order to maximize circulation, the BIOFALLS®
filter and skimmer are ideally placed on oppo-site ends of the pond, directly across from eachother (fig. 3).
3. LAY PLUMBING■ To eliminate the need to dig a trench, lay the flex-
ible PVC pipe in place, along the edge of the pond,before you begin excavating.
■ The flexible PVC can withstand extreme weatherconditions so it is unnecessary to dig a deep trenchfor the pipe.
■ To eliminate frozen, and potentially broken pipes,the pipe should be sloping down from the water-falls to the skimmer, with no low spots where watercan settle.
4. HOOK UP AND LEVEL YOUR BIOFALLS® FILTER
Installing the Bulkhead:■ Before you start to level the biological filter, it’s
wise to install the bulkhead fitting and PVC pipefitting (fig. 4).
■ Install the bulkhead fitting so that the rubber gas-ket is on the inside of the container and the plasticgasket is on the outside, with the threaded flangesticking out the back of the BIOFALLS® filter (fig.5). (Note: Grande BIOFALLS® filter does not containa plastic gasket.)
HOW TO GET STARTED IN WATER GARDENING 3
3 FIG. 2 Stream Design
4 FIG. 4 Attachbulkhead fitting.
4 FIG. 5 BulkheadAssembly
4 FIG. 3 Ideal placement forBIOFALLS® filter andSkimmer.
Slope going away from home: This is more challenging and more expensive.You will definitely have to bring fill material to the site if you want a stream visiblefrom the main viewing area. You must be very careful about fill compaction andretaining wall integrity. If done properly, it is an amazing transformation and wellworth the challenge.
Existing Lawn Grade
Retaining Fill MaterialWall
Slope going toward the home: This is the easiestand most natural looking. Simply shape and carvethe hillside for the desired affect. The trick with thisis to try and keep all soil on site. You may have tohaul some away, but it will not be a problem as longas you make provisions ahead of time.
Existing Grade
Remove Soil
PipeFitting
NutPlasticWasher
RubberGasket
Bulkhead
The Kink-Free Pipe isextremely flexible andsimply attaches onto thefittings with clamps.
■ The bulkhead fitting should be installed andtightened until the rubber gasket on the insideof the filter begins to bulge outward. (Note: Bulk-heads are reverse-threaded.)
■ Tighten the adapter one to two complete turnspast hand-tight. Do not overtighten – bulkheadsmay crack.
■ Use teflon thread or add a small bead of siliconeto the threads of the PVC pipe fitting to ensurea watertight seal. Then screw the pipe fittinginto the bulkhead.
Setting and Leveling BIOFALLS® filter:■ In order to avoid creating a “volcanic” look, do
not set the filter too high. It normally sits intothe ground a few inches so that you create theperception that Mother Nature herself hasinstalled the waterfall.
■ To avoid uneven settling, compact the areabeneath the filter with a hand tamper.
Attaching Flexible PVC Pipe:■ The filter is now ready for the flexible PVC to
be glued into place using PVC cement specifiedfor use with flexible piping.
■ Prime the inside of the PVC fitting and the out-side of the pipe where the flexible PVC cementwill be applied.
■ After priming, apply the cement to the fitting andthe PVC pipe and fit the two pieces together.
■ Hold the pipe into the fitting for at least 60 sec-onds to allow the glue to slightly set.
■ Wait 10 - 15 minutes to let the glue completelyset before you begin to bury the filter.
■ With a two-foot level, check the level of the filter. Your BIOFALLS® filter should be levelfrom side to side and tilt forward approximate-ly 1/4 of a bubble on the level (fig. 5 on page 3).
■ Before you start to backfill around the filter,install the support racks. Otherwise, you maynot be able to get it in place.
■ We also recommend having someone standinside the filter to keep it in place and level whileit’s being backfilled.
■ The excavated soil from the pond can be back-filled around the sides and back of theBIOFALLS® filter, creating a berm. Tamp thesoil while backfilling in order to reduce settling (fig. 7). Any additional soil can be spread aroundthe far side of the pond in order to create aplanting bed for perennials and annuals.
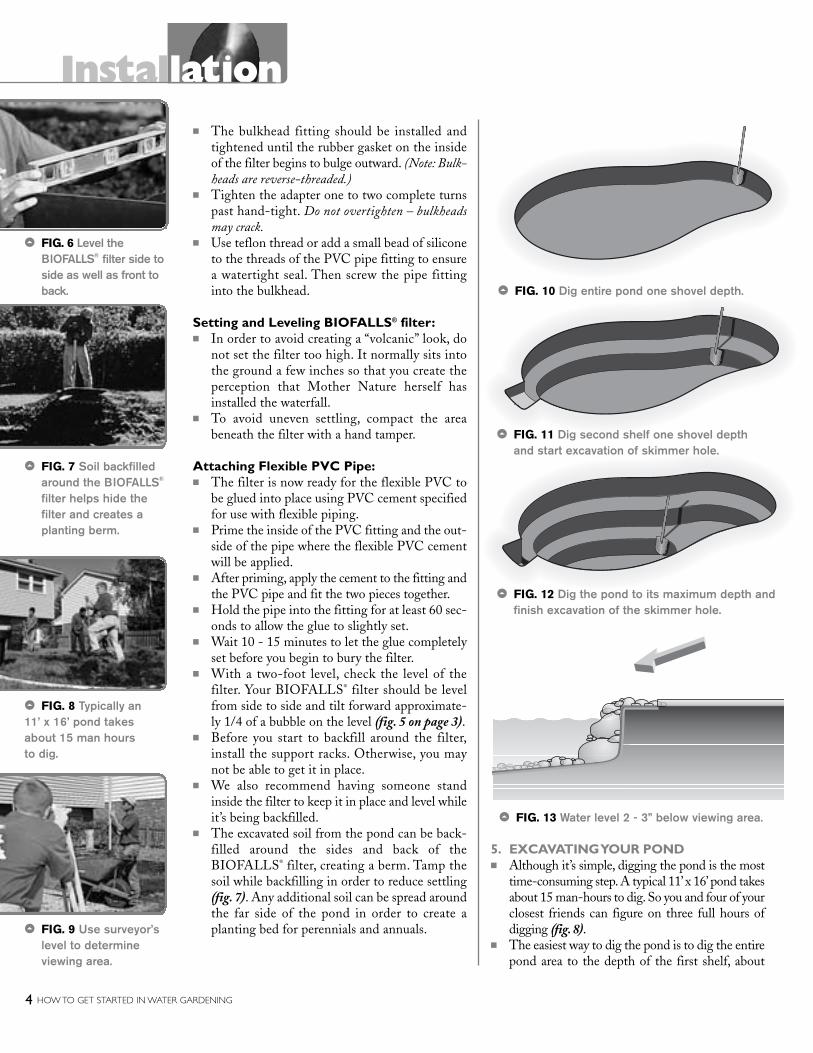
5. EXCAVATING YOUR POND ■ Although it’s simple, digging the pond is the most
time-consuming step. A typical 11’ x 16’ pond takesabout 15 man-hours to dig. So you and four of yourclosest friends can figure on three full hours of digging (fig. 8).
■ The easiest way to dig the pond is to dig the entire pond area to the depth of the first shelf, about
Installation
4 HOW TO GET STARTED IN WATER GARDENING
4 FIG. 9 Use surveyor’slevel to determineviewing area.
4 FIG. 13 Water level 2 - 3” below viewing area.
4 FIG. 7 Soil backfilledaround the BIOFALLS®
filter helps hide thefilter and creates aplanting berm.
4 FIG. 10 Dig entire pond one shovel depth.
4 FIG. 11 Dig second shelf one shovel depthand start excavation of skimmer hole.
4 FIG. 12 Dig the pond to its maximum depth and finish excavation of the skimmer hole.
4 FIG. 8 Typically an 11’ x 16’ pond takesabout 15 man hours to dig.
4 FIG. 6 Level theBIOFALLS® filter side toside as well as front toback.

8 - 12” deep or the approximate depthof the shovel blade (fig. 10 on page 4).
■ After the first level is dug, spray the out-line of the second shelf and dig that levelanother 8 - 12” deep (fig. 11 on page 4).
■ At this point, you will need to figureout what the water level of the pondwill be.
Determining the Water Level:■ The easiest way to determine the water
level is to use a surveyor’s level or sighttransit (fig. 9 on page 4).1. Figure out where the pond’s main
viewing area will be and determinethe level.
2. Once the level of the viewing area isdetermined, base the water level at
2 - 3” below that (fig. 13 on page 4)(Remember, when using a transit orsight level, the higher the reading,the lower the level.)
3. Check the level of the area directlyopposite the viewing area, as well asto the left and right side. Theseareas should be the same level as theviewing area. If any area is low, youcan use some soil to build up theedges so they are above the waterlevel by 2 - 3”.
■ After you have determined what thewater level will be, check what the levelof the first two shelves have been dugout to.
■ Your first shelf should be up to 12”below the water level.
■ The second shelf should be no deeperthan 16 - 20” deep. Adjust theseshelves if necessary.
■ Mark the outline of the third shelf anddig this down to the maximum depth –usually 24 - 30” deep (fig. 12 on page 4).
Skimmer Excavation:■ Alongside the pond, dig a hole to
house the skimmer filter.■ For Aquascape’s Standard and Large
skimmers, the dimensions are 24” wideby 20” from front to back.
Lily Pockets:■ On the second shelf, dig out small,
shallow, bowl-like areas for the waterlilies (fig. 15).
■ These pockets are simply depressionsor bowls, cut into the soil 6 - 8” deepand 10 - 16” in diameter. The goal isto create a natural-looking pond and
HOW TO GET STARTED IN WATER GARDENING 5
4 FIG. 14 Finish excavation byremoving any sharp debris thatmight damage the liner.
ON THE LEVELWhen excavating a pond,it is important to
make sure that all of the edges are level.Thisis not only to avoid an unexpected low edge,but also to make sure that the skimmer sitsat the proper height to skim. There are several different methods that can be used tolevel a pond, depending on the resourcesthat are available.
The most accurate method is to use a transit, either sight or laser, and take severalreadings around the perimeter of the pond.Transits need to be rented or bought,however,and may not be the most practical option fora one-time installation.There are two otheroptions that utilize more common householditems and may be more convenient.First,youcan take a standard 2”x 4” board and lay itacross the pond with a common bubble levelresting on the center.The level will show if thetwo sides are even,and all sides can be meas-ured in the same way by altering the angle ofthe board across the pond.
The second method is to use a line level.Aline level is basically a small bubble levelattached to the end of a string.The other endof the string is then attached to a stake that isplaced at any point around the perimeter ofthe pond.The level is then walked around thepond and readings are taken at several different points to ensure the sides are even.Remember, the pond does not have to be perfectly level,but general readings should betaken to avoid any major problems.
Installation
1st plant and rock shelf: shelf varies 8” or greater wide,
1 - 12” deep
Set 6 - 12” size cobblestones onvertical edges. Gravel on all
horizontal surfaces
2nd plant& rockshelf:
16 - 20”deep
Plant pocket 6 - 8” deep, 10 - 16” diameter
Water line
Marginal plants should beremoved from containers andplaced directly into the gravel
Liner ends 1 - 2”outside of pond
Mulch
3 FIG. 15 Pond excavation - side view of plant pockets.
this is possible only if plant pots are eliminatedor completely hidden.
6. INSTALL UNDERLAYMENT AND LINER Underlayment■ Check the excavated pond for sharp objects, such
as roots or rocks, that may damage the liner (fig. 14on page 5).
■ Unfold the underlayment and place it into yourexcavated pond.
■ The underlayment comes in a maximum width of15’. For larger ponds, simply cut and lay sections ofunderlayment throughout the excavated area.
■ Starting from the bottom of the pond, work theunderlayment into all of the shelves and plantpockets.
■ Proceed one shelf at a time until you’ve reached thetop shelf.
Liner■ Unfold and install the Aquascape EPDM fish
safe liner on top of the underlayment (fig. 16).■ The installation process is the same as the
underlayment, starting at the bottom and contouring the liner up and out of the pond (fig. 18).
■ Try to get the large folds out, but the main goalis to make sure that the liner is lying flat andgoing into all corners. This should take about 10minutes. (Double check that you have enoughliner around all your edges).
7. HOOKING UP THE SKIMMER Leveling and Setting the Height of the Skimmer■ The water level on the skimmer, when installed at
the correct height, should be approximately 3/4”below the opening (fig. 19).
■ Complete any excavation necessary to the hole dugfor the skimmer in order to set the skimmer to thepre-determined water level of the pond.
■ It is extremely important that the skimmer is level(side to side and front to back) as well as set to thecorrect water level. Compact the area beneath theskimmer with a hand tamper to avoid settling.
Connecting the Liner to the Skimmer■ Hold the liner up against the skimmer and make
sure there is some slack in it.■ From the inside of the skimmer box, use a white
marker or an awl and lightly mark the outerperimeter of the skimmer opening (fig.20 on page7). Mark a second box 1.5” inside of that line. Theinterior line is the line that you will follow to cutthe liner out for the skimmer faceplate. Markingthe interior line insures that you don’t cut too muchof the liner, which would result in a possible leak.
■ Cut out the inner box and insert the skimmer faceplateinto the hole (fig.21 on page 7).
■ Temporarily install the faceplate and liner to theskimmer using two screws in each of the upper cor-ners. Using an awl or nail, poke through the firsthole through the liner, all the way through to theinside of the filter box. Be careful not to damagethe threads on the nut inserts when punching theholes with the awl. Remove the awl or nail whileholding the faceplate and liner in place, and beginthreading one of the screws into the filter. Repeatthis process for the other screw.
■ Important: Insert the skimmer faceplate so the weirflap hinge is on the bot-tom.Installing the face-plate upside down(hinge on top) will not allow proper skim-ming action (fig. 17).
Note: Power tools are notrecommended for installingthe screws and may stripthe nut inserts.■ With the screws still
in place, remove thefaceplate and the linerfrom the front of theskimmer.
Installation
6 HOW TO GET STARTED IN WATER GARDENING
The EPDM Liner andUnderlayment are bothdurable and flexible;arguably the bestfoundation for the job!
4 FIG. 16 Place the liner on top of the underlayment,following the same installation procedures. Makesure liner is positioned in such a way that allows itto extend and completely cover the opening on theBIOFALLS® filter.
4 FIG. 18 Lay the under-layment and liner intothe excavated pondand conform tocontours and pockets.
4 FIG. 17 Properplacement of theskimmer faceplatewith hinge on the bottom.
4 FIG. 19 Crosssection of idealwater level viewedfrom front ofskimmer.
Ideal Water Level
3/4” BelowFront of Skimmer
Soil Level on 1st Shelf

Installation
■ Make sure that the faceof the skimmer box isclean, and free of dustand debris. Apply a beadof fish-safe siliconesealant around the skim-mer opening over andinside the nut inserts (fig.22). Use approximately ahalf tube of silicone forskimmer (full tube forGrande).
■ Replace the skimmer faceplate and the two cor-ner screws (fig. 23). Be careful – over-tighteningscrews may cause them to strip.
■ With the two corners secured, you may now punchthe remaining 10 holes with your awl and thread inall the screws (fig. 24).
■ Let dry for at least one hour before introducing water!
8. ADD ROCKS AND GRAVEL TO YOUR POND
■ See page 12 for calculation to estimate thequantity of rock and gravel required for the project.
■ When placing the boulders in the pond, keepin mind that you will be steppinginto the pond to maintain it occa-sionally, so the walls you createshould be sturdy, stable, and able tobear weight.
■ Start from the bottom, setting thelargest character boulders first, andthen fill in between with progres-sively smaller stones (fig. 25). Youare, in essence, creating a series of
small retaining walls. Stack the stones slightlyhigher than the next shelf height to help holdthe gravel in place.
■ Be careful when placing the large boulders soyou don’t damage the liner.
■ Install lights prior to adding gravel ... see sec-tion 9 on Underwater Lights.
■ Cover all remaining surfaces with decorativegravel. This will help lock the boulders in place,as well as cover the remaining liner, protectingit from ultraviolet rays, and giving bacteria aplace to colonize.
9. UNDERWATER LIGHTS■ After the boulders are in position, set your
underwater lights in between your boulders sothey are hidden from view. For the greatesteffect, lights should face away from the mainviewing area (fig. 27 on page 8).
■ See lighting system instructions for placement,positioning, and installation of underwaterlights.
■ While lights are being installed, one crewmember can fill the water lily pockets with 4 - 5” of ordinary garden soil and cover with a
1” layer of gravel.
HOW TO GET STARTED IN WATER GARDENING 7
The SiliconeSealant is safe forfish, and forms awater-tight seal.
4 FIG. 20 Mark theskimmer opening onliner and cut an area1.5” inside that mark.
4 FIG. 22 Afteralignment, removefaceplate and applysilicone sealant.
4 FIG. 23 Carefullyreplace the skimmerfaceplate into thesilicone-lined opening.
4 FIG. 24 Using an awl,poke holes through theliner at screw holes;screw into place.
4 FIG. 21 Placeskimmer faceplatethrough liner andplace into skimmerfor alignment.
4 FIG. 25 Starting at thebottom set the largestcharacter bouldersfirst then fill in withthe smaller ones.
4 FIG. 26 Wash downstone and gravel, then pump out the muddywater.
1 FIG. 27 Set under-water lightsbetween bouldersso they are hiddenfrom view.
10.WASH ROCKS/GRAVEL■ Using the garden hose, rinse the rocks and gravel
from the highest part of the pond down to the bot-tom (fig. 26 on page 7).
■ Place an extra sump pump or the pump includ-ed in the pond kit in the lowest area of the pondand, (through a section of pipe) pump themuddy water out. This step helps the pondwater clear up quickly.
11.FILL POND
12. BUILDING A WATERFALL AND STREAM ■ Before building the waterfall, you will need to do a
little preparation work. (If you are planning on build-ing a stream,please read the sidebar about STREAMCONSTRUCTION before proceeding.)
Hook Up the BIOFALLS® filter■ No power tools are needed for this part of the job.■ To attach the snout of the BIOFALLS® filter, pull
the liner up to the front of the BIOFALLS® filter.Make sure that you have plenty of slack in frontof the container, and also enough liner on each side
to build the waterfalls (We recommend having aminimum of two feet of liner on each side of theBIOFALLS® filter (fig. 32). Slack is left in frontof the BIOFALLS® filter to avoid stretching theliner when rocks are stacked to build the waterfall.
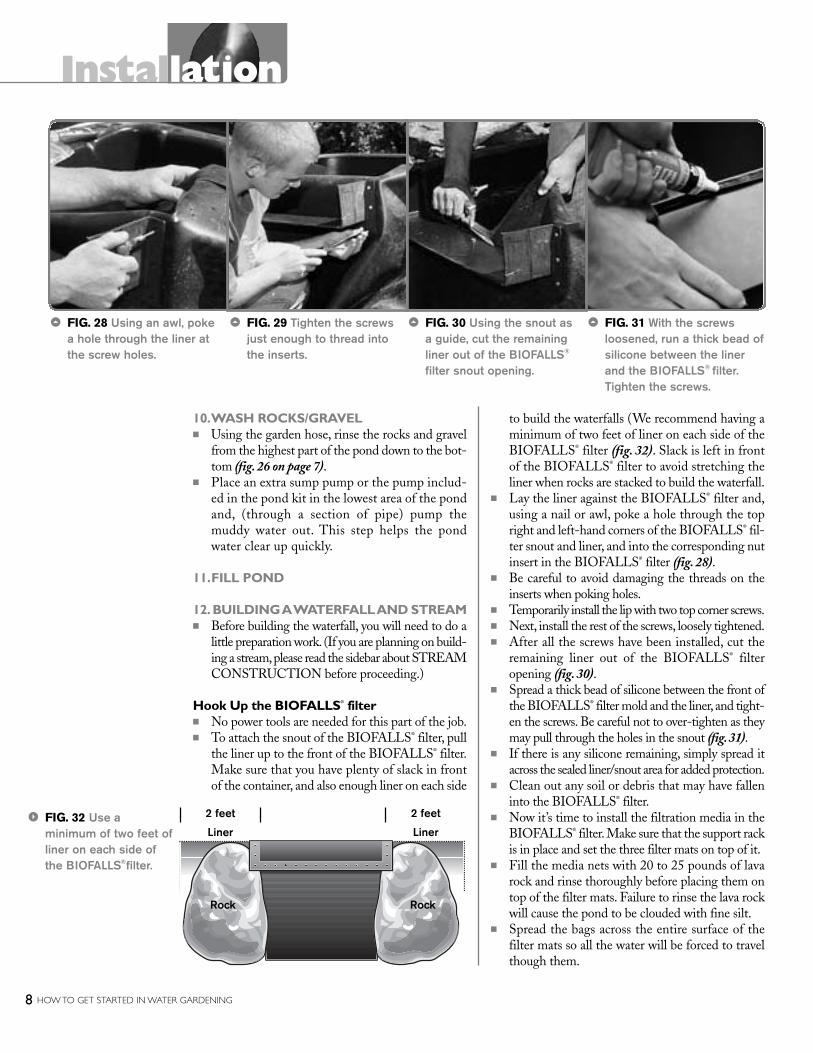
■ Lay the liner against the BIOFALLS® filter and,using a nail or awl, poke a hole through the topright and left-hand corners of the BIOFALLS® fil-ter snout and liner, and into the corresponding nutinsert in the BIOFALLS® filter (fig. 28).
■ Be careful to avoid damaging the threads on theinserts when poking holes.
■ Temporarily install the lip with two top corner screws.■ Next, install the rest of the screws, loosely tightened.■ After all the screws have been installed, cut the
remaining liner out of the BIOFALLS® filteropening (fig. 30).
■ Spread a thick bead of silicone between the front ofthe BIOFALLS® filter mold and the liner, and tight-en the screws. Be careful not to over-tighten as theymay pull through the holes in the snout (fig. 31).
■ If there is any silicone remaining, simply spread itacross the sealed liner/snout area for added protection.
■ Clean out any soil or debris that may have falleninto the BIOFALLS® filter.
■ Now it’s time to install the filtration media in theBIOFALLS® filter. Make sure that the support rackis in place and set the three filter mats on top of it.
■ Fill the media nets with 20 to 25 pounds of lavarock and rinse thoroughly before placing them ontop of the filter mats. Failure to rinse the lava rockwill cause the pond to be clouded with fine silt.
■ Spread the bags across the entire surface of the filter mats so all the water will be forced to travelthough them.
Installation
8 HOW TO GET STARTED IN WATER GARDENING
Rock Rock
2 FIG. 32 Use aminimum of two feet ofliner on each side ofthe BIOFALLS®filter.
4 FIG. 28 Using an awl, pokea hole through the liner atthe screw holes.
2 feet
Liner
4 FIG. 29 Tighten the screwsjust enough to thread intothe inserts.
4 FIG. 30 Using the snout asa guide, cut the remainingliner out of the BIOFALLS®
filter snout opening.
4 FIG. 31 With the screwsloosened, run a thick bead ofsilicone between the linerand the BIOFALLS® filter.Tighten the screws.
2 feet
Liner
Installation
Building the Waterfall■ The construction of the waterfall is what will make
or break a water feature.Take your time when build-ing it, and step back often to look at the placementof rocks from the viewing area.
■ The waterfall will always look better and more nat-ural if large, irregular stones are used in theconstruction. Do not stack small, flat rocks togeth-er to build the waterfall.This technique will make itlook more like a chimney than a waterfall.
■ Start by selecting larger stones to “frame” each sideof the falls. Place these large rocks on each side ofthe face of the BIOFALLS® filter (fig.32 on page 8).
■ Next, select larger rocks to construct the actual water-falls. The effect of the waterfall can be changed byplacement of stone. For a sheeting effect, stack rocksdirectly against the BIOFALLS® filter; for a splash-ing effect, set stones sloping away from theBIOFALLS® filter.
■ Keep the rocks tilted slightly forward so the waterwill run forward, not behind the rocks.
■ Now remove the two screws, lip and liner, whilekeeping all three connected.
■ Make sure the face of the BIOFALLS® filter is clean.■ Apply a bead of fish-safe silicone sealant around the
opening over the inserts.■ Use approximately 1/2 tube of silicone for the Mini
and Standard BIOFALLS® filter, and a full tube forthe Grande.
■ Reinstall the BIOFALLS® filter lip, liner, and screws.■ Now install the rest of the screws by poking a hole
through the liner with a nail or an awl, then thread-ing in the screws.
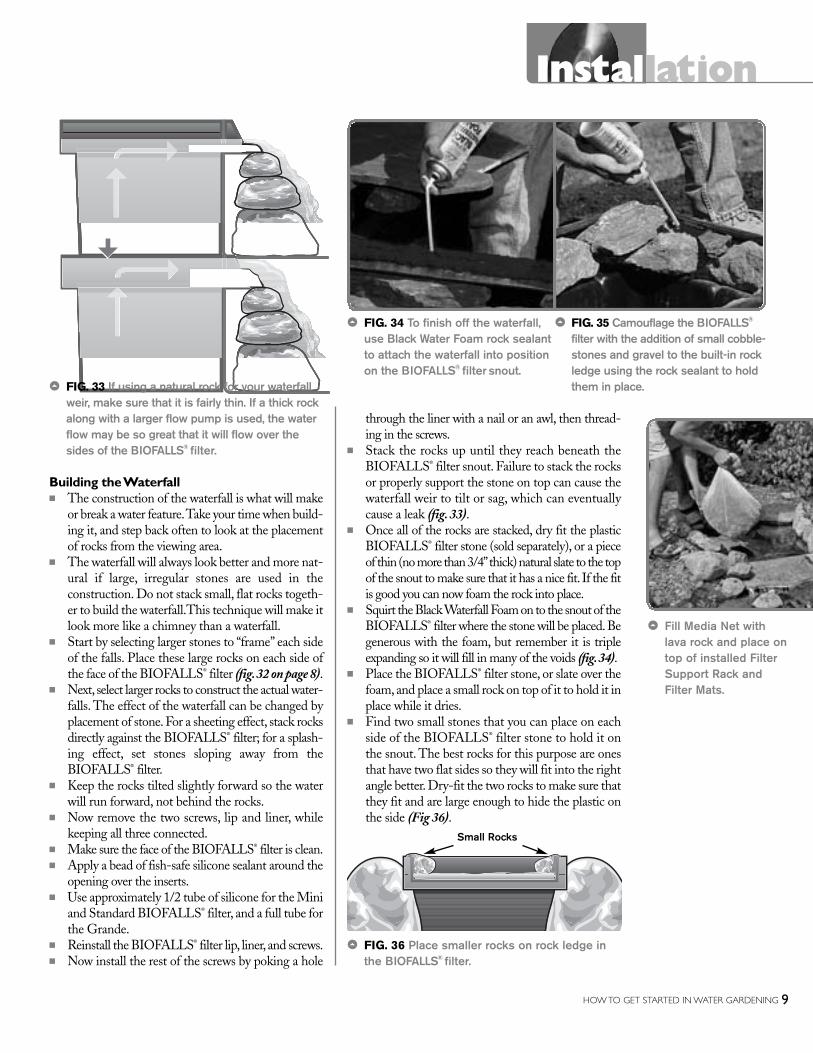
■ Stack the rocks up until they reach beneath theBIOFALLS® filter snout. Failure to stack the rocksor properly support the stone on top can cause thewaterfall weir to tilt or sag, which can eventuallycause a leak (fig. 33).
■ Once all of the rocks are stacked, dry fit the plasticBIOFALLS® filter stone (sold separately), or a pieceof thin (no more than 3/4”thick) natural slate to the topof the snout to make sure that it has a nice fit. If the fitis good you can now foam the rock into place.
■ Squirt the Black Waterfall Foam on to the snout of theBIOFALLS® filter where the stone will be placed.Begenerous with the foam, but remember it is tripleexpanding so it will fill in many of the voids (fig.34).
■ Place the BIOFALLS® filter stone, or slate over thefoam,and place a small rock on top of it to hold it inplace while it dries.
■ Find two small stones that you can place on eachside of the BIOFALLS® filter stone to hold it onthe snout. The best rocks for this purpose are onesthat have two flat sides so they will fit into the rightangle better. Dry-fit the two rocks to make sure thatthey fit and are large enough to hide the plastic onthe side (Fig 36).
HOW TO GET STARTED IN WATER GARDENING 9
4 FIG. 34 To finish off the waterfall,use Black Water Foam rock sealantto attach the waterfall into positionon the BIOFALLS® filter snout.
4 FIG. 36 Place smaller rocks on rock ledge inthe BIOFALLS® filter.
4 FIG. 35 Camouflage the BIOFALLS®
filter with the addition of small cobble-stones and gravel to the built-in rockledge using the rock sealant to holdthem in place.
Small Rocks
4 FIG. 33 If using a natural rock for your waterfallweir, make sure that it is fairly thin. If a thick rockalong with a larger flow pump is used, the waterflow may be so great that it will flow over thesides of the BIOFALLS® filter.
4 Fill Media Net withlava rock and place ontop of installed FilterSupport Rack andFilter Mats.
■ Remove the two rocks and spray foam into the corner of the BIOFALLS® filter, along the verticalwall of the snout and the stone. Place the rocks backinto place and your waterfall is complete.
Finishing the Top of the BIOFALLS® filter■ Find some smaller rocks that can sit on the rock
ledge in the BIOFALLS® filter (fig. 35 on page 9).■ Dry-fit all of the stones to make sure that they fit on
the ledge and will not fall into the BIOFALLS® filter.■ After all of these rocks have been dry-fitted, spray
some foam behind each one to hold them securelyin place (fig. 35 on page 9).
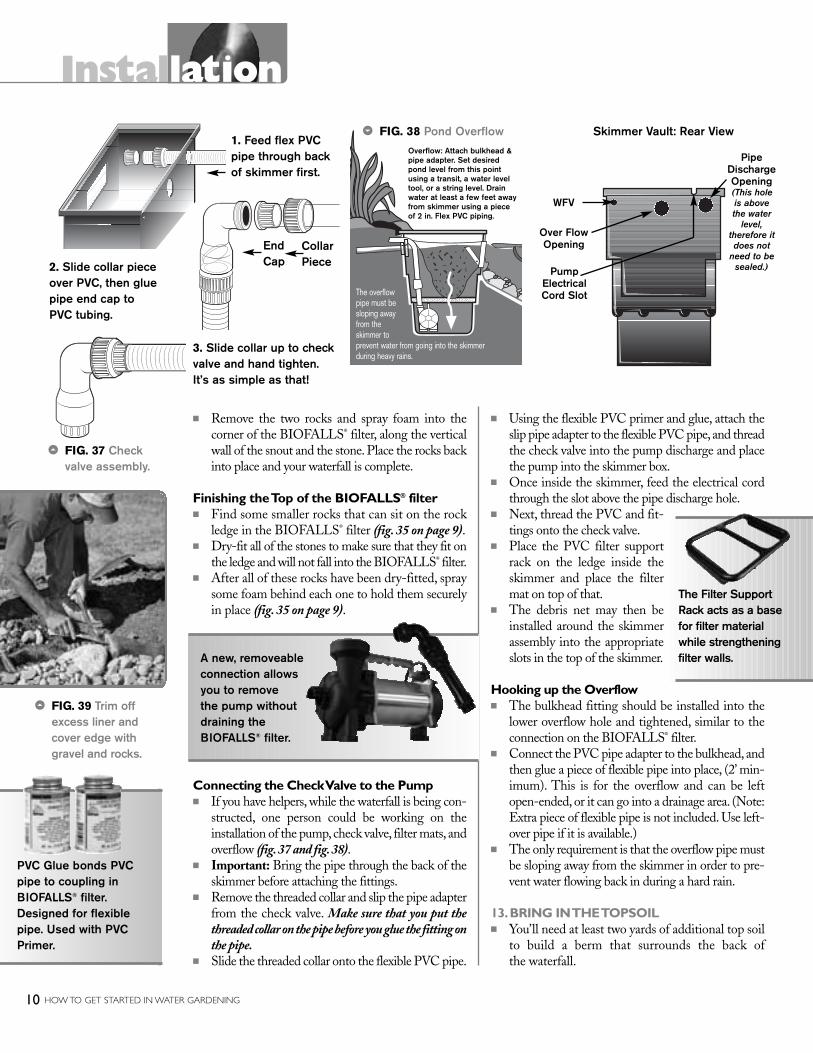
Connecting the Check Valve to the Pump■ If you have helpers, while the waterfall is being con-
structed, one person could be working on theinstallation of the pump,check valve, filter mats, andoverflow (fig. 37 and fig. 38).
■ Important: Bring the pipe through the back of theskimmer before attaching the fittings.
■ Remove the threaded collar and slip the pipe adapterfrom the check valve. Make sure that you put thethreaded collar on the pipe before you glue the fitting onthe pipe.
■ Slide the threaded collar onto the flexible PVC pipe.
■ Using the flexible PVC primer and glue, attach theslip pipe adapter to the flexible PVC pipe,and threadthe check valve into the pump discharge and placethe pump into the skimmer box.
■ Once inside the skimmer, feed the electrical cordthrough the slot above the pipe discharge hole.
■ Next, thread the PVC and fit-tings onto the check valve.
■ Place the PVC filter supportrack on the ledge inside theskimmer and place the filtermat on top of that.
■ The debris net may then beinstalled around the skimmerassembly into the appropriateslots in the top of the skimmer.
Hooking up the Overflow■ The bulkhead fitting should be installed into the
lower overflow hole and tightened, similar to theconnection on the BIOFALLS® filter.
■ Connect the PVC pipe adapter to the bulkhead,andthen glue a piece of flexible pipe into place, (2’ min-imum). This is for the overflow and can be leftopen-ended, or it can go into a drainage area. (Note:Extra piece of flexible pipe is not included. Use left-over pipe if it is available.)
■ The only requirement is that the overflow pipe mustbe sloping away from the skimmer in order to pre-vent water flowing back in during a hard rain.
13.BRING IN THE TOPSOIL■ You’ll need at least two yards of additional top soil
to build a berm that surrounds the back of the waterfall.
Installation
10 HOW TO GET STARTED IN WATER GARDENING
4 FIG. 39 Trim offexcess liner andcover edge withgravel and rocks.
4 FIG. 37 Checkvalve assembly.
1. Feed flex PVCpipe through backof skimmer first.
2. Slide collar pieceover PVC, then gluepipe end cap toPVC tubing.
3. Slide collar up to checkvalve and hand tighten.It’s as simple as that!
CollarPiece
EndCap
The overflowpipe must besloping awayfrom theskimmer toprevent water from going into the skimmerduring heavy rains.
3 FIG. 38 Pond Overflow Skimmer Vault: Rear ViewOverflow: Attach bulkhead &pipe adapter. Set desiredpond level from this pointusing a transit, a water leveltool, or a string level. Drainwater at least a few feet awayfrom skimmer using a pieceof 2 in. Flex PVC piping.
WFV
PipeDischargeOpening(This hole is abovethe water
level,therefore itdoes not
need to besealed.)
Over FlowOpening
PumpElectrical Cord Slot
PVC Glue bonds PVCpipe to coupling inBIOFALLS® filter.Designed for flexiblepipe. Used with PVCPrimer.
The Filter SupportRack acts as a basefor filter materialwhile strengtheningfilter walls.A new, removeable
connection allowsyou to remove the pump withoutdraining theBIOFALLS® filter.
Installation14.BUILD THE RETAINING WALL■ Finish off the berm by building a small retaining
wall behind it. This may or may not be needed,depending on the size of the berm and it’s transi-tion into the existing slope.
15.TWEAK THE WATERFALL■ As soon as the pond is filled to its proper level (3/4”
below the top opening of the skimmer) and all thefoam is dry, you may test the pump and waterfall(you’ll need to top off the water in the pond to thesame level after the waterfalls are running).
■ Placing smaller stones on the waterfall rock willalter the flow of water.
16.TRIM THE LINER■ With the waterfall running and the pond at the cor-
rect water level, go around the perimeter of thepond with a pair of scissors and trim off any excessliner (fig. 39 on page 10).
■ Make sure that you do not do this any earlier thannow, as you may have a low spot that you will needto fix before the pond is finished.
■ Now that the liner is trimmed, we recommend cov-ering the edge of the liner with gravel and rocks.
17.MULCH THE BERM■ The entire area may be mulched and any plant
material installed if necessary.
18.CLEAN UP■ The entire site should be cleaned of all debris and
extra materials.
19. OWNER’S MANUAL/BACTERIA■ If you are installing this pond for yourself, add
the recommended dosage of bacteria and readthe maintenance and care sections of Water Gar-dening – Getting Started (fig. 45 on page 12).
■ If you are a contractor, please add the recom-mended dosage of bacteria and give the WaterGardening – Getting Started magazine to thehappy pond-owner.
20.ENJOY!■ No further explanation needed.
BUILDING THE STREAM
■ Placing the BIOFALLS® filter away from theedge of the pond is always a good idea. Thisallows the creation of a meandering stream toadd a touch of nature to your water garden.
■ We typically place the BIOFALLS® filter 6 - 10feet from the edge of the pond. Twisting andturning the stream makes it look more natural,and will require a minimum 10’ x 15’ pieceof liner.
Excavation of the Stream■ Lay out the stream from the BIOFALLS® fil-
ter to the pond. The typical width of a streamshould be between 2 - 4 feet wide (Note: thewider the stream, the less movement of water youwill have). Vary the width of the stream through-out to mimic what would occur in nature.
■ Excavate the stream to a depth of 6 inches to 1 foot(fig. 46 on page 12). Vary the depth in the cornersand in smaller pools along the run of the streamto allow water to pool in those areas (fig. 43).
HOW TO GET STARTED IN WATER GARDENING 11
great water loss
thick waterfallstone
foam
little water loss
foam
thin stone,1/2”-1”
little water loss
foam
thin stonerecessed into
Leave 1/2” to 1”exposed above liner
4 FIG. 40 An oftenoverlooked part ofstream construction isthe thickness of yourwaterfall stone. Waterwill eventually seepthrough the foamjoints if the pumps areoff for prolongedperiods of time. Thewater will slowly seeparound the thick stone,resulting in water lossequal to the thicknessof the stone.
4 FIG. 41 By using a thinstone, the situation canbe easily remedied.
4 FIG. 42 If your onlyoption is a thickwaterfall stone, usethe above method.
Excavated soil from pond & stream
Upper Stream 55’
Deep Stream 20’ 10’
Seam Tape
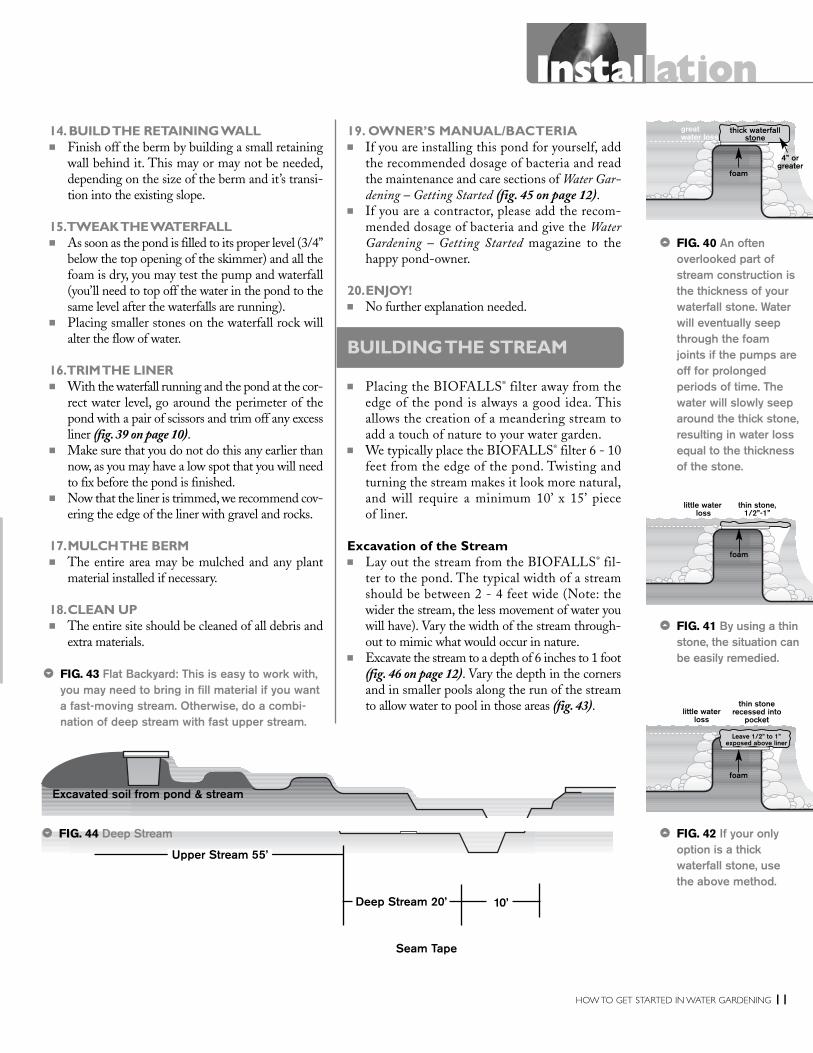
3 FIG. 43 Flat Backyard: This is easy to work with,you may need to bring in fill material if you wanta fast-moving stream. Otherwise, do a combi-nation of deep stream with fast upper stream.
3 FIG. 44 Deep Stream
4” orgreater

■ If your stream is being built on a slope, you willneed to create a few waterfalls in it (see fig. 2 onpage 3). To hold the water back when the pumpis shut off, you need to build a check dam at eachwaterfall (fig. 40-42 on page 11).
■ To make the stream look much more natural,you should place some larger boulders into it.Tomake this work properly, excavate the area wherethe rock will be placed a few inches deeper.Thiswill allow the rock to sit into the bottom of thestream, not just on the streambed (fig. 46).
■ Once you have the stream excavated, you can placethe liner into it.
Installation of Liner and Rocks■ Connect the liner to the BIOFALLS® filter as described above.■ Where the liner overlaps the pond, you will not need to seam the
liners together as long as you have a 6-inch waterfall or higher.Simply overlap the stream liner over the top of the pond liner.
■ Place rocks of varying sizes around the perimeter of the stream.During excavation of the stream, you dug a few areas where largerrocks will go.Put some of the Black Waterfall Foam into these div-ots and place the rocks on top. The foam will allow the water tobe diverted around and over the rocks instead of underneath them.
Deep Streams■ A deep stream is simply an extension of the pond itself (fig. 44
on page 11). By adding a deep stream to a pond, you allow thefish from the pond to swim to other areas that would otherwisenot be possible. One important construction technique you willneed to master, is a double-seam.
Installation
12 HOW TO GET STARTED IN WATER GARDENING
USEFUL CALCULATIONSFormulas to determine amount of rock:Quantity of boulders in a pond (tons) = length (ft.) x width (ft.) / 65
Quantity of 1/4”– 3” gravel (tons) = tons of boulders x .45
Quantity of boulders used in a stream = 3⁄4 ton per 10’ stream length
Quantity of 1/4”– 3” gravel (tons) = 1⁄3 ton per 10’ stream length
Approximate 3/4–1-1⁄4 tons of boulders to build around the face of yourStandard BIOFALLS® filter.Formula to determine approximate gallons in a pond:Gallons = length (ft.) x width (ft.) x avg. depth (ft.) x 7.48
4 FIG. 45WaterGardening -Getting Startedis your owner’smanual, savethis for futurereference.
6” - 1’
6” - 1’ 6” - 1’
2’ - 4’ (Typical) 6” - 1’
EPDM TapePrimer cleansand preparesliner for seaming.(Sold separately)
1. Clean about six inches on eachside of the seam edge with water.Then, thoroughly dry the linersand follow with primer. This elimi-nates dust and creates a tackysurface for the cover tape.
EPDM Liner is seamed using this taping process. After youcomplete the seam, the rest of the deep stream is handled just likethe rest of the pond was. For more information on streams, checkout www.aquascapedesigns.com.
2. Fold back the top sheet andclean both surfaces as shown,first with water. Then thoroughlydry the liners and follow withAquascape Designs’ Tape Primer.
3. Apply the seaming tape to theedge of the folded sheet, leavingabout 1/8 inch hanging over theedge of the liner. Leave the paperbacking in place at this time.
1. Overlap the two sheets to bejoined approximately threeinches. Use a plywood board, orother hard surface, under theliner seam for stability.
USING DOUBLE-SIDED SEAMING TAPE:
5. Flip the taped liner sheet backover the lower sheet, leaving thepaper backing in place.
6. Reach under the top sheet,grab paper backing, and pull outslowly while applying pressure tothe seam to remove any bubbles.
7. Go back over the seam asnecessary to ensure that alltrapped bubbles have beenremoved, and maximum adhesionachieved.
USING ONE-SIDED COVER TAPE:
1 32
5
7
6
1
4. Press the tape firmly intoplace, working the tape from thecenter-line outwards to removeany bubbles.
4
4. Go back over the seam asnecessary to ensure that alltrapped bubbles have beenremoved and maximum adhesionachieved.
4
3. Peel back the paper backing atone end and carefully press theexposed tape into place at theend of the seam. Reach underthe cover tape and slowly peeloff the paper backing, whilepressing tape into place.
3
2. Position the six inch wide,sticky, one-sided tape over thecenter of the seam.
2
SEAMING TWO SECTIONS OF LINER TOGETHER
3 FIG. 46 Stream Bed Cross Section
IDD04043037 • 188
OR