Embed Size (px)
Citation preview

WebTA Access for SESAM/SQL V7.0
README document
All rights reserved, including intellectual property rights. Technical data subject to modifications and delivery subject to availability. Any liability that the data and illustrations are complete, actual or correct is excluded. Designations may be trade-marks and/or copyrights of the respective manufacturer, the use of which by third parties for their own purposes may infringe the rights of such owner. Copyright (C) Fujitsu Technology Solutions 2011

Fujitsu Technology Solutions 2011 Page 2 of 27
Table of Contents Access for SESAM Application Programs under Web Transactions ........................................ 3 1 System Requirements ...................................................................................................... 3 2 Installing Web Transactions ............................................................................................. 4 3 Installing the Application ................................................................................................... 4 4 Configuring the Application before First Run .................................................................... 5 5 Starting the Dialog Application and general Information .................................................. 9 6 User Administration ........................................................................................................ 10 7 Working with Application Programs ................................................................................ 14 8 Terminating the Application ............................................................................................ 17 9 Other Configuration Steps .............................................................................................. 18
9.1 Modifying the Time Periods for the Implicit Timeout ............................................... 19 9.2 Refining the Role Concept ...................................................................................... 20 9.3 Activating the "K2" Function Key in the Application Supplied ................................. 25 9.4 Customizing the Host Application Format Display .................................................. 26
10 Other Notes .................................................................................................................... 27

Fujitsu Technology Solutions 2011 Page 3 of 27
Access for SESAM Application Programs under Web Transactions A WebTransactions solution has been developed for the SESAM/SQL PC interfac-es of the Utility Monitor, SESAM Monitor and SESADM application programs. Web-Transactions (WebTA) enables you to operate the SESAM application programs on the Internet or intranet using a browser. WebTA only requires a browser (preferably Internet Explorer) to be installed on your PC. No special emulation software is needed. This ensures that WebTA is almost completely independent from the Win-dows version installed on the PC. This document describes the requirements and installation steps necessary to run the application.
1 System Requirements The WebTA application created for SESAM/SQL runs on various platforms (BS2000/OSD, UNIX, Linux, Solaris and Microsoft Windows) with WebTransaction (OSD) as of version 5.0. The WebTA software connects the clients to the host application. In order to connect a host application, you will need a computer running a web server as well as the WebTA software. This computer needs to have the web server, WebTransactions and the accompanying base directory of the WebTA application for SESAM/SQL in-stalled. The host application and the WebTA application can run on the same BS2000 host. System and software requirements for the system configuration and installation of Web Transactions, in particular for the web server to be used (depending on the sys-tem platform used) are detailed in the manual entitled " WebTransactions, Connec-tion to OSD Applications V7.5", Chapter 2, "Installing WebTransactions". (URL: http://manuals.ts.fujitsu.com). "WebLab" development software is required for installation and configuration of the application. WebLab runs on Microsoft Windows platforms. Every product version of WebTransactions comes complete with WebLab and an administration program for the applications. All requirements for installing, developing and administering a Web-TA application using the WebLab development software are detailed in the manuals entitled "WebTransactions, Concepts and Functions V7.5" and "WebTransactions, Connection to OSD Applications V7.5". (URL: http://manuals.ts.fujitsu.com). The application developed for SESAM/SQL has been optimized for Internet Explor-er and guarantees a smooth operation if this browser version is used on the PC clients.

Fujitsu Technology Solutions 2011 Page 4 of 27
2 Installing Web Transactions If you have not already done so, you should first install WebTransactions (OSD) on the same computer where you will be installing the WebTA application. The manual entitled "Web Transactions, Connection to OSD Applications V7.5", Chapter 2, "In-stalling WebTransactions" explains the requirements that need to be taken into ac-count and how to proceed. (URL: http://manuals.ts.fujitsu.com). You will also need to install the WebLab development software on a 32-bit Windows computer if you have not already done so. You will be installing and configuring the application from this computer. The WebLab administration program should be used to create some of the conditions for installing the application later:
After launching the administration program, where necessary you should first en-ter any licenses required for working with WebTA.
In order to prepare the installation of the application you also need to create a pool for the base directory and enter all the users who are authorized to work with the pool and the directory to be installed in it. The steps required are detailed in the manual "WebTransactions, Connection to OSD Applications V7.5", Section 3.1, "Managing WebTransactions Servers".
Once these operations have been completed, you can install the supplied base directory of the WebTA application for SESAM/SQL in the pool created.
3 Installing the Application Use WebLab to install the application. Only users who are entered in the WebTA administration program and therefore have the relevant authorization can perform the installation. The "wt-sesam.zip" archive supplied contains the base directory of the applica-tion. The base directory in turn contains all the templates and files necessary for the procedure. The directory comes as a packed archive. In order to use the application you will need to unpack the base directory on the tar-get computer (the computer on which WebTransactions and the WebServer have been installed). This will create the application on this host. The WebLab develop-ment software transfer and packing wizard will help you with the installation. The ex-act procedure for unpacking a base directory is explained using an example in the "WebTransactions, Concepts and Functions V7.5", Chapter 6.8.3, "Unpacking an Application". You need to specify the connection parameters valid for the target host when un-packing the application. Using these details, the paths to the internal WebTransac-tions program calls contained in the application will be automatically adapted to the

Fujitsu Technology Solutions 2011 Page 5 of 27
target host. Once the base directory has been created, WebLab will connect to the application created. Before you can run the application some additional configuration steps are necessary. These also need to be performed using WebLab. The following section describes these steps.
4 Configuring the Application before First Run In order to enable the application to run in your environment, you must set or modify the connection parameters for your host application. Set or modify the following: host name; user ID; account name and password; start procedures for the SESAM application program in the host user ID. These parameters are located in base direc-tory templates which are run when starting a supported SESAM application program. The WebLab development software is required to customize these templates to your application. WebLab will assist you in modifying files in the base directory. You can find a general description of how to use WebLab in the "WebTransactions" manual, "Concepts" in Chapter 7, "The WebLab Development Environment". WebLab's online help will provide you with detailed extensive help. In order to modify files in the base directory, you will first need to use WebLab to connect to this directory. If you have just unpacked the base directory using WebLab this connection is already established. If there is not yet any active connection you can connect via the "file/connect" command on the WebLab menu bar. The base directory of a WebTA application is structured hierarchically. The base di-rectory's tree structure will be displayed on the left-hand side of the WebLab main window after the connection has been established. The display and handling of the tree structure is similar to that of Windows Explorer. The right-hand side of the main window (the WebLab working area) displays the file which has been selected for processing on the left hand-side.

Fujitsu Technology Solutions 2011 Page 6 of 27
SESAM/SQL integrates all three supported application programs (SESADM, SESAM Monitor SESMON, Utility Monitor SESUTI) into a single WebTA application. Each of these programs has a file in the base directory containing the parameters required to run the host application. These files can be found in the "config/forms" subdirectory of the base directory. All current templates of the application are located in this subdi-rectory:
The following files need to be customized to match the supported programs:
wtcFrame_auswahlsesadm.htm for SESADM
wtcFrame_auswahlsesmon.htm for the SESMON SESAM monitor
wtcFrame_auswahlsesuti.htm for the SESUTI utility monitor

Fujitsu Technology Solutions 2011 Page 7 of 27
In order to customize these files to match your application, you will need to perform the following steps for each of the files:
In WebLab, open the file to be edited. In this example it is the file used to se-lect the utility monitors.
The first part of the file defines the HTML page which will be displayed in the browser when this template is run. You can start each SESAM application program in the WebTA application more than once in parallel. You might need to do this, for example, if you wish to use the utility monitor with different DBHs on different systems. You therefore have to determine which program you want to run prior to the start. This is achieved via a selection list presented to the user in the browser. Customize this list to your individual application:

Fujitsu Technology Solutions 2011 Page 8 of 27
The second part of the file contains a "receive script", which will be run after the data sent by the browser has been received. A receive script is flagged by a "<wtonreceivescript>" tag. WebLab marks this tag in color. This script as-sesses the user's choice made via the selection list and sets the relevant con-nection parameters required to run the program. Enter the connection parame-ters of your application here following the pre-defined example. You need to know the following parameters to run the program:
Name of the host computer: WT_SYSTEM._sesamData.host
User identification: WT_SYSTEM._sesamData.userid
ID account: WT_SYSTEM._sesamData.account
ID password: WT_SYSTEM._sesamData.password
Start procedure required for the applications The command specified here will initiate a procedure which needs to exist in the ID specified and which starts the respective application program:
WT_SYSTEM._sesamData.sesadmPrc (for SESADM) WT_SYSTEM._sesamData.sesmonPrc (for SESMON) WT_SYSTEM._sesamData.utimonPrc (for UTIMON)
Save the modified files. Once these modifications have been completed you can run the application.

Fujitsu Technology Solutions 2011 Page 9 of 27
The preceding section described which configuration steps must be implemented in the application before you can begin your WebTa session on the client PC. The fol-lowing sections will explain how to start the dialog application in the browser and how to use the application.
5 Starting the Dialog Application and general Information The user launches the WebTA application on the client PC in the browser by calling up its home page. The "start.htm" home page is located in the "wwwdocs/html" subdirectory of the application's base directory. Enter the complete path (URL) for this home page in the browser to run the application: http://<hostname>/<virtual path>/<basedir>/wwwdocs/html/start.htm <virtual path> is the name which you assign for the pool under which the base direc-tories of your WebTransactions applications are located during administration of the WebTransactions server. The WebTA administrator must advise the user of the application on the PC client about the path. The home page links to the first template of the application, namely the user administration sign-on form (SingleSignOn). This will start the WebTA ses-sion. The next section describes the user administration functions. In order to prevent conflicts with the browser control buttons (e.g. "Back") the browser launches the application in a separate window and deactivates the navigation tool bar and the browser context menu. General information about the current version of SESAM/SQL and the release level of the application you can find as information page "info.htm". This page is also lo-cated in the "wwwdocs/html" subdirectory of the application's base directory. Enter the complete path (URL) in the browser to open the information page (like start.htm, see above): http://<hostname>/<virtual path>/<basedir>/wwwdocs/html/info.htm

Fujitsu Technology Solutions 2011 Page 10 of 27
6 User Administration
The WebTA application for SESAM/SQL uses a "SingleSignOn" procedure to au-thenticate and administer users. "Single Sign On" means that once the user has logged on with his/her user identifica-tion and password when launching the application all operations subsequently run in WebTA will use the same authentication details. SingleSignOn comprises an additional role concept, which ensures controlled access to the applications administered. This means the access authorization of individual users or user groups can be defined and 'roles' can be assigned to users in a single user administration. The application can be configured in such a way that each user will only see the selection menus he/she has been granted access to in the application concerned. When you start the application in the browser, the sign-on form for "SingleSignOn" will appear:

Fujitsu Technology Solutions 2011 Page 11 of 27
Each user must log on with their username and password to access the application. "SingleSignOn" generally differentiates between a registered user (user name "ad-min"), the administrator of this user administration, and all other users. The "admin" user has been pre-defined for the application. All other users should set up their de-tails themselves. The "admin" user password has also been pre-defined as "admin". For security reasons it should be changed as follows. Enable the "Change password" ("Passwort aendern") checkbox in the template shown above and enter a new password. The "admin" user may set up and administer any other users of the application, i.e. he/she is the administrator of the user administration. After logging on, the template described below will appear. This template offers three different functions: 1) Entering and deleting other users: The user can define new users or remove existing users from the administration on the "Users" ("Benutzer") page using the respective buttons "add" ("Hinzufuegen") and "delete" ("Loeschen") shown below. The "admin" user cannot be deleted.
Modifications only become effective after "Apply" ("Uebernehmen") has been pressed. Pressing "Reset" ("Zuruecksetzen") will cancel any modification.

Fujitsu Technology Solutions 2011 Page 12 of 27
2) Checking and modifying roles assigned to users: The following roles have been pre-defined in the application:
Administrator
SESADM
SESMON
UTIMON The "administrator" role is closely linked to the user administration described here. The other roles defined in the application (SESADM, SESMON, UTIMON) are linked to the application programs that users can run. This means a user with the "SESADM" role is authorized to operate the SESADM application program in the WebTA application, a user with the "SESMON" role may operate SESAM Monitor, and a user with the "UTIMON" role may operate the Utility Monitor. If you assign all three roles to one user in the application (as can be seen in the following examples), that user may run all three application programs. In the applications portal, a logged-on user will only see the programs in the start menu which his/her role(s) allow(s) him/her to access (see section "Working with Application Programs"). The "user assignment" ("Benutzerzuordnung") page displays all users holding a role selected in the list on the left hand-side. The respective users are marked in the list on the right. You can change the users for that role by marking them in the list on the right-hand side as well.

Fujitsu Technology Solutions 2011 Page 13 of 27
3) Checking and modifying role assignments: The "role assignment" ("Rollenzuordnung") page shows the users' roles and allows you to change them. The list on the right-hand side displays all the roles of the user marked on the left. You can make changes by marking items in the list on the right - just like in the user assignment.
To exit the user administration function, click "log off" ("Abmelden"). After exiting, an end template will appear, giving you the option of starting a new session again. Adding new roles: If you wish to add new user roles to the application or fine-tune the role concept im-plemented, you have to modify the respective templates defining the user roles. The "Other Configuration Steps" section in this document describes how to do this.

Fujitsu Technology Solutions 2011 Page 14 of 27
7 Working with Application Programs All WebTA supported application programs in SESAM/SQL (SESADM, Utility Monitor SESUTI, SESAM Monitor SESMON) are integrated into a single WebTA application and can be launched and operated from a common home page, the applications por-tal. Only users who have been registered by the administrator via "SingleSignOn" will see this portal after logon and can work with the application programs. This frame provides a common web interface for the application and allows you to launch the in-dividual application programs as processes (dialog objects) with connection to the host application. The browser window which appears to the user after logon consists of the following four distinct areas: header (1), main window (2), start menu (3) and selection menu (4):
(1)
(2)
(3)
(4)

Fujitsu Technology Solutions 2011 Page 15 of 27
You can control the processes using the selection buttons in the start and selection menu. Individual processes (programs) can be individually selected to run in the start menu "new process" ("Neuer Vorgang"). The program selected will then be displayed and administered as an open process in the selection menu. You may choose another new process in the start menu at any time and switch be-tween open processes in the selection menu.
It is possible to run a process more than once from the start menu presented in the frame. The application has been programmed for SESAM/SQL in such a way that you can start all programs offered (SESADM, SESUTI, SESMON) several times in parallel. At the launch you will be prompted for additional parameters to differentiate between the parallel processes of an application program. The selection list presented here is the one defined previously when configuring the application (see section "Configuring the Application before First Run"). The process will be run once you have selected a program and enabled your selection by clicking "run process" ("Vorgang starten").

Fujitsu Technology Solutions 2011 Page 16 of 27
The selection buttons in the open processes menu will display the parameters en-tered. In this way you can easily switch between multiple open processes in the same application program. When configuring the application you will also define how to label the selection buttons.
The first format of the selected application will appear in the browser main window after successful start-up. The actual processing of the process also takes place here (the utility monitor session in the above example). The default function keys of the terminal or application ("DUE", "K" and "F" keys) appear in the browser window on buttons and selection lists ("more keys", "P keys"). In addition to these keys, the WebTA interface provides several selection buttons (which do not correspond to any of the terminal keys) to control the Web TA session. They have the following functions:
"Print" - requests a terminal hardcopy print.
"Reset" - resets entry boxes without contacting the host application.
"Refresh" - updates the host application information on this page.
"Disconnect" - closes the connection to the host application.
"Suspend" - temporarily interrupts the connection. The application for SESAM/SQL is configured in such a way that the browser pages automatically update the host application information. The user does not, therefore, need to manually update the browser pages using the refresh key. If you end an open process using the "Disconnect" button, the connection to the host application will be terminated and the respective application button will be removed
Fujitsu Technology Solutions 2011 Page 17 of 27
from the open processes selection menu. The "Cancel" button in the start menu can be used to cancel the start of a process. The "End of Session" button will end the en-tire session, including any open processes. The application for SESAM/SQL does not explicitly support the “Print” (requesting a terminal hardcopy print) and "Suspend" (interruption of the connection to the host application) key functions which WebTA provides on the Web interface. Hint to the work with the application program SESAM-Monitor SESMON: In the start menu of the SESAM performance monitor you can set the refresh time for the output mediums “File”, “Screen” and “Syslst”. Starting the Application with Web-Transaction (OSD), the refresh time for the output medium “Screen” should be gree-ter or equal than 10 seconds.
8 Terminating the Application The user explicitly ends the session from the browser. A session is ended from the user administration when the administrator logs off. In the applications portal, selecting the "End of Session" button in the start menu of the frame terminates the session. In both cases, when the session is ended an end tem-plate will be displayed. You can use this template to start a new session. For this purpose there is a link in the template: "Starting a new session" ("Start einer neuen Sitzung").

Fujitsu Technology Solutions 2011 Page 18 of 27
An implicit end of a session is triggered by a WebTA supported timeout mechanism. The session will end if no request is made to WebTA within a defined timeout. The length of time (in seconds) for which WebTA waits for this request before the timeout mechanism is triggered, is saved in the global system attributes. The timeouts are as follows:
TIMEOUT_APPLICATION - this is the application timer, i.e. the length of time in seconds for which WebTA waits for a reply from the host application.
TIMEOUT_USER - this is the user timer, i.e. the time period in seconds for which WebTA waits for a reply from the user's browser communicating with that application.
WebTA's integrated timeout concept prevents "forgotten" sessions from continuing indefinitely. However, the timeout period for host application responses should be long enough to prevent premature disconnection from the application. In SESAM/SQL, the timeouts for all supported application programs are preset at 86,400 seconds (24 hours). You can use WebLab to change these timeouts if you so desire. The next section ("Other Configuration steps") explains how to do this.
9 Other Configuration Steps You can make further modifications to the application installed. These changes are not necessary to run the application but are optional to allow you to customize the application to match your individual environment. You will always need the WebLab development software to configure the application. The application for SESAM/SQL is partly based on WTBeans, a set of components provided by WebTransactions to program templates. Therefore you will need to modify some parts of WTBeans in order to perform the configuration steps described below. A general guide to working with WTBeans can be found in the WebLab ma-nuals ("Concepts", section 3.3, "WTBeans") and in the WebLab online help. Further information about WTBeans can be found in the documentation entitled "WTBean-Collection" for WebTransactions V7.5. (URL: http://ts.fujitsu.com/products/software/openseas/webtransactions.html) This section describes the following configuration options:
1) Modifying the time periods for the implicit timeout.
2) Refining the role concept.
3) Activating the "K2" function key.
4) Customizing the host application format display.

Fujitsu Technology Solutions 2011 Page 19 of 27
9.1 Modifying the Time Periods for the Implicit Timeout
You can modify the time periods for the application and user timeouts which are de-fined in the application and which terminate the application implicitly if they are ex-ceeded. The preset value for both timers is 24 hours (see previous section). In order to modify these timeouts, you will need to customize the following files in the con-fig/forms subdirectory of the base directory:
wtcFrame_startSesadm.htm for SESADM wtcFrame_startSesmon.htm for the SESMON SESAM monitor wtcFrame_startUtimon.htm for the SESUTI utility monitor
Proceed as follows:
Open the relevant file in WebLab.
Right-click the first row of the file (with a pink background in WebLab) and se-lect "Edit WTBeans".

Fujitsu Technology Solutions 2011 Page 20 of 27
A dialog box with tabs will open where you can edit the parameters required in
the "WT_SYSTEM attributes" tab. The preset value will appear. Change the values as necessary and confirm with "OK".
Save the modified file. The new values will be applied when the application is
next started.
9.2 Refining the Role Concept
The WebTA application comes with the roles described in the "user administration" section, i.e. the "admin" administrator and the Sesadm, Sesmon and Utimon "user roles". You may use WebLab to define further user roles if your application scenario requires them. For example, you can refine or fine tune the "Sesadm" role in such a way that only a certain user can administer a specified DBH (for instance the DBH with NAM/CNF x/y on a particular system). The following section explains how to do this.

Fujitsu Technology Solutions 2011 Page 21 of 27
Use WebLab to open the "SingleSignOn.htm" file in the "config/forms" subdi-rectory. This file defines the application roles.
If you wish to add further roles, you have to specify them here. Proceed as fol-
lows. Open the "wtcList roles" list in the file by right-clicking the "<wtcList roles>" box (with a green background) and selecting the "Edit list" function.
The open "Edit wtcSingleSignOn" dialog box shows the roles already defined. You can now add further roles by using the "Add" function. You need to speci-fy the parameters of the new list item in the open dialog box. Enter the name of the new role as "Role". In this example the role would be "Sesadmxy". Note: The name must not contain any spaces or certain special characters. Once you have entered the name, WebLab will check it.
Fujitsu Technology Solutions 2011 Page 22 of 27
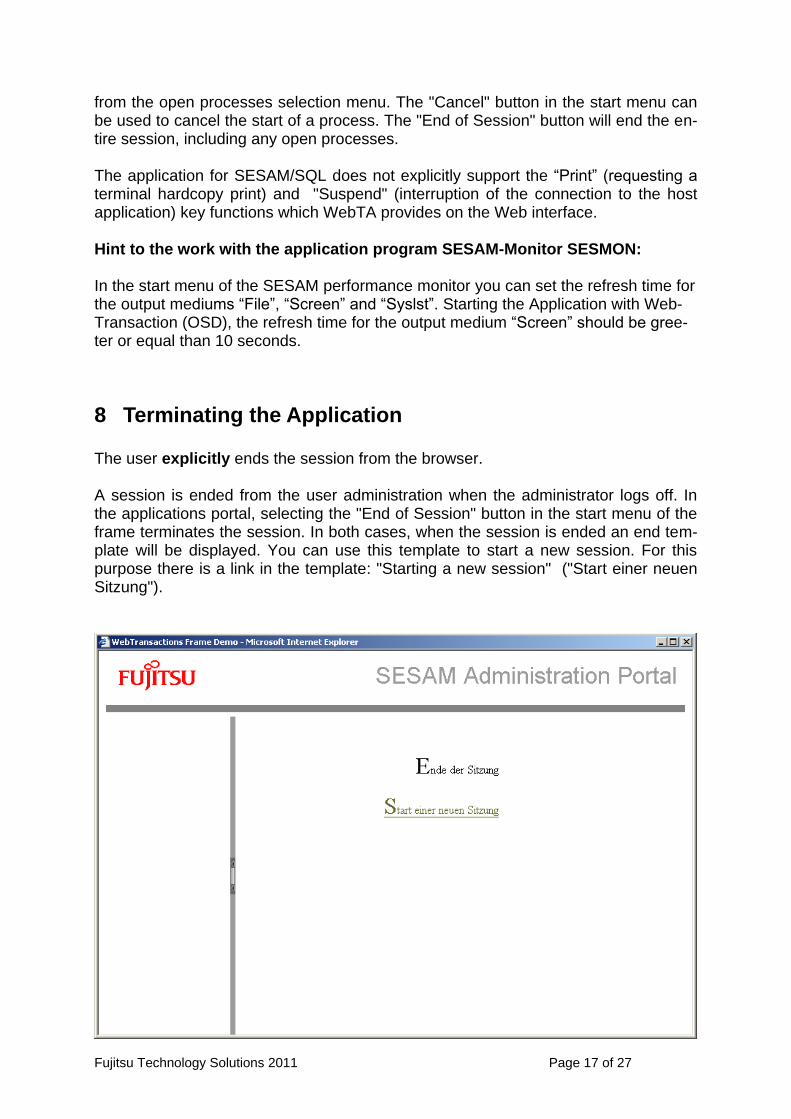
In the "1st template" specify the application template which will be displayed
to the user with that role as the first template of the application. Given that all application programs can be run from the same frame, this will still be the "wtcSingleSignOn_User" template for the new role as well. The "Ok" button saves the changes in the list. Save the modified file.

Fujitsu Technology Solutions 2011 Page 23 of 27
The link between the role and the executable dialog objects (the SESAM application programs) is stored in the "Frame.htm" file in the "config/forms" subdirectory. In order to modify this link, open this file using WebLab. In the file list, right-click the row with the green background "wtcList Dialogobjekte", then select the "Edit list" function. Edit the list as follows:
Now add a new entry with the following parameters in the open dialog box:
"Process name" - name of the new process. You can choose any process name you like. In our example it is: "sesadmxy", just like the name used before for defining the role.
"Label" - button label in the start menu. Again, you can choose any la-bel you like. In our example here it is: "SESADMXY".
"Display" – Tick this checkbox if you want the button of the new process to be displayed in the start menu.
"Role" - This box creates the link to the new user role. You therefore need to enter the name of the role previously defined in "SingleSig-nOn.htm" ("sesadmxy") here.
"Multiple" - indicates whether a multiple start can be run in the frame.
Fujitsu Technology Solutions 2011 Page 24 of 27
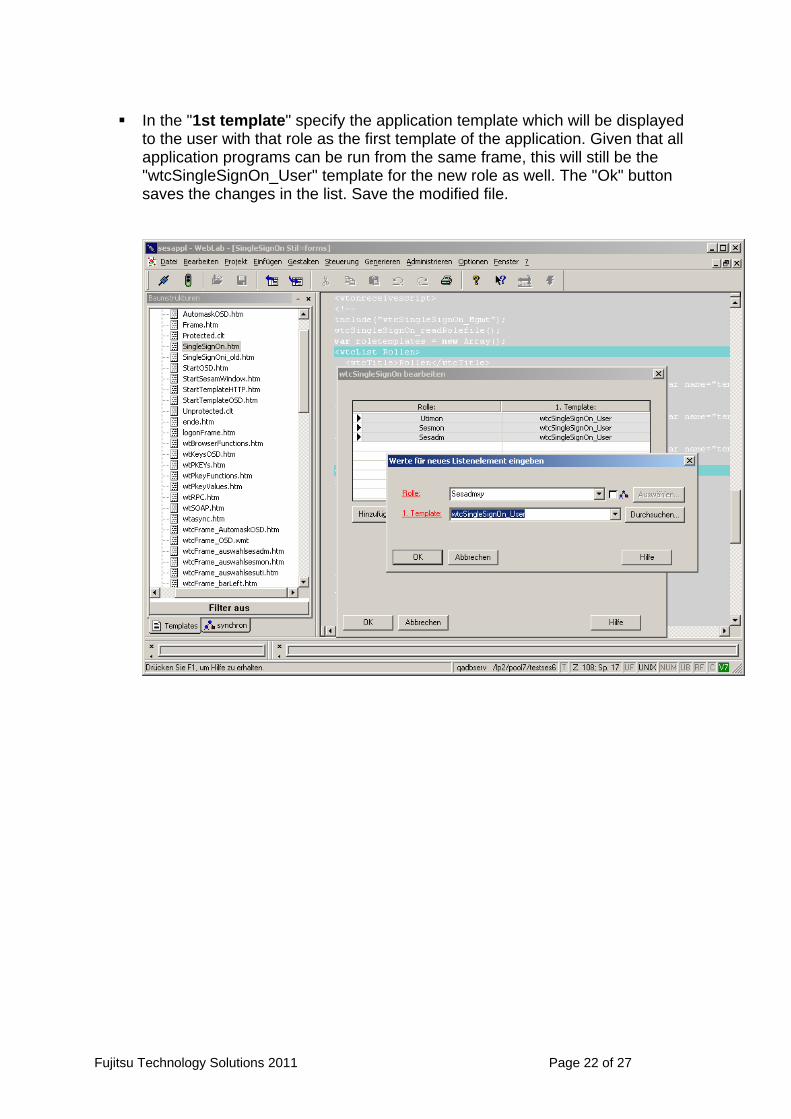
"Start template" - first template to be run if this process is selected. Specify the name of the newly selected template for "Sesadm xy" here (example "wtcFrame_auswahlsesadmxy.htm").
The changes will become effective once you click the "Ok" button. A new thread
(dialog object) is thus added to the list of dialog objects (“wtcList”) within the “Frame.htm” template. Specific methods are defined for each thread of the ”wtcFrame” object. These methods are callback methods which are called for cer-tain actions, e.g. deleting, activating or deactivating a dialog object. The methods are described in detail in the "WTBeanCollection" documentation, chapter “wtcFrame”/”methods and functions”. Please note that empty callback methods are generated when you add a new thread to the list. You must complete the me-thods by adding the appropriate code. Methods for already defined dialog objects (e.g. “sesadm”) in “Frame.htm” can serve as an example.

Fujitsu Technology Solutions 2011 Page 25 of 27
You need to re-create the start template of the new process
("wtcFrame_auswahlsesadmxy.htm"). In this example a new (blank) file can be created in WebLab and the contents of the existing wtcFrame_auswahlsesadm.htm file copied into the new file and adapted using the connection parameters for "DBH xy":
Save all modified files and re-start the application. First, log on as "admin" user
and then assign the new role (and other roles as necessary) to a registered user. Only that user will be authorized to work with the new process after he/she has logged on. No other users will see the newly defined process in the start menu.
9.3 Activating the "K2" Function Key in the Application Supplied
As already described in the section "Working with Application Programs", the function keys of the terminal or application in the browser window will appear on buttons and selection lists. The "K2" key is displayed in the window but for security reasons its function in the application is disabled. If you press "K2", a message will inform you that this function key is not supported. This prevents Web users of the application from accessing the BS2000 IDs running the application programs and any sensitive data. If you wish to

Fujitsu Technology Solutions 2011 Page 26 of 27
enable the function of this key in your application, you can use WebLab to modify the application accordingly. To do this, proceed as follows: Use WebLab to open "wtKeysOSD.htm" in the "config/forms" subdirectory:
This file defines the buttons for the functions keys which are supported by the appli-cation behind the "<wtElse>" keyword. In the fourth row ("K2" button handling), replace the operation defined after "ONCLICK=” ("alert....") with the text "wtSubmitKey(‚K2')" in accordance with the oth-er function buttons defined here (for example "K1").
9.4 Customizing the Host Application Format Display
All BS2000 proprietary mask formats of the application programs are converted to browser-enabled HTML files for the SESAM/SQL WebTA application. This is done by an automask template. The automask template automatically enables global settings for all formats (e.g. choosing the background color). However, SESAM/SQL does not feature any further format-specific definition of individual formats for the web interface of the application supplied. The general format layout in the browser basically corresponds to the mask layout in BS2000. It is standardized for all application formats and independent of format corrections which might be required in the host application.

Fujitsu Technology Solutions 2011 Page 27 of 27
WebTransactions allows you to define individual host formats using a "Capture" pro-cedure. In this way you can, for example, adapt the format layout to a Windows inter-face. The capture procedure for an OSD application is explained in the manual "WebTransactions , Connection to OSD Applications V7.5" in section "7.1", "Captur-ing with WebLab". Adjustments made to the format layout of these applications using the capture procedure will not, however, be saved in further product developments and in any corrected versions. The user will, therefore, have to repeat these adjust-ments in any updated or corrected version.
10 Other Notes Starting the Application in WebLab: During use you will connect to a WebTA application from a client PC using a brows-er. You can make changes in the application in WebLab without starting the session by opening a connection to the WebLab base directory in WebLab. WebLab provides you with another option for making changes in the application: You can edit tem-plates as you are working during a current session and check current modifications directly in the browser. If you wish to use WebLab to change templates in this way, you will need to start the WebTA session in WebLab itself rather than in the browser. For detailed instructions refer to the manual "WebTransactions, Concepts and Func-tions V7.5", Chapter 6, section 6.2.3 "Starting a session" and 6.5, "Editing templates". In order to begin a session using WebLab, you will need to specify some additional parameters required for opening a session at the start. For example, you will need to enter the name of the start template for the application. The start template is the template that should appear in the browser first during a session. Enter "SingleSig-nOn" as the name of the start template here to enable WebLab to open the session.