Embed Size (px)
Citation preview
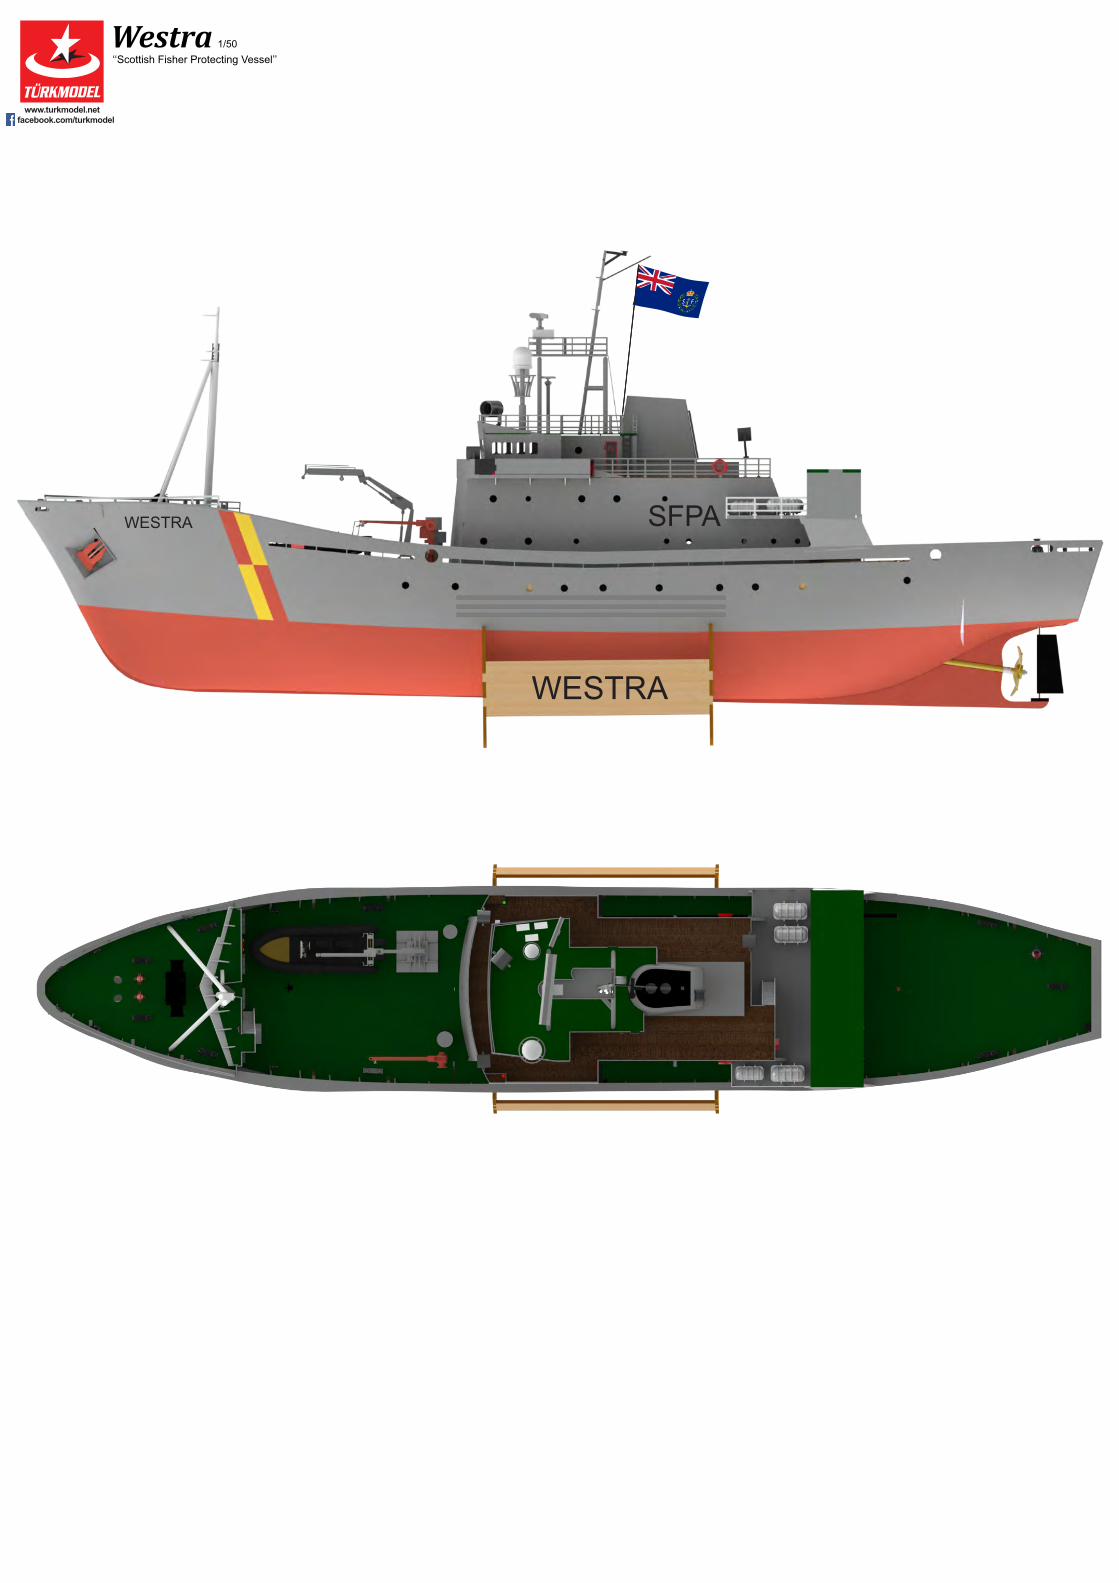
Westra1/50
‘‘Scott�sh F�sher Protect�ng Vessel’’
WESTRA
SFPAWESTRA
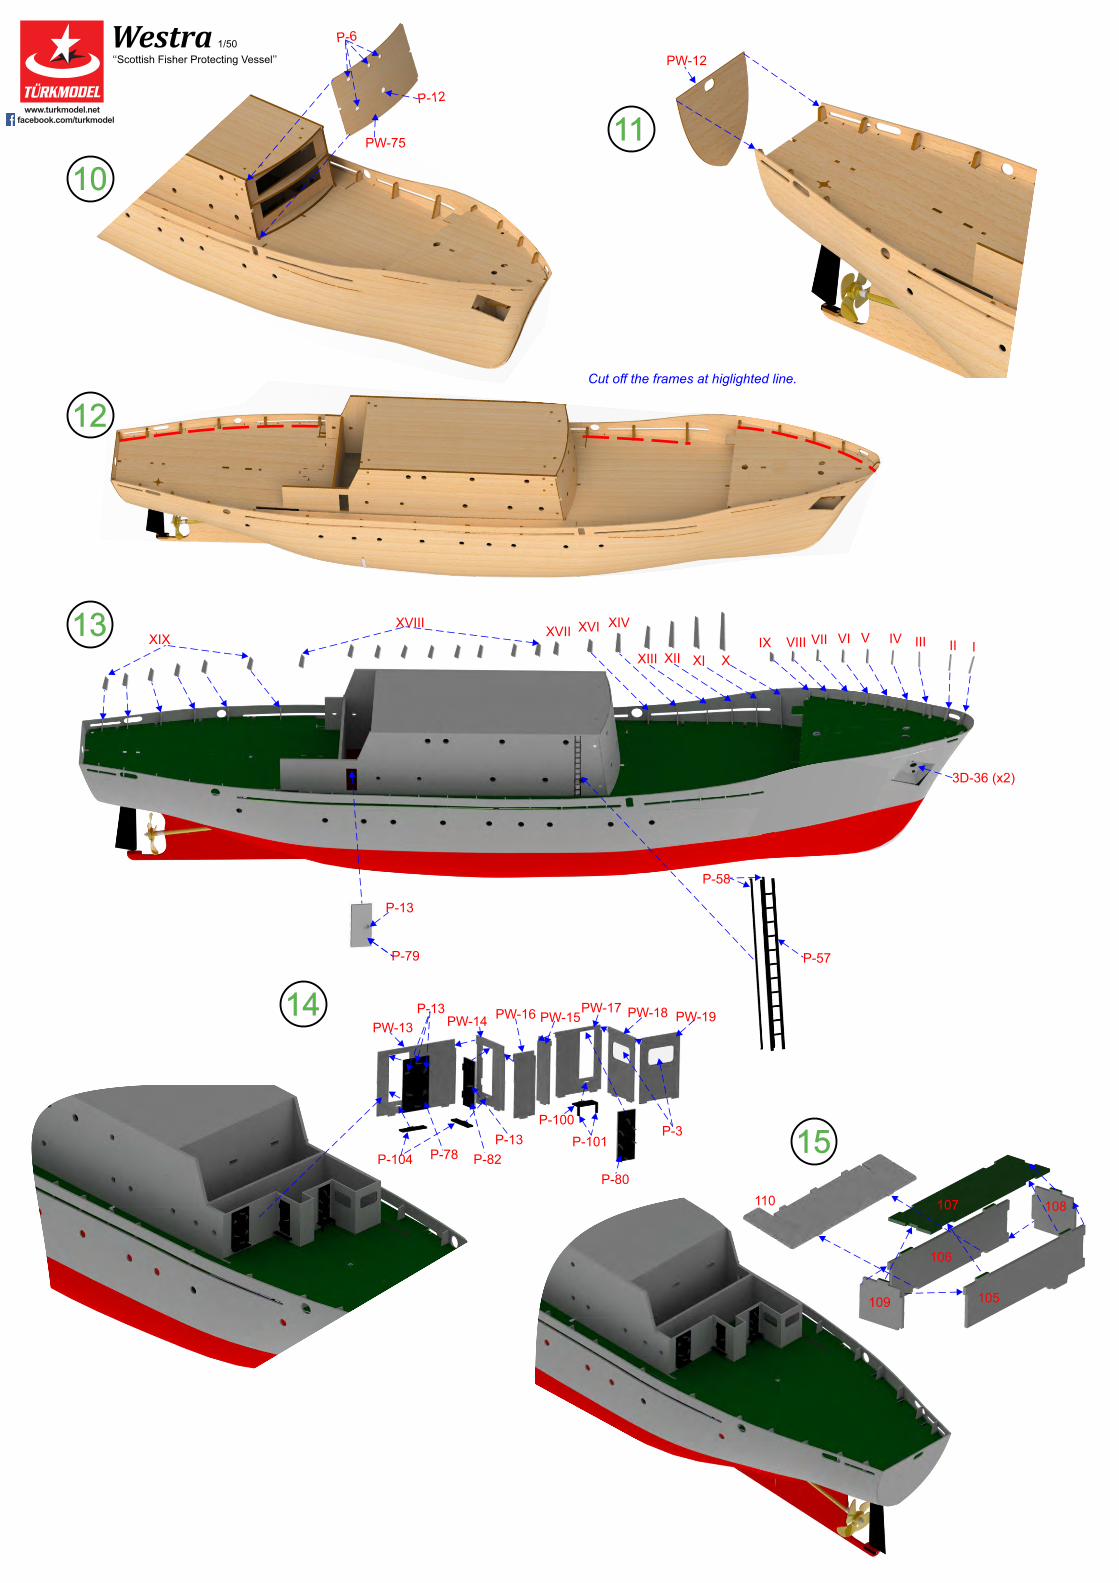
12
356789
101112
1314
1516
17
34 3233 31
29
30 28
21
22
23
24
25
56
26
100
36
35
19
20
4849
000
18
18
1
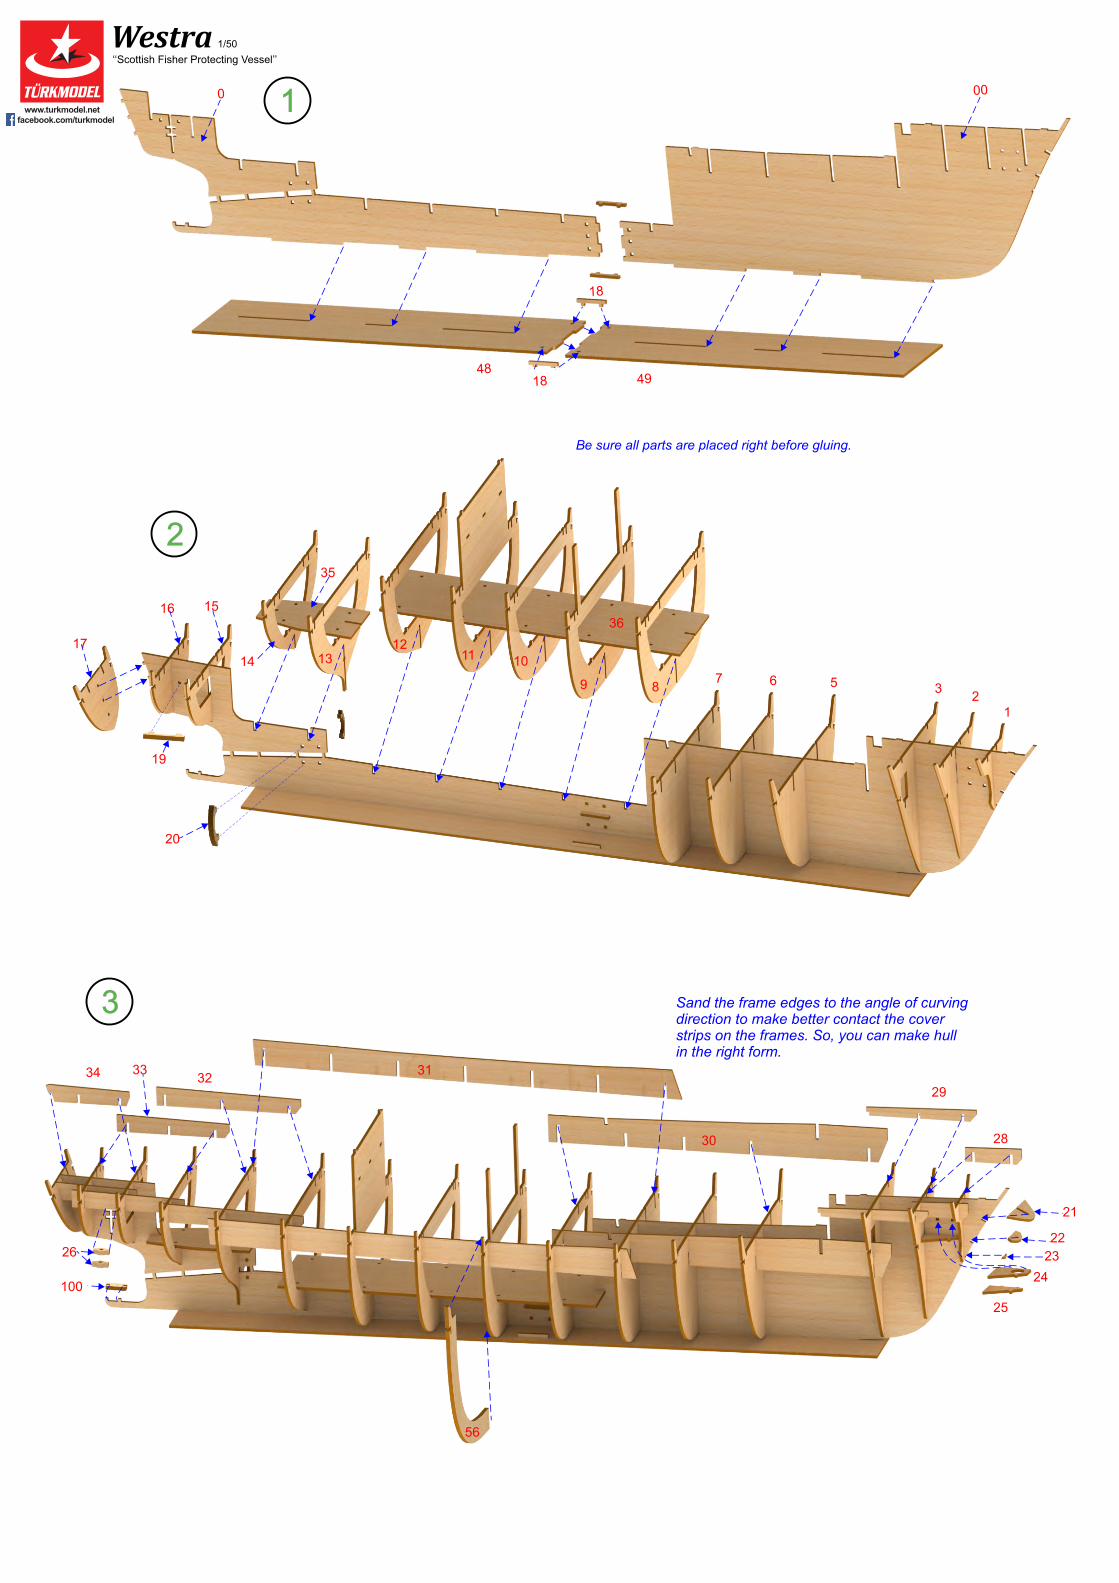
Westra1/50
‘‘Scott�sh F�sher Protect�ng Vessel’’
2
3 Sand the frame edges to the angle of curv�ng d�rect�on to make better contact the cover str�ps on the frames. So, you can make hull �n the r�ght form.
Be sure all parts are placed r�ght before glu�ng.
43
37
38
46
41 41
42 39
40
4
101
44 27
P-6
P-12
P-6
P-6
3D-41
3D-40
3D-39
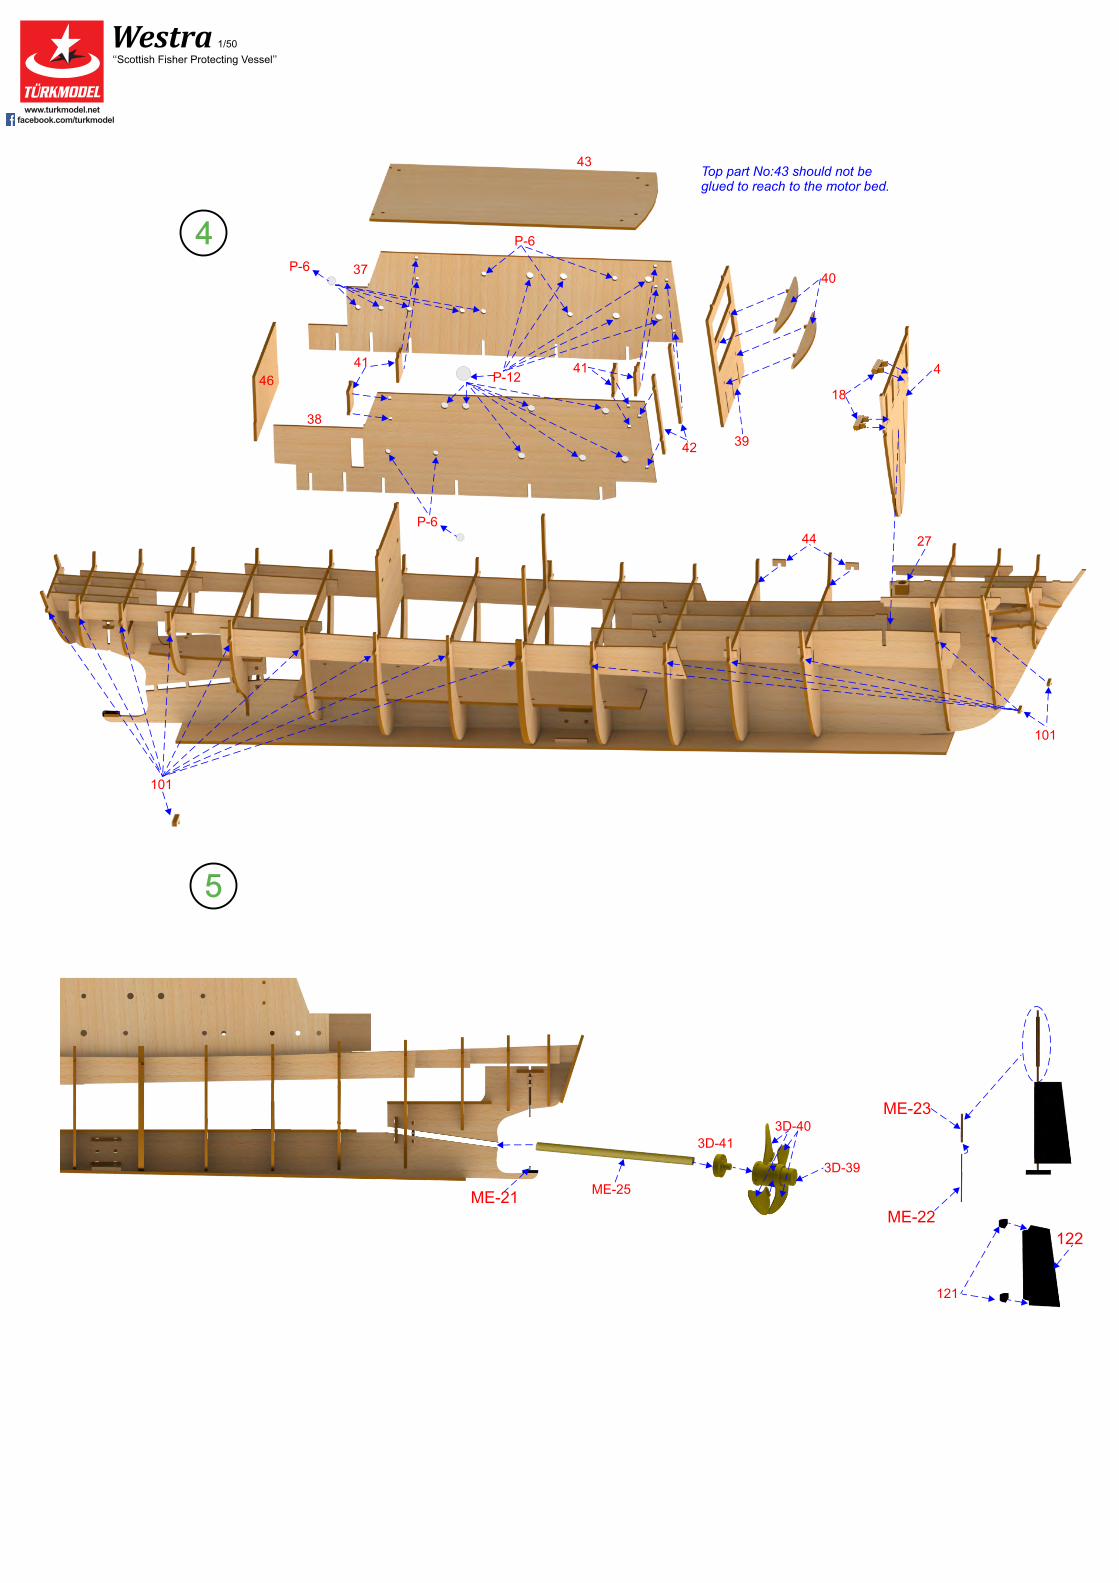
Westra1/50
‘‘Scott�sh F�sher Protect�ng Vessel’’
4
5
18
ME-25
Top part No:43 should not be glued to reach to the motor bed.
121
122
ME-23
ME-22ME-21
101
103102
PW-2
PW-1
PW-3
PW-4
PW-5
FLX-1
PW-10
PW-8
PW-9
PW-11
P-5
P-12
S-1 S-1
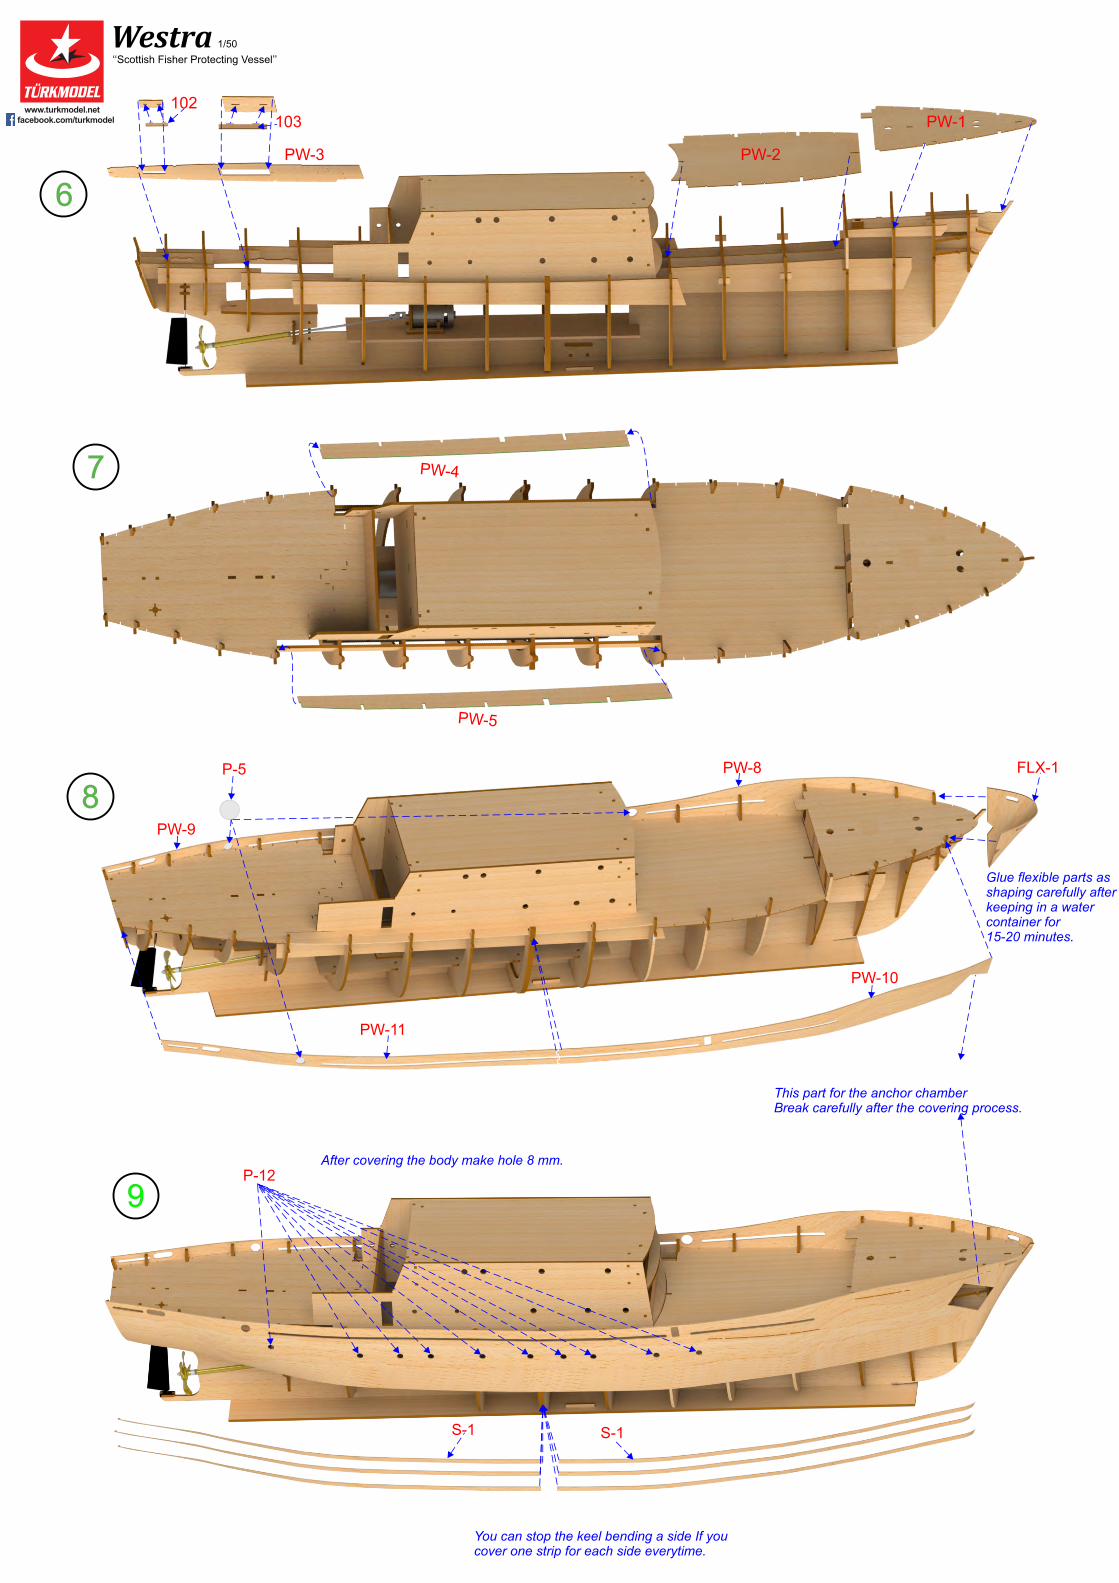
Westra1/50
‘‘Scott�sh F�sher Protect�ng Vessel’’
6
7
8
9
Glue flex�ble parts as shap�ng carefully after keep�ng �n a water conta�ner for 15-20 m�nutes.
Th�s part for the anchor chamber Break carefully after the cover�ng process.
You can stop the keel bend�ng a s�de If you cover one str�p for each s�de everyt�me.
After cover�ng the body make hole 8 mm.
110 107
106
105109
108
PW-13 PW-14 PW-15PW-16 PW-17 PW-18 PW-19
P-3
P-80
P-78 P-82
P-13
P-13
P-100
P-101
P-104
3D-36 (x2)
IIIIIIIVVVIVIIVIIIIXXIX
XXIXIIXIII
XIVXVIXVIIXVIII
P-13
P-79
PW-75
PW-12
P-12
P-6
P-57
P-58
Westra1/50
‘‘Scott�sh F�sher Protect�ng Vessel’’
10
11
12
13
15
14
Cut off the frames at h�gl�ghted l�ne.
PW-59
PW-60
PW-61
PW-74
120
PW-56
PW-57
ME-16
PW-71
PW-70
PW-73
PW-72
PW-43
PW-42
PW-44
54
PW-46
PW-47
PW-48
PW-49
PW-50
45
PW-45
PW-58
P-35
P-43
P-36
P-40P-39
P-45
P-33
P-38
P-44
P-37
47
P-59
P-60
P-63
P-64
PW-22
PW-23
PW-24
PW-25
PW-26
PW-78
3D-43
3D-51
PW-21
PW-20
PW-28
PW-32
PW-27
PW-31
PW-33
PW-34
P-81
PW-6
PW-35
PW-29
PW-30
PW-55
PW-36
PW-37
PW-41
PW-40PW-38
PW-39
PW-64
PW-65
PW-67
PW-68
PW-77
47
PW-52
PW-53
PW-51
PW-54
S-2P-1
P-2
P-4
PW-66
P-13P-83
P-84
P-10
P-11
Westra1/50
‘‘Scott�sh F�sher Protect�ng Vessel’’
PW-132
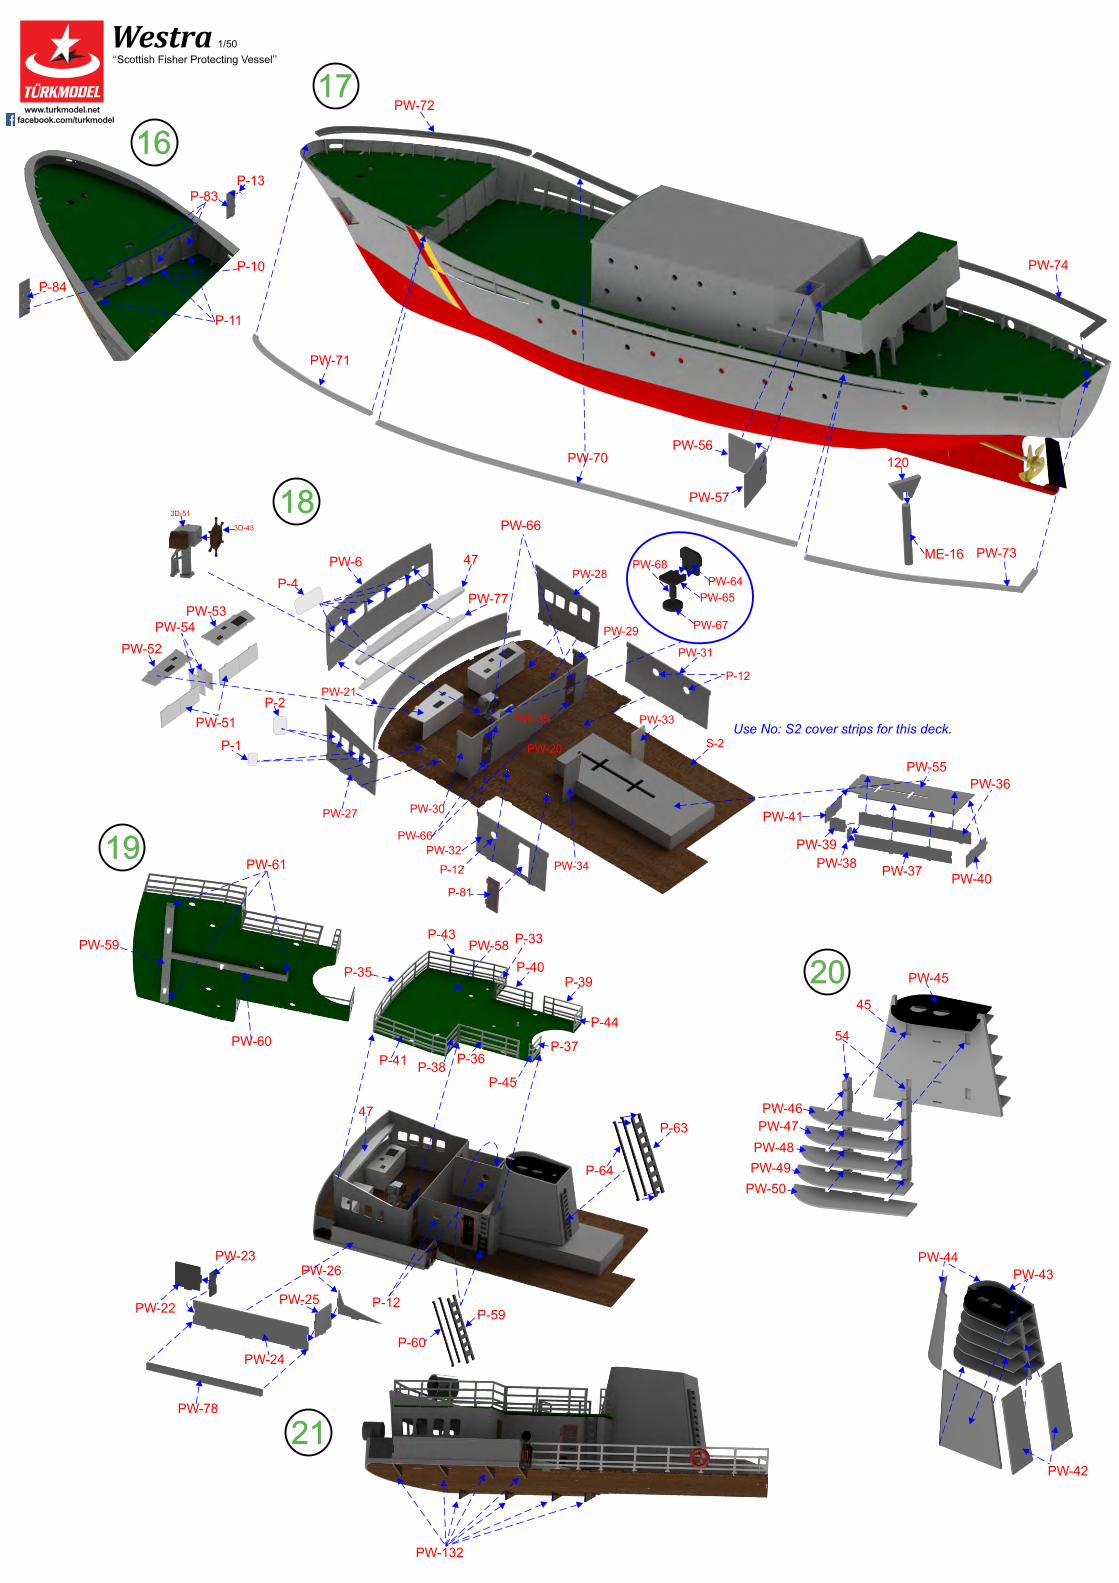
16
17
18
19
20
21
P-41
P-12
PW-66
P-12
P-12
Use No: S2 cover str�ps for th�s deck.
3D-2
3D-37
3D-38
ME-29
3D-5
3D-4 3D-6
3D-33D-4
3D-7
PW-105
PW-101
PW-101
PW-104
PW-102
PW-103
PW-106
PW-132
PW-133
3D-143D-15
3D-16
3D-17
PW-116
PW-114
PW-113
PW-115 PW-112
P-52
P-50P-49
P-61
P-62
3D-8
3D-343D-35
3D-8
3D-13
P-97
P-59
P-60
3D-123D-27
3D-28
ME-2
ME-4
ME-5
ME-3
P-109
P-110
P-112
3D-263D-9
3D-1
3D-1
R-1
3D-12
P-98
R-1
P-96
Westra1/50
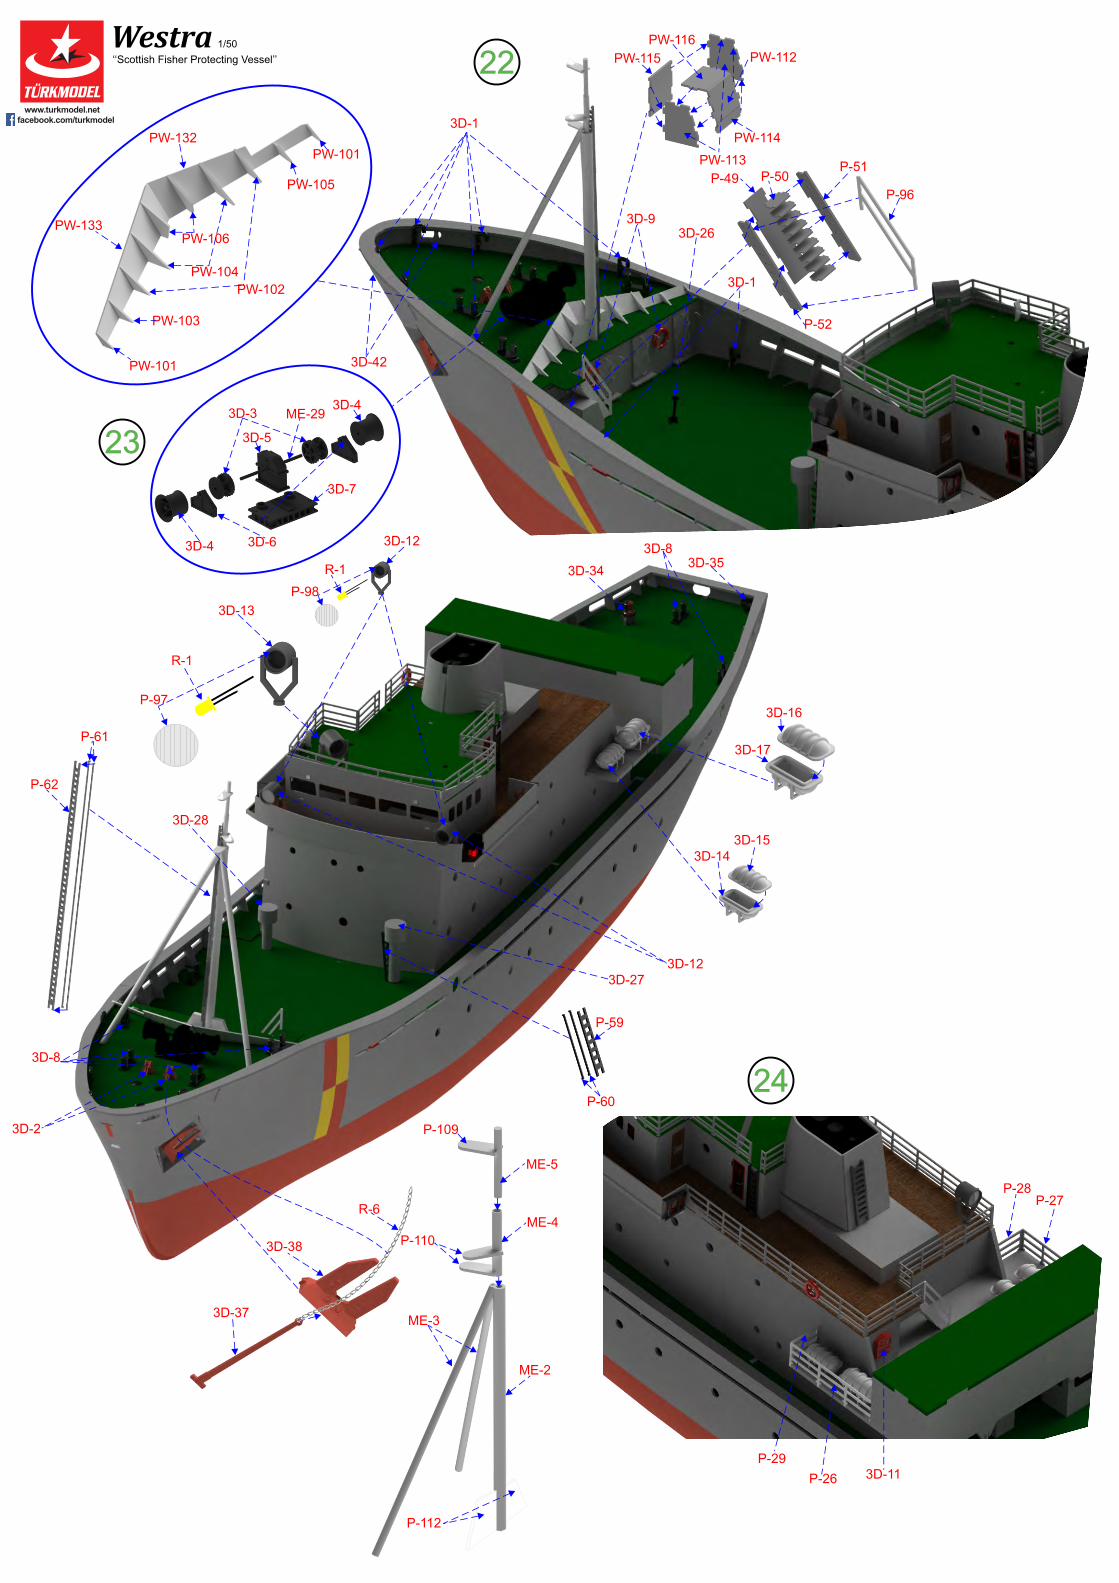
‘‘Scott�sh F�sher Protect�ng Vessel’’ 22
23
P-27P-28
P-26
P-293D-11
3D-42
P-51
R-6
24
PW-118
PW-119PW-117
PW-121
PW-126
PW-100
3D-22
3D-45
116
PW-120
ME-22
PW-124
PW-128
PW-123
PW-127117
PW-129
3D-44
ME-17
ME-20
PW-93
PW-97PW-95
PW-94
PW-98
PW-99
P-108
3D-19
P-107
PW-122
114
ME-19
ME-17
3D-20
3D-21
115
118
1193D-25
3D-23
3D-24PW-125
ME-1
PW-131
PW-130
PW-82
PW-83 PW-84
PW-85PW-86
PW-87
PW-88
PW-89
PW-90
PW-91
PW-92PW-81
PW-80 PW-79
PW-110
PW-108
PW-109PW-111
PW-107
3D-18
PW-96
3D-50
Westra1/50
‘‘Scott�sh F�sher Protect�ng Vessel’’
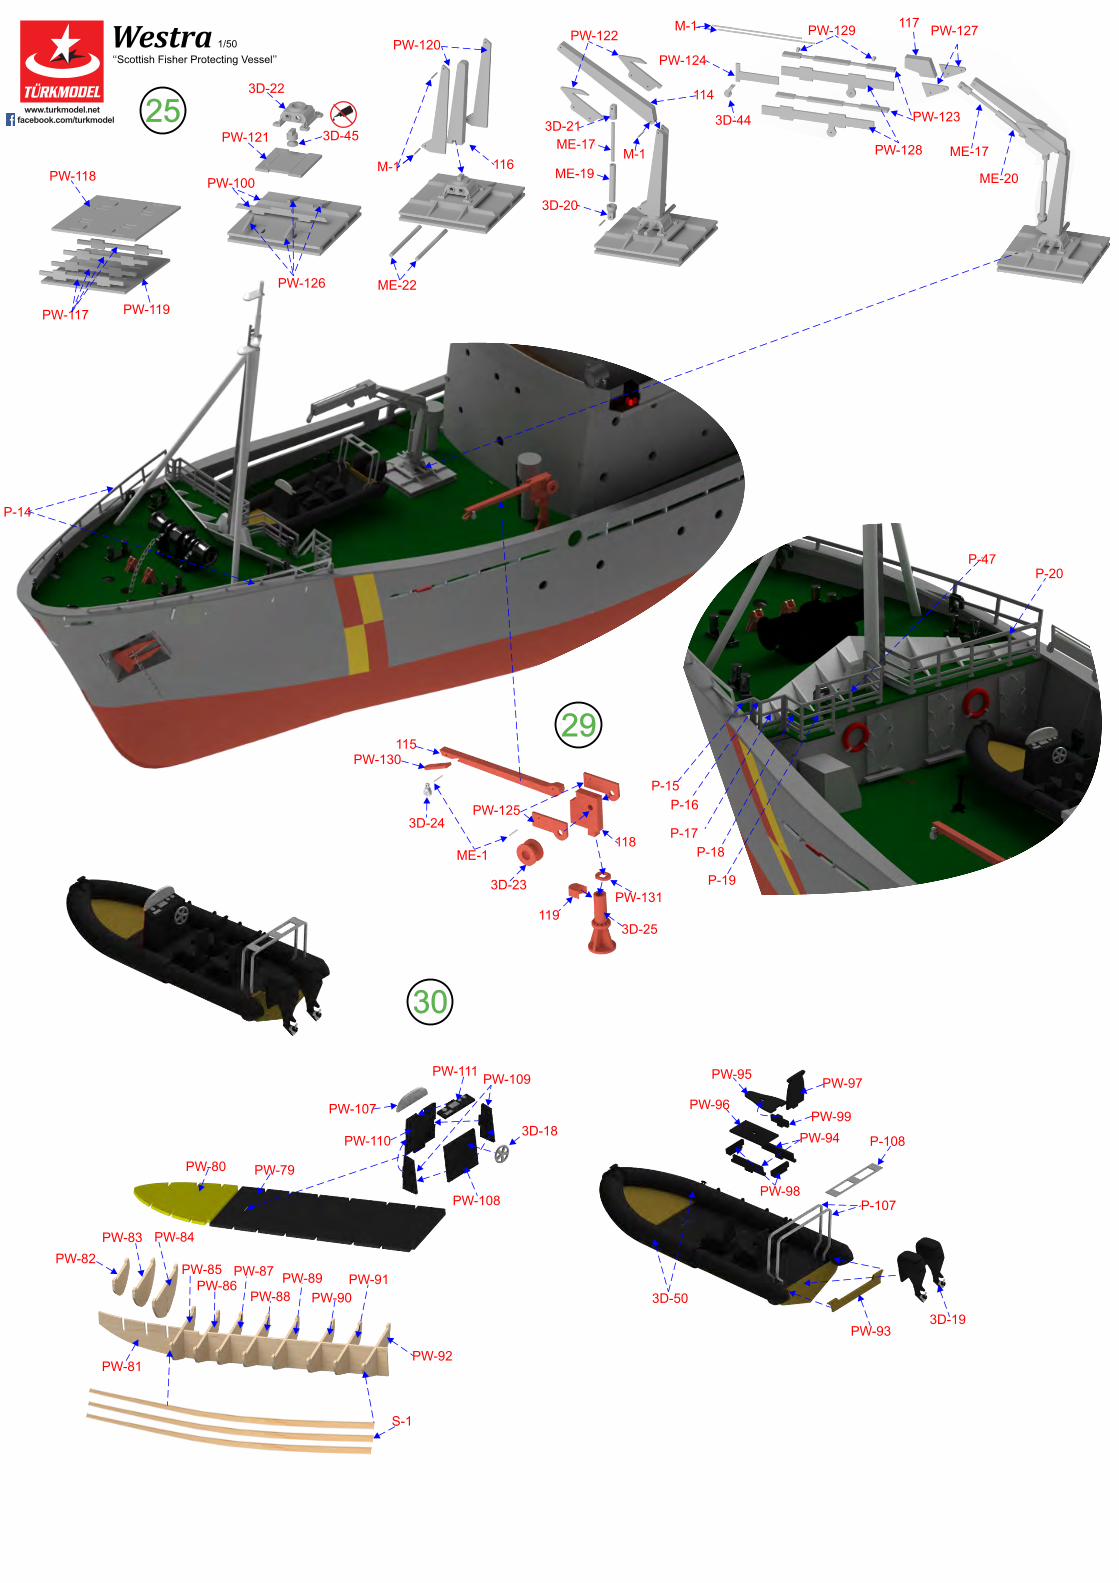
P-14
25
30
29
P-20P-47
P-19
P-18
P-17
P-16
P-15
M-1M-1
M-1
S-1
3D-10
3D-9
3D-33
ME-13ME-12
ME-12
ME-11
3D-31
3D-32
3D-46
3D-47
3D-49
3D-48
P-9
P-7
P-8
P-86
P-87
P-89
P-89
P-85
P-88
P-99P-103
P-102
P-51P-50P-49
P-54
P-53
P-95
ME-14
P-55
P-56
Westra1/50
‘‘Scott�sh F�sher Protect�ng Vessel’’
P-94
P-92P-93
P-91
P-90
26
P-23
P-24
P-25
P-21
P-22
P-31
P-42 P-32
P-34
P-30
PW-63
ME-15
ME-6
P-52
ME-7
ME-8
3D-29
ME-9
ME-10
3D-30
SAILOR
DC-4
DC-3
SAILOR
27
3D-52
3D-53
124
123
125
28
WE
STR
A
WESTRA
SFPA
PW-62
PW-69
R-7
DC-5DC-2
DC-1
S-1
Westra1/50
‘‘Scott�sh F�sher Protect�ng Vessel’’
Westra1/50
‘‘Scott�sh F�sher Protect�ng Vessel’’
R-5R-8
29
R-1
R-4
R-3
R-2
111
113
112
121
122
ME-23
ME-22
ME-21
Pass these stages If you don't bu�ld R/C model.R/C equ�pment �s sold seperatly, not �ncluded the k�t.
Hammer the bushes after lubr�cant through the shaft p�pe.
Westra1/50
‘‘Scott�sh F�sher Protect�ng Vessel’’
SERVO
BATTERYRECEIVER
30
❖
Please read the instruc�ons carefully before you start to build your model. Take notes if needed. So, you may find out the materials and the tools those you need.
❖
Use model knife to take out the parts the plywood sheets. Do not take them out with hand!
❖
Change of temperature effects on plywoods quickly. So that, do not release the plywoods. Keep t hem on a flat surface by pu�ng weight on them.
❖
You may s�ck together the wooden parts easily if you sand the brown areas caused by laser with sand paper.
❖
You should use super glue and white glue to s�ck together the wooden parts and use the super glue for metal parts.
❖
Building the keel of your model, before s�ck the frames, be sure the frames properly seated on the keel. Otherwise you can’t build the body of the model rightly. Exactly be sure that le� and right side of the frames are compatible and symmetrical.
❖
A�er building the keel of your model, before the covering, you should test the frame edges by a cover strip. You should sand with a piece of sandpaper the frame edges at the right degree to touch the strips on to the surface exactly. The curves are mostly the front and back side of the body.
❖ You should keep the strip �ps in the bowl filled with water approximately one hour. So that you may curve the strips on the curves easily these are mostly at the end and the front of the hull.
❖
You should cover the strip star�ng from the top for each side symmetrically.
❖
You should cut the upper side of the strip when overlap occurs especially at the front curve of the body.
❖
To make equal the surface of the body that caused by planking, you should sand with a piece of sandpaper
(Firstly you should use thick sandpaper, then you can apply thin sandpaper), .
You should fill the gaps a�er this processing. You may use le�over strips for wide gaps and model pu tty for small gaps.
❖
If you don’t want to appear wooden �ssue of the body of your model body; first, apply filler undercoat then sand with a thin sandpaper to make it ready to apply putty. Apply pu�y whole body and sandpaper again. Apply one more coat filler undercoat and sandpaper. You should not use very thick sandpaper to sand the pu�y and filler undercoat. You should repeat this process un�l you get the results as you want. You should apply undercoat paint to find out if any mistake appears at the body. The body gets rea dy for pain�ng a�er these applica�ons. You may use model brushes for filler coa�ng. In order to understand whether the materials (such paint, filler, undercoat, varnish, etc.) are compa�ble with each other, you should test on the unnecessary parts.
❖
Some of the model’s logo, name or the number are produced from decal paper. You should keep them in a bowl filled with warm water for two or three minutes. You should apply them to their places while releasing from their paper. You may a�ach easily If y ou apply gloss varnish to the place before applying the decals. You may apply ma�, gloss or sa�n varnish a�er this applica�on preferably.
❖
You should keep your model away from direct sunlight, heat and moist to avoid deforma�on in the course of �me.
www.turkmodel.net
www.facebook.com/turkmodel
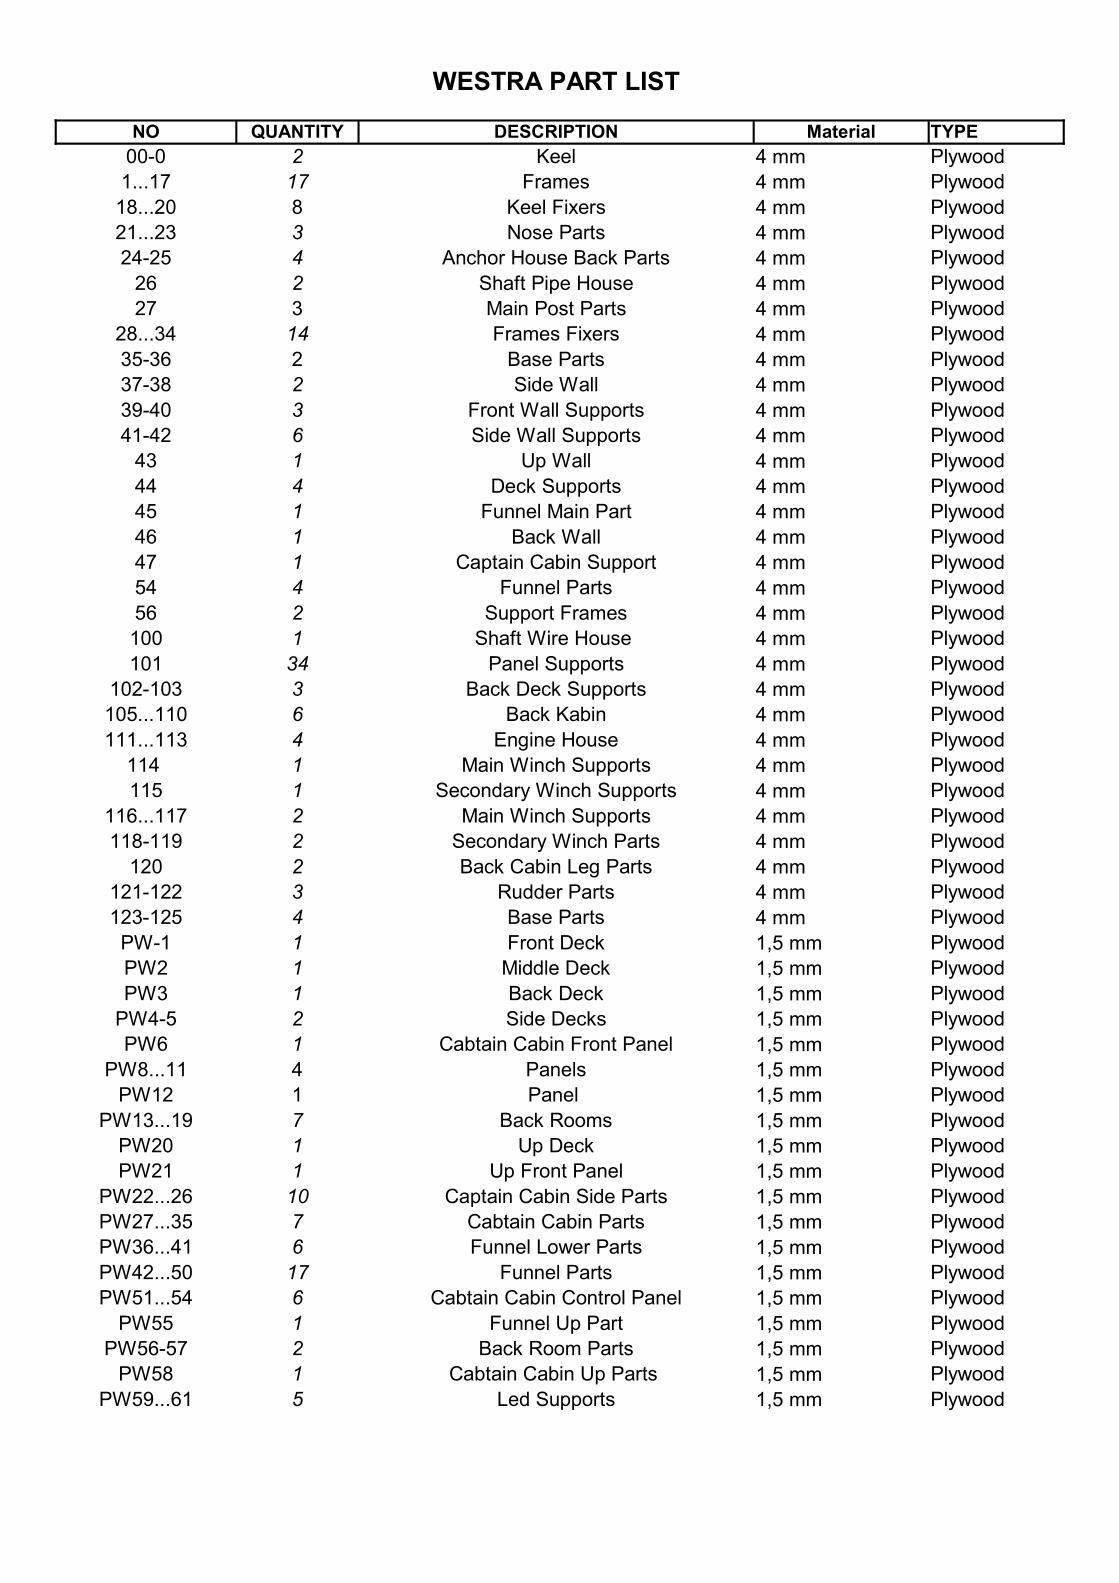
WESTRA PART LIST
NO QUANTITY DESCRIPTION Mater�al TYPE
00-0 2 Keel 4 mm Plywood
1...17 17 Frames 4 mm Plywood
18...20 8 Keel F�xers 4 mm Plywood
21...23 3 Nose Parts 4 mm Plywood
24-25 4 Anchor House Back Parts 4 mm Plywood
26 2 Shaft P�pe House 4 mm Plywood
27 3 Ma�n Post Parts 4 mm Plywood
28...34 14 Frames F�xers 4 mm Plywood
35-36 2 Base Parts 4 mm Plywood
37-38 2 S�de Wall 4 mm Plywood
39-40 3 Front Wall Supports 4 mm Plywood
41-42 6 S�de Wall Supports 4 mm Plywood
43 1 Up Wall 4 mm Plywood
44 4 Deck Supports 4 mm Plywood
45 1 Funnel Ma�n Part 4 mm Plywood
46 1 Back Wall 4 mm Plywood
47 1 Capta�n Cab�n Support 4 mm Plywood
54 4 Funnel Parts 4 mm Plywood
56 2 Support Frames 4 mm Plywood
100 1 Shaft W�re House 4 mm Plywood
101 34 Panel Supports 4 mm Plywood
102-103 3 Back Deck Supports 4 mm Plywood
105...110 6 Back Kab�n 4 mm Plywood
111...113 4 Eng�ne House 4 mm Plywood
114 1 Ma�n W�nch Supports 4 mm Plywood
115 1 Secondary W�nch Supports 4 mm Plywood
116...117 2 Ma�n W�nch Supports 4 mm Plywood
118-119 2 Secondary W�nch Parts 4 mm Plywood
120 2 Back Cab�n Leg Parts 4 mm Plywood
121-122 3 Rudder Parts 4 mm Plywood
123-125 4 Base Parts 4 mm Plywood
PW-1 1 Front Deck 1,5 mm Plywood
PW2 1 M�ddle Deck 1,5 mm Plywood
PW3 1 Back Deck 1,5 mm Plywood
PW4-5 2 S�de Decks 1,5 mm Plywood
PW6 1 Cabta�n Cab�n Front Panel 1,5 mm Plywood
PW8...11 4 Panels 1,5 mm Plywood
PW12 1 Panel 1,5 mm Plywood
PW13...19 7 Back Rooms 1,5 mm Plywood
PW20 1 Up Deck 1,5 mm Plywood
PW21 1 Up Front Panel 1,5 mm Plywood
PW22...26 10 Capta�n Cab�n S�de Parts 1,5 mm Plywood
PW27...35 7 Cabta�n Cab�n Parts 1,5 mm Plywood
PW36...41 6 Funnel Lower Parts 1,5 mm Plywood
PW42...50 17 Funnel Parts 1,5 mm Plywood
PW51...54 6 Cabta�n Cab�n Control Panel 1,5 mm Plywood
PW55 1 Funnel Up Part 1,5 mm Plywood
PW56-57 2 Back Room Parts 1,5 mm Plywood
PW58 1 Cabta�n Cab�n Up Parts 1,5 mm Plywood
PW59...61 5 Led Supports 1,5 mm Plywood
PW62 2 Back S�de Panel 1,5 mm Plywood
PW63 1 Radar Lower Deck 1,5 mm Plywood
PW66 2 Cabta�n Cab�n Doors 1,5 mm Plywood
PW64-65-67-68 4 Cabta�n Cab�n Cha�r 1,5 mm Plywood
PW69 2 Back S�de Panel 1,5 mm Plywood
PW70...74 6 Ra�ls 1,5 mm Plywood
PW75 1 Front Panel 1,5 mm Plywood
PW77 1 Cabta�n Cab�n Supports 1,5 mm Plywood
PW78 2 Up Deck S�de Support 1,5 mm Plywood
PW79...99 54 Zod�ac Parts 1,5 mm Plywood
PW100 2 W�nch Base Parts 1,5 mm Plywood
PW101...106 10 Washboard 1,5 mm Plywood
PW107...111 7 Zod�ac Wheel House 1,5 mm Plywood
PW112...116 5 Front Cab�n 1,5 mm Plywood
PW117...124 14 Ma�n W�nch Parts 1,5 mm Plywood
PW125-130-131 4 Secondary W�nch Parts 1,5 mm Plywood
PW126...129 10 Ma�n W�nch Parts 1,5 mm Plywood
PW132 1 Washboard Parts 1,5 mm Plywood
PW133 1 Washboard Parts 1,5 mm Plywood
I...XIX 68 Panel Supports 1,5 mm Plywood
FLX-1 1 Nose Parts 1 mm Plywood
S1 130 Cover Str�ps 1.6x5.5x650 mm Str�ps
S2 50 Secondary Cover Str�ps 0.5x4x350 mm Str�ps
ME-1 1 Flat W�re 0,8x1000 mm Metal
ME-2 1 Front Deck Ma�n Post 8x200 mm Metal
ME-3 2 Front Deck Ma�n S�de Post 5x190 mm Metal
ME-4 1 Front Deck Ma�n Up W�re-1 6x40 mm Metal
ME-5 1 Front Deck Ma�n Up W�re-2 4x40 mm Metal
ME-6 1 Small Radar W�re 4x50 mm Metal
ME-7 1 Ball Small Radar W�re 4x30 mm Metal
ME-8 1 Ball Small Radar P�pe 6x32 mm Metal
ME-9 1 Ball Large Radar W�re 5x40 mm Metal
ME-10 1 Ball Large Radar P�pe 7x32 mm Metal
ME-11 1 Up Deck W�re-1 3x30 mm Metal
ME-12 1 Up Deck W�re-2 4x172 mm Metal
ME-13 1 Up Deck W�re-3 1,5x58 mm Metal
ME-14 1 Up Deck W�re-4 1,5x26 mm Metal
ME-15 4 Up Radar Lower P�pe 5x90 mm Metal
ME-16 2 Back Cab�n Legs 5x40 mm Metal
ME-17 2 W�nch W�re 2x34 mm Metal
ME-18 2 W�nch W�re 1,7x25 mm Metal
ME-19 1 W�nch P�pe 3x20 mm Metal
ME-20 1 W�nch P�pe 3x17 mm Metal
ME-21 1 Rudder W�re 1,7x12 mm Metal
ME-22 1 Rudder W�re 1,7x60 Metal
ME-23 1 Rudder P�pe 3x40 mm Metal
ME-24 1 W�ndlass W�re 2x47 mm Metal
ME-25 1 Propeller W�re 7x80 mm Metal
3D1 10 J A�r Cond�t�oner - 3D Pr�ntout
3D2 2 Cha�n Bed - 3D Pr�ntout
3D3 2 W�ndlass Cha�n Bed - 3D Pr�ntout
3D4 2 W�ndlass Head - 3D Pr�ntout
3D5 1 W�ndlass M�ddle Part - 3D Pr�ntout
3D6 2 W�ndlass Legs - 3D Pr�ntout
3D7 1 W�ndlass Base - 3D Pr�ntout
3D8 8 Bollards - 3D Pr�ntout
3D9 4 L�febuoy and hanger - 3D Pr�ntout
3D10 2 L�febuoy and hanger - 3D Pr�ntout
NO QUANTITY DESCRIPTION Mater�al TYPE
3D11 2 F�re House - 3D Pr�ntout
3D12 3 Small Projector - 3D Pr�ntout
3D13 1 Large Projector - 3D Pr�ntout
3D14 1 Small l�feboat Male - 3D Pr�ntout
3D15 1 Small L�feboat Female - 3D Pr�ntout
3D16 3 Large L�feboat Projector Female - 3D Pr�ntout
3D17 3 Large L�feboat Projector Male - 3D Pr�ntout
3D18 1 Zod�ac Wheel - 3D Pr�ntout
3D19 2 Zod�ac Motor - 3D Pr�ntout
3D20 2 W�nch Hydraul�c Parts Down - 3D Pr�ntout
3D21 2 W�nch Hydraul�c Parts Up - 3D Pr�ntout
3D22 1 Ma�n W�nch Base Parts - 3D Pr�ntout
3D23 1 Secondary W�nch Ma�n Pulley - 3D Pr�ntout
3D24 1 Secondary W�nch Pulley - 3D Pr�ntout
3D25 1 Secondary W�nch Leg - 3D Pr�ntout
3D26 1 Zod�ac Bollards - 3D Pr�ntout
3D27 1 Long A�r Cond�t�oner - 3D Pr�ntout
3D28 1 Short A�r Cond�t�oner - 3D Pr�ntout
3D29 1 Small Ball Radar - 3D Pr�ntout
3D30 1 Large Ball Radar - 3D Pr�ntout
3D31 1 Small Radar - 3D Pr�ntout
3D32 1 Small Radar Motor - 3D Pr�ntout
3D33 1 Large Radar - 3D Pr�ntout
3D34 1 Large S�ngle Bollards - 3D Pr�ntout
3D35 1 Small S�ngle Bollards - 3D Pr�ntout
3D36 2 Anchor House - 3D Pr�ntout
3D37 2 Anchor Hanger - 3D Pr�ntout
3D38 2 Anchor - 3D Pr�ntout
3D39 1 Propeller center - 3D Pr�ntout
3D40 4 Propeller parts - 3D Pr�ntout
3D41 1 Propeller Male - 3D Pr�ntout
3D42 2 Double Nose Bollards - 3D Pr�ntout
3D43 1 Rudder - 3D Pr�ntout
3D44 1 Ma�n W�nch Pulley - 3D Pr�ntout
3D45 1 P�n - 3D Pr�ntout
3D46 1 P�pe-1 5x17 3D Pr�ntout
3D47 1 P�pe-2 5x34 3D Pr�ntout
3D48 2 P�pe-3 5x32 3D Pr�ntout
3D49 1 P�pe-4 5x22 3D Pr�ntout
3D50 2 Zod�ac S�de Parts - 3D Pr�ntout
3D51 1 Rudder House - 3D Pr�ntout
3D52 1 Large Furuno House - 3D Pr�ntout
3D53 1 Small Furuno House - 3D Pr�ntout
R1 20 Clear Led - Ready
R2 1 Red Led - Ready
R3 1 Green Led - Ready
R4 - Copper W�re 4 m Ready
R5 2 Jack - Ready
R6 - Cha�n 500 mm Ready
R7 - Black Yarn 2 m Ready
P1 4 Capta�n Cab�n W�ndows - Plex�
P2 4 Capta�n Cab�n W�ndows - Plex�
P3 2 Back Down Room Glasses - Plex�
P4 5 Cabta�n Cab�n Front Rectangle - Plex�
P5 3 Large Porthole Glass - Plex�
P6 14 M�ddel Cab�n Small Porthole Glass - Plex�
P7...9 3 Large Radar Leg Parts - Plex�
P10-11 4 Step Parts - Plex�
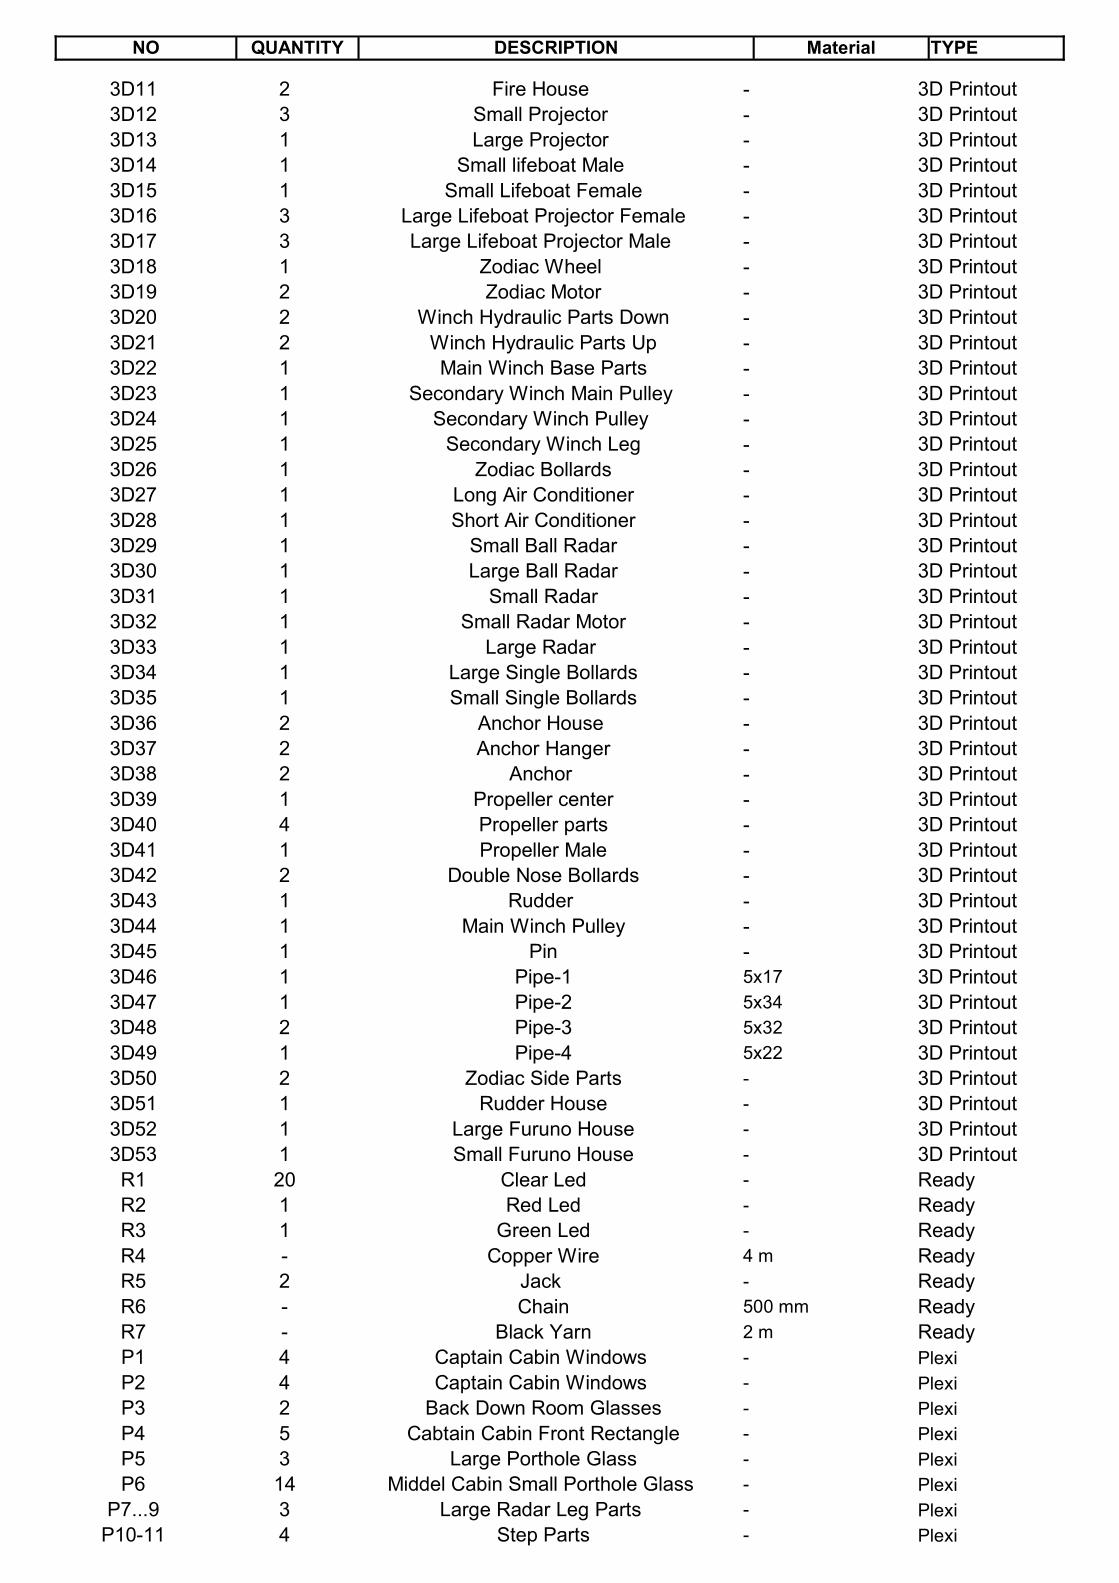
NO QUANTITY DESCRIPTION Mater�al TYPE
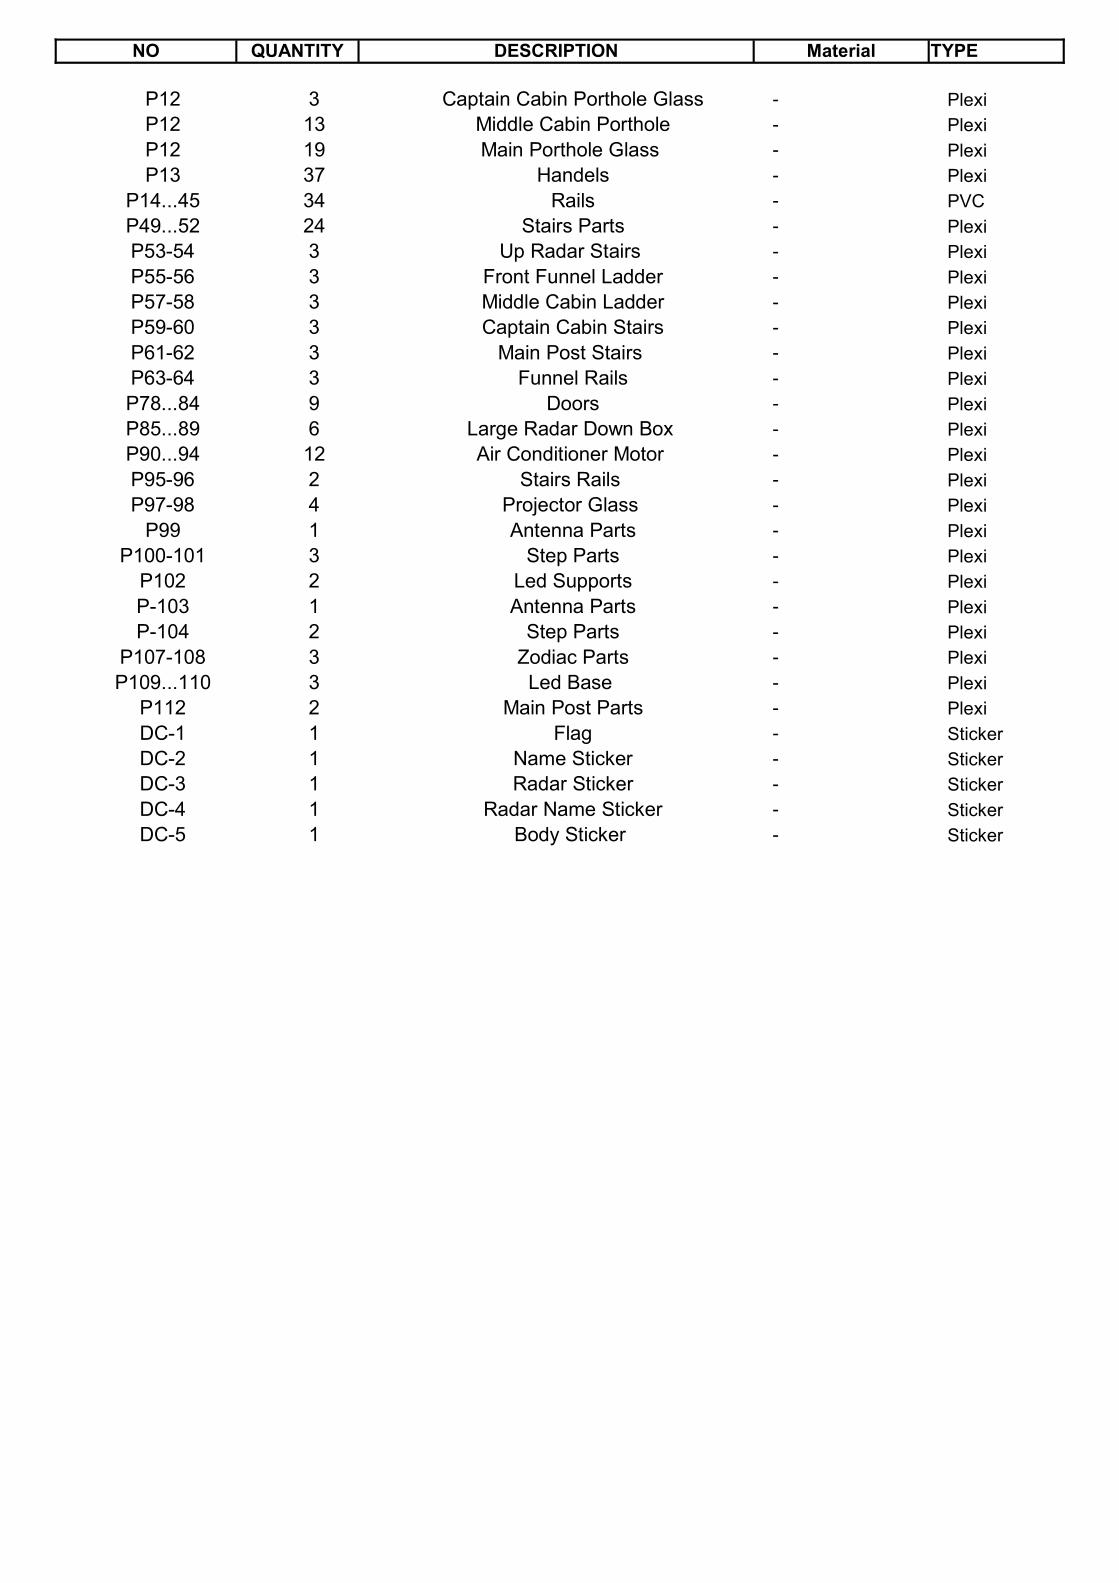
P12 3 Capta�n Cab�n Porthole Glass - Plex�
P12 13 M�ddle Cab�n Porthole - Plex�
P12 19 Ma�n Porthole Glass - Plex�
P13 37 Handels - Plex�
P14...45 34 Ra�ls - PVC
P49...52 24 Sta�rs Parts - Plex�
P53-54 3 Up Radar Sta�rs - Plex�
P55-56 3 Front Funnel Ladder - Plex�
P57-58 3 M�ddle Cab�n Ladder - Plex�
P59-60 3 Capta�n Cab�n Sta�rs - Plex�
P61-62 3 Ma�n Post Sta�rs - Plex�
P63-64 3 Funnel Ra�ls - Plex�
P78...84 9 Doors - Plex�
P85...89 6 Large Radar Down Box - Plex�
P90...94 12 A�r Cond�t�oner Motor - Plex�
P95-96 2 Sta�rs Ra�ls - Plex�
P97-98 4 Projector Glass - Plex�
P99 1 Antenna Parts - Plex�
P100-101 3 Step Parts - Plex�
P102 2 Led Supports - Plex�
P-103 1 Antenna Parts - Plex�
P-104 2 Step Parts - Plex�
P107-108 3 Zod�ac Parts - Plex�
P109...110 3 Led Base - Plex�
P112 2 Ma�n Post Parts - Plex�
DC-1 1 Flag - St�cker
DC-2 1 Name St�cker - St�cker
DC-3 1 Radar St�cker - St�cker
DC-4 1 Radar Name St�cker - St�cker
DC-5 1 Body St�cker - St�cker
NO QUANTITY DESCRIPTION Mater�al TYPE