Embed Size (px)
Citation preview
What’s New in Pro Tools and Pro Tools HD®
Version 10.0

Legal NoticesThis guide is copyrighted ©2011 by Avid Technology, Inc., (hereafter “Avid”), with all rights reserved. Under copyright laws, this guide may not be duplicated in whole or in part without the written consent of Avid.
003, 96 I/O, 96i I/O, 192 Digital I/O, 192 I/O, 888|24 I/O, 882|20 I/O, 1622 I/O, 24-Bit ADAT Bridge I/O, AudioSuite, Avid, Avid DNA, Avid Mojo, Avid Unity, Avid Unity ISIS, Avid Xpress, AVoption, Axiom, Beat Detective, Bomb Factory, Bruno, C|24, Command|8, Control|24, D-Command, D-Control, D-Fi, D-fx, D-Show, D-Verb, DAE, Digi 002, DigiBase, DigiDelivery, Digidesign, Digidesign Audio Engine, Digidesign Intelligent Noise Reduction, Digidesign TDM Bus, DigiDrive, DigiRack, DigiTest, DigiTranslator, DINR, DV Toolkit, EditPack, Eleven, HD Core, HD Process, Hybrid, Impact, Interplay, LoFi, M-Audio, MachineControl, Maxim, Mbox, MediaComposer, MIDI I/O, MIX, MultiShell, Nitris, OMF, OMF Interchange, PRE, ProControl, Pro Tools M-Powered, Pro Tools, Pro Tools|HD, Pro Tools LE, Pro Tools MP, QuickPunch, Recti-Fi, Reel Tape, Reso, Reverb One, ReVibe, RTAS, Sibelius, Smack!, SoundReplacer, Sound Designer II, Strike, Structure, SYNC HD, SYNC I/O, Synchronic, TL Aggro, TL AutoPan, TL Drum Rehab, TL Everyphase, TL Fauxlder, TL In Tune, TL MasterMeter, TL Metro, TL Space, TL Utilities, Transfuser, Trillium Lane Labs, Vari-Fi, Velvet, X-Form, and XMON are trademarks or registered trademarks of Avid Technology, Inc. Xpand! is Registered in the U.S. Patent and Trademark Office. All other trademarks are the property of their respective owners.
Product features, specifications, system requirements, and availability are subject to change without notice.
Guide Part Number 9329-65099-00 REV A 10/11
Documentation FeedbackAt Avid, we are always looking for ways to improve our documentation. If you have comments, corrections, or suggestions regarding our documentation, email us at [email protected].
Chapter 1. What’s New. . . . . . . . . . . . . . . . . . . . . . . . . . . . . . . . . . . . . . . . . . . . . . . . . . . . . . . . . . 1
Chapter 2. New and Enhanced System Capabilities. . . . . . . . . . . . . . . . . . . . . . . . . . . . . . . . . . 3
Comparison of System Capabilities. . . . . . . . . . . . . . . . . . . . . . . . . . . . . . . . . . . . . . . . . . . . 3
Increased Track Counts for Pro Tools HD and Pro Tools with Complete Production Toolkit . . . 4
New Maximum Setting for Automatic Delay Compensation . . . . . . . . . . . . . . . . . . . . . . . . . . 4
Low Latency Monitoring with Core Audio and ASIO Hardware . . . . . . . . . . . . . . . . . . . . . . . . 4
New Session File Format . . . . . . . . . . . . . . . . . . . . . . . . . . . . . . . . . . . . . . . . . . . . . . . . . . . 5
New Clip Group File Format . . . . . . . . . . . . . . . . . . . . . . . . . . . . . . . . . . . . . . . . . . . . . . . . . 5
Support for 32-bit Floating Point Audio Files . . . . . . . . . . . . . . . . . . . . . . . . . . . . . . . . . . . . . 5
Support for Interleaved Audio Files . . . . . . . . . . . . . . . . . . . . . . . . . . . . . . . . . . . . . . . . . . . . 6
Support for Mixed Audio File Formats . . . . . . . . . . . . . . . . . . . . . . . . . . . . . . . . . . . . . . . . . . 6
Support for WAVE Extensible File Format . . . . . . . . . . . . . . . . . . . . . . . . . . . . . . . . . . . . . . . 6
Support for RF64 Audio Files . . . . . . . . . . . . . . . . . . . . . . . . . . . . . . . . . . . . . . . . . . . . . . . . 7
Changing Session Settings in the Session Setup Window . . . . . . . . . . . . . . . . . . . . . . . . . . . 7
Changes to Pro Tools Nomenclature and Avid Rebranding . . . . . . . . . . . . . . . . . . . . . . . . . . 8
New In-Application Web Browsers . . . . . . . . . . . . . . . . . . . . . . . . . . . . . . . . . . . . . . . . . . . . 9
New Marketplace Menu . . . . . . . . . . . . . . . . . . . . . . . . . . . . . . . . . . . . . . . . . . . . . . . . . . . 10
Improvements to the Pro Tools Help Menu . . . . . . . . . . . . . . . . . . . . . . . . . . . . . . . . . . . . . 11
Chapter 3. New and Enhanced Import and Export Features . . . . . . . . . . . . . . . . . . . . . . . . . . 13
Export Selected Tracks As New Session. . . . . . . . . . . . . . . . . . . . . . . . . . . . . . . . . . . . . . . 13
New Save Session Copy Options . . . . . . . . . . . . . . . . . . . . . . . . . . . . . . . . . . . . . . . . . . . . 14
New Import Session Data Options . . . . . . . . . . . . . . . . . . . . . . . . . . . . . . . . . . . . . . . . . . . 15
Add to iTunes Library . . . . . . . . . . . . . . . . . . . . . . . . . . . . . . . . . . . . . . . . . . . . . . . . . . . . . 15
Share with SoundCloud . . . . . . . . . . . . . . . . . . . . . . . . . . . . . . . . . . . . . . . . . . . . . . . . . . . 17
Contents
Contents iii
iv
Chapter 4. New Editing Features and Enhancements . . . . . . . . . . . . . . . . . . . . . . . . . . . . . . . 21
Real-Time Fades . . . . . . . . . . . . . . . . . . . . . . . . . . . . . . . . . . . . . . . . . . . . . . . . . . . . . . . 21
Overlapping Crossfades View . . . . . . . . . . . . . . . . . . . . . . . . . . . . . . . . . . . . . . . . . . . . . . 22
Clip-Based Gain . . . . . . . . . . . . . . . . . . . . . . . . . . . . . . . . . . . . . . . . . . . . . . . . . . . . . . . . 22
Clip List Reveal In Finder/Explorer Right-Click Command . . . . . . . . . . . . . . . . . . . . . . . . . . 32
24-Hour Timeline . . . . . . . . . . . . . . . . . . . . . . . . . . . . . . . . . . . . . . . . . . . . . . . . . . . . . . . 32
Field Recorder Workflow Improvements . . . . . . . . . . . . . . . . . . . . . . . . . . . . . . . . . . . . . . . 33
Chapter 5. New Mixing Features and Enhancements . . . . . . . . . . . . . . . . . . . . . . . . . . . . . . . 35
Solo and Mute Status Indicators in the Edit Window . . . . . . . . . . . . . . . . . . . . . . . . . . . . . . 35
Automation Follows Edit Indicator . . . . . . . . . . . . . . . . . . . . . . . . . . . . . . . . . . . . . . . . . . . 35
Sync Status Indicators in the Edit Window . . . . . . . . . . . . . . . . . . . . . . . . . . . . . . . . . . . . . 36
Bus Interrogation. . . . . . . . . . . . . . . . . . . . . . . . . . . . . . . . . . . . . . . . . . . . . . . . . . . . . . . . 37
Support for 12 Systems with Satellite Link . . . . . . . . . . . . . . . . . . . . . . . . . . . . . . . . . . . . . 38
Chapter 6. New Control Surface and Worksurface Features and Enhancements . . . . . . . . 39
D-Command Multi-Mode . . . . . . . . . . . . . . . . . . . . . . . . . . . . . . . . . . . . . . . . . . . . . . . . . . 39
Enhanced EUCON Support . . . . . . . . . . . . . . . . . . . . . . . . . . . . . . . . . . . . . . . . . . . . . . . . 41
Chapter 7. New Plug-In Formats, Plug-Ins, and AudioSuite Improvements . . . . . . . . . . . . . 43
New AAX Plug-In Format. . . . . . . . . . . . . . . . . . . . . . . . . . . . . . . . . . . . . . . . . . . . . . . . . . 43
Native and DSP Plug-In Insert Processing . . . . . . . . . . . . . . . . . . . . . . . . . . . . . . . . . . . . . 43
Avid Channel Strip Plug-In. . . . . . . . . . . . . . . . . . . . . . . . . . . . . . . . . . . . . . . . . . . . . . . . . 44
Avid Down Mixer Plug-In . . . . . . . . . . . . . . . . . . . . . . . . . . . . . . . . . . . . . . . . . . . . . . . . . . 44
Mod Delay III . . . . . . . . . . . . . . . . . . . . . . . . . . . . . . . . . . . . . . . . . . . . . . . . . . . . . . . . . . 45
AudioSuite Improvements . . . . . . . . . . . . . . . . . . . . . . . . . . . . . . . . . . . . . . . . . . . . . . . . . 45
Pro Tools Plug-Ins Marketplace . . . . . . . . . . . . . . . . . . . . . . . . . . . . . . . . . . . . . . . . . . . . . 49
Chapter 8. Storage and Disk Performance Enhancements . . . . . . . . . . . . . . . . . . . . . . . . . . . 51
New Disk Engine. . . . . . . . . . . . . . . . . . . . . . . . . . . . . . . . . . . . . . . . . . . . . . . . . . . . . . . . 51
New Disk Cache Settings . . . . . . . . . . . . . . . . . . . . . . . . . . . . . . . . . . . . . . . . . . . . . . . . . 51
Enhanced Support for Network Attached Storage . . . . . . . . . . . . . . . . . . . . . . . . . . . . . . . . 52
Enhanced Support for Avid Unity MediaNetwork and ISIS Shared Storage. . . . . . . . . . . . . . 53
Chapter 9. Avid Interoperability Enhancements. . . . . . . . . . . . . . . . . . . . . . . . . . . . . . . . . . . . 55
New AAF and OMF Import and Export Features . . . . . . . . . . . . . . . . . . . . . . . . . . . . . . . . . 55
New Avid Interplay Features . . . . . . . . . . . . . . . . . . . . . . . . . . . . . . . . . . . . . . . . . . . . . . . 56
What’s New in Pro Tools and Pro Tools HD 10.0

Chapter 1: What’s New
Pro Tools® and Pro Tools HD version 10.0 pro-vide several new features and enhancements for qualified versions of Mac OS X and Windows 7.
New and Enhanced System Capabilities• Increased track counts for Pro Tools HD and
Pro Tools with Complete Production Toolkit:
• Increased possible number of voiceable au-dio tracks to 768 (at 48 kHZ)
• Increased possible number of Auxiliary In-put tracks to 512
• New Maximum setting for Automatic Delay Compensation (not available with Pro Tools|HD systems)
• Low Latency Monitoring with Core Audio and ASIO hardware with Pro Tools and Pro Tools HD
• New Pro Tools 10 session file format (.ptx)
• New clip group file format (.cgrp)
• Support for 32-bit floating point audio files
• Support for mixed audio file formats
• Support for interleaved audio files
• Support for WAVE Extensible audio file for-mat
• Support for RF64 files
• Ability to change session settings in the Session Setup window for newly recorded, processed, and imported audio
• Changes to Pro Tools nomenclature and Avid rebranding
• Pro Tools in-application Web browsers for easy access to the following online Avid Mar-ketplace and Pro Tools online resources:
• Your Account
• Plug-Ins
• Support and Training
• Upgrades
• Pro Tools Help
• Pro Tools Knowledge Base
• Avid Audio Forums
New Import and Export Features and Enhancements• Export Selected Tracks as New Session
• Save Session Copy options
• Import Session Data options
• Add to iTunes library
• Share with SoundCloud using Bounce to Disk or Export Selected Clips as Files commands
Chapter 1: What’s New 1

2
New Editing Features and Enhancements• Real-time fades
• Overlapping Crossfades view
• Clip-based Gain
• Clip List Reveal In Finder/Explorer Right-click command
• 24-hour Timeline
• Field Recorder workflow improvements (Pro Tools HD and Pro Tools with Complete Production Toolkit only)
New Mixing Features and Enhancements• Solo and Mute status indicators in the Edit
window
• Automation Follows Edit indicator in the Edit window
• Sync status indicators in the Edit window (Pro Tools HD with a SYNC Peripheral only)
• Bus interrogation
• Support for up to 12 systems with Satellite Link (Pro Tools|HD and HD Native systems only)
New Control Surface and Worksurface Features and Enhancements• D-Command Multimode (Pro Tools HD and
Pro Tools with Complete Production Toolkit only)
• Enhanced EUCON support
What’s New in Pro Tools and Pro Tools HD 10.0
New Plug-Ins Format, Plug-Ins, and Plug-In Features and Enhancements• New AAX plug-in format
• “Native” and “DSP” plug-in processing catego-ries for plug-in inserts (Pro Tools|HD systems only)
• New Avid Channel Strip Plug-In
• New Avid Down Mixer Plug-In
• New Avid Mod Delay III Plug-In
• AudioSuite Enhancements:
• Ability to open multiple AudioSuite win-dows simultaneously
• Fades preserved with AudioSuite rendering
• Clip metadata preserved with AudioSuite rendering
• AudioSuite handles
• Reverse command for Delay and Reverb AudioSuite plug-ins
• New Avid Marketplace command for easy ac-cess to online plug-in purchasing options
Storage and Disk Performance Enhancements• New Disk Engine
• New Disk Cache settings
• Enhanced support for Network-attached stor-age
• Enhanced Support for Avid Unity MediaNet-work® and ISIS® shared storage, including in-creased track counts, and Mac streaming
Avid Interoperability Enhancements• New AAF and OMF import and export features
• Pro Tools Avid Interplay® enhancements (Pro Tools HD only)
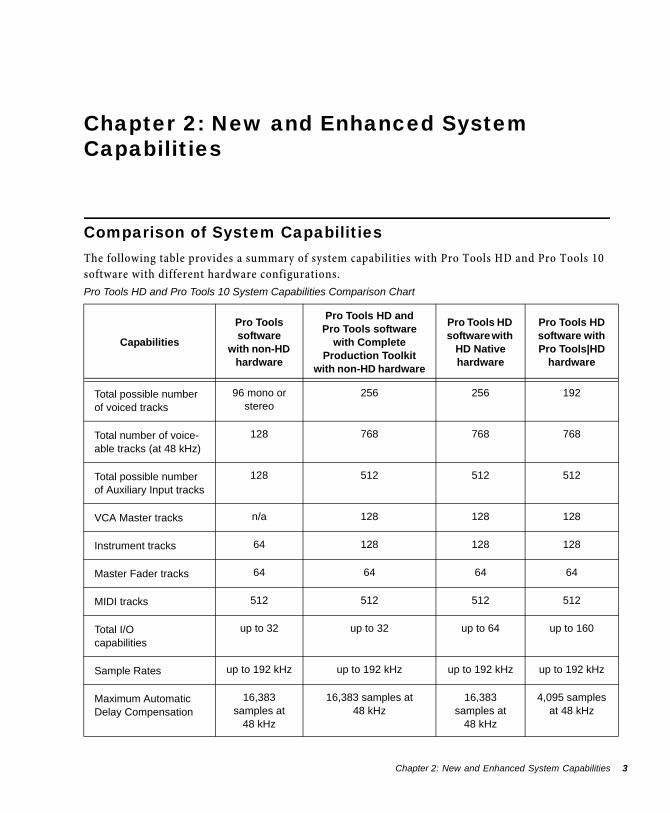
Chapter 2: New and Enhanced System Capabilities
Comparison of System CapabilitiesThe following table provides a summary of system capabilities with Pro Tools HD and Pro Tools 10 software with different hardware configurations.
Pro Tools HD and Pro Tools 10 System Capabilities Com parison ChartCapabilities
Pro Tools software
with non-HD hardware
Pro Tools HD and Pro Tools software
with Complete Production Toolkit
with non-HD hardware
Pro Tools HD software with
HD Native hardware
Pro Tools HD software with Pro Tools|HD
hardware
Total possible number of voiced tracks
96 mono or stereo
256 256 192
Total number of voice-able tracks (at 48 kHz)
128 768 768 768
Total possible number of Auxiliary Input tracks
128 512 512 512
VCA Master tracks n/a 128 128 128
Instrument tracks 64 128 128 128
Master Fader tracks 64 64 64 64
MIDI tracks 512 512 512 512
Total I/O capabilities
up to 32 up to 32 up to 64 up to 160
Sample Rates up to 192 kHz up to 192 kHz up to 192 kHz up to 192 kHz
Maximum Automatic Delay Compensation
16,383 samples at
48 kHz
16,383 samples at 48 kHz
16,383 samples at
48 kHz
4,095 samples at 48 kHz
Chapter 2: New and Enhanced System Capabilities 3
4
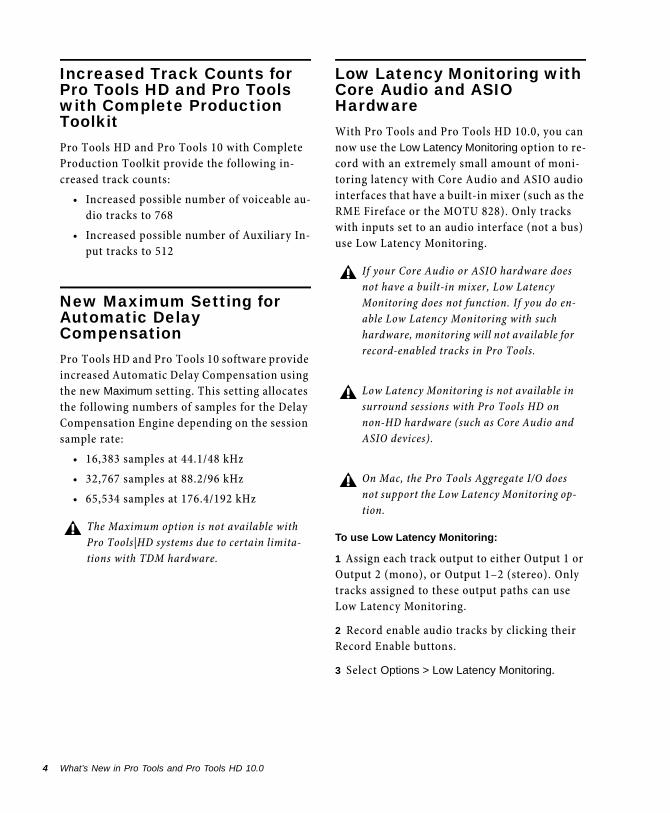
Increased Track Counts for Pro Tools HD and Pro Tools with Complete Production ToolkitPro Tools HD and Pro Tools 10 with Complete Production Toolkit provide the following in-creased track counts:
• Increased possible number of voiceable au-dio tracks to 768
• Increased possible number of Auxiliary In-put tracks to 512
New Maximum Setting for Automatic Delay CompensationPro Tools HD and Pro Tools 10 software provide increased Automatic Delay Compensation using the new Maximum setting. This setting allocates the following numbers of samples for the Delay Compensation Engine depending on the session sample rate:
• 16,383 samples at 44.1/48 kHz
• 32,767 samples at 88.2/96 kHz
• 65,534 samples at 176.4/192 kHz
The Maximum option is not available with Pro Tools|HD systems due to certain limita-tions with TDM hardware.
What’s New in Pro Tools and Pro Tools HD 10.0
Low Latency Monitoring with Core Audio and ASIO HardwareWith Pro Tools and Pro Tools HD 10.0, you can now use the Low Latency Monitoring option to re-cord with an extremely small amount of moni-toring latency with Core Audio and ASIO audio interfaces that have a built-in mixer (such as the RME Fireface or the MOTU 828). Only tracks with inputs set to an audio interface (not a bus) use Low Latency Monitoring.
To use Low Latency Monitoring:
1 Assign each track output to either Output 1 or Output 2 (mono), or Output 1–2 (stereo). Only tracks assigned to these output paths can use Low Latency Monitoring.
2 Record enable audio tracks by clicking their Record Enable buttons.
3 Select Options > Low Latency Monitoring.
If your Core Audio or ASIO hardware does not have a built-in mixer, Low Latency Monitoring does not function. If you do en-able Low Latency Monitoring with such hardware, monitoring will not available for record-enabled tracks in Pro Tools.
Low Latency Monitoring is not available in surround sessions with Pro Tools HD on non-HD hardware (such as Core Audio and ASIO devices).
On Mac, the Pro Tools Aggregate I/O does not support the Low Latency Monitoring op-tion.
When Low Latency Monitoring is enabled, Pro Tools disables software monitoring for re-cord-enabled tracks routed to Outputs 1–2 only. This lets you use the built-in mixer function on your Core Audio or ASIO hardware for record monitoring with Outputs 1 and 2 on your Core Audio or ASIO audio interface. Also, any plug-ins and sends assigned to record-enabled tracks are automatically bypassed, and must remain bypassed. Additionally, these tracks do not reg-ister on meters for Master Fader tracks in Pro Tools.
New Session File FormatPro Tools 10 uses a new session file format (.ptx). This means that sessions created in Pro Tools 10 cannot be opened in lower versions of Pro Tools. To share sessions with lower ver-sions of Pro Tools, you will need to use Save
Session Copy As to save a copy of the session to a lower session file format (see “New Save Ses-sion Copy Options” on page 14).
New Clip Group File FormatPro Tools 10 uses a new clip group file format (.cgrp). Region group files (.rgp) created with lower versions of Pro Tools can be imported into Pro Tools 10 sessions, but clip group files (.cgrp) cannot be imported into lower versions of Pro Tools. This new format maintains clip gain settings with clip groups.
For information about configuring your audio interface’s hardware mixer for di-rect monitoring, please refer to the manu-facturer’s documentation.
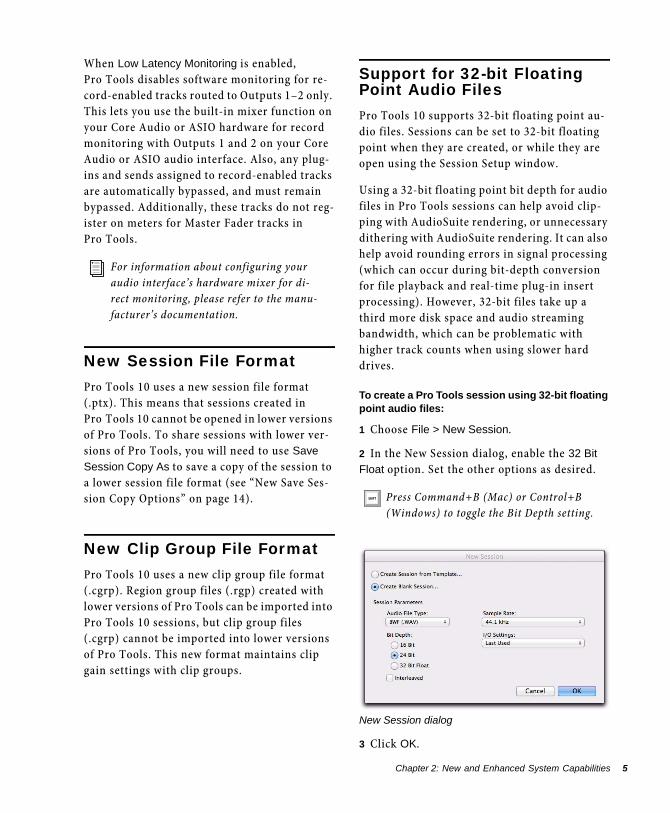
Support for 32-bit Floating Point Audio FilesPro Tools 10 supports 32-bit floating point au-dio files. Sessions can be set to 32-bit floating point when they are created, or while they are open using the Session Setup window.
Using a 32-bit floating point bit depth for audio files in Pro Tools sessions can help avoid clip-ping with AudioSuite rendering, or unnecessary dithering with AudioSuite rendering. It can also help avoid rounding errors in signal processing (which can occur during bit-depth conversion for file playback and real-time plug-in insert processing). However, 32-bit files take up a third more disk space and audio streaming bandwidth, which can be problematic with higher track counts when using slower hard drives.
To create a Pro Tools session using 32-bit floating point audio files:
1 Choose File > New Session.
2 In the New Session dialog, enable the 32 Bit
Float option. Set the other options as desired.
3 Click OK.
Press Command+B (Mac) or Control+B (Windows) to toggle the Bit Depth setting.
New Session dialog
Chapter 2: New and Enhanced System Capabilities 5
6
For information on changing the Bit Depth while a session is open, see “Changing Session Settings in the Session Setup Window” on page 7.
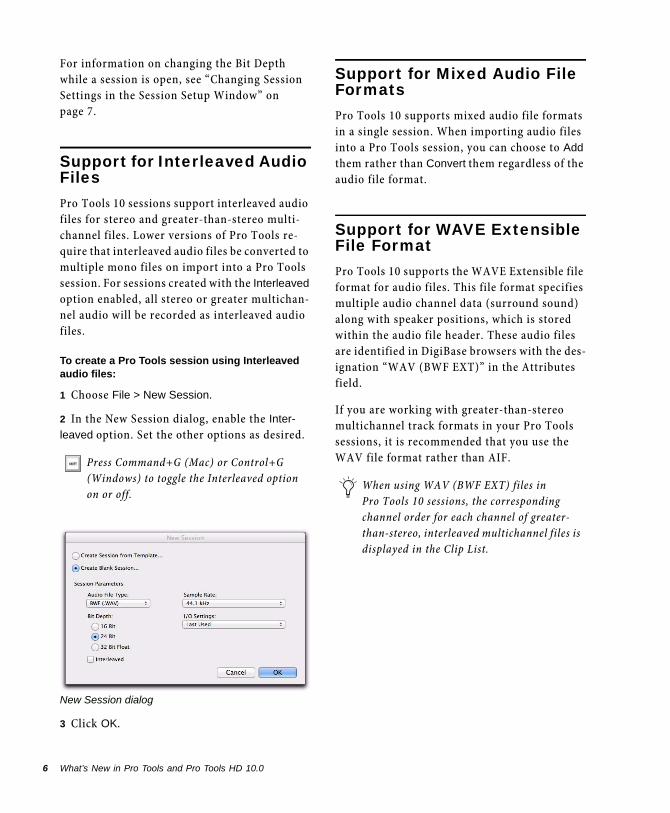
Support for Interleaved Audio FilesPro Tools 10 sessions support interleaved audio files for stereo and greater-than-stereo multi-channel files. Lower versions of Pro Tools re-quire that interleaved audio files be converted to multiple mono files on import into a Pro Tools session. For sessions created with the Interleaved option enabled, all stereo or greater multichan-nel audio will be recorded as interleaved audio files.
To create a Pro Tools session using Interleaved audio files:
1 Choose File > New Session.
2 In the New Session dialog, enable the Inter-
leaved option. Set the other options as desired.
3 Click OK.
Press Command+G (Mac) or Control+G (Windows) to toggle the Interleaved option on or off.
New Session dialog
What’s New in Pro Tools and Pro Tools HD 10.0
Support for Mixed Audio File FormatsPro Tools 10 supports mixed audio file formats in a single session. When importing audio files into a Pro Tools session, you can choose to Add them rather than Convert them regardless of the audio file format.
Support for WAVE Extensible File Format Pro Tools 10 supports the WAVE Extensible file format for audio files. This file format specifies multiple audio channel data (surround sound) along with speaker positions, which is stored within the audio file header. These audio files are identified in DigiBase browsers with the des-ignation “WAV (BWF EXT)” in the Attributes field.
If you are working with greater-than-stereo multichannel track formats in your Pro Tools sessions, it is recommended that you use the WAV file format rather than AIF.
When using WAV (BWF EXT) files in Pro Tools 10 sessions, the corresponding channel order for each channel of greater-than-stereo, interleaved multichannel files is displayed in the Clip List.

Support for RF64 Audio FilesPro Tools 10 supports RF64 audio files. RF64 is an extension to the WAV audio file format that addresses the 4 gigabyte size limitation of other WAV audio file formats.RF64 audio files are identified in DigiBase browsers with the desig-nation “MBWF” in the Attributes field.
Changing Session Settings in the Session Setup WindowWith Pro Tools 10, the Session Setup window lets you change the audio file Bit Depth, Audio Format, and whether or not files in the session are multi-mono or interleaved for all newly re-corded, imported and converted audio files, or files created by rendering (such as with Audio-Suite, Elastic Audio, or Consolidate). Since Pro Tools 10 supports sessions with mixed au-dio file formats and bit-depths, this is a signifi-cant change from previous versions of Pro Tools.
In lower versions of Pro Tools, the Session Setup window only displayed the Bit Depth and Audio
Format settings as specified when the session was created.
To use these files in a lower version of Pro Tools or in Media Composer, these files need to be edited and consolidated so that they are not larger than 4 GB.
Session Setup window, Format section
To change the Audio Format for the Pro Tools session:
1 Choose Setup > Session.
2 In the Session Setup window, select the desired audio file format (AIF or WAV) from the Audio
Format selector.
To change the Bit Depth for the Pro Tools session:
1 Choose Setup > Session.
2 In the Session Setup window, select the desired bit depth from the Bit Depth selector.
To enable (or disable) interleaved audio files for the Pro Tools session:
1 Choose Setup > Session.
2 In the Session Setup window, select (or dese-lect) the Interleaved option.
Session Setup window, selecting 32 Bit Float
Chapter 2: New and Enhanced System Capabilities 7
8
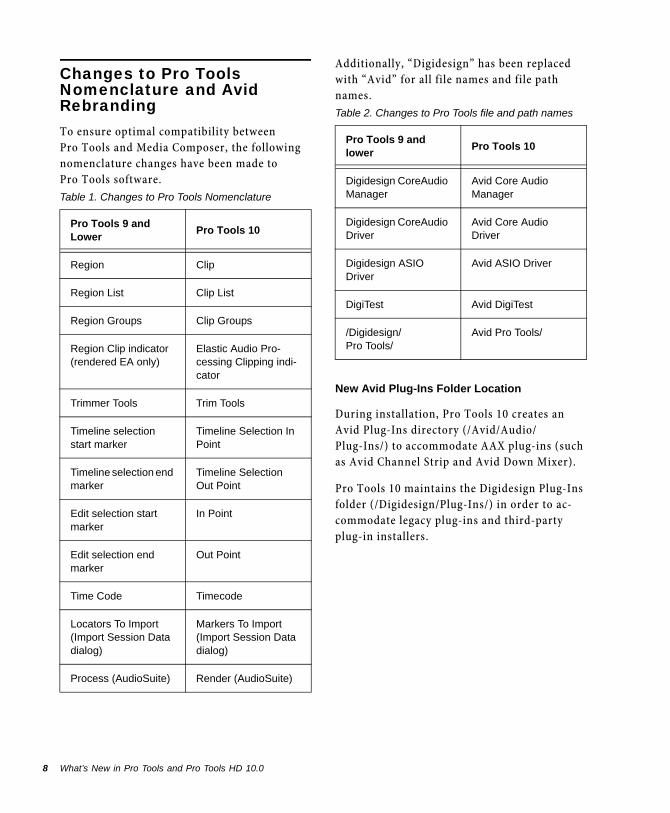
Changes to Pro Tools Nomenclature and Avid RebrandingTo ensure optimal compatibility between Pro Tools and Media Composer, the following nomenclature changes have been made to Pro Tools software.Table 1. Changes to Pro Tools Nomenclature
Pro Tools 9 and Lower
Pro Tools 10
Region Clip
Region List Clip List
Region Groups Clip Groups
Region Clip indicator (rendered EA only)
Elastic Audio Pro-cessing Clipping indi-cator
Trimmer Tools Trim Tools
Timeline selection start marker
Timeline Selection In Point
Timeline selection end marker
Timeline Selection Out Point
Edit selection start marker
In Point
Edit selection end marker
Out Point
Time Code Timecode
Locators To Import (Import Session Data dialog)
Markers To Import (Import Session Data dialog)
Process (AudioSuite) Render (AudioSuite)
What’s New in Pro Tools and Pro Tools HD 10.0
Additionally, “Digidesign” has been replaced with “Avid” for all file names and file path names.
New Avid Plug-Ins Folder Location
During installation, Pro Tools 10 creates an Avid Plug-Ins directory (/Avid/Audio/Plug-Ins/) to accommodate AAX plug-ins (such as Avid Channel Strip and Avid Down Mixer).
Pro Tools 10 maintains the Digidesign Plug-Ins folder (/Digidesign/Plug-Ins/) in order to ac-commodate legacy plug-ins and third-party plug-in installers.
Table 2. Changes to Pro Tools file and path names
Pro Tools 9 and lower
Pro Tools 10
Digidesign CoreAudio Manager
Avid Core Audio Manager
Digidesign CoreAudio Driver
Avid Core Audio Driver
Digidesign ASIO Driver
Avid ASIO Driver
DigiTest Avid DigiTest
/Digidesign/ Pro Tools/
Avid Pro Tools/
New In-Application Web BrowsersPro Tools provides easy access to the online Avid Store, as well as web-based Pro Tools Help, the Knowledge Base, and other online resources using two new in-application Web browsers.
Avid Marketplace Provides a secure web connec-tion to Avid’s online commerce web pages for Pro Tools.
Pro Tools Online Provides easy access to web-based Pro Tools Help, the Knowledge Base, and Avid audio community forums.
To launch the Pro Tools in-application Web browser for online commerce:
1 Ensure that you have an internet connection.
2 Choose one of the following from the Market-
place menu:• Your Account
• Plug-Ins • Support and Training
• Upgrades
To launch the Pro Tools in-application Web browser for online resources:
1 Ensure that you have an internet connection.
2 Choose one of the following from the Help menu:
• Pro Tools Help
• Pro Tools Knowledge Base
• Avid Audio Forums
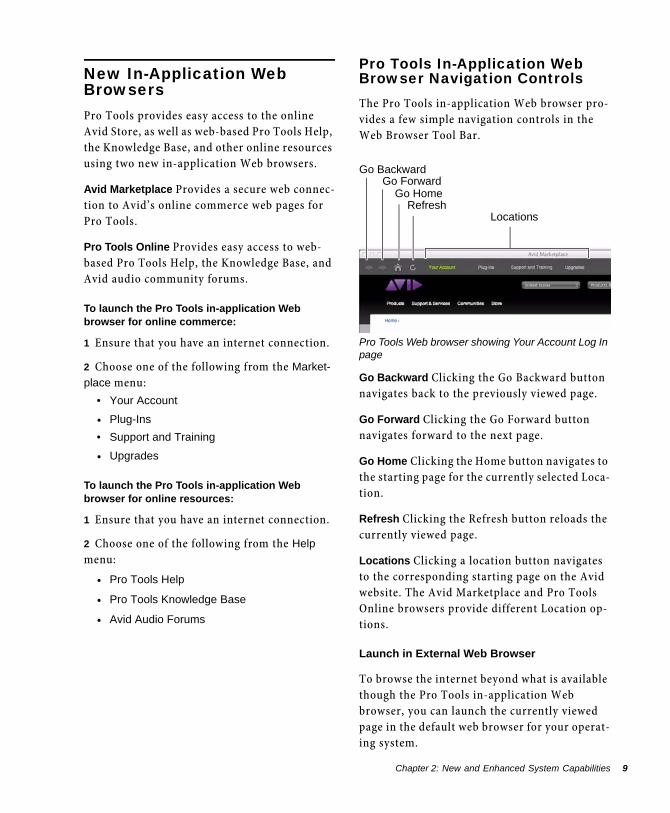
Pro Tools In-Application Web Browser Navigation ControlsThe Pro Tools in-application Web browser pro-vides a few simple navigation controls in the Web Browser Tool Bar.
Go Backward Clicking the Go Backward button navigates back to the previously viewed page.
Go Forward Clicking the Go Forward button navigates forward to the next page.
Go Home Clicking the Home button navigates to the starting page for the currently selected Loca-tion.
Refresh Clicking the Refresh button reloads the currently viewed page.
Locations Clicking a location button navigates to the corresponding starting page on the Avid website. The Avid Marketplace and Pro Tools Online browsers provide different Location op-tions.
Launch in External Web Browser
To browse the internet beyond what is available though the Pro Tools in-application Web browser, you can launch the currently viewed page in the default web browser for your operat-ing system.
Pro Tools Web browser showing Your Account Log In page
Go BackwardGo Forward
Go HomeRefresh
Locations
Chapter 2: New and Enhanced System Capabilities 9
10
To launch the currently viewed page in the default web browser for your operating system:
Click the Launch in Default Web Browser icon in either the Avid Marketplace window or the Pro Tools Online window.
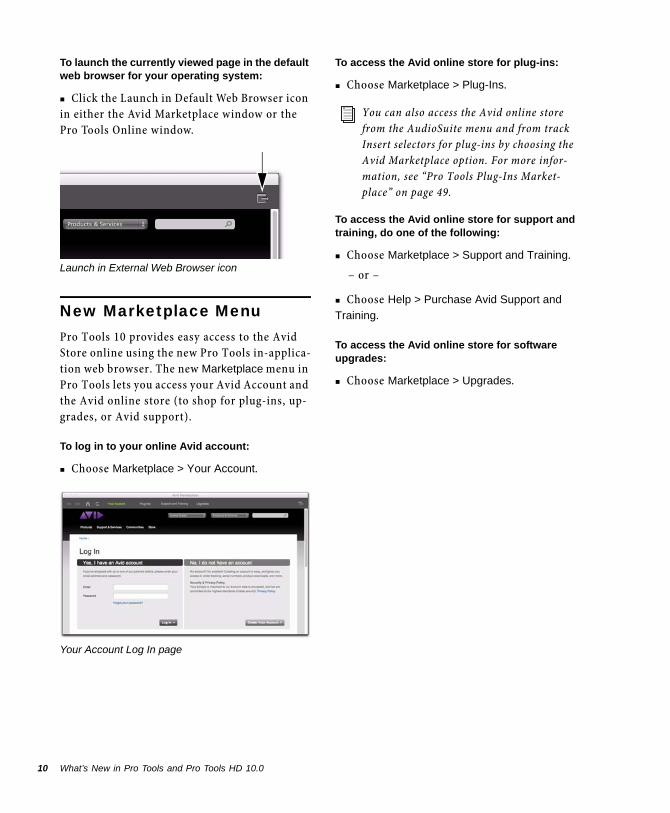
New Marketplace MenuPro Tools 10 provides easy access to the Avid Store online using the new Pro Tools in-applica-tion web browser. The new Marketplace menu in Pro Tools lets you access your Avid Account and the Avid online store (to shop for plug-ins, up-grades, or Avid support).
To log in to your online Avid account:
Choose Marketplace > Your Account.
Launch in External Web Browser icon
Your Account Log In page
What’s New in Pro Tools and Pro Tools HD 10.0
To access the Avid online store for plug-ins:
Choose Marketplace > Plug-Ins.
To access the Avid online store for support and training, do one of the following:
Choose Marketplace > Support and Training.
– or –
Choose Help > Purchase Avid Support and
Training.
To access the Avid online store for software upgrades:
Choose Marketplace > Upgrades.
You can also access the Avid online store from the AudioSuite menu and from track Insert selectors for plug-ins by choosing the Avid Marketplace option. For more infor-mation, see “Pro Tools Plug-Ins Market-place” on page 49.

Improvements to the Pro Tools Help MenuWith Pro Tools 10, the Help menu provides easy access to online resources in addition to the lo-cal resources that are installed with Pro Tools.
To access the Pro Tool online resources from the Help menu:
Click Help and choose one of the following:
• Pro Tools Help
• Pro Tools Knowledge Base
• Avid Audio Forums
Pro Tools web browser showing the online Avid Audio Forums
Pro Tools HelpThe Pro Tools Help command provides access to web-based Pro Tools Help within the Pro Tools web browser. This means that you will always have access to the latest Pro Tools Help files as they become available (independently of major Pro Tools releases). You will also have access to localized Pro Tools Help files as translations be-come available. Note that web-based Pro Tools Help defaults to the English version if your lo-calized language is not currently available.
If you are not connected to the Internet, Pro Tools will open the local English Help files that are installed with Pro Tools.
Pro Tools Knowledge BaseThe Pro Tools Knowledge Base command pro-vides access to the online Avid Knowledge Base using the new Pro Tools in-application web browser. The Avid Knowledge Base provides ex-tensive information for you to solve any prob-lems you may encounter with Pro Tools (includ-ing compatibility information and software updates).
Avid Audio ForumsThe Avid Audio Forums command provides ac-cess to the online Avid Audio Forums using the new Pro Tools in-application web browser. The Avid Audio Forum provide a broad-based user community where you can interact with other Pro Tools users.
You can also access Pro Tools Help online using Safari or Explorer. This can be use-ful if Pro Tools is not running, or if you want to change the version or language of Help you are using. Visit http://apps.avid.com/ProToolsHelp/.
Chapter 2: New and Enhanced System Capabilities 11

12
What’s New in Pro Tools and Pro Tools HD 10.0
Chapter 3: New and Enhanced Import and Export Features
Export Selected Tracks As New SessionPro Tools 10 lets you export any selected tracks in a session as a new session. This feature is es-pecially useful in collaborative situations.
For example, you might be working on a large post-production session and you want your col-laborator to work on only some dialog in the ses-sion while you continue working on other parts of the session. You can now select the dialog tracks and export them as a new session. Your collaborator can then open the new session and edit the dialog. When your collaborator is done, you can import the session data from the dialog session to update the dialog tracks in your big session.
To export selected tracks as a new session:
1 Select the tracks you want to export as a new session.
2 Choose File > Export > Selected Tracks As New
Session. The Save Session Copy dialog opens. (You can also open the Save Session Copy dialog by choosing File > Save Copy In.)
3 In the Save Session Copy dialog, configure the Session Format and Session Parameters settings and options as desired.
4 Verify that the Selected Tracks Only option is enabled.
5 Configure the Items to Copy settings and op-tions as desired.
6 You can also enable the Main Playlist Only op-tion if you don’t want to include any of the alter-nate playlists associated with any of the selected tracks in the new session.
7 Click OK. The Save dialog opens.
8 In the Save dialog, name the session.
9 Navigate to where you want to save the session.
10 Click Save.
A copy of the session that contains only the se-lected tracks from the source session is saved to the specified location.
Chapter 3: New and Enhanced Import and Export Features 13
14
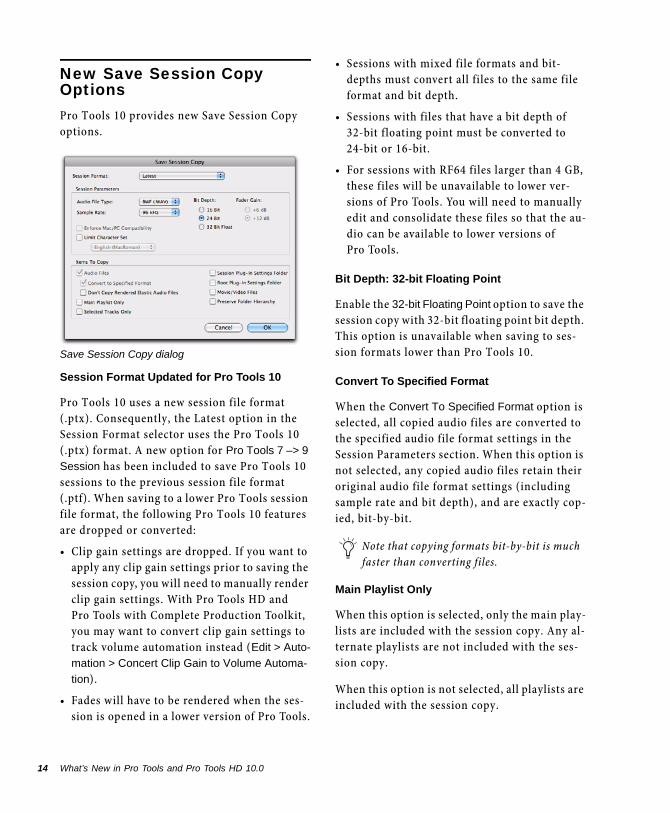
New Save Session Copy OptionsPro Tools 10 provides new Save Session Copy options.
Session Format Updated for Pro Tools 10
Pro Tools 10 uses a new session file format (.ptx). Consequently, the Latest option in the Session Format selector uses the Pro Tools 10 (.ptx) format. A new option for Pro Tools 7 –> 9
Session has been included to save Pro Tools 10 sessions to the previous session file format (.ptf). When saving to a lower Pro Tools session file format, the following Pro Tools 10 features are dropped or converted:
• Clip gain settings are dropped. If you want to apply any clip gain settings prior to saving the session copy, you will need to manually render clip gain settings. With Pro Tools HD and Pro Tools with Complete Production Toolkit, you may want to convert clip gain settings to track volume automation instead (Edit > Auto-
mation > Concert Clip Gain to Volume Automa-
tion).
• Fades will have to be rendered when the ses-sion is opened in a lower version of Pro Tools.
Save Session Copy dialog
What’s New in Pro Tools and Pro Tools HD 10.0
• Sessions with mixed file formats and bit-depths must convert all files to the same file format and bit depth.
• Sessions with files that have a bit depth of 32-bit floating point must be converted to 24-bit or 16-bit.
• For sessions with RF64 files larger than 4 GB, these files will be unavailable to lower ver-sions of Pro Tools. You will need to manually edit and consolidate these files so that the au-dio can be available to lower versions of Pro Tools.
Bit Depth: 32-bit Floating Point
Enable the 32-bit Floating Point option to save the session copy with 32-bit floating point bit depth. This option is unavailable when saving to ses-sion formats lower than Pro Tools 10.
Convert To Specified Format
When the Convert To Specified Format option is selected, all copied audio files are converted to the specified audio file format settings in the Session Parameters section. When this option is not selected, any copied audio files retain their original audio file format settings (including sample rate and bit depth), and are exactly cop-ied, bit-by-bit.
Main Playlist Only
When this option is selected, only the main play-lists are included with the session copy. Any al-ternate playlists are not included with the ses-sion copy.
When this option is not selected, all playlists are included with the session copy.
Note that copying formats bit-by-bit is much faster than converting files.

Selected Tracks Only
When this option is selected, only the selected tracks in the source session are saved with the session copy. This option is automatically en-abled when choosing File > Export > Selected
Tracks As New Session.
When this option is not selected, all tracks in the source session are saved with the session copy. This option is automatically disabled when choosing File > Save Session Copy.
New Import Session Data OptionsThe Import Session Data dialog provides the fol-lowing new and improved options.
Adjust Session Start Time to Match Source Start Time
When selected, the Adjust Session Start Time to
Match Source Start Time option lets you auto-matically set the start time of the current Pro Tools session to match the start time of the session, or AAF or OMF sequence you are im-porting.
When deselected, the imported session data is placed on the timeline in relation to the current session start time.
Timecode Mapping options
AAF/OMF Source Track Translation SettingsPro Tools 10 provides two new options for “translating” audio clips when importing AAF sequences or OMF files and sequences. These options replace the Clip-Based Gain pop-up menu and the Ignore Auto Gain option found in lower versions of Pro Tools.
Import Clip Gain
When selected, the Import Clip Gain option lets you import the clip-based gain settings in the se-quence as Pro Tools clip-based gain. When de-selected, clip-based gain settings are ignored. Media Composer and other Avid products pro-vide clip-based gain to adjust the volume of an individual audio clip.
Import Volume Automation
When selected, the Import Volume Automation
option lets you import volume automation in the sequence as Pro Tools Volume automation. When deselected, volume automation in the se-quence is ignored.
Add to iTunes LibraryPro Tools 10 lets you bounce your mix to your iTunes library using the new Add to iTunes Li-
brary option in the Bounce to Disk dialog. When this option is selected, the bounced file is copied to your local iTunes library.
New Translation settings
Chapter 3: New and Enhanced Import and Export Features 15
16
If the Add to iTunes Library option is enabled when bouncing to disk, the resultant audio file is automatically imported into iTunes the next time you launch the iTunes application. If iTunes is not installed on your computer, this option does not do anything.
The Add to iTunes Library option is only available if the Format is set to Mono (Summed) or Interleaved.
For more information about iTunes, visit www.apple.com.
What’s New in Pro Tools and Pro Tools HD 10.0
To export your mix to your iTunes library:
1 Choose File > Bounce to > Disk.
2 In the Bounce to Disk dialog, select the Bounce
Source.
3 Ensure that Format is set to Mono (Summed) or Interleaved.
4 Enable the Add to iTunes Library option.
5 Click Bounce.
6 Select a destination for the new audio file, en-ter a name, and click Save.
The bounced audio file is copied to your iTunes library, and iTunes launches automatically and imports the copied file.
Bounce to Disk, Add To iTunes Library option enabled

Share with SoundCloudSoundCloud is a social audio sharing site. Users create a public profile and fill it with audio they want to share. The audio can then be played by anyone, or by a select group of users. Sound-Cloud's easy sharing tools let you feature your tracks or playlists on any website, including so-cial networks like Twitter, Facebook, and Google+.
Pro Tools 10 lets you share your mix with SoundCloud using the new Share with Sound-
Cloud option in the Bounce to Disk dialog and in the Export Selected dialog. When this option is selected, the bounced file is automatically up-loaded to your SoundCloud account. If you do not have an account, you can create one for free.
Sharing with Sound Cloud Using Bounce to Disk
To share your mix with SoundCloud using Bounce to Disk:
1 Choose File > Bounce to > Disk.
2 In the Bounce to Disk dialog, select the Bounce
Source.
3 Ensure that Format is set to Mono (Summed) or Interleaved.
The Share with SoundCloud option is only available if the Format is set to Mono (Summed) or Interleaved.
For more information about SoundCloud, visit www.soundcloud.com.
4 Enable the Share with SoundCloud option.
5 Click Bounce.
6 Select a destination for the new audio file, en-ter a name, and click Save.
7 Configure the subsequent Share with Sound-Cloud dialog as desired (see “Share with Sound-Cloud Dialog” on page 19).
8 Click Share.
9 If you are not already logged in to your Sound-Cloud account, you are prompted to log in (see “Logging In To SoundCloud” on page 19).
The bounced file is written to your local drive and then posted directly to your SoundCloud ac-count if you are logged in.
Bounce to Disk, Share with SoundCloud option enabled
Chapter 3: New and Enhanced Import and Export Features 17
18
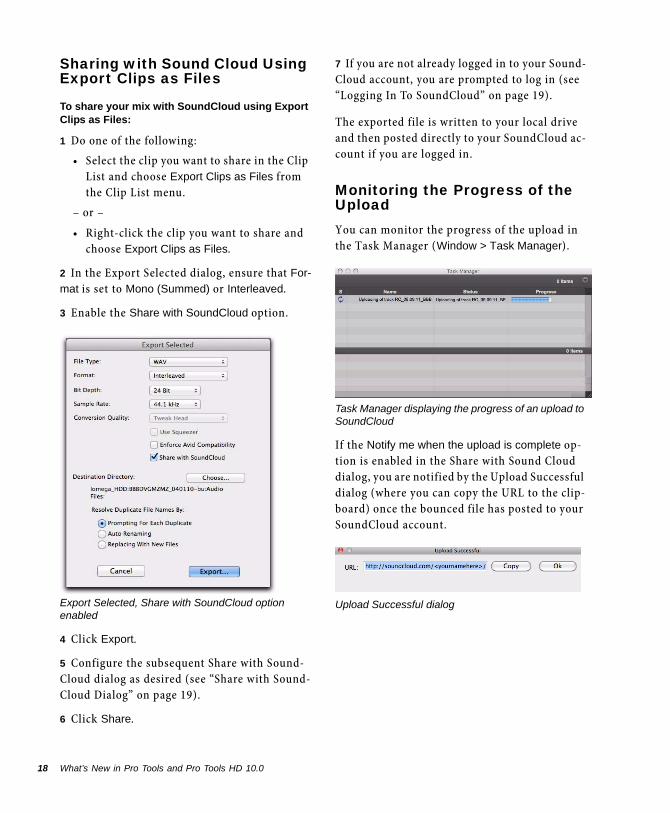
Sharing with Sound Cloud Using Export Clips as Files
To share your mix with SoundCloud using Export Clips as Files:
1 Do one of the following:
• Select the clip you want to share in the Clip List and choose Export Clips as Files from the Clip List menu.
– or –
• Right-click the clip you want to share and choose Export Clips as Files.
2 In the Export Selected dialog, ensure that For-
mat is set to Mono (Summed) or Interleaved.
3 Enable the Share with SoundCloud option.
4 Click Export.
5 Configure the subsequent Share with Sound-Cloud dialog as desired (see “Share with Sound-Cloud Dialog” on page 19).
6 Click Share.
Export Selected, Share with SoundCloud option enabled
What’s New in Pro Tools and Pro Tools HD 10.0
7 If you are not already logged in to your Sound-Cloud account, you are prompted to log in (see “Logging In To SoundCloud” on page 19).
The exported file is written to your local drive and then posted directly to your SoundCloud ac-count if you are logged in.
Monitoring the Progress of the UploadYou can monitor the progress of the upload in the Task Manager (Window > Task Manager).
If the Notify me when the upload is complete op-tion is enabled in the Share with Sound Cloud dialog, you are notified by the Upload Successful dialog (where you can copy the URL to the clip-board) once the bounced file has posted to your SoundCloud account.
Task Manager displaying the progress of an upload to SoundCloud
Upload Successful dialog
Logging In To SoundCloud
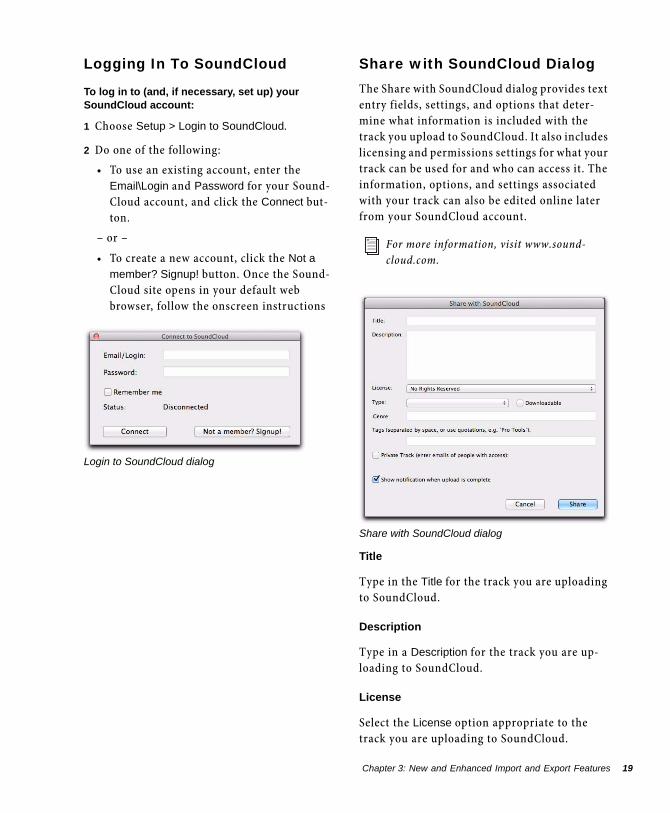
To log in to (and, if necessary, set up) your SoundCloud account:
1 Choose Setup > Login to SoundCloud.
2 Do one of the following:
• To use an existing account, enter the Email\Login and Password for your Sound-Cloud account, and click the Connect but-ton.
– or –
• To create a new account, click the Not a
member? Signup! button. Once the Sound-Cloud site opens in your default web browser, follow the onscreen instructions
Login to SoundCloud dialog
Share with SoundCloud DialogThe Share with SoundCloud dialog provides text entry fields, settings, and options that deter-mine what information is included with the track you upload to SoundCloud. It also includes licensing and permissions settings for what your track can be used for and who can access it. The information, options, and settings associated with your track can also be edited online later from your SoundCloud account.
Title
Type in the Title for the track you are uploading to SoundCloud.
Description
Type in a Description for the track you are up-loading to SoundCloud.
License
Select the License option appropriate to the track you are uploading to SoundCloud.
For more information, visit www.sound-cloud.com.
Share with SoundCloud dialog
Chapter 3: New and Enhanced Import and Export Features 19
20
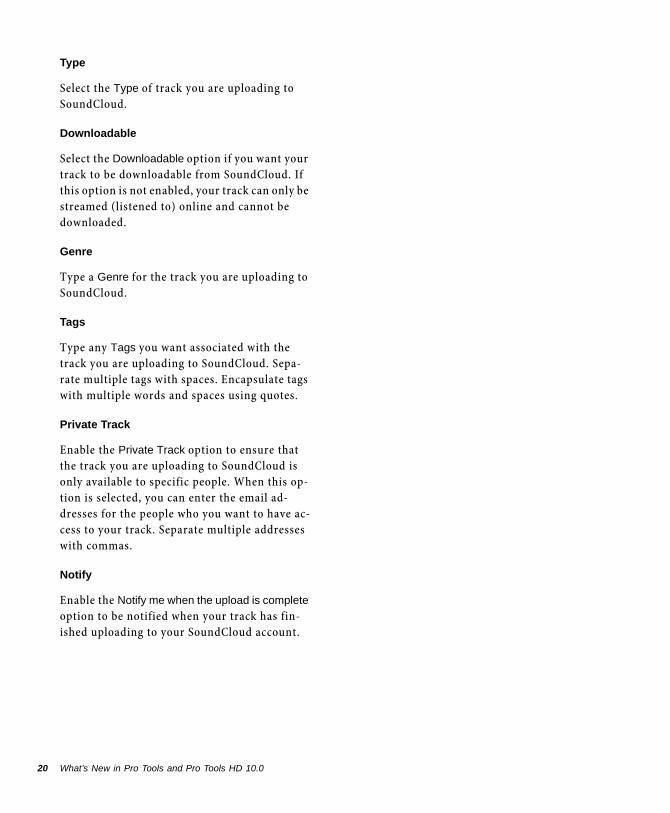
Type
Select the Type of track you are uploading to SoundCloud.
Downloadable
Select the Downloadable option if you want your track to be downloadable from SoundCloud. If this option is not enabled, your track can only be streamed (listened to) online and cannot be downloaded.
Genre
Type a Genre for the track you are uploading to SoundCloud.
Tags
Type any Tags you want associated with the track you are uploading to SoundCloud. Sepa-rate multiple tags with spaces. Encapsulate tags with multiple words and spaces using quotes.
Private Track
Enable the Private Track option to ensure that the track you are uploading to SoundCloud is only available to specific people. When this op-tion is selected, you can enter the email ad-dresses for the people who you want to have ac-cess to your track. Separate multiple addresses with commas.
Notify
Enable the Notify me when the upload is complete option to be notified when your track has fin-ished uploading to your SoundCloud account.
What’s New in Pro Tools and Pro Tools HD 10.0
Chapter 4: New Editing Features and Enhancements
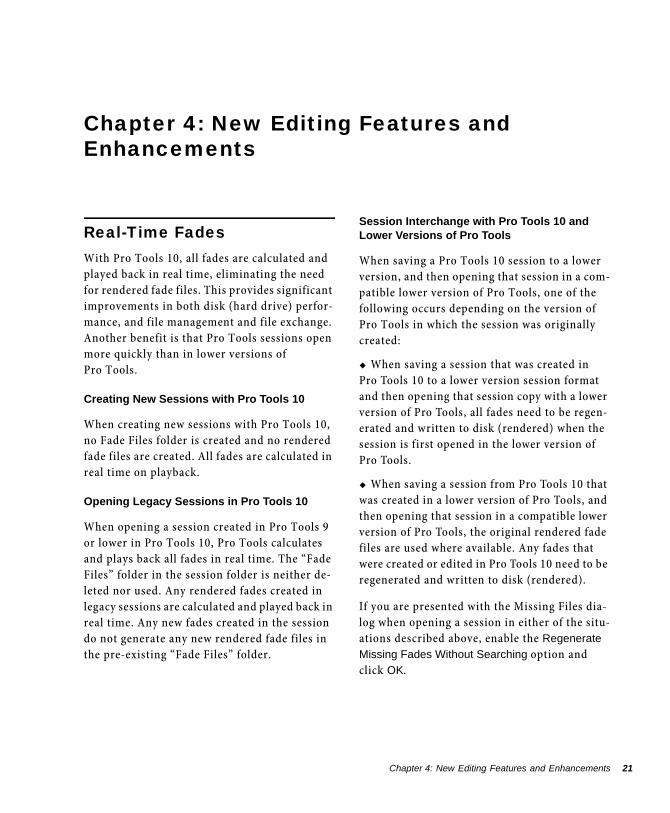
Real-Time FadesWith Pro Tools 10, all fades are calculated and played back in real time, eliminating the need for rendered fade files. This provides significant improvements in both disk (hard drive) perfor-mance, and file management and file exchange. Another benefit is that Pro Tools sessions open more quickly than in lower versions of Pro Tools.
Creating New Sessions with Pro Tools 10
When creating new sessions with Pro Tools 10, no Fade Files folder is created and no rendered fade files are created. All fades are calculated in real time on playback.
Opening Legacy Sessions in Pro Tools 10
When opening a session created in Pro Tools 9 or lower in Pro Tools 10, Pro Tools calculates and plays back all fades in real time. The “Fade Files” folder in the session folder is neither de-leted nor used. Any rendered fades created in legacy sessions are calculated and played back in real time. Any new fades created in the session do not generate any new rendered fade files in the pre-existing “Fade Files” folder.
Session Interchange with Pro Tools 10 and Lower Versions of Pro Tools
When saving a Pro Tools 10 session to a lower version, and then opening that session in a com-patible lower version of Pro Tools, one of the following occurs depending on the version of Pro Tools in which the session was originally created:
When saving a session that was created in Pro Tools 10 to a lower version session format and then opening that session copy with a lower version of Pro Tools, all fades need to be regen-erated and written to disk (rendered) when the session is first opened in the lower version of Pro Tools.
When saving a session from Pro Tools 10 that was created in a lower version of Pro Tools, and then opening that session in a compatible lower version of Pro Tools, the original rendered fade files are used where available. Any fades that were created or edited in Pro Tools 10 need to be regenerated and written to disk (rendered).
If you are presented with the Missing Files dia-log when opening a session in either of the situ-ations described above, enable the Regenerate
Missing Fades Without Searching option and click OK.
Chapter 4: New Editing Features and Enhancements 21

22
Real-Time Fades are Rendered on Export to AAF and OMF
When exporting tracks to AAF or OMF se-quences, all fades are rendered on export. This provides maximum compatibly with other ap-plications (such as Avid Media Composer) when importing AAF or OMF sequences exported from Pro Tools 10.
Overlapping Crossfades ViewPro Tools 10 lets you view overlapping wave-forms in crossfades.
To show (or hide) overlapping crossfades:
Select (or deselect) View > Waveform > Over-
lapping Crossfades.
Overlapping Crossfades view
What’s New in Pro Tools and Pro Tools HD 10.0
Clip-Based GainPro Tools 10 provides clip-based gain for quick and easy gain matching of clips (formerly called regions in Pro Tools) from different sources in a Pro Tools session. Clip-based gain is applied pre-mixer (pre-fader and before any plug-in processing). This is especially useful when working with field recordings and sample li-braries in post-production sessions.
By adjusting the clip gain for individual clips on a single track, you can match their relative gain levels so that you do not have to execute com-plex track volume automation to compensate.
The clip gain settings stay with the clip, which means you can move, and copy and paste clips with their corresponding clip gain settings. Clip gain settings can now be imported from AAF and OMF sequences exported from Media Com-poser. Likewise, clip gain settings can be ex-ported from Pro Tools with AAF sequences (but not OMF) to be imported into Media Composer.
All clips have a clip gain of 0 dB by default. Clip gain can be adjusted from –144 dB to +36.0 dB.
Static Versus Dynamic Clip Gain
You can have either static or dynamic clip gain settings for a single clip. Static clip gain simply means that there is a single gain setting for the entire clip (see “Simple Clip Gain Adjustment” on page 25). Dynamic clip gain means that you can have gain settings for a clip that vary over time (see “Graphically Editing Clip Gain” on page 25).
Multiple clips with different (static) Clip Gain settings
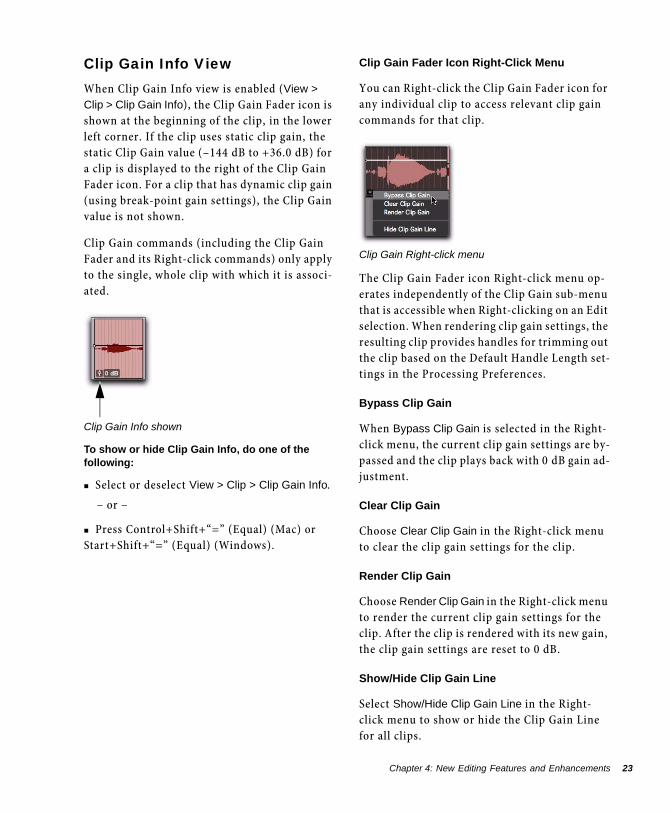
Clip Gain Info ViewWhen Clip Gain Info view is enabled (View >
Clip > Clip Gain Info), the Clip Gain Fader icon is shown at the beginning of the clip, in the lower left corner. If the clip uses static clip gain, the static Clip Gain value (–144 dB to +36.0 dB) for a clip is displayed to the right of the Clip Gain Fader icon. For a clip that has dynamic clip gain (using break-point gain settings), the Clip Gain value is not shown.
Clip Gain commands (including the Clip Gain Fader and its Right-click commands) only apply to the single, whole clip with which it is associ-ated.
To show or hide Clip Gain Info, do one of the following:
Select or deselect View > Clip > Clip Gain Info.
– or –
Press Control+Shift+“=” (Equal) (Mac) or Start+Shift+“=” (Equal) (Windows).
Clip Gain Info shown
Clip Gain Fader Icon Right-Click Menu
You can Right-click the Clip Gain Fader icon for any individual clip to access relevant clip gain commands for that clip.
The Clip Gain Fader icon Right-click menu op-erates independently of the Clip Gain sub-menu that is accessible when Right-clicking on an Edit selection. When rendering clip gain settings, the resulting clip provides handles for trimming out the clip based on the Default Handle Length set-tings in the Processing Preferences.
Bypass Clip Gain
When Bypass Clip Gain is selected in the Right-click menu, the current clip gain settings are by-passed and the clip plays back with 0 dB gain ad-justment.
Clear Clip Gain
Choose Clear Clip Gain in the Right-click menu to clear the clip gain settings for the clip.
Render Clip Gain
Choose Render Clip Gain in the Right-click menu to render the current clip gain settings for the clip. After the clip is rendered with its new gain, the clip gain settings are reset to 0 dB.
Show/Hide Clip Gain Line
Select Show/Hide Clip Gain Line in the Right-click menu to show or hide the Clip Gain Line for all clips.
Clip Gain Right-click menu
Chapter 4: New Editing Features and Enhancements 23

24
Clip Gain LineThe Clip Gain Line lets you edit the clip gain set-tings for any given clip using breakpoint edit-ing, much like with track-based volume automa-tion. However, unlike track-based volume automation, the clip gain settings are always as-sociated with the clip rather than with the track.The Clip Gain Line can be shown or hidden for all clips in the Edit window.
To show or hide the Clip Gain Line, do one of the following:
Select or deselect View > Clip > Clip Gain Line.
Press Control+Shift+“-” (Hyphen) (Mac) or Start+Shift+“-” (Hyphen) (Windows).
Right-click the Clip Gain Fader icon on any clip and choose Show Clip Gain Line or Hide Clip
Gain Line.
Right-click any clip and choose Clip Gain >
Show Clip Gain Line or Clip Gain > Hide Clip Gain
Line.
Clip Gain Line (with multiple breakpoints)
The Clip Gain Line is only shown when the track height is set to Small or larger.
What’s New in Pro Tools and Pro Tools HD 10.0
Clip Gain Line and Crossfades
Clip gain is applied on a clip-by-clip basis. When cross-fading between clips, the Clip Gain Line for the first clip carries through the fade out segment of the crossfade and the Clip Gain Line for the second clip carries through the fade in segment of the crossfade. Consequently, crossfades can display two Clip Gain Lines, one for the first clip and one for the second clip.
Clip Gain Lines prior to applying a crossfade
Clip Gain Lines after applying a crossfade

Editing Clip Gain
Simple Clip Gain Adjustment
To boost or attenuate the current clip gain settings for a single clip:
1 Ensure that the Clip Gain Info option is en-abled.
2 Click the Clip Gain Fader icon on the clip and drag the Clip Gain fader up or down to boost or attenuate the clip gain settings for the clip.
If a clip is Edit-locked and you attempt to edit clip gain, you are prompted to Cancel or Allow the edit.
Using the Clip Gain Fader to adjust the static clip gain value
Using the Clip Gain Fader to adjust all break-point clip gain values
Press Command (Mac) or Control (Win-dows) while adjusting the Clip Gain fader for fine control.
Graphically Editing Clip Gain
You can graphically edit clip gain using break-points on the Clip Gain Line for individual clips. When you drag a clip gain breakpoint up or down, the change in the gain setting value is nu-merically indicated. Dragging a clip gain break-point to the left or right adjusts its timing.
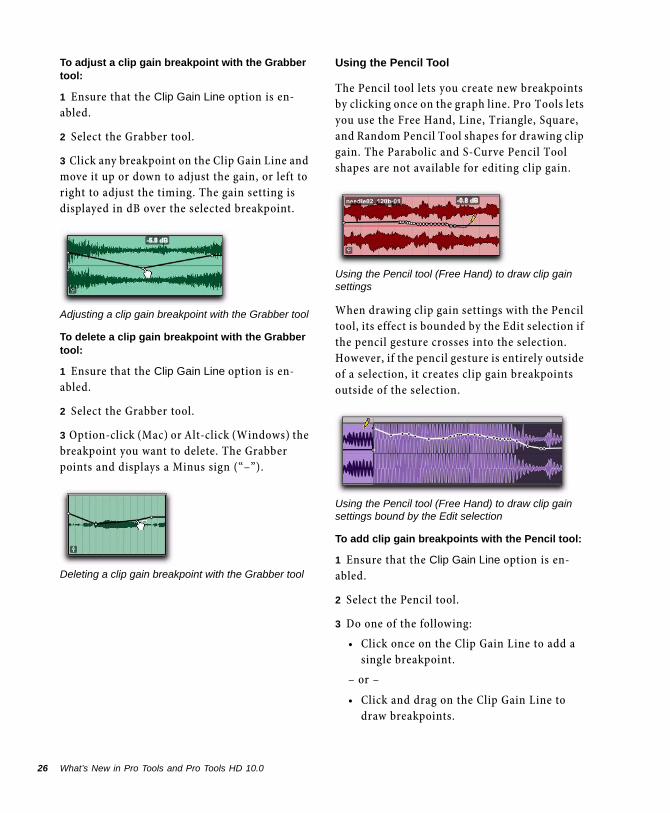
Using the Grabber Tool
Using the Grabber tool, you can add, adjust, and delete individual clip gain breakpoint settings.
To add a clip gain breakpoint with the Grabber tool:
1 Ensure that the Clip Gain Line option is en-abled.
2 Select the Grabber tool.
3 Click at any point on the Clip Gain Line for the clip to add a breakpoint. The Grabber points and displays a Plus sign (“+”).
Adding a clip gain breakpoint with the Grabber tool
Press Control+Shift+E (Mac) or Start+Shift+E (Windows) to add a Clip Gain breakpoint at the current Edit loca-tion.
Chapter 4: New Editing Features and Enhancements 25
26
To adjust a clip gain breakpoint with the Grabber tool:
1 Ensure that the Clip Gain Line option is en-abled.
2 Select the Grabber tool.
3 Click any breakpoint on the Clip Gain Line and move it up or down to adjust the gain, or left to right to adjust the timing. The gain setting is displayed in dB over the selected breakpoint.
To delete a clip gain breakpoint with the Grabber tool:
1 Ensure that the Clip Gain Line option is en-abled.
2 Select the Grabber tool.
3 Option-click (Mac) or Alt-click (Windows) the breakpoint you want to delete. The Grabber points and displays a Minus sign (“–”).
Adjusting a clip gain breakpoint with the Grabber tool
Deleting a clip gain breakpoint with the Grabber tool
What’s New in Pro Tools and Pro Tools HD 10.0
Using the Pencil Tool
The Pencil tool lets you create new breakpoints by clicking once on the graph line. Pro Tools lets you use the Free Hand, Line, Triangle, Square, and Random Pencil Tool shapes for drawing clip gain. The Parabolic and S-Curve Pencil Tool shapes are not available for editing clip gain.
When drawing clip gain settings with the Pencil tool, its effect is bounded by the Edit selection if the pencil gesture crosses into the selection. However, if the pencil gesture is entirely outside of a selection, it creates clip gain breakpoints outside of the selection.
To add clip gain breakpoints with the Pencil tool:
1 Ensure that the Clip Gain Line option is en-abled.
2 Select the Pencil tool.
3 Do one of the following:
• Click once on the Clip Gain Line to add a single breakpoint.
– or –
• Click and drag on the Clip Gain Line to draw breakpoints.
Using the Pencil tool (Free Hand) to draw clip gain settings
Using the Pencil tool (Free Hand) to draw clip gain settings bound by the Edit selection
To delete a clip gain breakpoint with the Pencil tool:
1 Ensure that the Clip Gain Line option is en-abled.
2 Select the Pencil tool.
3 Option-click (Mac) or Alt-click (Windows) the breakpoint you want to delete.
Using the Trim Tools
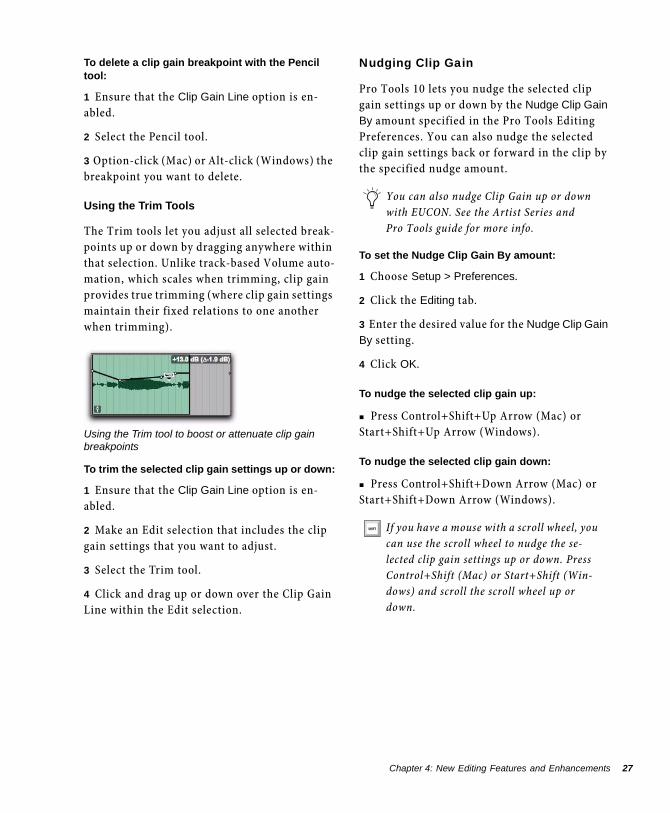
The Trim tools let you adjust all selected break-points up or down by dragging anywhere within that selection. Unlike track-based Volume auto-mation, which scales when trimming, clip gain provides true trimming (where clip gain settings maintain their fixed relations to one another when trimming).
To trim the selected clip gain settings up or down:
1 Ensure that the Clip Gain Line option is en-abled.
2 Make an Edit selection that includes the clip gain settings that you want to adjust.
3 Select the Trim tool.
4 Click and drag up or down over the Clip Gain Line within the Edit selection.
Using the Trim tool to boost or attenuate clip gain breakpoints
Nudging Clip Gain
Pro Tools 10 lets you nudge the selected clip gain settings up or down by the Nudge Clip Gain
By amount specified in the Pro Tools Editing Preferences. You can also nudge the selected clip gain settings back or forward in the clip by the specified nudge amount.
To set the Nudge Clip Gain By amount:
1 Choose Setup > Preferences.
2 Click the Editing tab.
3 Enter the desired value for the Nudge Clip Gain
By setting.
4 Click OK.
To nudge the selected clip gain up:
Press Control+Shift+Up Arrow (Mac) or Start+Shift+Up Arrow (Windows).
To nudge the selected clip gain down:
Press Control+Shift+Down Arrow (Mac) or Start+Shift+Down Arrow (Windows).
You can also nudge Clip Gain up or down with EUCON. See the Artist Series and Pro Tools guide for more info.
If you have a mouse with a scroll wheel, you can use the scroll wheel to nudge the se-lected clip gain settings up or down. Press Control+Shift (Mac) or Start+Shift (Win-dows) and scroll the scroll wheel up or down.
Chapter 4: New Editing Features and Enhancements 27

28
To nudge the selected clip gain back, do one of the following:
Press Control+Shift+“–” (Minus) (Mac) or Start+Shift+“–” (Minus) (Windows).
Press Control+Shift+M (Mac) or Start+Shift+M (Windows).
Press Control+Shift+“,” (Comma) (Mac) or Start+Shift+“,” (Comma) (Windows).
To nudge the selected clip gain forward, do one of the following:
Press Control+Shift+“+” (Plus) (Mac) or Start+Shift+“+” (Plus) (Windows).
Press Control+Shift+“.” (Period) (Mac) or Start+Shift+“.” (Period) (Windows).
Press Control+Shift+“/” (Slash) (Mac) or Start+Shift+“/” (Slash) (Windows).
Clearing Clip Gain
Pro Tools 10 lets you clear the clip gain settings for the current Edit selection. This resets the clip gain for the selection to 0 dB. For clips only partially included in the Edit selection, only the clip gain settings within the Edit selection are affected.
To clear clip gain, do one of the following:
Right-click a clip or Edit selection and choose Clip Gain > Clear Clip Gain.
Right-click the Clip Gain Fader icon for a sin-gle clip and choose Clear Clip Gain.
Select a clip or make an Edit selection and choose Edit > Clip Special > Clear Clip Gain.
Select a clip or make an Edit selection and press Control+Shift+B (Mac) or Start+Shift+B (Windows).
Press Option (Mac) or Alt (Windows) and click Clip Gain Fader icon for a single clip.
What’s New in Pro Tools and Pro Tools HD 10.0
Cutting, Copying, and Pasting Clip Gain
Pro Tools 10 lets you cut, copy, and paste clip gain settings, so that you can apply the clip gain settings from one clip to any other. Clip gain settings cannot be cut, copied, or pasted across clip boundaries.
To cut clip gain settings:
1 Select a single whole clip or make an Edit se-lection within a single whole clip.
2 Do one of the following:
• Choose Edit > Cut Special > Cut Clip Gain.
– or –
• Press Control+Shift+X (Mac) or Start+Shift+X (Windows).
The selected clip gain settings are cut and copied to the clipboard. Clip gain breakpoints on the clipboard are time-stamped with the playback times in the timebase of the track being copied (which means you can cut and paste clip gain settings from clips on tick-based tracks and have the pasted clip gain settings match the corre-sponding bar:beat locations of clips on other tick-based tracks).
To copy clip gain settings:
1 Select a single whole clip or make an Edit se-lection within a single whole clip.
2 Do one of the following:
• Choose Edit > Copy Special > Copy Clip
Gain.
• Press Control+Shift+C (Mac) or Start+Shift+C (Windows).
• Right-click any single whole clip selection and choose Clip Gain > Copy Clip Gain.
You can cut clip gain settings from any Edit selection. However, if you want to cut and paste clip gain settings, you can only paste the clip gain settings cut from a single clip.
The selected clip gain settings are copied to the clipboard. Clip gain breakpoints on the clip-board are time-stamped with the playback times in the timebase of the track being copied (which means you can copy and paste clip gain settings from clips on tick-based tracks and have the pasted clip gain settings match the correspond-ing bar:beat locations of clips on other tick-based tracks).
To paste clip gain settings:
1 Cut or Copy the clip gain settings you want.
2 Do one of the following:
• Select another clip.
• Make an Edit selection within a single whole clip.
• Place the Edit In Point where you want the cut or copied clip gain settings to be pasted.
3 Do one of the following:
• Choose Edit > Paste Clip Gain.
– or –
• Press Command+V (Mac) or Control+V (Windows).
The clip gain settings on the clipboard are pasted into the clip starting at the Edit In Point. The clip gain settings are pasted in their en-tirety, but only apply to a single clip. If the pasted clip gain settings extend beyond the end of the clip, they are all still associated with the clip. This means that if you trim out the clip later, the pasted clip gain is revealed. When pasting clip gain within a clip (rather than to a single whole clip of the same duration), break-points are added before and after the pasted data so that any clip gain settings outside the paste do not change.
Converting Clip Gain and Track Volume Automation(Pro Tools HD or Pro Tools with Complete Production Toolkit Only)
Pro Tools 10 lets you convert clip gain settings to track-based volume automation, as well as letting you convert track-based volume automa-tion to clip gain settings.
When converting clip gain settings to volume automation, the clip gain settings are cut from the clip and pasted to track-based volume auto-mation at the same timeline locations as the clip.
When converting track-based volume automa-tion to clip gain, the volume automation is cut from the track volume automation playlist and pasted to the clip. Once volume automation has been converted to clip gain, the clip gain set-tings stay with the clip when moved, cut, copied, or pasted.
To convert clip gain settings to track-based volume automation:
1 Select a clip or make an Edit selection.
2 Choose Edit > Automation > Convert Clip Gain to
Volume Automation.
To convert track-based volume automation to clip gain:
1 Select a clip or make an Edit selection.
2 Choose Edit > Automation > Convert Volume to
Clip Gain.
Any clip gain settings above +12 dB are lost when converted to volume automation. Also, clip gain settings within crossfades are cross-faded as part of the volume automation.
Chapter 4: New Editing Features and Enhancements 29
30
Coalescing Clip Gain and Track Volume Automation(Pro Tools HD or Pro Tools with Complete Production Toolkit Only)
Pro Tools 10 lets you coalesce clip gain settings to track-based volume automation, as well as letting you coalesce track-based volume auto-mation to clip gain settings.
When coalescing clip gain settings to volume au-tomation, the clip gain settings are cut from the clip and coalesced with track-based volume au-tomation at the same timeline locations as the clip.
When coalescing track-based volume automa-tion to clip gain, the volume automation is cut from the track volume automation playlist and coalesced with the selected clip gain settings. Once volume automation has been coalesced to clip gain, volume automation is set to 0 dB for the selection.
What’s New in Pro Tools and Pro Tools HD 10.0
To coalesce clip gain settings to track-based volume automation:
1 Select a clip or make an Edit selection.
2 Choose Edit > Automation > Coalesce Clip Gain
to Volume Automation.
To coalesce track-based volume automation to clip gain settings:
1 Select a clip or make an Edit selection.
2 Choose Edit > Automation > Coalesce Volume to
Clip Gain.
Bypassing Clip GainPro Tools 10 lets you bypass the current clip gain settings for any selected whole clip. This means that you can hear the clip without any clip gain adjustments without losing your cur-rent clip gain settings.
To bypass (or unbypass) clip gain for a clip, do one of the following:
Select one or more whole clips and choose Clip
> Clip Gain > Bypass Clip Gain (or choose Clip >
Clip Gain > Unbypass Clip Gain).
Right-click the Clip Gain Fader icon for a clip and select (or deselect) Bypass.
Right-click a clip or an Edit selection and choose Clip Gain > Bypass Clip Gain (or choose Clip Gain > Unbypass Clip Gain).
The clip gain settings for any whole clips within the Edit selection are bypassed (or unbypassed).
Any clip gain settings above +12 dB are lost when it is coalesced to volume automation. Also, clip gain within crossfades is cross-faded as part of the volume automation.
Rendering Clip GainPro Tools 10 lets you render the current clip gain settings for any selected whole clip. Ren-dering clip gain applies the current clip gain set-tings to a new clip and sets the clip gain settings for the new clip to 0 dB.
To render clip gain for a clip, do one of the following:
Select one or more whole clips and choose Clip > Clip Gain > Render Clip Gain.
Right-click the Clip Gain Fader icon for a clip and choose Render Clip Gain.
Right-click a clip or an Edit selection and choose Clip Gain > Render Clip Gain.
Clip gain for any whole clips within the Edit se-lection is rendered and their clip gain settings are reset to 0 dB.
For clips with any clip gain settings other than 0 dB, the Prepare DPE Tracks com-mand (for DestructivePunch) automatically renders all clip gain settings and resets all clip gain settings to 0 dB.
When rending AudioSuite processing in an AudioSuite mode that renders in clip gain, any clip gain settings are rendered first, and then AudioSuite processing is applied. Clip gain is reset to 0 dB for the resultant clip. However, when creating individual files with AudioSuite rendering, or overwriting files clip-by-clip, clip gain settings are pre-served. For more information, see “Conditions for AudioSuite Rendering with Handles, Fades, Clip Gain, and Metadata” on page 48.
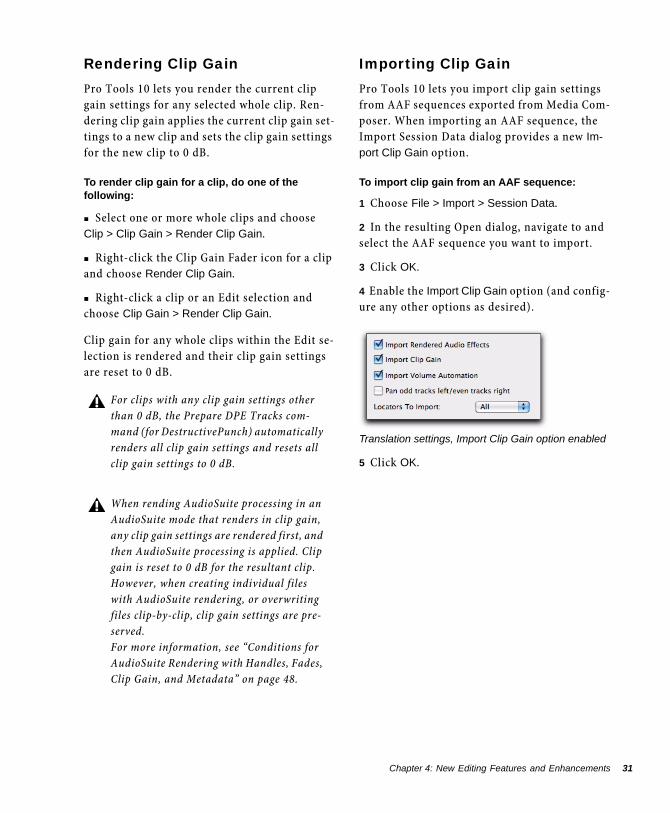
Importing Clip GainPro Tools 10 lets you import clip gain settings from AAF sequences exported from Media Com-poser. When importing an AAF sequence, the Import Session Data dialog provides a new Im-
port Clip Gain option.
To import clip gain from an AAF sequence:
1 Choose File > Import > Session Data.
2 In the resulting Open dialog, navigate to and select the AAF sequence you want to import.
3 Click OK.
4 Enable the Import Clip Gain option (and config-ure any other options as desired).
5 Click OK.
Translation settings, Import Clip Gain option enabled
Chapter 4: New Editing Features and Enhancements 31
32
Exporting Clip Gain with AAFClip gain settings can be exported with an AAF sequence and can be imported (and preserved) in Media Composer.
When exporting selected tracks as an AAF se-quence, clip gain is either rendered or exported for each clip depending on the individual clip gain settings. For any clip with static clip gain that does not exceed +12 dB, the clip gain set-ting is exported with the clip. For any clip with dynamic clip gain or any clip gain setting that exceeds +12 dB, the clip is rendered with the current clip gain settings and the rendered clip is exported.
Clip Gain and Clip GroupsClip gain settings for individual clips are pre-served in clip groups. Additionally, you can ad-just the clip gain settings for clip groups them-selves. To adjust the clip gain settings for individual clips within a clip group, the clips must first be ungrouped, edited, and then re-grouped.
Clip gain settings are preserved when clip groups are exported as clip group files. These clip groups files can then be imported into other sessions with the same clip gain settings.
To be able to export clip gain settings with an AAF sequence, ensure that the Enforce
Avid Compatibility option is enabled. If this option is not enabled, clip gain settings are not exported.
What’s New in Pro Tools and Pro Tools HD 10.0
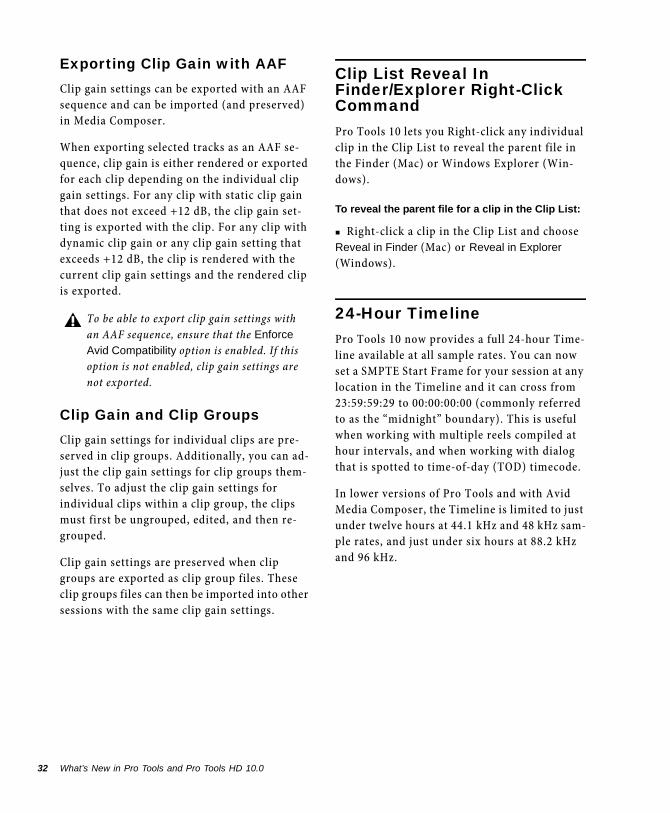
Clip List Reveal In Finder/Explorer Right-Click CommandPro Tools 10 lets you Right-click any individual clip in the Clip List to reveal the parent file in the Finder (Mac) or Windows Explorer (Win-dows).
To reveal the parent file for a clip in the Clip List:
Right-click a clip in the Clip List and choose Reveal in Finder (Mac) or Reveal in Explorer (Windows).
24-Hour TimelinePro Tools 10 now provides a full 24-hour Time-line available at all sample rates. You can now set a SMPTE Start Frame for your session at any location in the Timeline and it can cross from 23:59:59:29 to 00:00:00:00 (commonly referred to as the “midnight” boundary). This is useful when working with multiple reels compiled at hour intervals, and when working with dialog that is spotted to time-of-day (TOD) timecode.
In lower versions of Pro Tools and with Avid Media Composer, the Timeline is limited to just under twelve hours at 44.1 kHz and 48 kHz sam-ple rates, and just under six hours at 88.2 kHz and 96 kHz.
Field Recorder Workflow Improvements(Pro Tools HD or Pro Tools with Complete Production Toolkit Only)
Field Recorder Guide TrackWith Pro Tools 10, to enable Field Recorder functionality on a track, you designate it as a Field Recorder Guide Track. This allows Pro Tools to optimize performance by only cre-ating match lists for designated tracks.
In lower versions of Pro Tools, match lists were created for every audio track in a session, which took additional time and system resources.
Search for Matches Outside the SessionPro Tools 10 lets you search outside the current session for field recorder files, so that you can import only the audio you need, saving time and disk space.
Lower versions of Pro Tools can only search the contents of the Clip List for matching field re-corder channels. Due to the large amount of raw production field recorder files in many projects, having to import all of these into the session can be problematic.
For more information on Pro Tools field recorder workflows and features, see the Pro Tools Reference Guide.
Press Command+Option+Up/Down Arrow (Mac) or Control+Alt+Up/Down Arrow (Windows) to toggle field recorder matches found inside the session.
Don’t Convert PreferenceIn some workflows, production audio is re-corded at 48,048 Hz to compensate for a pull down that is applied downstream in the work-flow. With Pro Tools 10, you can choose to pull these files down to 48,000 Hz in real time during playback, by enabling the Don’t Convert Sample
Rate on Import from Workspace/Desktop option in Pro Tools Preferences (Preferences > Process-
ing > Import).
In lower versions of Pro Tools, enabling this function requires a more complex procedure, done during each import.
Chapter 4: New Editing Features and Enhancements 33

34
What’s New in Pro Tools and Pro Tools HD 10.0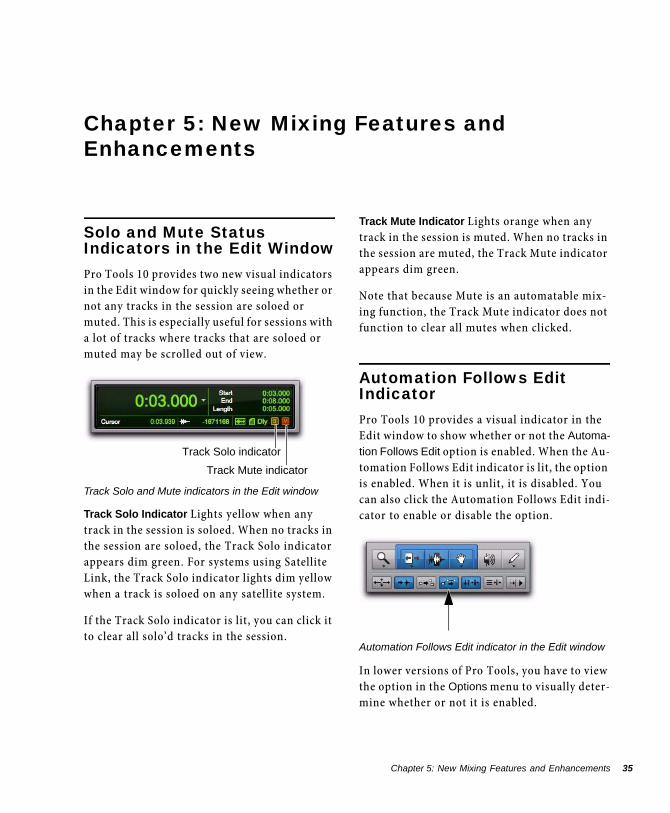
Chapter 5: New Mixing Features and Enhancements
Solo and Mute Status Indicators in the Edit WindowPro Tools 10 provides two new visual indicators in the Edit window for quickly seeing whether or not any tracks in the session are soloed or muted. This is especially useful for sessions with a lot of tracks where tracks that are soloed or muted may be scrolled out of view.
Track Solo Indicator Lights yellow when any track in the session is soloed. When no tracks in the session are soloed, the Track Solo indicator appears dim green. For systems using Satellite Link, the Track Solo indicator lights dim yellow when a track is soloed on any satellite system.
If the Track Solo indicator is lit, you can click it to clear all solo’d tracks in the session.
Track Solo and Mute indicators in the Edit window
Track Solo indicator
Track Mute indicator
Track Mute Indicator Lights orange when any track in the session is muted. When no tracks in the session are muted, the Track Mute indicator appears dim green.
Note that because Mute is an automatable mix-ing function, the Track Mute indicator does not function to clear all mutes when clicked.
Automation Follows Edit IndicatorPro Tools 10 provides a visual indicator in the Edit window to show whether or not the Automa-
tion Follows Edit option is enabled. When the Au-tomation Follows Edit indicator is lit, the option is enabled. When it is unlit, it is disabled. You can also click the Automation Follows Edit indi-cator to enable or disable the option.
In lower versions of Pro Tools, you have to view the option in the Options menu to visually deter-mine whether or not it is enabled.
Automation Follows Edit indicator in the Edit window
Chapter 5: New Mixing Features and Enhancements 35
36
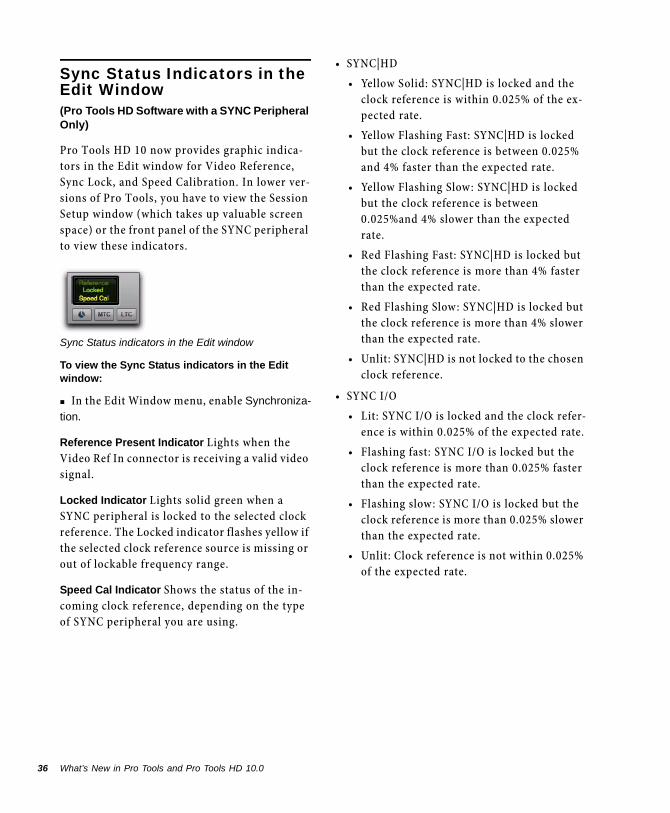
Sync Status Indicators in the Edit Window(Pro Tools HD Software with a SYNC Peripheral Only)
Pro Tools HD 10 now provides graphic indica-tors in the Edit window for Video Reference, Sync Lock, and Speed Calibration. In lower ver-sions of Pro Tools, you have to view the Session Setup window (which takes up valuable screen space) or the front panel of the SYNC peripheral to view these indicators.
To view the Sync Status indicators in the Edit window:
In the Edit Window menu, enable Synchroniza-
tion.
Reference Present Indicator Lights when the Video Ref In connector is receiving a valid video signal.
Locked Indicator Lights solid green when a SYNC peripheral is locked to the selected clock reference. The Locked indicator flashes yellow if the selected clock reference source is missing or out of lockable frequency range.
Speed Cal Indicator Shows the status of the in-coming clock reference, depending on the type of SYNC peripheral you are using.
Sync Status indicators in the Edit window
What’s New in Pro Tools and Pro Tools HD 10.0
• SYNC|HD
• Yellow Solid: SYNC|HD is locked and the clock reference is within 0.025% of the ex-pected rate.
• Yellow Flashing Fast: SYNC|HD is locked but the clock reference is between 0.025% and 4% faster than the expected rate.
• Yellow Flashing Slow: SYNC|HD is locked but the clock reference is between 0.025%and 4% slower than the expected rate.
• Red Flashing Fast: SYNC|HD is locked but the clock reference is more than 4% faster than the expected rate.
• Red Flashing Slow: SYNC|HD is locked but the clock reference is more than 4% slower than the expected rate.
• Unlit: SYNC|HD is not locked to the chosen clock reference.
• SYNC I/O
• Lit: SYNC I/O is locked and the clock refer-ence is within 0.025% of the expected rate.
• Flashing fast: SYNC I/O is locked but the clock reference is more than 0.025% faster than the expected rate.
• Flashing slow: SYNC I/O is locked but the clock reference is more than 0.025% slower than the expected rate.
• Unlit: Clock reference is not within 0.025% of the expected rate.
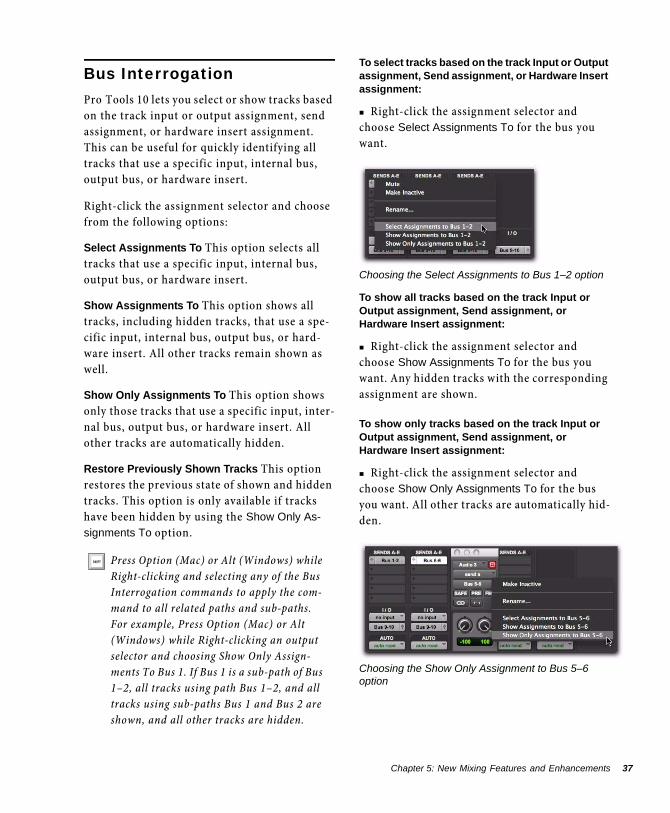
Bus InterrogationPro Tools 10 lets you select or show tracks based on the track input or output assignment, send assignment, or hardware insert assignment. This can be useful for quickly identifying all tracks that use a specific input, internal bus, output bus, or hardware insert.
Right-click the assignment selector and choose from the following options:
Select Assignments To This option selects all tracks that use a specific input, internal bus, output bus, or hardware insert.
Show Assignments To This option shows all tracks, including hidden tracks, that use a spe-cific input, internal bus, output bus, or hard-ware insert. All other tracks remain shown as well.
Show Only Assignments To This option shows only those tracks that use a specific input, inter-nal bus, output bus, or hardware insert. All other tracks are automatically hidden.
Restore Previously Shown Tracks This option restores the previous state of shown and hidden tracks. This option is only available if tracks have been hidden by using the Show Only As-
signments To option.
Press Option (Mac) or Alt (Windows) while Right-clicking and selecting any of the Bus Interrogation commands to apply the com-mand to all related paths and sub-paths. For example, Press Option (Mac) or Alt (Windows) while Right-clicking an output selector and choosing Show Only Assign-ments To Bus 1. If Bus 1 is a sub-path of Bus 1–2, all tracks using path Bus 1–2, and all tracks using sub-paths Bus 1 and Bus 2 are shown, and all other tracks are hidden.
To select tracks based on the track Input or Output assignment, Send assignment, or Hardware Insert assignment:
Right-click the assignment selector and choose Select Assignments To for the bus you want.
To show all tracks based on the track Input or Output assignment, Send assignment, or Hardware Insert assignment:
Right-click the assignment selector and choose Show Assignments To for the bus you want. Any hidden tracks with the corresponding assignment are shown.
To show only tracks based on the track Input or Output assignment, Send assignment, or Hardware Insert assignment:
Right-click the assignment selector and choose Show Only Assignments To for the bus you want. All other tracks are automatically hid-den.
Choosing the Select Assignments to Bus 1–2 option
Choosing the Show Only Assignment to Bus 5–6 option
Chapter 5: New Mixing Features and Enhancements 37

38
To restore all previously shown tracks:
Right-click any assignment selector and choose Restore Previously Shown Tracks.
Support for 12 Systems with Satellite Link(Pro Tools HD or HD Native Only)
With Pro Tools 10, the number of systems that can be linked with the Avid Satellite Link option increases to twelve. Lower versions of Pro Tools only supported up to five satellites.
Pro Tools 10 lets you link up to twelve Pro Tools systems (or up to eleven Pro Tools systems and a Video Satellite or Video Satellite LE system) over an Ethernet network, so that you can cue, play, and stop the transports, make play selec-tions, and solo tracks across any of the systems from any linked workstation.
To use more than five satellites, all linked sys-tems must be running Pro Tools 10.
Choosing the Restore Previously Shown Tracks option
For complete information on configuring and using the Satellite Link option, see the Satellite Link Guide.
What’s New in Pro Tools and Pro Tools HD 10.0
Chapter 6: New Control Surface and Worksurface Features and Enhancements
D-Command Multi-ModePro Tools 10 adds Multi-mode capability to D-Command consoles.
D-Command Multi-mode lets you use a single D-Command console to access two Pro Tools systems on a network. In Multi-mode, you can quickly switch worksurface control from one system to the other by pressing a single switch on the console.
When a D-Command unit is in Multi-mode, it is not possible to update its firmware. To allow updating of D-Command firmware from Pro Tools, first take the unit out of Multi-mode.
Chapter 6: New C
Enabling Multi-Mode
To enable a D-Command console to be declared on two Pro Tools systems, the D-Command Main Unit and any Fader Modules must first be placed in Multi-mode.
To place a D-Command unit in Multi-mode:
1 If a D-Command is declared on a system, do one of the following:
• Quit Pro Tools.
– or –
• Undeclare the D-Command in the Pro Tools Peripherals dialog.
2 Press and hold the Solo switch on the left-most Channel Strip on the unit for approximately three seconds.
When in Multi-mode, the unit displays “D-Com-mand Multi-Mode” in the Soft Keys (on a Main Unit) or in the Channel Displays (on a Fader Module).
ontrol Surface and Worksurface Features and Enhancements 39

40
Declaring D-Command Units when in Multi-Mode
When a D-Command unit is in Multi-mode, it appears in the Peripherals dialog twice, with the numbers “1” and “2” appended to its name. These two listings can then be declared on dif-ferent Pro Tools systems on the network.
To declare D-Command units in Multi-mode:
1 On the first Pro Tools system, choose Setup >
Peripherals, and click Ethernet Controllers.
2 In the Ethernet Controllers page, select En-
able. Pro Tools scans the Ethernet connection and finds the Multi-mode enabled D-Command units.
3 Declare the Main Unit and Fader Modules that end in the suffix “1,” in the order you want the units arranged from left to right.
4 Click OK to close the Peripherals window.
5 On the second Pro Tools system, repeat the above steps, declaring the Main Unit and Fader Modules that appear with the suffix “2,” in the same order from left to right as you declared them on the first Pro Tools system.
As you declare the D-Command units from each Pro Tools system, the Machine switch in the Transport Modes section of the Transport con-trols flashes to indicate that system is available.
What’s New in Pro Tools and Pro Tools HD 10.0
Using D-Command Multi-ModeWhen two Pro Tools systems are available in Multi-mode, you can view their transport syn-chronization status and instantly switch be-tween them using the Machine switch in the Transport Modes section of the Transport con-trols.
Pro Tools System Status Indication
The Machine switch shows the status of avail-able Pro Tools systems as follows:
Switching Control Between Pro Tools Systems
When a Pro Tools system is indicated as avail-able, you can switch control to that system by pressing the Machine switch in the Transport Modes section of the Transport controls.
Pro Tools system status indications
Mach switch state
Indication
Off No Pro Tools system avail-able
Flashing Available Pro Tools system, stopped or not locked to time-code, or error dialog on Pro Tools system
On (solid) Available Pro Tools system, locked to timecode
Enhanced EUCON Support(Pro Tools with EuControl Software and an Avid Artist or Pro Series Media Controller Only)
In Pro Tools 10, over 500 Pro Tools commands, shortcuts, and other functions have been “EUCON-ized,” and are now available for Soft Key assignment using EuControl software. These include all main menu commands, key-board shortcuts, Transport, automation, and other actions.
Default Application Sets are provided by EuCon-trol software (for Artist Series only). For Pro se-ries, the default application sets are provided by MC App (for MC Pro or System 5-MC), or with eMix (System 5 and its variants). The default ap-plication sets include the most commonly used functions appropriate for each unit. You can customize the Soft Keys at any time to best suit your projects and workflow
For a list of all EUCON-ized Pro Tools com-mands available in EuControl for Pro Tools 10, see the Pro Tools EUCON Guide.
For instructions on how to use EuControl soft-ware to program the Soft Keys, as well as how to take advantage of track layouts and other fea-tures, see the EUCON Application Setup Guide.
For step by step instructions on how to use Art-ist Control, Artist Mix, and Artist Transport with Pro Tools, see the Artist Series and Pro Tools Guide.
Chapter 6: New C
ontrol Surface and Worksurface Features and Enhancements 41
42
What’s New in Pro Tools and Pro Tools HD 10.0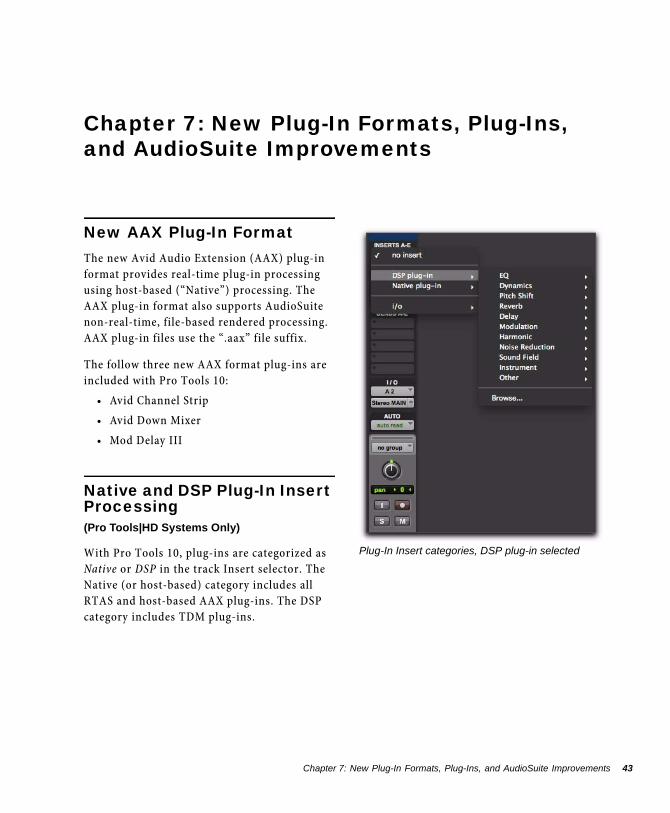
Chapter 7: New Plug-In Formats, Plug-Ins, and AudioSuite Improvements
New AAX Plug-In FormatThe new Avid Audio Extension (AAX) plug-in format provides real-time plug-in processing using host-based (“Native”) processing. The AAX plug-in format also supports AudioSuite non-real-time, file-based rendered processing. AAX plug-in files use the “.aax” file suffix.
The follow three new AAX format plug-ins are included with Pro Tools 10:
• Avid Channel Strip
• Avid Down Mixer
• Mod Delay III
Native and DSP Plug-In Insert Processing(Pro Tools|HD Systems Only)
With Pro Tools 10, plug-ins are categorized as Native or DSP in the track Insert selector. The Native (or host-based) category includes all RTAS and host-based AAX plug-ins. The DSP category includes TDM plug-ins.
Chapter 7:
Plug-In Insert categories, DSP plug-in selected
New Plug-In Formats, Plug-Ins, and AudioSuite Improvements 43
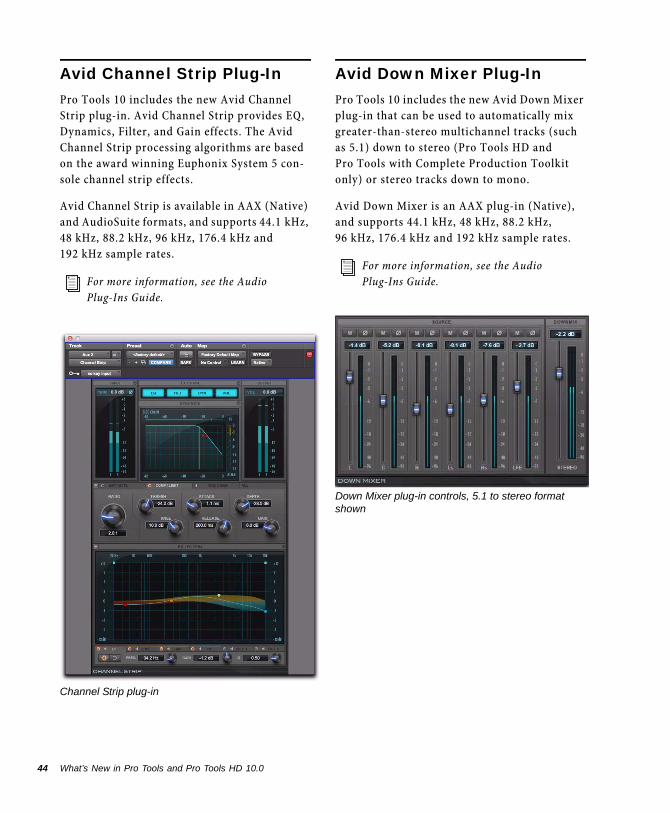
44
Avid Channel Strip Plug-InPro Tools 10 includes the new Avid Channel Strip plug-in. Avid Channel Strip provides EQ, Dynamics, Filter, and Gain effects. The Avid Channel Strip processing algorithms are based on the award winning Euphonix System 5 con-sole channel strip effects.
Avid Channel Strip is available in AAX (Native) and AudioSuite formats, and supports 44.1 kHz, 48 kHz, 88.2 kHz, 96 kHz, 176.4 kHz and 192 kHz sample rates.
For more information, see the Audio Plug-Ins Guide.
Channel Strip plug-in
What’s New in Pro Tools and Pro Tools HD 10.0
Avid Down Mixer Plug-InPro Tools 10 includes the new Avid Down Mixer plug-in that can be used to automatically mix greater-than-stereo multichannel tracks (such as 5.1) down to stereo (Pro Tools HD and Pro Tools with Complete Production Toolkit only) or stereo tracks down to mono.
Avid Down Mixer is an AAX plug-in (Native), and supports 44.1 kHz, 48 kHz, 88.2 kHz, 96 kHz, 176.4 kHz and 192 kHz sample rates.
For more information, see the Audio Plug-Ins Guide.
Down Mixer plug-in controls, 5.1 to stereo format shown
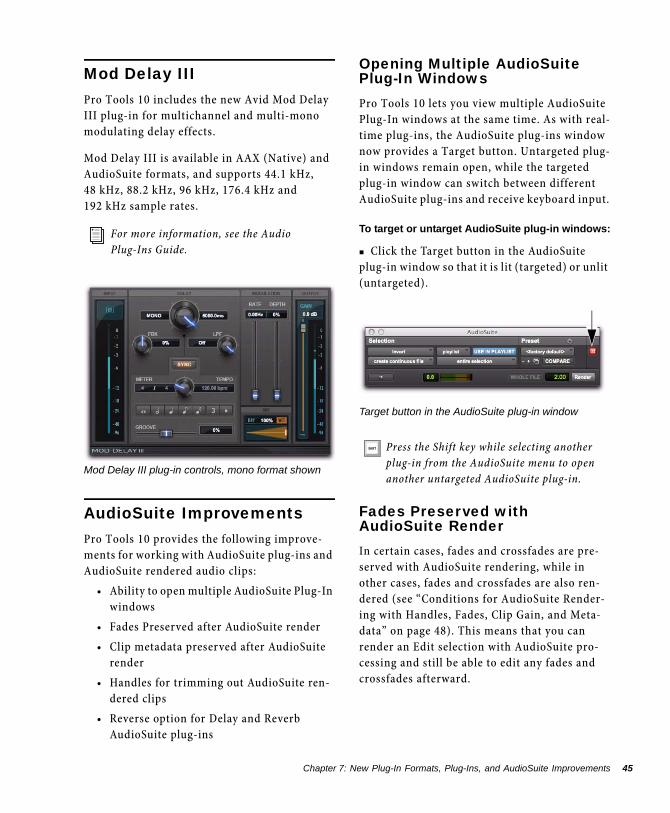
Mod Delay IIIPro Tools 10 includes the new Avid Mod Delay III plug-in for multichannel and multi-mono modulating delay effects.
Mod Delay III is available in AAX (Native) and AudioSuite formats, and supports 44.1 kHz, 48 kHz, 88.2 kHz, 96 kHz, 176.4 kHz and 192 kHz sample rates.
AudioSuite ImprovementsPro Tools 10 provides the following improve-ments for working with AudioSuite plug-ins and AudioSuite rendered audio clips:
• Ability to open multiple AudioSuite Plug-In windows
• Fades Preserved after AudioSuite render
• Clip metadata preserved after AudioSuite render
• Handles for trimming out AudioSuite ren-dered clips
• Reverse option for Delay and Reverb AudioSuite plug-ins
For more information, see the Audio Plug-Ins Guide.
Mod Delay III plug-in controls, mono format shown
Chapter 7:
Opening Multiple AudioSuite Plug-In WindowsPro Tools 10 lets you view multiple AudioSuite Plug-In windows at the same time. As with real-time plug-ins, the AudioSuite plug-ins window now provides a Target button. Untargeted plug-in windows remain open, while the targeted plug-in window can switch between different AudioSuite plug-ins and receive keyboard input.
To target or untarget AudioSuite plug-in windows:
Click the Target button in the AudioSuite plug-in window so that it is lit (targeted) or unlit (untargeted).
Fades Preserved with AudioSuite RenderIn certain cases, fades and crossfades are pre-served with AudioSuite rendering, while in other cases, fades and crossfades are also ren-dered (see “Conditions for AudioSuite Render-ing with Handles, Fades, Clip Gain, and Meta-data” on page 48). This means that you can render an Edit selection with AudioSuite pro-cessing and still be able to edit any fades and crossfades afterward.
Target button in the AudioSuite plug-in window
Press the Shift key while selecting another plug-in from the AudioSuite menu to open another untargeted AudioSuite plug-in.
New Plug-In Formats, Plug-Ins, and AudioSuite Improvements 45
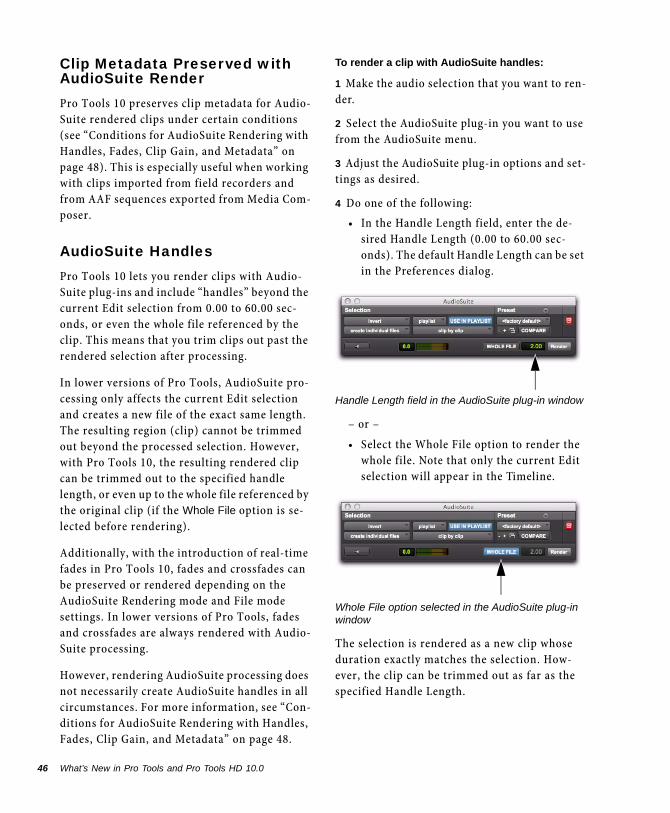
46
Clip Metadata Preserved with AudioSuite RenderPro Tools 10 preserves clip metadata for Audio-Suite rendered clips under certain conditions (see “Conditions for AudioSuite Rendering with Handles, Fades, Clip Gain, and Metadata” on page 48). This is especially useful when working with clips imported from field recorders and from AAF sequences exported from Media Com-poser.
AudioSuite HandlesPro Tools 10 lets you render clips with Audio-Suite plug-ins and include “handles” beyond the current Edit selection from 0.00 to 60.00 sec-onds, or even the whole file referenced by the clip. This means that you trim clips out past the rendered selection after processing.
In lower versions of Pro Tools, AudioSuite pro-cessing only affects the current Edit selection and creates a new file of the exact same length. The resulting region (clip) cannot be trimmed out beyond the processed selection. However, with Pro Tools 10, the resulting rendered clip can be trimmed out to the specified handle length, or even up to the whole file referenced by the original clip (if the Whole File option is se-lected before rendering).
Additionally, with the introduction of real-time fades in Pro Tools 10, fades and crossfades can be preserved or rendered depending on the AudioSuite Rendering mode and File mode settings. In lower versions of Pro Tools, fades and crossfades are always rendered with Audio-Suite processing.
However, rendering AudioSuite processing does not necessarily create AudioSuite handles in all circumstances. For more information, see “Con-ditions for AudioSuite Rendering with Handles, Fades, Clip Gain, and Metadata” on page 48.
What’s New in Pro Tools and Pro Tools HD 10.0
To render a clip with AudioSuite handles:
1 Make the audio selection that you want to ren-der.
2 Select the AudioSuite plug-in you want to use from the AudioSuite menu.
3 Adjust the AudioSuite plug-in options and set-tings as desired.
4 Do one of the following:
• In the Handle Length field, enter the de-sired Handle Length (0.00 to 60.00 sec-onds). The default Handle Length can be set in the Preferences dialog.
– or –
• Select the Whole File option to render the whole file. Note that only the current Edit selection will appear in the Timeline.
The selection is rendered as a new clip whose duration exactly matches the selection. How-ever, the clip can be trimmed out as far as the specified Handle Length.
Handle Length field in the AudioSuite plug-in window
Whole File option selected in the AudioSuite plug-in window
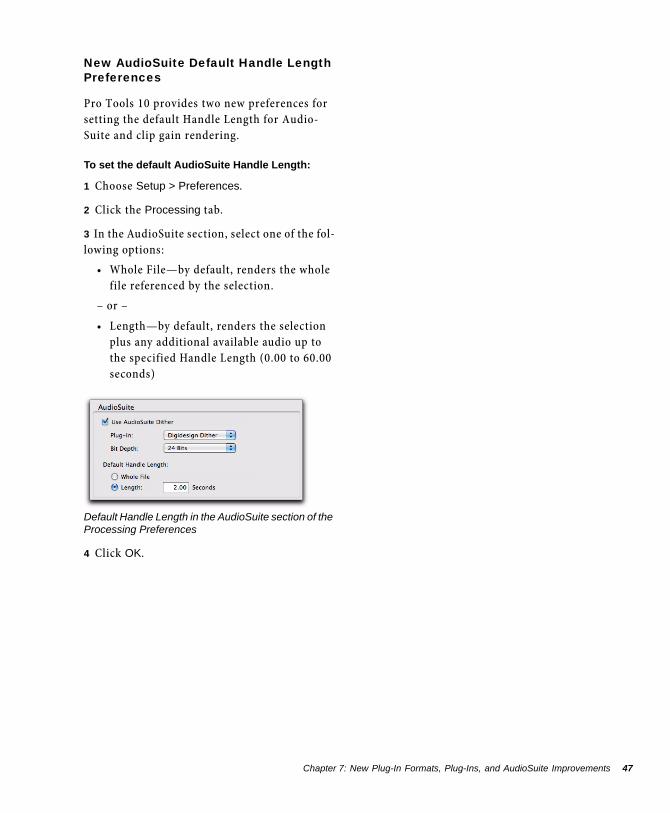
New AudioSuite Default Handle Length Preferences
Pro Tools 10 provides two new preferences for setting the default Handle Length for Audio-Suite and clip gain rendering.
To set the default AudioSuite Handle Length:
1 Choose Setup > Preferences.
2 Click the Processing tab.
3 In the AudioSuite section, select one of the fol-lowing options:
• Whole File—by default, renders the whole file referenced by the selection.
– or –
• Length—by default, renders the selection plus any additional available audio up to the specified Handle Length (0.00 to 60.00 seconds)
4 Click OK.
Default Handle Length in the AudioSuite section of the Processing Preferences
Chapter 7:
New Plug-In Formats, Plug-Ins, and AudioSuite Improvements 47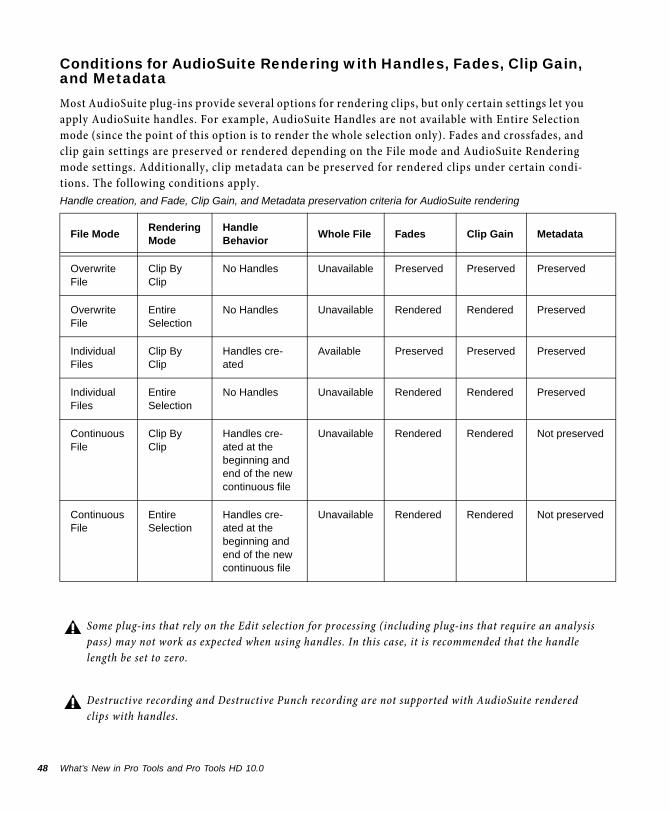
48
Conditions for AudioSuite Rendering with Handles, Fades, Clip Gain, and MetadataMost AudioSuite plug-ins provide several options for rendering clips, but only certain settings let you apply AudioSuite handles. For example, AudioSuite Handles are not available with Entire Selection mode (since the point of this option is to render the whole selection only). Fades and crossfades, and clip gain settings are preserved or rendered depending on the File mode and AudioSuite Rendering mode settings. Additionally, clip metadata can be preserved for rendered clips under certain condi-tions. The following conditions apply.
Handle creation, and Fade, Clip Gain, and Metadata preWhat’s New in Pro Tools and Pro Tools HD 10.0
servation criteria for AudioSuite rendering
File ModeRendering Mode
Handle Behavior
Whole File Fades Clip Gain Metadata
Overwrite File
Clip By Clip
No Handles Unavailable Preserved Preserved Preserved
Overwrite File
Entire Selection
No Handles Unavailable Rendered Rendered Preserved
Individual Files
Clip By Clip
Handles cre-ated
Available Preserved Preserved Preserved
Individual Files
Entire Selection
No Handles Unavailable Rendered Rendered Preserved
Continuous File
Clip By Clip
Handles cre-ated at the beginning and end of the new continuous file
Unavailable Rendered Rendered Not preserved
Continuous File
Entire Selection
Handles cre-ated at the beginning and end of the new continuous file
Unavailable Rendered Rendered Not preserved
Some plug-ins that rely on the Edit selection for processing (including plug-ins that require an analysis pass) may not work as expected when using handles. In this case, it is recommended that the handle length be set to zero.
Destructive recording and Destructive Punch recording are not supported with AudioSuite rendered clips with handles.
Reverse Option for Delay and Reverb AudioSuite Plug-InsPro Tools 10 provides a new Reverse button in the AudioSuite plug-in window footer for Re-verb and Delay plug-ins. This lets you easily ren-der reverse delay and reverb effects with a single click. Clicking the Reverse button provides three processes in one:
• First, it reverses the Edit selection.
• Then, it processes the reversed Edit selec-tion with the current plug-in settings.
• Finally, it reverses the processed Edit selec-tion.
Pro Tools Plug-Ins MarketplacePro Tools 10 provides a Marketplace option for plug-ins in the insert selector and the Audio-Suite menu. This lets you find plug-ins in the Avid online store for rent or purchase.
To browse plug-ins for rent or purchase in the Avid online store:
Do one of the following:
• From the Insert selector for Plug-Ins (Na-tive systems), or DSP plug-ins or Native
plug-ins (Pro Tools|HD systems), choose Avid Marketplace.
• From the AudioSuite menu, choose Avid
Marketplace.
• Choose Marketplace > Plug-Ins.
The Pro Tools in-application browser launches and you can shop at the Avid online store for Pro Tools plug-ins.
Chapter 7:
New Plug-In Formats, Plug-Ins, and AudioSuite Improvements 49
50
What’s New in Pro Tools and Pro Tools HD 10.0
Chapter 8: Storage and Disk Performance Enhancements
New Disk EnginePro Tools HD and Pro Tools 10 use a completely new disk engine that greatly increases perfor-mance for audio recording and playback. As a consequence, the DAE Playback Buffer Size set-ting provided in the Playback Engine in lower versions of Pro Tools is no longer necessary and had been removed. Also, for Pro Tools software only, the Cache Size setting has been removed as well.
Additionally, the Open-Ended Record Allocation settings provided in the Operation Preferences in lower versions of Pro Tools are no longer nec-essary and have been removed.
New Disk Cache Settings(Pro Tools HD and Pro Tools with Complete Production Toolkit Only)
Pro Tools HD and Pro Tools with Complete Pro-duction Toolkit now let you load audio files used in Pro Tools sessions into RAM for cached play-back. Pro Tools prioritizes files closest to the current playhead location. This way, when you start playback, those files are already cached for playback. This is especially useful when working with shared media storage (such as with Avid Unity MediaNetwork and ISIS shared storage systems).
To determine the maximum amount of RAM available for Disk Cache, Pro Tools polls the computer for the amount of RAM installed and subtracts 3 GB with Mac systems or 4 GB with Windows systems.
For example, if your computer has 12 GB of RAM installed, the total amount of RAM avail-able for the Disk Cache will be 9 GB (Mac) or 8 GB (Windows).
Note that Windows systems reserve more RAM for the system than Mac systems.
To set the amount of RAM for use by the Disk Cache:
1 Choose Setup > Playback Engine.
2 From the Disk Cache selector, select the amount of RAM you want to allocate for Disk Cache.
3 Click OK.
You can use the Cache Meters in the System Usage window to determine whether or not to assign more or less RAM to the Disk Cache for the current session.
Chapter 8: Storage and Disk Performance Enhancements 51
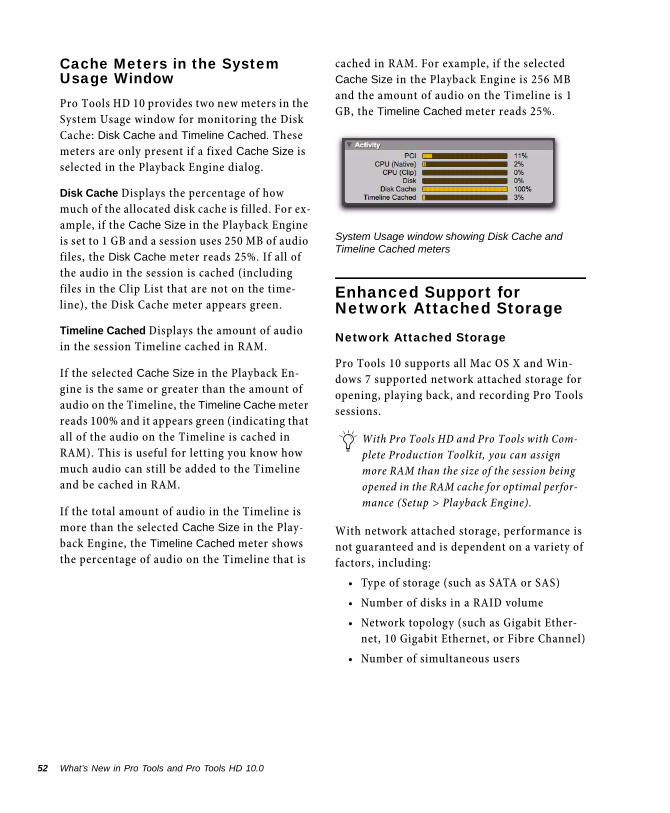
52
Cache Meters in the System Usage WindowPro Tools HD 10 provides two new meters in the System Usage window for monitoring the Disk Cache: Disk Cache and Timeline Cached. These meters are only present if a fixed Cache Size is selected in the Playback Engine dialog.
Disk Cache Displays the percentage of how much of the allocated disk cache is filled. For ex-ample, if the Cache Size in the Playback Engine is set to 1 GB and a session uses 250 MB of audio files, the Disk Cache meter reads 25%. If all of the audio in the session is cached (including files in the Clip List that are not on the time-line), the Disk Cache meter appears green.
Timeline Cached Displays the amount of audio in the session Timeline cached in RAM.
If the selected Cache Size in the Playback En-gine is the same or greater than the amount of audio on the Timeline, the Timeline Cache meter reads 100% and it appears green (indicating that all of the audio on the Timeline is cached in RAM). This is useful for letting you know how much audio can still be added to the Timeline and be cached in RAM.
If the total amount of audio in the Timeline is more than the selected Cache Size in the Play-back Engine, the Timeline Cached meter shows the percentage of audio on the Timeline that is
What’s New in Pro Tools and Pro Tools HD 10.0
cached in RAM. For example, if the selected Cache Size in the Playback Engine is 256 MB and the amount of audio on the Timeline is 1 GB, the Timeline Cached meter reads 25%.
Enhanced Support for Network Attached Storage
Network Attached Storage
Pro Tools 10 supports all Mac OS X and Win-dows 7 supported network attached storage for opening, playing back, and recording Pro Tools sessions.
With network attached storage, performance is not guaranteed and is dependent on a variety of factors, including:
• Type of storage (such as SATA or SAS)
• Number of disks in a RAID volume
• Network topology (such as Gigabit Ether-net, 10 Gigabit Ethernet, or Fibre Channel)
• Number of simultaneous users
System Usage window showing Disk Cache and Timeline Cached meters
With Pro Tools HD and Pro Tools with Com-plete Production Toolkit, you can assign more RAM than the size of the session being opened in the RAM cache for optimal perfor-mance (Setup > Playback Engine).

RAID
Pro Tools 10 supports hardware-based RAID (redundant array of independent disks) systems for opening, playing back, and recording Pro Tools sessions. However, performance is not guaranteed and is dependent on a variety of fac-tors including network bandwidth.
As with lower versions of Pro Tools, Pro Tools 10 also supports software-based RAID systems using ATTO RAID software, which makes sev-eral RAID volumes appear as a single volume to the operating system.
Enhanced Support for Avid Unity MediaNetwork and ISIS Shared StoragePro Tools 10 adds the following enhancements to working with Avid shared storage systems:
• Increased track counts and Mac streaming support for Pro Tools on Avid Unity Media-Network.
• Increased track counts and Mac streaming support for Pro Tools on ISIS 7000.
• Streaming support for Pro Tools on ISIS 5000.
• Elastic Audio processing support with Avid shared storage.
Exact track counts may vary depending on session size and amount of RAM allocated to the Disk Cache (see “New Disk Cache Set-tings” on page 51).
For more information, see the Pro Tools ISIS Guide and the Pro Tools Avid Media-Network Guide.
Chapter 8: Storage and Disk Performance Enhancements 53

54
What’s New in Pro Tools and Pro Tools HD 10.0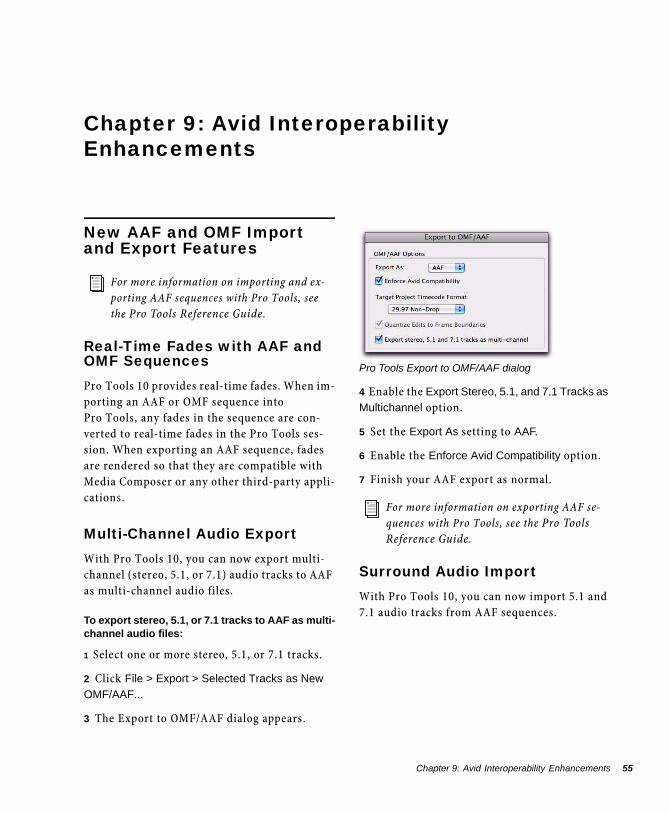
Chapter 9: Avid Interoperability Enhancements
New AAF and OMF Import and Export Features
Real-Time Fades with AAF and OMF SequencesPro Tools 10 provides real-time fades. When im-porting an AAF or OMF sequence into Pro Tools, any fades in the sequence are con-verted to real-time fades in the Pro Tools ses-sion. When exporting an AAF sequence, fades are rendered so that they are compatible with Media Composer or any other third-party appli-cations.
Multi-Channel Audio ExportWith Pro Tools 10, you can now export multi-channel (stereo, 5.1, or 7.1) audio tracks to AAF as multi-channel audio files.
To export stereo, 5.1, or 7.1 tracks to AAF as multi-channel audio files:
1 Select one or more stereo, 5.1, or 7.1 tracks.
2 Click File > Export > Selected Tracks as New
OMF/AAF...
3 The Export to OMF/AAF dialog appears.
For more information on importing and ex-porting AAF sequences with Pro Tools, see the Pro Tools Reference Guide.
4 Enable the Export Stereo, 5.1, and 7.1 Tracks as
Multichannel option.
5 Set the Export As setting to AAF.
6 Enable the Enforce Avid Compatibility option.
7 Finish your AAF export as normal.
Surround Audio ImportWith Pro Tools 10, you can now import 5.1 and 7.1 audio tracks from AAF sequences.
Pro Tools Export to OMF/AAF dialog
For more information on exporting AAF se-quences with Pro Tools, see the Pro Tools Reference Guide.
Chapter 9: Avid Interoperability Enhancements 55
56
Clip-Based Gain AutomationWith Pro Tools 10, you can now export and im-port clip-based gain automation, to and from AAF sequences. Imported clip-based gain data can be edited alongside (and used in lieu of) the normal volume automation used in Pro Tools (see “Importing Clip Gain” on page 15 and “Ex-porting Clip Gain with AAF” on page 15).
Import Rendered Audio EffectsIn Pro Tools 10, the Ignore Rendered Audio Ef-
fects option has been renamed as the Import Ren-
dered Audio Effects option. When this option is enabled, rendered clips with audio effects from Media Composer generated AAF sequences are imported into Pro Tools. When this option is disabled, the original, un-effected clip is im-ported.
Import Volume AutomationIn Pro Tools 10, the Ignore Auto-Gain option has be renamed as the Import Volume Automation op-tion. When this option is enabled, volume auto-mation is imported from AAF sequences ex-ported from Media Composer.
24-Hour TimelineWith Pro Tools 10, you can create, import, and combine sequences, up to a total sequence length of 24 hours. When preparing media for use with a Media Composer system, keep the maximum Media Composer sequence length in mind.
What’s New in Pro Tools and Pro Tools HD 10.0
New Avid Interplay Features
Send to PlaybackWith Pro Tools 10, you can export an AAF di-rectly to a third-party playback server for imme-diate live playback. Use of this feature requires the following options:
• Pro Tools Interplay software option
• Pro Tools Send to Playback software option
• Interplay Transfer system
• Avid Interplay Web Services
For more information, contact your local Avid sales or support representative.
Choose Media DestinationWith Pro Tools 10, media can be saved to your choice of available Interplay workspaces.
When checking sequences back in to Interplay, lower versions of Pro Tools are only able to write media to the workspace where the first clip in the sequence resides.
For more information about using Pro Tools with Avid Interplay, see the Pro Tools Avid Interplay Guide.
You can also now restrict access to some In-terplay workspaces to ensure media is not written to or overwritten in specified work-spaces.
Check Out of Standard SequencesWith Pro Tools 10, you can check out normal se-quences as well as sequences checked in specifi-cally for Pro Tools. Previously, Pro Tools was only able to check out “forPT” sequences.
Timecode MappingPro Tools 10 now provides the Match Timecode
option when exporting, in cases where the ses-sion start does not match the start of the desti-nation sequence on Interplay.
When this option is selected, this will take the timecode in/out points of the destination se-quence on Interplay, and export those same timecode positions from the Pro Tools session to the sequence.
In Pro Tools 9 and lower, checking in tracks to a sequence on Interplay requires that the Pro Tools session start time match that of the sequence. However, in some cases a Pro Tools user may want to retain content (such as tones or pre-roll audio), before the original sequence start time.
Chapter 9: Avid Interoperability Enhancements 57

58
What’s New in Pro Tools and Pro Tools HD 10.0
Avid2001 Junipero Serra Boulevard Daly City, CA 94014-3886 USA
Technical Support (USA)Visit the Online Support Center at www.avid.com/support
Product InformationFor company and product information, visit us on the web at www.avid.com