Embed Size (px)
Citation preview
Deploy two-tier hierarchy of PKI
Windows
Server 2012
Hands On Lab
Type the Abstract
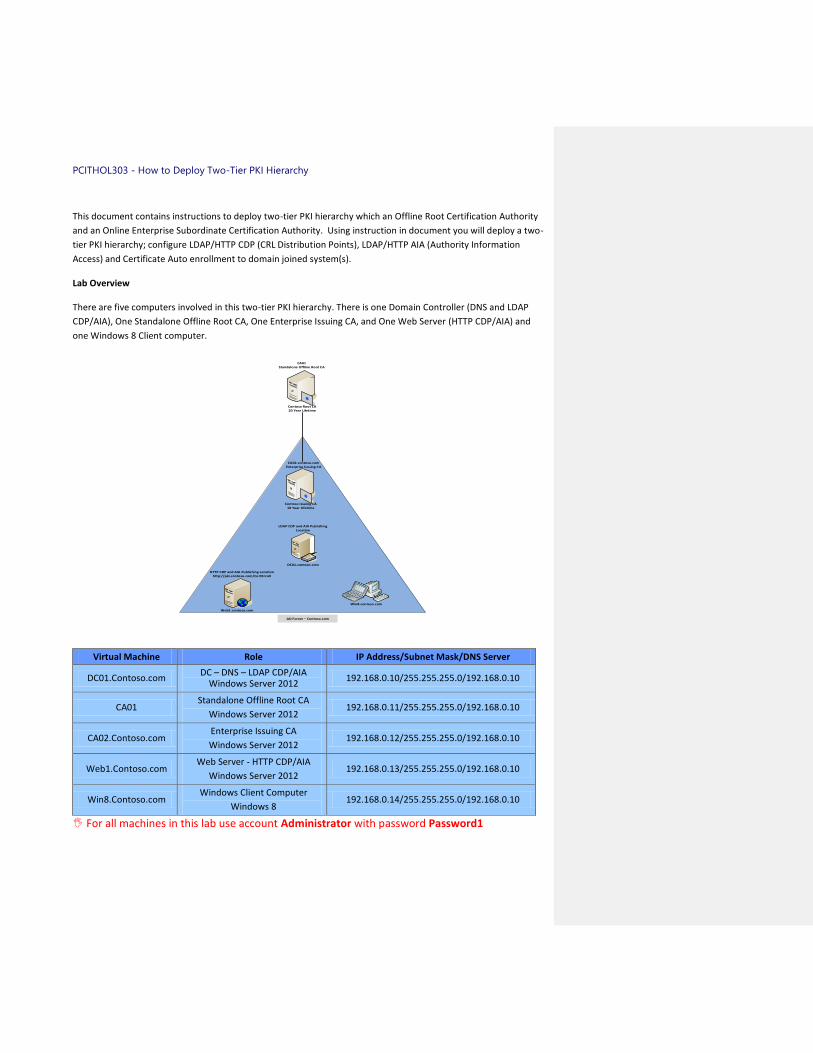
PCITHOL303 - How to Deploy Two-Tier PKI Hierarchy
This document contains instructions to deploy two-tier PKI hierarchy which an Offline Root Certification Authority
and an Online Enterprise Subordinate Certification Authority. Using instruction in document you will deploy a two-
tier PKI hierarchy; configure LDAP/HTTP CDP (CRL Distribution Points), LDAP/HTTP AIA (Authority Information
Access) and Certificate Auto enrollment to domain joined system(s).
Lab Overview
There are five computers involved in this two-tier PKI hierarchy. There is one Domain Controller (DNS and LDAP
CDP/AIA), One Standalone Offline Root CA, One Enterprise Issuing CA, and One Web Server (HTTP CDP/AIA) and
one Windows 8 Client computer.
Virtual Machine Role IP Address/Subnet Mask/DNS Server
DC01.Contoso.com DC – DNS – LDAP CDP/AIA
Windows Server 2012 192.168.0.10/255.255.255.0/192.168.0.10
CA01 Standalone Offline Root CA
Windows Server 2012 192.168.0.11/255.255.255.0/192.168.0.10
CA02.Contoso.com Enterprise Issuing CA
Windows Server 2012 192.168.0.12/255.255.255.0/192.168.0.10
Web1.Contoso.com Web Server - HTTP CDP/AIA
Windows Server 2012 192.168.0.13/255.255.255.0/192.168.0.10
Win8.Contoso.com Windows Client Computer
Windows 8 192.168.0.14/255.255.255.0/192.168.0.10
For all machines in this lab use account Administrator with password Password1
CA02.contoso.comEnterprise Issuing CA
CA01Standalone Offline Root CA
LDAP CDP and AIA Publishing Location
DC01.contoso.com
Win8.contoso.com
AD Forest – Contoso.com
Web1.contoso.com
HTTP CDP and AIA Publishing Locationhttp://pki.contoso.com/CertEnroll
Contoso Root CA20 Year Lifetime
Contoso Issuing CA10 Year Lifetime
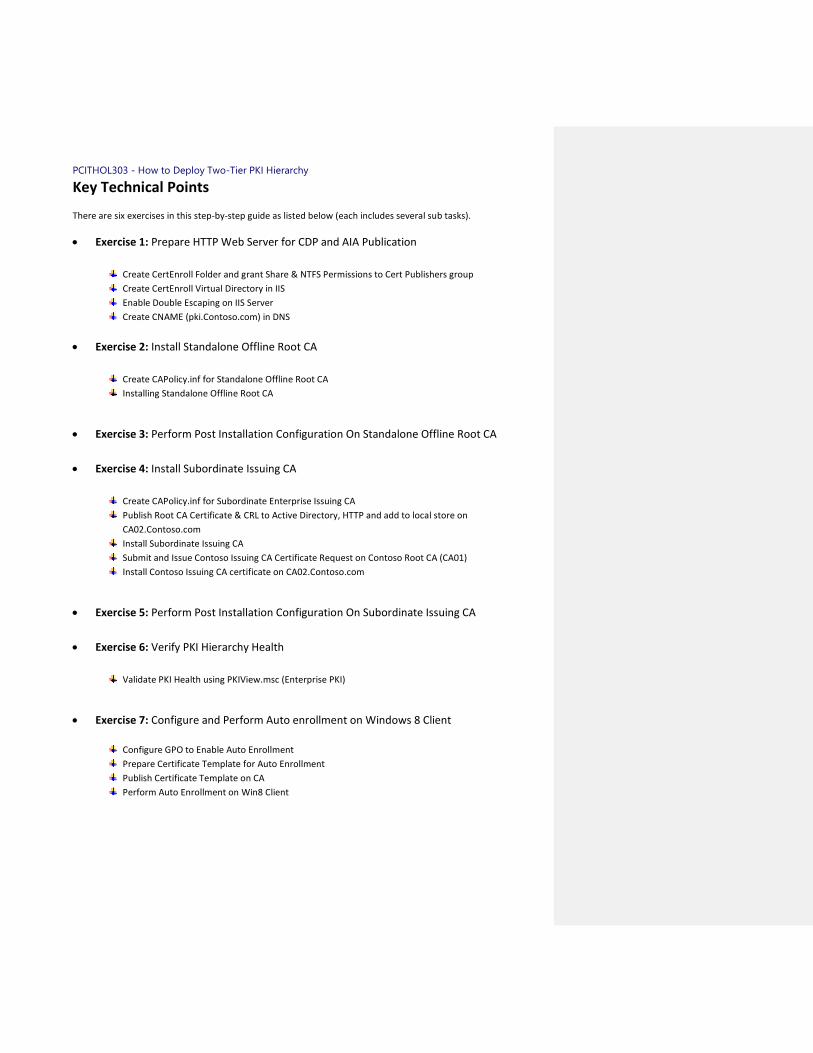
PCITHOL303 - How to Deploy Two-Tier PKI Hierarchy
Key Technical Points
There are six exercises in this step-by-step guide as listed below (each includes several sub tasks).
Exercise 1: Prepare HTTP Web Server for CDP and AIA Publication
Create CertEnroll Folder and grant Share & NTFS Permissions to Cert Publishers group
Create CertEnroll Virtual Directory in IIS
Enable Double Escaping on IIS Server
Create CNAME (pki.Contoso.com) in DNS
Exercise 2: Install Standalone Offline Root CA
Create CAPolicy.inf for Standalone Offline Root CA
Installing Standalone Offline Root CA
Exercise 3: Perform Post Installation Configuration On Standalone Offline Root CA
Exercise 4: Install Subordinate Issuing CA
Create CAPolicy.inf for Subordinate Enterprise Issuing CA
Publish Root CA Certificate & CRL to Active Directory, HTTP and add to local store on
CA02.Contoso.com
Install Subordinate Issuing CA
Submit and Issue Contoso Issuing CA Certificate Request on Contoso Root CA (CA01)
Install Contoso Issuing CA certificate on CA02.Contoso.com
Exercise 5: Perform Post Installation Configuration On Subordinate Issuing CA
Exercise 6: Verify PKI Hierarchy Health
Validate PKI Health using PKIView.msc (Enterprise PKI)
Exercise 7: Configure and Perform Auto enrollment on Windows 8 Client
Configure GPO to Enable Auto Enrollment
Prepare Certificate Template for Auto Enrollment
Publish Certificate Template on CA
Perform Auto Enrollment on Win8 Client
PCITHOL303 - How to Deploy Two-Tier PKI Hierarchy
Introduction
Estimated time to complete this lab 60 minutes – Complete lab time estimate as accurately as possible.
Objectives After completing this lab, you will be able to:
How to install and configure two-tier PKI Hierarchy How to configure key configuration settings (CDP and AIA) to deploy two-tier PKI Hierarchy How to configure certificate auto enrollment
Overview of Lab
Through this ILL you will learn about how to install and configure tow PKI Hierarchy. Also you will learn how to
configure auto enrollment.
Virtual Machine Technology This lab is completed using virtual machines that run on Windows Server® 2008 R2 Hyper-V™ technology. To log on
to the virtual machines, press CTRL+ALT+END and enter your logon credentials.
Note regarding pre-release software
Portions of this lab include software that is not yet released, and as such may still contain active or known issues.
While every effort has been made to ensure this lab functions as written, unknown or unanticipated results may be
encountered as a result of using pre-release software.
Note regarding user account control
Some steps in this lab may be subject to user account control. User account control is a technology which provides
additional security to computers by requesting that users confirm actions that require administrative rights. Tasks
that generate a user account control confirmation are denoted using a shield icon. If you encounter a shield icon,
confirm your action by selecting the appropriate button in the dialog box that is presented.

PCITHOL303 - How to Deploy Two-Tier PKI Hierarchy
Exercise 1: Prepare HTTP Web Server for CDP and AIA Publication
This task contains several sub-tasks as listed below ….
Create CertEnroll Folder and grant Share & NTFS Permissions to Cert Publishers group
Create CertEnroll Virtual Directory in IIS
Enable Double Escaping on IIS Server
Create CNAME (pki.Contoso.com) in DNS
Note – To save time Web Server (IIS) role has been installed on Web1.contoso.com.
Create CertEnroll Folder and grant Share & NTFS Permissions to Cert Publishers group
1 Log onto WEB1.Contoso.com as Contoso\Administrator using the password Password1
2 Open Windows Explorer and then go to C:\ drive.
3 Create folder called CertEnroll at the root of C:\ drive.
4 Right click on CertEnroll folder and then right click & select Properties.
5 On “CertEnroll Properties” page select Sharing tab to configure share permissions.
6 Click on Advanced Sharing option and then select Share this folder.
7 Click on Permissions and then click Add.
8 On “Select Users or Groups” page, type in Cert Publishers under the Enter the object names to select
field and then click OK.
9 On “Permissions for CertEnroll” page highlight Cert Publishers group and then select Change permission
and then click OK twice to go back to “CertEnroll Properties” page.
10 Select Security tab and click Edit to configure NTFS permissions.
11 On “Permissions for CertEnroll” page click Add.
12 On “Select Users or Groups” page, type in Cert Publishers under the Enter the object names to select
field and then click OK.
13 On “Permissions for CertEnroll” page highlight Cert Publishers group and then select Modify permission
and then click OK.
14 On “CertEnroll Properties” page, click Close.
Create CertEnroll Virtual Directory in IIS
1. Log onto WEB1.Contoso.com as Contoso\Administrator using the password Password1
2. Open Server Manager and click Tools and select Internet Information Services (IIS) Manager.

PCITHOL303 - How to Deploy Two-Tier PKI Hierarchy
3. On left side, expand WEB1 node and then expand Sites.
Note – On pop-up window click No.
4. Right click on Default Web Site and select Add Virtual Directory.
5. On “Add Virtual Directory” page, type CertEnroll as “Alias:” and C:\CertEnroll as “Physical Path:”. Click
OK.
6. Select CertEnroll virtual directory under Default Web Site on left side.
7. Double click on Directory Browsing in middle pane and then select Enable under Actions pane on right
side.
Enable Double Escaping on IIS Server
1. Log onto WEB1.Contoso.com as Contoso\Administrator using the password Password1
2. Open Command Prompt and type CD\ and hit Enter to go to C:\.
3. Then type cd %windir%\system32\inetsrv\ and hit Enter.
4. Type following command (all on one line) and hit Enter.
Appcmd set config "Default Web Site" /section:system.webServer/Security/requestFiltering
-allowDoubleEscaping:True
5. To restart IIS service type iisreset and hit Enter.
Create CNAME (pki.Contoso.com) in DNS
1. Log onto DC01.Contoso.com as Contoso\Administrator using the password Password1
2. Open Server Manager and click Tools and select DNS.
3. Expand Forward Lookup Zones, right click Contoso.com zone and then select New Alias (CNAME).
4. Enter PKI in the “Alias Name” field, then WEB1.Contoso.com. in the “Fully qualified domain name
(FQDN) for target host” field, then click OK.
Note - Include the terminating “.” in the FQDN in the previous step. In a production environment this alias
can resolve to a load balancer which distributes requests to any number of web servers that contain the
CA certificates and CRLs.
PCITHOL303 - How to Deploy Two-Tier PKI Hierarchy
Exercise 2: Install Standalone Offline Root CA
This task contains several sub-tasks as listed below ….
Create CAPolicy.inf for Standalone Offline Root CA
Installing Standalone Offline Root CA
Create CAPolicy.inf for Standalone Offline Root CA
1. Log onto CA01 as CA01\Administrator using the password Password1
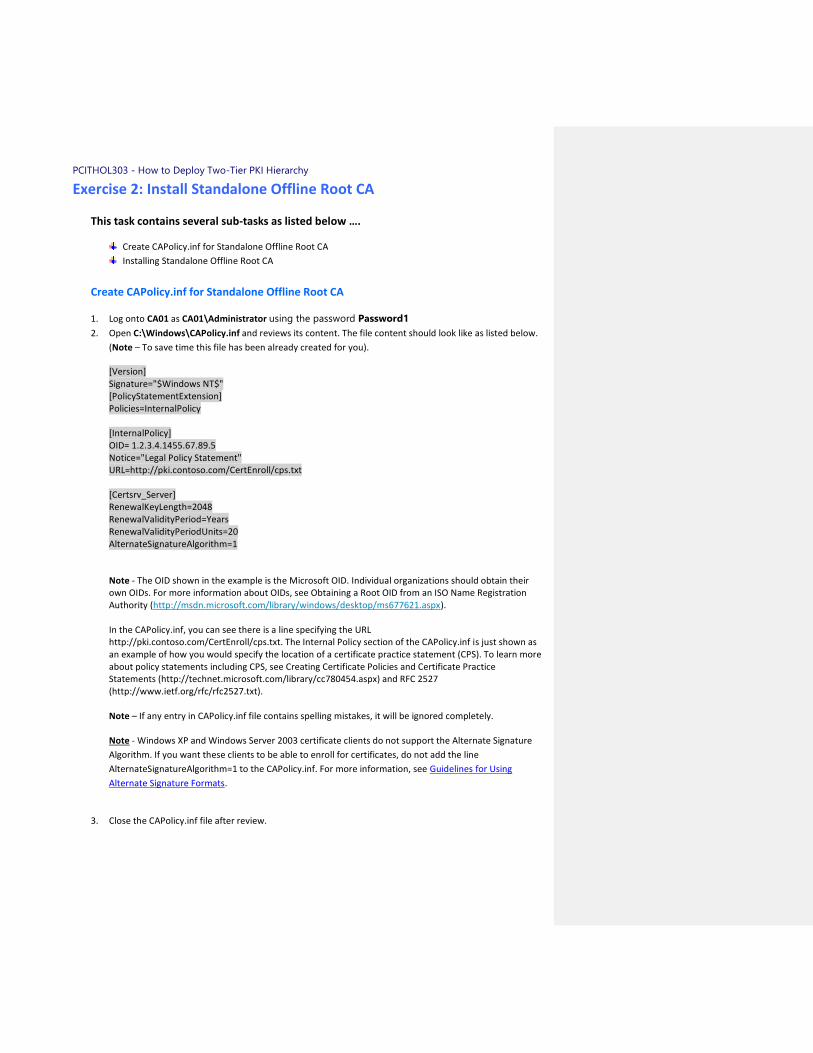
2. Open C:\Windows\CAPolicy.inf and reviews its content. The file content should look like as listed below.
(Note – To save time this file has been already created for you).
[Version] Signature="$Windows NT$" [PolicyStatementExtension] Policies=InternalPolicy [InternalPolicy] OID= 1.2.3.4.1455.67.89.5 Notice="Legal Policy Statement" URL=http://pki.contoso.com/CertEnroll/cps.txt [Certsrv_Server] RenewalKeyLength=2048 RenewalValidityPeriod=Years RenewalValidityPeriodUnits=20 AlternateSignatureAlgorithm=1
Note - The OID shown in the example is the Microsoft OID. Individual organizations should obtain their own OIDs. For more information about OIDs, see Obtaining a Root OID from an ISO Name Registration Authority (http://msdn.microsoft.com/library/windows/desktop/ms677621.aspx). In the CAPolicy.inf, you can see there is a line specifying the URL http://pki.contoso.com/CertEnroll/cps.txt. The Internal Policy section of the CAPolicy.inf is just shown as an example of how you would specify the location of a certificate practice statement (CPS). To learn more about policy statements including CPS, see Creating Certificate Policies and Certificate Practice Statements (http://technet.microsoft.com/library/cc780454.aspx) and RFC 2527 (http://www.ietf.org/rfc/rfc2527.txt). Note – If any entry in CAPolicy.inf file contains spelling mistakes, it will be ignored completely. Note - Windows XP and Windows Server 2003 certificate clients do not support the Alternate Signature
Algorithm. If you want these clients to be able to enroll for certificates, do not add the line
AlternateSignatureAlgorithm=1 to the CAPolicy.inf. For more information, see Guidelines for Using
Alternate Signature Formats.
3. Close the CAPolicy.inf file after review.
PCITHOL303 - How to Deploy Two-Tier PKI Hierarchy
Installing Standalone Offline Root CA
1. Log onto CA01 as CA01\Administrator using the password Password1 2. In Server Manager, click Manage, and then click Add Roles and Features.
3. On the “Before you begin” page, click Next.
4. On the “Select Installation Type” page, make sure that Role-based or feature-based installation is
selected and then click Next.
5. On the “Select Destination Server” page, make sure that CA01 is selected under Server Pool and then
click Next.
6. On the “Select Server Roles” page, select the Active Directory Certificate Services role.
7. When prompted to install Remote Server Administration Tools click Add Features. Click Next.
8. On the “Select Features” page, click Next.
9. On the “Active Directory Certificate Services” page, click Next.
10. On the “Select Role Services” page, the Certification Authority role is selected by default. Click Next.
11. On the “Confirm Installation Selections” page, verify the information and then click Install.
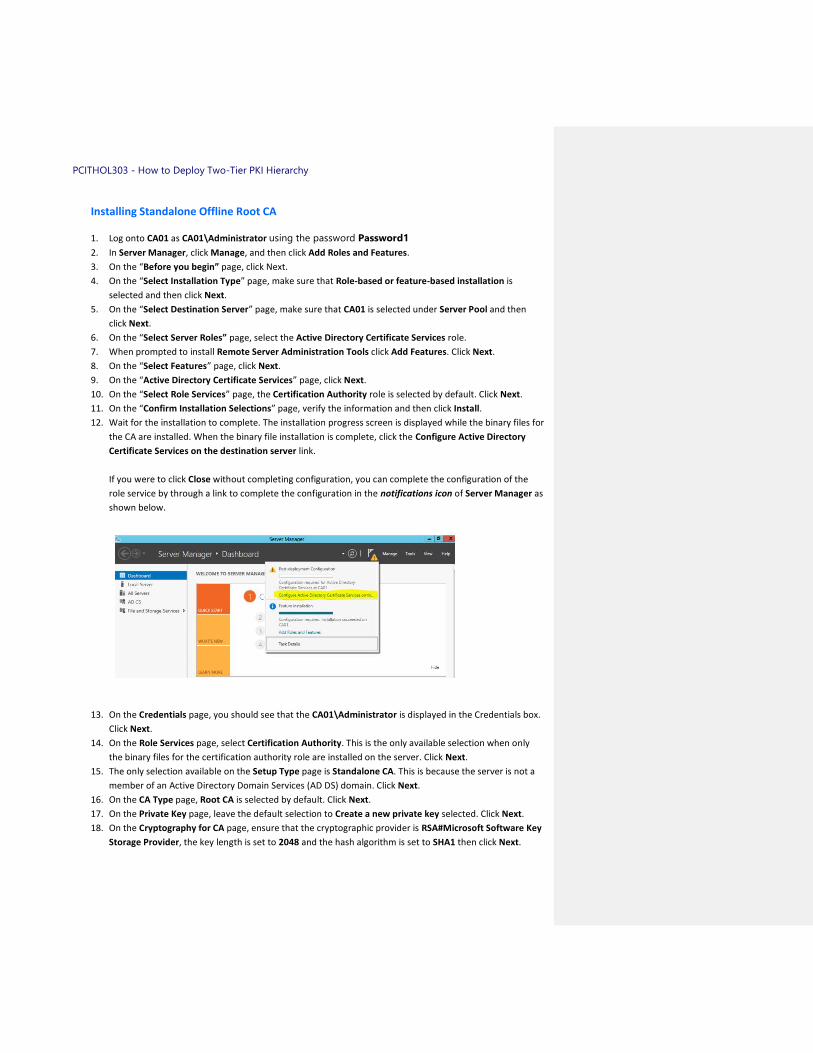
12. Wait for the installation to complete. The installation progress screen is displayed while the binary files for
the CA are installed. When the binary file installation is complete, click the Configure Active Directory
Certificate Services on the destination server link.
If you were to click Close without completing configuration, you can complete the configuration of the
role service by through a link to complete the configuration in the notifications icon of Server Manager as
shown below.
13. On the Credentials page, you should see that the CA01\Administrator is displayed in the Credentials box.
Click Next.
14. On the Role Services page, select Certification Authority. This is the only available selection when only
the binary files for the certification authority role are installed on the server. Click Next.
15. The only selection available on the Setup Type page is Standalone CA. This is because the server is not a
member of an Active Directory Domain Services (AD DS) domain. Click Next.
16. On the CA Type page, Root CA is selected by default. Click Next.
17. On the Private Key page, leave the default selection to Create a new private key selected. Click Next.
18. On the Cryptography for CA page, ensure that the cryptographic provider is RSA#Microsoft Software Key
Storage Provider, the key length is set to 2048 and the hash algorithm is set to SHA1 then click Next.
PCITHOL303 - How to Deploy Two-Tier PKI Hierarchy
19. On the CA Name page, in the Common name for this CA text box, type Contoso Root CA and then click
Next.
20. On the Validity Period page, enter 20 for the number of years for the certificate to be valid.
21. On the CA Database page, leave the default locations for the database and database log files. Click Next.
22. On the Confirmation page, click Configure.
23. On the Installation Progress page, click Close.
Note - The following Windows PowerShell commands would perform the same action as shown above.
Add-WindowsFeature Adcs-Cert-Authority –IncludeManagementTools
Install-AdcsCertificationAuthority –CAType StandaloneRootCA –CACommonName “Contoso Root CA” –
KeyLength 2048 –HashAlgorithm SHA1 –CryptoProviderName “RSA#Microsoft Software Key Storage
Provider” -ValidityPeriod Years -ValidityPeriodUnits 20 -Force
PCITHOL303 - How to Deploy Two-Tier PKI Hierarchy
Exercise 3: Perform Post Installation Configuration On Standalone
Offline Root CA
1. Log onto CA01 as CA01\Administrator using the password Password1
2. Open Command Prompt.
3. To define Active Directory Configuration Partition DN, type following command and then press Enter.
Make sure there is no spelling mistake or typos.
Certutil -setreg CA\DSConfigDN CN=Configuration,DC=Contoso,DC=com
4. To define CRL Period Units and CRL Period, type following command and then press Enter.
Certutil -setreg CA\CRLPeriodUnits 52
Certutil -setreg CA\CRLPeriod “Weeks”
5. To define CRL Overlap Period Units and CRL Overlap Period, type following command and then press Enter.
Certutil -setreg CA\CRLOverlapPeriodUnits 12
Certutil -setreg CA\CRLOverlapPeriod “Hours”
6. To define Validity Period Units for all issued certificates by this CA, type following command and then press Enter. Keep in mind that in our two tier PKI hierarchy we want Enterprise Issuing CA to have 10 year lifetime for its CA certificate. This is the reason we need to configure this value at standalone offline root CA.
Certutil -setreg CA\ValidityPeriodUnits 10
Certutil -setreg CA\ValidityPeriod “Years”
7. CA auditing depends on system Object Access auditing to be enabled. Therefore, to set up CA auditing for a system, you will need to configure following two settings.
a. Enable auditing for the CA by selecting which group of events to audit in the Certificate Authority MMC snap-in or by configuring AuditFilter registry key setting.
To configure Auditing for all CA related events, type following command and then press Enter.
Certutil -setreg CA\AuditFilter 127
b. Enable Object Access Auditing on the Certificate Authority. As Standalone Offline Root CA is not joined to domain we need to configure this setting using Local Security Policy.
Enable Object Access Auditing through Local Security Policy.
i. Open Server Manager and click on Tools then select Local Security Policy.
ii. Expand Local Policies and then select Audit Policy.
PCITHOL303 - How to Deploy Two-Tier PKI Hierarchy
iii. Double click Audit Object Access and then select Success and Failure then click OK.
iv. Close Local Security Policy editor.
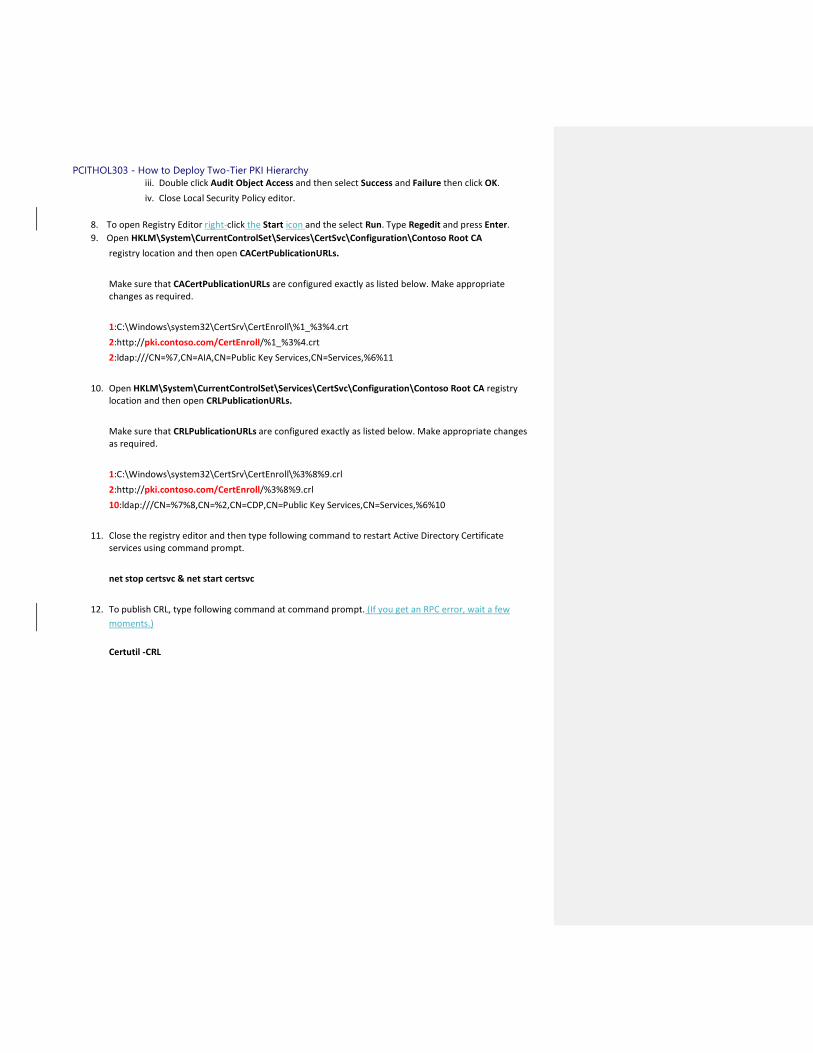
8. To open Registry Editor right-click the Start icon and the select Run. Type Regedit and press Enter.
9. Open HKLM\System\CurrentControlSet\Services\CertSvc\Configuration\Contoso Root CA
registry location and then open CACertPublicationURLs.
Make sure that CACertPublicationURLs are configured exactly as listed below. Make appropriate changes as required.
1:C:\Windows\system32\CertSrv\CertEnroll\%1_%3%4.crt
2:http://pki.contoso.com/CertEnroll/%1_%3%4.crt
2:ldap:///CN=%7,CN=AIA,CN=Public Key Services,CN=Services,%6%11
10. Open HKLM\System\CurrentControlSet\Services\CertSvc\Configuration\Contoso Root CA registry location and then open CRLPublicationURLs.
Make sure that CRLPublicationURLs are configured exactly as listed below. Make appropriate changes as required.
1:C:\Windows\system32\CertSrv\CertEnroll\%3%8%9.crl
2:http://pki.contoso.com/CertEnroll/%3%8%9.crl
10:ldap:///CN=%7%8,CN=%2,CN=CDP,CN=Public Key Services,CN=Services,%6%10
11. Close the registry editor and then type following command to restart Active Directory Certificate services using command prompt.
net stop certsvc & net start certsvc
12. To publish CRL, type following command at command prompt. (If you get an RPC error, wait a few
moments.)
Certutil -CRL

PCITHOL303 - How to Deploy Two-Tier PKI Hierarchy
Exercise 4: Install Subordinate Issuing CA
This task contains several sub-tasks as listed below ….
Create CAPolicy.inf for Subordinate Enterprise Issuing CA
Publish Root CA Certificate & CRL to Active Directory, HTTP and add to local store on
CA02.Contoso.com
Install Subordinate Issuing CA
Submit and Issue Contoso Issuing CA Certificate Request on Contoso Root CA (CA01)
Install Contoso Issuing CA certificate on CA02.Contoso.com
Create CAPolicy.inf for Subordinate Enterprise Issuing CA
1. Log onto CA02.Contoso.com as Contoso\Administrator using the password Password1
2. Open C:\Windows\CAPolicy.inf and reviews its content. The file content should look like as listed below.
(Note – To save time this file has been already created for you).
[Version] Signature="$Windows NT$" [Certsrv_Server] RenewalKeyLength=2048 RenewalValidityPeriod=Years RenewalValidityPeriodUnits=10 LoadDefaultTemplates=0 AlternateSignatureAlgorithm=1
Note - Windows XP and Windows Server 2003 certificate clients do not support the Alternate Signature
Algorithm. If you want these clients to be able to enroll for certificates, do not add the line
AlternateSignatureAlgorithm=1 to the CAPolicy.inf. For more information, see Guidelines for Using
Alternate Signature Formats.
3. Close the CAPolicy.inf file after review.
Publish Root CA Certificate & CRL to Active Directory, HTTP and add to local store on
CA02.Contoso.com
1. Log onto CA02.Contoso.com as Contoso\Administrator using the password Password1
2. Copy Root CA Certificate (.crt file) and Root CA CRL (.crl file) files from
\\192.168.0.11\C$\Windows\System32\CertSrv\CertEnroll directory to local C:\ drive.
3. On CA2, open a command prompt.
4. Type cd\ and press ENTER to change to the root of C:
3.5. To publish Contoso Root CA Certificate and CRL in Active Directory, type following command and then
press Enter.
Formatted: Font: (Default) +Body (Calibri)
Formatted: Indent: Left: 0.5", No bullets or numbering
Formatted: Font: Bold
Formatted: Font: (Default) +Body (Calibri)
Formatted: Indent: Left: 0.5", No bullets or numbering

PCITHOL303 - How to Deploy Two-Tier PKI Hierarchy
certutil -f -dspublish “CA01_Contoso Root CA.crt” RootCA
certutil -f -dspublish “Contoso Root CA.crl”
4.6. To publish Contoso Root CA Certificate and CRL to http://pki.Contoso.com/CertEnroll, copy
Contoso Root CA Certificate and CRL to \\Web1.Contoso.com\C$\CertEnroll directory. Type following commands and press Enter. Make sure to run following commands from root of C:\ drive.
copy "CA01_Contoso Root CA.crt" \\WEB1.Contoso.com\C$\CertEnroll\
copy "Contoso Root CA.crl" \\WEB1.Contoso.com\C$\CertEnroll\
5.7. To add Contoso Root CA Certificate and CRL in CA02.Contoso.com local store, type following command
and then press Enter. Make sure to run following commands from root of C:\ drive.
certutil -addstore -f root “CA01_Contoso Root CA.crt”
certutil -addstore -f root “Contoso Root CA.crl”
Install Subordinate Issuing CA
1. Log onto CA02.Contoso.com as Contoso\Administrator using the password Password1
2. In Server Manager, click Manage, and then click Add Roles and Features. 3. On the “Before you begin”, click Next. 4. On the “Select installation type” page, ensure the default selection of Role or Feature Based Installation
is selected. Click Next. 5. On the “Select destination server” page, ensure that CA02.contoso.com is selected and then click Next. 6. On the “Select server roles” page, select the Active Directory Certificate Services role. 7. When prompted to install Remote Server Administration Tools click Add Features. Click Next. 8. On the “Select features” page, click Next. 9. On the “Active Directory Certificate Services” page, click Next. 10. On the “Select role services” page, ensure Certification Authority is selected and then click Next. 11. On the “Confirm installation selections” page, verify the information and then click Install. 12. Wait for the installation to complete. The installation progress screen is displayed while the binary files for
the CA are installed. When the binary file installation is complete, click the Configure Active Directory
Certificate Services on the destination server link.
If you were to click Close without completing configuration, you could complete the configuration of the
role service by through a link to complete the configuration in the notifications icon of Server Manager.
13. On the “Credentials” page, the credentials for Contoso\Administrator appear. Click Next. 14. On the “Role Services” page, select Certification Authority. 15. On the “Setup Type” page, ensure that Enterprise CA is selected and then click Next. 16. On the “CA Type” page, select Subordinate CA to install an Enterprise Subordinate CA. Click Next. 17. On the “Private Key” page, ensure the Create a new private key option is selected and then click Next. 18. The “Cryptography for CA” page, ensure that the cryptographic provider is RSA#Microsoft Software Key
Storage Provider, key length is 2048, and the hash algorithm is set to SHA1. Click Next. 19. On the “CA Name” page, in “Common name for this CA”, type Contoso Issuing CA. You will see that the
distinguished name changes to CN=Contoso Issuing CA,DC=contoso,DC=com. Click Next.
PCITHOL303 - How to Deploy Two-Tier PKI Hierarchy
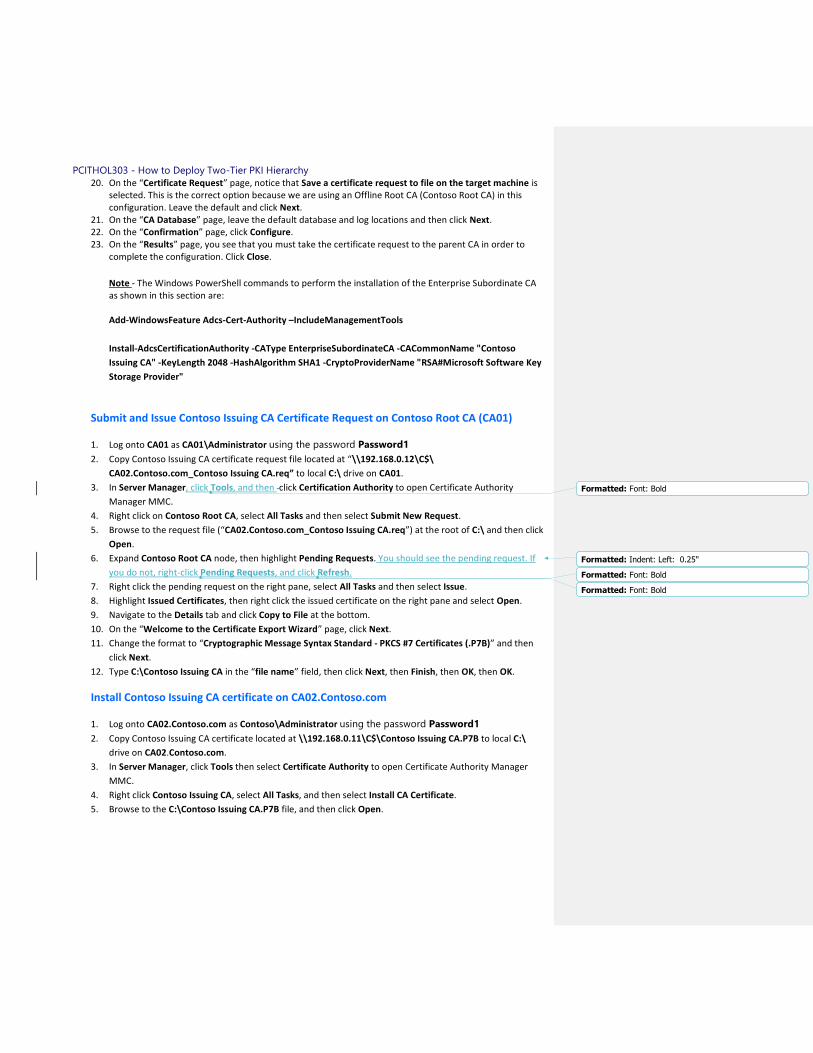
20. On the “Certificate Request” page, notice that Save a certificate request to file on the target machine is selected. This is the correct option because we are using an Offline Root CA (Contoso Root CA) in this configuration. Leave the default and click Next.
21. On the “CA Database” page, leave the default database and log locations and then click Next. 22. On the “Confirmation” page, click Configure. 23. On the “Results” page, you see that you must take the certificate request to the parent CA in order to
complete the configuration. Click Close.
Note - The Windows PowerShell commands to perform the installation of the Enterprise Subordinate CA as shown in this section are: Add-WindowsFeature Adcs-Cert-Authority –IncludeManagementTools
Install-AdcsCertificationAuthority -CAType EnterpriseSubordinateCA -CACommonName "Contoso
Issuing CA" -KeyLength 2048 -HashAlgorithm SHA1 -CryptoProviderName "RSA#Microsoft Software Key
Storage Provider"
Submit and Issue Contoso Issuing CA Certificate Request on Contoso Root CA (CA01)
1. Log onto CA01 as CA01\Administrator using the password Password1
2. Copy Contoso Issuing CA certificate request file located at “\\192.168.0.12\C$\
CA02.Contoso.com_Contoso Issuing CA.req” to local C:\ drive on CA01.
3. In Server Manager, click Tools, and then click Certification Authority to open Certificate Authority
Manager MMC.
4. Right click on Contoso Root CA, select All Tasks and then select Submit New Request.
5. Browse to the request file (“CA02.Contoso.com_Contoso Issuing CA.req”) at the root of C:\ and then click
Open.
6. Expand Contoso Root CA node, then highlight Pending Requests. You should see the pending request. If
you do not, right-click Pending Requests, and click Refresh.
7. Right click the pending request on the right pane, select All Tasks and then select Issue.
8. Highlight Issued Certificates, then right click the issued certificate on the right pane and select Open.
9. Navigate to the Details tab and click Copy to File at the bottom.
10. On the “Welcome to the Certificate Export Wizard” page, click Next.
11. Change the format to “Cryptographic Message Syntax Standard - PKCS #7 Certificates (.P7B)” and then
click Next.
12. Type C:\Contoso Issuing CA in the “file name” field, then click Next, then Finish, then OK, then OK.
Install Contoso Issuing CA certificate on CA02.Contoso.com
1. Log onto CA02.Contoso.com as Contoso\Administrator using the password Password1
2. Copy Contoso Issuing CA certificate located at \\192.168.0.11\C$\Contoso Issuing CA.P7B to local C:\
drive on CA02.Contoso.com.
3. In Server Manager, click Tools then select Certificate Authority to open Certificate Authority Manager
MMC.
4. Right click Contoso Issuing CA, select All Tasks, and then select Install CA Certificate.
5. Browse to the C:\Contoso Issuing CA.P7B file, and then click Open.
Formatted: Font: Bold
Formatted: Indent: Left: 0.25"
Formatted: Font: Bold
Formatted: Font: Bold

PCITHOL303 - How to Deploy Two-Tier PKI Hierarchy
6. To start Certificate Authority service, select Consoto Issuing CA in Certificate Authority MMC and click
Start Service icon in Certificate Authority Manager. (Note – You may have to wait for few seconds before
it allows you to start service).
Note - Start service icon is a black square with a green triangle insidea green triangle on the menu bar.
You can also start the service by enter the command net start certsvc at a command prompt.
7. Expand Contoso Issuing CA node, highlight Certificate Templates, and verify the default templates are not
present in the right pane. We removed these certificate templates using CAPolicy.inf configuration called
LoadDefaultTemplates=0.
Formatted: Font: Bold

PCITHOL303 - How to Deploy Two-Tier PKI Hierarchy
Exercise 5: Perform Post Installation Configuration On Subordinate
Issuing CA
1. Log onto CA02.Contoso.com as Contoso\Administrator using the password Password1
2. Open Command Prompt.
3. To define CRL Period Units and CRL Period, type following command and then press Enter.
Certutil -setreg CA\CRLPeriodUnits 1
Certutil -setreg CA\CRLPeriod “Weeks”
Certutil –setreg CA\CRLDeltaPeriodUnits 1
Certutil –setreg CA\CRLDeltaPeriod “Days”
4. To define CRL Overlap Period Units and CRL Overlap Period, type following command and then press Enter.
Certutil -setreg CA\CRLOverlapPeriodUnits 12
Certutil -setreg CA\CRLOverlapPeriod “Hours”
5. Default setting for Validity Period is 2 years in registry. Adjust this setting accordingly to meet your needs of entity certificate’s lifetime issued from Contoso Issuing CA. It is recommended to not configure this setting to more than half of total lifetime of Contoso Issuing CA certificate. Keep in mind that in our two tier PKI hierarchy scenario we want end-entity certificates to not have more than 5 year lifetime.
Certutil -setreg CA\ValidityPeriodUnits 5
Certutil -setreg CA\ValidityPeriod “Years”
6. CA auditing depends on system Object Access auditing to be enabled. Therefore, to set up CA auditing for a system, you will need to configure following two settings.
a. Enable auditing for the CA by selecting which group of events to audit in the Certificate Authority MMC snap-in or by configuring AuditFilter registry key setting.
To configure Auditing for all CA related events, type following command and then press Enter.
Certutil -setreg CA\AuditFilter 127
b. Enable Object Access Auditing on the Certificate Authority. We are configuring this setting using Local Security Policy however CA02.Contoso.com is domain joined so domain based GPO can be used to configure this setting as well.
Enable Object Access Auditing through Local Security Policy.
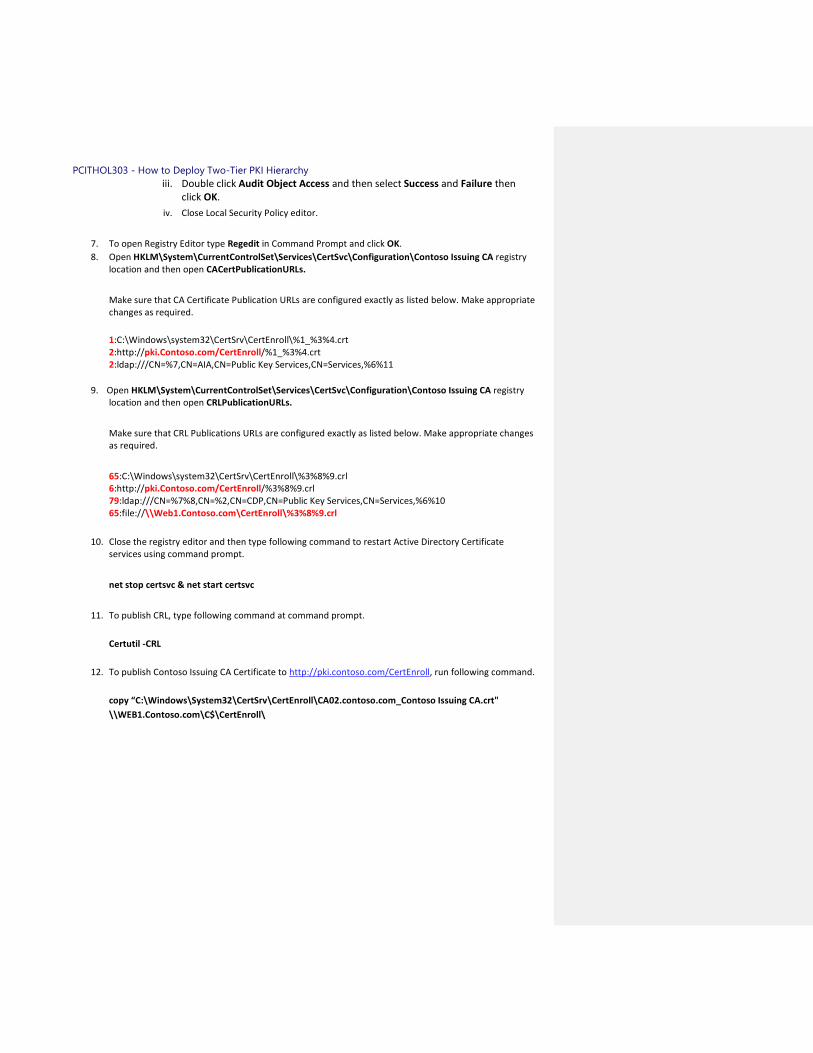
i. Click Start AdministrativeIn Server Manager, click Tools and then select Local Security Policy.
ii. Expand Local Policies and then select Audit Policy.
PCITHOL303 - How to Deploy Two-Tier PKI Hierarchy
iii. Double click Audit Object Access and then select Success and Failure then click OK.
iv. Close Local Security Policy editor.
7. To open Registry Editor type Regedit in Command Prompt and click OK.
8. Open HKLM\System\CurrentControlSet\Services\CertSvc\Configuration\Contoso Issuing CA registry location and then open CACertPublicationURLs.
Make sure that CA Certificate Publication URLs are configured exactly as listed below. Make appropriate changes as required.
1:C:\Windows\system32\CertSrv\CertEnroll\%1_%3%4.crt 2:http://pki.Contoso.com/CertEnroll/%1_%3%4.crt 2:ldap:///CN=%7,CN=AIA,CN=Public Key Services,CN=Services,%6%11
9. Open HKLM\System\CurrentControlSet\Services\CertSvc\Configuration\Contoso Issuing CA registry location and then open CRLPublicationURLs.
Make sure that CRL Publications URLs are configured exactly as listed below. Make appropriate changes as required.
65:C:\Windows\system32\CertSrv\CertEnroll\%3%8%9.crl 6:http://pki.Contoso.com/CertEnroll/%3%8%9.crl 79:ldap:///CN=%7%8,CN=%2,CN=CDP,CN=Public Key Services,CN=Services,%6%10 65:file://\\Web1.Contoso.com\CertEnroll\%3%8%9.crl
10. Close the registry editor and then type following command to restart Active Directory Certificate services using command prompt.
net stop certsvc & net start certsvc
11. To publish CRL, type following command at command prompt.
Certutil -CRL
12. To publish Contoso Issuing CA Certificate to http://pki.contoso.com/CertEnroll, run following command.
copy “C:\Windows\System32\CertSrv\CertEnroll\CA02.contoso.com_Contoso Issuing CA.crt"
\\WEB1.Contoso.com\C$\CertEnroll\
PCITHOL303 - How to Deploy Two-Tier PKI Hierarchy
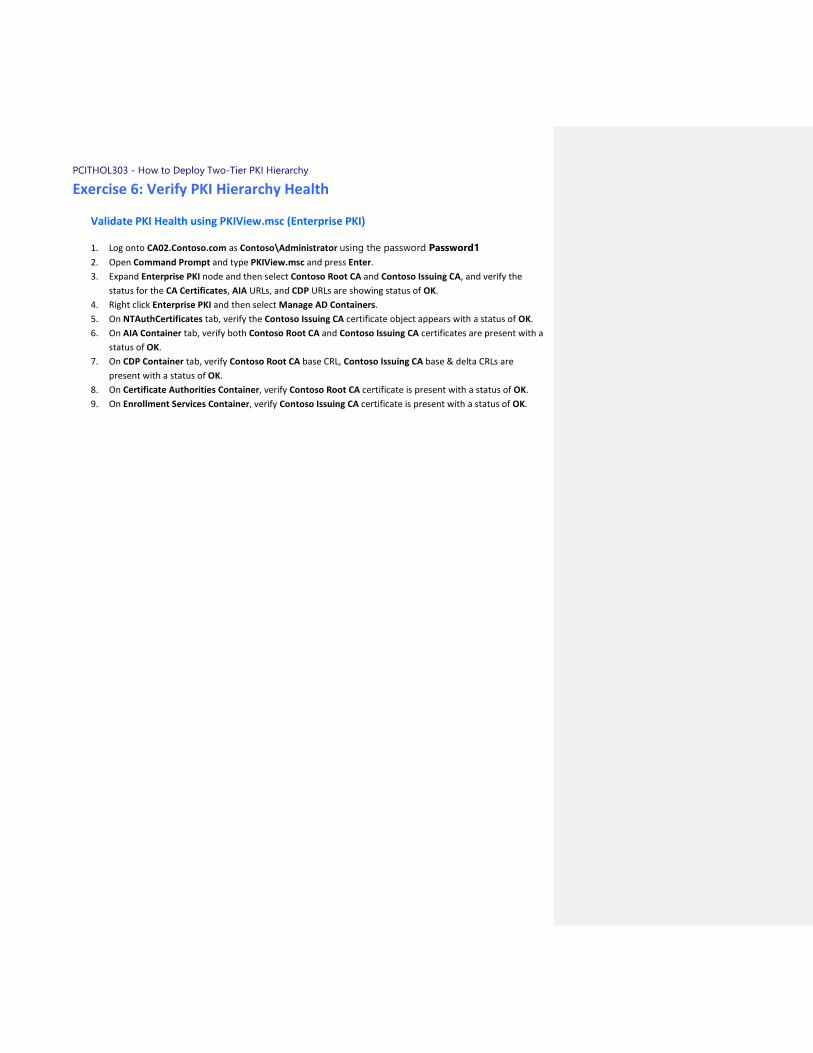
Exercise 6: Verify PKI Hierarchy Health
Validate PKI Health using PKIView.msc (Enterprise PKI)
1. Log onto CA02.Contoso.com as Contoso\Administrator using the password Password1
2. Open Command Prompt and type PKIView.msc and press Enter.
3. Expand Enterprise PKI node and then select Contoso Root CA and Contoso Issuing CA, and verify the
status for the CA Certificates, AIA URLs, and CDP URLs are showing status of OK.
4. Right click Enterprise PKI and then select Manage AD Containers.
5. On NTAuthCertificates tab, verify the Contoso Issuing CA certificate object appears with a status of OK.
6. On AIA Container tab, verify both Contoso Root CA and Contoso Issuing CA certificates are present with a
status of OK.
7. On CDP Container tab, verify Contoso Root CA base CRL, Contoso Issuing CA base & delta CRLs are
present with a status of OK.
8. On Certificate Authorities Container, verify Contoso Root CA certificate is present with a status of OK.
9. On Enrollment Services Container, verify Contoso Issuing CA certificate is present with a status of OK.

PCITHOL303 - How to Deploy Two-Tier PKI Hierarchy
Exercise 7: Configure and Perform Auto enrollment on Windows 8
Client
This task contains several sub-tasks as listed below ….
Configure GPO to Enable Auto Enrollment
Prepare Certificate Template for Auto Enrollment
Publish Certificate Template on CA
Perform Auto Enrollment on Win8 Client
Configure GPO to Enable Auto Enrollment
1. Log on to CA02.contoso.com as Contoso\Administrator using the password Password1
2. In Server Manager, click Tools and Select Group Policy Management.
3. Expand Forest: Contoso.com, then Domains and Contoso.com. Right click on Default Domain Policy and
click Edit.
4. Under Computer Configuration go to Policies\Windows Settings\Security Settings\Public Key Policies.
Note – To enable auto enrollment for User based certificate templates, you will also need to configure
GPO for User Configuration. In this exercise we are only enabling auto enrollment for Computer based
certificate templates.
5. While Public Key Polices selected, on right side on pane double click on Certificate Services Client – Auto
Enrollment.
6. Using drop down menu select Enabled. Once it is enabled select following two options as well.
Renew expired certificates, update pending certificates and remove revoked certificates
Update certificates that use certificate templates
7. Click OK.
Prepare Certificate Template for Auto Enrollment
1. Log onto CA02.Contoso.com as Contoso\Administrator using the password Password1
2. In Server Manager, click Tools and then select Certificate Authority to open Certification Authority MMC.
3. Expand Contoso Issuing CA, right click on Certificate Templates, and select Manage.
4. Double click on Workstation Authentication certificate template in the Certificate Templates Console page.
5. Go to Security tab and click Add.
6. Click on Object Types and select Computers. Click OK.
7. Type in Win8 under Enter the object names to select, and click Check Names. Click OK.
8. Grant Win8 computer object Read, Enroll and Autoenroll permissions. Click OK. Close Certificate Templates console.

PCITHOL303 - How to Deploy Two-Tier PKI Hierarchy
Publish Certificate Template on CA
1. Close the Certificates Templates console.
1. Log onto CA02.Contoso.com as Contoso\Administrator using the password Password1
4.3. Highlight Workstation Authentication in the “Enable Certificate Templates” page and then click OK. If you do not see the Workstation Authentication template, close the Certificate Authority console, reopen it and try the steps again.
Perform Auto Enrollment on Win8 Client
1. Log into Win8.Contoso.com as Contoso\Administrator using the password Password1
2. On the Start screen, type cmd and press ENTER.
2.3. Open At the Command Prompt, and then type gpupdate /force.
Note – You can achieve same result as above if you reboot the Win8.contoso.com.
3.4. Open Command Prompt and type MMC and press Enter. Click on File Select Add or Remove Snap-in.
4.5. Select Certificates, then click Add, click Computer Account, then Next, Finish again, then OK.
6. Expand Certificates, then Personal and Certificates. You will find your auto enrolled Workstations Authentication certificate.
5.7. Alternatively, at the command prompt, type certutil –viewstore MY, and press ENTER.
Formatted: Font: Bold
Formatted: Font: (Default) Times New Roman, 9.5 pt
Formatted: Font: Bold


![[MS-SRVS]: Server Service Remote Protocol... · 2016. 6. 22. · Server Service Remote Protocol server server server server. [MS-SRVS]](https://img.pdfslide.net/doc/110x75/6052fdcbe569cc07291c95a3/ms-srvs-server-service-remote-protocol-2016-6-22-server-service-remote.jpg)