Embed Size (px)
Citation preview
39
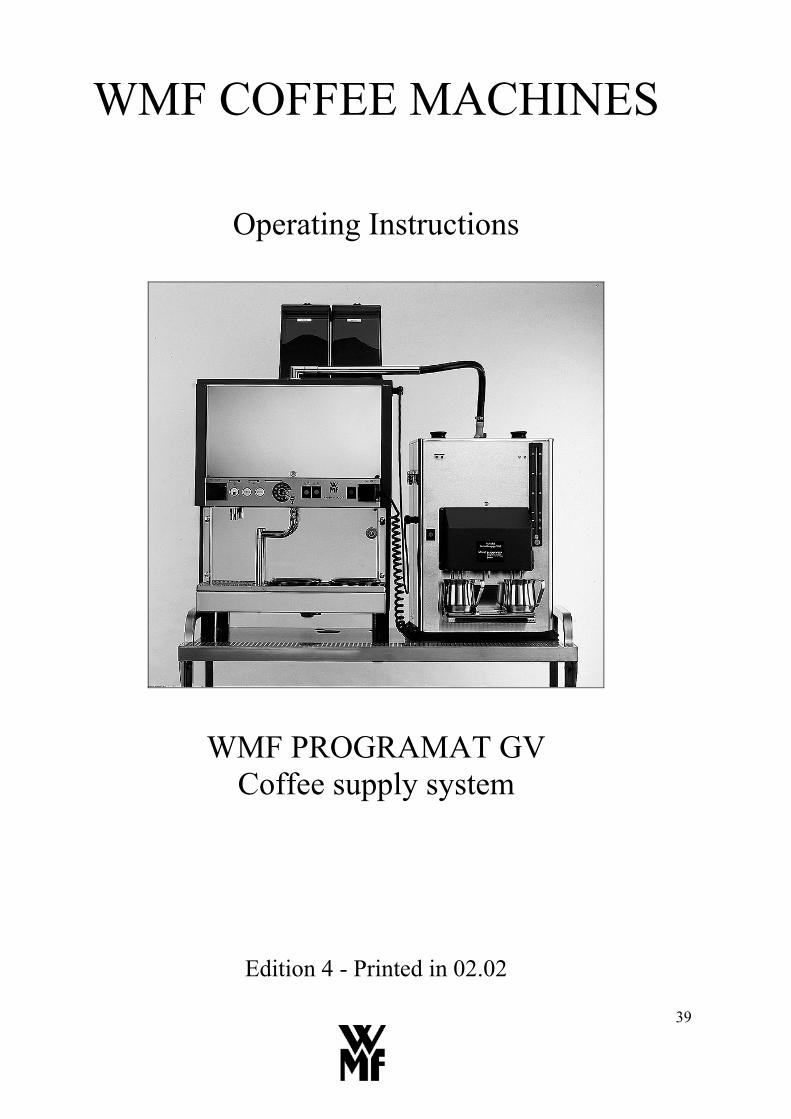
WMF COFFEE MACHINES
Operating Instructions
WMF PROGRAMAT GV Coffee supply system
Edition 4 - Printed in 02.02
40
Congratulations on the purchase of your WMF COFFEE MACHINE. Its advanced technology, long service life, economy and above all the quality of its coffee will delight you. Are you a person who does not like reading operating instructions? -Please do so anyway! You will get more pleasure from your WMF COFFEE MACHINE and will find it was worth it after all! Please follow all safety and cautionary instructions and pay special attention to the warning labels placed on the machine. This will help to avoid accidents and technical malfunctions. Never entrust the machine to anyone who is not familiar with the operating instructions. Keep these operating instructions near the machine. This will allow your operating personnel easy access to information at any time, and will enable them to take the appropriate action should there be any technical malfunctions.

41
TABLE OF CONTENTS 1 Machine features and components .................................................................................................. 43
2 General description........................................................................................................................... 44
3 Warnings............................................................................................................................................ 45
4 Safety instructions............................................................................................................................. 46
5 Technical data ................................................................................................................................... 48
6 Conditions for installation and operation....................................................................................... 49
7 Operation ........................................................................................................................................... 50 7.1 Starting up the machine ............................................................................................................... 50
7.1.1 Switching on (manually, without timer) 50 7.1.2 Switching on (via timer) 50
7.2 Brewing coffee ............................................................................................................................ 51 7.2.1 Dispensing coffee via the free-flow spout 52 7.2.2 Dispensing coffee into pots 54
7.3 Dispensing hot water ................................................................................................................... 55 7.3.1 Via the hot water spout 55 7.3.2 Via the free-flow spout 55
7.4 Storage urn................................................................................................................................... 56 7.5 Switching off the machine........................................................................................................... 57
7.5.1 Switching off without timer 57 7.5.2 Switching off with timer (optional) 57
8 Programming..................................................................................................................................... 58 8.1 Programming timer functions...................................................................................................... 58
8.1.1 Setting the time and date 58 8.1.2 Setting times for switching on and off 58 8.1.3 Programming the timer 59 8.1.4 Programming the coffee selection 61
9 Machine care...................................................................................................................................... 62 9.1 Daily cleaning.............................................................................................................................. 62
9.1.1 WMF Programat GV 62 9.1.2 Storage urn 63 9.1.3 When cleaning is necessary 64
9.2 Weekly cleaning .......................................................................................................................... 65 9.2.1 WMF Programat GV 65 9.2.2 Storage urn 65
9.3 General cleaning .......................................................................................................................... 66
10 Faults and indicators ........................................................................................................................ 68
11 WMF Customer-service.................................................................................................................... 69
12 Warranty claims................................................................................................................................ 69
13 WMF EC Declaration of conformity for coffee machines............................................................. 71
42
1
2
3
4
11
19
20
22
23
15
10
9
8
17
16
7
25
24
28
12
13
14
27
18
21
26
5 29
7 6
43
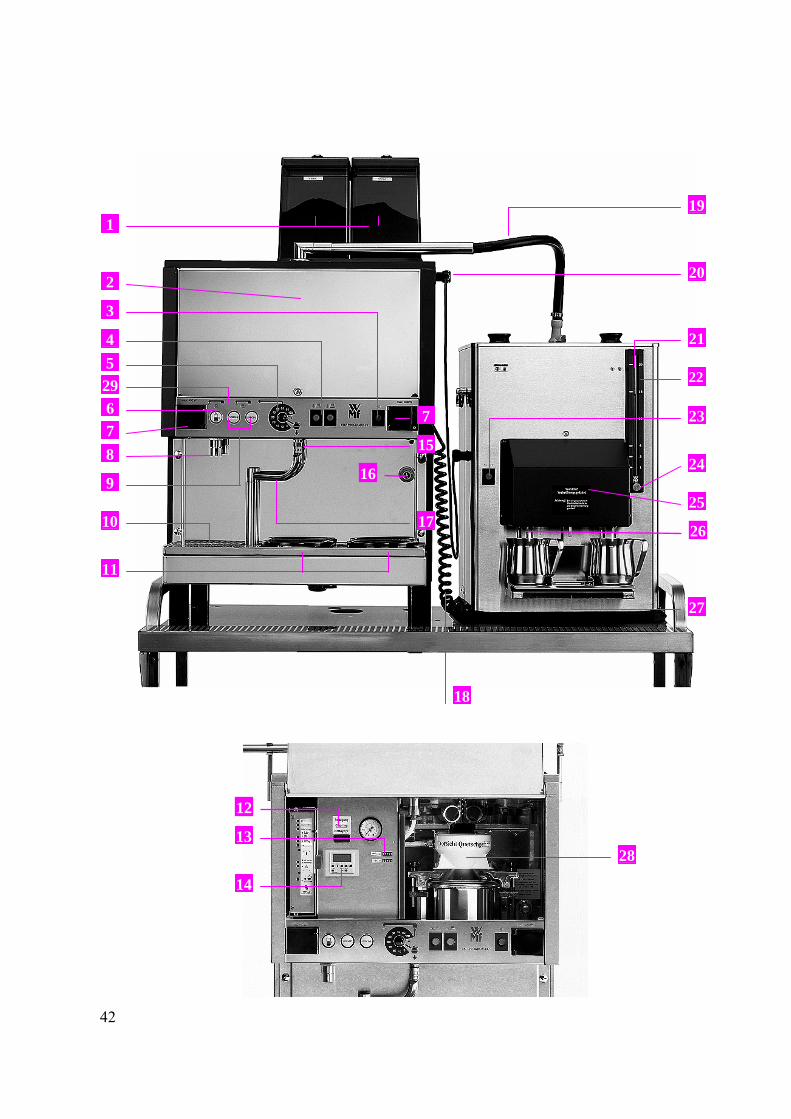
1 Machine features and components
1 Ground coffee hopper
2 Machine door
3 On / Off switch, WMF PROGRAMAT GV
4 On / Off switch, hotplates
5 Selector switch
6 Hot water spout
7 Socket outlet (on left and right)
8 Hot water spout
9 Start buttons for brewing coffee
10 Drip tray with drain connection
11 Hotplates
12 Cleaning button
13 Coffee counter (Normal / Special)
14 Timer (optional)
15 Coffee dispensing head for pots
16 Cleaning adapter (connection for drain pipe)
17 Swivelling spout for cleaning solution
18 Power cable, storage urn
19 Flexible hose for free-flow dispensing
20 Control line
21 Plug for viewglass
22 Level indicator
23 On / Off switch, storage urn
24 Screw plug for viewglass
25 Automatic double metering unit
26 Metering electrodes
27 Cup / pot table (adjustable)
28 Brewing unit
29 Cleaning display
44
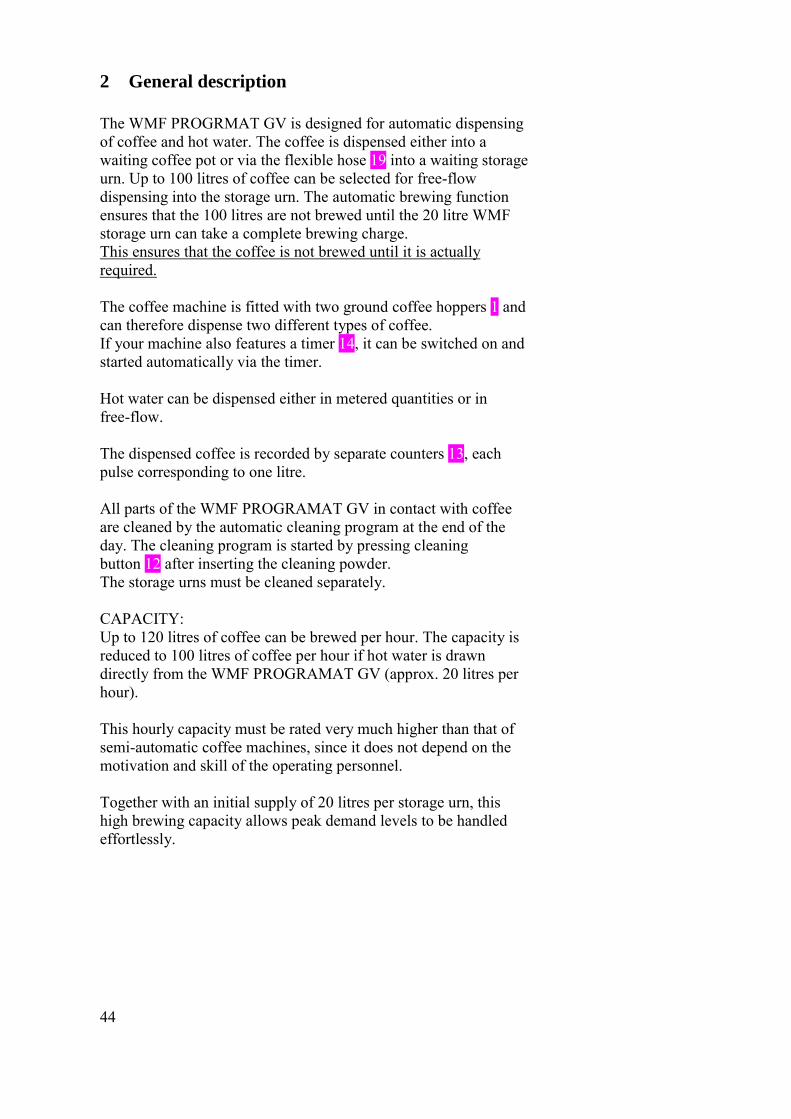
2 General description The WMF PROGRMAT GV is designed for automatic dispensing of coffee and hot water. The coffee is dispensed either into a waiting coffee pot or via the flexible hose 19 into a waiting storage urn. Up to 100 litres of coffee can be selected for free-flow dispensing into the storage urn. The automatic brewing function ensures that the 100 litres are not brewed until the 20 litre WMF storage urn can take a complete brewing charge. This ensures that the coffee is not brewed until it is actually required. The coffee machine is fitted with two ground coffee hoppers 1 and can therefore dispense two different types of coffee. If your machine also features a timer 14, it can be switched on and started automatically via the timer. Hot water can be dispensed either in metered quantities or in free-flow. The dispensed coffee is recorded by separate counters 13, each pulse corresponding to one litre. All parts of the WMF PROGRAMAT GV in contact with coffee are cleaned by the automatic cleaning program at the end of the day. The cleaning program is started by pressing cleaning button 12 after inserting the cleaning powder. The storage urns must be cleaned separately. CAPACITY: Up to 120 litres of coffee can be brewed per hour. The capacity is reduced to 100 litres of coffee per hour if hot water is drawn directly from the WMF PROGRAMAT GV (approx. 20 litres per hour). This hourly capacity must be rated very much higher than that of semi-automatic coffee machines, since it does not depend on the motivation and skill of the operating personnel. Together with an initial supply of 20 litres per storage urn, this high brewing capacity allows peak demand levels to be handled effortlessly.
45
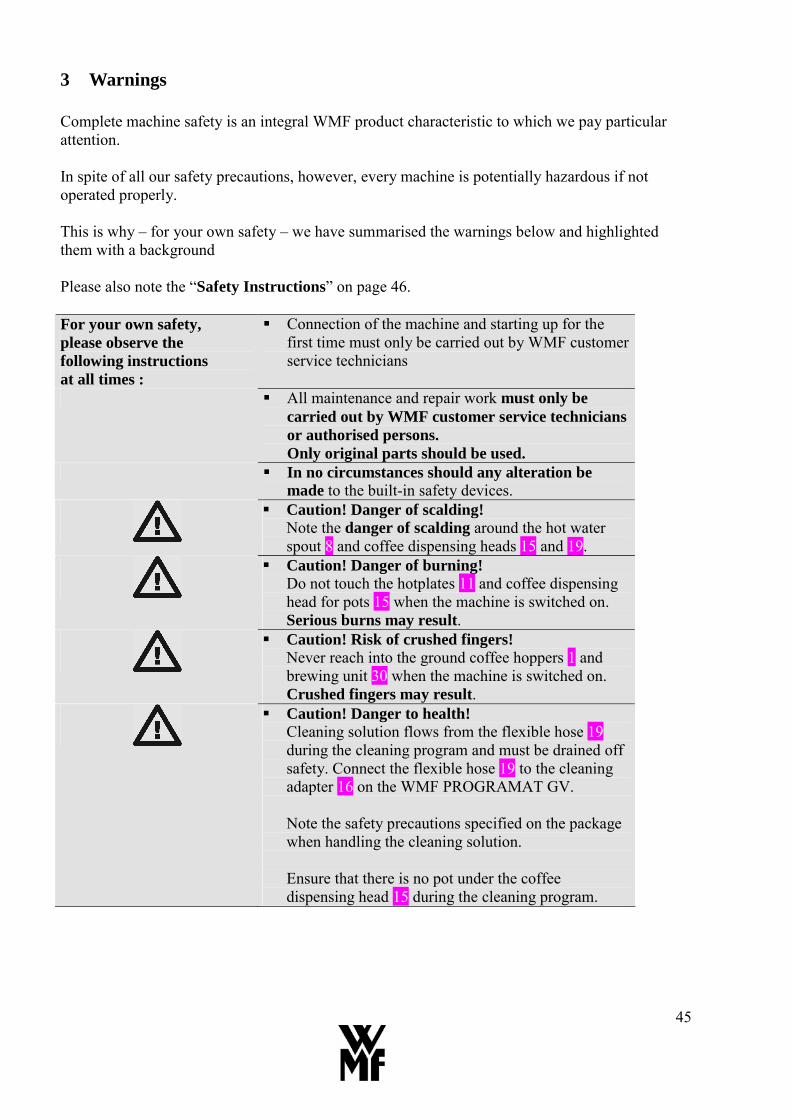
3 Warnings Complete machine safety is an integral WMF product characteristic to which we pay particular attention. In spite of all our safety precautions, however, every machine is potentially hazardous if not operated properly. This is why � for your own safety � we have summarised the warnings below and highlighted them with a background Please also note the �Safety Instructions� on page 46. For your own safety, please observe the following instructions at all times :
! Connection of the machine and starting up for the first time must only be carried out by WMF customer service technicians
! All maintenance and repair work must only be carried out by WMF customer service technicians or authorised persons. Only original parts should be used.
! In no circumstances should any alteration be made to the built-in safety devices.
! Caution! Danger of scalding! Note the danger of scalding around the hot water spout 8 and coffee dispensing heads 15 and 19.
! Caution! Danger of burning! Do not touch the hotplates 11 and coffee dispensing head for pots 15 when the machine is switched on. Serious burns may result.
! Caution! Risk of crushed fingers! Never reach into the ground coffee hoppers 1 and brewing unit 30 when the machine is switched on. Crushed fingers may result.
! Caution! Danger to health! Cleaning solution flows from the flexible hose 19 during the cleaning program and must be drained off safety. Connect the flexible hose 19 to the cleaning adapter 16 on the WMF PROGRAMAT GV. Note the safety precautions specified on the package when handling the cleaning solution. Ensure that there is no pot under the coffee dispensing head 15 during the cleaning program.
46
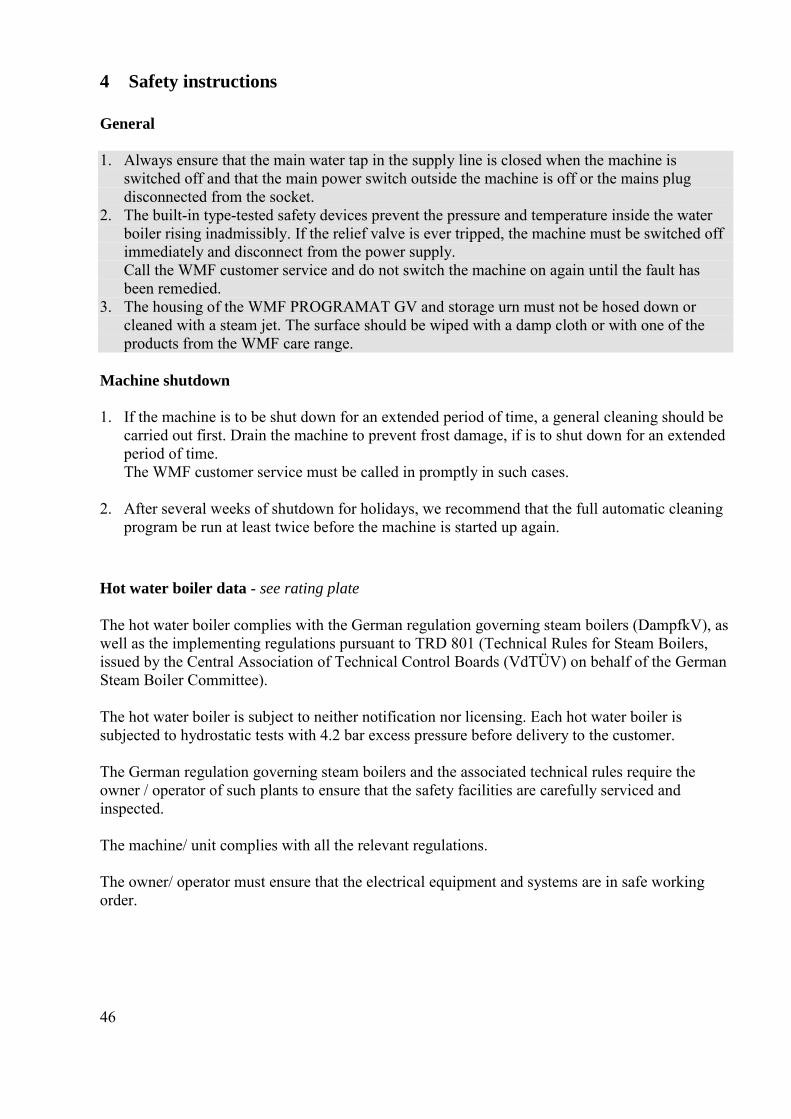
4 Safety instructions General 1. Always ensure that the main water tap in the supply line is closed when the machine is
switched off and that the main power switch outside the machine is off or the mains plug disconnected from the socket.
2. The built-in type-tested safety devices prevent the pressure and temperature inside the water boiler rising inadmissibly. If the relief valve is ever tripped, the machine must be switched off immediately and disconnect from the power supply. Call the WMF customer service and do not switch the machine on again until the fault has been remedied.
3. The housing of the WMF PROGRAMAT GV and storage urn must not be hosed down or cleaned with a steam jet. The surface should be wiped with a damp cloth or with one of the products from the WMF care range.
Machine shutdown 1. If the machine is to be shut down for an extended period of time, a general cleaning should be
carried out first. Drain the machine to prevent frost damage, if is to shut down for an extended period of time. The WMF customer service must be called in promptly in such cases.
2. After several weeks of shutdown for holidays, we recommend that the full automatic cleaning program be run at least twice before the machine is started up again.
Hot water boiler data - see rating plate The hot water boiler complies with the German regulation governing steam boilers (DampfkV), as well as the implementing regulations pursuant to TRD 801 (Technical Rules for Steam Boilers, issued by the Central Association of Technical Control Boards (VdTÜV) on behalf of the German Steam Boiler Committee). The hot water boiler is subject to neither notification nor licensing. Each hot water boiler is subjected to hydrostatic tests with 4.2 bar excess pressure before delivery to the customer. The German regulation governing steam boilers and the associated technical rules require the owner / operator of such plants to ensure that the safety facilities are carefully serviced and inspected. The machine/ unit complies with all the relevant regulations. The owner/ operator must ensure that the electrical equipment and systems are in safe working order.
47
Preventive measures against consequential machine damage ! Any technical devices, particularly large fully automatic machines, are a potential source of
danger when operated without supervision. ! We therefore recommend that the operator takes appropriate action to prevent damage, for
instance installing a suitable water detector in the site water supply line. ! If the local water has a carbonate hardness of more than 9° (German hardness), a WMF water
filter must be installed in the supply line to the machine. ! Maintenance intervals depend on how heavily the machine is used and on local water
conditions, and should be fixed by agreement with your service engineer. Even in the case of light use, maintenance should be carried out at least once a year and the water filter, if fitted, should be replaced.
48
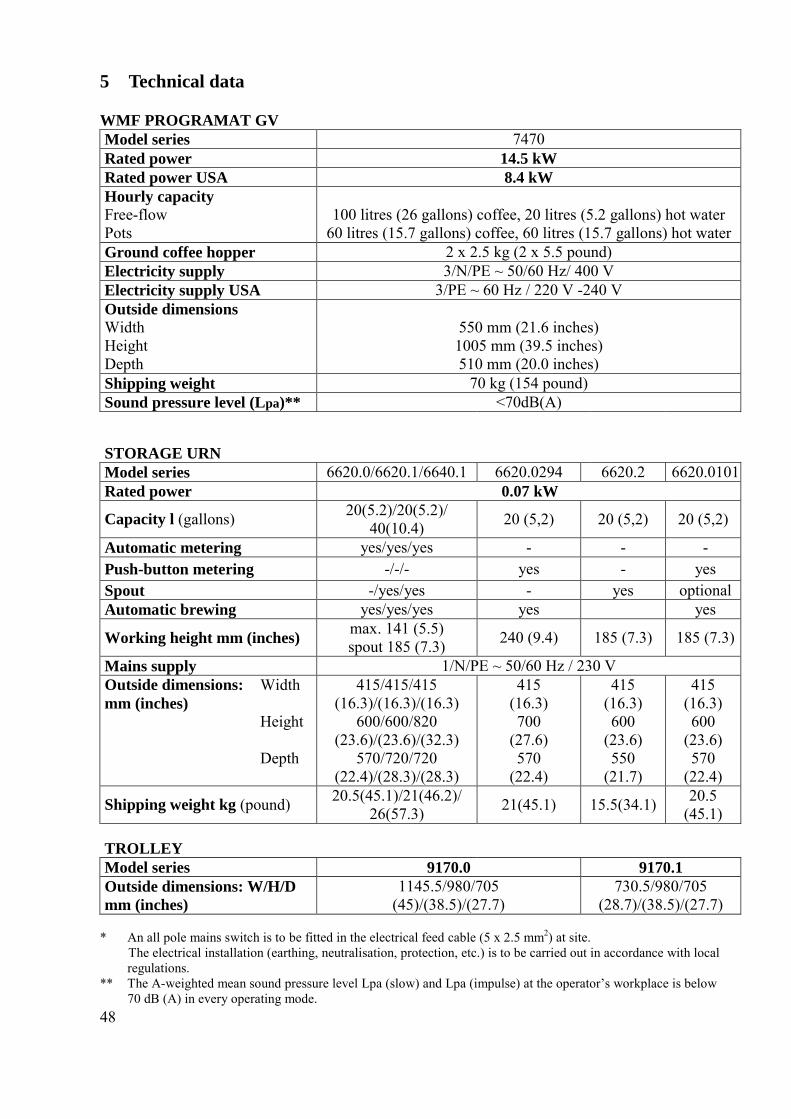
5 Technical data WMF PROGRAMAT GV Model series 7470 Rated power 14.5 kW Rated power USA 8.4 kW Hourly capacity Free-flow Pots
100 litres (26 gallons) coffee, 20 litres (5.2 gallons) hot water
60 litres (15.7 gallons) coffee, 60 litres (15.7 gallons) hot water Ground coffee hopper 2 x 2.5 kg (2 x 5.5 pound) Electricity supply 3/N/PE ~ 50/60 Hz/ 400 V Electricity supply USA 3/PE ~ 60 Hz / 220 V -240 V Outside dimensions Width Height Depth
550 mm (21.6 inches)
1005 mm (39.5 inches) 510 mm (20.0 inches)
Shipping weight 70 kg (154 pound) Sound pressure level (Lpa)** <70dB(A)
STORAGE URN
Model series 6620.0/6620.1/6640.1 6620.0294 6620.2 6620.0101Rated power 0.07 kW
Capacity l (gallons) 20(5.2)/20(5.2)/ 40(10.4) 20 (5,2) 20 (5,2) 20 (5,2)
Automatic metering yes/yes/yes - - - Push-button metering -/-/- yes - yes Spout -/yes/yes - yes optional Automatic brewing yes/yes/yes yes yes
Working height mm (inches) max. 141 (5.5) spout 185 (7.3) 240 (9.4) 185 (7.3) 185 (7.3)
Mains supply 1/N/PE ~ 50/60 Hz / 230 V Outside dimensions: Width mm (inches) Height Depth
415/415/415 (16.3)/(16.3)/(16.3)
600/600/820 (23.6)/(23.6)/(32.3)
570/720/720 (22.4)/(28.3)/(28.3)
415 (16.3) 700
(27.6) 570
(22.4)
415 (16.3) 600
(23.6) 550
(21.7)
415 (16.3) 600
(23.6) 570
(22.4)
Shipping weight kg (pound) 20.5(45.1)/21(46.2)/ 26(57.3) 21(45.1) 15.5(34.1) 20.5
(45.1) TROLLEY
Model series 9170.0 9170.1 Outside dimensions: W/H/D mm (inches)
1145.5/980/705 (45)/(38.5)/(27.7)
730.5/980/705 (28.7)/(38.5)/(27.7)
* An all pole mains switch is to be fitted in the electrical feed cable (5 x 2.5 mm2) at site.
The electrical installation (earthing, neutralisation, protection, etc.) is to be carried out in accordance with local regulations.
** The A-weighted mean sound pressure level Lpa (slow) and Lpa (impulse) at the operator�s workplace is below 70 dB (A) in every operating mode.
49
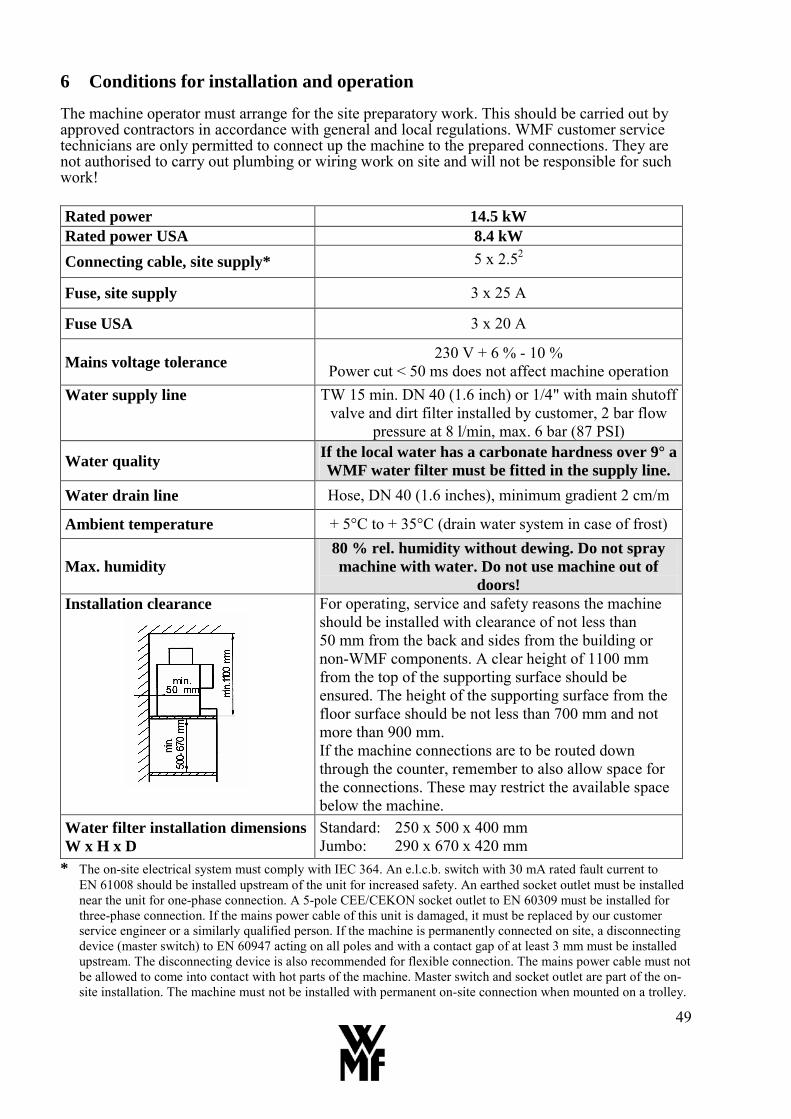
6 Conditions for installation and operation
The machine operator must arrange for the site preparatory work. This should be carried out by approved contractors in accordance with general and local regulations. WMF customer service technicians are only permitted to connect up the machine to the prepared connections. They are not authorised to carry out plumbing or wiring work on site and will not be responsible for such work!
Rated power 14.5 kW Rated power USA 8.4 kW Connecting cable, site supply* 5 x 2.52
Fuse, site supply 3 x 25 A
Fuse USA 3 x 20 A
Mains voltage tolerance 230 V + 6 % - 10 % Power cut < 50 ms does not affect machine operation
Water supply line TW 15 min. DN 40 (1.6 inch) or 1/4" with main shutoff valve and dirt filter installed by customer, 2 bar flow
pressure at 8 l/min, max. 6 bar (87 PSI)
Water quality If the local water has a carbonate hardness over 9° a WMF water filter must be fitted in the supply line.
Water drain line Hose, DN 40 (1.6 inches), minimum gradient 2 cm/m
Ambient temperature + 5°C to + 35°C (drain water system in case of frost)
Max. humidity 80 % rel. humidity without dewing. Do not spray machine with water. Do not use machine out of
doors! Installation clearance
For operating, service and safety reasons the machine should be installed with clearance of not less than 50 mm from the back and sides from the building or non-WMF components. A clear height of 1100 mm from the top of the supporting surface should be ensured. The height of the supporting surface from the floor surface should be not less than 700 mm and not more than 900 mm. If the machine connections are to be routed down through the counter, remember to also allow space for the connections. These may restrict the available space below the machine.
Water filter installation dimensions W x H x D
Standard: 250 x 500 x 400 mm Jumbo: 290 x 670 x 420 mm
* The on-site electrical system must comply with IEC 364. An e.l.c.b. switch with 30 mA rated fault current to EN 61008 should be installed upstream of the unit for increased safety. An earthed socket outlet must be installed near the unit for one-phase connection. A 5-pole CEE/CEKON socket outlet to EN 60309 must be installed for three-phase connection. If the mains power cable of this unit is damaged, it must be replaced by our customer service engineer or a similarly qualified person. If the machine is permanently connected on site, a disconnecting device (master switch) to EN 60947 acting on all poles and with a contact gap of at least 3 mm must be installed upstream. The disconnecting device is also recommended for flexible connection. The mains power cable must not be allowed to come into contact with hot parts of the machine. Master switch and socket outlet are part of the on- site installation. The machine must not be installed with permanent on-site connection when mounted on a trolley.
50
7 Operation
7.1 Starting up the machine
Caution! The machine may only be started up by WMF customer service engineers.
Before the machine is started up, the main tap in the fresh water supply line must be opened and the master power switch switched on.
7.1.1 Switching on (manually, without timer)
Press On / Off button 3. The machine is now switched on and heats up (approx. 7 minutes) until it reaches its operating temperature. The hot water dispensing button 6 flashes slowly during this time.
7.1.2 Switching on (via timer)
If your WMF PROGRAMAT GV has been equipped with a timer 14, the On / Off switch 3 remains On all the time, since the machine can be switched on manually, as well as automatically via timer 14 : Note that the machine remains a source of potential danger, even when operated via timer. We therefore recommend that someone is in attendance when the machine switches on in order to ensure compliance with the warnings and safety instructions.
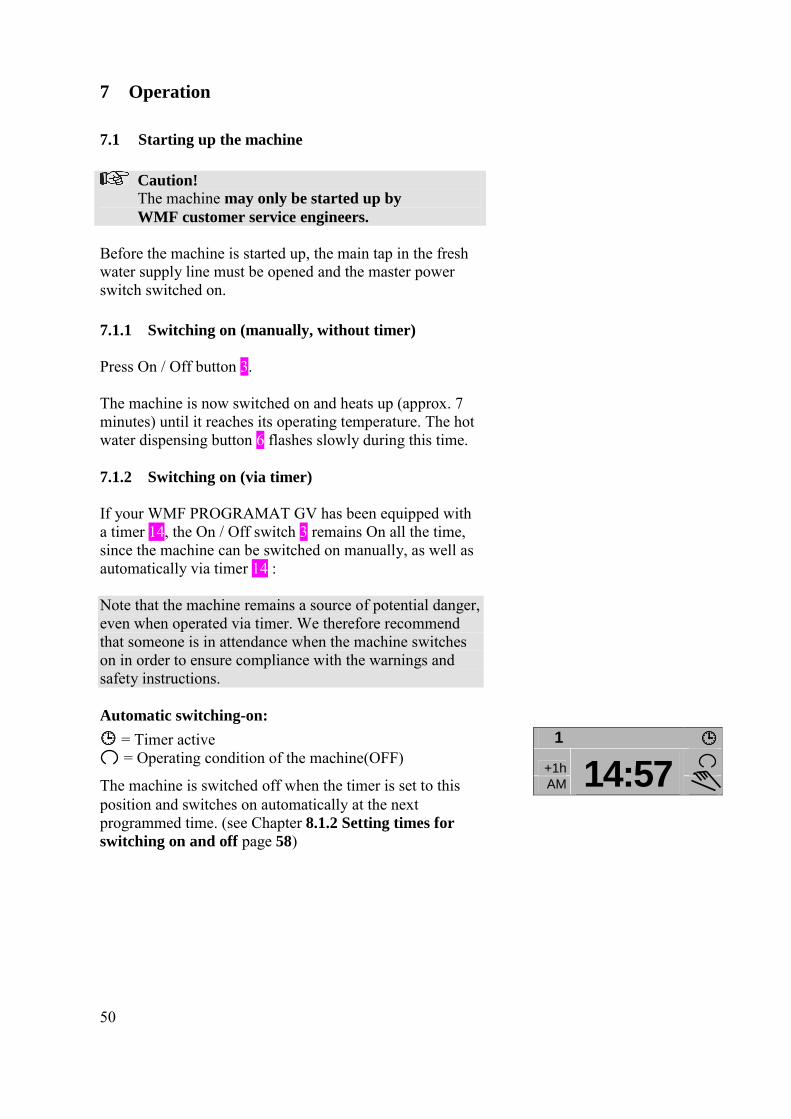
Automatic switching-on: """" = Timer active 1 2 3 4 5 6 7 """" = Operating condition of the machine(OFF)
+1h
The machine is switched off when the timer is set to this AM 14:57 position and switches on automatically at the next programmed time. (see Chapter 8.1.2 Setting times for switching on and off page 58)

51
Manual switching-on: (Timer still activated)
= Timer active, manually bypassed once 1 2 3 4 5 6 7 """" = Operating condition of the machine(ON)
+1hThe machine is switched (ON) by pressing the button , AM 14:57 but switches off automatically at the next programmed time. The timer is only bypassed on this one occasion.
Manual switching-on: (Timer deactivated)
Press button twice.
[ ] = Timer deactivated 1 2 3 4 5 6 7 = Operating condition of the machine(ON)
+1h[ ][ ][ ][ ]
The machine is switched on (ON) when button is AM 14:57 pressed twice, but the timer is deactivated at the same time. The machine can now be switched on and off via the ON / OFF switch 3.
7.2 Brewing coffee
Caution! Note the danger of scalding around the dispensing head for coffee pots 15 and the flexible coffee hose 19 during the brewing process.
The amount of coffee to be brewed must always be selected first: # Pot of coffee or # Large quantity via flexible coffee hose 19. The brewing process is started by pressing one of the buttons (NORMAL) or (SPECIAL). (NORMAL) refers to the left-hand ground coffee hopper, while (SPECIAL) refers to the right-hand hopper.
Fig. 1
This means that two different types of coffee can now be brewed automatically, e.g. normal coffee and decaffeinated coffee.
Normally; your WMF PROGRAMAT GV is programmed for one type of coffee and the ground coffee is always drawn from both ground coffee hoppers 1 alternately. Your coffee machine can be programmed for two types of coffee by the WMF customer service on request.
52
When pressed, button 9 lights up until the set quantity has been dispensed. In order to cancel a selection prematurely, turn selector 5 to �0�. However, the brewing process in progress will be completes first.
7.2.1 Dispensing coffee via the free-flow spout
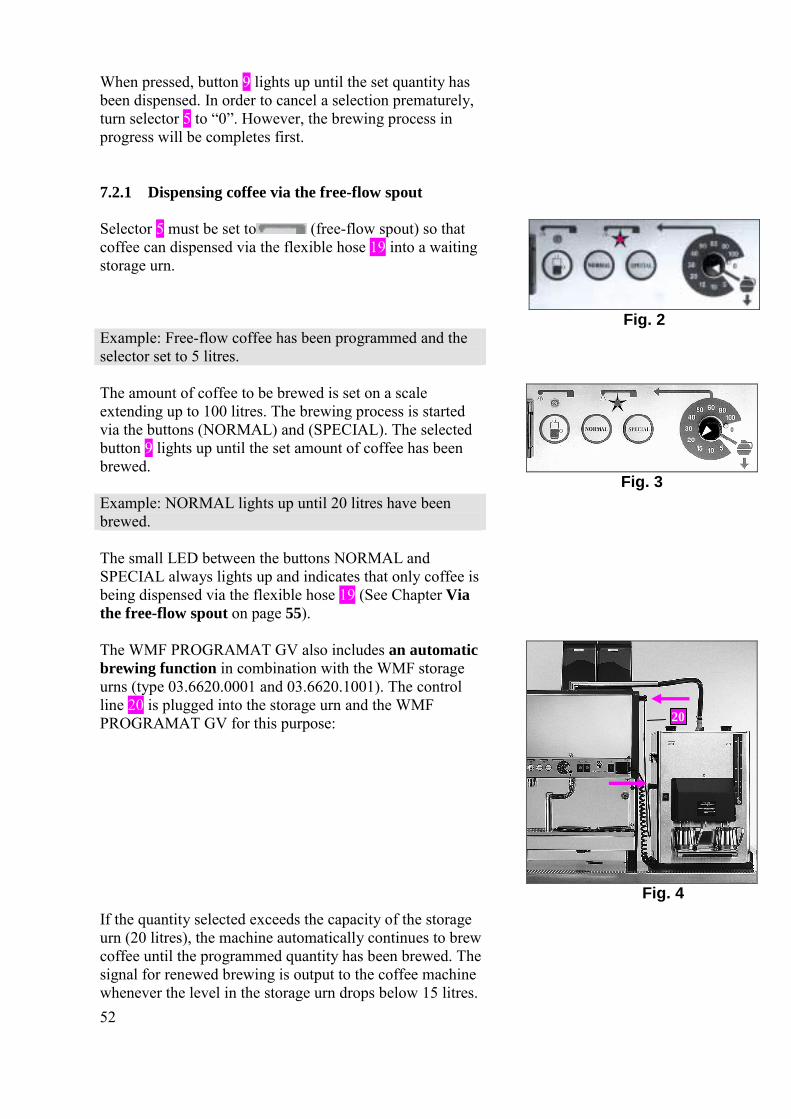
Selector 5 must be set to (free-flow spout) so that coffee can dispensed via the flexible hose 19 into a waiting storage urn.
Fig. 2
Example: Free-flow coffee has been programmed and the selector set to 5 litres.
The amount of coffee to be brewed is set on a scale extending up to 100 litres. The brewing process is started via the buttons (NORMAL) and (SPECIAL). The selected button 9 lights up until the set amount of coffee has been brewed.
Fig. 3
Example: NORMAL lights up until 20 litres have been brewed.
The small LED between the buttons NORMAL and SPECIAL always lights up and indicates that only coffee is being dispensed via the flexible hose 19 (See Chapter Via the free-flow spout on page 55).
The WMF PROGRAMAT GV also includes an automatic brewing function in combination with the WMF storage urns (type 03.6620.0001 and 03.6620.1001). The control line 20 is plugged into the storage urn and the WMF PROGRAMAT GV for this purpose:
Fig. 4
If the quantity selected exceeds the capacity of the storage urn (20 litres), the machine automatically continues to brew coffee until the programmed quantity has been brewed. The signal for renewed brewing is output to the coffee machine whenever the level in the storage urn drops below 15 litres.
20
53
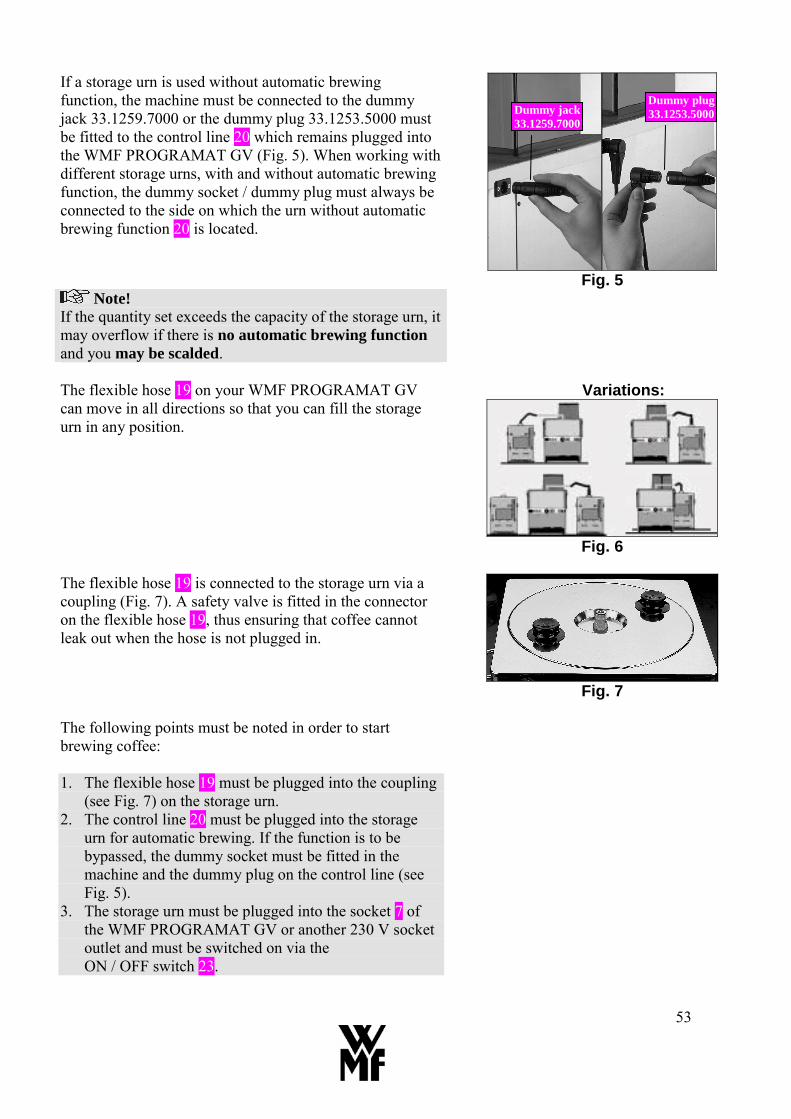
If a storage urn is used without automatic brewing function, the machine must be connected to the dummy jack 33.1259.7000 or the dummy plug 33.1253.5000 must be fitted to the control line 20 which remains plugged into the WMF PROGRAMAT GV (Fig. 5). When working with different storage urns, with and without automatic brewing function, the dummy socket / dummy plug must always be connected to the side on which the urn without automatic brewing function 20 is located.
Fig. 5
Note! If the quantity set exceeds the capacity of the storage urn, it may overflow if there is no automatic brewing function and you may be scalded.
The flexible hose 19 on your WMF PROGRAMAT GV can move in all directions so that you can fill the storage urn in any position.
Variations:
Fig. 6
The flexible hose 19 is connected to the storage urn via a coupling (Fig. 7). A safety valve is fitted in the connector on the flexible hose 19, thus ensuring that coffee cannot leak out when the hose is not plugged in.
Fig. 7
The following points must be noted in order to start brewing coffee: 1. The flexible hose 19 must be plugged into the coupling
(see Fig. 7) on the storage urn. 2. The control line 20 must be plugged into the storage
urn for automatic brewing. If the function is to be bypassed, the dummy socket must be fitted in the machine and the dummy plug on the control line (see Fig. 5).
3. The storage urn must be plugged into the socket 7 of the WMF PROGRAMAT GV or another 230 V socket outlet and must be switched on via the ON / OFF switch 23.
Dummy plug 33.1253.5000Dummy jack
33.1259.7000
54
The automatic brewing function ensures that there is a constant supply of coffee available to meet the continuous demand. Selector 5 is set to �0� if a selection is to be cancelled prematurely. The brewing process in progress is completed first, however.
Press the ON / OFF switch 3 to interrupt the dispensing of coffee immediately.
7.2.2 Dispensing coffee into pots
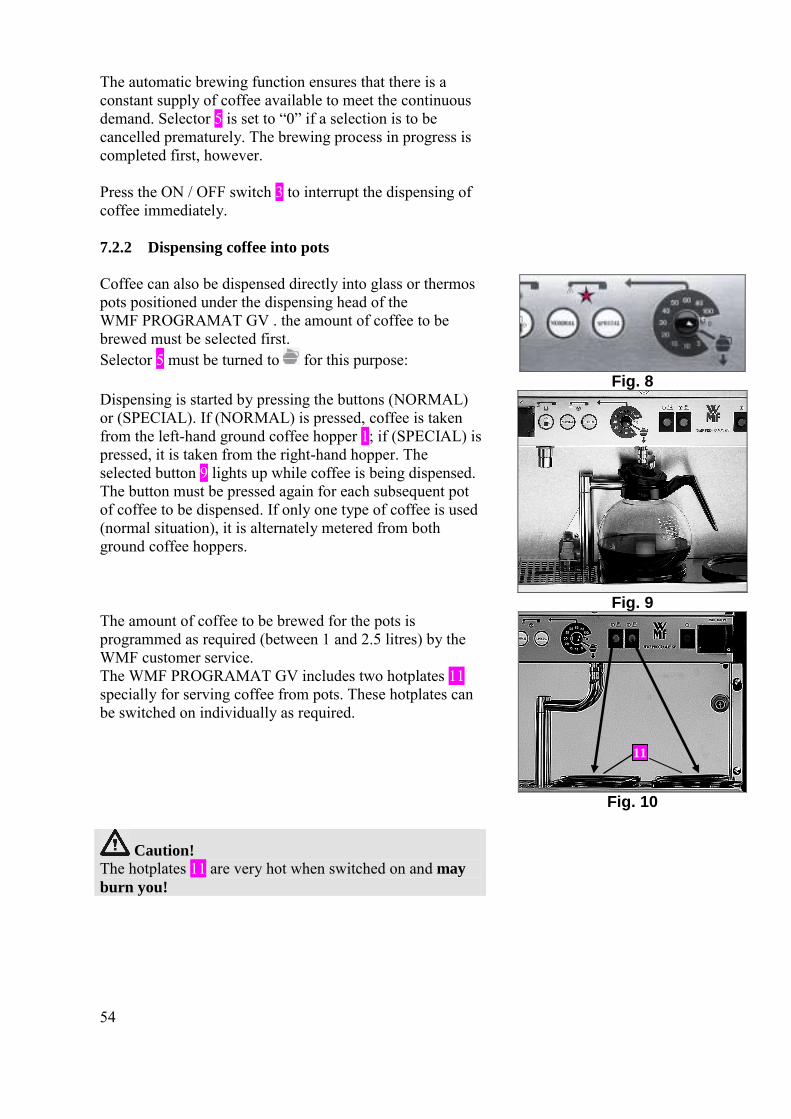
Coffee can also be dispensed directly into glass or thermos pots positioned under the dispensing head of the WMF PROGRAMAT GV . the amount of coffee to be brewed must be selected first. Selector 5 must be turned to for this purpose:
Fig. 8
Dispensing is started by pressing the buttons (NORMAL) or (SPECIAL). If (NORMAL) is pressed, coffee is taken from the left-hand ground coffee hopper 1; if (SPECIAL) is pressed, it is taken from the right-hand hopper. The selected button 9 lights up while coffee is being dispensed. The button must be pressed again for each subsequent pot of coffee to be dispensed. If only one type of coffee is used (normal situation), it is alternately metered from both ground coffee hoppers.
Fig. 9
The amount of coffee to be brewed for the pots is programmed as required (between 1 and 2.5 litres) by the WMF customer service. The WMF PROGRAMAT GV includes two hotplates 11 specially for serving coffee from pots. These hotplates can be switched on individually as required.
Fig. 10
Caution! The hotplates 11 are very hot when switched on and may burn you!
11
55
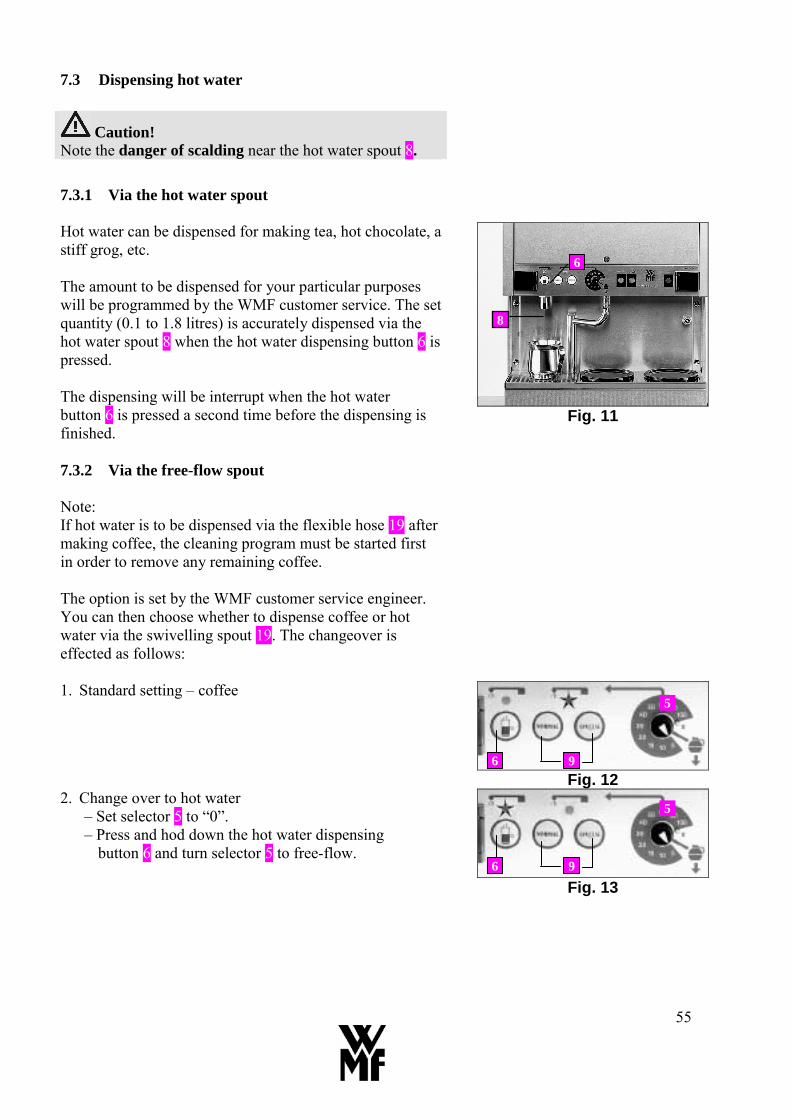
7.3 Dispensing hot water
Caution! Note the danger of scalding near the hot water spout 8.
7.3.1 Via the hot water spout
Hot water can be dispensed for making tea, hot chocolate, a stiff grog, etc. The amount to be dispensed for your particular purposes will be programmed by the WMF customer service. The set quantity (0.1 to 1.8 litres) is accurately dispensed via the hot water spout 8 when the hot water dispensing button 6 is pressed. The dispensing will be interrupt when the hot water button 6 is pressed a second time before the dispensing is finished.
Fig. 11
7.3.2 Via the free-flow spout
Note: If hot water is to be dispensed via the flexible hose 19 after making coffee, the cleaning program must be started first in order to remove any remaining coffee.
The option is set by the WMF customer service engineer. You can then choose whether to dispense coffee or hot water via the swivelling spout 19. The changeover is effected as follows:
1. Standard setting � coffee
Fig. 12
2. Change over to hot water � Set selector 5 to �0�. � Press and hod down the hot water dispensing
button 6 and turn selector 5 to free-flow.
Fig. 13
6 9
5
6 9
5
6
8
56
The LED above the hot water dispensing button 6 lights up. Now set the required quantity on selector 5 and press the hot water dispensing button 6 to start the delivery of hot water. The button 6 continuous to light up until the full quantity has been dispensed, the machine normally dispenses the preset quantities in batches of 5 litres.
If your WMF PROGRAMAT GV is set to �Free-flow dispensing of hot water�, you can still brew coffee via the dispensing head for coffee pots 15. Turn the selector 5 to the pot symbol and press (NORMAL) or (SPECIAL) to start brewing.
When the selector 5 is set to pot dispensing, small quantities of hot water can be also be dispensed via the hot water spout 8 by pressing the hot water dispensing button 6.
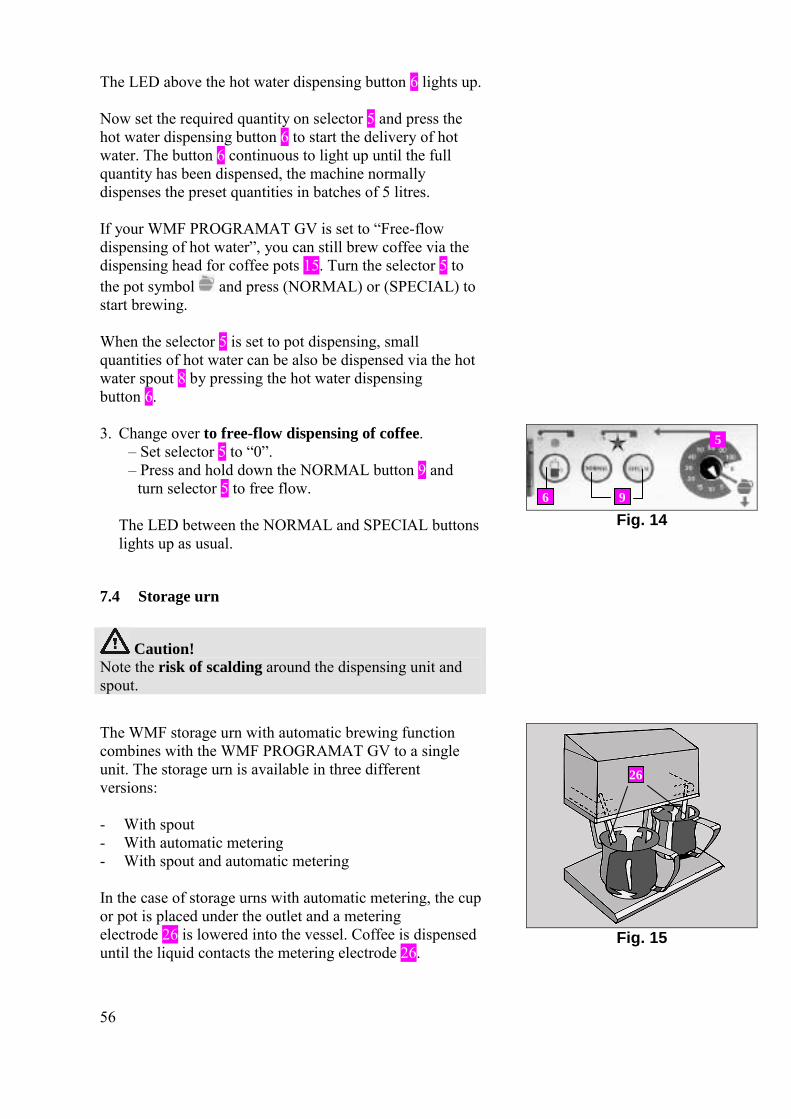
3. Change over to free-flow dispensing of coffee. � Set selector 5 to �0�. � Press and hold down the NORMAL button 9 and
turn selector 5 to free flow.
The LED between the NORMAL and SPECIAL buttons lights up as usual.
Fig. 14
7.4 Storage urn
Caution! Note the risk of scalding around the dispensing unit and spout.
The WMF storage urn with automatic brewing function combines with the WMF PROGRAMAT GV to a single unit. The storage urn is available in three different versions: - With spout - With automatic metering - With spout and automatic metering In the case of storage urns with automatic metering, the cup or pot is placed under the outlet and a metering electrode 26 is lowered into the vessel. Coffee is dispensed until the liquid contacts the metering electrode 26.
Fig. 15
26
6 9
5
57
7.5 Switching off the machine
Note! The daily cleaning program must be run through before switching of the machine.
As when switching on, the machine can be switched off in two different ways:
7.5.1 Switching off without timer
1. Press ON / OFF switch 3. 2. Switch off master power switch outside the machine. 3. Close water tap on fresh water supply line. 4. Lock the WMF PROGRAMAT GV and remove the
key.
7.5.2 Switching off with timer (optional)
If you cannot be present to switch off the machine at the end of the day, you can naturally use the timer for this purpose.
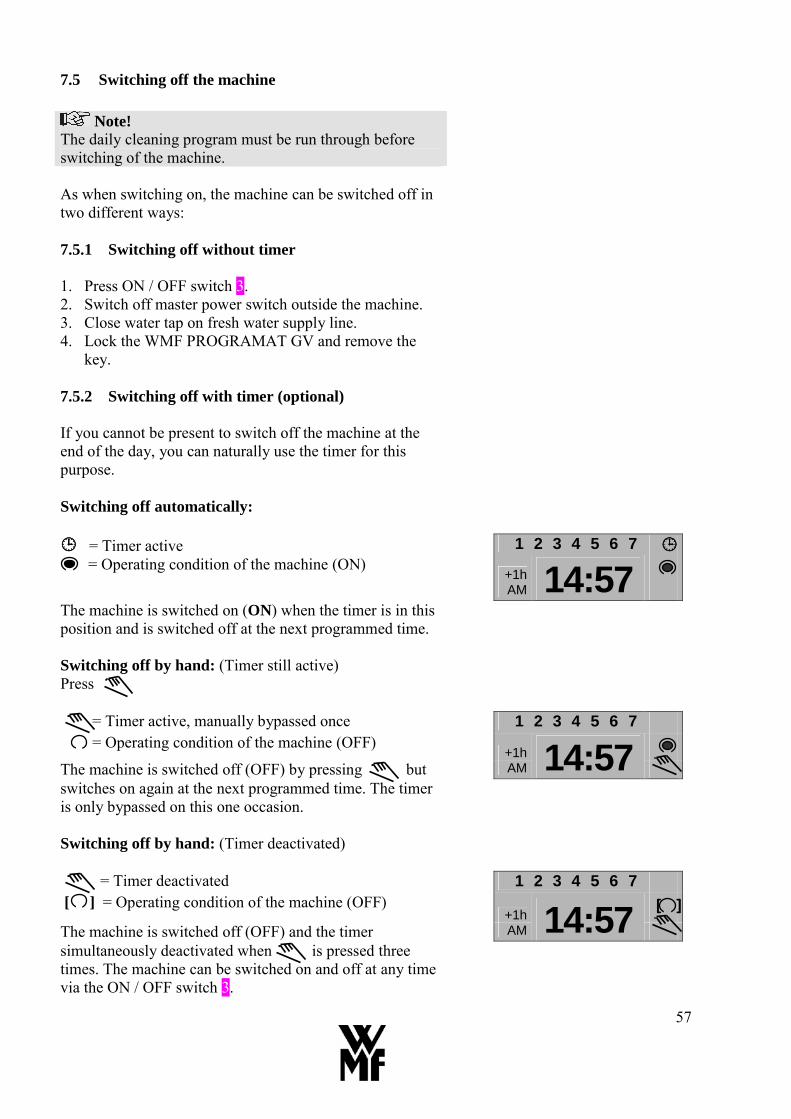
Switching off automatically: """" = Timer active 1 2 3 4 5 6 7 """" = Operating condition of the machine (ON)
+1h
AM 14:57 The machine is switched on (ON) when the timer is in this position and is switched off at the next programmed time. Switching off by hand: (Timer still active) Press = Timer active, manually bypassed once 1 2 3 4 5 6 7 = Operating condition of the machine (OFF)
+1hThe machine is switched off (OFF) by pressing but AM 14:57 switches on again at the next programmed time. The timer is only bypassed on this one occasion.
Switching off by hand: (Timer deactivated) = Timer deactivated 1 2 3 4 5 6 7 [ ] = Operating condition of the machine (OFF)
+1h[ ][ ][ ][ ]
The machine is switched off (OFF) and the timer AM 14:57 simultaneously deactivated when is pressed three times. The machine can be switched on and off at any time via the ON / OFF switch 3.
58
8 Programming
8.1 Programming timer functions
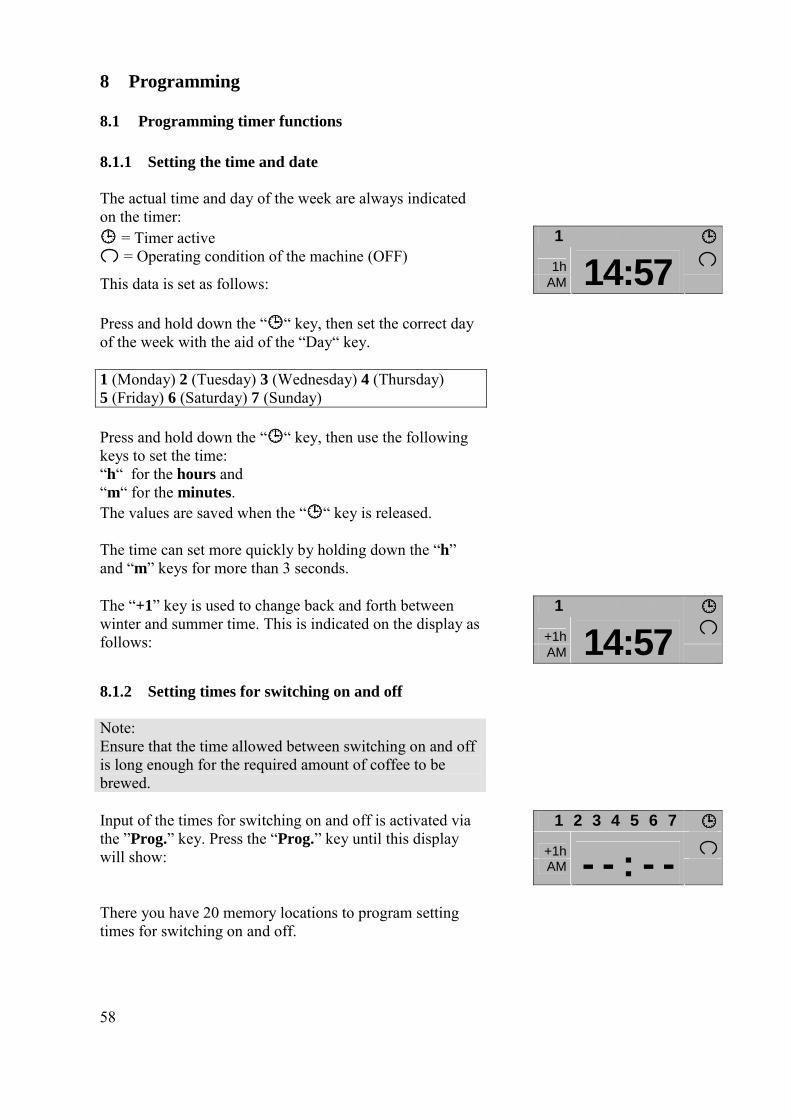
8.1.1 Setting the time and date
The actual time and day of the week are always indicated on the timer:
"""" = Timer active 1 2 3 4 5 6 7 """" = Operating condition of the machine (OFF)
1h
This data is set as follows: AM 14:57 Press and hold down the �""""� key, then set the correct day of the week with the aid of the �Day� key.
1 (Monday) 2 (Tuesday) 3 (Wednesday) 4 (Thursday) 5 (Friday) 6 (Saturday) 7 (Sunday)
Press and hold down the �""""� key, then use the following keys to set the time: �h� for the hours and �m� for the minutes. The values are saved when the �""""� key is released.
The time can set more quickly by holding down the �h� and �m� keys for more than 3 seconds.
1 2 3 4 5 6 7 """"
+1h
The �+1� key is used to change back and forth between winter and summer time. This is indicated on the display as follows:
AM 14:57 8.1.2 Setting times for switching on and off
Note: Ensure that the time allowed between switching on and off is long enough for the required amount of coffee to be brewed.
1 2 3 4 5 6 7 """"
+1h
Input of the times for switching on and off is activated via the �Prog.� key. Press the �Prog.� key until this display will show: AM - - : - - There you have 20 memory locations to program setting times for switching on and off.
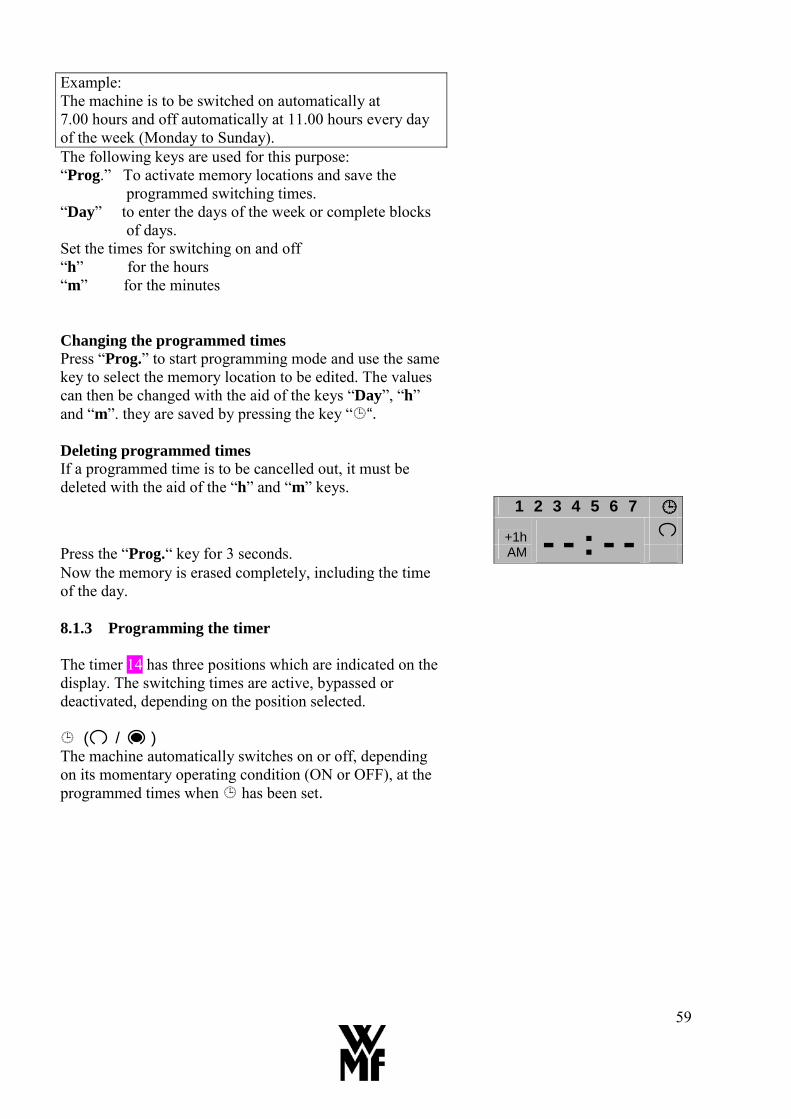
59
Example: The machine is to be switched on automatically at 7.00 hours and off automatically at 11.00 hours every day of the week (Monday to Sunday).
The following keys are used for this purpose: �Prog.� To activate memory locations and save the
programmed switching times. �Day� to enter the days of the week or complete blocks
of days.
Set the times for switching on and off �h� for the hours �m� for the minutes Changing the programmed times Press �Prog.� to start programming mode and use the same key to select the memory location to be edited. The values can then be changed with the aid of the keys �Day�, �h� and �m�. they are saved by pressing the key �"“.
Deleting programmed times If a programmed time is to be cancelled out, it must be deleted with the aid of the �h� and �m� keys.
1 2 3 4 5 6 7 """"
+1h
Press the �Prog.� key for 3 seconds. AM - - : - - Now the memory is erased completely, including the time of the day.
8.1.3 Programming the timer
The timer 14 has three positions which are indicated on the display. The switching times are active, bypassed or deactivated, depending on the position selected.
" ( / ) The machine automatically switches on or off, depending on its momentary operating condition (ON or OFF), at the programmed times when " has been set.
60
1 2 3 4 5 6 7 """"
+1h
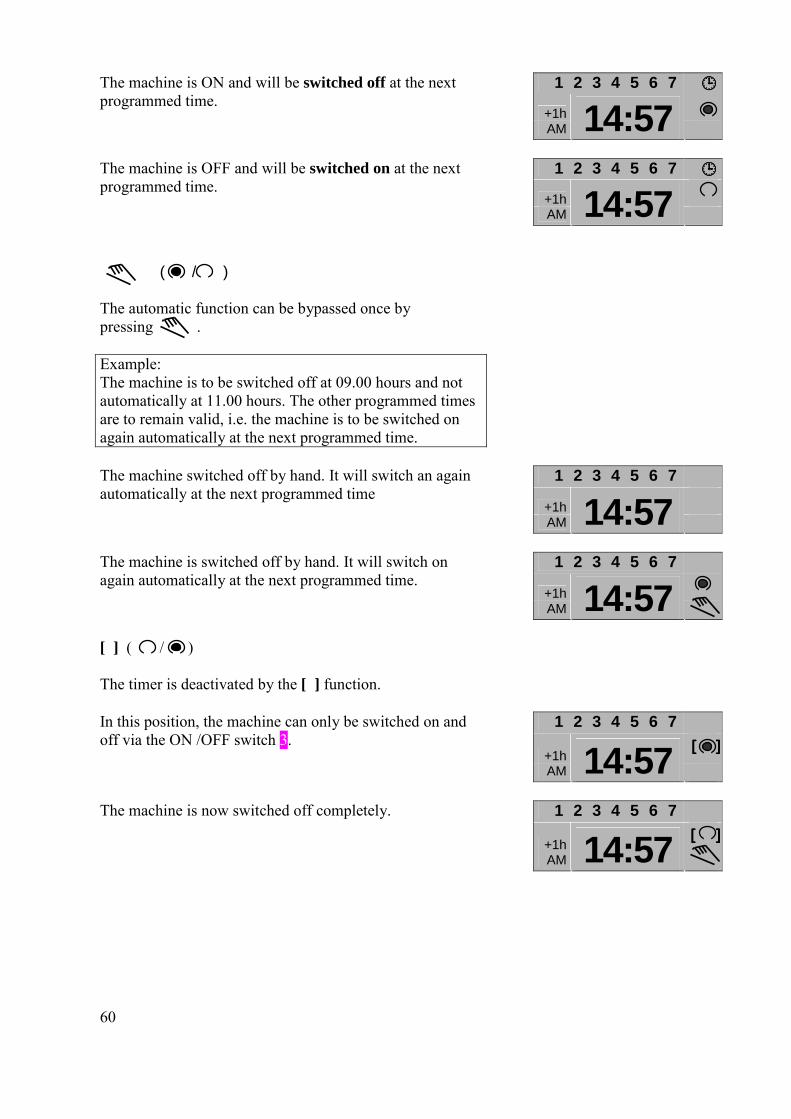
The machine is ON and will be switched off at the next programmed time.
AM 14:57
1 2 3 4 5 6 7 """"
+1h
The machine is OFF and will be switched on at the next programmed time.
AM 14:57 ( / ) The automatic function can be bypassed once by pressing .
Example: The machine is to be switched off at 09.00 hours and not automatically at 11.00 hours. The other programmed times are to remain valid, i.e. the machine is to be switched on again automatically at the next programmed time.
1 2 3 4 5 6 7
+1h
The machine switched off by hand. It will switch an again automatically at the next programmed time
AM 14:57
1 2 3 4 5 6 7
+1h
The machine is switched off by hand. It will switch on again automatically at the next programmed time.
AM 14:57 [ ] ( / ) The timer is deactivated by the [ ] function.
1 2 3 4 5 6 7
+1h [ ] [ ] [ ] [ ]
In this position, the machine can only be switched on and off via the ON /OFF switch 3.
AM 14:57
1 2 3 4 5 6 7
+1h [ ] [ ] [ ] [ ]
The machine is now switched off completely.
AM 14:57
61
8.1.4 Programming the coffee selection
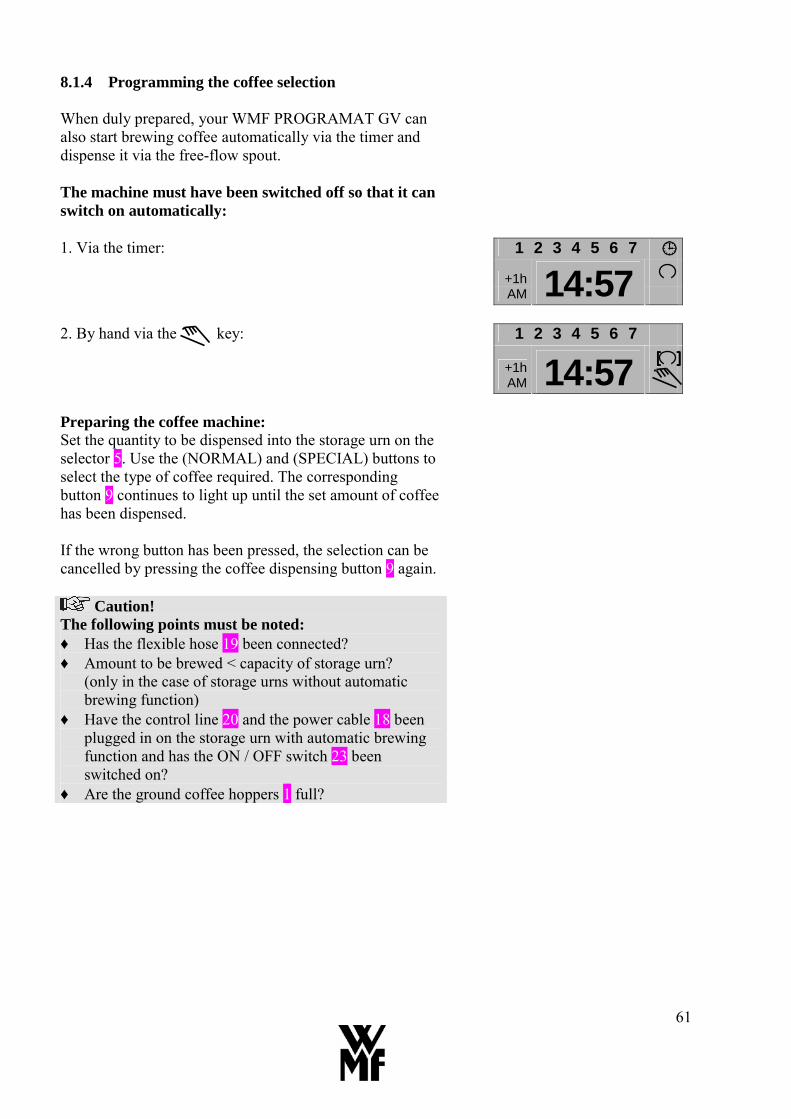
When duly prepared, your WMF PROGRAMAT GV can also start brewing coffee automatically via the timer and dispense it via the free-flow spout. The machine must have been switched off so that it can switch on automatically:
1. Via the timer: 1 2 3 4 5 6 7 """"
+1h AM 14:57 2. By hand via the key: 1 2 3 4 5 6 7
+1h[ ][ ][ ][ ]
AM 14:57 Preparing the coffee machine: Set the quantity to be dispensed into the storage urn on the selector 5. Use the (NORMAL) and (SPECIAL) buttons to select the type of coffee required. The corresponding button 9 continues to light up until the set amount of coffee has been dispensed. If the wrong button has been pressed, the selection can be cancelled by pressing the coffee dispensing button 9 again.
Caution! The following points must be noted: ♦ Has the flexible hose 19 been connected? ♦ Amount to be brewed < capacity of storage urn?
(only in the case of storage urns without automatic brewing function)
♦ Have the control line 20 and the power cable 18 been plugged in on the storage urn with automatic brewing function and has the ON / OFF switch 23 been switched on?
♦ Are the ground coffee hoppers 1 full?

62
9 Machine care
The housing of the WMF PROGRAMAT GV and storage urn must not be hosed down or cleaned with a steam jet. Wipe the surface with a damp cloth or products from our WMF cleaning range.
9.1 Daily cleaning
9.1.1 WMF Programat GV
Caution! Cleaning solution emerges from the flexible hose 19 and coffee dispensing head 15 during the cleaning process. Danger of scalding!
The fully automatic cleaning program must be run through daily in order to ensure correct functioning and that the coffee always tastes good. This program cleans all parts of the machine in contact with coffee. 1. Set selector 5 to �0�. 2. Wait until the momentary brewing process is
complete. 3. Connect the flexible hose 19 to the cleaning adapter
16 on the WMF PROGRAMAT GV (Fig. 16). This ensures that the cleaning solution is drained off safely.
Fig. 16
4. There must not be a pot under the dispensing head for coffee pots 15 so that the cleaning solution can be drained off properly (Fig. 17).
Fig. 17
15 16
19
16

63
5. Place a heaped spoonful (approx. 50 g) of the WMF
special powder detergent in the brewing unit 28.
Caution! Beware of crushed fingers! Do not reach into the brewing unit 28. 6. Press the cleaning button 12 for approx. 3 seconds
until the hot water dispensing button 6 flashes.
Fig. 18
7. The cleaning program is now run through
automatically and lasts approx. 8 minutes. The hot water dispensing button 6 stops flashing and goes out at the end of the program.
9.1.2 Storage urn
1. Unplug the power cable 18. 2. Fill with approx. 2 litres of hot water and WMF
special powder detergent. Use approx. 15 g detergent per 1 l water.
Note: Do not use any abrasive or caustic agents.
3. Remove deposits with the cleaning brush (Art.-Nr. 33 0350 3000) (Fig. 19).
Fig. 19
28
64
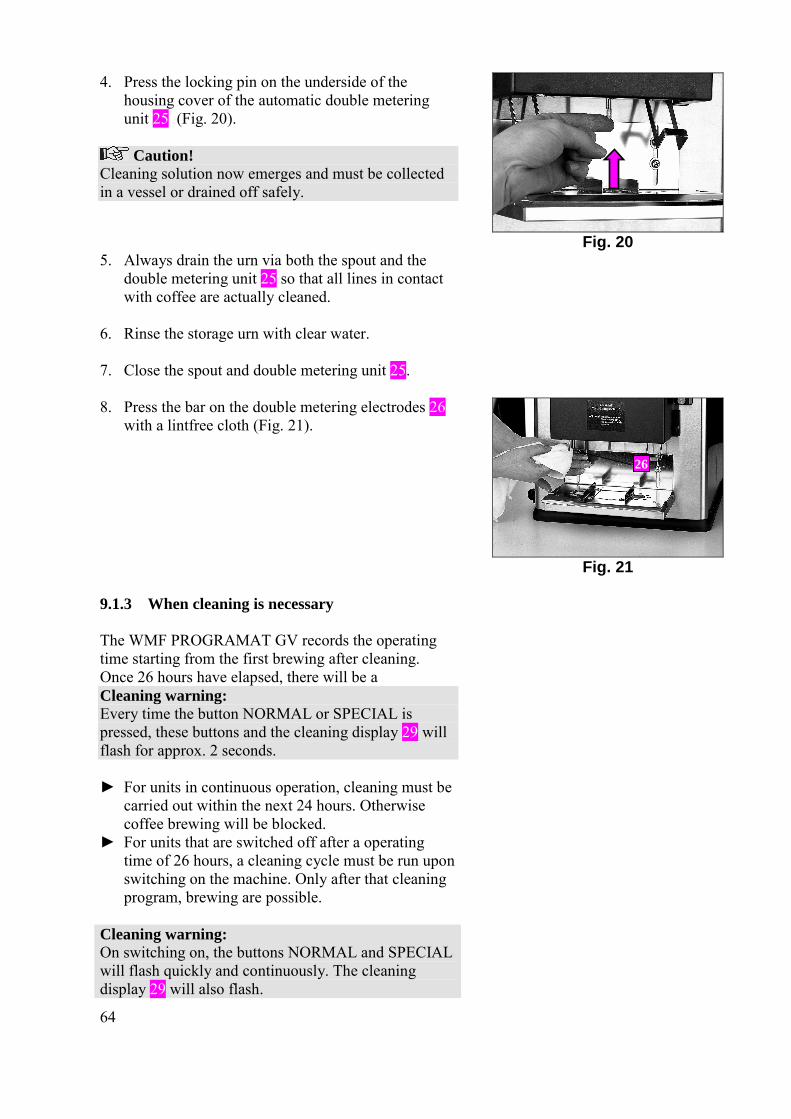
4. Press the locking pin on the underside of the
housing cover of the automatic double metering unit 25 (Fig. 20). Caution!
Cleaning solution now emerges and must be collected in a vessel or drained off safely.
Fig. 20
5. Always drain the urn via both the spout and the double metering unit 25 so that all lines in contact with coffee are actually cleaned.
6. Rinse the storage urn with clear water.
7. Close the spout and double metering unit 25.
8. Press the bar on the double metering electrodes 26 with a lintfree cloth (Fig. 21).
Fig. 21
9.1.3 When cleaning is necessary
The WMF PROGRAMAT GV records the operating time starting from the first brewing after cleaning. Once 26 hours have elapsed, there will be a
Cleaning warning: Every time the button NORMAL or SPECIAL is pressed, these buttons and the cleaning display 29 will flash for approx. 2 seconds.
► For units in continuous operation, cleaning must be carried out within the next 24 hours. Otherwise coffee brewing will be blocked.
► For units that are switched off after a operating time of 26 hours, a cleaning cycle must be run upon switching on the machine. Only after that cleaning program, brewing are possible.
Cleaning warning: On switching on, the buttons NORMAL and SPECIAL will flash quickly and continuously. The cleaning display 29 will also flash.
26
65
9.2 Weekly cleaning
9.2.1 WMF Programat GV
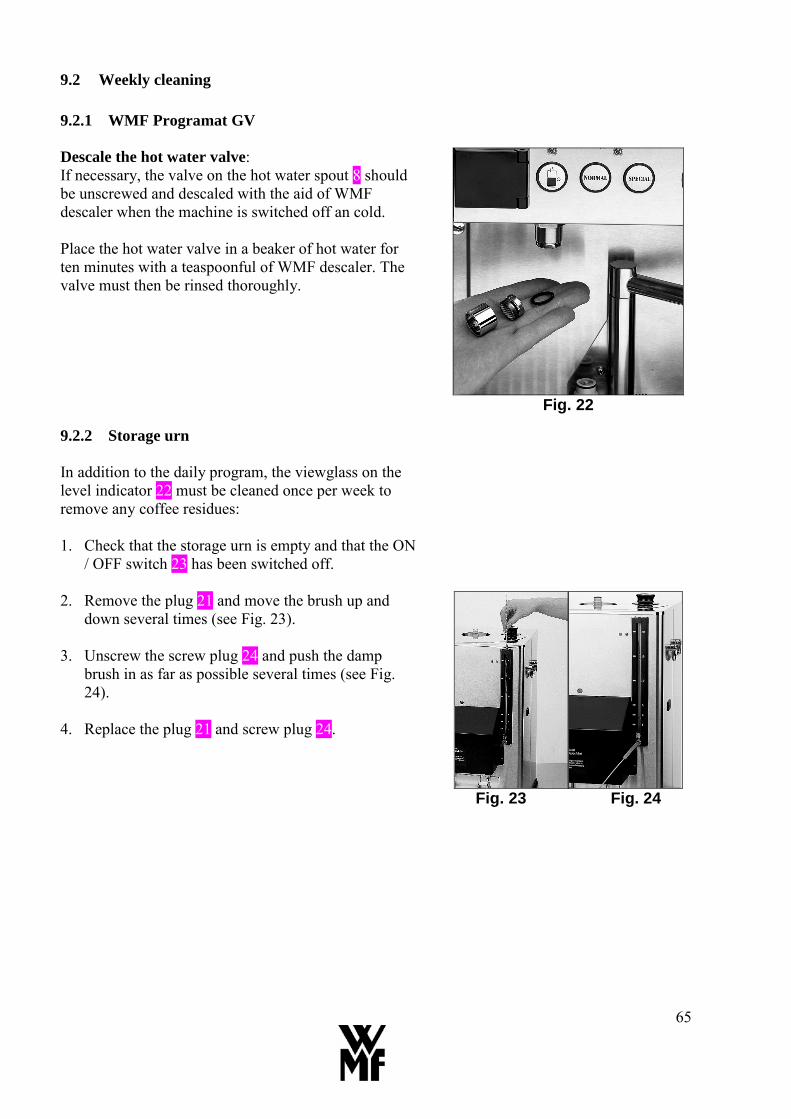
Descale the hot water valve: If necessary, the valve on the hot water spout 8 should be unscrewed and descaled with the aid of WMF descaler when the machine is switched off an cold. Place the hot water valve in a beaker of hot water for ten minutes with a teaspoonful of WMF descaler. The valve must then be rinsed thoroughly.
Fig. 22
9.2.2 Storage urn
In addition to the daily program, the viewglass on the level indicator 22 must be cleaned once per week to remove any coffee residues: 1. Check that the storage urn is empty and that the ON
/ OFF switch 23 has been switched off.
2. Remove the plug 21 and move the brush up and down several times (see Fig. 23).
3. Unscrew the screw plug 24 and push the damp brush in as far as possible several times (see Fig. 24).
4. Replace the plug 21 and screw plug 24.
Fig. 23 Fig. 24
66
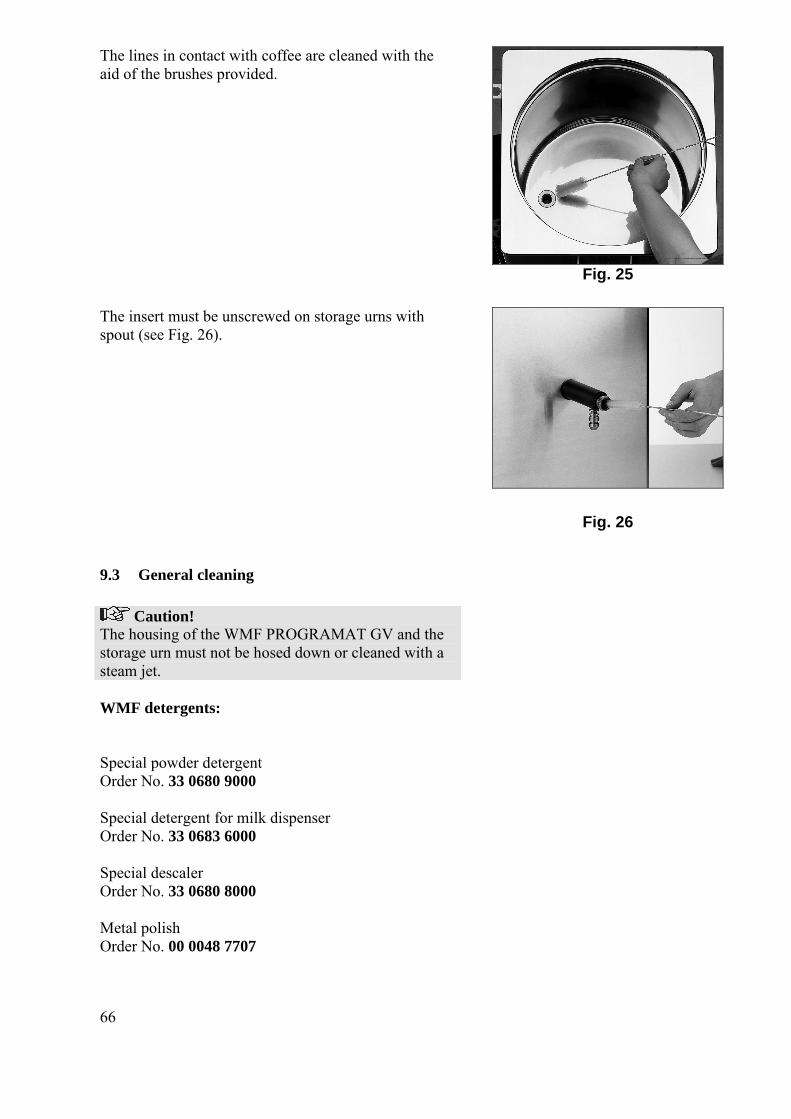
The lines in contact with coffee are cleaned with the aid of the brushes provided.
Fig. 25
The insert must be unscrewed on storage urns with spout (see Fig. 26).
Fig. 26
9.3 General cleaning
Caution! The housing of the WMF PROGRAMAT GV and the storage urn must not be hosed down or cleaned with a steam jet.
WMF detergents: Special powder detergent Order No. 33 0680 9000 Special detergent for milk dispenser Order No. 33 0683 6000 Special descaler Order No. 33 0680 8000 Metal polish Order No. 00 0048 7707
67
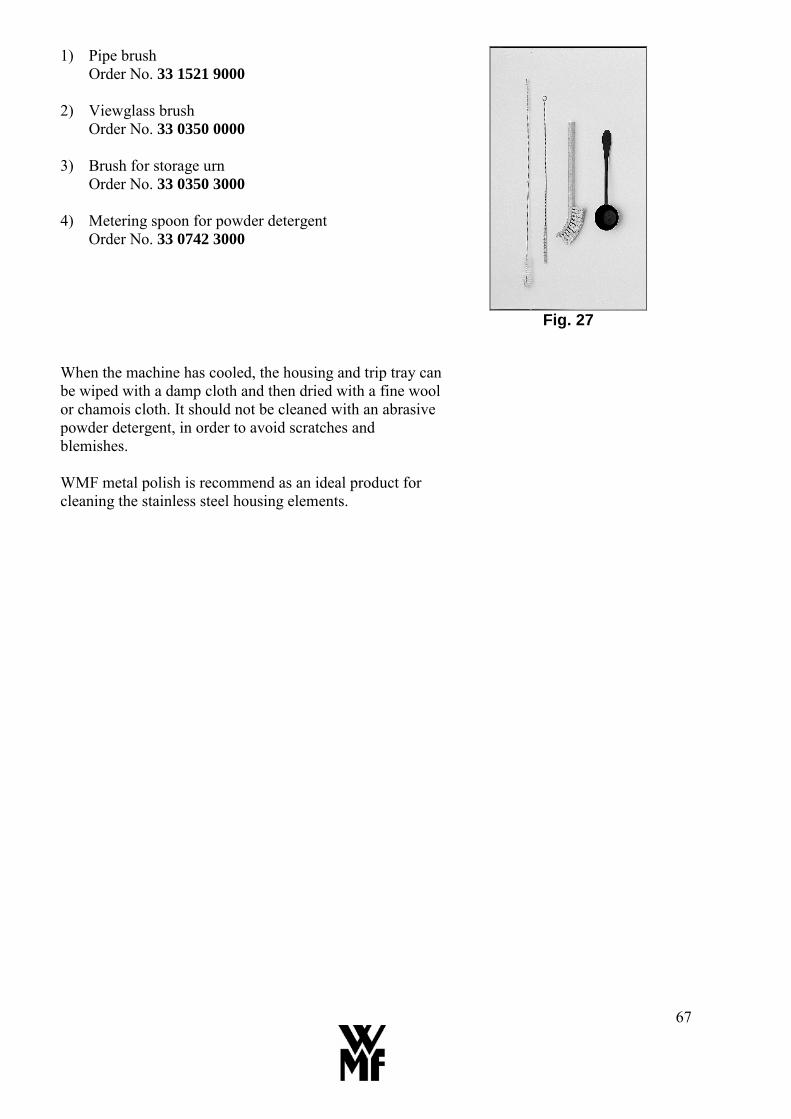
1) Pipe brush Order No. 33 1521 9000
2) Viewglass brush
Order No. 33 0350 0000 3) Brush for storage urn
Order No. 33 0350 3000 4) Metering spoon for powder detergent
Order No. 33 0742 3000
Fig. 27
When the machine has cooled, the housing and trip tray can be wiped with a damp cloth and then dried with a fine wool or chamois cloth. It should not be cleaned with an abrasive powder detergent, in order to avoid scratches and blemishes. WMF metal polish is recommend as an ideal product for cleaning the stainless steel housing elements.
68
10 Faults and indicators
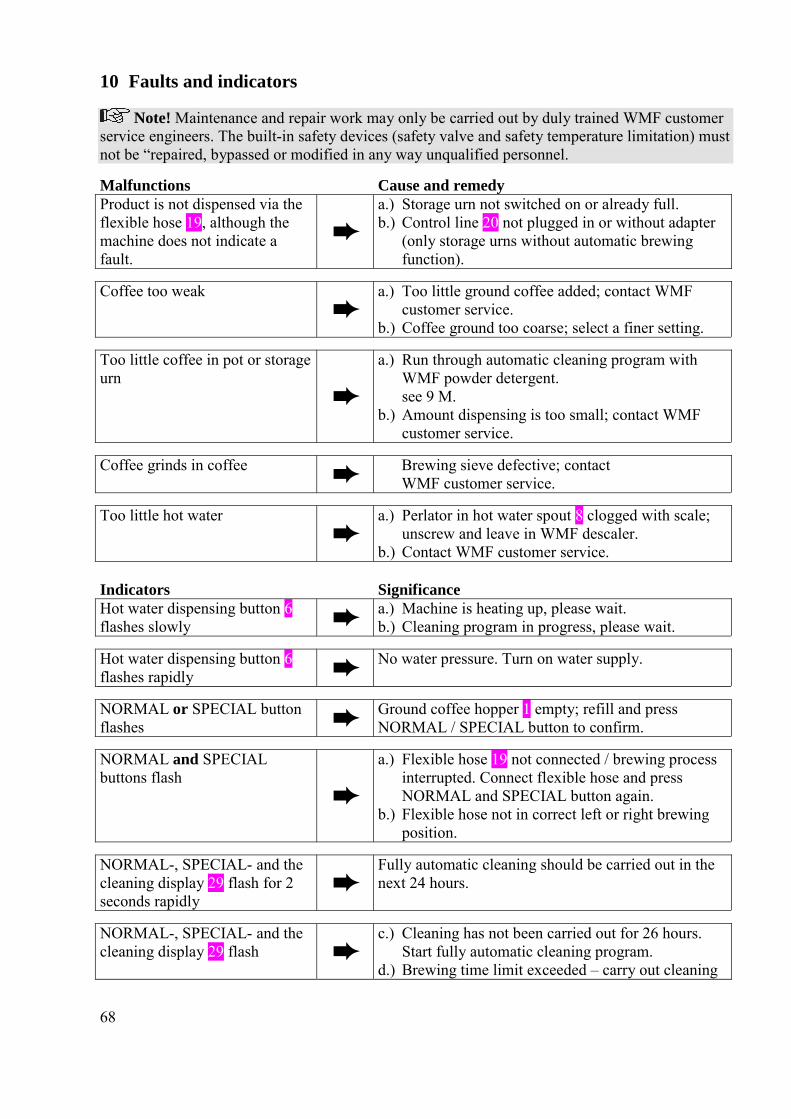
Note! Maintenance and repair work may only be carried out by duly trained WMF customer service engineers. The built-in safety devices (safety valve and safety temperature limitation) must not be �repaired, bypassed or modified in any way unqualified personnel. Malfunctions Cause and remedy Product is not dispensed via the flexible hose 19, although the machine does not indicate a fault.
➨ a.) Storage urn not switched on or already full. b.) Control line 20 not plugged in or without adapter
(only storage urns without automatic brewing function).
Coffee too weak ➨
a.) Too little ground coffee added; contact WMF customer service.
b.) Coffee ground too coarse; select a finer setting.
Too little coffee in pot or storage urn
➨
a.) Run through automatic cleaning program with WMF powder detergent. see 9 M.
b.) Amount dispensing is too small; contact WMF customer service.
Coffee grinds in coffee ➨
Brewing sieve defective; contact WMF customer service.
Too little hot water ➨
a.) Perlator in hot water spout 8 clogged with scale; unscrew and leave in WMF descaler.
b.) Contact WMF customer service. Indicators Significance Hot water dispensing button 6 flashes slowly ➨
a.) Machine is heating up, please wait. b.) Cleaning program in progress, please wait.
Hot water dispensing button 6 flashes rapidly ➨
No water pressure. Turn on water supply.
NORMAL or SPECIAL button flashes ➨
Ground coffee hopper 1 empty; refill and press NORMAL / SPECIAL button to confirm.
NORMAL and SPECIAL buttons flash
➨
a.) Flexible hose 19 not connected / brewing process interrupted. Connect flexible hose and press NORMAL and SPECIAL button again.
b.) Flexible hose not in correct left or right brewing position.
NORMAL-, SPECIAL- and the cleaning display 29 flash for 2 seconds rapidly
➨ Fully automatic cleaning should be carried out in the next 24 hours.
NORMAL-, SPECIAL- and the cleaning display 29 flash ➨
c.) Cleaning has not been carried out for 26 hours. Start fully automatic cleaning program.
d.) Brewing time limit exceeded � carry out cleaning
69
11 WMF Customer-service WMF�s comprehensive service network allows every area to be reached in a short period of time. Our personnel are experienced experts and carry special tools and the original spare parts required at all times, so that malfunctions can be remedied on the spot.
Please bear in mind that this is a professional commercial coffee machine. A machine of this type requires regular maintenance by our WMF Customer Service. The maintenance interval depends on how heavily the machine is used, but maintenance should be carried out at least once a year.
12 Warranty claims WMF shall give a warranty for legitimate defects as to quality as follows: Any products delivered or any services rendered showing a defect as to quality within the period of limitation shall be, at WMF�s reasonable discretion, repaired or rendered again, if the cause of the defect as to quality had already been present when the risk was passed. Claims for defects as to quality are subject to a limitation period of 12 months. This period shall start with the day when the risk is passed. The above period shall not apply in case there are longer periods required by the German Civil Code (BGB), e.g. pursuant to § 479 Sec. 1 BGB (right of recourse of the contractor), 438 Sec. 1 No. 2 BGB (buildings and things for buildings) and § 634a BGB (defects of construction). The warranty period is extended to cover a period of 24 months after the risk was passed, if the buyer, at the time of concluding the sales contract, also enters into a service agreement for a regular maintenance of the percolator purchased. The extension of the warranty period is only effective, if the service agreement concluded has a minimum term of two years. If putting the machine into operation is delayed for longer than four weeks due to reasons that are beyond the control of WMF, the warranty period shall begin four weeks after the machine being delivered to the customer. The buyer shall immediately give written notice of defects as to quality to WMF. Replaced parts shall pass into the ownership of WMF. At first WMF shall always be given the opportunity for a subsequent performance within a reasonable period. The buyer shall make available the rejected object to WMF.
70
We do not give a warranty: - for any components that are subject to a normal wear and tear. This includes but is not limited
to gaskets and washers, ribbons, and proportioning devices; - for defects caused by atmospheric influences, deposit of boiler scale, chemical, physical,
electro-chemical or electrical influences, unless these defects are attributed to a fault of WMF; - if a water filter is dispensed with, although the on-site water regime requires the use of a water
filter, and this results in defects. It is pointed out to the customer in the respective acknowledgement of order, whether the use of a water filter is required;
- for defects resulting from the failure to comply with the instructions relating to the handling, maintenance and attendance of the device (e.g. operating and maintenance instructions of WMF laid down in the operating manual of the respective percolator type);
- for defects resulting from the inappropriate or improper use, from the failure to use WMF genuine spare parts or from the faulty installation by the buyer or a third party, or from a faulty or negligent handling; and for consequences from modifications or repair works that were made improperly and without our consent by the buyer or a third party.
Claims for damages by the buyer, irrespective of their legal grounds, particularly on account of violations of the contractual obligation and on account of tortious acts, shall be excluded. The above exclusion shall not apply in so far as there is a mandatory liability, e.g. in case of giving warranties as to quality or durability, pursuant to the German Product Liability Act, in cases of willful acts, of gross negligence, of fatal injuries, of bodily injuries or injuries to health, or in case of any violation of substantive obligations from this contract. A reversal of the burden of proof to the disadvantage of the buyer is not implied by the above regulations.
71
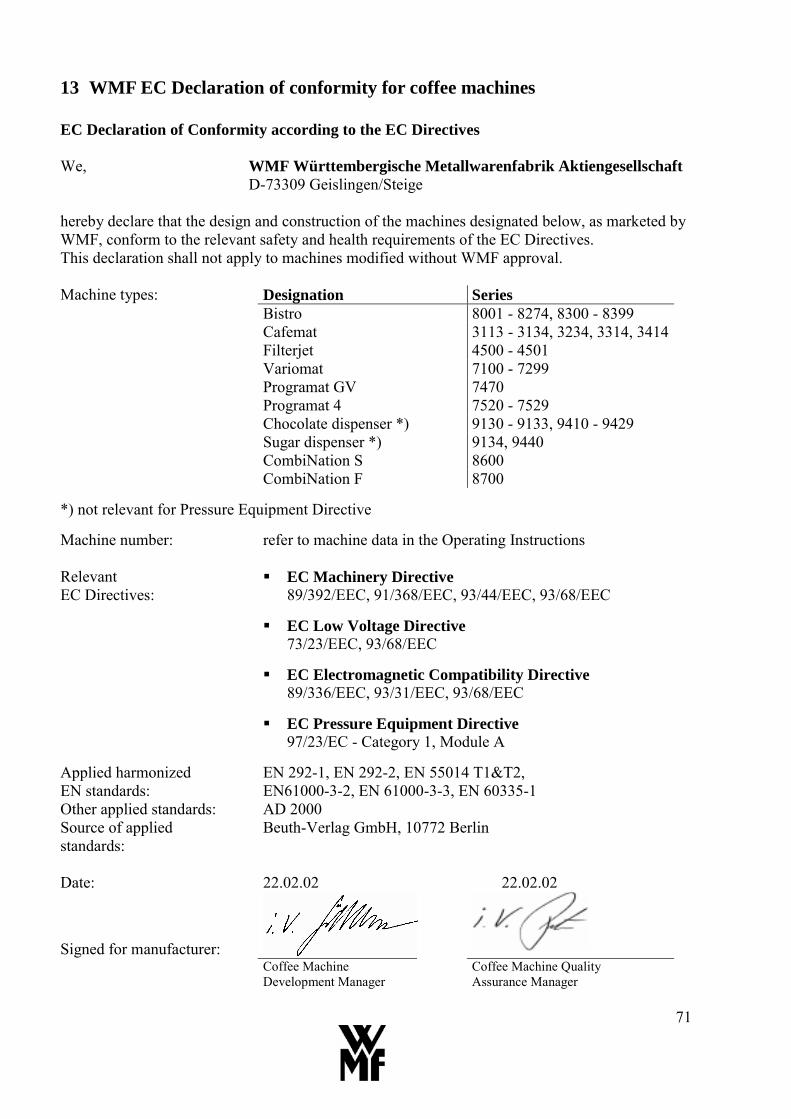
13 WMF EC Declaration of conformity for coffee machines EC Declaration of Conformity according to the EC Directives We, WMF Württembergische Metallwarenfabrik Aktiengesellschaft D-73309 Geislingen/Steige hereby declare that the design and construction of the machines designated below, as marketed by WMF, conform to the relevant safety and health requirements of the EC Directives. This declaration shall not apply to machines modified without WMF approval. Machine types: Designation Series Bistro 8001 - 8274, 8300 - 8399 Cafemat 3113 - 3134, 3234, 3314, 3414 Filterjet 4500 - 4501 Variomat 7100 - 7299 Programat GV 7470 Programat 4 7520 - 7529 Chocolate dispenser *) 9130 - 9133, 9410 - 9429 Sugar dispenser *) 9134, 9440 CombiNation S 8600 CombiNation F 8700 *) not relevant for Pressure Equipment Directive Machine number: refer to machine data in the Operating Instructions Relevant EC Directives:
! EC Machinery Directive 89/392/EEC, 91/368/EEC, 93/44/EEC, 93/68/EEC
! EC Low Voltage Directive
73/23/EEC, 93/68/EEC
! EC Electromagnetic Compatibility Directive 89/336/EEC, 93/31/EEC, 93/68/EEC
! EC Pressure Equipment Directive
97/23/EC - Category 1, Module A
Applied harmonized EN standards:
EN 292-1, EN 292-2, EN 55014 T1&T2, EN61000-3-2, EN 61000-3-3, EN 60335-1
Other applied standards: AD 2000 Source of applied standards:
Beuth-Verlag GmbH, 10772 Berlin
Date: 22.02.02 22.02.02
Signed for manufacturer:
Coffee Machine
Development Manager Coffee Machine Quality
Assurance Manager