Embed Size (px)
Citation preview
812-0055-002D
XMS Quick Start GuideOverview of Quick Start Steps This guide will quickly get you up and running with the Xirrus Management System (XMS). It includes instructions for setting up the XMS server and advice for getting started with XMS on dedicated Xirrus server appliances.
The XM-3320/3340/3360 Series Management Appliances are dedicated Linux-based network appliances that come with XMS server software pre-installed and ready to start automatically.
XMS provides two types of clients:
Web Client—administers the XMS Server and includes convenient Array management functions. Designed for speed and scalability.
Java Client—full functionality for monitoring and configuring Arrays.
To manage the XMS server and start the Web Client, see:
STEP 1 XMS Requirements on page 2
STEP 2 Managing the XMS Server (Web Client) on page 2
STEP 3 Initial Server Setup on page 4
The following sections highlight the most often used steps for starting to manage your Wi-Fi Array network:
STEP 4 Adding Networks and Devices on page 5
STEP 5 Viewing Performance—Dashboard on page 7
STEP 6 Monitoring System Performance and Security on page 8
STEP 7 Starting the XMS Java (User) Client on page 8
STEP 8 Configuring One Array or Multiple Arrays on page 9
STEP 9 Set Up Network Maps on page 12
STEP 10 Managing Arrays — Resources on page 14
STEP 11 Reports on page 15
STEP 12 XMS Server Administration on page 16
1
XMS Quick Start
STEP 1 XMS Requirements
Minimum System requirements—Web Client
The XMS web client requires one of the following secure web browsers:
Internet Explorer (version 7.0 or higher)
Mozilla Firefox (version 3.0 or higher)
Chrome (version 3.0 or higher)
Safari (version 5.0 or higher).
Minimum System requirements—Java Client
Java-enabled Web browser
Java Version 6—you must use Java SE Runtime Environment 6 or higher (http://java.sun.com/javase/downloads/index.jsp).
Monitor (1280 x 1024 or better); keyboard and mouse
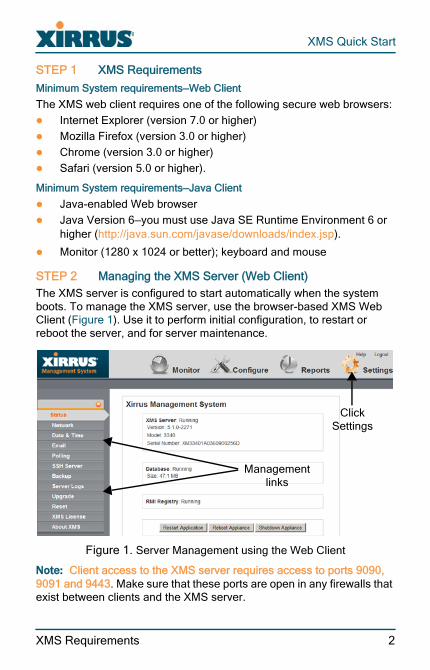
STEP 2 Managing the XMS Server (Web Client)The XMS server is configured to start automatically when the system boots. To manage the XMS server, use the browser-based XMS Web Client (Figure 1). Use it to perform initial configuration, to restart or reboot the server, and for server maintenance..
Figure 1. Server Management using the Web Client
Note: Client access to the XMS server requires access to ports 9090, 9091 and 9443. Make sure that these ports are open in any firewalls that exist between clients and the XMS server.
Management links
Click Settings
XMS Requirements 2

XMS Quick Start
1. To access the Web Client, set your browser’s URL to the server machine’s host/domain name or IP address, followed by a:9090.
• To start the Web Client using an IP address, note that the server gets an IP address from DHCP by default. If DHCP is not used, then the factory default IP address of Ethernet0 is 10.0.2.10; Ethernet1 is 10.0.2.11. For example, start the Web Client on Ethernet1 by entering http://10.0.2.11:9090 in your browser.
• To determine the server’s IP address via the serial CONSOLE port using CLI, the settings are: 115,200 bps, 1 stop bit, 8 data bits, no flow control, no parity. Log in to CLI using admin/admin.Type show ip to view the IP addresses assigned to each port.
• For more details on determining the IP address or connecting via the console port, please see the Quick Install Guide supplied with the server.
2. When the splash page appears, click Web Client on the lower right.
3. Log in using admin/admin, then click Settings on the top right. The Status page appears, showing a summary of server status.
Note: You may use CLI to manage the XMS server. Access it at port 2022 and log in using admin/admin. Do not use port 22.
If XMS is not running properly, you may click the Restart Application but-ton on the lower left to restart the XMS server software. If the server is currently running, an orderly shutdown will be performed first.
The Reboot Appliance button will reboot the Management Appliance—this will shut down XMS related processes in an orderly manner before rebooting. Rebooting and restarting will take about two minutes on a new Management Appliance. As XMS is used and the database grows, startup integrity checks will take longer. (For shutdown, see page 16.)
Managing the XMS Server (Web Client) 3
XMS Quick Start
STEP 3 Initial Server SetupThe following steps must be completed using the Web Client in order to configure the XMS server for proper performance.
Note: The XMS server requires a license for full operation. The license will be entered in Step 7 (page 8).
Network Settings
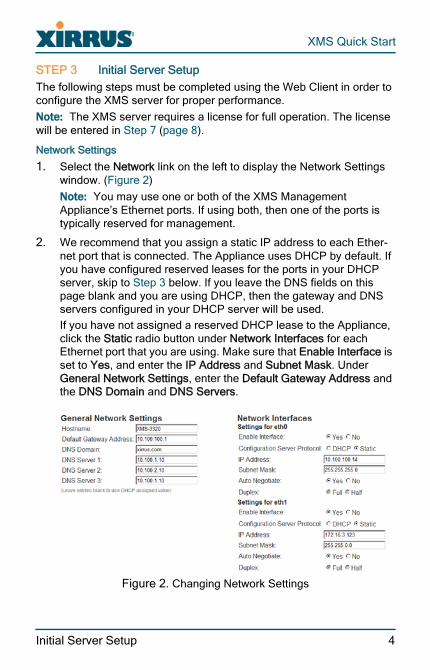
1. Select the Network link on the left to display the Network Settings window. (Figure 2)
Note: You may use one or both of the XMS Management Appliance’s Ethernet ports. If using both, then one of the ports is typically reserved for management.
2. We recommend that you assign a static IP address to each Ether-net port that is connected. The Appliance uses DHCP by default. If you have configured reserved leases for the ports in your DHCP server, skip to Step 3 below. If you leave the DNS fields on this page blank and you are using DHCP, then the gateway and DNS servers configured in your DHCP server will be used.
If you have not assigned a reserved DHCP lease to the Appliance, click the Static radio button under Network Interfaces for each Ethernet port that you are using. Make sure that Enable Interface is set to Yes, and enter the IP Address and Subnet Mask. Under General Network Settings, enter the Default Gateway Address and the DNS Domain and DNS Servers.
Figure 2. Changing Network Settings
Initial Server Setup 4
XMS Quick Start
3. The DNS Hostname of the Appliance is set to xirrus-xms by default. Xirrus devices (Arrays and PoGE injectors) send traps to the host-name xirrus-xms to announce their presence on the network and speed discovery. Thus, if you change the Appliance’s DNS Host-name, you should create an alias in your network’s DNS server to ensure that the Appliance is accessible using both the name xirrus-xms and your new name.
Date/Time Settings
1. Select the Date & Time link on the left.
2. Select your Time Zone. Enable Auto Adjust Daylight Savings by clicking Yes.
3. We recommend enabling Use Network Time Protocol (this is the default). To use SNMPv3 successfully, system time must be set using an NTP server on both the XMS server host machine and all Arrays using SNMPv3. You may modify the NTP Servers (primary, secondary, tertiary), or leave them at the default values which use NTP Pool time servers (http://www.pool.ntp.org/).
4. If you disable Use Network Time Protocol, set the correct time and date in the appropriate fields.
Next Steps
1. Select the Email link on the left and enter the SMTP server that XMS is to use for sending Email notifications (page 8) and mailing Reports (page 15).
2. Start adding networks and devices (page 5).
3. Create a backup schedule for the XMS database (page 16).
4. Start an XMS Java Client (page 7).
Note: Important! The XMS server does not have a default backup schedule, so you must create one after installation.
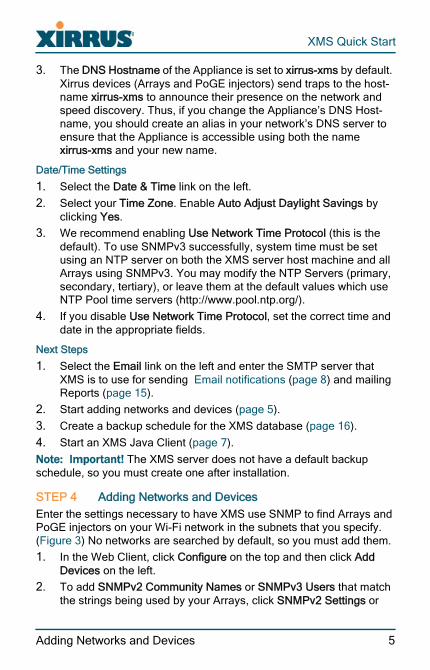
STEP 4 Adding Networks and DevicesEnter the settings necessary to have XMS use SNMP to find Arrays and PoGE injectors on your Wi-Fi network in the subnets that you specify. (Figure 3) No networks are searched by default, so you must add them.
1. In the Web Client, click Configure on the top and then click Add Devices on the left.
2. To add SNMPv2 Community Names or SNMPv3 Users that match the strings being used by your Arrays, click SNMPv2 Settings or
Adding Networks and Devices 5
XMS Quick Start
SNMPv3 Users. For XMS to discover and manage a device, the device must have SNMP v2 and/or v3 enabled. The device’s SNMPv2 community string or SNMPv3 read-write authentication settings must match one of those defined here for discovery.
The default SNMPv2 community name (xirrus) allows XMS to discover new Arrays that still have default SNMP settings (SNMPv2 is enabled with its Read Write Community String set to xirrus). Also, each Array’s Trap Host1 IP Address is set to hostname Xirrus-XMS by default (for the “Phone Home” feature). “Configuring an Array to be managed with XMS” on page 9 describes setting up SNMP on the Array for full functionality with XMS.
3. To add networks to be searched for devices, click Add Networks on the left. When the page appears, click the Add Network button on the upper left. In the Add New Network dialog box, enter the sub-net’s Network Address and Subnet Mask. Select Start Discovery to initiate discovery, then click OK. Discovery begins soon after add-ing a network. Be careful to specify the subnet accurately, to avoid creating excess traffic by searching an overly large network.
To add individual Arrays or management-capable PoGE injectors, use the Add Devices link on the left instead.
.
Figure 3. Managing discovery of devices
For more information, see Discovering the Network in the User Guide.
Note: When an Array or managed PoGE device boots up, it sends an SNMP trap to the XMS server’s default hostname, xirrus-xms. XMS can then add it to its discovered devices list. This Phone Home feature requires DNS to resolve the hostname xirrus-xms correctly. Thus, if you change the host name of the XMS server, you must configure DNS to resolve xirrus-xms to the actual name of the XMS server host.
Adding Networks and Devices 6
XMS Quick Start
STEP 5 Viewing Performance—Dashboard
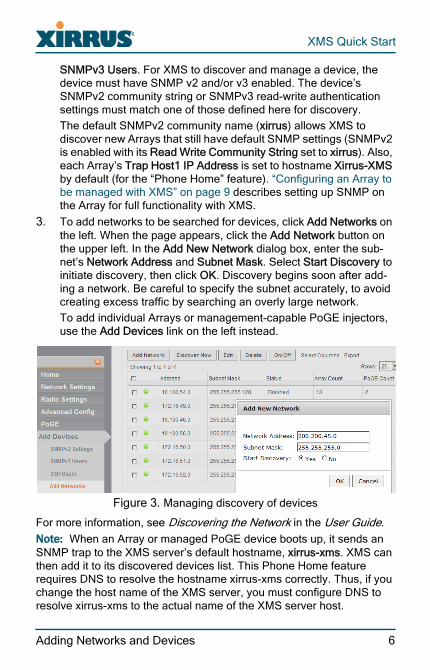
Figure 4. The Dashboard—the Main Web Client Window
In the Web Client, click Monitor on the top and then click Dashboard on the left. This displays the Dashboard, the main starting point for manag-ing the Array network. This frequently updated network summary includes Array/Radio Status, Station information, Rogue Overview, and Recent Alarms (Figure 4). Quickly assess system health, usage, and security.
The Station Connection Metrics section characterizes the average qual-ity of your connections by media type. For each type, it lists the number of stations, the average signal strength of the connections, and the aver-age actual connection rate.
Rogue Overview and Recent Alarms are described on page 8.
Viewing Performance—Dashboard 7
XMS Quick Start
STEP 6 Monitoring System Performance and SecurityThe Web Client Dashboard (page 7) summarizes network status. Recent Alarms and Rogue Overview windows are discussed below.
The Java Client provides information about Events and Syslog.
Recent AlarmsAlarms are triggered by Events. This section of the Dashboard lists the latest alarms. To see more information for an alarm in the list, click it to view the Alarm Details.
The Web Client’s Monitor mode pages for Events and Alarms list entries with a message column describing the event. Sort on any column by clicking its header. Click again to reverse the order.
Rogue Overview
This section of the Web Client Dashboard summarizes the rogue APs that have been detected by the Wi-Fi network. For a list of the rogues including information such as which Array found each one, see the Web Client’s Monitor mode Rogues page. To set or change the classification of a device, use the Java Client Security>Devices page.
Events and Syslog
Using the Java Client, view events by selecting Monitor> Events. View the Syslog by selecting Syslog from the Tools menu bar item. Events are detected by XMS; Syslog shows messages sent by Arrays. Thus each Array must be configured to use the XMS server as its Syslog server (Step 8). To search for events, use the Search button. Double-click a row (Events or Syslog) to see details.
Email notifications
To be notified via email when an event or alarm of a particular severity occurs, use the Java Client. Select Edit> Notifications while viewing an Event or Alarm window. Specify the severity that will trigger an email.
STEP 7 Starting the XMS Java (User) Client
1. To start the client for the first time, set your browser’s URL to the XMS server machine’s IP address or host/domain name, followed bya:9090. For example, http://192.168.10.40:9090. When the splash page appears, click Java Client. This downloads and starts the XMS Java Client, and puts a shortcut on your desktop that you may use to quickly start the client in the future.
Monitoring System Performance and Security 8
XMS Quick Start
2. Log in to the client (the factory default for both fields is admin).
In a few moments the client appears. It displays the Dashboard, providing an at-a-glance overview of all system status and activity.
3. The first time you start the client, XMS asks you to enter the server license. Until the license is installed, the server runs in a default mode that allows it to discover and manage only four Arrays. Xirrus will supply you with a License Key and Serial Number for your server. Enter both of these fields exactly as they were provided to you (the fields are not case-sensitive), and click Apply.
Note: The license specifies a maximum number of Arrays to be managed. To manage additional Arrays, please contact Xirrus for a license upgrade.
STEP 8 Configuring One Array or Multiple Arrays Use the XMS Java Client or the Web Management Interface (WMI) to set up an Array. Then use policies to apply all or parts of that Array’s configuration to as many other Arrays as you like. To manage Array licenses, see page 11.
Configuring a single Array to use as a model for other Arrays
To use XMS, right-click the Array in the Resources>Arrays window and use the Configure option for each feature to be configured.
To use WMI, right-click an Array in the Resources>Arrays window, and select Web Management.
Configuring an Array to be managed with XMS
XMS uses SNMP to manage the Wi-Fi network. SNMPv2 is enabled on Arrays by default with the community string xirrus; SNMPv3 is enabled by default with the username and password xirrus-rw. If XMS can’t dis-cover an Array, use the Array’s WMI to check the SNMP strings and the following settings:
To send traps to the XMS server, use Services >SNMP. Set Send Auth Failure Traps and set one or more SNMP Trap Host/Port(s). The Array uses the default trap host Xirrus-XMS to “phone home” to the XMS server and announce its presence on the network.
Select Network > Interfaces and enable Allow Management on Interface for any port that may be used by XMS to manage the Array.
Configuring One Array or Multiple Arrays 9

XMS Quick Start
After XMS has discovered an Array, perform the following steps in XMS (to use policies, see below):
For increased security, we strongly recommend replacing the Array’s SNMP defaults by entering your own SNMPv3 user names and passwords and/or SNMPv2 community strings. Make this change on the Array by creating and executing a Management Control policy with the desired SNMP settings. You must add these strings to XMS for device management (page 5).
Right-click the Array in the Resources >Arrays window and select Configure > System Information. Set Host Name to allow the Array to be more easily identified in XMS.
To send Syslog messages to XMS, create and execute a Services policy with the desired System Log settings. Enable the server, enter the XMS server’s IP Address, and set the Level high enough so you won’t receive excessive informational messages.
Using policies and Array groups for ease of management
Use policies to apply a uniform configuration to multiple Arrays at once. Create policies easily by reading the configuration of a properly set up (model) Array. There are a number of policy types. See the Policies chapter in the XMS User’s Guide for detailed information.
Note: When a policy is applied to an Array, it defines the entire configuration of a feature—any pre-existing configuration is replaced by the policy. To modify a feature’s configuration rather than replacing it, see Configuring a single Array to use as a model for other Arrays.
To create policies from a model Array, right-click that Array in the Resources>Arrays window and select Create Policies from Array. Select the policy types to create from the model, click Global to create a policy that includes all of the selected policies, and click Create. Note: We strongly recommend creating policies from model Arrays. Advanced users may create policies manually (page 11).
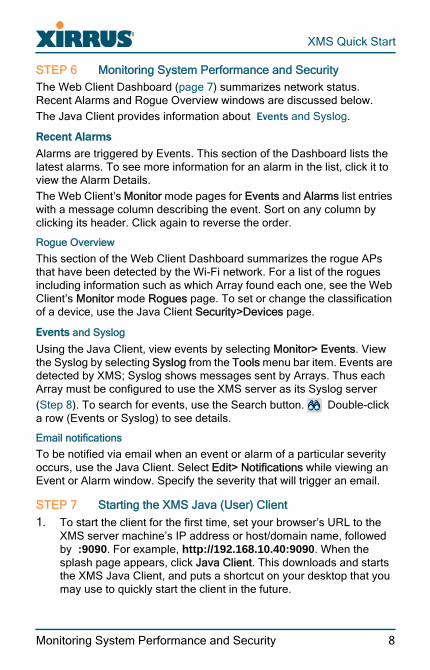
To create a policy manually, expand Configuration> Policies in the tree. Click the desired policy type. XMS displays existing policies (Figure 5). Click Add Policy, and enter the new policy. Some policies will allow you to specify a list of values, for example, creating multiple IP address pools for a DHCP Server policy. To enter a list value, click +.
To use a policy, click the Execute column for that policy in the Policy List. A dialog allows you to choose one or more Arrays on which to exe-cute the policy. The Task Results window shows the execution results.
Configuring One Array or Multiple Arrays 10
XMS Quick Start
Figure 5. DHCP Server List and Policy Details Windows
Tips for using policies
Create Global Policies with a master configuration. You may have created a number of policies for each policy type—a Global Policy lets you select a desired policy of each type, and apply the selected set to Arrays all at once rather than applying one policy at a time.
Create Array Groups to apply policies to a group of Arrays at once. Select Configuration >Groups (near the tree’s bottom), then click Add Group. Move Arrays to the right column to add them to the group, and click Apply. See the XMS User’s Guide for details. Select a group in the Dashboard or in Reports to see only that group’s data.
Use a Software Update policy to download a new Array software update to the XMS server, and to schedule updates of Arrays.
Managing Array Licenses
The Web Client can apply bulk licenses in one step, by reading in the Excel license file issued by Xirrus. You can view licensing information for your Arrays and manage individual licenses.
To manage licenses, click Configure at the top of the Web Client and then click Licenses. Use the Add button to add individual licenses, or click Import to read a license file. The Export button exports licenses to a file. See Managing Your Wi-Fi Arrays in the XMS User’s Guide for details.
Policy List
Execute
PolicyDetails
Add a value to a list
Configuring One Array or Multiple Arrays 11
XMS Quick Start
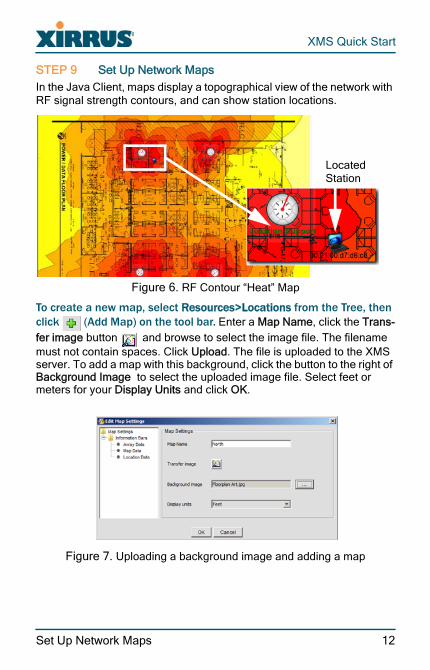
STEP 9 Set Up Network MapsIn the Java Client, maps display a topographical view of the network with RF signal strength contours, and can show station locations.
Figure 6. RF Contour “Heat” Map
To create a new map, select Resources>Locations from the Tree, then click (Add Map) on the tool bar. Enter a Map Name, click the Trans-fer image button and browse to select the image file. The filename must not contain spaces. Click Upload. The file is uploaded to the XMS server. To add a map with this background, click the button to the right of Background Image to select the uploaded image file. Select feet or meters for your Display Units and click OK.
Figure 7. Uploading a background image and adding a map
Located Station
Set Up Network Maps 12
XMS Quick Start
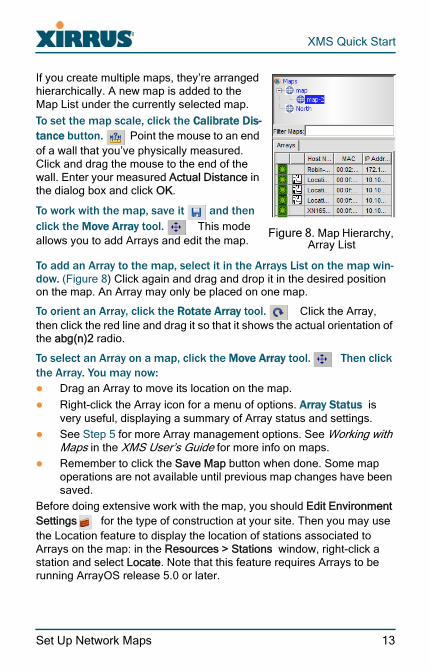
To add an Array to the map, select it in the Arrays List on the map win-dow. (Figure 8) Click again and drag and drop it in the desired position on the map. An Array may only be placed on one map.
To orient an Array, click the Rotate Array tool. Click the Array, then click the red line and drag it so that it shows the actual orientation of the abg(n)2 radio.
To select an Array on a map, click the Move Array tool. Then click the Array. You may now: Drag an Array to move its location on the map.
Right-click the Array icon for a menu of options. Array Status is very useful, displaying a summary of Array status and settings.
See Step 5 for more Array management options. See Working with Maps in the XMS User’s Guide for more info on maps.
Remember to click the Save Map button when done. Some map operations are not available until previous map changes have been saved.
Before doing extensive work with the map, you should Edit Environment Settings for the type of construction at your site. Then you may use the Location feature to display the location of stations associated to Arrays on the map: in the Resources > Stations window, right-click a station and select Locate. Note that this feature requires Arrays to be running ArrayOS release 5.0 or later.
If you create multiple maps, they’re arranged hierarchically. A new map is added to the Map List under the currently selected map.
To set the map scale, click the Calibrate Dis-tance button. Point the mouse to an end of a wall that you’ve physically measured. Click and drag the mouse to the end of the wall. Enter your measured Actual Distance in the dialog box and click OK.
To work with the map, save it and then click the Move Array tool. This mode allows you to add Arrays and edit the map.
Figure 8. Map Hierarchy, Array List
Set Up Network Maps 13
XMS Quick Start
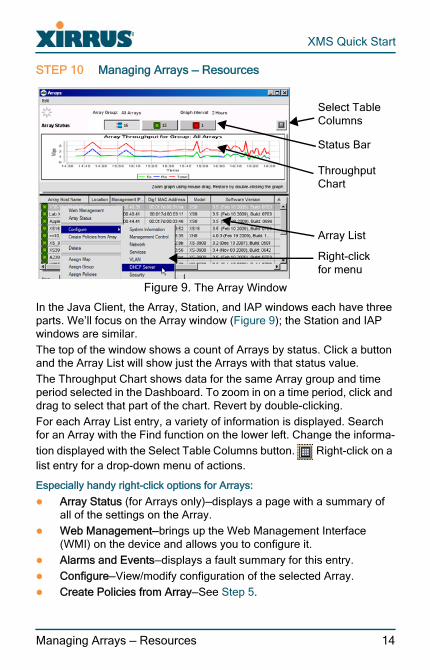
STEP 10 Managing Arrays — Resources
Array List
Status Bar
Right-click for menu
Select Table Columns
Throughput Chart
Figure 9. The Array Window
In the Java Client, the Array, Station, and IAP windows each have three parts. We’ll focus on the Array window (Figure 9); the Station and IAP windows are similar.
The top of the window shows a count of Arrays by status. Click a button and the Array List will show just the Arrays with that status value.
The Throughput Chart shows data for the same Array group and time period selected in the Dashboard. To zoom in on a time period, click and drag to select that part of the chart. Revert by double-clicking.
For each Array List entry, a variety of information is displayed. Search for an Array with the Find function on the lower left. Change the informa-tion displayed with the Select Table Columns button. Right-click on a list entry for a drop-down menu of actions.
Especially handy right-click options for Arrays:
Array Status (for Arrays only)—displays a page with a summary of all of the settings on the Array.
Web Management—brings up the Web Management Interface (WMI) on the device and allows you to configure it.
Alarms and Events—displays a fault summary for this entry.
Configure—View/modify configuration of the selected Array.
Create Policies from Array—See Step 5.
Managing Arrays — Resources 14
XMS Quick Start
Note that the Web Client has some additional handy options for manag-ing Arrays:
Click Monitor on the top, then select the Arrays link on the left. The toolbar buttons on the top allow you to Reboot or Pull Diagnostic Logs for Arrays.
Click Configure on the top, then select the Network Settings or Radio Settings link on the left. Both of these pages offer the conve-nience of importing files with settings for multiple Arrays/radios at once, These pages also allow you to apply identical settings to mul-tiple Arrays or radios in one step (except that in Network Settings, consecutive IP addresses will be applied).
STEP 11 ReportsThe web client reports provide information about the devices, performance, and usage of your network and Arrays. Click Reports on the top of the Web Client window to display the My Reports page, which lists all the reports you have created and allows you to View the latest or Archived reports. Click Run Now to start the report now. You may click the New Report link on the left and choose a type of report to create. All reports offer selection criteria, such as changing the time period shown, or the Arrays that are included. You may use the Customize page to add your own logo to reports.
Reports may be viewed in HTML, PDF, or Excel compatible (xls, csv) formats. They may also be emailed when created or when viewed later. The email server to use must be configured (see “Next Steps” on page 5).
Some particularly useful reports for a new user are:
Traffic Reports: Wireless Traffic—shows wireless throughput includ-ing management traffic (beacons, etc.) for the selected Arrays as a total and broken out individually. Station Traffic—shows throughput without management traffic. Ethernet Traffic—shows throughput of the Gigabit Ethernet ports for the selected Arrays. Error reports are also available.
Station Reports: Stations by Array—shows the number of stations associated to the selected Arrays.
Array Reports: Array Availablity—summarizes availability and failure statistics by Array. Array Inventory—creates an inventory list includ-ing MAC and IP address and serial number for selected Arrays.
Other Reports: There are several other reports, including Channel Usage and Rogue List.
Reports 15
XMS Quick Start
STEP 12 XMS Server Administration
Scheduling Database Backups
1. In the Web Client Settings window (Figure 1) click the Backup link. To schedule backups from the Java Client, select Admin > Backup Manager from the menu. In either case, proceed to the next step.
2. Specify the location where backups are to be saved—they must be saved to a remote host, and not on the Management Appliance itself. Enter the Domain name and specify a Path to the directory to be used for backups:
(UNC format) \\servername\share(SMB format) smb://servername/share
Enter login information for the remote host, and then be sure to click Save Location.
3. In the Schedule Backup section, enter a Backup Name, and select Backup Now to back up immediately, or select Schedule Backup.
4. If you select Schedule Backup, fields will appear for specifying when backups are to run. Select one or more days of the week, and enter the Time of Day for running backups. Click the Schedule Backup button at the bottom. Your new entry will appear in the list.
5. To see the backups that have been performed, click View Backups in the Restore Backups section at the bottom of the window. Review this periodically to make sure that backups have been per-formed successfully. Delete backups when they are no longer needed, to conserve disk space.
See XMS Administration in the XMS User’s Guide for more details.
Shutting down the XMS Server
Shutting down the server incorrectly can cause problems the next time you start XMS. Use the following procedure:
1. Close all clients. You may use Admin> Broadcast Message in the Java Client to alert users first.
2. In the Web Client Status window (Figure 1) click the Shutdown Application button.
3. The Management Appliance will then gracefully shut down. A con-firmation notice is displayed immediately when the shutdown pro-cess is initiated. It may take a few minutes for the Appliance to actually shut down and power itself off.
XMS Server Administration 16