Joel Johnson, Physics ERT 1.2, 11/5/15
1
OPTICS OF UNDERWATER PHOTOGRAPHY
Like many other people, I am interested in the beautiful and unique creatures that live in
the ocean, but my only means of viewing the underwater world is by photographs. The
underwater environment, however, places special demands on the design and use of
cameras. Underwater photography also entails “a distinctly different technique to land
photography, even if it is usually carried out using the same equipment, however modified.”
(Chenard & Petron, 2011, p. 3). Light behaves differently underwater to in air, which
explains why photographers encounter many problems, including the differential absorption
and refraction of light. These problems can be corrected by applying relevant laws of
Physics.
The marine environment is a hostile place for cameras. It contains 3.5% salt, which corrodes
metals, as well as many other suspended particles. Water’s high density - 800 times the
density of air (Chenard & Petron, 2011, p. 3) - means that light rays travel slower through it
than through air. This causes light rays to be refracted (deflected) as they pass into or out of
water. Its density also means that light rays travelling through it are scattered and absorbed
by water molecules, as well as by suspended particles (see figure 1). Also, as shown in Figure
Figure 3 - Different coloured light rays are absorbed at different rates.
Figure 2 - At noon, all of the sun’s rays penetrate the water, but at other times some of the light striking the ocean’s surface is reflected.
Figure 1 - Light rays travelling through water are scattered by
suspended particles.
Joel Johnson, Physics ERT 1.2, 11/5/15
2
2, a considerable portion of the light rays that strike
the ocean’s surface are reflected, except when the
sunlight strikes the surface perpendicularly
(Jackson, 2005).
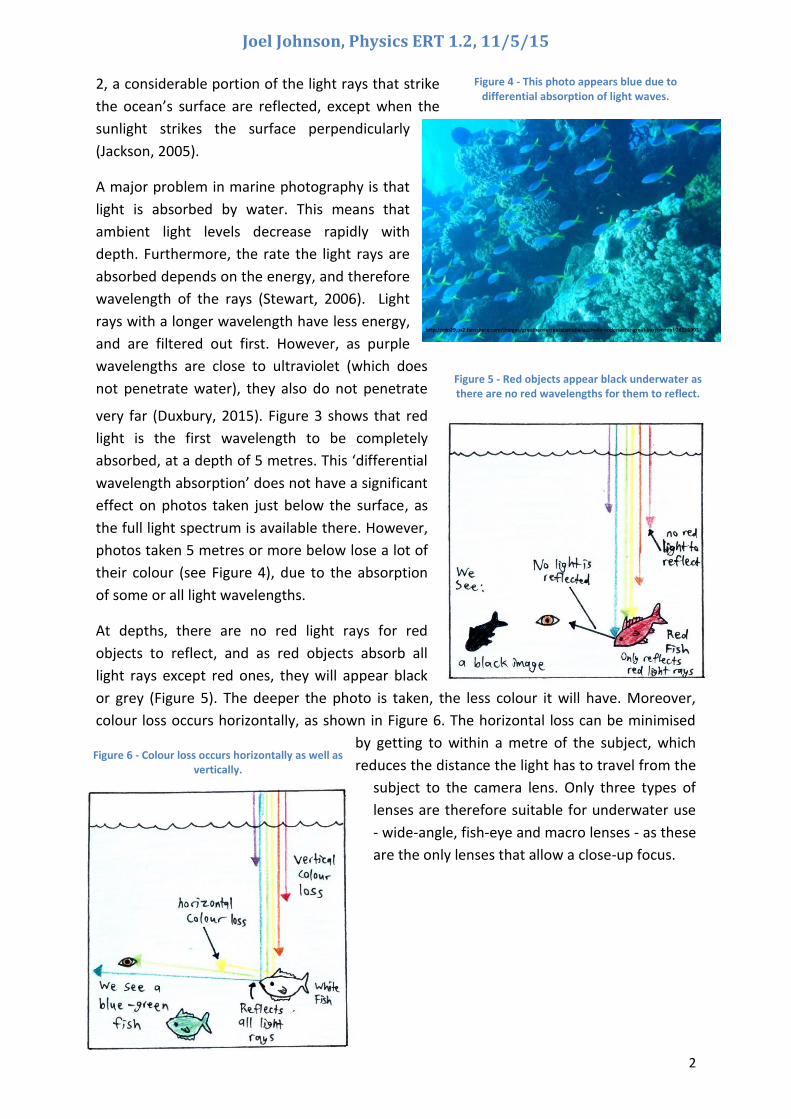
A major problem in marine photography is that
light is absorbed by water. This means that
ambient light levels decrease rapidly with
depth. Furthermore, the rate the light rays are
absorbed depends on the energy, and therefore
wavelength of the rays (Stewart, 2006). Light
rays with a longer wavelength have less energy,
and are filtered out first. However, as purple
wavelengths are close to ultraviolet (which does
not penetrate water), they also do not penetrate
very far (Duxbury, 2015). Figure 3 shows that red
light is the first wavelength to be completely
absorbed, at a depth of 5 metres. This ‘differential
wavelength absorption’ does not have a significant
effect on photos taken just below the surface, as
the full light spectrum is available there. However,
photos taken 5 metres or more below lose a lot of
their colour (see Figure 4), due to the absorption
of some or all light wavelengths.
At depths, there are no red light rays for red
objects to reflect, and as red objects absorb all
light rays except red ones, they will appear black
or grey (Figure 5). The deeper the photo is taken, the less colour it will have. Moreover,
colour loss occurs horizontally, as shown in Figure 6. The horizontal loss can be minimised
by getting to within a metre of the subject, which
reduces the distance the light has to travel from the
subject to the camera lens. Only three types of
lenses are therefore suitable for underwater use
- wide-angle, fish-eye and macro lenses - as these
are the only lenses that allow a close-up focus.
Figure 5 - Red objects appear black underwater as there are no red wavelengths for them to reflect.
Figure 6 - Colour loss occurs horizontally as well as vertically.
Figure 4 - This photo appears blue due to differential absorption of light waves.
Joel Johnson, Physics ERT 1.2, 11/5/15
3
One method of overcoming differential light
absorption is to use a correction filter on the
camera (Rowlands, 1985). The filter reduces
the amount of blue and green light entering
the lens, resulting in a more balanced image.
However, it can only be used when the ‘lost’
wavelengths are still present in small
quantities.
Although it is a common myth that only
sunlight can be used as a light source
(Harchandrai, 2011), the best solution is to use
a flash. As shown in Figure 7, the flash provides
white light – the full visible light spectrum – to
the subject of the photograph, allowing objects
illuminated by the flash to reflect their true
colours. The flash also increases the contrast of
images by providing a crisp light source.
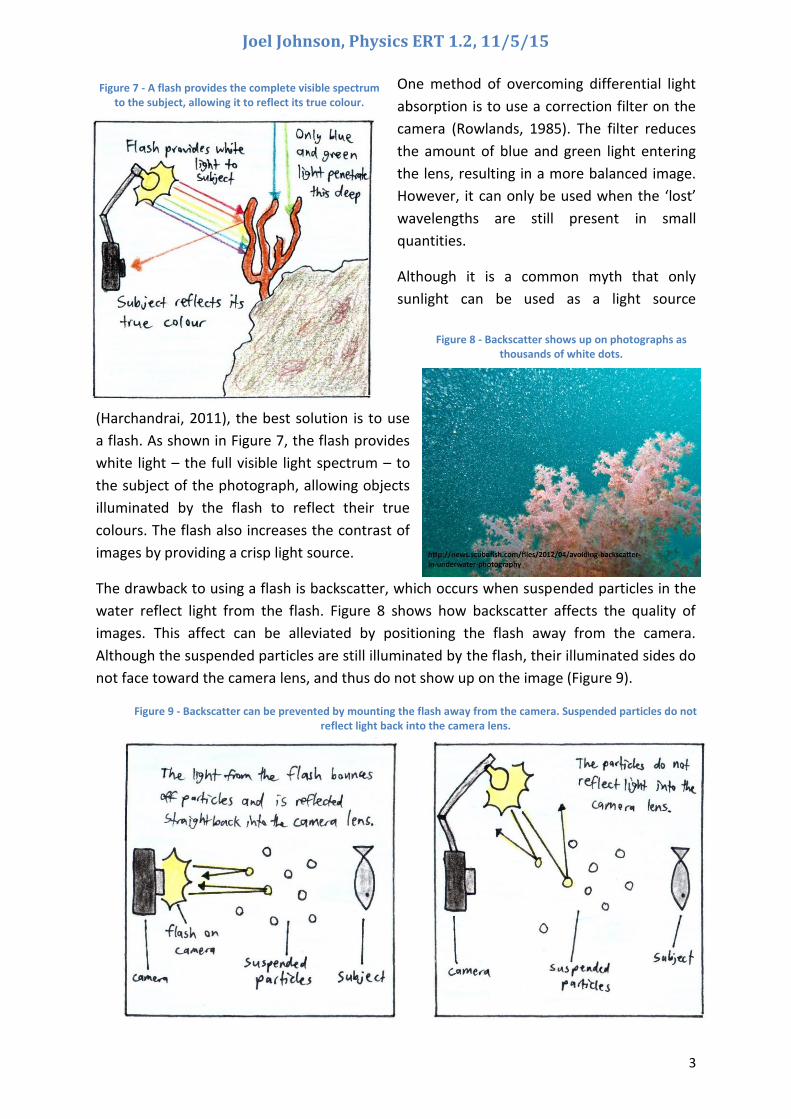
The drawback to using a flash is backscatter, which occurs when suspended particles in the
water reflect light from the flash. Figure 8 shows how backscatter affects the quality of
images. This affect can be alleviated by positioning the flash away from the camera.
Although the suspended particles are still illuminated by the flash, their illuminated sides do
not face toward the camera lens, and thus do not show up on the image (Figure 9).
Figure 7 - A flash provides the complete visible spectrum to the subject, allowing it to reflect its true colour.
Figure 8 - Backscatter shows up on photographs as thousands of white dots.
Figure 9 - Backscatter can be prevented by mounting the flash away from the camera. Suspended particles do not reflect light back into the camera lens.
Joel Johnson, Physics ERT 1.2, 11/5/15
4
Figure 12 – Photos taken with a wide angle lens through a flat port are distorted, similar to this grid.
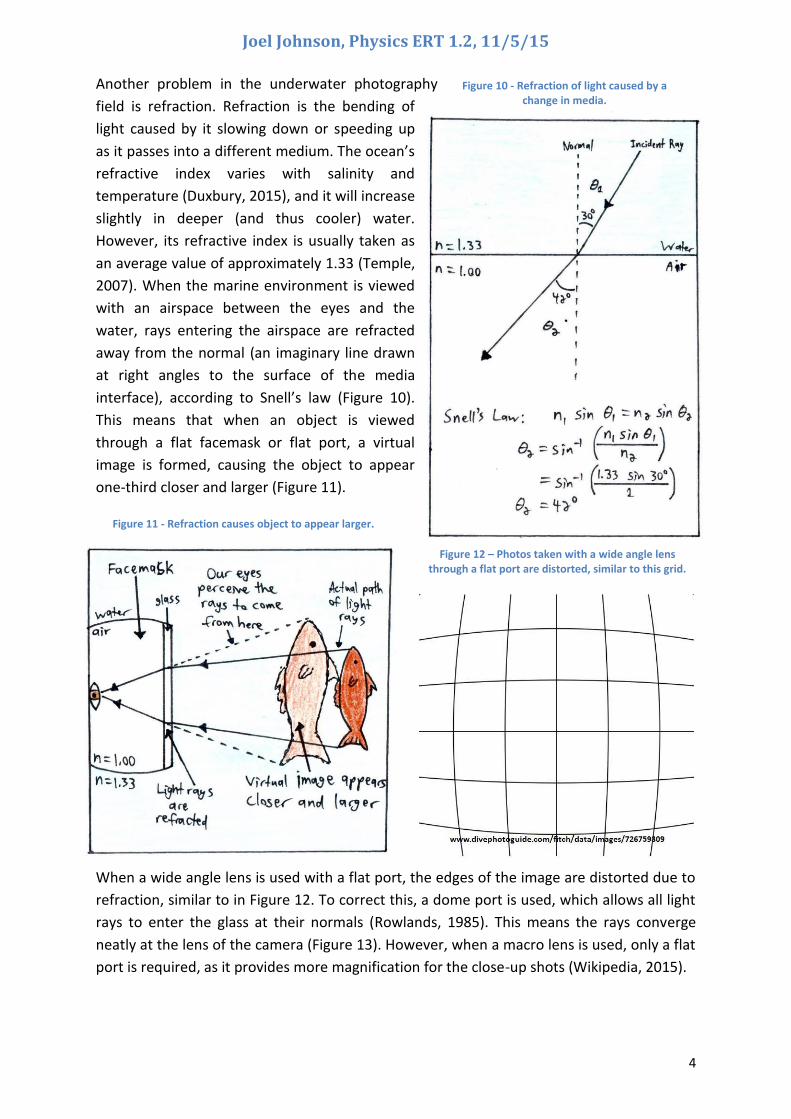
Another problem in the underwater photography
field is refraction. Refraction is the bending of
light caused by it slowing down or speeding up
as it passes into a different medium. The ocean’s
refractive index varies with salinity and
temperature (Duxbury, 2015), and it will increase
slightly in deeper (and thus cooler) water.
However, its refractive index is usually taken as
an average value of approximately 1.33 (Temple,
2007). When the marine environment is viewed
with an airspace between the eyes and the
water, rays entering the airspace are refracted
away from the normal (an imaginary line drawn
at right angles to the surface of the media
interface), according to Snell’s law (Figure 10).
This means that when an object is viewed
through a flat facemask or flat port, a virtual
image is formed, causing the object to appear
one-third closer and larger (Figure 11).
When a wide angle lens is used with a flat port, the edges of the image are distorted due to
refraction, similar to in Figure 12. To correct this, a dome port is used, which allows all light
rays to enter the glass at their normals (Rowlands, 1985). This means the rays converge
neatly at the lens of the camera (Figure 13). However, when a macro lens is used, only a flat
port is required, as it provides more magnification for the close-up shots (Wikipedia, 2015).
Figure 10 - Refraction of light caused by a change in media.
Figure 11 - Refraction causes object to appear larger.
Joel Johnson, Physics ERT 1.2, 11/5/15
5
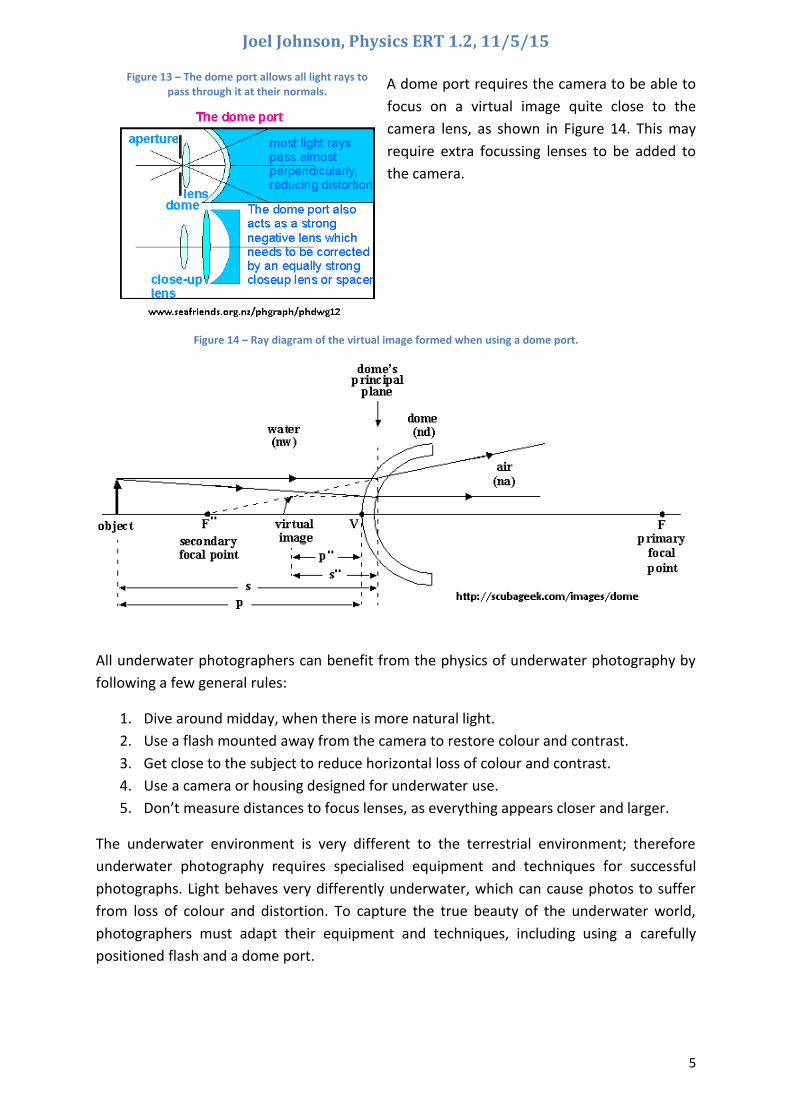
Figure 13 – The dome port allows all light rays to pass through it at their normals. A dome port requires the camera to be able to
focus on a virtual image quite close to the
camera lens, as shown in Figure 14. This may
require extra focussing lenses to be added to
the camera.
All underwater photographers can benefit from the physics of underwater photography by
following a few general rules:
1. Dive around midday, when there is more natural light.
2. Use a flash mounted away from the camera to restore colour and contrast.
3. Get close to the subject to reduce horizontal loss of colour and contrast.
4. Use a camera or housing designed for underwater use.
5. Don’t measure distances to focus lenses, as everything appears closer and larger.
The underwater environment is very different to the terrestrial environment; therefore
underwater photography requires specialised equipment and techniques for successful
photographs. Light behaves very differently underwater, which can cause photos to suffer
from loss of colour and distortion. To capture the true beauty of the underwater world,
photographers must adapt their equipment and techniques, including using a carefully
positioned flash and a dome port.
Figure 14 – Ray diagram of the virtual image formed when using a dome port.
Joel Johnson, Physics ERT 1.2, 11/5/15
6
Bibliography
Chenard, J & Petron, C 2011, ‘Understanding underwater photography: Elements from a
course session on underwater optics offered by Cinemarine’, Cinemarine, 2011, viewed 6
May 2015, http://www.cinemarine.com/cinemarine/fichiers/File/optiqueus.pdf.
Duxbury, AC 2015, ‘Seawater: Optical Properties’, Britannica, 15 January, viewed 30 April
2015, http://www.britannica.com/EBchecked/topic/531121/seawater/301669/Optical-
properties.
Harchandrai, P 2011, ‘An Introduction to Underwater Photography’, Tech 2, 21 January,
viewed 6 May 2015, http://tech.firstpost.com/news-analysis/an-introduction-to-
underwater-photography-17477.html.
Jackson, J 2005, Complete Diving Manual, New Holland Publishers (UK), London.
Rowlands, P 1985, ‘Basic Problems and Solutions’, The British Society of Underwater
Photographers, April, viewed 6 May 2015,
http://www.bsoup.org/Articles/Problems_Solutions.php.
Stewart, R 2006, ‘6.10 Light in the Ocean and Absorption of Light’, Ocean World, 15
September, viewed 18 May 2015,
http://oceanworld.tamu.edu/resources/ocng_textbook/chapter06/chapter06_10.htm.
Temple, S 2007, ‘Effect of Salinity on the refractive index of water: considerations for archer
fish aerial vision’, Research Gate, viewed 18 May,
http://www.researchgate.net/profile/Shelby_Temple/publication/43498663_Effect_of_sali
nity_on_the_refractive_index_of_water_considerations_for_archer_fish_aerial_vision/links
/004635176511fca956000000.pdf.
‘Underwater Photography’ 2015, Wikipedia, viewed 30 April 2015,
http://en.wikipedia.org/wiki/Underwater_photography.
Recommended