Tyco Electronics
This document contains information which isthe exclusive property of Tyco ElectronicsDistribution, Reproduction or use by othersis not permitted without the expressed written consent of Tyco Electronics.
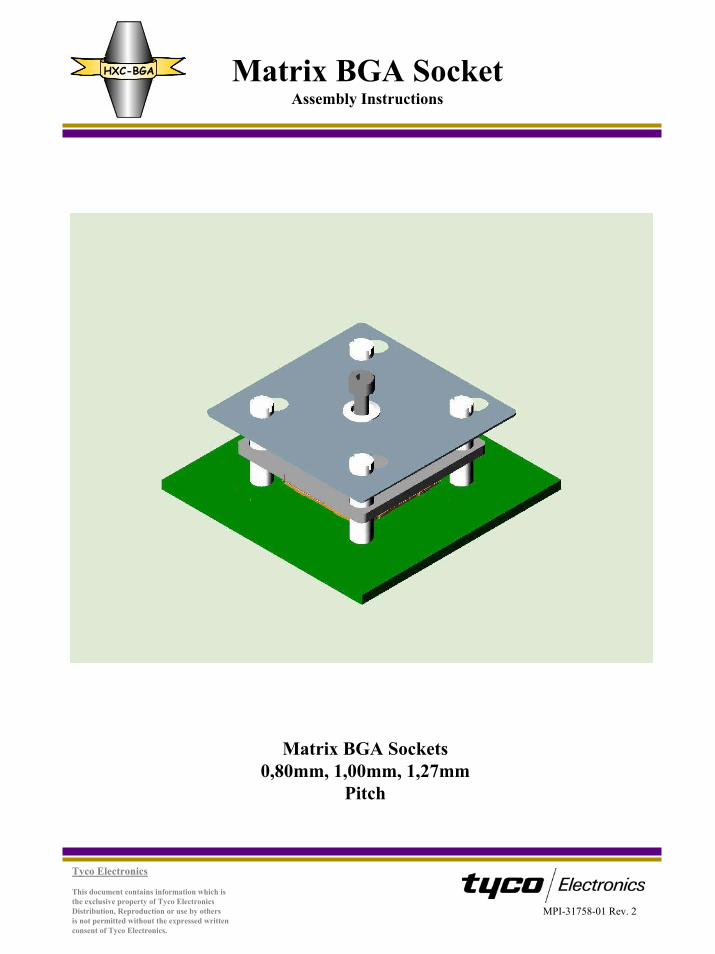
HXC-BGA Matrix BGA SocketAssembly Instructions
Matrix BGA Sockets0,80mm, 1,00mm, 1,27mm
Pitch
MPI-31758-01 Rev. 2
Tyco Electronics
This document contains information which isthe exclusive property of Tyco ElectronicsDistribution, Reproduction or use by othersis not permitted without the expressed written consent of Tyco Electronics.
HXC-BGA Matrix BGA SocketAssembly Instructions
1
2
43
56
7
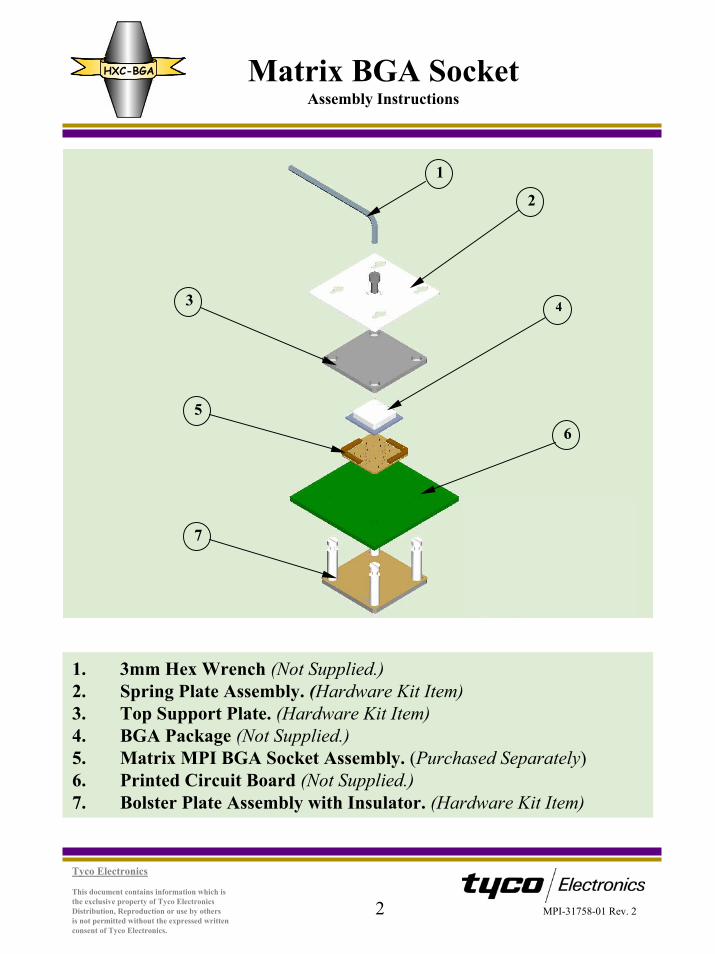
1. 3mm Hex Wrench (Not Supplied.)2. Spring Plate Assembly. (Hardware Kit Item)3. Top Support Plate. (Hardware Kit Item)4. BGA Package (Not Supplied.)5. Matrix MPI BGA Socket Assembly. (Purchased Separately)6. Printed Circuit Board (Not Supplied.)7. Bolster Plate Assembly with Insulator. (Hardware Kit Item)
2 MPI-31758-01 Rev. 2
Tyco Electronics
This document contains information which isthe exclusive property of Tyco ElectronicsDistribution, Reproduction or use by othersis not permitted without the expressed written consent of Tyco Electronics.
HXC-BGA Matrix BGA SocketAssembly Instructions
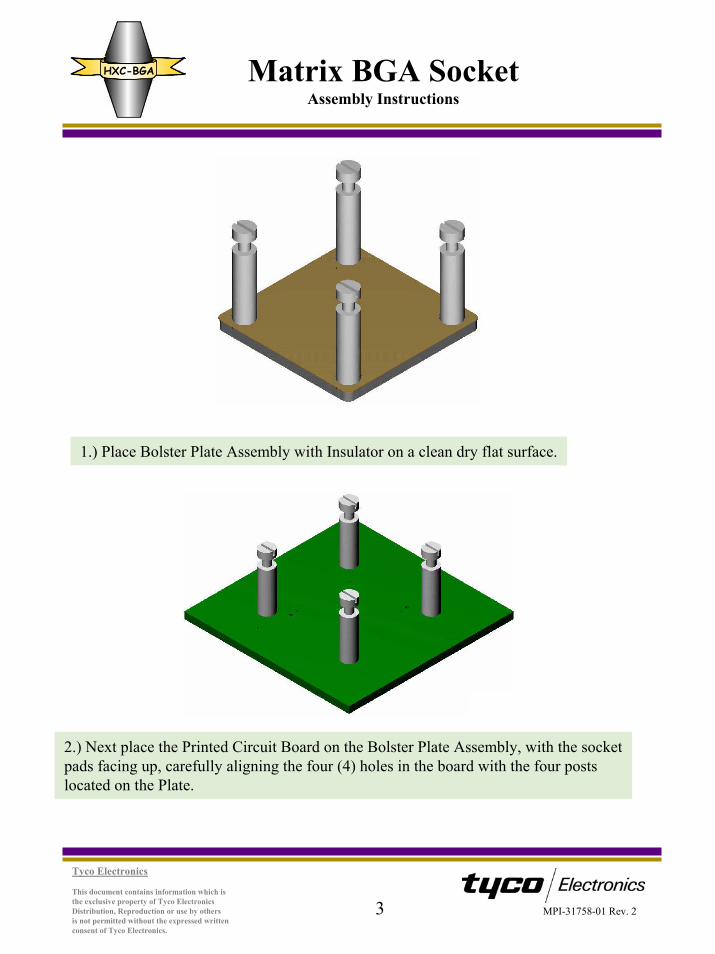
1.) Place Bolster Plate Assembly with Insulator on a clean dry flat surface.
2.) Next place the Printed Circuit Board on the Bolster Plate Assembly, with the socketpads facing up, carefully aligning the four (4) holes in the board with the four postslocated on the Plate.
3 MPI-31758-01 Rev. 2
Tyco Electronics
This document contains information which isthe exclusive property of Tyco ElectronicsDistribution, Reproduction or use by othersis not permitted without the expressed written consent of Tyco Electronics.
HXC-BGA Matrix BGA SocketAssembly Instructions
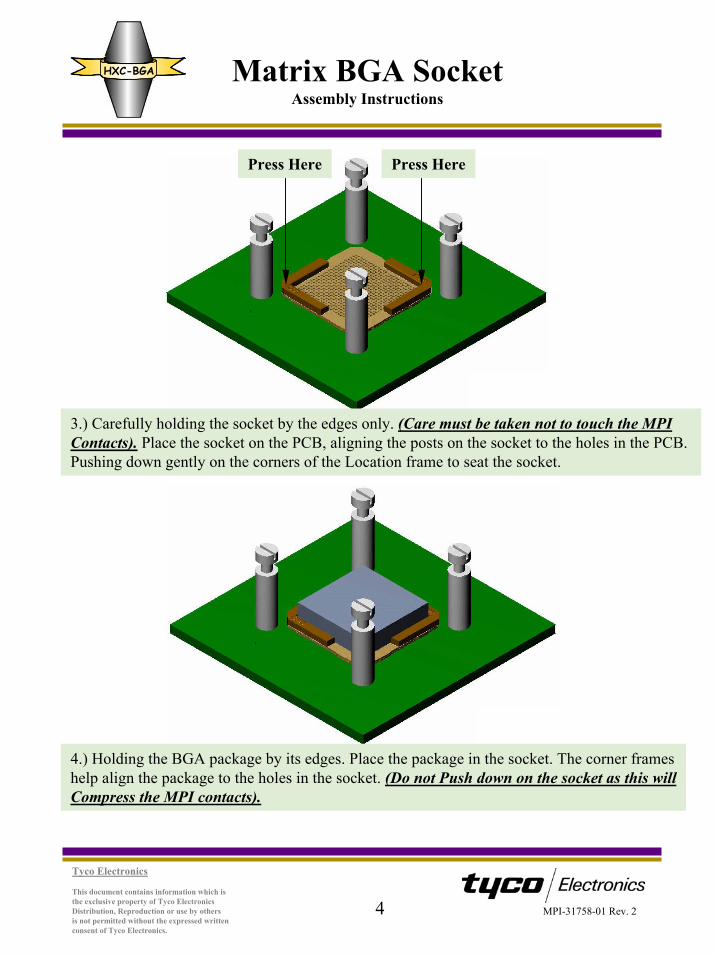
3.) Carefully holding the socket by the edges only. (Care must be taken not to touch the MPIContacts). Place the socket on the PCB, aligning the posts on the socket to the holes in the PCB. Pushing down gently on the corners of the Location frame to seat the socket.
Press HerePress Here
4.) Holding the BGA package by its edges. Place the package in the socket. The corner frameshelp align the package to the holes in the socket. (Do not Push down on the socket as this willCompress the MPI contacts).
4 MPI-31758-01 Rev. 2
Tyco Electronics
This document contains information which isthe exclusive property of Tyco ElectronicsDistribution, Reproduction or use by othersis not permitted without the expressed written consent of Tyco Electronics.
HXC-BGA Matrix BGA SocketAssembly Instructions
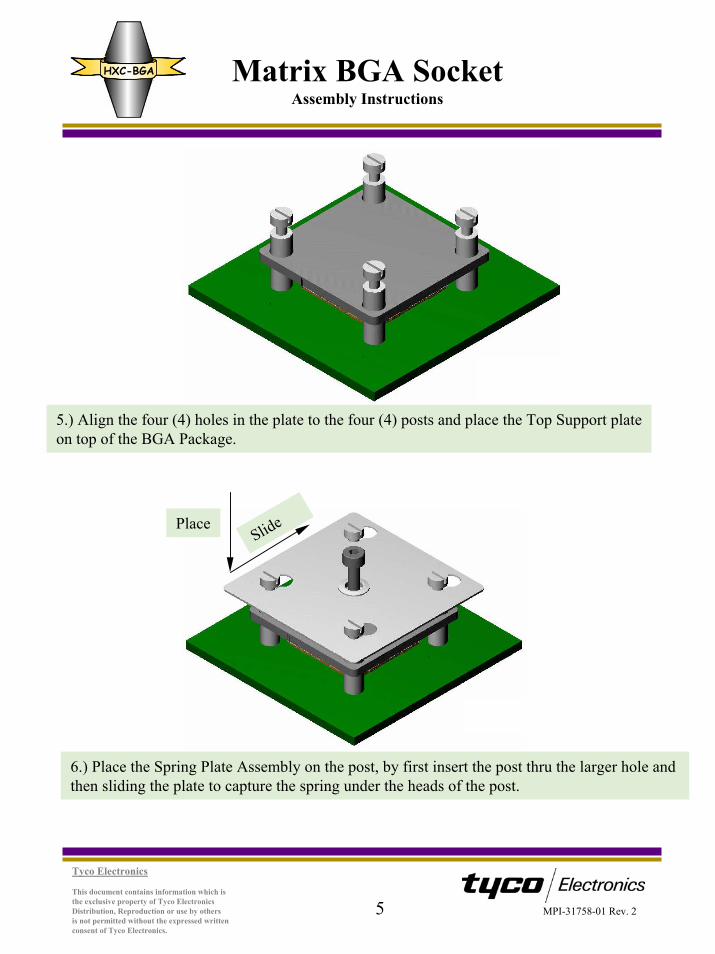
5.) Align the four (4) holes in the plate to the four (4) posts and place the Top Support plateon top of the BGA Package.
PlaceSlide
6.) Place the Spring Plate Assembly on the post, by first insert the post thru the larger hole and then sliding the plate to capture the spring under the heads of the post.
5 MPI-31758-01 Rev. 2
Tyco Electronics
This document contains information which isthe exclusive property of Tyco ElectronicsDistribution, Reproduction or use by othersis not permitted without the expressed written consent of Tyco Electronics.
HXC-BGA Matrix BGA SocketAssembly Instructions
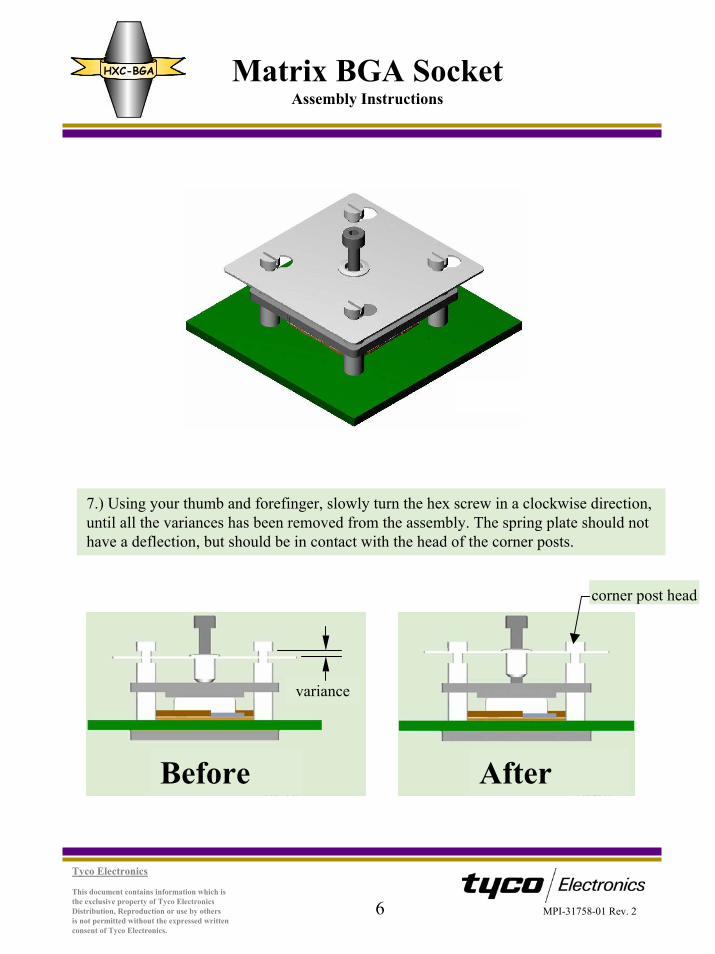
7.) Using your thumb and forefinger, slowly turn the hex screw in a clockwise direction, until all the variances has been removed from the assembly. The spring plate should nothave a deflection, but should be in contact with the head of the corner posts.
After
corner post head
Before
variance
6 MPI-31758-01 Rev. 2
Tyco Electronics
This document contains information which isthe exclusive property of Tyco ElectronicsDistribution, Reproduction or use by othersis not permitted without the expressed written consent of Tyco Electronics.
HXC-BGA Matrix BGA SocketAssembly Instructions
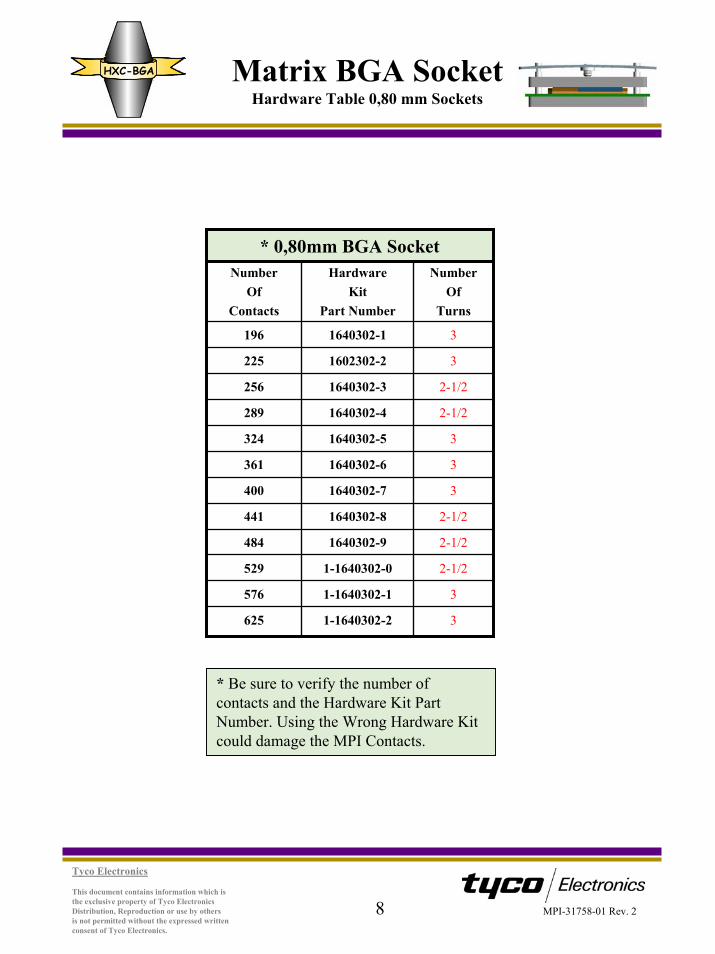
Start(1 Full Turn)
¼ Turn
½ Turn
¾ Turn9.) Turn the Hex Wrench the correct number of turns as prescribed in the table on the following Pages.(No. of Turns Vary according to Socket Size, pitch, and hardware kit.)
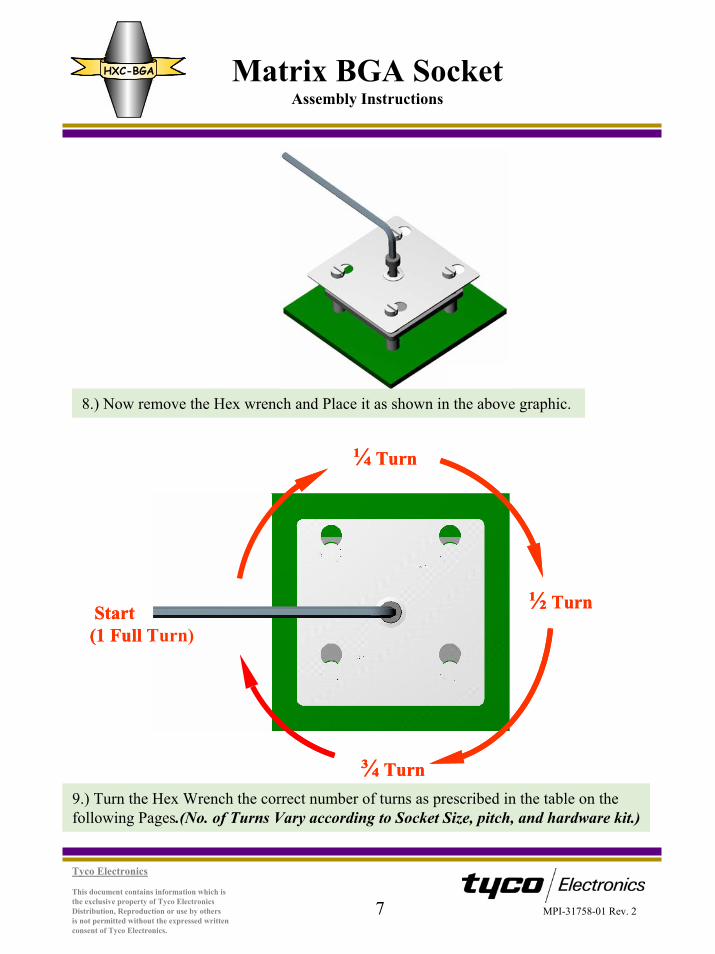
8.) Now remove the Hex wrench and Place it as shown in the above graphic.
Start(1 Full Turn)
¼ Turn
½ Turn
¾ Turn9.) Turn the Hex Wrench the correct number of turns as prescribed in the table on the following Pages.(No. of Turns Vary according to Socket Size, pitch, and hardware kit.)
8.) Now remove the Hex wrench and Place it as shown in the above graphic.
7 MPI-31758-01 Rev. 2
Tyco Electronics
This document contains information which isthe exclusive property of Tyco ElectronicsDistribution, Reproduction or use by othersis not permitted without the expressed written consent of Tyco Electronics.
HXC-BGA Matrix BGA SocketHardware Table 0,80 mm Sockets
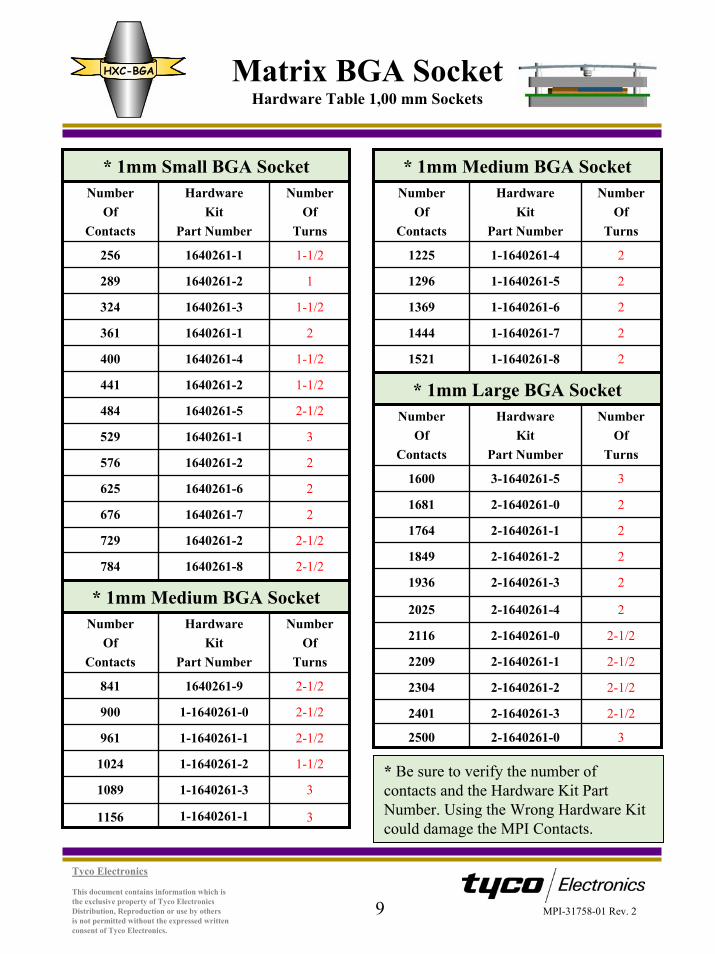
* 0,80mm BGA Socket
31-1640302-1576
31-1640302-2625
2-1/21-1640302-0529
2-1/21640302-9484
2-1/21640302-8441
31640302-7400
31640302-6361
31640302-5324
2-1/21640302-4289
2-1/21640302-3256
31602302-2225
31640302-1196
NumberOf
Turns
HardwareKit
Part Number
NumberOf
Contacts
* Be sure to verify the number of contacts and the Hardware Kit Part Number. Using the Wrong Hardware Kit could damage the MPI Contacts.
8 MPI-31758-01 Rev. 2
Tyco Electronics
This document contains information which isthe exclusive property of Tyco ElectronicsDistribution, Reproduction or use by othersis not permitted without the expressed written consent of Tyco Electronics.
HXC-BGA Matrix BGA SocketHardware Table 1,00 mm Sockets
* 1mm Small BGA Socket
* 1mm Medium BGA Socket
2-1/21640261-8784
21640261-7676
2-1/21640261-2729
21640261-6625
21640261-2576
31640261-1529
2-1/21640261-5484
1-1/21640261-2441
1-1/21640261-4400
21640261-1361
1-1/21640261-3324
11640261-2289
1-1/21640261-1256
NumberOf
Turns
HardwareKit
Part Number
NumberOf
Contacts
31-1640261-31089
1-1/21-1640261-21024
2-1/21-1640261-1961
2-1/21-1640261-0900
2-1/21640261-9841
NumberOf
Turns
HardwareKit
Part Number
NumberOf
Contacts
31-1640261-11156
* 1mm Medium BGA Socket
2401
2-1/22-1640261-22304
2-1640261-3 2-1/2
* 1mm Large BGA Socket
21-1640261-81521
21-1640261-71444
21-1640261-61369
21-1640261-51296
21-1640261-41225
NumberOf
Turns
HardwareKit
Part Number
NumberOf
Contacts
22-1640261-31936
22-1640261-21849
22-1640261-11764
22-1640261-01681
33-1640261-51600
NumberOf
Turns
HardwareKit
Part Number
NumberOf
Contacts
32-1640261-02500
2-1/22-1640261-12209
2-1/22-1640261-02116
22-1640261-42025
* Be sure to verify the number of contacts and the Hardware Kit Part Number. Using the Wrong Hardware Kit could damage the MPI Contacts.
9 MPI-31758-01 Rev. 2
Tyco Electronics
This document contains information which isthe exclusive property of Tyco ElectronicsDistribution, Reproduction or use by othersis not permitted without the expressed written consent of Tyco Electronics.
HXC-BGA Matrix BGA SocketHardware Table 1,27mm Sockets
* 1,27mm Small BGA Socket
* 1,27mm Medium BGA Socket
1-1/21640261-2441
1-1/21640261-4400
21640261-1361
1-1/21640261-3324
11640261-2289
1-1/21640261-1256
NumberOf
Turns
HardwareKit
Part Number
NumberOf
Contacts
2-1/22-1640261-7625
22-1640261-6576
31640261-9529
22-1640261-5484
2-1/21-1640261-1441
NumberOf
Turns
HardwareKit
Part Number
NumberOf
Contacts
33-1640261-3676
* 1,27mm Medium BGA Socket
1600
1-1/22-1640261-41521
3-1640261-5 3
* 1,27mm Large BGA Socket
2-1/21-1640261-0900
2-1/21640261-9841
2-1/22-1640261-8784
21-1640261-3729
NumberOf
Turns
HardwareKit
Part Number
NumberOf
Contacts
2-1/23-1640261-11225
2-1/21-1640261-91156
1-1/23-1640261-01089
33-1640261-21024
23-1640261-4961
NumberOf
Turns
HardwareKit
Part Number
NumberOf
Contacts
1-1/22-1640261-31444
1-1/22-1640261-21369
2-1/22-1640261-91296
* Be sure to verify the number of contacts and the Hardware Kit Part Number. Using the Wrong Hardware Kit could damage the MPI Contacts.
10 MPI-31758-01 Rev. 2
Tyco Electronics
This document contains information which isthe exclusive property of Tyco ElectronicsDistribution, Reproduction or use by othersis not permitted without the expressed written consent of Tyco Electronics.
HXC-BGA Matrix BGA SocketAssembly Instructions, Revision History
1. Preliminary Release 03/26/03
2. Preliminary Change 10/01/04
MPI-31758-01 Rev. 2
Recommended


![de partido a su piscina… - BINDER · Tipo BGA 160 BGA 215 BGA 275 BGA 320 BGA 430 BGA 550 BGA 600 BGA 1200 Tensión de conexión [VAC] 230 230 230 230 230 230 230 230 Rango de frecuencia](https://img.pdfslide.net/doc/110x75/5c132e8509d3f26c7c8c5e0d/de-partido-a-su-piscina-binder-tipo-bga-160-bga-215-bga-275-bga-320-bga-430.jpg)