*P518-149*P518-149
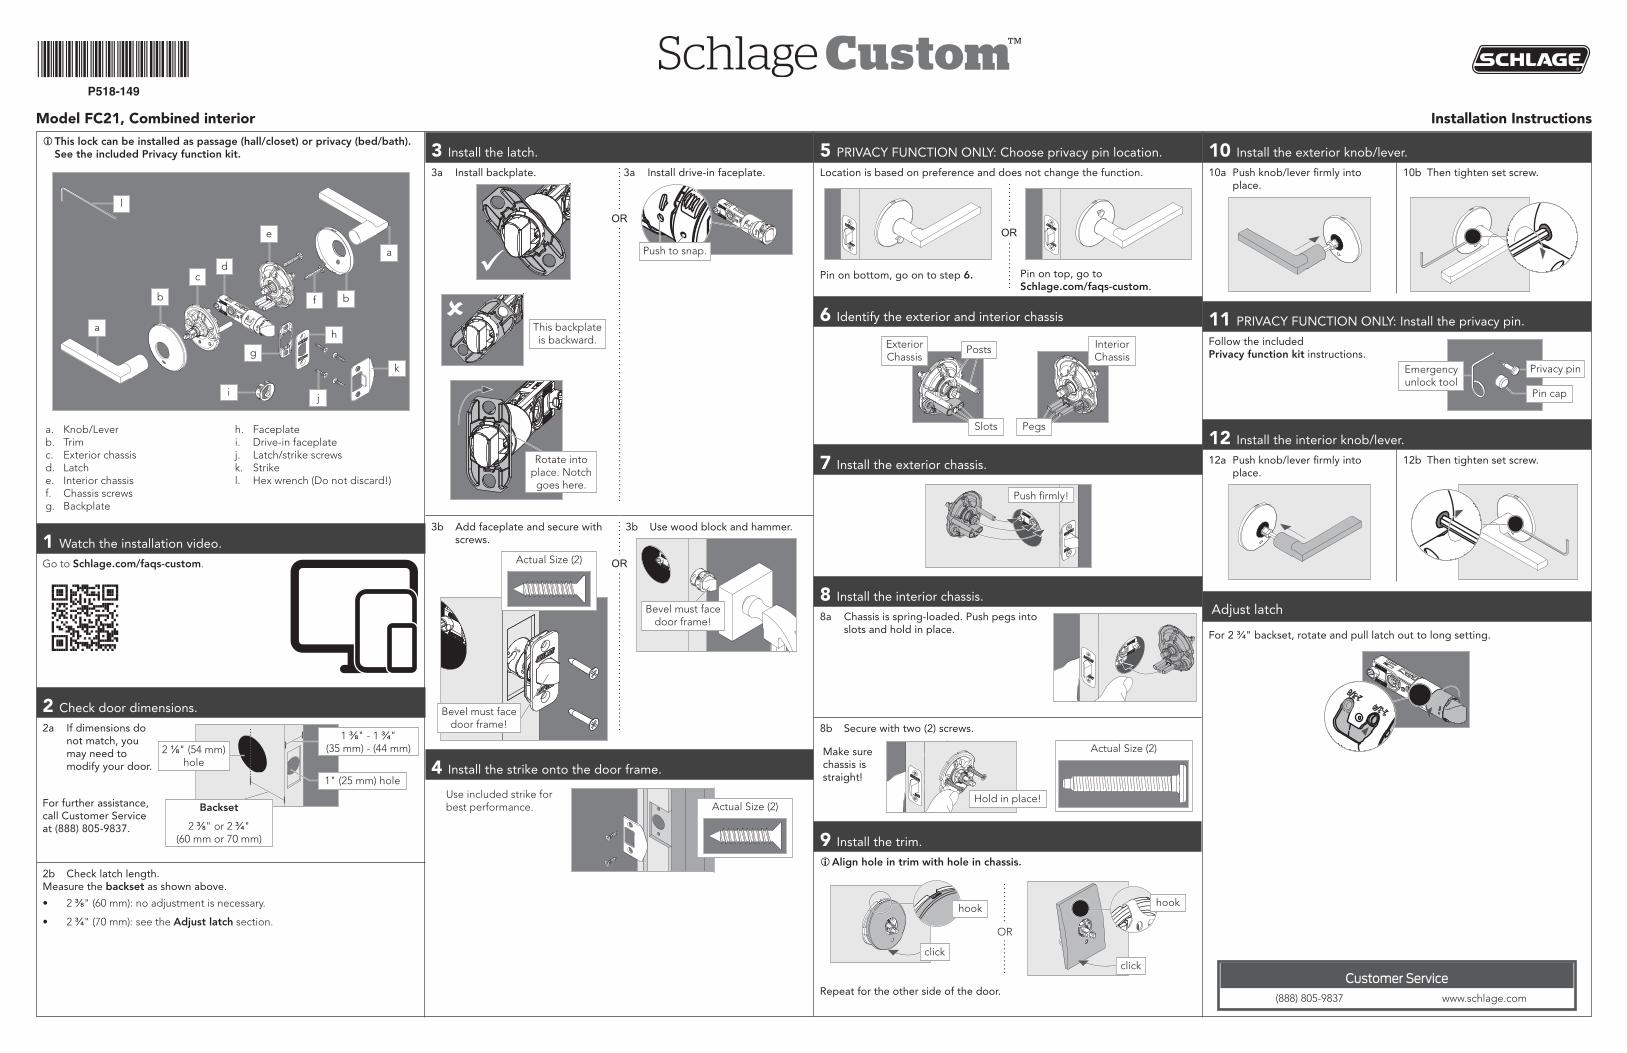
LThis lock can be installed as passage (hall/closet) or privacy (bed/bath). See the included Privacy function kit.
a
b
cd
e
f b
a
g
h
j
k
i
l
a. Knob/Leverb. Trimc. Exterior chassisd. Latche. Interior chassisf. Chassis screwsg. Backplate
h. Faceplatei. Drive-in faceplatej. Latch/strike screwsk. Strikel. Hex wrench (Do not discard!)
1 Watch the installation video.
Go to Schlage.com/faqs-custom.
2 Check door dimensions.
2a If dimensions do not match, you may need to modify your door.
For further assistance, call Customer Service at (888) 805-9837.
2b Check latch length.Measure the backset as shown above.
• 2 3/8" (60 mm): no adjustment is necessary.
• 2 3/4" (70 mm): see the Adjust latch section.
3 Install the latch.
3a Install backplate.
This backplate is backward.
Rotate into place. Notch goes here.
3a Install drive-in faceplate.
Push to snap.
3b Add faceplate and secure with screws.
Bevel must face door frame!
Actual Size (2)
3b Use wood block and hammer.
Bevel must face door frame!
4 Install the strike onto the door frame.
Actual Size (2)Use included strike for best performance.
5 PRIVACY FUNCTION ONLY: Choose privacy pin location.
Location is based on preference and does not change the function.
Pin on bottom, go on to step 6. Pin on top, go to Schlage.com/faqs-custom.
6 Identify the exterior and interior chassis
Pegs
Interior Chassis
Posts
Slots
Exterior Chassis
7 Install the exterior chassis.
Push firmly!
8 Install the interior chassis.
8a Chassis is spring-loaded. Push pegs into slots and hold in place.
8b Secure with two (2) screws.
Hold in place!
Actual Size (2)Make sure chassis is straight!
9 Install the trim.
LAlign hole in trim with hole in chassis.
click
hook
OR
click
hook
Repeat for the other side of the door.
10 Install the exterior knob/lever.
10a Push knob/lever firmly into place.
10b Then tighten set screw.
11 PRIVACY FUNCTION ONLY: Install the privacy pin.
Follow the included Privacy function kit instructions.
12 Install the interior knob/lever.
12a Push knob/lever firmly into place.
12b Then tighten set screw.
Adjust latch
For 2 3/4" backset, rotate and pull latch out to long setting.
2 1/8" (54 mm) hole
Backset
2 3/8" or 2 3/4" (60 mm or 70 mm)
1 3/8" - 1 3/4" (35 mm) - (44 mm)
1" (25 mm) hole
OR
OR
OR
Emergency unlock tool
Privacy pin
Pin cap
Model FC21, Combined interior Installation Instructions
Customer Service(888) 805-9837 www.schlage.com

© Allegion 2018Printed in U.S.A.
P518-149 Rev. 03/18-c
LEsta cerradura se puede instalar como paso (pasillo/armario) o por privacidad (dormitorio/baño).
a
b
cd
e
f b
a
g
h
j
k
i
l
a. Pomo/manijab. Moldurac. Chasis exteriord. Pestilloe. Chasis interiorf. Tornillos del chasisg. Placa posterior
h. Placa frontali. Placa frontal de inserciónj. Tornillos del pestillo/batientek. Batientel. Llave hexagonal (¡no desechar!)
1 Vea el video de instalación.
Visite Schlage.com/faqs-custom.
2 Verifique las dimensiones de la puerta.
2a Si las dimensiones no concuerdan, es posible que tenga que modificar su puerta.
En caso de necesitar asistencia, póngase en contacto con Servicio al Cliente al 1-888-805-9837.
2b Compruebe la longitud del pestillo.Mida la entrada de la cerradura tal como se muestra.
• 2 3/8" (60 mm): no hace falta ajustar.
• 2 3/4" (70 mm): consulte la sección de Ajustar el pestillo.
3 Instale el pestillo.
3a Instale la placa posterior.
Esta placa de
apoyo está al revés.
Gírela para insertarla en su lugar. Aquí se
inserta la ranura.
3a Instale la placa delantera de inserción.
Empuje para encajar.
3b Agregue la placa delantera y sujete con tornillos.
¡El bisel debe estar opuesto al marco de la
puerta!
Tamaño real (2)
3b Utilice un bloque de madera y un martillo.
¡El bisel debe estar opuesto al marco de la
puerta!
4 Instalar el batiente en el marco de la puerta.
Tamaño real (2)Use el batiente incluido para tener un mejor rendimiento.
5 FUNCIÓN DE PRIVACIDAD SOLAMENTE: Elija la ubicación del pasador de privacidad.
La ubicación se basa en la preferencia y no cambia la función.
Pasador en la parte inferior, continúe con el paso 6.
Pasador en la parte superior, visite Schlage.com/faqs-custom.
6 Identifique el chasis exterior e interior.
Pernos
Chasis interiorPostes
Ranuras
Chasis exterior
7 Instale el chasis exterior.
¡Empuje firmemente!
8 Instale el chasis interior.
8a El chasis se acciona mediante resorte. Coloque los pernos en las ranuras y sostenga en su lugar.
8b Fije con dos (2) tornillos.
¡Mantenga en su lugar!
Tamaño real (2)¡Asegúrese de que el chasis esté recto!
9 Instale la moldura.
LAlinee el orificio en la moldura con el orificio en el chasis.
hacer clic
gancho
O
hacer clic
gancho
Repita para el otro lado de la puerta.
10 Instale la perilla/manija exterior.
10a Empuje la perilla/manija firmemente para colocarlas en su lugar.
10b Luego, apriete el tornillo de fijación.
11 FUNCIÓN DE PRIVACIDAD SOLAMENTE: Instale el pasador de privacidad.
Siga las instrucciones en el Juego de funciones de privacidad incluido.
12 Instale la perilla/manija interior.
12a Empuje la perilla/manija firmemente para colocarlas en su lugar.
12b Luego, apriete el tornillo de fijación.
Ajuste el pestillo
Para la entrada de la cerradura de 2 3/4" (69 mm) de espesor, gire y tire del pestillo hacia fuera hasta un ajuste largo.
2 1/8" (54 mm) orificio
Entrada de la cerradura
2 3/8" o 2 3/4" (60 mm o 70 mm)
1 3/8" - 1 3/4" (35 mm) - (44 mm)
1" (25 mm) orificio
O
O
O
Herramienta de desbloqueo de
emergencia
Pasador de privacidad
Tapa del pasador
Modelo FC21, Interior combinado Instrucciones de instalación
Service à la clientèle1-888-805-9837 www.schlage.com
Recommended