R&S®TSMAxAutonomous Mobile Network ScannerRelease Notes
4900800502Version 12
(a0Þ52)

© 2021 Rohde & Schwarz GmbH & Co. KGMühldorfstr. 15, 81671 München, GermanyPhone: +49 89 41 29 - 0Email: [email protected]: www.rohde-schwarz.comSubject to change – data without tolerance limits is not binding.R&S® is a registered trademark of Rohde & Schwarz GmbH & Co. KG.Trade names are trademarks of the owners.
4900.8005.02 | Version 12 | R&S®TSMAx

ContentsR&S®TSMAx
3Release Notes 4900.8005.02 ─ 12
Contents1 Information on the current version and history..................................4
1.1 Version 04.01.00.04....................................................................................................... 5
1.2 Version 04.00.14.05....................................................................................................... 5
1.3 Version 04.00.09.04....................................................................................................... 6
1.4 Version 03.07.03.02....................................................................................................... 7
1.5 Version 03.06.02.01....................................................................................................... 8
1.6 Version 03.05.01.05....................................................................................................... 9
1.7 Version 03.04.01.04....................................................................................................... 9
1.8 Version 03.03.01.03..................................................................................................... 10
1.9 Version 03.01.01.04..................................................................................................... 11
1.10 Version 03.00.11.00..................................................................................................... 12
1.11 Version 03.00.10.02..................................................................................................... 13
1.12 Version 02.22.03.00 (initial version)...........................................................................14
2 Firmware update.................................................................................. 142.1 Preparing installation................................................................................................. 14
2.2 Executing setup.......................................................................................................... 15
2.2.1 Local execution of the setup file....................................................................................15
2.2.2 Remote execution of the setup file................................................................................18
2.2.3 Installation using a USB stick........................................................................................23
2.2.4 Firmware updated - mainboard flash............................................................................ 27
2.3 Calling R&S TSMAx web-GUI.....................................................................................28
2.4 Checking mode of operation......................................................................................29
3 R&S TSME Tools installation.............................................................. 303.1 Preparation.................................................................................................................. 30
3.2 R&S TSME Tools local installation............................................................................ 31
3.3 R&S TSME Tools remote installation........................................................................ 31
3.4 R&S TSME Tools installation using a USB stick......................................................32
4 Microsoft EDGE browser installation.................................................334.1 Preparation.................................................................................................................. 34
4.2 Microsoft EDGE browser local installation...............................................................34
Information on the current version and historyR&S®TSMAx
4Release Notes 4900.8005.02 ─ 12
4.3 Microsoft EDGE browser remote installation...........................................................35
5 Software installation............................................................................355.1 Remote ViCom server software................................................................................. 36
5.1.1 Preparation....................................................................................................................36
5.1.2 ViCom server local installation...................................................................................... 36
5.1.3 ViCom server remote installation.................................................................................. 37
5.1.4 ViCom server installation using a USB stick................................................................. 38
5.2 R&S NESTOR software...............................................................................................39
5.2.1 Preparation....................................................................................................................39
5.2.2 NESTOR local installation.............................................................................................40
5.2.3 NESTOR remote installation......................................................................................... 40
5.2.4 NESTOR installation using a USB stick........................................................................ 41
5.3 R&S SmartONE setup (SmartBenchmarker, ROMES, QualiPoc)............................42
5.3.1 Preparation....................................................................................................................43
5.3.2 SmartONE local installation.......................................................................................... 43
5.3.3 SmartONE remote installation.......................................................................................43
5.3.4 Initial software start / measurement mode selection..................................................... 44
6 Contacting customer support.............................................................48
1 Information on the current version and his-toryVariants: R&S TSMA, R&S TSMA6, R&S TSMA6BAll described procedures in these release notes are valid for these variants. In thiscase, the general term “TSMAx” is used. For different procedures, the specific variantis mentioned explicitly.
Information on the current version and historyR&S®TSMAx
5Release Notes 4900.8005.02 ─ 12
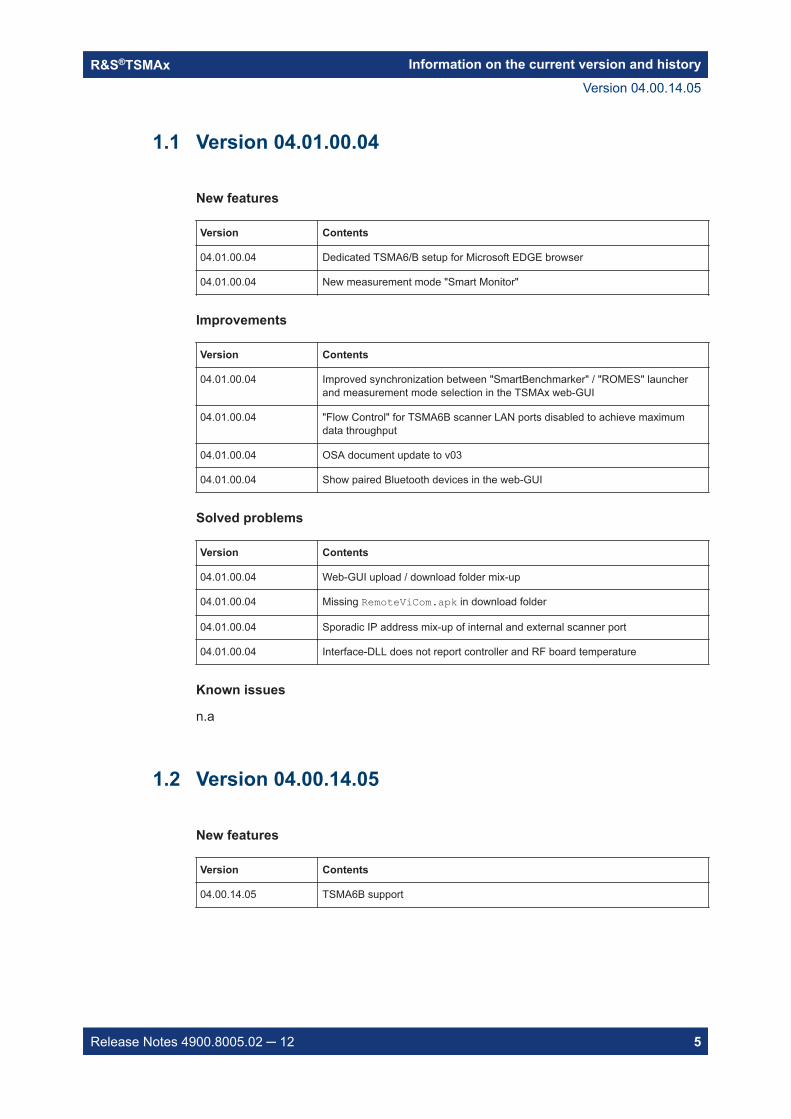
1.1 Version 04.01.00.04
New features
Version Contents
04.01.00.04 Dedicated TSMA6/B setup for Microsoft EDGE browser
04.01.00.04 New measurement mode "Smart Monitor"
Improvements
Version Contents
04.01.00.04 Improved synchronization between "SmartBenchmarker" / "ROMES" launcherand measurement mode selection in the TSMAx web-GUI
04.01.00.04 "Flow Control" for TSMA6B scanner LAN ports disabled to achieve maximumdata throughput
04.01.00.04 OSA document update to v03
04.01.00.04 Show paired Bluetooth devices in the web-GUI
Solved problems
Version Contents
04.01.00.04 Web-GUI upload / download folder mix-up
04.01.00.04 Missing RemoteViCom.apk in download folder
04.01.00.04 Sporadic IP address mix-up of internal and external scanner port
04.01.00.04 Interface-DLL does not report controller and RF board temperature
Known issues
n.a
1.2 Version 04.00.14.05
New features
Version Contents
04.00.14.05 TSMA6B support
Version 04.00.14.05

Information on the current version and historyR&S®TSMAx
6Release Notes 4900.8005.02 ─ 12
Improvements
Version Contents
04.00.14.05 Microcontroller flash with device restart
04.00.14.05 More detailed error log file
04.00.14.05 TSMA6 online help updated to v08
04.00.14.05 Disclaimer added
Solved problems
Version Contents
04.00.14.05 Bugfix HW watchdog/freezing (Defect 800077)
04.00.14.05 Bugfix TSMA recovery (Defect 822641)
04.00.14.05 Bugfix IP address conflict (Defect 836789)
04.00.14.05 Bugfix Hang-up with locked scanner access (Defect 768170)
04.00.14.05 Bugfix Power management topics (Defect 783225)
04.00.14.05 Bugfix LAN adapter settings (Defect 783230)
04.00.14.05 Scanner database update (available options TSMA6-K50, TSMA6-K51 were notdisplayed) (Defect 797434, CTS Ticket 797028)
Known issues
n.a
1.3 Version 04.00.09.04
New features
Version Contents
04.00.09.04 Web-GUI & firmware integration of "Smart Benchmarker" / "ROMES Expert"mode (679652)
04.00.09.04 TSMAx firmware migration as a 64-bit process (652378)
Improvements
Version Contents
04.00.09.04 Update R&S SmartCard Service to v1.3.7.0 (710446)
04.00.09.04 Update R&S LicenseServer to v1.19.2 (763346)
04.00.09.04 Glitch detection for remote shut-down command (735495)
Version 04.00.09.04

Information on the current version and historyR&S®TSMAx
7Release Notes 4900.8005.02 ─ 12
Version Contents
04.00.09.04 TSMA6 Online Help updated to v07 (689654)
04.00.09.04 R&S TSME Device Manager utility removed from firmware setup – a dedicatedsetup is available from R&S internet (https://www.rohde-schwarz.com/software/tsma/) (699751)
04.00.09.04 Firmware data log file (783261)
04.00.09.04 Improved scanner access method and application launch during start-up(783238)
04.00.09.04 Virtual Memory enabled per default (660418)
Solved problems
Version Contents
04.00.09.04 User-specific WLAN client IP address settings are set to default after restart(677841)
04.00.09.04 Boot problems with connected WiBu USB dongle (767411)
04.00.09.04 LAN adapter settings sometimes mixed or have wrong IP address after power-up- especially for the external UsbToLAN adapters TSPC-U2L / TSPC-U2L2(783230)
Known issues
n.a
1.4 Version 03.07.03.02
New features
Version Contents
03.07.03.02 Change password feature added to web-GUI (647173)
Improvements
Version Contents
03.07.03.02 Restart via web-GUI triggers a power cycle on the output ports AUX 1/2 of theBattery Pack Unit (632077)
03.07.03.02 Low battery power off is triggered with at least one battery falling below 5 %charge. (650756)
03.07.03.02 File upload size increased to 2 GB via web-GUI (667793)
03.07.03.02 Update Online Help v6 (663713)
03.07.03.02 Update .NET Framework v4.8 (644116)
Version 03.07.03.02

Information on the current version and historyR&S®TSMAx
8Release Notes 4900.8005.02 ─ 12
Solved problems
Version Contents
03.07.03.02 NESTOR license keys not detected after device startup (651490)
03.07.03.02 Blocked Remote Desktop access in ROMES / NESTOR mode (652421)
03.07.03.02 WLAN access point blocked when mobile phone OnePlus 7 is connected(653070)
03.07.03.02 Stability / USB enumeration issues of Mainboard controller (PSoC) (672447)
Known issues
n.a
1.5 Version 03.06.02.01
New features
n.a
Improvements
Version Contents
03.06.02.01 TSMA – LAN port driver update (394933)
Solved problems
Version Contents
03.06.02.01 Firmware flash procedure for micro-controller is sometimes started (577735)
03.06.02.01 TSMA6-BP (battery pack unit) - auxiliary power out is not switched off afterpower down (626415)
03.06.02.01 TSMA6 - sporadically powers on when battery pack unit is connected with DCpower (649082)
03.06.02.01 WLAN off/on cycle via rear panel slider does not start access point again(613383)
03.06.02.01 TSMA - reduced fan speed due to wrong temperature read out (638228)
Known issues
n.a
Version 03.06.02.01
Information on the current version and historyR&S®TSMAx
9Release Notes 4900.8005.02 ─ 12
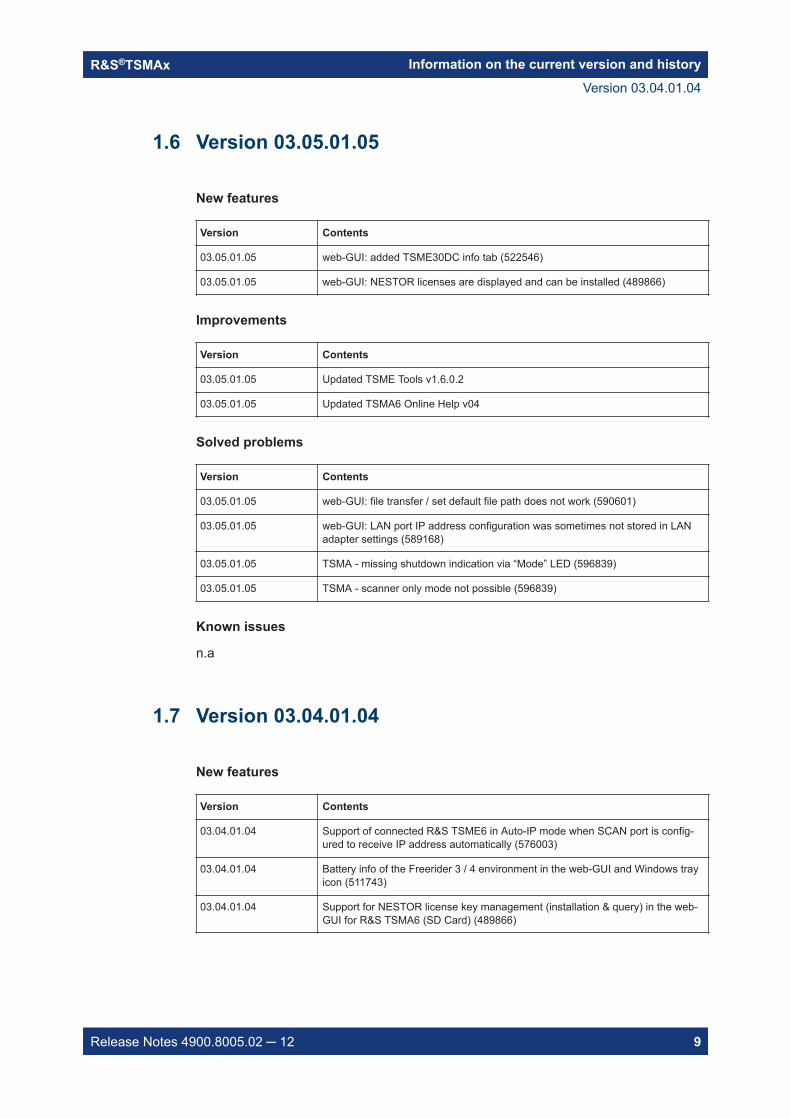
1.6 Version 03.05.01.05
New features
Version Contents
03.05.01.05 web-GUI: added TSME30DC info tab (522546)
03.05.01.05 web-GUI: NESTOR licenses are displayed and can be installed (489866)
Improvements
Version Contents
03.05.01.05 Updated TSME Tools v1.6.0.2
03.05.01.05 Updated TSMA6 Online Help v04
Solved problems
Version Contents
03.05.01.05 web-GUI: file transfer / set default file path does not work (590601)
03.05.01.05 web-GUI: LAN port IP address configuration was sometimes not stored in LANadapter settings (589168)
03.05.01.05 TSMA - missing shutdown indication via “Mode” LED (596839)
03.05.01.05 TSMA - scanner only mode not possible (596839)
Known issues
n.a
1.7 Version 03.04.01.04
New features
Version Contents
03.04.01.04 Support of connected R&S TSME6 in Auto-IP mode when SCAN port is config-ured to receive IP address automatically (576003)
03.04.01.04 Battery info of the Freerider 3 / 4 environment in the web-GUI and Windows trayicon (511743)
03.04.01.04 Support for NESTOR license key management (installation & query) in the web-GUI for R&S TSMA6 (SD Card) (489866)
Version 03.04.01.04
Information on the current version and historyR&S®TSMAx
10Release Notes 4900.8005.02 ─ 12
Improvements
Version Contents
03.04.01.04 Extended Device Footprint info including installed Windows patches / C:\Pro-gramData\Rohde-Schwarz\TSMA\SoftwareData.xml (514184)
03.04.01.04 Default power setting – “Auto Power On” (575793)
Solved problems
Version Contents
03.04.01.04 Wrong IP address for the WLAN access point in the web-GUI (571706)
03.04.01.04 Scanner access error during power-on / selftest is not indicated via “Mode” LED(535474)
03.04.01.04 Web-GUI displays invalid IP addresses when LAN cable is removed (580280)
03.04.01.04 LAN port IP settings in the web-GUI are sometimes not displayed correctly whenconfiguration was changed (573505)
Known issues
n.a
1.8 Version 03.03.01.03
New features
n.a.
Improvements
Version Contents
03.03.01.03 Generate Software Device Footprint (514184)
03.03.01.03 Enables 802.11n/ac mode (530267)
03.03.01.03 Update TSMA6 Online Help v03 (561965)
Solved problems
Version Contents
03.03.01.03 Sporadic auto-power on when switched off and powered from TSMAx-BP(543921)
03.03.01.03 Power On / Selftest ‘Mode’ LED indication (532166)
03.03.01.03 User IP settings of LAN adapters are kept after firmware setup (571744)
03.03.01.03 Local installation fails on TSMA (583467)
Version 03.03.01.03
Information on the current version and historyR&S®TSMAx
11Release Notes 4900.8005.02 ─ 12
Version Contents
03.03.01.03 Web-GUI shows ghost LAN adapter USB LAN 3 on TSMA (547615)
03.03.01.03 Wrong LAN adapter names on web-GUI overview page (554227)
Known issues
n.a
1.9 Version 03.01.01.04
New features
Version Contents
03.01.01.04 WLAN switch disables WLAN & Bluetooth module (519103)
03.01.01.04 Extended selftest and selftest result file (542753)
Improvements
Version Contents
03.01.01.04 Extended LAN configuration features in the web-GUI – “SCAN” port set toreceive IP address automatically (295872)
03.01.01.04 Updated Online Help (560374)
03.01.01.04 Updated TsmeTools v1.6.0.0 (560374)
Solved problems
Version Contents
03.01.01.04 Auto Power Off / delay time overwritten (538845)
03.01.01.04 Power on fails when battery pack is reconnected after previous power off(542695)
03.01.01.04 Wrong registry key for ROMES remote control (556449)
Known issues
Version Contents
03.01.01.04 Sporadic power on cycles when switched off and “Auto Power On” is enabled inpower settings (557375)
Version 03.01.01.04

Information on the current version and historyR&S®TSMAx
12Release Notes 4900.8005.02 ─ 12
1.10 Version 03.00.11.00
New features
Version Contents
03.00.11.00 R&S TSMA supported / one common firmware R&S TSMA / R&S TSMA6(431129)
03.00.11.00 ROMES support (from v18.3)
03.00.11.00 QualipocProbe support (from v18.3)
Improvements
Version Contents
03.00.11.00 OSA document update, OSA V2.0 (491523)
Solved problems
Version Contents
03.00.11.00 WLAN AP not ended if activated for remote firmware installation via WLAN(528763)
03.00.11.00 Failed microcontroller flash – hang up in boot loader mode – missing PSoCdevice in Windows Device Manager – TSMAx could not be switched off via "Pwr"button (477236)
03.00.11.00 Restore indication via LED now with correct color (491624)
03.00.11.00 Failed selftest / scanner interface blocked when WLAN switch is in “Off” position(519096)
03.00.11.00 Blocked scanner interface is detected (494456)
03.00.11.00 HW watchdog assert triggers restart and not a shut-down (499006)
03.00.11.00 Remote ViCom server could not start due to missing VS17 redist / solved withRemote ViCom setup v16.25(47662)
Known issues
Version Contents
03.00.11.00 NESTOR licenses could not be installed and verified in the web-GUI (489866)
03.00.11.00 rViCom ≤ v16.25 / rViCom server could not be accessed via WLAN connection(476632)
03.00.11.00 R&S TSMA6: A firmware upgrade from version 02.22.00.03 is not possible viaWLAN. Choose a different way for upgrade (local, USB stick, reps. remote instal-lation via LAN) (528763)
03.00.11.00 TSMA6 cannot be switched on (autopower on enabled) when a battery pack unitis connected, which has previously been shut down (542695)
Version 03.00.11.00
Information on the current version and historyR&S®TSMAx
13Release Notes 4900.8005.02 ─ 12
1.11 Version 03.00.10.02
New features
Version Contents
03.00.10.02 R&S TSMA supported / one common firmware R&S TSMA / R&S TSMA6(431129)
03.00.10.02 ROMES support (from v18.3)
03.00.10.02 QualipocProbe support (from v18.3)
Improvements
Version Contents
03.00.10.02 OSA document update, OSA V2.0 (491523)
Solved problems
Version Contents
03.00.10.02 WLAN AP not ended if activated for remote firmware installation via WLAN(528763)
03.00.10.02 Restore indication via LED now with correct color (491624)
03.00.10.02 Failed selftest / scanner interface blocked when WLAN switch is in “Off” position(519096)
03.00.10.02 Blocked scanner interface is detected (494456)
03.00.10.02 HW watchdog assert triggers restart and not a shut-down (499006)
03.00.10.02 Remote ViCom server could not start due to missing VS17 redist / solved withRemote ViCom setup v16.25(47662)
Known issues
Version Contents
03.00.10.02 NESTOR licenses could not be installed and verified in the web-GUI (489866)
03.00.10.02 rViCom ≤ v16.25 / rViCom server could not be accessed via WLAN connection(476632)
03.00.10.02 R&S TSMA6: A firmware upgrade from version 02.22.00.03 is not possible viaWLAN. Choose a different way for upgrade (local, USB stick, reps. remote instal-lation via LAN)
Version 03.00.10.02
Firmware updateR&S®TSMAx
14Release Notes 4900.8005.02 ─ 12
1.12 Version 02.22.03.00 (initial version)
New features
Version Contents
02.22.03.00 Initial R&S TSMA6 release
02.22.03.00 Support of R&S NESTOR starting from version v2.7.0
02.22.03.00 Support of R&S ViCom starting from version v16.20
02.22.03.00 User-specific configuration of WLAN SSID & key via web-GUI
02.22.03.00 Revised R&S TSMA Web-GUI
Improvements
n.a.
Solved problems
n.a.
Known issues
Version Contents
02.22.03.00 Firmware set up not applicable for R&S TSMA
02.22.03.00 rViCom Server – WLAN connection not supported yet
02.22.03.00 R&S NESTOR options cannot be installed and read-out via the web-GUI
02.22.03.00 The restore procedure is indicated by green blinking MODE LED (not blue).
2 Firmware updateAfter a firmware update, the following tools may still need to be updated.
● TSME tools● Microsoft EDGE browser
2.1 Preparing installation
Firmware update packages for the R&S TSMAx can be downloaded from the Rohde &Schwarz web page https://www.rohde-schwarz.com/us/firmware/tsmx/.
Preparing installation

Firmware updateR&S®TSMAx
15Release Notes 4900.8005.02 ─ 12
The firmware setup file can be found under the title R&S®TSMAx Firmwareww.xx.yy.zz.
There are several ways how to upgrade R&S TSMAx firmware / software. Select thepreferred way.
ONLY FOR R&S TSMA: Connection between scanner unit and internal PC unit
1 = SCAN Link connector (CPU port)2 = SCAN Link connector (Scanner Port)3 = SCAN Link interconnection cable
Connect the SCAN ports of scanner and PC unit of the R&S TSMA. Use only the LANinterconnection cable (R&S No. 5016.1890.00) for connecting the SCAN ports.
2.2 Executing setup
2.2.1 Local execution of the setup file
The local setup is executed from a remote PC and useful, if you have the device atyour own workplace. Mouse, monitor and keyboard must be connected to the devicedirectly. A LAN or WLAN connection must be established between the R&S TSMAxand the remote PC.
1. Connect mouse and keyboard to USB ports and a monitor to the HDMI port. Thesetup file must be available on the R&S TSMAx or on a USB stick.
2. Switch on the R&S TSMAx via the power button.
3. Copy the setup file (firmware TSMAx-Setup-<Version>.exe or software) into atemporary directory on the remote PC.
4. Check that the R&S TSMAx is in "PC Mode", see Chapter 2.4, "Checking mode ofoperation", on page 29.
Executing setup
Firmware updateR&S®TSMAx
16Release Notes 4900.8005.02 ─ 12
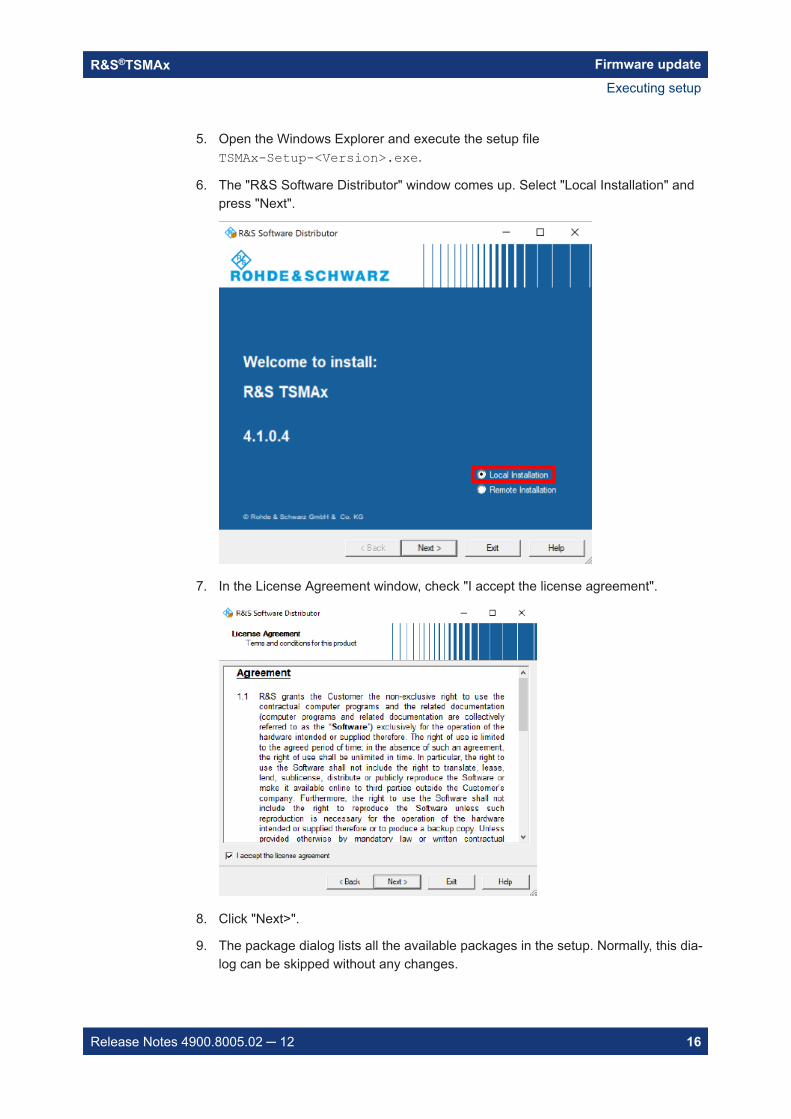
5. Open the Windows Explorer and execute the setup fileTSMAx-Setup-<Version>.exe.
6. The "R&S Software Distributor" window comes up. Select "Local Installation" andpress "Next".
7. In the License Agreement window, check "I accept the license agreement".
8. Click "Next>".
9. The package dialog lists all the available packages in the setup. Normally, this dia-log can be skipped without any changes.
Executing setup

Firmware updateR&S®TSMAx
17Release Notes 4900.8005.02 ─ 12
Select "Automatic Reboot".
10. Press "Install>" to start setup.The progress bar indicates the installation process.
Note: Do not switch off or unplug from power while running firmware/softwareupdate.
11. The device will automatically reboot after the installation is complete.If the automatic reboot is not activated, reboot the device manually.
Executing setup

Firmware updateR&S®TSMAx
18Release Notes 4900.8005.02 ─ 12
12. If the firmware package contains a new mainboard firmware, a separate flash rou-tine is started in a post process, see Chapter 2.2.4, "Firmware updated - main-board flash", on page 27.
13. Reload the web GUI and verify the displayed firmware/software version in the"Overview" menu. The installed version needs to be indicated
14. The firmware update is completed successfully and the device is ready for opera-tion when:
● TSMA6/TSMA6B: Mode LED = green resp. blue (depends on the state of theWLAN access point)
● TSMA: WLAN On = amber, WLAN Off = green
15. To configure the required measurement mode, see Chapter 2.4, "Checking modeof operation", on page 29.
2.2.2 Remote execution of the setup file
The remote setup is the preferred way, if the device is not accessible on site or if multi-ple TSMAx devices are to be updated simultaneously.
1. Copy the setup file (firmware TSMAx-Setup-<Version>.exe or software) into atemporary directory on the remote PC.
2. Establish a LAN respectively WLAN connection between the remote PC and theR&S TSMAx. Make sure the R&S TSMAx is switched on and the "Mode of Opera-tion" is "PC Mode", see Chapter 2.4, "Checking mode of operation", on page 29.
Executing setup
Firmware updateR&S®TSMAx
19Release Notes 4900.8005.02 ─ 12
a) Using LAN connection● Connect the LAN port (R&S TSMAx) with the host PC LAN port.
TSMA: The LAN port is marked with "LAN".TSMA6/TSMA6B: The LAN port is marked with the LAN symbol.
The default IP setting of this port is "DHCP client". For details on how toconfigure the remote PC, contact your network administrator.
b) Using WLAN connection● For R&S TSMA6/TSMA6B, the WLAN/Bluetooth switch must be "On".● On the remote PC, search for the TSMAx WLAN and connect to the net-
work. You find the parameters for the TSMAx WLAN access on a label atthe bottom of the device.WLAN SSID:– TSMA
TSMA-<xxxxxx> with xxxxxx as individual serial number– TSMA6
TSMA6-<xxxxxx> with xxxxxx as individual serial number– TSMA6B
TSMA6B-<xxxxxx> with xxxxxx as individual serial numberWLAN key: instrument (default)
3. Execute the firmware/software setup file on the connected remote PC. The "R&SSoftware Distributor" dialog box is coming up
Executing setup

Firmware updateR&S®TSMAx
20Release Notes 4900.8005.02 ─ 12
4. Select "Remote Installation" and click "Next>".
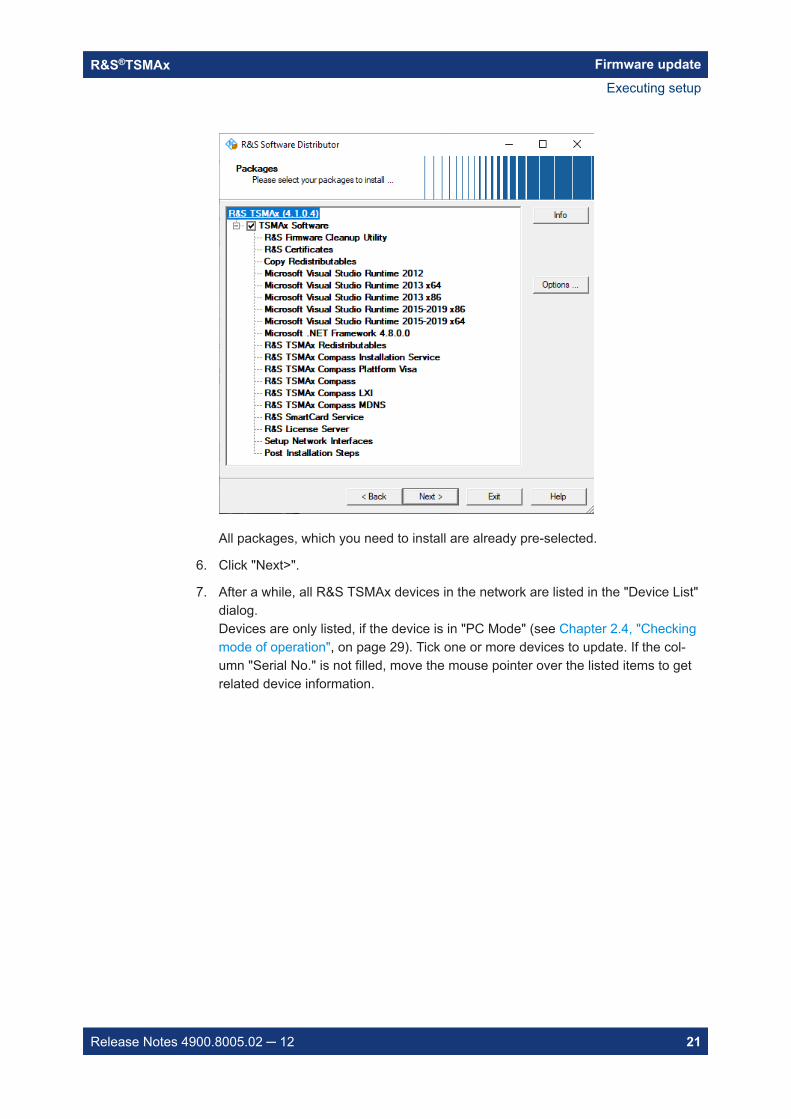
5. The package dialog list all the available packages to install.
Executing setup
Firmware updateR&S®TSMAx
21Release Notes 4900.8005.02 ─ 12
All packages, which you need to install are already pre-selected.
6. Click "Next>".
7. After a while, all R&S TSMAx devices in the network are listed in the "Device List"dialog.Devices are only listed, if the device is in "PC Mode" (see Chapter 2.4, "Checkingmode of operation", on page 29). Tick one or more devices to update. If the col-umn "Serial No." is not filled, move the mouse pointer over the listed items to getrelated device information.
Executing setup

Firmware updateR&S®TSMAx
22Release Notes 4900.8005.02 ─ 12
8. Click "Install".
Note: Do not switch off or unplug from power while running firmware/softwareupdate.
9. The state of the installation process is displayed in the "Status" column. The proc-ess is finished when the status indicates "Ready, see report for details!".
Note: If you are connected via WLAN, a reconnect to the TSMAx WLAN accesspoint may be necessary as the TSMAx reboots after the firmware/software update.
10. Press "Exit" to end the setup program on the remote PC.
11. Only for firmware update.If the firmware package contains a new mainboard firmware, a separate flash rou-tine is started in a post process, see Chapter 2.2.4, "Firmware updated - main-board flash", on page 27.
Note: If you are connected via WLAN, a reconnect to the TSMAx WLAN accesspoint may be necessary as the TSMAx reboots after the mainboard flash.
12. Reload the R&S TSMAx web GUI (see Chapter 2.3, "Calling R&S TSMAx web-GUI", on page 28) and verify the installed firmware /software version in the "Over-view".
Executing setup

Firmware updateR&S®TSMAx
23Release Notes 4900.8005.02 ─ 12
13. The firmware/software update is completed successfully and the device is ready foroperation when the firmware / software is listed correctly in the "Overview" page ofthe TSMAx web-GUI.
14. To configure the required measurement mode, see Chapter 2.4, "Checking modeof operation", on page 29.
2.2.3 Installation using a USB stick
The setup is initiated via the web GUI of the R&S TSMAx. In this case, the setup filemust be available in the root directory of a USB stick, which is connected to the R&STSMAx. To initiate the setup, usually a tablet or handheld device is used, which is con-nected via LAN or WLAN with the R&S TSMAx
1. Connect mouse, keyboard to the USB ports and a monitor.
2. Switch on the R&S TSMAx via power button.
Executing setup
Firmware updateR&S®TSMAx
24Release Notes 4900.8005.02 ─ 12
3. Copy the setup file onto the root directory of a USB memory stick.
a) For firmware installation: Copy the firmware setup fileTSMAx-Setup-<Version>.exe.
b) For software installation: Copy the corresponding software setup file.
4. Open the R&S TSMAx web GUI (see Chapter 2.3, "Calling R&S TSMAx web-GUI",on page 28).
5. Make sure, that the "Mode of Operation" is "PC Mode". Otherwise switch thedevice to "PC Mode" (see Chapter 2.4, "Checking mode of operation",on page 29).
6. In the R&S TSMAx web GUI, navigate to the menu "Update".
7. Select the appropriate setup file from one of the combo boxes.
● Firmware: "Select Firmware Setup File"● Software/Tools: Select the corresponding software box.
8. Press "Update Firmware/Software" next to the select box.The "Update" buttons are only active, if a valid setup file is available on the USBstick and the device is in "PC Mode".
Executing setup

Firmware updateR&S®TSMAx
25Release Notes 4900.8005.02 ─ 12
9. A confirmation dialog appears. Confirm with "OK" to start the update.
10. The firmware/software installation starts. The status text in the web GUI displays"Installation in progress…".
TSMA: The STATE LED starts blinking blue.TSMA6/TSMA6B: The Mode LED starts blinking blue.
Executing setup
Firmware updateR&S®TSMAx
26Release Notes 4900.8005.02 ─ 12
Note: Do not switch off or unplug from power while running firmware/softwareupdate.
11. When the installation of all firmware/software packages has finished, the R&STSMAx reboots.The Mode LED changes to blinking green (selftest).
Note: If you are connected via WLAN, a reconnect to the TSMAx WLAN accesspoint may be necessary.
12. Open the web GUI. After a while, the status text in the web GUI changes toNo error.The reboot is finished when the Mode LED changes into steady blue (WLAN APOn) or green (WLAN AP Off) color.
13. Only for firmware installation.If the firmware package contains a new mainboard firmware, a separate flash rou-tine is started in a post process, see Chapter 2.2.4, "Firmware updated - main-board flash", on page 27.
Note: If you are connected via WLAN, a reconnect to the TSMAx WLAN accesspoint may be necessary as the TSMAx reboots after the mainboard flash.
14. Reload the R&S TSMAx web GUI (see Chapter 2.3, "Calling R&S TSMAx web-GUI", on page 28) and verify the installed firmware /software version in the "Over-view".
Executing setup

Firmware updateR&S®TSMAx
27Release Notes 4900.8005.02 ─ 12
15. The device is ready for operation when the firmware/software is listed correctly andthe TSMAx is in the "Ready" state.TSMA6/TSMA6B: Mode LED = green resp. blue (depends on the state of theWLAN access point)TSMA: STATE LED = amber resp. green (depends on the state of the WLANaccess point)
16. To configure the required measurement mode, see Chapter 2.4, "Checking modeof operation", on page 29.
2.2.4 Firmware updated - mainboard flash
The following steps are only performed, if the firmware package contains a newermainboard firmware.
1. About one minute after the operating system is up again, the flash of the main-board firmware starts.
Executing setup
Firmware updateR&S®TSMAx
28Release Notes 4900.8005.02 ─ 12
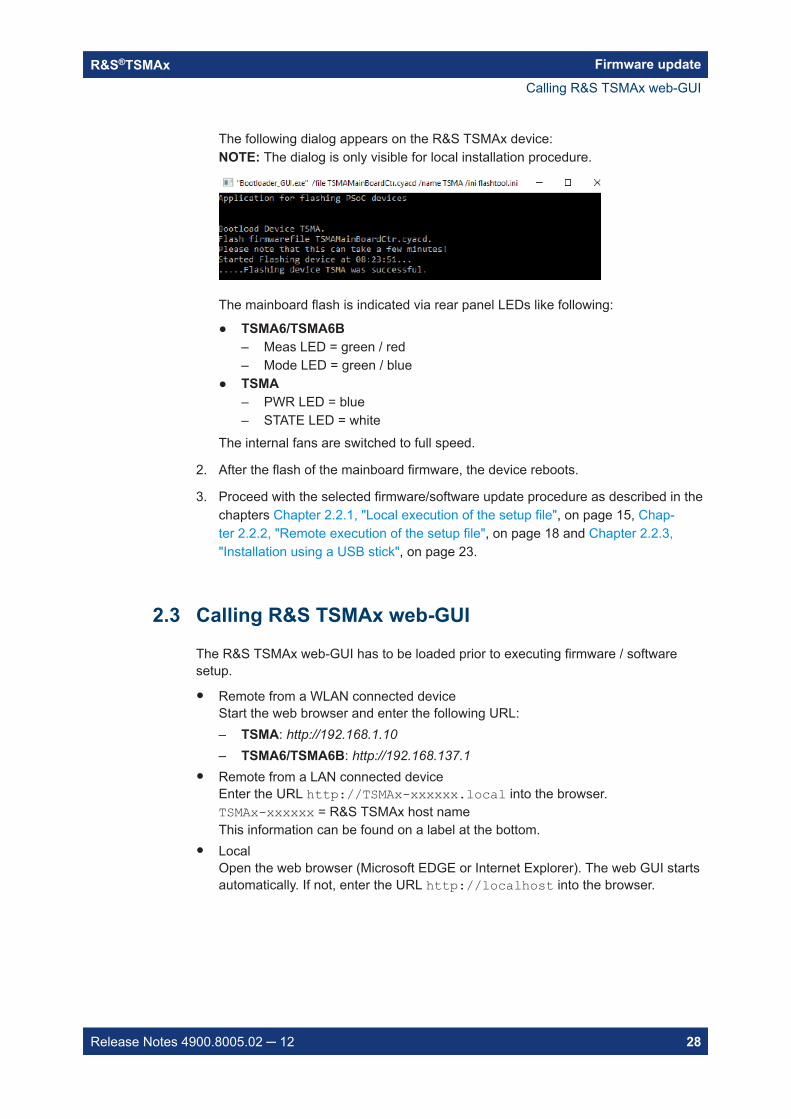
The following dialog appears on the R&S TSMAx device:NOTE: The dialog is only visible for local installation procedure.
The mainboard flash is indicated via rear panel LEDs like following:
● TSMA6/TSMA6B– Meas LED = green / red– Mode LED = green / blue
● TSMA– PWR LED = blue– STATE LED = white
The internal fans are switched to full speed.
2. After the flash of the mainboard firmware, the device reboots.
3. Proceed with the selected firmware/software update procedure as described in thechapters Chapter 2.2.1, "Local execution of the setup file", on page 15, Chap-ter 2.2.2, "Remote execution of the setup file", on page 18 and Chapter 2.2.3,"Installation using a USB stick", on page 23.
2.3 Calling R&S TSMAx web-GUI
The R&S TSMAx web-GUI has to be loaded prior to executing firmware / softwaresetup.
● Remote from a WLAN connected deviceStart the web browser and enter the following URL:– TSMA: http://192.168.1.10– TSMA6/TSMA6B: http://192.168.137.1
● Remote from a LAN connected deviceEnter the URL http://TSMAx-xxxxxx.local into the browser.TSMAx-xxxxxx = R&S TSMAx host nameThis information can be found on a label at the bottom.
● LocalOpen the web browser (Microsoft EDGE or Internet Explorer). The web GUI startsautomatically. If not, enter the URL http://localhost into the browser.
Calling R&S TSMAx web-GUI

Firmware updateR&S®TSMAx
29Release Notes 4900.8005.02 ─ 12
2.4 Checking mode of operation
To execute the setup on the R&S TSMAx, the mode of operation has to be "PC Mode".
1. Open the R&S TSMAx web GUI, see Chapter 2.3, "Calling R&S TSMAx web-GUI",on page 28.
2. The mode of operation is displayed in the "Overview" page. If the mode is already"PC Mode", you can skip this section.
3. If a different mode is activated, navigate to "Configuration" > "System" > "Mode",select the "PC Mode" and press the "Submit" button.
Checking mode of operation

R&S TSME Tools installationR&S®TSMAx
30Release Notes 4900.8005.02 ─ 12
4. Reload the web GUI after changing the mode, and ensure that the "Mode of Oper-ation" is "PC Mode".
3 R&S TSME Tools installationThe R&S TSME Tools are used for diagnostics and maintenance purposes of theTSMAx devices. It is recommended to always install the latest version on the devices.
For the R&S TSME Tools installation on the TSMAx devices, use only the R&S Distrib-utor version TSMAx-TsmeTools-<version>.exe.Example: TSMAx-TsmeTools-v1.7.4.1.exe (current version).
3.1 Preparation
1. Download the R&S TSME Tools setup file TSMAx-TsmeTools-<version>.exefrom the following source.
● TSMA: https://www.rohde-schwarz.com/software/tsma/
Preparation

R&S TSME Tools installationR&S®TSMAx
31Release Notes 4900.8005.02 ─ 12
● TSMA6/TSMA6B: https://www.rohde-schwarz.com/software/tsma6/
2. Choose the way of installation and follow the instructions how to prepare.
3.2 R&S TSME Tools local installation
Follow the general instructions in Chapter 2.2.1, "Local execution of the setup file",on page 15, step 1 to step 4.
1. Open the Windows Explorer and execute the setup fileTSMAx-TsmeTools-<version>.exe.
2. The "R&S Software Distributor" window comes up. Select "Local Installation" andpress "Next".
3. All subsequent steps are similar to local firmware installation, see Chapter 2.2.1,"Local execution of the setup file", on page 15, step 7 and following.
Do not switch off or unplug from power while running firmware/software update.
3.3 R&S TSME Tools remote installation
Follow the general instructions in Chapter 2.2.2, "Remote execution of the setup file",on page 18, step 1 to step 2.
R&S TSME Tools remote installation

R&S TSME Tools installationR&S®TSMAx
32Release Notes 4900.8005.02 ─ 12
1. Execute the setup file TSMAx-TsmeTools-<version>.exe on the remote PC.
2. The "R&S Software Distributor" comes up. Select "Remote Installation" and press"Next >".
3. All subsequent steps are similar to remote firmware installation, see Chapter 2.2.2,"Remote execution of the setup file", on page 18, step 4 and following.
3.4 R&S TSME Tools installation using a USB stick
Follow the general instructions in Chapter 2.2.3, "Installation using a USB stick",on page 23, step 1 to step 6.
1. Select the appropriate R&S TSME Tools setup fileTSMAx-TsmeTools-<version>.exe and press the button next to the select box.
R&S TSME Tools installation using a USB stick
Microsoft EDGE browser installationR&S®TSMAx
33Release Notes 4900.8005.02 ─ 12
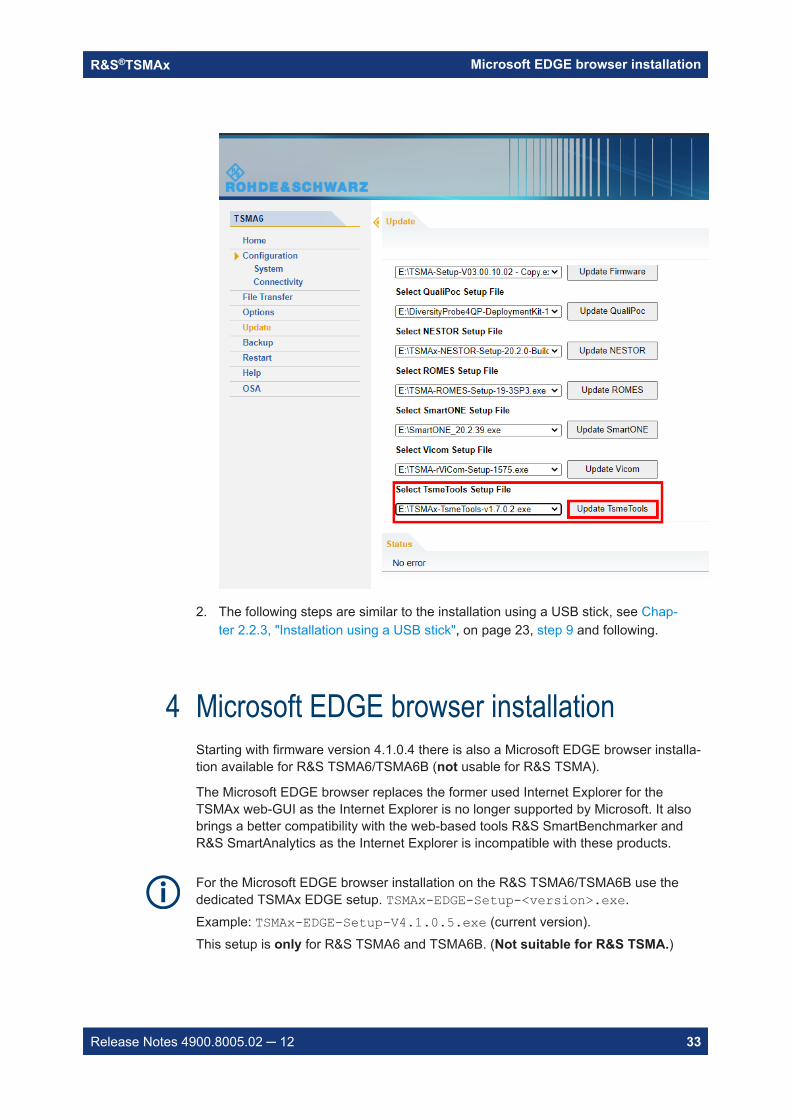
2. The following steps are similar to the installation using a USB stick, see Chap-ter 2.2.3, "Installation using a USB stick", on page 23, step 9 and following.
4 Microsoft EDGE browser installationStarting with firmware version 4.1.0.4 there is also a Microsoft EDGE browser installa-tion available for R&S TSMA6/TSMA6B (not usable for R&S TSMA).
The Microsoft EDGE browser replaces the former used Internet Explorer for theTSMAx web-GUI as the Internet Explorer is no longer supported by Microsoft. It alsobrings a better compatibility with the web-based tools R&S SmartBenchmarker andR&S SmartAnalytics as the Internet Explorer is incompatible with these products.
For the Microsoft EDGE browser installation on the R&S TSMA6/TSMA6B use thededicated TSMAx EDGE setup. TSMAx-EDGE-Setup-<version>.exe.Example: TSMAx-EDGE-Setup-V4.1.0.5.exe (current version).This setup is only for R&S TSMA6 and TSMA6B. (Not suitable for R&S TSMA.)

Microsoft EDGE browser installationR&S®TSMAx
34Release Notes 4900.8005.02 ─ 12
4.1 Preparation
1. Download the Microsoft EDGE browser setup fileTSMAx-EDGE-Setup-<version>.exe from https://www.rohde-schwarz.com/software/tsma6/.
2. Choose the way of installation and follow the instructions how to prepare.
4.2 Microsoft EDGE browser local installation
Follow the general instructions in Chapter 2.2.1, "Local execution of the setup file",on page 15, step 1 to step 4.
1. Open the Windows Explorer and execute the setup fileTSMAx-EDGE-Setup-<version>.exe.
2. The "R&S Software Distributor" window comes up. Select "Local Installation" andpress "Next".
3. All subsequent steps are similar to local firmware installation, see Chapter 2.2.1,"Local execution of the setup file", on page 15, step 7 and following.
Do not switch off or unplug from power while running firmware/software update.
Microsoft EDGE browser local installation
Software installationR&S®TSMAx
35Release Notes 4900.8005.02 ─ 12
4.3 Microsoft EDGE browser remote installation
Follow the general instructions in Chapter 2.2.2, "Remote execution of the setup file",on page 18, step 1 to step 2.
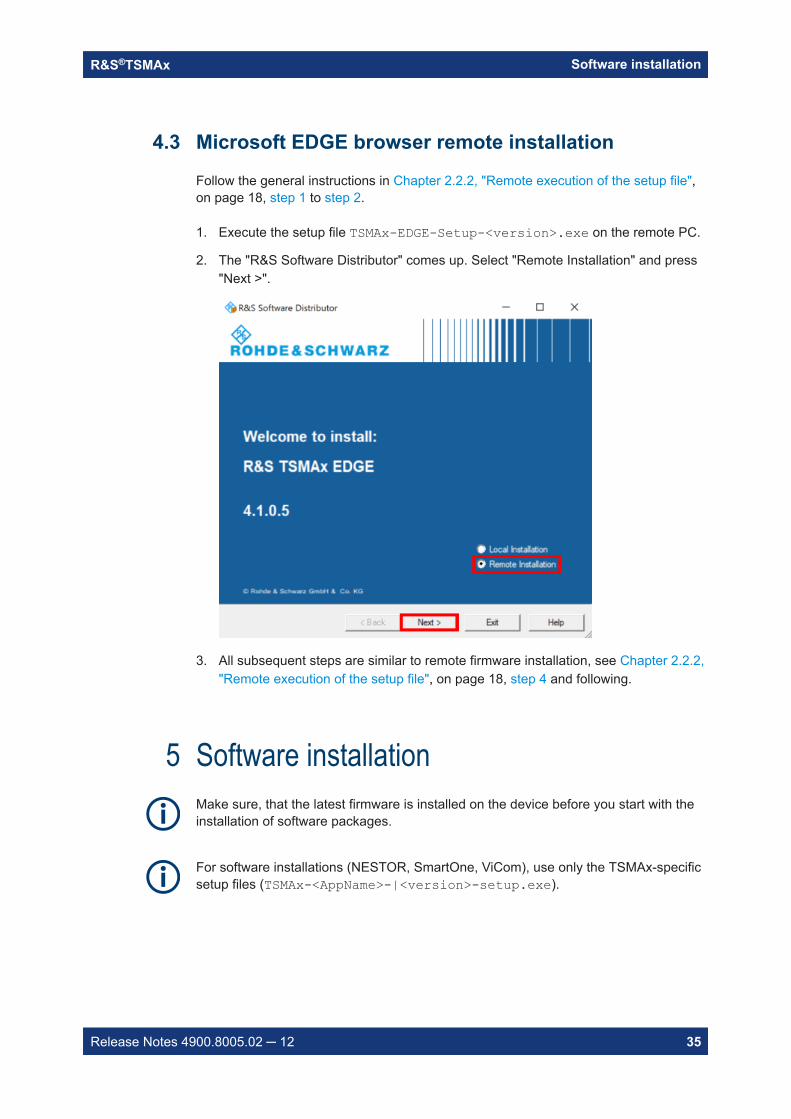
1. Execute the setup file TSMAx-EDGE-Setup-<version>.exe on the remote PC.
2. The "R&S Software Distributor" comes up. Select "Remote Installation" and press"Next >".
3. All subsequent steps are similar to remote firmware installation, see Chapter 2.2.2,"Remote execution of the setup file", on page 18, step 4 and following.
5 Software installationMake sure, that the latest firmware is installed on the device before you start with theinstallation of software packages.
For software installations (NESTOR, SmartOne, ViCom), use only the TSMAx-specificsetup files (TSMAx-<AppName>-|<version>-setup.exe).
Software installationR&S®TSMAx
36Release Notes 4900.8005.02 ─ 12
5.1 Remote ViCom server software
The Remote ViCom server (rViCom) is an additional software package for the R&STSMAx.
An upgrade of the Remote ViCom package is only recommended when operating theR&S TSMAx in "rViCom Server" mode.The update of the Remote ViCom package installation could be neglected for othermodes of operation (NESTOR, ROMES, QualiPoc).
The installed version of the Remote ViCom server on the R&S TSMAx needs to matchwith the applied version of rViCom client API on the remote Android device.In cases of a client / server mismatch, there are the following possibilities:● Downgrade the rViCom server version on the R&S TSMAx to match with the
applied rViCom client version on the Android device.● Upgrade the rViCom client version on the connected tablet / smartphone to comply
with the installed rViCom server version on the R&S TSMAx.
5.1.1 Preparation
1. To get the setup file TSMAx-rViCom-Setup-<Version>.exe, contact the R&Scustomer support.
2. Choose the way of installation and follow the instructions how to prepare.
5.1.2 ViCom server local installation
Follow the general instructions in Chapter 2.2.1, "Local execution of the setup file",on page 15, step 1 to step 4.
1. Open the Windows Explorer and execute the setup fileTSMAx-rViCom-Setup-<Version>.exe.
2. The "R&S Software Distributor" window comes up. Select "Local Installation" andpress "Next".
Remote ViCom server software

Software installationR&S®TSMAx
37Release Notes 4900.8005.02 ─ 12
3. All subsequent steps are similar to local firmware installation, see Chapter 2.2.1,"Local execution of the setup file", on page 15, step 7 and following.
Do not switch off or unplug from power while running firmware/software update.
5.1.3 ViCom server remote installation
Follow the general instructions in Chapter 2.2.2, "Remote execution of the setup file",on page 18, step 1 to step 2.
1. Execute the setup file TSMAx-rViCom-Setup-<Version>.exe on the remotePC.
2. The "R&S Software Distributor" comes up. Select "Remote Installation" and press"Next >".
Remote ViCom server software

Software installationR&S®TSMAx
38Release Notes 4900.8005.02 ─ 12
3. All subsequent steps are similar to remote firmware installation, see Chapter 2.2.2,"Remote execution of the setup file", on page 18, step 4 and following.
5.1.4 ViCom server installation using a USB stick
Follow the general instructions in Chapter 2.2.3, "Installation using a USB stick",on page 23, step 1 to step 6.
1. Select the appropriate setup file TSMAx-rViCom-Setup-<Version>.exe andpress the button next to the select box.
● Firmware version 01.xx.yy.zz: "Execute Setup"● Firmware version from 02.xx.yy.zz: "Update Vicom"
Remote ViCom server software

Software installationR&S®TSMAx
39Release Notes 4900.8005.02 ─ 12
2. The following steps are similar to the installation using a USB stick, see Chap-ter 2.2.3, "Installation using a USB stick", on page 23, step 8 to step 11.
5.2 R&S NESTOR software
Only execute the dedicated NESTOR setup for R&S TSMAx. The setup file is namedTSMAx_NESTOR_Setup-<Version>.exe.
5.2.1 Preparation
1. Download the software setup file TSMAx_NESTOR_Setup-<Version>.exe fromthe Rohde & Schwarz FTP server respectively NESTOR CD-ROM.
2. Choose the way of installation and follow the instructions how to prepare.
R&S NESTOR software
Software installationR&S®TSMAx
40Release Notes 4900.8005.02 ─ 12
5.2.2 NESTOR local installation
Follow the general instructions in Chapter 2.2.1, "Local execution of the setup file",on page 15, step 1 to step 4.
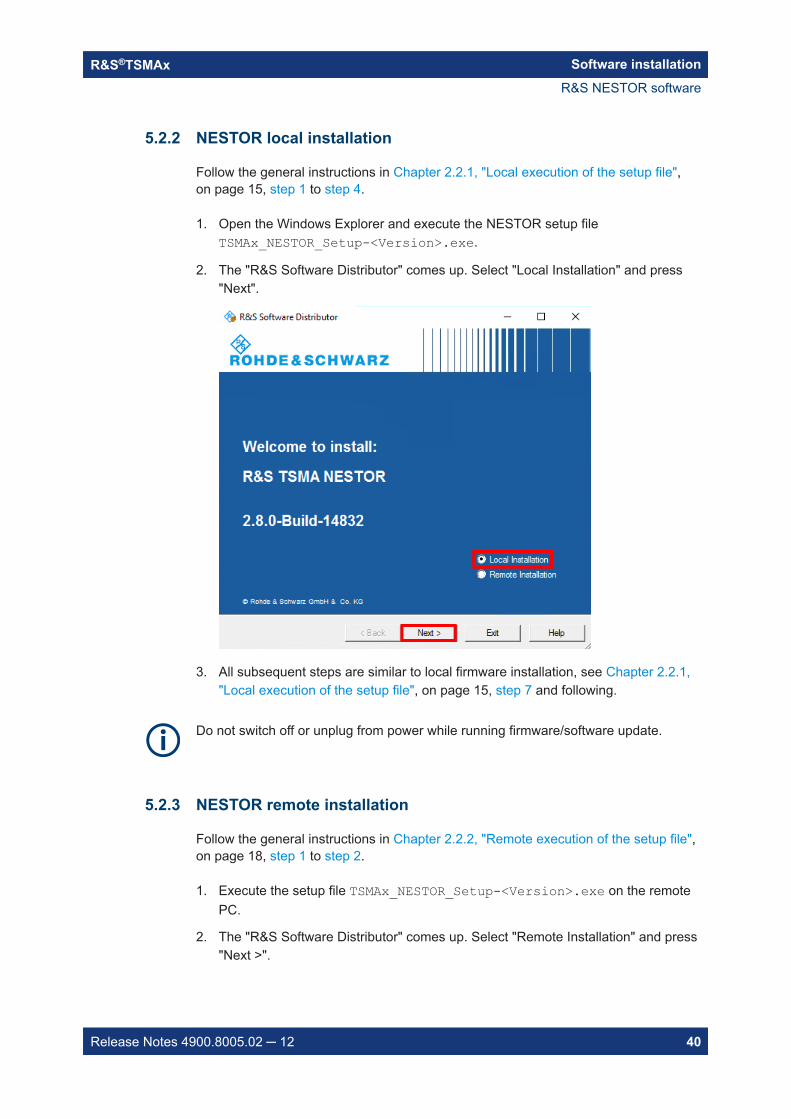
1. Open the Windows Explorer and execute the NESTOR setup fileTSMAx_NESTOR_Setup-<Version>.exe.
2. The "R&S Software Distributor" comes up. Select "Local Installation" and press"Next".
3. All subsequent steps are similar to local firmware installation, see Chapter 2.2.1,"Local execution of the setup file", on page 15, step 7 and following.
Do not switch off or unplug from power while running firmware/software update.
5.2.3 NESTOR remote installation
Follow the general instructions in Chapter 2.2.2, "Remote execution of the setup file",on page 18, step 1 to step 2.
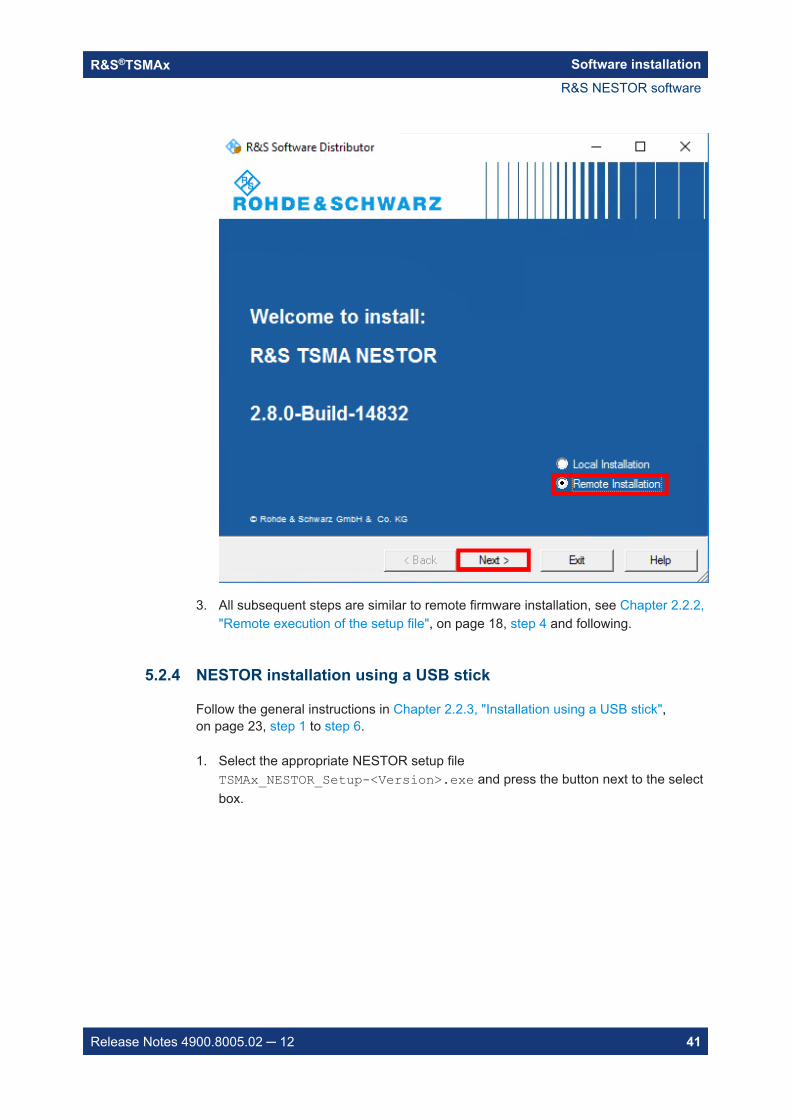
1. Execute the setup file TSMAx_NESTOR_Setup-<Version>.exe on the remotePC.
2. The "R&S Software Distributor" comes up. Select "Remote Installation" and press"Next >".
R&S NESTOR software
Software installationR&S®TSMAx
41Release Notes 4900.8005.02 ─ 12
3. All subsequent steps are similar to remote firmware installation, see Chapter 2.2.2,"Remote execution of the setup file", on page 18, step 4 and following.
5.2.4 NESTOR installation using a USB stick
Follow the general instructions in Chapter 2.2.3, "Installation using a USB stick",on page 23, step 1 to step 6.
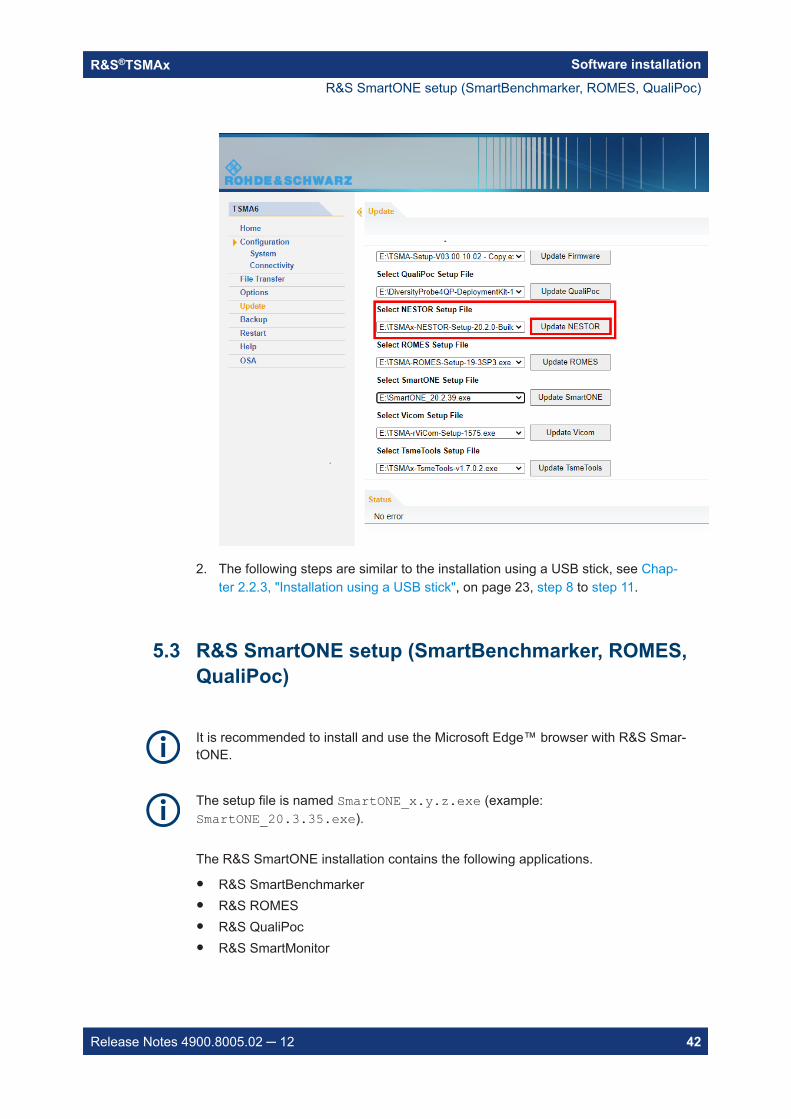
1. Select the appropriate NESTOR setup fileTSMAx_NESTOR_Setup-<Version>.exe and press the button next to the selectbox.
R&S NESTOR software
Software installationR&S®TSMAx
42Release Notes 4900.8005.02 ─ 12
2. The following steps are similar to the installation using a USB stick, see Chap-ter 2.2.3, "Installation using a USB stick", on page 23, step 8 to step 11.
5.3 R&S SmartONE setup (SmartBenchmarker, ROMES,QualiPoc)
It is recommended to install and use the Microsoft Edge™ browser with R&S Smar-tONE.
The setup file is named SmartONE_x.y.z.exe (example:SmartONE_20.3.35.exe).
The R&S SmartONE installation contains the following applications.
● R&S SmartBenchmarker● R&S ROMES● R&S QualiPoc● R&S SmartMonitor
R&S SmartONE setup (SmartBenchmarker, ROMES, QualiPoc)

Software installationR&S®TSMAx
43Release Notes 4900.8005.02 ─ 12
5.3.1 Preparation
1. Download the SmartONE setup file SmartONE_x.y.z.exe from the Rohde &Schwarz FTP server respectively SmartONE CD-ROM.
2. Choose the way of installation and follow the instructions how to prepare.
5.3.2 SmartONE local installation
Follow the general instructions in Chapter 2.2.1, "Local execution of the setup file",on page 15, step 1 to step 4.
1. Open the Windows Explorer and execute the SmartONE setup fileSmartONE_x.y.z.exe.
2. The "R&S Software Distributor" comes up. Select "Local Installation" and press"Next".
3. All subsequent steps are similar to local firmware installation, see Chapter 2.2.1,"Local execution of the setup file", on page 15, step 7 and following.
5.3.3 SmartONE remote installation
Follow the general instructions in Chapter 2.2.2, "Remote execution of the setup file",on page 18, step 1 to step 2.
R&S SmartONE setup (SmartBenchmarker, ROMES, QualiPoc)

Software installationR&S®TSMAx
44Release Notes 4900.8005.02 ─ 12
1. Execute the SmartONE setup file SmartONE_x.y.z.exe on the remote PC.
2. The "R&S Software Distributor" comes up. Select "Remote Installation" and press"Next >".
3. All subsequent steps are similar to remote firmware installation, see Chapter 2.2.2,"Remote execution of the setup file", on page 18, step 4 and following.
5.3.4 Initial software start / measurement mode selection
After the successful installation of R&S SmartONE, the device is always in the mode"QualiPoc".
Initial starting of SmartONE Expert (R&S ROMES)
1. Install the option key.
2. If used, connect the hardlock to a USB port.
3. Start the web GUI.
4. Navigate to "Configuration" > "System" > "Mode".
5. As "Mode of Operation", select "SmartONE Expert".
Make sure, that "Autostart" is deselected and no workspace is selected.
R&S SmartONE setup (SmartBenchmarker, ROMES, QualiPoc)

Software installationR&S®TSMAx
45Release Notes 4900.8005.02 ─ 12
6. Press "Submit".
After starting R&S ROMES, configure the following settings.
1. In the "Romes Technology Selector", select the technologies to be supported byyour ROMES installation.
R&S SmartONE setup (SmartBenchmarker, ROMES, QualiPoc)

Software installationR&S®TSMAx
46Release Notes 4900.8005.02 ─ 12
2. Press "OK".
3. In the "ROMESTecSelectorGUI" window, press "OK".
The current installation is adapted according to your selection and the ROMESstart process continues.
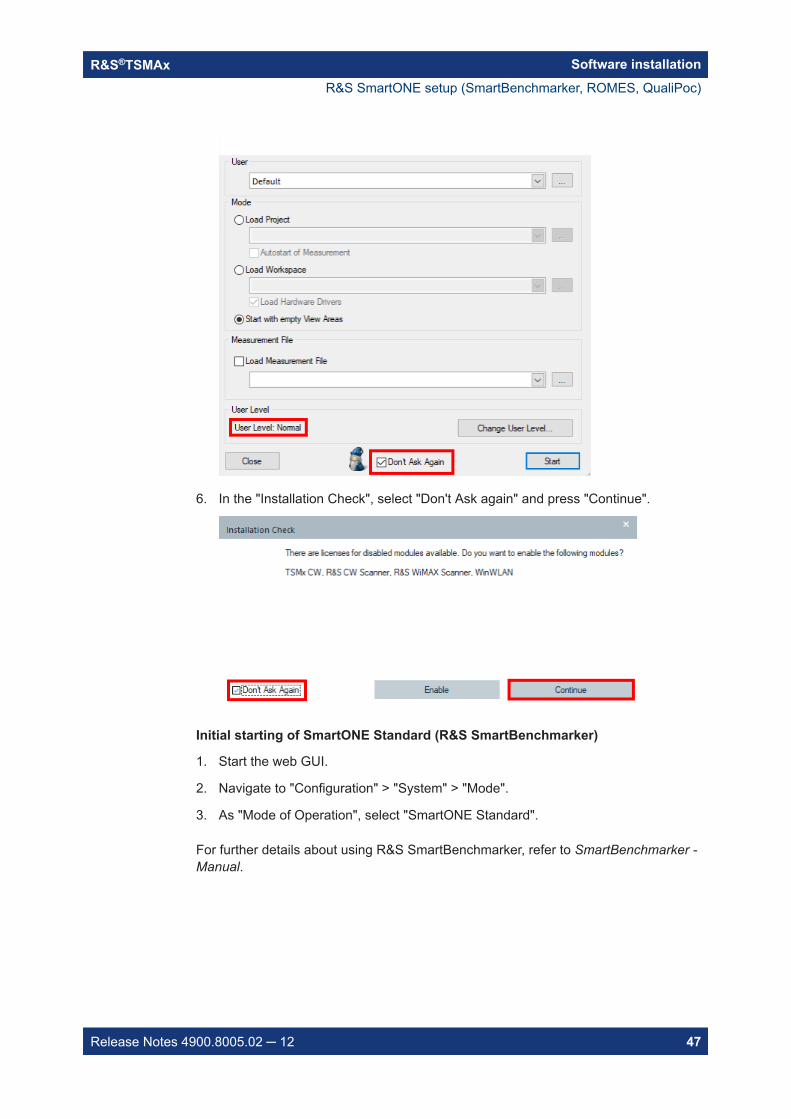
4. In the "User" window, check that the "User Level" is "Normal".
5. Select "Don't Ask again".
R&S SmartONE setup (SmartBenchmarker, ROMES, QualiPoc)
Software installationR&S®TSMAx
47Release Notes 4900.8005.02 ─ 12
6. In the "Installation Check", select "Don't Ask again" and press "Continue".
Initial starting of SmartONE Standard (R&S SmartBenchmarker)
1. Start the web GUI.
2. Navigate to "Configuration" > "System" > "Mode".
3. As "Mode of Operation", select "SmartONE Standard".
For further details about using R&S SmartBenchmarker, refer to SmartBenchmarker -Manual.
R&S SmartONE setup (SmartBenchmarker, ROMES, QualiPoc)
Contacting customer supportR&S®TSMAx
48Release Notes 4900.8005.02 ─ 12
6 Contacting customer supportTechnical support – where and when you need it
For quick, expert help with any Rohde & Schwarz product, contact our customer sup-port center. A team of highly qualified engineers provides support and works with youto find a solution to your query on any aspect of the operation, programming or applica-tions of Rohde & Schwarz products.
Contact information
Contact our customer support center at www.rohde-schwarz.com/support, or follow thisQR code:
Figure 6-1: QR code to the Rohde & Schwarz support page
Recommended