TROJANMY SPACE MY TIME
®
CAUTIONREAD ALL PRECAUTIONS AND
INSTRUCTIONS IN THIS MANUALBEFORE USING THIS EQUIPMENT
KEEP THIS MANUAL FORFUTURE REFERENCE
www.trojanhealth.co.za
#1 HOMEFITNESS
SOUTH AFRICA’S
SINCE19810861 876 526
0861 TROJANWARRANTY
IGNITE 350TREADMILL
TREADMILLCARE INSTRUCTION AND ASSEMBLY MANUAL

INDEX PAGE
1. SAFETY INSTRUCTIONS 3
2. PRE ASSEMBLY CHECK LIST 4
3. HARDWARE LIST 5
4. ASSEMBLY STEPS 6
5.. FOLDING INSTRUCTIONS 8
6. MAINTENANCE 9
7. GROUNDING INSTRUCTIONS 10
8. COMPUTER FUNCTIONS 11
9. FREQUENTLY ASKED QUESTIONS 15
10. PARTS LIST 16
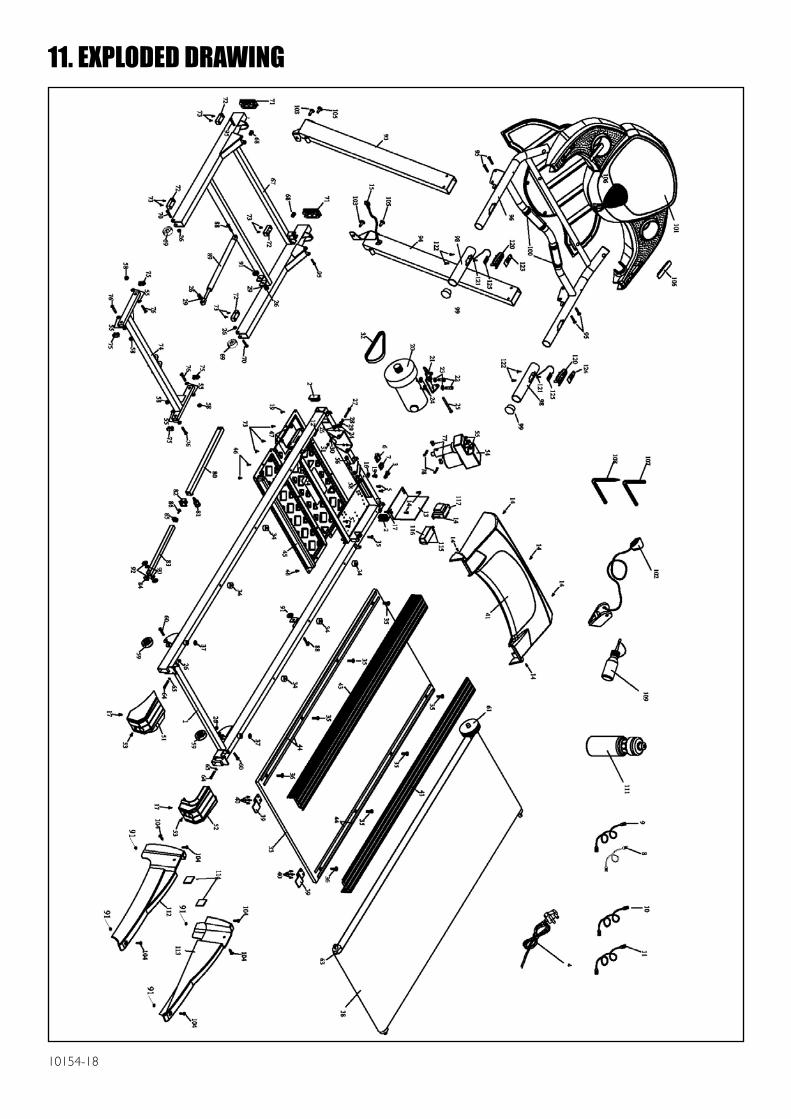
11. EXPLODED DRAWING 18
12 TROJAN 1 YEAR LIMITED WARRANTY 19
13. TROJAN REPAIRS PROCEDURE 20
10154-3
1. SAFETY INSTRUCTIONS
It is the sole responsibility of the purchaser of TROJAN products to read the owner’s manual, warning labels and instruct all
individuals, on proper usage of the equipment. Understanding each and every warning to the fullest is important. If any of these
instructions or warnings are unclear please contact Trojan Customer Services on 0861 876526 (0861 Trojan), within the Republic of
South Africa.
The equipment is only intended for HOME USE and is NOT INTENDED FOR COMMERCIAL, INSTITUTIONAL AND/OR
STUDIO FACILITIES USE.
Contact TROJAN with any questions regarding this classification. It is recommended that all users of TROJAN be informed of the
following information prior to use.
HEALTH WARNING• Beforestartinganyexerciseorconditioningprogramyoushouldconsultwithyourpersonalphysiciantoseeifyourequirea
completephysicalexam.Thisisespeciallyimportantifyouareovertheageof35orhaveneverexercised,arepregnantorsuffer
from any illness.
• Ifatanytimeduringexerciseyoufeelfaint,dizzyorexperiencepain,stopexercisingimmediatelyandconsultyourphysician.
• Toavoidmuscularpainandstrain,begineachworkoutbystretchingandwarmingupandendeachsessionbycoolingdownand
stretching.
ACCESS CONTROLTROJAN recommends that all fitness equipment be used in a supervised area. It is recommended that the equipment be located
in an access controlled area. Control is the responsibility of the owner. Keep children away from all equipment. Parents or other
supervising adults must provide close supervision of children if the equipment is used in the presence of children.
INSTALLATIONTROJAN recommends that all equipment:
• Besecuredtoorsetuponasolid,levelsurfacetostabilizeandeliminaterockingortippingoverduringtraining.
• Besetupinsideyourhomeawayfrommoistureanddust(theequipmentisnotdesignedforoutdooruse).
• Besetupwithsufficientventilationtoensureproperoperation.
• Besetupwithsufficientspacearoundtheequipmentsothatallexercisescanbecompletedsafely.Itis
recommendedthatthereshouldbeatleast1mofspacearoundtheequipmentwhereaccessisrequiredtoexercise.
Fortreadmillsitisrecommendedthatyouhave2mofspacebehindtherunningdeck.
• Beinstalledbyourteamofinstallers.
PROPER USAGE• Donotusetheequipmentinanywayotherthanasdesignedorintendedbythemanufacturer.Itisimperativethat
TROJAN equipment is used properly to avoid injury.
• Injuriesmayresultfromexercisingimproperlyorexcessively.
• YourTROJANequipmentshouldonlybeusedbyonepersonatatime.
• Becarefultomaintainyourbalancewhileusing,mounting,dismounting,folding,unfoldingorassemblingyourTROJAN
equipment to avoid injury.
• Donotattempttoadjustanyseats/pads/pulleysetc.whileyouareonyourTROJANequipment.
• Servicingotherthantheproceduresinthismanualshouldbeperformedbyanauthorizedservicerepresentativeonly.
• DANGER:Alwaysunplugthepowercordbeforecleaninganyequipmentpoweredbyelectricity.

10154-4
INSPECTION• Donotuseorpermituseofanyequipmentthatisdamagedorhaswornorbrokenparts.ForallTROJANequipmentuseonly
replacement parts supplied by TROJAN.
• Alwaysmakesurethatallnutsandboltsaretightenedpriortoeachuse.
• Cablesandbeltsposeanextremeliabilityifusedwhenfrayed.Alwaysreplaceanycableorbeltatfirstsignofwear.
• Routinelyinspectallaccessoryclipsthatjoinattachmentstothecablesandreplaceatthefirstsignofwear.
• Maintainlabelsandnameplates–donotremovelabelsforanyreason.Theycontainimportantinformation.
• Equipmentmaintenance–Preventativemaintenanceisthekeytosmoothoperatingequipment.Pleaseensurethatyou
follow our maintenance tips to ensure the continued correct function of your TROJAN equipment.
• Beforeanyuse,examineallaccessoriesapprovedforusewiththeTROJANequipmentfordamageorwear.
• ShouldyourTrojanequipmentappeardamagedorworndonotattempttouseorrepairtheequipmentyourself.
Please contact our service department on 0861 876526 (0861 Trojan) to arrange a repair.
OPERATING WARNINGS• Itisthepurchaser’sresponsibilitytoinstructallusersastotheproperoperatingproceduresofallTROJANequipment.
• Keepchildrenawayfromallmovingpartsandawayfromallstrengthequipment.Parentsmustprovideclosesupervisionof
children if the equipment is used in the presence of children.
• Donotwearloosefittingclothingorjewellerywhenusingtheequipment.Itisalsorecommendedthatuserstieuplonghair
to avoid contact with moving parts.
• Ensurethatanyonenotusingtheequipmentstaysclearoftheuser,accessoriesandmovingpartswhilethemachineisin
operation.
USER WEIGHT LIMITATIONS• ThisTROJANIGNITE350maynotbeusedbypersonsweighingmorethan130kg.
ELECTRICAL SAFETY• Keepthepowercordawayfromheatedsurfaces.
• Neverusetheequipmentifthepowercableorplugisfrayedordamaged.
• Neverusetheequipmentifthecord,equipmentorsurroundingfloorareaiswetordamp.
• Allelectricalproductsmustbegrounded.Thisproductissupplierwiththenecessarygroundingconnections.
Do not modify the plug provided with the product. If the plug will not fit into the power outlet, have a proper outlet installed by
a qualified electrician.
SAVE THIS INSTRUCTION MANUAL FOR FUTURE USE AND REFERENCEIf any of these instructions or warnings are unclear please contact Trojan Customer Services on 0861 876526 (0861 Trojan), within
the Republic of South Africa or visit www.trojanhealth.co.za.
SAFETY INSTRUCTIONS

Consol
Safety KeyHandpulse
Handgrip
Running Belt
Main Frame
Wheel Rear End Cap
Wheel
10154-5
2. PRE ASSEMBLY CHECK LISTThankyouforchoosingtheTROJAN IGNITE 350 TREADMILL.Wetakegreatprideinproducingthisqualityproductand
hopeitwillprovidemanyhoursofqualityexercisetomakeyoufeelbetter,lookbetterandenjoylifetoitsfullest.
Yes,itisaprovenfactthataregularexerciseprogramcanimproveyourphysicalandmentalhealth.Toooften,ourbusy
lifestyleslimitourtimeandopportunitytoexercise.TheTROJAN IGNITE 350 TREADMILL provides a convenient and
simple method to begin your assault on getting your body in shape and achieving a healthier lifestyle.
Before reading further, please familiarise yourself with the parts that are labelled.
Read this manual carefully before using the TROJAN IGNITE 350 TREADMILL.

10154-6
3. HARDWARE LISTITEM Description Qty ITEM Description Qty
1 Frame 1 95 TrussHexScrewM8xP1.25x40(SAEK242)
2
102 Safety Key/Clip 1 108 HexWrench+Screwdriver5mm(70mmx70mm)
1
112 Left Decoration Cover 1 107 HexWrench6mm(80mmx80mm) 1
113 Right Decoration Cover 1 109 Silicon 1
105 TrussHexScrewM8xP1.25x15 2 111 Bottle 1
103 TrussHexScrewM8xP1.25x25(SAE812525) 2 104 TrussPhilipsScrewM5xP0.8x20 6
91 PlasticWasherØ8xØ22x6t 4

Two persons are required to assemble the treadmill.
Caution! Please follow the assembly steps to avoid injury.
STEP 1Simultaneously raise both Handrail Tubes of the Computer Consol on Frame (1) as shown and securewith2HexScrews(95).
STEP2Simultaneously raise the Left and Right Uprightsandsecurewith2HexScrews(105)and2HexScrews(103).
STEP 3Wedge the Left and Right Decoration Covers (112,113) onto Frame (1) respectively as shown. Tighten each Decoration Cover (112,113) with 3 Philips Screws (104) and 2 Plastic Washers (91).
CAUTION: Ensure that cables are not damaged during
assembly or when tightening screws
CAUTION: Ensure that cables are not damaged during
assembly or when tightening screws.
CAUTION: Ensure that cables are not damaged during
assembly or when tightening screws.
10154-7
4. ASSEMBLY STEPS

10154-8
UNFOLDINGHold the treadmill running board with your left hand.
Pullthelockingknobwithyourrighthandandslowlylowerthe
treadmill running board. Remove your right hand as you slowly lower
therunningboardtothefloor.
(Figure 1)
FOLDINGEnsure the incline angle of the treadmill is at its lowest position.
Pullthelockingknobuntilthetreadmillrunningboardcanbelifted.
Liftthetreadmillrunningboardupuntillockingknobclickssecurely
into the hole.
(Figure 2 and 3)
TRANSPORTPlace your right foot onto the right base foot tube.
With two hands holding the left and right handgrip tubes, pull the
treadmill toward you.
You can now easily move the treadmill to the desired position by
pushing it on its wheels.
(Figure 4)
5. UNFOLDING / FOLDING / TRANSPORT

10154-9
HOW TO APPLY LUBRICANTLift one side of treadbelt.
Pour one half of the lubricant bottle under the center of the treadbelt on the top surface of the treadboard.
Walkonthetreadmillataslowspeedfor3to5minutestoevenlydistributelubricant.
NOTE:DONOToverlubricatetreadboard.Anyexcesslubricantthatcomesoutshouldbewipedoff.
NOTE: ONLY USE HALF THE BOTTLE OF LUBRICANT PER APPLICATION
LUBRICATION SCHEDULE.1.Checkthetreadboardlubricationduringinstallation.Ifit’snecessary,lubricatethetreadboard,usingthefullbottleof
lubricant provided, before using the treadmill for the first time.
2.Ifthetreadmillisusedonaregularbasis,therunningdeckshouldbelubricatedonceamonth.
3. If the treadmill is not used for two months or more, the treadmill must be lubricated before use.
6. MAINTENANCEYour treadmill should require little maintenance other than
periodically applying lubricant. Lubricating under the treadbelt
willensuresuperiorperformanceandextendthetreadmill’s
lifeexpectancy.
HOW TO CHECK TREADBELT FOR PROPER LUBRICATIONLift one side of the treadbelt and feel the top surface of the
treadboard.
Ifthesurfaceisslicktothetouch,thennofurtherlubrication
is required.
Ifthesurfaceisdrytothetouch,applyonepacketof
lubricant or half the bottle of lubricant.
BELT TRACKING ADJUSTMENTIf during use you notice that the running belt either shifts to
the right or the left of center, first remove the “Safety Key”
andunplugequipmentfromACpowersource.UsingHex
Wrenchprovided,turnleftrearrolleradjustmentclockwise
nomorethe1/4”ofaturn.RemoveHexWrench,insert
“Safety Key” and insert AC power cord into AC outlet. Turn
on your treadmill and observe after running for a few
minutes to see if the problem has been corrected. This may
takeseveraladjustments,sorepeattheaboveprocedure.

10154-10
7. GROUNDING INSTRUCTIONSThisproductmustbegrounded.Ifmalfunctionorbreakdownoccurs,groundingprovidesapathofleastresistancefor
electriccurrenttoreducetheriskofelectricshock.Thisproductisequippedwithacordhavinganequipment-grounding
conductor and a grounding plug. The plug must be plugged into an appropriate outlet that is properly installed and
grounded in accordance with all local codes and ordinances.
DANGER-improperconnectionoftheequiment-groundingconductorcanresultinariskofelectricshock.Checkwith
a qualified electrician or serviceman if you are in doubt as to whether the product is properly grounded. Do not modify
the plug provided with the product, if it will not fit the outlet; have a proper outlet installed by a qualified electrician.
Thisproductisforuseonanominal220-240voltcircuitandhasagroundingplugthatlooksliketheplugillustratedin
thefigure.Makesurethattheproductisconnectedtoanoutlethavingthesameconfigurationastheplug.Noadaptor
should be used with this product.
10154-11
8. COMPUTER FUNCTIONS
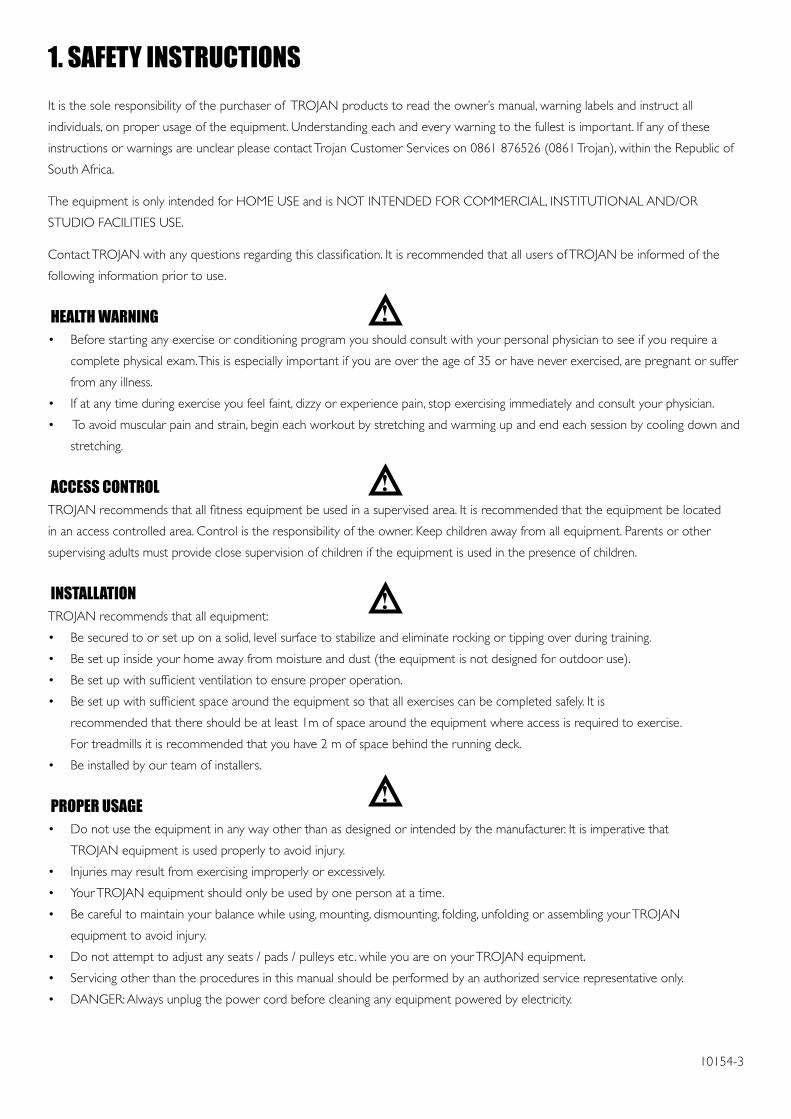
I. GENERAL OPERATION1. Turnonthetreadmill(theOn/Offswitchislocatedonthebackofthemotorcover).2. Put the Safety Key into the recess of the consol.3. The consol will now sound a warning beep and the consol window will display 00:00. This means the treadmill has
entered the Start/Ready mode. In this mode the user can hold the hand grip pulse sensor to detect their heart rate reading.
** The hand grip pulse sensor will show the relationship between the users heart rate and their age, and will determine if the effort put into running is suitable or not.
HEA
RT B
EATS
/MIN
170 OVER
150 166 MIDDLE
120 146 162 LOW
117 143 157
114 137 153
111 135 149
108 131 145
105 128 140
102 124 136
99 120 132
96 116
93
20 25 30 35 40 45 50 55 60 65 (Age)
4. Press tostarttreadmill,thetreadmillwillstartwithaspeedof1.0km/hr.Duringtheworkoutpressthe
keystoincrease/decreasethespeed.Press to control the incline angle. Press and the treadmill will
stop. If you press once, the window will display and all the values will stop changing. The consol will reset
to the START/READY status after 60 seconds. If you press for a second time and hold the button for
3 seconds the treadmill will automatically reset to the START/READY position.
5. Under the START/READY status press to enter into the other functions. Press to switch between Speed/
DistanceandCAL/Inclineduringworkout.
**Ifthesafetykey/clipisnotplacedintherecessoftheconsol,allthewindowswilldisplay“----”,whichmeansthe
treadmillcannotworknormally.
6. Press to start the fan and press it again to stop it.

10154-12
8. COMPUTER FUNCTIONS**WhentheSAFETYKEYistakenoffandthenreplaced,thetreadmillwillnotrepositionitselftothestartposition
(flat).YouneedtopresstheSTARTkeytorepositionthetreadmill.
** When the power is on, the treadmill will not reposition itself from any operating position it is in. You will need to press
theSTARTkeytorepositionthetreadmill.
**UnderSTART/READYstatusifyoupressandholdtheSTOPkeyfor5seconds,thetreadmillwillrepositionitselffrom
any position it is in.
**WhilstoperatinganyoftheprogramsifyoupresstheSTOPkeytheprogramwillstop.Iftheuserwantstoresumethe
program,presstheSTARTkey.IftheuserwantstoexittheprogrampresstheSTOPkeyagainandthecomputerwill
revertbacktotheSTART/READYstatus.
II. MODE FUNCTION KEY
1. Under the START/READY mode, press andtheSPEEDwindowwillflash.Underthismode,press or to
switch between P1 - P9.
2. P1 - P3: TIME GOAL, DISTANCE GOAL, CALORIE GOAL
2.1 After entering P1, you can set target time. The setting range is 5 - 99min, with a preset value of 20min. Set the de-
sired time using or . After setting the time, press to start with the slowest speed. During the
workoutyoucanchangethespeedusingtheSpeed buttons.
2.2 After entering P2, you can set target distance. The setting range is 1 - 9.9Km , with a preset value of 5Km. Set the
desired distance using or . After setting the distance, press to start with the slowest speed.
DuringtheworkoutyoucanchangethespeedusingtheSpeed buttons.
2.3 After entering P3 mode, you can set target calories. The setting range is 40 - 999cal, with a preset value of 200cal. Set
the desired calories using or . After setting the calories, press to start with the slowest speed.
DuringtheworkoutyoucanchangethespeedusingtheSpeed buttons.
3. P4 - P9 Program Control Function (each PROGRAM has 12 segments).
3.1.WhentheSpeedwindowbeginstoflash,youcanpress or until the desired P4 - P9 displays in the
Speed window. Press toconfirmandtheSpeedwindowwillstopflashing.
3.2.AfterselectingtheProgram,theInclinewindowwillstarttoflashtheexerciseintensitylevel(L1-L3).Press
or to select the desired level. Press toconfirmandtheInclinewindowwillstopflashing.
3.3.Afterthelevelisselected,theTimewindowwillflash,youcanpress or to change the time.
Press toconfirmandtheTimewindowwillstopflashing.
** Time preset value: 25(min) Range of time: 5 - 99(min)
10154-13
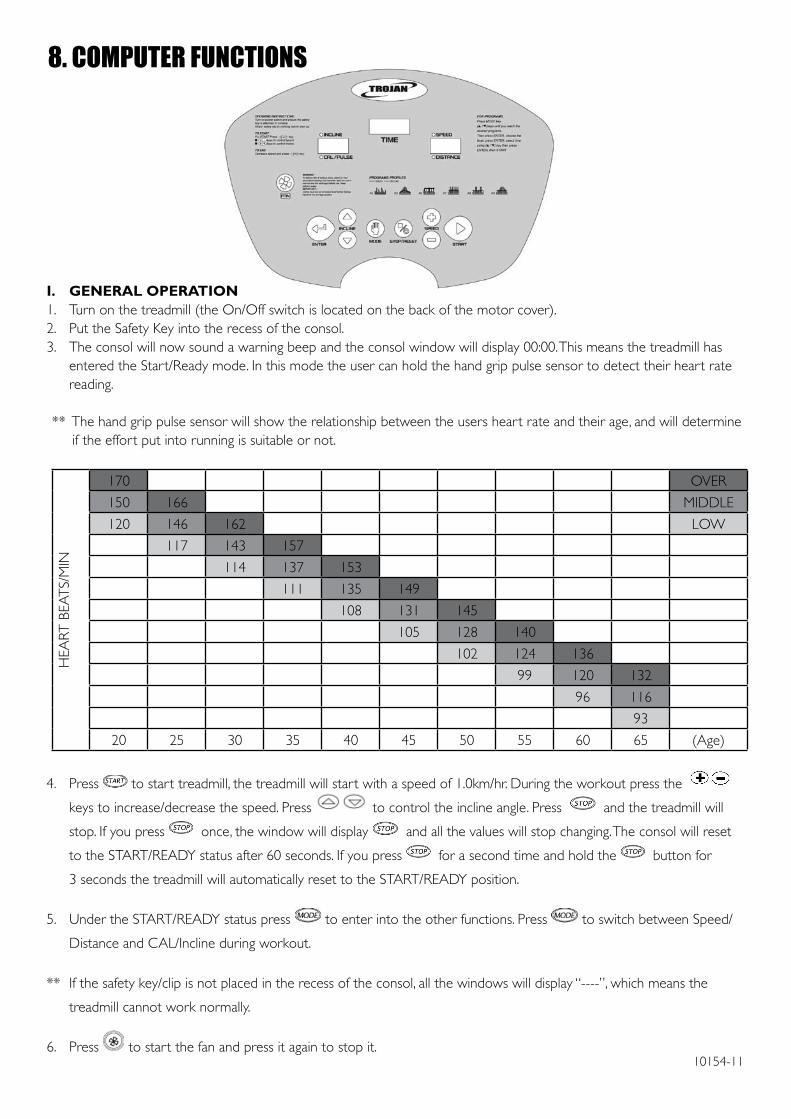
8. COMPUTER FUNCTIONS: PRESET PROGRAMMES3.4. Press and the treadmill runs according to the preset values of the program. The speed and inclination (of
the program’s 12 stages) will change continually according to the preset values. The first segment will last 2 minutes
and the following segments will each last for 1 minute. When the time period elapses, the speed and inclination will
change accordingly.
3.5. During the function setting of P4 - P9, if you press , the treadmill will start to operate using the unedited
preset values. Press or andthenyoucanchangethepresetvaluesofProgram,butinthenextstage,
the values will be reset to the original values of the Program.
3.6.IneachProgram,thereis1minuteforthewarmupexercisebeforeL1-L3isexecuted.Thespeedisdefinedbythe
start speed of each Level.
Refer to the below PROGRAM figures for the preset values:

10154-14
8. COMPUTER FUNCTIONS: PRESET PROGRAMMES

10154-15
9. FREQUENTLY ASKED QUESTIONSQ1. My consol is showing LS
• Treadmillhasnotreceivedaspeedsignalfor8seconds.
• Turnoffcomputer,unplug,leavefor30seconds,thenrestartthetreadmill.
• Iftheerrorpersistspleasecontactourcallcentreon0861876526(0861Trojan)
Q2. My consol is showing E1
• MemoryoftheconsolismalfunctioningortheCPUishavingaccessingproblems.
• Turnoffcomputer,unplug,leavefor30seconds,thenrestartthetreadmill.
• Iftheerrorpersistspleasecontactourcallcentreon0861876526(0861Trojan)
Q3. My computer consol is not working
1.Checkthatyourpowercordisinyourpoweroutletandison.
2.Checkthatyouhaveapowersupplytoyourhome.
3. Ensure that the consol computer cables have been connected properly when assembling the unit.
Q4. My consol is showing an “E2” error
1. This is an incline error.
2. Return incline to 0, and leave for 30 seconds
3. If the error continues, turn off computer, unplug, leave for 30 seconds, then restart the treadmill.
4. If the error persists, please contact our call centre on 0861 876526 (0861 Trojan)
Q5. The consol cannot read the hand pulse signal
1.Thehandpulsesensorswillnotoperatecorrectlyifyourskinisextremelydry.Moistenyourhandsandtryagain.
2.Avoidmovingyourhandswhileexercisingandholdthehandpulsesensorsfirmlywhileexercising.Ifyoudo
moveyourhandswhileexercising,givethecomputerafewsecondstoresampleanddisplayyourcorrectheartpulserate.
3. Clean the hand pulse sensors to ensure good contact between your body and the pulse sensor.
4. If the error persists, please contact 0861 876526 (0861 Trojan)
Q6. My LCD is dim
1.Checkifunitisindirectsunlight,moveifnecessary.
2. If display does not improve, please contact 0861 876 526

10154-16
10. PARTS LISTNo. Description Qty32 Drive Belt 1
33 Running Board 1
34 Rubber Cushion Pad 6
35 SocketPhilipsScrew 7
36 CounterSinkHexScrew 2
37 FoamSticker 2
38 Running Belt 1
39 RunningBoardExtensionPlate 2
40 Truss Philips Self Tapping Screw 8
41 Upper Motor Cover 1
43 Pedal 2
44 FoamSticker 4
45 Lower Motor Cover 1
46 Washer Drilling Philips Self Tapping Screw
10
47 Washer 351 Rear End Cap(Left) 152 Rear End Cap(Right) 153 Round Head Drilling Philips Self Tapping
Screw2
54 Incline Motor 1
55 Plastic Washer 10
56 CKSHexScrew 1
58 Nylon Nut 5
59 Wheel 2
60 TrussHexScrew 2
61 Front Roller 1
63 Rear Roller 1
64 CKSHexScrew 2
65 Washer 2
No. Description Qty1 Frame 12 End Cap use with 25x50x3.0t 23 Power Cord Clip 14 Power Cord 15 Round Head Philips Screw
M5xP0.8x8(Bronze)4
6 Power Switch 17 CircuitBreaker 18 ExtensionWire(White)14AWGx90x2T
(One End 90°)1
9 ExtensionWire(Kelly)14AWGx300m-mx1T1R
1
10 ExtensionWire(White)14AWGx300m-mx2T
1
11 ExtensionWire(Black)14AWGx300m-mx2T
1
12 Sensor 113 Control Set 114 TrussPhilipsScrewM5xP0.8x10 915 Control Wire(Lower) 116 Wire Clip Knob UC-0,(PCZUC0) 217 Washer Drilling Philips Self Tapping
ScrewØ4x163
19 TrussPhilipsSelfTappingScrewØ5x15 5
20 Motor 1
21 MotorFixingAdjustmentPlate 1
22 CKSHexScrewM8xP1.25x15 2
23 SpringWasherM8x3.0t 2
24 RubberPadØ18xØ8x2.0t 3
25 CKSHexScrewM8xP1.25x105(15mm)
1
26 NylonNutM8xP1.25 7
27 CKSHexScrewM8xP1.25x65(35mm) 1
28 SpringWasherM8x1.5t 1
29 WasherØ8xØ16x1.5t 3
30 Spring NCC141760 1
31 Nut 1

10154-17
10. PARTS LISTNo. Description Qty
96 Computer Tube 1
98 Foam Grip 2
99 Truss End Cap 2
100 Hand Pulse Set 2
101 Computer 1
102 Safety Key 1
103 TrussHexScrewM8xP1.25x25(SAE812525)Endroundandspiky
2
104 TrussPhilipsScrewM5xP0.8x20 6105 TrussHexScrewM8xP1.25x15 2
106 Cover 2
107 HexWrench6mm(80mmX80mm) 1
108 HexWrench+PlusDriver5mm(70mmX70mm)
1
109 SILICON 1
111 Bottle 1
112 Left Decoration Cover 1
113 Right Decoration Cover 1
114 FoamSticker 2
115 RoundHeadPhilipsScrewM5xP0.8x10 2
116 Filter 1
117 Choke 1
120 Handrail Switch Plastic 2
121 SelfTappingScrewØ3x8 2
122 SelfTappingScrewØ3x20 4
123 Handrail Switch Decal (A) 1
124 Handrail Switch Decal (S) 1
125 HandrailSwitch+Wire 2
No. Description Qty67 Base 168 Nut 269 Wheel PBK495215 270 TrussHexScrewM8xP1.25x40
(10mm)2
71 End Cap use with 30x60x2.0t 272 Foot Pad 473 Washer Drilling Philips Self Tapping
ScrewØ4x2011
74 Incline Base 1
75 End Cap use with 15x30x2.0t 4
76 TrussHexScrewM10xP1.5x35(10mm) 4
77 InclineBaseFlex -shaped Iron Plate Pin
2
78 RPinØ10xØ2.0 280 FlexTube-Lower 1
81 POP-PIN Head 1
82 End Cap 1
83 FlexTube-Upper 1
84 EndCapusewith20x20x1.5ttube 185 Cap 186 Round Head Philips Screw
M6XP1.0X201
88 TrussHexScrewM8xP1.25x60 2
89 Cylinder 1
90 Plastic Post Pad PCAP1721 2
91 PlasticWasherØ8xØ22x6t 6
92 PlasticWasherØ8.5xØ20x3.0t 2
93 Left Upright 1
94 Right Upright 1
95 TrussHexScrewM8xP1.25x40(SAEK242)End Round
6
10154-18
11. EXPLODED DRAWING

10154-19
12. TROJAN 1 YEAR WARRANTYThe Manufacturer hereby provides a warranty to the original purchaser of this product (‘the Consumer’) that this product will be free of manufacturing defects in materials and workmanship which under normal, personal, family or household use (commercial use expressly excluded) manifest themselves within the 1 year from the date of purchase.
EXCLUSIONS • Thewarrantydoesnotincludeandwillnotbeconstruedtocoverproductsdamagedasaresultofdisaster ; misuse;commercialuse;usenotinaccordancewithinthewritteninstructionsincludedwiththeproduct;abuse and/or any non-authorized modification of the product, incorrect installation of the product or normal wear and tear. • Alldemomodelscarrya3monthwarranty.
WAIVERThe warranty and the obligations of the Manufacturer provided herein are in lieu of, and the Consumer, waives all other warranties, guarantees, conditions or liabilities, express or implied, arising by law or otherwise, including without limitation, any obligation of the Manufacturer in respect of any injury, loss or damage (direct, indirect or consequential) arising out of the use of, or inability to use this product and whether or not occasioned by the Manufacturer’s negligence or any act or omission on its part.
PROOF OF PURCHASEAnyclaimintermsofthewarrantymustbesupportedbyaproofofpurchaseorawarrantynumber. Warranty numbers can be issued through contacting our call centre on 0861 Trojan (0861 876 526), or online at www.trojanhealth.co.za. If such proof is not available, then notwithstanding anything to the contrary herein, the service agent’s prevailing charges for services/repairs including call-out and/or spares will be payable by the Consumer upon collection or delivery of the repaired product.
The Consumer does not need to return the product to the store. The Consumer shall phone the Trojan hotline on 0861 Trojan (0861 876 526) and the Manufacturer’s authorized agent will at its discretion either repair the item at the Consumer’s residence or collect and repair the item at their premises.
During the warranty period the product may only be serviced and/or repaired by the Manufacturer’s duly authorized
agent(s).
Masstores(Pty).Ltd.,16PeltierDrive,Sunninghill,Sandton,Johannesburg,SouthAfrica.

10154-20
13. TROJAN REPAIRS PROCEDURE1. Procedure for repairs
ShouldyouexperienceanyfaultsorbreakdownsonyourTrojanequipment,pleaseadheretothefollowingprocedure
to have the fault rectified speedily and professionally.
• Donotreturntheproducttothestore*
• Call0861 876526 (0861 Trojan) to log the faulty product (under warranty or out of warranty)
• Theoperatorortechnicaladvisorwilltryidentifythefault,andwillbookaserviceteamcallout.
• Theserviceteamwillendeavourtofixtheprobleminyourhomeonanagreeddateandtime.
• Onlyifthefaultcannotberepairedintheconvenienceofyourhome,willtheserviceteamtakethe
faultyproductbacktotheservicecentre.
• Itemsrepairedinourservicecentrewillbereturnedtoyourhomeonanagreeddateandtime.
* Note:Should you live in an outlying area, it may be neccessary to return the product to the store nearest to you.Our
service operator will advise you of your repair procedure.
2. Cost of Repairs
2.1 Under warranty
• Anyitemsstillunderwarrantywillberepairedfreeofcharge,aslongasitcomplieswiththetermsand
conditions of the warranty. (refer to “warranties” section in this manual)
• AnyitemsthatneedtoberepairedthatareNOTcoveredinthewarrantywillbefortheconsumer’s
expense.Aquotefortherepair/replacementoftheseitemswillbeprovidedtotheconsumerfor
approval prior to repairs being conducted.
2.2 Out of Warranty
• Anyitemsthatneedtoberepairedoncethewarrantyhasexpiredwillbefortheconsumer’sexpense
including call out fees. A quote for the repair/replacement of these items will be provided to the
consumer for approval prior to repairs being conducted.
Recommended