XCAL-Mobile 4G (For Android OS) User Guide
Doc Rev: 2
Product Version: 4.3.xx
2013. 04
© Copyright by Accuver Co., Ltd. Page II
Ⓒ 2013 Accuver Co., Ltd., All rights reserved.
This documentation shall not be changed, distributed to the public, and opened to the third person without written permission.
Accuver is not responsible for any direct or indirect damages arisen or related to use of this manual. All information included
herein may be changed without prior notice.
Accuver Co., Ltd.,
Address: #1-301, Complex 2, Pangyo7 Techno Valley #633, Sampyung-Dong, Bundang-Gu, Seongnam-Si, Kyungki-Do
Web site: www.Accuver.com
Phone #: +82-31-788-1700
Fax #: +82-31-705-1246

I
Contents
Contents ........................................................................ I
Overview ...................................................................... 5
Special Features ........................................................ 6
Specification ............................................................. 6
Getting Started ............................................................. 7
Connecting PC and smart phone ................................... 8
Installing file explorer application (ES File Explorer) ........ 9
Transferring XCAL-Mobile 4G program file .................... 10
Starting XCAL-Mobile 4G ............................................. 12
Graphic User Interface .............................................. 14
RF Information ........................................................... 15
Android RF .............................................................. 17
WiFi Info ................................................................. 17
Signal Messages ....................................................... 18
External DM Summary .............................................. 19
3G Summary ........................................................... 19
3G Signal ................................................................ 20
3G Cell ................................................................... 21
LTE Summary .......................................................... 21
LTE Signal ............................................................... 22
LTE Cell .................................................................. 22
LTE Tx Power ........................................................... 23
LTE SIB1 ................................................................. 23
RTP Info.................................................................. 24
CDMA Summary ....................................................... 24
CDMA Signal ............................................................ 25
CDMA Cell ............................................................... 25
EVDO Cell ............................................................... 26
RF Information of Samsung chip ................................. 27
Android RF .............................................................. 29
WiFi Info ................................................................. 29
© Copyright by Accuver Co., Ltd. Page II
Signal Messages ...................................................... 30
4G Summary ........................................................... 31
4G Signal ................................................................ 31
4G Cell ................................................................... 32
4G Tx Power ........................................................... 32
4G SIB1 ................................................................. 33
4G Handover ........................................................... 33
4G RACH ................................................................ 34
Configuring LogMask .................................................. 35
Configuring LogMask Setting ..................................... 36
Configuring LogMask Setting of Samsung Chip ............. 37
Performing AutoCall Test ............................................ 38
Creating AutoCall Scenario ........................................ 39
Importing AutoCall Scenario ................................. 41
Starting AutoCall Test (In Classic tab) ......................... 42
Starting AutoCall Test (In All Scenario tab) .................. 44
Terminating AutoCall Test .......................................... 46
Monitoring in Google Map ........................................... 47
Displaying Data in Google Map ................................... 48
Configuring Map Options ........................................... 49
Configuring Map Options – Parameters ................... 50
Configuring Map Options – Settings ....................... 51
Importing BTS/Repeater Data ............................... 52
Call Result History ....................................................... 57
Uploading Log File ....................................................... 59
Uploading Setting ..................................................... 63
Additional Function ..................................................... 64
Manual Logging ........................................................ 65
Replay .................................................................... 67
Screen Capture ........................................................ 69
About ..................................................................... 70
Other Settings ......................................................... 72
Other Settings - Naming Log File .......................... 74
Other Settings - CSV Delimiter ............................. 75
Other Settings - RAT & Band Lock (Galaxy S3 GT-
I9305) .............................................................. 76

© Copyright by Accuver Co., Ltd. Page III
Other Settings - External GPS .............................. 77
Inbuilding Test ........................................................... 78
Configuring Inbuilding test ........................................ 79
Starting Inbuilding Test ............................................. 82
Moving Point Test ............................................... 83
Fixed Point Test .................................................. 89
Configuring Inbuilding Options ................................... 91
Configuring Inbuilding Options – Parameters .......... 92
Terminating XCAL-Mobile 4G ...................................... 93
Troubleshooting ......................................................... 95
Related Products ........................................................ 97
Appendix: Configuring AutoCall Scenario .................... 98
Time Configuration (Voice, Web, SMS, WiFi, E-Mail, Ping,
YouTube) ................................................................ 99
Time Configuration (FTP) ........................................ 100
Configuration for Each Call Type ............................... 101
Voice .............................................................. 101
FTP ................................................................ 101
Web ................................................................ 102
SMS ................................................................ 102
WiFi ................................................................ 103
E-Mail ............................................................. 103
Ping ................................................................ 104
Iperf ............................................................... 104
Youtube ........................................................... 105
VoLTE .............................................................. 105
MOS Setting ..................................................... 106
Multi Call ......................................................... 109
Multi RAB ........................................................ 109
Appendix: Call Events ................................................ 110
Voice .................................................................... 111
FTP ...................................................................... 111
Web ..................................................................... 112
SMS ..................................................................... 112
WiFi ..................................................................... 112
E-Mail ................................................................... 113
© Copyright by Accuver Co., Ltd. Page IV
Ping ..................................................................... 113
YouTube ............................................................... 113
VoLTE ................................................................... 113
Appendix: Parameter Description .............................. 114
LTE ...................................................................... 114
3G – UMTS/HSDPA/HSUPA ...................................... 116
2G – GSM/GPRS/EDGE ........................................... 117
2G – CDMA/EVDO .................................................. 118
Appendix: RTP Analysis in VoLTE ............................... 120
5
Overview
XCAL-Mobile 4G is a handheld based stand-alone application running on smart phones that enables QoS and QoE testing across
all WCDMA, GSM, and LTE technologies. XCAL-Mobile 4G application on smart phone in Android OS supports extensive
application testing and delivers real-time network measurement and visualization.
XCAL-Mobile 4G is provided for both indoor and outdoor measurement while it is also available for field drive test when it is
installed inside of a moving vehicle. It supports remote control function by connecting with other server solution series of
Accuver. All features can be controlled by using normal handset keys.

6
Special Features • Generates and terminates voice and data calls
automatically.
• Creates and edits measurement scenarios in portable
smart phone.
• Performs voice and data call measurement
simultaneously.
• Monitors statistics in real-time in message, graph,
table, and map.
• Provides multiple types of call events and parameters
for technologies.
• Shows monitoring data in mobile window as the
logging file is provided in *.drm and *.csv format.
• Supports both indoor and outdoor measurement.
• Supports Replay mode.
• Exports logging file to server both manually and
automatically.
• Reports errors of the program via e-mail
automatically.
Specification
• Technology: CDMA/EVDO, WCDMA, LTE
Supportive technology varies depending on
Smart Phone model. For detail, see Appendix:
Support Technology for Smart Phone Model.
• Terminal: Android smart phone OS up to Jelly Bean
(v4.1)
• Recommended RAM memory: 812 MB
• Call Type: Voice, FTP, Web, E-Mail, Iperf, Ping,
YouTube, VoLTE, Multi Call, Multi RAB
• RF Parameter: Android RF Info, WiFi Info, 3G
Summary, 3G Signal, 3G Cell, LTE Summary, LTE
Signal, LTE Cell, LTE Tx Power, LTE SIB1

7
Getting Started
This chapter describes how to install XCAL-Mobile 4G application in smart phone:
• How to Connect a PC to an Android-OS smart phone.
• How to install a file explorer application in Android-OS.
• How to copy XCAL-Mobile 4G program (*.apk) to Android-OS smart phone.

XCAL-Mobile 4G User Guide Chapter 2. Getting Started
© Copyright by Accuver Co., Ltd. Page 8
Connecting PC and smart phone
In order to install XCAL-Mobile 4G application on your smart phone, you first need to connect your smart phone and PC by
phone cable.
1. Connect PC and an Android-
OS smart phone by phone cable.
2. Swipe down from the top of smart phone screen to open notification center.
3. Tap USB connected. 4. Tap Turn on USB storage button.
5. PC and Android-OS smart phone is connected successfully.

XCAL-Mobile 4G User Guide Chapter 2. Getting Started
© Copyright by Accuver Co., Ltd. Page 9
Installing file explorer application (ES File Explorer)
ES File Explorer application helps you to navigate through your smart phone.
1. Tap Market icon on
your smart phone to open Android Market.
2. Android Market main screen appears. Tap Search icon.
3. Search for ES File Explorer.
4. Download and install the ES File Explorer application on your smart phone.
5. ES File Explorer application is successfully installed.

XCAL-Mobile 4G User Guide Chapter 2. Getting Started
© Copyright by Accuver Co., Ltd. Page 10
Transferring XCAL-Mobile 4G program file
You need to copy and paste XCAL-Mobile 4G application file in *.apk format onto your smart phone.
1. In PC, open driver of smart
phone. 2. Create a new folder. 3. Copy and paste XCAL-Mobile
4G program file (*.apk) into the new folder.
XCAL-Mobile 4G program file (*.apk) is provided upon purchase.
4. In smart phone, tap ES File Explorer icon to execute.
XCAL-Mobile 4G User Guide Chapter 2. Getting Started
© Copyright by Accuver Co., Ltd. Page 11
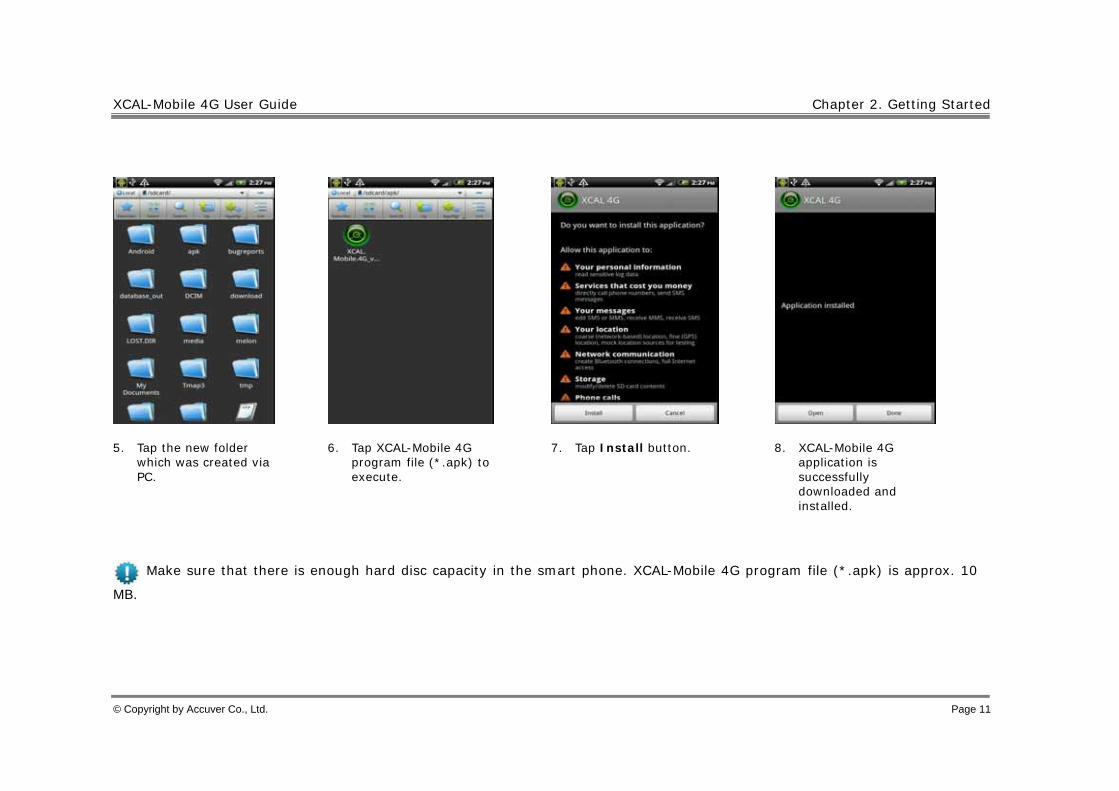
5. Tap the new folder which was created via PC.
6. Tap XCAL-Mobile 4G program file (*.apk) to execute.
7. Tap Install button. 8. XCAL-Mobile 4G application is successfully downloaded and installed.
Make sure that there is enough hard disc capacity in the smart phone. XCAL-Mobile 4G program file (*.apk) is approx. 10
MB.

12
Starting XCAL-Mobile 4G
By now, you have completed all necessary steps before starting and are ready to use XCAL-Mobile 4G application on your smart
phone.
Before you start XCAL-Mobile 4G, make sure
- Settings – Date and time - Auto (Use network-provided values) is checked.
- Internet access is available (WiFi, 3G or 4G).
XCAL-Mobile 4G User Guide Chapter 3. Starting XCAL-Mobile 4G
© Copyright by Accuver Co., Ltd. Page 13
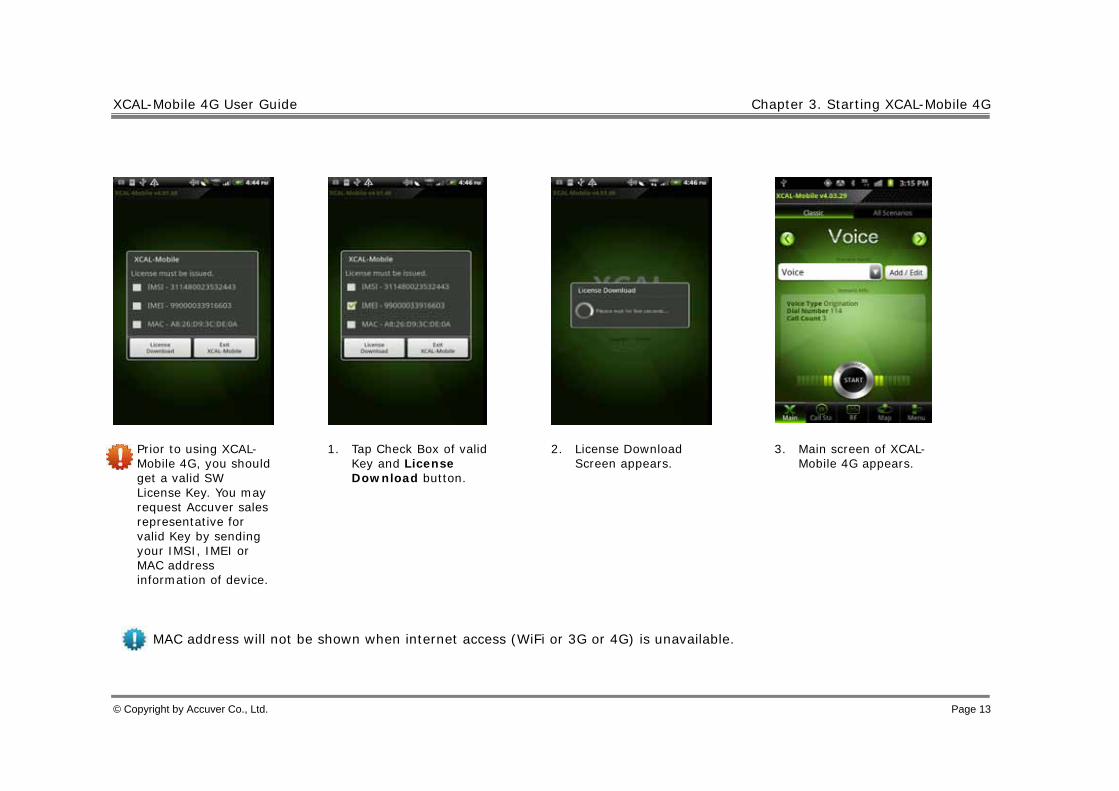
Prior to using XCAL-Mobile 4G, you should get a valid SW License Key. You may request Accuver sales representative for valid Key by sending your IMSI, IMEI or MAC address information of device.
1. Tap Check Box of valid Key and License Download button.
2. License Download Screen appears.
3. Main screen of XCAL-Mobile 4G appears.
MAC address will not be shown when internet access (WiFi or 3G or 4G) is unavailable.

XCAL-Mobile 4G User Guide Chapter 3. Starting XCAL-Mobile 4G
© Copyright by Accuver Co., Ltd. Page 14
Shows test result in real-time while measurement. For detail of call result, see Call Result History
Shows data and serving lines in Google map. For detail of call result, see Monitoring in Google Map.
Shows RF information of smart phone in real-time. For detail of RF information, see RF Information
Select call type and start AutoCall based on call scenario. For detail of AutoCall test, see AutoCall Test.
Graphic User Interface
XCAL-Mobile 4G’s intuitive and user-friendly user interface helps your measurement projects..
Starts AutoCall.
AutoCall Setting, Call History, Other Setting, Log Upload, Logmask Setting For detail, see Configuring AutoCall Scenario, Call Result History, Uploading Log File, Additional Function
XCAL-Mobile 4G version
Swipes left and right to select call type.
Taps combo box to select Auto Call scenario.
Shows Scenario details.
Taps Classic or All Scenario tab.

15
RF Information
XCAL-Mobile 4G displays real-time RF information of smart phone.
XCAL-Mobile 4G shows following RF parameters. • Android RF • WiFi Info • Signal Messages • 3G Summary • 3G Signal • 3G Cell • LTE Summary • LTE Signal
• LTE Cell • LTE Tx Power • LTE SIB1 • RTP Summary • CDMA Summary • CDMA Signal • CDMA Cell • EVDO Cell
RF parameters in blue color are available depending on device type.
For details of parameter description of each technology, see Appendix: Parameter Description.

XCAL-Mobile 4G User Guide Chapter 4. RF Information
© Copyright by Accuver Co., Ltd. Page 16
1. In main screen of XCAL-Mobile 4G, tap RF button.
2. To select RF parameter, swipe down the green bar at the top of the screen. You can see various RF information view types. Select a view type icon. For details, see next pages.
3. The selected view type screen appears.
Swipe left and right to monitor other RF Information screens.
Swipe up and down to monitor more data in a RF Information screen.
17
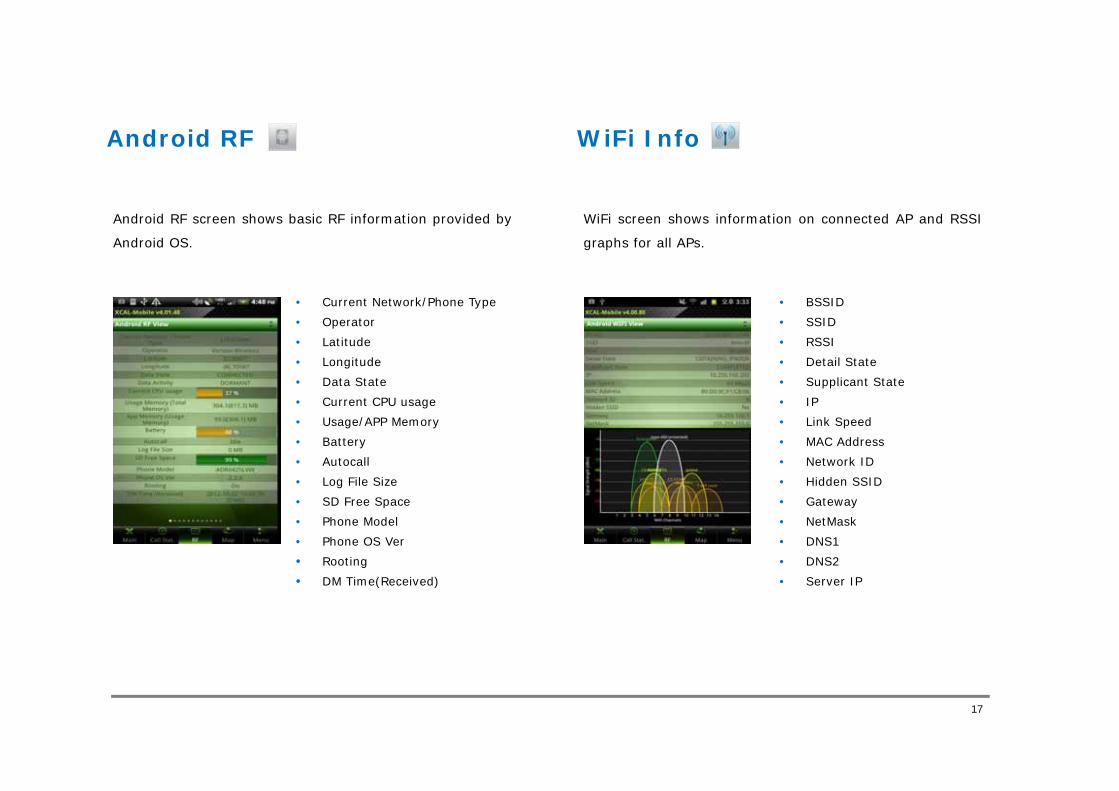
Android RF
Android RF screen shows basic RF information provided by
Android OS.
• Current Network/Phone Type • Operator • Latitude • Longitude • Data State • Current CPU usage • Usage/APP Memory • Battery • Autocall • Log File Size • SD Free Space • Phone Model • Phone OS Ver • Rooting • DM Time(Received)
WiFi Info
WiFi screen shows information on connected AP and RSSI
graphs for all APs.
• BSSID • SSID • RSSI • Detail State • Supplicant State • IP • Link Speed • MAC Address • Network ID • Hidden SSID • Gateway • NetMask • DNS1 • DNS2 • Server IP
XCAL-Mobile 4G User Guide Chapter 4. RF Information
© Copyright by Accuver Co., Ltd. Page 18
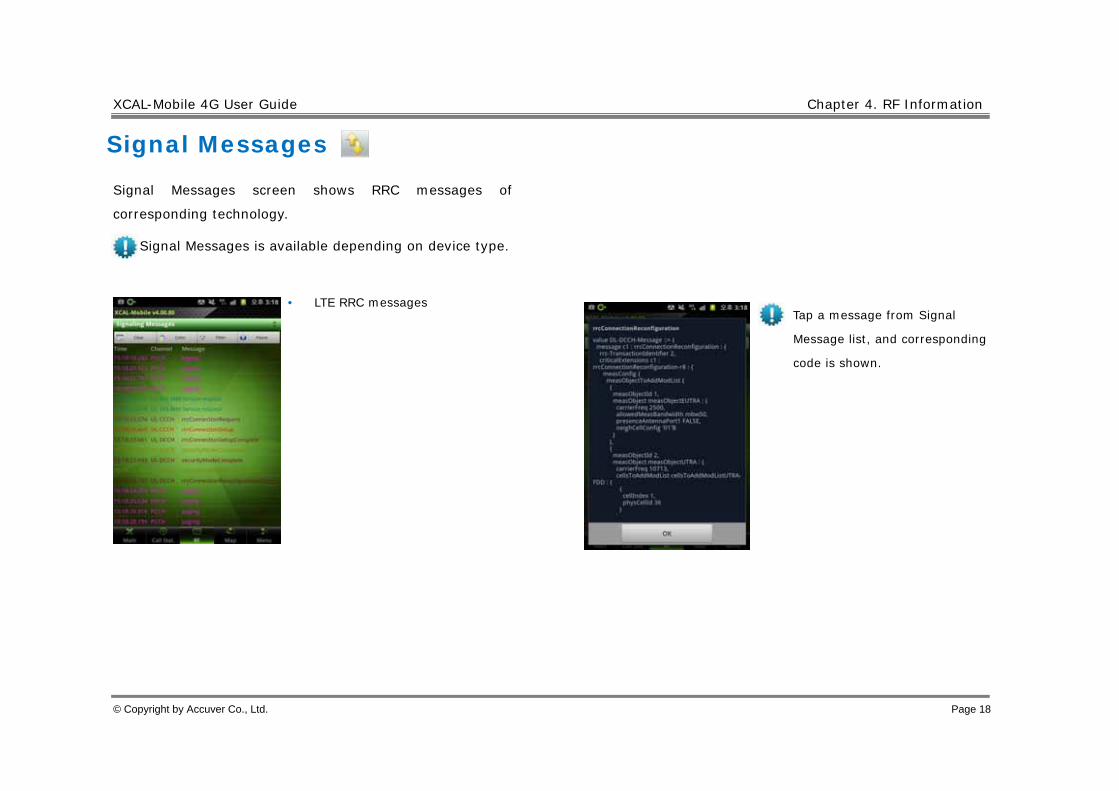
Signal Messages
Signal Messages screen shows RRC messages of
corresponding technology.
Signal Messages is available depending on device type.
• LTE RRC messages
Tap a message from Signal
Message list, and corresponding
code is shown.

XCAL-Mobile 4G User Guide Chapter 4. RF Information
© Copyright by Accuver Co., Ltd. Page 19
External DM Summary
External DM Summary screen shows information of XCAL-
Solo HW. External DM Summary screen shows information
when XCAL-Solo HW is connected to smart phone.
• Battery Level: Shows battery status of XCAL-Solo HW.
• Solo Version: Shows XCAL-Solo SW version.
• System Version: Shows XCAL-Solo FW version.
• Serial Number: Shows XCAL-Solo HW serial number.
3G Summary
3G Summary screen shows Rx, Tx, Adj Tx, BLER, CQI, DTX
Count, MAC-hs Layer, Physical, FTP Throughput, No. of
Codes, RG Down, RG Hold, RG Up, AG, SG, TTI, E-TFCI, UE
Power Headroom, SF Codes, Non Serving Cell ACK and
Happy bit information.
3G Summary is available depending on device type.
• RRC State • RB Assignment • DL UARFCN (Freq) • UL UARFCN (Freq) • Rx Power • Tx Power • BLER • SIR • Best Active PSC • Best Active Ec/Io • Best Active RSCP
XCAL-Mobile 4G User Guide Chapter 4. RF Information
© Copyright by Accuver Co., Ltd. Page 20
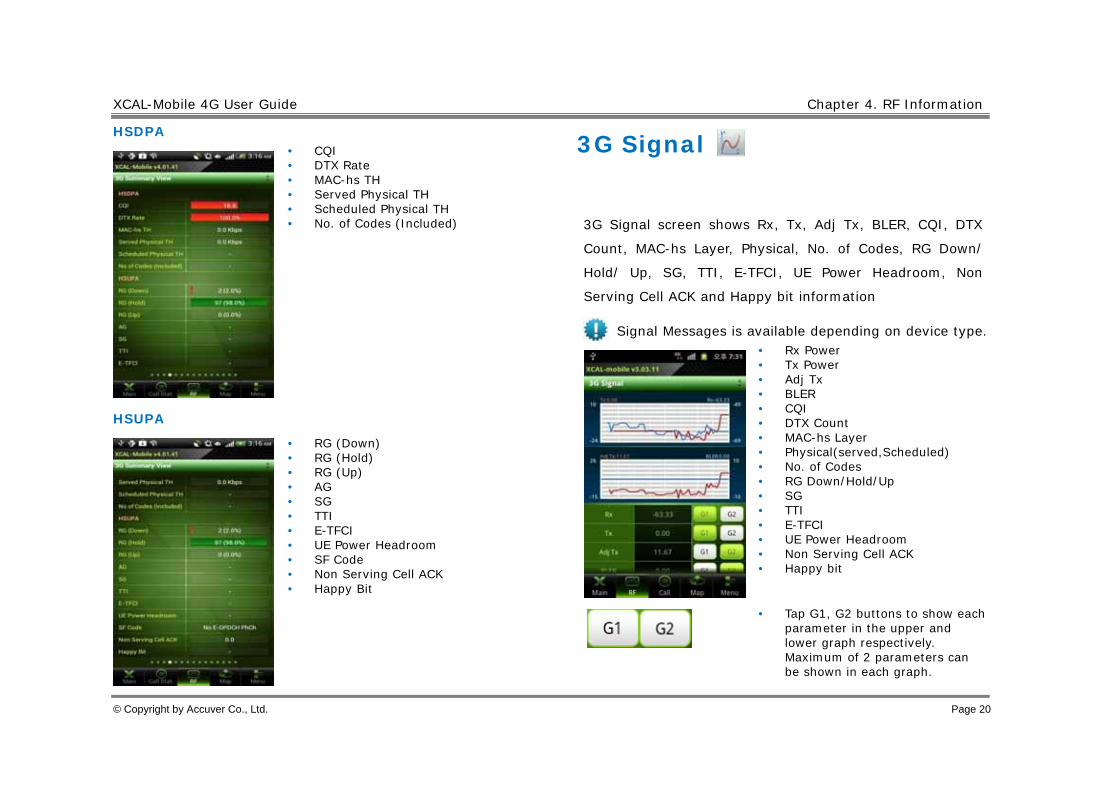
HSDPA
• CQI • DTX Rate • MAC-hs TH • Served Physical TH • Scheduled Physical TH • No. of Codes (Included)
HSUPA
• RG (Down) • RG (Hold) • RG (Up) • AG • SG • TTI • E-TFCI • UE Power Headroom • SF Code • Non Serving Cell ACK • Happy Bit
3G Signal
3G Signal screen shows Rx, Tx, Adj Tx, BLER, CQI, DTX
Count, MAC-hs Layer, Physical, No. of Codes, RG Down/
Hold/ Up, SG, TTI, E-TFCI, UE Power Headroom, Non
Serving Cell ACK and Happy bit information
Signal Messages is available depending on device type.
• Rx Power • Tx Power • Adj Tx • BLER • CQI • DTX Count • MAC-hs Layer • Physical(served,Scheduled) • No. of Codes • RG Down/Hold/Up • SG • TTI • E-TFCI • UE Power Headroom • Non Serving Cell ACK • Happy bit
• Tap G1, G2 buttons to show each parameter in the upper and lower graph respectively. Maximum of 2 parameters can be shown in each graph.
XCAL-Mobile 4G User Guide Chapter 4. RF Information
© Copyright by Accuver Co., Ltd. Page 21
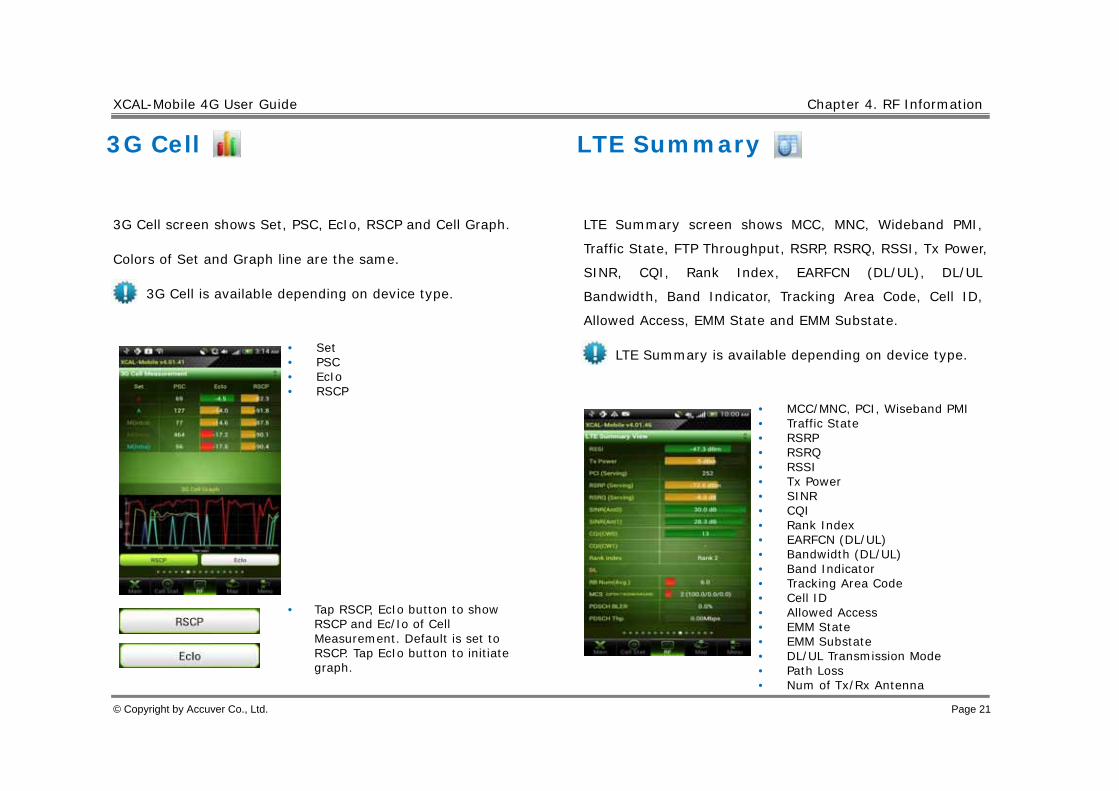
3G Cell
3G Cell screen shows Set, PSC, EcIo, RSCP and Cell Graph.
Colors of Set and Graph line are the same.
3G Cell is available depending on device type.
• Set • PSC • EcIo • RSCP
• Tap RSCP, EcIo button to show
RSCP and Ec/Io of Cell Measurement. Default is set to RSCP. Tap EcIo button to initiate graph.
LTE Summary
LTE Summary screen shows MCC, MNC, Wideband PMI,
Traffic State, FTP Throughput, RSRP, RSRQ, RSSI, Tx Power,
SINR, CQI, Rank Index, EARFCN (DL/UL), DL/UL
Bandwidth, Band Indicator, Tracking Area Code, Cell ID,
Allowed Access, EMM State and EMM Substate.
LTE Summary is available depending on device type.
• MCC/MNC, PCI, Wiseband PMI • Traffic State • RSRP • RSRQ • RSSI • Tx Power • SINR • CQI • Rank Index • EARFCN (DL/UL) • Bandwidth (DL/UL) • Band Indicator • Tracking Area Code • Cell ID • Allowed Access • EMM State • EMM Substate • DL/UL Transmission Mode • Path Loss • Num of Tx/Rx Antenna
XCAL-Mobile 4G User Guide Chapter 4. RF Information
© Copyright by Accuver Co., Ltd. Page 22
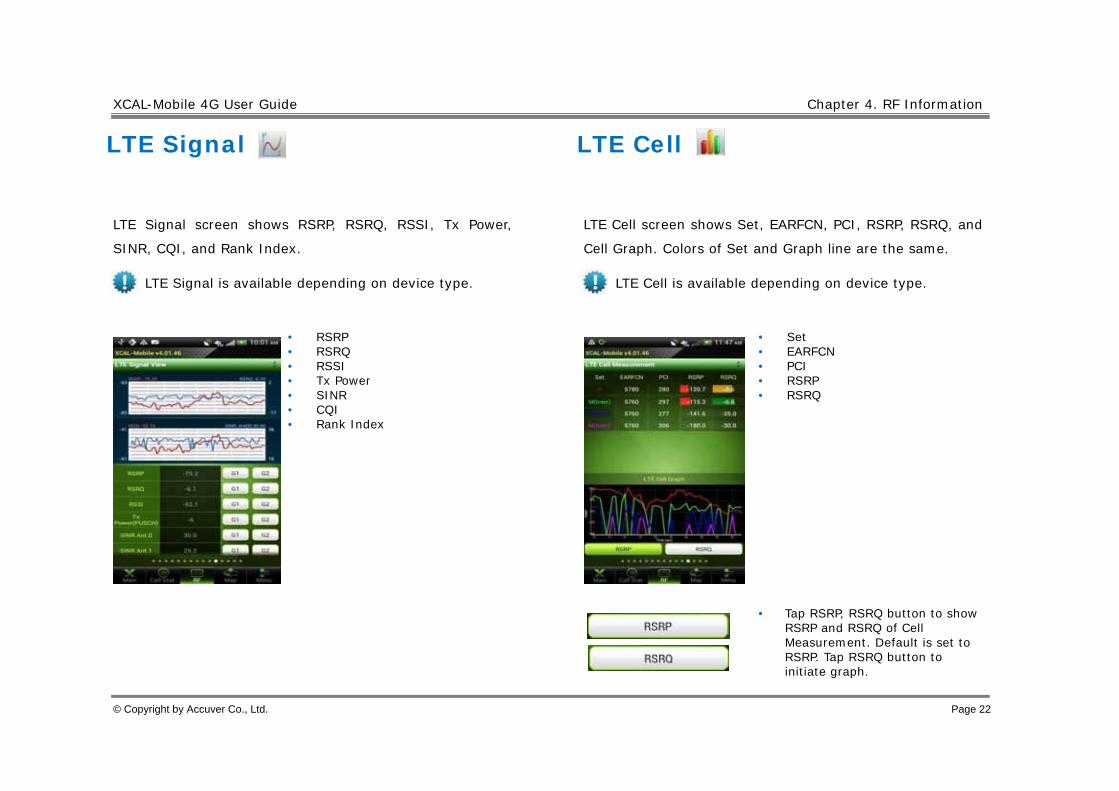
LTE Signal
LTE Signal screen shows RSRP, RSRQ, RSSI, Tx Power,
SINR, CQI, and Rank Index.
LTE Signal is available depending on device type.
• RSRP • RSRQ • RSSI • Tx Power • SINR • CQI • Rank Index
LTE Cell
LTE Cell screen shows Set, EARFCN, PCI, RSRP, RSRQ, and
Cell Graph. Colors of Set and Graph line are the same.
LTE Cell is available depending on device type.
• Set • EARFCN • PCI • RSRP • RSRQ
• Tap RSRP, RSRQ button to show RSRP and RSRQ of Cell Measurement. Default is set to RSRP. Tap RSRQ button to initiate graph.

XCAL-Mobile 4G User Guide Chapter 4. RF Information
© Copyright by Accuver Co., Ltd. Page 23
LTE Tx Power
4G Tx Power screen shows Start Time, Last Updated Time,
Tx Power, Sync Time, and X-Axis Resolution
LTE Tx Power is available depending on device type
• Start Time • Last Updated Time • Tx Power • Sync Time • X-Axis Resolution
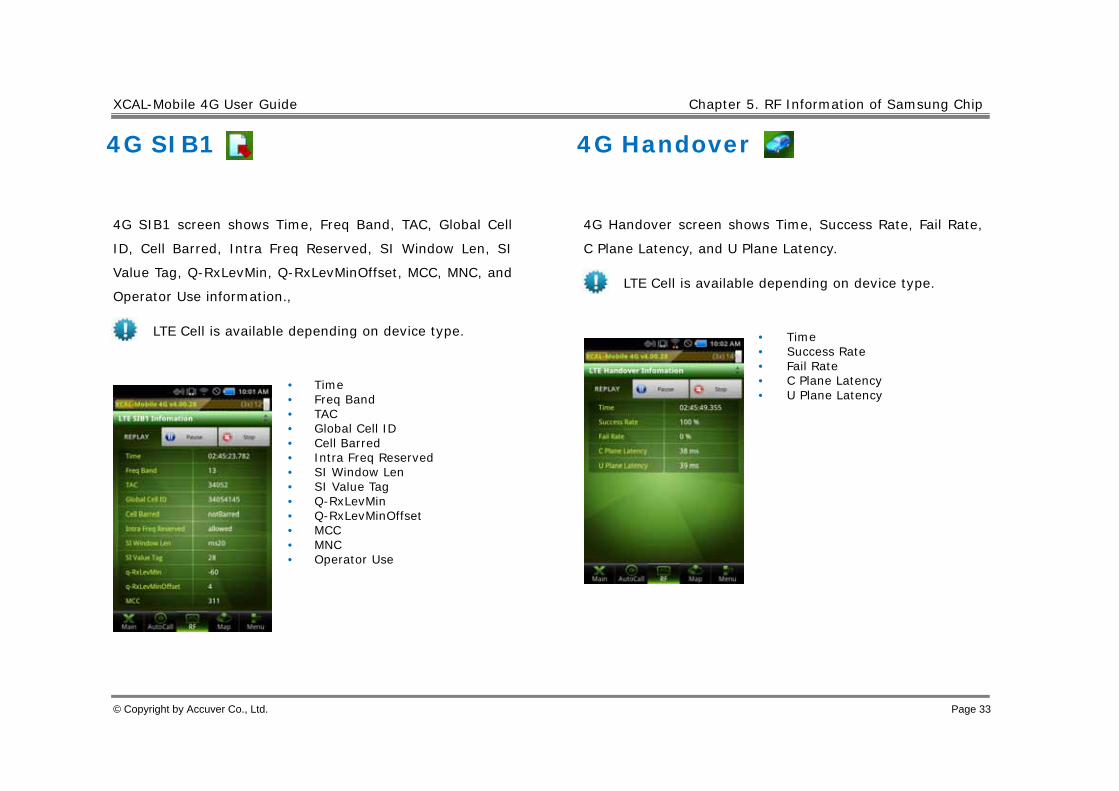
LTE SIB1
LTE SIB1 screen shows Time, Freq Band, TAC, Global Cell
ID, Cell Barred, Intra Freq Reserved, SI Window Len, SI
Value Tag, Q-RxLevMin, Q-RxLevMinOffset, MCC, MNC, and
Operator Use information.,
LTE SIB1 is available depending on device type.
• Time • Freq Band • TAC • Global Cell ID • Cell Barred • Intra Freq Reserved • SI Window Len • SI Value Tag • Q-RxLevMin • Q-RxLevMinOffset • MCC • MNC • Operator Use
XCAL-Mobile 4G User Guide Chapter 4. RF Information
© Copyright by Accuver Co., Ltd. Page 24
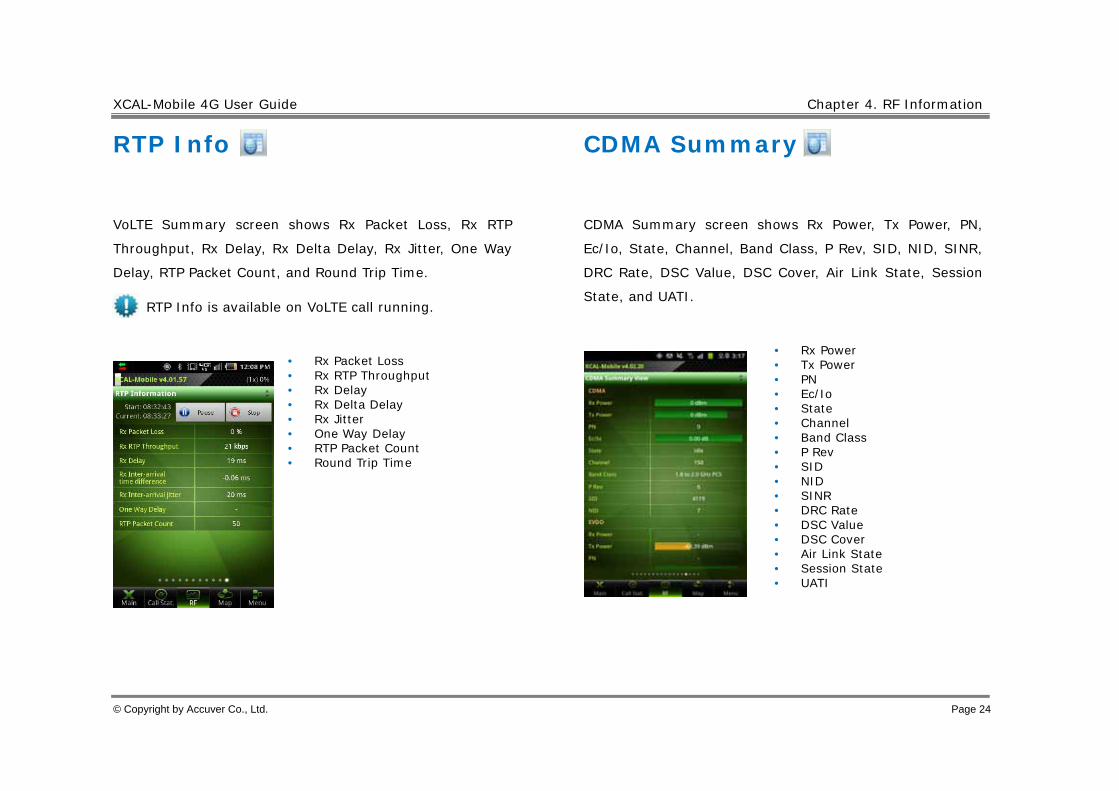
RTP Info
VoLTE Summary screen shows Rx Packet Loss, Rx RTP
Throughput, Rx Delay, Rx Delta Delay, Rx Jitter, One Way
Delay, RTP Packet Count, and Round Trip Time.
RTP Info is available on VoLTE call running.
• Rx Packet Loss • Rx RTP Throughput • Rx Delay • Rx Delta Delay • Rx Jitter • One Way Delay • RTP Packet Count • Round Trip Time
CDMA Summary
CDMA Summary screen shows Rx Power, Tx Power, PN,
Ec/Io, State, Channel, Band Class, P Rev, SID, NID, SINR,
DRC Rate, DSC Value, DSC Cover, Air Link State, Session
State, and UATI.
• Rx Power • Tx Power • PN • Ec/Io • State • Channel • Band Class • P Rev • SID • NID • SINR • DRC Rate • DSC Value • DSC Cover • Air Link State • Session State • UATI

XCAL-Mobile 4G User Guide Chapter 4. RF Information
© Copyright by Accuver Co., Ltd. Page 25
CDMA Signal
CDMA Signal screen shows Rx Power, Tx Power, Ec/Io, and
SINR or CDMA/EVDO.
• Rx Power • Tx Power • Ec/Io • SINR
CDMA Cell
CDMA Cell screen shows PN, Ec/Io, and Channel
information of CDMA.
• PN • Ec/Io • Channel
XCAL-Mobile 4G User Guide Chapter 4. RF Information
© Copyright by Accuver Co., Ltd. Page 26
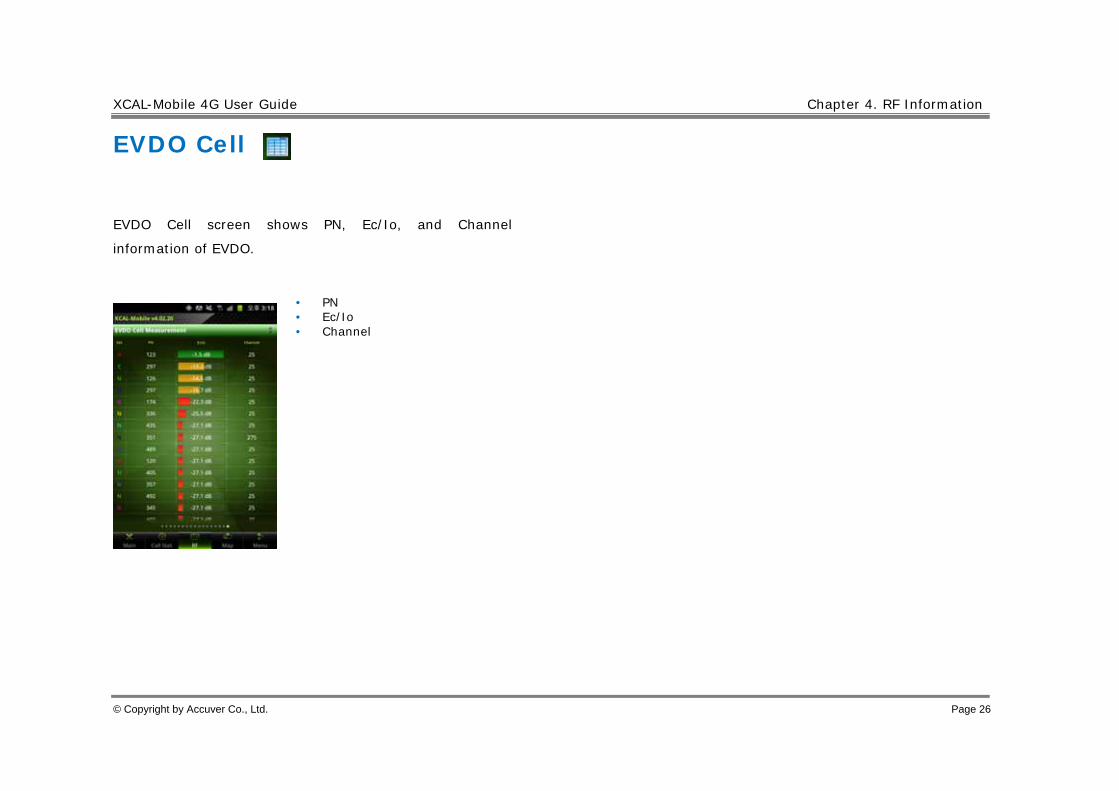
EVDO Cell
EVDO Cell screen shows PN, Ec/Io, and Channel
information of EVDO.
• PN • Ec/Io • Channel

27
RF Information of Samsung chip
XCAL-Mobile 4G displays real-time RF information of smart phone with Samsung Chip.
XCAL-Mobile 4G shows following RF parameters.
• Android RF • WiFi Info • Signal Messages • 4G Summary • 4G Signal
• 4G Cell • 4G Tx Power • 4G SIB1 • 4G Handover • 4G RACH
RF parameters in blue color are available depending on device type.

XCAL-Mobile 4G User Guide Chapter 5. RF Information of Samsung Chip
© Copyright by Accuver Co., Ltd. Page 28
1. In main screen of XCAL-Mobile 4G, tap RF button.
2. To select RF parameter, swipe down the green bar at the top of screen. You can see various RF information view types. Select a view type. For details, see next pages.
3. The selected view type screen appears.

29
Android RF
Android RF screen shows basic RF information provided by
Android OS.
• Current Network/Phone Type • Operator • Latitude • Longitude • Data State • Current CPU usage • Usage/APP Memory • Battery • Autocall • Log File Size • SD Free Space • Phone Model • Phone OS Ver • Rooting
WiFi Info
WiFi screen shows information on connected AP and RSSI
graphs for all APs.
• BSSID • SSID • RSSI • Detail State • Supplicant State • IP • Link Speed • MAC Address • Network ID • Hidden SSID • Gateway • NetMask • DNS1 • DNS2 • Server IP

XCAL-Mobile 4G User Guide Chapter 5. RF Information of Samsung Chip
© Copyright by Accuver Co., Ltd. Page 30
Signal Messages
Signal Messages screen shows RRC messages of corresponding technology.
Signal Messages is available depending on device type.
• LTE RRC messages
Tap a message from Signal
Message list, and corresponding
code is shown.

XCAL-Mobile 4G User Guide Chapter 5. RF Information of Samsung Chip
© Copyright by Accuver Co., Ltd. Page 31
4G Summary
4G Summary screen shows RAT, APN, Modem Status,
MIMO Type, DL/UL Frequency, Tx Power, PRACH Tx Power,
PCI, RSRP, RSRQ, RSSI, DL BLER, DL/UL Throughput, RRC
State, EMM State, EMM Func State, DL/UL RB Num, MCS,
GPS Performance, and Battery Info.
LTE Summary is available depending on device type.
• RAT/ APN • Modem Status • MIMO Type • DL/UL Frequency • Tx Power • PRACH Tx Power • PCI • RSRP(Ant0,1) • RSRQ(Ant0,1) • RSSI(Ant0,1) • DL BLER • DL/UL Throughput • RRC State • EMM State • EMM Func State • DL/UL RB Num, MCS • GPS Performance • Battery Info
4G Signal
4G Signal screen shows RSRP, RSRQ, RSSI, Tx Power,
PRACH Tx Power, and DL/UL Throughput
LTE Signal is available depending on device type.
• RSRP.Ant.0 • RSRQ.Ant.0 • RSSI.Ant.0 • RSRP.Ant.1 • RSRQ.Ant.1 • RSSI.Ant.1 • Tx Power • PRACH Tx Power • DL/UL Throughput • Tap G1, G2 buttons to show each
parameter in the upper and lower graph respectively. Maximum of 2 parameters can be shown in each graph.

XCAL-Mobile 4G User Guide Chapter 5. RF Information of Samsung Chip
© Copyright by Accuver Co., Ltd. Page 32
4G Cell
4G Cell screen shows EARFCN, PCI, RSSI, RSRP, and RSRQ.
LTE Cell is available depending on device type.
• EARFCN • PCI • RSSI • RSRP • RSRQ
4G Tx Power
4G Tx Power screen shows Start Time, Last Updated Time,
Tx Power, Sync Time, and X-Axis Resolution
LTE Cell is available depending on device type.
• Start Time • Last Updated Time • Tx Power • Sync Time • X-Axis Resolution
XCAL-Mobile 4G User Guide Chapter 5. RF Information of Samsung Chip
© Copyright by Accuver Co., Ltd. Page 33
4G SIB1
4G SIB1 screen shows Time, Freq Band, TAC, Global Cell
ID, Cell Barred, Intra Freq Reserved, SI Window Len, SI
Value Tag, Q-RxLevMin, Q-RxLevMinOffset, MCC, MNC, and
Operator Use information.,
LTE Cell is available depending on device type.
• Time • Freq Band • TAC • Global Cell ID • Cell Barred • Intra Freq Reserved • SI Window Len • SI Value Tag • Q-RxLevMin • Q-RxLevMinOffset • MCC • MNC • Operator Use
4G Handover
4G Handover screen shows Time, Success Rate, Fail Rate,
C Plane Latency, and U Plane Latency.
LTE Cell is available depending on device type.
• Time • Success Rate • Fail Rate • C Plane Latency • U Plane Latency

XCAL-Mobile 4G User Guide Chapter 5. RF Information of Samsung Chip
© Copyright by Accuver Co., Ltd. Page 34
4G RACH
4G RACH screen shows RACH messages of corresponding technology.
4G RACH is available depending on device type.
• 4G RACH Messages
Tap a message from Signal
Message list, and corresponding
code is shown.

35
Configuring LogMask
Before you begin measurement project, you are able to define log codes to collect and monitor. By selecting necessary log codes
for each technology, you may save time for creating logging file and performance capacity.
Log codes list varies depending on chipset type.
XCAL-Mobile 4G User Guide Chapter 6. Configuring LogMask
© Copyright by Accuver Co., Ltd. Page 36
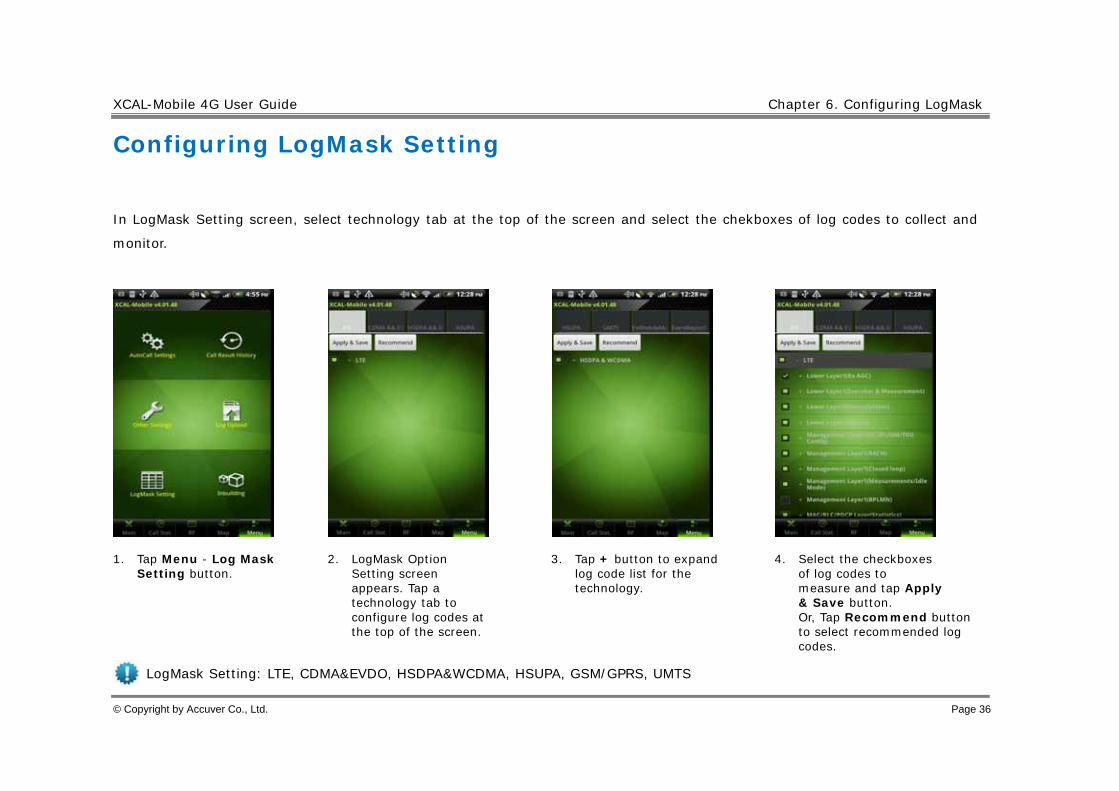
Configuring LogMask Setting
In LogMask Setting screen, select technology tab at the top of the screen and select the chekboxes of log codes to collect and
monitor.
1. Tap Menu - Log Mask Setting button.
2. LogMask Option Setting screen appears. Tap a technology tab to configure log codes at the top of the screen.
3. Tap + button to expand log code list for the technology.
4. Select the checkboxes of log codes to measure and tap Apply & Save button. Or, Tap Recommend button to select recommended log codes.
LogMask Setting: LTE, CDMA&EVDO, HSDPA&WCDMA, HSUPA, GSM/GPRS, UMTS

XCAL-Mobile 4G User Guide Chapter 6. Configuring LogMask
© Copyright by Accuver Co., Ltd. Page 37
Configuring LogMask Setting of Samsung Chip
In LogMask Setting screen, select techbology tab at top of the screen and select the chekboxes of log codes to be collected and
monitored.
1. Tap Menu - LogMask Setting button.
2. LogMask Option Setting screen appears. Tap Common/RRC/NAS Item button.
3. LTE LogMask Setting Screen appears.
4. Select the checkboxes of code codes to measure, and tap Save button.
5. The configured LogMask setting is saved successfully.
LogMask Setting: Common/RRC/NAS, LTE Phy, LTE Layer1, LTE Layer2, LTE DATA

38
Performing AutoCall Test
XCAL-Mobile 4G generates and terminates voice and data calls automatically.
• Configures and edits AutoCall scenario.
• Starts AutoCall test.
• Terminates AutoCall test.

XCAL-Mobile 4G User Guide Chapter 7. Performing AutoCall Test
© Copyright by Accuver Co., Ltd. Page 39
Creating AutoCall Scenario
Before you start AutoCall test, you need to pre-configure AutoCall scenario (script). AutoCall scenario can be configured and
edited in smart phone.
XCAL-Mobile 4G supports call types of Voice, FTP, Web, SMS, WiFi, E-Mail, Ping, and YouTube.
1. In main screen of XCAL-Mobile 4G, tap Menu tab.
2. Tap Autocall Settings.
Or, tap Scenario Edit button at the lower left corner of Main screen to move to AutoCall Scenario creation screen directly.
3. Tap a call type. Get Scenario: Downloads created AutoCall Scenario from FTP server to XCAL-Mobile. See Downloading AutoCall Scenario.
4. Enter a call name in Call Name entry field.
XCAL-Mobile 4G User Guide Chapter 7. Performing AutoCall Test
© Copyright by Accuver Co., Ltd. Page 40
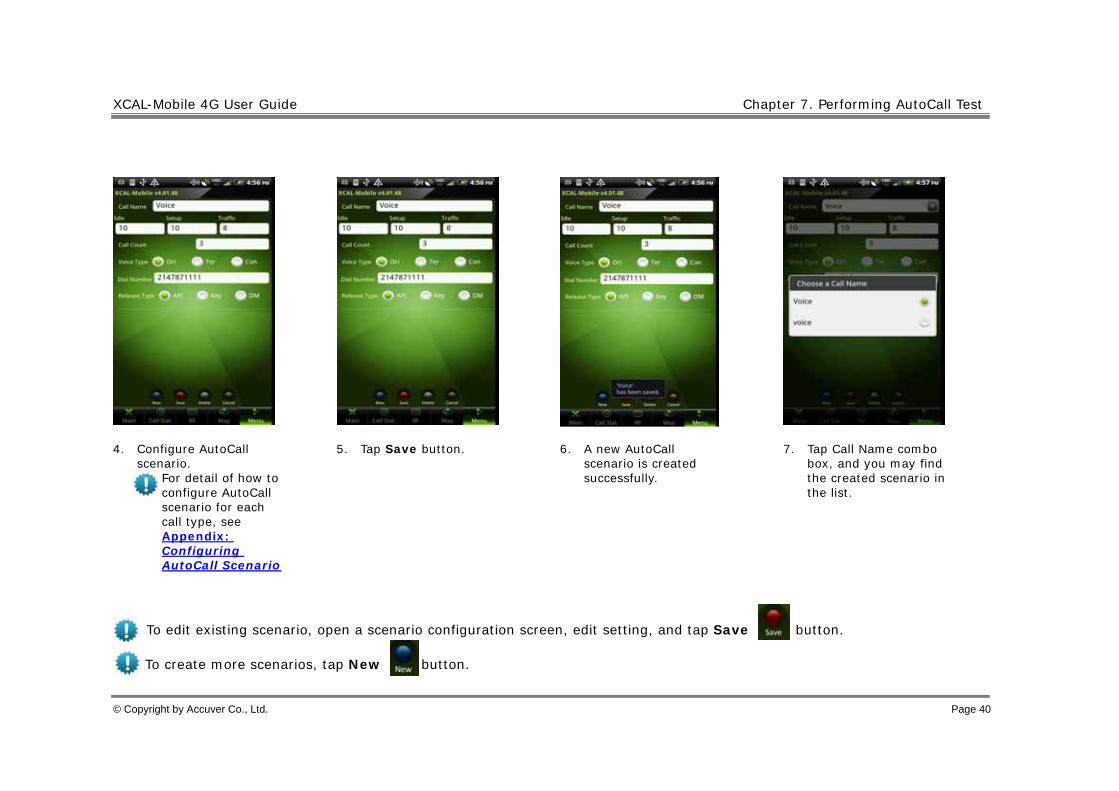
4. Configure AutoCall scenario.
For detail of how to configure AutoCall scenario for each call type, see Appendix: Configuring AutoCall Scenario
5. Tap Save button. 6. A new AutoCall scenario is created successfully.
7. Tap Call Name combo box, and you may find the created scenario in the list.
To edit existing scenario, open a scenario configuration screen, edit setting, and tap Save button.
To create more scenarios, tap New button.
XCAL-Mobile 4G User Guide Chapter 7. Performing AutoCall Test
© Copyright by Accuver Co., Ltd. Page 41
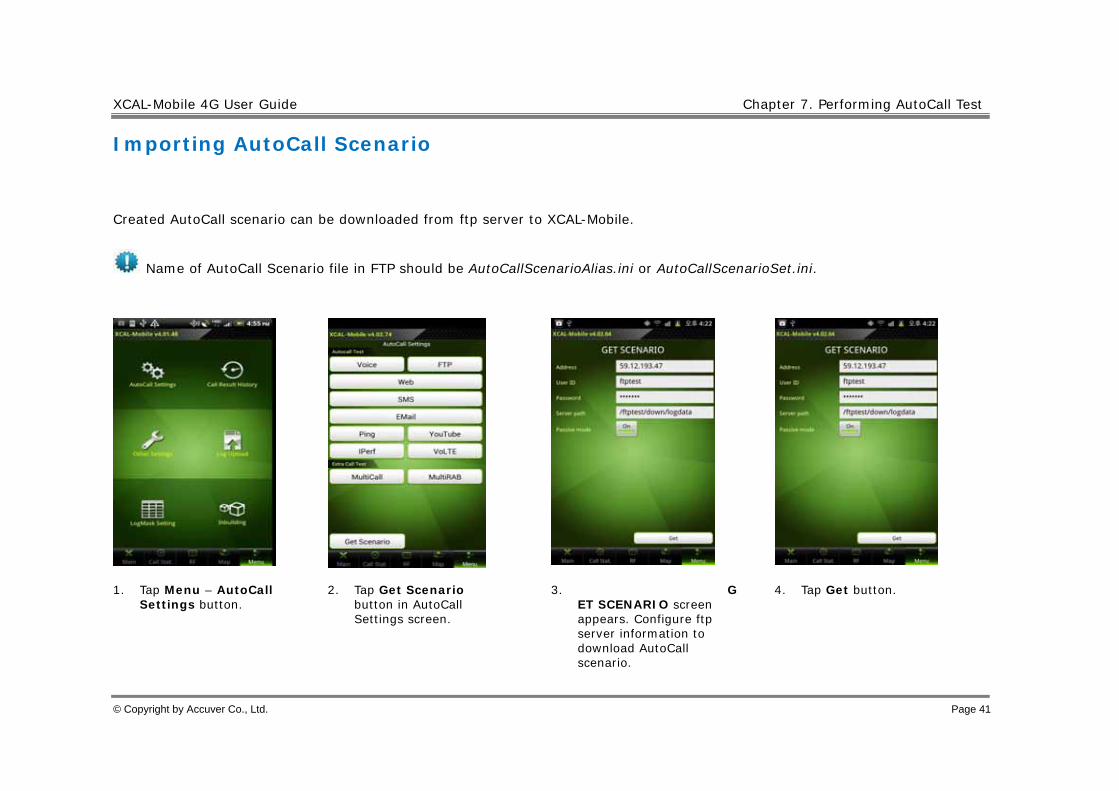
Importing AutoCall Scenario
Created AutoCall scenario can be downloaded from ftp server to XCAL-Mobile.
Name of AutoCall Scenario file in FTP should be AutoCallScenarioAlias.ini or AutoCallScenarioSet.ini.
1. Tap Menu – AutoCall Settings button.
2. Tap Get Scenario button in AutoCall Settings screen.
3. GET SCENARIO screen appears. Configure ftp server information to download AutoCall scenario.
4. Tap Get button.

XCAL-Mobile 4G User Guide Chapter 7. Performing AutoCall Test
© Copyright by Accuver Co., Ltd. Page 42
Starting AutoCall Test (In Classic tab)
You may start AutoCall test by tapping Start button in Main tab, and AutoCall test is started based on configured AutoCall
scenario.
1. Tap Main tab. 2. Swipe left and right on Call Type section to select a call type to test. And tap Scenario Name combo box to select a call scenario.
3. Tap Start button to start AutoCall.
4. AutoCall test starts.
XCAL-Mobile 4G User Guide Chapter 7. Performing AutoCall Test
© Copyright by Accuver Co., Ltd. Page 43
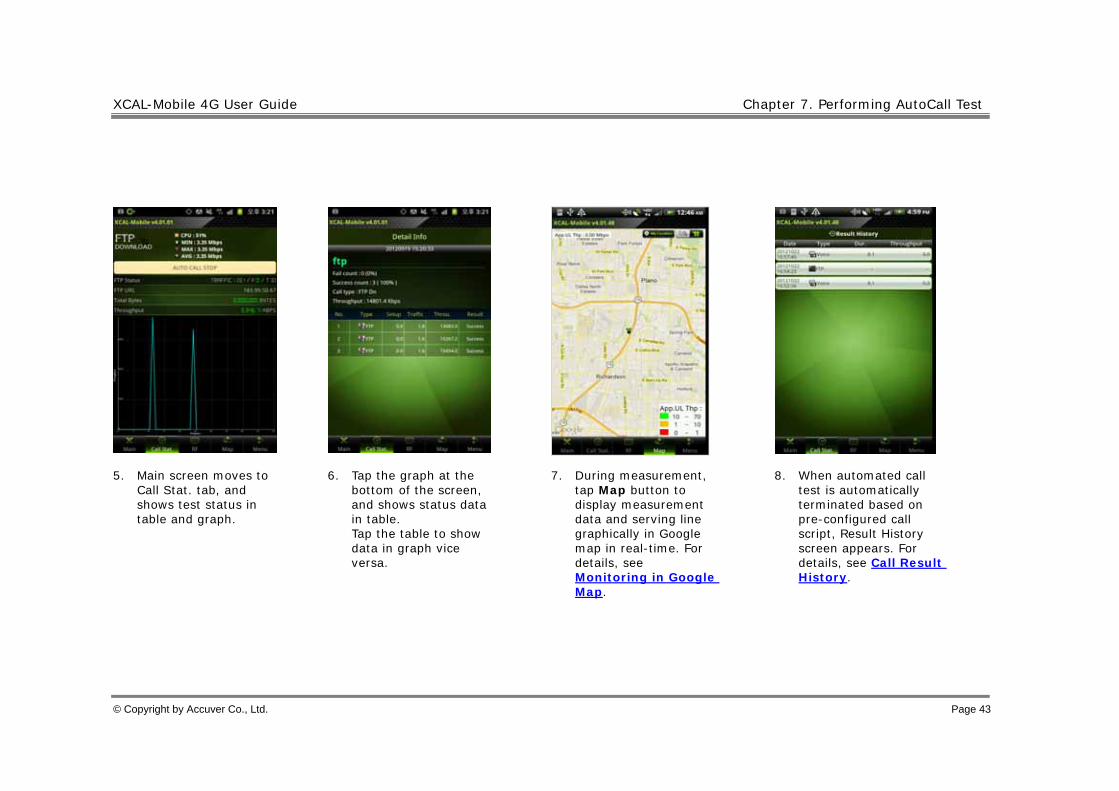
5. Main screen moves to Call Stat. tab, and shows test status in table and graph.
6. Tap the graph at the bottom of the screen, and shows status data in table. Tap the table to show data in graph vice versa.
7. During measurement, tap Map button to display measurement data and serving line graphically in Google map in real-time. For details, see Monitoring in Google Map.
8. When automated call test is automatically terminated based on pre-configured call script, Result History screen appears. For details, see Call Result History.
XCAL-Mobile 4G User Guide Chapter 7. Performing AutoCall Test
© Copyright by Accuver Co., Ltd. Page 44
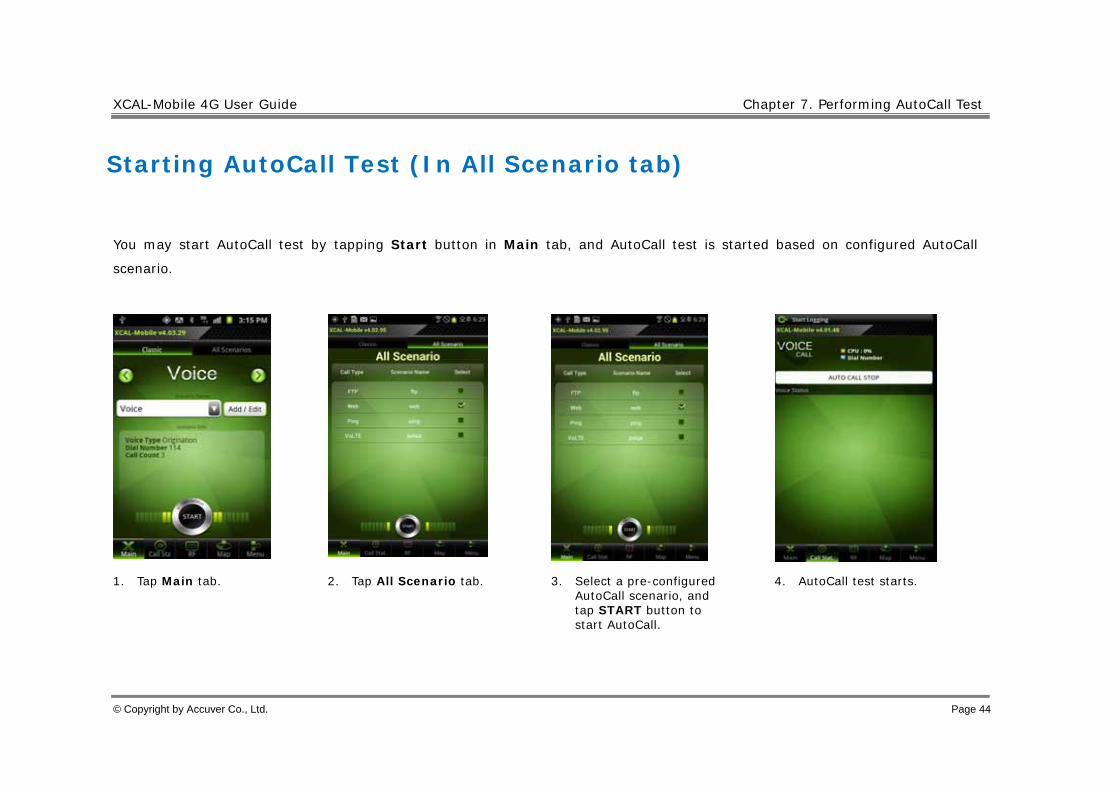
Starting AutoCall Test (In All Scenario tab)
You may start AutoCall test by tapping Start button in Main tab, and AutoCall test is started based on configured AutoCall
scenario.
1. Tap Main tab. 2. Tap All Scenario tab.
3. Select a pre-configured AutoCall scenario, and tap START button to start AutoCall.
4. AutoCall test starts.

XCAL-Mobile 4G User Guide Chapter 7. Performing AutoCall Test
© Copyright by Accuver Co., Ltd. Page 45
5. Main screen moves to Call Stat. tab, and shows test status in table and graph.
6. Tap the graph at the bottom of the screen, and shows status data in table. Tap the table to show data in graph vice versa.
7. During measurement, tap Map button to display measurement data and serving line graphically in Google map in real-time. For details, see Monitoring in Google Map.
8. When automated call test is automatically terminated based on pre-configured call script, Result History screen appears. For details, see Call Result History.
XCAL-Mobile 4G User Guide Chapter 7. Performing AutoCall Test
© Copyright by Accuver Co., Ltd. Page 46
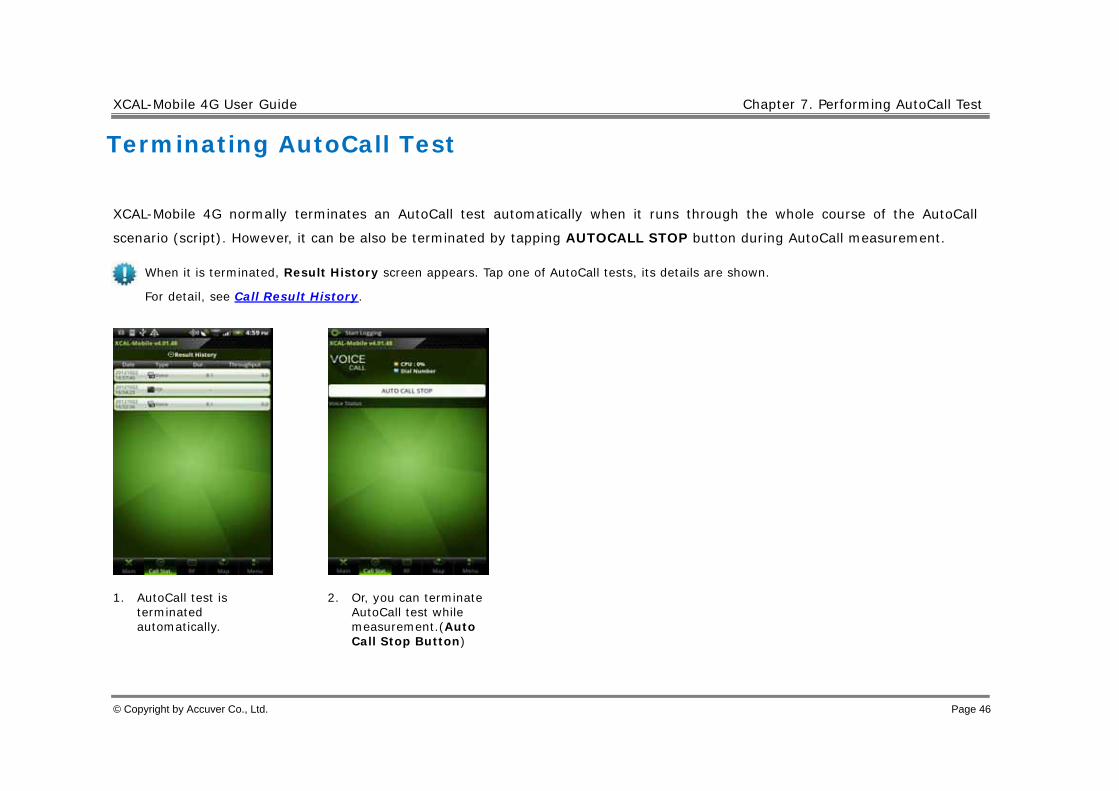
Terminating AutoCall Test
XCAL-Mobile 4G normally terminates an AutoCall test automatically when it runs through the whole course of the AutoCall
scenario (script). However, it can be also be terminated by tapping AUTOCALL STOP button during AutoCall measurement.
When it is terminated, Result History screen appears. Tap one of AutoCall tests, its details are shown.
For detail, see Call Result History.
1. AutoCall test is terminated automatically.
2. Or, you can terminate AutoCall test while measurement.(Auto Call Stop Button)
47
Monitoring in Google Map
Measurement data and serving lines are visualized in map in real-time during measurement. Internal GPS of smart phone is
used for location information, and if you import BTS/Repeater data, map displays their information. Google map supports two
map types; image map and satellite map.
The speed at which Google Map displays greatly depends on the internet access speed of the handset itself. 3G coverage
area shows faster update than that of 2G coverage area.
• Displays data in Google map.
• Configures map options.
• Configuring Map Options - Parameters
• Configuring Map Options - Settings.
• Imports BTS/Repeater Data
XCAL-Mobile 4G User Guide Chapter 8. Monitoring in Google Map
© Copyright by Accuver Co., Ltd. Page 48
Displaying Data in Google Map
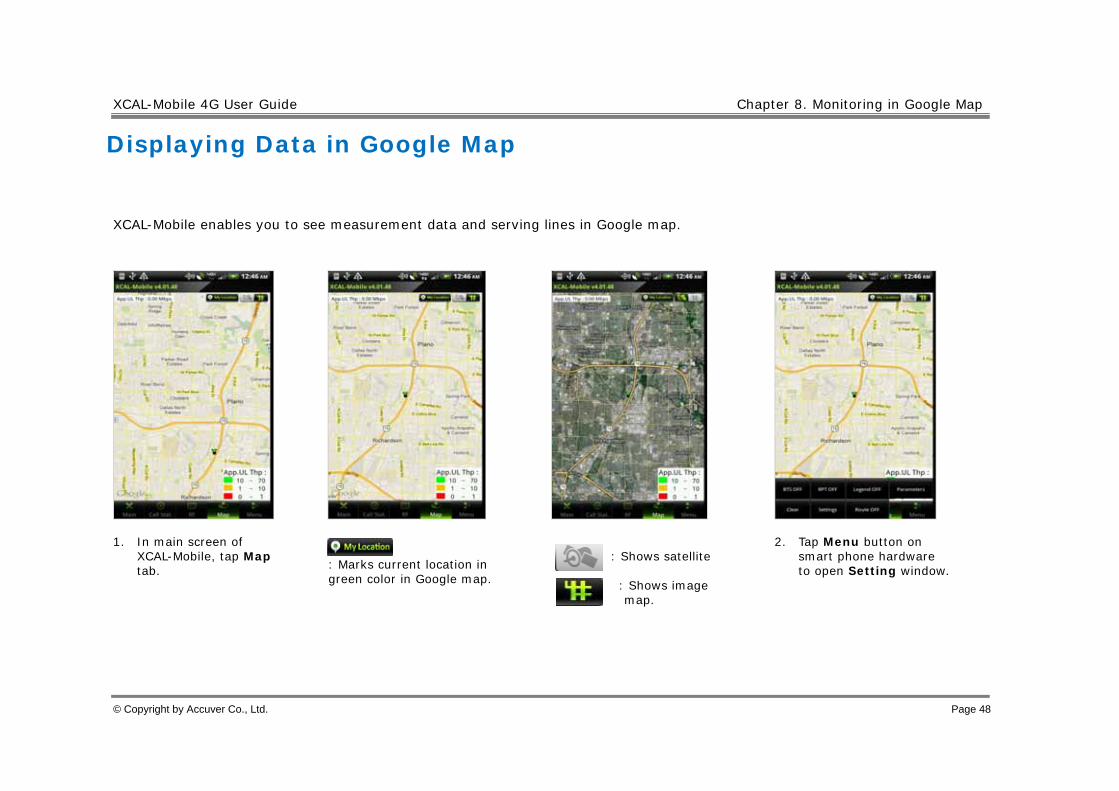
XCAL-Mobile enables you to see measurement data and serving lines in Google map.
1. In main screen of XCAL-Mobile, tap Map tab.
: Marks current location in green color in Google map.
: Shows satellite
: Shows image map.
2. Tap Menu button on smart phone hardware to open Setting window.

XCAL-Mobile 4G User Guide Chapter 8. Monitoring in Google Map
© Copyright by Accuver Co., Ltd. Page 49
Configuring Map Options
XCAL-Mobile enables you to change map setting in Google map. To open Map Options, tap Menu button on smart phone
hardware.
Items Description
BTS On/Off Shows/Hides BTS in map.
RPT On/Off Shows/Hides Repeater in map.
Legend On/Off Shows/Hides legend in map.
Parameter Selects parameters of technologies to display in map. For details, see
Configuring Map Options – Parameters.
Clear Clears data in map.
Call Event On/Off Shows/Hides call events in map.
Settings Configures symbol size, update time interval, minimum distance for
data update, user location, BTS/RPT size, serving line width, and
importing BTS data from FTP/local disk. For details, see Configuring
Map Options – Settings.
Route On/Off Shows/Hides Route in map.
Capture Captures current screen.
XCAL-Mobile 4G User Guide Chapter 8. Monitoring in Google Map
© Copyright by Accuver Co., Ltd. Page 50
Configuring Map Options – Parameters
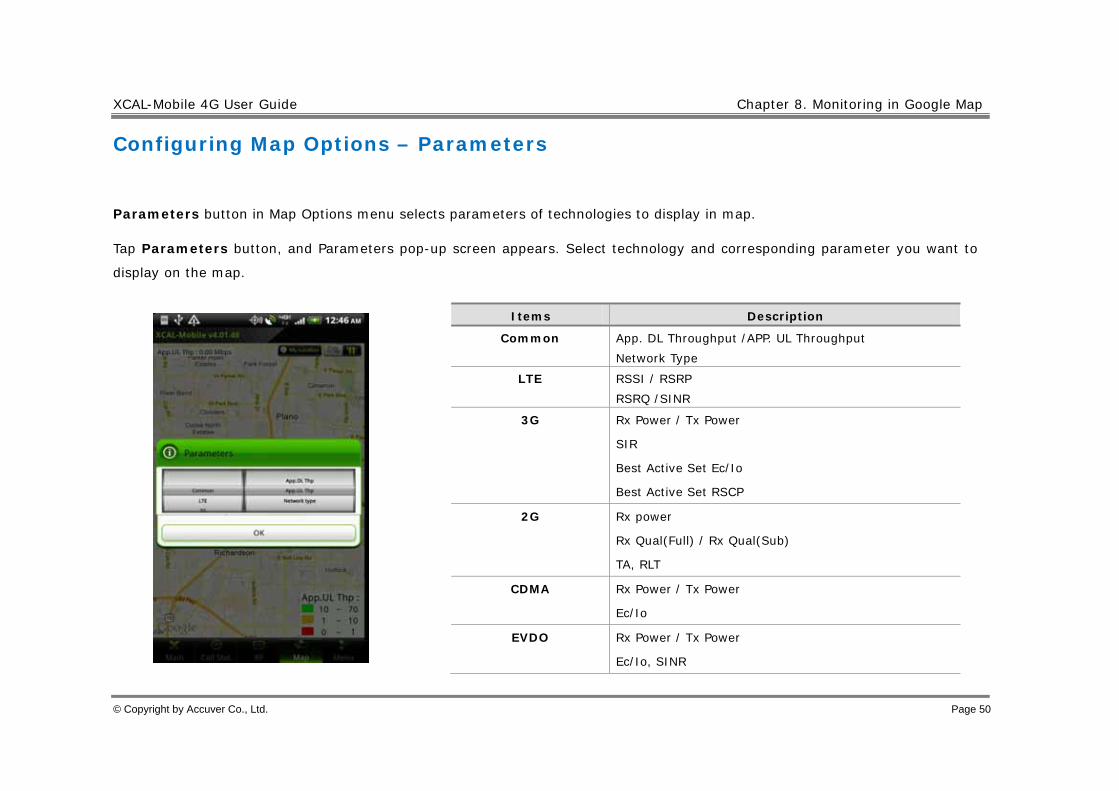
Parameters button in Map Options menu selects parameters of technologies to display in map.
Tap Parameters button, and Parameters pop-up screen appears. Select technology and corresponding parameter you want to
display on the map.
Items Description
Common App. DL Throughput /APP. UL Throughput Network Type
LTE RSSI / RSRP RSRQ /SINR
3G Rx Power / Tx Power
SIR
Best Active Set Ec/Io
Best Active Set RSCP
2G Rx power
Rx Qual(Full) / Rx Qual(Sub)
TA, RLT
CDMA Rx Power / Tx Power
Ec/Io
EVDO Rx Power / Tx Power
Ec/Io, SINR

XCAL-Mobile 4G User Guide Chapter 8. Monitoring in Google Map
© Copyright by Accuver Co., Ltd. Page 51
Configuring Map Options – Settings
Settings button in Map Options menu configures symbol size, update time interval, minimum distance for data update, user
location, BTS/RPT size, serving line width, and importing BTS data from FTP server or local disk.
Items Description
Symbol Size Configures symbol size that is currently displayed in the map.
Update Time Configures time to update to the map. (unit: sec)
Min. Distance Configures minimum distance to move to update to the map. (unit:
meter)
Auto Focus Places user location at the center of map when the current location is
out of the map.
Offline Map Loads and displays mobile local disc map when data connection (3G,
WiFi, LTE, etc.) is unavailable.
BTS/RPT Size Configures BTS/Repeater size.
Line Width Size Configures serving line width.
BTS Update From
FTP Server / Local
Disk
Imports BTS data from FTP server or Local Disk. Tap BTS Update
From FTP Server / Local disk button, and configure FTP server /
Local Disk information where BTS data file is saved. BTS data file
should be in *.ini format. For details, see Importing BTS/Repeater
Data.
Some FTP server requires Passive Mode on.
XCAL-Mobile 4G User Guide Chapter 8. Monitoring in Google Map
© Copyright by Accuver Co., Ltd. Page 52
Importing BTS/Repeater Data
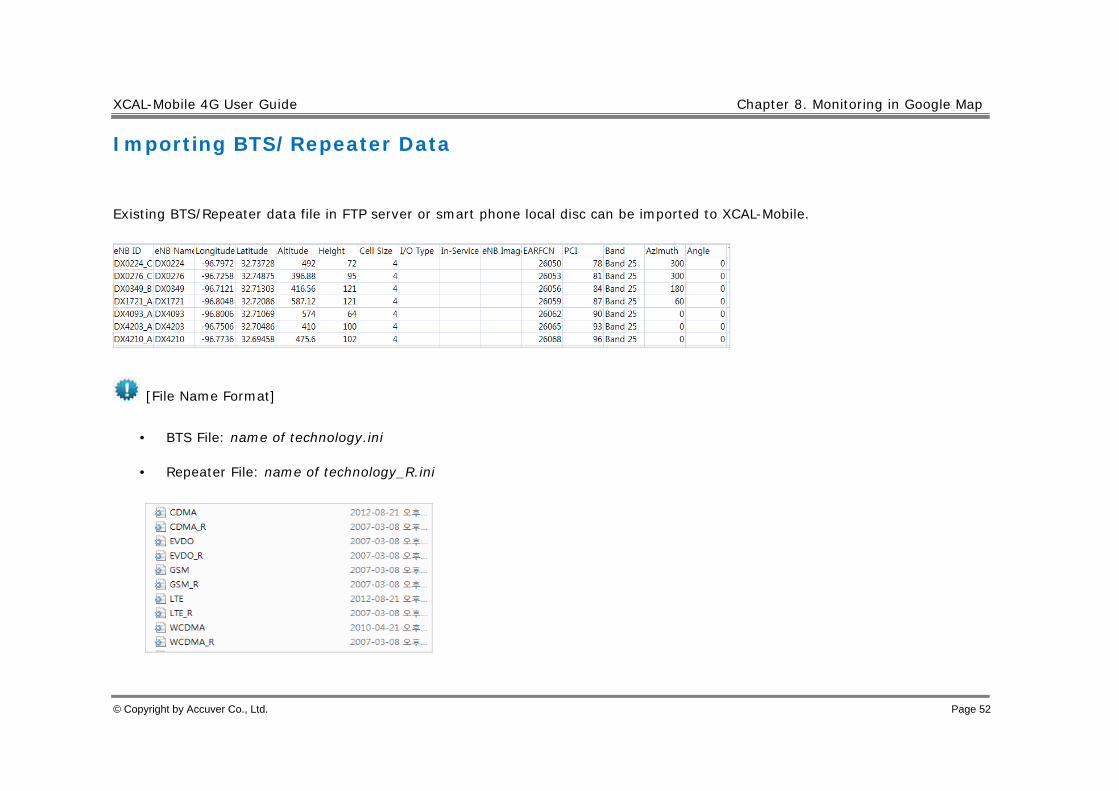
Existing BTS/Repeater data file in FTP server or smart phone local disc can be imported to XCAL-Mobile.
[File Name Format]
• BTS File: name of technology.ini
• Repeater File: name of technology_R.ini

XCAL-Mobile 4G User Guide Chapter 8. Monitoring in Google Map
© Copyright by Accuver Co., Ltd. Page 53
1. In main screen of XCAL-Mobile, tap Map tab.
2. Tap Menu button on smart phone hardware to open Setting window.
BTS Update From FTP Server: Imports existing BTS/RPT data file from designated FTP server. BTS Update From Local Disk: Imports existing BTS/RPT data file from smart phone local disc.

XCAL-Mobile 4G User Guide Chapter 8. Monitoring in Google Map
© Copyright by Accuver Co., Ltd. Page 54
[BTS Update from FTP Server] a. Tap BTS Update from
FTP Server button. BTS DB Server Settings screen appears.
b. Configure FTP information, and tap BTS Update or Repeater Update button.
c. XCAL-Mobile application connects to the configured FTP server and Server Connected pop-up message appears.
d. Tap to select *.ini file to import from DB file list.
e. Tap Yes button.

XCAL-Mobile 4G User Guide Chapter 8. Monitoring in Google Map
© Copyright by Accuver Co., Ltd. Page 55
f. Make sure DB Updated pop-up message is displayed.
g. Tap Save button to load imported BTS/RPT data file to map.
h. Imported BTS/RPT data is displayed in map.

XCAL-Mobile 4G User Guide Chapter 8. Monitoring in Google Map
© Copyright by Accuver Co., Ltd. Page 56
[BTS Update from Local Disk] a. Tap BTS Update from
Local Disk button. BTS Update From Local Disk screen appears.
b. Tap BTS/Repeater Update button.
c. Cell site DB Update screen appears.
d. Tap to select *.ini file to import from DB file list.
e. Tab Yes button. f. The selected BTS/RPT file is imported to XCAL-Mobile with the pop-up message of DB Updated
57
Call Result History
XCAL-Mobile 4G provides a list of AutoCall test you have completed and its details.
The list of AutoCall test result (Result History) is shown from;
• Result History list after terminating AutoCall test
• Call Result History in Menu tab

XCAL-Mobile 4G User Guide Chapter 9. Call Result History
© Copyright by Accuver Co., Ltd. Page 58
1. In main screen of XCAL-Mobile 4G, tap Menu tab.
2. Tap Call Result History.
3. Result History list appears.
4. Tap one of AutoCall tests, and XCAL-Mobile 4G shows its details.
5. Only FTP, Throughput Info appears when tapping test result in Detail Info.
3G , WiFi , LTE icons in Result History list shows each call test has been performed in 3G or WiFi or LTE
environment.
59
Uploading Log File
XCAL-Mobile 4G enables you to upload test logging file to a designated FTP server.
When AutoCall test is completed, log files are generated in *.drm and *.csv format as a pair. Logging files in *.csv format
help to see results of measurement data on smart phone itself. Logging files are saved in XCAL-Mobile 4G/Logging folder.

XCAL-Mobile 4G User Guide Chapter 10. Uploading Log File
© Copyright by Accuver Co., Ltd. Page 60
1. In main screen of XCAL-Mobile 4G.
2. Tap Menu tab. And Tap Log Upload button.
3. Do you want to turn Wi-Fi on? Pop-up screen is shown. Log Upload function is only available when WiFi is on.
4. A list of logging files is shown.

XCAL-Mobile 4G User Guide Chapter 10. Uploading Log File
© Copyright by Accuver Co., Ltd. Page 61
5. User can upload checked logging files to a designated FTP Server.
: Select all logging files. : Unselect all selected files. : Delete selected files. : Configure FTP Server. For details, see Uploading Setting.
When tapping Upload button without configuring Upload setting at the top-right of the screen, Not Found Server address is popped up at the bottom of the screen.
6. FTP server configuration screen appears.

XCAL-Mobile 4G User Guide Chapter 10. Uploading Log File
© Copyright by Accuver Co., Ltd. Page 62
7. Configure FTP server to upload logging files.
8. Tap Save button.
9. Tap Back button
10. Tap Upload button. Progress bar is shown.
11. When uploading process is finished, Upload End (Complete) 100% message is shown. Tap the screen to return the previous screen.
If you stop while uploading, End by User message is shown and uploading process is stopped.
XCAL-Mobile 4G User Guide Chapter 10. Uploading Log File
© Copyright by Accuver Co., Ltd. Page 63
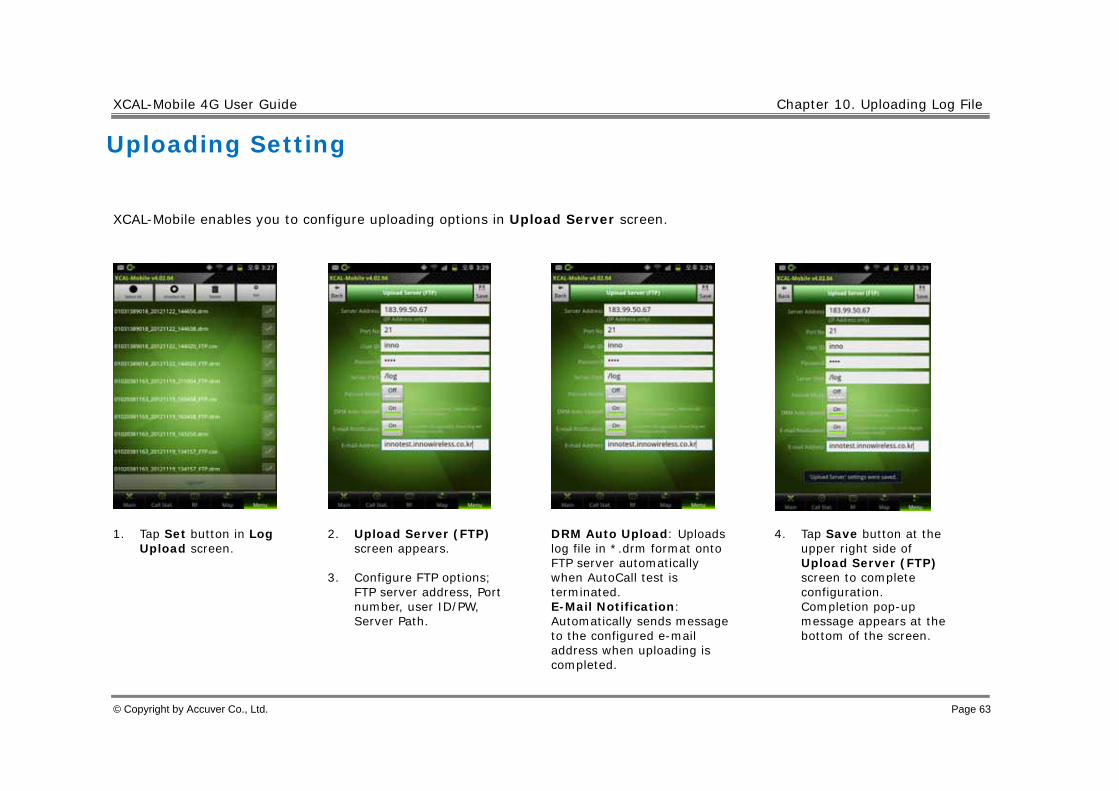
Uploading Setting
XCAL-Mobile enables you to configure uploading options in Upload Server screen.
1. Tap Set button in Log Upload screen.
2. Upload Server (FTP) screen appears.
3. Configure FTP options; FTP server address, Port number, user ID/PW, Server Path.
DRM Auto Upload: Uploads log file in *.drm format onto FTP server automatically when AutoCall test is terminated. E-Mail Notification: Automatically sends message to the configured e-mail address when uploading is completed.
4. Tap Save button at the upper right side of Upload Server (FTP) screen to complete configuration. Completion pop-up message appears at the bottom of the screen.
64
Additional Function
XCAL-Mobile 4G provides you with further functions.
• Manual Logging
• Replay
• Screen Capture
• About (License Return, Help)
• Other Settings (Naming Log File, CSV Delimiter, RAT & Band Lock, External GPS)
XCAL-Mobile 4G User Guide Chapter 11. Additional Function
© Copyright by Accuver Co., Ltd. Page 65
Manual Logging
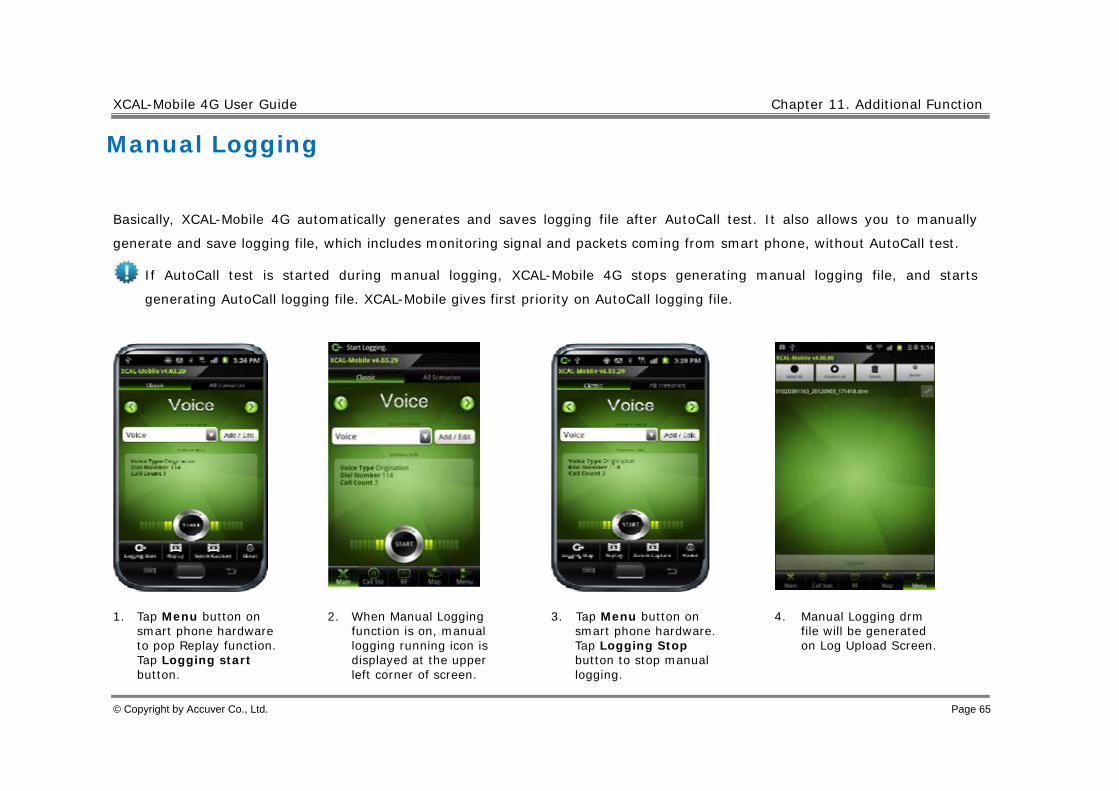
Basically, XCAL-Mobile 4G automatically generates and saves logging file after AutoCall test. It also allows you to manually
generate and save logging file, which includes monitoring signal and packets coming from smart phone, without AutoCall test.
If AutoCall test is started during manual logging, XCAL-Mobile 4G stops generating manual logging file, and starts
generating AutoCall logging file. XCAL-Mobile gives first priority on AutoCall logging file.
1. Tap Menu button on smart phone hardware to pop Replay function. Tap Logging start button.
2. When Manual Logging function is on, manual logging running icon is displayed at the upper left corner of screen.
3. Tap Menu button on smart phone hardware. Tap Logging Stop button to stop manual logging.
4. Manual Logging drm file will be generated on Log Upload Screen.
XCAL-Mobile 4G User Guide Chapter 11. Additional Function
© Copyright by Accuver Co., Ltd. Page 66
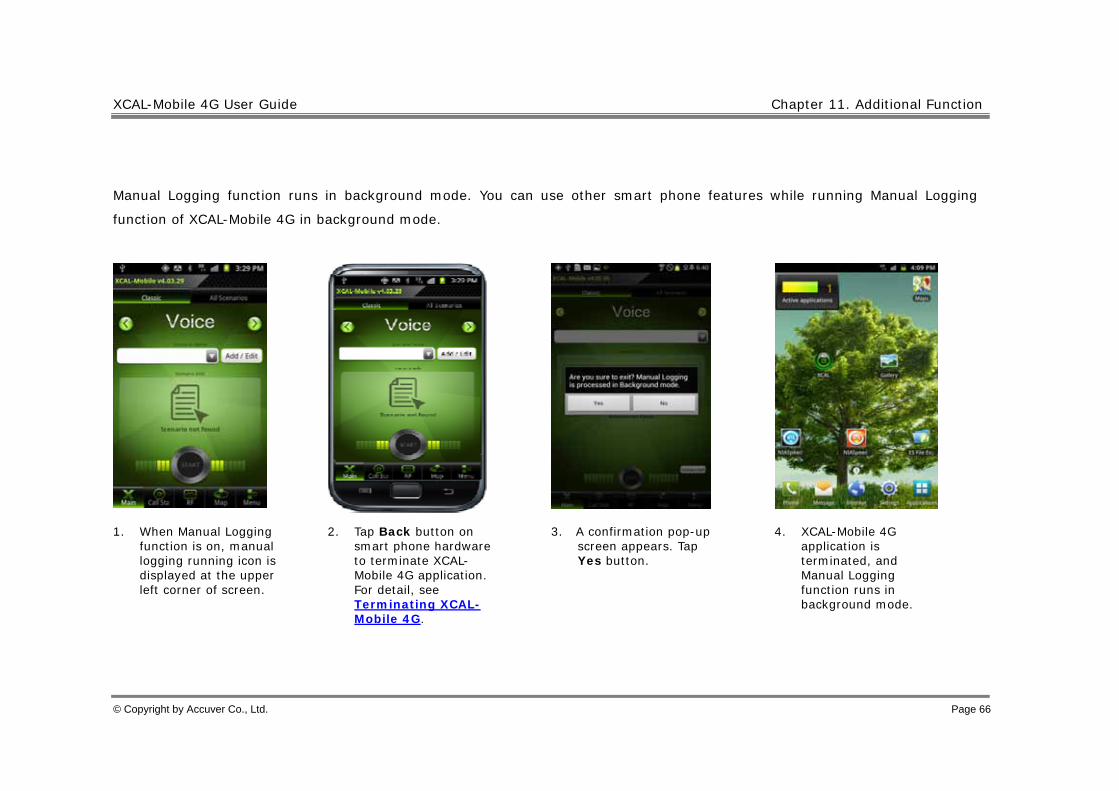
Manual Logging function runs in background mode. You can use other smart phone features while running Manual Logging
function of XCAL-Mobile 4G in background mode.
1. When Manual Logging function is on, manual logging running icon is displayed at the upper left corner of screen.
2. Tap Back button on smart phone hardware to terminate XCAL-Mobile 4G application. For detail, see Terminating XCAL-Mobile 4G.
3. A confirmation pop-up screen appears. Tap Yes button.
4. XCAL-Mobile 4G application is terminated, and Manual Logging function runs in background mode.
XCAL-Mobile 4G User Guide Chapter 11. Additional Function
© Copyright by Accuver Co., Ltd. Page 67
Replay
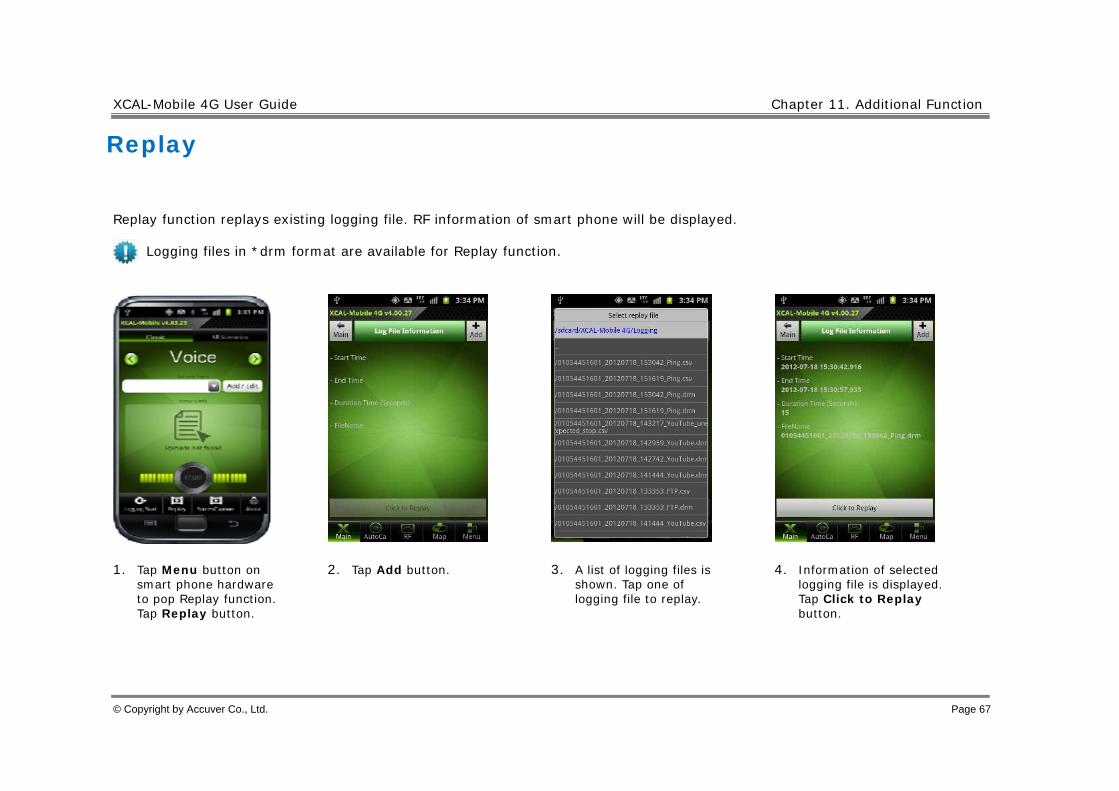
Replay function replays existing logging file. RF information of smart phone will be displayed.
Logging files in *drm format are available for Replay function.
1. Tap Menu button on smart phone hardware to pop Replay function. Tap Replay button.
2. Tap Add button. 3. A list of logging files is shown. Tap one of logging file to replay.
4. Information of selected logging file is displayed. Tap Click to Replay button.

XCAL-Mobile 4G User Guide Chapter 11. Additional Function
© Copyright by Accuver Co., Ltd. Page 68
5. Replay status is shown in percentage at the top of Replay screen. Replay is completed showing replay status of 100% at the top of Replay screen.
6. User can set the Replay speed using top of Screen. (1x, 2x, 3x)
XCAL-Mobile 4G User Guide Chapter 11. Additional Function
© Copyright by Accuver Co., Ltd. Page 69
Screen Capture
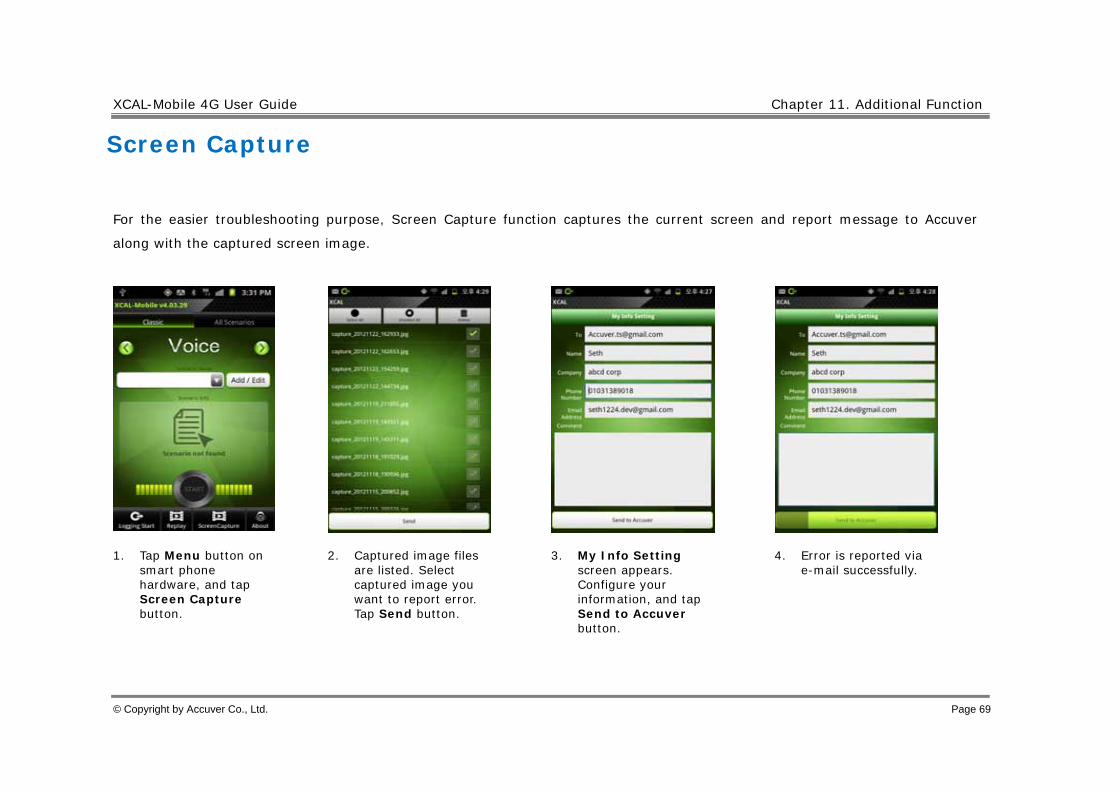
For the easier troubleshooting purpose, Screen Capture function captures the current screen and report message to Accuver
along with the captured screen image.
1. Tap Menu button on smart phone hardware, and tap Screen Capture button.
2. Captured image files are listed. Select captured image you want to report error. Tap Send button.
3. My Info Setting screen appears. Configure your information, and tap Send to Accuver button.
4. Error is reported via e-mail successfully.
XCAL-Mobile 4G User Guide Chapter 11. Additional Function
© Copyright by Accuver Co., Ltd. Page 70
About
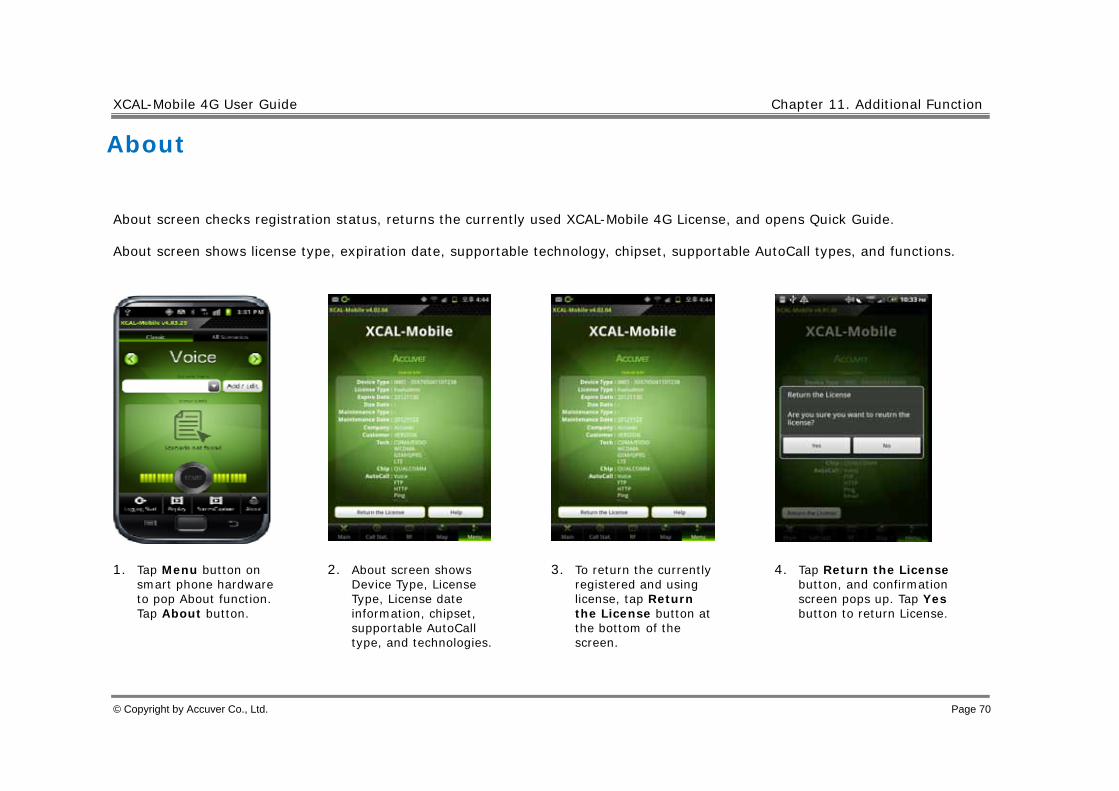
About screen checks registration status, returns the currently used XCAL-Mobile 4G License, and opens Quick Guide.
About screen shows license type, expiration date, supportable technology, chipset, supportable AutoCall types, and functions.
1. Tap Menu button on smart phone hardware to pop About function. Tap About button.
2. About screen shows Device Type, License Type, License date information, chipset, supportable AutoCall type, and technologies.
3. To return the currently registered and using license, tap Return the License button at the bottom of the screen.
4. Tap Return the License button, and confirmation screen pops up. Tap Yes button to return License.

XCAL-Mobile 4G User Guide Chapter 11. Additional Function
© Copyright by Accuver Co., Ltd. Page 71
5. To open help file, tap Help button in About screen.
6. Quick Guide of XCAL-Mobile is opening.
7. Swipe up and down the screen to read Quick Guide.
8. To close Quick Guide, tap Back button on smart phone hardware.
Quick Guide is not opened during AutoCall test.

XCAL-Mobile 4G User Guide Chapter 11. Additional Function
© Copyright by Accuver Co., Ltd. Page 72
Other Settings
Options screen enables you to configure extra options for program starting up operation, logging file, and etc.
To open Options screen, tap Menu – Other Settings button. Configure options, and tap Save button to save setting.
(Continue)
Items Description
Startup Configures options related to the program start-up. Auto Start: Executes XCAL-Mobile program when powering on the smart phone device. Auto Logging: Starts Manual Logging when executing XCAL-Mobile application.
Logging Configures options related to logging file. Packet Capture: Includes Packet Capture data to existing logging file.
Save to DRM File: Includes packet capture data to *.drm file. Save to PCAP File: Includes packet capture data to *.pcap file.
XCAL Format: Includes Timestamp data to existing log codes. Real Time Compress: Compresses logging file (*.drm -> *.drz) Path: Designates logging file save path.
XCAL-Mobile 4G User Guide Chapter 11. Additional Function
© Copyright by Accuver Co., Ltd. Page 73
(Continue)
Items Description
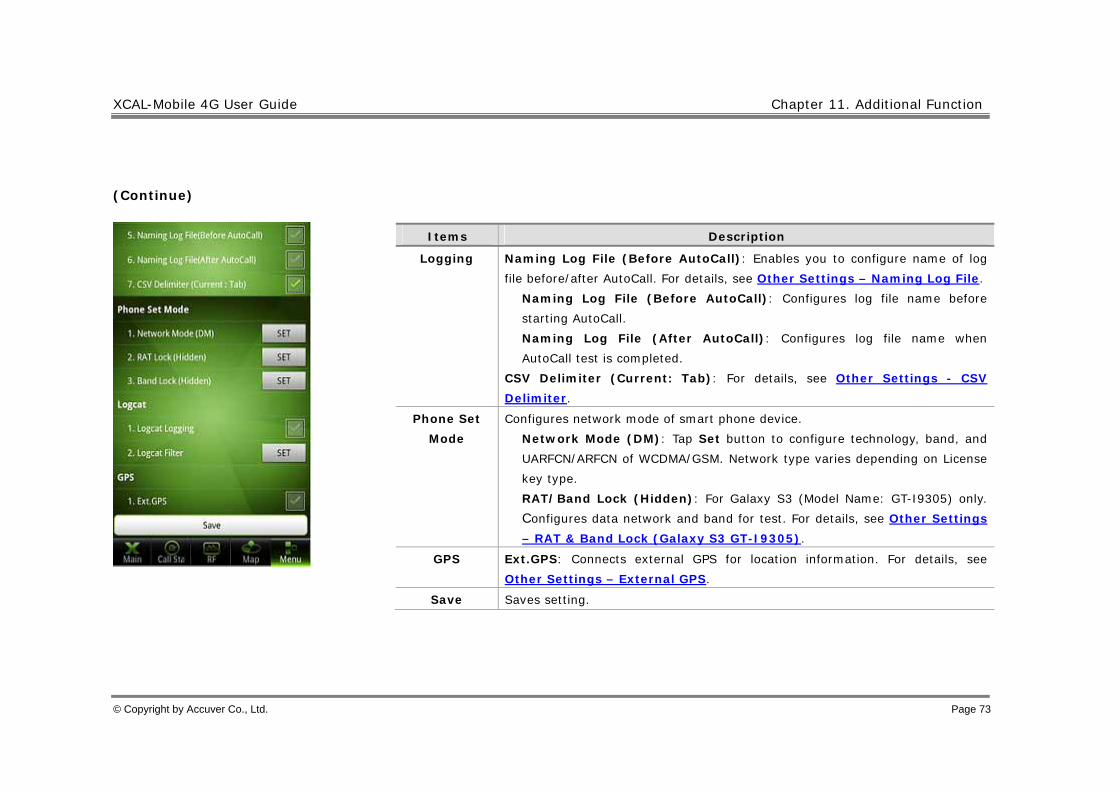
Logging Naming Log File (Before AutoCall): Enables you to configure name of log file before/after AutoCall. For details, see Other Settings – Naming Log File.
Naming Log File (Before AutoCall): Configures log file name before starting AutoCall. Naming Log File (After AutoCall): Configures log file name when AutoCall test is completed.
CSV Delimiter (Current: Tab): For details, see Other Settings - CSV Delimiter.
Phone Set Mode
Configures network mode of smart phone device. Network Mode (DM): Tap Set button to configure technology, band, and UARFCN/ARFCN of WCDMA/GSM. Network type varies depending on License key type. RAT/Band Lock (Hidden): For Galaxy S3 (Model Name: GT-I9305) only. Configures data network and band for test. For details, see Other Settings – RAT & Band Lock (Galaxy S3 GT-I9305).
GPS Ext.GPS: Connects external GPS for location information. For details, see Other Settings – External GPS.
Save Saves setting.

XCAL-Mobile 4G User Guide Chapter 11. Additional Function
© Copyright by Accuver Co., Ltd. Page 74
Other Settings - Naming Log File
XCAL-Mobile application is designed to save log file automatically when AutoCall or Manual Logging test is completed. With
Naming Log File option, you may configure name of log file in *.drm format. You can configure before or after AutoCall or
Manual Logging test.
1. Tap Menu – Other Settings.
2. Tap the checkbox for Naming Log File (Before/After AutoCall).
Naming Log File (Before AutoCall): Configures name of log file (*. drm) before starting AutoCall or Manual Logging test.
Naming Log File (After AutoCall): Configures name of log file (*.drm) after completing AutoCall or Manual Logging test.
3. Log file is saved with the user pre-configured log file name.

XCAL-Mobile 4G User Guide Chapter 11. Additional Function
© Copyright by Accuver Co., Ltd. Page 75
Other Settings - CSV Delimiter
XCAL-Mobile application is designed to create paired log files in *drm and *csv format when AutoCall or Manual Logging test is
completed. With CSV Delimiter option, you may configure delimiter in *.csv file between comma and tab. Default is set to
comma.
1. Tap Menu – Other Settings.
2. Default is set to Comma.
2. Default is set to Comma. Tap the checkbox for CSV Delimiter to change delimiter to Tab.
Examples of *.csv files with delimiter of Comma and Tab.

XCAL-Mobile 4G User Guide Chapter 11. Additional Function
© Copyright by Accuver Co., Ltd. Page 76
Other Settings - RAT & Band Lock (Galaxy S3 GT-I9305)
For Galaxy S3 (Model Name: GT-I9305) only which is currently used in EMEA and APAC.
RAT & Band Lock function enables you to configure data network and band for test.
1. Tap Menu – Other Settings.
2. Tap to select SET button for RAT Lock (hidden) or Band Lock (Hidden).
3. SET button for RAT Lock shows RAT Lock screen.
3-1. Tap to select the checkboxes of technologies, and tap SET button.
4. SET button for Band Lock (Hidden) shows Band Lock screen. Tap Conversion icon at the right side of Band Lock to converse to RAT Lock screen, and vice versa.
4-1. Tap + button to unfold technology bane.
4.2 Tap to select
checkboxes of bands, and tap SET button.
XCAL-Mobile 4G User Guide Chapter 11. Additional Function
© Copyright by Accuver Co., Ltd. Page 77
Other Settings - External GPS
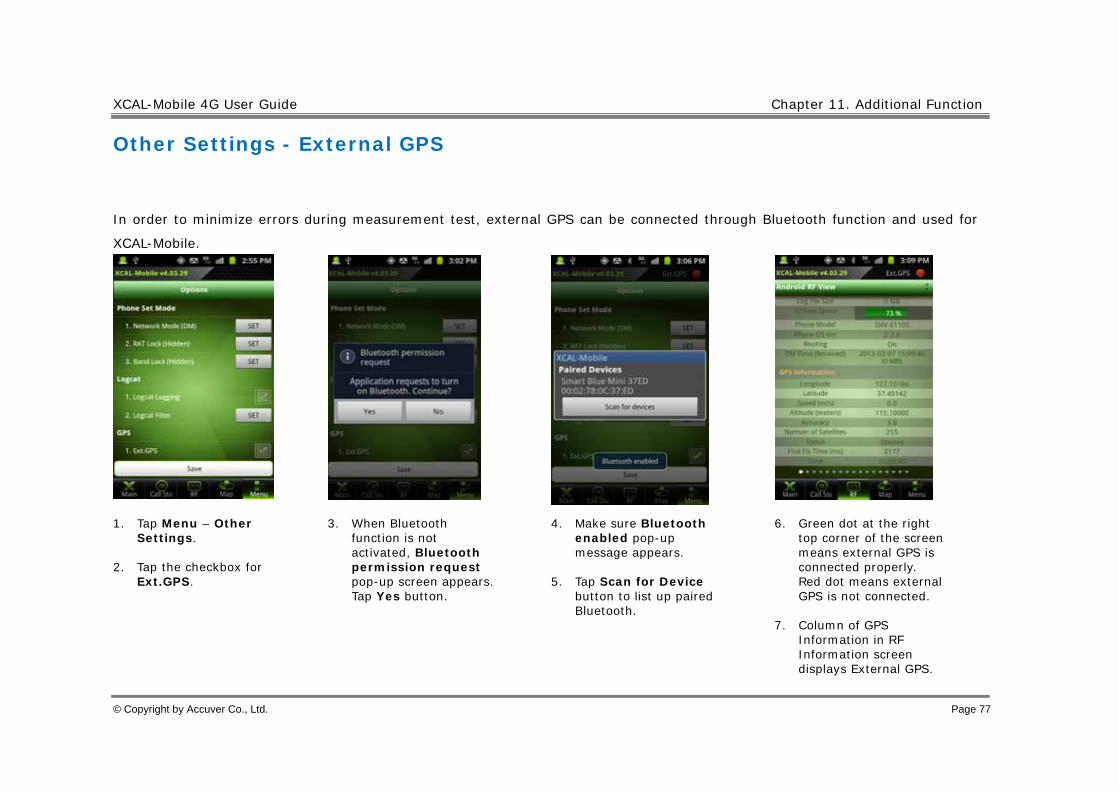
In order to minimize errors during measurement test, external GPS can be connected through Bluetooth function and used for
XCAL-Mobile.
1. Tap Menu – Other Settings.
2. Tap the checkbox for Ext.GPS.
3. When Bluetooth function is not activated, Bluetooth permission request pop-up screen appears. Tap Yes button.
4. Make sure Bluetooth enabled pop-up message appears.
5. Tap Scan for Device button to list up paired Bluetooth.
6. Green dot at the right top corner of the screen means external GPS is connected properly. Red dot means external GPS is not connected.
7. Column of GPS Information in RF Information screen displays External GPS.
78
Inbuilding Test
XCAL-Mobile enables you to perform measurement inside of a building.
• Configures Inbuilding test.
• Starts Inbuilding test.
- Moving Point: Performs call test while moving inside of a building.
- Fixed Point: Performs call test at a certain measurement point inside of a building.
XCAL-Mobile 4G User Guide Chapter 12. Inbuilding Test
© Copyright by Accuver Co., Ltd. Page 79
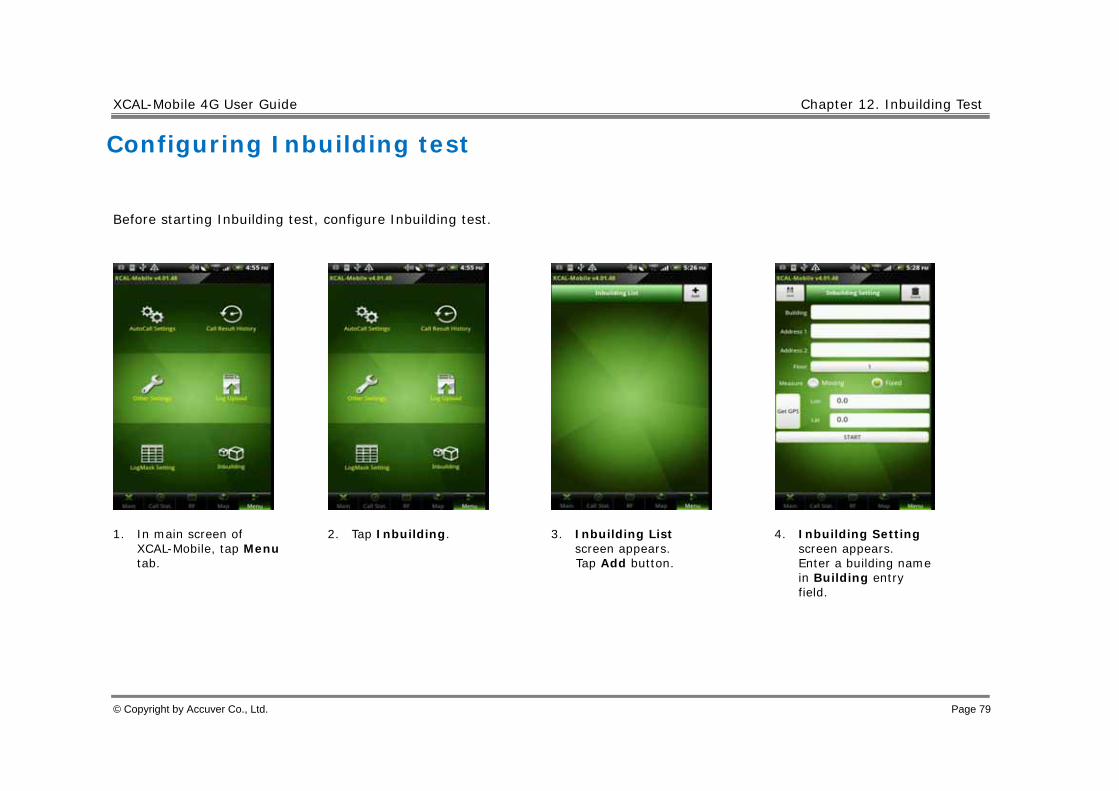
Configuring Inbuilding test
Before starting Inbuilding test, configure Inbuilding test.
1. In main screen of XCAL-Mobile, tap Menu tab.
2. Tap Inbuilding. 3. Inbuilding List screen appears. Tap Add button.
4. Inbuilding Setting screen appears. Enter a building name in Building entry field.
XCAL-Mobile 4G User Guide Chapter 12. Inbuilding Test
© Copyright by Accuver Co., Ltd. Page 80
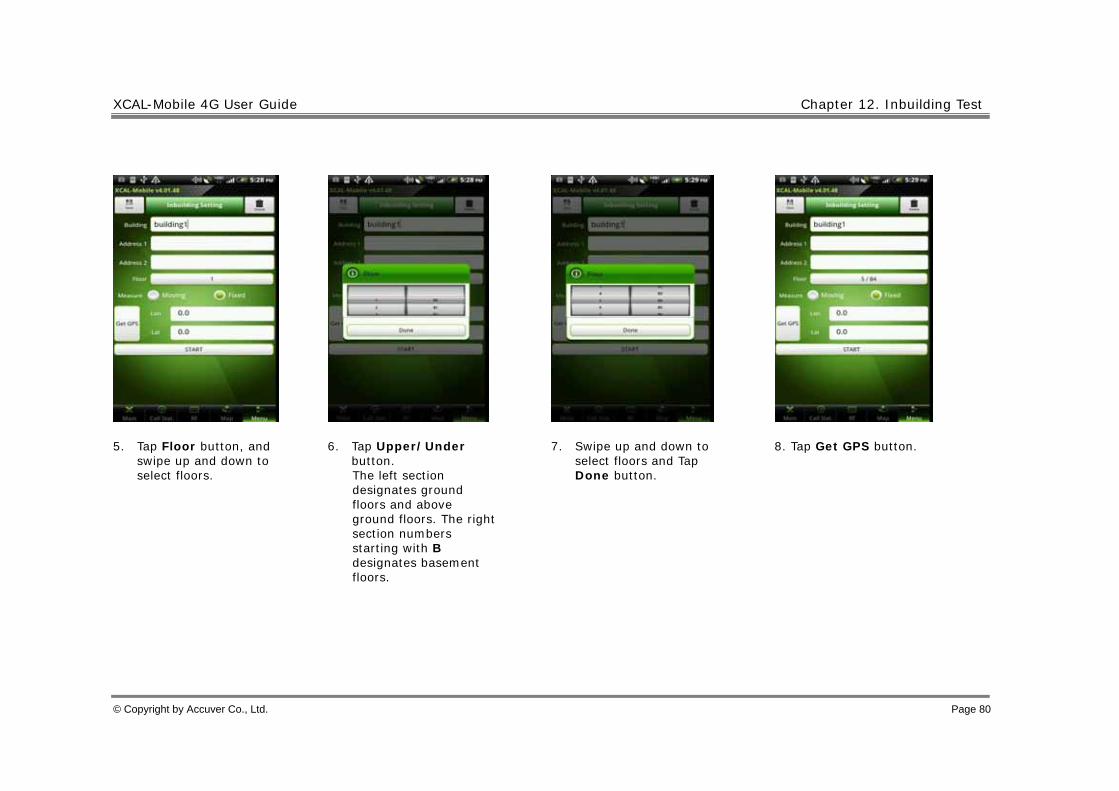
5. Tap Floor button, and swipe up and down to select floors.
6. Tap Upper/Under button. The left section designates ground floors and above ground floors. The right section numbers starting with B designates basement floors.
7. Swipe up and down to select floors and Tap Done button.
8. Tap Get GPS button.
XCAL-Mobile 4G User Guide Chapter 12. Inbuilding Test
© Copyright by Accuver Co., Ltd. Page 81
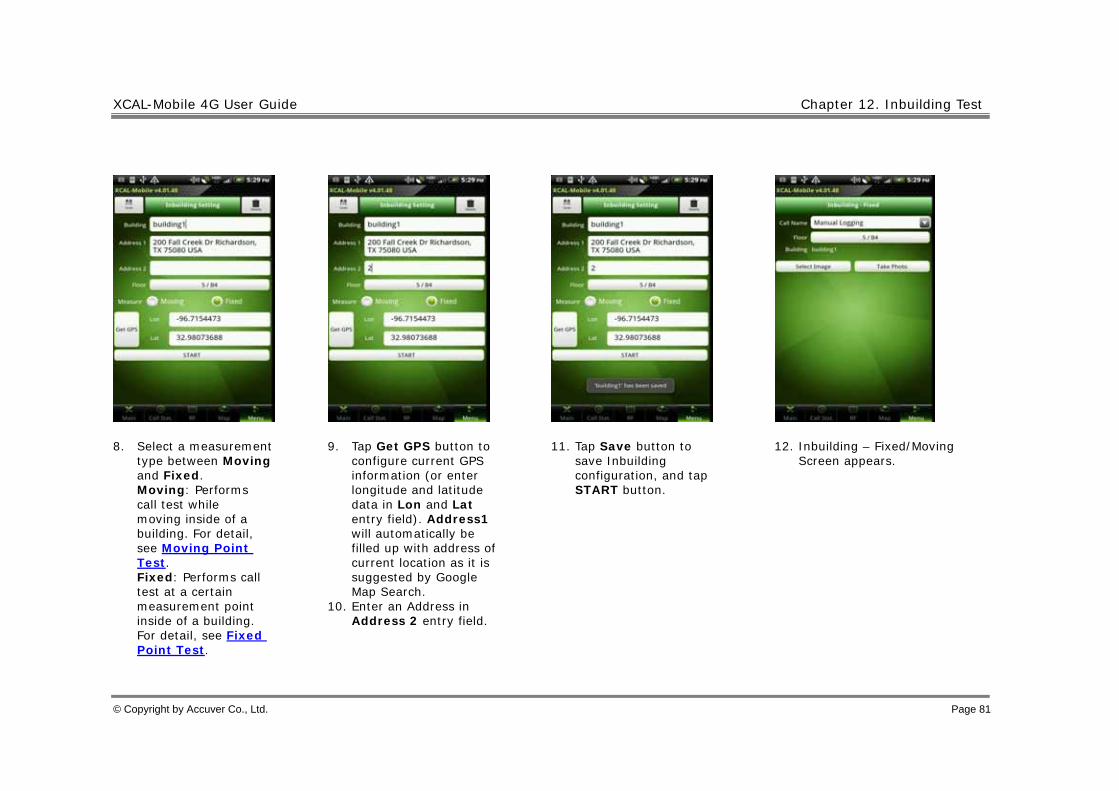
8. Select a measurement type between Moving and Fixed. Moving: Performs call test while moving inside of a building. For detail, see Moving Point Test. Fixed: Performs call test at a certain measurement point inside of a building. For detail, see Fixed Point Test.
9. Tap Get GPS button to configure current GPS information (or enter longitude and latitude data in Lon and Lat entry field). Address1 will automatically be filled up with address of current location as it is suggested by Google Map Search.
10. Enter an Address in Address 2 entry field.
11. Tap Save button to save Inbuilding configuration, and tap START button.
12. Inbuilding – Fixed/Moving Screen appears.
XCAL-Mobile 4G User Guide Chapter 12. Inbuilding Test
© Copyright by Accuver Co., Ltd. Page 82
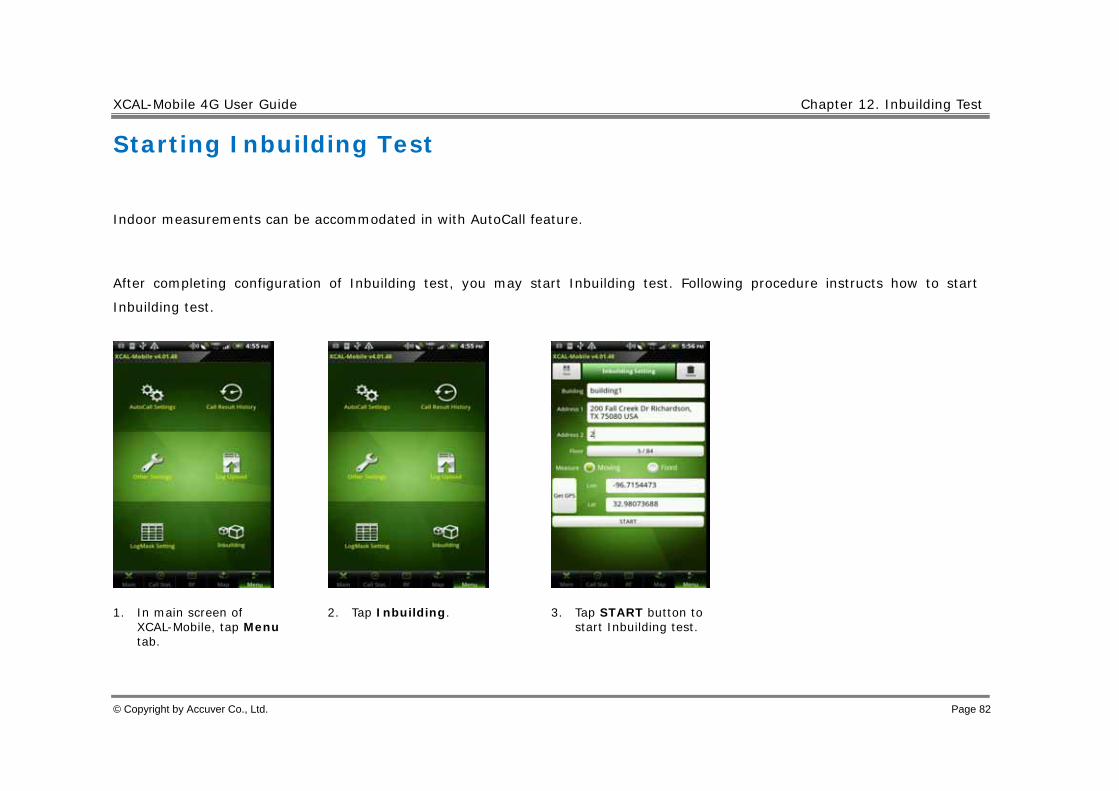
Starting Inbuilding Test
Indoor measurements can be accommodated in with AutoCall feature.
After completing configuration of Inbuilding test, you may start Inbuilding test. Following procedure instructs how to start
Inbuilding test.
1. In main screen of XCAL-Mobile, tap Menu tab.
2. Tap Inbuilding. 3. Tap START button to start Inbuilding test.

XCAL-Mobile 4G User Guide Chapter 12. Inbuilding Test
© Copyright by Accuver Co., Ltd. Page 83
Moving Point Test
By selecting Moving type for Inbuilding, XCAL-Mobile will perform measurements while moving among points inside of a
building.
The following procedure describes the process to follow after tapping the START button to start Inbuilding test.
1. Tap START button to start Inbuilding test.
2. Inbuilding – Moving screen appears.
3. Tap the combo box for Call Name to select call scenario.
4. Select floor.

XCAL-Mobile 4G User Guide Chapter 12. Inbuilding Test
© Copyright by Accuver Co., Ltd. Page 84
5. Select building image file. Select Image: Selects existing image file inside of smart phone. Take Photo: Takes photo.
6. Selected image file is shown.
7. Pinch open and out to zoom in and out of the image.
8. Tap a starting point on the image (floor map) to perform AutoCall test, and tap Yes to confirm this point is starting point.

XCAL-Mobile 4G User Guide Chapter 12. Inbuilding Test
© Copyright by Accuver Co., Ltd. Page 85
9. XCAL-Mobile is ready to start Inbuilding test (with AutoCall), and Start button is activated. Tap Start button, AutoCall test will begin. Move to the second point.
10. Inbuilding test is started, and its status is displayed at the lower left side of screen. Call measurement screen is shown for a few seconds and will return to Inbuilding image screen.
11. When you are arriving at the second point, tap the second point on image. Tap Yes button to confirm.
12. Configured parameters are shown on the image.
XCAL-Mobile 4G User Guide Chapter 12. Inbuilding Test
© Copyright by Accuver Co., Ltd. Page 86
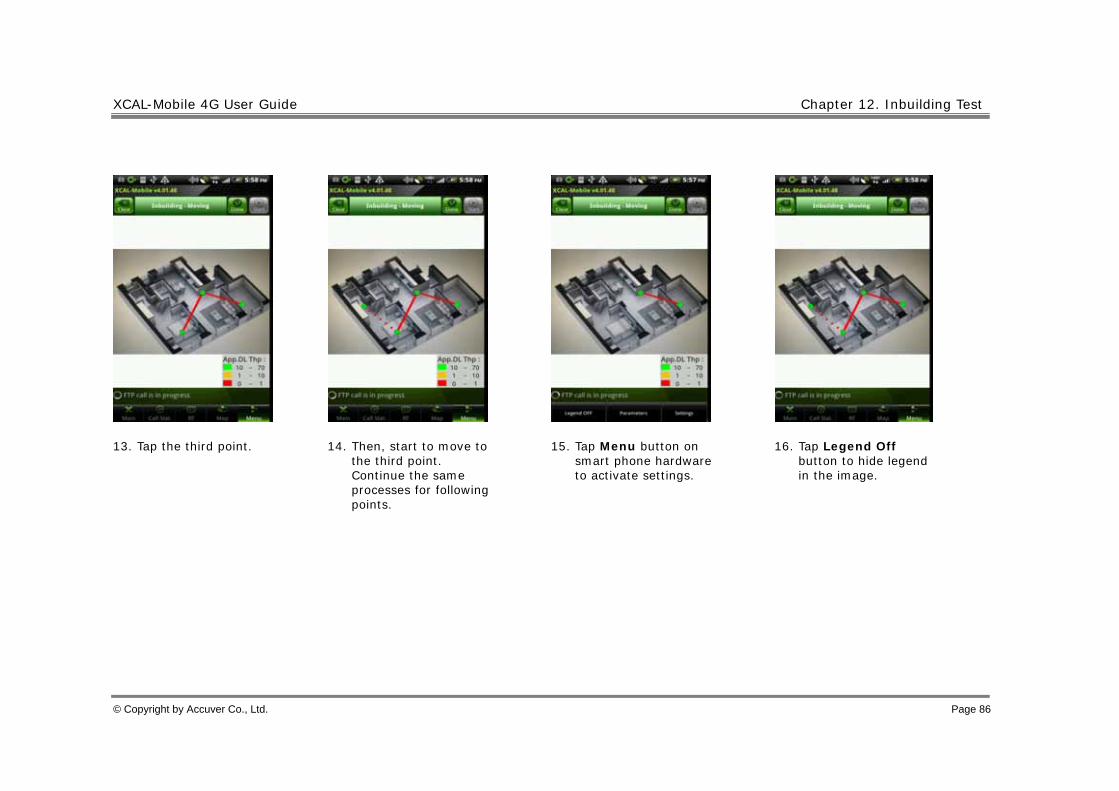
13. Tap the third point. 14. Then, start to move to the third point. Continue the same processes for following points.
15. Tap Menu button on smart phone hardware to activate settings.
16. Tap Legend Off button to hide legend in the image.

XCAL-Mobile 4G User Guide Chapter 12. Inbuilding Test
© Copyright by Accuver Co., Ltd. Page 87
17. Tap Parameters button to open parameters setting screen. Parameters are categorized by Common, LTE, 3G, 2G, CDMA, and EVDO.
18. Configure parameter. 19. Selected parameter is shown in image.
20. Tap Settings button to configure Update Time to apply parameter values.

XCAL-Mobile 4G User Guide Chapter 12. Inbuilding Test
© Copyright by Accuver Co., Ltd. Page 88
21. Tap Done button to terminate test.
22. When AutoCall is finished based on scenario, call test is automatically terminated.
23. Inbuilding test is completed, and Clear button is activated. To remove points, tap Clear button.
When Inbuilding test starts, Done button is activated. Selecting Done button will terminate/stop AutoCall test and Inbuilding test which is running.
XCAL-Mobile 4G User Guide Chapter 12. Inbuilding Test
© Copyright by Accuver Co., Ltd. Page 89
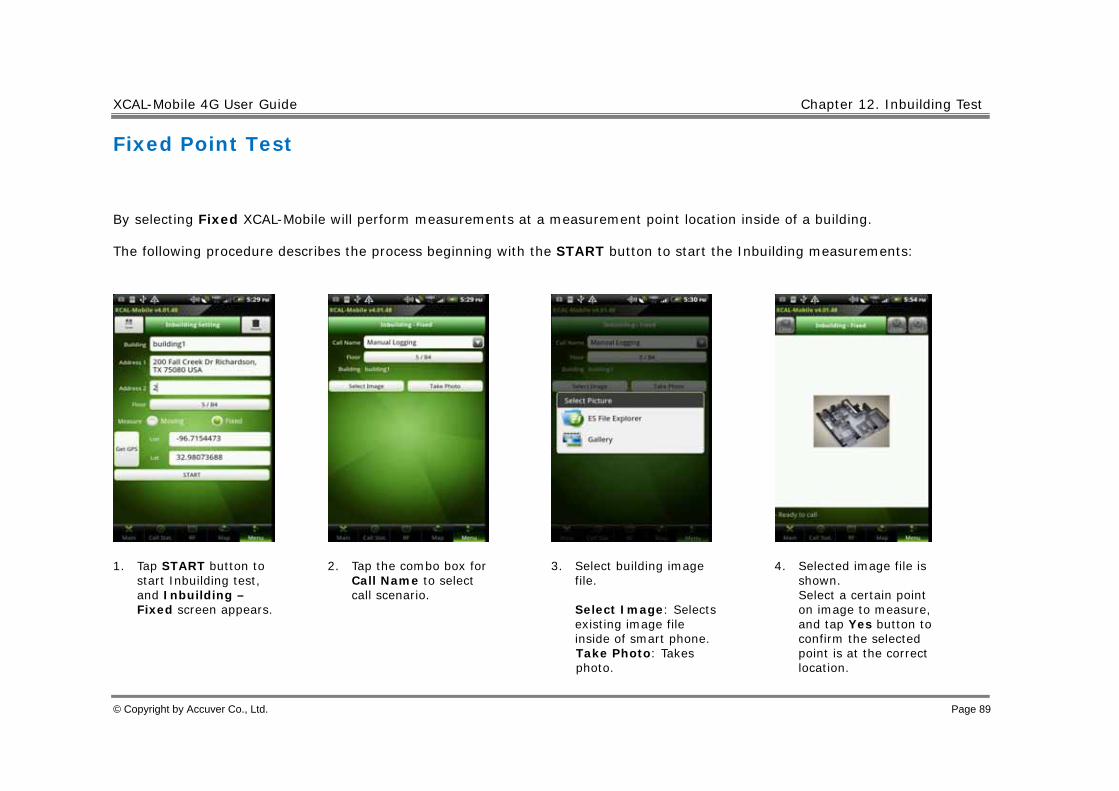
Fixed Point Test
By selecting Fixed XCAL-Mobile will perform measurements at a measurement point location inside of a building.
The following procedure describes the process beginning with the START button to start the Inbuilding measurements:
1. Tap START button to start Inbuilding test, and Inbuilding – Fixed screen appears.
2. Tap the combo box for Call Name to select call scenario.
3. Select building image file. Select Image: Selects existing image file inside of smart phone. Take Photo: Takes photo.
4. Selected image file is shown. Select a certain point on image to measure, and tap Yes button to confirm the selected point is at the correct location.
XCAL-Mobile 4G User Guide Chapter 12. Inbuilding Test
© Copyright by Accuver Co., Ltd. Page 90
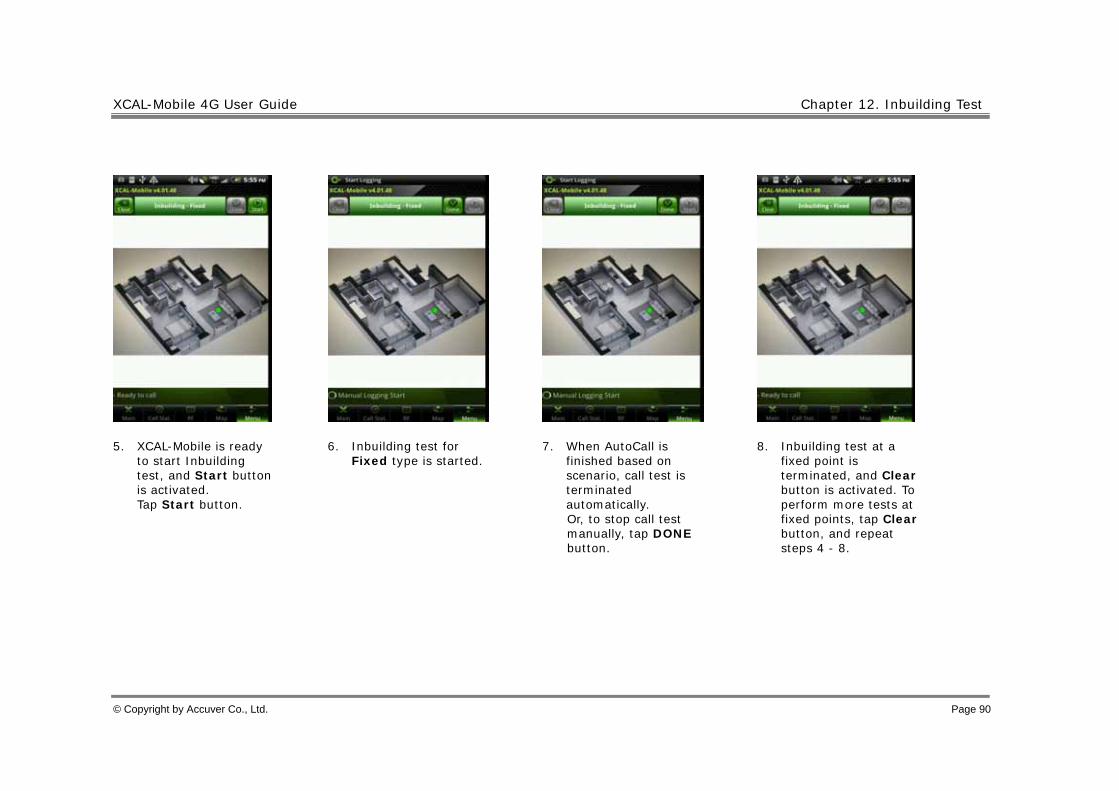
5. XCAL-Mobile is ready to start Inbuilding test, and Start button is activated. Tap Start button.
6. Inbuilding test for Fixed type is started.
7. When AutoCall is finished based on scenario, call test is terminated automatically. Or, to stop call test manually, tap DONE button.
8. Inbuilding test at a fixed point is terminated, and Clear button is activated. To perform more tests at fixed points, tap Clear button, and repeat steps 4 - 8.
XCAL-Mobile 4G User Guide Chapter 12. Inbuilding Test
© Copyright by Accuver Co., Ltd. Page 91
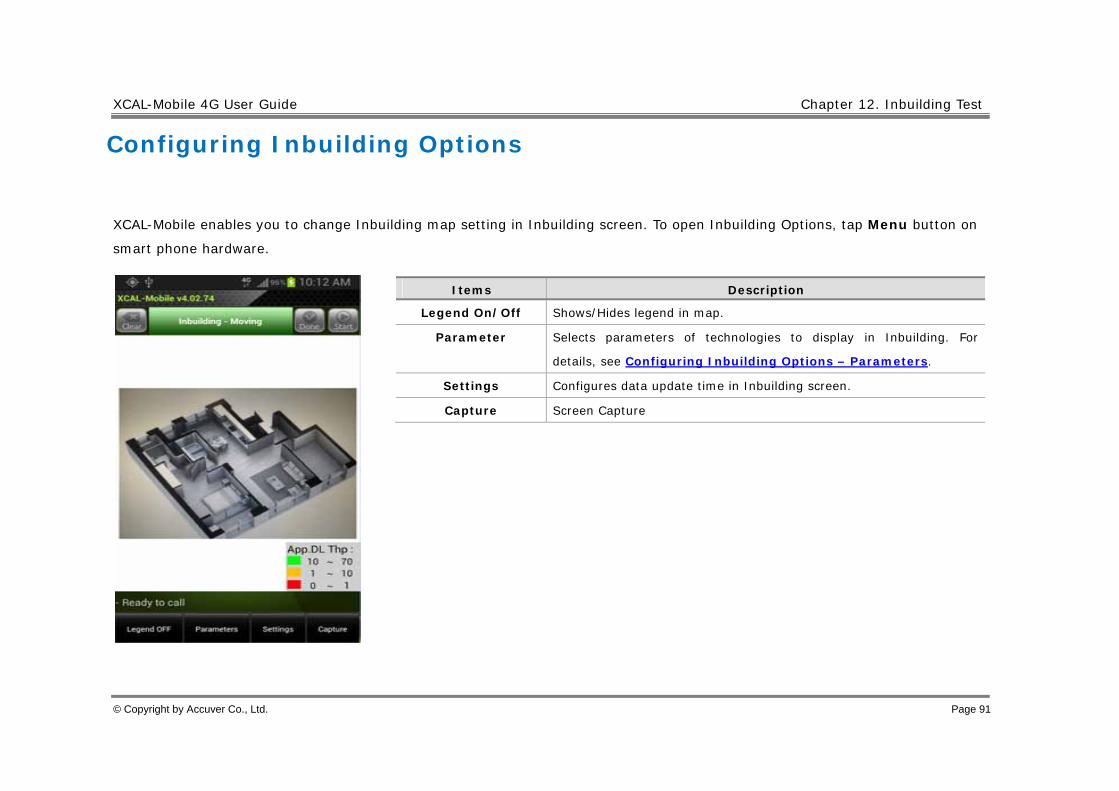
Configuring Inbuilding Options
XCAL-Mobile enables you to change Inbuilding map setting in Inbuilding screen. To open Inbuilding Options, tap Menu button on
smart phone hardware.
Items Description
Legend On/Off Shows/Hides legend in map.
Parameter Selects parameters of technologies to display in Inbuilding. For
details, see Configuring Inbuilding Options – Parameters.
Settings Configures data update time in Inbuilding screen.
Capture Screen Capture

XCAL-Mobile 4G User Guide Chapter 12. Inbuilding Test
© Copyright by Accuver Co., Ltd. Page 92
Configuring Inbuilding Options – Parameters
Parameters button in Inbuilding Options menu selects parameters of technologies to display in Inbuilding.
Tap Parameters button, and Parameters pop-up screen appears. Select technology and corresponding parameter you want to
display on the Inbuilding.
Items Description
Common App. DL Throughput /APP. UL Throughput Network Type
LTE RSSI / RSRP RSRQ /SINR
3G Rx Power / Tx Power
SIR
Best Active Set Ec/Io
Best Active Set RSCP
2G Rx power
Rx Qual(Full) / Rx Qual(Sub)
TA, RLT
CDMA Rx Power / Tx Power
Ec/Io
EVDO Rx Power / Tx Power
Ec/Io, SINR
93
Terminating XCAL-Mobile 4G
When you have completed all necessary measurement test with XCAL-Mobile 4G or you want to terminate the application while
measurement, you can terminate the application.
During AutoCall test, XCAL-Mobile 4G applciation cannot be terminated. Stop AutoCall test first by tapping AUTOCALL
STOP button in AutoCall test screen, and terminate the application. For details of how to terminate AutoCall test, see
Terminating AutoCall Test.
Press Home button on smart phone hardware, and XCAL-Mobile 4G application runs in background mode.

XCAL-Mobile 4G User Guide Chapter 13. Terminating XCAL-Mobile 4G
© Copyright by Accuver Co., Ltd. Page 94
1. When you want to terminate XCAL-Mobile 4G application, tap Back button on smart phone hardware.
2. Exit configuration pop-up screen appears. Tap Yes button.
3. XCAL-Mobile 4G application is terminated.
95
Troubleshooting
While using XCAL-Mobile, the program pops up a troubleshooting alarm screen when the program is terminated compulsively or
by anonymous errors and lauched again. You may report error to Accuver Technical Support team directly.
Error report is sent to Technical Support team via an e-mail automatically.

XCAL-Mobile 4G User Guide Chapter 14. Troubleshooting
© Copyright by Accuver Co., Ltd. Page 96
1. When you execute XCAL-Mobile after the program has been terminated compulsively or by anonymous errors, an alarm screen pops up.
2. Tap Send Error Report button to report error to Accuver Technical Support team. Don’t Send: Ignores the alarm screen, and do not show the alarm screen again. Later: Shows the alarm screen next time you execute XCAL-Mobile.
3. My Info Setting screen appears. Configure user information.
4. Tap Send to Accuver button to report the error via an e-mail automatically.
97
Related Products
XCAL-Mobile is compatible with Accuver’s other server-based solution series below.
is an autonomous total measurement and monitoring solution with web-based centralized management.
Simply by installing XCAL-Auto in any vehicles, XCAL-Auto automatically collects data over the air and its central server controls
remote-units and status information.
is a web-based total integrated platform that post-processes log files and provides engineers with a high
level KPI and call failure view of the network via web client access. It also supports automatic reporting, automatic diagnostics
of call failures, data export, download of log files, and etc.
98
Appendix: Configuring AutoCall Scenario
XCAL-Mobile 4G supports the following AutoCall types; Voice, FTP, Web, SMS, WiFi, E-Mail, Ping, and YouTube.
XCAL-Mobile 4G User Guide Appendix: Configuring AutoCall Scenario
© Copyright by Accuver Co., Ltd. Page 99
Time Configuration (Voice, Web, SMS, WiFi, E-Mail, Ping, YouTube)
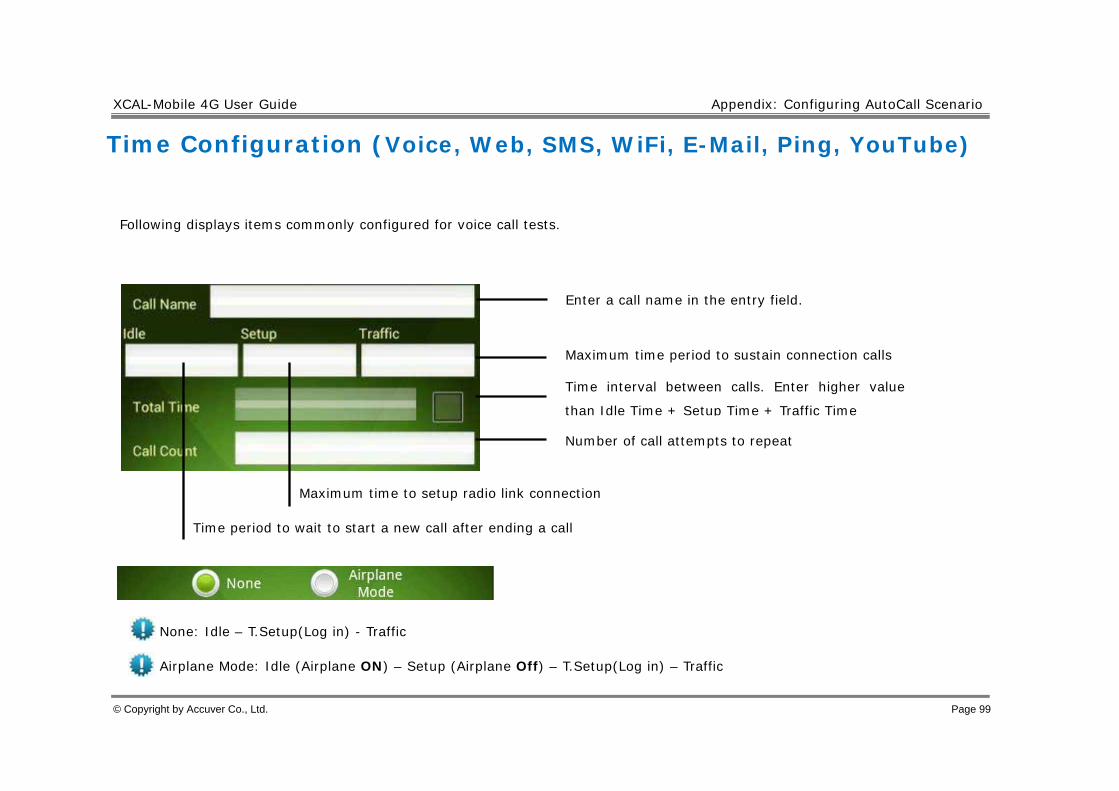
Following displays items commonly configured for voice call tests.
Maximum time period to sustain connection calls
Maximum time to setup radio link connection
Time period to wait to start a new call after ending a call
None: Idle – T.Setup(Log in) - Traffic
Airplane Mode: Idle (Airplane ON) – Setup (Airplane Off) – T.Setup(Log in) – Traffic
Enter a call name in the entry field.
Time interval between calls. Enter higher value
than Idle Time + Setup Time + Traffic Time
Number of call attempts to repeat

XCAL-Mobile 4G User Guide Appendix: Configuring AutoCall Scenario
© Copyright by Accuver Co., Ltd. Page 100
Time period to log in FTP Server
Time Configuration (FTP)
Followings displays items commonly configured for data call tests.
None: Idle – T.Setup (Log in) - Traffic
Airplane Mode: Idle (Airplane ON) – Setup (Airplane Off) – T.Setup (Log in) – Traffic
Enter a call name in the entry field.
Maximum time to setup network connection for a call. (Time Period to connect to data service)
Number of call attempts to repeat.
Time to complete task.
Time period to wait to start a new call after ending a call. (Time Period to change Flight Mode)

XCAL-Mobile 4G User Guide Appendix: Configuring AutoCall Scenario
© Copyright by Accuver Co., Ltd. Page 101
Configuration for Each Call Type
Followings are configuration options for each call type.
Voice
• Voice Type: 1)Ori : Call Send Test 2)Ter : Call Receive Test 3)Con : Continuous Call Test
(Traffic Time unlimited) • Dial Number: Phone Number
When tapping HW Menu button and tapping Speaker On button, you can use speakerphone function while processing Voice AutoCall test.
For details of MOS Setting in Voice, see MOS Setting configuration.
FTP
• FTP: 1) Down: Download data 2) Up: Upload data
• Passive Mode: FTP Server Option • FTP IP Address: Targeting URL • FTP User ID: FTP Server Setting • FTP Password: FTP Server Setting • FTP Server Path: FTP Folder Full
Name Setting(Down/Up) • FTP File Name: Name of the
original file to be downloaded from server (For Download test) Kilo(k) & Mega(m) Unit Support: ex) 100k, 230k, 2m, 10m, … (For Upload test)
• Pending: If select Pending ON 1)Interval: Set max time limitation that allows pending conditions 2)Threshold: Set data throughput limitation that allows pending conditions
• File duplicate: 1) Overwrite :
2) Delete :
XCAL-Mobile 4G User Guide Appendix: Configuring AutoCall Scenario
© Copyright by Accuver Co., Ltd. Page 102
Web
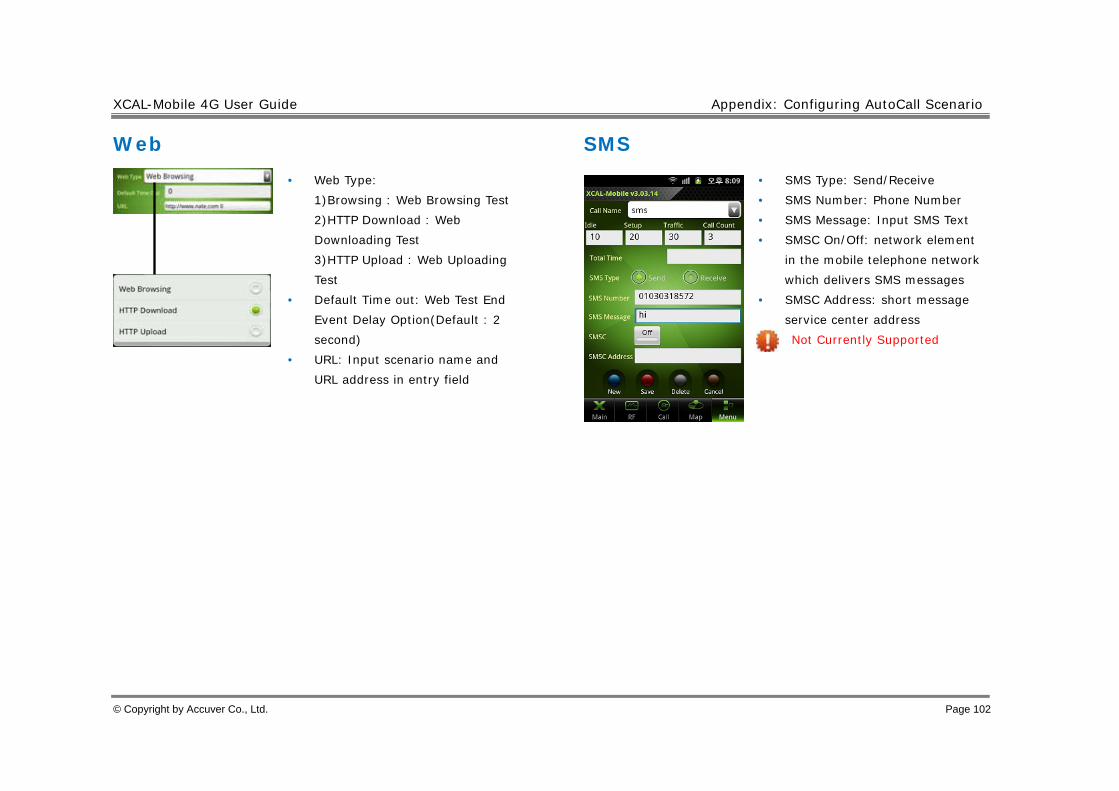
• Web Type: 1)Browsing : Web Browsing Test 2)HTTP Download : Web Downloading Test 3)HTTP Upload : Web Uploading Test
• Default Time out: Web Test End Event Delay Option(Default : 2 second)
• URL: Input scenario name and URL address in entry field
SMS
• SMS Type: Send/Receive • SMS Number: Phone Number • SMS Message: Input SMS Text • SMSC On/Off: network element
in the mobile telephone network which delivers SMS messages
• SMSC Address: short message service center address Not Currently Supported

XCAL-Mobile 4G User Guide Appendix: Configuring AutoCall Scenario
© Copyright by Accuver Co., Ltd. Page 103
WiFi
WiFi test connects and disconnects to a certain WiFi AP. • SSID: Target SSID select • Security Type: Select Security
Type of Target SSID • Password: Input Password of
Target SSID Not Currently Supported
• Gmail ID: Input the Google Gmail Account
• Password: Input Gmail Password • In Size: Select a text size
(50k, 100k, 300k, 500k, 1m) Available only with E-Mail sending.

XCAL-Mobile 4G User Guide Appendix: Configuring AutoCall Scenario
© Copyright by Accuver Co., Ltd. Page 104
Ping
• Destination: Input IP address or URL of ping test destination
• Count: Input ICMP request count • TTL: Input Time To Live (1 –
255) • Packet size: Input size of data
bytes to be transmitted • Interval: Input ICMP request
interval (second unit) • Success Rate:
Test Success Setting Value > Fail Rate Test Fail Setting Value < Fail Rate Fail Rate=[(Ping Count – Proceeded Count) + Fail of Proceeded count] / Ping Count
Iperf
Iperf test computes capacity of packet network performance. Destination: Inputs IP address or URL of ping test destination Port: Configures Port number. Mode: Selects between TCP and UDP. Direction: Selects between Up and Down. - Up: Transfers packet from smart
phone (client) to server. - Down: Transfers packet from
server (client) to smart phone. Packet Size (bytes): Activated when UDP is selected for Mode. Max Seq.Size (bytes):Activated when TCP is selected for Mode. Window Size (KB): Buffer Size (1~1024000) UDP Throughput (Kbit/sec): Activated when UDP is selected for Mode. (1~1024000) Remote Control: PC connects with Daemon Tool

XCAL-Mobile 4G User Guide Appendix: Configuring AutoCall Scenario
© Copyright by Accuver Co., Ltd. Page 105
Youtube
• Youtube setting: Select Youtube Content in Youtube website.
When you select a Youtube contents, setting options including Title, Duration, are configured automatically.
• Title: Youtube Content Title • Duration: Youtube Content
duration Info • Pending:
1) Interval : Set max time limitation that allows pending conditions
2) Threshold : Set data throughput limitation that allows pending conditions
VoLTE
• Voice Type: 1)Ori : Call Send Test 2)Ter : Call Receive Test 3)Con : Continuous Call Test in
Origination (Traffic Time unlimited) • Dial Number : Phone Number • RTP TIMEOUT: Drop is pegged
when none of RTP packets are received during the RTP TIMEOUT(second) set by user
• Video Call 1)On: Video VoLTE Call 2)Off: Voice VoLTE Call
When tapping HW Menu button and tapping Speaker On button, you can use speakerphone function while processing VoLTE AutoCall test.
For details of MOS Setting in Voice, see MOS Setting configuration.

XCAL-Mobile 4G User Guide Appendix: Configuring AutoCall Scenario
© Copyright by Accuver Co., Ltd. Page 106
While processing MOS call test, MOS values in progress can be monitored in the screen by tapping MOS screen.
MOS Setting
MOS Setting is in Voice and VoLTE. Tap MOS Setting On/Off button to activate/inactivate MOS configuration items. • Measurement Type:
- When XCAL-Solo HW is connected, Simplex (Down): Recording only Simply (Up): Play only TimeSync Half-Duplex: Play and record.
- When XCAL-Solo HW is NOT connected, Simplex (Down): Recording only
• Calculation: None (Recording Only):
Recording POLQA MOS (P.863): POLQA MOS value calculation after recording (Appearing only when there is POLQA license.)
• Original File: Original sound source (Reference file).
• Play File: Sound source to be played.
• Save Wave Stream: Saves sound • source in *.wav format after
recording (For MOS value calculation).
• Automatic Level Alignment: Adjusts volume level of recording file automatically (OPTICOM option).
• Solo H/W: Selects when XCAL-Solo HW is connected to Smart Phone.

XCAL-Mobile 4G User Guide Appendix: Configuring AutoCall Scenario
© Copyright by Accuver Co., Ltd. Page 107
[XCAL-Solo]
XCAL-Solo HW is connected to smart phone for POLQA test and sound source play while processing MOS test. It charges smart phone battery. [HW Specification] Operating Power Operating Voltage: 4.2v (Internal Battery), 5.0v (External USB) Current Consumption: 300mA @4.2V (Stand-by) Bluetooth: BT 2.1 EDR Wi-Fi: 802.11 b/g/n Phone Interface: USB2.0 (micro USB connector) x 1 Audio In/Out (3.5mm stereo jack) x 1 Battery: Internal battery(1850mAh) Memory Slot: Micro SD card slot x 1 Size: 95 x 65 x 10 mm Weight: 85g [Status Icons] When XCAL-Solo HW is connected to smart phone, status icon appears at the upper right corner of XCAL-Mobile
application screen.
: Charging
: Fully charged
: Charged less than 75%
: Charged less than 50%
: Charged less than 25%
: XCAL-Solo HW is not connected.
XCAL-Mobile 4G User Guide Appendix: Configuring AutoCall Scenario
© Copyright by Accuver Co., Ltd. Page 108
[POLQA TEST]
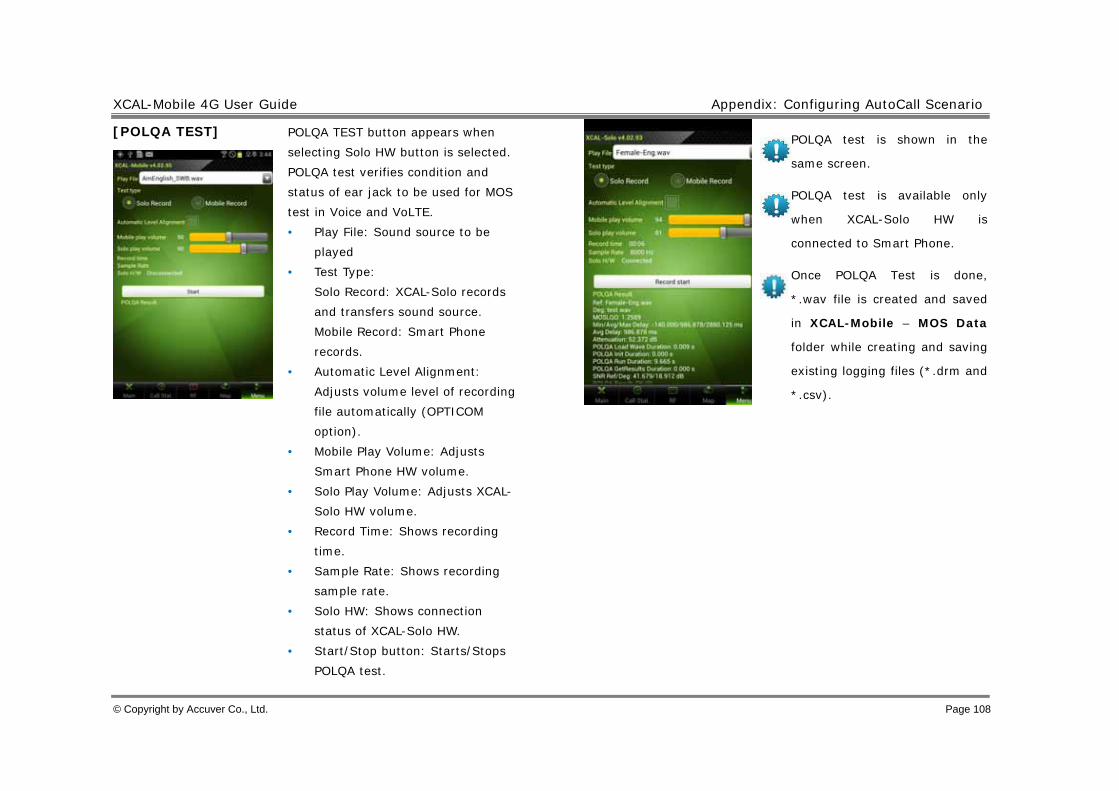
POLQA TEST button appears when selecting Solo HW button is selected. POLQA test verifies condition and status of ear jack to be used for MOS test in Voice and VoLTE. • Play File: Sound source to be
played • Test Type:
Solo Record: XCAL-Solo records and transfers sound source. Mobile Record: Smart Phone records.
• Automatic Level Alignment: Adjusts volume level of recording file automatically (OPTICOM option).
• Mobile Play Volume: Adjusts Smart Phone HW volume.
• Solo Play Volume: Adjusts XCAL-Solo HW volume.
• Record Time: Shows recording time.
• Sample Rate: Shows recording sample rate.
• Solo HW: Shows connection status of XCAL-Solo HW.
• Start/Stop button: Starts/Stops POLQA test.
POLQA test is shown in the
same screen.
POLQA test is available only
when XCAL-Solo HW is
connected to Smart Phone.
Once POLQA Test is done,
*.wav file is created and saved
in XCAL-Mobile – MOS Data
folder while creating and saving
existing logging files (*.drm and
*.csv).

XCAL-Mobile 4G User Guide Appendix: Configuring AutoCall Scenario
© Copyright by Accuver Co., Ltd. Page 109
Multi Call
Multi Call enables you to perform test based on multiple call scenarios sequentially. a. Tap scenario combo box to select
scenarios sequentially, and the selected call scenarios are listed.
b. Tap to select checkboxes of call scenario you want to include and process multi call.
c. Configure Repeat Count of call test.
d. Tap Save button. e. Tap Start button to start
automated Multi Call test.
Multi RAB
Multi RAB performs concurrent voice and data call test. Sync: Processes next call when one session (voice + data call) is terminated. Async: Processes voice and data call individually. Tap to select call scenario combo box to include call scenario in Multi RAB test.
XCAL-Mobile 4G User Guide Appendix: Configuring AutoCall Scenario
© Copyright by Accuver Co., Ltd. Page 110
Appendix: Call Events
XCAL-Mobile 4G provides test result with call events by call types depending on AutoCall types.

111
Voice
Events Description
Setup Fail Setup fail occurs when radio link setup failure happens.
Drop Call drop during progress of traffic
Idle * CDMA : Fail to receive general page
message
* WCDMA : Fail to receive rrc Connection
Request message
FTP
Events Description
Traffic Fail Traffic fail is declared if connection to
application layer fails after finishing PPP layer
connection.
*This event is available for data service such
as FTP, TFTP and HTTP
Pending If throughput is sustained under predefined threshold for designated time threshold, then pending is declared and the call will be dropped
*This event is available for FTP
Time Out If download or upload from/to application cannot be finished during predefined traffic time interval, Time Out is declared.
*This parameter is available for FTP
XCAL-Mobile 4G User Guide Appendix: Call Events
© Copyright by Accuver Co., Ltd. Page 112
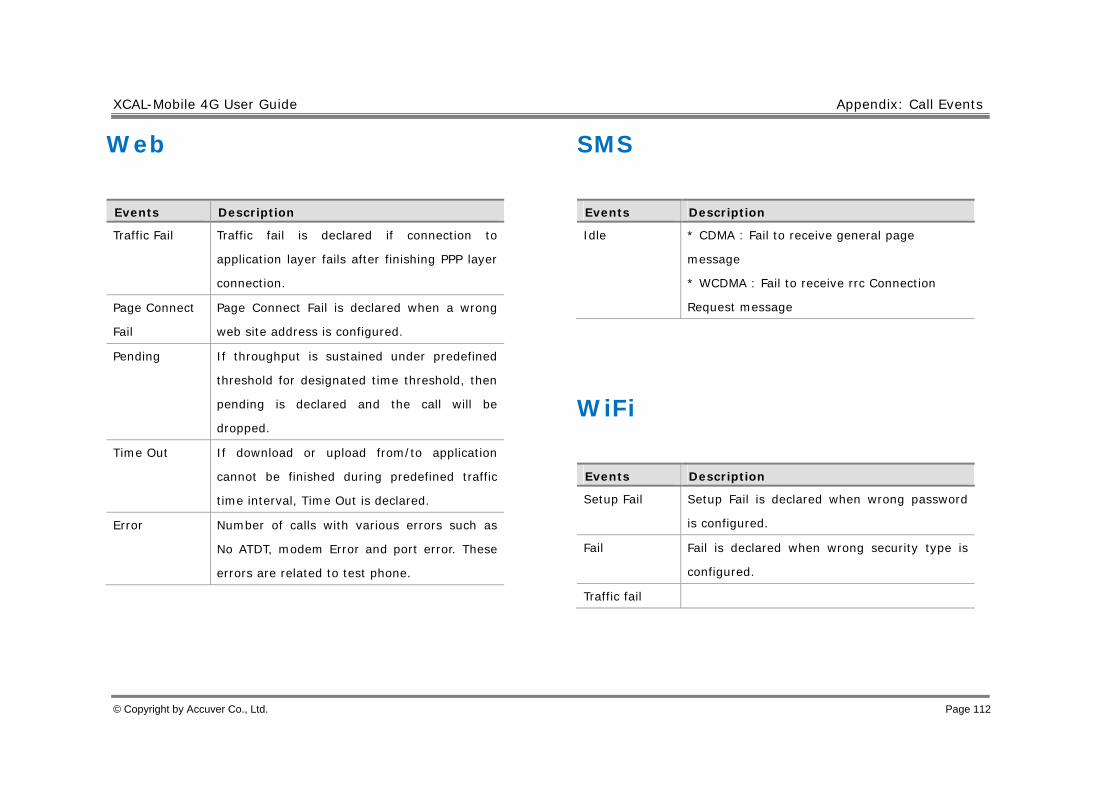
Web
Events Description
Traffic Fail Traffic fail is declared if connection to
application layer fails after finishing PPP layer
connection.
Page Connect
Fail
Page Connect Fail is declared when a wrong
web site address is configured.
Pending If throughput is sustained under predefined
threshold for designated time threshold, then
pending is declared and the call will be
dropped.
Time Out If download or upload from/to application
cannot be finished during predefined traffic
time interval, Time Out is declared.
Error Number of calls with various errors such as
No ATDT, modem Error and port error. These
errors are related to test phone.
SMS
Events Description
Idle * CDMA : Fail to receive general page
message
* WCDMA : Fail to receive rrc Connection
Request message
WiFi
Events Description
Setup Fail Setup Fail is declared when wrong password
is configured.
Fail Fail is declared when wrong security type is
configured.
Traffic fail
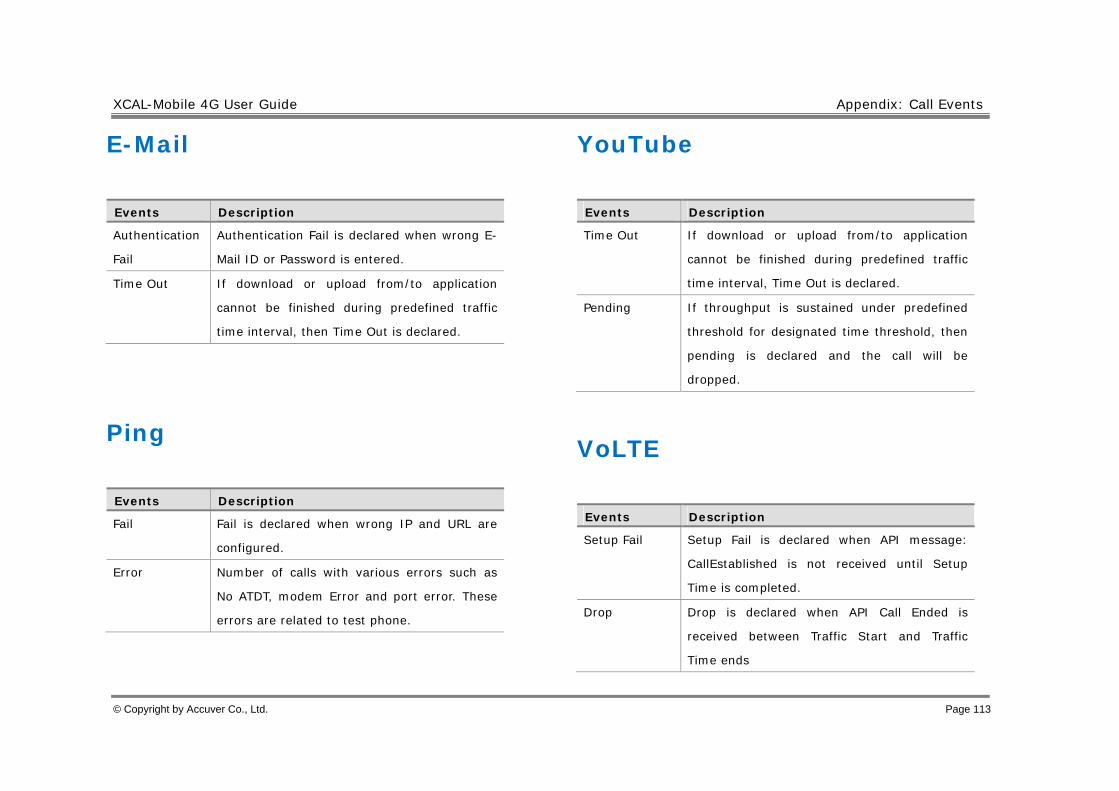
XCAL-Mobile 4G User Guide Appendix: Call Events
© Copyright by Accuver Co., Ltd. Page 113
Events Description
Authentication
Fail
Authentication Fail is declared when wrong E-
Mail ID or Password is entered.
Time Out If download or upload from/to application
cannot be finished during predefined traffic
time interval, then Time Out is declared.
Ping
Events Description
Fail Fail is declared when wrong IP and URL are
configured.
Error Number of calls with various errors such as
No ATDT, modem Error and port error. These
errors are related to test phone.
YouTube
Events Description
Time Out If download or upload from/to application
cannot be finished during predefined traffic
time interval, Time Out is declared.
Pending If throughput is sustained under predefined
threshold for designated time threshold, then
pending is declared and the call will be
dropped.
VoLTE
Events Description
Setup Fail Setup Fail is declared when API message:
CallEstablished is not received until Setup
Time is completed.
Drop Drop is declared when API Call Ended is
received between Traffic Start and Traffic
Time ends
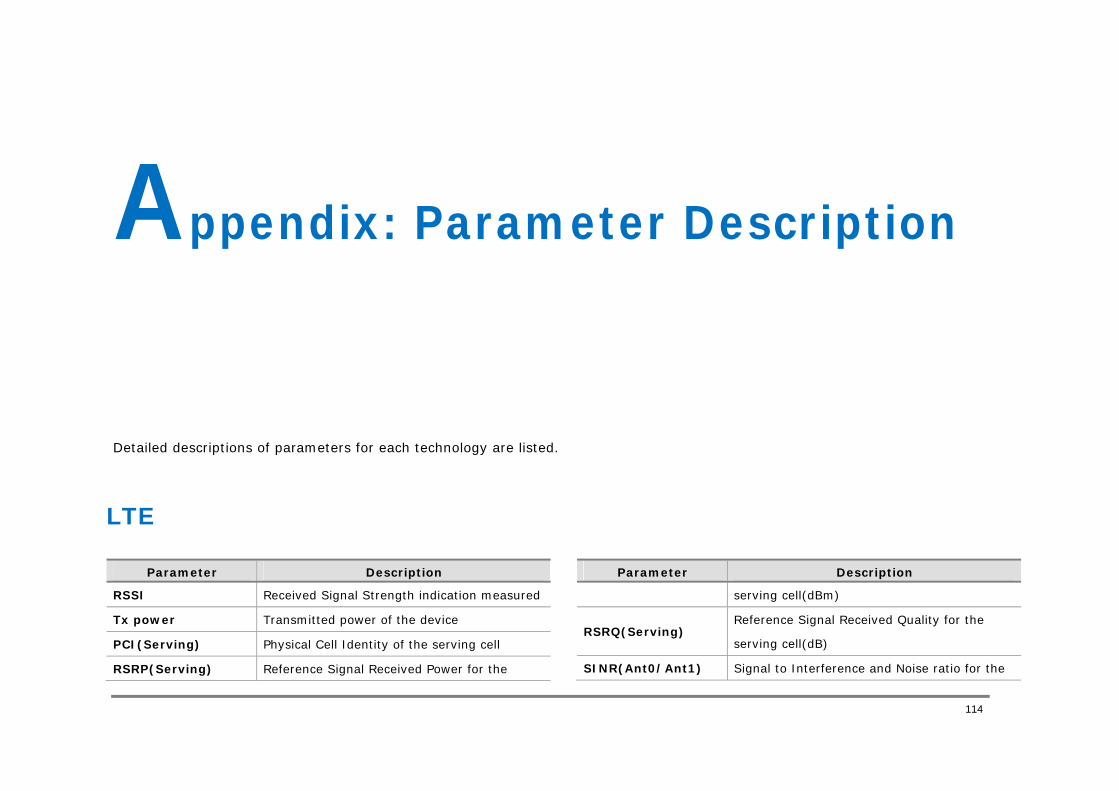
114
Appendix: Parameter Description
Detailed descriptions of parameters for each technology are listed.
LTE
Parameter Description
RSSI Received Signal Strength indication measured
Tx power Transmitted power of the device
PCI(Serving) Physical Cell Identity of the serving cell
RSRP(Serving) Reference Signal Received Power for the
Parameter Description
serving cell(dBm)
RSRQ(Serving) Reference Signal Received Quality for the
serving cell(dB)
SINR(Ant0/Ant1) Signal to Interference and Noise ratio for the
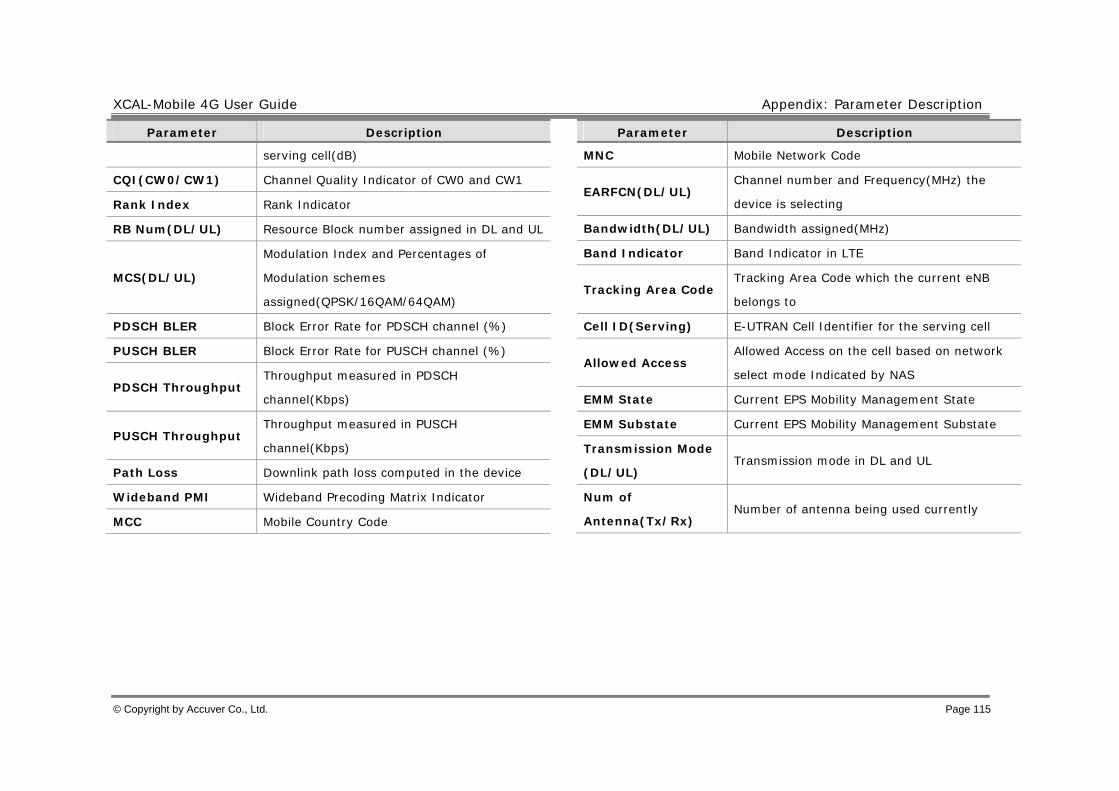
XCAL-Mobile 4G User Guide Appendix: Parameter Description
© Copyright by Accuver Co., Ltd. Page 115
Parameter Description
serving cell(dB)
CQI(CW0/CW1) Channel Quality Indicator of CW0 and CW1
Rank Index Rank Indicator
RB Num(DL/UL) Resource Block number assigned in DL and UL
MCS(DL/UL)
Modulation Index and Percentages of
Modulation schemes
assigned(QPSK/16QAM/64QAM)
PDSCH BLER Block Error Rate for PDSCH channel (%)
PUSCH BLER Block Error Rate for PUSCH channel (%)
PDSCH Throughput Throughput measured in PDSCH
channel(Kbps)
PUSCH Throughput Throughput measured in PUSCH
channel(Kbps)
Path Loss Downlink path loss computed in the device
Wideband PMI Wideband Precoding Matrix Indicator
MCC Mobile Country Code
Parameter Description
MNC Mobile Network Code
EARFCN(DL/UL) Channel number and Frequency(MHz) the
device is selecting
Bandwidth(DL/UL) Bandwidth assigned(MHz)
Band Indicator Band Indicator in LTE
Tracking Area Code Tracking Area Code which the current eNB
belongs to
Cell ID(Serving) E-UTRAN Cell Identifier for the serving cell
Allowed Access Allowed Access on the cell based on network
select mode Indicated by NAS
EMM State Current EPS Mobility Management State
EMM Substate Current EPS Mobility Management Substate
Transmission Mode
(DL/UL) Transmission mode in DL and UL
Num of
Antenna(Tx/Rx) Number of antenna being used currently
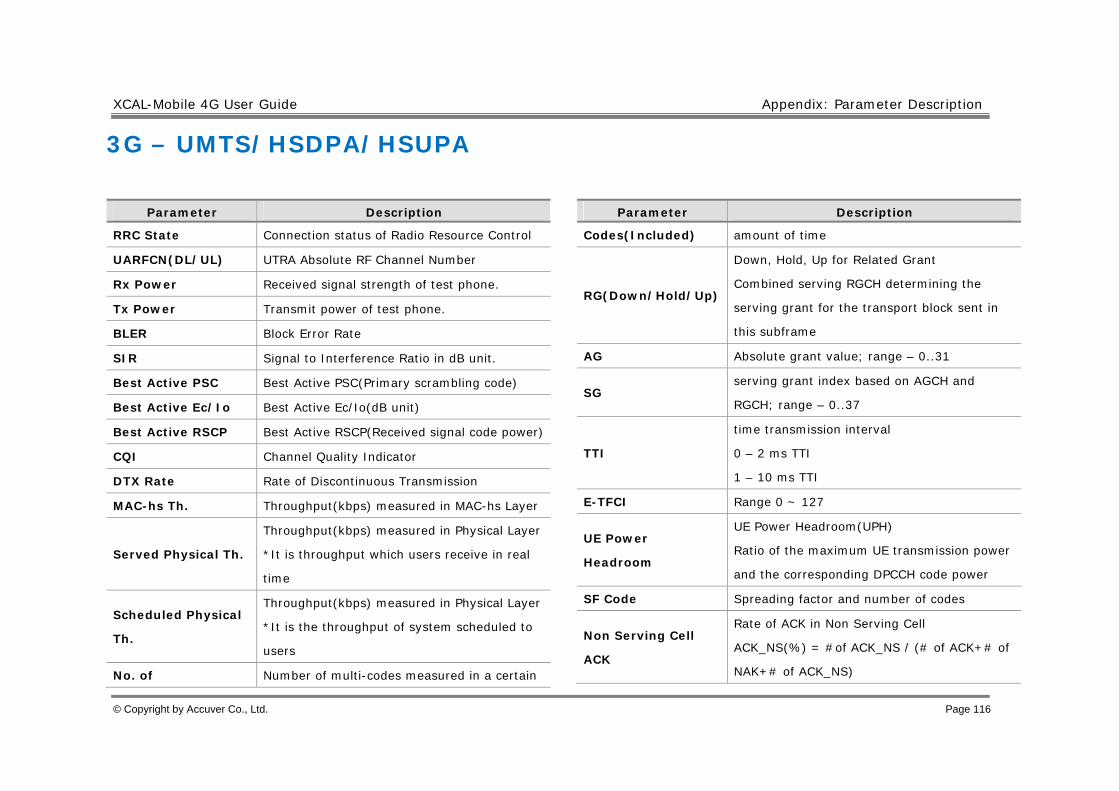
XCAL-Mobile 4G User Guide Appendix: Parameter Description
© Copyright by Accuver Co., Ltd. Page 116
3G – UMTS/HSDPA/HSUPA
Parameter Description
RRC State Connection status of Radio Resource Control
UARFCN(DL/UL) UTRA Absolute RF Channel Number
Rx Power Received signal strength of test phone.
Tx Power Transmit power of test phone.
BLER Block Error Rate
SIR Signal to Interference Ratio in dB unit.
Best Active PSC Best Active PSC(Primary scrambling code)
Best Active Ec/Io Best Active Ec/Io(dB unit)
Best Active RSCP Best Active RSCP(Received signal code power)
CQI Channel Quality Indicator
DTX Rate Rate of Discontinuous Transmission
MAC-hs Th. Throughput(kbps) measured in MAC-hs Layer
Served Physical Th.
Throughput(kbps) measured in Physical Layer
*It is throughput which users receive in real
time
Scheduled Physical
Th.
Throughput(kbps) measured in Physical Layer
*It is the throughput of system scheduled to
users
No. of Number of multi-codes measured in a certain
Parameter Description
Codes(Included) amount of time
RG(Down/Hold/Up)
Down, Hold, Up for Related Grant
Combined serving RGCH determining the
serving grant for the transport block sent in
this subframe
AG Absolute grant value; range – 0..31
SG serving grant index based on AGCH and
RGCH; range – 0..37
TTI
time transmission interval
0 – 2 ms TTI
1 – 10 ms TTI
E-TFCI Range 0 ~ 127
UE Power
Headroom
UE Power Headroom(UPH)
Ratio of the maximum UE transmission power
and the corresponding DPCCH code power
SF Code Spreading factor and number of codes
Non Serving Cell
ACK
Rate of ACK in Non Serving Cell
ACK_NS(%) = #of ACK_NS / (# of ACK+# of
NAK+# of ACK_NS)
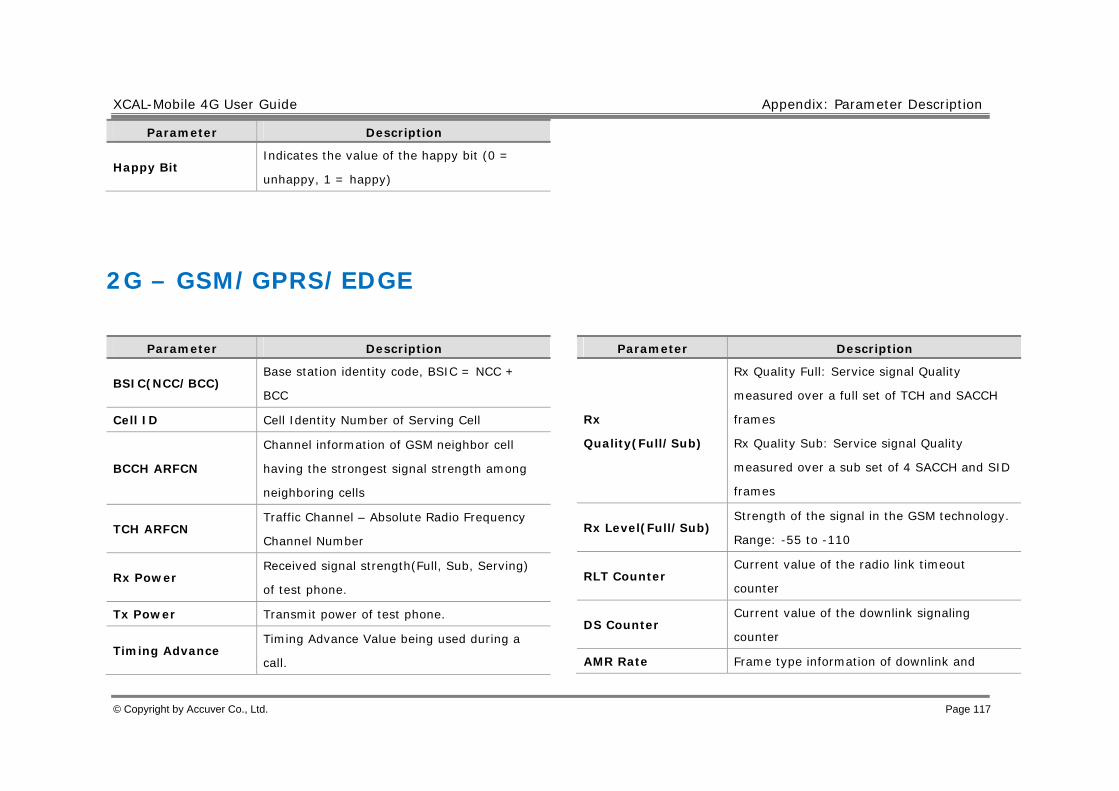
XCAL-Mobile 4G User Guide Appendix: Parameter Description
© Copyright by Accuver Co., Ltd. Page 117
Parameter Description
Happy Bit Indicates the value of the happy bit (0 =
unhappy, 1 = happy)
2G – GSM/GPRS/EDGE
Parameter Description
BSIC(NCC/BCC) Base station identity code, BSIC = NCC +
BCC
Cell ID Cell Identity Number of Serving Cell
BCCH ARFCN
Channel information of GSM neighbor cell
having the strongest signal strength among
neighboring cells
TCH ARFCN Traffic Channel – Absolute Radio Frequency
Channel Number
Rx Power Received signal strength(Full, Sub, Serving)
of test phone.
Tx Power Transmit power of test phone.
Timing Advance Timing Advance Value being used during a
call.
Parameter Description
Rx
Quality(Full/Sub)
Rx Quality Full: Service signal Quality
measured over a full set of TCH and SACCH
frames
Rx Quality Sub: Service signal Quality
measured over a sub set of 4 SACCH and SID
frames
Rx Level(Full/Sub) Strength of the signal in the GSM technology.
Range: -55 to -110
RLT Counter Current value of the radio link timeout
counter
DS Counter Current value of the downlink signaling
counter
AMR Rate Frame type information of downlink and
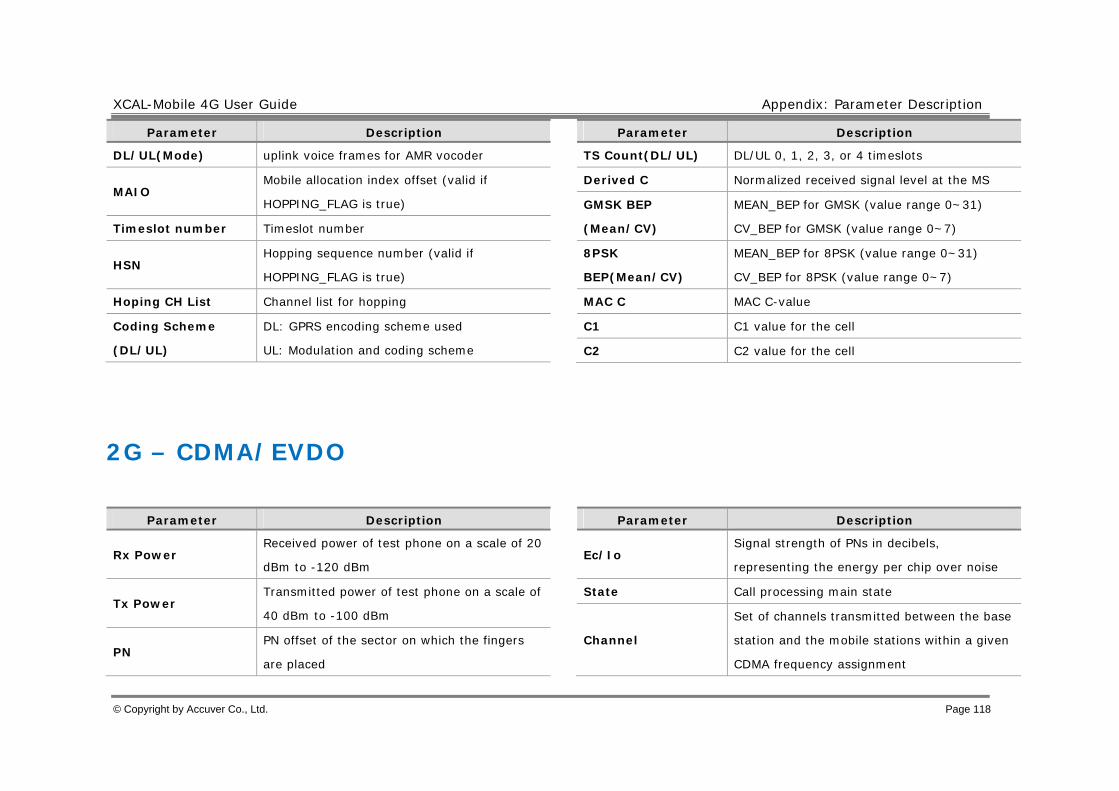
XCAL-Mobile 4G User Guide Appendix: Parameter Description
© Copyright by Accuver Co., Ltd. Page 118
Parameter Description
DL/UL(Mode) uplink voice frames for AMR vocoder
MAIO Mobile allocation index offset (valid if
HOPPING_FLAG is true)
Timeslot number Timeslot number
HSN Hopping sequence number (valid if
HOPPING_FLAG is true)
Hoping CH List Channel list for hopping
Coding Scheme
(DL/UL)
DL: GPRS encoding scheme used
UL: Modulation and coding scheme
Parameter Description
TS Count(DL/UL) DL/UL 0, 1, 2, 3, or 4 timeslots
Derived C Normalized received signal level at the MS
GMSK BEP
(Mean/CV)
MEAN_BEP for GMSK (value range 0~31)
CV_BEP for GMSK (value range 0~7)
8PSK
BEP(Mean/CV)
MEAN_BEP for 8PSK (value range 0~31)
CV_BEP for 8PSK (value range 0~7)
MAC C MAC C-value
C1 C1 value for the cell
C2 C2 value for the cell
2G – CDMA/EVDO
Parameter Description
Rx Power Received power of test phone on a scale of 20
dBm to -120 dBm
Tx Power Transmitted power of test phone on a scale of
40 dBm to -100 dBm
PN PN offset of the sector on which the fingers
are placed
Parameter Description
Ec/Io Signal strength of PNs in decibels,
representing the energy per chip over noise
State Call processing main state
Channel
Set of channels transmitted between the base
station and the mobile stations within a given
CDMA frequency assignment

XCAL-Mobile 4G User Guide Appendix: Parameter Description
© Copyright by Accuver Co., Ltd. Page 119
Parameter Description
Band Class A set of frequency channels and a numbering
scheme for these channels
P Rev Highest available protocol revision for the
base station
SID System Identification number.
NID Network Identification number
SINR Signal to Interference and Noise ratio for the
serving cell(dB)
DRC Rate Graphical representation of forward data rate
Parameter Description
allocation request from mobile station
DSC Value Graphical representation of 1xEV DSC Value
transmitted by the AT
Air Link State ALMP State information
Session State Summary of session layer states
Color Code Color code corresponding to the sector
UATI Unicast Access Terminal Identifier info
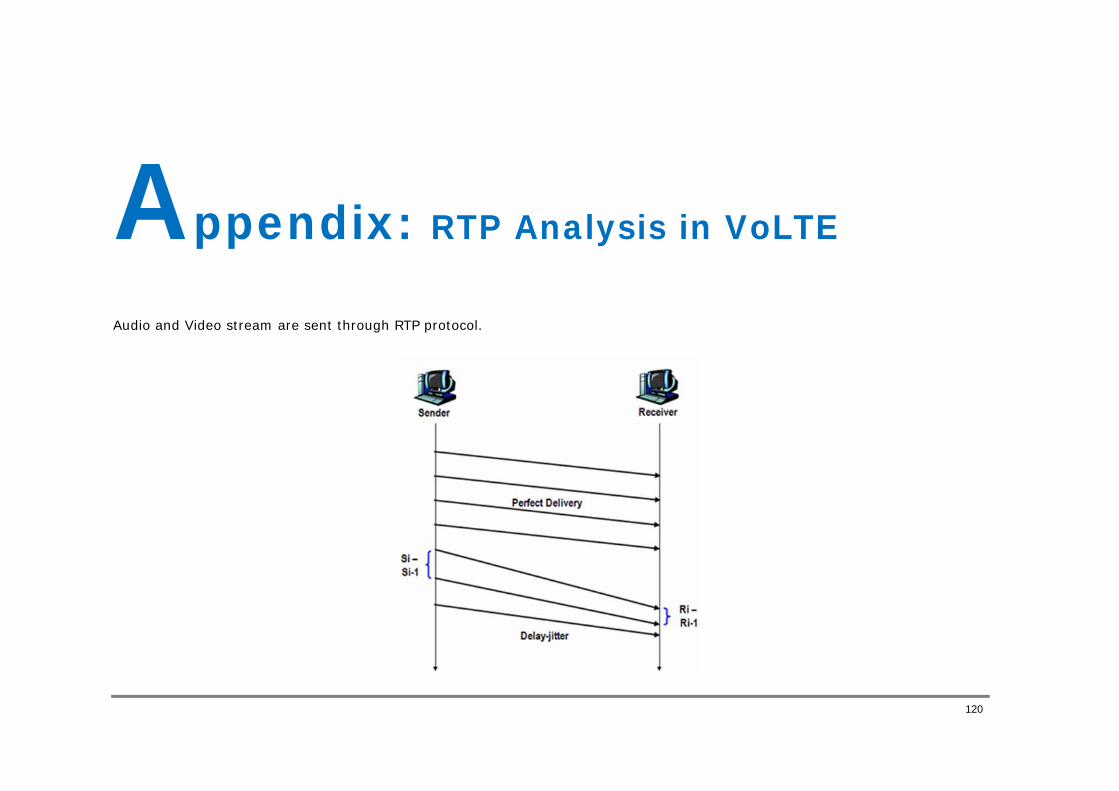
120
Appendix: RTP Analysis in VoLTE
Audio and Video stream are sent through RTP protocol.
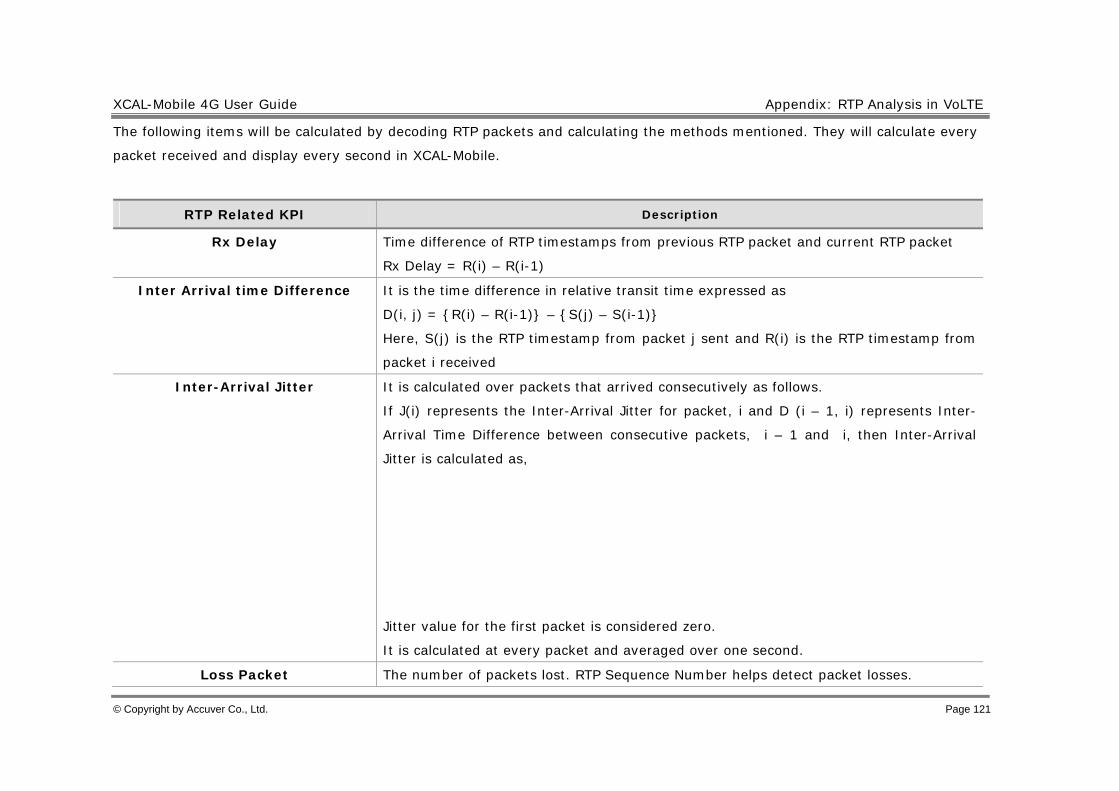
XCAL-Mobile 4G User Guide Appendix: RTP Analysis in VoLTE
© Copyright by Accuver Co., Ltd. Page 121
The following items will be calculated by decoding RTP packets and calculating the methods mentioned. They will calculate every
packet received and display every second in XCAL-Mobile.
RTP Related KPI Description
Rx Delay Time difference of RTP timestamps from previous RTP packet and current RTP packet
Rx Delay = R(i) – R(i-1)
Inter Arrival time Difference It is the time difference in relative transit time expressed as
D(i, j) = {R(i) – R(i-1)} – {S(j) – S(i-1)}
Here, S(j) is the RTP timestamp from packet j sent and R(i) is the RTP timestamp from
packet i received
Inter-Arrival Jitter It is calculated over packets that arrived consecutively as follows.
If J(i) represents the Inter-Arrival Jitter for packet, i and D (i – 1, i) represents Inter-
Arrival Time Difference between consecutive packets, i – 1 and i, then Inter-Arrival
Jitter is calculated as,
Jitter value for the first packet is considered zero.
It is calculated at every packet and averaged over one second.
Loss Packet The number of packets lost. RTP Sequence Number helps detect packet losses.
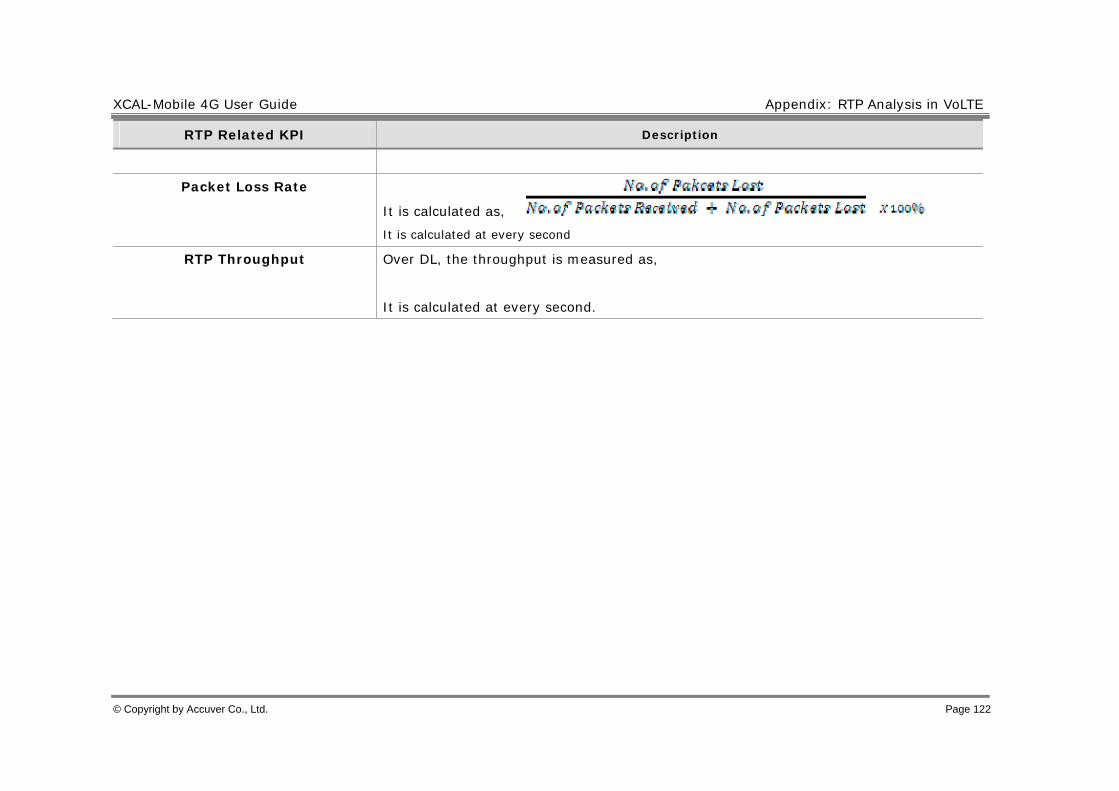
XCAL-Mobile 4G User Guide Appendix: RTP Analysis in VoLTE
© Copyright by Accuver Co., Ltd. Page 122
RTP Related KPI Description
Packet Loss Rate
It is calculated as,
It is calculated at every second
RTP Throughput Over DL, the throughput is measured as,
It is calculated at every second.
XCAL-Mobile 4G User Guide Appendix: RTP Analysis in VoLTE
© Copyright by Accuver Co., Ltd. Page 123
FCC Statement:
Federal Communication Commission Interference Statement This equipment has been tested and found to comply with the limits for a Class B digital device, pursuant to Part 15 of the FCC Rules. These limits are designed to provide reasonable protection against harmful interference in a residential installation. This equipment generates, uses and can radiate radio frequency energy and, if not installed and used in accordance with the instructions, may cause harmful interference to radio communications. However, there is no guarantee that interference will not occur in a particular installation. If this equipment does cause harmful interference to radio or television reception, which can be determined by turning the equipment off and on, the user is encouraged to try to correct the interference by one of the following measures:
● Reorient or relocate the receiving antenna.
● Increase the separation between the equipment and receiver.
● Connect the equipment into an outlet on a circuit different from that to which the receiver is connected.
● Consult the dealer or an experienced radio/TV technician for help.

XCAL-Mobile 4G User Guide Appendix: RTP Analysis in VoLTE
© Copyright by Accuver Co., Ltd. Page 124
FCC Caution: Any changes or modifications not expressly approved by the party responsible for compliance could void the user’s authority to operate this equipment. This device complies with Part 15 of the FCC Rules. Operation is subject to the following two conditions: (1) This device may not cause harmful interference, and (2) this device must accept any interference received, including interference that may cause undesired operation. For product available in the USA market, only channel 1~11 can be operated and these channel assignments deal with only the 2.4 GHz range. FCC Radiation Exposure Statement: This equipment complies with FCC radiation exposure limits set forth for an uncontrolled environment. This equipment should be installed and operated with minimum distance 20cm between the radiator & your body. This device and its antenna(s) must not be co-located or operation in conjunction with any other antenna or transmitter.

125
Recommended