Embed Size (px)
Citation preview

Central Venous Access Devices (CVADs)
PHOTO REFERENCE: http://community.nurseslounge.com/files/7750e5d445/1._CVAD.JPG
Central Venous Access Devices (CVADs)
Central Venous catheters or access devices can be categorized into four groups based on their design: o peripherally inserted central catheterso temporary (non-tunneled) central venous catheters o permanent (tunneled) central venous catheters o implantable ports.
Although tip location of all central lines may be the same, insertion sites may vary.
It is the responsibility of the Nurse to be knowledgeable of the CVADs design, purpose, limitations, and precautions and to educate patients and caregivers so they can independently manage their catheters whether in an inpatient, outpatient or homecare setting.
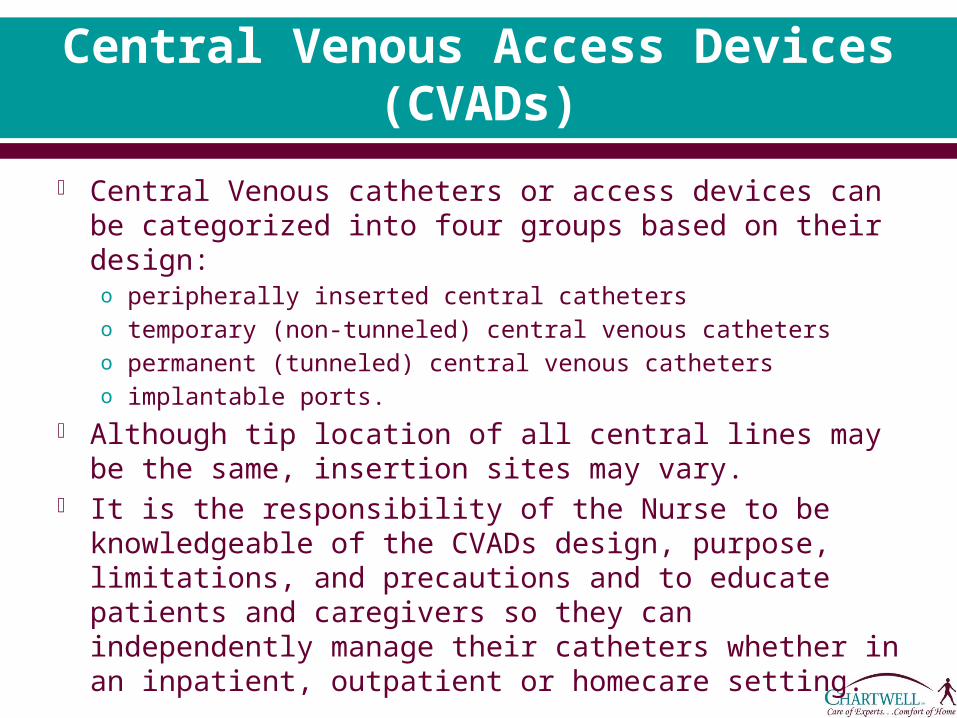
PICC Lines
PHOTO REFERENCE: http://www.utmedicalcenter.org/lib/image/manager/pages/departments/radiology/radiology-patient-services/picc-team-service/picchome1_opt.jpg
PHOTO REFERENCE: http://t1.gstatic.com/images?q=tbn:ANd9GcQmispXuKKSH9j2lAiEvPRIp35n8bg2u8WC0EEP9QDA0yNem5849s-vK2fY
PICC Lines By definition, and per its’ acronym, A PICC line is a
peripherally inserted central catheter. It is a long (approx. 50cm or 20 inches) slender flexible
tube that is inserted into a peripheral vein, typically in the upper arm of adults and children and sometimes the scalp and lower extremity of pediatric patients.
The PICC is then threaded along the vein into the subclavian and eventually into the vena cava and central circulation.
The Registered Nurse should understand that a PICC is a central venous access device (CVAD) which requires the same care as other central venous catheters to avoid complications and achieve positive patient outcomes.
PICC Lines Cont. In many Hospitals and outpatient settings the PICC line
has become the preferred alternative to central lines due to cost effectiveness, ease of insertion and significant lower incidence of major complications.
Specially trained and certified nursing teams have been effectively placing PICCs at the bedside, thereby decreasing costs and enhancing patient comfort.
Major complications such as hemothorax, pneumothorax, and vessel rupture are not typically present with PICC insertion.
In addition risk of infection is greatly reduced due to the mere placement of the line: upper arm, verses neck or chest for central line.
PICC Line Indications PICC lines are commonly used in acute care settings,
homecare settings and skilled nursing facilities for a variety of therapies.
They are used for short term therapies of only 1 week to long term therapies up to 1 year.
Some of the various indications are:o chemotherapy, o parenteral nutrition o repeated blood or blood products o frequent venous sampling in those with poor venous access o Central venous pressure monitoring in various critical care areas
Any infusate, regardless of osmolarity, pH, or other chemical properties of a solution or medication can be administered via PICC line.
o INS guidelines state that drugs which have a pH less than 5 and greater than 9 should be infused through a central line.
Types of PICC Lines PICC lines are typically made of polyurethane and
silicone. They typically range in size from 4-7 French, but
can be as small as 1.1 French for neonates. Due to the increasing need for high-pressure
injection for CT Scans, the use of polyurethane PICCs (Power) are increasing.
Single, double and triple lumen PICCs are available.
Types of PICC Lines Cont.
PICC lines are generally classified into either open ended or valved.
An open ended catheter is generally maintained with a Heparin lock solution because of blood reflux into the catheter tip.
With a valved catheter, a valve is built into the internal tip or external hub. o The valve prevents blood from the vessel from inadvertently entering the
catheter. While these valves have different designs and function in
different ways, the one common aspect is the fact that they can be flushed and locked with 0.9% Normal Saline solution only and do not require heparin.
Examples of these types of valved catheters are the o Groshong Cathetero Bard Solo PICCo Vaxcel PASV
PICC Line Placement PICC line placement can be done in both the
inpatient and outpatient setting and is performed by trained and qualified health care professionals such as :o Radiologists o Physician assistants and certified o Certified Registered Nurses.
The Basilic vein is preferred because of its large diameter; however the Cephalic vein can be used.
Least preferred are the Brachial veins due to increased risk of complications.

PICC Line Placement Cont.
There are 2 techniques commonly used to insert a PICC line. o The Peel Away Cannula Technique is performed by feel only
and then advanced and confirmed under fluoroscopy. o The second technique known as the Modified Seldinger
Technique involves ultrasound guidance to visualize the vessels in the upper arm then placement confirmation via fluoroscopy or chest x-ray.
Latest technology now combines ultrasound for vein access, magnetic tip location, and electrocardiographic (EKG) guided positioning for final tip confirmation.o This method prevents patient’s exposure to radiation and
saves time in repositioning catheter in the case of previous malposition.

PICC Line Placement Cont.
Arm circumference at the insertion site should be measured at time of insertion and recorded for future use to identify swelling that may not be accompanied by erythema.
Catheter measurements should also be documented in the patient record. o They should include total length, and external length.
Insertion measurements are necessary for PICC removal and ongoing assessment.
Accessed arm should not be used for phlebotomy or Blood pressure measurement.

PICC Line Placement Cont.
National Standards of practice, FDA, and CVAD manufacturers recommend placement of the PICC tip terminating in the distal end of the superior vena cava (SVC) at or near its junction with the right atrium.
The Infusion Nursing Standards of Practice recommends that all members of the Health care team collaboratively address CVAD tip location if the SVC is not used.
Nerve injury or irritation can be a complication during insertion of a PICC line, nearby nerves may get injured or irritated.
Signs and symptoms include: o shooting pains down the arm o numbness and tingling o sensation of pins and needles o weakness or in extreme cases paralysis. Though an uncommon
complication it is occurs most when the brachial vein is selected.
PICC Line Securement INS guidelines no longer list dressings as
stabilization devices. CVADS should be secured to minimize movement
in and out of the insertion site. A manufactured catheter securement device is
now the preferred alternative to tape or sutures when feasible.
These devices help reduce catheter dislodgement and the need for removal and reinsertion.
The chosen device should allow for assessment of catheter insertion site and should not alter the flow of fluid through the catheter.
PICC Line Securement Cont.
The securement device should be changed with the weekly dressing change or when loose or soiled.
Migration and dislodgement complications associated with PICC lines and even midlines occur most often due to improper anchoring of device.
Any signs or symptoms of the following should be reported immediately.o leaking at catheter site, o wet dressing, o swelling, o burning
A catheter that migrates externally should never be re-advanced into the vein. o It should be stabilized at the point of external migration and
assessed for proper placement before further use. o If catheter appears to have migrated a CXR may be indicated for
confirmation of placement.
PICC Line Cont. INS and NHIA recommend that site measurement
and external catheter length be routinely assessed, documented and compared with insertion record at regular intervals. It is suggested it be performed with weekly dressing changes.
Normal use of the accessed arm is needed to maintain circulation however patients should be educated to avoid: o strenuous worko lifting objects greater than 10 poundso repetitive motion o swimming
PICC Line Removal Per INS guidelines, PICC line removal should only be
performed on the order of a licensed independent practitioner.
The nurse should be competent in the process for VAD removal, including identification of potential complications, and appropriate nursing interventions and/or emergency measures as needed.
A PICC should be removed upon unresolved complications, therapy discontinuation, or if deemed unnecessary.
The patient should be positioned so that the CVAD insertion site is at or below the level of the heart to reduce the risk of air embolus. Supine position is preferred
Educate patient on Valsalva’s maneuver for all CVAD removal procedures.
PICC Line Removal Cont.
INS recommendations for PICC line removal are as follows:o Wash hands, use aseptic technique and observe standard precautions.o Remove stabilization device and dressing and disinfect catheter skin
junction.o Using gentle even pressure, slowly retract catheter from site with
dominant hand while holding site with gauze as patient performs Valsalva’s maneuver.
o After removal apply digital pressure to site until hemostasis is achieved, a minimum of 30 seconds.
o Apply a petroleum based ointment dressing to seal the skin-to-vein tract and decrease risk of air embolus. Change dressing every 24hrs until exit site is healed.
o Record length of CVAD removed and condition of tip. Compare with original insertion record to ensure entire length of catheter was removed.
o If resistance is met, do not attempt removal. Consider using relaxation techniques if patient is anxious. Place a warm compress or pack on arm for 15 minutes, then attempt again.
o If still unable to remove, notify physician.

Tunneled Central Venous Catheters
RHOTO REFERENCE: http://images.ddccdn.com/cg/images/en141690.jpg
PHOTO REFERENCE: http://www.bupa.co.uk/jahia/webdav/site/bupacouk/shared/Flash/Individual/health-information/factsheets/tunnelled-central-line/start-image.jpg
Tunneled Central Venous Catheters
A tunneled central venous catheter is a long silicone or polyurethane tube open at each end.
It is inserted into a central vein at one location (neck, chest or groin) and tunneled under the skin to a separate exit site, typically the chest. It exits the body several inches away from the vein.
A Dacron cuff, located and anchored just under the skin at the exit site, provides stability and helps reduce risks of infection.
Though more comfortable and discreet for patients than non-tunneled catheters, they still carry the same risks of hemorrhage, pneumothorax, and infection.
Tunneled CVCs Cont. Infection rates are reported to be lower with tunneled
catheters verses non-tunneled catheters. With proper care a tunneled catheter can remain in place for
several years. Tunneled catheters are often referred to by their brand name,
o Hickmano Hohn o Broviaco Leonard o Neostar o Groshong
They are available in single, double and triple lumens depending on brand.
Tunneled catheters are generally surgically placed or placed in radiology. In some facilities, highly trained infusion nurses are also performing the procedure. o As such, they are not able to be removed in the home.

Tunneled CVC Indications
Typically tunneled catheters are placed for long term therapy in patients with chronic illnesses or cancer.
They can be used in: o inpatient and outpatient settings for chemotherapy o parenteral nutritiono poor venous access o Plasma pheresis o dialysiso other prolonged therapies
Dialysis and plasma pheresis catheters are relatively large bore catheters to allow for high flow rates whereas smaller catheters may be used for infusion purposes.

Care and Maintenance of a Tunneled CVC
Care of a newly tunneled catheter follows the same guidelines as other CVADs.
Initial dressing should be changed in 24 hrs and then if using a transparent semi permeable dressing (TSM), weekly and as needed.
If gauze dressing is used it should be changed every 2 days. Once healed, tunneled catheters may go without a dressing
with a prescriber order unless the patient is immunocompromised.
In most cases sutures may be removed from a tunneled catheter insertion site 2-3 weeks after insertion with prescriber order.
Clean technique for dressing changes may be used 7-10 days after sutures are removed from a newly tunneled CVAD.
Care and Maintenance of a Tunneled CVC
Flushing the tunneled catheter depends on the manufacturers’ recommendations and in accordance with the treating clinician’s orders.
In general, Groshong, valved or closed tip catheters only require 0.9% Sodium chloride unless otherwise specified.
Non-tunneled Central Venous Catheters
Non-tunneled catheters are placed by physicians, radiologists and other trained health care professionals in an acute care setting.
They are inserted by direct venipuncture into the internal jugular, subclavian, and femoral veins.
The risk of pneumothorax and other complications are such that catheter placement needs to be in a setting where emergency intervention is readily available.
The risk of infection is significantly higher than that of other CVADs due to the fact that bacterial count in the area of insertion is much higher than other body areas.
They are typically inserted for short tem use and are not recommended for home use due to the higher incidences of complications.

Implanted Port
PHOTO REFERENCE: http://images.ddccdn.com/cg/images/en135134.jpg
PHOTO REFERENCE: http://jenneink.blogs.com/photos/uncategorized/port.jpgPHOTO REFERENCE: http://faculty.mercer.edu/summervill_j/jeanchiang/Mvc-083s.jpg
Implanted Ports Implantable ports are implanted subcutaneously to
provide access to the peritoneal cavity or the vascular, arterial, or epidural system.
The use of implantable ports has grown tremendously since their first use in 1981.
Oncology patients were the first recipients of implanted ports.
Acceptance of these devices has grown rapidly with more than 100,000 ports being implanted each year.
More than fourteen different manufacturers have designed their own type of port, yet most are similar in design, function, and application.
Implanted Ports Cont. The implantable port consists of the portal body and the
catheter. o The portal body is made of stainless steel, titanium, polysulfone, or a
combination thereof with an inner center space called a reservoir.o Most catheters are made of silicone, as this material is known to
produce fewer thrombi. The three principal outside features of the I.P. are the base,
the shoulder, and the barb. A self-sealing, compressed silicone septum, overlays the
portal body. The septum is designed for either top and/or side access. Port access is done by an I.P. needle, Huber needle, or a
needle with a deflective, non-coring tip. Several commercially made ports are available in single or
double lumen designs. Lower profile (thinner) designs are available for smaller
patients.

Implanted Port Indications
Like tunneled catheters, I.P’s are inserted in patients in need of long term access generally greater than three years.
Like tunneled catheters they are similarly used for patients with o chronic illnesses o chemotherapy o parenteral nutritiono pain management o frequent venous access o blood componentso other long term therapies
The advantage to having an IP is the absence of any external component decreasing risk for breakage and infection.
They are especially preferred among young active adults for cosmetic appearance and greater freedom with activities.
Placement of Implanted Ports
An implanted port is surgically placed subcutaneously beneath the skin, and generally in the chest region.
The incision is made halfway between the clavicle and nipple on either the left or right side of the chest.
The right side of the chest is generally preferred because of its direct path to the superior vena cava (SVC).
The surgeon makes the final decision about the site for implantation based on skin condition, presence of a pacemaker, and other medical conditions that would contra-indicate the use of a particular site.
An approximate 5-cm incision in the skin is made at the selected site. A pocket is created approximately two inches away from the incision
line and 0.5-cm to 2.0 cm deep into which the portal body is placed. The pocket is located away from the incision line in order to avoid
rupturing the incision with subsequent accessing of the port. The I.P. is placed in this pocket and sutured in place to the underlying
tissue.
Placement of Implanted Ports Cont.
The catheter is threaded subcutaneously from a point near the clavicle to meet with the portal body.
The catheter tip is advanced into the subclavian vein and terminated in the SVC/ right atrial junction. o It takes approximately two weeks for the body to establish a healed
tract for the tunneled catheter. The procedure is done under local anesthesia and takes from
30-60 minutes. Placement of the smaller P.A.S. port in the arm can be done in
a doctor’s office. Other sites used for the placement of an I.P. are in the
abdominal cavity with the tip of the catheter tunneled into the inferior vena cava (IVC).
The breast may also be used for I.P. placement in female patients.
Chest placement provides best stability to the port when accessed than does alternate locations.
Types of Implanted Ports
P.A.S. port, the Groshong port, the side-access port, and the dome (or Omega) port are common brands associated with IPs and some are available as single or dual access.
Port choice is primarily dependent upon the surgeon’s choice or availability within a particular medical facility.
Dual ports allow infusion of non-compatible medications and fluids. o Additional IV access increases the probability of complications such as
phlebitis, hematomas, and infiltration.
The RN is often the patient’s advocate in helping them choose the safest and most appropriate choice for venous access devices.

Types of Implanted Ports Cont.
Dual I.P.s have separate reservoirs and separate catheters to each reservoir; however the catheters are generally encased in one sleeve. o Each port requires individual care.
• If it is not clear whether a patient has a single or double port, palpate the skin over the port, a double lumen will be rectangular with two septum’s, a single lumen port will be round with one septum
o If each port of a dual lumen is accessed properly, two separate external catheters will extend from the dressing site.
The Groshong port is manufactured as a single or dual port. o The tip of the Groshong I.P. catheter has valves typical of the
tunneled Groshong catheter. o No heparin is required with the Groshong catheter because of these
valves. The Omega (or dome) port is shaped like a dome with a steel
mesh encasing the dome. The side access port is accessible from both sides of the port
body. A flat butterfly Huber needle is used to access these ports
Accessing an Implanted Port
Before accessing a patient’s I.P: o Visually assess and palpate chest wall for complications of
swelling and pain. o Assess for pain, or swelling in the shoulder, arms or fingers on
port side of body. o Examine neck veins for any distention. Gently palpate catheter
tract for kinking or coiling, but only if catheter is visible under the skin.
o Palpate I.P. under skin and assess portal body for position and observing for any unusual skin conditions over and around the IP.
o Report any unusual signs and symptoms to prescribing physician.
Accessing an Implanted Port Cont.
The IP should be accessed with the smallest gauge non-coring safety needle, or Huber needle, necessary to accommodate the prescribed therapy.
To reduce the risk of needle dislodgement while accessed, the Huber needle should:o be a length that allows the needle to make contact with the
back of the port when inserted and sit flush to the skin and secure within the port.
INS recommends replacement of non-coring needle every 7 days when left in place for continuous infusions.
The type of I.P. needle used differs with each facility. Huber needles come in various length and gauge and
with and without catheters attached.
Accessing an Implanted Port Cont.
Prior to use of an implanted port, patency should be confirmed by presence of blood return and ability to flush the port with preservative free 0.9% sodium chloride solution without evidence of infiltration.
When an IP is accessed, a TSM dressing or gauze dressing should cover the needle and access site.
If gauze is used to support the wings of an access needle under a TSM dressing, it can be considered a TSM dressing and changed every 7 days or when necessary per standards.
Gauze dressings alone or that cover a site under a TSM dressing are recommended to be changed every 2 days.
The use of positive pressure during non-coring needle withdrawal (de-accessing) should be used to reduce blood reflux and risks of thrombotic catheter occlusion.
INS recommendations for IP lock is 5mls of 100u/ml heparin before de-accessing. o Groshong-manufacturer recommends use of 0.9% preservative free sodium chloride
solution.

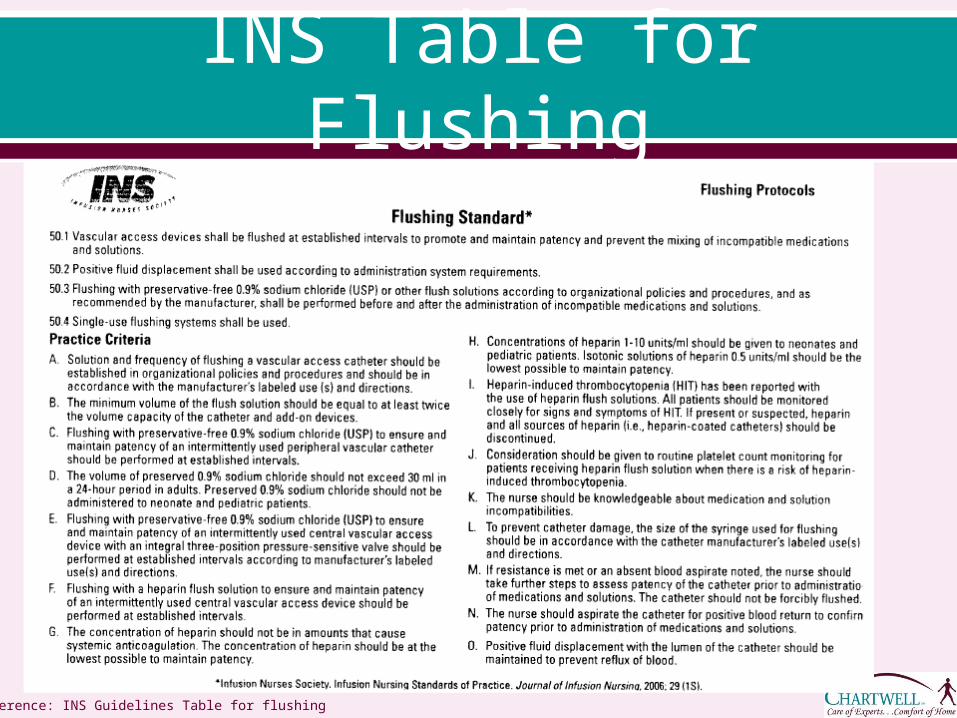
Flushing a Central Venous Access Device
Flushing a CVAD is not only critical to preserve function and prevent infection, it ensures catheter patency before a medication or IV solution is administered and after to prevent precipitation.
It is also necessary to flush between medication administration to clear the catheter and avoid incompatibilities.
The minimum volume of 0.9% sodium chloride depends on the type and size of the catheter, age of the patient, and therapy being given.
A nurse should aspirate for blood return before any administration of medication or solutions; if resistance is met and/or no blood return noted further steps should be taken to assess patency before use.
The catheter should never be forcibly flushed as this could lead to catheter rupture.
Patients and caregivers are not routinely taught to assess patency via blood return.
Flushing a Central Venous Access Device Cont.
Always use a 10ml or larger syringe to flush or administer medications. Smaller syringes have increased flushing pressure that can cause catheter rupture.
Turbulent flushing, an intermittent push-stop-push technique in which a small amount of 0.9% Sodium chloride solution is quickly injected then paused and repeated until the total amount of flush is given is now the standard in proper flushing.
This practice helps remove the build up of residue, medication and fibrin that may have formed on the inner walls of the catheter.
Even when not in use, CVADs must be flushed regularly to maintain patency.
There remains a lot of controversy and confusion surrounding flushing protocols and standardization of care differs between various health care settings.
Manufacturer’s recommendations and institution or agency protocol should be followed regarding amounts and intervals.

Flushing a Central Venous Access Device Cont.
INS recommendations for a CVAD in the Adult patient are as follows:o Flush before and after each medication with a minimum of
3-5mls preservative free normal saline solution.o Flush volume should be at least 2 times the internal volume
of the CVAD and all add on devices. (e.g., extension sets)o Lock solution may be instilled as a final flush to maintain
CVAD patency; instill 2-3mls heparin 10u/ml when CVAD is not in use. Implanted port uses 5mls 100u/ml heparin as a lock solution.
o Groshong-Manufacturer recommends 5 mls of normal saline only-and flush weekly when not in use. Note: Valved CVAD’s may require heparin when used long-term
o Flush/Lock CVAD at least once a day when not in use.
Certain needless connectors contain devices that prevent the backflow of blood and hence eliminate the need for heparin.
Heparin should be avoided in patients who are allergic, have clotting disorders, have a history or develop thrombocytopenia.
When a 0.9% Sodium chloride solution is incompatible with a medication being administered, a 5% Dextrose in water flush should be used before and after, followed by a 0.9% sodium chloride flush, and then heparin lock if indicated. o Dextrose solution should always be flushed from the catheter because
it can provide nutrients for biofilm growth. Pediatric guidelines for flushing may vary and should be
followed per MD order agency protocol.
Flushing a Central Venous Access Device Cont.
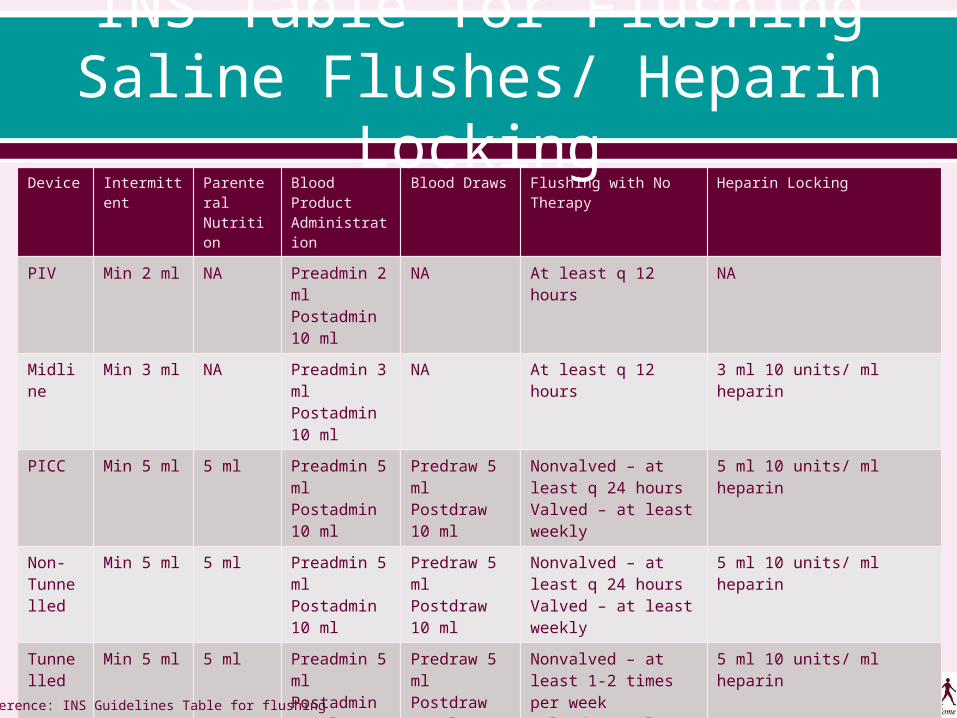
Device Intermittent
Parenteral Nutrition
Blood Product Administration
Blood Draws Flushing with No Therapy
Heparin Locking
PIV Min 2 ml NA Preadmin 2 mlPostadmin 10 ml
NA At least q 12 hours NA
Midline
Min 3 ml NA Preadmin 3 mlPostadmin 10 ml
NA At least q 12 hours 3 ml 10 units/ ml heparin
PICC Min 5 ml 5 ml Preadmin 5 mlPostadmin 10 ml
Predraw 5 mlPostdraw 10 ml
Nonvalved – at least q 24 hoursValved – at least weekly
5 ml 10 units/ ml heparin
Non-Tunnelled
Min 5 ml 5 ml Preadmin 5 mlPostadmin 10 ml
Predraw 5 mlPostdraw 10 ml
Nonvalved – at least q 24 hoursValved – at least weekly
5 ml 10 units/ ml heparin
Tunnelled
Min 5 ml 5 ml Preadmin 5 mlPostadmin 10 ml
Predraw 5 mlPostdraw 10 ml
Nonvalved – at least 1-2 times per weekValved – at least weekly
5 ml 10 units/ ml heparin
Port Min 5 ml 5 ml Preadmin 5 mlPostadmin 10 ml
Predraw 5 mlPostdraw 10 ml
Accessed Nonvalved – at least 1-2 time per weekValved – at least weeklyDeaccessed – at least monthly
3-5 ml 10 units/ ml heparinReference: INS Guidelines Table for flushing
INS Table for FlushingSaline Flushes/ Heparin Locking
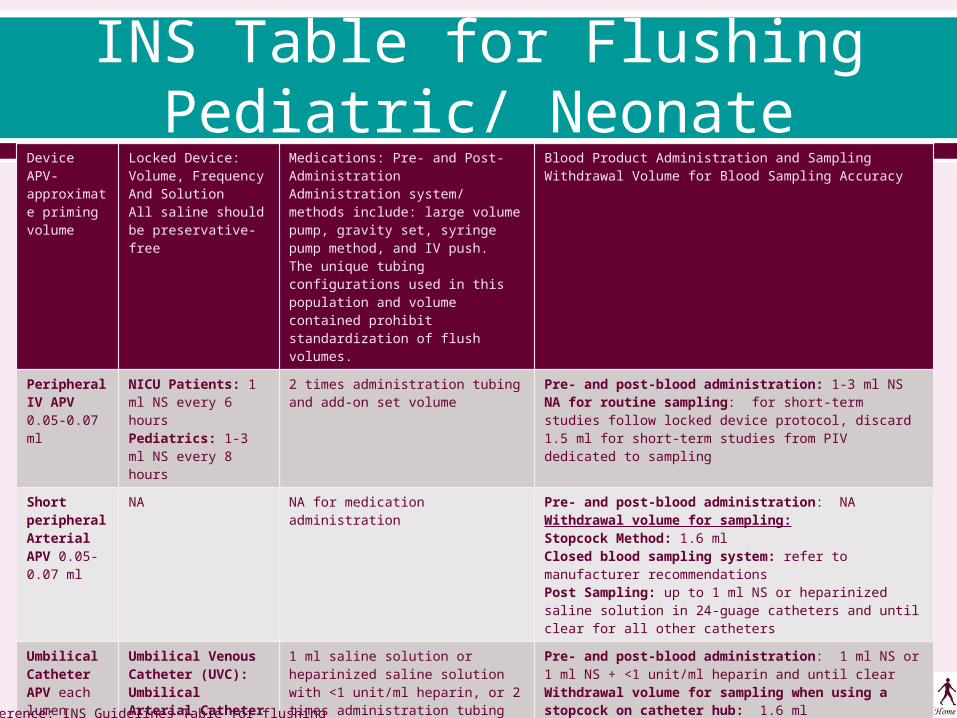
INS Table for FlushingPediatric/ Neonate
Device APV- approximate priming volume
Locked Device:Volume, FrequencyAnd SolutionAll saline should be preservative-free
Medications: Pre- and Post-Administration Administration system/ methods include: large volume pump, gravity set, syringe pump method, and IV push. The unique tubing configurations used in this population and volume contained prohibit standardization of flush volumes.
Blood Product Administration and SamplingWithdrawal Volume for Blood Sampling Accuracy
Peripheral IV APV0.05-0.07 ml
NICU Patients: 1 ml NS every 6 hoursPediatrics: 1-3 ml NS every 8 hours
2 times administration tubing and add-on set volume
Pre- and post-blood administration: 1-3 ml NSNA for routine sampling: for short-term studies follow locked device protocol, discard 1.5 ml for short-term studies from PIV dedicated to sampling
Short peripheral Arterial APV 0.05-0.07 ml
NA NA for medication administration Pre- and post-blood administration: NAWithdrawal volume for sampling:Stopcock Method: 1.6 mlClosed blood sampling system: refer to manufacturer recommendationsPost Sampling: up to 1 ml NS or heparinized saline solution in 24-guage catheters and until clear for all other catheters
Umbilical Catheter APV each lumen 0.15-0.32 ml
Umbilical Venous Catheter (UVC):Umbilical Arterial Catheter (UAC): typically not locked
1 ml saline solution or heparinized saline solution with <1 unit/ml heparin, or 2 times administration tubing and add-on set volume
Pre- and post-blood administration: 1 ml NS or 1 ml NS + <1 unit/ml heparin and until clearWithdrawal volume for sampling when using a stopcock on catheter hub: 1.6 mlClosed blood-sampling system: refer to manufacturer recommendations
Midline APVs[mls]3 F-0.164 F-0.195 F-0.22
2F: 1 ml NS + 10 units/ml heparin every 6 hours2.6F and larger: 2-3 ml NS + 10 units/ml heparin every 12 hours
2 times administration tubing and add-on set volume
Pre- and post-blood administration: 1-3 ml NS followed by locking solution or resume infusion.NA for routine sampling: for short-term studies follow locked device protocol, discard 1.5 ml for short-term studies from midline dedicated to samplingReference: INS Guidelines Table for flushing

INS Table for FlushingPediatric/ Neonate, Cont.
Device APV- approximate priming volume
Locked Device:Volume, FrequencyAnd Solution
Medications: Pre- and Post-Administration
Blood Product Administration and SamplingWithdrawal Volume for Blood Sampling Accuracy
PICC APVs1.9 F.: 0.06 ml3-3.5 F: 0.2-0.5ml4 F: 0.06 ml5 F: 0.4-0.8 ml6 F: 0.5-0.6 ml
2F: 1 ml NS + 10 units/ ml heparin every 6 hours2.6 F and larger: 2-3 ml NS + 10 units/ml heparin every 12 hours
2 times administration tubing and add-on set volume
2 F Sampling and pre- and post-blood administration: 1 ml to clear the catheter, then flush with 1ml NS followed by locking solution until clear2.6 F and larger sampling and pre- and post-blood administration:1-3 ml NS followed by locking solution or resume infusionWithdrawal volume: 3 times administration tubing and add-on set volume
Tunneled and Non-Tunneled APVs: 2-3 F 0.12-0.15 ml4 F 0.3 ml5 F 0.5 ml6 F 0.6-0.8 ml7 F 0.6-0.9 ml9 F 0.6-1.3 ml
NICU Patients: 1-3 ml NS + 10 units/ ml heparin ever 12-24 hoursPediatrics: 2 ml NS + 10 units/ ml heparin every 24 hours
2 times administration tubing and add-on set volume
Pre- and post-blood administration: 1 ml for NICU patients and 3 ml for all others of NS followed by locking solution or resume infusionWithdrawal volume for sampling: 3 times administration tubing and add-on set volume. Variation in size makes it difficult to recommend one volume for all patients.
Ports APVs[mls]0.8 mm I.D.: 0.81.0 mm I.D.: 1.1-1.21.1 mm I.D.: 1.21.4 mm I.D.: 1.71.6 mm I.D.: 2
If used for more than 1 medication daily: 3-5 ml NS + 10 units/ml heparinMonthly maintenance flush: 3-5 ml NS + 100 units/ ml heparin
2 times administration tubing and add-on set volume
Pre- and post-blood administration: 3-5 ml NS followed by locking solution or resume infusion.Withdrawal volume for sampling : 3 times administration tubing and add-on set volume. Variation in size makes it difficult to recommend one volume for all patients.
Reference: INS Guidelines Table for flushing
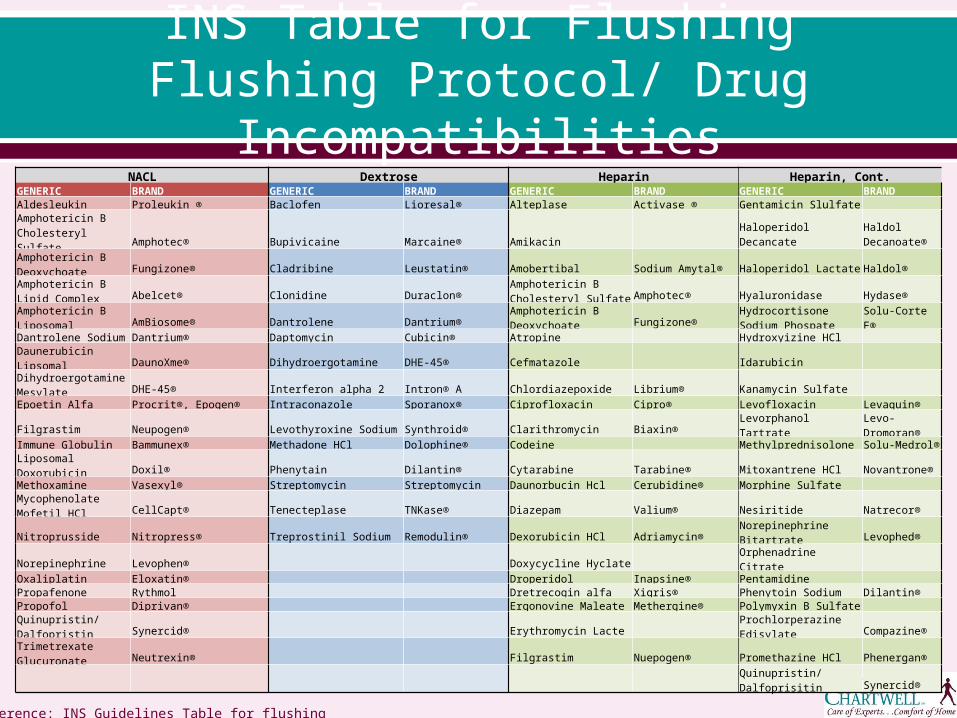
INS Table for FlushingFlushing Protocol/ Drug
Incompatibilities
Reference: INS Guidelines Table for flushing
NACL Dextrose Heparin Heparin, Cont.GENERIC BRAND GENERIC BRAND GENERIC BRAND GENERIC BRANDAldesleukin Proleukin ® Baclofen Lioresal® Alteplase Activase ® Gentamicin Slulfate Amphotericin B Cholesteryl Sulfate Amphotec® Bupivicaine Marcaine® Amikacin Haloperidol Decancate
Haldol Decanoate®
Amphotericin B Deoxychoate Fungizone® Cladribine Leustatin® Amobertibal Sodium Amytal® Haloperidol Lactate Haldol®Amphotericin B Lipid Complex Abelcet® Clonidine Duraclon®
Amphotericin B Cholesteryl Sulfate Amphotec® Hyaluronidase Hydase®
Amphotericin B Liposomal AmBiosome® Dantrolene Dantrium®Amphotericin B Deoxychoate Fungizone®
Hydrocortisone Sodium Phospate Solu-Corte F®
Dantrolene Sodium Dantrium® Daptomycin Cubicin® Atropine Hydroxyizine HCl
Daunerubicin Lipsomal DaunoXme® Dihydroergotamine DHE-45® Cefmatazole Idarubicin Dihydroergotamine Mesylate DHE-45® Interferon alpha 2 Intron® A Chlordiazepoxide Librium® Kanamycin Sulfate Epoetin Alfa Procrit®, Epogen® Intraconazole Sporanox® Ciprofloxacin Cipro® Levofloxacin Levaquin®
Filgrastim Neupogen® Levothyroxine Sodium Synthroid® Clarithromycin Biaxin® Levorphanol Tartrate Levo-Dromoran®Immune Globulin Bammunex® Methadone HCl Dolophine® Codeine Methylprednisolone Solu-Medrol®
Liposomal Doxorubicin Doxil® Phenytain Dilantin® Cytarabine Tarabine® Mitoxantrene HCl Novantrone®Methoxamine Vasexyl® Streptomycin Streptomycin Daunorbucin Hcl Cerubidine® Morphine Sulfate Mycophenolate Mofetil HCl CellCapt® Tenecteplase TNKase® Diazepam Valium® Nesiritide Natrecor®
Nitroprusside Nitropress® Treprostinil Sodium Remodulin® Dexorubicin HCl Adriamycin® Norepinephrine Bitartrate Levophed®
Norepinephrine Levophen® Doxycycline Hyclate Orphenadrine Citrate Oxaliplatin Eloxatin® Droperidol Inapsine® Pentamidine Propafenone Rythmol Dretrecogin alfa Xigris® Phenytoin Sodium Dilantin®Propofol Diprivan® Ergonovine Maleate Methergine® Polymyxin B Sulfate
Quinupristin/ Dalfopristin Synercid® Erythromycin Lacte Prochlorperazine Edisylate Compazine®
Trimetrexate Glucuronate Neutrexin® Filgrastim Nuepogen® Promethazine HCl Phenergan®
Quinupristin/ Dalfoprisitin Synercid®
INS Table for Flushing
Reference: INS Guidelines Table for flushing

Blood Sampling/Lab draws
INS and NHIA recommendations for lab draws for the adult patient are as follows:o Stop all infusions prior to blood sampling and flush the VAD with 10-
20mls preservative free 0.9% sodium chloride.o Discard the first 5mls blood drawn unless using for blood culture.o Remove cap/needleless connector before obtaining blood sample
for culture, and include all blood drawn in the specimen. (no discard)
o Flush with 10-20mls normal saline immediately following any lab draw, followed by lock solution if CVAD will not be in use.
o For multi-lumen CVADs the sample should be drawn from the distal most lumen; (or lumen recommended by manufacturer) for drug level sampling, use the lumen not being used for the drug infusion.
o Only the volume of blood needed for accurate testing should be obtained.
Pediatric guidelines vary between institution and agency and should be followed as such.

Care of the CVAD Hand hygiene is the #1 prevention in health associated infections (HAI).
CDC guidelines for hand hygiene should be followed to decontaminate hands prior to contact with any aspect of the CVAD.
Recommendations from CDC and INS are for CVAD dressing changes 24-48 hours after insertion then a minimum of every seven days or when becomes wet, soiled, or loses it’s integrity.
If a gauze dressing is being utilized, all edges should be secured with tape.
The recommendation for a gauze dressing is to change it every 2 days. Sterile gloves and face mask should always be worn when performing
CVAD dressing site care. Chlorhexedine solution, except in infants under 2 months of age, is the
preferred skin antisepsis for VAD site care though a combination of 1-2% tincture of iodine, povidone iodine and/or 70% alcohol may be used.
Apply all antiseptics to the skin with friction (scrubbing motion) to penetrate epidermal layers, even if applying in a circular motion from exit site outward. When alcohol/povidone combination is being used, alcohol scrub should precede the povidone scrub.
Allow all antiseptics (and skin protectants if used) to dry completely and naturally before applying dressing.
Care of the CVAD Cont. Caregivers may or may not be instructed in actual
dressing change procedure, as it varies within organizational policy.
CVADS should not have any antibiotic ointments applied to insertion site due to potential for promoting infection and antimicrobial resistance.
Hub antisepsis is an important step in preventing microorganisms being transferred into the catheter lumen. o A 15-second scrub using friction with alcohol or
chlorhexidine/alcohol to the needless connector/hub has been shown to prohibit microorganism entry on the surface.
o It must be performed prior to every access of the catheter. For example, if using the SASH procedure to flush the CVAD this means 4 alcohol pads, one before each of the four steps in the procedure and allowing alcohol to dry prior to each access.
Complications of Venous Access Devices
As with any vascular access device, there are risks and complications associated with placement.
Air embolism: Air bubbles may enter the bloodstream during insertion, while in place, or upon removal. o Healthcare professionals, patients and caregivers must be
educated in the prevention and signs and symptoms including:• tachycardia• lightheadedness• anxiety • confusion • palpitations • difficulty breathing • coughing • hypotension
o EMS must be activated immediately and patient should be instructed to lie down on left side with feet elevated until emergency personnel arrive.

Complications of Venous Access Devices Cont.
Phlebitis: Inflammation of the internal aspect of the vein. Symptoms include:• redness • pain at access site• streak formation• palpable venous cord
o Nurse or physician must be notified so measures can be taken. The three main causes of phlebitis are namely, mechanical,
chemical and infective or bacterial phlebitis.o Mechanical phlebitis can occur during insertion or from repeated
manipulation of the device. • Adequate securement of the catheter and use of warm heat can reduce the friction
and inflammation; however signs and symptoms that persists may need further intervention.
o Chemical phlebitis occurs when irritating drugs or solutions are administered through the catheter damaging the vessel. • Alternate VAD device may need inserted depending on therapy.
o Infective phlebitis is caused from bacteria. • A localized infection may be treated with frequent dressing changes and antibiotics
however a positive bacterial culture from the catheter or exit site may warrant removal.

Complications of Venous Access Devices Cont.
Grade Clinical Criteria
0 No Clinical Symptoms
1 Erythema at access site with or without pain
2 Pain at access site with erythema and/ or edema
3 Pain at access site with erythema , streak formation, and/ or palpable venous cord
4 Pain at access site with erythema , streak formation, palpable venous cord >1 inch in length, and /or purulent drainage
Phlebitis Scale
Reference: Box 23-5 Infiltration Scale. Page 472 Infusion Nurses Book.
Complications of Venous Access Devices Cont.
Infection: May develop either inside the vessel or at the insertion site. o Site should be inspected daily for any redness, pain,
swelling, pus-like drainage or fever and chills and should contact the nurse or MD immediately if develops.
o Typically the source is directly related to the dressing covering the site and often due to a dressing becoming wet.
o Once wet, moisture and body heat become an ideal breeding ground for bacteria.
o Patients/caregivers must be educated to report wet, soiled or compromised dressings.
Complications of Venous Access Devices Cont.
Occlusion: A catheter that becomes sluggish and difficult to flush, or unable to flush could indicate a partial or total occlusion. o Intraluminal occlusions occur as a result of blood clot formation
within the catheter, medication incompatibilities or precipitates. o Extraluminal occlusions result from formation of distal fibrin
sheath, catheter malposition, or mechanical obstruction (kinking). o Factors that predispose a catheter to occlusion are multiple
infusion therapies, frequent blood sampling and improper flushing.
o The patient/caregiver should be instructed to contact the nurse or physician for troubleshooting or early intervention.
o Catheter should be assessed appropriately, and managed accordingly.
o Use of an anti-thrombolytic agent may be indicated to prevent disruption of therapy and prevent further complications. • Anti-thrombolytic agents such as Cathflo can be used in midlines and CVADs when
prescribed.

Migration/dislodgement and damage: This occurs most often due to improper anchoring of device or excessive pressure when flushing the CVAD. o Any signs or symptoms of leaking at catheter site, wet
dressing, swelling, burning, or pain in the arm, shoulder or neck should be reported.
o Patient should be instructed to stop using the catheter and, if there is a visible crack or leak, apply a clamp above the site close to the catheters exit site, if possible.
o Catheter repair kits are available but not routinely available for home use due to the many different manufacturers and types of CVADs.
o Notify nurse/physician immediately.
Complications of Venous Access Devices Cont.
Patient Education Although the home care nurse provides expert clinical
assessment, judgment and care to the CVAD, the patients and caregivers are ultimately responsible for the day to day care of the CVAD.
Patient education becomes a critical intervention in safe and reliable home infusion therapy and CVAD care.
Many factors, physically and mentally, affecting patients or caregivers ability and readiness to learn must be assessed and routinely evaluated.
Aseptic technique and hand hygiene should be repeatedly reinforced, demonstrated and observed.
Patients and caregivers should be taught to inspect the site and dressing daily for any irregularities and given clear and simple instructions about what and when report.

References1. INS: Infusion Nursing Standards of Practice. Nursing Journal of Infusion 2011; 34, (1S) S37-S68
2. Hadaway, L. INS: Journal of Infusion Nursing: Short Peripheral Intravenous catheters and Infections 2012; 35(4) 230-235.
3. Carlos do Rego Furtado, L. INS: Journal of Infusion Nursing. Maintenance of Peripheral Venous Access and Its Impact on the Development of Phlebitis 2011;34 (6) 382-389
4. Dychter, S, Gold, D, Carson, D, Haller, M. INS: Journal of Infusion Nursing. Intravenous Therapy 2012; 35 (2) 84-91
5. Perucca, R. INS: Infusion Nursing, an Evidence Based Approach: Peripheral Venous Access Devices: Chapter 23 pp 456-479
6. NHIA: Central vascular guidelines for the Adult home based patient 6/25/11 7. INS: Policies and Procedures for Infusion Nursing 3rd edition. 84-102, 124-132 8. Lyons, M, Phalen, A. NHIA Infusion. An Evidentiary Review of Flushing Protocols in Home Care Patients with Peripherally Inserted Central Catheters 2012; 18(5) 32-40 9. Kramer, N Leone, M, Ross, K, Shaps, F, Cain, D. NHIA Infusion. CVAD Guidelines for Home Infusion. 2011; 17 (4)29-36 10. Hadaway, L. Targeting Therapy with CVAD: Nursing: 2008; 38(6) 35-40 11. Hufcut, T. Choosing an Effective and safe Central Venous catheter. An Evidence based Approach. Picclinenursing.com 12. Seigel, M. Kraemer-Cain, J. PICC Line Care at Home. Advance for Nurses. Nursing.advanceweb.com 13. Funaki, B. AJR Review. Central Venous Access: A Primer for the Diagnostic Radiologist. 2002; 179 (2) 14. Gorski, L. Home Healthcare Nurse. Central Venous Access Device Associated Infections: Recommendations for Best Practice in Home Infusion Therapy. 2010; 28(4) 221-229 15. CDC: Healthcare Associated Infections.(HAIs) Basic infection Control and Prevention Plan for Outpatient Oncology Settings 16. Bullock-Corkhill, M. INS: Infusion Nursing, an Evidence Based Approach: Central Venous Access Devices: Access and Insertion Approach, Chapter 24: 480-493 17. http://nursinglink.monster.com/training/articles/302-the-use-and-maintenance-of-implanted-port-vascular-access-deviceswww.journalofinfusionnursing.com18.http://infonet2.upmc.com/OurOrganization/Enterprise/Quality/Infection/Pages/Central-Line-Toolkit.aspx