Embed Size (px)
Citation preview
1
HCMC INTERNATIONAL UNIVERSITY
SCHOOL OF BIOTECHNOLOGY
MICROBIOLOGY
LABORATORY MANUAL
Prepared by: Dr. Ha Mai Dung; Tong Thi Hang
Revised by: Dr Nguyen Thi Thu Hoai
Ho Chi Minh City, 2011
latest update: 2015
2
HCMC INTERNATIONAL UNIVERSITY
SCHOOL OF BIOTECHNOLOGY
MICROBIOLOGY
LABORATORY MANUAL
Semester:………………………………….
Academic year:…………………………...
Student’s Name:………………………….
Student’s ID:……………..........................
Class:….………………………………….
Demonstrator’s Name: …………………..
3
CONTENTS
******** - Course title: MICROBIOLOGY’s LAB
- Number of credits: 1
No. Experiment Page No. Remark
01 LABORATORY 1:
• Allocation of laboratory place
• Introduction to the course
• Medium preparation
4
02 LABORATORY 2:
• Aseptic technique
• Culture technique
• Subculture
7
03 LABORATORY 3:
• Use of the microscope
• Wet mount preparation
• Smear preparation
• Gram staining
19
04 LABORATORY 4:
• Effects of different factors on microbial growth
• Preparation and care of stock culture
30
05 LABORATORY 5&6:
• Bacterial Population Counts
• Introduction to Bacterial identification process
• REVIEW AND TEST
36
APPENDICES AND REFERENCE
4
LABORATORY 1:
Allocation of laboratory place
Introduction to the course
Medium preparation
1. ALLOCATION OF LABORATORY PLACE:
Students should proceed to the appropriate laboratory where practical class groups will be
organized
2. INTRODUCTION TO THE COURSE:
Your demonstrator will outline the laboratory rules to you and answer any questions you have
about them. Demonstrators will also outline how materials should be discarded and inoculated
See Appendix 1, Appendix 2
3. MEDIUM PREPARATION:
Your tutor will explain the principles of microbiological culture media and guide you to
prepare medium.
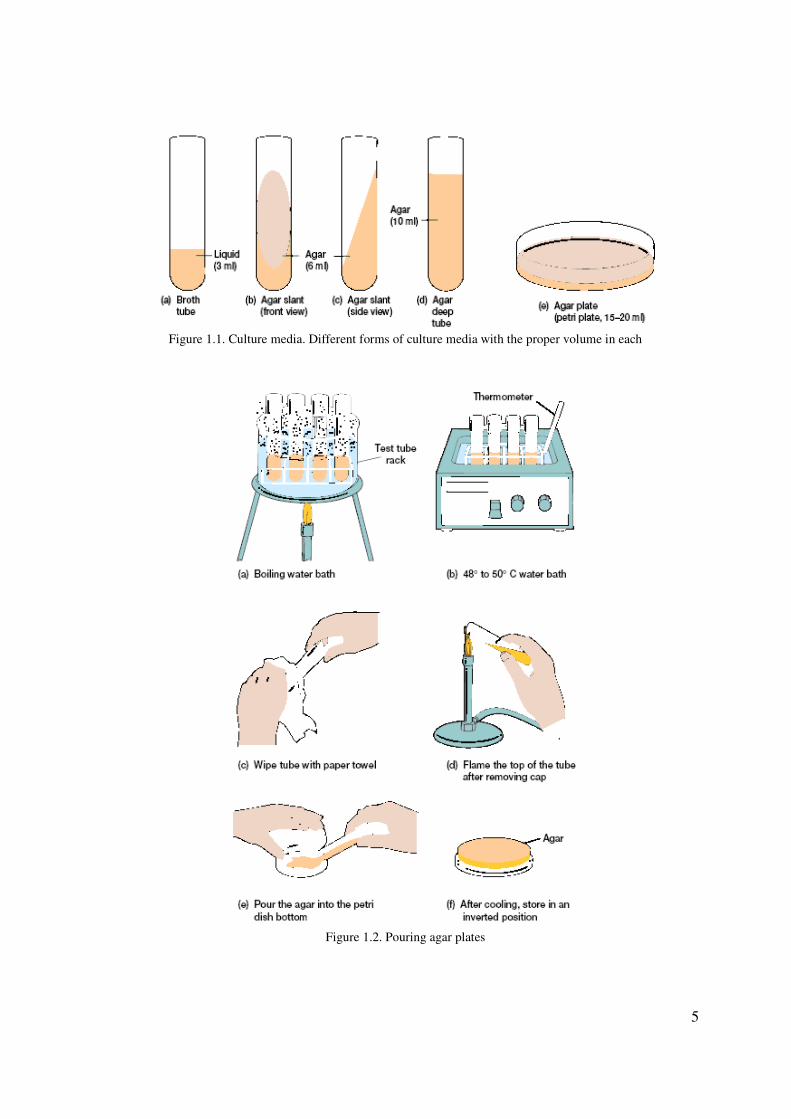
Microbiological Culture Media
The survival and growth of microorganisms depend on available nutrients and a favorable
growth environment. In the laboratory, the nutrient preparations that are used for culturing
microorganisms are called media (singular, medium). Three physical forms are used: liquid
or broth media; semisolid media; and solid media. The major difference among these media
is that solid and semisolid media contain a solidifying agent (usually agar), whereas a liquid
medium does not. Liquid media, such as nutrient broth, tryptic soy broth, or brain-heart
infusion broth (figure 1.1a), can be used to propagate large numbers of microorganisms in
fermentation studies and for various biochemical tests. Semisolid media can also be used in
fermentation studies, in determining bacterial motility, and in promoting anaerobic growth.
Solid media, such as nutrient agar or blood agar, are used (1) for the surface growth of
microorganisms in order to observe colony appearance, (2) for pure culture isolations, (3) for
storage of cultures, and (4) to observe specific biochemical reactions.
While in the liquefied state, solid media can be poured into either a test tube or Petri plate
(dish). If the medium in the test tube is allowed to harden in a slanted position, the tube is
designated an agar slant (figure 1.1b, c); if the tube is allowed to harden in an upright
position, the tube is designated an agar deep tube (figure 1.1d); and if the agar is poured into
a Petri plate, the plate is designated an agar plate (figure 1.1e). Agar pours (the same as
Agar deeps) containing about 15 to 16 ml of media are often used to prepare agar plates.
Microorganisms may be cultured using two different types of media. Chemically defined, or
synthetic, media are composed of known amounts of pure chemicals. Such media are often
used in culturing autotrophic microorganisms such as algae or nonfastidious heterotrophs. In
routine bacteriology laboratory exercises, complex, or nonsynthetic, media are employed.
These are composed of complex materials that are rich in vitamins and nutrients. Three of the
most commonly used components are beef extract, yeast extract, and peptones.
5
Figure 1.1. Culture media. Different forms of culture media with the proper volume in each
Figure 1.2. Pouring agar plates
6
Procedure:
In this exercise, students will prepare 4 nutrient agar plates, 2 slant agars and 2 broth. The
nutrient agar (containing beef extract, yeast extract, peptone, sodium chloride and agar), has
been prepared and sterilized and is provided in melted form, held at 55oC in constant
temperature bath.
Materials:
Bulk nutrient broth
Bulk nutrient agar held in class water bath, 55oC
Sterile tubes and plates
Procedure:
a. Label the base of each Petri dish with your group name, medium name and
date.
b. Remove agar from water bath. Gently tip to mix agar. Wipe excess water from
outside of bottle.
c. Set out the plastic Petri dishes, lids uppermost, unscrew the cap of the bottle
and cover the bottom of each dish with 15-20ml agar, holding the lid so as to
provide as much protection as possible during the pouring operation. Take care
to avoid contaminating the opening of the bottle during the pouring operation
and replace the lid as each dish is poured. Allow the agar to set before
handling.
d. Following the picture to prepare 2 nutrient broth tubes and 2 slant agar tubes
e. Follow your demonstrator’s instruction of how and where to store the medium.
f. Incubate all medium prepared at 370 C in 24 hrs, then put in a fridge.
Review Questions
1. Tell 10 main rules when working in microbiology Lab?
2. Tell different kinds of medium referring to medium’s liquid status and shapes?
3. Why do we have to incubate medium before storing in a fridge?
7
LABORATORY 2: Aseptic technique
Culture technique
Subculture
1. ASEPTIC TECHNIQUE
This exercise is concerned with those microorganisms which may be deposited on hands,
bottles, etc. through careless manipulations. To be a competent microbiologist, you must be
able to transfer microorganisms from one container to another without contaminating the
surrounding areas and objects.
Aseptic transfer of a culture from one culture vessel to another is successful only if no
contaminating microorganisms are introduced in the process. A transfer may involve the
transport of organisms from an isolated colony on a plate of solid medium to a broth tube, or
inoculating various media (solid or liquid) from a broth culture for various types of tests. The
general procedure is as follows:
Work Area Disinfection. The work area is first treated with a disinfectant to kill any
microorganisms that may be present. This step destroys vegetative cells and viruses;
Endospores, however, are not destroyed in this brief application of disinfectant.
Loops and Needles. The transport of organisms will be performed with an inoculating loop
or needle. To sterilize the loop or needle prior to picking up the organisms, heat must be
applied with a Bunsen burner flame, rendering them glowing red-hot.
Culture Tube Flaming. Before inserting the cooled loop or needle into a tube of culture, the
tube cap is removed and the mouth of the culture tube flamed. Once the organisms have been
removed from the tube, the tube mouth must be flamed again before returning the cap to the
tube.
Liquid Medium Inoculation. If a tube of liquid medium is to be inoculated, the tube mouth
must be flamed before inserting the loop into the tube. To disperse the organisms on the loop,
the loop should be twisted back and forth in the medium. If an inoculating needle is used for
stabbing a solid medium, the needle is inserted deep into the medium
Final Flaming. Once the inoculation is completed, the loop or needle is removed from the
tube, flamed as before, and returned to a receptacle. These tools should never be placed on the
tabletop. The inoculated tube is also flamed before placing the cap on the tube.
Petri Plate Inoculation. To inoculate a Petri plate, no heat is applied to the plate and a loop is
used for the transfer. When streaking the surface of the medium, the cover should be held
diagonally over the plate bottom to prevent air contamination of the medium.
Final Disinfection. When all work is finished, the work area is treated with disinfectant to
ensure that any microorganisms deposited during any of the procedures are eliminated. To
gain some practice in aseptic transfer of bacterial cultures, three simple transfers will be
8
performed here in this exercise: (1) broth culture to broth, (2) agar slant culture to agar slant,
and (3) agar plate to agar slant. Proceed as follows:
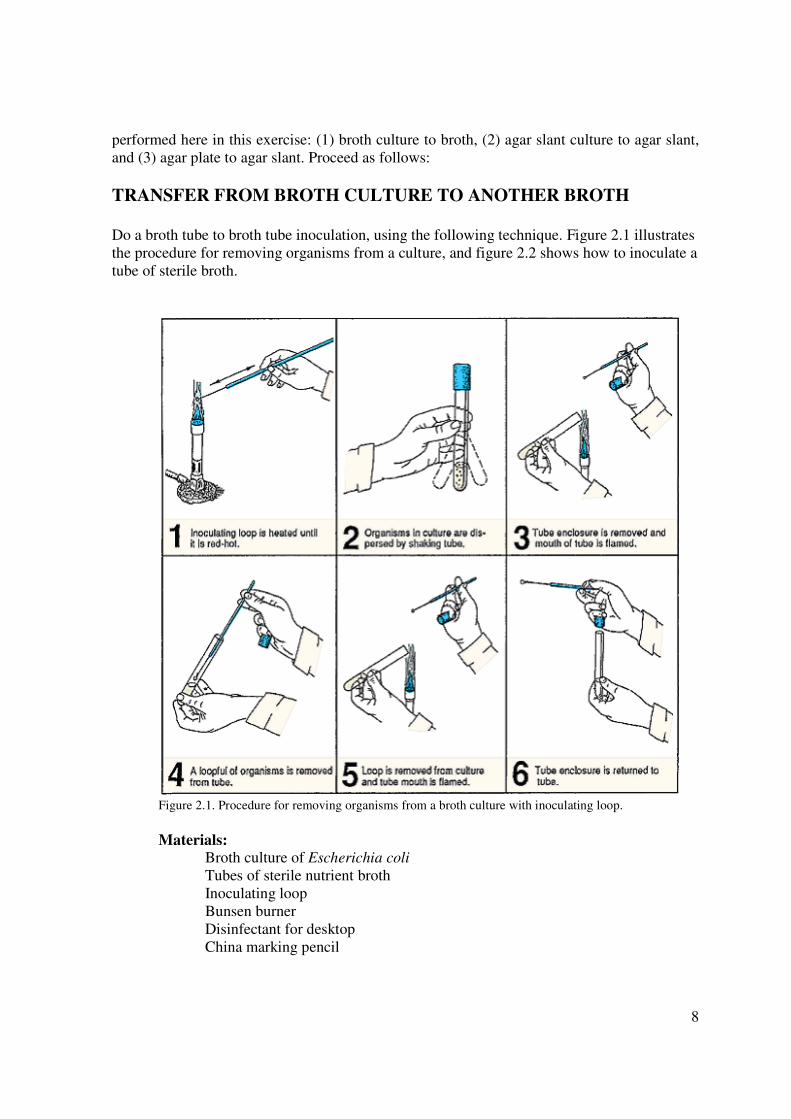
TRANSFER FROM BROTH CULTURE TO ANOTHER BROTH
Do a broth tube to broth tube inoculation, using the following technique. Figure 2.1 illustrates
the procedure for removing organisms from a culture, and figure 2.2 shows how to inoculate a
tube of sterile broth.
Figure 2.1. Procedure for removing organisms from a broth culture with inoculating loop.
Materials:
Broth culture of Escherichia coli
Tubes of sterile nutrient broth
Inoculating loop
Bunsen burner
Disinfectant for desktop
China marking pencil

9
1. Prepare your desktop by swabbing down its surface with a disinfectant.
2. With a china marking pencil, label a tube of sterile nutrient broth with your initials
and E. coli.
3. Sterilize your inoculating loop by holding it over the flame of a Bunsen burner until it
becomes bright red. The entire wire must be heated. See illustration 1, figure 2.1.
4. Using your free hand, gently shake the tube to disperse the culture (illustration 2,
figure 2.1). 5. Grasp the tube cap with the little finger of your hand holding the inoculating loop and
remove it from the tube. Flame the mouth of the tube as shown in illustration 3, figure
2.1.
6. Insert the inoculating loop into the culture (illustration 4, figure 2.1).
Figure 2.2. Procedure for inoculating a nutrient broth.
7. Remove the loop containing the culture, flame the mouth of the tube again
(illustration 5, figure 2.1), and recap the tube (illustration 6). Place the culture tube back
on the test-tube rack.
8. Grasp a tube of sterile nutrient broth with your free hand, carefully remove the cap
with your little finger, and flame the mouth of this tube (illustration 1, figure 2.2).
10
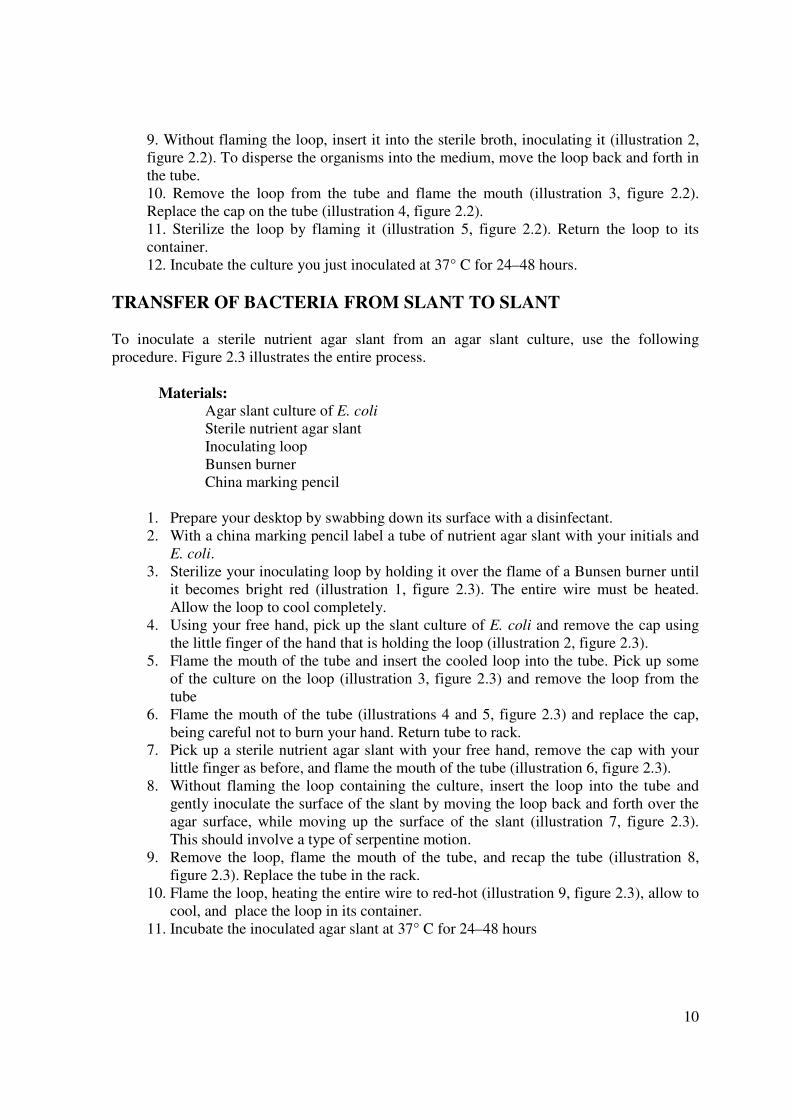
9. Without flaming the loop, insert it into the sterile broth, inoculating it (illustration 2,
figure 2.2). To disperse the organisms into the medium, move the loop back and forth in
the tube.
10. Remove the loop from the tube and flame the mouth (illustration 3, figure 2.2).
Replace the cap on the tube (illustration 4, figure 2.2).
11. Sterilize the loop by flaming it (illustration 5, figure 2.2). Return the loop to its
container.
12. Incubate the culture you just inoculated at 37° C for 24–48 hours.
TRANSFER OF BACTERIA FROM SLANT TO SLANT
To inoculate a sterile nutrient agar slant from an agar slant culture, use the following
procedure. Figure 2.3 illustrates the entire process.
Materials:
Agar slant culture of E. coli
Sterile nutrient agar slant
Inoculating loop
Bunsen burner
China marking pencil
1. Prepare your desktop by swabbing down its surface with a disinfectant.
2. With a china marking pencil label a tube of nutrient agar slant with your initials and
E. coli.
3. Sterilize your inoculating loop by holding it over the flame of a Bunsen burner until
it becomes bright red (illustration 1, figure 2.3). The entire wire must be heated.
Allow the loop to cool completely.
4. Using your free hand, pick up the slant culture of E. coli and remove the cap using
the little finger of the hand that is holding the loop (illustration 2, figure 2.3).
5. Flame the mouth of the tube and insert the cooled loop into the tube. Pick up some
of the culture on the loop (illustration 3, figure 2.3) and remove the loop from the
tube
6. Flame the mouth of the tube (illustrations 4 and 5, figure 2.3) and replace the cap,
being careful not to burn your hand. Return tube to rack.
7. Pick up a sterile nutrient agar slant with your free hand, remove the cap with your
little finger as before, and flame the mouth of the tube (illustration 6, figure 2.3).
8. Without flaming the loop containing the culture, insert the loop into the tube and
gently inoculate the surface of the slant by moving the loop back and forth over the
agar surface, while moving up the surface of the slant (illustration 7, figure 2.3).
This should involve a type of serpentine motion.
9. Remove the loop, flame the mouth of the tube, and recap the tube (illustration 8,
figure 2.3). Replace the tube in the rack.
10. Flame the loop, heating the entire wire to red-hot (illustration 9, figure 2.3), allow to
cool, and place the loop in its container.
11. Incubate the inoculated agar slant at 37° C for 24–48 hours

11
Figure 2.3. Procedure for inoculating a nutrient agar slant from a slant culture.
12
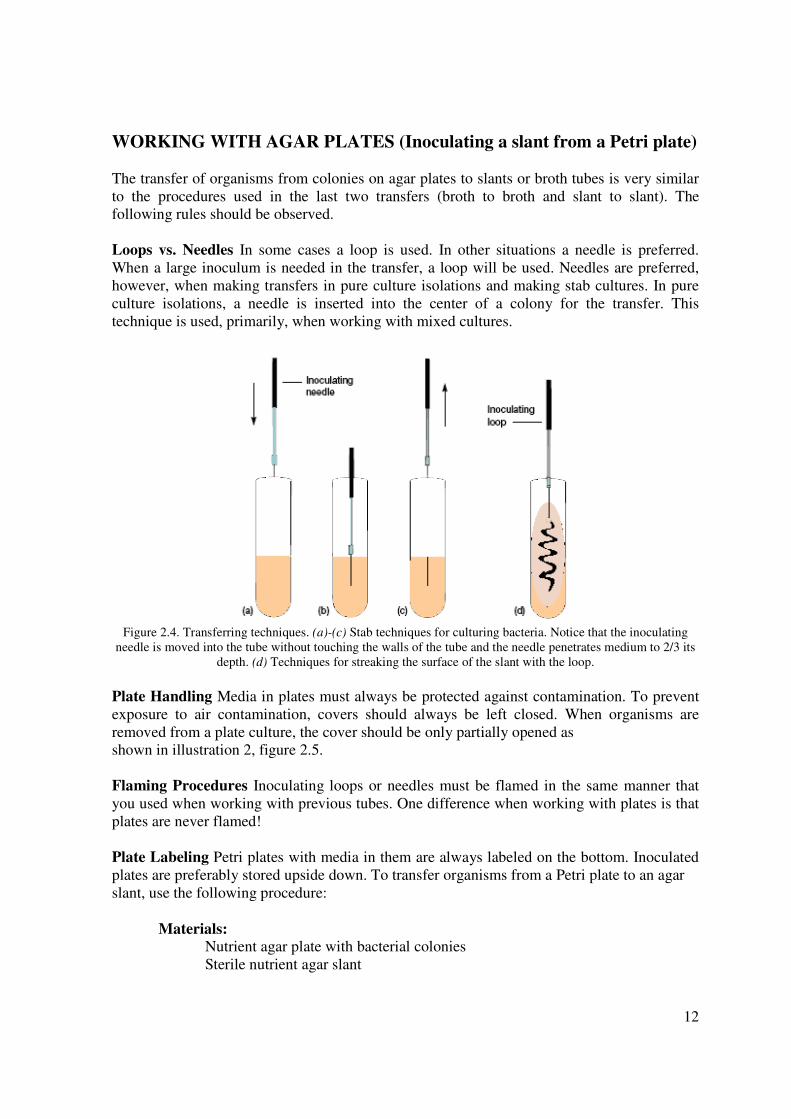
WORKING WITH AGAR PLATES (Inoculating a slant from a Petri plate)
The transfer of organisms from colonies on agar plates to slants or broth tubes is very similar
to the procedures used in the last two transfers (broth to broth and slant to slant). The
following rules should be observed.
Loops vs. Needles In some cases a loop is used. In other situations a needle is preferred.
When a large inoculum is needed in the transfer, a loop will be used. Needles are preferred,
however, when making transfers in pure culture isolations and making stab cultures. In pure
culture isolations, a needle is inserted into the center of a colony for the transfer. This
technique is used, primarily, when working with mixed cultures.
Figure 2.4. Transferring techniques. (a)-(c) Stab techniques for culturing bacteria. Notice that the inoculating
needle is moved into the tube without touching the walls of the tube and the needle penetrates medium to 2/3 its
depth. (d) Techniques for streaking the surface of the slant with the loop.
Plate Handling Media in plates must always be protected against contamination. To prevent
exposure to air contamination, covers should always be left closed. When organisms are
removed from a plate culture, the cover should be only partially opened as
shown in illustration 2, figure 2.5.
Flaming Procedures Inoculating loops or needles must be flamed in the same manner that
you used when working with previous tubes. One difference when working with plates is that
plates are never flamed!
Plate Labeling Petri plates with media in them are always labeled on the bottom. Inoculated
plates are preferably stored upside down. To transfer organisms from a Petri plate to an agar
slant, use the following procedure:
Materials:
Nutrient agar plate with bacterial colonies
Sterile nutrient agar slant
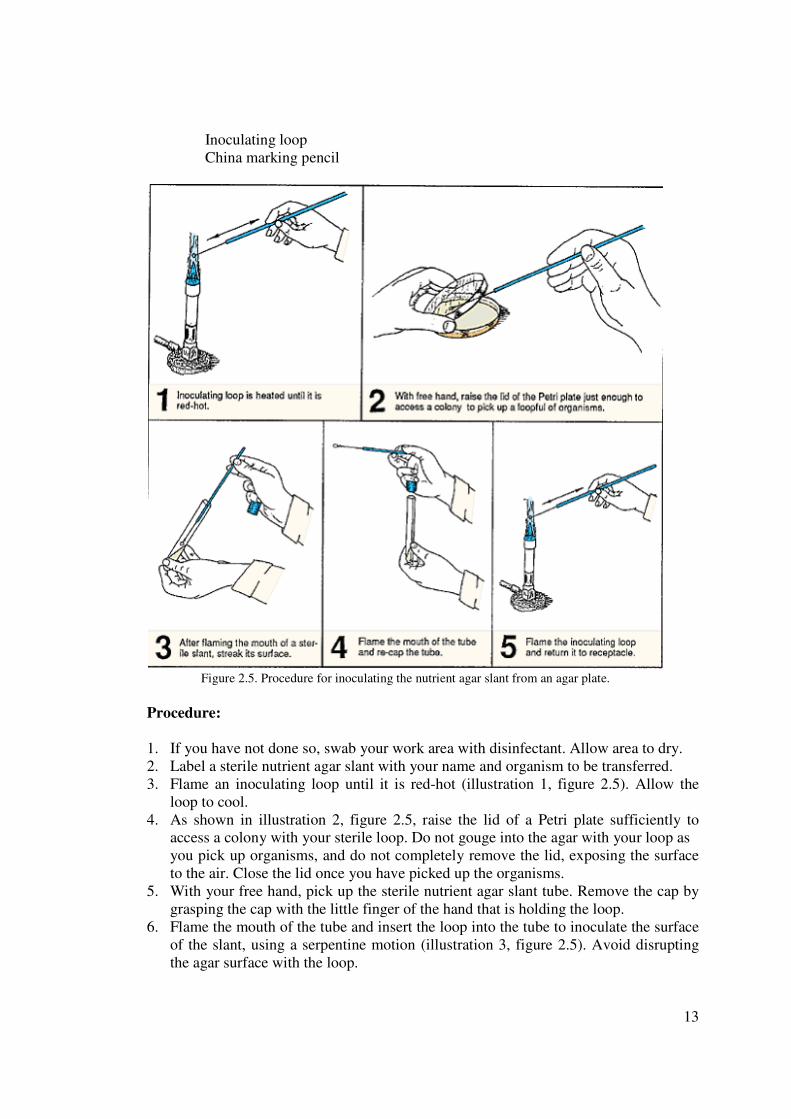
13
Inoculating loop
China marking pencil
Figure 2.5. Procedure for inoculating the nutrient agar slant from an agar plate.
Procedure:
1. If you have not done so, swab your work area with disinfectant. Allow area to dry.
2. Label a sterile nutrient agar slant with your name and organism to be transferred.
3. Flame an inoculating loop until it is red-hot (illustration 1, figure 2.5). Allow the
loop to cool.
4. As shown in illustration 2, figure 2.5, raise the lid of a Petri plate sufficiently to
access a colony with your sterile loop. Do not gouge into the agar with your loop as
you pick up organisms, and do not completely remove the lid, exposing the surface
to the air. Close the lid once you have picked up the organisms.
5. With your free hand, pick up the sterile nutrient agar slant tube. Remove the cap by
grasping the cap with the little finger of the hand that is holding the loop.
6. Flame the mouth of the tube and insert the loop into the tube to inoculate the surface
of the slant, using a serpentine motion (illustration 3, figure 2.5). Avoid disrupting
the agar surface with the loop.
14
7. Remove the loop from the tube and flame the mouth of the tube. Replace the cap on
the tube (illustration 4, figure 2.5).
8. Flame the loop (illustration 5, figure 2.5) and place it in its container.
9. Incubate the nutrient agar slant at 37° C for 24–48 hours.
2. CULTURE TECHNIQUE
When we try to study the bacterial flora of the body, soil, water, food, or any other part of our
environment, we soon discover that bacteria exist in mixed populations. It is only in very rare
situations that they occur as a single species. To be able to study the cultural, morphological,
and physiological characteristics of an individual species, it is essential, first of all, that the
organism be separated from the other species that are normally found in its habitat; in other
words, we must have a pure culture of the microorganism. Several different methods of
getting a pure culture from a mixed culture are available to us. The two most frequently used
methods involve making a streak plate or a pour plate. Both plate techniques involve thinning
the organisms so that the individual species can be selected from the others.
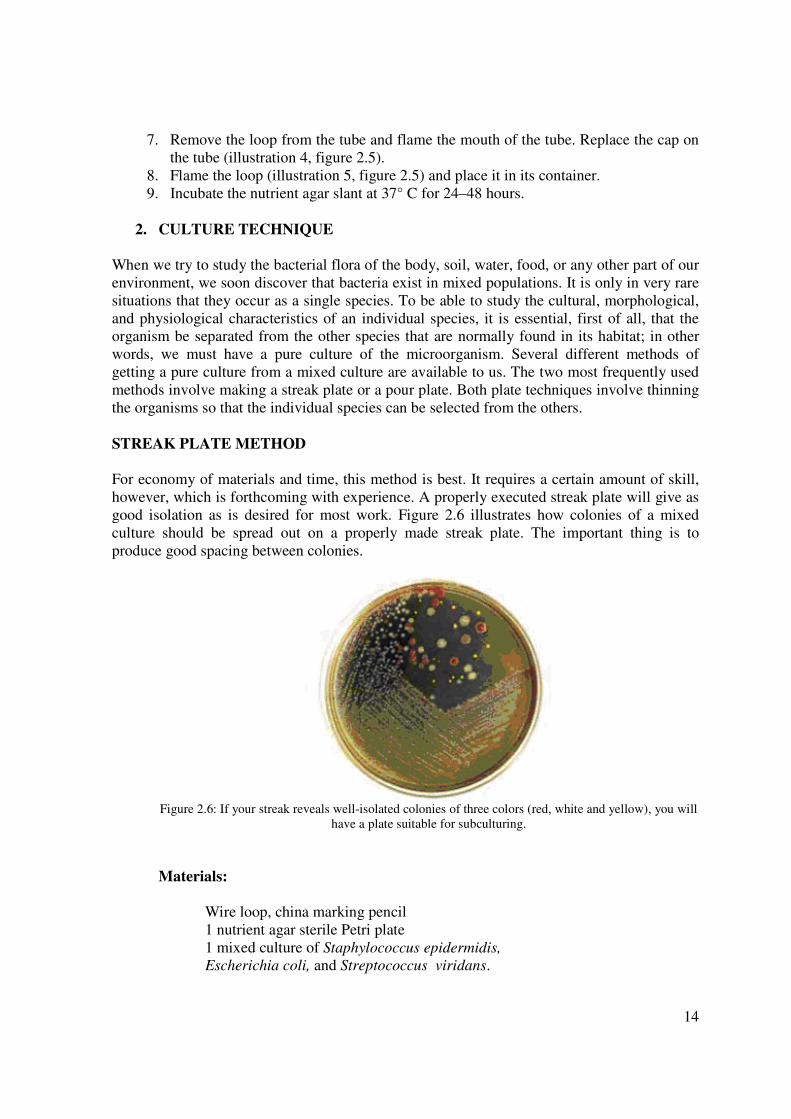
STREAK PLATE METHOD
For economy of materials and time, this method is best. It requires a certain amount of skill,
however, which is forthcoming with experience. A properly executed streak plate will give as
good isolation as is desired for most work. Figure 2.6 illustrates how colonies of a mixed
culture should be spread out on a properly made streak plate. The important thing is to
produce good spacing between colonies.
Figure 2.6: If your streak reveals well-isolated colonies of three colors (red, white and yellow), you will
have a plate suitable for subculturing.
Materials:
Wire loop, china marking pencil
1 nutrient agar sterile Petri plate
1 mixed culture of Staphylococcus epidermidis,
Escherichia coli, and Streptococcus viridans.
15
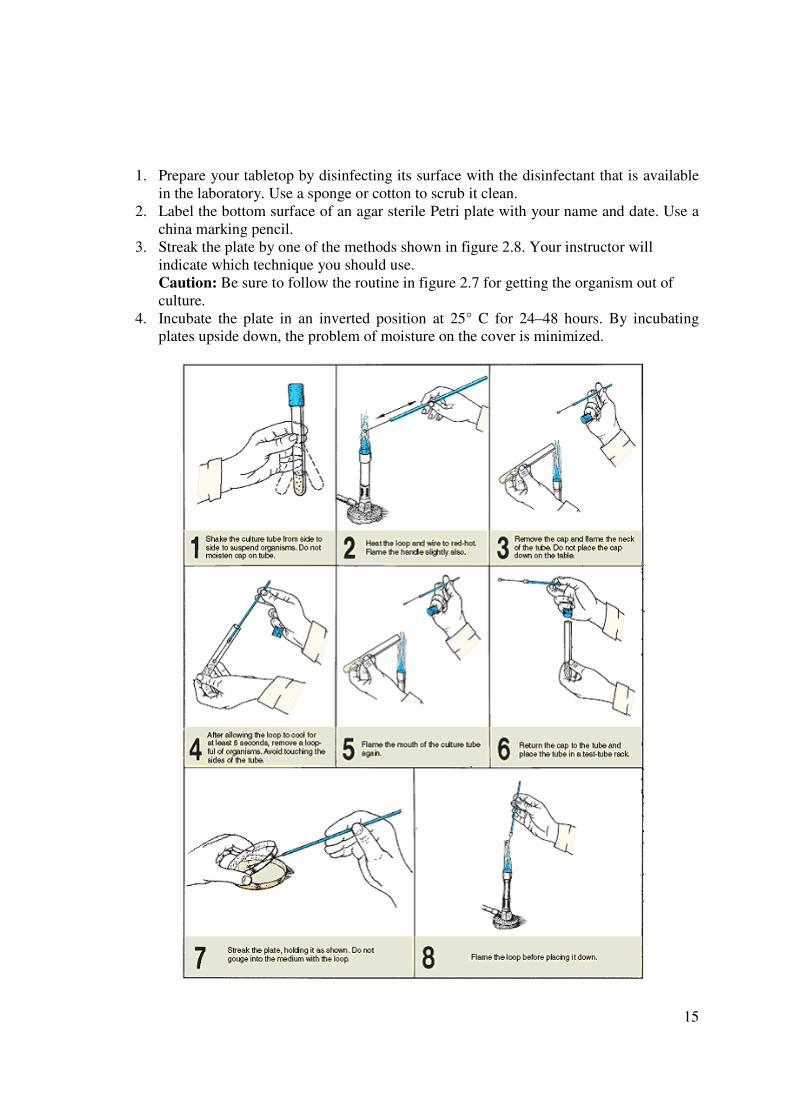
1. Prepare your tabletop by disinfecting its surface with the disinfectant that is available
in the laboratory. Use a sponge or cotton to scrub it clean.
2. Label the bottom surface of an agar sterile Petri plate with your name and date. Use a
china marking pencil.
3. Streak the plate by one of the methods shown in figure 2.8. Your instructor will
indicate which technique you should use.
Caution: Be sure to follow the routine in figure 2.7 for getting the organism out of
culture.
4. Incubate the plate in an inverted position at 25° C for 24–48 hours. By incubating
plates upside down, the problem of moisture on the cover is minimized.
16
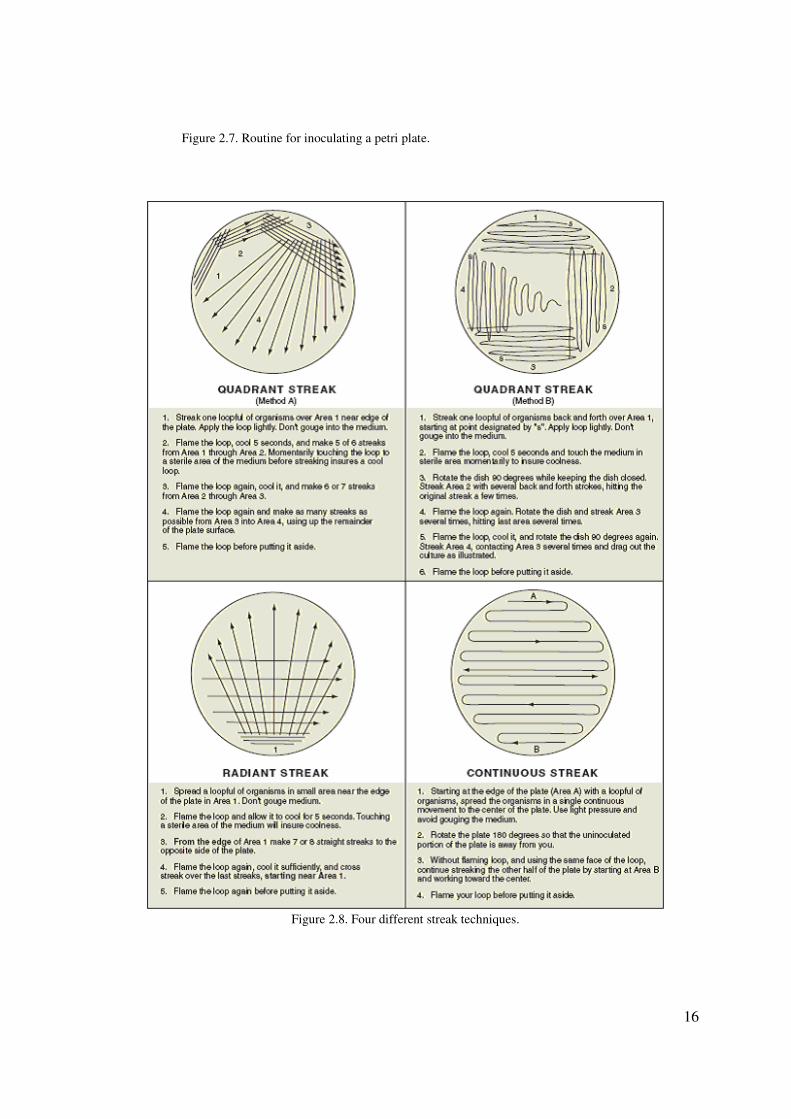
Figure 2.7. Routine for inoculating a petri plate.
Figure 2.8. Four different streak techniques.
17
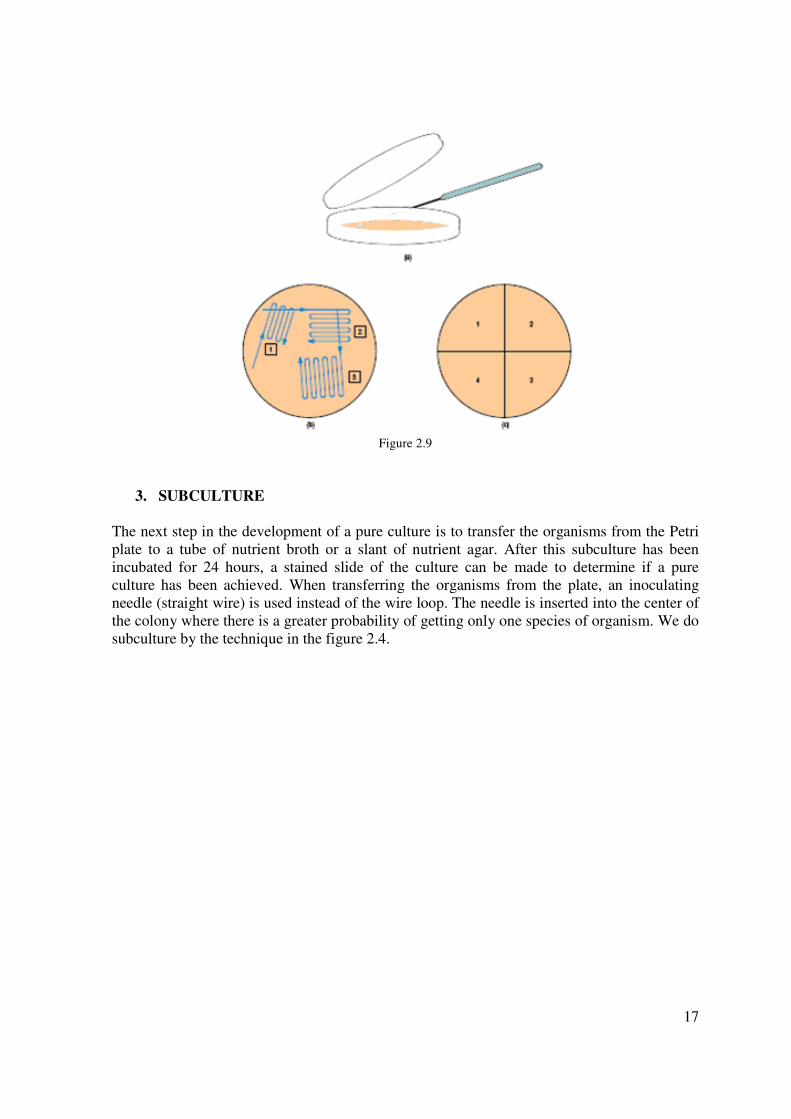
Figure 2.9
3. SUBCULTURE
The next step in the development of a pure culture is to transfer the organisms from the Petri
plate to a tube of nutrient broth or a slant of nutrient agar. After this subculture has been
incubated for 24 hours, a stained slide of the culture can be made to determine if a pure
culture has been achieved. When transferring the organisms from the plate, an inoculating
needle (straight wire) is used instead of the wire loop. The needle is inserted into the center of
the colony where there is a greater probability of getting only one species of organism. We do
subculture by the technique in the figure 2.4.

18
Figure 2.10. Microbiological transfer instruments. (a) Inoculating needle, and (b) inoculating loop.
Review Questions
1. What is the purpose of flaming in the aseptic technique?
2. In all routine laboratory work, petri plates are labeled on the bottom. Why?
3. In the streak-plate technique, how are microorganisms diluted and spread out to form
individual colonies?
4. Which area of a streak plate will contain the greatest amount of growth? The least
amount of growth? Explain your answers.
5. Draw your streaking patterns. Did you obtain isolated colonies? If not, what went
wrong?
6. Does each discrete colony represent the growth of one cell? Explain your answer.
Why can a single colony on a plate be used to start a pure culture?
7. How can a streak plate become contaminated?
8. What is the purpose of sub-culturing?
9. In sub-culturing, when do you use the inoculating loop?
10. How is it possible to contaminate a subculture?
11. How would you determine whether culture media given to you by the laboratory
instructor are sterile before you use them?
19
LABORATORY 3: Use of the microscope
Wet mount preparation
Smear preparation
Gram staining
1. USE OF THE MICROSCOPE
The bright-field light microscope is an instrument that magnifies images using two lens
systems. Initial magnification occurs in the objective lens. Most microscopes have at least
three objective lenses on a rotating base, and each lens may be rotated into alignment with the
eyepiece or ocular lens in which the final magnification occurs. The objective lenses are
identified as the low-power, high-dry, and oil immersion objectives. Each objective is also
designated by other terms. These terms give either the linear magnification or the focal
length. The latter is about equal to or greater than the working distance between the
specimens when in focus and the tip of the objective lens. For example, the low-power
objective is also called the 10x, or 16 millimeter (mm), objective; the high-dry is called the
40x, or 4 mm, objective; and the oil immersion is called the 90x, 100x, or 1.8 mm objective.
As the magnification increases, the size of the lens at the tip of the objective becomes
progressively smaller and admits less light. This is one of the reasons that changes in position
of the substage condenser and iris diaphragm are required when using different objectives
if the specimens viewed are to be seen distinctly. The condenser focuses the light on a small
area above the stage, and the iris diaphragm controls the amount of light that enters the
condenser. When the oil immersion lens is used, immersion oil fills the space between the
objective and the specimen. Because immersion oil has the same refractive index as glass,
the loss of light is minimized. The eyepiece, or ocular, at the top of the tube magnifies the
image formed by the objective lens. As a result, the total magnification seen by the observer is
obtained by multiplying the magnification of the objective lens by the magnification of the
ocular, or eyepiece. For example, when using the 10x ocular and the 43x objective, total
magnification is 10x43 = 430 times.
Use of the light microscope is an essential skill in the study of microorganisms. The size of
organisms and the internal structures to be observed determine the type of microscopy
needed. Use of the oil immersion objective (100x) is required if structures as small as 0.2uk
are to be observed.
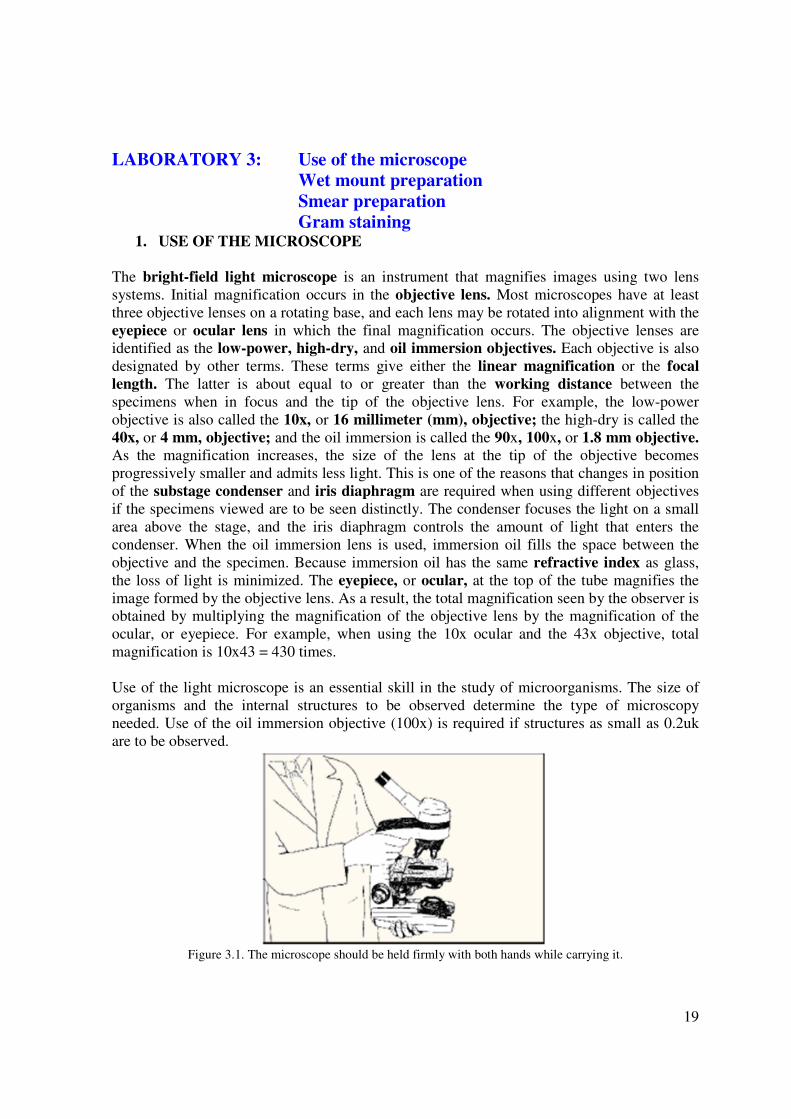
Figure 3.1. The microscope should be held firmly with both hands while carrying it.
20
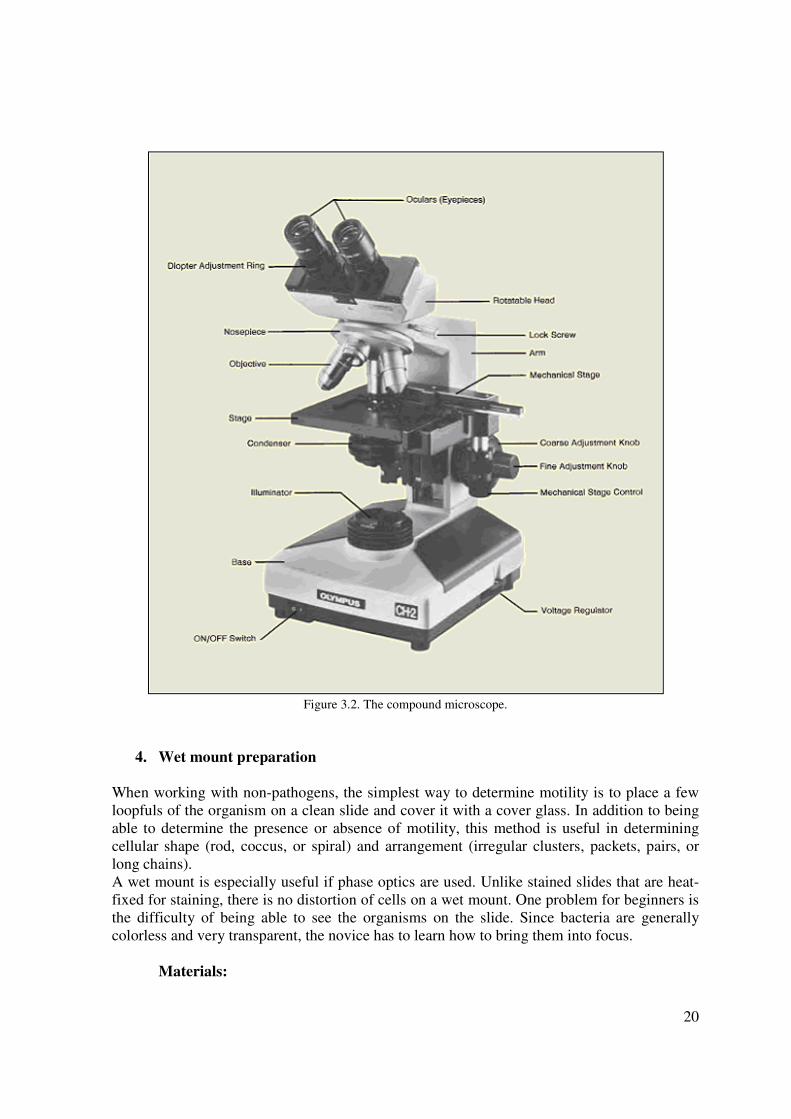
Figure 3.2. The compound microscope.
4. Wet mount preparation
When working with non-pathogens, the simplest way to determine motility is to place a few
loopfuls of the organism on a clean slide and cover it with a cover glass. In addition to being
able to determine the presence or absence of motility, this method is useful in determining
cellular shape (rod, coccus, or spiral) and arrangement (irregular clusters, packets, pairs, or
long chains).
A wet mount is especially useful if phase optics are used. Unlike stained slides that are heat-
fixed for staining, there is no distortion of cells on a wet mount. One problem for beginners is
the difficulty of being able to see the organisms on the slide. Since bacteria are generally
colorless and very transparent, the novice has to learn how to bring them into focus.
Materials:
21
Normal saline 0.9%
E. coli
Procedure:
a. Set up your microscope correctly using the method describe in Appendix 3.
b. Prepare a wet mount of the organism by placing a drop of the culture on a clean
dry slid and adding a coverslip. Avoid trapping air bubbles.
c. Examine the organism using both low power (10x) and high power (40x)
objectives. After focusing on an organism, reduce the condenser diaphragm to the
position where you see the clearest image of this unstained microorganism. Check
your microscope for problems in setting up.
d. Observe the overall appearance of the organism. Make diagrams, noting structures
which can be resolved with the 10x and 40x objectives.
Prepare wet mount slide of the organism, using several loopfuls of the organism
on the slides. Examine under an oil immersion objective. Observe the following guidelines:
• Use only scratch-free, clean slides and cover glasses. This is particularly important when
using phase-contrast optics.
• Label each slide with the name of the organism.
• By manipulating the diaphragm and voltage control, reduce the lighting sufficiently to make
the organisms visible. Unstained bacteria are very transparent and difficult to see.
• For proof of true motility, look for directional movement that is several times the long
dimension of the bacterium. The movement will also occur in different directions in the same
field.
• Ignore Brownian movement. Brownian movement is vibrational movement caused by
invisible molecules bombarding bacterial cells. If the only movement you see is vibrational
and not directional, the organism is nonmotile.
• If you see only a few cells exhibiting motility, consider the organism to be motile.
Characteristically, only a few of the cells will be motile at a given moment.
• Don’t confuse water current movements with true motility. Water currents are due to
capillary action caused by temperature changes and drying out. All objects move in a straight
line in one direction.
• And, finally, always examine a wet mount immediately, once it has been prepared, because
motility decreases with time after preparation.
2. SMEAR PREPARATION
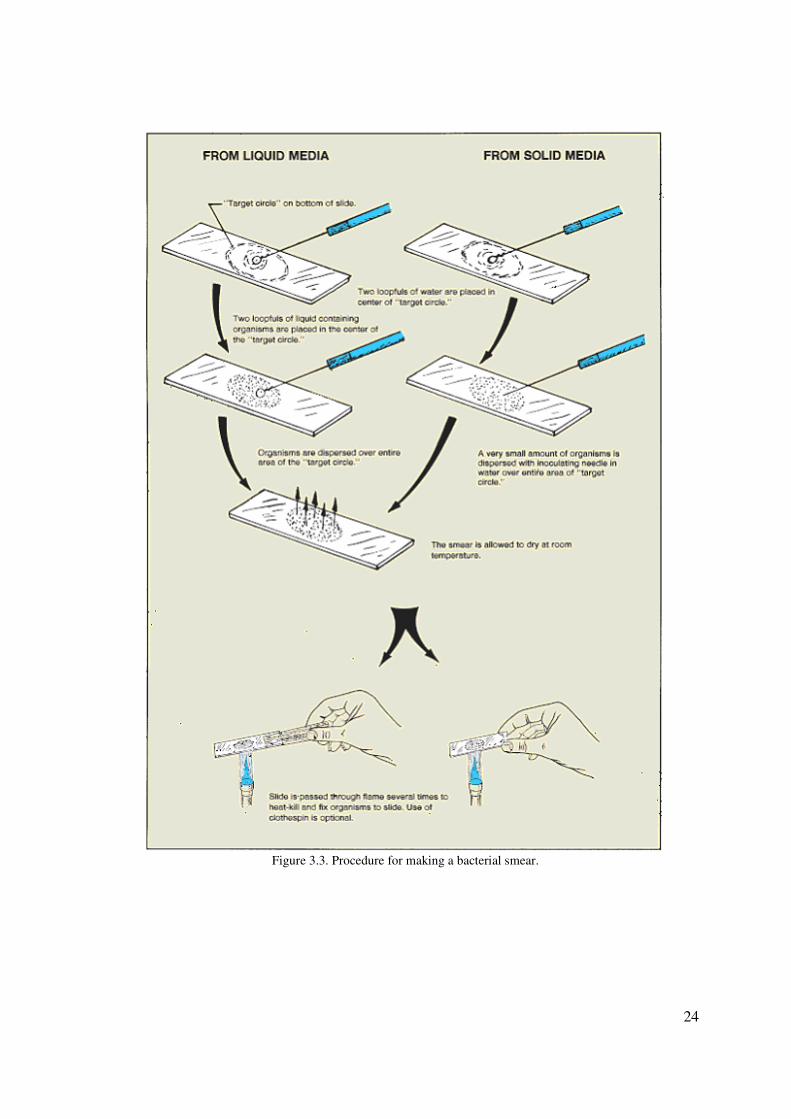
The first step in preparing a bacteriological smear differs according to the source of the
organisms. If the bacteria are growing in a liquid medium (broths, milk, saliva, urine, etc.),
one starts by placing one or two loopfuls of the liquid medium directly on the slide. From
solid media such as nutrient agar, blood agar, or some part of the body, one starts by placing
one or two loopfuls of water on the slide and then uses a straight inoculating wire to disperse
the organisms in the water. Bacteria growing on solid media tend to cling to each other and
must be dispersed sufficiently by dilution in water; unless this is done, the smear will be too
thick. The most difficult concept for students to understand about making slides from solid
media is that it takes only a very small amount of material to make a good smear.
22
FROM LIQUID MEDIA
(Broths, saliva, milk, etc.)
If you are preparing a bacterial smear from liquid media, follow this routine, which is
depicted on the left side of figure 3.3.
Materials:
Microscope slides
Bunsen burner
Wire loop
China marking pencil
Slide holder (clothespin), optional
1. Wash a slide with soap or Bon Ami and hot water, removing all dirt and grease. Handle the
clean slide by its edges.
2. Write the initials of the organism or organisms on the left-hand side of the slide with a
china marking pencil.
3. To provide a target on which to place the organisms, make a 1⁄2″ circle on the bottom side
of the slide, centrally located, with a marking pencil. Later on, when you become more
skilled, you may wish to omit the use of this “target circle.”
4. Shake the culture vigorously and transfer two loopfuls of organisms to the center of the
slide over the target circle. Be sure to flame the loop after it has touched the slide.
5. Spread the organisms over the area of the target circle.
6. Allow the slide to dry by normal evaporation of the water. Don’t apply heat.
7. After the smear has become completely dry, pass the slide over a Bunsen burner flame to
heat-kill the organisms and fix them to the slide. Note that in this step one has the option of
using or not using a clothespin to hold the slide. Use the option preferred by your instructor.
FROM SOLID MEDIA
When preparing a bacterial smear from solid media, such as nutrient agar or a part of the
body, follow this routine, which is depicted on the right side of figure 3.3.
Materials:
Microscope slides
Inoculating needle and loop
China marking pencil
Slide holder (clothespin), optional
Bunsen burner
1. Wash a slide with soap or Bon Ami and hot water, removing all dirt and grease.
Handle the clean slide by its edges.
2. Write the initials of the organism or organisms on the left-hand side of the slide with a
china marking pencil.
23
3. Mark a “target circle” on the bottom side of the slide with a china marking pencil.
Flame an inoculating loop, let it cool, and transfer two loopfuls of water to the center
of the target circle.
4. Flame an inoculating needle then let it cool. Pick up a very small amount of the
organisms, and mix it into the water on the slide. Disperse the mixture over the area of
the target circle. Be certain that the organisms have been well emulsified in the liquid.
Be sure to flame the inoculating needle before placing it aside.
5. Allow the slide to dry by normal evaporation of the water. Don’t apply heat.
6. Once the smear is completely dry, pass the slide over the flame of a Bunsen burner to
heat-kill the organisms and fix them to the slide. Use a clothespin to hold the slide if it
is preferred by your instructor. Some workers prefer to hold the slide with their fingers
so that they can monitor the temperature of the slide (to prevent overheating).
24
Figure 3.3. Procedure for making a bacterial smear.

25
Figure 3.4. Aseptic procedure for organism removal.

26
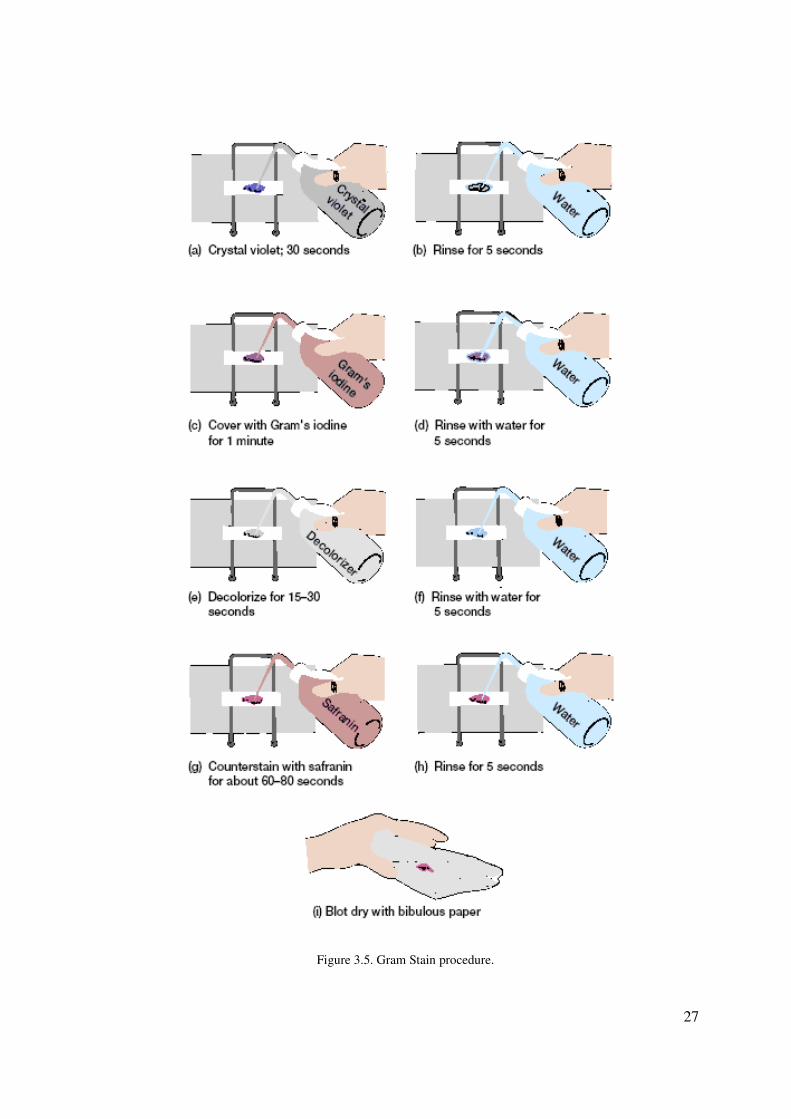
5. GRAM STAINING
The Gram stain (named after Christian Gram, Danish scientist and physician, 1853–1938) is
the most useful and widely employed differential stain in bacteriology. It divides bacteria into
two groups—gram negative and gram positive. The first step in the procedure involves
staining with the basic dye crystal violet. This is the primary stain. It is followed by
treatment with an iodine solution, which functions as a mordant; that is, it increases the
interaction between the bacterial cell and the dye so that the dye is more tightly bound or the
cell is more strongly stained. The smear is then decolorized by washing with an agent such as
95% ethanol or isopropanol-acetone. Gram-positive bacteria retain the crystal violet-iodine
complex when washed with the decolorizer, whereas gram-negative bacteria lose their crystal
violet-iodine complex and become colorless. Finally, the smear is counterstained with a
basic dye, different in color than crystal violet. This counterstain is usually safranin. The
safranin will stain the colorless, gram-negative bacteria pink but does not alter the dark purple
color of the gram-positive bacteria.
The end result is that gram-positive bacteria are deep purple in color and gram-negative
bacteria are pinkish to red in color.
Materials
Nutrient broth (liquid medium) of a mixture of ‘unknown’ organisms, (1) and (2).
Glass slides
Gram stain kit
Procedure:
a. Prepare Gram stains of the mixed broth culture as follows:
b. Place a loop-full of the mixed broth culture containing organisms (1) and (2) on a slide,
and spread to make a smear as demonstrated. Allow to dry. Heat fix
c. Make Gram stains of the smear:
1. Flood the smears with crystal violet and let stand for 30 seconds (figure 3.5a).
2. Rinse with water for 5 seconds (figure 3.5b).
3. Cover with Gram’s iodine mordant and let stand for 1 minute (figure 3.5c).
4. Rinse with water for 5 seconds (figure 3.5d).
5. Decolorize with 95% ethanol for 15 to 30 seconds. Do not decolorize too long. Add
the decolorizer drop by drop until the crystal violet fails to wash from the slide
(figure 3.5e). Alternatively, the smears may be decolorized for 30 to 60 seconds with
a mixture of isopropanol-acetone (3:1 v/v).
6. Rinse with water for 5 seconds (figure 3.5f ).
7. Counterstain with safranin for about 60 to 80 seconds (figure 3.5g).
8. Rinse with water for 5 seconds (figure 3.5h).
9. Blot dry with bibulous paper (figure 3.5i).
d. Examine the stained smear using oil immersion microscopy. Gram-positive organisms
stain blue to purple; gram-negative organisms stain pink to red. Record the morphology
and staining reaction of both organisms (1) and (2).
e. Leave your microscope set up and have your staining technique and interpretations
checked by your demonstrator.
27
Figure 3.5. Gram Stain procedure.

28
Figure 3.6. Color change that occur at each step in the Gram stain.
Review Questions 1. Why is the low-power objective placed in position when the microscope is stored or
carried?
2. Why is oil necessary when using the 90× to 100× objective?
3. What is the function of the iris diaphragm? The substage condenser?
4. In microbiology, what is the most commonly used objective? Explain your answer.
5. In microbiology, what is the most commonly used ocular? Explain your answer.
6. Why are unstained bacteria more difficult to observe than stained bacteria?
7. Describe the following types of bacterial movement:
Brownian movement
Flagella motion
Gliding motion
8. Which of the bacteria exhibited true motility on the slides?
9. How does true motility differ from Brownian movement?
10. What are the two purposes of heat fixation?
a.
b.
11. How would you define a properly prepared bacterial smear?
12. Why should you use an inoculating needle when making smears from solid media? An
inoculating loop from liquid media?
29
13. Name the reagent used and state the purpose of each of the following in the Gram
stain:
a. mordant
b. primary stain
c. decolorizer
d. counterstain
14. Which step is the most crucial or most likely to cause poor results in the Gram stain?
Why?
15. What part of the bacterial cell is most involved with Gram staining, and why?
16. Why must young cultures be used when doing a Gram stain?
17. What is meant by gram variable?
18. label the compound microscope below
30
LABORATORY 4.
EFFECTS OF DIFFERENT FACTORS ON MICROBIAL GROWTH
PREPARATION AND CARE OF STOCK CULTURES
1. OXYGEN REQUIREMENT
AIMS OF THIS PRACTICE
Bacteria vary greatly regarding their oxygen requirements. The purpose of this lab is to use
the techniques to determine the oxygen requirement of different bacteria.
PRINCIPLES
On the basis of oxygen tolerance, microorganisms can be placed into four classes. Strict
aerobes cannot survive in the absence of oxygen and produce energy only by oxidative
phosphorylation. Strict anaerobes generate energy by fermentation or by anaerobic
respiration and are killed in the presence of oxygen. Aerotolerant anaerobes generate ATP
only by fermentation, but have mechanisms to protect themselves from oxygen. Facultative
anaerobes prefer to grow in the presence of oxygen, using oxidative phosphorylation, but can
grow in an anaerobic environment using fermentation.
Materials
Bacterial strains:
Staphylococcus aureus
Escherichia coli
Streptococcus viridans
Bacillus subtilus
Temperature-control incubator
Petri disks with prepared TSA agar medium
Test tubes
TSB liquid medium
Inoculating needle
Candle, match
Glass jar with tight screw cap
Ethanol
Marking pens
Each group is provided 2 nutrient agar petri plates and the bacterial stocks. These stocks are
labeled with number.
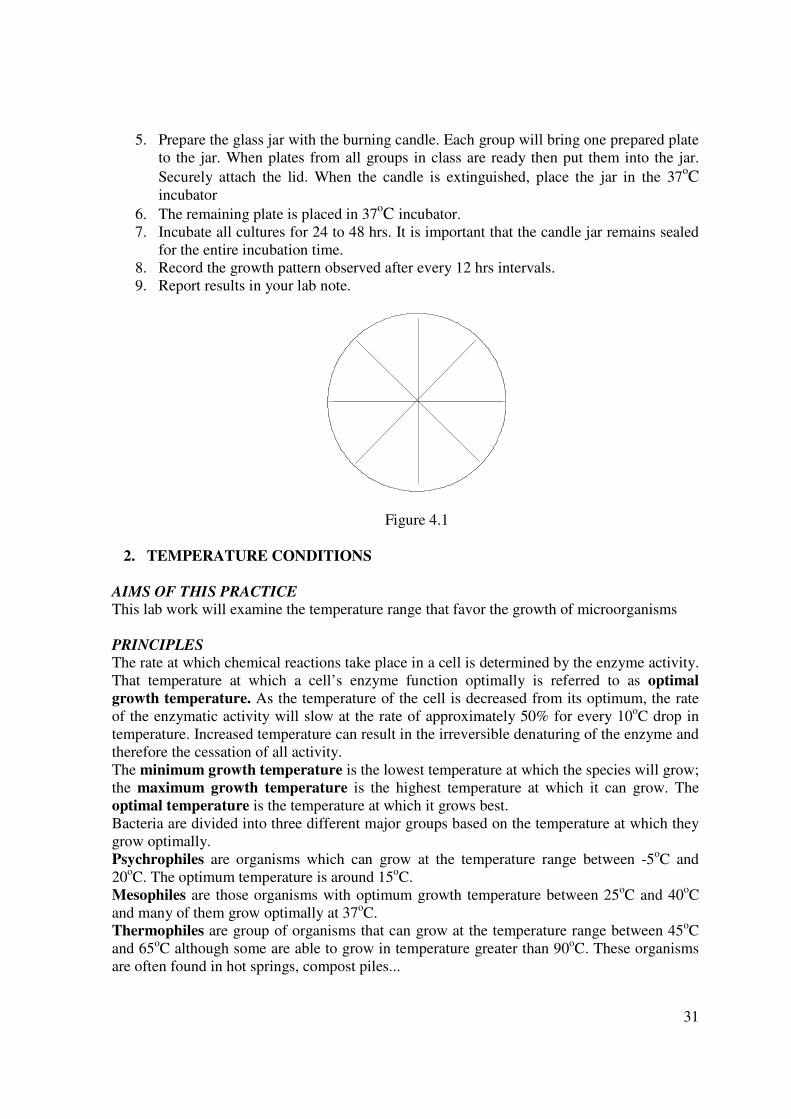
Procedure
1. Divide 2 petri plates into number of sections equally to the number of the bacterial
strains provided (figure 4.1).
2. Label on the side of the bottom plate: the group name, the initial time (time of doing
experiment), and the strain areas.
3. Each section will be inoculated with one of the organisms according to the area
marked.
4. Repeat with other plate.
31
5. Prepare the glass jar with the burning candle. Each group will bring one prepared plate
to the jar. When plates from all groups in class are ready then put them into the jar.
Securely attach the lid. When the candle is extinguished, place the jar in the 37oC
incubator
6. The remaining plate is placed in 37oC incubator.
7. Incubate all cultures for 24 to 48 hrs. It is important that the candle jar remains sealed
for the entire incubation time.
8. Record the growth pattern observed after every 12 hrs intervals.
9. Report results in your lab note.
Figure 4.1
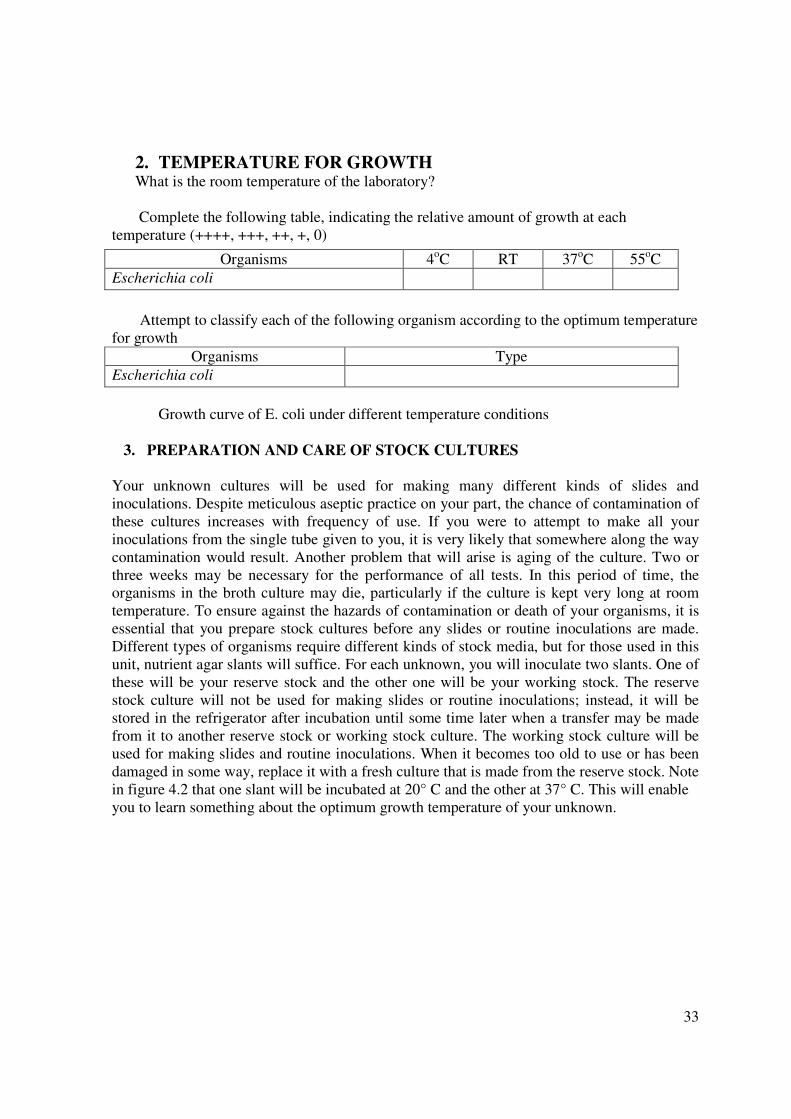
2. TEMPERATURE CONDITIONS
AIMS OF THIS PRACTICE
This lab work will examine the temperature range that favor the growth of microorganisms
PRINCIPLES
The rate at which chemical reactions take place in a cell is determined by the enzyme activity.
That temperature at which a cell’s enzyme function optimally is referred to as optimal
growth temperature. As the temperature of the cell is decreased from its optimum, the rate
of the enzymatic activity will slow at the rate of approximately 50% for every 10oC drop in
temperature. Increased temperature can result in the irreversible denaturing of the enzyme and
therefore the cessation of all activity.
The minimum growth temperature is the lowest temperature at which the species will grow;
the maximum growth temperature is the highest temperature at which it can grow. The
optimal temperature is the temperature at which it grows best.
Bacteria are divided into three different major groups based on the temperature at which they
grow optimally.
Psychrophiles are organisms which can grow at the temperature range between -5oC and
20oC. The optimum temperature is around 15
oC.
Mesophiles are those organisms with optimum growth temperature between 25oC and 40
oC
and many of them grow optimally at 37oC.
Thermophiles are group of organisms that can grow at the temperature range between 45oC
and 65oC although some are able to grow in temperature greater than 90oC. These organisms
are often found in hot springs, compost piles...
32
PREPARATION
Equipments and materials
- Tryptic soya broth, 100 ml- culture flask
- Incubators set at 4oC, room temperature, 37
oC, 55
oC
- inoculation loop,
Samples
Culture stocks of Escherichia coli
TASKS
1. Each group is provided 4 100 ml- culture flasks. Be sure to indicate the incubation
temperature on each flask (figure 4.1). One flask containing sterile medium only is
used for control.
2. Using the sterile loop, inoculate the flask with bacteria.
3. Incubate each plate at the designed temperature. Record OD600nm for each flask at
0h, 1h, 1h30’, 2h, 2h30’, 3h .
4. Report the results in your lab note. Draw the growth curve based on recorded values.
REPORT
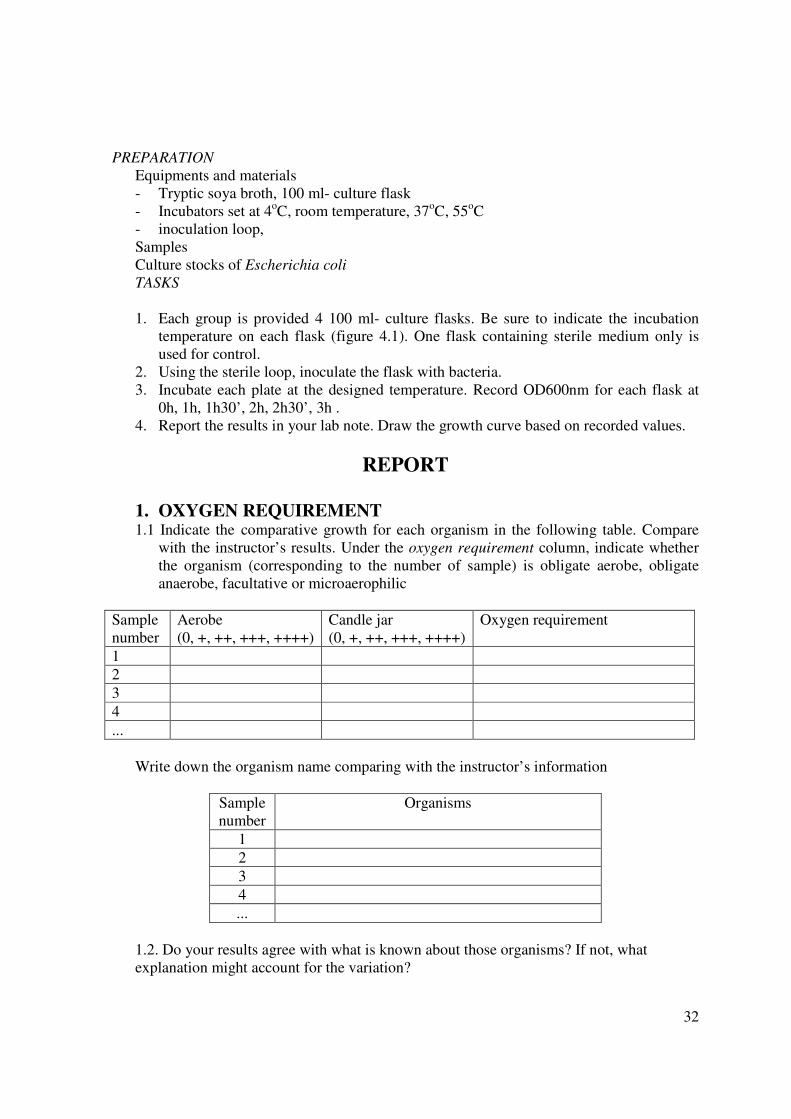
1. OXYGEN REQUIREMENT 1.1 Indicate the comparative growth for each organism in the following table. Compare
with the instructor’s results. Under the oxygen requirement column, indicate whether
the organism (corresponding to the number of sample) is obligate aerobe, obligate
anaerobe, facultative or microaerophilic
Sample
number
Aerobe
(0, +, ++, +++, ++++)
Candle jar
(0, +, ++, +++, ++++)
Oxygen requirement
1
2
3
4
...
Write down the organism name comparing with the instructor’s information
Sample
number
Organisms
1
2
3
4
...
1.2. Do your results agree with what is known about those organisms? If not, what
explanation might account for the variation?
33
2. TEMPERATURE FOR GROWTH What is the room temperature of the laboratory?
Complete the following table, indicating the relative amount of growth at each
temperature (++++, +++, ++, +, 0)
Attempt to classify each of the following organism according to the optimum temperature
for growth
Organisms Type
Escherichia coli
Growth curve of E. coli under different temperature conditions
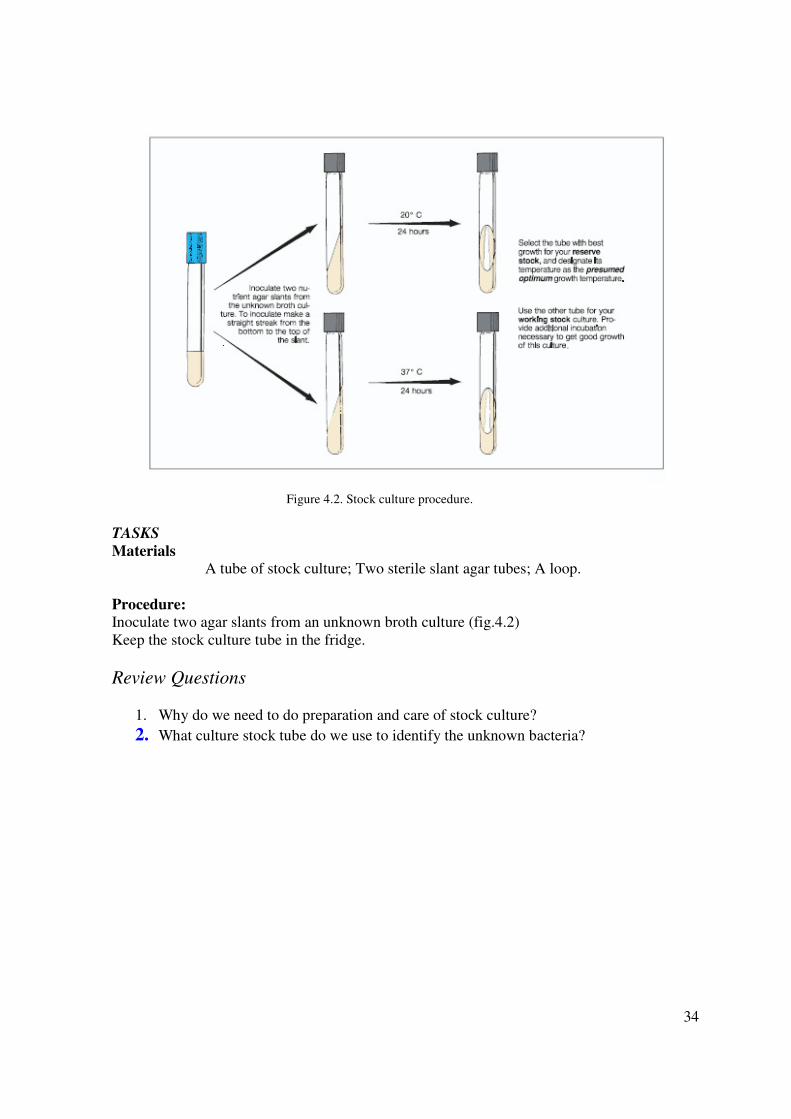
3. PREPARATION AND CARE OF STOCK CULTURES
Your unknown cultures will be used for making many different kinds of slides and
inoculations. Despite meticulous aseptic practice on your part, the chance of contamination of
these cultures increases with frequency of use. If you were to attempt to make all your
inoculations from the single tube given to you, it is very likely that somewhere along the way
contamination would result. Another problem that will arise is aging of the culture. Two or
three weeks may be necessary for the performance of all tests. In this period of time, the
organisms in the broth culture may die, particularly if the culture is kept very long at room
temperature. To ensure against the hazards of contamination or death of your organisms, it is
essential that you prepare stock cultures before any slides or routine inoculations are made.
Different types of organisms require different kinds of stock media, but for those used in this
unit, nutrient agar slants will suffice. For each unknown, you will inoculate two slants. One of
these will be your reserve stock and the other one will be your working stock. The reserve
stock culture will not be used for making slides or routine inoculations; instead, it will be
stored in the refrigerator after incubation until some time later when a transfer may be made
from it to another reserve stock or working stock culture. The working stock culture will be
used for making slides and routine inoculations. When it becomes too old to use or has been
damaged in some way, replace it with a fresh culture that is made from the reserve stock. Note
in figure 4.2 that one slant will be incubated at 20° C and the other at 37° C. This will enable
you to learn something about the optimum growth temperature of your unknown.
Organisms 4oC RT 37
oC 55
oC
Escherichia coli
34
TASKS
Materials
A tube of stock culture; Two sterile slant agar tubes; A loop.
Procedure:
Inoculate two agar slants from an unknown broth culture (fig.4.2)
Keep the stock culture tube in the fridge.
Review Questions
1. Why do we need to do preparation and care of stock culture?
2. What culture stock tube do we use to identify the unknown bacteria?
Figure 4.2. Stock culture procedure.
35
LABORATORY 5 &6:
Bacterial Population Counts
Introduction to Bacterial identification process
I. BACTERIAL POPULATION COUNTS
Many bacteriological studies require that we be able to determine the number of organisms
that are present in a given unit of volume. Several different methods are available to us for
such population counts. The method one uses is determined by the purpose of the study. We
learn the principals of quantitative plating (Standard Plate Count, or SPC) and turbidity
measurements to determine the number of bacteria in a culture sample. Although the two
methods are somewhat parallel in the results they yield, there are distinct differences. For one
thing, the SPC reveals information only as related to viable organisms; that is, colonies that
are seen on the plates after incubation represent only living organisms, not dead ones.
Turbidimetry results, on the other hand, reflect the presence of all organisms in a culture, dead
and living. In this exercise we do SPC method, turbidity measurement method is referred in
appendix 4.
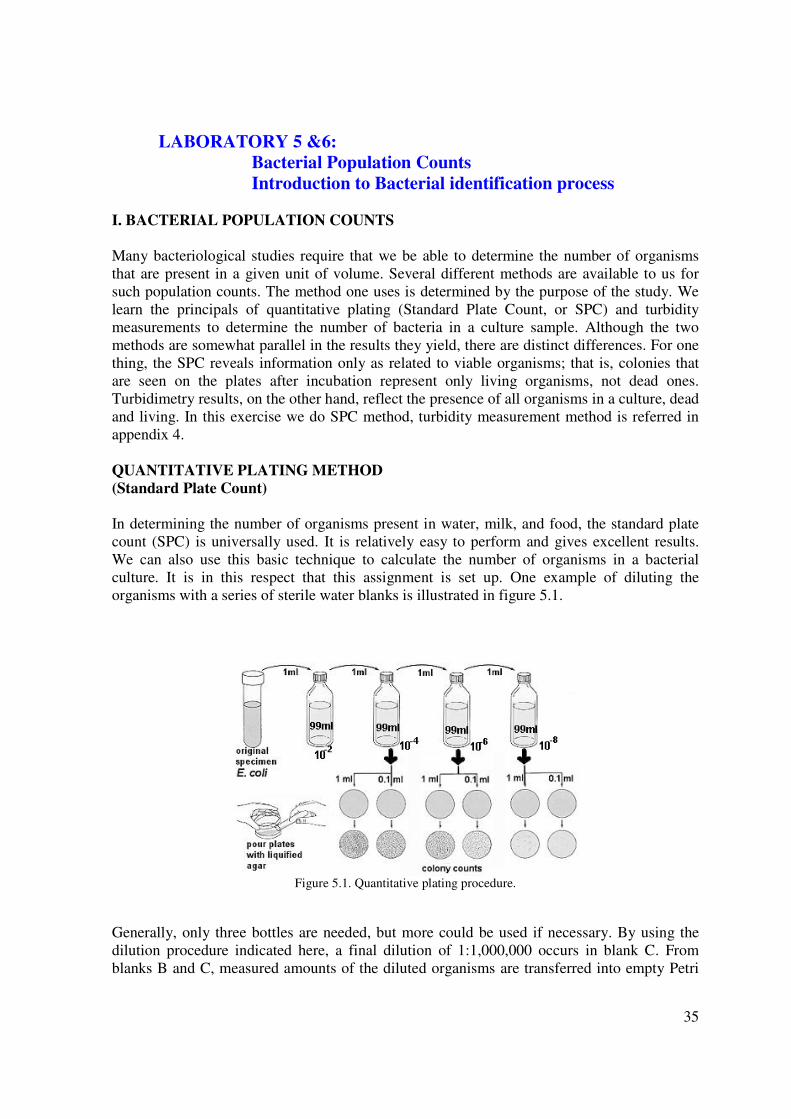
QUANTITATIVE PLATING METHOD
(Standard Plate Count)
In determining the number of organisms present in water, milk, and food, the standard plate
count (SPC) is universally used. It is relatively easy to perform and gives excellent results.
We can also use this basic technique to calculate the number of organisms in a bacterial
culture. It is in this respect that this assignment is set up. One example of diluting the
organisms with a series of sterile water blanks is illustrated in figure 5.1.
Figure 5.1. Quantitative plating procedure.
Generally, only three bottles are needed, but more could be used if necessary. By using the
dilution procedure indicated here, a final dilution of 1:1,000,000 occurs in blank C. From
blanks B and C, measured amounts of the diluted organisms are transferred into empty Petri
36
plates. Nutrient agar, cooled to 50° C, is then poured into each plate. After the nutrient agar
has solidified, the plates are incubated for 24 to 48 hours and examined. A plate that has
between 30 and 300 colonies is selected for counting. From the count it is a simple matter to
calculate the number of organisms per milliliter of the original culture. It should be pointed
out that greater accuracy can be achieved by pouring two plates for each dilution and
averaging the counts. Duplicate plating, however, has been avoided for obvious economic
reasons. Pipette Handling Success in this experiment depends considerably on proper
pipetting techniques (Appendix 5).
TASKS
Diluting and Plating Procedure
Materials:
per group:
1 tube (5 ml) broth culture of E. coli
1 tube (5 ml) sterile water
6 nutrient agar plates
1.1 ml pipettes
cannister for discarded pipettes
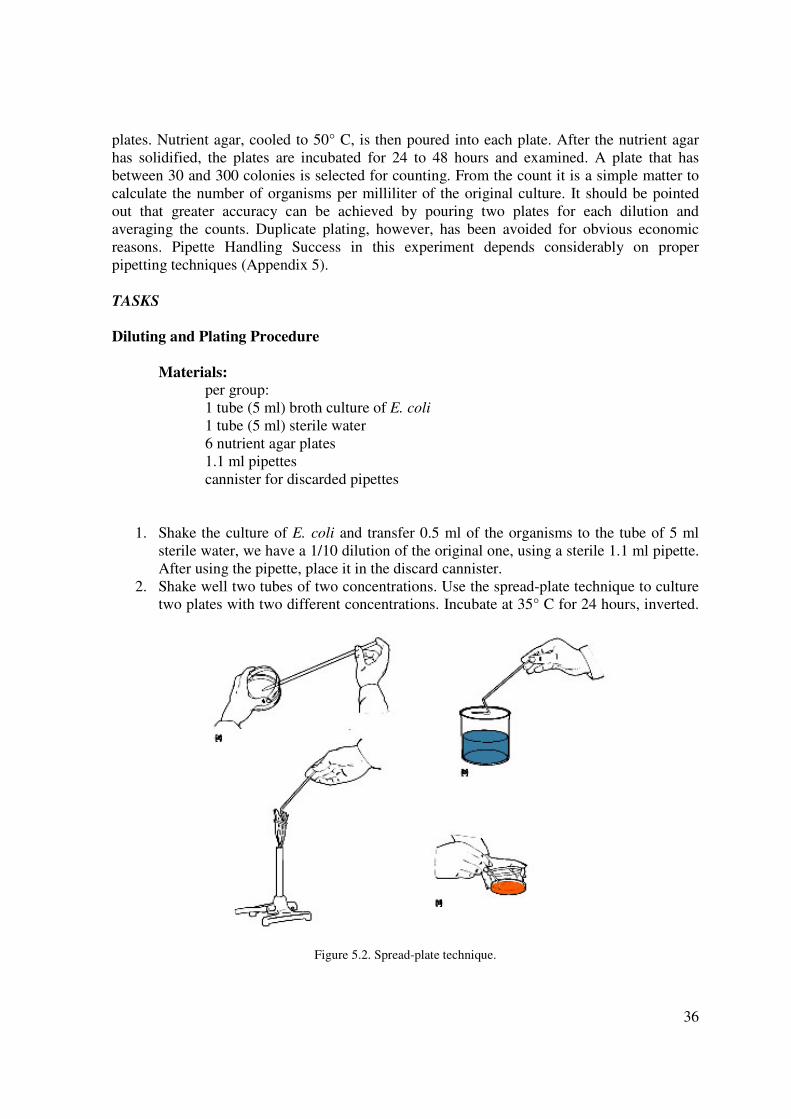
1. Shake the culture of E. coli and transfer 0.5 ml of the organisms to the tube of 5 ml
sterile water, we have a 1/10 dilution of the original one, using a sterile 1.1 ml pipette.
After using the pipette, place it in the discard cannister.
2. Shake well two tubes of two concentrations. Use the spread-plate technique to culture
two plates with two different concentrations. Incubate at 35° C for 24 hours, inverted.
Figure 5.2. Spread-plate technique.

37
Counting and Calculations
Materials:
2 culture plates
Quebec colony counter
Mechanical hand counter
1. Lay out the plates on the table in order of dilution
2. Place the plate on the Quebec colony counter. Start counting at the top of the plate,
using the grid lines to prevent counting the same colony twice. Use a mechanical hand
counter. Count every colony, regardless of how small or insignificant.
3. Comparison number of colonies from two concentrations
III. INTRODUCTION TO BACTERIAL IDENTIFICATON PROCESS
Identification of Unknown Bacteria
One of the most interesting experiences in introductory microbiology is to attempt to identify
an unknown microorganism that has been assigned to you as a laboratory problem. The next
exercises pertain to this phase of microbiological work. You will be given one or more
cultures of bacteria to identify. The only information that might be given to you about your
unknowns will pertain to their sources and habitats. All the information needed for
identification will have to be acquired by you through independent study. Although you will
be engrossed in trying to identify an unknown organism, there is a more fundamental
underlying objective of this series of exercises that goes far beyond simply identifying an
unknown. That objective is to gain an understanding of the cultural and physiological
characteristics of bacteria. Physiological characteristics will be determined with a series of
biochemical tests that you will perform on the organisms. Although correctly identifying the
unknowns that are given to you is very important, it is just as important that you thoroughly
understand the chemistry of the tests that you perform on the organisms. The first step in the
identification procedure is to accumulate information that pertains to the organisms’
morphological, cultural, and physiological (biochemical) characteristics. This involves
making different kinds of slides for cellular studies and the inoculation of various types of
media to note the growth characteristics and types of enzymes produced.
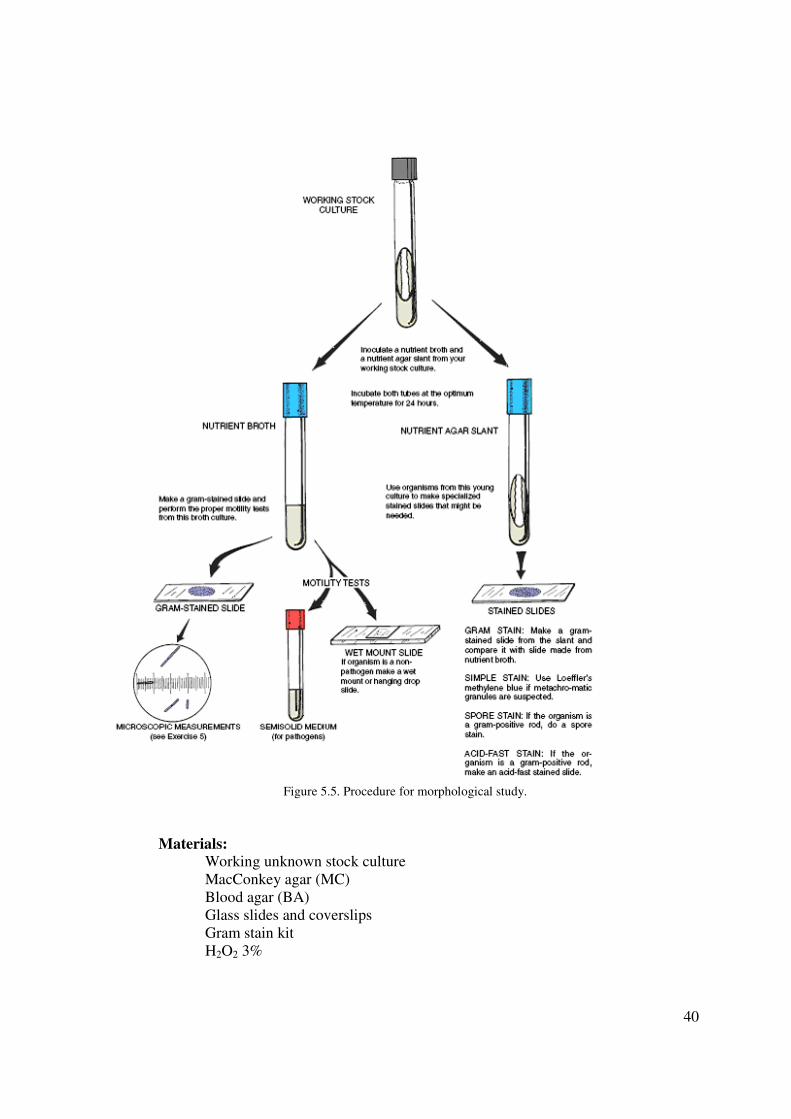
Morphological Study of Unknown
The first step in the identification of an unknown bacterial organism is to learn as much as
possible about its morphological characteristics. One needs to know whether the organism is
rod-, coccus-, or spiral shaped; whether or not it is pleomorphic; its reaction to gram staining;
and the presence or absence of endospores, capsules, or granules. All this morphological
information provides a starting point in the categorization of an unknown. Figure 46.1
illustrates the steps that will be followed in determining morphological characteristics of your
unknown. Note that fresh broth and slant cultures will be needed to make the various slides an
perform motility tests. Since most of the slide techniques were covered in Part 3, you will find
it necessary to refer to that section from time to time. Note that gram staining, motility testing,
and measurements will be made from the broth culture; gram staining and other stained slides
38
will also be made from the agar slant. The rationale as to the choice of broth or agar slants
will be explained as each technique is performed.
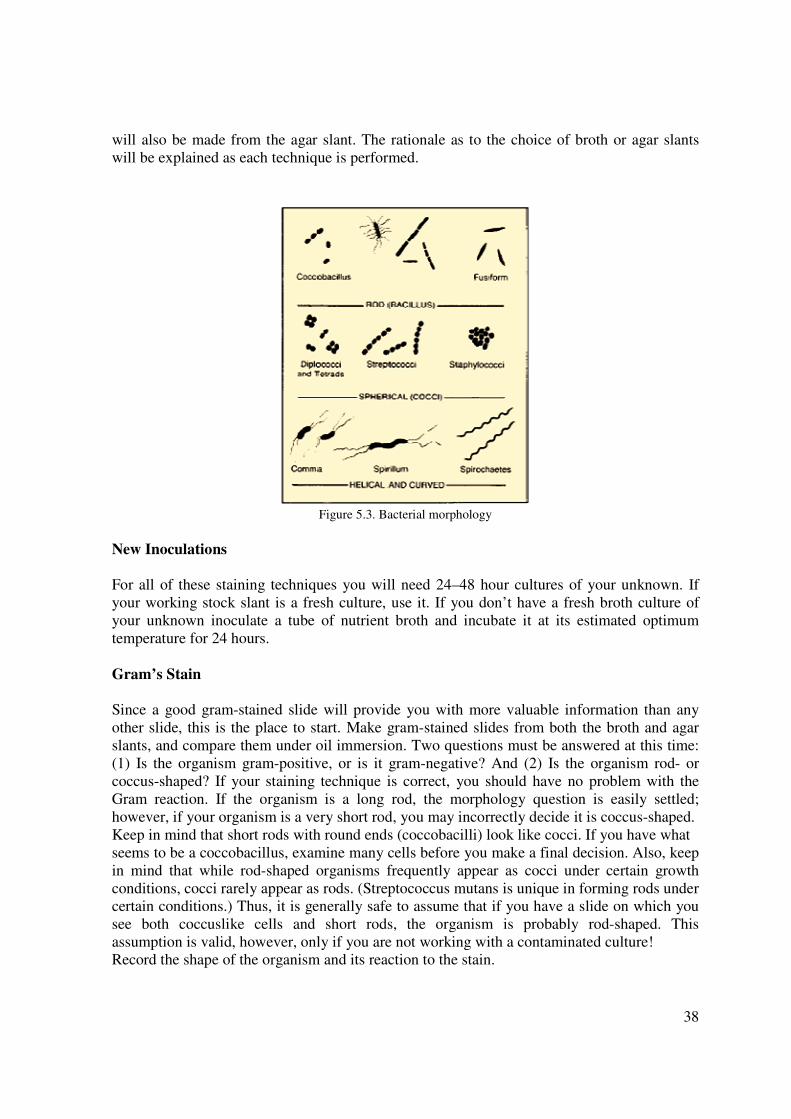
Figure 5.3. Bacterial morphology
New Inoculations
For all of these staining techniques you will need 24–48 hour cultures of your unknown. If
your working stock slant is a fresh culture, use it. If you don’t have a fresh broth culture of
your unknown inoculate a tube of nutrient broth and incubate it at its estimated optimum
temperature for 24 hours.
Gram’s Stain
Since a good gram-stained slide will provide you with more valuable information than any
other slide, this is the place to start. Make gram-stained slides from both the broth and agar
slants, and compare them under oil immersion. Two questions must be answered at this time:
(1) Is the organism gram-positive, or is it gram-negative? And (2) Is the organism rod- or
coccus-shaped? If your staining technique is correct, you should have no problem with the
Gram reaction. If the organism is a long rod, the morphology question is easily settled;
however, if your organism is a very short rod, you may incorrectly decide it is coccus-shaped.
Keep in mind that short rods with round ends (coccobacilli) look like cocci. If you have what
seems to be a coccobacillus, examine many cells before you make a final decision. Also, keep
in mind that while rod-shaped organisms frequently appear as cocci under certain growth
conditions, cocci rarely appear as rods. (Streptococcus mutans is unique in forming rods under
certain conditions.) Thus, it is generally safe to assume that if you have a slide on which you
see both coccuslike cells and short rods, the organism is probably rod-shaped. This
assumption is valid, however, only if you are not working with a contaminated culture!
Record the shape of the organism and its reaction to the stain.
39
Cell Size
Once you have a good gram-stained slide, determine the size of the organism with an ocular
micrometer. If the size is variable, determine the size range. Record this information.
Motility and Cellular Arrangement
If your organism is a nonpathogen make a wet mount or hanging drop slide from the broth
culture. This will enable you to determine whether the organism is motile, and it will allow
you to confirm the cellular arrangement. By making this slide from broth instead of the agar
slant, the cells will be well dispersed in natural clumps. Note whether the cells occur singly, in
pairs, masses, or chains. Remember to place the slide preparation in a beaker of disinfectant
when finished with it. If your organism happens to be a pathogen do not make a slide
preparation of the organisms; instead, stab the organism into a tube of semisolid or SIM
medium to determine motility. Incubate for 48 hours. Be sure to record your observations.
Cultural Characteristics
The cultural characteristics of an organism pertain to its macroscopic appearance on different
kinds of media. Descriptive terms, which are familiar to all bacteriologists, and are used in
Bergey’s Manual, must be used in recording cultural characteristics.
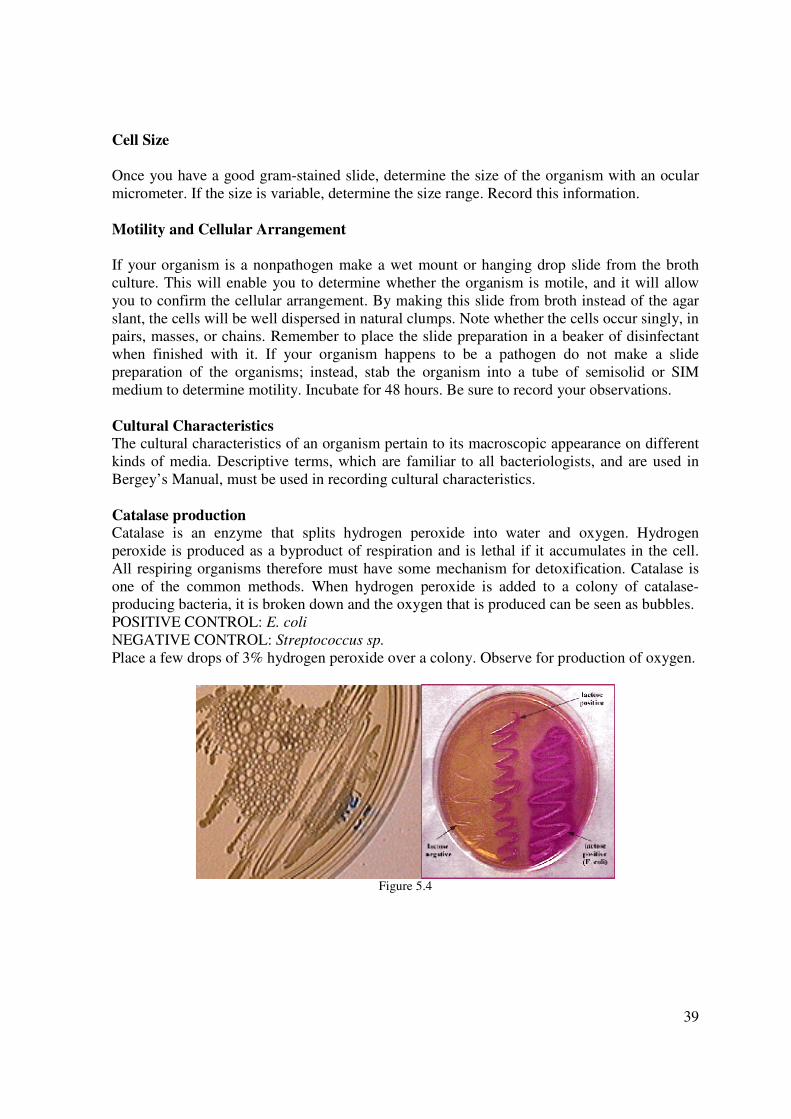
Catalase production
Catalase is an enzyme that splits hydrogen peroxide into water and oxygen. Hydrogen
peroxide is produced as a byproduct of respiration and is lethal if it accumulates in the cell.
All respiring organisms therefore must have some mechanism for detoxification. Catalase is
one of the common methods. When hydrogen peroxide is added to a colony of catalase-
producing bacteria, it is broken down and the oxygen that is produced can be seen as bubbles.
POSITIVE CONTROL: E. coli
NEGATIVE CONTROL: Streptococcus sp.
Place a few drops of 3% hydrogen peroxide over a colony. Observe for production of oxygen.
Figure 5.4
40
Figure 5.5. Procedure for morphological study.
Materials:
Working unknown stock culture
MacConkey agar (MC)
Blood agar (BA)
Glass slides and coverslips
Gram stain kit
H2O2 3%
41
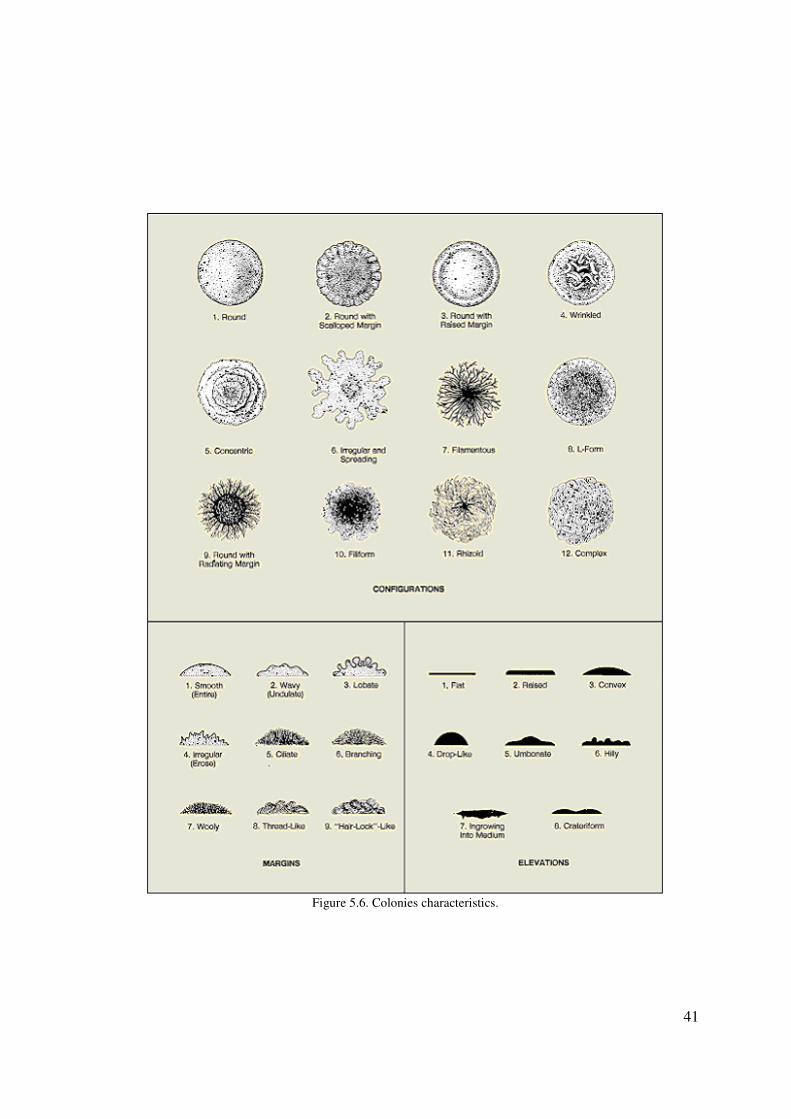
Figure 5.6. Colonies characteristics.
42
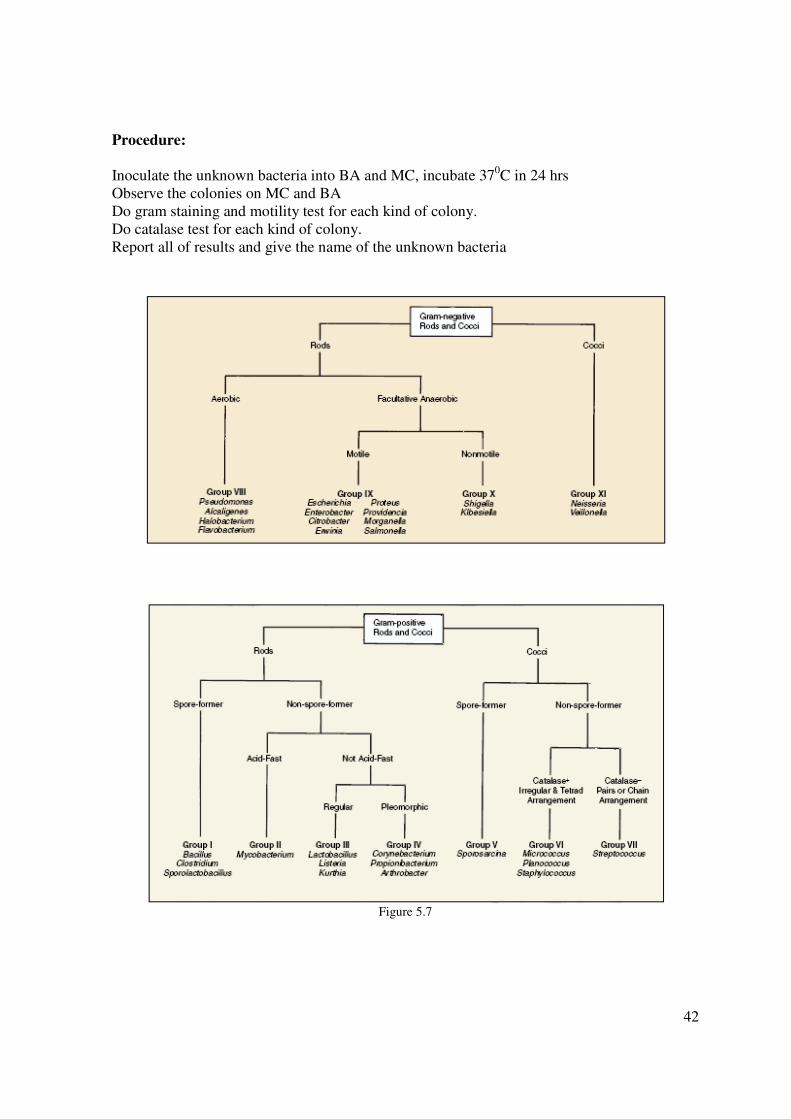
Procedure:
Inoculate the unknown bacteria into BA and MC, incubate 370C in 24 hrs
Observe the colonies on MC and BA
Do gram staining and motility test for each kind of colony.
Do catalase test for each kind of colony.
Report all of results and give the name of the unknown bacteria
Figure 5.7
43
Review Questions
1. Why is it necessary to perform a plate count in conjunction with the turbidimetry
procedure?
2. What is a CFU?
3. Outline some steps that you used to identify your unknown
LABORATORY 6:
1. Bacterial Population Counts (continuous)
2. Introduction to bacterial identification process (continuous)
3. Test:
a. The results of bacterial identification
b. Writing test from review questions in this manual
44
APPENDIX 1
SAFETY RULES IN THE LABORATORY
1. Only lab manuals, lab notebooks be brought to your laboratory work space
2. Lab-coats, gloves, comforters, lab-hats or safety-glasses must be worn at all times
3. Disinfecting your work area at the beginning and before leaving the lab-room.
4. Unauthorized experiments are not allowed
5. Be very careful with hot plates, Bunsen burners, stirring motors, high-voltage power
suppliers
6. All contaminated material must be disinfected before disposal or reuse
7. In the event of any accident or injury, report immediately to the laboratory instructors.
8. Working alone in the laboratory, eating, drinking, or smoking is strictly prohibited
9. After the lab-session, observe good hygiene by washing your hands before leaving the
laboratory

45
APPENDIX 2
SPECIFIC GUIDELINES FOR LAB SAFETY
1. Place all extra clothing, unnecessary books, purses, backpacks, and paraphernalia in an
appropriate place. Racks are provided for these materials. The laboratory work area must be
kept free of articles not actually in use.
2. Eating, drinking, and smoking are forbidden at all times in the laboratory.
3. Keep your locker or laboratory door clean. Do not allow your locker drawer to become
filled with cultures that have no value in your current work.
4. Return all reagents, cultures, and glassware to their appropriate places.
5. Wear a laboratory coat, smock, or lab apron when working in the laboratory. This will
protect clothing from contamination or accidental discoloration by staining solutions.
6. Do not place anything in your mouth while in the laboratory. This includes pencils, food,
and fingers. Learn to keep your hands away from your mouth and eyes.
7. Avoid contamination of benches, floor, and wastebaskets.
8. Clean your work area (laboratory bench) with a phenolic disinfectant such as 5% Lysol or
5% phenol or Ethanol 70% before and after each laboratory period. This standard procedure
lessens the chance for accidental infection as well as for contamination of cultures.
9. Special receptacles will be provided for infectious materials and used glass slides. Place all
discarded cultures and contaminated glassware into these receptacles. Do not let unwanted
and unneeded materials accumulate. Tall jars filled with a solution such as 5% Lysol or
special receptacles will be provided for pipettes.
10. When infectious material is accidentally spilled, cover it immediately with a disinfectant
such as 5% Lysol or 5% phenol and notify your instructor at once.
11. Flame wire loops and needles before and immediately after transfer of cultures. Do not
move through the laboratory with a loop or pipette containing infectious material.
12. Wash your hands thoroughly before and after each experiment, using disinfecting soap if
possible.
13. Label all experimental material with your:
a. Name
b. Date
d. Lab section (time)
e. Specimen/Organism
14. Contact staff immediately or ring the safety telephone number in case of an emergency
46
APPENDIX 3
SET UP MICROSCOPE
1. Set up Kohler illumination and focus on the object. Increase illumination up the
maximum useful amount provided by the lamp.
2. Replace the eyepiece with the telescope and focus it sharply on the ring of the
objective phase plate.
3. Rotate the condenser turret so that the number corresponding with the required phase
objective is in place. There should now be a clear image of both the objective ring and
the condenser annulus.
4. Centre the condenser annulus by the centering device so that the two rings coincide.
The condenser annulus should not be wider than the ring in the objective. It may be
narrower.
5. While inspecting the back lens make sure that, apart from the image of the filament, it
is evenly and fully illuminated. Difficulty will be encountered, for example, if the light
is out of centration or if the condenser N.A has been reduced so that the annulus is not
fully illuminated.
6. Restore the eyepiece and the phase microscope is ready for use.
47
APPENDIX 4
TURBIDITY MEASUREMENT
When it is necessary to make bacteriological counts on large numbers of cultures, the
quantitative plate count method becomes a rather cumbersome tool. It not only takes a
considerable amount of glassware and media, but it is also time-consuming. A much faster
method is to measure the turbidity of the culture with a spectrophotometer and translate this
into the number of organisms. To accomplish this, however, the plate count must be used to
establish the count for one culture of known turbidity. To understand how a
spectrophotometer works, it is necessary, first, to recognize the fact that a culture of bacteria
acts as a colloidal suspension, which will intercept the light as it passes through. Within
certain limits the amount of light that is absorbed is directly proportional to the concentration
of cells. Figure1 illustrates the path of light through a spectrophotometer. Note that a beam of
white light passes through two lenses and an entrance slit into a diffraction grating that
disperses the light into horizontal beams of all colors of the spectrum. Short wavelengths
(violet and ultraviolet) are at one end and long wavelengths (red and infrared) are at the other
end. The spectrum of light falls on a dark screen with a slit (exit slit) cut in it. Only that
portion of the spectrum that happens to fall on the slit goes through into the sample. It will be
a monochromatic beam of light. By turning a wavelength control knob on the instrument, the
diffraction grating can be reoriented to allow different wavelengths to pass through the slit.
The light that passes through the culture activates a phototube, which, in turn, registers
percent transmittance (% T) on a galvanometer. The higher the percent transmittance, the
fewer are the cells in suspension. There should be a direct proportional relationship between
the concentration of bacterial cells and the absorbance (optical density, O.D.) of the culture.
To demonstrate this principle, you will measure the %T of various dilutions of the culture
provided to you. These values will be converted to O.D. and plotted on a graph as a function
of culture dilution. You may find that there is a linear relationship between concentration of
cells and O.D. only up to a certain O.D. At higher O.D. values the relationship may not be
linear. That is, for a doubling in cell concentration, there may be less than a doubling in O.D.
Figure 1. Schematic of a spectrophotometer.
48
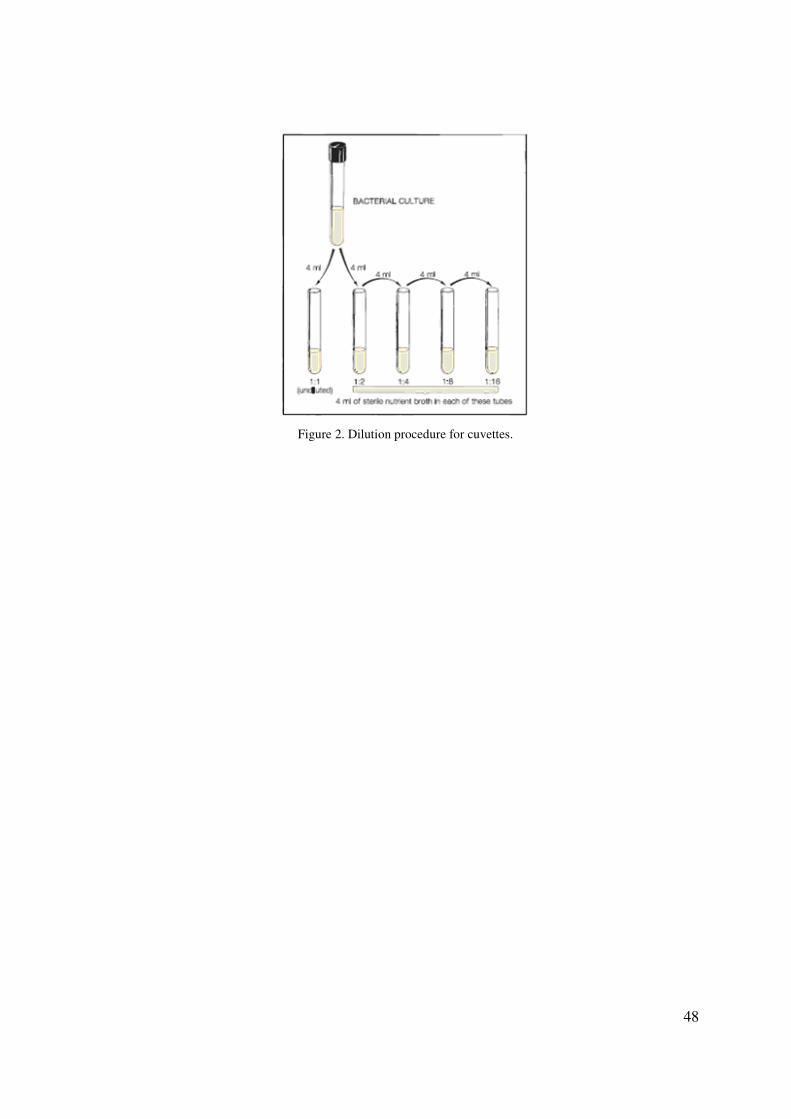
Figure 2. Dilution procedure for cuvettes.
49
APPENDIX 5
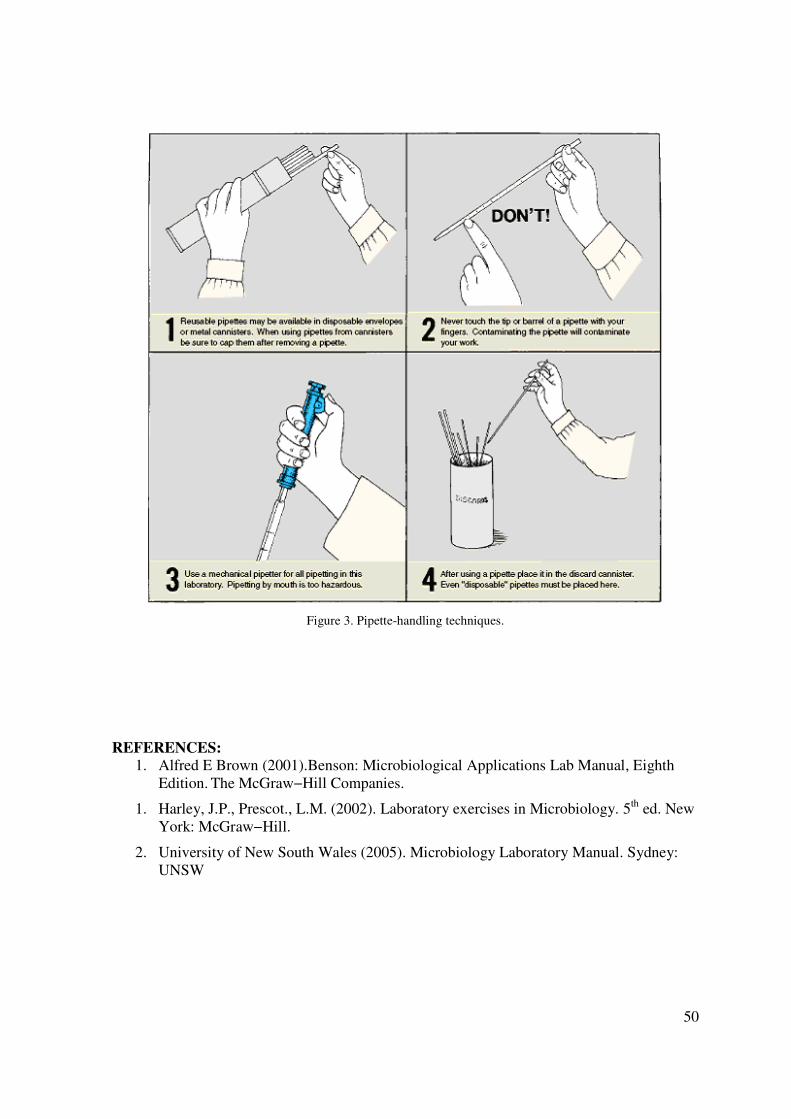
PROPER PIPETTING TECHNIQUES
Pipettes may be available to you in metal cannisters or in individual envelopes; they may be
disposable or reusable. In the distant past pipetting by mouth was routine practice. However,
the hazards are obvious, and today it must be avoided.
Your instructor will indicate the techniques that will prevail in this laboratory. If this is the
first time that you have used sterile pipettes, consult figure 3, keeping the following points in
mind:
1. When removing a sterile pipette from a cannister, do so without contaminating the
ends of the other pipettes with your fingers. This can be accomplished by gently
moving the cannister from side to side in an attempt to isolate one pipette from the
rest.
2. After removing your pipette, replace the cover on the cannister to maintain sterility of
the remaining pipettes.
3. Don’t touch the body of the pipette with your fingers or lay the pipette down on the
table before or after you use it. Keep that pipette sterile until you have used it, and
don’t contaminate the table or yourself with it after you have used it.
4. Always use a mechanical pipetting device such as the one in illustration 3, figure 3.
For safety reasons, deliveries by mouth are not acceptable in this laboratory.
5. Remove and use only one pipette at a time; if you need 3 pipettes for the whole
experiment and remove all 3 of them at once, there is no way that you will be able to
keep 2 of them sterile while you are using the first one.
6. When finished with a pipette, place it in the discard cannister. The discard cannister
will have a disinfectant in it. At the end of the period reusable pipettes will be washed
and sterilized by the laboratory assistant. Disposable pipettes will be discarded.
Students have been known to absentmindedly return used pipettes to the original
sterile cannister, and, occasionally, even toss them into the wastebasket. We are
certain that no one in this laboratory would ever do that!
50
Figure 3. Pipette-handling techniques.
REFERENCES:
1. Alfred E Brown (2001).Benson: Microbiological Applications Lab Manual, Eighth
Edition. The McGraw−Hill Companies.
1. Harley, J.P., Prescot., L.M. (2002). Laboratory exercises in Microbiology. 5th ed. New
York: McGraw−Hill.
2. University of New South Wales (2005). Microbiology Laboratory Manual. Sydney:
UNSW