Embed Size (px)
Citation preview
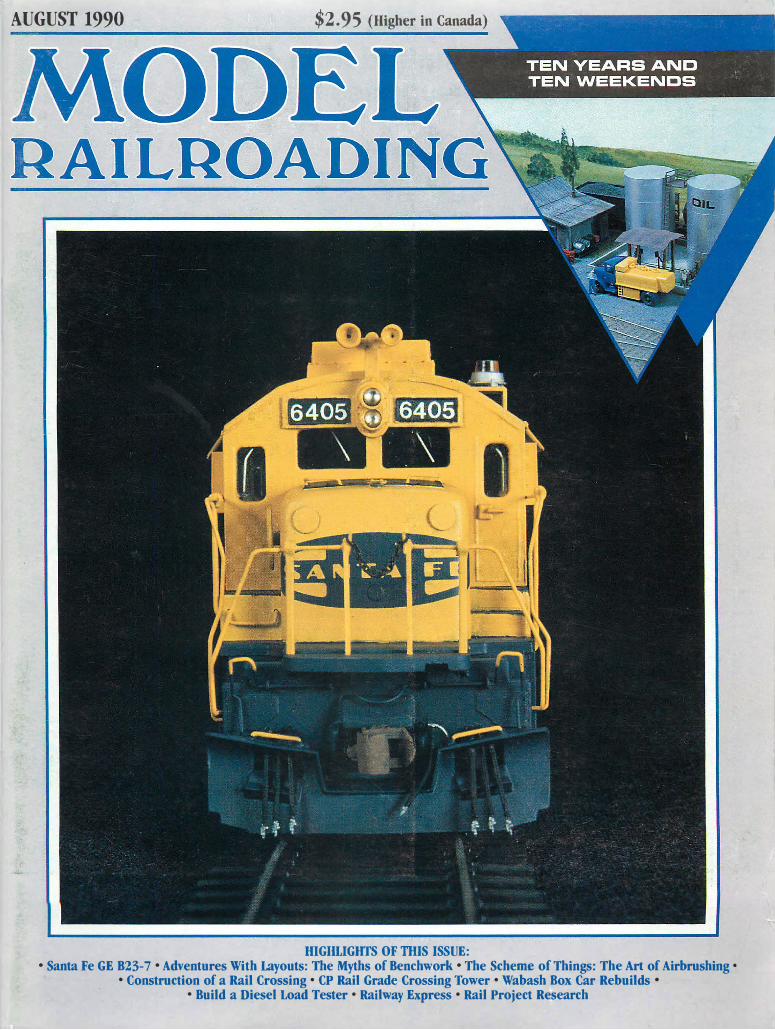
AUGUST 1990 $2.95 (Higher in Canada)
IDGIDJGHTS OF THIS ISSUE: • Santa Fe GE B23-7 • Adventures With Layouts: The Myths of Benchwork • The Scheme of Things: The Art of Airbrushing·
• Construction of a Rail Crossing· CP Rail Grade Crossing Tower· Wabash Box Car Rebuilds •
• Build a Diesel Load Tester· Railway Express· Rail Project Research
For a limited time AND while supplies last ...
lots of layouts
Plenty of How To's,
Kit Bashing, Directions
Everything You Need
. . . Plus Much More!
Model Railroading Magazine is offering a complete set of Back Issues from
Fall 1979 through December 1989 Regularly $194.95 per set ... Yours for only $164.95 per set.
You SAVE $30! The price of a subscription for 1990!
1-800-736-0427 Just state on enclosed order form that you want a complete set and
enclose your check for $164.95 and we'll handle the rest.
Orders must be received by July 31, 1990. Good while supplies last.
!. ' I��� . 1 Den;e��o��1:r���dr:���:�� �d��.�t::�I:� tax. MasterCard
Washington residents add 7.5% sales tax.
August 1990 VOLUME 20 NUMBER 8
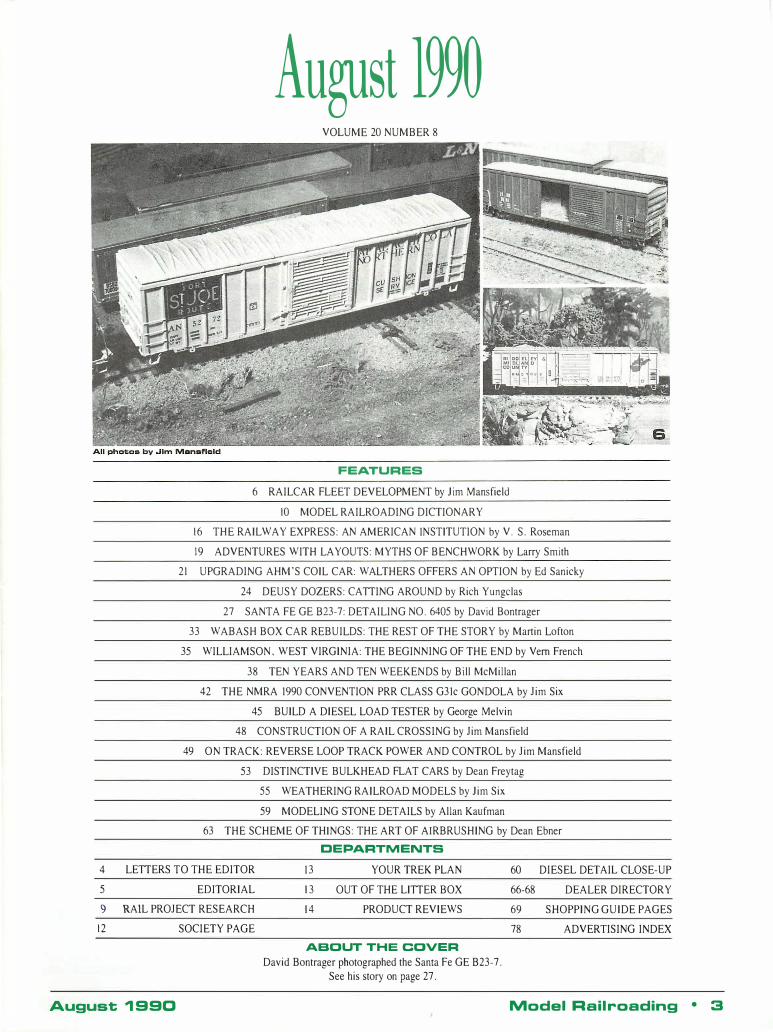
FEATURES 6 RAILCAR FLEET DEVELOPMENT by Jim Mansfield
10 MODEL RAILROADING DICTIONARY
16 THE RAILWAY EXPRESS: AN AMERICAN [NSTITUTION by V. S. Roseman
19 ADVENTURES WITH LAYOUTS: MYTHS OF BENCHWORK by Larry Smith
21 UPGRADING AHM'S COIL CAR: WALTHERS OFFERS AN OPTION by Ed San icky
24 DEUSY DOZERS: CAITING AROUND by Rich Yungclas
27 SANTA FE GE B23-7: DETAILING NO. 6405 by David Bontrager
33 WABASH BOX CAR REBUILDS: THE REST OF THE STORY by Martin Lofton
35 WILLIAMSON, WEST VIRGINIA: THE BEGINNING OF THE END by Vern French
38 TEN YEARS AND TEN WEEKENDS by Bill McMillan
42 THE NMRA 1990 CONVENTION PRR CLASS G31c GONDOLA by Jim Six
45 BUILD A DIESEL LOAD TESTER by George Melvin
48 CONSTRUCTION OF A RAIL CROSSING by Jim Mansfield
49 ON TRACK: REVERSE LOOP TRACK POWER AND CONTROL by Jim Mansfield
53 DISTINCTIVE BULKHEAD FLAT CARS by Dean Freytag
55 WEATHERING RAILROAD MODELS by Jim Six
59 MODELING STONE DETAILS by Allan Kaufman
63 THE SCHEME OF TH[NGS: THE ART OF AIRBRUSHING by Dean Ebner
DEPARTMENTS 4 LEITERS TO THE EDITOR [3 YOUR TREK PLAN 60 DIESEL DETAIL CLOSE-UP
5 EDITORIAL
9 RAIL PROJECT RESEARCH
12 SOCIETY PAGE
August 1 990
13 OUT OF THE LIITER BOX
14 PRODUCT REVIEWS
ABOUT THE COVER David Bontrager photographed the Santa Fe GE B23-7.
See his story on page 27.
66-68 DEALER DIRECTORY
69 SHOPPING GUIDE PAGES
78 ADVERTISING INDEX
Model Rail roading • :3
TO THE ED ITO R �------------------ ----- --- - -���-
Effective July 2, 1990, Arnie Ross resigned as editor
of Model Railroading magazine.
We have appreciated Arnie's contribution to edito
rial quality as well as her knowledge of model railroad
ing. We wish her all the best.
We will continue to publish a magazine of the highest
quality in terms of editorial excellence, technical accu
racy and graphics. We look forward to your continued
support.
We will introduce our new editor in the September
issue of Model Railroading.
Modelers' Sure Bet in Las Vegas . . .
Dear Amie, The Southern Nevada Model Railroad Engineers would like your
many readers who also visit our exciting city to know that we are here to provide an alternative to spending all their quarters, dimes, and nickels in our city's somewhat more popular and noisy attractions. We are a 26-year-old, twenty-odd member club with our own building (replica of an old Colorado D&RGW depot) housing our 25 ' x 45 ' Glitter Gulch & Western HO standard and narrow gauge layout. We meet every Friday evening from 7:30 p . m . ' t i l ???? with operations scheduled the 2nd and 4th Fridays of each month. All visitors to "Glitter Gulch " are cordially invited to join with us, and, if they wish, to bring their own equipment and operate through White River, Summit, Si lver City, and, of course, Glitter Gulch itself! Our club is located at Jones and Washburn in the northwestern corner of the city. Anyone wishing more information on the club or directions on how to get there is invited to contact the undersigned at 702-45 1 -3425 or Kelly "Chooch" Walsh at 702-368-09 1 6.
Sincerely, John "Chief" Groom , Club Secretary Las Vegas, Nevada
Further Information on B&M Moguls ...
Dear Ms . Ross, I noted the June issue of Model Railroading with interest, espe
cially the article on Boston & Maine's B - IS Moguls . I have also noted the following items in that article which need clarification/ correction. The earliest moguls that Boston & Maine acquired were from the Eastern RR when that road was leased to the B&M in 1 884. Subsequent leases of the Worcester Nashua and Rochester, Boston & Lowel l , Northern, and Fitchburg Railroads supplied many others , the bulk of which came from the last named railroad. These l ines did not " merge" to form the B&M, but rather were leased by i t .
Builders included Rhode Is land, Schenectady, Taunton, Hinkley, Brooks, and Dickson , with the first two mentioned supplying the vast majority of non-B- 1 5 B&M Moguls .
Survivors were renumbered in the 1 300-59 series in 1 9 1 1 . All except 1 333 (a B- 1 3-a) were scrapped by 1 930. The B- IS's were renumbered 1 360- 1 499 (except 1 432- 1 434 left vacant) in 1 9 1 1 . Numbers 1 360- 1 459 (with exceptions noted above) were built as B- IS, whereas numbers 1 460- 1 499 were built as B- IS-a. Subsequent modifications which entailed superheating and application of the Franklin "Economy" steam chests gave rise to the reclassification of B- 1 5 to B - I S-b and B - I S-a to B - IS-c. Not all B- IS/B- IS-a's received the modifications: These non-superheated machines were retired early, most by the l ate 30's .
4 • Model Rai l roading
There is one example left for inspection, B- IS-b # 1 45 5 is currently at Edaville RR in South Carver, Mass.
Numbers 1 460- 1 479 were built by Schenectady in 61 1 909 (delivered 71 1 909) and not 1 9 1 0 as stated in the article .
The photo caption on page 28 for # 1 44 1 would seem to indicate that the date of the photo is 1 907. That is the builder 's date. Photo of 1 428 on page 30 was taken in 1 948 and the photo of 1 495 on page 3 1 was taken at East Somervil le, Mass .
I have no idea what the B - I S-2 designation on the plow elevation on page 33 signifies, as this was not a B &M classification.
Sincerely, Harry A. Frye Historian, B&MRR H istorical Society Hooksett, New Hampshire
Customer Satisfaction . . .
Dear Roy, Read your review on Micro-Mark in MRG, June 1 990. I ' ve bought many tools from them over the past three years. Their
turnaround time for shipping is excellent, prices reasonable and everything appears to work as advertised. I bought a Sherline mill ing machine three years ago. Beautiful ! With no problem I
Sincerely, Norman J. Darish Andover, Massachusetts
P .S . Excellent magazine and photography
EDITOR'S NOTE: Incorrect information was contained in Contributing Editor J im
Mansfield' s response to a letter from Tony Racina of Kendall Park, New Jersey, titled "Switch Those Switches . " Mr. Mansfield's response should have read: "The ' N ' scale Model Power Turnouts come in 7%" and 1 4" radius. This results in a frog number of 3 and 5.4 respectively. " Thus the mention of the no . 6 frog makes sense. We are sorry for any inconvenience caused by this typo.
Concerning the use of the Radio Shack double pole, double throw, center-off, momentary toggle switch, i t should also be mentioned that a relay or other circuitry must be used when using the remaining row of unused pins to power indicator l ights or track side signaling. A future On TRACK article wi l l cover this in detail .
A u g u st 1 990
Publlshsrs S S Danielsen, Nick Siegel
General Manager Pam Greenberg
Production Manager LaDonna Vaughan
Contributing Editors Scott Anderson, Ron Bearden,
David Casdorph, Dean Ebner,
Patrick Lawson, Jim Mansfield,
George Melvin, Rich Picariello,
Jim Six, Larry E. Smith, W. Terry Stuart
Circulation Manager Maria Varholdt
Typography TypeTronics, Inc.
Typasetters Kristin Doughty, Roseanna Frechette
Model Railroading is published 12 times a year by Rocky Mountain Publishing, Inc , 2854 Larimer St, Denver, CO 80205, (303) 292-0124. Price per single copy is $2.95 in U.S.A. Subscriptions are $30.00 in the U.S.A. or $38.50 in Canada (or foreign) - payable in U S. funds. Unsolicited manuscripts or photographs should be accompanied by return postage and Rocky Mountain Publishing, Inc. assumes no responsibility for the loss or damage of such material. No part of this publication may be reprinted without written permission from the pubtishers, Printed in U.S.A
The information contained in the various articles in this magazine is presented in good faith, but no warranty is given, no results guaranteed, nor is any freedom from any patent or copyright to be inferred. Since we have no control over the physical conditions surrounding the application of information in this magazine, Rocky Mountain Publishing, Inc. and the various authors and editors disclaim any liability for untoward results and or for any physical injury incurred by using the information herein.
Copyright 1990 by Rocky Mountain Publishing, Inc.
Advertising For advertising information contact Pam Greenberg at 800-736-0427 or 303-292-0124.
Subscription end Book Orders For subscriptions and/or book orders, please send inquiries to Rocky Mountain Pubtishing, attention Maria Varholdt, 2854 Larimer Street, Denver, Colorado 80205 or call 1-800-736-0427. Visa or Mastercard accepted.
Model Railroading (ISSN 0199-1914) is published 12 times a year at $30.00 per year in U.S.A, $.'3R..5Ii1 ili\ Ca\12.da, U'f Rocky Mountain Publishing, Inc. at 2854 Larimer Street, Denver, Colorado 80205. 2nd Class postage paid at Denver, Colorado. Canadian Second Class Permit #9591.
Postmaster send address changes to Rocky Mountain Publishing, Inc , 2854 Larimer Street, Denver, Colorado 80205.
August 1 9 90
GUEST EDITORIAL by Jim Mansfield
Looking for a hobby? Take a look at ours ! Model railroading is a fascinating mix of many act ivities and has
an interest for just about everyone. It is an ever-growing hobby because you will continue to learn new skil l s , discover new ideas and see railroading, both past and present, in new and different ways . You wil l gain new friends and lifelong acquaintances in the process.
Model railroading is a truly unique hobby due to the special diversity and action it affords . While other hobbies you might be considering offer varied activities and fastpaced action, model railroading includes aspects not associated with other hobbies, and provides an evening of real istic action (running trains) in a quiet , relaxed and pleasant atmosphere.
A fondness for trains is the reason many people get started in the hobby , but diversity helps keep the activity level high. Many model railroaders enjoy the model building aspect of the hobby . One can build railcars, buildings, locomotives, etc . , and enjoy combining all these elements on a layout. Whi le the choice of model type is large, model building itself is only part of the hobby .
For those interested in artistic activity , model railroading provides an avenue of creativity in both two and three dimensions . Model railroads benefit from backdrops that seem to extend the layout for miles . Then there is scenery - everything from bare desert to lush wooded hi l lsides to crowded urban development - an actual threedimensional min iaturization of the real thing. Here you can be creative in discovering materials, refining techniques and building landscapes .
There are also many activities in the hobby other than classic model-building. A very noticeable one is carpentry . The bench work frame is a great place to develop and use ski l l s associated with hammer and nai ls , wood screws and drivers, and hand or power saws and dril ls . I get a great deal of satisfaction when I complete a port ion of benchwork. I t is not only the finished structure itself, but because its completion signals the end of yet another activity , track planning.
Even track planning is diverse. It generally starts with learning about prototype track structures Qunctions, yards, etc . ) , progresses through determining the type of railroading you wish to do, and ends with a sketch or drawing you use as a guide to build your track. When the planning for a portion of the layout is complete, you will be surprised how much knowledge you have gained. The more you learn about planning, the more you wil l enjoy some REAL fun, running trains.
Another popular activity that brings model rai lroaders together is electronics . There are people from all walks of l ife who enjoy electronics and a closely related activity computers - and they find model railroading an excellent and fun way to pursue their interests . Some started in the hobby, not because of trains, but entirely due to the appl i cation of electronics and computers. Both the hobby and these " newcomers" benefit from the diversity of model railroading.
Camera, Lights , Action ! " Hello, Job 1 03 , reach down in 0-3 and come out with a TTX 474826 . " Switching
cars and running trains is how the railroading gets into model railroading . To see your models come alive is truly a thri l l . A new window is opened if you decide to do some "prototype operation . " The hobby press has many books on operation - a favorite of mine is the John Armstrong book entitled Track PlanningJor Realistic Operation. This book teaches track planning by showing track arrangements needed by real railroads for their day-to-day operations . You put the book down knowing a lot about how and why a railroad works.
Like the real thing, model operation is quite diverse and can be simple (spotting a car at an industry) or complex (mainl ine dispatcher) . To get started, all you need is a train set consisting of a loop of track, a power pack, a locomotive and cars. You might also want a switch (turnout) for a spur. A local hobby shop wil l have the train set and the turnout. Give them a call and check it out. If you are in a shop now and looking for a hobby, s imply turn around and say, "Excuse me, but, how about these train sets . . . "
Model R a i l roading • 5
Railcar Fleet Development The Use of One Car Type
Can Add Prototypic Unifonnity to Your Roster by Jim Mansfield
I. �� �:!R==I'!I=��=I:iI'-i ��!!IlI�"'�"1...
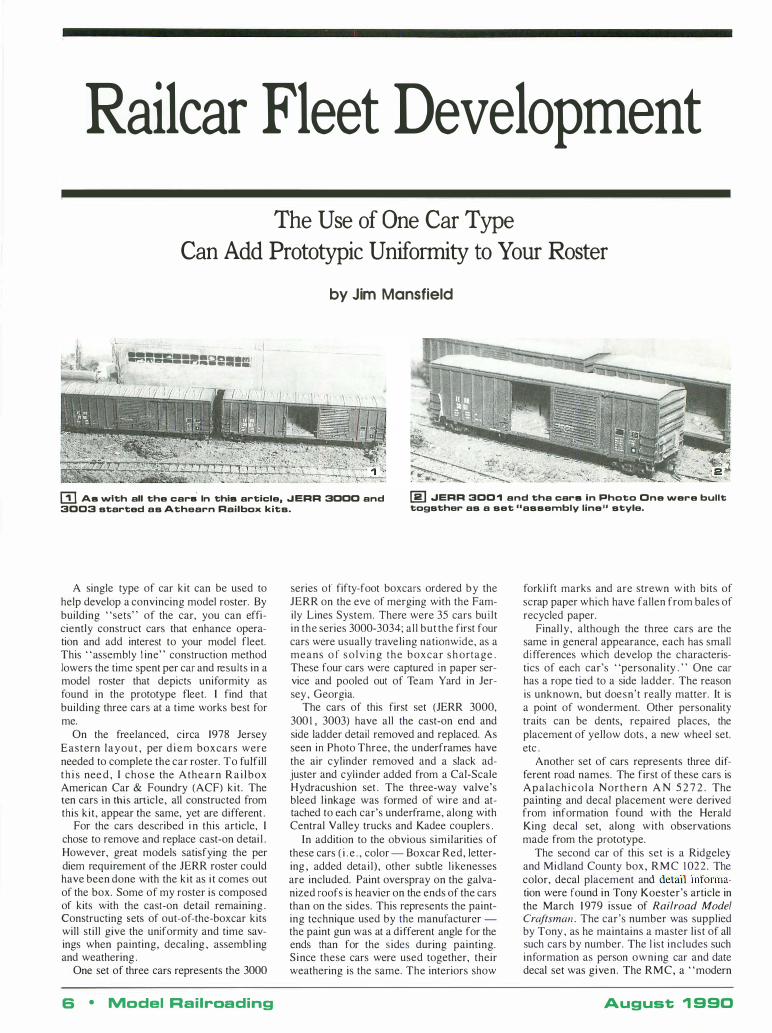
m As with all the cara in this article, ..IERR 3000 and 3003 started as Athearn Railbox kits.
(g] ..IERR 300"'1 and tha cars in Photo One were built togsther as a set "assembly line" style.
A single type of car kit can be used to help develop a convincing model roster. By building "sets" of the car, you can efficiently construct cars that enhance operation and add interest to your model fleet. This "assembly l ine" construction method lowers the time spent per car and results in a model roster that depicts uniformity as found in the prototype fleet. [ find that building three cars at a time works best for me.
On the freelanced, circa 1978 Jersey Eastern layou t , per d i e m boxcars were needed to complete the car roster. To fulfill t h i s nee d , [ chose the Athearn R a i l box American Car & Foundry (ACF) kit . The ten cars in this article, all constructed from this kit, appear the same, yet are different .
For the cars described i n this article, [ chose to remove and replace cast-on detai l . However, great models satisfying the per diem requirement of the JERR roster could have been done with the kit as i t comes out of the box. Some of my roster is composed of kits with the cast-on detail remaining . Constructing sets of out-of-the-boxcar kits will still give the uniformity and time savings when painting, decal ing , assembl ing and weathering .
One set of three cars represents the 3000
6 • Model Railroading
series of fifty-foot boxcars ordered by the JERR on the eve of merging with the Family Lines System. There were 35 cars built in the series 3000-3034; all but the first four cars were usually traveling nationwide, as a means o f s o l v i n g the boxcar s h ortage . These four cars were captured in paper service and pooled out of Team Yard in Jersey , Georgia.
The cars of this first set (JERR 3000, 300 1 , 3003) have all the cast-on end and side ladder detail removed and replaced. As seen in Photo Three, the underframes have the air cylinder removed and a slack adjuster and cylinder added from a Cal-Scale Hydracushion set . The three-way valve's bleed l inkage was formed of wire and attached to each car's underframe, along with Central Valley trucks and Kadee couplers .
In addition to the obvious similarities of these cars ( i . e . , color - Boxcar Red, lettering , added detail) , other subtle l ikenesses are included. Paint overspray on the galvanized roofs is heavier on the ends of the cars than on the sides. This represents the painting technique used by the manufacturer -the paint gun was at a different angle for the ends than for the s ides during painting. Since these cars were used together, their weathering is the same. The interiors show
forkl ift marks and are strewn w ith bits of scrap paper which have fallen from bales of recycled paper.
Final ly, although the three cars are the same in general appearance, each has small differences which develop the characteris· tics of each car's "personal ity . " One car has a rope tied to a side ladder. The reason is unknown, but doesn't really matter. It is a point of wonderment. Other personality traits can be dents, repaired places, the placement of yellow dots , a new wheel set, etc .
Another set of cars represents three different road names. The first of these cars is Apalac h i c o l a Northern A N 5 2 7 2 . The painting and decal placement were derived from information found with the Herald King decal set, along with observations made from the prototype.
The second car of this set is a Ridgeley and Midland County box, RMC 1 022. The color, decal placement and detail information were found in Tony Koester's article in the March 1 979 issue of Railroad Model Craftsman. The car's number was supplied by Tony , as he maintains a master list of all such cars by number. The l ist includes such information as person owning car and date decal set was given. The RMC, a "modern
August 1 990

00 Here is a typical underfreme \Nith modifications and deteils added as discussed in the article.
@] AN 6272; Apalachicola Northarn, \Nas constructed using the prototype 6 2 72 car as a guide.
6 ,� . ' ,: B
" A'" " :.:.A".... -
[§] RMC '1022 is a fictitious "modern short line" that is part of the Alleghany Midland layout.
[§] .JERR 3002 is the same style as the cers in Photos One and T\No. The side ladders are actually 0 scale handholds.
short l ine , " i s part of the operations on his Allegheny Midland layout.
The third car, JERR 3002, is the fourth of the four cars which worked out of Team Yard. The car is essentially identical to the other three J ERR cars, except for the lettering. Provisions were made during the merging talks to apply the Jersey Eastern' s lettering and, upon completion of the merger, to add the FL logo and lettering. Although the talks had been completed for some time, 3002 is the only car of the four to have the added lettering. 3002 was bad ordered in May 1978 and painted while in the car shop at L&N ' s Tilford Yard , Atlanta. The car was weathered before the l ogo a n d FL name were applied.
Now, we have six cars, all the same, all different, and all with distinct personalities of their own .
The next four cars add some differences by using some scratchbuilding techniques. I developed four progre s s i v e l e v e l s of craftsmanship in detai l ing these cars .
The first level is shown by R B O X 10019. This car is o f the same detail level as the six above, and was part of another set. The car's interior was detailed to suit the service i t furnished ( i .e., the transportation of bags of fertilizer) . The nailable steel
August 1 990
floor usually found on modern boxcars was simulated using the original Athearn floor, sanded s l ightly to highlight the floor detai l .
Painting and finishing the car were accomplished in several steps. The sides and ends were airbrushed Reefer Yel low, while the roof was painted Floquil Aluminum to represent the galvanized roof of the prototype. The roof carries an overspray from the yellow sides of the boxcar. The underframe was painted Weathered Black, as were the Central Valley trucks. Microscale decals supplied the lettering of the car, which was subsequently weathered to reflect its usual service. Incidentally, the number of the car, RBOX 10019, i s the number of an actual car which was photographed and measured to provide data for constructing the model .
A more advanced level involves some additional work on the basic Athearn Railbox . This level is shown with JERR 1009, part of yet another set. This car is one of the new order of fifty-foot boxcars delivered July 1978 by ACF. Lik'e many of the cars built in this era, it is equipped with a cushioning unit and has a few minor design differences which set it apart from the standard ACF Railboxcar. These d ifferences include the removal of the drip l ip on the ends of the roof as well as the tow ring on the side sill,
and the replacement of the bar ladders on each side of the car with standard four-rung ladders.
A Cal-Scale Hydracushion set was assembled according to the manufacturer's instructions and cemented to the underframe of the car. Brake rigging and Central Valley trucks were also attached; these components were pa inted S e m i -Gloss B lack .
The car itself was given a coat of Tuscan Red ( i ncluding the roof) , and was lettered with Herald King's Family Lines System decals. JERR reporting marks are used. The car shows no sign of weathering, as i t is not yet one month old.
Level t h ree i s i l l us trated by A B O X 50070. Although the side ribs of the ABOX are approximately the same width and spacing as on the Athearn model , the sides for the ABOX model were built separately due to the different contour of the side s i l ls , the s ide r ibs b e i n g about fi v e s c a l e i nc h e s longer, and the ABOX car having a n extra plug door.
The new ribs were made of strip styrene, while the new sides were constructed of . 020-inch styrene sheet. The right side panel was cut to the same length as the kit , but the left panel was shortened six scale
Model Rai l road in g • 7
•• .. . . ., . .. ,
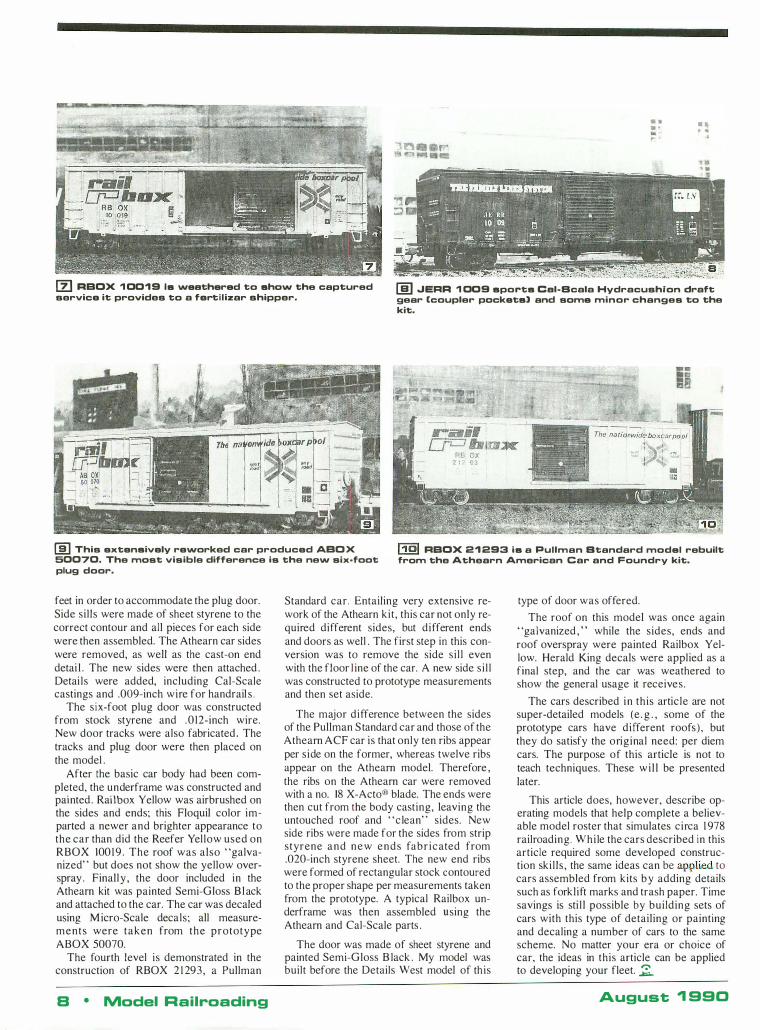
[Zl RBoX 1 0019 Is weathered to shaw the captured service it provides to a fertilizar shipper.
[i] .JERR 1 009 sports Cal-Scala Hydracushion draft gear [coupler packets) and same minor changes to the kit.
[i] This extensively reworked car produced ABO X 50070. The mast visible difference is the new six·foot plug door.
1101 RBoX 21293 is a Pullman Standard model rebuilt from the Athearn American Car and Foundry kit.
feet in order to accommodate the plug door. Side sills were made of sheet styrene to the correct contour and all pieces for each side were then assembled. The Athearn car sides were removed, as well as the cast-on end detai l . The new sides were then attached . Detai ls were added, including Cal-Scale castings and .009-inch wire for handrail s .
The six-foot plug door was constructed from stock styrene and .0 l2-inch wire. New door tracks were also fabricated. The tracks and plug door were then placed on the model .
After the basic car body had been completed, the underframe was constructed and painted. Railbox Yellow was airbrushed on the sides and ends; this Floquil color imparted a newer and brighter appearance to the car than did the Reefer Yellow used on RBOX 100 1 9 . The roof was also "galvanized" but does not show the yellow overspray . Finally , the door included in the Athearn kit was painted Semi-Gloss Black and attached to the car. The car was decaled using Micro-Scale decals; all measurements were taken from the prototype ABOX 50070.
The fourth level is demonstrated in the construction of RBOX 2 1 293, a Pullman
B • Model Railroading
Standard car. Entailing very extensive rework of the Athearn kit, this car not only required different sides, but different ends and doors as well . The first step in this conversion was to remove the side si l l even with the floor l ine of the car. A new side si l l was constructed to prototype measurements and then set aside.
The major difference between the sides of the Pullman Standard car and those of the Athearn ACF car is that only ten ribs appear per side on the former, whereas twelve ribs appear on the Athearn model. Therefore , the ribs on the Athearn car were removed with a no. 18 X-Acto® blade. The ends were then cut from the body casting, leaving the untouched roof and "clean" sides. New side ribs were made for the sides from strip styrene and new ends fabricated from .020-inch styrene sheet. The new end ribs were formed of rectangular stock contoured to the proper shape per measurements taken from the prototype. A typical Railbox underframe was then assembled using the Athearn and Cal-Scale parts .
The door was made of sheet styrene and painted Semi-Gloss B lack . My model was built before the Details West model of this
type of door was offered.
The roof on this model was once again "galvanized ," while the sides, ends and roof overspray were painted Railbox Yellow. Herald King decals were applied as a final step, and the car was weathered to show the general usage it receives.
The cars described in this article are not super-detailed models (e . g . , some of the prototype cars have different roofs) , but they do satisfy the original need: per diem cars. The purpose of this article is not to teach techniques. These wi l l be presented later.
This article does, however, describe operating models that help complete a believable model roster that simulates circa 1 978 railroading. Whi le the cars described in this article required some developed construction ski l ls , the same ideas can be applied to cars assembled from kits by adding details such as forklift marks and trash paper. Time savings is sti l l possible by building sets of cars with this type of detailing or painting and decaling a number of cars to the same scheme. No matter your era or choice of car, the ideas in this article can be applied to developing your fleet. �
August "1990
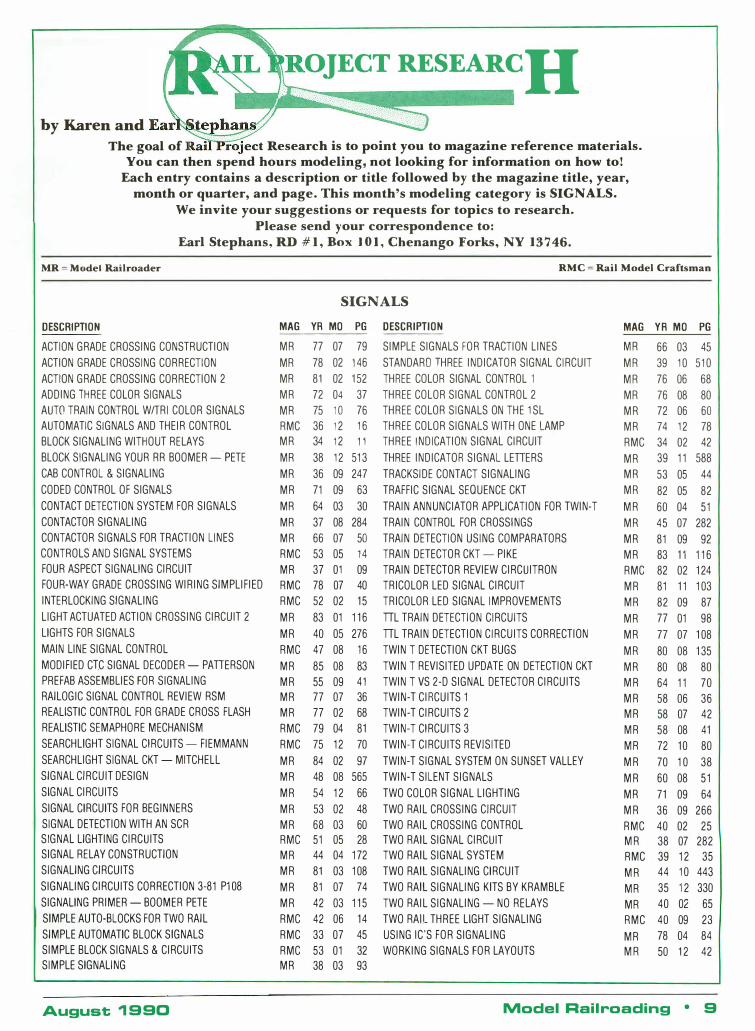
OJECT RESEARCH by Karen and
The goal of t Research is to point you to magazine reference materials. You can then spend hours modeling, not looking for information on how to!
Each entry contains a description or title followed by the magazine title, year, month or quarter, and page. This month's modeling category is SIGNALS.
We invite your suggestions or requests for topics to research. Please send your correspondence to:
Earl Stephans, RD #1, Box )01, Chenango Forks, NY 13746. MR = Model Railroader RMC = Rail Model Craftsman
DESCRIPTION
ACTION GRADE CROSSING CONSTRUCTION
ACTION GRADE CROSSING CORRECTION
ACTION GRADE CROSSING CORRECTION 2
ADDING THREE COLOR SIGNALS
AUTO TRAIN CONTROL WiTRI COLOR SIGNALS
AUTOMATIC SIGNALS AND THEIR CONTROL
BLOCK SIGNALING WITHOUT RELAYS
BLOCK SIGNALING YOUR RR BOOMER -"PETE
CAB CONTROL & SIGNALING
CODED CONTROL OF SIGNALS
CONTACT DETECTION SYSTEM FOR SIGNALS
CONTACTOR SIGNALING
CONTACTOR SIGNALS FOR TRACTION LINES
CONTROLS AND SIGNAL SYSTEMS
FOUR ASPECT SIGNALING CIRCUIT
FOUR-WAY GRADE CROSSING WIRING SIMPLIFIED
INTERLOCKING SIGNALING
LIGHT ACTUATED ACTION CROSSING CIRCUIT 2
LIGHTS FOR SIGNALS
MAIN LINE SIGNAL CONTROL
MODIFIED CTC SIGNAL DECODER -PATIERSON
PREFAB ASSEMBLIES FOR SIGNALING
RAILOGIC SIGNAL CONTROL REVIEW RSM
REALISTIC CONTROL FOR GRADE CROSS FLASH
REALISTIC SEMAPHORE MECHANISM
SEARCHLIGHT SIGNAL CIRCUITS - FIEMMANN
SEARCHLIGHT SIGNAL CKT -MITCHELL
SIGNAL CIRCUIT DESIGN
SIGNAL CIRCUITS
SIGNAL CIRCUITS FOR BEGINNERS
SIGNAL DETECTION WITH AN SCR
SIGNAL LIGHTING CIRCUITS
SIGNAL RELAY CONSTRUCTION
SIGNALING CIRCUITS
SIGNALING CIRCUITS CORRECTION 3-81 P108
SIGNALING PRIMER -BOOMER PETE
SIMPLE AUTO-BLOCKS FOR TWO RAIL
SIMPLE AUTOMATIC BLOCK SIGNALS
SIMPLE BLOCK SIGNALS & CIRCUITS
SIMPLE SIGNALING
August 1 9 90
SIGNALS MAG YR MO PG DESCRIPTION
MR 77 07 79 SIMPLE SIGNALS FOR TRACTION LINES
MR 78 02 146 STANDARD THREE INDICATOR SIGNAL CIRCUIT
MR 81 02 152 THREE COLOR SIGNAL CONTROL 1
MR 72 04 37 THREE COLOR SIGNAL CONTROL 2
MR 75 10 76 THREE COLOR SIGNALS ON THE 1SL
RMC 36 12 16 THREE COLOR SIGNALS WITH ONE LAMP
MR 34 12 11 THREE INDICATION SIGNAL CIRCUIT
MR 38 12 513 THREE INDICATOR SIGNAL LETIERS
MR 36 09 247 TRACKSIDE CONTACT SIGNALING
MR 71 09 63 TRAFFIC SIGNAL SEQUENCE CKT
MR 64 03 30 TRAIN ANNUNCIATOR APPLICATION FOR TWIN-T
MR 37 08 284 TRAIN CONTROL FOR CROSSINGS
MR 66 07 50 TRAIN DETECTION USING COMPARATORS
RMC 53 05 14 TRAIN DETECTOR CKT - PIKE
MR 37 01 09 TRAIN DETECTOR REVIEW CIRCUITRON
RMC 78 07 40 TRICOLOR LED SIGNAL CIRCUIT
RMC 52 02 15 TRICOLOR LED SIGNAL IMPROVEMENTS
MR 83 01 116 TIL TRAIN DETECTION CIRCUITS
MR 40 05 276 TIL TRAIN DETECTION CIRCUITS CORRECTION
RMC 47 08 16 TWIN T DETECTION CKT BUGS
MR 85 08 83 TWIN T REVISITED UPDATE ON DETECTION CKT
MR 55 09 41 TWIN T VS 2-D SIGNAL DETECTOR CIRCUITS
MR 77 07 36 TWIN-T CIRCUITS 1
MR 77 02 68 TWIN-T CIRCUITS 2
RMC 79 04 81 TWIN-T CIRCUITS 3
RMC 75 12 70 TWIN-T CIRCUITS REVISITED
MR 84 02 97 TWIN-T SIGNAL SYSTEM ON SUNSET VALLEY
MR 48 08 565 TWIN-T SILENT SIGNALS
MR 54 12 66 TWO COLOR SIGNAL LIGHTING
MR 53 02 48 TWO RAIL CROSSING CIRCUIT
MR 68 03 60 TWO RAIL CROSSING CONTROL
RMC 51 05 28 TWO RAIL SIGNAL CIRCUIT
MR 44 04 172 TWO RAIL SIGNAL SYSTEM
MR 81 03 108 TWO RAIL SIGNALING CIRCUIT
MR 81 07 74 TWO RAIL SIGNALING KITS BY KRAMBLE
MR 42 03 115 TWO RAIL SIGNALING-NO RELAYS
RMC 42 06 14 TWO RAJt THREE LIGHT SIGNALING
RMC 33 07 45 USING IC'S FOR SIGNALING
RMC 53 01 32 WORKING SIGNALS FOR LAYOUTS
MR 38 03 93
MAG YR MO PG
MR 66 03 45
MR 39 10 510
MR 76 06 68
MR 76 08 80
MR 72 06 60
MR 74 12 78
RMC 34 02 42
MR 39 11 588
MR 53 05 44
MR 82 05 82
MR 60 04 51
MR 45 07 282
MR 81 09 92
MR 83 11 116
RMC 82 02 124
MR 81 11 103
MR 82 09 87
MR 77 01 98
MR 77 07 108
MR 80 08 135
MR 80 08 80
MR 64 11 70
MR 58 06 36
MR 58 07 42
MR 58 08 41
MR 72 10 80
MR 70 10 38
MR 60 08 51
MR 71 09 64
MR 36 09 266
RMC 40 02 25
MR 38 07 282
RMC 39 12 35
MR 44 10 443
MR 35 12 330
MR 40 02 65
RMC 40 09 23
MR 78 04 84
MR 50 12 42
Model Rail roading • 9
Courtesy of NMRA "Glossary of Model Railroad Terms end Words," .July 1 966
A ABUTMENT - Concrete, masonry, or t imber w a l l s s upport i n g the ends of a bridge, trestle or tunnel portal .
AGENT - Reports trains to the dispatcher and performs duties similar to the agent of a real railroad. ANCHOR THEM - Twist up the brakes or, "Tie them down. "
APPROACH SIGNAL - A fixed signal used in connection with one or more signals to govern the approach thereto.
ASH CAT - Locomotive fireman.
ASHPAN - A trough at the bottom of a steam engine firebox, below the grates, to keep catch ash and clinkers to keep them from falling on the track.
ASPECT - The appearance of a signal from a point where the indication is visible (see Indication) .
ASSEMBLED MODEL - A model purchased in completed condition, but not painted or lettered.
AUTOMATIC B LOCK SIG N A L - A block signal with aspects changed automatically, actuated by the passage of a train or other conditions affecting the use of the block.
AUTOMATIC C O U PLER - A model coupler that is always ready to couple and can be uncoupled by means of magnets, ramps or other remote means.
B BACKDROP - A photo or painting on a wall or partition continuing the background scene to or above the horizon-line.
BACKGROUND - The area between the foreground and the backdrop or wal l .
B ACKHEAD - The backplate o f a locomotive boiler, usually inside the engine cab, upon which are mounted the valves, gauges and some controls . Also, a nickname for a locomotive fireman .
1 0 • Model Railroading
BALLAST - Gravel under ties used to drain water away from the wood to extend the period of replacement.
BALLAST SCORCHER - Locomotive engineer noted for high speed.
BARREL - That part of a steam engine boiler ahead of the firebox.
B A S C U LE B R I D G E - A c o u n t e rweighted, movable bridge opening by rotating on one or more fixed or moving horizontal axis . Most in RR use date between 1 900 and 1 930.
BASE LEVEL-The level of a model railroad (usually a yard) from which all other trackage rises or fall s .
BEANERY - Depot restaurant or nearby eatery .
BED TENDER - See Centipede.
BELPAIRE FIREBOX - A distinctive flat-topped firebox of deep section, tapering wider toward the bottom. Developed in 1 890, it was used extensively by the Great Northern and Pennsylvania railroads .
BENCH - A Berm.
BERM - Benches or "step-backs" used to reduce the chance of falling rock in long, steep rock slope.
BIG HOLE - E mergency application of brakes by the engineer.
BIG HOOK - Wrecking crane .
BLACK DIAMONDS - Coal .
BLOCK - A length of track with separate control on a real or model railroad. On the model it is electrically isolated by gaps or insulated railjoiners.
B LOCK S IG N A L - A fixed s igna l i n which the indications are given b y the color of a l ight only.
BOB TAIL - Switch engine . B .O . - Bad order, chalked on a car requiring repairs .
BODY TRACK - Each of the parallel tracks of a y ard upon w h ic h c ars are switched or stored .
BOGIE - A four-wheeled truck.
B OOMER - R a i l ro ad m a n i n c l ined to shift from one job to another, never quite contented where he is working.
B RAINS - Conductor.
B RAKEMAN - Operates turnouts without the aid of a tower, couples and uncouples cars, and is a member of a train crew.
B RASS COLLARS - Railroad officials.
B RASS HATS - Railroad management officials.
B RASS POUNDER - Telegrapher.
B RIDGE - One or more spans of various construction and materials used to convey tracks or roadway over something (valley, river, lower trackage , etc . )
B ROWNIES - Demerits given out for rule infraction .
B UG - A semi-automatic telegraph key that makes dots when the lever is pushed to one side and dashes when moved to the other side.
B UGGY - Caboose . BUMPER - (or B umper Beam) see Pilot Beam.
B UMPING POSTS - Constructions of metal or wood (even piles of dirt or sand) used to stop cars from running off the end of a length of track.
e CAB (CONTROL) - Electrical controls to permit management of the movements of one engine or train, including throttle, direction controller, and , sometimes, controls for signalling or communication with a central panel . CASEY JONES - An engineer inclined to high speed running.
CATENARY - Suspension system for
August 1 9 90
trolley wires using " messengers" from poles to support the actual power wires .
CENTIPEDE - A late steam era tender with weight distributed across a large Dumber of axles, having many wheels from end to end (also called a Bed Tender) .
CHARIOT - Caboose. CHECK VALVE - Prevents steam from escap ing where w ater e n ters a b o i l e r . Sometimes located o n the front side o f a boiler near the running board , sometimes on the top rear or top front of the boiler. CHORD - The top or bottom member of a bridge truss . CLASSIFICATION LIGHTS - Markers on an engine to indicate the class of train . CLASSIFICATION YARD - A yard in which cars are classified or grouped in accordance w i th some req u i rements or system. CLOCK - Locomotive steam gauge. COACH YARD - A yard in which passenger train cars are assembled, classified, or prepared for service. COAL BUNKER - The section of a steam engine tender that holds the coal . COFFIN FEEDWATER HEATER - A Feedwater Heater shaped l ike a large "C" with the opening down . Usually mounted on the upper front of the smokebox. COLOR POSITION LIGHT S IGNAL - A fixed signal in which the indications are given by color and position of two or more l ights. CONDUCTOR - One who usually is in charge of a train , but does not operate i t . Used in passenger, way freight and switching work. CONNECTING ROD - See Main Rod. CON S I S T - The makeup of a train of fie-1gb' or passenger cars . CONTACTS - Two metal surfaces that are mechanically brought together to close an electrical circuit or separated to open it . CONTROLLER - A general term that should be preceded or fol lowed by a word
August 1 990
describing i t s fu nc t i o n , i . e . , S peed Controller.
CONTROL PANEL - A place on a model railroad where electrical switches, meters and controls are mounted together for convenience of operation . CORNFIELD MEET - Head-on coll ision (usually due to overlapping or misunderstood train orders) . COUNTERWEIGHT - A hollow chamber in a steam engine driving wheel that was fi lled with lead to balance the weight of side and main rods. The counterweight on the driver where the main rod is attached is usually larger than counterweights on any other driving wheels. COU PLER - A mechanical connector to join two elements of a train together. COUPLING ROD - See Side Rod . COWCATCHER - Locomotive pilot . CROSSARM - Horizontal member on a pole supporting telephone or power wires . CROSSHEAD - On a steam engine, the guide that supports the coupling of the Main Rod to the Piston Rod. CROSSING - Where track or roadway :ntersects a ra i l road . No i n terchange o r change o f routing is possible . CROSS-KIT MODEL - A model built from components of more than one kit . CROSSOVER - Two or more turnouts permitting change of routing between parallel tracks . CROSS-OVER TRACK - A track connecting two adjacent tracks. CROWN SHEET - The roof of a steam engine firebox. Most steam is generated from water directly over this': Failure of an engine crew to keep water over the crown sheet was the most common cause of boiler explosions . CRUMMY - Caboose. C U R V E D T U R N O U T - A turnout i n which both branches curve i n the same d irection but with different radi i . CUSHIONS - Passenger train .
C U T - A removal of earth o r rock to permit a better gradient for track. A trench dug to faci l i tate the passage of trains or other vehicles. CYLINDER - The large casting, usually directly below the smokebox on a steam engine, containing the pistons that drive the locomotive's wheels .
D DECK - Floor of a locomotive cab . DEPARTURE YARD - A yard for assembling cars into trains for forwarding to another location (also Forwarding Yard) .
DETAI LED KIT - A model with added or altered parts going beyond the purchased kit .
DINKY - A small steam locomotive, usual ly with sidetanks for water in place of the conventional tender.
DIRECTION CONTROLLER - A device controll ing the direction of travel for an engine. In a model railroad, an electrical switch mounted in a cab control or pane l . DIRECT SUSPENSION - Trolley wires directly suspended from poles. DISHWASHERS - Roundhouse engine wipers .
DISPATCHER - Has responsibility for getting trains over his division in schedule time, or ( in case of extras) , the best possible time consistent with safety and operating rules. Does not operate trains himself. DIVISION - A segment of a railroad under the supervision of a single Superintendent. DOGHOUSE - Caboose. DOME - A housing above water levels of a boiler holding an inverted syphon that keeps w ater from leav ing the b o i l e r as steam passes to the cylinders. The Safety Valve and/or Whistle are often mounted on the dome. DRAFf GEAR - The coupler and uncoupling l i nkage . DRA W B A R - The l i n k per m i t t i n g a
(Continued on page 75)
Model Railroading • ., .,

• • • • • • • • • • • • • • • • • • • • • • • • • • • •
THE SOCIETY PAGE • • • • • • • • • • • • • • • • • • • • • • • • • • • •
WHO, WHAT &: WHERE THEY ARE . . .
SUPPORT YOUR SOCIETY - JOIN TODAY These are the real railroad historical societies that we are told still function.
H you are interested in one or more of these real railroads, EVERY issue has at least one article, one photo or one bit of historical information that is invaluable to you . . .
American Truck Historical Society P.O. Box 59200, Depl. MRG, Birmingham, AL 35259. Bimonthly magazine, $ 1 5.
Amtrak Historical Society Annuat Dues: $15. Amtrak Historicat Society, P.O. Box 1 019, SI. Johns, Arizona 85936
Ann Arbor Railroad Technical & Hist. Assoc, (also covers Michigan Northern and Tuscola & Saginaw Bay), P.O. Box 51 , Chesaning, M 1 486 1 6. Newsletter, $ 1 0.
Anthracite Railroads Historical Society (Cent rat of New Jersey, Lackawanna, Lehigh & Hudson River, Lehigh & New England, Lehigh Valley, Reading), P.O. Box 1 1 9, Bridgeport, PA 19405. Magazine, newsletter, $ 1 5.
Baltimore & Ohio Annual Dues: $1 5, B&O RR Historical Society, P.O. Box 1 3578, Bailimore, MD 2 1 203
Boston & Maine Annual Dues: $25 USI$30 Canadian. B&MRRHS, Inc. clo Membership Secretary, P.O. Box 2936. Middlesex Essex, GMF Woburn, MA 01 888-9998
Canadian National Lines Annual Dues: $25 susl. (US or Canadian). Covers CNR, GT, CV, DWP, GTW and subsidiaries. Send #10 SSAE for info-pack. In Canada, send to: CN Lines SIG, 1 1 2 Mapleton Dr . . Winnipeg, MB R2P t C9. In U.S .. send to: CN Lines SIG, RD t , Box 295, Alum Bank, PA 1 5521 -9658.
Central Vermont Historical Society Annual Dues: $ 1 5/$20 susl. Quaterterly newsletter. clo Martin J. McGuirk, 5806 Edith Court, Virginia Beach, VA 23464. LSSAE for further info.
Chesapeake & Ohio Annual Dues: $1 61$32 sust. C&O Hisl. Soc . . Membership Officer P.O. Box 79, Clifton Forge, VA 24422.
Chicago Burlington & Quincy Annual Dues: $ 1 7 .501$35 susl. Burlington Roule Hisl. Soc . , P.O. Box 456, LaGrange, I L 60525
Chicago & Eastern Illinois Annual Dues: $t2.50/$20 susl. C&EI Hisl. Soc .. clO Membership Chairman, P.O. Box 606, Creslwood, IL 60445
Chicago & North Western Annual Dues: $ 1 5.50. C&NW Hisl. Soc., Thomas Machowik, 1 7004 Locust Drive, Hazel Crest, IL 60429
Colorado Midland Subscription: $ 1 0 a year, Colorado Midland Quarterly, 1 73 1 N. Cooper, Colorado Springs, CO 80907
The Conrail Historical Society Annual dues: $15, $20 - Canada/Mexico, $30 -Overseas. P.O. Box 1 019, SI. Johns, AZ 85936.
Duluth Missabe & Iron Range Annual Dues: $7.501$ 1 0 susl. Missabe Hisl. Soc .. 7 1 9 Northland Ave., Stillwater, MN 55082
Early American Railroading Group P.O . Box 1 01 -Z, Allegan, MI 49010. Newsletter, $7.50.
East Broad Top (Friends of the . . , ) , P.O. Box 551 , Depl. MRG, Riverside, NJ 08075. Quarterly magazine, $20.
East Tennessee & Western North Carolina (Friends of the . . ), cia Jim Teese, P.O. Box 37029, Charlotte, NC 28237. Newsletter.
Erie Lackawanna Annual Dues: $15. Erie Lackawanna Hist. Soc., c/o Tim
. Stuy, 56-J Village Green, Budd Lake, NJ 07828.
Great Northern Annual Dues: $ 1 7.50. Great Northern Ry. Hisl. Soc., 1 78 1 Griffith, Berkeley, M1 48072.
Gulf Mobile & Ohio Annual Dues: $ 1 5. GM&O Hisl. Soc. , Inc . , P.O. Box 24, Chicago, IL 60499.
H.J. Heinz Special Interest Group clo Bill Dippert, 2650 NW Robinia Ln .. Depl. MRG, Portland, OR 97229-4037. Quarterly magazine, $15 per year ($6 to NMRA members).
Illinois Central Historical Society Annual Dues: Regular $1 5, Sustaining $20. ICHS Membership Depl. , clo James Kubajak, 1 48 1 8 Clifton Park, Midlothian, IL 60445.
Illinois Terminal Annual Dues: $101$15 sust. IT RR Hisl. Soc., clo A. Gill Sieperl. I I I . Cenl. College, East Peoria, I L 6 1 635.
1 2 • Model Rai l roading
Illinois Traction Society clo Dale Jenkins (Edilor), Depl. MRG, 20209 E. 1 4th S I . Norlh, Independence, MO 64056; or James Yasinski (membership), 19 Sunset Acres, Farmersville, IL 62533. Quarterly newsletter, $ 1 5.
Kansas City Southern Historical Society P.O. Box 1 78 1 5, Kansas C,ly, MO 641 34. Monlhly newsletter, semi-annual magazine and free admission to convention and swap meets. $ 1 5.
Katy Railroad Historical Society (also covers Missouri Kansas & Texas Railroad). Annual Dues: $15 - regular, $1 3 - under 1 810ver 65, $50 -supporting. Ouarterly magazine, Ihe KATY FLYER and yearly historical calendar. clo Roy V. Jackson 1 1 . 732 Via Miramonte, Mesquite, TX 751 50-3054.
Locomotives in Parks SIG clo Dick Nedrow. P.O. Box 50 1 , Depl. MRG. Manchesler, WA 98353. Send SSAE for information.
Louisville & Nashville Annual Dues: $12.50/$25 sust . , $20 foreignl$250 life. L&N HISI. Soc . . P.O. Box 1 7 1 22, Louisville, KY 402 1 7
Maryland & Pennsylvania Preservation & Historical Society
3609 Schoolhouse Ln .. Depl. MRG, Hafflsburg. PA 1 7 1 09. Send SSAE for more info - just forming.
Milwaukee Road Annual Dues: $1 2/$24 susl. Mi lwaukee Road Railfans Assoc . . clo Wendell Murphy, 7504 W. Ruby Ave . . Milwaukee, W I 532 1 8
Missabe Railroad Historical Society (Duluth, M lssabe & Iron Range and predecessors). Annual Dues: $12.50 - Reg. Membership; $20.00- Sus. Membership. 7 1 9 Northland Avenue, Stillwaler, MN 55082. Quarlerly magazine.
Missouri & Arkansas Railroad Museum (also covers Missouri & North Arkansas. Arkansas & Ozarks, and others), P.O. Box 44, Beaver, AR 72613. Magazine, $10.
Missouri Pacific (Includes Texas & Pacific) Annual Dues: $1 21$1 7 conlr. $20 for. Missouri Pacific Hisl. Soc .. Camille CllappuislTreas .. P.O. Box 1 87, Addis, LA 707 1 0.
Monon Annual Dues: $ 1 01$1 6 susl. Monon HH Hisl. & Tech. Soc. Inc .. clo E. J . Lewnard. 4 1 0 S. Emerson SI., MI. Prospecl, I L 60056.
National Model Railroad Association Annual Dues: $22. NMRA Bulletin is published monthly. National Model Railroad Association Inc . . 4121 Cromwell Road, Chattanooga, TN 37421 . (615) 892-2846.
National Railway Historical Society Annual Dues: $1 01$9 chap + dues. Nalional Railway Hist. Soc., c/o N.W. Bowers, Vice President Member, P.O. Box 58153, Philadelphia, PA 1 9 1 02.
New Haven Annual Dues: $20130 susl. Treas.lNHRHTA, Inc .. Rolly OsmunlMembership Chairman, 13 Franklin St .. North Haven, CT 06473
New York Central System Historical Society P.O. Box 745, Mentor, OH 44060. Quarterly magazine, $ 1 5.
Nickel Plate Road Annual Dues: $ 1 5. NKPHTS, P.O. Box 54027, Cincinnati, OH 45254-0027. NMRA Inc .. Headquarters, 4 1 21 Cromwell Rd . . Chaltanooga, TN 37421
Norfolk & Western Historical Society Annual Dues: $ 1 41$ 1 6 Can .. Mex. Norfolk & Western Hisl. Soc .. 638 Jefferson SI . , Ashland, OH 44805
Northern Pacific Railway Annual Dues: $1 5/$30 susl. Duane D. Durr, Number 1 0 32nd Ave. NE, Fargo, N D 58102.
Northwestern Pacific Annual Dues: $1 2.50. Northwestern Pacific RR Hisl. Soc. , P.o. Box 721 , Larkspur, CA 94939.
Ontario & Western Annual Dues: $21 .50 including NRHS $ 1 2.50 subscription. Onl. & Weslern RY Hisl. Soc. Inc .. Box 7 1 3, Middletown, NY 1 0940.
Pennsylvania Railroad Technical & Historical Annual Dues: $25. PRR RR Tech. & Hisl. Soc. , Inc . , Box 389, Upper Darby, P A 1 9082.
PPR (Philadelphia Chapter, PRR T & HS), 1 37 Stockton Rd . . Depl. MRG, Bryn Mawr, PA 1 901 0. Quarterly magazine, $ 1 0.
Pittsburgh, Shawmut & Northern Railroad Historical Society
RD 1 , Box 361 , Alfred Stalion, NY 1 4803. Newsletter.
Railroad Club of Chicago clo Richard C. Young, P.O . Box 4920, Dept. MRG, Chicago, IL 60680. Monthly newsletterlmagazine, $20 (within 1 50 mi. of Chicago), $ 1 0 elsewhere.
Railroad Club of Chicago 3737 W. Lyndale 51., Depl. MRG, Chicago, I L 60647. Newsletter, send SSAE for membership information .
Railway & Locomotive Historical Society Annual Dues: $1 5. Rai lway & Locomotive clo H. Arnold Wilder, Treas .. 46 Lowell Rd .. Westford, MA 0 1 886.
Reading Annual Dues: $20. RCT & HS, clo Robert L. Danner, P.O. Box 5 1 43, Reading, PA 1 96 1 2 .
Rio Grande Southern Historical & Technical Society
P.O. Box 3358, Depl. MRG, La Mesa, CA 92044. Quarterly magazine, $6.
Rock Island Annual Dues: $ 1 0. Rock I sland Tech. Soc . . David J. Engle, 8746 North Troost, Kansas City, MO 641 55.
Rutland Railroad Technical Association, Inc. cia Paul K. Larner, P.O. Box 1 58, 51. Albans Bay, VT 05481
Santa Fe Modeler Annual Dues: $ 1 81$28 susl. Canada: $23/$33 susl. Other Nations: $281$38 susl. Santa Fe Modelers Organization, 1 704 Valley Ridge Rd. , Norman, OK 73072.
Santa Fe Railway Historical Society, Inc. P.O. Box 92887, Depl. MRG, Long Beach, CA 90809-2887. Quarterly magazine, $ 1 2 .
Shore Line Interurban Annual Dues: $ 1 21$18 contr. Shore Line Interurban Hisl. Soc .. P.O. Box 346, Chicago, IL 60690.
Society of Freight Car Historians cia David G. Casdorph, P.O. Box 1 458, Monrovia, CA 9 1 0 1 7 . Magazine (Freight Cars Journal), $1 5.
Southeastern Railroad Technical Society (covers Attantic Coast Line, Seaboard Air Line, and Seaboard Coast Line), 4007 Paddlewheel Dr. , Brandon, FL 3351 1 . Ouarterly magazine, $ 1 2 .
Southern Annual Dues: $ 1 5. Southern RY Hist. Soc . , clo B. F. Roberts, P.O. Box 4094, Martinez, GA 30907.
Southern Pacific Annual Dues: $ 1 2.501$ 1 8.75 susUlor. SP H isl. & Tech. Soc .. P.O. Box 1 1 1 1 8, Santa Ana, CA 9271 1
The Soo Line Annual Dues: $ 1 6/$30 contr. The 500 Line Hisl. & Tech. Soc., clo Michael Harrington, Treas., 341 0 Kasten CI. , Middleton, WI 53562.
Spokane Portland & Seattle Annual Dues: $81$ 1 2 for. SP&S RY Hist. Soc. & SIG , 6824 1 91h. W. # 1 34 , Tacoma, WA 98466.
Teen Association of Model Railroaders clo Loan Eagle Payne, 1 028 Whaley Road, RD #4, New Carlisle, OH 45344 Bimonthly newsletter, $ 1 0.
Toledo Peoria & Western Annual Dues: $ 1 21$15 contr. TP&W Hisl. Soc., 6 1 5 Bullock S I . , Eureka, IL 6 1 530.
Union Pacific Annual Dues: $ 1 21$24 susl., $25 i nler. Union Pacific Hist. Soc .. clo Membership Secretary, P.O. Box 5653, Arvada, CO 80005-0653.
Wabash Annual Dues: $9/$1 2.50 contr. Wabash RR H isl . Soc., clo August M. Riccono, Business Manager., 535 Dielman Road, St. Louis, MO 631 32 .
Western Maryland Annual Dues: $ 1 5, Western Maryland RR Hist. Soc . . Inc . . P.O. Box 395, Union Bridge, M D 21 79 1 .
Augu st ., 9 90
Your trek plan for the weekend . ALABAMA Montgomery, Alabama Event: The Dixie Flyer '90 Date: November 1 7 , 1 990, 9:00 a . m . to
5:00 p . m . Location: Walter E. Bare Armory - Alabama
National Guard, 1045 Coliseum Blvd. Admission: General $2.00, under 12 free Information: Norm Pinney , 435 Honeysuckle
Ct. , Montgomery, Alabama 36 1 09, (205) 272-0274
Birmingham, Alabama Event: Second Annual Birmingham Model
Railroad Show Date: November 23, 24 and 25 , 1990 Location: Oporto-Madrid Armory,
B irmingham, Alabama Information: Larry Smith, 1 774 Wooddale
Circle, Pelham, Alabama (205) 988-0 1 26
LOUISIANA: Monroe, Louisiana Event: Model Train Exposition Date: September 8 and 9, 1990; Saturday
1 0:00 a.m. to 7:00 p . m . ; Sunday 10:00 a . m . t o 5:00 p . m .
Location: Monroe Civic Center, Lea Joyner Expressway
Admission: Adults $3.00, Children $ 1 .50 Information: Claudine Cartwright, 1 32
Hemlock, West Monroe, Louisiana 7 1 291 (318) 387-2372
Metairie (New Orleans), Louisiana Event: GM&O H istorical Society 18th Annual
Railroadiana Show and Sale Date: October 20, 1990, 1 0:00 a . m . to
4:00 p . m . Location: The Landmark Hotel Metairie,
2601 Severn Ave. Admission: Free to members, $ 1 .00 for
non-members Information: GM&O Historical Society Inc . ,
P.O. Box 463, Fairfield, Illinois 62837
MARYLAND Arbutus, Maryland Event: Mt. Clare Division, NMRA, 9th Annual
Train Flea Market and Auction Date: November 3, 1990, 1 1 a .m. to 4 p. m . Location: Arbutus Town Hall Admission: Tables $8.00, Admission $2.00 Information: Roy Brakmann, 3642 Ligon Road ,
Ellicott City, Maryland 2 1 043
MISSOURI St. Louis, Missouri Event: St. Louis Area Model Railroaders/Mid
Continental Region - NMRA Meet Date: November 3, 1990, 8 :30 a . m . to
3:00 p . m . Location: Holiday Inn, SW, 1 0709 Watson
Road, Crestwood, M issouri Admission: Preregistration $4.00, at the door
$6.00 Information: Ed Walton, 3200 Fox Hill Road,
St. Charles, M issouri 6330 1 , (3 1 4) 947- 1 582 evenings unti l 10:00 p . m . Central Time
NEW JERSEY Asbury, New Jersey Event: Garden State Central Model Railroad
Club Open House Date: October 19, 20, 2 1 , 26, 27 , and 28;
Fridays 7:00 p.m. to 9:00 p. m . , Saturdays � '2.'<l.\\d'3.'js U·.GG p .m. to 5:00 p .m.
Location: 607 8th Avenue, Asbury Park just off Main Street North
Admission: Donations - adults $2.00, children $ 1 . 00
Information: Bob Judge, 508 Lakewood Rd . , Neptune, New Jersey 07753 (201) 775-2394
August 1 9 90
OHIO Lima, Ohio Event: The Ada Model Railroad Club 6th
Annual Fall Model Railroad Show and Flea Market
Date: November 4, 1990, 1 0:00 a . m . to 4:00 p . m .
Location: Lima/Allen County Civic and Convention Center
Admission: $2.00 , under 1 2 free ( with adult) Information: Terry Prater, Box 1 36, McGuffey,
Ohio 45859, (4 1 9) 757-3922
OKLAHOMA Tulsa, Oklahoma Event: Tulsa Vo-Tech '90 Model Railroad Meet Date: October 6 , 1990, 8:30 a . m . to 5 :30 p . m . Location: Tulsa Vo-Tech , 342G South Memorial Admission: $5.00 at door, $4 .00 pre-registration
(less $ 1 .00 for Mid CoR and GCMRA members)
Information: Eric Spooner, 202 1 S. Lewis, Suite #350, Tulsa, Oklahoma 74 1 04
PENNSYL VANIA Harrisburg, Pennsylvania Event: Annual KMRHS Fall Train Meet and
Show in conjunction with Mid-Eastern Region " Keystone Convention 1 990"
Date: September 29, 1 990 9:00 a . m . to 4:00 p . m .
Location: Zembo Temple (3rd and Division Streets)
Admission: Adults: $3.00, Teens: $ 1 .00 , Youth: Free, Spouses of Adults with paid admission free
Information: Dr. Barry Sherman, 4700 Union Deposit Road, Suite 2 1 0, Harrisburg, Pennsylvania 17 1 1 1
Harrisburg, Pennsylvallia Event: Mid-Eastern Region/NMRA " Keystone
Convention 1990" Date: September 28, 29, and 30, 1990 3 :00 p . m .
Friday t o noon Sunday Location: Holiday Inn Centercity - Harrisburg Admission: Advance registration all-inclusive
fee: $49 .50 (members of NMRA ) , guests must be accompanied by NMRA member
Information: Terry Gardner, 1 303 Brandt Avenue, New Cumberland, Pennsylvania 1 7070
VIRGINIA Yorktown, Virginia Event: Chesapeake Bay Rai lroaders Semiannual
Swap Meet Date: November 1 7 , 1 990, 1 0:00 a . m . to
4:00 p.m. Location: I IO-C Dare Road Admission: $2.00 Information: W ilson Harrel l , 936 Moyer Road,
Newport News, Virginia 23602, (804) 877-7 1 5 2
CANADA Ottawa, Ontario, Canada Event: RAILFAIR '90 Date: October 13 and 14, 1 990. Open Saturday
1 1 :30 a.m.-5:30 p.m. , Sunday 10 a.m.-5:00 p.m.
Location: Algonquin College, Woodroffe Campus, Ontario, Canada. Free parking
Admission: Adults $4.00, teens/seniors $2.00, children (5- 1 2 yrs . ) $ 1 . 00
Information: D. H. Venables, 6 Trevor Crescent, Nepean, Ontario, Canada K2H 6H8
SOUTH AFRICA Braamfontein, Johannesburg Event: Third Nat'\. Model Railway Convention Date: October 1 1 , 1 2 , 1 3 , and 1 4 , 1990 Location: Airport Sun Hotel, Kempton Park,
near Jan S muts Airport Information: Bernard Green, Reef Rails '90, PO
Box 35275, Northcliff 2 1 1 5 (01 1 ) 706-6455
OUT OF THE LITTER BOX y A Kitt Basher
This column is devoted entirely to . . tips and tricks" of the trade. Any tidbit of information to make the hobby more
efficient and fun qualifies .
Tricks of the Trade The following tips have proved use
ful I . InsJant road grime/wea/her effect plus detail highlighting: a cheap and quick, rather effortless method of removing that " right-out-of-the-box" new look (especially plastic items) prior to get t ing around to total detai l i n g/ weathering . . . obtain a small quantity of baby powder and dry brush apply to visible surfaces ( l ight dusting) , then puff/blow off excess powder. Gone is that sheen, and out pops the various deta i l i n g t h at had been h i d i n g in the " sameness" of overall coloration . This is most effective on 'N' and 'Z' scale surfaces that are difficult to reach with minute amounts of accent paint . It can be easily removed with vigorous brushing and/or a damp cloth �r Q-tip. ®
2 . Ultra small uncoupling magnets: when using Kadee Magne-Matic® couplers, I ' ve found that standard/sectioned Kadee Magnets ( #3 1 2 , #32 1 , etc . ) are sometimes difficult t o incorporate with 'N' and 'Z' trackage. There is a WilY to install magnets within (versus under) the trackage proper using short track (straight or curved) to create assembled uncoupler sections. Obtain rare-earth magnet set #64- 1 895 from Radio Shack. Select a section of 'N' or 'Z' track. Cut one crosstie out ( middle of track length best ) . Glue (instant gel) each magnet (2/set) directly to underside of rail . . . centering a magnet on center l ine of each rail . . . paint magnets black . . . just disappear with ballasting accomplished. Uncoupling with converted Miirklin Trucks having metal wheels may cause problems: substitute Kadee plastic wheels .
Steam's Supreme, George A. Johnstone Toms River, New Jersey
Example: Ex-Miirklin (8885) to JlIJZ Hudson per N . Y . C. details Z scale can be detailed
Send us your . , tricks of the trade . " We' ll pay $10 for each idea w e print. Write to "Litter Box. " Model Railroading Magazine, Attn: Litter Box, 2854 Larimer St. , Denver, CO 80205.
Model Railroading • 1 3
N SCALE PRODUCT REVIEW
SQUEAK N PRODUCTS' SUSQUEHANNA RS I
Susquehanna RSI Squeak N Products Post Office Box 244 Allendale, New Jersey 07401 List Price: $75
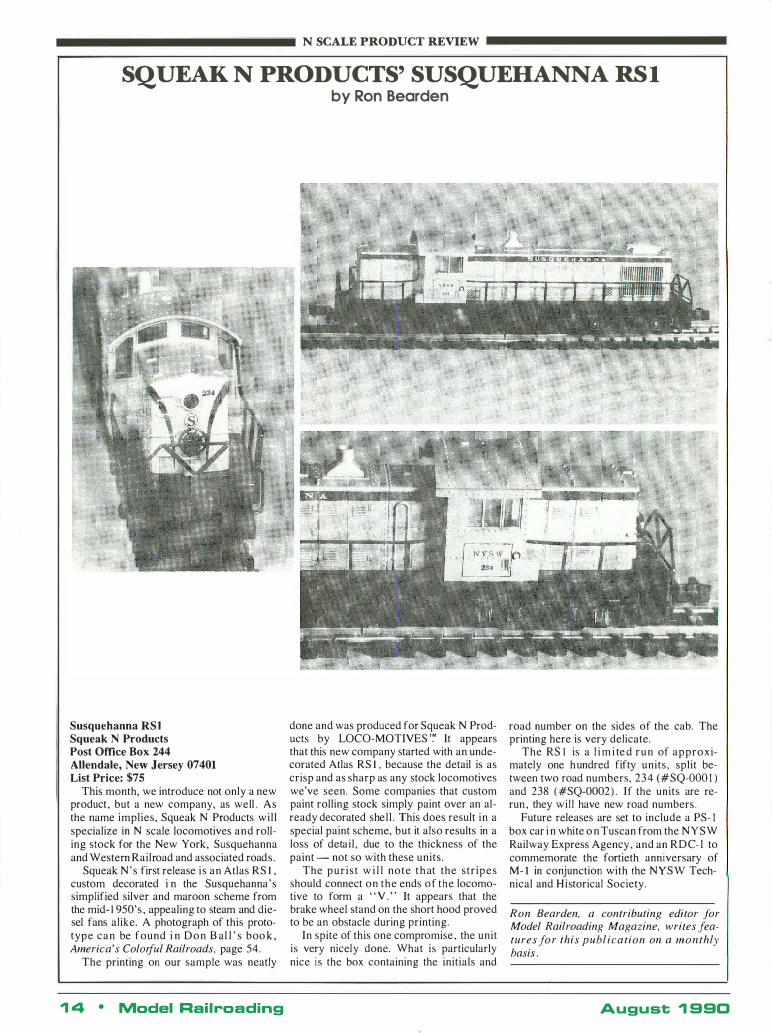
This month, we introduce not only a new product , but a new company, as well . As the name implies, Squeak N Products wi l l specialize in N scale locomotives and rolling stock for the New York, Susquehanna and Western Railroad and associated roads .
Squeak N ' s first release i s an Atlas RS I , custom decorated i n the Susquehanna's simplified silver and maroon scheme from the mid- 1 950's , appealing to steam and diesel fans alike. A photograph of this prototype can be found i n D o n B al l ' s boo k , America's ColO/Jul Railroads, page 54.
The printing on our sample was neatly
1 4 • Model Rail roading
by Ron Bearden
done and was produced for Squeak N Products by LOCO-MOTIVES '� It appears that this new company started with an undecorated Atlas RS I , because the detail is as crisp and as sharp as any stock locomotives we've seen. Some companies that custom paint rolling stock simply paint over an already decorated shel l . This does result in a special paint scheme, but it also results in a loss of detai l , due to the thickness of the paint - not so with these units .
The pur i s t w i l l note t h at the s tr ipes should connect on the ends of the locomotive to form a " V . " It appears that the brake wheel stand on the short hood proved to be an obstacle during printing.
In spite of this one compromise , the unit is very nicely done. What is particularly nice is the box containing the initials and
road number on the sides of the cab. The printing here is very delicate.
The RS 1 is a l i m i te d r u n of approximately one h undred fifty units, split between two road numbers, 234 (#SQ-OOO I ) and 238 ( #SQ-0002) . If the units are rerun , they wi l l have new road numbers .
Future releases are set to include a PS- I box car i n white o n Tuscan from the NYSW Railway Express Agency , and an RDC- l to commemorate the fortieth anniversary of M- l in conjunction with the NYSW Technical and Historical Society.
Ron Bearden, a contributing editor for Model Railroading Magazine, writes features for this publication on a monthly basis.
August 1 990
N SCALE PRODUCT REVIEW
GANGSAN OF KOREA'S BRASS VERTICAL WATER TANK
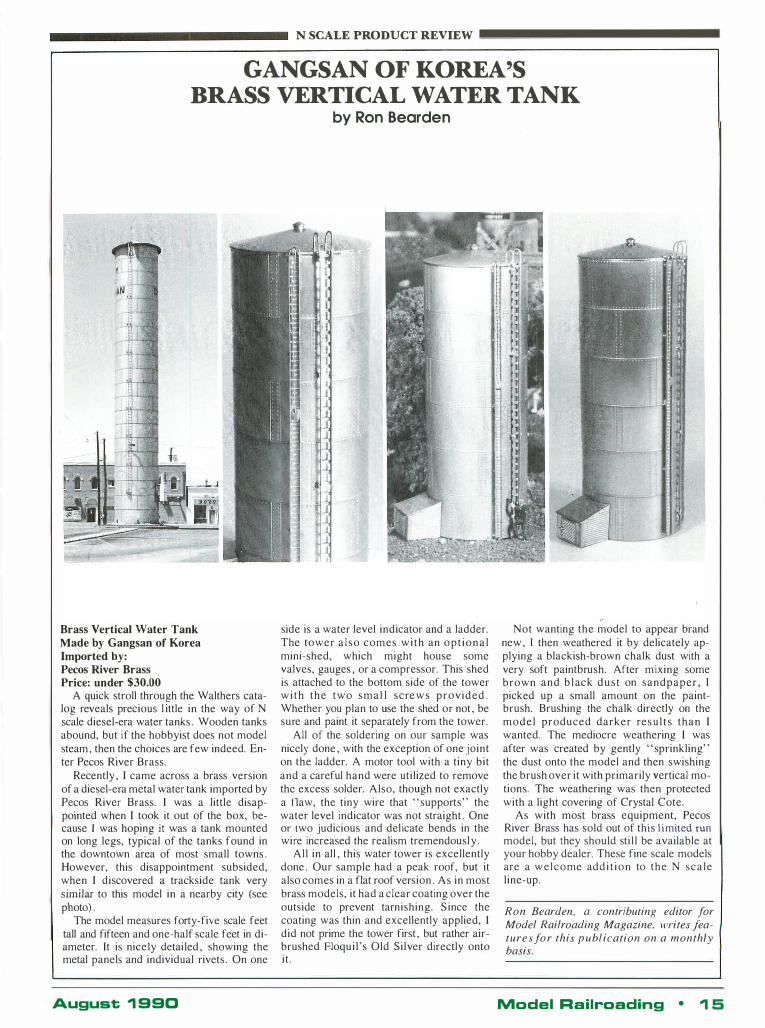
Brass Vertical Water Tank Made by Gangsan of Korea Imported by: Pecos River Brass Price: under $30.00
A quick stroll through the Walthers catalog reveals precious l ittle in the way of N scale diesel-era water tanks . Wooden tanks abound, but if the hobbyist does not model steam , then the choices are few indeed. Enter Pecos River Brass.
Recently , I came across a brass version of a diesel-era metal water tank imported by Pecos River Brass. I was a little disappointed when I took it out of the box, because I was hoping it was a tank mounted on long legs, typical of the tanks found in the downtown area of most small towns . However, this disappointment subsided, when I discovered a tracks ide tank very similar to this model in a nearby city (see photo) .
The model measures forty-five scale feet tall and fifteen and one-half scale feet in diameter. It is nicely detai led , showing the metal panels and individual rivets . On one
August '1 990
by Ron Bearden
side is a water level indicator and a ladder. The tower a l so comes w i t h an o p t i o n a l mini-shed, which might house some valves, gauges , or a compressor. This shed is attached to the bottom side of the tower w i t h the two smal l scre w s provided . Whether you plan to use the shed or not , be sure and paint it separately from the tower.
All of the soldering on our sample was nicely done , with the exception of one joint on the ladder. A motor tool with a tiny bit and a careful hand were utilized to remove the excess solder. Also, though not exactly a flaw, the tiny wire that "supports" the water level indicator was not straight . One or two judicious and del icate bends in the wire increased the realism tremendousl y .
All in all , this water tower is excellently done . Our sample had a peak roof, but it also comes in a flat roof version . As in most brass models, it had a clear coating over the outside to prevent tarnishing. S ince the coating was thin and excellently applied, I did not prime the tower first , but rather airbrushed Floqui l ' s Old Silver directly onto it .
Not wanting the model to appear brand new , I then weathered it by delicately applying a blackish-brown chalk dust with a very soft paintbrush. After mixing some brown and b l ack d u s t on sandpaper, I picked up a small amount on the paintbrush. Brushing the chalk directly on the model produced darker res u l t s than I wanted. The mediocre weathering I was after was created by gently "sprinkling" the dust onto the model and then swishing the brush over it with primarily vertical motions. The weathering was then protected with a light covering of Crystal Cote.
As with most brass equipment, Pecos River Brass has sold out of this l imited run model, but they should sti l l be available at your hobby dealer. These fine scale models are a welcome add i t i o n to the N scale l ine-up.
Ron Bearden, a contributing editor for Model Railroading Magazine, writes featuresfor this p ublication on a monthly basis.
Model Railroading • '1 5
The Railway Express: An Anterican Institution
(And Where Is It Now?) Part Two of Three
by V.S. Roseman
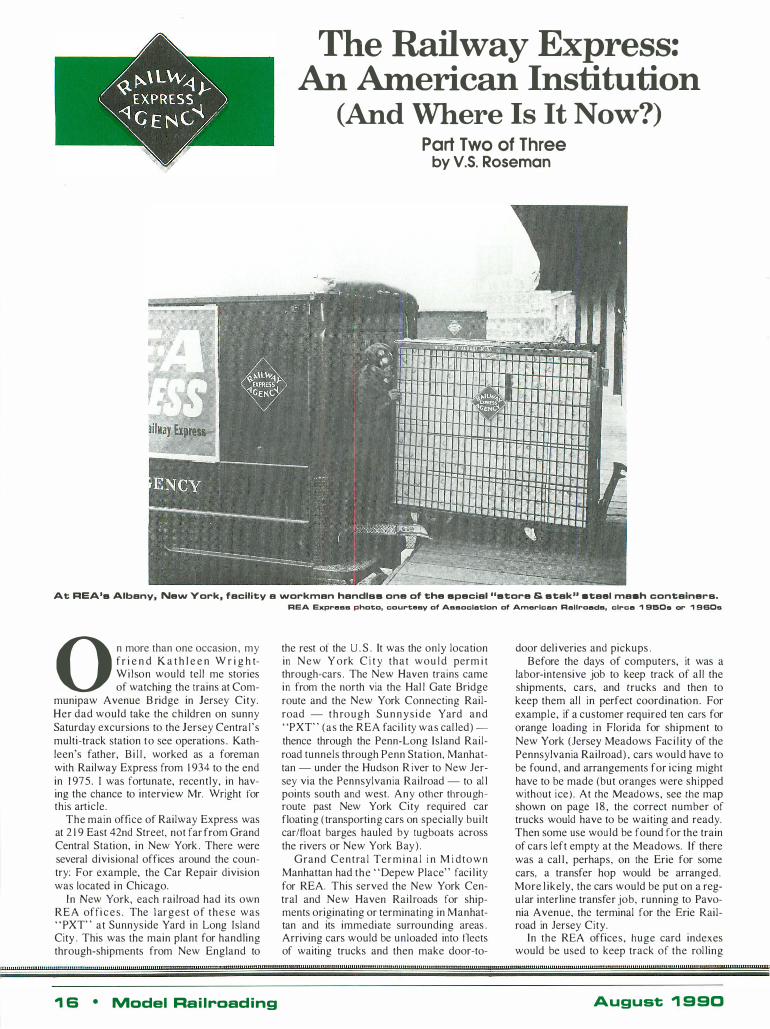
At REA's Albany, New York, facility a workman handlss one of the special "store & stak" staal mash containers.
O n more than one occasion , my fr i e n d K a t h l e e n W r i g h tWilson would tell me stories of watching the trains at Com
munipaw Avenue B ridge in Jersey City. Her dad would take the children on sunny Saturday excursions to the Jersey Centra l ' s multi-track station to see operations . Kathleen's father, B i l l , worked as a foreman with Railway Express from 1 934 to the end in 1 975 . I was fortunate, recently, in having the chance to interview Mr. Wright for this article.
The main office of Railway Express was at 2 1 9 East 42nd Street, not far from Grand Central Station, in New York . There were several divisional offices around the country: For example, the Car Repair division was located in Chicago.
In New York, each railroad had its own REA offi c e s . The l argest of these was "PXT" at Sunnyside Yard in Long Island City . This was the main plant for handling through-shipments from New England to
REA Express photo. courtesy of Association of American Railroads, circa 1 9150& or 1 960&
the rest of the U . S . It was the only location in New Y ork C i t y that wou l d perm i t through-cars . The New Haven trains came in from the north via the Hal l Gate Bridge route and the New York Connecting Railroad - t h rough Sunnys ide Yard and "PXT" (as the REA faci l i ty was cal led) thence through the Penn-Long Island Railroad tunnels through Penn Station, Manhattan - under the Hudson R iver to New Jersey via the Pennsylvania Railroad - to al l points south and west. Any other throughroute past New York City required car floating (transporting cars on specially built carlfloat barges hauled by tugboats across the rivers or New York Bay) .
Grand Central Termina l i n M i dtown Manhattan had the "Depew Place" faci l ity for REA. This served the New York Central and New Haven Railroads for shipments originating or terminating in Manhattan and its immediate surrounding areas . Arriving cars would be unloaded into fleets of waiting trucks and then make door-to-
door del iveries and pickups . Before the days of computers, it was a
labor-intensive job to keep track of all the shipments, cars, and trucks and then to keep them al l in perfect coordination. For example, if a customer required ten cars for orange loading in Florida for shipment to New York (Jersey Meadows Fac i l ity of the Pennsylvania Railroad) , cars would have to be found, and arrangements for icing might have to be made (but oranges were shipped without ice) . At the Meadows, see the map shown on page 1 8 , the correct number of trucks would have to be waiting and ready. Then some use would be found for the train of cars left empty at the Meadows. If there was a cal l , perhaps, on the Erie for some cars, a transfer hop would be arranged. More l ikely, the cars would be put on a regular interline transfer job, running to Pavonia Avenue, the terminal for the Erie Railroad in Jersey City.
In the REA offices, huge card indexes would be used to keep track of the rol ling
1I.!!!!I .. ""'m" .. "'''''''''''" .... '' ... tI!l1 •• '.' .... ,'''''''''!!",III''''''''"I!!11W'UIJ",,,,,It!l'Rt1"IIUIIlIIllurgnWtlwrq"IIlIlIm.'III!lIII""I!1""1""'I!!U"""IIII!I"''''''''',,.,."'u"'''''''''''''''''''''''''m'' ..... '''' ... !UIllIIt!l!!1'''''' ........ ,,!.!I!!!!'''''''''''''U!l1'''''' .. ,!!1' ........ ·" .... "!!1'u"""""""",, .. "t
., S • Madel Rai l road ing August ., 9 90
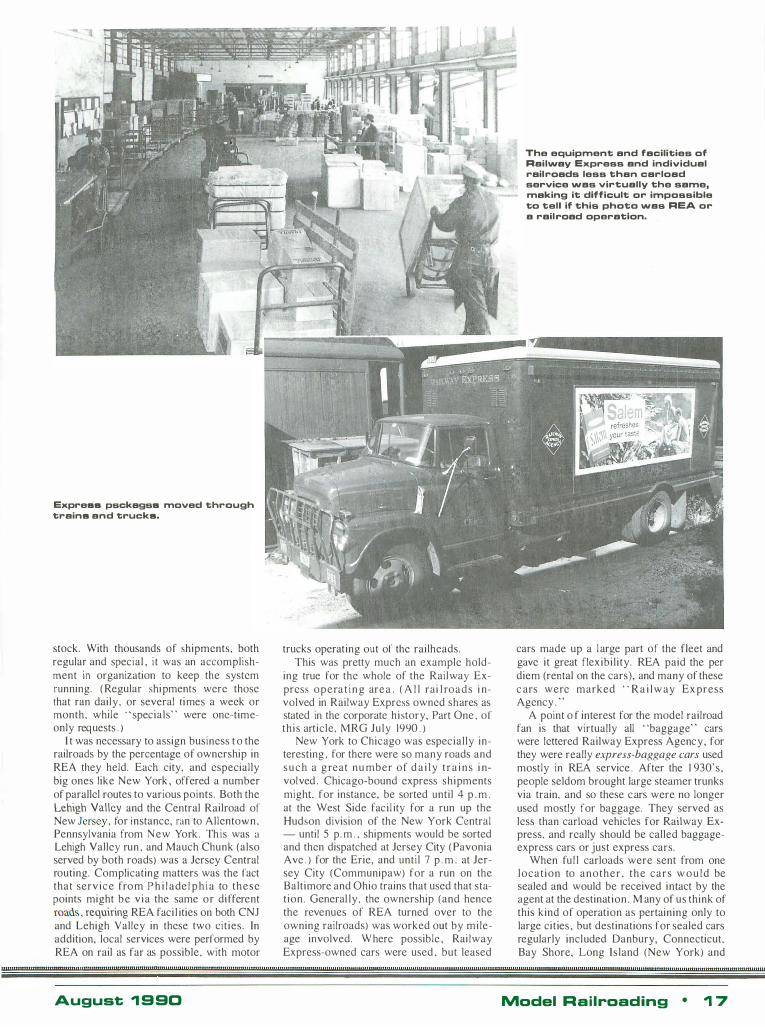
Express psckagss moved through trains and trucks.
stock. With thousands of shipments, both regular and special , it was an accomplishment in organization to keep the system running. (Regular shipments were those that ran daily, or several t imes a week or month, while " specials" were one-timeonly requests . )
I t was necessary to assign business t o the railroads by the percentage of ownership in REA they held. Each city, and especially big ones like New York , offered a number of parallel routes to various points. Both the Lehigh Valley and the Central Railroad of New Jersey , for instance, ran to Allentown, Pennsylvania from New York . Th is was a Lehigh Valley run , and Mauch Chunk (also served by both roads) was a Jersey Central routing. Complicating matters was the fact that serv ice fro m P h i l ade l p h i a to these points might be via the same or different roads, requiring REA faci l ities on both CNJ and Lehigh Valley in these two cities. In addition, local services were performed by REA on rail as far as possible, with motor
trucks operating out of the railheads. This was pretty much an example hold
ing true for the whole of the Railway Express opera t i n g area . ( A l l rai l roads i nvolved in Railway Express owned shares as stated in the corporate history, Part One , of this article, MRG July 1990 . )
New York to Chicago was especially interesting , for there were so many roads and s u c h a g reat nu mber of d a i l y t r a i n s i nvolved . Chicago-bound express shipments might, for instance, be sorted until 4 p . m . at the West Side facil ity for a run up the Hudson division of the New York Central - until 5 p. m . , shipments would be sorted and then dispatched at Jersey City (Pavonia Ave . ) for the Erie, and until 7 p . m . at Jersey City (Communipaw) for a run on the Baltimore and Ohio trains that used that station. General ly, the ownership (and hence the revenues of REA turned over to the owning railroads) was worked out by mileage involved. Where possible , Rai lway Express-owned cars were used , but leased
The equipment and facilities of Railway Express and individual rail roads less than carload service was virtually the same, making it difficult or impossible to tell if this photo was REA or a rail road operation.
cars made up a large part of the fleet and gave it great flexibility. REA paid the per diem (rental on the cars), and many of these c ars were marked " R a i l w ay Ex press Agency . "
A point o f interest for the model railroad fan is that virtually all "baggage" cars were lettered Railway Express Agency, for they were really express-baggage cars used mostly in REA service . After the 1 930' s , people seldom brought large steamer trunks via train, and so these cars were no longer used mostly for baggage. They served as less than carload vehicles for Railway Express, and really should be called baggageexpress cars or just express cars.
When ful l carloads were sent from one locat ion to another , the cars w o u l d be sealed and would be received intact by the agent at the destination. M any of us think of this kind of operation as pertaining only to large cities , but destinations for sealed cars regularly included Danbury, Connecticut, Bay Shore, Long Is land (New York) and
P'''''''lIlItttD'W't!!!!!!''""""g"lltltW'''rtrmUW"MR'g","""",uIIIIIIII'''''''''''III",,,,,,,,'ItI''''''1IT"", .. """"'''!I!''", ... ''u''u'''''''u'' .......... "" .......... ",''''II!''II!!!!lI!'''''' ...... '" ...... ,,""'''"tltltrI''''''"ultlt"''" ........ "''"'''" ............... ""III"",,,,,'''U .. ''uutp'ttDrD'' ... ,,''ruu,
August ., 9 90 Model R a i l roading • ., 7
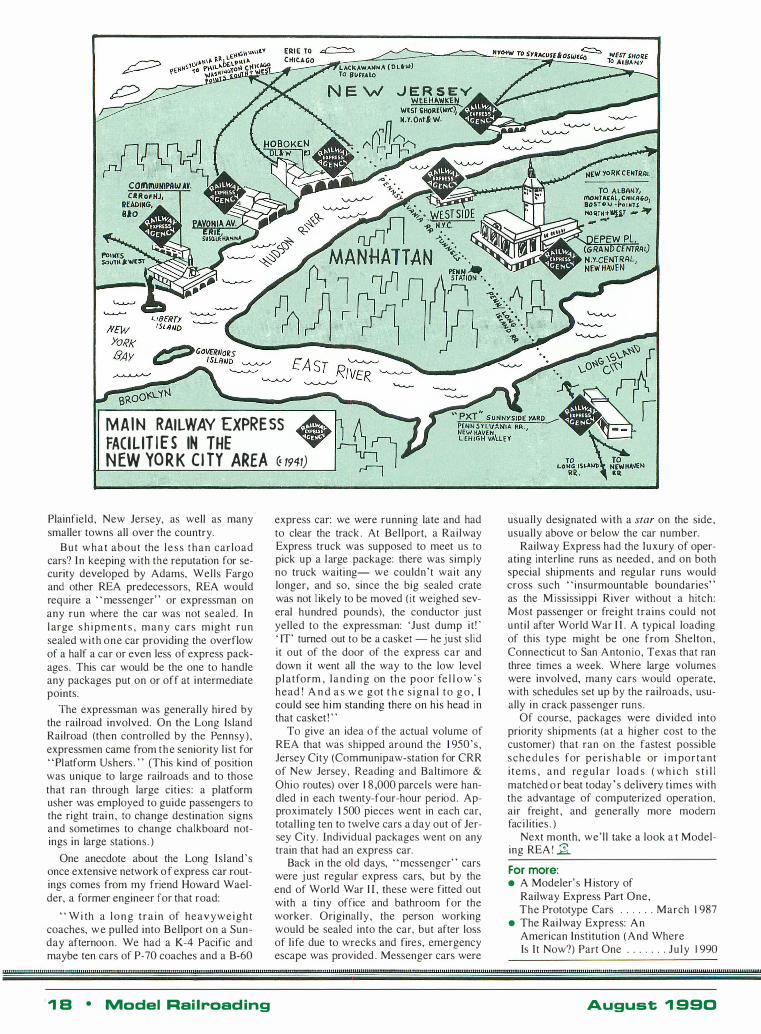
M A I N RAILWAY EXPRE SS ." "
FACIL IT I E S IN THE ' N EW YO R K CI TY AREA � 1941)
Plainfield, New Jersey, as well as many smaller towns all over the country.
But what about the less than carload cars? In keeping with the reputation for security developed by Adams, Wells Fargo and other REA predecessors, REA would require a " messenger" or expressman on any run where the car was not sealed. In l arge s h ipment s , many cars might run sealed with one car providing the overflow of a half a car or even less of express packages. This car would be the one to handle any packages put on or off at intermediate points.
The expressman was generally hired by the railroad involved. On the Long Island Railroad (then controlled by the Pennsy) , expressmen came from the seniority l ist for "Platform Ushers . " (This kind of position was unique to large railroads and to those that ran through large cities: a platform usher was employed to guide passengers to the right train , to change destination signs and sometimes to change chalkboard notings in large stations. )
One anecdote about the Long Island' s once extensive network o f express car routings comes from my friend Howard Waelder, a former engineer for that road:
" W i th a l o n g tra in of heavyweight coaches, we pul led into Bellport on a Sunday afternoon. We had a K-4 Pacific and maybe ten cars of P-70 coaches and a B-60
express car: we were running late and had to clear the track . At Bel lport, a Railway Express truck was supposed to meet us to pick up a large package: there was simply no truck waiting- we couldn' t wait any longer, and 50, since the big sealed crate was not l ikely to be moved ( i t weighed several hundred pounds), the conductor just yelled to the expressman: 'Just dump it ! ' ' IT' turned out to be a casket - he just sl id it out of the door of the express car and down it went all the way to the low level pl atform , landing on the poor fe l l o w ' s head ! A n d a s w e g ot t h e s igna l to g o , I could see him standing there on his head in that casket ! "
To give an idea o f the actual volume of REA that was shipped around the 1 950's , Jersey City (Comrnunipaw-station for CRR of New Jersey , Reading and Baltimore & Ohio routes) over 1 8 ,000 parcels were handled in each twenty-four-hour period. Approximately 1 500 pieces went in each car, total ling ten to twelve cars a day out of Jersey City. Individual packages went on any train that had an express car.
Back in the old days, "messenger" cars were j ust regular express cars, but by the end of World War I I , these were fitted out with a tiny office and bathroom for the worker. Original ly , the person working would be sealed into the car, but after loss of life due to wrecks and fires, emergency escape was provided . Messenger cars were
usually designated with a star on the side, usually above or below the car number.
Railway Express had the luxury of operating interline runs as needed , and on both special shipments and regular runs would cross such "insurmountable boundaries" as the Mississippi River without a hitch: Most passenger or freight trains could not until after World War I I . A typical loading of this type might be one from Shelton , Connecticut to San Antonio, Texas that ran three times a week. Where large volumes were involved, many cars would operate, with schedules set up by the railroads, usually in crack passenger runs .
Of course, packages were divided into priority shipments (at a higher cost to the customer) that ran on the fastest possible schedules for peri shable or i m portant i tems , and regular l o ad s ( wh i c h s t i l l matched o r beat today ' s delivery times with the advantage of computerized operation, air freight , and generally more modern faci lities . )
Next month, we'll take a look a t Modeling REA ! �
For more: • A Modeler' s H istory of
Railway Express Part One, The Prototype Cars . . . . . . March 1 987
• The Rai lway Express: An American Institution ( And Where Is I t Now?) Part One . . . . . . . Ju ly 1 990
"""",,,.m!!!.,,,,,.,.,,"tI'"'''I!''',,,,,,''',,,,,,,,W'''''''''III'WI!!''''',,,,,.," ... ',,,,,,,, .. ,,,,,III."' .. "'III ................... u"*" ....... '''"lIltll''''''''UIll"ItIW'' ... !!!"."!!!''''''''''!!" .. u'''" ........ ",""tllII''",''''''tt ... llu", .... w"'''''''',,It,,'',,.tllul!!""" ... ,,!!! ......... "!!! ...... '.m ... ''' .. '''!!!''''''' ...
1 B • Model Rai lroad ing August 1 990
by Larry Smith
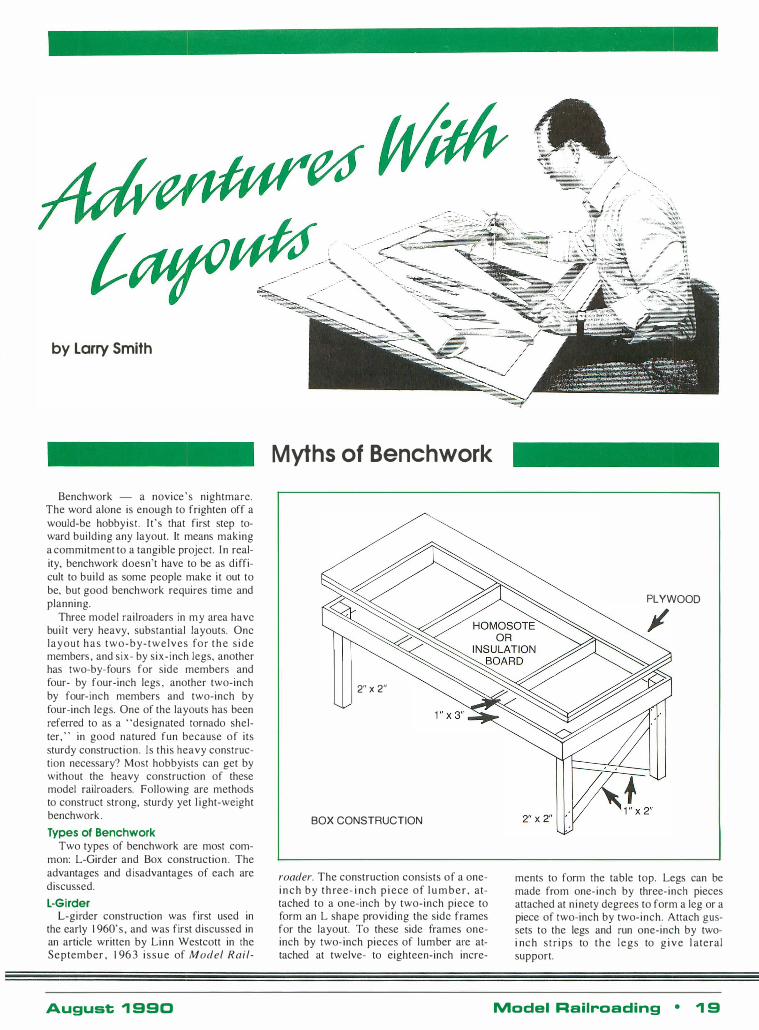
Benchwork - a novice ' s nightmare. The word alone is enough to frighten off a would-be hobbyist . I t ' s that first step toward building any layout. It means making a commitment to a tangible project. In reality, benchwork doesn't have to be as difficult to build as some people make it out to be, but good benchwork requires time and planning.
Three model railroaders in my area have bui l t very heavy, substantial layouts. One layout h a s two-by-twelves for t h e s i de members , and six- by six-inch legs, another has two-by-fours for side members and four- by four-inch legs , another two-inch by four-inch members and two-inch by four-inch legs. One of the layouts has been refened to as a "designated tornado shelter, " in good natured fun because of its sturdy construction. I s this heavy construction necessary? Most hobbyists can get by without the heavy construction of these model railroaders. Following are methods to construct strong, sturdy yet l ight-weight benchwork.
Types of Benchwork Two types of benchwork are most com
mon: L-Girder and Box construction . The advantages and d isadvantages of each are discussed.
L-Girder L-girder construction was first used in
the early 1 960' s , and was first discussed in an article written by Linn Westcott in the September , 1 96 3 i s s u e of Model Rail-
August 1 990
Myths of Benchwork
2" x 2"
BOX CONSTRUCTION
roader. The construction consists of a onei n c h by t h ree- i nch p i ece of l u m ber , attached to a one-inch by two-inch piece to form an L shape providing the side frames for the layout. To these side frames oneinch by two-inch pieces of lumber are attached at twelve- to eighteen-inch incre-
PLYWOOD
jI
ments to fonn the table top. Legs can be made from one-inch by three-inch pieces attached at ninety degrees to form a leg or a piece of two-inch by two-inch. Attach gussets to the legs and run one-inch by twoi nc h str ips to the legs to g i v e l ateral support.
Model Railroading • 1 9
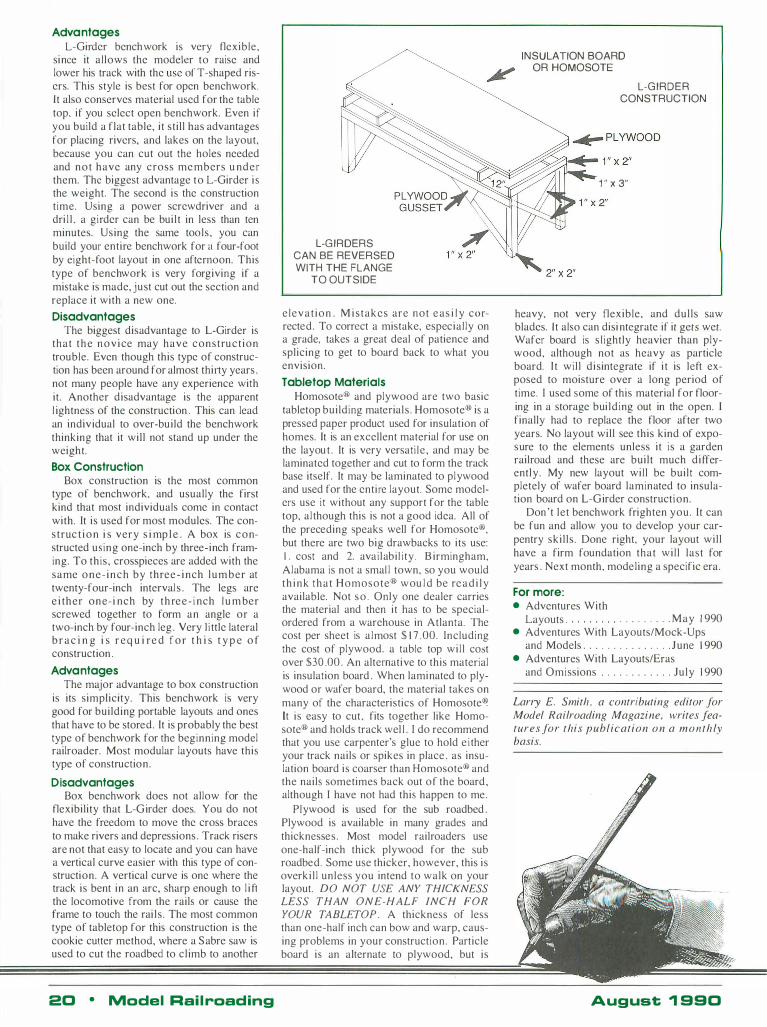
Advantages L-Girder bench work is very flexible,
since it allows the modeler to raise and lower his track with the use of T-shaped risers. This style is best for open benchwork. It also conserves material used for the table top. if you sclect open benchwork. Even if you build a flat table, it still has advantages for placing rivcrs, and lakes on the layout, because you can cut out the holcs needed and not have any cross me mbers u nder them. Thc biggest advantage to L-Girder i s the weight. The second is the construction time. Using a power screwdriver and a dri l l . a girder can be built in less than ten minutes. Using the same tools, you can build your entire benchwork for a four-foot by eight-foot layout in one afternoon. This type of bench work i s very forgiving if a mistake is made, just cut out the section and replace it with a new one.
Disadvantages The biggest disadvantage to L-Girder is
that t h e novice may have construct ion trouble. Even though this type of construction has been around for almost thilty years , not many people have any experience with it. Another disadvantage is the apparent l ightness of the construction . This can lead an individual to over-build the bench work thinking that it will not stand up under the weight.
Box Construction Box construction is the most common
type of benchwork, and usually the first kind that most individuals come in contact with. It is used for most modules. The construc t i o n i s very s i mp l e . A box is constructed using one-inch by three-inch framing. To this, crosspieces are added with the same one- inch by three - i nch lum ber at twenty-four-inch interval s . The legs are e i ther one- i nch by thre e - i nch l u m ber screwed together to form an angle or a two-inch by four-inch leg . Very l i ttle lateral b r a c i n g i s r e q u i re d f o r t h i s t y p e o f construction .
Advantages The major advantage to box construction
is its simplicity. This bench work is very good for building portable layouts and ones that have to be stored. It is probably the best type of benchwork for the beginning model railroader. Most modular layouts have this type of construction.
Disadvantages Box benchwork does not allow for the
flexibility that L-Girder does. You do not have the freedom to move the cross braces to make rivers and depressions . Track risers are not that easy to locate and you can have a vertical curve easier with this type of construction. A vertical curve is one where the track is bent in an arc, sharp enough to l i ft the locomotive from the rails or cause the frame to touch the rai ls . The most common type of tabletop for this construction is the cookie cutter method, where a Sabre saw is used to cut the roadbed to cl imb to another
20 • Model Rail roading
L-G IRDERS CAN BE REVERSED WITH THE FLANGE
TO OUTSIDE
e levat ion . M i stakes are not e as i l y corrected. To correct a mistake, especial ly on a grade, takes a great deal of patience and splicing to get to board back to what you envision.
Tabletop Materials Homosote® and plywood are two basic
tabletop building materials . Homosote® is a pressed paper product used for insulation of homes. [t is an excellent material for use on the layout . It is very versati le , and may be laminated together and cut to form the track base itself. It may be laminated to plywood and used for the entire layout. Some modelers use it without any support for the table top, al though this is not a good idea. All of the preceding speaks well for Homosote®, but there are two big drawbacks to its use: I . cost and 2. avai labil i ty. B irmingham, Alabama is not a smal l town, so you would t h i n k that Homosote® wou l d be re a d i l y available. Not s o . Only one dealer carries the material and then it has to be specialordered from a warehouse in Atlanta. The cost per sheet is a lmost $ 17 .00. Including the cost of plywood, a table top wi l l cost over $30.00. An alternative to this material is insulation board . When laminated to plywood or wafer board, the material takes on many of the characteristics of Homosote® It is easy to cut , fits together like Homosote® and holds track wel l . [ do recommend that you use carpenter's glue to hold e i ther your track nails or spikes in place . as insulation board is coarser than Homosote® and the nails sometimes back out of the board, although I have not had this happen to me.
Plywood is used for the sub roadbed . Plywood is available in many grades and thicknesses . Most model railroaders use one-half-inch thick plywood for the sub roadbed. Some use thicker, however, this is overki l l unless you intend to walk on your layout. DO NOT USE ANY THICKNESS LESS THAN ONE-HALF INCH FOR YOUR TABLETOP . A thickness of less than one-half inch can bow and warp, causing problems in your construction. Particle board is an alternate to plywood, but is
INSULATION BOARD OR HOMOSOTE
L-G IRDER CONSTRUCTION
1 " x 3"
heavy, not very flexible, and dulls saw blades. It also can disi ntegrate if it gets wet. Wafer board is s l ightly heavier than plywood, although not as heavy as particle board. I t wil l disintegrate if i t is left exposed to moisture over a long period of time. I used some of this material for flooring in a storage bui ld ing out in the open. [ finally had to replace the floor after two years. No layout will see this kind of exposure to the elements unless it is a garden railroad and these are built much differently . My new layout wil l be built completely of wafer board laminated to insulation board on L-Girder construction.
Don 't let benchwork frighten you. It can be fun and allow you to develop your carpentry skil ls . Done right, your layout wil l have a firm foundation that wi l l last for years . Next month, modeling a specific era.
For more: • Adventures With
Layouts . . . . . . . . . . May 1 990 • Adventures With Layouts/Mock-Ups
and Models . . . . . . . . . . . . . . . J une 1 990 • Adventures With Layouts/Eras
and Omissions . . . . . . . . . . . . July 1 990
Larry E. Smith , a contributing editor for Model Railroading Magazine, writes featuresfor this publication on a month ly basis.
August 1 990

Upgrading AHM"s Coil Car:
Walthers Offers an Option by Ed Sanicky
with an introduction by W. Terry Stuart
" Now you see them: now you don ' t . " THAT seems t o b e the history of the P&LE coil cars which Ed Sanicky dupl icated for this article . For shortly after their introduction in 1 966-67, many of them were taken out of service. The reason? Their clever clamshel l doors would jam and stop working, rendering them useless . That ' s when the P&LE decided to remove the covers .
Not too many years ago , railroad and steel industry economics virtually removed the P&LE! Indeed, railfans and modelers in our part of the country ( Northeastern Ohio) are even now eagerly awaiting the appearance of the first " Wheeling and Lake Erie" diesels . W&LE diesels? Right' You see, the company that purchased what's left of the P&LE will also operate much of the former W &LE (Norfolk Southern Brewster mai nline ) . The NS Brewster l ine is busy . But the P&LE trackage, except for that shared by CSX in the Pittsburgh area, has never been busy.
So where did the coil cars go in the interim, between the time the covers were removed and the day sightings of them had increased dramatically? McKees Rocks, Pennsylvania ( near Pittsburgh) , holds the answer to this question for the most part. This location is where the P&LE islwas based, and many of the cars simply were stored there .
Happily, the steel business has since rebounded, even i f not around Pittsburgh. And today, these distinctive cars are once again in active service. They 're seen mostly on Conrail in trains EIOi and OiEI ( EI-Elkhart, I ndiana; Oi-Oak Island , New York ) . These are trains worth watching, with a mix of rol ling stock that never fails to raise the adrenalin level just a point or two.
We' ve seen as many as seventeen of the P&LE coil gons (yes , they're still painted exactly as in Ed' s mode l , and they retain their P&LE reporting marks) in a single train . I think perhaps seven or eight were actually coupled together in a single cut.
The point of all this? I f you model any time period betwcen late 1 966 and present day , you can justify this piece of equipment on your layout - at least, if you model the Northeast. Th is makes me happy, and I hope it does the same for a majority of Model Railroading readers .
On that note, we've already had some feedback. On our recent trip to Detroit for the North Central Region " Vista Dome '90" convention, we took two of Ed ' s cars along . Many of the dozens of modelers who were kind enough to watch the clinic that J im Six and I did on our rolling stock modeling techniques seemed to single out Ed' s cars as some of the more " intriguing items " we displayed . We' re glad you enjoyed them, as we were happy to share them on Ed' s behalf.
Now , enjoy modeling one or more of these distinctive pieces . As to availabil ity of the AHM car, my guess is that careful shopping at flea markets will eventually procure one . Or maybe , like so many of us pack rats, you may already have one squirreled away . Bet it doesn't stay on the shelf much longer! - W. Ten), Stuart
While we're working on the underside of the car, take some small strips of scrap plastic and create " hangers" for the brake cy 1-inder and retainer valve. Follow the Walthers instruction sheet for correct placement, and add these items.
Two hori zontal p ieces of 2 x 3 ( E S M #8203) are now cemented to the top of each end platform, one even with the ends and the other appro x i ma t e l y s i x sca le inches from the end of the body. These hold the screening material representing the steel grating used as an end platform . I used some stainless steel strainer material as screening. You ' ll need to check with your local hobby supplier for some appropriate material , or raid the scrap box . Another poss ib i l i ty m i ght be box car roofw a l k material .
Carefully study the Protorype Modeler article andlor the photos accompanying this article for placement of the side and end
August 1 9 90
grabs , as well as the ladder on the right side of the car. I used Detail Associates #6207 ladders , as I l i ke t h e i r appearance and cross-section. Stirrup steps ( Detail Associates #64 1 I are appropriate; check photos for placement) are also added, replacing the ungainly plastic steps on the AHM casting. I fashioned my own grab irons from . 0 1 5 brass wire . For the brake whee l , I again went to the Walthers coi l car kit for parts 2 1 and 2 2 . Final ly , the projecting piece of Walthers part # I I must be removed and then cemented to the end of the side si l l , where it becomes the hangar portion of the cut lever dev ice . A Deta i l Assoc i ates #2206 eyebolt holds the homemade cut lever, which i s fabricated from . 0 1 5 w ire. The opposite end of the cut lever is inserted into a companion eyebolt below the cushion coupler cover (Walthers part # 1 4 ) .
I substituted Athearn #90399 roller bearing trucks with Kadee thirty-six- inch
wheelsets . I used Perfect Truck Screws to attach them to the extended bolsters we created earlier with the . 0 1 25 tubing . The use of two Kadee coupler height gauges (one at each end of the car) wil l help in adjusting the length of the t u b i n g , w h i c h consequently determines the height of the truck bolsters.
Also, the car's air hoses were fabricated from MSC Model Products BL- \ 2S '/24 -'/25 brake line ( a model automobile part ) . Athearn handrail stanchions make a handy eyebolt-type hanger to serve this purpose.
Now for painting and decal ing. I used Accu-paint AP-2 Stencil B lack and the Herald King H- 1 420 P&LE 1 00-Ton Hopper Car decal set. The yellow P&LE letters are a bit too tal l , but in the absence of any other commercial decal , the appearance is acceptable to me. Also, the dimensional data is understandably incorrect in the Herald King hopper decal set ; the decals made by
Model Railroad i n g • 2 1
Upgrading AHM's Coil Car: Walthers Offers an Option
I
BILL OF MATERIALS • AHM Coil Car
• Walthers 3850 Series Coil Car
• Detail Associates: • 2206 Eyebolts • 2505 .0 1 5 Brass Wire • 6207 Ladders (long) • 64 1 1 Stirrup Steps
• Evergreen Scale Models : • 2 2 1 .047 Rod (plug for car ends) • 224 .0 1 25 Tubing (or '1M') • 8203 HO 2x3 • 82 1 0 HO 2x l 0
• Kadee: • N o . 5 Coupl ers ( o r your choice of
alternative) • 52 1 Six-Inch Wheel Sets
• Herald King: • H- 1 420 P&LE 1 00-Ton H opper
Decals
• MSC Model Products: • BL- 1 25 '124 - '/25 Brake Line
• Athearn: • 90399 Roller Bearing Trucks
• Accu-Paint: • AP-2 Stencil Black
Microscale for 200-ton car data offer somewhat more appropriate numbers. The prototype ' s CAPY is 2 3 6 , 000; LD LMT i s 239,700; and LT WT is 75 , 300. The latter numbers wil l vary somewhat from car to car . Wi th a touch of weathering , your P&LE coi l gon should be ready for steel service.
The December [ 986 issue of Prototype Modeler magazine provides an article by Kevin N . Tomasic titled " Rebuilding an AHM Coil Car for the Pittsburgh & Lake
·
Erie , " which is the basis for the reconstruction of this unique piece of rolling stock.
The article provides good background for this project, and the acquisition of a copy of t h i s magaz i n e would probably prove worthwhile. PM has since been sold, but is currently available from Green Lantern Press, Limited, Post Office Box 7032, Fairfax Station, Virginia 22039.
As in the case of the original article, the fol lowing items should be removed from the AHM car: the coil covers and related parts, coi I s , brake wheel stand, trucks, and floor weight. The roof pieces are released by pulling the small pins out of the inner
22 • Model Railroading
continued
ends of the car. The levers that actuate the roof sections should also be removed, just as the prototype P&LE did when it discovered the c a r ' s major fau l t . A l t h o u g h a clever idea in theory, the covers quickly became inoperative with the s l ightest damage. Once the covers jammed, the car was rendered instantly useless. So these fortyn i n e cars (42250-42299, p u rc h ased i n 1 966-67 ) , were quickly converted t o open gondolas, while retaining the interesting sides and ends that the covers necessitated.
Additionally, the " fins" located inside the carbody must be removed. A pair of nippers or pl iers should quickly accomplish the job. There is no need to consider neatness at this point, because the next operation will accompiish this task with relative ease.
The major emphasis of the Prototype Modeler article was the reconstruction of the car's floor to bring it more in keeping with the prototype . Fortunately, Wm. K . Walthers has provided a n excellent alternative with the introduction of its line of cushion coil cars (3850 series) in HO scale. The Walthers floor is virtually perfect for the AHM/P&LE car, so we 're going to make a direct substitution.
Start by dril l ing a hole in the car floor somewhere between the bolsters, and enlarge it by fi l ing unti l it is possible to insert a saw blade . The goal is to remove the entire floor between the bolsters . Once i t ' s gone, file and sand smooth the inside of the carbody .
[n order to provide a new bolster for the trucks , i n sert Eve rgree n Sca le Models #224 . 0 1 25 tubing into the bolster holes . The precise length is unimpOItant, as it wi l l be adjusted later.
This leaves only the holes in the car's ends , which can be plugged with .047 styrene rod . Sand the installation smooth . The P&LE welded a plate on each end to cover the holes; this can be simulated with a piece of styrene sheet if you wish. Prototype photographs of the cars indicate that this treatment was not done in all cases, however.
Now let's move to the Walthers kit . In " part I , " remove all of the walkways and the truck bosses. [n " part 2 , " remove all of the flanges on the outside of the frame and also the center connecting bar. File and sand these parts to fit inside the AHM gondola body.
I
[n Walthers " part 3 , " cut the bolsters off on the inside edges , so that the on1y portion of the center beam that remains is the part equal to the floor weight.
Now sand and smooth the pieces (parts I , 2, and 3) making sure everything fits . Then glue the pieces together, fi tting them inside the gon body . You ' l l notice a gap at each end on the inside of the car. Fil l it with some Evergreen Sca le M ode l s # 8 2 1 0 2x I 0 stock.
After the parts are secure , let ' s focus on the end platforms . The running boards must be removed along with the cushion coupler support, making certain that the extensions of the end frames are NOT removed from either side of the car.
Now remove the molded-on grabirons. O n the reb u i l t cars , two grabi rons are placed on the left end of each car side, while a ladder is placed on each right end. Refer to the magazine article and/or the photos accompanying this article for specific locations.
Now take the previously-removed ends from the Walthers frame , and cut the cushion underframe assembly away where it joins the bolster. This, in turn, is cemented to the bottom of the car. It can be secured with a smal l screw, and a separate piece of styrene can be cemented on top of this assembly, cosmetically hiding the screw .J! Ed San icky is an Erie-Lackawanna modeler at heart . A native Clevelander, he attended junior high school just a block from the E-L's East 55th Street Shops. He's since built about two dozen E-L diesels and far more freight cars . Ed shares his hobby with his son, Ed, Junior. They' re often seen at area flea markets and tracks ide with cameras in hand.
For more: • Prototype Modeler . . . . December 1 986 • " Rebuilding an AHM Coil
Car for the Pittsburgh & Lake Erie . . . . . . by Kevin N . Tomasic
Time Capsule If you model any time between 1966 and
present day, you can "justify" this piece of equipment on your layout.
August 1 990
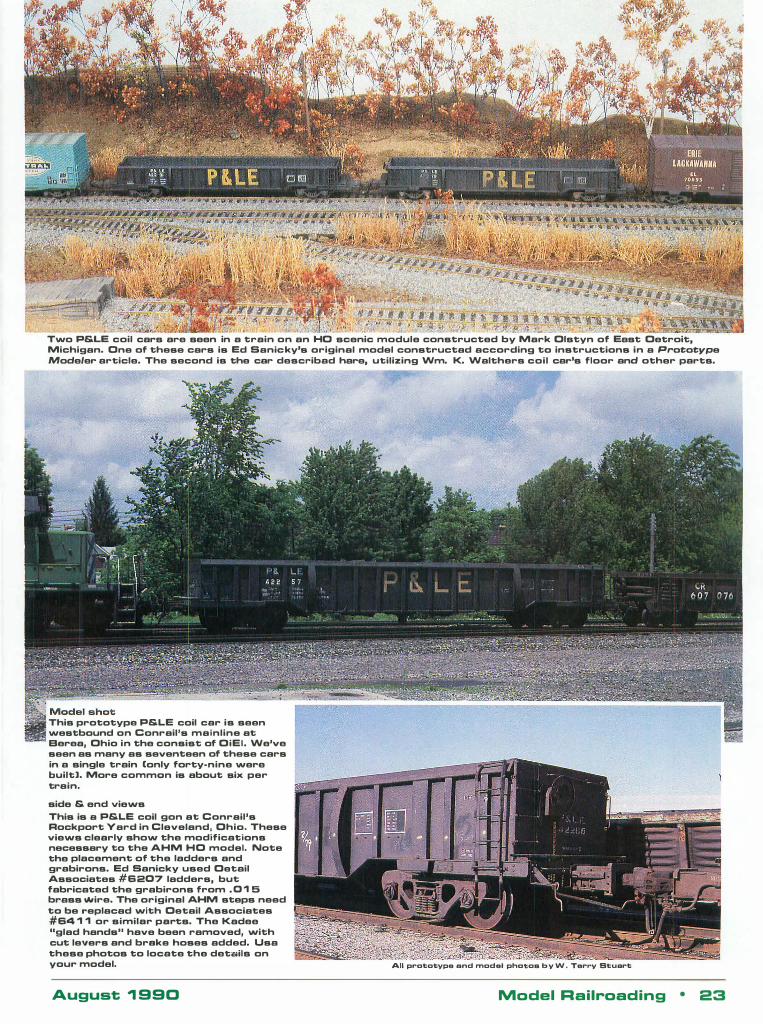
Two P&LE coil cars are seen in a train on an HO scenic module constructed by Mark Olstyn of East Oetroit, Michigan. One of these cars is Ed Sanic ky's original model constructad according to instructions in a Prototype Modeler article. The second is the car describad hare, utilizing Wm. K. Walthers coil car's floor and other parts.
This prototype P&LE coil car is seen westbound on Conrail's mainline at Berea, Ohio in the consist of OiEI. We've seen as many as seventeen of these cars in a single train [only forty·nine were built). More cornman is about six per train.
side & end views This is a P&LE coil gon at Conrail's Rockport Yard in Cleveland, Ohio. These views clearly show the modifications necessary to the AHM HO model. Note the placement of the ladders and grabirons. Ed Sanicky used Oetail Associates #6207 ladders, but fabricated the grabirons from .01 5 brass wire. The original AHM steps need to be replacad with Oetail Associates #6411 or similar parts. The Kadee "glad hands" have been ramoved, with cut levers and brake hoses added. Usa these photos to locate the details on your model.
August ., 990
All prototype and model photos b y W . Terry Stuart
Model Railroading • 23
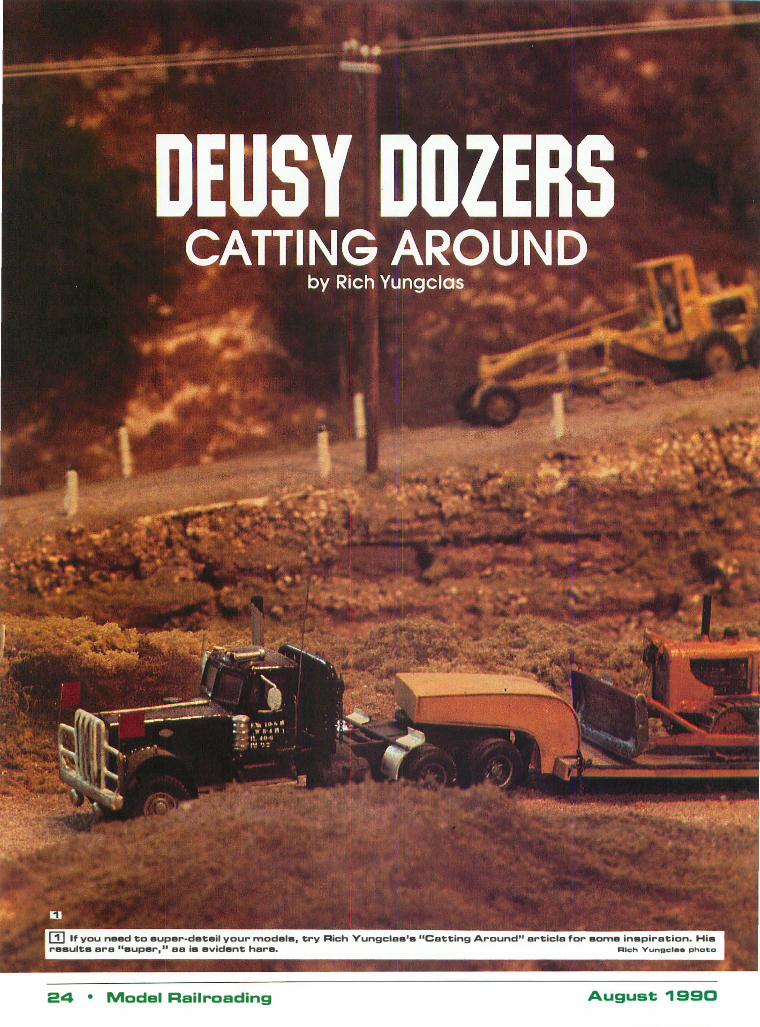
m If you need to euper·deteil your ",odels, try Rich Yungclas's "Catting Around" articla for so",e inspiration. His results ara "super, " aa is evident hare. Rich Vungclae photo
24 • Model Rail roading August 1 990
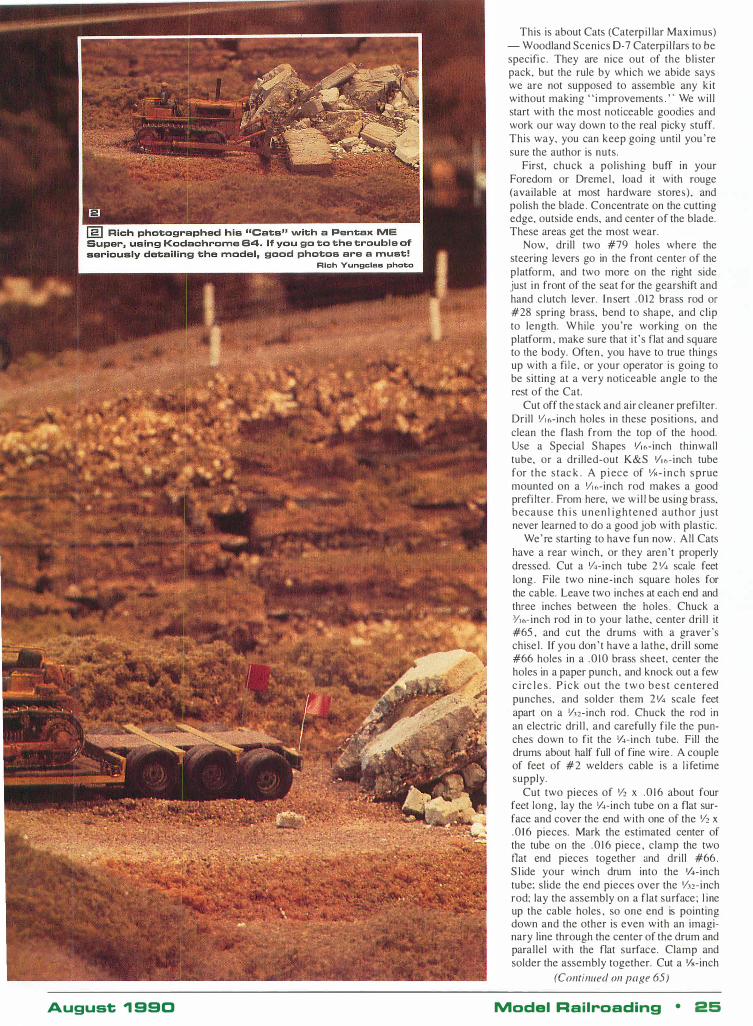
August ., 990
This is about Cats (Caterpil lar Maximus) - Woodland Scenics 0-7 Caterpil lars to be specific . They are nice out of the blister pack, but the rule by which we abide says we are not supposed to assemble any kit without making "improvements . " We will start with the most noticeable goodies and work our way down to the real picky stuff. This way, you can keep going until you 're sure the author is nuts.
First, chuck a polishing buff in your Foredom or Dremel , load it with rouge (available at most hardware stores) , and polish the blade . Concentrate on the cutting edge, outside ends, and center of the blade. These areas get the most wear.
Now, drill two #79 holes where the steering levers go in the front center of the platform, and two more on the right side just in front of the seat for the gearshift and hand clutch lever. Insert .0 12 brass rod or #28 spring brass, bend to shape, and clip to length. While you're working on the platform , make sure that i t 's flat and square to the body. Often, you have to true things up with a fi le , or your operator is going to be sitting at a very noticeable angle to the rest of the Cat.
Cut off the stack and air cleaner prefi lter. Drill Y' 6-inch holes in these positions, and clean the flash from the top of the hood. Use a Special Shapes '/'6-inch thinwall tube, or a drilled-out K&S '/' b-inch tube for the s tac k . A p i ece of YH- i n c h s prue mounted on a Y'6-inch rod makes a good prefi lter. From here, we wi l l be using brass, because t h i s unenl ightened author j ust never learned to do a good job with plastic.
We' re starting to have fun now . All Cats have a rear winch, or they aren't properly dressed. Cut a Y4-inch tube 2 Y. scale feet long . File two nine-inch square holes for the cable. Leave two inches at each end and three inches between the holes . Chuck a 3/'6- inch rod in to your lathe, center dri l l it #65 , and cut the drums with a graver's chisel . If you don ' t have a lathe, drill some #66 holes in a .0 10 brass sheet, center the holes in a paper punch, and knock out a few c irc l e s . P i c k out the t w o best centered punches, and solder them 2 '/. scale feet apart on a '/32-inch rod . Chuck the rod in an electric dri l l , and carefully file the punches down to fit the y.-inch tube. Fill the drums about half full of fine wire . A couple of feet of #2 welders cable is a l i fetime supply.
Cut two pieces of Y2 x . 0 1 6 about four feet long, lay the y.-inch tube on a flat surface and cover the end with one of the Y2 x .0 16 pieces. Mark the estimated center of the tube on the . 0 1 6 piece , clamp the two flat end pieces together and drill #66 . S l ide your winch drum into the 'I.-inch tube; slide the end pieces over the Y32-inch rod; lay the assembly on a flat surface ; l ine up the cable holes , so one end is pointing down and the other is even with an imaginary line through the center of the drum and parallel w ith the flat surface. Clamp and solder the assembly together. Cut a y.-inch
(Continued on page 65)
Model Railroading • 25
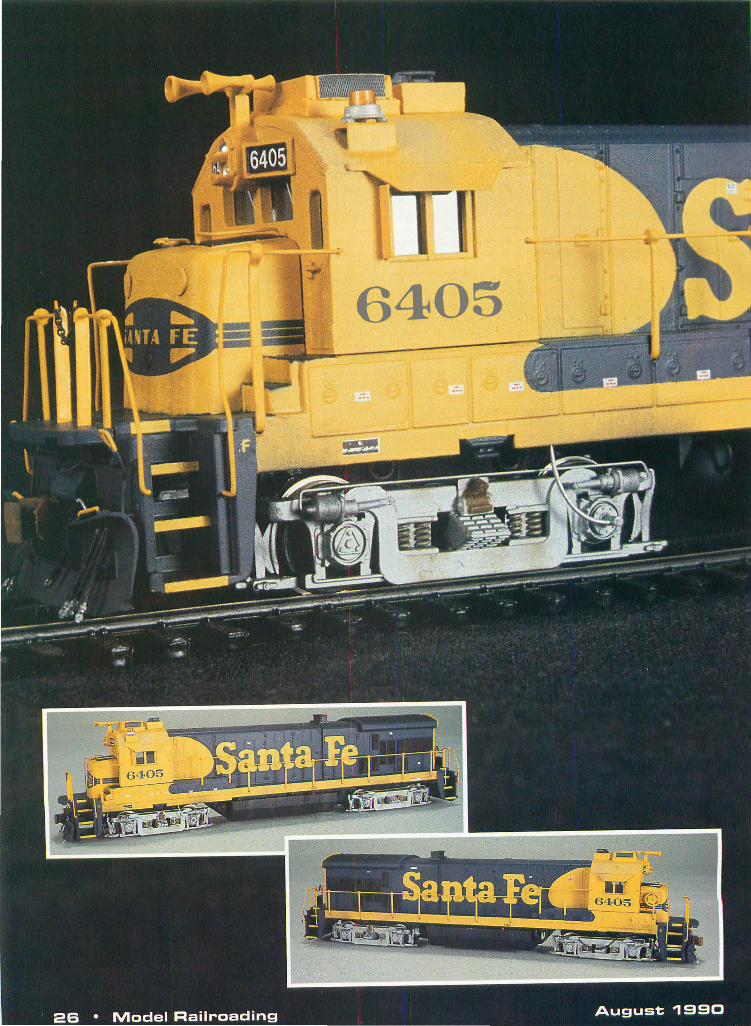
6405
--------��--------- -----
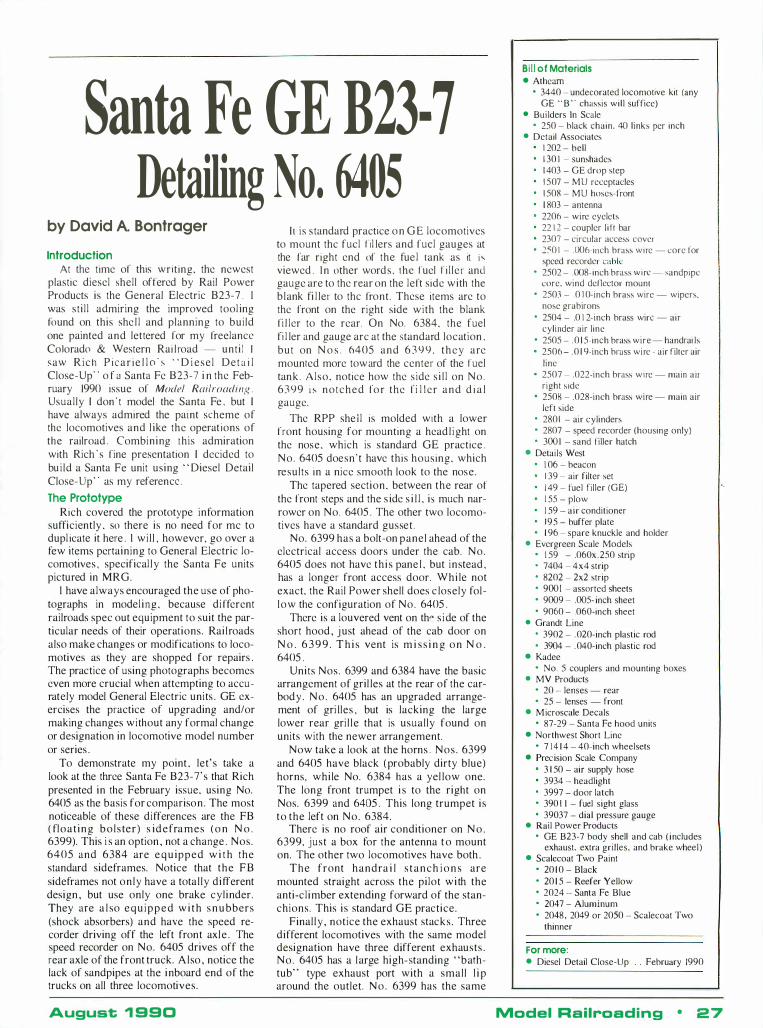
Santa Fe GE B23· 7 Detailing No. 6405
by David A Bontrager
Introduction At the time of this writing, the newest
plastic diesel shell offered by Rail Power Products is the General Electric B23-7 . I was sti l l admiring the improved tool ing found on this she l l and planning to build one painted and lettered for my freelance Colorado & Western Rai l road - unti l I saw Rich P i c a r i e l l o ' s " D i ese l Det a i l Close-Up" o f a Santa Fe B 23-7 i n the February 1990 issue of Model Railroading . Usually I don ' t model the Santa Fe . but I have always admired the paint scheme of the locomotives and l ike the operat ions of the railroad . Combining Ihis admiration with Rich ' s fine presentation I decided to bu i ld a Santa Fe unit using " Diesel Detail Close-Up" as my reference .
The Prototype Rich covered the prototype information
sufficiently , so there is no need for mc to dupl icate it here . I wi l l , however, go over a few items pertaining to General Electric locomotives , specifical ly the Santa Fe units pictured in MRG.
I have always encouraged the use of photographs in model ing, because di fferent railroads spec out equipment to suit the particular needs of their operations. Rai lroads also make changes or modifications to locomotives as they are shopped for repairs . The practice of using photographs becomes even more crucial when attempting to accurately model General Electric units . GE exercises the practice of upgrading and/or making changes without any formal change or designation in locomotive model number or series .
To demonstrate my point , let' s take a look at the three Santa Fe B23-7' s that Rich presented in the February issue, using No. 6405 as the basis for comparison . The most noticeable of these differences are the FB ( float ing bo l s ter) s id e fra mes ( o n N o . 6399). This i s an option , not a change . Nos. 6405 and 6384 are e q u ipped w i t h the standard sideframes. Notice that the FB sideframes not only have a total ly different design , but use only one brake cyl inder. They are a l so e q u i p p e d w i t h s n u bbers (shock absorbers) and have the speed recorder driving off the left front axl e . The speed recorder on No. 6405 drives off the rear axle of the front truck. Also , notice the lack of sandpipes at the inboard end of the trucks on all three locomotives.
August 1 990
I t i s s tandard practice o n G E locomotives to mount thc fucl fil lers and fucl gauges at the far right end of the fue l lank as it i s
viewed . I n other words . the fuel f i l ler and gauge are to the rear on the left side with the blank fi l ler to thc front. These items are to the front on the right side with the blank fi l ler to the rear. On No. 6384. the fuel fi l ler and gauge arc at the standard location . but on N o s . 6405 and 6 3 9 9 . they are mounled more toward the center of the fuel tank . Also. notice how the s ide s i l l on No. 6399 i s notched fo r the fi l l er and d i a l gauge.
The RPP she l l is molded with a lower front housing for mounting a head l ight on the nose, which is standard GE practice . No. 6405 doesn't have this housing, which results in a nice smooth look to the nose.
The tapered section. between the rear of the front steps and the s ide s i l l , is much narrower on No. 6405 . The other two locomotives have a standard gusset .
No. 6399 has a bolt-on panel ahead of the electrical access doors under the cab. No . 6405 does not have th i s pane l , but instead , has a longer front access door. Whi le not exact, the Rail Power shell does c losely fol low the configuration of No. 6405 .
There is a louvered vent on thp s ide of the short hood , j ust ahead of the cab door on N o . 6 3 9 9 . T h i s vent is m i s s i n g o n N o . 6405 .
Units Nos. 6399 and 6384 have the basic arrangement of gril les at the rear of the carbody. N o . 6405 has an upgraded arrangement of gri lles , but is lacking the large lower rear gri l le that is usually found on units with the newer arrangement.
Now take a look at the horns . Nos . 6399 and 6405 have black ( probably dirty blue) horns, whi le No. 6384 has a yel low one. The long front trumpet i s to the right on Nos. 6399 and 6405 . This long trumpet is to the left on No . 6384.
There is no roof air conditioner on N o . 6399, just a box for the antenna t o mount on. The other two locomotives have both .
The front handra i l s tanch i o n s are mounted straight across the pilot with the anti-c l imber extending forward of the stanchions. This is standard GE practice.
Final l y , notice the exhaust stacks . Three different locomotives with the same model designation have three different exhausts . No. 6405 has a large high-standing "bathtub" type exhaust port with a small l i p around the outlet. N o . 6399 has the same
Bill of Materials • Athearn
• 3440 - undecorated locomotive kit (any GE " B " chassis wil l suffice)
• Builders In Scale • 250 - black chain. 40 links per inch
• Detai I Associatcs 1 202 - bell 1 30 I - sunshades 1 403 - G E drop step 1 507 - M U rcccptacles 1 508 - MU hoscs-front 1 803 - antenna 2206 - wire eyelets 22 1 2 - couplcr l i l1 bar 2307 - circular access covcr 250 1 - .OO6-inch brass wire - core for speed recordcr cable
• 2502 - . 008- inch brass wire - sandplpe core. wind dcflcctor mount
• 2503 - .0 t o-inch brass wire - wipers. nose grabi rons
• 2504 - .0 1 2-inch brass wirc - air cylinder air l ine
• 2505 - . 0 1 5-inch brass wire - handrai ls 2506 - . 0 1 9-inch brass wirc - air filter air line 2507 - .022-inch brass wife - main air right sidc
• 2508 - .028-inch brass wire - main air left side
• 280 I - air cylinders • 2807 - speed recorder (housing only) • 300 I - sand filler hatch
• Details West 1 06 - beacon 1 39 - air filter set 1 49 - fuel filler (GE) 1 55 - plow 1 59 - air conditioner 1 9 5 - buffer plate 1 96 - spare knuckle and holder
• Evergreen Scale Models • 1 59 - .060x . 250 strip • 7404 - 4x4 strip • 8202 - 2x2 strip • 900 I - assorted sheets • 9009 - .005- inch sheet • 9060 - .060-inch sheet
• Grandt Line • 3902 - . 020-inch plastic rod • 3904 - . 040-inch plastic rod
• Kadee • NO. 5 couplers and mounting boxes
• MY Products • 20 - lenses - rear • 25 - lenses - front
• M icroscale Decals • 87-29 - Santa Fe hood units
• Northwest Short Line • 7 1 4 1 4 - 40-inch wheel sets
• Precision Scale Company 3 1 50 - air supply hose
• 3934 - headlight • 3997 - door latch • 390 I I - fuel sight glass • 39037 - dial pressure gauge
• Rail Power Products • GE B23-7 body shell and cab (includes
exhaust. extra grilles, and brake wheel) • Scalccoat Two Paint
• 20 1 0 - Black • 20 1 5 - Reefer Yellow • 2024 - Santa Fe Blue • 2047 - Aluminum • 2048 , 2049 or 2050 - Scalecoat Two
thinner
For more: • Diesel Detail Close-Up . . February 1990
Model Railroading • 2 7
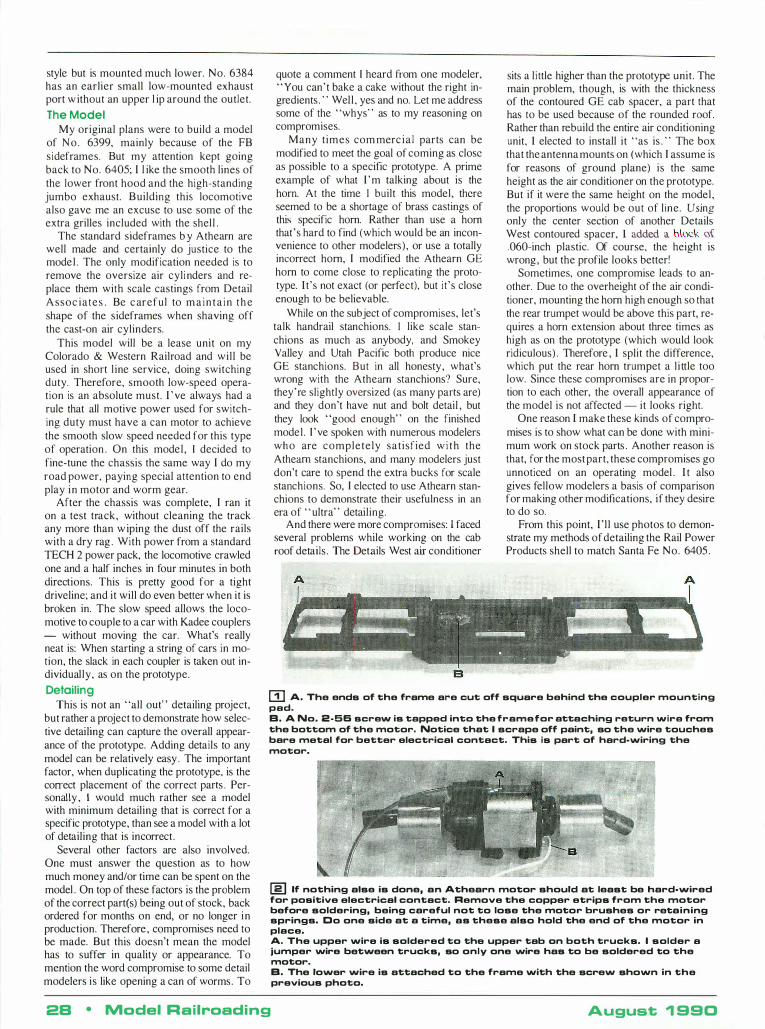
style but is mounted much lower. No. 6384 has an earlier small low-mounted exhaust port w ithout an upper l ip around the outlet.
The Model My original plans were to build a model
of No . 6399, mainly because of the FB sideframes. But my attention kept going back to No. 6405; I l ike the smooth lines of the lower front hood and the high-standing jumbo exhaust. Building this locomotive also gave me an excuse to use some of the extra grilles included with the shel l .
The standard sideframes b y Athearn are well made and certainly do justice to the model . The only modification needed is to remove the oversize air cylinders and replace them with scale castings from Detail Assoc iates . Be c areful to m a i n t a i n t h e shape of the sideframes when shaving off the cast-on air cylinders.
This model will be a lease unit on my Colorado & Western Railroad and will be used in short l ine service, doing switching duty. Therefore, smooth low-speed operation is an absolute must. I ' ve always had a rule that all motive power used for switching duty must have a can motor to achieve the smooth slow speed needed for this type of operation . On this model , I decided to fine-tune the chassis the same way I do my road power, paying special attention to end play in motor and worm gear.
After the chassis was complete, I ran it on a test track, without cleaning the track any more than w iping the dust off the rails with a dry rag . With power from a standard TECH 2 power pack, the locomotive crawled one and a half inches in four minutes in both directions. This is pretty good for a tight driveline; and it will do even better when it is broken in. The slow speed allows the locomotive to couple to a car with Kadee couplers - without moving the car. What's really neat is: When starting a string of cars in motion, the slack in each coupler is taken out individually, as on the prototype.
Detailing This is not an "all out" detailing project,
but rather a project to demonstrate how selective detailing can capture the overall appearance of the prototype. Adding details to any model can be relatively easy . The important factor, when duplicating the prototype, is the con'ect placement of the correct parts . Personally , 1 would much rather see a model with minimum detailing that is correct for a specific prototype, than see a model with a lot of detailing that is incorrect .
Several other factors are also involved. One must answer the question as to how much money and/or time can be spent on the model . On top of these factors is the problem of the correct partes) being out of stock, back ordered for months on end, or no longer in production. Therefore, compromises need to be made. But this doesn't mean the model has to suffer in quality or appearance. To mention the word compromise to some detail modelers is like opening a can of worms. To
quote a comment I heard from one modeler, "You can't bake a cake without the right ingredients . " Well , yes and no. Let me address some of the "whys" as to my reasoning on compromises.
Many t imes com merc ia l parts can be modified to meet the goal of coming as close as possible to a specific prototype. A prime example of what I 'm talking about is the horn. At the time I built this model, there seemed to be a shortage of brass castings of this specific horn. Rather than use a hom that 's hard to find (which would be an inconvenience to other modelers), or use a totally incorrect horn, I modified the Athearn GE horn to come close to replicating the prototype. It 's not exact (or perfect), but it 's close enough to be believable.
While on the subject of compromises, let's talk handrail stanchions. I like scale stanchions as much as anybody, and Smokey Valley and Utah Pacific both produce nice GE stanchions. But in all honesty, what's wrong with the Athearn stanchions? Sure, they're slightly oversized (as many parts are) and they don't have nut and bolt detail , but they look "good enough" on the finished model . I ' ve spoken with numerous modelers who are completely satisfied w i t h the Athearn stanchions, and many modelers just don't care to spend the extra bucks for scale stanchions. So, I elected to use Athearn stanchions to demonstrate their usefulness in an era of " ultra" detailing.
And there were more compromises: 1 faced several problems while working on the cab roof details . The Details West air conditioner
sits a l ittle higher than the prototype unit. The main problem, though, is with the thickness of the contoured GE cab spacer, a part that has to be used because of the rounded roof. Rather than rebuild the entire air conditioning unit, I elected to install it "as is . " The box that the antenna mounts on (which I assume is for reasons of ground plane) is the same height as the air conditioner on the prototype. But if it were the same height on the model, the proportions would be out of l ine. Using only the center section of another Details West contoured spacer, 1 added a block ()\ .060-inch plastic. Of course, the height is wrong, but the profile looks better!
Sometimes, one compromise leads to another. Due to the overheight of the air conditioner, mounting the horn high enough so that the rear trumpet would be above this part, requires a horn extension about three times as high as on the prototype (which would look ridiculous) . Therefore , I split the difference, which put the rear horn trumpet a l i ttle too low. Since these compromises are in proportion to each other, the overall appearance of the model is not affected - it looks right.
One reason I make these kinds of compromises is to show what can be done with minimum work on stock parts . Another reason is that, for the most part, these compromises go unnoticed on an operating model . I t also gives fellow modelers a basis of comparison for making other modifications, if they desire to do so.
From this point, I ' l l use photos to demonstrate my methods of detailing the Rail Power Products shell to match Santa Fe No. 6405 .
m A. The ends of the frame ar-e cut off square behind the coupler mounting pad. B. A No. 2·56 screw is tapped into the frame for attaching return wire from the bottom of the motor. Notice that I scrape off paint, so the wire touches bare metal for better electrical contact. This is part of hard·wiring the motor.
[g] If nothing alse is done, an Athearn motor should at least be hard·wired for positive electrical contact. Remove the copper etrips from the motor before soldering, being careful not to lose the motor brushes or retaining springs. Co one side at a time, as these also hold the end of the motor in place. A. The upper wire is soldered to the upper tab on both trucks. I solder a jumper wire between trucks, so only one wire has to be soldered to the motor. B. The lower wire is attached to the frame with the screw shown in the previous photo.
2B • Model Railroading August 1 990
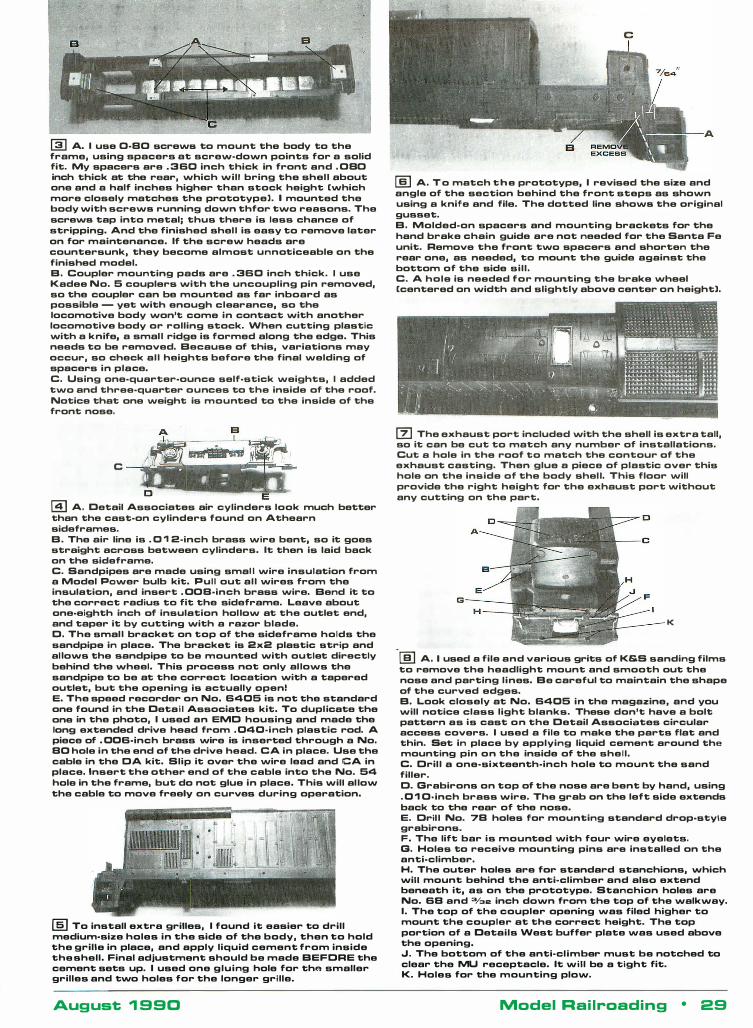
� A. I use O-BO screlNS to mount the body to the frame, using spacers at screlN-dolNn points for a solid fit. My spacers are . 3 60 inch thick in front and . OBO inch thick at the raar, lNhich lNiII bring the she" about one and a half inches higher than stock height [lNhich more closely matches the prototypel. I mounted the body lNith screlNS running dOlNn thfor tlNO reasons. The screlNS tap into metal; thus there is less chance of stripping. And the finished she" is easy to remove later on for maintenance. If the screlN heads are countersunk, they become almost unnoticeable on the finished model. B. Coupler mounting pads are . 360 inch thick. I use Kadee No. 5 couplers lNith the uncoupling pin removed, so the coupler can be mounted as far inboard as possible - yet lNith enough clearance, so the locomotive body lNon't come in contact lNith another locomotive body or rolling stock. When cutting plastic lNith a knife, a sma" ridge is formed along the edge. This needs to be removed. Because of this, variations may occur, so check a" heights before the final lNelding of spacers in place. C. Using one-quarter·ounce self-stick lNeights, I added tlNO and three-quarter ounces to the inside of the roof. Notice that one lNeight is mounted to the inside of the front nose.
C
� A. Detail Associates air cylinders look much better than the cast-on cylinders found on Athearn sideframes. B. The air line is . 0 1 2-inch brass lNire bent, so it goes straight across betlNeen cylinders. It then is laid back on the sideframe. C. Sandpipes are made using sma" lNire insulation from a Model POlNer bulb kit. Pull out a" lNires from the insulation, and insert . OOB-inch brass lNire. Bend it to the correct radius to fit the sideframe. Leave about one·eighth inch of insulation ho"olN at the outlet end, and taper it by cutting lNith a razor blade. O. The sma" bracket on top of the sideframe holds the sandpipe in place. The bracket is 2x2 plastic strip and a"olNs the sandpipe to be mounted lNith outlet directly behind the lNheel. This process not only a"olNs the sandpipe to be at the correct location lNith a tapered outlet, but the opening is actually open! E. The speed recorder on No. 6405 is not the standard one found in the Deta i l Associates kit. To dupl icate the one in the photo, I used an EMO housing and made the long extended drive head from . 040·i nch plastic rod. A piece of . 006-inch brass lNire is inserted through a No. BO hole in the end of the drive head. CA in place. Use the cable in the OA kit. Slip it over the lNire lead and CA in place. Insert the other end of the cable into the No. 54 hole in the frame, but do not glue in place. This lNili a"olN the cable to move freely on curves during operation.
[§] To install extra grilles, I found it easier to drill medium-size holes in the side of the body, then to hold the grille in place, and apply liquid cement from inside the shell. Final adjustment should be made BEFORE the cement sets up. I used one g l u i ng hole for the smaller grilles and tlNO holes for the longer grille.
August 1 990
rID A. T o match t h e prototype, I revised the size and angle of the section behind the front steps as sholNn using a knife and file. The dotted line sholNS the original gusset. B. Molded-on spacers and mounting brackets for the hand brake chain guide are not needed for the Santa Fe unit. Remove the front tlNO spacers and shorten the rear one, as needed, to mount the guide against the bottom of the side sil l . C. A hole is needed for mounting the brake lNheel [centered on lNidth and slightly above center on height).
[2] The exhaust port included lNith the shell is extra tall, so it can be cut to match any number of installations. Cut a hole in the roof to match the contour of the exhaust casting. Then glue a piece of plastic over this hole on the inside of the body she". This floor lNiII provide the right height for the exhaust port lNithout any cutting on the part.
K
lID A. I used a file and various grits of K&S sanding films to remove the headlight mount and smooth out the nose and parting l i nes. Be careful to maintain the shape of the curved edges. B. Look closely at No. 6405 in the magazine, and you lNiII notice class light blanks. These don't have a bolt pattern as is cast o n the Detail Associates circular access covers. I used a file to make the parts flat and thin. Set in place by applying liquid cement around the mounting pin o n the inside of the she". C. Ori" a one-sixteenth-inch hole to mount the sand filler. O. Grabirons on top of the nose are bent by hand, using . 0 1 O· inch brass lNire. The grab on the left side extends back to the rear of the nose. E. Ori" No. 7B holes for mounting standard drop'style grabirons. F. The lift bar is mounted lNith four lNire eyelets. G. Holes to receive mounting pins are installed on the anti-climber. H. The outer holes are for standard stanchions, lNhich lNiH mount behind the anti-climber and also extend beneath it, as on the prototype. Stanchion holes are No. 6B and 3/3e inch dOlNn from the top of the lNalklNay. I. The top of the coupler opening lNas filed higher to mount the coupler at the correct height. The top portion of a Details West buffer plate lNas used above the opening. oJ. The bottom of the anti-cl imber must be notched to clear the MU receptacle. It lNiH be a tight fit. K. Holes for the mounting plolN.
Model Rai l roading • 29
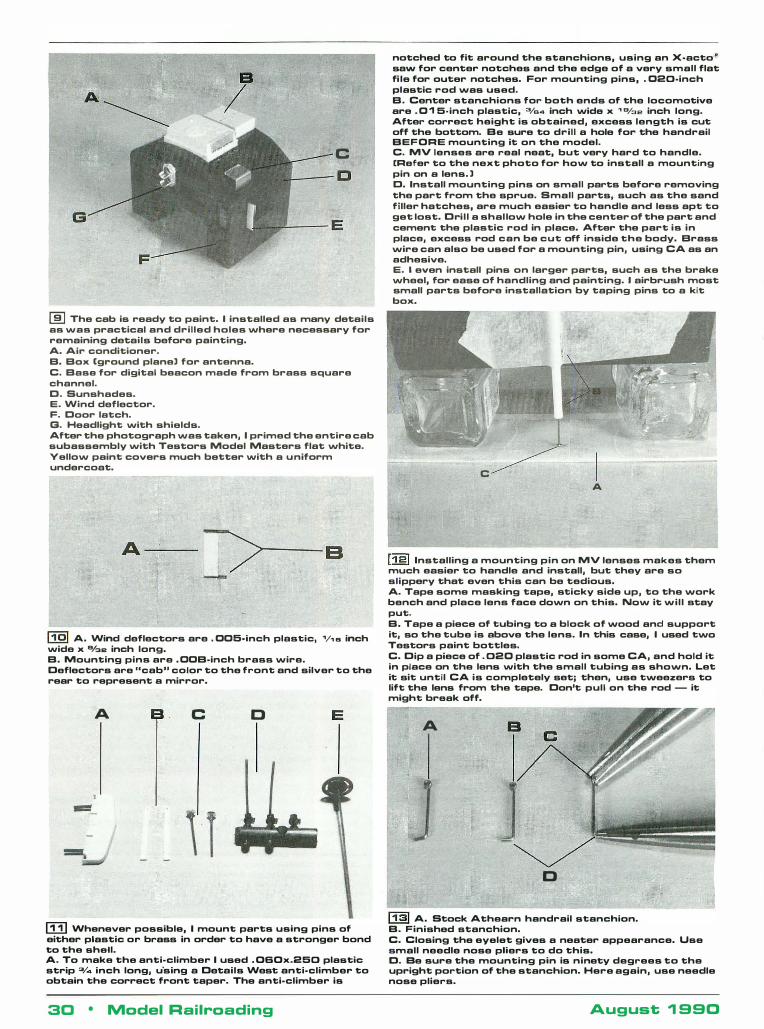
B
/ c
_-- 0
G
[ID The cab is ready to paint. I installed as many details as lNas practical and drilled holes lNhere necessary for remaining details before painting. A. Air conditioner. B. Box (ground plane] for antenna. C. Base for digital beacon made from brass square channel. D. Sunshades. E. Wind deflector. F. Door latch. G. Headlight lNith shields. After the photograph lNas taken, I primed the entire cab subassembly lNith Testors Model Masters flat lNhite. VeliolN paint covers much better lNith a u niform undercoat.
A ---
-
1101 A. Wind deflectors are . 00B·inch plastic, V' s inch lNide x She inch long. B. Mounting pins are . 00B·inch brass lNire. Deflectors are "cab" color to the front and silver to the rear to represent a mirror.
A s . c o E
' 1 [IT) Whenever possible, I mount parts using pins of either plastic or brass in order to have a stronger bond to the shell. A. To make the anti·climber I used . OBOx.2S0 plastic strip 3/ .. inch long, u'sing a Details West anti·climber to obtain the correct front taper. The anti·climber is
3D • Model Railroading
notched to fit around the stanchions, using an X·acto./! saw for center notches and the edge of a very small flat fi le for outer notches. For mounting pins, . 020·inch plastic rod lNas used. B. Center stanchions for both ends of the locomotive are . 0 1 S· inch plastic, 3/S4 inch lNide x ' She inch long. After correct height is obtained, excess length is cut off the bottom. Be sure to drill a hole for the handrail BEFORE mounting it on the model. C. MV lenses are real neat, but very hard to handle. (Refer to the next photo for hOlN to install a mounting pin on a lens. ] D. Install mounting pins on small parts before removing the part from the sprue. Small parts, such as the sand filler hatches, are much easier to handle and less apt to get lost. Dri l l a shal iolN hole in the center of the part and cement the plastic rod in place. After the part is in place, excess rod can be cut off inside the body. Brass lNire can also be used for a mounting pin, using CA as an adhesive. E. I even install pins on larger parts, such as the brake lNheel, for ease of handling and painting. I airbrush most small parts before installation by taping pins to a kit box.
C
A
11 21 Installing a mounting pin on MV lenses makes them much easier to handle and install, but they are so slippery that even this can be tedious. A. Tape some masking tape, sticky side up, to the lNork bench and place lens face dOlNn on this. NOlN it lNil i stay put. B. Tape a piece of tubing to a block of lNood and support it, so the tube is above the lens. In this case, I used tlNO Testors paint bottles. C. Dip a piece of . 020 plastic rod in some CA, and hold it in place on the lens lNith the small tubing as sholNn. Let it sit until CA is completely setj then, use tlNeezers to lift the lens from the tape. Don't pull on the rod - it might break off.
A
o
1131 A. Stock Athearn handrail stanchion. B. Finished stanchion. C. Closing the eyelet gives a neater appearance. Use small needle nose pliers to do this. D. Be sure the mounting pin is ninety degrees to the upright portion of the stanchion. Here again, use needle nose pliers.
August 1 990
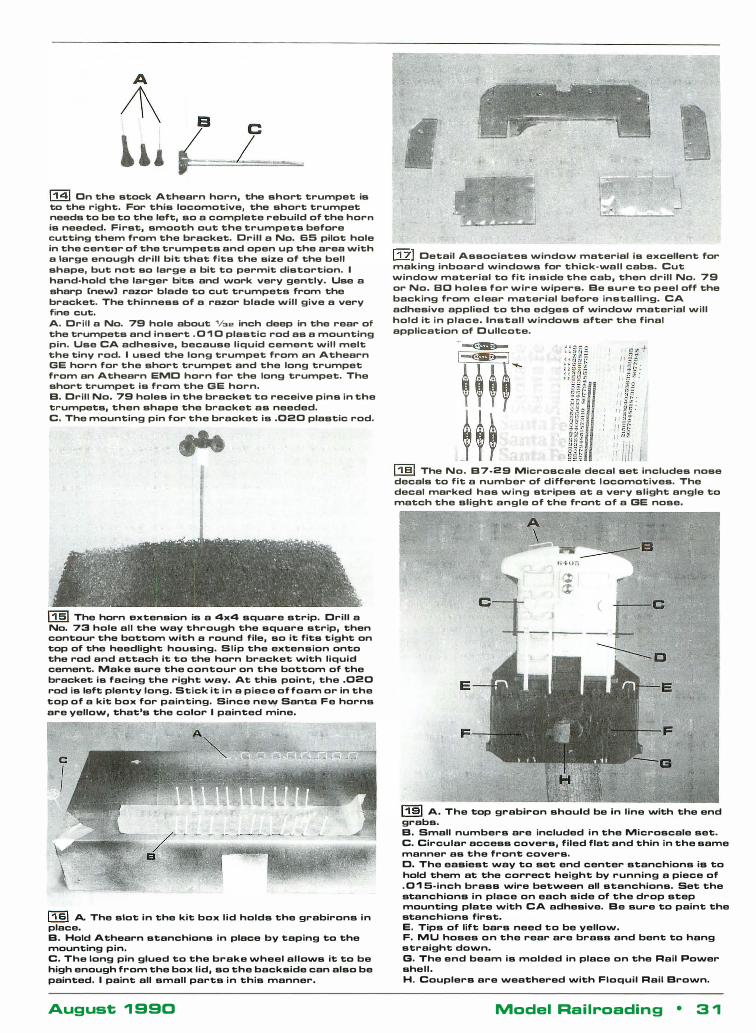
1141 On the stock Athearn horn, the short trumpet is to the right. For this locomotive, the short trumpet needs to be to the left, so a complete rebuild of the horn is needed. First, smooth out the trumpets before cutting them from the bracket. Oril l a No. 65 pilot hole in the center of the trumpets and open up the area with a large enough drill bit that fits the size of the bell shape, but not so large a bit to permit distortion. I hand·hold the larger bits and work very gently. Use a sharp (new) razor blade to cut trumpets from the bracket. The thinness of a razor blade will give a very fine cut. A. Crill a No. 79 hole about 1/"2 inch deep in the rear of the trumpets and insert . 0 1 0 plastic rod as a mounting pin. Use CA adhesive, because liquid cement will melt the tiny rod. I used the long trumpet from an Athearn GE horn for the short trumpet and the long trumpet from an Athearn EMC horn for the long trumpet. The short trumpet is from the GE horn. B. Crill No. 79 holes in the bracket to receive pins in the trumpets, then shape the bracket as needed. C. The mounting pin for the bracket is .020 plastic rod.
11 51 The horn extension is a 4x4 square strip. Crill a No. 73 hole all the way through the square strip, then contour the bottom with a round file, so it fits tight on top of the heedlight housing. Slip the extension onto the rod and attach it to the horn bracket with liquid cement. Make sure the contour on the bottom of the bracket is facing the right way. At this point, the .020 rod is left plenty long. Stick it in a piece of foam or in the top of a kit box for painting. Since ne"Y Santa Fe horns are yellow, that's the color I painted mine.
11 61 A. The slot in the kit box l id holds the grabirons in place. B. Hold Athearn stanchions in place by taping to the mounting pin. C. The long pin glued to the brake wheel allows it to be high enough from the box lid, so the backside can also be painted. I paint all small parts in this manner.
August 1 990
11 71 Cetail Associates window material is excellent for making inboard windows for thick·wall cabs. Cut window material to fit inside the cab, then drill No. 79 or No. BO holes for wire wipers. Be sure to peel off the backing from clear material before installing. CA adhesive applied to the edges of window material will hold it in place. Install windows after the final application of Cullcote.
11 BI The No. B7·29 Microscale decal set includes nose decals to fit a number of different locomotives. The decal marked has wing stripes at a very slight angle to match the slight angle of the front of a GE nose.
c
o
E
F
1191 A. The top grabiron should be in line with the end grabs. B. Small numbers are included in the Microscale set. C. Circular access covers, filed flat and thin in the same manner as the front covers. C. The easiest way to set end center stanchions is to hold them at the correct height by running a piece of . 0 1 5·inch brass wire between all stanchions. Set the stanchions in place on each side of the drop step mounting plate with CA adhesive. Be sure to paint the stanchions first. E. Tips of lift bars need to be yellow. F. MU hoses on the rear are brass and bent to hang straight down. G. The end beam is molded in place on the Rail Power shell. H. Couplers are weathered with Floquil Rail Brown.
Model Rai l roadin g • 3 1
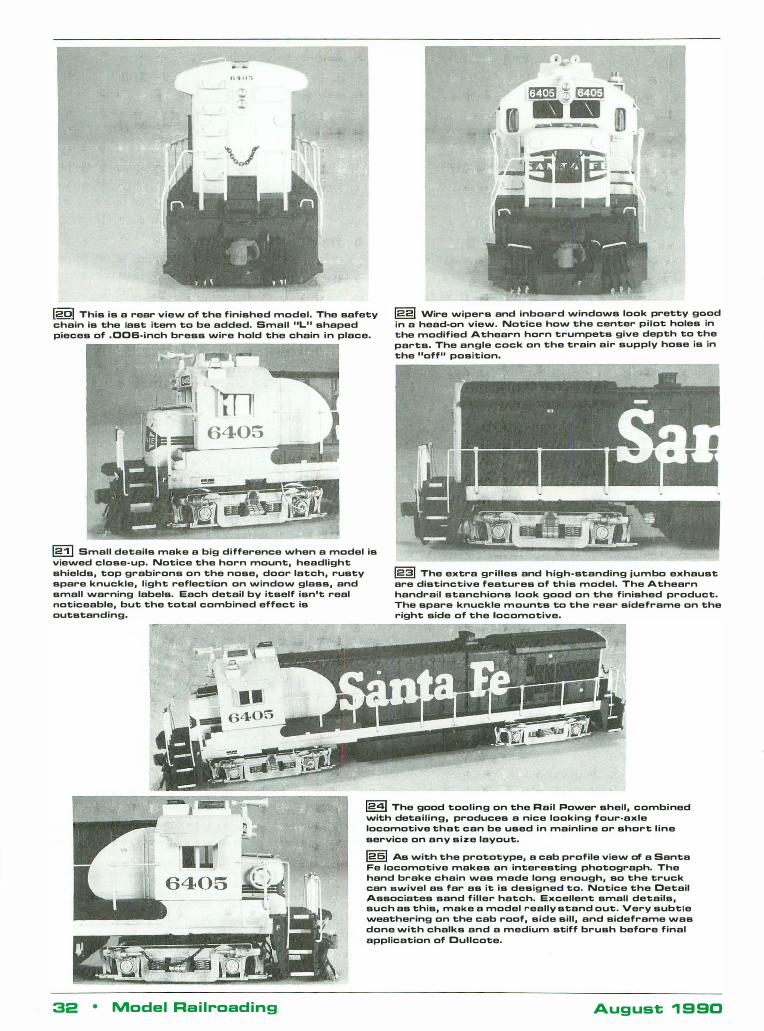
1201 This is a rear view of the finished model. The safety chain is the last item to be added. Small "L" shaped pieces of .00S·inch bress wire hold the chain in place.
1221 Wire wipers and inboard windows look pretty good in a head·on view. Notice how the center pilot holes in the modified Athearn horn trumpets give depth to the parts. The angle cock on the train air supply hose is in the "offJJ position.
ml 6405
121\ Small details make a big difference when a model is viewed close·up. Notice the horn mount, headlight shields, top grabirons on the nose, door latch, rusty spare knuckle, light reflection on window glass, and small warning labels. Each detail by itself isn't real noticeable, but the total combined effect is outstanding.
1231 The extra grilles and high·standing jumbo exhaust are distinctive features of this model. The Athearn handrail stanchions look good on the finished product. The spare knuckle mounts to the rear sideframe on the right side of the locomotive.
32 ·
r--------------------------------
Model Ra i l road ing
� The good tooling on the Rail Flower shell, combined with detailing, produces a nice looking four·axle locomotive that can be used in mainline or short l ine service on any size layout.
125\ As with the prototype, a cab profile view of a Santa Fe locomotive makes an interesting photograph. The hand brake chain was made long enough, so the truck can B\Nivel aa far as it is designed to. Notice the Detail Associates sand filler hatch. Excellent small details, such as this, make a model really stand out. Very subtle weathering on the cab roof, side sill, and sideframe was done with chalks and a medium stiff brush before final application of Dullcote.
Aug ust 1 9 90
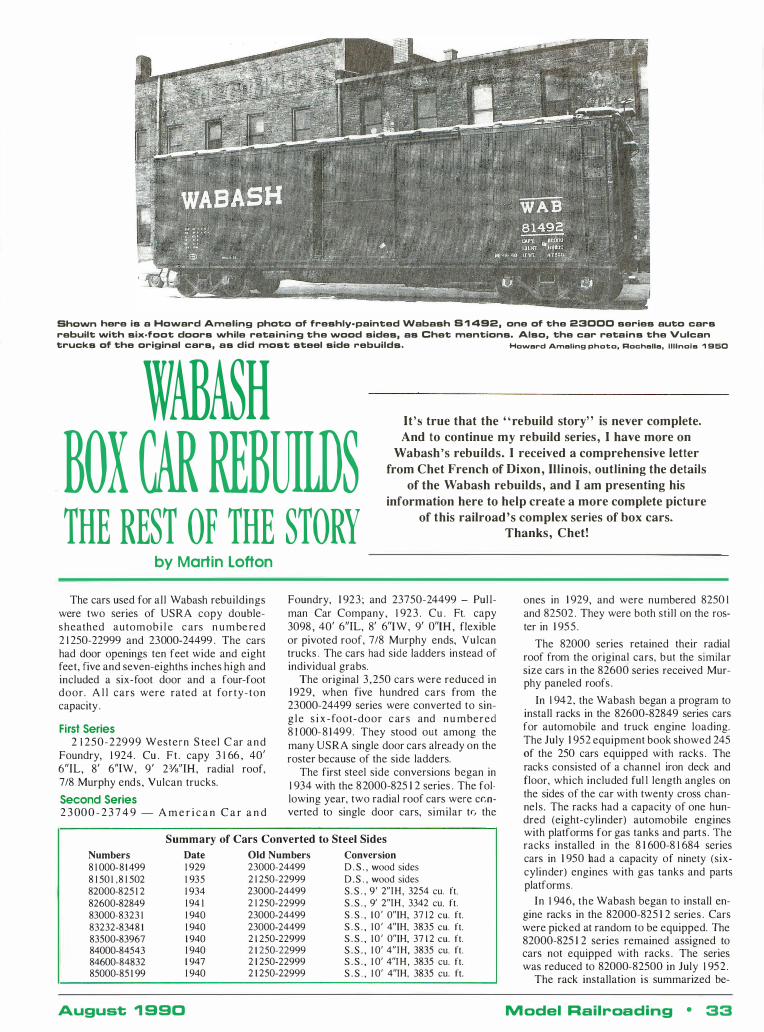
Shawn here is a Haward Ameling phata af freshly· painted Wabash 8 1 492, ane af the 23000 series auta cars rebuilt with six·faat daars while retaining the waad sides, as Chet mentians. Alsa, the car retains the Vulcan trucks af the ariginal cars, as did mast steel side rebuilds. Howard Amallng photo, Rochalla, illinois 1 950
WAB�H BOX CAR REBUILD� THE REST OF THE STORY
It's true that the " rebuild story" is never complete.
And to continue my rebuild series, I have more on
Wabash's rebuilds. I received a comprehensive letter
from Chet French of Dixon, Illinois, outlining the details
of the Wabash rebuilds, and I am presenting his
information here to help create a more complete picture
of this railroad's complex series of box cars.
by Martin Lofton
The cars used for al l Wabash rebuildings were two series of USRA copy doubles heathed automob i l e c ars n u m be red 2 1 250-22999 and 23000-24499 . The cars had door openings ten feet wide and eight feet, five and seven-eighths inches high and included a six-foot door and a four-foot door . A l l cars were rated at forty- ton capacity .
First Series 2 1 250-22999 Western S teel C ar a n d
Foundry, 1 924. Cu . F t . capy 3 1 66 , 40' 6"IL, 8' 6"[W, 9' 2%"IH, radial roof, 7/8 Murphy ends, Vulcan trucks.
Second Series 2 3 00 0 - 2 3 7 4 9 - A m e r i c a n C a r a n d
Foundry, 1 923 ; and 23750-24499 - Pul lman Car Company , 1 92 3 . Cu . Ft. capy 3098 , 40' 6"IL, 8' 6"IW, 9' O"IH , flexible or pivoted roof, 7/8 Murphy ends, Vulcan trucks . The cars had side ladders instead of individual grabs.
The original 3 ,250 cars were reduced in 1 929, when five hundred cars from the 23000-24499 series were converted to sing l e s i x -foot-door c ar s and n u mbered 8 1 000- 8 1 499. They stood out among the many USRA single door cars already on the roster because of the side ladders.
The first steel side conversions began in 1 934 with the 82000-825 1 2 series . The following year, two radial roof cars were ccnverted to single door cars, similar tG the
Summary of Cars Converted to Steel Sides
Numbers 8 1 000- 8 1 499 8 1 50 1 , 8 1 502 82000-825 1 2 82600-82849 83000-8323 1 83232-8348 1 83500-83967 84000-84543 84600-84832 85000-85 1 99
Date 1 929 1 935 1 934 1 94 1 1 940 1 940 1 940 1 940 1 947 1 940
August 1 990
Old Numbers 23000-24499 2 1 250-22999 23000-24499 2 1 250-22999 23000-24499 23000-24499 2 1 250-22999 2 1 250-22999 2 1 250-22999 2 1 250-22999
Conversion D . S . , wood sides D . S . , wood sides S . S . , 9' 2"IH, 3254 cu. ft. S . S . , 9' 2"IH , 3342 cu. ft. S . S . , 1 0 ' O"IH, 37 1 2 cu. ft. S . S . , 1 0 ' 4"IH, 3835 cu. ft. S . S . , 1 0 ' O"IH, 37 1 2 cu. ft. S . S . , 1 0' 4"IH, 3835 cu. ft. S . S . , 1 0' 4"I H , 3835 cu. ft. S . S . , 1 0' 4"IH, 3835 cu. ft.
Thanks, Chet!
ones in 1 929, and were numbered 8250 I and 82502 . They were both still on the roster in 1 95 5 .
The 82000 series retained their radial roof from the original cars, but the similar size cars in the 82600 series received Murphy paneled roofs .
In 1 942, the Wabash began a program to install racks in the 82600-82849 series cars for automobile and truck engine loading. The July 1 952 equipment book showed 245 of the 250 cars equipped with racks . The racks consisted of a channel iron deck and floor, which included ful l length angles on the sides of the car with twenty cross channels . The racks had a capacity of one hundred (eight-cylinder) automobile engines with platforms for gas tanks and parts . The racks installed in the 8 1 600-8 1 684 series cars in 1 950 had a capacity of ninety (sixcylinder) engines with gas tanks and parts platforms.
In 1 946, the Wabash began to install engine racks in the 82000-825 1 2 series . Cars were picked at random to be equipped. The 82000-825 1 2 series remained assigned to cars not equipped with racks . The series was reduced to 82000-82500 in July 1 952 .
The rack installation is summarized be-
M odel Railroading • 33
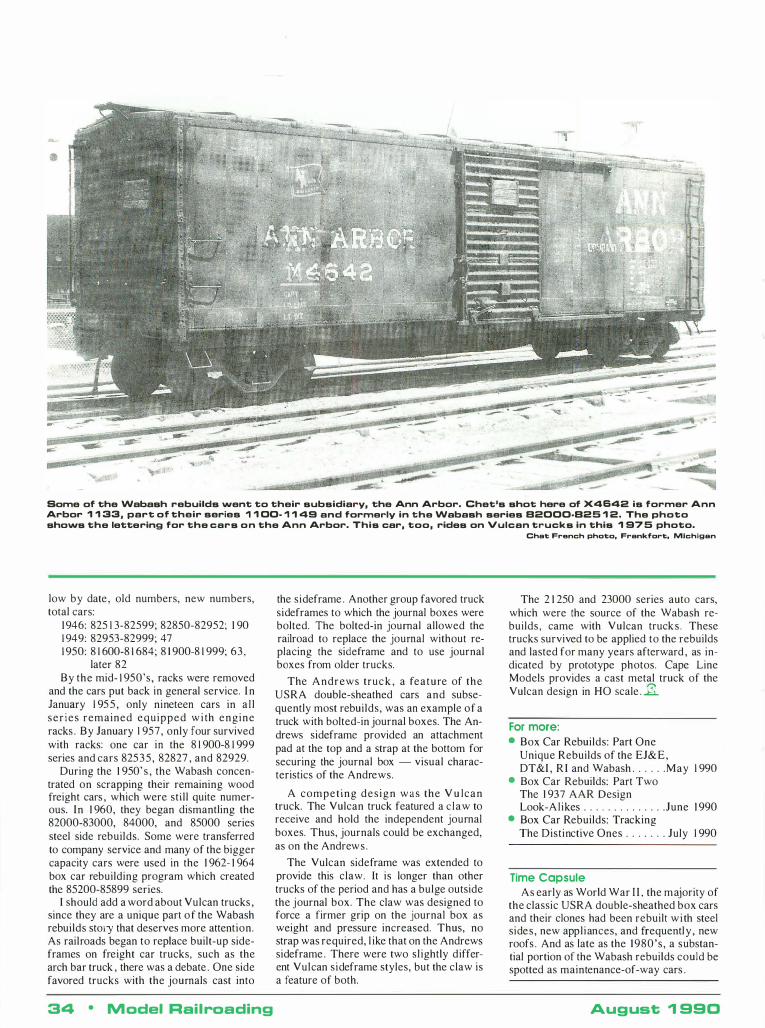
Some of the Wabash rebuilds went to their subsidiary, the Ann Arbor. Chet's shot here of X4642 is former Ann Arbor 1 1 33, part of their series 1 1 00· 1 1 49 and formerly in the Wabash series 82000·825 1 2. The photo shows the lettering for the cars o n the Ann Arbor. This car, too, rides on Vulcan trucks in this 1 975 photo.
low by date, old numbers, new numbers, total cars:
1 946: 825 1 3-82599; 82850-82952; 1 90 1 949: 82953-82999; 47 1 950: 8 1 600-8 1 684; 8 1 900-8 1 999; 63,
later 82 By the mid- 1 950's, racks were removed
and the cars put back in general service. In January 1 95 5 , only nineteen cars in a l l ser ies remained equipped w i th engine racks . By January 1 957, only four survived with racks: one car in the 8 1 900-8 1 999 series and cars 82535 , 82827 , and 82929.
During the 1 950' s , the Wabash concentrated on scrapping their remaining wood freight cars , which were still quite numerous. In 1 960, they began dismantling the 82000-83000, 84000, and 85000 series steel side rebuilds. Some were transferred to company service and many of the bigger capacity cars were used in the 1 962- 1 964 box car rebuilding program which created the 85200-85899 series.
I should add a word about Vulcan trucks , since they are a unique part o f the Wabash rebuilds story that deserves more attention. As railroads began to replace built-up sideframes on freight car trucks, such as the arch bar truck , there was a debate . One side favored trucks with the journals cast into
34 • M odel Rail roading
the sideframe . Another group favored truck sideframes to which the journal boxes were bolted. The bolted-in journal allowed the railroad to replace the journal without replacing the sideframe and to use journal boxes from older trucks.
The Andrews truc k , a feature of the USRA double-sheathed cars and subsequently most rebuilds, was an example of a truck with bolted-in journal boxes. The Andrews sideframe provided an attachment pad at the top and a strap at the bottom for securing the journal box - visual characteristics of the Andrews.
A competing des ign was the V u lcan truck. The Vulcan truck featured a c law to receive and hold the independent journal boxes. Thus, journals could be exchanged, as on the Andrews .
The Vulcan sideframe was extended to provide this claw. It is longer than other trucks of the period and has a bulge outside the journal box. The claw was designed to force a firmer grip on the journal box as weight and pressure increased. Thus, no strap was required, l ike that on the Andrews sideframe . There were two sl ightly different Vulcan sideframe styles, but the claw is a feature of both.
Chat French photo, Frankfort. Michigan
The 2 1 250 and 23000 series auto cars, which were the source of the Wabash rebuilds , came with Vulcan trucks . These trucks survived to be applied to the rebuilds and lasted for many years afterward , as indicated by prototype photos. Cape Line Models provides a cast metal truck of the Vulcan design in HO scale . li
For more: • Box Car Rebuilds: Part One
Unique Rebuilds of the EJ&E, DT&I , R I and Wabash . . . . . . May 1 990
• Box Car Rebuilds: Part Two The 1 937 AAR Design Look-Alikes . . . . . . . . . . . . . . June 1 990
• Box Car Rebuilds: Tracking The Distinctive Ones . . . . . . . July 1 990
Time Capsule As early as World War I I , the majority of
the classic USRA double-sheathed box cars and their clones had been rebuilt wi th steel sides , new appliances, and frequently , new roofs . And as late as the 1980's , a substantial portion of the Wabash rebuilds could be spotted as maintenance-of-way cars .
August � 990
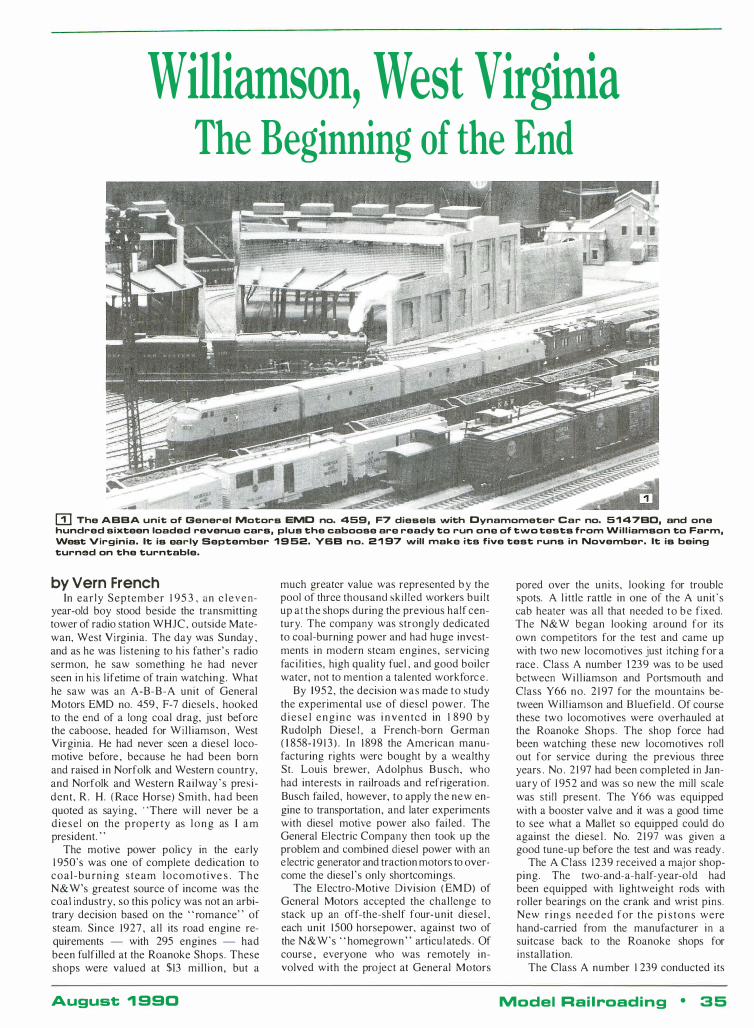
Williamson, West Virginia The Beginning of the End
-m The ABBA unit of Generel Motors EMD no. 459, F7 diesels \Nith Dynamometer Car no. 5147BO, and one hundred sixteen loaded revenue cars, pluB the caboose are ready to run one of t\NO tests from Will iamson to Farm, West Virginia. It is early September 1952. VSB no. 21 97 \Nill lTIake its five test runs in November. It is being turned on the turntable.
by Vern French In early September 1 95 3 , an e l e v e n
year-old boy stood beside the transmitting tower of radio station WHJC , outside Matewan, West Virginia. The day was Sunday , and as he was l istening to his father' s radio sermon, he saw something he had never seen in h is l ifetime of train watching. What he saw was an A-B-B-A unit of General Motors EMD no. 459 , F-7 diesels , hooked to the end of a long coal drag, just before the caboose, headed for Wil l iamson , West Virginia. He had never seen a diesel locomotive before , because he had been born and raised in Norfolk and Western country, and Norfolk and Western Railway ' s president, R . H. ( Race Horse) Smith, had been quoted as saying, "There wil l never be a d iese l on the p roperty as l o n g as I a m president. "
The motive power policy in the early 1 950's was one of complete dedication to coal-bu rn i n g steam locomot ive s . T h e N&W's greatest source o f income was the coal industry, so this pol icy was not an arbitrary decision based on the "romance" of steam. Since 1927 , all its road engine requirements - with 295 engines - had been fulfilled at the Roanoke Shops. These shops were valued at $13 mill ion, but a
August ., 990
much greater value was represented by the pool of three thousand skil led workers bui l t up at the shops during the previous half century. The company was strongly dedicated to coal-burning power and had huge investments in modern steam engines, servicing faci l it ies, high quality fuel , and good boiler water, not to mention a talented workforce .
By 1952, the decision was made to study the experimental use of diesel power. The d i e se l eng ine was i n vented in 1 890 by Rudolph Diese l , a French-born German ( 1 858- 1 9 1 3 ) . In 1 898 the American manufacturing rights werc bought by a wealthy St. Louis brewer, Adolphus B usch, who had interests in railroads and refrigerat ion. Busch failed, however, to apply the new engine to transportation, and later experiments with diesel motive power also failed . The General Electric Company then took up the problem and combined diesel power with an e lectric generator and traction motors to overcome the diesel 's only shortcomings.
The Electro-Motive Division ( EM D) of General Motors accepted the chal lenge to stack up an off-the-shelf four-unit diesel , each unit 1500 horsepower, against two of the N&W's " homegrown " articul ateds . Of course , everyone who was remotely involved with the project at General Motors
pored over the units, looking for trouble spots. A l ittle rattle in one of the A unit 's cab heater was all that needed to be fixed. The N&W began looking around for its own competitors for the test and came up with two new locomotives just itching for a race . Class A number 1 239 was to be used between Wil l iamson and Portsmouth and Class Y66 no. 2 1 97 for the mountains between Will iamson and Bluefield . Of course these two locomotives were overhauled at the Roanoke Shops. The shop force had been watching these new locomotives roll out for service during the previous three years . No . 2 1 97 had been completed in January of 1 952 and was so new the mill scale was still present. The Y66 was equipped with a booster valve and it was a good time to see what a Mallet so equipped could do against the diese l . No. 2 1 97 was given a good tune-up before the test and was ready .
The A Class 1239 received a major shopping. The two-and-a-half-year-old had been equipped with lightweight rods with roller bearings on the crank and wrist pins. New r ings needed for the p i s tons were hand-carried from the manufacturer in a suitcase back to the Roanoke shops for installation.
The Class A number 1 239 conducted its
Model Rai l roadi n g • 3 5
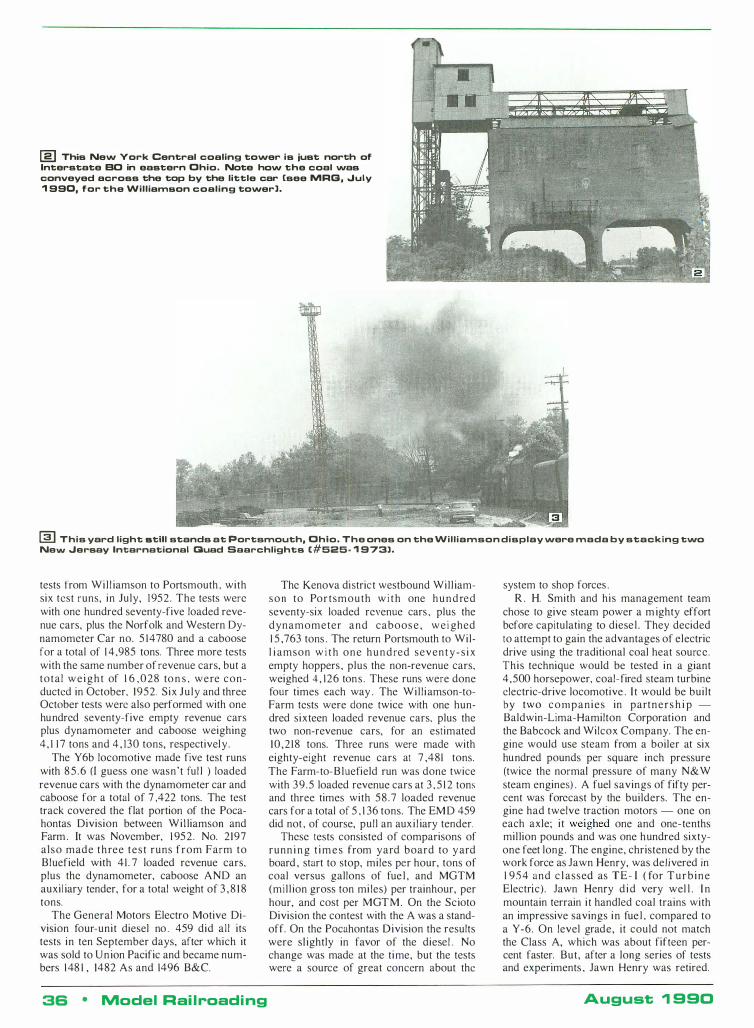
[g] This Ne\N York Central coaling to\Ner is just north of Interstate BO in eastern Ohio. Nate hO\N the coal \Nas conveyed across the tap by the little car [see MRG, .July 1990, far the Williamson coaling to\Ner).
00 This yard light atill stands at Portsmouth, Ohio. The ones an the Williamson display \Nere mada by stacking t\NO Ne\N .Jersay Intarnational Guad Saarchlights [#525· 1973).
tests from Wil l iamson to Portsmouth , with six test runs, in July, 1952. The tests were with one hundred seventy-five loaded revenue cars, plus the Norfolk and Western Dynamometer Car no. 5 14780 and a caboose for a total of 1 4,985 tons. Three more tests with the same number of revenue cars, but a tota l we ight of 1 6 , 028 to n s , were conducted in October, 1952. Six July and three October tests were also performed with one hundred seventy-five empty revenue cars plus dynamometer and caboose weighing 4, 1 1 7 tons and 4 , 130 tons, respectively .
The Y6b locomotive made five test runs with 8 5 . 6 (I guess one wasn't ful l ) loaded revenue cars with the dynamometer car and caboose for a total of 7 ,422 tons. The test track covered the flat portion of the Pocahontas Division between Wil liamson and Farm . It was November, 1 952 . No. 2197 also made t h ree test runs from Farm to Bluefield with 41 . 7 loaded revenue cars, plus the dynamometer, caboose AND an auxil iary tender, for a total weight of 3 , 8 1 8 tons.
The General Motors Electro Motive Division four-unit diesel no . 459 did all its tests in ten September days, after which it was sold to Union Pacific and became numbers 148 1 , 1482 As and 1496 B&C.
36 • Model Rai l roadi ng
The Kenova district westbound Will iamson to Portsmouth w i t h one h u n d red seventy-six loaded revenue cars , plus the dynamometer and caboos e , we i ghed 1 5 ,763 tons . The return Portsmouth to Will i amson w i t h one hundred sevent y - s i x empty hoppers, plus the non-revenue cars, weighed 4 , 126 tons . These runs were done four times each way . The Wil l iamson-toFarm tests were done twice with one hundred sixteen loaded revenue cars, plus the two non-revenue cars, for an estimated 10 ,2 18 tons. Three runs were made with eighty-eight revenue cars at 7 ,481 tons. The Farm-to-Bluefield run was done twice with 39 .5 loaded revenue cars at 3 , 5 1 2 tons and three times with 58 .7 loaded revenue cars for a total of 5 , 1 36 tons. The EM D 459 did not , of course, pull an auxi l iary tender.
These tests consisted of comparisons of runn i n g t i m e s from yard board to y ard board , start to stop, miles per hour, tons of coal versus gallons of fue l , and MGTM (mil l ion gross ton mi les) per trainhour, per hour, and cost per MGTM. On the Scioto Division the contest with the A was a standoff. On the Pocahontas Division the results were sl ightly in favor of the diesel . No change was made at the time, but the tests were a source of great concern about the
system to shop forces . R . H. Smith and his management team
chose 10 give steam power a m ighty effort before capitulating to diesel . They decided to attempt to gain the advantages of electric drive using the traditional coal heat source. This technique would be tested in a giant 4,500 horsepower, coal-fired steam turbine electric-drive locomotive . I t would be built by two companies in partners h i p -Baldwin-Lima-Hamilton Corporation and the Babcock and Wilcox Company. The engine would use steam from a boiler at six hundred pounds per square inch pressure (twice the normal pressure of many N&W steam engines) . A fuel savings of fifty percent was forecast by the builders. The engine had twelve traction motors - one on each axle; it weighed one and one-tenths mil lion pounds and was one hundred sixtyone feet long. The engine, christened by the work force as Jawn Henry, was delivered in 1 95 4 and c l assed as TE- I ( for Turb ine Electric). Jawn Henry d id very wel l . I n mountain terrain it handled coal trains with an impressive savings in fue l , compared to a Y -6. On level grade, it could not match the Class A, which was about fifteen percent faster. But, after a long series of tests and experiments , Jawn Henry was retired.
August 1 990
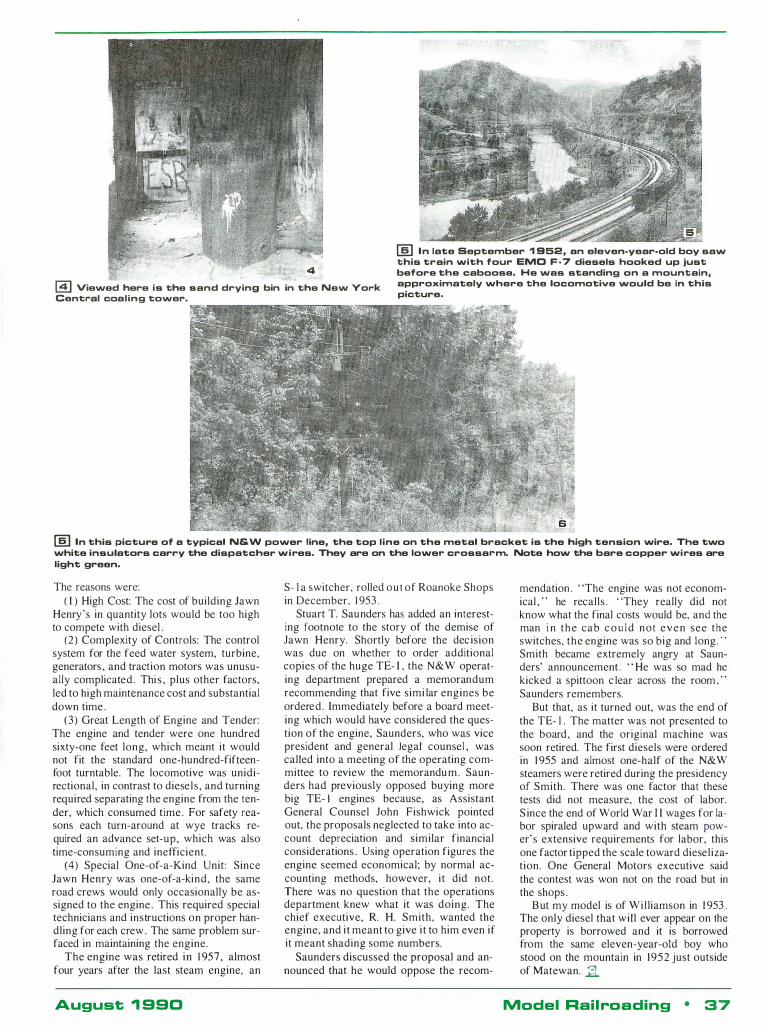
@] Viewed here is the sand drying bin in the -New York
Cent .. al coaling towe ...
[§] I n late September 1 9S2. an eleven·year·old boy saw this train with four EMO F · 7 diesels hooked up just before the caboose. He was standing on a mountain. approximately where the locomotive would be in this picture.
[§] In this pictu .. e of a typical N&W power line. the top line on the metal bracket is the high tension wire. The two white insulators carry the dispatche .. w i res. They are on the lowe .. crossa .. m. Note how the bare copper wi .. es are light green.
The reasons were: ( I ) High Cost: The cost of building Jawn
Henry's in quantity lots would be too high to compete with diesel .
(2) Complexity of Controls: The control system for the feed water system, turbine, generators , and traction motors was unusually complicated. Thi s , plus other factors, led to high maintenance cost and substantial down time .
(3) Great Length of Engine and Tender: The engine and tender were one hundred sixty-one feet long, which meant it would not fit the standard one-hundred-fifteenfoot turntable. The locomotive was unidirectional, in contrast to diesels , and turning required separating the engine from the tender, which consumed time . For safety reasons each turn-around at wye tracks required an advance set-up, which was also time-consuming and inefficient.
(4) Special One-of-a-Kind Unit: Since Jawn Henry was one-of-a-kind, the same road crews would only occasionally be assigned to the engine . This required special technicians and instructions on proper handling for each crew . The same problem surfaced in maintaining the engine.
The engine was retired in 1 957 , almost four years after the last steam engine, an
August ., 990
SO l a switcher, rolled out of Roanoke Shops in December, 1 953 .
Stuart T. Saunders has added an interesting footnote to the story of the demise of Jawn Henry. Shortly before the dec ision was due on whether to order additional copies of the huge TE- I , the N&W operating department prepared a memorandum recommending that five simi lar engines be ordered. Immediately before a board meeting which would have considered the question of the engine, Saunders, who was vice president and general legal counsel , was called into a meeting of the operating committee to review the memorandu m . Saunders had previously opposed buying more big TE- l engines because, as Assistant General Counsel John Fishwick pointed out, the proposals neglected to take into account depreciation and similar financial considerations . Using operation figures the engine seemed economical; by normal accounting methods, however, i t did not. There was no question that the operations department knew what it was doing. The chief executive, R. H. Smith, wanted the engine, and i t meant to give i t to him even if it meant shading some numbers.
Saunders discussed the proposal and announced that he would oppose the recom-
mendation . "The engine was not economical , " he recalls . "They really did not know what the final costs would be, and the man i n t h e cab c o u l d not e v e n see the switches, the engine was so big and long . " Smith became extremely angry at Saunders' announcement . " He was so mad he kicked a spittoon c lear across the room , " Saunders remembers.
But that, as it turned out, was the end of the TE- l . The matter was not presented to the board, and the original machine was soon retired. The first diesels were ordered in 1 955 and almost one-half of the N&W steamers were retired during the presidency of Smith. There was one factor that these tests did not measure, the cost of labor. S ince the end of World War I I wages for labor spiraled upward and with steam power' s extensive requirements for labor, this one factor tipped the scale toward dieselization. One General Motors executive said the contest was won not on the road but in the shops .
B ut my model is of Wil liamson in 1 953 . The only diesel that wil l ever appear on the property is borrowed and it is borrowed from the same eleven-year-old boy who stood on the mountain in 1952 just outside of Matewan. 11.
Model Rail roading • 37
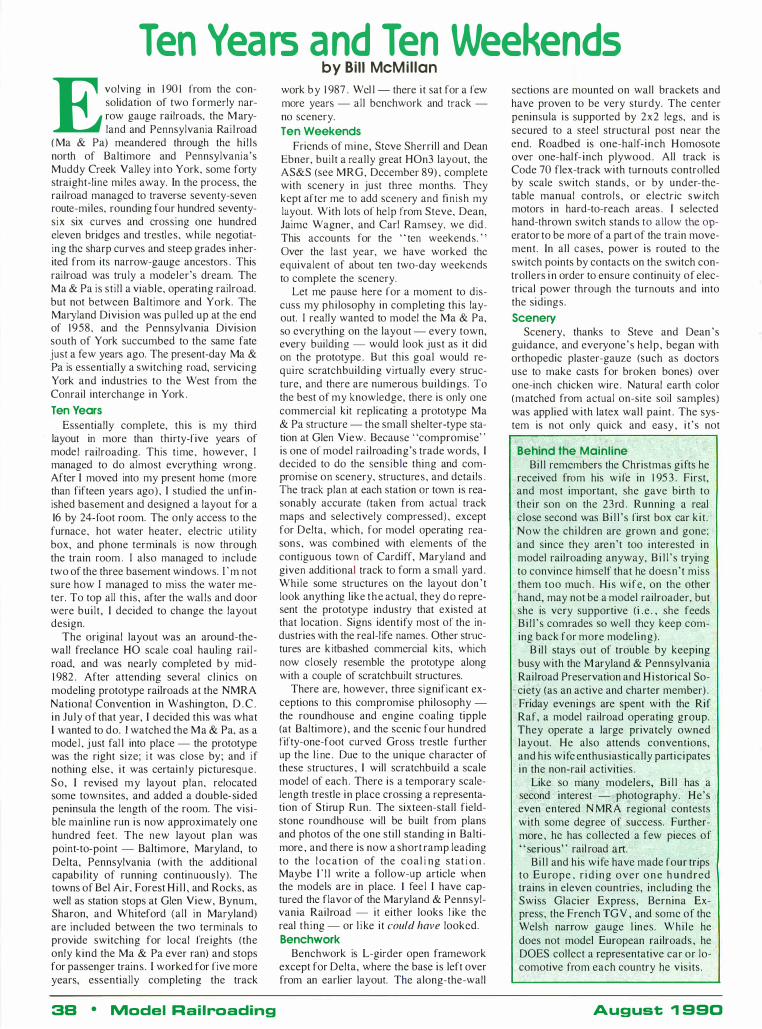
Ten Years and Ten Weekends E volving in 1 90 1 from the con
solidation of two formerly narrow gauge railroads, the M aryland and Pennsylvania Rai lroad
( Ma & Pa) meandered through the hi l ls north of Baltimore and Pennsylvania's Muddy Creek Valley into York, some forty straight-line mi les away. In the process, the railroad managed to traverse seventy-seven route-miles, rounding four hundred seventysix six curves and crossing one hundred eleven bridges and trestles, while negotiating the sharp curves and steep grades inherited from its narrow-gauge ancestors . This railroad was truly a modeler's dream. The Ma & Pa is st i l l a viable, operating railroad, but not between Baltimore and York. The Maryland Division was pul led up at the end of 1958, and the Pennsylvania Division south of York succumbed to the same fate just a few years ago. The present-day Ma & Pa is essentially a switching road, servicing York and industries to the West from the Conrail interchange in York .
Ten Years Essentially complete, this is my third
layout in more than thirty-five years of model railroading. This t ime, however, I managed to do almost everything wrong . After I moved into my present home (more than fifteen years ago) , I studied the unfinished basement and designed a layout for a 16 by 24-1'00t room. The only access to the furnace, hot water heater, electric ut i l ity box, and phone terminals is now through the train room . I also managed to include two of the three basement windows. I ' m not sure how I managed to miss the water meter. To top all this, after the wal ls and door were built , I decided to change the layout design.
The original layout was an around-thewall freelance HO scale coal hauling rai l road, and was nearly completed by mid-1 982 . After attending several cl inics on modeling prototype railroads at the NMRA National Convention in Washington, D . C . in July o f that year, I decided this was what I wanted to do. I watched the Ma & Pa, as a mode l , j ust fal l into place - the prototype was the right size; i t was close by; and i f nothing else, i t was certainly picturesque . So, I revised my layout plan, relocated some townsites, and added a double-sided peninsula the length of the room. The visible mainline run is now approximately one hundred feet. The new layout plan was point-to-point - Baltimore, Maryland, to Delta, Pennsylvania (with the additional capabi l ity of running continuously). The towns of Bel Air, Forest Hi l l , and Rocks, as well as station stops at Glen View, Bynum, Sharon, and Whiteford (all in Maryland) are included between the two terminals to provide switching for local freights (the only kind the Ma & Pa ever ran) and stops for passenger trains . I worked for five more years, essentially completing the track
3B • Model Railroading
by Bill McMil lan
work by 1 987 . Wel l - there it sat for a few more years - all benchwork and track -no scenery.
Ten Weekends Friends of mine, Steve Sherrill and Dean
Ebner, built a really great HOn3 layout, the AS&S (see MRG, December 89) , complete with scenery in just three months. They kept after me to add scenery and finish my layout. With lots of help from Steve, Dean, Jaime Wagner, and Carl Ramsey, we did . This accounts for the " ten weekends. " Over the last year, we have worked the equivalent of about ten two-day weekends to complete the scenery.
Let me pause here for a moment to discuss my philosophy in completing this layout. I really wanted to model the Ma & Pa, so everything on the layout - every town, every building - would look just as it did on the prototype . But this goal would require scratchbuilding virtually every structure, and there are numerous buildings. To the best of my knowledge, there is only one commercial kit replicating a prototype Ma & Pa structure - the small shelter-type station at Glen View. Because "compromise" is one of model railroading's trade words, I decided to do the sensible thing and compromise on scenery, structures, and details . The track plan at each station or town is reasonably accurate (taken from actual track maps and selectively compressed) , except for Delta, which, for model operating reasons, was combined with elements of the contiguous town of Cardiff, Maryland and given additional track to form a small yard . While some structures on the layout don ' t look anything like the actual, they do represent the prototype industry that existed at that location . Signs identify most of the industries with the real-l ife names. Other structures are kitbashed commercial kits, which now closely resemble the prototype along with a couple of scratchbuilt structures.
There are, however, three significant exceptions to this compromise philosophy -the roundhouse and engine coaling tipple (at Baltimore ) , and the scenic four hundred fifty-one-foot curved Gross trestle further up the l i ne . Due to the unique character of these structures , I will scratchbuild a scale model of each. There is a temporary scalelength trestle in place crossing a representation of Stirup Run. The sixteen-stall fieldstone roundhouse will be built from plans and photos of the one still standing in Baltimore , and there is now a short ramp leading to the l oc a t i on of the coal i ng stat i o n . Maybe I ' l l write a follow-up article when the models are in place. 1 fee l I have captured the flavor of the Maryland & Pennsylvania Railroad - it either looks l ike the real th ing - or l i ke it could have looked. Benchwork
Benchwork is L-girder open framework except for Delta, where the base is left over from an earlier layout. The along-the-wall
sections are mounted on wall brackets and have proven to be very sturdy. The center peninSUla is supported by 2x2 legs, and is secured to a steel structural post near the end. Roadbed is one-half-inch Homosote over one-half- inch plywood . All track is Code 70 flex-track with turnouts controlled by scale switch stands, or by under-thetable manual controls , or electric switch motors in hard-to-reach areas . I selected hand-thrown switch stands to allow the operator to be more of a part of the train movement. In all cases, power is routed to the switch points by contacts on the switch controllers in order to ensure continuity of electrical power through the turnouts and into the sidings.
Scenery Scenery, thanks to Steve and Dean 's
guidance, and everyone' s help, began with orthopedic plaster-gauze (such as doctors use to make casts for broken bones) over one-inch chicken wire . Natural earth color (matched from actual on-site soil samples) was applied with latex wall paint . The system is not only quick and easy , i t 's not
Behind the Mainline Bill remembers the Christmas gifts he
received from his wife in 1 95 3 . First, and most important, she gave birth to their son on the 23rd . Running a real close second was Bi l l ' s first box car kit . Now the chi ldren are grown and gone; and since they aren't too interested in model railroading anyway, B i l l ' s trying to convince himself that he doesn' t miss them too much . His wife, on the other hand, may not be a model railroader, but she is very supportive (i . e . , she feeds Bi l l ' s comrades so well they keep coming back for more modeling) .
B il l stays out of trouble by keeping busy with the M aryland & Pennsylvania Railroad Preservation and H i storical Society (as an active and charter member) . Friday evenings are spent with the Rif Raf, a model railroad operating group. They operate a large privately owned layout. He also attends conventions, and his wife enthusiastically participates in the non-rail activities .
Like so many modelers, Bi l l has a second interest - photography. He's even entered N MRA regional contests with some degree of success. Furthermore , he has collected a few pieces of " serious" railroad art.
Bil l and his wife have made four trips to E u rope , r i d ing over o n e h u ndred trains in eleven countries, including the Swiss Glacier Express, Bernina Express', the French TGY , and some of the Welsh narrow gauge l ines. While he does not model European railroads , he DOES collect a representative car or locomotive from each country he vis its .
August 1 990
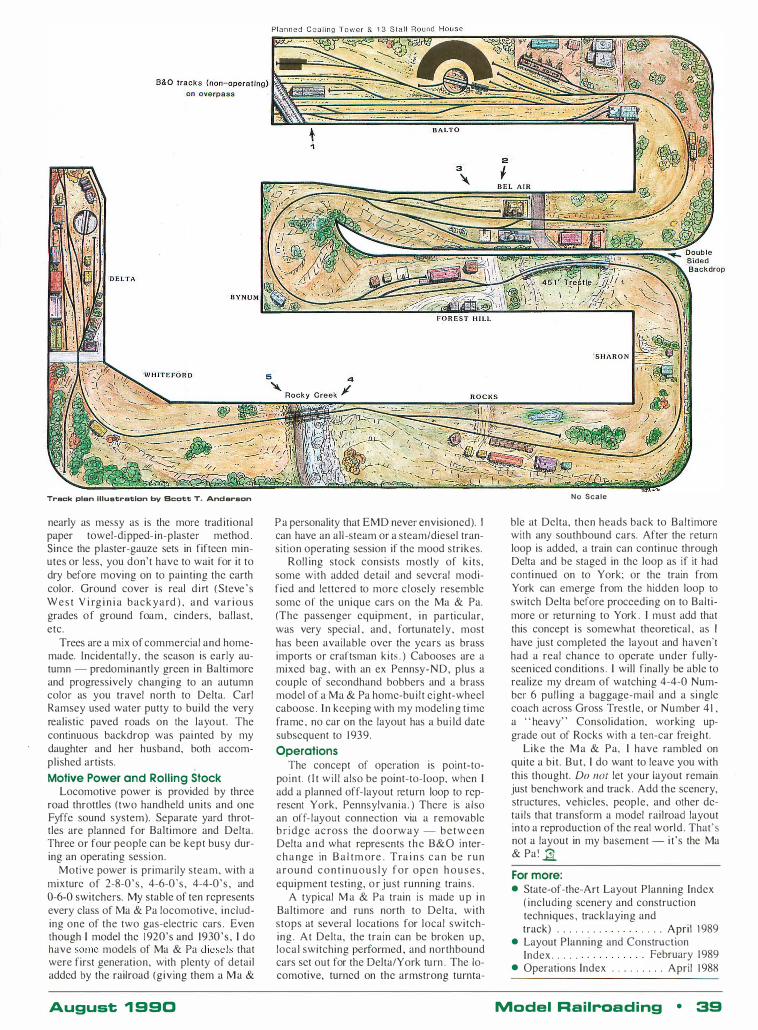
Treck plan illustration by Scott T. Anderson
nearly as messy as is the more traditional paper towel-dipped-in-plaster method . Since the plaster-gauze sets in fifteen minutes or less, you don't have to wait for it to dry before moving on to painting the earth color. Ground cover is real dirt ( Steve ' s W e s t V i rg i n i a backyard ) , and var ious grades of ground foam, cinders, ballast, etc.
Trees are a mix of commercial and homemade. Incidental ly , the season is early autumn - predominantly green in Baltimore and progressively changing to an autumn color as you travel north to Delta. Carl Ramsey used water putty to build the very realistic paved roads on the layout. The continuous backdrop was painted by my daughter and her husband, both accomplished artists.
Motive Power and Rolling Stock Locomotive power is provided by three
road throttles (two handheld units and one Fyffe sound system). Separate yard throttles are planned for Baltimore and Delta. Three or four people can be kept busy during an operating session.
Motive power is primarily steam, with a mixture of 2-8-0 ' s , 4-6-0's , 4-4-0' s , and 0-6-0 switchers. My stable of ten represents every class of Ma & Pa locomotive, including one of the two gas-electric cars . Even though I model the 1 920's and 1930 's , I do have some models of Ma & Pa diesels that were first generation, with plenty of detail added by the railroad (giving them a Ma &
August 1 990
Pa personality that EMD never envisioned). I can have an all -steam or a steam/diesel transition operating session if the mood strikes.
Roll ing stock consists mostly of kits, some with added detail and sevcral modified and lettered to more closely resemble some of the unique cars on the Ma & Pa. (The passenger equipment , in particular, was very special , and , fortunate ly , most has been available over the years as brass imports or craftsman kits . ) Cabooses are a mixed bag , with an ex Pennsy-ND, plus a couplc of secondhand bobbers and a brass model of a Ma & Pa home-built eight-wheel caboose . In keeping with my model ing t ime frame , no car on the layout has a bui ld date subsequent to 1939.
Operations The concept of operation is point-to
point . ( I t wi l l also be point-to-Ioop, when I add a planned off-layout return loop to represent York, Pennsylvania . ) There is also an off-layout connection via a removable b r i dge ac ros s the doorway - between Delta and what represents the B&O interc h a nge in B a l tm ore . Tra i n s c a n be run around c o n t i n u o u s l y for open h o u s e s , equipment testing, o r just running trains .
A typical M a & Pa train is made up in Baltimore and runs north to Delta, with stops at several locations for local switching . At Delta, the train can be broken up, local switching performed , and northbound cars set out for the Delta/York turn . The locomotive, turned on the armstrong turnta-
No Scale
ble at Delta, then heads back to Baltimore with any southbound cars. After the return loop is added, a train can continue through Delta and be staged in the loop as if it had continued on to York; or the train from York can emerge from the hidden loop to switch Delta before proceeding on to Baltimore or returning to York . I must add that this concept is somewhat theoretical , as I have just completed the layout and haven't had a real chance to operate under fullyseen iced conditions . I will finally be able to realize my dream of watching 4-4-0 Number 6 pull ing a baggage-mail and a single coach across Gross Trestle, or Number 4 1 , a " heavy" Consolidation, working upgrade out of Rocks with a ten-car freight.
Like the Ma & Pa, I have rambled on quite a bit. But , I do want to leave you with this thought. Do nOI let your layout remain just benchwork and track . Add the scenery, structures, vehicles, people, and other details that transform a model railroad layout into a reproduction of the real world. That' s not a layout in my basement - it's the Ma & Pa ! Jl For more: • State-of-the-Art Layout Planning Index
( including scenery and construction techniques , tracklaying and track) . . . . . . . . . . . . April 1 989
• Layout Planning and Construction Index . . . . . February 1989
• Operations Index . . . . . . . . . April 1988
Model Railroading • 39
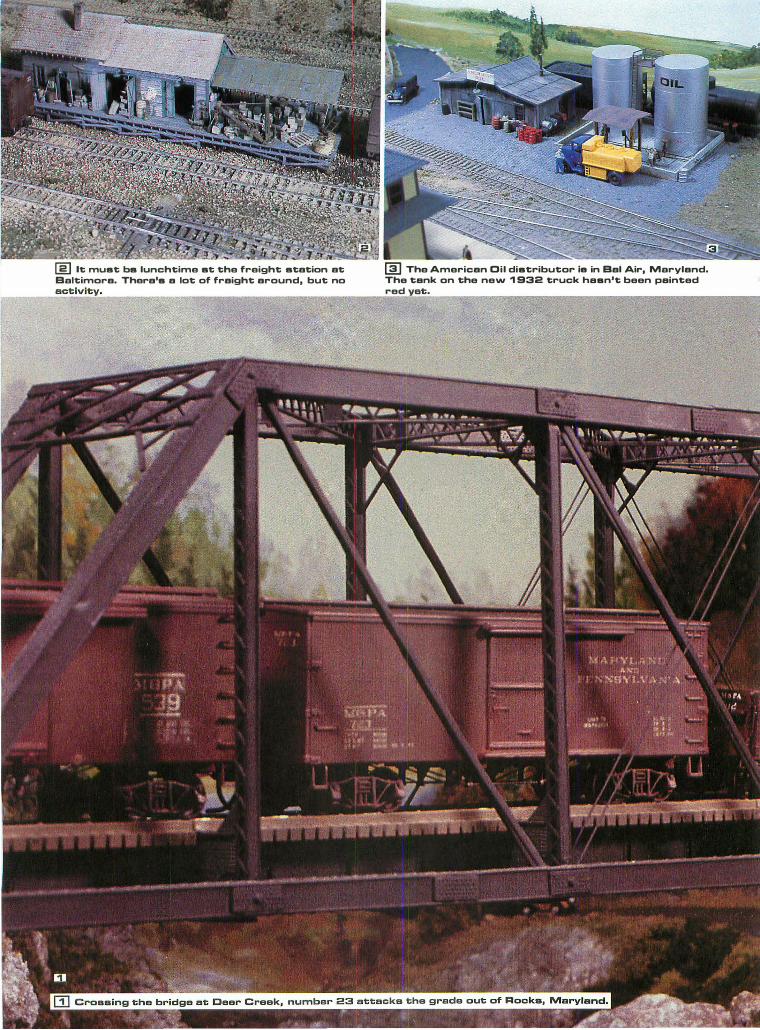
[g] It must bs lunchtime st the freight station at Baltimora. Thera's a lot of fraight around, but no
00 The American Oil distributor Ie in Bal Air, Maryland. The tank on the new 1 932 truck hasn't been painted red
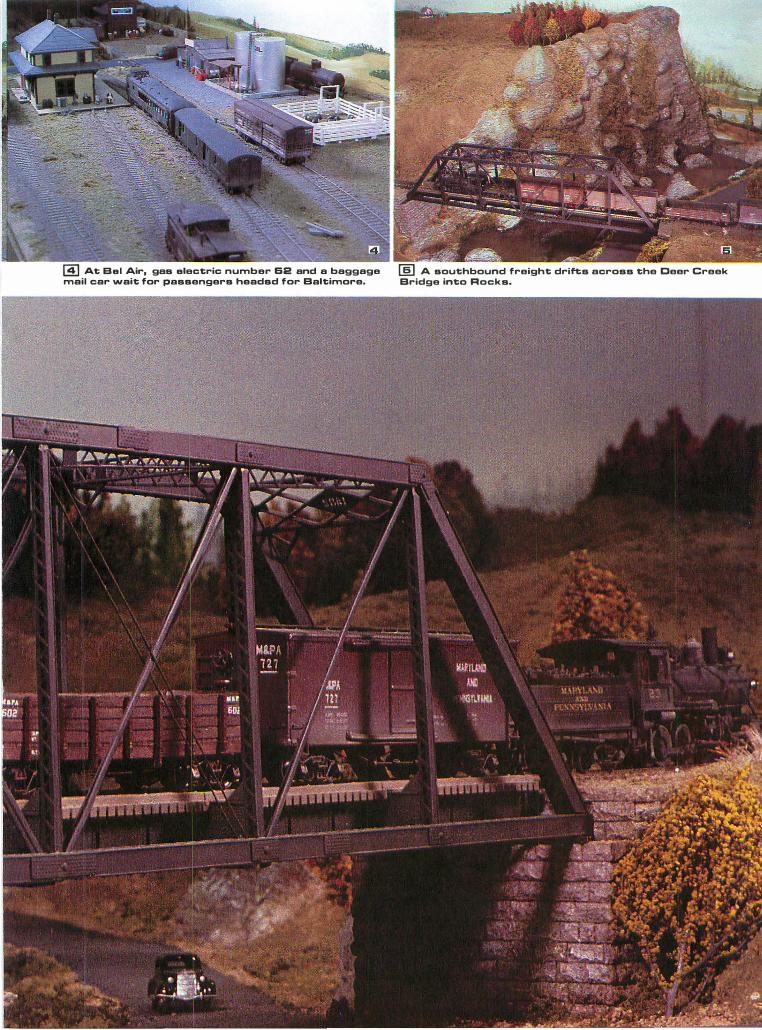
� At Bol Air, gas olectric number 62 and a baggage mail car wait for passengers headsd for Baltimore.
[§] A southbound freight drifts across the Ceer Creek Bridge into Rocks.
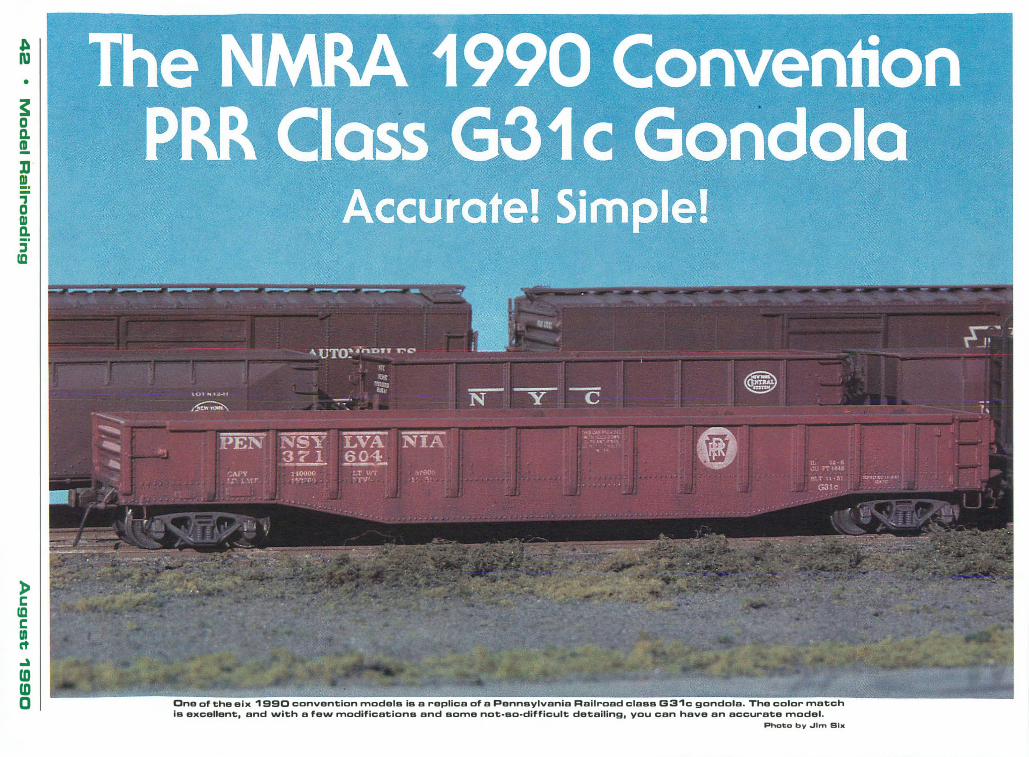
� IU •
s: D Il. !! lJ o !!!. , D DI Il. _. :l Ie
J> E: Ie E: III ct � to lD o One of the eix 1 990 convention models is a replica of a Pennsylvania Railroad class G31c gondola. The color match
is excellent, and with a few modifications and some not-so-difficult detailing, you can have an accurate model. Photo by ..JIm Six
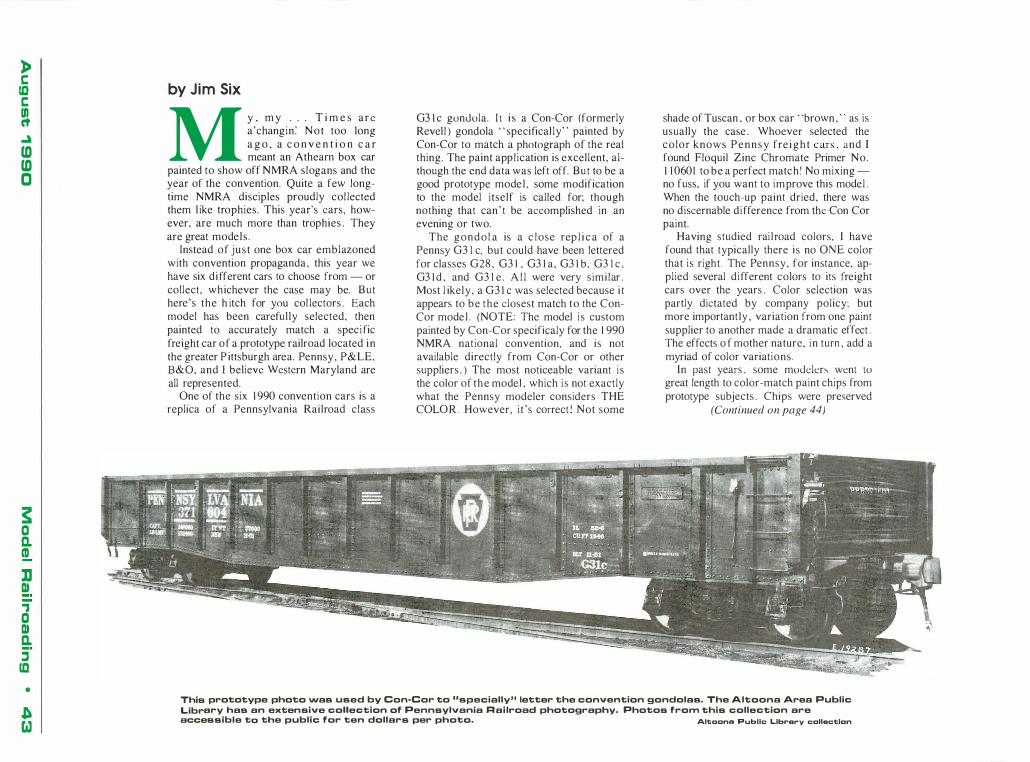
» c ID C � .Ji CD CD o
� a a. 111 IJ OJ --, a OJ a. :l ID
•
A Ll
by Jim Six
M y , m y . . . T i m e s a r e a'changin: N o t too long a g o , a c o n v e n t i o n c a r meant an Athearn box car
painted to show off NMRA slogans and the year of the convention. Quite a few longtime NMRA disciples proudly col lected them l ike trophies. This year's cars, however, are much more than trophies . They are great models .
Instead of just one box car emblazoned with convention propaganda, this year we have six different cars to choose from - or collect, whichever the case may be. But here's the h itch for you col lectors . Each model has been carefully selected, then painted to accurately match a specific freight car of a prototype railroad located in the greater P ittsburgh area. Pennsy , P&LE, 8&0, and I believc Wcstcrn Maryland are all represented.
One of the six 1 990 convention cars is a replica of a Pennsylvania Railroad class
G3 1 c gonJola. I t i s a Con-Cor (formerly Revel l ) gondola " specifical ly" painted by Con-Cor to match a photograph of the real thing. The paint app l ication is excellent, although the end data was left off. But to be a good prototype mode l , some modification to the model itself is called for; though nothing that can ' t be accomplished in an evening or two.
The gondo l a is a c l ose rep l i c a of a Pennsy G3 1 c, but could have been lettered for classes G28 , G3 1 , G3 1 a, G3 1 b, G3 1 c , G3 1 d , and G3 1 e . A l l were very s imilar . Most l ikely , a G3 1 c was selected because i t appears to be the closest match to the ConCor mode l . (NOTE: The model i s custom painted by Con-Cor specificaly for the 1 990 NMRA national convention, and is not available directly from Con-Cor or other suppliers . ) The most noticeable variant i s the color of the model , which i s not exactly what the Pennsy modeler considers THE COLOR. However, i t ' s correct ' Not some
shade of Tuscan , or box car "brown , " as is usually the case . Whoever selected the co lor knows P e n n s y fre i g h t cars , and I found Floquil Zinc Chromate Primer No. 1 1 060 I to be a perfect matc h ' No mixing no fuss, if you want to improve this model . When the touch-up paint dried, there was no discernable difference from the Con Cor paint.
Having studied rai l road colors, I have found that typically there is no ONE color that is right . The Pennsy, for instance, applied several different colors to its freight cars over the years . Color selection was partly dictated by company policy; but more importantly , variation from one paint supplier to another made a dramatic effect . The effects o f mother nature, in tum , add a myriad of color variations .
In past years , some moJelers went to great length to color-match paint chips from prototype subjects . Chips were preserved
(Continued on page 44)
This prototype photo was used by Con-Cor to "specially" letter the convention gondolas. The Altoona Area Public Library has an extensive collection of Pennsylvania Railroad photography. Photos from this collection are accessible tD the public for ten dollars per photo. Altoona Public Library collection
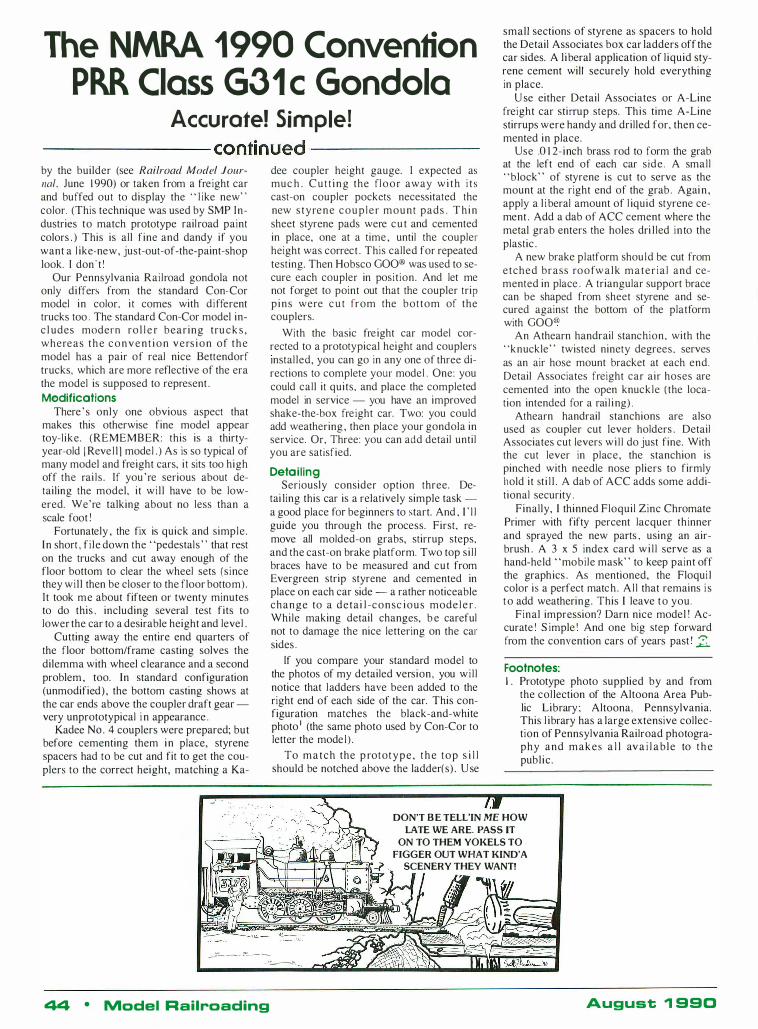
The NMRA 1990 Convention PM Class G31 c Gondola
small sections of styrene as spacers to hold the Detail Associates box car ladders off the car sides. A l iberal application of l iquid styrene cement will securely hold everything in place.
U se either Detail Associates or A-Line freight car stirrup steps. This time A-Line stirrups were handy and drilled for, then cemented in place.
Accurate! Simple! -------- continued -------- Use .0 1 2- inch brass rod to form the grab
at the left end of each car s ide . A small "block" of styrene is cut to serve as the mount at the right end of the grab . Agai n , apply a l i beral amount of l iquid styrene cement . Add a dab of ACC cement where the metal grab enters the holes dri l led into the plastic .
by the builder (see Railroad Model Jour-1101, June 1 990) or taken from a freight car and buffed out to display the " l ike new" color. (This technique was used by SMP Industries to match prototype railroad paint colors . ) This is all fine and dandy if you want a l ike-new, just-out-of-the-paint-shop look. I don ' t !
Our Pennsylvania Railroad gondola not only differs from the standard Con-Cor model in color. it comes with different trucks too . The standard Con-Cor model inc l udes modern ro l l e r bearing tru c k s , whereas t h e c o n v e n t i o n vers i o n of t h e model has a pair of real nice Bettendorf trucks, which are more reflective of the era the model is supposed to represent . Modifications
There ' s only one obvious aspect that makes this otherwise fine model appear toy-like. (REMEMBER: this is a thirtyyear-old I Reve l l ] model . ) As is so typical of many model and freight cars, it sits too high off the rai ls . If you 're serious about detailing the model, it wi l l have to be lowered. We're talking about no less than a scale foot !
Fortunately , the fix is quick and simple . In short , f i le down the "pedestals " that rest on the trucks and cut away enough of the floor bottom to clear the wheel sets (s ince they wil l then be closer to the floor bottom). It took me about fifteen or twenty minutes to do this , including several test fits to lower the car to a desirable height and level .
Cutting away the entire end quarters of the floor bottom/frame casting solves the dilemma with wheel clearance and a second problem , too. In standard configuration (unmodified) , the bottom casting shows at the car ends above the coupler draft gear very unprototypical i n appearance .
Kadee NO . 4 couplers were prepared; but before cementing them in place, styrene spacers had to be cut and fit to get the couplers to the correct height, matching a Ka-
" , . . . - .
�":.- -- :"!...- -
dee coupler height gauge. I expected as muc h . C u t t i n g the fl o o r away w i t h i t s cast-on coupler pockets necessitated the new s tyrene c o u p l e r mount pads . Th in sheet styrene pads were cut and cemented in place, one at a time , until the coupler height was correct . This called for repeated testing. Then Hobsco GOO® was used to secure each coupler in posit ion. And let me not forget to point out that the coupler trip p ins were c u t from the bottom of the couplers.
With the basic freight car model corrected to a prototypical height and couplers Instal led, you can go in any one of three directions to complete your model . One: you could call it quits, and place the completed model in service - you have an improved shake-the-box freight car. Two: you could add weathering , then place your gondola in service. Or, Three: you can add detail until you are satisfied.
Detai ling Seriously consider option three. De
tai ling this car is a relatively simple task a good place fO!' beginners to start. And , I ' l l guide you through the process. First, remove all molded-on grabs, stirrup steps, and the cast-on brake platform. Two top si l l braces have to be measured and cut from Evergreen strip styrene and cemented in place on each car side - a rather noticeable change to a detai l -consc ious mode l e r . While making detail changes, b e careful not to damage the nice lettering on the car sides .
If you compare your standard model to the photos of my detailed version, you wi l l notice that ladders have been added to the right end of each side of the car. This configuration matches the black-and-white photo ! (the same photo used by Con-Cor to letter the mode l ) .
To match the p rototype , t h e top s i l l should be notched above the ladder(s) . U se
A new brake platform should be cut from etched brass roofwalk mater ia l and cemented in place . A triangular support brace can be shaped from sheet styrene and secured against the bottom of the platform with GOO®
An Athearn handrail stanchion, with the "knuckle" twisted ninety degrees. serves as an air hose mount bracket at each end. Detail Associates freight car air hoses are cemented into the open knuckle ( the location intended for a rai l ing) .
Athearn handrail stanchions are also used as coupler cut lever holders . Detail Associates cut levers wi l l do just fine. With the cut lever in place, the stanchion is pinched with needle nose pliers to firmly hold it st i l l . A dab of ACC adds some additional security .
Finally, I thinned Floquil Zinc Chromate Primer with fifty percent lacquer thinner and sprayed the new parts , using an airbrush . A 3 x 5 index card wi l l serve as a hand-held "mobile mask" to keep paint off the graphics . As mentioned, the Floqui l color is a perfect match . Al l that remains i s t o add weathering. This I leave t o you.
Final impression? Darn nice model ! Accurate ! S imple ! And one big step forward from the convention cars of years past ! � Footnotes: I . Prototype photo supplied by and from
the col lection of the Altoona Area Public Library ; Altoona, Pennsylvania. This l ibrary has a large extensive collection of Pennsylvania Railroad photography and makes a l l av a i l a b le to t h e public .
DON'T B E TELL'IN ME HOW
LATE WE ARE. PASS IT
ON TO THEM YOKELS TO
F1GGER OUT WHAT KIND'A
SCENERY THEY WANT!
'�'.
44 • Model Railroading August 1 990
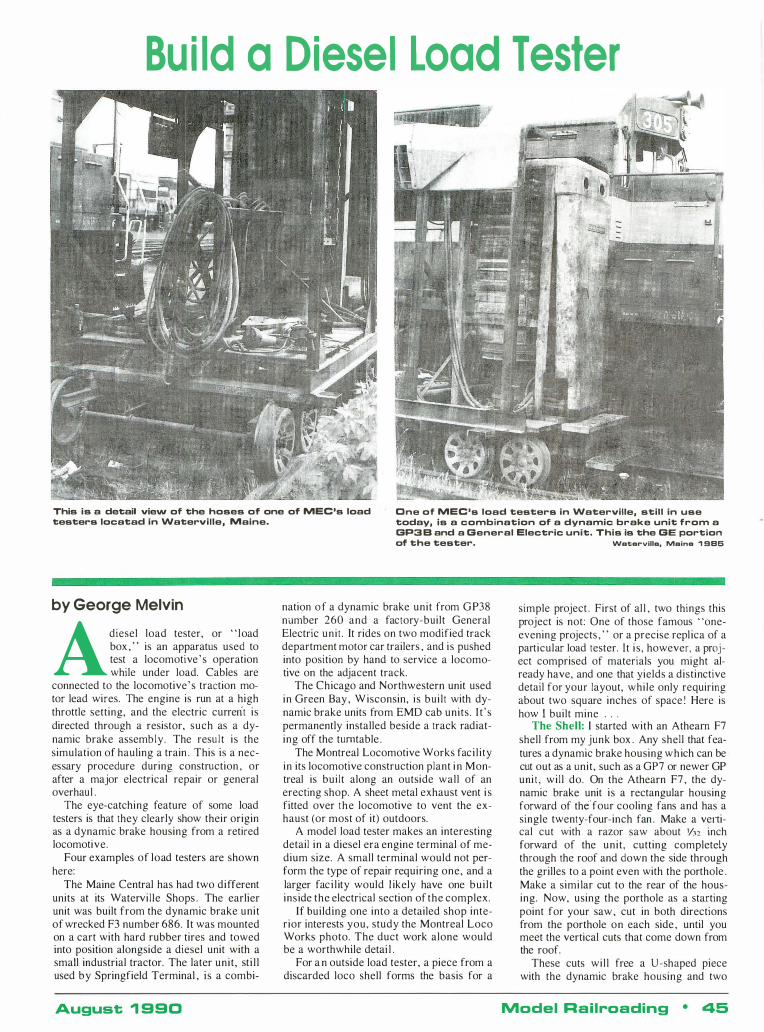
Bu i ld a Diesel Load Tester
This is a detail view of the hoses of one of MEC's load testers locatad in Waterville, Maine.
One of MEC's load testers in Waterville, still in use today, is a combination of a dynamic brake unit from a GP3B and a General Electric unit. This is the GE portion of the tester. Waterville, Maine 1 985
by George Melvin
A diesel load tester, or "load box , " is an apparatus used to test a locomotive ' s operation while under load. Cables are
connected to the locomotive' s traction motor lead wires. The engine is run at a high throttle setting, and the electric currerit is directed through a resistor, such as a dynamic brake assembly. The resu l t is the simulation of hauling a train . This is a necessary procedure during construction , or after a major electrical repair or general overhaul .
The eye-catching feature of some load testers is that they clearly show their origin as a dynamic brake housing from a retired locomotive.
Four examples of load testers are shown here:
The Maine Central has had two different units at its Watervil le Shops . The earlier unit was built from the dynamic brake unit of wrecked F3 number 686. It was mounted on a cart with hard rubber tires and towed into position alongside a diesel unit with a small industrial tractor. The later unit, sti l l used by Springfield Terminal , is a combi-
August 1 990
nation o f a dynamic brake unit from GP38 number 260 and a factory-built General Electric unit . It rides on two modified track department motor car trailers , and is pushed into position by hand to service a locomotive on the adjacent track.
The Chicago and Northwestern unit used in Green Bay , W isconsin, is buil t with dynamic brake units from EMD cab units. I t ' s permanently installed beside a track radiating off the turntable .
The Montreal Locomotive Works faci l ity in its locomotive construction plant in Montreal is built along an outside wall of an erecting shop. A sheet metal exhaust vent i s fitted over the locomotive to vent the exhaust (or most of it) outdoors.
A model load tester makes an interesting detail in a diesel era engine terminal of medium size. A small terminal would not perform the type of repair requiring one, and a larger facil ity would l ikely have one buil t inside the electrical section of the complex.
If building one into a detailed shop interior interests you, study the Montreal Loco Works photo. The duct work alone would be a worthwhile detai l .
For a n outside load tester, a piece from a discarded loco shell forms the basis for a
simple project . First of al l , two things this project is not: One of those famous "oneevening projects , " or a precise repl ica of a particular load tester. it is , however, a project comprised of materials you might already have, and one that yields a distinctive detail for your layout, while only requiring about two square inches of space I Here is how I built mine . . .
The Shell: I started with an Athearn F7 shell from my junk box . Any shell that features a dynamic brake housing which can be cut out as a unit, such as a GP7 or newer GP uni t , wil l do. On the Athearn F7 , the dynamic brake unit is a rectangular housing forward of the' four cooling fans and has a single twenty-four-inch fan . Make a veliical cut with a razor saw about '132 inch forward of the unit , cutting completely through the roof and down the side through the grilles to a point even with the porthole . Make a similar cut to the rear of the housing. Now, using the porthole as a starting point for your saw , cut in both directions from the porthole on each side , until you meet the vertical cuts that come down from the roof.
These cuts wil l free a U -shaped piece with the dynamic brake housing and two
Model Railroading • 45
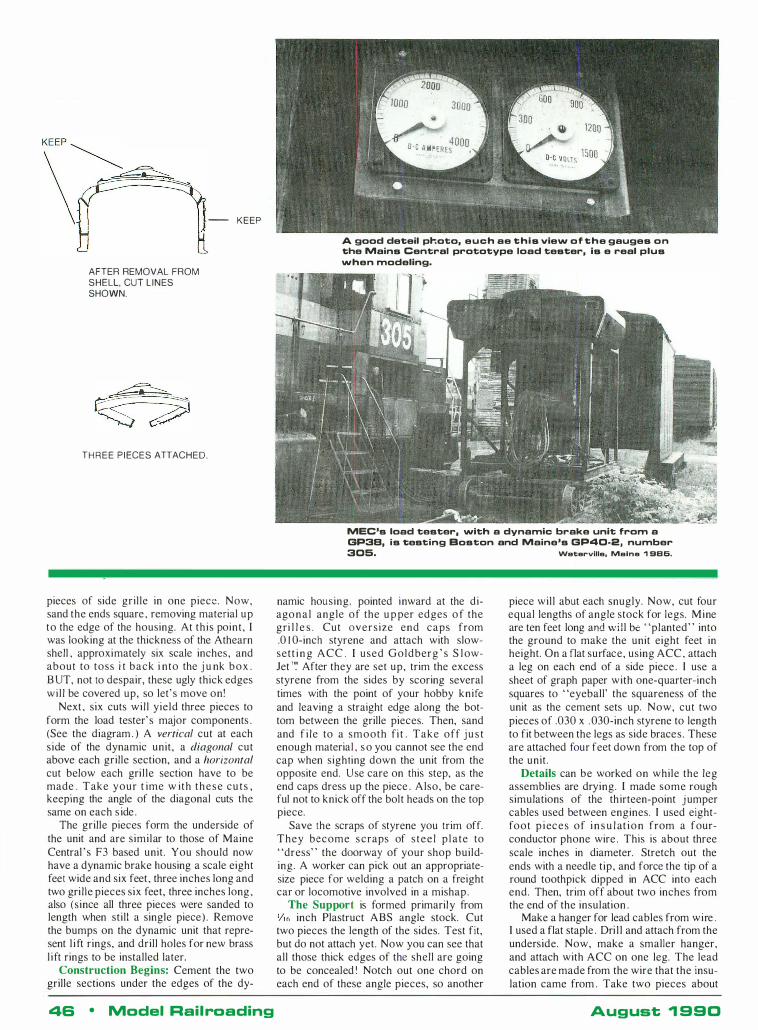
KEEP �
\ ��
AFTER REMOVAL FROM SHELL, CUT LINES SHOWN.
THREE P I ECES ATTACHED.
-- KEEP
pieces of side grille in one piece. Now, sand the ends square , removing material up to the edge of the housing. At this point, I was looking at the thickness of the Athearn shell , approximately six scale inches, and about to toss i t back i nto the j u nk box . B UT, not to despair, these ugly thick edges wil l be covered up, so let' s move on!
Next , six cuts wi l l yield three pieces to form the load tester' s major components . (See the diagram . ) A vertical cut at each side of the dynamic unit, a diagonal cut above each grille section, and a horizontal cut below each gri l le section have to be made . Take your t ime w ith these cu ts , keeping the angle of the diagonal cuts the same on each s ide .
The grille pieces form the underside of the unit and are similar to those of Maine Central ' s F3 based unit. You should now have a dynamic brake housing a scale eight feet wide and six feet , three inches long and two gri l le pieces six feet, three inches long , also (since all three pieces were sanded to length when still a single piece) . Remove the bumps on the dynamic unit that repre· sent l i ft rings, and drill holes for new brass l ift rings to be installed later.
Construction Begins: Cement the two grille sections under the edges of the dy·
46 • Model Rail roading
A good deteil photo, e u c h ae t h i s view o f t h e gauges o n the Mains Central prototype load tester, is e real plus when modeling.
MEC's load tester, with a dynamic brake unit from a GP3B, is testing Boston and Maine's GP40-2, number 305. Waterville. Maine 1 986.
namic housing, pointed inward at the di· ago nal angle of the u p per edges o f the gri l l e s . Cut overs ize end caps from .0 I O-inch styrene and attach with slowsett i n g ACe . I used Goldberg ' s S l owJet T� After they are set up, trim the excess styrene from the sides by scoring several times with the point of your hobby knife and leaving a straight edge along the bottom between the grille pieces. Then, sand and f i le to a smooth fi t . Take off j u s t enough material , s o you cannot see the end cap when sighting down the unit from the opposite end. U se care on this step, as the end caps dress up the piece . Also, be careful not to knick off the bolt heads on the top piece.
Save the scraps of styrene you trim off. They become s craps of s tee l p l ate to "dress" the doorway of your shop building. A worker can pick out an appropriatesize piece for welding a patch on a freight car or locomotive involved in a mishap.
The Support is formed primarily from '/,6 inch Plastruct ABS angle stock. Cut two pieces the length of the sides. Test fit, but do not attach yet. Now you can see that all those thick edges of the shell are going to be concealed ! Notch out one chord on each end of these angle pieces, so another
piece will abut each snugly. Now, cut four equal lengths of angle stock for legs. Mine are ten feet long and will be "planted" into the ground to make the unit eight feet in height. On a flat surface, using ACC , attach a leg on each end of a side piece . I use a sheet of graph paper with one-quarter-inch squares to "eyeball' the squareness of the unit as the cement sets up. Now, cut two pieces of .030 x . 030-inch styrene to length to fit between the legs as side braces . These are attached four feet down from the top of the unit .
Details can be worked on while the leg assemblies are drying. I made some rough simulations of the thirteen-point j umper cables used between engines. I used eightfoot p i eces of i n s u l at i o n from a fourconductor phone wire . This is about three scale inches in diameter. Stretch out the ends with a needle tip, and force the tip of a round toothpick dipped in ACC into each end. Then, trim off about two inches from the end of the insulation .
Make a hanger for lead cables from wire . I used a flat staple . Dri l l and attach from the underside. Now, make a smaller hanger, and attach with ACC on one leg. The lead cables are made from the wire that the insulation came from . Take two pieces about
August ., 990
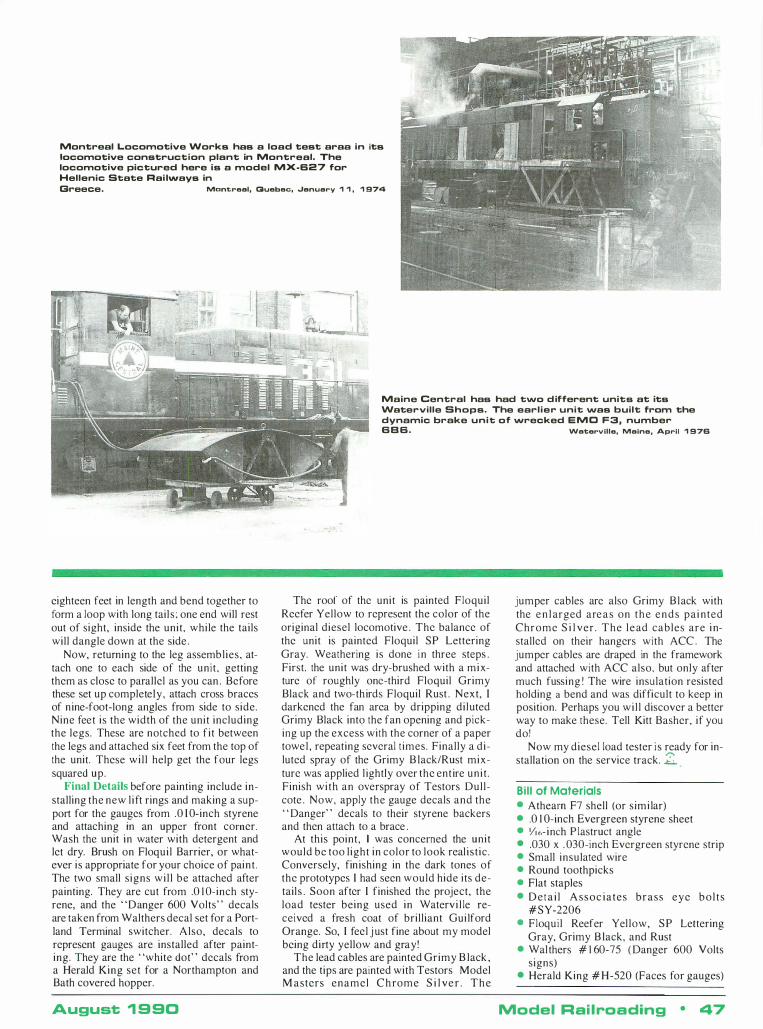
Montreal Locomotive Works has a load test araa in its locomotive construction plant in Montreal. The locomotive pictured here is a model MX-S27 for Hellenic State RaihNays in Greec::;e. Montreal, Buebee, .... anuary 1 1 , 1 974
Maine Central has had two different units at its Waterville Shops. The earlier unit was built from the dynamic brake unit of wrecked EMO F3, number
eighteen feet in length and bend together to form a loop with long tails ; one end will rest out of sight, inside the unit, while the tails will dangle down at the side .
Now, returning to the leg assemblies, attach one to each side of the unit, getting them as close to parallel as you can . Before these set up completely, attach cross braces of nine-foot-Iong angles from side to side. Nine feet is the width of the unit including the legs. These are notched to fit between the legs and attached six feet from the top of the unit. These wil l help get the four legs squared up.
Final Details before painting include installing the new l ift rings and making a suppOli for the gauges from .0 I O-inch styrene and attaching in an upper front corner. Wash the unit in water with detergent and let dry. Brush on Floquil Barrier, or whatever is appropriate for your choice of paint . The two small signs wil l be attached after painting. They are cut from .0 1 0-inch styrene, and the "Danger 600 Volts" decals are taken from Walthers decal set for a Portland Terminal switcher. Also, decals to represent gauges are installed after painting. They are the "white dot" decals from a Herald King set for a Northampton and Bath covered hopper.
August 1 9 90
BBS. Waterville, Maine, April 1 976
The roof of the unit is painted Floquil Reefer Yellow to represent the color of the original diesel locomotive . The balance of the unit is painted Floquil SP Lettering Gray. Weathering is done in three steps . First. the unit was dry-brushed with a mixture of roughly one-third Floquil Grimy Black and two-thirds Floquil Rust . Next, I darkened the fan area by dripping diluted Grimy Black into the fan opening and picking up the excess with the corner of a paper towel , repeating several t imes. Finally a diluted spray of the Grimy B lack/Rust mixture was applied l ightly over the ent ire unit . Finish with an overspray of Testors Dullcote . Now, apply the gauge decals and the " Danger" decals to their styrene backers and then attach to a brace .
At this point, I was concerned the unit would be too light in color to look real ist ic . Conversely, finishing in the dark tones of the prototypes I had seen would hide its details . Soon after I finished the project, the load tester being used in Watervi l le received a fresh coat of brilliant Gui lford Orange. So, I feel j ust fine about my model being dirty yellow and gray!
The lead cables are painted Grimy B lack , and the tips are painted with Testors Model M asters enamel C h rome S i l ve r . T h e
jumper cables are also Grimy Black with the e n l arged are a s on t h e ends pai nted Chrome S i l ver . The lead cables are installed on their hangers with ACe . The jumper cables are draped in the framework and attached with ACC also, but only after much fussing ! The wire insulation resisted holding a bend and was difficult to keep in position. Perhaps you wil l discover a better way to make these. Tell Kitt Basher, if you do'
Now my diesel load tester i s ready for installation on the service track. ,;;:;. . Bill of Materials • Athearn F7 shell (or s imilar) • .0 I O-inch Evergreen styrene sheet • Y'6-inch P lastruct angle • .030 x . 030-inch Evergreen styrene strip • Small insulated wire • Round toothpicks • Flat staples • Deta i l Assoc iates brass eye bol ts
#SY-2206 • Floquil Reefer Yel low, SP Lettering
Gray, Grimy B lack, and Rust • Walthers # 1 60-75 ( Danger 600 Volts
signs) • Herald King # H-520 (Faces for gauges)
Model Rai l roading • 47
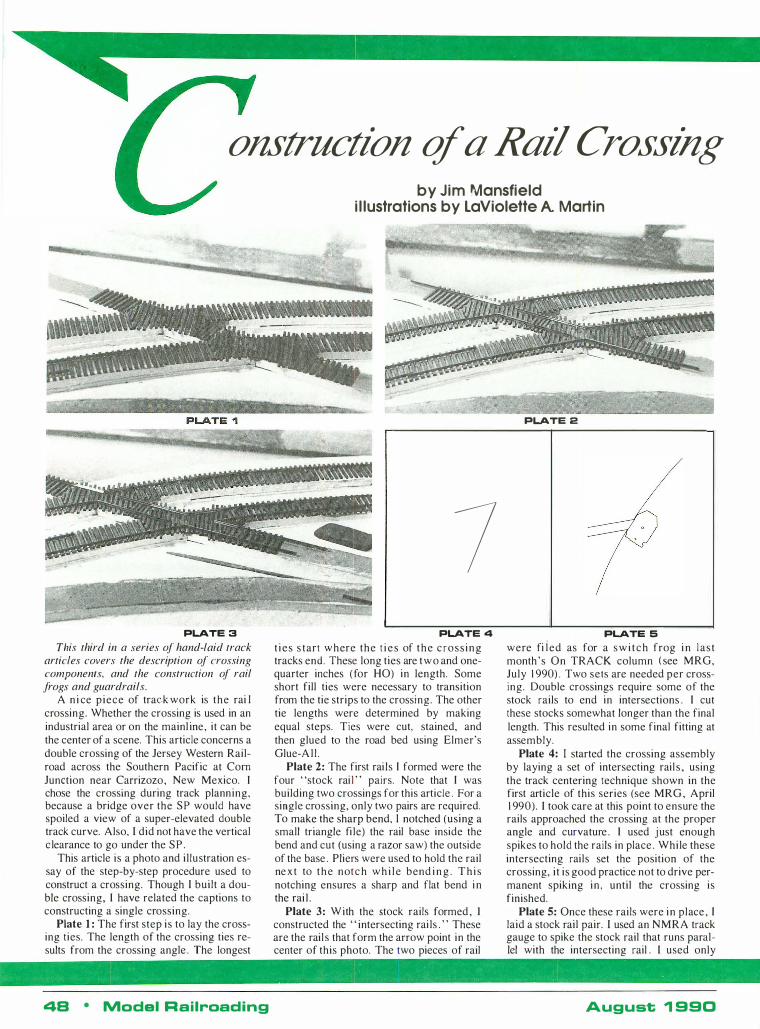
onstructlon of a Ralt Crossing
PLATE 3
This third in a series of hand-laid track articles covers the description of crossing components, and the construction of rail frogs and guardrails.
A n i ce piece of track work is the rai I crossing. Whether the crossing is used in an industrial area or on the mainl ine, it can be the center of a scene. This article concerns a double crossing of the Jersey Western Railroad across the Southern Pacific at Corn Junction near Carrizozo, New Mexico. I chose the crossing during track planning, because a bridge over the SP would have spoiled a view of a super-elevated double track curve. Also, I did not have the vertical c learance to go under the S P .
This article is a photo and il lustration essay of the step-by-step procedure used to construct a crossing. Though I built a double crossing, I have related the captions to constructing a single crossing.
Plate 1 : The first step is to lay the crossing ties. The length of the crossing ties results from the crossing angle . The longest
4B • Model Railroading
by Jim Mansfield i l lustrations by LaViolette A Martin
7 PLATE 4
t ies s tart where the t i e s of t h e cross ing tracks end. These long ties are two and onequarter inches (for HO) in length. Some short fill ties were necessary to transition from the tie strips to the crossing. The other tie lengths were determined by making equal steps. Ties were cut, stained, and then glued to the road bed using Elmer's Glue-Al l .
Plate 2: The first rai ls I formed were the four "stock rai l " pairs. Note that I was building two crossings for this article . For a single crossing, only two pairs are required. To make the sharp bend, I notched (using a small triangle fi le) the rail base inside the bend and cut (using a razor saw) the outside of the base . Pliers were used to hold the rail ne xt to t h e notc h w h i l e bend i n g . T h i s notching ensures a sharp and flat bend i n the rai l .
Plate 3: W ith the stock rails formed , I constructed the " intersecting rai ls . " These are the rail s that form the arrow point in the center of this photo. The two pieces of rail
PLATE 2
PLATE 5
were fi i ed as for a s w i t c h frog i n l as t month 's On TRACK column ( see MRG, July 1 990) . Two sets are needed per crossing. Double crossings require some of the stock rails to end in intersections . I cut these stocks somewhat longer than the final length. This resulted in some final fitting at assembly.
Plate 4: I started the crossing assembly by laying a set of intersecting rail s , using the track centering technique shown in the first article of this series (see MRG , April 1 990). I took care at this point to ensure the rails approached the crossing at the proper angle and curvature . I used j ust enough spikes to hold the rails in place . While these intersecting rails set the position of the crossing, it is good practice not to drive permanent spiking in , until the crossing is finished.
Plate 5: Once these rails were in place , I laid a stock rail pair. I used an NMRA track gauge to spike the stock rail that runs parallel with the intersecting rail . I used only
August 1 990
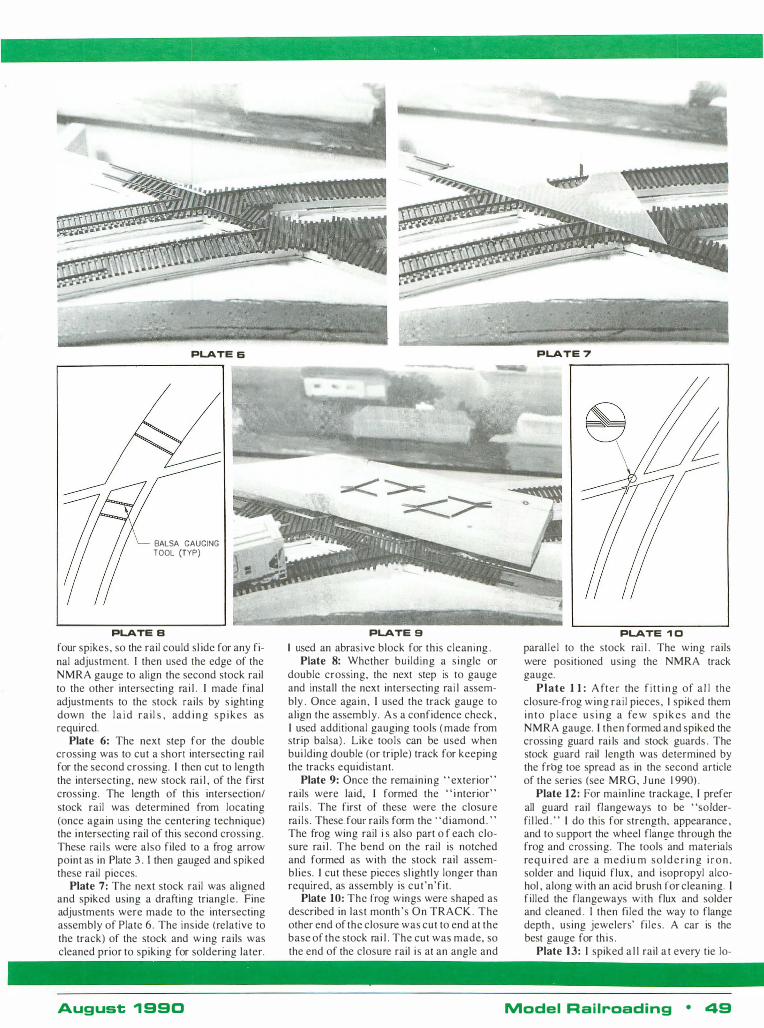
PLATE 6
BALSA GAUGING TOOL (TYP)
PLATE B
four spikes , so the rail could sl ide for any final adjustment. I then used the edge of the NMRA gauge to align the second stock rail to the other intersecting rai l . I made final adjustments to the stock rails by s ighting down the l a i d ra i l s , add i n g s p i kes as required.
Plate 6: The next step for the double crossing was to cut a short intersecting rail for the second crossing. I then cut to length the intersecting, new stock rai l , of the first crossing. The length of this intersection/ stock rail was determined from locating (once again using the centering technique) the intersecting rail of this second crossing. These rai l s were also filed to a frog arrow point as in Plate 3 . 1 then gauged and spiked these rail pieces.
Plate 7: The next stock rail was aligned and spiked using a drafting triangle . Fine adjustments were made to the intersecting assembly of Plate 6 . The ins ide ( relative to the track) of the stock and wing rails was cleaned prior to spiking for soldering later.
August 1 990
PLATE 9 I used an abrasive block for this cleaning .
Plate 8: Whether building a s ingle or double crossing, the next step is to gauge and install the next intersecting rai l assembly . Once again , I used the track gauge to align the assembly. As a confidence check , I used additional gauging tools ( made from strip balsa) . Like tools can be used when bui lding double (or triple) track for keeping the tracks equidistant.
Plate 9: Once the remaining " exterior" rails were laid, I formed the " i nterior" rai l s . The first of these were the closure rai l s . These. four rails form the "diamond . " The frog wing rail i s also part o f each closure rai l . The bend on the rail is notched and formed as with the stock rail assemblies. I cut these pieces sl ightly longer than required, as assembly is cut 'n'fit .
Plate 10: The frog wings were shaped as described in last month 's On TRACK . The other end of the closure was cut to end at the base of the stock rai l . The cut was made, so the end of the closure rail i s at an angle and
PLATE 7
PLATE 1 0
paral le l to the stock rai l . The wing rails were positioned using the NMRA track gauge.
Plate 1 1 : Aft e r the f i t t i n g of a l l the closure-frog wing rai l pieces, 1 spiked them into p l ace u s i n g a fe w s p i k e s and the NMRA gauge. I then formed and spiked the crossing guard rai Is and stock guards . The stock guard rail length was determined by the frog toe spread as in the second article of the series (see MRG, J une 1 990) .
Plate 1 2 : For mainline trackage, 1 prefer all guard rail f1angeways to be "solderfi l led . " I do this for strength, appearance , and to sUppOl1 the wheel flange through the frog and crossing. The tools and materials req u i red are a medi u m so lder ing i r o n . solder and l iquid flux, and i sopropyl alcohol , along with an acid brush for cleaning. I filled the flangeways with flux and solder and cleaned . I then fi led the way to flange depth , using jewelers' fi les . A car is the best gauge for thi s .
Plate 13: I spiked a l l rail a t every tie 10-
Model R a i l roading • 49
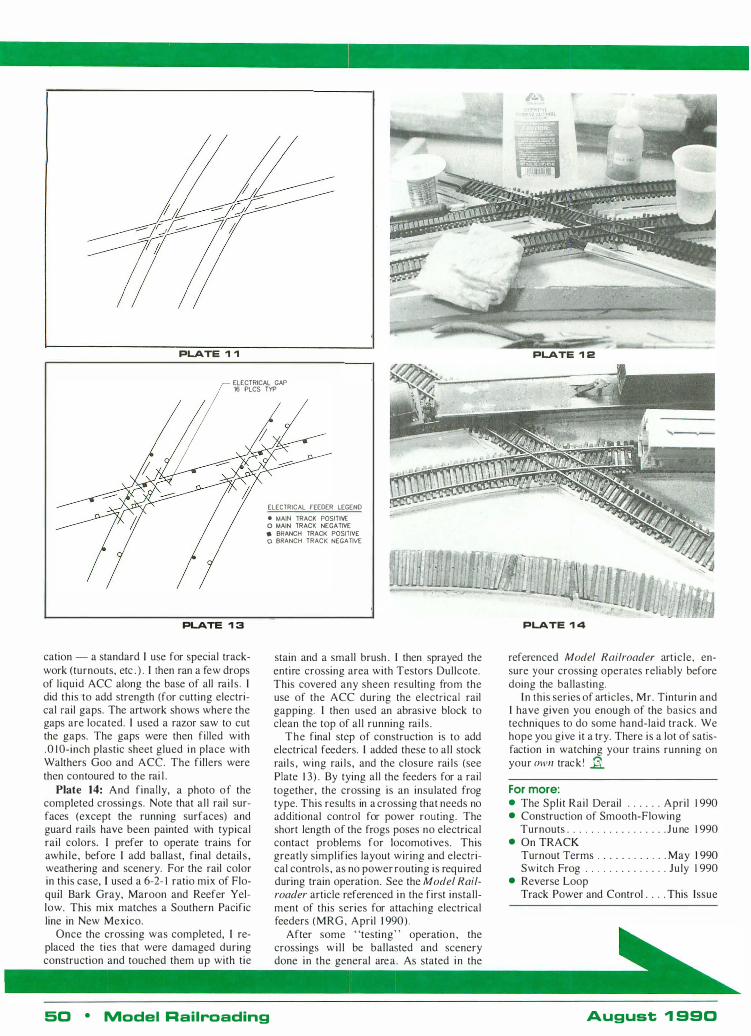
PLATE 1 1
ELECTRICAL GAP 16 PLCS TYP
PLATE 1 3
cation - a standard I use for special trackwork (turnouts, etc . ) . I then ran a few drops of liquid ACC along the base of all rai ls . I did this to add strength (for cutting electrical rail gaps. The artwork shows where the gaps are located. I used a razor saw to cut the gaps. The gaps were then filled with .0 I O-inch plastic sheet glued in place with Walthers Goo and ACe. The fillers were then contoured to the rai l .
Plate 14: And finally, a photo o f the completed crossings. Note that all rail surfaces (except the running surfaces) and guard rails have been painted with typical rail colors. I prefer to operate trains for awhile, before I add ballast, final detail s , weathering and scenery. For the rail color in this case, I used a 6-2- 1 ratio mix of Floquil Bark Gray, Maroon and Reefer Yellow. This mix matches a Southern Pacific line in New Mexico.
Once the crossing was completed, I replaced the ties that were damaged during construction and touched them up with tie
ELECTRICAL FEEDER LEGEND
• MAIN TRACK POSITIVE
o MAIN TRACK NEGA nVE
• BRANCH TRACK POSITIVE
o BRANCH TRACK NEGA nVE
stain and a small brush . I then sprayed the entire crossing area with Testors Dullcote. This covered any sheen resulting from the use of the ACC during the electrical rail gapping. I then used an abrasive block to clean the top of all running rai ls .
The final step of construction is to add electrical feeders. I added these to all stock rail s , wing rai ls , and the closure rai ls (see Plate 1 3) . By tying all the feeders for a rail together, the crossing is an insulated frog type. This results in a crossing that needs no additional control for power routing. The short length of the frogs poses no electrical contact problems for locomotives. This greatly simplifies layout wiring and electrical controls , as no power routing is required during train operation. See the Model Railroader article referenced in the first installment of this series for attaching electrical feeders (MRG , April 1 990) .
After some "testing" operation , the crossings wil l be ballasted and scenery done in the general area. As stated in the
50 • Model Railroading
PLATE 1 2
PLATE 1 4
referenced Model Railroader article, ensure your crossing operates reliably before doing the ballasting.
In this series of articles, Mr. Tinturin and I have given you enough of the basics and techniques to do some hand-laid track. We hope you give it a try. There is a lot of satisfaction in watching your trains running on your own track ! Jl
For more: • The Split Rail Derail . . . . . . April 1 990 • Construction of Smooth-Flowing
Turnouts . . . . . . . . . . . . . . . . . June 1 990 • On TRACK
Turnout Terms . . . . . . . . . . . . May 1 990 Switch Frog . . . . . . . . . . . . . . July 1 990
• Reverse Loop Track Power and Control . . . . This Issue
August � 990
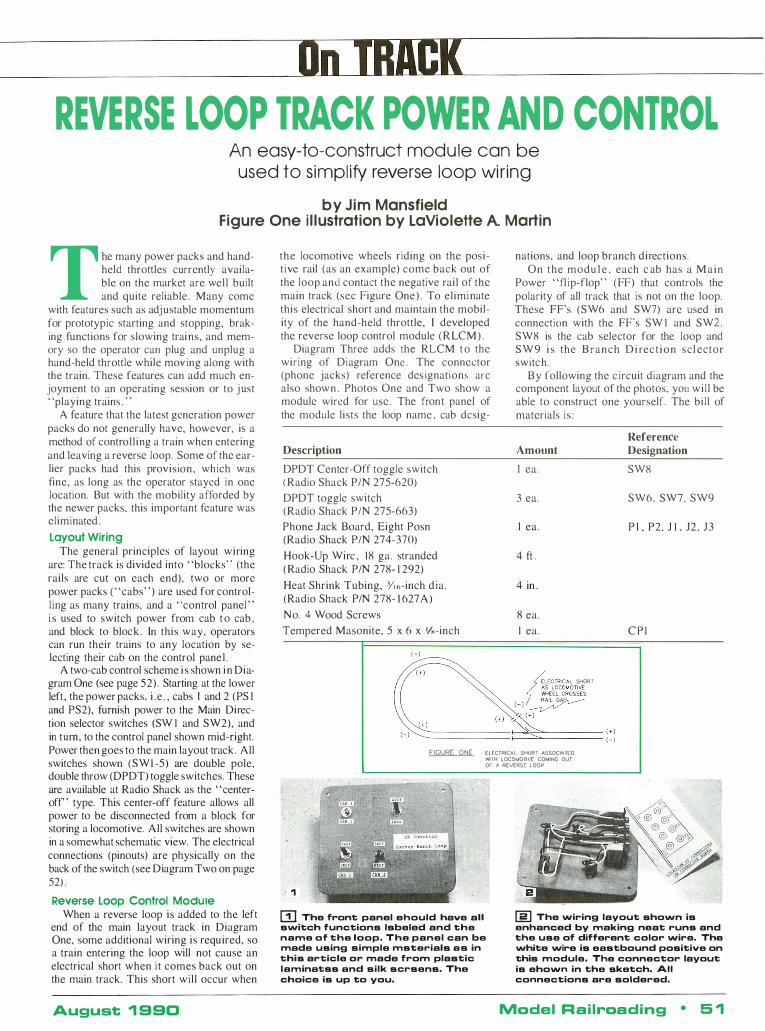
On TRACK REVERSE LOOP TRACK POWER AND CONTROL
An easy-to-construct modu le can be used to s impl ify reverse loop wi r ing
by J im Mansfield Figure One i l lustration by LaViolette A Martin
T he many power packs and handheld throttles currently available on the market are wel l built and quite reliable . Many come
with features such as adj ustable momentum for prototypic starting and stopping, braking functions for slowing trai ns, and memory so the operator can plug and unplug a hand-held throttle while mov ing along with the train. These features can add much enjoyment to an operating session or to j ust "playing trains . "
A feature that the latest generation power packs do not generally have, however, is a method of control l ing a train when entering and leaving a reverse loop. Some of the earlier packs had this provision, which was fine, as long as the operator stayed in one location. But with the mobility afforded by the newer packs, this important feature was eliminated .
Layout Wiring The general principles of layout wiring
are: The track is divided into "blocks" (the rails are cut on each end), two or more power packs ( "cabs") are used for controll ing as many trains, and a "control panel " i s used to switch power from cab t o cab . and block to block . In this way, operators can run their trains to any location by selecting their cab on the control pane l .
A two-cab control scheme i s shown i n Diagram One (see page 52) . Starting at the lower left , the power packs, i .e . , cabs I and 2 ( PS I and PS2), furnish power to the Main Direction selector switches (SW I and SW2), and in tum, to the control panel shown mid-right. Power then goes to the main layout track . All switches shown (SW 1 -5) are double pole, double throw (DPDT) toggle switches. These are available at Radio Shack as the "centeroff ' type. This center-off feature allows all power to be disconnected from a block for storing a locomotive. All switches are shown in a somewhat schematic view. The electrical connections (pinouts) are physically on the back of the switch (see Diagram Two on page 52) .
Reverse Loop Control ModUle When a reverse loop is added to the left
end of the main layout track in Diagram One, some additional wiring is required, so a train entering the loop will not cause an electrical short when i t comes back out on the main track. This short wil l occur when
August 1 990
the locomotive wheels riding on the posit ive rail (as an example) come back out of the loop and contact the negative rai l of the main track (sec Figure One ) . To el imi nate this electrical short and maintain the mobility of the hand-held throttle, I developed the reverse loop control module (RLCM ) .
Diagram Three adds the RLCM t o the wiring of Diagram One . The connector (phone jacks) reference des ignations arc also shown . Photos One and Two show a module wired for use . The front panel of the module lists the loop name . cab dcsig-
Description
DPDT Center-Off toggle switch ( Radio Shack PIN 275-620)
DPDT toggle switch (Radio Shack PIN 275-663)
Phone Jack Board, Eight Posn (Radio Shack PIN 274-370)
Hook-Up Wirc , 18 gao stranded ( Radio Shack PIN 278- 1 292)
Heat Shrink Tubing, Y'6-inch dia . (Radio Shack PIN 278- 1 627 A)
No. 4 Wood Screws
Tempered Masonite, 5 x 6 x '1K-inch
(-I
nations, and loop branch directions. On t he modu l e , each c ab has a M a i n
Power "fl ip-flop" (FF) that controls the polarity of all track that is not on the loop. These FF's (SW6 and SW7) are used in connection with the FF's SW I and SW2 . SW8 is the cab selector for the loop and S W 9 i s the B ranch D i rec t i o n scl ector switc h .
B y following the c ircuit diagram and the component layout of the photos, you wi l l be able to construct one yourself. The bil l of materials i s :
Amount
I ea.
3 ea.
I ea.
4 ft .
4 in .
8 ea.
I ea.
Reference Designation
SW8
SW6, SW7. SW9
P I , P2. J I . J 2 . J 3
C P I �+I fLEC TR CAL SHOR T AS LOCQI.40nve: 'M-lEEL CROSSES
. RAl l G� ( - I �
\ ( " �" "'� .�� ( _ ) I f--,�::::=----s�==== ( + 1 f-- (_I FIGURE ONE ELECTRICAL SHORT ASSOCIATED
'MTH LOCOMOTIVE COMING OUT OF A REVERSE LOOP
.,
m The front panel ehould have all s""itch functions Isbeled and the name of the loop. The panel can be made using simple msterials a s in this article or made from plastic laminatss and silk scrsens. The choice is up to you.
[g] The wiring layout sho""n is enhanced by making neat runs and the use of different color ""ire. The ""hite ""ire is eastbound positive on this module. The connector layout is eho""n in the sketch. All connections are soldered.
Model R a i l road i n g • 5 1

NOTES
t P$ t and P$2 aH� IhloWes 01 your cholcO 2 SWI-5 1l10 OPOT conlor·oll togglo swllCllCS
3 SW\·5 p,nouts conhgurod as ,n Diagram Two
SWitch Position Shown: - Eastbound 01 5W l , $W2, SW6 and SW7 - Cab Two 01 SW3, SW4, SWS and SW8 - Jersey Westem BranCh 01 SW9 'u" I I 1 1
1 I I !
DIAGRAM TWO PINOUTS FOR A DOUBLE POLE· To add'honal DOUBLE THROW TOGGLE SWITCH blOCkS (PSI)
To addiliona hlocks (PS2)
LOOP TRACK <l1li EASTBOUND
'---------<t---.::=7 L-__________ �----� �
SW9
,r-----' 4 Ffom 5W.J on O,ag/am Ono
From 5WS on j, O,aglarn Onc FfOm 5W4on O,agram Ono
f---- CONTROL PANEL ------t.� ....
SW8
NOTES
1 SW8 IS a DPOT COnlcr·ott toggte swllch
2 SW6· 7 and SW9 are OPOT toggtc swltChcS
3 SW6·9 Pinouts contlgurce as II, Diagram Two
.1 5W8 has lhe luncl,on ol lOOp block cab selector as aoos 5W3·5 01 D.agram Onc
E:Jgi: 5W6 To Conuot Parol on Diagram One
DIAGRAM ONE ELECTRICAL DIAGRAM FOR TWO CAB CONTROL OF LAYOUT
The size and arrangement of the panel is designed for ease of operation. The mounting holes for the switches are . 25-inch diameter. The four small holes in the comers of the panel are clearance for the wood screws, These screws will hold the panel on the layout 's fascia board . A clearance hole about 33/4 x 43/. inches must be cut in the fascia, The phone jack connector board is attached to the back of the RLCM module, using small blocks of wood glued to the panel and drilled to accept the wood screws placed through the mounting holes of the jack board , The height of the blocks is determined by the thickness of the fascia.
Placing the RLCM The module should be positioned close to
the reverse loop. In this way, an operator can throw the necessary switches while staying with the train . I f the module is connected to the power packs or control panel wi th more than fi ve fee t of w i re , use twelve-gauge wire to prevent voltage drop. I f a memory type of hand-he l d , wa lkaround throttle is used on the layout, the module should be close to a tether plug.
Using the Module Once the connections are made between
RLCM and the power pack, control panel and loop track using the connectors (phone jacks) P I , P2, J I , J2 and 1 3 , a train can be run through the loop ,
The flip-flops mentioned above are interactive , As an example, consider SW I and SW6, If SW I is thrown, it reverses the voltage polarity going to both the main track and the loop track. If SW6 is then thrown,
52 • Model Railroadi ng
Pl P2
F am 5W 1 on From 5W2 on O,aqram Cne O,agl(lIn Ono
DIAGRAM THREE ELECTRICAL DIAGRAM FOR THE REVERSE LOOP CONTROL MODULE
the polar i ty o f t h e m a i n track is again flipped, These two FF' s act l ike the direction switch on the power pack or throttle a locomotive will change direction. But, no matter how SW I and SW6 are thrown, the direction of the locomotive is sti l l control led by the throttle,
To run a train from the right-most track block of Diagram Three, you first set SW I (or SW2) and SW6 (or SW7) to eastbound, You then se lect the appropri ate cab o n SW3-5 . N o w , if you place your throttle direction switch so the train moves "forward " toward the loop, you are set until you approach the loop, Prior to reaching the loop, confirm to which branch of the loop you are routed, Select your cab using SW8 , and then position the Branch Direction switch SW9 to match the route, Once it is confirmed that the loop turnout and RLCM branch switch match, the loop may be entered, Once the train is completely in the loop, you throw FF SW6 (or SW7), thereby matching the main track polarity to the polarity of the outbound end of the loop track. Once the loop turnout is thrown, so your train can go through the turnout , you may proceed.
Upgrades The first upgrade that can be made to the
RLCM is configuring the module for using more than two cabs on the layout. This is done by replacing SW8 with a rotary switch (available as Radio Shack PIN 275- 1 385 ) , This switch will allow the selection o f up to five cabs and allow for a "power off" setting, This increases the number of Main Power flip-flops,
The next upgrade is to the " Auto-Select RLCM , " This modification entai ls the replacement of the Branch Direction flip-flop (SW9) with an auto-select relay , This relay can be mounted on the module and controlled by the loop turnout switch machine pos i t ion u t i l i z i ng m a c h i n e contacts . If enough contacts of sufficient power ratings are available on the switch machine, the complete function could be handled there,
The second part of this modification is the elimination of the main track power flip-flop. To do this, a train occupancy detector must be included at each end of the loop. When a train trips the detector prior to leaving the loop, a flip-flop relay ( one for each cab) will be energized and change the main track polarity for the cab selected by SW8, These relays wil l be located on the module to simplify wiring at the layout .
When two or more modules are to be used on the layout, or if one loop is nested inside another, some additional control logic must be util ized ,
If there is enough interest, I wil l be glad to prepare an article on the necessary modifications . You may contact me at Model Railroading, 2854 Larimer Street, Denver, Colorado 80205 with your requests ,
There you go, for a few bucks , You can really enhance that new memory walkaround ' 1i For more: • On TRACK
Turnout Terms . . . . , , . , , . , May 1 990 • On TRACK
Switch Frog . . . . . . . . , . . " July 1 990
August '1 99 0
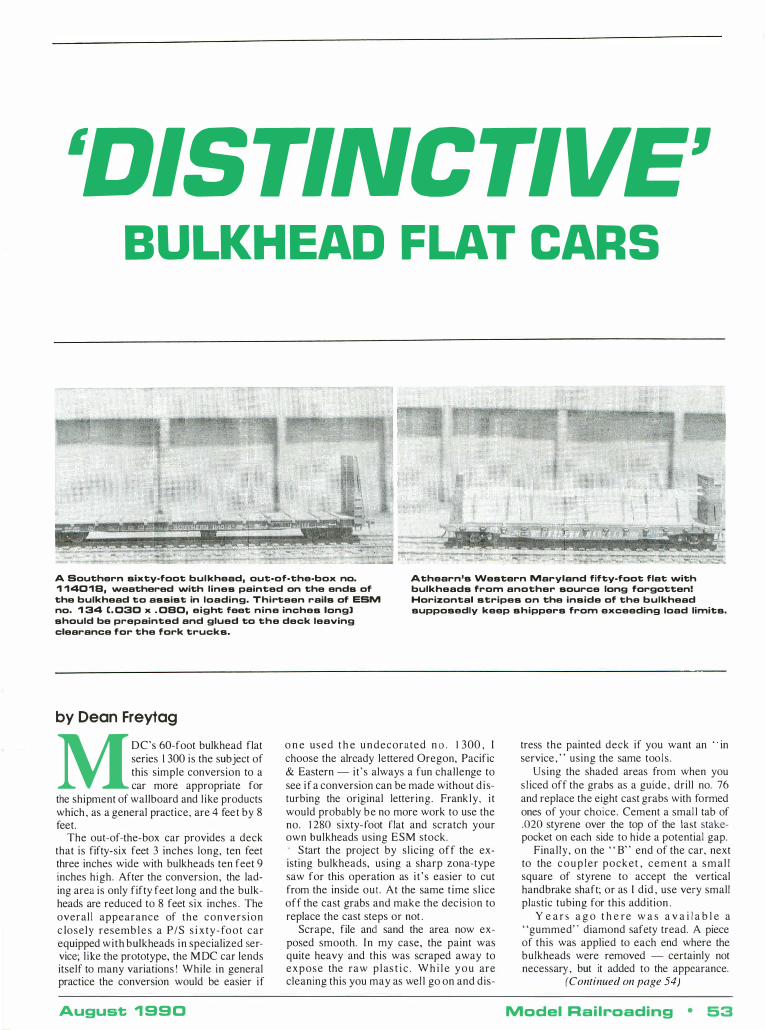
'DIS TINC TI VEl BULKHEAD FLAT CARS
A Southern sixty·foot bul khead, out·of·the·box no. 1 1 40 1 B, weathered with lines painted on the ends of the bulkhead to assist in loading. Thirteen rails of ESM no. 1 34 (. 030 x . OBO, eight feet nine inches long) should be prepainted and glued to the deck leaving clearance for the fork trucks.
Athearn's Western Maryland fifty·foot flat with bulkheads from another source long forgotten! Horizontal stripes on the inside of the bulkhead supposedly keep shippers from exceeding load limits.
by Dean Freytag
M DC's 60-foot bulkhead flat series 1 300 is the subject of this simple conversion to a car more appropriate for
the shipment of wallboard and l ike products which , as a general practice, are 4 feet by 8 feet.
The out-of-the-box car provides a deck that is fifty-six feet 3 inches long, ten feet three inches wide with bulkheads ten feet 9 inches high. After the conversion, the lading area is only fifty feet long and the bulkheads are reduced to 8 feet six inches . The overall appearance of the convers ion c losely resemb l e s a PIS s i x ty-fo o t car equipped with bulkheads in specialized service; l ike the prototype, the M DC car lends itself to many variations ! While in general practice the conversion would be easier if
August 1 99 0
o n e used t h e u n decorated n o . 1 300 , I choose the already lettered Oregon, Pacific & Eastern - it's always a fun challenge to see if a conversion can be made without d isturbing the original lettering. Frankly, i t would probably be no more work to use the no. 1 280 sixty-foot flat and scratch your own bulkheads using ESM stock.
Start the project by slicing off the existing bulkheads, using a sharp zona-type saw for this operation as i t ' s easier to cut from the inside out. At the same time sl ice off the cast grabs and make the decision to replace the cast steps or not .
Scrape, file and sand the area now exposed smooth. In my case, the paint was quite heavy and this was scraped away to expose the raw plas t i c . W h i l e y o u are cleaning this you may as wel l go on and dis-
tress the painted deck if you want an " in service , " using the same tools .
Using the shaded areas from when you s l iced off the grabs as a guide , drill no. 76 and replace the eight cast grabs with formed ones of your choice. Cement a smal l tab of .020 styrene over the top of the last stakepocket on each side to hide a potential gap.
Final ly, on the " B" end of the car, next to the c o u p l er pocket , cement a s m al l square of styrene to accept the vertical handbrake shaft; or as I did , use very small plastic tubing for this addition .
Y e a r s a g o t h e re w a s a v a i l a b l e a "gummed" diamond safety tread. A piece of this was applied to each end where the bulkheads were removed - certainly not necessary , but it added to the appearance.
(Continued on page 54)
Madel Railroading • 53
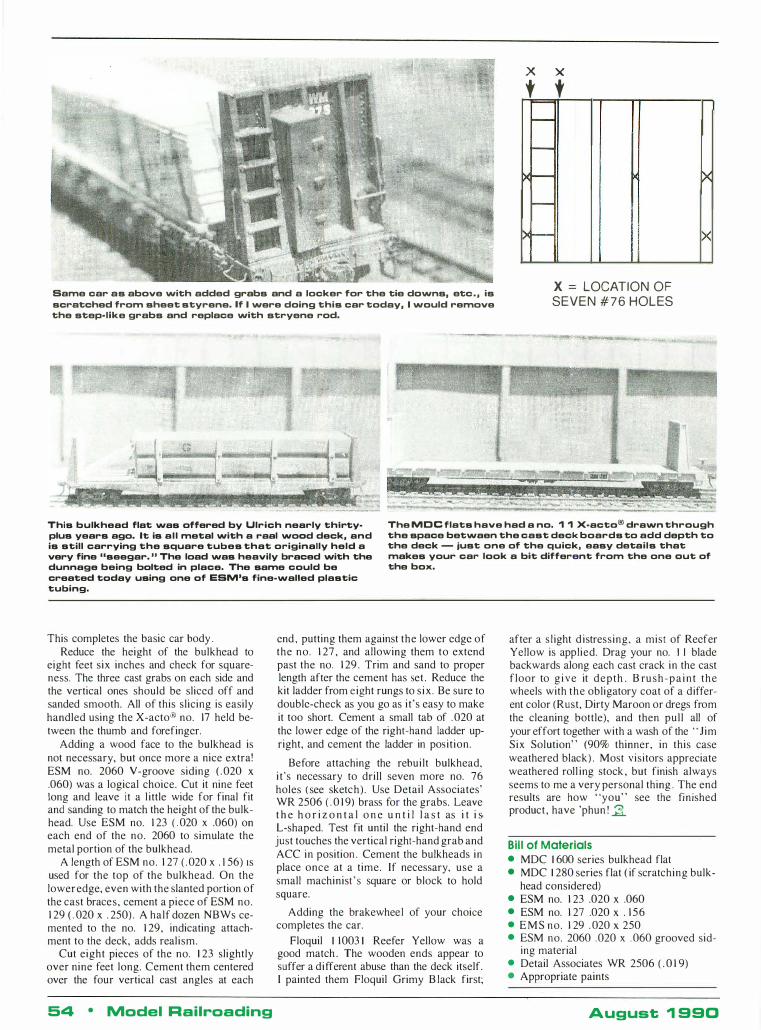
Same car as above with added grabs and a locker for the tie dawns, etc . , is scratched from sheet styrene. If I were doing this car today, I would remove the step·like grabs and replace with stryene rod.
x x • • -
---
-
)<--
>e-
x = LOCATION OF SEVEN #76 HOLES
�
X
This bulkhead flat was offered by Ulrich nearly thirty· plus years ago. It is a l l metal with a raal woad deck, and is still carrying the square tubes that originally held a very fine "seegar. " The load was heavily braced with the dunnage being bolted in place. The same could be created today using one of ESM's fine·walled plastic tubing.
The MDe flats have had a no. 1 1 X.acto® drawn through the space betwaen the cast deck boards to add depth to the deck - just one of the quick, easy details that makes your car look a bit different from the one aut of the box.
This completes the basic car body . Reduce the height of the bulkhead to
eight feet six inches and check for squareness. The three cast grabs on each side and the vertical ones should be sliced off and sanded smooth. All of this slicing is easily handled using the X-acto® no. 17 held between the thumb and forefinger.
Adding a wood face to the bulkhead is not necessary, but once more a nice extra! ESM no. 2060 V-groove siding ( . 020 x .060) was a logical choice. Cut it nine feet long and leave it a l ittle wide for final fit and sanding to match the height of the bulkhead. Use ESM no. 1 23 ( . 020 x .060) on each end of the no. 2060 to simulate the metal portion of the bulkhead.
A length of ESM no. 1 27 ( . 020 x . 1 56) is used for the top of the bulkhead. On the lower edge, even with the slanted portion of the cast braces, cement a piece of ESM no. 1 29 ( . 020 x . 250) . A half dozen NBWs cemented to the no. 1 29, indicating attachment to the deck, adds realism.
Cut eight pieces of the no. 1 23 slightly over nine feet long. Cement them centered over the four vertical cast angles at each
54 • Model Railroading
end , putting them against the lower edge of the no. 1 27 , and allowing them to extend past the no. 1 29 . Trim and sand to proper length after the cement has set . Reduce the kit ladder from eight rungs to s ix . Be sure to double-check as you go as it 's easy to make it too short. Cement a small tab of . 020 at the lower edge of the right-hand ladder upright, and cement the ladder in position.
Before attaching the rebuilt bulkhead, i t 's necessary to drill seven more no. 76 holes ( see sketch) . Use Detail Associates' WR 2506 ( . 0 1 9) brass for the grabs. Leave t h e h o r i z o n t a l o n e u n t i l l a s t as i t i sL-shaped. Test fit until the right-hand end just touches the vertical right-hand grab and ACC in position . Cement the bulkheads in place once at a time. If necessary, use a small machinist ' s square or block to hold square.
Adding the brakewheel of your choice completes the car.
Floquil 1 1 003 1 Reefer Yellow was a good match . The wooden ends appear to suffer a different abuse than the deck itself. I painted them Floquil Grimy B lack first;
after a s l ight d istressing, a mist of Reefer Yellow is applied. Drag your no. I I blade backwards along each cast crack in the cast floor to g i ve it depth . B rush-pa in t the wheels with the obligatory coat of a different color (Rust, Dirty Maroon or dregs from the cleaning bottle), and then pull all of your effort together with a wash of the "Jim Six Solution" (90% thinner, in this case weathered black) . Most visitors appreciate weathered roll ing stock , but finish always seems to me a very personal thing . The end results are how "you" see the finished product , have 'phun ! 1i
Bill of Materials • MDC 1 600 series bulkhead flat • MDC 1 280 series flat ( if scratching bulk-
head considered) • ESM no. 1 23 .020 x .060 • ESM no. 1 27 .020 x . 1 56 • EMS no. 1 29 . 020 x 250 • ESM no. 2060 .020 x . 060 grooved sid
ing material • Detail Associates WR 2506 ( . 0 1 9) • Appropriate paints
August 1 990
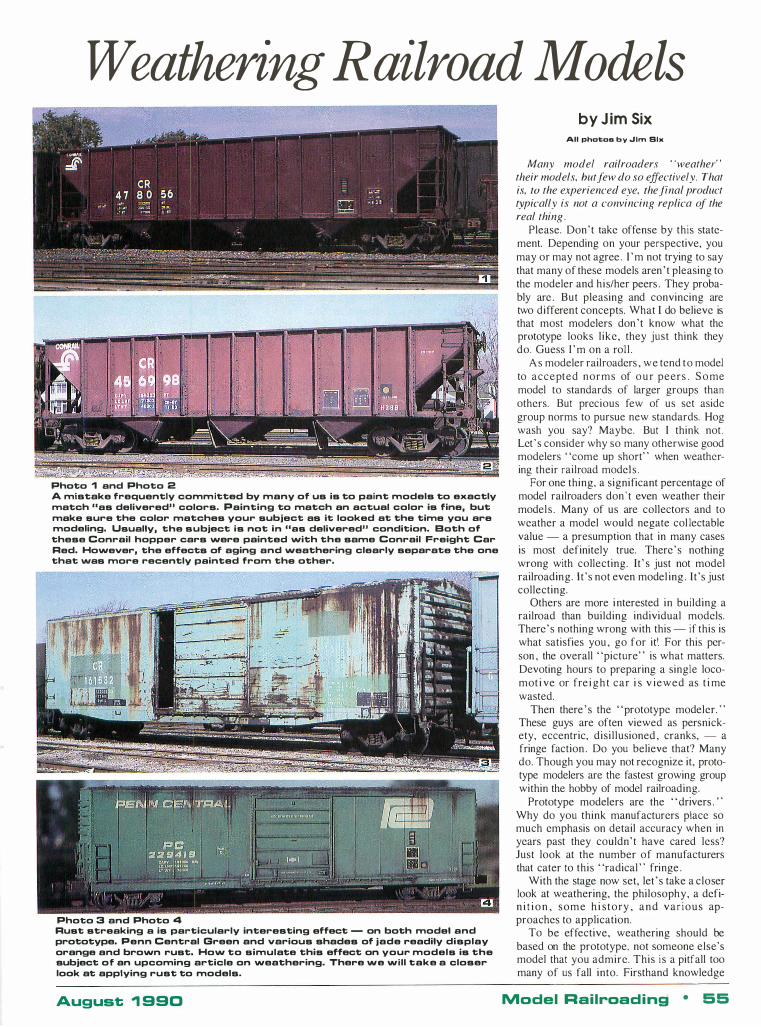
Weathering R ailroad Models
Photo 1 and Photo 2 A mistake frequently comm itted by many of us is to paint models to exactly match "as delivered" colors. Painting to match an actual color is fine. but make sure the color matches your subject as it looked at the time you are modeling. Usually. the subject is not in "as delivered" condition. Both of these Conrail hopper cars were painted with the same Conrail Freight Car Red. However. the effects of aging and weathering clearly separate the one that was more recently painted from the other.
Photo 3 and Photo 4 Rust streaking a is particularly interesting effect - on both model and prototype. Penn Central Green and various shades of jade readily display orange and brown rust. How to simulate this effect on your models is the subject of an upcoming article on weathering. There we will take a closer look at applying rust to models.
August ., 990
by Jim Six All photos by .Jim Six
Many model railroaders . 'weather" their models, but few do so effectively. ThaI is, 10 Ihe experienced eye, the final product typically is not a convincing replica of the real thing .
Please. Don' t take offense by this statement. Depending on your perspective, you may or may not agree. I ' m not trying to say that many of these models aren 't pleasing to the modeler and his/her peers . They probably are . But pleasing and convincing are two different concepts. What I do believe is that most modelers don ' t know what the prototype looks like, they just think they do, Guess I ' m on a rol l .
As modeler railroaders , we tend to model to accepted norms of o u r peers . S o me model to standards of larger groups than others. But precious few of us set aside group norms to pursue new standards. Hog wash you say? Maybe. But I think not . Let ' s consider why so many otherwise good modelers "come up short" when weathering their railroad models .
For one thing, a significant percentage of model railroaders don ' t even weather their models . Many of us are collectors and to weather a model would negate col lectable value - a presumption that in many cases is most definitely true. There' s nothing wrong with collecting. It ' s just not model railroading. I t ' s not even model ing . I t 's just collecting.
Others are more interested in building a railroad than building individual models. There's nothing wrong with this - if this is what satisfies you , go for itl For this person , the overall "picture" is what matters. Devoting hours to preparing a single locomot i ve or fre i g h t car i s v iewed as t i me wasted.
Then there 's the "prototype modeler. " These guys are often viewed as persnickety, eccentric, disil lusioned , cranks, - a fringe faction . Do you believe that? Many do. Though you may not recognize it, prototype modelers are the fastest growing group within the hobby of model railroading.
Prototype modelers are the " drivers . " Why do you think manufacturers place so much emphasis on detail accuracy when in years past they couldn' t have cared less? Just look at the number of manufacturers that cater to this "radical " fringe .
With the stage now set, let ' s take a closer look at weathering, the philosophy, a defin i t i o n , some h i s tory , a n d var ious approaches to application.
To be effective, weathering should be based on the prototype, not someone else's model that you admire. This i s a pitfall too many of us fall into. Firsthand knowledge
Model Railroad i ng • 55
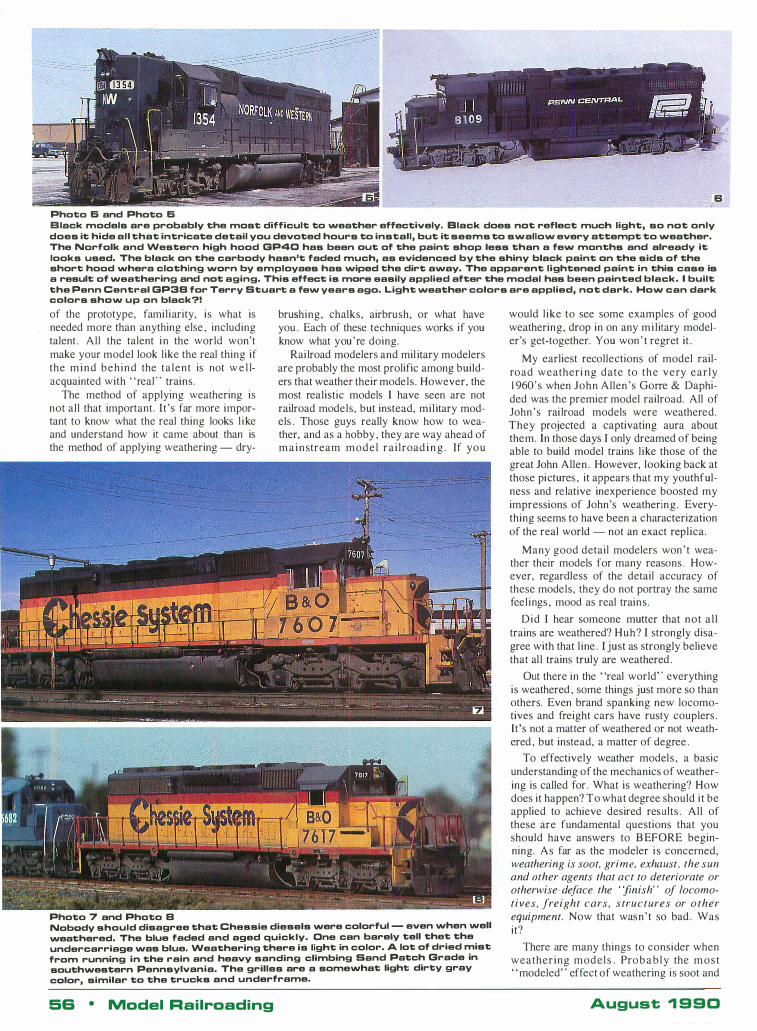
Photo 6 and Photo 6 Black models are probably the mast difficult to weather effectively. Black does nat reflect much light, so nat only does it hide all that intricate detail you devoted hours to install, but it seems to swallow every attempt to weather. The Norfolk and Western high hood GP40 has been aut of the paint shop less than a few months and already it looks used. The black an the carbody hasn't faded much, as evidenced by the shiny black paint an the sids of the short hood whera clothing warn by employaes has wiped the dirt away. The apparent lightened paint in this case is a result of weathering and nat aging. This effect is mare easily applied after the modal has been painted black. I built the Penn Central GP3B for Terry Stuart a few years ago. Light weather colors are applied, nat dark. How can dark colors shaw up an black?!
of the prototype, familiarity, is what is needed more than anything else , including talent . All the talent in the world won't make your model look like the real thing if the mind behind the talent is not w e l lacquainted with "real " trains.
The method of applying weathering is not all that important. It 's far more important to know what the real thing looks l ike and understand how it came about than is the method of applying weathering - dry-
Photo 7 and Photo B
brUShing, chalks, airbrush, or what have you . Each of these techniques works if you know what you're doing.
Rai lroad modelers and mil itary modelers are probably the most prolific among builders that weather their models. However, the most realistic models I have seen are not railroad models, but instead, mil itary models . Those guys really know how to weather, and as a hobby , they are way ahead of mainstream model rai lroad i n g . If you
Nobody should disagree that Chessie diesels were colorful - even when well
weathered. The blue faded and aged quickly. One can barely tell thet the
undercarriage was blue. Weathering there is light in calor. A lot of dried mist
from running in the rain and heavy sanding climbing Sand Patch Grade in southwestern Pennsylvania. The grilles are a somewhat light dirty gray
calor, similar to the trucks and underframe.
56 • Model Railroading
would like to see some examples of good weathering, drop in on any mi litary modeler's get-together. You won ' t regret it .
My earliest recollections of model railroad weatheri ng date to the very early 1 960' s when John Allen 's Gorre & Daphided was the premier model railroad. All of John 's rai lroad models were weathered. They projected a captivating aura about them. In those days I only dreamed of being able to build model trains l ike those of the great John Allen . However, looking back at those pictures , it appears that my youthfulness and relative inexperience boosted my impressions of John's weathering . Everything seems to have been a characterization of the real world - not an exact repl ica.
Many good detail modelers won ' t weather their models for many reasons . However, regardless of the detail accuracy of these models, they do not portray the same feelings , mood as real trains .
Did I hear someone mutter that not a l l trains are weathered? Huh? I strongly disagree with that l ine . I just as strongly believe that al l trains truly are weathered .
Out there in the "real world" everything is weathered , some things just more so than others. Even brand spanking new locomotives and freight cars have rusty couplers . It's not a matter of weathered or not weathered , but instead, a matter of degree .
To effectively weather models , a basic understanding of the mechanics of weathering is called for. What is weathering? How does it happen? To what degree should i t be applied to achieve desired results . All of these are fundamental questions that you should have answers to B EFORE beginning. As far as the modeler i s concerned, weathering is soot, grime. exhaust , the sun and other agents that act to deteriorate or otherwise· deface the "finish" of locomotives, freight cars, structures or other equipment. Now that wasn ' t so bad . Was it?
There are many things to consider when weathering model s . Probably the m o s t " modeled" effect of weathering is soot and
August ., 990
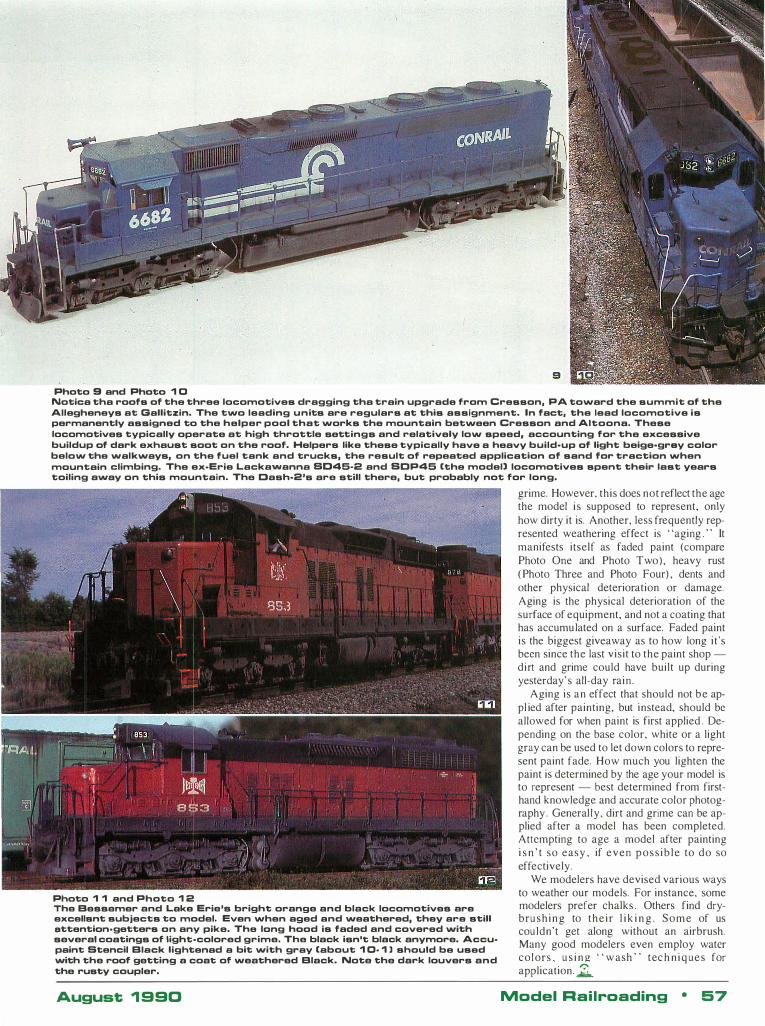
Photo 9 and Photo 1 0 Notica tha roofs of the three locomotives dragging tha train upgrade from Cresson, PA toward the summit of the Allegheneys at Gallitzin. The two leading u n its are regulars at this assignment. In fact, the lead locomotive is permanently assigned to the helper pool that works the mountain between Cresson and Altoona. These locomotives typically operate at high throttle settings and relatively low speed, accounting for the excessive buildup of dark exhaust soot on the roof. Helpers like these typically have a heavy build·up of light beige-grey color below the walkways, on the fuel tank and trucks, the result of repeated application of sand for traction when mountain climbing. The ex-Erie Lacka�anna 8045-2 and 8DP45 (the modell locomotives spent their last years toiling away on this mountain. The Dash-2's are still there, but probably not for long.
Photo 1 1 and Photo 1 2 The Bessemer and Lake Erie's bright orange and black locomotives are excellsnt subjects to model. Even when aged and weathered, they are still sttention.getters on any pike. The long hood is faded and covered with several coatings of light-colored grime. The black isn't black anymore. Accupaint Stencil Black lightenad a bit with gray (about 1 0· 1 ) should be used with the roof getting a coat of weathered Black. Note the dark louvers and the rusty coupler.
August 1 990
grime. However, this does not reflect the age the model i s supposed to represent, only how dirty it is. Another, less frequently represented weathering effect is "aging . " It manifests itself as faded paint (compare Photo One and Photo Two) , heavy rust ( Photo Three and Photo Four) , dents and other physical deterioration or damage. Aging is the physical deterioration of the surface of equipment, and not a coating that has accumulated on a surface. Faded paint is the biggest giveaway as to how long it 's been since the last visit to the paint shop -dirt and grime could have built up during yesterday' s all-day rain .
Aging is an effect that should not be appl ied after painting, but instead, should be allowed for when paint is first applied . Depending on the base color, white or a light gray can be used to let down colors to represent paint fade. How much you lighten the paint is determined by the age your model is to represent - best determined from firsthand knowledge and accurate color photography . General ly , dirt and grime can be applied after a model has been completed. Attempting to age a model after painting i s n ' t so easy , if even p o s s i b l e to do so effectively.
We modelers have devised various ways to weather our models. For instance, some modelers prefer chalks . Others find drybru s h i n g to the ir l i k i n g . Some of us couldn't get along without an airbrush. Many good modelers even employ water col ors , u s i n g " w ash " tec h n iques for application. �
Madel Railroading • 57
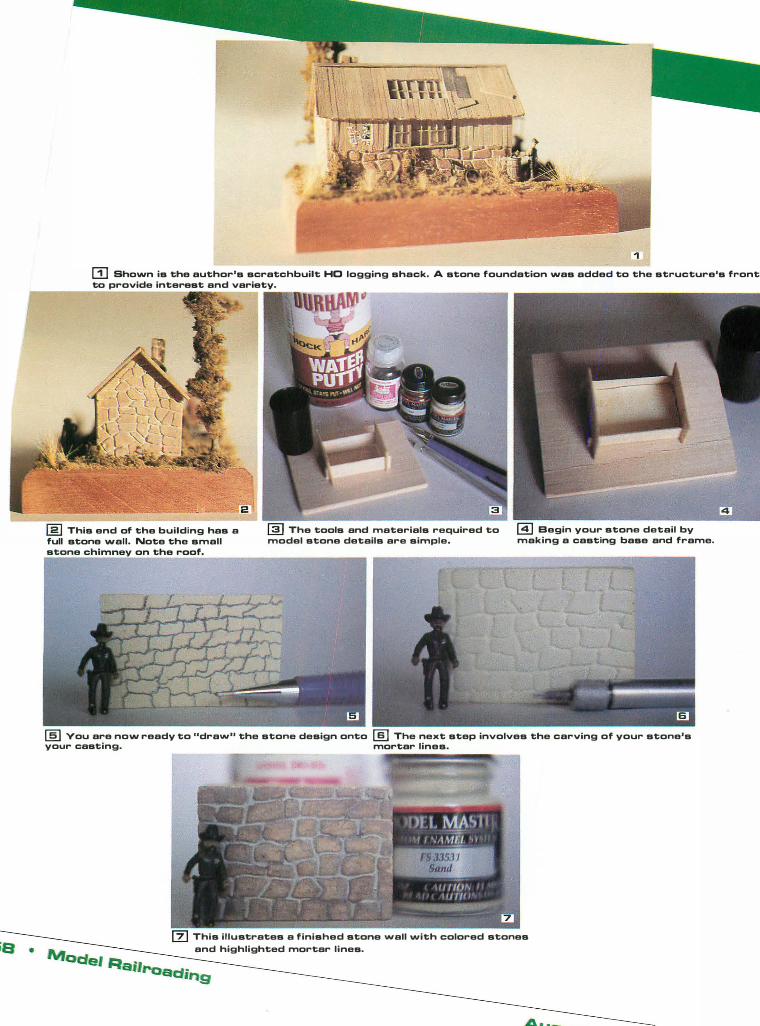
m Shown is the author's scratchbuilt HO logging shack. A stone foundation was added to the structure's front to provide interest and variety.
This end of the building has a full stone wall. Note the small stone on the roof.
The tools and materials required to model stone details are simple.
--------------------�
� Begin your stone detail by making a casting base and frame.
[§] You are now ready to "dra\N" the stone design onto [§] The next step involves the carving of your stone's your casting. mortar lines.
This illustrates a finished stone \Nail \Nith colored stones and highlighted mortar lines.
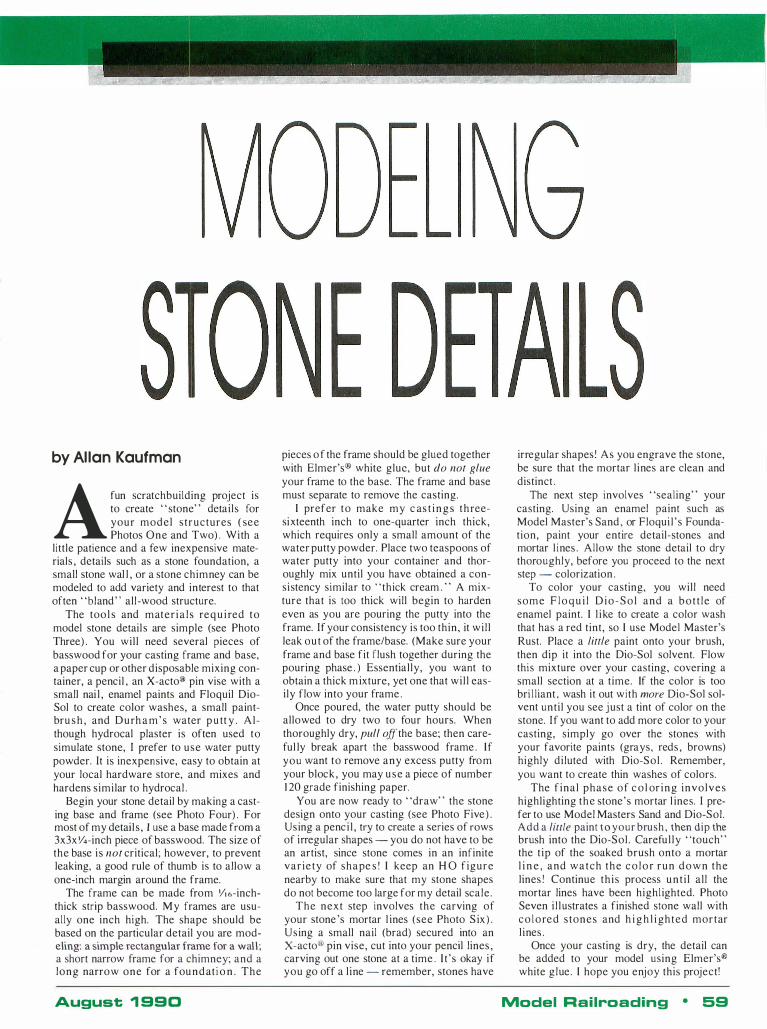
by Al lan Kaufman
A fun scratchbuilding project is to create " stone" details for your model structures ( see Photos One and Two) . With a
little patience and a few inexpensive materials , details such as a stone foundation, a small stone wal l , or a stone chimney can be modeled to add variety and interest to that often "bland " all -wood structure.
The too l s and materi a l s req u i red to model stone detail s are simple (see Photo Three) . You will need several pieces of basswood for your casting frame and base, a paper cup or other disposable mixing container, a pencil , an X-acto® pin vise with a small nai l , enamel paints and Floquil DioSol to create color washes, a small paintbru s h , and Durh a m ' s water p u tt y . Although hydrocal plaster is often used to simulate stone, I prefer to use water putty powder. It is inexpensive, easy to obtain at your local hardware store, and mixes and hardens similar to hydrocal .
Begin your stone detail by making a casting base and frame (see Photo Four) . For most of my details , I use a base made from a 3x3x Y4-inch piece of basswood. The size of the base i s not critical; however, to prevent leaking, a good rule of thumb is to allow a one-inch margin around the frame.
The frame can be made from Y' 6-inchthick strip basswood. My frames are usually one inch high. The shape should be based on the particular detail you are modeling: a simple rectangular frame for a wall; a short narrow frame for a chimney; and a long narrow one for a foundat i o n . The
August 1 990
pieces o f the frame should be glued together with Elmer's® white glue, but do not glue your frame to the base. The frame and base must separate to remove the casting.
I prefer to make my c as t i n g s t h reesixteenth inch to one-quarter inch thick, which requires only a small amount of the water putty powder. Place two teaspoons of water putty into your container and thoroughly mix until you have obtained a consistency similar to "thick cream . " A mixture that is too thick will begin to harden even as you are pouring the putty into the frame. If your consistency is too thin, it wi l l leak out of the frame/base. (Make sure your frame and base fit flush together during the pouring phase . ) Essentially, you want to obtain a thick m ixture, yet one that wil l easily flow into your frame .
Once poured, the water putty should be allowed to dry two to four hours. When thoroughly dry, pull off the base; then careful ly break apart the basswood frame . If you want to remove any excess putty from your block, you may use a piece of number 1 20 grade finishing paper.
You are now ready to "draw" the stone design onto your casting (see Photo Five) . Using a penci l , try to create a series of rows of irregular shapes - you do not have to be an artist, since stone comes in an infinite variety of shape s ! I keep an H O figure nearby to make sure that my stone shapes do not become too large for my detail scale.
The next step involves the carving of your stone 's mortar l ines (see Photo S ix) . Using a small nail (brad) secured into an X-acto® pin vise, cut into your pencil lines , carving out one stone at a time . I t ' s okay if you go off a l ine - remember, stones have
irregular shapes I As you engrave the stone, be sure that the mortar l ines are clean and distinct .
The next step involves "sealing" your casting. Using an enamel paint such as Model Master's Sand , or Floqui l ' s Foundation, paint your entire detail-stones and mortar l ines . Allow the stone detail to dry thoroughly, before you proceed to the next step - colorization .
To color your casting, you will need some F l o q u i l D i o - S o l and a bot t le of enamel paint. I l i ke to create a color wash that has a red tint, so I use Model Master's Rust. Place a little paint onto your brush, then dip it into the Dio-Sol solvent. Flow this mixture over your casting, covering a small section at a time. If the color is too bri l liant , wash it out with more Dio-Sol solvent unti l you see j ust a tint of color on the stone. If you want to add more color to your casting, simply go over the stones with your favorite paints (grays, reds , browns) highly di luted with Dio-Sol . Remember, you want to create thin washes of colors.
The f inal phase of c o l or ing involves highlighting the stone's mortar l ines. I prefer to use Model Masters Sand and Dio-Sol . Add a little paint to your brush , then dip the brush into the Dio-Sol . Careful ly "touch" the t ip of the soaked brush onto a mortar l i n e , and watch the c o l o r run down the lines ! Continue th is process unt i l all the mortar lines have been highlighted. Photo Seven i l lustrates a finished stone wall with c o l o red stones and h i g h l i ghted mortar l ines .
Once your casting is dry, the detail can be added to your model using Elmer's® white glue. I hope you enjoy this project!
Model Railroading • 59
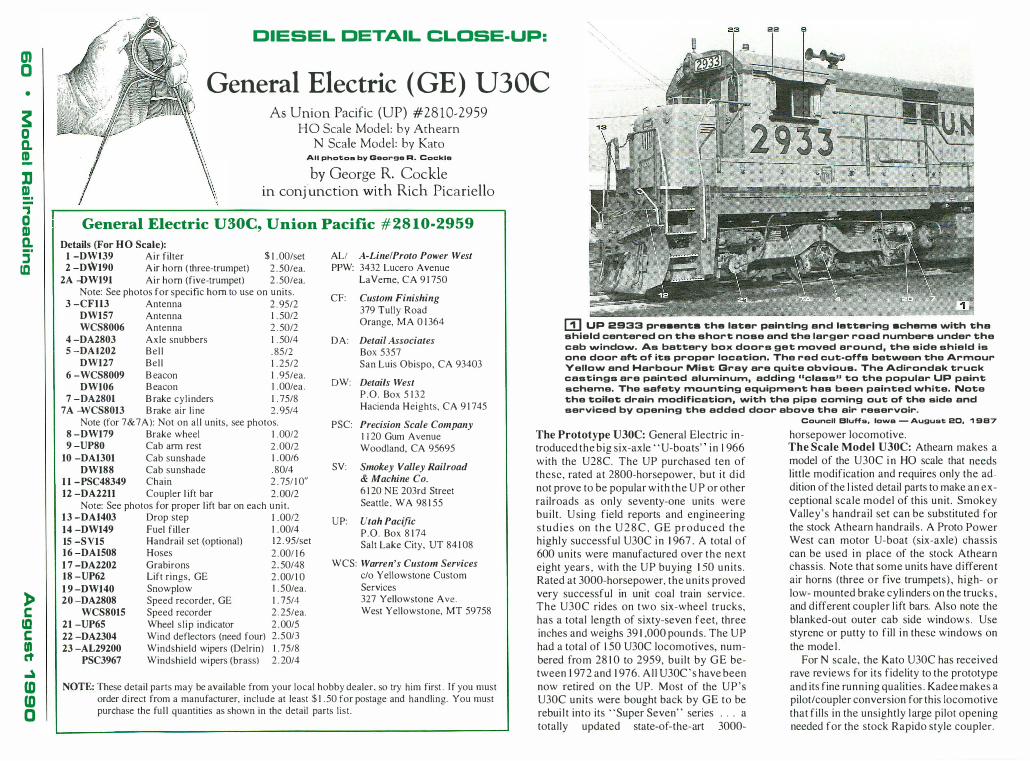
OJ o •
� o Q. CD -
IJ m --
., o m Q. _. :::J ID
l> t ID t UI C1' � lD lD o
" . DIESEL DETAIL CLOSE-UP: 22
General Electric (GE) U30C As Union Pacific (UP) #28 1 0-2959
HO Scale Model: by Athearn N Scale Model: by Kato
All photos by George R. Cockle
by George R. Cockle in confunction with Rich Picariello
General Electric U30C, Union Pacific #28 10·2959
Details (For HO Scale): I -DW139 Air filter $ 1 . 00/set 2 -DW190 A ir horn ( three-trumpet) 2 . 50/ea.
2A -DW19l Air horn (five-trumpet) 2 . 50/ea. Note: See photos for specific horn to use on units.
3 -CF1l3 Antenna 2 . 95/2 DW1S7 Antenna 1 . 5012 WCSS006 Antenna 2 . 50/2
4 -DA2S03 Axle snubbers 1 . 50/4 S -DA1202 Bell . 85/2
DW127 Bell 1 . 25/2 6 -WCSS009 B eacon 1 . 95/ea.
DW106 B eacon I . OO/ea . 7 -DA2S0l B rake cylinders 1 . 75/8
7A -WCSS013 B rake air l ine 2 . 95/4 Note (for 7&7A): Not on all units, see photos.
S -DW179 Brake wheel 1 . 0012 9 -UPSO Cab arm rest 2 . 00/2
10 -DA1301 Cab sunshade 1 . 00/6 DW1SS Cab sunshade . 80/4
l l -PSC4S349 Chain 2 . 751 1 0" 12 -DA2211 Coupler l ift bar 2 . 00/2
Note: See photos for proper l ift bar on each unit. 13 -DA1403 Drop step 1 . 0012 14 -DW149 Fuel filler 1 . 00/4 IS -SVIS Handrail set (optional) 1 2 . 95/set 16 -DAISOS Hoses 2 . 001 1 6 1 7 -DA2202 Grabirons 2. 50/48 lS -UP62 Lift rings, GE 2 . 00/ 1 0 1 9 -DW140 Snowplow 1 . 50/ea. 20 -DA2S0S Speed recorder, GE 1 . 75/4
WCSSOIS Speed recorder 2. 25/ea. 21 -UP6S Wheel slip indicator 2 . 00/5 22 -DA2304 Wind deflectors (need four) 2.50/3 23 -AL29200 Windshield wipers (Delrin) 1 . 75/8
PSC3967 Windshield wipers (brass) 2 . 20/4
ALI A-Line/Proto Power West PPW: 3432 Lucero Avenue
LaVerne, CA 9 1 750
CF: Custom Finishing 379 Tully Road Orange, MA 0 1 364
DA: Detail Associates Box 5357 San Luis Obispo, CA 93403
DW: Details West P.O. Box 5 1 3 2 Hacienda Heights, CA 9 1 745
PSC: Precision Scale Company I 1 20 Gum Avenue Woodland, CA 95695
SV: Smokey Valley Railroad & Machine Co. 6 1 20 NE 203rd Street Seattle , W A 98 1 55
UP: Utah Pacific P.O. Box 8 1 74 Salt Lake City, UT 84 1 08
WCS: Warren's Custom Services c/o Yellowstone Custom Services 327 Yellowstone Ave. West Yellowstone, MT 59758
NOTE: These detail parts may be available from your local hobby dealer, so try him first . If you must order direct from a manufacturer, include at least $ 1 . 50 for postage and handling. You must purchase the ful l quantities as shown in the detail parts list.
m UP 2933 presente the later painting and lettering scheme with tha shield centered on the short nose and the larger road numbers under the cab ""indo"". As battery box doors get moved around. the side shield is one door aft of its proper location. The red cut-ofts between the Armour Yellow and Harbour Mist Gray are quite obvious. The Adirondak truck castings are painted aluminum, adding "classJJ to the popular UP paint schelT\e. The safety IT\ounting equiplT\ent has been painted white. Note the toilet drain modification, with the pipe cOlT\ing out of the side and serviced by opening the added door above the air reservoir.
The Prototype U30C: General Electric introduced the big six-axle ' ' U-boats" in 1 966 with the U28C. The UP purchased ten of these, rated at 2800-horsepower, but i t did not prove to be popular with the U P or other railroads as only seventy-one units were built . Using field reports and engineering s tud ies on t h e U 2 8 C , GE produced the highly successful U30C in 1 967 . A total of 600 units were manufactured over the next eight years , with the UP buying 1 50 units . Rated at 3000-horsepower, the units proved very successful in unit coal train service. The U30C rides on two six-wheel trucks, has a total length of sixty-seven feet, three inches and weighs 39 1 ,000 pounds. The UP had a total of 1 50 U30C locomotives, numbered from 28 1 0 to 2959, built by GE between 1 97 2 and 1 976. All U30C ' s have been now retired on the UP. Most of the UP's U30C units were bought back by GE to be rebui l t into its " Super Seven" series . . . a totally updated state-of-the-art 3000-
Council Bluffs. Iowa - August 20. 1 9B7
horsepower locomotive. The Scale Model U30C: Athearn makes a model of the U30C i n HO scale that needs little modification and requires only the addition of the l isted detail parts to make an exceptional scale model of this unit. Smokey Valley' s handrail set can be substituted for the stock Athearn handrail s . A Proto Power West can motor U-boat (six-axle) chassis can be used in place of the stock Athearn chassis . Note that some units have different air horns (three or five trumpets) , high- or low- mounted brake cyli nders on the trucks , and different coupler l ift bars. Also note the blanked-out outer cab side windows. Use styrene or putty to fill in these windows on the mode l .
For N scale, the Kato U30C has received rave reviews for its fidelity to the prototype and its fine running qualities . Kadee makes a pilot/coupler conversion for this locomotive that fills in the unsightly large pilot opening needed for the stock Rapido style coupler.
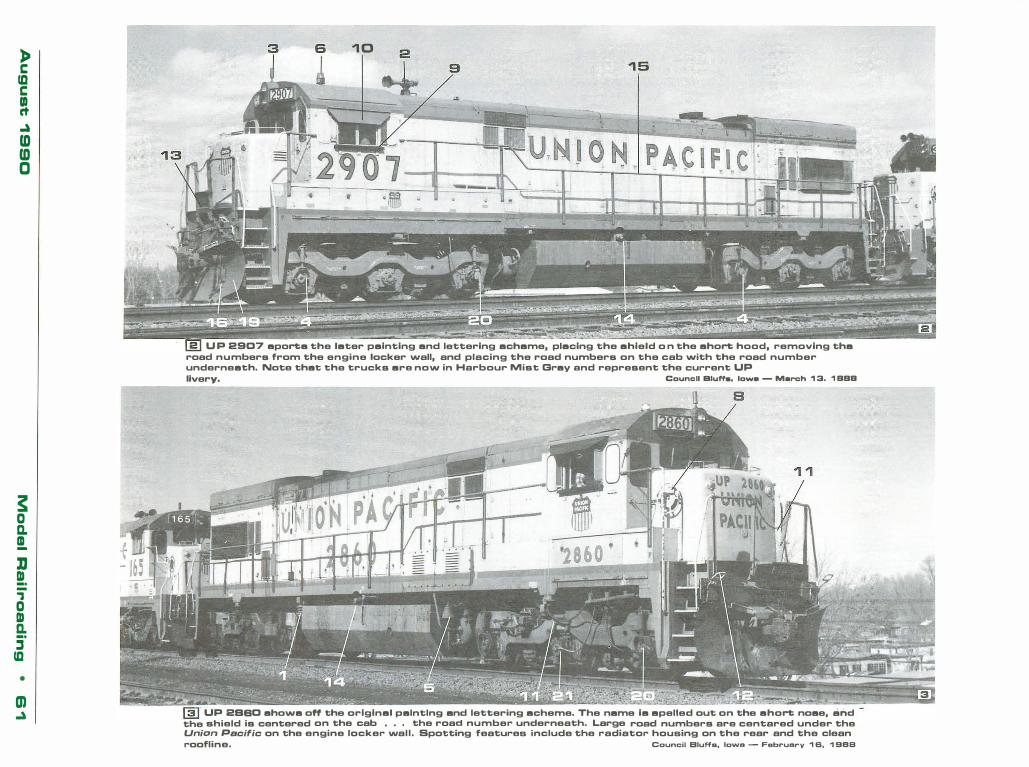
» t: UJ t: (I) rt "" m m o
� o D. !!. lJ 0) _. -., o 0) D. -. � UJ •
m ""
1 0 1 5
U P 2907 aporta the later painting and lettering achame, placing the ahield o n the ahort hood, removing tha road numbers from the engine locker wall, and placing the road numbers on the cab with the road number underneath. Note that the trucks are now in Harbour Mist Gray and represent the current UP
.----livery. Council Bluffs. lowe - March 1 3. 1 BBB
B
. UP 2SS0 ahowa off the original painting and lettering acheme. The name ia apelled out on the ahort noae, and -the shield is centered on the cab • . . the road number underneath. Large road numbers are centared under the Union Pacific on the engine locker wal l . Spotting features include the radiator housing on the rear and the clean roofline. Council Bluffs. Iowa - February 1 6, ., 9SB
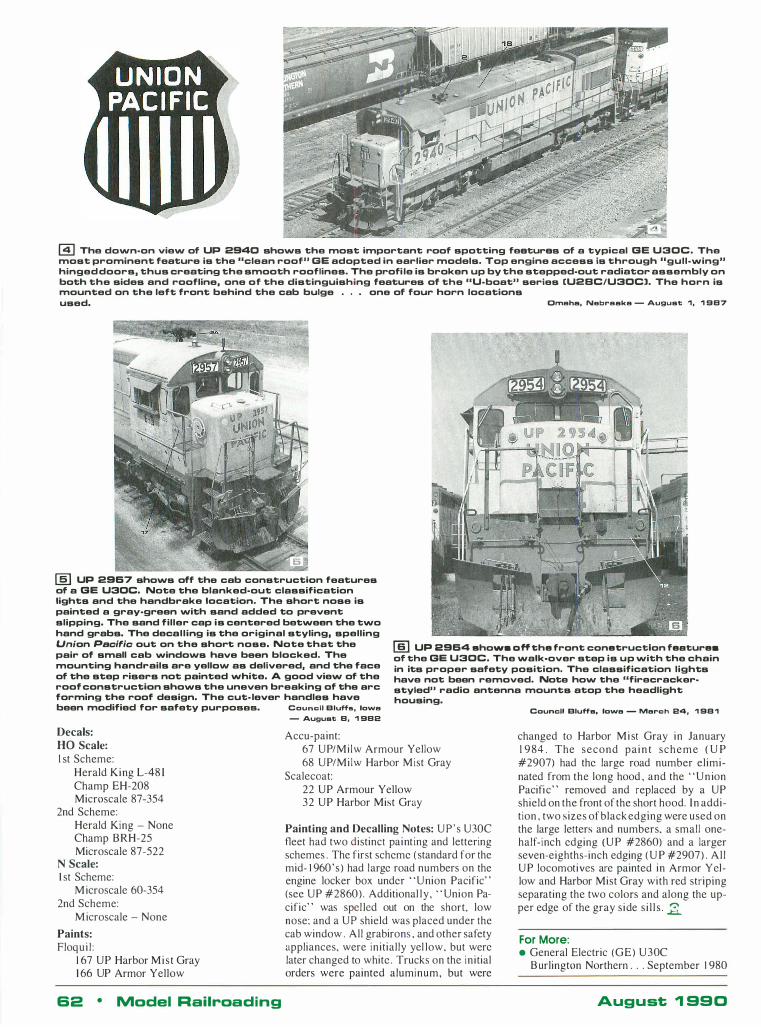
� The dOVlfn·on vieVlf of UP 2940 shoVlfs the most important roof spotting feetures of a typical BE U30C. The most prominent feature is the "clean roof" GE adopted in earlier models. Top engine access is through "gull·Vlfing" hinged doors, thus creating the smooth rooflines. The profi le is broken up by the stepped·out radiator assembly on both the sides and roofline, one of the distinguishing features of the "U·boat" series [U2BC/U30CJ. The horn is mounted on the left front behind the cab bulge . . . one of four horn locations used. Omahs, Nebraska - August 1, 1 987
,
[§] UP 2967 shoVlfs off the cab construction features of a BE U30C. Note the blanked·out classification lights and the handbrake location. The short nose is painted a gray·green Vlfith sand added to prevent slipping. The sand filler cap is centered betVlfeen the tVlfO hand grabs. The decalling is the original styling, spelling Union Pacific out on the short nose. Note that the pair of small cab VlfindoVlfs have been blocked. The mounting handrails are yelloVlf as delivered, and the face of the step risers not painted Vlfhite. A good vieVlf of the roof construction shoVlfs the uneven breaking of the arc forming the roof design. The cut· lever handles have been modified for safety purpOSBS. Council Bluffs. Iowa
- August 8. 1 982
00 UP 2964 show. aff the front conetructlon feature. of the GE U30C. The walk·over step is up Vlfith the chain in its proper safety position. The classification lights have not been removed. Note hoVlf the "firecracker· styled" radio antenna mounts atop the headlight housing.
Decals: HO Scale: 1 st Scheme:
Herald King L-48 I Champ EH-208 Microscale 87-354
2nd Scheme: Herald King - None Champ BRH-25 Microscale 87-522
N Scale: 1 st Scheme:
Microscale 60-354 2nd Scheme:
Microscale - None
Paints: Floqui l :
1 67 UP Harbor Mist Gray 1 66 UP Armor Yellow
62 • Model Railroading
Accu-paint: 67 UP/Milw Armour Yellow 68 UP/Milw Harbor Mist Gray
Scalecoat: 22 UP Armour Yellow 32 UP Harbor Mist Gray
Painting and Decalling Notes: UP's U30C fleet had two distinct paint ing and lettering schemes . The first scheme (standard for the mid- 1 960's ) had large road numbers on the engine locker box under "Union Pacific" (see UP #2860) . Additional ly, " Union Pacific" was spel led out on the short, low nose; and a UP shield was placed under the cab window . All grabirons , and other safety appliances, were initially yel low, but were later changed to white . Trucks on the initial orders were painted aluminum, but were
Council Bluffs. Iowa - March 24, 1 9B 1
changed to Harbor Mist Gray in January 1 9 84 . The second pai n t scheme ( U P #2907) had the large road number eliminated from the long hood , and the "Union Pacific" removed and replaced by a UP shield on the front of the short hood. In addition , two sizes of black edging were used on the large letters and numbers, a small onehalf-inch edging ( U P #2860) and a larger seven-eighths-inch edging ( U P #2907) . Al l UP locomotives are painted in Armor Yellow and Harbor Mist Gray with red striping separating the two colors and along the upper edge of the gray side s i l l s . �
For More: • General Electric (GE) U30C
B urlington Northern . . . September 1 980
August 1 99 0
The
This month 's question prods us into a discussion of the types of airbrushes and associated equipment.
Q: I am interested in buying an airbrush. What type should I get?
The airbrush can become one of the most versatile tools in the hobby. Before actually purchasing an airbrush, ask yourself the fol lowing questions:
• What am I going to paint? • Do I want an airbrush that is easy to
use and maintain? • One that is multifunctional with which
I can control both the application of paint and flow of air?
• Or do I want one for specific purposes or just for general use?
There are many manufacturers and types of airbrushes available on the market. One of the problems facing a modeler today is selecting the right one . Two of the most popular airbrushes are the single-action and double-action. Before you invest a lot of time and money in an airbrush, let ' s review some of the basics. First, visit your local hobby shop. Chances are they wil l have several types by several manufacturers to check out. Pick one up, feel the weight and shape; it should feel comfortable and fit well in your hand. Hold several models in your hand, as you would hold a penci l . Ask the salesperson to explain the features of each. (They may very well own and use an airbrush . ) Several hobby shops even offer cl inics . (Watch YOUR TREK PLAN FOR THE WEEKEND in MRG for one in your area. ) Some owners/salespeople may be wil l ing to demonstrate a mode l .
One of the biggest problems facing a beginning airbrush user is apprehension . Before j u m p i n g r ight i n and p a i n t i n g that super-detailed model or brass engine , practice on a plastic model car or freight car, until you get the feel , control adjustment,
August 1 990
by Dean Ebner
spray pattern , etc . I find that using a piece of cardboard to check my spray patterns is helpful .
When looking at airbrushes, don ' t confuse a spray gun with an airbrush . A spray gun can effectively spray paint; however, you do not have as fine a control over the application of paint as you do with a precision airbrush. A spray gun i s fine for covering large areas where rapid coverage is required, such as scenery. Let ' s discuss the features of a s i n g l e - a c t i o n and d o u b l eact ion airbrush, and the characteristics of each.
Single-Action The single-action airbrush is probably
one of the most popular airbrushes for modelers beginning custom painting. Several manufacturers offer different styles . The single-action a irbrush is lightweight, has a minimum of moving parts, and is easy to clean and maintain . The drawback is that this type only al lows you to control the flow of air, not the flow rate of the paint. Al l adjustments for changing the spray pattern on an external-mix s ingle-action airbrush for the flow of the paint must be done manual ly . After any adjustment , i t is advisable to take a moment to spray a test pattern on a piece of cardboard before you start painting. This way you can make additional adj u s tments befo re you start p a i n t i n g the mode l . A single-action airbrush doesn' t give you the control of both paint and a ir fl ow as a d o u b l e - a c t i o n a i rbrush doe s . Since paint does not pass through the channel of the a irbrush of an externa l m i x , cleaning i s fast and simple.
Another single-action airbrush is the i nternal mix . The internal mix is s imi lar in operation to the external mix, with the exception that adjustments are made at the rear of the airbrush; and the paint i s mixed
internal l y . S ingle-action airbrushes are great when you need to maintain a constant spray pattern, such as painting the rails on your track.
Double-Action The double-action airbrush, on the other
hand, offers the greatest versati l ity and the most control over the quantity and application rate of paint. The flow of air and paint is controlled by the control lever on the top of the airbrush . To start the flow of air, simply push the lever down. By gently pul l ing the lever back , you start the paint flowing. Double-action airbrushes al low you to vary the paint from a thin l ine to a wide pattern . It allows you greater flexibil i ty, especially in producing different effects with respect to weathering.
Double-action airbrushes come in varyi n g s i zes and weights . S o m e are rather heavy , and after a long period of use, your hand may tire. Because it is more complicated, the double-action is also harder to clean and maintai n . After a painting session, each internal component must be removed and cleaned and i nspected . Reassembly must be done with care to avoid bending the tip of the needle or damaging any internal components, such as Teflon® seals. r have seen beautiful models painted with both types of airbrushes, and the most important factor is always the technique developed and used by the modeler.
Airbrush Accessories B oth s i ng l e - a n d d o u b l e- a c t i o n a i r
brushes offer different tip and needle sizes, ranging from, a hairline to a broad pattern . My recommendation for a l l-around general use is to stay with a medium tip and needle. As you progress, additional tips, needles , and accessories can be purchased to expand your painting techniques .
When you purchase your airbrush , it may come as a ki t . Some of the items included
Model Rai l roading • 63
The Art of Airbrushing
are: a wrench , airbrush holder, color cup, extra needle and tip (sometimes) , and several sizes of mixing bottles . A color cup is great to use when you have a smal l painting or weathering job . The mixing bottles can be used anytime, but they are especially great when painting a fleet of freight cars. The air hose, usually included in kits, wil l either be a rubber or braided hose. I personally prefer the braided variety for greater durabi I i ty and l i fe expectancy . The remaining items are fairly self-explanatory.
Cleaning and Care of an Airbrush As with most investments, you want to
ensure your airbrush wil l provide many years of service. The proper care and cleaning of an airbrush should be done after each painting session. Residual paint can dry and clog the air and paint passages . The first step is to turn the airbrush upside down and, while holding the control lever down , flow copious amounts of solvent through the pick-up tube on the bottom, using a glass eyedropper for this process . Next, shut off the air supply and begin disassembly, removing all moving parts: t ip, needle, control lever, etc . Using cotton swabs ( with a paper or wood shaft) and a soft l i nt-free cloth . clean each moving part - including the inside of the barrel and tip area - until all paint residue has been removed. Whi le reassembl ing the airbrush , do not use any grease or oi l on the internal components. You may want to apply a small drop of oil to the threads on the tip and the handle. By taking a few moments to properly clean your airbrush, you can have many years of service .
If you are sti l l unsure as to what airbrush to buy . write to several manufacturers for brochures on their products. Check your local l ibrary for books on airbrush painting. No matter which airbrush you select, the one thing to remember is to practice, pract ice , prac t i ce ( and try to not get too frustrated) .
Painting Equipment Now that you have purchased your air
brush, you need to have ancil lary support equipment. The following is a selected list of some of the basic items needed: compressed air supply, regulator, respirator, ventilation ( spray booth) , and gloves .
Compressed Air Supply In the beginning, you may want to use
cans of propellant . These are only good for short periods, however, and can get rather expensive over a long period ot time . An
64 • Model Railroad ing
11111 II (col1lilllledji"om page 63)
other disadvantage is that cans of propellant do not offer any direct means of regulating the air pressure . As they are used, you lose constant air pressure . Several alternatives are: trucklcar inner tube, rechargeable CO2 tanks, and an air compressor. The use of an inner tube or CO2 tank requires recharging and some method o f reg u l a t i ng the a i r pressure.
Air compressors are the best source for constant air flow . There are two basic types of air compressors - a diaphragm or piston . These can have a constant running feature or a regulated air flow by an automatic shut-off switch. The ideal air compressor for airbrushing wi l l have a variable control providing a 0-50 psi supply of air. Shop around your local hadrware stores for the different types that are available. They are often " on sale" for $ 1 20-$ 1 50 . or you may be able to find a used one at a garage sale . I personally have a compressor with a fivegallon storage tank with a maximum press u re rat i n g of 1 20 p s i . W h atever compressed air supply you choose, select the one best suited for your needs . If you plan on doing a lot of painting, you may want to invest in a good-quality air compressor. Besides, your kids will recognize the most impOI·tant use for the compressor immediate ly : pumping up tires on bicycles!
Regulator To properly apply most model paints ,
manufacturers recommend a pressure sett ing of 1 8-20 psi . To attain this we need some means of regulating the air pressure. This is the only way to create a consistent smooth application of paint for our models . When choosing a regulator, select one that will provide you with a variable range of adjustment , 0-50 psi , as a minimum.
Regulators may come with a moisture trap/filter. This type is preferable, s ince the air we use needs to be clean and dry. Moisturc , even a small residual amount, can cause the paint to spit and splatter as it is being applied. An alternative to the combination of moisture trap/filter is to install each of these in- l ine separately. A good quality air filter will also prevent dust part icles from getting into the paint (and eventually ending up on your model ' ) .
Respirator This is one of the most important pieces
of equipment you can own. Model paints are extremely toxic and flammable . Fumes from these paints and solvents can cause respiratory , neurological , and skin damage.
Painting exposes you to these agents not only through paint overs pray , but during mixing and cleaning . When purchasing a spray mask or respirator, select one that has been tested and approved for filteringlremoval of organic vapors and paint pat1iculates. Further information on identifying an approved respirator can be obtained from the National Institute for Occupational Safety and Health (NIOSH) . (NOTE: M icroscale now offers water-soluble finishes . )
Venti lation/Spray Booth The best way to reduce or avoid exposure
to toxic vapors and materials is to have adequate venti lat ion. This doesn't mean you can stop wearing the respirator; it simply assists in removing toxic vapors. I do not recommend using an open window, as any change in wind patterns can blow the spray directly back towards you . Do not use air conditioners or floor/window fans, either. These are not adequate for vapor removal; besides, a spark-proof motor is required . Remember, we are using flammable solvents . There are commercial spray booths available for a reasonable cost , or you can bui ld one of your own to fit your needs. I f you don ' t have a spray booth, it is recommended that all painting be done outdoors .
Gloves To protect your hands from paint and sol
v e n ts , rubberl latex d i s posable g l o v e s should b e worn. They w i l l not only protect your hands from the solvents , but they ' l l keep the paint off your skin ent irely . Another advantage to wearing gloves is that natural oils in your skin wi l l not transfer to the model during painting (creating smudge marks) .
I don't want to instil l "the fear o f airbrushing or custom painting" to anyone, just a word of caution and care. Using your airbrush is a lot offun . I t is rewarding to see that nicely detailed model , engine , or structure finally take on the look of the prototype. We all want our models to look l i ke the ones featured in Model Railroading, and now you can do it by using an airbrush. If you have any questions regarding custom painting, please send them to me c/o MRG, 2854 Larimer Street , Denver, Colorado 80205 . Questions regarding safety issues should be directed to your local NIOSH office . .d For more: • The Scheme of Things :
The Art of Custom Painting . . J uly 1 990
Augu st � g90
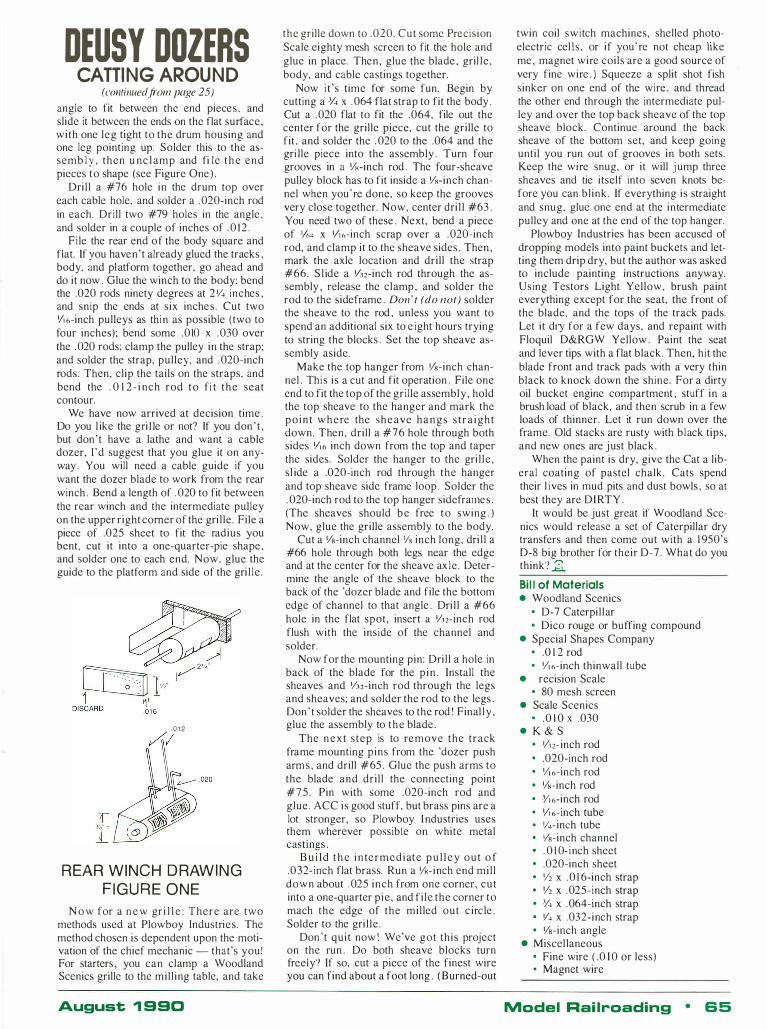
DEUSY DOZERS CATTING AROUND
(contil1uedfi'oll1 page 25)
angle to fit between the end pieces , and slide it between the ends on the flat surface, with one leg tight to the drum housing and one leg pointing up. Solder this to the assemb l y , then u nc l amp and fi Ie t h e end pieces to shape (see Figure One ) .
Dril l a #76 hole in the drum top over each cable hole, and solder a .020-inch rod in each. Drill two #79 holes in the angle , and solder in a couple of inches of . 0 1 2 .
Fi le the rear end o f the body square and flat. If you haven't already glued the tracks , body. ;nd platform together, go ahead and do it now . Glue the winch to the body; bend the .020 rods ninety degrees at 2 '14 inches , and snip the ends at six inches . Cut two 1/' 6-inch pulleys as thin as possible (two to four inches); bend some .010 x .030 over the .020 rods; clamp the pulley in the strap; and solder the strap, pulley, and .020-inch rods. Then, clip the tails on the straps, and bend the . 0 1 2 - i nch rod to fi t t h e seat contour.
We have now arrived at decision time . Do you l ike the gri l le or not? If you don ' t , but don' t have a lathe and want a cable dozer, I 'd suggest that you glue it on anyway . You will need a cable guide if you want the dozer blade to work from the rear winch . Bend a length of . 020 to fit between the rear winch and the intermediate pulley on the upper right corner of the gri l le . File a piece of .025 sheet to fit the radius you bent, cut it into a one-quarter-pie shape , and solder one to each end. Now, glue the guide to the platform and side of the gri l le .
. 0 1 2 �I
REAR WINCH D RAWING F IGURE ONE
N o w for a n e w gri l l e : There are two methods used at Plowboy Industries . The method chosen is dependent upon the motivation of the chief mechanic - that's youl For starters , you can clamp a Woodland Scenics grille to the mil l ing table, and take
August 1 990
the grille down to .020. Cut some Precision Scale eighty mesh screen to fit the hole and glue in place. Then, glue the blade , gril le , body, and cable castings together.
Now i t ' s time for some fun. Begin by cutting a % x . 064 flat strap to fit the body . Cut a .020 flat to fit the .064, file out the center for the grille piece, cut the grille to fit and solder the . 020 to the .064 and the grille piece into the assembly .
· Turn four
grooves in a YH-inch rod . The four-sheave pulley block has to fit inside a YH- inch channel when you' re done, so keep the grooves very close together. Now, center dri l l #63 . You need two of these . Next, bend a piece of '164 x '/, o-inch scrap over a .020-inch rod, and clamp it to the sheave sides . Then , mark the axle location and drill the strap #66. S l ide a '/32-inch rod through the assembly , release the clamp , and solder the rod to the sideframe . DOII ' t (do IIOt) solder the sheave to the rod , unless you want to spend an additional six to e ight hours trying to string the blocks . Set the top sheave assembly aside.
Make the top hanger from 'is-inch channel . This is a cut and fit operation . File one end to fit the top of the grille assembly , hold the top sheave to the hanger and mark the p o i n t w h e re the she ave hangs s t ra ight down. Then, drill a #76 hole through both sides '116 inch down from the top and taper the sides. Solder the hanger to the gri l le , sl ide a .020-inch rod through the hanger and top sheave side frame loop . Solder the . 020-inch rod to the top hanger sideframe s . (The sheaves should b e free t o swing . ) Now, glue the grille assembly to the body.
Cut a Ys-inch channel 'Is inch long, dri l l a #66 hole through both legs near the edge and at the center for the sheave ax le . Determine the angle of the sheave block to the back of the 'dozer blade and file the bottom edge of channel to that angle . Dri l l a #66 hole in the flat spot, insert a Yn-inch rod flush with the inside of the channel and solder.
Now for the mounting pin: Dril l a hole in back of the blade for the p in . Install the sheaves and Y32-inch rod through the legs and sheaves; and solder the rod to the legs . Don ' t solder the sheaves to the rod ! Final ly , glue the assembly to the blade .
The n e x t s tep is to re move the track frame mounting pins from the 'dozer push arms , and drill #65 . Glue the push arms to the blade and dril l the connecting point #75 . Pin with some .020-inch rod and glue. ACC is good stuff, but brass pins are a lot stronger, so Plowboy I ndustries uses them wherever possible on white metal castings .
B uil d t h e i n te rmediate p u l l e y o u t o f .032- inch flat brass. Run a Y8-inch end mil l down about . 025 inch from one corner, cut into a one-quarter pie, and fi le the corner to mach the edge of the milled out c ircle . Solder to the gri l le .
Don ' t quit now l We've got this project on the run . Do both sheave blocks turn freely? If so, cut a piece of the finest wire you can find about a foot long . (Burned-out
twin coil switch machines, shelled photoelectric cel ls , or if you' re not cheap like me , magnet wire coils are a good source of very fine wire . ) Squeeze a split shot fish sinker on one end of the wire , and thread the other end through the intermediate pulley and over the top back sheave of the top sheave block. Continue around the back sheave of the bottom set, and keep going until you run out of grooves in both sets. Keep the wire snug, or it will j ump three sheaves and tie itself into seven knots before you can blink. If everything is straight and snug, glue one end at the intermediate pulley and one at the end of the top hanger.
Plowboy Industries has been accused of dropping models into paint buckets and letting them drip dry, but the author was asked to include painting instructions anyway. Using Testors Light Yellow, brush paint everything except for the seat, the front of the blade, and the tops of the track pads. Let it dry for a few days, and repaint with Floquil D&RGW Yellow . Paint the seat and lever tips with a flat black. Then, hit the blade front and track pads with a very thin black to knock down the shine. For a dirty oil bucket engine compartment , stuff in a brush load of black, and then scrub in a few loads of thinner. Let it run down over the frame. Old stacks are rusty with black tips, and new ones are j ust black .
When the paint is dry, give the Cat a liberal coating of pastel chalk. Cats spend their l ives in mud pits and dust bowls , so at best they are DIRTY .
It would be just great if Woodland Scenics would release a set of Caterpillar dry transfers and then come out with a 1 950's D-8 big brother for their D-7. What do you think? ..d. Bi l l of Materials • Woodland Scenics
• D-7 Caterpil lar • Dico rouge or buffing compound
• Special Shapes Company • .0 1 2 rod • Y' 6-inch thinwall tube
• recision Scale • 80 mesh screen
• Scale Scenics • .0 1 0 x . 030
• K & S • '/32- inch rod • .020-inch rod • Y' 6-inch rod • Ys-inch rod • Y'6-inch rod • Y' 6-inch tube • 'I4- inch tube • 'is-inch channel
. 0 1 0- inch sheet • .020-inch sheet • Y2 x . 0 1 6-inch strap • Y2 x .025-inch strap • % x .064-inch strap • '/4 x .032-inch strap • 'is-inch angle
• Miscel laneous • Fine wire ( . 0 I 0 or less) • Magnet wire
Model Rai lroading • 65
MODEL RAILROADING'S DEALER DIRECTORY FRESNO SAN LUIS OBISPO SIMSBURY ST. PETERSBURG ELGIN INDIANAPOLIS
ARIZONA TOM'S TRAINS LAWS HOBBY CENTER VALLEY HOBBIES. INC. HOBBY HOUSE B & G TRAIN WORLD BIG BOY HOBBIES 2245 E. HAMMONO AVE. 855 MARSH 777 HOPMEAOOW ST. 6393 9TH ST. NORTH 829 WALNUT AVE. 8893 PENDLETON PIKE 93703 209-266-3192 93401 805-544-5518 06070 203-651-3234 33702 813-521-4148 60120 708-888-2646 46226 317-898-6284
ARIZONA CITY LAKEWOOD SAN MARCOS STRATFORD TAMPA
FRANKLIN PARK INDIANAPOLIS FAMILY HOBBIES CHESTER HOLLEY TRAINS & TREASURES HOBBY WAREHOUSE AMERICAN HOBBY SUPPLY 4 1 1 BARNUM AVE. CUT-OFF MODEL RAILROAD SPECIALIST END DF TRACK HOBBIES N GAUGE TRAIN SHOP
9674 MONACD BLVD. 4118 E. SOUTH ST. 829 SAN MARCOS BLVD. STRATFORD SQUARE 3818 S. HIMES AVE. 9739 FRANKLIN AVE. 8863 PENDLETON PIKE
85223 602-466-5870 90712 21 3-531-1413 92069 61 9-744-4221 06497 203-375-1949 3361 1 81 3-831-7202 60131 708-455-2510 46226 31 7-898-4883
GLENDALE LANCASTER SANTA CLARA UNCASVILLE TAMPA GLENVIEW LAFAYETTE VAL'S HOBBY HANGER INC. SMITH BROS. HOBBIES & CRAFTS TRAIN SHDP TRACKSIOE HAPPY HOBO KLiPPERS TOYS & HOBBIES MAIN HOBBY 5B22-A W. CAMELBACK RD. 1 223 W. AVE. I 1829 PRUNER lOGE AVE. 63 MOXLEY RD. 5403 N. CHURCH ST. 1314 WAUKEGAN RD. 625 COLUMBIA ST. 85301 602-934-6174 93534 805-942-6984 95050 408-296-1050 06382 203-848-0480 33614 81 3-886-5072 60025 312-724-2040 47901 317-742-6634
MESA LA VERNE STOCKTON WOLCOTT KANKAKEE
LOGANSPORT THE OWL'S ROOST ROY'S TRAIN WORLD ARROW HOBBY SERVICE & SUPPLY DELTA DEPDT THE HDBBY GALLERY GEORGIA MODEL RAILROAD SHOP THE SHED
1033 S. COUNTRY CLUB DR. 1754 WHITE AVENUE 2949 S. AIRPDRT WAY 1810 MERIDEN RD. 342 S. WASHINGTDN AVE. 2725 PERRYSBURG RD.
85202 602-833-4353 91750 714-593-7733 95206 209-982-0913 06716 203-879-231 6 60901 815-932-6100 46947 219-722-2711
PHOENIX LOMPOC STOCKTON CHAMBLEE LA GRANGE
MICHIGAN CITY LA GRANGe HOBBY BILL'S CABOOSE MIKE'S TRAINS & HOBBIES STANDARD HOBBIES
DELAWARE GArIDY DANCERS CENTER INC. B & A HOBBIES & CRAFTS
1829 D W INDIAN SCHOOL R D. 104 W. OCEAN AVE. 7542 PACIFIC AVE. 5460 PEACHTREE RD 25 S. LAGRANGE RD. 408 fRANKLIN 85015 602-266-5866 93436 805-736-6747 95207 209-477-0477 30341 404-451-7425 60525 31 2-354-1220 46360 219-874-2382
SCOTTSDALE LOS ANGELES TURLOCK WILMINGTON LILBURN MARION MICHIGAN CITY HOBBY TOWN NATICK STORE SQUARE ROUNDHOUSE HOBBI ART INC. SUNRISE HOBBIES MARK'S TRAINS & HOBBIES EISELE PHOTDGRAPHY 9180 E. INDIAN BEND RD. #f-4 505 S. fLOWER ST. , C LEVEL 1468 LANDER AVE. 4709 ,IRKWOOD HWY. 656 INDIAN TRAIL ROAD 1204A W. CENTRAL 1 810 RIDGEMOOR DR. 85256 602-948-3946 90071 21 3-626-3339 95380 209-668-4454 19808 302-999-0144 30247 404-925-7430 62959 61 8-993-3708 46360 21 9-874-3058
LOS ANGELES VENTURA WILMINGTON
RIVERDALE MOUNT PROSPECT SOUTH BEND
ARKANSAS TROXEL BROS. MODELS fRIENDS RIGHT TRACK HOBBIES MITCHELL'S, INC.
RIVERDALE STATION HIS & HERS HOBBIES HOBBY LAND 4319 W. 2ND ST. 1818 E. MAIN ST. 21 1 9 CONCORD PIKE
6504 CHURCH S1.. SUITE 8 15 W. BUSSE AVE. 343 LINCOLN WAY W. 90004 21 3-382-6626 93003 805-643-5338 fAIRfAX SHOPPII�G CENTER
30274 404-991-6085 60056 312-392-2668 46601 21 9-287-0180 19803 302-652-3258
OARDENELLE MONTEREY WESTMINSTER SAVANNAH OAK LAWN
RIVER VALLEY HOBBIES TRAINS & TRIVIA ARNIES TRAINS BULL STREET STATION PAT'S HOBBIES & CRAFTS IOWA PO BOX 425 700 EE CANNERY ROW 6450 WESTMINSTER AVE. 151 BULL S1. 5730 W. 95TH S1.
72834 501-129-1270 93490 408-372-8277 92683 714-893-1015 31402 912-236-4344 60453 312-424-6131
FORT SMITH MORENO VALLEY PALATINE BURLINGTON GOLDEN SPIKE LONG'S DRUG STORE #224
COLORADO FLORIDA IDAHO PALATINE HOBBY, LTO. HOBBYCRAFT SHOP
505 S. 1 7TH 25070 ALESSANDRO BLVD. 43 E. NORTHWEST HWY. 801-803 JEfFERSON 72901 501-785-2557 92388-4313 714-242-5060 60067 708-358-7888 52601 319-754-4979
NORTH LITTLE ROCK NORTH HOLLYWOOD AURORA
DAYTONA BEACH BOISE PARK RIDGE
CEDAR RAPIDS RAIL fAIR HILL 'S HOBBY & MADIJO HOBBY HOUSE THE ROUNDHOUSE
SUMMER VALLEY SHOP. CTR. DUNN TOYS AND HOBBIES LITTLE BIT JUNCTION COLLECTORS SHOP BOX KAR HOBBIES 5302 MacARTHUR DR. 12804 VICTORY BLVD.
UNIT 4-A, 16911 E. QUINCY AVE. 1545 BEACH ST. 10452 fAIRVIEW AVE. 10 PRAIRIE 109 THIRD AVE. SE 72118 501-753-0495 91606 818-769-0403
8001 3 303-699-5660 32014 904-153-7691 83704 208-376-4047 60068 708-823-4464 52401 319-362-1291
NORTHRIDGE DENVER FORT LAUDERDALE ROSCOE DES MOINES
CALIFORNIA SMITH BROS. HOBBY CENTER CABOOSE HOBBIES DISCOUNT TRAINS
ILLINOIS ROSCOE HOBBV CENTER HOBBY HAVEN
8941 RESEDA BLVD. 500 S. BROADWAY 312 E. OAKLAND PK. BLVO. 5508 CLAYTON CIR. 7672 HICKMAN RD. 91324 818-885-8636 80209 303-777-6766 33334 305-564-2440 61073 81 5-623-6087 50322 51 5-276-8785
ALBANY OAKLAND FORT COLLINS FORT LAUDERDALE
BELLEVILLE ROSELLE FORT DODGE
KIT & CABOODLE TOM COLE'S CROSSING GATE HOBBY TOWN WARRICK CUSTOM HOBBIES TRAIN DOCTOR ROSELLE HOBBY JUNCTION BOB BAKER HOBBY SHOP
1404 SOLANO AVE. 6128 LASALLE AVE. 2100 DRAKE DAVIE SHOPPING CENTER
715 EAST MAIN l l 1 E. MAIN ST. 1424 5TH AVE. S 94706 415-524-9942 94611 415-339-9722 80526 303-224-5445
4693 S. UNIVERSITY DR. 62220 60172 312-980-5056 50501 515-955-9894
33328 305-434-9777
BERKELEY ORANGE GRAND JUNCTION FORT WALTON BEACH BERWYN SPRINGFIELD MASON CITY
BERKELEY HARDWARE FRANK'S HOBBY SHOP THE HOBBY HUT HOBBY CENTER HOBBY CITY WHISTLE POST EAST SIDE TRAINS 1145 UNIVERSITY AVE. 666 N. TUSTIN AVE. 811 N. 12TH S1 764 N. BEAL PKWY. 6910 CERMAK RD. 1347 W. MONROE PLAZA 932 B E. STATE ST. 94704 41 5-845-0410 92667 714-639-9901 81501 303-242-8761 32548 904-862-0620 60402 708-795-0280 62704 21 7-744-6675 50401 515-423-1748
BREA PALM DESERT LAKEWOOD LAKELAND
BLOOMINGTON STREATOR
IRON HORSE D. S. MODELS COLPAR HOBBIES PERKINS HOBBIESI HOBBYLAND INC. ON TRACK HOBBIES
116 S. BREA BLVD. 74 - 11 5 HWY. l l l 3333 S. WADSWORTH BLVD. COLLECTIBLES 616 N. MAIN S1. 506 E. MAIN ST. KANSAS 92621 714-529-1795 92260 619-346-2486 80227 303-989-7008 1 1 1 7 S. fLORIDA AVE.
61701 309-828-1442 61364 815-672-3668 33803 813-683-3251
BURBANK PALM SPRINGS LOVELAND LANTANA BURBANK TINLEY PARK GREAT BEND THE TRAIN SHACK REALISTIC MINIATURE TRAINS THOMPSON'S HOBBIES THE DEPOT GOLDEN SPIKE TRAIN SHOP THE RIGHT TRACK TAYLOR'S TOYS 1 030 N. HOLLYWOOD WAY 2233 N . PALM CANYON OR. 1730 W. EISENHOVIER BLVD. 603 RIDGE RD. 6357 W. 79TH ST. 17028 S. OAK PARK AVE. 3120 1 0TH ST. 91505 818-842-3330 92262 619-325-3662 80537 303-669-2326 33462 407-585-1982 60459 31 2-598-3114 60477 708-429-3335 67530 316-793-9698
CAMPBELL REDONDO BEACH
WESTMINSTER MIAMI CHAMPAIGN JUNCTION CITY SOUTH BAY MODEL 0 & J HOBBY RAILROAD SUPPLY CO.
HOBBYTOWN ORANGE BLOSSOM HOBBIES PRAIRIE GARDENS INC. INDIANA
R C HOBBIES 96 N. SAN TOMAS AQUINO RD. 6975 E. 88TH AVE. 1975 NW 36TH ST. 3000 W. SPRINGfiELD 1 1 5 W. 7TH 95008 408-379-1696 2701 ARTESIA BLVD.
80020 303-431 -0482 33142 305-633-2521 61821 217-356-5558 66441 913-238-1877 90278 213-542-3686
CONCORD SAN DIEGO ORLANDO
CHICAGO CROWN POINT
KANSAS CITY COLONIAL PHOTO & HOBBY INC. CLAUSSENS IRON HORSE HOBBY
IRON HORSE TRAINS REEDS HOBBY CONNECTICUT RAY BYERS
CHICAGOLANO HOBBY 1 04 W. CLARK ST. J'S HOBBY HAVEN 3494 CLAYTON RD 8039 LA MESA 8LVD.
634 N. MILLS ST. 6017 N. NORTHWEST HWY. P O BOX 159 4601 STATE AVE.
94519 415-682-5775 92041 619-464-1672 32803-4675 407-841-1485
60631 46307 219-663-3086 66102 913-287-3030
COSTA MESA SAN DIEGO BRANFORD ORLANDO
CHICAGO EVANSVILLE OLATHE
BRANfORD HOBBIES THE TRAIN DEPOT PEACEVILLE TRAIN SHOP TRAIN CROSSING WEST COAST HOBBIES 609 BOSTON POST RD. 859 S. ORLANDO AVE.
TROST HOBBY SHOP A A HOBBY SHOP 189 S. ROGERS RD.
1089C BAKER ST. 4690 CONVOY S1. WEST MAIN HWY. 17-92 3105-3 1 1 1 W. 63RD ST. 2023 W. fRANKLIN ST.
SUITE 1604 92626 714-549-1 596 921 1 1 619-560-9636 06405 203-488-9865 32789 407-629-1365
60629 312-925-1000 47712 81 2-423-8888 66062 91 3-782-6965
ESCONDIDO SAN DIEGO MANCHESTER
PENSACOLA CREST HILL FORT WAYNE OVERLAND PARK NEW ENGLAND HOBBY HOBBY TOWN THE WHISTLE STOP SUPPLY INC. BOBE'S HOBBY HOUSE WALT'S HOBBY SHOP HOBBY LAND OVERLAND RAILS 1356 W. VALLEY PKWY., SUITE I 3834 4TH AVE. 71 HILLIARD ST. 5719 N.W. ST. 1701 N. LARKIN AVE. 416 COLISEUM BLVD. 7317A W. 97TH ST. 92025 92103 619-295-7340 06040 203-646-0610 32505 904-433-2187 60435 81 5-741-0043 46805 219-483-8186 66112 913-341 - 1 144
ESCONDIDO SAN FRANCISCO MILFORD PLANTATION DOWNERS GROVE FORT WAYNE
TOPEKA SUMMIT HOBBIESI SHORT LINES JUNCTION MAILWAYS-TRAINS ARE US THE HOBBY PARLOR UNIVERSAL HOBBIES INC. DOWNERS GROVE HOBBIES SUMMIT SPEEDWAY fUN fOR ALL HOBBIES 740 METCALF #26 200 FOLSOM AT MAIN 1201 BOSTON POST RD. 141 S. STATE RO , #7 6234 S. MAIN ST. 1706 W. TILL RD. 2029 SW GAGE BLVD. 92025 619-489-5020 94105 415-981-2523 06460 203-874-2424 33317 305-581-9390 60516 708-960-5900 4681 8 219-489-7223 66604 913-272-5772
66 • Model Railroading August 1 99 0
YOUNGSTOWN LEMOYNE SALT LAKE CITY SEAnLE CALGARY
OHIO BOARDMAN HOBBY CENTER KEYSTONE HOBBY CENTER
SOUTH DAKOTA GREAT ESCAPE HOBBIES AMERICAN EAGLES INC. TRAltlS & SUCH
6820 MARKET Sf. 312 HUMMEL AVE. 1773 WEST 4160 SOUTH 2220 NW MARKET Sf. 4125·4 Sf. NW 44512 216·758·1522 17043 71 7·763-7534 84119 801 ·966· 7785 98117 206·782·8448 AB T2K lA3 403·282·2442
AVON LITITZ
SIOUX FALLS SALT LAKE CITY SPOKANE EDMONTON
APPLEWOOO MINIATURE RULES MODEL TRAINS
OONOVANS HOBBY CENTER HAMMOND HOBBIES SUNSET JUNCTION ROUtlDHOUSE SALES
36555 DETROIT RD. OKLAHOMA 101 N. BROAD Sf. INDEPENDENCE PLAZA
50 S. MAIN. SUITE 21 1 E 213 SPRAGUE AVE. 1 0425 80TH AVE. 4401 1 216·934·6366
17543 71 7·626·1273 3813 S. WESTERN AVE.
84144 801·531 ·6074 99202 509·838·2379 AB T6E lVI 403·433·0917 1·800·359·6366 57105 605·338·6945
CANTON OKLAHOMA CITY MECHANICSBURG
TACOMA NORTH WESTMINSTER MECHANICSBURG HOBBY HUT FALCON HOBBIES WHISTLESTOP TRAINS
WARREN G. WILTROUT TENNESSEE VERMONT PACIFIC RAILWAY HOBBIES CREATIVE HOBBYCRAFT STORES
2847 WHIPPLE AVE. NW 1313 BRmON RO. 42 E . MAIN ST. 5 1 15 100TH SW NO. 7 42 6TH ST.
44708 216·477·9904 73114 405·842·4846 17055 71 7·697·8633 98499 206·581 ·4453 BC V3L 2Z1 504·525·6644
CINCINNATI OKLAHOMA CITY MONTOURSVillE BRENTWOOD ST. JOHNSBURY VANCDUVER
GOLF MANOR HOBBIES WOODWAROS ENGLISH MODEL RR SUPPLY NASHVILLE DEPOT HOBBY SHOP ELLIS PAINT WALLPAPER GLS WEST VIRGINIA
CENTRAL HOBBIES 2235 LOSANTIVILLE AVE. 2941 W. HEFNER RD. 21 HOWARD ST. 4924 THOROUGHBRED LANE 85 EASTERN AVE. 365 E BROADWAY 45237 513·351·3849 73120 405·751·4994 17754 71 7·36B·2516 37027 61 5·371·5350 05819 802·748·3806 BC V5T lW5 604·874·5716
CINCINNATI TULSA PERKASIE CHAITANOOGA NITRO VERNON
HOBBY TOWN #15 ACTION HOBBIES LESHERS II CHAnANOOGA DEPOT VIRGINIA
NITRO HOBBY·N·CRAFT CENTER TRACKSIDE TRAINS 9525 KENWOOD RD. #29 4423 E. 31ST Sf. 21 N. 7TH Sf. 4148 RINGGOLO RD .. STE. A·5 104 21ST ST . . PO BOX 695 2507 HWY. #6 45242 513·793·5 1 12 74135 918·745·9698 18944 21 5·257·4055 37412 61 5·622·0630 25143 304·755·4304 BC VIT 5G4 604·545·4500
CLEVELAND TULSA PIITSBURGH CLARKSVILLE ALEKANORIA WINNIPEG
HOBBY HOUSE INC. WINGS·N· THINGS. INC. A B CHARLES SON HOBBY SHOP THE HOBBY SHOP CORNISH & SONS HOBBY WISCONSIN
GOLDEN SPIKE MOOEL SHOP 800 HURON RD. 5241 S PEORIA 3213 W. LIBERTY AVE. 1616 CUNNINGHAM PL. 6239 limE RIVER TPKE. 76 MAGDALENE BAY 441 15 216·781·3210 74105 918·745·0034 15216 41 2·561·3068 37042 615·553·0350 22312 703·941·2634 MB R3T 3L2 204·667·2080
CLEVELAND PIITSBURGH MEMPHIS FAllS CHURCH
APPLETON WINNIPEG ARLINGTON HOBBY CRAFTERS NATIONAL HOBBY, INC.
O REGON BILL & WALT'S HOBBY SHOP MODEL RR HOBBY SHOP
WILLSTON CENTER BESTS' HOBBIES GOOCH'S HOBBIES 5238 RIDGE RD. 116 SMITHFIELD Sf. 3436 PARK AVE.
6176 ARLINGTON BLVD. 2700 W. COLLEGE AVE , #8 185 SHERBROOK ST. 44129 216·749·2450 15222 412·281·9040 381 1 1 901 ·324·7245
22044 703·532·2224 54914 MB R3C 2R7 204·))5·2743
CLEVELANO McMINNVILLE PIITSBURGH MEMPHIS GRAFTON BROOKFIELD WINNIPEG WING'S HOBBY SHOP. INC. RED CABOOSE BILL & WALT'S HOBBY SHOP TOBACCO CORNER NEWSROOM GRAFTON HOBBY CENTER HOBBY HORSE WAREHOUSE HOBBIES 171 1 2 DETROIT AVE. 2147 THREE MILE LANE 48U1 McKNIGHT RD. 671 S. MENDENHALL 1 10·C DARE RD. 16750 W. BLUEMDUND 445 KENSINGTON Sf. 44107 216·221·5383 97128 503·472-B720 15237 412·366·8686 381 17 901·682·3326 23692 804·898·4184 53005 414·782·2170 MB R3J 1JB 204·837·7887
COLUMBUS PORTlAND PIITSBURGH LYNCHBURG KENOSHA HALIFAX STRETE HOBBIES HOBBIES UNLIMITED IRON HORSE HOBBY SHOP
TEXAS TRAINS UNLIMITED IRON RAILS OF KENOSHA MARITIME HOBBIES & CRAFTS
3655 SULLIVANT AVE. 4503 N. INTERSTATE AVE. 1950 PAINTERS RUN RD. 2016 LAKESIDE DR. 2031 22ND AVE. SCO-IA SOUARE 43228 614·279·6959 97217 503·287·4090 15241 41 2·221·2250 24501 804·385·5036 53140 414·552·B075 NS B3J 1N9 902·423·8870
COLUMBUS PORTLAND
READING AUSTIN NORFOLK
LA CRDSSE TRURO HOBBY HOUSE HOBBY TOWN U.S.A. SNUG HARBOR TOY CRAFT THE TRAIN STATION 6671 SW BEAVERTON IRON HORSE HOBBY HOUSE
BRODIE OAKS SHOPPING CTR. HOBBY SHOP TRAIN HOUSE UNEEDA HOBBY 4430 INDIANOLA AVE. HILLSDALE HWY. 60 S 6TH ST.
4107 CAPITAL OF TEXAS HWY. B481 CHESAPEKE BLVD. 1704 GEORGE Sf. 25 INGLIS PLACE 43214 614·262·9056 97225 503·292·3790 19602 21 5·373·6927
78704 235 1 8 804·587·4710 54603 608·781 ·4974 NS B2N 4B5 902·895·0308
CUYAHOGA FALLS PORTLAND REAOING CORPUS CHRISTI PETERS8URG
MADISON 8URLINGTON
WALT'S HOBBY SHOP CANADIAN FINE SCALE RAIL CROSSING JIM'S WHISTLE STOP G & K HOBBY CENTRE LEISURE TIME HOBBIES 2791 S. CRATER RD. THE TRAIN SHOP
N SCALE SPECIALTIES 119 W. PORTAGE TRAIL 14037 SE STARK 720 GORDON S1 1326 AIRLINE FOOD LION PLAZA 99 W. BELTLINE HWY.
535 LOCUST S1 44221·3221 216·945·5552 97233 503·252·71 1 8 19601 21 5·374·B598 78412 51 2·991-7161 23B05 B04·861 - 1333 5371 3 608·276·8070
ON L7S 1V4 41 6·333·6560
LIMA PORTLAND SCRANTON DALLAS RICHMONO MARSHFIELD
BURLINGTON BUD & CAROL'S TRAIN SHOP SWITCH STAND HOBBIES SCRANTON HOBBY CENTER BOB BYE HAll'S HOBBY HOUSE HOBBY CE�TER SPRING GREEN FLORAL & HOBBY
HUTCH'S TRAINS 1566 N. COOL RD . 2514 SE 122ND AVE. 420 LACKAWAN�A AVE. 4822 BRYAN ST. 4925 W. BROAD ST. #402 1302 N. CENTRAL AVE.
490 BRANT ST. 45801 419·649·2287 97236 503·760·5804 18503 71 7·342·1963 75204 214·821 ·2550 23230 804·359·4720 SHOPKO PlAZA
ON L7R 2G4 41 6·637·3721 54449 715·387·3421
LORAIN STRASBURG FORT WORTH RICHMONO MILWAUKEE CANATA THE CORIIER STORE
PENNSYLVANIA STRASBURG TRAIN SHOP OLD TIME HOBBIES TOY CENTER. INC. MITCHELL MODEL RR & HOBBY CANATA HOBBY CTR. (OnAWA)
1249 COLORADO AVE. ROUTE 741 E. BOX 130 3501 A BLUE BONNE.TT CIR. 10441 MIDLOTHIAN TPKE. 120B W. MITCHELL ST. 462 HAZELOEAN RO . . UNIT 18 44052 216·288·2351 17579 71 7·687·0464 76109 81 7·927·5208 23235 804·288·4475 53204 414·672-8822 ON K2L 1V3
MAUMEE ALLENTOWN WAYNE HOUSTON ROANOKE MILWAUKEE KINGSTON J & M TRAINS & HOBBIES ALLENTOWN TOY TRAIN SERVo SMALL WORLD HOBBIES LARRY'S HOBBIES ROANOKE RAILS TERMINAL HOBBY SHOP LLOYD SHALES HOBBY SUPPLY 2566 PARKWAY PlAZA 125 112 N. 1 1TH ST. 163 E. LANCASTER AVE. 156·F 1960 EAST 11 S . JEFFERSON Sf. 5619 W. FLORIST AVE. 208 DIVISION Sf. 43537 419·893·2621 18102 21 5·821·0740 19087 21 5·687·6875 77073 713-443·7373 24011 703·342·5930 53218 414·637·0770 ON K7K 3Z1 613·548·8427
MIDDlETOWN 8ETHLEHEM WESTCHESTER KILLEEN
SUFFOLK MERRICKVILLE HOBBY CENTER NEENAH SOUTH PARK HOBBIES MAC'S HOBBY HALL BRANDYWINE HOBBIES
414 N. 8TH Sf. MIKE'S TRAINLAND BESTS' HOBBIES LARKSPUR LINE LTD. 1815 mus AVE. 721 LINDEN ST. 1502 WESTCHESTER PIKE
P O. BOX 849 5661 SHOULDERS HILL RD. 1011 S. LAKE ST. RR4 45042 5 13·424·5124 18018 215·866·8465 19382 21 5·696·9049
76541 81 7·634·0488 23435 804·484·4224 54956 414·722·8532 ON KOG lNO 613·269·3690
NORTH CANTON 8LUE RIDGE SUMMIT WHITEHALL LEWISVILLE SHE80YGAN OnAWA NICK'S SALES & SERVICE MAINLINE HOBBY SUPPLY ADAMS HOBBY WORLD SOUTHWEST TRAINS MEMORY LANE HOBBY CENTRE 7251 MIDDLEBRANCH NE 15015 BUCHANAN TRAIL E 3300 SEVENTH 5T. 540 SURF SUITE 1 1 8 1926 SUPERIOR AVE. 1579 BANK ST. 44721 216·494·0125 17214 71 7·794·2860 18052 215·434·7744 75067 214·221·5891 53081 414·458·4835 ON K1H 7Z3
NORTH CANTON ERIE
MESQUITE WAUSAU OnAWA CARS & TRAINS HOBBY SHOP TRAINS & THINGS
4500 E. LAKE RD. RHODE ISLAND COLLECTOR SHOP AND HOBBY
WASHINGTON POPES HOBBYLAN O HOBBY HOUSE LTD.
226 W. MAPLE ST. HARBOR CREEK MALL 1220 N. TWN. EAST BLVD. 640 S. 3RD AVE. 89 MONTREAL RD.
44720 216·499·1666 16511 814·899·1347 75150 214·613·2051 54401 71 5·842·4371 ON K1L 6E8 613·749·5245
NORWALK GEIDSBURG
PAWTUCKET PLANO AUBURN WEST 8ENO PETER80ROUGH
TOMMY GILBERT MODEL DE BYS HOBBY EMPORIUM PAUL'S HOBBIES RAILROAD SUPPLY PARENT HOBBIES RAILROAD CROSSING WAGNER'S HOBBY HOUSE WEST BEND HOBBIES INC. 183 SIMCOE S1 46 E. MAIN 346 E. WATER S1 272 WEST AVE. 1520 G AVE. 131 E. MAIN ST. 144 N. MAIN ST. P.O. BOX 1552 44857 419·668·3019 17325 717·337·1992 02860 401 -722·2398 75074 214·423·9054 98002 206·939·2515 53095 414·334·0487 ON K9J 7H7 705·742·7238
SOLON JENKINTOWN WAKEFIELD BELLINGHAM MONTREAL HOBBY WORLD JENKINTOWN HOBBY CENTER THE TRAINSHEO GOLD Hill STATION HOBBY WORLD LTD. 33840 AURORA RD. GREENWOOD AVE. & LEEDOM ST. 79 OLD TOWER HILL RD. 1 1 30 CORNWALL AVE. 5450 SHERBROOKE W 44139 216·248·1978 19046 21 5·884·7555 02879 401 ·789·1420 98225 206·671·8802 PO H4A 1V9 514·481 ·5434
STEU8ENVILLE JOHNSTOWN CHEHALIS MONTREAl CUSTOM HOBBIES AL'S TRAINS
SOUTH CAROLINA UTAH NORTHWEST TRAIN DEPOT
CANADA LE COIN OU CHEMINOT INC.
432 MAirI ST. 161 VILLAGE STREET 1671 N. NATIONAL AVE. 5344 BElANGER EST 43952 614·266·6016 15902 814·266·8725 9B532 206·736·5600 PO H1T 1 E2 514·728·8443
SYlVANIA LANCASTER GREENVillE SALT LAKE CITY
FERNDALE CALGARY GREAT ESCAPE DOUGLAS MODELS SEMAPHORE TRAIN & HOBBY SMIID'S HOBBY & CRAFT PLEASANTBURG SHOPPING CTR * * • * 55TH YEAR • • • • M & M DEPOT HOBBY WEST
5700 MONROE ST. 1226 MILLERSVILLE PIKE 1426 LAURENS RD. 2065 E . 33RD SOUTH 51
2032 MAIII ST , PO BOX 182B 5011 MACLEOD TR. SW 43560 419·885·1533 17603 717·393·2521 29607 803·235·8320 84109 801 -487·7752 98248 206·384·2552 AB T20 OA9 403·244·9990
August ., 990 Model Rail roading • 67
MALDEN LANSING CHESTERFIELD RENO HUNTINGTON
KENTUCKY CHARLES RO SUPPL V CO. THE HOBBV HUB INC. HOBBY STATION HOBBIES EMPORIUM
NEW M EXICO CABOOSE INC.
347 A PLEASANT ST. 526 FRANDOR AVE. 1 724 CLARKSON RD. 5380 MEADOWOOD MALL CR. 208 WALL ST. 02148 617-321-0090 48912 517-351 -5846 63017 314-537-3060 89502 702-825-9670 1 1 743 516-427-8288
HOPKINSVILLE NORTH EASTON LANSING KANSAS CITY RENO AL8UQUERQUE JOHNSON CITY THE HOBBY SHOP
4000 FT. CAMP8ELL BLVD. lINDSTRDMS RIDER'S HOBBY SHOP SPOTLIGHT MODEL RR HOBBIES OF RENO ABAJO DEPOT THE TRAIN SHOP
PENNYRILE MALL 50 ELM S1. 1609 E. MICHIGAN AVE. 7427 TROOST AVE. 535 E. MOANA LANE 3301 MENAUL NE. STE. NO. 16 210 GRAND AVE.
42240 502-886-5747 02356 617-238-6224 48912 517-332-6880 64131 816·444-7331 89502 702-826-6006 87107 505-881-2322 13790 607-797-9035
PARIS NORTHAMPTON LAPEER KIRKWOOO LAS CRUCES NEW YORK CA800SE CORNER H. L. CHILDS & SON J & 0 HOB81ES HOBBY STATION
NEW HAMPSHIRE THE HOBBY HUT THE TRAIN SHOP 2015 MAIN S1. 25 STATE 51. 288 S. MAIN 301 S KIRKWOOD RD. 126 WYATI DR. 23 W. 45TH ST. 40361 606-987-1257 01061 48446 31 3-664-1414 63122 31 4-822-1917 88005 505-514-0991 10036 21 1-730-0409
WARREN PETOSKEY RAYTOWN 80SCAWEN PATCHOGUE TUCKERS HOBBIES
LOUISIANA BOX 1090 DOUG'S PHOTO AND HOBBY P M TRAINS & ROC,S CONCORD CAR SHOPS NEW YORK
HARRY'S DEPOT 303 E. MITCHEll 10101 E 64TH ST. RT. 3 & 4. 1 1 5 KING ST. 128 MEDFORD AVE . . R-. 1 1 2 8 BACON ST. 49770 616-347-4233 64133 816-358-6160 03303 603-796-1320 1 1 772 51 6-475-9056 01083 413-436-5318
ALEXANDRIA WEST 80YlSTON
ROCHESTER SPRINGFIELD MANCHESTER AMITYVILLE PITISFORD HARES MARY CARTER JOE'S HOBBY CENTER
PAINT & HOBBY CRAFT HENRY'S H08BY HOUSE
CAMPUS CORNERS SHPG. CTR. HOBBYDASHERY INC. PAUL E . 80UROUE CO. INC K & P HOBBIES H08BY PEDDLER
4529 LEE ST. 67 W. BOYLSTON ST. UNIT 1
105 S. LIVERNOIS 1312 E. BAmEFIELD 608 WILLOW ST 55 MERRICK RD. 7 SCHOEN PL.
71302 31 8-443-2755 01583 508-754-5604
48063 31 3-651-8842 65804 4 1 7-883-4609 03103 603-625-8919 1 1 701 51 6-598-2405 14534 716-381-4532
8ATON ROUGE SOUTHFIELD NORTH CONWAY
APALACHIN ROCHESTER BRASS CABOOSE LOUISIANA CENTRAL HOBBIES MICHIGAN
DEL'S TRAIN CENTER MONTANA IUNDER CAROLL REED) BEAM ELECTRIC ANDY'S TRAINS
10246 flORIDA BLVD. 23123 LAHSER RD. RTE. 434 108 SCOnsVILLE RD 70815 504-273-0095 48034 313-357-5770
NORCROSS CIRCLE 13732 607-625-2222 14611 716-235· 1 587 03860 603-356-9922
LAmmE ANN ARBOR ST. CLAIR SHORES GREAT FALLS NORTH HAMPTON
8ALLSTON SPA ROCHESTER FlITS PHOTO & HOBBY SHOP RON'S MODEL RAILROAD SHOP RIDER'S HOBBY SHOP WHISTLE STOP HOBBY TRAINS HOBBYLAND VILLAGE SHOPPING CENTER THE DEPOT THE WHISTlE STOP
1416 S. COLLEGE RD. 1 15 W. LIBERTY 21 7 1 4 HARPER AVE. 820 CENTRAL US RT. 1 108 MILTON AVE. 1 967 RIDGE RD. E
70503 318-232-5536 48104 313-668-8646 48080 313-771 -6770 59401 406-453-3131 03862 603-964-9292 1 2020 5 18-885-8789 1 4622 71 6-467-7590
NEW ORLEANS BAY CITY WESTLAND 81NGHAMTDN SCHENECTADY HUB HOBBY SUPPLY CUM CRAFT INC. DAVE'S HOBBY & TV
NEBRASKA NEW JERSEY GEORGE'S CABOOSE ADIRONDACK HOBBIES
2618 S. BROAD ST 1008 ADAMS 29026 WARREN RD 85 ROBINSON ST. 2331 ALTON ST. 70115 504-822-3914 48706 51 7-092-6177 48185 31 3-422-4464 13904 607-775-5277 1 2309 51 8-393-8836
SHREVEPORT CANTON WESTLAND LINCOLN A8ERDEEN
BROOKLYN SMITHTOWN COOKS COLLECTORS CORNER RIDER'S HOBBY SHOP NANKIN HARDWARE & HOBBY HOBBY TOWN LINCOLN HOBBY SHOP
WAL rs HOBBI SHOP THREE GUYS HOBBIES 4401 YOUREE OR. 41007 FORO RD. 35101 fORO RD. 3231 S. 13TH RT. 34
7909 5TH AVE. 99 E . MAIN ST STRATMORE SHOPPING CENTER 71105 31 8-865-7632 48187 313-981-8700 48185 313-722-5700 68502 402-421 -7699 07747 201 -583-0505
1 1 209 718-745-4991 1 1 787 51 6-265-8303
CLARE LINCOLN
ABSECON BUFFALO WAPPINGERS FALLS HOBBY TOWN USA
MAINE THE AARDVARK
MINNESOTA SUnER PLACE MALL THE ROUNDHOUSE INC. K VAL HOBBIES VALLEY MOOEl TRAINS 4855 BROWNS RD. 400 NEW JERSEY AVE. 277 HINMAN AVE. 3 FULTON ST 48617 51 7-386-3288
5221 SOUTH 48TH 5T 08201 609-641-8474 14216 71 6-875-2837 12590 914-297-7511 68516 402-483-7427
BRUNSWICK COLOMA BEMIDJI LINCOLN
8LOOMFIELD BUFFALO
WHITE PLAINS HOOGE'S HOBBYTOWN NIAGARA HOBBY & CRAFT MART ASK YOUR MOTHER J & W MODEl TRAINS HOBBY HUTCH
EAST PARK MALL DANA'S HOBBY SHOP OPEN EVENINGS & SUNDAY WESTCHESTER HOBBIES 49 PLEASANT ST. 6450 BECHT RD. E PAUL BUNYAN MALL
220 NORTH 66TH ST 392 BROAD ST. 3366 UNION RD. AT WALOEN 102 E. POST RD. 0401 1 207-729-1542 49038 61 6-468-55B6 56601 218-751 -9734
68505 402-464-2858 07003 201-743-3951 14225 716-681-1666 10601 91 4-949-7943
DEARBORN DULUTH LINCOLN
CHESTER CLAY ROLLIES MODEL RAILROAD
MARYLAND JOE'S HOBBY CENTER VALLEY MODElS
CROSSIfIG THE HOBBY & GAME ANNEX SYRACUSE TRAIN & HOBBY NORTH CAROLINA 7845 WYOMIlIG AVE. 361-C CANAL PARK OR. ROUTE 24 8135 RT. 1 1
48126 31 3-933-6567 55802 218-727-1603 5606 S. 48TH ST.
07930 201-879-4263 13041 31 5-422-3328 68516 402-423-9337
8ALTIMORE EAST DETROIT RICHFiElD OMAHA COLTS NECK EAST NORTHPORT ASHEVILLE
M B KLEIN. INC. JOE'S HOBBY CENTER HUB HOBBY CENTER BEL AIR HOBBYCRAFT CTR JUST TRAINS LARRY'S HOBBY SUPPLIES INC. ANTIOUE TRAIN & TOY CO. 162 N. GAY ST. 17900 E. TEN MILE 6416 PENN AVE. S 12100 W. CENTER RD. 41 HWY. 34 3021 JERICHO TPKE. 523 MERRIMON AVE. IINCLUOES MAIL OROER)
48021 313-773-8294 55423 612-866-9575 68144 402-333-4846 07722 201-409-2772 1 1731 516-499-7166 28804 704-253-7648 21202 301-539-6207
FARMINGTON ROB81NSVILLE OMAHA FLORENCE
EAST ROCHESTER CHARLOnE
CATONSVILLE HOBBY TOWN USA SPORTS AMERICA & CHAR LOnE ElEC. TRAIN CTR.
PRO CUSTOM HOBBIES. INC. JOE'S HOBBY CENTER HUB HOBBY NORTH ROCK BROOK VillAGE HOBBY CENTRE
DESPATCH JUNCTION 520 B-4 CLANTON RD.
721 FREDERICK RD. 35203 GRAND RIVER 41 14 LAKELAND AVE. N 1 1011 ELM S1 304 BROAD S1.
100 STATION RD. 77 CORPORATE PARK
21228 301-78B-8770 48024 313-477-6266 55422 61 2-490-1675 68144 402-391 -5669 08518 609-499-2992
14445 716-385-5570 28217 704-527-0392
MOUNT AIRY FLINT SAINT CLOUD
OMAHA MERCERVillE flORAL PARK CHARLDnE
DENNISON'S TRACKSIOE RIDER'S BAKERS CRAFT & HOBBY SCALE RAIL
IRON HORSE HOBBIES JERICHO HOBBY & TRAIN CTR. THE MODELER'S HOBBY SHOP HOBBIES THE BEDER HOBBY PEOPLE
DIV. PLACE FASHION CENTER 4205 S 87TH S1. 1 1 6 FLOCK RD. 158 JERICHO TPKE. 4B08 C CENTRAL AVE.
2-4 S. MAIN ST. 3012 CORUNrIA RO. 56301 611-252-0460 BOX 27242
08629 609-586-1282 1 1 001 212-352-5067 28205 704-537-9963 21771 301-831-72 1 1 48503 31 3-234-4051 68127 402-339-3380
SPRING LAKE PARK SCOTISBLUFF
MONMOUTH GENEVA FAYETIEVILLE
FRASER HOBBY TOWN TRAINS-N-RAILS HOBBY SUPPLY
MASSACHUSETTS P & 0 HOBBY SHOP UNIVERSITY HOBBIES
MONUMENT MALL HOBBY & GAME #3 LAKE CITY HOBBIES 8USINESS LOOP HWY. 301 S 31902 GROESSBECK HWY. 8185 UNIVERSITY AVE. NE
2302 FRONTAGE RO. 4095 U.S. HWY. 1. SUITE 1 9 30 CHERRY ST. 2313A GILLIESPIE S1. 48026 313-773-7200 55432 612-7BO-4189
69361 308-635-7001 08852 201-329-0030 14456 315-781-0807 28306 919-433-2036
BEDFORD GRAND RAPIDS PENNSAUKEN GLENMONT KINSTON
BEDFORD TRAIN SHOP HOBBY WORLD MISSISSIPPI NEVADA
TED'S ENGINE HOUSE H 0 CUSTOM TRAINS KANES TRAINS 32 SHAWSHEEN AVE. 2851 CLYDE PARK SW 6307 WESTFIELD AVE. 4 BRIGHTON WOOD RD . 910 W. HIGHLAND 01730 617-275-7525 49509 616-538-6130 08110 609-662-0222 1 2077 518-462-6209 28501 919-523-5444
BOLTON GRAND RAPIDS LAUREl LAS VEGAS PISCATAWAY HICKSVILLE RALEIGH
SCALE MODEL PRODUCTS RIOER'S HOBBY SHOP HOBBY CORNER PRC TRAINS MODEL RAILROAD SHOP HOBBY IMAGES THE HOBBY SHOP 63 HUDSON RD. 2055 28TH ST. SE 1534 N. FIRST AVE. 300 W. UTAH VAIL AVE. & NEW MARKET RD. 89 JERUSALEM AVE. 2020 CAMERON S1. P.O. BOX 72 49508 616-247-9933 39440 601-649-4501 89102 702-383-3325 08854 201-968-5696 llBOI 516-822-8259 27605 919-833- 1 1 23 01740 508-779-5056
GRAND RAPIDS RED 8ANK HORSEHEADS WILSON
BOSTON LAS VEGAS ALTOONA SHOPS THE ANTIQUE 8ARN & TRAIN SHOP ERIC FUCHS STAN'S ROUNDHOUSE
MISSOURI TRAIN EXCHANGE HOBBY MASTERS INC. 584 WESTINGHOUSE RD. RT. 2 BOX 22 28 TREMONT S1. 3219 EASTERN SE 6008 BOULDER HWY. 62 WHITE ST. VILLAGE PLAZA FOREST HILLS & DOWNING ST. 02108 603-622-5534 49508 61 6-143-4633 89122 702-456-8766 07701 201-842-6020 14845 607 -739-891 6 27893 919-237-6778
EAST LONGMEADOW HOLLAND BALLWIN NORTH LAS VEGAS RUTHERFORO LIST YOUR SHOP IN OUR DEALER DIRECTORY THE fAMILY HOBBY SHOP COBBLESTONE CRAFTS/HOBBIES CHECKERED FLAG HOBBY CNTRY. PETERSON HOBBIES/CRAFTS CHOO CHOO EDDIES 48 SHAKER RD. 84 E 8TH 14755 MANCHESTER RD. 3262B CIVIC CENTER OR. 38 AMES AVE. 01028 413-525-7345 49423 616-396-3029 63011 314-394-7600 89030 702-649-331 1 07073 201-43B-45B8 $6 PER MONTH EAST WEYMOUTH - KALAMAZOO 8LUE SPRINGS RENO WESTMONT CALL PAM GREENBERG so. SHORE HOBBY CENTER RIDER'S HOBBY SHOP MAINLINE TRAINS HIGH SIERRA MODElS SAmER'S HOBBY SHOP 800-736-0427 or 303-292-0124 777 BROAD ST. 3417 S. WESTNEDGE AVE. 1003 MAIN 953 W. MOANA LANE 14 HADDON AVE. 02189 61 7-331-1 234 49008 61 6-349-2666 64015 816-224-6962 89509 702-825-9098 08108 609-854-7136
S8 • Model R a i l roading August 1 99 0
SHOPPING GUIDE MULTI-SCALE
SCALE STRUCTURE S LLMITED IS COMING BACK BIGGER ANO BETTER THAN BEFORE!
• NEW CONSERVATIVE PRICING • NEW UP-TO-DATE DESIGNS • NEW PRODUCTS
SEND $3.00 FOR ALL NEW CATALOG.
1'. 0 . L10X 2665-lUALLAS. TEXAS 75226
MULTI-SCALE lunCOA/T mODEll
"Quality for the CraHsman" HO & 0 SCALE CRAFTSMAN KITS
ROLLING STOCK. BUILDINGS. COALING TOWERS. NEW STUff. ETC
ASK YOUR DEAL ER LSSAE FOR LIST. SPECIFY SCALE
P.O. BOX 725 BLACK MOUNTAIN , NC 28711
N
�QUEi\K N PRODUCTS THE SUSQUEHANNA SOURCE
FOR N SCALE MODELERS • LOCOMOTIVES • ROLLING STOCK • SPECIAL PRODUCTS
OTHER NORTHEASTERN ROAD NAMES TOO' i • • • • • • • • • • • • • • • • •
OEPT. I , P.O. BOX 244 ALLENOALE, NJ 07401·0244
VIDEO
AME RICAN ALTAVISTA
• SALUOA MAINLINE • CLINCHfiELD SERIES • SPENCER SHOPS
SEND S8.95 FOR SALUDA MODELERS GUIOE.
1520 MARTIN ST., SUITE 202 WINSTON·SALEM, NC 27103
VIDEO @ ALLEN KELLER PRODUCTIONS THE NAME IN
MODEL RAILROAD TAPES The Grea1 Model Railroad '" Series
SEND SASE FOR LISTING 861 LARKRIDGE AVE.
BOARDMAN, OH 44512
August 1 990
MULTI-SCALE G RANDT LINE
PRODUCTS DETAIL PARTS AND KITS
fOR THE DISCR I M I NATING MODELER 1 /2", 0, HO, S, N
SEND $3. 75 FOR Ho.W CATALOG $415 FOR 0 S CATALOG
1040 B SHARY CT. CONCORD, CA 9451 B
HO Ie Ie tc:.�,�:.� �,�,.�
THE Passenger People in HO Since 1978
Passenq,,' C a r K , t !> and D e l a . ' P a r I s
ALL-SCALE N . P. PAINT SHOP
CUSTOM DETAILING. PAINTING. WEATHER ING • RAILROADS . STEAM. DIESEL. MOTIVE POWER.
ROLLING STOCK. STRUCTURES • SPECIAL FEATURE' ROSEBUD COAL • EXCELLENT REfERENCES UPON REOUEST
fOR FREE CONSULTATION WRITE VERN GREENWOOD
1029 ARLINGTON DRIVE BILLINGS, MT 59101 or call (406) 245-2824
( , --1
MULTI-SCALE
WOOD CRAFTSMAN KITS HO · HOn3 • S • 003 • 0
HO · HOn 3 Scalo Cillabg 51 00 , S Scale llS1 SS/,E o Scale C.11alog S 1 00 • On 3 Scale LIS1 SSAE
• • • Please Spec�y Scale' • • Cash or Slaml=6 only
YE OLDE HUFF N PUFF P O 80, 53
Penna Furnace. PA 16865-0053
HO
The Coach Yard
SERIES
• THE FINEST HO BRASS MODELS
• AVAILABLE AT
BEITER DEALERS
P.O . BOX 593 DEl MAR, CA 92014·0593
ALL-SCALE
Rix Products • RESIOENTIAL STRUCTURES
• SWITCH MACHINES & MOUNTING BRACKETS • UNCOUPLING TOOL FOR KADEE COUPLERS • RAIL-ITS
7707 OLD ORCHARD TRAIL EVANSVILLE, IN 47712
81 2-422-6810
,--
MULTI-SCALE
GBS Micro 'ILiting '. • For F R E E Ca talog '
Send LSSAE to P.O. Box 1 6063 Shawnee, KS 66203
EASTE R N S E A B OA R D M O D E LS
40' CHEMICAL TANKS! • 1405 PAN PACifiC • 1406 DOW CHEMICALS • 1 40B EMERY CHEMICALS
SEND SASE FOR CURRENT PRODUCTS
P.O. BOX 3 1 6 UTILE FERRY, NJ 07643·0316
ALL-SCALE
CARAN d'ACHE WATER SOLUBLE EARTHTONE COLOR PENCILS IN
A SPECIAL SET FOR MODEL RAILROADING GREAT FOR WEATHERING. BRICK WORK. ETC.
$ 1 1 00 fOR A DOZEN
Mall Poslal Money Order ONLY To.
WILLIAMSON TERMINAL 34 AT THE FALLS
BUSHKILL, PA 18324
"Dear, the EPA is here about your oil spill. "
Model R a i l roading •
Z & Nn3-Sca/e 4 Wheel Passenger
Car Trucks 720 South Grape Street - Medford, OR 97501 . U.S.A. #904 .. . $3.95 DEALER INQUIRIES WELCOME
NEW!! ! The Z and Nn3-Scale Height Gauge ... "Ready-to-Run" Z-Scale Layouts These disftncftve layouts by Noch®ore finished to the last minute detail with hcnd-painted buildings and landscaped terrain. Tolal layout Is 17 l IZ' x 23 1/2' and comes complete with superior quality MorkllrlJl) track & switches. WIth your power pack and Mlcro-TrainSlll roiling stock. you could be enjoying Z-Scale TODAYI #528-881 9 ... $750.00 each
Easy to use. this 5-ln- 1 gauge determines coupler. trip pin & car body height AND track & wheel width. An Indispensable tooll #920 . . . $5,95
ASK YOUR DEALER FOR MICRO-TRAINS®
DRY TRANSFERS! ! ! WE HAVE THEMl
FOR TANK CARS
AVAILABLE IN N, HO, S, and °
C· D·S L E T T E R I N G LTD. P.o. B O X 2003 STATI O N "0"
OTTAWA, ONTARIO K1P SW3
])PBPLB�1 s 110 Es
PROBABLY THE BEST LITTLE MODEL RAILROADER'S
SHOP IN CHICAGOLAND OPEN 7 DAYS A WEEK
HO - HOn3 - N - 0 - On3 - S - Sn3 - G 1 468 Lee Street (Rt. 45) . Des Plaines, lL 60018
Phone (708) 297·21 1 8 = .. iii] IEJ
J1 Ii ' m Ii If) Ii d CJ Ii P O Box 322 , M ontoursville , PA 1 7 754- 0322 C-'lj[i&h If ole[ I<ai[roa �uff['J .
.
Dockside Switch Engine
P h o t o o f r ea d y t o run D ocks i d e
# 3 - 2 0 7 #
'3 - 2 0 8
# 3 - 2 0 9 # 3 - 2 1 1 # 3 - 2 1 2
READY TO RUN
Und e c o r a t ed P e n n s y l v a n i a Un i o n Pa c i f i c B a l t i m o r e and O h i o S a n t a F e
HO D o c k s i d e 0 - 4 - 0 P l a s t i c body & Cy l i nde r , ( mo l ded u s i ng t h e o r i g i n a l V a r n ey mo l d ) . D C - 7 7 mo t o r . D i e c a s t u n d e r f rame and c o v e r p l a t e . d i e cast 5 0 " d r i ve r s w i th R P - 2 5 f l ang es . l i g h t ed . x 2 f c o u p l e r s . b r a s s h a n d r a i l pos t and w i r e
• Model Railroading
$ 4 2 . 9 5 $ 4 2 . 9 5 $ 4 2 . 9 5 $ 4 2 . 9 5 $ 4 2 . 9 5
P h o t o o f Docks i d e w i t h va l ve g e a r
a n d s upe rd e t a i l i ng .
# 3 - 2 1 7 Va l v e G e a r K i t $ 1 6 . 9 5 # 3 - 2 1 8 Superde t a i l K i t $ 1 6 . 9 5 T h e s e k i t s w i l l f i t t h e V a r ney o r L i f e L i ke Docks i d es
$ 3 . 5 0 f o r s h i p p i ng and h a nd l i n g s
August 1 990
rYllCROSCALE DECALS] - • fIl ,��
'iji Dtt ' �Tnp��'�?fr: ��' " � WHEN YOU WANT, WHAT YOU WAN;,m;H: ��; ;;: :I��t,�;�, � WANT IT. .. MAKE IT WITH MICROSCALE DECALS " '.-:'
:' MICROSCALE DECALS ARE NOW AVAI LABLE IN N, HO, S, 0 & G SCALES.
NEW MICROSCALE DECALS IN ALL SCALES ARE PRODUCED EVERY
1 . :-- MONTH. YOUR HO BBY DEALER HAS ALL THE COLORFUL DETAILS. ���l � � �t;� . .);.;>. � � . � :::�� I ���::':'::�::.:' FLASH! MICRO FLAT. MICRO GLOSS and new MICRO SATIN, ;;C�OSCALE':-;;:el Flnish-��f�gt�11 � ing Coatings are back, after a year and a half In development, and are better than ever. The
�I.�;��;" '�'� Micro Coatings' water reducible acrylic formula now features a fast drying crystal clear coat
y .••• �'.. :\t� lng that enhances your model for the u ltimate In finishing realism. Addillonally these essen• " '- . tial ongredlents of the MICROSCALE MODEL FINISHING SYSTEM are non-yellowing, no color
- / ��
Microscale Industries, Inc. 1555 Placentia Ave.
Newport Beach, CA 92663 Dept. fl
I C I .,
I I.'
Mather Stockcar from 1 930s to 1 960s,
401 cars now in HO fOL . . .
B&O, CNW, ACY Alton GM&O GN, NP, CB&Q
o Single deck, 7' 9" IH kit # 8 . 1 , $25
o Double deck, 7' 9" IH kit # 8 .2, $25
unpainted castings, detail parts, decals for all roads
for weight add Cape Line . . . o Andrews trucks,
part #8 .3 , $5 o Bettendorf trucks,
part #8.4, $5 Sunshine Models
Box 3054 Salinas CA 93912
$2 shpg, CA res. add 6 3/4 % ta:>
.... -'::.�. Jll#DffiilL-"
Subscri ption Form Please e nter my su bscri ption to N Scale. $24.00 for 1 year (6 i ssues)
Name: ______________________________ _
Address: ____________________________ _
City: _______________ State: __ Zip: ____ _
August 1 990 Model Railroading •
Now at your local dealer
Track Side Detail Parts
EC 901 Electrical Relay Cabinet
1 Door
EC 902 Electrical Relay Cabinet
2 Door
SM 903 Switch Motor & Mount
EC 904 Electrical Relay Cabinet
4 Door
. . W�
FOR PEOPLE WHO BEL IEVE
IN DUALITY The Kadee® Magne· Matic® Coupler
is the Standard By C hoice of Modelers World,Wlde!
DEALER INOUIRIES WElCOME WRITE, FAX or PHONE TOOAY!
KADEE®QUALITY PRODUCTS
720 South Grape SI,.el Medford, OR 9750 I U.S.A
PHONE: 1 503 1 772·9890 FAX. 1 5031 772·8392
G S Gondola
� 1 ·309·647·5305 Putt ..... Creek 24Hrs./day
.......... Video
PAiNTiNG & WEAThERiNG STRUCTURES
Create "WOW ! " , realism 1 1 0 min. of step by step instruction
with Larry A. Nelson
S 3 0 . �!!h S'lIppmfj &. HandlIng -+ 3.50 It ReSldenf.: add 51.88 sales laT
fO R Il� Canton I l6 1�20
HOScaie Available now at your Dealers. Our new kif includes all the super detailed parts to build the model shown except decals and couplers. The prototype was buift in the 40's and operated on the SP, UP, WP, IC, GN and many other roads. Our model faithfully follows the prototype with doubte corruga tions, scafe steps & grabs, and full underfr.imc & brake gear. IDETAllLS
I'.U BOX �il:11 8 8 HACIHII)A Hf.KniTS. (AUI'. Y174!i #200 Composite Side Kit $18.95 #220 SteefSide Kit $18.95 mMb
Box 5357, San Luis Obispo CA 93403
Two magazines to seNe you :
Prototype Modeler -Correct prototype modeling info
THE SCALE COUPLER -Simple how-to projects in HO scale
Send $2,00 for a sample, or $3.00 for both, GREEN LANTERN PRESS LTD.
p,o, Box 7032 Fairfax Station, VA 22039-7032
• Model Rail road ing
TEEN-AGERS The Teen Association of Model Railroaders is dedicated to h e l p i ng teens with the hobby. For information write:
TAMR,
c/o Lone Eagle Payne,
1028 Whaley Rd., R. 4, New Carlisle, Ohio 45344
"HO" GAUGE TEMPLATE
k' _ . ... .... :;. ...
(Each kit contains 4 shts. rx lOW, 2 shts. 9"')( 16", 1 sht. 16" x z:n
Templates & Kits also available in
"N", "S", "0" & "G"
-. -, '
. ' Available at fine hobby and ,"",,-=�.�.'i-I" 1-;-- - train stores OR include -..;"- � $2.00 for Shippin9 (Texas
-" residents add 8% sales tax and send to:
CTT, INC. 109 Medallion Center . Dallas, TX 75214
(214) 373·9469 DEALER INQUIRIES WELCOME!
August 1 990
ESCAPE TO S SCALE! Enjoy the great advantages of S scale, the
mid-size scale more model railroaders are turning to. Learn all about this main line scale, discover the bi-monthly S Gaugian magazine. Articles, photos, plans, ads, $24.00 a year; $29.00 outside USA. Sample copy, $5.00. Sn3 Modeler magazine, semi-annual; great plans, photos, features. $11 .00 a year; $17.00 outside USA. Sample copy, $5.00.
Other books for your railroad library: LOGGING RAILROADS OF SOUTH CAROLINA by Thomas Fetters details this state's numerous logging lines with maps, text, photos and drawings. Plenty of Shays, Heislers and odd-ball equipment! Great modeling ideas! $39.95 and $2.75 postage; $5 foreign.
TRAINS OF AMERICA by Don Heimburger is 204 pages, 10" by 1 1 " hardbound featuring nearly 400 superb, large color photos of B5 U.S. railroads! $41.95 and $2.75 postage; $5 foreign.
Rio Grande Narrow Gauge Recollections by John Norwood, 272-page hardbound, 250 il lustrations, 2B chapters giving John's personal account of the Rio Grande. A sequel to John's first Rio Grande book! $3B.95 and $2.75 postage; add $5 foreign.
Along the East Broad Top, 24B pages hardbound, 350 illustrations, $39.95 and $2.75 postage; $5 foreign.
Wabash, 320-page hardbound with 550 photos of this proud Midwest railroad. $3B.95 and $2.75 postage; $5 foreign.
VICTORY BRANCH RAILROAD OF VERMONTchronicles the history of the 11-mile branch of the SI. Johnsbury and Lake Champlain that ran between 1BB3 and 1917. Softbound. $B.95 and $2.00 postage.
Spirit of the South Shore. BO-page il lustrated softbound. $11 .95 and $1 .75 postage; $22.95 and $2.75 hardbound; $5 foreign. Your Introduction to S Gauge-This 72-page softbound features articles, photos, plans. $6.95 and $2.00 postage. Sn3 Modeling-A 96-page softbound with numerous how-to articles, photos and plans. $11.95 and $2.00 postage.
Building & Operating Model RR's-A 120-page softbound detailing 18 different S scale layouts in text, track diagrams and photos. More than 200 photos. $9.95 and $2.00 postage.
Fiddletown & Copperopolis, $9.95 and $2.00 softbound; $17.95 and $2.50 hardbound.
A.C. Gilbert's Heritage-164-page history of this faSCinating company and the AF trains they made. Softbound, $14.95 and $2.00 postage; hardbound, $22.95 and $2.75 postage.
Catalog of S/Sn3 Products, 116 pages, $4.95; $8.00 outside USA.
Dealer inquiries invited Heimburger House
Publishing Co. 7236 W. Madison St . Forest Park, IL 60130
PRIVATE ROADNAME DECALS
COMPUTERIZED TYPE SETIING 14 Standard Type Styles
PLUS Special Lettering Arrangements
R oman ill@� �0MA.N ROMAN �C>� ROMAN cJlaif Large. Stamped. Self Addressed
Envetope lor FREE Sample & Inlo s'rapRics • 1 1 1 1 Beechwood Rd. CUSTOM DECALS BuHalo Grove, IL 60089
Over 50 di f ferent Old-Time and Modern styles i n stock. Fu l ly assembled, sharply detailed, all metal . Free rol l i n g, i n sulated metal wheels. Send stamped, self-addressed envelope for catalog page.
CAPE LI N E MODELS Box 493
W i lbraham, M A 0 1 095
Journal of
PASSENGER-TRANSPORT SYSTEMS & TECHNOLOGY
The study of passenger transportation from an eclectic and hol istic perspective. All modes - rai l , bus, ferry, air l ine. Architecture, Geography, Equipment . Route histo ry. Aesthet ics & technomorphology. Literature notes and reviews. For serious passenger transport enthusiasts and historians. 6x9 forrnat. G lossy paper. Avai lable by subscription only. 2 issues - $15 .00. Make checks payable to D.G. Casdorph, P. O. Box 2480, Monrovia, CA 91017 .
BINDERS to save your copies of
Model Railroading Box Files
$7.95 each 3 for $21 .95 6 for $39 .95
Binders
$9.95 e ach 3 for $27.95 6 for $52.95
Order Direct From:
Jesse Jones Industries 499 E. Erie Ave. , Dept. M RG Phi ladelphia , PA 1 91 34
Enclose check, money order (or charge orders over $ 1 5 to your VISA, MasterCard, Diners Club or American Express Card) but you must include the card number, expiration date, Interbank number and your Sig nature .
For binder or box file orders only, and for charge cards, call Jesse Jones Industries direct at 1 -800-972-58'58.
You must add $1 .00 per binder or box fi le for sh ipp ing inside the U.S.A. or $2.50 (in U.S. funds only) per box file or binder for orders to be shipped outside the U . S.A.
lAt._I Model Rai lroading
ads
SELL For rates and
information ca l l Pam Green berg 303-292-0124 or
800-736-0427
PHILIP ROSS HASTINGS
BOSTON & MAINE
The price for t h is very special book is 548.')0. postpaid. Foreign/Overseas add $5 .00 shipping; U.S. Funcls only.
August '1 9 90
L&RP-Dept. HG P.o. Box 95 Richmond, VT 05477
From the publ isher of LOCOll/uliue E- NailiNIY Preselvalion magaZine and by speci,tI arrangemenl with Ihe estate of P h i l i p Hasti ngs comes t he first book or a m u l t i-vol u me' series: Ihe Phi l ip I{oss I l asti ngs Col lection .
Pl1ilip Ross HasU"gs: Tbe Bosto1l & Mai"e feat u res approximalely 200 phol os-m,l ny previously u n puhlished - seic-cted from P h i l 's l i fet i me photo file: . 20H pages, 100 pound stoc k . 9 1 /4 " x I I 5/8" h a rdhound with dusl cover.
Model Rai lroading •
behind the scenes at Walthers
You and your family are invited "behind the scenes" for a fascinating look at how Walthers products are manufactured, packaged and shipped to hobby Dealers around the world ! Our tour guides will show you over 50,000 model railroad items in our warehouse, plus a variety of operating layouts. Tours are conducted Monday through Friday (use schedule below for hours). Join us for a personal look at the world 's largest selection of Model Railroad products!
Walthers is just 90 miles north of Chicago and minutes away from other M i lwau kee attractions including: Kalmbach Publ ishing Co. , t h e world famous Milwaukee County Zoo, M i t c h e l l Pa rk Domes Horticultural Conservatory, Milwaukee County Museum and m uch, much more !
Call for tour times Monday through Friday (414)52 7-0770. For a free, ful l-color brochure of things to do i n Mi lwaukee, write to us at:
Walthers Tours 5601 W. Florist Ave. Milwaukee, WI 532 1 8
CHICAGO . ILLINOIS
Greenberg', mODEL RAILROADinG
Riley O'Connor
N E W & A V A I L A B L E
* Magic in Miniature Brings the action of full-scale railroading to coffee tables,
desk drawers, and briefcases! Helps you with the basics of layout design and construction, wiring, scenery, maintenance, interchange with other modules, and more.
96 pages, 26 color photographs of layouts, with many helpful black and white photographs and drawings.
Softback, #1 0-7170, $14.95 Hardcover, #1 0-7170 HB, $25.00
Shipping: Add $2.50 on orders under $40. $40/more are postpaid. within U.S.
GREENBERG PUBLISHING CO. Sykesville, MD 21784 (301)795-7447
A Tl A " A' D ' P MT/J TJ1THE
P . F . E . WOOD REEFER JI /1 j li.. D liJJ U ff 1 KIT YOU'VE BEEN 'WAITING FOR --
SEE YOUR DEALER New from TICHY TRAIN GROUP, (FORMERLY THE GOULD LIN E ) .
I I II I I ' I / I ��
J> I 1· This exciting kit fo.lthfully recreo.tes the fo.MOUS elo.ss R-40 'w'ood Reefer, , !, _ f ns opero.ted by both the SP fUP o.nd 'w'P ro.llroo.ds,
Stnrt your 'REEFER BLOCK' now! ERA : 1920 to 1960's
#4024 $14. 50 A SUPER KIT FROM
SEND SASE FOR CATALOG
55 KENNEDY D R IVE
HAU PPAUG E , N.Y. 1 1 788 Protot>'Pe photo w.e. Whittaker
Looking for a particular scale? Try these pages:
Multi Scale . . . . . . . . . . . . . . . . . . . . . . . . . . . . . . . . . . . . . . . . . . . . . . 69, 70, 7 1 , 74 HO Scale . . . . . . . . . . . . . . . . . . . . . . . . . . . . . . . . . . . . . . . . . . . . . . . . . . . . . 69 , 72 N Scale . . . . . . . . . . . . . . . . . . . . . . . . . . . . . . . . . . . . . . . . . . . . . . . . . . . . . . . 69, 7 1 Z Scale . . . . . . . . . . . . . . . . . . . . . . . . . . . . . . . . . . . . . . . . . . . . . . . . . . . . . . . . . . . 69 S Scale . . . . . . . . . . . . . . . . . . . . . . . . . . . . . . . . . . . . . . . . . . . . . . . . . . . . . . . . . . . 69 Miscellaneous . . . . . . . . . . . . . . . . . . . . . . . . . . . . . . . . . . . . . . . . . . . . . . 72, 73 , 74
74 • Model Railroading August 1 990
DICTIONARV stearn engine to pull its tender. DRAWBAR PULL - The pull ing power of a steam engine. Also now used for other rail motive power. D R I L L TR ACK - A track connect ing with the ladder track and used for movements in yard switching. DRIVERS - See Driving Wheels. DRIVING WHEELS - On a steam engine, those wheels supporting the main weight of the engine (for traction) and given power by the cylinders and side rods to propel the engine. Engines designed for speed usually had large diameter driving wheels , in part to allow space for the necessary counterweights. Engines intended for slow service or heavy pull ing commonly had smaller driving wheels (under 60") . DRUNKARD - Late Saturday night passenger train . DUAL-GAGE TRACK - Three o r four rails on the same ties to permit passage of railroad equipment of two different gages (usually standard and narrow gage) . DUMMY COUPLER - A prototype appearing coupler w i t h a non-working knuckle. DWARF S IGNAL - A small ( low) fixed signal , usually in yards.
E EAGLE EYE - Locomotive engineer. EARTHWORK - The act of removing or relocating materials of the earth 's surface , or the structure resu lting from such activity. E L E P H A N T E A R S - S e e S m o k e Deflectors. ELEVATED TRACK - Trackage running above streets. ELEVATION - The height of trac k , terrain and other features above a selected datum level (see Base Leve l ) . ELSCO FEEDWATER HEATER - A Feedwater Heater shaped l ike a horizontal cyl i nder and u s u a l ly m o u nted atop the smokebox ahead of the stack. EMBANKMENT - An earthwork created with earth or fill brought to a site to permit smooth grades in trackage going over undulating ground (the embankment itself is also sometimes referred to as "a fil l " ) . ENGINEER - Controls the movement of one engine (or group of engines controlled as a unit). EQUALIZED TRUCKS - Wheel sets on rolling stock with pivoting side frames to compensate for undulations in trackage , not necessarily sprung. EXTRA - A tra in not authorized by a timetable schedule (sometimes " Extra Train" ) , such as a work train or additional section of a regular train .
F FAST CLOCK - A speeded-up clock used in model operations to simpl ify t imetable scheduling and give the i llusion of greater distances traveled . Proportions of 4: I , 6: I , and 1 2: I are common.
August 1 990
FENDERS - Arrangements of pi les protecting bridge piers/abutments or docks from dam age by water craft or m o v i n g refuse. FILL - Earthwork dumped to build up low areas above ground level, usuall y as approaches for bridges or crossing low spots . FlREBOY - Locomotive fireman FIREBOX - The combustion chamber of a steam engine. FISH PLATE - A rail joiner. FIST - The characteristic pattern of sending by an individual telegrapher. FIXED S IGNAL - A signal with a fixed location indicating a condition affecting the movement of a train . FLATS - Buildings or landscape bu i l t in bas re l ief , or a pa inted cutout u s u a l l y mounted between the background and the backdrop ( i . e . , little or no actual depth of structure) . FLIMSY - Train order (from the tissue paper they were written on) . FOREGROUND - The scenery and objects in front of/nearest to the position of an observer. FORWARDING YARD - A yard for assembling cars into trains for forwarding to another location (also Departure Yard). FRAME FRONT RAIL - The frame extension between the first driving wheel and the pilot beam. FREELANCE MODEL - Not following a specific prototype . FROG - Construction permitting divergence of rout i ng on track or overhead wires. FRONT TRUCK - See Pilot Truck . G GAGE (Gauge) - The distance between rai l s in a model or prototype railroad. GANDY DANCERS - Section men (track workers) . Named for the Gandy Co. of Chicago which manufactured many of the shovels used in constructing the first transcontinental railroad (and other lines being built in the same era) . GARDEN - S witch yard (trackage where trains are stored or assembled) . GATE - Switch . GAUNTLET TRACK - Two tracks of the same gage laid on the same ties to narrow the right-of-way without interchange of route . GENERATOR - The steam driven device, usually mounted on the top of the boiler ahead of the stack or j ust in front of the cab , that generates e l ectri c i t y on a locomotive. GOAT - Yard engine . GRAB IRONS - Metal rods required for safety on railroad rolling stock . They occur above or beside all steps and l adders , and along horizontal surfaces as steam engine running boards. GRADE - The degree or percentage of up or down slope on trackage. Sometimes the slope itself.
GRADING - The act of relocating earth to make a better gradient for trackage. Sometimes the resulting structure itself. GRATES - The bottom of a steam engine f irebox . C a n be s h aken to d r i p ash and cl inkers to improve combustion . GRA VITY YARD - A classification yard in which car movements are accomplished by engines pushing cars u p a summit, beyond which cars move by gravity (also Hump Yard) . G R E A S E M O N K E Y - M a n w h o o i l s journal boxes on cars. GROU NDED BRUSH - The brush of an electric motor which is connected to the frame of the motor. GROU NDED TRUCK - The truck frame that is not insulated from the frame of the engine or car. GROUNDED WHEEL(s) - The wheels which are not insulated from the grounded truck frame or engine frame . GRUNT - Locomotive engineer. GUARD RAIL - Metal or wood rails laid parallel to running rails to prevent wheels from running off the side of a bridge or into tunnel wal l s in case of a derailment. GUSSET - Plate used to make strong connections between members in an iron or steel bridge (usual ly a truss bridge) . GUYS - Wire or rod bracing to steady a pole or stack .
H HACK - Caboose. HANGER - In bridging: a vertical member used to suspend the roadway or deck but not essential to the strength of the actual supporting structure . HEARSE - Caboose. HIGHBALL - Signal indicating " al l clear ahead" or to start a train (from the raised colored balls used as the first signalling devices) . HIGH IRON - Main line trackage . HI-RA I L - Toy trains (also Tin Plate ) . No particular adherence to scale and detail . HOBO - A tramp. HOG - Large, heavy-looking steam locomotive, usually in freight use. HOGGER - Locomotive engineer. HOLDING YARD - Yard trackage for temporary storage of cars or trains for immediate use , freeing other yard tracks for making up trains. HOME S IGNAL - A fixed signal at the entrance of a route or block , governing trains or engines entering or using that route or block. HOUSE TRACK - A track alongside, or entering, a freight house and used for cars rece i v i n g or d e l iver ing loads t o the " house" or factory . HUMP YARD - A classification yard in which car movements are accomplished by engines pushing cars up a summit, beyond which cars move by gravity (also Gravity Yard) .
Model Railroading • 7 5

DICTIONARV INDIAN VALLEY LINE - Legendary ( imaginary) railroad with idyllic conditions . . . a railroader' s dream. INDICATION - The information conveyed by the aspect of a visual signal . INITIAL STATION - The station where a scheduled or extra train originates. INJECTOR - A steam driven device that forces water from a tender to a steam engine boiler. INTERCHANGE TRACK - Track for cars being interchanged between railroads. INTERLOCKING - An arrangement of signals and signal appliances (in a model, usually including track power) so interconnected that their movement must follow each other in a pre-determined sequence. Routing may be set up automatically or manually . IRON HORSE - Steam locomotive.
J JOHNSON BAR - Steam locomotive reverse lever. JOIN THE B IRDS - Jump from a moving train before a crash . JUMPER - A wire or rod used to make a connection between nearby electrical terminals or rail s . Normally a light gage wire, often used temporarily.
K KETTLE - s m a l l or ineffic ient steam locomotive. KEY - Telegraph sending instrument. KITCHEN - Caboose or engine cab. KNUCKLE - The working part of a model or prototype coupler. Appearing l ike the fingers of a cupped right hand, the knuckle must open (extend) to uncouple elements of a train.
L LACING - Diagonal bracing riveted between solid elements of a "Box Girder. " LADDER TRACK - A track from which Body Tracks branch. LAGGING - The 2" thick insulation coati ng a steam engine boi ler from cab to smokebox . Someti mes the smoke box would also be "lagged. " LCL - Less than carload lots of freight. LEADING TRUCK - See Pilot Truck . LEAD TRACK - An extended track connecting either end of a yard with the main track. LIFT OUT ( Hatch) - A moveable section blending with adjoining scenery which l ifts , sl ides or swings on hinges to open a hole in a layout permitting access to areas beyond reach from the perimeter (also see Pop Up: . LIGHT ENGINE - Moving locomotive hauling no cars. LIGHTNING SLINGER - Telegrapher. LINK AND PIN - Effective but dangero u s coupler system i n use before the " knuckle coupler" was invented. LOOP - A length of track which turns
76 • Model Rai l roading
back, passing over or under itself to change elevation. LOUSE CAGE - Caboose .
M MAIN - The main line trackage of a railroad or model railroad. MAIN CRANK PIN -The eccentric on the Main Driver that controls the valve motion to avoid "dead center" problems. Driving Wheel cranks are offset a quarter turn on different sides of a two cylinder steam engine, thus giving a more even transmission of power to the wheels. MAIN DRIVER - The steam engine Driving Wheel to which is connected the Main Rod. M A I N L I N E - Trackage extending through yards and between stations upon which trains are operated by timetable and controlled by train orders or block signals . M A I N R O D - I n a s team e n g i n e , t h e heavy steel beam that connects the Piston Rod to the Main Driver. MARKER LIGHTS - Lights on the last car of a freight or passenger train to show the direction of travel . MASTER MANIAC - Master mechanic of a railroad.
MEET - Trains coming from opposite directions come to the same block or turnout. One must defer and take a siding while the other proceeds . MERRY-GO-ROUND - Turntable . MIKE - M ikado type steam locomotive (2-8-2 wheel arrangement). MILL - Typewriter (sometimes applied to a locomotive) . MOVABLE BRIDGES - Bridges that provide clearance for passage of (usually) vessels by pivoting on a horizontal or vertical axis. MUZZLE LOADER - Steam locomotive requiring hand-feeding of fuel .
N NEWS B UTCHER - Agent selling magazines (sometimes food) on passenger trains. N M R A - Nat io nal Model Rai l road Association.
o OPERATING TRAINS - The movement of trains according to a schedule or other method fol lowing prototype practice (see Running Trains) . OPERATOR - Mans a section control pane l , contro l l i n g the movement of a l l trains through h i s territory (may b e the c o m b i n e d d u t i e s o f e n g i ne e r a n d towerman) . OVERLOAD PROTECTION - A fuse, circuit breaker or lamp used to prevent damage to electrical devices from exc<!ssive current flow (short circuits or surges) .
p PASS - A train of higher priority overtakes a slower train traveling in the same direction, which takes a siding to let the faster train go by.
PICKUP - Any whee l , truck, shoe, wiper, trolley or other device used to transfer electric current from rails to l ights and/or motors of model trains. PIER - In bridging, a support between spans of a bridge. PIKE - A railroad, or model railroad. PILOT BEAM - The end si l l supporting the pilot or steps and draft gear.
PILOT - The leading structure on a steam engine, often called a cowcatcher in the early days. Freight or Switch engines often have steps instead of a sloping shape to clear the rai ls .
PILOT T R U C K - T h e non- powered wheels in front of driving wheels . A four wheel engine truck is called a " bogie" and a two wheel is a "pony . " Pilot Trucks are designed to steer the engine through curves and turnouts .
PLUSH - Passenger train . POINTS - The moving sections o f rails that determine tra i n rou t i n g through a turnout .
POLING - Moving a car on a parallel (adjacent) track by a metal tipped pole braced against the pilot beam of an engine . Engines equipped for this have concave circles on the outer front corner of their pilot beam .
POLING YARD - A yard in which car movements are accomplished by poling.
PONY - A two wheeled truck.
POP UP - An opening in scenery of a layout permitting access to areas beyond reach from the perimeter (see Lift Out) .
POSITION LIGHT SIGNAL - A fixed signal in which the indications are given by the position of two or more l ights .
POUNDING THEIR EARS - S leeping .
POWER PACK - A device that converts " house current" to the electrical power used to operate a model railroad, usually alternating current to direct current at different (lower) voltages.
POWER REVERSE - A steam driven device (almost always on the right side of the boiler and below the running board) that shifts the valve gear on a steam engine to cause driving wheels to turn forward or back.
PROTOTYPE - A ful l-size "real-l ife" example of something modeled. PULL THE PIN - Quit a job (refers to separating a Link And Pin coupler). PULSE POWER - Use of " half-wave" direct current from a recti fier to start an e l ectric motor or perm i t it to operate smoothly at low speeds (low motor RPM ) .
Q QUILL - Steam locomotive whistle (usually handmade and distinctive with different tones) .
R RAIL - Railroad man, or model railroader.
August '1 99 0

D ICTIONARY RAIL CODE - The height o f a model rail measured in 1 / I OOOths of an inch. RAIL JOINER - A device used to l ine up and hold model rail ends where they meet . Metal joiners pass electrical current. Insulated joiners break circuits. READY-TO-RUN (also RTR) - A model purchased completely finished and ready to use, including painting and lettering (and, for rolling stock, couplers ) . RECEIVING YARD - Yard trackage for receiving trains pending breaking down for classification. REGULAR TRAIN - A train authorized by timetable schedule. RELIEF TRACK - An extended siding long enough to allow an inferior train to continue running while a faster or superior train passes. RETRACTABLE B R IDGE - A Rolling Bridge.
REVENUE CARS - Rolling stock that brings in fun d s , as opposed to m o t i v e power, maintenance o f way equipment, wreckers, etc .
REVERSING LOOP - A length of track looping back on itself, joining at a turnout, so that direction of train travel is reversed coming out of the loop .
RHEOSTAT - A variable resistance electrical control device permitting adjustment of the flow of current. Commonly used as a throttle (speed) control for model railroads. RIGHT OF WAY - The area including and adjoining the track, including grounds around stations, bridges, signals and other railroad owned structures. RINGMASTER - Yardmaster. ROLLING BRIDGE - Movable bridge proving c learance by withdrawing to one side of the opening spanned. ROLLI N G STOCK - M o b i l e ra i l road equipment including motive power and revenue cars (freight and pasenger) . RULE G - Railroad regulation prohibiting use of hard l iquor on duty. RUNNING BOARD - Narrow wooden or treaded-steel platform on the side of a locomotive or atop freight cars where appropriate (box , refrig . , tank, etc . ) . RUNNING GEAR - The wheels , springs, journals, equalizers and rods comprising the mot ive power sy stem of a steam locomotive. RUNNING TRACK - A track reserved for movement through a yard. RUNNING TRAINS - The movement of trains according to one 's fancy without regard to prototype practice (see Operating Trains ) .
S SAFETY VALVE - A (usually) spring actuated device designed to open when needed to keep boiler pressure from exceeding predetermined l i m i t s . U s u a l l y mounted o n the steam dome o r o n the boiler just behind i t .
August 1 990
SAND BOX - The dome or box mounted atop a steam engine boiler (to keep the sand dry) carrying sand to let down when driv ing wheels s l ip . SAND DOME - See Sand Box. S ECTION - In model trackage: the block or blocks managed by one direction controller, In a train: one of several trains running on the same schedule. S EMAPHORE SIGNAL - A fixed signal in which the day indications are given by the position of a semaphore arm and night signals are given by l ights attached to the semaphore arm. SEPARATING YARD - A yard adjoining a receiving yard, in which cars are separated according to district, commodity , or other required order. SCALE - The relationship of a model to the prototype , as in one inch equalling 1 60 feet for " N " and 1 :87 for HO.
SCALE M ILE (or any scale distance) -The le ngth represent ing a prototype distancellength for any given scale . In HO a mile is approximately 6 1 feet. SCALE MODEL - A model faithful ly reproducing a specific prototype in dimension and detail .
SCENERY BASE - Screen wire , chicken wire, styrofoam or cardboard strips covered with paper, burlap, or other material upon which the terrain is placed.
SCENERY SUPPORT - B racing materials, usually wood, holding the Scenery Base in place.
SCENICKING - Making scenery for a model railroad, including terrain, structures and natural growth such as trees a n d shrubs.
SCENIC SURFACE - See Terrain . SCHEDULE - That part o f a timetable which prescribes class, direction, number and movement for a regular train. S C R A T C H B U I LT - A m o d e l c o nstructed by the builder from separately acquired components , SHACK - Caboose. SHANTY - Caboose. SIDE ROD - The heavy steel beam that connects all Driving Wheels on one side of a steam engine, transmitting the power from the Main Rod to each wheel. S I DING - A length of track with a turnout at both ends , i . e . , an alternate path to permit trains to pass or meet . SIGNAL - In model railroading, an indication of a condition affecting the movement of a train. S!NGLE TRACK - Trackage upon which trains run in both directions . S KIPPER - Conductor. SKUNK - Diesel locomotive (to old-time, steam railroaders) . SLIM GAGE - Narrow gage '(less than four feet 8 Y2 inches) . SMILE - In model railroading, a scaled down mile to work with " fast time" for
t imetable operations to compress space. In HO, using a 6: I clock, a SMILE is about 1 0 feet (see Scale Mile) . SMOKE BOX - The front of the boiler where exhaust steam from the cylinders creates an updraft to draw gasses from the firebox and tubes out the engine stack. SMOKE DEFLECTORS - Large vertical metal plates usually fastened to a steam engine running board even with the smoke box , designed to l ift smoke away from the c ab ( al s o S moke L i fters and E lephant Ears) . S M O K E L I F T E R S - S e e S m o k e Deflectors. SNOOZER - Pul lman s leeper. SP AN - The length of trolley wire bet ween poles or the d i stance between abutments/piers in bridging ( i . e . , the length of a supporting unit) . The bridge between abutments/piers may also be referred to as a " span . " SPARKS - Telegrapher. SPIRAL - A transition curve with a uniform change of curvature.
SPRUNG TRUCKS - Wheel sets on rolling stock with springs between the sideframes and bolster to give the car a better ride over uneven track, not necessarily equalized. SPUR - A length of track extending from a turnout and terminating. STACK - Located on top of the smokebox , the stack acts as a venturi to draw hot combust ion gasses from the firebox through boiler tubes , thereby also heating water in the boiler beyond the firebox. In late-steam-era coal and oi l burners, stacks tended to be short. Older engines had tall stacks of various shapes designed to hold down emission of sparks . STATION - A place where trains stop or leave the main for traffic. STEAM DOME - See Dome. STEM WIN DER - Geared locomotive (also hand-braked trolley car) . STINKER - A hotbox on a car journal. STORAGE YARD - A yard in which cars are held awaiting disposition. STRUCTURES - In model railroading, all buildings and man-made fixtures, including such things as fences, telephone poles and retaining wal ls . S UPERELEV ATION - The outer rail on a curve is raised above the inner rail to compensate for centrifugal force for trains running at speed. S UPERIOR TRAIN - A train having precedence over another train. SWING B RIDGE - A movable bridge opening to provide clearance by rotating on a horizontal axis. They may be very short, or over 500 ' l o n g . A " turntab l e " is a highly specialized use of this bridge. SWITCH - In model raillroading, a control device managing electrical flow. In r a i l r o a d i n g , i n t e rc h a n ge a b l e w i t h " Turnout. "
Model Railroading • 7 7
ADVERTISERS INDEX AUGUST 1990
Allen Keller Productions . . . . . . . . . . . . . . 69 American AltaVista . . . . . . . . . . . . . . . . . . 69 Bowser Manufacturing . . . . . . . . . . . . . . . 70 CDS Lettering Limited . . . . . . . . . . . . . . . . 70 Caran d' Ache . . . . . . . . . . . . . . . . . . . . . . 72 Cape Line Models . . . . . . . . . . . . . . . . . . . 72 The Coach Yard . . . . . . . . . . . . . . . . . . . . . 69 Collectible Trains . . . . . . . . . . . . . . . . . . . 72 Dealer Directory . . . . . . . . . . . . . . . . . . . . 69 Des Plaines Hobbies . . . . . . . . . . . . . . . . . 70 Detail Associates . . . . . . . . . . . . . . . . . . . . 72 Details West . . . . . . . . . . . . . . . . . . . . . . . 72 Eastern Seaboard Models . . . . . . . . . . . . . 69 Freight Cars Journal . . . . . . . . . . . . . . Insert
G-R-S Micro-Liting . . . . . . . . . . . . . . . . . . 69 Grandt Line Products, Inc . . . . . . . . . . . . . 69 Greenberg Publishing Company . . . . . . . . 74 Green Lantern Press, Ltd . . . . . . . . . . . . . 72 Heimburger Publishing Company . . . . . . . 73 Hundman Publishing, Incorporated y . . . 71 Jesse Jones Industries . . . . . . . . . . . . . . . 73 Journal of Passenger-Transport . . . . . . . 73 Kadee Quality Products . . . . . . . . . . . . . . . 72 Limited Editions . . . . . . . . . . . . . . . . . . . . 69 Locomotive and Railway Preservation . . . 73 Microscale . . . . . . . . . . . . . . . . . . . . . . . . 71 Micro-Trains® . . . . . . . . . . . . . . . . . . . . . . 70 Model Railroading
Magazine . . . . . . . . . . . Inside Front Cover Model Railroading
Magazine Dictionary . . . . . . . . . . . . 75-78 N . P. Paint Shop . . . . . . . . . . . . . . . . . . . . 69 N Scale Magazine . . . . . . . . . . . . . . . . . . . 71 Overland Models, Inc . . . . . . . . . Back Cover
Putt Creek Video . . . . . . . . . . . . . . . . . . . . 72 Rail Graphics . . . . . . . . . . . . . . . . . . . . . . 73 Rix Products . . . . . . . . . . . . . . . . . . . . . . . 69 Rocky Mountain
Publishing . . . . . . . . . . Inside Back COver
Scale Structures Ltd . . . . . . . . . . . . . . . . . 69 Shopping Guide Pages . . . . . . . . . . . . . . . 69 Squeak N Products . . . . . . . . . . . . . . . . . . 69 Starr's Hobby Craft . . . . . . . . . . . . . . . . . . 70 Suncoast Models . . . . . . . . . . . . . . . . . . . 69 Sunshine Models . . . . . . . . . . . . . . . . . . . 71 Teen Association of
Model Railroaders . . . . . . . . . . . . . . . . . 72 Tichy Train Group . . . . . . . . . . . . . . . . . . . 74 Tioga Publications . . . . . . . . . . . . . . . Insert
Walthers . . . . . . . . . . . . . . . . . . . . . . . . . . 74
Ye OIde Huff N Puff . . . . . . . . . . . . . . . . . . 69
7 B • Model Railroading
DICTIONARV SWITCH MACHINE - A motor, electrical coi l . relay, rotary motor or pneumatic device used to move the points of a turnout .
T TALLOWPOT - Locomotive fireman . TANK - Steam locomotive tender. TANKER - A freight car carrying liquid such as oi l . TEAKETTLE - Small o r inefficient steam locomoti ve.
TELL TALE - Knotted l ight ropes suspended over the track to warn trainmen atop cars of low bridges or tunnel portals ahead .
TENDER TANK - The section of a steam engine tender that holds water.
TERRAIN - In model rai l roading, the surface layer of scenery . u s u a l l y made of painted and textured plaster over a Scenery Base , and simulating soi l . h i l l s . streams , rocks. roads . farm fields . etc .
TERRAIN DETAILING - In model railroading, the carving, molding or otherwise shaping of Terrain materials (usually piaster) to appear l i ke rock outcrop p i n g s . plowed fields, rutted roads , etc .
THIRTY - Signature meaning "end" used by telegraphers (and editors) .
TH ROTTLE - A device used t o vary the propulsion power to a motor. In model railroading, usually changing the flow of electric current. T H R OTTLE J E R K E R - Locomotive engineer.
TIMETABLE - The schedule of regular trains which authorizes movements and gives special instructions .
TIMETABLE OPERATION - Operating model trains acording to a timetable , ususally with "fast time . "
T!N LIZZARD - Streamlined diesel locomotive and train .
TIN PLATE - Toy trains (also Hi-Rail ) . N o particular adherence to scale and detail . TORPEDO - A small explosive device ( l i k e a c h i l d ' s " c ap " ) w i th soft metal clamps to permit train crews to fasten it to the top of a rail . When a train ran over it , the bang of the torpedo warned of a hazard ahead . TOWERMAN - Operates turnouts and signal indications from a tower. TRACK - Rails upon which trains move. TRAILING TRUCK - A two, four or six wheel engine truck supporting the weight of the firebox and cab behind the last driving wheel . TRAIN - One or more coupled engines, with or without cars. TRAIN CREW - Operating personnel of a ' train (or moth'!! train) , usually engineer, f i re m a n , b r a k e m a n ( o r m e n ) , a n d conductor. T R A Y E U N G G R U NT - Tra v e l i ng engineer.
TRUCK M O U NTED C O U PLER - A coupler mounted on the truck bolster so as to pivot with the truck (sometimes called a Talgo Coupler mount). TURNOUT - A construction of rails to allow for diverging routes, sometimes ( incorrectly) referred to as a switch. TURNT ABLE - A movable bridge pivoting on a hOrizontal axis , used to turn locomotive, or cars at a servicing facilit) or "end of track . "
U UNCOUPLING RAMP (Uncoupler Ramp) - In model rai lroading, a device used to cause automatic couplers to open
V Y ALYE GEAR - The rods and piston, controlling steam to the main piston, dnvlllg a steam engine. affecting power. speed and determining direction . VANDERBILT TENDER - A distinctive steam engine tender in which the Tender Tank is an unsheathed cylinder. VARNISH - Passenger train. VEGETATION - all model scenery representing growing things such as grass. shrubs and trees . VERTICAL-LIFT BRIDGES - Movable bridges providing clearance by raising the deck straight up like an elevator.
W WEEPHOLES - Openings (or pipes) in a retaining wall to allow water to drain out of the earth or rock mass behind. WHISKERS - Seniority. W I NG R A I LS - S h ort g u ard ra i l s departing from the point of a frog to guide wheels through a turnout. WOOTTEN FIREBOX - an unusually low , wide firebox developed in 1 877 for burning anthracite coal. Always the full width of a steam engined therefore mounted above or behind the drivers (found in engines like "camel backs " ) . W O R T H I N G T O N F E E D W A T E R HEATER - A Feedwater Heater shaped like a rectangular box. Usually mounted atop the smokebox ahead of the stack. WYE- A switch or turnout somewhat in the form of a triangle, used to reverse the direction of a locomotive where a turntable is unavailable.
x V YARD - A system of tracks designed for making up trains or storing cars. YARDMASTER - In charge of a yard . YARD TRACKS - Special purpose trackage in yards for storing revenue or company rol l ing stock, icing, coaling, ash removal, and other functions.
Z ZOO KEEPER - Gate tender at a large passenger station.
August 1 990
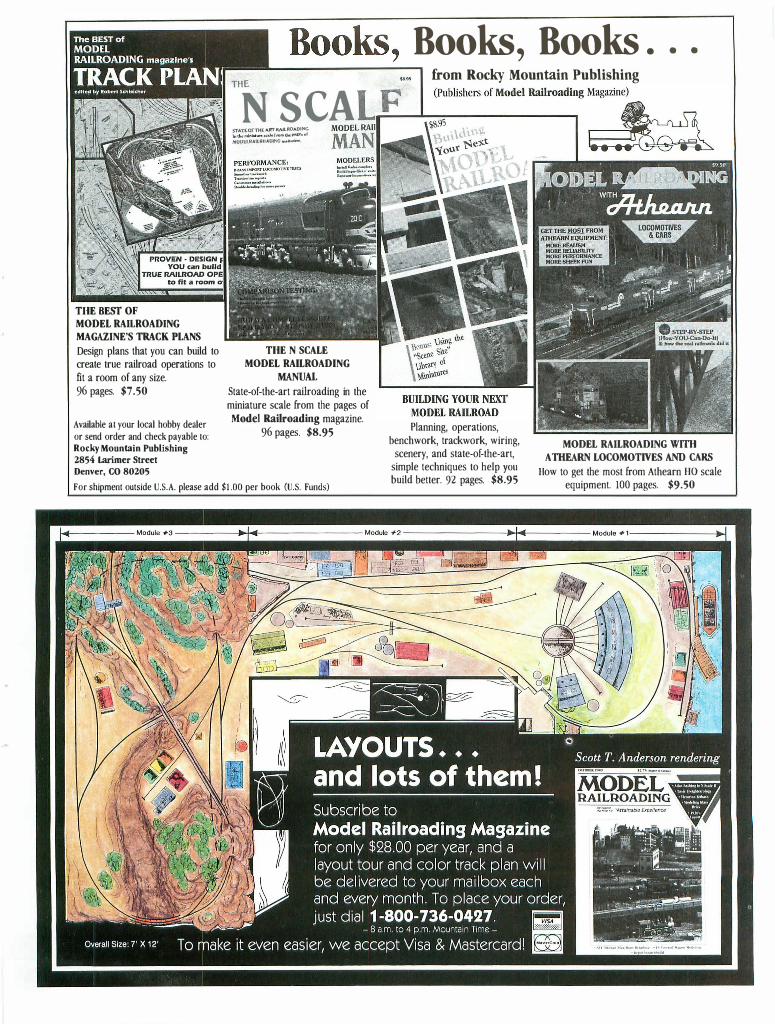
Books, Books, Books . • •
from Rocky Mountain Publishing �1lIIIiII.1 THN SCA ....
r---�-----,
TIlE SESf OF MODEL RAILROADING MAGAZINE'S TRACK PLANS Design plans that you can build to create true railroad operations to fit a room of any size. 96 pages. $7.50
Available at your local hobby dealer or send order and check payable to: Rocky Mountain Publishing 2854 Larimer Street Denver, CO 80205
STATEOf'nlE ART RAlUtOADlNC Inu.. "NniaI .... ouI-f..-Ihep&&C • ..f .'ltQDEI.RAllllOAOINO _ .........
TIlE N SCALE MODEL RAILROADING
MANUAL State-of-the-art railroading in the miniature scale from the pages of Model Railroading magazine.
96 pages. $8.95
For shipment outside U.S.A. please add $1 .00 per book (U.S. Funds)
Planning, operations, benchwork, track\'lOrk, wiring,
scenery, and state-of-the-art, simple techniques to help YOll build better. 92 pages. $8.95
MODEL RAILROADING WITII ATHEARN LOCOMOTIVES AND CARS
How to get the most from Athearn HO scale equipment. 100 pages. $9.50
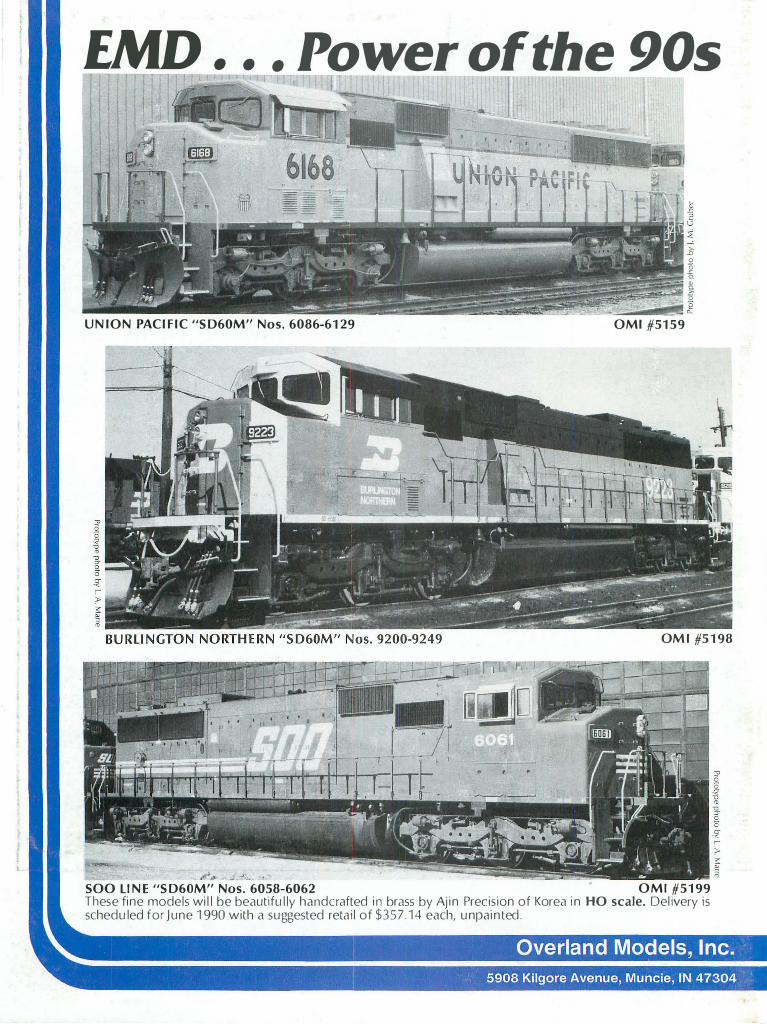
fMD . • . Power of the 90s
U N I O N PAC I F I C "S D60M" Nos. 6086-61 29
>-" o <5 .c Q. � co
� � aMI #51 5 9
aM I #5 1 98
SOO LI N E "S D60M" Nos. 6058-6062 a M I # 5 1 99 These fi ne models wi l l be beautifu l ly handcrafted i n brass by Aj i n Precis ion of Korea i n HO scale. Del ivery is sched u led for J u ne 1 990 with a suggested reta i l of $357 . 1 4 each, u npai n ted .