Embed Size (px)
Citation preview

Avaya Aura® Application Enablement Services TSAPI and CVLAN Client and SDK Installation Guide
Release 6.3June 2014
Issue 2

© 2014 Avaya Inc. All Rights Reserved.
NoticeWhile reasonable efforts were made to ensure that the information in this document was complete and accurate at the time of printing, Avaya Inc. can assume no liability for any errors. Changes and corrections to the information in this document might be incorporated in future releases.
Documentation disclaimerAvaya Inc. is not responsible for any modifications, additions, or deletions to the original published version of this documentation unless such modifications, additions, or deletions were performed by Avaya. Customer and/or End User agree to indemnify and hold harmless Avaya, Avaya's agents, servants and employees against all claims, lawsuits, demands and judgments arising out of, or in connection with, subsequent modifications, additions or deletions to this documentation to the extent made by the Customer or End User.
Link disclaimerAvaya Inc. is not responsible for the contents or reliability of any linked Web sites referenced elsewhere within this documentation, and Avaya does not necessarily endorse the products, services, or information described or offered within them. We cannot guarantee that these links will work all the time and we have no control over the availability of the linked pages.
WarrantyAvaya Inc. provides a limited warranty on this product. Refer to your sales agreement to establish the terms of the limited warranty. In addition, Avaya’s standard warranty language, as well as information regarding support for this product, while under warranty, is available through the Avaya Support Web site: http://www.avaya.com/support
LicensesUSE OR INSTALLATION OF THE PRODUCT INDICATES THE END USER'S ACCEPTANCE OF THE TERMS SET FORTH HEREIN AND THE GENERAL LICENSE TERMS AVAILABLE ON THE AVAYA WEB SITE http://support.avaya.com/LicenseInfo/ ("GENERAL LICENSE TERMS"). IF YOU DO NOT WISH TO BE BOUND BY THESE TERMS, YOU MUST RETURN THE PRODUCT(S) TO THE POINT OF PURCHASE WITHIN TEN (10) DAYS OF DELIVERY FOR A REFUND OR CREDIT.Avaya grants End User a license within the scope of the license types described below. The applicable number of licenses and units of capacity for which the license is granted will be one (1), unless a different number of licenses or units of capacity is specified in the Documentation or other materials available to End User. "Designated Processor" means a single stand-alone computing device. "Server" means a Designated Processor that hosts a software application to be accessed by multiple users. "Software" means the computer programs in object code, originally licensed by Avaya and ultimately utilized by End User, whether as stand-alone Products or pre-installed on Hardware. "Hardware" means the standard hardware Products, originally sold by Avaya and ultimately utilized by End User.
License type(s)Designated System(s) License (DS). End User may install and use each copy of the Software on only one Designated Processor, unless a different number of Designated Processors is indicated in the Documentation or other materials available to End User. Avaya may require the Designated Processor(s) to be identified by type, serial number, feature key, location or other specific designation, or to be provided by End User to Avaya through electronic means established by Avaya specifically for this purpose.Concurrent User License (CU). End User may install and use the Software on multiple Designated Processors or one or more Servers, so long as only the licensed number of Units are accessing and using the Software at any given time. A “Unit” means the unit on which Avaya, at its sole discretion, bases the pricing of its licenses and can be, without limitation, an agent, port or user, an e-mail or voice mail account in the name of a person or corporate function (e.g., webmaster or helpdesk), or a directory entry in the administrative database utilized by the Product that permits one user to interface with the Software. Units may be linked to a specific, identified Server.Database License (DL). Customer may install and use each copy of the Software on one Server or on multiple Servers provided that each of the Servers on which the Software is installed communicate with no more than a single instance of the same database. CPU License (CP). End User may install and use each copy of the Software on a number of Servers up to the number indicated by Avaya provided that the performance capacity of the Server(s) does not exceed the performance capacity specified for the Software. End User may not re-install or operate the Software on Server(s) with a larger performance capacity without Avaya's prior consent and payment of an upgrade fee. Named User License (NU). Customer may: (i) install and use the Software on a single Designated Processor or Server per authorized Named User (defined below); or (ii) install and use the Software on a Server so long as only authorized Named Users access and use the Software. "Named User," means a user or device that has been expressly authorized by Avaya to access and
use the Software. At Avaya's sole discretion, a "Named User" may be, without limitation, designated by name, corporate function (e.g., webmaster or helpdesk), an e-mail or voice mail account in the name of a person or corporate function, or a directory entry in the administrative database utilized by the Product that permits one user to interface with the Product. Shrinkwrap License (SR). With respect to Software that contains elements provided by third party suppliers, End User may install and use the Software in accordance with the terms and conditions of the applicable license agreements, such as "shrinkwrap" or "clickwrap" license accompanying or applicable to the Software ("Shrinkwrap License"). The text of the Shrinkwrap License will be available from Avaya upon End User’s request (see “Third-party Components" for more information).
Copyright Except where expressly stated otherwise, the Product is protected by copyright and other laws respecting proprietary rights. Unauthorized reproduction, transfer, and or use can be a criminal, as well as a civil, offense under the applicable law.
Third-party componentsCertain software programs or portions thereof included in the Product may contain software distributed under third party agreements ("Third Party Components"), which may contain terms that expand or limit rights to use certain portions of the Product ("Third Party Terms"). Information identifying Third Party Components and the Third Party Terms that apply to them is available on the Avaya Support Web site:http://support.avaya.com/ThirdPartyLicense/
Preventing toll fraud"Toll fraud" is the unauthorized use of your telecommunications system by an unauthorized party (for example, a person who is not a corporate employee, agent, subcontractor, or is not working on your company's behalf). Be aware that there can be a risk of toll fraud associated with your system and that, if toll fraud occurs, it can result in substantial additional charges for your telecommunications services.
Avaya fraud interventionIf you suspect that you are being victimized by toll fraud and you need technical assistance or support, call Technical Service Center Toll Fraud Intervention Hotline at +1-800-643-2353 for the United States and Canada. For additional support telephone numbers, see the Avaya Support Web site:http://www.avaya.com/support
TrademarksAvaya and Avaya Aura are registered trademarks of Avaya Inc. All non-Avaya trademarks are the property of their respective owners.
Downloading documentsFor the most current versions of documentation, see the Avaya Support Web site: http://www.avaya.com/support
Contact Avaya supportAvaya provides a telephone number for you to use to report problems or to ask questions about your product. The support telephone number is 1-800-242-2121 in the United States. For additional support telephone numbers, see the Avaya Support Web site:http://www.avaya.com/support

AE Services TSAPI and CVLAN Client and SDK Installation Guide June 2014 3
About This Document . . . . . . . . . . . . . . . . . . . . . . . . . . . . . . . . . . . 7Intended Audiences . . . . . . . . . . . . . . . . . . . . . . . . . . . . . . . . . . 7TSAPI and CVLAN backward compatibility . . . . . . . . . . . . . . . . . . . . . 8
TSAPI . . . . . . . . . . . . . . . . . . . . . . . . . . . . . . . . . . . . . . 8CVLAN . . . . . . . . . . . . . . . . . . . . . . . . . . . . . . . . . . . . . 8
Conventions Used in This Document . . . . . . . . . . . . . . . . . . . . . . . . 9About file naming conventions . . . . . . . . . . . . . . . . . . . . . . . . . . 9
TSAPI and CVLAN client and SDK documentation . . . . . . . . . . . . . . . . . 10Customer Support . . . . . . . . . . . . . . . . . . . . . . . . . . . . . . . . . . . 10
Chapter 1: Getting the files for installation . . . . . . . . . . . . . . . . . . . . . . . 11Downloading software from PLDS . . . . . . . . . . . . . . . . . . . . . . . . . . 12Downloading clients and SDKs from Avaya Support . . . . . . . . . . . . . . . . 14Downloading clients from Avaya DevConnect. . . . . . . . . . . . . . . . . . . . 15
Chapter 2: Installing the AE Services TSAPI clients and SDKs . . . . . . . . . . . . 17TSAPI client and SDK operating system requirements . . . . . . . . . . . . . . . 17Gathering Pre-Installation Data . . . . . . . . . . . . . . . . . . . . . . . . . . . . 20
If you do not have the host name or IP address . . . . . . . . . . . . . . . . . 20Installing and Configuring the TSAPI Windows Client . . . . . . . . . . . . . . . 21
Installing the TSAPI Windows client . . . . . . . . . . . . . . . . . . . . . . 21Accessing the TSAPI Windows client desktop components . . . . . . . . . . 23Verifying the TSAPI Windows client installation . . . . . . . . . . . . . . . 24Using TSAPI Spy while running TSAPI Test . . . . . . . . . . . . . . . . . . . 25Removing the TSAPI Windows client . . . . . . . . . . . . . . . . . . . . . . 25
Removing the TSAPI Windows client from a Windows 7 and 8 systems . 25Removing the TSAPI Windows client from a non-Windows 8 system . . . 26
Upgrading the TSAPI Windows client . . . . . . . . . . . . . . . . . . . . . . 26Editing the TSAPI Windows client configuration file (tslib.ini) . . . . . . . . . 27
Specifying Alternate Tlinks for the TSAPI Windows client . . . . . . . . . 27TSAPI Windows client certificate authentication . . . . . . . . . . . . . . 29Adding Certificate Configuration statements to the tslib.ini file . . . . . . 30
Network-based installations for the TSAPI Windows client . . . . . . . . . . 34Copying the software and installing the first TSAPI client . . . . . . . . . 35Installing the next client: customizing the tslib.ini file prior to installation 36Installing the next client: sharing a single tslib.ini file among clients . . . 37
Installing and Configuring the TSAPI Linux Client . . . . . . . . . . . . . . . . . 38Installing the TSAPI Linux client . . . . . . . . . . . . . . . . . . . . . . . . . 38Editing the Linux client configuration file . . . . . . . . . . . . . . . . . . . . 39
Specifying the location of the tslibrc file . . . . . . . . . . . . . . . . . . . 39
Contents

Contents
4 AE Services TSAPI and CVLAN Client and SDK Installation Guide June 2014
Making basic changes to the tslibrc file . . . . . . . . . . . . . . . . . . . 39Specifying Alternate Tlinks for the Linux client . . . . . . . . . . . . . . . 39TSAPI Linux client certificate authentication . . . . . . . . . . . . . . . . 41Adding certificate configuration statements to the tslibrc file . . . . . . . 41
Using TSAPI Test to verify Linux client installations . . . . . . . . . . . . . . 45Removing the TSAPI Linux client . . . . . . . . . . . . . . . . . . . . . . . . 47Upgrading the TSAPI Linux client . . . . . . . . . . . . . . . . . . . . . . . . 47
About TSAPI Links (Tlinks) . . . . . . . . . . . . . . . . . . . . . . . . . . . . . . 48Administering port settings for a firewall . . . . . . . . . . . . . . . . . . . . . . 48Installing and Managing the TSAPI Windows SDK . . . . . . . . . . . . . . . . . 49
The AE Services TSAPI SDK and the programming environment . . . . . . . 49How to obtain the TSAPI SDK. . . . . . . . . . . . . . . . . . . . . . . . . . . 49Installing the TSAPI Windows SDK. . . . . . . . . . . . . . . . . . . . . . . . 49Viewing the TSAPI Windows SDK Components . . . . . . . . . . . . . . . . . 51Removing the TSAPI Windows SDK . . . . . . . . . . . . . . . . . . . . . . . 51
Removing the TSAPI Windows SDK from a Windows 7 and 8 system. . . 51Removing the TSAPI Windows SDK from a non-Windows 8 system . . . 52
Upgrading the TSAPI Windows SDK . . . . . . . . . . . . . . . . . . . . . . . 52Installing and Managing the TSAPI Linux SDK . . . . . . . . . . . . . . . . . . . 53
Installing the TSAPI Linux SDK . . . . . . . . . . . . . . . . . . . . . . . . . . 53Removing the TSAPI Linux SDK . . . . . . . . . . . . . . . . . . . . . . . . 54Upgrading the TSAPI Linux SDK . . . . . . . . . . . . . . . . . . . . . . . . . 54
Chapter 3: Installing the AE Services CVLAN Client/SDK . . . . . . . . . . . . . . . 55The CVLAN Client . . . . . . . . . . . . . . . . . . . . . . . . . . . . . . . . . 55
CVLAN client and certificate management. . . . . . . . . . . . . . . . . . . . . . 55The CVLAN SDK . . . . . . . . . . . . . . . . . . . . . . . . . . . . . . . . . . . . 57
CVLAN client connections with AE Services . . . . . . . . . . . . . . . . . . 57CVLAN Client/SDK requirements . . . . . . . . . . . . . . . . . . . . . . . . . . . 58Installing the CVLAN Windows Client/SDK . . . . . . . . . . . . . . . . . . . . . 60Removing the CVLAN Windows Client/SDK . . . . . . . . . . . . . . . . . . . . 62
Removing the CVLAN Windows Client from a non-Windows 8 system . . 62Removing the CVLAN Windows Client from a Windows 8 system . . . . . 62
Upgrading the CVLAN Windows Client/SDK. . . . . . . . . . . . . . . . . . . . . 63Installing the CVLAN Linux Client/SDK . . . . . . . . . . . . . . . . . . . . . . . 64Removing the CVLAN Linux Client/SDK . . . . . . . . . . . . . . . . . . . . . . . 65Upgrading the CVLAN Linux Client/SDK. . . . . . . . . . . . . . . . . . . . . . . 65The ASAI test utility . . . . . . . . . . . . . . . . . . . . . . . . . . . . . . . . . 66Using the ASAI test utility . . . . . . . . . . . . . . . . . . . . . . . . . . . . . . . 66

Contents
AE Services TSAPI and CVLAN Client and SDK Installation Guide June 2014 5
Appendix A: Managing certificates. . . . . . . . . . . . . . . . . . . . . . . . . . . . 69An overview of certificate management for TSAPI and CVLAN clients . . . . . . 69
Server certificate authentication . . . . . . . . . . . . . . . . . . . . . . . . . 69Using the default certificate - no certificate configuration required . . . . 70If you use your own certificates - the 'default location' option . . . . . . . 71
Using certificates issued by a trusted in-house or third-party certificate authority 73AE Services certificate administration . . . . . . . . . . . . . . . . . . . . . . . . 74
Client certificate authentication . . . . . . . . . . . . . . . . . . . . . . . . . 75
Appendix B: File naming conventions . . . . . . . . . . . . . . . . . . . . . . . . . . 77
Appendix C: TSAPI client message tracing . . . . . . . . . . . . . . . . . . . . . . . 79TSAPI Spy - a Windows client message tracing tool . . . . . . . . . . . . . . . . 79
Overview of the TSAPI Spy for Windows interface . . . . . . . . . . . . . . . 80Using the Log to File option to direct output to a trace file . . . . . . . . . 82
Procedure for creating a trace file . . . . . . . . . . . . . . . . . . . . . . . . 83Working with the streams list . . . . . . . . . . . . . . . . . . . . . . . . . 85
Understanding trace output. . . . . . . . . . . . . . . . . . . . . . . . . . . . 85TSAPI Spy Trace Records . . . . . . . . . . . . . . . . . . . . . . . . . . . 86TSAPI Spy Error Records . . . . . . . . . . . . . . . . . . . . . . . . . . . 88
Using the TSAPI Spy with Windows Server 2003 . . . . . . . . . . . . . . . . 88Client message tracing for Linux-based TSAPI clients . . . . . . . . . . . . . . . 89
How to enable message tracing . . . . . . . . . . . . . . . . . . . . . . . . . 89Examining trace files . . . . . . . . . . . . . . . . . . . . . . . . . . . . . . . 90
Glossary . . . . . . . . . . . . . . . . . . . . . . . . . . . . . . . . . . . . . . . . 93
. . . . . . . . . . . . . . . . . . . . . . . . . . . . . . . . . . . . . . . . 97
Index . . . . . . . . . . . . . . . . . . . . . . . . . . . . . . . . . . . . . . . . 99

Contents
6 AE Services TSAPI and CVLAN Client and SDK Installation Guide June 2014

Purpose
AE Services TSAPI and CVLAN Client and SDK Installation Guide June 2014 7
Chapter 1: Introduction
PurposeThis document describes tested product characteristics and capabilities, including product overview and feature descriptions, interoperability, performance specifications, security, and licensing requirements.
Intended audienceThis document is intended for people who want to gain a high-level understanding of the product features, functions, capacities, and limitations.
Document changes since last issueThe following changes have been made to this document since the last issue:
● Added a new section on Client certificate authentication on page 26.
● Updated TSAPI client and SDK operating system requirements on page 17..
● Updated Upgrading the TSAPI Windows client on page 26.
● Updated CVLAN client and certificate management on page 55.
● Updated TSAPI Windows client certificate authentication on page 29.
● Updated Specifying the location of the tslibrc file on page 39.

Chapter 1: Introduction
8 AE Services TSAPI and CVLAN Client and SDK Installation Guide June 2014
Resources
DocumentationThe following table lists the related documents for Avaya Aura® Application Enablement Services. Most of the documents listed are Release 6.3.3. Those listed that are for earlier releases have not required an update and remain compatible with AE Services 6.3.3. Obtain the related documents and documents about other Avaya products mentioned in this guide from the Avaya Support website: Avaya support site.
For information about setting up AE Services, Release 6.3.3, see the following documents.
● Implementing Avaya AuraR Application Enablement Services for Avaya AuraR System Platform, 02-603468
● Implementing Avaya AuraR Application Enablement Services for a Bundled Server, 02-300356
● Implementing Avaya AuraR Application Enablement Services in a Software-Only Environment, 02-300355
● Avaya AuraR Application Enablement Services using VMwareR in the Avaya AuraR Virtualized Environment Deployment Guide
● Avaya AuraR Application Enablement Services Administration and Maintenance Guide, 02-300357
● Avaya AuraR Application Enablement Services Management Console online help (which is included with the AE Services server software)
● Administering Meeting Exchange. Applications, 04-603544
● White Paper on Avaya AuraR Application Enablement Services Integration for IBMR
● LotusR SametimeR Guidelines for a clustered environment
AE Services documents are available from the Web in Portable Document Format (.pdf) at the Avaya Support Web Site (http://www.avaya.com/support).
TrainingThe following courses are available on https://www.avaya-learning.com. To search for the course, in the Search field, enter the course code and click Go.

Avaya Mentor videos
AE Services TSAPI and CVLAN Client and SDK Installation Guide June 2014 9
Avaya Mentor videosAvaya Mentor videos are available to provide technical content on how to install, configure, and troubleshoot Avaya products.
Videos are available on the Avaya support site, listed under the video document type, and on the Avaya-run channel on YouTube.
To find videos on the Avaya support site, select the product name, and check the videos checkbox to see a list of available videos.
Note:Note: Videos are not available for all products.
To find the Avaya Mentor videos on YouTube, go to http://www.youtube.com/AvayaMentor and perform one of the following actions:
● Enter a key word or key words in the Search Channel to search for a specific product or topic.
● Scroll down Playlists, and click the name of a topic to see the available list of videos posted on the site.
Course code Course title
ATI02595AEN Application Enablement Services Implementation and Administration (Assessment)
AVA00962WEN Application Enablement Services 4.0 Overview
1U00223O Avaya Aura Application Enablement Services (AES) 6.2 - L2
1U00222O Avaya Aura Application Enablement Services (AES) 6.2 - L1
3U00127O Designing Avaya Aura Application Enablement Services (AES) - Technical SalesL1
10U00030E Knowledge Access: AIPS - Avaya Aura Application Enablement ServicesImplementation
4100 Avaya Aura(R) Application Enablement Services Implementation Test
9Z04481V Application Enablement Services
Chapter 1: Introduction
10 AE Services TSAPI and CVLAN Client and SDK Installation Guide June 2014
SupportVisit the Avaya Support website at http://support.avaya.com for the most up-to-date documentation, product notices, and knowledge articles. You can also search for release notes, downloads, and resolutions to issues. Use the online service request system to create a service request. Chat with live agents to get answers to questions, or request an agent to connect you to a support team if an issue requires additional expertise.
WarrantyAvaya provides a 90-day limited warranty on Communication Manager. To understand the terms of the limited warranty, see the sales agreement or other applicable documentation. In addition, the standard warranty of Avaya and the details regarding support for Communication Manager in the warranty period is available on the Avaya Support website at http:// support.avaya.com/ under Help & Policies > Policies & Legal > Warranty & Product Lifecycle. See also Help & Policies > Policies & Legal > License Terms.

AE Services TSAPI and CVLAN Client and SDK Installation Guide June 2014 15
Chapter 2: Getting the files for installation
You can download the clients and SDKs from the following Web sites:
● Avaya Product Licensing and Delivery System (PLDS) Web site
https://plds.avaya.com● Avaya Support Web site (for Avaya customers with maintenance agreements)
http://support.avaya.com● Avaya DevConnect Web site (for DevConnect members)
http://www.avaya.com/devconnect

Chapter 2: Getting the files for installation
16 AE Services TSAPI and CVLAN Client and SDK Installation Guide June 2014
Downloading software from PLDSUse the following procedure to download the TSAPI client or the CVLAN client and SDK from the Avaya Product Licensing and Delivery System (PLDS) Web site. This procedure assumes that you are an Avaya customer and you have registered on the Avaya PLDS Web site.
Note:Note: The TSAPI client and CVLAN client and SDK are available from the Avaya PLDS
Web site, but the TSAPI SDK is not. To obtain the TSAPI SDK, contact an authorized Avaya Business Partner or an Avaya Account Executive.
1. Type https://plds.avaya.com in your web browser to open the Product Licensing and Delivery System Web site.
2. From the LOGIN NOW page, type your email address and password, and click SUBMIT.
3. From the main menu on the Home page, click Assets > View Downloads.
4. From the Downloads page, with the Search by Download tab displaying, follow these steps.
a. In the Company name field, enter your company's name.
b. From the Application field, select Application Enablement Services.
c. From the Download Type field, select Software Downloads.
d. From the Version field, select the current release, 6.3.3, for example.
e. Click Search Downloads.
5. On the Software Downloads list, locate the appropriate download, and click Download.
● Avaya Aura Application Enablement Services TSAPI Client Linux 6.3.3 ● Avaya Aura Application Enablement Services TSAPI Client MS Windows 6.3.3 ● Avaya Aura Application Enablement Services CVLAN Client Windows 6.3.3 ● Avaya Aura Application Enablement Services CVLAN Client Linux 6.3.3
6. From the About Download Manager page, click Click to download your file now.
Note:Note: The first time you use the Download Manager, your browser displays a Security
Warning and asks if you want to install the Download Manager. Click Install and complete the procedure for installing the Download Manager.
7. From the Save As dialog box, which displays the file name (for example, tsapi-client-win32-6.3.3-454.zip), browse to a folder on your file system and click Save. (Keep in mind that this is an example file name. The numbers following tsapi-client-win32-6.3.3 are subject to change.)

Downloading software from PLDS
AE Services TSAPI and CVLAN Client and SDK Installation Guide June 2014 17
8. Your system displays the Avaya Download Manager window. Use this window to monitor the status of your download.
When the status is "Finished," your file has been saved to the folder you specified in the Save As dialog box.
9. Click Exit to exit the Avaya Download Manager. Your browser displays the PLDS Downloads page. A check mark appears next to the software you downloaded.
10. Click Log out to log out of PLDS.
11. Close your browser.
Next steps
For the Windows clients, go to the folder you specified in the Save as dialog box, and extract the .zip file.
Start the installation as directed in the following chapters. The installation instructions assume that you have downloaded (and, when necessary, extracted) the files to an appropriate directory on your file system.
● Chapter 2: Installing the AE Services TSAPI clients and SDKs
● Chapter 3: Installing the AE Services CVLAN Client/SDK
Chapter 2: Getting the files for installation
18 AE Services TSAPI and CVLAN Client and SDK Installation Guide June 2014
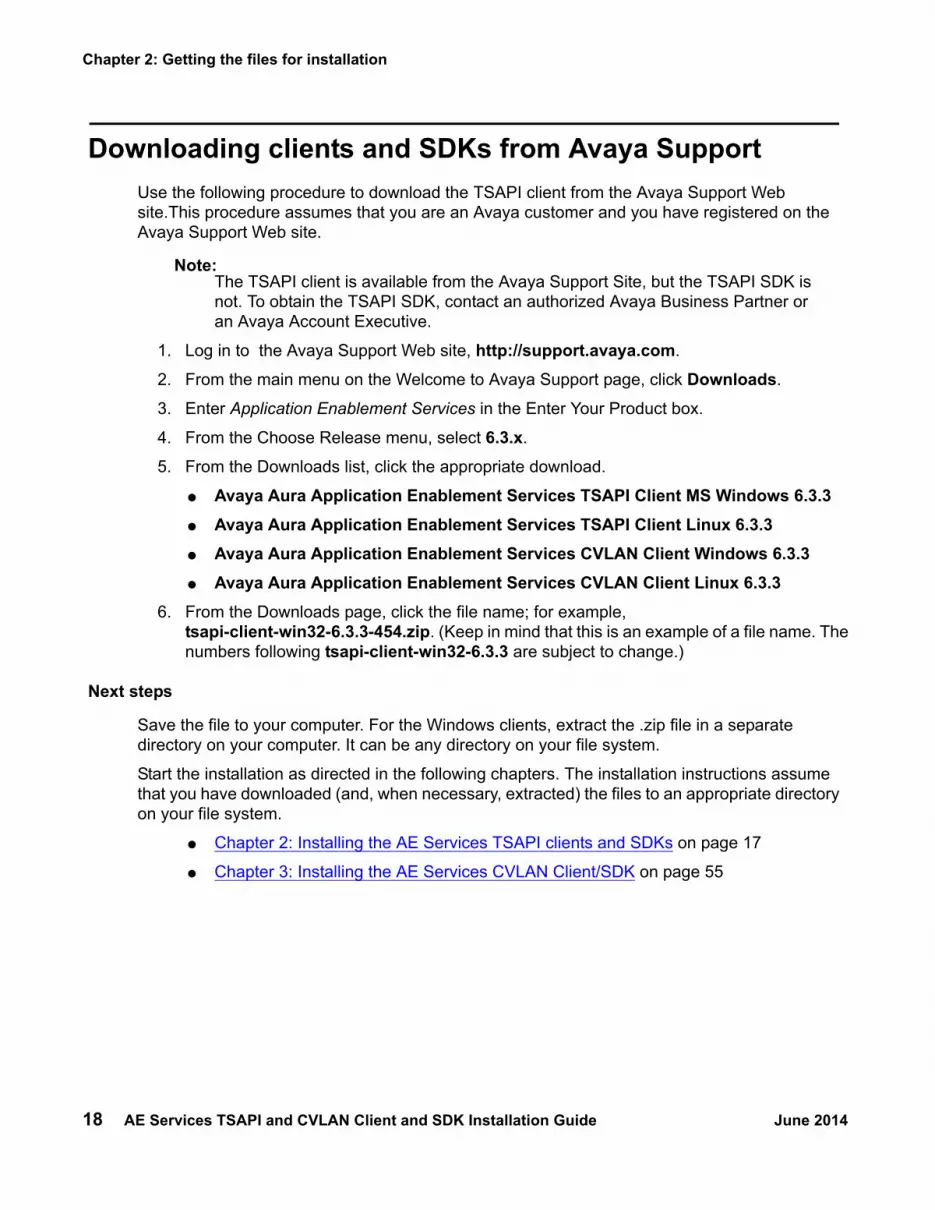
Downloading clients and SDKs from Avaya Support Use the following procedure to download the TSAPI client from the Avaya Support Web site.This procedure assumes that you are an Avaya customer and you have registered on the Avaya Support Web site.
Note:Note: The TSAPI client is available from the Avaya Support Site, but the TSAPI SDK is
not. To obtain the TSAPI SDK, contact an authorized Avaya Business Partner or an Avaya Account Executive.
1. Log in to the Avaya Support Web site, http://support.avaya.com.
2. From the main menu on the Welcome to Avaya Support page, click Downloads.
3. Enter Application Enablement Services in the Enter Your Product box.
4. From the Choose Release menu, select 6.3.x.
5. From the Downloads list, click the appropriate download.
● Avaya Aura Application Enablement Services TSAPI Client MS Windows 6.3.3● Avaya Aura Application Enablement Services TSAPI Client Linux 6.3.3● Avaya Aura Application Enablement Services CVLAN Client Windows 6.3.3● Avaya Aura Application Enablement Services CVLAN Client Linux 6.3.3
6. From the Downloads page, click the file name; for example, tsapi-client-win32-6.3.3-454.zip. (Keep in mind that this is an example of a file name. The numbers following tsapi-client-win32-6.3.3 are subject to change.)
Next steps
Save the file to your computer. For the Windows clients, extract the .zip file in a separate directory on your computer. It can be any directory on your file system.
Start the installation as directed in the following chapters. The installation instructions assume that you have downloaded (and, when necessary, extracted) the files to an appropriate directory on your file system.
● Chapter 2: Installing the AE Services TSAPI clients and SDKs on page 17
● Chapter 3: Installing the AE Services CVLAN Client/SDK on page 55

Downloading clients from Avaya DevConnect
AE Services TSAPI and CVLAN Client and SDK Installation Guide June 2014 19
Downloading clients from Avaya DevConnect Use the following procedure to download the TSAPI clients from the Avaya DevConnect Web site.
Note:Note: This procedure assumes that you are an Avaya DevConnect member and that
you have registered on the Avaya DevConnect Web site.
! Important:Important: The TSAPI client is available from the DevConnect Web site, but the TSAPI SDK
is not. If you are a Gold or Platinum DevConnect member, you can order the TSAPI SDK through DevConnect. For more information, contact an authorized Avaya Business Partner or an Avaya Account Executive.
1. Log in to the Avaya DevConnect Web site, http://www.avaya.com/devconnect 2. Click Downloads.
3. Click Telephony Services API (TSAPI). 4. Click the arrow after Programming Resources, and then check the Software
Development Kits check box.
5. From the list of results, select the appropriate download.
● Avaya Aura Application Enablement Services 6.3.3 TSAPI Client (Win32)● Avaya Aura Application Enablement Services 6.3.3 TSAPI Client (Linux)
6. Read and accept the license agreement, and then click the Download button.
7. Save the file to your computer; for example, tsapi-client-win32-6.3.3-454.zip. (Keep in mind that this is an example of a file name. The numbers following tsapi-client-win32-6.3.3 are subject to change.)
Next steps
For the Windows clients, extract the .zip file in a separate directory on your computer. It can be any directory on your file system.
Start the installation as directed in the following chapter. The installation instructions assume that you have downloaded (and, when necessary, extracted) the files to an appropriate directory on your file system.
● Chapter 2: Installing the AE Services TSAPI clients and SDKs on page 17

Chapter 2: Getting the files for installation
20 AE Services TSAPI and CVLAN Client and SDK Installation Guide June 2014

TSAPI client and SDK operating system requirements
AE Services TSAPI and CVLAN Client and SDK Installation Guide June 2014 17
Chapter 2: Installing the AE Services TSAPI clients and SDKs
This chapter describes the installation process for Avaya Aura Application Enablement Services (AE Services) Telephony Services Application Programming Interface (TSAPI) clients and software development kits (SDKs). For TSAPI applications to run in an AE Services/ Communication Manager environment, you must install the TSAPI client.
TSAPI client and SDK operating system requirementsThe AE Services TSAPI client can be installed on the following client platforms:
● Windows, see Table 2: TSAPI Windows client and SDK - operating system requirements on page 18
● Linux, see Table 3: TSAPI Linux client and SDK - hardware and software requirements on page 19
● Citrix - Avaya supports multiple Citrix clients connected to a single Citrix Server running a TSAPI Windows client application. AE Services supports Citrix Client Metaframe XPE v4.0. For more information refer to the Citrix documentation at www.citrix.com.

Chapter 2: Installing the AE Services TSAPI clients and SDKs
18 AE Services TSAPI and CVLAN Client and SDK Installation Guide June 2014
Table 2: TSAPI Windows client and SDK - operating system requirements
Component Requirements
CPU Intel 8086 instruction set architecture
Windows 32-bit Client Platform Operating Systems
● Windows 8 Pro● Windows 8 Enterprise● Windows 7 Professional● Windows 7 Enterprise● Windows 7 Ultimate● Windows XP Professional● Windows 2003 Server Standard Edition
Windows 64-bit Client Platform Operating Systems supporting TSAPI applications running in 32-bit compatibility mode
● Windows 8 Pro● Windows 8 Enterprise● Windows 7 Professional● Windows 7 Enterprise● Windows 7 Ultimate● Windows Server 2008 R2● Windows Server 2012 R2

TSAPI client and SDK operating system requirements
AE Services TSAPI and CVLAN Client and SDK Installation Guide June 2014 19
Note:Note: Before installing the TSAPI Linux Client on a Red Hat Enterprise Linux ES v5.0
system, you may need to perform a separate installation of the following RPM:
openssl097a-0.9.7a-9.el5_4.2.i386.rpm
This RPM may be available with your Red Hat Linux installation media and is also available for download at http://rpm.pbone.net.
Table 3: TSAPI Linux client and SDK - hardware and software requirements
Component Requirements
CPU Intel 8086 instruction set architecture
Red Hat Enterprise Linux (RHEL) 32-bit Versions
● Red Hat Enterprise Linux ES v4.0 Update 6● Red Hat Enterprise Linux ES v5.0 Update 7● Red Hat Enterprise Linux ES v5.0 Update 8
Red Hat Enterprise Linux (RHEL) 64-bit Versions supporting TSAPI applications running in 32-bit compatibility mode
● Red Hat Enterprise Linux ES v5.0 Update 7● Red Hat Enterprise Linux ES v5.0 Update 8● Red Hat Enterprise Linux ES v5.0 Update 9● Red Hat Enterprise Linux ES v5.0 Update 10

Chapter 2: Installing the AE Services TSAPI clients and SDKs
20 AE Services TSAPI and CVLAN Client and SDK Installation Guide June 2014
Gathering Pre-Installation DataBefore you install the TSAPI client, obtain the following information:
● IP address or Host Name of the AE Server from the AE Services administrator
● whether the TSAPI links are encrypted and, if so, whether the default CA certificate is being used for encryption. If the TSAPI links are encrypted, and the default CA certificate is not being used, you will need to supply and configure the appropriate CA certificate on the client.
● whether alternate TSAPI links are administered. If alternate TSAPI links are administered, you should configure the alternate Tlinks after the installation.
If you do not have the host name or IP addressIf you do not have the Host name or IP address of the AE Server, you can still install the client. Follow the installation procedure (Installing the TSAPI Windows client on page 21), and at Step 7 complete the AE Services Server Configuration dialog box as follows.
In the Host Name or IP Address field, type a place holder, such as myserver or 1.2.3.4 and accept the default port number. The setup program issues a Warning dialog when you click Add to List or Next, but it lets you continue with the installation.
After installation, when you get a valid host name or IP address, you will need to edit the tslib.ini file and add the appropriate host name or IP address for the AE Server. For more information, see Editing the TSAPI Windows client configuration file (tslib.ini) on page 27.

Installing and Configuring the TSAPI Windows Client
AE Services TSAPI and CVLAN Client and SDK Installation Guide June 2014 21
Installing and Configuring the TSAPI Windows Client
Installing the TSAPI Windows client Use the following procedure to install the TSAPI Windows client.
Note:Note: Use the network drive based installation procedure if you need to install a
significant number of TSAPI Windows clients. For information about network-based installation and setting up configuration files (tslib.ini), see Network-based installations for the TSAPI Windows client on page 34.
! Important:Important: Make sure you have completed the instructions for downloading the installation
files and saving them to your computer. See Chapter 2: Getting the files for installation.
1. Log on to your computer as a user with administrator-equivalent permissions.
2. Go to the directory that contains the TSAPI Windows client files that you downloaded, and double-click setup.exe.
Setup displays the Welcome dialog box.
3. Click Next. Setup searches for any older versions of the TSAPI client.
● If Setup detects the Avaya CT TS Win32 client, it issues the warning “The Avaya CT Win 32 Client needs to be uninstalled before the installation can continue.” When you click OK, the installation program exits.
● If Setup detects an earlier, incompatible version of the Avaya Application Enablement Services TSAPI client, it displays a dialog box with the message "Setup has detected an older version of the Avaya Application Enablement Services TSAPI Client on your system. This version needs to be removed before the installation can continue. Would you like Setup to remove this version for your now?"
Click Yes to have Setup remove the earlier version of the TSAPI client software for you automatically. Your exsiting TSAPI client configuration settings will be preserved.
After completing the search, Setup displays the License Agreement dialog box.
4. Carefully review the license agreement, select I accept the terms of the license agreement, and then click Next. Setup displays the Choose Destination Location dialog box.

Chapter 2: Installing the AE Services TSAPI clients and SDKs
22 AE Services TSAPI and CVLAN Client and SDK Installation Guide June 2014
5. Click Next to accept the default destination folder. For 32-bit Windows platforms, the default destination folder is C:\Program Files\Avaya\AE Services\TSAPI Client. For 64-bit Windows platforms, the default destination folder is C:\Program Files (x86)\Avaya\AE Services\TSAPI Client.
Setup displays the AE Services Server Configuration dialog box.
6. Complete the AE Services Server Configuration dialog box.
The information you specify in this dialog box is saved in the tslib.ini file. If you do not have this information, see If you do not have the host name or IP address on page 20.
a. In the Host Name or IP Address field type a valid host name or IP address of the AE Server, for example:
192.168.123.44 (IP address)
aeserver1 or aeserver.company.com (host name)
b. In the Port Number field, accept the default 450. If your installation uses more than one AE Server, click Add to List. You can repeat substeps a and b to add multiple host names or IP addresses to the Configured AE Services Servers list box.
Note:Note: If Setup detects a previously installed TSAPI client or a previous tslib.ini file, it will
display the list of previously configured AE Servers (along with the default port) in the Configured AE Services Servers dialog box. If you are re-using any of the same AE Servers from the list, you can click Next to proceed. Otherwise, you can delete the AE Servers that are not required.
c. Click Next.Setup displays the Ready to Install the Program dialog box.
7. Click Install to begin the installation.
Setup displays the Setup Status dialog box as it installs files, and then displays the Installation Wizard Complete dialog box.
8. From the Installation Wizard Complete dialog box, click Finish.
Setup exits.
This completes the procedure to install the TSAPI Windows client. Your next step is to verify that the components in your configuration can communicate. See Verifying the TSAPI Windows client installation on page 24.
Installing and Configuring the TSAPI Windows Client
AE Services TSAPI and CVLAN Client and SDK Installation Guide June 2014 23
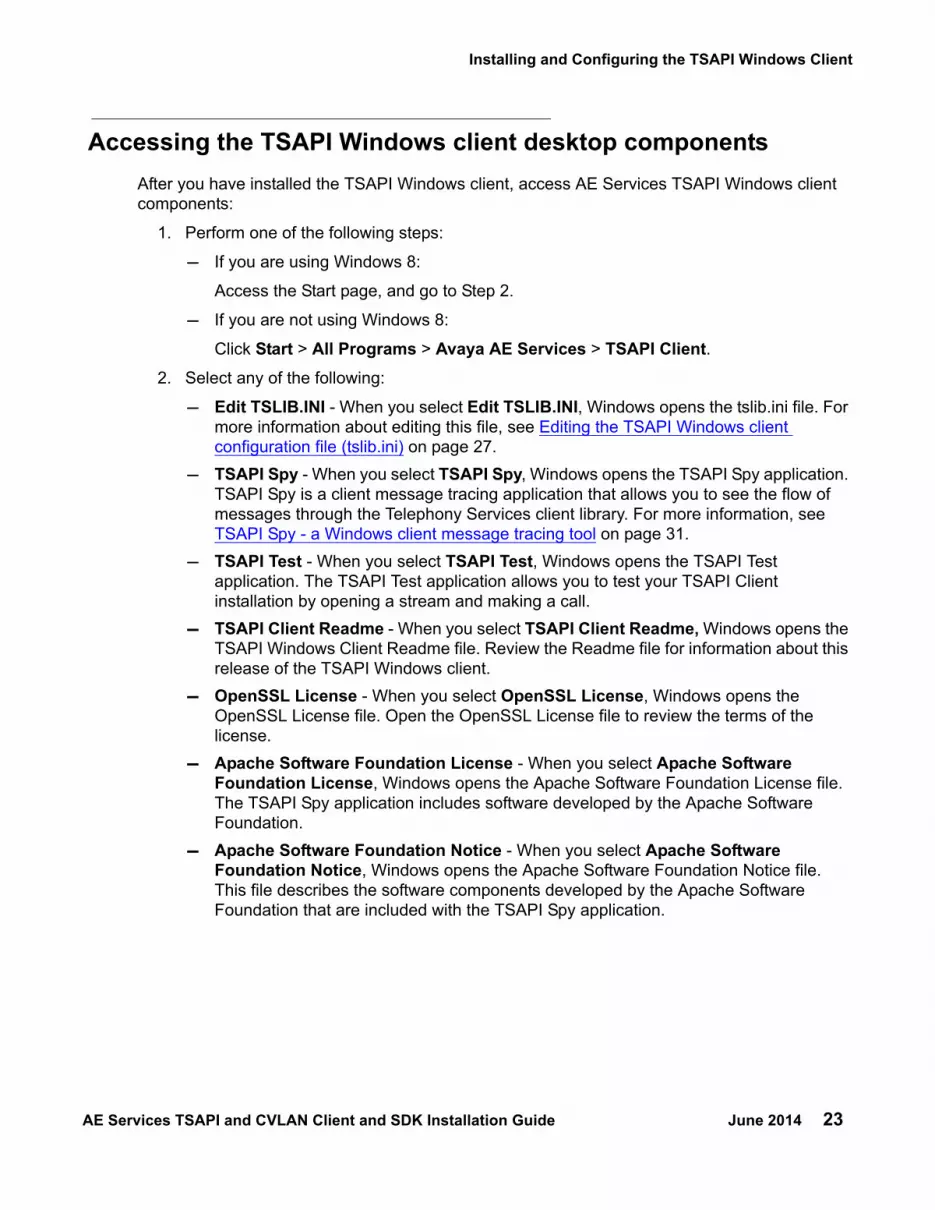
Accessing the TSAPI Windows client desktop componentsAfter you have installed the TSAPI Windows client, access AE Services TSAPI Windows client components:
1. Perform one of the following steps:
- If you are using Windows 8:
Access the Start page, and go to Step 2.
- If you are not using Windows 8:
Click Start > All Programs > Avaya AE Services > TSAPI Client.2. Select any of the following:
- Edit TSLIB.INI - When you select Edit TSLIB.INI, Windows opens the tslib.ini file. For more information about editing this file, see Editing the TSAPI Windows client configuration file (tslib.ini) on page 27.
- TSAPI Spy - When you select TSAPI Spy, Windows opens the TSAPI Spy application. TSAPI Spy is a client message tracing application that allows you to see the flow of messages through the Telephony Services client library. For more information, see TSAPI Spy - a Windows client message tracing tool on page 31.
- TSAPI Test - When you select TSAPI Test, Windows opens the TSAPI Test application. The TSAPI Test application allows you to test your TSAPI Client installation by opening a stream and making a call.
- TSAPI Client Readme - When you select TSAPI Client Readme, Windows opens the TSAPI Windows Client Readme file. Review the Readme file for information about this release of the TSAPI Windows client.
- OpenSSL License - When you select OpenSSL License, Windows opens the OpenSSL License file. Open the OpenSSL License file to review the terms of the license.
- Apache Software Foundation License - When you select Apache Software Foundation License, Windows opens the Apache Software Foundation License file. The TSAPI Spy application includes software developed by the Apache Software Foundation.
- Apache Software Foundation Notice - When you select Apache Software Foundation Notice, Windows opens the Apache Software Foundation Notice file. This file describes the software components developed by the Apache Software Foundation that are included with the TSAPI Spy application.

Chapter 2: Installing the AE Services TSAPI clients and SDKs
24 AE Services TSAPI and CVLAN Client and SDK Installation Guide June 2014
Verifying the TSAPI Windows client installationAfter you have installed the TSAPI Windows client, use TSAPI Test to verify that the components in your configuration can communicate.
Follow this procedure to run the TSAPI Test application.
1. Perform one of the following steps:
- If you are using Windows 8:
On the Start page, click on TSAPI Test.- If you are not using Windows 8:
Click Start > All Programs > Avaya AE Services > TSAPI Client > TSAPI Test.Windows opens the TSAPI Test application.
2. Complete the TSAPI Test Application dialog box as follows:
a. In the Server field, select the tlink that corresponds to the AE Services server and Avaya Communication Manager that you want to test. Tlinks are names that the TSAPI Service assigns to the TSAPI CTI links between the AE Server and Communication Manager.
b. In the User field, type your CT User user ID.
Note:Note: A CT User is a person or an application administered in the AE Services User
database with the "CT User" field set to "yes." CT User authorization is controlled by the AE Services Security Database.
c. In the Password field, type your CT User password.
d. In the From field, under Make Telephone Call, type a phone number that is administered in Avaya Communication Manager.
Note:Note: If the Security Database is enabled for the TSAPI Service, the CT User entered in
step 2b must have permission in the AE Services Security Database to control this phone number.
e. In the To field, under Make Telephone Call, type a second phone number that is administered in Avaya Communication Manager.
f. Click Dial.If the call is successful TSAPI Test displays a message box with the following message:
Call successfully originated. Dismiss this message box to terminate call.

Installing and Configuring the TSAPI Windows Client
AE Services TSAPI and CVLAN Client and SDK Installation Guide June 2014 25
Note:Note: If the call is not successful, TSAPI Test displays a message box with a message
that indicates the reason for failure. See Using TSAPI Spy while running TSAPI Test.
g. Click Close to exit TSAPI Test.
This completes the procedure to verify the TSAPI Windows client installation
Using TSAPI Spy while running TSAPI TestIf your call fails while you are running TSAPI Test, use TSAPI Spy to monitor the activity between the AE Server and the client running TSAPI Test. For more information about TSAPI Spy, see Appendix B: TSAPI client message tracing.
Follow this procedure to monitor your call with TSAPI Spy.
1. Perform one of the following steps:
- If you are using Windows 8:
On the Start page, click on TSAPI Spy.
- If you are not using Windows 8:
Click Start > All Programs > Avaya AE Services > TSAPI Client > TSAPI Spy.
Windows opens the TSAPI Spy application.
2. Perform the procedure Verifying the TSAPI Windows client installation and monitor the activity between the AE Services TSAPI Service and TSAPI Test.
Removing the TSAPI Windows client
Removing the TSAPI Windows client from a Windows 7 and 8 systems
Use the following procedure to remove either the TSAPI Windows client or the Avaya CT Windows client from a Windows 7 and 8 systems.
1. Open the Control Panel.2. From the Control Panel, click Uninstall a program.
Windows displays the Programs and Features window.
3. Select Avaya Application Enablement Services TSAPI Client, and click Uninstall. A confirmation dialog box appears.

Chapter 2: Installing the AE Services TSAPI clients and SDKs
26 AE Services TSAPI and CVLAN Client and SDK Installation Guide June 2014
4. Click Yes.
Setup uninstalls the software, and displays the Uninstall Complete dialog box.
5. Click Finish.
This completes the procedure to remove the TSAPI Windows client. Note that the tslib.ini file does not get removed from the TSAPI Client installation.
Removing the TSAPI Windows client from a non-Windows 8 system
Use the following procedure to remove the TSAPI Windows client from a non-Windows 8 system.
1. Click Start > Control Panel.2. From the Control Panel, click Add or Remove Programs.
Windows displays the Add or Remove Programs dialog box.
3. Select Avaya Application Enablement Services TSAPI Client, and click Remove.
A confirmation dialog box appears.
4. Click Yes.
Setup uninstalls the software, and displays the Uninstall Complete dialog box.
5. Click Finish.
This completes the procedure to remove the TSAPI Windows client. Note that the tslib.ini file does not get removed from the TSAPI Client installation folder.
Upgrading the TSAPI Windows clientIf you are upgrading from the Avaya Computer Telephony (Avaya CT) TSAPI Windows (TS Win32) client to the Avaya Application Enablement Services TSAPI Windows client, you must remove the Avaya CT TS Win32 client before you install the Avaya Application Enablement Services TSAPI Windows client.
If you are upgrading from an older version of the Avaya Application Enablement Services TSAPI Windows client to a newer version, you do not need to remove the older version first. Follow the installation procedure in Installing the TSAPI Windows client on page 21.

Installing and Configuring the TSAPI Windows Client
AE Services TSAPI and CVLAN Client and SDK Installation Guide June 2014 27
Editing the TSAPI Windows client configuration file (tslib.ini)You can customize the behavior of TSAPI Windows clients by editing the TSAPI client configuration files. The tslib.ini file is a file that contains configuration information for the TSAPI client. It is installed with the TSAPI Client installation folder. You can open the file by performing one of the following steps:
● Windows 8 system:
On the Start page, click on Edit TSLIB.INI. ● Non-Windows 8 system:
Click Start > All Programs > Avaya AE Services > TSAPI Client > Edit TSLIB.INI. The configuration file is organized into several sections. Before you edit the configuration, read through the following list to familiarize yourself with the contents of each section.
● [Telephony Servers]- When you install the TSAPI Client and complete the AE Services Server Configuration dialog box, AE Services adds the host name or IP address to the [Telephony Servers] section of the tslib.ini file.
You can edit [Telephony Servers] to change the Host Name or IP address of the AE Server or to create entries for additional AE Servers. Each entry must be in the following format (spaces are not valid in host names): hostname=port_number or IPaddress=port_number. For example: aeserver.domain.com=450 or 192.168.123.44=450
Note:Note: If you use a firewall, see Administering port settings for a firewall on page 48.
● [Config] - If you are using secure (encrypted) TSAPI links, use this section to configure settings for server certificate and client certificate authentication. If you are not sure whether you need to use this section, see TSAPI Windows client certificate authentication on page 29. If you do plan to set up the [Config] section, see Adding Certificate Configuration statements to the tslib.ini file on page 30.
● [Alternate Tlinks] - Use this section if you want your TSAPI Windows clients to use the Alternate Tlinks feature. See Specifying Alternate Tlinks for the TSAPI Windows client on page 27.
● [Shared Admin] - Use this section when you want to use a pointer to a server-based tslib.ini file. See Installing the next client: sharing a single tslib.ini file among clients on page 37.
Specifying Alternate Tlinks for the TSAPI Windows client
The Alternate Tlinks feature allows the TSAPI client library to select an alternate Tlink if the preferred Tlink is unavailable when trying to establish a session. To put this feature into effect, you must specify the alternate Tlinks in the TSAPI Configuration file. For a brief description of Tlinks, see About TSAPI Links (Tlinks) on page 48.

Chapter 2: Installing the AE Services TSAPI clients and SDKs
28 AE Services TSAPI and CVLAN Client and SDK Installation Guide June 2014
! Important:Important: When multiple AE Servers are used as alternates, the CT User user ID and
password used by the application must be configured identically on each AE Server.
Follow these steps to set up a list of alternate Tlinks in the tslib.ini file. You are essentially adding statements that specify a list of alternate Tlinks for the TSAPI Service.
1. Perform one of the following steps:
● Windows 8 system:
On the Start page, click on Edit TSLIB.INI. ● non-Windows 8 system:
Click Start > All Programs > Avaya AE Services > TSAPI Client > Edit TSLIB.INI. to open the tslib.ini file.
2. Locate the line [Alternate Tlinks] in the tslib.ini file, or add this line to the end of the file if it is not present. This line is required if you want your TSAPI Windows clients to use the Alternate Tlinks feature.
3. Following the [Alternate Tlinks] line, add a list of alternate Tlink entries.
Alternates(TLINK)=TLINK1:TLINK2:TLINK3:TLINK4
where:
● Alternates is the label for the first ordered list (you can have up to 16 lists)
● (TLINK) is the name of the preferred Tlink, for example (AVAYA#CM1#CSTA#AESRV1). Be sure to enclose the preferred Tlink name in parentheses.
● = The equal sign is a separator between the preferred Tlink, and the list of 1 to 4 alternate Tlinks. You must use the equal sign (=) to separate the preferred Tlink and the list of alternate Tlinks.
● TLINK1:TLINK2:TLINK3:TLINK4 is an ordered list of Tlink names that are used as alternates if the preferred Tlink is not available. Be sure to separate each Tlink name with a colon. You can specify from 1 to 4 Tlinks as alternates for the preferred Tlink.
ExamplesIn Example 1, there are two AE Servers, AESRV1 and AESRV2, that each have a TSAPI link to the same switch, CM1. When opening a stream, if AESERV1 is unavailable, the TSAPI client will attempt to use AESRV2 instead of AESRV1.
Example 1
[Alternate Tlinks]Alternates(AVAYA#CM1#CSTA#AESRV1)=AVAYA#CM1#CSTA#AESRV2
In Example 2, there are four AE Servers that each have a TSAPI link to the same switch, CM1.
When opening a stream:

Installing and Configuring the TSAPI Windows Client
AE Services TSAPI and CVLAN Client and SDK Installation Guide June 2014 29
● If AESRV1 is unavailable, the TSAPI client will attempt to use AESRV2 instead of AESRV1.
● If AESRV2 is also unavailable, then the TSAPI client will attempt to use AESRV3.
● If AESRV3 is also unavailable, then the TSAPI client will attempt to use AESRV4.
● If AESRV4 is also unavailable, then the TSAPI client will not be able to establish a connection with an AE server.
Example 2
[Alternate Tlinks]Alternates(AVAYA#CM1#CSTA#AESRV1)=AVAYA#CM1#CSTA#AESRV2:AVAYA#CM1#CSTA#AESRV3:AVAYA#CM1#CSTA#AESRV4
TSAPI Windows client certificate authentication
The TSAPI Service may be configured to use Transport Layer Security (TLS) for encrypting TSAPI client connections to the AE Services server. When the TSAPI client requests a secure connection to the AE Services server, the TSAPI service sends a certificate to the TSAPI client that allows the client to verify the identity if the server. This process is knwon as server certificate authentication.
You can configure the TSAPI Service to request a certificate from the client so that the AE Services server can verify the identity of the client. This process is known as client certificate authentication.
For server certificate authentication, you may either use the Avaya Product Root Certificate Authority (CA) certificate as the server certificate (this is the default), or a CA certificate issued by a trusted in-house or third-party certificate authority or your own certificate.
For client certificate authentication, AE Services does not provide a default certificate. You must provide and install your own certificates for client certificate authentication.
For more information about certificates, see Appendix A: Managing certificates on page 21.
Note:Note: The tslib.ini configuration file provides several configuration settings to control the
behavior of the TSAPI client during server certificate and client certificate authentication.
You do not have to add any certificate configuration settings under the following conditions:
● You do not need to add any certificate configuration settings to the tslib.ini file if you do not use secure client connections, and hence, certificates.
● If you use secure client connections, you do not need to add any server certificate authentication settings to the tslib.ini file for either of the following situations:
- You use the default AE Services certificate for server certificate authentication.- You use your own certificates and the trusted CA certificate is installed on the client
computer in the file <installation-directory>\certs\ca\aesCerts.cer.

Chapter 2: Installing the AE Services TSAPI clients and SDKs
30 AE Services TSAPI and CVLAN Client and SDK Installation Guide June 2014
● If you use secure client connections, you do not need to add any client certificate authentication settings to the tslib.ini file for either of the following situations:
- The TSAPI Service is not configured to perform client certificate authentication.- The client keystore containing the client certificate is installed on the client computer in
the file <installation-directory>\certs\tsapiClient.pfx and does not have a password.
Adding Certificate Configuration statements to the tslib.ini file
If you are using your own certificates for server certificate authentication, and you are not using the predefined location for storing certificates (that is, the aesCerts.cer file), you must add statements to the tslib.ini file that specify where your certificates are located. For example,
[Config]
Trusted CA File=<certificate_location>
Verify Server FQDN=0
where:
● Trusted CA File is the label for the file specification. The equal sign (=) is a separator between the label and the file specification.
certificate_location is the full pathname of a file containing the certificate(s) for your trusted CA in Privacy Enhanced Mail (PEM) format.For example,
C:\Program Files\Avaya\AE Services\TSAPI Client\certs\ca\ExampleCorpServCert.cer
Note that the specified file may contain several certificates.
● Verify Server FQDN is a setting that determines whether the TSAPI client verifies the Fully Qualified Domain Name (FQDN) in the Server Certificate (for added security).
Note:Note: This setting should be set to 0 when the AE Server is using the Avaya Product
Root CA Certificate.
If you want the client to check the certificate for the FQDN, use this setting: Verify Server FQDN=1.
If you do not want the client to check the certificate for the FQDN, use this setting: Verify Server FQDN=0.
If the TSAPI Service is configured to perform client certificate authentication and you are not using the predefined location for the client keystore (that is, the tsapiClient.pfx file), or if the client keystore is password protected, then you must add statements to the tslib.ini file that specify the location and/or password of the client keystore. For example:
[Config]
Client KeyStore=<keystore-location>

Installing and Configuring the TSAPI Windows Client
AE Services TSAPI and CVLAN Client and SDK Installation Guide June 2014 31
KeyStore Password=<keystore-password>
where:
● The Client KeyStore setting specifies the full pathname of a PKCS12 (Public-Key Cryptography Standards #12) keystore containing the client certificate that the TSAPI client should send to the TSAPI Service.
For example:
Client KeyStore="C:\Program Files (x86)\Avaya\AE Services\TSAPI Client\certs\myKeystore.pfx"
● The KeyStore Password setting specifies the password of the client keystore.
For example:
KeyStore Password=p@ssWord!
If the client keystore does not have a password, then this configuration setting is not needed.

Chapter 2: Installing the AE Services TSAPI clients and SDKs
32 AE Services TSAPI and CVLAN Client and SDK Installation Guide June 2014
Figure 1: Sample tslib.ini file - Part 1
TSLIB.INI
[Telephony Servers]
; List your Telephony Servers and Application Enablement (AE) Services; servers that offer TSAPI Telephony Services above.; Each entry must have the following format:; host_name=port_number; where:; - host_name is either the domain name or IP address of the ; AE Services server.; - port_number is the TSAPI Service port number. The default port ; number used by AE Services is 450.;For example:; aeserver.mydomain.com=450; 192.168.123.45=450; 3ffe:ffff:100:f101:2e0:18ff:fe90:9205=450
[Config]; When accessing Telephony Services via a secure, encrypted; connection, the Application Enablement (AE) Services server; sends its certificate to the TSAPI client, and the TSAPI client; verifies that the certificate is signed by a trusted Certificate; Authority (CA).; If your organization has installed its own certificate on the AE; server, then the TSAPI client must have access to the trusted; CA certificate(s) for the AE Services server certificate. Provide; the location of a file containing the trusted CA certificate(s) here.
The [Telephony Servers] sectionspecifies the AE Services serversthat your installation uses.
The [Config] section specifies
where your Trusted CA required if you are using your own certificates, and you alreadyhave a predefined location for your certificates.
The [Config] section allows you to specify where your Trusted CA certificates for server certificate authentication are stored, and where your client certificates for client certificate authentication are stored. You do not need to edit this section if you do not use secure client connections

Installing and Configuring the TSAPI Windows Client
AE Services TSAPI and CVLAN Client and SDK Installation Guide June 2014 33
Figure 2: Sample tslib.ini file - Part 2
TSLIB.INI
[Alternate Tlinks]; This file may specify alternate TSAPI links (Tlinks) for a ; preferred Tlink.; The format of each entry is:; Alternates(preferred_Tlink)=alternate_Tlink_1:alternate_Tlink2:...; Each entry may specify between one and four alternate Tlinks for; the preferred Tlink. Up to 16 entries are allowed.; For example: ; Alternates(AVAYA#CM1#CSTA#AES1)=AVAYA#CM1#CSTA#AES2:AVAYA#CM1#CSTA#AES3; specifies that both AVAYA#CM1#CSTA#AES2 and AVAYA#CM1#CSTA#AES3 are; alternate Tlinks for AVAYA#CM1#CSTA#AES1.
[Shared Admin]; Instead of each workstation maintaining its own list of servers, a ; shared tslib.ini file may be placed on a network file system, ; for example:; tslib.ini=n:\csta\tslib.ini; This entry overrides the [Telephony Servers] section, if any.
The [Alternate Tlinks] sectionprovides you with a way tospecify links to an alternate
The [Shared Admin] section
provides you with a way point toanother tslib.ini file. The localtslib.ini file on the client machinegoes to the shared tslib.ini filefor the list of AE Servers.
AE Server or Switch Connection.

Chapter 2: Installing the AE Services TSAPI clients and SDKs
34 AE Services TSAPI and CVLAN Client and SDK Installation Guide June 2014
Network-based installations for the TSAPI Windows clientThis section provides two installation scenarios for network-based installation. Use the following table as your guide for the installation scenario that you want to use.
Scenario 1: Customizing the tslib.ini file prior to installation
Scenario 2: Sharing a single tslib.ini file among clients
Caution: Although this method allows you to maintain only one centrally-located configuration file, the drawback is that an outage of the file server where the configuration file resides could prevent all of your TSAPI clients from connecting to the AE Server.
1 Copy the software and install the first TSAPI client as described in Copying the software and installing the first TSAPI client on page 35.
1 Copy the software and install the first TSAPI client as described in Copying the software and installing the first TSAPI client on page 35.
2 Install the next TSAPI client and all subsequent clients as described in Installing the next client: customizing the tslib.ini file prior to installation on page 36.
2 Install the next TSAPI client using the [Shared Admin] settings in the tslib.ini file as described in Installing the next client: sharing a single tslib.ini file among clients on page 37.

Installing and Configuring the TSAPI Windows Client
AE Services TSAPI and CVLAN Client and SDK Installation Guide June 2014 35
Copying the software and installing the first TSAPI client
To install the Windows client software from a network drive, you must first transfer the TSAPI Windows client installation software to the network drive. Then client computers can install from the file server.
1. Create or locate a directory such as \TSAPI\Client on a network drive (you can do this remotely from a client computer, or directly from the file server).
2. Copy the files for the TSAPI Windows client installation software to the \TSAPI\Client directory on the network drive. (If the TSAPI Windows client installation software is provided as a .zip file, then extract the files from the .zip file to the \TSAPI\Client directory on the network file server.)
3. [Initial client installation] On the client computer, go to the \TSAPI\Client directory on the network drive, and double-click setup.exe to install the TSAPI Windows client. At this point you would follow Steps 3 through 8 of the procedure to install the TSAPI Windows client (see Installing the TSAPI Windows client on page 21). Notice that in Step 6 of the TSAPI Windows client installation procedure you are providing the Host Name or IP Address of the AE Services Server that gets added to the tslib.ini file.
4. Make any other changes to the tslib.ini file, such as specifying alternate Tlinks or configuration settings for secure Tlinks.
Chapter 2: Installing the AE Services TSAPI clients and SDKs
36 AE Services TSAPI and CVLAN Client and SDK Installation Guide June 2014
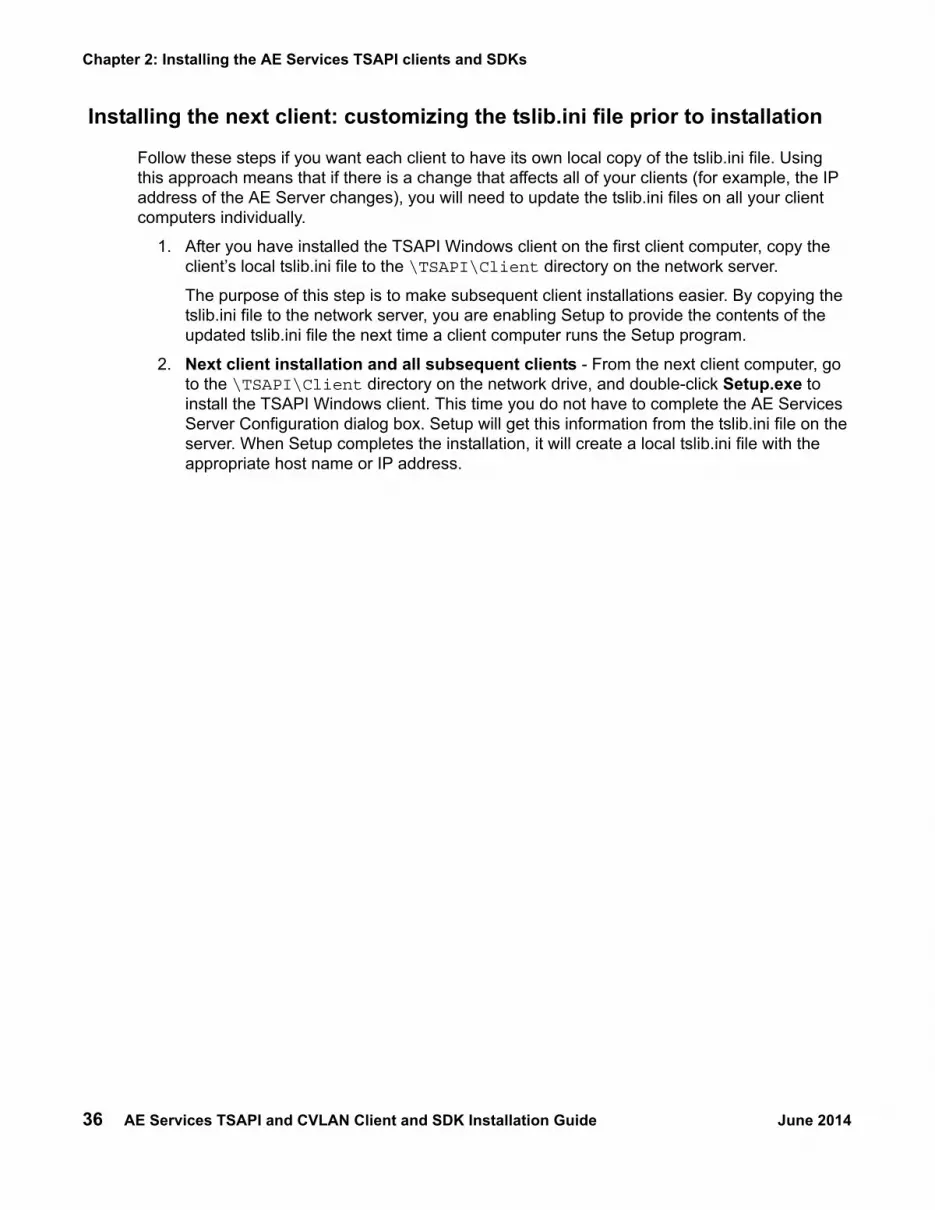
Installing the next client: customizing the tslib.ini file prior to installation
Follow these steps if you want each client to have its own local copy of the tslib.ini file. Using this approach means that if there is a change that affects all of your clients (for example, the IP address of the AE Server changes), you will need to update the tslib.ini files on all your client computers individually.
1. After you have installed the TSAPI Windows client on the first client computer, copy the client’s local tslib.ini file to the \TSAPI\Client directory on the network server.
The purpose of this step is to make subsequent client installations easier. By copying the tslib.ini file to the network server, you are enabling Setup to provide the contents of the updated tslib.ini file the next time a client computer runs the Setup program.
2. Next client installation and all subsequent clients - From the next client computer, go to the \TSAPI\Client directory on the network drive, and double-click Setup.exe to install the TSAPI Windows client. This time you do not have to complete the AE Services Server Configuration dialog box. Setup will get this information from the tslib.ini file on the server. When Setup completes the installation, it will create a local tslib.ini file with the appropriate host name or IP address.

Installing and Configuring the TSAPI Windows Client
AE Services TSAPI and CVLAN Client and SDK Installation Guide June 2014 37
Installing the next client: sharing a single tslib.ini file among clients
Follow these steps if you want all of your clients to share a single copy of the tslib.ini file. Using these settings means that the local tslib.ini file on each client will direct the TSAPI Windows client library to obtain the host name or IP address of the AE Services server from the shared TSLIB.INI file.
CAUTION:!
CAUTION: This method allows you to maintain only one centrally-located configuration file, and the drawback is that an outage of the file server where the configuration file resides could prevent all of your TSAPI clients from connecting to the AE Server.
1. After you have installed the TSAPI Windows client on the first client computer, perform the following steps:
a. Copy the client’s local TSLIB.INI file to the network file server (for example, h:\TSAPI\Client\sharedtslib.ini). Do not overwrite the TSLIB.INI file in the \TSAPI\Client folder containing the TSAPI Windows client installation software.
b. Edit the [Shared Admin] section of the client’s local tslib.ini file to contain the full pathname of the shared TSLIB.INI file on the network file server. For example: tslib.ini=h:\TSAPI\Client\sharedtslib.ini (where h:\TSAPI\Client specifies the network drive and path to the tslib.ini file on your server).
c. Now copy the client’s local TSLIB.INI file to the \TSAPI\Client directory on the network file server, overwriting the TSLIB.INI file in the directory that contains the TSAPI Windows client installation software.
2. Next client installation and subsequent installations - From another client computer, go to the \TSAPI\Client directory on the network drive, and double-click setup.exe to install the TSAPI Windows client. This time you do not have to complete the AE Services Server Configuration dialog box. Setup will install the updated TSLIB.INI file that points to the shared TSLIB.INI file.
[Shared Admin]
; Instead of each workstation maintaining its own list of servers, a shared
; tslib.ini file may be placed on a network file system.
tslib.ini=h:\TSAPI\Client\sharedtslib.ini

Chapter 2: Installing the AE Services TSAPI clients and SDKs
38 AE Services TSAPI and CVLAN Client and SDK Installation Guide June 2014
Installing and Configuring the TSAPI Linux Client
Installing the TSAPI Linux clientFollow this procedure to install the TSAPI Linux client.
Note:Note: Make sure you have completed the instructions for downloading the installation
files and saving them to your computer. See Chapter 2: Getting the files for installation.
Note:Note: Before installing the TSAPI Linux Client on a Red Hat Enterprise Linux ES v5.0
system, you may need to perform a separate installation of the following RPM: openssl097a-0.9.7a-9.el5_4.2.i386.rpm
This RPM may be available with your Red Hat Linux installation media and is also available for download at http://rpm.pbone.net.
1. Log in to the client computer as root.
2. Go to the directory that contains the TSAPI Linux Client installation program tsapi-client-linux-version-build.bin. Where,
● version is the TSAPI Linux Client version number.
● build is the TSAPI Linux Client build number.
3. Use the chmod command to make the TSAPI Linux Client installation program executable. For example, chmod +x tsapi-client-linux-6.3.3-94.bin.
4. Run the TSAPI Linux Client installation program to begin the installation. For example: ./tsapi-client-linux-6.3.3-94.bin
5. Press the Enter key to display the End User License Agreement.
6. Carefully review the license agreement. When the installation program asks if you agree to the license terms, enter y.
7. When the installation program asks you to enter a temporary directory for the installation RPM, enter a valid directory, or press the Enter key to accept the default directory (/tmp).
8. When the installation program prompts for confirmation, enter y.
This completes the procedure to install the TSAPI Linux client. Your next step is to edit the tslibrc file. See Editing the Linux client configuration file on page 39).

Installing and Configuring the TSAPI Linux Client
AE Services TSAPI and CVLAN Client and SDK Installation Guide June 2014 39
Editing the Linux client configuration fileYou can customize the behavior of TSAPI Linux clients by editing the TSAPI client configuration files. The TSAPI Linux client uses a configuration file called tslibrc, which, by default, is located in /usr/lib/tslibrc.
Specifying the location of the tslibrc file
TSAPI Linux clients rely on the tslibrc configuration file to identify the AE Servers that are available on the network. To provide TSAPI Linux clients with access to the AE Servers, you must edit the tslibrc configuration file.
You can specify an alternate location for this file by setting and exporting the shell environment variable TSLIBRC. If the TSLIBRC variable is not set, the client library searches your $HOME directory for a file named .tslibrc. If the client library cannot locate a configuration file after looking in both TSLIBRC and .tslibrc, it looks for the file /usr/lib/tslibrc.
Making basic changes to the tslibrc file
Follow this procedure to edit the tslibrc file.
1. Use your text editor to open the /usr/lib/tslibrc file.
2. Replace 127.0.0.1 with either the fully qualified domain name or the IP address of the AE Server that you want to access, and the port number you want to use (450 is the default port number for the TSAPI Service).
host_name port_number # comment
where:
● host_name is an Internet domain name or IP address (spaces are not valid in host names)
● port_number is the TCP port for the TSAPI Service’s name. If the port number is omitted, a default value of 450 is assumed.
● # comment is the area to the right of the pound sign for comments.
If you use a firewall, see Administering port settings for a firewall on page 48.
Specifying Alternate Tlinks for the Linux client
The Alternate Tlinks feature allows the TSAPI client library to select an alternate Tlink if the preferred Tlink is unavailable when trying to establish a session. To put this feature into effect, you must specify the alternate Tlinks in the TSAPI Configuration file. For a brief description of Tlinks, see About TSAPI Links (Tlinks) on page 48.
Chapter 2: Installing the AE Services TSAPI clients and SDKs
40 AE Services TSAPI and CVLAN Client and SDK Installation Guide June 2014
! Important:Important: When multiple AE Servers are used as alternates, the CT User user id and
password used by the application must be configured identically for each AE Server.
Follow these steps to set up a list of alternate Tlinks in the tslib.ini file.
1. Use your text editor to open the /usr/lib/tslibrc file.
2. Add a list of alternate Tlink entries, using the following format.
Alternates(TLINK)=TLINK1:TLINK2:TLINK3:TLINK4
where:
● Alternates is the label for the first ordered list (you can have up to 16 lists)
● (TLINK) is the name of the preferred Tlink, for example (AVAYA#CM1#CSTA#AESRV1). Be sure to enclose the preferred Tlink name in parentheses.
● = The equal sign is a separator between the preferred Tlink, and the list of 1 to 4 alternate Tlinks. You must use the equal sign (=) to separate the preferred Tlink and the list of additional alternate Tlinks.
● TLINK1:TLINK2:TLINK3:TLINK4 is an ordered list of Tlink names that are used as alternates if the preferred Tlink is not available. Be sure to separate each Tlink name with a colon. You can specify from 1 to 4 Tlinks for each list of alternates.
ExamplesIn Example 1, there are two AE Servers, AESRV1 and AESRV2, that each have a TSAPI link to the same switch, CM1. When opening a stream, if AESERV1 is unavailable, the TSAPI client will attempt to use AESRV2 instead of AESRV1.
Example 1
#[Alternate Tlinks]Alternates(AVAYA#CM1#CSTA#AESRV1)=AVAYA#CM1#CSTA#AESRV2In Example 2, there are four AE Servers that each have a TSAPI link to the same switch, CM1.
When opening a stream:
● If AESRV1 is unavailable, the TSAPI client will attempt to use AESRV2 instead of AESRV1.
● If AESRV2 is also unavailable, then the TSAPI client will attempt to use AESRV3.
● If AESRV3 is also unavailable, then the TSAPI client will attempt to use AESRV4.

Installing and Configuring the TSAPI Linux Client
AE Services TSAPI and CVLAN Client and SDK Installation Guide June 2014 41
● If AESRV4 is also unavailable, then the TSAPI client will not be able to establish a connection with an AE server.
Example 2
#[Alternate Tlinks]Alternates(AVAYA#CM1#CSTA#AESRV1)=AVAYA#CM1#CSTA#AESRV2:AVAYA#CM1#CSTA#AESRV3:AVAYA#CM1#CSTA#AESRV4
TSAPI Linux client certificate authentication
The TSAPI Service may be configured to provide Transport Layer Security (TLS) for encrypting data exchanged between the TSAPI client and the AE Services server. If you plan to use encrypted links, you have the option of using the Avaya Product Root Certificate Authority (CA) certificate (this is the default), or using certificates issued by a trusted in-house or third-party certificate authority (also referred to as your own certificates). For more information about certificates, see Appendix A: Managing certificates on page 21.
Note:Note: You do not have to add any configuration settings for certificates under the
following conditions:
● You do not use encrypted connections, and, hence, certificates.
● You use encrypted Tlinks with the default AE Services certificate. The default AE Services certificate is signed by the Avaya Product Root Certificate Authority (CA). The certificate for the Avaya Product Root CA is installed with the TSAPI Linux client in /opt/mvap/tsapi/client/certs/CA/avayaprca.pem.
● You use encrypted Tlinks with your own certificates, and you have copied the trusted CA certificate to the client computer as /opt/mvap/tsapi/client/certs/CA/aesCerts.pem. When establishing a secure connection, the TSAPI client checks to see if you have provided this file. If so, you do not need to configure the location of the Trusted CA File in the tslibrc file.
Adding certificate configuration statements to the tslibrc file
If you are using your own certificates for server certificate authentication, and you are not using the predefined location for storing certificates (that is, /opt/mvap/tsapi/client/certs/CA/aesCerts.pem), you must add statements to the tslibrc file that specify where your certificates are located. For example:
Trusted CA File=<certificate_location>
Verify Server FQDN=0
where:

Chapter 2: Installing the AE Services TSAPI clients and SDKs
42 AE Services TSAPI and CVLAN Client and SDK Installation Guide June 2014
● Trusted CA File is the label for the file specification. The equal sign (=) is a separator between the label and the file specification.
certificate_location is the full pathname of a file containing the certificate(s) for your trusted CA in Privacy Enhanced Mail (PEM) format. For example:
/opt/mvap/tsapi/clients/certs/CA/exampleCA.pemNote that the specified file may contain several certificates.
● Verify Server FQDN is a setting that determines whether the TSAPI client verifies the Fully Qualified Domain Name (FQDN) in the Server Certificate (for added security).
Note:Note: This setting should be set to 0 when the AE Server is using the Avaya Product
Root CA Certificate.
- If you want the client to check the certificate for the FQDN, use this setting: Verify Server FQDN=1
- If you do not want the client to check the certificate for the FQDN, use this setting: Verify Server FQDN=0
Alternatively, you could just omit this line.
If the TSAPI Service is configured to perform client certificate authentication and you are not using the predefined location for the client keystore (that is, the tsapiClient.pfx file), or if the client keystore is password protected, then you must add statements to the tslibrc file that specify the location and/or password of the client keystore. For example:
Client KeyStore=<keystore-location>
KeyStore Password=<keystore-password>
where:
● The Client KeyStore setting specifies the full pathname of a PKCS12 (Public-Key Cryptography Standards #12) keystore containing the client certificate that the TSAPI client should send to the TSAPI Service.For example:
Client KeyStore=/home/ctiuser/certs/myKeystore.pfx● The KeyStore Password setting specifies the password of the client keystore.
For example:
KeyStore Password=p@ssWord!If the client keystore does not have a password, then this configuration setting is not needed.
Figure 3: Editing the tslibrc file - Part 1
# /usr/lib/tslibrc - Linux Telephony Services Library Configuration File
# Blank lines and text beginning with "#" are ignored.
#

Installing and Configuring the TSAPI Linux Client
AE Services TSAPI and CVLAN Client and SDK Installation Guide June 2014 43
# [Telephony Servers]
#
# List your Telephony Servers and Application Enablement (AE) Services
# servers that offer TSAPI Telephony Services below.
#
# Each entry must have the following format:
#
# host_name [port_number]
#
# where:
#
# - host_name is either the domain name or IP address of the AE Services
# server.
# - port_number is the TSAPI Service port number. The default port number
# used by AE Services is 450.
#
# For example:
#
# aeserver.mydomain.com 450 # host name example
# 192.168.123.45 450 # IPv4 address example
# 3ffe:ffff:100:f101:2e0:18ff:fe90:9205 450 # IPv6 address example
#
# Edit the following entry to use the actual host name or IP address of
# your AE Services server.
127.0.0.1 450 # Edit this entry
# [Config]
#
# When accessing Telephony Services via a secure, encrypted connection,
# the Application Enablement (AE) Services server sends its certificate
# to the TSAPI client, and the TSAPI client verifies that the certificate
# is signed by a trusted Certificate Authority (CA).
#
# If your organization has installed its own certificate on the AE
# Server, then the TSAPI client must have access to the trusted CA
# certificate(s) for the AE Services server certificate. Provide the
# location of a file containing the trusted CA certificate(s) here.
# For example:
#
# Trusted CA File=/usr/local/ssl/certs/verisign.pem
Figure 4: Editing the tslibrc file - Part 2
# [Alternate Tlinks]
#
# This file may specify alternate TSAPI links (Tlinks) for a preferred
# Tlink.

Chapter 2: Installing the AE Services TSAPI clients and SDKs
44 AE Services TSAPI and CVLAN Client and SDK Installation Guide June 2014
#
# The format of each entry is:
#
# Alternates(preferred_Tlink)=alternate_Tlink_1:alternate_Tlink_2:...
#
# Each entry may specify between one and four alternate Tlinks for the
# preferred Tlink. Up to 16 entries are allowed.
#
# For example:
#
# Alternates(AVAYA#CM1#CSTA#AES1)=AVAYA#CM1#CSTA#AES2:AVAYA#CM1#CSTA#AES3
#
# specifies that both AVAYA#CM1#CSTA#AES2 and AVAYA#CM1#CSTA#AES3 are
# alternate Tlinks for AVAYA#CM1#CSTA#AES1.
# Individual users may override the contents of this file by setting
# the TSLIBRC environment variable to the pathname of an alternate file
# (in this same format) or by creating a ".tslibrc" file in their $HOME
# directory.

Installing and Configuring the TSAPI Linux Client
AE Services TSAPI and CVLAN Client and SDK Installation Guide June 2014 45
Using TSAPI Test to verify Linux client installations To verify the TSAPI Linux client installation, use TSAPI Test to make a call.
Follow this procedure to run a TSAPI Test session for the Linux clients. See Figure 5 for an example of a TSAPI Test session.
Note:Note: Before performing this procedure, you must edit the /usr/lib/tslibrc file (or the
.tslibrc file in your home directory) so that it contains the host name or IP address of the AE Services server. See Making basic changes to the tslibrc file on page 39.
1. Log into the client computer.
2. Start the TSAPI Test program by typing /usr/lib/tstest at the command prompt.
The TSAPI Test program displays a numbered list of the available servers.
3. At the prompt to enter a server number (the range of numbers varies according to your configuration), type an appropriate number.
4. At the Server login prompt type your CT User user id.
Note:Note: A CT User is a person or an application administered in the AE Services User
database with the "CT User" field set to "yes." CT User authorization is controlled by the AE Services Security Database.
5. At the Server password prompt enter your CT User password.
6. At the calling number prompt, enter a valid extension number, for example: 72412.
Note:Note: If the Security Database is enabled for the TSAPI Service, the CT User entered in
Step 4 must have permission in the AE Services Security Database to control this phone number.
7. At the called number prompt, type another valid extension number, for example: 75587.
After entering all the information, TSAPI Test attempts to open a stream and make a call from the calling number to the called number. TSAPI Test indicates the results of the test. If the open stream request cannot open a stream to the server, TSAPI Test will display an error message, and TSAPI Test will terminate.
● For information about Application control services (ACS) error messages, see Appendix A: Universal Failure Events, in the Avaya Aura® Application Enablement Services TSAPI for Avaya Communication Manager Programmer’s Reference, 02-300544.
● For information about CSTA messages see, Chapter 4 of the Avaya Aura® Application Enablement Services TSAPI for Avaya Communication Manager Programmer’s Reference, 02-300544.

Chapter 2: Installing the AE Services TSAPI clients and SDKs
46 AE Services TSAPI and CVLAN Client and SDK Installation Guide June 2014
Figure 5: Sample TSAPI Test session
Start the sessionTelephony Services*** Make Call Test ***
Searching for Servers...
1) ATT#G3_SWITCH#CSTA#SERVER12) ATT#G3_SWITCH#CSTA#POOH3) ATT#G3_SWITCH#CSTA#DAGOTTO
Enter a server number between 1 and 3 (default 1):Server login (default admin):Server password:CallING number: 72412CallED number: 75587
If the open stream succeeds, TSAPI Test displays the following:cstaMakeCall() succeeded!cstaClearConnection() succeeded!
If the open stream fails, TSAPI Test will display an ACS error, for example:acsOpenStream() failed with ACS Universal FailureError 25:Bad password or login.
If a CSTA service fails, TSAPI Test will display a CSTA error, for example:cstaMakeCall() failed with CSTA Universal FailureError 12:Invalid CSTA device identifier

Installing and Configuring the TSAPI Linux Client
AE Services TSAPI and CVLAN Client and SDK Installation Guide June 2014 47
Removing the TSAPI Linux clientFollow this procedure to remove the TSAPI Linux client.
1. Log in as root.
2. Use the rpm -e command to remove the TSAPI client. For example:
rpm -e tsapi-client-linux
The Red Hat package manager removes the TSAPI Linux client
3. To verify that the software has been removed, type the following command:
rpm -q tsapi-client-linux
The system responds with the following message:
package tsapi-client-linux is not installed
This completes the procedure to remove the TSAPI Linux client.
Upgrading the TSAPI Linux clientFollow these steps to upgrade the AE Services TSAPI Linux client.
1. Remove the previous version of the client (see Removing the TSAPI Linux client on page 47)
2. Install the latest version of the client (see Installing the TSAPI Linux client on page 38).

Chapter 2: Installing the AE Services TSAPI clients and SDKs
48 AE Services TSAPI and CVLAN Client and SDK Installation Guide June 2014
About TSAPI Links (Tlinks)A TSAPI Link (Tlink) represents the availability of the TSAPI Service for a particular switch connection by way of a particular AE Server. The AE Services administrator creates a Tlink by adding a TSAPI Link through the AE Services Management Console (AE Services > TSAPI > TSAPI Links). A Tlink name has the following format:
AVAYA#switch_connection_name#service_type#AE-server-name
where:
● AVAYA indicates that the TSAPI Service is provided by Avaya.
● switch_connection_name represents the Switch Connection name. The AE Services administrator determines the switch connection name when he/she administers a Switch Connection in AE Services Management Console.
● service_type refers to the CSTA service type. It can be either of the following:
- CSTA - If theTSAPI Link is administered as unencrypted (nonsecure). - CSTA-S - If the TSAPI Link is administered as encrypted (secure).
● AE_server_name is the name of the AE Server providing the TSAPI Service for the switch connection. The AE Server name is assigned by the person who performs the AE Services installation.
ExampleAVAYA#CM1#CSTA-S#AESRV1
Administering port settings for a firewallIf a firewall is present between the AE Services server and the TSAPI client machine, make sure that the address in the TSLIB.INI or tslibrc configuration file uses the externally facing IP address of your firewall instead of the IP address of the AE Server.

Installing and Managing the TSAPI Windows SDK
AE Services TSAPI and CVLAN Client and SDK Installation Guide June 2014 49
Installing and Managing the TSAPI Windows SDK
The AE Services TSAPI SDK and the programming environmentAE Services recommends that you install the TSAPI client when you install the TSAPI SDK. The TSAPI client provides the run-time libraries that are necessary for running your application in the AE Services-Communication Manager environment, and it provides tools for verifying the installation. Also, if you plan to use the TSAPI Exerciser, you must install the TSAPI Windows client.
Note:Note: The TSAPI Exerciser is available for the TSAPI Windows client only.
After you install the AE Services TSAPI client and SDK for your particular operating system, see the Avaya Aura® Application Enablement Services TSAPI for Communication Manager Programmer’s Reference, 02-3005444, for information about using the SDK components.
How to obtain the TSAPI SDKThe TSAPI SDK must be purchased. If you are a customer, contact an authorized Avaya Business Partner or an Avaya Account Executive to obtain the TSAPI SDK. If you are a Gold or Platinum DevConnect member, you can order the TSAPI SDK through DevConnect.
Installing the TSAPI Windows SDKFollow this procedure to install the TSAPI Windows SDK.
Note:Note: For information about obtaining the TSAPI SDK, see How to obtain the TSAPI
SDK on page 49.
1. Log on to your computer as a user with administrator-equivalent permissions.2. Insert the TSAPI SDK CD into your computer’s CD-ROM drive.3. From the toolbar, click Start > Run.4. In the Run window, type the drive ID of your CD-ROM drive (for example, D:\), and click
OK. 5. From the window displaying the files on the CD, navigate to the sdk\Windows folder, open
the file tsapi-sdk-win32-6.3.3-build.zip, and double-click setup.exe.Setup displays the Welcome dialog box.

Chapter 2: Installing the AE Services TSAPI clients and SDKs
50 AE Services TSAPI and CVLAN Client and SDK Installation Guide June 2014
6. Click Next. Setup searches for any older versions of the TSAPI SDK.
● If Setup detects the Avaya Computer Telephony version of the SDK, it issues the following warning and stops the installation: "The Avaya CT SDK needs to be uninstalled before the installation can continue."
● If Setup detects an earlier, incompatible version of the Avaya Application Enablement Services TSAPI SDK, it displays a dialog box with the message: "Setup has detected an older version of the Avaya Application Enablement Services TSAPI SDK on your system. This version needs to be removed before the installation can continue. Would you like Setup to remove this version for you now?"
Click Yes to have Setup remove the earlier version of the TSAPI SDK software for you automatically.
Setup displays the License Agreement dialog box.
7. Carefully review the license agreement, select I accept the terms of the license agreement, and then click Next.Setup displays the Choose Destination Location dialog box with the default destination folder. For 32-bit Windows platforms, the default destination is C:\Program Fles\Avaya\AE Services\SDKs\TSAPI . For 64-bit Windows platforms, the default destination is C:\Program Fles (x86)\Avaya\AE Services\SDKs\TSAPI .
8. Click Next.Setup displays the Select Features dialog box with all of the TSAPI SDK Components selected by default: Headers and Libraries, Sample Code, and TSAPI Exerciser.
9. Click Next.Setup displays the Ready to Install the Program dialog box
10. Click Install .
Setup installs the files. When it has finished installing files, Setup displays the InstallShield Wizard Complete dialog box.
11. Click Finish.
This completes the procedure to install the Windows TSAPI Windows SDK. Continue with Viewing the TSAPI Windows SDK Components to learn about the TSAPI SDK.

Installing and Managing the TSAPI Windows SDK
AE Services TSAPI and CVLAN Client and SDK Installation Guide June 2014 51
Viewing the TSAPI Windows SDK ComponentsTo view the TSAPI Windows SDK components:
1. Perform one of the following steps:
- If you are using Windows 8:
On the Start page, click on Avaya AE Services.
- If you are not using Windows 8:
Click Start > All Programs > Avaya AE Services > SDKs > TSAPI.2. Select any of the following components:
- Explore Sample Code - When you select Explore Sample Code, Windows displays the Samples directory which includes additional directories that contain coding examples for developing applications. For more information about Sample Code, see “Contents of the TSAPI SDK,” in Chapter 2 of the Avaya Aura® Application Enablement Services TSAPI for Communication Manager Programmer’s Reference, 02-300544.
- TSAPI SDK Readme - When you select Read Me, Windows displays the TSAPI Windows SDK Readme file, which contains late-breaking information that might be not included in the documentation.
- TSAPI Exerciser - When you select TSAPI Exerciser, Windows opens the TSAPI Exerciser. The TSAPI Exerciser is an application that enables you to send CSTA requests across a TSAPI CTI link and view the exchange of messages between the TSAPI Exerciser and the AE Server. For more information about using the TSAPI Exerciser, see TSAPI Exerciser Help, which is included with the TSAPI Exerciser.
- TSAPI Exerciser Scripting Instructions - When you select TSAPI Exerciser Scripting Instructions, Windows opens a PDF file that describes the TSAPI Exerciser script interpreter.
Removing the TSAPI Windows SDK
Removing the TSAPI Windows SDK from a Windows 7 and 8 system
Use the following procedure to remove the TSAPI Windows SDK.
1. Access Control Panel.2. From the Control Panel, click Uninstall a program.
Windows displays the Programs and Features window.

Chapter 2: Installing the AE Services TSAPI clients and SDKs
52 AE Services TSAPI and CVLAN Client and SDK Installation Guide June 2014
3. Select Avaya Application Enablement Services TSAPI SDK, and click Uninstall. A confirmation dialog box appears.
4. Click Yes.
Setup uninstalls the software, and displays the Uninstall Complete dialog box.
Removing the TSAPI Windows SDK from a non-Windows 8 system
Use the standard Windows procedure to remove the TSAPI Windows SDK.
1. From the desktop, open the Control Panel. For example, click Start > Control Panel.2. From the Control Panel, click Add or Remove Programs.
Windows displays the Add or Remove Programs dialog box.
3. Select Avaya Application Enablement Services TSAPI SDK, and click Remove.
4. A confirmation dialog box appears.
5. Click Yes.
Setup uninstalls the software, and displays the Uninstall Complete dialog box.
6. Click Finish.
This completes the procedure to remove the TSAPI Windows SDK.
Upgrading the TSAPI Windows SDKIf you are upgrading from the Avaya Computer Telephony (Avaya CT) TSAPI Windows (TS Win32) SDK to the Avaya Application Enablement Services TSAPI Windows SDK, you must remove the Avaya CT TS Win32 SDK before you install the Avaya Application Enablement Services TSAPI Windows SDK.
If you are upgrading from an older version of the Avaya Application Enablement Services TSAPI Windows SDK to a newer version, you do not need to remove the older version first. Follow the installation procedure in Installing the TSAPI Windows SDK on page 48. See Installing the TSAPI Windows SDK on page 49.

Installing and Managing the TSAPI Linux SDK
AE Services TSAPI and CVLAN Client and SDK Installation Guide June 2014 53
Installing and Managing the TSAPI Linux SDK
Installing the TSAPI Linux SDKFollow this procedure to install the TSAPI Linux SDK.
Note:Note: The TSAPI Linux Client must be installed before the TSAPI Linux SDK can be
installed.
Note:Note: For information about obtaining the TSAPI SDK, see How to obtain the TSAPI
SDK on page 49.
1. Log in to the computer where you are installing the SDK as root.
2. Insert the TSAPI SDK CD into your computer’s CD-ROM drive.
3. Type mount /mnt/cdrom/ to mount the file system.
4. Type cd /mnt/cdrom/sdk/Linux to change to the directory containing the TSAPI Linux SDK installation program tsapi-sdk-linux-version-build.bin.where:
● version is the TSAPI Linux SDK version number.
● build is the TSAPI Linux SDK build number.
5. Run the TSAPI Linux installation program to begin the installation.For example:./tsapi-sdk-linux-6.3.3-94.bin
6. Press the Enter key to display the SDK License Agreement.
7. Carefully review the license agreement. When the installation program asks "Do you agree to the license terms?", enter "y".
8. When the installation program asks you to enter a temporary directory for the installation RPM, enter a valid directory, or press the Enter key to accept the default directory (/tmp).
9. When the installation program prompts for confirmation, enter y.

Chapter 2: Installing the AE Services TSAPI clients and SDKs
54 AE Services TSAPI and CVLAN Client and SDK Installation Guide June 2014
Removing the TSAPI Linux SDKFollow this procedure to remove the TSAPI Linux SDK.
1. Log in as root.
2. Use the rpm -e command to remove the TSAPI Linux SDK. For example:
rpm -e tsapi-sdk-linux
The Red Hat package manager removes the TSAPI Linux SDK.
3. To verify that the software has been removed, type the following command:
rpm -q tsapi-sdk-linux
The system responds with the following message:
package tsapi-sdk-linux is not installed
This completes the procedure to remove the TSAPI Linux SDK.
Upgrading the TSAPI Linux SDKFollow these steps to upgrade the AE Services TSAPI Linux SDK.
1. Remove the previous version of the SDK (see Removing the TSAPI Linux SDK on page 54).
2. If a previous version of the TSAPI Linux client is installed, remove the previous version of the client (see Removing the TSAPI Linux client on page 47).
3. Install the latest version of the TSAPI Linux client (see Installing the TSAPI Linux client on page 38.
4. Install the latest version of the SDK (see Installing the TSAPI Linux SDK on page 53).
CVLAN client and certificate management
AE Services TSAPI and CVLAN Client and SDK Installation Guide June 2014 55
Chapter 3: Installing the AE Services CVLAN Client/SDK
The Avaya Aura Application Enablement Services CVLAN Client/SDK, which can be installed on a client workstation, provides client computers with remote access to Communication Manager third-party call control capabilities. Access is provided by the CVLAN Service running on an AE Services Server (referred to as the AE Server).
The CVLAN Client and the CVLAN Software Development Kit (referred to in this document as the CVLAN Client/SDK) are packaged together.
Note:Note: The CVLAN Client/SDK is provided for maintaining existing applications. It is not
intended for new application development.
The CVLAN Client The CVLAN client provides the runtime libraries (cvlancli.dll for Windows-based systems, and libasai.so for Linux-based systems) that are required by CVLAN applications.
CVLAN client and certificate managementThe CVLAN client can use Transport Layer Security (TLS) to encrypt data exchanged between the CVLAN client and the AE Services server. When the CVLAN client requests a secure connection to the AE Services server, the CVLAN Service sends a certificate to the CVLAN client that allows the client to verify the server's identity. This process is knwon as server certificate authentication.
Similarly, beginning with AE Services Release 6.3.3, the CVLAN Service may be configured to request a certificate from the client so that the AE Services server can verify the client's identity. This process is known as client certificate authentication.
For server certificate authentication, you may either use the Avaya Product Root Certificate Authority (CA) certificate as the server certificate (this is the default), or a CA certificate issued by a trusted in-house or third-party certificate authority (also referred to as your own certificate).
The Avaya Product Root CA certificate is installed on the CVLAN client in the following location:
● Windows: <installation-directory>\certs\ca\avayaprca.cer

Chapter 3: Installing the AE Services CVLAN Client/SDK
56 AE Services TSAPI and CVLAN Client and SDK Installation Guide June 2014
● Linux: /usr/adm/cvlan/certs/CA/avayaprca.pem
If you choose to use your own certificates, a file in Privacy Enhanced Mail (PEM) format that contains the certifcate(s) for your trusted CA must be installed in the following location:
● Windows: <installation-directory>\certs\ca\aesCerts.cer
● Linux: /usr/adm/cvlan/certs/CA/aesCerts.pem
Note that this file may contain several certificates.
For client certificate authentication, AE Services does not provide a default certificate. You must provide and install your own certificates for client certificate authentication.
The default location for the PKCS12 (Public-Key Cryptography Standards #12) keystore containing the client certificate for client certificate authentication is:
● Windows: <installation-directory>\certs\cvlanClient.pfx
● Linux: /usr/adm/cvlan/certs/cvlanClient.pfx
If you choose to use a different file for the client keystore, the environment variable CLIENT_KEYSTORE must contain the full pathname of the keystore. Otherwise, this environment variable must not be set.
If the client keystore is password protected, then the environment variable KEYSTORE_PWD must contain the password for the keystore. Otherwise, this environment variable must not be set.
For more information about certificates, see Managing certificates on page 67.

The CVLAN SDK
AE Services TSAPI and CVLAN Client and SDK Installation Guide June 2014 57
The CVLAN SDKThe CVLAN SDK provides additional software for developing and maintaining CVLAN based applications. The CVLAN SDK contains the following components for developing or updating your applications:
● CVLAN client (cvlancli.dll for Windows based systems and libasai.so for Linux systems)
● header files
● sample code
● utilities
For information about developing and maintaining CVLAN applications, see the Avaya Aura® Application Enablement Services CVLAN Programmer’s Reference, 02-300546.
CVLAN client connections with AE ServicesCVLAN application programs use the asai_open() and asai_open_port() functions to initiate connections to the AE Server.
Use the asai_open() function in your program to specify a non-secure connection for port number 9999 and a secure connection for any other port number. For more information, see the Avaya Aura® Application Enablement Services CVLAN Programmer’s Reference, 02300546. See asai_open (3ASAI).The asai_open_port() API call allows your program to specify a specific port number in the port_number parameter and to explicitly indicate whether the connection is secure. For more information, see Avaya Aura® Application Enablement Services CVLAN Programmer’s Reference, 02300546. See asai_open_port (3ASAI).

Chapter 3: Installing the AE Services CVLAN Client/SDK
58 AE Services TSAPI and CVLAN Client and SDK Installation Guide June 2014
CVLAN Client/SDK requirementsThe AE Services CVLAN Client/SDK can be installed on the following client platforms.
● Windows - for more information, see Table 4: CVLAN Windows Client/SDK - hardware and software requirements on page 58
● Linux - for more information, see Table 5: CVLAN Linux Client/SDK - hardware and software requirements on page 59
Table 4: CVLAN Windows Client/SDK - hardware and software requirements
Component Requirements
CPU Intel 8086 instruction set architecture
Windows 32-bit Client Platform Operating Systems
● Windows 8 Pro● Windows 8 Enterprise● Windows 7 Professional● Windows 7 Enterprise● Windows 7 Ultimate● Windows XP Professional● Windows 2003 Server Standard Edition
Windows 64-bit Client Platform Operating Systems supporting CVLAN applications running in 32-bit compatibility mode
● Windows 8 Pro● Windows 8 Enterprise● Windows 7 Professional● Windows 7 Enterprise● Windows 7 Ultimate● Windows Server 2008 R2● Windows Server 2012 R2

CVLAN Client/SDK requirements
AE Services TSAPI and CVLAN Client and SDK Installation Guide June 2014 59
Table 5: CVLAN Linux Client/SDK - hardware and software requirements
Component Requirements
Red Hat Enterprise Linux (RHEL) 32-bit Versions
Red Hat Enterprise Linux ES v5.0 Update 8Red Hat Enterprise Linux ES v5.0 Update 9Red Hat Enterprise Linux ES v5.0 Update 10
Red Hat Enterprise Linux (RHEL) 64-bit Versions supporting CVLAN applications running in 32-bit compatibility mode
Red Hat Enterprise Linux ES v5.0 Update 8Red Hat Enterprise Linux ES v5.0 Update 9Red Hat Enterprise Linux ES v5.0 Update 10

Chapter 3: Installing the AE Services CVLAN Client/SDK
60 AE Services TSAPI and CVLAN Client and SDK Installation Guide June 2014
Before installing this release of the CVLAN Linux Client on a Red Hat Enterprise Linux ES v5.8 system, you may need to perform a separate installation of the following RPM:
openssl097a-0.9.7a-9.el5_4.2.i386.rpmThis RPM may be available with your Red Hat Linux installation media and is also available for download at http://rpm.pbone.net.
Installing the CVLAN Windows Client/SDKFollow this procedure to install the CVLAN Windows Client/SDK on a Windows workstation.
! Important:Important: Make sure you have completed the instructions for downloading the installation
files and saving them to your computer. See Chapter 2: Getting the files for installation.
1. Log on to your computer as a user with administrator-equivalent permissions.
2. Go to the directory that contains the CVLAN Windows client/SDK files that you downloaded, and double-click setup.exe.
Setup displays the Welcome dialog box.
3. Click Next.Setup displays the License Agreement dialog box.
4. Carefully review the license agreement, select I accept the terms of the license agreement, and then click Next.Setup displays the Choose Destination Location dialog box with the default destination folder. For 32-bit Windows platforms, the default destination folder is C:\Program Files\Avaya\AE Services\CVLAN. For 64-bit Windows platforms, the default destination folder is C:\Program Files (x86)\Avaya\AE Services\CVLAN.
5. Click Next.Setup displays the Ready to Install the Program dialog box.
6. Click Install.Setup installs the files. Next, Setup displays a Question dialog box asking if you want to view the Readme file now.
7. Click Yes to view the Readme file. After reviewing the Readme file, either close the file or minimize the display.
Setup displays the InstallShield Wizard Complete dialog box.
8. Click Finish.
Installing the CVLAN Windows Client/SDK
AE Services TSAPI and CVLAN Client and SDK Installation Guide June 2014 61
Continue with Using the ASAI test utility on page 66.

Chapter 3: Installing the AE Services CVLAN Client/SDK
62 AE Services TSAPI and CVLAN Client and SDK Installation Guide June 2014
Removing the CVLAN Windows Client/SDK
Removing the CVLAN Windows Client from a non-Windows 8 system
Follow this procedure to remove the CVLAN Windows Client/SDK from a non-Windows 8 system.
1. From the desktop, click Start > Control Panel.2. From the Control Panel, click Add/Remove Programs.
Windows displays the Add/Remove Programs Properties dialog box.
3. Select Avaya Application Enablement Services CVLAN Client, and click Remove.
A confirmation dialog box appears.
4. Click Yes.
The uninstall program removes the software and displays an Information box indicating that the program and all of its components have been removed.
5. Click Finish. This completes the procedure to remove the CVLAN Windows Client/SDK.
Removing the CVLAN Windows Client from a Windows 8 system
Use the following procedure to remove the CVLAN Windows Client/SDK from a Windows 8 system.
1. Access Control Panel.2. From the Control Panel, click Uninstall a program.
Windows displays the Programs and Features window.
3. Select Avaya Application Enablement Services CVLAN Client, and click Uninstall. A confirmation dialog box appears.
4. Click Yes.
The uninstall program removes the software and displays an Information box indicating that the program and all of its components have been removed.
5. Click Finish. This completes the procedure to remove the CVLAN Windows Client/SDK.

Upgrading the CVLAN Windows Client/SDK
AE Services TSAPI and CVLAN Client and SDK Installation Guide June 2014 63
Upgrading the CVLAN Windows Client/SDKIf you are upgrading a previous CVLAN Windows client the recommended steps are as follows:
1. Remove the previous version of the Client/SDK. See Removing the CVLAN Windows Client/SDK on page 62)
2. Install the latest version of the Client/SDK. See Installing the CVLAN Windows Client/SDK on page 60).
Although it is not a requirement that you remove the previous version of the Client/SDK, it is strongly recommended.

Chapter 3: Installing the AE Services CVLAN Client/SDK
64 AE Services TSAPI and CVLAN Client and SDK Installation Guide June 2014
Installing the CVLAN Linux Client/SDKFollow this procedure to install the CVLAN Linux Client/SDK.
Note:Note: Make sure you have completed the instructions for downloading the installation
files and saving them to your computer. See Chapter 2: Getting the files for installation.
Note:Note: Before installing this release of the CVLAN Linux Client on a Red Hat Enterprise
Linux ES v5.8 system, you may need to perform a separate installation of the following RPM: openssl097a-0.9.7a-9.el5_4.2.i386.rpm. This RPM may be available with your Red Hat Linux installation media and is also available for download at http://rpm.pbone.net.
1. Log in to the computer where you are installing the CVLAN Linux client/SDK as root.
2. Go to the directory that contains the CVLAN Linux Client/SDK installation program cvlan-client-linux-version-build.bin. Where,
● version is the CVLAN Linux Client/SDK version number.
● build is the CVLAN Linux Client/SDK build number.
3. Use the chmod command to make the CVLAN Linux Client/SDK installation program executable. For example, chmod +x cvlan-client-linux-6.3.3-94.bin
4. Run the CVLAN Linux/Client SDK installation program to begin the installation. For example, ./cvlan-client-linux-6.3.3-94.bin
5. Press the Enter key to display the End User License Agreement.
6. Carefully review the license agreement. When the installation program asks if you agree to the license terms, enter y.
7. When the installation program asks you to enter a temporary directory for the installation RPM, enter a valid directory, or press the Enter key to accept the default directory (/tmp).
8. When the installation program prompts for confirmation, enter y.This completes the procedure to install the CVLAN Linux Client/SDK.
Note:Note: Review the readme file (/usr/adm/cvlan/readme)for release-specific
information.
Continue with Using the ASAI test utility on page 66.

Removing the CVLAN Linux Client/SDK
AE Services TSAPI and CVLAN Client and SDK Installation Guide June 2014 65
Removing the CVLAN Linux Client/SDKFollow this procedure to remove the CVLAN Linux Client/SDK.
1. Log in to the client computer as root.
2. To remove the CVLAN Linux Client/SDK, type the following command:
rpm -e cvlan-client-linux
3. To verify that the software has been removed, type
rpm -q cvlan-client-linux
The system responds with the following message:
package cvlan-client-linux is not installed
This completes the procedure to remove the CVLAN Linux Client/SDK.
Upgrading the CVLAN Linux Client/SDKUse the following guidelines to upgrade the AE Services CVLAN Linux Client/SDK.
1. Remove the previous version of the Client/SDK. See Removing the CVLAN Linux Client/SDK on page 65.
2. Install the latest version of the Client/SDK. See Installing the CVLAN Linux Client/SDK on page 64.
Although it is not a requirement that you remove the previous version of the Client/SDK, it is strongly recommended.

Chapter 3: Installing the AE Services CVLAN Client/SDK
66 AE Services TSAPI and CVLAN Client and SDK Installation Guide June 2014
The ASAI test utility Use the ASAI test utility (asai_test) to determine if the CVLAN client and AE Server are communicating. The usage of the asai_test command is as follows:
Linux
/usr/adm/cvlan/bin/asai_test -m <server> <link number>
where:<server> is the host name or IP address of the AE Server.<link number> is the link number (1-16) of the CVLAN link to be tested. (The link number is also known as the "signal number.")
Windows"<installation-directory>utils\asai_test -m <server> <link number>"
where:<server> is the host name or IP address of the AE Server.<link number> is the link number (1-16) of the CVLAN link to be tested. (The link number is also known as the "signal number.")
Using the ASAI test utilityFollow this procedure to using the ASAI test utility.
1. At the command prompt (Linux based systems) or MS-DOS prompt (Windows), type the following command.
Linux
/usr/adm/cvlan/bin/asai_test -m abcserver 2
where: abcserver is the host name or IP address of the AE Server.
Windows"<installation-directory>\utils\asai_test -m abcserver 2"
where: abcserver is the host name or IP address of the AE Server.
If the test is successful, the CVLAN Service responds with results similar to the following:
=== Test for CVLAN Link 2===
Heartbeat test with switch for CVLAN Link 02 was successful
===Test Completed===

Using the ASAI test utility
AE Services TSAPI and CVLAN Client and SDK Installation Guide June 2014 67
2. If asai_test fails, take the appropriate course of action:
● Contact the AE Services administrator.
● If you are authorized to perform AE Services OAM administration, continue with the following steps.
a. Log into the AE Server, and select Utilities > Diagnostics > AE Services > ASAI Test.AE Services OAM displays the ASAI Test page.
b. Select the link numbers you want to test with the ASAI Test utility, and click Test.OAM displays the ASAI Test Result page, which indicates the results of the test. A successful test will display the following message on the ASAI Test Result page.
Heartbeat test with switch for CVLAN Link 02 was successful.

Chapter 3: Installing the AE Services CVLAN Client/SDK
68 AE Services TSAPI and CVLAN Client and SDK Installation Guide June 2014

Server certificate authentication
AE Services TSAPI and CVLAN Client and SDK Installation Guide June 2014 21
Appendix A: Managing certificates
! Important:Important: The information in this appendix applies only if you are using encrypted client
connections.
This appendix of certificate management describes certificate authentication for TSAPI and CVLAN client connections. Prior to AE Services Release 6.3.3, only server certificate authentication was available. Beginning with AE Services Release 6.3.3, client certification authentication is also available.
Additionally, this overview describes how to configure the TSAPI and CVLAN clients for certificate authentication.
Note:Note: The TSAPI Linux client and the CVLAN Linux client do not support certificates
signed with SHA-2 (e.g., SHA-256 or SHA-512) hash functions.
Server certificate authentication When the AE Services TSAPI or CVLAN client establishes a secure connection to the AE Services server, the server sends a certificate to the client that allows the client to verify the server's identity. This process is known as server certificate authentication This process is the same if you use your own certificates or if you use the AE Services default server certificate, which is signed by the Avaya Product Certificate Authority certificate. See Figure 1: Server Certificate Authentication on page 22 for an illustration.
The process of server certificate authentication occurs on the client, as follows:
1. The client sends a request to the server for a secure session.
2. The server sends its server certificate to the client.
3. The client checks the server certificate to determine the following:
a. If the server certificate is issued by a certificate authority that the client trusts. The client checks the name of the CA.
To comply, the name of the certification authority (CA) on the certificate must match the name of the CA on the client’s trusted certificate.
b. If the server certificate is within its validity window.
The client checks to see if the current time falls between the Not Before and Not After dates in the server certificate.

Appendix A: Managing certificates
22 AE Services TSAPI and CVLAN Client and SDK Installation Guide June 2014
c. If the common name in the server certificate matches the name of the server to which the client is connected.
If the names do not match, the client can not trust the certificate. This only applies if the client has been configured with "Verify Server FQDN=1".
Figure 1: Server Certificate Authentication
Using the default certificate - no certificate configuration requiredThe AE Services server includes a default server certificate, which is signed by the Avaya Product Certificate Authority (CA). Also, the AE Services client installation programs for TSAPI and CVLAN install the Avaya Product CA certificate on the client computer. See Figure 2 for an illustration.
! Important:Important: If you plan to use the default certificate you do not have to perform any additional
client configuration for server certificate authentication.
Table 1: Where AE Services installs the default CA certificate
TSAPI Win32 client <installation-folder>\certs\ca\avayaprca.cer
TSAPI Linux client /opt/mvap/tsapi/client/certs/CA/avayaprca.pem

Server certificate authentication
AE Services TSAPI and CVLAN Client and SDK Installation Guide June 2014 23
If you use your own certificates - the 'default location' optionNotice in Figure 2 that frame B is labeled as the "default location" option.
If you use your own certificates, and you copy your certificates to a specified location, you do not have to update the configuration files (tslib.ini, for Win32 clients and tslibrc, for Linux clients). The specified locations are listed in Table 2.
Table 2: TSAPI and CVLAN- if you use your own certificates: the "default location option"
CVLAN Linux client /usr/adm/cvlan/certs/CA/avayaprca.pem
CVLAN Win32 client <installation-folder>\certs\ca\avayaprca.cer
TSAPI Win32 client <installation-folder>\certs\ca\aesCerts.cer
TSAPI Linux client /opt/mvap/tsapi/client/certs/CA/aesCerts.pem
CVLAN Win32 client <installation-folder>\certs\ca\aesCerts.cer
CVLAN Linux client /usr/adm/cvlan/clients/certs/CA/aesCerts.pem

Appendix A: Managing certificates
24 AE Services TSAPI and CVLAN Client and SDK Installation Guide June 2014
Figure 2: Where AE Services installs the CA certificate (per-client)
Using certificates issued by a trusted in-house or third-party certificate authority
If you plan to use your own certificates, as opposed to using the default Avaya certificate, familiarize yourself with the tasks described in Table 3.

Server certificate authentication
AE Services TSAPI and CVLAN Client and SDK Installation Guide June 2014 25
AE Services certificate administrationIf you are using your own certificates, the scope of both AE Services client and AE Services server administration tasks increases. To be able to use your own certificates for the AE Services TSAPI and CVLAN clients, certificate administration is required on the AE Services server.
Table 3: Scenario for setting up AE Services - if you use your own certificates
Task Interface
TSAPI
1 Install the Trusted CA’s Certificate on your client.
On the computer where the client software is installed.
2 If you are using your own certificates, and you are not using the predefined location for storing certificates, you must add statements to the configuration file that specify where your certificates are located.
On the Windows computer where the TSAPI client software is installed. Edit the tslib.ini file. See TSAPI Windows client certificate authentication on page 29.
On the Linux computer where the TSAPI client software is installed. Edit the tslibrc file. See TSAPI Linux client certificate authentication on page 41.
CVLAN
1 Install the Trusted CA’s Certificate on your client.
On the computer where the client software is installed.
2 Make sure the certificate is installed in the proper location.
On the computer that the client is installed on. See CVLAN client and certificate management on page 55.

Appendix A: Managing certificates
26 AE Services TSAPI and CVLAN Client and SDK Installation Guide June 2014
If you are configuring TSAPI and CVLAN clients in an environment that uses certificates issued by a trusted in-house or third-party certificate authority, Table 4 provides you with a general frame of reference for the related AE Services administrative tasks.
Client certificate authenticationBeginning with AE Services Release 6.3.3, the TSAPI and CVLAN Services may be configured to request a certificate from the client so that the AE Services server can verify the client's identity. This process is known as client certificate authentication.
Table 4: Scenario for setting up TSAPI and CVLAN - if you use your own certificates
Description Notes
1 Create a server certificate request for AE Services.
See "Creating a server certificate signing request for the AE Services server" in the Avaya Aura® Application Enablement Services Administration and Maintenance Guide, 02-30357 (AE Services Administration and Maintenance Guide).
2 Create an AE Services server certificate.
See "Creating a server certificate for AE Services" in the AE Services Administration and Maintenance Guide.
3 Import the server certificate into AE Services.
See "Importing the server certificate into AE Services" in the AE Services Administration and Maintenance Guide.
TSAPI-related administrative tasks
1 Administer TSAPI links as encrypted.
See "Administering TSAPI Links" in the AE Services Administration and Maintenance Guide.
CVLAN-related administrative tasks
1 Add a CVLAN link. See "Administering CVLAN Links" in the AE Services Administration and Maintenance Guide.
2 Add a CVLAN client. See "Adding CVLAN Clients" in the AE Services Administration and Maintenance Guide.

Client certificate authentication
AE Services TSAPI and CVLAN Client and SDK Installation Guide June 2014 27
The process of client certificate authentication occurs on the server, as follows:
1. After the client has authenticated the server's certificate, the server sends a request to the client for its certificate.
2. The client sends its certificate to the server.
3. The server checks the client certificate to determine the following:
a. If the client certificate is issued by a certificate authority that the server trusts.
b. If the client certificate is within its validity window. The server checks to see if the current time falls between the Not Before and Not After dates in the client certificate.
c. If the client certificate can be used for client authentication.The server checks to see if the client certificate's Extended Key Usage field includes Client Authentication.
When all the security checks are satisfied the client and server can exchange secure messages.
Figure 3: Client Certificate Authentication
Using the default client keystore locationIf the TSAPI Service is configured to perform client certificate authentication and you install the client keystore containing the client certificate in the default location, you do not need to configure the location of the client keystore in the TSAPI client library configuration file. Table 5: TSAPI - Default client keystore locations on page 28 locations lists the default location of the client keystore for the TSAPI Windows and Linux client libraries.

Appendix A: Managing certificates
28 AE Services TSAPI and CVLAN Client and SDK Installation Guide June 2014
Table 5: TSAPI - Default client keystore locations
If the CVLAN Service is configured to perform client certificate authentication and you install the client keystore containing the client certificate in the default location, then you do not need to set the environment variable CLIENT_KEYSTORE for your CVLAN applications. Table 6: CVLAN - Default TSAPI client keystore locations on page 28 lists the default location of the client keystore for the CVLAN Windows and Linux client libraries.
Table 6: CVLAN - Default TSAPI client keystore locations
Configuring the client keystore location and passwordIf the client keystore is not installed in the default location, or if the client keystore is password protected, familiarize yourself with the tasks described in Table 7: Tasks for specifying the client keystore location and password on page 29 for specifying the client keystore location and password.
TSAPI Windows client <installation-folder>\certs\tsapiClient.pfx
TSAPI Linux client /opt/mvap/tsapi/client/certs/tsapiClient.pfx
CVLAN Windows client <installation-folder>\certs\cvlanClient.pfx
CVLAN Linux client /usr/adm/cvlan/certs/cvlanClient.pfx

Client certificate authentication
AE Services TSAPI and CVLAN Client and SDK Installation Guide June 2014 29
Table 7: Tasks for specifying the client keystore location and passwordTask Instructions
TSAPI
1 Install the client keystore on the computer where the TSAPI client software is installed.
2 If you are not using the default location for the client keystore file, see Table 5: TSAPI - Default client keystore locations on page 28, or if the client keystore file is password protected, you must add statements to the TSAPI client library configuration file that specify where the client keystore is located and/or the password for the client keystore.
On the Windows computer where the TSAPI client software is installed, edit the tslib.ini file to provide values for the Client KeyStore and/or KeyStore Password settings. See Adding Certificate Configuration statements to the tslib.ini file on page 30.On the Linux computer where the TSAPI client software is installed, edit the tslibrc file to provide values for the Client KeyStore and/or KeyStore Password settings. See Adding certificate configuration statements to the tslibrc file on page 41.
CVLAN
1 Install the client keystore on the computer where the CVLAN client software is installed.
2 If you are not using the default location for the client keystore file, see Table 6: CVLAN - Default TSAPI client keystore locations on page 28, you must set the environment variable CLIENT_KEYSTORE to the location of the client keystore file.
On the computer where the CVLAN client software is installed, set the environment variable CLIENT_KEYSTORE to the location of the client keystore file. See CVLAN client and certificate management on page 55.
3 If the client keystore file is password protected, you must set the environment variable KEYSTORE_PWD to the password for the client keystore.
On the computer where the CVLAN client software is installed, set the environment variable KEYSTORE_PWD to the password for the client keystore file. See CVLAN client and certificate management on page 55.

Appendix A: Managing certificates
30 AE Services TSAPI and CVLAN Client and SDK Installation Guide June 2014

TSAPI Spy - a Windows client message tracing tool
AE Services TSAPI and CVLAN Client and SDK Installation Guide June 2014 31
Appendix B: TSAPI client message tracing
TSAPI Spy - a Windows client message tracing toolThe TSAPI Client includes TSAPI Spy, a client message tracing application that lets you see the flow of messages through the client TSAPI Library (TSLIB). TSAPI Spy traces messages as they enter and leave the library in both directions: from application(s) to the TSAPI Service; from the TSAPI Service to application(s). This section includes the following topics:
● Overview of the TSAPI Spy for Windows interface on page 32
● Using the Log to File option to direct output to a trace file on page 34
● Working with the streams list on page 37
● TSAPI Spy Trace Records on page 38
● TSAPI Spy Error Records on page 40
● Using the TSAPI Spy with Windows Server 2003 on page 40
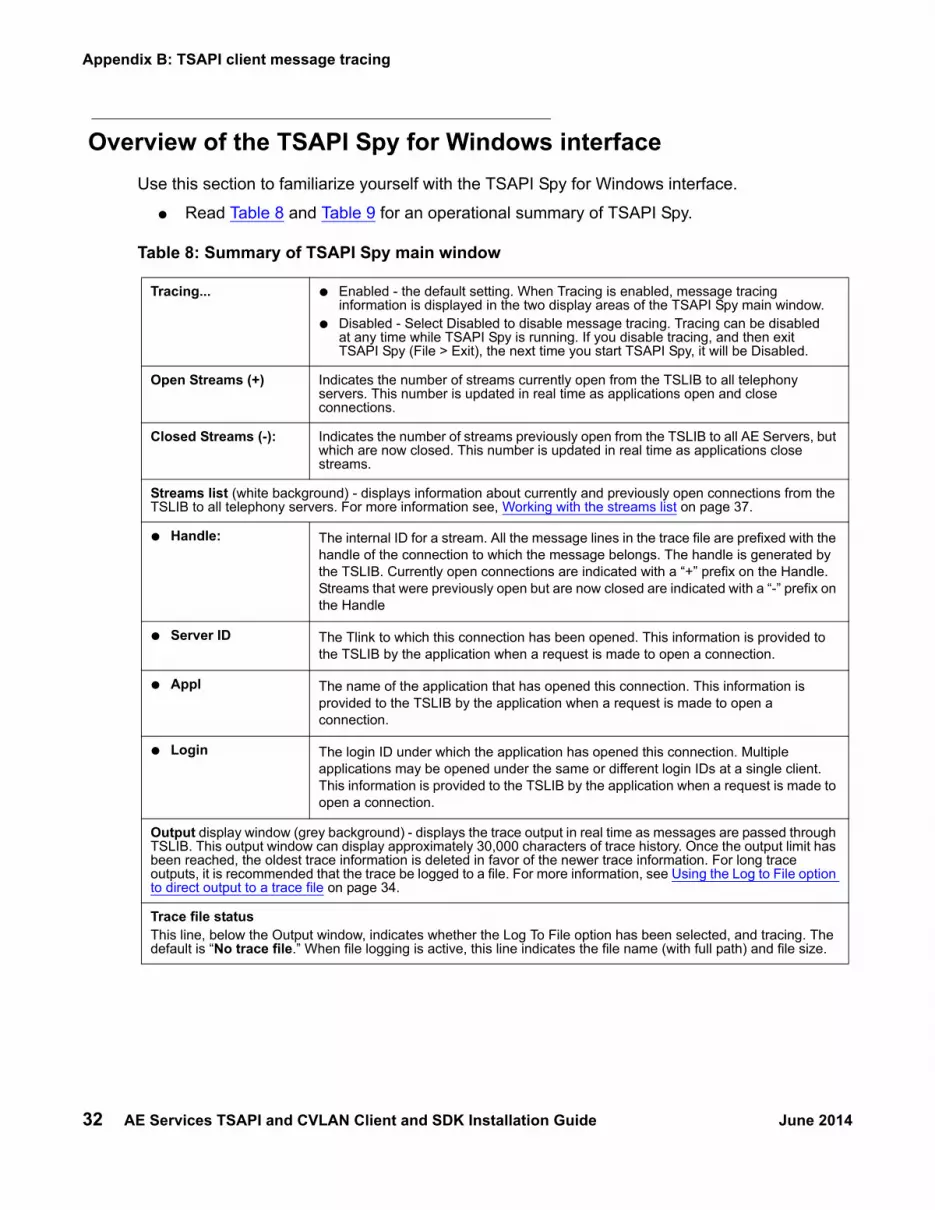
Appendix B: TSAPI client message tracing
32 AE Services TSAPI and CVLAN Client and SDK Installation Guide June 2014
Overview of the TSAPI Spy for Windows interfaceUse this section to familiarize yourself with the TSAPI Spy for Windows interface.
● Read Table 8 and Table 9 for an operational summary of TSAPI Spy.
Table 8: Summary of TSAPI Spy main window
Tracing... ● Enabled - the default setting. When Tracing is enabled, message tracing information is displayed in the two display areas of the TSAPI Spy main window.
● Disabled - Select Disabled to disable message tracing. Tracing can be disabled at any time while TSAPI Spy is running. If you disable tracing, and then exit TSAPI Spy (File > Exit), the next time you start TSAPI Spy, it will be Disabled.
Open Streams (+) Indicates the number of streams currently open from the TSLIB to all telephony servers. This number is updated in real time as applications open and close connections.
Closed Streams (-): Indicates the number of streams previously open from the TSLIB to all AE Servers, but which are now closed. This number is updated in real time as applications close streams.
Streams list (white background) - displays information about currently and previously open connections from the TSLIB to all telephony servers. For more information see, Working with the streams list on page 37.
● Handle: The internal ID for a stream. All the message lines in the trace file are prefixed with the handle of the connection to which the message belongs. The handle is generated by the TSLIB. Currently open connections are indicated with a “+” prefix on the Handle. Streams that were previously open but are now closed are indicated with a “-” prefix on the Handle
● Server ID The Tlink to which this connection has been opened. This information is provided to the TSLIB by the application when a request is made to open a connection.
● Appl The name of the application that has opened this connection. This information is provided to the TSLIB by the application when a request is made to open a connection.
● Login The login ID under which the application has opened this connection. Multiple applications may be opened under the same or different login IDs at a single client. This information is provided to the TSLIB by the application when a request is made to open a connection.
Output display window (grey background) - displays the trace output in real time as messages are passed through TSLIB. This output window can display approximately 30,000 characters of trace history. Once the output limit has been reached, the oldest trace information is deleted in favor of the newer trace information. For long trace outputs, it is recommended that the trace be logged to a file. For more information, see Using the Log to File option to direct output to a trace file on page 34.
Trace file status This line, below the Output window, indicates whether the Log To File option has been selected, and tracing. The default is “No trace file.” When file logging is active, this line indicates the file name (with full path) and file size.

TSAPI Spy - a Windows client message tracing tool
AE Services TSAPI and CVLAN Client and SDK Installation Guide June 2014 33
Table 9: TSAPI Spy Menu Options
File: ● Exit - Use menu item is used to exit TSAPI Spy. The system menu may also be used to exit the application.
Edit: ● Copy - copies the selected text (if any) from the Output window onto the Clipboard. The text is then available to be pasted into any application of your choosing. If no text is selected in the Output window, this menu item is grayed and disabled.
● Clear Buffer - clears out the contents of the Output window. Once this is done, the original contents are lost (the data is NOT copied to the Clipboard).
● Select All - selects all of the text in the Output window. The Copy menu item can then be used.
● Purge Closed Streams - deletes all closed connections (indicated with a “-” prefix) from the streams list and resets the Closed Streams count to 0, leaving only currently open connections in the Streams List.
Options All options, except Auto-Trace New Streams, are disabled by default.
● Always On Top - causes the TSAPI Spy window to be topmost on the screen display.This setting is disabled by default (a check mark does not appear next to it).
● Auto-Trace New Streams - causes newly opened connections (which open after TSAPI Spy is started) to be traced automatically. This option is described in more detail in Working with the streams list on page 37. This setting is enabled by default (a check mark appears next to it).
● Show Internal Events - causes non-application messages to be traced. The majority of messages normally traced through the CSTA32.DLL are application-to-telephony server and telephony server-to-application messages. There are, however, a small number of messages that the TSLIB generates to facilitate application/telephony server communications.This setting is disabled by default (a check mark does not appear next to it).
● Log To File - causes all trace messages to be logged to a file specified by the user. See Using the Log to File option to direct output to a trace file on page 34. This setting is disabled by default (a check mark does not appear next to it).

Appendix B: TSAPI client message tracing
34 AE Services TSAPI and CVLAN Client and SDK Installation Guide June 2014
Using the Log to File option to direct output to a trace file
The TSAPI Spy application allows you to trace the TSAPI messages exchanged by the TSAPI Windows client library and the TSAPI Service. The trace output is displayed in the main window, but you may also direct the trace output to a file by enabling the "Log to File" option.
Prior to Release 5.2, this option created a single log file that would grow without bound. Beginning with Release 5.2, you can limit the amount of disk space used by the TSAPI Spy "Log to File" option:
Within the TSAPI Spy "Log to File" dialog box, set the check box for "Use Multiple Trace Files". Then adjust the values for "Maximum Number of Trace Files to Create" and "Maximum Size for Each Trace File" based on your preferences.
Each time the trace file reaches its maximum size, the trace file will "roll over". This means that if messages are being logged to file tsapispy.trc, then the first time the trace file rolls over, that file is renamed as tsapispy.trc.1 and a new tsapispy.trc file is created to receive additional log output.
To generalize, if the Trace File Name is tsapispy.trc and the "Maximum Number of Trace Files to Create" is some value n, then each time the tsapispy.trc file reaches the maximum size:
● The file tsapispy.trc.n is removed.
● Any trace files (tsapispy.trc.1, tsapispy.trc.2, ..., tsapispy.trc.n-1) that exist are renamed as (tsapispy.trc.2, tsapispy.trc.3, ..., tsapispy.trc.n).
● The file tsapispy.trc is renamed tsapispy.trc.1.
● A new tsapispy.trc file is created to receive additional log output.

TSAPI Spy - a Windows client message tracing tool
AE Services TSAPI and CVLAN Client and SDK Installation Guide June 2014 35
Procedure for creating a trace fileFollow this procedure to create a trace file.
1. Perform one of the following steps:
- If you are using Windows 8:
On the Start page, click on TSAPI Spy.
- If you are not using Windows 8:
Click Start > All Programs > Avaya AE Services > TSAPI Client > TSAPI Spy.
AE Services displays the TSAPI Spy for Win32 window.
2. From the Telephony Services Spy for Win32 window, select Options > Log To File... .
Windows displays the Log to File dialog box.
3. Follow these steps to complete the Create Trace File dialog box:
a. Accept the default for Log Trace Messages (enabled).
b. In the Trace File Name field, type a name for the trace file (for example, c:\cstatrace.txt), or, choose a location by clicking Browse.
The default extension assigned to trace files is .trc, but you can use any filename and extension.
c. If you would like the trace messages to be logged to a single file that grows without bound, clear the check box for Use Multiple Trace Files and click OK.
! Important:Important: Use this option with care to avoid using excessive disk space.
Appendix B: TSAPI client message tracing
36 AE Services TSAPI and CVLAN Client and SDK Installation Guide June 2014
d. If you would like to control the amount of disk space consumed by the trace files, set the check box for Use Multiple Trace Files. Then adjust the values for "Maximum Number of Trace Files to Create" and "Maximum Size for Each Trace File" based on your preferences and click OK.
Turning off Log to File
When you want to stop TSAPI Spy from writing output to the trace file, follow this procedure.
1. Select Options > Log To File (the Log to File option will have a check mark).
2. Uncheck the Log Trace Messages check box.
All of the options become disabled.
3. Click OK.
TSAPI Spy displays an information box that prompts you to confirm that you want to close the trace file.
4. Click OK.
TSAPI Spy closes the trace file.

TSAPI Spy - a Windows client message tracing tool
AE Services TSAPI and CVLAN Client and SDK Installation Guide June 2014 37
Working with the streams list
When you first start TSAPI Spy, Tracing and Auto-Trace New Streams are enabled by default. When Tracing is enabled, all connections that are currently open are traced. When Auto-Trace New Stream is enabled, tracing is enabled when a new connection is opened.
To indicate that tracing is enabled for a connection (or connections), TSAPI Spy highlights the connection displayed in the streams list.
● To disable Tracing for all streams, select the Disabled option button.
● To disable Auto-Trace New Streams, select Options > Auto-Trace New Streams. When you clear the check mark for Auto-Trace New Streams, tracing is not enabled for a new connection when it is opened.
Understanding trace outputTo understand trace output, think of the client library as a two-way pipeline, with messages entering and leaving both ends. Messages may originate or terminate in one of three places:
● the application
● the TSAPI Service
● the client library (for internal events)
The trace records track the progress of a message through the pipeline, enabling you to determine which messages have been sent and whether or not they have reached their destination.
Normally, two trace records are generated for each message: one as it enters the pipeline, and one as it exits. Messages entering and leaving the application side (or the library itself) are presented in detail, with the value of each data element displayed in an appropriate format. The corresponding trace records to/from the TSAPI Service only indicate successful transport of the message across the network.

Appendix B: TSAPI client message tracing
38 AE Services TSAPI and CVLAN Client and SDK Installation Guide June 2014
TSAPI Spy Trace Records
Trace records displayed in the Output window (or trace file) are separated by blank lines. Each begins with a time stamp and one of the following phrases which describes the record:
● RECEIVED FROM APPLICATION - the application has generated a message to be delivered to the TSAPI Service. The message is displayed in detail.
● RECEIVED FROM TSERVER - a message from the TSAPI Service has arrived in the client library receive queue. Notification only.
● DELIVERED TO APPLICATION - the application has accepted the message from the client library. The message is displayed in detail.
● FROM LIBRARY - the client library has generated an internal message to be delivered to the TSAPI Service. The message is displayed in detail.
● FOR LIBRARY - the client library has accepted an internal message from the TSAPI Service. The message is displayed in detail.
A typical request from an application generates three trace records, in the following sequence: RECEIVED FROM APPLICATION, RECEIVED FROM TSERVER, DELIVERED TO APPLICATION. An event report from the TSAPI Service generates only the latter two records. Trace records from multiple messages may be interleaved.

TSAPI Spy - a Windows client message tracing tool
AE Services TSAPI and CVLAN Client and SDK Installation Guide June 2014 39
Figure 4 shows a portion of the trace output resulting from a cstaMakeCall request:
Figure 4: Trace Output sample display

Appendix B: TSAPI client message tracing
40 AE Services TSAPI and CVLAN Client and SDK Installation Guide June 2014
TSAPI Spy Error Records
Certain network errors are also reported by TSAPI Spy. These reports are displayed in the following form:
● CONNECTION TERMINATED BY TSERVER (condition code = xxxx)
where xxxx is a numerical error code in hexadecimal notation. The most common error codes reported are:
- 2745 (this means the connection is aborted)- 2746 (the connection has been reset)- 2742 (the network is down)
● CONNECTION TERMINATED BY CLIENT LIBRARY (condition code = 0), which indicates that the client has detected a loss of connectivity with the AE Services server
Other codes are possible under unusual conditions. Report the code to technical support when you request assistance.
Using the TSAPI Spy with Windows Server 2003When using a standard Windows Remote Desktop Connection to start the TSAPI Spy on a Windows Server 2003-based server where the TSAPI application is running as a Windows service, the TAPI Spy will not provide any trace messages. To capture the messages sent and received by the TSAPI application, the Remote Desktop Connection used to start the TSAPI Spy must connect to the console session.
Use the following procedure to open a console session to a Windows Server 2003-based server:
1. Click Start > Run.
The Run dialog box appears.
2. Enter c:\windows\system32\mstsc.exe /console and click OK.
A Remote Desktop Connection window appears.
3. Complete the host name or IP address of the application, and configure any other options you want.
4. Click Connect.
Note:Note: Each computer has only one console session. When you connect to the console
session remotely, other users may be unable to log on to the computer locally.

Client message tracing for Linux-based TSAPI clients
AE Services TSAPI and CVLAN Client and SDK Installation Guide June 2014 41
Client message tracing for Linux-based TSAPI clientsFor Linux-based clients, the message tracing ability is built into the shared client library file (libcsta.so). The tracing capability allows a user to log the flow of messages through applications using the TSAPI Linux clients.
Messages are traced as they enter and leave the library in both directions: from applications to the TSAPI Service and from the TSAPI Service to applications. Trace messages are written directly to a file specified by the user. Message tracing is performed on an application-by-application basis, according to each application’s environment settings.
How to enable message tracingTo enable the TSAPI Message Tracing feature, set and export the environment variable CSTATRACE before starting your TSAPI application. The CSTATRACE environment variable specifies the name of the file where the TSAPI messages will be logged.
Beginning with Release 5.2 of the AE Services TSAPI Linux client, you can control the amount of disk space used by the TSAPI Message Tracing feature by setting and exporting the following additional environment variables:
● CSTATRACE_MAX_FILE_INDEX - This environment variable controls the number of TSAPI trace files that will be created.
Each time the trace file reaches its maximum size (see CSTATRACE_MAX_FILE_SIZE, described below), the trace file will "roll over". This means that if messages are being logged to file cstatrace, then the first time the trace file rolls over, that file is renamed as cstatrace.1 and a new cstatrace file is created to receive additional log output.
To generalize, if messages are being logged to file cstatrace and CSTATRACE_MAX_FILE_INDEX is set to some value n, then each time the cstatrace file reaches its maximum size:
- The file cstatrace.n is removed.- Any trace files (cstatrace.1, cstatrace.2, ..., cstatrace.n-1) that exist are renamed as
(cstatrace.2, cstatrace.3, ..., cstatrace.n).- The file cstatrace is renamed cstatrace.1.- A new cstatrace file is created to receive additional log output.
In effect, the number of TSAPI trace files that may be created is limited to CSTATRACE_MAX_FILE_INDEX + 1.
Valid values for CSTATRACE_MAX_FILE_INDEX are 1-9. If CSTATRACE_MAX_FILE_SIZE is set but CSTATRACE_MAX_FILE_INDEX is not set, then CSTATRACE_MAX_FILE_INDEX defaults to 9.

Appendix B: TSAPI client message tracing
42 AE Services TSAPI and CVLAN Client and SDK Installation Guide June 2014
● CSTATRACE_MAX_FILE_SIZE - This environment variable controls the maximum size of each TSAPI trace file.
Valid values for CSTATRACE_MAX_FILE_SIZE are 1-10000 (MB). If CSTATRACE_MAX_FILE_INDEX is set but CSTATRACE_MAX_FILE_SIZE is not set, then CSTATRACE_MAX_FILE_SIZE defaults to 10 (MB).
When neither CSTATRACE_MAX_FILE_INDEX nor CSTATRACE_MAX_FILE_SIZE is set, then messages will be logged to a single file that grows without bound. Use caution when collecting TSAPI trace messages this way to avoid using excessive disk space.
Also, note that the TSAPI Message Tracing feature is provided for troubleshooting purposes only. Enabling this feature will degrade the performance of the TSAPI Linux client library.
Examining trace filesFigure 5 depicts sample output from a tracing session started by setting CSTATRACE. The number that appears at the beginning of each line is the ACS handle for the stream.
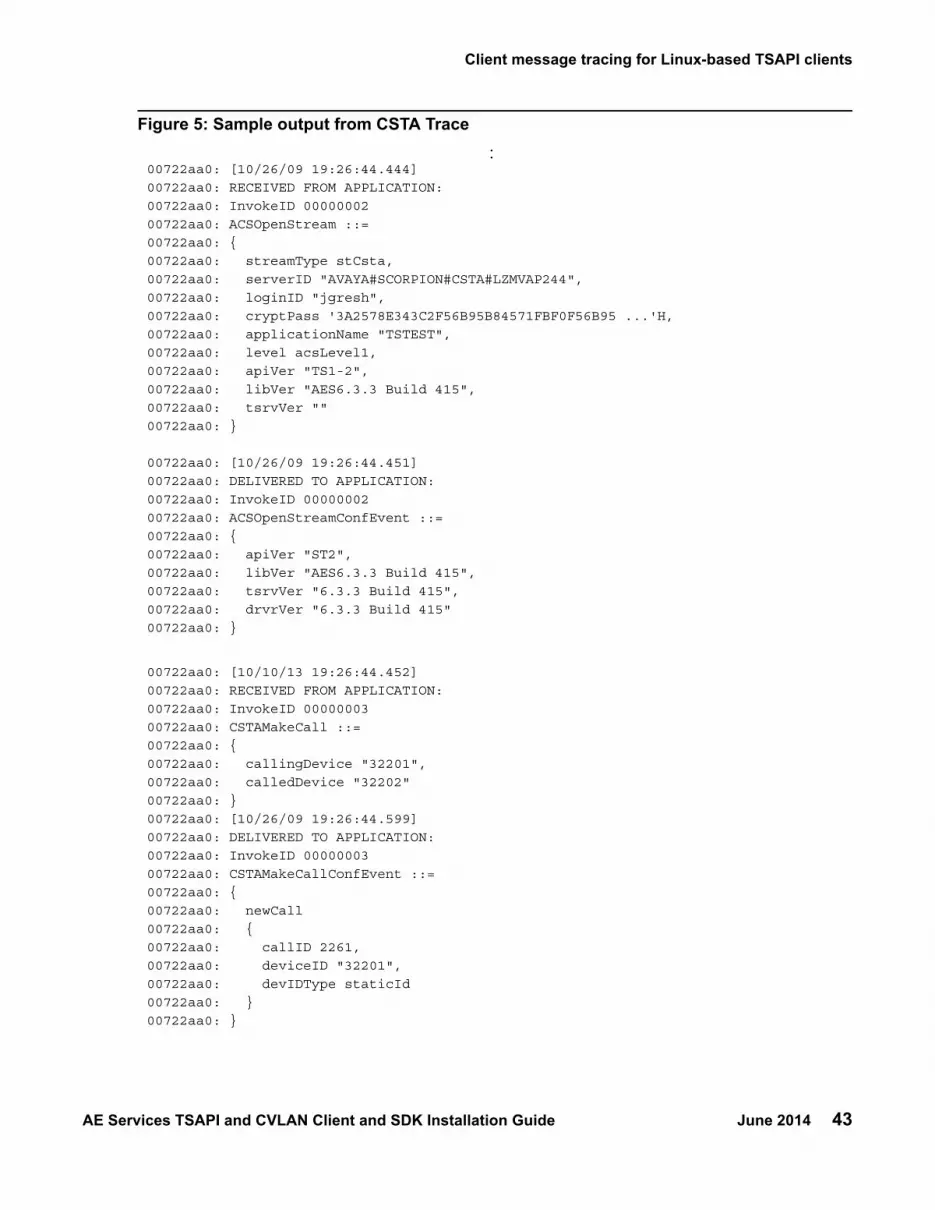
Client message tracing for Linux-based TSAPI clients
AE Services TSAPI and CVLAN Client and SDK Installation Guide June 2014 43
Figure 5: Sample output from CSTA Trace:
00722aa0: [10/26/09 19:26:44.444]
00722aa0: RECEIVED FROM APPLICATION:
00722aa0: InvokeID 00000002
00722aa0: ACSOpenStream ::=
00722aa0: {
00722aa0: streamType stCsta,
00722aa0: serverID "AVAYA#SCORPION#CSTA#LZMVAP244",
00722aa0: loginID "jgresh",
00722aa0: cryptPass '3A2578E343C2F56B95B84571FBF0F56B95 ...'H,
00722aa0: applicationName "TSTEST",
00722aa0: level acsLevel1,
00722aa0: apiVer "TS1-2",
00722aa0: libVer "AES6.3.3 Build 415",
00722aa0: tsrvVer ""
00722aa0: }
00722aa0: [10/26/09 19:26:44.451]
00722aa0: DELIVERED TO APPLICATION:
00722aa0: InvokeID 00000002
00722aa0: ACSOpenStreamConfEvent ::=
00722aa0: {
00722aa0: apiVer "ST2",
00722aa0: libVer "AES6.3.3 Build 415",
00722aa0: tsrvVer "6.3.3 Build 415",
00722aa0: drvrVer "6.3.3 Build 415"
00722aa0: }
00722aa0: [10/10/13 19:26:44.452]
00722aa0: RECEIVED FROM APPLICATION:
00722aa0: InvokeID 00000003
00722aa0: CSTAMakeCall ::=
00722aa0: {
00722aa0: callingDevice "32201",
00722aa0: calledDevice "32202"
00722aa0: }
00722aa0: [10/26/09 19:26:44.599]
00722aa0: DELIVERED TO APPLICATION:
00722aa0: InvokeID 00000003
00722aa0: CSTAMakeCallConfEvent ::=
00722aa0: {
00722aa0: newCall
00722aa0: {
00722aa0: callID 2261,
00722aa0: deviceID "32201",
00722aa0: devIDType staticId
00722aa0: }
00722aa0: }

Appendix B: TSAPI client message tracing
44 AE Services TSAPI and CVLAN Client and SDK Installation Guide June 2014

AE Services TSAPI and CVLAN Client and SDK Installation Guide June 2014 45
Appendix C: File naming conventions
The following file naming convention provides you with a convenient way of interpreting the file names of AE Services deliverables. This naming convention is not a formal standard, it is simply a guideline for reading file names.
<api>- <type>- <target>- <version> - <build>.<suffix>Where:
Examples
● TSAPI Windows client - tsapi-client-win32-6.3.3-170.zip● TSAPI Linux client - tsapi-client-linux-6.3.3-94.bin● TSAPI Windows SDK - tsapi-sdk-win32-6.3.3-170.zip● TSAPI Linux SDK - tsapi-sdk-linux-6.3.3-94.bin● CVLAN Windows client and SDK - cvlan-client-win32-6.3.3-70.zip● CVLAN Linux client and SDK - cvlan-client-linux-6.3.3-94.bin
Table 10 applies the naming convention to the AE Services deliverables.
<api>- Refers to the name of the API. For example, tsapi or cvlan<type>- Refers to the type of deliverable. Can be client- , sdk- ,or
client-sdk (for ISOs).
<target> Refers to the name of the operating system.
<version> Refers to the software version.
- <build> Refers to the software build number, preceded by a dash. Note: This number changes frequently. It is often represented in this document by x instead of an actual build number.
.<suffix> Refers to the file or package type.

Appendix C: File naming conventions
46 AE Services TSAPI and CVLAN Client and SDK Installation Guide June 2014
Table 10: AE Services TSAPI and CVLAN software deliverables -- file names
<api>- <type>- <target>- <version> -<build>1
1. Build numbers change frequently. These numbers are provided as examples only.
.<suffix>
tsapi- client- linux- 6.3.3 -170 .bin
tsapi- client- win32- 6.3.3 -170 .zip
tsapi- sdk- linux- 6.3.3 -170 .bin
tsapi- sdk- win32- 6.3.3 -170 .zip
cvlan- client- linux- 6.3.3 -70 .bin
cvlan- client- win32- 6.3.3 -70 .zip

AE Services TSAPI and CVLAN Client and SDK Installation Guide June 2014 47
Glossary
API Application Programming Interface. An API is a published specification that describes how to access the functions of a software-based service.
ASAI Adjunct Switch Application Interface - ASAI is a protocol that enables software applications to access call processing capabilities provided by Avaya Communication Manager.
Certificate Authority (CA)
A certificate authority is an organization that issues and manages security credentials, including digitally signed certificates containing public keys for message encryption and decryption.
Computer Telephony Integration
Abbreviated as CTI. The integration of services provided by a computer and a telephone. In simplest terms, it means connecting a computer to a communications server (or switch) and having the computer issue commands that control calls. All services running on the AE server (TSAPI, CVLAN, DLG, and DMCC) are CTI services.
CTI Computer Telephony Integration. CTI is the use of computers to manage telephone calls.
CTI Link The term CTI link refers to a generic link type that is used in the context of Communication Manager administration. As a generic link type, it can refer to any of the following AE Services links: CVLAN links, DLG links, and TSAPI links (JTAPI and the Telephony Web Service use TSAPI links). When an OAM Web page, such as TSAPI Service Summary, displays a column heading for a CTI link type, it is referring to TSAPI link as it is administered on Communication Manager. Up to 64 links can be administered on Communication Manager.

CT User
48 AE Services TSAPI and CVLAN Client and SDK Installation Guide June 2014
CT User Computer Telephony User. A user (or an application) administered in the AE Services User Service as a CT User derives authorization from the Security Database. CT Users include the following users or applications: TSAPI Service users (including JTAPI users), Telephony Web Service users, and Device, Media and Call Control users who use the Call Control Services (CSTA III Single-Step Conference, Snapshot Call, and Snapshot Device).
CVLAN CallVisor/LAN - CallVisor/LAN is a C programming API based on the ASAI message set.
JTAPI Java Telephony Application Programming Interface. JTAPI is a scalable, extensible API integrating both first-party and third-party call control models. The AE Services JTAPI implementation provides access to the complete set of Third Party call control features provided by the TSAPI Service. JTAPI uses the TSAPI Service for communication with Avaya Communication Manager. For information about JTAPI, see the Avaya Aura® Application Enablement Services JTAPI Programmer’s Guide, 02-603488.
Link A communications channel between system components.
Operations, Administration, and Maintenance
Abbreviated as OAM. The administrative interface for the Application Enablement Services platform.
PEM Privacy Enhanced Mail - A file format for storing private keys, public keys, and certificates. A PEM file may contain either personal certificates or certificates from a Certificate Authority.
Private Data Private data is a switch-specific software implementation that provides value added services.
Routing Selecting an appropriate path for a call. When a routing application is started, it sends route registration requests, which contain a device ID, to Communication Manager. Routing requests instruct Communication Manager to send all incoming calls to these device IDs (in the TSAPI Service). The TSAPI Service sends the call to the application for routing. Communication Manager does not route these calls. Also referred to as adjunct routing.

TSAPI
AE Services TSAPI and CVLAN Client and SDK Installation Guide June 2014 49
SDK Software Development Kit. An SDK is a package that enables a programmer to develop applications for a specific platform. Typically, an SDK includes one or more APIs, documentation, and, in some cases, programming tools.
Tlink A Tlink is a service identifier that is created when the administrator adds a TSAPI Link in AE Services OAM. A Tlink refers to a switch connection between a specific switch and a specific AE Server.
TLS Transport Layer Security. TLS is a protocol intended to secure and authenticate communications across public networks through data encryption. TLS is an enhancement to SSL version 3, and is a proposed Internet Standard.
TSAPI Telephony Services API. TSAPI is a C- language based API for third-party call and device control, and based on CSTA standards.

TSAPI
50 AE Services TSAPI and CVLAN Client and SDK Installation Guide June 2014

AE Services TSAPI and CVLAN Client and SDK Installation Guide June 2014 97

98 AE Services TSAPI and CVLAN Client and SDK Installation Guide June 2014

AE Services TSAPI and CVLAN Client and SDK Installation Guide June 2014 99
Index
Index
AAlternate Tlinks . . . . . . . . . . . . . . . . . . 39ASAI test utility . . . . . . . . . . . . . . . . . . 66Avaya CT Windows SDK . . . . . . . . . . . 51, 52, 62
Cclient certificate authentication . . . . . . . . . .27, 42CVLAN
installing Linux Client . . . . . . . . . . . . . . 64installing Linux SDK. . . . . . . . . . . . . . . 64installing Windows Client . . . . . . . . . . . . 60installing Windows SDK . . . . . . . . . . . . . 60
EErrors
reported by TSAPI Spy . . . . . . . . . . . . . 88
GGlossary . . . . . . . . . . . . . . . . . . . . . 93
IInstalling CVLAN Linux Client and SDK . . . . . . . 64Installing CVLAN Windows Client and SDK . . . . . 60Installing TSAPI Linux client . . . . . . . . . . . . 38Installing TSAPI Linux SDK. . . . . . . . . . . . . 53Installing TSAPI Windows client. . . . . . . . . . . 21Installing TSAPI Windows SDK . . . . . . . . . . . 49
Ooperating system requirements . . . . . . . . . . . 17
RRemoving
TSAPI Windows SDK . . . . . . . . . . . 51, 52, 62Removing CVLAN Windows client . . . . . . . . . 62Removing TSAPI Linux client . . . . . . . . . . .47, 54Removing TSAPI Linux SDK . . . . . . . . . . . . 54Removing, TSAPI Windows client . . . . . . . . . . 25
Sserver certificate authentication . . . . . . . . . . . 41Software
downloading . . . . . . . . . . . . . . . . . . 12
TTS Spy
error records . . . . . . . . . . . . . . . . . . 88file logging . . . . . . . . . . . . . . . . . . . 82trace records . . . . . . . . . . . . . . . . . . 86
TS Spy menu options . . . . . . . . . . . . . . . . 81TSAPI Linux client, removing . . . . . . . . . . 47, 54TSAPI Linux SDK, removing . . . . . . . . . . . . 54TSAPI Spy
client library model . . . . . . . . . . . . . . . 85TSAPI Test, verifying installation . . . . . . . . . . 24TSAPI Win32 client, verifying installation . . . . . . . 24TSAPI Windows client, installing. . . . . . . . . . . 21TSAPILIB
tracing client messages with TSAPI Spy . . . . . 79tslib.ini configuration file. . . . . . . . . . . . . . . 29tslibrc configuration file . . . . . . . . . . . . . . . 39
VVerifying installation of CVLAN client. . . . . . . . . 66

100 AE Services TSAPI and CVLAN Client and SDK Installation Guide June 2014
Index


