Embed Size (px)
Citation preview

BBeennttlleeyy PPrroojjeeccttWWiissee CCoonnnneeccttoorr ffoorr AArrccGGIISS VV88ii
IImmpplleemmeennttaattiioonn GGuuiiddee
DAA038750‐1/0001
Bentley Systems, Inc. 685, Stockton Drive Exton, PA 19341 www.bentley.com

BBeennttlleeyy PPrroojjeeccttWWiissee CCoonnnneeccttoorr ffoorr AArrccGGIISS VV88ii IImmpplleemmeennttaattiioonn GGuuiiddee
© 2009 Bentley Systems, Incorporated 2
Table of Contents
Installing the Orchestration Framework ........................................................................................................................ 3
Installing the ProjectWise Integration Server ................................................................................................................ 5
Installing ProjectWise Administrator ............................................................................................................................. 5
Installing ProjectWise Explorer ...................................................................................................................................... 6
Installing ProjectWise Geospatial Integration Server .................................................................................................... 6
Installing ProjectWise Geospatial Administrator ........................................................................................................... 6
Installing ProjectWise Geospatial Explorer .................................................................................................................... 6
Installing and Licensing the ArcGIS Desktop .................................................................................................................. 6
Installing the ArcGIS Connector Server .......................................................................................................................... 9
Installing the ProjectWise Administrator Extension for ArcGIS Connector ................................................................... 9
Installing ProjectWise Explorer Extension for ArcGIS Connector .................................................................................. 9
Configuring ProjectWise ................................................................................................................................................ 9
Configuring the ArcGIS Connector Server ................................................................................................................... 18
Configuring the ProjectWise Administrator Extension for ArcGIS Connector ............................................................. 23
Configuring the ArcGIS Connector Security ................................................................................................................. 26
Extracting for view only from ArcSDE .......................................................................................................................... 27
Configuring ProjectWise Geospatial ............................................................................................................................ 30
Extracting with the intent to modify and post ............................................................................................................ 35

BBeennttlleeyy PPrroojjeeccttWWiissee CCoonnnneeccttoorr ffoorr AArrccGGIISS VV88ii IImmpplleemmeennttaattiioonn GGuuiiddee
INSTALLING THE ORCHESTRATION FRAMEWORK (Has to be on the same machine as the ProjectWise Connector for ArcGIS Server)
1. Browse to the installation folder.
2. Run the ProjectWise installer setup.exe. The following window opens.
3. Click on Install for ProjectWise Orchestration Framework Service.
4. Follow the steps in the wizard.
5. Select the default install location.
6. Perform a typical installation.
7. The Bentley Orchestration Shepherd runs as a windows service, so enter a windows user name and password and a domain.
a. Domain: the windows domain name (on a machine not on a domain use the computer name).
b. User: the windows user under which the ProjectWise Orchestration Framework Service will run.
c. Password: password of the windows user.
d. Confirm Password: reenter password.
© 2009 Bentley Systems, Incorporated 3

BBeennttlleeyy PPrroojjeeccttWWiissee CCoonnnneeccttoorr ffoorr AArrccGGIISS VV88ii IImmpplleemmeennttaattiioonn GGuuiiddee
Note Typically, organizations create a dedicated windows account for the Orchestration framework.
8. Next, create a new SQL Server database dedicated to the Orchestration framework metadata that will be used to store the ArcGIS Connector configuration metadata and operation logs.
9. Select the Use specific username and password option and enter:
a. User Name: ‘sa’ (use the ‘sa’ user when using connector products).
b. Password: the ‘sa’ user password.
10. Click the New button and enter a name of your choice for the new database, and click OK.
© 2009 Bentley Systems, Incorporated 4

BBeennttlleeyy PPrroojjeeccttWWiissee CCoonnnneeccttoorr ffoorr AArrccGGIISS VV88ii IImmpplleemmeennttaattiioonn GGuuiiddee
11. Click OK.
12. Click Finish.
13. Verify ProjectWise Orchestration Framework Service V8i is running by looking at the windows services. This service must be running to install the ArcGIS Connector server component.
INSTALLING THE PROJECTWISE INTEGRATION SERVER 1. Browse to the installation folder of ProjectWise Server.
2. Run the ProjectWise installer setup.exe. The following window opens.
3. Click on ProjectWise Integration Server.
4. Follow the steps in the wizard, click Next and then Install.
5. Close the main setup window.
INSTALLING PROJECTWISE ADMINISTRATOR 1. Browse to the ProjectWise Administrator installation folder.
2. Run the ProjectWise installer setup.exe.
3. Click on ProjectWise Administrator.
4. Follow the steps in the wizard and accept all default options.
5. Close the main setup window.
© 2009 Bentley Systems, Incorporated 5

BBeennttlleeyy PPrroojjeeccttWWiissee CCoonnnneeccttoorr ffoorr AArrccGGIISS VV88ii IImmpplleemmeennttaattiioonn GGuuiiddee
© 2009 Bentley Systems, Incorporated 6
INSTALLING PROJECTWISE EXPLORER 1. Browse to the ProjectWise Explorer installation folder.
2. Run the ProjectWise installer setup.exe.
3. Install the ProjectWise Explorer.
4. Follow the steps in the wizard and accept all default options.
5. Close the main setup window.
INSTALLING PROJECTWISE GEOSPATIAL INTEGRATION SERVER 1. Browse to the installation folder.
2. Run the setup.exe.
3. Follow the steps in the wizard and accept all default options.
INSTALLING PROJECTWISE GEOSPATIAL ADMINISTRATOR 1. Browse to the installation folder of ProjectWise Geospatial Administrator.
2. Run the setup.exe.
3. Follow the steps in the wizard and accept all default options.
INSTALLING PROJECTWISE GEOSPATIAL EXPLORER 1. Browse to the installation folder of ProjectWise Geospatial Explorer.
2. Run the setup.exe.
3. Follow the steps in the wizard and accept all default options.
INSTALLING AND LICENSING THE ARCGIS DESKTOP (Has to be on the ArcGIS Connector Server Machine)
The ArcGIS Connector requires the ArcGIS Desktop to be installed on the server machine running the ArcGIS Connector.
1. Browse to the install directory of the ArcGIS Desktop 9.3. Could be on a DVD or CD
2. Run the ArcGIS Desktop installer setup.exe.

BBeennttlleeyy PPrroojjeeccttWWiissee CCoonnnneeccttoorr ffoorr AArrccGGIISS VV88ii IImmpplleemmeennttaattiioonn GGuuiiddee
3. Click on ArcGIS Desktop
4. Click on Install ArcGIS Desktop
5. Follow the prompt and make sure you select the custom option
6. Select the .NET integration option.
7. Once installed, license the ArcGIS Desktop by pointing at an existing ArcGIS License Server.
8. Go to Start > All Programs > ArcGIS > Desktop Administrator.
9. Select License Manager and enter the name of the ArcGIS License server to be used.
10. Select Availability and make sure there is at least one license of ArcEditor or ArcInfo available.
For more information please see:
http://webhelp.esri.com/arcgisdesktop/9.3/toc.cfm?Action=1&LID=4893&rand=194#4893
11. Go to Start > All Programs > ArcGIS > ArcCatalog and make sure it starts properly.
12. Create a new SDE database connection to validate connectivity between the ArcGIS Connector server and the ArcSDE database.
13. To connect to ArcSDE, double‐click on Add Spatial Database Connection.
© 2009 Bentley Systems, Incorporated 7

BBeennttlleeyy PPrroojjeeccttWWiissee CCoonnnneeccttoorr ffoorr AArrccGGIISS VV88ii IImmpplleemmeennttaattiioonn GGuuiiddee
14. Enter SDE Connection parameters (see example below).
Note See: http://webhelp.esri.com/arcgisdesktop/9.3/index.cfm?TopicName=Creating_spatial_database_connectionsfor details.
© 2009 Bentley Systems, Incorporated 8

BBeennttlleeyy PPrroojjeeccttWWiissee CCoonnnneeccttoorr ffoorr AArrccGGIISS VV88ii IImmpplleemmeennttaattiioonn GGuuiiddee
© 2009 Bentley Systems, Incorporated 9
INSTALLING THE ARCGIS CONNECTOR SERVER (Has to be on the same machine than the Orchestration Framework)
1. Make sure the ProjectWise Orchestration Framework Service V8i is running.
2. Install the MicroStation prerequisite pack 08.11.05.
3. Browse to the ArcGIS Connector Server component installation folder.
4. Run the ArcGIS Connector Server component installer setup.exe.
5. Follow the steps in the wizard and accept all default options. Make sure the Anyone who uses this computer (all user) option is selected.
6. Accept the default install location.
7. Click Next.
8. Click Install on the last panel.
INSTALLING THE PROJECTWISE ADMINISTRATOR EXTENSION FOR ARCGIS CONNECTOR
1. Browse to the ArcGIS Connector Administrator installation folder.
2. Run the ArcGIS Connector Administrator installer setup.exe.
3. Follow the steps in the wizard and accept all default options.
INSTALLING PROJECTWISE EXPLORER EXTENSION FOR ARCGIS CONNECTOR 1. Browse to the ArcGIS Connector Client installation folder.
2. Run the ArcGIS Connector Client installer setup.exe.
3. Follow the steps in the wizard and accept all default options.
CONFIGURING PROJECTWISE Create a new ProjectWise datasource on SQL Server (MSDE database). Note that the datasource could also be created on an UTF‐8 Oracle instance.
1. Start MSDE Plus 3.0 (this can be downloaded from the internet) or start the SQL Server console manager.
2. Connect to SQL Server using the ‘sa’ user credentials.

BBeennttlleeyy PPrroojjeeccttWWiissee CCoonnnneeccttoorr ffoorr AArrccGGIISS VV88ii IImmpplleemmeennttaattiioonn GGuuiiddee
3. Right‐click on Databases and select New Database.
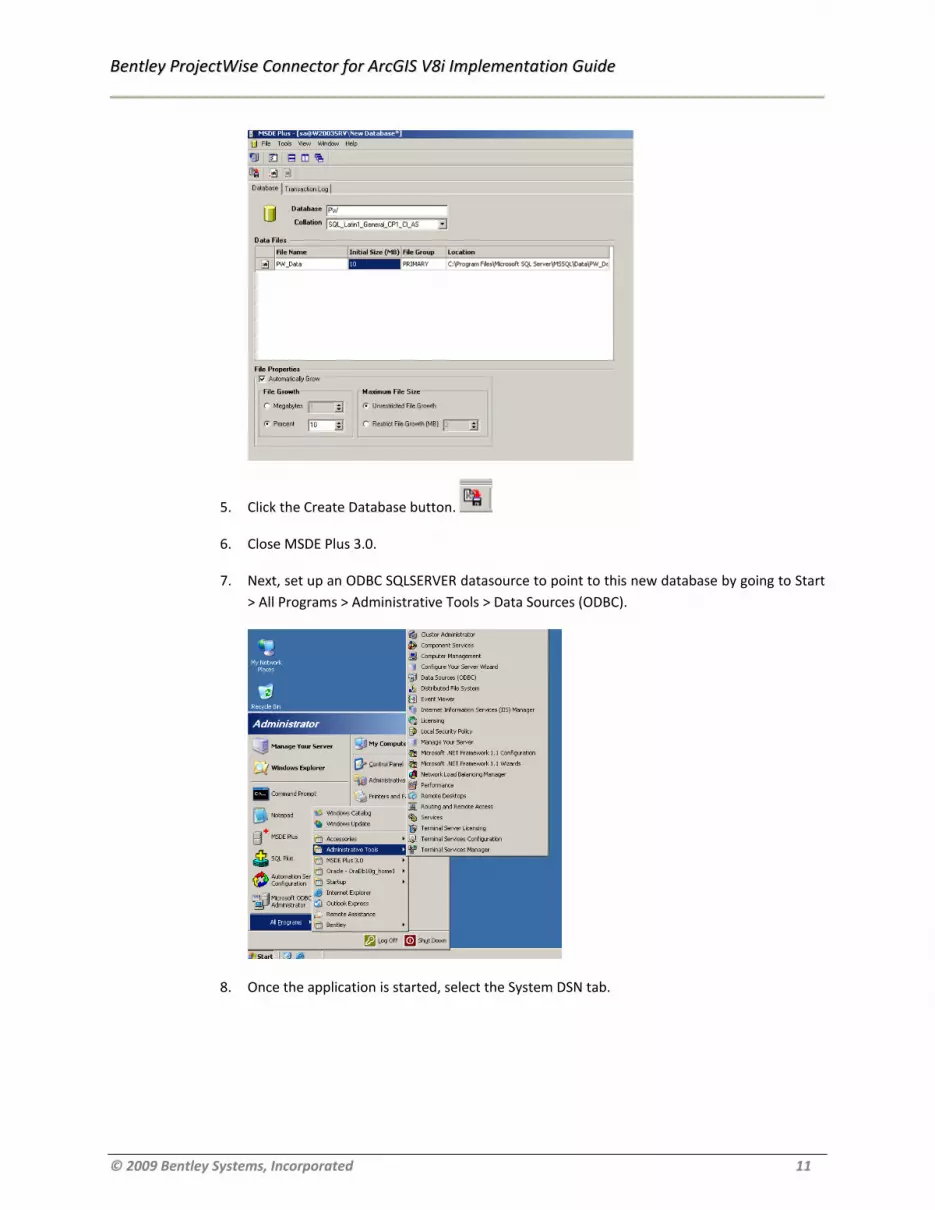
4. Enter PW as the database name and set the initial file size to 10MB.
© 2009 Bentley Systems, Incorporated 10
BBeennttlleeyy PPrroojjeeccttWWiissee CCoonnnneeccttoorr ffoorr AArrccGGIISS VV88ii IImmpplleemmeennttaattiioonn GGuuiiddee
5. Click the Create Database button.
6. Close MSDE Plus 3.0.
7. Next, set up an ODBC SQLSERVER datasource to point to this new database by going to Start > All Programs > Administrative Tools > Data Sources (ODBC).
8. Once the application is started, select the System DSN tab.
© 2009 Bentley Systems, Incorporated 11

BBeennttlleeyy PPrroojjeeccttWWiissee CCoonnnneeccttoorr ffoorr AArrccGGIISS VV88ii IImmpplleemmeennttaattiioonn GGuuiiddee
9. Click Add… and select SQLServer driver.
10. Click Finish.
11. Enter PW as the name of the ODBC datasource and select local server (or an existing SQL Server) for the server.
© 2009 Bentley Systems, Incorporated 12

BBeennttlleeyy PPrroojjeeccttWWiissee CCoonnnneeccttoorr ffoorr AArrccGGIISS VV88ii IImmpplleemmeennttaattiioonn GGuuiiddee
12. Click Next.
13. Select the SQL Server integrated security and use the sa user credentials.
14. Click Next.
15. Change the default database to PW.
16. Click Next and accept the default on the next panel.
17. Click Finish and test the ODBC datasource.
18. Once you are back on the main ODBC panel click OK to close the application.
19. Next, create a new ProjectWise datasource using the ODBC datasource we just created by starting ProjectWise Administrator.
20. Right‐click on Datasources and select New Datasource.
© 2009 Bentley Systems, Incorporated 13

BBeennttlleeyy PPrroojjeeccttWWiissee CCoonnnneeccttoorr ffoorr AArrccGGIISS VV88ii IImmpplleemmeennttaattiioonn GGuuiiddee
21. Click Next on the first two panels.
22. Enter the datasource name, for example pwsql.
23. Select the PW ODBC datasource.
© 2009 Bentley Systems, Incorporated 14

BBeennttlleeyy PPrroojjeeccttWWiissee CCoonnnneeccttoorr ffoorr AArrccGGIISS VV88ii IImmpplleemmeennttaattiioonn GGuuiiddee
24. Click Next.
25. Enter user name: sa and password: admin.
26. Click Next.
27. Enter the ProjectWise Administrator user name and password.
28. Click Next.
29. Turn off the Create Datasource from template option and click Finish.
© 2009 Bentley Systems, Incorporated 15

BBeennttlleeyy PPrroojjeeccttWWiissee CCoonnnneeccttoorr ffoorr AArrccGGIISS VV88ii IImmpplleemmeennttaattiioonn GGuuiiddee
30. Turn on Enable 'Create' button and click the Create button.
31. Make sure all the tables are created properly and that no errors occur.
32. Specify a windows folder for the file storage location, enter the password for the ProjectWise Administrator, and click OK.
© 2009 Bentley Systems, Incorporated 16

BBeennttlleeyy PPrroojjeeccttWWiissee CCoonnnneeccttoorr ffoorr AArrccGGIISS VV88ii IImmpplleemmeennttaattiioonn GGuuiiddee
© 2009 Bentley Systems, Incorporated 17
33. Make sure all tables are created properly and that no errors occur, then click Close. Your ProjectWise datasource is now ready.
Here we will use the EastCity example dataset provided with the product. The personal Geodatabase can be found (by default) in: C:\Program Files\Bentley\ProjectWise Connector for ArcGIS\examples\EastCity894\EastCity.mdb.
The first thing to do is to create the user and load the dataset in ArcSDE:
1. Using the ArcGIS and RDMS tools, create a new SDE user called eastcity. See ArcSDE help for instructions.
2. Connect to ArcSDE using the eastcity user by double‐clicking on Add Spatial Database Connection in ArcCatalog.
3. Enter the proper connection information.
4. In ArcCatalog, browse to the example eastcity personal geodatabase shipped with the ArcGIS server install, usually located in C:\Program Files\Bentley\ProjectWise Connector for ArcGIS\examples\EastCity894.
5. Expand the Eastcity geodatabase, right‐click on the eastcity feature dataset and select Copy.
6. Once connected successfully, right‐click in the blank space in the content view and select Paste. This should copy the example data into ArcSDE.
7. Then register the dataset as versioned to allow the Connector to edit the data by right‐clicking on the eastcity feature dataset and selecting Register As Versioned.
Now that we have loaded the example data in ArcSDE, we will configure the ArcGIS Connector to work with it.

BBeennttlleeyy PPrroojjeeccttWWiissee CCoonnnneeccttoorr ffoorr AArrccGGIISS VV88ii IImmpplleemmeennttaattiioonn GGuuiiddee
© 2009 Bentley Systems, Incorporated 18
CONFIGURING THE ARCGIS CONNECTOR SERVER 1. Go to Start > All Programs > Bentley ProjectWise Connector for ArcGIS > Geospatial
Connector Administrator.
2. Click New.
3. If this is the first time you started this application it will ask you to traverse the Connector Engine Configuration wizard. This is equivalent to running Connector Engine Configuration wizard as a separate step from the Start menu and then running the Geospatial Connector Administrator as a second step.
4. The Explanation panel will guide you through the process of configuring the ArcGIS Connector.
5. Specify the workspace root directory, which is the location where the configuration information needed by the connector will be stored. The specified folder also stores all the workspaces for the current server. Workspace root directories share a location so the workspace can be shared among all the connector users.
For example enter \\YourServer\AGC (where AGC is a shared folder).
Note Typically, this folder should be shared if it is to be used in workspace profiles inside ProjectWise.
6. Specify the number of processors.
The number of processors suggested in the wizard is based on the amount of RAM available on the connector server machine at the time the wizard is run.
Note The number of processors can be changed any time by running the Connector Engine Configuration wizard from Start > All Programs > Bentley ProjectWise Connector for ArcGIS > Connector Engine Configuration.
7. After the configuration is performed, click Finish.
A new type job, ReloadConfigCache, is started on the server and the server metadata is updated. The progress of this job may be monitored using the Connector Job Status tool located on the server machine under Start > All Programs > ProjectWise Connector for ArcGIS > Connector Job Status.
8. Click Finish.
9. The Create New Configuration Set dialog opens. Enter the following:
a. Set: ArcGISRawConnect.
b. Name: the name of the configuration set, e.g. EastCity.
c. Description: (optional) the description of the configuration set.

BBeennttlleeyy PPrroojjeeccttWWiissee CCoonnnneeccttoorr ffoorr AArrccGGIISS VV88ii IImmpplleemmeennttaattiioonn GGuuiiddee
d. Host: name of the server where ARCSDE database is running.
e. User: EastCity.
f. Password: EastCity.
10. Click Test.
11. If the test succeeds, click Finish; otherwise verify if you have made a typo in the connection parameters.
12. To make ArcSDE Feature classes visible they need to be registered with the ArcGIS Connector. Expand the Graphical Sources tree item and then expand the ArcGIS Connection.
13. Right‐click on the Named Connection and select Register Features.
Note You may have to re‐enter the password used to create the configuration set.
© 2009 Bentley Systems, Incorporated 19

BBeennttlleeyy PPrroojjeeccttWWiissee CCoonnnneeccttoorr ffoorr AArrccGGIISS VV88ii IImmpplleemmeennttaattiioonn GGuuiiddee
14. Once the Registered Features List displays, select the ArcSDE Feature classes you want to make visible to all ArcGIS Connector users regardless of their security access. (Security access will be set up later).
15. A summary of the registered features displays. These features display under Features in the All Users section.
16. Create a new user workspace by right‐clicking on User Workspaces and selecting Add > User Workspace.
17. Add placement methods for all features by right‐clicking on one feature at a time and selecting a given placement method, for example Insert >Polygon Placement Collection Metadata.
18. Update the All Users section command manager by right‐clicking on the Command Manager and selecting Add Command Manager List (or Update Command Manager List if the Command Manager List is already added).
19. Add an end‐user connection to the configuration set and assign the workspace created in the previous step to this connection by expanding the Graphical Sources tree item, the ArcGIS Connection, and the Named Connection.
20. Right‐click on Connections and click Add > Connection.
© 2009 Bentley Systems, Incorporated 20

BBeennttlleeyy PPrroojjeeccttWWiissee CCoonnnneeccttoorr ffoorr AArrccGGIISS VV88ii IImmpplleemmeennttaattiioonn GGuuiiddee
Note The registered features are filtered by the user specified in the Connections section, which allows many ways to access the same data. For example: read‐only or read‐write, or hide some features. ArcSDE security is fully enforced. In the current release, it is possible to map the ProjectWise user with end‐user connections; this operation is done inside the ProjectWise Administrator.
21. Enter the ArcSDE user name and password you would like for your ArcGIS Connector clients.
22. Select the User Workspace created earlier and click Apply.
© 2009 Bentley Systems, Incorporated 21

BBeennttlleeyy PPrroojjeeccttWWiissee CCoonnnneeccttoorr ffoorr AArrccGGIISS VV88ii IImmpplleemmeennttaattiioonn GGuuiiddee
23. Save your changes.
24. Click Notify to notify the connector of schema changes.
25. Monitor the SchemaEditStop job created using the Job Status Monitor located at Start > All Programs > ProjectWise Connector for ArcGIS > Connector Job Status.
26. The job must finish successfully for the connector to function properly.
27. Once this job is complete, configure the ProjectWise Administrator to see the mapping between the end‐user connections created in the Geospatial Connector Administrator and the ProjectWise users; this allows full security controls over the ArcSDE database from a ProjectWise administrator seat.
© 2009 Bentley Systems, Incorporated 22

BBeennttlleeyy PPrroojjeeccttWWiissee CCoonnnneeccttoorr ffoorr AArrccGGIISS VV88ii IImmpplleemmeennttaattiioonn GGuuiiddee
Note Feature symbology can be changed and reflected for all subsequent extractions. It is also possible to work with Property Based Annotation and Property Based Symbology. See the Geospatial Connector Administrator help for further details.
CONFIGURING THE PROJECTWISE ADMINISTRATOR EXTENSION FOR ARCGIS CONNECTOR
1. Start ProjectWise Administrator.
2. Connect to the available datasource.
3. Browse to the Users tree item.
4. It is recommended to create a new ProjectWise user dedicated to the ArcGIS Connector. For example, user called AGC using password AGC.
5. On the Geospatial tab, set this user as a Geospatial Administrator.
© 2009 Bentley Systems, Incorporated 23

BBeennttlleeyy PPrroojjeeccttWWiissee CCoonnnneeccttoorr ffoorr AArrccGGIISS VV88ii IImmpplleemmeennttaattiioonn GGuuiiddee
6. It is recommended to set the user as part of the Administrator group on the Member Of tab. This gives the user access to all folders in the datasource. This user will be used by the ArcGIS Connector to checkout and checkin the ProjectWise document to be processed by the connector.
© 2009 Bentley Systems, Incorporated 24

BBeennttlleeyy PPrroojjeeccttWWiissee CCoonnnneeccttoorr ffoorr AArrccGGIISS VV88ii IImmpplleemmeennttaattiioonn GGuuiiddee
7. Select the Connection to ArcGIS tree item; one line item must display in the right pane. Right‐click and select configure
8. Enter the following on the General tab of the dialog.
a. Spatial Database Connector Server Machine Name or IP: this is name or IP address of the machine running the ArcGIS Connector Server.
b. ProjectWise User: the ProjectWise user created or to be used for the ArcGIS Connector interaction with ProjectWise.
c. Password: the password for the ProjectWise user specified above.
© 2009 Bentley Systems, Incorporated 25

BBeennttlleeyy PPrroojjeeccttWWiissee CCoonnnneeccttoorr ffoorr AArrccGGIISS VV88ii IImmpplleemmeennttaattiioonn GGuuiiddee
Note In the Spatial Database Connector Server Machine field, enter the appropriate server name. This normally corresponds to the full computer name in My Computer properties of the machine where the ProjectWise Connector for ArcGIS is installed. A corresponding IP Address can also be used. An optional description can be entered. For the ProjectWise user used by the ArcGIS for checkin and checkout, enter the user name and password created in the preceding step.
9. Click Apply. The following should display, Status: All settings are synchronized with the datasource.
CONFIGURING THE ARCGIS CONNECTOR SECURITY To control what is seen by a ProjectWise Explorer user, establish a mapping between the ProjectWise user and the ArcGIS Connector end user connection (created in the Geospatial Connector Administrator).
1. Click on the Security tab.
2. Click on the Manage button.
3. Select a ProjectWise user or group and associate it to the End‐User Connection defined in the Geospatial Connector Administrator.
Note This dialog allows you to perform a mapping between the ProjectWise users and the ArcGIS Connector end‐user connections. This mapping is used by the ProjectWise Explorer Extension to determine what end‐user connections should be visible to a given ProjectWise user.
4. Click OK to accept.
© 2009 Bentley Systems, Incorporated 26

BBeennttlleeyy PPrroojjeeccttWWiissee CCoonnnneeccttoorr ffoorr AArrccGGIISS VV88ii IImmpplleemmeennttaattiioonn GGuuiiddee
EXTRACTING FOR VIEW ONLY FROM ARCSDE The first step is to select a Coordinate system that will be used for the Background Map and extraction processes. To do so, start ProjectWise Administrator.
1. Log in to the datasource.
2. Expand the datasource tree and right‐click on Coordinate System and click Add.
3. Select UTM83‐17 like shown below:
4. Open ProjectWise Explorer and connect to your datasource.
5. Select a folder and right‐click on it.
6. Select Spatial Database > New Spatial Database Connection.
© 2009 Bentley Systems, Incorporated 27

BBeennttlleeyy PPrroojjeeccttWWiissee CCoonnnneeccttoorr ffoorr AArrccGGIISS VV88ii IImmpplleemmeennttaattiioonn GGuuiiddee
7. Accept the defaults and click Next.
8. Accept the defaults and click Next.
© 2009 Bentley Systems, Incorporated 28

BBeennttlleeyy PPrroojjeeccttWWiissee CCoonnnneeccttoorr ffoorr AArrccGGIISS VV88ii IImmpplleemmeennttaattiioonn GGuuiiddee
9. Select the wanted feature classes from the list.
10. Check the “Select all features (maximum extent)” option, select the Coordinate System (UTM83‐17) and specify a name for the document to be created. Then click Next.
11. Select Extract All Documents to perform the extraction now and click Finish.
12. Observe the job status; by right‐clicking on the folder, select Spatial Database‐>View Job Status for folder you can see all the details by going to Filter > Show detail messages. (Press F5 to update the view.)
13. Double‐click the document created in ProjectWise to open it in Bentley Map.
14. Fit the view to view the content of the extraction.
© 2009 Bentley Systems, Incorporated 29

BBeennttlleeyy PPrroojjeeccttWWiissee CCoonnnneeccttoorr ffoorr AArrccGGIISS VV88ii IImmpplleemmeennttaattiioonn GGuuiiddee
CONFIGURING PROJECTWISE GEOSPATIAL Now you will create a simple background map using the DGN file that has been created by the extraction process.
1. Expand the Background Maps node, right click on Geospatial Maps and select Create Background Map. The Geospatial Map Creation dialog displays:
Note Note: Make sure the “Location of the Map Engine for the current Datasource”
reflects the address of your Geospatial Background Map Engine (or Geo Web Publisher). If not, then revise you settings using the Background Map Engine Settings dialog:
© 2009 Bentley Systems, Incorporated 30

BBeennttlleeyy PPrroojjeeccttWWiissee CCoonnnneeccttoorr ffoorr AArrccGGIISS VV88ii IImmpplleemmeennttaattiioonn GGuuiiddee
2. Click Manage from the Geospatial Map Creation dialog. The Administration dialog displays. And create an Automated iDPR connection:
3. Specify a name: EastCity
© 2009 Bentley Systems, Incorporated 31

BBeennttlleeyy PPrroojjeeccttWWiissee CCoonnnneeccttoorr ffoorr AArrccGGIISS VV88ii IImmpplleemmeennttaattiioonn GGuuiiddee
4. Check the “Get files from ProjectWise” box and browse for a ProjectWise folder (the EastCity folder where our DGN has been created earlier, by the extraction process).
5. Specify a Physical Path in which the file will be copied. Click Apply.
6. Now we will create an iDPR file using the Automated iDPR Graphical Sources section. Right‐click on Automated iDPR and click Add:
7. Specify a Name: EastCity
8. Select the EastCity connection previously defined and then select the Input File, “EastCity.dgn” that has been created earlier during the extraction process. Click Apply and then, Start Process. During this process, an iDPR file format will be generated from this design file. Then this file will be used to create the Background Map.
9. Come back into the Geospatial Map Creation dialog and click on the Maps button in order to launch the Map Author.
© 2009 Bentley Systems, Incorporated 32

BBeennttlleeyy PPrroojjeeccttWWiissee CCoonnnneeccttoorr ffoorr AArrccGGIISS VV88ii IImmpplleemmeennttaattiioonn GGuuiiddee
10. In the Map Author, click on the New Map tool and specify a name: EastCity.
11. Now click the New Layer tool and browse for your EastCity graphical source.
© 2009 Bentley Systems, Incorporated 33

BBeennttlleeyy PPrroojjeeccttWWiissee CCoonnnneeccttoorr ffoorr AArrccGGIISS VV88ii IImmpplleemmeennttaattiioonn GGuuiiddee
12. Check the Displayed at startup box and click Apply.
13. Save your Map.
14. Come back into the Geospatial Map Creation dialog and click on the Refresh button. Your newly created Background Map should be displayed in the Available maps list. Select it and click the arrow to move it to the Selected maps list. You will be prompted to select the Coordinate System. Pick UTM83‐17 from the drop down list and click OK.
15. Click Close.
16. To get a preview of you Background Map, right click on it’s name and select Preview:
17. Now we can assign this Background Map to the EastCity folder in ProjectWise Explorer. To do so, right‐click on the EastCity folder form ProjectWise Explorer and select Properties. Select the Geospatial tab ans choose the Background Map from the list:
© 2009 Bentley Systems, Incorporated 34

BBeennttlleeyy PPrroojjeeccttWWiissee CCoonnnneeccttoorr ffoorr AArrccGGIISS VV88ii IImmpplleemmeennttaattiioonn GGuuiiddee
18. Open ProjectWise Explorer to test your background map by selecting the Geospatial tab on a folder for which this Background Map has been assigned.
19. If this is the first time you accessed the Geospatial tab on any folder you will be prompted to install the VPR control which allows viewing the background map.
EXTRACTING WITH THE INTENT TO MODIFY AND POST This section shows how to perform an extraction from the database with the intent to modify the data with Bentley Map and post the modifications back into the database.
1. In order to get all XFM placement methods required to edit the data, Bentley Map must be started using the appropriate workspace. The simplest way to do this is to create a ProjectWise Workspace profile.
2. Start ProjectWise Administrator.
3. Expand the Workspace Profile tree item.
© 2009 Bentley Systems, Incorporated 35

BBeennttlleeyy PPrroojjeeccttWWiissee CCoonnnneeccttoorr ffoorr AArrccGGIISS VV88ii IImmpplleemmeennttaattiioonn GGuuiiddee
4. Right‐click on Unmanaged and select New > Workspace Profile…
5. On the General tab, enter the name of the workspace profile, ‘EastCity’ for this exercise.
6. Select the MicroStation Settings tab and enter the following parameters.
a. Root directory: Enter the workspace root directory specified in section CONFIGURING THE ARCGIS CONNECTOR SERVER for example: \\Your ServerName\AGC\Workspace.
b. User Configuration File Name: browse for the .ucf file using the […] button.
7. Open ProjectWise Explorer and connect to your datasource.
© 2009 Bentley Systems, Incorporated 36

BBeennttlleeyy PPrroojjeeccttWWiissee CCoonnnneeccttoorr ffoorr AArrccGGIISS VV88ii IImmpplleemmeennttaattiioonn GGuuiiddee
8. Right‐click on a folder in which you would like to extract information from the spatial database and select properties.
9. On the Workspace tab, select the EastCity workspace profile created earlier.
10. To perform the extraction from the spatial database, select the same folder and right‐click. Select Spatial Database > New Spatial Database Connection.
11. Select Extract from Spatial Database with the intent to modify and post and Single Document.
12. Click Next.
13. Select a Spatial database and turn on Automatic Commit to Base Version and Automatic Delete of the Edit Version.
14. Click Next.
15. Select the features to be extracted and click Next.
© 2009 Bentley Systems, Incorporated 37

BBeennttlleeyy PPrroojjeeccttWWiissee CCoonnnneeccttoorr ffoorr AArrccGGIISS VV88ii IImmpplleemmeennttaattiioonn GGuuiiddee
16. Select “Use or modify the document extent” , select the Coordinate System and specify a name for the document to be created. Then click the Edit Geometry button in order to specify the area to be extracted. .
17. Click Next.
18. Select the Extract All Documents option.
19. Observe the job status; right‐click on the folder and select Filter > Show detail messages to see all the details (press F5 to update the view).
20. Once the extraction is completed, open the DGN by double‐clicking on it.
21. Perform some edits using MicroStation and Bentley Map tools. For example, you can move a feature, modify the property of an existing feature, create a new feature, and so on…
22. Save the document and exit the Bentley Map application. Accept to check in the document back into ProjectWise.
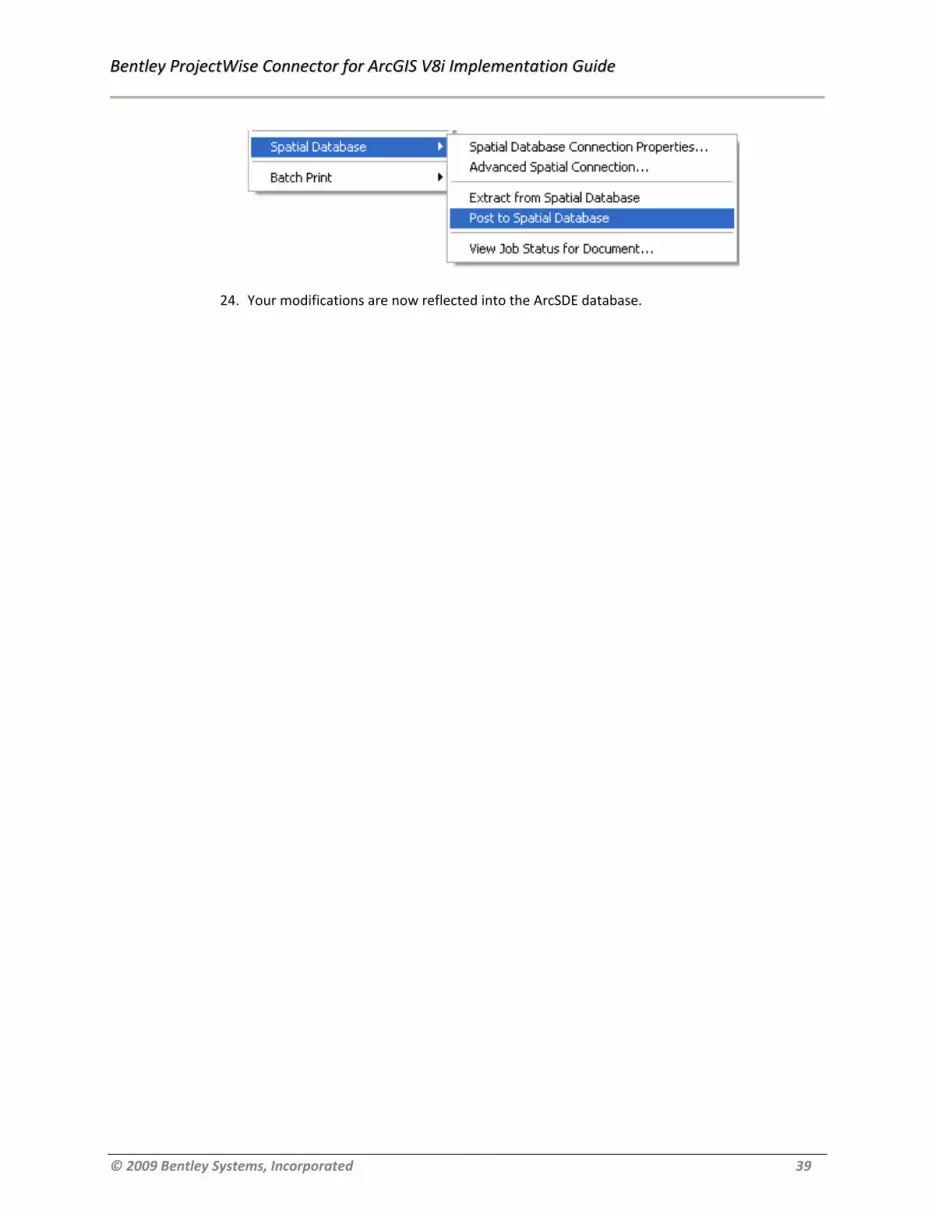
23. Post the result by right‐clicking on the document and selecting Spatial Database > Post to Spatial Database.
© 2009 Bentley Systems, Incorporated 38
BBeennttlleeyy PPrroojjeeccttWWiissee CCoonnnneeccttoorr ffoorr AArrccGGIISS VV88ii IImmpplleemmeennttaattiioonn GGuuiiddee
24. Your modifications are now reflected into the ArcSDE database.
© 2009 Bentley Systems, Incorporated 39


