Embed Size (px)
Citation preview
Updated 02.05.14
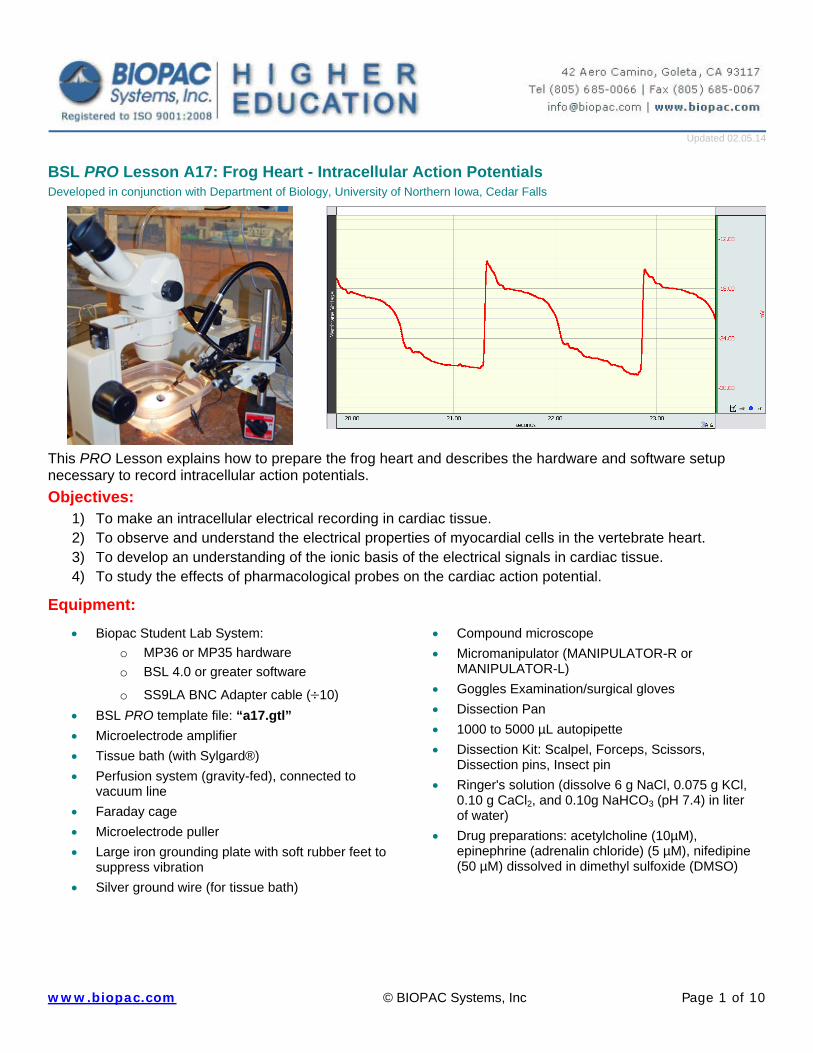
BSL PRO Lesson A17: Frog Heart - Intracellular Action Potentials Developed in conjunction with Department of Biology, University of Northern Iowa, Cedar Falls
This PRO Lesson explains how to prepare the frog heart and describes the hardware and software setup necessary to record intracellular action potentials.
Objectives: 1) To make an intracellular electrical recording in cardiac tissue. 2) To observe and understand the electrical properties of myocardial cells in the vertebrate heart. 3) To develop an understanding of the ionic basis of the electrical signals in cardiac tissue. 4) To study the effects of pharmacological probes on the cardiac action potential.
Equipment:
Biopac Student Lab System:
o MP36 or MP35 hardware
o BSL 4.0 or greater software
o SS9LA BNC Adapter cable (10)
BSL PRO template file: “a17.gtl”
Microelectrode amplifier
Tissue bath (with Sylgard®)
Perfusion system (gravity-fed), connected to vacuum line
Faraday cage
Microelectrode puller
Large iron grounding plate with soft rubber feet to suppress vibration
Silver ground wire (for tissue bath)
Compound microscope
Micromanipulator (MANIPULATOR-R or MANIPULATOR-L)
Goggles Examination/surgical gloves
Dissection Pan
1000 to 5000 µL autopipette
Dissection Kit: Scalpel, Forceps, Scissors, Dissection pins, Insect pin
Ringer's solution (dissolve 6 g NaCl, 0.075 g KCl, 0.10 g CaCl2, and 0.10g NaHCO3 (pH 7.4) in liter of water)
Drug preparations: acetylcholine (10µM), epinephrine (adrenalin chloride) (5 µM), nifedipine (50 µM) dissolved in dimethyl sulfoxide (DMSO)
www.biopac.com © BIOPAC Systems, Inc Page 1 of 10
BSL PRO Lesson A17 BIOPAC Systems, Inc.
www.biopac.com
Background: Across many animal phyla, the circulation of body fluids is important for the distribution of gases, nutrients and waste products. In many cases, the well-being of the organism is contingent on the production and precise regulation of internal fluid flow. Contractions by muscular regions in the vascular system maintain and control the flow and pressure of internal fluids. Among most organisms with a circulatory system, there are basically two types of hearts. In the neurogenic heart, beat and strength of cardiac contractions are determined extrinsically by the nervous system of the organism.
If the nervous system is destroyed the heart stops beating. Other organisms have myogenic hearts. In these, the fundamental signal regulating cardiac contraction, or beat, is incipient or generated within the cardiac tissue. When this type of heart is removed from the organism, it continues to beat for some time in isolation. Regions of the cardiac tissue known as the pacemaker rhythmically produce action potentials. The signal is transmitted to myocytes which then contract. Consequently, the pacemaker produces a cardiac action potential that is propagated and eventually stimulates myocytes to generate a force. The force propels fluids through the circulatory system. The signal produced by the pacemaker is, however, up and down regulated by the nervous system. So when the organism needs a faster heart beat and greater cardiac output, neurons or hormones will increase the rate of signal production by the pacemaker. Alternatively, other neurons may antagonize the pacemaker, slowing it down thus decreasing the beat-frequency and cardiac output. The myogenic heart is common among all higher vertebrates. However, it is not uniquely vertebrate in nature. Myogenic hearts also occur in many invertebrates and protochordates. In fish and amphibians, the pacemaker is located in the sinus venosus (SV). In reptiles, birds and mammals, it is located in the sinoatrial node (SA).
This exercise involves recording action potential from cardiac tissue in an amphibian. Here, we will use the frog heart as a physiological model to understand basic cardiac activity because they are small, economical, and readily accessible. The frog is suggested because its myogenic heart survives prolonged exposure to room temperature and reduced oxygen levels (hypoxia).To experiment on a mammalian heart, the tissue must be maintained at 37˚C and aerated vigorously with a special gas mixture. To be sure, there are differences between the mammalian and amphibian heart.
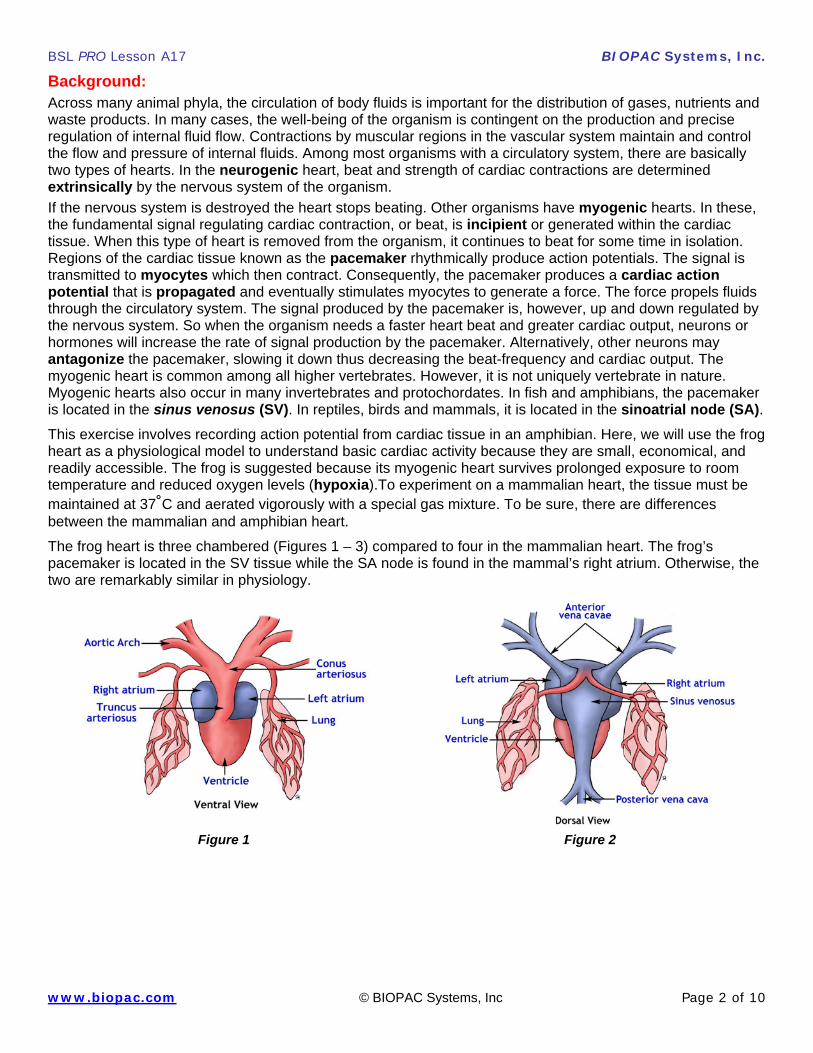
The frog heart is three chambered (Figures 1 – 3) compared to four in the mammalian heart. The frog’s pacemaker is located in the SV tissue while the SA node is found in the mammal’s right atrium. Otherwise, the two are remarkably similar in physiology.
Figure 1 Figure 2
© BIOPAC Systems, Inc Page 2 of 10

BSL PRO Lesson A17 BIOPAC Systems, Inc.
www.biopac.com
Figure 3
For coordinating myocardial contractions, the sequence is controlled by an orderly propagation of the cardiac impulse from the pacemaker to the myocyte. This signal spreads rapidly from the pacemaker to the atrial and ventricular myocardium via intercellular pathways established by cellular couplings. Connexin proteins establish gap junction connections (also called intercalated disks) between myocytes permitting the spread of the impulse from cell to cell. The cardiac potential, in fact, assumes different forms as it travels from the pacemaker to the contractile myocytes. Depending upon placement of the microelectrode, it is possible to record any of the three types of signals shown in Figure 4. It is most likely you will record an atrial or ventricular signal rather than a “nodal” signal during this exercise.
Figure 4a Sinoatrial Node Figure 4b Atrium Figure 4c Ventricle
As electrical impulses are propagated across cardiac muscles, the myocyte contracts. Unlike skeletal muscle, calcium (Ca++) for actinomyosin interaction and cellular shortening comes from outside the cell. The endoplasmic reticulum (i.e. sarcoplasmic reticulum) of cardiac myocytes is poorly developed when compared to skeletal myocyte fibers. In skeletal myocytes, an impulse initialed at the neuromuscular junction travels along the cell membrane until it reaches a transverse tubule (t-tubue). Here the impulse is diverted to the interior of the myocyte and is eventually transmitted to the sarcoplasmic reticulum (SR). As the signal passes over the SR, voltage-gated Ca++ channels open releasing the divalent cation into the sarcoplasm.
After interacting with troponin covering the thin filament, muscle tension develops as Ca++ increases in the sarcoplasm. During relaxation, Ca++ is actively pumped by a Ca++-ATPase back into the sarcoplasmic reticulum and awaits another impulse. In cardiac myocytes, on the other hand, the impulse opens voltage-gated Ca++ channels as it moves across the cell membrane and the divalent cation enters from the exterior promoting contraction. During relaxation, a Ca++-ATPase extrude the Ca++ to the extracellular space. Compounds like nifedipine (NIF) are known as dihydropyridine calcium blockers that work on the L-type (long-time open) calcium channel. This drug will reduce the force generate during cardiac myocyte contraction.
The form of the impulse in cardiac tissue is somewhat like the action potential in the axon (see Figure 4a, b, and c). From experiments with the giant squid axon, we know that voltage-gated channels and concentration gradients for both sodium (Na+) and potassium (K+) are required to generate an action potential. Likewise, these are required for the myocardial impulse. In addition, there is a role for Ca++ ions and channels.
© BIOPAC Systems, Inc Page 3 of 10
BSL PRO Lesson A17 BIOPAC Systems, Inc.
www.biopac.com
After depolarization to threshold, voltage-gate Na+ channels open temporally shifting the membrane voltage to a positive value before they automatically inactivate. During this period, the delayed-rectified K+ channels open to repolarize the membrane voltage. While the Na+ channels inactivate, the depolarized status of the membrane activates voltage-gated Ca++ channels. After a few milliseconds, the Ca++ channels automatically inactivate, and the outwardly-directed K+ ion-current repolarizes the membrane voltage to the resting potential (Vm). As a result of an inwardly directed Ca++current, there is a “lagging” shoulder or plateau in the cardiac impulse (see Fig 4c). The fast depolarizing component of the impulse in the cardiac myocyte is due to the inwardly-directed Na+ current while the slow plateau is due to a delayed inwardly-directed Ca++ current. Ultimately after inactivation of the two cation channels, the outwardly-directed K+ current will return the membrane voltage to the resting potential. The membrane is then ready for another depolarization cycle. The various ion phases in the signal can be altered easily by manipulating K+, Na+ and Ca++ concentrations in the bathing Ringer’s solution.
During this exercise you will record cardiac potentials from several regions of an isolated heart. Because cardiac cells are coupled by gap junctions and form a syncytium, the electrode only needs to be placed near a group of cells to record the potential. You will also apply different chemicals or pharmacological probes (drugs) to the preparation. These substances we use will either alter the pacemaker’s ability to produce a signal (to accelerate or to impede the oscillator,) or change the ability of the myocardial cells to contract. Substances that modify the beat-frequency of the heart are called chronotropic agents while those altering the amplitude or strength of muscular contractions are called inotropic. Common chronotropic agents resemble the neurotransmitters norepinephrine (a sympathetic agent) and acetylcholine (a parasympathetic agent).
Some compounds block sodium or potassium channels independently controlling the production of the pacemaker signal. Other compounds are calcium antagonists which have a major impact on myocyte contraction. These compounds may also influence the behavior of the pacemaker. Interestingly, there are “designer” calcium-blocking drugs selective for either contraction or pacemaker activity. You will apply some of these compounds to your preparation to understand how heart function is modulated.
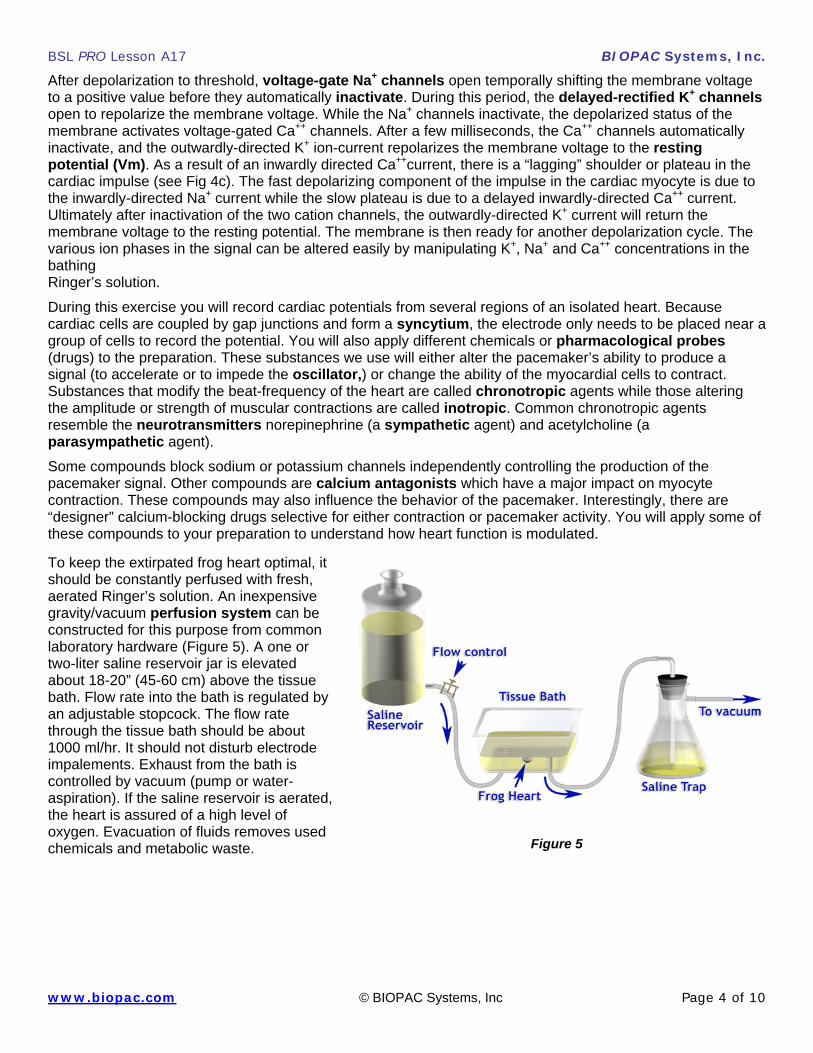
To keep the extirpated frog heart optimal, it should be constantly perfused with fresh, aerated Ringer’s solution. An inexpensive gravity/vacuum perfusion system can be constructed for this purpose from common laboratory hardware (Figure 5). A one or two-liter saline reservoir jar is elevated about 18-20” (45-60 cm) above the tissue bath. Flow rate into the bath is regulated by an adjustable stopcock. The flow rate through the tissue bath should be about 1000 ml/hr. It should not disturb electrode impalements. Exhaust from the bath is controlled by vacuum (pump or water-aspiration). If the saline reservoir is aerated, the heart is assured of a high level of oxygen. Evacuation of fluids removes used chemicals and metabolic waste.
Figure 5
0 © BIOPAC Systems, Inc Page 4 of 1

BSL PRO Lesson A17 BIOPAC Systems, Inc.
www.biopac.com
The microelectrode measurement is very sensitive to external vibration and electrical interference. The tissue bath and micromanipulator can be placed on a large (heavy) iron base plate that has soft rubber feet to absorb vibration. The perfusion system, micromanipulator, microelectrode amplifier and base plate should all be contained within a Faraday cage to minimize electrical interference. The cage and iron base plate are both connected to earth ground at the same point. The microelectrode amplifier reference input (“-” or “Voltage Follower” etc.) must be in contact with the tissue bath Ringer’s solution via a silver wire (inserted in bath). Figure 6 shows an example of a low-cost setup.
Figure 6
Setup: The following assumptions are made:
The MP36/35 is connected to the host computer and that the Biopac Student Lab software has been installed and is known to work with the MP unit.
The glass microelectrodes filled with 3 M KCl have been made and tested to have a resistance between 10 and 40 Megohms.
1. Turn OFF MP unit.
2. Connect the BIOPAC SS9LA Adapter cable (10) between CH 1 of the MP36/35 and the microelectrode amplifier (BNC) output.
3. Turn ON the MP36/35 unit.
4. Launch the BSL PRO software and open the template file “a17.gtl” in one of two ways:
a. From Startup dialog, click the PRO Lessons tab and double-click on the lesson title in the list. If you do not see the lesson title, try the next opening method.
b. From Startup dialog, choose the Create/Record a new experiment option, click Open Graph template from disk and then click OK. Navigate to the file, select it and click Open.
Figure 7
FROG PREP: Double-pith the frog (if necessary, see BSL PRO Lesson A01 - Frog Preparation for details). You should apply amphibian Ringer’s solution to the frog in five-minute intervals.
1. Carefully expose the frog heart.
a. Cut the skin from the groin to the throat of the frog.
b. Cut through the pectoral girdle to expose the heart in the pericardial sac.
c. Use dissection pins to hold the body to the dissection tray.
© BIOPAC Systems, Inc Page 5 of 10
BSL PRO Lesson A17 BIOPAC Systems, Inc.
www.biopac.com
Figure 8
Figure 9
Figure 10
Figure 11
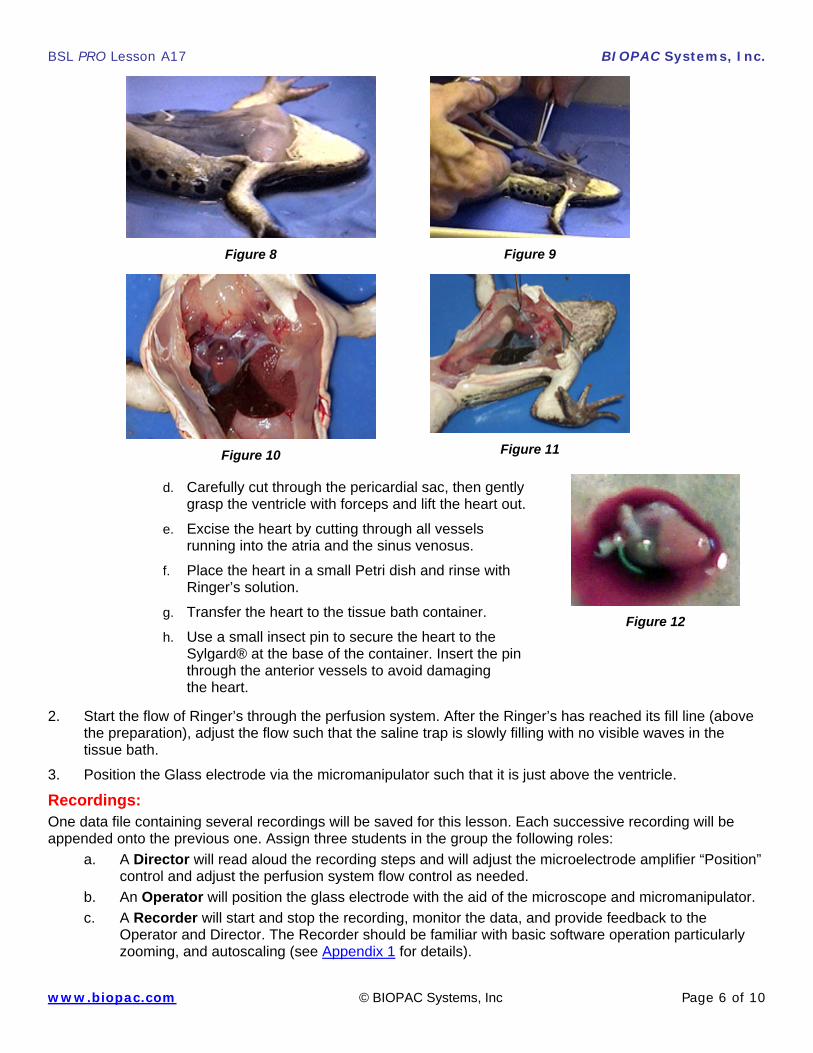
d. Carefully cut through the pericardial sac, then gently grasp the ventricle with forceps and lift the heart out.
e. Excise the heart by cutting through all vessels running into the atria and the sinus venosus.
f. Place the heart in a small Petri dish and rinse with Ringer’s solution.
g. Transfer the heart to the tissue bath container.
h. Use a small insect pin to secure the heart to the Sylgard® at the base of the container. Insert the pin through the anterior vessels to avoid damaging the heart.
Figure 12
2. Start the flow of Ringer’s through the perfusion system. After the Ringer’s has reached its fill line (above the preparation), adjust the flow such that the saline trap is slowly filling with no visible waves in the tissue bath.
3. Position the Glass electrode via the micromanipulator such that it is just above the ventricle.
Recordings: One data file containing several recordings will be saved for this lesson. Each successive recording will be appended onto the previous one. Assign three students in the group the following roles:
a. A Director will read aloud the recording steps and will adjust the microelectrode amplifier “Position” control and adjust the perfusion system flow control as needed.
b. An Operator will position the glass electrode with the aid of the microscope and micromanipulator.
c. A Recorder will start and stop the recording, monitor the data, and provide feedback to the Operator and Director. The Recorder should be familiar with basic software operation particularly zooming, and autoscaling (see Appendix 1 for details).
© BIOPAC Systems, Inc Page 6 of 10
BSL PRO Lesson A17 BIOPAC Systems, Inc.
www.biopac.com
Zero adjustment:
1. Operator: Move the micromanipulator, using the coarse vertical adjustment, until the tip of the glass electrode is submerged in the Ringer’s solution BUT NOT impaling the heart.
2. Recorder: Click Start to begin the recording.
3. Director: Adjust the “Position” knob on the microelectrode amplifier until the baseline reads 0 mV.
4. Operator: Use the coarse vertical adjustment to slowly move the electrode tip towards the tissue. The Recorder must call out when they see a deflection in the data at which point the Operator backs out the electrode just slightly.
Note: If the tip of the microelectrode contacts the tissue too quickly, it will break off!
Finding the action potential:
5. Operator: Use the fine vertical adjustment of the micromanipulator to carefully bring the electrode tip back down to the tissue. Carefully move the electrode up and down at the surface tissue until the Recorder sees a downward deflection and an action potential signal. Notes:
Be patient and move slowly and cautiously. The electrode may move out of the cell due to the movement of the beating heart. Readjust the
electrode position using the fine vertical adjustment.
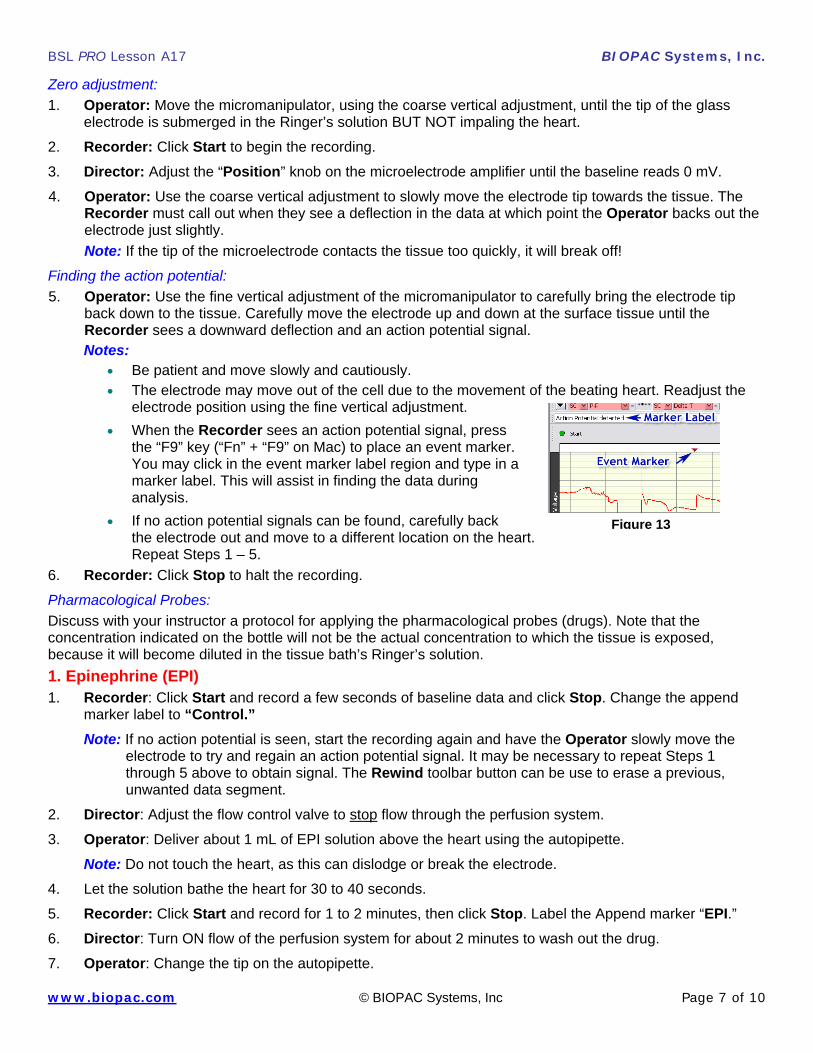
When the Recorder sees an action potential signal, press the “F9” key (“Fn” + “F9” on Mac) to place an event marker. You may click in the event marker label region and type in a marker label. This will assist in finding the data during analysis.
Figure 13 If no action potential signals can be found, carefully back the electrode out and move to a different location on the heart. Repeat Steps 1 – 5.
6. Recorder: Click Stop to halt the recording.
Pharmacological Probes:
Discuss with your instructor a protocol for applying the pharmacological probes (drugs). Note that the concentration indicated on the bottle will not be the actual concentration to which the tissue is exposed, because it will become diluted in the tissue bath’s Ringer’s solution.
1. Epinephrine (EPI) 1. Recorder: Click Start and record a few seconds of baseline data and click Stop. Change the append
marker label to “Control.”
Note: If no action potential is seen, start the recording again and have the Operator slowly move the electrode to try and regain an action potential signal. It may be necessary to repeat Steps 1 through 5 above to obtain signal. The Rewind toolbar button can be use to erase a previous, unwanted data segment.
2. Director: Adjust the flow control valve to stop flow through the perfusion system.
3. Operator: Deliver about 1 mL of EPI solution above the heart using the autopipette.
Note: Do not touch the heart, as this can dislodge or break the electrode.
4. Let the solution bathe the heart for 30 to 40 seconds.
5. Recorder: Click Start and record for 1 to 2 minutes, then click Stop. Label the Append marker “EPI.”
6. Director: Turn ON flow of the perfusion system for about 2 minutes to wash out the drug.
7. Operator: Change the tip on the autopipette.
© BIOPAC Systems, Inc Page 7 of 10
BSL PRO Lesson A17 BIOPAC Systems, Inc.
www.biopac.com
2. Acetylcholine (ACH) Repeat steps 1 – 7 above, but apply 1mL of ACH in Step 3. Label the append marker for Step 5 “ACH.”
3. Nifedipine (NIF) Repeat steps 1 – 7 above, but apply 1mL of NIF in Step 3. Label the append marker for Step 5 “NIF.”
Optional If time permits, additional experiments using Na+ free or 10 mM K+ Frog Ringer’s solutions may be performed.
Done Save the data by choosing “File > Save As.”
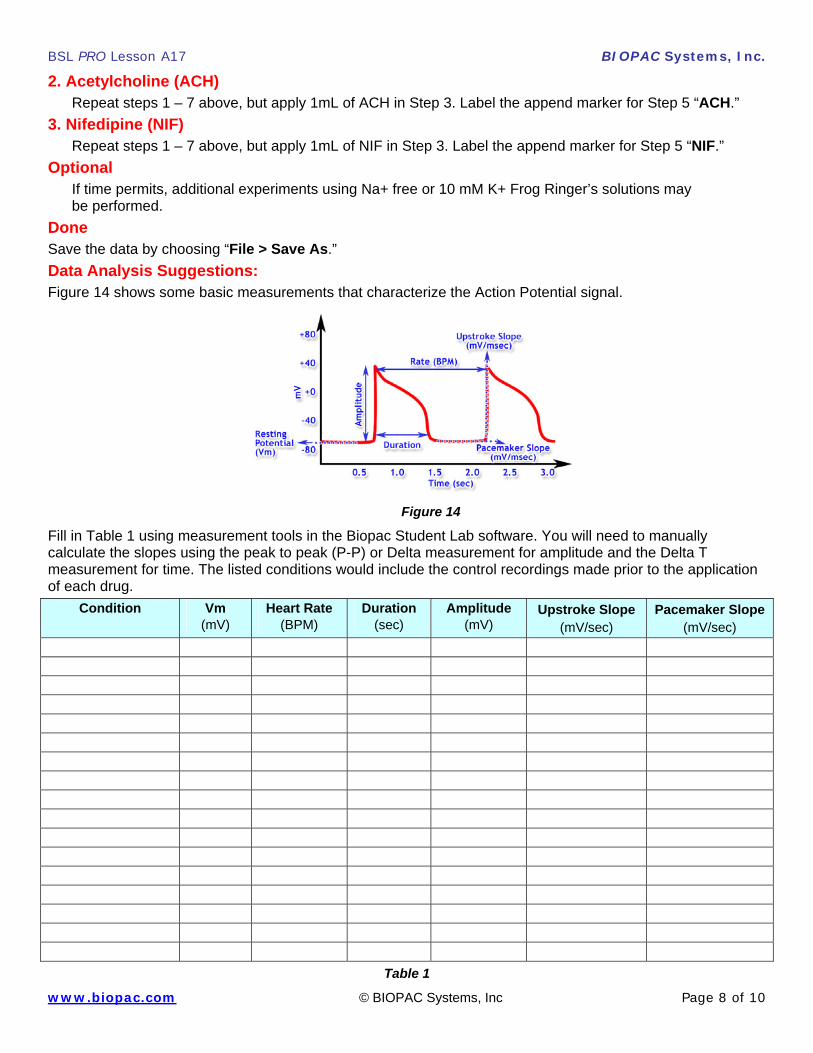
Data Analysis Suggestions: Figure 14 shows some basic measurements that characterize the Action Potential signal.
Figure 14
Fill in Table 1 using measurement tools in the Biopac Student Lab software. You will need to manually calculate the slopes using the peak to peak (P-P) or Delta measurement for amplitude and the Delta T measurement for time. The listed conditions would include the control recordings made prior to the application of each drug.
Condition Vm (mV)
Heart Rate (BPM)
Duration (sec)
Amplitude (mV)
Upstroke Slope (mV/sec)
Pacemaker Slope (mV/sec)
Table 1
© BIOPAC Systems, Inc Page 8 of 10

BSL PRO Lesson A17 BIOPAC Systems, Inc.
www.biopac.com
Measurement examples:
The I-beam cursor is used to select an area from the start of the AP signal to the end. The P-P measurement displays the amplitude and the Delta T measurement displays the time interval of the selected area (Figure 15).
Figure 15
An area is selected from the start of one AP signal to start of the next AP signal. The BPM measurement calculates and displays the “beats per minute” between the endpoints of the selected area.
Figure 16
Note: CH 41 is a real-time calculation channel that calculates the heart rate from the AP signal on a beat-by-beat basis. Because each BPM value can only be determined at the end of the cycle, it will be out of sync with the AP signal by one cycle. It also takes at least two cycles to lock onto the signal after the start of the recording. Real time BPM can be a very useful view to observe changes in heart rate; however it cannot always “lock onto” the signal due to noise or wandering baseline. CH 41 can be toggled on or off by holding down the “Alt” button (“Option” on Mac) AND clicking on the Channel button in the graph.
Questions: 1) When drugs are added to heart tissue, did the form of the cardiac signal change?
2) How does BPM change with EPI? ACH? Can you explain how these influence the “pacemaker?”
3) Is there a change in amplitude of the cardiac signal with EPI or ACH? Duration? Period?
4) Do ACH and EPI have a similar effect on the pacemaker slope?
5) Does NIF have an impact on amplitude and/or the shape of the cardiac signal? Does it appear to influence BPM?
6) If you increased the K+ concentration in the Frog Ringer’s solution, how do you think that would change the cardiac signal? What would happen if you used a Na+-free Frog Ringer’s solution?
© BIOPAC Systems, Inc Page 9 of 10
BSL PRO Lesson A17 BIOPAC Systems, Inc.
www.biopac.com
Appendix 1: Autoscaling data:
Graph data can be autoscaled vertically and horizontally for enhanced viewing.
Autoscale vertically by using the toolbar button or “Display > Autoscale Waveforms” to optimize the vertical display and allow closer examination of the waveform.
Autoscale horizontally by using the toolbar button or “Display > Autoscale Horizontal” to display the entire horizontal time scale in a single graph window.
Zooming in and out of data:
Use the Zoom tool to magnify portions of the waveform for a closer look.
Zoom in by selecting the toolbar icon and click/drag over the area of interest.
To zoom back, use Ctrl – (minus) or “Display > Zoom Back.”
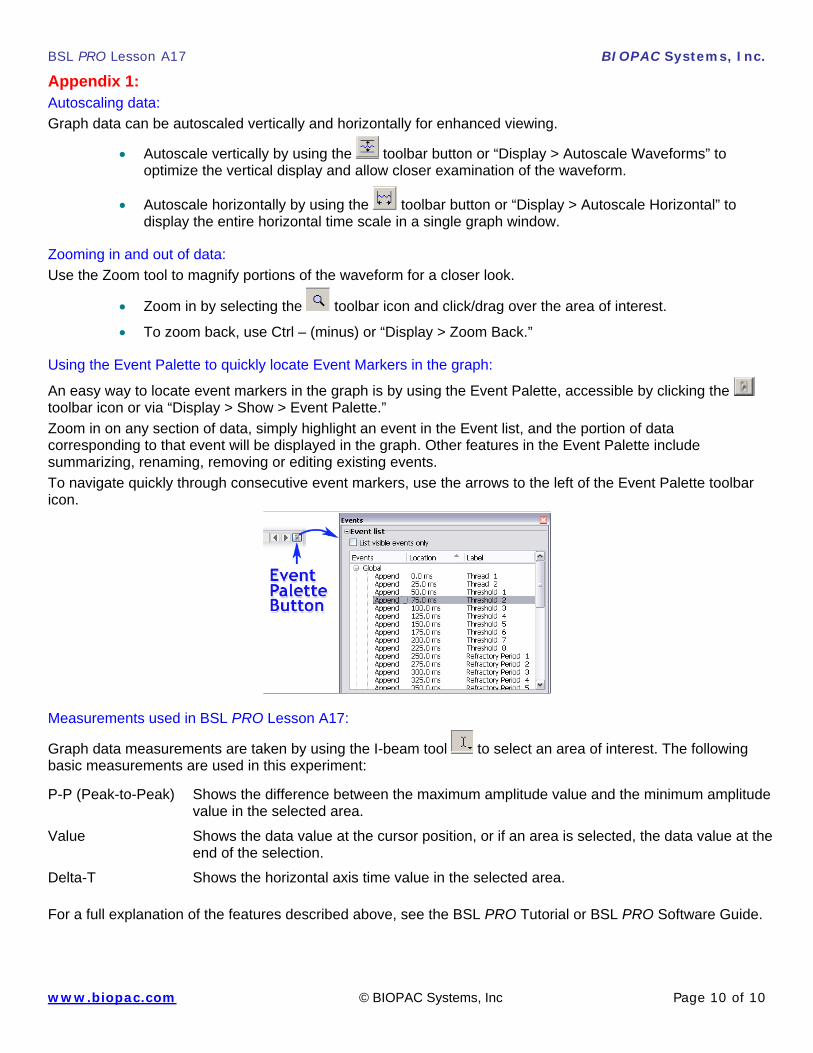
Using the Event Palette to quickly locate Event Markers in the graph:
An easy way to locate event markers in the graph is by using the Event Palette, accessible by clicking the toolbar icon or via “Display > Show > Event Palette.”
Zoom in on any section of data, simply highlight an event in the Event list, and the portion of data corresponding to that event will be displayed in the graph. Other features in the Event Palette include summarizing, renaming, removing or editing existing events.
To navigate quickly through consecutive event markers, use the arrows to the left of the Event Palette toolbar icon.
Measurements used in BSL PRO Lesson A17:
Graph data measurements are taken by using the I-beam tool to select an area of interest. The following basic measurements are used in this experiment:
P-P (Peak-to-Peak) Shows the difference between the maximum amplitude value and the minimum amplitude value in the selected area.
Value Shows the data value at the cursor position, or if an area is selected, the data value at the end of the selection.
Delta-T Shows the horizontal axis time value in the selected area.
For a full explanation of the features described above, see the BSL PRO Tutorial or BSL PRO Software Guide.
© BIOPAC Systems, Inc Page 10 of 10


