Embed Size (px)
Citation preview
Canems 6 & 8 Cylinder Ignition ECU www.canems.co.uk Release Version 1.00
___________________________________________________________________________
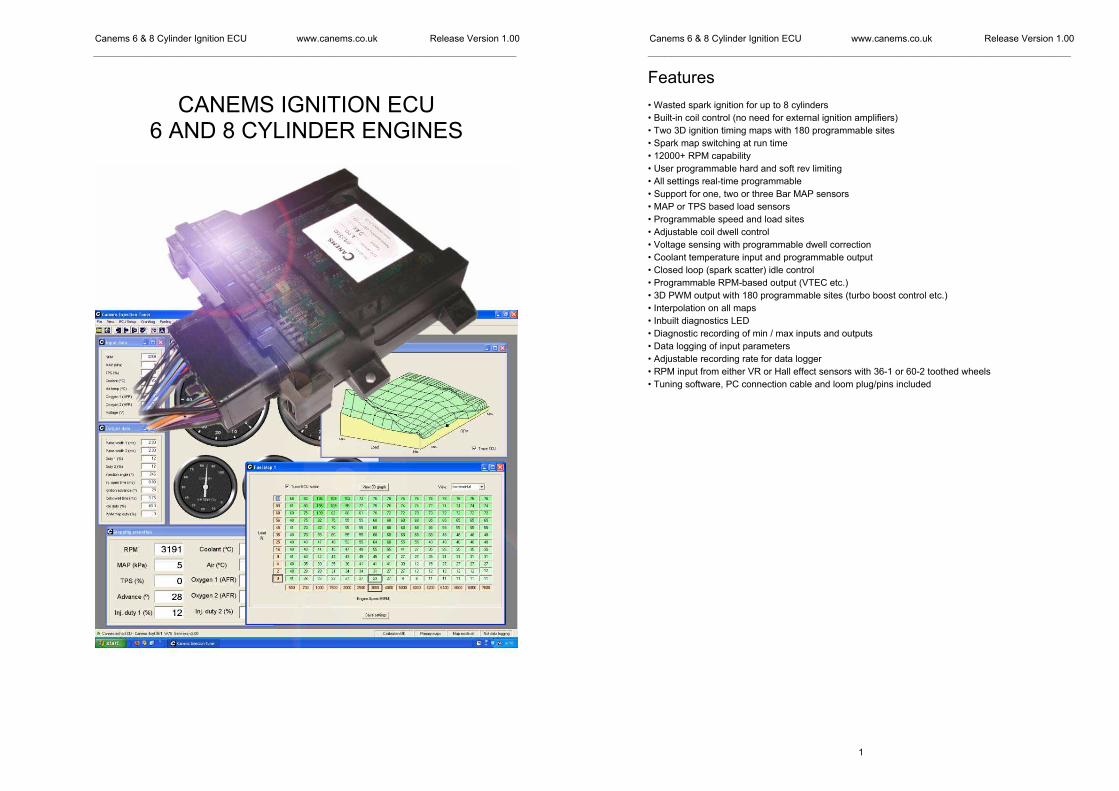
CANEMS IGNITION ECU 6 AND 8 CYLINDER ENGINES
Canems 6 & 8 Cylinder Ignition ECU www.canems.co.uk Release Version 1.00
___________________________________________________________________________
1
Features
� Wasted spark ignition for up to 8 cylinders
� Built-in coil control (no need for external ignition amplifiers)
� Two 3D ignition timing maps with 180 programmable sites
� Spark map switching at run time
� 12000+ RPM capability
� User programmable hard and soft rev limiting
� All settings real-time programmable
� Support for one, two or three Bar MAP sensors
� MAP or TPS based load sensors
� Programmable speed and load sites
� Adjustable coil dwell control
� Voltage sensing with programmable dwell correction
� Coolant temperature input and programmable output
� Closed loop (spark scatter) idle control
� Programmable RPM-based output (VTEC etc.)
� 3D PWM output with 180 programmable sites (turbo boost control etc.)
� Interpolation on all maps
� Inbuilt diagnostics LED
� Diagnostic recording of min / max inputs and outputs
� Data logging of input parameters
� Adjustable recording rate for data logger
� RPM input from either VR or Hall effect sensors with 36-1 or 60-2 toothed wheels
� Tuning software, PC connection cable and loom plug/pins included
Canems 6 & 8 Cylinder Ignition ECU www.canems.co.uk Release Version 1.00
___________________________________________________________________________
2
Specification
� Weight 468 grams
� Dimensions 140mm x 153mm x 54mm
� Rugged ABS casing with ceramic heat sinks
� Waterproof to IP67 specification (one metre)
� Negative earth power supply, 7 – 18V
� ECU current consumption < 0.5A
� Ignition coil current - maximum 10A
� PWM output - maximum 5A
� Programmable outputs - maximum 1A
� 30-way high current, waterproof connector
� RS232 serial port interface with optional USB support
Canems 6 & 8 Cylinder Ignition ECU www.canems.co.uk Release Version 1.00
___________________________________________________________________________
3
Before you get started…
The Canems 8 cylinder ignition ECU uses the same tuning software as our injection ECU. Therefore, there are settings within the ECU that can be altered but will have no effect on the running engine. For example, ‘Fuel Map 1’ is only used with a fuel injected engine.
If you would like to upgrade your ignition only ECU to full injection specification, the unit must be returned to Canems for reprogramming.
The Canems 8 cylinder ignition ECU has four high current ignition outputs. Each output can hold a constant current of 10 Amps maximum. Wasted spark coils should have a primary resistance coil of greater than 0.6 Ohms.
Support is available from Canems in sourcing components, installing the engine management system and programming the ECU to suit your requirements. The ECU is designed to operate in conjunction with easily obtainable components. It is our policy to design systems that require no unique hardware, and will always endeavour to have spares available in the future.
Rolling road time is expensive, so our software is designed to be quick and easy to use; even for people with little experience. All maps can be accessed with keyboard shortcuts, and you can change values with one touch of the keyboard. There is no need to waste valuable time when typing individual values and you can even tune your 3D maps visually, with the aid of graphical representations.
Our ECUs are designed to give total reliability and total control over engine parameters. However, full responsibility for the engine and vehicle in question remains solely with the owner. Canems can in no way be held responsible for damage or injury caused by incorrect fitting procedures, failure in use or neglect of appropriate safety measures.
Canems 6 & 8 Cylinder Ignition ECU www.canems.co.uk Release Version 1.00
___________________________________________________________________________
4
Basic terminology
PWM
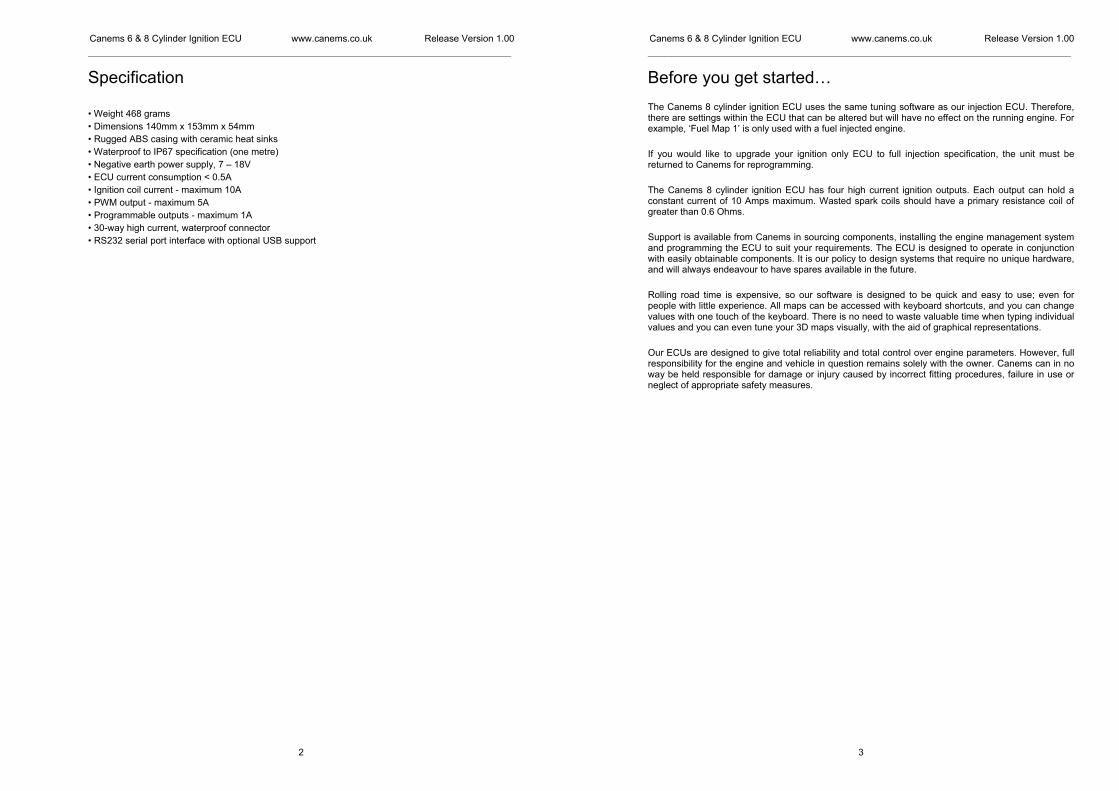
Standing for Pulse Width Modulation, PWM is used by the ECU to vary the amount of power sent to a device (such as an idle control valve). For example, an output switching with a duty cycle of 50% will effectively provide half the power available at 100% duty cycle. Thus, changing the duty cycle will change the average power available to the device. The PWM outputs from the Canems ECU operate at 80Hz, meaning the on / off switching pattern repeats itself 80 times per second.
Open loop / closed loop
Open loop control refers to an ECU operation that has no feedback. For example, if a fuel setting in the ECU has been told to inject a certain amount of fuel, it will do this, regardless of whether the engine is already running too rich or too lean.
Closed loop control means that feedback is used. The complement to the example above would be a lambda sensor, which would tell the ECU that the engine is running too rich or too lean. The ECU would then use this feedback to adjust fuel delivery accordingly.
Canems 6 & 8 Cylinder Ignition ECU www.canems.co.uk Release Version 1.00
___________________________________________________________________________
5
Using the software
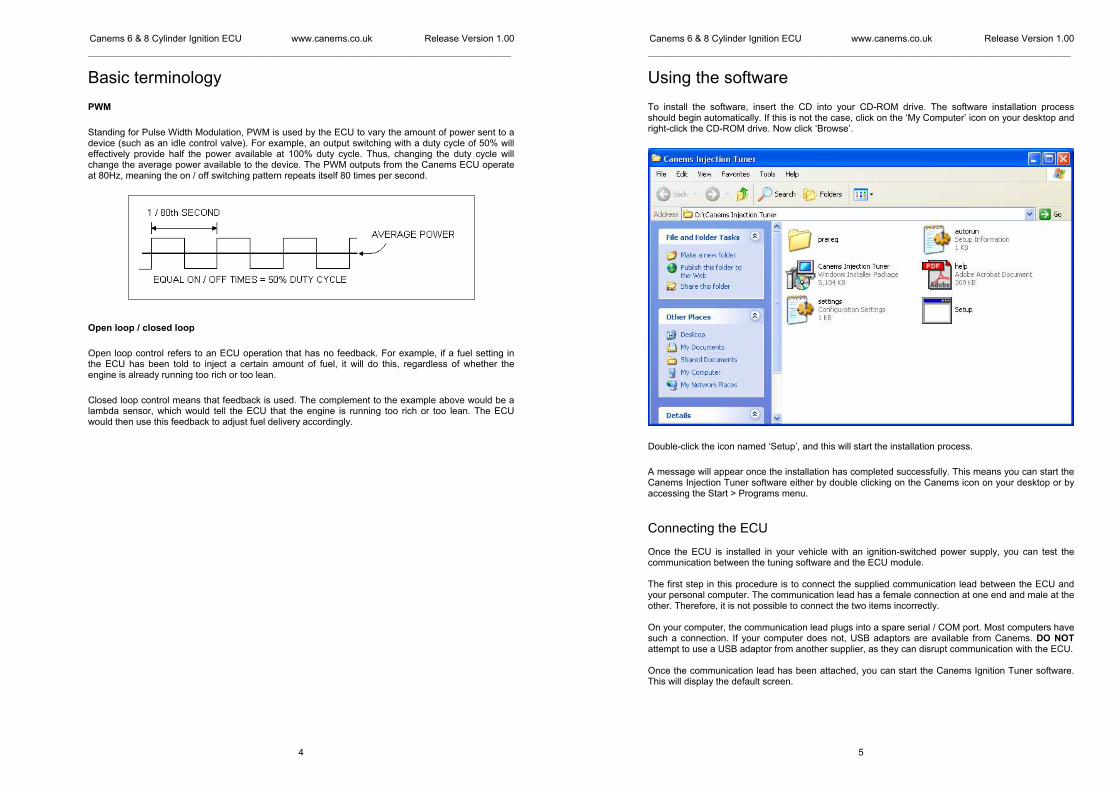
To install the software, insert the CD into your CD-ROM drive. The software installation process should begin automatically. If this is not the case, click on the ‘My Computer’ icon on your desktop and right-click the CD-ROM drive. Now click ‘Browse’.
Double-click the icon named ‘Setup’, and this will start the installation process.
A message will appear once the installation has completed successfully. This means you can start the Canems Injection Tuner software either by double clicking on the Canems icon on your desktop or by accessing the Start > Programs menu.
Connecting the ECU Once the ECU is installed in your vehicle with an ignition-switched power supply, you can test the communication between the tuning software and the ECU module. The first step in this procedure is to connect the supplied communication lead between the ECU and your personal computer. The communication lead has a female connection at one end and male at the other. Therefore, it is not possible to connect the two items incorrectly. On your computer, the communication lead plugs into a spare serial / COM port. Most computers have such a connection. If your computer does not, USB adaptors are available from Canems. DO NOT attempt to use a USB adaptor from another supplier, as they can disrupt communication with the ECU. Once the communication lead has been attached, you can start the Canems Ignition Tuner software. This will display the default screen.
Canems 6 & 8 Cylinder Ignition ECU www.canems.co.uk Release Version 1.00
___________________________________________________________________________
6
The Canems software will automatically detect the ECU.
Once the software has managed to locate the ECU, all settings will be downloaded to your computer. This process takes only a few seconds, and is the starting point from where you can begin to modify the ECU settings – referred to as ‘mapping’.
Canems 6 & 8 Cylinder Ignition ECU www.canems.co.uk Release Version 1.00
___________________________________________________________________________
7
Inputs, outputs and real-time data
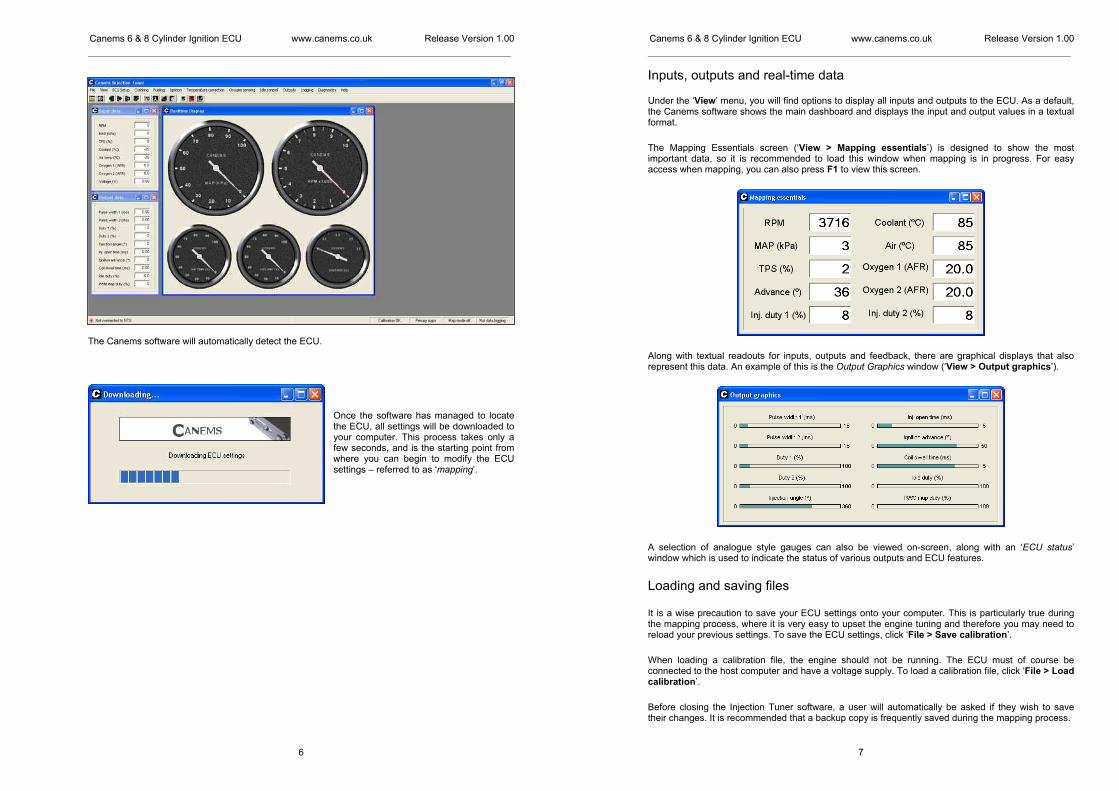
Under the ‘View’ menu, you will find options to display all inputs and outputs to the ECU. As a default, the Canems software shows the main dashboard and displays the input and output values in a textual format.
The Mapping Essentials screen (‘View > Mapping essentials’) is designed to show the most important data, so it is recommended to load this window when mapping is in progress. For easy access when mapping, you can also press F1 to view this screen.
Along with textual readouts for inputs, outputs and feedback, there are graphical displays that also represent this data. An example of this is the Output Graphics window (‘View > Output graphics’).
A selection of analogue style gauges can also be viewed on-screen, along with an ‘ECU status’ window which is used to indicate the status of various outputs and ECU features.
Loading and saving files
It is a wise precaution to save your ECU settings onto your computer. This is particularly true during the mapping process, where it is very easy to upset the engine tuning and therefore you may need to reload your previous settings. To save the ECU settings, click ‘File > Save calibration’.
When loading a calibration file, the engine should not be running. The ECU must of course be connected to the host computer and have a voltage supply. To load a calibration file, click ‘File > Load calibration’.
Before closing the Injection Tuner software, a user will automatically be asked if they wish to save their changes. It is recommended that a backup copy is frequently saved during the mapping process.
Canems 6 & 8 Cylinder Ignition ECU www.canems.co.uk Release Version 1.00
___________________________________________________________________________
8
Starting the engine
Before attempting to start the engine, make sure you have read and understood all necessary sections of this installation guide.
Calibrating the TPS
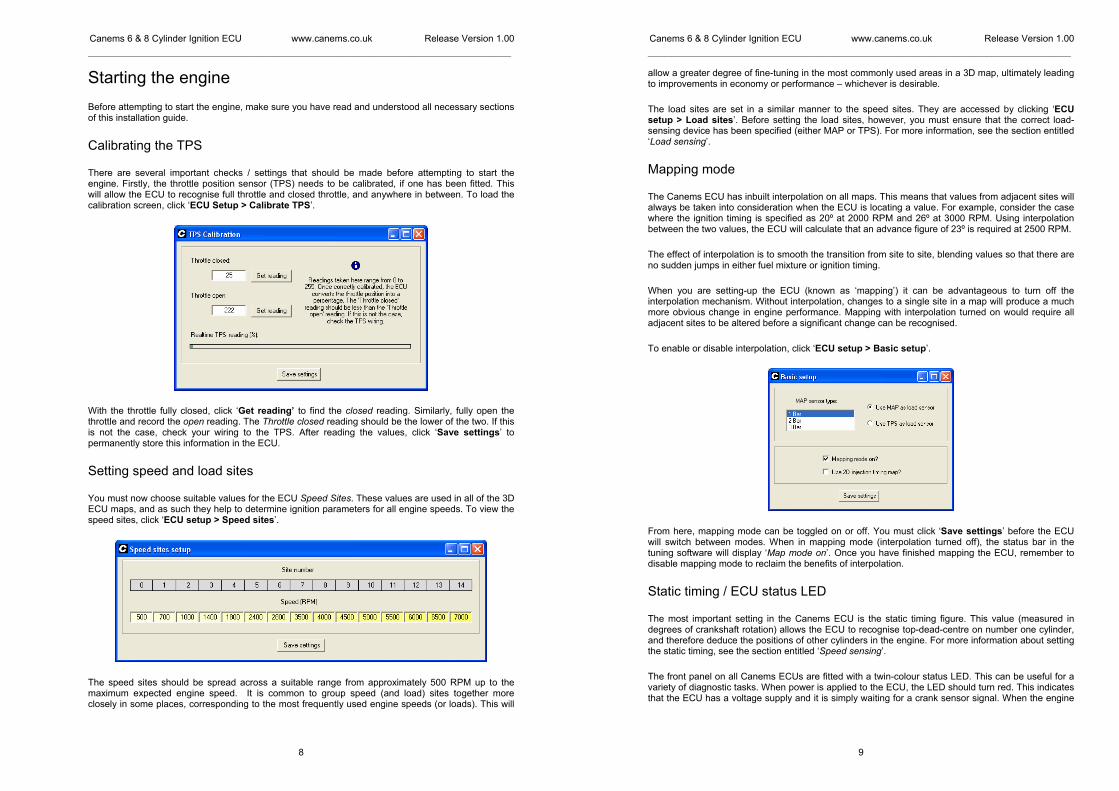
There are several important checks / settings that should be made before attempting to start the engine. Firstly, the throttle position sensor (TPS) needs to be calibrated, if one has been fitted. This will allow the ECU to recognise full throttle and closed throttle, and anywhere in between. To load the calibration screen, click ‘ECU Setup > Calibrate TPS’.
With the throttle fully closed, click ‘Get reading’ to find the closed reading. Similarly, fully open the throttle and record the open reading. The Throttle closed reading should be the lower of the two. If this is not the case, check your wiring to the TPS. After reading the values, click ‘Save settings’ to permanently store this information in the ECU.
Setting speed and load sites
You must now choose suitable values for the ECU Speed Sites. These values are used in all of the 3D ECU maps, and as such they help to determine ignition parameters for all engine speeds. To view the speed sites, click ‘ECU setup > Speed sites’.
The speed sites should be spread across a suitable range from approximately 500 RPM up to the maximum expected engine speed. It is common to group speed (and load) sites together more closely in some places, corresponding to the most frequently used engine speeds (or loads). This will
Canems 6 & 8 Cylinder Ignition ECU www.canems.co.uk Release Version 1.00
___________________________________________________________________________
9
allow a greater degree of fine-tuning in the most commonly used areas in a 3D map, ultimately leading to improvements in economy or performance – whichever is desirable.
The load sites are set in a similar manner to the speed sites. They are accessed by clicking ‘ECU setup > Load sites’. Before setting the load sites, however, you must ensure that the correct load-sensing device has been specified (either MAP or TPS). For more information, see the section entitled ‘Load sensing’.
Mapping mode
The Canems ECU has inbuilt interpolation on all maps. This means that values from adjacent sites will always be taken into consideration when the ECU is locating a value. For example, consider the case where the ignition timing is specified as 20º at 2000 RPM and 26º at 3000 RPM. Using interpolation between the two values, the ECU will calculate that an advance figure of 23º is required at 2500 RPM.
The effect of interpolation is to smooth the transition from site to site, blending values so that there are no sudden jumps in either fuel mixture or ignition timing.
When you are setting-up the ECU (known as ‘mapping’) it can be advantageous to turn off the interpolation mechanism. Without interpolation, changes to a single site in a map will produce a much more obvious change in engine performance. Mapping with interpolation turned on would require all adjacent sites to be altered before a significant change can be recognised.
To enable or disable interpolation, click ‘ECU setup > Basic setup’.
From here, mapping mode can be toggled on or off. You must click ‘Save settings’ before the ECU will switch between modes. When in mapping mode (interpolation turned off), the status bar in the tuning software will display ‘Map mode on’. Once you have finished mapping the ECU, remember to disable mapping mode to reclaim the benefits of interpolation.
Static timing / ECU status LED
The most important setting in the Canems ECU is the static timing figure. This value (measured in degrees of crankshaft rotation) allows the ECU to recognise top-dead-centre on number one cylinder, and therefore deduce the positions of other cylinders in the engine. For more information about setting the static timing, see the section entitled ‘Speed sensing’.
The front panel on all Canems ECUs are fitted with a twin-colour status LED. This can be useful for a variety of diagnostic tasks. When power is applied to the ECU, the LED should turn red. This indicates that the ECU has a voltage supply and it is simply waiting for a crank sensor signal. When the engine
Canems 6 & 8 Cylinder Ignition ECU www.canems.co.uk Release Version 1.00
___________________________________________________________________________
10
is turned over on the starter motor, the LED should turn green. A green light indicates that the ECU has detected a crank sensor signal and has successfully located top-dead-centre of the engine.
It is expected that the LED may oscillate occasionally between red and green whilst cranking, but it is important that this is not the case once the engine is running. A status LED which flickers to red indicates that the ECU has lost the position of TDC and is therefore unable to inject fuel or fire the ignition. A flickering status LED can indicate a defective crank sensor arrangement, electrical interference or poor earth connections to the ECU itself.
Canems 6 & 8 Cylinder Ignition ECU www.canems.co.uk Release Version 1.00
___________________________________________________________________________
11
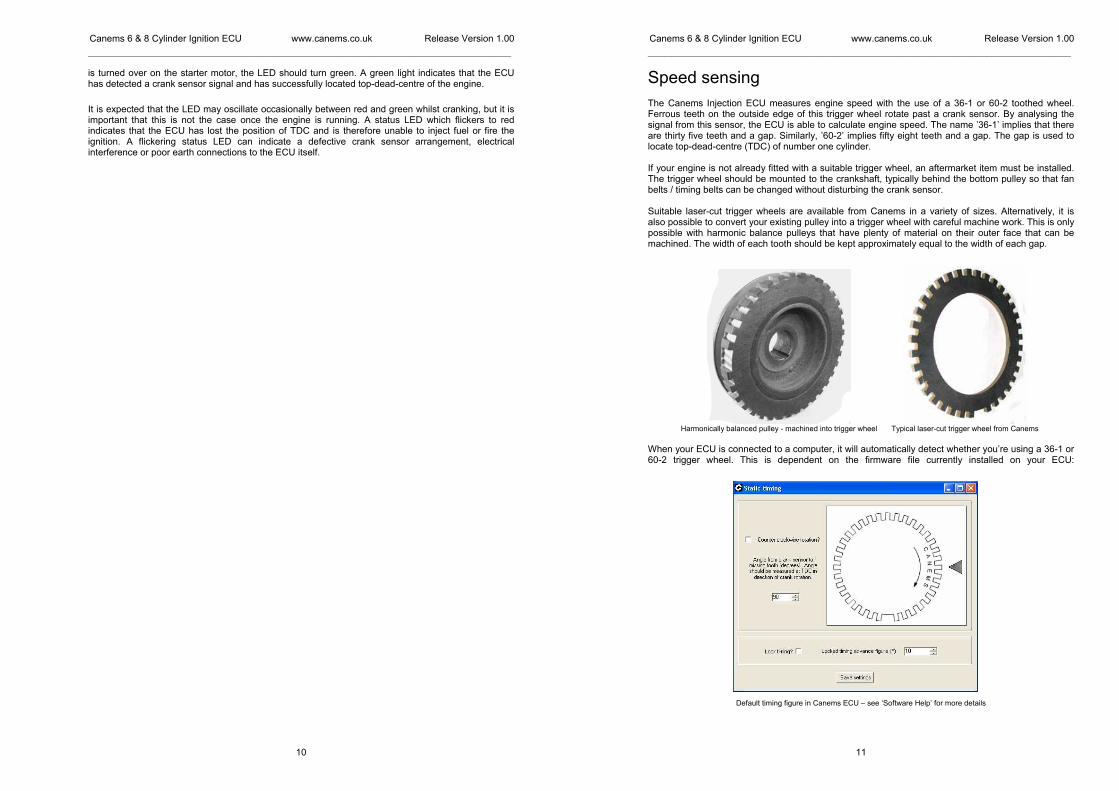
Speed sensing The Canems Injection ECU measures engine speed with the use of a 36-1 or 60-2 toothed wheel. Ferrous teeth on the outside edge of this trigger wheel rotate past a crank sensor. By analysing the signal from this sensor, the ECU is able to calculate engine speed. The name ’36-1’ implies that there are thirty five teeth and a gap. Similarly, ’60-2’ implies fifty eight teeth and a gap. The gap is used to locate top-dead-centre (TDC) of number one cylinder. If your engine is not already fitted with a suitable trigger wheel, an aftermarket item must be installed. The trigger wheel should be mounted to the crankshaft, typically behind the bottom pulley so that fan belts / timing belts can be changed without disturbing the crank sensor. Suitable laser-cut trigger wheels are available from Canems in a variety of sizes. Alternatively, it is also possible to convert your existing pulley into a trigger wheel with careful machine work. This is only possible with harmonic balance pulleys that have plenty of material on their outer face that can be machined. The width of each tooth should be kept approximately equal to the width of each gap.
Harmonically balanced pulley - machined into trigger wheel
Typical laser-cut trigger wheel from Canems
When your ECU is connected to a computer, it will automatically detect whether you’re using a 36-1 or 60-2 trigger wheel. This is dependent on the firmware file currently installed on your ECU:
Default timing figure in Canems ECU – see ‘Software Help’ for more details

Canems 6 & 8 Cylinder Ignition ECU www.canems.co.uk Release Version 1.00
___________________________________________________________________________
12
Depending on your abilities, there are two ways to set the static timing: Mechanical method: Turn the engine to TDC for number one cylinder (does not need to be on firing stroke). Fabricate crank sensor mounting bracket and install crank sensor such that it is facing the crankshaft pulley. Mark the point on the crankshaft pulley which is opposite the centre of the sensor. Carefully measure 90 degrees from this point, in the direction of crankshaft rotation. This is where the centre of the missing tooth should be located. Software method: Install trigger wheel and crank sensor wherever convenient. Turn the engine to TDC for number one cylinder (does not need to be on firing stroke). Now measure the angle from the centre of the crank sensor to the centre of the missing tooth, in the direction of crankshaft rotation. This angle is the ‘static timing’ angle, and must be programmed into the ECU. For example, if the angle was 283 degrees:
In the static timing box (ECU Setup > Static timing), type the angle. In this case, 283 degrees. Then click Save settings. The on-screen trigger wheel will rotate to mimic the positions of the trigger wheel and crank sensor on your own engine. Double check that the on-screen simulation matches the layout on your own engine. In practice, even with careful measurement, the true timing position can be a few degrees out from this theoretical figure. It is therefore recommended to verify the timing with a strobe light once the engine is running. The static timing can then be trimmed to the nearest one degree, using the software method described above. Note that some strobe lights can interfere with the ECU power supply, so try to use an external power supply if possible. Furthermore, because the ECU uses a wasted spark ignition system, some advanced strobe lights can be fooled into thinking the engine is running at double speed. If in doubt, either use a basic strobe light with no advance/retard knob or else set the advance/retard knob to zero degrees. Example: A Mini owner needs to verify the static timing figure. By measuring the angle from the crank sensor to the missing tooth, the owner has already set the static timing at 283 degrees. The engine has started and is running with this static timing figure, so he knows the timing isn’t far out. He has read that he needs approximately 15 degrees of ignition advance at 1500 rpm. Thus, he locks the ignition timing figure and then clicks Save settings:
Canems 6 & 8 Cylinder Ignition ECU www.canems.co.uk Release Version 1.00
___________________________________________________________________________
13
The owner now holds the engine at approximately 1500 rpm, and attaches the strobe light inductive pickup to number one HT lead. Most Minis have a series of pointers protruding from the timing case. The top-most pointer indicates TDC. Each subsequent pointer indicates 4 degrees of ignition advance.
With the strobe light running, the TDC marker coincides with the second pointer on the timing case (left). So the engine is actually running with eight degrees of ignition advance. The static timing figure needs to be advanced by seven degrees to give the desired timing figure of fifteen degrees. The static timing is adjusted in software, and the timing checked again (right).
The crank sensor itself can be of two types. Most common is the VR (variable reluctance) sensor. These create an A.C. voltage signal which corresponds to the teeth on the trigger wheel rotating past the tip of the sensor.
Sensor
Connections
Ford
1. Crank sensor signal (ECU pin 3D)
2. Crank sensor earth (ECU pin 3C)
Vauxhall
1. Crank sensor signal (ECU pin 3D)
2. Crank sensor earth (ECU pin 3C)
3. Cable shielding (ECU pin 3C)
Magneti Marelli
1. Crank sensor earth (ECU pin 3C)
2. Crank sensor signal (ECU pin 3D)
Peugeot
1. Crank sensor signal (ECU pin 3D)
2. Crank sensor earth (ECU pin 3C)
3. Cable shielding (ECU pin 3C)
The universal crank sensor we supply is a Ford item with connections as described above. They use a Junior Timer connector to plug into the wiring loom, as with the majority of other sensors. It is important to note that VR sensors are polarity conscious. Make note of the connections above, but for different sensors you must determine which pin is positive and which is negative. The sensor should produce a positive voltage when brought towards a steel object, and a negative voltage when taken away again. This can be verified with a multi-meter. The second type of crank sensor is a Hall sensor. These are more costly than a VR sensor, because they produce a digital on/off signal rather than an analog signal. However, this makes them less susceptible to picking up electrical interference. Hall sensors typically have three connections. These are ground, signal and power supply. If you decide to use a Hall sensor, make sure it is designed to use a ferrous trigger wheel of at least 36 teeth, and does not require magnetic triggers. The crank sensor should be mounted on a very rigid support so that the sensor is aiming towards the centre of the crank pulley. Ensure that the bracket will not work loose or fatigue over time, as the ECU cannot function without an RPM reading. Also take special care to ensure that the crank sensor
Canems 6 & 8 Cylinder Ignition ECU www.canems.co.uk Release Version 1.00
___________________________________________________________________________
14
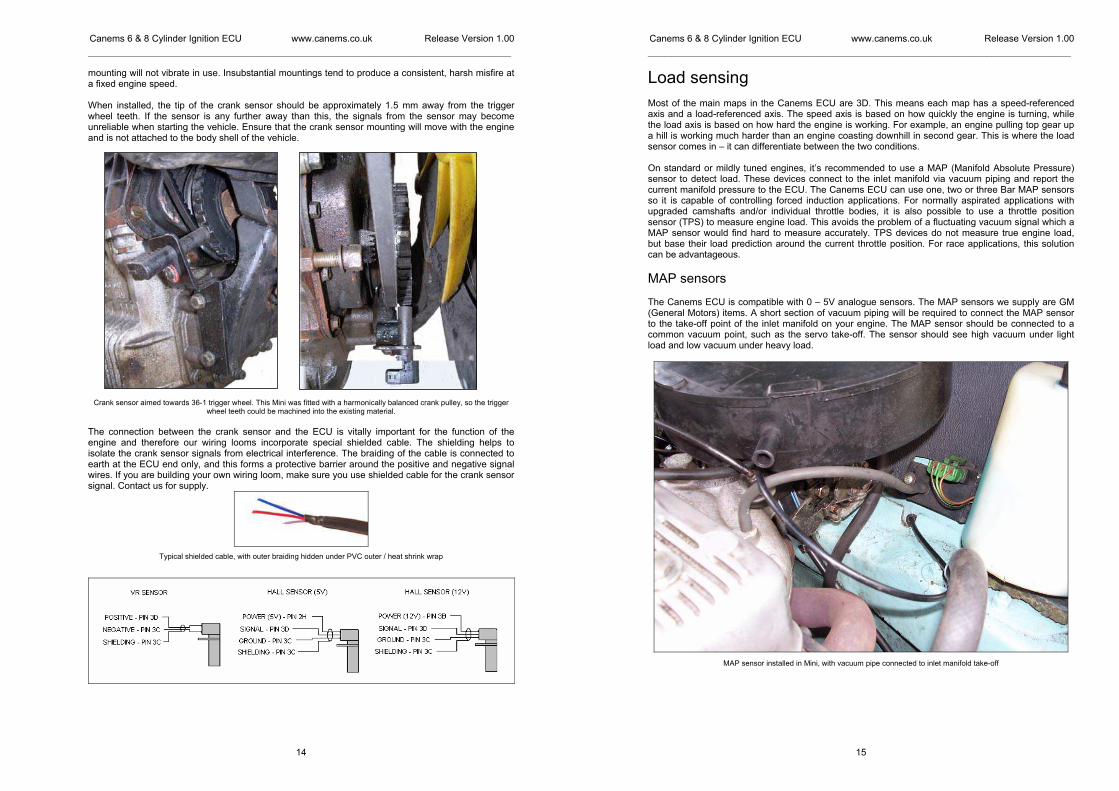
mounting will not vibrate in use. Insubstantial mountings tend to produce a consistent, harsh misfire at a fixed engine speed. When installed, the tip of the crank sensor should be approximately 1.5 mm away from the trigger wheel teeth. If the sensor is any further away than this, the signals from the sensor may become unreliable when starting the vehicle. Ensure that the crank sensor mounting will move with the engine and is not attached to the body shell of the vehicle.
Crank sensor aimed towards 36-1 trigger wheel. This Mini was fitted with a harmonically balanced crank pulley, so the trigger
wheel teeth could be machined into the existing material.
The connection between the crank sensor and the ECU is vitally important for the function of the engine and therefore our wiring looms incorporate special shielded cable. The shielding helps to isolate the crank sensor signals from electrical interference. The braiding of the cable is connected to earth at the ECU end only, and this forms a protective barrier around the positive and negative signal wires. If you are building your own wiring loom, make sure you use shielded cable for the crank sensor signal. Contact us for supply.
Typical shielded cable, with outer braiding hidden under PVC outer / heat shrink wrap
Canems 6 & 8 Cylinder Ignition ECU www.canems.co.uk Release Version 1.00
___________________________________________________________________________
15
Load sensing Most of the main maps in the Canems ECU are 3D. This means each map has a speed-referenced axis and a load-referenced axis. The speed axis is based on how quickly the engine is turning, while the load axis is based on how hard the engine is working. For example, an engine pulling top gear up a hill is working much harder than an engine coasting downhill in second gear. This is where the load sensor comes in – it can differentiate between the two conditions. On standard or mildly tuned engines, it’s recommended to use a MAP (Manifold Absolute Pressure) sensor to detect load. These devices connect to the inlet manifold via vacuum piping and report the current manifold pressure to the ECU. The Canems ECU can use one, two or three Bar MAP sensors so it is capable of controlling forced induction applications. For normally aspirated applications with upgraded camshafts and/or individual throttle bodies, it is also possible to use a throttle position sensor (TPS) to measure engine load. This avoids the problem of a fluctuating vacuum signal which a MAP sensor would find hard to measure accurately. TPS devices do not measure true engine load, but base their load prediction around the current throttle position. For race applications, this solution can be advantageous.
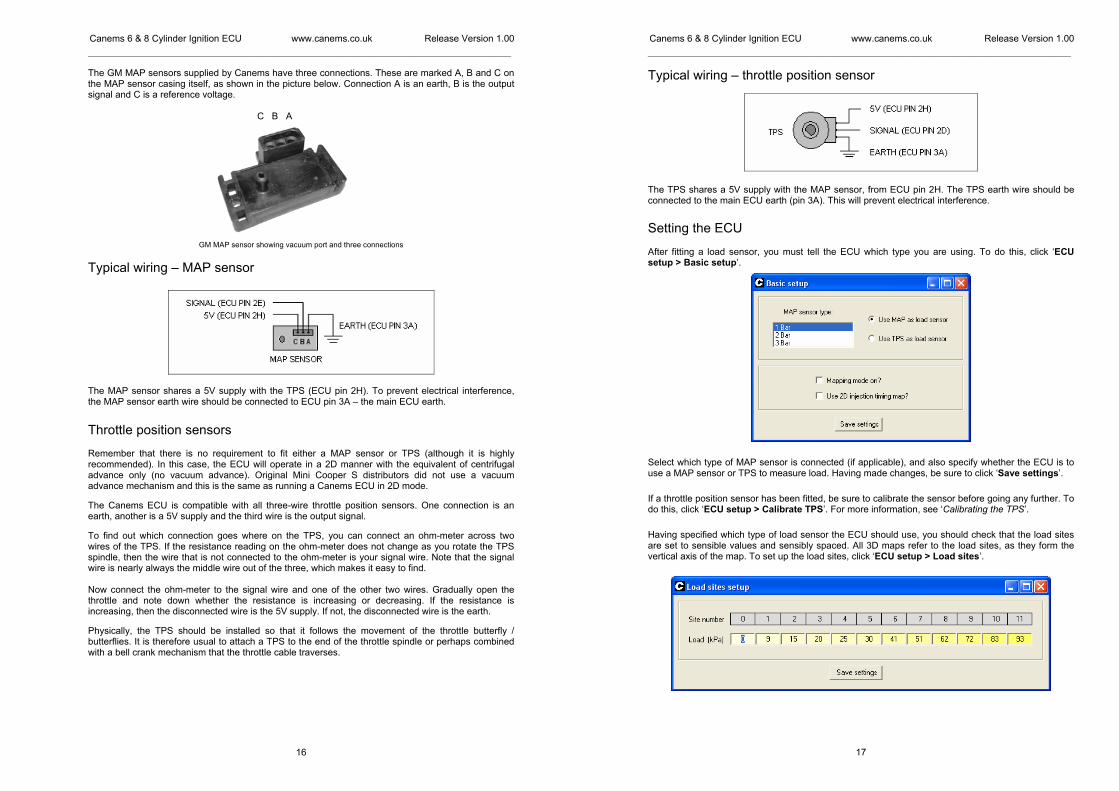
MAP sensors The Canems ECU is compatible with 0 – 5V analogue sensors. The MAP sensors we supply are GM (General Motors) items. A short section of vacuum piping will be required to connect the MAP sensor to the take-off point of the inlet manifold on your engine. The MAP sensor should be connected to a common vacuum point, such as the servo take-off. The sensor should see high vacuum under light load and low vacuum under heavy load.
MAP sensor installed in Mini, with vacuum pipe connected to inlet manifold take-off
Canems 6 & 8 Cylinder Ignition ECU www.canems.co.uk Release Version 1.00
___________________________________________________________________________
16
The GM MAP sensors supplied by Canems have three connections. These are marked A, B and C on the MAP sensor casing itself, as shown in the picture below. Connection A is an earth, B is the output signal and C is a reference voltage.
C B A
GM MAP sensor showing vacuum port and three connections
Typical wiring – MAP sensor
The MAP sensor shares a 5V supply with the TPS (ECU pin 2H). To prevent electrical interference, the MAP sensor earth wire should be connected to ECU pin 3A – the main ECU earth.
Throttle position sensors Remember that there is no requirement to fit either a MAP sensor or TPS (although it is highly recommended). In this case, the ECU will operate in a 2D manner with the equivalent of centrifugal advance only (no vacuum advance). Original Mini Cooper S distributors did not use a vacuum advance mechanism and this is the same as running a Canems ECU in 2D mode.
The Canems ECU is compatible with all three-wire throttle position sensors. One connection is an earth, another is a 5V supply and the third wire is the output signal.
To find out which connection goes where on the TPS, you can connect an ohm-meter across two wires of the TPS. If the resistance reading on the ohm-meter does not change as you rotate the TPS spindle, then the wire that is not connected to the ohm-meter is your signal wire. Note that the signal wire is nearly always the middle wire out of the three, which makes it easy to find. Now connect the ohm-meter to the signal wire and one of the other two wires. Gradually open the throttle and note down whether the resistance is increasing or decreasing. If the resistance is increasing, then the disconnected wire is the 5V supply. If not, the disconnected wire is the earth.
Physically, the TPS should be installed so that it follows the movement of the throttle butterfly / butterflies. It is therefore usual to attach a TPS to the end of the throttle spindle or perhaps combined with a bell crank mechanism that the throttle cable traverses.
Canems 6 & 8 Cylinder Ignition ECU www.canems.co.uk Release Version 1.00
___________________________________________________________________________
17
Typical wiring – throttle position sensor
The TPS shares a 5V supply with the MAP sensor, from ECU pin 2H. The TPS earth wire should be connected to the main ECU earth (pin 3A). This will prevent electrical interference.
Setting the ECU After fitting a load sensor, you must tell the ECU which type you are using. To do this, click ‘ECU setup > Basic setup’.
Select which type of MAP sensor is connected (if applicable), and also specify whether the ECU is to use a MAP sensor or TPS to measure load. Having made changes, be sure to click ‘Save settings’.
If a throttle position sensor has been fitted, be sure to calibrate the sensor before going any further. To do this, click ‘ECU setup > Calibrate TPS’. For more information, see ‘Calibrating the TPS’.
Having specified which type of load sensor the ECU should use, you should check that the load sites are set to sensible values and sensibly spaced. All 3D maps refer to the load sites, as they form the vertical axis of the map. To set up the load sites, click ‘ECU setup > Load sites’.
Canems 6 & 8 Cylinder Ignition ECU www.canems.co.uk Release Version 1.00
___________________________________________________________________________
18
There are twelve load sites in the Canems ECU, and these should be programmed to fall within the range of possible load values. Load values should increase in size from left to right.
When using a MAP sensor, load is measured in kilopascals (kPa). A one bar sensor ranges from 0 - 100kPa (0kPa being minimum load). Two bar sensors range from 0 - 200kPa and three bar sensors from 0 – 300 kPa. TPS load values range from 0 to 100%, with 100% denoting full throttle and therefore full engine load.
After changing load site values, click ‘Save settings’.
Canems 6 & 8 Cylinder Ignition ECU www.canems.co.uk Release Version 1.00
___________________________________________________________________________
19
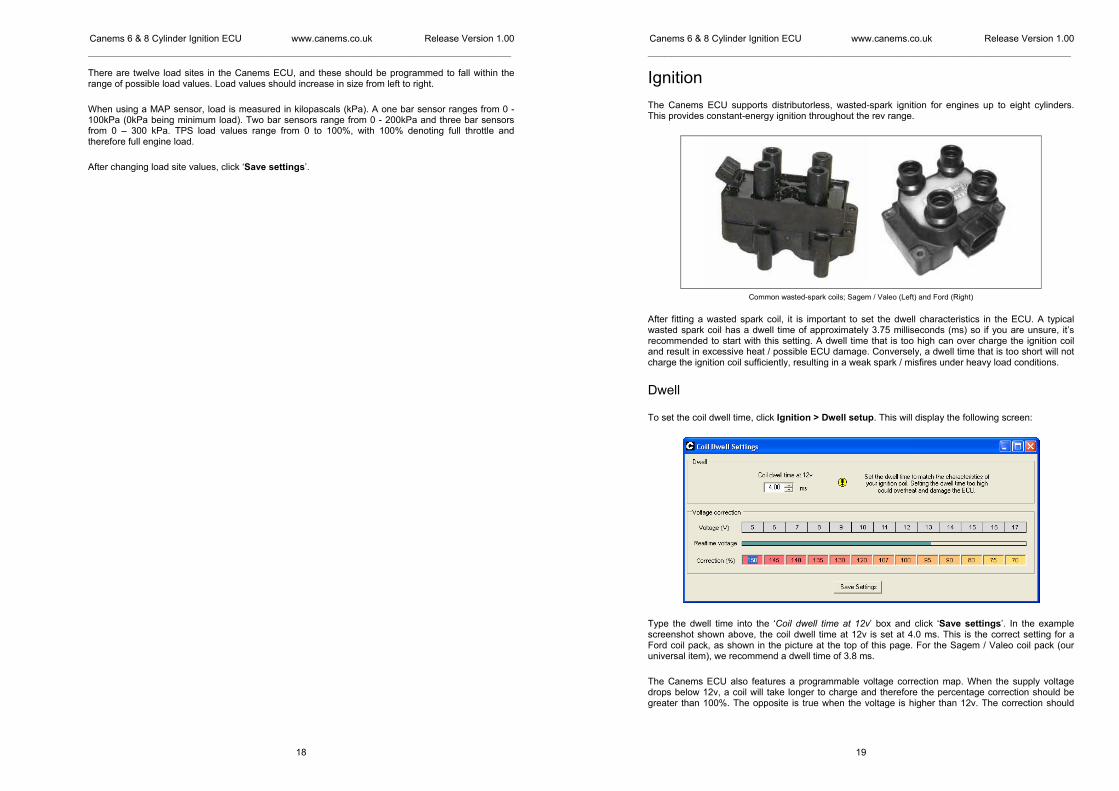
Ignition The Canems ECU supports distributorless, wasted-spark ignition for engines up to eight cylinders. This provides constant-energy ignition throughout the rev range.
Common wasted-spark coils; Sagem / Valeo (Left) and Ford (Right)
After fitting a wasted spark coil, it is important to set the dwell characteristics in the ECU. A typical wasted spark coil has a dwell time of approximately 3.75 milliseconds (ms) so if you are unsure, it’s recommended to start with this setting. A dwell time that is too high can over charge the ignition coil and result in excessive heat / possible ECU damage. Conversely, a dwell time that is too short will not charge the ignition coil sufficiently, resulting in a weak spark / misfires under heavy load conditions.
Dwell
To set the coil dwell time, click Ignition > Dwell setup. This will display the following screen:
Type the dwell time into the ‘Coil dwell time at 12v’ box and click ‘Save settings’. In the example screenshot shown above, the coil dwell time at 12v is set at 4.0 ms. This is the correct setting for a Ford coil pack, as shown in the picture at the top of this page. For the Sagem / Valeo coil pack (our universal item), we recommend a dwell time of 3.8 ms.
The Canems ECU also features a programmable voltage correction map. When the supply voltage drops below 12v, a coil will take longer to charge and therefore the percentage correction should be greater than 100%. The opposite is true when the voltage is higher than 12v. The correction should
Canems 6 & 8 Cylinder Ignition ECU www.canems.co.uk Release Version 1.00
___________________________________________________________________________
20
always be set to 100% at 12v. The ECU comes pre-programmed with a typical voltage-correction map, which should be sufficient for virtually all types of ignition coil.
Ignition maps
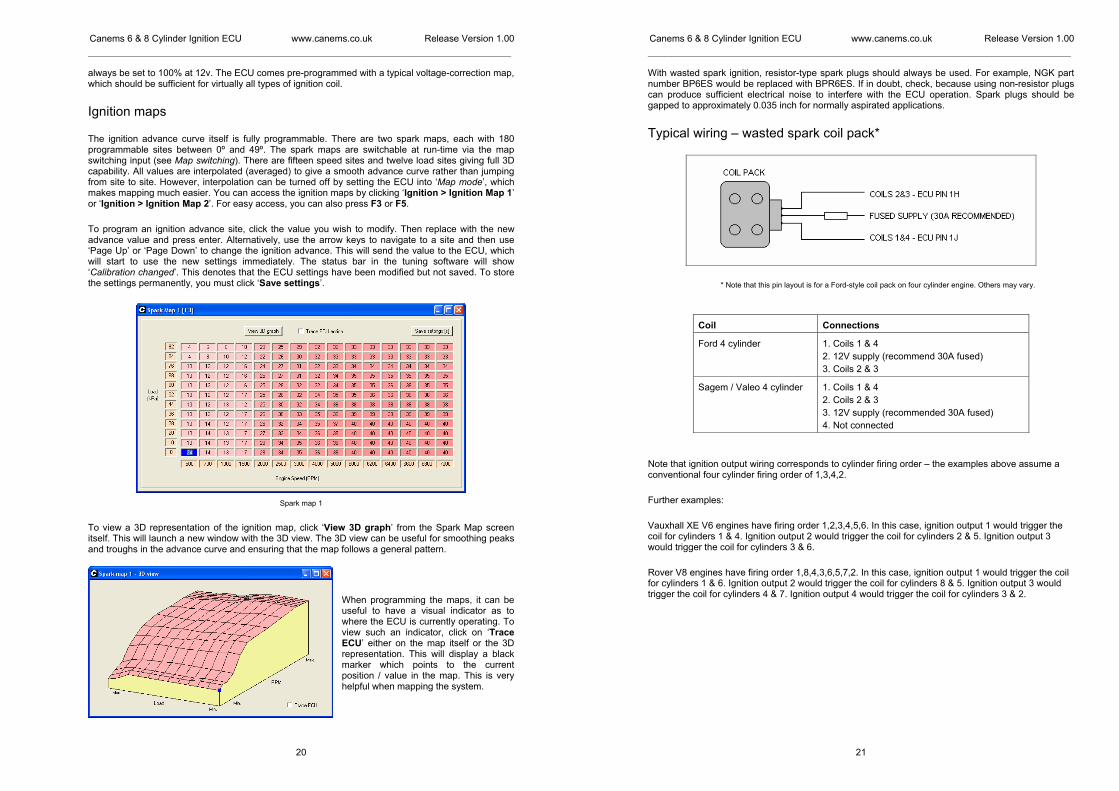
The ignition advance curve itself is fully programmable. There are two spark maps, each with 180 programmable sites between 0º and 49º. The spark maps are switchable at run-time via the map switching input (see Map switching). There are fifteen speed sites and twelve load sites giving full 3D capability. All values are interpolated (averaged) to give a smooth advance curve rather than jumping from site to site. However, interpolation can be turned off by setting the ECU into ‘Map mode’, which makes mapping much easier. You can access the ignition maps by clicking ‘Ignition > Ignition Map 1’ or ‘Ignition > Ignition Map 2’. For easy access, you can also press F3 or F5.
To program an ignition advance site, click the value you wish to modify. Then replace with the new advance value and press enter. Alternatively, use the arrow keys to navigate to a site and then use ‘Page Up’ or ‘Page Down’ to change the ignition advance. This will send the value to the ECU, which will start to use the new settings immediately. The status bar in the tuning software will show ‘Calibration changed’. This denotes that the ECU settings have been modified but not saved. To store the settings permanently, you must click ‘Save settings’.
Spark map 1
To view a 3D representation of the ignition map, click ‘View 3D graph’ from the Spark Map screen itself. This will launch a new window with the 3D view. The 3D view can be useful for smoothing peaks and troughs in the advance curve and ensuring that the map follows a general pattern.
When programming the maps, it can be useful to have a visual indicator as to where the ECU is currently operating. To view such an indicator, click on ‘Trace ECU’ either on the map itself or the 3D representation. This will display a black marker which points to the current position / value in the map. This is very helpful when mapping the system.
Canems 6 & 8 Cylinder Ignition ECU www.canems.co.uk Release Version 1.00
___________________________________________________________________________
21
With wasted spark ignition, resistor-type spark plugs should always be used. For example, NGK part number BP6ES would be replaced with BPR6ES. If in doubt, check, because using non-resistor plugs can produce sufficient electrical noise to interfere with the ECU operation. Spark plugs should be gapped to approximately 0.035 inch for normally aspirated applications.
Typical wiring – wasted spark coil pack*
* Note that this pin layout is for a Ford-style coil pack on four cylinder engine. Others may vary.
Coil
Connections
Ford 4 cylinder
1. Coils 1 & 4
2. 12V supply (recommend 30A fused)
3. Coils 2 & 3
Sagem / Valeo 4 cylinder
1. Coils 1 & 4
2. Coils 2 & 3
3. 12V supply (recommended 30A fused)
4. Not connected
Note that ignition output wiring corresponds to cylinder firing order – the examples above assume a conventional four cylinder firing order of 1,3,4,2.
Further examples:
Vauxhall XE V6 engines have firing order 1,2,3,4,5,6. In this case, ignition output 1 would trigger the coil for cylinders 1 & 4. Ignition output 2 would trigger the coil for cylinders 2 & 5. Ignition output 3 would trigger the coil for cylinders 3 & 6.
Rover V8 engines have firing order 1,8,4,3,6,5,7,2. In this case, ignition output 1 would trigger the coil for cylinders 1 & 6. Ignition output 2 would trigger the coil for cylinders 8 & 5. Ignition output 3 would trigger the coil for cylinders 4 & 7. Ignition output 4 would trigger the coil for cylinders 3 & 2.
Canems 6 & 8 Cylinder Ignition ECU www.canems.co.uk Release Version 1.00
___________________________________________________________________________
22
Coolant temperature sensing
It is not necessary to fit a coolant temperature sensor to run wasted spark ignition, but doing so can give you some handy features. Namely programmable fan switching temperatures and idle control activation temperature. You can also datalog engine temperatures to ensure reliability.
The Canems ECU uses Bosch-type coolant temperature sensors, common fitment on most modern engines. The coolant sensor should be positioned in the water jacket before the thermostat. Therefore, true engine temperature will be reported to the ECU during the warmup phase, whilst the thermostat is still closed. If there are no suitable positions for the sensor in the engine casting itself, it can be located in a bypass hose.
Bosch coolant sensor as used with Canems ECU
Typical wiring – Coolant sensor
It is highly recommended to earth the coolant sensor at the same location as the ECU itself (Pin 3A). This will eliminate electrical interference on the coolant sensor input wire.
Canems 6 & 8 Cylinder Ignition ECU www.canems.co.uk Release Version 1.00
___________________________________________________________________________
23
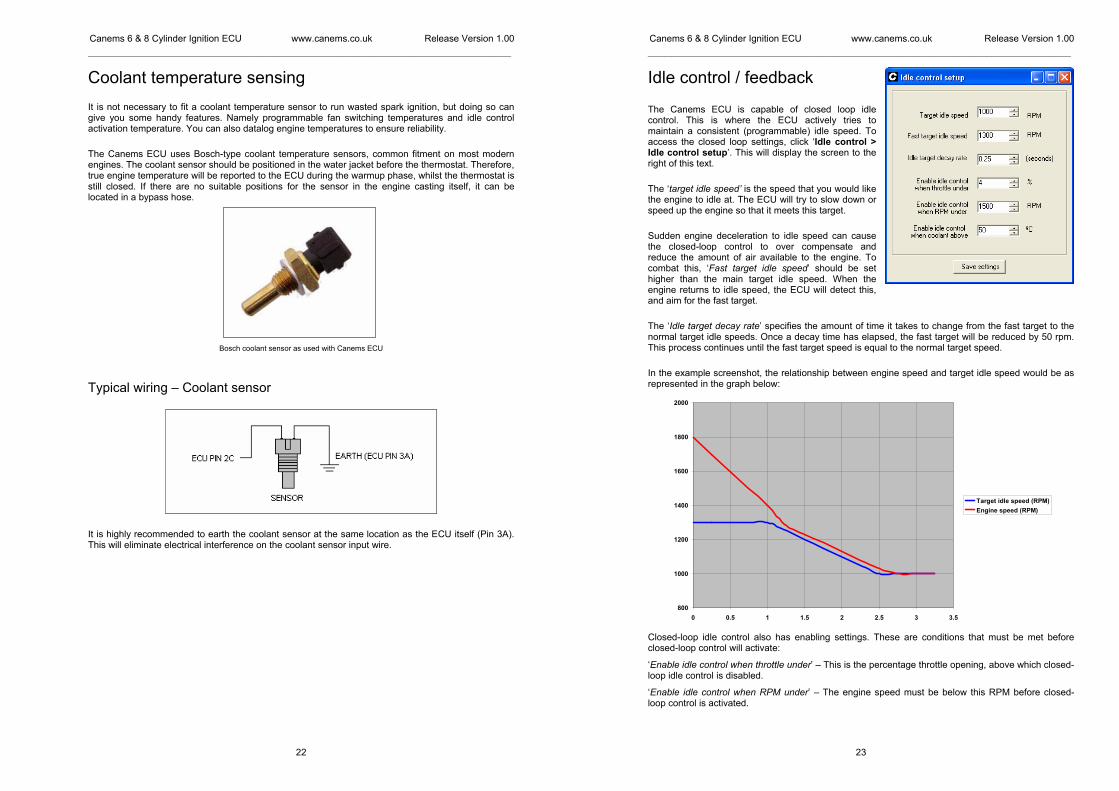
Idle control / feedback The Canems ECU is capable of closed loop idle control. This is where the ECU actively tries to maintain a consistent (programmable) idle speed. To access the closed loop settings, click ‘Idle control > Idle control setup’. This will display the screen to the right of this text.
The ‘target idle speed’ is the speed that you would like the engine to idle at. The ECU will try to slow down or speed up the engine so that it meets this target.
Sudden engine deceleration to idle speed can cause the closed-loop control to over compensate and reduce the amount of air available to the engine. To combat this, ‘Fast target idle speed’ should be set higher than the main target idle speed. When the engine returns to idle speed, the ECU will detect this, and aim for the fast target.
The ‘Idle target decay rate’ specifies the amount of time it takes to change from the fast target to the normal target idle speeds. Once a decay time has elapsed, the fast target will be reduced by 50 rpm. This process continues until the fast target speed is equal to the normal target speed.
In the example screenshot, the relationship between engine speed and target idle speed would be as represented in the graph below:
800
1000
1200
1400
1600
1800
2000
0 0.5 1 1.5 2 2.5 3 3.5
Target idle speed (RPM)
Engine speed (RPM)
Closed-loop idle control also has enabling settings. These are conditions that must be met before closed-loop control will activate:
‘Enable idle control when throttle under’ – This is the percentage throttle opening, above which closed-loop idle control is disabled.
‘Enable idle control when RPM under’ – The engine speed must be below this RPM before closed-loop control is activated.
Canems 6 & 8 Cylinder Ignition ECU www.canems.co.uk Release Version 1.00
___________________________________________________________________________
24
‘Enable idle control when coolant above’ – The coolant temperature which must be reached before closed-loop idle control activates.
Whenever the enabling conditions (outlined above) are not met, the idle control is disabled.
When all of the conditions for closed-loop control have been met, the ECU attempts to meet the target idle speed by speeding up or slowing down the engine. This is achieved by altering the ignition timing.
Spark scatter idle control
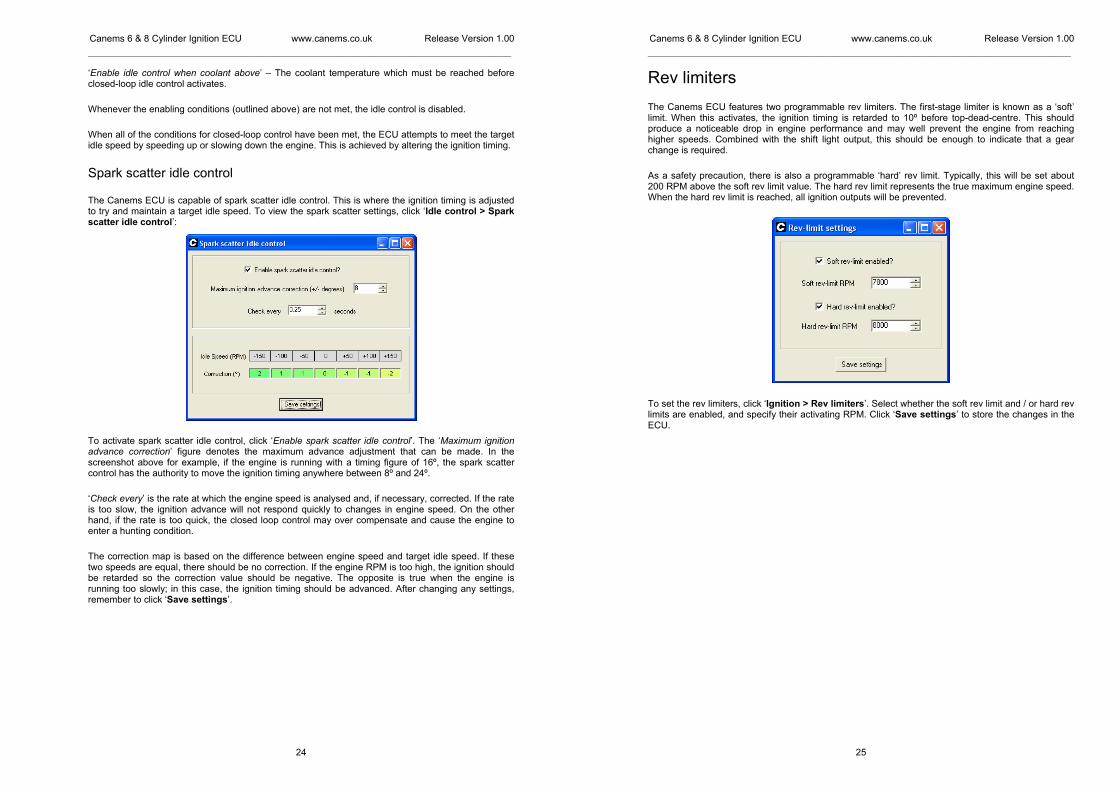
The Canems ECU is capable of spark scatter idle control. This is where the ignition timing is adjusted to try and maintain a target idle speed. To view the spark scatter settings, click ‘Idle control > Spark scatter idle control’:
To activate spark scatter idle control, click ‘Enable spark scatter idle control’. The ‘Maximum ignition advance correction’ figure denotes the maximum advance adjustment that can be made. In the screenshot above for example, if the engine is running with a timing figure of 16º, the spark scatter control has the authority to move the ignition timing anywhere between 8º and 24º.
‘Check every’ is the rate at which the engine speed is analysed and, if necessary, corrected. If the rate is too slow, the ignition advance will not respond quickly to changes in engine speed. On the other hand, if the rate is too quick, the closed loop control may over compensate and cause the engine to enter a hunting condition.
The correction map is based on the difference between engine speed and target idle speed. If these two speeds are equal, there should be no correction. If the engine RPM is too high, the ignition should be retarded so the correction value should be negative. The opposite is true when the engine is running too slowly; in this case, the ignition timing should be advanced. After changing any settings, remember to click ‘Save settings’.
Canems 6 & 8 Cylinder Ignition ECU www.canems.co.uk Release Version 1.00
___________________________________________________________________________
25
Rev limiters
The Canems ECU features two programmable rev limiters. The first-stage limiter is known as a ‘soft’ limit. When this activates, the ignition timing is retarded to 10º before top-dead-centre. This should produce a noticeable drop in engine performance and may well prevent the engine from reaching higher speeds. Combined with the shift light output, this should be enough to indicate that a gear change is required.
As a safety precaution, there is also a programmable ‘hard’ rev limit. Typically, this will be set about 200 RPM above the soft rev limit value. The hard rev limit represents the true maximum engine speed. When the hard rev limit is reached, all ignition outputs will be prevented.
To set the rev limiters, click ‘Ignition > Rev limiters’. Select whether the soft rev limit and / or hard rev limits are enabled, and specify their activating RPM. Click ‘Save settings’ to store the changes in the ECU.
Canems 6 & 8 Cylinder Ignition ECU www.canems.co.uk Release Version 1.00
___________________________________________________________________________
26
Map switching The Canems ECU can run from two ignition timing maps and two main fuel maps. Switching from primary maps to secondary maps is achieved by connecting ECU pin 2A to ground. Therefore, a switch on the dashboard can be wired so that the user has control over economy / performance maps or duel fuel control.
To access / program primary and secondary ignition maps, click ‘Ignition > Ignition Map 1’ or ‘Ignition > Ignition Map 2’.
When the ECU is connected to the Canems Injection Tuner software, the status bar will automatically display whether the primary or secondary maps are currently in use.
Canems 6 & 8 Cylinder Ignition ECU www.canems.co.uk Release Version 1.00
___________________________________________________________________________
27
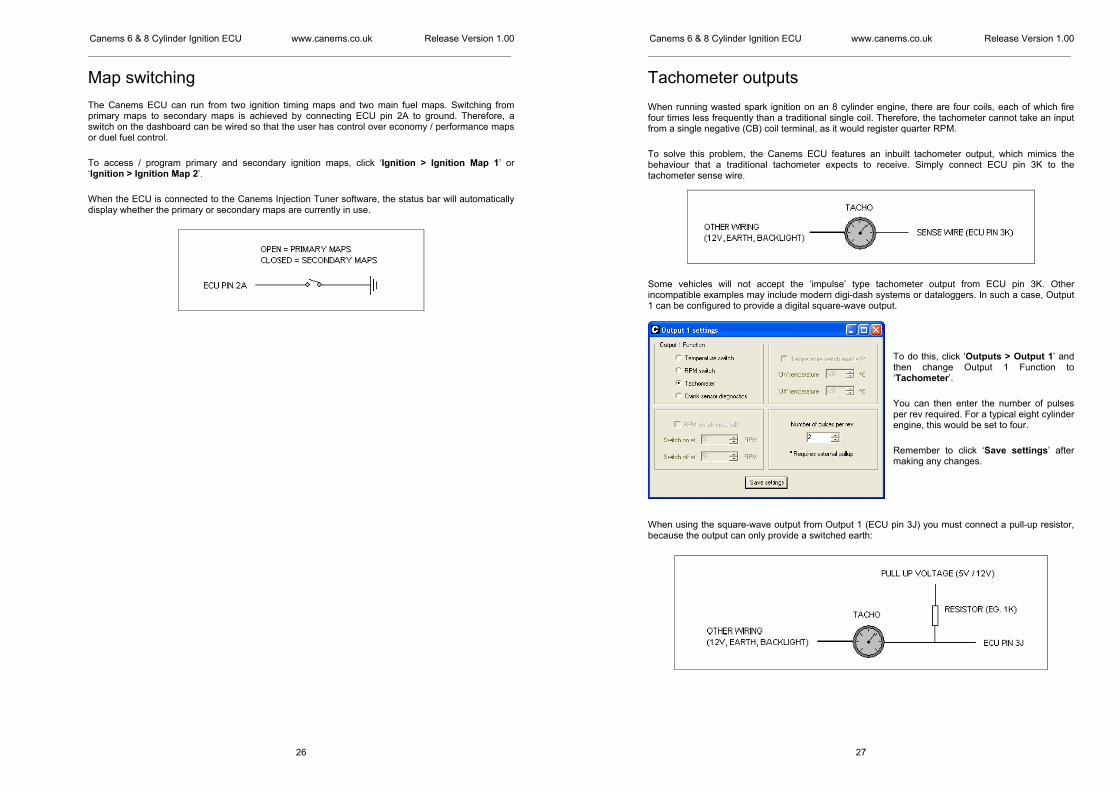
Tachometer outputs
When running wasted spark ignition on an 8 cylinder engine, there are four coils, each of which fire four times less frequently than a traditional single coil. Therefore, the tachometer cannot take an input from a single negative (CB) coil terminal, as it would register quarter RPM.
To solve this problem, the Canems ECU features an inbuilt tachometer output, which mimics the behaviour that a traditional tachometer expects to receive. Simply connect ECU pin 3K to the tachometer sense wire.
Some vehicles will not accept the ‘impulse’ type tachometer output from ECU pin 3K. Other incompatible examples may include modern digi-dash systems or dataloggers. In such a case, Output 1 can be configured to provide a digital square-wave output.
To do this, click ‘Outputs > Output 1’ and then change Output 1 Function to ‘Tachometer’.
You can then enter the number of pulses per rev required. For a typical eight cylinder engine, this would be set to four.
Remember to click ‘Save settings’ after making any changes.
When using the square-wave output from Output 1 (ECU pin 3J) you must connect a pull-up resistor, because the output can only provide a switched earth:
Canems 6 & 8 Cylinder Ignition ECU www.canems.co.uk Release Version 1.00
___________________________________________________________________________
28
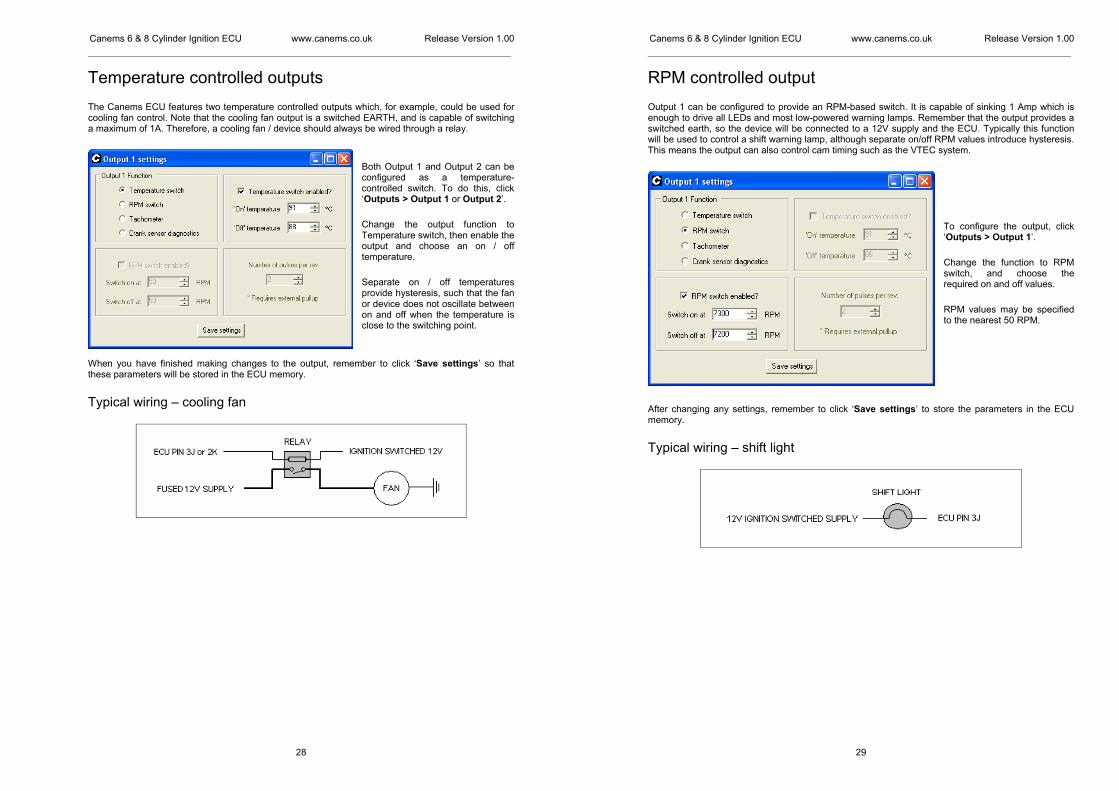
Temperature controlled outputs
The Canems ECU features two temperature controlled outputs which, for example, could be used for cooling fan control. Note that the cooling fan output is a switched EARTH, and is capable of switching a maximum of 1A. Therefore, a cooling fan / device should always be wired through a relay.
Both Output 1 and Output 2 can be configured as a temperature-controlled switch. To do this, click ‘Outputs > Output 1 or Output 2’.
Change the output function to Temperature switch, then enable the output and choose an on / off temperature.
Separate on / off temperatures provide hysteresis, such that the fan or device does not oscillate between on and off when the temperature is close to the switching point.
When you have finished making changes to the output, remember to click ‘Save settings’ so that these parameters will be stored in the ECU memory.
Typical wiring – cooling fan
Canems 6 & 8 Cylinder Ignition ECU www.canems.co.uk Release Version 1.00
___________________________________________________________________________
29
RPM controlled output
Output 1 can be configured to provide an RPM-based switch. It is capable of sinking 1 Amp which is enough to drive all LEDs and most low-powered warning lamps. Remember that the output provides a switched earth, so the device will be connected to a 12V supply and the ECU. Typically this function will be used to control a shift warning lamp, although separate on/off RPM values introduce hysteresis. This means the output can also control cam timing such as the VTEC system.
To configure the output, click ‘Outputs > Output 1’.
Change the function to RPM switch, and choose the required on and off values.
RPM values may be specified to the nearest 50 RPM.
After changing any settings, remember to click ‘Save settings’ to store the parameters in the ECU memory.
Typical wiring – shift light
Canems 6 & 8 Cylinder Ignition ECU www.canems.co.uk Release Version 1.00
___________________________________________________________________________
30
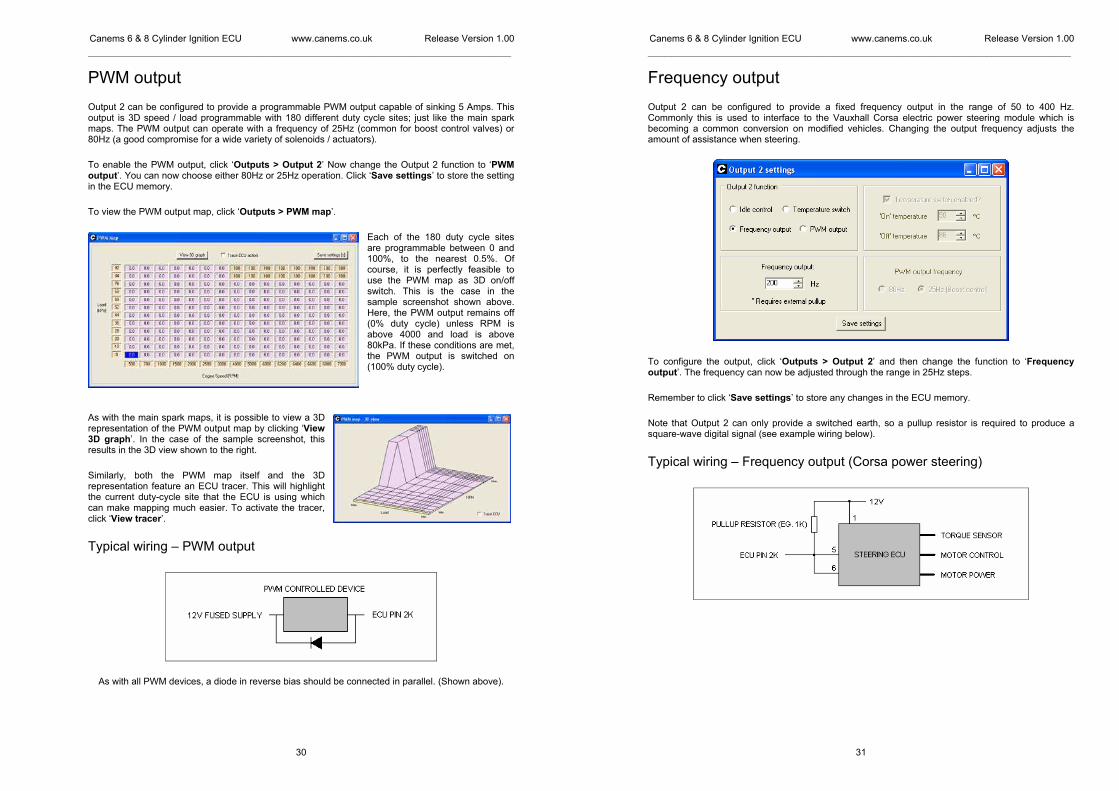
PWM output
Output 2 can be configured to provide a programmable PWM output capable of sinking 5 Amps. This output is 3D speed / load programmable with 180 different duty cycle sites; just like the main spark maps. The PWM output can operate with a frequency of 25Hz (common for boost control valves) or 80Hz (a good compromise for a wide variety of solenoids / actuators).
To enable the PWM output, click ‘Outputs > Output 2’ Now change the Output 2 function to ‘PWM output’. You can now choose either 80Hz or 25Hz operation. Click ‘Save settings’ to store the setting in the ECU memory.
To view the PWM output map, click ‘Outputs > PWM map’.
Each of the 180 duty cycle sites are programmable between 0 and 100%, to the nearest 0.5%. Of course, it is perfectly feasible to use the PWM map as 3D on/off switch. This is the case in the sample screenshot shown above. Here, the PWM output remains off (0% duty cycle) unless RPM is above 4000 and load is above 80kPa. If these conditions are met, the PWM output is switched on (100% duty cycle).
As with the main spark maps, it is possible to view a 3D representation of the PWM output map by clicking ‘View 3D graph’. In the case of the sample screenshot, this results in the 3D view shown to the right.
Similarly, both the PWM map itself and the 3D representation feature an ECU tracer. This will highlight the current duty-cycle site that the ECU is using which can make mapping much easier. To activate the tracer, click ‘View tracer’.
Typical wiring – PWM output
As with all PWM devices, a diode in reverse bias should be connected in parallel. (Shown above).
Canems 6 & 8 Cylinder Ignition ECU www.canems.co.uk Release Version 1.00
___________________________________________________________________________
31
Frequency output
Output 2 can be configured to provide a fixed frequency output in the range of 50 to 400 Hz. Commonly this is used to interface to the Vauxhall Corsa electric power steering module which is becoming a common conversion on modified vehicles. Changing the output frequency adjusts the amount of assistance when steering.
To configure the output, click ‘Outputs > Output 2’ and then change the function to ‘Frequency output’. The frequency can now be adjusted through the range in 25Hz steps.
Remember to click ‘Save settings’ to store any changes in the ECU memory.
Note that Output 2 can only provide a switched earth, so a pullup resistor is required to produce a square-wave digital signal (see example wiring below).
Typical wiring – Frequency output (Corsa power steering)

Canems 6 & 8 Cylinder Ignition ECU www.canems.co.uk Release Version 1.00
___________________________________________________________________________
32
Data logging
The Canems Injection Tuner software has inbuilt data logging capabilities, so that twenty four real-time parameters can be saved to the connected computer and played back at a later time in graphical form. The data logger has selectable recording rates along with selectable parameters. Choosing a lower recording rate with fewer parameters will use less disk space on the host computer and is recommended for longer data logs.
To view the logging options, click ‘Logging > Options’. This will open the screen to the right, where you can choose the parameters that you wish to record. The sample rate is also selectable, with four rates; maximum, half, quarter and eighth. The number of samples per second is dependant on the speed of the connected computer, though most computers are capable of recording twenty samples of the twenty-four parameters every second. After making changes to the logging options, click ‘Save settings’. This will save your specified logging options onto your computer, so that they will be used as a default from now on.
To start a data logging session, click ‘Logging > Start’. You will be prompted for a file name, under which the data log will be saved. Clicking ‘Ok’ will commence the log, and the chosen parameters will be saved successively to the connected computer. The status bar will indicate ‘Datalogging’ to show that the logging process has begun. Similarly, to stop a data log session, click ‘Logging > Stop’. The status bar will indicate ‘Not data logging’.
To view a saved data log, click ‘Logging > Log viewer’.
Canems 6 & 8 Cylinder Ignition ECU www.canems.co.uk Release Version 1.00
___________________________________________________________________________
33
After opening the Log Viewer, click ‘Open data log’ and select the data log file that you wish to view. By default, the Log Viewer shows the first minute of the data log. If the data log is longer than this, the view can be moved forwards by either thirty seconds or five minutes by clicking ‘Forward 30s’ or ‘Forward 5min’, respectively. Similarly, the data log view is moved backwards in time by clicking either ‘Back 30s’ or ‘Back 5min’.
The level of detail in the viewer can also be controlled, so that it is possible to ‘zoom in’ on an area of particular interest. To do this, click ‘Zoom in’ successively. Clicking ‘zoom out’ naturally has the opposite effect.
Canems 6 & 8 Cylinder Ignition ECU www.canems.co.uk Release Version 1.00
___________________________________________________________________________
34
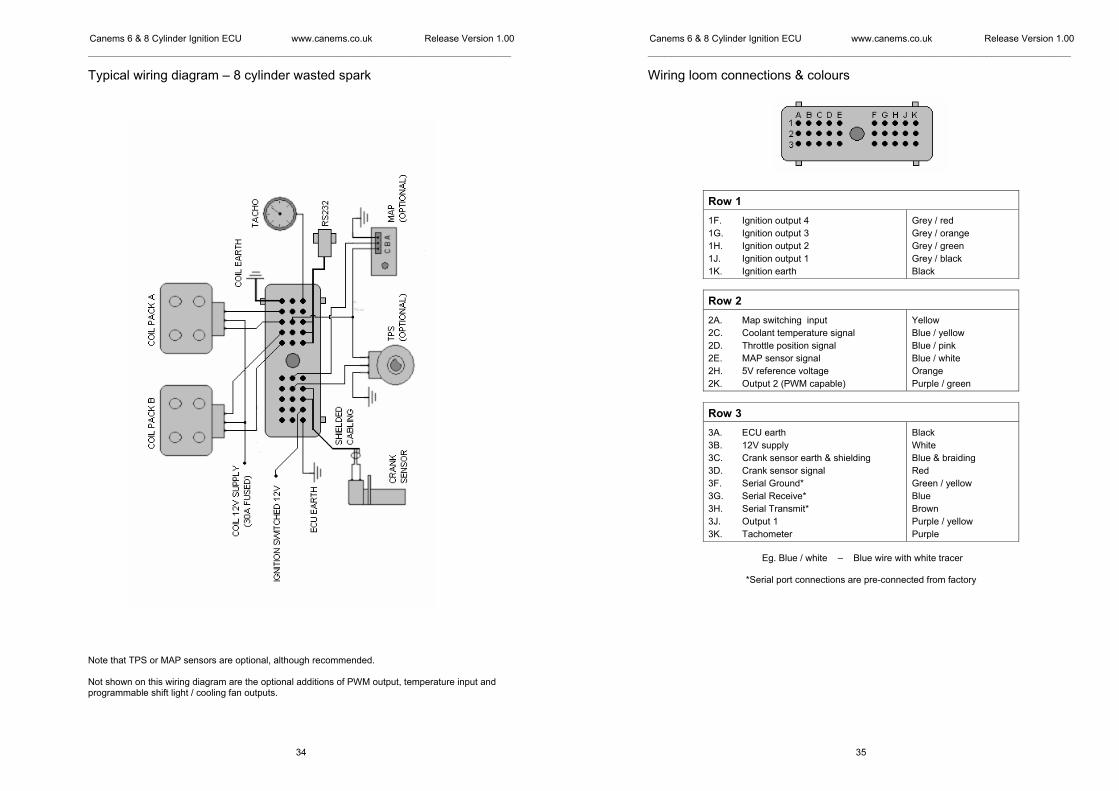
Typical wiring diagram – 8 cylinder wasted spark
Note that TPS or MAP sensors are optional, although recommended. Not shown on this wiring diagram are the optional additions of PWM output, temperature input and programmable shift light / cooling fan outputs.
Canems 6 & 8 Cylinder Ignition ECU www.canems.co.uk Release Version 1.00
___________________________________________________________________________
35
Wiring loom connections & colours
Row 1
1F. Ignition output 4
1G. Ignition output 3
1H. Ignition output 2
1J. Ignition output 1
1K. Ignition earth
Grey / red
Grey / orange
Grey / green
Grey / black
Black
Row 2
2A. Map switching input
2C. Coolant temperature signal
2D. Throttle position signal
2E. MAP sensor signal
2H. 5V reference voltage
2K. Output 2 (PWM capable)
Yellow
Blue / yellow
Blue / pink
Blue / white
Orange
Purple / green
Row 3
3A. ECU earth
3B. 12V supply
3C. Crank sensor earth & shielding
3D. Crank sensor signal
3F. Serial Ground*
3G. Serial Receive*
3H. Serial Transmit*
3J. Output 1
3K. Tachometer
Black
White
Blue & braiding
Red
Green / yellow
Blue
Brown
Purple / yellow
Purple
Eg. Blue / white – Blue wire with white tracer
*Serial port connections are pre-connected from factory
Canems 6 & 8 Cylinder Ignition ECU www.canems.co.uk Release Version 1.00
___________________________________________________________________________
36
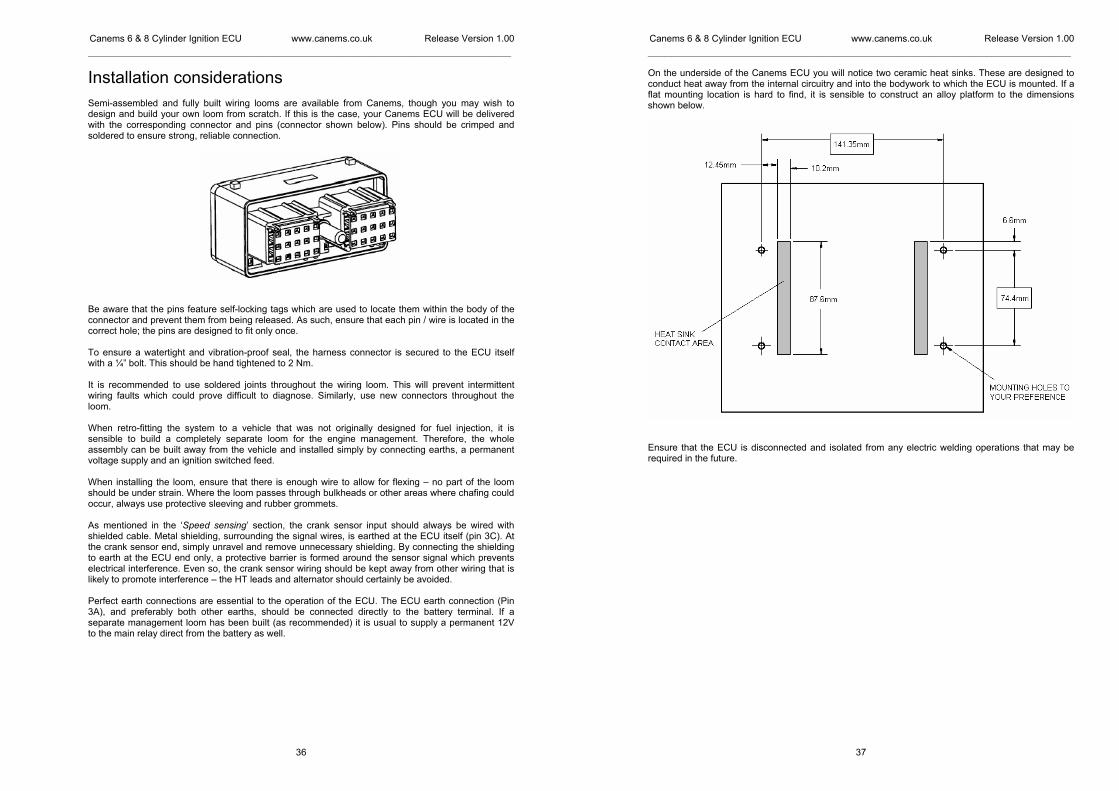
Installation considerations Semi-assembled and fully built wiring looms are available from Canems, though you may wish to design and build your own loom from scratch. If this is the case, your Canems ECU will be delivered with the corresponding connector and pins (connector shown below). Pins should be crimped and soldered to ensure strong, reliable connection.
Be aware that the pins feature self-locking tags which are used to locate them within the body of the connector and prevent them from being released. As such, ensure that each pin / wire is located in the correct hole; the pins are designed to fit only once. To ensure a watertight and vibration-proof seal, the harness connector is secured to the ECU itself with a ¼” bolt. This should be hand tightened to 2 Nm. It is recommended to use soldered joints throughout the wiring loom. This will prevent intermittent wiring faults which could prove difficult to diagnose. Similarly, use new connectors throughout the loom. When retro-fitting the system to a vehicle that was not originally designed for fuel injection, it is sensible to build a completely separate loom for the engine management. Therefore, the whole assembly can be built away from the vehicle and installed simply by connecting earths, a permanent voltage supply and an ignition switched feed. When installing the loom, ensure that there is enough wire to allow for flexing – no part of the loom should be under strain. Where the loom passes through bulkheads or other areas where chafing could occur, always use protective sleeving and rubber grommets. As mentioned in the ‘Speed sensing’ section, the crank sensor input should always be wired with shielded cable. Metal shielding, surrounding the signal wires, is earthed at the ECU itself (pin 3C). At the crank sensor end, simply unravel and remove unnecessary shielding. By connecting the shielding to earth at the ECU end only, a protective barrier is formed around the sensor signal which prevents electrical interference. Even so, the crank sensor wiring should be kept away from other wiring that is likely to promote interference – the HT leads and alternator should certainly be avoided. Perfect earth connections are essential to the operation of the ECU. The ECU earth connection (Pin 3A), and preferably both other earths, should be connected directly to the battery terminal. If a separate management loom has been built (as recommended) it is usual to supply a permanent 12V to the main relay direct from the battery as well.
Canems 6 & 8 Cylinder Ignition ECU www.canems.co.uk Release Version 1.00
___________________________________________________________________________
37
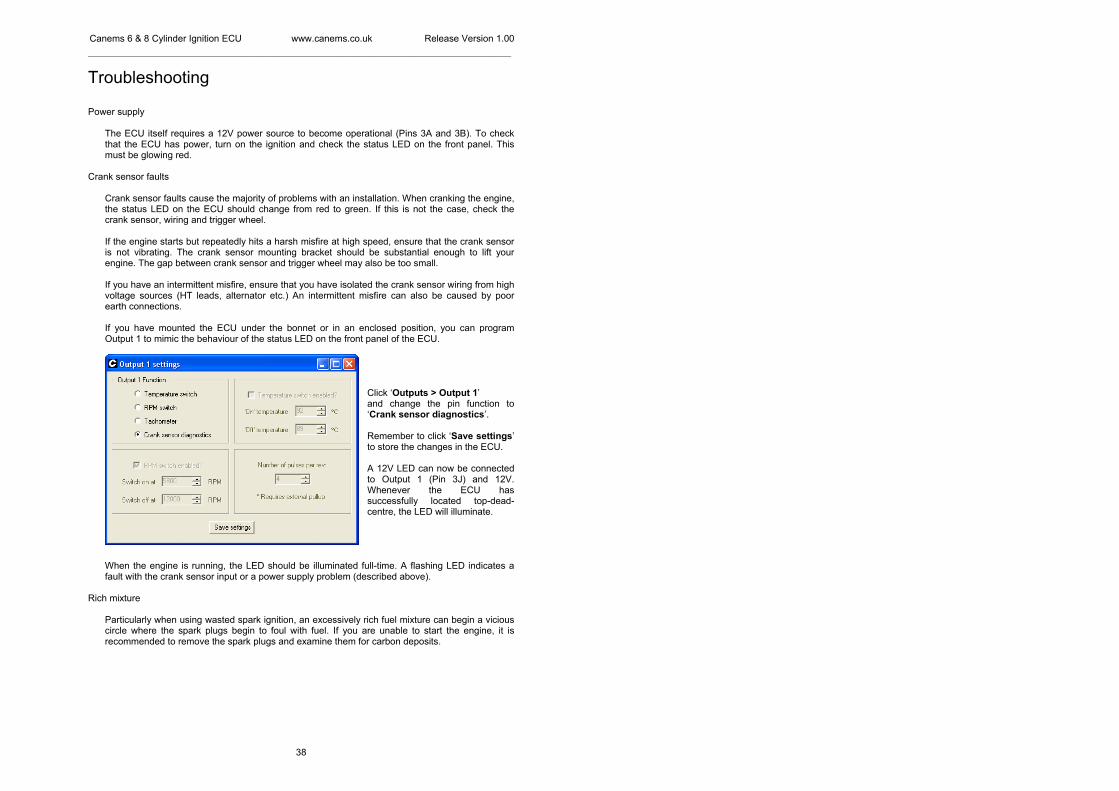
On the underside of the Canems ECU you will notice two ceramic heat sinks. These are designed to conduct heat away from the internal circuitry and into the bodywork to which the ECU is mounted. If a flat mounting location is hard to find, it is sensible to construct an alloy platform to the dimensions shown below.
Ensure that the ECU is disconnected and isolated from any electric welding operations that may be required in the future.
Canems 6 & 8 Cylinder Ignition ECU www.canems.co.uk Release Version 1.00
___________________________________________________________________________
38
Troubleshooting Power supply
The ECU itself requires a 12V power source to become operational (Pins 3A and 3B). To check that the ECU has power, turn on the ignition and check the status LED on the front panel. This must be glowing red.
Crank sensor faults
Crank sensor faults cause the majority of problems with an installation. When cranking the engine, the status LED on the ECU should change from red to green. If this is not the case, check the crank sensor, wiring and trigger wheel. If the engine starts but repeatedly hits a harsh misfire at high speed, ensure that the crank sensor is not vibrating. The crank sensor mounting bracket should be substantial enough to lift your engine. The gap between crank sensor and trigger wheel may also be too small. If you have an intermittent misfire, ensure that you have isolated the crank sensor wiring from high voltage sources (HT leads, alternator etc.) An intermittent misfire can also be caused by poor earth connections. If you have mounted the ECU under the bonnet or in an enclosed position, you can program Output 1 to mimic the behaviour of the status LED on the front panel of the ECU.
Click ‘Outputs > Output 1’ and change the pin function to ‘Crank sensor diagnostics’. Remember to click ‘Save settings’ to store the changes in the ECU. A 12V LED can now be connected to Output 1 (Pin 3J) and 12V. Whenever the ECU has successfully located top-dead-centre, the LED will illuminate.
When the engine is running, the LED should be illuminated full-time. A flashing LED indicates a fault with the crank sensor input or a power supply problem (described above).
Rich mixture Particularly when using wasted spark ignition, an excessively rich fuel mixture can begin a vicious circle where the spark plugs begin to foul with fuel. If you are unable to start the engine, it is recommended to remove the spark plugs and examine them for carbon deposits.


