Embed Size (px)
Citation preview
CS Gold® AdminWeb™ Software User Guide
Managed by Information Technology
Oklahoma State University Stillwater Oklahoma Updated 6/27/2019
CS Gold® WebManager Software
CS Gold AdminWeb User Guide
6/27/2019 OSU Stillwater Information TechnologyCS Gold AdminWeb User Guide 2 of 34
Table of Contents 1 Introduction .......................................................................................................................................... 3
2 Log In ..................................................................................................................................................... 3
3 Patron Lookup ....................................................................................................................................... 5
3.1 Add/Edit/Remove Patron Groups ................................................................................................. 7
3.2 Meal Plan ...................................................................................................................................... 7
3.2.1 Add a Meal Plan .................................................................................................................... 8
3.2.2 Edit a Meal Plan .................................................................................................................... 9
3.2.3 Drop a Meal Plan ................................................................................................................. 10
3.3 Stored Value/Credit .................................................................................................................... 10
3.3.1 Add an SV&C Plan ............................................................................................................... 11
3.3.2 Edit an SV&C Plan ................................................................................................................ 12
3.3.3 Drop an SV&C Plan .............................................................................................................. 12
3.3.4 Enter SV&C Transactions..................................................................................................... 13
3.4 Access .......................................................................................................................................... 14
4 Access Assignments ............................................................................................................................ 15
4.1 Configure Access Assignments .................................................................................................... 15
4.2 Duplicate an Access Assignment ................................................................................................. 21
5 Patron Access Exception ..................................................................................................................... 22
6 Open/Close Exception ......................................................................................................................... 23
7 Remove Exceptions ............................................................................................................................. 23
8 Patron Group Management ................................................................................................................ 24
8.1 Creating a New Patron Group ..................................................................................................... 24
8.2 Manage Patron Group Members ................................................................................................ 24
8.3 Managing Group Access Assignments ........................................................................................ 25
8.4 Managing Access Schedules ........................................................................................................ 26
9 Web Reporting .................................................................................................................................... 27
10 Ad Hoc Reports ............................................................................................................................... 27
11 Reader Status .................................................................................................................................. 30
12 Door Viewer .................................................................................................................................... 32
12.1 Door Viewer Features ................................................................................................................. 33
12.2 Recent Activity ............................................................................................................................ 34
12.3 Manual Update Mode ................................................................................................................. 34
13 Log Out ............................................................................................................................................ 34
CS Gold AdminWeb User Guide
6/27/2019 OSU Stillwater Information TechnologyCS Gold AdminWeb User Guide 3 of 34
1 Introduction CS Gold® AdminWeb™ software is a web solution for most common CS Gold administrative
functionality. Functionality for each administrator is based on the functionality provided via the
desktop client interface and includes patron management, access management, reader status,
remote door, and reports.
• Patron management includes the ability to view pertinent patron information and manage
patron group assignments, meal plans, stored value/credit plans, and transactions.
• Access management allows those with the privileges the ability to add/modify/remove
patron groups, schedules, and calendars. This includes patron group memberships as well
as location assignments.
• Reader status allows administrators to see the status of assigned locations.
• Remote door (door viewer) allows administrators to check current status of doors, view
recent activity, and lock/unlock doors.
• Reports provides all reports that are available with the desktop interface.
There are a few features that are not yet available via the web interface, including:
• SQL Interface
• Conferences
• Alarms
• Offline Door Management
You may use both interfaces to perform your duties. Be aware that the desktop client continues
to require a separate password, not synchronized with O-Key.
The web interface utilizes your O-Key shortname and O-Key password for authentication. It is
accessible from the OSU domain, so you may perform functions remotely, after logging into the
OSU domain via https://osuvpn.okstate.edu.
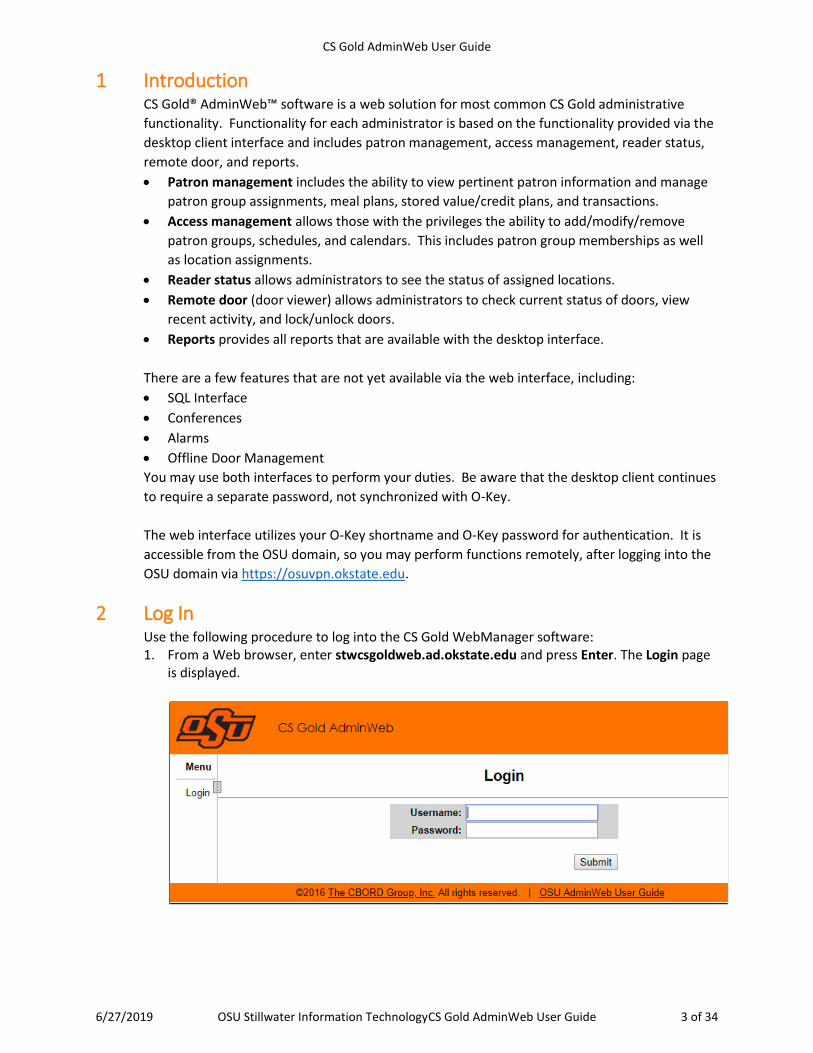
2 Log In Use the following procedure to log into the CS Gold WebManager software: 1. From a Web browser, enter stwcsgoldweb.ad.okstate.edu and press Enter. The Login page
is displayed.
CS Gold AdminWeb User Guide
6/27/2019 OSU Stillwater Information TechnologyCS Gold AdminWeb User Guide 4 of 34
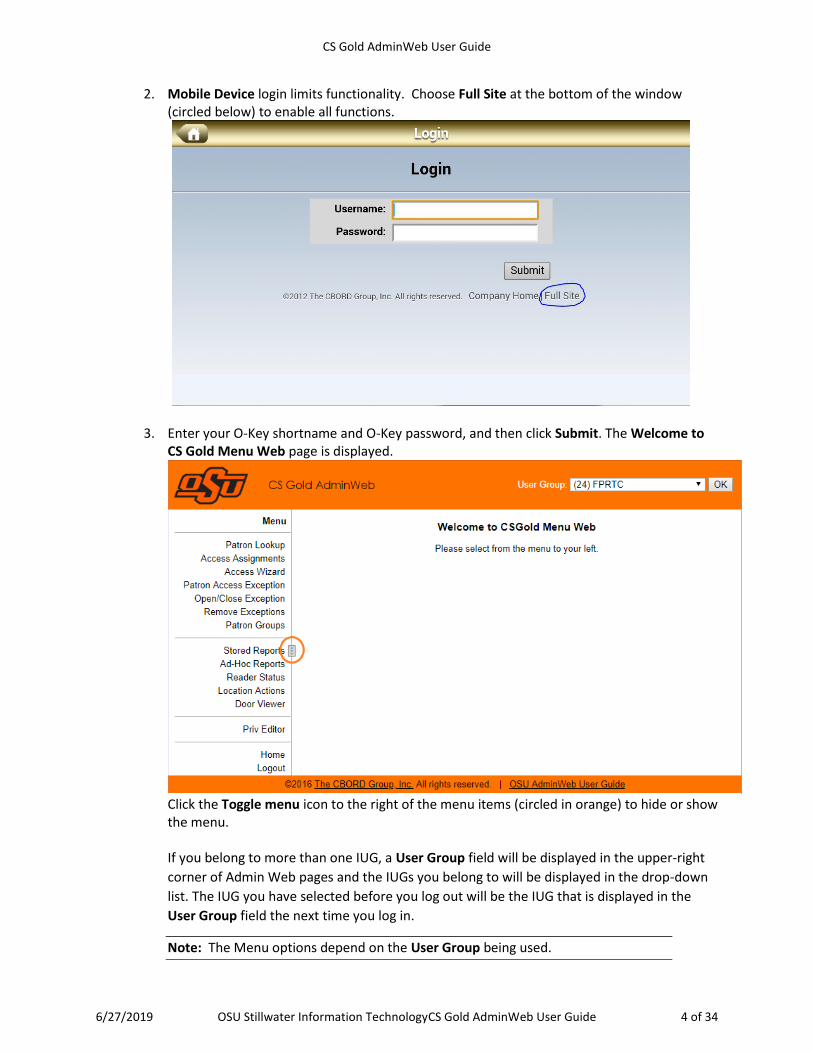
2. Mobile Device login limits functionality. Choose Full Site at the bottom of the window
(circled below) to enable all functions.
3. Enter your O-Key shortname and O-Key password, and then click Submit. The Welcome to CS Gold Menu Web page is displayed.
Click the Toggle menu icon to the right of the menu items (circled in orange) to hide or show the menu. If you belong to more than one IUG, a User Group field will be displayed in the upper-right
corner of Admin Web pages and the IUGs you belong to will be displayed in the drop-down
list. The IUG you have selected before you log out will be the IUG that is displayed in the
User Group field the next time you log in.
Note: The Menu options depend on the User Group being used.
CS Gold AdminWeb User Guide
6/27/2019 OSU Stillwater Information TechnologyCS Gold AdminWeb User Guide 5 of 34
3 Patron Lookup The Web version of the Patron Lookup GUI allows you to maintain the following information:
• General patron
• Meal plan
• SV&C plan
• Flag settings
• Access assignments
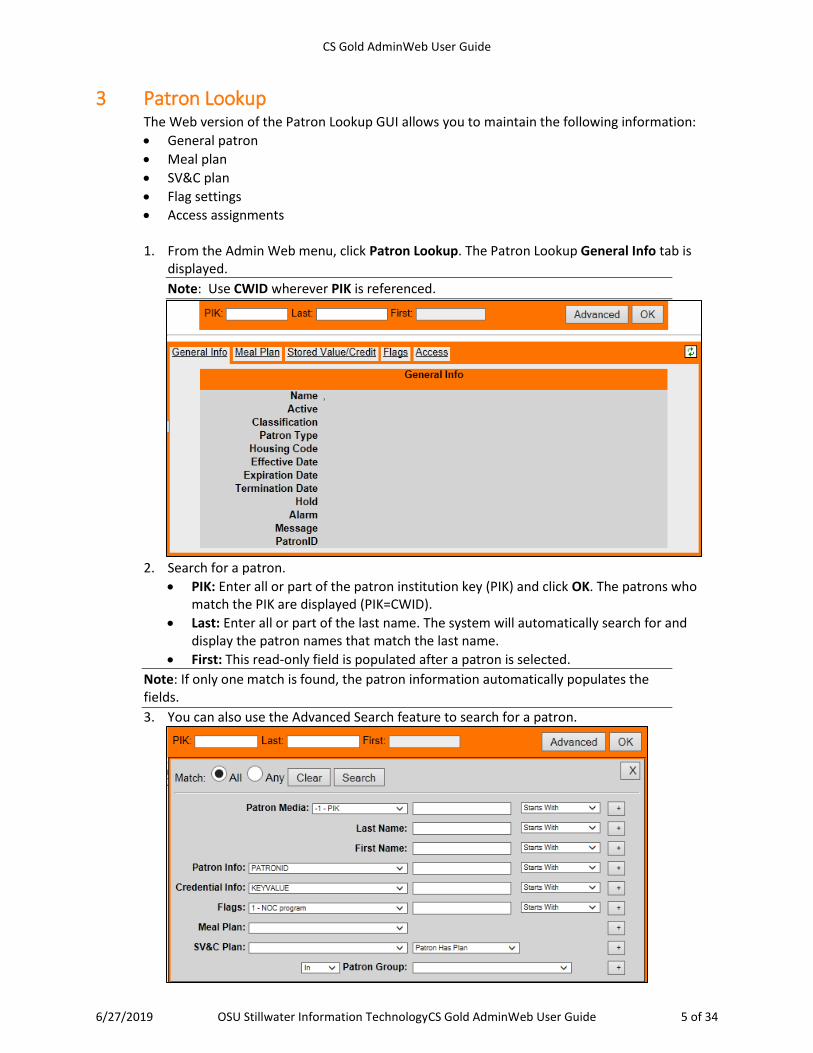
1. From the Admin Web menu, click Patron Lookup. The Patron Lookup General Info tab is displayed.
Note: Use CWID wherever PIK is referenced.
2. Search for a patron.
• PIK: Enter all or part of the patron institution key (PIK) and click OK. The patrons who match the PIK are displayed (PIK=CWID).
• Last: Enter all or part of the last name. The system will automatically search for and display the patron names that match the last name.
• First: This read-only field is populated after a patron is selected.
Note: If only one match is found, the patron information automatically populates the fields.
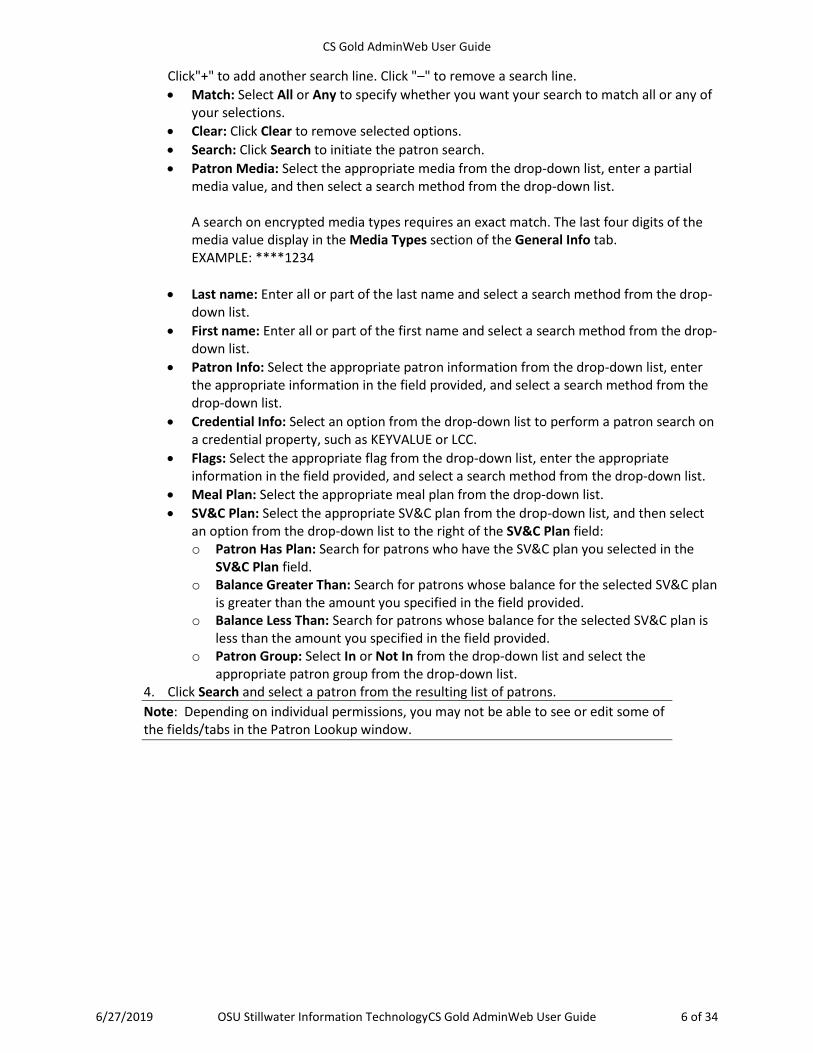
3. You can also use the Advanced Search feature to search for a patron.
CS Gold AdminWeb User Guide
6/27/2019 OSU Stillwater Information TechnologyCS Gold AdminWeb User Guide 6 of 34
Click"+" to add another search line. Click "–" to remove a search line.
• Match: Select All or Any to specify whether you want your search to match all or any of your selections.
• Clear: Click Clear to remove selected options.
• Search: Click Search to initiate the patron search.
• Patron Media: Select the appropriate media from the drop-down list, enter a partial media value, and then select a search method from the drop-down list. A search on encrypted media types requires an exact match. The last four digits of the media value display in the Media Types section of the General Info tab. EXAMPLE: ****1234
• Last name: Enter all or part of the last name and select a search method from the drop-down list.
• First name: Enter all or part of the first name and select a search method from the drop-down list.
• Patron Info: Select the appropriate patron information from the drop-down list, enter the appropriate information in the field provided, and select a search method from the drop-down list.
• Credential Info: Select an option from the drop-down list to perform a patron search on a credential property, such as KEYVALUE or LCC.
• Flags: Select the appropriate flag from the drop-down list, enter the appropriate information in the field provided, and select a search method from the drop-down list.
• Meal Plan: Select the appropriate meal plan from the drop-down list.
• SV&C Plan: Select the appropriate SV&C plan from the drop-down list, and then select an option from the drop-down list to the right of the SV&C Plan field: o Patron Has Plan: Search for patrons who have the SV&C plan you selected in the
SV&C Plan field. o Balance Greater Than: Search for patrons whose balance for the selected SV&C plan
is greater than the amount you specified in the field provided. o Balance Less Than: Search for patrons whose balance for the selected SV&C plan is
less than the amount you specified in the field provided. o Patron Group: Select In or Not In from the drop-down list and select the
appropriate patron group from the drop-down list. 4. Click Search and select a patron from the resulting list of patrons.
Note: Depending on individual permissions, you may not be able to see or edit some of the fields/tabs in the Patron Lookup window.
CS Gold AdminWeb User Guide
6/27/2019 OSU Stillwater Information TechnologyCS Gold AdminWeb User Guide 7 of 34
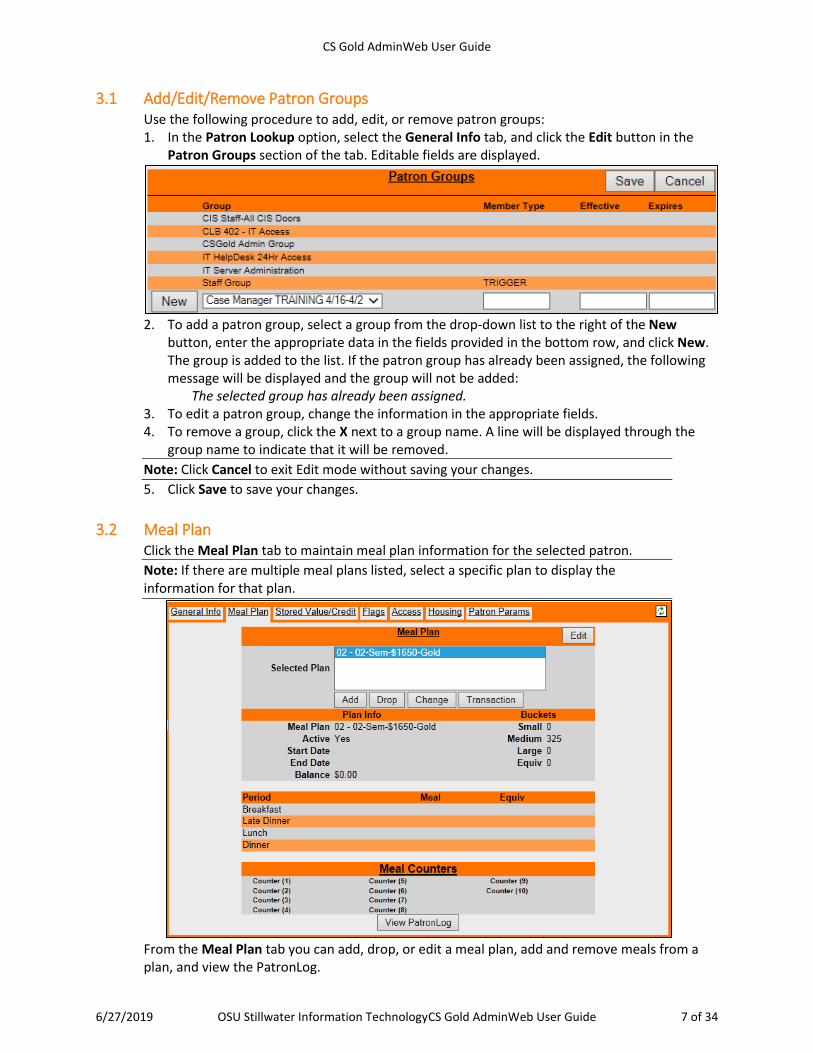
3.1 Add/Edit/Remove Patron Groups Use the following procedure to add, edit, or remove patron groups: 1. In the Patron Lookup option, select the General Info tab, and click the Edit button in the
Patron Groups section of the tab. Editable fields are displayed.
2. To add a patron group, select a group from the drop-down list to the right of the New
button, enter the appropriate data in the fields provided in the bottom row, and click New. The group is added to the list. If the patron group has already been assigned, the following message will be displayed and the group will not be added:
The selected group has already been assigned. 3. To edit a patron group, change the information in the appropriate fields. 4. To remove a group, click the X next to a group name. A line will be displayed through the
group name to indicate that it will be removed.
Note: Click Cancel to exit Edit mode without saving your changes.
5. Click Save to save your changes.
3.2 Meal Plan Click the Meal Plan tab to maintain meal plan information for the selected patron.
Note: If there are multiple meal plans listed, select a specific plan to display the information for that plan.
From the Meal Plan tab you can add, drop, or edit a meal plan, add and remove meals from a plan, and view the PatronLog.
CS Gold AdminWeb User Guide
6/27/2019 OSU Stillwater Information TechnologyCS Gold AdminWeb User Guide 8 of 34
When you click View PatronLog on the Meal Plan tab, PatronTrans.rpt is selected in Ad Hoc Reports. The default report is configurable with the same user configuration parameter used to configure the Patron Lookup GUI (PatronGUIPatronLog_Meal).
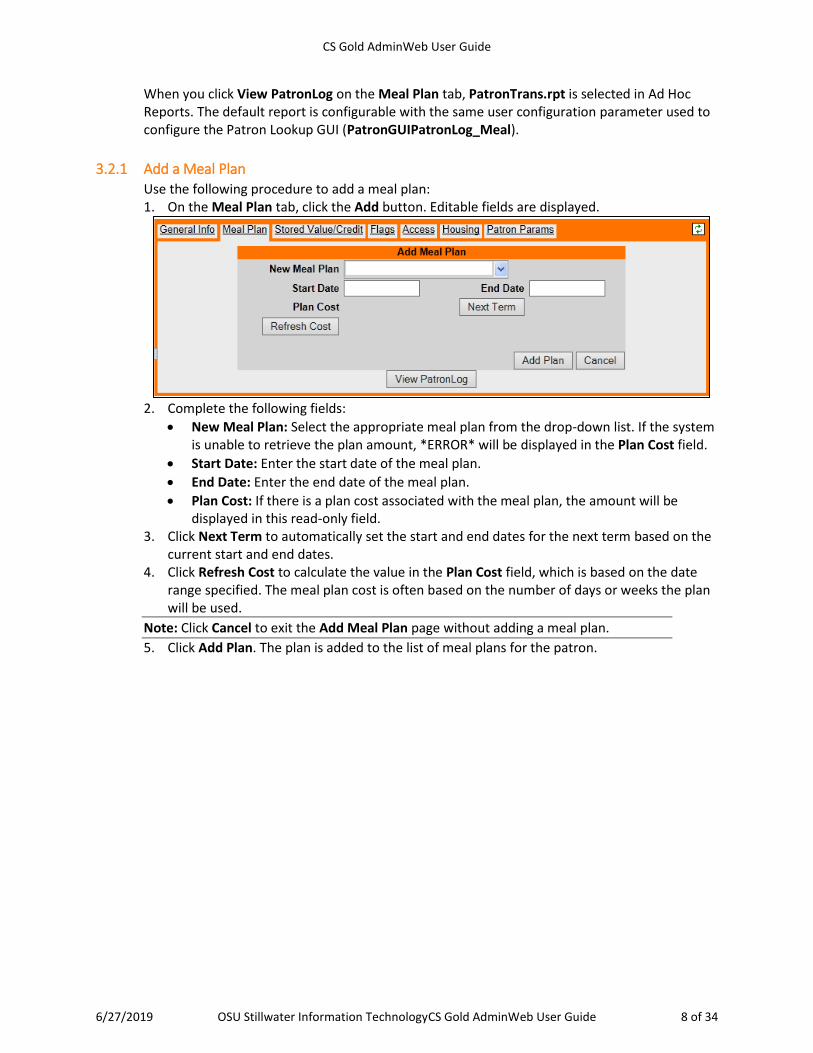
3.2.1 Add a Meal Plan Use the following procedure to add a meal plan: 1. On the Meal Plan tab, click the Add button. Editable fields are displayed.
2. Complete the following fields:
• New Meal Plan: Select the appropriate meal plan from the drop-down list. If the system is unable to retrieve the plan amount, *ERROR* will be displayed in the Plan Cost field.
• Start Date: Enter the start date of the meal plan.
• End Date: Enter the end date of the meal plan.
• Plan Cost: If there is a plan cost associated with the meal plan, the amount will be displayed in this read-only field.
3. Click Next Term to automatically set the start and end dates for the next term based on the current start and end dates.
4. Click Refresh Cost to calculate the value in the Plan Cost field, which is based on the date range specified. The meal plan cost is often based on the number of days or weeks the plan will be used.
Note: Click Cancel to exit the Add Meal Plan page without adding a meal plan.
5. Click Add Plan. The plan is added to the list of meal plans for the patron.
CS Gold AdminWeb User Guide
6/27/2019 OSU Stillwater Information TechnologyCS Gold AdminWeb User Guide 9 of 34
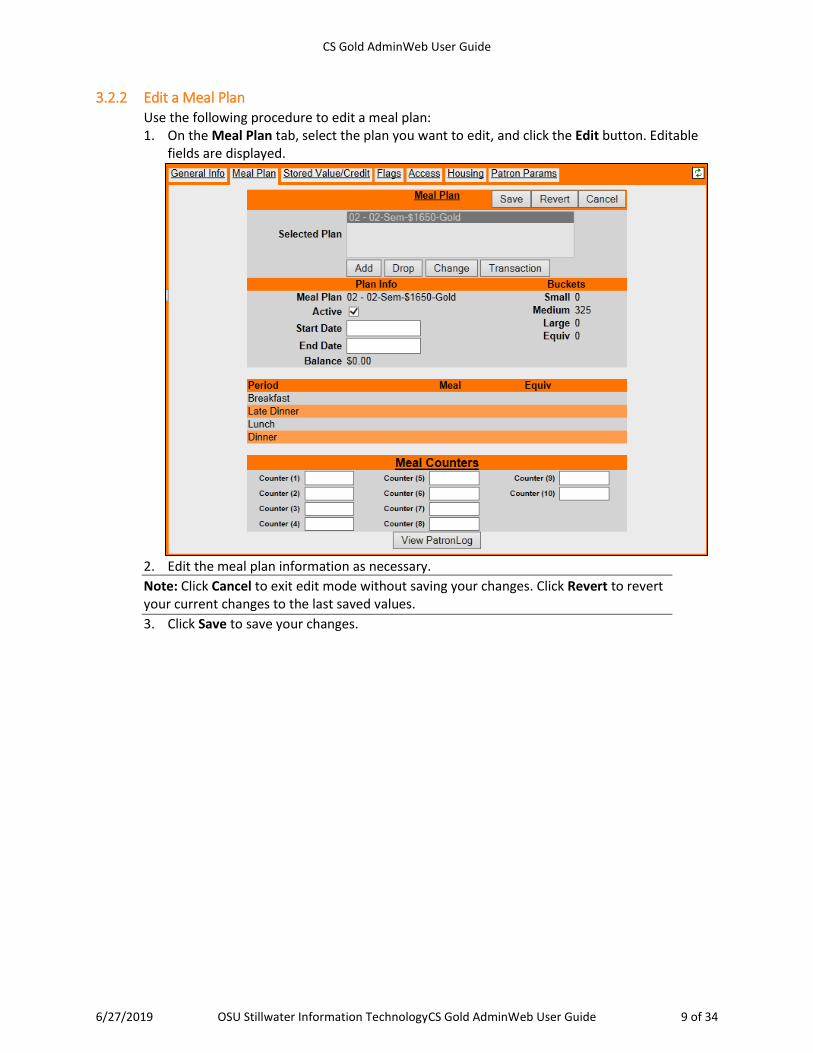
3.2.2 Edit a Meal Plan Use the following procedure to edit a meal plan: 1. On the Meal Plan tab, select the plan you want to edit, and click the Edit button. Editable
fields are displayed.
2. Edit the meal plan information as necessary.
Note: Click Cancel to exit edit mode without saving your changes. Click Revert to revert your current changes to the last saved values.
3. Click Save to save your changes.
CS Gold AdminWeb User Guide
6/27/2019 OSU Stillwater Information TechnologyCS Gold AdminWeb User Guide 10 of 34
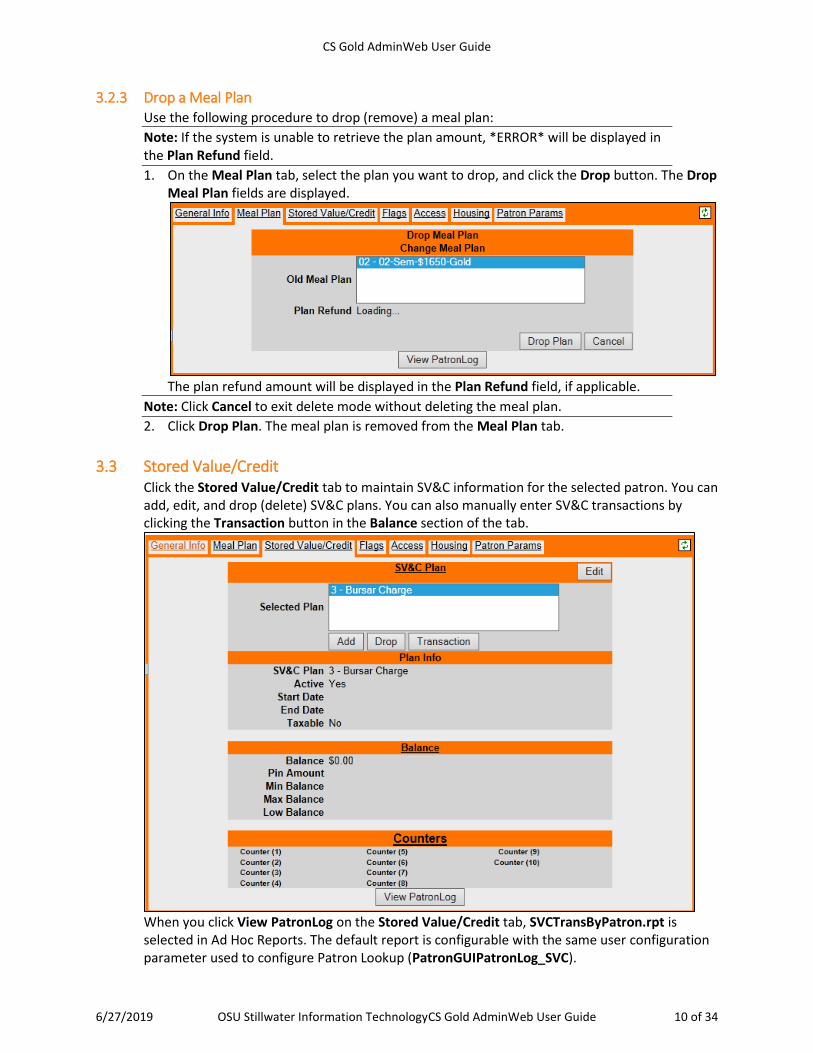
3.2.3 Drop a Meal Plan Use the following procedure to drop (remove) a meal plan:
Note: If the system is unable to retrieve the plan amount, *ERROR* will be displayed in the Plan Refund field.
1. On the Meal Plan tab, select the plan you want to drop, and click the Drop button. The Drop Meal Plan fields are displayed.
The plan refund amount will be displayed in the Plan Refund field, if applicable.
Note: Click Cancel to exit delete mode without deleting the meal plan.
2. Click Drop Plan. The meal plan is removed from the Meal Plan tab.
3.3 Stored Value/Credit Click the Stored Value/Credit tab to maintain SV&C information for the selected patron. You can add, edit, and drop (delete) SV&C plans. You can also manually enter SV&C transactions by clicking the Transaction button in the Balance section of the tab.
When you click View PatronLog on the Stored Value/Credit tab, SVCTransByPatron.rpt is selected in Ad Hoc Reports. The default report is configurable with the same user configuration parameter used to configure Patron Lookup (PatronGUIPatronLog_SVC).
CS Gold AdminWeb User Guide
6/27/2019 OSU Stillwater Information TechnologyCS Gold AdminWeb User Guide 11 of 34
If there are multiple SV&C plans listed, select a specific plan to display the information for that plan.
You can use the Advanced Search feature to check SV&C balances.
Select a plan from the Advanced Search SV&C Plan drop-down list and then select one of the following options:
• Patron Has Plan: Search for patrons who have the plan currently selected in the SV&C Plan field.
• Balance Greater Than: Search for patrons whose balance for the currently selected plan is greater than the amount you specified in the field provided.
• Balance Less Than: Search for patrons whose balance for the currently selected plan is less than the amount you specified in the field provided.
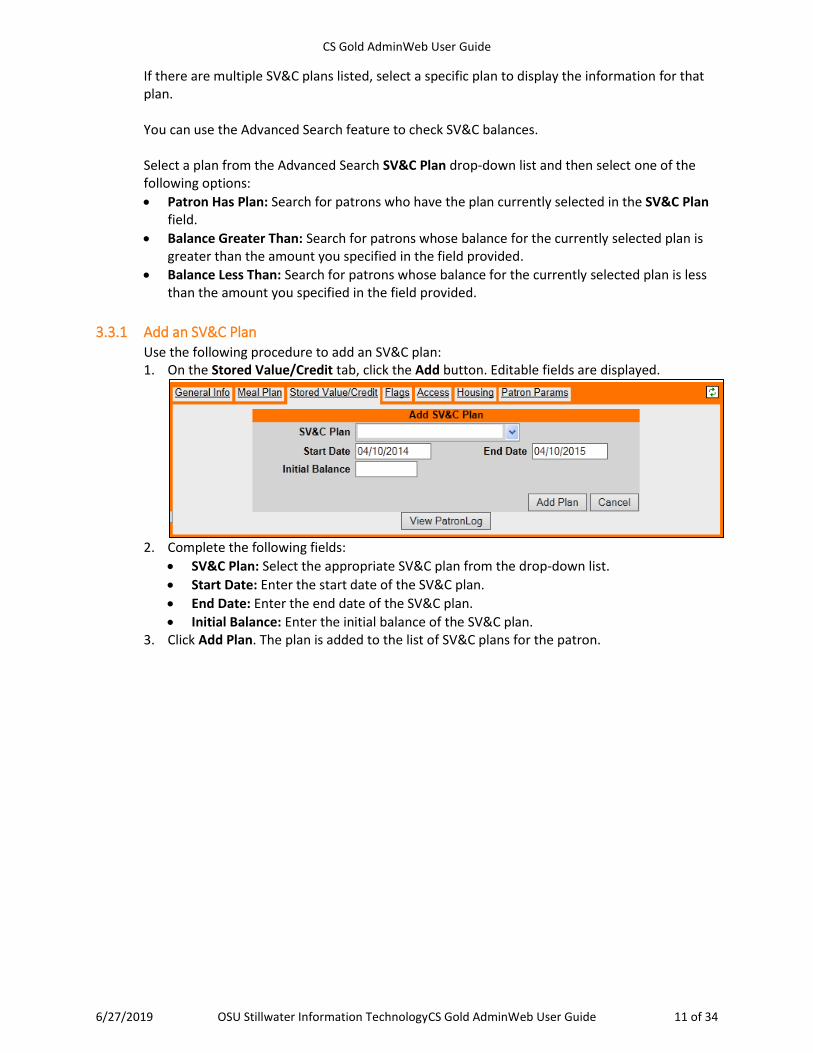
3.3.1 Add an SV&C Plan Use the following procedure to add an SV&C plan: 1. On the Stored Value/Credit tab, click the Add button. Editable fields are displayed.
2. Complete the following fields:
• SV&C Plan: Select the appropriate SV&C plan from the drop-down list.
• Start Date: Enter the start date of the SV&C plan.
• End Date: Enter the end date of the SV&C plan.
• Initial Balance: Enter the initial balance of the SV&C plan. 3. Click Add Plan. The plan is added to the list of SV&C plans for the patron.
CS Gold AdminWeb User Guide
6/27/2019 OSU Stillwater Information TechnologyCS Gold AdminWeb User Guide 12 of 34
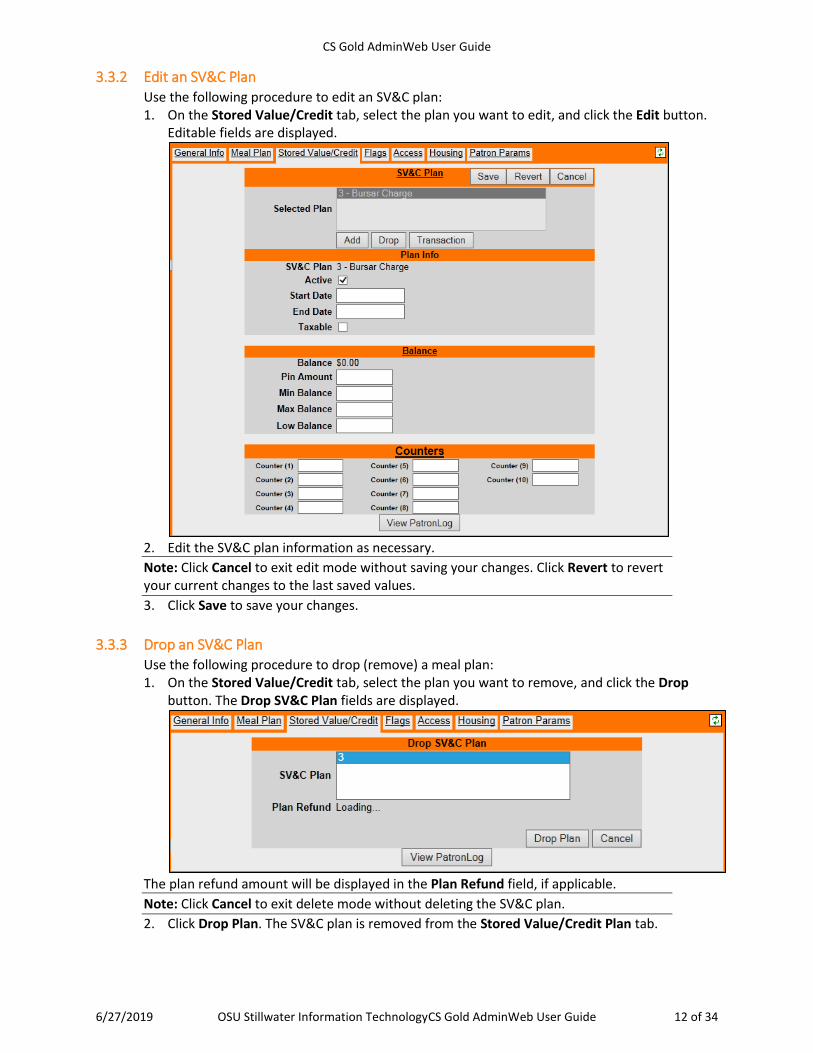
3.3.2 Edit an SV&C Plan Use the following procedure to edit an SV&C plan: 1. On the Stored Value/Credit tab, select the plan you want to edit, and click the Edit button.
Editable fields are displayed.
2. Edit the SV&C plan information as necessary.
Note: Click Cancel to exit edit mode without saving your changes. Click Revert to revert your current changes to the last saved values.
3. Click Save to save your changes.
3.3.3 Drop an SV&C Plan Use the following procedure to drop (remove) a meal plan: 1. On the Stored Value/Credit tab, select the plan you want to remove, and click the Drop
button. The Drop SV&C Plan fields are displayed.
The plan refund amount will be displayed in the Plan Refund field, if applicable.
Note: Click Cancel to exit delete mode without deleting the SV&C plan.
2. Click Drop Plan. The SV&C plan is removed from the Stored Value/Credit Plan tab.
CS Gold AdminWeb User Guide
6/27/2019 OSU Stillwater Information TechnologyCS Gold AdminWeb User Guide 13 of 34
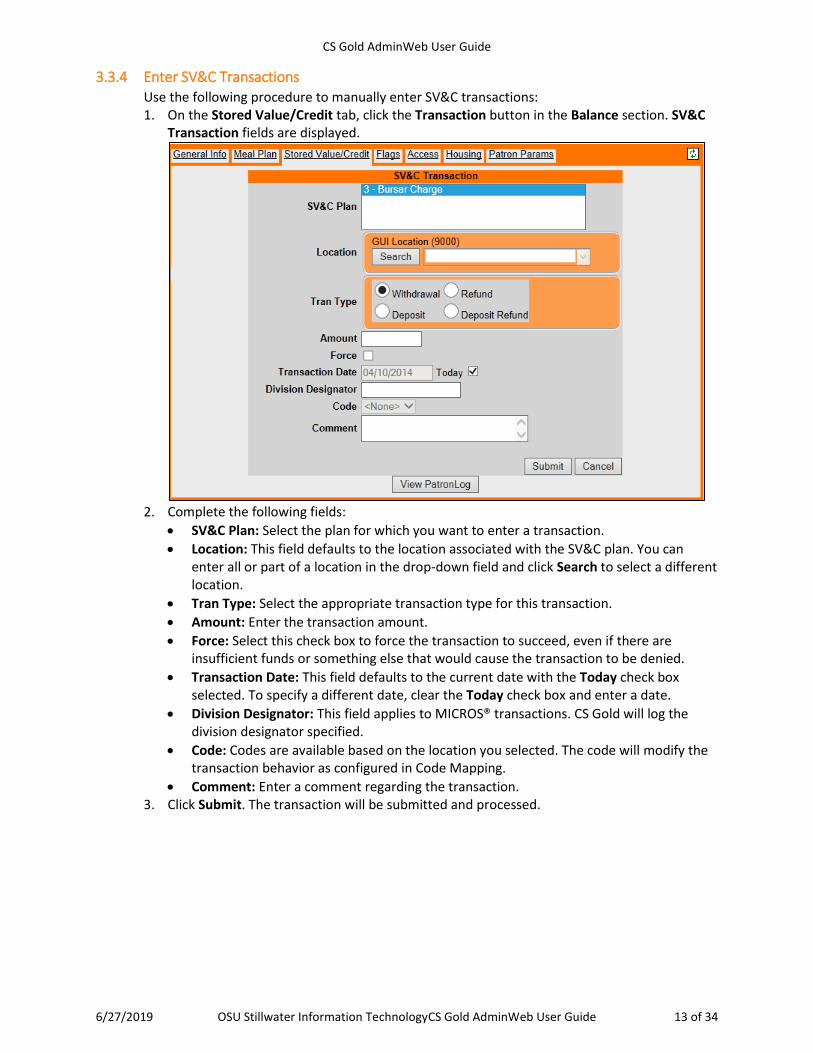
3.3.4 Enter SV&C Transactions Use the following procedure to manually enter SV&C transactions: 1. On the Stored Value/Credit tab, click the Transaction button in the Balance section. SV&C
Transaction fields are displayed.
2. Complete the following fields:
• SV&C Plan: Select the plan for which you want to enter a transaction.
• Location: This field defaults to the location associated with the SV&C plan. You can enter all or part of a location in the drop-down field and click Search to select a different location.
• Tran Type: Select the appropriate transaction type for this transaction.
• Amount: Enter the transaction amount.
• Force: Select this check box to force the transaction to succeed, even if there are insufficient funds or something else that would cause the transaction to be denied.
• Transaction Date: This field defaults to the current date with the Today check box selected. To specify a different date, clear the Today check box and enter a date.
• Division Designator: This field applies to MICROS® transactions. CS Gold will log the division designator specified.
• Code: Codes are available based on the location you selected. The code will modify the transaction behavior as configured in Code Mapping.
• Comment: Enter a comment regarding the transaction. 3. Click Submit. The transaction will be submitted and processed.
CS Gold AdminWeb User Guide
6/27/2019 OSU Stillwater Information TechnologyCS Gold AdminWeb User Guide 14 of 34
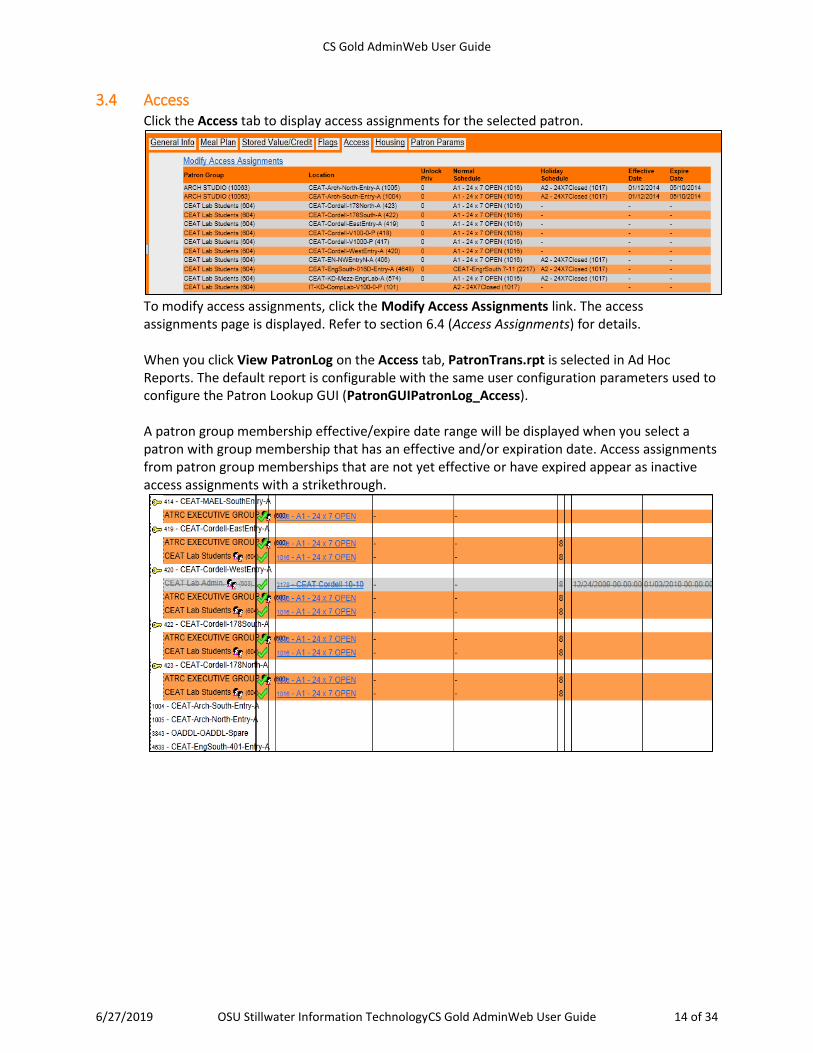
3.4 Access Click the Access tab to display access assignments for the selected patron.
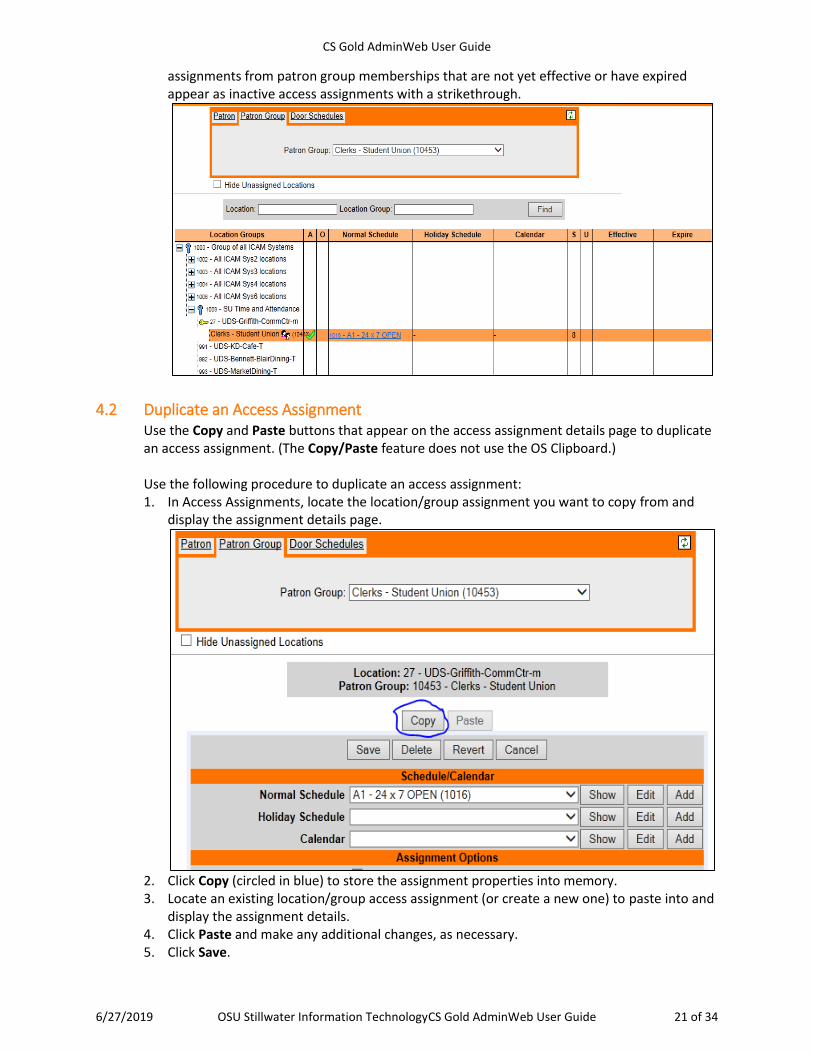
To modify access assignments, click the Modify Access Assignments link. The access assignments page is displayed. Refer to section 6.4 (Access Assignments) for details. When you click View PatronLog on the Access tab, PatronTrans.rpt is selected in Ad Hoc Reports. The default report is configurable with the same user configuration parameters used to configure the Patron Lookup GUI (PatronGUIPatronLog_Access). A patron group membership effective/expire date range will be displayed when you select a patron with group membership that has an effective and/or expiration date. Access assignments from patron group memberships that are not yet effective or have expired appear as inactive access assignments with a strikethrough.
CS Gold AdminWeb User Guide
6/27/2019 OSU Stillwater Information TechnologyCS Gold AdminWeb User Guide 15 of 34
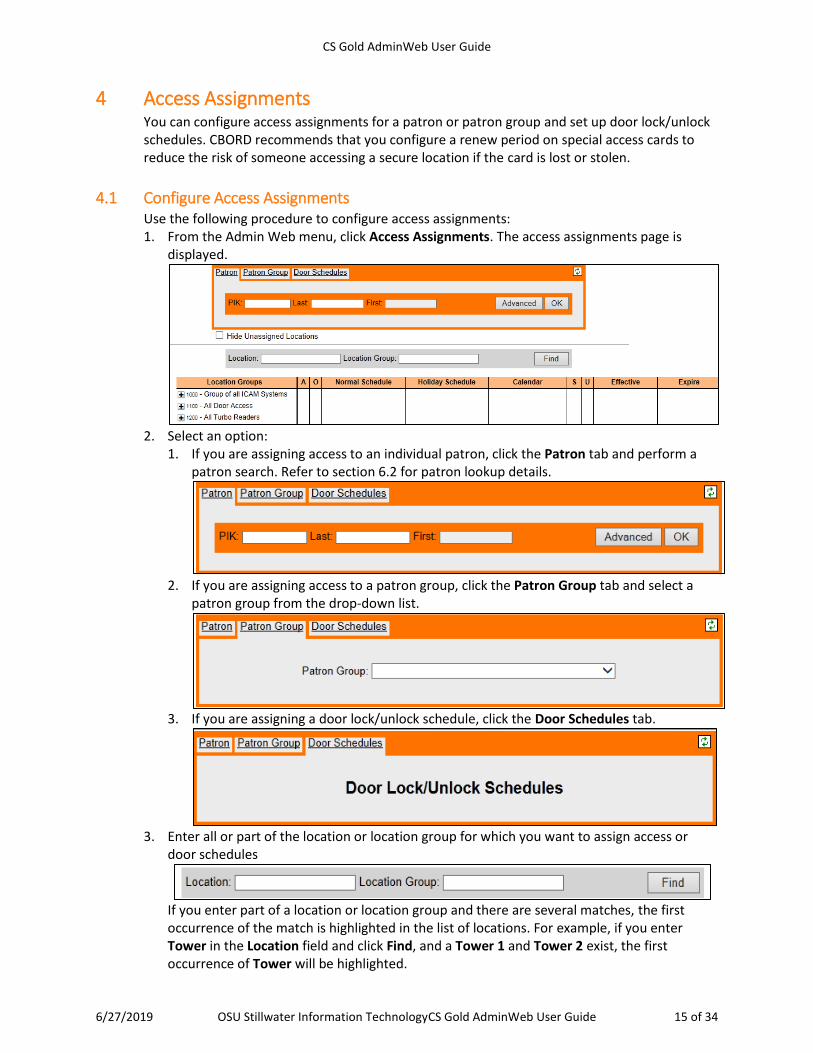
4 Access Assignments You can configure access assignments for a patron or patron group and set up door lock/unlock schedules. CBORD recommends that you configure a renew period on special access cards to reduce the risk of someone accessing a secure location if the card is lost or stolen.
4.1 Configure Access Assignments Use the following procedure to configure access assignments: 1. From the Admin Web menu, click Access Assignments. The access assignments page is
displayed.
2. Select an option:
1. If you are assigning access to an individual patron, click the Patron tab and perform a patron search. Refer to section 6.2 for patron lookup details.
2. If you are assigning access to a patron group, click the Patron Group tab and select a
patron group from the drop-down list.
3. If you are assigning a door lock/unlock schedule, click the Door Schedules tab.
3. Enter all or part of the location or location group for which you want to assign access or
door schedules
If you enter part of a location or location group and there are several matches, the first occurrence of the match is highlighted in the list of locations. For example, if you enter Tower in the Location field and click Find, and a Tower 1 and Tower 2 exist, the first occurrence of Tower will be highlighted.
CS Gold AdminWeb User Guide
6/27/2019 OSU Stillwater Information TechnologyCS Gold AdminWeb User Guide 16 of 34
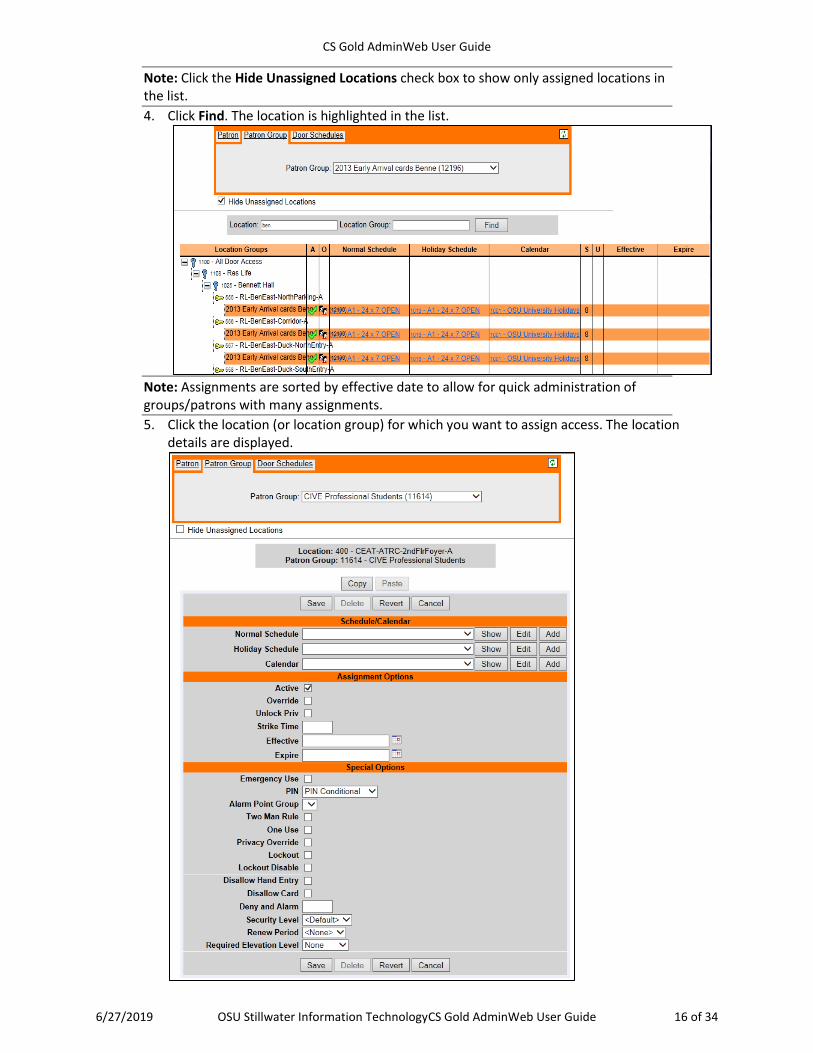
Note: Click the Hide Unassigned Locations check box to show only assigned locations in the list.
4. Click Find. The location is highlighted in the list.
Note: Assignments are sorted by effective date to allow for quick administration of groups/patrons with many assignments.
5. Click the location (or location group) for which you want to assign access. The location details are displayed.
CS Gold AdminWeb User Guide
6/27/2019 OSU Stillwater Information TechnologyCS Gold AdminWeb User Guide 17 of 34
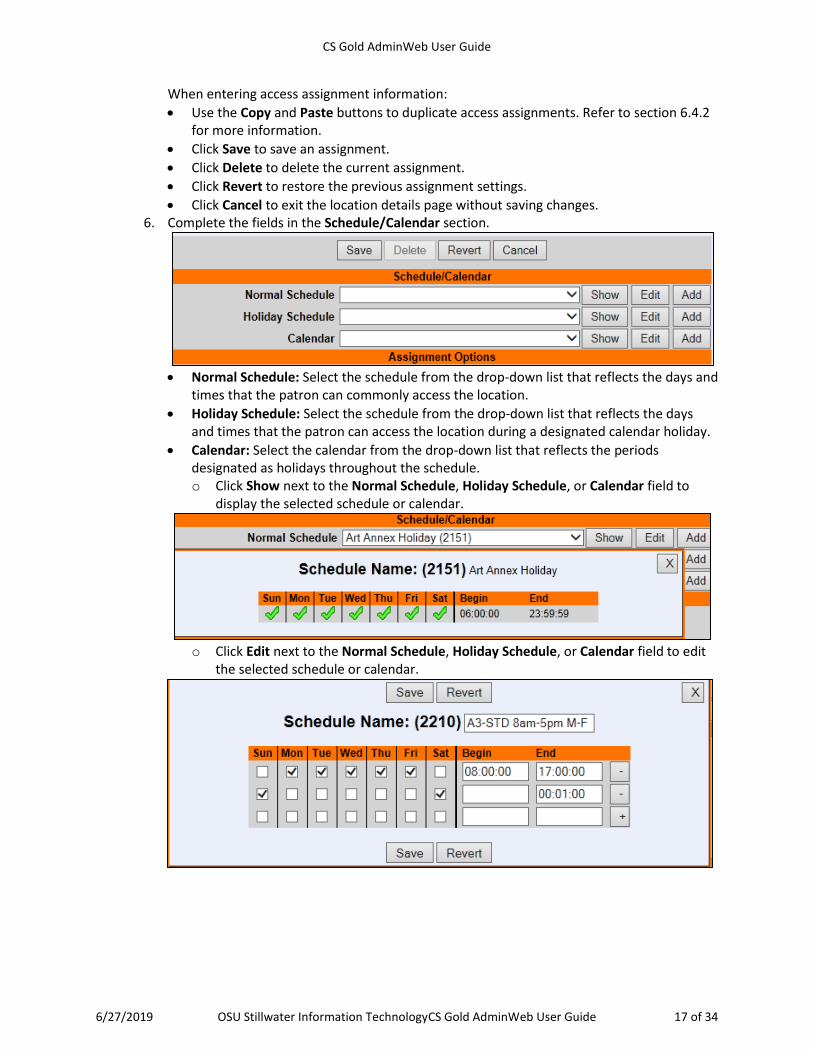
When entering access assignment information:
• Use the Copy and Paste buttons to duplicate access assignments. Refer to section 6.4.2 for more information.
• Click Save to save an assignment.
• Click Delete to delete the current assignment.
• Click Revert to restore the previous assignment settings.
• Click Cancel to exit the location details page without saving changes. 6. Complete the fields in the Schedule/Calendar section.
• Normal Schedule: Select the schedule from the drop-down list that reflects the days and
times that the patron can commonly access the location.
• Holiday Schedule: Select the schedule from the drop-down list that reflects the days and times that the patron can access the location during a designated calendar holiday.
• Calendar: Select the calendar from the drop-down list that reflects the periods designated as holidays throughout the schedule. o Click Show next to the Normal Schedule, Holiday Schedule, or Calendar field to
display the selected schedule or calendar.
o Click Edit next to the Normal Schedule, Holiday Schedule, or Calendar field to edit
the selected schedule or calendar.
CS Gold AdminWeb User Guide
6/27/2019 OSU Stillwater Information TechnologyCS Gold AdminWeb User Guide 18 of 34
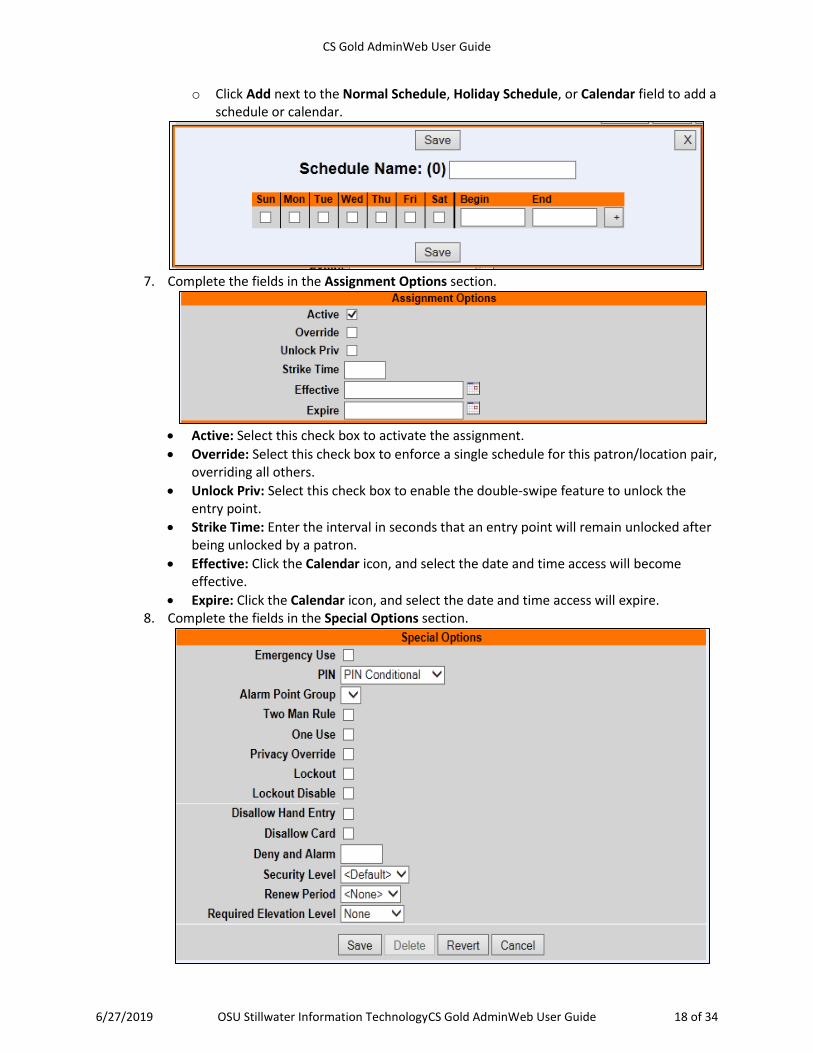
o Click Add next to the Normal Schedule, Holiday Schedule, or Calendar field to add a
schedule or calendar.
7. Complete the fields in the Assignment Options section.
• Active: Select this check box to activate the assignment.
• Override: Select this check box to enforce a single schedule for this patron/location pair, overriding all others.
• Unlock Priv: Select this check box to enable the double-swipe feature to unlock the entry point.
• Strike Time: Enter the interval in seconds that an entry point will remain unlocked after being unlocked by a patron.
• Effective: Click the Calendar icon, and select the date and time access will become effective.
• Expire: Click the Calendar icon, and select the date and time access will expire. 8. Complete the fields in the Special Options section.
CS Gold AdminWeb User Guide
6/27/2019 OSU Stillwater Information TechnologyCS Gold AdminWeb User Guide 19 of 34
Note: Not all devices support all of the features in the Special Options section. Refer to the appropriate device documentation to verify whether a feature is supported.
• Emergency Use: Select this check box if the patron has 24/7 access to the location, regardless of the door schedule, access assignment schedule, and Lockout status. During an emergency lock down, only people with Emergency Use access can open the door. It is useful to have a card that emergency personnel can use during an emergency.
• PIN: This value is considered only if the location has been configured with 2 - Inherit from Access Assignment as the value for the RDR_REQUIRE_PIN parameter in the Location Configuration GUI. o No PIN Required: The patron is not required to enter a PIN at this location. o PIN Required: The patron is required to enter a PIN at this location. If the patron
does not have a PIN, the patron will not be able to enter this location. o PIN Conditional: The patron is required to enter a PIN at this location if the patron
has a PIN. If the patron does not have a PIN, a PIN is not required. This option is the default.
• Alarm Point Group: Select an alarm point group from the drop-down list to enable the <A + Swipe> and <Hold + Swipe> features to arm and disarm points from the reader governing this location. Patrons will press the A button and swipe their card to arm points from the reader, and press the Hold button and swipe their card to disarm points from the reader. For more information, refer to the CS Access™ Control Guide (TP-820305-001).
• Two Man Rule: A Two Man Rule card will open a door if a second, distinct Two Man Rule card is also swiped within five seconds. A Two Man Rule card by itself or in concert with a regular (not a Two Man Rule card) will not open the door.
• One Use: Select this check box if the patron can only access the location one time.
• Lockout: Lockout cards also carry Lockout Disable privileges. Selecting this check box grants both access privileges. Swipe a lockout card once to cause the door to enter a locked state. The door will stay locked, regardless of its internal schedule. Only Emergency Use privilege cards can enter during lockout. Other cards cannot enter, even if the patron has access under ordinary situations. When the situation is resolved, swipe the Lockout card a second time to return the doors to their normal status.
• Privacy Override: This option is used for locksets that support deadbolts or privacy override.
• Lockout Disable: This option is reserved for future use.
• Disallow Hand Entry: Select this check box if the patron will not be allowed to use a hand entry number to access the location. If this check box is selected, the patron can access the location only by swiping a card, even if the HANDENTRY media type is defined. If the Disallow Hand Entry check box is not selected, the location can be accessed by entering the hand entry number or by swiping a card; either method will work if the patron has both media types defined.
Note: You cannot select both Disallow Hand Entry and Disallow Card.
• Disallow Card: Select this check box if the patron will not be allowed to swipe a card to access the location. If this check box is selected, the patron can access the location only by entering a hand entry number, even if the CARD media type is defined. If the Disallow Card check box is not selected, the location can be accessed by entering the hand entry number or by swiping a card; either method will work if the patron has both media types defined.
• Deny and Alarm: This option is reserved for future use.
CS Gold AdminWeb User Guide
6/27/2019 OSU Stillwater Information TechnologyCS Gold AdminWeb User Guide 20 of 34
• Security Level: By default, the security level is based on the location. If you need to set a specific security level for the access assignment, select a security level from the drop-down list.
• Renew Period: Select the number of days the card will carry out the action of the access assignment from the drop-down list. If the card is not re-encoded during the renew period, it can be re-encoded later without changing the access assignment. For example, if an electrician was assigned access to Building A for two days and he tries to enter Building A on day three, access will be denied. The administrator can re-encode the card if additional access has been approved.
• Required Elevation Level: Select the elevation level that determines which elevated level must be activated for the assignment to become effective. Currently, Elevated is the indicator that restricts the option to use when the patron’s masterkey is activated. This option supports the masterkey access privilege elevation feature.
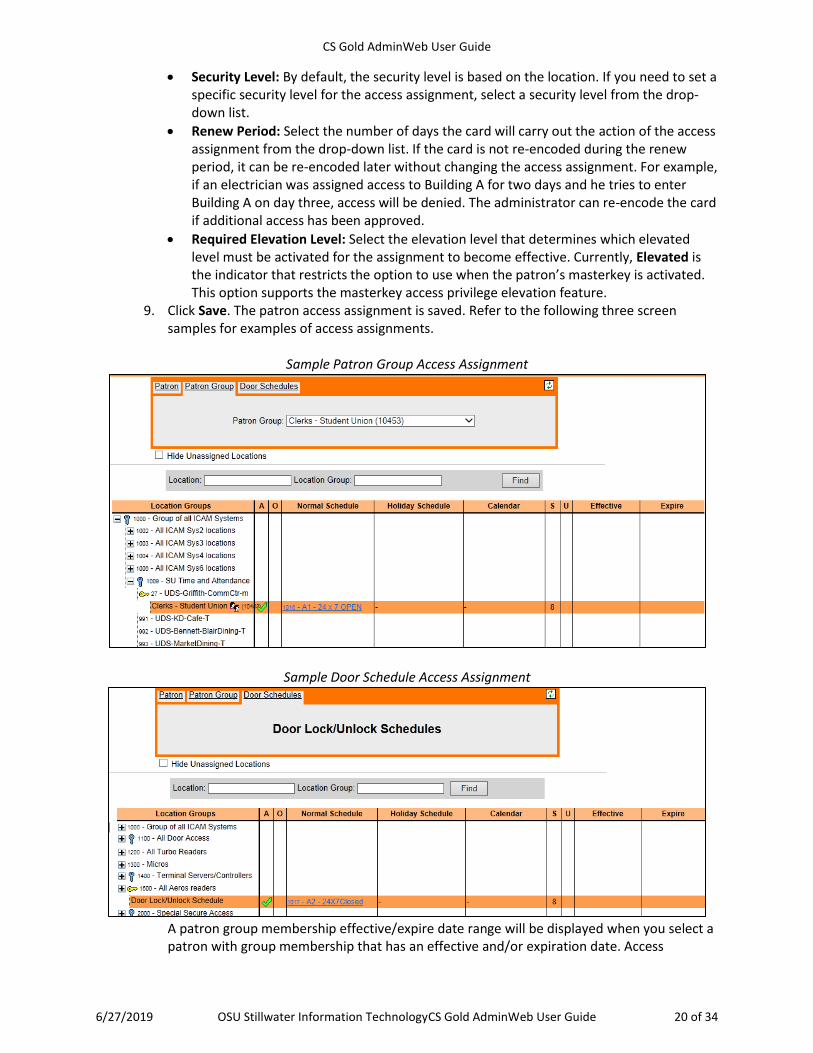
9. Click Save. The patron access assignment is saved. Refer to the following three screen samples for examples of access assignments.
Sample Patron Group Access Assignment
Sample Door Schedule Access Assignment
A patron group membership effective/expire date range will be displayed when you select a patron with group membership that has an effective and/or expiration date. Access
CS Gold AdminWeb User Guide
6/27/2019 OSU Stillwater Information TechnologyCS Gold AdminWeb User Guide 21 of 34
assignments from patron group memberships that are not yet effective or have expired appear as inactive access assignments with a strikethrough.
4.2 Duplicate an Access Assignment Use the Copy and Paste buttons that appear on the access assignment details page to duplicate an access assignment. (The Copy/Paste feature does not use the OS Clipboard.) Use the following procedure to duplicate an access assignment: 1. In Access Assignments, locate the location/group assignment you want to copy from and
display the assignment details page.
2. Click Copy (circled in blue) to store the assignment properties into memory. 3. Locate an existing location/group access assignment (or create a new one) to paste into and
display the assignment details. 4. Click Paste and make any additional changes, as necessary. 5. Click Save.
CS Gold AdminWeb User Guide
6/27/2019 OSU Stillwater Information TechnologyCS Gold AdminWeb User Guide 22 of 34
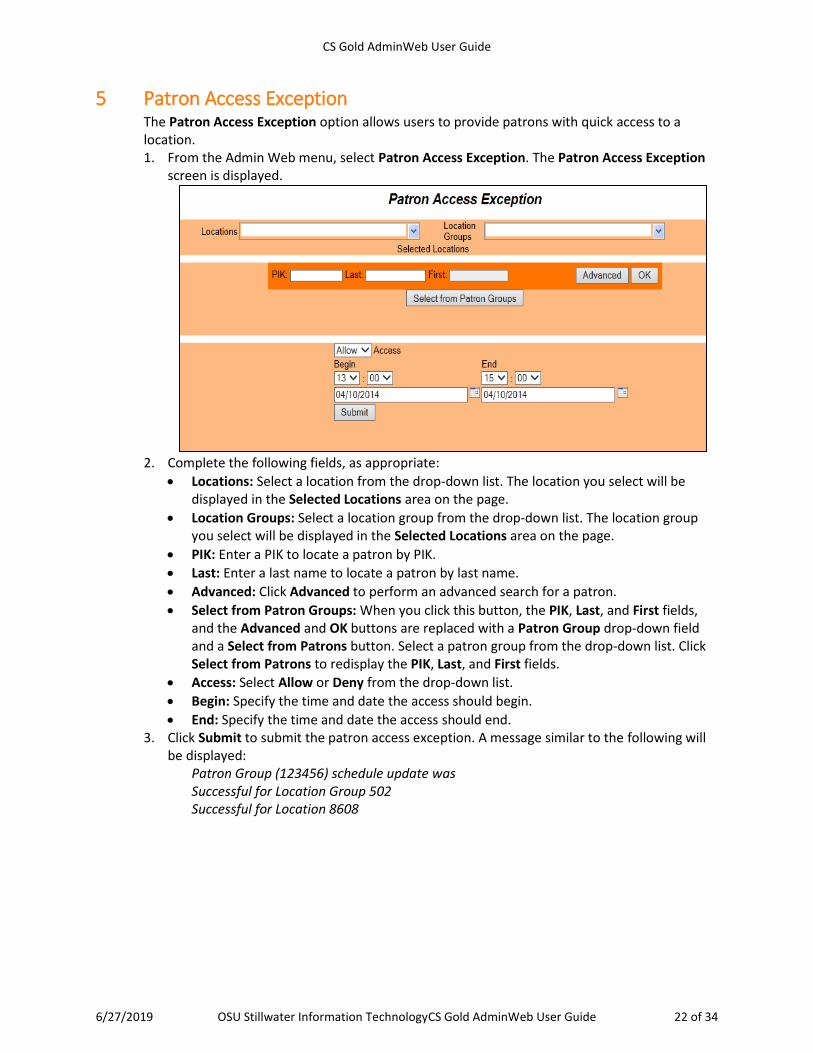
5 Patron Access Exception The Patron Access Exception option allows users to provide patrons with quick access to a location. 1. From the Admin Web menu, select Patron Access Exception. The Patron Access Exception
screen is displayed.
2. Complete the following fields, as appropriate:
• Locations: Select a location from the drop-down list. The location you select will be displayed in the Selected Locations area on the page.
• Location Groups: Select a location group from the drop-down list. The location group you select will be displayed in the Selected Locations area on the page.
• PIK: Enter a PIK to locate a patron by PIK.
• Last: Enter a last name to locate a patron by last name.
• Advanced: Click Advanced to perform an advanced search for a patron.
• Select from Patron Groups: When you click this button, the PIK, Last, and First fields, and the Advanced and OK buttons are replaced with a Patron Group drop-down field and a Select from Patrons button. Select a patron group from the drop-down list. Click Select from Patrons to redisplay the PIK, Last, and First fields.
• Access: Select Allow or Deny from the drop-down list.
• Begin: Specify the time and date the access should begin.
• End: Specify the time and date the access should end. 3. Click Submit to submit the patron access exception. A message similar to the following will
be displayed: Patron Group (123456) schedule update was Successful for Location Group 502 Successful for Location 8608
CS Gold AdminWeb User Guide
6/27/2019 OSU Stillwater Information TechnologyCS Gold AdminWeb User Guide 23 of 34
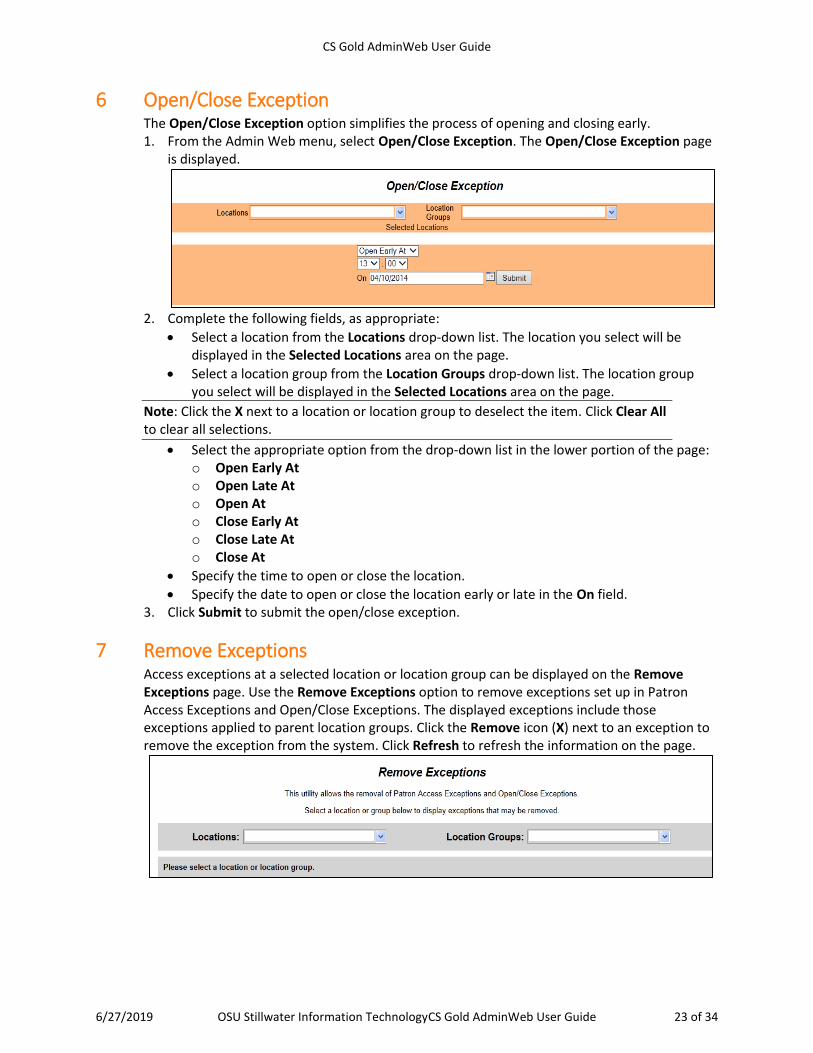
6 Open/Close Exception The Open/Close Exception option simplifies the process of opening and closing early. 1. From the Admin Web menu, select Open/Close Exception. The Open/Close Exception page
is displayed.
2. Complete the following fields, as appropriate:
• Select a location from the Locations drop-down list. The location you select will be displayed in the Selected Locations area on the page.
• Select a location group from the Location Groups drop-down list. The location group you select will be displayed in the Selected Locations area on the page.
Note: Click the X next to a location or location group to deselect the item. Click Clear All to clear all selections.
• Select the appropriate option from the drop-down list in the lower portion of the page: o Open Early At o Open Late At o Open At o Close Early At o Close Late At o Close At
• Specify the time to open or close the location.
• Specify the date to open or close the location early or late in the On field. 3. Click Submit to submit the open/close exception.
7 Remove Exceptions Access exceptions at a selected location or location group can be displayed on the Remove Exceptions page. Use the Remove Exceptions option to remove exceptions set up in Patron Access Exceptions and Open/Close Exceptions. The displayed exceptions include those exceptions applied to parent location groups. Click the Remove icon (X) next to an exception to remove the exception from the system. Click Refresh to refresh the information on the page.
CS Gold AdminWeb User Guide
6/27/2019 OSU Stillwater Information TechnologyCS Gold AdminWeb User Guide 24 of 34
8 Patron Group Management
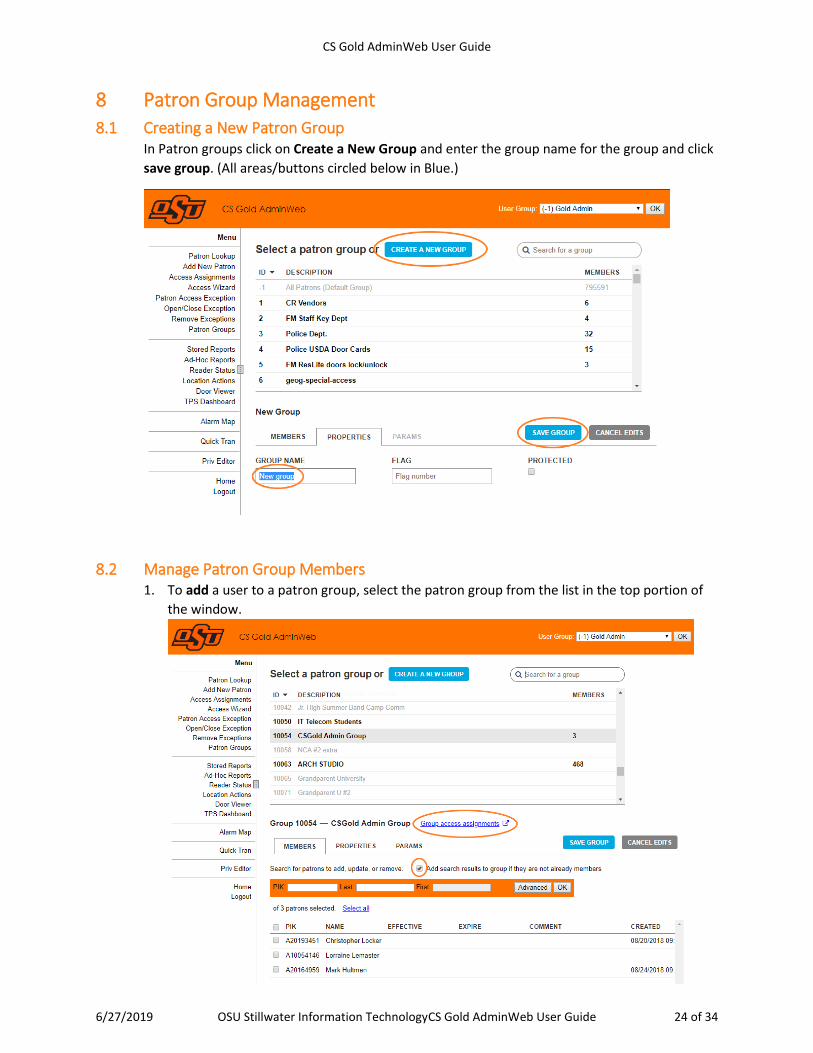
8.1 Creating a New Patron Group In Patron groups click on Create a New Group and enter the group name for the group and click
save group. (All areas/buttons circled below in Blue.)
8.2 Manage Patron Group Members 1. To add a user to a patron group, select the patron group from the list in the top portion of
the window.
CS Gold AdminWeb User Guide
6/27/2019 OSU Stillwater Information TechnologyCS Gold AdminWeb User Guide 25 of 34
2. Search for the patron with PIK (BannerID)/Last/First name as search criteria. If you expect
more than one patron to be returned by the search, be sure the box labeled Add search
results to group if they are not already members is NOT checked. If more than one patron
is returned by the search, be sure only the individuals that are to be added have the check
box marked. Be sure to select Save Group to save the changes.
3. To delete a patron from the group, select the group and search for the patron using any
criteria like above, or just scroll through the list in the bottom portion of the window and
uncheck the check box next to the patron.
4. Click Remove Selected from Group and Save Group.
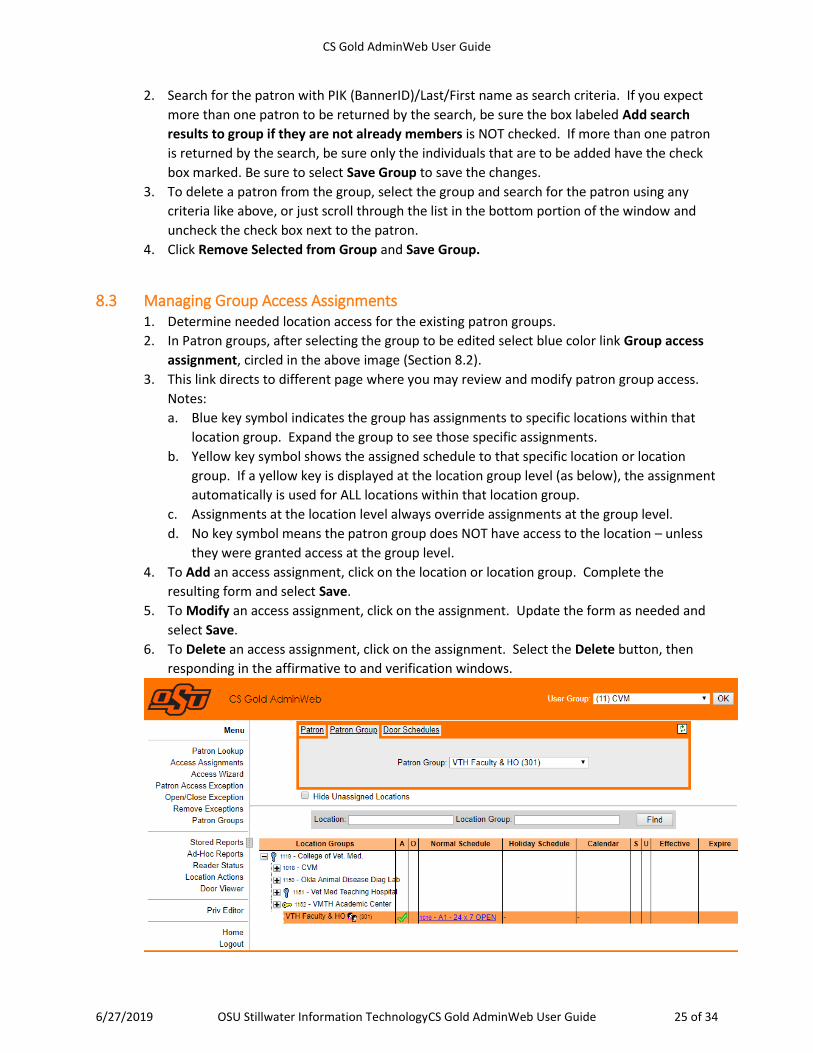
8.3 Managing Group Access Assignments 1. Determine needed location access for the existing patron groups.
2. In Patron groups, after selecting the group to be edited select blue color link Group access
assignment, circled in the above image (Section 8.2).
3. This link directs to different page where you may review and modify patron group access.
Notes:
a. Blue key symbol indicates the group has assignments to specific locations within that
location group. Expand the group to see those specific assignments.
b. Yellow key symbol shows the assigned schedule to that specific location or location
group. If a yellow key is displayed at the location group level (as below), the assignment
automatically is used for ALL locations within that location group.
c. Assignments at the location level always override assignments at the group level.
d. No key symbol means the patron group does NOT have access to the location – unless
they were granted access at the group level.
4. To Add an access assignment, click on the location or location group. Complete the
resulting form and select Save.
5. To Modify an access assignment, click on the assignment. Update the form as needed and
select Save.
6. To Delete an access assignment, click on the assignment. Select the Delete button, then
responding in the affirmative to and verification windows.
CS Gold AdminWeb User Guide
6/27/2019 OSU Stillwater Information TechnologyCS Gold AdminWeb User Guide 26 of 34
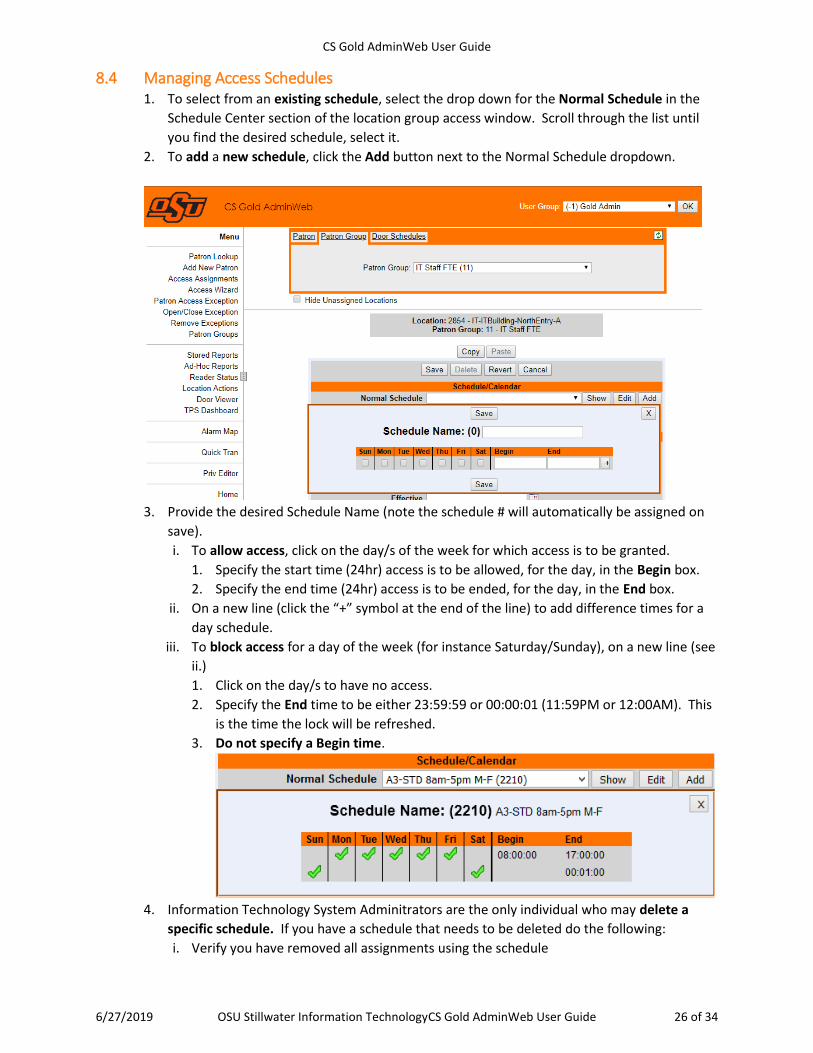
8.4 Managing Access Schedules 1. To select from an existing schedule, select the drop down for the Normal Schedule in the
Schedule Center section of the location group access window. Scroll through the list until
you find the desired schedule, select it.
2. To add a new schedule, click the Add button next to the Normal Schedule dropdown.
3. Provide the desired Schedule Name (note the schedule # will automatically be assigned on
save).
i. To allow access, click on the day/s of the week for which access is to be granted.
1. Specify the start time (24hr) access is to be allowed, for the day, in the Begin box.
2. Specify the end time (24hr) access is to be ended, for the day, in the End box.
ii. On a new line (click the “+” symbol at the end of the line) to add difference times for a
day schedule.
iii. To block access for a day of the week (for instance Saturday/Sunday), on a new line (see
ii.)
1. Click on the day/s to have no access.
2. Specify the End time to be either 23:59:59 or 00:00:01 (11:59PM or 12:00AM). This
is the time the lock will be refreshed.
3. Do not specify a Begin time.
4. Information Technology System Adminitrators are the only individual who may delete a
specific schedule. If you have a schedule that needs to be deleted do the following:
i. Verify you have removed all assignments using the schedule
CS Gold AdminWeb User Guide
6/27/2019 OSU Stillwater Information TechnologyCS Gold AdminWeb User Guide 27 of 34
ii. Email [email protected] and identify the schedule name and number and request
the CSGold schedule be deleted.
9 Web Reporting Use the following procedure to use the Web Reporting module:
Note: Files that have been downloaded are no longer displayed, unless Show All has been selected.
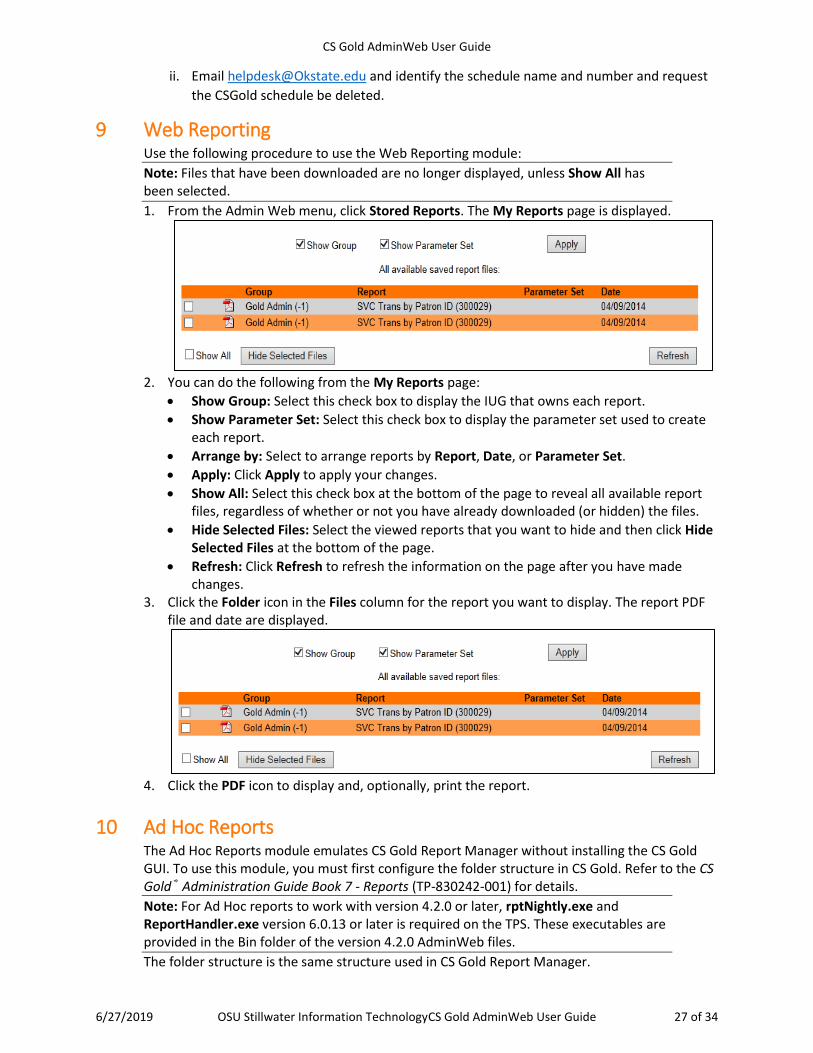
1. From the Admin Web menu, click Stored Reports. The My Reports page is displayed.
2. You can do the following from the My Reports page:
• Show Group: Select this check box to display the IUG that owns each report.
• Show Parameter Set: Select this check box to display the parameter set used to create each report.
• Arrange by: Select to arrange reports by Report, Date, or Parameter Set.
• Apply: Click Apply to apply your changes.
• Show All: Select this check box at the bottom of the page to reveal all available report files, regardless of whether or not you have already downloaded (or hidden) the files.
• Hide Selected Files: Select the viewed reports that you want to hide and then click Hide Selected Files at the bottom of the page.
• Refresh: Click Refresh to refresh the information on the page after you have made changes.
3. Click the Folder icon in the Files column for the report you want to display. The report PDF file and date are displayed.
4. Click the PDF icon to display and, optionally, print the report.
10 Ad Hoc Reports The Ad Hoc Reports module emulates CS Gold Report Manager without installing the CS Gold GUI. To use this module, you must first configure the folder structure in CS Gold. Refer to the CS Gold® Administration Guide Book 7 - Reports (TP-830242-001) for details.
Note: For Ad Hoc reports to work with version 4.2.0 or later, rptNightly.exe and ReportHandler.exe version 6.0.13 or later is required on the TPS. These executables are provided in the Bin folder of the version 4.2.0 AdminWeb files.
The folder structure is the same structure used in CS Gold Report Manager.
CS Gold AdminWeb User Guide
6/27/2019 OSU Stillwater Information TechnologyCS Gold AdminWeb User Guide 28 of 34
EXAMPLE:
• Cabinet
• Folder o File
You can do the following:
• Select a report.
• Determine how long a report is kept.
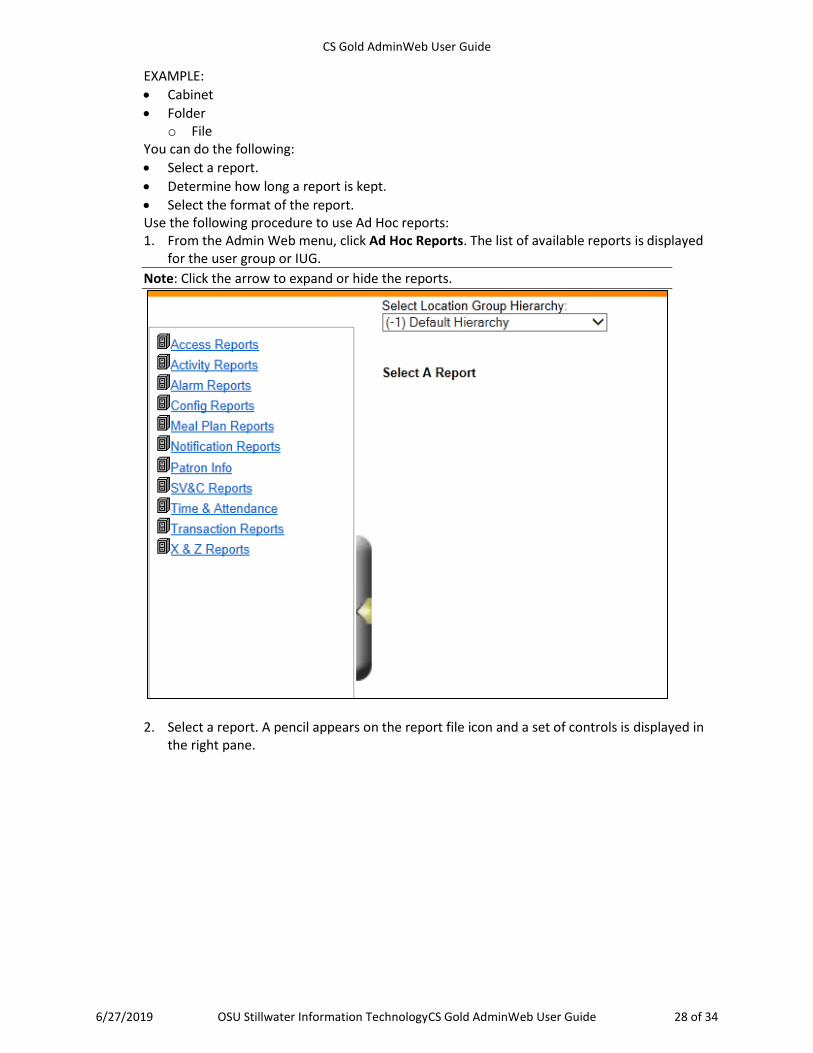
• Select the format of the report. Use the following procedure to use Ad Hoc reports: 1. From the Admin Web menu, click Ad Hoc Reports. The list of available reports is displayed
for the user group or IUG.
Note: Click the arrow to expand or hide the reports.
2. Select a report. A pencil appears on the report file icon and a set of controls is displayed in the right pane.
CS Gold AdminWeb User Guide
6/27/2019 OSU Stillwater Information TechnologyCS Gold AdminWeb User Guide 29 of 34
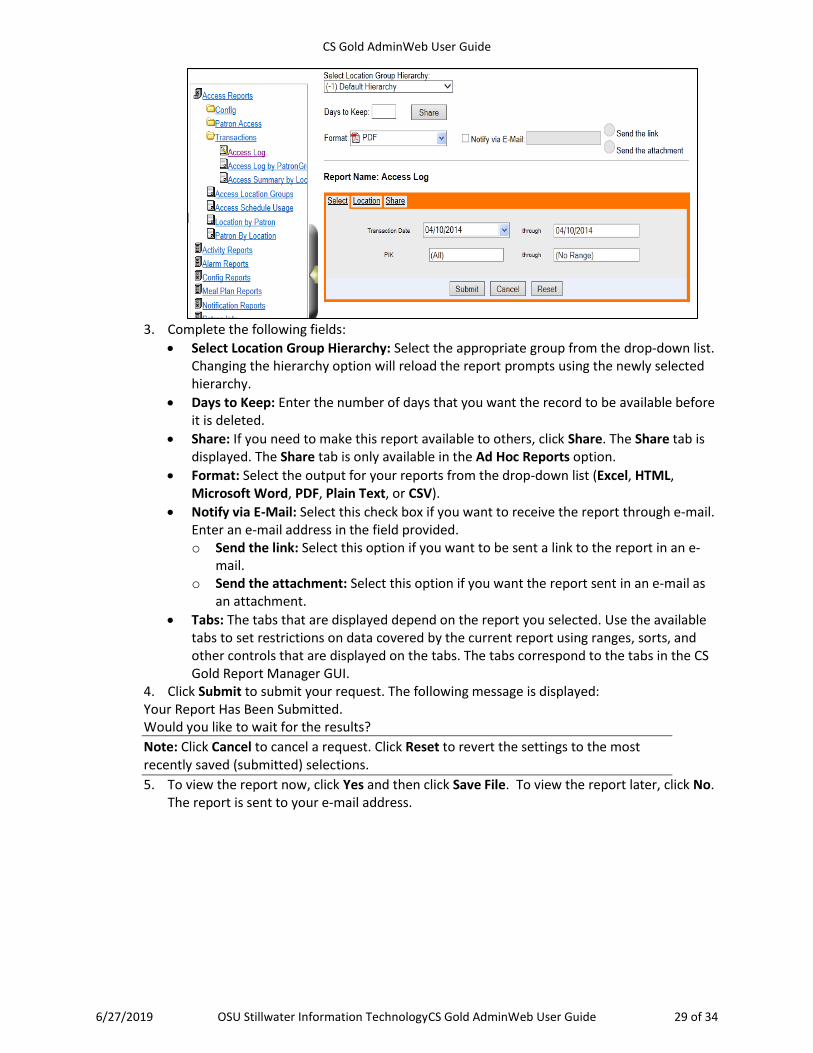
3. Complete the following fields:
• Select Location Group Hierarchy: Select the appropriate group from the drop-down list. Changing the hierarchy option will reload the report prompts using the newly selected hierarchy.
• Days to Keep: Enter the number of days that you want the record to be available before it is deleted.
• Share: If you need to make this report available to others, click Share. The Share tab is displayed. The Share tab is only available in the Ad Hoc Reports option.
• Format: Select the output for your reports from the drop-down list (Excel, HTML, Microsoft Word, PDF, Plain Text, or CSV).
• Notify via E-Mail: Select this check box if you want to receive the report through e-mail. Enter an e-mail address in the field provided. o Send the link: Select this option if you want to be sent a link to the report in an e-
mail. o Send the attachment: Select this option if you want the report sent in an e-mail as
an attachment.
• Tabs: The tabs that are displayed depend on the report you selected. Use the available tabs to set restrictions on data covered by the current report using ranges, sorts, and other controls that are displayed on the tabs. The tabs correspond to the tabs in the CS Gold Report Manager GUI.
4. Click Submit to submit your request. The following message is displayed: Your Report Has Been Submitted. Would you like to wait for the results?
Note: Click Cancel to cancel a request. Click Reset to revert the settings to the most recently saved (submitted) selections.
5. To view the report now, click Yes and then click Save File. To view the report later, click No. The report is sent to your e-mail address.
CS Gold AdminWeb User Guide
6/27/2019 OSU Stillwater Information TechnologyCS Gold AdminWeb User Guide 30 of 34
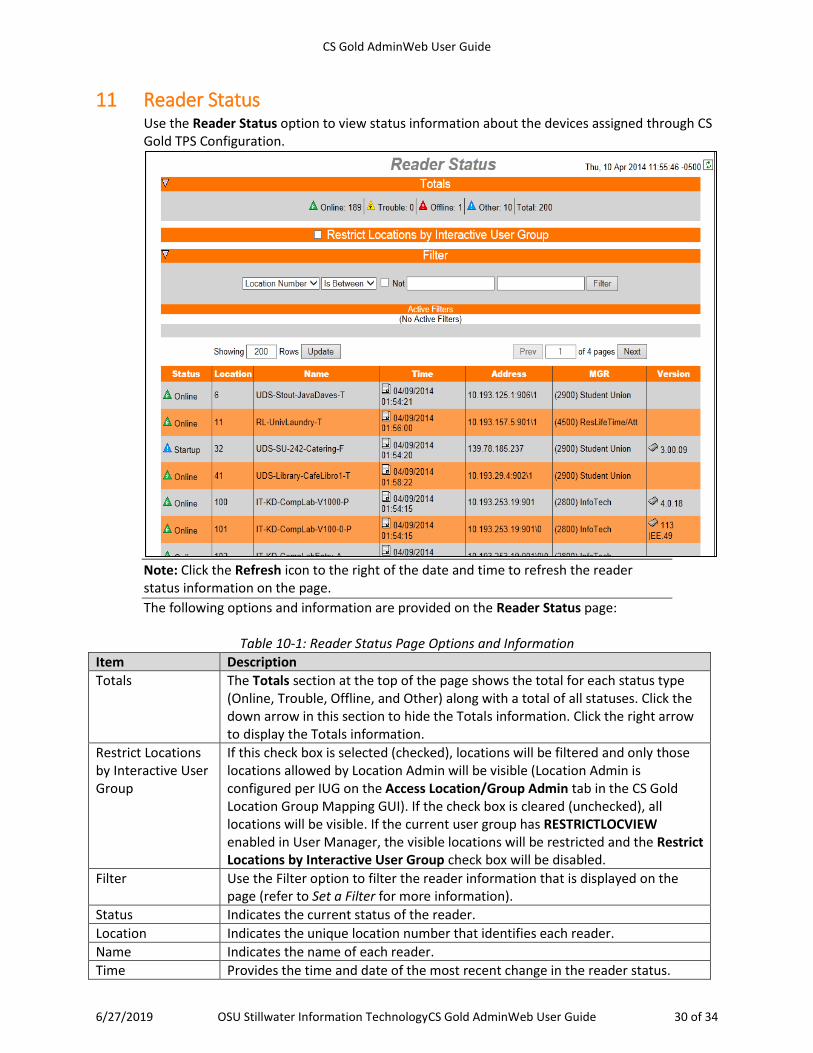
11 Reader Status Use the Reader Status option to view status information about the devices assigned through CS Gold TPS Configuration.
Note: Click the Refresh icon to the right of the date and time to refresh the reader status information on the page.
The following options and information are provided on the Reader Status page:
Table 10-1: Reader Status Page Options and Information
Item Description
Totals The Totals section at the top of the page shows the total for each status type (Online, Trouble, Offline, and Other) along with a total of all statuses. Click the down arrow in this section to hide the Totals information. Click the right arrow to display the Totals information.
Restrict Locations by Interactive User Group
If this check box is selected (checked), locations will be filtered and only those locations allowed by Location Admin will be visible (Location Admin is configured per IUG on the Access Location/Group Admin tab in the CS Gold Location Group Mapping GUI). If the check box is cleared (unchecked), all locations will be visible. If the current user group has RESTRICTLOCVIEW enabled in User Manager, the visible locations will be restricted and the Restrict Locations by Interactive User Group check box will be disabled.
Filter Use the Filter option to filter the reader information that is displayed on the page (refer to Set a Filter for more information).
Status Indicates the current status of the reader.
Location Indicates the unique location number that identifies each reader.
Name Indicates the name of each reader.
Time Provides the time and date of the most recent change in the reader status.
CS Gold AdminWeb User Guide
6/27/2019 OSU Stillwater Information TechnologyCS Gold AdminWeb User Guide 31 of 34
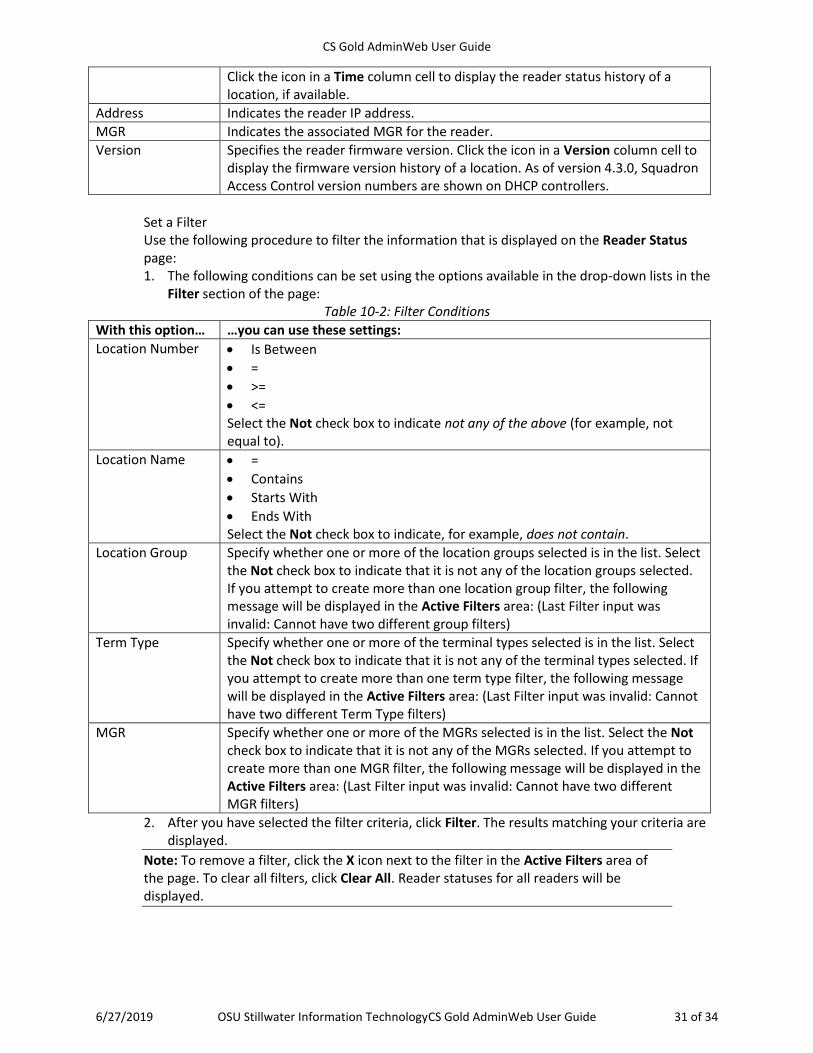
Click the icon in a Time column cell to display the reader status history of a location, if available.
Address Indicates the reader IP address.
MGR Indicates the associated MGR for the reader.
Version Specifies the reader firmware version. Click the icon in a Version column cell to display the firmware version history of a location. As of version 4.3.0, Squadron Access Control version numbers are shown on DHCP controllers.
Set a Filter Use the following procedure to filter the information that is displayed on the Reader Status page: 1. The following conditions can be set using the options available in the drop-down lists in the
Filter section of the page: Table 10-2: Filter Conditions
With this option… …you can use these settings:
Location Number • Is Between
• =
• >=
• <= Select the Not check box to indicate not any of the above (for example, not equal to).
Location Name • =
• Contains
• Starts With
• Ends With Select the Not check box to indicate, for example, does not contain.
Location Group Specify whether one or more of the location groups selected is in the list. Select the Not check box to indicate that it is not any of the location groups selected. If you attempt to create more than one location group filter, the following message will be displayed in the Active Filters area: (Last Filter input was invalid: Cannot have two different group filters)
Term Type Specify whether one or more of the terminal types selected is in the list. Select the Not check box to indicate that it is not any of the terminal types selected. If you attempt to create more than one term type filter, the following message will be displayed in the Active Filters area: (Last Filter input was invalid: Cannot have two different Term Type filters)
MGR Specify whether one or more of the MGRs selected is in the list. Select the Not check box to indicate that it is not any of the MGRs selected. If you attempt to create more than one MGR filter, the following message will be displayed in the Active Filters area: (Last Filter input was invalid: Cannot have two different MGR filters)
2. After you have selected the filter criteria, click Filter. The results matching your criteria are displayed.
Note: To remove a filter, click the X icon next to the filter in the Active Filters area of the page. To clear all filters, click Clear All. Reader statuses for all readers will be displayed.
CS Gold AdminWeb User Guide
6/27/2019 OSU Stillwater Information TechnologyCS Gold AdminWeb User Guide 32 of 34
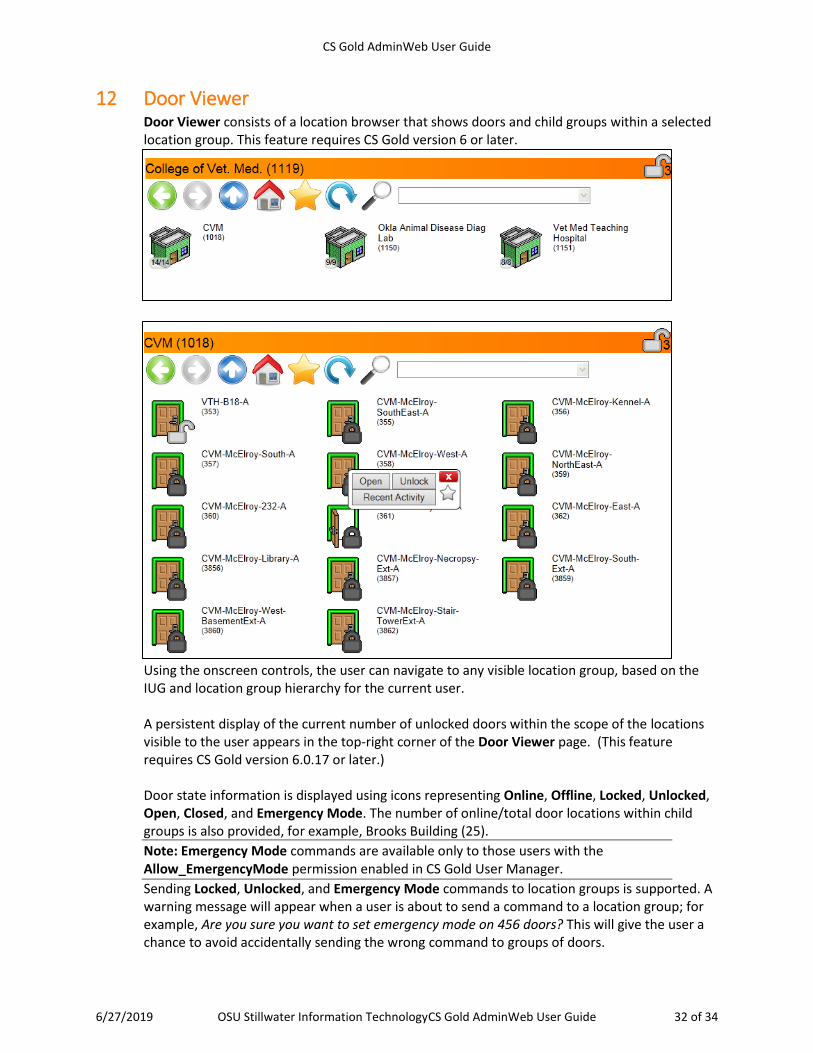
12 Door Viewer Door Viewer consists of a location browser that shows doors and child groups within a selected location group. This feature requires CS Gold version 6 or later.
Using the onscreen controls, the user can navigate to any visible location group, based on the IUG and location group hierarchy for the current user.
A persistent display of the current number of unlocked doors within the scope of the locations visible to the user appears in the top-right corner of the Door Viewer page. (This feature requires CS Gold version 6.0.17 or later.)
Door state information is displayed using icons representing Online, Offline, Locked, Unlocked, Open, Closed, and Emergency Mode. The number of online/total door locations within child groups is also provided, for example, Brooks Building (25).
Note: Emergency Mode commands are available only to those users with the Allow_EmergencyMode permission enabled in CS Gold User Manager.
Sending Locked, Unlocked, and Emergency Mode commands to location groups is supported. A warning message will appear when a user is about to send a command to a location group; for example, Are you sure you want to set emergency mode on 456 doors? This will give the user a chance to avoid accidentally sending the wrong command to groups of doors.
CS Gold AdminWeb User Guide
6/27/2019 OSU Stillwater Information TechnologyCS Gold AdminWeb User Guide 33 of 34
Sending multiple door commands is also supported. A progress display in the top left corner of the page shows the number of door commands remaining to be sent (for example, 14 in progress).
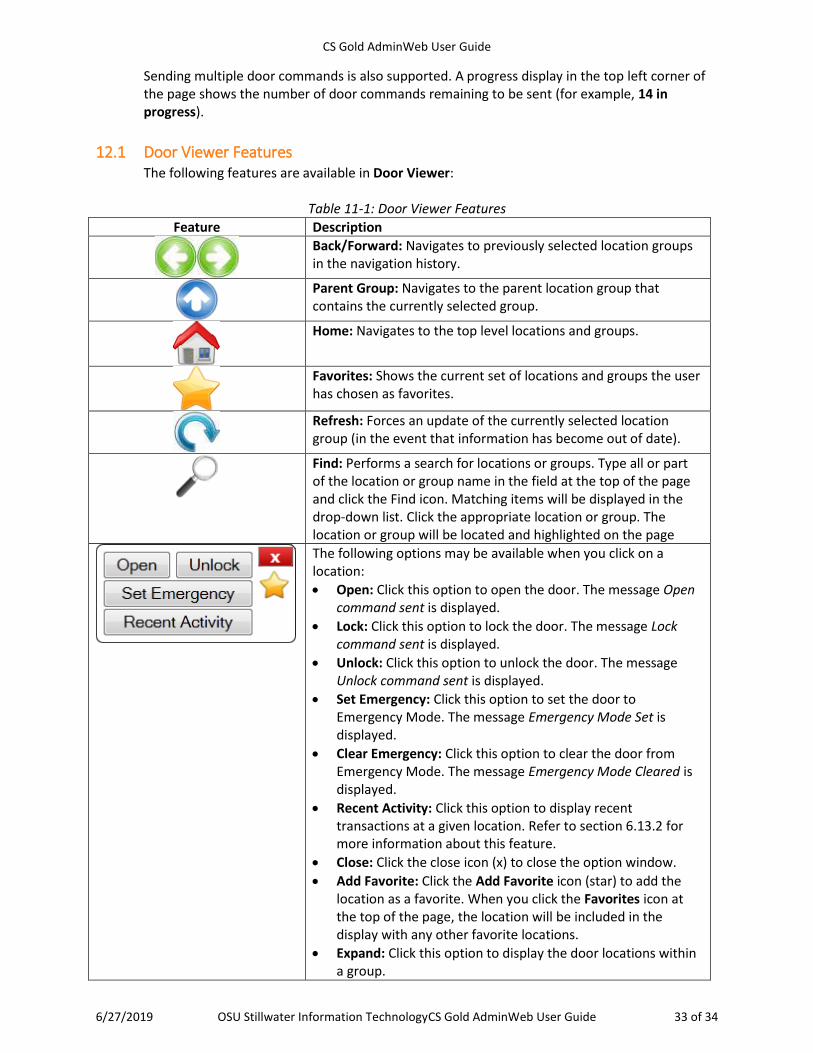
12.1 Door Viewer Features The following features are available in Door Viewer:
Table 11-1: Door Viewer Features
Feature Description
Back/Forward: Navigates to previously selected location groups in the navigation history.
Parent Group: Navigates to the parent location group that contains the currently selected group.
Home: Navigates to the top level locations and groups.
Favorites: Shows the current set of locations and groups the user has chosen as favorites.
Refresh: Forces an update of the currently selected location group (in the event that information has become out of date).
Find: Performs a search for locations or groups. Type all or part of the location or group name in the field at the top of the page and click the Find icon. Matching items will be displayed in the drop-down list. Click the appropriate location or group. The location or group will be located and highlighted on the page
The following options may be available when you click on a location:
• Open: Click this option to open the door. The message Open command sent is displayed.
• Lock: Click this option to lock the door. The message Lock command sent is displayed.
• Unlock: Click this option to unlock the door. The message Unlock command sent is displayed.
• Set Emergency: Click this option to set the door to Emergency Mode. The message Emergency Mode Set is displayed.
• Clear Emergency: Click this option to clear the door from Emergency Mode. The message Emergency Mode Cleared is displayed.
• Recent Activity: Click this option to display recent transactions at a given location. Refer to section 6.13.2 for more information about this feature.
• Close: Click the close icon (x) to close the option window.
• Add Favorite: Click the Add Favorite icon (star) to add the location as a favorite. When you click the Favorites icon at the top of the page, the location will be included in the display with any other favorite locations.
• Expand: Click this option to display the door locations within a group.
CS Gold AdminWeb User Guide
6/27/2019 OSU Stillwater Information TechnologyCS Gold AdminWeb User Guide 34 of 34
Door commands are disabled for read-only locations based on the Location Admin privilege settings for the current user.
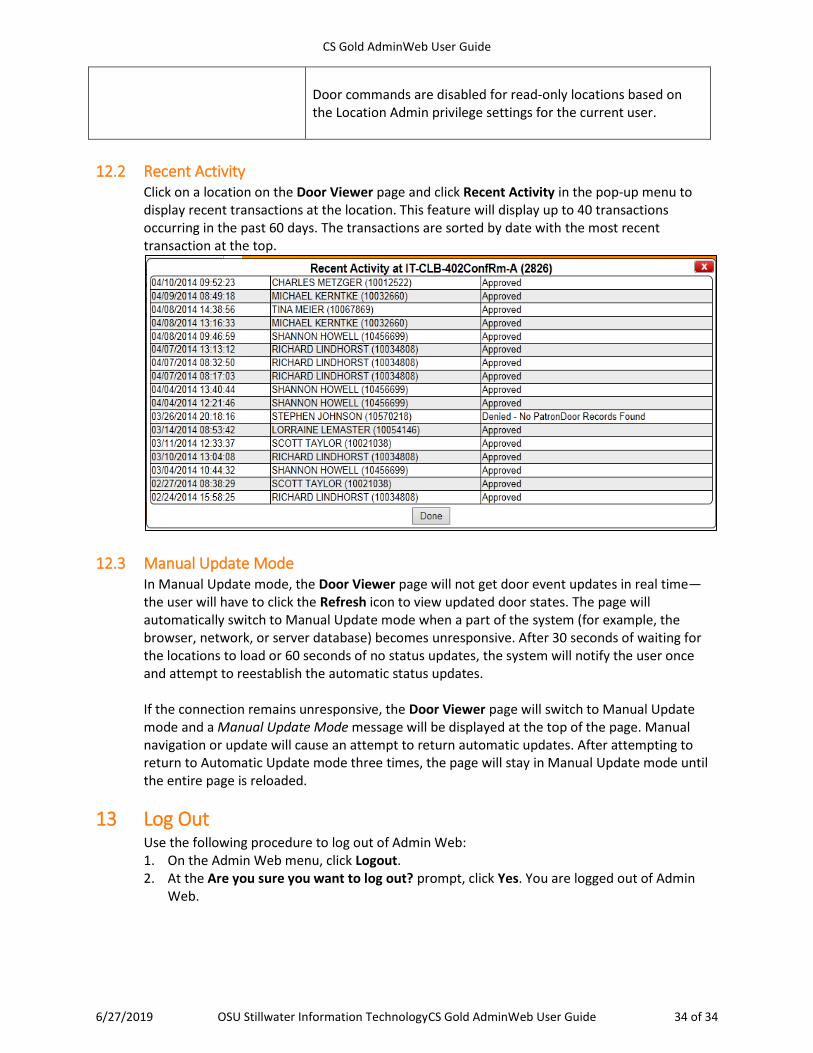
12.2 Recent Activity Click on a location on the Door Viewer page and click Recent Activity in the pop-up menu to display recent transactions at the location. This feature will display up to 40 transactions occurring in the past 60 days. The transactions are sorted by date with the most recent transaction at the top.
12.3 Manual Update Mode In Manual Update mode, the Door Viewer page will not get door event updates in real time—the user will have to click the Refresh icon to view updated door states. The page will automatically switch to Manual Update mode when a part of the system (for example, the browser, network, or server database) becomes unresponsive. After 30 seconds of waiting for the locations to load or 60 seconds of no status updates, the system will notify the user once and attempt to reestablish the automatic status updates. If the connection remains unresponsive, the Door Viewer page will switch to Manual Update mode and a Manual Update Mode message will be displayed at the top of the page. Manual navigation or update will cause an attempt to return automatic updates. After attempting to return to Automatic Update mode three times, the page will stay in Manual Update mode until the entire page is reloaded.
13 Log Out Use the following procedure to log out of Admin Web: 1. On the Admin Web menu, click Logout. 2. At the Are you sure you want to log out? prompt, click Yes. You are logged out of Admin
Web.


