Embed Size (px)
Citation preview

Create e-book
from balayage to

from balayage to illuminage
The popularity of balayage and blonding services continues to grow, inspiring this season’s movement: from balayage to illuminage.
This semester, Wella Professionals showcase the broad ways in which you can lighten and tone your clients’ hair. Our Portfolio of products is designed to support you at every step.

illuminage and brazilian illuminage
copper melt
pearlized lift
metallic melt
color movement
tableof content

Being blonde has stood the test of time, remaining a staple in the world of hair and beauty. Celebrity icons including Marilyn Monroe, David Bowie and Madonna helped to make the world of blonde hugely attractive and aspirational. While blonde trends continue to evolve into something new, 2018 saw blonde remain as the most searched for color category*.
It is evident the desired blonde of today is balayage. The multi-tonal, easy to maintain, color technique allows clients to stay true to their roots while celebrating lightness. Results vary from soft and natural to bold sweeping panels. With over 17M hashtags on instagram, balayage is definitely here to stay.
blonde
balayage
background
There are two main drivers of this semester‘s story: the desirability of blonde hair and the popularity of balayage.
#blonde60.7 M
#blondehair22.1 M
#blondehighlights924 K
#balayage19.7 M#brunettebalayage
495 K
#blondebalayage1.7 M
* according to an analysis of Google keyword data in the US and UK run by Performics.
@xobeautybynicole
@maureira.hair

this season’s color movement is
Inspired by the world-dominating trend of balayage and the popularity of blonde looks, this semester’s color movement focuses on lightening and blonding services.
from balayage to illuminage
#balayage
#dimensionalhair
#blondehair
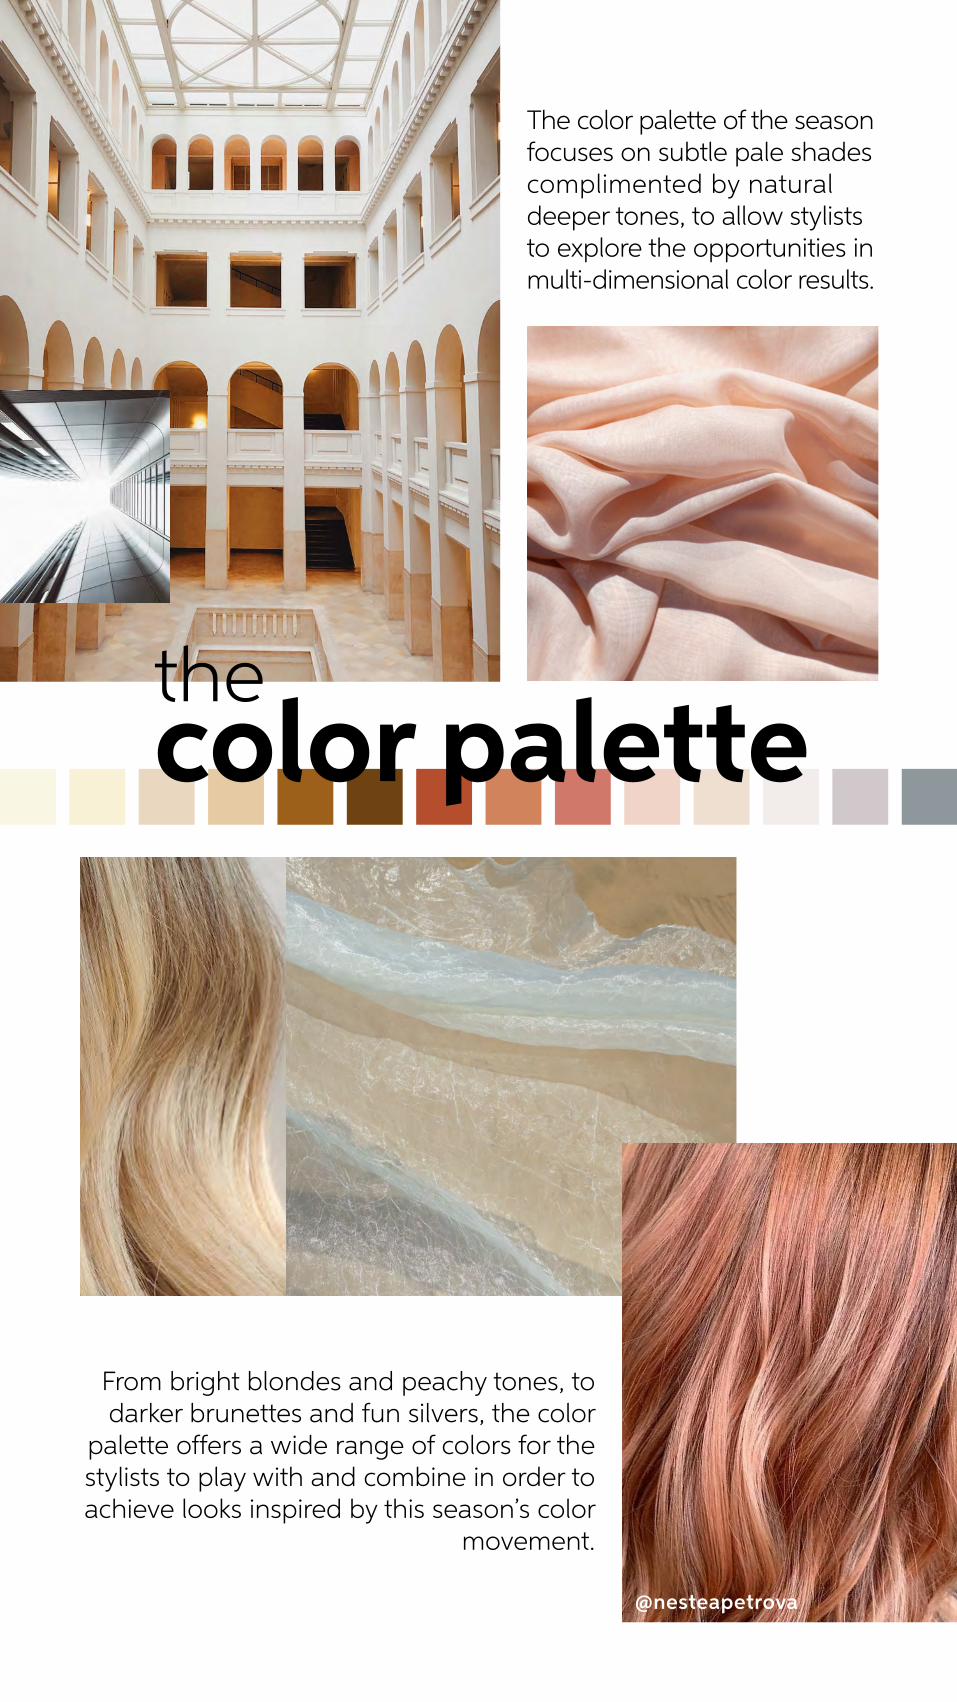
From bright blondes and peachy tones, to darker brunettes and fun silvers, the color
palette offers a wide range of colors for the stylists to play with and combine in order to achieve looks inspired by this season’s color
movement.
The color palette of the season focuses on subtle pale shades complimented by natural deeper tones, to allow stylists to explore the opportunities in multi-dimensional color results.
the color palette
@nesteapetrova

But what exactly does balayage mean?
Balayage is a hugely popular term. However, the color result it represents have become vast and varied.
Wella Professionals are clarifying the different results you can get with the technique of balayage and introducing 2 new premium services that build on this iconic technique.
Stylists have 3 services to recommend to their clients with specific differences, allowing them to satisfy their clients with the perfect lightening service, adapted to their needs.
evolvingfrom balayage
@tst_with_refined
@xobeautybynicole
@jsantoswella
@tombadgerhair
@maureira.hair

A graduation from dark natural root to brightened ends. Balayage creates a full head lighter feel with a shadowed root. For those who seek a sun kissed look or over all lightness.
balayage
#highlights
#blonde
#balayage

Now, we are bringing balayage into the light introducing illuminage. A
natural and luminous balayage, with a luxe feel. With seamless transitions
and sheer reflective results don’t just color hair, illuminate it.
Illuminage details and accentuates areas within the hair, framing the face and enhancing the perimeter. Creating seamless transitions with multi-tonal reflections and a natural sheer result.
From balayage to illuminage.
The most luminous, natural-looking,
balayage yet. With seamless transitions and sheer reflective
results don’t just color hair, illuminate it.
introducing illuminage

Brazilian illuminage is perfect for those who seek clarity and brightness. Accentuated con- trast both frames the face and lengths of your hair with light, while giving a seamless transitions from a more natural shadowed root with threads of brightness melting into enhanced lightness on the ends.
Accentuated contrast brings definition to your curls with gentle toning for condition
and shine. A seamless blend from a dark root transitions
into threads of lightness and enhanced brightness
through your curls.
premium balayage services
introducing brazilian illuminage

illuminage featuringRomeu Felipe
“Illuminage shows beauty through accentuating contrast of light and dark”
- Romeu Felipe
#loveilluminage

Brazilian hairdressers have become know for their expertise
in lightening. Providing individual services and results nonmatter what your natural hair color is.
Who better to bring this alive than the Wella Global Color Ambasador Romeu Felipe.
Romeu has become one of the worlds leading lightening
experts with a unique technical approach for each client
creating balayage results from seemless natural transitions to
accentuating contrast.
why brazil?

Romeu’s expert kit
To bring Illuminage to life Romeu relies on his hero products.
“Brazilian illuminage is a technique that lightens the majority of the
hair. So it is very important to use BlondorPlex and WellaPlex No. 2 as it
provides 97 % less breakage.”
“The best quality of ILLUMINA COLOR is the sheer color result it gives to the hair and natural tones.”
“Curly hair needs extra care as it is naturally drier and more
dull. Color Touch is the gentle and caring color option and
giving an amazing shiny finish to curly hair.”
10/34 8/41

technique
• In foil lightening (precision application)
• Toning/glossing for blending
difference vs. illuminage
• More clarity and lightness• More highs and lows -
Accentuating contrast
placement
Face framing •Contouring halo •
brazilian illuminage services

step 3 blonde toning Create an individual finish to lightened hair that is reflective, tonal and expensive.
step 2 root shadowing To create the perfect shadowed root that transitions beautifully into clear lightened ends, this simple step is applied to towel dried hair.
expert tip: “to prevent the hair from drying out try using ColorMotion+ Pre Color Treatment.”
expert tip: “adding a natural or neutral to your target shade will help you shadow at the root with long lasting results.”
service steps
Each look has been individually designed by Romeu Felipeto provide a service to achieve the end look. Each service will require 3 steps:
step 1 lightening Be it free hand or foiling, the lightening stage follows precision sectioning on key areas of the head. Be it for face framing, perimeter lightening or dark to light transitions.

sectioning
zigzag Varying the size of the zigzag helps to create a connection between the interlocking sections. The zigzag can be separated in two – the top being the peaks and the bottom part being the valleys.
triangle Back combed triangles create a blend from light to dark. The focal point remains seamless while the base of the triangle creates a slice effect from the highest point of application.
inverted triangle An inverted triangle backcombed will create a seemless blend with the downward focal point creating a thread of lightness from the highest point of application.
acute triangle This allows you to focused lightening through the mid-lengths and ends.
triangle highlight combination Creates threads of lightness that veil a shadowed root and transition into lighter ends.
large weave
slice
back to back
expert backcombing tip: for the perfect seamless finish backcomb with two shallow strokes and one deep.

illuminage

sectioning after
illuminage
before
step 1 lightening ILLUMINA COLOR and Welloxon Perfect Developer formula A 30 g Blondor Freelights + 45 g 9 % / 30 vol Blondor Freelights Developer + 2 ml WellaPlexformula B 20 g 8/93 + 20 g 9/19 + 40 g 9 % / 30 vol
step 2 root shadowing formula C 20 g 7/ + 20 g 7/81 + 80 g 1.9 %
step 3 blonde toningformula D 20 g 8/93 + 40 g 1.9 % formula E 30 g 10/36 + 60 g 1.9 %

1Starting at the nape area, take small
zigzag sections. Thread formula A slightly away from the roots,
applying more product to saturate the ends. Apply to every second
section, isolating with clear sheets for separation and visible control.
2From ear to center forehead, take diagonal slices. Feathering formula A lightly towards the roots, whilst building product up at the lengths and ends.
step 1 lightening
expert tip: when working with large section remember toelevate the hair up and reapply to the under side of the sections. Use clear sheet to isolate in between section and to have visible control.
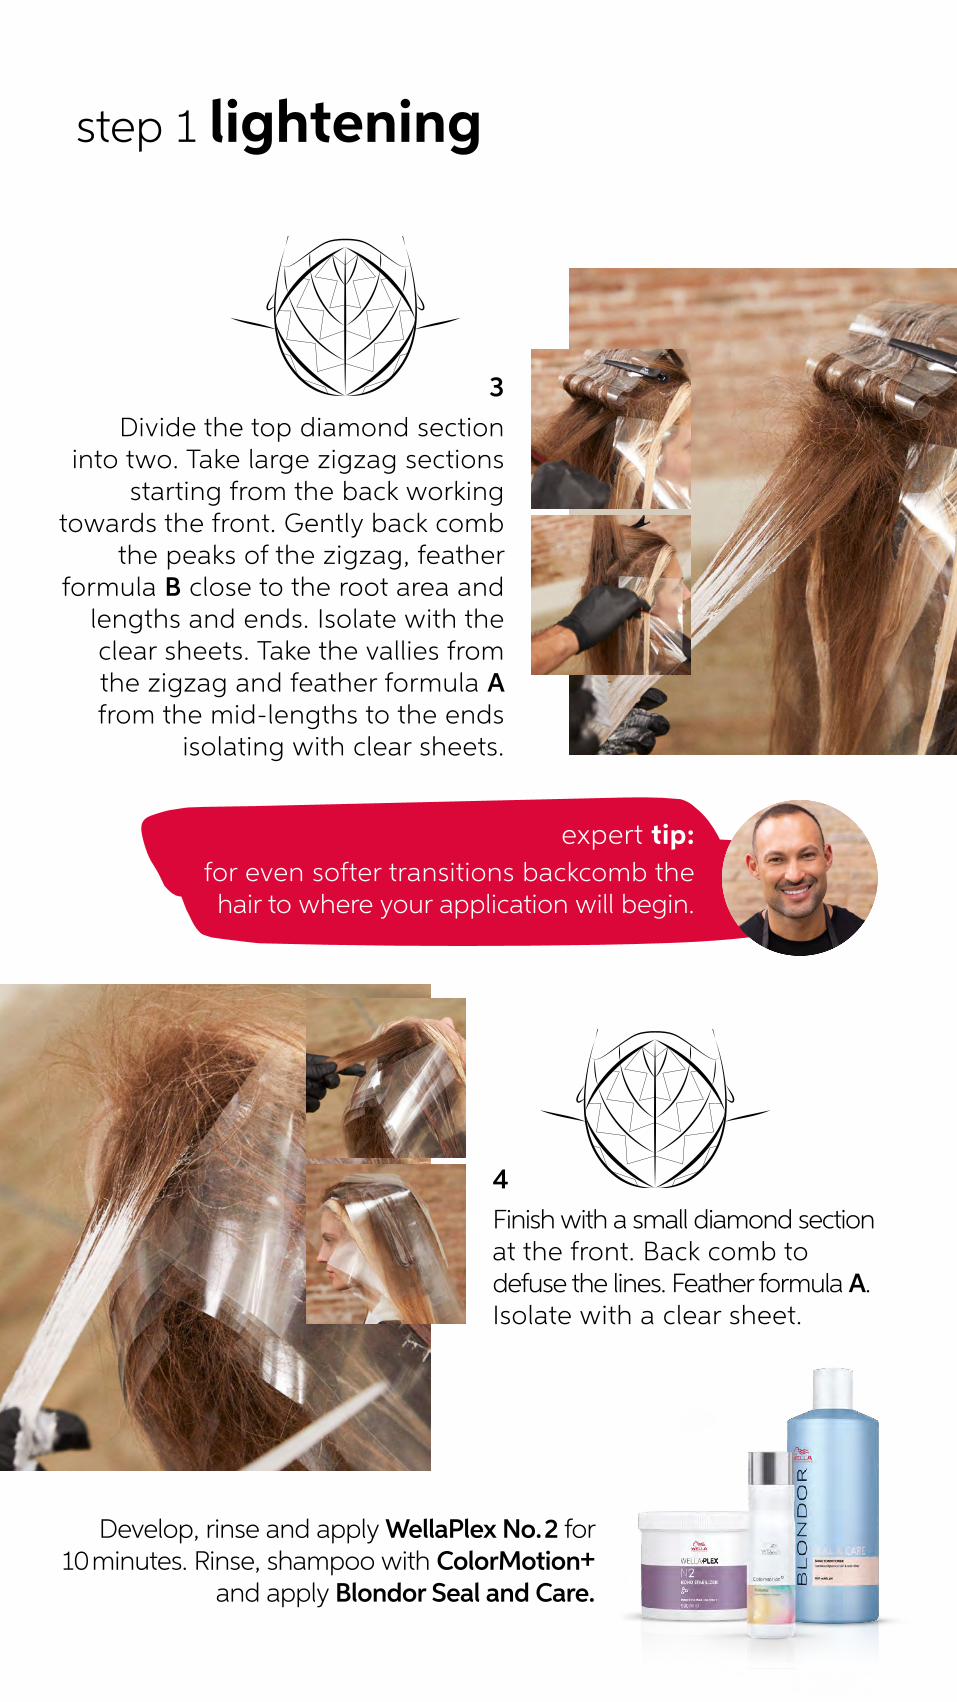
3Divide the top diamond section
into two. Take large zigzag sections starting from the back working
towards the front. Gently back comb the peaks of the zigzag, feather
formula B close to the root area and lengths and ends. Isolate with the clear sheets. Take the vallies from the zigzag and feather formula A from the mid-lengths to the ends
isolating with clear sheets.
4Finish with a small diamond section at the front. Back comb to defuse the lines. Feather formula A. Isolate with a clear sheet.
Develop, rinse and apply WellaPlex No. 2 for 10 minutes. Rinse, shampoo with ColorMotion+
and apply Blondor Seal and Care.
step 1 lightening
expert tip: for even softer transitions backcomb the hair to where your application will begin.

step 2 root shadowing
step 3 blondetoning
1On damp hair, begin at the nape
applying formula C just away from the scalp. Bringing it down to approx. 7 cm to the mid area.
Retake the same sectioning by separating the perimeter with the
diamond section at the crown. At the perimeter apply formula E from mid-
lengths to ends. On the diamond section apply formula D to the mid
area and formula E to the ends. Develop for up to 20 minutes, rinse
shampoo with Color Motion+ and apply Color Motion+ Express Post
Color Treatment.
2Apply lightly towards the front hairline, in small sections. Develop for 15 minutes.
Rinse thoroughly.
expert tip: why not try combining root shadowing and toning into a one step color melt. This is perfect when softer transition are required.

brazilian

sectioning
after
before
step 1 lightening BlondorPlex and Welloxon Perfectformula A 60 g BlondorPlex + 90 g 6 %
step 2 root shadowing ILLUMINA COLOR and Welloxon Perfectformula B 20 g 6/19 + 20 g 6/ + 80 g 1.9 %
step 3 blonde toning ILLUMINA COLOR and Welloxon Perfectformula C 20 g 10/38 + 40 g 1.9 %
brazilian illuminage
expert tip: use Illuminage Highlighting Papers for faster application
and optimal lift.

expert tip: for maximum lightness around the face add an extra foil to the remaining ends.
1Begin with back to back large
weaves at the nape of the neck. Then work up to the
occipital bone with three backcombed triangle sections.
2In a brick work pattern continue through the back with a triangle slice combination.
3Repeat this method
above the ear but this time use an acute triangle.
step 1 lightening

4Work through the fringe with
slices to create the face frame. One final triangle each side
ensures brightness through the lengths and ends.
5Work across the top section of the head in backcombed large weaves or slices.
6Develop, rinse and apply
WellaPlex No. 2 for 10 minutes. Rinse, shampoo and apply
Blondor Seal and Care.
step 1 lightening

1Beginning at the nape of the
neck, apply formula B to the root area. Work in horizontal sections
finishing at the front hairline. Develop for 10 minutes.
2Start to comb formula B further down the hair. Develop for further 10 minutes.
3Comb further
down the hair for a final 10 minutes.
Rinse.
step 2 root shadowing

1 Tone the mid lengths and
ends with formula C.
2Rinse, shampoo with ColorMotion+ and apply Express Post Color Treatment.
step 3 blonde toning

brazilian
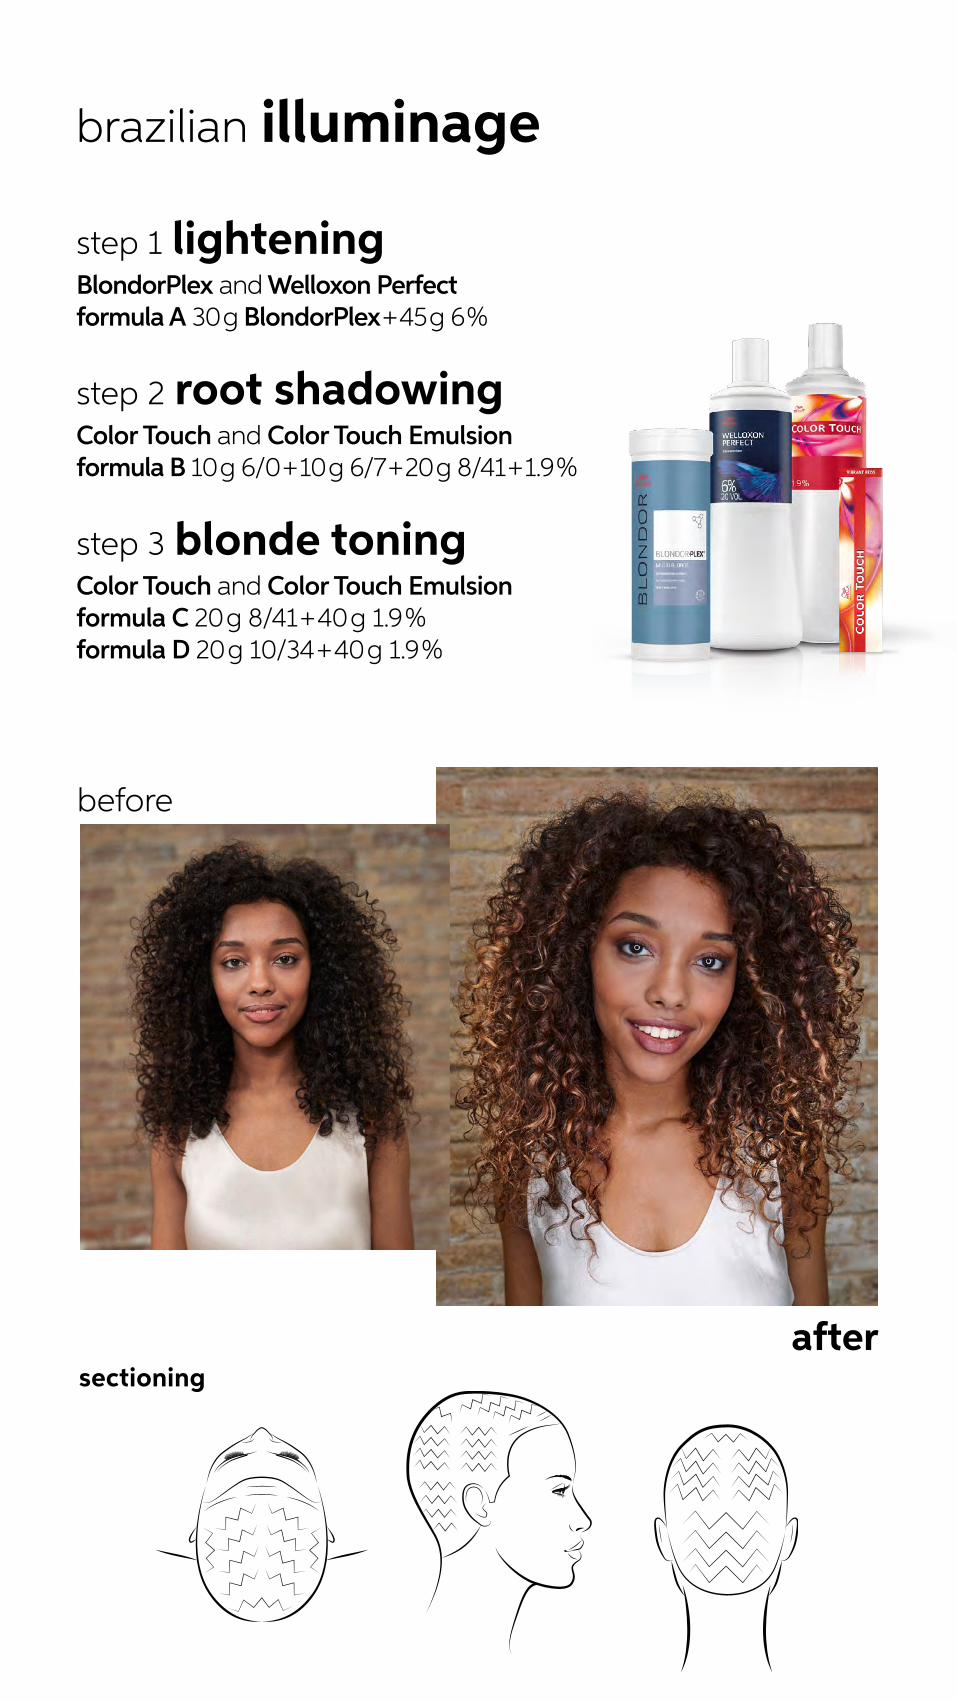
sectioningafter
before
step 1 lightening BlondorPlex and Welloxon Perfectformula A 30 g BlondorPlex + 45 g 6 %
step 2 root shadowingColor Touch and Color Touch Emulsionformula B 10 g 6/0 + 10 g 6/7 + 20 g 8/41 + 1.9 %
step 3 blonde toning Color Touch and Color Touch Emulsionformula C 20 g 8/41 + 40 g 1.9 %formula D 20 g 10/34 + 40 g 1.9 %
brazilian illuminage

expert tip: for more defined curls weave additional sections.
1Smoothening out the curls
before sectioning can help for easy backcoming. Beginning at the nape of the neck working in zigzag
sections, backcomb and apply formula A to every second section.
2Halving the area above the occipital bone continue this method in two channel sections through the back of the head.
3Continue through the side area with zigzag sections.
step 1 lightening

4On the front hair line apply
back comb slices back to back outlining the hair line.
5Complete the top section in a herring bone sectioning pattern. Work through with backcombed zigzag sections.
6Develop, rinse and apply WellaPlex
No. 2 for 10 minutes. Rinse, shampoo and apply Blondor Seal and Care.
step 1 lightening

expert tip: curly hair can be very porous. Keep an eye during development time to avoid losing your highlights completely.
1Beginning at the nape of the
neck apply formula B to the root area. Work in horizontal sections
finishing at the front hairline. Develop for 10 minutes.
2Start to comb formula B further down the hair. Develop for 5 minutes.
Tone the mid lengths and ends melting formula C into formula D.
Rinse shampoo with ColorMotion+ and apply Express Post Color Treatment.
step 2 root shadowing
step 3 blonde toning

creative color

Kai’s top tip: “blending is key for a seamless color melt. Use your fingers to create a soft transition from deeper roots to lighter ends.”
Ryan’s top tip: „I love working with
Base Breaker because it gives my client a
seamless color result.”
This season, hair color experts Ryan and Kai share their favorite looks.
@Ryan.Weeden Wella Professionals, North American Color Ambassador
Ryan comes to us straight from the US, where he’s built an empire around teaching balayage.
@Kai.SohnWella Professionals Educator
Kai has been an Educator in Germany for 5 years and is a member of the
Wella Creative Team. He specializes in multi-tonal looks like color melts.
creative color
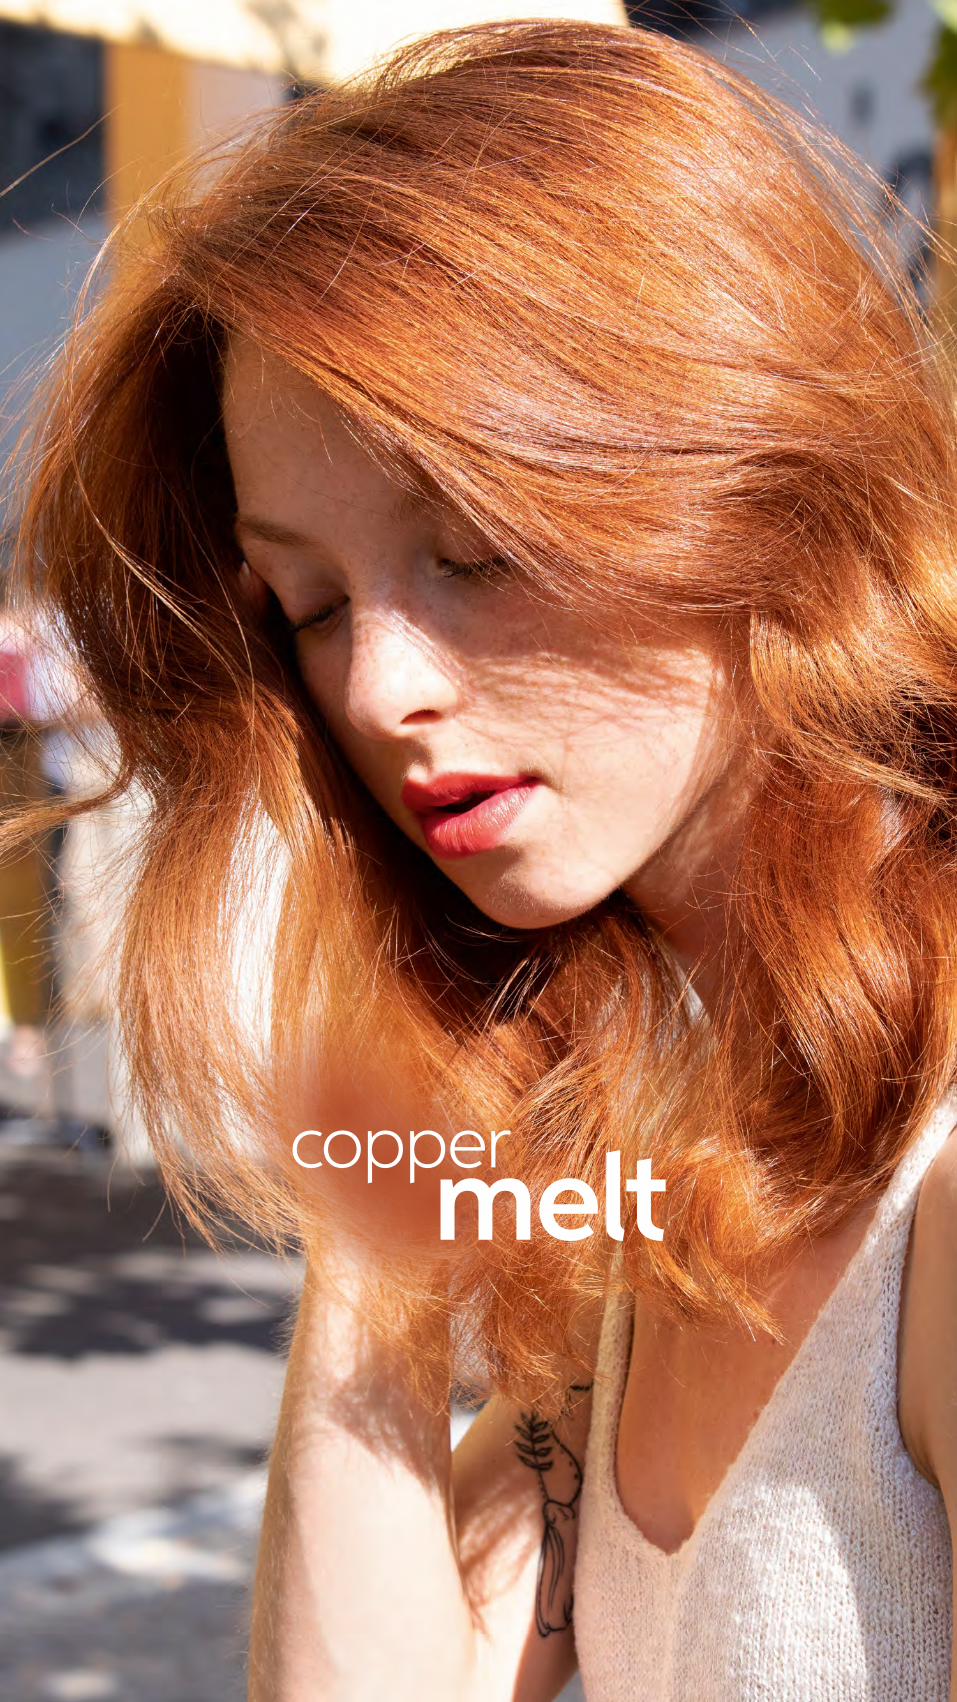
copper melt

Introducing two NEW shades from Color Touch, in a look that perfectly complements this semester‘s color palette.
Burnished Copper
Oxidized Copper
Copper Rose
Combine and cocktail together with other shades in the Color Touch range to create modern red color effects for your clients.
Here are Kai’s favorite formulations for achieving the look:
copper melt
10/34 + 0/56 8/41 + 6/35
10/34 + 7/43
8/41 + 9/97
10/34 + 9/03
8/41 + 8/3
10/34 8/41
NEWNEW

after
before
color formulas Color Touch and Color Touch EmulsionA: 10 g 7/43 + 10 g 8/41 + 40 g 1.9 %B: 10 g 8/41 + 10 g 9/16 + 40 g 1.9 %C: 10 g 10/34 + 20 g 4 % D: 20 g 10/34 + 5 g 8/43 + 50 g 1.9 %
expert tip:the Color Motion+ Pre-Treatment is amazing when working on porous hair for a more even finish.
* when using Structure+ Mask ** when using Structure+ Mask vs. no treatment
ColorMotion+ for color protection for up to 8 weeks* & stronger hair from root to tip.**
step 1 color

expert tip: seamlessly transition the roots into the ends using a comb or fingers.
1Prepare the hair
with ColorMotion+ Pre-Treatment.
Apply formula A to the root area.
Apply over the line of regrowth.
3As you work up towards the
crown, continue to take 1 cm slices.
Alternate formulas B, C, D until you reach the top.
Repeat on the other side.
2Starting at the nape, take a diagonal section apply formula B to the lengths and ends.
4Develop for 20 minutes, remove and neutralize with ColorMotion+ Express Post Color Treatment in just 30 seconds!
step 1 color

2For a soft wave, take vertical
sections and wrap the hair around the GHD Curve Classic.
1For smoothness and natural shine, mix EIMI Oil Spritz and Velvet Amplifier in your hands and then work through hair.
expert tip: give your color result
maximum impact! I’ve used a soft wave to reveal the different
shade mixes in the hair.
step 2 styling

pearlized lift

Base breaking is a service that lightens the natural hair in between or on the same day as highlighting or balayage techniques. It helps to soften the regrowth for long lasting results while blending the natural hair with the previously lightened areas.
Blondor Base Breakers are specifically designed for an express base breaking service while gently depositing tone in up to 10 minutes. This allows you to lighten the natural hair up to 1 level while neutralizing unwanted warmth on both the natural hair and the pre-lightened areas. Aiding in softening the contrast of the light and dark areas of the hair for a more natural and bright look and feel. All while being gentle on the hair.
Two cool shades for all your blonding services:
Cool /19 - A soft ash cendre tone ideal for natural hair from 6/0 to 8/0 and to neutralize yellow tones.
Extra Cool / 86 – An intense pearl violet tone ideal for natural hair from 6/0 to 8/0 and to neutralize yellow orange tones.
Natural hair Highlighted hairBase broken and toned hair
pearlizedlift

MIXING DEVELOPMENT TIME
(1:) 30 g (:1) 30 g (1:) 30 g (:1) 30 g
Up to 10 minutesMix 1:1 with 1.9 % for 1 level lift and a soft deposit of tone
Mix 1:1 with 3 % for 1 level lift and a more intense deposit of tone
after
before
step 1 color
formula BlondorPlex and Welloxon Perfect A: 30 g BlondorPlex + 45 g 6 %Blondor Base Breaker and Welloxon PerfectB: 30 g Cool /19 + 30 g 1.9 %

2Use a fine weave, apply formula A root to tip until a full head of highlights is achieved.
Develop until very pale yellow. Remove and apply WellaPlex
No. 2. Rinse, shampoo and neutralize with
Blondor Seal and Care.
4Immediately comb
through the lengths and ends. Develop
for up to 10 minutes.
3To break the base, apply formula B on towel dried hair using applicator bottle. Begin around the face for more brightness.
1Divide the hair into 5 sections.
step 1 color

Allow to cool, shake out and finish with Dynamic Fix.
expert tip: for bounce, heat protection and smoothness, combine Extra Volume, Thermal Image and Cocktail Me.
A beach wave will reveal dimensions of color. Hold the
GHD Curve Classic horizontally and work up the head.
styling products EIMI Thermal ImageEIMI Extra-VolumeEIMI Cocktail Me
step 2 styling

metallic melt

Achieving perfect grey and silver hair is not easy – in fact it can be the toughest hair color to create and to maintain. Follow our step by step and learn how to achieve pure grey for your client with two new shades from COLOR FRESH CREATE.
step 1
pre-lightening
step 2
pre-toning
step 3
toning
Three simple steps for a clean grey result
metallic melt

after
before
the perfect canvas acarte blanche for your creativity
formula Blondor, Welloxon Perfect, WellaPlexA: 60 g Soft Blond Cream + 90 g 4 % + 12 g WellaPlex
expert tip: when lightening the hair, start at the back, where the hair is thicker and darker.

10/9/
6/
5/
4/
3/
2/BLACK
BROWN
REDDISH/BROWN
REDDISH/ORANGE
ORANGE
ORANGE/YELLOW
YELLOW
VERY PALE YELLOW7/
8/
PALE YELLOW
you want to be here
1Apply formula A using a classic full
head application to lighten the roots.
tip: use very fine sections for better lift control.
expert tip: if regrowth is longer than 2 cm, use a virgin application and apply at the mid-band first.
2Process at room temperature until level 9 or 10 is achieved. Rinse and apply WellaPlex No. 2 for 10 minutes. Shampoo with ColorMotion+ and then apply Blondor Seal and Care.
step 1 pre-lightening

level 7 Orange Yellow
NOT RECOMMENDED
level 8-9 Yellow to Pale Yellow
Pre-toning with ILLUMINA COLOR
10/ + 10/81 Pre-toning with
KP ME+ 10/ + 10/16
level 10 Very Pale Yellow
Pre-toning with Color Touch 10/6 + 10/ OR ILLUMINA COLOR
10/ + 10/69
It is key to understand why grey hair color is so subtle and delicate. Below are three expert tips to help you optimize your color understanding and secure the perfect lightening service.
the complexity of grey
1Achieving a clear base and
consistent lightening from roots to ends is crucial to achieve desired
grey tonality. The perfect depth for clean grey & silver is level 9 - 10.

3Once your desired grey shade is
achieved, maintain your hair color with INVIGO BLONDE Recharge.
2 Identifying the exact underlying pigment exposed secures the choice of the right pre-toner formula.
Sheer and luminous ILLUMINA COLOR is the perfect product choice to pre-tone your hair. Its Violet based shading is ideal in this case.
Koleston Perfect ME+ and Color Touch are two other product choice possibilities.

Pre-Toning neutralizes the remaining warmth left in the hair allowing full reflection of the shades tonality.
1Use the color wheel principle to
choose the best shades to neutralize the remaining warmth in the hair.
2Apply color B from root to tip and process 20 minutes. Rinse and neutralize with Color-Motion+ Post Color Treatment.
formula ILLUMINA COLOR, Welloxon PerfectB: 20 g 10/ + 20 g 10/69 + 80 g 1.9 %
step 2 pre-toning

ORANGE
YELLOW
GREEN
BLUE
VIOLET
RED
expert tip: it is very important to tone the hair before applying the 2 new grey shades as the blue & violet based shading will appear weak or inexistant, due to the neutralization process. Think of the color wheel principle.
complementary colorOpposite colors neutralize one another
step 2 pre-toning
after pre-tonebefore pre-tone

step 3 color fresh create
1Section the head in two, isolating a top, side and back section. On the lower section, at the sides and on the back, apply color C from root to tip.
formula COLOR FRESH CREATEC: Sandstorm GreyD: Supernova Silver

3Process the color for 20 minutes, rinse and style with EIMI Sugar Lift and EIMI Cocktail Me.
2On the top section, apply color C
at the roots and color D on midlength and ends, melting
in between the index and major finger.

Grey comes in many different depths. To create your personalized grey and play with different depths, add COLOR FRESH CREATE additive, Tonight Dusk, to your favorite grey formula.
Deeper grey with tonight dusk
Pure 20+1* 10+1* 5+1* 2+1* 1+1*
*20 + 1 means: 20 parts of the used shade + 1 part Tonight Dusk!
#sandstormgrey
#supernovasilver
deeper greys


