Embed Size (px)
Citation preview
Prepared for: Prepared by:
Superfund Standby Program AECOM NYSDEC Latham, NY Albany, NY July 2015
HEALTH AND SAFETY PLAN (HASP) Korkay, Inc. Site 70 West Main Street Broadalbin, NY 12025 Work Assignment No. D00445-20
Prepared for: New York State Department of Environmental Conservation 625 Broadway Albany, New York 12233
Prepared by: AECOM Technical Services Northeast, Inc. 40 British American Boulevard Latham, New York 12110
Health and Safety Plan Expiration Date: August 2016
Project No: 60273289
AECOM Health and Safety Plan i
Project Health and Safety Plan
This project Health and Safety Plan (HASP) was prepared for employees performing a specific, limited scope of work. It was prepared based on the best available information regarding the physical and chemical hazards known or suspected to be present on the project site. While it is not possible to discover, evaluate, and protect in advance against all possible hazards, which may be encountered during the completion of this project, adherence to the requirements of the HASP will significantly reduce the potential for occupational injury.
By signing below, I acknowledge that I have reviewed and hereby approve the HASP for the Former Kenco Chemical Company site. This HASP has been written for the exclusive use of AECOM, its employees, and subcontractors. The plan is written for specified site conditions, dates, and personnel, and must be amended if these conditions change.
Prepared by:
July 30, 2015 Walter O. Howard Date Project Manager 518-951-2387
Concurrence by:
July 30, 2015 Michael Grasso, CIH Date Operations Health and Safety Manager 607-201-6737
AECOM Health and Safety Plan i
Executive Summary
The purpose of this Health and Safety Plan (HASP) is to address health and safety concerns related to AECOM managed activities at the Korkay Inc, site, located at 70 West Main Street in Broadalbin, NY. The specific roles, responsibilities, authority, and requirements as they pertain to the safety of employees and the scope of services are discussed herein. The document is intended to identify known potential hazards and facilitate communication and control measures to prevent injury or harm. Additionally, provisions to control the potential for environmental impact from these activities are included where applicable.
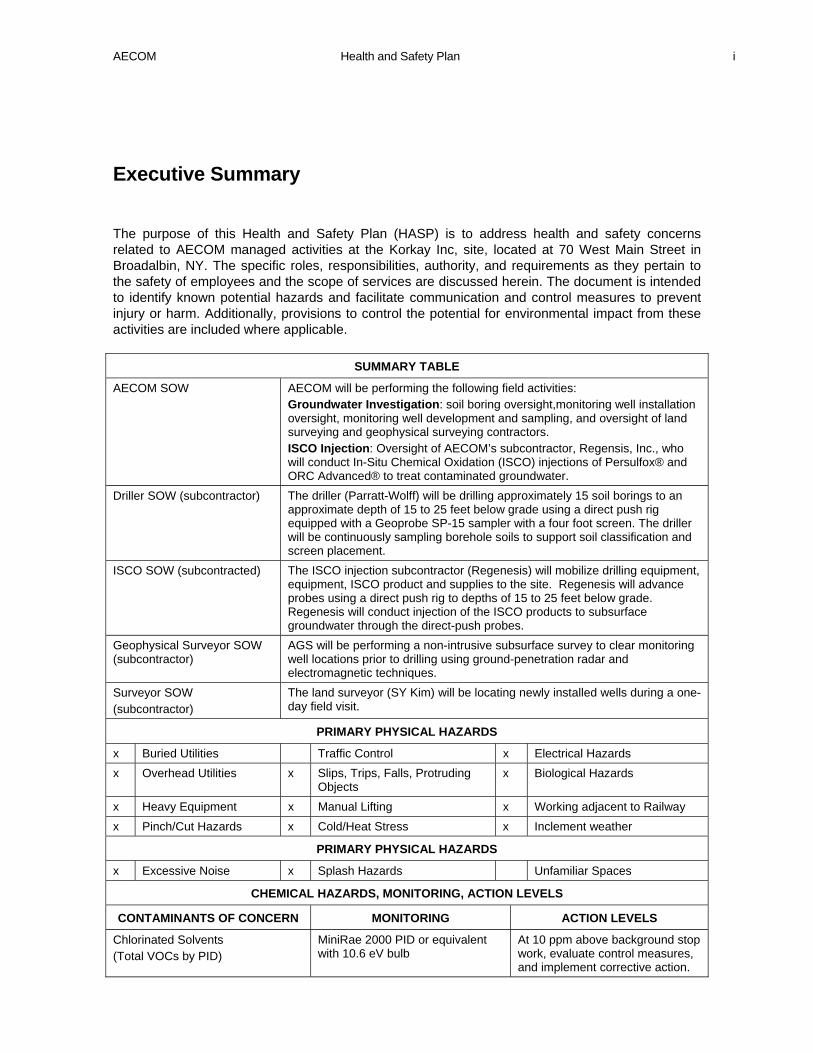
SUMMARY TABLE
AECOM SOW AECOM will be performing the following field activities: Groundwater Investigation: soil boring oversight,monitoring well installation oversight, monitoring well development and sampling, and oversight of land surveying and geophysical surveying contractors. ISCO Injection: Oversight of AECOM’s subcontractor, Regensis, Inc., who will conduct In-Situ Chemical Oxidation (ISCO) injections of Persulfox® and ORC Advanced® to treat contaminated groundwater.
Driller SOW (subcontractor) The driller (Parratt-Wolff) will be drilling approximately 15 soil borings to an approximate depth of 15 to 25 feet below grade using a direct push rig equipped with a Geoprobe SP-15 sampler with a four foot screen. The driller will be continuously sampling borehole soils to support soil classification and screen placement.
ISCO SOW (subcontracted) The ISCO injection subcontractor (Regenesis) will mobilize drilling equipment, equipment, ISCO product and supplies to the site. Regenesis will advance probes using a direct push rig to depths of 15 to 25 feet below grade. Regenesis will conduct injection of the ISCO products to subsurface groundwater through the direct-push probes.
Geophysical Surveyor SOW (subcontractor)
AGS will be performing a non-intrusive subsurface survey to clear monitoring well locations prior to drilling using ground-penetration radar and electromagnetic techniques.
Surveyor SOW (subcontractor)
The land surveyor (SY Kim) will be locating newly installed wells during a one-day field visit.
PRIMARY PHYSICAL HAZARDS
x Buried Utilities Traffic Control x Electrical Hazards
x Overhead Utilities x Slips, Trips, Falls, Protruding Objects
x Biological Hazards
x Heavy Equipment x Manual Lifting x Working adjacent to Railway
x Pinch/Cut Hazards x Cold/Heat Stress x Inclement weather
PRIMARY PHYSICAL HAZARDS
x Excessive Noise x Splash Hazards Unfamiliar Spaces
CHEMICAL HAZARDS, MONITORING, ACTION LEVELS
CONTAMINANTS OF CONCERN MONITORING ACTION LEVELS
Chlorinated Solvents (Total VOCs by PID)
MiniRae 2000 PID or equivalent with 10.6 eV bulb
At 10 ppm above background stop work, evaluate control measures, and implement corrective action.
AECOM Health and Safety Plan ii
All staff are bound by the provisions of this HASP and are required to participate in a preliminary project safety meeting to familiarize them with the anticipated hazards and respective onsite controls. The discussion will cover the entire HASP subject matter, putting emphasis on critical elements of the plan; such as the emergency response procedures, personal protective equipment, site control strategies, and monitoring requirements. In addition, daily tailgate safety meetings will be held to discuss: the anticipated scope of work, required controls, identify new hazards and controls, incident reporting, review the results of inspections, any lessons learned or concerns from the previous day.
AECOM Health and Safety Plan iii
July 2015
Contents
1.0 INTRODUCTION .................................................................................................................. 1-1
1.1 General ............................................................................................................................ 1-1
1.2 Project Policy Statement .................................................................................................. 1-1
1.3 References ....................................................................................................................... 1-1
2.0 SITE INFORMATION AND SCOPE OF WORK .................................................................. 2-1
2.1 Site Information ................................................................................................................ 2-1 2.1.1 General Description ..................................................................................................... 2-1 2.1.2 Site Background/History and Previous Investigations ................................................. 2-1
2.2 Scope of Work .................................................................................................................. 2-3 2.2.1 Mobilization/Demobilization ......................................................................................... 2-3 2.2.2 Utility Clearance ........................................................................................................... 2-3 2.2.3 Groundwater Sampling ................................................................................................ 2-3 2.2.4 Investigative-Derived Waste (IDW) Management ....................................................... 2-4 2.2.5 Equipment Decontamination ....................................................................................... 2-4 2.2.6 Survey .......................................................................................................................... 2-4 2.2.7 Additional Work Operations ......................................................................................... 2-4
3.0 HAZARD ASSESSMENT (SAFETY) ................................................................................... 3-1
3.1 Physical Hazards ............................................................................................................. 3-1 3.1.1 Drilling Operations ....................................................................................................... 3-1 3.1.2 Electrical Hazards ........................................................................................................ 3-2 3.1.3 Falls on Same Level .................................................................................................... 3-2 3.1.4 Hand and Power Tools ................................................................................................ 3-3 3.1.5 Manual Lifting .............................................................................................................. 3-3 3.1.6 Noise Exposure ........................................................................................................... 3-4 3.1.7 Operating Motor Vehicles ............................................................................................ 3-4 3.1.8 Overhead Utilities ........................................................................................................ 3-6 3.1.9 Spill Prevention ............................................................................................................ 3-6 3.1.10 Underground Utilities ................................................................................................... 3-7
3.2 Wildlife, Plant and Insect Hazards ................................................................................... 3-8 3.2.1 Poison Ivy .................................................................................................................... 3-8 3.2.2 Ticks ............................................................................................................................. 3-9 3.2.3 Mosquitos .................................................................................................................. 3-10 3.2.4 Wasps and Bees ........................................................................................................ 3-10
3.3 Weather Hazards ........................................................................................................... 3-11 3.3.1 Heat Stress ................................................................................................................ 3-11
3.4 Hazard Analysis ............................................................................................................. 3-11
3.5 Task Specific SH&E Procedures ................................................................................... 3-12
4.0 SH&E REQUIREMENTS (SAFETY) .................................................................................... 4-1
4.1 HAZWOPER Qualifications .............................................................................................. 4-1
4.2 Medical Monitoring ........................................................................................................... 4-1
4.3 Site-Specific Safety Training ............................................................................................ 4-1
AECOM Health and Safety Plan iv
July 2015
4.4 Tailgate Meetings ............................................................................................................. 4-1
4.5 Hazard Communication ................................................................................................... 4-2
4.6 Confined Space Entry ...................................................................................................... 4-2
4.7 Hazardous, Solid, or Municipal Waste ............................................................................. 4-2
4.8 General Safety Rules ....................................................................................................... 4-2 4.8.1 Housekeeping .............................................................................................................. 4-2 4.8.2 Smoking, Eating, or Drinking ....................................................................................... 4-3 4.8.3 Personal Hygiene ........................................................................................................ 4-3 4.8.4 Buddy System .............................................................................................................. 4-3 4.8.5 Stop Work Authority ..................................................................................................... 4-3 4.8.6 Client Specific Safety Requirements ........................................................................... 4-3
5.0 EXPOSURE MONITORING PROCEDURES (HEALTH) .................................................... 5-1
5.1 Contaminant Exposure Hazards ...................................................................................... 5-1 5.1.1 Volatile Organic Compounds ....................................................................................... 5-1 5.1.2 Semi-Volatile Organic Compounds ............................................................................. 5-1
5.2 Real-Time Exposure Measurement ................................................................................. 5-1 5.2.1 Frequency of Air Monitoring ........................................................................................ 5-1 5.2.2 Photoionization Detector (PID) .................................................................................... 5-2
6.0 ENVIRONMENTAL PROGRAM .......................................................................................... 6-1
6.1 Environmental Compliance and Management ................................................................. 6-1 6.1.1 Air Emissions ............................................................................................................... 6-1 6.1.2 Hazardous Waste Management .................................................................................. 6-1 6.1.3 Storm Water Pollution Prevention ............................................................................... 6-1 6.1.4 Wetlands Protection ..................................................................................................... 6-1 6.1.5 Critical Habitat Protection ............................................................................................ 6-1 6.1.6 Environmental Protection............................................................................................. 6-1
7.0 PERSONAL PROTECTIVE EQUIPMENT ........................................................................... 7-1
7.1 Introduction ...................................................................................................................... 7-1
7.2 Inspection of PPE ............................................................................................................. 7-2
7.3 PPE Donning Guidance ................................................................................................... 7-2
7.4 PPE Doffing Guidance ..................................................................................................... 7-2
8.0 SITE CONTROLS/DECONTAMINATION ........................................................................... 8-3
8.1 General ............................................................................................................................ 8-3
8.2 Controlled Work Areas ..................................................................................................... 8-3 8.2.1 Exclusion Zone ............................................................................................................ 8-3 8.2.2 Contamination Reduction Zone ................................................................................... 8-4 8.2.3 Support Zone ............................................................................................................... 8-4
8.3 Site Access ...................................................................................................................... 8-4 8.3.1 Site Security ................................................................................................................. 8-4
8.4 Decontamination .............................................................................................................. 8-4 8.4.1 General Requirements ................................................................................................. 8-4 8.4.2 Decontamination Tools ................................................................................................ 8-5
AECOM Health and Safety Plan v
July 2015
8.4.3 Personal Decontamination........................................................................................... 8-5 8.4.4 Equipment Decontamination ....................................................................................... 8-6
9.0 PROJECT HEALTH AND SAFETY ORGANIZATION ........................................................ 9-7
9.1 Project Manager ............................................................................................................... 9-7
9.2 Site Supervisor ................................................................................................................. 9-7 9.2.1 Responsibilities ............................................................................................................ 9-7 9.2.2 Authority ....................................................................................................................... 9-7 9.2.3 Qualifications ............................................................................................................... 9-8
9.3 Employees ....................................................................................................................... 9-8 9.3.1 Employee Responsibilities ........................................................................................... 9-8 9.3.2 Employee Authority ...................................................................................................... 9-8
9.4 Safety Professional .......................................................................................................... 9-8
9.5 Subcontractors ................................................................................................................. 9-8
9.6 Visitors ............................................................................................................................. 9-9
10.0 EMERGENCY RESPONSE PLANNING ......................................................................... 10-10
10.1 Emergency Action Plan ................................................................................................ 10-10 10.1.1 Site-Specific Emergency Procedures ...................................................................... 10-10
10.2 Incident Reporting ........................................................................................................ 10-11 10.2.1 Incidents Requiring Reporting ................................................................................. 10-11
10.3 Spill/Release Reporting ............................................................................................... 10-11
10.4 Emergency Contacts .................................................................................................... 10-12
10.5 Emergency Hospital Route/Detail Map ........................................................................ 10-13
11.0 PERSONNEL ACKNOWLEDGEMENT ............................................................................. 11-1

AECOM Health and Safety Plan vi
July 2015
Attachments
Attachment A Task Hazard Analyses
Attachment B Safety Data Sheets
Attachment C Applicable SH&E SOPs
AECOM Health and Safety Plan
July 2015
1-1
1.0 Introduction
This Health and Safety Plan (HASP) (including Attachments A-E) provides a general description of the levels of personal protection and safe operating guidelines expected of each employee or subcontractor associated with the environmental services being conducted at the Korkay, Inc. site, located at 70 West Main Street in Broadalbin, New York. This HASP also identifies chemical and physical hazards known to be associated with the AECOM-managed activities addressed in this document.
HASP Supplements will be generated as necessary to address any additional activities or changes in site conditions, which may occur during field operations.
1.1 General
The provisions of this HASP are mandatory for all AECOM personnel engaged in fieldwork associated with the environmental services being conducted at the subject site. A copy of this HASP, any applicable HASP Supplements and the AECOM’s North America Safety, Health, and Environmental (SH&E) Procedures and Manual shall be accessible on site and available for review at all times. Record keeping will be maintained in accordance with this HASP and the applicable Standard Operating Procedures (SOPs). In the event of a conflict between this HASP, the SOPs and federal, provincial, state, and local regulations, workers shall follow the most stringent/protective requirements. Concurrence with the provisions of this HASP is mandatory for all personnel at the site covered by this HASP and must be signed on the acknowledgement page.
1.2 Project Policy Statement
AECOM is committed to protecting the safety and health of our employees and meeting our obligations with respect to the protection of others affected by our activities. We are also committed to protecting and preserving the natural environment in which we operate. The safety of persons and property is of vital importance to the success of this project and accident prevention measures shall be taken toward the avoidance of needless waste and loss. It shall be the policy of this project that all operations be conducted safely. Onsite supervisors are responsible for those they supervise by maintaining a safe and healthy working environment in their areas of responsibility, and by fairly and uniformly enforcing safety and health rules and requirements for all project personnel. Subcontractors shall comply with the requirements of this HASP, provisions contained within the contract document and all applicable rules, requirements and health, safety and environmental regulations. All practical measures shall be taken to promote safety and maintain a safe place to work. Contractors are wholly responsible for the prevention of accidents on work under their direction and shall be responsible for thorough safety and loss control programs and the execution of their own safety plans for the protection of workers.
1.3 References
This HASP conforms to the regulatory requirements and guidelines established in the following documents:
AECOM Health and Safety Plan
July 2015
1-2
Title 29, Part 1910 of the Code of Federal Regulations (29 CFR 1910), Occupational Safety and Health Standards (with special attention to Section 120, Hazardous Waste Operations and Emergency Response).
Title 29, Part 1926 of the Code of Federal Regulations (29 CFR 1926), Safety and Health Regulations for Construction.
National Institute for Occupational Safety and Health (NIOSH)/OSHA/U.S. Coast Guard (USCG)/EPA, Occupational Safety and Health Guidance Manual for Hazardous Waste Site Activities, Publication No. 85-115, 1985.
The requirements in this HASP also conform to AECOM’s Corporate Safety Program requirements as specified in AECOM‘s North America Safety, Health, and Environmental (SH&E) Procedures and Manual.
AECOM Health and Safety Plan
July 2015
2-1
2.0 Site Information and Scope of Work
AECOM will conduct environmental services at the Korkay, Inc site. Work will be performed in accordance with the applicable Work Assignment Scope of Work (SOW) and associated Project Work Plan. Deviations from the listed SOW will require that a Safety Professional review and changes made to this HASP, to ensure adequate protection of personnel and other property.
The following is a summary of relevant data concerning the project site, and the work procedures to be performed. The Project Work Plan prepared by AECOM as a companion document to this HASP provides more detail concerning both site history and planned work operations.
2.1 Site Information
This section provides a general description and historical information associated with the site.
2.1.1 General Description
Korkay, Incorporated (Korkay) located in Broadalbin, NY, was a supplier of detergents, solvents, and degreasers to the automotive industry from 1969 to 1980. Korkay purchased bulk quantities of chemicals that were stored on-site for repackaging and/or blending into commercial products including automobile wax, and hand cleaners. In addition to the commercial products being produced, Korkay also operated as a drum reclamation facility. Drums were accepted containing a variety and quantity of chemicals that remains undetermined. The drums were emptied of any remaining chemicals, washed, rinsed and relined. This process was conducted without appropriate containment of the chemicals, and chemical laden rinsate being discharged through the facilities septic system or directly to the ground surface. The NYSDEC and NYSDOH inspected the Site in 1979 and documented the occurrence of these activities. In 1980, Korkay installed a 4,000 gallon above ground storage tank (AST) to appropriately contain the residual chemicals and rinsate generated from drum reclamation. Reports and Site documentation indicate that the drums contained acetone, isopropyl alcohol, degreasers, and perfumes as well as other chemicals.
2.1.2 Site Background/History and Previous Investigations
Korkay was a supplier of detergents, solvents, and degreasers to the automotive industry from 1969 to 1980. Korkay purchased bulk quantities of chemicals that were stored on-site for repackaging and/or blending into commercial products including automobile wax, and hand cleaners. In addition to the commercial products being produced, Korkay also operated as a drum reclamation facility. Drums were accepted containing a variety and quantity of chemicals that remains undetermined. The drums were emptied of any remaining chemicals, washed, rinsed and relined. This process was conducted without appropriate containment of the chemicals, and chemical laden rinsate being discharged through the facilities septic system or directly to the ground surface. The NYSDEC and NYSDOH inspected the Site in 1979 and documented the occurrence of these activities. In 1980, Korkay installed a 4,000 gallon above ground storage tank (AST) to appropriately contain the residual chemicals and rinsate generated from drum reclamation. Reports and Site documentation indicate that the drums contained acetone, isopropyl alcohol, degreasers, and perfumes as well as other chemicals.
AECOM Health and Safety Plan
July 2015
2-2
In 1998 a phase II investigation was conducted. Multimedia sampling identified several inorganic and volatile organic compounds (VOCs) in groundwater at concentrations exceeding applicable standards. Subsequently, a remedial investigation (RI) was completed, followed by a feasibility study (FS), (Final Phase I and II FS, Camp Dresser and McKee 1995) to determine appropriate remedial activities to be conducted in order to address the contamination present at the site.
A Record of Decision (ROD) was entered by the NYSDEC in March 1996 which documented the site cleanup objectives and requirements for the remedial activities to be conducted. In August 1997, a remedial action was conducted at the site which included demolition of a building, and excavation and disposal of contaminated soils. In November 1998, a soil vapor extraction/air sparging (SVE/AS) system was constructed and put into operation in order to address the residual soil contamination. The SVE system was operated intermittently until 2003, when confirmatory soil sampling indicated that the soil cleanup objectives had been achieved.
In 2007, AECOM entered into Work Assignment No. D004445-20 of the State Superfund Standby Contract with the New York State Department of Environmental Conservation (NYSDEC). This work assignment included the generation of a Remedial System Operation (RSO) report, continued environmental sampling (groundwater monitoring and soils), site maintenance and reporting. In August 2007 soil borings were installed within the SVE/AS treatment area to collect soil data in support of the RSO. The RSO determined that the SVE/AS system was effective in reducing VOC concentrations in the vadose zone soils closest to the extraction wells (VEWs), but that “dead zones” existed in the areas between the VEWs and that VOC concentrations had not been significantly reduced in the saturated soils. A focused feasibility study was conducted as part of the RSO and the recommended remedial alternative was excavation and offsite disposal of the soils exceeding cleanup standards. Based on the available data during the preparation of the RSO, the area of impacted soil was assumed to be 60-feet (ft) by 60-ft as the actual extent of contaminated soil had not been delineated as part of the August 2007 sampling event. The RSO estimated about 1,200 tons of soil would be excavated and sent offsite for disposal.
At the request of the NYSDEC 88 soil borings were installed in March 2010 to delineated the 60-ft by 60ft excavation area proposed by the RSO. However, the borings completed at the edge of that area appeared to be impacted and the NYSDEC asked AECOM to complete additional borings to further delineated the nature and extent of soil impacts beyond the 60-ft by 60-ft area. In March 2010 AECOM completed 28 additional borings and conducted VOC and pesticide sampling activities. Results from these sampling activities indicated that soil contamination was more widespread than initially thought, about 20,500 square ft, requiring a much larger volume of soil to be excavated and removed from the Site for disposal. In order to avoid conducting a large scale excavation in situ remedies began to be considered for the Site at this time.
In 2014, under the NYS Superfund Standby Contract Work Assignment number D007626-20, AECOM conducted a groundwater direct push investigation to further delineate and characterize the dissolved phase groundwater impacts, and to collect soil samples for analysis of natural oxidant demand (NOD) to evaluate the effectiveness of using an oxidant for in situ remediation of contaminated soil and groundwater at the Site. The results of the July 2014 activities indicated that the extent of the dissolved phase groundwater impacts appeared to be greater than previous investigations and monitoring had suggested and that in situ chemical oxidation (ISCO) would be a favorable remedy at the site. Consequently, ISCO was selected as the remedy to be implemented for source zone remediation of the onsite saturated zone.
AECOM Health and Safety Plan
July 2015
2-3
2.2 Scope of Work
The scope of work for this project includes the completion of drilling and groundwater monitoring well installation and groundwater sampling. In addition, the scope of work includes the performance of an ISCO injection program by an AECOM subcontractor to treat groundwater in the contaminant plume.
2.2.1 Mobilization/Demobilization
Mobilization and demobilization represent limited pre and post-task activities. These activities include driving to and from the site; initial site preparations, such as work station and equipment setup, and post-work activities, such as general housekeeping. This activity does not represent any intrusive activities.
2.2.2 Utility Clearance
This task includes verification of utility mark-outs and presence of the clear dig permits (on-site). All utility clearance shall be obtained by the authorizing authority for the subject site. In addition to one-call clearance, a private utility location contractor (AGS) will be used to pre-clear boreholes. Temporary Boring and Well Installation Oversight
AECOM personnel will be performing oversight for the installation of temporary borings installed using a Geo-probe rig and monitoring wells using hollow-stem auger (HSA) techniques. A drilling subcontractor (Parratt-Wolff) will be utilized for the installation of monitoring wells (2-inch PVC) to a predetermined depth. The major activities involved with installation of a monitoring well or a temporary boring are as follows:
Pre-sampling event notifications and approval
Set-up for boring/well installation
Monitor air quality in the workers breathing zone
Log soils and screen with a PID
Administrative activities
2.2.3 Groundwater Sampling
This activity will include the collection of groundwater samples from the existing monitoring well network, temporary Geo-probe points, and newly installed monitoring wells. Groundwater samples will be collected using inertial pumps and tubing. The major activities involved with collecting groundwater samples from the site and surrounding properties include the following:
Pre-sampling event notifications and approval
Set-up for sampling activities
Purge wells
Collect groundwater samples
Sample prep and sample shipping
AECOM Health and Safety Plan
July 2015
2-4
Administrative activities
2.2.4 Investigative-Derived Waste (IDW) Management
IDW will be collected and categorized as non-hazardous or hazardous. Liquids (purge water, decontamination water) generated during site activities will be processed through the on-site treatment system. Soil cuttings will be drummed and tested for characterization.
2.2.5 Equipment Decontamination
AECOM and subcontractor personnel will perform decontamination of equipment used to perform work within controlled work areas.
Before any drilling is begun, and at the completion of drilling, the drilling subcontractor shall decontaminate drilling equipment that will be used on site. The drilling subcontractor shall provide a high-pressure steam cleaner for decontamination of all downhole drilling equipment. The drill rig shall be steam-cleaned between each location. Soil sampling equipment shall be decontaminated between each use, using a phosphate free detergent and potable water in accordance with ASTM D 5088. The drilling subcontractor shall construct a temporary decontamination pad to contain all decontamination water generated during decontamination of drill rigs and tools.
Pre-cleaned and dedicated sampling materials/equipment will be used to collect the soil and groundwater samples for laboratory analysis. After the samples are collected, any disposable, or one-time use equipment (tubing, bladders) will placed in a plastic bag for disposal per accordance with the paragraph above. Non-disposable sampling and drilling equipment that contacted the soil and/or groundwater will be decontaminated between each sampling location. Gross sediments and/or contamination will first be removed from the sampling and drilling equipment. The equipment will then be washed with DI water and Alconox detergent and then rinsed with DI water.
2.2.6 Survey
AECOM will subcontract a NYS Licensed Land Surveyor to survey the locations of new monitoring wells.
2.2.7 Additional Work Operations
Operations at the site may require additional tasks not identified in this section or addressed in Attachment A, THAs. Before performing any task not covered in this HASP a THA must be prepared, and approved by the Safety Professional.
AECOM Health and Safety Plan
July 2015
3-1
3.0 Hazard Assessment (Safety)
3.1 Physical Hazards
The following physical hazards are anticipated to be present on the site. Additional hazards may be noted on the THA’s developed for the individual tasks.
3.1.1 Drilling Operations
AECOM will be overseeing the drilling operations which include hollow-stem, rotary and/or direct push drilling. The hazards associated with drill rigs are caught by or between moving or rotating parts, struck by the movement of the drill rig or material being handled, contact with above ground and below ground utilities, and slips trips and falls on slippery surfaces, hose lines, and drilling material.
AECOM employees are not authorized to operate any type of mobile drill rig, and shall stay out of the path of travel of a drill rig and away from rotating and moving parts of a drill rig when it is operating. Specific requirements for drilling and boring can be found in SOP S3NA-405-PR1 Drilling, Boring, and Direct Push Probing. Prior to drilling it is important and the law that underground utilities be identified by calling 811 to have buried utilities identified and located. It is also important to identify aboveground utilities, such as electrical lines, cable television or telephone wires that may be in the vicinity of the proposed bore hole or path of travel of the drill rig. The minimum safe clearance distance from above ground utilities such as electrical wires is 10 feet. Drill rig precautions are as follows:
The drill rig and components shall be inspected daily by the drill rig operator;
Except for the driller and helper, all personnel will stay away (e.g., 15+ ft) from the rig when it is operating unless it is necessary to be near it;
If required to approach the drill rig for the collection of samples or down hole observations the drill rig must be taken out of gear to stop movement of boring tools. Only then can you approach the rig;
Loose fitting clothing must be secured when in the vicinity of drilling operations;
The drill rig operator shall perform a visual safety of the drill rig daily and after it has been moved to a new location;
Cell phone, text messaging or the use of personal headsets is prohibited when working on or near a drill rig;
Borehole will be immediately backfilled upon completion of work;
If a borehole is to be left open, the opening will be marked with "Caution-Open Trench" tape. If necessary, metal plates will be placed over the borehole to permit vehicular crossing; and
As necessary hearing protection shall be used when near drilling operations.
AECOM Health and Safety Plan
July 2015
3-2
3.1.2 Electrical Hazards
AECOM employees are not authorized to work on electrical equipment or near any part of an electrical circuit unless they are protected against shock by guarding or by de-energizing and grounding the circuit. Information on general electrical safety can be found in SOP S3NA-302-PR Electrical, General and information on hazard energy control (lockout) is found in SOP S3NA-410-PR Hazardous Energy Control.
Potential electrical hazards include electric shock, electrocution, burns, fires, and explosion. Electrical cords used to carry electrical power pose a trip and fall hazards. The use of portable generator poses an electrical hazard and also the hazard associated with exposure to carbon monoxide.
To prevent potential electrical incidents the following basic electrical practices must be followed at all times while working on this project.
Use ground fault circuit interrupters (GFCIs) when using electrical powered tools/equipment. GFCIs prevent electrical shock by detecting the loss of electricity from a power cord and/or electrical device.
Temporary electrical cords must be rated for extra hard usage or hard usage and must be of the three-wire type with a grounding pin and a grounding receptacle. Look for the following letters on the cord: S, SJ, ST, or SO markings on the cord.
Inspect all electrical cords for signs of wear and exposed wiring, strain, and ripped, torn, cut or burned insulation. Defective cords shall be removed from service.
Electrical tools and equipment must be grounded, of the double insulated or cordless type battery operated.
Fuel generators before use and re-fuel only after the engine has been shut down and allowed to cool.
Never use a portal generator indoors. Locate a generator so that the exhaust is downwind from your position or locations where carbon monoxide can enter (e.g. confined spaces, indoor locations etc.).
3.1.3 Falls on Same Level
Falls from slips and trips are common workplace occurrences that can result in serious injuries and disabilities. The most common types of falls are falls at the same level. Fall hazards exist in most workplaces including offices, manufacturing and construction. Slips and trips can be prevented by following these guidelines:
Personnel shall be vigilant in providing clear footing, clearly identifying obstructions, holes, protruding objects or other tripping hazards and maintaining an awareness of uneven terrain and slippery surfaces;
Walking and working surfaces shall be kept free of materials, obstructions, and substances that could cause a surface to become slick or otherwise hazardous;
Always utilize roads, pathways, or other designated routes or travel. Do not take shortcuts;
Makeshift substitute ladders such as toolboxes, buckets, and coolers shall not be used;
AECOM Health and Safety Plan
July 2015
3-3
It is prohibited from multi-tasking while using a cell phone, text messaging, or using other personal headsets;
Walk around, not over or on, debris or equipment that might have been stored in the work area;
Don’t jump from platforms or truck beds;
Don’t climb on stock piles or trucks; and
When carrying equipment, identify a path that is clear of any obstructions. It might be necessary to remove obstacles to create a smooth, unobstructed access point to the work areas on-site.
Falls from elevation greater than 6 feet above a lower level or less than 6 feet above dangerous equipment can result in serious injury and even death. To prevent falls from elevations the walking and working surface must be surrounded on all open sides by standard railings or their equivalent (fence, barricade or cover), or by employees who are protected by a personal fall arrest system.
3.1.4 Hand and Power Tools
Employees who use hand and power tools and are exposed to the hazards of falling, flying, abrasive, and splashing objects, or to harmful dusts, fumes, mists, vapors, or gases must be provided with the appropriate personal protective equipment.
Work operations will require employees to use utility knives for opening boxes, etc. Shovels, slam bars, and other hand tools may also be needed to perform work. Use of this equipment will be performed in accordance with S3NA-305-PR Hand and Power Tools.
Basic safety guidelines when using cutting and other hand tools includes:
Keep all tools in good condition with regular maintenance;
Use the right tool for the job;
Examine each tool for damage before use and do not use damaged tools;
Operate tools according to the manufacturers’ instructions;
Provide and use properly the right personal protective equipment;
All electrical connections for these tools must be suitable for the type of tool and the working conditions (wet, dusty, flammable vapors);
A ground-fault circuit interrupter (GFCI) must be used; and
Noise hazard associated with pneumatic tools. Working with noisy tools requires proper, effective use of appropriate hearing protection.
3.1.5 Manual Lifting
Using the proper techniques to lift and move heavy pieces of equipment (i.e. sample coolers) is important to reduce the potential for back injury. Manual lifting is addressed in SOP S3NA-308-PR, Manuel Lifting. The following precautions should be implemented when lifting or moving heavy objects:
Bend at the knees, not the waist. Let your legs do the lifting;
AECOM Health and Safety Plan
July 2015
3-4
Do not twist while lifting;
Bring the load as close to you as possible before lifting;
Be sure the path you are taking while carrying a heavy object is free of obstructions and slip, trip and fall hazards;
Use mechanical devices to move objects that are too heavy to be moved manually; and,
If mechanical devices are not available, ask another person to assist you.
3.1.6 Noise Exposure
The use of construction equipment can expose the field team to noise levels that exceed the 85 dB for an 8-hour day. Exposure to noise can result in the following:
Temporary hearing losses where normal hearing returns after a rest period;
Interference with speech communication and the perception of auditory signals;
Interference with the performance of complicated tasks;
Permanent hearing loss due to repeated exposure resulting in nerve destruction in the hearing organ; and
Since personal noise monitoring will not be conducted during the proposed activities, employees must follow this general rule of thumb: If the noise levels are such that you must shout at someone two (2) feet away from you, you need to be wearing hearing protection. Employees can wear either disposable earplugs or earmuffs but all hearing protection must have a minimum noise reduction rating (“NRR”) of 27 decibels (“dB”).
3.1.7 Operating Motor Vehicles
Work activities will require authorized drivers to operate company owned or leased vehicles. Site conditions may require vehicles to be operated in and around the work area consisting of an off-road surface. Operating a motor vehicle is addressed in SOP S3NA-005-PR Vehicle and Driver Safety Program.
Only Authorized Drivers shall operate a motor vehicle (rental, personal, or AECOM owned/leased) while on AECOM business. Authorized drivers shall:
Possession of the appropriate qualifications;
Having a good driving record;
Comply with AECOM’s Global Travel Policy and the applicable state laws while operating a motor vehicle;
Use of a cell phone or text messaging while driving is strictly prohibited. It is illegal to use a cell phone or text message while driving in Massachusetts;
Seat belts shall be worn by all occupants whenever the vehicle is in motion;
The number of passengers shall not exceed the manufacturer’s specifications for the vehicle;
Loads shall be secured and shall not exceed the manufacturer’s specifications and legal weight limits for the vehicle, or regulatory requirements (i.e., threshold for DOT);
AECOM Health and Safety Plan
July 2015
3-5
Headlights or daytime running lights will be used at all times the vehicle is operating;
Secure the vehicle with the emergency brake and caulk blocks when parked on a slope;
Perform pre-operation vehicle inspections;
Arrange for preventive maintenance services for the vehicle and maintain it in sound mechanical condition;
Not operate the vehicle if unsafe or if conditions exist that would likely result in vehicle damage or personal injury;
Not use the vehicle for any unofficial use including personal business unless specific permission is given by the Supervisor;
Transport only persons on AECOM related business or those persons receiving transportation as a prescribed service;
Not pick up hitchhikers;
Not use the vehicle for transportation to or from work or park at a residence overnight unless approved by the employee’s Supervisor;
Not smoke or allow anyone else to smoke in the vehicle;
Be responsible for any damage caused by abuse of the vehicle; and
Secure the vehicle when left unattended.
Extra caution is required when operating a motor vehicle on an off-road surface to prevent getting stuck, injury, or damage. Off-road driving should use the following guidelines:
If inexperienced, seek supervisory advice and training;
Vehicles should only be driven off roads after all other options have been considered;
Prior to driving off-road check to see that the vehicle is in good operating condition and your tires are properly inflected. Realize the limitation of your vehicle and do not become over confident;
Seat belts should be kept fastened at all times and all loose objects in the vehicle securely fastened to prevent them from becoming projectiles;
Drive according to the ground conditions. Speed and power are not required in rough off-road driving. Monitor the ground conditions ahead of the vehicle. Before driving over rough terrain, the terrain should be inspected on foot first;
When slowly traversing difficult areas of soft ground, try to keep the vehicle in motion. Once stopped it will be far more difficult to get it going again. If the vehicle becomes stuck, do not spin the wheels, as it will dig them further into the ground and will emit projectiles causing potential injury and damage. Slowly rock the vehicle backwards and forwards until the vehicle becomes dislodged. If not, place appropriate material (wooden planks, mats, branches, etc.) under the wheel to improve traction;
When climbing hills, always proceed straight up or down. Never drive a hill at an angle. Do not attempt to climb a hill if you do not feel confident that the vehicle will climb it safety; and
Prior to returning to the road, do a vehicle inspection to confirm the vehicle is road worthy.
AECOM Health and Safety Plan
July 2015
3-6
3.1.8 Overhead Utilities
Accidental contact with an energized line or arcing between a high power line and grounded equipment can cause electrocution of equipment operators or nearby ground personnel, and damage to power transmission and operating equipment. While maintaining a safe distance from all energized lines is the preferred means for control of this hazard, Site conditions may not always accommodate this. Additional information on Overhead Electrical Lines can be found in SOP S3NA-406-PR Electrical Lines, Overhead.
If work will (or may) occur within 50 feet of any energized line. Safe working distance is the minimum distance which must be maintained between any energized electrical line and any part of the operating equipment to maintain adequate safety margins, and is based on the line voltage of the power line. The following safe working distance criteria will be applied for all AECOM operations:
Determine the voltage of the power line by contacting the utility company or owner;
Unless verified, it will be assumed that all lines are energized; and
When power lines cross the Site or access roads, signs shall be posted on each side of the crossing approach indicating the presence of the power lines. On heavily travel routes rider poles or “goalposts” shall be located on each side of the crossing approach to ensure the lowering of booms, mast, dump bodies, and other attachments to a safe position.
Line Voltage (Kilovolts) Minimum Safe Working Distance
Line Voltage (Kilovolts) Minimum Safe Working Distance
0 – 50 10 feet
>50 – 200 15 feet
>200 – 350 20 feet
>350 – 500 25 feet
>500 – 750 35 feet
>750 – 1000 45 feet
Source: American National Standards Institute, Publication B30.5.
3.1.9 Spill Prevention
The purpose of this section is to define practices and procedures for the prevention, containment, and cleanup of incidental discharges of hazardous substances during the project. These substances include both the contaminated material encountered as a result of the environmental activities, such as contaminated soils and decontamination liquids, and fluids, such as lubricating fluids, diesel fuel, gasoline, etc.
3.1.9.1 Prevention
Prevention of unnecessary spills is of first priority. Prevention measures include:
All equipment will be inspected for leaks before daily and after service.
All containers will be inspected daily for decay. No open container will be exposed to rainfall, snowfall, etc. without being emptied and cleaned of residue.
AECOM Health and Safety Plan
July 2015
3-7
Storage of material such as fuels, oils, and solvents on-site will be limited to the minimum required. All fluids will be stored in individual fluid containers appropriate and approved for the material.
Drums or other containers too large to be stored in containers will be stored raised off the ground on a liner and covered by plastic.
All nearby storm sewers, catch basins, drains, and related structures will be protected from being impacted from investigation-related runoff and/or releases to the environment. Prevention methods, such as booms, berms or other effective materials, will be used as necessary to ensure proper mitigation.
3.1.9.2 Release Reporting
All releases must be reported to the AECOM PM, Regional Safety Health and Environmental Manager and Incident Reporting Line at (800-348-5046), with the PM providing notification to the Client representative, no matter how small of a release. Consideration will need to be given to whether or not the release is deemed to be a reportable to the New York Department of Environmental Conservation (DEC) or the EPA, National Spill Response Center. See Section 10.3 Environmental Spill/Release Reporting.
After initial response actions have been completed an incident investigation will be performed to determine the root causes of the incident and corrective actions, and lessons learned shall be shared to prevent future reoccurrence. Once the response is complete, the responding personnel will conduct an inventory of supplies used during the response effort and re-stock any used response equipment that could not be decontaminated and reused.
3.1.9.3 Response to Release
A spill containment kit shall be available on the site. The spill containment kit shall contain the following items; sock boom, sorbent pads and granular absorbent. The response for a release of potentially hazardous material entails the following:
Determine the nature of the substance released.
Eliminate all sources of ignition.
Isolate the affected area or initiate area evacuation.
Contain the flow of the material from the source if this can be done safely (diking/berms drip pan).
Following the procedures and using the protective equipment as indicated by the Safety Data Sheet (SDS), contain the release to the smallest area possible and initiate cleanup
Dispose of all residues in accordance with the SDS.
3.1.10 Underground Utilities
New York State Law requires that a utility clearance be performed prior to initiation of any subsurface work. The number to call in this area to request a mark-out of natural gas, electric, telephone, cable television, water and sewer lines in the proposed excavation or boring locations is 811. Work will not begin until the required utility clearances have been performed. Additional information on underground utilities can be found in SOP S3NA-417-PR Utilities, Underground.
AECOM Health and Safety Plan
July 2015
3-8
Utility clearance organizations typically do not mark-out underground utility lines that are located on private property. As such, the drilling contractor must exercise due diligence and try to identify the location of any private utilities on the property being investigated. AECOM can fulfill this requirement in several ways, including:
Obtaining as-built drawings for the areas being investigated from the property owner;
Visually reviewing each proposed soil boring locations with the property owner or knowledgeable Site representative;
Performing a geophysical survey to locate utilities; and
Hiring a private line locating firm to determine the location of utility lines that are present at the property.
All underground utilities shall be exposed via hand or soft-dig techniques within 5 feet of a mark out or within the distance required by the owner of the utility before operating any mechanized equipment. Use of mechanical means or using a hand auger is not permitted.
When soft digging use a non-cutting nozzle. A digging bar should be limited to prying out material encountered during the soft-dig; and
Where hand digging is performed a blunt-nosed shovel must be used to loosen the soil and a regular shovel to remove to remove it. Do not stab at the soil or stomp on the shovel with both feet. A pickax, hand auger, digging bar or similar tools should not be used.
3.2 Wildlife, Plant and Insect Hazards
During the course of field work employees are at risk of being exposed to poisonous plants, insects, spiders and snakes. The two most prevalent biological hazards are poison ivy and ticks. Additional information on Biological Hazards can be found in S3NA-313-PR Wildlife, Plants and Insects.
3.2.1 Poison Ivy
Poison ivy is a common cause of a skin irritation called contact dermatitis that may result in a red, itchy rash consisting of small bumps, blisters or swelling. This native perennial grows throughout the Northeast, in woods, fields, and sometimes in the garden. It grows in sun or shade, and in wet or dry places. Its growth habit depends on where it is growing, resulting in a trailing ground cover, free-standing shrub, or a vine supported by trees, shrubbery and fences. All parts of the poison ivy plant contain, urushiol, which causes the allergic reaction. Most poisonings occur during the growing season when the presence of lush foliage increases the chance of contact, but the dormant stems and roots of the vine can cause winter poisoning as well.
The best protection against poison ivy is to avoid contact with the plant (leaves, stems and roots). The best defense against contracting poison ivy is to recognize the plants. The adage “leaves of three, let it be” refers to the groupings of three leaflets connected to a common stem that characterize most of these plants. However, if you cannot avoid poison ivy, follow these precautions to help prevent contact:
Wear protective clothing such as long-sleeved shirts, long trousers, boots or sturdy shoes with socks and gloves;
Use a barrier cream such as CoreTex IvyX™ Pre-Contact solution; and
AECOM Health and Safety Plan
July 2015
3-9
If heat stress will not be a problem the use of a Tyvek™ coveralls and nitrile gloves is recommended for areas with heavy poison ivy infestation.
If contact with poison ivy has been made or is suspected, follow these guidelines:
As soon as possible (within 5–10 minutes of contact), wash all exposed skin with strong soap (i.e. Dawn) and water to remove the oil. If this is not possible, rinse thoroughly with water;
Use a post-contact skin cleanser such as Technu® skin cleanse or CoreTex IvyX™ cleanser towelettes;
Put on gloves to remove clothes and shoes, and wash clothing in hot water and detergent to remove any plant oil that may be on them;
Notify your supervisor if contact or suspected contact is made with poison ivy; and
If a severe allergic reaction develops, seek medical attention.
3.2.2 Ticks
Ticks transmit bacteria that cause illnesses such as Lyme disease or Rocky Mountain spotted fever. Ticks wait for a host from the tips of grasses and shrubs (not from trees). When brushed by a person, they quickly let go of the vegetation and climb onto the host. Ticks can only crawl; they cannot fly or jump. The tick season typically lasts from April through October; peak season is May through July; seasons can vary depending on climate. Ticks can be active on winter days when the ground temperatures are about 45 degrees Fahrenheit.
The best way to protect oneself against tick borne illness is to avoid tick bites. This includes avoiding known tick-infested areas. However, if wooded areas or areas with tall grass and weeds are visited, the following precautions can be used to help prevent tick bites and decrease the risk of disease:
Wear protective clothing such as long-sleeved shirts, long trousers, boots or sturdy shoes and a head covering. (Ticks are easier to detect on light-colored clothing);
Tuck trouser cuffs in socks. Tape the area where pants and socks meet so ticks cannot crawl under clothing;
Apply insect repellent containing 10 percent to 30 percent N,N-Diethyl-meta-toluamide (“DEET”) or 5 percent to 10 percent picaridin primarily to clothes. Apply sparingly to exposed skin. Do not spray directly to the face; spray the repellent onto hands and then apply to face. Avoid sensitive areas like the eyes, mouth and nasal membranes. Be sure to wash treated skin after coming indoors;
Use repellents containing permethrin to treat clothes (especially pants, socks and shoes) but not skin. Always follow label directions; do not misuse or overuse repellents;
Those who wish to avoid the use of insect repellent or treated clothing should consider the use of the Original Bug Shirt® and pants, and tick/chigger garters;
Personnel should carefully inspect themselves each day for the presence of ticks or any rashes. This is important since prompt removal of the tick can prevent disease transmission. Removal of the tick is important in that the tick should not be crushed and care must be taken so that the head is also removed. Contact the RSHEM for guidelines on removing ticks; and
AECOM Health and Safety Plan
July 2015
3-10
Report tick exposure and bites to your supervisor.
3.2.3 Mosquitos
Mosquitoes are carriers of the West Nile Virus, and other diseases. As mentioned above, DEET is an effective mosquito repellent and is recommended. Although concentrated DEET formulations protect longer than those that are more dilute, little improvement is offered by concentrations of the active ingredient higher than 50 percent. Adverse effects, though documented, are infrequent and are generally associated with gross overuse of the product. Users should avoid the temptation to apply the most concentrated product available. The transient protection offered by more dilute preparations can be extended by reapplication. When using DEET care should be taken to reapply the repellant when its effectiveness wears.
3.2.4 Wasps and Bees
Wasps (hornets and yellow-jackets) and bees (honeybees and bumblebees) are common insects that may pose a potential hazard to the field team if work is performed during spring, summer or fall. Bees normally build their nests in the soil. However, they use other natural holes such as abandoned rodent nests or tree hollows. Wasps make a football-shaped, paper-like nest either below or above the ground. Yellow-jackets tend to build their nests in the ground but hornets tend to build their nests in trees and shrubbery.
To avoid bees and wasps:
If you see insects flying to and from a particular place, avoid it;
If you are going to be in an area where disturbing a nest is likely, wear long pants and a long sleeved shirt. Insect repellent applied to your skin or clothing will not deter these stinging insects;
Wear light colored clothing;
Remain as calm as possible if a bee or wasp lands on your skin;
If you don’t want to wait for it to leave, gently and slowly brush it away. It is best not to wear perfume, cologne, or other scented soaps or scented shampoos as this attracts bees and wasps; and
Never swing, strike or run rapidly away since quick movement often provokes attack and painful stings.
When a wasp or a bee stings a person, it injects a venomous fluid under the skin. The venom causes a painful swelling that may last for several days. The following should be followed to minimize the reaction of a bee or wasp sting:
Gently scrape the area of the bite using a blunt object like a fingernail or a credit card to remove the stinger. If removed within 15 seconds of the sting, the severity of the sting is reduced;
Try not to rub or scratch the sting site after the stinger is removed;
Wash the sting site with soap and water;
Apply a cold or ice pack wrapped in cloth for a few minutes; and
AECOM Health and Safety Plan
July 2015
3-11
If you develop hives, difficulty breathing or swallowing, wheezing or similar symptoms of allergic reaction, SEEK MEDICAL ATTENTION IMMEDIATELY. People with known allergies to insect stings should NEVER work alone.
3.3 Weather Hazards
Field activities are not permitted when severe weather conditions exist. The Site Supervisor will monitor real-time weather and local weather forecasts during site work activities. 30-30 Rule: Work will be stopped when there are less than 30 seconds between a flash of lightning and the rumble of thunder and workers will seek shelter promptly. Employees will remain in shelter until 30 minutes after the last flash of lightning or rumble of thunder.
Severe weather can occur with little warning. Employees will be vigilant for the potentials for storms, lightning, high winds, and flash flood events.
3.3.1 Heat Stress
Heat stress may vary based upon work activities, PPE/clothing selection, geographical locations, and weather conditions. To reduce the potential of developing heat be aware of the signs and symptoms of heat stress and watch fellow employees for signs of heat stress.
Heat stress can be a significant hazard, particularly for non-acclimated personnel operating in a hot, humid setting. Site personnel will be instructed in the identification of a heat stress victim, the first-aid treatment procedures for the victim and the prevention of heat stress casualties. Work-rest cycles will be determined and the appropriate measures taken to prevent heat stress as outlined in SOP S3NA-511-PR Heat Stress Prevention Program. Heat stress prevention methods are as follows:
Education of workers on the signs and symptoms of heat related illnesses:
Provide water and sports drinks.
Provide a shaded area.
Evaluate the need for excessive PPE
Monitor co-workers for signs and symptoms of heat related illnesses
Establish a work rest cycle- work 40 minutes of every hour with 20 minutes spent at rest in the shade.
3.4 Hazard Analysis
Task Hazard Analyses (THAs) have been completed for all tasks identified in the Scope of Work (Attachment A):
Geophysical Survey
Direct Push Drilling/Macrocore Sampling/Grab groundwater sampling
Drilling/Well Installation

AECOM Health and Safety Plan
July 2015
3-12
Land Survey
Well Development and Groundwater Sampling
As a result of unanticipated work activities or changing conditions, additional THAs may be required. All additional THAs will be reviewed and approved by the SH&E Professional.
3.5 Task Specific SH&E Procedures
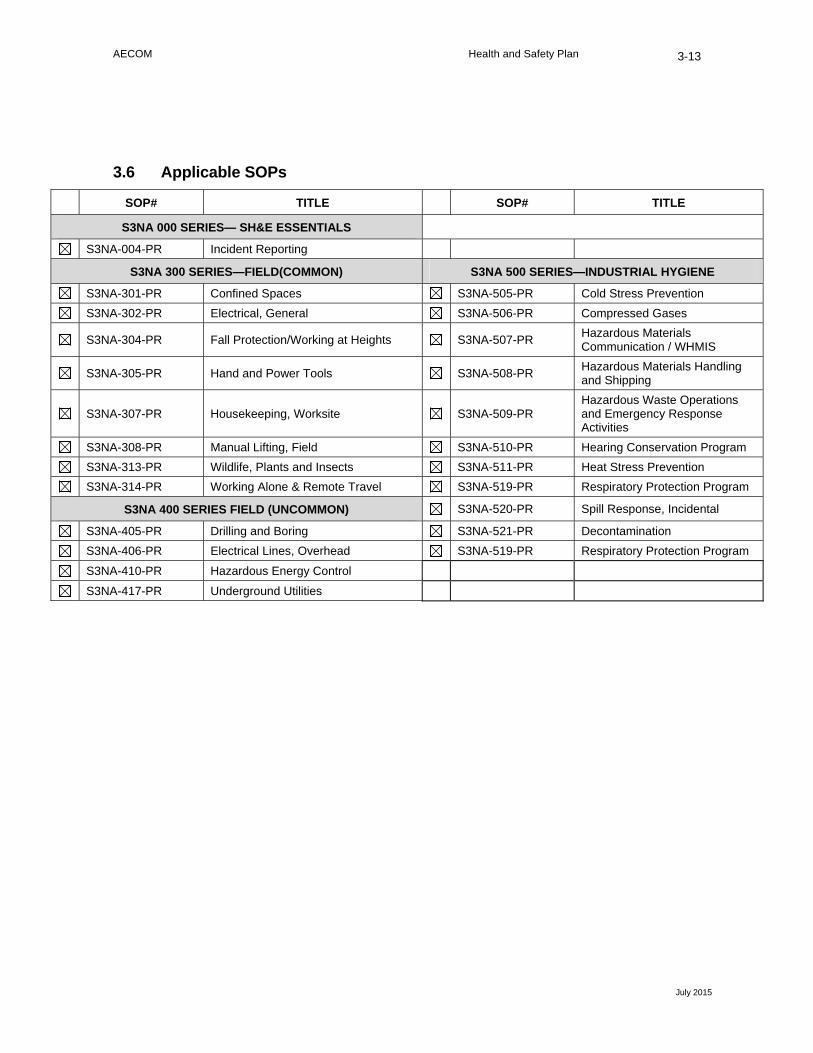
As discussed in Section 5.0, personnel may be exposed to a variety of chemical and physical hazards resulting from task or equipment-specific activities. The controls for many of these hazards are discussed in SOPs found in the 300 to 500 Series of the North America SH&E SOPs. Applicable SOPs are shown in bold in below and provided in Attachment C.
AECOM Health and Safety Plan
July 2015
3-13
3.6 Applicable SOPs
SOP# TITLE SOP# TITLE
S3NA 000 SERIES— SH&E ESSENTIALS
S3NA-004-PR Incident Reporting
S3NA 300 SERIES—FIELD(COMMON) S3NA 500 SERIES—INDUSTRIAL HYGIENE
S3NA-301-PR Confined Spaces S3NA-505-PR Cold Stress Prevention
S3NA-302-PR Electrical, General S3NA-506-PR Compressed Gases
S3NA-304-PR Fall Protection/Working at Heights S3NA-507-PR Hazardous Materials Communication / WHMIS
S3NA-305-PR Hand and Power Tools S3NA-508-PR Hazardous Materials Handling and Shipping
S3NA-307-PR Housekeeping, Worksite S3NA-509-PR Hazardous Waste Operations and Emergency Response Activities
S3NA-308-PR Manual Lifting, Field S3NA-510-PR Hearing Conservation Program
S3NA-313-PR Wildlife, Plants and Insects S3NA-511-PR Heat Stress Prevention
S3NA-314-PR Working Alone & Remote Travel S3NA-519-PR Respiratory Protection Program
S3NA 400 SERIES FIELD (UNCOMMON) S3NA-520-PR Spill Response, Incidental
S3NA-405-PR Drilling and Boring S3NA-521-PR Decontamination
S3NA-406-PR Electrical Lines, Overhead S3NA-519-PR Respiratory Protection Program
S3NA-410-PR Hazardous Energy Control
S3NA-417-PR Underground Utilities
AECOM Health and Safety Plan
July 2015
4-1
4.0 SH&E Requirements (Safety)
4.1 HAZWOPER Qualifications
Personnel performing work at the job Site must be qualified as HAZWOPER workers (unless otherwise noted in specific THAs or by the SSO), and must meet the medical monitoring and training requirements specified in the AECOM’s North America SH&E Standard Operating Procedures.
4.2 Medical Monitoring
In accordance with the requirements of 29 CFR 1910.120(f) site personnel entering the exclusion zone (EZ) or contaminate reduction zone (CRZ) shall be medical qualified to work on a hazardous waste site and to wear respiratory protection.
The medical examinations will be administered on a pre-employment and annual or biannual basis, as warranted in the opinion of examining doctor by symptoms of exposure or specialized activities. These examinations will also be provided to employees upon termination of employment or reassignment to non-hazardous waste site activities. For the purpose of this HASP, all contractors will assume the employer’s responsibility in obtaining the necessary medical monitoring for their employees and provide compliance documentation upon request.
If site monitoring procedures indicate that a possible exposure has occurred above the OSHA permissible exposure limit (PEL), employees may be required to receive supplemental medical testing to document any symptoms that may be specific to the particular materials present.
4.3 Site-Specific Safety Training
All AECOM personnel performing activities at the Site will be trained in accordance with S3NA-003-PR SH&E Training. All personnel are required to remain current in all of their required training and evaluate their need for additional training when there is a change in work. In addition to the general health and safety training programs, personnel will be required to complete any supplemental task specific training developed for the tasks to be performed. Administration and compliance with the requirements for additional task-specific training will be the responsibility of the project or lead manager. Any additional required training that is completed will be documented and tracked in the project files.
4.4 Tailgate Meetings
Prior to the commencement of daily project activities, a tailgate safety meeting will be conducted by the SSO to review the specific requirements of this HASP, applicable THA. Attendance at the daily tailgate meeting is mandatory for all employees at the Site covered by this HASP and must be documented on the attendance form. All safety training documentation is to be maintained in the project file by the SSO.
AECOM Health and Safety Plan
July 2015
4-2
4.5 Hazard Communication
Hazardous materials that may be encountered as existing on-site environmental or physical/health contaminants during the work activities are addressed in this HASP and their properties, hazards and associated required controls will be communicated to all affected staff and subcontractors.
In addition, any employee or organization (contractor or subcontractor) intending to bring any hazardous material onto this AECOM-controlled work Site must first provide a copy of the item’s Safety Data Sheet (SDS) to the SSO for review and filing (the SSO will maintain copies of all SDS on-site). SDS may not be available for locally-obtained products, in which case some alternate form of product hazard documentation will be acceptable in accordance with the requirements of S3NA-507-PR Hazardous Materials Communication/WHMIS.
All personnel shall be briefed on the hazards of any chemical product they use, and shall be aware of and have access to all SDS.
All containers on-site shall be properly labeled to indicate their contents. Labeling on any containers not intended for single-day, individual use shall contain additional information indicating potential health and safety hazards (flammability, reactivity, etc.).
4.6 Confined Space Entry
Confined space entry is not anticipated by AECOM employees for this site. If confined spaces are identified, the SSO/site supervisor will inform all employees of the location of confined spaces and prevent unauthorized entry. Confined space entry procedures and training requirements are listed in S3NA 301 PR, Confined Spaces.
Multiple vessels/containers associated with the treatment system could be considered confined spaces; however, they are cleaned by properly licensed and trained hazardous materials contractors with their own confined space entry programs.
4.7 Hazardous, Solid, or Municipal Waste
If hazardous, solid, and/or municipal wastes are generated during any phase of the project, the waste shall be accumulated, labeled, and disposed of in accordance with applicable Federal and State regulations.
4.8 General Safety Rules
All Site personnel shall conduct themselves in a safe manner and maintain a working environment that is free of additional hazards, in adherence to S3NA-001-PR Safe Work Standards and Rules and S3NA-103-PR General Housekeeping.
4.8.1 Housekeeping
During Site activities, work areas will be continuously policed for identification of excess trash and unnecessary debris. Excess debris and trash will be collected and stored in an appropriate container (e.g., plastic trash bags, garbage can, roll-off bin) prior to disposal. At no time will debris or trash be intermingled with waste PPE or contaminated materials.
AECOM Health and Safety Plan
July 2015
4-3
4.8.2 Smoking, Eating, or Drinking
Smoking, eating and drinking will not be permitted inside any controlled work area at any time. Field workers will first wash hands and face immediately after leaving controlled work areas (and always prior to eating or drinking). Consumption of alcoholic beverages is prohibited at any AECOM site. Smoking, eating or drinking must be in an approved area.
4.8.3 Personal Hygiene
The following personal hygiene requirements will be observed:
Water Supply: A water supply meeting the following requirements will be utilized:
Potable Water - An adequate supply of potable water will be available for field personnel consumption. Potable water can be provided in the form of water bottles or water coolers. Where water coolers are available, individual-use cups will be provided as well as adequate disposal containers. Potable water containers will be properly identified in order to distinguish them from non-potable water sources.
Non-Potable Water - All containers of non-potable water will be marked with a label stating:
Non-Potable Water Not Intended for Drinking Water Consumption
Toilet Facilities: Where toilet facilities are not located on the jobsite, the crews shall have transportation readily available to nearby toilet facilities.
Washing Facilities - Commercial towelettes or equivalent will be available for cleansing of hands or other body parts.
4.8.4 Buddy System
All field personnel will use the buddy system when working within any controlled work area. Personnel belonging to another organization on-site can serve as "buddies" for AECOM personnel. Under no circumstances will any employee be present alone in a controlled work area. For areas not in controlled work areas, the procedures outlined in S3NA-314-PR Working Alone Remote Travel will be followed at all times.
4.8.5 Stop Work Authority
All employees have the right and duty to stop work when conditions are unsafe and to assist in correcting these conditions as outlined in S3NA-002-PR Stop Work Authority.
4.8.6 Client Specific Safety Requirements
The client has specified no additional health and safety requirements.
AECOM Health and Safety Plan
July 2015
5-1
5.0 Exposure Monitoring Procedures (Health)
5.1 Contaminant Exposure Hazards
The following is a discussion of the hazards presented to worker personnel during this project from on-site chemical hazards known, suspected or anticipated to be present on-site.
5.1.1 Volatile Organic Compounds
Volatile Organic Compounds (VOCs) refer to a group of volatile compounds or mixtures that are relatively stable chemically and that exists in the liquid state at temperatures of approximately 32 to 82F. VOCs are typically organic solvents used for extracting, dissolving, or suspending materials such as fats, waxes, and resins that are not soluble in water.
Inhalation and percutaneous absorption are the primary routes of exposure. Organic compounds are metabolized or they accumulate in the lipid-rich tissues such as the liver, fat cells, or the nervous system. Solvent inhalation by workers can cause effects ranging from an alcohol-like intoxication to narcosis and death from respiratory failure. Symptoms include drowsiness, headache, dizziness, dyspepsia, and nausea.
5.1.2 Semi-Volatile Organic Compounds
A semi-volatile organic compound (SVOC) is an organic compound which has a boiling point higher than water and which may vaporize when exposed to temperatures above room temperature. Semi-volatile organic compounds include phenols and polynuclear aromatic hydrocarbons (PAH). Because of their slow rate of release from sources and because of their propensity to partition into sorbed states, SVOCs can persist for years.
Many SVOCs alter the activity of hormones in humans and wildlife and are therefore known as endocrine disrupting chemicals (EDCs). EDCs are suspected to contribute to the occurrence of neurodevelopmental and behavioral problems (e.g., mental retardation or attention deficit disorder), reproductive abnormalities (e.g., decreased fertility or hypospadias), metabolic disorders (e.g., obesity, diabetes), and cancer (e.g., breast, prostate, and testicular cancers).
5.2 Real-Time Exposure Measurement
5.2.1 Frequency of Air Monitoring
The frequency of the air monitoring is dependent on the type of intrusive work and the location of the work being conducted in the exclusion zone. At the discretion of the Safety Professional, real time air monitoring shall be collected during the initial intrusive activities and periodically throughout the course of the activities (i.e. every 15-30 minutes during remedial activities). Initial air monitoring shall also be conducted when the location of the intrusive work changes, when there has been a change in operations and a change in respiratory protection requirements and/or work practices. Air monitoring readings shall be conducted at breathing zone levels (4- 6 feet above ground level).
AECOM Health and Safety Plan
July 2015
5-2
5.2.2 Photoionization Detector (PID)
A photoionization detector (PID) with a 10.6 eV lamp will be used to determine the airborne concentration of total organic vapors (ionization potential of < 10.6 eV) of personnel in the exclusion zone. However, should odors be detected without a reading on the PID personnel should move to an upwind location and the source of the odor should be determined and corrective action instituted.
The PID will be functional tested following the manufacturer’s instructions. The PID will be maintained in accordance with the manufacturer’s instructions. Functional tests shall be recorded in a field logbook. The instruction manual for the instrument must be maintained on the project site.
5.2.2.1 Instrument Action Levels
Action levels are based on consistent 10-15 minute readings as conducted at breathing zone levels (4-6 feet above ground level).
5.2.2.2 Total Organic Vapors
The following limits will be used to assess whether total organic vapor are acceptable in the worker-breathing zone (4-6 feet above ground level) using a PID.
Where the total organic vapor concentration in the worker-breathing zone (4-6 feet above ground level) exceeds 5 ppm above background but less than 10 ppm above background mitigation measure must be implement. Where the total organic vapor concentration in the worker-breathing zone (4-6 feet above ground level) exceeds 10 ppm above background work must stop, contact the Safety Professional and PM.

AECOM Health and Safety Plan
July 2015
5-3
AECOM Health and Safety Plan
July 2015
6-1
6.0 Environmental Program
6.1 Environmental Compliance and Management
This project and the individual tasks will comply with all federal, state, provincial, and local environmental requirements.
Project work will be conducted in general accordance with the NYSDEC DER-10, Technical Guidance for Site Investigation and Remediation (NYSDEC, 2010a), technical requirements in Contract D007626 between NYSDEC and AECOM (NYSDEC and AECOM, 2010), and United States Environmental Protection Agency (USEPA) Guidance for Conducting Remedial Investigations and Feasibility Studies Under CERCLA (USEPA, 1988).
6.1.1 Air Emissions
The treatment system has an exhaust stack that emits less than 0.5 lbs/hour of VOCs per NYSDEC Air Guide 1. Community Air Monitoring will be performed to ensure other field activities allow negligible emissions.
6.1.2 Hazardous Waste Management
IDW will be collected and categorized as non-hazardous or hazardous. Potentially hazardous IDW soil cuttings will be tested and disposed of within 90 calendar days of completing the field activities. Potentially hazardous IDW waste will be staged onsite then delivered to an IDW storage facility for processing. All liquids will be discharged to the treatment system.
6.1.3 Storm Water Pollution Prevention
The treatment system operates under a SPDES equivalent discharge permit (permittee is NYSDEC). No other activities are expected to generate stormwater, since all fluids will be containerized and discharged to the treatment system.
6.1.4 Wetlands Protection
Although there are wetlands within the study area, the activities outlined in this HASP are not expected to infringe upon the wetlands.
6.1.5 Critical Habitat Protection
Based on the Fish & Wildlife Impact Assessment, no critical habitat protection is required for site activities.
6.1.6 Environmental Protection
Due to the nature of the work, no special actions are required to ensure environmental protections.
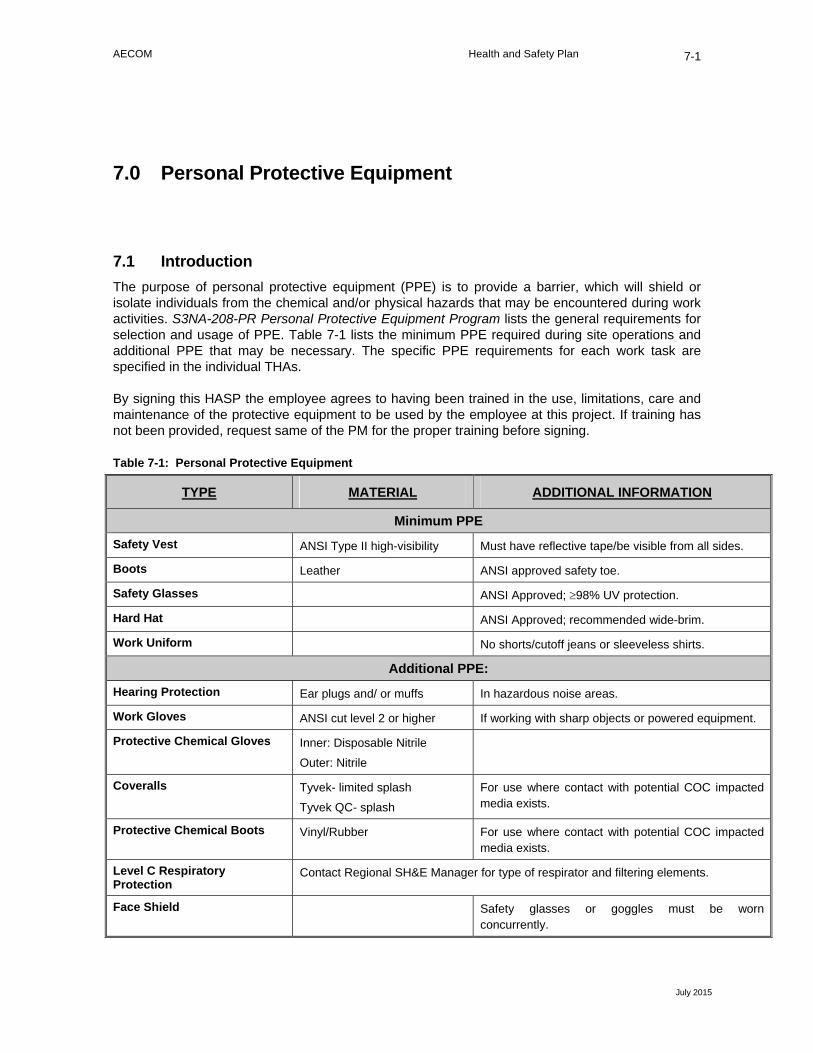
AECOM Health and Safety Plan
July 2015
7-1
7.0 Personal Protective Equipment
7.1 Introduction
The purpose of personal protective equipment (PPE) is to provide a barrier, which will shield or isolate individuals from the chemical and/or physical hazards that may be encountered during work activities. S3NA-208-PR Personal Protective Equipment Program lists the general requirements for selection and usage of PPE. Table 7-1 lists the minimum PPE required during site operations and additional PPE that may be necessary. The specific PPE requirements for each work task are specified in the individual THAs.
By signing this HASP the employee agrees to having been trained in the use, limitations, care and maintenance of the protective equipment to be used by the employee at this project. If training has not been provided, request same of the PM for the proper training before signing.
Table 7-1: Personal Protective Equipment
TYPE MATERIAL ADDITIONAL INFORMATION
Minimum PPE
Safety Vest ANSI Type II high-visibility Must have reflective tape/be visible from all sides.
Boots Leather ANSI approved safety toe.
Safety Glasses ANSI Approved; 98% UV protection.
Hard Hat ANSI Approved; recommended wide-brim.
Work Uniform No shorts/cutoff jeans or sleeveless shirts.
Additional PPE:
Hearing Protection Ear plugs and/ or muffs In hazardous noise areas.
Work Gloves ANSI cut level 2 or higher If working with sharp objects or powered equipment.
Protective Chemical Gloves Inner: Disposable Nitrile
Outer: Nitrile
Coveralls Tyvek- limited splash
Tyvek QC- splash
For use where contact with potential COC impacted media exists.
Protective Chemical Boots Vinyl/Rubber For use where contact with potential COC impacted media exists.
Level C Respiratory Protection
Contact Regional SH&E Manager for type of respirator and filtering elements.
Face Shield Safety glasses or goggles must be worn concurrently.
AECOM Health and Safety Plan
July 2015
7-2
7.2 Inspection of PPE
Before use of protective clothing, all personnel shall determine that the clothing material is correct for the specified task at hand. The clothing is to be visually inspected for imperfect seams, non-uniform coatings, tears and malfunctioning closures. It is to be held up to the light to check for pinholes. It is to be flexed to observe for cracks or other signs of shelf deterioration. If the product has been used previously, it should be inspected inside and out for signs of chemical deterioration, such as discoloration, swelling and stiffness. During work, the clothing should be periodically inspected for evidence of chemical deterioration, closure failure, tears, punctures and seam discontinuities.
Before using gloves, check for pinhole leaks. Face shields and lenses should be checked for cracks, crazing and fogginess. It is imperative that any equipment found to be defective be replaced immediately. Respirators must be inspected in accordance with the manufacturer’s instructions. Ensure that the cartridges and filter elements are the proper type.
7.3 PPE Donning Guidance
The following procedures will be used when donning PPE:
Put on work clothes or coveralls;
Put on the required chemical protective coveralls;
Put on the required chemical protective boots or boot covers (Never cut disposable booties from your feet with basic utility knives);
Tape the legs of the coveralls to the boots with duct tape;
Put on the required chemical protective gloves;
Tape the wrists of the protective coveralls to the gloves; and
Don the remaining PPE, such as safety glasses or goggles.
7.4 PPE Doffing Guidance
Whenever a field crew member leaves the exclusion zone of a work area, the following decontamination sequence must be followed:
Rinse contaminated materials from the boots or remove contaminated overboots;
Clean reusable protective equipment;
Remove protective garments and equipment (remove inner gloves last to protect against dermal contact during doffing outer garments);
All disposable clothing should be placed in plastic bags
Wash hands, arms, face and neck as appropriate; and
Proceed to clean area and dress in clean clothing.
AECOM Health and Safety Plan
July 2015
8-3
8.0 Site Controls/Decontamination
8.1 General
The purpose of site control is to minimize potential contamination of workers, protect the public from site hazards, and prevent vandalism. The degree of site control necessary depends on the site characteristics, site size, and the surrounding community.
Controlled work areas will be established at each work location, and if required, will be established directly prior to the work being conducted. As appropriate, diagrams designating specific controlled work areas will be drawn on site maps, posted in the support vehicle or trailer and discussed during the daily safety meetings. If the site layout changes, the new areas and their potential hazards will be discussed immediately after the changes are made.
8.2 Controlled Work Areas
Each HAZWOPER controlled work area will consist of the following three zones:
Exclusion Zone: Contaminated work area.
Contamination Reduction Zone: Decontamination area.
Support Zone: Uncontaminated or “clean area” where personnel should not be exposed to hazardous conditions.
Each zone will be periodically monitored in accordance with the air monitoring requirements established in this HASP. The Exclusion Zone and the Contamination Reduction Zone are considered work areas. The Support Zone is accessible to the public (e.g., vendors, inspectors).
8.2.1 Exclusion Zone
The Exclusion Zone (EZ) is the area where primary activities occur, such as sampling, remediation operations, installation of wells, cleanup work, etc. This area must be clearly marked with hazard tape, barricades or cones, or enclosed by fences or ropes. Only personnel involved in work activities, and meeting the requirements specified in the applicable THA and this HASP will be allowed in an Exclusion Zone.
The extent of each area will be sufficient to ensure that personnel located at/beyond its boundaries will not be affected in any substantial way by hazards associated with sample collection activities.
All personnel should be alert to prevent unauthorized, accidental entrance into controlled-access areas (the EZ and CRZ). If such an entry should occur, the trespasser should be immediately escorted outside the area, or all HAZWOPER-related work must cease. All personnel, equipment,
AECOM Health and Safety Plan
July 2015
8-4
and supplies that enter controlled-access areas must be decontaminated or containerized as waste prior to leaving (through the CRZ only).
8.2.2 Contamination Reduction Zone
The Contamination Reduction Zone (CRZ) is the transition area between the contaminated area and the clean area. Decontamination is the main focus in this area. The decontamination of workers and equipment limits the physical transfer of hazardous substances into the clean area. This area must also be clearly marked with hazard tape and access limited to personnel involved in decontamination.
8.2.3 Support Zone
The Support Zone is an uncontaminated zone where administrative and other support functions, such as first aid, equipment supply, emergency information, etc., are located. The Support Zone shall have minimal potential for significant exposure to contaminants (i.e., background levels).
Employees will establish a Support Zone (if necessary) at the site before the commencement of site activities. The Support Zone would also serve as the entry point for controlling site access.
8.3 Site Access
All personnel entering the site shall complete the “Site Entry/Exit Log” located at the site trailer or primary site support vehicle.
8.3.1 Site Security
Maintain security in the Support Zone and at access control points.
When feasible, install fencing or other physical barrier around the site.
After hours, enlist public enforcement agencies, such as the local police department, if the site presents a significant risk to local health and safety.
Secure the equipment
8.4 Decontamination
8.4.1 General Requirements
All possible and necessary steps shall be taken to reduce or minimize contact with chemicals and contaminated/impacted materials while performing field activities (e.g., avoid sitting or leaning on, walking through, dragging equipment through or over, tracking, or splashing potential or known contaminated/impacted materials, etc.
All personal decontamination activities shall be performed with an attendant (buddy) to provide assistance to personnel that are performing decontamination activities. Depending on specific site hazards, attendants may be required to wear a level of protection that is equal to the required level in the Exclusion Zone (EZ).
All persons and equipment entering the EZ shall be considered contaminated, and thus, must be properly decontaminated prior to entering the SZ.
AECOM Health and Safety Plan
July 2015
8-5
Decontamination procedures may vary based on site conditions and nature of the contaminant(s). If chemicals or decontamination solutions are used, care should be taken to minimize reactions between the solutions and contaminated materials. In addition, personnel must assess the potential exposures created by the decontamination chemical(s) or solutions. The applicable Safety Data Sheet (SDS) must be reviewed, implemented, and filed by personnel contacting the chemicals/solutions.
All contaminated PPE and decontamination materials shall be contained, stored and disposed of in accordance with site-specific requirements determined by site management.
8.4.2 Decontamination Tools
The equipment required to perform decontamination may vary based on site-specific conditions and the nature of the contaminant(s). The following equipment is commonly used for decontamination purposes:
Soft-bristle scrub brushes or long-handled brushes to remove contaminants;
Hoses, buckets of water or garden sprayers for rinsing;
Large plastic/galvanized wash tubs or children's wading pools for washing and rinsing solutions;
Large plastic garbage cans or similar containers lined with plastic bags for the storage of contaminated clothing and equipment;
Metal or plastic cans or drums for the temporary storage of contaminated liquids; and
Paper or cloth towels for drying protective clothing and equipment.
8.4.3 Personal Decontamination
Decontamination will take place in the area designated as the CRZ. Personnel egress to and from this zone will be limited in order to minimize the potential spread of contaminated sediments to clean areas. Under no circumstances is a potentially contaminated person to exit the site by means other than through the CRZ, except in emergencies as directed by the Site Health and Safety Officer. Upon leaving the site for any reason, personnel will be required to remove all contaminated clothing or equipment before leaving the CRZ.
For Level D PPE, disposable gloves will be disposed of as municipal waste. All personnel wearing Modified Level D PPE in a work area must undergo decontamination prior to entering a SZ. In the CRZ, the personnel decontamination area will consist of the following stations:
Station 1: Personnel entering the CRZ will remove the sediment contamination from their outer clothing, boots and instruments using brushes and cloths. Personnel will also wipe down respirators if they have been used.
Station 2: Personnel will remove their outer garment and outer gloves and dispose of them as municipal waste. Personnel will then decontaminate their boots, with an aqueous solution of detergent or other appropriate cleaning solution. These items will then be hand carried to the next station. Inner gloves may then be discarded as municipal waste.
Station 3: Personnel will thoroughly wash their hands and face before leaving the CRZ. Air purifying cartridges will be removed from respirators, if used, and then sanitized, dried and placed in a clean plastic bag.
AECOM Health and Safety Plan
July 2015
8-6
8.4.4 Equipment Decontamination
All potentially contaminated equipment will remain in the EZ until the end of the activity. A bristle brush and a soap and water solution (Alconox) will be used to remove sediment contamination from all equipment and will be decontaminated accordingly before being removed from the CRZ. A pump sprayer may be utilized for each rinse station.
For larger equipment, a high-pressure washer may need to be used. Some contaminants require the use of a detergent or chemical solution and scrub brushes to ensure proper decontamination.
For smaller equipment, use the following steps for decontamination:
Remove majority of visible gross contamination in EZ.
Wash equipment in decontamination solution with a scrub brush and/or power wash heavy equipment.
Rinse equipment.
Visually inspect for remaining contamination.

AECOM Health and Safety Plan
July 2015
9-7
9.0 Project Health and Safety Organization
9.1 Project Manager
The Project Manager (PM), Mr. Walter Howard, has overall management authority and responsibility for all site operations, including safety. The PM will provide the Site Supervisor with work plans, staff, and budgetary resources, which are appropriate to meet the safety needs of the project operations. The PM will be held responsible for the safety performance of the project.
9.2 Site Supervisor
The site supervisor, Mr. Ross McCredy has the overall responsibility and authority to direct work operations at the job site according to the provided work plans and for implementing and enforcing this HASP and AECOM’s SOPs. The Site Supervisor is the AECOM designated Site Safety Officer (SSO).
9.2.1 Responsibilities
The Site Supervisor is responsible to:
Discuss deviations from the work plan with the PM.
Discuss safety issues with the PM, and field personnel.
Development and implementation of corrective actions for site safety deficiencies.
Conduct inspections of the site for compliance with this HASP and applicable SOPs.
Investigate all incidents that occur on the project site.
9.2.2 Authority
The Site Supervisor has authority to:
Verify that all operations are in compliance with the requirements of this HASP, and halt any activity that poses a potential hazard to personnel, property, or the environment.
Temporarily suspend individuals from field activities for infractions against the HASP pending consideration by the Safety Professional, and the PM.
Immediately correct any hazards that may appear.
AECOM Health and Safety Plan
July 2015
9-8
9.2.3 Qualifications
In addition to being Hazardous Waste Operations and Emergency Response (HAZWOPER)-qualified the Site Supervisor is required to have completed the 8-hour HAZWOPER Supervisor Training Course in accordance with 29 CFR 1910.120 (e)(4). The Site Supervisor has the experience to recognize hazards associated with a particular task, and has the ability to mitigate those hazards.
9.3 Employees
9.3.1 Employee Responsibilities
Responsibilities of employees associated with this project include, but are not limited to:
Understanding and abiding by the policies and procedures specified in the HASP and other applicable safety policies, and clarifying those areas where understanding is incomplete.
Providing feedback to health and safety management relating to omissions and modifications in the HASP or other safety policies.
Notifying the Site Supervisor and/or PM, in writing, of unsafe conditions and acts.
9.3.2 Employee Authority
The health and safety authority of each employee assigned to the site includes the following:
The right to refuse to work and/or stop work authority when the employee feels that the work is unsafe (including subcontractors or team contractors), or where specified safety precautions are not adequate or fully understood.
The right to refuse to work on any site or operation where the safety procedures specified in this HASP or other safety policies are not being followed.
The right to contact the Safety Professional at any time to discuss potential concerns.
The right and duty to stop work when conditions are unsafe, and to assist in correcting these conditions.
9.4 Safety Professional
The Safety Professional is the member of the AECOM Safety, Health and Environmental Department assigned to provide guidance and technical support for the project. Duties include the following:
Approving this HASP and any required changes.
Reviewing all personal exposure monitoring results.
Investigating any reported unsafe acts or conditions.
9.5 Subcontractors
The requirements for subcontractor selection and subcontractor safety responsibilities are outlined in S3NA-213-PR Subcontractors. Each AECOM subcontractor is responsible for assigning specific work tasks to their employees. Each subcontractor's management will provide qualified employees and allocate sufficient time, materials, and equipment to safely complete assigned tasks. In
AECOM Health and Safety Plan
July 2015
9-9
particular, each subcontractor is responsible for equipping its personnel with any required personnel protective equipment (PPE) and all required training.
AECOM considers each subcontractor to be an expert in all aspects of the work operations for which they are tasked to provide, and each subcontractor is responsible for compliance with the regulatory requirements that pertain to those services. Each subcontractor is expected to perform its operations in accordance with its own unique safety policies and procedures, in order to ensure that hazards associated with the performance of the work activities are properly controlled. Copies of any required safety documentation for a subcontractor's work activities will be provided to AECOM for review prior to the start of onsite activities, if required.
Hazards not listed in this HASP but known to any subcontractor, or known to be associated with a subcontractor's services, must be identified and addressed to the AECOM PM or the Site Supervisor prior to beginning work operations. The Site Supervisor or authorized representative has the authority to halt any subcontractor operations, and to remove any subcontractor or subcontractor employee from the site for failure to comply with established health and safety procedures or for operating in an unsafe manner.
9.6 Visitors
Authorized visitors (e.g., client representatives, regulators, AECOM management staff, etc.) requiring entry to any work location on the site will be briefed by the Site Supervisor on the hazards present at that location. Visitors will be escorted at all times at the work location and will be responsible for compliance with their employer's health and safety policies. In addition, this HASP specifies the minimum acceptable qualifications, training and personal protective equipment which are required for entry to any controlled work area; visitors must comply with these requirements at all times.
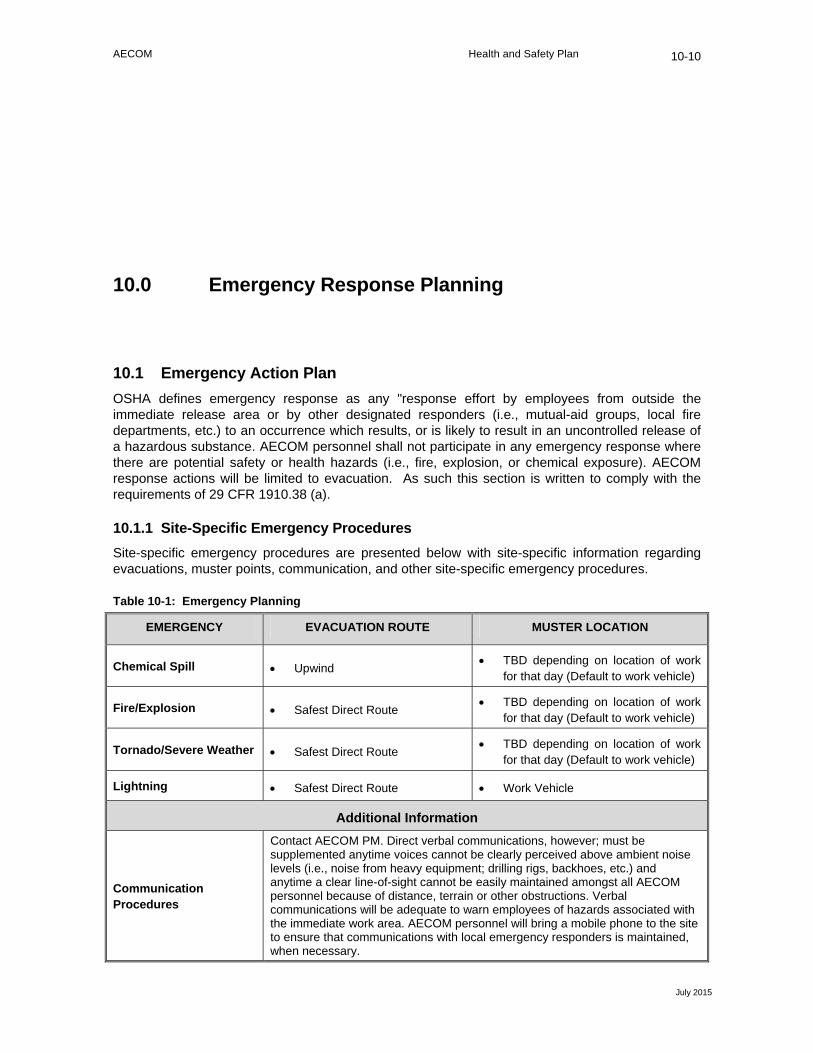
AECOM Health and Safety Plan
July 2015
10-10
10.0 Emergency Response Planning
10.1 Emergency Action Plan
OSHA defines emergency response as any "response effort by employees from outside the immediate release area or by other designated responders (i.e., mutual-aid groups, local fire departments, etc.) to an occurrence which results, or is likely to result in an uncontrolled release of a hazardous substance. AECOM personnel shall not participate in any emergency response where there are potential safety or health hazards (i.e., fire, explosion, or chemical exposure). AECOM response actions will be limited to evacuation. As such this section is written to comply with the requirements of 29 CFR 1910.38 (a).
10.1.1 Site-Specific Emergency Procedures
Site-specific emergency procedures are presented below with site-specific information regarding evacuations, muster points, communication, and other site-specific emergency procedures.
Table 10-1: Emergency Planning
EMERGENCY EVACUATION ROUTE MUSTER LOCATION
Chemical Spill Upwind TBD depending on location of work
for that day (Default to work vehicle)
Fire/Explosion Safest Direct Route TBD depending on location of work
for that day (Default to work vehicle)
Tornado/Severe Weather Safest Direct Route TBD depending on location of work
for that day (Default to work vehicle)
Lightning Safest Direct Route Work Vehicle
Additional Information
Communication Procedures
Contact AECOM PM. Direct verbal communications, however; must be supplemented anytime voices cannot be clearly perceived above ambient noise levels (i.e., noise from heavy equipment; drilling rigs, backhoes, etc.) and anytime a clear line-of-sight cannot be easily maintained amongst all AECOM personnel because of distance, terrain or other obstructions. Verbal communications will be adequate to warn employees of hazards associated with the immediate work area. AECOM personnel will bring a mobile phone to the site to ensure that communications with local emergency responders is maintained, when necessary.
AECOM Health and Safety Plan
July 2015
10-11
10.2 Incident Reporting
The Employee Incident Reporting and Assistance Hotline number is the preferred number to use for any safety- and security-related issues, other than a life-threatening event, in which case, dial 911 immediately. The hotline will route you directly to WorkCare for assistance with injuries when needed, and it will connect you with our DCS Americas Safety, Health & Environment (SH&E) team to assist you in managing incidents and injuries.
1-800-348-5046
10.2.1 Incidents Requiring Reporting
Any injury or illness that occurs while conducting business on behalf of AECOM, such as sprains, strains, pain or discomfort; Any biological exposures (embedded ticks, poison rash, bee stings, fire ant bites, etc.);
Any motor vehicle incident/accident, regardless of fault, occurring during the course of your work in an AECOM-owned/leased/rented vehicle or a personal vehicle used for business purposes (e.g., body damage, flat tires, cracked windshields, fender-benders, etc.);
Any damage to property allegedly inflicted by AECOM or our subcontractors (e.g., contact with utilities, broken fences, damaged equipment, etc.);
Ergonomic pain or discomfort (e.g., back pain, neck pain, strains, sore wrists, etc.);
Regulatory inspections or site visits by an agent of a regulatory agency (also contact your area or region SH&E manager immediately);
Environmental spills or releases, regardless of quantity (e.g., hydraulic line breaks, fuel spills, investigative derived waste spills, etc.);
Any security-related incidents; and
Near misses—incidents where any of the above could have happened but did not.
10.3 Spill/Release Reporting
All environmental spills or releases of hazardous materials (e.g., fuels, solvents, etc.), whether in excess of the Reportable Quantity or not, will be immediately reported to the AECOM Project Manager (PM) and Regional SH&E Manager. Also you are required to call the Employee Incident Reporting and Assistance Hotline.
The PM is responsible for notifying the client, AECOM legal representative and for determining if the spill or release is reportable to the New York State Department of Environmental Conservation or the EPA, National Spill Response Center.
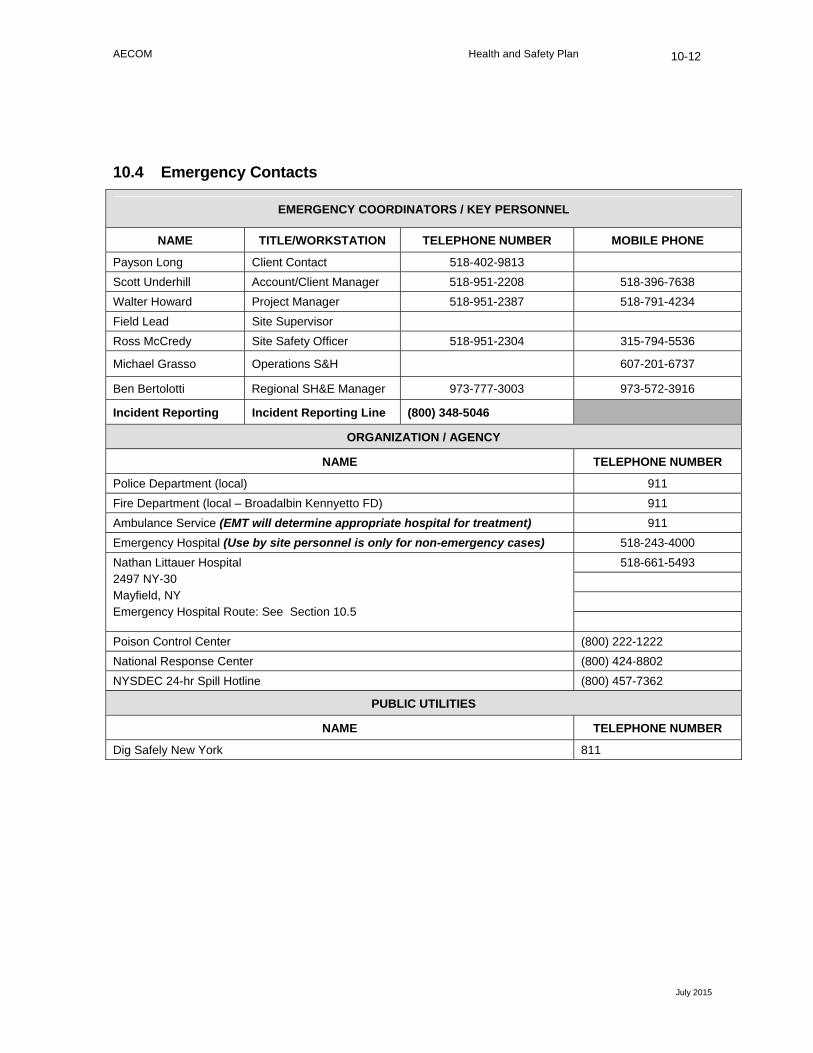
AECOM Health and Safety Plan
July 2015
10-12
10.4 Emergency Contacts
EMERGENCY COORDINATORS / KEY PERSONNEL
NAME TITLE/WORKSTATION TELEPHONE NUMBER MOBILE PHONE
Payson Long Client Contact 518-402-9813
Scott Underhill Account/Client Manager 518-951-2208 518-396-7638
Walter Howard Project Manager 518-951-2387 518-791-4234
Field Lead Site Supervisor
Ross McCredy Site Safety Officer 518-951-2304 315-794-5536
Michael Grasso Operations S&H 607-201-6737
Ben Bertolotti Regional SH&E Manager 973-777-3003 973-572-3916
Incident Reporting Incident Reporting Line (800) 348-5046
ORGANIZATION / AGENCY
NAME TELEPHONE NUMBER
Police Department (local) 911
Fire Department (local – Broadalbin Kennyetto FD) 911
Ambulance Service (EMT will determine appropriate hospital for treatment) 911
Emergency Hospital (Use by site personnel is only for non-emergency cases) 518-243-4000
Nathan Littauer Hospital 2497 NY-30 Mayfield, NY Emergency Hospital Route: See Section 10.5
518-661-5493
Poison Control Center (800) 222-1222
National Response Center (800) 424-8802
NYSDEC 24-hr Spill Hotline (800) 457-7362
PUBLIC UTILITIES
NAME TELEPHONE NUMBER
Dig Safely New York 811
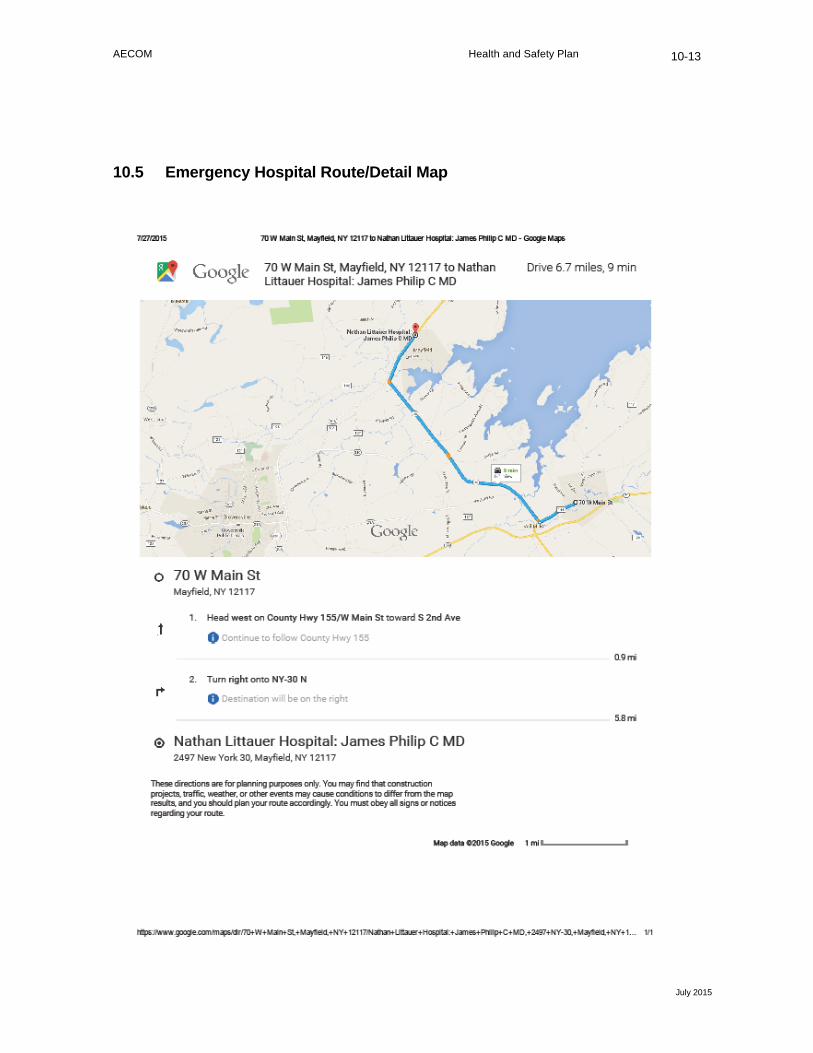
AECOM Health and Safety Plan
July 2015
10-13
10.5 Emergency Hospital Route/Detail Map
AECOM Health and Safety Plan
July 2015
11-1
11.0 Personnel Acknowledgement
By signing below, the undersigned acknowledges that he/she has read and reviewed the AECOM Health and Safety Plan for the Korkay site. The undersigned also acknowledges that he/she has been instructed in the contents of this document and understands the information pertaining to the specified work, and will comply with the provisions contained therein.
PRINT NAME SIGNATURE ORGANIZATION DATE

Attachment A Task Hazard Analyses

THA_01 - THA for Korkay_ Inc.-Latham-Drilling and Well Installation Oversight
http://connect.na.aecomnet.com/...B%2523Howard%252C%2520Walter%253B%2523%26IsGroupRender%3DTRUE&Defaul[7/30/2015 12:43:11 PM]
Task Hazard AnalysisProject Name Korkay, Inc. Project
Number60273289
Client NYSDEC Location Latham
Start Date 7/27/2015 End Date 3/1/2018
FieldSupervisor
McCredy, Ross ProjectManager
Howard, Walter
Region US - North Business Line Environment
Task Name Drilling and Well InstallationOversight
TaskFrequency
One Time
Associated Safe Work Plan, Health and Safety Plan or other project safety plan:
HASP, Korkay Site, 70 West Main Street, Broadalbin, NY
Job EventsTravel
drive in personal, rented or company vehicle to/from site from hotel or home.
Hazards1. Driving, vehicle
Normal local traffic.
Risk: mediumSite Specific Primary Controls:Complete a pre-use visual inspection. No hand-held electronic devices. Be aware of road conditions and drive onlyto your comfort level.
Required Trainings:
Vehicle and Driver Awareness eLearning (AECOM)
Key SOPs:
S3NA-005-PR Driver and Vehicle Safety Program; S3NA-205-PR, Equipment Inspections
PPE:
Have a radio, cell phone or other communication device for emergency useAll Personal Protective Equipment shall be inspected prior to use. Any PPE or equipment not in safe working conditionshall be marked and removed from service.Modifications to Site Specific Controls/Comments:All PPE shall be inspected prior to use. Any PPE or equipment not in safe working condition shall be replaced withproperly working equipment.
Existing Site HazardsHeat/cold stress, vehicular traffic (working near road and moving between locations), slips/trips/falls, biological hazards,weather hazards.
Hazards1. Heat or sun exposure
Low risk outside of summer months
Risk: mediumSite Specific Primary Controls:Buddy system; heat stress monitoring; heat stress control plan (including shelters, work rotation, methods ofcooling)
Required Trainings:
Heat Stress Awareness Training
Key SOPs:
S3NA-511-PR Heat Stress Prevention
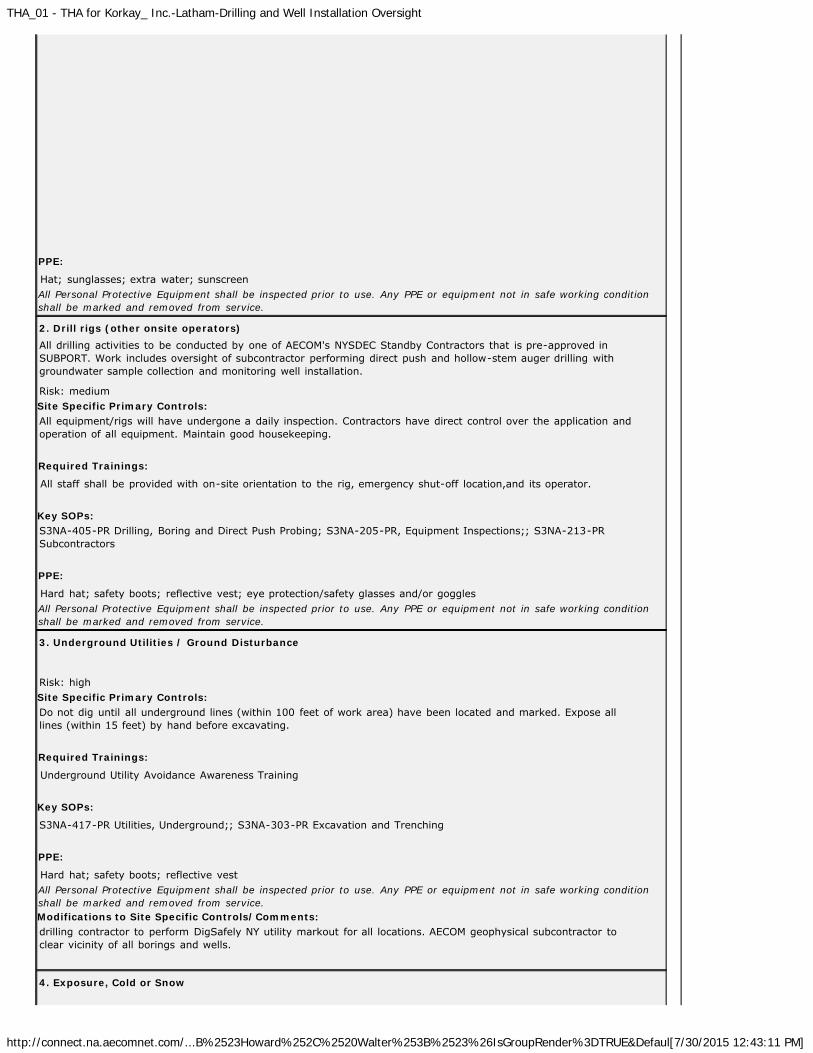
THA_01 - THA for Korkay_ Inc.-Latham-Drilling and Well Installation Oversight
http://connect.na.aecomnet.com/...B%2523Howard%252C%2520Walter%253B%2523%26IsGroupRender%3DTRUE&Defaul[7/30/2015 12:43:11 PM]
PPE:
Hat; sunglasses; extra water; sunscreenAll Personal Protective Equipment shall be inspected prior to use. Any PPE or equipment not in safe working conditionshall be marked and removed from service.
2. Drill rigs (other onsite operators)All drilling activities to be conducted by one of AECOM's NYSDEC Standby Contractors that is pre-approved inSUBPORT. Work includes oversight of subcontractor performing direct push and hollow-stem auger drilling withgroundwater sample collection and monitoring well installation.
Risk: mediumSite Specific Primary Controls:All equipment/rigs will have undergone a daily inspection. Contractors have direct control over the application andoperation of all equipment. Maintain good housekeeping.
Required Trainings:
All staff shall be provided with on-site orientation to the rig, emergency shut-off location,and its operator.
Key SOPs:S3NA-405-PR Drilling, Boring and Direct Push Probing; S3NA-205-PR, Equipment Inspections;; S3NA-213-PRSubcontractors
PPE:
Hard hat; safety boots; reflective vest; eye protection/safety glasses and/or gogglesAll Personal Protective Equipment shall be inspected prior to use. Any PPE or equipment not in safe working conditionshall be marked and removed from service.
3. Underground Utilities / Ground Disturbance
Risk: highSite Specific Primary Controls:Do not dig until all underground lines (within 100 feet of work area) have been located and marked. Expose alllines (within 15 feet) by hand before excavating.
Required Trainings:
Underground Utility Avoidance Awareness Training
Key SOPs:
S3NA-417-PR Utilities, Underground;; S3NA-303-PR Excavation and Trenching
PPE:
Hard hat; safety boots; reflective vestAll Personal Protective Equipment shall be inspected prior to use. Any PPE or equipment not in safe working conditionshall be marked and removed from service.Modifications to Site Specific Controls/Comments:drilling contractor to perform DigSafely NY utility markout for all locations. AECOM geophysical subcontractor toclear vicinity of all borings and wells.
4. Exposure, Cold or Snow
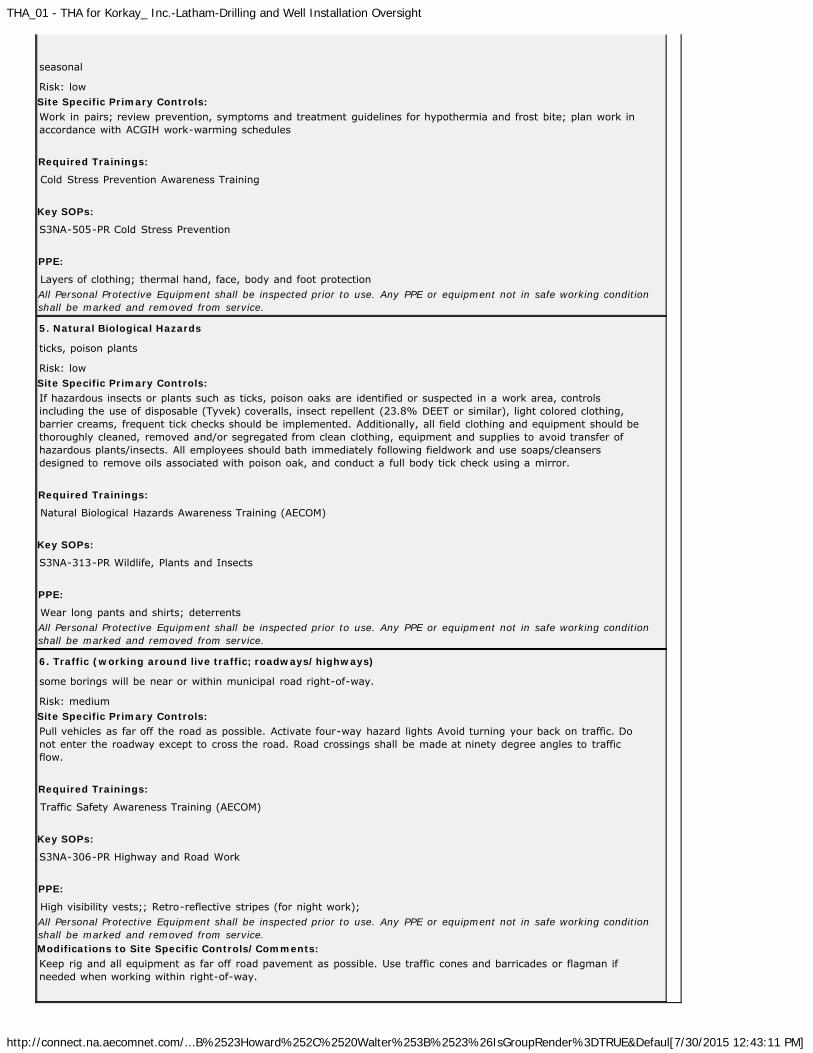
THA_01 - THA for Korkay_ Inc.-Latham-Drilling and Well Installation Oversight
http://connect.na.aecomnet.com/...B%2523Howard%252C%2520Walter%253B%2523%26IsGroupRender%3DTRUE&Defaul[7/30/2015 12:43:11 PM]
seasonal
Risk: lowSite Specific Primary Controls:Work in pairs; review prevention, symptoms and treatment guidelines for hypothermia and frost bite; plan work inaccordance with ACGIH work-warming schedules
Required Trainings:
Cold Stress Prevention Awareness Training
Key SOPs:
S3NA-505-PR Cold Stress Prevention
PPE:
Layers of clothing; thermal hand, face, body and foot protectionAll Personal Protective Equipment shall be inspected prior to use. Any PPE or equipment not in safe working conditionshall be marked and removed from service.
5. Natural Biological Hazards
ticks, poison plants
Risk: lowSite Specific Primary Controls:If hazardous insects or plants such as ticks, poison oaks are identified or suspected in a work area, controlsincluding the use of disposable (Tyvek) coveralls, insect repellent (23.8% DEET or similar), light colored clothing,barrier creams, frequent tick checks should be implemented. Additionally, all field clothing and equipment should bethoroughly cleaned, removed and/or segregated from clean clothing, equipment and supplies to avoid transfer ofhazardous plants/insects. All employees should bath immediately following fieldwork and use soaps/cleansersdesigned to remove oils associated with poison oak, and conduct a full body tick check using a mirror.
Required Trainings:
Natural Biological Hazards Awareness Training (AECOM)
Key SOPs:
S3NA-313-PR Wildlife, Plants and Insects
PPE:
Wear long pants and shirts; deterrentsAll Personal Protective Equipment shall be inspected prior to use. Any PPE or equipment not in safe working conditionshall be marked and removed from service.
6. Traffic (working around live traffic; roadways/highways)
some borings will be near or within municipal road right-of-way.
Risk: mediumSite Specific Primary Controls:Pull vehicles as far off the road as possible. Activate four-way hazard lights Avoid turning your back on traffic. Donot enter the roadway except to cross the road. Road crossings shall be made at ninety degree angles to trafficflow.
Required Trainings:
Traffic Safety Awareness Training (AECOM)
Key SOPs:
S3NA-306-PR Highway and Road Work
PPE:
High visibility vests;; Retro-reflective stripes (for night work);All Personal Protective Equipment shall be inspected prior to use. Any PPE or equipment not in safe working conditionshall be marked and removed from service.Modifications to Site Specific Controls/Comments:Keep rig and all equipment as far off road pavement as possible. Use traffic cones and barricades or flagman ifneeded when working within right-of-way.
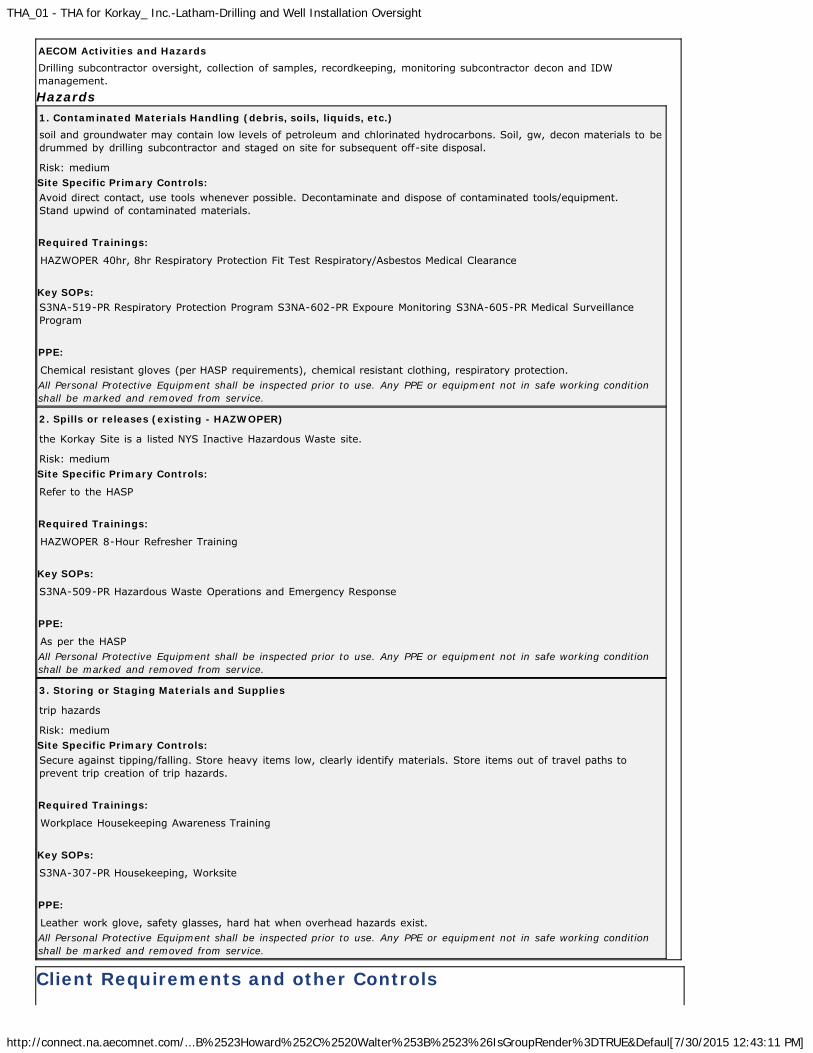
THA_01 - THA for Korkay_ Inc.-Latham-Drilling and Well Installation Oversight
http://connect.na.aecomnet.com/...B%2523Howard%252C%2520Walter%253B%2523%26IsGroupRender%3DTRUE&Defaul[7/30/2015 12:43:11 PM]
AECOM Activities and HazardsDrilling subcontractor oversight, collection of samples, recordkeeping, monitoring subcontractor decon and IDWmanagement.
Hazards1. Contaminated Materials Handling (debris, soils, liquids, etc.)soil and groundwater may contain low levels of petroleum and chlorinated hydrocarbons. Soil, gw, decon materials to bedrummed by drilling subcontractor and staged on site for subsequent off-site disposal.
Risk: mediumSite Specific Primary Controls:Avoid direct contact, use tools whenever possible. Decontaminate and dispose of contaminated tools/equipment.Stand upwind of contaminated materials.
Required Trainings:
HAZWOPER 40hr, 8hr Respiratory Protection Fit Test Respiratory/Asbestos Medical Clearance
Key SOPs:S3NA-519-PR Respiratory Protection Program S3NA-602-PR Expoure Monitoring S3NA-605-PR Medical SurveillanceProgram
PPE:
Chemical resistant gloves (per HASP requirements), chemical resistant clothing, respiratory protection.All Personal Protective Equipment shall be inspected prior to use. Any PPE or equipment not in safe working conditionshall be marked and removed from service.
2. Spills or releases (existing - HAZWOPER)
the Korkay Site is a listed NYS Inactive Hazardous Waste site.
Risk: mediumSite Specific Primary Controls:
Refer to the HASP
Required Trainings:
HAZWOPER 8-Hour Refresher Training
Key SOPs:
S3NA-509-PR Hazardous Waste Operations and Emergency Response
PPE:
As per the HASPAll Personal Protective Equipment shall be inspected prior to use. Any PPE or equipment not in safe working conditionshall be marked and removed from service.
3. Storing or Staging Materials and Supplies
trip hazards
Risk: mediumSite Specific Primary Controls:Secure against tipping/falling. Store heavy items low, clearly identify materials. Store items out of travel paths toprevent trip creation of trip hazards.
Required Trainings:
Workplace Housekeeping Awareness Training
Key SOPs:
S3NA-307-PR Housekeeping, Worksite
PPE:
Leather work glove, safety glasses, hard hat when overhead hazards exist.All Personal Protective Equipment shall be inspected prior to use. Any PPE or equipment not in safe working conditionshall be marked and removed from service.
Client Requirements and other Controls
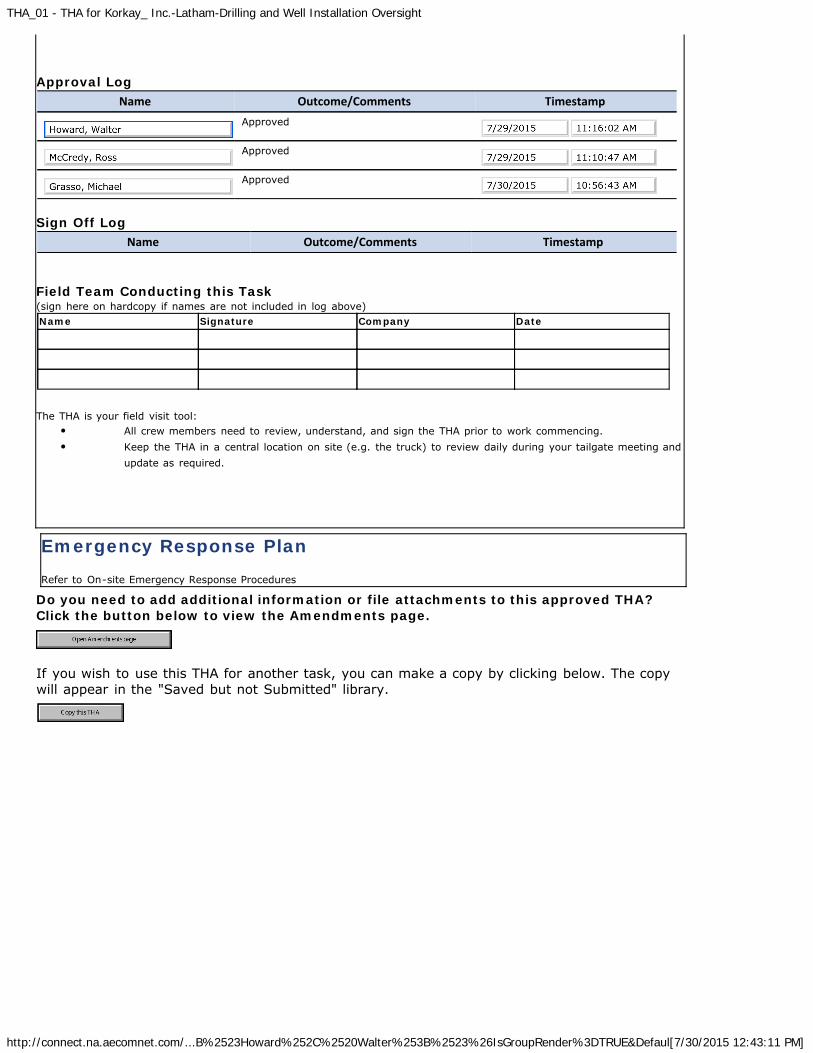
THA_01 - THA for Korkay_ Inc.-Latham-Drilling and Well Installation Oversight
http://connect.na.aecomnet.com/...B%2523Howard%252C%2520Walter%253B%2523%26IsGroupRender%3DTRUE&Defaul[7/30/2015 12:43:11 PM]
Approval LogName Outcome/Comments Timestamp
Approved
Approved
Approved
Sign Off Log
Name Outcome/Comments Timestamp Field Team Conducting this Task(sign here on hardcopy if names are not included in log above)Name Signature Company Date
The THA is your field visit tool:
All crew members need to review, understand, and sign the THA prior to work commencing.Keep the THA in a central location on site (e.g. the truck) to review daily during your tailgate meeting andupdate as required.
Emergency Response Plan Refer to On-site Emergency Response Procedures
Do you need to add additional information or file attachments to this approved THA?Click the button below to view the Amendments page.
If you wish to use this THA for another task, you can make a copy by clicking below. The copywill appear in the "Saved but not Submitted" library.
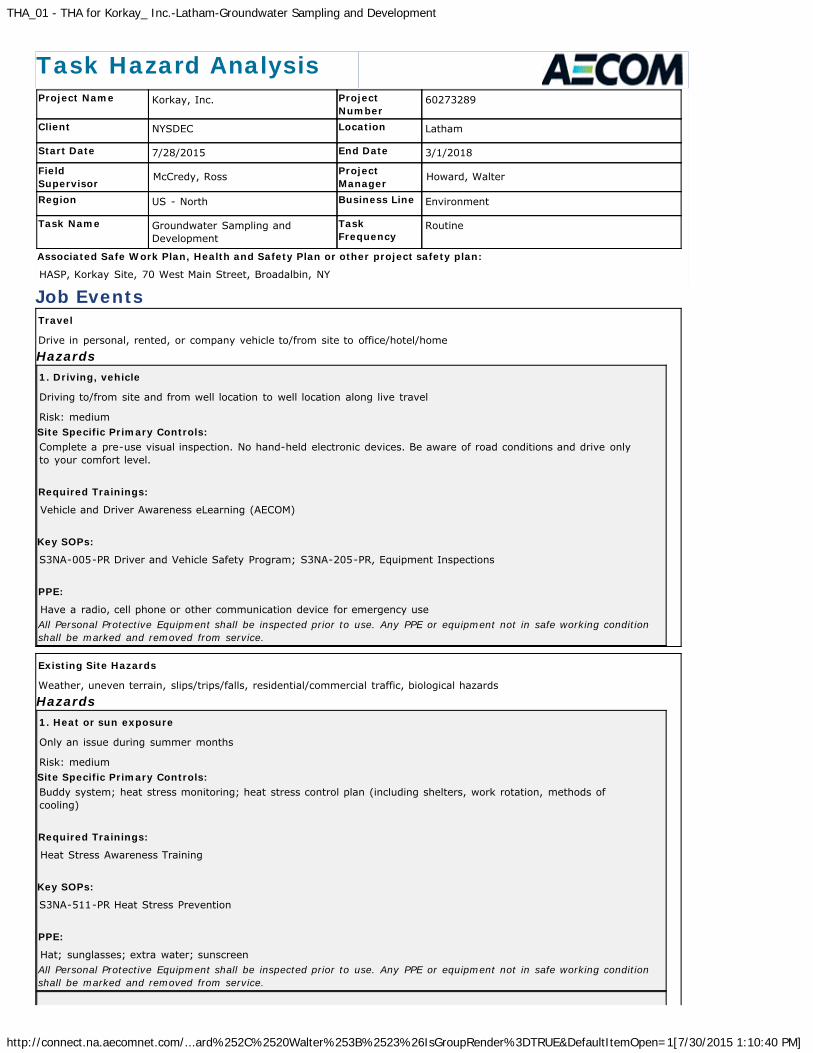
THA_01 - THA for Korkay_ Inc.-Latham-Groundwater Sampling and Development
http://connect.na.aecomnet.com/...ard%252C%2520Walter%253B%2523%26IsGroupRender%3DTRUE&DefaultItemOpen=1[7/30/2015 1:10:40 PM]
Task Hazard AnalysisProject Name Korkay, Inc. Project
Number60273289
Client NYSDEC Location Latham
Start Date 7/28/2015 End Date 3/1/2018
FieldSupervisor
McCredy, Ross ProjectManager
Howard, Walter
Region US - North Business Line Environment
Task Name Groundwater Sampling andDevelopment
TaskFrequency
Routine
Associated Safe Work Plan, Health and Safety Plan or other project safety plan:
HASP, Korkay Site, 70 West Main Street, Broadalbin, NY
Job EventsTravel
Drive in personal, rented, or company vehicle to/from site to office/hotel/home
Hazards1. Driving, vehicle
Driving to/from site and from well location to well location along live travel
Risk: mediumSite Specific Primary Controls:Complete a pre-use visual inspection. No hand-held electronic devices. Be aware of road conditions and drive onlyto your comfort level.
Required Trainings:
Vehicle and Driver Awareness eLearning (AECOM)
Key SOPs:
S3NA-005-PR Driver and Vehicle Safety Program; S3NA-205-PR, Equipment Inspections
PPE:
Have a radio, cell phone or other communication device for emergency useAll Personal Protective Equipment shall be inspected prior to use. Any PPE or equipment not in safe working conditionshall be marked and removed from service.
Existing Site Hazards
Weather, uneven terrain, slips/trips/falls, residential/commercial traffic, biological hazards
Hazards1. Heat or sun exposure
Only an issue during summer months
Risk: mediumSite Specific Primary Controls:Buddy system; heat stress monitoring; heat stress control plan (including shelters, work rotation, methods ofcooling)
Required Trainings:
Heat Stress Awareness Training
Key SOPs:
S3NA-511-PR Heat Stress Prevention
PPE:
Hat; sunglasses; extra water; sunscreenAll Personal Protective Equipment shall be inspected prior to use. Any PPE or equipment not in safe working conditionshall be marked and removed from service.
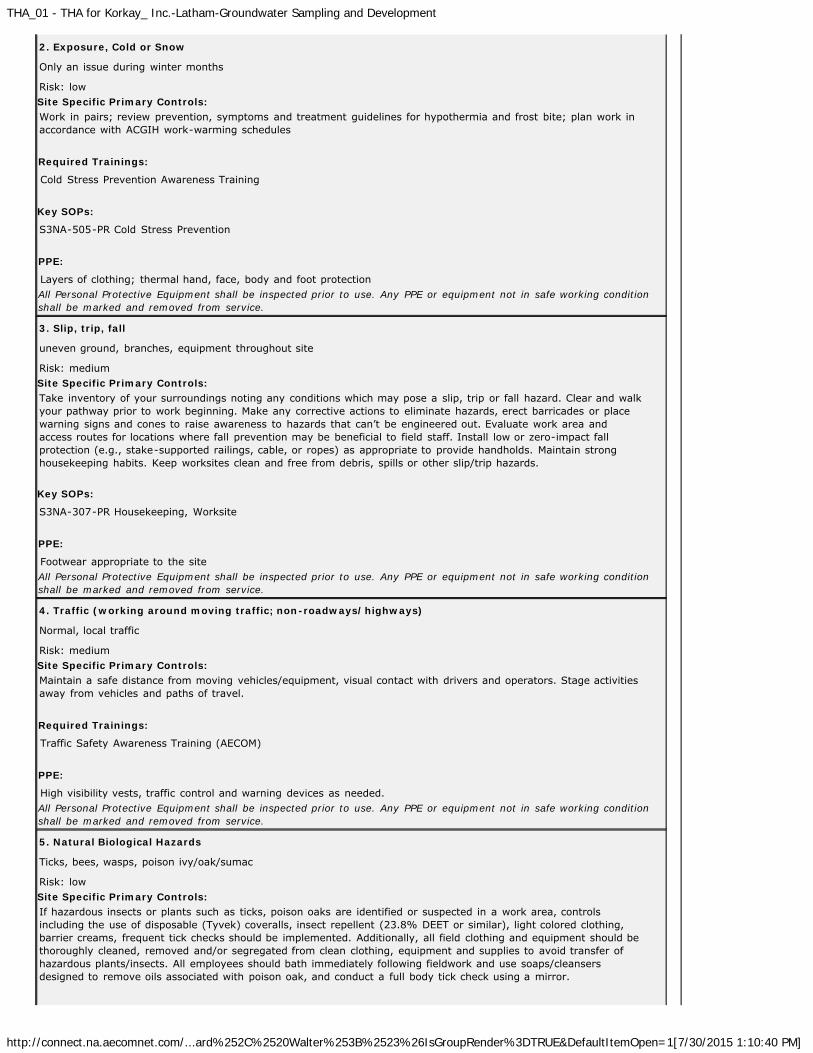
THA_01 - THA for Korkay_ Inc.-Latham-Groundwater Sampling and Development
http://connect.na.aecomnet.com/...ard%252C%2520Walter%253B%2523%26IsGroupRender%3DTRUE&DefaultItemOpen=1[7/30/2015 1:10:40 PM]
2. Exposure, Cold or Snow
Only an issue during winter months
Risk: lowSite Specific Primary Controls:Work in pairs; review prevention, symptoms and treatment guidelines for hypothermia and frost bite; plan work inaccordance with ACGIH work-warming schedules
Required Trainings:
Cold Stress Prevention Awareness Training
Key SOPs:
S3NA-505-PR Cold Stress Prevention
PPE:
Layers of clothing; thermal hand, face, body and foot protectionAll Personal Protective Equipment shall be inspected prior to use. Any PPE or equipment not in safe working conditionshall be marked and removed from service.
3. Slip, trip, fall
uneven ground, branches, equipment throughout site
Risk: mediumSite Specific Primary Controls:Take inventory of your surroundings noting any conditions which may pose a slip, trip or fall hazard. Clear and walkyour pathway prior to work beginning. Make any corrective actions to eliminate hazards, erect barricades or placewarning signs and cones to raise awareness to hazards that can’t be engineered out. Evaluate work area andaccess routes for locations where fall prevention may be beneficial to field staff. Install low or zero-impact fallprotection (e.g., stake-supported railings, cable, or ropes) as appropriate to provide handholds. Maintain stronghousekeeping habits. Keep worksites clean and free from debris, spills or other slip/trip hazards.
Key SOPs:
S3NA-307-PR Housekeeping, Worksite
PPE:
Footwear appropriate to the siteAll Personal Protective Equipment shall be inspected prior to use. Any PPE or equipment not in safe working conditionshall be marked and removed from service.
4. Traffic (working around moving traffic; non-roadways/highways)
Normal, local traffic
Risk: mediumSite Specific Primary Controls:Maintain a safe distance from moving vehicles/equipment, visual contact with drivers and operators. Stage activitiesaway from vehicles and paths of travel.
Required Trainings:
Traffic Safety Awareness Training (AECOM)
PPE:
High visibility vests, traffic control and warning devices as needed.All Personal Protective Equipment shall be inspected prior to use. Any PPE or equipment not in safe working conditionshall be marked and removed from service.
5. Natural Biological Hazards
Ticks, bees, wasps, poison ivy/oak/sumac
Risk: lowSite Specific Primary Controls:If hazardous insects or plants such as ticks, poison oaks are identified or suspected in a work area, controlsincluding the use of disposable (Tyvek) coveralls, insect repellent (23.8% DEET or similar), light colored clothing,barrier creams, frequent tick checks should be implemented. Additionally, all field clothing and equipment should bethoroughly cleaned, removed and/or segregated from clean clothing, equipment and supplies to avoid transfer ofhazardous plants/insects. All employees should bath immediately following fieldwork and use soaps/cleansersdesigned to remove oils associated with poison oak, and conduct a full body tick check using a mirror.
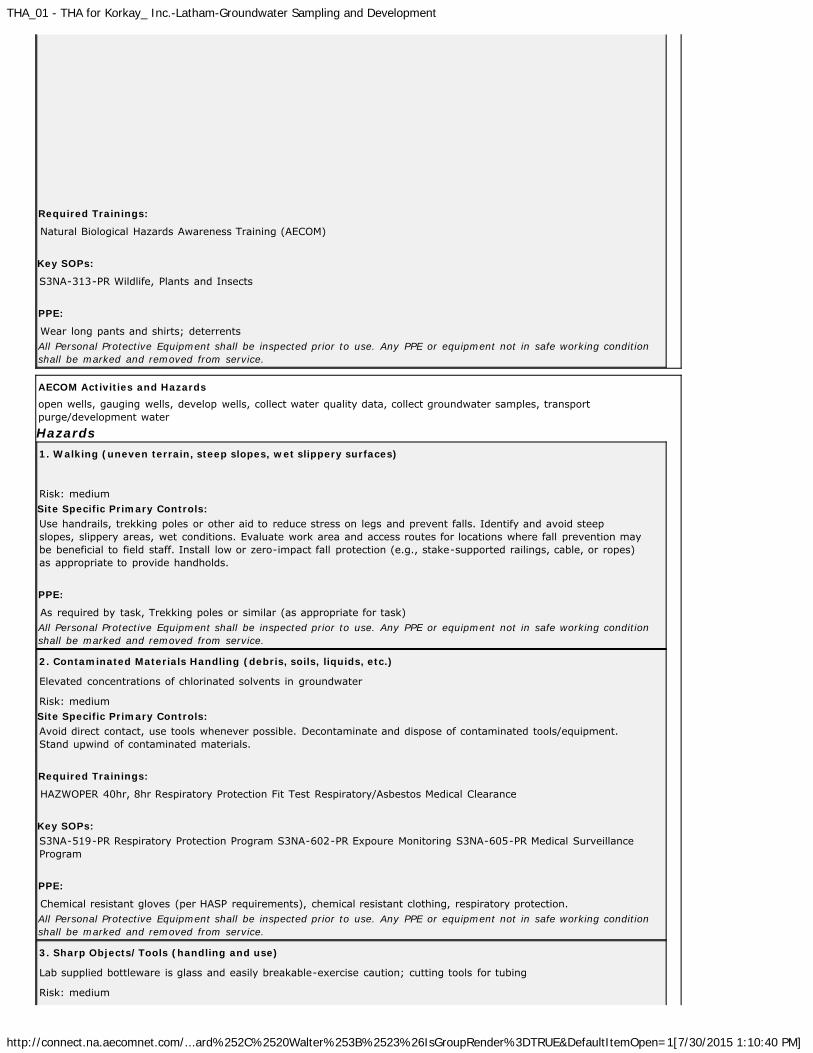
THA_01 - THA for Korkay_ Inc.-Latham-Groundwater Sampling and Development
http://connect.na.aecomnet.com/...ard%252C%2520Walter%253B%2523%26IsGroupRender%3DTRUE&DefaultItemOpen=1[7/30/2015 1:10:40 PM]
Required Trainings:
Natural Biological Hazards Awareness Training (AECOM)
Key SOPs:
S3NA-313-PR Wildlife, Plants and Insects
PPE:
Wear long pants and shirts; deterrentsAll Personal Protective Equipment shall be inspected prior to use. Any PPE or equipment not in safe working conditionshall be marked and removed from service.
AECOM Activities and Hazardsopen wells, gauging wells, develop wells, collect water quality data, collect groundwater samples, transportpurge/development water
Hazards1. Walking (uneven terrain, steep slopes, wet slippery surfaces)
Risk: mediumSite Specific Primary Controls:Use handrails, trekking poles or other aid to reduce stress on legs and prevent falls. Identify and avoid steepslopes, slippery areas, wet conditions. Evaluate work area and access routes for locations where fall prevention maybe beneficial to field staff. Install low or zero-impact fall protection (e.g., stake-supported railings, cable, or ropes)as appropriate to provide handholds.
PPE:
As required by task, Trekking poles or similar (as appropriate for task)All Personal Protective Equipment shall be inspected prior to use. Any PPE or equipment not in safe working conditionshall be marked and removed from service.
2. Contaminated Materials Handling (debris, soils, liquids, etc.)
Elevated concentrations of chlorinated solvents in groundwater
Risk: mediumSite Specific Primary Controls:Avoid direct contact, use tools whenever possible. Decontaminate and dispose of contaminated tools/equipment.Stand upwind of contaminated materials.
Required Trainings:
HAZWOPER 40hr, 8hr Respiratory Protection Fit Test Respiratory/Asbestos Medical Clearance
Key SOPs:S3NA-519-PR Respiratory Protection Program S3NA-602-PR Expoure Monitoring S3NA-605-PR Medical SurveillanceProgram
PPE:
Chemical resistant gloves (per HASP requirements), chemical resistant clothing, respiratory protection.All Personal Protective Equipment shall be inspected prior to use. Any PPE or equipment not in safe working conditionshall be marked and removed from service.
3. Sharp Objects/Tools (handling and use)
Lab supplied bottleware is glass and easily breakable-exercise caution; cutting tools for tubing
Risk: medium
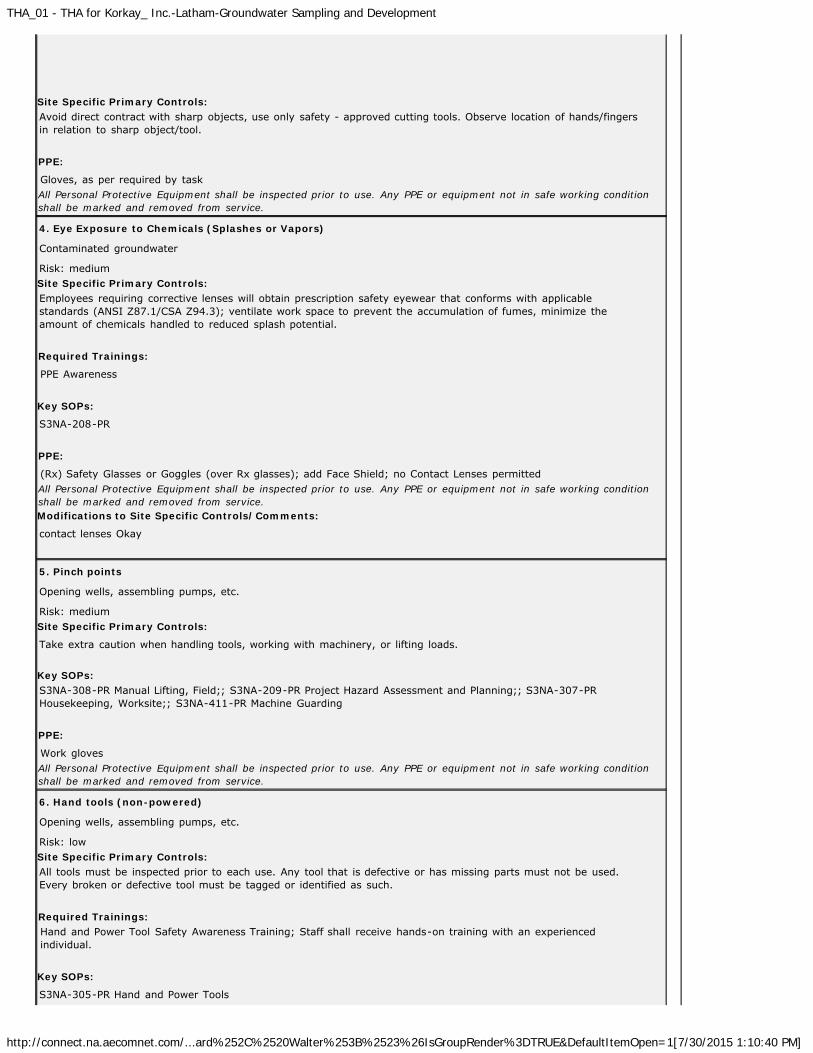
THA_01 - THA for Korkay_ Inc.-Latham-Groundwater Sampling and Development
http://connect.na.aecomnet.com/...ard%252C%2520Walter%253B%2523%26IsGroupRender%3DTRUE&DefaultItemOpen=1[7/30/2015 1:10:40 PM]
Site Specific Primary Controls:Avoid direct contract with sharp objects, use only safety - approved cutting tools. Observe location of hands/fingersin relation to sharp object/tool.
PPE:
Gloves, as per required by taskAll Personal Protective Equipment shall be inspected prior to use. Any PPE or equipment not in safe working conditionshall be marked and removed from service.
4. Eye Exposure to Chemicals (Splashes or Vapors)
Contaminated groundwater
Risk: mediumSite Specific Primary Controls:Employees requiring corrective lenses will obtain prescription safety eyewear that conforms with applicablestandards (ANSI Z87.1/CSA Z94.3); ventilate work space to prevent the accumulation of fumes, minimize theamount of chemicals handled to reduced splash potential.
Required Trainings:
PPE Awareness
Key SOPs:
S3NA-208-PR
PPE:
(Rx) Safety Glasses or Goggles (over Rx glasses); add Face Shield; no Contact Lenses permittedAll Personal Protective Equipment shall be inspected prior to use. Any PPE or equipment not in safe working conditionshall be marked and removed from service.Modifications to Site Specific Controls/Comments:
contact lenses Okay
5. Pinch points
Opening wells, assembling pumps, etc.
Risk: mediumSite Specific Primary Controls:
Take extra caution when handling tools, working with machinery, or lifting loads.
Key SOPs:S3NA-308-PR Manual Lifting, Field;; S3NA-209-PR Project Hazard Assessment and Planning;; S3NA-307-PRHousekeeping, Worksite;; S3NA-411-PR Machine Guarding
PPE:
Work glovesAll Personal Protective Equipment shall be inspected prior to use. Any PPE or equipment not in safe working conditionshall be marked and removed from service.
6. Hand tools (non-powered)
Opening wells, assembling pumps, etc.
Risk: lowSite Specific Primary Controls:All tools must be inspected prior to each use. Any tool that is defective or has missing parts must not be used.Every broken or defective tool must be tagged or identified as such.
Required Trainings:Hand and Power Tool Safety Awareness Training; Staff shall receive hands-on training with an experiencedindividual.
Key SOPs:
S3NA-305-PR Hand and Power Tools
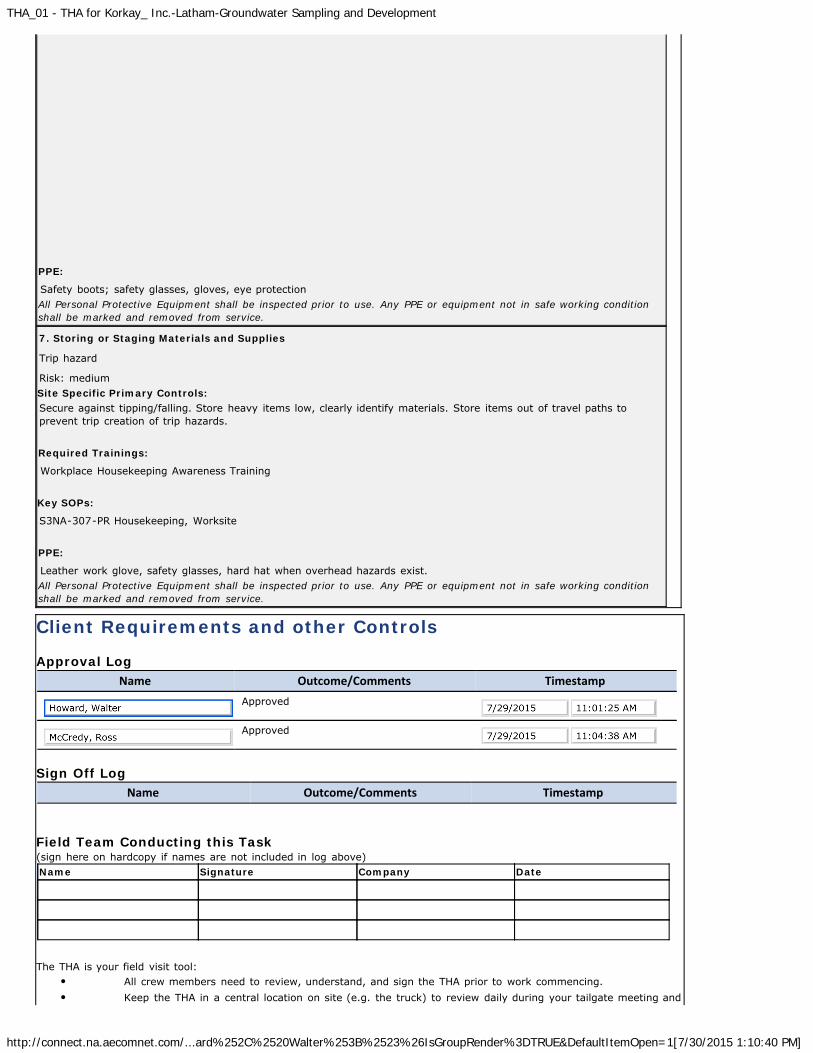
THA_01 - THA for Korkay_ Inc.-Latham-Groundwater Sampling and Development
http://connect.na.aecomnet.com/...ard%252C%2520Walter%253B%2523%26IsGroupRender%3DTRUE&DefaultItemOpen=1[7/30/2015 1:10:40 PM]
PPE:
Safety boots; safety glasses, gloves, eye protectionAll Personal Protective Equipment shall be inspected prior to use. Any PPE or equipment not in safe working conditionshall be marked and removed from service.
7. Storing or Staging Materials and Supplies
Trip hazard
Risk: mediumSite Specific Primary Controls:Secure against tipping/falling. Store heavy items low, clearly identify materials. Store items out of travel paths toprevent trip creation of trip hazards.
Required Trainings:
Workplace Housekeeping Awareness Training
Key SOPs:
S3NA-307-PR Housekeeping, Worksite
PPE:
Leather work glove, safety glasses, hard hat when overhead hazards exist.All Personal Protective Equipment shall be inspected prior to use. Any PPE or equipment not in safe working conditionshall be marked and removed from service.
Client Requirements and other Controls Approval Log
Name Outcome/Comments TimestampApproved
Approved
Sign Off Log
Name Outcome/Comments Timestamp Field Team Conducting this Task(sign here on hardcopy if names are not included in log above)Name Signature Company Date
The THA is your field visit tool:
All crew members need to review, understand, and sign the THA prior to work commencing.Keep the THA in a central location on site (e.g. the truck) to review daily during your tailgate meeting and
THA_01 - THA for Korkay_ Inc.-Latham-Groundwater Sampling and Development
http://connect.na.aecomnet.com/...ard%252C%2520Walter%253B%2523%26IsGroupRender%3DTRUE&DefaultItemOpen=1[7/30/2015 1:10:40 PM]
update as required.
Emergency Response Plan Refer to On-site Emergency Response Procedures
Do you need to add additional information or file attachments to this approved THA?Click the button below to view the Amendments page.
If you wish to use this THA for another task, you can make a copy by clicking below. The copywill appear in the "Saved but not Submitted" library.
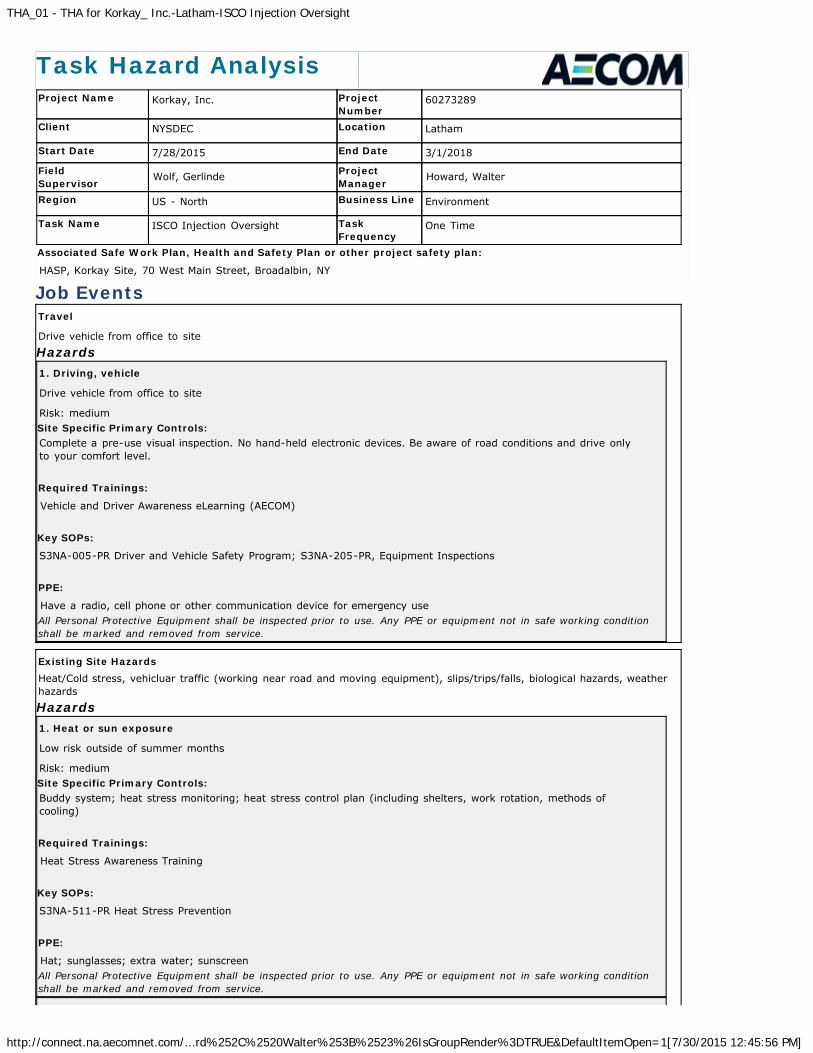
THA_01 - THA for Korkay_ Inc.-Latham-ISCO Injection Oversight
http://connect.na.aecomnet.com/...rd%252C%2520Walter%253B%2523%26IsGroupRender%3DTRUE&DefaultItemOpen=1[7/30/2015 12:45:56 PM]
Task Hazard AnalysisProject Name Korkay, Inc. Project
Number60273289
Client NYSDEC Location Latham
Start Date 7/28/2015 End Date 3/1/2018
FieldSupervisor
Wolf, Gerlinde ProjectManager
Howard, Walter
Region US - North Business Line Environment
Task Name ISCO Injection Oversight TaskFrequency
One Time
Associated Safe Work Plan, Health and Safety Plan or other project safety plan:
HASP, Korkay Site, 70 West Main Street, Broadalbin, NY
Job EventsTravel
Drive vehicle from office to site
Hazards1. Driving, vehicle
Drive vehicle from office to site
Risk: mediumSite Specific Primary Controls:Complete a pre-use visual inspection. No hand-held electronic devices. Be aware of road conditions and drive onlyto your comfort level.
Required Trainings:
Vehicle and Driver Awareness eLearning (AECOM)
Key SOPs:
S3NA-005-PR Driver and Vehicle Safety Program; S3NA-205-PR, Equipment Inspections
PPE:
Have a radio, cell phone or other communication device for emergency useAll Personal Protective Equipment shall be inspected prior to use. Any PPE or equipment not in safe working conditionshall be marked and removed from service.
Existing Site HazardsHeat/Cold stress, vehicluar traffic (working near road and moving equipment), slips/trips/falls, biological hazards, weatherhazards
Hazards1. Heat or sun exposure
Low risk outside of summer months
Risk: mediumSite Specific Primary Controls:Buddy system; heat stress monitoring; heat stress control plan (including shelters, work rotation, methods ofcooling)
Required Trainings:
Heat Stress Awareness Training
Key SOPs:
S3NA-511-PR Heat Stress Prevention
PPE:
Hat; sunglasses; extra water; sunscreenAll Personal Protective Equipment shall be inspected prior to use. Any PPE or equipment not in safe working conditionshall be marked and removed from service.
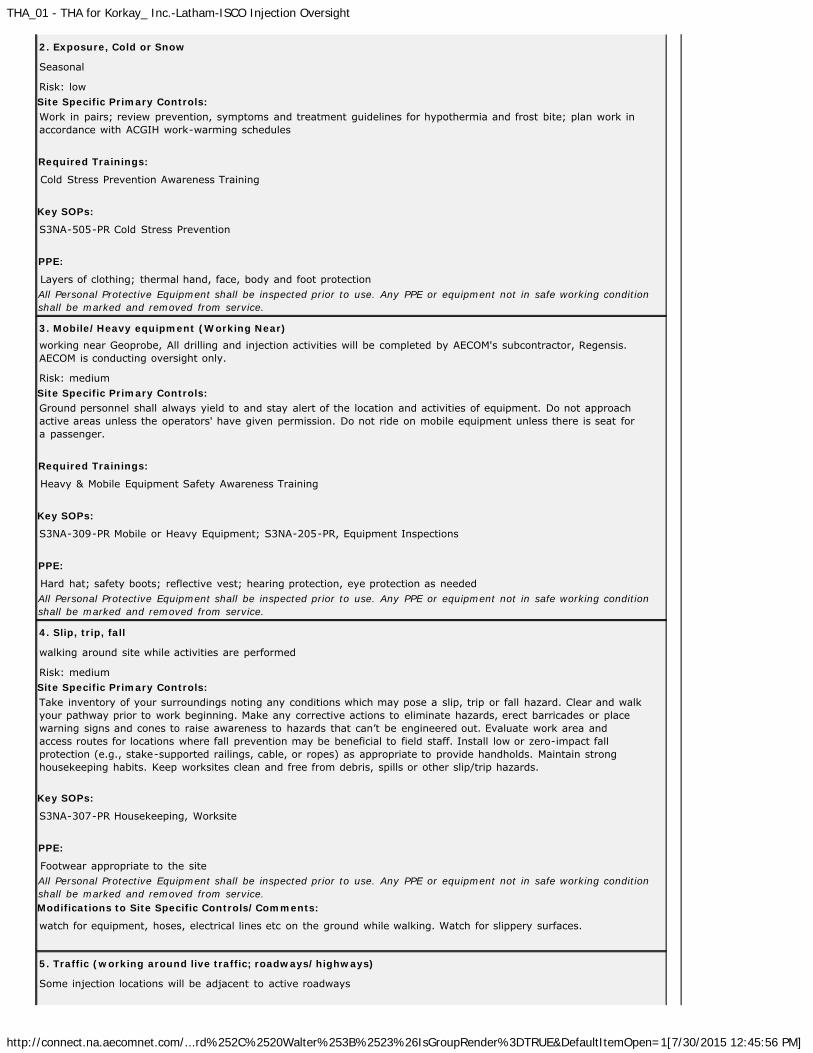
THA_01 - THA for Korkay_ Inc.-Latham-ISCO Injection Oversight
http://connect.na.aecomnet.com/...rd%252C%2520Walter%253B%2523%26IsGroupRender%3DTRUE&DefaultItemOpen=1[7/30/2015 12:45:56 PM]
2. Exposure, Cold or Snow
Seasonal
Risk: lowSite Specific Primary Controls:Work in pairs; review prevention, symptoms and treatment guidelines for hypothermia and frost bite; plan work inaccordance with ACGIH work-warming schedules
Required Trainings:
Cold Stress Prevention Awareness Training
Key SOPs:
S3NA-505-PR Cold Stress Prevention
PPE:
Layers of clothing; thermal hand, face, body and foot protectionAll Personal Protective Equipment shall be inspected prior to use. Any PPE or equipment not in safe working conditionshall be marked and removed from service.
3. Mobile/Heavy equipment (Working Near)working near Geoprobe, All drilling and injection activities will be completed by AECOM's subcontractor, Regensis.AECOM is conducting oversight only.
Risk: mediumSite Specific Primary Controls:Ground personnel shall always yield to and stay alert of the location and activities of equipment. Do not approachactive areas unless the operators' have given permission. Do not ride on mobile equipment unless there is seat fora passenger.
Required Trainings:
Heavy & Mobile Equipment Safety Awareness Training
Key SOPs:
S3NA-309-PR Mobile or Heavy Equipment; S3NA-205-PR, Equipment Inspections
PPE:
Hard hat; safety boots; reflective vest; hearing protection, eye protection as neededAll Personal Protective Equipment shall be inspected prior to use. Any PPE or equipment not in safe working conditionshall be marked and removed from service.
4. Slip, trip, fall
walking around site while activities are performed
Risk: mediumSite Specific Primary Controls:Take inventory of your surroundings noting any conditions which may pose a slip, trip or fall hazard. Clear and walkyour pathway prior to work beginning. Make any corrective actions to eliminate hazards, erect barricades or placewarning signs and cones to raise awareness to hazards that can’t be engineered out. Evaluate work area andaccess routes for locations where fall prevention may be beneficial to field staff. Install low or zero-impact fallprotection (e.g., stake-supported railings, cable, or ropes) as appropriate to provide handholds. Maintain stronghousekeeping habits. Keep worksites clean and free from debris, spills or other slip/trip hazards.
Key SOPs:
S3NA-307-PR Housekeeping, Worksite
PPE:
Footwear appropriate to the siteAll Personal Protective Equipment shall be inspected prior to use. Any PPE or equipment not in safe working conditionshall be marked and removed from service.Modifications to Site Specific Controls/Comments:
watch for equipment, hoses, electrical lines etc on the ground while walking. Watch for slippery surfaces.
5. Traffic (working around live traffic; roadways/highways)
Some injection locations will be adjacent to active roadways
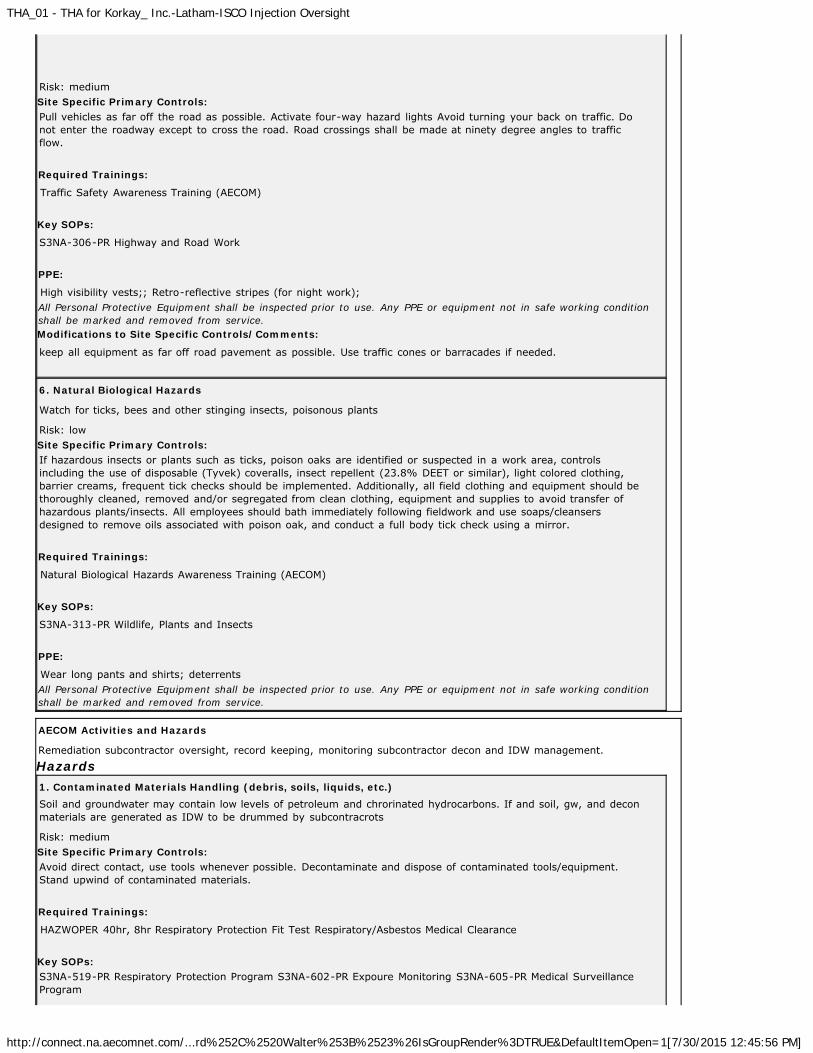
THA_01 - THA for Korkay_ Inc.-Latham-ISCO Injection Oversight
http://connect.na.aecomnet.com/...rd%252C%2520Walter%253B%2523%26IsGroupRender%3DTRUE&DefaultItemOpen=1[7/30/2015 12:45:56 PM]
Risk: mediumSite Specific Primary Controls:Pull vehicles as far off the road as possible. Activate four-way hazard lights Avoid turning your back on traffic. Donot enter the roadway except to cross the road. Road crossings shall be made at ninety degree angles to trafficflow.
Required Trainings:
Traffic Safety Awareness Training (AECOM)
Key SOPs:
S3NA-306-PR Highway and Road Work
PPE:
High visibility vests;; Retro-reflective stripes (for night work);All Personal Protective Equipment shall be inspected prior to use. Any PPE or equipment not in safe working conditionshall be marked and removed from service.Modifications to Site Specific Controls/Comments:
keep all equipment as far off road pavement as possible. Use traffic cones or barracades if needed.
6. Natural Biological Hazards
Watch for ticks, bees and other stinging insects, poisonous plants
Risk: lowSite Specific Primary Controls:If hazardous insects or plants such as ticks, poison oaks are identified or suspected in a work area, controlsincluding the use of disposable (Tyvek) coveralls, insect repellent (23.8% DEET or similar), light colored clothing,barrier creams, frequent tick checks should be implemented. Additionally, all field clothing and equipment should bethoroughly cleaned, removed and/or segregated from clean clothing, equipment and supplies to avoid transfer ofhazardous plants/insects. All employees should bath immediately following fieldwork and use soaps/cleansersdesigned to remove oils associated with poison oak, and conduct a full body tick check using a mirror.
Required Trainings:
Natural Biological Hazards Awareness Training (AECOM)
Key SOPs:
S3NA-313-PR Wildlife, Plants and Insects
PPE:
Wear long pants and shirts; deterrentsAll Personal Protective Equipment shall be inspected prior to use. Any PPE or equipment not in safe working conditionshall be marked and removed from service.
AECOM Activities and Hazards
Remediation subcontractor oversight, record keeping, monitoring subcontractor decon and IDW management.
Hazards1. Contaminated Materials Handling (debris, soils, liquids, etc.)Soil and groundwater may contain low levels of petroleum and chrorinated hydrocarbons. If and soil, gw, and deconmaterials are generated as IDW to be drummed by subcontracrots
Risk: mediumSite Specific Primary Controls:Avoid direct contact, use tools whenever possible. Decontaminate and dispose of contaminated tools/equipment.Stand upwind of contaminated materials.
Required Trainings:
HAZWOPER 40hr, 8hr Respiratory Protection Fit Test Respiratory/Asbestos Medical Clearance
Key SOPs:S3NA-519-PR Respiratory Protection Program S3NA-602-PR Expoure Monitoring S3NA-605-PR Medical SurveillanceProgram
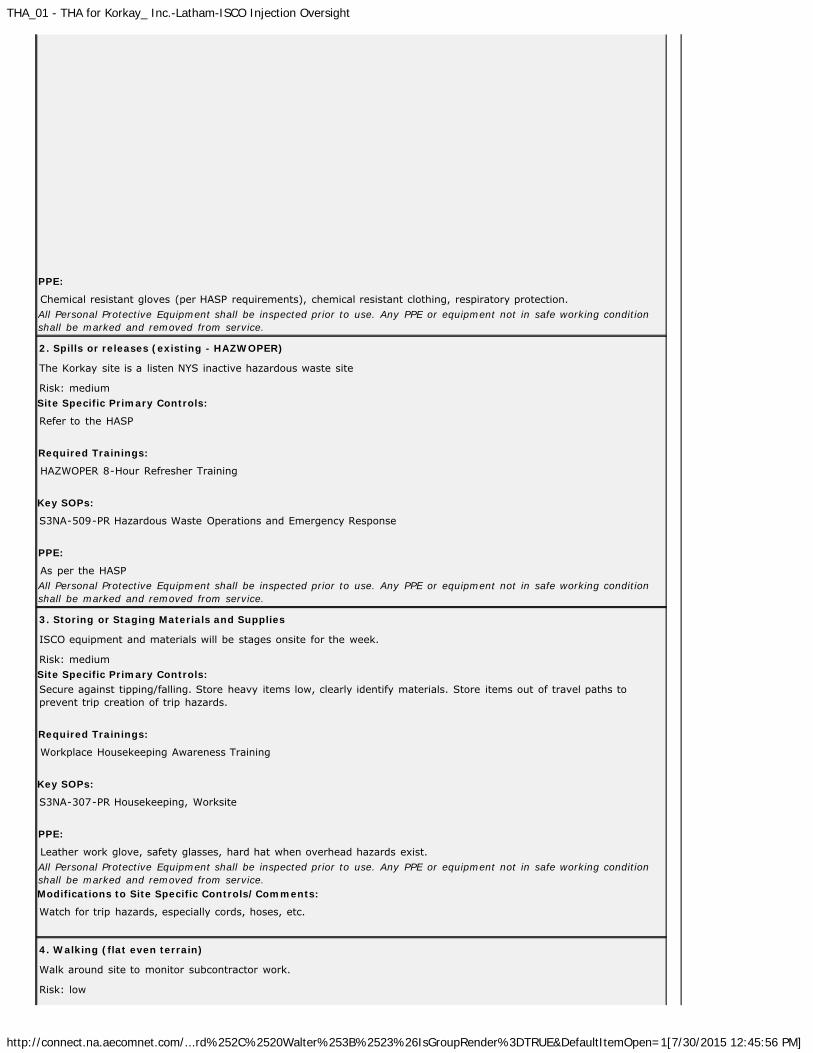
THA_01 - THA for Korkay_ Inc.-Latham-ISCO Injection Oversight
http://connect.na.aecomnet.com/...rd%252C%2520Walter%253B%2523%26IsGroupRender%3DTRUE&DefaultItemOpen=1[7/30/2015 12:45:56 PM]
PPE:
Chemical resistant gloves (per HASP requirements), chemical resistant clothing, respiratory protection.All Personal Protective Equipment shall be inspected prior to use. Any PPE or equipment not in safe working conditionshall be marked and removed from service.
2. Spills or releases (existing - HAZWOPER)
The Korkay site is a listen NYS inactive hazardous waste site
Risk: mediumSite Specific Primary Controls:
Refer to the HASP
Required Trainings:
HAZWOPER 8-Hour Refresher Training
Key SOPs:
S3NA-509-PR Hazardous Waste Operations and Emergency Response
PPE:
As per the HASPAll Personal Protective Equipment shall be inspected prior to use. Any PPE or equipment not in safe working conditionshall be marked and removed from service.
3. Storing or Staging Materials and Supplies
ISCO equipment and materials will be stages onsite for the week.
Risk: mediumSite Specific Primary Controls:Secure against tipping/falling. Store heavy items low, clearly identify materials. Store items out of travel paths toprevent trip creation of trip hazards.
Required Trainings:
Workplace Housekeeping Awareness Training
Key SOPs:
S3NA-307-PR Housekeeping, Worksite
PPE:
Leather work glove, safety glasses, hard hat when overhead hazards exist.All Personal Protective Equipment shall be inspected prior to use. Any PPE or equipment not in safe working conditionshall be marked and removed from service.Modifications to Site Specific Controls/Comments:
Watch for trip hazards, especially cords, hoses, etc.
4. Walking (flat even terrain)
Walk around site to monitor subcontractor work.
Risk: low
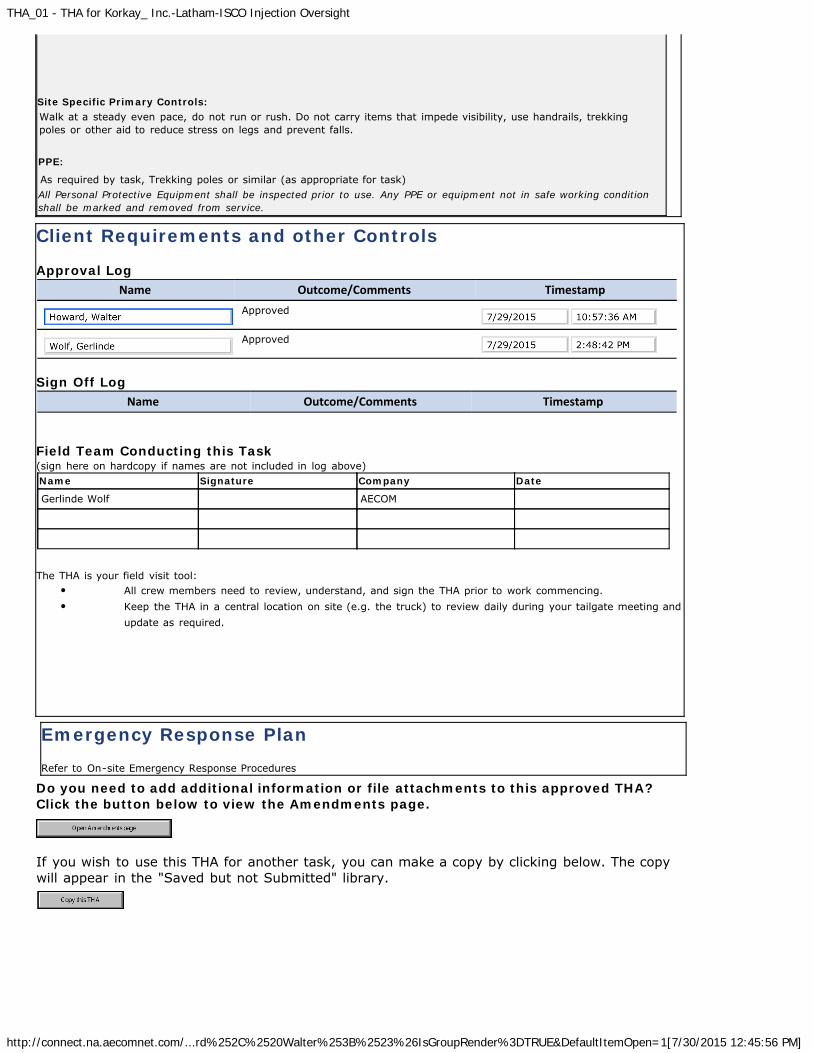
THA_01 - THA for Korkay_ Inc.-Latham-ISCO Injection Oversight
http://connect.na.aecomnet.com/...rd%252C%2520Walter%253B%2523%26IsGroupRender%3DTRUE&DefaultItemOpen=1[7/30/2015 12:45:56 PM]
Site Specific Primary Controls:Walk at a steady even pace, do not run or rush. Do not carry items that impede visibility, use handrails, trekkingpoles or other aid to reduce stress on legs and prevent falls.
PPE:
As required by task, Trekking poles or similar (as appropriate for task)All Personal Protective Equipment shall be inspected prior to use. Any PPE or equipment not in safe working conditionshall be marked and removed from service.
Client Requirements and other Controls Approval Log
Name Outcome/Comments TimestampApproved
Approved
Sign Off Log
Name Outcome/Comments Timestamp Field Team Conducting this Task(sign here on hardcopy if names are not included in log above)Name Signature Company Date
Gerlinde Wolf AECOM
The THA is your field visit tool:
All crew members need to review, understand, and sign the THA prior to work commencing.Keep the THA in a central location on site (e.g. the truck) to review daily during your tailgate meeting andupdate as required.
Emergency Response Plan Refer to On-site Emergency Response Procedures
Do you need to add additional information or file attachments to this approved THA?Click the button below to view the Amendments page.
If you wish to use this THA for another task, you can make a copy by clicking below. The copywill appear in the "Saved but not Submitted" library.

THA_01 - THA for Korkay_ Inc.-Latham-Survey Oversight
http://connect.na.aecomnet.com/...ard%252C%2520Walter%253B%2523%26IsGroupRender%3DTRUE&DefaultItemOpen=1[7/30/2015 1:11:09 PM]
Task Hazard AnalysisProject Name Korkay, Inc. Project
Number60273289
Client NYSDEC Location Latham
Start Date 7/28/2015 End Date 3/1/2018
FieldSupervisor
McCredy, Ross ProjectManager
Howard, Walter
Region US - North Business Line Environment
Task Name Survey Oversight TaskFrequency
One Time
Associated Safe Work Plan, Health and Safety Plan or other project safety plan:
HASP, Korkay Site, 70 West Main Street, Broadalbin, NY
Job EventsTravel
Drive in personal, rented, or company vehicle to/from site to home/hotel
Hazards1. Driving, vehicle
Normal local traffic
Risk: mediumSite Specific Primary Controls:Complete a pre-use visual inspection. No hand-held electronic devices. Be aware of road conditions and drive onlyto your comfort level.
Required Trainings:
Vehicle and Driver Awareness eLearning (AECOM)
Key SOPs:
S3NA-005-PR Driver and Vehicle Safety Program; S3NA-205-PR, Equipment Inspections
PPE:
Have a radio, cell phone or other communication device for emergency useAll Personal Protective Equipment shall be inspected prior to use. Any PPE or equipment not in safe working conditionshall be marked and removed from service.Modifications to Site Specific Controls/Comments:All PPE shall be inspected prior to use. Any PPE or equipment not in safe working condition shall be marked andremoved from service.
Existing Site HazardsHeat or Sun Exposure, Vehicular Traffic( working near road and moving between locations), Slips/trips/falls, biologicalfactors, weather hazards
Hazards1. Heat or sun exposure
Low risk outside of summer months
Risk: mediumSite Specific Primary Controls:Buddy system; heat stress monitoring; heat stress control plan (including shelters, work rotation, methods ofcooling)
Required Trainings:
Heat Stress Awareness Training
Key SOPs:
S3NA-511-PR Heat Stress Prevention

THA_01 - THA for Korkay_ Inc.-Latham-Survey Oversight
http://connect.na.aecomnet.com/...ard%252C%2520Walter%253B%2523%26IsGroupRender%3DTRUE&DefaultItemOpen=1[7/30/2015 1:11:09 PM]
PPE:
Hat; sunglasses; extra water; sunscreenAll Personal Protective Equipment shall be inspected prior to use. Any PPE or equipment not in safe working conditionshall be marked and removed from service.
3. Slip, trip, fall
unfamiliar walking terrain, large area to cover with variable surfaces
Risk: mediumSite Specific Primary Controls:Take inventory of your surroundings noting any conditions which may pose a slip, trip or fall hazard. Clear and walkyour pathway prior to work beginning. Make any corrective actions to eliminate hazards, erect barricades or placewarning signs and cones to raise awareness to hazards that can’t be engineered out. Evaluate work area andaccess routes for locations where fall prevention may be beneficial to field staff. Install low or zero-impact fallprotection (e.g., stake-supported railings, cable, or ropes) as appropriate to provide handholds. Maintain stronghousekeeping habits. Keep worksites clean and free from debris, spills or other slip/trip hazards.
Key SOPs:
S3NA-307-PR Housekeeping, Worksite
PPE:
Footwear appropriate to the siteAll Personal Protective Equipment shall be inspected prior to use. Any PPE or equipment not in safe working conditionshall be marked and removed from service.Modifications to Site Specific Controls/Comments:All PPE shall be inspected prior to use. Any PPE or equipment not in safe working condition shall be marked andremoved from service.
4. Eye exposure to protruding/ poking objects
Mainly vegetation in uncleared areas
Risk: mediumSite Specific Primary Controls:Inspect work area for protruding objects that can poke employees; remove poking hazards when possible orproceed through work area taking steps to clear protrusions from the path of travel by hand (i.e. twigs/brancheswhen conducting surveys in wooded areas).
Required Trainings:
PPE Awareness
Key SOPs:
S3NA-208-PR
PPE:
Tight fitting/foam sealed (Rx) Safety Glasses or Goggles (over Rx glasses)All Personal Protective Equipment shall be inspected prior to use. Any PPE or equipment not in safe working conditionshall be marked and removed from service.Modifications to Site Specific Controls/Comments:All PPE shall be inspected prior to use. Any PPE or equipment not in safe working condition shall be marked andremoved from service.
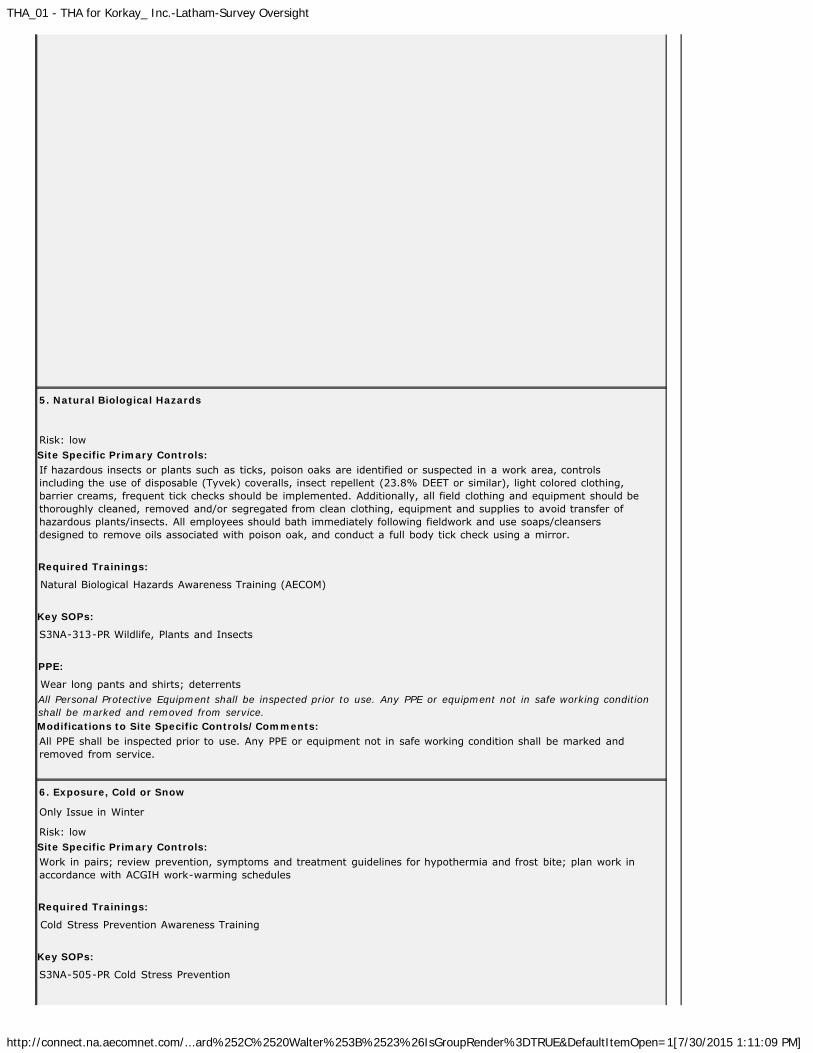
THA_01 - THA for Korkay_ Inc.-Latham-Survey Oversight
http://connect.na.aecomnet.com/...ard%252C%2520Walter%253B%2523%26IsGroupRender%3DTRUE&DefaultItemOpen=1[7/30/2015 1:11:09 PM]
5. Natural Biological Hazards
Risk: lowSite Specific Primary Controls:If hazardous insects or plants such as ticks, poison oaks are identified or suspected in a work area, controlsincluding the use of disposable (Tyvek) coveralls, insect repellent (23.8% DEET or similar), light colored clothing,barrier creams, frequent tick checks should be implemented. Additionally, all field clothing and equipment should bethoroughly cleaned, removed and/or segregated from clean clothing, equipment and supplies to avoid transfer ofhazardous plants/insects. All employees should bath immediately following fieldwork and use soaps/cleansersdesigned to remove oils associated with poison oak, and conduct a full body tick check using a mirror.
Required Trainings:
Natural Biological Hazards Awareness Training (AECOM)
Key SOPs:
S3NA-313-PR Wildlife, Plants and Insects
PPE:
Wear long pants and shirts; deterrentsAll Personal Protective Equipment shall be inspected prior to use. Any PPE or equipment not in safe working conditionshall be marked and removed from service.Modifications to Site Specific Controls/Comments:All PPE shall be inspected prior to use. Any PPE or equipment not in safe working condition shall be marked andremoved from service.
6. Exposure, Cold or Snow
Only Issue in Winter
Risk: lowSite Specific Primary Controls:Work in pairs; review prevention, symptoms and treatment guidelines for hypothermia and frost bite; plan work inaccordance with ACGIH work-warming schedules
Required Trainings:
Cold Stress Prevention Awareness Training
Key SOPs:
S3NA-505-PR Cold Stress Prevention
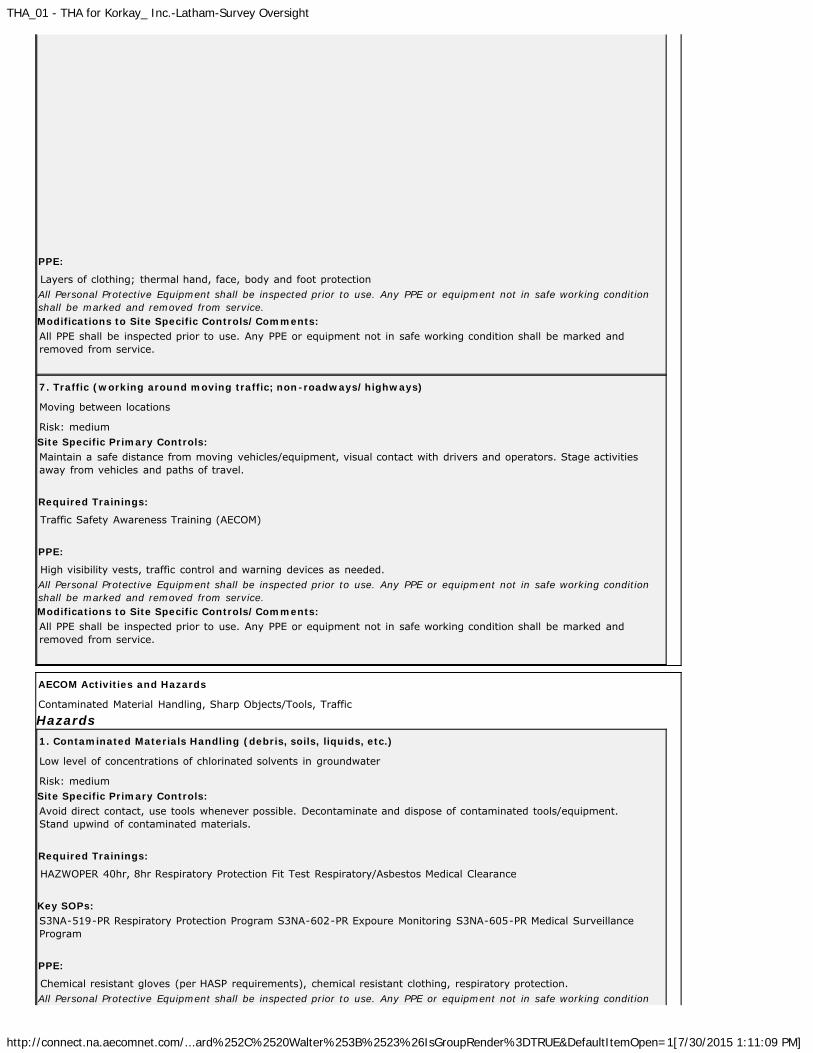
THA_01 - THA for Korkay_ Inc.-Latham-Survey Oversight
http://connect.na.aecomnet.com/...ard%252C%2520Walter%253B%2523%26IsGroupRender%3DTRUE&DefaultItemOpen=1[7/30/2015 1:11:09 PM]
PPE:
Layers of clothing; thermal hand, face, body and foot protectionAll Personal Protective Equipment shall be inspected prior to use. Any PPE or equipment not in safe working conditionshall be marked and removed from service.Modifications to Site Specific Controls/Comments:All PPE shall be inspected prior to use. Any PPE or equipment not in safe working condition shall be marked andremoved from service.
7. Traffic (working around moving traffic; non-roadways/highways)
Moving between locations
Risk: mediumSite Specific Primary Controls:Maintain a safe distance from moving vehicles/equipment, visual contact with drivers and operators. Stage activitiesaway from vehicles and paths of travel.
Required Trainings:
Traffic Safety Awareness Training (AECOM)
PPE:
High visibility vests, traffic control and warning devices as needed.All Personal Protective Equipment shall be inspected prior to use. Any PPE or equipment not in safe working conditionshall be marked and removed from service.Modifications to Site Specific Controls/Comments:All PPE shall be inspected prior to use. Any PPE or equipment not in safe working condition shall be marked andremoved from service.
AECOM Activities and Hazards
Contaminated Material Handling, Sharp Objects/Tools, Traffic
Hazards1. Contaminated Materials Handling (debris, soils, liquids, etc.)
Low level of concentrations of chlorinated solvents in groundwater
Risk: mediumSite Specific Primary Controls:Avoid direct contact, use tools whenever possible. Decontaminate and dispose of contaminated tools/equipment.Stand upwind of contaminated materials.
Required Trainings:
HAZWOPER 40hr, 8hr Respiratory Protection Fit Test Respiratory/Asbestos Medical Clearance
Key SOPs:S3NA-519-PR Respiratory Protection Program S3NA-602-PR Expoure Monitoring S3NA-605-PR Medical SurveillanceProgram
PPE:
Chemical resistant gloves (per HASP requirements), chemical resistant clothing, respiratory protection.All Personal Protective Equipment shall be inspected prior to use. Any PPE or equipment not in safe working condition
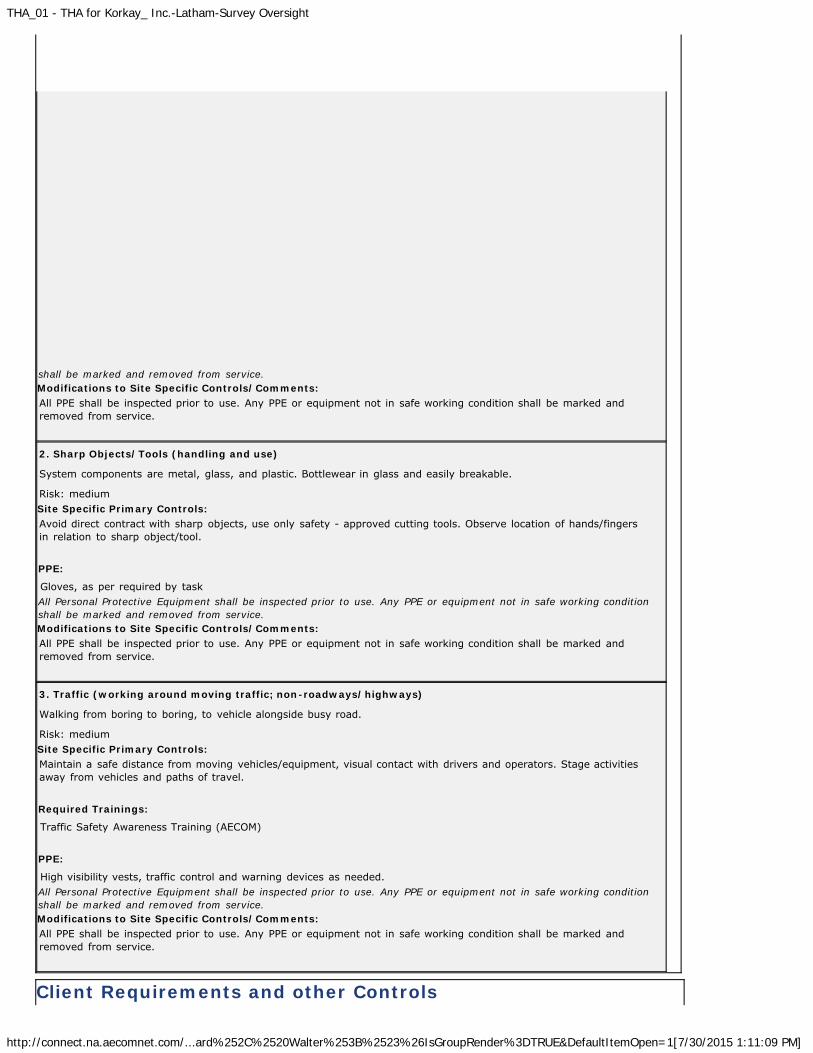
THA_01 - THA for Korkay_ Inc.-Latham-Survey Oversight
http://connect.na.aecomnet.com/...ard%252C%2520Walter%253B%2523%26IsGroupRender%3DTRUE&DefaultItemOpen=1[7/30/2015 1:11:09 PM]
shall be marked and removed from service.Modifications to Site Specific Controls/Comments:All PPE shall be inspected prior to use. Any PPE or equipment not in safe working condition shall be marked andremoved from service.
2. Sharp Objects/Tools (handling and use)
System components are metal, glass, and plastic. Bottlewear in glass and easily breakable.
Risk: mediumSite Specific Primary Controls:Avoid direct contract with sharp objects, use only safety - approved cutting tools. Observe location of hands/fingersin relation to sharp object/tool.
PPE:
Gloves, as per required by taskAll Personal Protective Equipment shall be inspected prior to use. Any PPE or equipment not in safe working conditionshall be marked and removed from service.Modifications to Site Specific Controls/Comments:All PPE shall be inspected prior to use. Any PPE or equipment not in safe working condition shall be marked andremoved from service.
3. Traffic (working around moving traffic; non-roadways/highways)
Walking from boring to boring, to vehicle alongside busy road.
Risk: mediumSite Specific Primary Controls:Maintain a safe distance from moving vehicles/equipment, visual contact with drivers and operators. Stage activitiesaway from vehicles and paths of travel.
Required Trainings:
Traffic Safety Awareness Training (AECOM)
PPE:
High visibility vests, traffic control and warning devices as needed.All Personal Protective Equipment shall be inspected prior to use. Any PPE or equipment not in safe working conditionshall be marked and removed from service.Modifications to Site Specific Controls/Comments:All PPE shall be inspected prior to use. Any PPE or equipment not in safe working condition shall be marked andremoved from service.
Client Requirements and other Controls
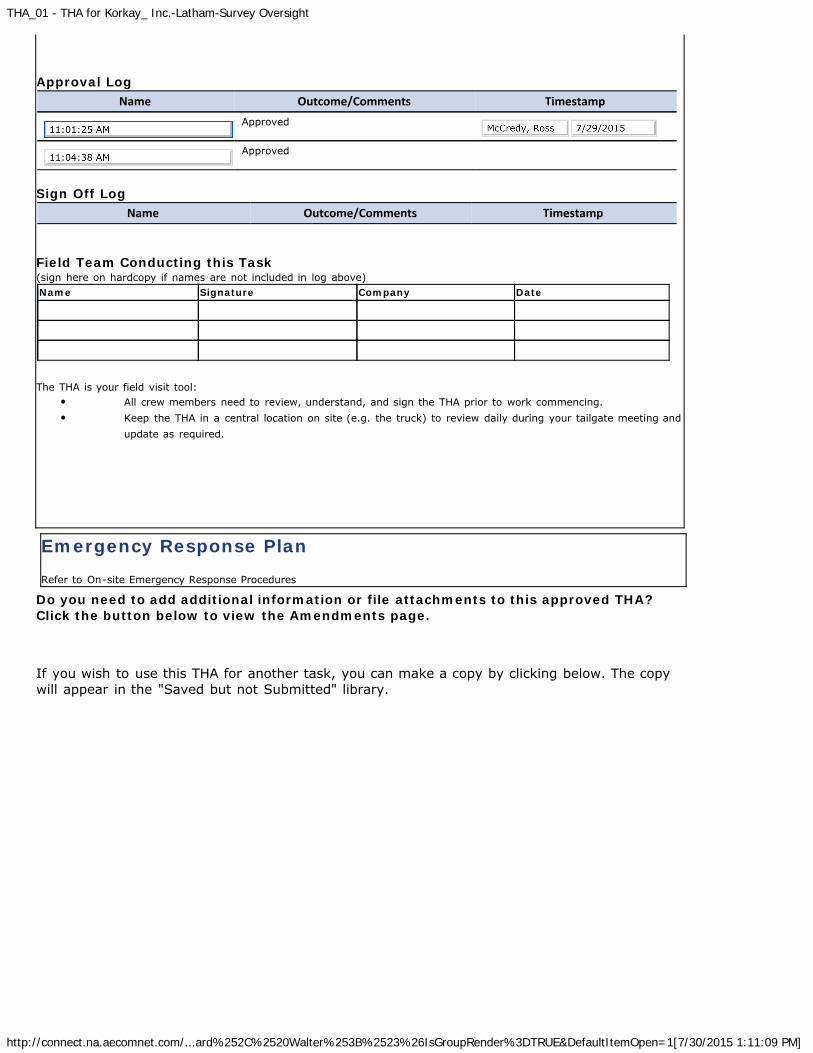
THA_01 - THA for Korkay_ Inc.-Latham-Survey Oversight
http://connect.na.aecomnet.com/...ard%252C%2520Walter%253B%2523%26IsGroupRender%3DTRUE&DefaultItemOpen=1[7/30/2015 1:11:09 PM]
Approval Log
Name Outcome/Comments TimestampApproved
Approved
Sign Off Log
Name Outcome/Comments Timestamp Field Team Conducting this Task(sign here on hardcopy if names are not included in log above)Name Signature Company Date
The THA is your field visit tool:
All crew members need to review, understand, and sign the THA prior to work commencing.Keep the THA in a central location on site (e.g. the truck) to review daily during your tailgate meeting andupdate as required.
Emergency Response Plan Refer to On-site Emergency Response Procedures
Do you need to add additional information or file attachments to this approved THA?Click the button below to view the Amendments page.
If you wish to use this THA for another task, you can make a copy by clicking below. The copywill appear in the "Saved but not Submitted" library.
Attachment B Safety Data Sheets
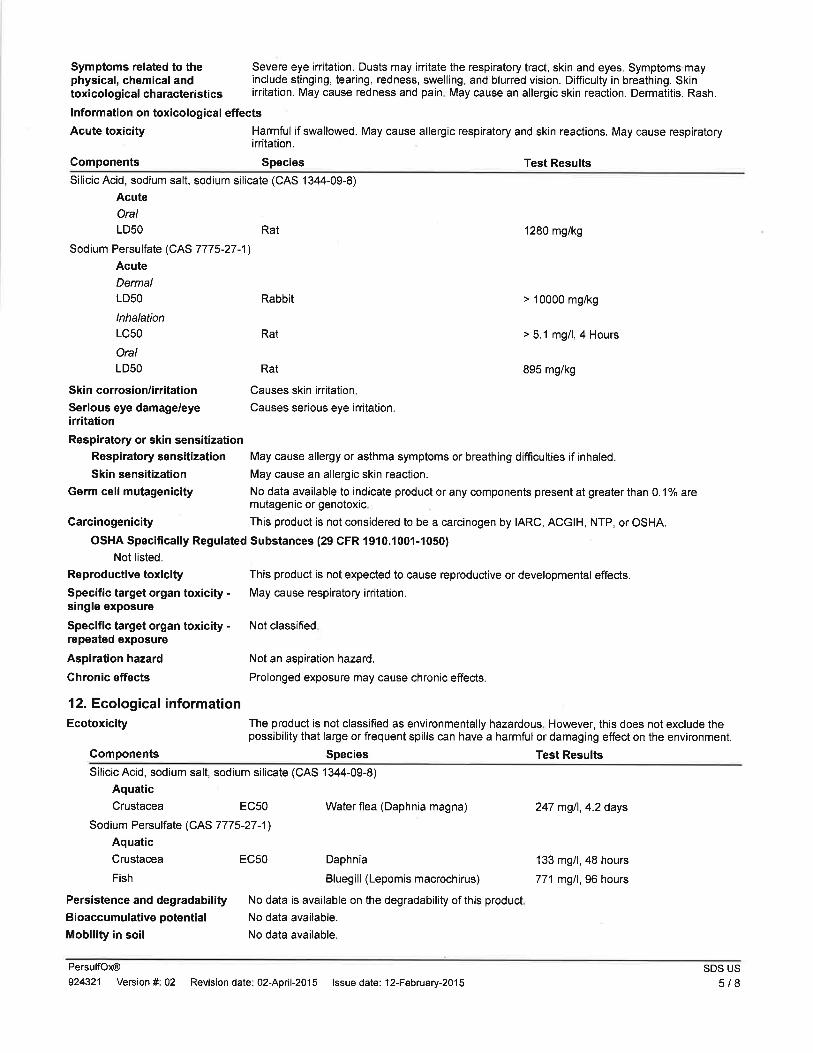
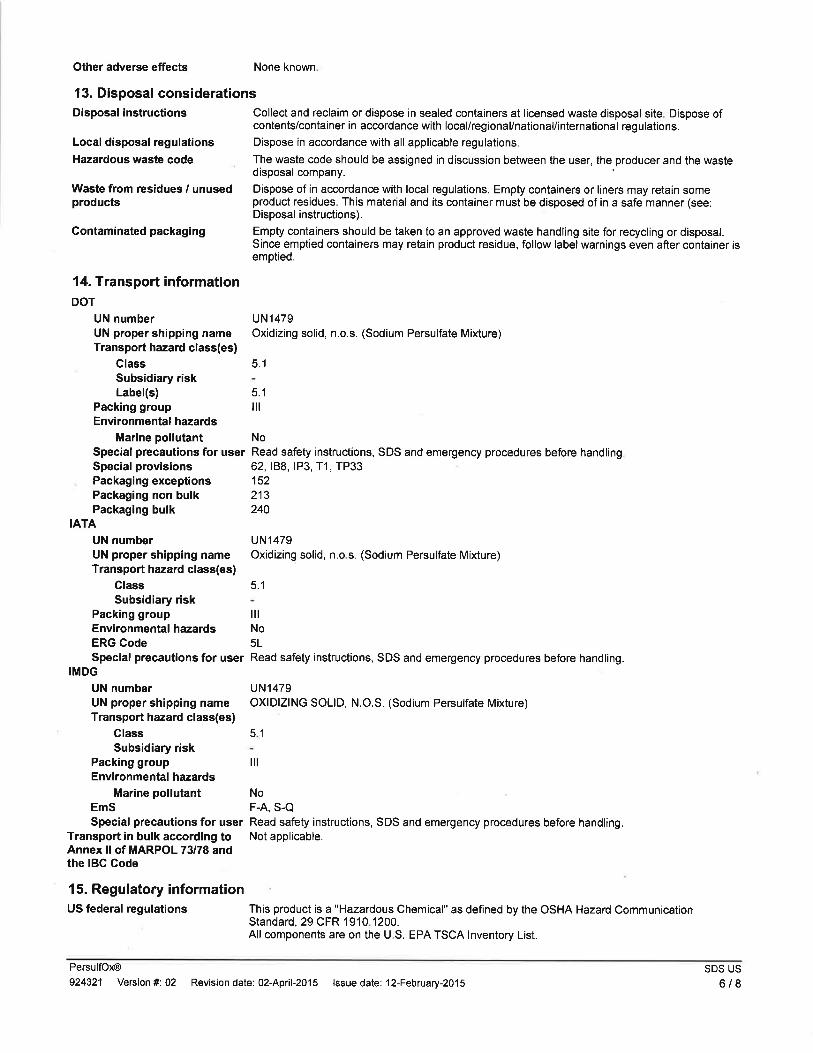
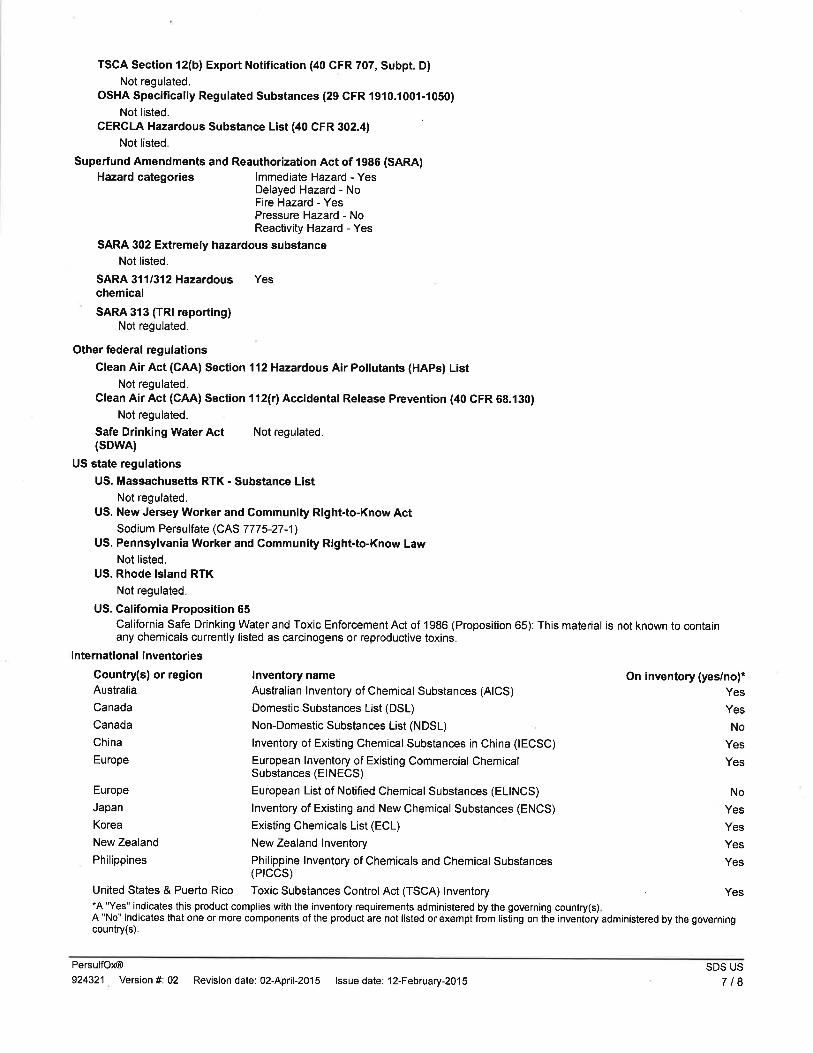
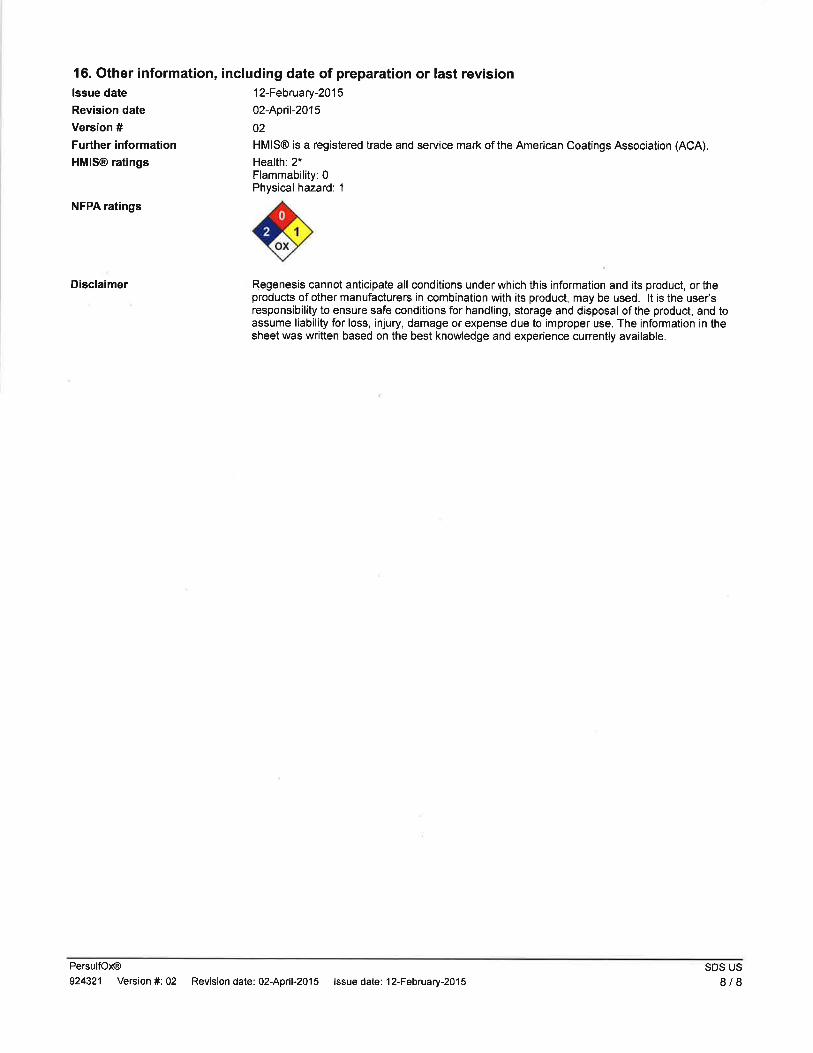

Attachment C Applicable SH&E SOPs
Vehicle and Driver Safety Program (S3NA-005-PR1)Revision 4 March 27, 2015
PRINTED COPIES ARE UNCONTROLLED. CONTROLLED COPY IS AVAILABLE ON COMPANY INTRANET. 1 of 9
Americas
Vehicle and Driver Safety Program S3NA-005-PR1
1.0 Purpose and Scope
1.1 This procedure applies to employees who operate motor vehicles that are owned, rented, or leased by AECOM and to employees who use personal, client or government-supplied vehicles while conducting AECOM business. This Vehicle and Driver Safety Program applies to AECOM Americas operations. Policies and procedures related to the operation of commercial motor vehicles are in addition to this procedure, see S3NA-404-PR1 Commercial Motor Vehicles. Operational procedures related to the use of AECOM owned vehicles are addressed in the Americas Fleet Vehicle Operations Policy.
1.2 Vehicle and transportation related death is among the leading causes of death in the United States. In the occupational setting, motor vehicle crashes are the number one cause of death.
1.3 Vehicle damage and damage to property by vehicles are generally avoidable incidents that can result in injuries and added costs for repairs and replacements.
2.0 Terms and Definitions
2.1 Americas Fleet Vehicle Management – The team of AECOM employees who oversee the operations, safety, and performance of the Americas Fleet.
2.2 Authorized Driver – AECOM employees who have provided proof of a current driver’s license, proof of insurance and completed AECOM Driver & Vehicle Safety Training. Employees authorized to operate an AECOM Fleet Vehicle must receive additional approval by Region Fleet Vehicle Coordinators. Refer to Americas Fleet Vehicle Operations Policy.
2.3 Commercial Motor Vehicle (CMV) – For AECOM operations, a CMV is defined as a vehicle used for AECOM business that:
Carries a quantity of hazardous material beyond the criteria in 49 CFR 173.6 (Materials of Trade).
2.4 Company Business – Any activity that is performed in the name of the company. This includes vehicle travel between work locations, client sites, meeting locations as well as driving performed as a part of work related travel (driving to and from airports, hotels, train stations). Company business does not include driving that is a part of a routine commute from home to an office location.
2.5 Distracted Driving – An activity that takes the driver’s attention away from the primary task of driving.
2.6 Driving Under the Influence (DUI)/Driving While Intoxicated (DWI) – DUI is the operation of a vehicle on company business under the influence of alcohol, drugs, medications, or other substances capable of inducing an altered mental state and/or impairing physical and mental judgments such that the influence of said substances produces impairment in violation of governmental laws for the location of the impairment.
2.7 Fatigue – A general term used to describe the experience of being “sleepy”, “tired” or “exhausted”. The effect of fatigue is both a physiological and a psychological and can severely impair a driver’s judgement.Fatigue can cause lapses in concentration which could prove fatal. Fatigue is not just a problem for drivers on long trips as a drivers can also suffer from fatigue even on short trips.
2.8 Fleet Vehicle – A motorized vehicle owned or leased by AECOM. These vehicles may be assigned to a specific driver or may be part of an office vehicle pool.
2.9 IndustrySafe – AECOM’s internal database for the management of safety, health and environmental incidents. IndustrySafe is accessible to all AECOM employees, and maintains confidentiality for protected information.
Vehicle and Driver Safety Program (S3NA-005-PR1)Revision 4 March 27, 2015
PRINTED COPIES ARE UNCONTROLLED. CONTROLLED COPY IS AVAILABLE ON COMPANY INTRANET. 2 of 9
2.10 Journey Management – A process for planning and executing necessary journeys safely.
2.11 Local Laws – Signs, postings, laws, regulations, ordinances and codes applicable for the jurisdiction in which the motor vehicle is being operated.
2.12 Managers/Management – All AECOM company personnel with supervisory responsibilities or direct reports.
2.13 Mobile Communication Device – A mobile electronic device that is used to receive or communicate voice, email, internet, and/or public media. The device requires user interaction (typing, dialing, reading, keying, etc.) that distracts the motor vehicle operator. Example devices include, but are not limited to:
Mobile/Cellular phones
Personal Data Assistant (PDA)
iPads, iPods, or other tablet models
Computers
Global Positioning System receivers
2.14 Motor Vehicle Report (MVR) – A listing of the tickets (violations), incidents collision for an individual driver over a period of time (e.g. 3 years, 5 years) provided by a state or provincial authority such as the Department of Motor Vehicles.
2.15 Personal Vehicle – A motorized vehicle owned or leased by an employee.
2.16 Spotters – Extra personnel that may provide guidance when maneuvering in close and/or complex situations in order to avoid the occurrence of an incident.
2.17 Task Hazard Analysis (THA) – A process for planning and evaluating tasks, such as driving, for hazards and control measures to reduce and eliminate the risk of a harmful event.
2.18 Vehicle Incident – An incident, for the purposes of this procedure, is a vehicle collision or other vehicle related event where personal injury or property damage occurs. This includes theft, vandalism, and criminal mischief. Citations are considered incidents when the citation is received during the course of business and results in a restricted or suspended license, a governmental motor vehicle agency assigning points to the employee’s license, or the employee provides AECOM’s insurance as proof of insurance at the time of incident.
3.0 References
3.1 AECOM US, Canada and South America Employee Handbook (HR Department)
3.2 Americas Fleet Vehicle Operations Policy
3.3 AECOM Global Travel Policy
3.4 National Safety Council
3.5 Smith Systems
3.6 WP-001-PR Firearms Standard
3.7 S2-032-PR1 Weapons Safety
3.8 S3NA-003-PR1 SH&E Training
3.9 S3NA-004-PR1 Incident Reporting
3.10 S3NA-209-PR1 Project Hazard Assessment and Planning
3.11 S3NA-404-PR1 Commercial Motor Vehicles
3.12 S3NA-603-PR1 Incident Investigation and Review
Vehicle and Driver Safety Program (S3NA-005-PR1)Revision 4 March 27, 2015
PRINTED COPIES ARE UNCONTROLLED. CONTROLLED COPY IS AVAILABLE ON COMPANY INTRANET. 3 of 9
4.0 Procedure
4.1 Roles and Responsibilities
4.1.1 Regional Executive
Supports the implementation of the Americas Fleet Vehicle Operations Policy, including preventative maintenance, vehicle disposition and insurance.
Providing necessary resources to manage vehicles and drivers to the extent their operation requires.
4.1.2 Supervisor
Confirming employees are informed of the provisions of this procedure and related vehicle procedures.
Providing a copy of this procedure to an employee who will be driving an AECOM owned, leased or personal vehicle for company business.
Verifying that each employee has completed S3NA-005-FM1 Driver’s Authorization per the instructions on the form.
Allowing employees to designate time to complete required driving safety training, vehicle inspections and related activities.
Assigning driving tasks to authorized employees only.
Selecting and providing vehicles for use by authorized employees that are appropriate for the planned working conditions and environment.
Supporting employees in the reporting of vehicle incidents per S3NA-004-PR1 Incident Reporting, including the entry of the incident into IndustrySafe.
4.1.3 Employee
Following this procedure and applicable laws while operating a vehicle.
Completing required training consistent with the training needs assessment and requirements per the S3NA-003-PR1 SH&E Training.
Reporting to their supervisor if the vehicle selected is not appropriate for working conditions and environment.
Reporting to their supervisor if they are inexperienced in operating the type of vehicle they are assigned.
Reporting to their supervisor if they are inexperienced driving in the type of working conditions and environment they are assigned.
Review the Driving THA and prepare a Journey Management Plan by completing the S3NA-005-TP1 Journey Management Plan.
Immediately reporting vehicle incidents per S3NA-004-PR1 Incident Reporting, including the entry of the incident into IndustrySafe.
Notifying their Supervisor, Region SH&E Manager, and Region Counsel upon receipt of a legal summons associated with a moving violation related to the use of a company vehicle.
Immediately reporting a change or limitation(s) to his or her Driver’s License to his or her Supervisor.
Conducting a pre-operational inspection of the vehicle for damage or deficiencies andreporting discovered deficiencies affecting the safe operation of the motor vehicle to theappropriate authority (Region Fleet Vehicle Coordinator, Rental Car Agency or other).
Vehicle and Driver Safety Program (S3NA-005-PR1)Revision 4 March 27, 2015
PRINTED COPIES ARE UNCONTROLLED. CONTROLLED COPY IS AVAILABLE ON COMPANY INTRANET. 4 of 9
4.1.4 Region SH&E Manager / SH&E Department
Maintaining and updating resources for Driver Safety Training
Maintaining this procedure and updating it when regulatory or company policies dictate.
Assisting operational leaders with determining the risk incurred by the use of motor vehicles.
Participating in the incident investigation and review process.
4.1.5 Region Fleet Vehicle Coordinator (in their assigned regions)
Escalating safety issues related to fleet vehicles for resolution through the Fleet Management Company.
Disposing of fleet vehicles per the guidance in the Americas Fleet Vehicle Operations Policy.
Refer to the Region SH&E Manager for Fleet Vehicle driver training verification and risk assessment.
4.1.6 Region Human Resources Manager
Responsible for verifying license and proof of personal vehicle insurance at the time of hireand upon verification of the Driver Authorization Form.
4.2 General Procedures and Practices
Only Authorized Drivers are to operate a motor vehicle (rental, personal, or AECOM owned/leased) while on AECOM business, refer to S3NA-005-WI1 Authorized Driver Safety Practices.
Drivers must comply with AECOM’s Global Travel Policy, Americas Fleet Vehicle Operations Policy,and the applicable laws. (NOTE: Individual state, provincial, and local laws vary.)
AECOM Fleet Vehicles and Rentals Cars should not be operated if the age or mileage on that vehicle exceeds the following:
o Light/Medium Duty Trucks: 72 months/150,000 miles
o Sedans: 36 months/80,000
o Sport Utility Vehicles/Vans: 60 months/100,000 miles
Seat belts are to be worn by the occupants. The number of passengers shall not exceed the manufacturer’s specifications for the vehicle.
Motorcycles may not be operated on company business unless:
o Specific approval is provided by the Supervisor with concurrence from the Region SH&E Manager.
o A hazard analysis is completed.
o Required training and license is in place.
o Headlights or daytime running lights will be used when the vehicle is in operation. Class 2 or 3 safety vest worn while operating a motorcycle.
Fire arms and weapons are not permitted in AECOM Fleet Vehicles or rental vehicles insured by AECOM. Firearms and weapons in personal vehicles are subject to the laws and regulations of the respective local, provincial, state, territory, federal and region and/or country. In accordance with the Global Safety Department standards, no firearms or weapons are allowed to be used without express permission by the Region Executive and Chief Security Officer, refer to the WP-001-PR Global Firearms Standard. Exceptions can be made in writing from the Region Executive and Chief Security Officer if knives or weapons are required as part of the work activity or for third party protection andplanned for appropriate hazard control measures and training, refer to the S2-032-PR1 Weapons Safety. Vehicles are to be selected based on the nature of planned use. In some working conditions,four-wheel drive and higher clearance vehicles may be required to ensure safe travel. Vehiclerequirements/specifications must be identified in the project specific safety plan or THA.
Vehicle and Driver Safety Program (S3NA-005-PR1)Revision 4 March 27, 2015
PRINTED COPIES ARE UNCONTROLLED. CONTROLLED COPY IS AVAILABLE ON COMPANY INTRANET. 5 of 9
Vehicles are to be outfitted with the appropriate support equipment based on the THA or client vehicle specifications. Support equipment may include cones, rotating waning lights, warning flags, vehicle identification (magnetic door signs or similar,), wheel chocks, cargo nets, rollover protection.
Drivers are to operate vehicles in a manner that avoids situations where backing is necessary. Reverse parking of all vehicles while on business is required. Backing of trucks and heavy equipment requiresthen a spotter to assist the driver in avoiding collisions.
Non-AECOM drivers (subcontractors, joint venture partners, clients) are prohibited from operating an AECOM leased or owned vehicle unless the activity is specifically agreed to in the applicable contract and only if the use of the vehicle is consistent with the terms of the contract.
4.3 Distracted Driving
The use of all mobile communication devices (MCDs) while driving is strictly prohibited. MCDs include all hand-held or hands-free devices, including all mobile phones and other portable electronic devices that cause driver distraction such as tablets (e.g., iPads), PDAs, pagers, iPods, MP3s, GPS, DVD players, laptops, etc. Employees shall not use a personal or company MCD while driving a company vehicle; use a company MCD while driving a personal vehicle; or use a personal MCD while driving a personal vehicle on company business. Driving includes the time spent in traffic or while stopped at red lights or stop signs.
GPS units and GPS units on smart phones may only be used if factory installed or secured to the vehicle with a bracket that allows the driver to view the image without having to take their eyes off the road.Electronic devices shall be setup for operation prior to commencing driving activities.
4.4 Impairment
Impairment can take many forms ranging from fatigue, to the use of prescription medication or alcohol (even small amounts), to the abuse use of illegal and legal drugs and alcohol. AECOM Employees are not to drive in an impaired condition.
AECOM employees are prohibited from being under the influence of alcohol or drugs or improperly using medication in a way that could diminish, or raise questions concerning, an employee’s ability to perform at his or her best while performing services for or on behalf of AECOM.
AECOM Employees are prohibited from operating a vehicle if they are experiencing signs and symptoms of fatigue. Employees should stop work and rest before driving. No Employee should operate a vehicle if they have worked 14 consecutive hours within a 24 hour period.
4.5 Task Hazard Analysis (THA)
All Employees are to review a Driving THA prior to driving for company business, refer to S3NA-209-PR1Project Hazard Assessment and Planning.
4.6 Journey Management
Journey Management is a process for planning and executing necessary journeys safely. JourneyManagement includes the following steps:
Determining if the trip is necessary;
Evaluating alternative safer modes of transport;
Evaluating the potential to combine journeys with others.
Trips in excess of 100 miles (160 kms) (each way), or into remote or hazardous areas, or when otherwise deemed necessary, shall have a Journey Management Plan (JMP). This plan typically includes the route, location of route hazards, timing, rest periods and locations, communications, emergency response and security arrangements.
A sample Journey Management Plan has been provided in S3NA-005-TP1 Journey Management Plan.
Drivers are responsible for developing the Journey Management Plan in coordination with their Supervisor,Project Manager and Region SH&E Manager (as appropriate).
Vehicle and Driver Safety Program (S3NA-005-PR1)Revision 4 March 27, 2015
PRINTED COPIES ARE UNCONTROLLED. CONTROLLED COPY IS AVAILABLE ON COMPANY INTRANET. 6 of 9
4.7 Driver Safety Training
Driver safety training is to be assigned based on the risks posed with the work environment and vehicle type, using the training needs assessment process, refer to S3NA-003-PR1 SH&E Training. Adetermination of training type is at the discretion of the Supervisor, the following guidance will be applied:
Driver Safety Awareness – is appropriate for Authorized Drivers who periodically use their personal vehicle, AECOM Fleet Vehicle or rental car for AECOM business. Driver Safety Awareness training is an eLearning module approximately 1 Hour in length.
Defensive Driver (online) – is appropriate for authorized drivers who are assigned an AECOM Fleet Vehicle or rental vehicle for a significant period of time with the expectation that the Employee utilizes the vehicle on a regular basis for AECOM business. Defensive Driver training is provided online through one of the following AECOM-approved training resources:
o The National Safety Council
o Alert Driving
Defensive Driver (hands-on) – is appropriate for Authorized Drivers who drive in remote locations, hazardous environments (such as refineries, ports, terminals etc.), at-risk drivers, and as required by clients. Defensive Driver hands-on training is provided through one of the following AECOM-approvedtraining resources such as Smith Systems. Hands on defensive driver training may also be required as a result of an incident or negative Motor Vehicle Report.
Driver Retraining – Drivers involved in repeated motor vehicle incidents, incidents of sufficient severity or concern, or drivers identified as at-risk through AECOM’s Motor Vehicle Report/Driver Abstract process shall be subject to a driver retraining program that may include any of the above programs or other training programs appropriate for the type of driving the employees performs. Retraining programs will be implemented at the discretion of the Supervisor and Region SH&E Manager Depending on the severity of the incident, the Employee may be subject to disciplinary and refused the right to drive on behalf of AECOM.
Special Vehicles and Driving Conditions – Vehicles such as All-Terrain Vehicles (ATVs), four wheel drive vehicles, motorized carts, box vans and trailers (towing) require specialized training and supervision. Use of these types of vehicles is limited to AECOM projects, therefore training and qualification programs for drivers will be project specific. The Project Manager shall work with the Region SH&E Manager to tailor training to the specific needs of the project.
4.8 AECOM Fleet Vehicles (additional requirements)
The requirements of this procedure apply to the use of AECOM Owned or Leased Vehicle, and additional requirements are set forth in the Americas Fleet Vehicle Operations Policy.
Fleet Vehicles are to be parked on project sites in a manner that prevents the driver from backing (reversing) upon departure. For example, the vehicle should be backed into a parking spot or drivers should select a parking spot that allows them to “pull” through” so that the vehicle is facing the direction of departure.
Fleet Vehicles are to have a “Safety Kit” that contains a first-aid kit, portable fire extinguisher, safety triangle, and two reflective safety vests. If not available, contact the Region Fleet Vehicle Coordinatorabout how to obtain one through the procurement system.
4.9 Personal Vehicles (additional requirements)
The requirements of this procedure apply to the use of a personal vehicle for company business. Additional requirements are set forth in the AECOM Global Travel Policy.
4.10 Rental Vehicles (additional requirements)
The requirements of this procedure apply to the use of a rental vehicle for company business. Additional requirements are set forth in the AECOM Global Travel Policy.
Vehicle and Driver Safety Program (S3NA-005-PR1)Revision 4 March 27, 2015
PRINTED COPIES ARE UNCONTROLLED. CONTROLLED COPY IS AVAILABLE ON COMPANY INTRANET. 7 of 9
4.11 Requirements for Authorized Drivers
Review the S3NA-005-WI1 Authorized Driver Safety Practices for more specifics.
Perform pre-operation vehicle inspections, a sample vehicle inspection checklist is provided in S3NA-005-FM2 Vehicle Inspection Checklist.
Arrange for preventive maintenance services for the vehicle and maintain it in sound mechanical condition, per manufacturer’s recommendations.
Drivers are not to permit unauthorized persons to operate an AECOM owned/leased/rented vehicle.
Do not operate the vehicle if unsafe maintenance conditions exist that would likely result in vehicle damage or personal injury. This applies to vehicles owned or leased by AECOM and to personally-owned vehicles used for company business. Escalate other maintenance issues for correction to appropriate authority (Region Fleet Vehicle Coordinator, Rental Car Agency, Supervisor etc.).
Use AECOM owned or leased vehicles for business only. Exceptions to use the vehicle as transportation to and from work, parking at residences overnight, may be permitted only if written approval is obtained from the Regional Executive.
Transport only persons on AECOM related business or those persons receiving transportation as a prescribed service. Only drive vehicles in conditions for which the driver has the appropriate training and experience.
No smoking by the driver or passengers in the vehicle.
Drivers are responsible for damage caused by abuse of the vehicle.
Secure the vehicle when left unattended.
Securing loads in the inside and outside compartments of the vehicle. Do not rely on weight/shape of load alone. Always use a cargo net, straps, containers or other mechanical device when necessary to ensure load is secure. Mark loads that extend the beyond the end of truck, trailer or similar edge with a red warning flag of at least 16 square inches.
Refrain from modifying existing equipment (warning sounds, backing alarms etc.) and from installingaftermarket equipment including toolboxes, truck caps, specialty lights, or towing equipment) without approval from the Regional Executive, Region Fleet Vehicle Coordinator, and AECOM ProcurementDepartment.
Shut the engine off when refuelling the vehicle.
4.12 Emergency Preparedness
The following suggested items should be kept in vehicles used for company business in remote project locations:
o First Aid kit, appropriate to the work and crew size, or per regulations.
o Fire extinguisher, safety triangle, and safety vest
o Emergency equipment (e.g., flares, flashlight, blanket, drinking water, etc.) based on conditions.
o Means of communication (cell phone, radio or satellite phone), extra batteries or a charger.
To the extent possible, Employees should refrain from changing tires or making repairs to vehicles in the field. A road side assistance service should be identified for vehicles used for company business in advance travel.
Specific emergency procedures are to be identified in the Journey Management Plan or the THA.
Vehicle and Driver Safety Program (S3NA-005-PR1)Revision 4 March 27, 2015
PRINTED COPIES ARE UNCONTROLLED. CONTROLLED COPY IS AVAILABLE ON COMPANY INTRANET. 8 of 9
4.13 Vehicle Incidents
Vehicle incidents are to be managed consistent with S3NA-004-PR1 Incident Reporting.
For vehicle incidents that involve non-emergency injuries or potential injuries, Employees must call theIncident Reporting and Assistance Line at 1.800.348.5046 for connection with Work Care medical support. The Employee or Supervisor is responsible for making the initial notification into IndustrySafewithin 4 hours of the event.
For vehicle incidents that involve property damage greater than $2,500, Employees are to call theIncident Reporting and Assistance Line at 1.800.348.5046 for connection with appropriate resources within AECOM, The Employee or Supervisor is responsible for making the initial notification into IndustrySafe within 4 business hours of the event.
Non-critical and no-injury incidents (property damage less than $2,500, near misses, etc.), theEmployee or Supervisor is responsible for making the case entry into IndustrySafe by the end of the work shift (at least within 24 hours of the event).
For Fleet Vehicles, employees must contact the AECOM Fleet Management Company (Wheels: 800-477-2211) to report the incident. Refer to the Americas Fleet Vehicle Operations Policy for further information. Vehicle incidents that result in property damage or loss greater than $2,500 or cause injuries to AECOM Employees that result in medical treatment are to be investigated using the AECOM Incident Investigation Process in S3NA-603-PR1 Incident Investigation and Review.
The Employee(s) involved in the incident are advised to:
o Provide (if requested) to police and the other driver(s) their liability insurance information.
o Not operate a damaged vehicle if its safety is questionable, its operating condition is illegal by applicable laws or its condition is such that further damage would likely result from its operation.
o Cooperate with Region Counsel if the incident results in unresolved risks or third party claims, or if the Employee receives a Summons, Complaint or other legal documents relating to a traffic incident.
o NOT ADMIT LIABILITY, AGREE TO PAY FOR DAMAGE OR SIGN A DOCUMENT RELATED TO AN INCIDENT EXCEPT AS REQUIRED BY LAW. Statements made in haste or anger may be legally damaging.
o Employees must report the incident to AECOM’s Global Travel Department. If the incident involved a third party, the driver is responsible for obtaining a copy of the police report and providing to global travel
4.14 Drug and Alcohol Testing
Testing for Alcohol and/or Drugs procedures are specified in the US and Canadian EmployeeHandbook and administered through the AECOM Human Resources Department.
In the event that a police/regulatory officer responding to a vehicle incident administers field and/or laboratory impairment testing AECOM reserves the right to obtain copies of such testing results for inclusion in the incident report and consideration in a subsequent incident investigation.
4.15 Citations and Violations
Citations and violations which occur while driving for company business are to be reported as a Vehicleincident, using S3NA-004-PR1 Incident Reporting within 24-hours.
The Employee is personally responsible for payment of fines for moving violations and parking citations incurred while driving a vehicle on AECOM business and for reporting such Incidents to his/her Supervisor, Region SH&E Manager, and Region Counsel.
If an Authorized Driver receives a citation for DUI/DWI/Operating Under the Influence, is suspended from driving or has his/her driver’s license revoked, he/she is required to notify his/her Supervisor and
Vehicle and Driver Safety Program (S3NA-005-PR1)Revision 4 March 27, 2015
PRINTED COPIES ARE UNCONTROLLED. CONTROLLED COPY IS AVAILABLE ON COMPANY INTRANET. 9 of 9
Region Fleet Vehicle Coordinator within 8 hours of the action. Failure to do this may result in disciplinary action up to and including termination.
5.0 Records
5.1 None
6.0 Attachments
6.1 S3NA-005-WI1 Authorized Driver Safety Practices
6.2 S3NA-005-FM1 Driver Authorization
6.3 S3NA-005-FM2 Vehicle Inspection Checklist
6.4 S3NA-005-TP1 Journey Management Plan
Authorized Driver Safety Practices (S3NA-005-WI1)Revision 1 December 31, 2014PRINTED COPIES ARE UNCONTROLLED. CONTROLLED COPY IS AVAILABLE ON COMPANY INTRANET. 1 of 4
Americas
Authorized Driver Safety Practices S3NA-005-WI1
1.0 Before Vehicle Operation
1.1 Conduct a Pre-Trip Vehicle Inspection, S3NA-005-FM2.
1.2 Be familiar with applicable client rules and regulations when on the client’s sites. The employee may, for example, be required to leave their keys in the ignition with the vehicle turned off or to display a vehicle pass. When parking, it is recommended that employees back the vehicle into the parkingspace.
1.3 Plan your travel to avoid being in a rush, traveling during peak traffic hours, and traveling through high traffic volume areas. Utilize the S3NA-005-TP1 Journey Management Plan as appropriate.
2.0 During Vehicle Operation
2.1 The Driver and all passengers must wear seatbelts at all times.
2.2 Maintain a safe distance when travelling behind other vehicles.
2.3 Confirm the area behind your vehicle is clear prior to and while reversing a vehicle.
2.4 When parking the vehicle on the edge of a roadway, turn on the four-way indicators (hazard lights) prior to leaving the vehicle. Use cones or other warning devices, and wear a high visibility traffic vest.
2.5 Observe extra caution in and around emergency and construction zones.
2.6 Avoid unattended rest areas, when possible, and especially at night.
2.7 If the vehicle breaks down, attempt to get to a secured location. Call police or roadside assistance as appropriate. Do not leave the vehicle.
2.8 Contact the police to help those with car trouble instead of stopping to assist.When possible, staff should have a car mechanic or roadside assistance change or repair a flat tire. If the Driver or passenger must change a tire, the Driver and passenger must adhere to the manufacturer’s specifications and observe theproper lifting technique and safety procedures. Proper lifing is addressed in S3NA-308-PR1 Manual Lifting,Field.
3.0 24 – Hour Roadside Assistance, AECOM Fleet Vehicles only: Wheels: 800-477-2211
3.1 Authorized Drivers are to park Vehicles are to on project sites in a manner that prevents the driver from backing (reversing) upon departure. For example, the vehicle should be backed into a parking spot or the driver should select a parking spot that allows them to “pull” through” so that the vehicle is facing the direction of departure.
3.2 Authorized Drivers should use the “Get Out And Look” (GOAL) method before placing a vehicle in motion.Drivers are to make a 360-degree (360 ) walk around of the vehicle immediately before placing vehicle into motionin order to determinewhether there are hazards or possible obstructions in the proposed path of travel. Drivers are to clear the area of people and objects before placing the vehicle in motion. A check will also be performed to ensure overhead and side clearances are adequate. The following are recommended best practices:
Placement of cones on the right side of the front and rear of vehicle upon parking and retrieved during the 360 GOAL walk-around.
In lieu of cones, place GOAL magnets on the right side of the hood and truck/tailgate of the vehicle upon parking. The GOAL magnets should then be retrieved during the 360 GOAL walk around just prior to moving the vehicle again.
Authorized Driver Safety Practices (S3NA-005-WI1)Revision 1 December 31, 2014PRINTED COPIES ARE UNCONTROLLED. CONTROLLED COPY IS AVAILABLE ON COMPANY INTRANET. 2 of 4
Place a GOAL sticker on the driver side door window as a reminder to get out and look.
4.0 If Vehicle is to be Left Unattended
4.1 Turn the ignition off, remove the key and set the emergency brake (if parked on an incline).
4.2 Lock and secure the vehicle.
4.3 Secure equipment and property in a locked trunk or tool chest.
4.4 Do not leave keys in an unattended vehicle.
5.0 Staff shall Drive Defensively
5.1 Look aheadtaking at least 15 seconds to visually identify if there is slowing traffic or another type of road hazard ahead or to your side. Don’t drive behind vehicles that block your view.
5.2 Get the big pictureand look for hazards (other motorists, pedestrians, cyclists, road debris, etc.)
5.3 Scan your mirrorsevery 5 – 8 seconds to look for hazards. Don’t stare or fix your eyes on any one item for too long.
5.4 Leave yourself an outby monitoring your space in front, behind and to each side of the vehicle, leaving enough are as a cushion so that you can take evasive action if needed.
5.5 Be seen by all other drivers, pedestrians, cyclists and others using or crossing the road. Use your headlights and avoid driving in the blind spot of other vehicles. Make sure your horn works and use it to warn others.
6.0 Road Rage
6.1 Road rage is a dangerous driving situation that can occur and should be avoided whenever possible, but NEVER instigated. Do not get drawn into a confrontation. Avoid any confrontational eye contact or gestures.
6.2 The driver should be aware of the vehicles around them, paying frequent attention to the vehicle’s mirrors.
6.3 Get out of the way.even if the other motorist is speeding, it is safest not to make a point by staying in your lane. The other driver may be dealing with an emergency situation.
6.4 Unless it is necessary to use the horn as an alert, do so sparingly.
6.5 If someone is following you after an on-the-road encounter, drive to a public place or to the nearest police station and seek assistance.
6.6 Attempt to note the offender’s license plate number and write it down as soon as it is safe to do so and the vehicle is not in motion.
6.7 Report any aggressive driving to the police immediately. This action may aid in preventing further occurrences by the same driver.
7.0 Work Trucks
7.1 When accessing any pickup truck box, staff will: step up into the box to avoid excess reaching and strain and; use three point contact getting in and out of the truck box (i.e., avoid jumping off the tailgate).
7.2 Be vigilant of differences between trucks and small cars related to blind spots, turning radius, and required overhead and undercarriage clearances.
8.0 Winter Driving
8.1 Clear snow from exterior vehicle surfaces.
8.2 Avoid using cruise control on icy roads.
Authorized Driver Safety Practices (S3NA-005-WI1)Revision 1 December 31, 2014PRINTED COPIES ARE UNCONTROLLED. CONTROLLED COPY IS AVAILABLE ON COMPANY INTRANET. 3 of 4
8.3 Accelerate and brake gently to reduce skids or spinouts.
8.4 Wear winter clothing that does not restrict movement, vision or hearing.
8.5 Where required, have snow chains for the vehicle and be familiar with their installation.
8.6 Use extra caution while driving during hazardous winter conditions.
8.7 Avoid sudden changes of speed or direction to reduce possibility of skidding.
8.8 Drivers should leave extra distance between their vehicle and the vehicle ahead of them. Stopping on ice takes about eight times the distance that it takes on dry pavement.
8.9 Carry suitable warm clothing and emergency equipment during the winter months. Temperatures can plunge rapidly.
8.10 Be aware of icy patches on the road bridges and intersections that are especially prone to ice patches.
8.11 Be familiar with the skid control procedures for the type of vehicle being driven (i.e., front, rear or four-wheel drive).
9.0 Gravel Roads and Remote Locations
9.1 Prior to driving on a road with an assigned radio frequency, the passenger will test the two-way radio toconfirm that the proper radio frequency is set, and that the transmission is being received clearly by other traffic. The passenger will operate the two-way radio.
9.2 Drivers will maintain appropriate speed for the road conditions.
9.3 Headlights will be used when operating the vehicle.
9.4 Drivers will respect the understood road protocol, drive defensively and respect intersections.
9.5 4WD options will be utilized at the discretion and comfort level of the driver. If road conditions are questionable even for 4WD use, the road will not be traveled and either another route found or the job postponed until road conditions improve.
10.0 Off-road
10.1 If inexperienced, seek supervisory advice and training.
10.2 Vehicles should only be driven off roads after other available options (e.g., use of ATV’s, etc.) have been considered.
10.3 Prior to driving off-road, check to see that the vehicle is in good operating condition and your tires are properly inflated.
10.4 Realize the limitations of your vehicle and do not become over confident.
10.5 Seat belts should be kept fastened and loose objects in the vehicle securely fastened to prevent them from becoming projectiles in the event of a sudden stop.
10.6 Drive according to the ground conditions.
10.7 Speed and power are normally not required in rough off-road driving.
10.8 Learn to read the surrounding terrain. Monitor the ground conditions ahead of the vehicle -- it is essential to know what to expect in light of the road conditions.
10.9 When slowly traversing difficult areas of soft ground, try to keep the vehicle in motion. Once stopped it will be far more difficult to get the vehicle going again. If the vehicle becomes stuck, do not spin the wheels, as it will only dig in further or deeper until the vehicle chassis rests on the ground. Try to go slowly backwards in the vehicle’s own tracks, as these have been previously compressed by the vehicle. In most cases this will
Authorized Driver Safety Practices (S3NA-005-WI1)Revision 1 December 31, 2014PRINTED COPIES ARE UNCONTROLLED. CONTROLLED COPY IS AVAILABLE ON COMPANY INTRANET. 4 of 4
be successful. If not, place appropriate material (e.g., wooden planks, mats, branches, etc.) under the wheel to improve traction.
10.10 Before driving over rough terrain, the terrain should be inspected on foot first.
10.11 When climbing hills in the vehicle go straight up or down. It is also smart to know what is on the other side of the hill before going up. At the base of the hill the driver should apply more power. Ease up on the power while approaching the top and before going over the crest. If the vehicle stalls on the ascent, back straight down the hill in reverse. For downhill travel in a vehicle with manual transmission, always use the lowest appropriate gear, and do not disengage the clutch to allow the vehicle to coast. If the vehicle is equipped with an automatic transmission, use low range and the lowest drive setting. DO NOT drive a hill at an anglethis increases the risk for a roll-over incident. If the hill is very steep and you do not feel confident that your vehicle can make it up, then do not attempt it.
10.12 When driving through water, consider the maximum wading depth of the vehicle. The air intake must always be kept clear of water. Driving through water should always be done slowly to keep the bow wave low. In addition, slow speed prevents a hot engine from suffering tension cracks by sudden contact with cold water.Check the brakes after leaving the water.
10.13 Prior to returning to the road, do a vehicle inspection to confirm the vehicle is road worthy.
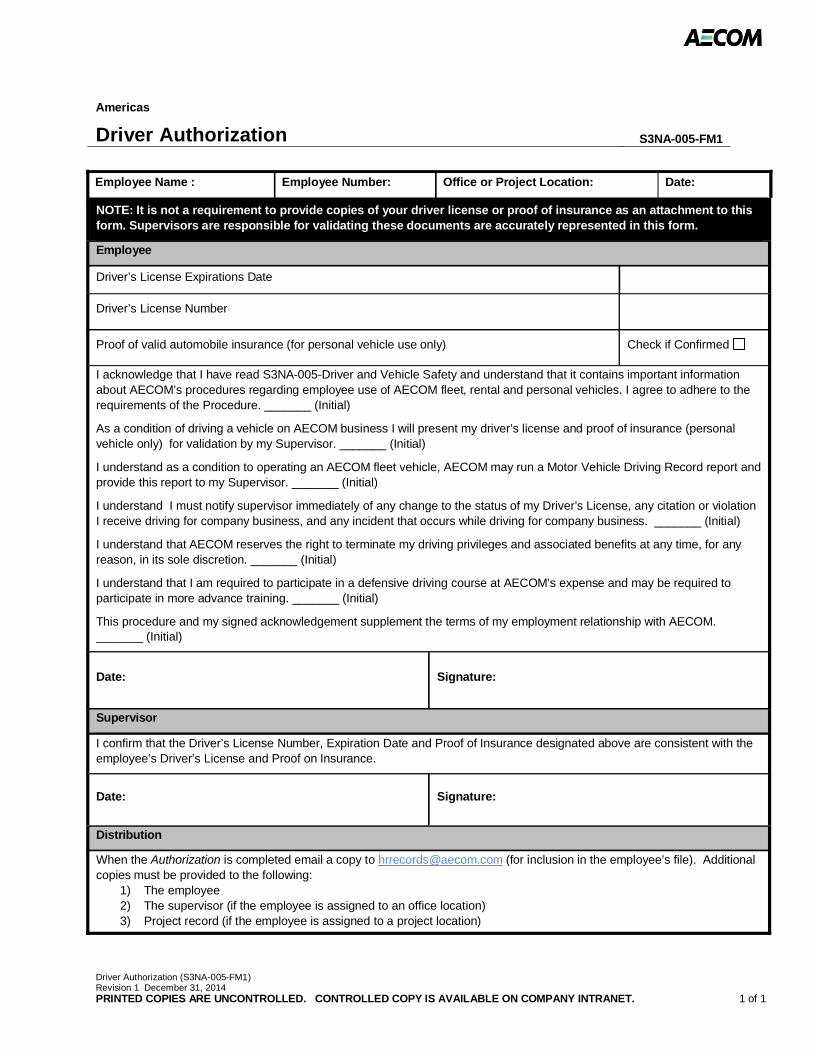
Driver Authorization (S3NA-005-FM1)Revision 1 December 31, 2014PRINTED COPIES ARE UNCONTROLLED. CONTROLLED COPY IS AVAILABLE ON COMPANY INTRANET. 1 of 1
Americas
Driver Authorization S3NA-005-FM1
Employee Name : Employee Number: Office or Project Location: Date:
NOTE: It is not a requirement to provide copies of your driver license or proof of insurance as an attachment to this form. Supervisors are responsible for validating these documents are accurately represented in this form.
Employee
Driver’s License Expirations Date
Driver’s License Number
Proof of valid automobile insurance (for personal vehicle use only) Check if Confirmed
I acknowledge that I have read S3NA-005-Driver and Vehicle Safety and understand that it contains important information about AECOM’s procedures regarding employee use of AECOM fleet, rental and personal vehicles. I agree to adhere to the requirements of the Procedure. _______ (Initial)
As a condition of driving a vehicle on AECOM business I will present my driver’s license and proof of insurance (personal vehicle only) for validation by my Supervisor. _______ (Initial)
I understand as a condition to operating an AECOM fleet vehicle, AECOM may run a Motor Vehicle Driving Record report and provide this report to my Supervisor. _______ (Initial)
I understand I must notify supervisor immediately of any change to the status of my Driver’s License, any citation or violation I receive driving for company business, and any incident that occurs while driving for company business. _______ (Initial)
I understand that AECOM reserves the right to terminate my driving privileges and associated benefits at any time, for any reason, in its sole discretion. _______ (Initial)
I understand that I am required to participate in a defensive driving course at AECOM’s expense and may be required to participate in more advance training. _______ (Initial)
This procedure and my signed acknowledgement supplement the terms of my employment relationship with AECOM. _______ (Initial)
Date: Signature:
Supervisor
I confirm that the Driver’s License Number, Expiration Date and Proof of Insurance designated above are consistent with the employee’s Driver’s License and Proof on Insurance.
Date: Signature:
Distribution
When the Authorization is completed email a copy to [email protected] (for inclusion in the employee’s file). Additional copies must be provided to the following:
1) The employee2) The supervisor (if the employee is assigned to an office location) 3) Project record (if the employee is assigned to a project location)

Vehicle Inspection Checklist (S3NA-005-FM2)Revision 0 December 31, 2014
PRINTED COPIES ARE UNCONTROLLED. CONTROLLED COPY IS AVAILABLE ON COMPANY INTRANET. 1 of 2
Americas
Vehicle Inspection Checklist S3NA-005-FM2
Vehicle Tag No : Date: Time: Mileage: Driver Name: Location:
Inspection Checklist: This Pre-Trip Vehicle Inspection Checklist is intended to be completed by the vehicle driver prior to departing on a trip. Checking boxes means that item is present and functioning. Deficiencies increase risk of an incident and should be repaired or correctedprior to departure. This checklist should only be used in addition to an on-going vehicle maintenance program. For AECOM Fleet Vehicles, report defiencies to: 800-477-2211 (Wheels)
Item Yes No N/A
1. General
1-1. Proof of insurance and registration available and current?
1-2. Is the date of the last regular maintenance known, or is the mileage/date of next scheduled maintenance known?
1-3. Have any safety recalls issued for this vehicle been addressed?
1-4. Is the overall condition of the vehicle good (no leaks , body damage, unusual sounds when started)?
2. Tires
2-1. Do all four tires have sufficient tread for driving conditions? Legal limit: 2/32” (for rain/snow: > 4/32”)
2-2. Are tires sufficiently inflated for driving conditions?
2-3. Are the lug nuts and stem capspresent and tight for each tire?
2-4. Is the spare tire and jack present and in good condition?
3. Driver’s and Passenger’s Seat
3-1. Are the pedal pads in good condition?
3-2. Are the floor mats in good condition and not interfering with the pedals?
3-3. Is the seat properly adjusted (including the headrest)?
3-4. Is the seatbelt in good condition?
3-5. Are the mirrors is good condition (not broken, dirty)?
3-6. Is the dashboard free of warning lights and do the gauges appear to work when the car is started?
3-7. Does the horn work?
3-8. Are distractions such as cell phones and gps units secured so they do not encourage?
4. Lights and Signals
4 -1. Do the headlights and high beams work?
4-2. Do the turn signals work (front and rear)?
4-3. Do the brake lights work, including the high light in the rear window?
4-4. Do the hazard lights (emergency flashers) work?
4-5. Do backing lights work?
5. Windows and Windshield
5-1. Is the windshield clean and unbroken?
5-2. Are the wiper blades in good condition (front and rear)?
5-3. Are all the windows clean and unbroken and windshield fluid available and operational?
6. Emergency Equipment (as needed per conditions/project requirements)
6-1. Is there a “Safety Kit” (fire extinguisher, first aid, safety triangle and 2 reflective vests)?
6-2. Is there a first aid kit, has it been inspected recently?
6-3. Is a means for emergency communication available?

Vehicle Inspection Checklist (S3NA-005-FM2)Revision 0 December 31, 2014
PRINTED COPIES ARE UNCONTROLLED. CONTROLLED COPY IS AVAILABLE ON COMPANY INTRANET. 2 of 2
7. Other Equipment (as needed per conditions/project requirements)
7-1. Is there a means to secured loads (cargo next, container)?
7-2. Are cones or other warning devices available?
7-3. Is weather specific equipment (snow chains, tired etc.)?
Journey Management Plan (S3NA-005-TP1)Revision 2 December 31, 2014
PRINTED COPIES ARE UNCONTROLLED. CONTROLLED COPY IS AVAILABLE ON COMPANY INTRANET. 1 of 2
Americas
Journey Management Plan S3NA-005-TP1
Journey Management Plan – required for trips > 100 miles (one way)
1. Driver and Passenger Information
Driver Name:
Driver Training Completed:
Passengers:
2. Vehicle Information
Vehicle Type/Description:
3. Trip Information
What is the purpose of the trip?
Single Trip: Reoccurring Trip: / / to / /
Is traveling for this purpose necessary?
Have alternate modes of travel (telepresence, public transportation, air,) been evaluated? YES NO
Departure Location:
Departure Date: Time:
Arrival Location:
Arrival Date: Estimated Time:
What is the weather forecast:
What is the route of travel: (okay to insert map)
4. Special ConditionsCheck all that may apply:Night Driving Rugged Terrain (4 x 4)Weather Large Vehicles/Farm EquipmentLong Driving (Over 2 hours) AnimalsFatigue Rush Hour/Heavy TrafficPotential for distraction TowingOther ___________________ Other ___________________Other ___________________ Other ___________________
Journey Management Plan (S3NA-005-TP1)Revision 2 December 31, 2014
PRINTED COPIES ARE UNCONTROLLED. CONTROLLED COPY IS AVAILABLE ON COMPANY INTRANET. 2 of 2
5. Site Arrival/Departure Procedure
1) Notify supervisor of safe arrival.
6. Site Arrival/Departure Procedure
1) Notify supervisor of safe arrival.
7. Emergency Planning
AECOM Supervisor (Name and Phone):
AECOM Project Manager (Name and Phone):
Roadside Service: For AECOM Fleet Vehicles Use: 800-477-2211 (Wheels)
AECOM Incident Reporting Line: 800-348-5046
AECOM Fleet Management: 800-477-2211
8. Approvals: all JMPs shall be reviewed and acknowledged by the driver and the driver’s supervisor. A copy of the form shall remain with the driver and the supervisor for the duration of the journey. (Electronic copies are acceptable).
Driver’s Signature:
Project Manager or Supervisor Name and Signature:
Electrical, General (S3NA-302-PR1) Revision 1 November 1, 2014 PRINTED COPIES ARE UNCONTROLLED. CONTROLLED COPY IS AVAILABLE ON COMPANY INTRANET. Page 1 of 5
Americas
Electrical, General S3NA-302-PR1
1.0 Purpose and Scope
1.1 To minimize and control electrical hazards in the workplace.
1.2 This procedure applies to all AECOM Americas-based employees and operations.
1.3 As a general rule, AECOM employees shall not work on exposed, energized systems with a potential greater than 50 volts. This work should be performed by a qualified electrician.
2.0 Terms and Definitions
2.1 Arc Flash – A dangerous condition associated with the release of energy during an electrical arc.
2.2 Arc Flash Analysis – A mathematical determination of the energy released by an electric arc and the distance from the source that a flash hazard exists. The process for an Arc Flash Analysis is defined in National Fire Protection Act 70E of the National Electric Code.
2.3 Circuit Protective Device – A load-rated switch, circuit breaker, or other device specifically designed as a disconnecting means for opening, reversing, or closing of live circuits.
2.4 Energized Electrical Equipment – Electrically connected to or having a source of voltage.
2.5 Flash Hazard – A dangerous situation associated with the release of energy caused by an electric arc.
2.6 Ground Fault Circuit Interrupter (GFCI) – An electrical device that protects the users of all devices connected to it from electrical shock. The GFCI is part of the circuit or device in use and continuously measures the current in that circuit. If a leakage of current is detected, as in the case of an electrical short circuit, the circuit is opened at the GFCI and current cannot flow beyond the GFCI.
2.7 Licensed Electrician – A person who possesses the local licenses and certifications to work on electrical circuitry, panels or equipment if full compliance with local legislation.
2.8 Portable Electric Equipment – Cord- and plug-connected equipment and extension cords.
2.9 Qualified Persons – Individuals who have specific and documented training to avoid the hazards of working on or near energized electrical equipment and have been specifically permitted to near exposed energized and parts.
2.10 Shock Hazard – A dangerous situation associated with the possible release of energy caused by contact or approach to live parts.
2.11 Unqualified Persons – Individuals with little or no training to avoid the hazards of energized electrical parts or equipment.
3.0 References
3.1 Learning Management System (LMS)
3.2 S3NA-208-PR1 Personal Protective Equipment Program
3.3 S3NA-209-PR1 Project Hazard Assessment and Planning
3.4 S3NA-406-PR1 Electrical Lines, Overhead
3.5 S3NA-410-PR1 Hazardous Energy Control
Electrical, General (S3NA-302-PR1) Revision 1 November 1, 2014 PRINTED COPIES ARE UNCONTROLLED. CONTROLLED COPY IS AVAILABLE ON COMPANY INTRANET. Page 2 of 5
4.0 Procedure
4.1 Roles and Responsibilities
4.1.1 Project Manager
• Approve all Energized Electrical Work Permits.
• Provide technical guidance in support of this procedure
4.1.2 District SH&E Manager
• Provide technical guidance in support to the Project Manager.
4.1.3 Site Safety Supervisor or Site Safety Officer
• Assist the Project Manager in compliance with the requirements of this procedure.
4.1.4 Employees
• All AECOM employees engaged in project field activities shall follow the requirements of this procedure.
• AECOM employees will stop work if workers, other than Qualified Persons, are exposed to live electrical systems at unknown voltages or potentials greater than 50 volts
• No employee shall open electrical panels unless they are a Qualified Person.
4.2 Training
Employees who have potential exposures to electrical hazards shall be trained in and be familiar with the electrical safety-related work practices required by the applicable regulations. Refer to the S3NA-209-PR1 Project Hazard Assessment and Planning for specific required training assigned in the LMS.
4.3 General Requirements
4.3.1 Electrical outlets utilized to supply power for electrical equipment during field operations shall be of the three-wire grounding type. They should be tested for correct polarity and adequacy of the ground with a circuit analyzer. If it is determined that the outlet is incorrectly wired or inadequately grounded, it must not be used until serviced by a licensed electrician.
4.3.2 GFCI devices will be in place between the equipment and power source for all temporary circuits unless protected by an assured equipment grounding program as defined in this procedure and S3NA-302-WI2 Ground Fault Protection Safe Work Practices (i.e., circuits that are not part of a permanently installed facility electrical system, such as on a construction site or temporary field installation).
4.4 Distribution System Setup
4.4.1 Under no circumstances shall electrical lines be routed through doorways, hatches, windows, or other openings.
4.4.2 Electric lines crossing work areas, personnel, or vehicular traffic areas shall be either fastened securely overhead (at a height that provides safe clearance for work operations), or protected by a cover capable of withstanding the imposed loads without creating a trip hazard.
4.4.3 Circuit breakers shall be labeled to indicate their use.
4.4.4 All circuit breaker panels shall be kept covered when not in use.
4.4.5 All live parts of electrical equipment operating at 50 volts or more shall be properly guarded against accidental contact.
4.4.6 Extension Cord Use
• Extension cords and electrical connections on handheld and other power tools will be inspected prior to use for cuts, kinks, frayed wires, etc. If any deficiency is noted, the
Electrical, General (S3NA-302-PR1) Revision 1 November 1, 2014 PRINTED COPIES ARE UNCONTROLLED. CONTROLLED COPY IS AVAILABLE ON COMPANY INTRANET. Page 3 of 5
equipment will be tagged “OUT OF SERVICE” and removed from service. Manufacturer-installed insulated electrical cords will not be repaired except by a licensed electrician.
• Extension cords are not to be placed across aisles, through doors, through holes in a wall, or in areas where the cord may be damaged or create a tripping hazard.
• Extension cord sets for use in field operations should be of the three-wire grounding type and will be rated for the intended load.
• Use of extension cords is allowed only for temporary installations not to exceed 90 days.
• Extension cords shall be provided with a plug cap that is either molded to the cord or equipped with a cord clamp to prevent strain on the terminal screws.
• Extension cords shall not be fastened with staples or otherwise hung in a manner that could damage the outer jacket or insulation.
• Ground fault circuit interrupters shall be used for all nonpermanent wiring needed for construction purposes or when working outdoors, in wet or moist areas or elsewhere as required by legislation.
4.4.7 Temporary Lights/Task Lights
• A temporary light shall not be suspended by the cord unless the cord and light are designed for suspension.
• Temporary lights shall be equipped with bulb protectors unless they are installed at least 7 or more feet overhead.
4.5 Working on or Near Energized Parts
4.5.1 Working on Energized Circuits
Working on or near energized parts covers either potential direct physical contact or contact by means of tools or equipment and working close enough to the energized part to draw an arc.
Any work on exposed, live electrical systems above 50 volts shall be done by a licensed electrician.
• Prior to performing any work near exposed, energized systems, the Qualified Person shall:
o Confirm with the Licensed Electrician that it is safe to do so.
o Perform a Shock Hazard Analysis.
o Perform an Arc Flash Analysis.
o Establish emergency contacts.
o Complete and have approved the Energized Electrical Work Permit.
o Have all required personal protective equipment (PPE), insulated tools, and test equipment tested and ready to use.
o Know and understand the procedures to be followed.
o Ensure that adequate lighting and clearance space is available.
o Remove all conductive clothing and jewelry.
4.5.2 Working Near Overhead Power Lines
• Personnel working in the vicinity of overhead power lines, either on the ground or elevated, shall comply with S3NA-406-PR1 Electrical Lines, Overhead.
• All workers and equipment including cranes and drill rigs shall maintain a clearance distance of at least 50 feet from overhead power lines unless a detailed assessment demonstrating that a smaller clearance distance provides protection has been completed.
Electrical, General (S3NA-302-PR1) Revision 1 November 1, 2014 PRINTED COPIES ARE UNCONTROLLED. CONTROLLED COPY IS AVAILABLE ON COMPANY INTRANET. Page 4 of 5
4.6 Grounding
4.6.1 The path to ground from circuits, equipment, and enclosures will be permanent and continuous.
4.6.2 Electrical installations at project sites will be protected by either an equipment grounding conductor program or GFCIs. The two options are:
• All 120-volt, single-phase, 15- and 20-amp receptacles that are not part of permanent wiring will be protected by GFCIs.
• The equipment grounding conductor program will cover extension cords, receptacles, and cord- and plug-connected equipment. The program will include the following elements:
o A written description of the program.
o A competent person to implement the program.
o Daily visual inspections of extension cords and cord- and plug-connected equipment for defects. Equipment found damaged or defective shall be removed from use and not used until repaired.
o Continuity tests of the equipment grounding conductors or receptacles, extension cords, and cord- and plug-connected equipment every three months.
o Compliance with the applicable legislative requirements for grounding of systems, circuits, and equipment.
4.6.3 If the equipment grounding conductor program option is chosen, the designated competent person at the site shall maintain inspection records.
4.7 PPE/Work Practices
4.7.1 PPE requirements shall be determined based on the results of each of the following: Task Hazard Analysis, Shock Hazard Analysis, and Arc Flash Analysis. Refer to the S3NA-208-PR1 Personal Protective Equipment Program.
4.7.2 Nonconductive hardhats shall be worn when there is danger of head injury from electric shock or burns due to exposure to energized parts.
4.7.3 Jewelry shall not be worn when working around or with energized parts.
4.7.4 Insulated tools shall be used to work with energized parts. Tools that have insulation that might be damaged (e.g., rubber handles) shall be inspected prior to each use to confirm the insulation is not damaged.
4.7.5 Eye protection with side shields shall be worn when working with energized parts.
4.7.6 Rubber mats, non-conductive shields, or protective barriers shall be used as needed to protect employees from electrical hazards.
4.7.7 Appropriate insulating gloves shall be worn to pick up or unplug connections that are in highly conductive areas, such as in water.
4.7.8 Do not plug in or unplug electric equipment with wet hands.
4.8 Portable Electrical Equipment
4.8.1 Double-insulated, portable, industrial-type electrical tools meeting the requirements of the National Electrical Code (NEC) (United States) / Canadian Electrical Code (CE Code) are authorized for use (ground wire not required). Where this type of tool is used, the equipment will be distinctly marked.
4.8.2 Portable electrical tools not provided with special insulating or grounding protection are not for use in damp, wet, or conductive locations (e.g., by persons standing on the ground or on metal floors).
4.8.3 All portable electrical appliances and equipment with non-current-carrying metal parts to which personnel may be exposed shall be grounded by a continuous conductor of adequate capacity from
Electrical, General (S3NA-302-PR1) Revision 1 November 1, 2014 PRINTED COPIES ARE UNCONTROLLED. CONTROLLED COPY IS AVAILABLE ON COMPANY INTRANET. Page 5 of 5
the device to a grounded receptacle. The Site Safety Officer shall resolve any question of whether or not a particular appliance should be grounded.
4.8.4 Manufacturer-installed guards shall not be tampered with, modified, or removed. These guards will be in place and utilized during operation of equipment.
4.8.5 Portable electrical equipment shall be handled in a manner that will not cause physical damage to the equipment.
4.8.6 Portable electrical equipment shall not be carried by the cord, nor raised or lowered by the cord.
4.8.7 Electrical cords shall not be removed from a receptacle by pulling on the cord line.
4.8.8 Employees' hands shall not be wet when plugging and unplugging cord and plug connected equipment and extension cords.
4.8.9 Portable electric equipment shall be disconnected when not in use, before servicing, and when changing accessories such as blades, bits, and cutters.
4.8.10 Portable electric equipment and extension cords used in potentially wet locations shall be approved for use in those locations by a nationally recognized testing laboratory, inspection agency, or other organization concerned with product evaluation (e.g., F.M., UL, etc.).
4.8.11 Portable electric equipment and extension cords used in areas exposed to gases, fumes, vapors, liquids, or other agents having a deteriorating effect shall be approved for use in those locations.
4.8.12 Portable electric equipment and extension cords used in areas in which hazardous concentrations of flammable gases or vapors exist shall be approved for use in those locations.
4.8.13 After a circuit is de-energized by a circuit protective device, the circuit may not be manually reenergized until it has been determined that the equipment and circuit can be safely energized.
4.8.14 The outlet box for portable extension cords for outdoor use shall be weatherproof and shall be maintained in good condition.
5.0 Records
5.1 The Shock Hazard Analysis and the Arc Flash Analysis forms shall be retained in the project file.
5.2 The completed S3NA-302-FM1 Energized Electrical Work Permit shall be retained in the project file.
6.0 Attachments
6.1 S3NA-302-WI1 Electrical Safe Work Practices
6.2 S3NA-302-WI2 Ground Fault Protection Safe Work Practices
6.3 S3NA-302-WI3 Generator Safety Card
6.4 S3NA-302-FM1 Energized Electrical Work Permit
6.5 S3NA-302-ST Electrical Regulations
Electrical Safe Work Practices (S3NA-302-WI1) Revision 1 November 1, 2014 PRINTED COPIES ARE UNCONTROLLED. CONTROLLED COPY IS AVAILABLE ON COMPANY INTRANET. Page 1 of 13
Americas
Electrical Safe Work Practices S3NA-302-WI1
1.0 Purpose
1.1 The purpose of this work instruction is to confirm that all live electrical work conducted under the control of AECOM personnel is carried out in accordance with legislation and recognized best practices in order to provide adequate protection to workers from potential arc flash and/or electrical shock.
2.0 Definitions
2.1 Arc Rating – The maximum incident energy resistance demonstrated by a material prior to breakdown or at the onset of a second-degree skin burn (expressed in cal/cm2).
2.2 Flash Hazard – A dangerous situation associated with the release of energy caused by an electric arc.
2.3 Energized Electrical Equipment – Electrically connected to or having a source of voltage.
2.4 Shock Hazard – A dangerous situation associated with the possible release of energy caused by contact or approach to live parts.
3.0 Responsibilities
3.1 Project Manager
3.1.1 Be familiar with all precautions and Federal and State/Provincial regulations and Best Practices.
3.1.2 Provide training on this Work Instruction to authorized employees covering:
• Nature and control of known shock and arc flash hazards.
• Means of eliminating and controlling shock and arc flash hazards.
• Special electrical personal protective equipment (PPE) requirements (task specific).
• Procedure for reporting any deviations to this Work Instruction.
3.1.3 Control access to energized electrical equipment with potential of shock or arc flash to authorized personnel only.
3.1.4 Confirm availability of proper tools for the operation and maintenance of electrical equipment.
3.1.5 Proper identification and guarding of potentially hazardous electrical equipment.
3.1.6 Providing available electrical one-line diagrams.
3.1.7 Confirm proper housekeeping around energized electrical equipment at all times.
3.1.8 Provide proper working conditions, including adequate lighting, to facilitate work in a safe environment.
3.1.9 Provide proper supervision of employees.
3.1.10 Maintaining a list of authorized electrical supervisor, authorized electrical worker, and attendant.
3.1.11 Implementation an ongoing evaluation of this Best Management Practice.
3.1.12 Terminate the work and cancel the permit when live work has been completed or any new electrical hazard arises.
3.1.13 Verify that communication modes are available and have been tested.
3.1.14 Remove unauthorized individuals who enter or who attempt to enter the approach boundaries during live work.
Electrical Safe Work Practices (S3NA-302-WI1) Revision 1 November 1, 2014 PRINTED COPIES ARE UNCONTROLLED. CONTROLLED COPY IS AVAILABLE ON COMPANY INTRANET. Page 2 of 13
3.1.15 Confirm that live work remains consistent with terms of the live work permit and that acceptable working conditions are maintained.
3.1.16 Withdraw the live work permit and stop all work if unsafe conditions are reported during any live work (e.g. sparking, smoldering etc.). Do not permit work on that equipment until the cause of any unsafe condition is thoroughly investigated and the live work procedure has been reviewed to prevent reoccurrence.
3.2 Authorized Electrical Attendant
3.2.1 Practice all precautions and Federal and State/Provincial regulations and Best Practices.
3.2.2 Understand the hazards that may be faced during live work, including the potential for arc flash, shock hazard, and other related hazards.
3.2.3 Be aware of the potential of arc flash or shock possible to the authorized worker.
3.2.4 Maintain an accurate count of authorized workers working near the live equipment or inside approach boundaries.
3.2.5 Remain near the approach boundary until relieved by another authorized electrical attendant.
3.2.6 Communicate with authorized workers as necessary to confirm maintenance of safe conditions at all times.
3.2.7 Monitor activities inside and outside the approach zone to determine if it is safe for the worker to continue to remain in the approach zone. Order the authorized worker to stop live work under any of the following conditions:
• The attendant detects a problem;
• The attendant detects the signs of short-circuiting, such as electrical sparking, smoldering, or any other abnormality;
• The attendant detects a situation outside the approach zone that could endanger the worker; and
• If the attendant cannot effectively and safely perform all assigned duties.
3.2.8 Perform no other duties that might interfere with the attendant’s primary duty to monitor and protect the authorized worker.
3.3 Authorized Electrical Worker
3.3.1 Perform all work in accordance with Federal and State/Provincial regulations, AECOM policies and procedures, and this work instruction.
3.3.2 Be continuously alert, focused, and aware of the hazards of performing the task.
3.3.3 Understand AECOM Safety, Health and Environmental policies and standards as well as site-specific electrical safe work practices.
3.3.4 Examine and understand all the documents provided by AECOM and manufacturers, including all specific hazards, advisories, cautions, etc.
3.3.5 Be knowledgeable of the use and selection of the proper tools to safely perform the electrical task safely.
3.3.6 Complete a Safe Work Plan prior to the start of a task and during work, if conditions change.
3.3.7 Maintain good housekeeping around work areas. Remove all debris, materials, etc., at the completion of tasks.
3.3.8 Report any hazardous (uncontrolled) conditions to AECOM’s authorized supervisor.
3.3.9 Understand the hazards that may be faced during live work, including arc flash, shock, or other electrical hazards.
Electrical Safe Work Practices (S3NA-302-WI1) Revision 1 November 1, 2014 PRINTED COPIES ARE UNCONTROLLED. CONTROLLED COPY IS AVAILABLE ON COMPANY INTRANET. Page 3 of 13
3.3.10 Properly use required PPE and electrical tools as specified in this work instruction and the applicable Safe Work Plan.
3.3.11 Communicate with the authorized electrical attendant as necessary.
3.3.12 Alert the attendant whenever any abnormality occurs (e.g., sparking, minor shock, burning smell, etc.) or symptoms of unsafe conditions are observed.
3.3.13 Stop all work and exit from the approach zone whenever:
• An order to evacuate is given by the authorized electrical attendant or the authorized supervisor; or
• When the worker observes any warning sign or symptom of short circuiting or a dangerous situation; or
• When the supervisor gives an order to stop work.
4.0 Multi-employer Live Electrical Work Coordination
4.1 AECOM will:
• Inform the contractor that the workplace contains shock and/or arc flash potential and that live work is allowed only through compliance with a live work permit program meeting the requirements of the applicable Federal and State/Provincial legislation.
• Appraise the contractor of the elements of the work, including the hazards identified and all past experiences with the live work that make the live work hazardous.
• Appraise the contractor of any precautions or procedures that have been implemented for the protection of employees in the approach zone where contractor personnel will be working.
• Coordinate live work operations with the contractor when both AECOM employees and contractor employees will be working in or near approach zone, so that employees of AECOM and the contractor do not endanger each other.
• Debrief the contractor at the conclusion of the live work operations.
4.2 Contractor Requirements – In addition to complying with the live work permit requirements, each contractor who is retained to perform live electrical work will:
• Obtain any available information regarding live work from the Project Manager.
• Coordinate live work operations with the Project Manager when both AECOM personnel and contractor personnel will be jointly working in or near the approach zone.
• Practice work in accordance with Federal and State/Provincial regulations and industry best practices.
• Inform AECOM’s Project Manager of the live work permit that the contractor will be using and of any hazards confronted or created during live work, either through debriefing or during live work.
5.0 Required Minimum Qualifications
5.1 All electrical work including instrumentation, installations, maintenance, troubleshooting, calibration, and operation of breakers will only be conducted by qualified, trained, and skilled personnel (this includes AECOM personnel and contractors/subcontractors). These personnel will meet all qualification requirements mandated by the Federal/State/Provincial regulations as well as applicable electrical associations and trade bodies.
5.2 The Project Manager, in consultation with the Safety, Health and Environment (SH&E) Department, will determine the minimum qualifications requirements for any work with the potential for arc flash.
Electrical Safe Work Practices (S3NA-302-WI1) Revision 1 November 1, 2014 PRINTED COPIES ARE UNCONTROLLED. CONTROLLED COPY IS AVAILABLE ON COMPANY INTRANET. Page 4 of 13
6.0 Working on or Near Electrical Conductors of Circuit Parts
6.1 Safe work practices shall be used to safeguard employees from injury when working on or near exposed electric conductors or circuit parts that can be energized.
• Live Parts – Safe Work Conditions: Live parts to which an employee might be exposed shall be put into an electrically safe work condition before an employee works on or near them.
• Live Parts – Unsafe Work Conditions: Only qualified persons shall be permitted to work on electrical conductors or circuit parts that have not been put into electrically safe conditions.
6.2 Working on or near exposed electrical conductors OR circuit parts that are, or might become, energized – Prior to working on or near exposed electrical conductors and circuit parts operating at 50 volts or more, lockout/tagout devices shall be applied in accordance with AECOM and site-specific policies.
6.3 Electrical Hazard Analysis – If the live parts operating at 50 volts or more are not placed in electrically safe condition, other safety-related work practices shall be used to protect employees who might be exposed to electrical hazards. Safe work practices mentioned below shall be established before any person approaches exposed live parts within limited approach boundary:
6.3.1 Shock Hazard Analysis – A shock hazard analysis shall determine the voltage to which personnel will be exposed, boundary requirements, and the PPE necessary in order to minimize the possibility of electrical shock.
6.3.2 Flash Hazard Analysis – A flash hazard analysis shall be done in order to protect personnel from the possibility of being injured by an arc flash. The analysis shall determine the flash protection boundary and the PPE that people within the flash protection boundary shall use.
7.0 Shock Hazard Analysis and Approach Boundaries
7.1 A comprehensive Shock Hazard Analysis Survey is the method used to:
7.1.1 Systematically analyze shock hazards,
7.1.2 Identify approach boundaries, and
7.1.3 Identify appropriate PPE.
7.2 Before permitting live work on electrical equipment, each project site having electrical equipment operating at more than 50 volts is required to conduct a Shock Hazard Analysis Survey. Upon completion of the survey, the applicable electrical areas/spaces will be labeled in accordance with survey results.
7.3 Shock hazard analysis for individual equipment is not required if a facility-wide shock hazard analysis has been conducted and if conditions (including labels and signage) are maintained at all times.
NOTE: Only authorized personnel are allowed to work within the approach boundaries.
7.4 No qualified person shall approach or take any conductive object closer to exposed live parts operating at 50 volts or more than the restricted approach boundary set forth in Appendix A-1 [Table 130.2 (C) of the National Fire Protection Act (NFPA) 70-E].
7.5 In the absence of a facility-wide survey, a Shock Hazard Analysis (including the identification of approach boundaries) shall be conducted (see Appendix A-1 of this Practice) for all electrical equipment operating at over 50 volts.
7.6 Results of both facility-wide as well as individual Shock Hazard Analysis Survey shall be made available to all authorized employees. Additionally, any recommendations given by the survey generated from the survey shall be reviewed by the Project Manager and shall be addressed in a timely manner.
8.0 Arc Flash Hazard Analysis and Approach Boundaries
8.1 Arc flash safety requirements apply to all electrical equipment operating at 50 volts or more.
Electrical Safe Work Practices (S3NA-302-WI1) Revision 1 November 1, 2014 PRINTED COPIES ARE UNCONTROLLED. CONTROLLED COPY IS AVAILABLE ON COMPANY INTRANET. Page 5 of 13
8.2 A comprehensive Arc Flash Hazard Analysis Survey is the method used to:
8.2.1 Systematically analyze the potential for arc flash,
8.2.2 Identify the limits of the approach, and
8.2.3 Identify appropriate PPE.
8.3 Once a comprehensive facility Arc Flash Survey has been conducted and electrical work areas/spaces are labeled in accordance with survey results, an individual Arc Flash Hazard Analysis is not required, provided that qualified personnel confirm that the conditions, as indicated on the labels and signs, are maintained.
NOTE: Only authorized personnel are allowed to work within the limits of approach.
8.4 Please refer to Appendix A-1 for details.
8.5 Prior to performing any work on energized electrical systems, an Arc Flash Hazard Analysis (including the identification of approach boundaries) will be conducted in accordance Appendix F of this practice (taken from NFPA 70E Section 130.3).
9.0 Required PPE Categorized by Exposure
The following specialized PPE requirements will be used while working on energized electrical systems:
9.1 PPE as prescribed by the shock hazard analysis and arc flash analysis; or
9.2 PPE requirements identified in Appendix A-2 of this practice (taken from NFPA 70E Sections 130.2 and 130.7).
10.0 Required Tools and Equipment
Only tools and testing or protective equipment approved by ANSI/ASTM/CSA for the relevant voltage rating [see Table130.7(C)(8) or Canadian Standards Association for appropriate voltage rating] will be used when working on energized electrical systems. All tools and testing or protective equipment will be visually inspected prior to use to confirm that the protection systems associated with the tool or equipment are not damaged or impaired and that diagnostic meters and tools are configured properly. Any tool or testing or protective equipment suspected of being compromised will be immediately taken out of service and will be tagged for disposal.
11.0 Work on Energized Electrical Systems
11.1 All electrical maintenance or troubleshooting will be done on de-energized circuits, to the extent practical. Work on energized circuits can only be done under special circumstances using a “Live Work Permit” issued by authorized electrical supervisor. This permit takes into consideration the voltage levels, known electrical hazards, communication requirements, and need for watch persons, etc. The following procedure will be observed for a live work permit:
11.1.1 The person requesting the work (authorized worker) will complete the permit and will retain the original with him or her during the work. Copy of the permit will be displayed at a prominent location in the control room as a notice that live work has been authorized in certain part of the plant/project.
11.1.2 Permit will be reviewed for correctness, proper safety precautions, and adequacy of controls by the authorized electrical supervisor. After satisfying all safety requirements, an authorized electrical supervisor will sign the permit and will give the original copy to the authorized electrical worker.
11.1.3 Upon work completion, the authorized worker will note any observation on the permit and will return the original to the authorized supervisor.
11.1.4 Authorized supervisor will keep both copies of the permit as a controlled record for a period of 12 months.
Electrical Safe Work Practices (S3NA-302-WI1) Revision 1 November 1, 2014 PRINTED COPIES ARE UNCONTROLLED. CONTROLLED COPY IS AVAILABLE ON COMPANY INTRANET. Page 6 of 13
11.2 The following conditions will be met for live electrical work:
11.2.1 If any equipment or instrumentation is to be disabled while other related components or systems are still functioning, the Live Work Permit should record how process safety of the remaining systems will be maintained.
11.2.2 All electrical and instrumentation work conducted will be recorded in the applicable MCC log. The documentation will include a reference to the permit number where appropriate.
11.2.3 The worker will inform the operations supervisor that he or she intends to de-energize a circuit. He or she will also inform the operations supervisor when the work is complete and that the system can be returned to service.
11.3 See S3NA-302-FM1 Energized Electrical Work Permit for a suggested template for a “Live Work Permit.”
12.0 Lockout/Tagout Policy and Procedures
12.1 All equipment will be locked out prior to any work commencing in accordance with AECOM’s procedure S3NA-410-PR1 Hazardous Energy Control and applicable site-specific lockout/tagout program.
13.0 Troubleshooting Procedure
13.1 The troubleshooting of electrical equipment often requires working with live circuits. Where possible, work will be done on de-energized circuits following the relevant AECOM and site-specific lockout/tagout policy. However, troubleshooting may require limited work on live circuits; if such work is required it will be done using the “Live Work Permit” and site-specific Troubleshooting Guidelines.
14.0 Housekeeping
14.1 All areas containing electrical equipment will:
14.1.1 Be maintained and kept clean.
14.1.2 Be well illuminated.
14.1.3 Not be used for storage of supplies.
14.1.4 Not be used for the storage of any flammable materials.
14.1.5 Be assessed for safety hazards.
14.1.6 Be suitably ventilated to control dust, temperature, and humidity.
15.0 Communication
15.1 Personnel working in or around equipment with electrical hazards will employ a suitable means of communication to confirm their safety.
15.2 The means of communication may include:
15.2.1 Authorized attendant (required for ALL live work conducted on 600 volts and above).
15.2.2 Permits.
15.2.3 Two-way radios.
16.0 Signage and Labels
16.1 MCCs, ECRs, battery rooms, and electrical panels are required to have the following labeling to identify arc flash and shock hazards. The information on the label will include:
16.1.1 Flash Hazard Boundary (Arc Flash Current);
16.1.2 Flash Hazard at 18 inches in cal/cm2 or joules;
Electrical Safe Work Practices (S3NA-302-WI1) Revision 1 November 1, 2014 PRINTED COPIES ARE UNCONTROLLED. CONTROLLED COPY IS AVAILABLE ON COMPANY INTRANET. Page 7 of 13
16.1.3 Hazard Risk Categories (PPE requirements);
16.1.4 Shock Hazards;
16.1.5 Limited Approach Boundaries;
16.1.6 Restricted Approach;
16.1.7 Prohibited Approach; and
16.1.8 Log book to record all electrically related activities.
16.2 All doorways to buildings and enclosures containing energized electrical equipment will be signed to indicate that:
16.2.1 Access is restricted to authorized personnel only; and
16.2.2 Electrical hazards exist beyond this (boundary, door, etc.).
17.0 Management of Change
17.1 Any changes to electrical and/or project instrumentation will be approved by the project manager prior to implementation.
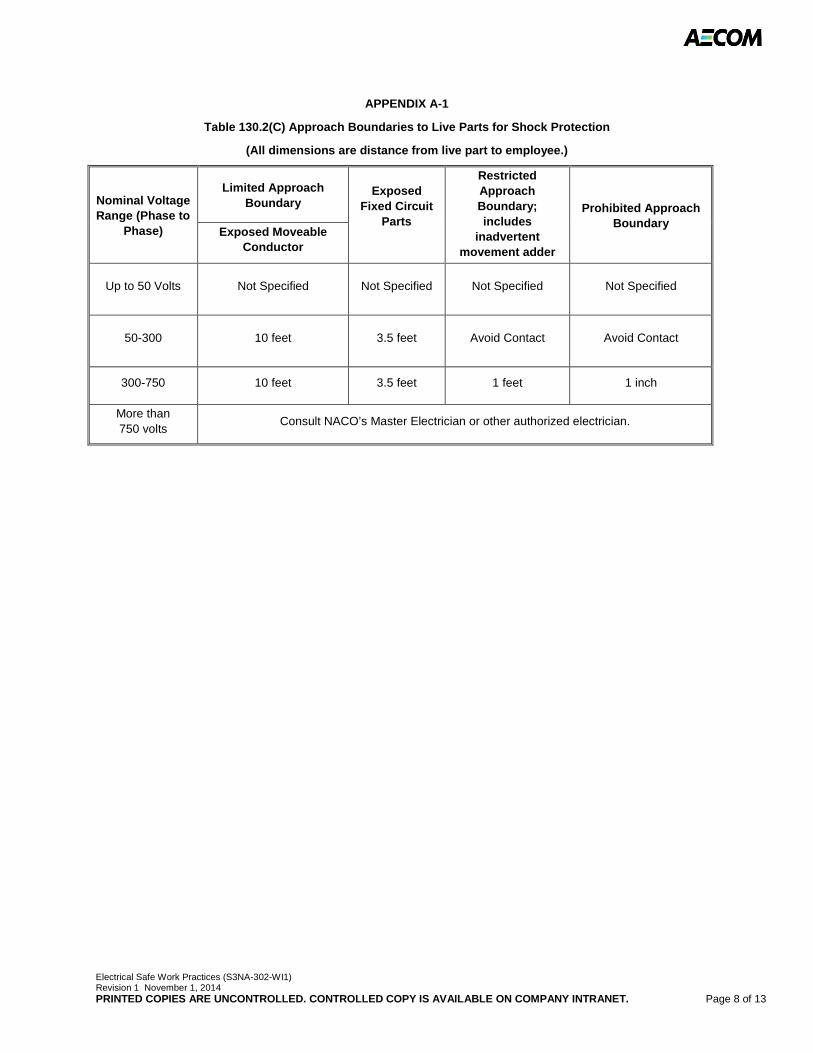
Electrical Safe Work Practices (S3NA-302-WI1) Revision 1 November 1, 2014 PRINTED COPIES ARE UNCONTROLLED. CONTROLLED COPY IS AVAILABLE ON COMPANY INTRANET. Page 8 of 13
APPENDIX A-1
Table 130.2(C) Approach Boundaries to Live Parts for Shock Protection
(All dimensions are distance from live part to employee.)
Nominal Voltage Range (Phase to
Phase)
Limited Approach Boundary
Exposed
Fixed Circuit Parts
Restricted Approach Boundary; includes
inadvertent movement adder
Prohibited Approach Boundary
Exposed Moveable Conductor
Up to 50 Volts Not Specified Not Specified Not Specified Not Specified
50-300 10 feet 3.5 feet Avoid Contact Avoid Contact
300-750 10 feet 3.5 feet 1 feet 1 inch
More than 750 volts
Consult NACO’s Master Electrician or other authorized electrician.
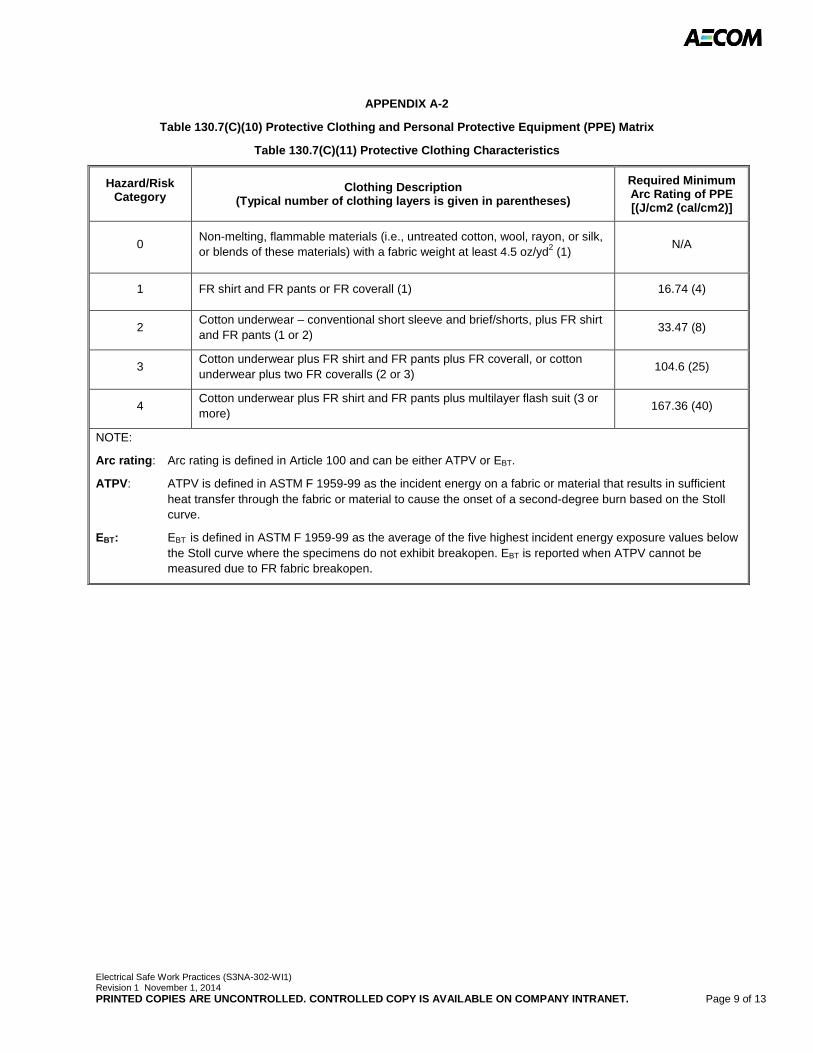
Electrical Safe Work Practices (S3NA-302-WI1) Revision 1 November 1, 2014 PRINTED COPIES ARE UNCONTROLLED. CONTROLLED COPY IS AVAILABLE ON COMPANY INTRANET. Page 9 of 13
APPENDIX A-2
Table 130.7(C)(10) Protective Clothing and Personal Protective Equipment (PPE) Matrix
Table 130.7(C)(11) Protective Clothing Characteristics
Hazard/Risk Category
Clothing Description (Typical number of clothing layers is given in parentheses)
Required Minimum Arc Rating of PPE [(J/cm2 (cal/cm2)]
0 Non-melting, flammable materials (i.e., untreated cotton, wool, rayon, or silk, or blends of these materials) with a fabric weight at least 4.5 oz/yd2 (1)
N/A
1 FR shirt and FR pants or FR coverall (1) 16.74 (4)
2 Cotton underwear – conventional short sleeve and brief/shorts, plus FR shirt and FR pants (1 or 2)
33.47 (8)
3 Cotton underwear plus FR shirt and FR pants plus FR coverall, or cotton underwear plus two FR coveralls (2 or 3)
104.6 (25)
4 Cotton underwear plus FR shirt and FR pants plus multilayer flash suit (3 or more)
167.36 (40)
NOTE:
Arc rating: Arc rating is defined in Article 100 and can be either ATPV or EBT.
ATPV: ATPV is defined in ASTM F 1959-99 as the incident energy on a fabric or material that results in sufficient heat transfer through the fabric or material to cause the onset of a second-degree burn based on the Stoll curve.
EBT: EBT is defined in ASTM F 1959-99 as the average of the five highest incident energy exposure values below the Stoll curve where the specimens do not exhibit breakopen. EBT is reported when ATPV cannot be measured due to FR fabric breakopen.
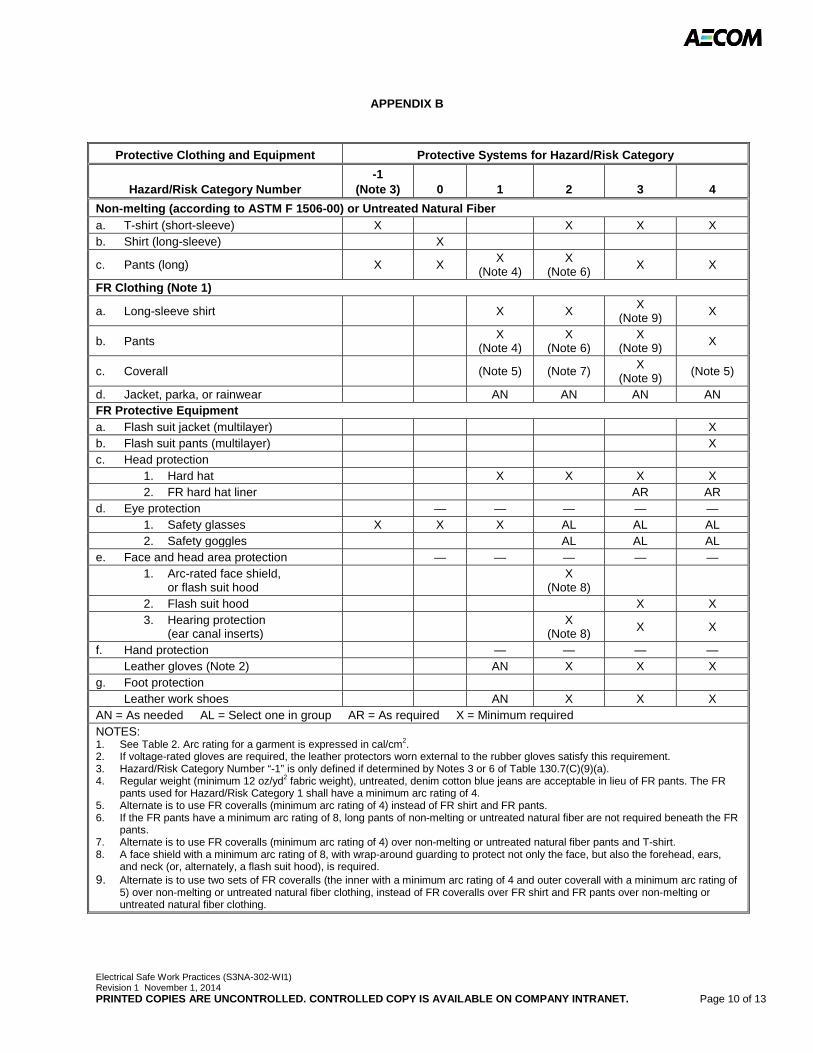
Electrical Safe Work Practices (S3NA-302-WI1) Revision 1 November 1, 2014 PRINTED COPIES ARE UNCONTROLLED. CONTROLLED COPY IS AVAILABLE ON COMPANY INTRANET. Page 10 of 13
APPENDIX B
Protective Clothing and Equipment Protective Systems for Hazard/Risk Category
Hazard/Risk Category Number -1
(Note 3) 0 1 2 3 4
Non-melting (according to ASTM F 1506-00) or Untreated Natural Fiber
a. T-shirt (short-sleeve) X X X X b. Shirt (long-sleeve) X
c. Pants (long) X X X
(Note 4) X
(Note 6) X X
FR Clothing (Note 1)
a. Long-sleeve shirt X X X
(Note 9) X
b. Pants X
(Note 4) X
(Note 6) X
(Note 9) X
c. Coverall (Note 5) (Note 7) X
(Note 9) (Note 5)
d. Jacket, parka, or rainwear AN AN AN AN FR Protective Equipment a. Flash suit jacket (multilayer) X b. Flash suit pants (multilayer) X c. Head protection 1. Hard hat X X X X 2. FR hard hat liner AR AR d. Eye protection — — — — — 1. Safety glasses X X X AL AL AL 2. Safety goggles AL AL AL e. Face and head area protection — — — — — 1. Arc-rated face shield,
or flash suit hood
X (Note 8)
2. Flash suit hood X X 3. Hearing protection
(ear canal inserts)
X (Note 8)
X X
f. Hand protection — — — — Leather gloves (Note 2) AN X X X g. Foot protection Leather work shoes AN X X X AN = As needed AL = Select one in group AR = As required X = Minimum required NOTES: 1. See Table 2. Arc rating for a garment is expressed in cal/cm2. 2. If voltage-rated gloves are required, the leather protectors worn external to the rubber gloves satisfy this requirement. 3. Hazard/Risk Category Number “-1” is only defined if determined by Notes 3 or 6 of Table 130.7(C)(9)(a). 4. Regular weight (minimum 12 oz/yd2 fabric weight), untreated, denim cotton blue jeans are acceptable in lieu of FR pants. The FR
pants used for Hazard/Risk Category 1 shall have a minimum arc rating of 4. 5. Alternate is to use FR coveralls (minimum arc rating of 4) instead of FR shirt and FR pants. 6. If the FR pants have a minimum arc rating of 8, long pants of non-melting or untreated natural fiber are not required beneath the FR
pants. 7. Alternate is to use FR coveralls (minimum arc rating of 4) over non-melting or untreated natural fiber pants and T-shirt. 8. A face shield with a minimum arc rating of 8, with wrap-around guarding to protect not only the face, but also the forehead, ears,
and neck (or, alternately, a flash suit hood), is required. 9. Alternate is to use two sets of FR coveralls (the inner with a minimum arc rating of 4 and outer coverall with a minimum arc rating of
5) over non-melting or untreated natural fiber clothing, instead of FR coveralls over FR shirt and FR pants over non-melting or untreated natural fiber clothing.
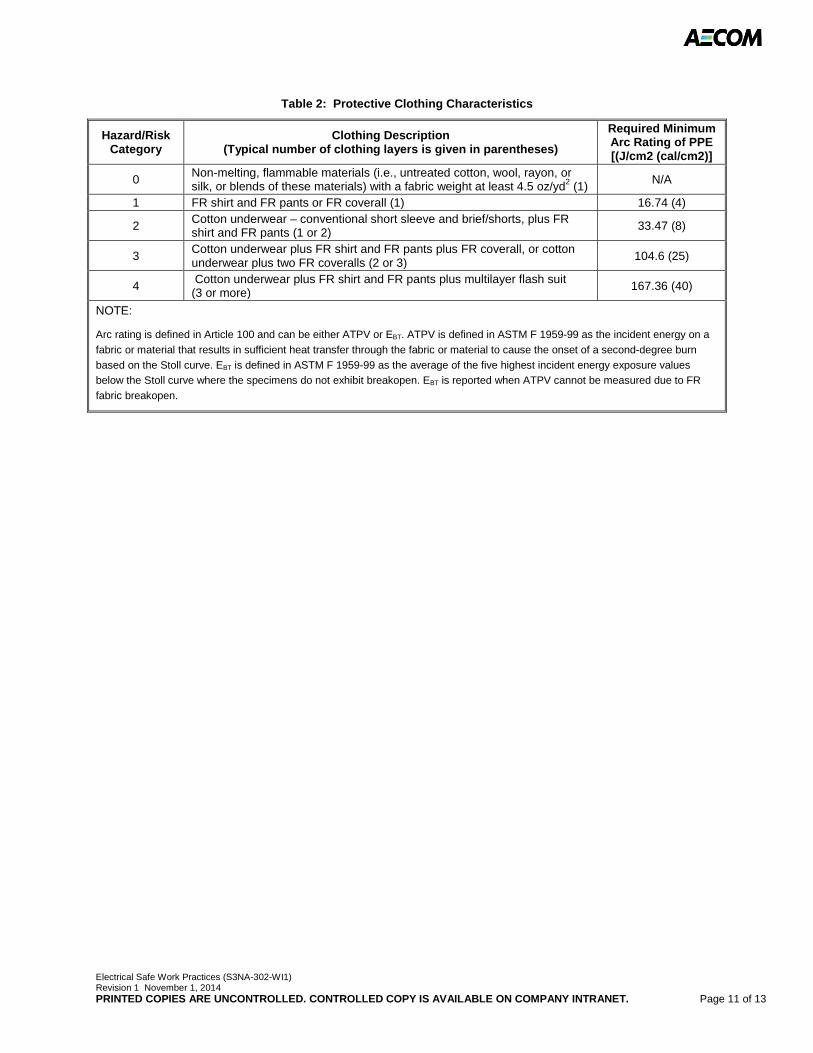
Electrical Safe Work Practices (S3NA-302-WI1) Revision 1 November 1, 2014 PRINTED COPIES ARE UNCONTROLLED. CONTROLLED COPY IS AVAILABLE ON COMPANY INTRANET. Page 11 of 13
Table 2: Protective Clothing Characteristics
Hazard/Risk Category
Clothing Description (Typical number of clothing layers is given in parentheses)
Required Minimum Arc Rating of PPE [(J/cm2 (cal/cm2)]
0 Non-melting, flammable materials (i.e., untreated cotton, wool, rayon, or silk, or blends of these materials) with a fabric weight at least 4.5 oz/yd2 (1)
N/A
1 FR shirt and FR pants or FR coverall (1) 16.74 (4)
2 Cotton underwear – conventional short sleeve and brief/shorts, plus FR shirt and FR pants (1 or 2)
33.47 (8)
3 Cotton underwear plus FR shirt and FR pants plus FR coverall, or cotton underwear plus two FR coveralls (2 or 3)
104.6 (25)
4 Cotton underwear plus FR shirt and FR pants plus multilayer flash suit (3 or more)
167.36 (40)
NOTE:
Arc rating is defined in Article 100 and can be either ATPV or EBT. ATPV is defined in ASTM F 1959-99 as the incident energy on a
fabric or material that results in sufficient heat transfer through the fabric or material to cause the onset of a second-degree burn
based on the Stoll curve. EBT is defined in ASTM F 1959-99 as the average of the five highest incident energy exposure values
below the Stoll curve where the specimens do not exhibit breakopen. EBT is reported when ATPV cannot be measured due to FR
fabric breakopen.
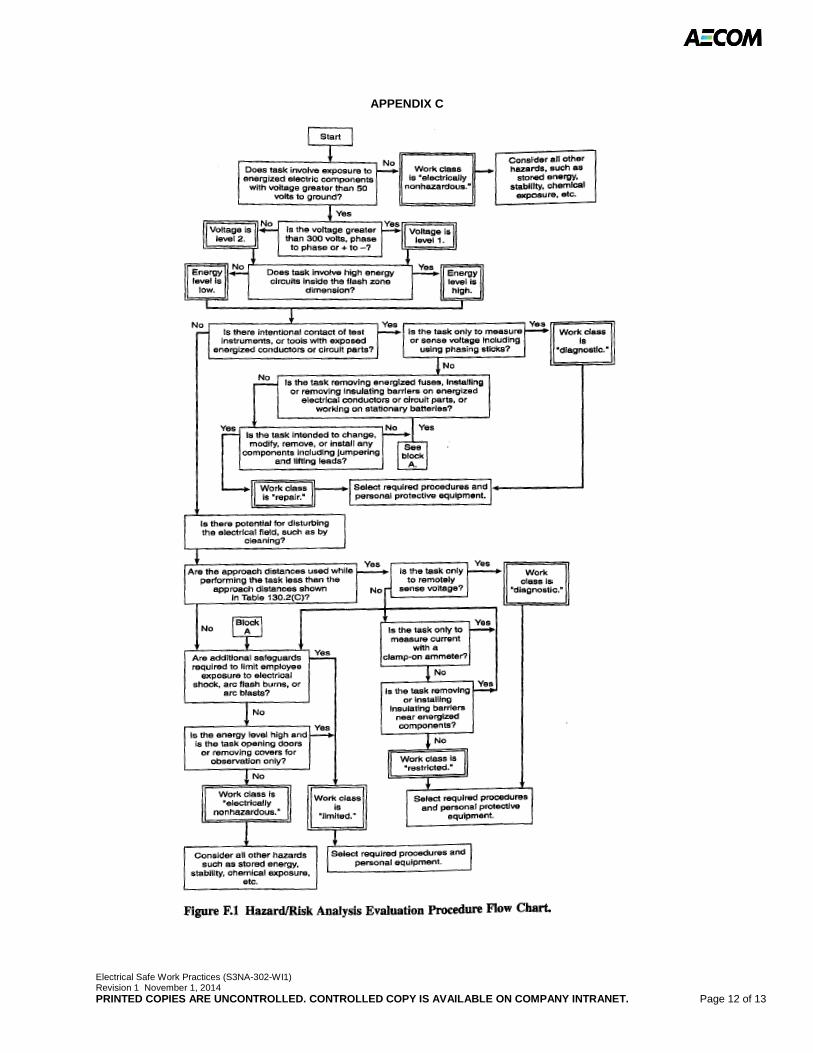
Electrical Safe Work Practices (S3NA-302-WI1) Revision 1 November 1, 2014 PRINTED COPIES ARE UNCONTROLLED. CONTROLLED COPY IS AVAILABLE ON COMPANY INTRANET. Page 12 of 13
APPENDIX C
HAZARD RISK ELIMINATING PROCEDURE
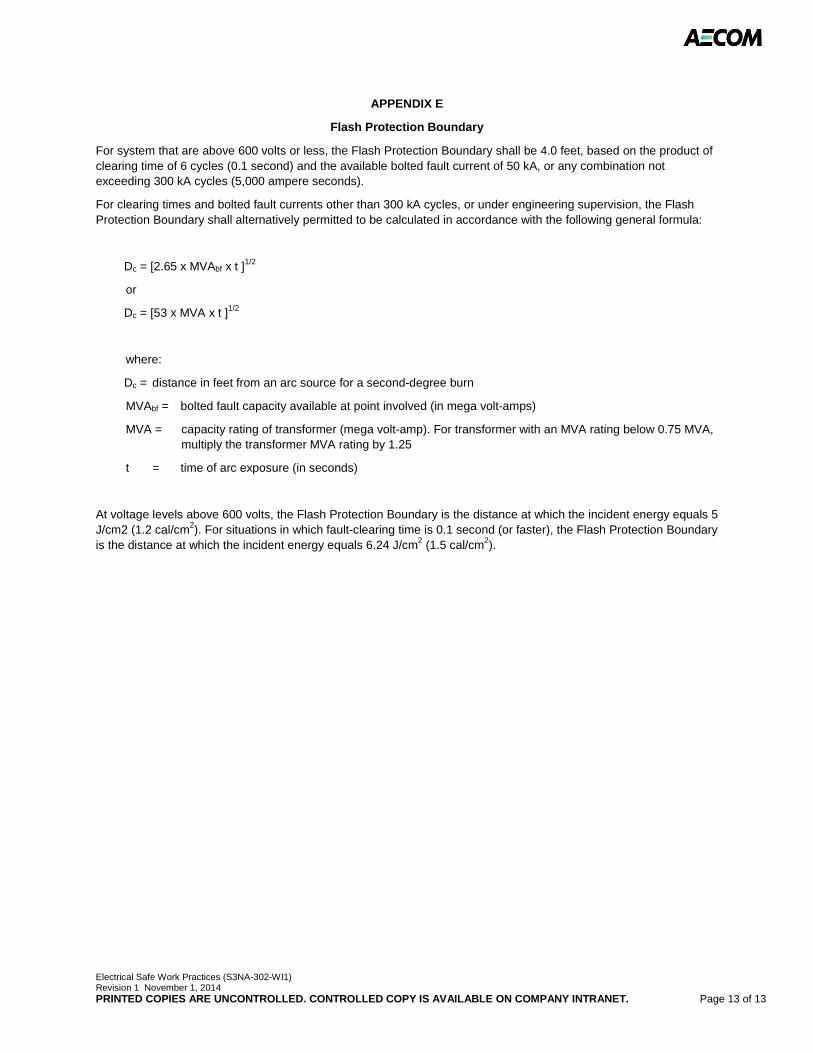
Electrical Safe Work Practices (S3NA-302-WI1) Revision 1 November 1, 2014 PRINTED COPIES ARE UNCONTROLLED. CONTROLLED COPY IS AVAILABLE ON COMPANY INTRANET. Page 13 of 13
APPENDIX E
Flash Protection Boundary
For system that are above 600 volts or less, the Flash Protection Boundary shall be 4.0 feet, based on the product of clearing time of 6 cycles (0.1 second) and the available bolted fault current of 50 kA, or any combination not exceeding 300 kA cycles (5,000 ampere seconds).
For clearing times and bolted fault currents other than 300 kA cycles, or under engineering supervision, the Flash Protection Boundary shall alternatively permitted to be calculated in accordance with the following general formula:
Dc = [2.65 x MVAbf x t ]1/2
or
Dc = [53 x MVA x t ]1/2
where:
Dc = distance in feet from an arc source for a second-degree burn
MVAbf = bolted fault capacity available at point involved (in mega volt-amps)
MVA = capacity rating of transformer (mega volt-amp). For transformer with an MVA rating below 0.75 MVA, multiply the transformer MVA rating by 1.25
t = time of arc exposure (in seconds)
At voltage levels above 600 volts, the Flash Protection Boundary is the distance at which the incident energy equals 5 J/cm2 (1.2 cal/cm2). For situations in which fault-clearing time is 0.1 second (or faster), the Flash Protection Boundary is the distance at which the incident energy equals 6.24 J/cm2 (1.5 cal/cm2).

Ground Fault Protection Safe Work Practices (S3NA-302-WI2) Revision 1 November 1, 2014 PRINTED COPIES ARE UNCONTROLLED. CONTROLLED COPY IS AVAILABLE ON COMPANY INTRANET. Page 1 of 3
Americas
Ground Fault Protection Safe Work Practices S3NA-302-WI2
1.0 Background
1.1 “Ground fault protection” is required on construction sites. To provide this protection, either “ground fault circuit interrupters” (GFCI) are to be used with temporary receptacles, or if allowed by legislation an “assured equipment grounding conductor program” is to be established in which plug-connected electrical equipment, extension cords, and temporary receptacles are tested on a periodic basis.
2.0 Ground Fault Circuit Interrupters
2.1 A GFCI is an electrical device that is designed to prevent electrocution from electrical leakage. It is designed to measure the difference in amperage between the “hot” wire and the “neutral” wire in a circuit. Under ideal conditions, the amperage should be the same in both wires. If there is electrical leakage (a ground-fault), the amperages will be different. If the difference is more than a predetermined amount, the GFCI “trips” and stops the flow of electricity.
2.2 GFCIs may trip from many causes:
2.2.1 Electrical leakage in the tool from internal defects, damaged insulation or from normal leakage in long runs of cords.
2.2.2 Moisture in the air or cords lying in water or on moist dirt.
2.2.3 Too many tools on one GFCI circuit.
2.2.4 Faulty wiring of the GFCI into the circuit.
2.2.5 Defective GFCI.
2.2.6 Any such tripping will require the problem to be corrected before the protected circuit can be re-set.
2.3 All 120-volt, single-phase, 15- and 20-ampere temporary receptacles shall be protected with “approved” GFCIs. “Approved” means listed by Underwriters Laboratories.
2.4 There are several types of GFCIs.
2.4.1 A combination circuit breaker and GFCI that is installed in place of the ordinary circuit breaker.
2.4.2 A receptacle containing a built-in GFCI.
2.4.3 A portable GFCI that plugs into a receptacle and allows the extension cord or tool to be plugged into the GFCI.
2.4.4 A portable unit containing several GFCI protected receptacles.
2.5 GFCIs contain a test button and a reset button. Each GFCI needs to be tested prior to use and on a periodic basis depending upon the manufacturer's recommendations (at a minimum monthly).
3.0 Assured Equipment Grounding Conductor Program
3.1 If allowed by local legislation, assured equipment grounding conductor program is to be used instead of GFCIs to provide ground fault protection, the program shall be governed by the following requirements.
3.1.1 Temporary receptacles shall be electrically grounded in accordance with the temporary wiring requirements of the National Electrical Code (United States)/Canadian Electrical Code.
3.1.2 Extension cords shall be three-wire cords containing an equipment grounding conductor (ground wire).
3.1.3 Electrical equipment that is plugged into a receptacle or extension cord (portable electrical tools, bench grinders, electric heaters, etc.) shall have a ground wire properly attached to the non-current-carrying metal

Ground Fault Protection Safe Work Practices (S3NA-302-WI2) Revision 1 November 1, 2014 PRINTED COPIES ARE UNCONTROLLED. CONTROLLED COPY IS AVAILABLE ON COMPANY INTRANET. Page 2 of 3
parts of the equipment. (Double-insulated tools have no ground wire and are therefore exempt from these testing and recording requirements but still need to be inspected for defects.)
3.1.4 The Worksite Manager and/or Supervisor are required to designate one or more competent persons to administer this testing and recording program.
3.1.5 Periodic testing of all plug-connected equipment, all extension cords, and all temporary receptacles is to be conducted at the following times:
• Before a new item (equipment, cord, or receptacle) is put into use.
• After any repairs to the item.
• After any incident in which the item may have been damaged.
• Within three months of the last test. (An exception is allowed in the Standard in which extension cords, and temporary receptacles, which are fixed in place and are not exposed to damage, may be tested every months months.)
3.1.6 The purpose of the test is to determine the following:
• Temporary receptacles—to be sure that the receptacle is grounded.
• Extension Cords—to be sure that the ground wire is connected to the proper terminal at each end and that the ground wire is continuous throughout the length of the cord.
• Plug Connected Equipment—to be sure that the ground wire is connected to the proper terminal and to the non-current carrying metal parts of the equipment and that the ground wire is continuous from the equipment to the plug.
3.1.7 The tests may be conducted using the following instruments:
• A receptacle tester may be used to test receptacles and to test extension cords when plugged into a receptacle.
• A continuity tester, or a volt-ohm meter, may be used to test equipment and to test extension cords when not plugged into a receptacle.
3.1.8 Records must be kept to show which items have passed the test and when the test was conducted. These records may be either written inspection logs, a color-coding system using colored tape attached to the item, or some other effective means.
3.1.9 Color coding shall be used in the following manner:
• After a plug-connected piece of equipment or an extension cord has passed the test, colored tape is to be placed around the cord near the plug. After a temporary receptacle has passed the test, colored tape is to be placed on the cover plate.
• Any set of colors may be used, with the exception of white, black, or silver.
• If there has been no overall site requirements established by the general contractor, use the following colors for the test periods.
January, February, March Red
April, May, June Blue
July, August, September Orange
October, November, December Green
3.1.10 The tests administered every three months are to begin on the first working day of each quarter. Testing and color coding are to be continued until all items covered by this program have been tested. The test administered every six months, for those receptacles and extension cords needing only semi-annual testing, are to be color coded using the quarterly color current at the time of the semi-annual test.
Ground Fault Protection Safe Work Practices (S3NA-302-WI2) Revision 1 November 1, 2014 PRINTED COPIES ARE UNCONTROLLED. CONTROLLED COPY IS AVAILABLE ON COMPANY INTRANET. Page 3 of 3
3.1.11 A visual inspection of plug-connected equipment, extension cords, and temporary receptacles is to be made by the user before each use. The purpose of the visual inspection is to look for damage or defects that could affect the safe use of the item. (Exception: extension cords and temporary receptacles that are fixed in place and not exposed to damage are not required to be given a daily visual inspection, but it is a good idea to do the daily visual inspection anyway.)
3.1.12 Equipment, cords, or receptacles showing damage or defects that could affect its safe operation are not to be used. This applies not only to the visual inspection before each use but also applies to any evidence of damage observed any time during use. Damaged items are to be taken out of service and are not to be used until properly repaired and retested.
3.1.13 Equipment covered by this program is not to be used until the equipment has been tested and color coded according to the requirements of this program.
3.1.14 A copy of this program is to be kept at the worksite.
Generator Safety Card (S3NA-302-WI3) Revision 1 November 1, 2014 PRINTED COPIES ARE UNCONTROLLED. CONTROLLED COPY IS AVAILABLE ON COMPANY INTRANET. Page 1 of 2
Americas
Generator Safety Card S3NA-302-WI3
1.0 Objective/Overview
1.1 Portable generators should be used with extreme caution in order to prevent personal injury. When using a portable generator it is important to follow the manufacturer’s instructions to avoid injuring someone or damaging your generator or appliances. Allow only trained, authorized personnel to operate the generator. Along with training, consider the need for other safety measures, including proper maintenance of equipment and personal protective equipment (PPE). It is important to note that muscle strains are the most common injury associated with portable generators.
2.0 Safe Operating Guidelines:
2.1 Follow manufacturer’s recommended operating instructions; every generator is not the same.
2.2 Maintain adequate ventilation. Generators emit carbon monoxide (CO). Never operate a generator in an enclosed building without proper ventilation.
2.3 Turn the generator off to refuel. Gasoline and its vapors may ignite if they come into contact with hot components or an electrical spark, so store fuel in a properly designed container in a secure location.
2.4 To avoid a shock, make sure that your hands are dry and that you are standing in a dry place whenever you operate the generator.
2.5 Turn off equipment and lights supplied by the generator until it is running.
2.6 Use the right extension cord. Use only UL-listed, three-prong extension cords. Be sure the extension cord is the proper size (wire-gauge) to handle the electric load that will be plugged into it.
2.7 Ensure the generator is properly grounded prior to each use.
2.8 Using a portable generator to tie into the wiring of an existing structure shall be done only by a licensed electrician.
2.8.1 Potential Hazards include:
• Lifting, carrying, and pulling starter cords;
• Burns from contact with the hot muffler or engine;
• Shocks/electrocution;
• Noise exposure; and
• Inhaling exhaust gases, CO.
2.8.2 Training Requirements include:
• Review of applicable standard operating procedures;
• Back Injury Prevention;
• Demonstrated knowledge on the use of a generator; and
• Review of manufacturers operating guidelines.
2.8.3 Level D PPE include:
• Leather Gloves;
• Hearing Protection; and
• Long Sleeve Shirt (i.e., to shield from burns, etc.).

Generator Safety Card (S3NA-302-WI3) Revision 1 November 1, 2014 PRINTED COPIES ARE UNCONTROLLED. CONTROLLED COPY IS AVAILABLE ON COMPANY INTRANET. Page 2 of 2
2.8.4 Other Safety Tips include:
• Have a Class A:B:C fire extinguisher readily available at all times.
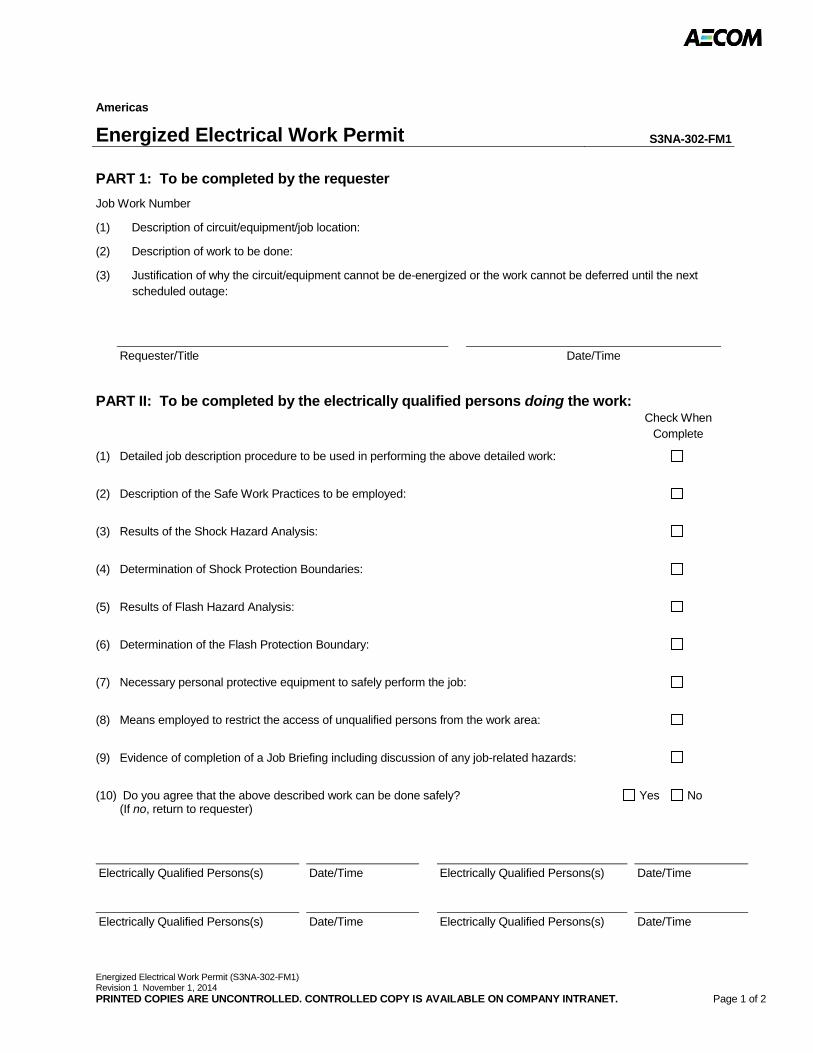
Energized Electrical Work Permit (S3NA-302-FM1) Revision 1 November 1, 2014 PRINTED COPIES ARE UNCONTROLLED. CONTROLLED COPY IS AVAILABLE ON COMPANY INTRANET. Page 1 of 2
Americas
Energized Electrical Work Permit S3NA-302-FM1
PART 1: To be completed by the requester
Job Work Number
(1) Description of circuit/equipment/job location:
(2) Description of work to be done:
(3) Justification of why the circuit/equipment cannot be de-energized or the work cannot be deferred until the next scheduled outage:
Requester/Title Date/Time
PART II: To be completed by the electrically qualified persons doing the work: Check When Complete
(1) Detailed job description procedure to be used in performing the above detailed work:
(2) Description of the Safe Work Practices to be employed:
(3) Results of the Shock Hazard Analysis:
(4) Determination of Shock Protection Boundaries:
(5) Results of Flash Hazard Analysis:
(6) Determination of the Flash Protection Boundary:
(7) Necessary personal protective equipment to safely perform the job:
(8) Means employed to restrict the access of unqualified persons from the work area:
(9) Evidence of completion of a Job Briefing including discussion of any job-related hazards:
(10) Do you agree that the above described work can be done safely? Yes No (If no, return to requester)
Electrically Qualified Persons(s) Date/Time Electrically Qualified Persons(s) Date/Time
Electrically Qualified Persons(s) Date/Time Electrically Qualified Persons(s) Date/Time

Energized Electrical Work Permit (S3NA-302-FM1) Revision 1 November 1, 2014 PRINTED COPIES ARE UNCONTROLLED. CONTROLLED COPY IS AVAILABLE ON COMPANY INTRANET. Page 2 of 2
Authorized by: Authorized Supervisor Date/Time
Notes:
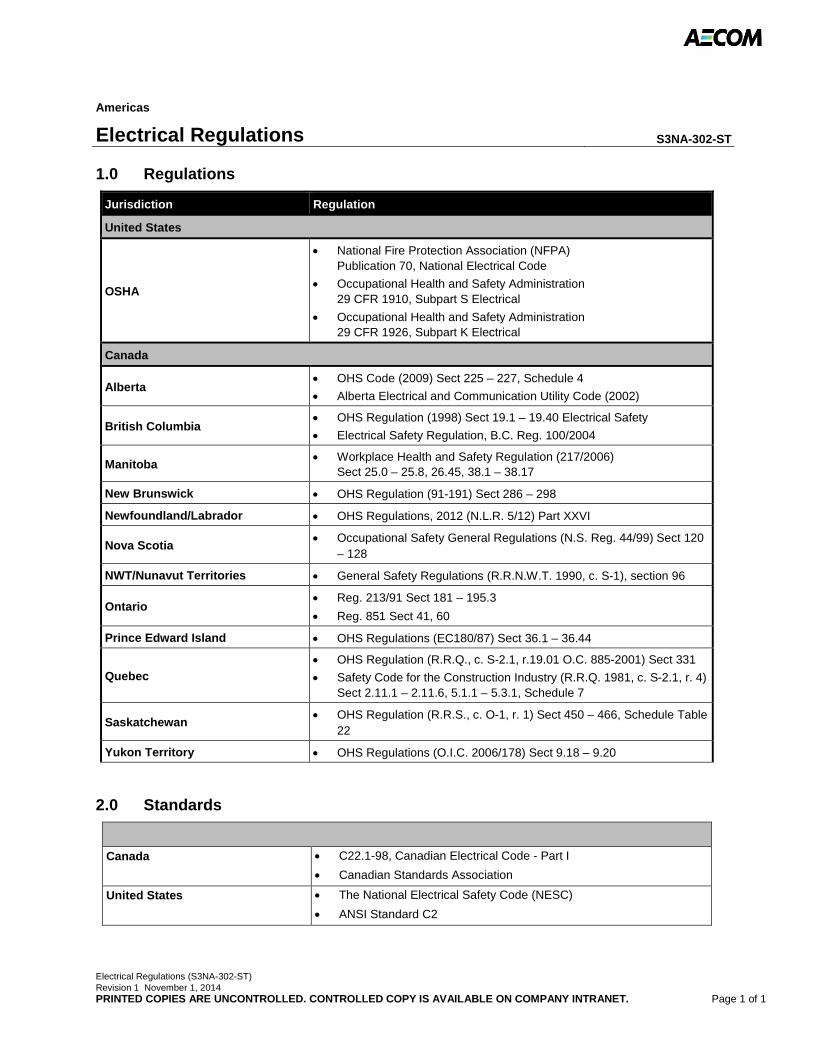
Electrical Regulations (S3NA-302-ST) Revision 1 November 1, 2014 PRINTED COPIES ARE UNCONTROLLED. CONTROLLED COPY IS AVAILABLE ON COMPANY INTRANET. Page 1 of 1
Americas
Electrical Regulations S3NA-302-ST
1.0 Regulations
Jurisdiction Regulation
United States
OSHA
• National Fire Protection Association (NFPA) Publication 70, National Electrical Code
• Occupational Health and Safety Administration 29 CFR 1910, Subpart S Electrical
• Occupational Health and Safety Administration 29 CFR 1926, Subpart K Electrical
Canada
Alberta • OHS Code (2009) Sect 225 – 227, Schedule 4
• Alberta Electrical and Communication Utility Code (2002)
British Columbia • OHS Regulation (1998) Sect 19.1 – 19.40 Electrical Safety
• Electrical Safety Regulation, B.C. Reg. 100/2004
Manitoba • Workplace Health and Safety Regulation (217/2006)
Sect 25.0 – 25.8, 26.45, 38.1 – 38.17
New Brunswick • OHS Regulation (91-191) Sect 286 – 298
Newfoundland/Labrador • OHS Regulations, 2012 (N.L.R. 5/12) Part XXVI
Nova Scotia • Occupational Safety General Regulations (N.S. Reg. 44/99) Sect 120
– 128
NWT/Nunavut Territories • General Safety Regulations (R.R.N.W.T. 1990, c. S-1), section 96
Ontario • Reg. 213/91 Sect 181 – 195.3
• Reg. 851 Sect 41, 60
Prince Edward Island • OHS Regulations (EC180/87) Sect 36.1 – 36.44
Quebec • OHS Regulation (R.R.Q., c. S-2.1, r.19.01 O.C. 885-2001) Sect 331
• Safety Code for the Construction Industry (R.R.Q. 1981, c. S-2.1, r. 4) Sect 2.11.1 – 2.11.6, 5.1.1 – 5.3.1, Schedule 7
Saskatchewan • OHS Regulation (R.R.S., c. O-1, r. 1) Sect 450 – 466, Schedule Table
22
Yukon Territory • OHS Regulations (O.I.C. 2006/178) Sect 9.18 – 9.20
2.0 Standards
Canada • C22.1-98, Canadian Electrical Code - Part I • Canadian Standards Association
United States • The National Electrical Safety Code (NESC)
• ANSI Standard C2
Hand and Power Tools (S3NA-305-PR1) Revision 2 November 1, 2014 PRINTED COPIES ARE UNCONTROLLED. CONTROLLED COPY IS AVAILABLE ON COMPANY INTRANET. Page 1 of 2
Americas
Hand and Power Tools S3NA-305-PR1
1.0 Purpose and Scope
1.1 Provides the AECOM requirements for all manually operated hand and power tools and equipment use, handling and storage.
1.2 This procedure applies to all AECOM Americas-based employees and operations.
2.0 Terms and Definitions
2.1 None
3.0 References
3.1 S3NA-003-PR1 SH&E Training
3.2 S3NA-205-PR1 Equipment Inspections & Maintenance
3.3 S3NA-208-PR1 Personal Protective Equipment Program
3.4 S3NA-302-PR1 Electrical, General
3.5 S3NA-410-PR1 Hazardous Energy Control
3.6 S3NA-510-PR1 Hearing Conservation Program
4.0 Procedure
4.1 Roles and Responsibilities
4.1.1 Project Managers/Field Task Managers/Supervisors – Ensure that all aspects of this procedure are followed and adhered to on all AECOM projects, sites and locations. If a specific tool is not included in the attachments, appropriate guidelines shall be established prior to work associated with that equipment, including following manufacturer’s recommendations.
4.1.2 Region Safety, Health and Environment (SH&E) Manager – Provide technical guidance and support as to this procedure.
4.1.3 Employees – No work with any tool that they are not familiar with without first obtaining training associated with that equipment. In addition, employees must following manufacturer’s recommendations for its use and must not modify the equipment without first obtaining authorization from the manufacturer.
4.2 Restrictions
4.2.1 No employee shall use any hand tool, unless they are familiar with the use and operation of the equipment or have received specific instruction on its use and operation.
4.2.2 All tools will be used in accordance with manufacturer’s specifications.
4.3 Training
4.3.1 Instruction in the proper use, safe handling, and maintenance of tools will be provided to employees unfamiliar with the tool. Refer to the attachments section for specifics and ocncurrence in the employee’s Training Needs Assessment (TNA) per the S3NA-003-PR1 SH&E Training procedure.
Hand and Power Tools (S3NA-305-PR1) Revision 2 November 1, 2014 PRINTED COPIES ARE UNCONTROLLED. CONTROLLED COPY IS AVAILABLE ON COMPANY INTRANET. Page 2 of 2
4.4 Personal Protective Equipment
4.4.1 Lockout devices (padlocks, multiple lock hasps, tags), gloves appropriate to the task, safety-toed boots, as required, hard hats and eye and face protection, as required and in accordance with the S3NA-208-PR1 Personal Protective Equipment Program.
4.5 Inspections
4.5.1 All tools must be inspected prior to each use. Any tool that is defective or has missing parts must not be used. Every broken or defective tool must be tagged ‘out of service’. Tagged tools will be returned to the supervisor for repair or replacement. Tagged tools will be immediately removed from service.
4.5.2 All tools must be inspected to manufacture’s specifications according to tool rests and guard adjustment tolerances. All tools will be inspected to ascertain that all safety devices are present and functioning properly in accordance with the S3NA-205-PR1 Equipment Inspections & Maintenance procedure.
5.0 Records
5.1 None
6.0 Attachments
6.1 S3NA-305-WI1 Chainsaw Safety Card
6.2 S3NA-305-WI2 Circular Saw Safety Card
6.3 S3NA-305-WI3 Cut Off Saw Safety Card
6.4 S3NA-305-WI4 Handheld Grinder Safety Card
6.5 S3NA-305-WI5 Impact Wrench Safety Card
6.6 S3NA-305-WI6 Nail Gun Safety Card
6.7 S3NA-305-WI7 Dustless Vacuum Safety Card
6.8 S3NA-305-WI8 Power Drill Safety Card
6.9 S3NA-305-WI9 Pressure Washer Safety Card
6.10 S3NA-305-WI10 Reciprocating Saw Safety Card
6.11 S3NA-305-WI11 Sander Safety Card
6.12 S3NA-305-WI12 Utility Knife Safety Card
6.13 S3NA-305-WI13 Wood Chipper Safety Card
6.14 S3NA-305-WI14 Clearing and Grubbing Equipment Safety Card
6.15 S3NA-305-WI15 Pneumatic Tools Safety Card
6.16 S3NA-305-WI16 Manual Hand Tools Safety Card
6.17 S3NA-305-WI17 Small Engines Safety Card
6.18 S3NA-305-WI18 Electric and Battery Powered Hand Tools Safety Card
6.19 S3NA-305-GL1 Hand and Power Tools Guide
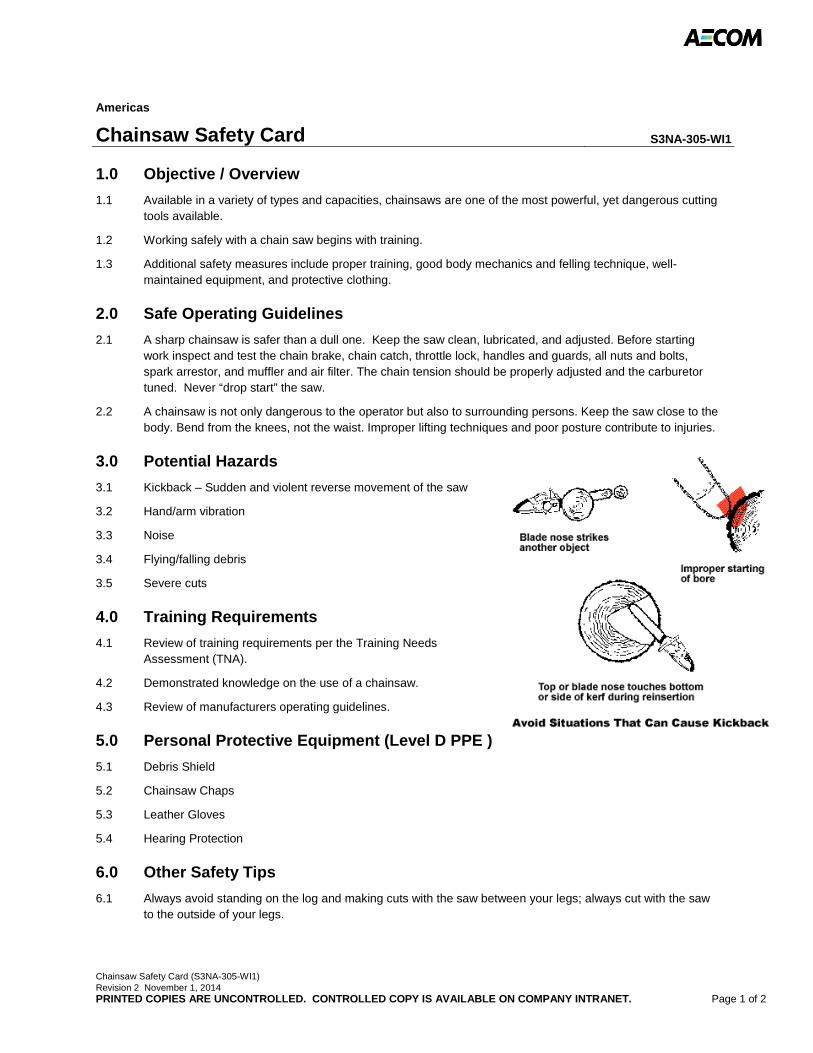
Chainsaw Safety Card (S3NA-305-WI1) Revision 2 November 1, 2014 PRINTED COPIES ARE UNCONTROLLED. CONTROLLED COPY IS AVAILABLE ON COMPANY INTRANET. Page 1 of 2
Americas
Chainsaw Safety Card S3NA-305-WI1
1.0 Objective / Overview
1.1 Available in a variety of types and capacities, chainsaws are one of the most powerful, yet dangerous cutting tools available.
1.2 Working safely with a chain saw begins with training.
1.3 Additional safety measures include proper training, good body mechanics and felling technique, well-maintained equipment, and protective clothing.
2.0 Safe Operating Guidelines
2.1 A sharp chainsaw is safer than a dull one. Keep the saw clean, lubricated, and adjusted. Before starting work inspect and test the chain brake, chain catch, throttle lock, handles and guards, all nuts and bolts, spark arrestor, and muffler and air filter. The chain tension should be properly adjusted and the carburetor tuned. Never “drop start” the saw.
2.2 A chainsaw is not only dangerous to the operator but also to surrounding persons. Keep the saw close to the body. Bend from the knees, not the waist. Improper lifting techniques and poor posture contribute to injuries.
3.0 Potential Hazards
3.1 Kickback – Sudden and violent reverse movement of the saw
3.2 Hand/arm vibration
3.3 Noise
3.4 Flying/falling debris
3.5 Severe cuts
4.0 Training Requirements
4.1 Review of training requirements per the Training Needs Assessment (TNA).
4.2 Demonstrated knowledge on the use of a chainsaw.
4.3 Review of manufacturers operating guidelines.
5.0 Personal Protective Equipment (Level D PPE )
5.1 Debris Shield
5.2 Chainsaw Chaps
5.3 Leather Gloves
5.4 Hearing Protection
6.0 Other Safety Tips
6.1 Always avoid standing on the log and making cuts with the saw between your legs; always cut with the saw to the outside of your legs.
Chainsaw Safety Card (S3NA-305-WI1) Revision 2 November 1, 2014 PRINTED COPIES ARE UNCONTROLLED. CONTROLLED COPY IS AVAILABLE ON COMPANY INTRANET. Page 2 of 2
6.2 Determine where the tree/limb will fall prior to cutting. Always ensure that personnel and equipment are not in the path of the falling tree/log, and that you have time to move away. If necessary, flag/or fence off the area to prevent entry.
6.3 Always stand to one side of the limb you are to cut, never straddle it.
6.4 Always keep in mind where the chain will go if it breaks; never position yourself or other people in line with the chain.
6.5 Keep the chain out of the dirt, debris will fly, the teeth will be dulled and the chain life shortened.
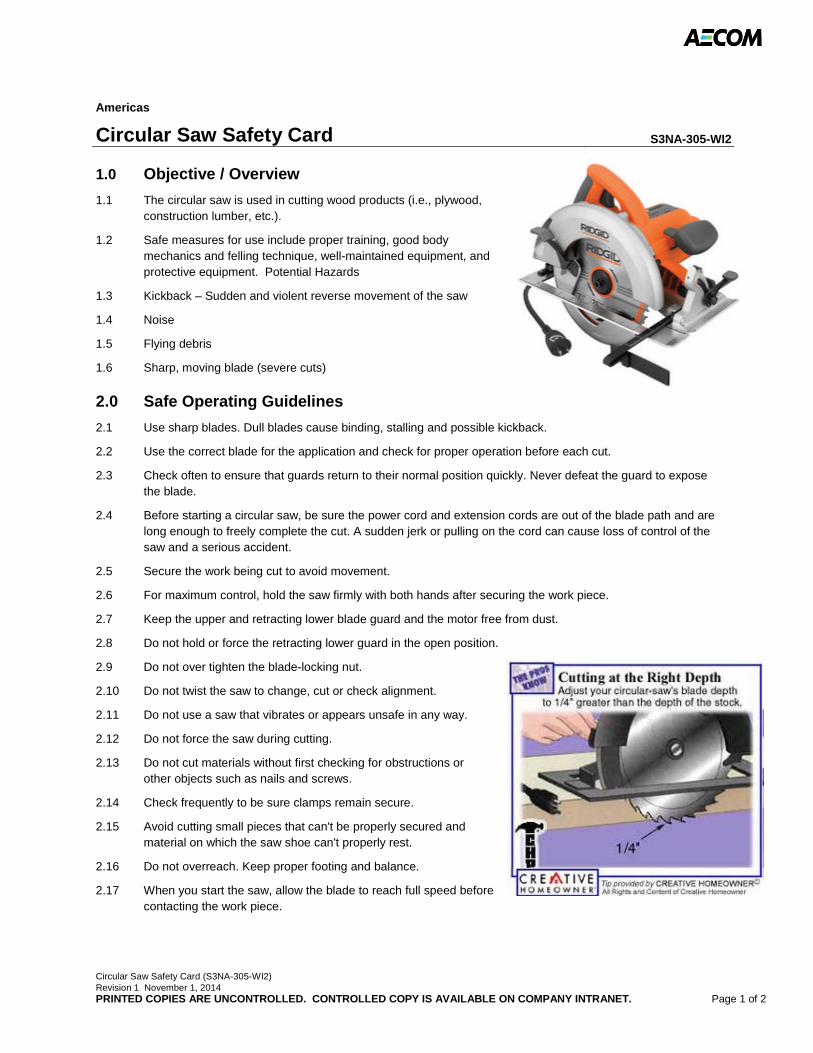
Circular Saw Safety Card (S3NA-305-WI2) Revision 1 November 1, 2014 PRINTED COPIES ARE UNCONTROLLED. CONTROLLED COPY IS AVAILABLE ON COMPANY INTRANET. Page 1 of 2
Americas
Circular Saw Safety Card S3NA-305-WI2
1.0 Objective / Overview
1.1 The circular saw is used in cutting wood products (i.e., plywood, construction lumber, etc.).
1.2 Safe measures for use include proper training, good body mechanics and felling technique, well-maintained equipment, and protective equipment. Potential Hazards
1.3 Kickback – Sudden and violent reverse movement of the saw
1.4 Noise
1.5 Flying debris
1.6 Sharp, moving blade (severe cuts)
2.0 Safe Operating Guidelines
2.1 Use sharp blades. Dull blades cause binding, stalling and possible kickback.
2.2 Use the correct blade for the application and check for proper operation before each cut.
2.3 Check often to ensure that guards return to their normal position quickly. Never defeat the guard to expose the blade.
2.4 Before starting a circular saw, be sure the power cord and extension cords are out of the blade path and are long enough to freely complete the cut. A sudden jerk or pulling on the cord can cause loss of control of the saw and a serious accident.
2.5 Secure the work being cut to avoid movement.
2.6 For maximum control, hold the saw firmly with both hands after securing the work piece.
2.7 Keep the upper and retracting lower blade guard and the motor free from dust.
2.8 Do not hold or force the retracting lower guard in the open position.
2.9 Do not over tighten the blade-locking nut.
2.10 Do not twist the saw to change, cut or check alignment.
2.11 Do not use a saw that vibrates or appears unsafe in any way.
2.12 Do not force the saw during cutting.
2.13 Do not cut materials without first checking for obstructions or other objects such as nails and screws.
2.14 Check frequently to be sure clamps remain secure.
2.15 Avoid cutting small pieces that can't be properly secured and material on which the saw shoe can't properly rest.
2.16 Do not overreach. Keep proper footing and balance.
2.17 When you start the saw, allow the blade to reach full speed before contacting the work piece.
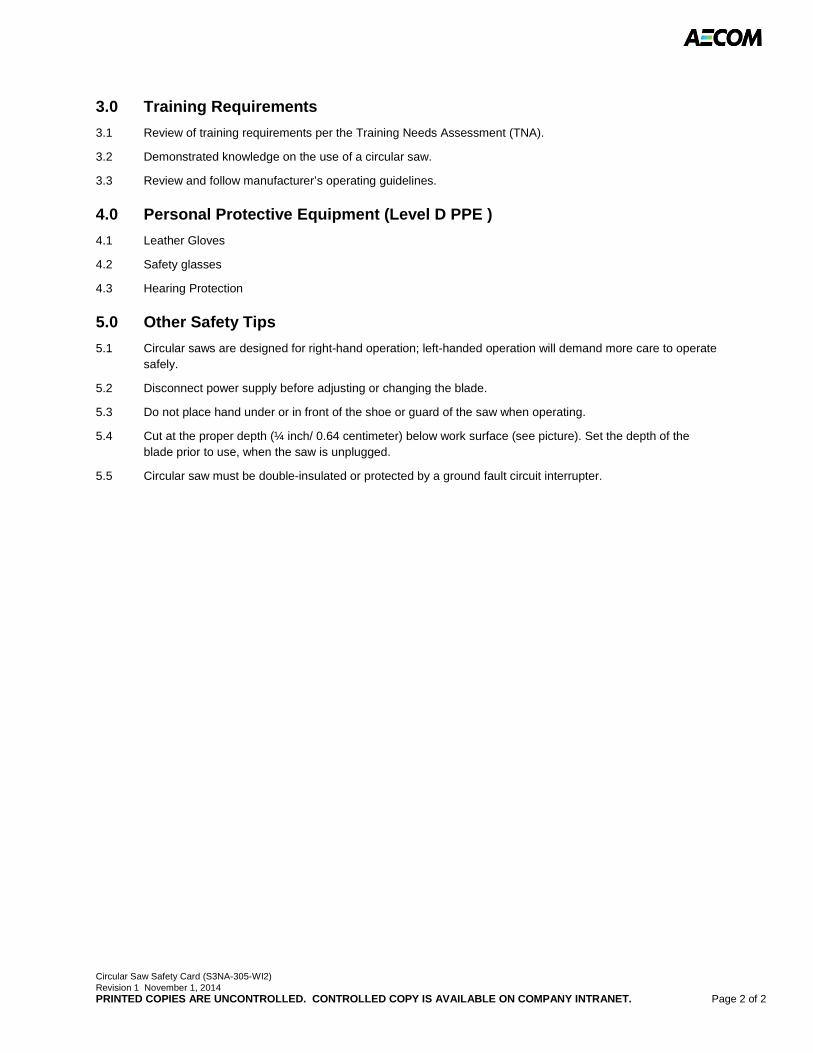
Circular Saw Safety Card (S3NA-305-WI2) Revision 1 November 1, 2014 PRINTED COPIES ARE UNCONTROLLED. CONTROLLED COPY IS AVAILABLE ON COMPANY INTRANET. Page 2 of 2
3.0 Training Requirements
3.1 Review of training requirements per the Training Needs Assessment (TNA).
3.2 Demonstrated knowledge on the use of a circular saw.
3.3 Review and follow manufacturer’s operating guidelines.
4.0 Personal Protective Equipment (Level D PPE )
4.1 Leather Gloves
4.2 Safety glasses
4.3 Hearing Protection
5.0 Other Safety Tips
5.1 Circular saws are designed for right-hand operation; left-handed operation will demand more care to operate safely.
5.2 Disconnect power supply before adjusting or changing the blade.
5.3 Do not place hand under or in front of the shoe or guard of the saw when operating.
5.4 Cut at the proper depth (¼ inch/ 0.64 centimeter) below work surface (see picture). Set the depth of the blade prior to use, when the saw is unplugged.
5.5 Circular saw must be double-insulated or protected by a ground fault circuit interrupter.
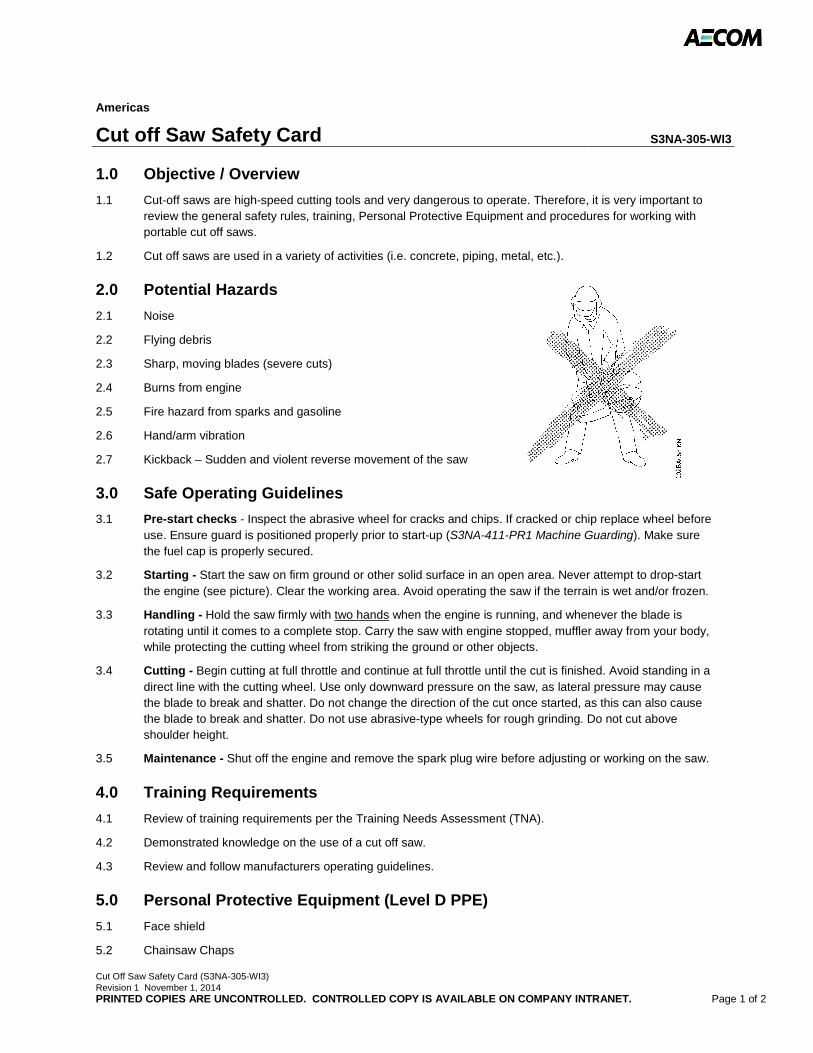
Cut Off Saw Safety Card (S3NA-305-WI3) Revision 1 November 1, 2014 PRINTED COPIES ARE UNCONTROLLED. CONTROLLED COPY IS AVAILABLE ON COMPANY INTRANET. Page 1 of 2
Americas
Cut off Saw Safety Card S3NA-305-WI3
1.0 Objective / Overview
1.1 Cut-off saws are high-speed cutting tools and very dangerous to operate. Therefore, it is very important to review the general safety rules, training, Personal Protective Equipment and procedures for working with portable cut off saws.
1.2 Cut off saws are used in a variety of activities (i.e. concrete, piping, metal, etc.).
2.0 Potential Hazards
2.1 Noise
2.2 Flying debris
2.3 Sharp, moving blades (severe cuts)
2.4 Burns from engine
2.5 Fire hazard from sparks and gasoline
2.6 Hand/arm vibration
2.7 Kickback – Sudden and violent reverse movement of the saw
3.0 Safe Operating Guidelines
3.1 Pre-start checks - Inspect the abrasive wheel for cracks and chips. If cracked or chip replace wheel before use. Ensure guard is positioned properly prior to start-up (S3NA-411-PR1 Machine Guarding). Make sure the fuel cap is properly secured.
3.2 Starting - Start the saw on firm ground or other solid surface in an open area. Never attempt to drop-start the engine (see picture). Clear the working area. Avoid operating the saw if the terrain is wet and/or frozen.
3.3 Handling - Hold the saw firmly with two hands when the engine is running, and whenever the blade is rotating until it comes to a complete stop. Carry the saw with engine stopped, muffler away from your body, while protecting the cutting wheel from striking the ground or other objects.
3.4 Cutting - Begin cutting at full throttle and continue at full throttle until the cut is finished. Avoid standing in a direct line with the cutting wheel. Use only downward pressure on the saw, as lateral pressure may cause the blade to break and shatter. Do not change the direction of the cut once started, as this can also cause the blade to break and shatter. Do not use abrasive-type wheels for rough grinding. Do not cut above shoulder height.
3.5 Maintenance - Shut off the engine and remove the spark plug wire before adjusting or working on the saw.
4.0 Training Requirements
4.1 Review of training requirements per the Training Needs Assessment (TNA).
4.2 Demonstrated knowledge on the use of a cut off saw.
4.3 Review and follow manufacturers operating guidelines.
5.0 Personal Protective Equipment (Level D PPE)
5.1 Face shield
5.2 Chainsaw Chaps
Cut Off Saw Safety Card (S3NA-305-WI3) Revision 1 November 1, 2014 PRINTED COPIES ARE UNCONTROLLED. CONTROLLED COPY IS AVAILABLE ON COMPANY INTRANET. Page 2 of 2
5.3 Hearing protection: earplugs and/or earmuffs
5.4 Respirator if required (concrete operations)
6.0 Other Safety Tips
6.1 Keep flammable and combustible materials away from saw while cutting metal.

Hand-Held Grinder Safety Card (S3NA-305-WI4) Revision 1 November 1, 2014 PRINTED COPIES ARE UNCONTROLLED. CONTROLLED COPY IS AVAILABLE ON COMPANY INTRANET. Page 1 of 2
Americas
Handheld Grinder Safety Card S3NA-305-WI4
1.0 Objective / Overview
1.1 Handheld grinders are high-speed electric- or pneumatic-powered grinding tools used to shape or cut metal, and can be dangerous to operate.
1.2 Grinders are used in a variety of activities (i.e., piping installation/repair, metal, restoring, polishing, sharpening, etc.).
2.0 Potential Hazards
2.1 Kickback – Sudden and violent reverse movement of the grinder
2.2 Flying debris
2.3 Moving parts (severe cuts)
2.4 Fire hazard from sparks igniting nearby debris or objects
2.5 Noise
2.6 Hand/arm vibration
3.0 Safe Operating Guidelines
3.1 Basic safety rules can help prevent hazards associated with the use of handheld grinders:
3.1.1 Never carry the tool by the cord (or the hose for pneumatic tools).
3.1.2 Never yank the cord or the hose to disconnect the tool from the receptacle.
3.1.3 Keep cords and hoses away from heat, oil, and sharp edges.
3.1.4 Denergize tools when not in use, before servicing, and when changing accessories such as blades/bits/cutters.
3.1.5 All observers should be kept at a safe distance from the work area.
3.1.6 Always secure work with clamps or a vise, freeing both hands to operate the tool.
3.1.7 Avoid accidental starting; do not hold a finger on the trigger/switch while carrying a powered tool.
3.1.8 Tools should be maintained with care. They should be kept clean and sharp for the best performance. Follow instructions in the user’s manual for lubricating and care instructions.
3.1.9 Be sure to keep your footing and maintain proper balance.
3.1.10 The proper apparel should be worn. Loose clothing or jewelry can become caught in moving parts.
3.1.11 Inspect the tool before every use. Damaged tools must be removed from use and tagged “DO NOT USE”.
4.0 Training Requirements
4.1 Review of training rquirements per the Trainign Needs Assessment (TNA).
4.2 Demonstrated knowledge on the use of a handheld grinder.
4.3 Follow manufacturers operating guidelines, especially for proper grinding wheel attachment.
Hand-Held Grinder Safety Card (S3NA-305-WI4) Revision 1 November 1, 2014 PRINTED COPIES ARE UNCONTROLLED. CONTROLLED COPY IS AVAILABLE ON COMPANY INTRANET. Page 2 of 2
5.0 Personal Protective Equipment (PPE)
5.1 Leather gloves
5.2 Safety glasses with sideshields
5.3 Hearing protection: earplugs and/or earmuffs
5.4 Other PPE as necessary for the work site/activity
6.0 Other Safety Tips
6.1 Keep flammable and combustible materials away from the grinder.
6.2 Have a fire extinguisher on hand while using grinder.
6.3 Inspect the abrasive wheel for cracks and chips. If cracked or chipped, replace wheel before use.
6.4 Ensure safety guard(s) is positioned properly prior to start-up.
6.5 Never clamp a handheld grinder in a vice.
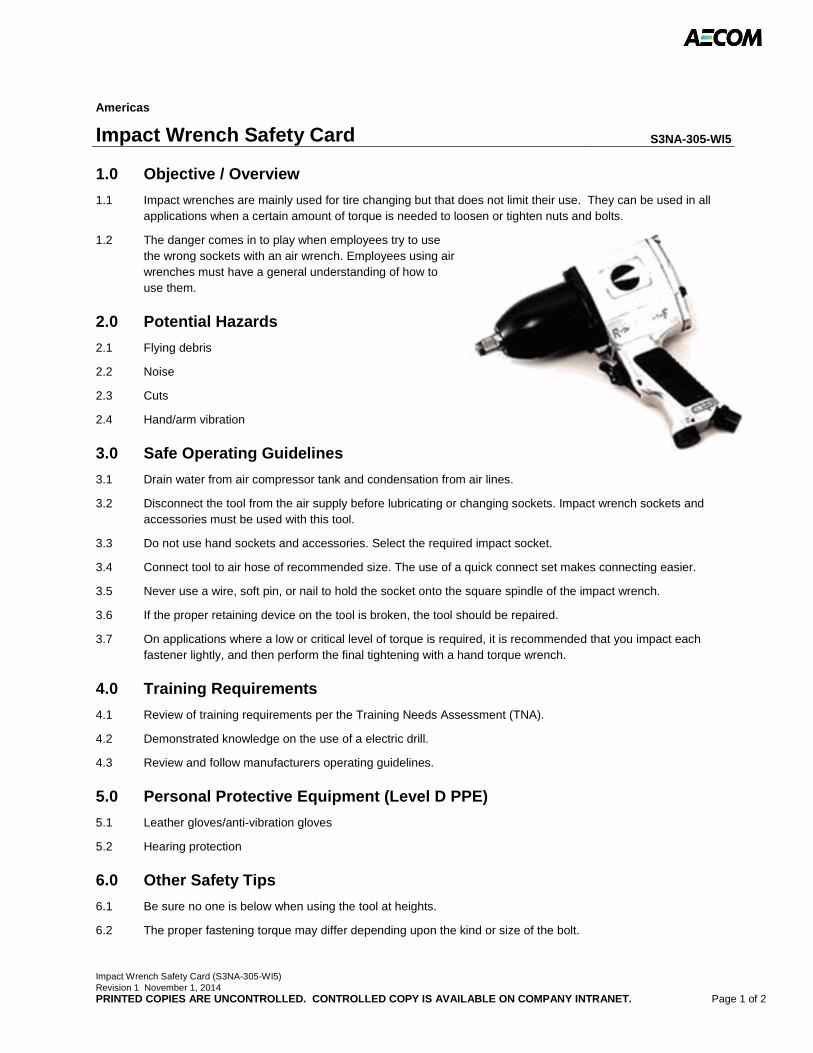
Impact Wrench Safety Card (S3NA-305-WI5) Revision 1 November 1, 2014 PRINTED COPIES ARE UNCONTROLLED. CONTROLLED COPY IS AVAILABLE ON COMPANY INTRANET. Page 1 of 2
Americas
Impact Wrench Safety Card S3NA-305-WI5
1.0 Objective / Overview
1.1 Impact wrenches are mainly used for tire changing but that does not limit their use. They can be used in all applications when a certain amount of torque is needed to loosen or tighten nuts and bolts.
1.2 The danger comes in to play when employees try to use the wrong sockets with an air wrench. Employees using air wrenches must have a general understanding of how to use them.
2.0 Potential Hazards
2.1 Flying debris
2.2 Noise
2.3 Cuts
2.4 Hand/arm vibration
3.0 Safe Operating Guidelines
3.1 Drain water from air compressor tank and condensation from air lines.
3.2 Disconnect the tool from the air supply before lubricating or changing sockets. Impact wrench sockets and accessories must be used with this tool.
3.3 Do not use hand sockets and accessories. Select the required impact socket.
3.4 Connect tool to air hose of recommended size. The use of a quick connect set makes connecting easier.
3.5 Never use a wire, soft pin, or nail to hold the socket onto the square spindle of the impact wrench.
3.6 If the proper retaining device on the tool is broken, the tool should be repaired.
3.7 On applications where a low or critical level of torque is required, it is recommended that you impact each fastener lightly, and then perform the final tightening with a hand torque wrench.
4.0 Training Requirements
4.1 Review of training requirements per the Training Needs Assessment (TNA).
4.2 Demonstrated knowledge on the use of a electric drill.
4.3 Review and follow manufacturers operating guidelines.
5.0 Personal Protective Equipment (Level D PPE)
5.1 Leather gloves/anti-vibration gloves
5.2 Hearing protection
6.0 Other Safety Tips
6.1 Be sure no one is below when using the tool at heights.
6.2 The proper fastening torque may differ depending upon the kind or size of the bolt.

Impact Wrench Safety Card (S3NA-305-WI5) Revision 1 November 1, 2014 PRINTED COPIES ARE UNCONTROLLED. CONTROLLED COPY IS AVAILABLE ON COMPANY INTRANET. Page 2 of 2
6.3 Check the torque with a torque wrench.

Nail Gun Safety Card (S3NA-305-WI6) Revision 2 November 1, 2014 PRINTED COPIES ARE UNCONTROLLED. CONTROLLED COPY IS AVAILABLE ON COMPANY INTRANET. Page 1 of 2
Americas
Nail Gun Safety Card S3NA-305-WI6
1.0 Objective / Overview
1.1 Nail guns are useful tools, but must be handled with care.
1.2 Nail guns have been shown to be the cause of unnecessary injuries when the design of the gun places emphasis on speed, rather than safety.
2.0 Potential Hazards
2.1 Flying debris/nails
2.2 Imbedded object
2.3 Puncture wounds
2.4 Noise
3.0 Safe Operating Guidelines
3.1 Watch out for other crewmembers working near you.
3.2 Never let an inexperienced crewmember use a nail gun without supervised training.
3.3 Never use bottled gas as a power source for pneumatic tools.
3.4 Disconnect a nail gun before you service it.
3.5 Hold your hand a good 12 inches back from the ends of studs or joists when you are nailing.
3.6 Keep the gun properly aligned with your work both vertically and horizontally.
3.7 Never nail with the gun pointed toward you or anyone else on the job.
3.8 Never try to nail beyond your reach.
4.0 Training Requirements
4.1 Review of training requirements per the Trainign Needs Assessment.
4.2 Demonstrated knowledge on the use of a coring machine.
4.3 Review and follow manufacturers operating guidelines.
5.0 Personal Protective Equipment (Level D PPE)
5.1 Leather gloves
5.2 Hearing protection
6.0 Other Safety Tips
6.1 When you are moving about the work area keep your finger off the trigger until you are ready to fire. Make sure you have only placed the nose guard against the material you are going to nail together.
6.2 Never rest the gun against any part of your body, or try to climb a ladder with the gun cradled against your body.
6.3 Be aware of what is located behind the nailing surface. Never place hands or other body parts directly behind the nailing surface.

Nail Gun Safety Card (S3NA-305-WI6) Revision 2 November 1, 2014 PRINTED COPIES ARE UNCONTROLLED. CONTROLLED COPY IS AVAILABLE ON COMPANY INTRANET. Page 2 of 2
6.4 Use only for intended work.
6.5 Avoid nailing into knots as nail can splinter wood.
6.6 Never disable safety tip on gun.
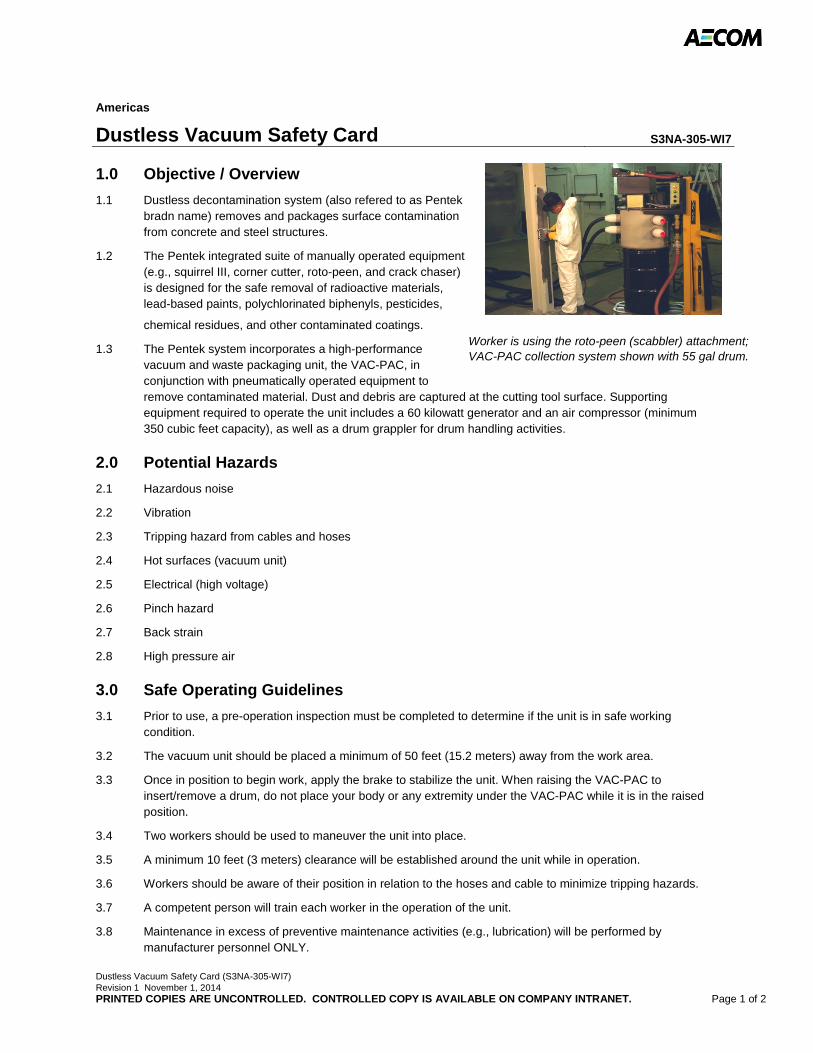
Dustless Vacuum Safety Card (S3NA-305-WI7) Revision 1 November 1, 2014 PRINTED COPIES ARE UNCONTROLLED. CONTROLLED COPY IS AVAILABLE ON COMPANY INTRANET. Page 1 of 2
Americas
Dustless Vacuum Safety Card S3NA-305-WI7
1.0 Objective / Overview
1.1 Dustless decontamination system (also refered to as Pentek bradn name) removes and packages surface contamination from concrete and steel structures.
1.2 The Pentek integrated suite of manually operated equipment (e.g., squirrel III, corner cutter, roto-peen, and crack chaser) is designed for the safe removal of radioactive materials, lead-based paints, polychlorinated biphenyls, pesticides,
chemical residues, and other contaminated coatings.
1.3 The Pentek system incorporates a high-performance vacuum and waste packaging unit, the VAC-PAC, in conjunction with pneumatically operated equipment to remove contaminated material. Dust and debris are captured at the cutting tool surface. Supporting equipment required to operate the unit includes a 60 kilowatt generator and an air compressor (minimum 350 cubic feet capacity), as well as a drum grappler for drum handling activities.
2.0 Potential Hazards
2.1 Hazardous noise
2.2 Vibration
2.3 Tripping hazard from cables and hoses
2.4 Hot surfaces (vacuum unit)
2.5 Electrical (high voltage)
2.6 Pinch hazard
2.7 Back strain
2.8 High pressure air
3.0 Safe Operating Guidelines
3.1 Prior to use, a pre-operation inspection must be completed to determine if the unit is in safe working condition.
3.2 The vacuum unit should be placed a minimum of 50 feet (15.2 meters) away from the work area.
3.3 Once in position to begin work, apply the brake to stabilize the unit. When raising the VAC-PAC to insert/remove a drum, do not place your body or any extremity under the VAC-PAC while it is in the raised position.
3.4 Two workers should be used to maneuver the unit into place.
3.5 A minimum 10 feet (3 meters) clearance will be established around the unit while in operation.
3.6 Workers should be aware of their position in relation to the hoses and cable to minimize tripping hazards.
3.7 A competent person will train each worker in the operation of the unit.
3.8 Maintenance in excess of preventive maintenance activities (e.g., lubrication) will be performed by manufacturer personnel ONLY.
Worker is using the roto-peen (scabbler) attachment; VAC-PAC collection system shown with 55 gal drum.
Dustless Vacuum Safety Card (S3NA-305-WI7) Revision 1 November 1, 2014 PRINTED COPIES ARE UNCONTROLLED. CONTROLLED COPY IS AVAILABLE ON COMPANY INTRANET. Page 2 of 2
4.0 Personal Protective Equipment (Level D PPE ensemble)
4.1 Leather gloves (maintenance)
4.2 Tyvek suit (with hood)
4.3 Anti-vibration gloves (operation)
4.4 Hearing protection (plugs or muffs)
5.0 Other Safety Tips
5.1 Always know where the emergency stop is located.
5.2 Operators of a motorized drum grappler must be trained in agreement with the powered industrial truck standard.
5.3 Review S3NA-302-PR1 Electrical, General prior to refueling the electrical generator and/or compressor.
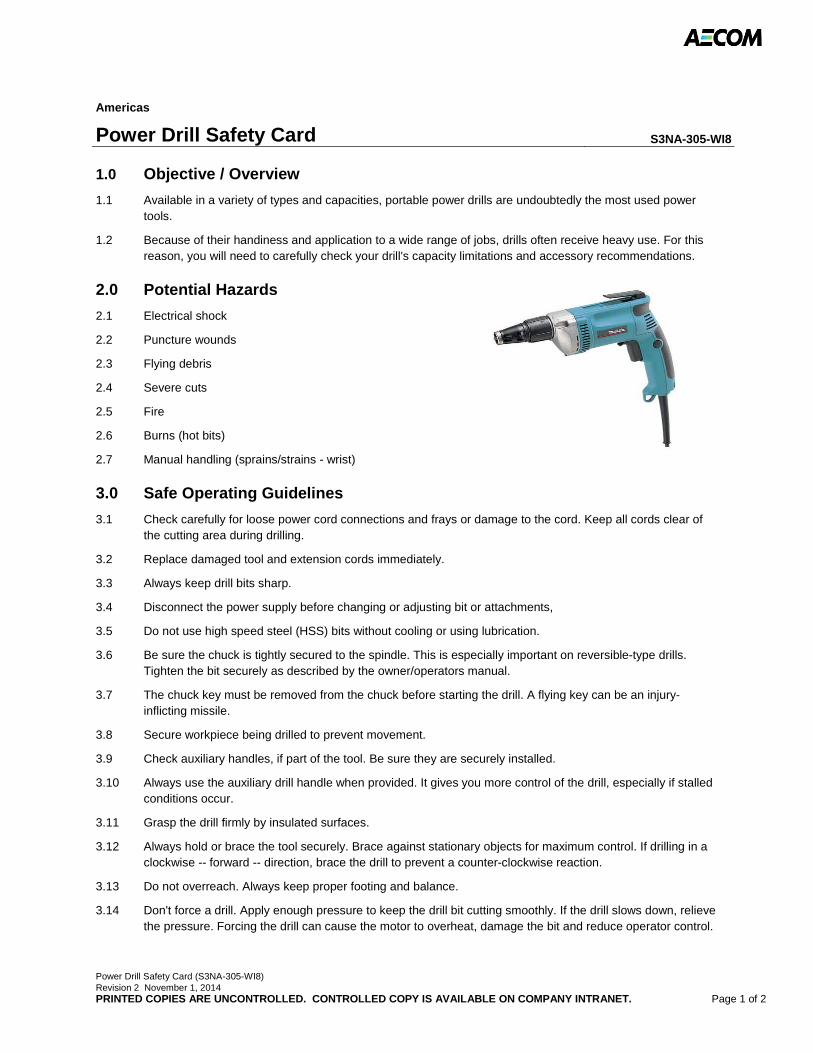
Power Drill Safety Card (S3NA-305-WI8) Revision 2 November 1, 2014 PRINTED COPIES ARE UNCONTROLLED. CONTROLLED COPY IS AVAILABLE ON COMPANY INTRANET. Page 1 of 2
Americas
Power Drill Safety Card S3NA-305-WI8
1.0 Objective / Overview
1.1 Available in a variety of types and capacities, portable power drills are undoubtedly the most used power tools.
1.2 Because of their handiness and application to a wide range of jobs, drills often receive heavy use. For this reason, you will need to carefully check your drill's capacity limitations and accessory recommendations.
2.0 Potential Hazards
2.1 Electrical shock
2.2 Puncture wounds
2.3 Flying debris
2.4 Severe cuts
2.5 Fire
2.6 Burns (hot bits)
2.7 Manual handling (sprains/strains - wrist)
3.0 Safe Operating Guidelines
3.1 Check carefully for loose power cord connections and frays or damage to the cord. Keep all cords clear of the cutting area during drilling.
3.2 Replace damaged tool and extension cords immediately.
3.3 Always keep drill bits sharp.
3.4 Disconnect the power supply before changing or adjusting bit or attachments,
3.5 Do not use high speed steel (HSS) bits without cooling or using lubrication.
3.6 Be sure the chuck is tightly secured to the spindle. This is especially important on reversible-type drills. Tighten the bit securely as described by the owner/operators manual.
3.7 The chuck key must be removed from the chuck before starting the drill. A flying key can be an injury-inflicting missile.
3.8 Secure workpiece being drilled to prevent movement.
3.9 Check auxiliary handles, if part of the tool. Be sure they are securely installed.
3.10 Always use the auxiliary drill handle when provided. It gives you more control of the drill, especially if stalled conditions occur.
3.11 Grasp the drill firmly by insulated surfaces.
3.12 Always hold or brace the tool securely. Brace against stationary objects for maximum control. If drilling in a clockwise -- forward -- direction, brace the drill to prevent a counter-clockwise reaction.
3.13 Do not overreach. Always keep proper footing and balance.
3.14 Don't force a drill. Apply enough pressure to keep the drill bit cutting smoothly. If the drill slows down, relieve the pressure. Forcing the drill can cause the motor to overheat, damage the bit and reduce operator control.
Power Drill Safety Card (S3NA-305-WI8) Revision 2 November 1, 2014 PRINTED COPIES ARE UNCONTROLLED. CONTROLLED COPY IS AVAILABLE ON COMPANY INTRANET. Page 2 of 2
4.0 Training Requirements
4.1 Review of training needs per the Training Needs Assessment.
4.2 Demonstrated knowledge on the use of a power drill.
4.3 Review and follow manufacturers operating guidelines.
5.0 Personal Protective Equipment (Level D PPE)
5.1 Safety glasses
5.2 Leather Gloves
6.0 Other Safety Tips
6.1 Electric drills must be double-insulated or plugged into a ground fault circuit interrupter outlet.
6.2 Never carry tool by cord or yank it to disconnect from receptacle.
6.3 Keep cord away from sharp edges.
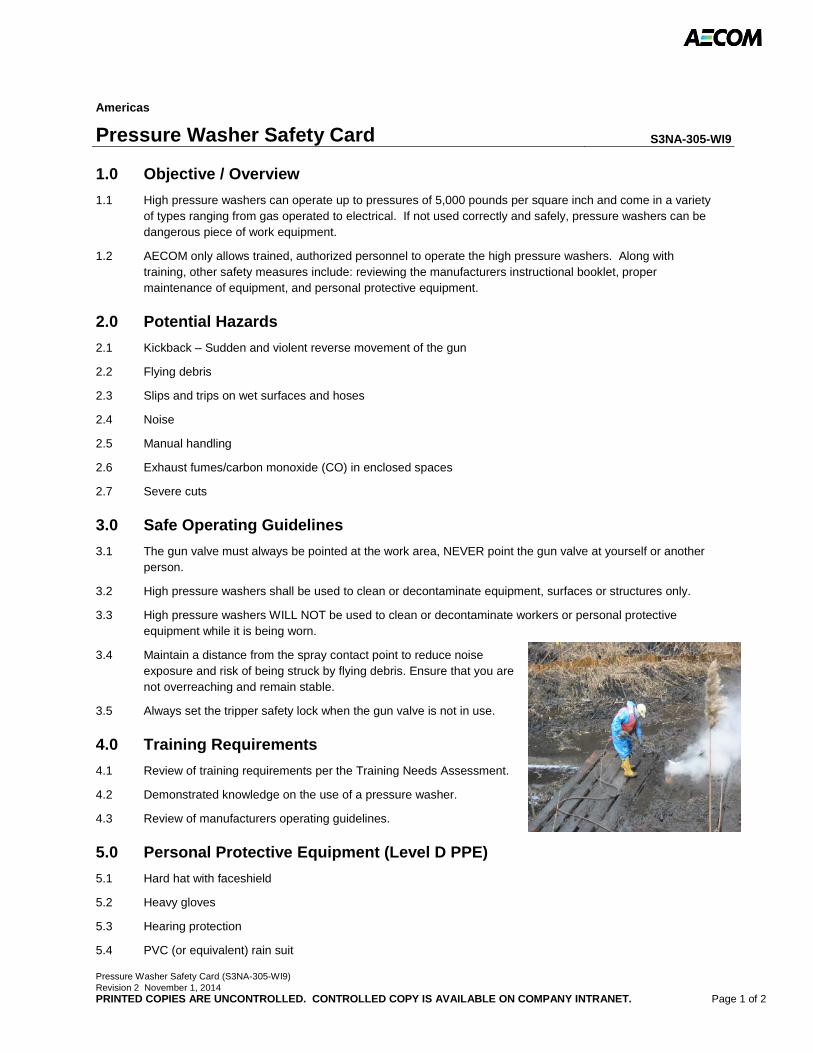
Pressure Washer Safety Card (S3NA-305-WI9) Revision 2 November 1, 2014 PRINTED COPIES ARE UNCONTROLLED. CONTROLLED COPY IS AVAILABLE ON COMPANY INTRANET. Page 1 of 2
Americas
Pressure Washer Safety Card S3NA-305-WI9
1.0 Objective / Overview
1.1 High pressure washers can operate up to pressures of 5,000 pounds per square inch and come in a variety of types ranging from gas operated to electrical. If not used correctly and safely, pressure washers can be dangerous piece of work equipment.
1.2 AECOM only allows trained, authorized personnel to operate the high pressure washers. Along with training, other safety measures include: reviewing the manufacturers instructional booklet, proper maintenance of equipment, and personal protective equipment.
2.0 Potential Hazards
2.1 Kickback – Sudden and violent reverse movement of the gun
2.2 Flying debris
2.3 Slips and trips on wet surfaces and hoses
2.4 Noise
2.5 Manual handling
2.6 Exhaust fumes/carbon monoxide (CO) in enclosed spaces
2.7 Severe cuts
3.0 Safe Operating Guidelines
3.1 The gun valve must always be pointed at the work area, NEVER point the gun valve at yourself or another person.
3.2 High pressure washers shall be used to clean or decontaminate equipment, surfaces or structures only.
3.3 High pressure washers WILL NOT be used to clean or decontaminate workers or personal protective equipment while it is being worn.
3.4 Maintain a distance from the spray contact point to reduce noise exposure and risk of being struck by flying debris. Ensure that you are not overreaching and remain stable.
3.5 Always set the tripper safety lock when the gun valve is not in use.
4.0 Training Requirements
4.1 Review of training requirements per the Training Needs Assessment.
4.2 Demonstrated knowledge on the use of a pressure washer.
4.3 Review of manufacturers operating guidelines.
5.0 Personal Protective Equipment (Level D PPE)
5.1 Hard hat with faceshield
5.2 Heavy gloves
5.3 Hearing protection
5.4 PVC (or equivalent) rain suit
Pressure Washer Safety Card (S3NA-305-WI9) Revision 2 November 1, 2014 PRINTED COPIES ARE UNCONTROLLED. CONTROLLED COPY IS AVAILABLE ON COMPANY INTRANET. Page 2 of 2
6.0 Other Safety Tips
6.1 Never fill a pressure washer fuel tank with fuel while the engine is running or if the engine is still hot.
6.2 Non-operators must remain a minimum of 25 feet from the operator.
6.3 High-pressure washing equipment should be cleaned often to avoid dirt buildup, especially around the trigger and guard area.
6.4 Always set the trigger safety lock when the gun valve is not in use.
6.5 Relieve the pressure in the system before coupling and uncoupling hoses.
6.6 Visually inspect the full length of high pressure discharge hose and inspect other high pressure fluid-handling components for abrasions or cuts, damage caused by exposure to chemicals and for damage caused by kinks in the hose.

Reciprocating Saw Safety Card (S3NA-305-WI10) Revision 2 November 1, 2014 PRINTED COPIES ARE UNCONTROLLED. CONTROLLED COPY IS AVAILABLE ON COMPANY INTRANET. Page 1 of 2
Americas
Reciprocating Saw Safety Card S3NA-305-WI10
1.0 Objective / Overview
1.1 The versatility of the reciprocating saw, in cutting metal, pipe, wood and other materials have made it a widely used tool.
1.2 By design, it is a simple tool to handle. Its demands for safe use, however, are very important.
2.0 Potential Hazards
2.1 Flying debris
2.2 Noise
2.3 Sharp, moving parts (cuts)
2.4 Hand/arm vibration
3.0 Safe Operating Guidelines
3.1 Use sharp blades. Dull blades can produce excessive heat, make sawing difficult, result in forcing the tool, and possibly cause an accident.
3.2 Position yourself to maintain full control of the tool, and avoid cutting above shoulder height.
3.3 To minimize blade flexing and provide a smooth cut, use the shortest blade that will do the job.
3.4 The work piece must be clamped securely, and the shoe of the saw held firmly against the work to prevent operator injury and blade breakage.
3.5 Maintain firm contact between the saw's shoe and the material being cut.
3.6 When making a "blind" cut (you can't see behind what is being cut), be sure that hidden electrical wiring, or water pipes are not in the path of the cut.
3.7 If wires are present, they must be disconnected at their power source by a qualified person or avoided, to prevent the possibility of lethal shock or fire.
3.8 Water pipes must be drained and capped.
3.9 Always hold the tool by the insulated grouping surfaces. When making anything other than a through cut, allow the tool to come to a complete stop before removing the blade from the work piece. This prevents breakage of the blade, and possible loss of tool control.
3.10 Different work surfaces demand different blades.
4.0 Training Requirements
4.1 Review of training requirement per the Training Needs Assessment (TNA).
4.2 Demonstrated knowledge on the use of a reciprocating saw.
4.3 Review and follow manufacturers operating guidelines.
The correct way to hold the reciprocating saw while operating.
Reciprocating Saw Safety Card (S3NA-305-WI10) Revision 2 November 1, 2014 PRINTED COPIES ARE UNCONTROLLED. CONTROLLED COPY IS AVAILABLE ON COMPANY INTRANET. Page 2 of 2
5.0 Personal Protective Equipment (Level D PPE)
5.1 Safety glasses
5.2 Hearing protection
6.0 Other Safety Tips
6.1 Do not operate reciprocating saw in explosive atmospheres.
6.2 Do not overreach. Keep proper footing and balance at all times.
6.3 Do not use tool if switch is not operating correctly.
6.4 Check for misalignment or binding of moving parts, breakage or parts and any other condition that may affect the tool’s operation.
6.5 Do not wear jewelry on the fingers/wrists during use.
6.6 Always use two hands to operate saw (see picture).
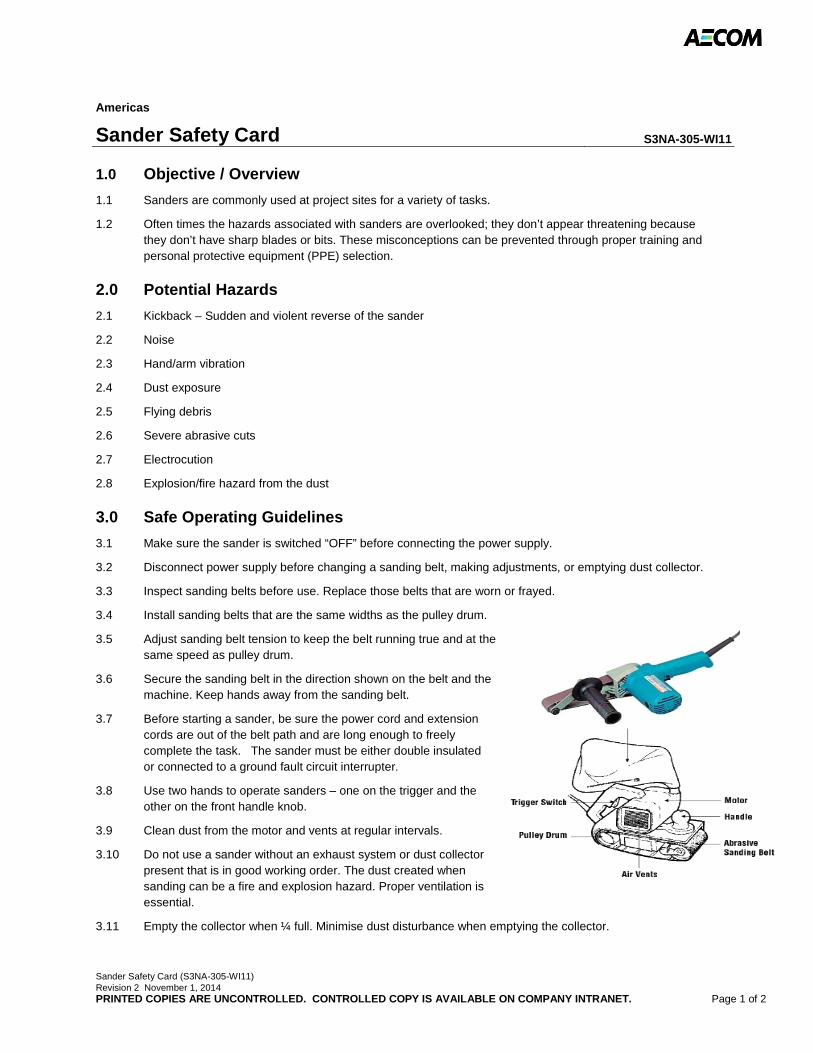
Sander Safety Card (S3NA-305-WI11) Revision 2 November 1, 2014 PRINTED COPIES ARE UNCONTROLLED. CONTROLLED COPY IS AVAILABLE ON COMPANY INTRANET. Page 1 of 2
Americas
Sander Safety Card S3NA-305-WI11
1.0 Objective / Overview
1.1 Sanders are commonly used at project sites for a variety of tasks.
1.2 Often times the hazards associated with sanders are overlooked; they don’t appear threatening because they don’t have sharp blades or bits. These misconceptions can be prevented through proper training and personal protective equipment (PPE) selection.
2.0 Potential Hazards
2.1 Kickback – Sudden and violent reverse of the sander
2.2 Noise
2.3 Hand/arm vibration
2.4 Dust exposure
2.5 Flying debris
2.6 Severe abrasive cuts
2.7 Electrocution
2.8 Explosion/fire hazard from the dust
3.0 Safe Operating Guidelines
3.1 Make sure the sander is switched “OFF” before connecting the power supply.
3.2 Disconnect power supply before changing a sanding belt, making adjustments, or emptying dust collector.
3.3 Inspect sanding belts before use. Replace those belts that are worn or frayed.
3.4 Install sanding belts that are the same widths as the pulley drum.
3.5 Adjust sanding belt tension to keep the belt running true and at the same speed as pulley drum.
3.6 Secure the sanding belt in the direction shown on the belt and the machine. Keep hands away from the sanding belt.
3.7 Before starting a sander, be sure the power cord and extension cords are out of the belt path and are long enough to freely complete the task. The sander must be either double insulated or connected to a ground fault circuit interrupter.
3.8 Use two hands to operate sanders – one on the trigger and the other on the front handle knob.
3.9 Clean dust from the motor and vents at regular intervals.
3.10 Do not use a sander without an exhaust system or dust collector present that is in good working order. The dust created when sanding can be a fire and explosion hazard. Proper ventilation is essential.
3.11 Empty the collector when ¼ full. Minimise dust disturbance when emptying the collector.
Sander Safety Card (S3NA-305-WI11) Revision 2 November 1, 2014 PRINTED COPIES ARE UNCONTROLLED. CONTROLLED COPY IS AVAILABLE ON COMPANY INTRANET. Page 2 of 2
3.12 Do not exert excessive pressure on a moving sander. The weight of the sander provides adequate pressure for the job.
3.13 Do not work on unsecured stock unless it is heavy enough to stay in place. Clamp the stop into place or use a ‘stop block’ to prevent movement.
3.14 Do not overreach. Always keep proper footing and balance.
3.15 Do not cover air vents of the sander.
3.16 Check often to ensure that guards are in their normal position.
4.0 Training Requirements
4.1 Review of training requirements per the Training Needs Assessment (TNA).
4.2 Review and follow manufacturers operating guidelines.
5.0 Personal Protective Equipment (Level D PPE)
5.1 Hearing protection
5.2 Safety Glasses
5.3 Leather gloves
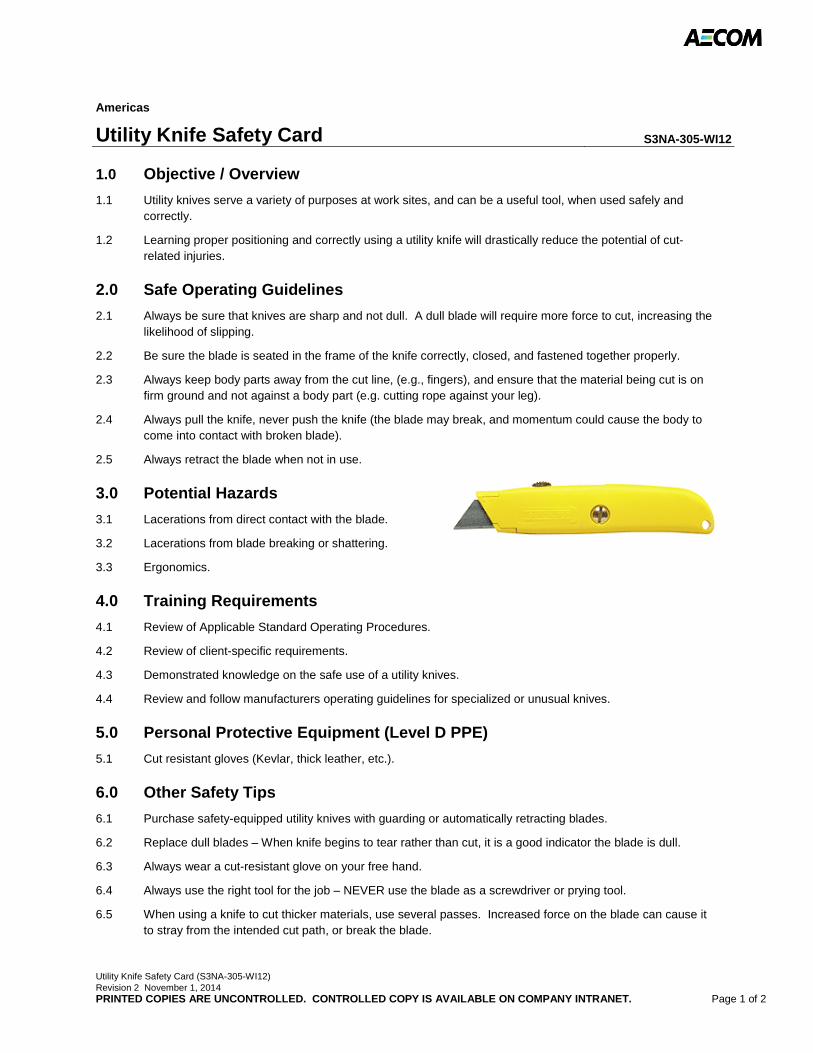
Utility Knife Safety Card (S3NA-305-WI12) Revision 2 November 1, 2014 PRINTED COPIES ARE UNCONTROLLED. CONTROLLED COPY IS AVAILABLE ON COMPANY INTRANET. Page 1 of 2
Americas
Utility Knife Safety Card S3NA-305-WI12
1.0 Objective / Overview
1.1 Utility knives serve a variety of purposes at work sites, and can be a useful tool, when used safely and correctly.
1.2 Learning proper positioning and correctly using a utility knife will drastically reduce the potential of cut-related injuries.
2.0 Safe Operating Guidelines
2.1 Always be sure that knives are sharp and not dull. A dull blade will require more force to cut, increasing the likelihood of slipping.
2.2 Be sure the blade is seated in the frame of the knife correctly, closed, and fastened together properly.
2.3 Always keep body parts away from the cut line, (e.g., fingers), and ensure that the material being cut is on firm ground and not against a body part (e.g. cutting rope against your leg).
2.4 Always pull the knife, never push the knife (the blade may break, and momentum could cause the body to come into contact with broken blade).
2.5 Always retract the blade when not in use.
3.0 Potential Hazards
3.1 Lacerations from direct contact with the blade.
3.2 Lacerations from blade breaking or shattering.
3.3 Ergonomics.
4.0 Training Requirements
4.1 Review of Applicable Standard Operating Procedures.
4.2 Review of client-specific requirements.
4.3 Demonstrated knowledge on the safe use of a utility knives.
4.4 Review and follow manufacturers operating guidelines for specialized or unusual knives.
5.0 Personal Protective Equipment (Level D PPE)
5.1 Cut resistant gloves (Kevlar, thick leather, etc.).
6.0 Other Safety Tips
6.1 Purchase safety-equipped utility knives with guarding or automatically retracting blades.
6.2 Replace dull blades – When knife begins to tear rather than cut, it is a good indicator the blade is dull.
6.3 Always wear a cut-resistant glove on your free hand.
6.4 Always use the right tool for the job – NEVER use the blade as a screwdriver or prying tool.
6.5 When using a knife to cut thicker materials, use several passes. Increased force on the blade can cause it to stray from the intended cut path, or break the blade.
Utility Knife Safety Card (S3NA-305-WI12) Revision 2 November 1, 2014 PRINTED COPIES ARE UNCONTROLLED. CONTROLLED COPY IS AVAILABLE ON COMPANY INTRANET. Page 2 of 2
6.6 When changing blades, always handle from the non-sharp side. Cover blade with duct tape and dispose.
6.7 Use an alternate tool when possible (scissors, wire cutters, etc.).
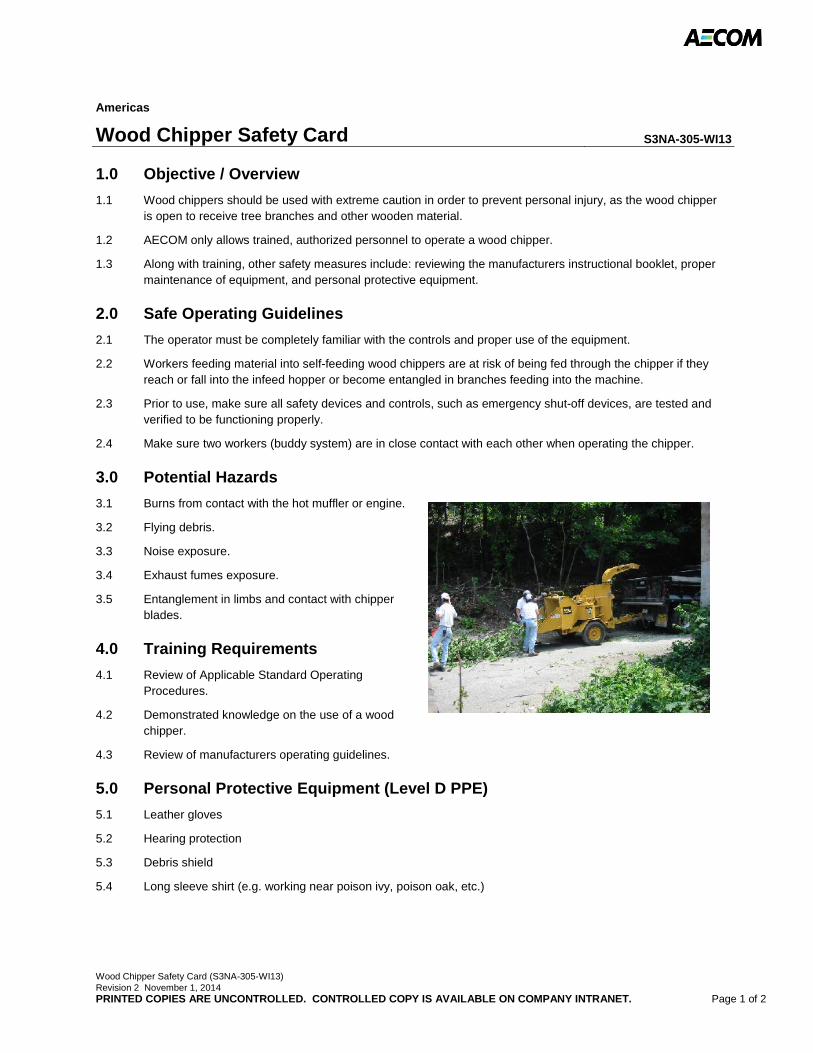
Wood Chipper Safety Card (S3NA-305-WI13) Revision 2 November 1, 2014 PRINTED COPIES ARE UNCONTROLLED. CONTROLLED COPY IS AVAILABLE ON COMPANY INTRANET. Page 1 of 2
Americas
Wood Chipper Safety Card S3NA-305-WI13
1.0 Objective / Overview
1.1 Wood chippers should be used with extreme caution in order to prevent personal injury, as the wood chipper is open to receive tree branches and other wooden material.
1.2 AECOM only allows trained, authorized personnel to operate a wood chipper.
1.3 Along with training, other safety measures include: reviewing the manufacturers instructional booklet, proper maintenance of equipment, and personal protective equipment.
2.0 Safe Operating Guidelines
2.1 The operator must be completely familiar with the controls and proper use of the equipment.
2.2 Workers feeding material into self-feeding wood chippers are at risk of being fed through the chipper if they reach or fall into the infeed hopper or become entangled in branches feeding into the machine.
2.3 Prior to use, make sure all safety devices and controls, such as emergency shut-off devices, are tested and verified to be functioning properly.
2.4 Make sure two workers (buddy system) are in close contact with each other when operating the chipper.
3.0 Potential Hazards
3.1 Burns from contact with the hot muffler or engine.
3.2 Flying debris.
3.3 Noise exposure.
3.4 Exhaust fumes exposure.
3.5 Entanglement in limbs and contact with chipper blades.
4.0 Training Requirements
4.1 Review of Applicable Standard Operating Procedures.
4.2 Demonstrated knowledge on the use of a wood chipper.
4.3 Review of manufacturers operating guidelines.
5.0 Personal Protective Equipment (Level D PPE)
5.1 Leather gloves
5.2 Hearing protection
5.3 Debris shield
5.4 Long sleeve shirt (e.g. working near poison ivy, poison oak, etc.)
Wood Chipper Safety Card (S3NA-305-WI13) Revision 2 November 1, 2014 PRINTED COPIES ARE UNCONTROLLED. CONTROLLED COPY IS AVAILABLE ON COMPANY INTRANET. Page 2 of 2
6.0 Other Safety Tips
6.1 Stand to the side of the chipper while inserting limbs into chipper, never stand directly in front.
6.2 Insert trunk portion of tree/limb first. This will prevent the branches from getting entangled with clothing, etc. and pulling you in with the tree/limb.
6.3 Bystanders should be kept at least 25 feet away when in operation.
6.4 Keep the area around the wood chipper free of tripping hazards.
6.5 Never wear loose clothing that may get caught on feed material or moving parts.
6.6 Always set the trigger safety lock when the gun valve is not in use.
6.7 Never fill the fuel tank while the engine is running or if the engine is still hot.
Clearing and Grubbing Equipment Safety Card (S3NA-305-WI14) Revision 2 November 1, 2014 PRINTED COPIES ARE UNCONTROLLED. CONTROLLED COPY IS AVAILABLE ON COMPANY INTRANET. Page 1 of 4
Americas
Clearing and Grubbing Equipment Safety Card S3NA-305-WI14 The following safety precautions will be followed during site clearing and tree falling
1.0 Hand Tools
1.1 All hand tools shall be in safe condition. Tools shall be inspected by the user daily.
1.2 Handles shall be sound, straight and tight-fitting.
1.3 Driven tools shall be dressed to remove any mushrooming.
1.4 Cutting tools shall be kept sharp and properly shaped.
1.5 All clearing activities shall terminate during electrical storms and periods of high winds.
1.6 Dead, broken or rotted limbs or trees (widow makers) shall be felled first.
1.7 Always wear the appropriate Personal Protective Equipment (PPE) when using hand tools, particularly eye and hand protection.
1.8 Use the right tool that is being used for the job to reduce chance of unexpected occurrences. Do not submit or use makeshift tools.
1.9 Defective tools shall not be used. They shall be taken out of service until repaired or replaced.
1.10 Check tools for damage or wear prior to each use to reduce chance of unexpected occurrences.
1.11 Replace cracked or broken handles on files, hammers, screwdrivers, or sledges.
1.12 Replace worn jaws on wrenches, pipe tools, and pliers
1.13 Redress burred or mushroomed heads on striking tools.
1.14 Sharpen cutting tools frequently to reduce chance of unexpected occurrences.
1.15 Store hand tools properly after each use.
1.16 Tools shall be clean and dry to avoid slippage when in use.
1.17 Never leave tools on ladders, scaffolds, or overhead work areas when they are not in use (a high number of injuries occur from objects/tools falling from overhead work areas in construction).
1.18 Always keep tools being used in overhead work areas in containers that will prevent them from falling.
1.19 Carry tools using a heavy belt or apron and hang tools at your sides.
1.20 Never carry tools in your pockets or hanging behind your back.
1.21 Avoid muscle strain and fatigue by doing the following:
• Avoid using hand tools with your wrist bent.
• Choose tools that allow you to keep your wrist straight when using them.
• Always PULL on wrenches and pliers. Never push unless you hold the tool with your palm open.
• Always cut away from yourself when using cutting tools.
1.22 Establish balance and stable footing when using a bar for prying. Pry bars can slip or break without warning.
1.23 Be aware of the presence of other personnel when using any tool, especially picks or axes.
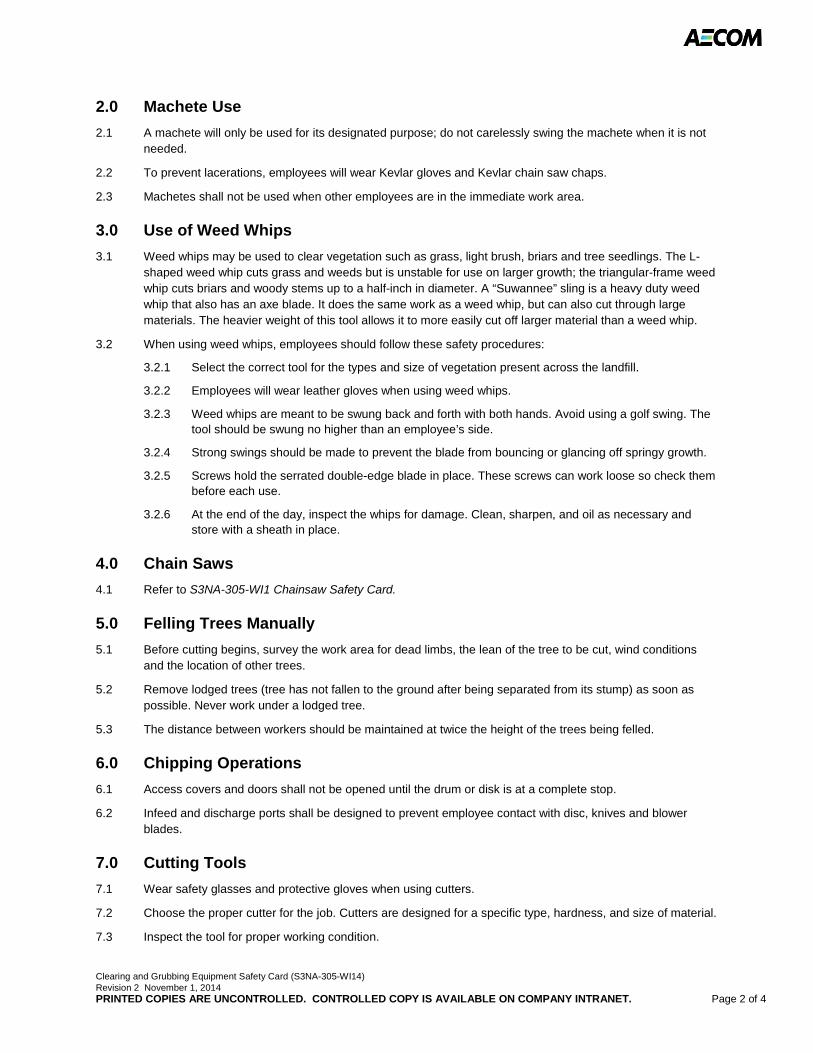
Clearing and Grubbing Equipment Safety Card (S3NA-305-WI14) Revision 2 November 1, 2014 PRINTED COPIES ARE UNCONTROLLED. CONTROLLED COPY IS AVAILABLE ON COMPANY INTRANET. Page 2 of 4
2.0 Machete Use
2.1 A machete will only be used for its designated purpose; do not carelessly swing the machete when it is not needed.
2.2 To prevent lacerations, employees will wear Kevlar gloves and Kevlar chain saw chaps.
2.3 Machetes shall not be used when other employees are in the immediate work area.
3.0 Use of Weed Whips
3.1 Weed whips may be used to clear vegetation such as grass, light brush, briars and tree seedlings. The L-shaped weed whip cuts grass and weeds but is unstable for use on larger growth; the triangular-frame weed whip cuts briars and woody stems up to a half-inch in diameter. A “Suwannee” sling is a heavy duty weed whip that also has an axe blade. It does the same work as a weed whip, but can also cut through large materials. The heavier weight of this tool allows it to more easily cut off larger material than a weed whip.
3.2 When using weed whips, employees should follow these safety procedures:
3.2.1 Select the correct tool for the types and size of vegetation present across the landfill.
3.2.2 Employees will wear leather gloves when using weed whips.
3.2.3 Weed whips are meant to be swung back and forth with both hands. Avoid using a golf swing. The tool should be swung no higher than an employee’s side.
3.2.4 Strong swings should be made to prevent the blade from bouncing or glancing off springy growth.
3.2.5 Screws hold the serrated double-edge blade in place. These screws can work loose so check them before each use.
3.2.6 At the end of the day, inspect the whips for damage. Clean, sharpen, and oil as necessary and store with a sheath in place.
4.0 Chain Saws
4.1 Refer to S3NA-305-WI1 Chainsaw Safety Card.
5.0 Felling Trees Manually
5.1 Before cutting begins, survey the work area for dead limbs, the lean of the tree to be cut, wind conditions and the location of other trees.
5.2 Remove lodged trees (tree has not fallen to the ground after being separated from its stump) as soon as possible. Never work under a lodged tree.
5.3 The distance between workers should be maintained at twice the height of the trees being felled.
6.0 Chipping Operations
6.1 Access covers and doors shall not be opened until the drum or disk is at a complete stop.
6.2 Infeed and discharge ports shall be designed to prevent employee contact with disc, knives and blower blades.
7.0 Cutting Tools
7.1 Wear safety glasses and protective gloves when using cutters.
7.2 Choose the proper cutter for the job. Cutters are designed for a specific type, hardness, and size of material.
7.3 Inspect the tool for proper working condition.
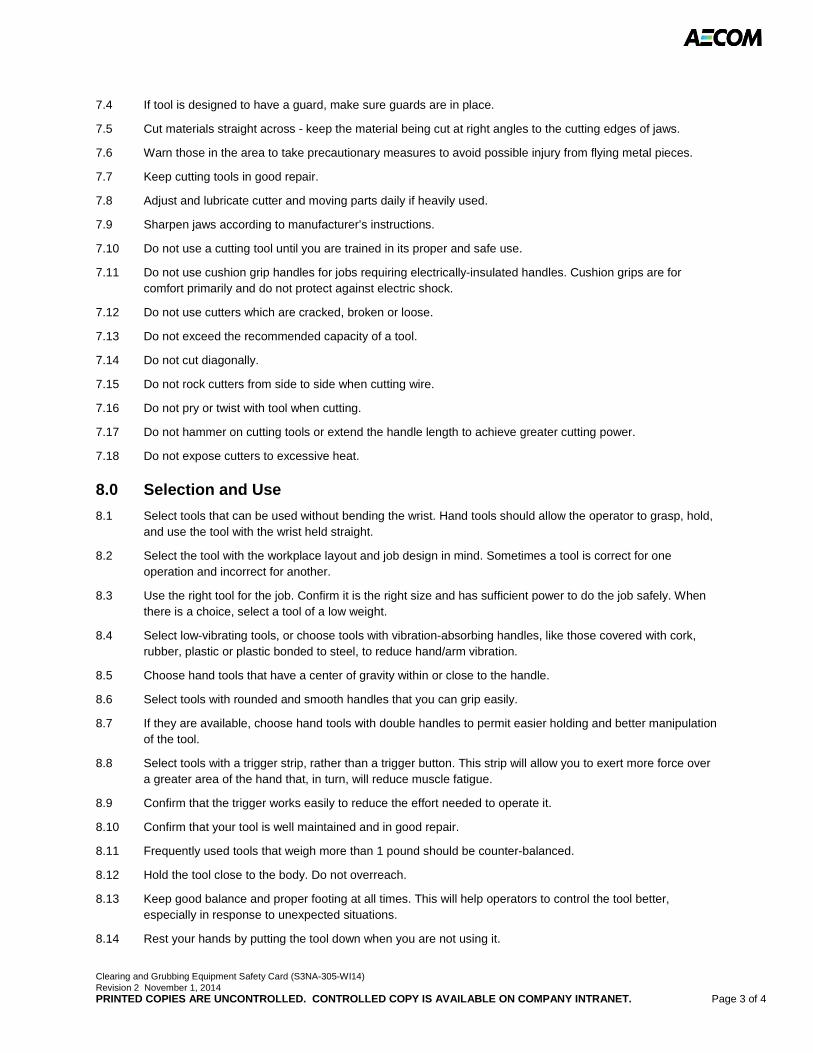
Clearing and Grubbing Equipment Safety Card (S3NA-305-WI14) Revision 2 November 1, 2014 PRINTED COPIES ARE UNCONTROLLED. CONTROLLED COPY IS AVAILABLE ON COMPANY INTRANET. Page 3 of 4
7.4 If tool is designed to have a guard, make sure guards are in place.
7.5 Cut materials straight across - keep the material being cut at right angles to the cutting edges of jaws.
7.6 Warn those in the area to take precautionary measures to avoid possible injury from flying metal pieces.
7.7 Keep cutting tools in good repair.
7.8 Adjust and lubricate cutter and moving parts daily if heavily used.
7.9 Sharpen jaws according to manufacturer’s instructions.
7.10 Do not use a cutting tool until you are trained in its proper and safe use.
7.11 Do not use cushion grip handles for jobs requiring electrically-insulated handles. Cushion grips are for comfort primarily and do not protect against electric shock.
7.12 Do not use cutters which are cracked, broken or loose.
7.13 Do not exceed the recommended capacity of a tool.
7.14 Do not cut diagonally.
7.15 Do not rock cutters from side to side when cutting wire.
7.16 Do not pry or twist with tool when cutting.
7.17 Do not hammer on cutting tools or extend the handle length to achieve greater cutting power.
7.18 Do not expose cutters to excessive heat.
8.0 Selection and Use
8.1 Select tools that can be used without bending the wrist. Hand tools should allow the operator to grasp, hold, and use the tool with the wrist held straight.
8.2 Select the tool with the workplace layout and job design in mind. Sometimes a tool is correct for one operation and incorrect for another.
8.3 Use the right tool for the job. Confirm it is the right size and has sufficient power to do the job safely. When there is a choice, select a tool of a low weight.
8.4 Select low-vibrating tools, or choose tools with vibration-absorbing handles, like those covered with cork, rubber, plastic or plastic bonded to steel, to reduce hand/arm vibration.
8.5 Choose hand tools that have a center of gravity within or close to the handle.
8.6 Select tools with rounded and smooth handles that you can grip easily.
8.7 If they are available, choose hand tools with double handles to permit easier holding and better manipulation of the tool.
8.8 Select tools with a trigger strip, rather than a trigger button. This strip will allow you to exert more force over a greater area of the hand that, in turn, will reduce muscle fatigue.
8.9 Confirm that the trigger works easily to reduce the effort needed to operate it.
8.10 Confirm that your tool is well maintained and in good repair.
8.11 Frequently used tools that weigh more than 1 pound should be counter-balanced.
8.12 Hold the tool close to the body. Do not overreach.
8.13 Keep good balance and proper footing at all times. This will help operators to control the tool better, especially in response to unexpected situations.
8.14 Rest your hands by putting the tool down when you are not using it.

Clearing and Grubbing Equipment Safety Card (S3NA-305-WI14) Revision 2 November 1, 2014 PRINTED COPIES ARE UNCONTROLLED. CONTROLLED COPY IS AVAILABLE ON COMPANY INTRANET. Page 4 of 4
8.15 Reduce power to the lowest setting that can complete the job safely. This action reduces tool vibration at the source.
8.16 Confirm that cutting tools, drill bits, etc., are kept sharp, clean, and well maintained.
8.17 Do not wear gloves, loose clothing or jewelry while using revolving power tools. Tie back long hair or wear appropriate hair protection to prevent hair from getting caught in moving parts of equipment (manufacturer’s operating manual for recommended PPE and/or safety issues/concerns).
8.18 Do not use a tool unless you have been trained to use it safely and know its limitations and hazards.
9.0 Storage and Handling
9.1 All tools shall be stored in a manner to prevent damage and injury. Store tools in a dry, secure location when they are not being used.
9.2 Tools shall be properly put away after each use.
9.3 Sharp or pointed tools shall be handled only if the sharp/pointed edge is covered, carried in a tool box or other device designed for that purpose, or the sharp/pointed edge is pointed downward, away from the body.
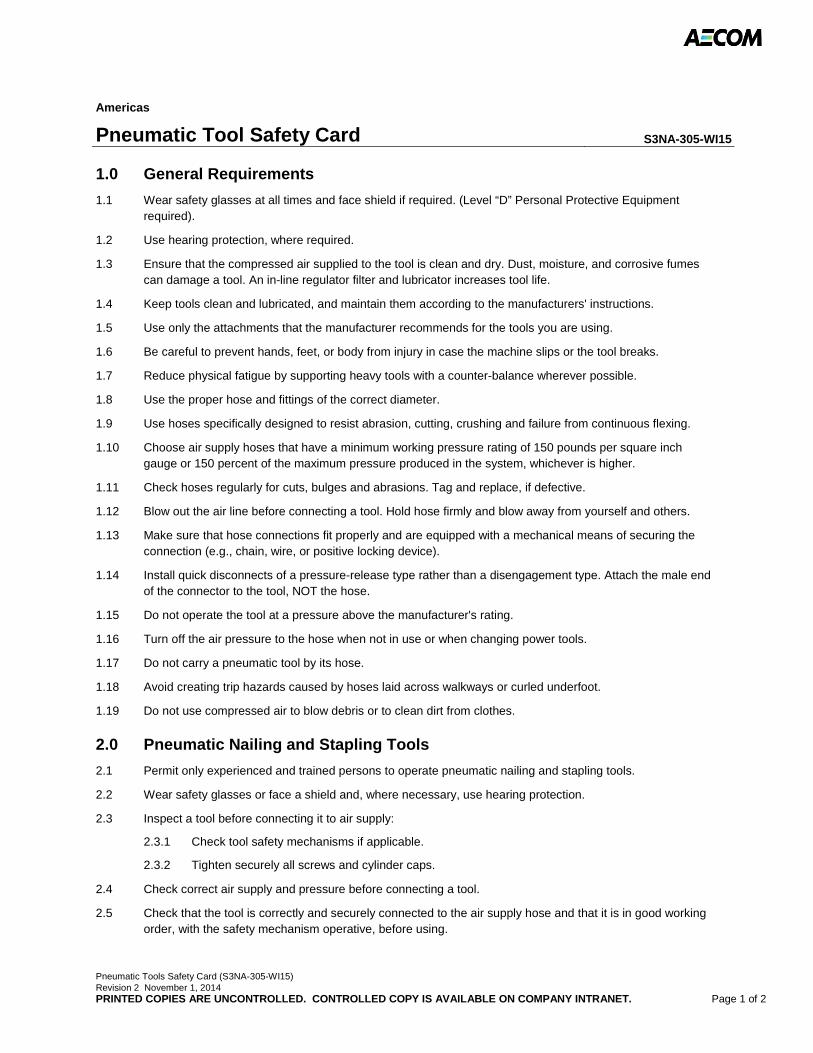
Pneumatic Tools Safety Card (S3NA-305-WI15) Revision 2 November 1, 2014 PRINTED COPIES ARE UNCONTROLLED. CONTROLLED COPY IS AVAILABLE ON COMPANY INTRANET. Page 1 of 2
Americas
Pneumatic Tool Safety Card S3NA-305-WI15
1.0 General Requirements
1.1 Wear safety glasses at all times and face shield if required. (Level “D” Personal Protective Equipment required).
1.2 Use hearing protection, where required.
1.3 Ensure that the compressed air supplied to the tool is clean and dry. Dust, moisture, and corrosive fumes can damage a tool. An in-line regulator filter and lubricator increases tool life.
1.4 Keep tools clean and lubricated, and maintain them according to the manufacturers' instructions.
1.5 Use only the attachments that the manufacturer recommends for the tools you are using.
1.6 Be careful to prevent hands, feet, or body from injury in case the machine slips or the tool breaks.
1.7 Reduce physical fatigue by supporting heavy tools with a counter-balance wherever possible.
1.8 Use the proper hose and fittings of the correct diameter.
1.9 Use hoses specifically designed to resist abrasion, cutting, crushing and failure from continuous flexing.
1.10 Choose air supply hoses that have a minimum working pressure rating of 150 pounds per square inch gauge or 150 percent of the maximum pressure produced in the system, whichever is higher.
1.11 Check hoses regularly for cuts, bulges and abrasions. Tag and replace, if defective.
1.12 Blow out the air line before connecting a tool. Hold hose firmly and blow away from yourself and others.
1.13 Make sure that hose connections fit properly and are equipped with a mechanical means of securing the connection (e.g., chain, wire, or positive locking device).
1.14 Install quick disconnects of a pressure-release type rather than a disengagement type. Attach the male end of the connector to the tool, NOT the hose.
1.15 Do not operate the tool at a pressure above the manufacturer's rating.
1.16 Turn off the air pressure to the hose when not in use or when changing power tools.
1.17 Do not carry a pneumatic tool by its hose.
1.18 Avoid creating trip hazards caused by hoses laid across walkways or curled underfoot.
1.19 Do not use compressed air to blow debris or to clean dirt from clothes.
2.0 Pneumatic Nailing and Stapling Tools
2.1 Permit only experienced and trained persons to operate pneumatic nailing and stapling tools.
2.2 Wear safety glasses or face a shield and, where necessary, use hearing protection.
2.3 Inspect a tool before connecting it to air supply:
2.3.1 Check tool safety mechanisms if applicable.
2.3.2 Tighten securely all screws and cylinder caps.
2.4 Check correct air supply and pressure before connecting a tool.
2.5 Check that the tool is correctly and securely connected to the air supply hose and that it is in good working order, with the safety mechanism operative, before using.
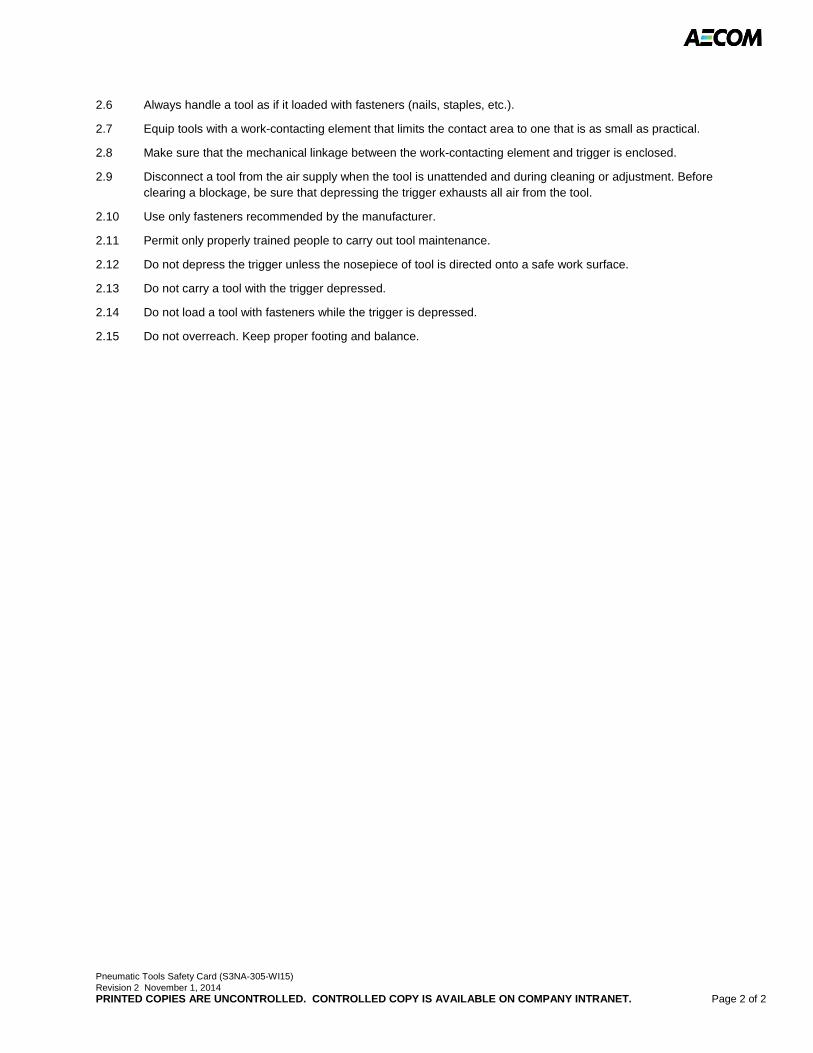
Pneumatic Tools Safety Card (S3NA-305-WI15) Revision 2 November 1, 2014 PRINTED COPIES ARE UNCONTROLLED. CONTROLLED COPY IS AVAILABLE ON COMPANY INTRANET. Page 2 of 2
2.6 Always handle a tool as if it loaded with fasteners (nails, staples, etc.).
2.7 Equip tools with a work-contacting element that limits the contact area to one that is as small as practical.
2.8 Make sure that the mechanical linkage between the work-contacting element and trigger is enclosed.
2.9 Disconnect a tool from the air supply when the tool is unattended and during cleaning or adjustment. Before clearing a blockage, be sure that depressing the trigger exhausts all air from the tool.
2.10 Use only fasteners recommended by the manufacturer.
2.11 Permit only properly trained people to carry out tool maintenance.
2.12 Do not depress the trigger unless the nosepiece of tool is directed onto a safe work surface.
2.13 Do not carry a tool with the trigger depressed.
2.14 Do not load a tool with fasteners while the trigger is depressed.
2.15 Do not overreach. Keep proper footing and balance.
Manual Hand Tools Safety Card (S3NA-305-WI16) Revision 2 November 1, 2014 PRINTED COPIES ARE UNCONTROLLED. CONTROLLED COPY IS AVAILABLE ON COMPANY INTRANET. Page 1 of 7
Americas
Manual Hand Tools Safety Card S3NA-305-WI16
1.0 Hammers
1.1 Hammers are designed according to the intended purpose. Select a hammer that is comfortable for you and that is the proper size and weight for the job. Misuse can cause the striking face to chip, possibly causing a serious injury.
1.2 Choose a hammer with a striking face diameter approximately ½ inch (1.3 centimeters) larger than the face of the tool being struck (e.g., chisels, punches, wedges, etc.).
1.3 Ensure that the head of the hammer is firmly attached to the handle.
1.4 Replace loose, cracked or splintered handles.
1.5 Discard any hammer with mushroomed or chipped face or with cracks in the claw or eye sections.
1.6 Strike a hammer blow squarely with the striking face parallel to the surface being struck. Always avoid glancing blows and over and under strikes. (Hammers with beveled faces are less likely to chip or spall).
1.7 Look behind and above you before swinging the hammer.
1.8 Watch the object you are hitting.
1.9 Hold the hammer with your wrist straight and your hand firmly wrapped around the handle.
1.10 Do not use a hammer with a loose or damaged handle.
1.11 Do not use handles that are rough, cracked, broken, splintered, sharp-edged or loosely attached to the head.
1.12 Do not use any hammer head with dents, cracks, chips, mushrooming, or excessive wear.
1.13 Do not use a hammer for any purpose for which it was not designed or intended.
1.14 Do not use one hammer to strike another hammer, other hard metal objects, stones or concrete.
1.15 Do not redress, grind, weld or reheat-treat a hammer head.
1.16 Do not strike with the side or cheek of the hammer.
2.0 Wrenches
2.1 Inspect pipe wrenches periodically for worn or unsafe parts and replace them (e.g., check for worn threads on the adjustment ring and movable jaw).
2.2 Keep pipe wrench teeth clean and sharp.
2.3 Face a pipe wrench forward. Turn wrench so pressure is against heel jaw.
2.4 Pull, rather than push on the pipe wrench handle. Maintain a proper stance with feet firmly placed to hold your balance.
2.5 Do not use a pipe wrench as a hammer, or strike a pipe wrench with a hammer.
2.6 Do not use pipe wrenches on nuts and bolts.
2.7 Do not use a pipe extender for extra leverage. Get a larger pipe wrench.
2.8 Replace pipe cutter wheels which are nicked or otherwise damaged.
2.9 Use a three- or four-wheeled cutter, if there is not enough space to swing the single wheel pipe cutter completely around the pipe.
Manual Hand Tools Safety Card (S3NA-305-WI16) Revision 2 November 1, 2014 PRINTED COPIES ARE UNCONTROLLED. CONTROLLED COPY IS AVAILABLE ON COMPANY INTRANET. Page 2 of 7
2.10 Choose a cutting wheel suitable for cutting the type of pipe material required:
2.10.1 Thin wheel for cutting ordinary steel pipe.
2.10.2 Stout wheel for cutting cast iron.
2.10.3 Other wheels for cutting stainless steel, plastic and other materials.
2.11 Select the proper hole diameter and correct tap size to tap a hole. The hole should be sized so that the thread cut by the tap will be about 75 percent as deep as the thread on the tap.
2.12 Use a proper tap wrench (with a “T” handle) for turning a tap.
2.13 Use lubricant or machine cutting fluid with metals other than cast iron.
2.14 Do not permit chips to clog flutes (groves in the tap that allow metal chips to escape from the hole). The chips may prevent the tap from turning – this may result in the tap breaking if you continue to apply pressure.
2.15 Do not use a conventional adjustable wrench for turning a tap – it will cause uneven pressure on the tap that may cause it to break.
2.16 Do not attempt to thread hardened steel. This can chip or damage the die.
2.17 Do not thread any rod or other cylindrical object that is larger in diameter than the major diameter of the die thread.
2.18 Do not use a spiral reamer on a rotating pipe. The reamer may snag and cause serious injury.
3.0 Pliers and Wire Cutters
3.1 Pliers are made in various shapes and sizes and for many uses. Use the correct pliers or wire cutters for the job.
3.2 Choose pliers or wire cutters that have a grip span of 2½ – 3½ inches (6.4 – 8.9 centimeters) to prevent your palm or fingers from being pinched when the tools are closed.
3.3 Use adjustable pliers that allow you to grip the work piece firmly while maintaining a comfortable handgrip (i.e., hand grasp is not too wide).
3.4 Use tools only if they are in good condition.
3.5 Make sure that the cutting edges are sharp. Dull and worn-down cutting edges require many times more force for cutting.
3.6 Make sure that the toothed jaws are clean and sharp. Greasy or worn-down jaws can result in compromised safety. Such tools also require increased force to hold the work piece which, in turn, increases the risk of muscular fatigue and repetitive strain injuries.
3.7 Oil pliers and wire cutters regularly. A drop of oil on the hinge will make the tools easier to use.
3.8 Pull on the pliers; do not push away from you when applying pressure. If the tool slips unexpectedly, you may lose your balance or injure your hand.
3.9 Cut at right angles. Never rock the cutting tool from side to side or bend wire back and forth against the cutting edges.
3.10 Do not cut hardened wire unless the pliers or wire cutters are specifically manufactured for this purpose.
3.11 Do not expose pliers or wire cutters to excessive heat.
3.12 Do not bend stiff wire with light pliers. Needle-nose pliers can be damaged by using the tips to bend large wire. Use a sturdier tool.
3.13 Do not use pliers as a hammer.
Manual Hand Tools Safety Card (S3NA-305-WI16) Revision 2 November 1, 2014 PRINTED COPIES ARE UNCONTROLLED. CONTROLLED COPY IS AVAILABLE ON COMPANY INTRANET. Page 3 of 7
3.14 Do not hammer on pliers or wire cutters to cut wires or bolts.
3.15 Do not extend the length of handles to gain greater leverage. Use a larger pair of pliers for gripping or a bolt cutter for cutting.
3.16 Do not use cushion grip handles for jobs requiring tools with electrically insulated handles. Cushion grips are for comfort primarily and do not protect against electric shock.
3.17 Do not use pliers on nuts and bolts; use a wrench.
4.0 Screwdrivers
4.1 Screwdrivers are made in various shapes and sizes and for many uses. Use the correct screwdriver for the job.
4.2 Choose contoured handles that fit the shank tightly, with a flange to keep the hand from slipping off the tool.
4.3 Use a slot screwdriver with a blade tip width that is the same as the width of the slotted screw head.
4.4 For cross-head screws, use the correct size and type of screwdriver; a Phillips screwdriver may slip out of a screw head designed for use with the slightly flatter-tipped Pozi-driv screwdriver.
4.5 Use a vise or clamp to hold the stock if the piece is small or moves easily.
4.6 Keep the screwdriver handle clean. A greasy handle could cause an injury or damage from unexpected slippage.
4.7 If work must be carried out on “live” electrical equipment, use screwdrivers that have insulated handles designed for electrical work and a non-conducting shaft. Remember, most plastic handles are designed for grip and comfort.
4.8 Use non-magnetic tools when working near strong magnets (e.g., in some laboratories).
4.9 Use a screw-holding screwdriver (with screw-holding clips or magnetic blades) to get screws started in awkward, hard-to-reach areas. Square-tipped screwdrivers (e.g., Robertson) that hold screws with recessed square holes are also useful in such situations.
4.10 Use an offset screwdriver in close quarters where a conventional screwdriver cannot be used.
4.11 Use a screwdriver that incorporates the following features when continuous work is needed:
4.11.1 Use a pistol grip to provide for a straighter wrist and better leverage.
4.11.2 Use a "Yankee drill" mechanism (spiral ratchet screwdriver or push screwdriver) which rotates the blade when the tool is pushed forward.
4.11.3 Use a ratchet device to drive hard-to-move screws efficiently, or use a powered screwdriver.
4.12 File a rounded tip square making sure the edges are straight. A dull or rounded tip can slip out of the slot and cause hand injury or damage to materials.
4.13 Store screwdrivers in a rack or partitioned pouch so that the proper screwdriver can be selected quickly.
4.14 Do not lean or push on a screwdriver with any more force than necessary to keep contact with the screw. A screw properly piloted and fitted will draw itself into the right position when turned. Keep the shank directly over the screw being driven.
4.15 Do not hold the stock in one hand while using the screwdriver with the other. If the screwdriver slips out of the slot you may cut your hand.
4.16 Do not hammer screws that cannot be turned.
4.17 Do not grind the tip to fit another size screw head.
Manual Hand Tools Safety Card (S3NA-305-WI16) Revision 2 November 1, 2014 PRINTED COPIES ARE UNCONTROLLED. CONTROLLED COPY IS AVAILABLE ON COMPANY INTRANET. Page 4 of 7
4.18 Do not try to use screwdrivers on screw heads for which they are not designed (e.g., straight blade screwdrivers on Phillips, clutch head, Torx or multi-fluted spline screw heads).
4.19 Do not use defective screwdrivers (e.g., ones with rounded or damaged edges or tips; split or broken handles; or bent shafts).
4.20 Do not use a screwdriver for prying, punching, chiseling, scoring, scraping or stirring paint.
4.21 Do not use pliers on the handle of a screwdriver for extra turning power. A wrench should be used only on the square screwdriver shank designed for that purpose.
4.22 Do not expose a screwdriver blade to excessive heat. Heat can affect the temper of the metal and weaken the tool.
4.23 Do not use a screwdriver to check if an electrical circuit is live. Use a suitable meter or other circuit testing device.
4.24 Do not carry screwdrivers in your pockets.
5.0 Snips
5.1 Wear safety glasses and protective gloves when working with snips. Small pieces of metal may go flying in the air and cut edges of metal are sharp.
5.2 Snips are made in various shapes and sizes for various tasks. The handle can be like those on scissors with finger and thumb holes or like plier handles. Models are available for cutting in straight lines and in curves to the left or right.
5.3 Universal snips can cut in both straight and wide curves.
5.4 Straight snips and duckbill snips (flat blade, "perpendicular" to the handle, with pointed tips) are generally designed to cut in straight lines; some duckbill snips are designed for cutting curved lines.
5.5 Hawk's bill snips (with crescent-shaped jaws) are used for cutting tight circles.
5.6 Aviation snips have compound leverage that reduces the effort required for cutting.
5.7 Offset snips have jaws that are set at an angle from the handle.
5.8 Select the right size and type of snips for the job; check the manufacturer's specifications about the intended use of the snips (e.g., type of cut - straight, wide curve, tight curve, right or left, and maximum thickness and kind of metal or other material that can be cut).
5.9 Use only snips that are sharp and in good condition.
5.10 Use snips for cutting soft metal only. Hard or hardened metal should be cut with tools designed for that purpose.
5.11 Use ordinary hand pressure for cutting. If extra force is needed, use a larger tool.
5.12 Cut so that the waste is on the right if you are right-handed or on the left if you are left-handed.
5.13 Avoid springing the blades. This results from trying to cut metal that is too thick or heavy for the snips you are using.
5.14 Keep the nut and the pivot bolt properly adjusted at all times.
5.15 Oil the pivot bolt on the snips occasionally.
5.16 Do not try to cut sharp curves with straight cut snips.
5.17 Do not cut sheet metal thicker than the manufacturer's recommended upper limit (e.g., cuts up to 16-gauge cold, rolled steel or 18-gauge stainless steel). Do not extend the length of handles to gain greater leverage.
5.18 Do not hammer or use your foot to exert extra pressure on the cutting edges.
Manual Hand Tools Safety Card (S3NA-305-WI16) Revision 2 November 1, 2014 PRINTED COPIES ARE UNCONTROLLED. CONTROLLED COPY IS AVAILABLE ON COMPANY INTRANET. Page 5 of 7
5.19 Do not use cushion grip handles for tasks requiring insulated handles. They are for comfort primarily and not for protection against electric shocks.
5.20 Do not attempt to re-sharpen snips in a sharpening device designed for scissors, garden tools, or cutlery.
6.0 Wood Chisels
6.1 Wear safety glasses.
6.2 Wood chisels are made in various shapes and sizes and for many uses. Use the correct chisel for the job.
6.3 Use the right size of chisel for the job.
6.4 Choose smooth, rectangular handles that have no sharp edges and are attached firmly to the chisel.
6.5 Ensure that the cutting edge is sharp. Dull chisels can be difficult to control and require more effort to do the job.
6.6 Check stock thoroughly for knots, staples, nails, screws, or other foreign objects before chiseling.
6.7 Clamp stock so it cannot move.
6.8 Adjust your stance so that you do not lose your balance if the tool slips.
6.9 Chip or cut away from yourself.
6.10 Keep your hands and body behind the cutting edge.
6.11 Use a wooden or plastic mallet with a large striking face on all chisels. Only heavy-duty or framing chisels are made of a solid or molded handle that can be struck with a steel hammer.
6.12 Make finishing or paring cuts with hand pressure alone.
6.13 Place chisels safely within the plastic protective caps to cover cutting edges when not in use.
6.14 Replace any chisel that is bent or shows dents, cracks, chips, or excessive wear.
6.15 Store chisels in a “storage roll,” a cloth or plastic bag with slots for each chisel, and keep them in a drawer or tray.
6.16 Replace broken or splintered handles.
6.17 Sharpen cutting edges as often as necessary.
6.18 Do not use a wood chisel as a pry or a wedge.
6.19 Do not use a wood chisel on metal.
6.20 Do not use an all-steel chisel with a mushroomed face or a chipped edge. Redress with a file or whetstone.
6.21 Do not use a grinder to redress heat-treated tools. Use a whetstone.
6.22 Do not use a dull chisel.
7.0 Wrenches
7.1 Use the correct wrench for the job - pipe wrenches for pipes and plumbing fittings, and general-use wrenches for nuts and bolts.
7.2 Discard any damaged wrenches (e.g., open-ended wrenches with spread jaws or box wrenches with broken or damaged points).
7.3 Select the correct jaw size to avoid slippage.
7.4 Position your body in a way that will prevent you from losing balance and hurting yourself if the wrench slips or something (e.g., a bolt) suddenly breaks.

Manual Hand Tools Safety Card (S3NA-305-WI16) Revision 2 November 1, 2014 PRINTED COPIES ARE UNCONTROLLED. CONTROLLED COPY IS AVAILABLE ON COMPANY INTRANET. Page 6 of 7
7.5 Use a box or socket wrench with a straight handle, rather than an off-set handle, when possible.
7.6 Ensure that the jaw of an open-ended wrench is in full contact (fully seated, “flat,” not tilted) with the nut or bolt before applying pressure.
7.7 Face an adjustable wrench “forward,” adjust tightly and turn the wrench so pressure is against the permanent or fixed jaw.
7.8 Ensure that the teeth of a pipe wrench are sharp and free of oil and debris and that the pipe or fitting is clean to prevent unexpected slippage and possible injuries.
7.9 Apply a small amount of pressure to a ratchet wrench initially to ensure that the ratchet wheel (or gear) is engaged with the pawl (a catch fitting in the gear) for the direction you are applying pressure.
7.10 Support the head of the ratchet wrench when socket extensions are used.
7.11 Pull on a wrench using a slow, steady pull; do not use fast, jerky movements.
7.12 Stand aside when work is done with wrenches overhead.
7.13 Make sure adjustable wrenches do not "slide" open during use.
7.14 Keep tools well maintained (cleaned and oiled).
7.15 Clean and place tools and wrenches in a tool box, rack or tool belt after use.
7.16 Do not push on a wrench - losing your balance is more likely if the wrench slips.
7.17 Do not use a wrench that is bent or damaged.
7.18 Do not use worn adjustable wrenches. Inspect the knurl, jaw and pin for wear.
7.19 Do not pull on an adjustable wrench that is loosely adjusted.
7.20 Do not use pipe wrenches on nuts or bolts.
7.21 Do not use pipe wrenches for lifting or bending pipes.
7.22 Do not use a wrench on moving machinery.
7.23 Do not use the wrong tools for the job. For example, never use pliers instead of a wrench or a wrench as a hammer.
7.24 Do not use a makeshift wrench.
7.25 Do not insert a shim in a wrench for better fit.
7.26 Do not strike a wrench (except a "strike face" wrench) with a hammer or similar object to gain more force.
7.27 Do not increase the leverage by adding sleeved additions (e.g., a pipe) to increase tool handle length.
7.28 Do not expose a wrench to excessive heat (like from a blow torch) that could affect the temper of the metal and ruin the tool.
8.0 Files/Rasps
8.1 Do not use a file as a pry bar, hammer, screwdriver, or chisel.
8.2 When using a file or a rasp, grasp the handle in one hand and the toe of the file in the other.
8.3 Do not hammer on a file.
9.0 Chisels
9.1 Do not use a chisel that has a dull cutting edge.
9.2 Do not use chisels that have "mushroomed" striking heads.
Manual Hand Tools Safety Card (S3NA-305-WI16) Revision 2 November 1, 2014 PRINTED COPIES ARE UNCONTROLLED. CONTROLLED COPY IS AVAILABLE ON COMPANY INTRANET. Page 7 of 7
9.3 Hold a chisel by using a tool holder if possible.
9.4 Clamp small work pieces in the vise and chip towards the stationary jaw when working with a chisel.
10.0 Vises
10.1 When clamping a long work piece in a vise, support the far end of the work piece by using an adjustable pipe stand, saw horse or box.
10.2 Position the work piece in the vise so that the entire face of the jaw supports the work piece.
10.3 Do not use a vise that has worn or broken jaw inserts, or has cracks or fractures in the body of the vise.
10.4 Do not slip a pipe over the handle of a vise to gain extra leverage.
11.0 Clamps
11.1 Do not use the C-clamp for hoisting materials.
11.2 Do not use the C-clamp as a permanent fastening device.
12.0 Jacks
12.1 Do not exceed the jack’s rated lifting capacity as noted on the label of the jack.
12.2 Clear all tools, equipment and any other obstructions from under the vehicle before lowering the jack.
Small Engine Safety Card (S3NA-305-WI17) Revision 2 November 1, 2014 PRINTED COPIES ARE UNCONTROLLED. CONTROLLED COPY IS AVAILABLE ON COMPANY INTRANET. Page 1 of 2
Americas
Small Engine Safety Card S3NA-305-WI17
1.0 Objective / Overview
1.1 Operate small engine machines, such as push mowers, weed trimmers, and leaf blowers, in a safe manner.
1.2 You should be trained and competent in how to operate and maintain them in a safe manner.
1.3 Read the operator’s manual. It will contain detailed information on the safe operation and maintenance of the machine. If you do not have a manual, ask if one can be obtained from the manufacturer.
2.0 Potential Hazards
2.1 Flying debris
2.2 Noise
2.3 Moving and sharp parts (cuts)
2.4 Hot surfaces (burns)
3.0 Safe Operating Guidelines
3.1 Do not wear loose or baggy clothing around tools with rotating parts.
3.2 Never run the engine indoors, in poorly ventilated areas, or in a location where the exhaust could be drawn into a building through an opening.
3.3 Never store engine with fuel in fuel tank inside a building with potential sources of ignition such as hot water and space heaters, clothes dryers, electric motors, etc.
3.4 Never remove fuel cap or add fuel when engine is running.
3.5 Never start or operate the engine with the fuel fill cap removed.
3.6 Refuelling: allow engine to cool; fill in well-ventilated area; and do not smoke while re-fuelling.
3.7 Use only properly labelled, American National Standards Institute/Canadian Standards Association- approved red gasoline containers to store and dispense fuel.
3.8 Do not pour fuel from engine or siphon fuel by mouth.
3.9 Never leave the engine unattended while it is running.
3.10 Never operate the engine with an unguarded engine shaft.
3.11 Do not modify the engine or tamper with the factory setting of the engine governor.
3.12 Never operate the engine without a muffler guard in place and avoid touching hot areas of the engine.
3.13 Keep all flammable materials away from the muffler and the rest of the engine; do not idle or park the engine in dry grass or ground cover.
3.14 When working on the equipment, avoid accidental starts by removing the ignition key, turn off all engine switches, disconnect the battery and disconnect the spark plug, keeping it away from metal part.
3.15 Always wear hearing protection when operating an engine.
Small Engine Safety Card (S3NA-305-WI17) Revision 2 November 1, 2014 PRINTED COPIES ARE UNCONTROLLED. CONTROLLED COPY IS AVAILABLE ON COMPANY INTRANET. Page 2 of 2
4.0 Training Requirements
4.1 Review of training requirements per the Training Needs Assessment (TNA).
4.2 Demonstrated knowledge on the use of small engine equipment.
4.3 Review and follow manufacturers operating guidelines.
5.0 Personal Protective Equipment (Level D PPE)
5.1 Always wear safety glasses with shields
5.2 Leather or cotton gloves
5.3 Long pants and long sleeve shirt
5.4 Safety toe work boots
5.5 Hearing protection (earmuffs or earplugs)
Electric and Battery Hand Tools Safety Card (S3NA-305-WI18) Revision 2 November 1, 2014 PRINTED COPIES ARE UNCONTROLLED. CONTROLLED COPY IS AVAILABLE ON COMPANY INTRANET. Page 1 of 6
Americas
Electrical and Battery Hand Tools Safety Card S3NA-305-WI18 All electrical tools and equipment must be operated in accordance with the requirements of S3NA-302-PR1 Electrical, General.
1.0 Safe Work Practices
1.1 Maintain all electrical tools and cords in good condition and not overloaded.
1.2 Do not wear loose or baggy clothing around tools with rotating parts.
1.3 The switch on the tool must be in the OFF position before connecting it to a power source.
1.4 Verify that the power source is the same voltage and current as indicated on the nameplate of the tool. Using a higher voltage can cause serious injury to the operator as well as burn out the tool.
1.5 The tool must have an approved three-wire cord with a three-prong plug so that it can be used only in a properly grounded three-hole receptacle, unless the tool is double insulated to protect the operator from electrical shock.
1.6 All outdoor receptacles must be protected by means of a ground fault circuit interrupter (GFCI or GFI) available in portable or fixed models. Do not use any electric power tools outdoors in a receptacle that is not properly protected.
1.7 Report all shocks and/or sparks from electrical tools, no matter how minor. The tool in question should be tagged out and not be used until it has been checked for ground fault.
1.8 Maintain electrical cords and appliances in good working order.
1.8.1 Cords and appliances must be American National Standards Institute/Canadian Standards Association approved.
1.8.2 Never carry an electric tool by the cord or disconnect the plug by pulling or jerking on the cord (can damage, loosen, or separate connections).
1.8.3 Check cords frequently for such damage such as kinks, cuts, and cracked or broken outer jackets (any cord that feels more than comfortably warm to the touch should be checked by an electrician for overloading).
1.9 Store electrical cords in a clean, dry area off the ground to prevent damage to cord.
1.10 Equipment must have proper guards or shields and they must remain in place. If, due to damage or deterioration, the original guard provided on a piece of equipment cannot be put in place, the tool must be removed from service.
1.11 Do not modify, remove, or disable any machine guards.
1.12 Stand to one side when engaging or disengaging an electrical circuit breaker to avoid electrical flash backs.
1.13 It’s strongly advisable to use GFCI with all portable electric tools at any time.
1.14 A cord should not be pulled or dragged over nails, hooks, or other sharp objects that may cause cuts in the insulation. In addition, cords should never be placed on radiators, steam pipes, walls, and windows. Particular attention should be placed on connections behind furniture, since files and bookcases may be pushed tightly against electrical outlets, severely bending the cord at the plug.
1.15 Disconnect electrical equipment before cleaning, adjusting, or applying flammable solutions. If a guard is removed to clean or repair parts, replace it before testing the equipment and returning the machine to service.
1.16 Only authorized persons are permitted to activate, de-activate or lockout electrical equipment.
Electric and Battery Hand Tools Safety Card (S3NA-305-WI18) Revision 2 November 1, 2014 PRINTED COPIES ARE UNCONTROLLED. CONTROLLED COPY IS AVAILABLE ON COMPANY INTRANET. Page 2 of 6
1.17 Where there is or may be a danger to a worker, from the inadvertent operation of electrical equipment, then that equipment must be locked out and tagged prior to commencing work.
1.17.1 Switch off all appropriate devices (MCC, Distribution Panel, Disconnect).
1.17.2 Lock and tag Electrical Supply devices in the “OFF” position.
1.17.3 Test to be sure the equipment cannot be operated at the STOP-START switch.
1.17.4 Test to be sure electrical equipment is de-energized.
1.17.5 After completion of task, remove padlocks and destroy tags.
2.0 Inspection
2.1 Inspect tools for any damage prior to each use.
2.2 Ensure that the power tool has the correct guard, shield or other attachment that the manufacturer recommends.
2.3 Ensure that the tools are properly grounded using a three-prong plug, are double insulated (and are labeled as such), or are powered by a low-voltage isolation transformer; this will protect users from an electrical shock.
2.4 Check electric tools to ensure that a tool with a three-prong plug has an approved three-wire cord and is grounded. The three-prong plug should be plugged in a properly grounded three-pole outlet. If an adapter must be used to accommodate a two-hole receptacle, the adapter wire must be attached to a known, functioning ground. Never remove the third, grounding prong from a plug.
2.5 Check the handle and body casing of the tool for cracks or other damage.
2.6 If the tool has auxiliary or double handles, check to see that they installed securely.
2.7 Inspect cords for defects: check the power cord for cracking, fraying, and other signs of wear or faults in the cord insulation.
2.8 Any tool with a spring-operated trigger switch shall be fully functional.
2.9 Check for damaged switches and ones with faulty trigger locks.
2.10 Inspect the plug for cracks and for missing, loose or faulty prongs.
2.11 If a tool is defective, remove it from service, and tag it clearly “Out of service for repair.” Replace damaged equipment immediately – do not use defective tools “temporarily.” DO NOT ATTEMPT FIELD REPAIRS.
3.0 Battery Powered Tools
3.1 Use only the kind of battery that the tool manufacturer specifies for the battery-powered tool that you are using.
3.2 Recharge a battery-powered tool only with a charger that is specifically intended for the battery in that tool.
3.3 Remove the battery from the tool or ensure that the tool is switched off or locked off before changing accessories, making adjustments, or storing the tool.
3.4 Store a battery pack safely so that no metal parts, nails, screws, wrenches and so on can come in contact with the battery terminals; this could result in shorting out the battery and possibly cause sparks, fires or burns.

Electric and Battery Hand Tools Safety Card (S3NA-305-WI18) Revision 2 November 1, 2014 PRINTED COPIES ARE UNCONTROLLED. CONTROLLED COPY IS AVAILABLE ON COMPANY INTRANET. Page 3 of 6
4.0 Using Electric Tools
4.1 Switch off the tools before connecting them to a power supply.
4.2 If a power cord feels more than comfortably warm or if a tool is sparking excessively, have it checked by an electrician or other qualified person.
4.3 Disconnect the power supply before making adjustments or changing accessories.
4.4 Remove any wrenches and adjusting tools before turning on a tool.
4.5 Inspect the cord for fraying or damage before each use. Tag defective tools clearly with an “Out of Service” tag and replace immediately with a tool in good running order.
4.6 During use, keep power cords clear of tools and the path that the tool will take.
4.7 Use clamps, a vice or other devices to hold and support the piece being worked on, when practical to do so. This will allow you to use both hands for better control of the tool and will help prevent injuries if a tool jams or binds in a work piece.
4.8 Use only approved extension cords that have the proper wire size for the length of cord and power requirements of the electric tool that you are using. This will prevent the cord from overheating.
4.9 For outdoor work, use outdoor extension cords marked “W-A” or “W.”
4.10 Suspend power cords over aisles or work areas to eliminate stumbling or tripping hazards.
4.11 Eliminate octopus connections: if more than one receptacle plug is needed, use a power bar or power distribution strip that has an integral power cord and a built-in overcurrent protection.
4.12 Pull the plug not the cord when unplugging a tool. Pulling the cord causes wear and may adversely affect the wiring to the plug - an electrical shock to the operator may result.
4.13 Keep power cords away from heat, water, oil, sharp edges and moving parts. They can damage the insulation and cause a shock.
4.14 Avoid accidental starting by ensuring the tool is turned off before you plug it in. Also do not walk around with a plugged-in tool with your finger touching the switch.
4.15 Do not bypass the ON/OFF switch and operate the tools by connecting and disconnecting the power cord.
4.16 Do not disconnect the power supply of the tool by pulling or jerking the cord from the outlet.
4.17 Do not leave a running tool unattended. Do not leave it until it has been turned off, has stopped running completely, and has been unplugged.
4.18 Do not use electric tools in wet conditions or damp locations unless tool is connected to a GFCI.
4.19 Do not expose electric power tools to rain or wet conditions; wet tools increase the likelihood for getting an electric shock.
4.20 Avoid body contact with grounded surfaces like refrigerators, pipes and radiators when using electric powered tools; this will reduce the likelihood of shock if the operator's body is grounded.
4.21 Do not plug several power cords into one outlet by using single-to-multiple outlet adapters or converters (“cube taps”).
4.22 Do not use light duty power cords.
4.23 Do not connect or splice extension cords together to make a longer connection; the resulting extension cord may not be able to provide sufficient current or power safely.
4.24 Do not carry electrical tools by the power cord.
4.25 Do not tie power cords in knots; knots can cause short circuits and shocks. Loop the cords or use a twist lock plug.
Electric and Battery Hand Tools Safety Card (S3NA-305-WI18) Revision 2 November 1, 2014 PRINTED COPIES ARE UNCONTROLLED. CONTROLLED COPY IS AVAILABLE ON COMPANY INTRANET. Page 4 of 6
4.26 Never break off the third prong on a plug: replace broken three-prong plugs and make sure the third prong is properly grounded.
4.27 Never use extension cords as permanent wiring; use extension cords only as a temporary power supply to an area that does not have a power outlet.
4.28 Do not walk on or allow vehicles or other moving equipment to pass over unprotected power cords. Cords should be put in conduits or protected by placing planks on each side of them.
4.29 Do not brush away sawdust, shavings or turnings while the tool is running. Never use compressed air for cleaning surfaces or removing sawdust, metal turnings, etc.
4.30 Do not operate tools in an area containing explosive vapors or gases.
4.31 Do not clean tools with flammable or toxic solvents.
4.32 Do not surprise or touch anyone who is operating a tool. Startling a tool operator could end up causing an accident or injury.
5.0 Belt Sanders
5.1 Refer to S3NA-305-WI11 Sander Safety Card.
6.0 Drills
6.1 Refer to S3NA-305-WI8 Power Drill Safety Card.
7.0 Planers
7.1 Wear safety glasses.
7.2 Disconnect the planer from the power supply before making any adjustments to the cutter head or blades.
7.3 Use blades of the same weight and set at the same height.
7.4 Ensure that the blade-locking screws are tight.
7.5 Remove adjusting keys and wrenches before turning on power.
7.6 Support the material (stock) in a comfortable position that will allow the job to be done safely and accurately.
7.7 Check stock thoroughly for staples, nails, screws, or other foreign objects before using a planer.
7.8 Start a cut with the infeed table (front shoe) resting firmly on the stock and with the cutter head slightly behind the edge of the stock.
7.9 Use two hands to operate a planer - one hand on the trigger switch and the other on a front handle.
7.10 Do not put your finger or any object in a deflector to clean out chips while a planer is running.
7.11 Disconnect the power supply when stopping to dump out chips.
7.12 Do not set a planer down until blades have stopped turning.
7.13 Keep all cords clear of cutting area.
8.0 Routers
8.1 Wear safety glasses.
8.2 Disconnect the power supply before making any adjustments or changing bits.
8.3 Ensure that the bit is securely mounted in the chuck and the base is tight.
Electric and Battery Hand Tools Safety Card (S3NA-305-WI18) Revision 2 November 1, 2014 PRINTED COPIES ARE UNCONTROLLED. CONTROLLED COPY IS AVAILABLE ON COMPANY INTRANET. Page 5 of 6
8.4 Put the base of the router on the work, template or guide. Make sure that the bit can rotate freely before switching on the motor.
8.5 Secure stock. Never rely on yourself or a second person to support or hold the material. Sudden torque or kickback from the router can cause damage and injury.
8.6 Before using a router, check stock thoroughly for staples, nails, screws or other foreign objects.
8.7 Keep all cords clear of cutting area.
8.8 Always hold both hands on router handles, until a motor has stopped. Do not set the router down until the exposed router bit has stopped turning.
8.9 Do not overreach. Keep proper footing and balance.
8.10 When inside routing, start the motor with the bit above the stock. When the router reaches full power, lower the bit to two times the required depth.
8.11 When routing outside edges, guide the router counter clockwise around the work.
8.12 When routing bevels, moldings and other edge work, make sure the router bit is in contact with the stock to the left of a starting point and is pointed in the correct cutting direction.
8.13 Feed the router bit into the material at a firm, controlled speed.
8.14 With softwood, you can sometimes move the router as fast as it can go. With hardwood, knotty and twisted wood, or with larger bits, cutting may be very slow.
8.15 The sound of the motor can indicate safe cutting speeds. When the router is fed into the material too slowly, the motor makes a high-pitched whine. When the router is pushed too hard, the motor makes a low growling noise.
8.16 When the type of wood or size of the bit requires going slow, make two or more passes to prevent the router from burning out or kicking back.
8.17 To decide the depth of cut and how many passes to make, test the router on scrap lumber similar to the work.
9.0 Circular Saws
9.1 Refer to S3NA-305-WI2 Circular Saw Safety Card.
10.0 Other Saws
10.1 Wear safety glasses.
10.2 Disconnect power supply before changing or adjusting blades.
10.3 Use lubricants when cutting metals.
10.4 Keep all cords clear of cutting area.
10.5 Position the saw beside the material before cutting and avoid entering the cut with a moving blade.
10.6 Make sure guards, if present, are installed and are working properly.
10.7 Remember sabre saws cut on the upstroke.
10.8 Secure and support stock as close as possible to the cutting line to avoid vibration.
10.9 Keeps the base or shoe of the saw in firm contact with the stock being cut.
10.10 Select the correct blade for the material being cut and allow it to cut steadily. Do not force it. Clean and sharp blades operate best.
10.11 Set the blade to go no further than 1/8 to 1/4 inch deeper than the material being cut.
Electric and Battery Hand Tools Safety Card (S3NA-305-WI18) Revision 2 November 1, 2014 PRINTED COPIES ARE UNCONTROLLED. CONTROLLED COPY IS AVAILABLE ON COMPANY INTRANET. Page 6 of 6
10.12 Do not start cutting until the saw reaches its full power.
10.13 Do not force a saw along or around a curve. Allow the machine to turn with ease.
10.14 Do not insert a blade into or withdraw a blade from a cut or lead hole while the blade is moving.
10.15 Do not put down a saw until the motor has stopped.
10.16 Do not reach under or around the stock being cut.
10.17 Maintain control of the saw always. Avoid cutting above shoulder height.
10.18 External Cuts
10.18.1 Make sure that the blade is not in contact with the material or the saw will stall when the motor starts.
10.18.2 Hold the saw firmly down against the material and switch the saw on.
10.18.3 Feed the blade slowly into the stock, maintaining an even forward pressure.
10.19 Internal Cuts
10.19.1 Drill a lead hole slightly larger than the saw blade. With the saw switched off, insert the blade in the hole until the shoe rests firmly on the stock.
10.19.2 Do not let the blade touch the stock until the saw has been switched on.
Hand and Power Tools (S3NA-305-GL1) Revision 2 November 1, 2014 PRINTED COPIES ARE UNCONTROLLED. CONTROLLED COPY IS AVAILABLE ON COMPANY INTRANET. Page 1 of 5
Americas
Hand and Power Tools Guide S3NA-305-GL1
1.0 Exposure
1.1 Employees who use hand and power tools and are exposed to the hazards of falling, flying, abrasive, and splashing objects, or to harmful dusts, fumes, mists, vapors, or gases must be provided with the appropriate personal protective equipment (PPE) and training.
2.0 Basic Safety Rules
2.1 Keep all tools in good condition with regular maintenance.
2.2 Use the right tool for the job.
2.3 Examine each tool for damage before use and do not use damaged tools.
2.4 Operate tools according to the manufacturers’ instructions.
2.5 Provide and use properly the right PPE.
2.6 All electrical connections for these tools must be suitable for the type of tool and the working conditions (wet, dusty, flammable vapors).
2.7 When a temporary power source is used for construction, a ground-fault circuit interrupter should be used.
2.8 Eye protection is required, and head and face protection is recommended for employees working with pneumatic tools.
2.9 Screens must also be set up to protect nearby workers from being struck by flying fragments around chippers, riveting guns, staplers, or air drills.
2.10 Compressed air guns should never be pointed toward anyone.
2.11 Workers should never “dead-end” them against themselves or anyone else.
2.12 A chip guard must be used when compressed air is used for cleaning.
2.13 Use of heavy jackhammers can cause fatigue and strains. Heavy rubber grips reduce these effects by providing a secure handhold.
2.14 Workers operating a jackhammer must wear safety glasses and safety shoes that protect them against injury if the jackhammer slips or falls. A face shield also should be used.
2.15 Hand-arm vibration exposure is associated with the use of hand tools. Consider the need for controls such as limiting your tool use time, adjusting your grip to be loose but stable, and using anti-vibration gloves.
2.16 Noise hazard is associated with pneumatic and many other tools. Working with noisy tools such as jackhammers requires proper, effective use of appropriate hearing protection.
3.0 Hazard Prevention Sharp Objects
3.1 Employees, when using saw blades, knives, or other tools, should direct the tools away from aisle areas and away from other employees working in close proximity.
3.2 Knives and scissors must be sharp; dull tools can cause more hazards than sharp ones.
3.3 Cracked saw blades and grinder disc must be removed from service.
3.4 Wrenches must not be used when jaws are sprung to the point that slippage occurs.
3.5 Impact tools such as drift pins, wedges, and chisels must be kept free of mushroomed heads.
Hand and Power Tools (S3NA-305-GL1) Revision 2 November 1, 2014 PRINTED COPIES ARE UNCONTROLLED. CONTROLLED COPY IS AVAILABLE ON COMPANY INTRANET. Page 2 of 5
3.6 The wooden handles of tools must not be splintered.
3.7 Iron or steel hand tools may produce sparks that can be an ignition source around flammable substances. Where this hazard exists, spark-resistant tools made of non-ferrous materials should be used where flammable gases, highly volatile liquids, and other explosive substances are stored or used.
4.0 Hazard Prevention of Power tools
4.1 Precautions
4.1.1 Never carry a tool by the cord or hose.
4.1.2 Never yank the cord or the hose to disconnect it from the receptacle.
4.1.3 Keep cords and hoses away from heat, oil, and sharp edges.
4.1.4 Disconnect tools when not using them, before servicing and cleaning them, and when changing accessories such as blades, bits, and cutters.
4.1.5 Keep all people not involved with the work at a safe distance from the work area.
4.1.6 Secure work with clamps or a vise, freeing both hands to operate the tool.
4.1.7 Avoid accidental starting. Do not hold fingers on the switch button while carrying a plugged-in tool.
4.1.8 Maintain tools with care; keep them sharp and clean for best performance.
4.1.9 Follow instructions in the user’s manual for lubricating and changing accessories.
4.1.10 Be sure to keep good footing and maintain good balance when operating power tools.
4.1.11 Wear proper apparel for the task. Loose clothing, ties, or jewelry can become caught in moving parts.
4.1.12 Remove all damaged portable electric tools from use and tag them: “Do Not Use.”
4.2 Guards
4.2.1 The exposed moving parts of power tools need to be safeguarded. Belts, gears, shafts, pulleys, sprockets, spindles, drums, flywheels, chains, or other reciprocating, rotating, or moving parts of equipment must be guarded.
4.2.2 Machine guards, as appropriate, must be provided to protect the operator and others from the following:
• Point of operation.
• In-running nip points.
• Rotating parts.
• Flying chips and sparks.
• Safety guards must never be removed when a tool is being used. Portable circular saws having a blade greater than 2 inches (5.08 centimeters) in diameter must be equipped at all times with guards.
• An upper guard must cover the entire blade of the saw. A retractable lower guard must cover the teeth of the saw, except where it makes contact with the work material. The lower guard must automatically return to the covering position when the tool is withdrawn from the work position.
5.0 Operating Controls and Switches
5.1 The following hand-held power tools must be equipped with a constant-pressure switch or control that shuts off the power when pressure is released: drills; tappers; fastener drivers; horizontal, vertical, and angle grinders with wheels more than 2 inches (5.08 centimeters) in diameter; disc sanders with discs greater than
Hand and Power Tools (S3NA-305-GL1) Revision 2 November 1, 2014 PRINTED COPIES ARE UNCONTROLLED. CONTROLLED COPY IS AVAILABLE ON COMPANY INTRANET. Page 3 of 5
2 inches (5.08 centimeters); belt sanders; reciprocating saws; saber saws, scroll saws, and jigsaws with blade shanks greater than 1/4-inch (0.63 centimeters) wide; and other similar tools.
5.2 These tools also may be equipped with a “lock-on” control, if it allows the worker to also shut off the control in a single motion using the same finger or fingers.
5.3 The following hand-held power tools must be equipped with either a positive “on-off” control switch, a constant pressure switch, or a “lock-on” control:
5.3.1 Disc sanders with discs 2 inches (5.08 centimeters) or less in diameter.
5.3.2 Grinders with wheels 2 inches (5.08 centimeters) or less in diameter.
5.3.3 Platen sanders, routers, planers, laminate trimmers, nibblers, shears, and scroll saws; and jigsaws, saber and scroll saws with blade shanks a nominal 1/4-inch (6.35 millimeters) or less in diameter.
5.3.4 It is recommended that the constant-pressure control switch be regarded as the preferred device.
5.3.5 Other hand-held power tools such as circular saws having a blade diameter greater than 2 inches (5.08 centimeters), chain saws, and percussion tools with no means of holding accessories securely must be equipped with a constant-pressure switch.
6.0 Electrical Shock Caution
6.1 Electrical shocks, which can lead to injuries such as heart failure and burns, are among the major hazards associated with electric powered tools. Under certain conditions, even a small amount of electric current can result in fibrillation of the heart and death.
6.2 An electric shock also can cause the worker to fall off a ladder or other elevated work surface and be injured due to the fall.
6.3 To protect the worker from shock and burns, electric tools must have a three-wire cord with a ground and be plugged into a grounded receptacle, be double insulated, or be powered by a low-voltage isolation transformer.
6.4 Three-wire cords contain two current-carrying conductors and a grounding conductor. Any time an adapter is used to accommodate a two-hole receptacle, the adapter wire must be attached to a known ground.
6.5 The third prong must never be removed from the plug.
6.6 Double-insulated tools are available that provide protection against electrical shock without third-wire grounding. On double-insulated tools, an internal layer of protective insulation completely isolates the external housing of the tool.
7.0 Electric Tools General Practice
7.1 Operate electric tools within their design limitations.
7.2 Use gloves and appropriate safety footwear when using electric tools.
7.3 Store electric tools in a dry place when not in use.
7.4 Do not use electric tools in damp or wet locations unless they are approved for that purpose.
7.5 Keep work areas well lighted when operating electric tools. Ensure that cords from electric tools do not present a tripping hazard.
7.6 In the construction industry, employees who use electric tools must be protected by ground-fault circuit interrupters or an assured equipment-grounding conductor program.

Hand and Power Tools (S3NA-305-GL1) Revision 2 November 1, 2014 PRINTED COPIES ARE UNCONTROLLED. CONTROLLED COPY IS AVAILABLE ON COMPANY INTRANET. Page 4 of 5
8.0 Pneumatic Tools (powered by compressed air)
8.1 There are several dangers associated with the use of pneumatic tools. First and foremost is the danger of getting hit by one of the tool’s attachments or by some kind of fastener the worker is using with the tool.
8.2 Pneumatic tools must be checked to see that the tools are fastened securely to the air hose to prevent them from becoming disconnected.
8.3 A short wire or positive locking device attaching the air hose to the tool must also be used and will serve as an added safeguard.
8.4 If an air hose is more than 1/2-inch (12.7 millimeters) in diameter, a safety excess flow valve must be installed at the source of the air supply to reduce pressure in case of hose failure.
8.5 In general, the same precautions should be taken with an air hose that are recommended for electric cords, because the hose is subject to the same kind of damage or accidental striking, and because it also presents tripping hazards.
8.6 When using pneumatic tools, a safety clip or retainer must be installed to prevent attachments such as chisels on a chipping hammer from being ejected during tool operation.
8.7 Pneumatic tools that shoot nails, rivets, staples, or similar fasteners and operate at pressures more than 100 pounds per square inch (6,890 kPa), must be equipped with a special device to keep fasteners from being ejected, unless the muzzle is pressed against the work surface.
8.8 Airless spray guns that atomize paints and fluids at pressures of 1,000 pounds or more per square inch (6,890 kPa) must be equipped with automatic or visible manual safety devices that will prevent pulling the trigger until the safety device is manually released.
9.0 Liquid Fuel Tools (operated with gasoline)
9.1 The worker must be careful to handle, transport, and store gas or fuel only in approved flammable liquid containers, according to proper procedures for flammable liquids.
9.2 Before refilling a fuel-powered tool tank, the worker must shut down the engine and allow it to cool to prevent accidental ignition of hazardous vapors.
9.3 When a fuel-powered tool is used inside a closed area, effective ventilation and/or proper respirators such as atmosphere-supplying respirators must be utilized to avoid breathing carbon monoxide.
9.4 Noise hazards associated with gasoline engines must be mitigated by proper hearing protection utilization. Ear plugs, ear muffs or a combination of the two must be used to protect workers from excessive noise levels.
9.5 Fire extinguishers must also be available in the area.
10.0 Hydraulic Power Tools (fluid run)
10.1 The fluid used in hydraulic power tools must be an approved fire-resistant fluid and must retain its operating characteristics at the most extreme temperatures to which it will be exposed. The exception to fire-resistant fluid involves all hydraulic fluids used for the insulated sections of derrick trucks, aerial lifts, and hydraulic tools that are used on or around energized lines. This hydraulic fluid shall be of the insulating type.
10.2 The manufacturer’s recommended safe operating pressure for hoses, valves, pipes, filters, and other fittings must not be exceeded.
10.3 All jacks—including lever and ratchet jacks, screw jacks, and hydraulic jacks—must have a stop indicator, and the stop limit must not be exceeded. Also, the manufacturer’s load limit must be permanently marked in a prominent place on the jack, and the load limit must not be exceeded.
Hand and Power Tools (S3NA-305-GL1) Revision 2 November 1, 2014 PRINTED COPIES ARE UNCONTROLLED. CONTROLLED COPY IS AVAILABLE ON COMPANY INTRANET. Page 5 of 5
10.4 A jack should never be used to support a lifted load. Once the load has been lifted, it must immediately be blocked up. Put a block under the base of the jack when the foundation is not firm, and place a block between the jack cap and load if the cap might slip.
10.5 To set up a jack, make certain of the following:
10.5.1 The base of the jack rests on a firm, level surface;
10.5.2 The jack is correctly centered;
10.5.3 The jack head bears against a level surface; and
10.5.4 The lift force is applied evenly.
10.6 Proper maintenance of jacks is essential for safety. All jacks must be lubricated regularly. In addition, each jack must be inspected according to the following schedule:
10.6.1 For jacks used continuously or intermittently at one site—inspected at least once every 6 months;
10.6.2 For jacks sent out of the shop for special work—inspected when sent out and inspected when returned; and
10.6.3 For jacks subjected to abnormal loads or shock—inspected before use and immediately thereafter.
Highway and Road Work (S3NA-306-PR1)Revision 1 November 1, 2014PRINTED COPIES ARE UNCONTROLLED. CONTROLLED COPY IS AVAILABLE ON COMPANY INTRANET. Page 1 of 7
Americas
Highway and Road Work S3NA-306-PR1
1.0 Purpose and Scope
1.1 To address potential hazards that may occur during highway construction or during work within the right of way of a public or private roadway.
1.2 This procedure applies to all AECOM Americas-based employees and operations.
2.0 Terms and Definitions
2.1 Personal Protective Equipment (PPE) – Safety clothing and equipment worn by workers in traffic areas to provide protection and heightened visibility from physical hazards including moving vehicles and construction equipment.
2.2 Traffic areas – Any work area where workers are located within 20 feet of moving traffic, existing or anticipated.
2.3 Traffic Protection Plan – A detailed plan for the protection of workers in a work zone. The plan must contain a written description of the traffic hazards to which workers may be exposed and measures used to protect them meeting local legislation.
2.4 Traffic Control Plan – A detailed plan for the control of traffic during construction, maintenance, or utility operations on a highway/road, taking into account the organized, systematic, safe conduct of the project, including, as applicable, detours, staging sequences, work vehicle access and egress from work sites, temporary barriers, removal of old pavement markings and selection and planned implementation of appropriate typical layouts for traffic control. Plan must be written to meet local legislation.
2.5 WOF – Workers on foot.
3.0 References
3.1 Learning Management System (LMS)
3.2 S3NA-208-PR1 Personal Protective Equipment Program
3.3 S3NA-209-PR1 Project Hazard Assessment and Planning
3.4 Transportation Association of Canada, Manual of Uniform Traffic Control Devices for Canada (2014)
3.5 U.S. Department of Transportation – Federal Highway Administration (FHWA) – Manual of Uniform Traffic Control Devices (2009 edn. With revision number 1 and 2 incorporated, dated May 2012)
4.0 Procedure
4.1 Roles and Responsibilities
4.1.1 Project Manager or Supervisor
Responsible for administering the procedure and for determining the measures and configuration of the temporary traffic control zone in accordance with specifications for workers, motorists, and pedestrians, and the protection of AECOM employees.
See that employees assigned to work in traffic areas are trained in the use of traffic control systems and Personal Protective Equipment (PPE).
4.1.2 Flag Person
Stand in a safe position, be clearly visible, have an unobstructed view of approaching traffic, and be positioned at least 80 feet (25 meters) away from the work area unless circumstances
Highway and Road Work (S3NA-306-PR1)Revision 1 November 1, 2014PRINTED COPIES ARE UNCONTROLLED. CONTROLLED COPY IS AVAILABLE ON COMPANY INTRANET. Page 2 of 7
or space requirements, such as working at or near an intersection, dictate otherwise.
Trained and competent and will use appropriate PPE.
Instructed in traffic control and flagging procedures, will be provided with sufficient breaks, and will not be permitted to work alone for extended periods as per local legislation.
Not to engage in conversation with motorists except to provide clear instructions and will stay alert at their points of duty until relieved.
4.1.3 Site Safety Officer
Responsible to the Project Manager/Supervisor for the implementation of safety and the internal traffic protection and control plans within a highway/road worksite.
Be responsible for traffic safety coordination on the specified project.
Have training in the requirements of the governing transportation authority and the applicable Occupational Health and Safety legislation.
Be involved in conducting hazard assessments, developing the mitigating strategies and Safe Job Procedures, and reviewing their implementation for any project where traffic is identified as a hazard to AECOM staff.
4.2 Training
4.2.1 Employees who have potential exposures to highway and road hazards shall be trained. Refer to the S3NA-209-PR1 Project Hazard Assessment and Planning for specific required training assigned in the LMS.
4.2.2 All staff will receive on-site orientation to the hazards and controls.
4.2.3 Only staff with appropriate flag person (traffic control) training will act as a flag person.
4.2.4 Flag persons must be instructed on the specific project traffic control plan.
4.2.5 Flag persons must be trained/certified in signalling methods required by the authority in charge.
4.2.6 WOF, equipment operators, and drivers in internal work zones must know the routes that construction vehicles will use.
4.2.7 Equipment operators and signal persons must know the hand signals used on the worksite.
4.2.8 Operators and WOF must know the visibility limits and the "blind spots" for each vehicle on site.
4.2.9 Workers should be made aware of the ways in which hazards associated with shift work and night work may affect their performance.
4.3 PPE
4.3.1 PPE requirements shall be determined based on the task hazard analysis. Refer to the S3NA-208-PR1 Personal Protective Equipment Program.
High visibility safety vest/apparel with retro-reflective stripes (American National Standards Institute/Canadian Standards Association [ANSI/CSA] Class II at minimum).
Work conducted at night may require that the minimum level of apparel worn be, at minimum.
ANSI/CSA Class III, as required by governing legislation.
Protective headwear, foot wear, safety glasses and hearing protection.
Two-way radio or other means of effective communication.
4.4 Traffic accommodation equipment, as required by the Traffic Protection Plan
The traffic accommodation equipment could entail:
A rooftop beacon light for the vehicle, where required
Highway and Road Work (S3NA-306-PR1)Revision 1 November 1, 2014PRINTED COPIES ARE UNCONTROLLED. CONTROLLED COPY IS AVAILABLE ON COMPANY INTRANET. Page 3 of 7
Pylons, Glo-posts, flags, barricades and/or flagging tape, warning lights, flashing light boards
Signage
Flagging equipment, as required:
o Daytime:
Flag person's "Stop and Slow" paddle
PPE including high-visibility clothing meeting local legislation.
Drinking water
Bug repellent and/or sun screen as conditions warrant
Optional radio communication (if required)
o Night time (additional requirements):
A retro-reflective "Stop and Slow" paddle
A flashlight fitted with a red signaling baton
Flashing yellow beacons set up in advance of the flag person
Additional night time PPE
4.5 Traffic Control Plan
4.5.1 Each Project Manager shall prepare a project Traffic Protection Plan addressing traffic controls and worker protection appropriate for the team’s exposures. The Traffic Protection Plan may be a stand-alone document, or contained within the project Health and Safety Plan or Safe Work Plan if allowed by legislation. Plans shall address the following if applicable:
Closure zones within the project boundaries
Work zone protections: various styles of concrete, water, sand, collapsible barriers, crash cushions, and truck mounted attenuators
Guide vehicles
Communications
Night operations work within traffic controls
PPE
Sanitation
Traffic control plans and permits
Training
Worker and heavy mobile equipment interface
4.5.2 A Traffic Control Plan will be completed for the movement of vehicles in areas where workers are conducting other tasks.
4.5.3 Drivers, WOF and pedestrians will be able to see and understand the routes they are to follow.
4.5.4 Where there are several projects, coordinated vehicle routes and communication between contractors will reduce vehicular struck-by incidents.
4.5.5 Hazard identification and plan development shall be performed in accordance with this procedure. The plans shall include the identification of the responsibility for personnel and implementation of the safety program under highway construction activities.
4.5.6 Other requirements for supporting activities such as excavations, heavy equipment usage, personal protective equipment, etc. shall be applicable and addressed in accordance with other procedures.
Highway and Road Work (S3NA-306-PR1)Revision 1 November 1, 2014PRINTED COPIES ARE UNCONTROLLED. CONTROLLED COPY IS AVAILABLE ON COMPANY INTRANET. Page 4 of 7
A traffic protection plan will be an integral part of the Health and Safety Plan or Safe Work Plan whenever staff will be exposed to the hazards of vehicular traffic during project work (this may include surveys, drilling and soils inspections, bridge or overpass inspections, inspection of roadway construction projects).
Work duration, road width, and traffic volume are some of the key considerations to be contemplated when designing a Traffic Protection Plan. The Traffic Protection Plan will address the specific vehicular hazards and describe the measures that will be implemented to protect employees.
Traffic Control and Protection Plan will be developed in consultation with a qualified supervisor or manager experienced in traffic control. In addition, a supervisor will be designated to oversee the implementation of the protection plan until work is completed.
Occupational Health and Safety regulations and associated standards or guidebooks provide instruction on the use of traffic control devices in temporary construction, maintenance, and utility work zones for worker and motorist safety and to minimize the disruption of traffic flow.
Schedule work to avoid periods of heavy traffic.
Alert traffic of work ahead, by placing signs or cones well ahead of the work area.
If the work area is being managed under a Traffic Control Plan or Traffic Protection Plan, obtain copies of these plans before commencing work.
Traffic accommodation that is adequate in good weather conditions and daylight may not be adequate under adverse weather conditions and/or hours of darkness. Reassess the accommodation based on conditions.
Traffic accommodation will be planned to provide safe conditions for the protection and safe passage of motorists, pedestrians, and employees at all work sites. It will include all areas located within the traveled portion of a roadway including shoulders, ditches, and boulevards.
4.6 Restrictions
4.6.1 Applicable legislated requirements governing all aspects of traffic safety, including directing traffic, signage, PPE, traffic control devices in temporary construction, maintenance and utility work zones,will be reviewed in preparation for the site-specific traffic control, protection or accommodation plan.
4.6.2 No personnel will be allowed onto the site without first reviewing the project-specific Traffic Protection Plan.
4.7 Short-Term Traffic Protection
4.7.1 Always wear the appropriate PPE to maintain your visibility to vehicular traffic. Wear a tear-away fluorescent reflective vest (and retro-reflective stripes on the arms and legs for night work or during periods of limited visibility) at all times.
4.7.2 Pull your vehicles off as far to the right of the travelled portion of the road as possible. Confirm that the shoulder of the highway or street where you will park your vehicle is wide enough to allow for safe access to and egress from the vehicle.
4.7.3 Always park your vehicle at least 100 feet (30 metres) from the flag person station. The vehicle should be positioned between the flag person and the work crew.
4.7.4 Activate the four-way flashers and rotating beacon (if required) for your vehicle prior to exiting the vehicle.
4.7.5 Plan an escape route prior to exiting the vehicle.
4.7.6 Load and unload materials or equipment from the passenger side of the vehicle.
4.7.7 Avoid turning your back to oncoming traffic.
4.7.8 Be aware of mobile equipment that may be operating in the work area.
Highway and Road Work (S3NA-306-PR1)Revision 1 November 1, 2014PRINTED COPIES ARE UNCONTROLLED. CONTROLLED COPY IS AVAILABLE ON COMPANY INTRANET. Page 5 of 7
4.7.9 Do not enter onto the travelled portion of the road except to cross the road. Road crossings should be made at a 90 degree angle to the direction of the road.
4.8 Long-Term Traffic Protection
4.8.1 Traffic accommodation will be provided BEFORE the work starts and will be maintained until the work is completed.
4.8.2 Generally, for long-term duration work activities that are performed at construction projects, the Constructor of the project is required to develop a Traffic Protection Plan.
4.8.3 If AECOM has assumed the role of Constructor for the project, the Traffic Protection Plan will be developed and implemented prior to the commencement of work activities at the project.
4.8.4 If AECOM is not the Constructor for the project, the traffic Protection Plan for the project will be developed by our Client or a Constructor designated by the Client.
4.8.5 The Traffic Protection Plan should be reviewed with AECOM employees during orientation to the project.
4.9 Signage
4.9.1 Standard highway signs for information, speed limits, and work zones will assist drivers in identifying designated traffic paths.
4.9.2 Provide appropriate instructional signage such as: EVACUATION ROUTE; DO NOT ENTER; REDUCED SPEED AHEAD; ROAD CLOSED; and NO OUTLET.
4.9.3 Using standard highway signs for internal construction worksite traffic control will assist workers in recognizing the route they are to use at the construction site.
4.9.4 Traffic Signs
Signage will be of acceptable standards, in good condition, clean, legible, suited to thepurpose, and meeting local legislation requirements
Signage will be secured or weighted.
Routinely inspect signage for placement, cleanliness, and physical damage.
Cover road traffic control signage when no activity is present.
4.10 Traffic Control Devices
4.10.1 Standard traffic control devices, signals, and message boards will instruct drivers to follow a path away from where work is being done.
4.10.2 The authority in charge will determine the approved traffic control devices such as cones, barrels, barricades, and delineator posts that will be used as part of the Traffic Control Plan.
4.11 Work Zone Protections
4.11.1 Various styles of concrete, water, sand, collapsible barriers, crash cushions, and truck-mounted attenuators shall be used to limit motorist intrusions into the construction work zone, as appropriate.
4.11.2 All AECOM staff shall be made aware of controls established by the Contractor.
4.11.3 AECOM staff shall wear the required safety equipment at all times.
4.11.4 In the absence of a contractor, when AECOM staff are in the field alone—e.g., investigations, surveys—all appropriate Department of Transportation traffic control standards and devices shall be observed and placed in position.
4.11.5 The work zone shall be made safe by its separation from traffic.
Highway and Road Work (S3NA-306-PR1)Revision 1 November 1, 2014PRINTED COPIES ARE UNCONTROLLED. CONTROLLED COPY IS AVAILABLE ON COMPANY INTRANET. Page 6 of 7
4.12 Flagging
4.12.1 Flag persons and others providing temporary traffic control will wear Class 2 or 3 high visibility retro-reflective clothing in compliance with local legislation.
4.12.2 Drivers should be warned in advance with signs that there will be a flag person ahead.
4.12.3 Flag person should use STOP/SLOW signs or paddles. The STOP sign should be octagonal with a red background and white letters and border. The SLOW sign should be octagonal with an orange background and black letters and a border.
4.12.4 "Flag Person Ahead" signs will be posted in advance of each flag person's station. Such signs will be removed promptly when the flagging operation terminates.
4.13 Lighting
4.13.1 Flag person stations should be illuminated. Lighting for workers on foot and equipment operators is to be at least 5 foot (1.5 meter) candles or greater.
4.13.2 Where available lighting is not sufficient, flares or chemical lighting should be used.
4.13.3 Glare affecting workers and motorists should be controlled or eliminated.
4.14 Driving
4.14.1 Seatbelts and rollover protection will be used on equipment and vehicles as stated by the manufacturer.
4.14.2 When pulling off to the side of the road, AECOM personnel will park their vehicles at minimum of 20 feet (6 meters) or the width of two traffic lanes from moving traffic.
4.15 Night Operations and Work within Traffic Controls
4.15.1 Night work on roadways should not be done unless absolutely necessary and unless the work area is adequately lit.
4.15.2 Operations with night activities will have a written plan that addresses the safety issues of working at night. The plan will address, but is not limited to:
Reflectivity
o All equipment used in the work zone shall have ANSI/CSA approved reflective material placed to increase the visibility of the equipment.
o All reflective surfaces shall be cleaned as required so that the reflectivity of the material is not degraded. Any areas of reflective surface that is damaged or obscured will be replaced.
o Personnel working at night will have reflective tape on their hardhats and will wear retro-reflective vests and each limb that meet the legislative requirements.
o Additional measures such as white disposable coveralls, reflective bands, flashlights with red cones and personal battery-operated strobe lights may be used when practical.
Illumination
o Whenever feasible and practical, light plants will be used to illuminate the work area.
o On mobile operations, additional lighting on equipment may be used to illuminate the work area.
o All equipment shall have working lights and at a minimum, have working strobe or warning beacon lights.
o All flag persons will be placed in illuminated areas only.
Highway and Road Work (S3NA-306-PR1)Revision 1 November 1, 2014PRINTED COPIES ARE UNCONTROLLED. CONTROLLED COPY IS AVAILABLE ON COMPANY INTRANET. Page 7 of 7
o All lighting is to be checked after setup to confirm that it is not interfering with approaching traffic, other equipment in the work zone, and meets the legislative Occupational Health and Safety requirements.
Task Hazard Analysis and Communication
o Prior to the start of any night operation, a detailed task hazard analysis will be made addressing the possible hazards of night work. Refer to the S3NA-209-PR1 Project Hazard Assessment and Planning. The task hazard analysis will be reviewed with the crews and updated as needed. At the start of each shift, a Daily Safety Reminder will be used to reaffirm the provisions of the night work requirements as found in the task hazard analysis and this policy.
o The task hazard analysis should also provide for:
The selection of a competent person responsible for maintaining surveillance on the work area to alert other workers of vehicles encroaching on the work zone.
A method to signal workers when vehicles encroach on the work zone.
A system to account for workers at all times, which may include a buddy system.
Emergency communication or warning signals used by a worker such as a radio, signal horn, or whistle, which will be used to call for help.
4.16 Attenuator Vehicles
4.16.1 It is good construction practice to place an attenuator truck or pick-up truck (minimum) immediately ahead of workers in a work zone.
4.16.2 The vehicle of choice should be placed to provide the best protection for workers.
4.16.3 The tires should be placed so that when struck the vehicle will turn away from workers.
4.17 Closures within a Closure
4.17.1 On occasion, satellite operations may be performed under full freeway traffic closures. For this type of work, special precautions referred to as a "closure within a closure" is to be implemented in accordance with the following:
Posted speed limits within closures should be set at 15 miles (24 kilometers) per hour.
Signs are to be installed approximately 250 feet (76 meters) in advance of and behind the work zone to alert drivers who may approach from either direction of the upcoming work zone.
The work area is to be completely delineated with Type 1 barricades (candlesticks).
Any vehicle used for AECOM field work shall be equipped with a functioning four way flashers and rotating beacon placed on the roof of the vehicle.
5.0 Records
5.1 Traffic Protection Plans, Traffic Control Plans and completed Equipment Checklists will be maintained in project files.
6.0 Attachments
6.1 S3NA-306-FM1 Equipment Checklist
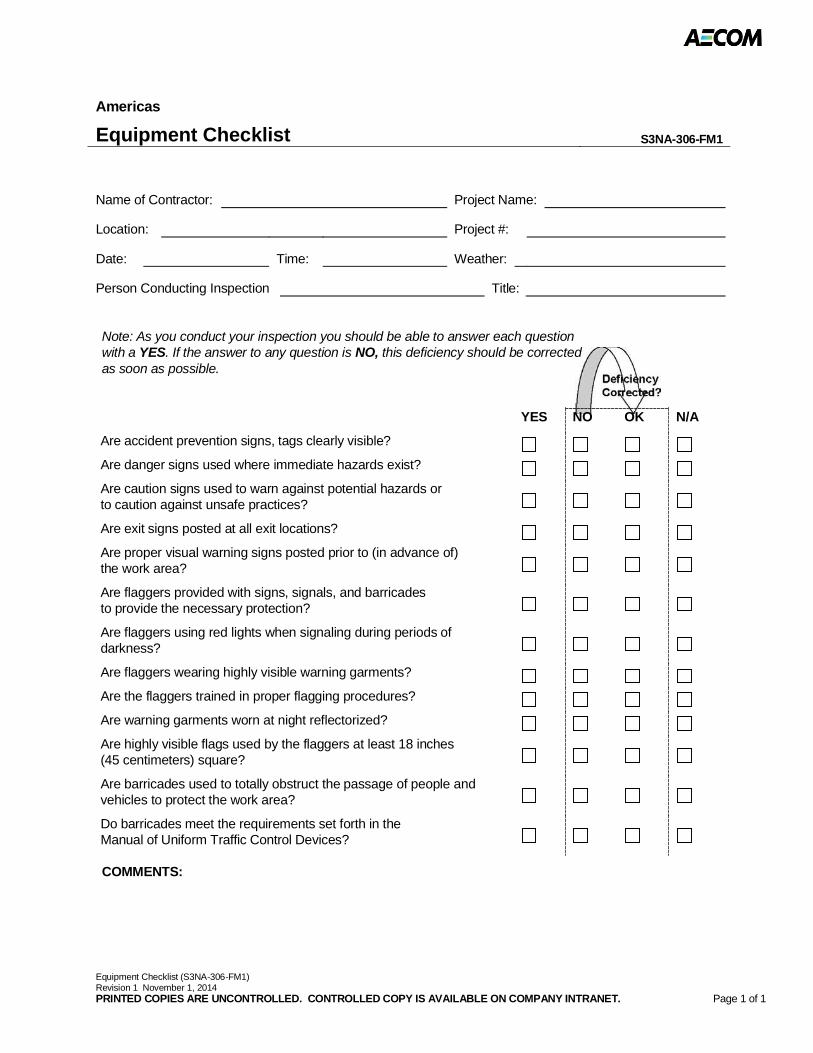
Equipment Checklist (S3NA-306-FM1)Revision 1 November 1, 2014PRINTED COPIES ARE UNCONTROLLED. CONTROLLED COPY IS AVAILABLE ON COMPANY INTRANET. Page 1 of 1
Americas
Equipment Checklist S3NA-306-FM1
Name of Contractor: Project Name:
Location: Project #:
Date: Time: Weather:
Person Conducting Inspection Title:
Note: As you conduct your inspection you should be able to answer each question with a YES. If the answer to any question is NO, this deficiency should be corrected as soon as possible.
YES NO OK N/A
Are accident prevention signs, tags clearly visible?
Are danger signs used where immediate hazards exist?
Are caution signs used to warn against potential hazards or to caution against unsafe practices?
Are exit signs posted at all exit locations?
Are proper visual warning signs posted prior to (in advance of)the work area?
Are flaggers provided with signs, signals, and barricades to provide the necessary protection?
Are flaggers using red lights when signaling during periods of darkness?
Are flaggers wearing highly visible warning garments?
Are the flaggers trained in proper flagging procedures?
Are warning garments worn at night reflectorized?
Are highly visible flags used by the flaggers at least 18 inches (45 centimeters) square?
Are barricades used to totally obstruct the passage of people and vehicles to protect the work area?
Do barricades meet the requirements set forth in the Manual of Uniform Traffic Control Devices?
COMMENTS:
Housekeeping, Worksite (S3NA-307-PR1) Revision 2 November 1, 2014 PRINTED COPIES ARE UNCONTROLLED. CONTROLLED COPY IS AVAILABLE ON COMPANY INTRANET. Page 1 of 3
Americas
Housekeeping, Worksite S3NA-307-PR1
1.0 Purpose and Scope
1.1 This procedure provides AECOM’s work practices as well as personal hygiene and work site sanitation standards for housekeeping.
1.2 Applies to all AECOM Americas-based staff and field worksites.
2.0 Terms and Definitions
2.1 None
3.0 References
3.1 S3NA-103-PR1 Housekeeping, Office
3.2 S3NA-208-PR1 Personal Protective Equipment Program
4.0 Procedure
4.1 Roles and Responsibilities
4.1.1 Supervisor (or Project Manager)
Responsible for the procedure’s implementation and the details of addressing housekeeping policy within the worksite.
4.1.2 SH&E Department
Monitor, assess, and report on project housekeeping when visiting worksites.
4.1.3 Employees
Responsible for reporting any areas of concern to the Supervisor for prompt resolution as well as for maintaining worksites that are free from debris, clutter, and slipping or tripping hazards.
4.2 Smoking, Eating, and Drinking
4.2.1 Eating and drinking will be permitted in designated areas at AECOM project sites and as specified on client sites.
4.2.2 Smoking will be permitted only in areas:
• designated in compliance with applicable local laws, regulations, legislation, and ordinances, by the Supervisior
• situated in locations that are not in the immediate vicinity of activities associated with work site activities
• Free of fire hazard
• That will not contaminate indoor areas and HVAC systems. Specifically, there shall be no smoking within 16 feet (5 meters ) around doorways, windows, air vents, and HVAC intakes and equipment.
Additionally, Supervisiors will designate each smoking area giving primary consideration to those employees who do not smoke.
4.2.3 Employees involved in the performance of certain activities will not be permitted to smoke, eat, drink, or use smokeless tobacco, except during breaks (e.g., HAZWOPER-controlled work areas).
Housekeeping, Worksite (S3NA-307-PR1) Revision 2 November 1, 2014 PRINTED COPIES ARE UNCONTROLLED. CONTROLLED COPY IS AVAILABLE ON COMPANY INTRANET. Page 2 of 3
4.2.4 Site employees will first wash hands and face after completing work activities and prior to eating or drinking.
4.3 Water Supply
Water supplies will be available for use on site and will comply with the following requirements:
• Potable Water: An adequate supply of drinking water will be available for site staff consumption. Potable water can be provided in the form of approved well or city water, bottled water, or drinking fountains. Where drinking fountains are not available, individual use cups will be provided as well as adequate disposal containers. Potable water containers will be properly identified in order to distinguish them from nonpotable water sources.
• Nonpotable Water: Nonpotable water will not be used for drinking purposes. Nonpotable water may not be used for hand washing or other personal hygiene activities but may be used for other types of cleaning activities. All containers/supplies of nonpotable water used will be properly identified and labeled as such.
4.4 Toilet Facilities
4.4.1 Toilet facilities will be available for site staff and visitors. Should subcontractor staff be located on-site for extended periods, it may become necessary to obtain temporary toilet facilities. Exceptions to this requirement will apply to mobile crews where work activities and locations permit transportation to nearby toilet facilities.
4.4.2 A minimum of one toilet will be provided for every 20 site staff, with separate toilets maintained for each sex, except where there are less than five total staff on site. For mobile crews where work activities and locations permit use of nearby toilet facilities (e.g., gas station, or rest stop), on-site facilities are not required.
4.5 Washing Facilities
4.5.1 Hand and Face: Site staff will wash hands and face after completing work activities and prior to breaks, lunch, or completion of workday.
4.5.2 Personal Cleaning Supplies: Cleaning supplies at AECOM project sites will consist of soap, water, and disposable paper towels or items of equal use/application (e.g., anti-bacterial gels, wipes, etc.).
4.6 Clothing and Personal Protective Equipment (PPE)
4.6.1 All PPE will be kept clean at all times and maintained in accordance with the manufacturer’s, AECOM’s. and applicable regulatory, legislative, or provincial requirements. Refer to the S3NA--208-PR1 Personal Protective Equipment Program.
4.6.2 General Work Areas - At all times work areas will be kept free of dirt and debris that may impact the safety of site staff and visitors. All trash receptacles will be emptied regularly.
4.6.3 Break Areas and Lunchrooms - Site staff will observe the following requirements when using break areas and lunchrooms at AECOM project sites:
4.6.4 All food and drink items will be properly stored when not in use.
4.6.5 Food items will not be stored in personal lockers for extended periods in order to prevent the potential for vermin infestation.
4.6.6 Perishable foods will be refrigerated whenever possible.
4.6.7 All waste food containers will be discarded in trash receptacles.
4.6.8 All tables, chairs, counters, sinks, and similar surfaces will be kept clean and free of dirt, waste food, and food containers at all times.
4.6.9 Refrigerators used to store food items will be maintained at 45 degrees Fahrenheit and emptied of all unclaimed food items weekly. Refrigerators used to store food will be labeled as such so that only food and drinks are stored within the refrigerator.
Housekeeping, Worksite (S3NA-307-PR1) Revision 2 November 1, 2014 PRINTED COPIES ARE UNCONTROLLED. CONTROLLED COPY IS AVAILABLE ON COMPANY INTRANET. Page 3 of 3
4.6.10 Routine cleaning of refrigerators will also be performed on a regular basis.
4.7 Vermin Control
4.7.1 Every enclosed workplace shall be constructed, equipped, and maintained, so far as reasonably practicable, to prevent the entrance or harborage of rodents, insects, and other vermin.
4.7.2 A continuing and effective extermination program shall be instituted where the presence of rodents, insects, or other vermin is detected.
4.8 General Housekeeping
4.8.1 All work areas shall be kept clean to the extent that the nature of the work allows.
4.8.2 Every work area shall be maintained, so far as practicable, in a dry condition. Where wet processes are used, drainage shall be maintained and platforms, mats, or other dry standing places shall be provided, where practicable, or appropriate waterproof footgear shall be provided.
4.8.3 Protruding objects or placement of materials on paths or foot traffic areas present a problem with regard to slips, trips, falls, and puncture wounds. Employees will use a reasonable amount of effort to keep slip, trip, and fall hazards to a minimum.
4.8.4 Excess debris and trash will be collected and stored in an appropriate container (e.g., plastic trash bags, garbage can, roll-off bin) prior to disposal.
4.8.5 At no time will debris or trash be intermingled with waste PPE or contaminated materials.
4.8.6 Material and equipment must be placed, stacked, or stored in a stable and secure manner. Stacked material or containers must be stabilized as necessary by interlocking, strapping, or other effective means of restraint to protect the safety of workers.
4.8.7 An area in which material may be dropped, dumped, or spilled must be guarded to prevent inadvertent entry by workers or protected by adequate covers and guarding.
4.8.8 Floors, platforms, ramps, stairs, and walkways available for use by workers must be maintained in a state of good repair and kept free of slipping and tripping hazards. If such areas are taken out of service, the employer must take reasonable means for preventing entry or use.
4.8.9 Site ice / snow conditions shall be assessed prior to the start of work each day and controls for removal of ice or slip risk mitigation shall be implemented as necessary.
4.8.10 Hazardous areas not intended to be accessible to workers must be secured by locked doors or equivalent means of security and must not be entered unless safe work procedures are developed and followed.
4.8.11 Worksite Offices and Trailers - Worksite offices and trailers will be maintained in accordance with S3NA-103-PR1 Housekeeping, Office.
5.0 Records
5.1 None
6.0 Attachments
6.1 None
Manual Lifting Field (S3NA-308-PR1) Revision 1 November 1, 2014 PRINTED COPIES ARE UNCONTROLLED. CONTROLLED COPY IS AVAILABLE ON COMPANY INTRANET. Page 1 of 2
Americas
Manual Lifting, Field S3NA-308-PR1
1.0 Purpose and Scope
1.1 This procedure provides the requirements for use when performing manual materials handling activities (e.g., lifting/handling of items or materials).
1.2 This procedure applies to all field staff for AECOM Americas-based operations.
2.0 Terms and Definitions
2.1 Manual Materials Handling – Moving or handling things by lifting, lowering, pushing, pulling, carrying, holding, or restraining.
2.2 Team Handling – Team handling occurs when more than one person is involved during the lift.
3.0 References
3.1 OSHA Technical Manual
3.2 National Safety Council
3.3 Canadian Centre for Occupational Health and Safety
4.0 Procedure
4.1 Roles and Responsibilities
4.1.1 Project Manager
Responsible for administering the procedure and providing resources and direction on proper lifting/handling techniques.
4.1.2 District SH&E Manager
Assist in identifying activities with a high potential for lifting/handling strains/injuries as well as the associated mitigation strategies and training on proper lifting/manual materials handling techniques.
4.1.3 Employees
Responsible for reviewing and following S3NA-308-WI1 Manual Lifting Safe Work Practices.
4.2 Mechanical Controls
4.2.1 Mechanical equipment or assistance such as dollies, carts, come-alongs, or rollers are preferable to be used whenever possible rather than the employee physically moving materials.
4.2.2 Mechanical assistance will be of proper size, have wheels sized for the terrain, and be designed to prevent pinching or undue stress on wrists.
4.2.3 Objects to be moved will be secured to prevent falling and properly balanced to prevent tipping.
4.3 Administrative Controls
4.4 When significant, sustained lifting work is required, it is desirable to rotate employees to spread the work load among several people and thereby avoid fatigue.
4.5 Rotation is not simply performing a different job but instead is performing a job that utilizes a completely different muscle group from the ones that have been overexerted.
4.6 All employees exposed to manual handling hazards shall be trained on safe lifting and handling of loads.

Manual Lifting Field (S3NA-308-PR1) Revision 1 November 1, 2014 PRINTED COPIES ARE UNCONTROLLED. CONTROLLED COPY IS AVAILABLE ON COMPANY INTRANET. Page 2 of 2
5.0 Records
5.1 None
6.0 Attachments
6.1 S3NA-308-WI1 Manual Lifting Safe Work Practices
Manual Lifting Safe Work Practices (S3NA-308-WI1) Revision 1 November 1, 2014 PRINTED COPIES ARE UNCONTROLLED. CONTROLLED COPY IS AVAILABLE ON COMPANY INTRANET. Page 1 of 6
Americas
Manual Lifting Safe Work Practices S3NA-308-WI1
1.0 General
1.1 Before Performing a Lift:
1.1.1 Check to see if mechanical aids such as hoists, lift trucks/dollies, or wheelbarrows are available.
1.1.2 Do not lift if you are not sure that you can handle the load safely.
1.1.3 Confirm that, based on your own physical capabilities and medical limitations, you can lift the load without overexertion. Get help with heavy or awkward loads.
1.1.4 Confirm that the load is “free” to move.
1.1.5 Check that the planned destination of the load is free of obstacles and debris.
1.1.6 Confirm that the path to the planned destination of the load is clear. Grease, oil, water, litter, and debris can cause slips and falls.
1.1.7 Particular handling and lifting techniques are needed for different kinds of loads or materials being handled (for example, compact loads, small bags, large sacks, drums, barrels, cylinders, and sheet materials like metal or glass). See Section 2.0 for additional guidance.
1.2 General Tips for Lifting
1.2.1 Prepare for the lift by warming up your muscles.
1.2.2 Make certain that your balance is good. Feet should be shoulder width apart, with one foot beside and the other foot behind the object that is to be lifted.
1.2.3 Bend the knees; do not stoop. Keep the back straight, but not vertical. There is a difference. Tucking in the chin straightens the back.
1.2.4 Grip the load with the palms of your hands and your fingers. The palm grip is much more secure. Tuck in the chin again to make certain your back is straight before starting to lift.
1.2.5 Use your body weight to start the load moving, then lift by pushing up with the legs. This makes full use of the strongest set of muscles.
1.2.6 Keep the arms and elbows close to the body while lifting.
1.2.7 Carry the load close to the body. Do not twist your body while carrying the load. To change direction, shift your foot position and turn your whole body.
1.2.8 Watch where you are going!
1.2.9 To lower the object, bend the knees. Do not stoop. To deposit the load on a bench or shelf, place it on the edge and push it into position. Confirm that your hands and feet are clear when placing the load.
1.3 Engineering Controls
1.3.1 Material handling tasks should be designed to minimize the weight, range of motion, and frequency of the activity.
1.3.2 Alter the task to eliminate the hazardous motion and/or change the position of the object in relation to the employee's body—such as adjusting the height of a pallet or shelf.
1.3.3 Work methods and stations should be designed to minimize the distance between the person and the object being handled.
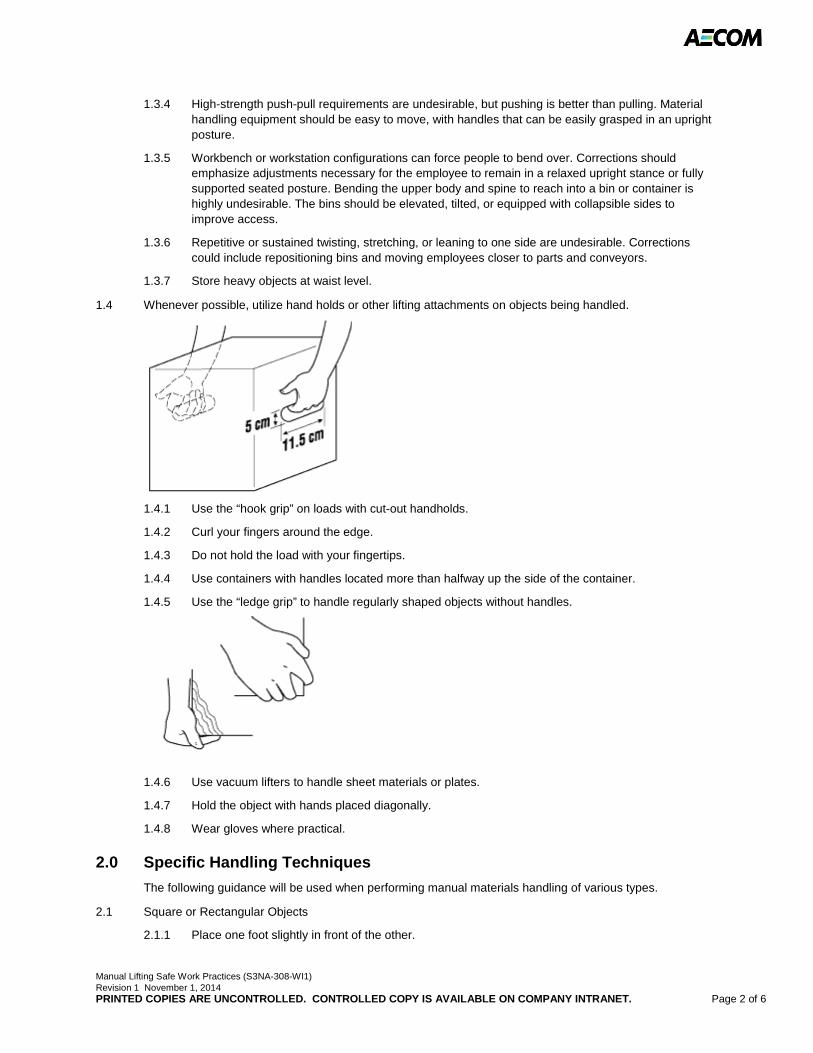
Manual Lifting Safe Work Practices (S3NA-308-WI1) Revision 1 November 1, 2014 PRINTED COPIES ARE UNCONTROLLED. CONTROLLED COPY IS AVAILABLE ON COMPANY INTRANET. Page 2 of 6
1.3.4 High-strength push-pull requirements are undesirable, but pushing is better than pulling. Material handling equipment should be easy to move, with handles that can be easily grasped in an upright posture.
1.3.5 Workbench or workstation configurations can force people to bend over. Corrections should emphasize adjustments necessary for the employee to remain in a relaxed upright stance or fully supported seated posture. Bending the upper body and spine to reach into a bin or container is highly undesirable. The bins should be elevated, tilted, or equipped with collapsible sides to improve access.
1.3.6 Repetitive or sustained twisting, stretching, or leaning to one side are undesirable. Corrections could include repositioning bins and moving employees closer to parts and conveyors.
1.3.7 Store heavy objects at waist level.
1.4 Whenever possible, utilize hand holds or other lifting attachments on objects being handled.
1.4.1 Use the “hook grip” on loads with cut-out handholds.
1.4.2 Curl your fingers around the edge.
1.4.3 Do not hold the load with your fingertips.
1.4.4 Use containers with handles located more than halfway up the side of the container.
1.4.5 Use the “ledge grip” to handle regularly shaped objects without handles.
1.4.6 Use vacuum lifters to handle sheet materials or plates.
1.4.7 Hold the object with hands placed diagonally.
1.4.8 Wear gloves where practical.
2.0 Specific Handling Techniques
The following guidance will be used when performing manual materials handling of various types.
2.1 Square or Rectangular Objects
2.1.1 Place one foot slightly in front of the other.
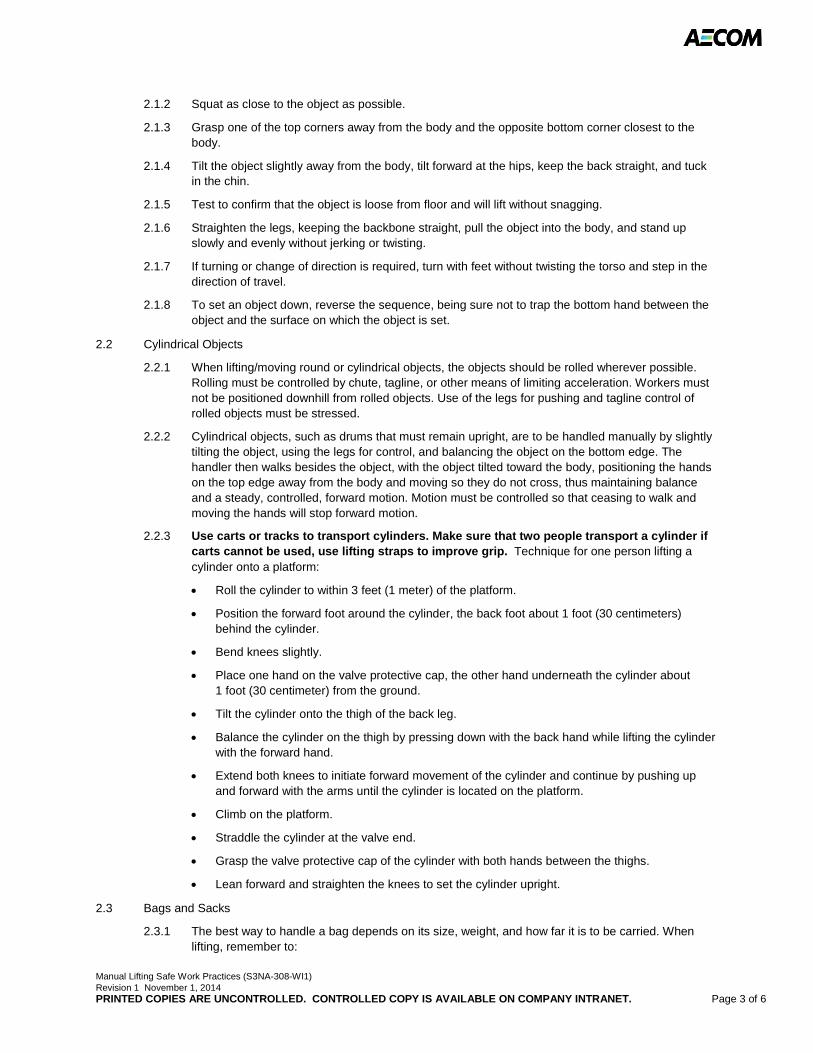
Manual Lifting Safe Work Practices (S3NA-308-WI1) Revision 1 November 1, 2014 PRINTED COPIES ARE UNCONTROLLED. CONTROLLED COPY IS AVAILABLE ON COMPANY INTRANET. Page 3 of 6
2.1.2 Squat as close to the object as possible.
2.1.3 Grasp one of the top corners away from the body and the opposite bottom corner closest to the body.
2.1.4 Tilt the object slightly away from the body, tilt forward at the hips, keep the back straight, and tuck in the chin.
2.1.5 Test to confirm that the object is loose from floor and will lift without snagging.
2.1.6 Straighten the legs, keeping the backbone straight, pull the object into the body, and stand up slowly and evenly without jerking or twisting.
2.1.7 If turning or change of direction is required, turn with feet without twisting the torso and step in the direction of travel.
2.1.8 To set an object down, reverse the sequence, being sure not to trap the bottom hand between the object and the surface on which the object is set.
2.2 Cylindrical Objects
2.2.1 When lifting/moving round or cylindrical objects, the objects should be rolled wherever possible. Rolling must be controlled by chute, tagline, or other means of limiting acceleration. Workers must not be positioned downhill from rolled objects. Use of the legs for pushing and tagline control of rolled objects must be stressed.
2.2.2 Cylindrical objects, such as drums that must remain upright, are to be handled manually by slightly tilting the object, using the legs for control, and balancing the object on the bottom edge. The handler then walks besides the object, with the object tilted toward the body, positioning the hands on the top edge away from the body and moving so they do not cross, thus maintaining balance and a steady, controlled, forward motion. Motion must be controlled so that ceasing to walk and moving the hands will stop forward motion.
2.2.3 Use carts or tracks to transport cylinders. Make sure that two people transport a cylinder if carts cannot be used, use lifting straps to improve grip. Technique for one person lifting a cylinder onto a platform:
• Roll the cylinder to within 3 feet (1 meter) of the platform.
• Position the forward foot around the cylinder, the back foot about 1 foot (30 centimeters) behind the cylinder.
• Bend knees slightly.
• Place one hand on the valve protective cap, the other hand underneath the cylinder about 1 foot (30 centimeter) from the ground.
• Tilt the cylinder onto the thigh of the back leg.
• Balance the cylinder on the thigh by pressing down with the back hand while lifting the cylinder with the forward hand.
• Extend both knees to initiate forward movement of the cylinder and continue by pushing up and forward with the arms until the cylinder is located on the platform.
• Climb on the platform.
• Straddle the cylinder at the valve end.
• Grasp the valve protective cap of the cylinder with both hands between the thighs.
• Lean forward and straighten the knees to set the cylinder upright.
2.3 Bags and Sacks
2.3.1 The best way to handle a bag depends on its size, weight, and how far it is to be carried. When lifting, remember to:
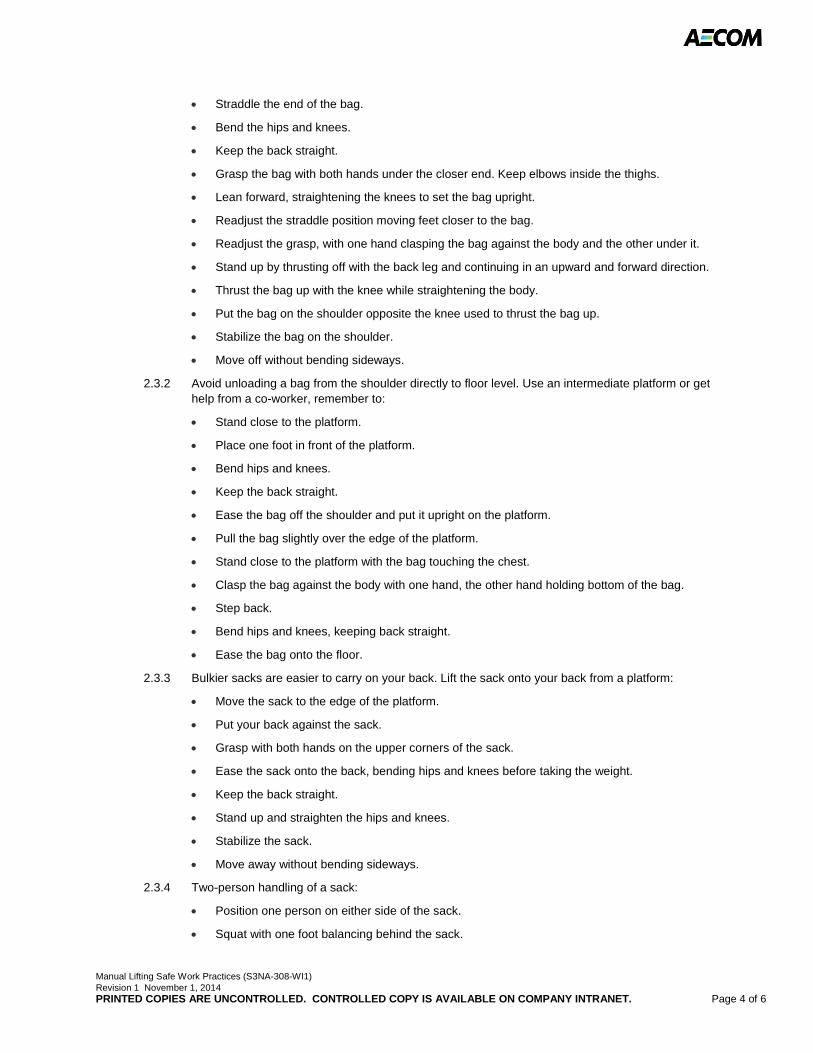
Manual Lifting Safe Work Practices (S3NA-308-WI1) Revision 1 November 1, 2014 PRINTED COPIES ARE UNCONTROLLED. CONTROLLED COPY IS AVAILABLE ON COMPANY INTRANET. Page 4 of 6
• Straddle the end of the bag.
• Bend the hips and knees.
• Keep the back straight.
• Grasp the bag with both hands under the closer end. Keep elbows inside the thighs.
• Lean forward, straightening the knees to set the bag upright.
• Readjust the straddle position moving feet closer to the bag.
• Readjust the grasp, with one hand clasping the bag against the body and the other under it.
• Stand up by thrusting off with the back leg and continuing in an upward and forward direction.
• Thrust the bag up with the knee while straightening the body.
• Put the bag on the shoulder opposite the knee used to thrust the bag up.
• Stabilize the bag on the shoulder.
• Move off without bending sideways.
2.3.2 Avoid unloading a bag from the shoulder directly to floor level. Use an intermediate platform or get help from a co-worker, remember to:
• Stand close to the platform.
• Place one foot in front of the platform.
• Bend hips and knees.
• Keep the back straight.
• Ease the bag off the shoulder and put it upright on the platform.
• Pull the bag slightly over the edge of the platform.
• Stand close to the platform with the bag touching the chest.
• Clasp the bag against the body with one hand, the other hand holding bottom of the bag.
• Step back.
• Bend hips and knees, keeping back straight.
• Ease the bag onto the floor.
2.3.3 Bulkier sacks are easier to carry on your back. Lift the sack onto your back from a platform:
• Move the sack to the edge of the platform.
• Put your back against the sack.
• Grasp with both hands on the upper corners of the sack.
• Ease the sack onto the back, bending hips and knees before taking the weight.
• Keep the back straight.
• Stand up and straighten the hips and knees.
• Stabilize the sack.
• Move away without bending sideways.
2.3.4 Two-person handling of a sack:
• Position one person on either side of the sack.
• Squat with one foot balancing behind the sack.

Manual Lifting Safe Work Practices (S3NA-308-WI1) Revision 1 November 1, 2014 PRINTED COPIES ARE UNCONTROLLED. CONTROLLED COPY IS AVAILABLE ON COMPANY INTRANET. Page 5 of 6
• Keep back straight.
• Grasp with the outer hand on the upper corner, the other hand holding the bottom of the sack.
• On one person's command:
o Stand up and straighten the hips and knees.
o Move toward the stack.
o Put the sack on the stack.
2.4 Sheet Materials
2.4.1 When lifting sheet materials:
• Stand close to the pile of sheets in a walking stance.
• Grasp sheet firmly at the midpoint of its long side with the closer hand.
• Pull sheet up and toward the body.
• Change grip using your other hand and put your fingers on top of the sheet.
• Pull sheet up to the vertical position and to the side until one half is off the pile.
• Grasp the lower edge of the sheet with the free hand and support the hand by placing it on your knee.
• Stand up without bending or twisting body.
• Whenever moving sheet materials, be cognizant of wind conditions.
2.4.2 To carry sheets:
• Use drywall carts to carry sheet materials.
• Get help from another person where carts are not available.
• Apply carrying handles for manual carrying.
• Always use gloves and carrying handle for glass and other materials with sharp edges.
2.4.3 Use team lifting and carrying where other solutions are inappropriate.
• Remember that the combined strength of the team is less than the sum of individual strength.
• Select team members of similar height and strength.
• Assign a leader to the team.
• Determine a set of commands to be used such as "lift," "walk," "stop," and "down." Make sure that everyone knows what to do when they hear the command.
• Follow the commands given by the team leader.
• Practice team lifting and carrying together before attempting the task.
2.5 Material Storage
2.5.1 When storing materials on site:
• Store materials at a convenient height.
• Leave the lowest shelf unused if necessary.
• Use vertically mobile shelves to avoid bending and overhead reaching.
• Use bin racks for storing small items.
• Store heavy and frequently used materials at waist height.
• Do not store materials at floor level.

Manual Lifting Safe Work Practices (S3NA-308-WI1) Revision 1 November 1, 2014 PRINTED COPIES ARE UNCONTROLLED. CONTROLLED COPY IS AVAILABLE ON COMPANY INTRANET. Page 6 of 6
• Use hand trucks with elevating devices in storage and loading areas.
• Use trucks with a tilting device to avoid bending.
• Use elevating platforms to avoid overhead reaching.
Mobile or Heavy Equipment (S3NA-309-PR1)Revision 2 November 1, 2014PRINTED COPIES ARE UNCONTROLLED. CONTROLLED COPY IS AVAILABLE ON COMPANY INTRANET. Page 1 of 7
Americas
Mobile or Heavy Equipment S3NA-309-PR1
1.0 Purpose and Scope
1.1 Outline the safe working requirements for working with and near mobile or heavy equipment and heavy equipment operation.
1.2 This procedure applies to all AECOM Americas-based employees and operations.
2.0 Terms and Definitions
2.1 Heavy equipment – All excavating equipment include scrapers, loaders, crawler or wheel tractors, excavators, backhoes, bulldozers, off-highway trucks, graders, agricultural and industrial tractors, and similar equipment.
2.2 Operator – Any person who operates the controls while the heavy equipment is in motion or the engine is running.
2.3 Ground personnel/workers – Personnel performing work on the ground around heavy equipment (note: operators are considered ground personnel when outside of the equipment cab).
3.0 References
3.1 S3NA-202-PR1 Competent Person Designation
3.2 S3NA-205-PR1 Equipment Inspections & Maintenance
3.3 S3NA-406-PR1 Electrical Lines, Overhead
4.0 Procedure
4.1 Roles and Responsibilities
4.1.1 Project Managers/Site Supervisor
Responsible for ensuring all equipment is in good working order and all equipment operators are qualified on the piece of machinery they are assigned. Ensure that subcontractor machinery and mechanized equipment is certified in accordance with the requirements of S3NA-309-FM1 Certification of Machinery and Mechanized Equipment.
4.1.2 Employees
Confirm that all rented equipment arrives in proper working order with the manufacturer’s operating manual before acceptance from the supplier.
4.1.3 Operators (of mobile equipment)
Operate the equipment safely, maintain full control of the equipment, and comply with the laws governing the operation of the equipment. Immediately report defects and conditions affecting the safe operation of the equipment to the site Supervisor.
4.2 Communication
4.2.1 Communication between site supervisors/managers, heavy equipment operators, and other site personnel is a key method of preventing serious injury or death during heavy equipment operations.
4.2.2 The following points outline the communication requirements during heavy equipment operations:
Site Supervisors/Project Managers shall confirm that all operators are notified/informed of when, where, and how many ground personnel will be working on site.
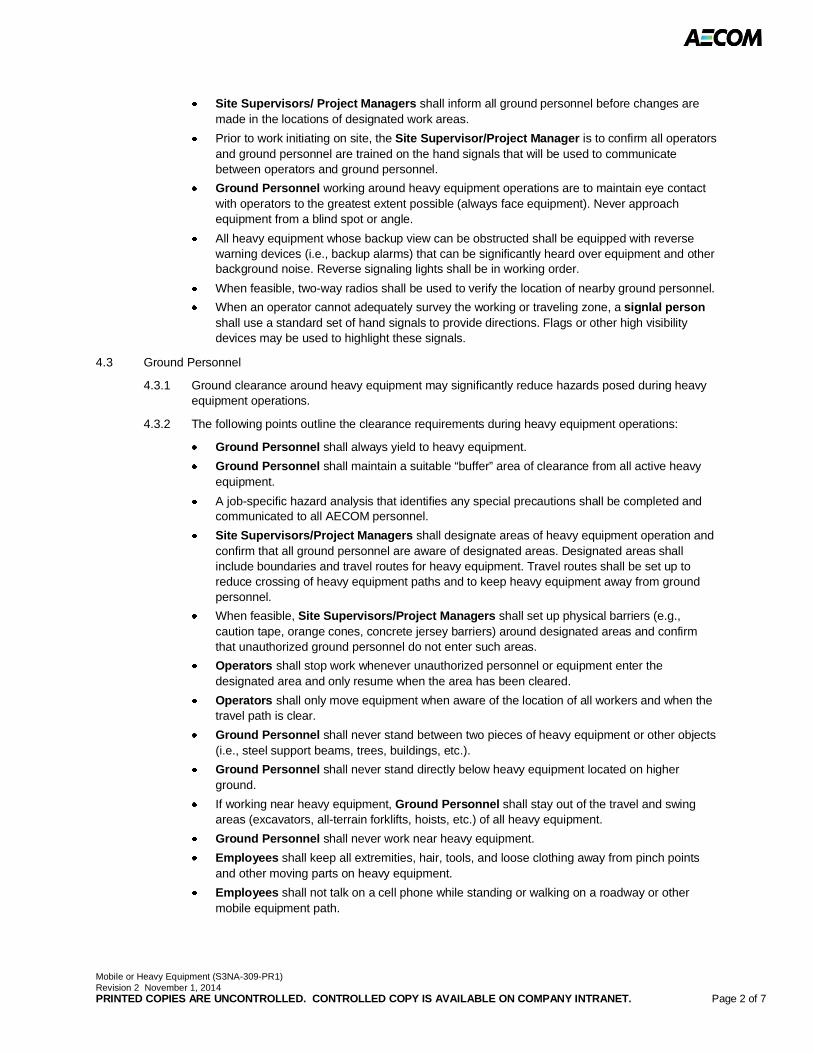
Mobile or Heavy Equipment (S3NA-309-PR1)Revision 2 November 1, 2014PRINTED COPIES ARE UNCONTROLLED. CONTROLLED COPY IS AVAILABLE ON COMPANY INTRANET. Page 2 of 7
Site Supervisors/ Project Managers shall inform all ground personnel before changes are made in the locations of designated work areas.
Prior to work initiating on site, the Site Supervisor/Project Manager is to confirm all operators and ground personnel are trained on the hand signals that will be used to communicate between operators and ground personnel.
Ground Personnel working around heavy equipment operations are to maintain eye contact with operators to the greatest extent possible (always face equipment). Never approach equipment from a blind spot or angle.
All heavy equipment whose backup view can be obstructed shall be equipped with reverse warning devices (i.e., backup alarms) that can be significantly heard over equipment and other background noise. Reverse signaling lights shall be in working order.
When feasible, two-way radios shall be used to verify the location of nearby ground personnel.
When an operator cannot adequately survey the working or traveling zone, a signlal personshall use a standard set of hand signals to provide directions. Flags or other high visibility devices may be used to highlight these signals.
4.3 Ground Personnel
4.3.1 Ground clearance around heavy equipment may significantly reduce hazards posed during heavy equipment operations.
4.3.2 The following points outline the clearance requirements during heavy equipment operations:
Ground Personnel shall always yield to heavy equipment.
Ground Personnel shall maintain a suitable “buffer” area of clearance from all active heavy equipment.
A job-specific hazard analysis that identifies any special precautions shall be completed and communicated to all AECOM personnel.
Site Supervisors/Project Managers shall designate areas of heavy equipment operation and confirm that all ground personnel are aware of designated areas. Designated areas shall include boundaries and travel routes for heavy equipment. Travel routes shall be set up to reduce crossing of heavy equipment paths and to keep heavy equipment away from ground personnel.
When feasible, Site Supervisors/Project Managers shall set up physical barriers (e.g., caution tape, orange cones, concrete jersey barriers) around designated areas and confirmthat unauthorized ground personnel do not enter such areas.
Operators shall stop work whenever unauthorized personnel or equipment enter the designated area and only resume when the area has been cleared.
Operators shall only move equipment when aware of the location of all workers and when the travel path is clear.
Ground Personnel shall never stand between two pieces of heavy equipment or other objects (i.e., steel support beams, trees, buildings, etc.).
Ground Personnel shall never stand directly below heavy equipment located on higher ground.
If working near heavy equipment, Ground Personnel shall stay out of the travel and swing areas (excavators, all-terrain forklifts, hoists, etc.) of all heavy equipment.
Ground Personnel shall never work near heavy equipment.
Employees shall keep all extremities, hair, tools, and loose clothing away from pinch points and other moving parts on heavy equipment.
Employees shall not talk on a cell phone while standing or walking on a roadway or other mobile equipment path.

Mobile or Heavy Equipment (S3NA-309-PR1)Revision 2 November 1, 2014PRINTED COPIES ARE UNCONTROLLED. CONTROLLED COPY IS AVAILABLE ON COMPANY INTRANET. Page 3 of 7
4.3.3 At a minimum, all Ground Personnel and Operators outside of heavy equipment shall wear the following:
High visibility, reflective (Class 2) safety vest that is visible from all angles and made of fluorescent material and orange, white, or yellow reflective material (confirm that vest is not faded or covered with outer garments, dirt, etc.)
Retro-reflective striping for arms and legs (night work)
American National Standards Institute/Canadian Standards Association- (ANSI/CSA-)approved hard hat
ANSI/CSA-approved safety glasses with side shields
ANSI/CSA-approved work boots (unless project requirements are more stringent)
ANSI/CSA-approved hearing protection as needed
Appropriate work clothes (i.e., full-length jeans/trousers and a sleeved shirt; no tank, crew tops or other loose clothing permitted).
4.4 Prior to work commencing
4.4.1 All mobile equipment will be inspected pre-shift and then regularly as required with the details of the inspection recorded in a log book.
4.4.2 The Operator will report defects and conditions affecting the safe operation of the equipment to the Site Supervisor or employer. Any repair or adjustment necessary for the safe operation of the equipment will be made before the equipment is used.
4.4.3 Exposed moving parts on mobile equipment which are a hazard to the operator or to other workers will be guarded and if a part will be exposed for proper function it will be guarded as much as is practicable consistent with the intended function of the component.
4.4.4 An approved 4A40BC fire extinguisher shall be present on all mobile equipment.
4.4.5 Inform the operators of the equipment that AECOM employees are in the area and inquire if there are any restricted areas or specific rules or requirements. In some industrial facilities, mobile equipment has the ‘right of way’.
4.4.6 Where the Operator will not have a full view of the path of travel, a signal person will be used on the ground that has a full view of the load, the operator, and the path.
4.4.7 Mobile equipment in which the operator cannot directly or by mirror or other effective device see immediately behind the machine will have an automatic audible warning device which activates whenever the equipment controls are positioned to move the equipment in reverse, and if practicable, is audible above the ambient noise level.
4.5 Operation
4.5.1 The Operator of mobile equipment is the only worker permitted to ride the equipment unless the equipment is a worker transportation vehicle.
4.5.2 A person will not operate mobile equipment unless the person has received adequate instruction and training in the safe use of the equipment, and has demonstrated to a qualified supervisor or instructor competency in operating the equipment.
4.5.3 The Operator of mobile equipment will operate the equipment safely, maintain full control of the equipment, and comply with the laws governing the operation of the equipment.
4.5.4 A site Supervisor will not knowingly operate or permit a worker to operate mobile equipment which is, or could create, an undue hazard to the health or safety of any person.
4.5.5 The Operator of mobile equipment will not leave the controls unattended unless the equipment has been secured against inadvertent movement such as by setting the parking brake, placing the transmission in the manufacturer's specified park position, and by chocking wheels where necessary.
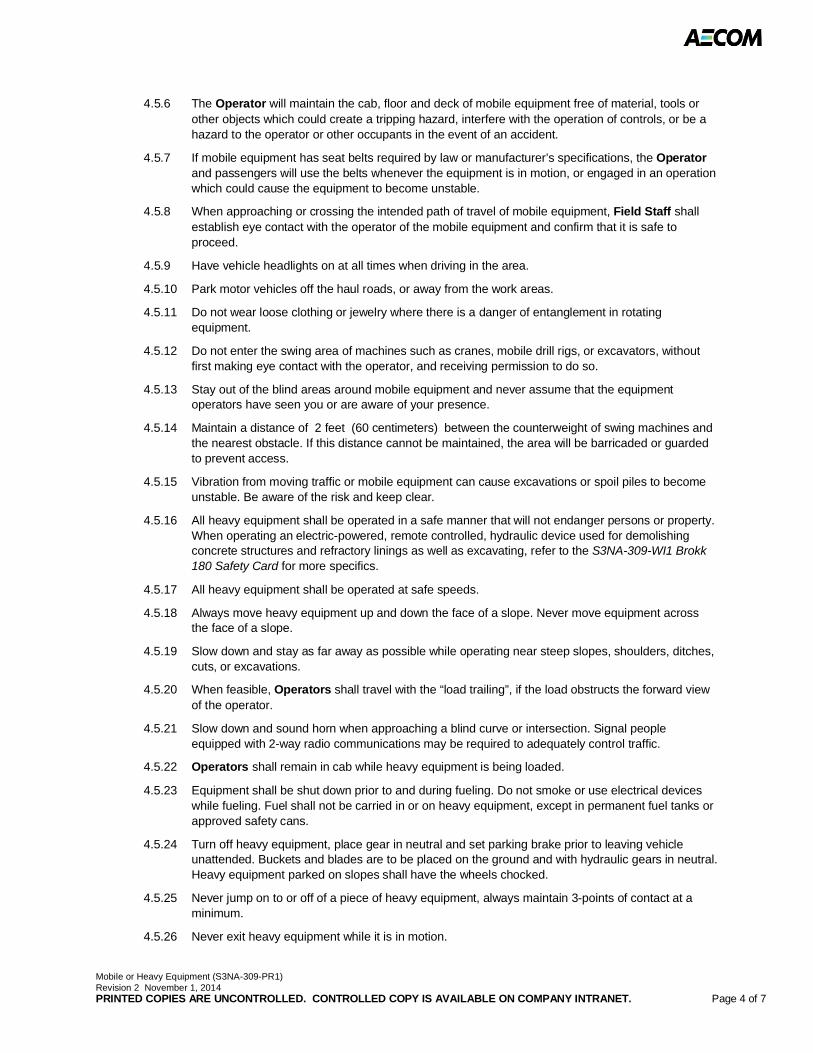
Mobile or Heavy Equipment (S3NA-309-PR1)Revision 2 November 1, 2014PRINTED COPIES ARE UNCONTROLLED. CONTROLLED COPY IS AVAILABLE ON COMPANY INTRANET. Page 4 of 7
4.5.6 The Operator will maintain the cab, floor and deck of mobile equipment free of material, tools or other objects which could create a tripping hazard, interfere with the operation of controls, or be a hazard to the operator or other occupants in the event of an accident.
4.5.7 If mobile equipment has seat belts required by law or manufacturer’s specifications, the Operatorand passengers will use the belts whenever the equipment is in motion, or engaged in an operation which could cause the equipment to become unstable.
4.5.8 When approaching or crossing the intended path of travel of mobile equipment, Field Staff shall establish eye contact with the operator of the mobile equipment and confirm that it is safe to proceed.
4.5.9 Have vehicle headlights on at all times when driving in the area.
4.5.10 Park motor vehicles off the haul roads, or away from the work areas.
4.5.11 Do not wear loose clothing or jewelry where there is a danger of entanglement in rotating equipment.
4.5.12 Do not enter the swing area of machines such as cranes, mobile drill rigs, or excavators, without first making eye contact with the operator, and receiving permission to do so.
4.5.13 Stay out of the blind areas around mobile equipment and never assume that the equipment operators have seen you or are aware of your presence.
4.5.14 Maintain a distance of 2 feet (60 centimeters) between the counterweight of swing machines and the nearest obstacle. If this distance cannot be maintained, the area will be barricaded or guarded to prevent access.
4.5.15 Vibration from moving traffic or mobile equipment can cause excavations or spoil piles to become unstable. Be aware of the risk and keep clear.
4.5.16 All heavy equipment shall be operated in a safe manner that will not endanger persons or property.When operating an electric-powered, remote controlled, hydraulic device used for demolishing concrete structures and refractory linings as well as excavating, refer to the S3NA-309-WI1 Brokk 180 Safety Card for more specifics.
4.5.17 All heavy equipment shall be operated at safe speeds.
4.5.18 Always move heavy equipment up and down the face of a slope. Never move equipment across the face of a slope.
4.5.19 Slow down and stay as far away as possible while operating near steep slopes, shoulders, ditches, cuts, or excavations.
4.5.20 When feasible, Operators shall travel with the “load trailing”, if the load obstructs the forward viewof the operator.
4.5.21 Slow down and sound horn when approaching a blind curve or intersection. Signal peopleequipped with 2-way radio communications may be required to adequately control traffic.
4.5.22 Operators shall remain in cab while heavy equipment is being loaded.
4.5.23 Equipment shall be shut down prior to and during fueling. Do not smoke or use electrical devices while fueling. Fuel shall not be carried in or on heavy equipment, except in permanent fuel tanks or approved safety cans.
4.5.24 Turn off heavy equipment, place gear in neutral and set parking brake prior to leaving vehicle unattended. Buckets and blades are to be placed on the ground and with hydraulic gears in neutral. Heavy equipment parked on slopes shall have the wheels chocked.
4.5.25 Never jump on to or off of a piece of heavy equipment, always maintain 3-points of contact at a minimum.
4.5.26 Never exit heavy equipment while it is in motion.
Mobile or Heavy Equipment (S3NA-309-PR1)Revision 2 November 1, 2014PRINTED COPIES ARE UNCONTROLLED. CONTROLLED COPY IS AVAILABLE ON COMPANY INTRANET. Page 5 of 7
4.5.27 Passengers shall only ride in heavy equipment designed for occupancy of passengers.
4.5.28 Never ride on the outside of a piece of heavy equipment (e.g., tailgates, buckets, steps, etc.).
4.5.29 Site vehicles will be parked in a designated parking location away from heavy equipment.
4.5.30 Operators shall never push/pull “stuck” or “broken-down” equipment unless a spotter determines that the area is cleared of all personnel around and underneath the equipment.
4.5.31 If designated for work in contaminated areas/zones, equipment shall be kept in the exclusion zone until work or the shift has been completed. Equipment will be decontaminated within designated decontamination areas.
4.5.32 Equipment left unattended at night adjacent to traveled roadways shall have appropriate lights or reflectors, or barricades equipped with appropriate lights or reflectors, to identify the location of that equipment, and shall not be closer than 6 feet (or the regulatory requirement for the work location) to the active roadway.
4.5.33 Pneumatic-tired earthmoving haulage equipment, with a maximum speed exceeding 15 miles per hour, shall be equipped with fenders on all wheels.
4.5.34 Lift trucks shall have the rated capacity clearly posted on the vehicle, and the ratings are not to be exceeded.
4.5.35 Steering or spinner knobs shall not be attached to steering wheels.
4.5.36 High-lift rider industrial trucks shall be equipped with overhead guards.
4.5.37 When ascending or descending grades in excess of 5 percent, loaded trucks shall be driven with the load upgrade.
4.5.38 All belts, gears, shafts, pulleys, sprockets, spindles, drums, flywheels, chains, or other reciprocating, rotating or moving parts of equipment shall be guarded when exposed to contact by persons or when they otherwise create a hazard.
4.5.39 All hot surfaces of equipment, including exhaust pipes or other lines, shall be guarded or insulated to prevent injury and fire.
4.5.40 All equipment having a charging skip shall be provided with guards on both sides and open end of the skip area to prevent persons from walking under the skip while it is elevated.
4.5.41 Platforms, foot walks, steps, handholds, guardrails, and toeboards shall be designed, constructed, and installed on machinery and equipment to provide safe footing and access ways.
4.5.42 Substantial overhead protection shall be provided for the operators of fork lifts and similar equipment.
4.6 Utilities
4.6.1 When contacted by heavy equipment, aboveground and underground utilities may cause severe injuries or death as a result of electrocution, explosion, etc. Refer to the S3NA-406-PR1 Electrical Lines, Overhead procedure for more specifics.
4.6.2 The following outline the requirements while performing heavy equipment operations that may lead to contact with aboveground or underground utilities:
Always be aware of surrounding utilities.
Confirm all equipment (i.e., dump trailers, loaders, excavators, etc.) is lowered prior to moving underneath of aboveground utilities.
Confirm utilities are cleared and identified prior to beginning any earthmoving operation. Contact the local utility service providers for clearance prior to performing work. Confirmdocumentation of the contact is made; date, number; contact name, organization, etc.

Mobile or Heavy Equipment (S3NA-309-PR1)Revision 2 November 1, 2014PRINTED COPIES ARE UNCONTROLLED. CONTROLLED COPY IS AVAILABLE ON COMPANY INTRANET. Page 6 of 7
4.7 Training
4.7.1 The Operator or other qualified supervisor will provide all on-site personnel with an orientation to the mobile equipment and its associated hazards and controls.
4.7.2 Only designated, qualified personnel shall operate heavy equipment.
4.7.3 Operators shall have all appropriate local, State, or Federal licenses or training to operate a designated piece of heavy equipment.
4.7.4 Operators shall be evaluated through documented experience and routine monitoring of activities unless the equipment is operated by an AECOM operator in which case a practical evaluation is needed. Operators shall be knowledgeable and competent in the operation of a designated piece of heavy equipment.
4.8 Inspection and Maintenance
4.8.1 Maintenance records for any service, repair or modification which affects the safe performance of the equipment will be maintained and be reasonably available to the operator and maintenance personnel during work hours. Refer to the S3NA-205-PR1 Equipment Inspections & Maintenanceprogram.
4.8.2 Maintenance records will be maintained on the site or project for mobile equipment.
4.8.3 Servicing, maintenance and repair of mobile equipment will not be done when the equipment is operating, unless continued operation is essential to the process and a safe means is provided.
4.8.4 All heavy equipment shall have a documented inspection and if necessary, repaired prior to use. Operators shall not operate heavy equipment that has not been cleared for use. All machinery and mechanized equipment will be certified to be in safe operating condition (refer to S3NA-309-FM1 Certification of Machinery and Mechanized Equipment) by a competent person (refer to S3NA-202-PR1 Competent Person Designation) seven days prior to on-site operation, and is valid for one year.
4.8.5 All heavy equipment shall be inspected at a minimum to the manufacturer’s recommendations prior to each work shift. All defects shall be reported to the Supervisor/Project Manager immediately. Inspection records shall be maintained at the site. If a manufacturer’s or company-specific inspection checklist is not provided, use the Heavy Equipment Pre-Operation Inspection Checklist (S3NA-309-FM2 Heavy Machinery Pre-Operation Checklist).
4.8.6 Defective heavy equipment shall be immediately taken out of service until repaired.
4.9 Fueling and batteries
4.9.1 A well-ventilated area shall be used for refueling.
4.9.2 Only the type and quality of fuel recommended by the engine manufacturer shall be used.
4.9.3 Fuel tanks shall not be filled while the engine is running. All electrical switches shall be turned off.
4.9.4 No one shall spill fuel on hot surfaces. Any spillage should be cleaned before starting an engine.
4.9.5 Spilled fuel shall be cleaned with cotton rags or cloths; do not use wool or metallic cloth.
4.9.6 Open flames, lighted smoking materials, or sparking equipment shall remain well away from the fueling area.
4.9.7 Heaters in carrier cabs shall be turned off when refueling the carrier or the drill rig.
4.9.8 Portable fuel containers shall not be filled completely to allow expansion of the fuel during temperature changes.
4.9.9 The fuel nozzle shall be kept in contact with the tank being filled to prevent static sparks from igniting the fuel.
4.9.10 Portable fuel containers shall not travel in the vehicle or carrier cab with personnel.
Mobile or Heavy Equipment (S3NA-309-PR1)Revision 2 November 1, 2014PRINTED COPIES ARE UNCONTROLLED. CONTROLLED COPY IS AVAILABLE ON COMPANY INTRANET. Page 7 of 7
4.9.11 Fuel containers and transfer hoses shall be kept in contact with a metal surface during travel to prevent buildup of a static charge.
4.9.12 Batteries shall be serviced in a ventilated area while wearing appropriate Personal Protective Equipment.
4.9.13 When a battery is removed from a vehicle or service unit, the battery shall be disconnected ground post first.
4.9.14 When installing a battery, the battery shall be connected ground post last.
4.9.15 When charging a battery, cell caps shall be loosened prior to charging to permit gas to escape.
4.9.16 When charging a battery, the power source shall be turned off to the battery before either connecting or disconnecting charger loads to the battery posts.
4.9.17 Spilled battery acid shall be immediately flushed off the skin with a continuous supply of water.
4.9.18 Should battery acid get into the eyes, the eyes shall be flushed immediately with copious amounts of water and medical attention shall be sought immediately.
4.9.19 To avoid battery explosions, the cells shall be filled with electrolytes. A flashlight (not an open flame) shall be used to check water electrolyte levels. Avoid creating sparks around batteries by shorting across a battery terminal. Lighted smoking materials and flames shall be kept at least 25 feet (7.6 meters) away from battery-charging stations.
5.0 Records
5.1 Inspection records shall be maintained with the equipment.
6.0 Attachments
6.1 S3NA-309-WI1 Brokk180 Safety Card
6.2 S3NA-309-FM1 Certification of Machinery and Mechanized Equipment
6.3 S3NA-309-FM2 Heavy Machinery Pre-Operation Checklist
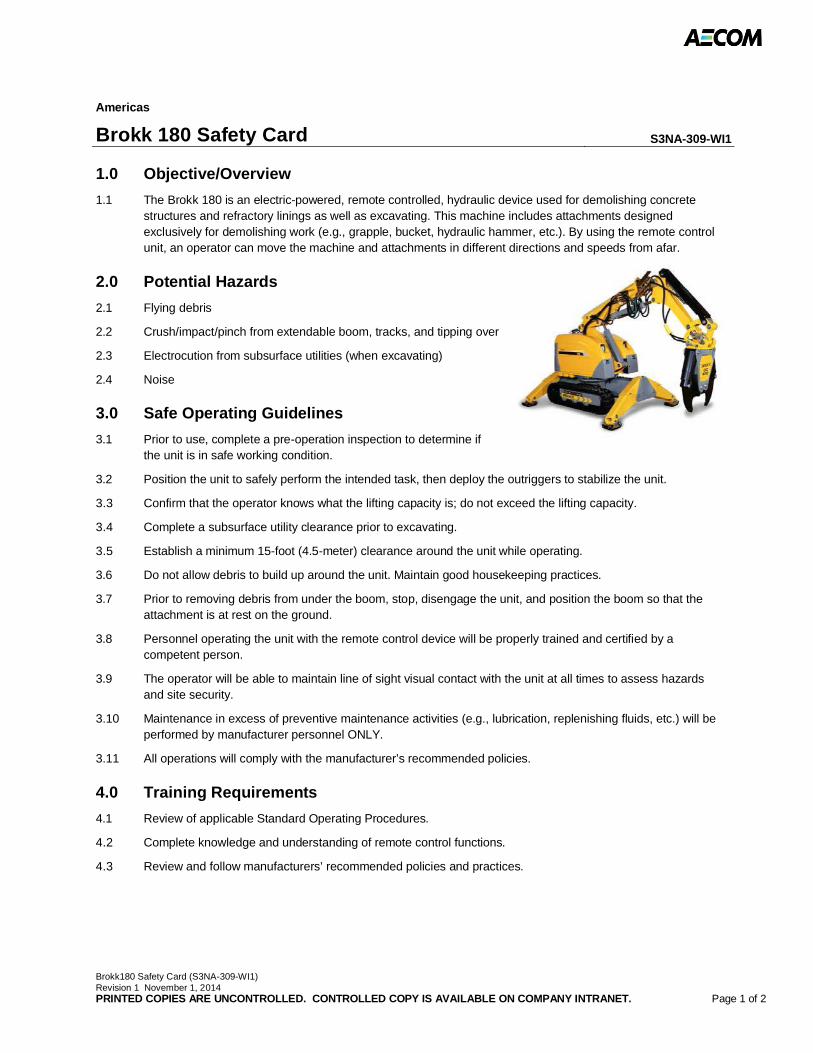
Brokk180 Safety Card (S3NA-309-WI1)Revision 1 November 1, 2014PRINTED COPIES ARE UNCONTROLLED. CONTROLLED COPY IS AVAILABLE ON COMPANY INTRANET. Page 1 of 2
Americas
Brokk 180 Safety Card S3NA-309-WI1
1.0 Objective/Overview
1.1 The Brokk 180 is an electric-powered, remote controlled, hydraulic device used for demolishing concrete structures and refractory linings as well as excavating. This machine includes attachments designed exclusively for demolishing work (e.g., grapple, bucket, hydraulic hammer, etc.). By using the remote controlunit, an operator can move the machine and attachments in different directions and speeds from afar.
2.0 Potential Hazards
2.1 Flying debris
2.2 Crush/impact/pinch from extendable boom, tracks, and tipping over
2.3 Electrocution from subsurface utilities (when excavating)
2.4 Noise
3.0 Safe Operating Guidelines
3.1 Prior to use, complete a pre-operation inspection to determine if the unit is in safe working condition.
3.2 Position the unit to safely perform the intended task, then deploy the outriggers to stabilize the unit.
3.3 Confirm that the operator knows what the lifting capacity is; do not exceed the lifting capacity.
3.4 Complete a subsurface utility clearance prior to excavating.
3.5 Establish a minimum 15-foot (4.5-meter) clearance around the unit while operating.
3.6 Do not allow debris to build up around the unit. Maintain good housekeeping practices.
3.7 Prior to removing debris from under the boom, stop, disengage the unit, and position the boom so that the attachment is at rest on the ground.
3.8 Personnel operating the unit with the remote control device will be properly trained and certified by a competent person.
3.9 The operator will be able to maintain line of sight visual contact with the unit at all times to assess hazards and site security.
3.10 Maintenance in excess of preventive maintenance activities (e.g., lubrication, replenishing fluids, etc.) will be performed by manufacturer personnel ONLY.
3.11 All operations will comply with the manufacturer’s recommended policies.
4.0 Training Requirements
4.1 Review of applicable Standard Operating Procedures.
4.2 Complete knowledge and understanding of remote control functions.
4.3 Review and follow manufacturers’ recommended policies and practices.
Brokk180 Safety Card (S3NA-309-WI1)Revision 1 November 1, 2014PRINTED COPIES ARE UNCONTROLLED. CONTROLLED COPY IS AVAILABLE ON COMPANY INTRANET. Page 2 of 2
5.0 Personal Protective Equipment (Level D ensemble)
5.1 Class II (minimum) American National Standards Institute/Canadian Safety Association Safety Vest
5.2 Hearing protection (ear plugs and/or ear muffs)
5.3 Leather gloves
6.0 Other Safety Tips
6.1 Never stand under a raised boom.
6.2 Pay close attention to power cords for potential tripping hazard and equipment entanglement.
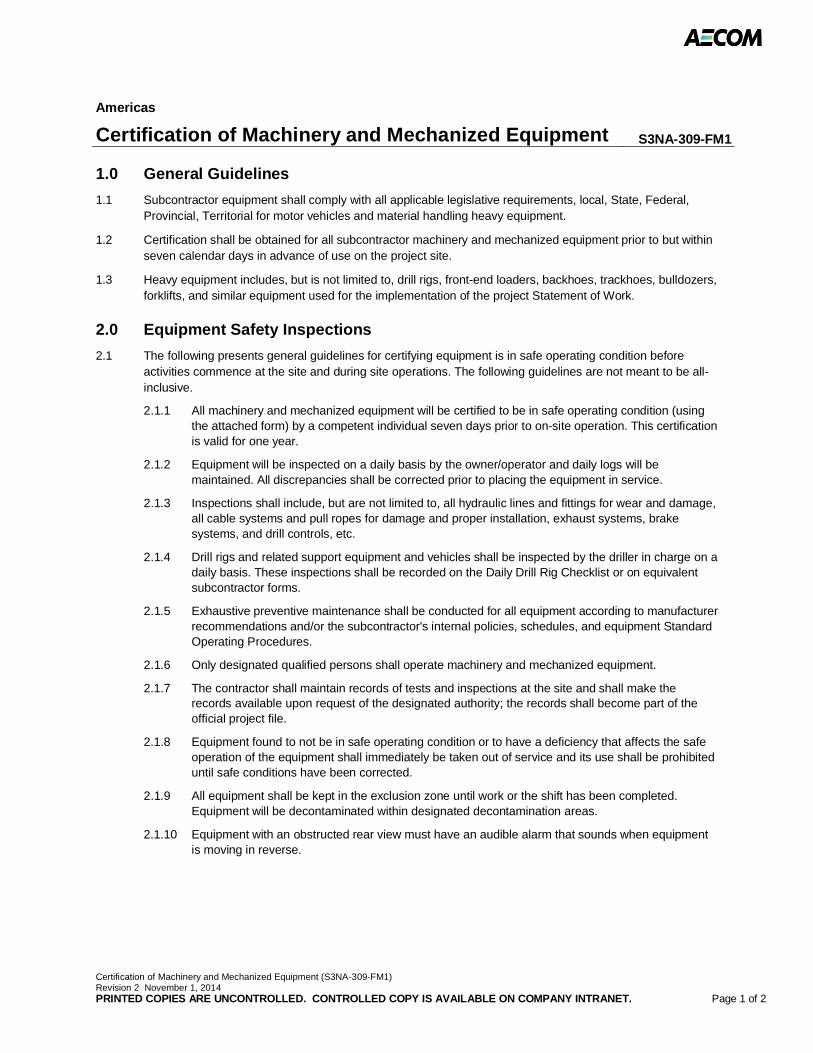
Certification of Machinery and Mechanized Equipment (S3NA-309-FM1)Revision 2 November 1, 2014PRINTED COPIES ARE UNCONTROLLED. CONTROLLED COPY IS AVAILABLE ON COMPANY INTRANET. Page 1 of 2
Americas
Certification of Machinery and Mechanized Equipment S3NA-309-FM1
1.0 General Guidelines
1.1 Subcontractor equipment shall comply with all applicable legislative requirements, local, State, Federal, Provincial, Territorial for motor vehicles and material handling heavy equipment.
1.2 Certification shall be obtained for all subcontractor machinery and mechanized equipment prior to but within seven calendar days in advance of use on the project site.
1.3 Heavy equipment includes, but is not limited to, drill rigs, front-end loaders, backhoes, trackhoes, bulldozers, forklifts, and similar equipment used for the implementation of the project Statement of Work.
2.0 Equipment Safety Inspections
2.1 The following presents general guidelines for certifying equipment is in safe operating condition before activities commence at the site and during site operations. The following guidelines are not meant to be all-inclusive.
2.1.1 All machinery and mechanized equipment will be certified to be in safe operating condition (using the attached form) by a competent individual seven days prior to on-site operation. This certificationis valid for one year.
2.1.2 Equipment will be inspected on a daily basis by the owner/operator and daily logs will be maintained. All discrepancies shall be corrected prior to placing the equipment in service.
2.1.3 Inspections shall include, but are not limited to, all hydraulic lines and fittings for wear and damage, all cable systems and pull ropes for damage and proper installation, exhaust systems, brake systems, and drill controls, etc.
2.1.4 Drill rigs and related support equipment and vehicles shall be inspected by the driller in charge on a daily basis. These inspections shall be recorded on the Daily Drill Rig Checklist or on equivalent subcontractor forms.
2.1.5 Exhaustive preventive maintenance shall be conducted for all equipment according to manufacturer recommendations and/or the subcontractor's internal policies, schedules, and equipment Standard Operating Procedures.
2.1.6 Only designated qualified persons shall operate machinery and mechanized equipment.
2.1.7 The contractor shall maintain records of tests and inspections at the site and shall make the records available upon request of the designated authority; the records shall become part of the official project file.
2.1.8 Equipment found to not be in safe operating condition or to have a deficiency that affects the safe operation of the equipment shall immediately be taken out of service and its use shall be prohibited until safe conditions have been corrected.
2.1.9 All equipment shall be kept in the exclusion zone until work or the shift has been completed. Equipment will be decontaminated within designated decontamination areas.
2.1.10 Equipment with an obstructed rear view must have an audible alarm that sounds when equipment is moving in reverse.
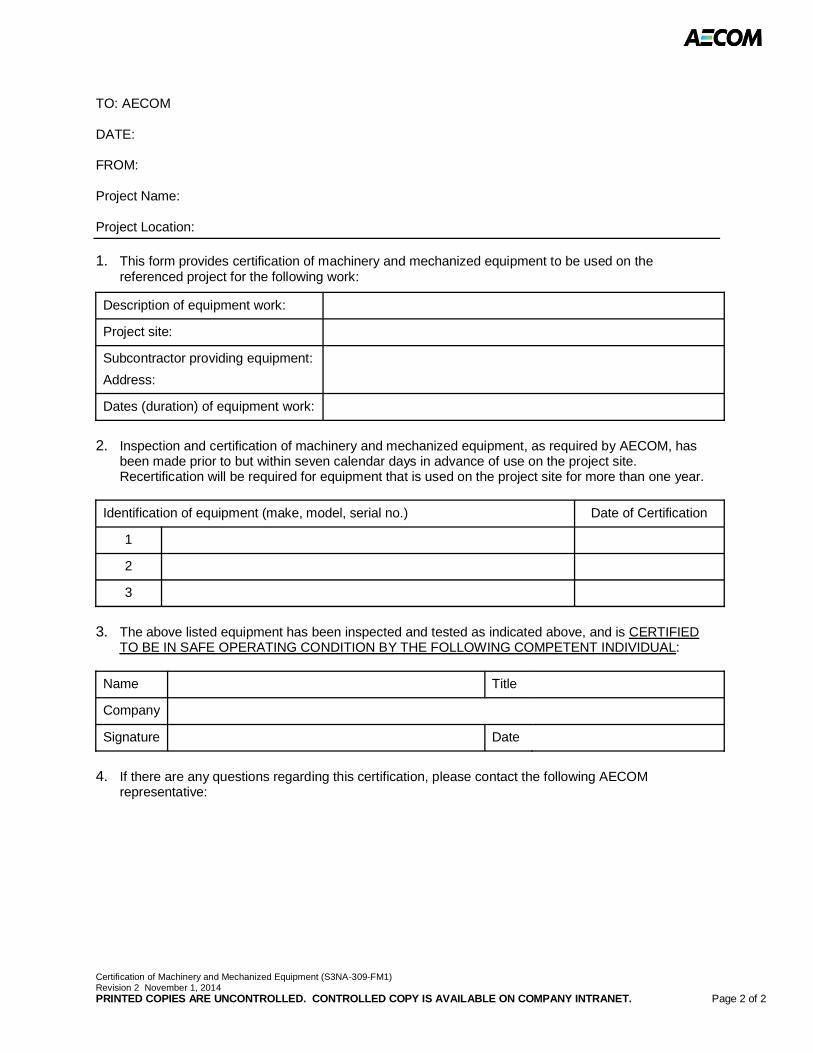
Certification of Machinery and Mechanized Equipment (S3NA-309-FM1)Revision 2 November 1, 2014PRINTED COPIES ARE UNCONTROLLED. CONTROLLED COPY IS AVAILABLE ON COMPANY INTRANET. Page 2 of 2
TO: AECOM
DATE:
FROM:
Project Name:
Project Location:
1. This form provides certification of machinery and mechanized equipment to be used on the referenced project for the following work:
Description of equipment work:
Project site:
Subcontractor providing equipment:
Address:
Dates (duration) of equipment work:
2. Inspection and certification of machinery and mechanized equipment, as required by AECOM, has been made prior to but within seven calendar days in advance of use on the project site.Recertification will be required for equipment that is used on the project site for more than one year.
Identification of equipment (make, model, serial no.) Date of Certification
1
2
3
3. The above listed equipment has been inspected and tested as indicated above, and is CERTIFIED TO BE IN SAFE OPERATING CONDITION BY THE FOLLOWING COMPETENT INDIVIDUAL:
Name Title
Company
Signature Date
4. If there are any questions regarding this certification, please contact the following AECOM representative:
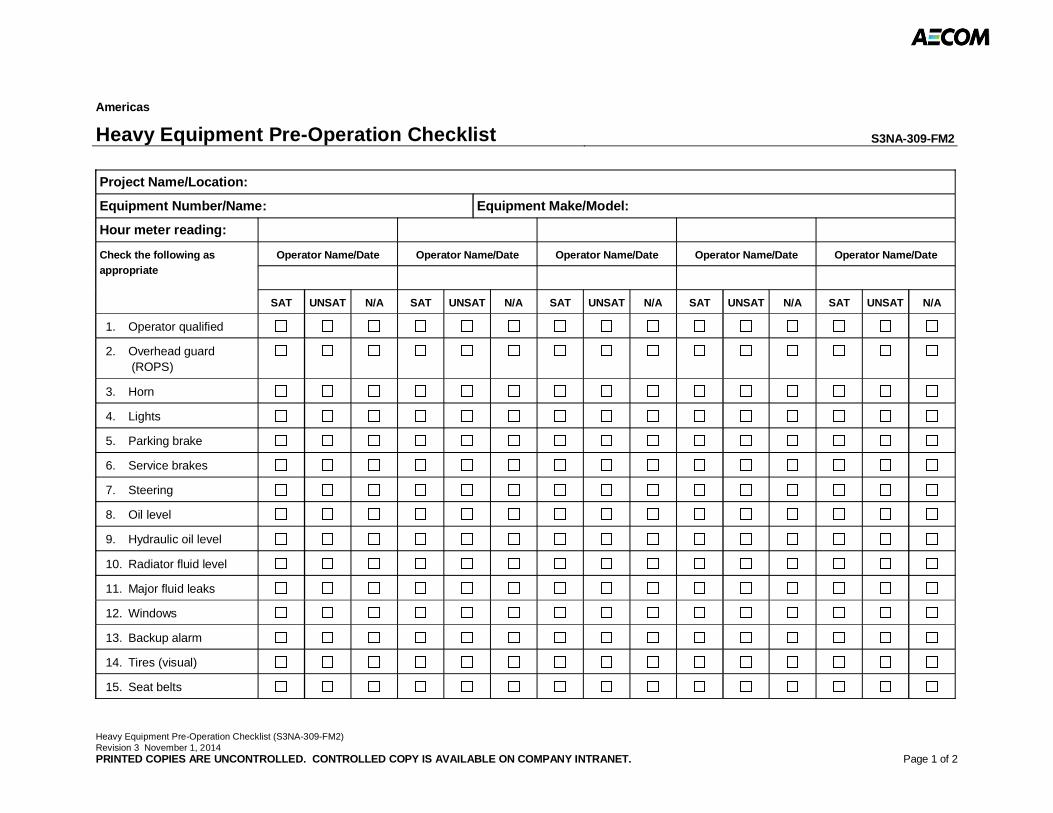
Heavy Equipment Pre-Operation Checklist (S3NA-309-FM2)Revision 3 November 1, 2014PRINTED COPIES ARE UNCONTROLLED. CONTROLLED COPY IS AVAILABLE ON COMPANY INTRANET. Page 1 of 2
Americas
Heavy Equipment Pre-Operation Checklist S3NA-309-FM2
Project Name/Location:
Equipment Number/Name: Equipment Make/Model:
Hour meter reading:
Check the following as
appropriate
Operator Name/Date Operator Name/Date Operator Name/Date Operator Name/Date Operator Name/Date
SAT UNSAT N/A SAT UNSAT N/A SAT UNSAT N/A SAT UNSAT N/A SAT UNSAT N/A
1. Operator qualified
2. Overhead guard(ROPS)
3. Horn
4. Lights
5. Parking brake
6. Service brakes
7. Steering
8. Oil level
9. Hydraulic oil level
10. Radiator fluid level
11. Major fluid leaks
12. Windows
13. Backup alarm
14. Tires (visual)
15. Seat belts
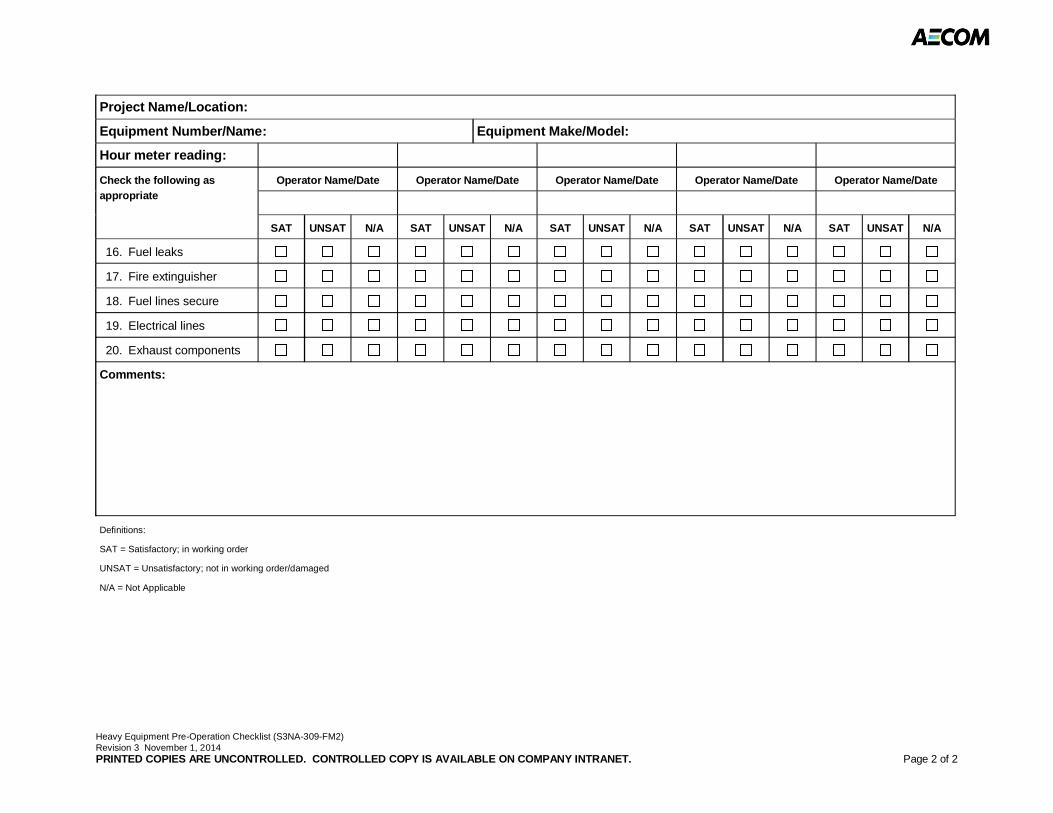
Heavy Equipment Pre-Operation Checklist (S3NA-309-FM2)Revision 3 November 1, 2014PRINTED COPIES ARE UNCONTROLLED. CONTROLLED COPY IS AVAILABLE ON COMPANY INTRANET. Page 2 of 2
Project Name/Location:
Equipment Number/Name: Equipment Make/Model:
Hour meter reading:
Check the following as
appropriate
Operator Name/Date Operator Name/Date Operator Name/Date Operator Name/Date Operator Name/Date
SAT UNSAT N/A SAT UNSAT N/A SAT UNSAT N/A SAT UNSAT N/A SAT UNSAT N/A
16. Fuel leaks
17. Fire extinguisher
18. Fuel lines secure
19. Electrical lines
20. Exhaust components
Comments:
Definitions:
SAT = Satisfactory; in working order
UNSAT = Unsatisfactory; not in working order/damaged
N/A = Not Applicable
Wildlife, Plants and Insects (S3NA-313-PR1)Revision 2 December 31, 2014PRINTED COPIES ARE UNCONTROLLED. CONTROLLED COPY IS AVAILABLE ON COMPANY INTRANET. Page 1 of 13
Americas
Wildlife, Plants and Insects S3NA-313-PR1
1.0 Purpose and Scope
1.1 Communicates the requirements and precautions to be taken by AECOM employees to protect against thebiological hazards associated with insects, arachnids, snakes, poisonous plants, and other animals referredto herein collectively as “biological hazards”.
1.2 This procedure applies to all AECOM Americas-based employees and operations.
2.0 Terms and Definitions
2.1 Field Work – Any activity conducted at a site that contains brush, overgrown grass, leaf litter, poisonousplants, or is located near mosquito breeding areas and includes work in structures where animals might existthat harbor fleas or ticks or where spiders and mites could be present. Field work includes, but is not limitedto, Phase I, Phase II, Operations Monitoring & Maintenance, biological surveys, and other work that meetsthe definition of field work.
2.2 Poisonous – Capable of harming or killing by or as if by poison; toxic or venomous.
2.3 Phase I Environmental Site Assessment – Investigation of real property to determine the possibility ofcontamination, based on visual observation and property history, but no physical testing. Under newEnvironmental Protection Agency regulations that went into effect on November 1, 2006, a Phase I, as it iscalled for short, will be mandatory for all investors who wish to take advantage of ComprehensiveEnvironmental Response, Compensation, and Liability Act defenses that will shield them from liability forfuture cleanup, should that prove necessary. The new Phase I rules, called “All Appropriate Inquiry” or AAI,also require more investigation than previously mandated. Investors can expect to see dramatic priceincreases over prior experiences.
2.4 Phase II Environmental Site Assessment – Investigation of real property through physical samplings andanalyses to determine the nature and extent of contamination and, if indicated, a description of therecommended remediation method.
3.0 References
3.1 WP-001-PR Firearms Standard
3.2 S2-032-PR1 Weapons Safety
3.3 S3NA-004-PR1 Incident Report
3.4 S3NA-208-PR1 Personal Protective Equipment Program
3.5 S3NA-209-PR1 Project Hazard Assessment and Planning
3.6 S3NA-511-PR1 Heat Stress
3.7 Public Health Agency of Canada on Ticks and Lyme Disease in Canada
3.8 Public Health Agency of Canada on West Nile Virus
3.9 United States Center for Disease Control (CDC) on Lyme Disease
3.10 New York State Department of Health, 2007. Health Advisory, Tick and Insect Repellents.
3.11 Spectrum Brands, 2007. Personal Insect Repellent Products.
3.12 U.S. Centers for Disease Control and Prevention, 2004. Tick Management Handbook
Wildlife, Plants and Insects (S3NA-313-PR1)Revision 2 December 31, 2014PRINTED COPIES ARE UNCONTROLLED. CONTROLLED COPY IS AVAILABLE ON COMPANY INTRANET. Page 2 of 13
3.13 U.S. Environmental Protection Agency, 2006. Permethrin Facts: Preregistration Eligibility Decision FactSheet
3.14 U.S. National Pesticide Information Center, 1997, National Pesticide Telecommunications Network FactSheet for Permethrin
3.15 U.S. Environmental Protection Agency, 2005. New Pesticide Fact Sheet, Picaridin
4.0 Procedure
4.1 Roles and Responsibilities
4.1.1 Project Managers / Supervisors
Responsible for managing field work.
Work with employees to see that a Task Hazard Analysis (THA) for the work to be conductedhas been performed prior to the beginning of the field work and that it includes an assessmentof potential biological hazards.
If biological hazards are identified as an exposure risk in the workplace, control measures thatmay be applied at the project site will be implemented to reduce the potential for employees tobe exposed to injuries and illnesses while working.
If the exposures cannot be eliminated or managed with engineering controls, the ProjectManager or Supervisor will approve the use of Personal Protective Equipment (PPE) andprotective repellents and lotions and ensure that exposed employees have and use theseproducts.
Approve the costs associated with the PPE and materials necessary to protect employeesfrom the biological hazards covered by this procedure.
4.1.2 Region Safety, Health and Environment (SH&E) Manager
Participate in incident reporting and investigations when appropriate.
Work with Office Manager (Operations), SH&E Department and project Safety Professionalsprovide training and guidance to employees consistent with this procedure.
During the performance of project site visits, assess the precautions being taken against therequirements of this procedure.
Assist project teams in identifying hazards and selecting appropriate control measures.
4.1.3 Office Managers (Operations)
Assure implementation of this procedure in their regions and offices.
Participate in incident reporting and investigations when appropriate.
4.1.4 Field Staff / Employees
Participate in required training on this procedure.
Participate in the development of THAs for the project, identify control measures to limitexposure and request PPE, repellents, and protective lotions required by this Procedure.
Obtain approval from Project Managers and/or Supervisors to purchase selected PPE prior topurchasing.
Implement the precautions appropriate to prevent exposure to the hazardous wildlife, insectsand plants.
Observe requirements for reporting as detailed within the Procedure.
Participate in incident reporting and investigations when appropriate.
Wildlife, Plants and Insects (S3NA-313-PR1)Revision 2 December 31, 2014PRINTED COPIES ARE UNCONTROLLED. CONTROLLED COPY IS AVAILABLE ON COMPANY INTRANET. Page 3 of 13
4.2 Overview
4.2.1 The procedures discussed below are detailed because these hazards have historically posed themost significant risk to AECOM employees. Note that this discussion is not a fully encompassinglist of hazards and as part of the THA, in accordance with the S3NA-209-PR1 Project HazardAssessment and Planning, conducted by the project team, additional consideration must be givento other biological hazards.
4.2.2 Departments of Public Health local to the worksite, as well as the Centers for Disease Control(CDC) can serve as a resource for identifying biological hazards not discussed in this procedure.
4.2.3 If additional biological hazards are identified, the project team should contact the Region SH&EManager to discuss the hazards and identify effective control measures that can be implemented atthe project site.
4.3 Employee Sensitivity
4.3.1 Sensitivity to toxins generated by plants, insects and animals varies according to dosage and theability of the victim to process the toxin; therefore, it is difficult to predict whether a reaction willoccur, or how severe the reaction will be. Staff should be aware that there are a large number oforganisms capable of causing serious irritations and allergic reactions. Some reactions will onlyerupt if a secondary exposure to sunlight occurs. Depending on the severity of the reaction, theresult can be severe scarring, blindness or even death.
4.3.2 Employees / Field Staff also need to consider whether they are sensitive to the use of insectrepellents.
4.4 Planning and Hazard Assessment
4.4.1 The AECOM project team shall ensure that the potential for exposure to specific biological hazardsare assessed prior to the commencement of work and that the procedures specified by thisprocedure are integrated into the task hazard analysis (THA) planning process and conveyed toAECOM employees conducting the field work (also referred to as field staff). This information shallbe communicated in the site-specific Safe Work Plan (SWP), Health and Safety Plan (HASP), theTHA, pre-project kickoff meetings, and tailgate meetings at the project site.
4.4.2 It is important to note that the precautions to be taken by AECOM employees to decrease the riskof exposure to biological hazards can directly increase the risk of heat-related illness due to thermalstresses. Therefore, heat stress monitoring and precautions shall be included as a criticalcomponent of the project-specific hazard assessments in accordance with S3NA-511-PR1 HeatStress.
4.4.3 During the preparation of the project-specific SWP, HASP and project specific THA, ProjectManagers, Supervisors, and the project staff will determine what biological hazards might beencountered during the project and will prescribe the precautions to be taken to reduce thepotential for exposure and the severity of resulting illnesses. Consideration will be given toconditions such as weather, proximity to breeding areas, host animals, and published informationdiscussing the presence of the hazards.
4.4.4 It should be assumed that at least one of the biological hazards exists whenever working onundeveloped property. This can include insect activity any time that local temperatures exceed 40degrees Fahrenheit (4.5 degrees Celsius) for a period of more than 24 hours. The stubble androots of poisonous plants can be a hazard any time of year, including when some plants aredormant or mown.
4.4.5 The hazard assessments must also consider the additional hazards posed by vegetative clearingsuch as the increased risk of coming in contact with poison ivy, oak or sumac and hazardsassociated with the use of tools and equipment to remove vegetation.
4.4.6 Employees in the field where biological hazards exist will not enter the hazard areas unless theyare wearing the appropriate protective clothing, repellents, and barrier creams specified below. Ifthe hazard is recognized in the field but was not adequately assessed during the THA, the field
Wildlife, Plants and Insects (S3NA-313-PR1)Revision 2 December 31, 2014PRINTED COPIES ARE UNCONTROLLED. CONTROLLED COPY IS AVAILABLE ON COMPANY INTRANET. Page 4 of 13
staff shall stop work and not proceed until the THA has been amended and protective measuresimplemented.
4.4.7 A decision flow chart and table for determining the potential for biological hazards in the U.S. hasbeen provided in S3NA-313-WI1 Biological Hazard Assessment Decision Flow Chart HazardAssessment (U.S.).
4.4.8 Restrictions:
In accordance with the Global Safety Department standards, no firearms or weapons areallowed to be used without express permission by the Region Executive and chief SecurityOfficer, refer to the WP-001-PR Global Firearms Standard.
No weapons related work shall occur without an assessment that includes appropriate hazardcontrol measures and training, refer to the S2-032-PR1 Weapons Safety.
Staff with life-threatening reactions shall not undertake work in areas infested with the allergen(e.g., wasps, poison ivy), unless precautions are met which satisfy a medical practitioner’srequirements.
4.5 Habitat Avoidance, Elimination, and/or Control
4.5.1 Ticks, Spiders and other Insects
The most effective method to manage worker safety and health is to eliminate, avoid and/orcontrol hazards. Clearing the project site of brush, high grass and foliage reduces the potentialfor exposure to biological hazards. Clearing will not eliminate the exposure to flying insects andthere might be an increased exposure to ticks, spiders, and poisonous plants during theclearing process.
Projects such as subsurface environmental assessment or remediation are often candidatesfor brush and overgrown grass to be cleared. In these instances, the Project Manager shalleither request that the client eliminate vegetation, or request approval from the client to havevegetation clearing added to the scope of work.
When projects must be conducted in areas that cannot or may not be cleared of foliage,personal precautions and protective measures shall be prescribed.
Mosquitoes breed in stagnant water and typically only travel a quarter mile (less than half akilometer) from their breeding site. Whenever possible, stagnant water should be drained toeliminate breeding areas. Project Managers and client site managers should be contacted todetermine whether water can be drained and the most appropriate method for drainingcontainers, containment areas, and other objects of standing water.
If water cannot be drained, products similar to Mosquito Dunks® can be placed in the water tocontrol mosquitoes. Once wet, the Mosquito Dunks® kill the immature, aquatic stage of themosquito. The active ingredient is a beneficial organism that is lethal to mosquito larvae, butharmless to fish, humans, and other animals. Mosquito Dunks® provide long-term protectionfor 30 days or more.
4.5.2 Poisonous Plants
If poisonous plants are identified in the work area, field staff will mark the plants using eitherflags or marking paint, and discuss what the specific indicator will be to signal to other fieldstaff to avoid the designated area. If field staff decide to use ground-marking paint to identifypoisonous plants, they should discuss this tactic with the Project Manager (and Client asappropriate) to gain approval.
If removal of the plants is considered, it should be subcontracted to a professional landscapingservice that is capable and experienced in removing the plant. If herbicides are considered foruse, a discussion will need to occur with the Project Manager (and Client as appropriate) todetermine whether it is acceptable to apply herbicides at the work site. Application ofherbicides may require a license.
Wildlife, Plants and Insects (S3NA-313-PR1)Revision 2 December 31, 2014PRINTED COPIES ARE UNCONTROLLED. CONTROLLED COPY IS AVAILABLE ON COMPANY INTRANET. Page 5 of 13
Field staff shall not attempt to physically remove poisonous plants from the work area unlessa clearing procedure including PPE is prepared in advance and approved by the RegionSH&E Manager. If a SWP or HASP is prepared for the project, the clearing procedure shouldbe included and the required PPE specified.
4.5.3 Wildlife Hazards (Wild Animals, Reptiles and Birds)
Staff must not work alone in areas where the risk of an encounter with dangerous wildlife is high.Wildlife handling must only be completed under direct supervision of an experienced individual.Refer to the following work instructions for more specifics on prevention:
S3NA-313-WI11 Large Carnivores
S3NA-313-WI12 Bear Safety
S3NA-313-WI13 Small Mammals
S3NA-313-WI14 Snakes
S3NA-313-WI15 Alligators
4.5.4 Bird Droppings
Work in any area where pigeons or other flying animals may nest, a written statement from theclient shall be obtained in regards to the potential for, and extent of, accumulation of excrementon/in the structure from pigeons and other winged animals.
4.6 Insects
4.6.1 Insects for which precautionary measures should be taken include but are not limited to:mosquitoes (potential carriers of disease aside from dermatitis), black flies, wasps, bees, ticks, fireants and European fire ants.
4.6.2 Employees with known allergies to insect stings should consult their personal physician for adviceon any immediate medications that they should carry with them. AECOM highly recommends thatemployees with known allergies inform their co-workers of the allergy and the location of themedications they might carry for the allergy.
4.6.3 Ticks
Ticks can be encountered when walking in tall grass or shrubs. They crawl up clothingsearching for exposed skin where they will insert mouthparts to drink blood. The most seriousconcern is a possibility of contracting a disease.
Data from the CDC indicates that tick-borne diseases have become increasingly prevalent. Atthe same time, tick repellents have become both safe and effective so it is possible to preventthe vast majority of bites and, therefore, most related illnesses. The use of permethrin isstrongly advised.
The most common and severe tick-borne illnesses in the U.S. are Lyme disease, Ehrlichiosis,and Rocky Mountain spotted fever. A summary table listing CDC informational resources forthese diseases is provided in S3NA-313-WI2 Ticks along with a listing of CDC informationresources and maps showing the distribution of common tick-borne diseases in the U.S.
When working in areas where ticks may occur, it is recommended that clothes are turnedinside out and shaken at the end of day; do not wear the same clothes two days in a row.
To remove ticks that are embedded in skin, utilize a tick key. Alternatively use tweezers orfingers to carefully grasp the tick as close to the skin as possible and pull slowly upward,avoiding twisting or crushing the tick. Do not try to burn or smother the tick. Cleanse the bitearea with soap and water, alcohol, or household antiseptic. Note the date and location of thebite and save the tick in a secure container such as an empty pill vial or film canister. A bit ofmoistened paper towel placed inside the container will keep ticks from drying out.
Wildlife, Plants and Insects (S3NA-313-PR1)Revision 2 December 31, 2014PRINTED COPIES ARE UNCONTROLLED. CONTROLLED COPY IS AVAILABLE ON COMPANY INTRANET. Page 6 of 13
Familiarize yourself with the characteristic bulls-eye pattern of Lyme disease infectionsurrounding the bite. If you notice this type of pattern or rash resulting from a tick bite, contactAECOM reporting line 1 (800) 348-5046 and asked to be connected to WorkCare for medicalsupport. If this service is unavailable, contact your personal physician or a local medical clinic.
o Canada – National Microbiology Laboratory (NML) (Phone: (204) 789-2000; email:[email protected]). The NML will conduct diagnostic testing for the Lyme diseaseagent as well as several other disease-causing agents. The NML results will not onlybenefit anyone bit by the tick, but will also assist the NML in their goal to accurately mapthe distribution of the tick species and associated diseases in Canada.
o U.S. – IGeneX, Inc. (Phone: (800) 832-3200; www.igenex.com). IGeneX will test the tickfor the presence of the Lyme bacteria. They also test ticks for Babesia microti and/orBabesia duncani (formerly WA-1), Ehrlichia, Bartonella henselae and Rickettsia (RockyMountain Spotted Fever). All tick testing should be coordinated through WorkCare,AECOM’s Corporate medical provider using the S3NA-313-FM1 Tick Test Request Form.
If you experience symptoms such as fever, headache, fatigue, and a skin rash, you shouldimmediately visit a medical practitioner as Lyme disease is treated easily with antibiotics in theearly stages, but can spread to the heart, joints, and nervous system if left untreated.
4.6.4 Chiggers
Chiggers are mite larvae, approximately ½ millimeter in size, and typically invisible to thenaked eye. While chiggers are not known to carry infectious diseases, their bites and resultingrashes and itching can lead to dermatitis and a secondary infection.
Chiggers are typically active from the last hard freeze in the winter or spring to the first hardfreeze. They are active all year in the Gulf Coast and tropical areas.
4.6.5 Spiders
Spiders can be found in derelict buildings, sheltered areas, basements, storage areas, wellheads and even on open ground. Spiders can be found year round in sheltered areas and areoften present in well heads and valve boxes.
Most spider bites produce wounds with localized inflammation and swelling. The Black Widowand Brown Recluse spiders in the U.S. and others outside the U.S. inject a toxin that causesextensive tissue damage and intense pain.
Additional information on spider identification can be found in attachment S3NA-313-WI3Poisonous Spider Identification.
4.6.6 Mosquitoes
4.6.6.1 When a mosquito bites, it injects an enzyme that breaks down blood capillaries and actsas an anticoagulant. The enzymes induce an immune response in the host that results initching and local inflammation. The tendency to scratch the bite sites can lead tosecondary infections.
4.6.6.2 CDC data indicates that mosquito-borne illnesses, including the strains of encephalitis, area health risk to field staff. At least one of the Encephalitis strains listed below is known toexist in every area of the U.S. and in many other countries as well:
Eastern Equine encephalitis
Western Equine encephalitis
West Nile Virus
St. Louis encephalitis
La Crosse encephalitis
Wildlife, Plants and Insects (S3NA-313-PR1)Revision 2 December 31, 2014PRINTED COPIES ARE UNCONTROLLED. CONTROLLED COPY IS AVAILABLE ON COMPANY INTRANET. Page 7 of 13
4.6.6.3 Mosquitoes can transmit the West Nile Virus and other forms of encephalitis afterbecoming infected by feeding on the blood of birds which carry the virus. Positive cases ofWest Nile Virus have been confirmed throughout North America since 2007.
4.6.6.4 Most people infected with the virus experience no symptoms or they have flu-likesymptoms. Sometimes though, the virus can cause severe illness, resulting inhospitalization and even death, so proper precautions should be taken. Consult a medicalpractitioner if you suspect you have West Nile Virus. Other diseases including DengueFever and Malaria are spread by mosquitoes in the sub-tropic and tropical parts of theworld. See S3NA-313-WI4 Mosquito Borne Diseases for information on the locationswhere mosquito borne diseases are known to be present.
4.6.7 Bees and Hornets
Wasps and bees will cause a painful sting to anyone if they are harassed. They are of mostconcern for individuals with allergic reactions who can go into anaphylactic shock. Also,instances where an individual is exposed to multiple stings can cause a serious health concernfor anyone. These insects are most likely to sting when their hive or nest is threatened.
Bees, hornets, and wasps may be found in derelict buildings, sheltered areas, behind coversor lids and even on open ground. Other protective measures are not normally effective againstaggressive, flying insects. Be aware of the potential areas for these types of insects, approachthese locations cautiously and if you locate insect back away without disturbing. Avoidreaching into areas where visibility is limited”.
If stung by a wasp, bees, or hornet, notify a co-worker or someone who can help should youhave an allergic reaction. Stay calm and treat the area with ice or cold water. Seek medicalattention if you have any reactions to the sting such as developing a rash, excessive swellingor pain at the site of the bite or sting, or any swelling or numbness beyond the site of the biteor sting.
4.6.8 Fire Ants
The fire ant (southern and western U.S.) and the European fire ant (northeastern U.S. andeastern Canada) is often very abundant where it is established. It is very aggressive andcommonly climbs up clothing and stings unprovoked when it comes into contact with skin.Painful irritations will persist for an hour or more.
4.6.9 Poisonous Plants
4.6.10 Plants that field staff should recognize and take precautions to avoid include: poison sumac, poisonivy (terrestrial and climbing), poison oak, giant hogweed1 (or giant cow parsnip), wild parsnip,devil’s club and stinging nettle. Many others are extremely poisonous to eat (e.g., poison hemlock;water parsnip) – do not eat anything that has not been identified. Refer to S3NA-313-WI5 Plants ofConcern for information on locations where some of these poisonous plants are found in the U.S.
Poisonous plants including poison ivy, oak and sumac, which contain the oil urushiol thatproduces a rash, can lead to dermatitis and infections. Exposure to urushiol produces a rashthat can be irritating and cause the exposed employee to scratch the affected area, increasingsusceptibility for an infection. It should be noted that each time an employee is exposed tourushiol the severity of the reaction increases. In cases that involve severe rashes, medicaltreatment may be necessary to control the rash.
Wild parsnip is found throughout the U.S. and contains a poison that produces a rash similar topoison oak and ivy. Unlike poison oak and ivy, the active oil will not be present on unbrokenleaves. See S3NA-313-WI6 Wild Parsnip Identification for additional information and photos ofwild parsnip.
1 Phytodermatisi producer: keep skin covered and wash well after exposure
Wildlife, Plants and Insects (S3NA-313-PR1)Revision 2 December 31, 2014PRINTED COPIES ARE UNCONTROLLED. CONTROLLED COPY IS AVAILABLE ON COMPANY INTRANET. Page 8 of 13
Of the toxic plants in the cashew family, poison ivy (Rhus radicans) is most widespread. Itgrows as ina a variety of forms from a low sprawling shrub, dense ground cover, and or a thickwoody vine that grows high into the tree canopy. Poison oak (Rhus diversiloba) is typically alow shrub in drier soils. Both of these plants have leaves of three and white berries. Poisonsumac (Rhus vernix) is a tall shrub that is less prolific in distribution. It grows in wet areas, hasa compound leaf with a red leaf stem (rachis), and white berries. All of these plants possessurushiol oils in nearly all parts of the plant. Touching the plant causes an itchy skin rash thatshows up several days following contact. People have a wide range of reactions which insevere cases can lead to oozing blisters on large parts of the body. Some people apparentlynever react and others who have never had a reaction may develop an allergy after years offrequent contact.
Several plants in the carrot family contain toxic sap that causes severe dermatitis if it comesinto contact with skin that is then exposed to sunlight. The most serious reaction is caused bythe giant hogweed (Heracleum mantegazzianum), a plant that is spreading in southern Ontarioand is also present in southwestern British Columbia. The plant is enormous, attaining up to 16feet (5 meters) in height, which it does in one growing season. Contact causes painfulblistering that can cause permanent disfigurement. It is to be avoided. Similar but less seriousreactions can be caused by meadow parsnip (Pastinaca sativa) and cow parsnip (Heracleumlanatum). Meadow parsnip can be very abundant on disturbed sites.
Nettles, particularly stinging nettle (Urtica dioica) and wood nettle (Laportea canadensis)contain urticating hairs on the leaves and stems that cause sharp pain or itchiness on contactwith skin. The irritation is immediate and normally lasts no more than an hour and there are nolasting consequences.
Some plants contain abundant stiff spines that can present a safety hazard, particularly if oneis to fall into them. These include the cactus (Opuntia spp.), devils club (Oplopanax horridum),and prickly-ash (Zanthoxylon americanum).
4.6.11 A large number of plants are not harmful to touch but may contain poisonous berries or foliage thatcould cause serious complications or death if they are ingested. It goes without saying to not eatany berries or plants if you are unsure of their identity.
4.6.12 Giant hogweed presents the most serious health risk. Field staff should learn to recognize andavoid it if encountered.
4.6.13 Employees / Field Staff who develop a rash as a result of exposure to poisonous plants shall reportthe exposure immediately to their Supervisor or Project Manager who will then forward the report tothe Region SH&E Manager.
4.7 Additional Wildlife Hazards (Wild Animals, Reptiles and Birds)
4.7.1 Refer to following for protection and prevention:
S3NA-313-WI11 Large Carnivores
S3NA-313-WI12 Bear Safety
S3NA-313-WI13 Small Mammals
S3NA-313-WI14 Snakes
S3NA-313-WI15 Alligators
4.7.2 Bird Droppings
Bird excrement may be encountered due to the nesting of pigeons and other birds and wingedanimals (e.g., bats) on or in structures. Substantial accumulations of droppings can pose physicaland health risks as slippery surfaces (if wet) and if the material is disturbed and becomes airborne,it can be inhaled or ingested if personal hygiene practices are not implemented. Inhalation ofairborne droppings can cause diseases such as histoplasmosis. Exposure to surfaces with bird
Wildlife, Plants and Insects (S3NA-313-PR1)Revision 2 December 31, 2014PRINTED COPIES ARE UNCONTROLLED. CONTROLLED COPY IS AVAILABLE ON COMPANY INTRANET. Page 9 of 13
droppings shall be safeguarded by implementing proper work practices, training employees forawareness and using PPE. See S3NA-313-WI10 Bird Droppings Safe Work Practices.
4.8 Personal Protective Equipment (PPE)
4.8.1 The selection of PPE is dependent on the hazard present and a Task Hazard Analysis (THA)should be conducted to determine situation-specific PPE required refer to S3NA-208-PR1 PersonalProtective Equipment Program.
4.8.2 At a minimum, in addition to any project-specific PPE, long sleeves and pants should be worn onfield projects where the risk of biological encounter exists.
4.8.3 PPE for insects should include insect repellent, bug nets, bug jackets, or similar deterrents. Socksshould be pulled over pant legs where the threat of exposure is anticipated.
4.8.4 Epi-pens2 or other personal medication should be carried by those staff that is aware thatanaphylactic shock is a possibility for them.
4.9 Personal Precautions and Personal Protective Measures
4.9.1 Precautions
Be aware of the potential irritants in your area and know how to recognize them.
Modify activities to avoid encounters (diurnal rhythms, seasonal rhythms).
Wear protective clothing.
When working in areas where there may be small insects that “hitchhike” (e.g., ticks, spiders,scorpions), it is recommended that clothes are turned inside out and shaken at the end of day;do not wear same clothes two days in a row.
Staff should always be aware of where they are placing their hands, or where they are sitting inorder to avoid contact with potential toxins.
4.9.2 Insects, Spiders, and Ticks
Chemically-treated field clothing, full-length clothing, or Tyvek® coveralls.
Use of Permethrin to treat field clothing.
Application of insect repellent to clothing and/or exposed skin.
Routine personal checks.
Exercise care when collecting samples and avoid reaching into areas where visibility is limited.If stung by an insect or bitten by a spider or tick, attempt to identify the attacker and notify a co-worker or someone who can help should the bite site become painful, discolored, or swollen.Stay calm and treat the area with ice or cold water. Seek medical attention if you have anyreactions to the sting such as developing a rash, excessive swelling or pain at the site of thebite, or any swelling or numbness beyond the site of the bite.
Oil of lemon eucalyptus, DEET, and Permethrin have been recommended by the CDC foreffective protection against mosquitoes that may carry the West Nile virus and relateddiseases.
Note that DEET will reduce the effectiveness of Fire Resistance Clothing (FRC) and should notbe applied to this clothing. If working in FRC, field staff can apply DEET to their skin and letdry prior to putting FRC on, or use Permethrin as it has been shown not to reduce theeffectiveness of FRC. Permethrin will need to be applied to FRC well in advance of theplanned work.
1 Epi-pens must be prescribed by a personal physician. Renew epi-pens on a regular schedule to ensure effectiveness andmake sure your field companions know where it is and how to use it if you cannot self administer the dose.
Wildlife, Plants and Insects (S3NA-313-PR1)Revision 2 December 31, 2014PRINTED COPIES ARE UNCONTROLLED. CONTROLLED COPY IS AVAILABLE ON COMPANY INTRANET. Page 10 of 13
4.9.3 Poisonous Plants
Field staff conducting clearing, grubbing, or similarly disturbing work activities in areas wherepoisonous plants exist shall wear either long-sleeve clothing or Tyvek® coveralls, anddisposable cotton, leather or synthetic gloves. Field Staff must not touch exposed skin (neckand face) with potentially contaminated gloves. Tyvek® and gloves worn to protect fromexposure to poisonous plants will be treated as contaminated, removed from the body in amanner that the contamination is not spread, and placed in plastic bags for disposal.
Personal clothing that has been exposed to poisonous plants shall be decontaminated with apoisonous plant cleanser such as Tecnu® or removed in a careful manner, bagged andwashed separately from other clothing to remove urushiol.
For dermatitis caused by poison ivy, poison oak, or poison sumac, calamine lotion is effective.
Work boots will be decontaminated with either soap and water or a cleansing agent such asTecnu® cleanser.
Remember that in the fall and winter the hazard still exists in the form of stubble and roots.
Employees / Field Staff who develop a rash as a result of exposure to poisonous plants shallreport the exposure immediately to their Supervisor or Project Manager who will forward thereport to the Region SH&E Manager.
4.9.4 PPE Recommendations
The following recommendations may be considered by the project team to determine if the use ofPPE is necessary for the type of work planned:
Disposable gloves may be cotton, leather, or synthetic materials and must not be reused afterremoving.
Clearing activities present the greatest risk to field staff exposure but reduce the risks oncecompleted. Recommendation – Use full protection from ticks and insects during the clearingactivities including insect repellents, Tyvek® coveralls, and gloves.
If the foliage being cleared includes poisonous plants, exposed skin will be treated with adermal barrier cream such as Tecnu®’s Oak ‘n Ivy Armor or Enviroderm’s Ivy Block and eithera full-face respirator or a half-face respirator (with goggles) fitted with a P-100 (HEPA) dustfilter.
Work in habitats with direct exposure to ticks, mosquitoes, and poisonous plants is likely andthe scope of work does not allow for worksite control measures like vegetative clearing:Recommendation – Full protection from biological hazards including insect repellents, Tyvek®coveralls or full-length clothing, poisonous plant barrier creams and wipes, and gloves.
Work in habitats with direct exposure to ticks and mosquitoes and no exposure to poisonousplants is likely and the scope of work typically does allow for worksite control measures likevegetative clearing: Recommendation – Protection including insect repellents and Tyvek®coveralls or full-length clothing.
Work in habitats with direct exposure to poisonous plants and no exposure to ticks or insects islikely and the scope of work does not allow for worksite control measures like vegetativeclearing: Recommendation – Full protection from poisonous plants including insect repellents,Tyvek® coveralls or full-length clothing, poisonous plant barrier creams and wipes, and gloves.
Industrial/Commercial/Office Facilities – Direct contact with biological hazards is consideredunlikely or low risk: Recommendation – PPE for biological hazards are not required; however,Tyvek coveralls and insect repellentrepellent should be available if exposure to spiders, flyinginsects, or other biological hazards is encountered.
Work in areas where no biological hazards are expected because of the local environment,winter weather, or property development: Recommendation – PPE for biological hazards is not

Wildlife, Plants and Insects (S3NA-313-PR1)Revision 2 December 31, 2014PRINTED COPIES ARE UNCONTROLLED. CONTROLLED COPY IS AVAILABLE ON COMPANY INTRANET. Page 11 of 13
required; however, Tyvek® coveralls and insect repellentrepellent should be available ifexposures to spiders, flying insects, or other biological hazards are encountered.
4.9.5 Selection and Configuration of Field Clothing
4.9.5.1 See S3NA-313-WI7 Configuration Clothing for Protection against ticks and insects forillustrations and instructions for configuring, taping, and tucking clothing.
4.9.5.2 At a minimum, field staff will wear long-legged pants and long-sleeve shirts or Tyvek®coveralls to reduce the amount of exposed skin when biological hazards are identified atthe work site. Gloves will also be worn consistent with the recommendations of the site-specific SWP, HASP and/or THA to minimize hand exposure.
4.9.5.3 Where ticks, chiggers, and spiders are presumed to exist, the Tyvek® or chemicallytreated clothing will be taped to the work boots.
4.9.5.4 Chemical Treatment of Field Clothing
Oil of lemon eucalyptus, DEET, and Permethrin have been recommended by the CDC foreffective protection against mosquitoes that may carry the West Nile virus and relateddiseases.
4.9.5.4.1 Lemon Eucalyptus
Lemon Eucalyptus is a plant-based insect repellent on the market as RepelLemon Eucalyptus. The products have been proven to be effective againstmosquitoes, deer ticks, and no-see-ums for up to six hours. Derived from Oil ofLemon Eucalyptus, this non-greasy lotion or spray has a pleasant scent and isnot known to be toxic to humans. The spray or lotions will be effective forapproximately two to six hours and should be reapplied every two hours tosustain protection. Lemon Eucalyptus products cannot be applied to fire retardantclothing.
4.9.5.4.2 DEET
Note that DEET will reduce the effectiveness of FRC and should not be appliedto this clothing. If working in FRC, field staff can apply DEET to their skin prior toputting FRC on, or use Permethrin as it has been shown not to reduce theeffectiveness of FRC. Permethrin will need to be applied to FRC well in advanceof the planned work.
4.9.5.4.3 Permethrin
When selected as part of a project’s PPE requirements, the AECOM ProjectManager shall ensure that field teams wear clothing treated with thechemical Permethrin, which is an insecticide with repellent propertiesregistered with the Environmental Protection Agency and recommended bythe CDC. Information regarding the toxicity and product safety of Permethrinis provided in S3NA-313-WI8 Insect Repellent Active Ingredient ProductInformation. Permethrin is highly effective in preventing tick bites whenapplied to clothing, but is not effective when applied directly to the skin. Twooptions are available for Permethrin treatment of clothing worn during fieldwork: 1) pre-treatment of fabric by the clothing manufacturer; or 2) personstreatment of their personal clothing using 0.5 percent Permethrin spray.AECOM strongly recommends the first option (field staff obtaining pre-treated clothing) to avoid the time required, potential risk, and housekeepingissues involved with manually treating the clothing with spray. Purchasepre-treated clothing in accordance with S3NA-208-PR1 Personal ProtectiveEquipment Program and with the approval of your Supervisor or ProjectManager. For more information visit the AECOM Americas SH&E website.
Wildlife, Plants and Insects (S3NA-313-PR1)Revision 2 December 31, 2014PRINTED COPIES ARE UNCONTROLLED. CONTROLLED COPY IS AVAILABLE ON COMPANY INTRANET. Page 12 of 13
The Permethrin pre-treatment is odorless and retains its effectiveness forapproximately 25 washings. After 25 washings, the pre-treated clothing willbe considered no longer effective and removed from service. Clothing thathas been manually treated field staff will be considered effective for fivewash cycles.
Also, use of clothing that has been pre-treated with Permethrin offers areduction in the use and application of other insect repellents that must beapplied directly to the skin. Costs for clothing shall be charged to projects asa consumable item. If charging to the project is not possible, the chargesshould be managed as an operational expense. Supervisor or ProjectManager approval is required prior to purchase.
If the employee / field staff opts not to utilize chemically pre-treatedclothing while potentially exposed to insects, spiders and/or ticks, they musteither: 1) wear Tyvek® coveralls taped to the boots, or 2) wear full-lengthclothing consisting of long-legged pants and long-sleeved shirts treated withan insect repellent containing Permethrin, DEET, or an organic alternative totheir work clothing.
4.9.5.5 Manual Treatment of Field Clothing
If clothing pre-treated with Permethrin is not available or not purchased prior to fieldwork, field staff may manually treat their clothing with Permethrin spray. The outersurfaces of all external clothing to be worn during field work should be treated with 0.5percent Permethrin spray a minimum of 2 to 4 hours prior to field work (boots,trousers, shirt, jackets, rain gear) in accordance with recommendations provided bythe New York State Department of Health presented in S3NA-313-WI9 New YorkDepartment of Health Recommendations for Permethrin Application. This will likelyrequire treatment at home or the office prior to field mobilization. Caution should beused when applying Permethrin as it is highly toxic to fish and house cats. Clothingtreatment will last for approximately five wash cycles (check the specific instructionsfor the product used.) Purchase of PPE and Repellents and Lotions
Costs for clothing, repellents, lotions, and other PPE shall be charged to projects as aconsumable item. If charging to the project is not possible, the charges should bemanaged as an operational expense. Supervisor or Project Manager approval isrequired prior to purchase.
Material Safety Data Sheets (MSDS) for the repellents, lotions, and cleansersdiscussed in this Procedure are not required because the repellents, lotion, andclothing are consumer products used in the manner intended for the general public.Although not required, a MSDS should be obtained for the products used and placedinto the office MSDS library and site-specific health and safety plans. SelectedMSDSs are available on the AECOM Americas SH&E website.
4.10 Personal Hygiene and Body Checks
4.10.1 Tick-borne diseases typically require that the tick be imbedded for four hours to begin diseasetransfer. The oils from poisonous plants can take up to 4 hours after exposure to penetrate the skinand react with the live proteins under the skin.
4.10.2 It is recommended that exposed skin be checked frequently for the presence of ticks, insects,rashes, or discolorations. External clothing should also be checked for the presence of ticks andinsects; these should be retained for identification and to determine if medical treatment is needed.
4.10.3 Field Staff will shower as soon as practical after working in the field and examine their bodies forthe presence of ticks, insect bites, rashes, or swollen areas. If imbedded ticks are found, theyshould be removed using the technique described in S3NA-313-WI2 Ticks, the tick should bepreserved with the date and location of the bite noted, and retained for identification if medicaltreatment is needed as described in Section 4.10 of this Procedure.
Wildlife, Plants and Insects (S3NA-313-PR1)Revision 2 December 31, 2014PRINTED COPIES ARE UNCONTROLLED. CONTROLLED COPY IS AVAILABLE ON COMPANY INTRANET. Page 13 of 13
4.10.4 The presence of an imbedded tick, rash, or abnormal reactions will be reported as an SH&EIncident to the Project Manager or Supervisor who will forward the report to the Region SH&EManager for follow up.
4.11 Training
4.11.1 Field staff must learn to recognize organisms that represent a threat in the regions in which theywork – experienced field staff must provide on the job training to assist staff with hazardrecognition.
4.11.2 Field staff who have severe allergic reactions are strongly recommended to notify their ProjectManager, field Supervisor and Employees of the potential for a reaction and demonstrate whatmedication they might need and how it is administered.
4.12 Remedies / Exposure
4.12.1 If you suspect exposure to an irritant, identify the cause including obtaining a specimen if possible.Document the occurrence as a safety precaution if the exposure should lead to complications.There is a host of over the counter treatment options available for exposures to various biologicalhazards.
4.12.2 Report the incident, call WorkCare for advice, or consult a private doctor if necessary, refer to theS3NA-004-PR1 Incident Report procedure for more specifics.
5.0 Records
None
6.0 Attachments
6.1 S3NA-313-WI1 Biological Hazard Assessment Decision Flow Chart
6.2 S3NA-313-WI2 Ticks
6.3 S3NA-313-WI3 Poisonous Spider Identification
6.4 S3NA-313-WI4 Mosquito Borne Diseases
6.5 S3NA-313-WI5 Plants of Concern
6.6 S3NA-313-WI6 Wild Parsnip Identification
6.7 S3NA-313-WI7 Configuration Clothing for Protection against ticks and insects
6.8 S3NA-313-WI8 Insect Repellent Active Ingredient Product Information
6.9 S3NA-313-WI9 New York Department of Health Recommendations for Permethrin Application
6.10 S3NA-313-WI10 Bird Droppings Safe Work Practices
6.11 S3NA-313-WI11 Large Carnivores
6.12 S3NA-313-WI12 Bear Safety
6.13 S3NA-313-WI13 Small Mammals
6.14 S3NA-313-WI14 Snakes
6.15 S3NA-313-WI15 Alligators
6.16 S3NA-313-FM1 Tick Test Request Form
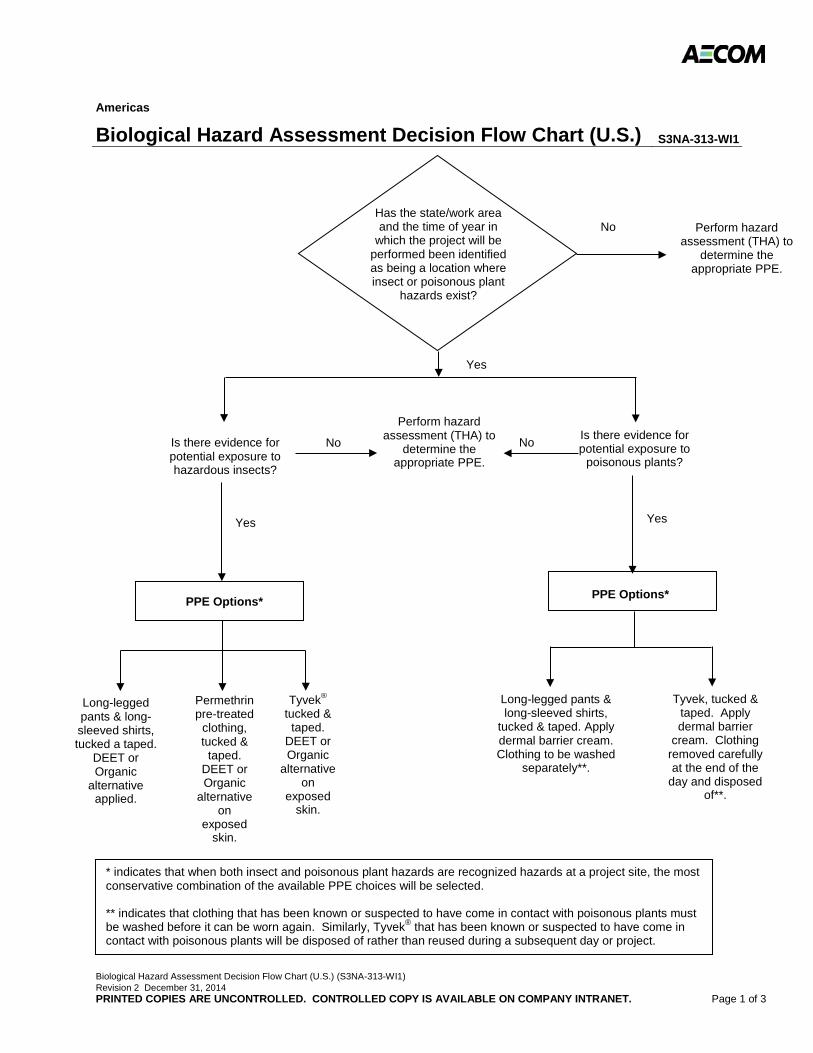
Biological Hazard Assessment Decision Flow Chart (U.S.) (S3NA-313-WI1) Revision 2 December 31, 2014 PRINTED COPIES ARE UNCONTROLLED. CONTROLLED COPY IS AVAILABLE ON COMPANY INTRANET. Page 1 of 3
Americas
Biological Hazard Assessment Decision Flow Chart (U.S.) S3NA-313-WI1
PPE Options*
Tyvek® tucked &
taped. DEET or Organic
alternative on
exposed skin.
Permethrin pre-treated
clothing, tucked &
taped. DEET or Organic
alternative on
exposed skin.
Tyvek, tucked & taped. Apply dermal barrier
cream. Clothing removed carefully at the end of the
day and disposed of**.
Has the state/work area and the time of year in
which the project will be performed been identified as being a location where insect or poisonous plant
hazards exist?
Perform hazard assessment (THA) to
determine the appropriate PPE.
No
Is there evidence for potential exposure to hazardous insects?
Is there evidence for potential exposure to
poisonous plants?
Perform hazard assessment (THA) to
determine the appropriate PPE.
No No
Yes
Yes
Long-legged pants & long-sleeved shirts, tucked a taped.
DEET or Organic
alternative applied.
Yes
Long-legged pants & long-sleeved shirts,
tucked & taped. Apply dermal barrier cream. Clothing to be washed
separately**.
* indicates that when both insect and poisonous plant hazards are recognized hazards at a project site, the most conservative combination of the available PPE choices will be selected. ** indicates that clothing that has been known or suspected to have come in contact with poisonous plants must be washed before it can be worn again. Similarly, Tyvek® that has been known or suspected to have come in contact with poisonous plants will be disposed of rather than reused during a subsequent day or project.
PPE Options*
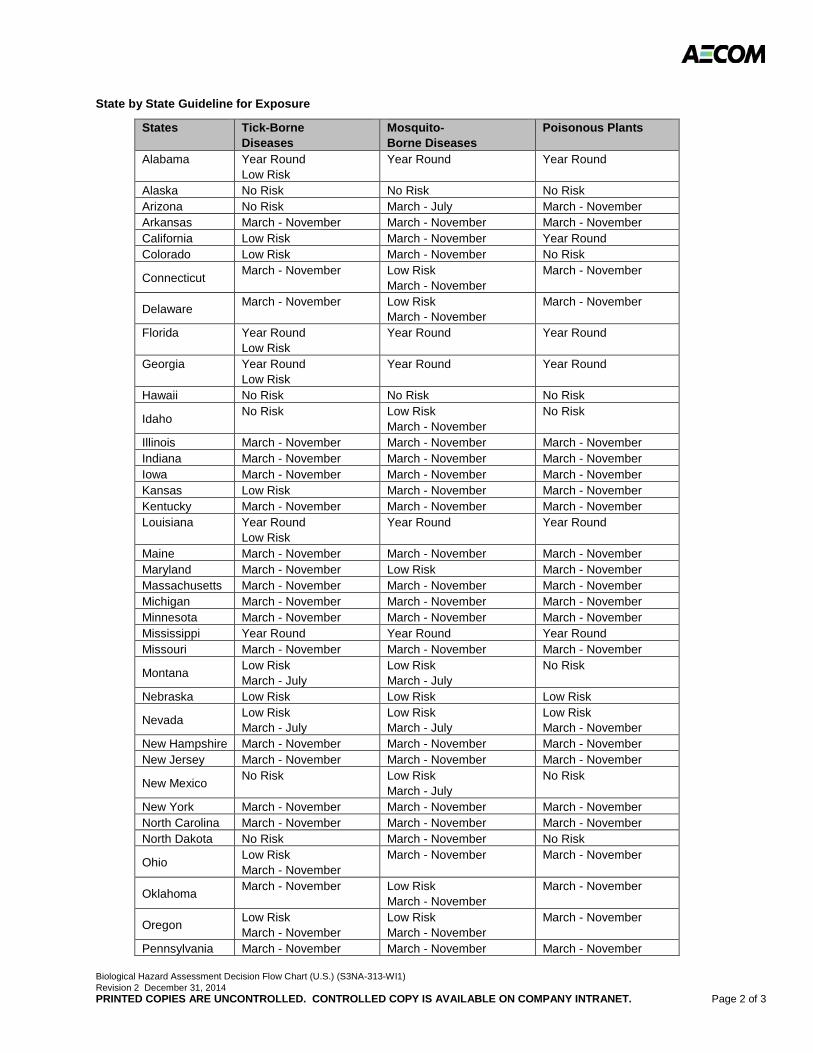
Biological Hazard Assessment Decision Flow Chart (U.S.) (S3NA-313-WI1) Revision 2 December 31, 2014 PRINTED COPIES ARE UNCONTROLLED. CONTROLLED COPY IS AVAILABLE ON COMPANY INTRANET. Page 2 of 3
State by State Guideline for Exposure
States Tick-Borne Diseases
Mosquito- Borne Diseases
Poisonous Plants
Alabama
Year Round Low Risk
Year Round Year Round
Alaska No Risk No Risk No Risk Arizona No Risk March - July March - November Arkansas March - November March - November March - November California Low Risk March - November Year Round Colorado Low Risk March - November No Risk
Connecticut March - November Low Risk
March - November March - November
Delaware March - November Low Risk
March - November March - November
Florida Year Round Low Risk
Year Round Year Round
Georgia Year Round Low Risk
Year Round Year Round
Hawaii No Risk No Risk No Risk
Idaho No Risk Low Risk
March - November No Risk
Illinois March - November March - November March - November Indiana March - November March - November March - November Iowa March - November March - November March - November Kansas Low Risk March - November March - November Kentucky March - November March - November March - November Louisiana Year Round
Low Risk Year Round Year Round
Maine March - November March - November March - November Maryland March - November Low Risk March - November Massachusetts March - November March - November March - November Michigan March - November March - November March - November Minnesota March - November March - November March - November Mississippi Year Round Year Round Year Round Missouri March - November March - November March - November
Montana Low Risk March - July
Low Risk March - July
No Risk
Nebraska Low Risk Low Risk Low Risk
Nevada Low Risk March - July
Low Risk March - July
Low Risk March - November
New Hampshire March - November March - November March - November New Jersey March - November March - November March - November
New Mexico No Risk Low Risk
March - July No Risk
New York March - November March - November March - November North Carolina March - November March - November March - November North Dakota No Risk March - November No Risk
Ohio Low Risk March - November
March - November March - November
Oklahoma March - November Low Risk
March - November March - November
Oregon Low Risk March - November
Low Risk March - November
March - November
Pennsylvania March - November March - November March - November
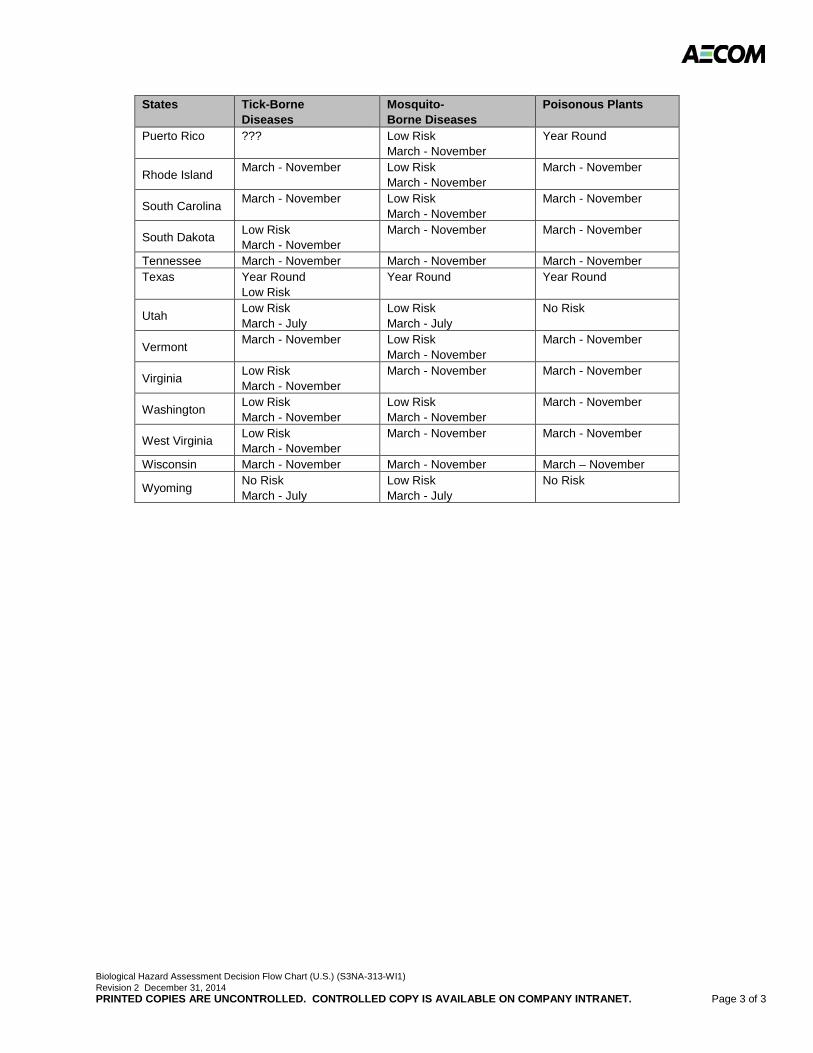
Biological Hazard Assessment Decision Flow Chart (U.S.) (S3NA-313-WI1) Revision 2 December 31, 2014 PRINTED COPIES ARE UNCONTROLLED. CONTROLLED COPY IS AVAILABLE ON COMPANY INTRANET. Page 3 of 3
States Tick-Borne Diseases
Mosquito- Borne Diseases
Poisonous Plants
Puerto Rico ??? Low Risk March - November
Year Round
Rhode Island March - November Low Risk
March - November March - November
South Carolina March - November Low Risk
March - November March - November
South Dakota Low Risk March - November
March - November March - November
Tennessee March - November March - November March - November Texas Year Round
Low Risk Year Round Year Round
Utah Low Risk March - July
Low Risk March - July
No Risk
Vermont March - November Low Risk
March - November March - November
Virginia Low Risk March - November
March - November March - November
Washington Low Risk March - November
Low Risk March - November
March - November
West Virginia Low Risk March - November
March - November March - November
Wisconsin March - November March - November March – November
Wyoming No Risk March - July
Low Risk March - July
No Risk
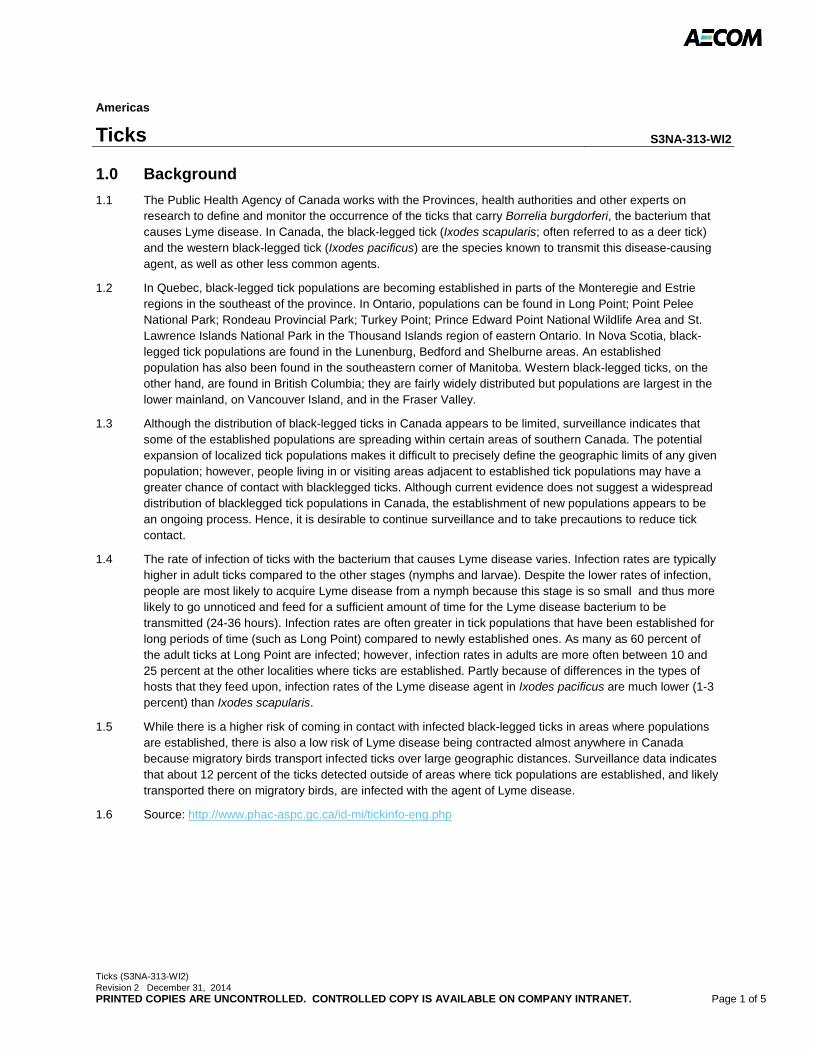
Ticks (S3NA-313-WI2) Revision 2 December 31, 2014 PRINTED COPIES ARE UNCONTROLLED. CONTROLLED COPY IS AVAILABLE ON COMPANY INTRANET. Page 1 of 5
Americas
Ticks S3NA-313-WI2
1.0 Background
1.1 The Public Health Agency of Canada works with the Provinces, health authorities and other experts on research to define and monitor the occurrence of the ticks that carry Borrelia burgdorferi, the bacterium that causes Lyme disease. In Canada, the black-legged tick (Ixodes scapularis; often referred to as a deer tick) and the western black-legged tick (Ixodes pacificus) are the species known to transmit this disease-causing agent, as well as other less common agents.
1.2 In Quebec, black-legged tick populations are becoming established in parts of the Monteregie and Estrie regions in the southeast of the province. In Ontario, populations can be found in Long Point; Point Pelee National Park; Rondeau Provincial Park; Turkey Point; Prince Edward Point National Wildlife Area and St. Lawrence Islands National Park in the Thousand Islands region of eastern Ontario. In Nova Scotia, black-legged tick populations are found in the Lunenburg, Bedford and Shelburne areas. An established population has also been found in the southeastern corner of Manitoba. Western black-legged ticks, on the other hand, are found in British Columbia; they are fairly widely distributed but populations are largest in the lower mainland, on Vancouver Island, and in the Fraser Valley.
1.3 Although the distribution of black-legged ticks in Canada appears to be limited, surveillance indicates that some of the established populations are spreading within certain areas of southern Canada. The potential expansion of localized tick populations makes it difficult to precisely define the geographic limits of any given population; however, people living in or visiting areas adjacent to established tick populations may have a greater chance of contact with blacklegged ticks. Although current evidence does not suggest a widespread distribution of blacklegged tick populations in Canada, the establishment of new populations appears to be an ongoing process. Hence, it is desirable to continue surveillance and to take precautions to reduce tick contact.
1.4 The rate of infection of ticks with the bacterium that causes Lyme disease varies. Infection rates are typically higher in adult ticks compared to the other stages (nymphs and larvae). Despite the lower rates of infection, people are most likely to acquire Lyme disease from a nymph because this stage is so small and thus more likely to go unnoticed and feed for a sufficient amount of time for the Lyme disease bacterium to be transmitted (24-36 hours). Infection rates are often greater in tick populations that have been established for long periods of time (such as Long Point) compared to newly established ones. As many as 60 percent of the adult ticks at Long Point are infected; however, infection rates in adults are more often between 10 and 25 percent at the other localities where ticks are established. Partly because of differences in the types of hosts that they feed upon, infection rates of the Lyme disease agent in Ixodes pacificus are much lower (1-3 percent) than Ixodes scapularis.
1.5 While there is a higher risk of coming in contact with infected black-legged ticks in areas where populations are established, there is also a low risk of Lyme disease being contracted almost anywhere in Canada because migratory birds transport infected ticks over large geographic distances. Surveillance data indicates that about 12 percent of the ticks detected outside of areas where tick populations are established, and likely transported there on migratory birds, are infected with the agent of Lyme disease.
1.6 Source: http://www.phac-aspc.gc.ca/id-mi/tickinfo-eng.php
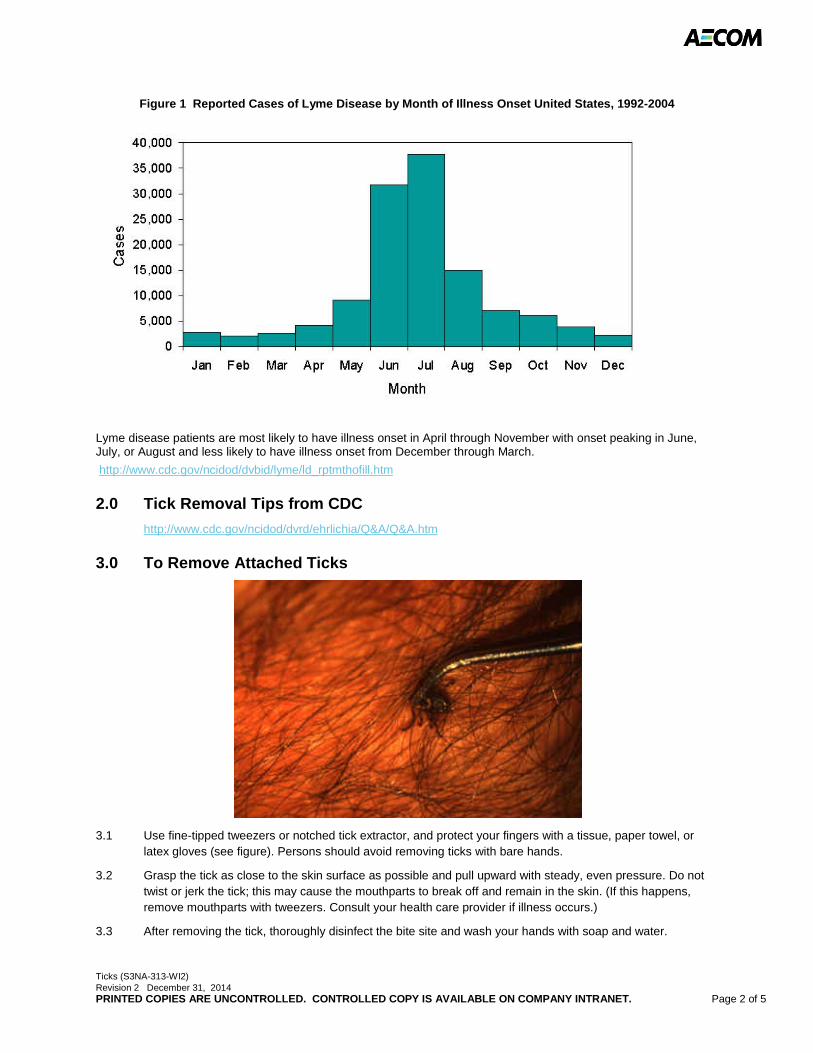
Ticks (S3NA-313-WI2) Revision 2 December 31, 2014 PRINTED COPIES ARE UNCONTROLLED. CONTROLLED COPY IS AVAILABLE ON COMPANY INTRANET. Page 2 of 5
Figure 1 Reported Cases of Lyme Disease by Month of Illness Onset United States, 1992-2004
Lyme disease patients are most likely to have illness onset in April through November with onset peaking in June, July, or August and less likely to have illness onset from December through March.
http://www.cdc.gov/ncidod/dvbid/lyme/ld_rptmthofill.htm
2.0 Tick Removal Tips from CDC
http://www.cdc.gov/ncidod/dvrd/ehrlichia/Q&A/Q&A.htm
3.0 To Remove Attached Ticks
3.1 Use fine-tipped tweezers or notched tick extractor, and protect your fingers with a tissue, paper towel, or latex gloves (see figure). Persons should avoid removing ticks with bare hands.
3.2 Grasp the tick as close to the skin surface as possible and pull upward with steady, even pressure. Do not twist or jerk the tick; this may cause the mouthparts to break off and remain in the skin. (If this happens, remove mouthparts with tweezers. Consult your health care provider if illness occurs.)
3.3 After removing the tick, thoroughly disinfect the bite site and wash your hands with soap and water.
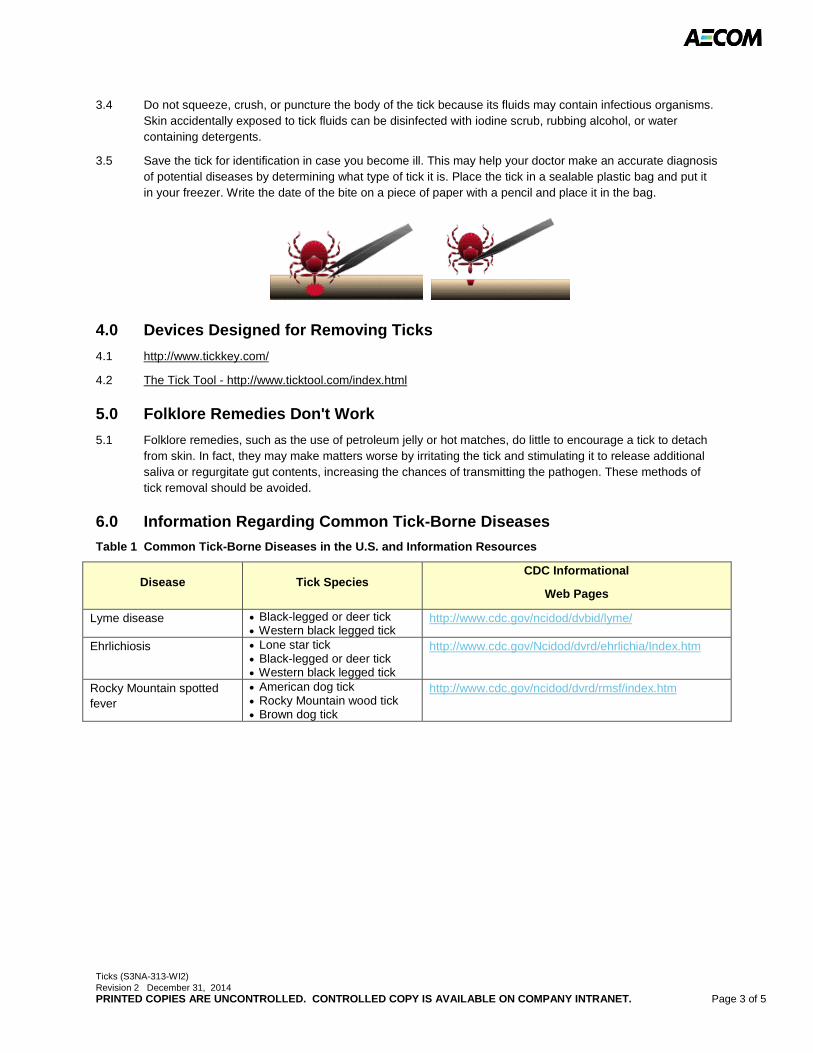
Ticks (S3NA-313-WI2) Revision 2 December 31, 2014 PRINTED COPIES ARE UNCONTROLLED. CONTROLLED COPY IS AVAILABLE ON COMPANY INTRANET. Page 3 of 5
3.4 Do not squeeze, crush, or puncture the body of the tick because its fluids may contain infectious organisms. Skin accidentally exposed to tick fluids can be disinfected with iodine scrub, rubbing alcohol, or water containing detergents.
3.5 Save the tick for identification in case you become ill. This may help your doctor make an accurate diagnosis of potential diseases by determining what type of tick it is. Place the tick in a sealable plastic bag and put it in your freezer. Write the date of the bite on a piece of paper with a pencil and place it in the bag.
4.0 Devices Designed for Removing Ticks
4.1 http://www.tickkey.com/
4.2 The Tick Tool - http://www.ticktool.com/index.html
5.0 Folklore Remedies Don't Work
5.1 Folklore remedies, such as the use of petroleum jelly or hot matches, do little to encourage a tick to detach from skin. In fact, they may make matters worse by irritating the tick and stimulating it to release additional saliva or regurgitate gut contents, increasing the chances of transmitting the pathogen. These methods of tick removal should be avoided.
6.0 Information Regarding Common Tick-Borne Diseases
Table 1 Common Tick-Borne Diseases in the U.S. and Information Resources
Disease Tick Species CDC Informational
Web Pages
Lyme disease • Black-legged or deer tick • Western black legged tick
http://www.cdc.gov/ncidod/dvbid/lyme/
Ehrlichiosis • Lone star tick • Black-legged or deer tick • Western black legged tick
http://www.cdc.gov/Ncidod/dvrd/ehrlichia/Index.htm
Rocky Mountain spotted fever
• American dog tick • Rocky Mountain wood tick • Brown dog tick
http://www.cdc.gov/ncidod/dvrd/rmsf/index.htm
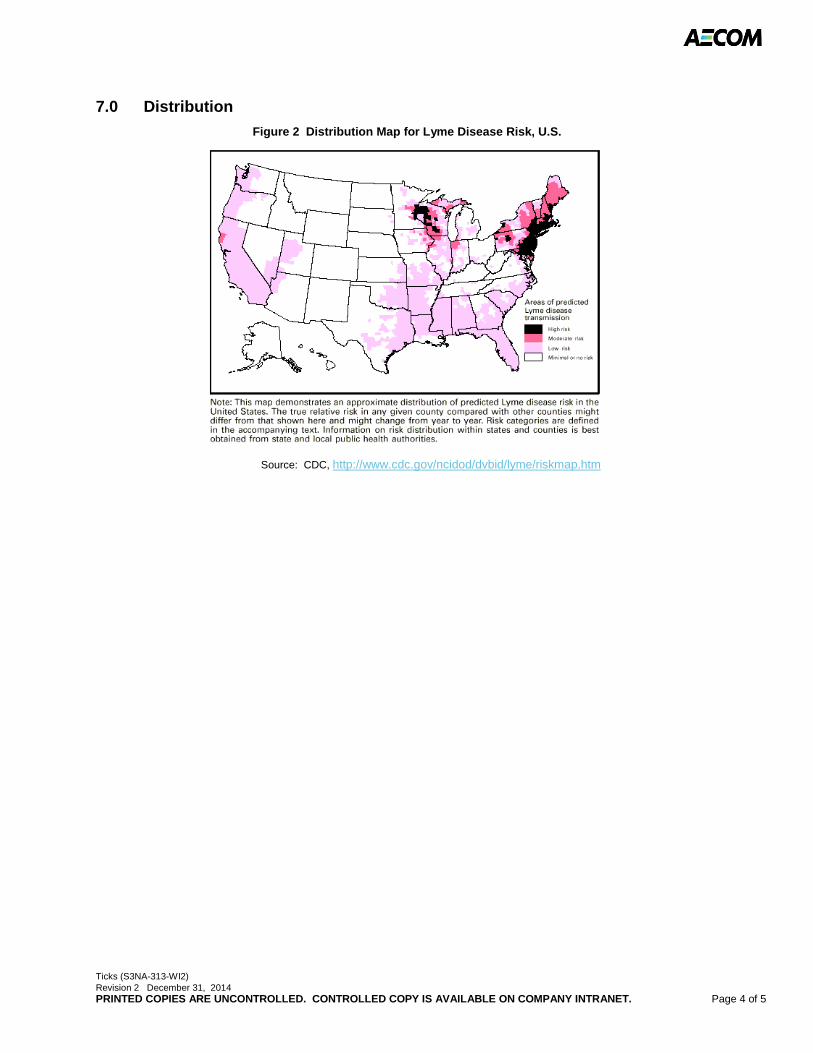
Ticks (S3NA-313-WI2) Revision 2 December 31, 2014 PRINTED COPIES ARE UNCONTROLLED. CONTROLLED COPY IS AVAILABLE ON COMPANY INTRANET. Page 4 of 5
7.0 Distribution
Figure 2 Distribution Map for Lyme Disease Risk, U.S.
Source: CDC, http://www.cdc.gov/ncidod/dvbid/lyme/riskmap.htm
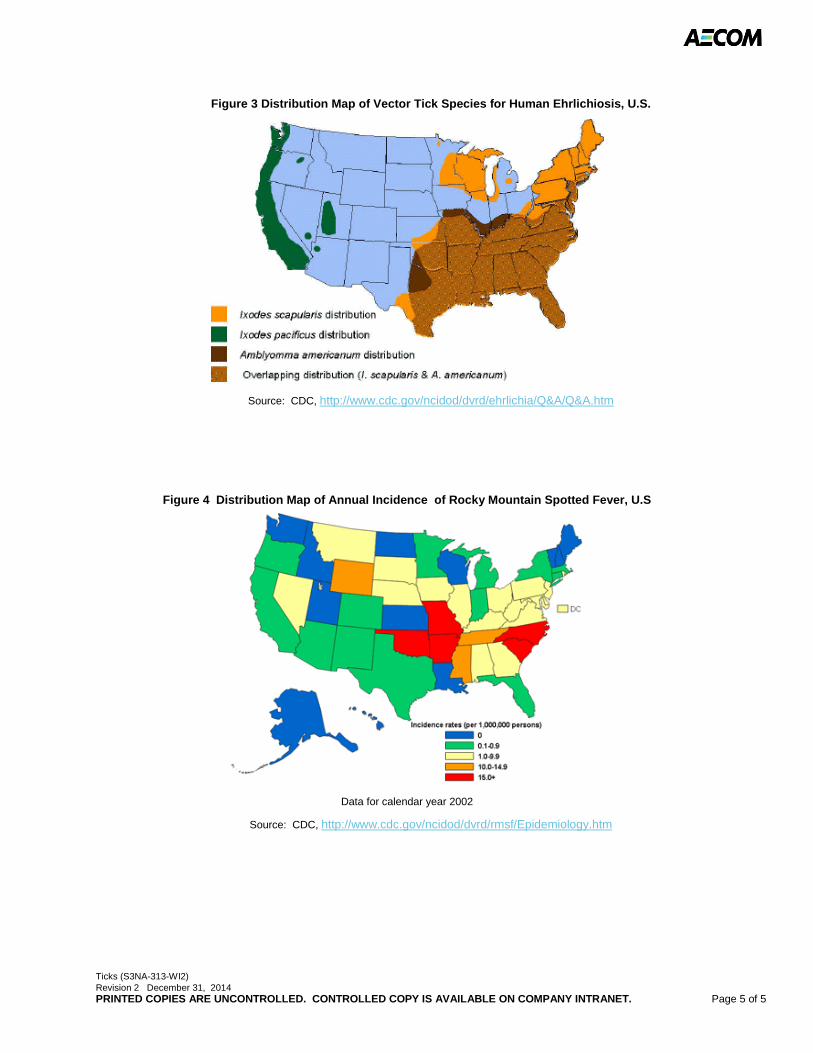
Ticks (S3NA-313-WI2) Revision 2 December 31, 2014 PRINTED COPIES ARE UNCONTROLLED. CONTROLLED COPY IS AVAILABLE ON COMPANY INTRANET. Page 5 of 5
Figure 3 Distribution Map of Vector Tick Species for Human Ehrlichiosis, U.S.
Source: CDC, http://www.cdc.gov/ncidod/dvrd/ehrlichia/Q&A/Q&A.htm
Figure 4 Distribution Map of Annual Incidence of Rocky Mountain Spotted Fever, U.S
Data for calendar year 2002
Source: CDC, http://www.cdc.gov/ncidod/dvrd/rmsf/Epidemiology.htm
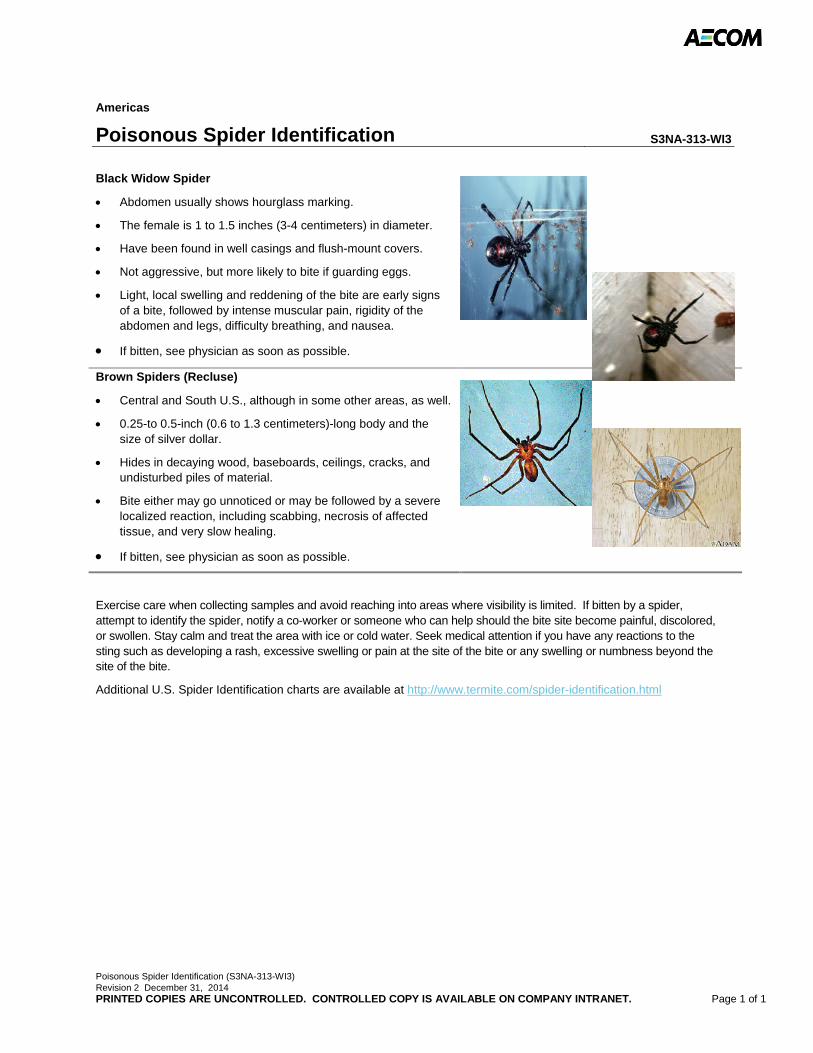
Poisonous Spider Identification (S3NA-313-WI3) Revision 2 December 31, 2014 PRINTED COPIES ARE UNCONTROLLED. CONTROLLED COPY IS AVAILABLE ON COMPANY INTRANET. Page 1 of 1
Americas
Poisonous Spider Identification S3NA-313-WI3
Black Widow Spider
• Abdomen usually shows hourglass marking.
• The female is 1 to 1.5 inches (3-4 centimeters) in diameter.
• Have been found in well casings and flush-mount covers.
• Not aggressive, but more likely to bite if guarding eggs.
• Light, local swelling and reddening of the bite are early signs of a bite, followed by intense muscular pain, rigidity of the abdomen and legs, difficulty breathing, and nausea.
• If bitten, see physician as soon as possible.
Brown Spiders (Recluse)
• Central and South U.S., although in some other areas, as well.
• 0.25-to 0.5-inch (0.6 to 1.3 centimeters)-long body and the size of silver dollar.
• Hides in decaying wood, baseboards, ceilings, cracks, and undisturbed piles of material.
• Bite either may go unnoticed or may be followed by a severe localized reaction, including scabbing, necrosis of affected tissue, and very slow healing.
• If bitten, see physician as soon as possible.
Exercise care when collecting samples and avoid reaching into areas where visibility is limited. If bitten by a spider, attempt to identify the spider, notify a co-worker or someone who can help should the bite site become painful, discolored, or swollen. Stay calm and treat the area with ice or cold water. Seek medical attention if you have any reactions to the sting such as developing a rash, excessive swelling or pain at the site of the bite or any swelling or numbness beyond the site of the bite.
Additional U.S. Spider Identification charts are available at http://www.termite.com/spider-identification.html
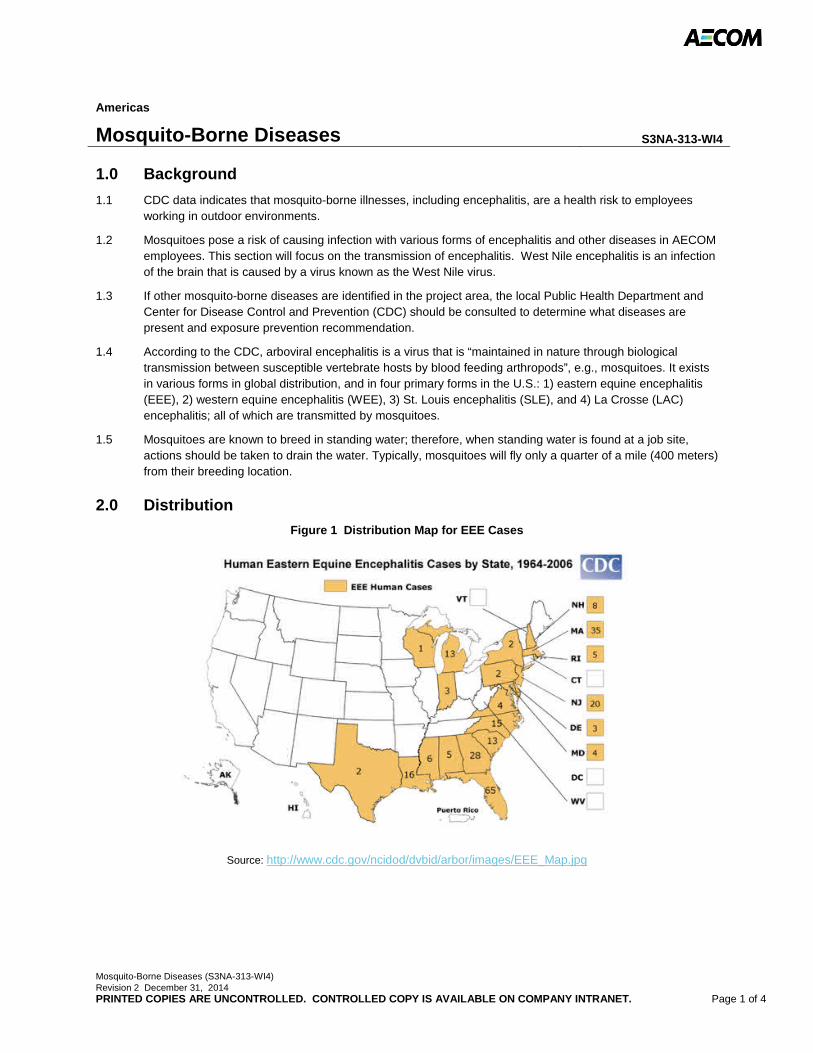
Mosquito-Borne Diseases (S3NA-313-WI4) Revision 2 December 31, 2014 PRINTED COPIES ARE UNCONTROLLED. CONTROLLED COPY IS AVAILABLE ON COMPANY INTRANET. Page 1 of 4
Americas
Mosquito-Borne Diseases S3NA-313-WI4
1.0 Background
1.1 CDC data indicates that mosquito-borne illnesses, including encephalitis, are a health risk to employees working in outdoor environments.
1.2 Mosquitoes pose a risk of causing infection with various forms of encephalitis and other diseases in AECOM employees. This section will focus on the transmission of encephalitis. West Nile encephalitis is an infection of the brain that is caused by a virus known as the West Nile virus.
1.3 If other mosquito-borne diseases are identified in the project area, the local Public Health Department and Center for Disease Control and Prevention (CDC) should be consulted to determine what diseases are present and exposure prevention recommendation.
1.4 According to the CDC, arboviral encephalitis is a virus that is “maintained in nature through biological transmission between susceptible vertebrate hosts by blood feeding arthropods”, e.g., mosquitoes. It exists in various forms in global distribution, and in four primary forms in the U.S.: 1) eastern equine encephalitis (EEE), 2) western equine encephalitis (WEE), 3) St. Louis encephalitis (SLE), and 4) La Crosse (LAC) encephalitis; all of which are transmitted by mosquitoes.
1.5 Mosquitoes are known to breed in standing water; therefore, when standing water is found at a job site, actions should be taken to drain the water. Typically, mosquitoes will fly only a quarter of a mile (400 meters) from their breeding location.
2.0 Distribution
Figure 1 Distribution Map for EEE Cases
Source: http://www.cdc.gov/ncidod/dvbid/arbor/images/EEE_Map.jpg

Mosquito-Borne Diseases (S3NA-313-WI4) Revision 2 December 31, 2014 PRINTED COPIES ARE UNCONTROLLED. CONTROLLED COPY IS AVAILABLE ON COMPANY INTRANET. Page 2 of 4
Figure 2 Distribution Map for WEE Cases
Source: http://www.cdc.gov/ncidod/dvbid/arbor/images/WEE_Map.jpg
Figure 3 Distribution Map for SLE Cases
Source: http://www.cdc.gov/ncidod/dvbid/arbor/images/SLE_Map.jpg
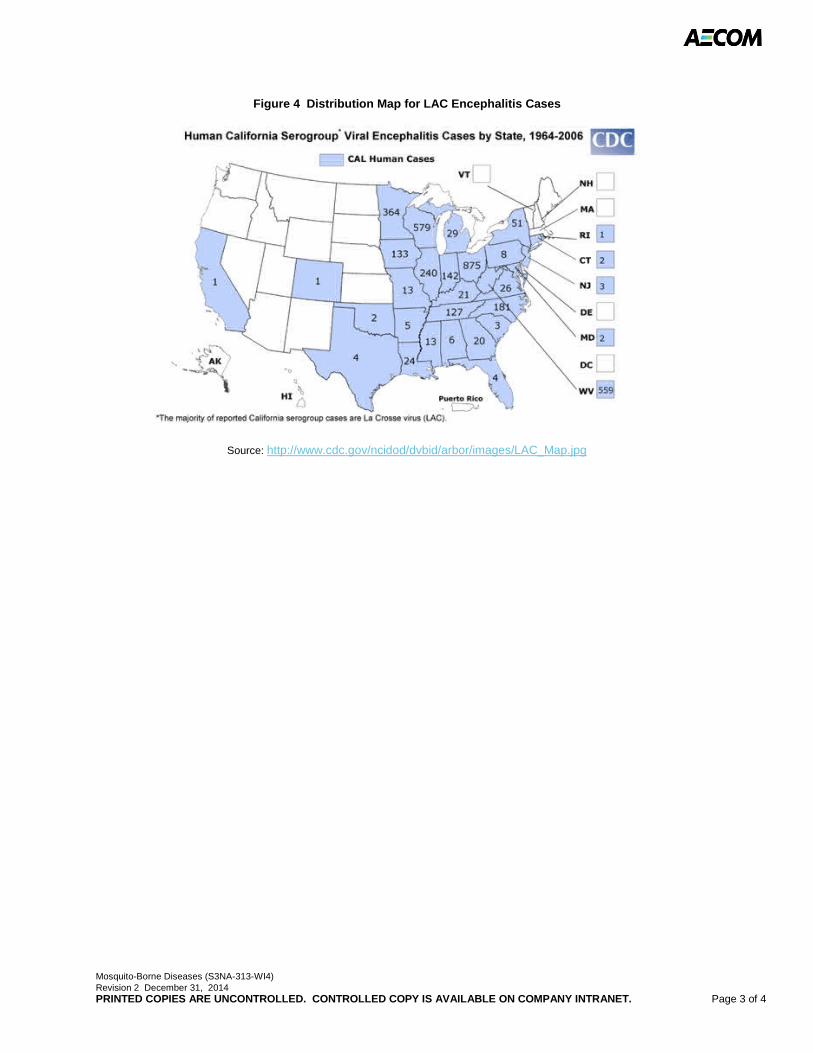
Mosquito-Borne Diseases (S3NA-313-WI4) Revision 2 December 31, 2014 PRINTED COPIES ARE UNCONTROLLED. CONTROLLED COPY IS AVAILABLE ON COMPANY INTRANET. Page 3 of 4
Figure 4 Distribution Map for LAC Encephalitis Cases
Source: http://www.cdc.gov/ncidod/dvbid/arbor/images/LAC_Map.jpg
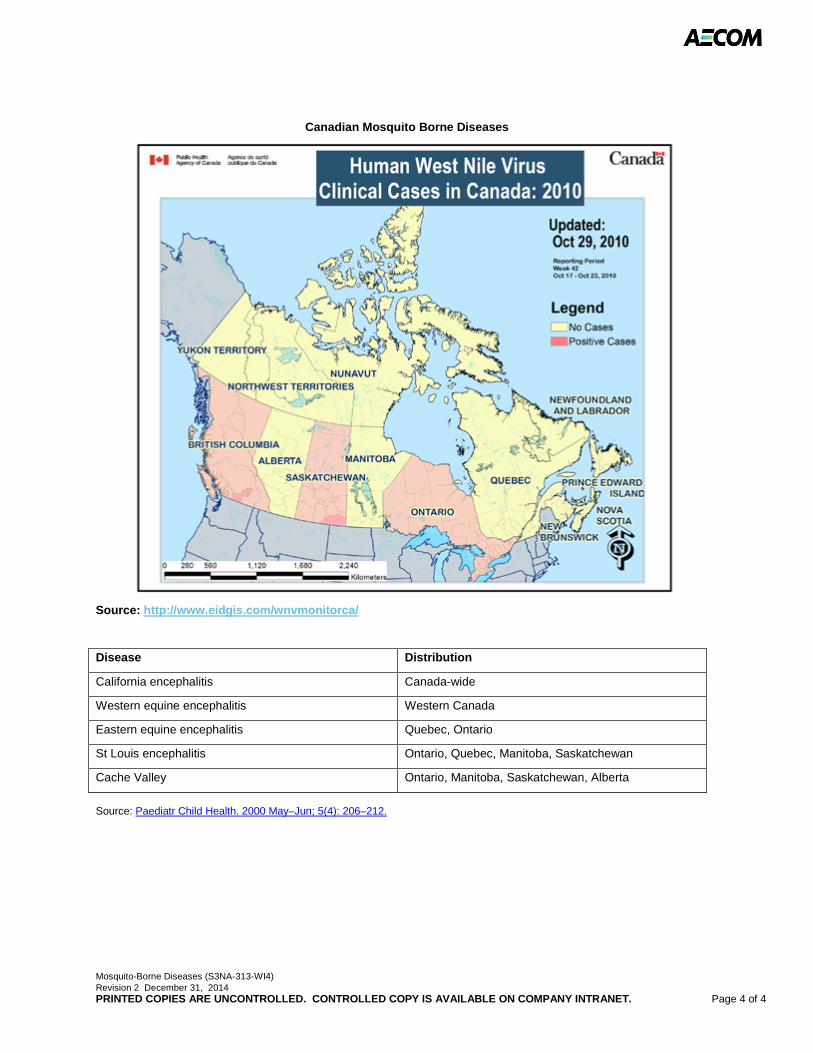
Mosquito-Borne Diseases (S3NA-313-WI4) Revision 2 December 31, 2014 PRINTED COPIES ARE UNCONTROLLED. CONTROLLED COPY IS AVAILABLE ON COMPANY INTRANET. Page 4 of 4
Canadian Mosquito Borne Diseases
Source: http://www.eidgis.com/wnvmonitorca/
Disease Distribution
California encephalitis Canada-wide
Western equine encephalitis Western Canada
Eastern equine encephalitis Quebec, Ontario
St Louis encephalitis Ontario, Quebec, Manitoba, Saskatchewan
Cache Valley Ontario, Manitoba, Saskatchewan, Alberta
Source: Paediatr Child Health. 2000 May–Jun; 5(4): 206–212.
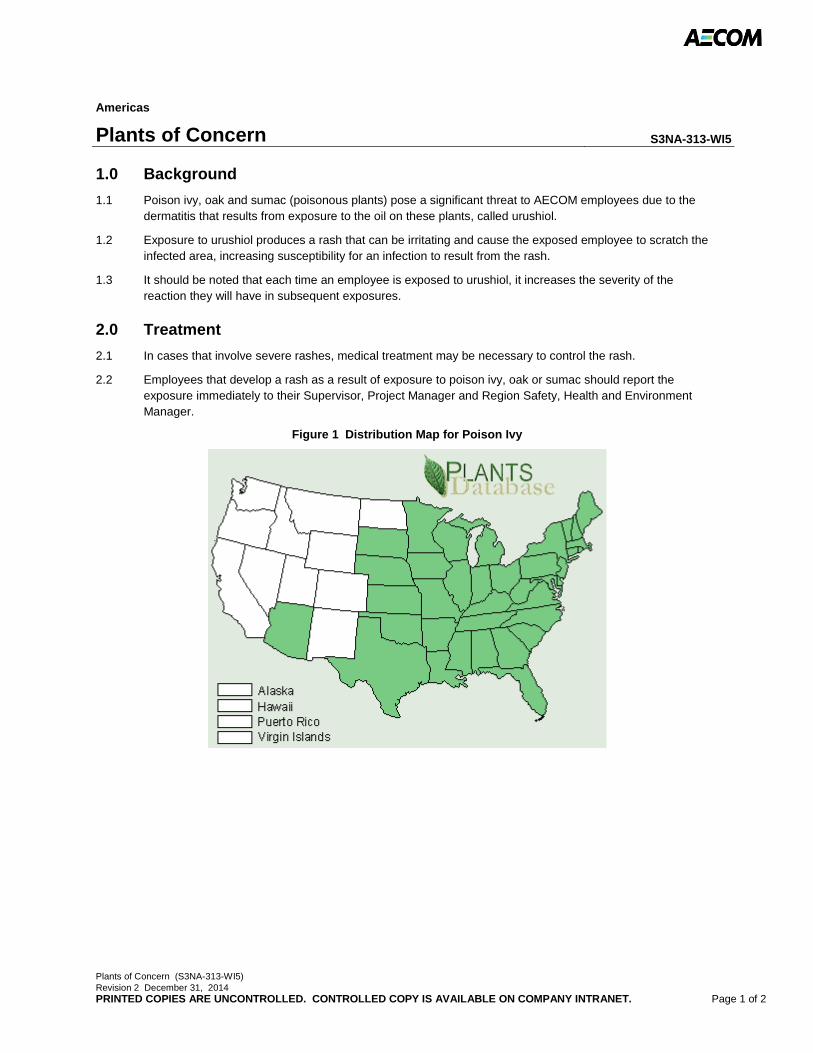
Plants of Concern (S3NA-313-WI5) Revision 2 December 31, 2014 PRINTED COPIES ARE UNCONTROLLED. CONTROLLED COPY IS AVAILABLE ON COMPANY INTRANET. Page 1 of 2
Americas
Plants of Concern S3NA-313-WI5
1.0 Background
1.1 Poison ivy, oak and sumac (poisonous plants) pose a significant threat to AECOM employees due to the dermatitis that results from exposure to the oil on these plants, called urushiol.
1.2 Exposure to urushiol produces a rash that can be irritating and cause the exposed employee to scratch the infected area, increasing susceptibility for an infection to result from the rash.
1.3 It should be noted that each time an employee is exposed to urushiol, it increases the severity of the reaction they will have in subsequent exposures.
2.0 Treatment
2.1 In cases that involve severe rashes, medical treatment may be necessary to control the rash.
2.2 Employees that develop a rash as a result of exposure to poison ivy, oak or sumac should report the exposure immediately to their Supervisor, Project Manager and Region Safety, Health and Environment Manager.
Figure 1 Distribution Map for Poison Ivy
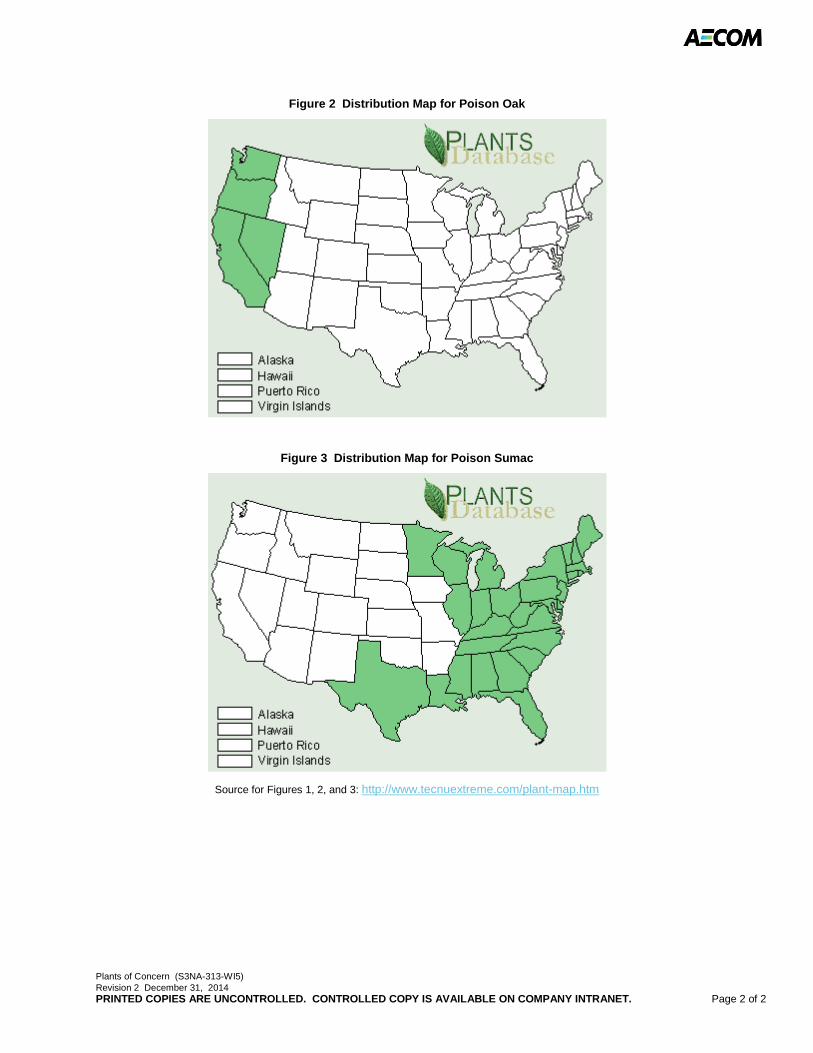
Plants of Concern (S3NA-313-WI5) Revision 2 December 31, 2014 PRINTED COPIES ARE UNCONTROLLED. CONTROLLED COPY IS AVAILABLE ON COMPANY INTRANET. Page 2 of 2
Figure 2 Distribution Map for Poison Oak
Figure 3 Distribution Map for Poison Sumac
Source for Figures 1, 2, and 3: http://www.tecnuextreme.com/plant-map.htm
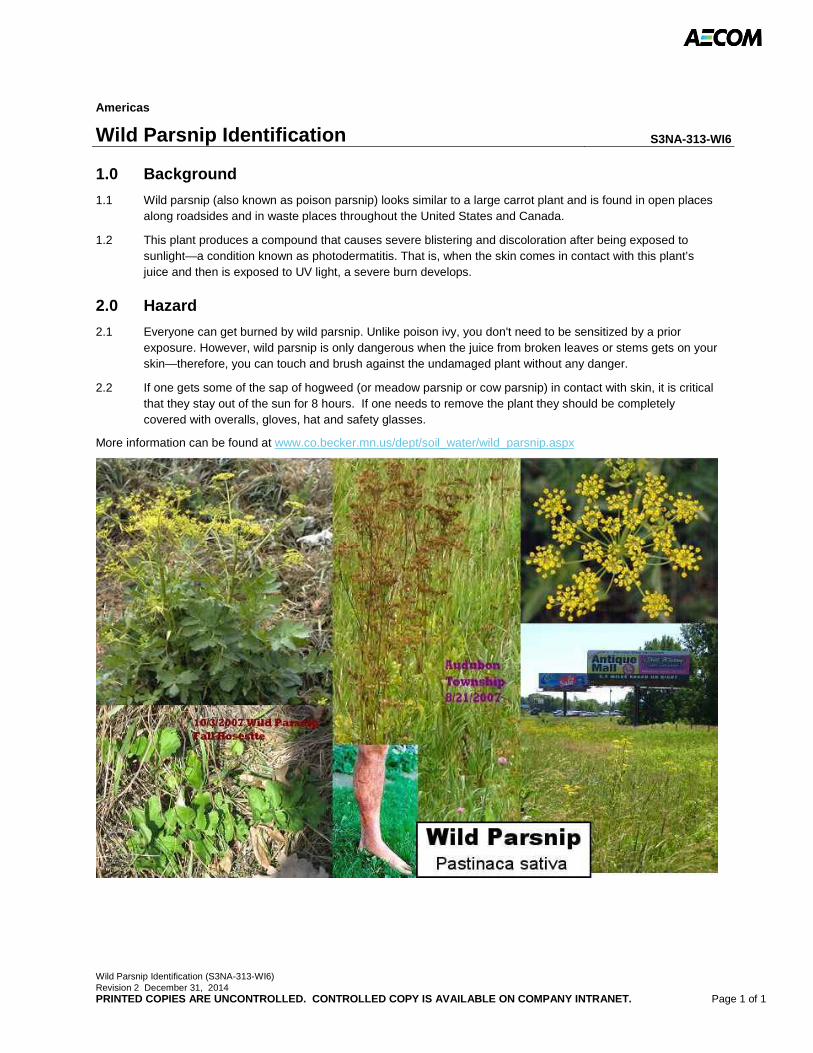
Wild Parsnip Identification (S3NA-313-WI6) Revision 2 December 31, 2014 PRINTED COPIES ARE UNCONTROLLED. CONTROLLED COPY IS AVAILABLE ON COMPANY INTRANET. Page 1 of 1
Americas
Wild Parsnip Identification S3NA-313-WI6
1.0 Background
1.1 Wild parsnip (also known as poison parsnip) looks similar to a large carrot plant and is found in open places along roadsides and in waste places throughout the United States and Canada.
1.2 This plant produces a compound that causes severe blistering and discoloration after being exposed to sunlight—a condition known as photodermatitis. That is, when the skin comes in contact with this plant’s juice and then is exposed to UV light, a severe burn develops.
2.0 Hazard
2.1 Everyone can get burned by wild parsnip. Unlike poison ivy, you don't need to be sensitized by a prior exposure. However, wild parsnip is only dangerous when the juice from broken leaves or stems gets on your skin—therefore, you can touch and brush against the undamaged plant without any danger.
2.2 If one gets some of the sap of hogweed (or meadow parsnip or cow parsnip) in contact with skin, it is critical that they stay out of the sun for 8 hours. If one needs to remove the plant they should be completely covered with overalls, gloves, hat and safety glasses.
More information can be found at www.co.becker.mn.us/dept/soil_water/wild_parsnip.aspx
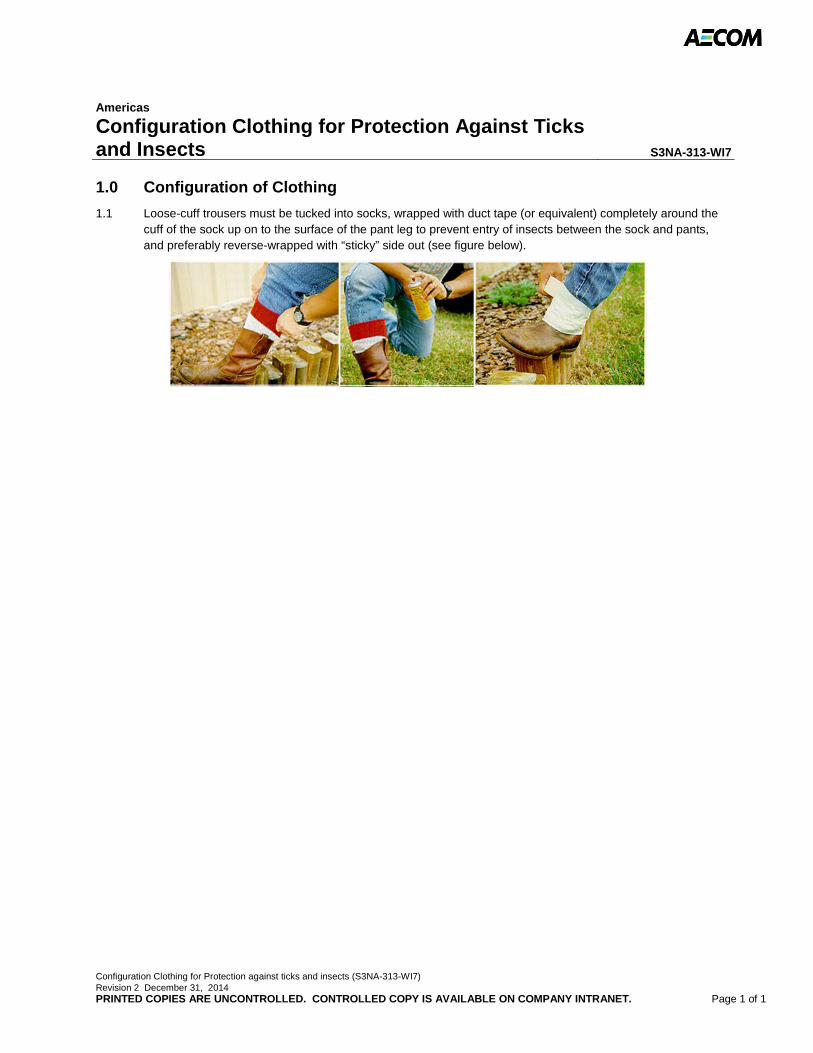
Configuration Clothing for Protection against ticks and insects (S3NA-313-WI7) Revision 2 December 31, 2014 PRINTED COPIES ARE UNCONTROLLED. CONTROLLED COPY IS AVAILABLE ON COMPANY INTRANET. Page 1 of 1
Americas
Configuration Clothing for Protection Against Ticks and Insects S3NA-313-WI7
1.0 Configuration of Clothing
1.1 Loose-cuff trousers must be tucked into socks, wrapped with duct tape (or equivalent) completely around the cuff of the sock up on to the surface of the pant leg to prevent entry of insects between the sock and pants, and preferably reverse-wrapped with “sticky” side out (see figure below).
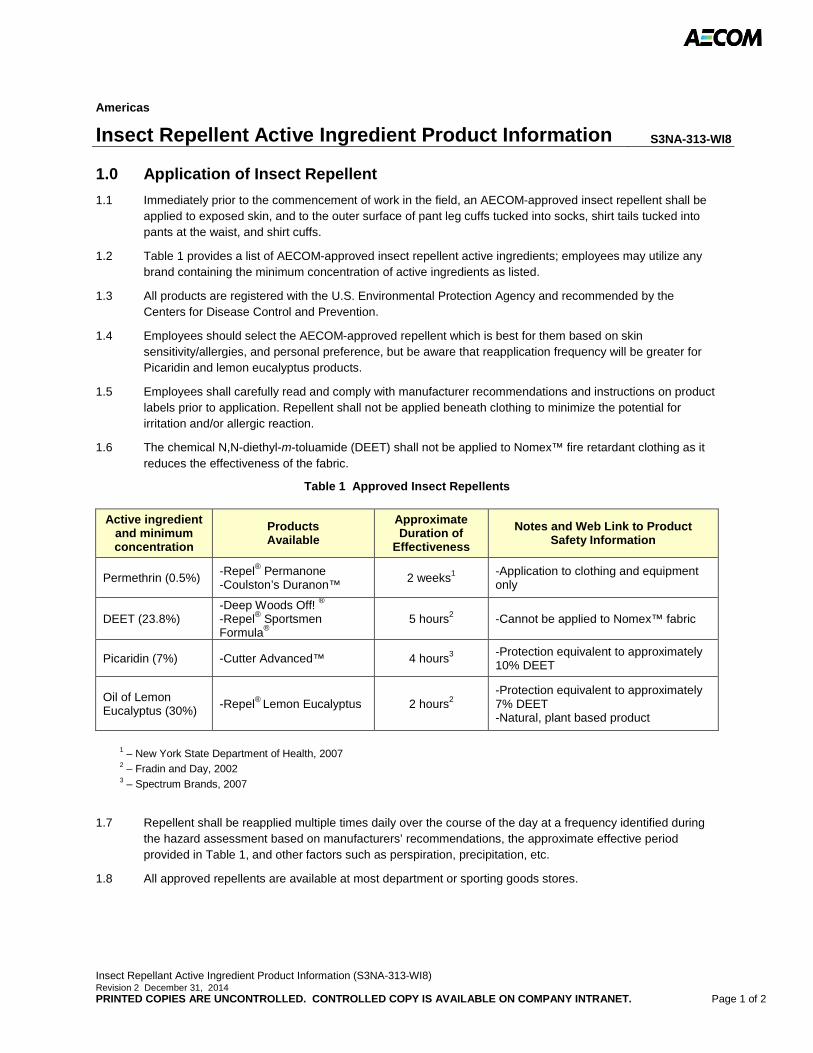
Insect Repellant Active Ingredient Product Information (S3NA-313-WI8) Revision 2 December 31, 2014 PRINTED COPIES ARE UNCONTROLLED. CONTROLLED COPY IS AVAILABLE ON COMPANY INTRANET. Page 1 of 2
Americas
Insect Repellent Active Ingredient Product Information S3NA-313-WI8
1.0 Application of Insect Repellent
1.1 Immediately prior to the commencement of work in the field, an AECOM-approved insect repellent shall be applied to exposed skin, and to the outer surface of pant leg cuffs tucked into socks, shirt tails tucked into pants at the waist, and shirt cuffs.
1.2 Table 1 provides a list of AECOM-approved insect repellent active ingredients; employees may utilize any brand containing the minimum concentration of active ingredients as listed.
1.3 All products are registered with the U.S. Environmental Protection Agency and recommended by the Centers for Disease Control and Prevention.
1.4 Employees should select the AECOM-approved repellent which is best for them based on skin sensitivity/allergies, and personal preference, but be aware that reapplication frequency will be greater for Picaridin and lemon eucalyptus products.
1.5 Employees shall carefully read and comply with manufacturer recommendations and instructions on product labels prior to application. Repellent shall not be applied beneath clothing to minimize the potential for irritation and/or allergic reaction.
1.6 The chemical N,N-diethyl-m-toluamide (DEET) shall not be applied to Nomex™ fire retardant clothing as it reduces the effectiveness of the fabric.
Table 1 Approved Insect Repellents
Active ingredient and minimum concentration
Products Available
Approximate Duration of
Effectiveness
Notes and Web Link to Product Safety Information
Permethrin (0.5%) -Repel® Permanone -Coulston’s Duranon™
2 weeks1 -Application to clothing and equipment only
DEET (23.8%) -Deep Woods Off! ® -Repel® Sportsmen Formula®
5 hours2 -Cannot be applied to Nomex™ fabric
Picaridin (7%) -Cutter Advanced™ 4 hours3 -Protection equivalent to approximately 10% DEET
Oil of Lemon Eucalyptus (30%)
-Repel® Lemon Eucalyptus 2 hours2 -Protection equivalent to approximately 7% DEET -Natural, plant based product
1 – New York State Department of Health, 2007 2 – Fradin and Day, 2002 3 – Spectrum Brands, 2007
1.7 Repellent shall be reapplied multiple times daily over the course of the day at a frequency identified during the hazard assessment based on manufacturers’ recommendations, the approximate effective period provided in Table 1, and other factors such as perspiration, precipitation, etc.
1.8 All approved repellents are available at most department or sporting goods stores.
Insect Repellant Active Ingredient Product Information (S3NA-313-WI8) Revision 2 December 31, 2014 PRINTED COPIES ARE UNCONTROLLED. CONTROLLED COPY IS AVAILABLE ON COMPANY INTRANET. Page 2 of 2
Insect Repellent Active Ingredient Product Information
Product Safety Information
Facts about the repellants recommended by AECOM are available by clicking on the embedded link.
National Pesticide Telecommunications Network Fact Sheet: Permethrin and Picaridin
Picaridin
Picaridin Fact Sheet.pdf
Permethrin
Permethrin Fact Sheet.pdf
DEET
DEET Fact Sheet.pdf
Lemon Eucalyptus
Lemon Eucalyptus fact sheet.pdf
New York Department of Health Recommendations for Permethrin Application (S3NA-313-WI9) Revision 2 December 31, 2014 PRINTED COPIES ARE UNCONTROLLED. CONTROLLED COPY IS AVAILABLE ON COMPANY INTRANET. Page 1 of 1
Americas
Permethrin Application S3NA-313-WI9
1.0 Application Recommendations
1.1 Source: New York State Department of Health, 2007. Health Advisory, Tick and Insect Repellents. http://www.health.state.ny.us/nysdoh/westnile/pdf/2737.pdf
1.2 Products containing permethrin are for use on clothing only—not on skin. Permethrin kills ticks and insects that come in contact with treated clothes. It is effective for two weeks or more if the clothing is not laundered.
2.0 Treat Clothing Only– DO NOT APPLY TO SKIN.
2.1 Read carefully and follow manufacturer's recommendations for application.
2.2 If you accidentally get the product on your skin, immediately wash with soap and water.
2.3 Apply to clothing in a well-ventilated outdoor area, protected from wind.
2.4 Only spray Permethrin products on the outer surface of clothing and shoes before you put them on - do not apply to clothing while it is being worn. Only spray enough product to lightly moisten the outer surface of the fabric causing a slight color change or darkening; do not saturate clothing. Do not exceed recommended spraying times. Pay special attention while treating socks, trouser cuffs and shirt cuffs to ensure proper coverage. Hang the treated clothing outdoors and allow clothing to dry for at least two hours (four hours under humid conditions) before wearing.
2.5 Do not treat clothing more than once every two weeks. Launder treated clothing separately from other clothing at least once before retreating.
2.6 Keep treated clothes in a separate bag. Those who frequent tick or mosquito habitats should consider having a set of clothes, preferably long-sleeved shirt, pants and socks that are used only in such settings. These clothes can be treated with a Permethrin-containing product according to the label directions, worn only when needed, and then placed in a separate bag when not in use. In hot weather, when long-sleeved shirt and pants may be uncomfortable, pants and jackets made of insect netting (either untreated or treated with repellent) can be worn. Such clothes are available in some sporting good stores and through outdoor equipment catalogs.
1. U. S. Environmental Protection Agency. 1999. Office of Pesticide Programs List of Chemicals Evaluated for Carcinogenic Potential-August 25, 1999. Office of Pesticide Programs. Washington, DC.
Bird Droppings Safe Work Practices (S3NA-313-WI10) Revision 2 December 31, 2014 PRINTED COPIES ARE UNCONTROLLED. CONTROLLED COPY IS AVAILABLE ON COMPANY INTRANET. Page 1 of 2
Americas
Bird Droppings Safe Work Practices S3NA-313-WI10
1.0 Background
1.1 According to the National Institute for Occupational Safety and Health (NIOSH), histoplasmosis is an infectious disease caused by inhaling spores of a fungus called Histoplasma capsulatum (abbreviated H. capsulatum) that may inhabit accumulated masses of pigeon droppings and excrement of other birds and flying animals. Its symptoms vary greatly, but the disease primarily affects the lungs. Occasionally, other organs are affected. This form of the disease is called disseminated histoplasmosis, and it can be fatal if untreated. The acute respiratory disease form of histoplasmosisis is characterized by respiratory symptoms, a general ill feeling, fever, chest pains, and a dry or non-productive cough. Distinct patterns may be seen on a chest x-ray. Chronic lung disease resembles tuberculosis and can worsen over months or years. If symptoms occur, they may start within 3 to 17 days of exposure, with an average of 10 days. On a positive note, histoplasmosis is not contagious.
1.2 Psittacosis, although primarily a respiratory disease, can cause a wide variety of clinical manifestations. Generally, about 10 days after infection occurs, the clinical illness begins abruptly with fever, chills, weakness, fatigue, muscle pain, anorexia, nausea, vomiting, excessive sweating and difficulty with breathing, headache, backache, and sensitivity to light.
1.3 Hypersensitivity pneumonitis is also known as pigeon breeder’s disease.
2.0 Symptoms
2.1 The acute form of hypersensitivity pneumonitis is clinically characterized by chills, fever, cough, breathlessness without wheezing, and malaise 4-10 hours after exposure. In general, an acute attack subsides after 18 to 24 hours.
3.0 Treatment
3.1 If a person should develop any of the symptoms as noted above, or others, it is important to see a physician and inform him of an exposure to pigeon/bird or bat excrement. A failure to diagnose the preceding conditions could occur if a treating physician is unaware of a patient’s exposure to pigeon/bird or bat excrement.
4.0 Prevention
4.1 Prior to work in any area where pigeons or other flying animals may nest, a written statement from the client shall be obtained in regards to the potential for, and extent of, accumulation of excrement on/in the structure from pigeons and other winged animals.
4.2 The client shall be asked to provide appropriate details as to the basis for their statement (e.g., date of last visual survey for pigeon/bird or bat excrement accumulation, date of last excrement removal effort, etc.).
4.3 In no case will an AECOM employee or contract employee be permitted to commence structure inspection procedures without the Project Manager having received and evaluated the aforementioned written statement from the client.
4.4 According to NIOSH, the best way to prevent exposure to H. capsulatum spores during survey and inspection work is to avoid situations where excrement and other potentially contaminated material can become airborne and inhaled. Therefore, it is preferable that the efforts to determine if, and to what extent, there is an accumulation of pigeon/bird or bat excrement on/in structures, or the efforts to clean-up/remove/dispose of such contaminated material, be left to the client or subcontracted out.

Bird Droppings Safe Work Practices (S3NA-313-WI10) Revision 2 December 31, 2014 PRINTED COPIES ARE UNCONTROLLED. CONTROLLED COPY IS AVAILABLE ON COMPANY INTRANET. Page 2 of 2
5.0 Safe Work Practices
5.1 In those cases where AECOM employees or contract employees are contracted by the client to determine the extent of accumulation of animal excrement in/on structures, the following minimum safety and health precautions shall be taken. (NOTE: precautionary measures are based on recommendations and best practices prescribed in the NIOSH 2004 public document titled Histoplasmosis – Protecting Workers at Risk).
5.2 All workers shall wear disposable protective clothing (Tyvek® coveralls). Disposable overalls with hoods shall be donned when working in areas where H. capsulatum spore-contaminated material is likely to fall from overhead.
5.3 All workers shall wear disposable shoe coverings fitted with ridged soles made of slip-resistant material to reduce the likelihood of slipping on wet or dusty surfaces. Gloves shall be worn.
5.4 All workers shall wear a full facepiece air purifying respirator fitted with P100 (HEPA) cartridges. If entering an enclosed area in which the extent of excrement contamination is unknown, additional protective measures shall be taken such that workers shall wear a powered air-purifying respirator (APR) with full facepiece fitted with P100 (HEPA) cartridges. Any variance from these requirements must be approved by the Region Safety, Health an Environment Manager. Workers donning APRs shall be medically screened, cleared, and trained in their proper use in accordance with AECOM safety program standards.
5.5 If contaminated material must be disturbed for purposes of removal/disposal or during the structure inspect process, it shall be wetted down prior to all work and will be rewetted as necessary to minimize airborne dusting.
5.6 After working in H. capsulatum spore-contaminated areas and before removing any respiratory protective equipment, workers shall remove all protective clothing and shoe coverings and seal them in a heavy-duty plastic bag for disposal.
5.7 Workers shall observe a high degree of personal hygiene, even if the exposure is casual. Special care shall be taken to wash hands, face, and other areas of exposed skin thoroughly before eating, drinking or smoking.
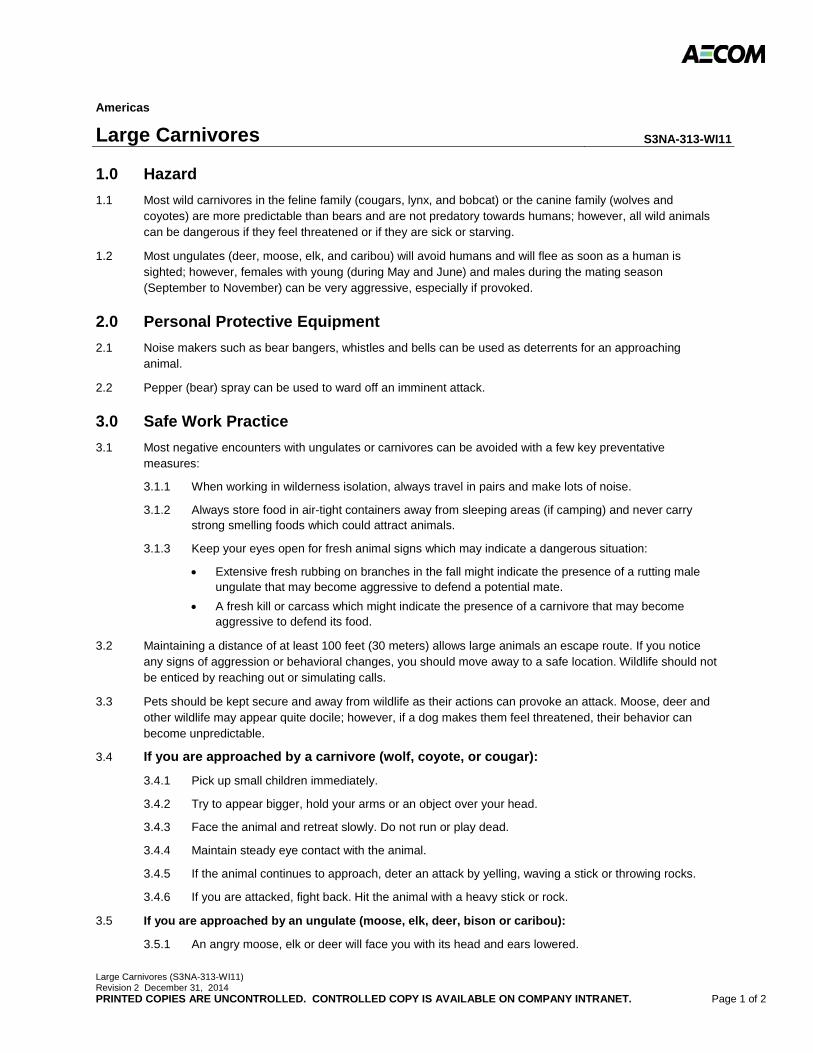
Large Carnivores (S3NA-313-WI11) Revision 2 December 31, 2014 PRINTED COPIES ARE UNCONTROLLED. CONTROLLED COPY IS AVAILABLE ON COMPANY INTRANET. Page 1 of 2
Americas
Large Carnivores S3NA-313-WI11
1.0 Hazard
1.1 Most wild carnivores in the feline family (cougars, lynx, and bobcat) or the canine family (wolves and coyotes) are more predictable than bears and are not predatory towards humans; however, all wild animals can be dangerous if they feel threatened or if they are sick or starving.
1.2 Most ungulates (deer, moose, elk, and caribou) will avoid humans and will flee as soon as a human is sighted; however, females with young (during May and June) and males during the mating season (September to November) can be very aggressive, especially if provoked.
2.0 Personal Protective Equipment
2.1 Noise makers such as bear bangers, whistles and bells can be used as deterrents for an approaching animal.
2.2 Pepper (bear) spray can be used to ward off an imminent attack.
3.0 Safe Work Practice
3.1 Most negative encounters with ungulates or carnivores can be avoided with a few key preventative measures:
3.1.1 When working in wilderness isolation, always travel in pairs and make lots of noise.
3.1.2 Always store food in air-tight containers away from sleeping areas (if camping) and never carry strong smelling foods which could attract animals.
3.1.3 Keep your eyes open for fresh animal signs which may indicate a dangerous situation:
• Extensive fresh rubbing on branches in the fall might indicate the presence of a rutting male ungulate that may become aggressive to defend a potential mate.
• A fresh kill or carcass which might indicate the presence of a carnivore that may become aggressive to defend its food.
3.2 Maintaining a distance of at least 100 feet (30 meters) allows large animals an escape route. If you notice any signs of aggression or behavioral changes, you should move away to a safe location. Wildlife should not be enticed by reaching out or simulating calls.
3.3 Pets should be kept secure and away from wildlife as their actions can provoke an attack. Moose, deer and other wildlife may appear quite docile; however, if a dog makes them feel threatened, their behavior can become unpredictable.
3.4 If you are approached by a carnivore (wolf, coyote, or cougar):
3.4.1 Pick up small children immediately.
3.4.2 Try to appear bigger, hold your arms or an object over your head.
3.4.3 Face the animal and retreat slowly. Do not run or play dead.
3.4.4 Maintain steady eye contact with the animal.
3.4.5 If the animal continues to approach, deter an attack by yelling, waving a stick or throwing rocks.
3.4.6 If you are attacked, fight back. Hit the animal with a heavy stick or rock.
3.5 If you are approached by an ungulate (moose, elk, deer, bison or caribou):
3.5.1 An angry moose, elk or deer will face you with its head and ears lowered.
Large Carnivores (S3NA-313-WI11) Revision 2 December 31, 2014 PRINTED COPIES ARE UNCONTROLLED. CONTROLLED COPY IS AVAILABLE ON COMPANY INTRANET. Page 2 of 2
3.5.2 Back away slowly.
3.5.3 Look for something to get behind like a tree or a car. You can go faster around an obstacle than the ungulate can.
3.5.4 An ungulate is more likely to bluff charge but if it continues the charge and you are attacked in the open, curl up in a ball on the ground. Always protect your head with your arms and lie still.
3.5.5 Stay still after the attack until the ungulate moves away.
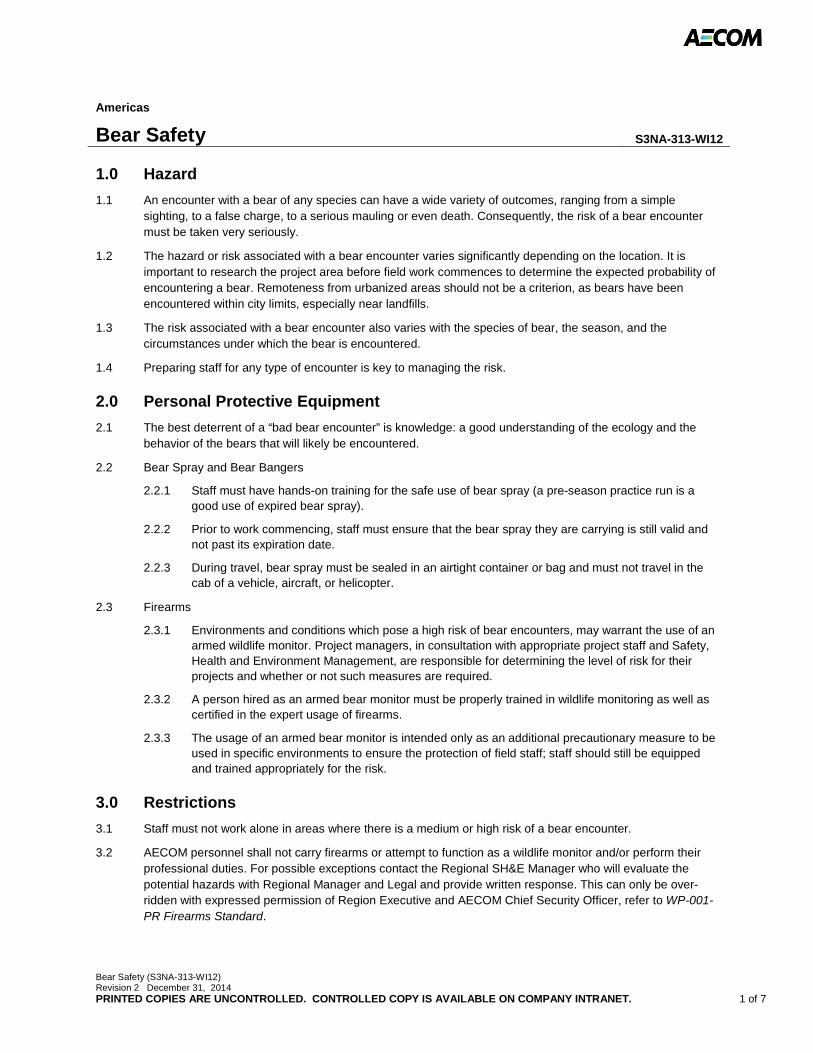
Bear Safety (S3NA-313-WI12) Revision 2 December 31, 2014 PRINTED COPIES ARE UNCONTROLLED. CONTROLLED COPY IS AVAILABLE ON COMPANY INTRANET. 1 of 7
Americas
Bear Safety S3NA-313-WI12
1.0 Hazard
1.1 An encounter with a bear of any species can have a wide variety of outcomes, ranging from a simple sighting, to a false charge, to a serious mauling or even death. Consequently, the risk of a bear encounter must be taken very seriously.
1.2 The hazard or risk associated with a bear encounter varies significantly depending on the location. It is important to research the project area before field work commences to determine the expected probability of encountering a bear. Remoteness from urbanized areas should not be a criterion, as bears have been encountered within city limits, especially near landfills.
1.3 The risk associated with a bear encounter also varies with the species of bear, the season, and the circumstances under which the bear is encountered.
1.4 Preparing staff for any type of encounter is key to managing the risk.
2.0 Personal Protective Equipment
2.1 The best deterrent of a “bad bear encounter” is knowledge: a good understanding of the ecology and the behavior of the bears that will likely be encountered.
2.2 Bear Spray and Bear Bangers
2.2.1 Staff must have hands-on training for the safe use of bear spray (a pre-season practice run is a good use of expired bear spray).
2.2.2 Prior to work commencing, staff must ensure that the bear spray they are carrying is still valid and not past its expiration date.
2.2.3 During travel, bear spray must be sealed in an airtight container or bag and must not travel in the cab of a vehicle, aircraft, or helicopter.
2.3 Firearms
2.3.1 Environments and conditions which pose a high risk of bear encounters, may warrant the use of an armed wildlife monitor. Project managers, in consultation with appropriate project staff and Safety, Health and Environment Management, are responsible for determining the level of risk for their projects and whether or not such measures are required.
2.3.2 A person hired as an armed bear monitor must be properly trained in wildlife monitoring as well as certified in the expert usage of firearms.
2.3.3 The usage of an armed bear monitor is intended only as an additional precautionary measure to be used in specific environments to ensure the protection of field staff; staff should still be equipped and trained appropriately for the risk.
3.0 Restrictions
3.1 Staff must not work alone in areas where there is a medium or high risk of a bear encounter.
3.2 AECOM personnel shall not carry firearms or attempt to function as a wildlife monitor and/or perform their professional duties. For possible exceptions contact the Regional SH&E Manager who will evaluate the potential hazards with Regional Manager and Legal and provide written response. This can only be over-ridden with expressed permission of Region Executive and AECOM Chief Security Officer, refer to WP-001-PR Firearms Standard.
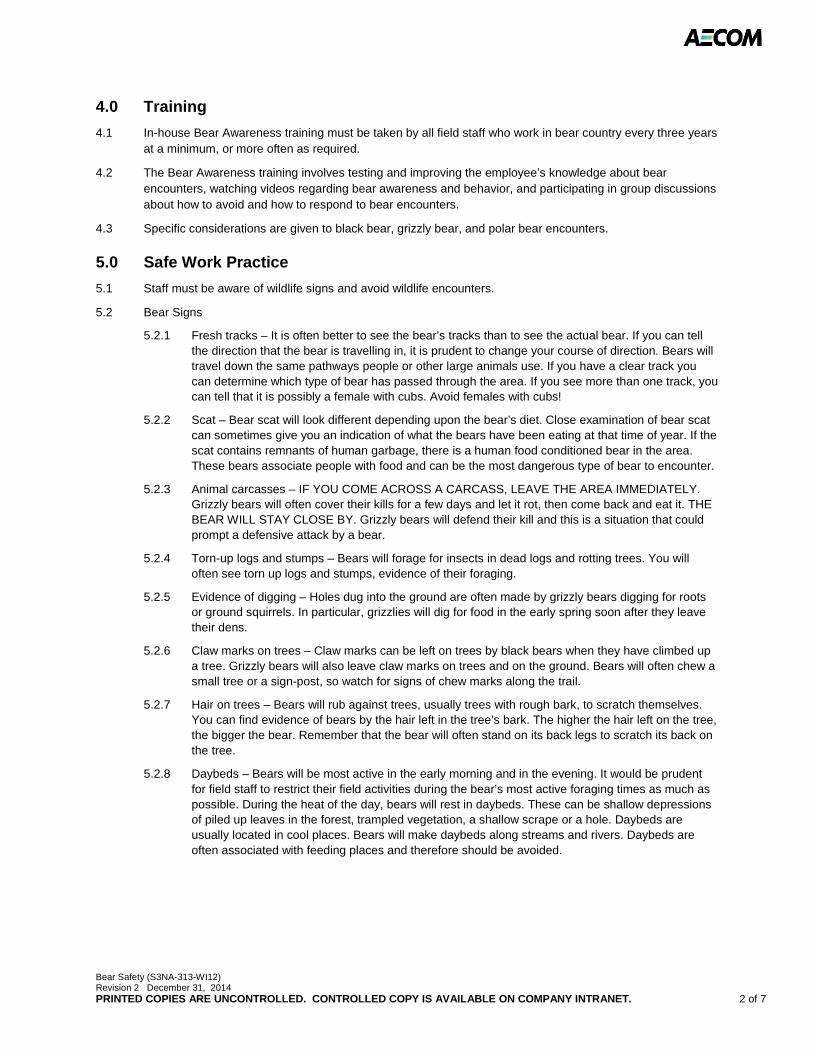
Bear Safety (S3NA-313-WI12) Revision 2 December 31, 2014 PRINTED COPIES ARE UNCONTROLLED. CONTROLLED COPY IS AVAILABLE ON COMPANY INTRANET. 2 of 7
4.0 Training
4.1 In-house Bear Awareness training must be taken by all field staff who work in bear country every three years at a minimum, or more often as required.
4.2 The Bear Awareness training involves testing and improving the employee’s knowledge about bear encounters, watching videos regarding bear awareness and behavior, and participating in group discussions about how to avoid and how to respond to bear encounters.
4.3 Specific considerations are given to black bear, grizzly bear, and polar bear encounters.
5.0 Safe Work Practice
5.1 Staff must be aware of wildlife signs and avoid wildlife encounters.
5.2 Bear Signs
5.2.1 Fresh tracks – It is often better to see the bear’s tracks than to see the actual bear. If you can tell the direction that the bear is travelling in, it is prudent to change your course of direction. Bears will travel down the same pathways people or other large animals use. If you have a clear track you can determine which type of bear has passed through the area. If you see more than one track, you can tell that it is possibly a female with cubs. Avoid females with cubs!
5.2.2 Scat – Bear scat will look different depending upon the bear’s diet. Close examination of bear scat can sometimes give you an indication of what the bears have been eating at that time of year. If the scat contains remnants of human garbage, there is a human food conditioned bear in the area. These bears associate people with food and can be the most dangerous type of bear to encounter.
5.2.3 Animal carcasses – IF YOU COME ACROSS A CARCASS, LEAVE THE AREA IMMEDIATELY. Grizzly bears will often cover their kills for a few days and let it rot, then come back and eat it. THE BEAR WILL STAY CLOSE BY. Grizzly bears will defend their kill and this is a situation that could prompt a defensive attack by a bear.
5.2.4 Torn-up logs and stumps – Bears will forage for insects in dead logs and rotting trees. You will often see torn up logs and stumps, evidence of their foraging.
5.2.5 Evidence of digging – Holes dug into the ground are often made by grizzly bears digging for roots or ground squirrels. In particular, grizzlies will dig for food in the early spring soon after they leave their dens.
5.2.6 Claw marks on trees – Claw marks can be left on trees by black bears when they have climbed up a tree. Grizzly bears will also leave claw marks on trees and on the ground. Bears will often chew a small tree or a sign-post, so watch for signs of chew marks along the trail.
5.2.7 Hair on trees – Bears will rub against trees, usually trees with rough bark, to scratch themselves. You can find evidence of bears by the hair left in the tree’s bark. The higher the hair left on the tree, the bigger the bear. Remember that the bear will often stand on its back legs to scratch its back on the tree.
5.2.8 Daybeds – Bears will be most active in the early morning and in the evening. It would be prudent for field staff to restrict their field activities during the bear’s most active foraging times as much as possible. During the heat of the day, bears will rest in daybeds. These can be shallow depressions of piled up leaves in the forest, trampled vegetation, a shallow scrape or a hole. Daybeds are usually located in cool places. Bears will make daybeds along streams and rivers. Daybeds are often associated with feeding places and therefore should be avoided.
Bear Safety (S3NA-313-WI12) Revision 2 December 31, 2014 PRINTED COPIES ARE UNCONTROLLED. CONTROLLED COPY IS AVAILABLE ON COMPANY INTRANET. 3 of 7
5.3 Prevention
5.3.1 Your best defense against bears is to actively practice bear avoidance techniques when working in the field. You can prevent chance encounters by taking the following precautions:
• Know the areas and habitats bears use at different times of the year, and attempt to avoid such areas or be extremely cautious if you have to travel through them.
• Contact the local Fish & Wildlife Office to get current information on the bears in the area. Ask what other camps are in the area and if they are following good bear avoidance practices. (i.e., do they keep a clean camp?) If there are nearby human food sources available, e.g., an open dumpsite, the local bears may not be afraid to approach your camp.
• Always be aware of your surroundings. Stay alert. Watch for signs of bears along your route.
• Use binoculars to look around for bears when you are in open terrain.
• Never approach a bear if you see one feeding in the distance.
• Note the behavior of other wildlife in the area. Flocks of ravens can alert you to a possible animal carcass, and perhaps a bear. The area should be avoided. Bird or squirrel alarm calls might be telling you that a bear is near.
• Whenever possible, travel in daylight and try to avoid areas with restricted visibility, e.g., dense brush.
• Make lots of noise, especially when travelling in dense vegetation. Sing, shout, or talk loudly. You can carry portable air horns or cans of rocks. (Please note that bear bells are not effective – they do not make enough noise to warn a bear that you are approaching. You need to be loud so the bear can hear you coming.) Remember that the noise you make can be masked by loud natural sounds such as the wind or water. Therefore it is possible that the noise you make can go unnoticed by a bear whose attention is focused on feeding. You must make every attempt not to surprise a bear. In areas of loud natural noise, be louder!
• Stay together and travel in groups. Bears are less likely to attack groups of people. When travelling in groups, stay close together. Being in a group doesn’t help if the individuals have spread apart along the trail.
• Pets should not accompany you when you are travelling in bear country. If you must take your pet, keep the animal on a short leash at all times. Unleashed dogs will harass bears and once scared, run back to their owner with an angry bear in pursuit.
• Do not wear perfumes or cosmetic products when you are travelling in bear country. Do not mask your human scent.
• Women should use internal sanitary protection, (i.e. tampons) when menstruating and burn all used sanitary products after usage. Keep all used sanitary supplies in sealed bags until you have a chance to burn them.
• Children should be kept very close by in bear country.
• Carry bear deterrents and know their limitations. Be familiar with how to use the deterrents, how to transport the deterrent safely and under what conditions it is most effective. Carry the deterrent in a belt, out in front and ready to grab at a moment’s notice, never in your backpack.
5.4 Field Worker Precautions in Bear Country
5.4.1 Field workers should take extra precautions when working in bear country:
• Make every effort to go out into the field with another person; you should not be working alone in the field. One person can act as a lookout for the other. Keep watch for bear signs.
• Never approach a bear.
Bear Safety (S3NA-313-WI12) Revision 2 December 31, 2014 PRINTED COPIES ARE UNCONTROLLED. CONTROLLED COPY IS AVAILABLE ON COMPANY INTRANET. 4 of 7
• Report where you are going and when you will return every time you leave camp. Have a plan of action if someone does not report back to camp at a specified time.
• Bears do get used to a camp’s schedule and you will have fewer surprise encounters if everyone in the camp comes and goes at the same time every day.
• Take a two-way radio with you when you go out into the field.
• Always carry bear deterrents with you in the field and understand each deterrent’s limitations. Carry your deterrents on a belt, out in front and ready to use instantly. Do not carry your deterrents in your backpack.
• Keep any food that you take with you sealed in odor-proof/bear-proof containers. Make every attempt to take odorless food with you, not something with a heavy scent.
• Pack out any garbage in odor-proof containers and burn once you return to camp.
• The noise of an ATV or skidoo can scare off a bear. Starting the machine and revving it up can scare off a curious bear. DO NOT CHASE A BEAR WITH AN ATV OR SKIDOO. You may need to drive the ATV around in circles to scare off the bear, but do not chase the bear.
• Take extra precautions when travelling along lakes or stream beds; bears use streams and river beds as travel routes. Be sure to carry noise makers.
• Limit your workday so you are not out in the early morning or evening when bears are most likely to be foraging.
• All Field Workers should be proficient in First Aid. Do not go out into the field without first aid training.
• All field camps should have a First Aid Kit.
• All field camps should have means of communication with local ambulance or air ambulance personnel.
• A person’s best defense against bears is to avoid them. If this is not possible, then being heard, smelled, or seen may lessen your chances of surprising a bear and/or provoking an attack.
• All wildlife should be respected, avoided, and not harassed at any time.
• Cooking in remote areas should be avoided. Any food should be stored in airtight containers and all garbage should be managed appropriately: “pack it in, pack it out”.
• A bear in camp or within human structures is not a chance encounter. If this bear challenges you, you must fight, scream, and do whatever is necessary to live, no matter what species the bear is!
• In general, there are two types of bear encounters: Defensive and Non-defensive for grizzly bears and black bears. Your response will vary based on your assessment of the situation (your training will help you in identifying these situations and the appropriate response).
6.0 Encounters
6.1 General Recommendations When Encountering a Bear
• Consider your surroundings and assess the situation before you act.
• Remain calm. Do not turn your back to a bear.
• DO NOT RUN – You will trigger the bear’s natural response to chase you. Bears are extremely fast and you cannot outrun a bear. (They are as fast as an Olympic sprinter, so if you are not faster than an Olympic sprinter, don’t run! They can run 25 miles per hour [40 kilometers per hour] and you can’t!) You cannot outswim a bear either.
Bear Safety (S3NA-313-WI12) Revision 2 December 31, 2014 PRINTED COPIES ARE UNCONTROLLED. CONTROLLED COPY IS AVAILABLE ON COMPANY INTRANET. 5 of 7
6.2 Bear Encounters in the Field
6.2.1 Your response will depend upon the type of encounter.
6.2.2 Bears are more predictable than once believed and you can determine your best course of action in a confrontation by understanding the bear’s characteristics and motivation. There are two pieces of information you should be aware of in any bear encounter:
• The type of bear you are dealing with, and
• The reason for the encounter.
6.2.3 Some people believe that when you stand your ground against a predatory black bear attack, the bear will feel threatened and leave. This has been effective in some cases. HOWEVER, it is not effective against a grizzly bear predatory attack and it is very difficult to know when it will be effective against black bears. Polar bears do not follow the same behavioral patterns as grizzly and black bears; polar bears are almost always aggressive and will not back down. Special considerations must be given to projects where polar bear encounters are anticipated.
6.3 If you can leave undetected:
6.3.1 Leave the area quietly in the same direction that you came from.
6.3.2 Move while the bear’s head is down. Stop moving when the bear lifts its head to check its surroundings.
6.3.3 Stay downwind so the bear will not pick up your scent.
6.3.4 When you have moved a safe distance away, you can either watch and wait until the bear leaves or make a wide detour around the bear.
6.3.5 If the bear is unaware of you and approaching, allow the bear the right of way.
6.4 If you cannot leave undetected:
6.4.1 Let the bear know that you are present by smell first; therefore move upwind so they can pick up your scent.
6.4.2 If it is possible, try to keep the bear in your sight. Watch to see if the bear leaves when it smells that a person is nearby.
6.4.3 Attempt to move out of the way without being noticed by the bear. If you cannot do this, talk loudly to let the bear know where you are.
6.5 If the bear is aware of you but in the distance:
• Remain calm.
• Continue walking slowly in the same general direction, but head away from the bear.
• DO NOT RUN. The bear can quickly outrun you if it is so inclined.
• If the bear begins to follow you, drop your pack or some article, (not food) to distract the bear. This may distract the bear long enough for you to escape. If you drop food for the bear – you will help the bear associate food with humans and teach it that aggressive behaviour will be rewarded with food.
• If it is a grizzly following you, climb a tree if there is a large tree around. Although grizzlies can climb trees, they are often not motivated enough to try. Very large grizzlies are not able to climb trees well. If grizzlies climb, they can go 9 to 13 feet (3 to 4 meters). Grizzlies will try and push trees over so do not climb a small tree.
6.6 If the bear is aware of you and close:
• A bear will feel threatened in a close confrontation. The bear’s natural tendency will be to reduce or to remove the threat. Assist the bear by acting as non-threatening as possible.
• Do not make direct eye contact with the bear.
Bear Safety (S3NA-313-WI12) Revision 2 December 31, 2014 PRINTED COPIES ARE UNCONTROLLED. CONTROLLED COPY IS AVAILABLE ON COMPANY INTRANET. 6 of 7
• Do not make any sudden moves.
• Do not run!
• The bear needs to identify you as a person, so talk in low tones and slowly wave your arms over your head.
• Attempt to give the bear an opportunity to leave. Be sure the bear has an open escape route. Do not corner a wild animal.
• Try to back away slowly and/or climb a tree if appropriate.
• Attempt to deter the bear if you are in a safe position.
6.7 If the bear is close and threatening:
• If you have a deterrent such as a bear banger or bear spray, be prepared to use it depending on how close the bear is. Try to scare the bear off.
• If you do not have a deterrent, or if using the deterrent is not successful, act as non-threatening as possible.
• Talk to the bear in a calm authoritative tone of voice.
• Do not startle or provoke the bear by making sudden moves.
• Never imitate the bear’s aggressive sounds, signals or posture. The bear is attempting to establish dominance and imitating its moves is a challenge to its dominance.
• Back slowly away from the bear and drop a pack or some other article in order to distract the bear momentarily.
• Remember that the bear may be defending cubs that you have not yet seen or they have a food cache nearby. Attempt to look as non-threatening as possible.
6.8 If the bear is very close and approaching:
• A distance of less than 164 feet (50 meters) in an open area and closer in a forested area.
• If the bear continues to approach, use your deterrent.
• If the bear does not respond to the deterrent you must now STAND YOUR GROUND!
• If the bear continues to approach and is acting aggressive, YOU MAY HAVE TO SHOOT if you are carrying a firearm.
6.9 If the Bear Charges:
• A bear will charge you at high speed down on all four legs and often crouched low to the ground.
• Bears do not charge when standing up on the hind legs.
• Many charges are bluffs and the bear will often stop or veer off just at the last minute. It is difficult to know if the bear is bluff charging or not until it gets very close.
• When faced with a charging bear you have two options:
o Use your bear deterrent; or
o Roll into a ball and cover your neck and head with your arms if you are unarmed and have no other choice.
6.10 Playing Dead
6.10.1 Note: Playing dead is a very controversial topic among seasoned field personnel. Some will tell you to never play dead in any situation, others will swear that it is the only thing you should do. Playing dead is a personal choice that you will have to make.
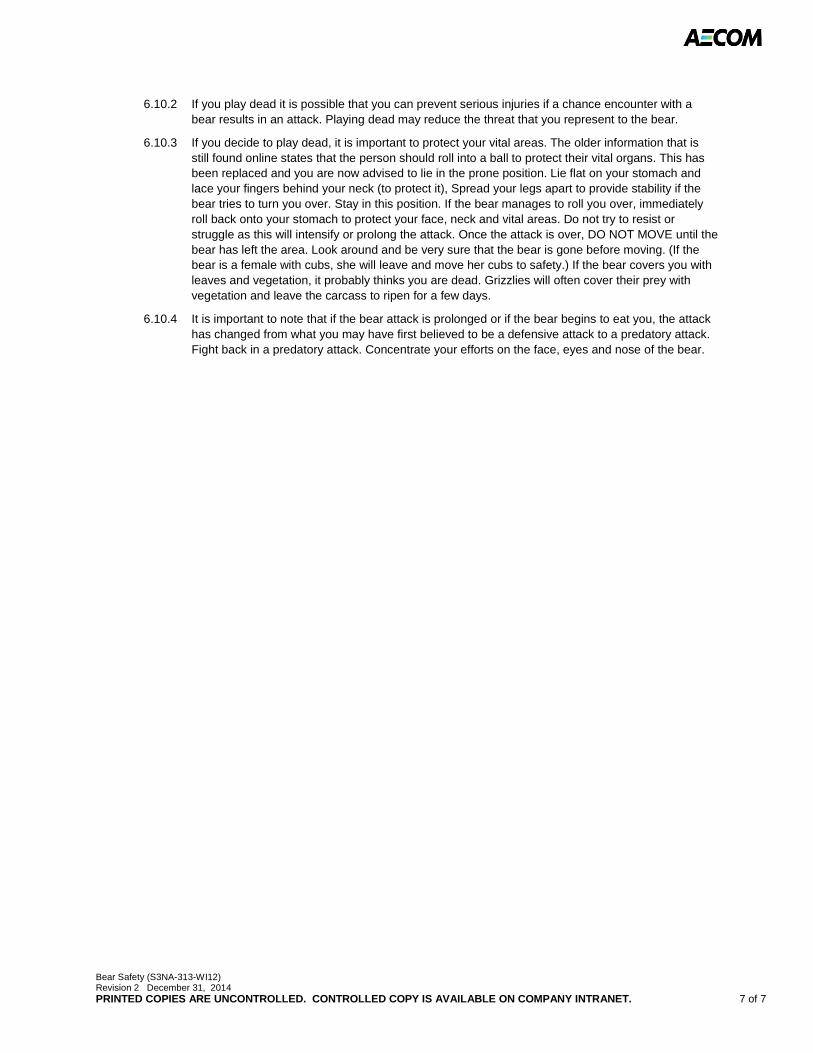
Bear Safety (S3NA-313-WI12) Revision 2 December 31, 2014 PRINTED COPIES ARE UNCONTROLLED. CONTROLLED COPY IS AVAILABLE ON COMPANY INTRANET. 7 of 7
6.10.2 If you play dead it is possible that you can prevent serious injuries if a chance encounter with a bear results in an attack. Playing dead may reduce the threat that you represent to the bear.
6.10.3 If you decide to play dead, it is important to protect your vital areas. The older information that is still found online states that the person should roll into a ball to protect their vital organs. This has been replaced and you are now advised to lie in the prone position. Lie flat on your stomach and lace your fingers behind your neck (to protect it), Spread your legs apart to provide stability if the bear tries to turn you over. Stay in this position. If the bear manages to roll you over, immediately roll back onto your stomach to protect your face, neck and vital areas. Do not try to resist or struggle as this will intensify or prolong the attack. Once the attack is over, DO NOT MOVE until the bear has left the area. Look around and be very sure that the bear is gone before moving. (If the bear is a female with cubs, she will leave and move her cubs to safety.) If the bear covers you with leaves and vegetation, it probably thinks you are dead. Grizzlies will often cover their prey with vegetation and leave the carcass to ripen for a few days.
6.10.4 It is important to note that if the bear attack is prolonged or if the bear begins to eat you, the attack has changed from what you may have first believed to be a defensive attack to a predatory attack. Fight back in a predatory attack. Concentrate your efforts on the face, eyes and nose of the bear.
Small Mammals (S3NA-313-WI13) Revision 2 December 31, 2014 PRINTED COPIES ARE UNCONTROLLED. CONTROLLED COPY IS AVAILABLE ON COMPANY INTRANET. Page 1 of 2
Americas
Small Mammals S3NA-313-WI13
1.0 Hazard
1.1 Working in the field either directly or indirectly with small mammals has inherent risks of injury or exposure to zoonotic diseases (infectious diseases that can be transmitted from animals to humans) that all field staff need to protect themselves against.
1.2 The risks are usually higher when there is direct contact with a wild animal, either through a break in the skin (blood), saliva, or excrement; however, there are also risks through air-borne diseases (e.g., Hantavirus).
1.3 Obviously, wildlife biologists directly handling wildlife, dead or alive, or working with wildlife feces or in enclosed habitats (such as caves), have an increased risk of exposure to a wider range of zoonotic diseases and should take extra precautions.
2.0 Personal Protective Equipment
2.1 Full-length clothing (long sleeves and pants)
2.2 Insect repellent
2.3 Respiratory equipment (when directly handling wildlife)
2.4 Gloves (when directly handling wildlife)
3.0 References
3.1 Trapping and Tagging Small Mammals. A RIC Standard for British Columbia. 1993. Dr. Todd Zimmerling.
4.0 Restrictions
4.1 Wildlife handling must only be completed under direct supervision of an experienced individual.
5.0 Training
5.1 Any staff that will be handling wildlife must be adequately trained and/or supervised by a wildlife biologist experienced in the job task.
6.0 Safe Work Practice
6.1 Wild animals can carry a variety of diseases that humans can contract: viral, parasitic, bacterial, and protozoal. Basic Personal Protective Equipment such as full-length clothing, gloves and a respiratory mask will greatly reduce the risk of exposure.
6.2 Whenever a wild animal must be handled, the procedure must be accomplished as safely and quickly as possible.
6.3 Proper techniques must be employed to avoid or minimize the risk of personal injury while, at the same time, avoiding or minimizing injury to the animal.
6.4 Gloves, catch sticks, caging, and other appropriate equipment may be necessary when handling a wild animal. Most of these animals will be extremely stressed, resisting every restraint attempt.
6.5 In the unfortunate circumstance that a person is bitten or scratched, he or she should cleanse the wound thoroughly with soap and flush with water immediately, providing for a mechanical removal of potentially infective organisms. This should be followed by cleansing under medical supervision and consultation with a physician to consider the potential exposure to the rabies virus.
Small Mammals (S3NA-313-WI13) Revision 2 December 31, 2014 PRINTED COPIES ARE UNCONTROLLED. CONTROLLED COPY IS AVAILABLE ON COMPANY INTRANET. Page 2 of 2
7.0 Rabies
7.1 You will not be able to accurately determine if an animal has rabies simply by observation as traditional symptoms of rabies (foaming at the mouth, biting, etc.) do not occur in all animals nor at all stages. There are some mammals that are at a higher risk than others for the rabies virus, such as raccoons, skunks, stray cats and dogs, foxes, coyotes, rodents. and bats; however, any mammal can contract the virus.
7.2 Rabies is contracted by contact of an infected animal’s saliva with an open wound – a bite or a scratch.
7.3 Symptoms of rabies in humans usually do not present themselves for a minimum of 10 days to a year or longer (the average is 30 to 50 days). Symptoms are typical of a flu, including malaise, loss of appetite, fatigue, headache, and fever. Over half of all patients have pain (sometimes itching) or numbness at the site of exposure. They may complain of insomnia or depression. Two to ten days later, signs of nervous system damage appear; these include hyperactivity and hypersensitivity, disorientation, hallucinations, seizures, and paralysis.
7.4 Because rabies is so difficult to detect and positively identify, it is very important to consult a physician immediately. If rabies is a possibility, begin treatment with the rabies vaccine as soon as possible (unlike other vaccines, rabies vaccination begins after exposure because the virus takes a comparatively long time to induce disease).
8.0 Hantavirus
8.1 Rodents can carry a variety of diseases; of notable concern is the North American hantavirus which can cause Hantavirus Pulmonary Syndrome (HPS).
8.2 A common host of the hantavirus is deer mouse and related species (Peromyscus spp.), which are common throughout much of North America.
8.3 Although infection is rare, it can be fatal and, therefore, it is necessary that risk of exposure be minimized. Infection can be spread to humans when they:
8.3.1 Breathe air contaminated by deer mouse saliva, urine or feces containing infectious hantaviruses; or
8.3.2 Accidentally rub eyes, mouth or broken skin with hantavirus-infected deer mouse saliva, urine or feces.
8.4 The following precautions will be taken for all field operations:
8.4.1 Limit exposure to soils handling and use gloves where appropriate.
8.4.2 Wash or sanitize hands often throughout the day and before meals.
8.4.3 Equipment bags, storage areas, and vehicles will be inspected daily for signs of deer mouse infestation.
8.4.4 Rodent-proof storage containers will be used when practical.
8.4.5 Do not enter buildings infested with deer mice without adequate respiratory protection.
8.4.6 Droppings should never be removed by vacuuming or sweeping. Wetting down an area with a mixture of 1:9 household bleach and water solution will reduce risk of airborne exposure.
8.5 If flu-like symptoms develop three days to six weeks after exposure to rodents, a doctor should be contacted immediately (mechanical ventilation is the primary method of treatment).
Snakes (S3NA-313-WI14) Revision 2 December 31, 2014 PRINTED COPIES ARE UNCONTROLLED. CONTROLLED COPY IS AVAILABLE ON COMPANY INTRANET. Page 1 of 4
Americas
Snakes S3NA-313-WI14
1.0 Hazard
1.1 Snakes have the ability to inject venom. A bite from a venomous snake, which may inject varying degrees of toxic venom, is rarely fatal but should always be considered a medical emergency.
2.0 Personal Protective Equipment
2.1 Long pants and shirts
2.2 Heavy gloves if staff will be handling debris or be close to the ground
2.3 Rubber boots, or boots that fully cover the foot (not sandals!) and preferably are at least 10 inches (25 centimeters) high
2.4 Snake Chaps that cover at least the shin
2.5 Personal first aid kit
3.0 References
3.1 The Eastern Massasauga Rattlesnake Stewardship Guide. A resource and field guide for living with rattlesnakes in Ontario. Sponsored by the Government of Canada, and distributed on behalf of the Toronto Zoo and the Eastern Massasauga Rattlesnake Recover Team.
3.2 http://www.rattlesnakes.us/
3.3 http://drdavidson.ucsd.edu/Portals/0/snake/Crotalus.htm
4.0 Restrictions
4.1 Staff must not work alone in areas where the risk of a snake encounter is high.
5.0 Training
5.1 Staff must be notified of the hazard before work commences.
6.0 Safe Work Practice
6.1 Staff working in areas known to be inhabited by venomous snakes should take extra precautions, be able to identify the local snake species, and understand the best practices for administering first aid.
6.2 Most snakes in Canada are non-venomous; and most snake bites are not fatal, only painful. Learning to identify snake species will assist you in responding appropriately to an encounter, and will assist medical professionals in determining if antivenin needs to be administered if anyone is bit.
6.3 Most snakes are non-aggressive and will only attack if immediately threatened.
6.4 Prevention
6.4.1 Before venturing out into the wilderness, familiarize yourself with the snakes in your area, both venomous and non-venomous species.
6.4.2 Learn which habitats the venomous species in your region are likely to be encountered in, and use caution when in those habitats.
6.4.3 Try as much as possible not to take a snake by surprise.
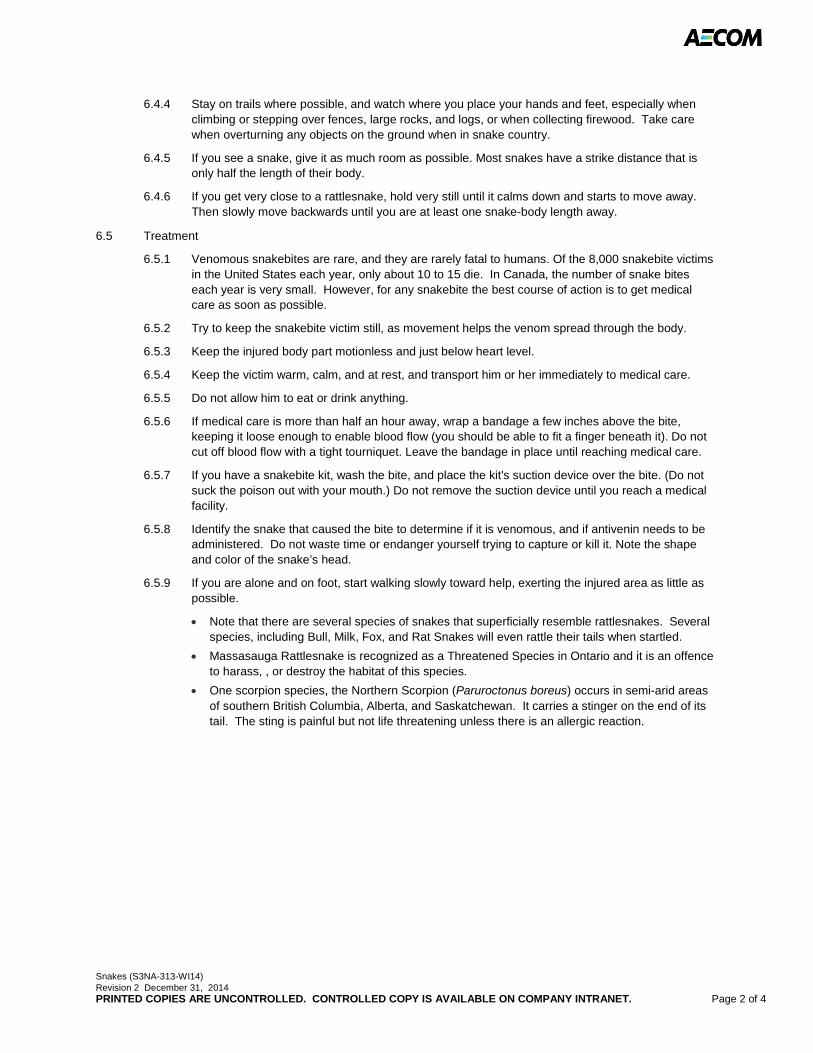
Snakes (S3NA-313-WI14) Revision 2 December 31, 2014 PRINTED COPIES ARE UNCONTROLLED. CONTROLLED COPY IS AVAILABLE ON COMPANY INTRANET. Page 2 of 4
6.4.4 Stay on trails where possible, and watch where you place your hands and feet, especially when climbing or stepping over fences, large rocks, and logs, or when collecting firewood. Take care when overturning any objects on the ground when in snake country.
6.4.5 If you see a snake, give it as much room as possible. Most snakes have a strike distance that is only half the length of their body.
6.4.6 If you get very close to a rattlesnake, hold very still until it calms down and starts to move away. Then slowly move backwards until you are at least one snake-body length away.
6.5 Treatment
6.5.1 Venomous snakebites are rare, and they are rarely fatal to humans. Of the 8,000 snakebite victims in the United States each year, only about 10 to 15 die. In Canada, the number of snake bites each year is very small. However, for any snakebite the best course of action is to get medical care as soon as possible.
6.5.2 Try to keep the snakebite victim still, as movement helps the venom spread through the body.
6.5.3 Keep the injured body part motionless and just below heart level.
6.5.4 Keep the victim warm, calm, and at rest, and transport him or her immediately to medical care.
6.5.5 Do not allow him to eat or drink anything.
6.5.6 If medical care is more than half an hour away, wrap a bandage a few inches above the bite, keeping it loose enough to enable blood flow (you should be able to fit a finger beneath it). Do not cut off blood flow with a tight tourniquet. Leave the bandage in place until reaching medical care.
6.5.7 If you have a snakebite kit, wash the bite, and place the kit's suction device over the bite. (Do not suck the poison out with your mouth.) Do not remove the suction device until you reach a medical facility.
6.5.8 Identify the snake that caused the bite to determine if it is venomous, and if antivenin needs to be administered. Do not waste time or endanger yourself trying to capture or kill it. Note the shape and color of the snake’s head.
6.5.9 If you are alone and on foot, start walking slowly toward help, exerting the injured area as little as possible.
• Note that there are several species of snakes that superficially resemble rattlesnakes. Several species, including Bull, Milk, Fox, and Rat Snakes will even rattle their tails when startled.
• Massasauga Rattlesnake is recognized as a Threatened Species in Ontario and it is an offence to harass, , or destroy the habitat of this species.
• One scorpion species, the Northern Scorpion (Paruroctonus boreus) occurs in semi-arid areas of southern British Columbia, Alberta, and Saskatchewan. It carries a stinger on the end of its tail. The sting is painful but not life threatening unless there is an allergic reaction.
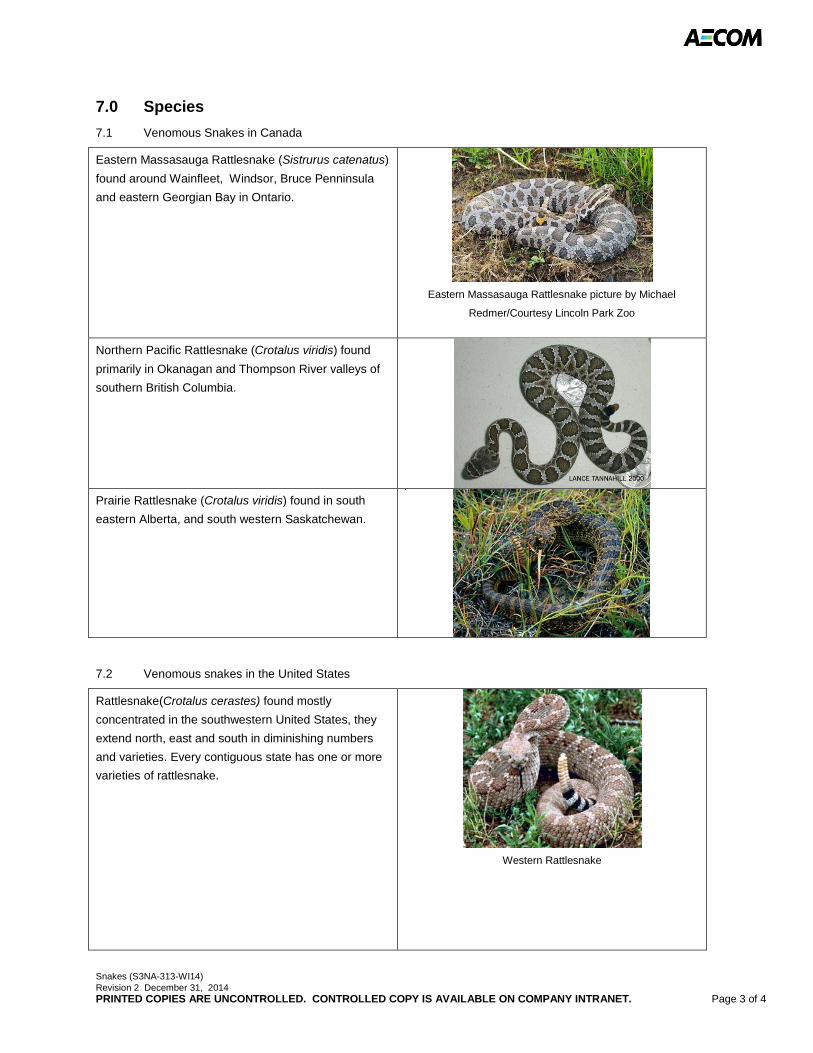
Snakes (S3NA-313-WI14) Revision 2 December 31, 2014 PRINTED COPIES ARE UNCONTROLLED. CONTROLLED COPY IS AVAILABLE ON COMPANY INTRANET. Page 3 of 4
7.0 Species
7.1 Venomous Snakes in Canada
Eastern Massasauga Rattlesnake (Sistrurus catenatus)
found around Wainfleet, Windsor, Bruce Penninsula
and eastern Georgian Bay in Ontario.
Eastern Massasauga Rattlesnake picture by Michael
Redmer/Courtesy Lincoln Park Zoo
Northern Pacific Rattlesnake (Crotalus viridis) found
primarily in Okanagan and Thompson River valleys of
southern British Columbia.
Prairie Rattlesnake (Crotalus viridis) found in south
eastern Alberta, and south western Saskatchewan.
7.2 Venomous snakes in the United States
Rattlesnake(Crotalus cerastes) found mostly
concentrated in the southwestern United States, they
extend north, east and south in diminishing numbers
and varieties. Every contiguous state has one or more
varieties of rattlesnake.
Western Rattlesnake

Snakes (S3NA-313-WI14) Revision 2 December 31, 2014 PRINTED COPIES ARE UNCONTROLLED. CONTROLLED COPY IS AVAILABLE ON COMPANY INTRANET. Page 4 of 4
The rattlesnake is found in many different biomes
ranging from along the coast at sea level, the inland
prairies and desert areas to the mountains at
elevations of more than 10,000 feet.
Species include: Sidewinder, Santa Catalina, Western,
Mojave, Red Diamond, Western Diamond, Ridge
Nosed, Eastern Diamondback, and Pigmy.
Eastern Diamondback
Copperhead (Agkistrodon contortrix) is the most
common venomous snake found in the eastern United
States. It can be found in the states of Texas,
Oklahoma, Kansas, Missouri, Arkansas, Louisiana,
Mississippi, Alabama, Georgia, Florida, South Carolina,
North Carolina, Tennessee, Kentucky, Virginia, Illinois,
Indiana, Ohio, Iowa, Pennsylvania, Maryland, New
Jersey, Delaware, New York, Connecticut, and
Massachusetts.
Cottonmouths (water moccasins) (Agkistrodon piscivorus) found in the eastern United States from
Virginia, south through the Florida peninsula and west
to Arkansas, eastern and southern Oklahoma, and east
and central Texas.
Coral Snake (Micrurus sp.) found in the southern range
of many temperate United States including North
Carolina, Georgia, Alabama, Mississippi, Louisiana,
Texas, Arkansas, Kentucky, Arizona, and New Mexico.
Eastern Coral Snake, Micrurus fulvius
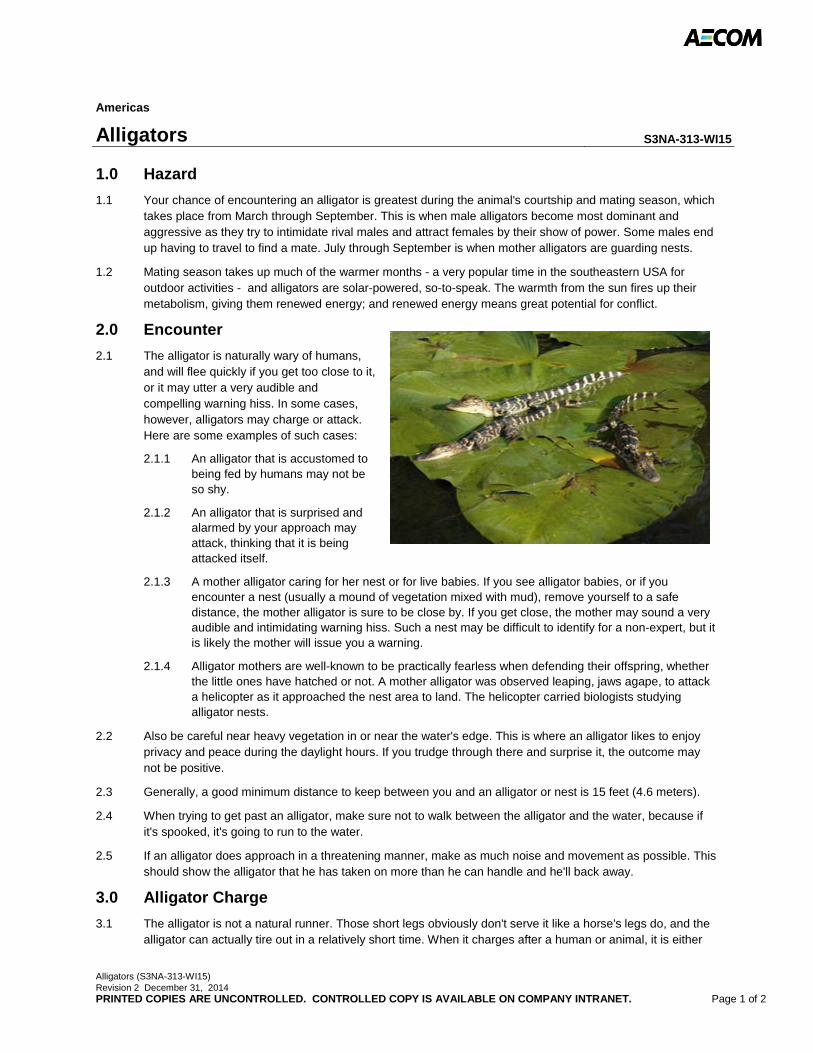
Alligators (S3NA-313-WI15) Revision 2 December 31, 2014 PRINTED COPIES ARE UNCONTROLLED. CONTROLLED COPY IS AVAILABLE ON COMPANY INTRANET. Page 1 of 2
Americas
Alligators S3NA-313-WI15
1.0 Hazard
1.1 Your chance of encountering an alligator is greatest during the animal's courtship and mating season, which takes place from March through September. This is when male alligators become most dominant and aggressive as they try to intimidate rival males and attract females by their show of power. Some males end up having to travel to find a mate. July through September is when mother alligators are guarding nests.
1.2 Mating season takes up much of the warmer months - a very popular time in the southeastern USA for outdoor activities - and alligators are solar-powered, so-to-speak. The warmth from the sun fires up their metabolism, giving them renewed energy; and renewed energy means great potential for conflict.
2.0 Encounter
2.1 The alligator is naturally wary of humans, and will flee quickly if you get too close to it, or it may utter a very audible and compelling warning hiss. In some cases, however, alligators may charge or attack. Here are some examples of such cases:
2.1.1 An alligator that is accustomed to being fed by humans may not be so shy.
2.1.2 An alligator that is surprised and alarmed by your approach may attack, thinking that it is being attacked itself.
2.1.3 A mother alligator caring for her nest or for live babies. If you see alligator babies, or if you encounter a nest (usually a mound of vegetation mixed with mud), remove yourself to a safe distance, the mother alligator is sure to be close by. If you get close, the mother may sound a very audible and intimidating warning hiss. Such a nest may be difficult to identify for a non-expert, but it is likely the mother will issue you a warning.
2.1.4 Alligator mothers are well-known to be practically fearless when defending their offspring, whether the little ones have hatched or not. A mother alligator was observed leaping, jaws agape, to attack a helicopter as it approached the nest area to land. The helicopter carried biologists studying alligator nests.
2.2 Also be careful near heavy vegetation in or near the water's edge. This is where an alligator likes to enjoy privacy and peace during the daylight hours. If you trudge through there and surprise it, the outcome may not be positive.
2.3 Generally, a good minimum distance to keep between you and an alligator or nest is 15 feet (4.6 meters).
2.4 When trying to get past an alligator, make sure not to walk between the alligator and the water, because if it's spooked, it's going to run to the water.
2.5 If an alligator does approach in a threatening manner, make as much noise and movement as possible. This should show the alligator that he has taken on more than he can handle and he'll back away.
3.0 Alligator Charge
3.1 The alligator is not a natural runner. Those short legs obviously don't serve it like a horse's legs do, and the alligator can actually tire out in a relatively short time. When it charges after a human or animal, it is either
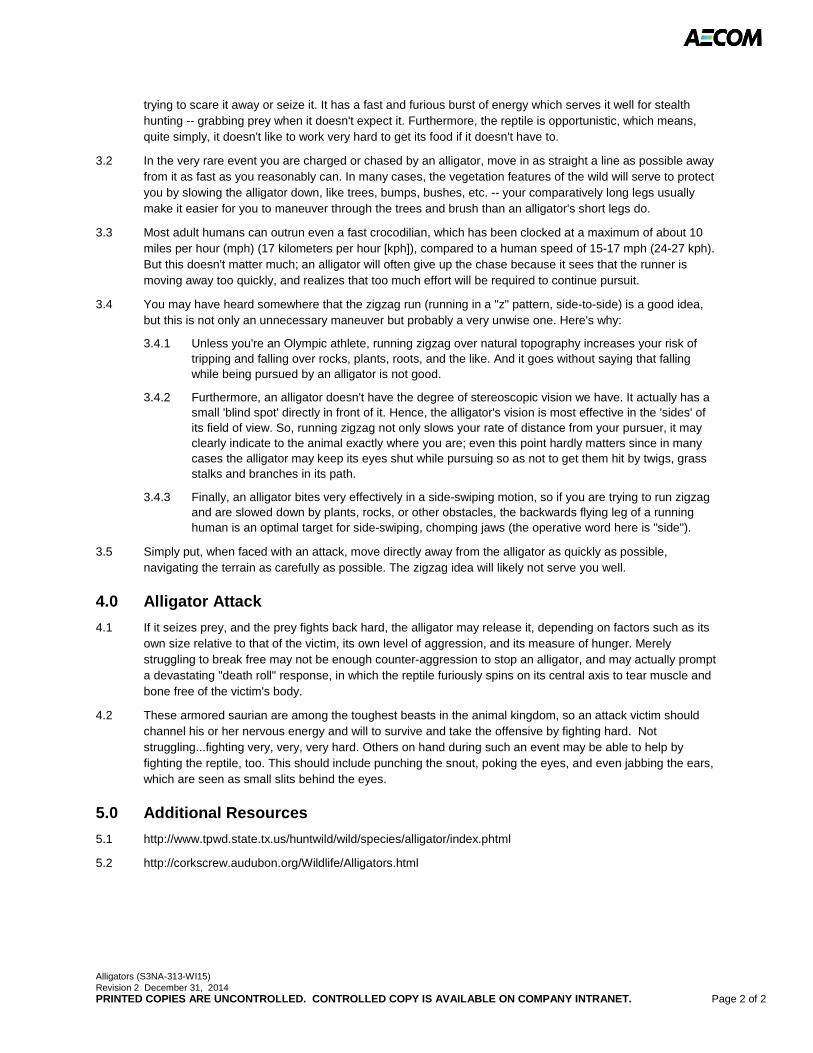
Alligators (S3NA-313-WI15) Revision 2 December 31, 2014 PRINTED COPIES ARE UNCONTROLLED. CONTROLLED COPY IS AVAILABLE ON COMPANY INTRANET. Page 2 of 2
trying to scare it away or seize it. It has a fast and furious burst of energy which serves it well for stealth hunting -- grabbing prey when it doesn't expect it. Furthermore, the reptile is opportunistic, which means, quite simply, it doesn't like to work very hard to get its food if it doesn't have to.
3.2 In the very rare event you are charged or chased by an alligator, move in as straight a line as possible away from it as fast as you reasonably can. In many cases, the vegetation features of the wild will serve to protect you by slowing the alligator down, like trees, bumps, bushes, etc. -- your comparatively long legs usually make it easier for you to maneuver through the trees and brush than an alligator's short legs do.
3.3 Most adult humans can outrun even a fast crocodilian, which has been clocked at a maximum of about 10 miles per hour (mph) (17 kilometers per hour [kph]), compared to a human speed of 15-17 mph (24-27 kph). But this doesn't matter much; an alligator will often give up the chase because it sees that the runner is moving away too quickly, and realizes that too much effort will be required to continue pursuit.
3.4 You may have heard somewhere that the zigzag run (running in a "z" pattern, side-to-side) is a good idea, but this is not only an unnecessary maneuver but probably a very unwise one. Here's why:
3.4.1 Unless you're an Olympic athlete, running zigzag over natural topography increases your risk of tripping and falling over rocks, plants, roots, and the like. And it goes without saying that falling while being pursued by an alligator is not good.
3.4.2 Furthermore, an alligator doesn't have the degree of stereoscopic vision we have. It actually has a small 'blind spot' directly in front of it. Hence, the alligator's vision is most effective in the 'sides' of its field of view. So, running zigzag not only slows your rate of distance from your pursuer, it may clearly indicate to the animal exactly where you are; even this point hardly matters since in many cases the alligator may keep its eyes shut while pursuing so as not to get them hit by twigs, grass stalks and branches in its path.
3.4.3 Finally, an alligator bites very effectively in a side-swiping motion, so if you are trying to run zigzag and are slowed down by plants, rocks, or other obstacles, the backwards flying leg of a running human is an optimal target for side-swiping, chomping jaws (the operative word here is "side").
3.5 Simply put, when faced with an attack, move directly away from the alligator as quickly as possible, navigating the terrain as carefully as possible. The zigzag idea will likely not serve you well.
4.0 Alligator Attack
4.1 If it seizes prey, and the prey fights back hard, the alligator may release it, depending on factors such as its own size relative to that of the victim, its own level of aggression, and its measure of hunger. Merely struggling to break free may not be enough counter-aggression to stop an alligator, and may actually prompt a devastating "death roll" response, in which the reptile furiously spins on its central axis to tear muscle and bone free of the victim's body.
4.2 These armored saurian are among the toughest beasts in the animal kingdom, so an attack victim should channel his or her nervous energy and will to survive and take the offensive by fighting hard. Not struggling...fighting very, very, very hard. Others on hand during such an event may be able to help by fighting the reptile, too. This should include punching the snout, poking the eyes, and even jabbing the ears, which are seen as small slits behind the eyes.
5.0 Additional Resources
5.1 http://www.tpwd.state.tx.us/huntwild/wild/species/alligator/index.phtml
5.2 http://corkscrew.audubon.org/Wildlife/Alligators.html
Drilling, Boring, and Direct-Push Probing (S3NA-405-PR1) Revision 1 October 24, 2014 PRINTED COPIES ARE UNCONTROLLED. CONTROLLED COPY IS AVAILABLE ON COMPANY INTRANET. Page 1 of 8
Americas
Drilling, Boring, and Direct-Push Probing S3NA-405-PR1
1.0 Purpose and Scope
1.1 Provides procedures designed to help prevent injuries to personnel working on the project and pedestrians, property damage, and adverse environmental impact as a result of potential hazards associated with drilling, boring and direct-push probing, including encountering underground utilities, subsurface installations, and potential overhead hazards.
1.2 Provides the minimum requirements to be followed when drilling, boring, and probing work are performed.
1.3 This procedure applies to all Americas-based employees and operations.
1.4 The Project Manager is responsible for meeting all the requirements in this procedure.
1.5 A variance provision has been included for certain requirements of this procedure found in Sections 4.3.2, 4.8.1 and 4.10. Any variance from these procedures must be approved by the District General Manager or the District SH&E Manager.
1.6 AECOM’s clients may have specific procedures which must be followed to identify and map utility and subsurface structures on their properties or facilities. Following the client’s procedures over this procedure must be approved by the District General Manager or the District SH&E Manager.
2.0 Terms and Definitions
2.1 Underground Utilities – All utility systems located beneath grade level, including, but not limited to, gas, electrical, water, compressed air, sewage, signaling, and communications, etc.
2.2 Ground Disturbance (GD) – Any indentation, interruption, intrusion, excavation, construction, or other activity in the earth’s surface as a result of work that results in the penetration of the ground.
2.3 Intrusive Activities – Excavation of soil borings, installations of monitoring wells, installation of soil gas sampling probes, excavation of test pits/trenches or other man-made cuts, cavity, trench, or depression in an earth surface formed by earth removal.
2.4 Subsurface Installations – Includes subterranean tunnels, underground parking garages, and other structures beneath the surface.
3.0 References
3.1 I2-141-PR1 Subs Management Procedure
3.2 S3NA-003-PR1 SH&E Training
3.3 S3NA-205-PR1 Equipment Inspections & Maintenance
3.4 S3NA-208-PR1 Personal Protection Equipment Program
3.5 S3NA-306-PR1 Highway and Road Work
3.6 S3NA-406-PR1 Electrical Lines, Overhead
3.7 S3NA-406-FM1 Overhead Electrical Lines Acknowledgement
3.8 S3NA-417-PR1 Underground Utilities and Subsurface Installation Clearance Process
3.9 S3NA-510-PR1 Hearing Conservation Program
3.10 Learning Management System (LMS)
3.11 National Groundwater Association, 2008
3.12 Environmental Remediation Drilling Safety Guideline
Drilling, Boring, and Direct-Push Probing (S3NA-405-PR1) Revision 1 October 24, 2014 PRINTED COPIES ARE UNCONTROLLED. CONTROLLED COPY IS AVAILABLE ON COMPANY INTRANET. Page 2 of 8
4.0 Procedure 4.1 Roles and Responsibilities
4.1.1 Project Manager – Initial and authorize work to proceed using the S3NA-405-FM2 Pre-Drilling, Boring, and Direct-Push Checklist. Authorizes (with Site Supervisor and District SH&E Manager’s concurrence) if interrupted due to unexpected effect.
4.1.2 District General Manager and District SH&E Manager – Authorize any variances from this procedure. Authorization to proceed with drilling if interrupted due to unexpected debris or concrete.
4.2 Flow Chart/Checklist
4.2.1 S3NA-405-FM1 Key Points to Know Flow Chart for Pre-Drilling, Boring, and Direct-Push Probing is a flow chart of the key points to know of the Pre-Drilling, Boring, and Direct-push probing requirements that are addressed in this procedure. Prior to any intrusive subsurface work, the S3NA-405-FM2 Pre-Drilling, Boring, and Direct-Push Checklist must be filled out and signed by the AECOM Project Manager. If the answer to any question on the checklist is “No” or “N/A”, no ground disturbance can take place without the approval of the AECOM Project Manager. The Project Manager must initial the checklist to authorize this approval.
4.3 Urban (or Non-Urban Areas without a one-call system)
4.3.1 Be aware that in urban (i.e., city or town) areas there may be subsurface installations (e.g., underground garages) and utilities (e.g., public water, sewer, and gas pipelines) that are not covered by one-call systems. These subsurface installations and utilities require additional investigation and diligence beyond the one-call system. Additional investigation and diligence beyond the one-call system is also recommended for non-urban areas.
4.3.2 In urban areas, private utility locating companies must be called to identify, through geophysical surveys and other means, the presence of private utilities installed by the property owner (i.e. irrigation systems) and to verify the presence of public utilities on the properties. Hand clearing is required in urban areas. Private locates are also required in urban areas. Any variance from these requirements must be approved by the District General Manager or the District SH&E Manager. Private locates and hand clearing is also recommended for non-urban areas.
4.3.3 The presence of subsurface installations and utilities requires special care when obstructions/ refusal and voids are encountered and when unexpected absence of soil recovery occurs during drilling operations. Other indicators of subsurface installations and utilities are the presence of warning tape, pea gravel, sand, non-indigenous material, bentonite, red concrete (indicative of electrical duct banks) and any departure from native soil or backfill.
4.4 Permits and Access Agreements
4.4.1 All applicable permits (e.g., government, working near rail road, etc.) will be identified, obtained, and adhered to.
4.4.2 All applicable client on-site safety procedures shall be understood and adhered to, and all client permits will be obtained.
4.4.3 Access agreements will be obtained and adhered to as necessary.
4.4.4 Federal/State/Provincial/Territorial regulations that govern drill rig operations and exposed moving parts shall be adhered to.
4.5 Pre-Qualifying and Re-Qualifying Drilling Subcontractors
4.5.1 All drilling subcontractors will be properly pre-qualified through AECOM’s Subport (refer to I2-141-PR1 Subs Management Procedure). The qualifications of the drilling crew performing the work will be evaluated prior to each mobilization and each day by AECOM’s on-site representative to assure
Drilling, Boring, and Direct-Push Probing (S3NA-405-PR1) Revision 1 October 24, 2014 PRINTED COPIES ARE UNCONTROLLED. CONTROLLED COPY IS AVAILABLE ON COMPANY INTRANET. Page 3 of 8
that their safety performance, training, qualifications, equipment, processes, and approaches reflect AECOM standards for excellence.
4.5.2 All drilling subcontractor equipment will be properly maintained and properly equipped, and the drilling subcontractor will verify their equipment is fully functional as a normal part of their daily and pre-work routine. Refer to S3NA-205-PR1 Equipment Inspections & Maintenance procedure.
4.6 General Health and Safety
4.6.1 Health and Safety Plan – At a minimum, a health and safety plan (HASP) that includes task hazard analyses (THAs) shall be prepared prior to any drilling, boring, and direct-push probing activities. The HASP will address any required environmental monitoring including gas monitoring, dust, noise, metals, radiation or other monitoring as may be appropriate for site conditions. All HASP requirements will be followed by the project team.
4.6.2 Training
• All on-site staff involved with drilling, boring, and direct-push probing activities shall be provided with on-site orientation of the drill rig and its operation.
• All on-site staff involved with drilling, boring, and direct-push probing shall be trained in identifying underground utilities and subsurface installations and the requirements.
• All operators and assistants shall have industry-standard safety training and be versed in the equipment to be utilized. This training may include, but is not limited to, HAZWOPER, Petroleum Safety Training (or Construction Safety Training), and H2S Alive as appropriate. All staff involved with drilling, boring and direct-push probing activities at a client site shall receive the applicable client-required training. Refer to the S3NA-003-PR1 SH&E Training and Learning Management System (LMS).
4.6.3 Personal Protective Equipment – Refer to the S3NA-208-PR1 Personal Protection Equipment Program for best practices. These requirements may be modified or expanded in the HASP, which will override these requirements. Clothing shall be close fitting and comfortable without loose ends, straps, draw strings, belts, or otherwise unfastened parts that might catch on some rotating or translating component of the rig.
4.6.4 Hearing Conservation – Hearing conservation program requirements may apply when working around operating equipment. Refer to S3NA-510-PR1 Hearing Conservation Program. Each worker shall wear noise-reducing ear protectors around operating equipment or during elevated noise levels. Distance from the elevated noise level is the primary measure of control for non-essential drilling personnel.
4.7 Identification and Mapping of Utility and Subsurface Structures
4.7.1 The locations of subsurface and overhead utilities and subsurface installations will be investigated, documented, and shown on a site plan (a scaled site plan shall be used when feasible). Refer to S3NA-406-PR1 Electrical Lines Overhead and S3NA-417 PR1 Underground Utilities and Subsurface Installation Clearance Process.
4.7.2 Documentation of utility and subsurface installation clearance process (calling one call, responses from utilities) must be at the site along with the scaled site plan will be on-site at all times of intrusive activities.
4.8 Site Walk
4.8.1 A site walk shall be conducted by the project team/site manager with the objectives of reviewing all planned intrusive activity locations, the locations of subsurface and overhead utilities and the potential for subsurface installations, to determine the appropriate utility clearance activities, and to observe other physical hazards. If possible, particularly at urban and industrial sites, the client/property owner or someone knowledgeable about the site and site utilities will attend the site
Drilling, Boring, and Direct-Push Probing (S3NA-405-PR1) Revision 1 October 24, 2014 PRINTED COPIES ARE UNCONTROLLED. CONTROLLED COPY IS AVAILABLE ON COMPANY INTRANET. Page 4 of 8
walk. Any variance from these requirements must be approved by the District General Manager or the District SH&E Manager.
4.8.2 The Site Walk is iterative with the Identification and mapping of Utility and Subsurface Structures and should be repeated as necessary following the Identification and Mapping of Utility and Subsurface Structures.
4.9 Proposed Subsurface Investigation Locations
4.9.1 All proposed subsurface locations will be reviewed in comparison to subsurface and overhead utilities and subsurface installations and adjustments made as necessary.
4.9.2 Minimum set back distances from subsurface and overhead utilities and subsurface installations will be established including 5 feet (1.5 meters) from any subsurface utility, 7 feet (2.1 meters) from the pad surrounding any underground storage tanks, and 10 feet (3 meters) from any overhead energized electrical line (or further depending on line voltage). These set back distances are a minimum; government regulations and utility requirements may dictate a greater set back distance.
4.10 Utility Clearance Investigation Location Confirmation
4.10.1 In urban areas, proposed subsurface locations will be hand cleared to 5 feet/1.5 meters (soil borings and wells) or 2 foot/0.6 meter (soil gas sampling probes) using non-mechanical methods (including soft dig (e.g., post hole digger, air knife, hand auger, etc.). Hand clearance should be extended if locations of deep utilities and structures are not known. In non-urban areas, hand clearing should be conducted if possible. Any variance from these requirements must be approved by the District General Manager or the District SH&E Manager.
4.11 Drill Rig Inspections
4.11.1 All drill rigs will be inspected prior to the initiation of drilling and daily during drilling following the S3NA-405-FM3 Daily Drill Rig Inspection Checklist. This inspection is the responsibility of the drilling subcontractor who will provide written documentation of the inspection prior to the start of drilling each day.
4.12 Unanticipated Concrete/Debris or Void
4.12.1 If unanticipated concrete/debris is encountered and/or if a void is encountered, drilling will be immediately discontinued and the Project Manager notified. Drilling may only proceed with District General Manager or the District SH&E Manager approval.
4.13 Traffic Control
4.13.1 When operating near public vehicular and pedestrian traffic, the on-site personnel shall take every precaution necessary to see that the work zone is properly established, identified, and isolated from both moving traffic and passerby pedestrians (refer to S3NA-306-PR1 Highway and Road Work).
4.13.2 All traffic control devices shall be installed, placed, and maintained in accordance with a Traffic Control Plan, client specifications, and/or the Manual of Uniform Traffic Control Devices and Manual of Uniform Traffic Control Devices for Canada in Canada. Traffic control devices shall consist of and not be limited to
• Directional and informational signage;
• High visibility barricades, cones, or barrels;
• Lighting; and
• Other equipment and devices as required.
4.14 Clearing Work Areas
4.14.1 In addition to any minimum requirements the drilling subcontractor may have, prior to set up, adequate site clearing and leveling shall be performed to accommodate the rig and supplies and provide a safe working area. Clearing the site includes clearing the intended drilling area of
Drilling, Boring, and Direct-Push Probing (S3NA-405-PR1) Revision 1 October 24, 2014 PRINTED COPIES ARE UNCONTROLLED. CONTROLLED COPY IS AVAILABLE ON COMPANY INTRANET. Page 5 of 8
underground utilities in accordance with S3NA-417-PR1 Underground Utilities and Subsurface Installation Clearance Process. Drilling or probing shall not commence when tree limbs, unstable ground, or site obstructions cause unsafe tool handling conditions.
4.15 Drilling Activities
4.15.1 In addition to any minimum requirements the drilling subcontractor may have, the following safety measures shall be taken during drilling and probing operations on site:
• The operator and helper shall be present during all active rig operations.
• Site personnel shall remain within visual contact of the rig operator.
• Hard hats, approved safety boots, safety glasses, and hearing protection shall be worn in the work zone (radius around the rig equal to the height of the drill rig mast) of a rig.
• Gas monitoring shall be conducted as appropriate.
• Hands shall be kept away from moving parts including augers.
• When observing drilling, stand upwind of the drill rig to prevent potential exposure to vapors that may be emitted from the borehole.
• The emergency shut-off switch on the rig shall be identified to site personnel and tested on a daily basis by the operator.
• Unauthorized personnel shall be kept outside of the rig work zone.
• Rig crew and other field personnel shall not use a cell phone while operating the drill rig or other equipment or within the rig work zone.
• Do not drive the rig from hole to hole with the mast (derrick) in the raised position.
• Before raising the mast (derrick) look up to check for overhead obstructions. Refer to S3NA-417-PR1 Utilities, Underground and S3NA-406-PR1 Electrical Lines, Overhead.
• Before raising the mast (derrick), all rig personnel (with the exception of the operator) and visitors should be cleared from the areas immediately to the rear and the sides of the mast. All rig personnel and visitors should be informed that the mast is being raised prior to raising it.
• Before the mast (derrick) of a drill rig is raised and drilling is commenced, the drill rig shall be first leveled and stabilized with leveling jacks and/or solid cribbing. The drill rig shall be releveled if it settles after initial set up. Lower the mast (derrick) only when the leveling jacks are down, and do not raise the leveling jack pads until the mast (derrick) is lowered completely.
• The operator of a rig shall only operate a drill rig from the position of the controls. The rig shall not be in operation if the operator of the rig leave the area of the controls
• Throwing or dropping tools shall not be permitted. All tools shall be carefully passed by hand between personnel or a hoist line should be used.
• If it is necessary to operate the rig within an enclosed area, make certain that exhaust fumes are conducted out of the area. Exhaust fumes can be toxic and some cannot be detected by smell.
• Clean mud and grease from boots before mounting a rig platform and use hand holds and railings. Watch for slippery ground when dismounting from the platform.
• During freezing weather, do not touch any metal parts of the rig with exposed flesh. Freezing of moist skin to metal can occur almost instantaneously.
• All unattended bore holes shall be adequately covered or otherwise protected to prevent rig personnel, site visitors, or animals from stepping or falling into the hole. All open bore holes shall be covered, protected, or backfilled adequately and according to Federal/State/Provincial/ Territorial or local regulations on completion of the drilling project.
• When using a ladder on a rig, face the ladder and grasp either the side rails or the rungs with both hands while ascending and descending. Always use adequate fall protection and a full body harness when climbing above 6 feet (2 meters) of the ground. Do not attempt to use one
Drilling, Boring, and Direct-Push Probing (S3NA-405-PR1) Revision 1 October 24, 2014 PRINTED COPIES ARE UNCONTROLLED. CONTROLLED COPY IS AVAILABLE ON COMPANY INTRANET. Page 6 of 8
or both hands to carry a tool while on a ladder. Use a hoist line and a tool “bucket” or a safety hook to raise or lower hand tools.
4.16 Use of Manual Slide Hammer
4.16.1 The following health and safety procedures should be followed when using a manual slide hammer to install shallow injection points, drive point piezometers and drill tools:
• Only use a manual slide hammer that either attaches directly to the point/piezometer being driven or that incorporates a cap on the point/piezometer/drill tool that prevents the slide hammer from slipping off the point/piezometer/drill tool.
• Always grasp the slide manual slide hammer (handles if equipped with handles) with both hands while driving the point/piezometer/drill tool.
• Never allow hands or feet to get between the manual slide hammer and the drive plate or anvil.
4.17 Use of Augers
4.17.1 The following general health and safety procedures should be followed when supervising borings with continuous flight hollow-stem augers:
• Never place hands or fingers under the bottom of an auger section when it is being hoisted over the top of the auger section in the ground or other hard surfaces such as the drill rig platform.
• Never allow feet to get under the auger section that is being hoisted.
• When augers are rotating, stay clear of the rotating auger and other rotating components of the drill rig. Never reach behind or around a rotating auger for any reason.
• Use a long-handled shovel to move auger cuttings away from a rotating auger. Never use your hands or feet to move cuttings away from a rotating auger.
• Do not attempt to remove earth from rotating augers. Augers should be cleaned only when the drill rig is in neutral and the augers are stopped from rotating.
• Loud noises may occur while driving split spoons. At minimum hearing protection shall be worn when driving split spoons.
• Keep feet clear of rope cat head rope.
4.18 Rotary, Sonic and Core Drilling
4.18.1 In addition to the health and safety procedures identified above, the following general health and safety procedures should be followed when supervising borings with rotary, sonic and core drilling:
• Drill rods should not be braked during lowering into the hole with drill rod chuck jaws. Drill rods should not be held or lowered into the hole with pipe wrenches.
• If a string of drill rods are accidentally or inadvertently released into the hole, do not attempt to grab the falling rods with your hands or a wrench.
• When drill rods are hoisted from the hole, they should be cleaned for safe handling with a rubber or other suitable rod wiper. Do not use your hands to clean drilling fluids from drill rods.
• When drill rods are rotating, stay clear of the rotating components of the drill rig. Never reach behind or around a rotating drill rod for any reason.
• Use a long-handled shovel to move cuttings away from the top of the borehole. Never use your hands or feet to move cuttings away from the borehole.
• If work shall progress over a portable drilling fluid (mud) pit, do not attempt to stand on narrow sides or cross members. The mud pit should be equipped with rough-surfaced, fitted cover panels of adequate strength to hold drill rig personnel.
• Keep away from area where drill rods are being moved or raised to the rig. Do not stand in the area where a drill rod will fall or slide if it should be dropped.
Drilling, Boring, and Direct-Push Probing (S3NA-405-PR1) Revision 1 October 24, 2014 PRINTED COPIES ARE UNCONTROLLED. CONTROLLED COPY IS AVAILABLE ON COMPANY INTRANET. Page 7 of 8
• Loud noises may occur during drilling. Hearing protection shall be worn.
4.19 Direct-push
4.19.1 The following general health and safety procedures should be followed when supervising drilling borings with direct-push drilling:
• When drill rods are hoisted from the hole, they should be cleaned for safe handling with a rubber or other suitable rod wiper. Do not use your hands to clean drilling fluids from drill rods.
• If work shall progress over a portable drilling fluid (mud) pit, do not attempt to stand on narrow sides or cross members. The mud pit should be equipped with rough-surfaced, fitted cover panels of adequate strength to hold drill rig personnel.
• Drill rods should not be lifted and leaned unsecured against the mast. Either provide some method of securing the upper ends of the drill rod sections for safe vertical storage or lay the rods down.
4.20 Site Movement of Equipment
4.20.1 The individual who transports a rig on and off a drilling site should:
• Be properly licensed and should only operate the vehicle according to Federal/State/Provincial/ Territorial, and local regulations.
• Know the traveling height (overhead clearance), width, length and weight of the rig with carrier and know highway and bridge load, width and overhead limits, making sure these limits are not exceeded with and adequate margin.
• Allow for mast overhand when cornering or approaching other vehicles or structures.
• Be aware that the canopies of service stations and motels are often too low for a drill rig mast to clear with the mast in the travel position.
• Watch for low hanging electrical lines, particularly at the entrances to drilling sites or restaurants, motels, other commercial sites.
• Never travel on a street, road, or highway with the mast (derrick) of the rig in the raised or partially raised position.
• Remove all ignition keys if rig is left unattended unless client requirements specify that the keys remain in the ignition switch at all times.
4.20.2 Loading and Unloading
• Use ramps of adequate design that are solid and substantial enough to bear the weight of the rig with carrier, including tools.
• Load and unload on level ground.
• Use the assistance of someone on the ground as a guide.
• Check the brakes on the rig carrier before approaching loading ramps.
• Distribute the weight of the rig, carrier, and tools on the trailer so that the center of weight is approximately on the centerline of the trailer and so that some of the trailer load is transferred to the height of the pulling vehicle. Refer to the trailer manufacturer’s weight distribution recommendations.
• The rig and tools should be secured to the hauling vehicle with ties, chains, and/or load binders of adequate capacity.
Drilling, Boring, and Direct-Push Probing (S3NA-405-PR1) Revision 1 October 24, 2014 PRINTED COPIES ARE UNCONTROLLED. CONTROLLED COPY IS AVAILABLE ON COMPANY INTRANET. Page 8 of 8
4.20.3 Off-Road Movement
The following safety suggestions relate to off-road movement:
• Before moving a drill rig, first walk the route of travel, inspecting for depressions, stumps, gullies, ruts, and similar obstacles.
• Always check the brakes of a drill rig carrier before traveling, particularly on rough, uneven, or hilly ground.
• Discharge all passengers before moving a drill rig on rough or hilly terrain.
• Use caution when traveling side-hill. Conservatively evaluate side-hill capability of drill rigs, because the arbitrary addition of drilling tools may raise the center of mass. When possible, travel directly uphill or downhill. Increase tire pressures before traveling in hilly terrain (do not exceed rated tire pressure).
• Attempt to cross obstacles such as small logs and small erosion channels or ditches squarely, not at an angle.
• Use the assistance of someone on the ground as a guide when lateral or overhead clearance is close.
• After the drill has been moved to a new drilling site, set all brakes and/or locks. Always block/ chock the wheels.
5.0 Records
5.1 None
6.0 Attachments
6.1 S3NA-405-WI1 Core Drilling Machine Safety Card
6.2 S3NA-405-FM1 Key Points to Know Flow Chart for Pre-Drilling, Boring, and Direct-Push Probing
6.3 S3NA-405-FM2 Pre-Drilling, Boring, and Direct-Push Checklist
6.4 S3NA-405-FM3 Daily Drill Rig Inspection Checklist
6.5 S3NA-405-ST Drilling and Boring – Jurisdictions/Regulations
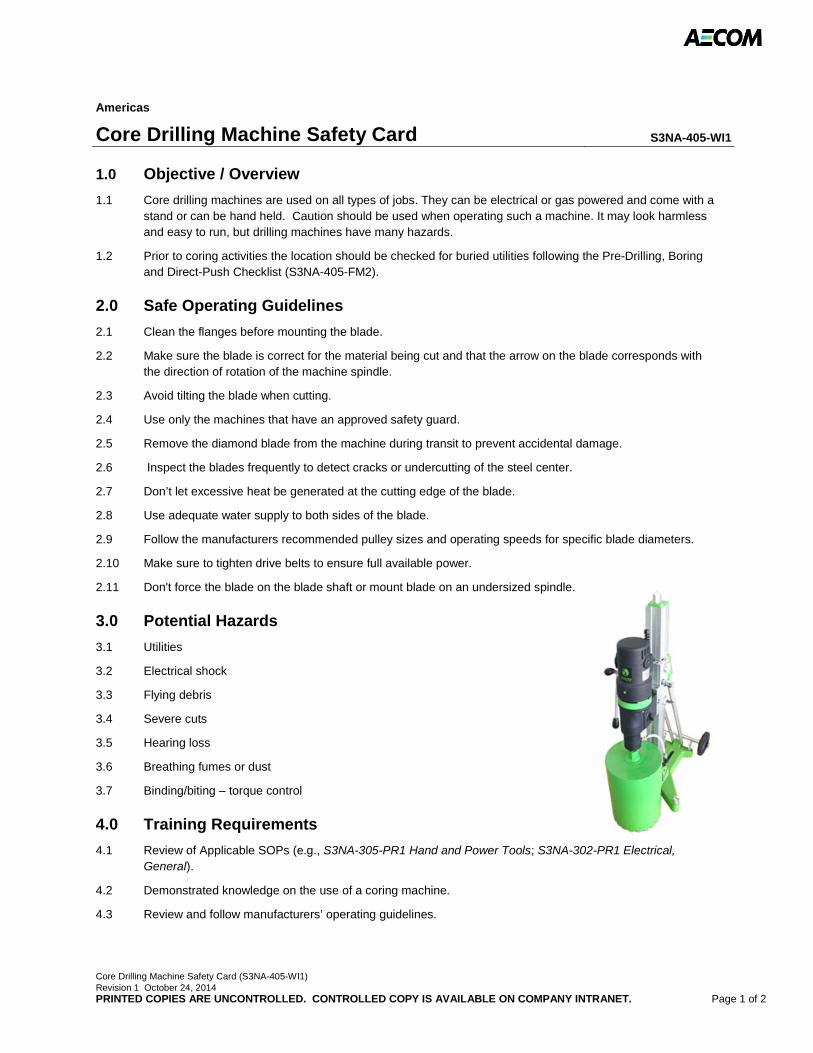
Core Drilling Machine Safety Card (S3NA-405-WI1) Revision 1 October 24, 2014 PRINTED COPIES ARE UNCONTROLLED. CONTROLLED COPY IS AVAILABLE ON COMPANY INTRANET. Page 1 of 2
Americas
Core Drilling Machine Safety Card S3NA-405-WI1
1.0 Objective / Overview
1.1 Core drilling machines are used on all types of jobs. They can be electrical or gas powered and come with a stand or can be hand held. Caution should be used when operating such a machine. It may look harmless and easy to run, but drilling machines have many hazards.
1.2 Prior to coring activities the location should be checked for buried utilities following the Pre-Drilling, Boring and Direct-Push Checklist (S3NA-405-FM2).
2.0 Safe Operating Guidelines
2.1 Clean the flanges before mounting the blade.
2.2 Make sure the blade is correct for the material being cut and that the arrow on the blade corresponds with the direction of rotation of the machine spindle.
2.3 Avoid tilting the blade when cutting.
2.4 Use only the machines that have an approved safety guard.
2.5 Remove the diamond blade from the machine during transit to prevent accidental damage.
2.6 Inspect the blades frequently to detect cracks or undercutting of the steel center.
2.7 Don’t let excessive heat be generated at the cutting edge of the blade.
2.8 Use adequate water supply to both sides of the blade.
2.9 Follow the manufacturers recommended pulley sizes and operating speeds for specific blade diameters.
2.10 Make sure to tighten drive belts to ensure full available power.
2.11 Don't force the blade on the blade shaft or mount blade on an undersized spindle.
3.0 Potential Hazards
3.1 Utilities
3.2 Electrical shock
3.3 Flying debris
3.4 Severe cuts
3.5 Hearing loss
3.6 Breathing fumes or dust
3.7 Binding/biting – torque control
4.0 Training Requirements
4.1 Review of Applicable SOPs (e.g., S3NA-305-PR1 Hand and Power Tools; S3NA-302-PR1 Electrical, General).
4.2 Demonstrated knowledge on the use of a coring machine.
4.3 Review and follow manufacturers’ operating guidelines.
Core Drilling Machine Safety Card (S3NA-405-WI1) Revision 1 October 24, 2014 PRINTED COPIES ARE UNCONTROLLED. CONTROLLED COPY IS AVAILABLE ON COMPANY INTRANET. Page 2 of 2
5.0 Personal Protective Equipment (Level D PPE)
5.1 Leather gloves
5.2 Face shield
5.3 Steel-toed/composite-toed boots
5.4 Hearing protection
5.5 Respirator or dust mask
6.0 Other Safety Tips
6.1 Keep fingers and hands away from the cutting edge.
6.2 Hold handle firmly when operating.
6.3 A subsurface utility clearance should be performed prior to initiating drilling operations.
6.4 Stand firmly and apply body weight at anchored side of guarded platform.
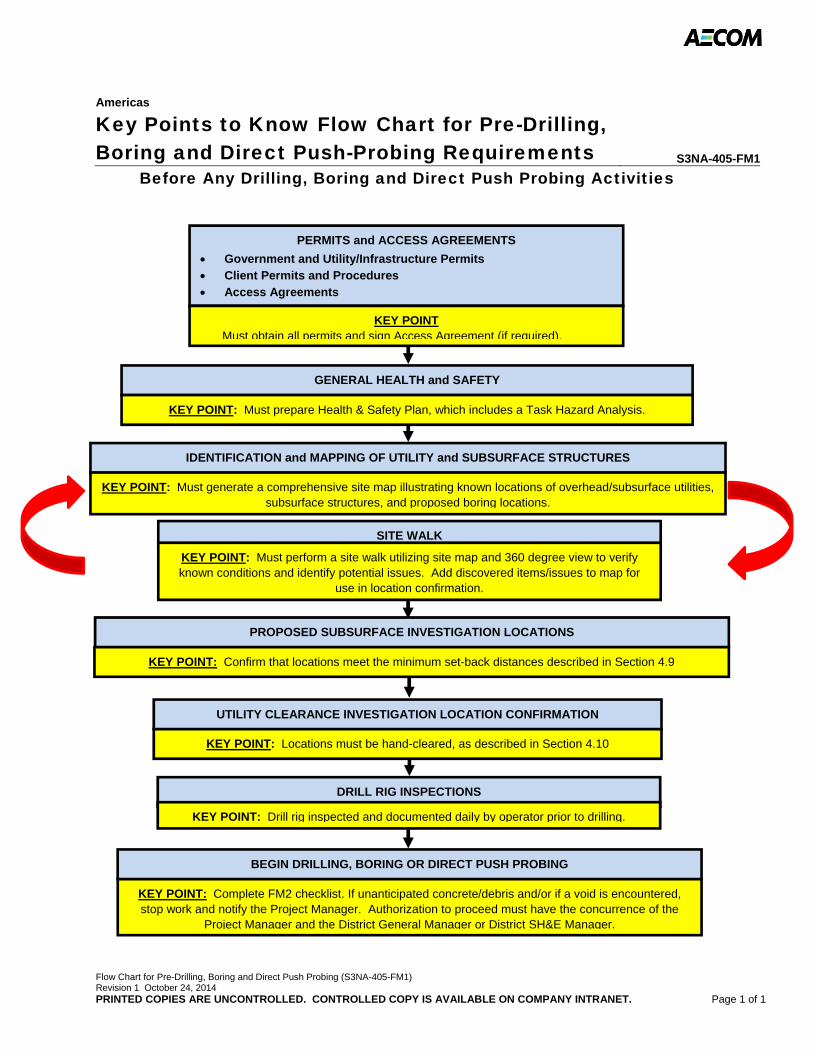
Flow Chart for Pre-Drilling, Boring and Direct Push Probing (S3NA-405-FM1) Revision 1 October 24, 2014 PRINTED COPIES ARE UNCONTROLLED. CONTROLLED COPY IS AVAILABLE ON COMPANY INTRANET. Page 1 of 1
Americas
Key Points to Know Flow Chart for Pre-Drilling, Boring and Direct Push-Probing Requirements S3NA-405-FM1
Before Any Drilling, Boring and Direct Push Probing Activities
PERMITS and ACCESS AGREEMENTS
Government and Utility/Infrastructure Permits Client Permits and Procedures Access Agreements
KEY POINT Must obtain all permits and sign Access Agreement (if required).
DRILL RIG INSPECTIONS
KEY POINT: Drill rig inspected and documented daily by operator prior to drilling.
UTILITY CLEARANCE INVESTIGATION LOCATION CONFIRMATION
KEY POINT: Locations must be hand-cleared, as described in Section 4.10
PROPOSED SUBSURFACE INVESTIGATION LOCATIONS
KEY POINT: Confirm that locations meet the minimum set-back distances described in Section 4.9
IDENTIFICATION and MAPPING OF UTILITY and SUBSURFACE STRUCTURES
KEY POINT: Must generate a comprehensive site map illustrating known locations of overhead/subsurface utilities, subsurface structures, and proposed boring locations.
GENERAL HEALTH and SAFETY
KEY POINT: Must prepare Health & Safety Plan, which includes a Task Hazard Analysis.
SITE WALK
KEY POINT: Must perform a site walk utilizing site map and 360 degree view to verify known conditions and identify potential issues. Add discovered items/issues to map for
use in location confirmation.
BEGIN DRILLING, BORING OR DIRECT PUSH PROBING
KEY POINT: Complete FM2 checklist. If unanticipated concrete/debris and/or if a void is encountered, stop work and notify the Project Manager. Authorization to proceed must have the concurrence of the
Project Manager and the District General Manager or District SH&E Manager.
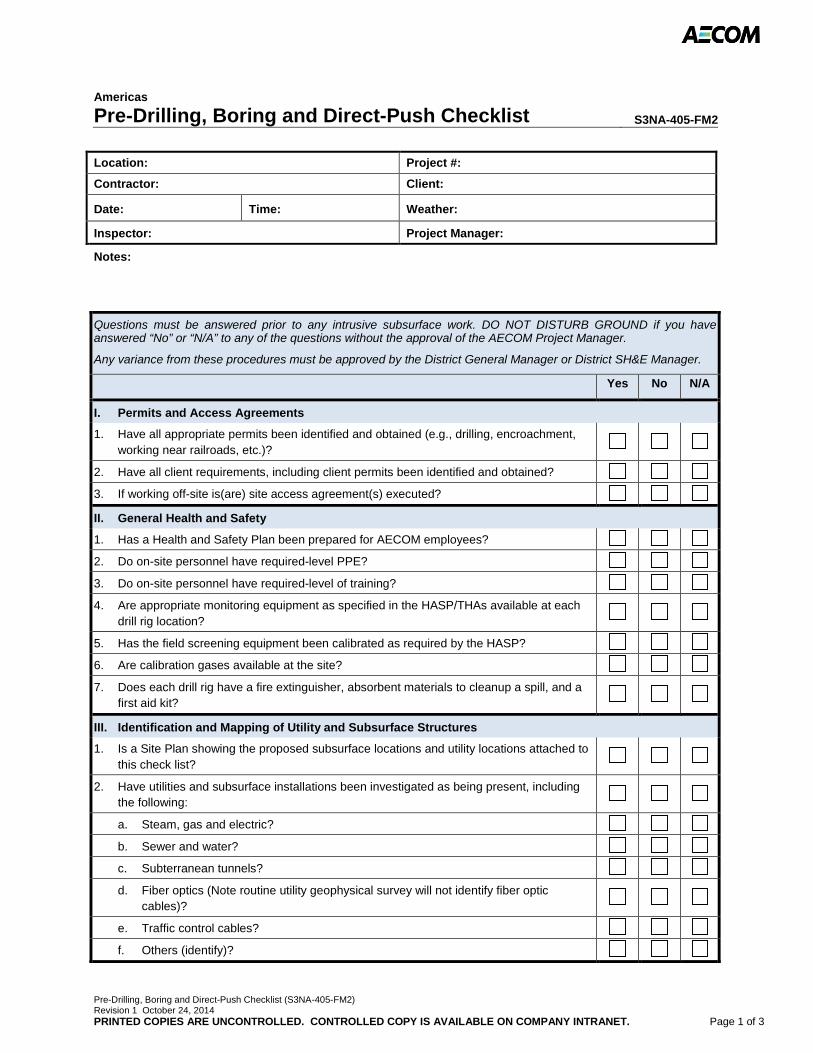
Pre-Drilling, Boring and Direct-Push Checklist (S3NA-405-FM2) Revision 1 October 24, 2014 PRINTED COPIES ARE UNCONTROLLED. CONTROLLED COPY IS AVAILABLE ON COMPANY INTRANET. Page 1 of 3
Americas
Pre-Drilling, Boring and Direct-Push Checklist S3NA-405-FM2
Location: Project #:
Contractor: Client:
Date: Time: Weather:
Inspector: Project Manager:
Notes:
Questions must be answered prior to any intrusive subsurface work. DO NOT DISTURB GROUND if you have answered “No” or “N/A” to any of the questions without the approval of the AECOM Project Manager.
Any variance from these procedures must be approved by the District General Manager or District SH&E Manager.
Yes No N/A
I. Permits and Access Agreements
1. Have all appropriate permits been identified and obtained (e.g., drilling, encroachment, working near railroads, etc.)?
2. Have all client requirements, including client permits been identified and obtained? 3. If working off-site is(are) site access agreement(s) executed?
II. General Health and Safety
1. Has a Health and Safety Plan been prepared for AECOM employees? 2. Do on-site personnel have required-level PPE? 3. Do on-site personnel have required-level of training? 4. Are appropriate monitoring equipment as specified in the HASP/THAs available at each
drill rig location?
5. Has the field screening equipment been calibrated as required by the HASP? 6. Are calibration gases available at the site? 7. Does each drill rig have a fire extinguisher, absorbent materials to cleanup a spill, and a
first aid kit?
III. Identification and Mapping of Utility and Subsurface Structures
1. Is a Site Plan showing the proposed subsurface locations and utility locations attached to this check list?
2. Have utilities and subsurface installations been investigated as being present, including
the following:
a. Steam, gas and electric? b. Sewer and water? c. Subterranean tunnels? d. Fiber optics (Note routine utility geophysical survey will not identify fiber optic
cables)?
e. Traffic control cables? f. Others (identify)?
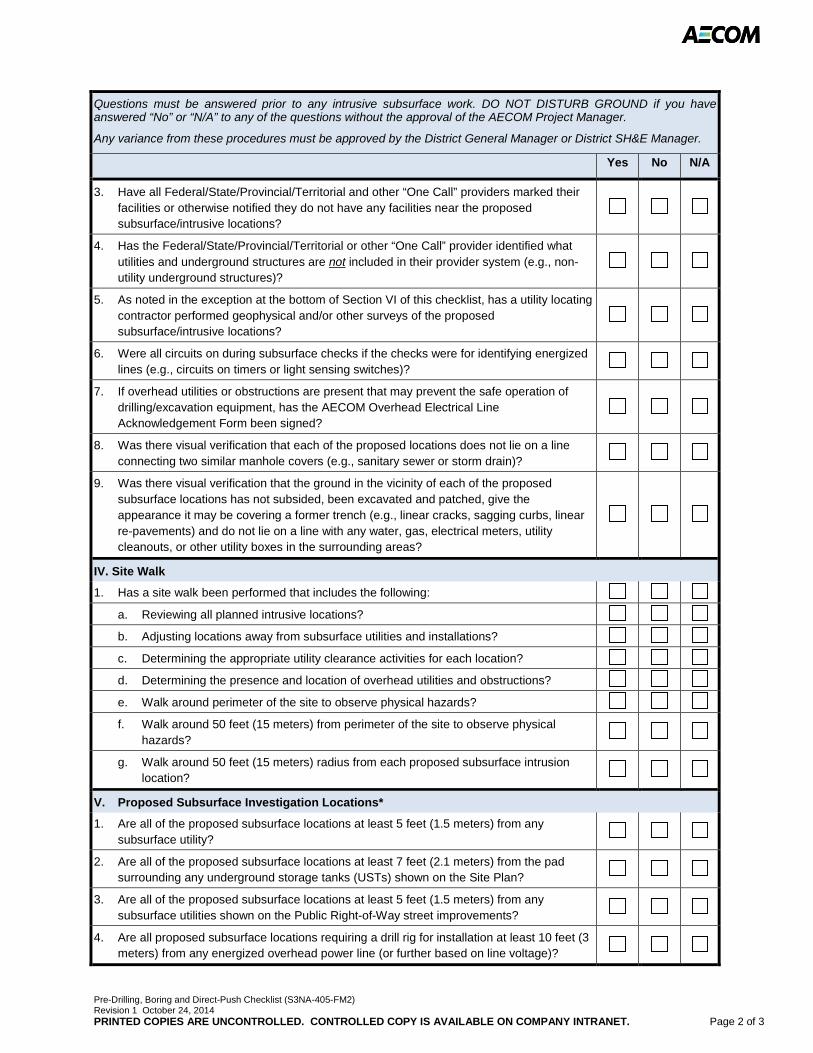
Pre-Drilling, Boring and Direct-Push Checklist (S3NA-405-FM2) Revision 1 October 24, 2014 PRINTED COPIES ARE UNCONTROLLED. CONTROLLED COPY IS AVAILABLE ON COMPANY INTRANET. Page 2 of 3
Questions must be answered prior to any intrusive subsurface work. DO NOT DISTURB GROUND if you have answered “No” or “N/A” to any of the questions without the approval of the AECOM Project Manager.
Any variance from these procedures must be approved by the District General Manager or District SH&E Manager.
Yes No N/A
3. Have all Federal/State/Provincial/Territorial and other “One Call” providers marked their facilities or otherwise notified they do not have any facilities near the proposed subsurface/intrusive locations?
4. Has the Federal/State/Provincial/Territorial or other “One Call” provider identified what utilities and underground structures are not included in their provider system (e.g., non-utility underground structures)?
5. As noted in the exception at the bottom of Section VI of this checklist, has a utility locating contractor performed geophysical and/or other surveys of the proposed subsurface/intrusive locations?
6. Were all circuits on during subsurface checks if the checks were for identifying energized lines (e.g., circuits on timers or light sensing switches)?
7. If overhead utilities or obstructions are present that may prevent the safe operation of
drilling/excavation equipment, has the AECOM Overhead Electrical Line Acknowledgement Form been signed?
8. Was there visual verification that each of the proposed locations does not lie on a line connecting two similar manhole covers (e.g., sanitary sewer or storm drain)?
9. Was there visual verification that the ground in the vicinity of each of the proposed
subsurface locations has not subsided, been excavated and patched, give the appearance it may be covering a former trench (e.g., linear cracks, sagging curbs, linear re-pavements) and do not lie on a line with any water, gas, electrical meters, utility cleanouts, or other utility boxes in the surrounding areas?
IV. Site Walk
1. Has a site walk been performed that includes the following: a. Reviewing all planned intrusive locations? b. Adjusting locations away from subsurface utilities and installations? c. Determining the appropriate utility clearance activities for each location? d. Determining the presence and location of overhead utilities and obstructions? e. Walk around perimeter of the site to observe physical hazards? f. Walk around 50 feet (15 meters) from perimeter of the site to observe physical
hazards?
g. Walk around 50 feet (15 meters) radius from each proposed subsurface intrusion location?
V. Proposed Subsurface Investigation Locations*
1. Are all of the proposed subsurface locations at least 5 feet (1.5 meters) from any subsurface utility?
2. Are all of the proposed subsurface locations at least 7 feet (2.1 meters) from the pad
surrounding any underground storage tanks (USTs) shown on the Site Plan?
3. Are all of the proposed subsurface locations at least 5 feet (1.5 meters) from any subsurface utilities shown on the Public Right-of-Way street improvements?
4. Are all proposed subsurface locations requiring a drill rig for installation at least 10 feet (3
meters) from any energized overhead power line (or further based on line voltage)?
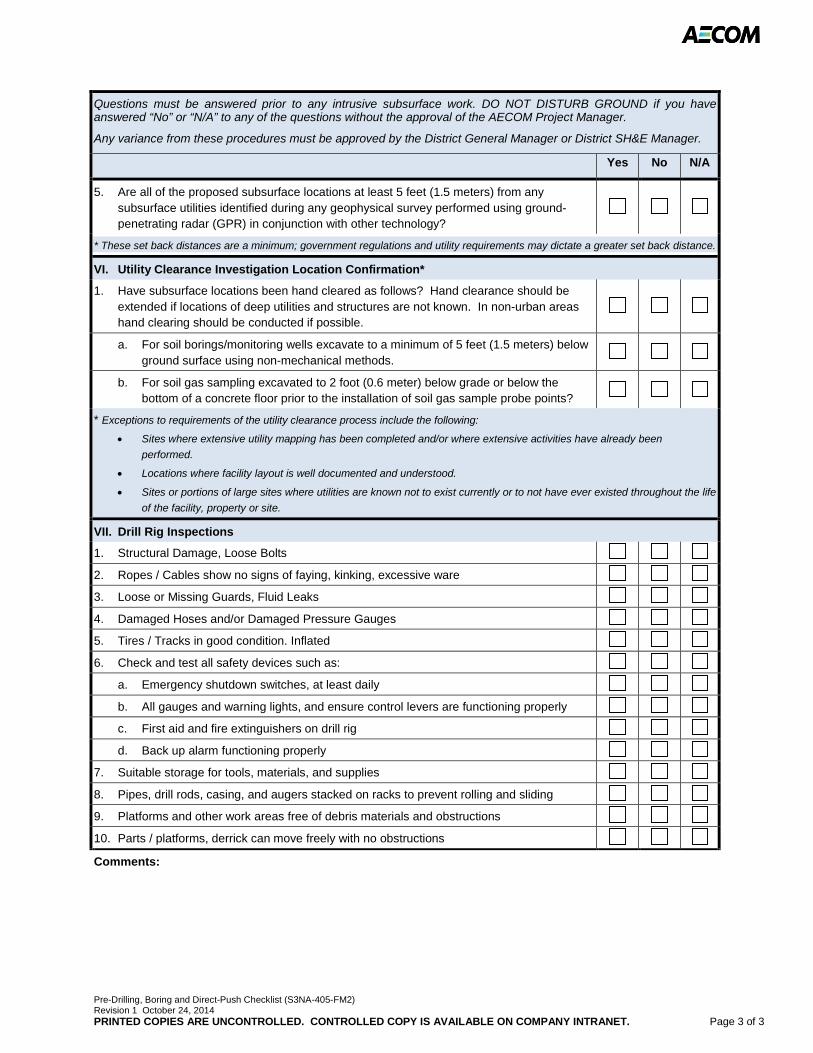
Pre-Drilling, Boring and Direct-Push Checklist (S3NA-405-FM2) Revision 1 October 24, 2014 PRINTED COPIES ARE UNCONTROLLED. CONTROLLED COPY IS AVAILABLE ON COMPANY INTRANET. Page 3 of 3
Questions must be answered prior to any intrusive subsurface work. DO NOT DISTURB GROUND if you have answered “No” or “N/A” to any of the questions without the approval of the AECOM Project Manager.
Any variance from these procedures must be approved by the District General Manager or District SH&E Manager.
Yes No N/A
5. Are all of the proposed subsurface locations at least 5 feet (1.5 meters) from any subsurface utilities identified during any geophysical survey performed using ground-penetrating radar (GPR) in conjunction with other technology?
* These set back distances are a minimum; government regulations and utility requirements may dictate a greater set back distance.
VI. Utility Clearance Investigation Location Confirmation*
1. Have subsurface locations been hand cleared as follows? Hand clearance should be extended if locations of deep utilities and structures are not known. In non-urban areas hand clearing should be conducted if possible.
a. For soil borings/monitoring wells excavate to a minimum of 5 feet (1.5 meters) below ground surface using non-mechanical methods.
b. For soil gas sampling excavated to 2 foot (0.6 meter) below grade or below the
bottom of a concrete floor prior to the installation of soil gas sample probe points?
* Exceptions to requirements of the utility clearance process include the following:
• Sites where extensive utility mapping has been completed and/or where extensive activities have already been performed.
• Locations where facility layout is well documented and understood.
• Sites or portions of large sites where utilities are known not to exist currently or to not have ever existed throughout the life of the facility, property or site.
VII. Drill Rig Inspections
1. Structural Damage, Loose Bolts 2. Ropes / Cables show no signs of faying, kinking, excessive ware 3. Loose or Missing Guards, Fluid Leaks 4. Damaged Hoses and/or Damaged Pressure Gauges 5. Tires / Tracks in good condition. Inflated 6. Check and test all safety devices such as:
a. Emergency shutdown switches, at least daily b. All gauges and warning lights, and ensure control levers are functioning properly c. First aid and fire extinguishers on drill rig d. Back up alarm functioning properly
7. Suitable storage for tools, materials, and supplies 8. Pipes, drill rods, casing, and augers stacked on racks to prevent rolling and sliding 9. Platforms and other work areas free of debris materials and obstructions 10. Parts / platforms, derrick can move freely with no obstructions Comments:
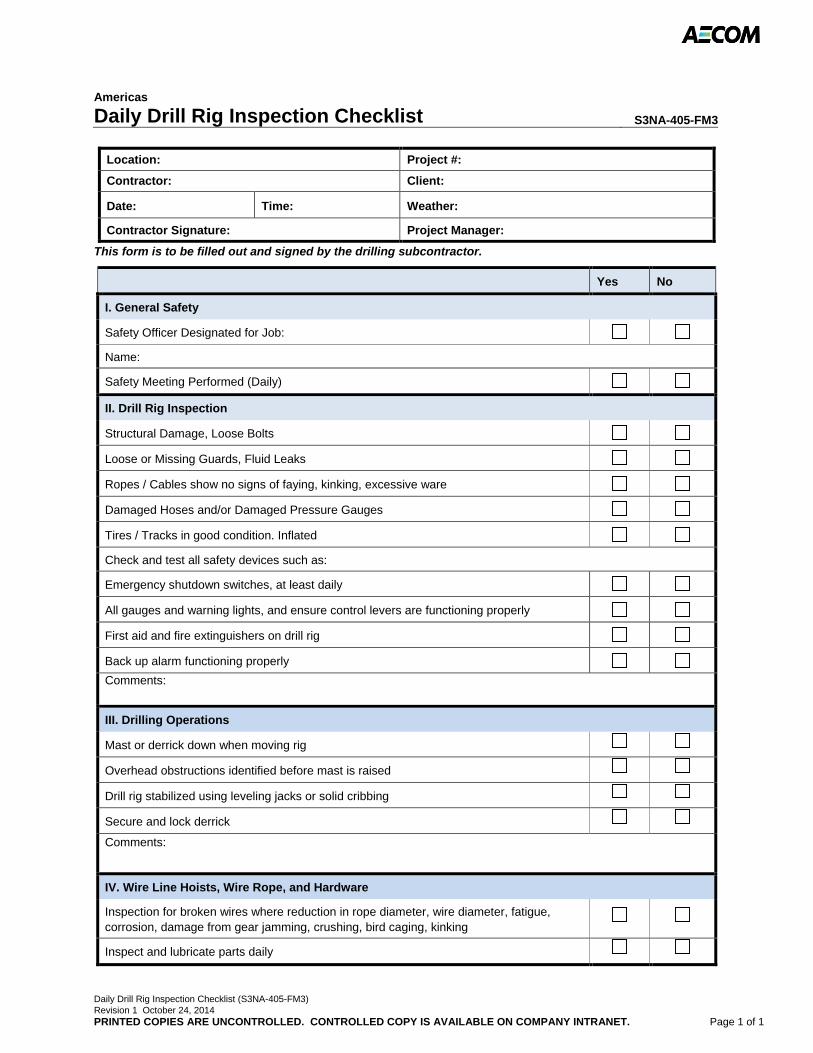
Daily Drill Rig Inspection Checklist (S3NA-405-FM3) Revision 1 October 24, 2014 PRINTED COPIES ARE UNCONTROLLED. CONTROLLED COPY IS AVAILABLE ON COMPANY INTRANET. Page 1 of 1
Americas
Daily Drill Rig Inspection Checklist S3NA-405-FM3
Location: Project #:
Contractor: Client:
Date: Time: Weather:
Contractor Signature: Project Manager:
This form is to be filled out and signed by the drilling subcontractor.
Yes No
I. General Safety
Safety Officer Designated for Job:
Name:
Safety Meeting Performed (Daily)
II. Drill Rig Inspection
Structural Damage, Loose Bolts
Loose or Missing Guards, Fluid Leaks
Ropes / Cables show no signs of faying, kinking, excessive ware
Damaged Hoses and/or Damaged Pressure Gauges
Tires / Tracks in good condition. Inflated
Check and test all safety devices such as:
Emergency shutdown switches, at least daily
All gauges and warning lights, and ensure control levers are functioning properly
First aid and fire extinguishers on drill rig
Back up alarm functioning properly
Comments:
III. Drilling Operations
Mast or derrick down when moving rig
Overhead obstructions identified before mast is raised
Drill rig stabilized using leveling jacks or solid cribbing
Secure and lock derrick
Comments:
IV. Wire Line Hoists, Wire Rope, and Hardware
Inspection for broken wires where reduction in rope diameter, wire diameter, fatigue, corrosion, damage from gear jamming, crushing, bird caging, kinking
Inspect and lubricate parts daily
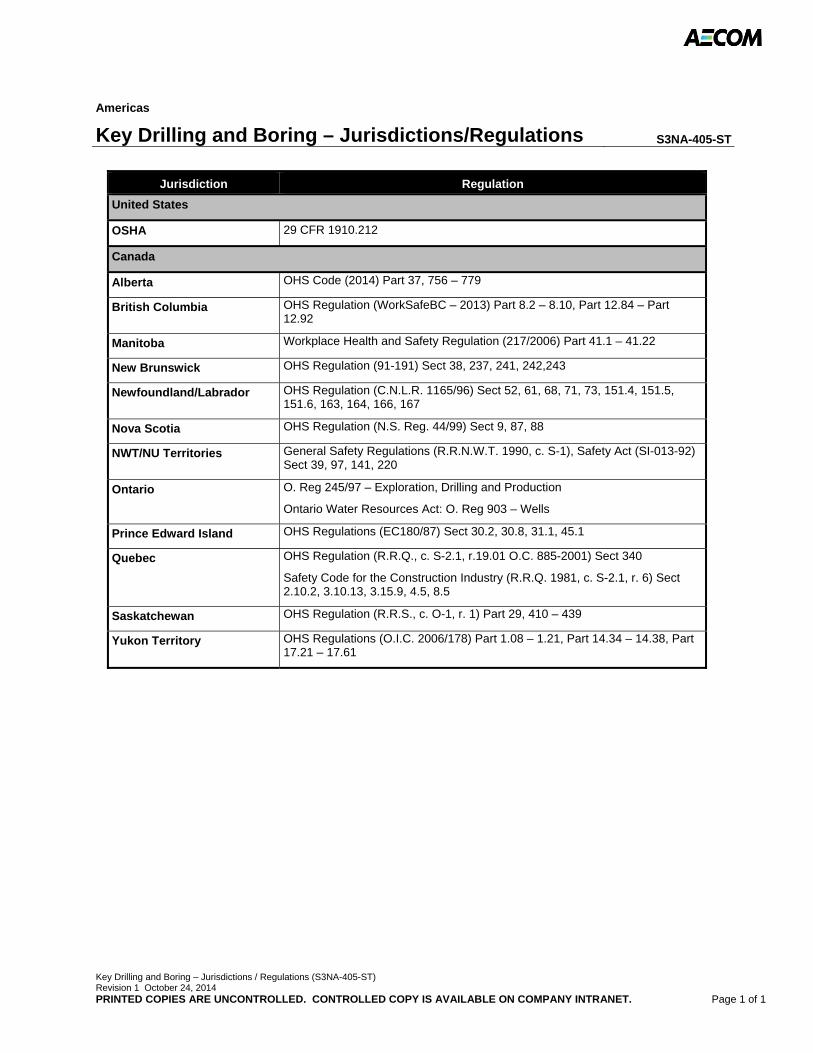
Key Drilling and Boring – Jurisdictions / Regulations (S3NA-405-ST) Revision 1 October 24, 2014 PRINTED COPIES ARE UNCONTROLLED. CONTROLLED COPY IS AVAILABLE ON COMPANY INTRANET. Page 1 of 1
Americas
Key Drilling and Boring – Jurisdictions/Regulations S3NA-405-ST
Jurisdiction Regulation
United States
OSHA 29 CFR 1910.212
Canada
Alberta OHS Code (2014) Part 37, 756 – 779
British Columbia OHS Regulation (WorkSafeBC – 2013) Part 8.2 – 8.10, Part 12.84 – Part 12.92
Manitoba Workplace Health and Safety Regulation (217/2006) Part 41.1 – 41.22
New Brunswick OHS Regulation (91-191) Sect 38, 237, 241, 242,243
Newfoundland/Labrador OHS Regulation (C.N.L.R. 1165/96) Sect 52, 61, 68, 71, 73, 151.4, 151.5, 151.6, 163, 164, 166, 167
Nova Scotia OHS Regulation (N.S. Reg. 44/99) Sect 9, 87, 88
NWT/NU Territories General Safety Regulations (R.R.N.W.T. 1990, c. S-1), Safety Act (SI-013-92) Sect 39, 97, 141, 220
Ontario O. Reg 245/97 – Exploration, Drilling and Production
Ontario Water Resources Act: O. Reg 903 – Wells
Prince Edward Island OHS Regulations (EC180/87) Sect 30.2, 30.8, 31.1, 45.1
Quebec OHS Regulation (R.R.Q., c. S-2.1, r.19.01 O.C. 885-2001) Sect 340
Safety Code for the Construction Industry (R.R.Q. 1981, c. S-2.1, r. 6) Sect 2.10.2, 3.10.13, 3.15.9, 4.5, 8.5
Saskatchewan OHS Regulation (R.R.S., c. O-1, r. 1) Part 29, 410 – 439
Yukon Territory OHS Regulations (O.I.C. 2006/178) Part 1.08 – 1.21, Part 14.34 – 14.38, Part 17.21 – 17.61
Electrical Lines, Overhead (S3NA-406-PR1) Revision 2 December 31, 2014 PRINTED COPIES ARE UNCONTROLLED. CONTROLLED COPY IS AVAILABLE ON COMPANY INTRANET. 1 of 5
Americas
Electrical Lines, Overhead S3NA-406-PR1
1.0 Purpose and Scope
1.1 Provides the safe work requirements to be observed where overhead electrical lines, electrical apparatus, or any energized (exposed or insulated) parts are present at a job site.
1.2 This procedure applies to all AECOM Americas-based employees and operations, except where local or governmental regulations are more stringent.
2.0 Terms and Definitions
2.1 Arc Flash Hazard – A dangerous condition associated with the possible release of energy caused by and electric arc. Arc flash is the light and heat produced from an electric arc supplied with sufficient electrical energy to cause substantial damage, harm, fire, or injury.
2.2 Electrical Hazard – A dangerous condition such that contact or equipment failure can result in electric shock, arc flash burn, thermal burn, or blast.
2.3 Minimum Approach Distance (M.A.D.) – The M.A.D. is the closest distance any employee or any part of the operating equipment is permitted to approach an energized or a grounded object.
2.4 Qualified Person (Electrical Transmission and Distribution) – A person trained and knowledgeable in the construction and operation of electrical transmission and distribution equipment or a specific work method, and has been trained to recognize and avoid electrical hazards that might be present with respect to that equipment or work method.
2.5 Types of Overhead Lines:
• Overhead electrical lines
• Structural cable supports
• Guy wires
• Cable television / communication lines
3.0 References
3.1 29 CFR 1926 Subpart CC, “Cranes & Derrics in Construction”
3.2 29 CFR 1926 Subpart V, “Power Transmission and Distribution”
3.3 29 CFR 1926.453, “Aerial Lifts”
3.4 American National Standards Institute (ANSI) A92 Series, “Elevating and Vehicle Lift Devices”
3.5 ANSI B30.5, “Mobile and Locomotive Cranes”
3.6 Learning Management System (LMS)
3.7 National Fire Protection Agency (NFPA) 70E, “Standard for Electrical Safety in the Work Place”
3.8 I2-141-PR1 Subs Management Procedure
3.9 S3NA-004 PR1 Incident Reporting
3.10 S3NA-209-PR1 Project Hazard Assessment and Planning
3.11 S3NA-302-PR1 Electrical, General
Electrical Lines, Overhead (S3NA-406-PR1) Revision 2 December 31, 2014 PRINTED COPIES ARE UNCONTROLLED. CONTROLLED COPY IS AVAILABLE ON COMPANY INTRANET. 2 of 5
4.0 Procedure
4.1 Roles & Responsibilities
4.1.1 Project Manager
• Identify conditions where overhead electrical lines may be present and outline what is required in the task hazard analysis or safety plan refer to the S3NA-209-PR1 Project Hazard Assessment and Planning.
• Coordinate and communicate with subcontractors or employees working around overhead electrical lines, refer to I2-141-PR1 Subs Management Procedure.
• Confirm the S3NA-406-FM1 Overhead Electrical Lines Acknowledgement form is completed by anyone working around overhead electrical lines on the project site.
4.1.2 SH&E Department
• Assist and support the Project Manager in planning and responding to concerns regarding the exposure to overhead electrical lines.
4.1.3 Employees
• Inform the Project Manager of field conditions that may expose risks to overhead electrical lines.
4.1.4 Overhead line Owner/Operator
• Complete the S3NA-406-FM1 Overhead Electrical Lines Acknowledgement and submit to AECOM prior to performing work.
4.2 Training
4.2.1 Project Managers shall ensure that each equipment operator and crew member assigned to work with the equipment is trained in accordance with the S3NA-209-PR1 Project Hazard Assessment and Planning for specific required training assigned in the LMS. Additional training requirements include:
• Overhead lines are presumed to be energized unless the utility overhead line owner/ operator confirms that the overhead line has been and continues to be de-energized and visibly grounded at the worksite.
• Overhead lines are presumed to be uninsulated unless the utility overhead line owner/operator or a registered Professional Engineer who is a Qualified Person with respect to electrical power transmission and distribution confirms that a line is insulated.
• The limitations of an insulating link/device, proximity alarm, and range control (and similar) device, if used.
• Follow the S3NA-302-PR1 Electrical, General procedures to properly ground equipment and the limitations of grounding.
4.3 General Requirements
4.3.1 Project Managers must contact the overhead owner/operator (i.e. local utility company) before work is done or before equipment is operated within 50 feet (15.25 meters) of an energized overhead line, to determine the voltage of the overhead line and establish the appropriate M.A.D. The Minimum Approach Distance vs Voltage varies from Province to Province in Canada. The minimum approach distance or the regulatory minimum distance requirements, whichever is more stringent, must be maintained. Figure 4-1 lists the Phase-to-Phase voltage rating voltages in kilovolts and the M.A.D.s applicable to all AECOM operations:
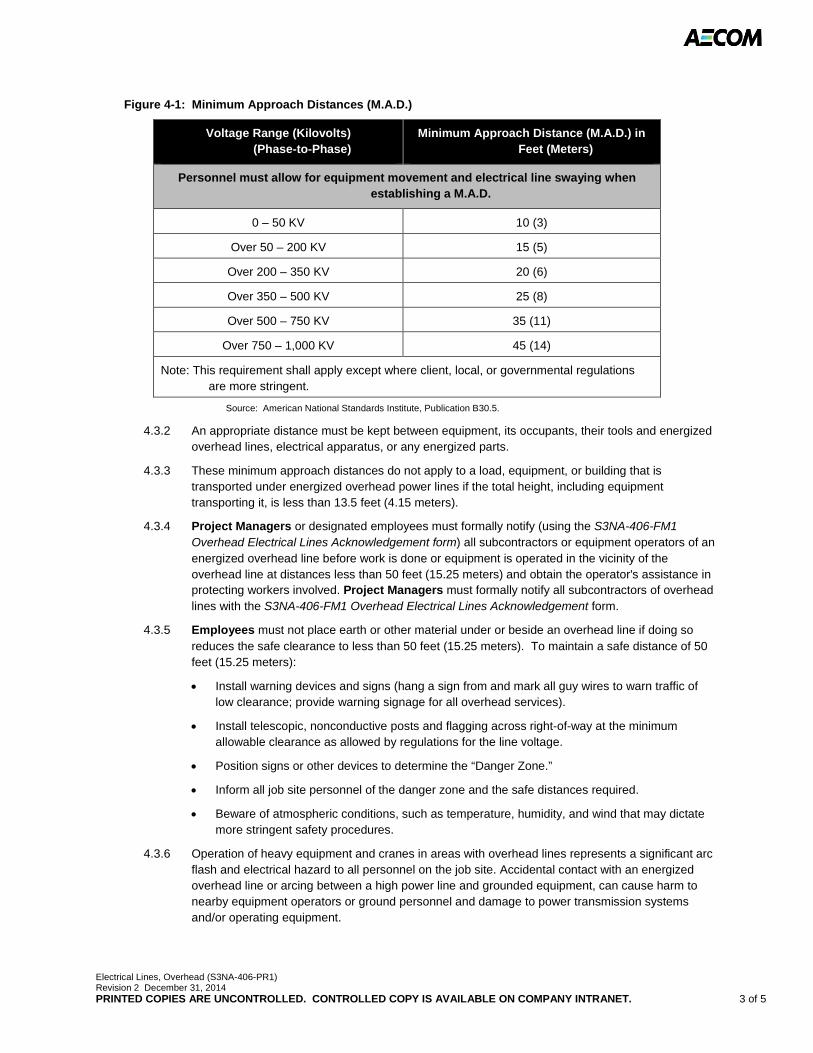
Electrical Lines, Overhead (S3NA-406-PR1) Revision 2 December 31, 2014 PRINTED COPIES ARE UNCONTROLLED. CONTROLLED COPY IS AVAILABLE ON COMPANY INTRANET. 3 of 5
Figure 4-1: Minimum Approach Distances (M.A.D.)
Voltage Range (Kilovolts) (Phase-to-Phase)
Minimum Approach Distance (M.A.D.) in Feet (Meters)
Personnel must allow for equipment movement and electrical line swaying when establishing a M.A.D.
0 – 50 KV 10 (3)
Over 50 – 200 KV 15 (5)
Over 200 – 350 KV 20 (6)
Over 350 – 500 KV 25 (8)
Over 500 – 750 KV 35 (11)
Over 750 – 1,000 KV 45 (14)
Note: This requirement shall apply except where client, local, or governmental regulations are more stringent.
Source: American National Standards Institute, Publication B30.5.
4.3.2 An appropriate distance must be kept between equipment, its occupants, their tools and energized overhead lines, electrical apparatus, or any energized parts.
4.3.3 These minimum approach distances do not apply to a load, equipment, or building that is transported under energized overhead power lines if the total height, including equipment transporting it, is less than 13.5 feet (4.15 meters).
4.3.4 Project Managers or designated employees must formally notify (using the S3NA-406-FM1 Overhead Electrical Lines Acknowledgement form) all subcontractors or equipment operators of an energized overhead line before work is done or equipment is operated in the vicinity of the overhead line at distances less than 50 feet (15.25 meters) and obtain the operator's assistance in protecting workers involved. Project Managers must formally notify all subcontractors of overhead lines with the S3NA-406-FM1 Overhead Electrical Lines Acknowledgement form.
4.3.5 Employees must not place earth or other material under or beside an overhead line if doing so reduces the safe clearance to less than 50 feet (15.25 meters). To maintain a safe distance of 50 feet (15.25 meters):
• Install warning devices and signs (hang a sign from and mark all guy wires to warn traffic of low clearance; provide warning signage for all overhead services).
• Install telescopic, nonconductive posts and flagging across right-of-way at the minimum allowable clearance as allowed by regulations for the line voltage.
• Position signs or other devices to determine the “Danger Zone.”
• Inform all job site personnel of the danger zone and the safe distances required.
• Beware of atmospheric conditions, such as temperature, humidity, and wind that may dictate more stringent safety procedures.
4.3.6 Operation of heavy equipment and cranes in areas with overhead lines represents a significant arc flash and electrical hazard to all personnel on the job site. Accidental contact with an energized overhead line or arcing between a high power line and grounded equipment, can cause harm to nearby equipment operators or ground personnel and damage to power transmission systems and/or operating equipment.
Electrical Lines, Overhead (S3NA-406-PR1) Revision 2 December 31, 2014 PRINTED COPIES ARE UNCONTROLLED. CONTROLLED COPY IS AVAILABLE ON COMPANY INTRANET. 4 of 5
4.3.7 Although maintaining a safe distance from all energized overhead lines is the preferred means for control of this hazard, this may not always be feasible due to site conditions. If work will (or may) occur within 50 feet (15.25 meters) of any energized conductor, the procedures outlined below will be observed:
4.3.7.1 Overhead electrical lines will be identified on each job site before the work commences. For each identified line, the Project Manager must determine whether it is energized (and the operating voltage for energized lines), and whether work operations will require that activities with heavy equipment (excavators, loaders, cranes, aerial work platforms, etc.) will occur within 50 feet (15.25 meters) of the line.
4.3.7.2 Job site personnel must maintain a clearance of at least 10 feet (3 meters) between any part of the operating equipment, its occupants and their tools from any overhead line carrying up to 50,000 volts.
4.3.7.3 One foot (0.3 meters) additional clearance is required for every additional 30,000 volts or less.
4.3.7.4 If equipment operation must take place within 50 feet (15 meters), a signal person must be used with clear view of the overhead utility & the equipment operator.
4.4 Minimum Approach Distance Reduction
4.4.1 Where any work task will not allow the minimum safe working distance to be maintained, an alternate means of protection must be implemented by the Project Manager and approved by the Safety, Health and Environment (SH&E) Department. In order of preference, acceptable procedures are:
• De-energize the overhead line(s)/lockout by local utility authorities; or
• Implement alternative procedures as identified by the overhead line owner/operator or a registered professional engineer.
4.4.2 De-energize Overhead Lines
• Elimination of electrical power provides the most acceptable means of ensuring safety of personnel. While temporary site overhead lines are often under the control of the site manager (and can be de-energized locally), electrical distribution and transmission lines can be de-energized only by the overhead line owner/operator. De-energizing of an overhead line often requires advance coordination with the overhead line owner/operator. At least one week advance notice should be provided.
• Project Managers must confirm with the utility overhead line owner/operator that the overhead line has been de-energized and visibly grounded at the job site.
4.4.3 Alternative Procedures
• Project Managers may implement alternative procedures to prevent arc flash and electrical contact. These procedures must be identified by the overhead line owner/operator or a registered Professional Engineer who is a Qualified Person with respect to electrical power transmission and distribution.
• A planning meeting with the Project Manager, SH&E Department and the overhead line owner/operator (or registered Professional Engineer) must be held to determine the most effective alternative procedures.
• Alternative procedures shall meet all client, local and governmental regulatory requirements.
• Insulating Barriers must be rated for the voltage line being guarded. These barriers may not be part of or attached to the equipment. The M.A.D. shall only be reduced within the designed working dimensions of the insulating barrier. This determination shall be made by a Qualified
Electrical Lines, Overhead (S3NA-406-PR1) Revision 2 December 31, 2014 PRINTED COPIES ARE UNCONTROLLED. CONTROLLED COPY IS AVAILABLE ON COMPANY INTRANET. 5 of 5
Person in accordance with local or governmental requirements for work practices near energized equipment.
• Dedicated Line Spotters must be trained to enable them to effectively perform their task, including training on the applicable local and governmental regulations.
4.5 Additional Safety Measures
4.5.1 The following additional safety measures shall be implemented as needed when working around energized power lines:
• Provide equipment with proximity warning devices. These provide an audible alarm if any part of the equipment gets too close to a line.
• Install ground safety stops. These prevent vehicles from accidentally entering hazardous areas.
• Equip cranes with a boom-cage guard. This prevents the boom from becoming energized if an electrical line is contacted.
• Utilize insulated links and polypropylene tag lines. These prevent the transmission of electricity to loads or tag line handlers if an electrical line is contacted.
NOTE: These additional safeguards are intended as supplemental protection. Use of these measures is not permissible as a substitute for maintaining the safe working distance or implementation of the procedures in Section 4.1.
4.6 Emergency Planning
4.6.1 Project Managers shall complete a site-specific emergency plan as part of their project safety plan or task hazard analysis for all operations during which equipment is operated within 50 feet (15.25 meters) of an energized overhead power line or conductor. This plan shall identify the following information:
• The importance to the operator's safety of remaining inside the cab except where there is an imminent danger of fire, explosion, or other emergency that necessitates leaving the cab.
• The safest means of evacuating from equipment that may be energized.
• The potentially energized zone around the equipment.
• The need for crew in the area to avoid approaching or touching the equipment and the load.
• The means to de-energize the power line or live conductor.
• The contact information for the utility overhead line owner/operator and emergency services.
• In the event of an incident, the employee must report it in accordance with S3NA-004 PR1 Incident Reporting.
5.0 Records
5.1 Retain the Overhead Electrical Lines Acknowledgement forms in the project files.
6.0 Attachments
6.1 S3NA-406-FM1 Overhead Electrical Lines Acknowledgement Form
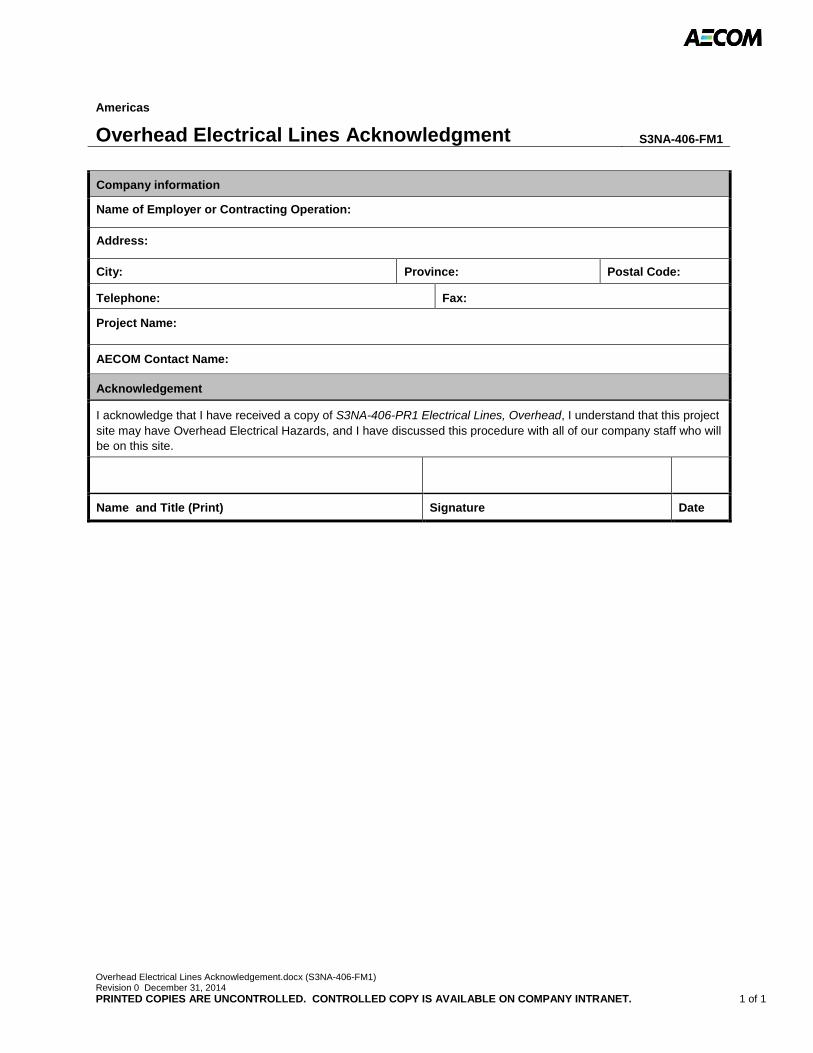
Overhead Electrical Lines Acknowledgement.docx (S3NA-406-FM1) Revision 0 December 31, 2014 PRINTED COPIES ARE UNCONTROLLED. CONTROLLED COPY IS AVAILABLE ON COMPANY INTRANET. 1 of 1
Americas
Overhead Electrical Lines Acknowledgment S3NA-406-FM1
Company information
Name of Employer or Contracting Operation:
Address:
City: Province: Postal Code:
Telephone: Fax:
Project Name:
AECOM Contact Name:
Acknowledgement
I acknowledge that I have received a copy of S3NA-406-PR1 Electrical Lines, Overhead, I understand that this project site may have Overhead Electrical Hazards, and I have discussed this procedure with all of our company staff who will be on this site.
Name and Title (Print) Signature Date
Hazardous Materials Communication / WHMIS (S3NA-507-PR1) Revision 1 December 31, 2014 PRINTED COPIES ARE UNCONTROLLED. CONTROLLED COPY IS AVAILABLE ON COMPANY INTRANET. 1 of 10
Americas
Hazardous Materials Communication/WHMIS S3NA-507-PR1
1.0 Purpose and Scope
1.1 Provides a Hazard Communication Program so that AECOM employees are informed of the hazards of the chemicals to which they may be exposed in the course of their work by way of container labeling and other forms of warning, safety data sheets (SDS), and employee training.
1.2 This procedure applies to all AECOM Americas-based employees and operations.
1.3 The program applies to the use of any hazardous substances which are known to be present in the workplace in such a manner that employees may be exposed under normal conditions of use or in a foreseeable emergency.
2.0 Terms and Definitions
2.1 Acute Effect – An adverse effect on the human body with immediate onset of symptoms.
2.2 Article – A manufactured item: (1) which is formed to a specific shape or design during manufacture; (2) which has end use function(s) dependent in whole or in part upon its shape or design during end use; and, (3) which does not release or otherwise result in exposure to, a hazardous chemical, under normal conditions of use.
2.3 Carcinogen – Those chemicals appearing in any of the following reference sources are established as carcinogens for hazard communication purposes:
• National Toxicology Program (NTP) Annual Report on Carcinogens.
• International Agency for Research on Cancer (IARC) Monographs, Volumes 1-34. Note: The Registry of Toxic Effects of Chemical Substances published by NIOSH indicates whether a substance has been found by NTP or IARC to be a potential carcinogen.
2.4 Chemical Name – The scientific designation of a substance in accordance with the nomenclature system developed by the International Union of Pure and Applied Chemistry or the system developed by the Chemical Abstracts Service.
2.5 Chronic Effect – An adverse effect on the human body with symptoms which develop slowly over a long period of time or which frequently recur.
2.6 Combustible Liquid – Any liquid having a flash point at or above 100°F (37.8°C) but below 200°F (93.3°C), except any mixture having components with flash points of 200°F (93.3°C), or higher, the total volume of which makes up 99% or more of the total volume of the mixture.
2.7 Common Name – Any designation or identification such as code name, code number, trade name or brand name used to identify a substance other than by its chemical name.
2.8 Container – Any bag, barrel, bottle, box, can, cylinder, drum, reaction vessel, storage tank or the like that contains a hazardous chemical. For purposes of this Safety Operating Procedure (SOP) and Occupational Safety and Health Administration (OSHA) standard, pipes or piping systems, and engines, fuel tanks, or other operating systems in a vehicle are not considered to be containers.
2.9 Establishment – Any separate and distinct AECOM office, laboratory or other company facility.
2.10 Exposure – Any situation arising from work operations where an employee may ingest, inhale, absorb through the skin or eyes or otherwise come into contact with a hazardous substance.
2.11 Flammable – A substance that falls into one of the following categories:
Hazardous Materials Communication / WHMIS (S3NA-507-PR1) Revision 1 December 31, 2014 PRINTED COPIES ARE UNCONTROLLED. CONTROLLED COPY IS AVAILABLE ON COMPANY INTRANET. 2 of 10
2.11.1 Flammable Aerosol – An aerosol that when tested by the method described in 16 CFR 1500.45, yields a flame projection exceeding 18 inches at full valve opening or flashback (a flame extending back to the valve) at any degree of valve opening;
2.11.2 Flammable Gas – A gas that at ambient temperature and pressure:
• Forms a flammable mixture with air at a concentration of 13% of volume or less; or
• Forms a range of flammable mixtures with air wider than 12% by volume, regardless of the lower limit.
2.11.3 Flammable Liquid – Any liquid having a flash point below 100°F (37.8°C), except any mixture having components with flash points of 100°F (37.8°C) or higher, the total of which make up 99% or more of the total volume of the mixture.
2.11.4 Flammable Solid – A solid, other than a blasting agent or explosive as defined in 8 CCR 5237(a), that is liable to cause fire through friction, absorption of moisture, spontaneous chemical change or retained heat from manufacturing or processing or which can be ignited readily and when ignited burns so vigorously and persistently as to create a serious hazard.
A chemical shall be considered to be a flammable solid if, when tested by the method described in 16 CFR 1500.44, it ignites and burns with a self-sustained flame at a rate greater than one-tenth of an inch per second along its major axis.
2.12 Flash Point – Minimum temperature of a liquid at which it gives off sufficient vapors to form an ignitable mixture with the air near the surface of the liquid or within the container used.
2.13 Hazardous Chemical – Those chemicals appearing in any of the following reference sources are established as hazardous chemicals for hazard communication purposes.
• 29 CFR Part 1910, Subpart Z, Toxic and Hazardous Substances, OSHA.
• Hazardous Products Act, R.C.S. 1985, c. H-3, section 2, Canada.
• For operations within the state of California, the list of hazardous substances prepared by the California Director of Industrial Relations pursuant to Labor Code Section 6382. The concentrations and footnotes, which are applicable to the list, shall be understood to modify the same substance on all other source lists or hazard determinations set forth in § 8 CCR 5194(d)(3)(B) and (d)(5)(D).
2.14 Hazardous Substance – A hazardous chemical or carcinogen, or a product or mixture containing a hazardous chemical or carcinogen provided that:
2.14.1 The hazardous chemical is 1% or more of the mixture or product or 2% if the hazardous chemical exists as an impurity in the mixture; or
2.14.2 The carcinogen is 0.1%or more of the mixture or product;
2.14.3 Manufacturers, importers and distributors will be relied upon to perform the appropriate hazard determination for the substances they produce or sell.
2.14.4 The following materials are not covered by the Hazard Communication Standard:
• Any hazardous waste as defined by the Solid Waste Disposal Act, as amended by the Resource Conservation and Recovery Act of 1976, as amended (42 USC 6901 et seq.) when subject to regulations issued under that act by the Environmental Protection Agency.
• Tobacco or tobacco products;
• Wood or wood products. Note: Wood dust is not exempt since the hazards of wood dust are not “self-evident” as are the hazards of wood or wood products;
• Consumer products (including pens, pencils, adhesive tape) used in the work place under typical consumer usage;
• Articles (i.e. plastic chairs);
• Foods, drugs, or cosmetics intended for personal consumption by employees while in the work place;

Hazardous Materials Communication / WHMIS (S3NA-507-PR1) Revision 1 December 31, 2014 PRINTED COPIES ARE UNCONTROLLED. CONTROLLED COPY IS AVAILABLE ON COMPANY INTRANET. 3 of 10
• Foods, drugs, cosmetics in retail store packaged for retail sale; and
• Any drug in solid form used for direct administration to the patient (i.e., tablets or pills).
2.15 Hazardous Substance Inventory (HSI) / WHMIS Log – A listing of all chemicals stored or used at an office or project site. Note that the list may be imbedded in a project Health and Safety Plan.
2.16 Immediate Use – Means that the hazardous chemical will be under the control of and used only by the person who transfers it from a labeled container and only within the work shift in which it is transferred.
2.17 SDS – A Safety Data Sheet prepared pursuant to state and federal regulations, OSHA Form 174 and Canada regulations (Controlled Products regulations, schedule 1).
2.18 SDS Administrator – The individual or group designated by the Office Manager (Operations) or Project Manager to maintain the establishment-specific inventory list or log and the SDS binder required if that establishment uses or stores hazardous substances.
2.19 NFPA – A system of categories, colors and numbers was created to provide basic hazard information. It enables firefighters and other emergency personnel to easily decide whether or not to evacuate an area or proceed with emergency control operations. The three principal categories of identification are Health, Flammability and Instability. A numerical range of “0 to 4” indicates the severity of the hazard. A “4” indicates the most severe and a “0” indicates a minimal hazard.
2.20 Mixture – Any solution or intimate admixture of two or more substances which do not react chemically with each other.
2.21 Reactivity – A measure of the tendency of a substance to undergo chemical reaction with the release of energy.
2.22 Solubility – The ability of substance to blend and mix uniformly with another.
2.23 Specific Gravity (density) – Ratio of the weight of a substance to the weight of the same volume of another substance. As used in this directive, specific gravity or density refers to the weight of substance as compared to the weight of an equal volume of water.
2.24 Vapor Density – The weight of a vapor-air mixture resulting from the vaporization of a volatile liquid at equilibrium temperature and pressure conditions, as compared with the weight of an equal volume of air under the same conditions.
2.25 WHMIS – The Workplace Hazardous Materials Information System (WHMIS) is Canada's national hazard communication standard. The key elements of the system are cautionary labeling of containers of WHMIS "controlled products", the provision of material safety data sheets (SDSs) and worker education and training programs.
3.0 References
3.1 Additional definitions can be found in the Hazardous Material Regulations (HMR), the Transportation of Dangerous Goods (TDG) Regulations, and the International Air Transport Association (IATA) Dangerous Goods Regulation (DGR)
3.2 S3NA-003-PR1 SH&E Training
3.3 S3NA-208-PR1 Personal Protective Equipment Program
3.4 S3NA-209-PR1 Project Hazard Assessment and Planning
3.5 S3NA-509-PR1 Hazardous Waste Operations and Emergency Response
Hazardous Materials Communication / WHMIS (S3NA-507-PR1) Revision 1 December 31, 2014 PRINTED COPIES ARE UNCONTROLLED. CONTROLLED COPY IS AVAILABLE ON COMPANY INTRANET. 4 of 10
4.0 Procedure
4.1 Roles and Responsibilities
4.1.1 Region SH&E Manager / SH&E Department
• Audit their regional offices to assure that they maintain an establishment-specific Hazardous Substance Inventory (HSI).
• Audit their regional offices to assure that if an establishment-specific HSI is required, that SDSs are available for each substance listed on the HSI.
• Provide interpretation of SDSs and hazard information for WHMIS labels/NFPA labels and other information to assist in training employees.
• Provide hazard communication training to AECOM employees and file documents of this training.
• Review SDS for adequacy of completion to meet the OSHA and Canadian standard and returning them to supplier, if necessary.
4.1.2 Project Manager / Site Safety Officer (SSO)
• Access or obtain, and maintain copies of SDS from:
o All AECOM subcontractors bringing chemicals onto the project site; and
o The client, for all of the client’s chemicals to which AECOM or AECOM subcontract employees are potentially exposed.
4.1.3 Office Manager (Operations)
• Have an operations-specific, written hazard communication program which at least describes how the requirements of this Procedure and the US OSHA and Canadian Hazard Communication requirements for labels and other forms of warning, material safety data sheets, and employee information and training will be met.
• Appoint an SDS administrator for their establishment if they store or use hazardous substances.
• Confirm, if required, that the SDS Administrator maintains an HSI for their establishment.
• Confirm that SDS are available for all substances listed on their establishment’s HSI.
• Confirm that a copy of this Procedure and the site-specific SDS are available to all employees. Employees shall be instructed in the location of this Procedure and the SDS.
• Confirm that all employees in their office affected by the HAZCOM standard are provided with the appropriate training, including new employees.
4.1.4 Supervisor
• Confirm that all employees under their supervision have received the initial and periodic training required by this SOP prior to assigning employees to tasks involve the use of, or potential exposure to, hazardous substances.
• Notify employees of hazardous substances covered by this SOP that are used in their work area.
• Determine the potential fire, toxic, or reactivity hazards which are likely to be encountered in the handling or utilization of a hazardous substance and will communicate this information to their affected employees, before any are permitted to work with it.
• Confirm that an SDS is available for each hazardous substance used, or potentially encountered, in the work areas or on the projects that are under their supervision.
• Notify subcontractors (working for AECOM) of any hazardous substances that are used or stored by AECOM to which the subcontractor’s employees may be exposed.
Hazardous Materials Communication / WHMIS (S3NA-507-PR1) Revision 1 December 31, 2014 PRINTED COPIES ARE UNCONTROLLED. CONTROLLED COPY IS AVAILABLE ON COMPANY INTRANET. 5 of 10
• Notify clients or property owner/operators of chemicals brought onto their property by AECOM or AECOM’s subcontractors.
• Request SDSs from all subcontractor organization for the relevant chemicals they bring onto an AECOM controlled site.
4.1.5 Employee
• Confirm that they have received appropriate hazard communication training prior to working with materials that fall under the standard.
• Only work with materials for which they have been instructed on how to find an SDS and how to work with that material safely.
• Provide a copy of all SDSs received to the SDS Administrator at their facility.
• Verify that an SDS is available in their work area for each hazardous substance that they use.
4.2 General Procedure
4.2.1 Confirm that containers of hazardous substances that they use are properly labelled. All employees have a right to, and should, know the properties and potential hazards of substances to which they may be exposed.
4.2.2 Should AECOM assign employees that do not read and speak English to tasks with chemical exposures, communications will be provided in the language understood by that employee.
4.3 Employee Information and Training
4.3.1 Each AECOM employee who handles or is exposed to hazardous substances must be provided information and training, refer to S3NA-003-PR1 SH&E Training, on hazardous substances in their work area:
• At the time of their initial assignment; and
• Whenever a new hazard is introduced into their work area.
4.3.2 As a minimum, the training requirements apply to employees in the following job categories:
• All employees who perform field work that involves the use of, or potential exposure to, hazardous substances; and
• Laboratory Employees.
4.3.3 The Initial Training will provide instruction in the following:
• Methods and observations that may be used to detect the presence or release of a hazardous substance in the work area (such as personal monitoring, visual appearance or odor of hazardous substances being released, etc.);
• The physical and health hazards of substances in the work area and measures and procedures AECOM has implemented to protect employees; and
• The details of this hazard communication program (SOP), including an explanation of the labelling system and the SDS, and how he/she can obtain and use appropriate hazard information.
• Any operations in their work area in which hazardous substances are present;
• Location and availability of this written hazard communications program (SOP);
• Their right to personally receive information regarding hazardous substances to which they may be exposed;
• Their right to have their physician receive information regarding hazardous substances to which they may be exposed; and
Hazardous Materials Communication / WHMIS (S3NA-507-PR1) Revision 1 December 31, 2014 PRINTED COPIES ARE UNCONTROLLED. CONTROLLED COPY IS AVAILABLE ON COMPANY INTRANET. 6 of 10
• Their right against discharge or other discrimination (in California) due to the employee’s exercise of rights afforded pursuant to provisions of the California Hazardous Substances Information and Training Act.
4.3.4 Periodic Training and Training for Non-Routine Tasks
Additional training will be provided to employees who have received initial training whenever:
• A new hazardous substance is introduced into their work area;
• A new or revised SDS is received, which indicates significantly increased risks to employee health as compared to those stated on the previous SDS; and
• Non-routine tasks are performed, which will potentially result in exposure to hazardous substances, or exposure under circumstances, which were not addressed during initial training.
Supervisors, in coordination with their Region SH&E Manager, shall provide such training through an explanation of the information on the contents of the SDS for that substance.
When training their employees, supervisors shall explain:
• Any health hazards associated with use of the substance or mixture;
• Proper precautions for handling;
• Necessary personal protective equipment or other safety precautions to prevent or minimize exposure; and
• Emergency procedures for spills, fire, disposal, and first aid.
For most projects involving field work, this periodic training requirement will be facilitated through the implementation of the site specific HASP that has been developed for the project.
4.3.5 Documentation of Initial and Periodic Training
• All training required shall be documented at the time it is performed by having the employee sign a copy of a training attendance sheet.
4.4 Hazardous Waste Exemption
4.4.1 In the U.S., hazardous wastes are excluded from the state and federal Hazard Communication standards. AECOM employees who handle or are otherwise exposed to hazardous wastes are covered by the requirements of the Resource Conservation and Recovery Act (RCRA) and other local waste related laws and regulations and the OSHA Hazardous Waste Operations and Emergency Response (HAZWOPER) standard at 29 CFR 1910.120 and S3NA-509-PR1 Hazardous Waste Operations and Emergency Response.
4.5 Hazardous Substance Inventory and Chemical Usage
Establishment of a Specific Hazardous Substance Inventory (HSI) or WHMIS Log, as referenced or contained within the safe to work plan, refer S3NA-209-PR1 Project Hazard Assessment and Planning, shall include:
• If an AECOM establishment uses or stores additional hazardous substances, an establishment-specific HSI must be maintained at that establishment.
• If it is determined that an office-specific HSI is needed, the Office Manager (Operations) shall assure that one is developed and maintained by someone appointed as the establishment’s SDS Administrator.
• The content of the office-specific written inventory shall be updated as new hazardous substances are procured for, or removed from, the establishment and shall be verified by the Region SH&E Manager through regular inspections of the establishment.
Hazardous Materials Communication / WHMIS (S3NA-507-PR1) Revision 1 December 31, 2014 PRINTED COPIES ARE UNCONTROLLED. CONTROLLED COPY IS AVAILABLE ON COMPANY INTRANET. 7 of 10
• In order to meet the 30-years-after-employment-termination record retention requirement, the office or project specific HSIs shall be managed as a permanent record.
Prior to using any chemical, a Task Hazard Analysis (THA) shall be completed by the employees assigned to use the chemical. The analysis will identify the hazards associated with the tasks to be performed and prescribe the Personal Protective Equipment (PPE) to be used, refer to S3NA-208-PR1 Personal Protective Equipment Program.
4.6 Safety Data Sheets (SDS)
4.6.1 Establishment-Specific SDS Inventory
• If it is determined that an AECOM establishment is required to maintain an establishment-specific inventory SDSs for the specific hazardous substances must be maintained on file at that establishment.
• The Region SH&E Manager shall audit the local office or project for SDS request and maintenance and report deficiencies to the appropriate management level, as necessary, to assure compliance with this SOP.
4.6.2 Field Project Sites and Client Facilities
• The Project Manager and/or the Site Safety Officer shall access or obtain, and maintain copies of SDS from:
o All AECOM subcontractors bringing chemicals onto the project site; and
o The client, for all of the client’s chemicals to which AECOM or AECOM subcontract employees are potentially exposed.
4.6.3 Employee Access to SDSs
SDSs should be maintained at the local establishment that uses that hazardous substance. Copies of the SDS should be made available to the employee upon request to the office’s SDS Administrator.
4.6.4 Field Access to SDSs
When hazardous substances are brought into the field, the user must assure that a copy of the SDS for that substance accompanies it and is available at the field location where it is to be used.
4.6.5 SDSs for AECOM Products
It is unlikely that AECOM activities would create a chemical for which a new SDS were needed. If such a chemical were created, the SH&E Department shall work with the appropriate operations groups to draft, review, and publish the new SDS.
4.6.6 Content of the Safety Data Sheet:
• Safety Data Sheets, previously referred to as Material Safety Data Sheets, will now require a 16-section format that is essentially the same as the ANSI standard for Hazardous Workplace Chemicals-Hazard Evaluation and Safety Data Sheets and Precautionary Labeling Preparation (ANSI Z400.1 & Z129.1 – 2010).
• Section 1, Identification includes product identifier; manufacturer or distributor name, address, phone number; emergency phone number; recommended use; restrictions on use.
• Section 2, Hazard(s) identification includes all hazards regarding the chemical; required label elements.
• Section 3, Composition/information on ingredients includes information on chemical ingredients; trade secret claims.
• Section 4, First-aid measures includes important symptoms/ effects, acute, delayed; required treatment.
Hazardous Materials Communication / WHMIS (S3NA-507-PR1) Revision 1 December 31, 2014 PRINTED COPIES ARE UNCONTROLLED. CONTROLLED COPY IS AVAILABLE ON COMPANY INTRANET. 8 of 10
• Section 5, Fire-fighting measures lists suitable extinguishing techniques, equipment; chemical hazards from fire.
• Section 6, Accidental release measures lists emergency procedures; protective equipment; proper methods of containment and cleanup.
• Section 7, Handling and storage lists precautions for safe handling and storage, including incompatibilities.
• Section 8, Exposure controls/personal protection lists OSHA's Permissible Exposure Limits (PELs); Threshold Limit Values (TLVs); appropriate engineering controls; personal protective equipment (PPE).
• Section 9, lists the chemical's characteristics.
• Section 10, Stability and reactivity lists chemical stability and possibility of hazardous reactions.
• Section 11, Toxicological information includes routes of exposure; related symptoms, acute and Section 9, Physical and chemical properties chronic effects; numerical measures of toxicity.
• Section 12, Ecological information
• Section 13, Disposal considerations
• Section 14, Transport information
• Section 15, Regulatory information
• Section 16, Other information, includes the date of preparation or last revision.
SDSs that do not contain this information shall be returned to the distributor or manufacturer to be updated.
4.6.7 Trade Secrets
Some hazardous substance suppliers may claim the information requested on SDSs is proprietary and not provide the information to AECOM.
When SDSs supplied to the Region SH&E Manager indicate that proprietary information has been withheld, the Region SH&E Manager will either obtain the necessary information to make a hazard assessment or reject the material for use within AECOM.
4.6.8 For Canadian operations, all relevant SDS must be current (no more than 3 years old) and readily available (in French and English) for all hazardous materials.
4.7 Labeling
4.7.1 Containers of hazardous substances used or stored in each AECOM establishment must be labeled, tagged or marked with the following information:
• Product name or Identifier;
• Hazard Pictogram;
• Signal Word;
• Physical, Health, Environmental Statements;
• Supplemental Information;
• Precautionary Measures and Pictograms;
• First Aid Statements;
• Name and Address of Company; and
• Telephone Number.
Hazardous Materials Communication / WHMIS (S3NA-507-PR1) Revision 1 December 31, 2014 PRINTED COPIES ARE UNCONTROLLED. CONTROLLED COPY IS AVAILABLE ON COMPANY INTRANET. 9 of 10
4.7.2 Labels on containers shall not be removed or defaced. Labels or other forms of warning shall be legible, in English and French (Canada), and prominently displayed on the container.
4.7.3 Any failure to have the appropriate labeling information on a container at any time will be cause to suspend use of the product until the container is properly labeled.
4.7.4 Carcinogen Labeling
Chemicals which have been indicated as positive or suspect carcinogens by either OSHA, ACGIH, the International Agency for Research on Cancer (IARC) (World Health Organization), or the National Toxicology Program (NTP) will be considered to be carcinogenic for purpose of the HCS. The following pictogram will be used to identify carcinogens:
4.7.5 Stationary Process Containers
If there is stationary process equipment within a work area, signs, placards, process sheets, batch tickets, operating procedures, or other such written materials may be used in lieu of fixed labels on the containers, as long as the alternative method conveys the appropriate hazard information. The written materials shall be readily accessible to the employees in the work area.
4.7.6 Portable Containers
Portable containers of hazardous substances need not be labelled when the substance is transferred from labelled containers and is intended for immediate use of the employee who performs the transfer.
Containers of hazardous substances transferred from labelled containers and not intended for the immediate use of the employee performing the transfer shall be labelled with the chemical name and a hazard warning label in accordance with the National Fire Protection Association’s (NFPA) 704M Hazard Identification System shall be attached.
4.8 Chemical Storage
4.8.1 Hazardous chemicals are to be stored in labeled containers with the lids securely closed and taped if possible.
4.8.2 Flammable and combustible materials must be stored in fire impervious cabinets in designated stockroom areas. Chemicals must be stored in compliance with instructions provided on their labels, SDS, or the manufacturer’s specifications.
4.8.3 All hazardous chemicals must be stored in a manner that prevents spillage and leakage from exposing people or the environment to the chemical.
4.8.4 Hazardous chemicals shall not be stored with foods or beverages. Food and beverages shall not be consumed in areas where hazardous chemicals are used or stored.
4.9 Chemical Use in Offices
4.9.1 In general, hazardous substances should not be taken into office areas, conference rooms, or break areas, contact the SH&E Department for guidance If this general requirement is infeasible.
4.9.2 General exceptions to this rule are the following:
• Liquid paper;
• Toner;
• Cleaners;
• Isobutylene calibration gas; and
• pH calibration solutions for instruments.
4.9.3 Each office or location using or storing hazardous materials will develop a written office/ location-specific Hazard Communication/WHMIS Program.
Hazardous Materials Communication / WHMIS (S3NA-507-PR1) Revision 1 December 31, 2014 PRINTED COPIES ARE UNCONTROLLED. CONTROLLED COPY IS AVAILABLE ON COMPANY INTRANET. 10 of 10
4.9.4 If the local office decides to implement the requirements of the standard in any way that differs from this procedure, they shall verify the changes with the SH&E Department, document the changes, and communicate the differences to all affected employees.
4.10 Canada-specific
4.10.1 Consumer products are exempt from supplier labels and SDS requirements. Some cleaning solvents may be packaged as consumer products and these must be labeled in accordance with the Consumer Product Act requirements.
4.10.2 In addition to the labelling of storage containers in the workplace, the contents of process piping (including valves), process vessels and reaction vessels are required to be identified through the use of colour coding, labels, placards or other modes of identifications that must be communicated to workers through training programs. It is very important for employees to be aware of and understand Client labelling requirements for these types of process systems.
5.0 Records
5.1 None
6.0 Attachments
6.1 None
Hazardous Materials Handling, Shipping, and Manifesting (S3NA-508-PR1) Revision 1 December 31, 2015 PRINTED COPIES ARE UNCONTROLLED. CONTROLLED COPY IS AVAILABLE ON COMPANY INTRANET. 1 of 5
Americas
Hazardous Materials Handling, Shipping, and Manifesting S3NA-508-PR1
1.0 Purpose and Scope
1.1 Prescribes the minimum requirements for shipping samples, hazardous materials (HZM) and dangerous goods. It is designed to provide a framework for compliance with the requirements of the U.S. Department of Transportation (DOT) Hazardous Materials Regulations (HMR)published under 49 CFR or Transport Canada Transportation of Dangerous Goods Regulations (TDG Regulations) published under Amendment 6 (SOR/2008-34) for shipment of hazardous materials/dangerous goods by land, and the International Air Transportation Association (IATA) Dangerous Goods Regulations (DGR) for shipping dangerous goods by air, and other applicable regulations in other countries.
1.2 Applies to all AECOM Americas based staff and operations.
2.0 Terms and Definitions
A complete list of definitions can be found in their entirety in the HMR, the TDG Regulations, and the IATA DGR. The below represents those terms most likely to affect AECOM’s operations.
2.1 Agency Letter – A letter approved by both AECOM’s Legal Department and the client and that authorizes AECOM to act as its agent for the purpose of arranging for the transport and/or disposal of waste, and indemnifies AECOM’s liability when acting “As an Agent of [client’s name]”.
2.2 Carrier – A person engaged in the transportation of passengers or property by land, water, or air either as a common, contract, private carrier, or civil aircraft.
2.3 Dangerous goods – Articles or substances which are capable of posing a risk to health, safety, property or the environment and which are shown in the list of dangerous goods in the TDG Regulations and/or IATA regulations or which are classified according to the TDG Regulations and/or IATA regulations, generally synonymous with hazardous materials.
2.4 Delegations of Authority (DOA) – The framework of authority within which AECOM (Americas) carries out its day‐to‐day operations.
2.5 Generator – The party that created the hazardous waste; hazardous waste generators are divided into categories based on the amount of waste they produce each month.
2.6 Hazardous materials (HzM) – A substance or material which has been determined by the U.S. Secretary of Transportation to be capable of posing an unreasonable risk to health, safety, and property when transported in commerce, and includes hazardous substances, hazardous wastes, marine pollutants, and elevated temperature materials.
2.6.1 Hazardous materials may include, but are not limited to: batteries, adhesives, paints, compressed gases, nuclear density meters, laboratory reagents, field samples, soil and sand siftings, hazardous wastes, and materials used for bench scale and pilot plant operations. While most environmental samples (both water and soil) do not meet the definition of hazardous material, extreme care must be taken to properly classify materials. HzM Classifications are as follows:
• Class 1 Explosives;
• Class 2 Gases;
• Class 3 Flammable Liquid;
• Class 4 Flammable Solid, Spontaneously Combustible, and Dangerous When Wet;
• Class 5 Oxidizer, Organic Peroxide;
Hazardous Materials Handling, Shipping, and Manifesting (S3NA-508-PR1) Revision 1 December 31, 2015 PRINTED COPIES ARE UNCONTROLLED. CONTROLLED COPY IS AVAILABLE ON COMPANY INTRANET. 2 of 5
• Class 6 Poison (Toxic), Poison Inhalation Hazard, Infectious Substance;
• Class 7 Radioactive;
• Class 8 Corrosive; or
• Class 9 Miscellaneous Hazardous Material.
2.7 Hazardous Waste (HzW) – A “solid waste” which because of its quantity, concentration, or physical, chemical, or infectious characteristics may (1) Pose a substantial present or potential hazard to human health or the environment when improperly treated, stored or disposed of, or otherwise mismanaged; or (2) cause or contribute to an increase in mortality, or an increase in irreversible or incapacitating illness. Four types of hazardous waste exists:
• Listed Waste: Wastes that USEPA has determined are hazardous. The lists include the F-list (waste from common manufacturing and industrial processes), K-list (wastes from specific industries), and P- and U-lists (wastes from commercial chemical products).
• Characterized Wastes: Wastes that do not meet any of the listings above but that exhibit ignitability, corrosivity, reactivity, or toxicity.
• Universal Wastes: Batteries, pesticides, mercury-containing equipment and lamps.
• Mixed Wastes: Waste that contains both radioactive and hazardous waste components.
2.8 Hazardous Waste Manifest System – A set of forms, reports, and procedures designed to seamlessly track hazardous waste from the time it leaves the generator facility where it was produced, until it reaches the off-site waste management facility that will store, treat, or dispose of the hazardous waste.
2.9 HzM employee – A person who is employed by AECOM who in the course of employment directly affects dangerous goods/hazardous materials transportation safety. This term includes employees who prepare hazardous materials for transportation, or are responsible for safety of transporting hazardous materials.
2.10 HzM employer – A person who uses one or more of its employees in connection with transporting dangerous goods/hazardous materials in commerce, causing hazardous materials to be transported or shipping in commerce.
2.11 HMR – Hazardous Material Regulation
2.12 IATA – International Air Transport Association.
2.13 ICAO – International Civil Aviation Organization
2.14 Manifest – A paper document that contains information on the type and quantity of the waste being transported, instructions for handling the waste, and signature lines for all parties involved in the disposal process, which must be signed by each party that handles the waste.
2.15 Materials of Trade (MOT) – A hazardous material, other than a hazardous waste, that is carried on a motor vehicle:
• For the purpose of protecting the health and safety of the motor vehicle operator or passengers;
• For the purpose of supporting the operation or maintenance of a motor vehicle (including its auxiliary equipment); or
• By a private motor carrier in direct support of a principal business that is other than transportation by motor vehicle.
2.16 NAPL – Non-aqueous phase liquid
2.17 Offeror – Any person who performs functions including selecting packaging, physical transfer of hazardous materials, classifying hazardous materials, preparing shipping papers, signing hazardous material certifications on shipping papers (as agent for), marking or placarding vehicles or packagings, or providing placards to carriers.
Hazardous Materials Handling, Shipping, and Manifesting (S3NA-508-PR1) Revision 1 December 31, 2015 PRINTED COPIES ARE UNCONTROLLED. CONTROLLED COPY IS AVAILABLE ON COMPANY INTRANET. 3 of 5
2.18 Reportable Quantity (RQ) – The spill- or incident-related quantity of a material listed in the applicable Federal, State, or Provincial regulations requiring a formal report.
2.19 Serious Hazardous Materials Incident – Anytime a material is found outside of its containment and has the potential to harm people or the environment.
2.20 Shipper – see Carrier
2.21 Transporter – An entity that moves hazardous waste from one site to another by highway, rail, water, or air.
3.0 References
3.1 S3NA-003-PR1 SH&E Training
3.2 S3NA-004-PR1 Incident Reporting
3.3 Sub-Delegations of Authority, Americas
4.0 Procedure
4.1 Roles and Responsibilities
4.1.1 Project Manager / Office Manager (Operations)
• Verifying the potential to ship HzM via a carrier during the planned scope of services and if confirmed, identify the appropriately trained individuals are available to support the HzM shipment.
• Prior to authorizing an AECOM employee to sign a client’s Hazardous Waste Manifest, the Project Manager will:
o Verify with the Office of Risk Management that the necessary Sub-Delegations of Authority, Americas approvals are in-place;
o Obtain an Agency Letter approved by both the client and Region Counsel.
• Prior to assignment, confirm that employees are properly trained to perform their job-specific assignments.
• Filing copies of all HzM shipping documents in the project files.
• Providing for the appropriate storage of the HzM in the office or other necessary location.
• Verifying that the HzM to-be shipped is prepared/packaged by the designated DOT Level 1 or 2 Shipper.
• Immediately reporting any incident, spill, release, mishandling, mislabelling, etc. related to a HzM shipment to AECOM’s Incident Reporting Line, refer to S3NA-004-PR Incident Reporting.
4.1.2 Employee
• Shipping or transporting HzM as authorized.
• Signing a client’s Hazardous Waste Manifest as authorized.
• Immediately reporting any incident, spill, release, mishandling, mislabelling, etc. related to a HzM shipment to the Supervisor.
4.1.3 DOT Level 1 Shipper
• Identifying, with the support of a DOT Level 2 Shipper, the appropriate HzM shipping requirements (i.e., packaging, labelling, regulated status, and shipping documents).
• Preparing the necessary HzM shipping documents.
• Contacting a DOT Level 2 Shipper if uncertain of the shipping requirements.

Hazardous Materials Handling, Shipping, and Manifesting (S3NA-508-PR1) Revision 1 December 31, 2015 PRINTED COPIES ARE UNCONTROLLED. CONTROLLED COPY IS AVAILABLE ON COMPANY INTRANET. 4 of 5
• Maintaining the appropriate training as required by the HMR, TDG, and IATA.
4.1.4 DOT Level 2 Shipper
• Serving as the HzM shipping Subject Matter Expert for the Geography, Region, or other business unit , as appropriate.
• Supporting information requests from DOT Level I Shippers.
4.1.5 Americas SH&E Director
• Contracting a 24-hour emergency response service with a telephone number that will be answered by a person either with information on the hazards of the shipment or with immediate access to such a person.
• Maintaining the annual renewal of AECOM’s U.S. DOT Hazardous Materials Registration.
• Posting AECOM’s Hazardous Materials Registration on myAECOM.
• Defining the training to be required of employees involved in HZM shipping and facilitate the delivery of that training.
4.1.6 Region SH&E Manager
• Provide resources to employees involved in shipping hazardous materials.
• Approving the designation of a DOT Level 2 Shipper.
• Supporting the delivery of HzM shipping and Hazardous Waste Manifest training.
4.1.7 Region Counsel
• Reviewing and approving the Agency Letter authorizing AECOM to sign a client’s Hazardous Waste Manifest “As an Agent of [client’s name]”.
• Updating the template Agency Letter to address additional liabilities, as necessary.
• Providing the template Agency Letter to Project Managers, as requested.
4.1.8 Office of Risk Management
• Supporting Project Managers in understanding the applicable Sub-Delegations of Authority, Americas requirements as it pertains to signing a client’s Hazardous Waste Manifest “As an Agent of [client’s name]”.
4.2 General Requirements
4.2.1 Employees designated as HzM DOT Level 1 or 2 Shippers are the only individuals authorized to physically transport or prepare documents to ship HzM via a carrier.
4.2.2 Specific technical names must be used on shipping documents (i.e., Shipper’s Declaration for Dangerous Goods); never use an acronym (i.e., LNAPL) as the technical name.
4.2.3 Shipments of HzM must be placed in appropriate containers to prevent any leaks or releases of the HzM.
4.2.4 All HzM shipments via a carrier must be reported to INFOTRAC (for U.S.) and CANUTEL (for Canada) prior to shipment.
4.2.5 Employees are not authorized to physically transport HzM quantities, in a motor vehicle, in excess of the MOT limits.
4.2.6 Employees are only authorized to sign a client’s Hazardous Waste Manifest if:
• The necessary approvals have been obtained per the Sub-Delegations of Authority, Americas;
• The client could not logistically sign the manifest given they were not on the site;
• An Agency Letter was signed by the client and approved by Region Counsel; and
Hazardous Materials Handling, Shipping, and Manifesting (S3NA-508-PR1) Revision 1 December 31, 2015 PRINTED COPIES ARE UNCONTROLLED. CONTROLLED COPY IS AVAILABLE ON COMPANY INTRANET. 5 of 5
• Employees completed the required training.
4.2.7 AECOM will never be identified as the GENERATOR on a client’s Hazardous Waste Manifest.
4.2.8 Never sign a client’s Hazardous Waste Manifest as AECOM, sign “As an Agent of [client name]”.
4.3 Training
4.3.1 Employees involved in shipping hazardous materials/dangerous goods (e.g., packaging, preparing paperwork, loading and/or unloading, and transporting hazardous materials) are required to have documented training prior to shipping activities, refer to S3NA-003-PR SH&E Training. Training requirements are based on the type of materials shipped (e.g., calibration/compressed gases, laboratory reagents, field samples, hazardous wastes, etc.) and employee responsibility.
• DOT Level 1 Shipper Performance Training: The specific content of this 4-hour training will vary depending on the country in which you are performing work (Canada vs. US) and is focused on proper procedures for packaging, labeling and shipping HzM/HzW over land and sea. This training has a three year renewal requirement.
• DOT Level 2 Shipper Performance Training: A comprehensive 2-day HzM shipping training course typically completed in an in-person seminar.
• IATA Performance Training: This training supplements Level 1 training and provides additional information for the proper shipment of HzM/HzW via air transportation. This training has a two year renewal requirement.
• Resource Conservation and Recovery Act (RCRA) Part B Awareness Training (US Project Sites): Applicable to employees shipping HzW, including listed wastes, from US project sites. General RCRA Awareness training can be completed through online vendors. Additional project-specific training regarding HzW generation, project site roles and responsibilities, HzW management and shipment will need to be coordinated between the Project Manager and Client. Training may also include procedures for signing waste documents, i.e. profiles and characterization forms, where permitted by client contracts. Training will be provided in accordance with Permits, Consent Orders or other Regulatory Agency-issued agreements regarding project site HzW generation. This training has an annual renewal requirement.
5.0 Records
5.1 Bill of Lading, Shipper’s Declaration for Dangerous Goods, Agency Letter and Hazardous Waste Manifest will be retained in the project files.
6.0 Attachments
6.1 S3NA-508-WI1 Hazardous Materials Shipping Guidelines
Hazardous Materials Shipping Guidelines (S3NA-508-WI1) Revision 1 December 31, 2015 PRINTED COPIES ARE UNCONTROLLED. CONTROLLED COPY IS AVAILABLE ON COMPANY INTRANET. 1 of 2
Americas
Hazardous Materials Shipping Guidelines S3NA-508-WI1
1.0 Purpose and Scope
1.1 The following information outlines the generally accepted guidelines for preparing a HzM or Dangerous Goods package for shipment in compliance with the requirements of the U.S. Department of Transportation (DOT) Hazardous Materials Regulations (HMR)published under 49 CFR or Transport Canada Transportation of Dangerous Goods Regulations (TDG Regulations) published under Amendment 6 (SOR/2008-34) for shipment of hazardous materials/dangerous goods by land, and the International Air Transportation Association (IATA) Dangerous Goods Regulations (DGR) for shipping dangerous goods by air. However, this information is not implied or to be construed as a replacement for the regulatory requirements, rather this information is intended to help an individual better understand the necessary steps and formulate questions surrounding the shipment of HzM and/or Dangerous Goods.
2.0 Shipping
2.1 Select the best way to ship the hazardous material based on the quantity, hazard(s), and mode of transportation (e.g., air, land, water). Since more restrictive requirements apply to air shipments, ground shipment (e.g., use of a lab courier service) is encouraged for shipping HzM.
2.2 Most (if not all) package shipments (Common Carriers such as Federal Express, UPS, etc.) are transported by air. Air transportation of hazardous materials is regulated by IATA. AECOM will occasionally ship HzM internationally (e.g., Puerto Rico is considered an international destination by Federal Express). AECOM employees must follow the IATA DGR for any air transportation of hazardous materials.
3.0 Ground transportation of HzM may use either HMR or TDG Regulations protocols
3.1 Specific packaging and shipping instructions apply to all dangerous goods shipments. These instructions vary by chemical/product and are different for passenger aircraft and cargo aircraft.
3.2 Carrier-specific requirements can be obtained from the Internet or by calling the carrier’s customer service line.
3.3 The process for offering HzM for shipment includes:
• Determine the proper shipping name, hazard class, labeling requirements, and packing group.
• Determine and comply with the proper packaging instructions.
• Choose the proper package based on the packaging instruction and the type and quantity of material being shipped.
• Ensure package contents are compatible.
• Package, mark and label according to applicable regulations and instructions.
• Prepare shipping papers and complete the bill of lading or shipper’s declaration for dangerous goods, according to applicable regulations and according to the carrier’s specific requirements.
• Include on the shipping documents the shipper’s certification, emergency response information and telephone number.
• Include with the shipment a copy of the applicable emergency response information with shipping papers for responders to use in emergency situations. This information includes, but is not limited to, appropriate pages from the DOT Emergency Response Guidebook (ERG) and/or Material Safety Data Sheets (MSDS).
Hazardous Materials Shipping Guidelines (S3NA-508-WI1) Revision 1 December 31, 2015 PRINTED COPIES ARE UNCONTROLLED. CONTROLLED COPY IS AVAILABLE ON COMPANY INTRANET. 2 of 2
3.4 AECOM employees participating in shipping HzM are required to provide a 24-hour emergency response telephone number that must be answered by a person either with information on the hazards of the shipment or with immediate access to such a person. AECOM has selected INFOTRAC® (http://www.infotrac.net/) to provide 24-hour emergency response support service. All HzM shipping papers which list INFOTRAC® for 24-hour emergency response must list AECOM’s account number 74984.
3.5 Determine the placard or placards required for the materials being offered for transportation, provide placards and affix as required.
3.6 Notify the carrier of the proper shipping name, hazard class and total quantity of each hazardous material being offered for transportation, and make a final check for compliance with regulations and instructions before tendering the shipment to the carrier. All HzM shipping papers and dangerous goods airbills must be typed.
Hazardous Waste Operations and Emergency Response Activities (S3NA-509-PR1) Revision 1 December 31, 2014 PRINTED COPIES ARE UNCONTROLLED. CONTROLLED COPY IS AVAILABLE ON COMPANY INTRANET. 1 of 16
Americas
Hazardous Waste Operations and Emergency Response Activities S3NA-509-PR1
1.0 Purpose and Scope
1.1 Provides requirements for AECOM operations pertaining to hazardous waste and emergency response (HAZWOPER) services.
1.2 This procedure applies to all AECOM Americas-based employees and operations.
1.3 In Canada there is no direct federal or provincial counterpart to HAZWOPER; however, as due diligence and in compliance with applicable provincial duty of care/general duty clauses, staff working in Canada will comply with this procedure.
2.0 Terms and Definitions
2.1 Emergency Response – A response effort by employees from outside the immediate release area or by other designated responders (i.e., mutual-aid groups, local fire departments, etc.) to an occurrence that results, or is likely to result, in an uncontrollable release of a hazardous substance. Responses to incidental release of hazardous substances where the substance can be absorbed, neutralized, or otherwise controlled at the time of release by employees in the immediate release area or by maintenance personnel are not considered to be emergency responses within the scope of the HAZWOPER standard. Responses to releases of hazardous substances where there is no potential safety or health hazard are not considered to be emergency responses.
2.2 Health and Safety Plan (HASP) – A document prepared for each project that contains site-specific information including the Emergency Response Plan for the project.
2.3 Incident Command System (ICS) – ICS is a standardized on-scene incident management concept designed specifically to allow responders to adopt an integrated organizational structure equal to the complexity and demands of any single incident or multiple incidents without being hindered by jurisdictional boundaries. In the ICS the first person responding to an incident becomes the Incident Commander and turns that title and duties over to more qualified responders as they arrive on scene.
2.4 First Responder – First responders are individuals who are likely to witness or discover a hazardous substance release, injury, fire, or other incident and who have been trained to initiate an emergency response sequence by notifying the proper authorities of the release. They would take no further action beyond first aid, initial control of the incident, and notifying the authorities and others of the incident.
2.5 Hazardous Materials Specialist – Hazardous materials specialists are individuals who respond with and provide support to hazardous materials technicians. Their duties parallel those of the hazardous materials technician; however, those duties require a more directed or specific knowledge of the various substances they may be called upon to contain. The hazardous materials specialist would also act as the site liaison with federal, state, local, and other government authorities in regards to site activities.
2.6 Hazardous Materials Technician – Hazardous materials technicians are individuals who respond to releases or potential releases for the purpose of stopping the release. They assume a more aggressive role than a first responder in that they will approach the point of release in order to plug, patch, or otherwise stop the release of a hazardous substance.
2.7 Incident Commander – The Incident Commander (IC) is responsible for all aspects of the response, including developing incident objectives and managing all incident operations. The title and responsibilities are typically assumed by a qualified IC from the client or public sector.
2.8 Hazardous Waste – Hazardous waste is waste that is dangerous or potentially harmful to our health or the environment. Hazardous wastes can be liquids, solids, gases, or sludges. They can be discarded
Hazardous Waste Operations and Emergency Response Activities (S3NA-509-PR1) Revision 1 December 31, 2014 PRINTED COPIES ARE UNCONTROLLED. CONTROLLED COPY IS AVAILABLE ON COMPANY INTRANET. 2 of 16
commercial products, like cleaning fluids or pesticides, or the byproducts of manufacturing processes. Hazardous waste are divided into
• Listed wastes (http://www.epa.gov/osw/hazard/wastetypes/listed.htm),
• Characteristic wastes (http://www.epa.gov/osw/hazard/wastetypes/characteristic.htm),
• Universal wastes (http://www.epa.gov/osw/hazard/wastetypes/universal/index.htmwastes), and
• Mixed wastes
• Specific procedures determine how waste is identified (http://www.epa.gov/osw/hazard/wastetypes/wasteid/index.htm), classified, listed, and delisted.
2.9 Hazardous Materials – A hazardous material is any item or agent (biological, chemical, physical) that has the potential to cause harm to humans, animals, or the environment, either by itself or through interaction with other factors. Additionally a hazardous material may be defined as any substance or chemical which is a "health hazard" or "physical hazard," including chemicals that are carcinogens, toxic agents, irritants, corrosives, sensitizers; agents that act on the hematopoietic system; agents that damage the lungs, skin, eyes, or mucous membranes; chemicals that are combustible, explosive, flammable, oxidizers, pyrophorics, unstable-reactive, or water-reactive; and chemicals that in the course of normal handling, use, or storage may produce or release dusts, gases, fumes, vapors, mists, or smoke that may have any of the previously mentioned characteristics. This may be caused when released by spilling, leaking, pumping, pouring, emitting, emptying, discharging, injecting, escaping, leaching, dumping, disposing into the environment, by being transported or moved, and items or chemicals that are "special nuclear source" or byproduct materials or radioactive substances.
3.0 References
3.1 Federal Emergency Management Agency—FEMA: Incident Command System www.fema.gov
3.2 29 CFCR 1910.120, Hazardous Waste Operations and Emergency Response
3.3 29 CFR 1910.38, Emergency Action Plans
3.4 I2-141-PR1 Subs Management Procedure
3.5 I2-221-PR1 Project Plan Procedure
3.6 Q3NA-141-PR1 Subs Management – Procurement, Oversight and Ratings
3.7 S3NA-003-PR1 SH&E Training
3.8 S3NA-004-PR1 Incident Reporting
3.9 S3NA-203-PR1 Emergency Response Planning, Field
3.10 S3NA-208-PR1 Personal Protective Equipment Program
3.11 S3NA-209-PR1 Project Hazard Assessment and Planning
3.12 S3NA-520-PR1 Spill Response, Incidental
3.13 S3NA-602-PR1 Exposure Monitoring
3.14 S3NA-604-PR1 Medical Records
3.15 S3NA-605-PR1 Medical Surveillance Program
Hazardous Waste Operations and Emergency Response Activities (S3NA-509-PR1) Revision 1 December 31, 2014 PRINTED COPIES ARE UNCONTROLLED. CONTROLLED COPY IS AVAILABLE ON COMPANY INTRANET. 3 of 16
4.0 Procedure
4.1 Roles and Responsibilities
4.1.1 Office Manager (Operations)
• Provide support to the implementation of Health and Safety Plans and Emergency Action Plans.
4.1.2 Project Manager
• Prepare or request a HASP for every AECOM project with Hazardous Waste Operations and Emergency Response Activities, refer to S3NA-209-PR1 Project Hazard Assessment and Planning.
• Verify that all personnel working on the project are qualified.
• Request client’s emergency response procedures.
• Appoint a Site Safety Officer (SSO) for each project.
• Communicate the site-specific emergency response details to all employees assigned to a field project.
• Confirm that the necessary communications equipment for the project is available.
• Confirm that an accident/incident investigation is performed and a report is filed; refer to S3NA-004-PR1 Incident Reporting.
4.1.3 Region SH&E Manager / SH&E Department
• Provide technical guidance for the development and implementation of Health and Safety Plans and Emergency Action Plans.
• Prepare emergency action plans as part of project HASPs and emergency reference sheets.
• Interface with the local emergency responders when necessary.
• Interface with clients regarding facility emergency response procedures.
4.1.4 Site Safety Officer (SSO)
• Verify that a HASP is available for the project.
• Communicate the site-specific emergency response details to all employees assigned to a field project.
• Stop work and initiate emergency response procedures as required.
• Account for all AECOM and subcontractor employees after site evacuation.
• Conduct pre-entry briefing and daily tailgate meetings and review facility and site-specific emergency procedures.
• Brief on-site and off-site responders in the event of an emergency.
4.1.5 Employees
• Maintain HAZWOPER training.
• Follow the HASP and emergency procedures prepared for the project.
• Initiate emergency response via verbal communications or the alarm system if first to encounter the emergency.
4.1.6 All personnel (e.g., AECOM employees, general laborers, equipment operators, chemists, supervisors, etc.) performing activities at hazardous waste sites that expose or potentially expose them to hazardous wastes and health hazards are considered HAZWOPER site workers and must meet the training and medical surveillance requirements specified in 29 CFR 1910.120(e) and (f),

Hazardous Waste Operations and Emergency Response Activities (S3NA-509-PR1) Revision 1 December 31, 2014 PRINTED COPIES ARE UNCONTROLLED. CONTROLLED COPY IS AVAILABLE ON COMPANY INTRANET. 4 of 16
respectively. Additional training may be required based on site activities including related exposures and risks (e.g., confined space entry, excavations, fall protection, other materials [lead], etc.). These additional training requirements are to be outlined in the project- or site-specific health and safety plan (HASP).
4.2 Personnel Qualifications—Medical Surveillance and Training
4.2.1 HAZWOPER-qualified employees will participate in the following medical surveillance and training requirements. Medical surveillance and SH&E training requirements are further described in S3NA-605-PR1 Medical Surveillance and S3NA-003-PR1 SH&E Training respectively.
4.2.2 Medical Surveillance
Specific HAZWOPER medical examination protocols have been developed by AECOM’s Corporate Medical Provider (CMP) to meet the requirements of 29 CFR 1910.120(f). To be medically qualified to perform HAZWOPER work, employees receive the following medical examinations:
• Initial (Baseline) Examination—The initial examination is part of pre-employment requirements and must be completed (with results received) prior to the employee’s start of work date.
• Annual Examination—HAZWOPER-qualified employees will complete a medical examination once each year. Medical qualification expires on the anniversary date of the last examination completed. There will be no “grace period” exemptions beyond this date without the express approval of the Region SH&E Manager. At the recommendation of the SH&E Department, the CMP may approve an alternate examination frequency at periods of up to two years (biennial) in cases in which the worker’s exposures to environmental contaminants are infrequent and typically well below any occupational exposure limits (e.g., senior management personnel).
• Termination Examination—When reassigned to non-HAZWOPER duties, or at the conclusion of employment at AECOM, HAZWOPER-qualified personnel will be provided with the opportunity to receive a termination medical examination.
• Special Examinations—The SH&E Department and the CMP will jointly determine the need for special examinations because of:
o Unusual exposure conditions; and
o In response to possible overexposures.
The CMP will determine the medical protocol elements for each of these examinations based on exposure information provided by the SH&E Department. The CMP will evaluate the results of each employee’s examination and will provide a written statement of medical clearance clearly stating medical compliance with the HAZWOPER regulatory standard (29 CFR 1910.120(f)) and approval of the employee to perform unrestricted HAZWOPER activities. for initial and annual examinations, the CMP will also evaluate the employee for the use of air purifying and supplied air respiratory protection. The written evaluation from these examinations will indicate the CMP’s approval/limitations on the employee’s use of respiratory protection.
4.2.3 Training
All personnel assigned to work at a hazardous waste site must participate in training meeting the requirements of 29 CFR 1910.120(e).
Initial 40-Hour Training—Before being assigned to a HAZWOPER site, AECOM employees must complete 40 hours of off-site training meeting the requirements of 29 CFR 1910.120(e)(3)(i). At the conclusion of training, personnel will receive a written certification of course completion, signed by the instructor, that indicates the course of instruction (40-hour HAZWOPER) and training dates. A copy of this certification must be provided to the employee’s Region SH&E Manager. Employees
Hazardous Waste Operations and Emergency Response Activities (S3NA-509-PR1) Revision 1 December 31, 2014 PRINTED COPIES ARE UNCONTROLLED. CONTROLLED COPY IS AVAILABLE ON COMPANY INTRANET. 5 of 16
are responsible for maintaining their own copy of this certificate and for presenting it to the site safety officer when working on any HAZWOPER site.
In addition to the initial 40-hour training, the employee must receive three days of actual supervision by a trained experienced supervisor.
Available Training Sources:
• On-site training provided by the SH&E Department.
• Outsourced training providers approved by the SH&E Department.
Refresher 8-Hour Training—To remain qualified to perform on-site HAZWOPER work activities, each AECOM employee will complete 8 hours of HAZWOPER refresher training meeting the requirements of 29 CFR 1910.120(e)(8) at yearly intervals following completion of Initial 40-hour training. At the conclusion of training, personnel will receive a written certification of course completion, signed by the instructor, that indicates the course of instruction (8-hour HAZWOPER Refresher) and the training date. A copy of this certification must be provided to the employee’s SH&E Coordinator. Employees are responsible for maintaining their own copy of this certificate and for presenting it to the site supervisor when working on any HAZWOPER site.
Available Training Sources:
• Internet-based training approved by SH&E Department;
• On-site training provided by the SH&E Department; and
• Outsourced training providers approved by the SH&E Department.
Supervisor 8-Hour Training—Any AECOM employee acting in a management capacity for HAZWOPER activities (e.g., project manager, site safety officers, etc.) must complete an additional 8 hours of HAZWOPER Supervisor training meeting the requirements of 29 CFR 1910.120(e)(4). Although this training is required only once, supervisors must maintain their overall HAZWOPER qualification through annual completion of refresher training. At the conclusion of Supervisor 8-Hour Training personnel will receive a written certification of course completion, signed by the instructor that indicates the course of instruction and the training date. A copy of this certification must be provided to the Region SH&E Manager. Employees are responsible for maintaining their own copy of this certificate and for presenting it to the senior site supervisor when working on any HAZWOPER site.
Available Training Sources:
• On-site training provided by the SH&E Department, and
• Outsourced training providers approved by the SH&E Department.
24-Hour HAZWOPER Training—Site support contractors and site visitors may qualify to substitute 24-hour HAZWOPER training in place of 40-hour training, as specified in 29 CFR 1910.120(e)(3)(ii). Personnel potentially qualifying for this alternative training include:
• Site support personnel who will not work in any Exclusion Zone areas.
Subcontractors and site visitors whose duties will not entail significant exposure to site contaminants defined as not working in any areas where airborne contaminant concentrations exceed one-half of any applicable occupational exposure limit, and no contact or exposure to materials with site contaminant concentrations exceeding natural background levels. The Region SH&E Manager or SH&E department designee must approve the substitution of 24-hour training for initial 40-hour training. Persons qualifying for 24-hour training must provide written certification of course completion prior to beginning work on site. Persons completing 24-hour training must complete 8 hours of annual refresher training at the required interval to maintain eligibility for on-site work and must provide proof of this training (as necessary to demonstrate retraining) prior to beginning work on site.
Hazardous Waste Operations and Emergency Response Activities (S3NA-509-PR1) Revision 1 December 31, 2014 PRINTED COPIES ARE UNCONTROLLED. CONTROLLED COPY IS AVAILABLE ON COMPANY INTRANET. 6 of 16
4.2.4 Subcontractor Personnel
Any subcontractor organization whose employees will support AECOM operations at a HAZWOPER site will:
• Provide the Project Manager with a copy of their written HAZWOPER medical surveillance and training program requirements. The elements of the program(s) must be similar to those for AECOM’s own program, as detailed above, refer to I2-141-PR1 Subs Management Procedure and Q3NA-141-PR1 Subs Management – Procurement, Oversight and Ratings.
• Provide the Project Manager with written certification of a physician’s approved medical clearance for each employee who will work on the site. Certification can be demonstrated by:
o A copy of the physician’s signed medical clearance for each employee (preferred), or
o A letter identifying the medical status and clearance expiration date of every employee, signed by the company’s safety director or an officer of the company.
o A copy of the each employee’s training certifications, which will include:
- The initial 40-hour training certificate (24-hour training may be substituted with Region SH&E Manager approval).
- The most current Refresher training certificate (must be current within the previous one-year period).
- A copy of the Supervisor training certificate for each person serving in a site supervisory capacity (e.g., project manager, site safety officers, etc.).
4.3 Project SH&E Documentation—Health and Safety Plans (HASP)
4.3.1 The project SH&E documentation prepared for HAZWOPER activities is referred to as a site-specific Health and Safety Plan (HASP), and must meet the requirements presented in 29 CFR 1910.120(b)(4).
4.3.2 A safety and health risk or hazard analysis for each on-site task that will be performed.
4.3.3 The required HASP plan elements include:
• A description of the work location, the site history, and a summary of any information available concerning site hazards (including both physical hazards and contamination conditions);
• A summary of the work activities to be performed under AECOM’s scope of activities;
• Identified risks must include both chemical and physical hazards to which personnel may be exposed during the conduct of the work task;
• Protective measures for each work task to prevent or mitigate the potential hazards identified in the hazard analyses;
• Personal protective equipment (PPE) requirements for each work task, refer to S3NA-208-PR1 Personal Protective Equipment Program;
• Frequency and types of air monitoring, personal monitoring, and environmental sampling techniques and instrumentation to be used;
• Site control measures;
• Decontamination procedures; and
• An emergency response plan, S3NA-509-FM4 Emergency Information and Hazard Assessment, addressing actions to be taken in the event of each type of credible incident that might result during the performance of planned work activities, including minor and major injuries, and chemical release and fire. Response plans must address the means for coordinating the evacuation of all on-site personnel in the event of a catastrophic incident.
Hazardous Waste Operations and Emergency Response Activities (S3NA-509-PR1) Revision 1 December 31, 2014 PRINTED COPIES ARE UNCONTROLLED. CONTROLLED COPY IS AVAILABLE ON COMPANY INTRANET. 7 of 16
4.3.4 Responsibility for development of each AECOM HASP will be coordinated between the Project Manager and the Region SH&E Manager or SH&E Department designee as part of project initiation. Regardless of where the HASP is developed, it will be reviewed and approved by the SH&E Department prior to submission to any agency outside of AECOM.
4.3.5 Contractors and Subcontractors
4.3.5.1 The health and safety of any contractor’s or subcontractor’s employees is solely the responsibility of that contractor or subcontractor, who shall evaluate the hazards and potential hazards to their own employees and shall adhere to their own Health and Safety Plan.
4.3.5.2 In addition, all AECOM subcontractors’ Health and Safety Plans will, at a minimum conform to the requirements of the AECOM Health and Safety Plan. The AECOM Health and Safety Plan does not, nor is it intended to, address procedures of contractors or subcontractors during their site activities.
4.4 Personal Protective Equipment (PPE) Ensembles
4.4.1 Defined HAZWOPER PPE ensembles are specified for general use on all AECOM HAZWOPER operations. The project HASP may specify modifications to these requirements to meet site-specific conditions.
4.4.2 Level D Ensemble
The Level D ensemble provides a minimal level of skin protection (primarily against physical rather than chemical hazards) and no respiratory protection. Level D PPE is the minimum work uniform which will be used on HAZWOPER sites. Its use is appropriate when there is no significant potential for encountering hazardous substances or health hazards while working in controlled work areas.
Level D Equipment List:
• Hard hat,
• Eye protection,
• Safety-toe work boots,
• Shirts with sleeves and long pants (shorts are unacceptable for use), and
• Hearing protection (as required).
4.4.3 Modified Level D Ensemble
The Modified Level D ensemble provides moderate skin protection against contact with hazardous substances, but no respiratory protection. Its use is appropriate where there is a moderate-to-low potential for skin contact with known hazardous substances and health hazards, but no significant inhalation hazard is anticipated. The Modified Level D ensemble will consist of the Level D ensemble, supplemented by the addition of one or more of the following items:
Modified Level D Equipment List:
• Chemical-resistant disposable outer coveralls,
• Chemical-resistant outer gloves taped to outer coveralls,1
• Chemical-resistant inner gloves, and1
• Chemical-resistant safety-toe boots (taped to outer coveralls).
1 Selection of specific glove types/materials will be provided in the project HASP based on consideration of the contaminants and the physical conditions of the work.

Hazardous Waste Operations and Emergency Response Activities (S3NA-509-PR1) Revision 1 December 31, 2014 PRINTED COPIES ARE UNCONTROLLED. CONTROLLED COPY IS AVAILABLE ON COMPANY INTRANET. 8 of 16
4.4.4 Level C Ensemble
The Level C ensemble provides moderate skin protection against contact with hazardous substances and moderate respiratory protection. Its use is appropriate where there is the potential for skin contact with known hazardous substances and health hazards, together with a limited and well-defined potential for exposure via inhalation.
Level C Equipment List:
• Full-face air-purifying respirator (APR) equipped with cartridge types as designated in the project HASP,2
• Chemical-resistant disposable outer coveralls,
• Chemical-resistant outer gloves taped to outer coveralls,3
• Chemical-resistant inner gloves,3
• Hard hat,
• Safety-toe boots taped to coveralls; the use of boot covers (e.g., booties) or chemical-resistant boots may be specified, and
• Hearing protection (as required).
4.4.5 Level B Ensemble
The Level B ensemble provides both the highest level of inhalation exposure protection and considerable skin contact protection. Its use is appropriate where there are significant known or suspected hazardous substances and health hazards, involving both skin and inhalation exposure (up to and including Immediately Dangerous to Life or Health [IDLH] conditions) or where adverse atmospheric conditions cannot be mitigated by use of air purifying respirators (e.g., oxygen deficient atmospheres or chemicals with poor warning properties). The use of Level B PPE requires prior approval by the Region SH&E Manager.
Level B Equipment List:
• Supplied air respirator (SCBA or air line system with Grade D or better breathing air),
• Chemical-resistant disposable outer coveralls,
• Chemical-resistant outer glove taped to outer coveralls,3
• Chemical-resistant inner gloves,3
• Hard hat,
• Chemical resistant safety-toe boots taped to coveralls, and
• Hearing protection (as required).
4.4.6 Level A Ensemble
The Level A ensemble provides the highest level of both respiratory and skin protection, up to and including protection against skin contact with vapor-phase contaminants. The use of Level A PPE requires prior approval by the Americas SH&E Director.
Specific Level A ensemble components will be determined on a case-by-case basis by the SH&E Department.
2 Selection of specific cartridges will be made by the SH&E Department (or Competent Person – Respiratory Protection as designated by the DSM) based on contaminants present. A
cartridge change-out frequency will also be specified in the HASP based on the manufacturer’s cartridge performance data.
3 Selection of specific glove types/materials will be provided in the project HASP based on consideration of the contaminants and the physical conditions of the work.
Hazardous Waste Operations and Emergency Response Activities (S3NA-509-PR1) Revision 1 December 31, 2014 PRINTED COPIES ARE UNCONTROLLED. CONTROLLED COPY IS AVAILABLE ON COMPANY INTRANET. 9 of 16
4.5 Field Emergency Response Plans
4.5.1 AECOM employees are not expected to take action or to participate in rescues or responses to chemical releases beyond the initial discovery of the release and immediate mitigation actions such as closing a valve, placing absorbents, and notifying the client and or public emergency response system (911.) If AECOM employees are to participate in the response to a chemical release beyond the initial reaction, there must be a contractual provision for this response and the employees must be specifically trained for this response. This document is designed to provide guidelines on how to prepare a written plan that will ensure prompt and proper response to an emergency situation that arises during field investigations and to outline the duties of AECOM employees during a field emergency and the associated training requirements.
4.5.2 Site specific health and safety plans that are prepared to comply with the HAZWOPER standard (29 CFR 1910.120) must address emergency response. This standard specifically outlines the elements that must be contained in an emergency response plan. However, the definition of emergency response, as written in 29 CFR 1910.120, focuses on emergencies involving the uncontrolled release of hazardous substances. Under 29 CFR 1910.120, an employer can opt to evacuate employees from the danger area when such an emergency occurs. AECOM does not expect its employees to actively assist in the handling of uncontrollable chemical releases that may occur during the implementation of field programs. As such, and as provided by the HAZWOPER standard, AECOM is exempt from the emergency response plan requirements of the standard as long as it provides an emergency action plan within the HASP that complies with 29 CFR 1910.38 (a). Therefore, all emergency response plans required under 29 CFR 1910.120 will be written to comply with 29 CFR 1910.38 (a).
4.5.3 The HAZWOPER standard does not prohibit AECOM employees from performing limited response activities. AECOM employees can provide response assistance by placing absorbent pillows or vermiculite around a small, contained spill that occurs during sampling efforts. Refer to the S3NA-520-PR1 Spill Response, Incidental procedure which describes the specific procedures that AECOM will follow when responding to an incidental chemical spill.
4.5.4 Field Project Preparation
Every HASP that is prepared by AECOM will contain an emergency response section in which the required elements of an emergency action plan will be contained, refer to S3NA-203-PR1 Emergency Response Planning, Field for more specifics. For all projects that do not require a HASP, an emergency reference sheet will be prepared; minimally, the sheet will list the telephone numbers of the local emergency responders and the local hospital and provides directions to the local hospital. When AECOM is working at an operating facility, the emergency response procedures of the facility will be appended to the HASP or the emergency reference sheet.
There are two types of emergency situations that AECOM personnel must be prepared for and that must be addressed in the emergency action plan. These include:
• Emergencies related to the operations of our clients at the facility where AECOM is working.
• Emergencies related to our own on-site activities/investigations.
AECOM employees are typically not expected to take action or participate in responses to chemical releases beyond the initial discovery of the release and immediate mitigation actions such as closing a valve, placing absorbents, and notifying the client and or public emergency response system (911.)
Employees are not to accept the role of Incident Commander without specific authority from the Region SH&E Manager and the Office Manager (Operations) responsible for the project. Assuming the role of the Incident Commander requires training beyond the scope of this Procedure.
4.5.5 Client Facility Emergency Response Procedures
AECOM implements field programs on active properties, including manufacturing facilities. These facilities have typically developed an emergency response plan that is specific to facility-related
Hazardous Waste Operations and Emergency Response Activities (S3NA-509-PR1) Revision 1 December 31, 2014 PRINTED COPIES ARE UNCONTROLLED. CONTROLLED COPY IS AVAILABLE ON COMPANY INTRANET. 10 of 16
emergencies. If AECOM is working at an operating facility, emergency procedures established by the facility must be followed in the event of a facility catastrophe. AECOM personnel must be aware of and familiar with the alarm signals used at the facility to alert personnel to an emergency. AECOM personnel must also know where to assemble in the event of a facility evacuation as the facility must be able to account for all personnel, including subcontractors such as AECOM in the event of an evacuation.
The first priority in AECOM’s preparation of a project emergency action plan is to ensure that the responsibilities under the client's emergency response plan are fully understood. Because of the nature of their business, many of our clients have in-house fire brigades, medical staff, and hazardous materials teams that can assist AECOM in the event of an emergency related to our field activities. In many instances, our clients prefer or require that subcontractors seek emergency assistance through their facility first before calling outside responders to the site.
A copy of the facility’s procedures must be made available to AECOM so that the information can be incorporated into the HASP or attached to the emergency reference sheet. If this information is not available to AECOM prior to arriving on site, the SSO must meet with client representatives upon arrival to the facility to review procedures in the event of an emergency related to plant operations.
4.5.6 Emergency Action Plan
As a minimum, each emergency action plan must contain the following topics as required by 29 CFR 1910.38 (a):
• Procedures and contact information for reporting emergencies to public service responders and on-site (client or host employer) emergency control centers.
• Emergency escape procedures and emergency escape route assignments.
• Procedures to be followed by employees who remain to operate critical site operations before they evacuate.
• Procedures to account for all employees after emergency evacuation is complete.
• Rescue and medical duties for those employees who are to perform them.
• Preferred means of reporting fires and other emergencies.
• PPE to protect employees from expected exposures and potential exposures during an emergency.
• Names of persons or departments who can be contacted for further information (i.e. emergency reference sheet).
• Availability of medical surveillance for workers who might have been exposed to chemicals, bloodborne pathogens, or other biological agents as a result of project work or emergency response.
In addition, each plan must establish the specific alarm system that will be used on site to warn employees of an AECOM emergency. The chosen alarm signals should not conflict with alarm signals already in place at the facility.
4.5.7 Escape Routes and Procedures
Prior to the commencement of on-site activities, the SSO must determine how AECOM employees will evacuate each AECOM work area of the site. Two or more routes that are separate or remote from each other for each work area must be identified. Multiple routes are necessary in case one is blocked by fire or chemical spill. These routes must not overlap because, if a common point were obstructed, all intersecting routes would be blocked.
Prominent wind direction should also be considered when designating escape routes and assembly areas. Escape routes and assembly areas should be upwind of the site whenever possible.
Hazardous Waste Operations and Emergency Response Activities (S3NA-509-PR1) Revision 1 December 31, 2014 PRINTED COPIES ARE UNCONTROLLED. CONTROLLED COPY IS AVAILABLE ON COMPANY INTRANET. 11 of 16
Upon arrival to the site, the SSO must verify that the selected routes are appropriate for evacuation. During an emergency, the quickest and most direct route should be selected. However, when working at an operating facility, the established escape routes of the facility should be used whenever possible. In the event of a facility-related emergency, all AECOM employees must meet at the facility's assembly area so that the client can verify that AECOM has evacuated the property.
4.5.8 Accounting Method for All Employees after Evacuation
The SSO is responsible for determining that all AECOM employees have been successfully evacuated from the work area(s). It is the responsibility of each AECOM subcontractor to verify that all of its employees evacuated the site and to report this information to the SSO. All employees must meet at the designated assembly area. A headcount is an acceptable way to determine complete evacuation when the field team is of a small size. The site log-in book should be referenced when attempting to account for more than 10 people. In the event of a facility-related emergency, the SSO must notify facility representatives that all AECOM employees and AECOM subcontract employees have successfully evacuated the work area(s). The SSO must notify emergency responders if any employee is unaccounted for and where on the site they were last seen.
In the event of a project-related emergency, the SSO will provide off-site emergency responders or on-site HAZMAT teams or fire brigades (Incident Commander) with all available knowledge about the emergency situation upon their arrival to the scene.
4.5.9 Employees Who Remain to Operate Critical Site Operations Before They Evacuate
All equipment and operations are required to cease in accordance with the established alarm signal procedures. The only exception will be related to health and safety. The SSO must determine at the time of the emergency if health and safety will be jeopardized by immediate stoppage of any particular piece of equipment. If such a determination is made, personnel involved in critical operations must be minimized. Once it is determined that the operation is no longer needed or the threat to the operators is imminent, operations will cease and the operators will immediately evacuate.
4.5.10 Rescue and Medical Duties
Only currently trained individuals will administer first aid or CPR. If the injury is life threatening, the Emergency Medical System (EMS) should be called (911). Depending on the procedures established for the project, the SSO would contact an emergency responder directly or notify the facility representatives for medical assistance. If the employee needs medical attention that cannot be provided on-site, the SSO shall escort the individual to the local hospital identified on the emergency reference sheet and shall remain with the person until release or admittance is determined. The escort will relay all appropriate medical information to the Project Manager and Region SH&E Manager.
4.5.11 Preferred Means of Reporting
Unless facility representatives specifically indicate that they prefer AECOM personnel to notify them first of an emergency, the SSO will directly contact the appropriate emergency responders listed on the emergency reference sheet.
4.5.12 Alarm Signals
An emergency communication system must be in effect at all sites. The most simple and effective emergency communication system in many situations will be direct verbal communications. However, verbal communications must be supplemented any time voices cannot be clearly perceived above ambient noise levels and any time a clear line of sight can not be easily maintained among all AECOM personnel because of distance, terrain, or other obstructions.
Portable two-way radio communications may be used when employees must work out of the line of sight of other workers.
Hazardous Waste Operations and Emergency Response Activities (S3NA-509-PR1) Revision 1 December 31, 2014 PRINTED COPIES ARE UNCONTROLLED. CONTROLLED COPY IS AVAILABLE ON COMPANY INTRANET. 12 of 16
When verbal communications must be supplemented, the following emergency signals shall be implemented using handheld portable air horns, whistles, or similar devices. Signals must be capable of being perceived above ambient noise by all employees in the affected portions of the workplace.
• One Blast: General Warning—A relatively minor and localized, yet important, on-site event. An example of this type of an event would be a minor chemical spill where there is no immediate danger to life or health yet personnel working on the site should be aware of the situation so that unnecessary problems can be avoided. If one horn blast is sounded, personnel must stop all activity and equipment on-site and await further instructions from the SSO.
• Three Blasts: Medical Emergency—A medical emergency for which immediate first aid or emergency medical care is required. If three horn blasts are sounded, all first aid and/or CPR trained personnel should respond as appropriate. All other activity and equipment should stop and personnel should await further instructions from the SSO.
• Three Blasts Followed by One Continuous Blast: Immediate Threat to Life and Health—A situation that could present an immediate danger to life and health of personnel onsite. Examples include fires, explosions, large hazardous chemical release, severe weather-related emergencies, or security threats. If three horn blasts followed by a continuous blast are sounded, all activity and equipment must stop. All personnel must evacuate the site and meet in the designated assembly area where the SSO will account for all employees. The SSO will arrange for other emergency response actions if necessary. Information concerning the need to follow decontamination procedures during an emergency evacuation will be addressed in the emergency action plan.
• The SSO or his designate will acknowledge the distress signal with two short blasts on the air-horn or whistle.
• One Continuous Blast Following Any of the Above: All Clear/Return to Work—Personnel who sound the initial alarm are required to send an all clear signal when the emergency is over.
4.5.13 Emergency Reference Sheet
An emergency reference sheet (see S3NA-509-FM4 Emergency Information and Hazard Assessment) must be prepared for projects not requiring a HASP. Each emergency reference sheet must list the following:
• Emergency phone numbers for local police, fire, and ambulance service.
• In-house facility extensions for reporting an emergency (applies to operating facilities only).
• Phone number and address of closest hospital with an emergency room to the site.
• Directions to the hospital from the site.
• Map highlighting the site-to-hospital route.
• Phone number for the Poison Control Center.
• Names and phone numbers of AECOM representatives and facility representatives.
4.5.14 On-site and Off-site Communications
Regardless of the size or location of AECOM's field projects, it is extremely important that both on-site and off-site communications be maintained so that in the event of an emergency employees can contact each other or place a phone call immediately with the appropriate responder(s).
Walkie-talkies are required when members of the field team are working in separate areas of the site and verbal communications are no longer effective because of distance. A walkie-talkie must be available for each team that is working in a separate area of the site.
Hazardous Waste Operations and Emergency Response Activities (S3NA-509-PR1) Revision 1 December 31, 2014 PRINTED COPIES ARE UNCONTROLLED. CONTROLLED COPY IS AVAILABLE ON COMPANY INTRANET. 13 of 16
When AECOM is working at an occupied facility, access to a telephone may not be a problem. When AECOM is working on abandoned properties or when there is no access to a phone, a cellular telephone must be brought to the work location.
4.5.15 Evacuation
Although emergency evacuation procedures are included in AECOM's initial 40-hour HAZWOPER training, emergency procedures at each site will be different. Therefore, employees must be instructed about the specifics of the emergency procedures developed for the site during the site-specific pre-entry briefing that must be held daily prior to the commencement of field activities. Update training is required anytime escape routes or procedures change. An evacuation drill will be conducted for projects that are scheduled for one month or longer. Visitors and untrained employees shall not be allowed into the project area until they receive a safety briefing including evacuation alarms and procedures.
4.5.16 First Responder
First responders shall have sufficient training or have had sufficient experience to objectively demonstrate competency in the following areas:
• An understanding of what hazardous substances are, and the risks associated with them in an incident.
• An understanding of the potential outcomes associated with an emergency.
• The ability to recognize the presence of hazardous substances and physical hazards in an emergency.
• An understanding of the role of the first responder.
• The ability to realize the need for additional resources and to make appropriate notifications to the communication center.
4.5.17 First Responder HAZWOPER Operations Level
First responders at the operations level are individuals who respond to releases or potential releases of hazardous substances as part of the initial response to the site for the purpose of protecting nearby persons, property, or the environment from the effects of the release. They are trained to respond in a defensive fashion without actually trying to stop the release. Their function is to contain the release from a safe distance, keep it from spreading, and prevent exposures. First responders at the operational level shall have received at least eight hours of training or have had sufficient experience to objectively demonstrate competency in the following areas in addition to those listed for the awareness level and the employer shall so certify:
• Knowledge of the basic hazard and risk assessment techniques.
• Know how to select and use proper personal protective equipment provided to the first responder operational level.
• An understanding of basic hazardous materials terms.
• Know how to perform basic control, containment, and/or confinement operations within the capabilities of the resources and personal protective equipment available with their unit.
• Know how to implement basic decontamination procedures.
• An understanding of the relevant standard operating procedures and termination procedures.
4.5.18 Hazardous Materials Technician
Hazardous materials technicians shall have received at least 24 hours of training equal to the first responder operations level and in addition have competency in the following areas and the employer shall so certify:
• Know how to implement the employer's emergency response plan.
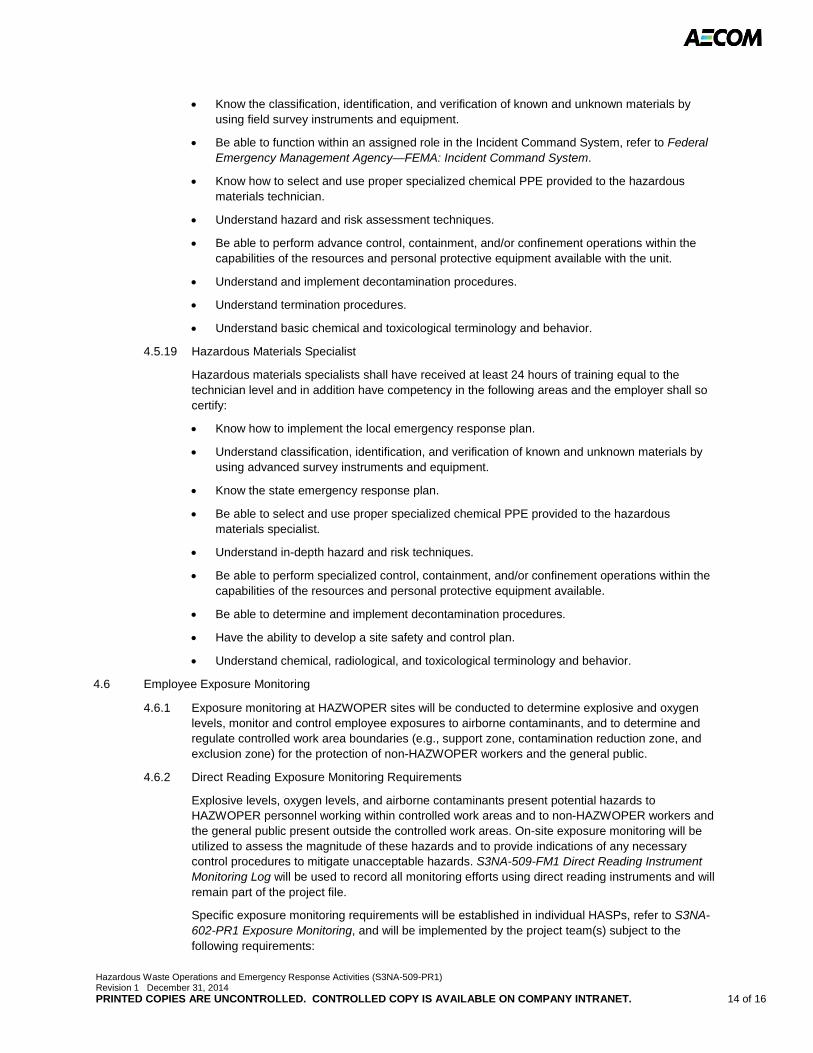
Hazardous Waste Operations and Emergency Response Activities (S3NA-509-PR1) Revision 1 December 31, 2014 PRINTED COPIES ARE UNCONTROLLED. CONTROLLED COPY IS AVAILABLE ON COMPANY INTRANET. 14 of 16
• Know the classification, identification, and verification of known and unknown materials by using field survey instruments and equipment.
• Be able to function within an assigned role in the Incident Command System, refer to Federal Emergency Management Agency—FEMA: Incident Command System.
• Know how to select and use proper specialized chemical PPE provided to the hazardous materials technician.
• Understand hazard and risk assessment techniques.
• Be able to perform advance control, containment, and/or confinement operations within the capabilities of the resources and personal protective equipment available with the unit.
• Understand and implement decontamination procedures.
• Understand termination procedures.
• Understand basic chemical and toxicological terminology and behavior.
4.5.19 Hazardous Materials Specialist
Hazardous materials specialists shall have received at least 24 hours of training equal to the technician level and in addition have competency in the following areas and the employer shall so certify:
• Know how to implement the local emergency response plan.
• Understand classification, identification, and verification of known and unknown materials by using advanced survey instruments and equipment.
• Know the state emergency response plan.
• Be able to select and use proper specialized chemical PPE provided to the hazardous materials specialist.
• Understand in-depth hazard and risk techniques.
• Be able to perform specialized control, containment, and/or confinement operations within the capabilities of the resources and personal protective equipment available.
• Be able to determine and implement decontamination procedures.
• Have the ability to develop a site safety and control plan.
• Understand chemical, radiological, and toxicological terminology and behavior.
4.6 Employee Exposure Monitoring
4.6.1 Exposure monitoring at HAZWOPER sites will be conducted to determine explosive and oxygen levels, monitor and control employee exposures to airborne contaminants, and to determine and regulate controlled work area boundaries (e.g., support zone, contamination reduction zone, and exclusion zone) for the protection of non-HAZWOPER workers and the general public.
4.6.2 Direct Reading Exposure Monitoring Requirements
Explosive levels, oxygen levels, and airborne contaminants present potential hazards to HAZWOPER personnel working within controlled work areas and to non-HAZWOPER workers and the general public present outside the controlled work areas. On-site exposure monitoring will be utilized to assess the magnitude of these hazards and to provide indications of any necessary control procedures to mitigate unacceptable hazards. S3NA-509-FM1 Direct Reading Instrument Monitoring Log will be used to record all monitoring efforts using direct reading instruments and will remain part of the project file.
Specific exposure monitoring requirements will be established in individual HASPs, refer to S3NA-602-PR1 Exposure Monitoring, and will be implemented by the project team(s) subject to the following requirements:
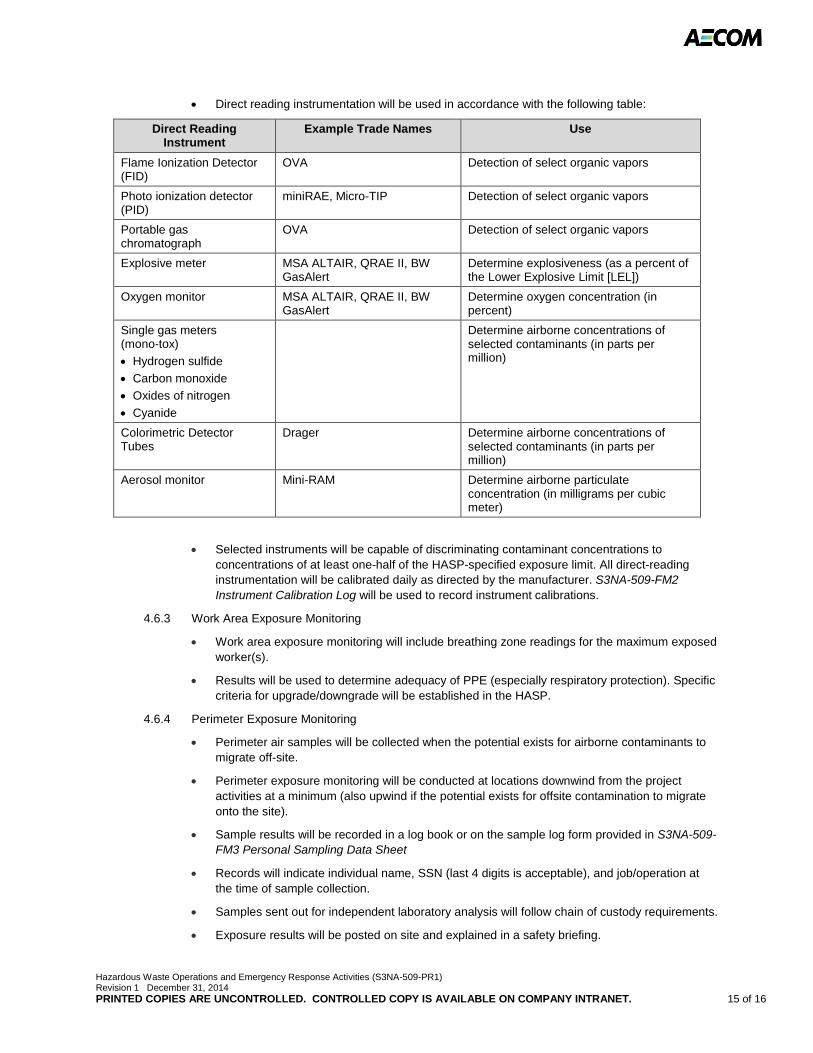
Hazardous Waste Operations and Emergency Response Activities (S3NA-509-PR1) Revision 1 December 31, 2014 PRINTED COPIES ARE UNCONTROLLED. CONTROLLED COPY IS AVAILABLE ON COMPANY INTRANET. 15 of 16
• Direct reading instrumentation will be used in accordance with the following table:
Direct Reading Instrument
Example Trade Names Use
Flame Ionization Detector (FID)
OVA Detection of select organic vapors
Photo ionization detector (PID)
miniRAE, Micro-TIP Detection of select organic vapors
Portable gas chromatograph
OVA Detection of select organic vapors
Explosive meter MSA ALTAIR, QRAE II, BW GasAlert
Determine explosiveness (as a percent of the Lower Explosive Limit [LEL])
Oxygen monitor MSA ALTAIR, QRAE II, BW GasAlert
Determine oxygen concentration (in percent)
Single gas meters (mono-tox)
• Hydrogen sulfide
• Carbon monoxide
• Oxides of nitrogen
• Cyanide
Determine airborne concentrations of selected contaminants (in parts per million)
Colorimetric Detector Tubes
Drager Determine airborne concentrations of selected contaminants (in parts per million)
Aerosol monitor Mini-RAM Determine airborne particulate concentration (in milligrams per cubic meter)
• Selected instruments will be capable of discriminating contaminant concentrations to concentrations of at least one-half of the HASP-specified exposure limit. All direct-reading instrumentation will be calibrated daily as directed by the manufacturer. S3NA-509-FM2 Instrument Calibration Log will be used to record instrument calibrations.
4.6.3 Work Area Exposure Monitoring
• Work area exposure monitoring will include breathing zone readings for the maximum exposed worker(s).
• Results will be used to determine adequacy of PPE (especially respiratory protection). Specific criteria for upgrade/downgrade will be established in the HASP.
4.6.4 Perimeter Exposure Monitoring
• Perimeter air samples will be collected when the potential exists for airborne contaminants to migrate off-site.
• Perimeter exposure monitoring will be conducted at locations downwind from the project activities at a minimum (also upwind if the potential exists for offsite contamination to migrate onto the site).
• Sample results will be recorded in a log book or on the sample log form provided in S3NA-509-FM3 Personal Sampling Data Sheet
• Records will indicate individual name, SSN (last 4 digits is acceptable), and job/operation at the time of sample collection.
• Samples sent out for independent laboratory analysis will follow chain of custody requirements.
• Exposure results will be posted on site and explained in a safety briefing.
Hazardous Waste Operations and Emergency Response Activities (S3NA-509-PR1) Revision 1 December 31, 2014 PRINTED COPIES ARE UNCONTROLLED. CONTROLLED COPY IS AVAILABLE ON COMPANY INTRANET. 16 of 16
• Employees will receive a written statement of results within 15 days of receipt from the laboratory.
• Results of all personal exposure monitoring will be provided to the SH&E department for inclusion in the employee medical records, refer to S3NA-604-PR1 Medical Records.
5.0 Records
5.1 All forms and documents generated during a HAZWOPER project will be maintained in the project file.
6.0 Attachments
6.1 S3NA-509-FM1 Direct Reading Instrument Monitoring Log
6.2 S3NA-509-FM2 Instrument Calibration Log
6.3 S3NA-509-FM3 Personal Sampling Data Sheet
6.4 S3NA-509-FM4 Emergency Information and Hazard Assessment
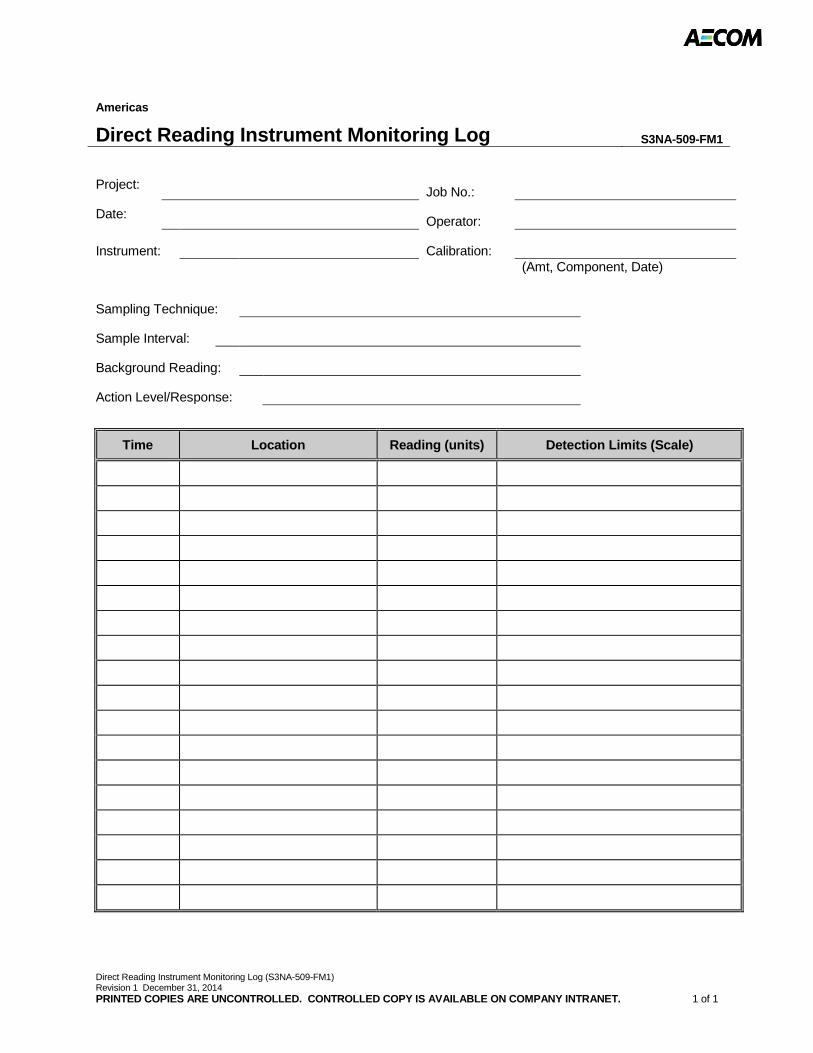
Direct Reading Instrument Monitoring Log (S3NA-509-FM1) Revision 1 December 31, 2014 PRINTED COPIES ARE UNCONTROLLED. CONTROLLED COPY IS AVAILABLE ON COMPANY INTRANET. 1 of 1
Americas
Direct Reading Instrument Monitoring Log S3NA-509-FM1
Project: Job No.:
Date: Operator:
Instrument: Calibration:
(Amt, Component, Date)
Sampling Technique:
Sample Interval:
Background Reading:
Action Level/Response:
Time Location Reading (units) Detection Limits (Scale)
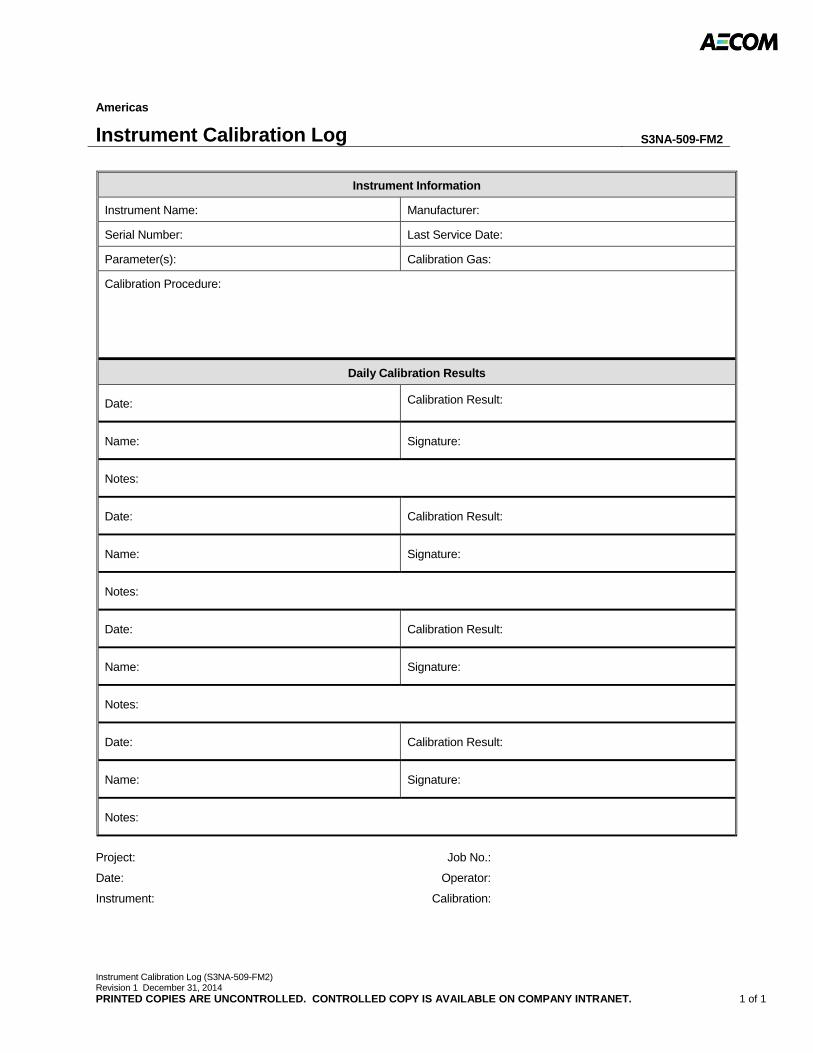
Instrument Calibration Log (S3NA-509-FM2) Revision 1 December 31, 2014 PRINTED COPIES ARE UNCONTROLLED. CONTROLLED COPY IS AVAILABLE ON COMPANY INTRANET. 1 of 1
Americas
Instrument Calibration Log S3NA-509-FM2
Instrument Information
Instrument Name: Manufacturer:
Serial Number: Last Service Date:
Parameter(s): Calibration Gas:
Calibration Procedure:
Daily Calibration Results
Date: Calibration Result:
Name: Signature:
Notes:
Date: Calibration Result:
Name: Signature:
Notes:
Date: Calibration Result:
Name: Signature:
Notes:
Date: Calibration Result:
Name: Signature:
Notes:
Project: Job No.:
Date: Operator:
Instrument: Calibration:
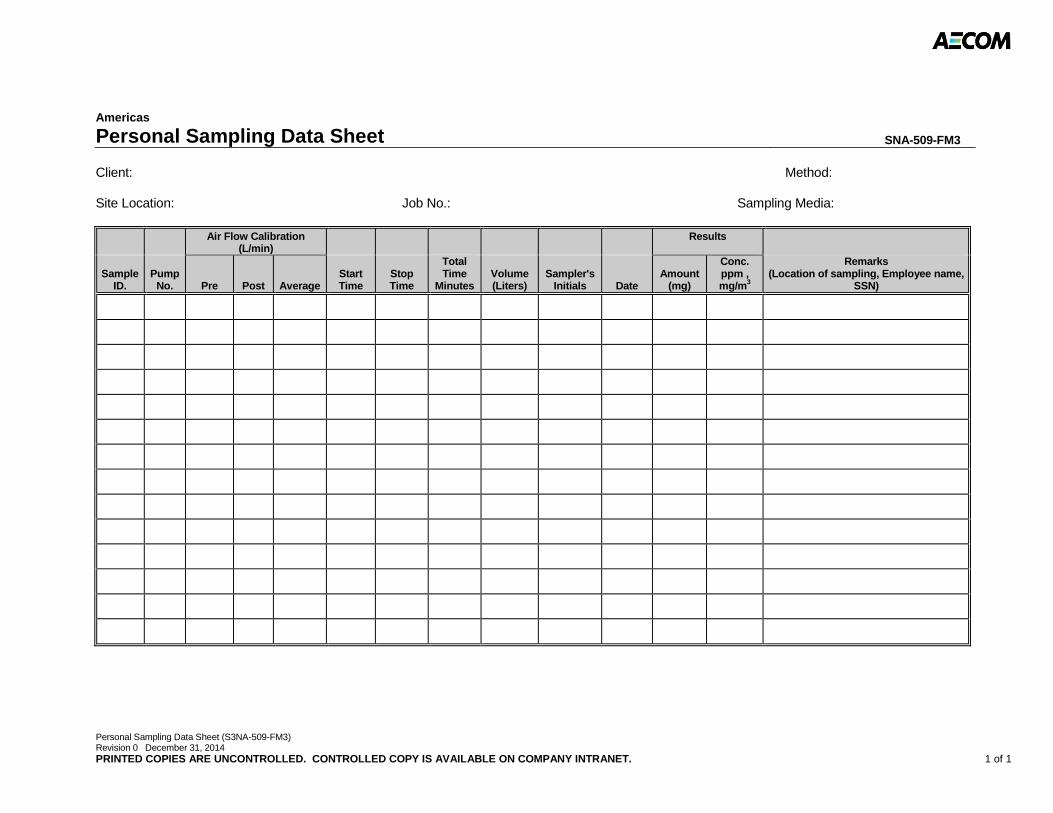
Personal Sampling Data Sheet (S3NA-509-FM3) Revision 0 December 31, 2014 PRINTED COPIES ARE UNCONTROLLED. CONTROLLED COPY IS AVAILABLE ON COMPANY INTRANET. 1 of 1
Americas
Personal Sampling Data Sheet SNA-509-FM3
Client: Method: Site Location: Job No.: Sampling Media:
Air Flow Calibration (L/min)
Results
Sample ID.
Pump No. Pre Post Average
Start Time
Stop Time
Total Time
Minutes Volume (Liters)
Sampler's Initials Date
Amount (mg)
Conc. ppm , mg/m3
Remarks (Location of sampling, Employee name,
SSN)
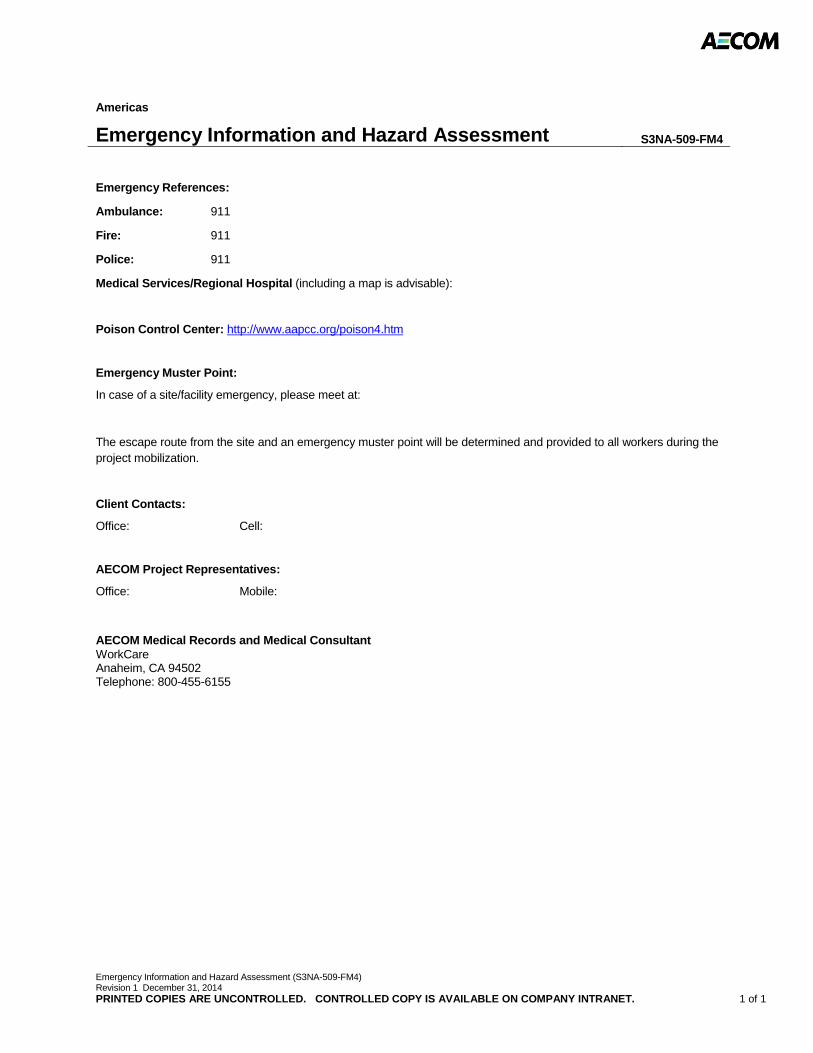
Emergency Information and Hazard Assessment (S3NA-509-FM4) Revision 1 December 31, 2014 PRINTED COPIES ARE UNCONTROLLED. CONTROLLED COPY IS AVAILABLE ON COMPANY INTRANET. 1 of 1
Americas
Emergency Information and Hazard Assessment S3NA-509-FM4
Emergency References:
Ambulance: 911
Fire: 911
Police: 911
Medical Services/Regional Hospital (including a map is advisable):
Poison Control Center: http://www.aapcc.org/poison4.htm
Emergency Muster Point:
In case of a site/facility emergency, please meet at:
The escape route from the site and an emergency muster point will be determined and provided to all workers during the project mobilization.
Client Contacts:
Office: Cell:
AECOM Project Representatives:
Office: Mobile:
AECOM Medical Records and Medical Consultant WorkCare Anaheim, CA 94502 Telephone: 800-455-6155
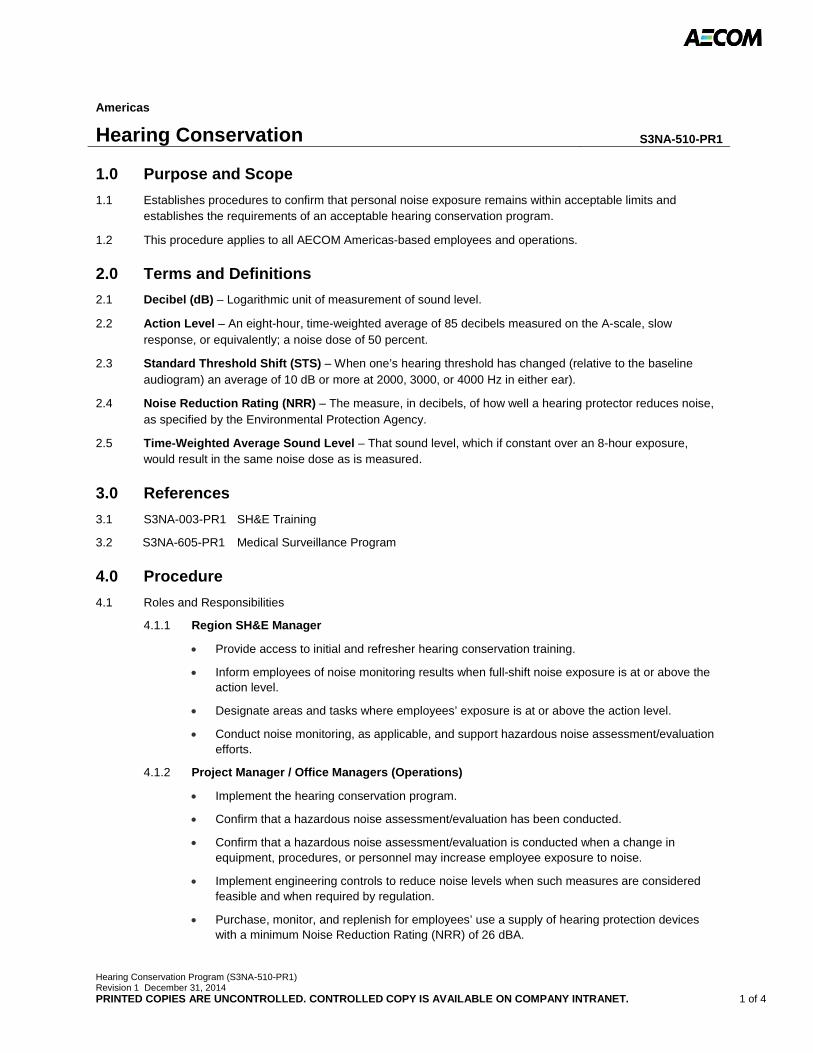
Hearing Conservation Program (S3NA-510-PR1) Revision 1 December 31, 2014 PRINTED COPIES ARE UNCONTROLLED. CONTROLLED COPY IS AVAILABLE ON COMPANY INTRANET. 1 of 4
Americas
Hearing Conservation S3NA-510-PR1
1.0 Purpose and Scope
1.1 Establishes procedures to confirm that personal noise exposure remains within acceptable limits and establishes the requirements of an acceptable hearing conservation program.
1.2 This procedure applies to all AECOM Americas-based employees and operations.
2.0 Terms and Definitions
2.1 Decibel (dB) – Logarithmic unit of measurement of sound level.
2.2 Action Level – An eight-hour, time-weighted average of 85 decibels measured on the A-scale, slow response, or equivalently; a noise dose of 50 percent.
2.3 Standard Threshold Shift (STS) – When one’s hearing threshold has changed (relative to the baseline audiogram) an average of 10 dB or more at 2000, 3000, or 4000 Hz in either ear).
2.4 Noise Reduction Rating (NRR) – The measure, in decibels, of how well a hearing protector reduces noise, as specified by the Environmental Protection Agency.
2.5 Time-Weighted Average Sound Level – That sound level, which if constant over an 8-hour exposure, would result in the same noise dose as is measured.
3.0 References
3.1 S3NA-003-PR1 SH&E Training
3.2 S3NA-605-PR1 Medical Surveillance Program
4.0 Procedure
4.1 Roles and Responsibilities
4.1.1 Region SH&E Manager
• Provide access to initial and refresher hearing conservation training.
• Inform employees of noise monitoring results when full-shift noise exposure is at or above the action level.
• Designate areas and tasks where employees’ exposure is at or above the action level.
• Conduct noise monitoring, as applicable, and support hazardous noise assessment/evaluation efforts.
4.1.2 Project Manager / Office Managers (Operations)
• Implement the hearing conservation program.
• Confirm that a hazardous noise assessment/evaluation has been conducted.
• Confirm that a hazardous noise assessment/evaluation is conducted when a change in equipment, procedures, or personnel may increase employee exposure to noise.
• Implement engineering controls to reduce noise levels when such measures are considered feasible and when required by regulation.
• Purchase, monitor, and replenish for employees’ use a supply of hearing protection devices with a minimum Noise Reduction Rating (NRR) of 26 dBA.
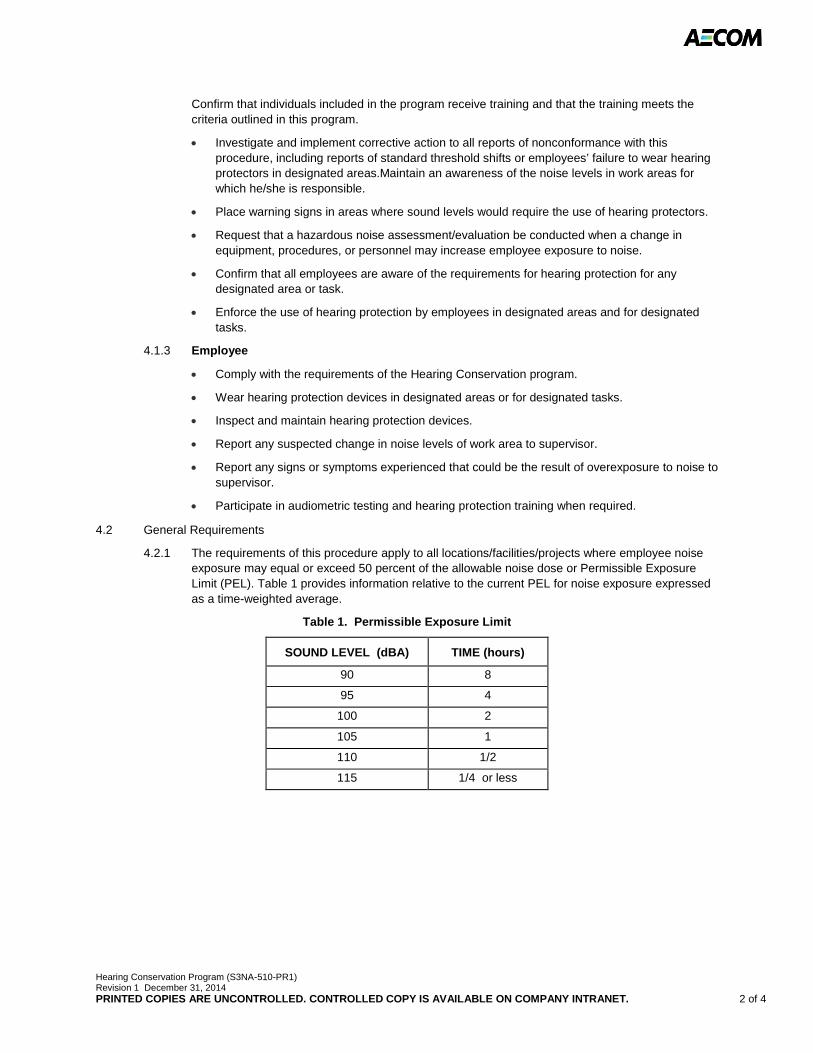
Hearing Conservation Program (S3NA-510-PR1) Revision 1 December 31, 2014 PRINTED COPIES ARE UNCONTROLLED. CONTROLLED COPY IS AVAILABLE ON COMPANY INTRANET. 2 of 4
Confirm that individuals included in the program receive training and that the training meets the criteria outlined in this program.
• Investigate and implement corrective action to all reports of nonconformance with this procedure, including reports of standard threshold shifts or employees’ failure to wear hearing protectors in designated areas.Maintain an awareness of the noise levels in work areas for which he/she is responsible.
• Place warning signs in areas where sound levels would require the use of hearing protectors.
• Request that a hazardous noise assessment/evaluation be conducted when a change in equipment, procedures, or personnel may increase employee exposure to noise.
• Confirm that all employees are aware of the requirements for hearing protection for any designated area or task.
• Enforce the use of hearing protection by employees in designated areas and for designated tasks.
4.1.3 Employee
• Comply with the requirements of the Hearing Conservation program.
• Wear hearing protection devices in designated areas or for designated tasks.
• Inspect and maintain hearing protection devices.
• Report any suspected change in noise levels of work area to supervisor.
• Report any signs or symptoms experienced that could be the result of overexposure to noise to supervisor.
• Participate in audiometric testing and hearing protection training when required.
4.2 General Requirements
4.2.1 The requirements of this procedure apply to all locations/facilities/projects where employee noise exposure may equal or exceed 50 percent of the allowable noise dose or Permissible Exposure Limit (PEL). Table 1 provides information relative to the current PEL for noise exposure expressed as a time-weighted average.
Table 1. Permissible Exposure Limit
SOUND LEVEL (dBA) TIME (hours)
90 8
95 4
100 2
105 1
110 1/2
115 1/4 or less
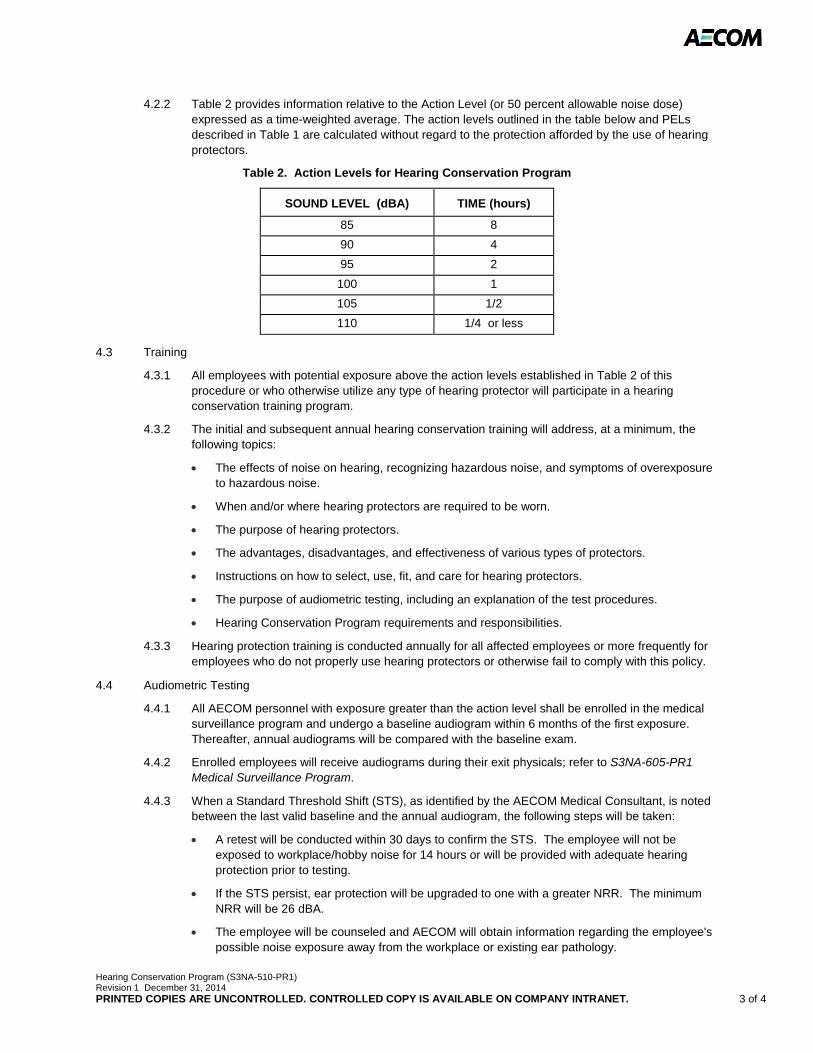
Hearing Conservation Program (S3NA-510-PR1) Revision 1 December 31, 2014 PRINTED COPIES ARE UNCONTROLLED. CONTROLLED COPY IS AVAILABLE ON COMPANY INTRANET. 3 of 4
4.2.2 Table 2 provides information relative to the Action Level (or 50 percent allowable noise dose) expressed as a time-weighted average. The action levels outlined in the table below and PELs described in Table 1 are calculated without regard to the protection afforded by the use of hearing protectors.
Table 2. Action Levels for Hearing Conservation Program
SOUND LEVEL (dBA) TIME (hours)
85 8
90 4
95 2
100 1
105 1/2
110 1/4 or less
4.3 Training
4.3.1 All employees with potential exposure above the action levels established in Table 2 of this procedure or who otherwise utilize any type of hearing protector will participate in a hearing conservation training program.
4.3.2 The initial and subsequent annual hearing conservation training will address, at a minimum, the following topics:
• The effects of noise on hearing, recognizing hazardous noise, and symptoms of overexposure to hazardous noise.
• When and/or where hearing protectors are required to be worn.
• The purpose of hearing protectors.
• The advantages, disadvantages, and effectiveness of various types of protectors.
• Instructions on how to select, use, fit, and care for hearing protectors.
• The purpose of audiometric testing, including an explanation of the test procedures.
• Hearing Conservation Program requirements and responsibilities.
4.3.3 Hearing protection training is conducted annually for all affected employees or more frequently for employees who do not properly use hearing protectors or otherwise fail to comply with this policy.
4.4 Audiometric Testing
4.4.1 All AECOM personnel with exposure greater than the action level shall be enrolled in the medical surveillance program and undergo a baseline audiogram within 6 months of the first exposure. Thereafter, annual audiograms will be compared with the baseline exam.
4.4.2 Enrolled employees will receive audiograms during their exit physicals; refer to S3NA-605-PR1 Medical Surveillance Program.
4.4.3 When a Standard Threshold Shift (STS), as identified by the AECOM Medical Consultant, is noted between the last valid baseline and the annual audiogram, the following steps will be taken:
• A retest will be conducted within 30 days to confirm the STS. The employee will not be exposed to workplace/hobby noise for 14 hours or will be provided with adequate hearing protection prior to testing.
• If the STS persist, ear protection will be upgraded to one with a greater NRR. The minimum NRR will be 26 dBA.
• The employee will be counseled and AECOM will obtain information regarding the employee's possible noise exposure away from the workplace or existing ear pathology.
Hearing Conservation Program (S3NA-510-PR1) Revision 1 December 31, 2014 PRINTED COPIES ARE UNCONTROLLED. CONTROLLED COPY IS AVAILABLE ON COMPANY INTRANET. 4 of 4
• Qualified medical personnel will review the audiograms. This group will determine the need for a medical referral.
• The employee will be notified in writing by either the Region SH&E Manager or the AECOM Medical Provider of the STS, within 21 days of determination, as required by regulation.
• The employee's supervisor will be notified of the shift in hearing threshold.
4.4.4 If the employee who has experienced a STS is exposed to 85 dBA for eight hours or 80 dBA for 12 hours, mandatory use of ear protection is required.
4.5 Monitoring of Noise Levels
4.5.1 When information indicates that any employee's exposure may equal or exceed the action level as specified in Table 2, the Region SH&E Manager shall develop and implement a monitoring program to identify employees for inclusion in the hearing conservation program and to enable the proper selection of hearing protectors.
4.6 Hearing Protectors
4.6.1 Selection of appropriate hearing protectors must be based on actual or anticipated exposure levels. At a minimum, hearing protectors must provide a level of protection that brings actual or anticipated exposure below the PEL established for the time period shown in the table above. Additional information relative to hearing protector use is as follows:
• Hearing protection will be mandatory for all employees exposed to 85 dBA for eight hours.
• Hearing protection will be mandatory for all employees working in any area that has not been evaluated for noise exposure and the ambient noise level in the area is such that you must raise your voice to have a normal conversation with someone less than three feet from you and/or when within 25 feet of an operating piece of heavy equipment.
• Hearing protection will be mandatory for all employees who work on or near heavy equipment unless personal dosimetry or other techniques have been used to document actual exposure.
• Hearing protectors will be made available to all employees at no cost to the employees who may be exposed to 85 dBA for eight hours.
• Hearing protection will be mandatory for all employees exposed to 85 dBA for any period of time and who have experienced an STS.
5.0 Records
5.1 Noise exposure measurement records will be retained for two years at the project/facility.
5.2 Audiogram records will be retained in the employee’s medical records as per S3NA-605-PR1 Medical Surveillance Program.
5.3 Employee training session documentation will be retained in accordance with S3NA-003-PR1 SH&E Training.
6.0 Attachments
6.1 S3NA-510-WI1 Hearing Protection Guidelines
6.2 S3NA-510-FM1 Site-Specific Hearing Conservation Program
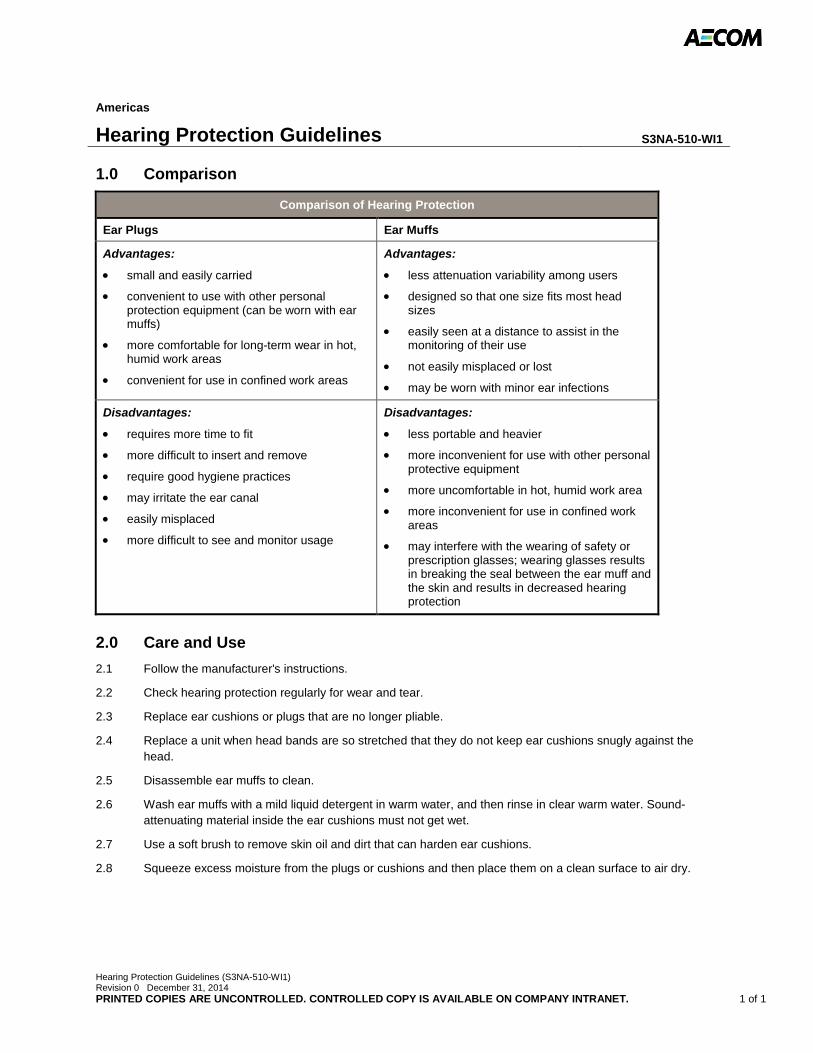
Hearing Protection Guidelines (S3NA-510-WI1) Revision 0 December 31, 2014 PRINTED COPIES ARE UNCONTROLLED. CONTROLLED COPY IS AVAILABLE ON COMPANY INTRANET. 1 of 1
Americas
Hearing Protection Guidelines S3NA-510-WI1
1.0 Comparison
Comparison of Hearing Protection
Ear Plugs Ear Muffs
Advantages:
• small and easily carried
• convenient to use with other personal protection equipment (can be worn with ear muffs)
• more comfortable for long-term wear in hot, humid work areas
• convenient for use in confined work areas
Advantages:
• less attenuation variability among users
• designed so that one size fits most head sizes
• easily seen at a distance to assist in the monitoring of their use
• not easily misplaced or lost
• may be worn with minor ear infections
Disadvantages:
• requires more time to fit
• more difficult to insert and remove
• require good hygiene practices
• may irritate the ear canal
• easily misplaced
• more difficult to see and monitor usage
Disadvantages:
• less portable and heavier
• more inconvenient for use with other personal protective equipment
• more uncomfortable in hot, humid work area
• more inconvenient for use in confined work areas
• may interfere with the wearing of safety or prescription glasses; wearing glasses results in breaking the seal between the ear muff and the skin and results in decreased hearing protection
2.0 Care and Use
2.1 Follow the manufacturer's instructions.
2.2 Check hearing protection regularly for wear and tear.
2.3 Replace ear cushions or plugs that are no longer pliable.
2.4 Replace a unit when head bands are so stretched that they do not keep ear cushions snugly against the head.
2.5 Disassemble ear muffs to clean.
2.6 Wash ear muffs with a mild liquid detergent in warm water, and then rinse in clear warm water. Sound-attenuating material inside the ear cushions must not get wet.
2.7 Use a soft brush to remove skin oil and dirt that can harden ear cushions.
2.8 Squeeze excess moisture from the plugs or cushions and then place them on a clean surface to air dry.

Site-Specific Hearing Conservation Program (S3NA-510-FM1) Revision 0 December 31, 2014 PRINTED COPIES ARE UNCONTROLLED. CONTROLLED COPY IS AVAILABLE ON COMPANY INTRANET. 1 of 3
Americas
Site-Specific Hearing Conservation Program S3NA-510-FM1
Site (Project)
1.0 Monitoring
As per regulation, noise monitoring will be conducted by the following procedure:
Such monitoring will consist of (check those that apply):
Noise Dosimetry Sound Level Meter Survey
Specific instrumentation to be used is (make/model):
Make Model
and will be calibrated at a frequency of and documented in the .
Monitoring strategy is as follows (list all equipment and activities on site that may involve sound pressure levels above 80 dBA and an explanation of the strategy to document actual exposures):
Area/Equipment Monitoring Strategy
Where areas or equipment are not clearly identified, all monitoring will be documented utilizing an illustrated layout (attach form developed for the specific site). Monitoring frequency will be in accordance with the strategy outlined above and when the following changes in site conditions/activities occur:
1.
2.
3.
4.
5.
Site-Specific Hearing Conservation Program (S3NA-510-FM1) Revision 0 December 31, 2014 PRINTED COPIES ARE UNCONTROLLED. CONTROLLED COPY IS AVAILABLE ON COMPANY INTRANET. 2 of 3
2.0 Employee Notification
All site employees exposed above the regulated action level (85 dBA – 8 hour TWA) will be notified of the monitoring results by (insert name/title) at an interval not to exceed after completion of monitoring.
Notification shall be written, with a copy to the SH&E Department. Documentation of employee notifications and corresponding signatures of notified employees will be kept in the site health and safety logbook/files.
3.0 Observation of Monitoring
All employees affected by the monitoring, or a designated employee representative, shall be given the opportunity to observe noise monitoring procedures. This will be achieved by:
4.0 Audiometric Testing Program and Requirements
AECOM employees who perform field activities where noise exposure above action levels is expected are required to participate in an audiometric testing program. Additionally, any subcontractors performing work on AECOM projects where noise levels exceeding action level will be required to provide documentation that they participate in an audiometric testing program that meets the applicable regulations. Documentation of participation in the testing program will be maintained by and will be located at .
5.0 Hearing Protectors and Estimating Attenuation
A selection of suitable hearing protectors will be made available to all employees who are expected to have 8-hour TWA noise exposures above 85 dBA. The types anticipated to be available include:
Protection Type Attenuation
Hearing protector attenuation will be evaluated by for specific noise environments according to the
following method prior to determining their suitability for use:
1.
2.
3.
Site-Specific Hearing Conservation Program (S3NA-510-FM1) Revision 0 December 31, 2014 PRINTED COPIES ARE UNCONTROLLED. CONTROLLED COPY IS AVAILABLE ON COMPANY INTRANET. 3 of 3
The following site employees will be required to wear hearing protectors during specific activities and the results of site-specific monitoring conducted in accordance with this procedure. (This section can be completed after monitoring, if necessary).
Employee Name Activity Type Type of Protection
Hearing protectors will be properly fitted by upon initial distribution to site workers.
Training in the use and care of hearing protectors shall be conducted by during the initial site-specific health and safety training. Training contents shall meet the requirements set forth in this procedure and the applicable regulations.
Hearing protectors will be distributed by from the storage location at the .
6.0 Access to Information and Training Materials
All information required by regulation to be made available to the employees will be posted by (insert name/title) at the .
Local Occupational Health and Safety Regulations will also be kept on site.
7.0 Recordkeeping
Records required by AECOM’s Hearing Conservation Program and Regulations shall be completed by and shall be maintained at the and placed on permanent file at the for the minimum duration required by the standard. Employees can access their individual records by contacting .
All records required by this section will be transferred to any employee’s successive employer if AECOM ceases to do business.
8.0 Approvals Project Manager: Date:
SH&E Representative: Date:
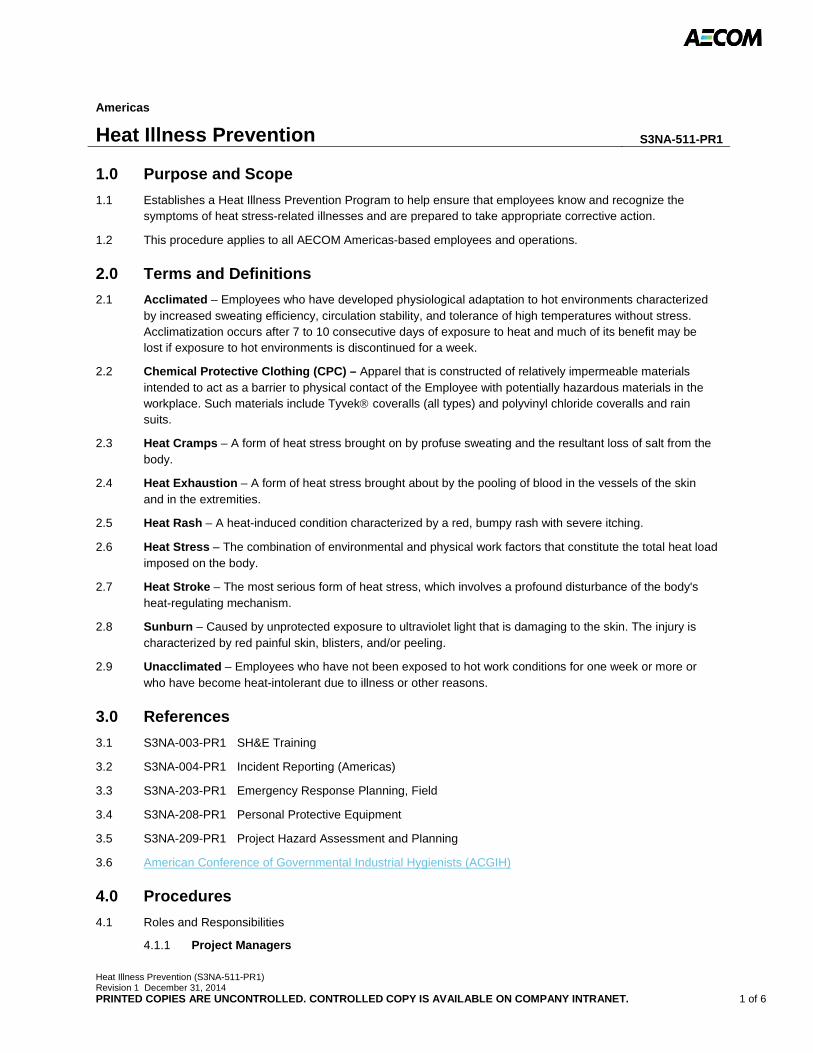
Heat Illness Prevention (S3NA-511-PR1) Revision 1 December 31, 2014 PRINTED COPIES ARE UNCONTROLLED. CONTROLLED COPY IS AVAILABLE ON COMPANY INTRANET. 1 of 6
Americas
Heat Illness Prevention S3NA-511-PR1
1.0 Purpose and Scope
1.1 Establishes a Heat Illness Prevention Program to help ensure that employees know and recognize the symptoms of heat stress-related illnesses and are prepared to take appropriate corrective action.
1.2 This procedure applies to all AECOM Americas-based employees and operations.
2.0 Terms and Definitions
2.1 Acclimated – Employees who have developed physiological adaptation to hot environments characterized by increased sweating efficiency, circulation stability, and tolerance of high temperatures without stress. Acclimatization occurs after 7 to 10 consecutive days of exposure to heat and much of its benefit may be lost if exposure to hot environments is discontinued for a week.
2.2 Chemical Protective Clothing (CPC) – Apparel that is constructed of relatively impermeable materials intended to act as a barrier to physical contact of the Employee with potentially hazardous materials in the workplace. Such materials include Tyvek coveralls (all types) and polyvinyl chloride coveralls and rain suits.
2.3 Heat Cramps – A form of heat stress brought on by profuse sweating and the resultant loss of salt from the body.
2.4 Heat Exhaustion – A form of heat stress brought about by the pooling of blood in the vessels of the skin and in the extremities.
2.5 Heat Rash – A heat-induced condition characterized by a red, bumpy rash with severe itching.
2.6 Heat Stress – The combination of environmental and physical work factors that constitute the total heat load imposed on the body.
2.7 Heat Stroke – The most serious form of heat stress, which involves a profound disturbance of the body's heat-regulating mechanism.
2.8 Sunburn – Caused by unprotected exposure to ultraviolet light that is damaging to the skin. The injury is characterized by red painful skin, blisters, and/or peeling.
2.9 Unacclimated – Employees who have not been exposed to hot work conditions for one week or more or who have become heat-intolerant due to illness or other reasons.
3.0 References
3.1 S3NA-003-PR1 SH&E Training
3.2 S3NA-004-PR1 Incident Reporting (Americas)
3.3 S3NA-203-PR1 Emergency Response Planning, Field
3.4 S3NA-208-PR1 Personal Protective Equipment
3.5 S3NA-209-PR1 Project Hazard Assessment and Planning
3.6 American Conference of Governmental Industrial Hygienists (ACGIH)
4.0 Procedures
4.1 Roles and Responsibilities
4.1.1 Project Managers
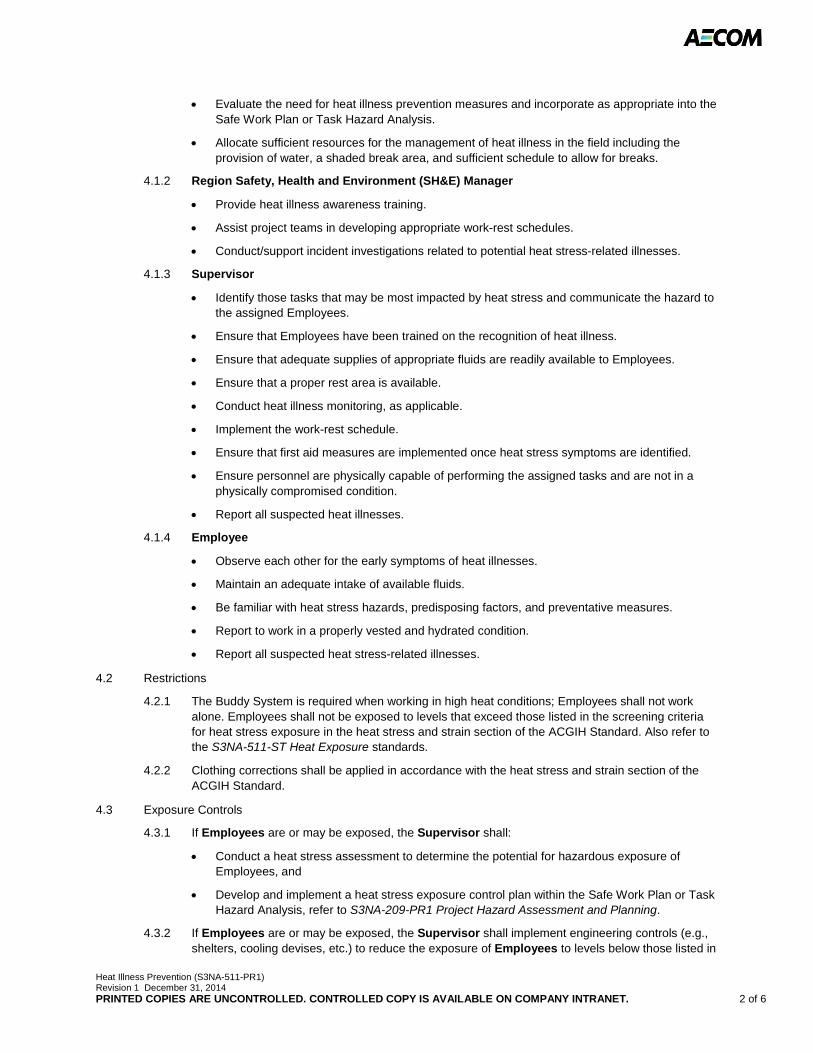
Heat Illness Prevention (S3NA-511-PR1) Revision 1 December 31, 2014 PRINTED COPIES ARE UNCONTROLLED. CONTROLLED COPY IS AVAILABLE ON COMPANY INTRANET. 2 of 6
• Evaluate the need for heat illness prevention measures and incorporate as appropriate into the Safe Work Plan or Task Hazard Analysis.
• Allocate sufficient resources for the management of heat illness in the field including the provision of water, a shaded break area, and sufficient schedule to allow for breaks.
4.1.2 Region Safety, Health and Environment (SH&E) Manager
• Provide heat illness awareness training.
• Assist project teams in developing appropriate work-rest schedules.
• Conduct/support incident investigations related to potential heat stress-related illnesses.
4.1.3 Supervisor
• Identify those tasks that may be most impacted by heat stress and communicate the hazard to the assigned Employees.
• Ensure that Employees have been trained on the recognition of heat illness.
• Ensure that adequate supplies of appropriate fluids are readily available to Employees.
• Ensure that a proper rest area is available.
• Conduct heat illness monitoring, as applicable.
• Implement the work-rest schedule.
• Ensure that first aid measures are implemented once heat stress symptoms are identified.
• Ensure personnel are physically capable of performing the assigned tasks and are not in a physically compromised condition.
• Report all suspected heat illnesses.
4.1.4 Employee
• Observe each other for the early symptoms of heat illnesses.
• Maintain an adequate intake of available fluids.
• Be familiar with heat stress hazards, predisposing factors, and preventative measures.
• Report to work in a properly vested and hydrated condition.
• Report all suspected heat stress-related illnesses.
4.2 Restrictions
4.2.1 The Buddy System is required when working in high heat conditions; Employees shall not work alone. Employees shall not be exposed to levels that exceed those listed in the screening criteria for heat stress exposure in the heat stress and strain section of the ACGIH Standard. Also refer to the S3NA-511-ST Heat Exposure standards.
4.2.2 Clothing corrections shall be applied in accordance with the heat stress and strain section of the ACGIH Standard.
4.3 Exposure Controls
4.3.1 If Employees are or may be exposed, the Supervisor shall:
• Conduct a heat stress assessment to determine the potential for hazardous exposure of Employees, and
• Develop and implement a heat stress exposure control plan within the Safe Work Plan or Task Hazard Analysis, refer to S3NA-209-PR1 Project Hazard Assessment and Planning.
4.3.2 If Employees are or may be exposed, the Supervisor shall implement engineering controls (e.g., shelters, cooling devises, etc.) to reduce the exposure of Employees to levels below those listed in

Heat Illness Prevention (S3NA-511-PR1) Revision 1 December 31, 2014 PRINTED COPIES ARE UNCONTROLLED. CONTROLLED COPY IS AVAILABLE ON COMPANY INTRANET. 3 of 6
the screening criteria for heat stress exposure in the heat stress and strain section of the ACGIH Standard.
4.3.3 If engineering controls are not practicable, the Supervisor shall reduce the exposure of Employees to levels below those listed in the screening criteria for heat stress exposure in the heat stress and strain section of the ACGIH Standard by providing administrative controls, including a work-rest cycle or personal protective equipment, if the equipment provides protection equally effective as administrative controls.
4.3.4 If Employees are or may be exposed, the Supervisor shall provide and maintain an adequate supply of cool, potable water close to the work area for the use of a heat exposed Employee.
4.3.5 If an Employee shows signs or reports symptoms of heat stress or strain, they shall be removed from the hot environment and treated by an appropriate first aid attendant on site, if available, or by a physician, refer to S3NA-511-WI2 Symptoms and Treatment for more specifics.
4.4 Heat Stress Planning
4.4.1 Heat stress can be a significant field site hazard, especially for Employees wearing CPC. To prepare the field for emergency response planning, refer to S3NA-203-PR1 Emergency Response Planning, Field procedure. The project and site specific risks need to be planned using a Safe Work Plan or Task Hazard Analysis, refer to the S3NA-209-PR1 Project Hazard Assessment and Planning procedure.
4.4.2 The workforce will gradually work up to a full workload under potentially stressful conditions to allow for proper acclimation.
4.4.3 Employees shall be instructed in the recognition of heat stress symptoms, the first aid treatment procedures for severe heat stress, and the prevention of heat stress injuries. Employees must be encouraged to immediately report any heat stress that they may experience or observe in fellow Employees. Supervisors must use such information to adjust the work-rest schedule to accommodate such problems.
4.4.4 Wherever possible, a designated break area should be established in an air conditioned space, or in shaded areas where air conditioning is impractical. The break area should be equipped to allow Employees to loosen or remove protective clothing, and sufficient seating should be available for all Employees. During breaks, Employees must be encouraged to drink plenty of water or other liquids, even if not thirsty, to replace lost fluids and to help cool off. Cool water should be available at all times in the break area, and in the work area itself unless hygiene/chemical exposure issues prevent it.
4.5 Symptoms and Treatment
4.5.1 Employees who exhibit ANY signs of significant heat stress (e.g., profuse sweating, confusion and irritability, pale, clammy skin) shall be relieved of all duties at once, made to rest in a cool location, and provided with large amounts of cool water.
4.5.2 Anyone exhibiting symptoms of heat stroke (red dry skin, or unconsciousness) must be taken immediately to the nearest medical facility. Steps must be taken to cool the person during transportation (clothing removal, wet the skin, air conditioning, etc.).
4.5.3 Severe heat stress (heat stroke) is a life-threatening condition that must be treated by a competent medical authority.
4.6 Prevention
4.6.1 All Employees working in extreme heat or sun should understand the following guidelines for preventing and detecting heat exhaustion and heat stroke.
• Take frequent short breaks in areas sheltered from direct sunlight; eat and drink small amounts frequently.
• Try to schedule work for the coolest part of the day, early morning and evening.
Heat Illness Prevention (S3NA-511-PR1) Revision 1 December 31, 2014 PRINTED COPIES ARE UNCONTROLLED. CONTROLLED COPY IS AVAILABLE ON COMPANY INTRANET. 4 of 6
• Avoid strenuous physical activity outdoors during the hottest part of the day.
• Wear a hat and light-colored, loose-fitting clothing to reflect the sun.
• Avoid sudden changes of temperature, refer to S3NA-511-WI1 Temperature Thresholds.
• Air out a hot vehicle before getting into it.
• If you take diuretics, ask your doctor about taking a lower dose during hot weather.
• When working in heat, drink 1 quart of water per hour of work.
• Avoid caffeine and alcohol as they increase dehydration.
• Monitor urine frequency and color to detect dehydration, refer to the S3NA-511-GL1 Dehydration Chart.
4.6.2 Personal Protective Equipment
• Review the S3NA-208-PR1 Personal Protective Equipment procedure.
• Wear a hat and light-colored, loose-fitting clothing to reflect the sun.
• Apply sunscreen to exposed skin (SPF 30 or greater, follow directions on label).
• Wear sunglasses with UV protection.
• Pack extra water to avoid dehydration (try freezing water in bottles overnight to help keep the water cooler for longer during the day).
4.7 Work-Rest Schedule Practices
• Intake of fluid will be increased beyond that which satisfies thirst, and it is important to avoid "fluid debt," which will not be made up as long as the individual is sweating.
• Two 8-ounce glasses of water should be taken prior to beginning work, then up to 32 ounces (1 quart) per hour during the work shift; fluid replacement at frequent intervals is most effective.
• The best fluid to drink is water; liquids like coffee or soda do not provide efficient hydration and may increase loss of water.
• If commercial electrolyte drinks (e.g., Gatorade) are used, the drink should be diluted with water, or 8 ounces of water should be taken with each 8 ounces of electrolyte beverage.
• Additional salt is usually not needed and salt tablets should not be taken.
• Replacement fluids should be cool, but not cold.
• Breaks will be taken in a cool, shaded location, and any impermeable clothing should be opened or removed.
• Dry clothing or towels will be available to minimize chills when taking breaks.
• Manual labor will not be performed during breaks, other than paperwork or similar light tasks.
• Other controls that may be used include:
o Scheduling work at night or during the cooler parts of the day (6 a.m.–10 a.m., 3 p.m.–7 p.m.).
o Erecting a cover or partition to shade the work area.
o Wearing cooling devices such as vortex tubes or cooling vests beneath protective garments. If cooling devices are worn, only physiological monitoring will be used to determine work activity.
4.8 Evaluating the Work-Rest Schedule’s Effectiveness
4.8.1 Once a work-rest schedule is established, the Supervisor must continually evaluate its effectiveness through observation of Employees for signs/symptoms of heart stress. Measurement of each employee’s vitals (e.g., pulse, blood pressure, and temperature) can provide additional information in determining if the schedule is adequate, and is accomplished as follows:
Heat Illness Prevention (S3NA-511-PR1) Revision 1 December 31, 2014 PRINTED COPIES ARE UNCONTROLLED. CONTROLLED COPY IS AVAILABLE ON COMPANY INTRANET. 5 of 6
• At the start of the workday each employee’s baseline pulse rate (in beats per minute [bpm]) is determined by taking a pulse count for 15 seconds and multiplying the result by four or by using an automated pulse count device. Pulse rates can then be measured at the beginning and end of each break period to determine if the rest period allows adequate cooling by applying the following criteria:
o Each employee’s maximum heart rate at the start of any break should be a bpm of less than 180 minus employee’s age. If this value is exceeded for any Employee, the duration of the following work period will be decreased by at least 10 minutes.
o At the end of each work period, all employees’ heart rates must have returned to within +10% of the baseline pulse rate. If any employee’s pulse rate exceeds this value the break period will be extended for at least 5 minutes, at the end of which pulse rates will be remeasured and the end-of-break criteria again applied.
• Use a clinical thermometer or similar device to measure the oral/ear temperature at the beginning (before drinking liquids) and end of each break period and apply the following criteria:
o If the oral temperature exceeds 99.6 degrees Fahrenheit (°F) (36.6 degrees Celsius [°C]), shorten the next work cycle by one-third without changing the rest period.
o If the oral temperature still exceeds 99.6°F (36.6°C) at the beginning of the next rest period, shorten the following work cycle by one-third.
• Use of an automated or similar blood pressure device will be used to assess each employee’s blood pressure at the beginning and end of each break period to determine if the rest period allows adequate cooling by applying the following criteria:
o If the blood pressure of an Employee is outside of 90/60 to 150/90, then the Employee will not be allowed to begin or resume work; extend the break period by at least five minutes, at the end of which blood pressure rates will be remeasured and the end-of-break criteria again applied.
4.8.2 All physiological monitoring of heat stress will be documented using S3NA-511-FM1 Heat Stress Monitoring Log.
4.9 Provision of Water
4.9.1 Water shall be provided (paid) by the project or program; if Employees purchase their own drinking water because water is not otherwise available on site, they shall be reimbursed.
4.10 Training
4.10.1 Employees and their Supervisors that may be exposed to the hazard will be oriented to the hazard and the controls prior to work commencing.
4.10.2 Those Employees potentially exposed to heat stress will receive training, refer to the S3NA-003-PR1 SH&E Training procedure. Training will include, but is not limited to:
• Sources of heat stress (environmental and personal), influence of protective clothing, and importance of acclimatization;
• How the body handles heat and acclimatization;
• Recognition of heat-related illness symptoms;
• Preventative/corrective measures;
o Employees will be informed of the harmful effects of excessive alcohol consumption in the prevention of heat stress.
o All employees will be informed of the importance of adequate rest and proper diet in the prevention of heat stress.

Heat Illness Prevention (S3NA-511-PR1) Revision 1 December 31, 2014 PRINTED COPIES ARE UNCONTROLLED. CONTROLLED COPY IS AVAILABLE ON COMPANY INTRANET. 6 of 6
• First aid procedures for heat stress-related illnesses; and
• Immediate reporting of any heat-related incident (injury, illness, near-miss), refer to the S3NA-004-PR1 Incident Reporting (Americas) procedure.
5.0 Records
5.1 None
6.0 Attachments
6.1 S3NA-511-WI1 Temperature Thresholds
6.2 S3NA-511-WI2 Symptoms and Treatment
6.3 S3NA-511-FM1 Heat Stress Monitoring Log
6.4 S3NA-511-GL1 Dehydration Chart
6.5 S3NA-511-ST Heat Exposure
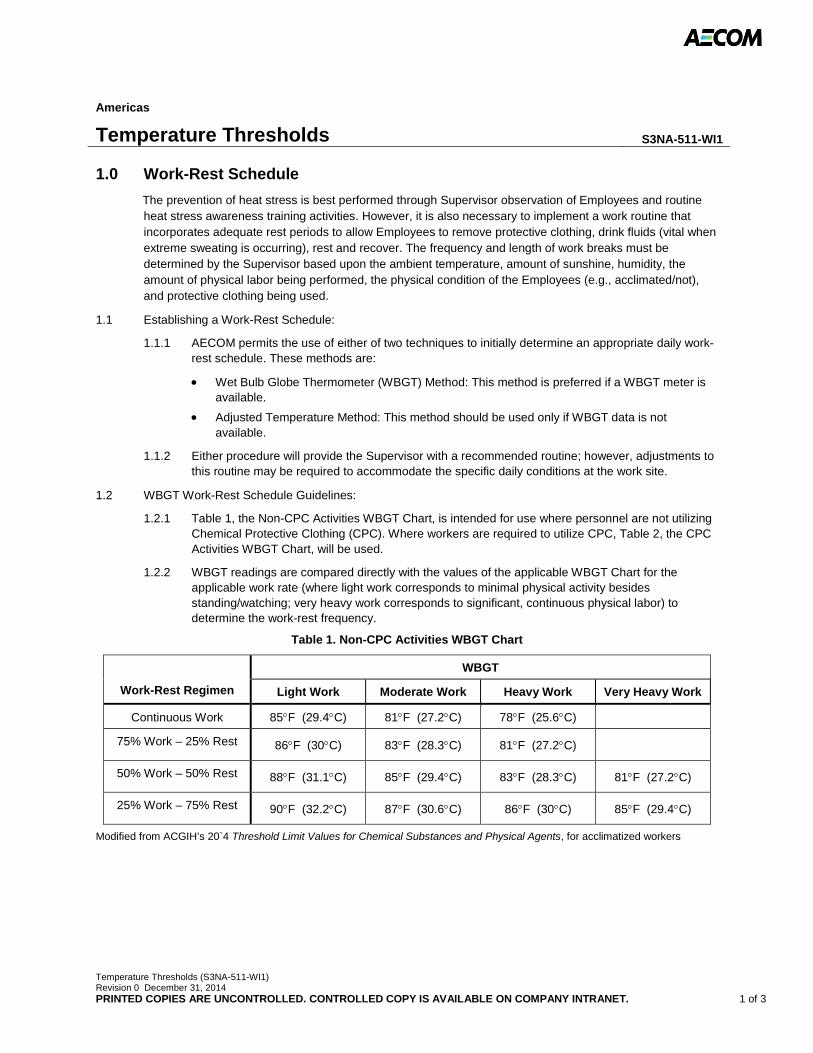
Temperature Thresholds (S3NA-511-WI1) Revision 0 December 31, 2014 PRINTED COPIES ARE UNCONTROLLED. CONTROLLED COPY IS AVAILABLE ON COMPANY INTRANET. 1 of 3
Americas
Temperature Thresholds S3NA-511-WI1
1.0 Work-Rest Schedule
The prevention of heat stress is best performed through Supervisor observation of Employees and routine heat stress awareness training activities. However, it is also necessary to implement a work routine that incorporates adequate rest periods to allow Employees to remove protective clothing, drink fluids (vital when extreme sweating is occurring), rest and recover. The frequency and length of work breaks must be determined by the Supervisor based upon the ambient temperature, amount of sunshine, humidity, the amount of physical labor being performed, the physical condition of the Employees (e.g., acclimated/not), and protective clothing being used.
1.1 Establishing a Work-Rest Schedule:
1.1.1 AECOM permits the use of either of two techniques to initially determine an appropriate daily work-rest schedule. These methods are:
• Wet Bulb Globe Thermometer (WBGT) Method: This method is preferred if a WBGT meter is available.
• Adjusted Temperature Method: This method should be used only if WBGT data is not available.
1.1.2 Either procedure will provide the Supervisor with a recommended routine; however, adjustments to this routine may be required to accommodate the specific daily conditions at the work site.
1.2 WBGT Work-Rest Schedule Guidelines:
1.2.1 Table 1, the Non-CPC Activities WBGT Chart, is intended for use where personnel are not utilizing Chemical Protective Clothing (CPC). Where workers are required to utilize CPC, Table 2, the CPC Activities WBGT Chart, will be used.
1.2.2 WBGT readings are compared directly with the values of the applicable WBGT Chart for the applicable work rate (where light work corresponds to minimal physical activity besides standing/watching; very heavy work corresponds to significant, continuous physical labor) to determine the work-rest frequency.
Table 1. Non-CPC Activities WBGT Chart
Work-Rest Regimen
WBGT
Light Work Moderate Work Heavy Work Very Heavy Work
Continuous Work 85°F (29.4°C) 81°F (27.2°C) 78°F (25.6°C)
75% Work – 25% Rest 86°F (30°C) 83°F (28.3°C) 81°F (27.2°C)
50% Work – 50% Rest 88°F (31.1°C) 85°F (29.4°C) 83°F (28.3°C) 81°F (27.2°C)
25% Work – 75% Rest 90°F (32.2°C) 87°F (30.6°C) 86°F (30°C) 85°F (29.4°C)
Modified from ACGIH’s 20`4 Threshold Limit Values for Chemical Substances and Physical Agents, for acclimatized workers
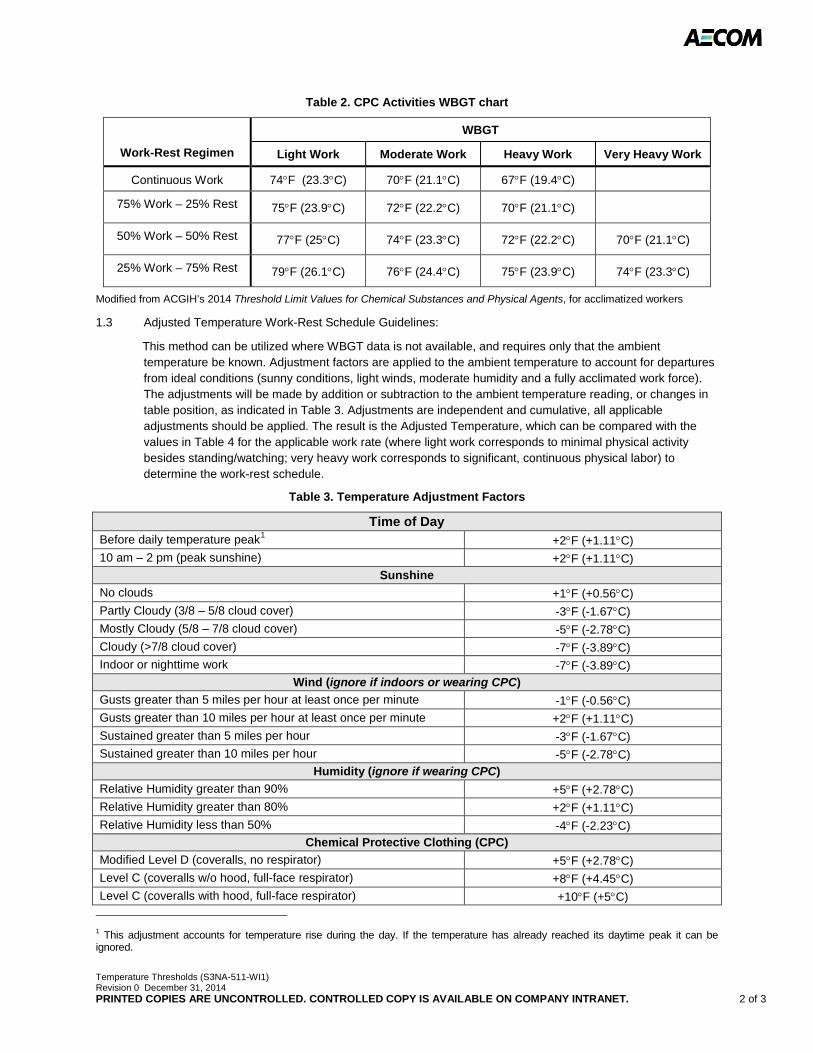
Temperature Thresholds (S3NA-511-WI1) Revision 0 December 31, 2014 PRINTED COPIES ARE UNCONTROLLED. CONTROLLED COPY IS AVAILABLE ON COMPANY INTRANET. 2 of 3
Table 2. CPC Activities WBGT chart
Work-Rest Regimen
WBGT
Light Work Moderate Work Heavy Work Very Heavy Work
Continuous Work 74°F (23.3°C) 70°F (21.1°C) 67°F (19.4°C)
75% Work – 25% Rest 75°F (23.9°C) 72°F (22.2°C) 70°F (21.1°C)
50% Work – 50% Rest 77°F (25°C) 74°F (23.3°C) 72°F (22.2°C) 70°F (21.1°C)
25% Work – 75% Rest 79°F (26.1°C) 76°F (24.4°C) 75°F (23.9°C) 74°F (23.3°C)
Modified from ACGIH’s 2014 Threshold Limit Values for Chemical Substances and Physical Agents, for acclimatized workers
1.3 Adjusted Temperature Work-Rest Schedule Guidelines:
This method can be utilized where WBGT data is not available, and requires only that the ambient temperature be known. Adjustment factors are applied to the ambient temperature to account for departures from ideal conditions (sunny conditions, light winds, moderate humidity and a fully acclimated work force). The adjustments will be made by addition or subtraction to the ambient temperature reading, or changes in table position, as indicated in Table 3. Adjustments are independent and cumulative, all applicable adjustments should be applied. The result is the Adjusted Temperature, which can be compared with the values in Table 4 for the applicable work rate (where light work corresponds to minimal physical activity besides standing/watching; very heavy work corresponds to significant, continuous physical labor) to determine the work-rest schedule.
Table 3. Temperature Adjustment Factors
Time of Day Before daily temperature peak1 +2°F (+1.11°C)
10 am – 2 pm (peak sunshine) +2°F (+1.11°C) Sunshine
No clouds +1°F (+0.56°C)
Partly Cloudy (3/8 – 5/8 cloud cover) -3°F (-1.67°C)
Mostly Cloudy (5/8 – 7/8 cloud cover) -5°F (-2.78°C)
Cloudy (>7/8 cloud cover) -7°F (-3.89°C)
Indoor or nighttime work -7°F (-3.89°C)
Wind (ignore if indoors or wearing CPC)
Gusts greater than 5 miles per hour at least once per minute -1°F (-0.56°C)
Gusts greater than 10 miles per hour at least once per minute +2°F (+1.11°C)
Sustained greater than 5 miles per hour -3°F (-1.67°C)
Sustained greater than 10 miles per hour -5°F (-2.78°C)
Humidity (ignore if wearing CPC)
Relative Humidity greater than 90% +5°F (+2.78°C)
Relative Humidity greater than 80% +2°F (+1.11°C)
Relative Humidity less than 50% -4°F (-2.23°C) Chemical Protective Clothing (CPC)
Modified Level D (coveralls, no respirator) +5°F (+2.78°C)
Level C (coveralls w/o hood, full-face respirator) +8°F (+4.45°C)
Level C (coveralls with hood, full-face respirator) +10°F (+5°C)
1 This adjustment accounts for temperature rise during the day. If the temperature has already reached its daytime peak it can be ignored.
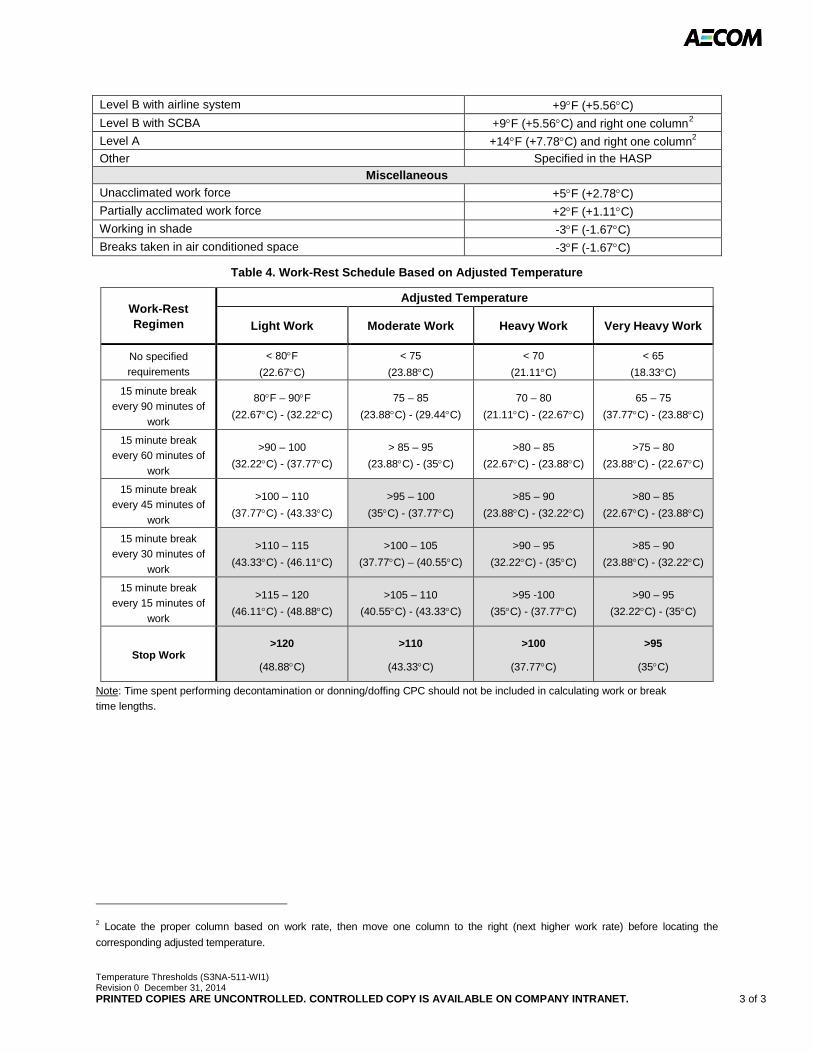
Temperature Thresholds (S3NA-511-WI1) Revision 0 December 31, 2014 PRINTED COPIES ARE UNCONTROLLED. CONTROLLED COPY IS AVAILABLE ON COMPANY INTRANET. 3 of 3
Level B with airline system +9°F (+5.56°C)
Level B with SCBA +9°F (+5.56°C) and right one column2
Level A +14°F (+7.78°C) and right one column2
Other Specified in the HASP
Miscellaneous
Unacclimated work force +5°F (+2.78°C)
Partially acclimated work force +2°F (+1.11°C)
Working in shade -3°F (-1.67°C)
Breaks taken in air conditioned space -3°F (-1.67°C)
Table 4. Work-Rest Schedule Based on Adjusted Temperature
Work-Rest Regimen
Adjusted Temperature
Light Work Moderate Work Heavy Work Very Heavy Work
No specified
requirements
< 80°F
(22.67°C)
< 75
(23.88°C)
< 70
(21.11°C)
< 65
(18.33°C)
15 minute break
every 90 minutes of
work
80°F – 90°F
(22.67°C) - (32.22°C)
75 – 85
(23.88°C) - (29.44°C)
70 – 80
(21.11°C) - (22.67°C)
65 – 75
(37.77°C) - (23.88°C)
15 minute break
every 60 minutes of
work
>90 – 100
(32.22°C) - (37.77°C)
> 85 – 95
(23.88°C) - (35°C)
>80 – 85
(22.67°C) - (23.88°C)
>75 – 80
(23.88°C) - (22.67°C)
15 minute break
every 45 minutes of
work
>100 – 110
(37.77°C) - (43.33°C)
>95 – 100
(35°C) - (37.77°C)
>85 – 90
(23.88°C) - (32.22°C)
>80 – 85
(22.67°C) - (23.88°C)
15 minute break
every 30 minutes of
work
>110 – 115
(43.33°C) - (46.11°C)
>100 – 105
(37.77°C) – (40.55°C)
>90 – 95
(32.22°C) - (35°C)
>85 – 90
(23.88°C) - (32.22°C)
15 minute break
every 15 minutes of
work
>115 – 120
(46.11°C) - (48.88°C)
>105 – 110
(40.55°C) - (43.33°C)
>95 -100
(35°C) - (37.77°C)
>90 – 95
(32.22°C) - (35°C)
Stop Work >120
(48.88°C)
>110
(43.33°C)
>100
(37.77°C)
>95
(35°C)
Note: Time spent performing decontamination or donning/doffing CPC should not be included in calculating work or break
time lengths.
2 Locate the proper column based on work rate, then move one column to the right (next higher work rate) before locating the
corresponding adjusted temperature.
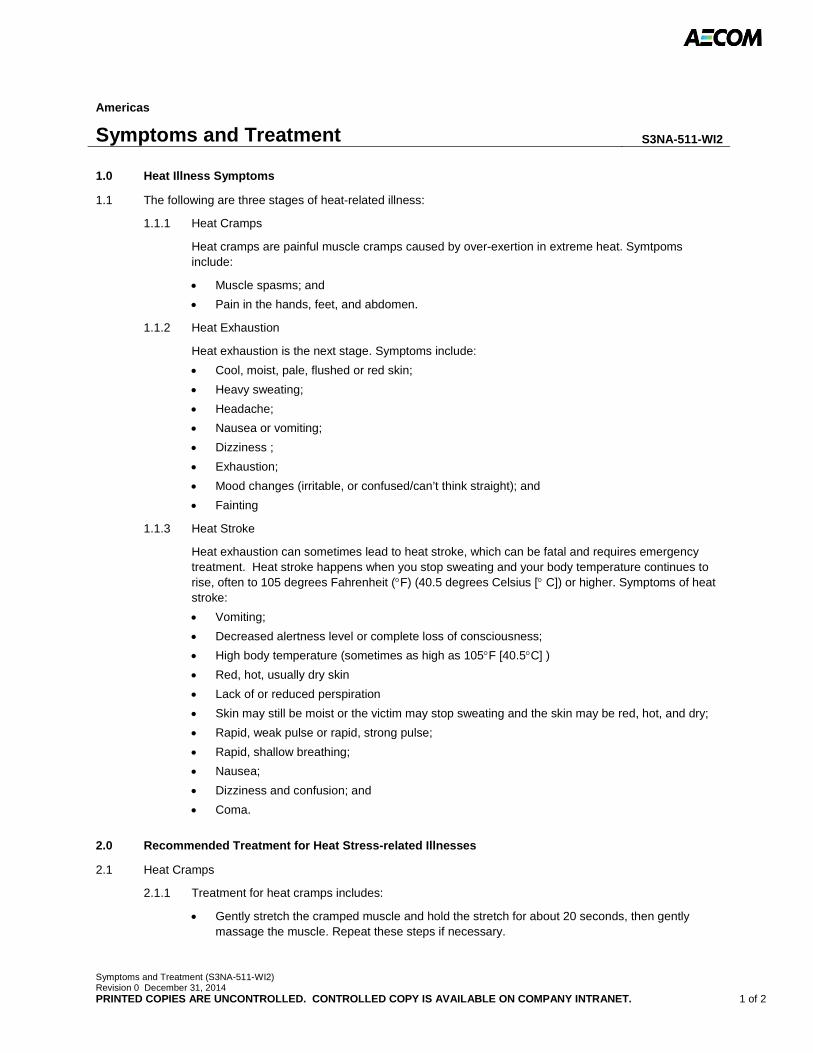
Symptoms and Treatment (S3NA-511-WI2) Revision 0 December 31, 2014 PRINTED COPIES ARE UNCONTROLLED. CONTROLLED COPY IS AVAILABLE ON COMPANY INTRANET. 1 of 2
Americas
Symptoms and Treatment S3NA-511-WI2
1.0 Heat Illness Symptoms
1.1 The following are three stages of heat-related illness:
1.1.1 Heat Cramps
Heat cramps are painful muscle cramps caused by over-exertion in extreme heat. Symtpoms include:
• Muscle spasms; and
• Pain in the hands, feet, and abdomen.
1.1.2 Heat Exhaustion
Heat exhaustion is the next stage. Symptoms include:
• Cool, moist, pale, flushed or red skin;
• Heavy sweating;
• Headache;
• Nausea or vomiting;
• Dizziness ;
• Exhaustion;
• Mood changes (irritable, or confused/can’t think straight); and
• Fainting
1.1.3 Heat Stroke
Heat exhaustion can sometimes lead to heat stroke, which can be fatal and requires emergency treatment. Heat stroke happens when you stop sweating and your body temperature continues to rise, often to 105 degrees Fahrenheit (°F) (40.5 degrees Celsius [° C]) or higher. Symptoms of heat stroke:
• Vomiting;
• Decreased alertness level or complete loss of consciousness;
• High body temperature (sometimes as high as 105°F [40.5°C] )
• Red, hot, usually dry skin
• Lack of or reduced perspiration
• Skin may still be moist or the victim may stop sweating and the skin may be red, hot, and dry;
• Rapid, weak pulse or rapid, strong pulse;
• Rapid, shallow breathing;
• Nausea;
• Dizziness and confusion; and
• Coma.
2.0 Recommended Treatment for Heat Stress-related Illnesses
2.1 Heat Cramps
2.1.1 Treatment for heat cramps includes:
• Gently stretch the cramped muscle and hold the stretch for about 20 seconds, then gently massage the muscle. Repeat these steps if necessary.
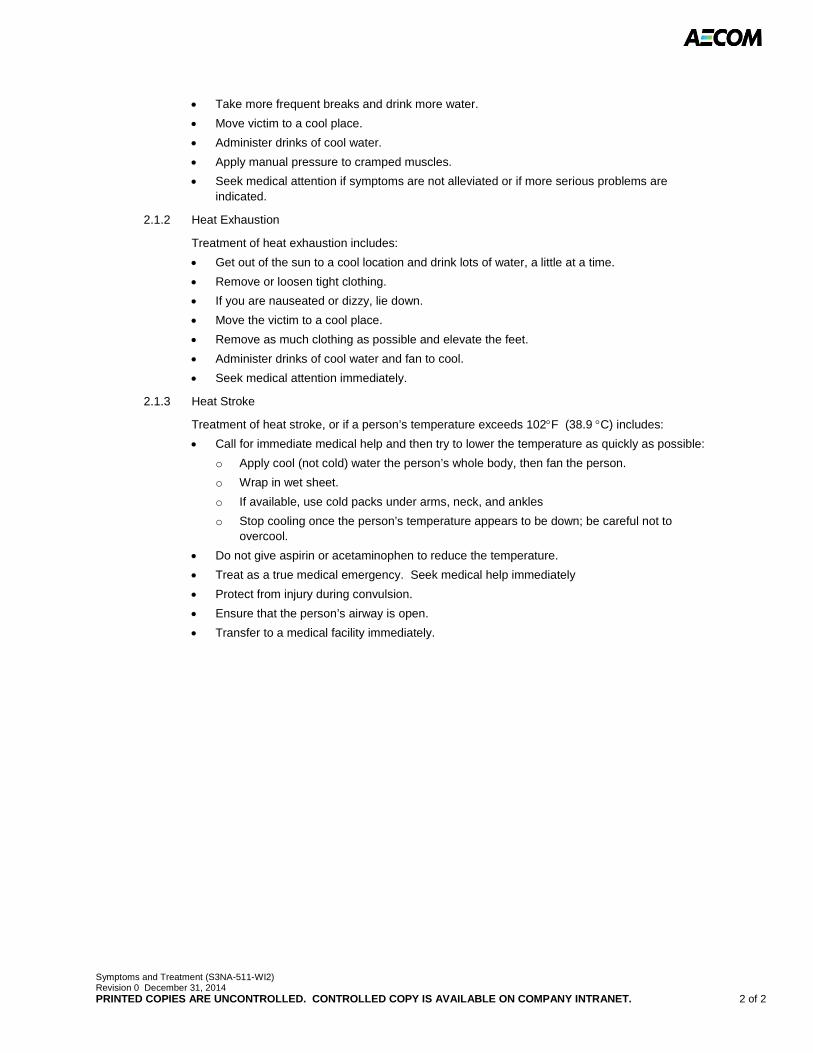
Symptoms and Treatment (S3NA-511-WI2) Revision 0 December 31, 2014 PRINTED COPIES ARE UNCONTROLLED. CONTROLLED COPY IS AVAILABLE ON COMPANY INTRANET. 2 of 2
• Take more frequent breaks and drink more water.
• Move victim to a cool place.
• Administer drinks of cool water.
• Apply manual pressure to cramped muscles.
• Seek medical attention if symptoms are not alleviated or if more serious problems are indicated.
2.1.2 Heat Exhaustion
Treatment of heat exhaustion includes:
• Get out of the sun to a cool location and drink lots of water, a little at a time.
• Remove or loosen tight clothing.
• If you are nauseated or dizzy, lie down.
• Move the victim to a cool place.
• Remove as much clothing as possible and elevate the feet.
• Administer drinks of cool water and fan to cool.
• Seek medical attention immediately.
2.1.3 Heat Stroke
Treatment of heat stroke, or if a person’s temperature exceeds 102°F (38.9 °C) includes:
• Call for immediate medical help and then try to lower the temperature as quickly as possible:
o Apply cool (not cold) water the person’s whole body, then fan the person.
o Wrap in wet sheet.
o If available, use cold packs under arms, neck, and ankles
o Stop cooling once the person’s temperature appears to be down; be careful not to overcool.
• Do not give aspirin or acetaminophen to reduce the temperature.
• Treat as a true medical emergency. Seek medical help immediately
• Protect from injury during convulsion.
• Ensure that the person’s airway is open.
• Transfer to a medical facility immediately.
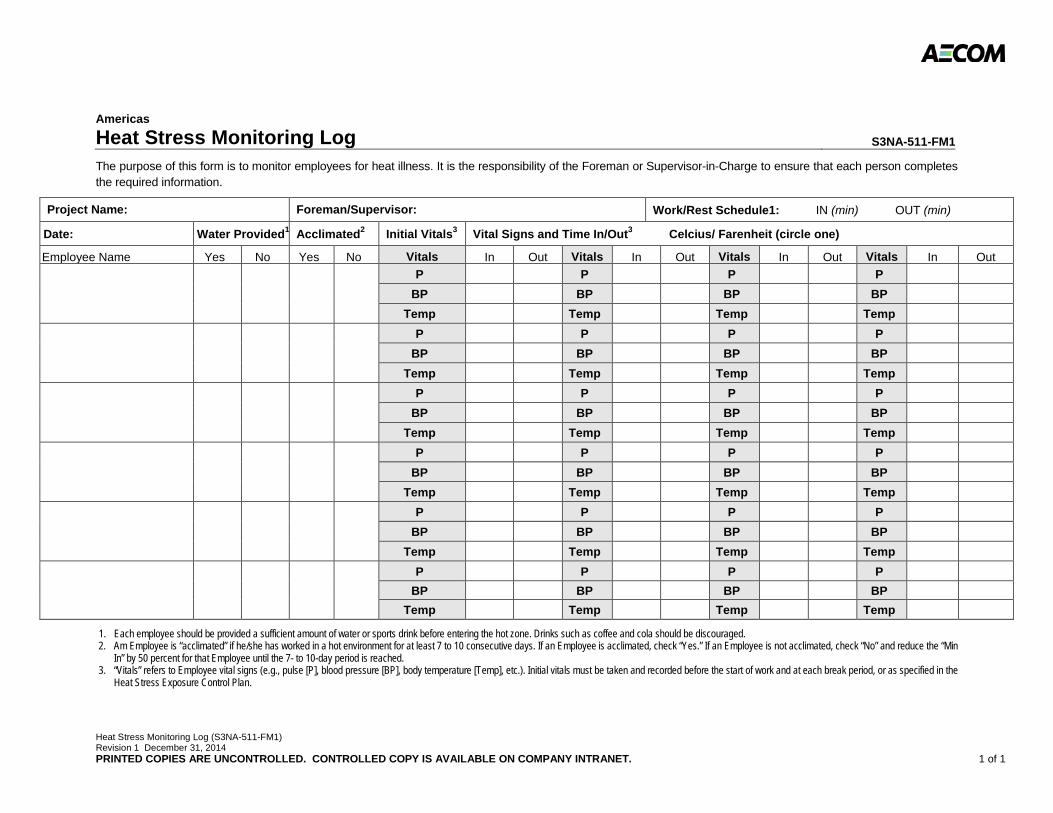
Heat Stress Monitoring Log (S3NA-511-FM1) Revision 1 December 31, 2014 PRINTED COPIES ARE UNCONTROLLED. CONTROLLED COPY IS AVAILABLE ON COMPANY INTRANET. 1 of 1
Americas
Heat Stress Monitoring Log S3NA-511-FM1
The purpose of this form is to monitor employees for heat illness. It is the responsibility of the Foreman or Supervisor-in-Charge to ensure that each person completes the required information.
Project Name: Foreman/Supervisor: Work/Rest Schedule1: IN (min) OUT (min)
Date: Water Provided1 Acclimated2 Initial Vitals3 Vital Signs and Time In/Out3 Celcius/ Farenheit (circle one)
Employee Name Yes No Yes No Vitals In Out Vitals In Out Vitals In Out Vitals In Out
P P P P
BP BP BP BP
Temp Temp Temp Temp
P P P P
BP BP BP BP
Temp Temp Temp Temp
P P P P
BP BP BP BP
Temp Temp Temp Temp
P P P P
BP BP BP BP
Temp Temp Temp Temp
P P P P
BP BP BP BP
Temp Temp Temp Temp
P P P P
BP BP BP BP
Temp Temp Temp Temp
1. Each employee should be provided a sufficient amount of water or sports drink before entering the hot zone. Drinks such as coffee and cola should be discouraged. 2. Am Employee is “acclimated” if he/she has worked in a hot environment for at least 7 to 10 consecutive days. If an Employee is acclimated, check “Yes.” If an Employee is not acclimated, check “No” and reduce the “Min
In” by 50 percent for that Employee until the 7- to 10-day period is reached. 3. “Vitals” refers to Employee vital signs (e.g., pulse [P], blood pressure [BP], body temperature [Temp], etc.). Initial vitals must be taken and recorded before the start of work and at each break period, or as specified in the
Heat Stress Exposure Control Plan.
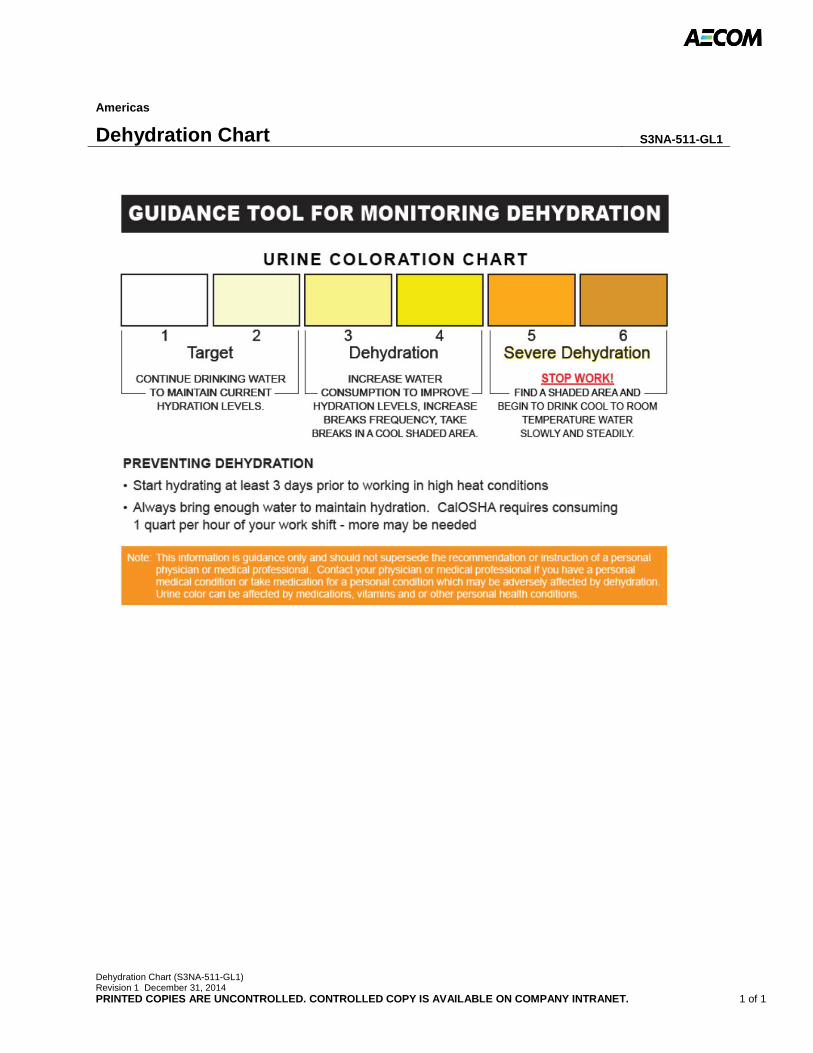
Dehydration Chart (S3NA-511-GL1) Revision 1 December 31, 2014 PRINTED COPIES ARE UNCONTROLLED. CONTROLLED COPY IS AVAILABLE ON COMPANY INTRANET. 1 of 1
Americas
Dehydration Chart S3NA-511-GL1
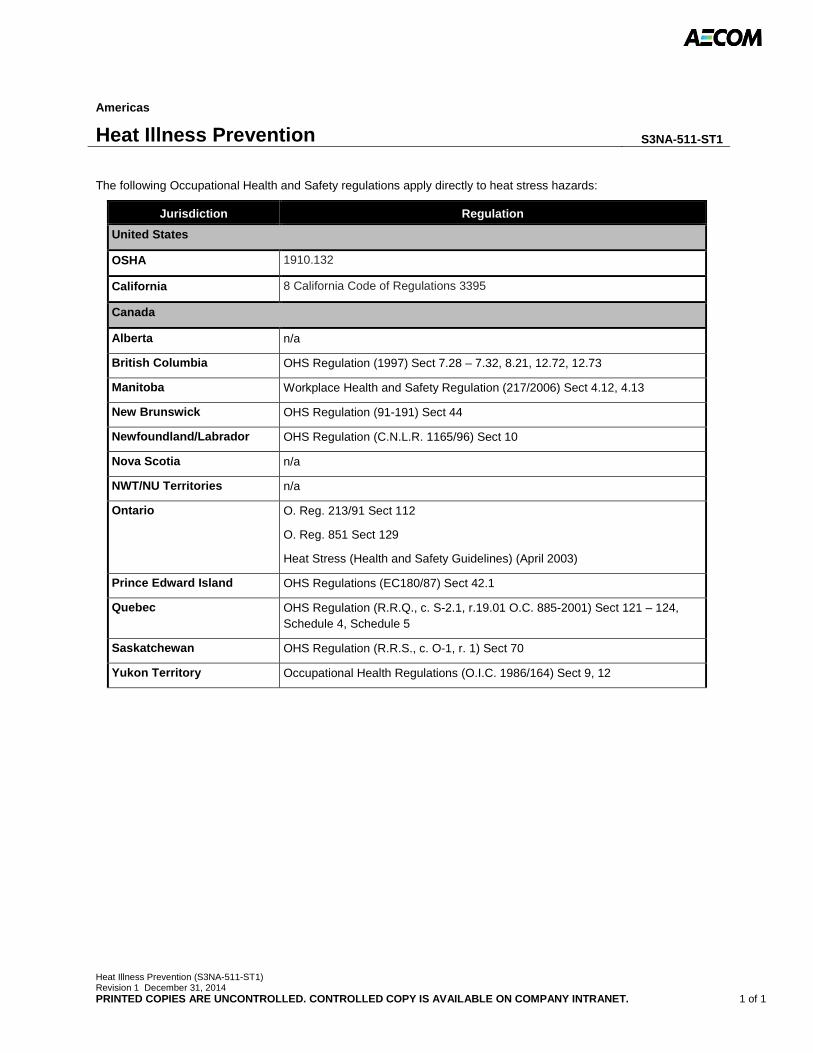
Heat Illness Prevention (S3NA-511-ST1) Revision 1 December 31, 2014 PRINTED COPIES ARE UNCONTROLLED. CONTROLLED COPY IS AVAILABLE ON COMPANY INTRANET. 1 of 1
Americas
Heat Illness Prevention S3NA-511-ST1
The following Occupational Health and Safety regulations apply directly to heat stress hazards:
Jurisdiction Regulation
United States
OSHA 1910.132
California 8 California Code of Regulations 3395
Canada
Alberta n/a
British Columbia OHS Regulation (1997) Sect 7.28 – 7.32, 8.21, 12.72, 12.73
Manitoba Workplace Health and Safety Regulation (217/2006) Sect 4.12, 4.13
New Brunswick OHS Regulation (91-191) Sect 44
Newfoundland/Labrador OHS Regulation (C.N.L.R. 1165/96) Sect 10
Nova Scotia n/a
NWT/NU Territories n/a
Ontario O. Reg. 213/91 Sect 112
O. Reg. 851 Sect 129
Heat Stress (Health and Safety Guidelines) (April 2003)
Prince Edward Island OHS Regulations (EC180/87) Sect 42.1
Quebec OHS Regulation (R.R.Q., c. S-2.1, r.19.01 O.C. 885-2001) Sect 121 – 124, Schedule 4, Schedule 5
Saskatchewan OHS Regulation (R.R.S., c. O-1, r. 1) Sect 70
Yukon Territory Occupational Health Regulations (O.I.C. 1986/164) Sect 9, 12
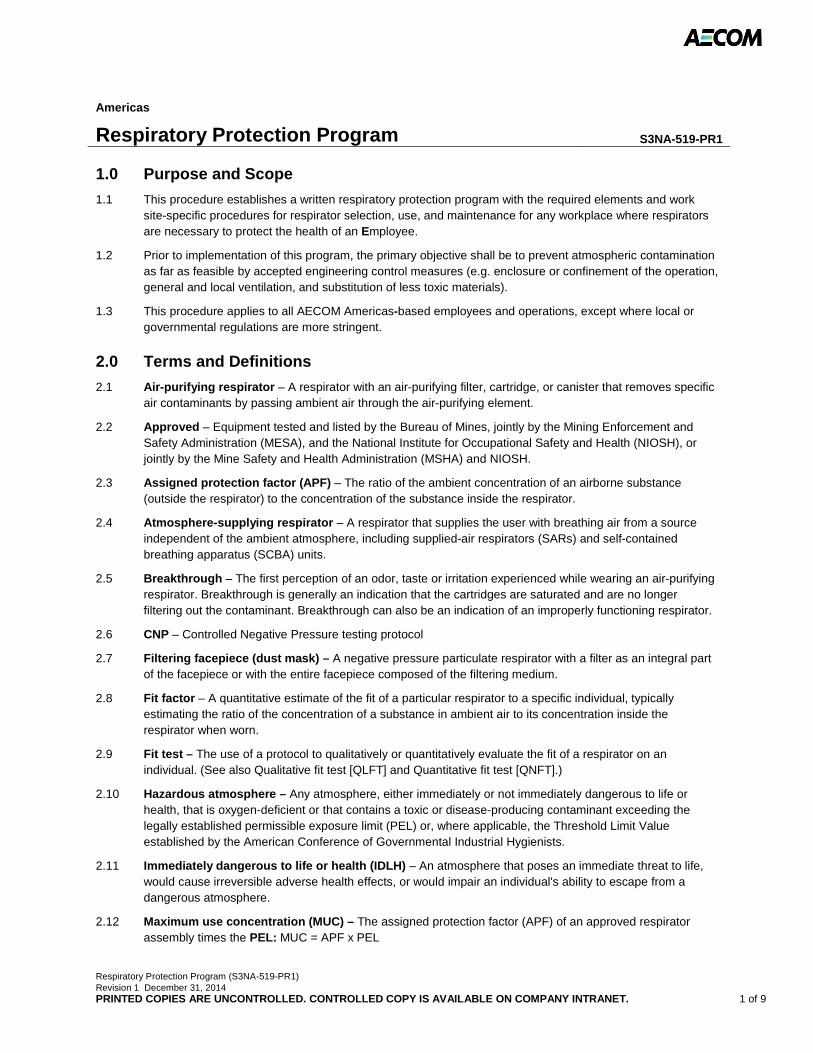
Respiratory Protection Program (S3NA-519-PR1) Revision 1 December 31, 2014 PRINTED COPIES ARE UNCONTROLLED. CONTROLLED COPY IS AVAILABLE ON COMPANY INTRANET. 1 of 9
Americas
Respiratory Protection Program S3NA-519-PR1
1.0 Purpose and Scope
1.1 This procedure establishes a written respiratory protection program with the required elements and work site-specific procedures for respirator selection, use, and maintenance for any workplace where respirators are necessary to protect the health of an Employee.
1.2 Prior to implementation of this program, the primary objective shall be to prevent atmospheric contamination as far as feasible by accepted engineering control measures (e.g. enclosure or confinement of the operation, general and local ventilation, and substitution of less toxic materials).
1.3 This procedure applies to all AECOM Americas-based employees and operations, except where local or governmental regulations are more stringent.
2.0 Terms and Definitions
2.1 Air-purifying respirator – A respirator with an air-purifying filter, cartridge, or canister that removes specific air contaminants by passing ambient air through the air-purifying element.
2.2 Approved – Equipment tested and listed by the Bureau of Mines, jointly by the Mining Enforcement and Safety Administration (MESA), and the National Institute for Occupational Safety and Health (NIOSH), or jointly by the Mine Safety and Health Administration (MSHA) and NIOSH.
2.3 Assigned protection factor (APF) – The ratio of the ambient concentration of an airborne substance (outside the respirator) to the concentration of the substance inside the respirator.
2.4 Atmosphere-supplying respirator – A respirator that supplies the user with breathing air from a source independent of the ambient atmosphere, including supplied-air respirators (SARs) and self-contained breathing apparatus (SCBA) units.
2.5 Breakthrough – The first perception of an odor, taste or irritation experienced while wearing an air-purifying respirator. Breakthrough is generally an indication that the cartridges are saturated and are no longer filtering out the contaminant. Breakthrough can also be an indication of an improperly functioning respirator.
2.6 CNP – Controlled Negative Pressure testing protocol
2.7 Filtering facepiece (dust mask) – A negative pressure particulate respirator with a filter as an integral part of the facepiece or with the entire facepiece composed of the filtering medium.
2.8 Fit factor – A quantitative estimate of the fit of a particular respirator to a specific individual, typically estimating the ratio of the concentration of a substance in ambient air to its concentration inside the respirator when worn.
2.9 Fit test – The use of a protocol to qualitatively or quantitatively evaluate the fit of a respirator on an individual. (See also Qualitative fit test [QLFT] and Quantitative fit test [QNFT].)
2.10 Hazardous atmosphere – Any atmosphere, either immediately or not immediately dangerous to life or health, that is oxygen-deficient or that contains a toxic or disease-producing contaminant exceeding the legally established permissible exposure limit (PEL) or, where applicable, the Threshold Limit Value established by the American Conference of Governmental Industrial Hygienists.
2.11 Immediately dangerous to life or health (IDLH) – An atmosphere that poses an immediate threat to life, would cause irreversible adverse health effects, or would impair an individual's ability to escape from a dangerous atmosphere.
2.12 Maximum use concentration (MUC) – The assigned protection factor (APF) of an approved respirator assembly times the PEL: MUC = APF x PEL
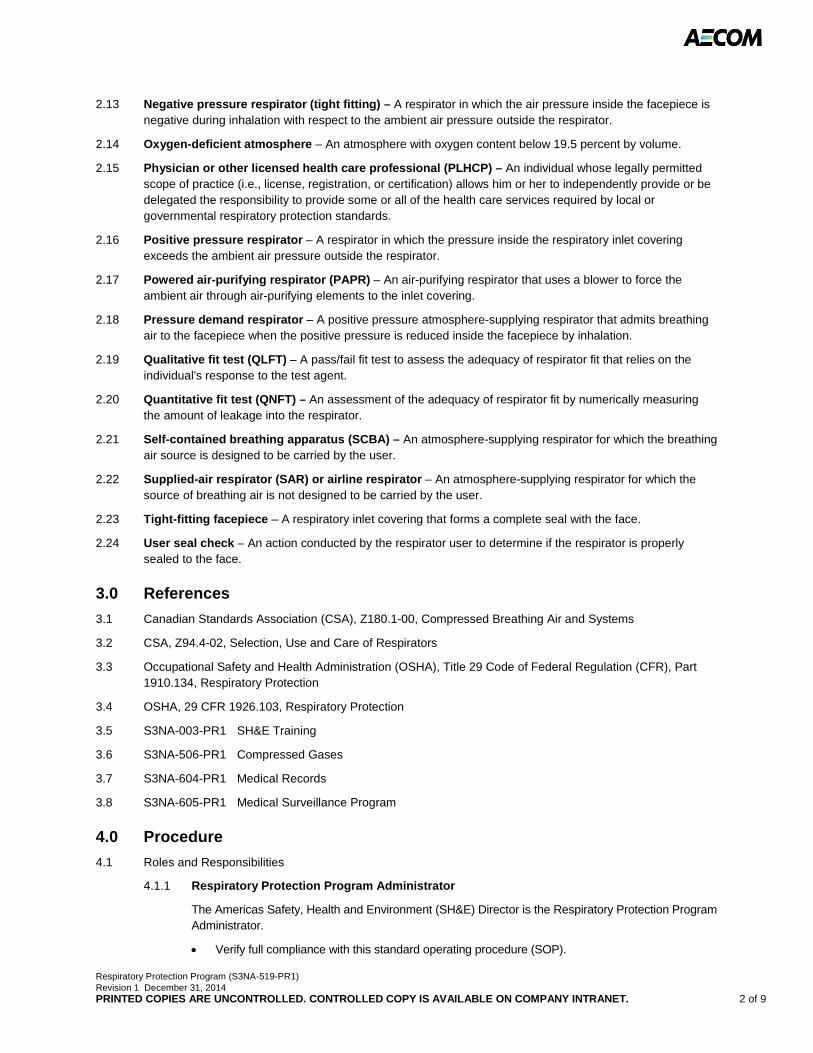
Respiratory Protection Program (S3NA-519-PR1) Revision 1 December 31, 2014 PRINTED COPIES ARE UNCONTROLLED. CONTROLLED COPY IS AVAILABLE ON COMPANY INTRANET. 2 of 9
2.13 Negative pressure respirator (tight fitting) – A respirator in which the air pressure inside the facepiece is negative during inhalation with respect to the ambient air pressure outside the respirator.
2.14 Oxygen-deficient atmosphere – An atmosphere with oxygen content below 19.5 percent by volume.
2.15 Physician or other licensed health care professional (PLHCP) – An individual whose legally permitted scope of practice (i.e., license, registration, or certification) allows him or her to independently provide or be delegated the responsibility to provide some or all of the health care services required by local or governmental respiratory protection standards.
2.16 Positive pressure respirator – A respirator in which the pressure inside the respiratory inlet covering exceeds the ambient air pressure outside the respirator.
2.17 Powered air-purifying respirator (PAPR) – An air-purifying respirator that uses a blower to force the ambient air through air-purifying elements to the inlet covering.
2.18 Pressure demand respirator – A positive pressure atmosphere-supplying respirator that admits breathing air to the facepiece when the positive pressure is reduced inside the facepiece by inhalation.
2.19 Qualitative fit test (QLFT) – A pass/fail fit test to assess the adequacy of respirator fit that relies on the individual's response to the test agent.
2.20 Quantitative fit test (QNFT) – An assessment of the adequacy of respirator fit by numerically measuring the amount of leakage into the respirator.
2.21 Self-contained breathing apparatus (SCBA) – An atmosphere-supplying respirator for which the breathing air source is designed to be carried by the user.
2.22 Supplied-air respirator (SAR) or airline respirator – An atmosphere-supplying respirator for which the source of breathing air is not designed to be carried by the user.
2.23 Tight-fitting facepiece – A respiratory inlet covering that forms a complete seal with the face.
2.24 User seal check – An action conducted by the respirator user to determine if the respirator is properly sealed to the face.
3.0 References
3.1 Canadian Standards Association (CSA), Z180.1-00, Compressed Breathing Air and Systems
3.2 CSA, Z94.4-02, Selection, Use and Care of Respirators
3.3 Occupational Safety and Health Administration (OSHA), Title 29 Code of Federal Regulation (CFR), Part 1910.134, Respiratory Protection
3.4 OSHA, 29 CFR 1926.103, Respiratory Protection
3.5 S3NA-003-PR1 SH&E Training
3.6 S3NA-506-PR1 Compressed Gases
3.7 S3NA-604-PR1 Medical Records
3.8 S3NA-605-PR1 Medical Surveillance Program
4.0 Procedure
4.1 Roles and Responsibilities
4.1.1 Respiratory Protection Program Administrator
The Americas Safety, Health and Environment (SH&E) Director is the Respiratory Protection Program Administrator.
• Verify full compliance with this standard operating procedure (SOP).
Respiratory Protection Program (S3NA-519-PR1) Revision 1 December 31, 2014 PRINTED COPIES ARE UNCONTROLLED. CONTROLLED COPY IS AVAILABLE ON COMPANY INTRANET. 3 of 9
• Determine the need for medical evaluations or any other additional medical attention related to the use of a respirator.
• Perform the program evaluations described in this SOP.
4.1.2 Office Manager (Operations) / Project Manager /Supervisor
• Verify compliance with the respiratory protection program set forth in this procedure.
• Verify that only those employees who are medically qualified, properly trained, and fit tested are assigned to respirator work.
• Verify that respirators are provided, repaired, or replaced as may be required due to wear and deterioration.
4.1.3 Site Safety Officer
• Confirm that the service is available to respond prior to any employees entering the IDLH area.
4.1.4 Region SH&E Manager
• Monitor compliance with the various aspects of this program.
• Provide technical assistance regarding respirator selection and use, evaluate the effectiveness of this program, and support respirator training and fit testing.
• Audit company compliance with this procedure.
4.1.5 Employee
• Use respiratory protection in accordance with instructions and training received.
• Maintain the respirator in accordance with this SOP and the manufacturer’s instructions.
• Immediately report any malfunction of the respirator to the Supervisor or Project Manager or other responsible person.
4.2 Training
4.2.1 Employees who wear respiratory protection must receive training before they are assigned to a task that requires the use of respiratory protection.
4.2.2 Employees that may be exposed to a respiratory hazard will be oriented to the hazard and the controls prior to beginning work.
4.2.3 Atmospheric testing will be carried out by someone trained in the use, calibration, and interpretation of the test equipment.
4.2.4 Retraining shall be administered annually, and when the following situations occur:
• Changes in the workplace or the type of respirator render previous training obsolete;
• Inadequacies in the Employee's knowledge or use of the respirator indicate that the Employee has not retained the requisite understanding or skill; or
• Any other situation arises in which retraining appears necessary to verify safe respirator use.
4.2.5 Basic Respirator Training Program
Respirator training classes will include, at a minimum, the following:
• Instruction in the nature of the respiratory hazards, whether acute, chronic, or both, and a description of potential health effects if the respirators are not used;
• Why the respirator is necessary and how improper fit, usage, or maintenance can compromise the protective effect of the respirator;
• The limitations and capabilities of the respirator;
Respiratory Protection Program (S3NA-519-PR1) Revision 1 December 31, 2014 PRINTED COPIES ARE UNCONTROLLED. CONTROLLED COPY IS AVAILABLE ON COMPANY INTRANET. 4 of 9
• Proper fitting, including demonstrations and practice in wearing, adjusting, determining the fit of, and performing a user seal check (in accordance with S3NA-519-WI1 Fit Testing Protocol, S3NA-519-FM1 Respiratory Equipment Fit Test and S3NA-519-WI2 User Seal Check Procedures) each time respirator is donned;
• How to inspect, put on, use and remove the respirator;
• How to use the respirator effectively in emergency situations, including situations in which the respirator malfunctions;
• The procedures for maintenance and storage of the respirator;
• How to recognize medical signs and symptoms that may limit or prevent the effective use of respirators; and
• The general requirements of local or governmental Respiratory Protection Standards.
4.3 Medical Surveillance
4.3.1 No Employee shall be assigned to a task that requires the use of a respirator unless it has been determined that he/she is physically able to perform the work while using the required respirator.
4.3.2 Prior to wearing a respirator, Employees will complete an initial baseline medical surveillance examination performed by a PLHCP in accordance with the requirements of S3NA-605-PR1 Medical Surveillance Program.
4.3.3 Additional medical examinations will be provided to employees who wear respirators when:
• An Employee reports medical signs or symptoms that are related to ability to use a respirator;
• A PLHCP, Supervisor, or the Respiratory Protection Program Administrator determines that an Employee needs to be reevaluated;
• Information from the Respiratory Protection Program, including observations made during fit testing and program evaluation, indicates a need for Employee reevaluation; or
• A change occurs in workplace conditions (e.g., physical work effort, protective clothing, temperature, etc.) that may result in a substantial increase in the physiological burden placed on an Employee.
4.3.4 All medical surveillance examinations shall occur during normal working hours; shall be convenient, understandable, and confidential; and the Employee will be given chance to discuss results with examining physician.
4.4 Respirator Selection
4.4.1 Project Managers shall select and provide an appropriate respirator based on the respiratory hazard(s) to which the Employee is exposed and workplace or user factors that may affect respirator performance and reliability.
4.4.2 Project Managers shall identify and evaluate the respiratory hazard(s) in the workplace. Evaluations shall include a reasonable estimate of employee exposures to respiratory hazard(s) and an identification of the contaminant's chemical state and physical form.
4.4.3 Where the employee exposure cannot be identified or reasonably estimated, the atmosphere shall be considered IDLH.
4.4.4 Only approved respirators shall be selected and they shall be used in compliance with the conditions of their certification.
4.4.5 Respirators shall be selected from a sufficient number of respirator models and sizes so that the respirator is acceptable to, and correctly fits, the user.
Respiratory Protection Program (S3NA-519-PR1) Revision 1 December 31, 2014 PRINTED COPIES ARE UNCONTROLLED. CONTROLLED COPY IS AVAILABLE ON COMPANY INTRANET. 5 of 9
4.5 Fit Testing Procedures
4.5.1 Employees using a tight-fitting respirator shall pass an appropriate QLFT or QNFT prior to initial use of the respirator, whenever a different respirator facepiece (size, style, model or make) is used, and at least annually thereafter.
4.5.2 Additional fit tests will be performed:
• Whenever there is an indication that changes in the Employee’s physical condition might have an effect on respirator fit (such conditions include, but are not limited to, facial scarring, dental changes, cosmetic surgery, or an obvious change in body weight);
• If the Employee notifies his/her Supervisor or Region SH&E Manager that the fit of his/her respirator is unacceptable.
4.5.3 The fit test shall be administered using a QLFT or QNFT protocol accepted by local or governmental regulations.
4.5.4 QLFT may only be used to fit test negative pressure air-purifying respirators that must achieve a fit factor of 100 or less.
4.6 Interference with Gas-Tight Seal
4.6.1 The employer shall not permit respirators with tight-fitting facepieces to be worn by Employees who have:
• Facial hair that comes between the sealing surface of the facepiece and the face or that interferes with valve function; or
• Any condition that interferes with the face-to-facepiece seal or valve function.
4.6.2 If an employee wears corrective glasses or goggles or other personal protective equipment, the Supervisor or Project Manager shall ensure that such equipment is worn in a manner that does not interfere with the seal of the facepiece to the face of the user.
4.6.3 Employees shall perform a user seal check each time they don the respirator.
4.7 Specification of Proper Level of Respiratory Protection
4.7.1 The Region SH&E Manager or his/her designated and qualified representative shall provide guidance on the proper selection and use of all respiratory protective devices, including half-face and full-face air purifying respirators, airline respirators, and self-contained breathing apparatus. This information is generally specified as part of the written site-specific Health and Safety Plan (HASP).
4.7.2 Employees engaged in activities not covered by a HASP must consult with the Region SH&E Manager or his/her designated representative to determine the proper equipment prior to use. Whenever appropriate, exposure levels will be measured to verify that the actual use conditions are within the limitations of the approvals specified by NIOSH/MSHA for the selected respirator.
4.8 Change Out Schedule
Filter cartridges shall be changed out whenever an increase in breathing resistance is detected by the user.
4.8.1 When available, chemical cartridges that are equipped with end-of-service life indicators (ESLI) shall be utilized. In those cases, cartridges should be changed when indicated by the ESLI.
4.8.2 In the absence of cartridges equipped with an ESLI, employees shall change chemical cartridges on the following schedule:
• Immediately if breakthrough is perceived; and
• In accordance with the change out schedule based upon the anticipated contaminant concentration, environmental conditions, employee work rate, and the specific data provided by manufacturer.
Respiratory Protection Program (S3NA-519-PR1) Revision 1 December 31, 2014 PRINTED COPIES ARE UNCONTROLLED. CONTROLLED COPY IS AVAILABLE ON COMPANY INTRANET. 6 of 9
4.8.3 When PAPRs are worn, the same rules apply with the exception that filter cartridges should be changed when airflow through the filter elements decreases to an unacceptable level, as indicated by the manufacturer’s test device.
4.9 Air-Supplying Respirator Use
4.9.1 Air-supplying respirators will be specified for use when it has been determined that any of the following conditions exist:
• The oxygen concentration is less than 19.5 percent;
• The contaminant is unknown or its concentration cannot be quantified;
• The airborne contaminant concentration is above its IDLH;
• An air-purifying respirator canister or cartridge that removes the contaminant is not available;
• The contaminant concentration is above the concentration for which an air-purifying canister or cartridge is approved; or
• The contaminant concentration is above the MUC of a full-face air-purifying respirator.
4.9.2 No Employee may engage in an operation requiring the use of an air-supplied respirator unless the Region SH&E Manager has reviewed the operation and approved its use.
4.9.3 The determination of the type of air-supplying respirator (i.e., SCBA, airline, demand, pressure demand, etc.) which is appropriate for the job, outside standby persons, communication, proper training and equipment, notification procedures, and necessary action all require planning. Mandatory equipment including SCBA or SAR with auxiliary air supply and emergency appropriate retrieval equipment or equivalent rescue means will be made by the Region SH&E Manager or his/her designated representative at the time of review. The need for any additional precautions (i.e., equipment specific training, on-site health and safety support, etc.) will also be determined by the Region SH&E Manager.
4.10 Minimum Procedures for IDLH atmospheres
4.10.1 One Employee or, when needed, more than one Employee shall be located outside the IDLH atmosphere. This employee shall be responsible for communicating with the Employees in the IDLH atmosphere, alerting rescue services if needed, and restricting entrance to the IDLH area by untrained and unapproved persons.
4.10.2 Visual, voice, or signal line communication shall be maintained between the Employee(s) in the IDLH atmosphere and the employee(s) located outside the IDLH atmosphere.
4.10.3 The Employee(s) located outside the IDLH atmosphere shall be trained and equipped to provide effective emergency rescue or to initiate on-site rescue services.
4.10.4 If on-site rescue services are to be used, the Site Safety Officer shall confirm that the service is available to respond prior to any employees entering the IDLH area.
4.10.5 Employee(s) located outside the IDLH area and/or on-site rescue services shall be equipped with:
• Pressure demand or other positive pressure SCBAs, or a pressure demand or other positive pressure supplied-air respirator with auxiliary SCBA; and either
• Appropriate retrieval equipment for removing the employee(s) who enter(s) these hazardous atmospheres where retrieval equipment would contribute to the rescue of the employee(s) and would not increase the overall risk resulting from entry; or
• Equivalent means for rescue where retrieval equipment would create a hazard to the Employees in the IDLH area.
Respiratory Protection Program (S3NA-519-PR1) Revision 1 December 31, 2014 PRINTED COPIES ARE UNCONTROLLED. CONTROLLED COPY IS AVAILABLE ON COMPANY INTRANET. 7 of 9
4.11 Breathing Air
4.11.1 Compressed air used for respiration shall be of high purity and shall meet, as a minimum, the requirements of the specification for Grade D breathing air as described in Compressed Gas Association Specification G-7.1 (ANSI Z86.1).
4.11.2 Oxygen shall NOT be used as a source of breathing air at any time in open-circuit SCBAs or airline respirators.
4.11.3 Compressor Supplied Breathing Air
All compressors used for filling SCBA air cylinders or for supplying airline respirators shall be equipped with the following safety and standby devices:
• The compressor intake shall be located to verify that only respirable (uncontaminated) air is admitted. This requires attention to the location of the compressor intake with respect to compressor engine exhaust, chemical storage or use areas, and suitable intake screening or filtration.
• Alarms to indicate compressor failure (such as low-pressure air horns, etc.) shall be installed in the system.
• A receiver of sufficient capacity to enable the respirator wearer to exit from a contaminated atmosphere shall be provided.
If an oil-lubricated compressor is used to supply breathing air, it shall be equipped with both of the following devices:
• A continuous reading carbon monoxide monitoring system set to alarm should the carbon monoxide concentration exceed 10 parts per million; and,
• A high temperature alarm which will activate when the discharge air exceeds 110 percent of the normal operating temperature in degrees Fahrenheit.
An in-line purifying filter assembly to remove oil, condensed water, particulates, odors, and organic vapors shall be used in conjunction with the air compressor.
4.11.4 Routine inspection and maintenance of air compressor shall be performed and documented with the S3NA-519-FM3 Respiratory Equipment Inspection. Compressed Air Cylinder Systems for Airline Respirators
• Compressed Air Cylinders shall meet the requirements of S3NA-506-PR1 Compressed Gases
• Compressed air cylinder systems used to supply airline respirators shall be equipped with low pressure warning bells (e.g., Scott Pak-Alarm) or similar warning devices to indicate air pressure in the manifold below 500 pounds per square inch (psi). When such systems are used, one employee shall be assigned as safety standby within audible range of the low pressure alarm.
• Airline hose couplings shall be incompatible with outlets for other gas systems to prevent inadvertently supplying airline respirators with nonrespirable gases or oxygen.
• The air pressure at the hose connection to airline respiratory equipment shall be within the range specified in the approval of the equipment by the manufacturer.
4.11.5 Compressed Air Cylinder Systems for Recharging SCBAs
• When a cascade system is used to recharge SCBA air cylinders, it shall be equipped with a high-pressure supply hose and coupling rated at a capacity of at least 3,000 psi.
4.11.6 Escape/Egress Units
• Escape/egress unit respirators are intended for use in areas where escape with a short-term (5 minutes) air supply is necessary.
Respiratory Protection Program (S3NA-519-PR1) Revision 1 December 31, 2014 PRINTED COPIES ARE UNCONTROLLED. CONTROLLED COPY IS AVAILABLE ON COMPANY INTRANET. 8 of 9
• They may be used as adjuncts to airline pressure demand respirators as a backup air supply or as independent emergency devices in areas where respiratory protection is not normally required.
• Appropriate training shall be conducted and documented prior to assigning Employees to tasks or locations subject to the use of these respirators.
• Escape/egress units (5 minutes) shall never be used to enter a hazardous atmosphere or as primary standby respirators for confined space entry.
4.12 Respirator Inspection, Cleaning, Maintenance, and Storage
When respirator use is required, only properly cleaned and maintained NIOSH/MSHA approved respirators shall be used.
4.12.1 Inspection
• Respirators should be inspected before and after use. Those for emergency use should be inspected once per month.
• All connections, including gaskets, o-rings should be checked for damage and tightness.
• The facepiece should be inspected for cracks and rubber or elastomer parts should be checked for deterioration and pliability.
• All respirators shall be inspected routinely by the user before, during, and after each use. Defects shall be reported to their Supervisor or Project Manager. No defective respirator shall be issued or worn.
• Routinely used respiratory equipment shall be inspected by an individual qualified by experience or training to do the work.
4.12.2 Cleaning and Maintenance
• Respirator facepiece assemblies shall be cleaned and sanitized minimally after each day of use in accordance with the requirements specified in S3NA-519-WI3 Respirator Cleaning Procedures.
• Respiratory equipment shall not be passed from one person to another until it has been cleaned and sanitized.
• Respiratory equipment shall be maintained according to manufacturer’s instructions.
• Where respirators are assigned to individual employees, management shall verify compliance with cleaning and maintenance requirements by periodic inspection and field audits of respiratory equipment and document is with the S3NA-519-FM2 Respiratory Equipment Maintenance Log.
• The respirator should then be inspected for any damaged parts (repair should only be done by trained personnel with the proper tools) and cleaned with a hot water/mild detergent solution.
• In field situations, a premoistened towelette (e.g., baby wipes) can be used. The mask should then be rinsed with clean warm water and dried.
• Alcohol should never be used to clean masks as it can damage the facepieces and rubber parts.
4.12.3 Storage
• Store clean respirators so that they are protected from dust, excessive moisture, damaging chemicals, temperature extremes and direct sunlight. They should be placed in a sealed plastic bag and stored in the original box.
Respiratory Protection Program (S3NA-519-PR1) Revision 1 December 31, 2014 PRINTED COPIES ARE UNCONTROLLED. CONTROLLED COPY IS AVAILABLE ON COMPANY INTRANET. 9 of 9
4.13 Hygiene
Employees must leave the work area to wash, change cartridges, or if they detect breakthrough or resistance.
4.14 Costs
The costs for training, medical examinations, fit testing, respirators, and cleaning materials should be considered as operational costs.
4.15 Program Evaluation
4.15.1 The Region SH&E Manager will conduct evaluations of the workplace as necessary to verify that the provisions of the current written program are being effectively implemented and that it continues to be effective.
4.15.2 The Region SH&E Manager will regularly (i.e., during annual training) consult Employees required to use respirators to assess their views on program effectiveness and to identify any problems. Any problems that are identified during this assessment shall be corrected. Factors to be assessed include but are not limited to:
• Respirator fit (including the ability to use the respirator without interfering with effective workplace performance);
• Appropriate respirator selection for the hazards to which the Employee is exposed;
• Proper respirator use under the workplace conditions the Employee encounters; and
• Proper respirator maintenance.
5.0 Records
5.1 Medical Records under this section will be maintained at a minimum in accordance with S3NA-604-PR1 Medical Records.
5.2 Fit Test Records must be maintained in the Employee’s health and safety records. S3NA-519-FM1 Respiratory Equipment Fit Test will be used to document each fit test.
5.3 Training Records shall be maintained in accordance with S3NA-003-PR1 SH&E Training.
6.0 Attachments
6.1 S3NA-519-WI1 Fit Testing Protocol
6.2 S3NA-519-WI2 User Seal Check Procedures
6.3 S3NA-519-WI3 Respirator Cleaning Procedures
6.4 S3NA-519-FM1 Respiratory Equipment Fit Test
6.5 S3NA-519-FM2 Respiratory Equipment Maintenance Log
6.6 S3NA-519-FM3 Respiratory Equipment Inspection
Fit Testing Protocol (S3NA-519-WI1) Revision 0 December 31, 2014 PRINTED COPIES ARE UNCONTROLLED. CONTROLLED COPY IS AVAILABLE ON COMPANY INTRANET. 1 of 5
Americas
Fit Testing Protocol S3NA-519-WI1
1.0 Selection
1.1 The Employee shall be allowed to pick the most acceptable respirator from a sufficient number of respirator models and sizes so that the respirator is acceptable to, and correctly fits, the Employee.
1.2 Prior to the selection process, the Employee shall be shown how to put on a respirator, how it should be positioned on the face, how to set strap tension, and how to determine an acceptable fit. A mirror shall be available to assist the Employee in evaluating the fit and positioning of the respirator. This instruction may not constitute the Employee’s formal training on respirator use, because it is only a review.
1.3 The Employee shall be informed that he/she is being asked to select the respirator that provides the most acceptable fit. Each respirator represents a different size and shape and if fitted and used properly will provide adequate protection.
2.0 Comfort
2.1 The Employee shall be instructed to hold each chosen face piece up to the face and to eliminate those that obviously do not give an acceptable fit.
2.2 The more acceptable face pieces are noted in case the one selected proves unacceptable; the most comfortable mask is donned and worn at least 5 minutes to assess comfort.
2.3 If the Employee is not familiar with using a particular respirator, he/she shall be directed to don the mask several times and to adjust the straps each time to become adept at setting proper tension on the straps.
2.4 Assessment of comfort shall include a review of the following points with the Employee and allowing he/she adequate time to determine the comfort of the respirator:
• Position of the mask on the nose;
• Room for eye protection;
• Room to talk; and
• Position of mask on face and cheeks.
3.0 Fit Test Criteria
3.1 The following criteria shall be used to help determine the adequacy of the respirator fit:
• Chin properly placed;
• Adequate strap tension, not overly tightened;
• Fit across nose bridge;
• Respirator of proper size to span distance from nose to chin;
• Tendency of respirator to slip; and
• Self-observation in mirror to evaluate fit and respirator position.
3.2 The Employee shall conduct a user seal check, either the negative and positive pressure seal checks described in S3NA-519-WI2 User Seal Check Procedures or those recommended by the respirator manufacturer that provide equivalent protection to the procedures in S3NA-519-WI2 User Seal Check Procedures.
Fit Testing Protocol (S3NA-519-WI1) Revision 0 December 31, 2014 PRINTED COPIES ARE UNCONTROLLED. CONTROLLED COPY IS AVAILABLE ON COMPANY INTRANET. 2 of 5
3.3 Before conducting the negative and positive pressure checks, the Employee shall be told to seat the mask on the face by moving the head from side to side and up and down slowly while taking in a few slow deep breaths. Another face piece shall be selected and retested if the Employee fails the user seal check tests.
3.4 The test shall not be conducted if there is any hair growth between the skin and the face piece sealing surface, such as stubble beard growth, beard, moustache, or sideburns that cross the respirator sealing surface. Any type of apparel that interferes with a satisfactory fit shall be altered or removed.
3.5 If an Employee exhibits difficulty in breathing during the tests, she or he shall be referred to a physician or other licensed health care professional, as appropriate, to determine whether the Employee can wear a respirator while performing her or his duties.
3.6 If the Employee finds the fit of the respirator unacceptable, the Employee shall be given the opportunity to select a different respirator and to be retested.
4.0 Exercise Regimen
4.1 Prior to the commencement of the fit test, the Employee shall be given a description of the fit test and their responsibilities during the test procedure. The description of the process shall include a description of the test exercises that will be performed. The respirator to be tested shall be worn for at least 5 minutes before the start of the fit test.
4.2 The fit test shall be performed while the Employee is wearing any applicable safety equipment that may be worn during actual respirator use and that could interfere with respirator fit.
5.0 General Test Exercises
5.1 The following test exercises are to be performed for all fit testing methods prescribed in this procedure, except for the Controlled Negative Pressure (CNP REDON) method. A separate fit testing exercise regimen is contained in the CNP protocol. The Employee shall perform exercises, in the test environment, in the following manner:
5.1.1 Normal breathing. In a normal standing position, without talking, the Employee shall breathe normally.
5.1.2 Deep breathing. In a normal standing position, the Employee shall breathe slowly and deeply, taking caution so as not to hyperventilate.
5.1.3 Turning head side to side. Standing in place, the Employee shall slowly turn his/her head from side to side between the extreme positions on each side. The head shall be held at each extreme momentarily so the Employee can inhale at each side.
5.1.4 Moving head up and down. Standing in place, the Employee shall slowly move his/her head up and down. The Employee shall be instructed to inhale in the up position (i.e., when looking toward the ceiling).
5.1.5 Talking. The Employee shall talk out loud slowly and loud enough so as to be heard clearly by the test conductor. The Employee can read from a prepared text such as the Rainbow Passage, count backward from 100, or recite a memorized poem or song.
• Rainbow Passage. “When the sunlight strikes raindrops in the air, they act like a prism and form a rainbow. The rainbow is a division of white light into many beautiful colors. These take the shape of a long round arch with its path high above and its two ends apparently beyond the horizon. There is, according to legend, a boiling pot of gold at one end. People look, but no one ever finds it. When a man looks for something beyond reach, his friends say he is looking for the pot of gold at the end of the rainbow.”
5.1.6 Grimace. The Employee shall grimace by smiling or frowning. (This applies only to QNFT testing; it is not performed for QLFT.)
Fit Testing Protocol (S3NA-519-WI1) Revision 0 December 31, 2014 PRINTED COPIES ARE UNCONTROLLED. CONTROLLED COPY IS AVAILABLE ON COMPANY INTRANET. 3 of 5
5.1.7 Bending over. The Employee shall bend at the waist as if he/she were to touch his/her toes. Jogging in place shall be substituted for this exercise in those test environments such as shroud-type QNFT or QLFT units that do not permit bending over at the waist.
5.1.8 Normal breathing. In a normal standing position, without talking, the Employee shall breathe normally (this is the same as the first test).
5.2 Each test exercise shall be performed for one minute except for the grimace exercise, which shall be performed for 15 seconds.
5.3 The Employee shall be questioned by the test conductor regarding the comfort of the respirator upon completion of the protocol. If it has become unacceptable, another model of respirator shall be tried.
5.4 The respirator shall not be adjusted once the fit test exercises begin. Any adjustment voids the test and the fit test must be repeated.
6.0 Qualitative Fit Test (QLFT) Protocols
6.1 General
• AECOM will ensure that persons administering QLFT are able to calibrate equipment and perform tests properly, recognize invalid tests, and ensure that test equipment is in proper working order.
• AECOM will ensure that that QLFT equipment is kept clean and well maintained so as to operate within the parameters for which it was designed.
6.2 Irritant Smoke (Stannic Chloride) Protocol
6.2.1 This QLFT uses a person’s response to the irritating chemicals released in the “smoke” produced by a stannic chloride ventilation smoke tube to detect leakage into the respirator.
6.2.2 General Requirements and Precautions
• The respirator to be tested shall be equipped with high-efficiency particulate air (HEPA) or P100 series filter(s).
• Only stannic chloride smoke tubes shall be used for this protocol.
• No form of test enclosure or hood for the Employee shall be used.
• The smoke can be irritating to the eyes, lungs, and nasal passages. The test conductor shall take precautions to minimize the Employee’s exposure to irritant smoke. Sensitivity varies, and certain individuals may respond to a greater degree to irritant smoke. Care shall be taken when performing the sensitivity screening checks that determine whether the Employee can detect irritant smoke to use only the minimum amount of smoke necessary to elicit a response from the Employee.
• The fit test shall be performed in an area with adequate ventilation to prevent exposure of the person conducting the fit test or the build-up of irritant smoke in the general atmosphere.
6.2.3 Sensitivity Screening Check
The Employee to be tested must demonstrate his or her ability to detect a weak concentration of the irritant smoke.
• The test operator shall break both ends of a ventilation smoke tube containing stannic chloride and attach one end of the smoke tube to a low flow air pump set to deliver 200 milliliters per minute or to an aspirator squeeze bulb. The test operator shall cover the other end of the smoke tube with a short piece of tubing to prevent potential injury from the jagged end of the smoke tube.
• The test operator shall advise the Employee that the smoke can be irritating to the eyes, lungs, and nasal passages and instruct the Employee to keep his/her eyes closed while the test is performed.
Fit Testing Protocol (S3NA-519-WI1) Revision 0 December 31, 2014 PRINTED COPIES ARE UNCONTROLLED. CONTROLLED COPY IS AVAILABLE ON COMPANY INTRANET. 4 of 5
• The Employee shall be allowed to smell a weak concentration of the irritant smoke before the respirator is donned to become familiar with its irritating properties and to determine if he/she can detect the irritating properties of the smoke. The test operator shall carefully direct a small amount of the irritant smoke in the Employee's direction to determine that he/she can detect it.
6.2.4 Irritant Smoke Fit Test Procedure
• The Employee being fit tested shall don the respirator without assistance, and perform the required user seal check(s).
• The Employee shall be instructed to keep his/her eyes closed.
• The test operator shall direct the stream of irritant smoke from the smoke tube toward the face seal area of the Employee, using the low-flow pump or the squeeze bulb. The test operator shall begin at least 12 inches from the facepiece and move the smoke stream around the whole perimeter of the mask. The operator shall gradually make two more passes around the perimeter of the mask, moving to within 6 inches of the respirator.
• If the Employee being tested has not had an involuntary response and/or has not detected the irritant smoke, proceed with the test exercises.
• The General Test Exercises shall be performed by the Employee while the respirator seal is being continually challenged by the smoke, directed around the perimeter of the respirator at a distance of 6 inches.
• If the Employee being fit tested reports detecting the irritant smoke at any time, the test is failed. The Employee being retested must repeat the entire sensitivity check and fit test procedure.
• Each Employee passing the irritant smoke test without evidence of a response (involuntary cough, irritation) shall be given a second sensitivity screening check, with the smoke from the same smoke tube used during the fit test, once the respirator has been removed, to determine whether he/she still reacts to the smoke. Failure to evoke a response shall void the fit test.
• If a response is produced during this second sensitivity check, then the fit test is passed.
7.0 Quantitative Fit Test (QNFT) Protocols
7.1 General
• AECOM will confirm that persons administering QNFT are able to calibrate equipment and perform tests properly, recognize invalid tests, calculate fit factors properly, and ensure that test equipment is in proper working order.
• AECOM will ensure that QNFT equipment is kept clean and is maintained and calibrated according to the manufacturer's instructions so as to operate at the parameters for which it was designed.
7.2 Ambient Aerosol Condensation Nuclei Counter (CNC) Quantitative Fit Testing Protocol
7.2.1 The ambient aerosol CNC quantitative fit testing (PortacountTM) protocol quantitatively fit tests respirators with the use of a probe. The probed respirator is only used for QNFTs. A probed respirator has a special sampling device installed on the respirator to allow the probe to sample the air from inside the mask. A probed respirator is required for each make, style, model, and size that the employer uses and can be obtained from the respirator manufacturer or distributor. The CNC instrument manufacturer, TSI Inc., also provides probe attachments (TSI sampling adapters) that permit fit testing in an Employee's own respirator. A minimum fit factor pass level of at least 100 is necessary for a half-mask respirator, and a minimum fit factor pass level of at least 500 is required for a full facepiece negative pressure respirator. The entire screening and testing procedure shall be explained to the Employee prior to the conduct of the screening test.
Fit Testing Protocol (S3NA-519-WI1) Revision 0 December 31, 2014 PRINTED COPIES ARE UNCONTROLLED. CONTROLLED COPY IS AVAILABLE ON COMPANY INTRANET. 5 of 5
7.2.2 Portacount Fit Test Requirements
• Check the respirator to make sure the sampling probe and line are properly attached to the face piece and that the respirator is fitted with a particulate filter capable of preventing significant penetration by the ambient particles used for the fit test (e.g., National Institute for Occupational Safety and Health, Title 42 Code of Federal Regulations 84 series 100, series 99, or series 95 particulate filter) according to the manufacturer's instructions.
• Instruct the Employee to be tested to don the respirator for 5 minutes before the fit test starts. This purges the ambient particles trapped inside the respirator and permits the wearer to make certain the respirator is comfortable. This Employee shall already have been trained on how to wear the respirator properly.
• Check the following conditions for the adequacy of the respirator fit: chin properly placed; adequate strap tension, not overly tightened; fit across nose bridge; respirator of proper size to span distance from nose to chin; tendency of the respirator to slip; self-observation in a mirror to evaluate fit and respirator position.
• Have the person wearing the respirator do a user seal check. If leakage is detected, determine the cause. If leakage is from a poorly fitting face piece, try another size of the same model respirator, or another model of respirator.
• Follow the manufacturer's instructions for operating the Portacount and proceed with the test.
• The Employee shall be instructed to perform the exercises in General Test Exercises.
• After the test exercises, the Employee shall be questioned by the test conductor regarding the comfort of the respirator upon completion of the protocol. If it has become unacceptable, another model of respirator shall be tried.
7.2.3 Portacount Test Instrument
• The Portacount will automatically stop and calculate the overall fit factor for the entire set of exercises. The overall fit factor is what counts. The Pass or Fail message will indicate whether or not the test was successful. If the test was a Pass, the fit test is over.
• Since the pass or fail criterion of the Portacount is Employee programmable, the test operator shall confirm that the pass or fail criterion meet the requirements for minimum respirator performance.
• A record of the test needs to be kept on file, assuming the fit test was successful. The record must contain the Employee's name; overall fit factor; make, model, style, and size of respirator used; and date tested.
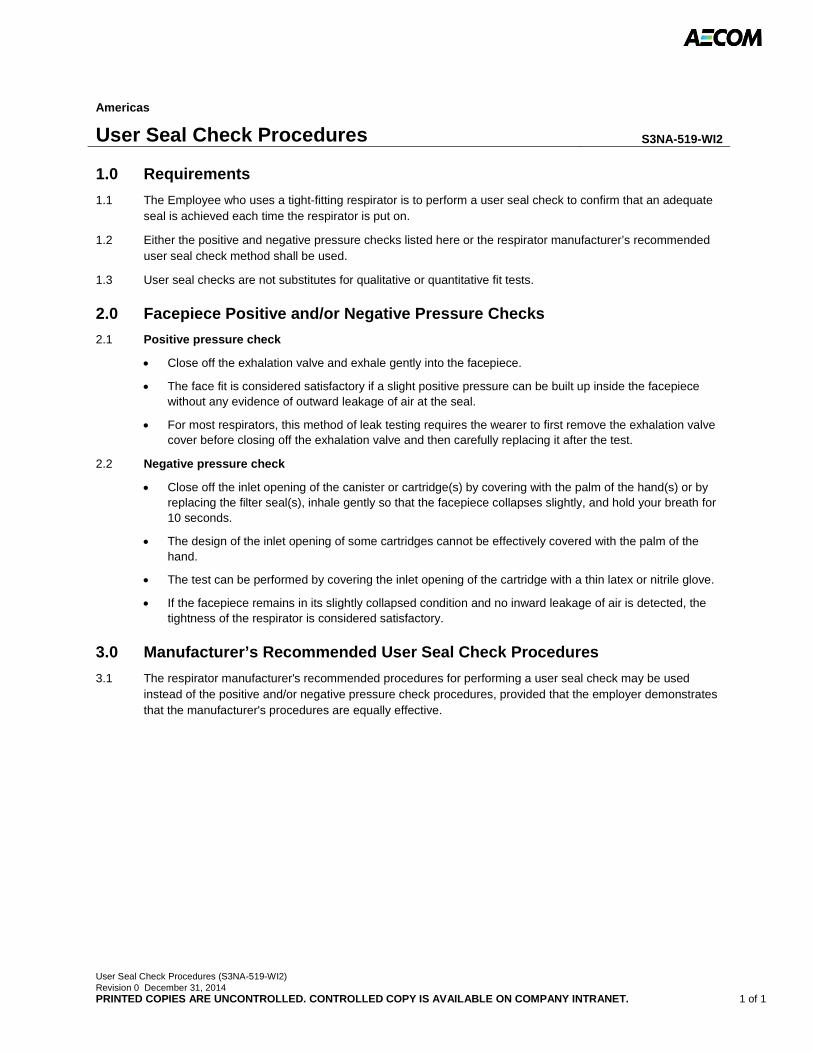
User Seal Check Procedures (S3NA-519-WI2) Revision 0 December 31, 2014 PRINTED COPIES ARE UNCONTROLLED. CONTROLLED COPY IS AVAILABLE ON COMPANY INTRANET. 1 of 1
Americas
User Seal Check Procedures S3NA-519-WI2
1.0 Requirements
1.1 The Employee who uses a tight-fitting respirator is to perform a user seal check to confirm that an adequate seal is achieved each time the respirator is put on.
1.2 Either the positive and negative pressure checks listed here or the respirator manufacturer’s recommended user seal check method shall be used.
1.3 User seal checks are not substitutes for qualitative or quantitative fit tests.
2.0 Facepiece Positive and/or Negative Pressure Checks
2.1 Positive pressure check
• Close off the exhalation valve and exhale gently into the facepiece.
• The face fit is considered satisfactory if a slight positive pressure can be built up inside the facepiece without any evidence of outward leakage of air at the seal.
• For most respirators, this method of leak testing requires the wearer to first remove the exhalation valve cover before closing off the exhalation valve and then carefully replacing it after the test.
2.2 Negative pressure check
• Close off the inlet opening of the canister or cartridge(s) by covering with the palm of the hand(s) or by replacing the filter seal(s), inhale gently so that the facepiece collapses slightly, and hold your breath for 10 seconds.
• The design of the inlet opening of some cartridges cannot be effectively covered with the palm of the hand.
• The test can be performed by covering the inlet opening of the cartridge with a thin latex or nitrile glove.
• If the facepiece remains in its slightly collapsed condition and no inward leakage of air is detected, the tightness of the respirator is considered satisfactory.
3.0 Manufacturer’s Recommended User Seal Check Procedures
3.1 The respirator manufacturer's recommended procedures for performing a user seal check may be used instead of the positive and/or negative pressure check procedures, provided that the employer demonstrates that the manufacturer's procedures are equally effective.
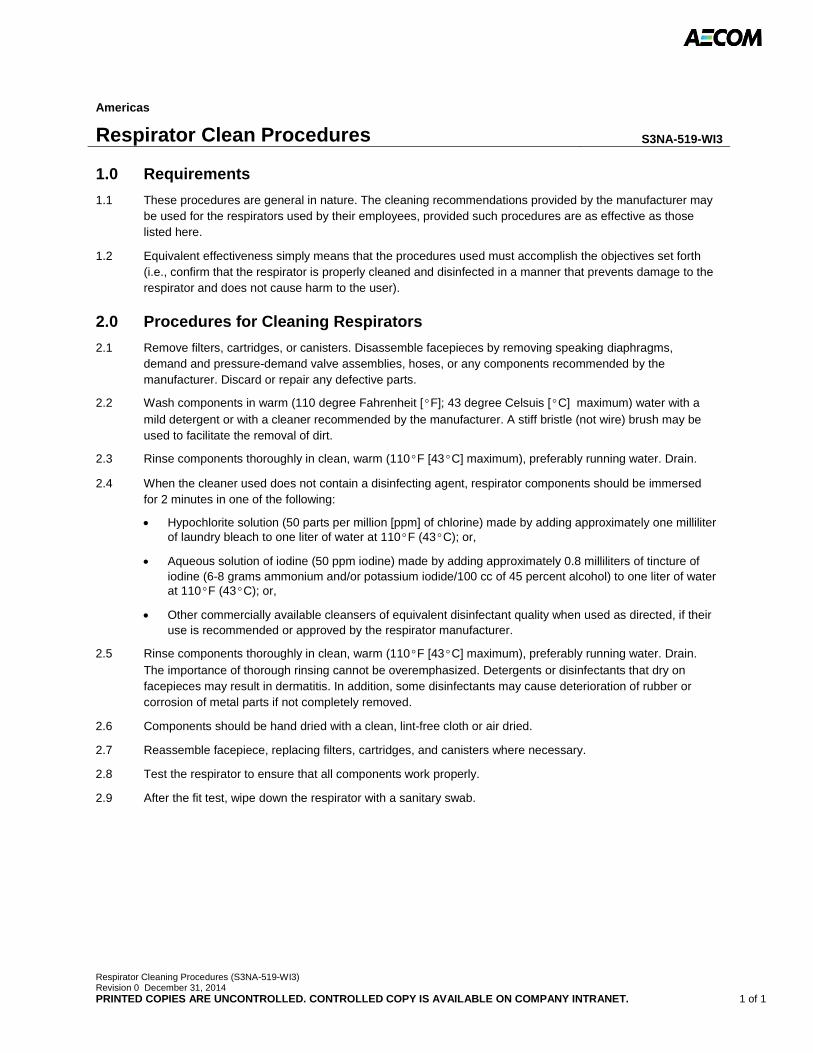
Respirator Cleaning Procedures (S3NA-519-WI3) Revision 0 December 31, 2014 PRINTED COPIES ARE UNCONTROLLED. CONTROLLED COPY IS AVAILABLE ON COMPANY INTRANET. 1 of 1
Americas
Respirator Clean Procedures S3NA-519-WI3
1.0 Requirements
1.1 These procedures are general in nature. The cleaning recommendations provided by the manufacturer may be used for the respirators used by their employees, provided such procedures are as effective as those listed here.
1.2 Equivalent effectiveness simply means that the procedures used must accomplish the objectives set forth (i.e., confirm that the respirator is properly cleaned and disinfected in a manner that prevents damage to the respirator and does not cause harm to the user).
2.0 Procedures for Cleaning Respirators
2.1 Remove filters, cartridges, or canisters. Disassemble facepieces by removing speaking diaphragms, demand and pressure-demand valve assemblies, hoses, or any components recommended by the manufacturer. Discard or repair any defective parts.
2.2 Wash components in warm (110 degree Fahrenheit [°F]; 43 degree Celsuis [°C] maximum) water with a
mild detergent or with a cleaner recommended by the manufacturer. A stiff bristle (not wire) brush may be used to facilitate the removal of dirt.
2.3 Rinse components thoroughly in clean, warm (110°F [43°C] maximum), preferably running water. Drain.
2.4 When the cleaner used does not contain a disinfecting agent, respirator components should be immersed for 2 minutes in one of the following:
• Hypochlorite solution (50 parts per million [ppm] of chlorine) made by adding approximately one milliliter of laundry bleach to one liter of water at 110°F (43°C); or,
• Aqueous solution of iodine (50 ppm iodine) made by adding approximately 0.8 milliliters of tincture of iodine (6-8 grams ammonium and/or potassium iodide/100 cc of 45 percent alcohol) to one liter of water at 110°F (43°C); or,
• Other commercially available cleansers of equivalent disinfectant quality when used as directed, if their use is recommended or approved by the respirator manufacturer.
2.5 Rinse components thoroughly in clean, warm (110°F [43°C] maximum), preferably running water. Drain.
The importance of thorough rinsing cannot be overemphasized. Detergents or disinfectants that dry on facepieces may result in dermatitis. In addition, some disinfectants may cause deterioration of rubber or corrosion of metal parts if not completely removed.
2.6 Components should be hand dried with a clean, lint-free cloth or air dried.
2.7 Reassemble facepiece, replacing filters, cartridges, and canisters where necessary.
2.8 Test the respirator to ensure that all components work properly.
2.9 After the fit test, wipe down the respirator with a sanitary swab.
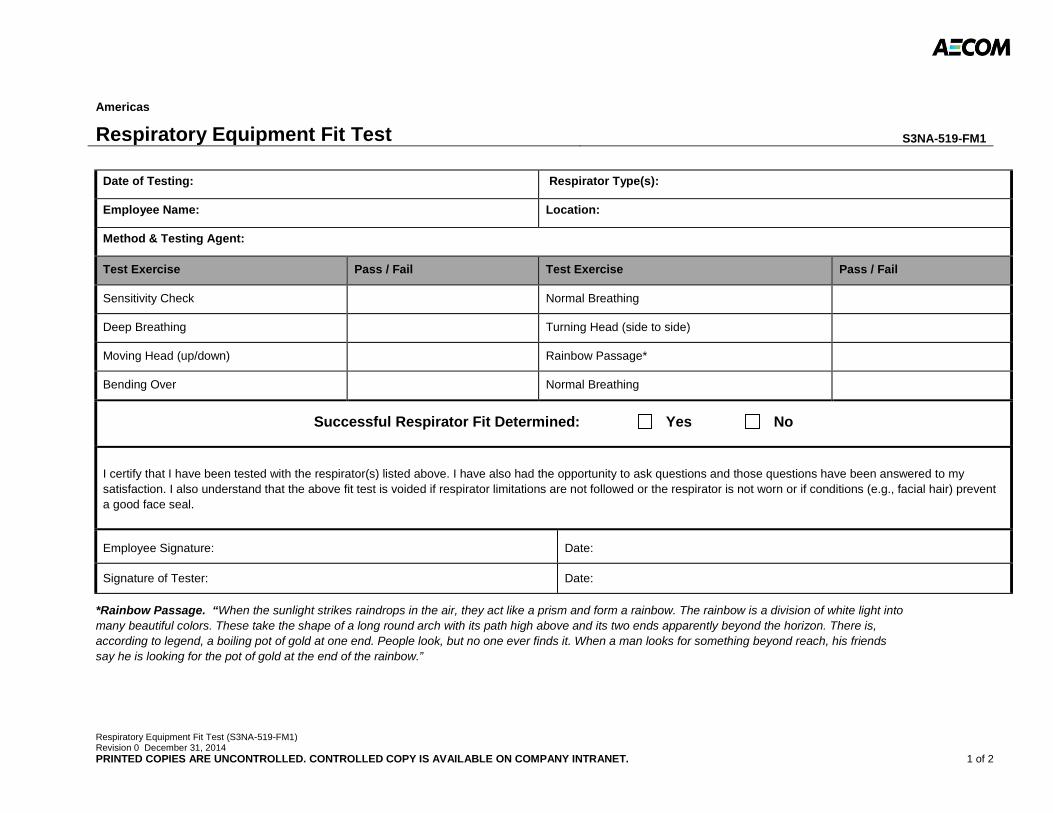
Respiratory Equipment Fit Test (S3NA-519-FM1) Revision 0 December 31, 2014 PRINTED COPIES ARE UNCONTROLLED. CONTROLLED COPY IS AVAILABLE ON COMPANY INTRANET. 1 of 2
Americas
Respiratory Equipment Fit Test S3NA-519-FM1
Date of Testing: Respirator Type(s):
Employee Name: Location:
Method & Testing Agent:
Test Exercise Pass / Fail Test Exercise Pass / Fail
Sensitivity Check Normal Breathing
Deep Breathing Turning Head (side to side)
Moving Head (up/down) Rainbow Passage*
Bending Over Normal Breathing
Successful Respirator Fit Determined: Yes No
I certify that I have been tested with the respirator(s) listed above. I have also had the opportunity to ask questions and those questions have been answered to my satisfaction. I also understand that the above fit test is voided if respirator limitations are not followed or the respirator is not worn or if conditions (e.g., facial hair) prevent a good face seal.
Employee Signature: Date:
Signature of Tester: Date:
*Rainbow Passage. “When the sunlight strikes raindrops in the air, they act like a prism and form a rainbow. The rainbow is a division of white light into many beautiful colors. These take the shape of a long round arch with its path high above and its two ends apparently beyond the horizon. There is, according to legend, a boiling pot of gold at one end. People look, but no one ever finds it. When a man looks for something beyond reach, his friends say he is looking for the pot of gold at the end of the rainbow.”
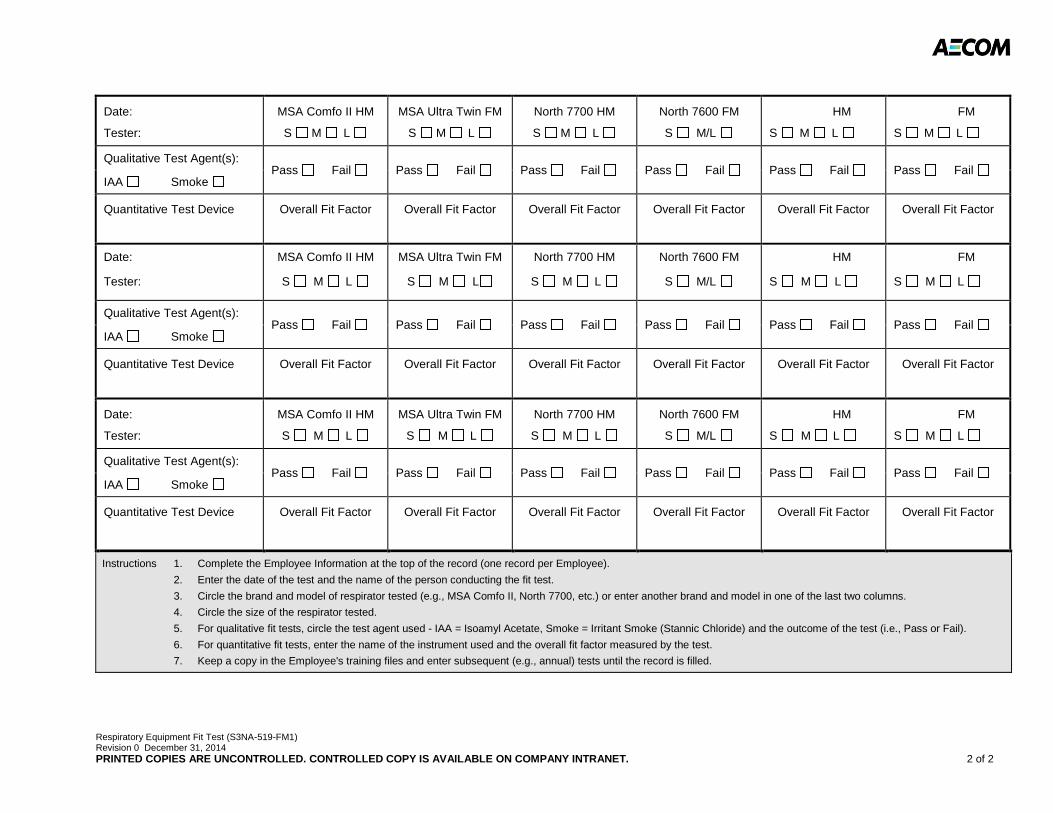
Respiratory Equipment Fit Test (S3NA-519-FM1) Revision 0 December 31, 2014 PRINTED COPIES ARE UNCONTROLLED. CONTROLLED COPY IS AVAILABLE ON COMPANY INTRANET. 2 of 2
Date:
Tester:
MSA Comfo II HM
S M L
MSA Ultra Twin FM
S M L
North 7700 HM
S M L
North 7600 FM
S M/L
HM
S M L
FM
S M L
Qualitative Test Agent(s): Pass Fail Pass Fail Pass Fail Pass Fail Pass Fail Pass Fail
IAA Smoke
Quantitative Test Device
Overall Fit Factor
Overall Fit Factor
Overall Fit Factor
Overall Fit Factor
Overall Fit Factor
Overall Fit Factor
Instructions 1. Complete the Employee Information at the top of the record (one record per Employee).
2. Enter the date of the test and the name of the person conducting the fit test.
3. Circle the brand and model of respirator tested (e.g., MSA Comfo II, North 7700, etc.) or enter another brand and model in one of the last two columns.
4. Circle the size of the respirator tested.
5. For qualitative fit tests, circle the test agent used - IAA = Isoamyl Acetate, Smoke = Irritant Smoke (Stannic Chloride) and the outcome of the test (i.e., Pass or Fail).
6. For quantitative fit tests, enter the name of the instrument used and the overall fit factor measured by the test.
7. Keep a copy in the Employee's training files and enter subsequent (e.g., annual) tests until the record is filled.
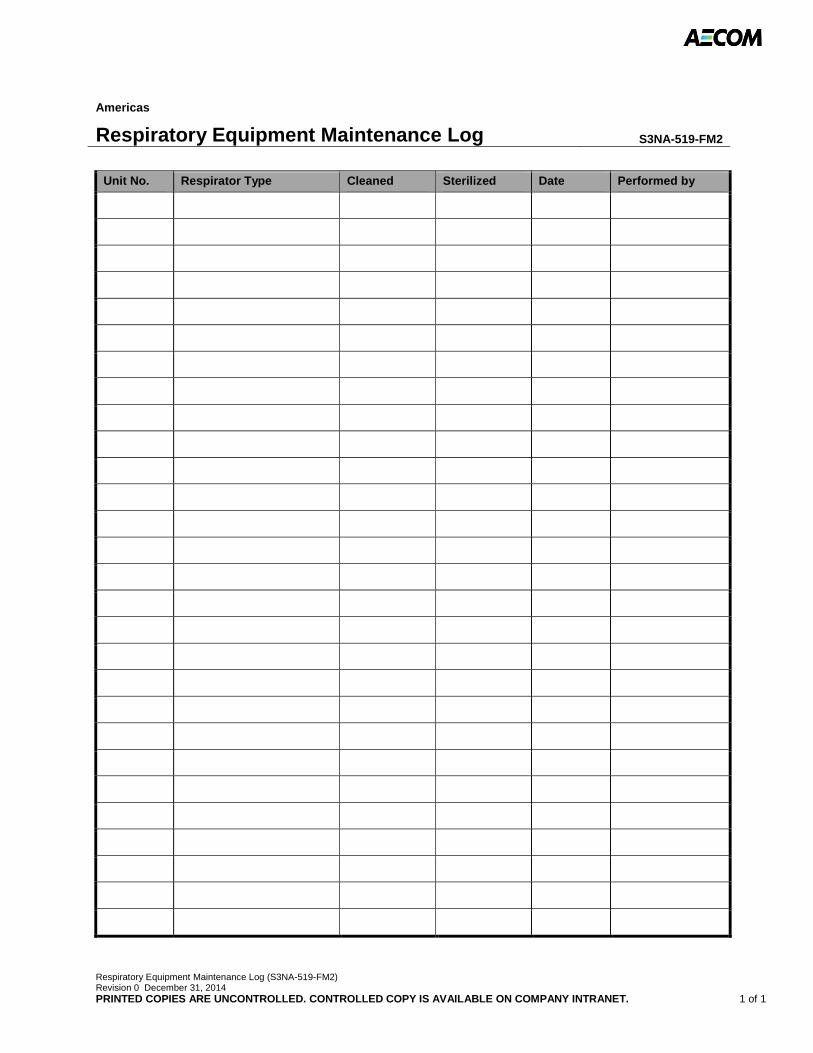
Respiratory Equipment Maintenance Log (S3NA-519-FM2) Revision 0 December 31, 2014 PRINTED COPIES ARE UNCONTROLLED. CONTROLLED COPY IS AVAILABLE ON COMPANY INTRANET. 1 of 1
Americas
Respiratory Equipment Maintenance Log S3NA-519-FM2
Unit No. Respirator Type Cleaned Sterilized Date Performed by
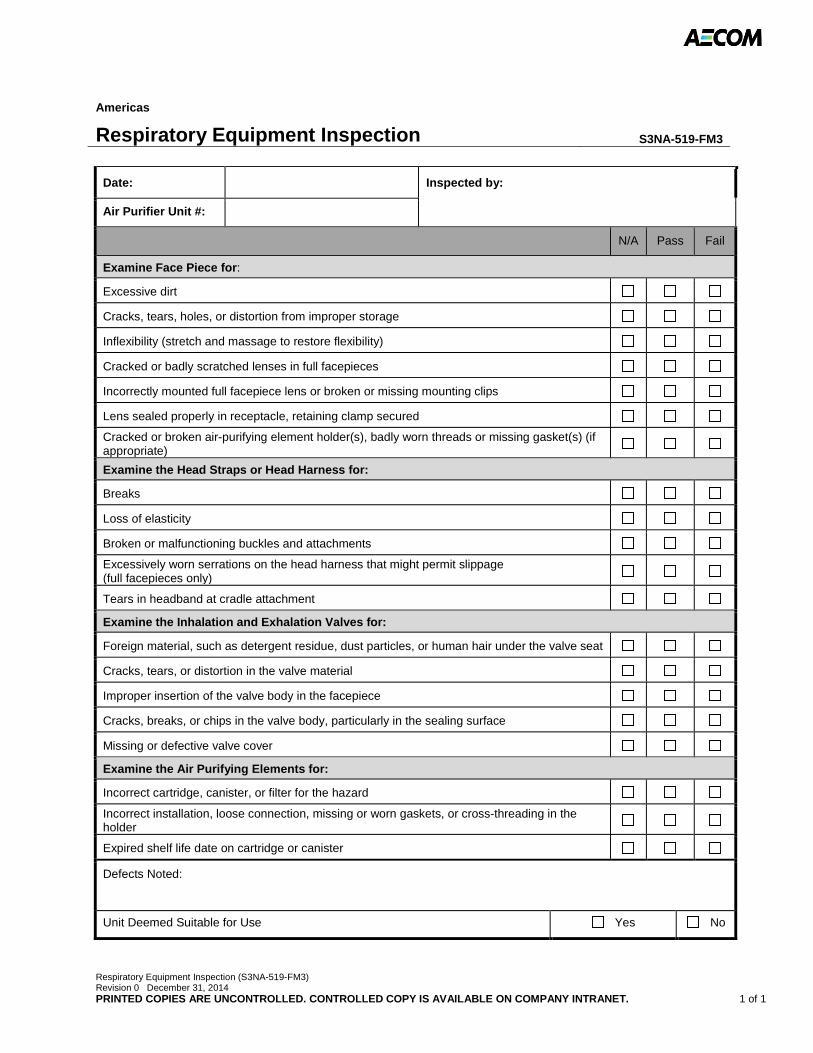
Respiratory Equipment Inspection (S3NA-519-FM3) Revision 0 December 31, 2014 PRINTED COPIES ARE UNCONTROLLED. CONTROLLED COPY IS AVAILABLE ON COMPANY INTRANET. 1 of 1
Americas
Respiratory Equipment Inspection S3NA-519-FM3
Date: Inspected by:
Air Purifier Unit #:
N/A Pass Fail
Examine Face Piece for:
Excessive dirt
Cracks, tears, holes, or distortion from improper storage
Inflexibility (stretch and massage to restore flexibility)
Cracked or badly scratched lenses in full facepieces
Incorrectly mounted full facepiece lens or broken or missing mounting clips
Lens sealed properly in receptacle, retaining clamp secured
Cracked or broken air-purifying element holder(s), badly worn threads or missing gasket(s) (if appropriate)
Examine the Head Straps or Head Harness for:
Breaks
Loss of elasticity
Broken or malfunctioning buckles and attachments
Excessively worn serrations on the head harness that might permit slippage (full facepieces only)
Tears in headband at cradle attachment
Examine the Inhalation and Exhalation Valves for:
Foreign material, such as detergent residue, dust particles, or human hair under the valve seat
Cracks, tears, or distortion in the valve material
Improper insertion of the valve body in the facepiece
Cracks, breaks, or chips in the valve body, particularly in the sealing surface
Missing or defective valve cover
Examine the Air Purifying Elements for:
Incorrect cartridge, canister, or filter for the hazard
Incorrect installation, loose connection, missing or worn gaskets, or cross-threading in the holder
Expired shelf life date on cartridge or canister
Defects Noted:
Unit Deemed Suitable for Use Yes No
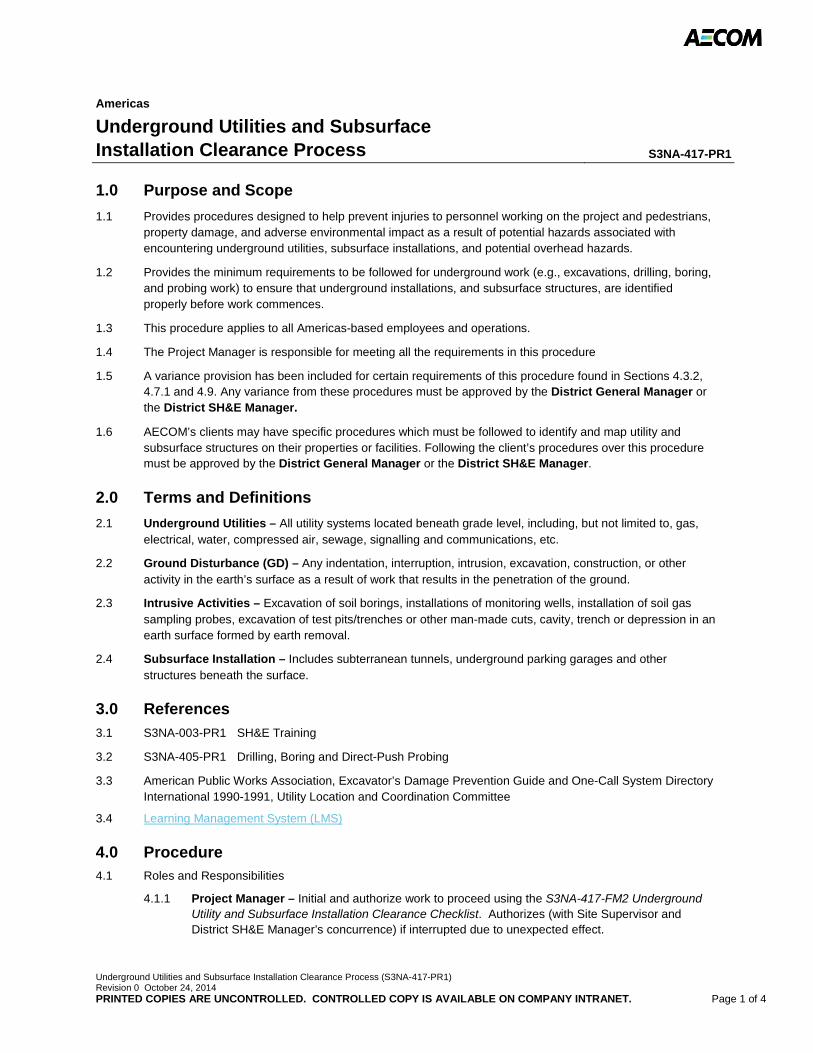
Underground Utilities and Subsurface Installation Clearance Process (S3NA-417-PR1) Revision 0 October 24, 2014 PRINTED COPIES ARE UNCONTROLLED. CONTROLLED COPY IS AVAILABLE ON COMPANY INTRANET. Page 1 of 4
Americas
Underground Utilities and Subsurface Installation Clearance Process S3NA-417-PR1
1.0 Purpose and Scope
1.1 Provides procedures designed to help prevent injuries to personnel working on the project and pedestrians, property damage, and adverse environmental impact as a result of potential hazards associated with encountering underground utilities, subsurface installations, and potential overhead hazards.
1.2 Provides the minimum requirements to be followed for underground work (e.g., excavations, drilling, boring, and probing work) to ensure that underground installations, and subsurface structures, are identified properly before work commences.
1.3 This procedure applies to all Americas-based employees and operations.
1.4 The Project Manager is responsible for meeting all the requirements in this procedure
1.5 A variance provision has been included for certain requirements of this procedure found in Sections 4.3.2, 4.7.1 and 4.9. Any variance from these procedures must be approved by the District General Manager or the District SH&E Manager.
1.6 AECOM’s clients may have specific procedures which must be followed to identify and map utility and subsurface structures on their properties or facilities. Following the client’s procedures over this procedure must be approved by the District General Manager or the District SH&E Manager.
2.0 Terms and Definitions
2.1 Underground Utilities – All utility systems located beneath grade level, including, but not limited to, gas, electrical, water, compressed air, sewage, signalling and communications, etc.
2.2 Ground Disturbance (GD) – Any indentation, interruption, intrusion, excavation, construction, or other activity in the earth’s surface as a result of work that results in the penetration of the ground.
2.3 Intrusive Activities – Excavation of soil borings, installations of monitoring wells, installation of soil gas sampling probes, excavation of test pits/trenches or other man-made cuts, cavity, trench or depression in an earth surface formed by earth removal.
2.4 Subsurface Installation – Includes subterranean tunnels, underground parking garages and other structures beneath the surface.
3.0 References
3.1 S3NA-003-PR1 SH&E Training
3.2 S3NA-405-PR1 Drilling, Boring and Direct-Push Probing
3.3 American Public Works Association, Excavator’s Damage Prevention Guide and One-Call System Directory International 1990-1991, Utility Location and Coordination Committee
3.4 Learning Management System (LMS)
4.0 Procedure 4.1 Roles and Responsibilities
4.1.1 Project Manager – Initial and authorize work to proceed using the S3NA-417-FM2 Underground Utility and Subsurface Installation Clearance Checklist. Authorizes (with Site Supervisor and District SH&E Manager’s concurrence) if interrupted due to unexpected effect.
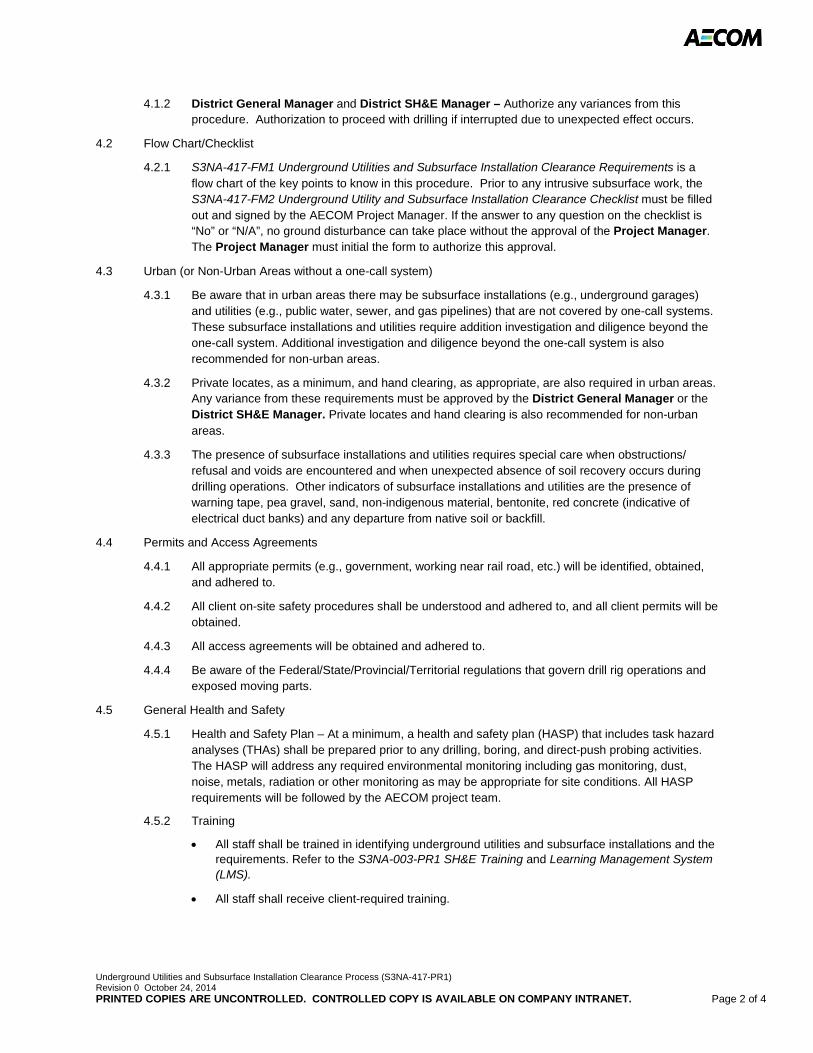
Underground Utilities and Subsurface Installation Clearance Process (S3NA-417-PR1) Revision 0 October 24, 2014 PRINTED COPIES ARE UNCONTROLLED. CONTROLLED COPY IS AVAILABLE ON COMPANY INTRANET. Page 2 of 4
4.1.2 District General Manager and District SH&E Manager – Authorize any variances from this procedure. Authorization to proceed with drilling if interrupted due to unexpected effect occurs.
4.2 Flow Chart/Checklist
4.2.1 S3NA-417-FM1 Underground Utilities and Subsurface Installation Clearance Requirements is a flow chart of the key points to know in this procedure. Prior to any intrusive subsurface work, the S3NA-417-FM2 Underground Utility and Subsurface Installation Clearance Checklist must be filled out and signed by the AECOM Project Manager. If the answer to any question on the checklist is “No” or “N/A”, no ground disturbance can take place without the approval of the Project Manager. The Project Manager must initial the form to authorize this approval.
4.3 Urban (or Non-Urban Areas without a one-call system)
4.3.1 Be aware that in urban areas there may be subsurface installations (e.g., underground garages) and utilities (e.g., public water, sewer, and gas pipelines) that are not covered by one-call systems. These subsurface installations and utilities require addition investigation and diligence beyond the one-call system. Additional investigation and diligence beyond the one-call system is also recommended for non-urban areas.
4.3.2 Private locates, as a minimum, and hand clearing, as appropriate, are also required in urban areas. Any variance from these requirements must be approved by the District General Manager or the District SH&E Manager. Private locates and hand clearing is also recommended for non-urban areas.
4.3.3 The presence of subsurface installations and utilities requires special care when obstructions/ refusal and voids are encountered and when unexpected absence of soil recovery occurs during drilling operations. Other indicators of subsurface installations and utilities are the presence of warning tape, pea gravel, sand, non-indigenous material, bentonite, red concrete (indicative of electrical duct banks) and any departure from native soil or backfill.
4.4 Permits and Access Agreements
4.4.1 All appropriate permits (e.g., government, working near rail road, etc.) will be identified, obtained, and adhered to.
4.4.2 All client on-site safety procedures shall be understood and adhered to, and all client permits will be obtained.
4.4.3 All access agreements will be obtained and adhered to.
4.4.4 Be aware of the Federal/State/Provincial/Territorial regulations that govern drill rig operations and exposed moving parts.
4.5 General Health and Safety
4.5.1 Health and Safety Plan – At a minimum, a health and safety plan (HASP) that includes task hazard analyses (THAs) shall be prepared prior to any drilling, boring, and direct-push probing activities. The HASP will address any required environmental monitoring including gas monitoring, dust, noise, metals, radiation or other monitoring as may be appropriate for site conditions. All HASP requirements will be followed by the AECOM project team.
4.5.2 Training
• All staff shall be trained in identifying underground utilities and subsurface installations and the requirements. Refer to the S3NA-003-PR1 SH&E Training and Learning Management System (LMS).
• All staff shall receive client-required training.
Underground Utilities and Subsurface Installation Clearance Process (S3NA-417-PR1) Revision 0 October 24, 2014 PRINTED COPIES ARE UNCONTROLLED. CONTROLLED COPY IS AVAILABLE ON COMPANY INTRANET. Page 3 of 4
4.6 Identification and Mapping of Utility and Subsurface Structures
4.6.1 The locations of subsurface and overhead utilities and subsurface installations will be investigated, documented, and shown on a site plan (a scaled site plan shall be used when feasible). Refer to S3NA-406-PR1 Electrical Lines Overhead and S3NA-417-FM2 Underground Utilities and Subsurface Installation Clearance Checklist.
4.6.2 Documentation of utility and subsurface installation clearance along with the scaled site plan will be on site at all times of intrusive activities.
4.6.3 Identification and mapping of Utility and Subsurface Structures is iterative with the Site Walk and should be repeated as necessary following the Site Walk as appropriate.
4.7 Site Walk
4.7.1 A site walk shall be conducted by the AECOM project team/site manager with the objectives of reviewing all planned intrusive activity locations, the locations of subsurface and overhead utilities and the potential for subsurface installations, to determine the appropriate utility clearance activities, and to observe other physical hazards. If possible, particularly at urban and industrial sites, the client/property owner or someone knowledgeable about the site and site utilities will attend the site walk. Any variance from these requirements must be approved by the District General Manager or the District SH&E Manager.
4.7.2 The site walk is iterative with the Identification and mapping of Utility and Subsurface Structures and should be repeated as necessary following the Identification and Mapping of Utility and Subsurface Structures.
4.8 Proposed Subsurface Investigation Locations
4.8.1 All proposed subsurface locations will be reviewed in comparison to subsurface and overhead utilities and subsurface installations and adjustments made as necessary.
4.8.2 Minimum set back distances from subsurface and overhead utilities and subsurface installations will be established including 5 feet (1.5 meters) from any subsurface utility, 7 feet (2.1 meters) from the pad surrounding any underground storage tanks, and 10 feet (3 meters) from any overhead energized electrical line (or further depending on line voltage). These set back distances are a minimum; government regulations and utility requirements may dictate a greater set back distance.
4.9 Utility Clearance Investigation Location Confirmation
4.9.1 In urban areas, proposed subsurface locations will be hand cleared to 5 feet/1.5 meters (soil borings and wells) or 1 foot/0.3 meter (soil gas sampling probes) using non-mechanical methods. Hand clearance should be extended if locations of deep utilities and structures are not known. In non-urban areas, hand clearing should be conducted if possible. Any variance from these requirements must be approved by the District General Manager or the District SH&E Manager.
4.10 Surface Markings
4.10.1 Once the underground installation has been identified, proper surface markings shall be made in accordance with the guidelines from the One-Call System (811), guidance contained in this procedure or as contract-specified.
4.10.2 Color-coded surface marks (paints or similar coatings) shall be used to indicate the type, location, and route of buried installations. Additionally, to increase visibility, color-coded vertical markers (temporary stakes or flags) shall supplement surface marks.
4.10.3 All marks and markers shall indicate the name, initials, or logo of the company that owns or operates the installation and the width of the installation if it is greater than 2 inches.
4.10.4 If the surface over the buried installation is to be removed, supplemental offset marking shall be used. Offset markings shall be on a uniform alignment and shall clearly indicate that the actual installation is a specific distance away.
Underground Utilities and Subsurface Installation Clearance Process (S3NA-417-PR1) Revision 0 October 24, 2014 PRINTED COPIES ARE UNCONTROLLED. CONTROLLED COPY IS AVAILABLE ON COMPANY INTRANET. Page 4 of 4
4.11 Uniform Color Coding
4.11.1 The colors and corresponding installation type are as follows unless otherwise contract-specified.:
Red: Electric Power Lines, Cables, Conduit, and Lighting Cables
Yellow: Gas, Oil, Stream, Petroleum, or Gaseous Materials
Orange: Communication, Alarm or Signal Lines, Cables, or Conduit
Green: Sewers and Drain Lines
White: Proposed Ground Disturbance area
Pink: Temporary Survey Markings
Blue: Potable Water
Purple: Nonpotable Water
5.0 Records
5.1 None
6.0 Attachments
6.1 S3NA-417-WI1 One-Call System Definition and Directory
6.2 S3NA-417-FM1 Flow Chart for Underground Utilities and Subsurface Installation Clearance
6.3 S3NA-417-FM2 Underground Utility and Subsurface Installation Clearance Checklist
6.4 S3NA-417-ST Underground Utilities-Jurisdictions/Regulations
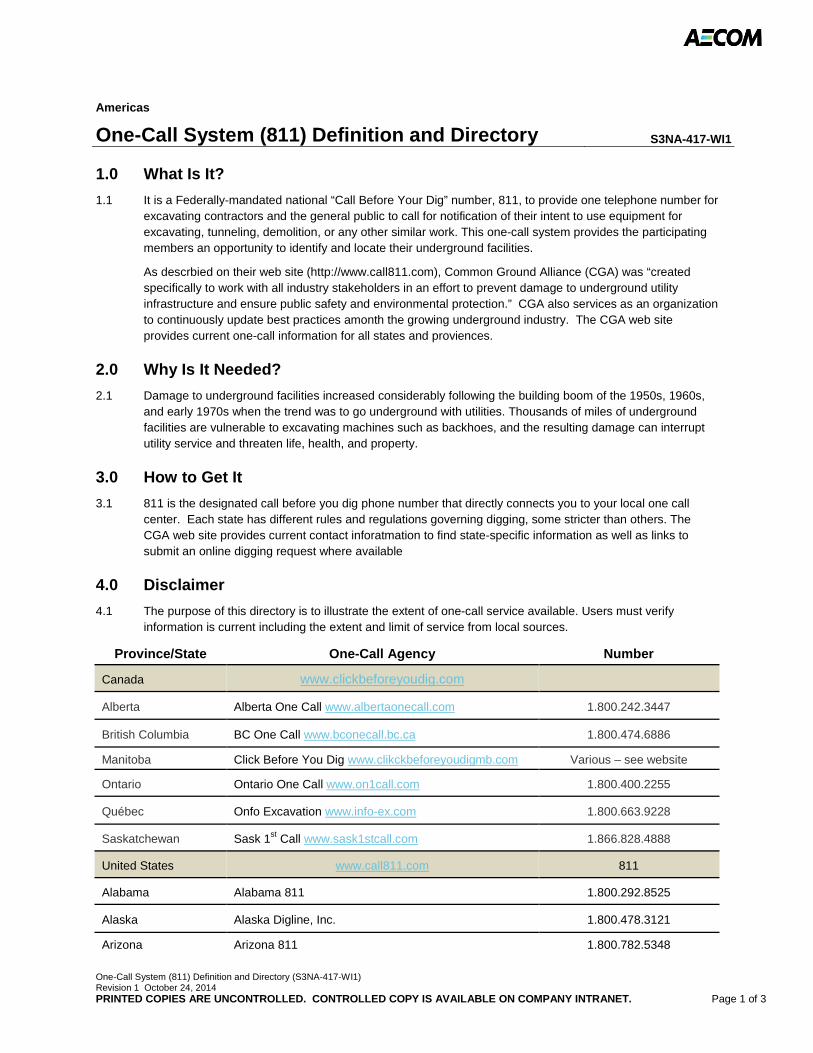
One-Call System (811) Definition and Directory (S3NA-417-WI1) Revision 1 October 24, 2014 PRINTED COPIES ARE UNCONTROLLED. CONTROLLED COPY IS AVAILABLE ON COMPANY INTRANET. Page 1 of 3
Americas
One-Call System (811) Definition and Directory S3NA-417-WI1
1.0 What Is It?
1.1 It is a Federally-mandated national “Call Before Your Dig” number, 811, to provide one telephone number for excavating contractors and the general public to call for notification of their intent to use equipment for excavating, tunneling, demolition, or any other similar work. This one-call system provides the participating members an opportunity to identify and locate their underground facilities.
As descrbied on their web site (http://www.call811.com), Common Ground Alliance (CGA) was “created specifically to work with all industry stakeholders in an effort to prevent damage to underground utility infrastructure and ensure public safety and environmental protection.” CGA also services as an organization to continuously update best practices amonth the growing underground industry. The CGA web site provides current one-call information for all states and proviences.
2.0 Why Is It Needed?
2.1 Damage to underground facilities increased considerably following the building boom of the 1950s, 1960s, and early 1970s when the trend was to go underground with utilities. Thousands of miles of underground facilities are vulnerable to excavating machines such as backhoes, and the resulting damage can interrupt utility service and threaten life, health, and property.
3.0 How to Get It
3.1 811 is the designated call before you dig phone number that directly connects you to your local one call center. Each state has different rules and regulations governing digging, some stricter than others. The CGA web site provides current contact inforatmation to find state-specific information as well as links to submit an online digging request where available
4.0 Disclaimer
4.1 The purpose of this directory is to illustrate the extent of one-call service available. Users must verify information is current including the extent and limit of service from local sources.
Province/State One-Call Agency Number
Canada www.clickbeforeyoudig.com
Alberta Alberta One Call www.albertaonecall.com 1.800.242.3447
British Columbia BC One Call www.bconecall.bc.ca 1.800.474.6886
Manitoba Click Before You Dig www.clikckbeforeyoudigmb.com Various – see website
Ontario Ontario One Call www.on1call.com 1.800.400.2255
Québec Onfo Excavation www.info-ex.com 1.800.663.9228
Saskatchewan Sask 1st Call www.sask1stcall.com 1.866.828.4888
United States www.call811.com 811
Alabama Alabama 811 1.800.292.8525
Alaska Alaska Digline, Inc. 1.800.478.3121
Arizona Arizona 811 1.800.782.5348
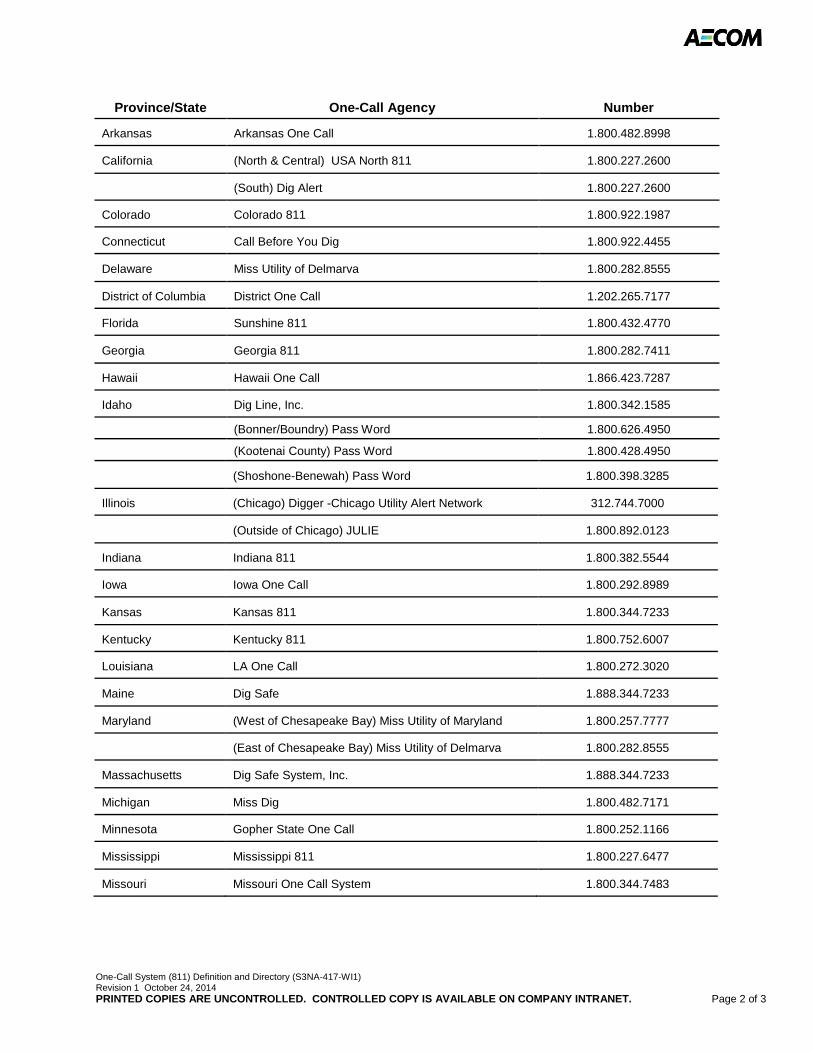
One-Call System (811) Definition and Directory (S3NA-417-WI1) Revision 1 October 24, 2014 PRINTED COPIES ARE UNCONTROLLED. CONTROLLED COPY IS AVAILABLE ON COMPANY INTRANET. Page 2 of 3
Province/State One-Call Agency Number
Arkansas Arkansas One Call 1.800.482.8998
California (North & Central) USA North 811 1.800.227.2600
(South) Dig Alert 1.800.227.2600
Colorado Colorado 811 1.800.922.1987
Connecticut Call Before You Dig 1.800.922.4455
Delaware Miss Utility of Delmarva 1.800.282.8555
District of Columbia District One Call 1.202.265.7177
Florida Sunshine 811 1.800.432.4770
Georgia Georgia 811 1.800.282.7411
Hawaii Hawaii One Call 1.866.423.7287
Idaho Dig Line, Inc. 1.800.342.1585
(Bonner/Boundry) Pass Word 1.800.626.4950
(Kootenai County) Pass Word 1.800.428.4950
(Shoshone-Benewah) Pass Word 1.800.398.3285
Illinois (Chicago) Digger -Chicago Utility Alert Network 312.744.7000
(Outside of Chicago) JULIE 1.800.892.0123
Indiana Indiana 811 1.800.382.5544
Iowa Iowa One Call 1.800.292.8989
Kansas Kansas 811 1.800.344.7233
Kentucky Kentucky 811 1.800.752.6007
Louisiana LA One Call 1.800.272.3020
Maine Dig Safe 1.888.344.7233
Maryland (West of Chesapeake Bay) Miss Utility of Maryland 1.800.257.7777
(East of Chesapeake Bay) Miss Utility of Delmarva 1.800.282.8555
Massachusetts Dig Safe System, Inc. 1.888.344.7233
Michigan Miss Dig 1.800.482.7171
Minnesota Gopher State One Call 1.800.252.1166
Mississippi Mississippi 811 1.800.227.6477
Missouri Missouri One Call System 1.800.344.7483
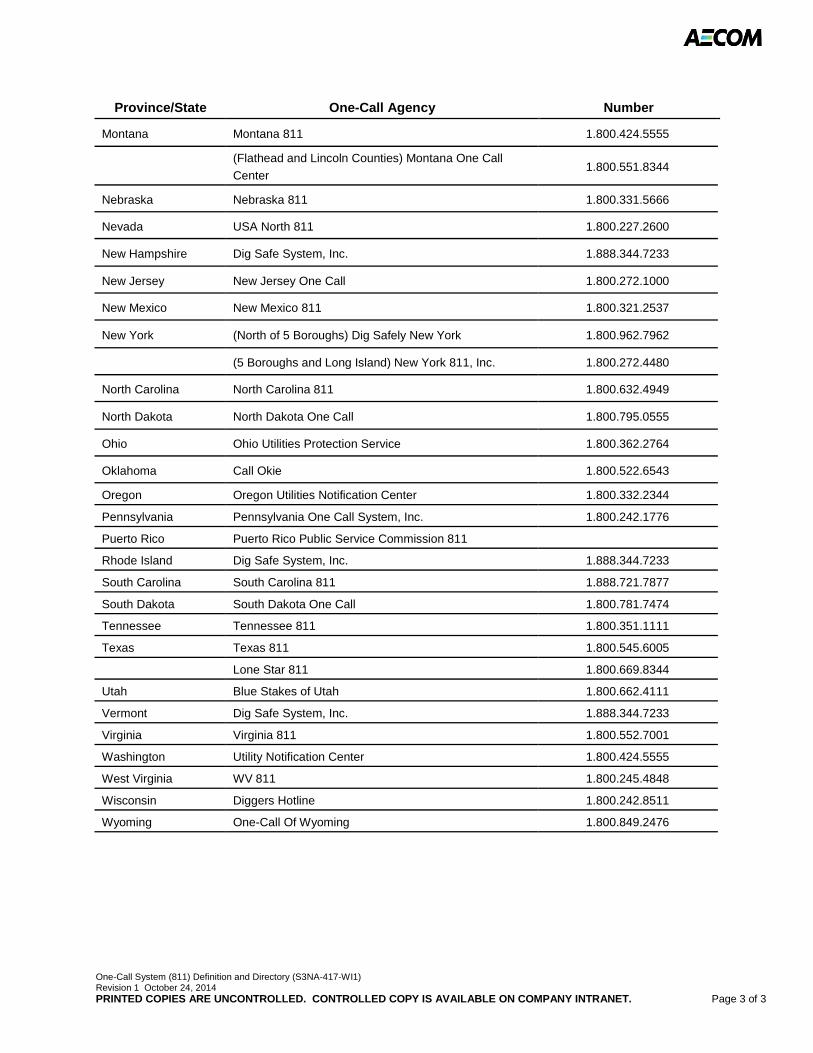
One-Call System (811) Definition and Directory (S3NA-417-WI1) Revision 1 October 24, 2014 PRINTED COPIES ARE UNCONTROLLED. CONTROLLED COPY IS AVAILABLE ON COMPANY INTRANET. Page 3 of 3
Province/State One-Call Agency Number
Montana Montana 811 1.800.424.5555
(Flathead and Lincoln Counties) Montana One Call
Center 1.800.551.8344
Nebraska Nebraska 811 1.800.331.5666
Nevada USA North 811 1.800.227.2600
New Hampshire Dig Safe System, Inc. 1.888.344.7233
New Jersey New Jersey One Call 1.800.272.1000
New Mexico New Mexico 811 1.800.321.2537
New York (North of 5 Boroughs) Dig Safely New York 1.800.962.7962
(5 Boroughs and Long Island) New York 811, Inc. 1.800.272.4480
North Carolina North Carolina 811 1.800.632.4949
North Dakota North Dakota One Call 1.800.795.0555
Ohio Ohio Utilities Protection Service 1.800.362.2764
Oklahoma Call Okie 1.800.522.6543
Oregon Oregon Utilities Notification Center 1.800.332.2344
Pennsylvania Pennsylvania One Call System, Inc. 1.800.242.1776
Puerto Rico Puerto Rico Public Service Commission 811
Rhode Island Dig Safe System, Inc. 1.888.344.7233
South Carolina South Carolina 811 1.888.721.7877
South Dakota South Dakota One Call 1.800.781.7474
Tennessee Tennessee 811 1.800.351.1111
Texas Texas 811 1.800.545.6005
Lone Star 811 1.800.669.8344
Utah Blue Stakes of Utah 1.800.662.4111
Vermont Dig Safe System, Inc. 1.888.344.7233
Virginia Virginia 811 1.800.552.7001
Washington Utility Notification Center 1.800.424.5555
West Virginia WV 811 1.800.245.4848
Wisconsin Diggers Hotline 1.800.242.8511
Wyoming One-Call Of Wyoming 1.800.849.2476
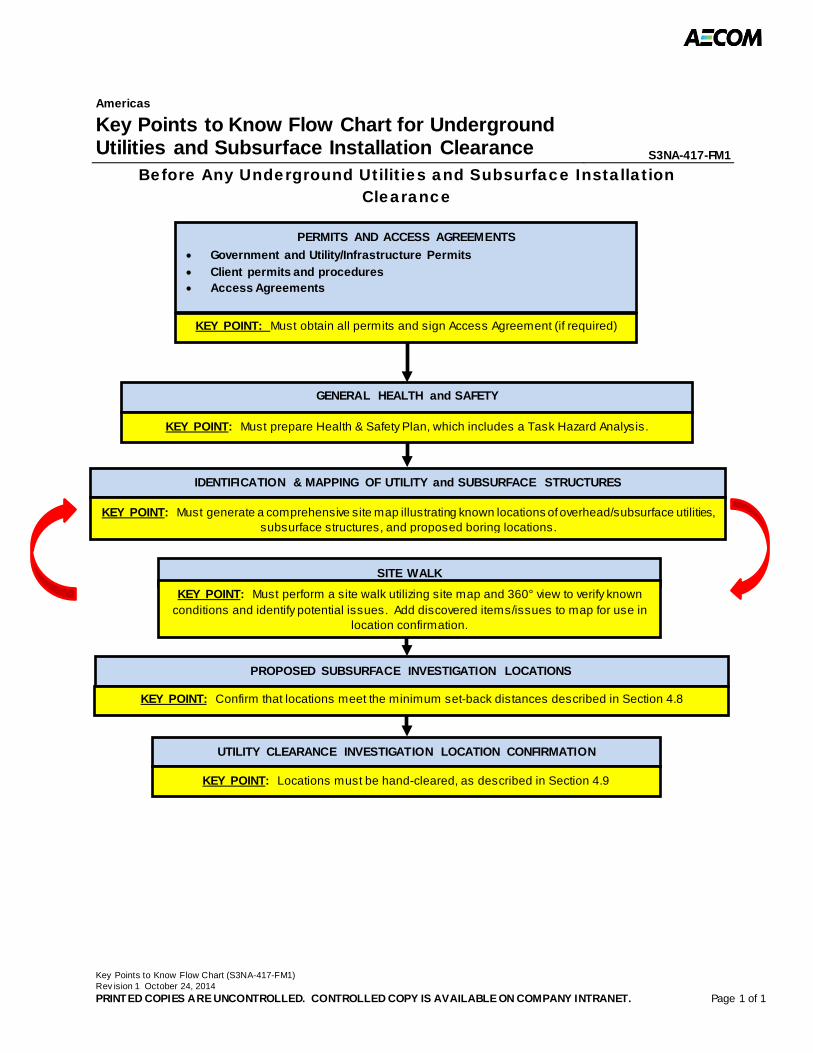
Key Points to Know Flow Chart (S3NA-417-FM1) Rev ision 1 October 24, 2014 PRINTED COPIES ARE UNCONTROLLED. CONTROLLED COPY IS AVAILABLE ON COMPANY INTRANET. Page 1 of 1
Americas
Key Points to Know Flow Chart for Underground Utilities and Subsurface Installation Clearance S3NA-417-FM1
Before Any Underground Utilities and Subsurface Installation Clearance
PERMITS AND ACCESS AGREEMENTS
• Government and Utility/Infrastructure Permits
• Client permits and procedures • Access Agreements
KEY POINT: Must obtain all permits and sign Access Agreement (if required)
UTILITY CLEARANCE INVESTIGATION LOCATION CONFIRMATION
KEY POINT: Locations must be hand-cleared, as described in Section 4.9
PROPOSED SUBSURFACE INVESTIGATION LOCATIONS
KEY POINT: Confirm that locations meet the minimum set-back distances described in Section 4.8
IDENTIFICATION & MAPPING OF UTILITY and SUBSURFACE STRUCTURES
KEY POINT: Must generate a comprehensive site map illustrating known locations of overhead/subsurface utilities, subsurface structures, and proposed boring locations.
GENERAL HEALTH and SAFETY
KEY POINT: Must prepare Health & Safety Plan, which includes a Task Hazard Analysis.
SITE WALK KEY POINT: Must perform a site walk utilizing site map and 360° view to verify known
conditions and identify potential issues. Add discovered items/issues to map for use in location confirmation.
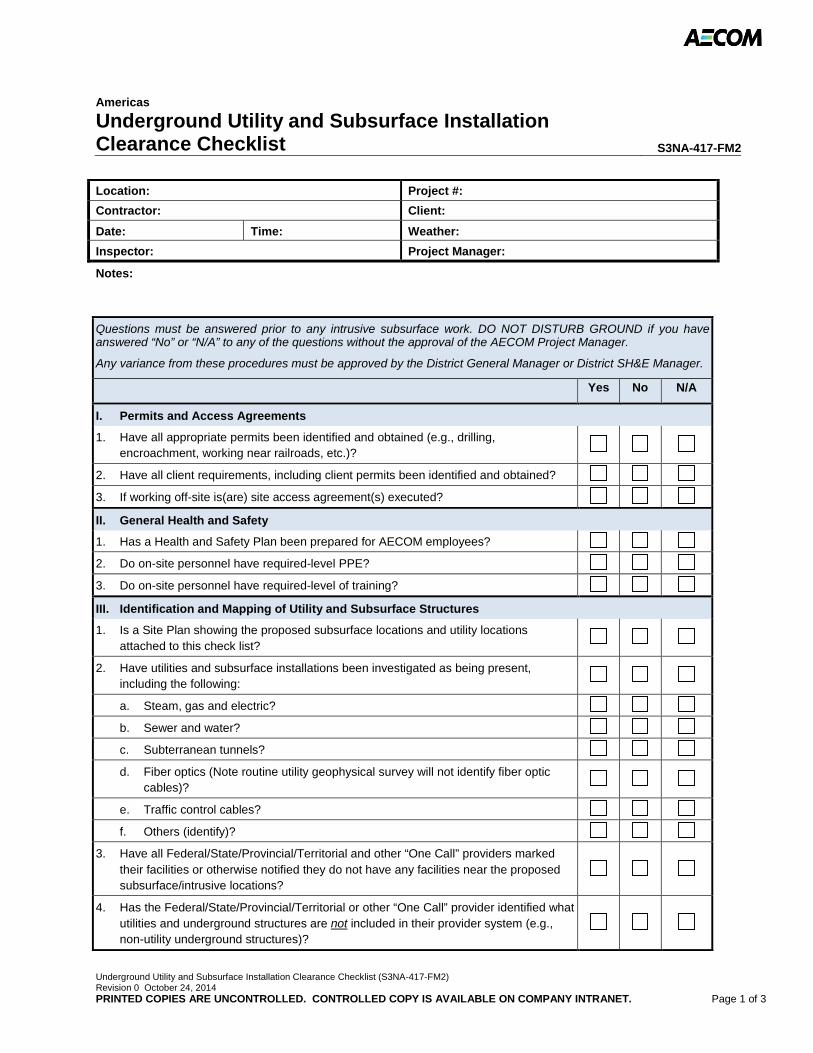
Underground Utility and Subsurface Installation Clearance Checklist (S3NA-417-FM2) Revision 0 October 24, 2014 PRINTED COPIES ARE UNCONTROLLED. CONTROLLED COPY IS AVAILABLE ON COMPANY INTRANET. Page 1 of 3
Americas
Underground Utility and Subsurface Installation Clearance Checklist S3NA-417-FM2
Location: Project #:
Contractor: Client:
Date: Time: Weather:
Inspector: Project Manager:
Notes:
Questions must be answered prior to any intrusive subsurface work. DO NOT DISTURB GROUND if you have answered “No” or “N/A” to any of the questions without the approval of the AECOM Project Manager.
Any variance from these procedures must be approved by the District General Manager or District SH&E Manager.
Yes No N/A
I. Permits and Access Agreements
1. Have all appropriate permits been identified and obtained (e.g., drilling, encroachment, working near railroads, etc.)?
2. Have all client requirements, including client permits been identified and obtained? 3. If working off-site is(are) site access agreement(s) executed? II. General Health and Safety
1. Has a Health and Safety Plan been prepared for AECOM employees? 2. Do on-site personnel have required-level PPE? 3. Do on-site personnel have required-level of training? III. Identification and Mapping of Utility and Subsurface Structures
1. Is a Site Plan showing the proposed subsurface locations and utility locations attached to this check list?
2. Have utilities and subsurface installations been investigated as being present,
including the following:
a. Steam, gas and electric? b. Sewer and water? c. Subterranean tunnels? d. Fiber optics (Note routine utility geophysical survey will not identify fiber optic
cables)?
e. Traffic control cables? f. Others (identify)?
3. Have all Federal/State/Provincial/Territorial and other “One Call” providers marked their facilities or otherwise notified they do not have any facilities near the proposed subsurface/intrusive locations?
4. Has the Federal/State/Provincial/Territorial or other “One Call” provider identified what utilities and underground structures are not included in their provider system (e.g., non-utility underground structures)?
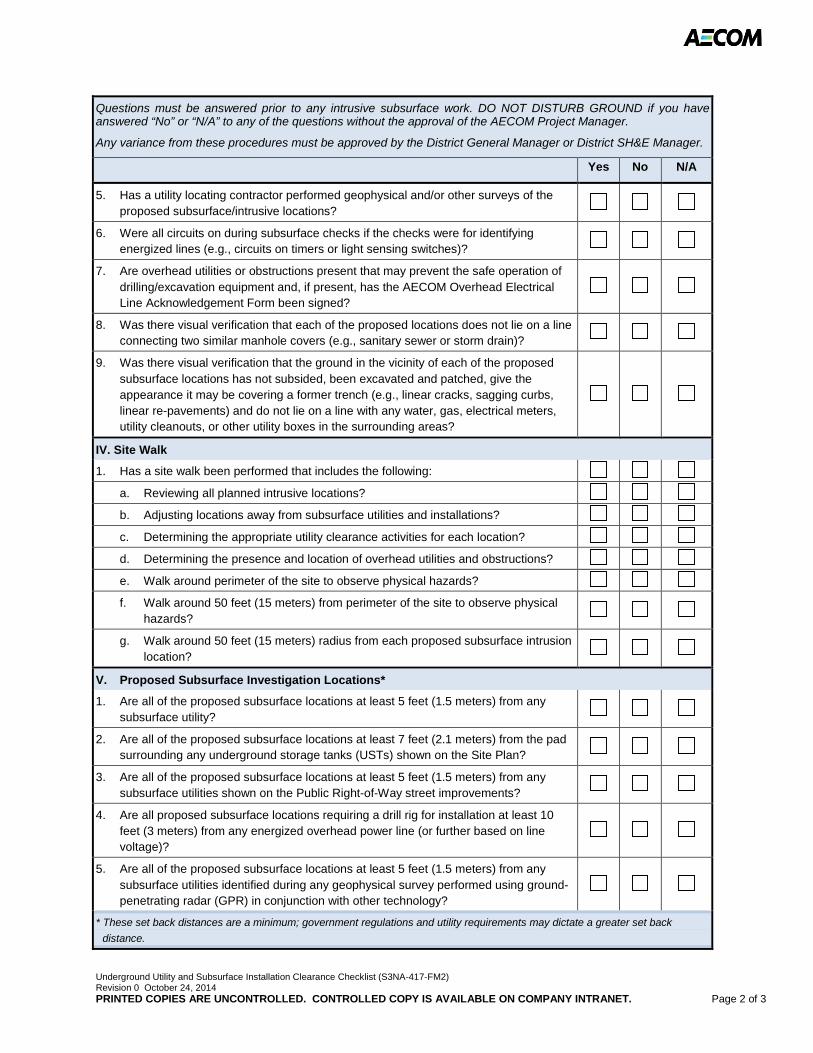
Underground Utility and Subsurface Installation Clearance Checklist (S3NA-417-FM2) Revision 0 October 24, 2014 PRINTED COPIES ARE UNCONTROLLED. CONTROLLED COPY IS AVAILABLE ON COMPANY INTRANET. Page 2 of 3
Questions must be answered prior to any intrusive subsurface work. DO NOT DISTURB GROUND if you have answered “No” or “N/A” to any of the questions without the approval of the AECOM Project Manager.
Any variance from these procedures must be approved by the District General Manager or District SH&E Manager.
Yes No N/A
5. Has a utility locating contractor performed geophysical and/or other surveys of the proposed subsurface/intrusive locations?
6. Were all circuits on during subsurface checks if the checks were for identifying
energized lines (e.g., circuits on timers or light sensing switches)?
7. Are overhead utilities or obstructions present that may prevent the safe operation of drilling/excavation equipment and, if present, has the AECOM Overhead Electrical Line Acknowledgement Form been signed?
8. Was there visual verification that each of the proposed locations does not lie on a line connecting two similar manhole covers (e.g., sanitary sewer or storm drain)?
9. Was there visual verification that the ground in the vicinity of each of the proposed
subsurface locations has not subsided, been excavated and patched, give the appearance it may be covering a former trench (e.g., linear cracks, sagging curbs, linear re-pavements) and do not lie on a line with any water, gas, electrical meters, utility cleanouts, or other utility boxes in the surrounding areas?
IV. Site Walk
1. Has a site walk been performed that includes the following: a. Reviewing all planned intrusive locations? b. Adjusting locations away from subsurface utilities and installations? c. Determining the appropriate utility clearance activities for each location? d. Determining the presence and location of overhead utilities and obstructions? e. Walk around perimeter of the site to observe physical hazards? f. Walk around 50 feet (15 meters) from perimeter of the site to observe physical
hazards?
g. Walk around 50 feet (15 meters) radius from each proposed subsurface intrusion location?
V. Proposed Subsurface Investigation Locations*
1. Are all of the proposed subsurface locations at least 5 feet (1.5 meters) from any subsurface utility?
2. Are all of the proposed subsurface locations at least 7 feet (2.1 meters) from the pad
surrounding any underground storage tanks (USTs) shown on the Site Plan?
3. Are all of the proposed subsurface locations at least 5 feet (1.5 meters) from any subsurface utilities shown on the Public Right-of-Way street improvements?
4. Are all proposed subsurface locations requiring a drill rig for installation at least 10
feet (3 meters) from any energized overhead power line (or further based on line voltage)?
5. Are all of the proposed subsurface locations at least 5 feet (1.5 meters) from any subsurface utilities identified during any geophysical survey performed using ground-penetrating radar (GPR) in conjunction with other technology?
* These set back distances are a minimum; government regulations and utility requirements may dictate a greater set back distance.
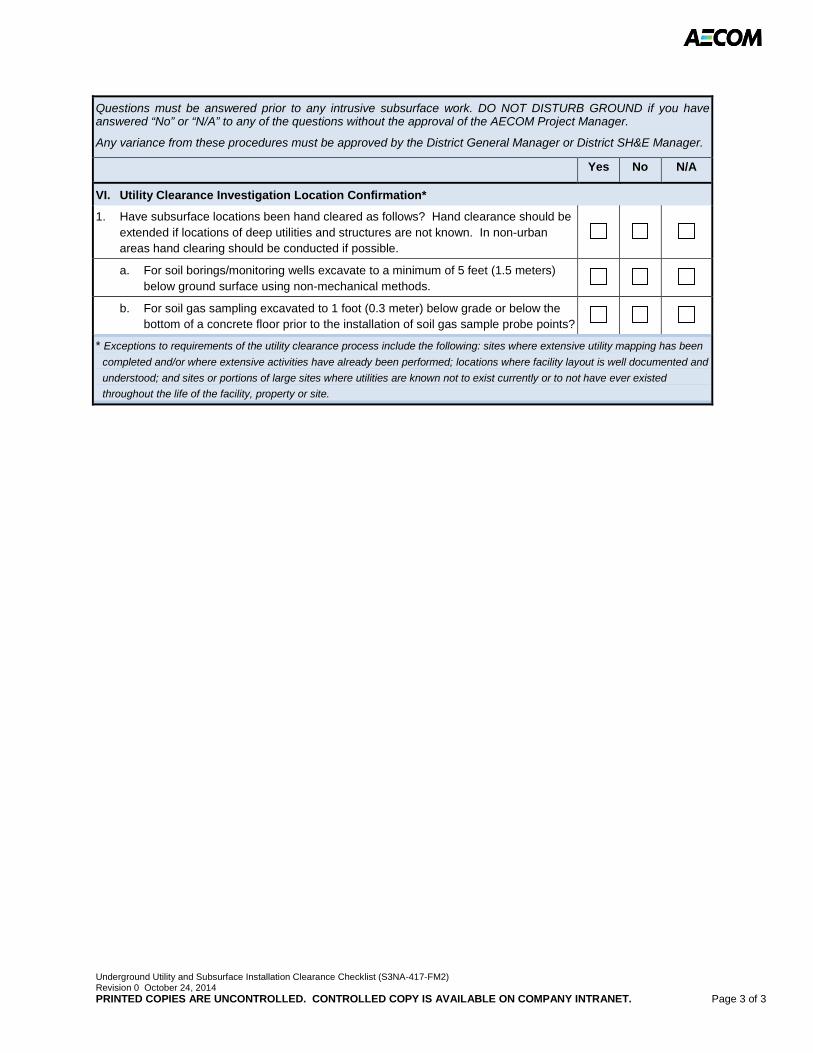
Underground Utility and Subsurface Installation Clearance Checklist (S3NA-417-FM2) Revision 0 October 24, 2014 PRINTED COPIES ARE UNCONTROLLED. CONTROLLED COPY IS AVAILABLE ON COMPANY INTRANET. Page 3 of 3
Questions must be answered prior to any intrusive subsurface work. DO NOT DISTURB GROUND if you have answered “No” or “N/A” to any of the questions without the approval of the AECOM Project Manager.
Any variance from these procedures must be approved by the District General Manager or District SH&E Manager.
Yes No N/A
VI. Utility Clearance Investigation Location Confirmation*
1. Have subsurface locations been hand cleared as follows? Hand clearance should be extended if locations of deep utilities and structures are not known. In non-urban areas hand clearing should be conducted if possible.
a. For soil borings/monitoring wells excavate to a minimum of 5 feet (1.5 meters) below ground surface using non-mechanical methods.
b. For soil gas sampling excavated to 1 foot (0.3 meter) below grade or below the
bottom of a concrete floor prior to the installation of soil gas sample probe points?
* Exceptions to requirements of the utility clearance process include the following: sites where extensive utility mapping has been completed and/or where extensive activities have already been performed; locations where facility layout is well documented and understood; and sites or portions of large sites where utilities are known not to exist currently or to not have ever existed throughout the life of the facility, property or site.
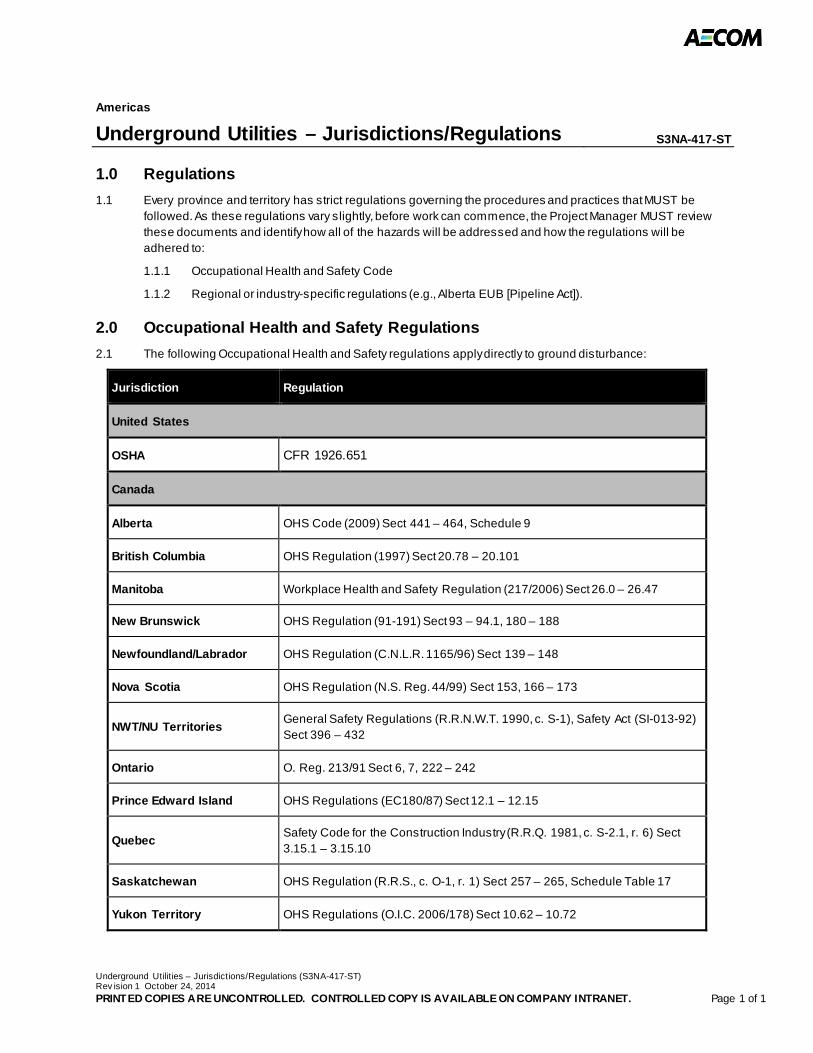
Underground Utilities – Jurisdictions/Regulations (S3NA-417-ST) Rev ision 1 October 24, 2014 PRINTED COPIES ARE UNCONTROLLED. CONTROLLED COPY IS AVAILABLE ON COMPANY INTRANET. Page 1 of 1
Americas
Underground Utilities – Jurisdictions/Regulations S3NA-417-ST
1.0 Regulations
1.1 Every province and territory has strict regulations governing the procedures and practices that MUST be followed. As these regulations vary slightly, before work can commence, the Project Manager MUST review these documents and identify how all of the hazards will be addressed and how the regulations will be adhered to:
1.1.1 Occupational Health and Safety Code
1.1.2 Regional or industry-specific regulations (e.g., Alberta EUB [Pipeline Act]).
2.0 Occupational Health and Safety Regulations
2.1 The following Occupational Health and Safety regulations apply directly to ground disturbance:
Jurisdiction Regulation
United States
OSHA CFR 1926.651
Canada
Alberta OHS Code (2009) Sect 441 – 464, Schedule 9
British Columbia OHS Regulation (1997) Sect 20.78 – 20.101
Manitoba Workplace Health and Safety Regulation (217/2006) Sect 26.0 – 26.47
New Brunswick OHS Regulation (91-191) Sect 93 – 94.1, 180 – 188
Newfoundland/Labrador OHS Regulation (C.N.L.R. 1165/96) Sect 139 – 148
Nova Scotia OHS Regulation (N.S. Reg. 44/99) Sect 153, 166 – 173
NWT/NU Territories General Safety Regulations (R.R.N.W.T. 1990, c. S-1), Safety Act (SI-013-92) Sect 396 – 432
Ontario O. Reg. 213/91 Sect 6, 7, 222 – 242
Prince Edward Island OHS Regulations (EC180/87) Sect 12.1 – 12.15
Quebec Safety Code for the Construction Industry (R.R.Q. 1981, c. S-2.1, r. 6) Sect 3.15.1 – 3.15.10
Saskatchewan OHS Regulation (R.R.S., c. O-1, r. 1) Sect 257 – 265, Schedule Table 17
Yukon Territory OHS Regulations (O.I.C. 2006/178) Sect 10.62 – 10.72


