Embed Size (px)
Citation preview
Index Page
User Manual
1 PHPKB API Reference Guide
2 Front End at a Glance
3 Admin Control Panel At a Glance
4 PHPKB SAML Single Sign-On (SSO) Reference Guide
5 How to use the User Manual?
6 General Overview of PHPKB Knowledge Base Management Software
Admin Control Panel
1 Admin Control Panel Interface
2 Admin Dashboard
Languages
1 Adding a language translator account
2 Deleting a language file
3 Managing Languages
4 Assigning languages to translators
5 Adding a new language
6 Translating language files
Tools
1 Taking backup of knowledge base data
2 Harvesting emails from knowledge base
3 Optimising KB Database
4 Indexing Attachments
5 Sitemap Generator
Data Import
1 Importing data from an HTML file
2 Importing data from a CSV file
Manage Settings
1 Article Settings
2 Feature Settings
3 General Settings
4 Miscellaneous Settings
Statistics & Reports
1 Knowledge Base Traffic Statistics
2 Statistics Overview
3 Failed Logins Statistics
4 Article Referrers
Search Statistics
1 Successful and Failed Searches
2 Search Summary
User Statistics
1 Active Users
2 Article Contributors
3 Users Summary
4 Popular Authors
Category Statistics
1 Empty Categories
2 Category Summary
3 Popular Categories
Article Statistics
1 Articles Monthly Report
2 Most Mailed Articles
3 Articles Summary
4 Most Printed Articles
5 Popular Articles
6 Most Discussed Articles
7 Top Rated Articles
8 Article Referrers
User Groups
1 Managing User Groups
2 Creating a user group
Users
1 Creating a new user account
2 Searching Users
3 Managing User Accounts
4 Different levels of users in knowledge base
News & Announcements
1 Autosaved News Drafts
2 Adding a news
3 Managing News
Glossary
1 Adding a glossary term
2 Managing Glossary Terms
Support Tickets
1 Tickets and their status
2 Managing Support Tickets 3 Sending reply to a ticket
4 Publishing a ticket as an article in knowledge base
5 Submitting support tickets in knowledge base
6 Ticket History
Comments
1 Managing Comments
2 How to add a comment?
Articles
1 Article Locking
2 What are the differences between public and private articles in a knowledge base?
3 How to Author an Article in the Knowledge Base?
4 Article Interface in Front-end Area
5 My Articles
6 Collaborating on an article
7 Trash Box
8 Managing Articles
9 Autosaved Drafts
10 Adding a new article
11 Types of articles
12 Searching Articles
Article Subscribers
1 Subscribing to an article
2 Managing Subscribers
Article WYSIWYG Editor
1 Inserting an image into WYSIWYG editor
2 Features of WYSIWYG editor
Document Versioning
1 Managing Article Versions
2 Comparing Article Versions
Custom Fields
1 Adding a new custom field
2 Managing Custom Fields
Article Templates
1 Creating a new template
2 Managing Templates
Categories
1 Managing Categories
2 Adding a new category
Category Subscribers
1 Subscribing to a category
2 Managing Subscribers
End User Interface
1 Front End at a Glance
2 End User Interface at a glance

CATEGORY
User Manual6 Articles
0 2500
PHPKB API Reference Guide
Ajay Chadha Dec 30, 2019 at 3:49AM User Manual
This module enables you to use REST API through your PHPKB software. It includes a variety of useful commands in order to get information from your PHPKB installation remotely, through third party applications. The PHPKB API operates over
HTTPS and uses JSON as its data format. The API is a RESTful API and utilizes HTTP methods and HTTP status codes to specify requests and responses.
A REST API defines a set of functions which developers can perform requests and receive responses via HTTP protocol such as GET and POST. This is exactly what you will get from our product. Nothing less, nothing more. If you are unsure about
your coding skills or you do not understand what exactly an API is, feel free to raise a comment with your specific question.
PHPKB API Reference GuideThis document provides details on how to use the API available in PHPKB knowledge base management software. It acts as a reference guide and covers topics such as enabling the API server, generating the API verification keys, preparing the
request URL parameters for submitting a valid request to the API server.
The API can be called through the browser directly, which is the easiest approach. If your knowledge base is installed at https://www.yoursite.com/phpkb/ then API server can be accessed from https://www.yoursite.com/phpkb/api.php .
Note: In order to make any requests to PHPKB API, you'll need to authorize your requests by providing valid API key.
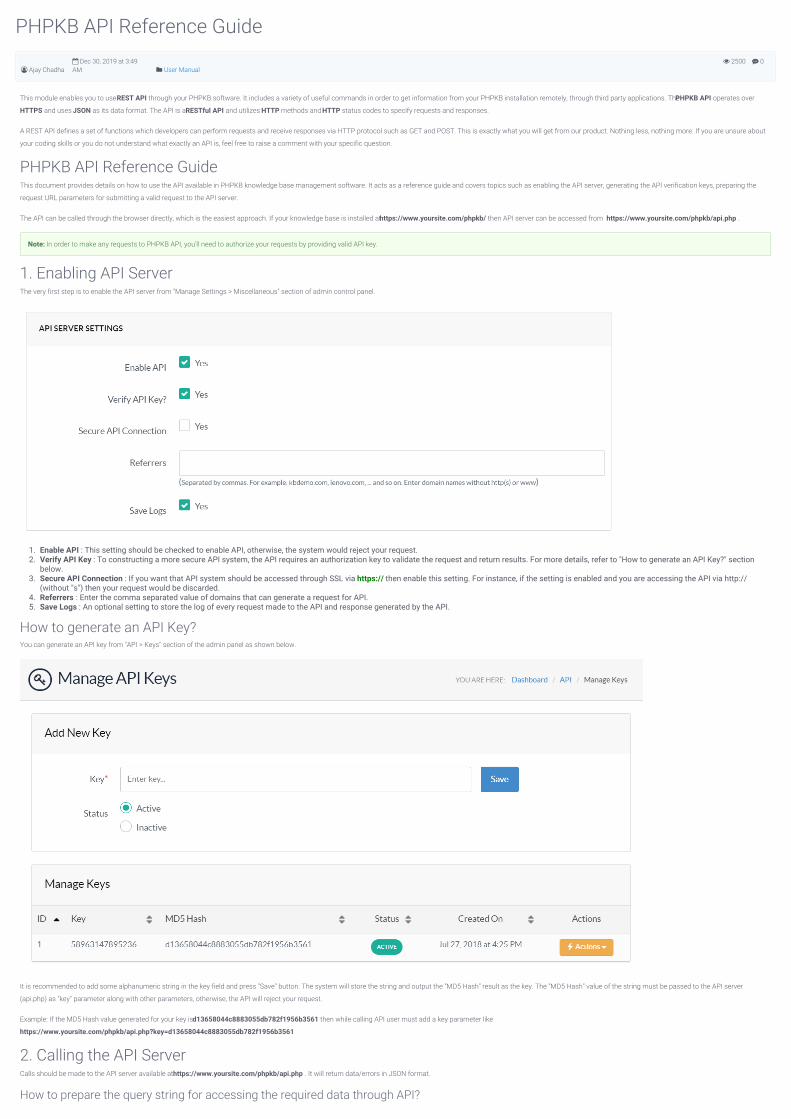
1. Enabling API ServerThe very first step is to enable the API server from "Manage Settings > Miscellaneous" section of admin control panel.
1. Enable API : This setting should be checked to enable API, otherwise, the system would reject your request.2. Verify API Key : To constructing a more secure API system, the API requires an authorization key to validate the request and return results. For more details, refer to "How to generate an API Key?" section
below.3. Secure API Connection : If you want that API system should be accessed through SSL via https:// then enable this setting. For instance, if the setting is enabled and you are accessing the API via http://
(without "s") then your request would be discarded.4. Referrers : Enter the comma separated value of domains that can generate a request for API.5. Save Logs : An optional setting to store the log of every request made to the API and response generated by the API.
How to generate an API Key?You can generate an API key from "API > Keys" section of the admin panel as shown below.
It is recommended to add some alphanumeric string in the key field and press "Save" button. The system will store the string and output the "MD5 Hash" result as the key. The "MD5 Hash" value of the string must be passed to the API server
(api.php) as "key" parameter along with other parameters, otherwise, the API will reject your request.
Example: If the MD5 Hash value generated for your key is d13658044c8883055db782f1956b3561 then while calling API user must add a key parameter like
https://www.yoursite.com/phpkb/api.php?key=d13658044c8883055db782f1956b3561
2. Calling the API ServerCalls should be made to the API server available at https://www.yoursite.com/phpkb/api.php . It will return data/errors in JSON format.
How to prepare the query string for accessing the required data through API?
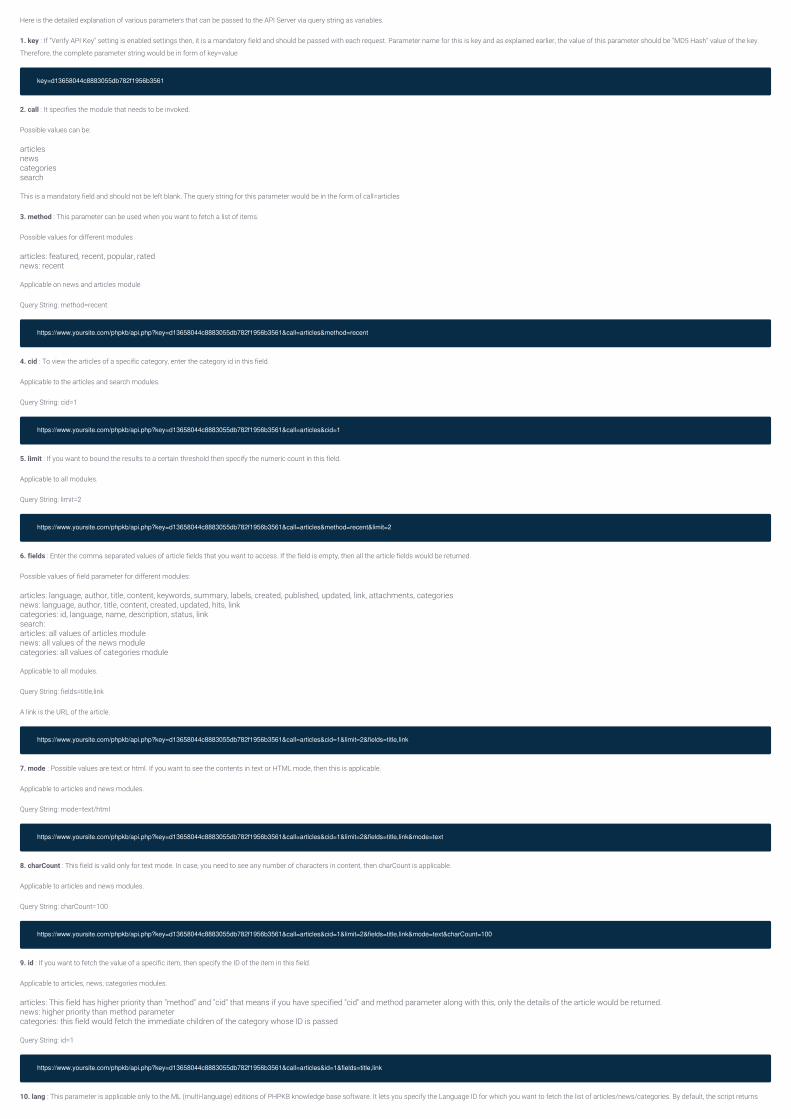
Here is the detailed explanation of various parameters that can be passed to the API Server via query string as variables.
1. key : If "Verify API Key" setting is enabled settings then, it is a mandatory field and should be passed with each request. Parameter name for this is key and as explained earlier, the value of this parameter should be "MD5 Hash" value of the key.
Therefore, the complete parameter string would be in form of key=value
key=d13658044c8883055db782f1956b3561
2. call : It specifies the module that needs to be invoked.
Possible values can be:
articlesnewscategoriessearch
This is a mandatory field and should not be left blank. The query string for this parameter would be in the form of call=articles
3. method : This parameter can be used when you want to fetch a list of items.
Possible values for different modules
articles: featured, recent, popular, ratednews: recent
Applicable on news and articles module
Query String: method=recent
https://www.yoursite.com/phpkb/api.php?key=d13658044c8883055db782f1956b3561&call=articles&method=recent
4. cid : To view the articles of a specific category, enter the category id in this field.
Applicable to the articles and search modules.
Query String: cid=1
https://www.yoursite.com/phpkb/api.php?key=d13658044c8883055db782f1956b3561&call=articles&cid=1
5. limit : If you want to bound the results to a certain threshold then specify the numeric count in this field.
Applicable to all modules.
Query String: limit=2
https://www.yoursite.com/phpkb/api.php?key=d13658044c8883055db782f1956b3561&call=articles&method=recent&limit=2
6. fields : Enter the comma separated values of article fields that you want to access. If the field is empty, then all the article fields would be returned.
Possible values of field parameter for different modules:
articles: language, author, title, content, keywords, summary, labels, created, published, updated, link, attachments, categoriesnews: language, author, title, content, created, updated, hits, linkcategories: id, language, name, description, status, linksearch:articles: all values of articles modulenews: all values of the news modulecategories: all values of categories module
Applicable to all modules.
Query String: fields=title,link
A link is the URL of the article.
https://www.yoursite.com/phpkb/api.php?key=d13658044c8883055db782f1956b3561&call=articles&cid=1&limit=2&fields=title,link
7. mode : Possible values are text or html. If you want to see the contents in text or HTML mode, then this is applicable.
Applicable to articles and news modules.
Query String: mode=text/html
https://www.yoursite.com/phpkb/api.php?key=d13658044c8883055db782f1956b3561&call=articles&cid=1&limit=2&fields=title,link&mode=text
8. charCount : This field is valid only for text mode. In case, you need to see any number of characters in content, then charCount is applicable.
Applicable to articles and news modules.
Query String: charCount=100
https://www.yoursite.com/phpkb/api.php?key=d13658044c8883055db782f1956b3561&call=articles&cid=1&limit=2&fields=title,link&mode=text&charCount=100
9. id : If you want to fetch the value of a specific item, then specify the ID of the item in this field.
Applicable to articles, news, categories modules.
articles: This field has higher priority than "method" and "cid" that means if you have specified "cid" and method parameter along with this, only the details of the article would be returned.news: higher priority than method parametercategories: this field would fetch the immediate children of the category whose ID is passed
Query String: id=1
https://www.yoursite.com/phpkb/api.php?key=d13658044c8883055db782f1956b3561&call=articles&id=1&fields=title,link
10. lang : This parameter is applicable only to the ML (multi-language) editions of PHPKB knowledge base software. It lets you specify the Language ID for which you want to fetch the list of articles/news/categories. By default, the script returns
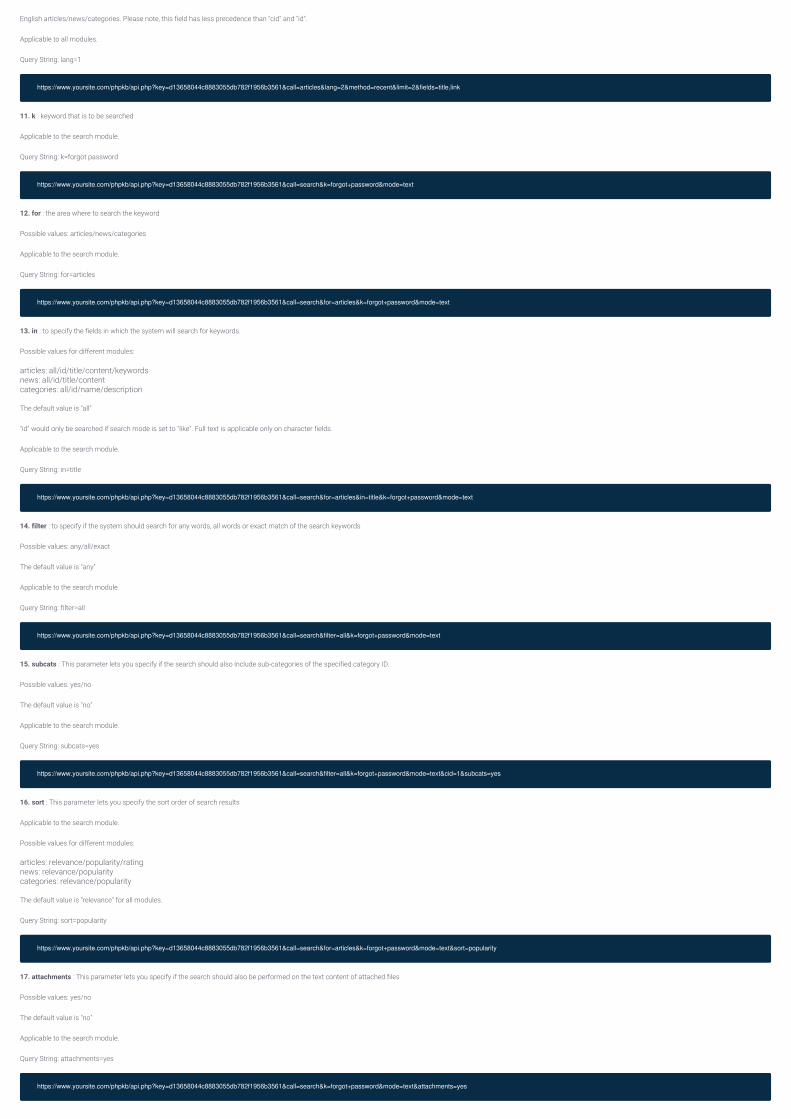
English articles/news/categories. Please note, this field has less precedence than "cid" and "id".
Applicable to all modules.
Query String: lang=1
https://www.yoursite.com/phpkb/api.php?key=d13658044c8883055db782f1956b3561&call=articles&lang=2&method=recent&limit=2&fields=title,link
11. k : keyword that is to be searched
Applicable to the search module.
Query String: k=forgot password
https://www.yoursite.com/phpkb/api.php?key=d13658044c8883055db782f1956b3561&call=search&k=forgot+password&mode=text
12. for : the area where to search the keyword
Possible values: articles/news/categories
Applicable to the search module.
Query String: for=articles
https://www.yoursite.com/phpkb/api.php?key=d13658044c8883055db782f1956b3561&call=search&for=articles&k=forgot+password&mode=text
13. in : to specify the fields in which the system will search for keywords.
Possible values for different modules:
articles: all/id/title/content/keywordsnews: all/id/title/contentcategories: all/id/name/description
The default value is "all"
"id" would only be searched if search mode is set to "like". Full text is applicable only on character fields.
Applicable to the search module.
Query String: in=title
https://www.yoursite.com/phpkb/api.php?key=d13658044c8883055db782f1956b3561&call=search&for=articles&in=title&k=forgot+password&mode=text
14. filter : to specify if the system should search for any words, all words or exact match of the search keywords
Possible values: any/all/exact
The default value is "any"
Applicable to the search module.
Query String: filter=all
https://www.yoursite.com/phpkb/api.php?key=d13658044c8883055db782f1956b3561&call=search&filter=all&k=forgot+password&mode=text
15. subcats : This parameter lets you specify if the search should also include sub-categories of the specified category ID.
Possible values: yes/no
The default value is "no"
Applicable to the search module.
Query String: subcats=yes
https://www.yoursite.com/phpkb/api.php?key=d13658044c8883055db782f1956b3561&call=search&filter=all&k=forgot+password&mode=text&cid=1&subcats=yes
16. sort : This parameter lets you specify the sort order of search results
Applicable to the search module.
Possible values for different modules:
articles: relevance/popularity/ratingnews: relevance/popularitycategories: relevance/popularity
The default value is "relevance" for all modules.
Query String: sort=popularity
https://www.yoursite.com/phpkb/api.php?key=d13658044c8883055db782f1956b3561&call=search&for=articles&k=forgot+password&mode=text&sort=popularity
17. attachments : This parameter lets you specify if the search should also be performed on the text content of attached files
Possible values: yes/no
The default value is "no"
Applicable to the search module.
Query String: attachments=yes
https://www.yoursite.com/phpkb/api.php?key=d13658044c8883055db782f1956b3561&call=search&k=forgot+password&mode=text&attachments=yes
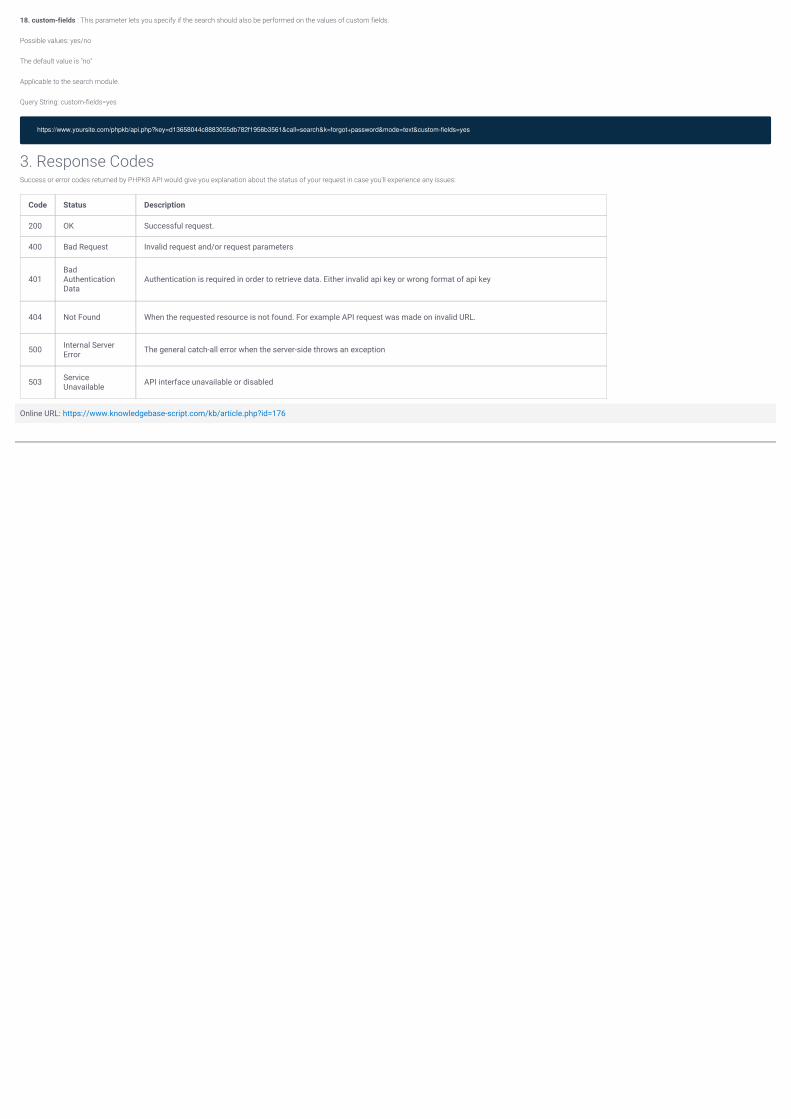
18. custom-fields : This parameter lets you specify if the search should also be performed on the values of custom fields.
Possible values: yes/no
The default value is "no"
Applicable to the search module.
Query String: custom-fields=yes
https://www.yoursite.com/phpkb/api.php?key=d13658044c8883055db782f1956b3561&call=search&k=forgot+password&mode=text&custom-fields=yes
3. Response CodesSuccess or error codes returned by PHPKB API would give you explanation about the status of your request in case you'll experience any issues:
Code Status Description
200 OK Successful request.
400 Bad Request Invalid request and/or request parameters
401BadAuthenticationData
Authentication is required in order to retrieve data. Either invalid api key or wrong format of api key
404 Not Found When the requested resource is not found. For example API request was made on invalid URL.
500 Internal ServerError The general catch-all error when the server-side throws an exception
503 ServiceUnavailable API interface unavailable or disabled
Online URL: https://www.knowledgebase-script.com/kb/article.php?id=176
0 8
Front End at a Glance Gurjeet Kaur Jul 30, 2015 at 3:55 PM User Manual
Front End programs allow direct access by the user of a certain program to have access to further devices, programs, or databases. In the case of PHPKB, they are able to access articles written directly through the programs and they can change
them if need be. Users and the company can both access the front end to read and edit the same articles that are on there.
Articles are published under certain categories on front end. All of the end users can view each article page by clicking on the specific article title from the list of all the articles displayed under each category page. The article page contains
certain article details like; title or sometimes a question, the content or the answers to that question, the article's author, a rating, number of views, user comments, any attachments, custom fields, categories under which it is filed etc. There are
many article options on the right side of your screen. All you need to do is specify the various actions that can be done with or on a certain article. The article page also contains any related articles or basically, articles that are like the article in
question.
There are a few different types of articles that can appear on front end. You can have pending articles which are basically in a pending state because they have not been reviewed and published yet. After that, you get the Approved Articles which are
written by a super user, editor or they can be accepted articles of a writer. On the other hand, you can have Disapproved Articles which have been disapproved by an editor or a super user.
Featured articles are very important articles and will always be shown on the knowledgebase front end home page under the title of featured articles. These can be made featured articles if they are very important for your whole knowledgebase.
Featured Articles also appear at the top positions of the lists of articles.
Expired articles have a certain life-cycle. This means that the knowledgebase controls their life-cycle. You as the programmer can set a certain time limit for articles that will give them limits they will be accessible by KB end users. The article will
automatically stop appearing in the list of published articles when it has reached its expiration date.
Saved Draft articles come in a list of incomplete articles that can either be completed or deleted later on.
Online URL: https://www.knowledgebase-script.com/kb/article.php?id=66
0 18
Admin Control Panel At a Glance Gurjeet Kaur Jul 30, 2015 at 12:55 PM User Manual
Admin Control Panel At a Glance
The PHPKB Knowledgebase system is quite easy to use and it comes with a highly interactive Graphical User Interface. This Interface also has demotic and innate interface elements. The user does not need to do any retraining in order to start
using the PHPKB Knowledge Base Software. The use of AJAX makes sure that the application is faster or is more responsive as sections of pages can also be reloaded individually. This will ultimately reduce the bandwidth usage and the load time.
The interface of PHPKB is divided into two distinct parts; the Header Section and the Workspace Area. From both of these areas, you are able to navigate around the software and find what you need. The Header Section gives you all the detail that
you need to run the software, with shortcuts and a navigation bar. The Workspace Area is where you will manage all of your features.
Within the Navigation Bar, you have access to a few different features, such as; Articles, Categories, Comments, Tickets, News, Glossary, Languages, and Users, User Groups, Statistics, Tools, Shortcut Links, and many other things that you could need to use while
running the program. These tabs open up and give you access to more things within your Workspace. If you need to look at anything further, you can go here to check them out.
If you try to perform any sort of action an it is not able to be done, you will receive an Error Notification that will tell you exactly what you couldn't do and why you couldn't do it. They will even give you the steps to try in which you should follow to complete the task you
want to do.
You could also come across Tooltips. These handy pop-ups with a question mark will give you a tip for help if you simply hover over the small icon.
PHPKB software has Breadcrumbs that are found below the headers section. These help to provide the hierarchical site structures and give links to the parent pages of the current page you are on.
There is also a very handy WYSIWYG editor that is fully compatible with majorly used browsers. WYSIWYG Editor of PHPKB Knowledge Base Software is full of features and provides you with the essential HTML editing functionalities with total
control of the styles. You can change font colors, sizes, format, etc.
Online URL: https://www.knowledgebase-script.com/kb/article.php?id=65
PHPKB SAML Single Sign-On (SSO) Reference Guide
Ajay Chadha Jun 3, 2020 at 6:48AM User Manual
This article provides instructions for configuring Single Sign-On between your website/application authentication system and PHPKB knowledge base software.
How Single Sign-On (SSO) works with PHPKB software?PHPKB supports Single Sign-On (SSO) which will allow you to authenticate your end users using your authentication service, such as your web application's login. Once verified, your end users can then view your knowledge base. However, if your end users navigate directly to your knowledge base without first authenticating, they would be
redirected to your login page. With SSO user just needs to login once to your website or other application and he immediately and automatically gets authenticated to PHPKB. SSO feature makes user, who's logged into your system, authenticated to your knowledge base. We also provide a simple PHP example that shows how SSO works.
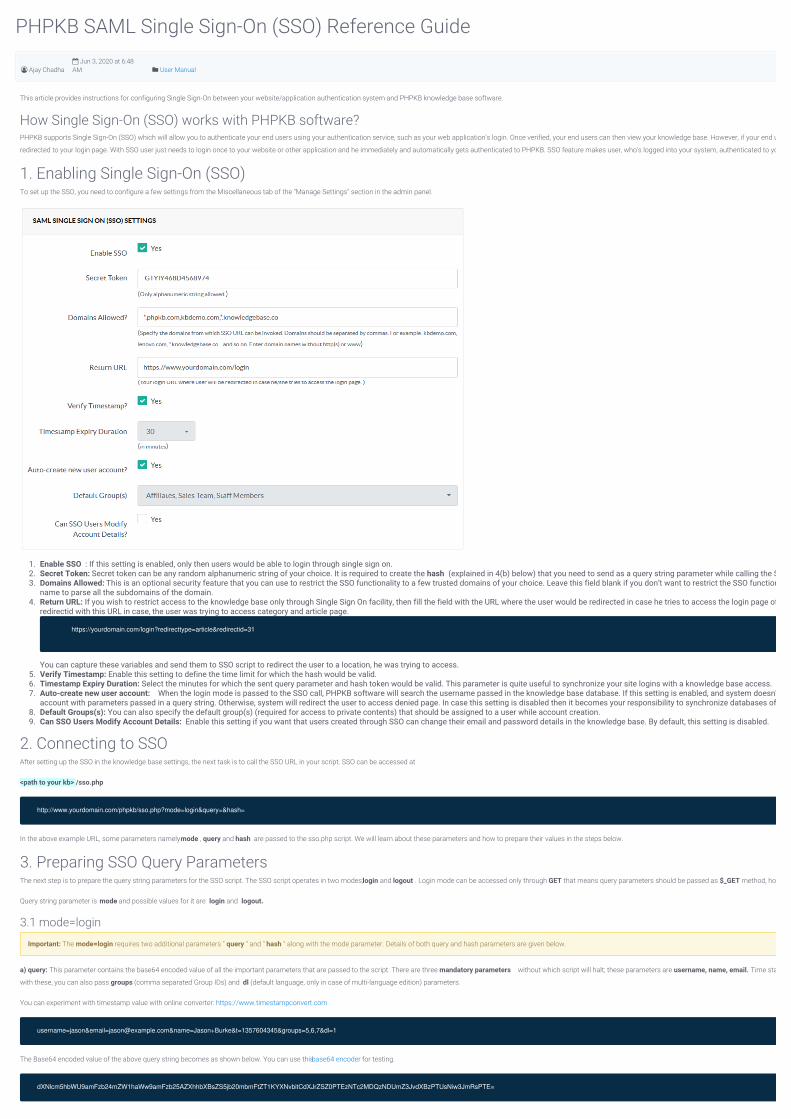
1. Enabling Single Sign-On (SSO)To set up the SSO, you need to configure a few settings from the Miscellaneous tab of the "Manage Settings" section in the admin panel.
1. Enable SSO : If this setting is enabled, only then users would be able to login through single sign on.2. Secret Token: Secret token can be any random alphanumeric string of your choice. It is required to create the hash (explained in 4(b) below) that you need to send as a query string parameter while calling the SSO URL. It is a mandatory field and can’t be left blank.3. Domains Allowed: This is an optional security feature that you can use to restrict the SSO functionality to a few trusted domains of your choice. Leave this field blank if you don’t want to restrict the SSO functionality to any particular domain(s). You can specify
name to parse all the subdomains of the domain. 4. Return URL: If you wish to restrict access to the knowledge base only through Single Sign On facility, then fill the field with the URL where the user would be redirected in case he tries to access the login page of a knowledge base. PHPKB sends two additional parameters redirecttype and
redirectid with this URL in case, the user was trying to access category and article page.
https://yourdomain.com/login?redirecttype=article&redirectid=31
You can capture these variables and send them to SSO script to redirect the user to a location, he was trying to access.5. Verify Timestamp: Enable this setting to define the time limit for which the hash would be valid.6. Timestamp Expiry Duration: Select the minutes for which the sent query parameter and hash token would be valid. This parameter is quite useful to synchronize your site logins with a knowledge base access.7. Auto-create new user account: When the login mode is passed to the SSO call, PHPKB software will search the username passed in the knowledge base database. If this setting is enabled, and system doesn't find the passed username in a knowledge base, it will auto-create the new
account with parameters passed in a query string. Otherwise, system will redirect the user to access denied page. In case this setting is disabled then it becomes your responsibility to synchronize databases of your site and knowledge base.8. Default Groups(s): You can also specify the default group(s) (required for access to private contents) that should be assigned to a user while account creation.9. Can SSO Users Modify Account Details: Enable this setting if you want that users created through SSO can change their email and password details in the knowledge base. By default, this setting is disabled.
2. Connecting to SSOAfter setting up the SSO in the knowledge base settings, the next task is to call the SSO URL in your script. SSO can be accessed at
<path to your kb> /sso.php
http://www.yourdomain.com/phpkb/sso.php?mode=login&query=&hash=
In the above example URL, some parameters namely mode , query and hash are passed to the sso.php script. We will learn about these parameters and how to prepare their values in the steps below.
3. Preparing SSO Query ParametersThe next step is to prepare the query string parameters for the SSO script. The SSO script operates in two modes; login and logout . Login mode can be accessed only through GET that means query parameters should be passed as $_GET method, however, logout mode can be accessed via both
Query string parameter is mode and possible values for it are login and logout.
3.1 mode=login
Important: The mode=login requires two additional parameters " query " and " hash " along with the mode parameter. Details of both query and hash parameters are given below.
a) query: This parameter contains the base64 encoded value of all the important parameters that are passed to the script. There are three mandatory parameters without which script will halt; these parameters are username, name, email. Time stamp
with these, you can also pass groups (comma separated Group IDs) and dl (default language, only in case of multi-language edition) parameters.
You can experiment with timestamp value with online converter: https://www.timestampconvert.com
username=jason&[email protected]&name=Jason+Burke&t=1357604345&groups=5,6,7&dl=1
The Base64 encoded value of the above query string becomes as shown below. You can use this base64 encoder for testing.
dXNlcm5hbWU9amFzb24mZW1haWw9amFzb25AZXhhbXBsZS5jb20mbmFtZT1KYXNvbitCdXJrZSZ0PTEzNTc2MDQzNDUmZ3JvdXBzPTUsNiw3JmRsPTE=

You need to pass this base64 encoded string to the query parameter as shown below.
query=dXNlcm5hbWU9amFzb24mZW1haWw9amFzb25AZXhhbXBsZS5jb20mbmFtZT1KYXNvbitCdXJrZSZ0PTEzNTc2MDQzNDUmZ3JvdXBzPTUsNiw3JmRsPTE=
b) hash: This parameter contains the token required to check the authenticity of the data sent to SSO script. Hash is a sha256 representation of query parameter and secret token specified in the SSO settings.
sha256(base64encoded_query + secret_token)
Important: The plus (+) symbol shown above is only used to represent concatenation of Base64 Encoded Query String and the Secret Token. It does not mean that plus (+) symbol is to be used between both while generating SHA256 Hash. So, with the base64 value of query string mentioned above and the secret token used in our SSO
settings (in the screenshot above), the concatenated string becomes:
dXNlcm5hbWU9amFzb24mZW1haWw9amFzb25AZXhhbXBsZS5jb20mbmFtZT1KYXNvbitCdXJrZSZ0PTEzNTc2MDQzNDUmZ3JvdXBzPTUsNiw3JmRsPTE=GTYIY468D4568974
where GTYIY468D4568974 is the value of secret token.
You can use this SHA256 hash generator for testing.
So, the SHA256 value is passed to the "hash" parameter as shown below.
hash=654C7D200A0E7A804C8053633CBEF8C0D30D9EA4991DA6C274958CD5DE1D34A4
The complete SSO URL with parameters that you can link from your site would look like:
http://www.yourdomain.com/phpkb/sso.php?mode=login&query=dXNlcm5hbWU9amFzb24mZW1haWw9amFzb25AZXhhbXBsZS5jb20mbmFtZT1KYXNvbitCdXJrZSZ0PTEzNTc2MDQzNDUmZ3JvdXBzPTUsNiw3JmRsPTE=&hash=654C7D200A0E7A804C8053633CBEF8C0D30D9EA4991DA6C274958CD5DE1D34A4
c) redirecttype: When a non-logged in user tries to access the article or category page, the SSO script redirects him to URL specified in 'Return URL' setting along with this parameter which can have any of the two values article or category. After a user logs in to your portal, you can send this parameter back to SSO script to transfer the user to
the page which he/she was trying to access.
redirecttype=category
d) redirectid: This parameter defines the ID of the article/category depending upon the value of the redirecttype parameter. You should send this parameter along with redirecttype parameter to send the user to a precise location.
redirectid=1
Now, the complete URL will look like:
http://www.yourdomain.com/phpkb/sso.php?mode=login&query=dXNlcm5hbWU9amFzb24mZW1haWw9amFzb25AZXhhbXBsZS5jb20mbmFtZT1KYXNvbitCdXJrZSZ0PTEzNTc2MDQzNDUmZ3JvdXBzPTUsNiw3JmRsPTE=&hash=654C7D200A0E7A804C8053633CBEF8C0D30D9EA4991DA6C274958CD5DE1D34A4&redirecttype=category&redirectid=1
3.2 mode=logoutThe Logout mode can be called in both ways either through POST or GET. When a user logs out from your site/application, you can either make a call to the SSO script with mode=logout
Example: http://www.yourdomain.com/phpkb/sso.php?mode=logout
or can call the above URL through your script with POST call. POST call would return the success status code 200 in JSON format. You can use it to confirm a successful logout of user from the knowledge base.
Error CodesCode Description
400E1 Missing required URL parameter.
400E2 Invalid URL parameter received.
400E3 Timestamp parameter too old.
400E4 User account can not be created because duplicate usernames are not allowed.
401E1 Authentication failed; could not authenticate user because of invalid hash.
401E2 Could not authenticate request because of invalid domain referrer.
404E1 The requested user account is inactive.
404E2 The requested user account not found in database.
500E1 Database Error.
503E1 SSO is not available. SSO is currently disabled.
Online URL: https://www.knowledgebase-script.com/kb/article.php?id=180
0 3317
How to use the User Manual?
Ajay Chadha Jan 27, 2017 at 5:12AM User Manual
This User Manual describes the GUI and working of front-end area as well as administration control panel of the PHPKB Knowledge Base Software. It explains you the functioning of each of the screens.
A Few Key Concepts:
End Users - your knowledge base readers. They may be customers, partners, affiliates, staff members or general public users.Admin Users – your organization's team, the people who write and manage the FAQs.End User Section (Interface) / Front End / Public Section – This is the public-facing part of your knowledge base; the knowledge base home for your users.Admin Control Panel / Back End - This is the place where all the magic happens. Admin users use this to manage articles, categories, news, tickets, users, reports, etc. The entire configuration happens here. Yourknowledge base administrators use this control panel to change settings and configure elements such as staff users, user groups etc.
Customer Support:
We are here to help! If you hit a bump let us know. We're a reputed company and eager to please. We hope to stay that way. We'll do whatever it takes to make PHPKB the best, hassle-free knowledge management software.
Our offices are open from 9 AM - 6 PM Monday to Saturday (Indian Time GMT+5:30) except national holidays.
You can get in touch with our agents and engineers by live chat, email, telephone, contact us form.
Live Chat: Live chat is available at https://www.knowledgebase-script.com/contact.phpEmail: You can email us at [email protected]/Fax: You can call us on the numbers given below in weekdays during office hours.Telephone: +91 (0) 181-4613940Mobile: +91 (0) 98158-43940
Contact Us - You can send your questions/comments/suggestions using the Contact Form.
Our Postal Address:
Chadha Software Technologies
139, Cheema Nagar
Mithapur Road
Jalandhar City – 144003
Punjab (INDIA)
DISCLAIMER: The information in this User’s Manual is accurate at the time of writing. This user’s Manual is provided “as is” without express or implied warranty of any kind. Neither Chadha Software Technologies nor its employees/affiliates/agents
assume any liability for inaccuracies in the user’s manual, or losses incurred by use or misuse of the information in this User’s Guide.
Online URL: https://www.knowledgebase-script.com/kb/article.php?id=63
0 10142
General Overview of PHPKB Knowledge Base Management Software
Ajay Chadha Jan 27, 2017 at 5:15AM User Manual
About PHPKB Software
PHPKB Knowledge Base Software allows you to create an unlimited, searchable library of FAQs, articles, how-to documents, resolutions, announcements, product manuals and more. PHPKB makes it easy for your customers to find the information
they need & reduce your support workload by offering self-service based online support to your users. With the use of PHPKB software, your support team can create categorized knowledge base articles to share step-by-step instructions and
guides, along workarounds and solutions to common problems faced by customers (end-users). PHPKB software can be easily re-skinned to match a company’s design scheme. No doubt, It is the most modern knowledge base management
software in the industry.
Web Based Self-Service Support
Help your customers help themselves with self-service support model. Intelligent self-service helps your customers in finding answers to their questions in the easiest and most efficient way. According to Forrester, 72% of customers prefer self-
service to resolve their support issues over picking up the phone or sending an email. Self-service support is on the rise - customers want it and fast-growing companies need it as a competitive advantage. PHPKB software will help you reduce
volume of support tickets and provide an amazing customer experience through self-service support model. We have a strong belief that self-service is becoming a preferred way for customers to get help with products and services of a company.
Most customers would prefer self-service than calling an old-school call center and talking to a customer service agent.
Access Management
PHPKB allows you to limit (restrict) access to certain private categories based on user-groups. This way, members of a user-group can access the private categories assigned only to their user-group. They will not be able to access the private
categories assigned to other groups.
Self-hosted OR Cloud-hosted Setup
PHPKB Knowledge Base Software is powerful yet simple, affordable, and comes with your choice of hosting in our cloud or on your server.
Cloud Setup - With a cloud setup there is no software to install, maintain, upgrade or backup. We take care of everything for you. You can create a demo in 30 seconds and deploy to your customers in less than 30minutes. At PHPKB we understand that your data is just yours. At any time you can extract all your knowledge base data and choose to host PHPKB on your own servers. Whether you decide to do this or not; youalways have the choice.Self Hosted Setup - PHPKB can be deployed on your own servers. You have full access to the source code allowing you to make any changes you want. PHPKB runs on almost any operating system and web-serverand simply requires PHP 5.x and MySQL to work. You are welcome to download a demo or create a demo account that you can migrate to a local install at any point.
Full Overview
You may wish to read complete overview of the PHPKB software.
Online URL: https://www.knowledgebase-script.com/kb/article.php?id=64

CATEGORY
Admin Control Panel2 Articles
0 3573
Admin Control Panel Interface
Gurjeet Kaur Jul 15, 2020 at 8:50AM Admin Control Panel
PHPKB knowledge base has easy to use, highly interactive graphical user interface with demotic and innate interface elements. The use of AJAX makes the application faster or more responsive as sections of pages can also be reloaded individually
which reduces the bandwidth usage and load time. The PHPKB interface is divided into three parts:
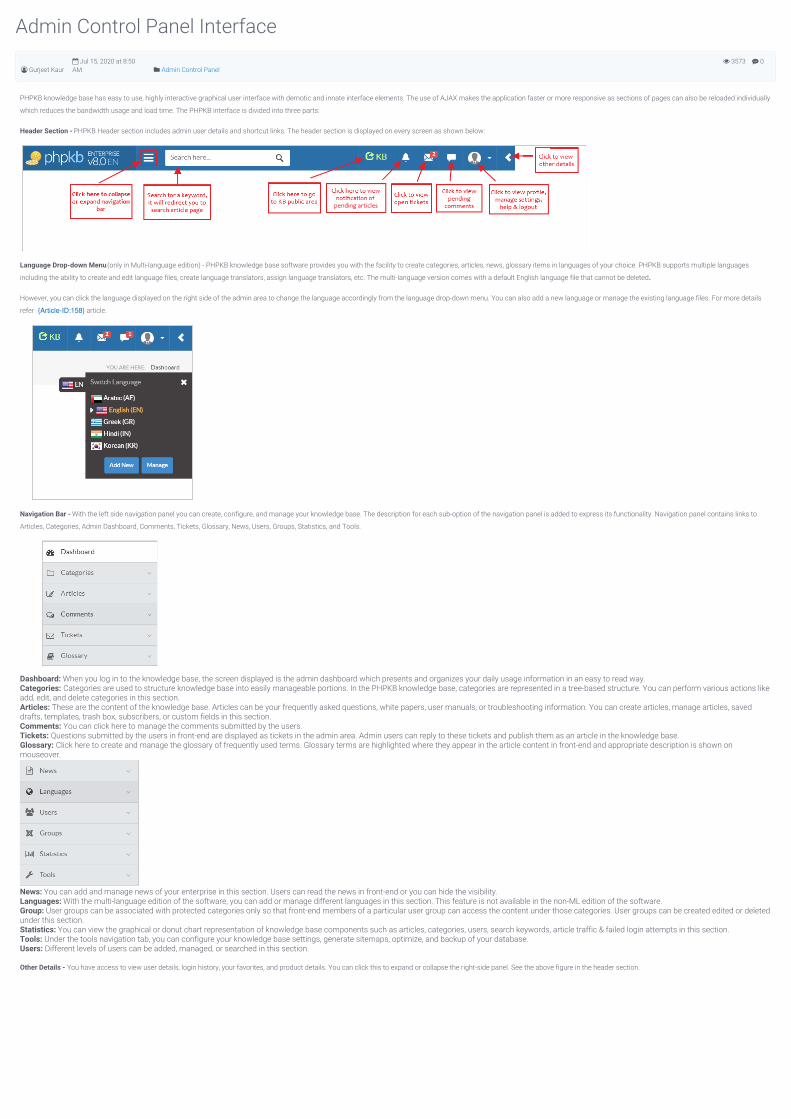
Header Section - PHPKB Header section includes admin user details and shortcut links. The header section is displayed on every screen as shown below:
Language Drop-down Menu (only in Multi-language edition) - PHPKB knowledge base software provides you with the facility to create categories, articles, news, glossary items in languages of your choice. PHPKB supports multiple languages
including the ability to create and edit language files, create language translators, assign language translators, etc. The multi-language version comes with a default English language file that cannot be deleted.
However, you can click the language displayed on the right side of the admin area to change the language accordingly from the language drop-down menu. You can also add a new language or manage the existing language files. For more details
refer {Article-ID:158} article.
Navigation Bar - With the left side navigation panel you can create, configure, and manage your knowledge base. The description for each sub-option of the navigation panel is added to express its functionality. Navigation panel contains links to
Articles, Categories, Admin Dashboard, Comments, Tickets, Glossary, News, Users, Groups, Statistics, and Tools.
Dashboard: When you log in to the knowledge base, the screen displayed is the admin dashboard which presents and organizes your daily usage information in an easy to read way.Categories: Categories are used to structure knowledge base into easily manageable portions. In the PHPKB knowledge base, categories are represented in a tree-based structure. You can perform various actions likeadd, edit, and delete categories in this section.Articles: These are the content of the knowledge base. Articles can be your frequently asked questions, white papers, user manuals, or troubleshooting information. You can create articles, manage articles, saveddrafts, templates, trash box, subscribers, or custom fields in this section.Comments: You can click here to manage the comments submitted by the users. Tickets: Questions submitted by the users in front-end are displayed as tickets in the admin area. Admin users can reply to these tickets and publish them as an article in the knowledge base.Glossary: Click here to create and manage the glossary of frequently used terms. Glossary terms are highlighted where they appear in the article content in front-end and appropriate description is shown onmouseover.
News: You can add and manage news of your enterprise in this section. Users can read the news in front-end or you can hide the visibility.Languages: With the multi-language edition of the software, you can add or manage different languages in this section. This feature is not available in the non-ML edition of the software.Group: User groups can be associated with protected categories only so that front-end members of a particular user group can access the content under those categories. User groups can be created edited or deletedunder this section.Statistics: You can view the graphical or donut chart representation of knowledge base components such as articles, categories, users, search keywords, article traffic & failed login attempts in this section.Tools: Under the tools navigation tab, you can configure your knowledge base settings, generate sitemaps, optimize, and backup of your database.Users: Different levels of users can be added, managed, or searched in this section.
Other Details - You have access to view user details, login history, your favorites, and product details. You can click this to expand or collapse the right-side panel. See the above figure in the header section.
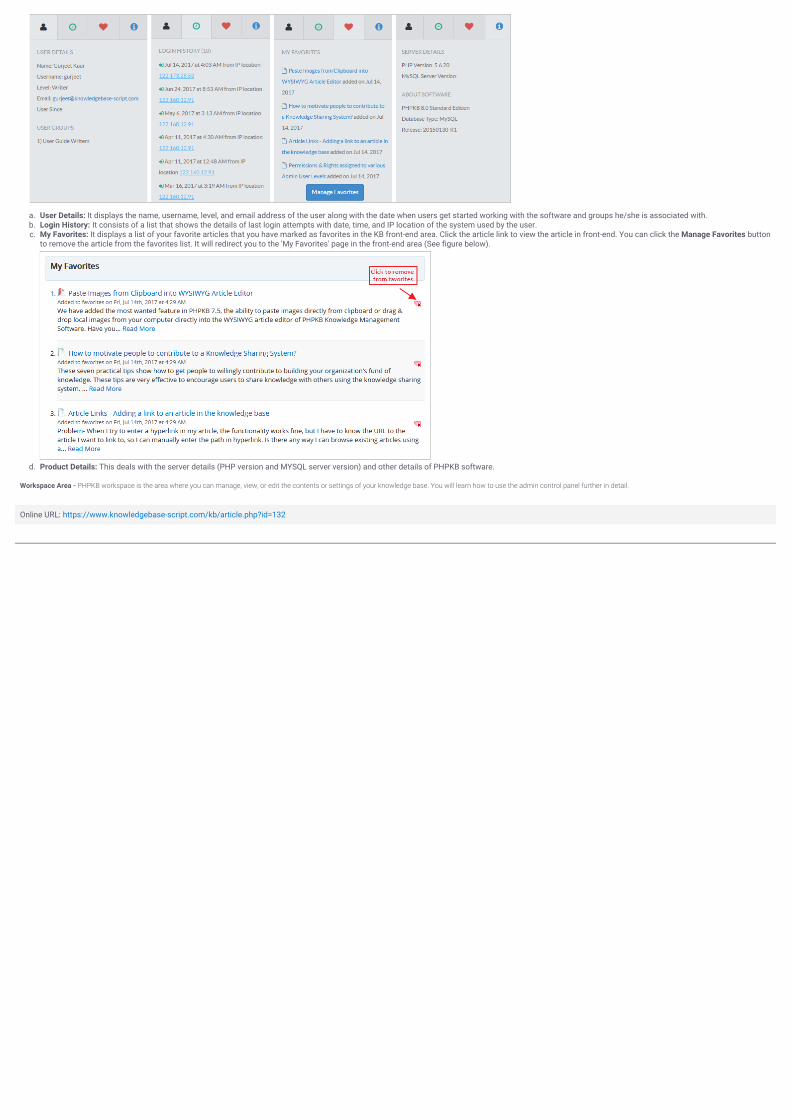
a. User Details: It displays the name, username, level, and email address of the user along with the date when users get started working with the software and groups he/she is associated with.b. Login History: It consists of a list that shows the details of last login attempts with date, time, and IP location of the system used by the user.c. My Favorites: It displays a list of your favorite articles that you have marked as favorites in the KB front-end area. Click the article link to view the article in front-end. You can click the Manage Favorites button
to remove the article from the favorites list. It will redirect you to the 'My Favorites' page in the front-end area (See figure below).
d. Product Details: This deals with the server details (PHP version and MYSQL server version) and other details of PHPKB software.
Workspace Area - PHPKB workspace is the area where you can manage, view, or edit the contents or settings of your knowledge base. You will learn how to use the admin control panel further in detail.
Online URL: https://www.knowledgebase-script.com/kb/article.php?id=132
0 3700
Admin Dashboard
Gurjeet Kaur Aug 4, 2017 at 4:27AM Admin Control Panel
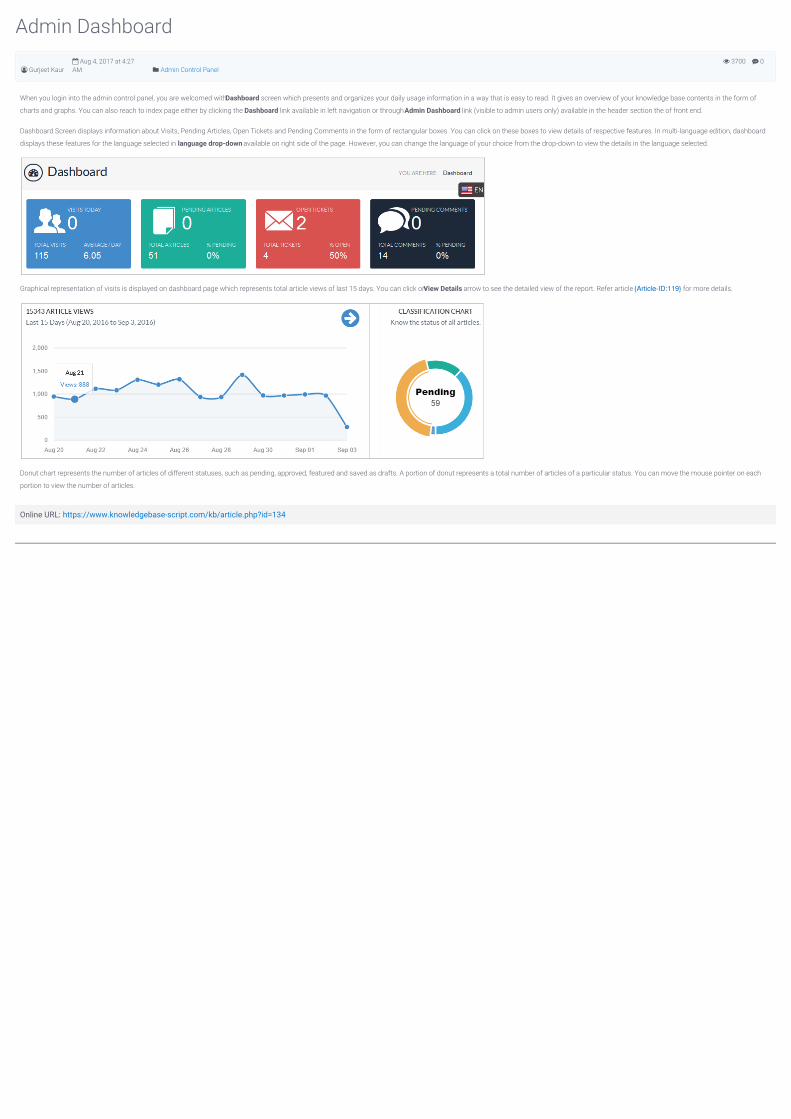
When you login into the admin control panel, you are welcomed with Dashboard screen which presents and organizes your daily usage information in a way that is easy to read. It gives an overview of your knowledge base contents in the form of
charts and graphs. You can also reach to index page either by clicking the Dashboard link available in left navigation or through Admin Dashboard link (visible to admin users only) available in the header section the of front end.
Dashboard Screen displays information about Visits, Pending Articles, Open Tickets and Pending Comments in the form of rectangular boxes. You can click on these boxes to view details of respective features. In multi-language edition, dashboard
displays these features for the language selected in language drop-down available on right side of the page. However, you can change the language of your choice from the drop-down to view the details in the language selected.
Graphical representation of visits is displayed on dashboard page which represents total article views of last 15 days. You can click on View Details arrow to see the detailed view of the report. Refer article {Article-ID:119} for more details.
Donut chart represents the number of articles of different statuses, such as pending, approved, featured and saved as drafts. A portion of donut represents a total number of articles of a particular status. You can move the mouse pointer on each
portion to view the number of articles.
Online URL: https://www.knowledgebase-script.com/kb/article.php?id=134

CATEGORY
Languages6 Articles
0 2444
Adding a language translator account
Gurjeet Kaur Aug 4, 2017 at 4:02AM Languages
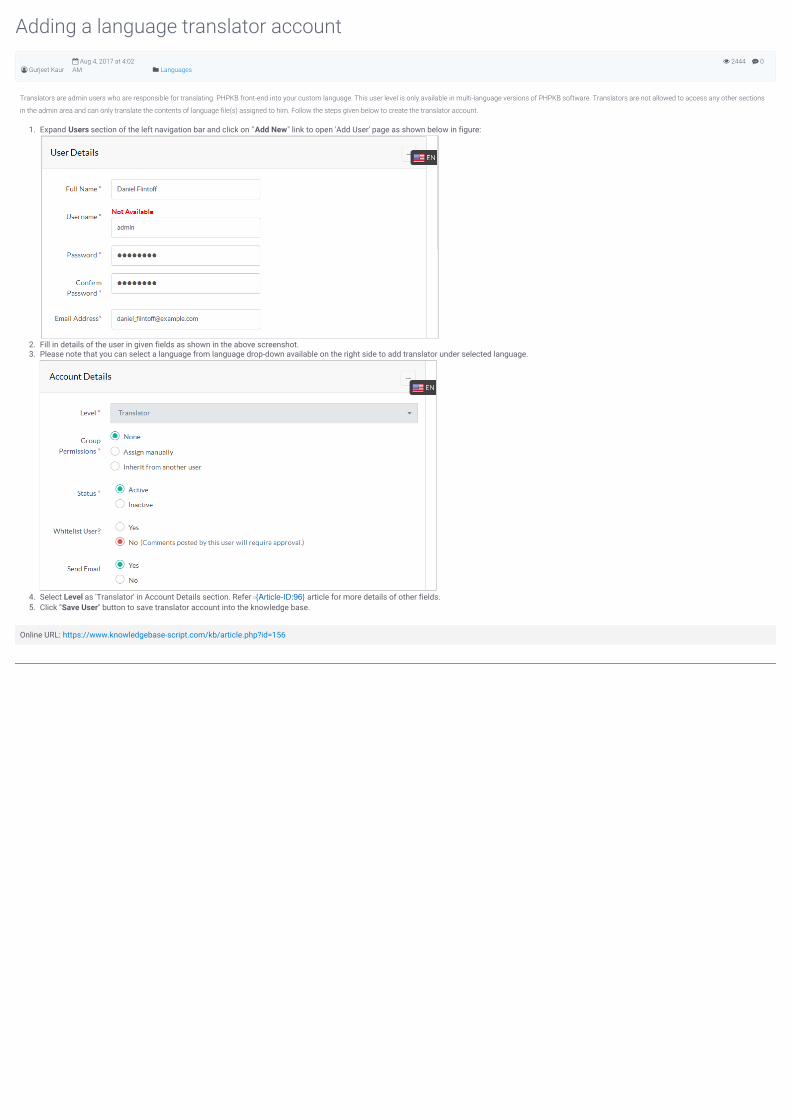
Translators are admin users who are responsible for translating PHPKB front-end into your custom language. This user level is only available in multi-language versions of PHPKB software. Translators are not allowed to access any other sections
in the admin area and can only translate the contents of language file(s) assigned to him. Follow the steps given below to create the translator account.
1. Expand Users section of the left navigation bar and click on "Add New" link to open 'Add User' page as shown below in figure:
2. Fill in details of the user in given fields as shown in the above screenshot.3. Please note that you can select a language from language drop-down available on the right side to add translator under selected language.
4. Select Level as 'Translator' in Account Details section. Refer {Article-ID:96} article for more details of other fields.5. Click "Save User" button to save translator account into the knowledge base.
Online URL: https://www.knowledgebase-script.com/kb/article.php?id=156
0 2502
Deleting a language file
Gurjeet Kaur Mar 30, 2019 at 4:14AM Languages
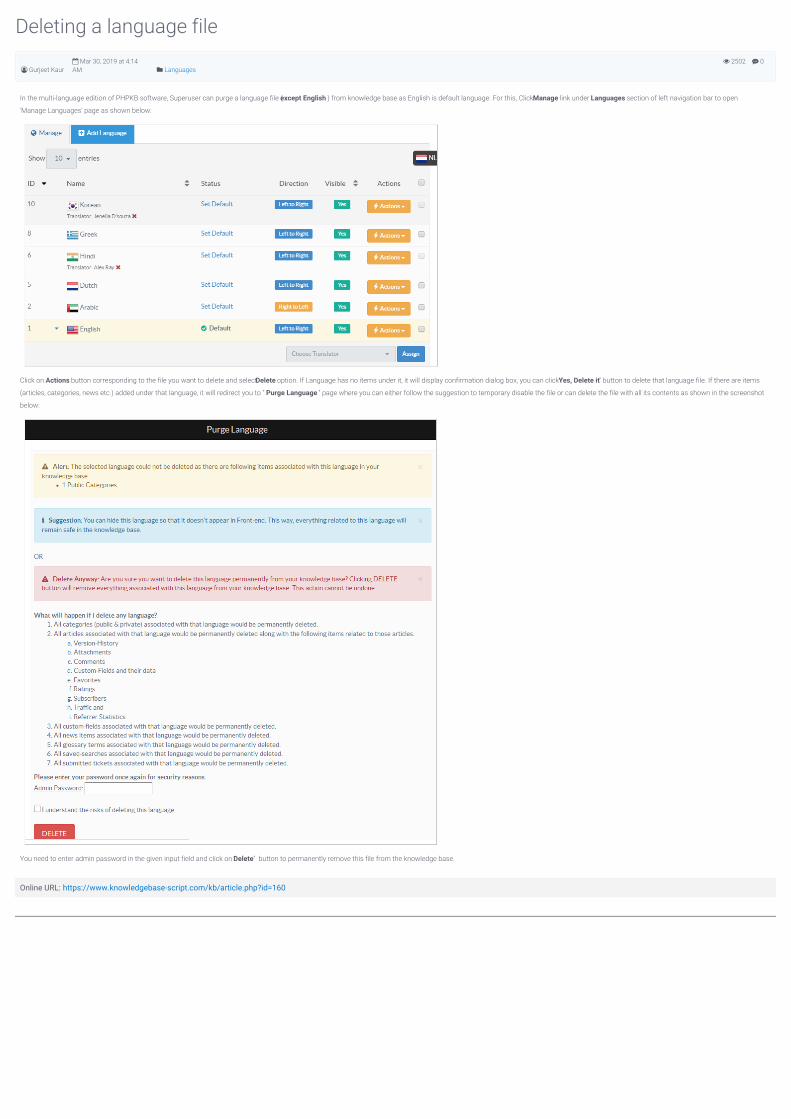
In the multi-language edition of PHPKB software, Superuser can purge a language file ( except English ) from knowledge base as English is default language. For this, Click Manage link under Languages section of left navigation bar to open
'Manage Languages' page as shown below:
Click on Actions button corresponding to the file you want to delete and select Delete option. If Language has no items under it, it will display confirmation dialog box, you can click "Yes, Delete it" button to delete that language file. If there are items
(articles, categories, news etc.) added under that language, it will redirect you to " Purge Language " page where you can either follow the suggestion to temporary disable the file or can delete the file with all its contents as shown in the screenshot
below:
You need to enter admin password in the given input field and click on "Delete" button to permanently remove this file from the knowledge base.
Online URL: https://www.knowledgebase-script.com/kb/article.php?id=160
0 2594
Managing Languages
Gurjeet Kaur Feb 19, 2020 at 6:15AM Languages
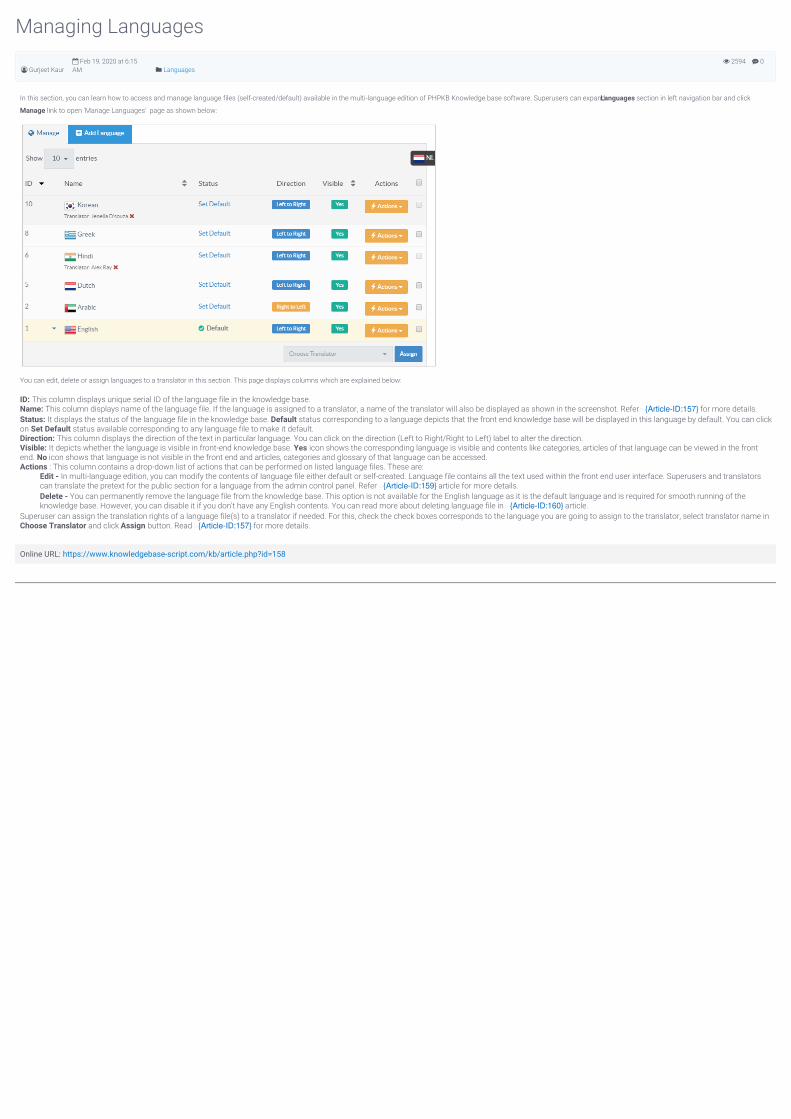
In this section, you can learn how to access and manage language files (self-created/default) available in the multi-language edition of PHPKB Knowledge base software. Superusers can expand Languages section in left navigation bar and click
Manage link to open 'Manage Languages' page as shown below:
You can edit, delete or assign languages to a translator in this section. This page displays columns which are explained below:
ID: This column displays unique serial ID of the language file in the knowledge base.Name: This column displays name of the language file. If the language is assigned to a translator, a name of the translator will also be displayed as shown in the screenshot. Refer {Article-ID:157} for more details.Status: It displays the status of the language file in the knowledge base. Default status corresponding to a language depicts that the front end knowledge base will be displayed in this language by default. You can clickon Set Default status available corresponding to any language file to make it default.Direction: This column displays the direction of the text in particular language. You can click on the direction (Left to Right/Right to Left) label to alter the direction.Visible: It depicts whether the language is visible in front-end knowledge base. Yes icon shows the corresponding language is visible and contents like categories, articles of that language can be viewed in the frontend. No icon shows that language is not visible in the front end and articles, categories and glossary of that language can be accessed.Actions : This column contains a drop-down list of actions that can be performed on listed language files. These are:
Edit - In multi-language edition, you can modify the contents of language file either default or self-created. Language file contains all the text used within the front end user interface. Superusers and translatorscan translate the pretext for the public section for a language from the admin control panel. Refer {Article-ID:159} article for more details. Delete - You can permanently remove the language file from the knowledge base. This option is not available for the English language as it is the default language and is required for smooth running of theknowledge base. However, you can disable it if you don't have any English contents. You can read more about deleting language file in {Article-ID:160} article.
Superuser can assign the translation rights of a language file(s) to a translator if needed. For this, check the check boxes corresponds to the language you are going to assign to the translator, select translator name inChoose Translator and click Assign button. Read {Article-ID:157} for more details.
Online URL: https://www.knowledgebase-script.com/kb/article.php?id=158
0 2628
Assigning languages to translators
Gurjeet Kaur Aug 21, 2017 at 6:50AM Languages
Superuser can assign the language(s) to any translator so that he can access the admin control panel to complete the translation job assigned to him. Moreover, superusers can revoke the translation right back from translator if required. This
section will help you learn how to assign a language to the translator. Follow the steps mentioned below:
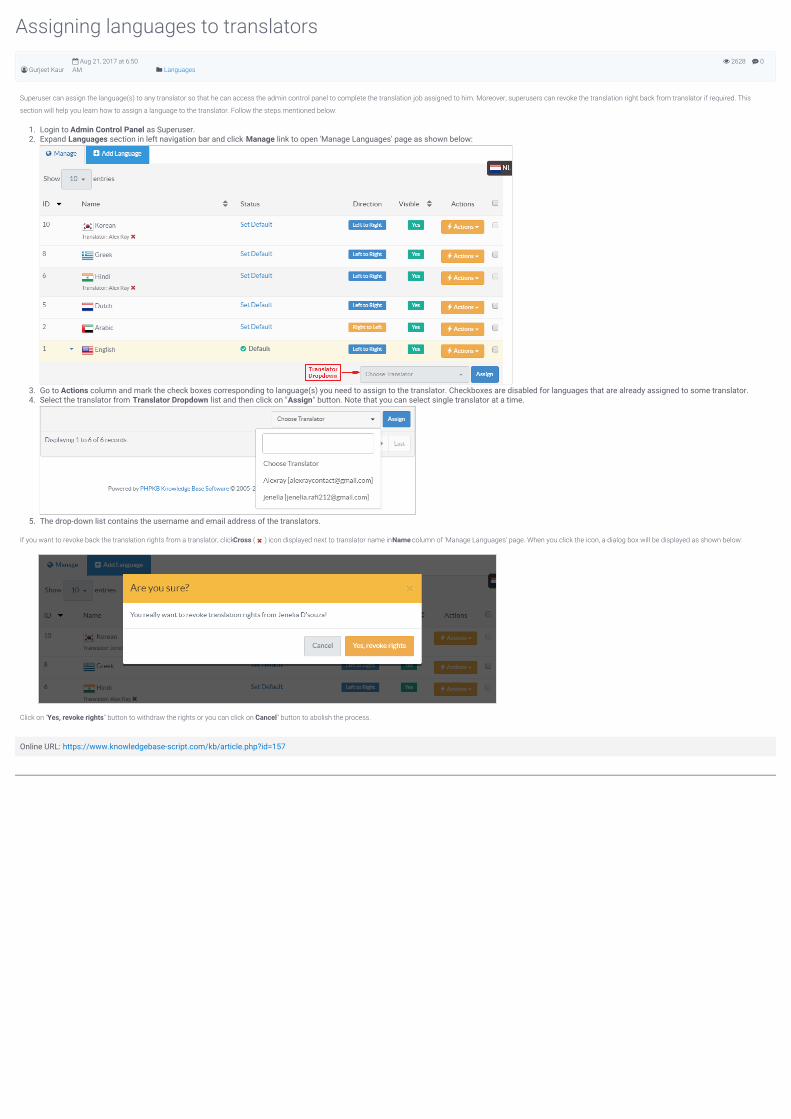
1. Login to Admin Control Panel as Superuser.2. Expand Languages section in left navigation bar and click Manage link to open 'Manage Languages' page as shown below:
3. Go to Actions column and mark the check boxes corresponding to language(s) you need to assign to the translator. Checkboxes are disabled for languages that are already assigned to some translator.4. Select the translator from Translator Dropdown list and then click on "Assign" button. Note that you can select single translator at a time.
5. The drop-down list contains the username and email address of the translators.
If you want to revoke back the translation rights from a translator, click Cross ( ) icon displayed next to translator name in Name column of 'Manage Languages' page. When you click the icon, a dialog box will be displayed as shown below:
Click on "Yes, revoke rights" button to withdraw the rights or you can click on "Cancel" button to abolish the process.
Online URL: https://www.knowledgebase-script.com/kb/article.php?id=157
0 2646
Adding a new language
Gurjeet Kaur Aug 24, 2017 at 7:40AM Languages
Multi-Language (ML) Edition of PHPKB knowledge base software provides the facility to create categories, articles, news, glossary items in multiple languages. Moreover, this edition offers you to setup the front end interface in the desired language.
For creating all these features in the language of your choice, you should create the language file first. PHPKB software provides one default language file i.e. English. However, you can follow the steps mentioned below to create your own language
files:
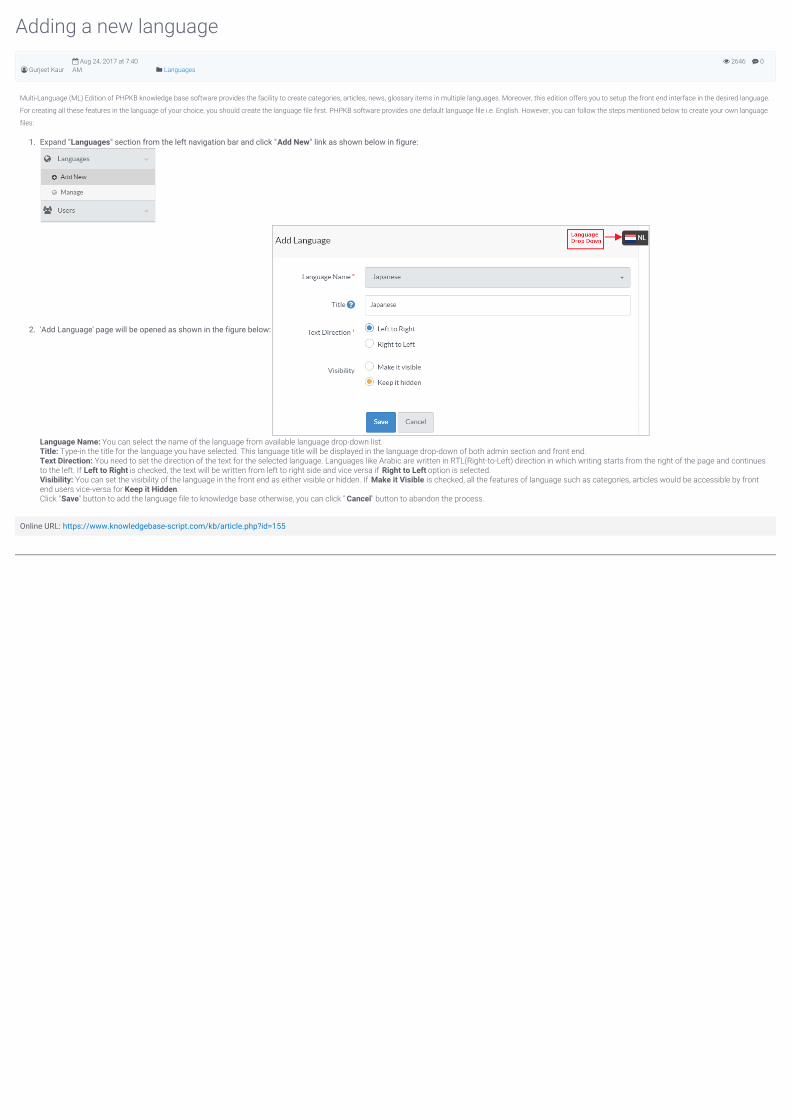
1. Expand "Languages" section from the left navigation bar and click "Add New" link as shown below in figure:
2. 'Add Language' page will be opened as shown in the figure below:
Language Name: You can select the name of the language from available language drop-down list.Title: Type-in the title for the language you have selected. This language title will be displayed in the language drop-down of both admin section and front end.Text Direction: You need to set the direction of the text for the selected language. Languages like Arabic are written in RTL(Right-to-Left) direction in which writing starts from the right of the page and continuesto the left. If Left to Right is checked, the text will be written from left to right side and vice versa if Right to Left option is selected.Visibility: You can set the visibility of the language in the front end as either visible or hidden. If Make it Visible is checked, all the features of language such as categories, articles would be accessible by frontend users vice-versa for Keep it Hidden.Click "Save" button to add the language file to knowledge base otherwise, you can click " Cancel" button to abandon the process.
Online URL: https://www.knowledgebase-script.com/kb/article.php?id=155
0 2843
Translating language files
Gurjeet Kaur Aug 21, 2017 at 6:25AM Languages
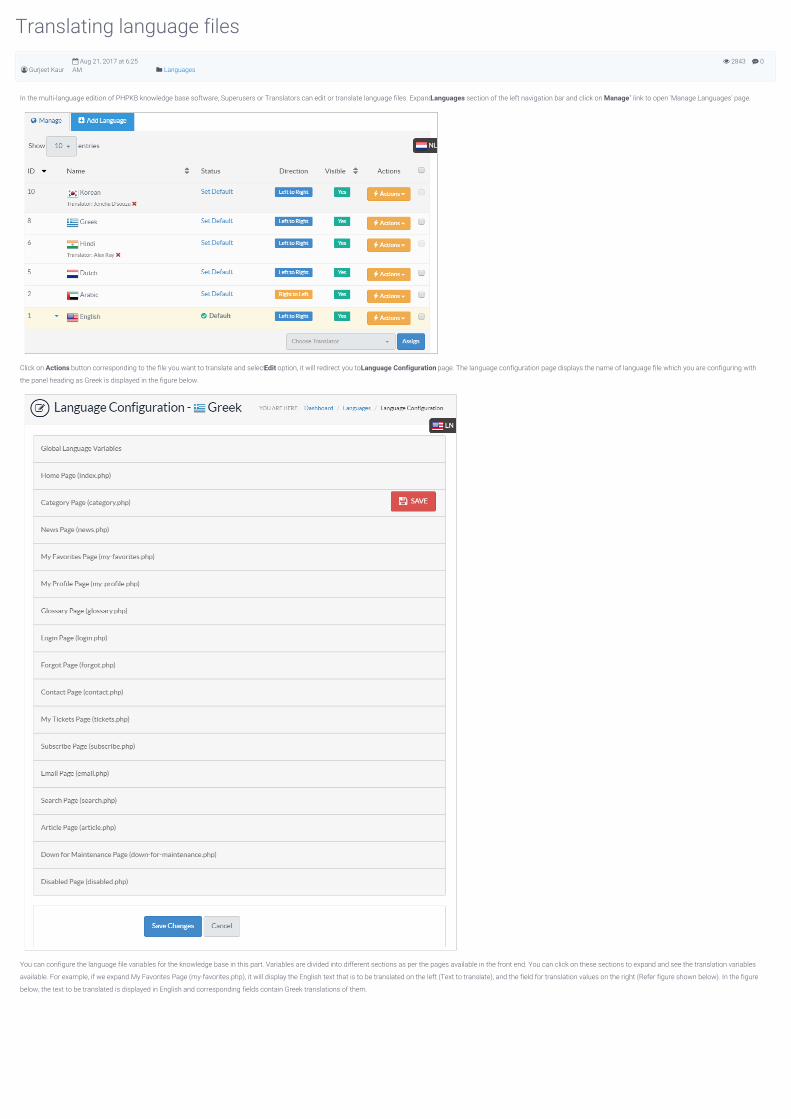
In the multi-language edition of PHPKB knowledge base software, Superusers or Translators can edit or translate language files. Expand Languages section of the left navigation bar and click on "Manage" link to open 'Manage Languages' page.
Click on Actions button corresponding to the file you want to translate and select Edit option, it will redirect you to Language Configuration page. The language configuration page displays the name of language file which you are configuring with
the panel heading as Greek is displayed in the figure below.
You can configure the language file variables for the knowledge base in this part. Variables are divided into different sections as per the pages available in the front end. You can click on these sections to expand and see the translation variables
available. For example, if we expand My Favorites Page (my-favorites.php), it will display the English text that is to be translated on the left (Text to translate), and the field for translation values on the right (Refer figure shown below). In the figure
below, the text to be translated is displayed in English and corresponding fields contain Greek translations of them.
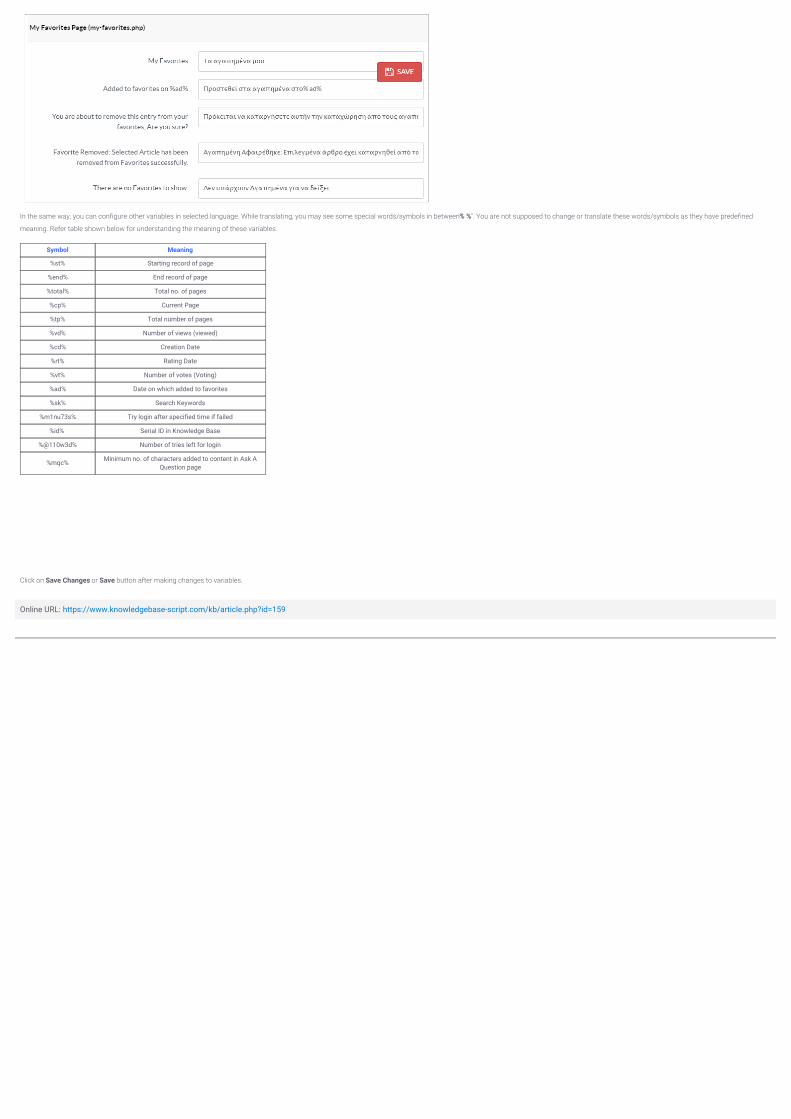
Symbol Meaning
%st% Starting record of page
%end% End record of page
%total% Total no. of pages
%cp% Current Page
%tp% Total number of pages
%vd% Number of views (viewed)
%cd% Creation Date
%rt% Rating Date
%vt% Number of votes (Voting)
%ad% Date on which added to favorites
%sk% Search Keywords
%m1nu73s% Try login after specified time if failed
%id% Serial ID in Knowledge Base
%@110w3d% Number of tries left for login
%mqc% Minimum no. of characters added to content in Ask AQuestion page
In the same way, you can configure other variables in selected language. While translating, you may see some special words/symbols in between "% %". You are not supposed to change or translate these words/symbols as they have predefined
meaning. Refer table shown below for understanding the meaning of these variables.
Click on Save Changes or Save button after making changes to variables.
Online URL: https://www.knowledgebase-script.com/kb/article.php?id=159

CATEGORY
Tools5 Articles
0 2401
Taking backup of knowledge base data
Gurjeet Kaur Aug 24, 2017 at 7:36AM Tools
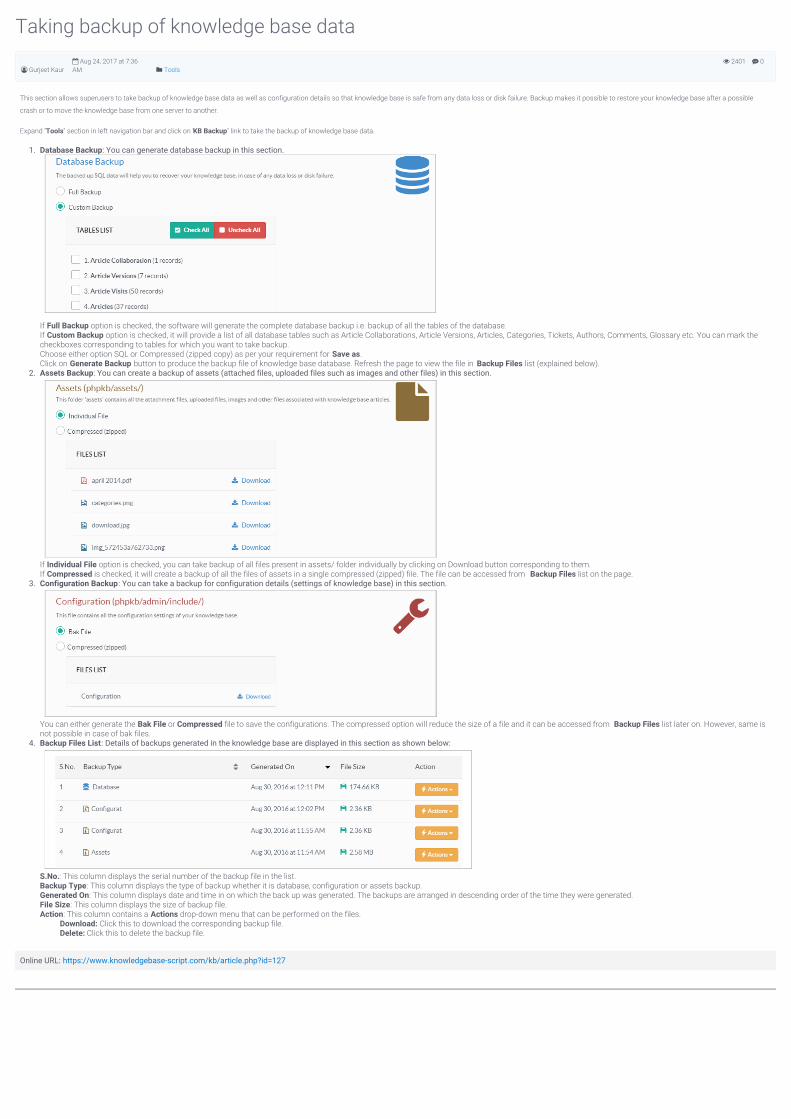
This section allows superusers to take backup of knowledge base data as well as configuration details so that knowledge base is safe from any data loss or disk failure. Backup makes it possible to restore your knowledge base after a possible
crash or to move the knowledge base from one server to another.
Expand "Tools" section in left navigation bar and click on "KB Backup" link to take the backup of knowledge base data.
1. Database Backup: You can generate database backup in this section.
If Full Backup option is checked, the software will generate the complete database backup i.e. backup of all the tables of the database.If Custom Backup option is checked, it will provide a list of all database tables such as Article Collaborations, Article Versions, Articles, Categories, Tickets, Authors, Comments, Glossary etc. You can mark thecheckboxes corresponding to tables for which you want to take backup. Choose either option SQL or Compressed (zipped copy) as per your requirement for Save as.Click on Generate Backup button to produce the backup file of knowledge base database. Refresh the page to view the file in Backup Files list (explained below).
2. Assets Backup: You can create a backup of assets (attached files, uploaded files such as images and other files) in this section.
If Individual File option is checked, you can take backup of all files present in assets/ folder individually by clicking on Download button corresponding to them.If Compressed is checked, it will create a backup of all the files of assets in a single compressed (zipped) file. The file can be accessed from Backup Files list on the page.
3. Configuration Backup: You can take a backup for configuration details (settings of knowledge base) in this section.
You can either generate the Bak File or Compressed file to save the configurations. The compressed option will reduce the size of a file and it can be accessed from Backup Files list later on. However, same isnot possible in case of bak files.
4. Backup Files List: Details of backups generated in the knowledge base are displayed in this section as shown below:
S.No.: This column displays the serial number of the backup file in the list.Backup Type: This column displays the type of backup whether it is database, configuration or assets backup.Generated On: This column displays date and time in on which the back up was generated. The backups are arranged in descending order of the time they were generated.File Size: This column displays the size of backup file.Action: This column contains a Actions drop-down menu that can be performed on the files.
Download: Click this to download the corresponding backup file.Delete: Click this to delete the backup file.
Online URL: https://www.knowledgebase-script.com/kb/article.php?id=127
0 2463
Harvesting emails from knowledge base
Gurjeet Kaur Aug 23, 2017 at 2:15AM Tools
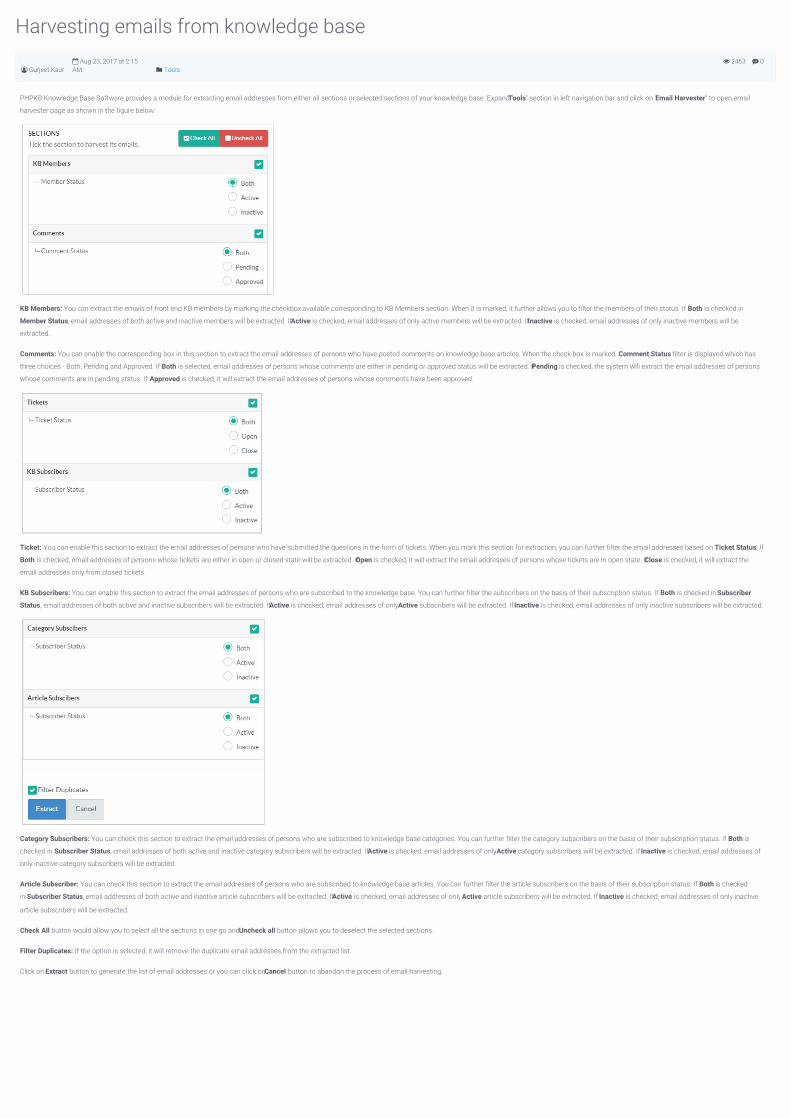
PHPKB Knowledge Base Software provides a module for extracting email addresses from either all sections or selected sections of your knowledge base. Expand "Tools" section in left navigation bar and click on "Email Harvester" to open email
harvester page as shown in the figure below:
KB Members: You can extract the emails of front end KB members by marking the checkbox available corresponding to KB Members section. When it is marked, it further allows you to filter the members of their status. If Both is checked in
Member Status, email addresses of both active and inactive members will be extracted. If Active is checked, email addresses of only active members will be extracted. If Inactive is checked, email addresses of only inactive members will be
extracted.
Comments: You can enable the corresponding box in this section to extract the email addresses of persons who have posted comments on knowledge base articles. When the check box is marked, Comment Status filter is displayed which has
three choices - Both, Pending and Approved. If Both is selected, email addresses of persons whose comments are either in pending or approved status will be extracted. If Pending is checked, the system will extract the email addresses of persons
whose comments are in pending status. If Approved is checked, it will extract the email addresses of persons whose comments have been approved.
Ticket: You can enable this section to extract the email addresses of persons who have submitted the questions in the form of tickets. When you mark this section for extraction, you can further filter the email addresses based on Ticket Status. If
Both is checked, email addresses of persons whose tickets are either in open or closed state will be extracted. If Open is checked, it will extract the email addresses of persons whose tickets are in open state. If Close is checked, it will extract the
email addresses only from closed tickets.
KB Subscribers: You can enable this section to extract the email addresses of persons who are subscribed to the knowledge base. You can further filter the subscribers on the basis of their subscription status. If Both is checked in Subscriber
Status, email addresses of both active and inactive subscribers will be extracted. If Active is checked, email addresses of only Active subscribers will be extracted. If Inactive is checked, email addresses of only inactive subscribers will be extracted.
Category Subscribers: You can check this section to extract the email addresses of persons who are subscribed to knowledge base categories. You can further filter the category subscribers on the basis of their subscription status. If Both is
checked in Subscriber Status, email addresses of both active and inactive category subscribers will be extracted. If Active is checked, email addresses of only Active category subscribers will be extracted. If Inactive is checked, email addresses of
only inactive category subscribers will be extracted.
Article Subscriber: You can check this section to extract the email addresses of persons who are subscribed to knowledge base articles. You can further filter the article subscribers on the basis of their subscription status. If Both is checked
in Subscriber Status, email addresses of both active and inactive article subscribers will be extracted. If Active is checked, email addresses of only Active article subscribers will be extracted. If Inactive is checked, email addresses of only inactive
article subscribers will be extracted.
Check All button would allow you to select all the sections in one go and Uncheck all button allows you to deselect the selected sections.
Filter Duplicates: If the option is selected, it will remove the duplicate email addresses from the extracted list.
Click on Extract button to generate the list of email addresses or you can click on Cancel button to abandon the process of email harvesting.
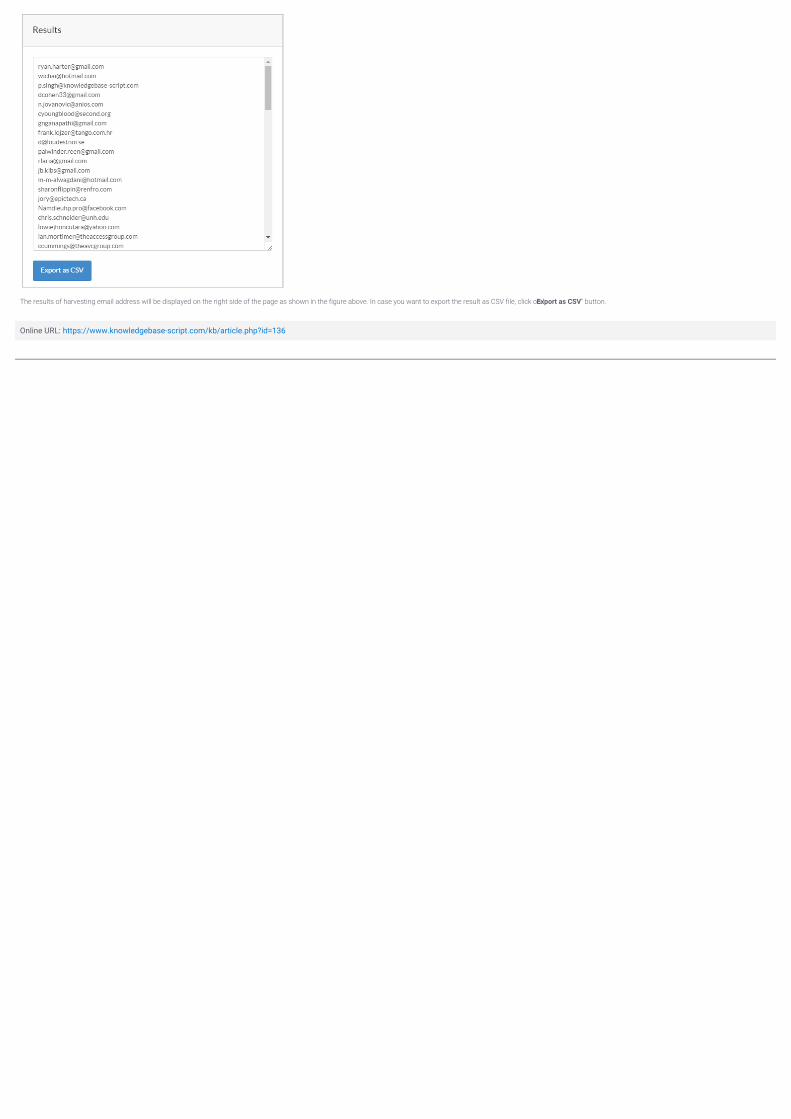
The results of harvesting email address will be displayed on the right side of the page as shown in the figure above. In case you want to export the result as CSV file, click on "Export as CSV" button.
Online URL: https://www.knowledgebase-script.com/kb/article.php?id=136
0 2541
Optimising KB Database
Gurjeet Kaur Aug 1, 2017 at 6:55AM Tools
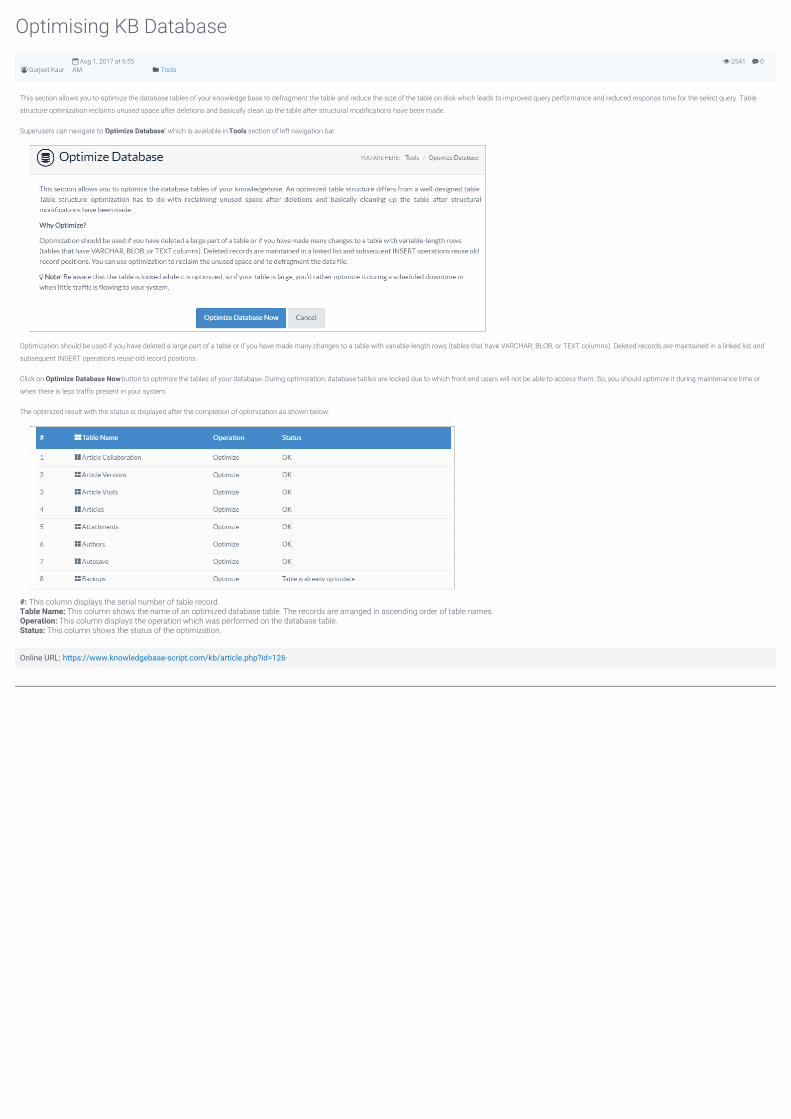
This section allows you to optimize the database tables of your knowledge base to defragment the table and reduce the size of the table on disk which leads to improved query performance and reduced response time for the select query. Table
structure optimization reclaims unused space after deletions and basically clean up the table after structural modifications have been made.
Superusers can navigate to "Optimize Database" which is available in Tools section of left navigation bar.
Optimization should be used if you have deleted a large part of a table or if you have made many changes to a table with variable-length rows (tables that have VARCHAR, BLOB, or TEXT columns). Deleted records are maintained in a linked list and
subsequent INSERT operations reuse old record positions.
Click on Optimize Database Now button to optimize the tables of your database. During optimization, database tables are locked due to which front-end users will not be able to access them. So, you should optimize it during maintenance time or
when there is less traffic present in your system.
The optimized result with the status is displayed after the completion of optimization as shown below:
#: This column displays the serial number of table record.Table Name: This column shows the name of an optimized database table. The records are arranged in ascending order of table names.Operation: This column displays the operation which was performed on the database table.Status: This column shows the status of the optimization.
Online URL: https://www.knowledgebase-script.com/kb/article.php?id=126
0 2620
Indexing Attachments
Gurjeet Kaur Aug 4, 2017 at 3:27AM Tools
PHPKB Knowledge Base is able to index text content to the files attached to knowledge base articles in order to make them searchable. Attachment Indexing is supported in all editions of PHPKB knowledge base software. Some documents can be
searched without any advanced tools, while others need PHP modules enabled or installed plugins. You can index the article attachments of PDF, Word, Excel and Power Point documents. You can index the attachments either automatically or
manually. Follow the instructions given below to enable the index plugins in manage settings.
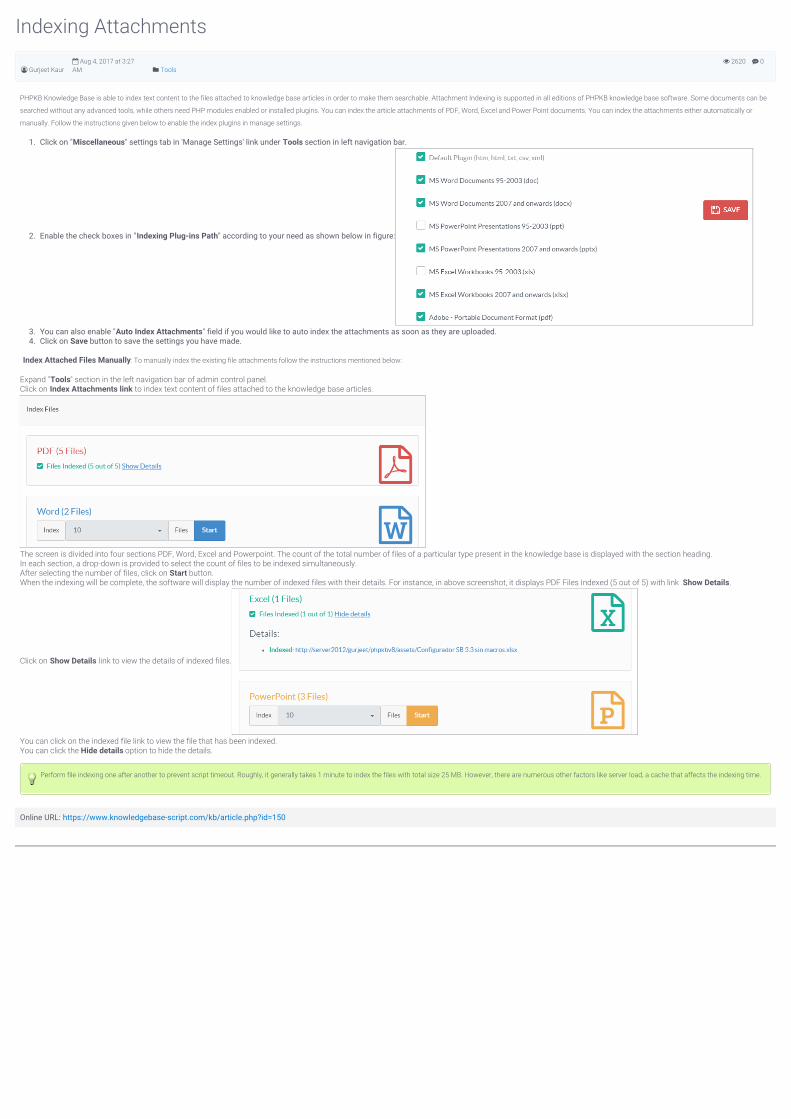
1. Click on "Miscellaneous" settings tab in 'Manage Settings' link under Tools section in left navigation bar.
2. Enable the check boxes in "Indexing Plug-ins Path" according to your need as shown below in figure:
3. You can also enable "Auto Index Attachments" field if you would like to auto index the attachments as soon as they are uploaded.4. Click on Save button to save the settings you have made.
Index Attached Files Manually: To manually index the existing file attachments follow the instructions mentioned below:
Expand "Tools" section in the left navigation bar of admin control panel.Click on Index Attachments link to index text content of files attached to the knowledge base articles.
The screen is divided into four sections PDF, Word, Excel and Powerpoint. The count of the total number of files of a particular type present in the knowledge base is displayed with the section heading.In each section, a drop-down is provided to select the count of files to be indexed simultaneously.After selecting the number of files, click on Start button.When the indexing will be complete, the software will display the number of indexed files with their details. For instance, in above screenshot, it displays PDF Files Indexed (5 out of 5) with link Show Details.
Click on Show Details link to view the details of indexed files.
You can click on the indexed file link to view the file that has been indexed.You can click the Hide details option to hide the details.
Perform file indexing one after another to prevent script timeout. Roughly, it generally takes 1 minute to index the files with total size 25 MB. However, there are numerous other factors like server load, a cache that affects the indexing time.
Online URL: https://www.knowledgebase-script.com/kb/article.php?id=150
0 2739
Sitemap Generator
Gurjeet Kaur Aug 1, 2017 at 7:12AM Tools
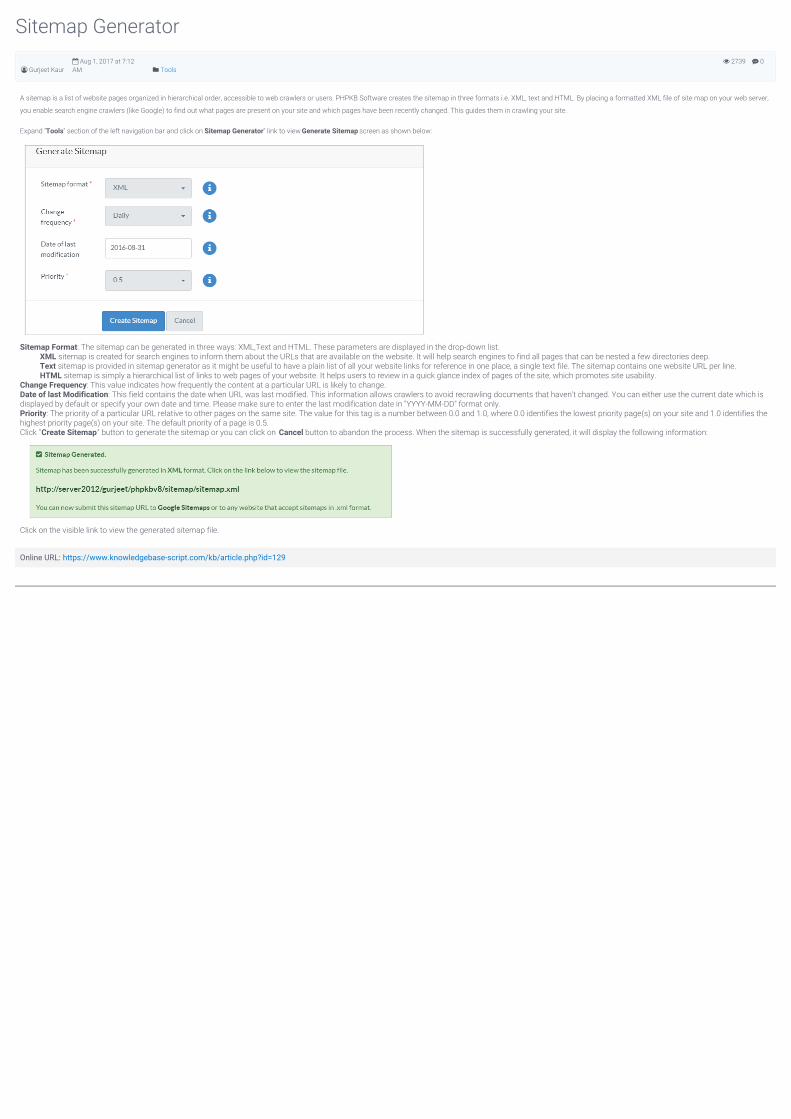
A sitemap is a list of website pages organized in hierarchical order, accessible to web crawlers or users. PHPKB Software creates the sitemap in three formats i.e. XML, text and HTML. By placing a formatted XML file of site map on your web server,
you enable search engine crawlers (like Google) to find out what pages are present on your site and which pages have been recently changed. This guides them in crawling your site.
Expand "Tools" section of the left navigation bar and click on "Sitemap Generator" link to view Generate Sitemap screen as shown below:
Sitemap Format: The sitemap can be generated in three ways: XML,Text and HTML. These parameters are displayed in the drop-down list.XML sitemap is created for search engines to inform them about the URLs that are available on the website. It will help search engines to find all pages that can be nested a few directories deep.Text sitemap is provided in sitemap generator as it might be useful to have a plain list of all your website links for reference in one place, a single text file. The sitemap contains one website URL per line. HTML sitemap is simply a hierarchical list of links to web pages of your website. It helps users to review in a quick glance index of pages of the site, which promotes site usability.
Change Frequency: This value indicates how frequently the content at a particular URL is likely to change.Date of last Modification: This field contains the date when URL was last modified. This information allows crawlers to avoid recrawling documents that haven't changed. You can either use the current date which isdisplayed by default or specify your own date and time. Please make sure to enter the last modification date in "YYYY-MM-DD" format only.Priority: The priority of a particular URL relative to other pages on the same site. The value for this tag is a number between 0.0 and 1.0, where 0.0 identifies the lowest priority page(s) on your site and 1.0 identifies thehighest priority page(s) on your site. The default priority of a page is 0.5.Click "Create Sitemap" button to generate the sitemap or you can click on Cancel button to abandon the process. When the sitemap is successfully generated, it will display the following information:
Click on the visible link to view the generated sitemap file.
Online URL: https://www.knowledgebase-script.com/kb/article.php?id=129

CATEGORY
Data Import2 Articles
0 2472
Importing data from an HTML file
Gurjeet Kaur Aug 4, 2017 at 3:07AM Data Import
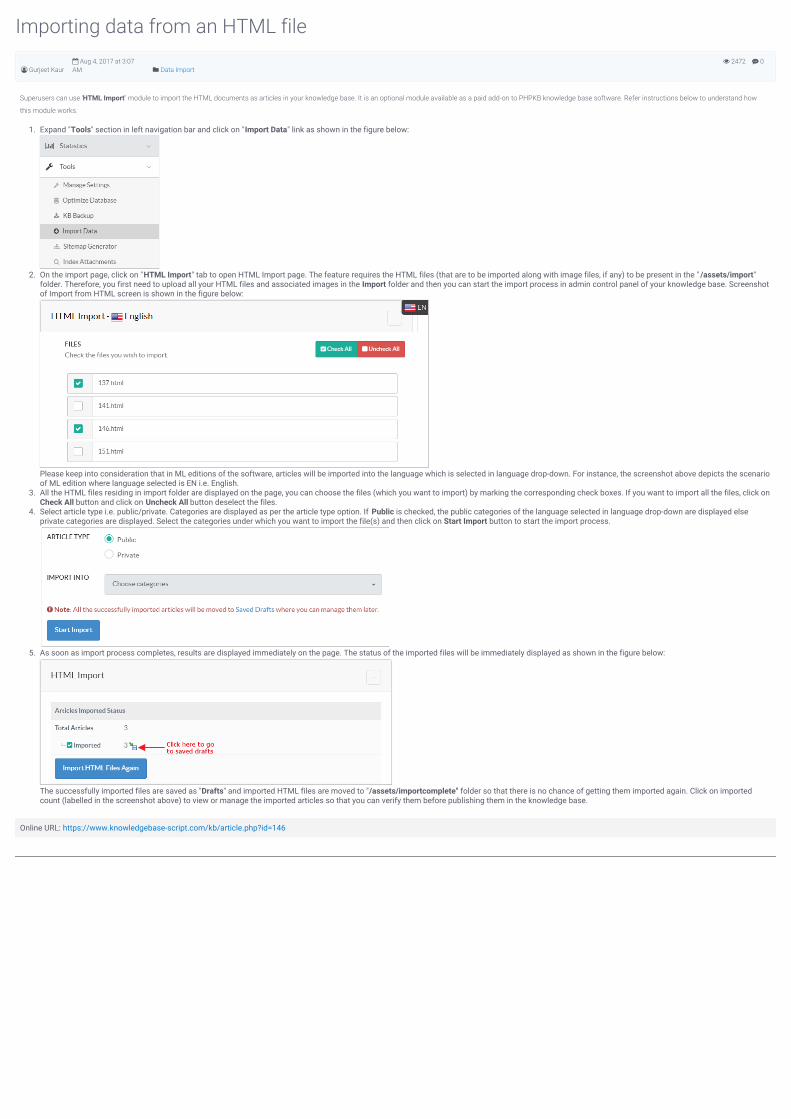
Superusers can use "HTML Import" module to import the HTML documents as articles in your knowledge base. It is an optional module available as a paid add-on to PHPKB knowledge base software. Refer instructions below to understand how
this module works.
1. Expand "Tools" section in left navigation bar and click on "Import Data" link as shown in the figure below:
2. On the import page, click on "HTML Import" tab to open HTML Import page. The feature requires the HTML files (that are to be imported along with image files, if any) to be present in the " /assets/import"folder. Therefore, you first need to upload all your HTML files and associated images in the Import folder and then you can start the import process in admin control panel of your knowledge base. Screenshotof Import from HTML screen is shown in the figure below:
Please keep into consideration that in ML editions of the software, articles will be imported into the language which is selected in language drop-down. For instance, the screenshot above depicts the scenarioof ML edition where language selected is EN i.e. English.
3. All the HTML files residing in import folder are displayed on the page, you can choose the files (which you want to import) by marking the corresponding check boxes. If you want to import all the files, click onCheck All button and click on Uncheck All button deselect the files.
4. Select article type i.e. public/private. Categories are displayed as per the article type option. If Public is checked, the public categories of the language selected in language drop-down are displayed elseprivate categories are displayed. Select the categories under which you want to import the file(s) and then click on Start Import button to start the import process.
5. As soon as import process completes, results are displayed immediately on the page. The status of the imported files will be immediately displayed as shown in the figure below:
The successfully imported files are saved as "Drafts" and imported HTML files are moved to "/assets/importcomplete" folder so that there is no chance of getting them imported again. Click on importedcount (labelled in the screenshot above) to view or manage the imported articles so that you can verify them before publishing them in the knowledge base.
Online URL: https://www.knowledgebase-script.com/kb/article.php?id=146
0 3027
Importing data from a CSV file
Gurjeet Kaur Aug 2, 2017 at 3:49AM Data Import
This section allows you to import articles in bulk from CSV file. By default, CSV import page is displayed. CSV stands for Comma Separated Values, sometimes also called as Comma Delimited is a specially formatted plain text file which stores
spreadsheet or basic database information in a very simple format, with one record on each line, and each field within that record separated by a comma.
Expand "Tools" in left navigation bar and click on "Import Data" to import CSV data.
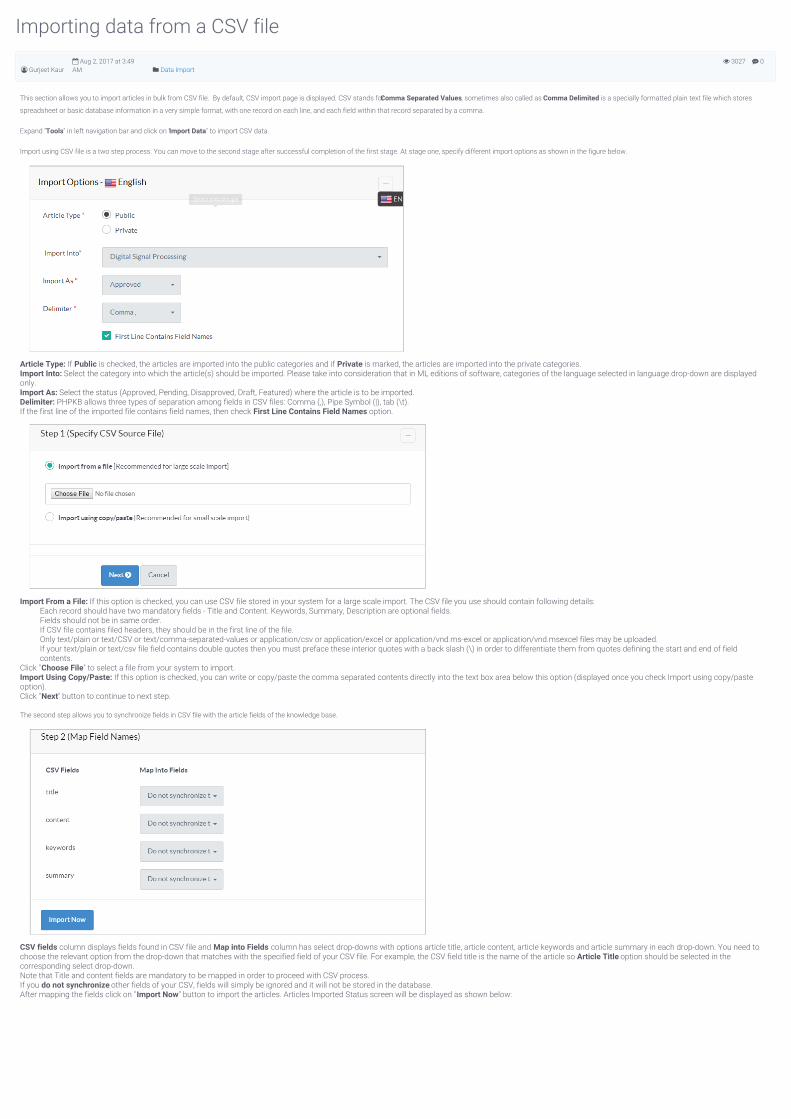
Import using CSV file is a two step process. You can move to the second stage after successful completion of the first stage. At stage one, specify different import options as shown in the figure below.
Article Type: If Public is checked, the articles are imported into the public categories and if Private is marked, the articles are imported into the private categories.Import Into: Select the category into which the article(s) should be imported. Please take into consideration that in ML editions of software, categories of the language selected in language drop-down are displayedonly.Import As: Select the status (Approved, Pending, Disapproved, Draft, Featured) where the article is to be imported.Delimiter: PHPKB allows three types of separation among fields in CSV files: Comma (,), Pipe Symbol (|), tab (\t).If the first line of the imported file contains field names, then check First Line Contains Field Names option.
Import From a File: If this option is checked, you can use CSV file stored in your system for a large scale import. The CSV file you use should contain following details:Each record should have two mandatory fields - Title and Content. Keywords, Summary, Description are optional fields.Fields should not be in same order.If CSV file contains filed headers, they should be in the first line of the file.Only text/plain or text/CSV or text/comma-separated-values or application/csv or application/excel or application/vnd.ms-excel or application/vnd.msexcel files may be uploaded.If your text/plain or text/csv file field contains double quotes then you must preface these interior quotes with a back slash (\) in order to differentiate them from quotes defining the start and end of fieldcontents.
Click "Choose File" to select a file from your system to import.Import Using Copy/Paste: If this option is checked, you can write or copy/paste the comma separated contents directly into the text box area below this option (displayed once you check Import using copy/pasteoption).Click "Next" button to continue to next step.
The second step allows you to synchronize fields in CSV file with the article fields of the knowledge base.
CSV fields column displays fields found in CSV file and Map into Fields column has select drop-downs with options article title, article content, article keywords and article summary in each drop-down. You need tochoose the relevant option from the drop-down that matches with the specified field of your CSV file. For example, the CSV field title is the name of the article so Article Title option should be selected in thecorresponding select drop-down.Note that Title and content fields are mandatory to be mapped in order to proceed with CSV process.If you do not synchronize other fields of your CSV, fields will simply be ignored and it will not be stored in the database.After mapping the fields click on "Import Now" button to import the articles. Articles Imported Status screen will be displayed as shown below:
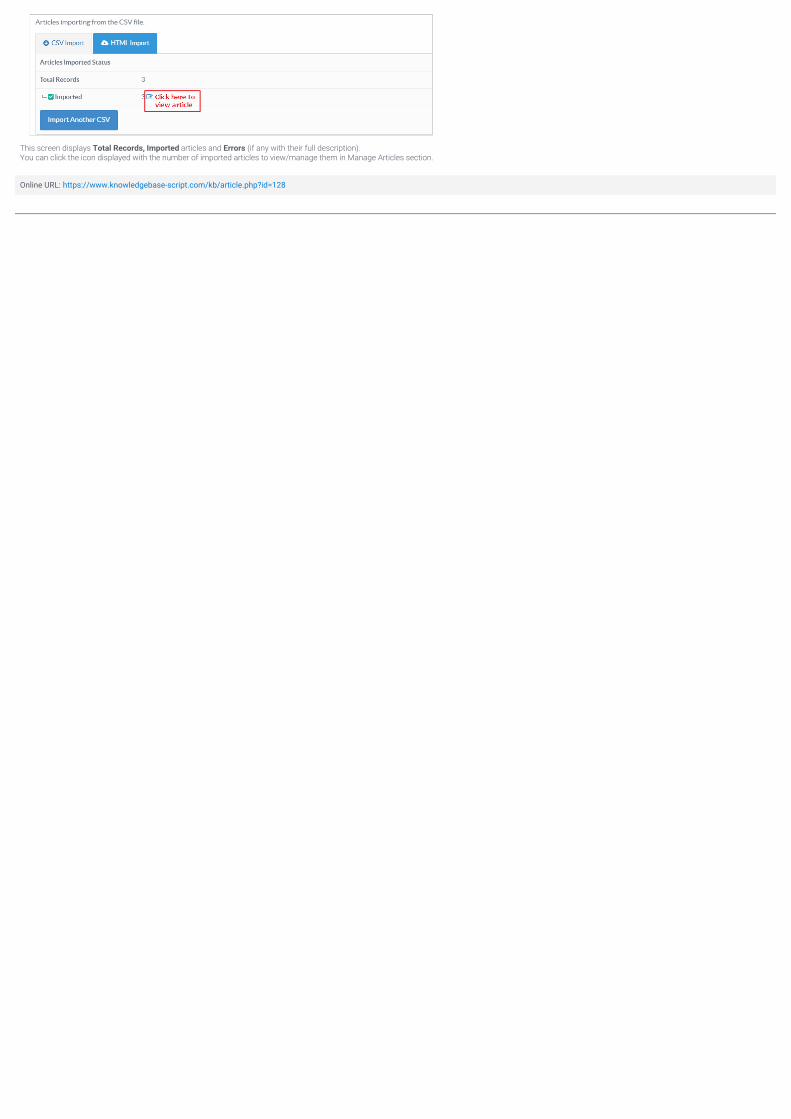
This screen displays Total Records, Imported articles and Errors (if any with their full description).You can click the icon displayed with the number of imported articles to view/manage them in Manage Articles section.
Online URL: https://www.knowledgebase-script.com/kb/article.php?id=128

CATEGORY
Manage Settings4 Articles
0 2994
Article Settings
Gurjeet Kaur Aug 23, 2017 at 2:25AM Manage Settings
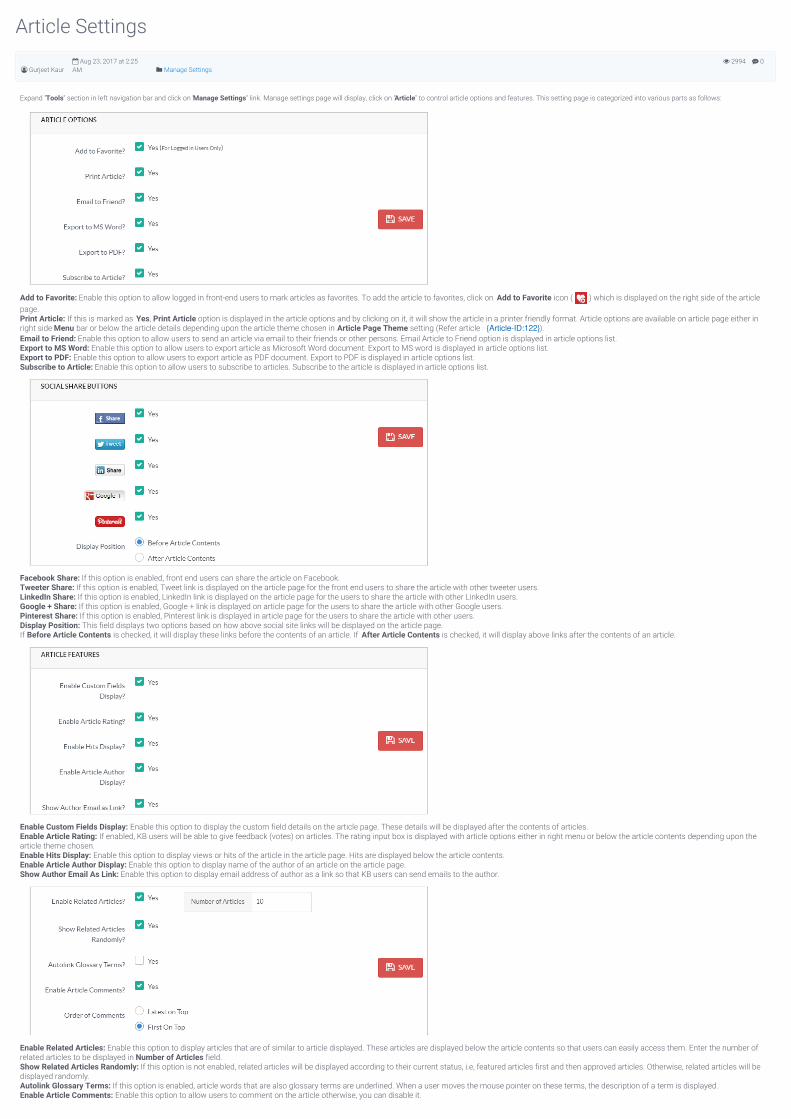
Expand "Tools" section in left navigation bar and click on "Manage Settings" link. Manage settings page will display, click on "Article" to control article options and features. This setting page is categorized into various parts as follows:
Add to Favorite: Enable this option to allow logged in front-end users to mark articles as favorites. To add the article to favorites, click on Add to Favorite icon ( ) which is displayed on the right side of the articlepage.Print Article: If this is marked as Yes, Print Article option is displayed in the article options and by clicking on it, it will show the article in a printer friendly format. Article options are available on article page either inright side Menu bar or below the article details depending upon the article theme chosen in Article Page Theme setting (Refer article {Article-ID:122}).Email to Friend: Enable this option to allow users to send an article via email to their friends or other persons. Email Article to Friend option is displayed in article options list.Export to MS Word: Enable this option to allow users to export article as Microsoft Word document. Export to MS word is displayed in article options list. Export to PDF: Enable this option to allow users to export article as PDF document. Export to PDF is displayed in article options list.Subscribe to Article: Enable this option to allow users to subscribe to articles. Subscribe to the article is displayed in article options list.
Facebook Share: If this option is enabled, front end users can share the article on Facebook.Tweeter Share: If this option is enabled, Tweet link is displayed on the article page for the front end users to share the article with other tweeter users.LinkedIn Share: If this option is enabled, LinkedIn link is displayed on the article page for the users to share the article with other LinkedIn users.Google + Share: If this option is enabled, Google + link is displayed on article page for the users to share the article with other Google users.Pinterest Share: If this option is enabled, Pinterest link is displayed in article page for the users to share the article with other users.Display Position: This field displays two options based on how above social site links will be displayed on the article page.If Before Article Contents is checked, it will display these links before the contents of an article. If After Article Contents is checked, it will display above links after the contents of an article.
Enable Custom Fields Display: Enable this option to display the custom field details on the article page. These details will be displayed after the contents of articles.Enable Article Rating: If enabled, KB users will be able to give feedback (votes) on articles. The rating input box is displayed with article options either in right menu or below the article contents depending upon thearticle theme chosen.Enable Hits Display: Enable this option to display views or hits of the article in the article page. Hits are displayed below the article contents.Enable Article Author Display: Enable this option to display name of the author of an article on the article page.Show Author Email As Link: Enable this option to display email address of author as a link so that KB users can send emails to the author.
Enable Related Articles: Enable this option to display articles that are of similar to article displayed. These articles are displayed below the article contents so that users can easily access them. Enter the number ofrelated articles to be displayed in Number of Articles field.Show Related Articles Randomly: If this option is not enabled, related articles will be displayed according to their current status, i.e, featured articles first and then approved articles. Otherwise, related articles will bedisplayed randomly.Autolink Glossary Terms: If this option is enabled, article words that are also glossary terms are underlined. When a user moves the mouse pointer on these terms, the description of a term is displayed. Enable Article Comments: Enable this option to allow users to comment on the article otherwise, you can disable it.
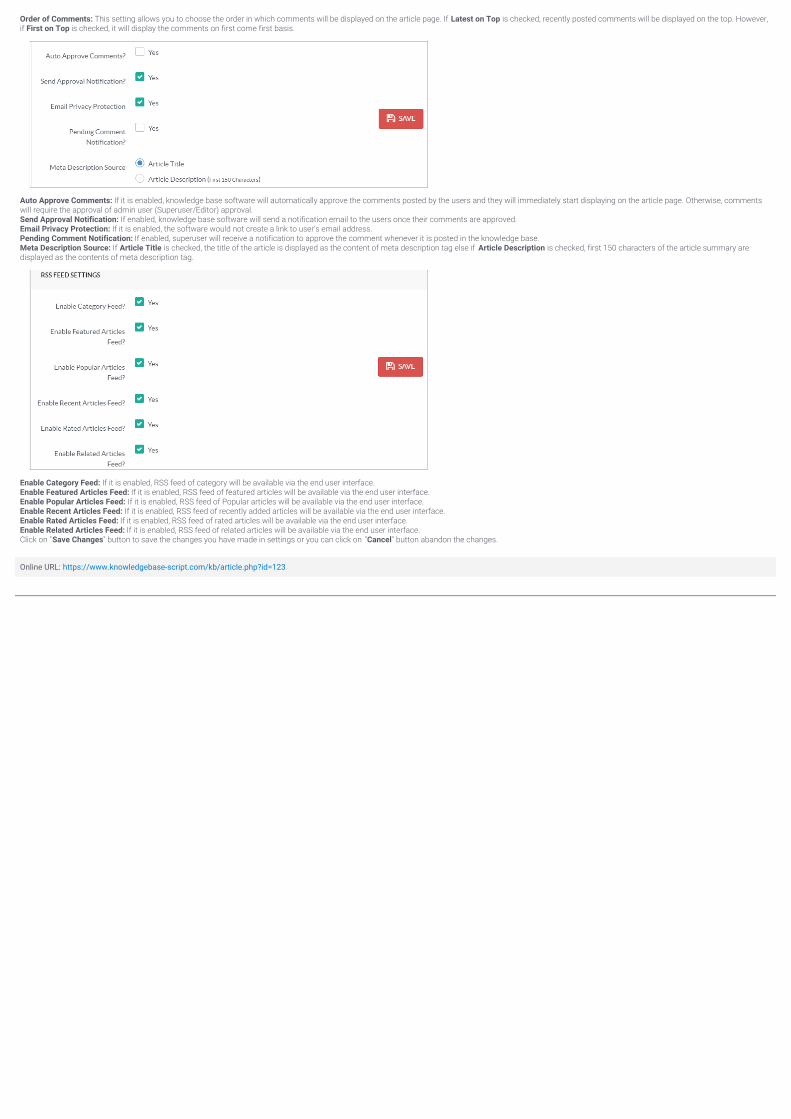
Order of Comments: This setting allows you to choose the order in which comments will be displayed on the article page. If Latest on Top is checked, recently posted comments will be displayed on the top. However,if First on Top is checked, it will display the comments on first come first basis.
Auto Approve Comments: If it is enabled, knowledge base software will automatically approve the comments posted by the users and they will immediately start displaying on the article page. Otherwise, commentswill require the approval of admin user (Superuser/Editor) approval.Send Approval Notification: If enabled, knowledge base software will send a notification email to the users once their comments are approved.Email Privacy Protection: If it is enabled, the software would not create a link to user's email address.Pending Comment Notification: If enabled, superuser will receive a notification to approve the comment whenever it is posted in the knowledge base.Meta Description Source: If Article Title is checked, the title of the article is displayed as the content of meta description tag else if Article Description is checked, first 150 characters of the article summary aredisplayed as the contents of meta description tag.
Enable Category Feed: If it is enabled, RSS feed of category will be available via the end user interface.Enable Featured Articles Feed: If it is enabled, RSS feed of featured articles will be available via the end user interface.Enable Popular Articles Feed: If it is enabled, RSS feed of Popular articles will be available via the end user interface.Enable Recent Articles Feed: If it is enabled, RSS feed of recently added articles will be available via the end user interface.Enable Rated Articles Feed: If it is enabled, RSS feed of rated articles will be available via the end user interface.Enable Related Articles Feed: If it is enabled, RSS feed of related articles will be available via the end user interface.Click on "Save Changes" button to save the changes you have made in settings or you can click on "Cancel" button abandon the changes.
Online URL: https://www.knowledgebase-script.com/kb/article.php?id=123
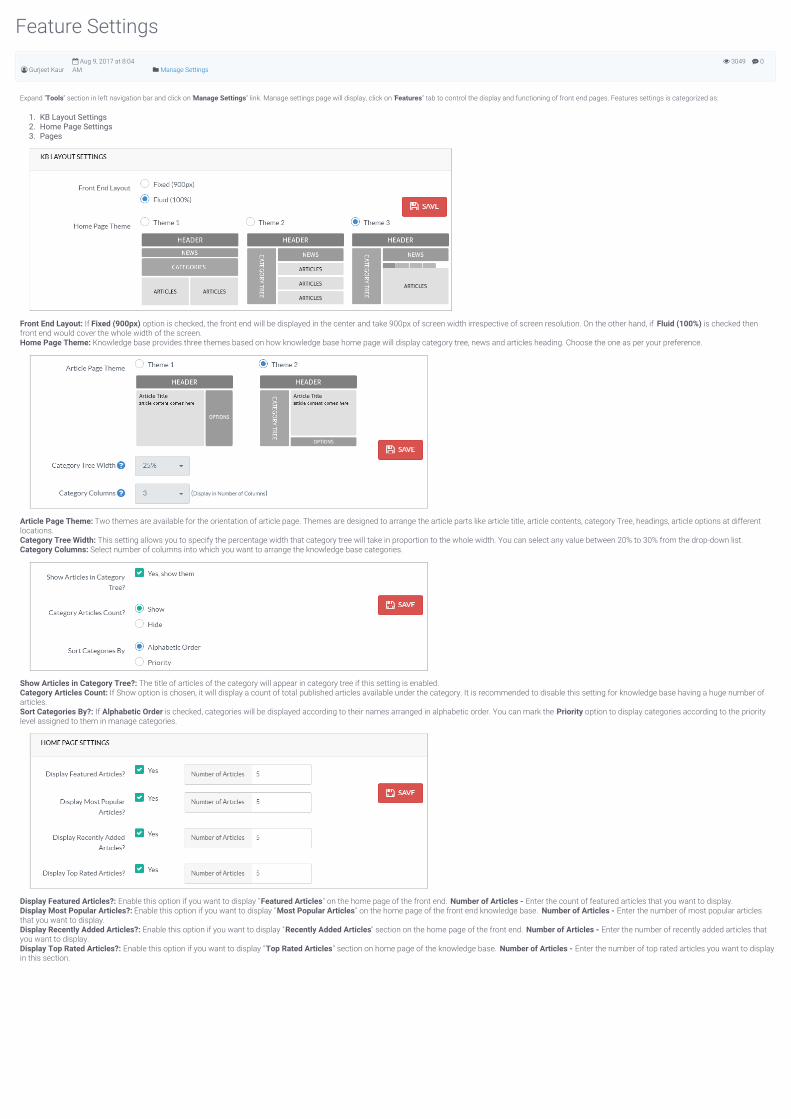
0 3049
Feature Settings
Gurjeet Kaur Aug 9, 2017 at 8:04AM Manage Settings
Expand "Tools" section in left navigation bar and click on "Manage Settings" link. Manage settings page will display, click on "Features" tab to control the display and functioning of front end pages. Features settings is categorized as:
1. KB Layout Settings2. Home Page Settings3. Pages
Front End Layout: If Fixed (900px) option is checked, the front end will be displayed in the center and take 900px of screen width irrespective of screen resolution. On the other hand, if Fluid (100%) is checked thenfront end would cover the whole width of the screen.Home Page Theme: Knowledge base provides three themes based on how knowledge base home page will display category tree, news and articles heading. Choose the one as per your preference.
Article Page Theme: Two themes are available for the orientation of article page. Themes are designed to arrange the article parts like article title, article contents, category Tree, headings, article options at differentlocations.Category Tree Width: This setting allows you to specify the percentage width that category tree will take in proportion to the whole width. You can select any value between 20% to 30% from the drop-down list.Category Columns: Select number of columns into which you want to arrange the knowledge base categories.
Show Articles in Category Tree?: The title of articles of the category will appear in category tree if this setting is enabled.Category Articles Count: If Show option is chosen, it will display a count of total published articles available under the category. It is recommended to disable this setting for knowledge base having a huge number ofarticles.Sort Categories By?: If Alphabetic Order is checked, categories will be displayed according to their names arranged in alphabetic order. You can mark the Priority option to display categories according to the prioritylevel assigned to them in manage categories.
Display Featured Articles?: Enable this option if you want to display "Featured Articles" on the home page of the front end. Number of Articles - Enter the count of featured articles that you want to display.Display Most Popular Articles?: Enable this option if you want to display "Most Popular Articles" on the home page of the front end knowledge base. Number of Articles - Enter the number of most popular articlesthat you want to display.Display Recently Added Articles?: Enable this option if you want to display "Recently Added Articles" section on the home page of the front end. Number of Articles - Enter the number of recently added articles thatyou want to display.Display Top Rated Articles?: Enable this option if you want to display "Top Rated Articles" section on home page of the knowledge base. Number of Articles - Enter the number of top rated articles you want to displayin this section.
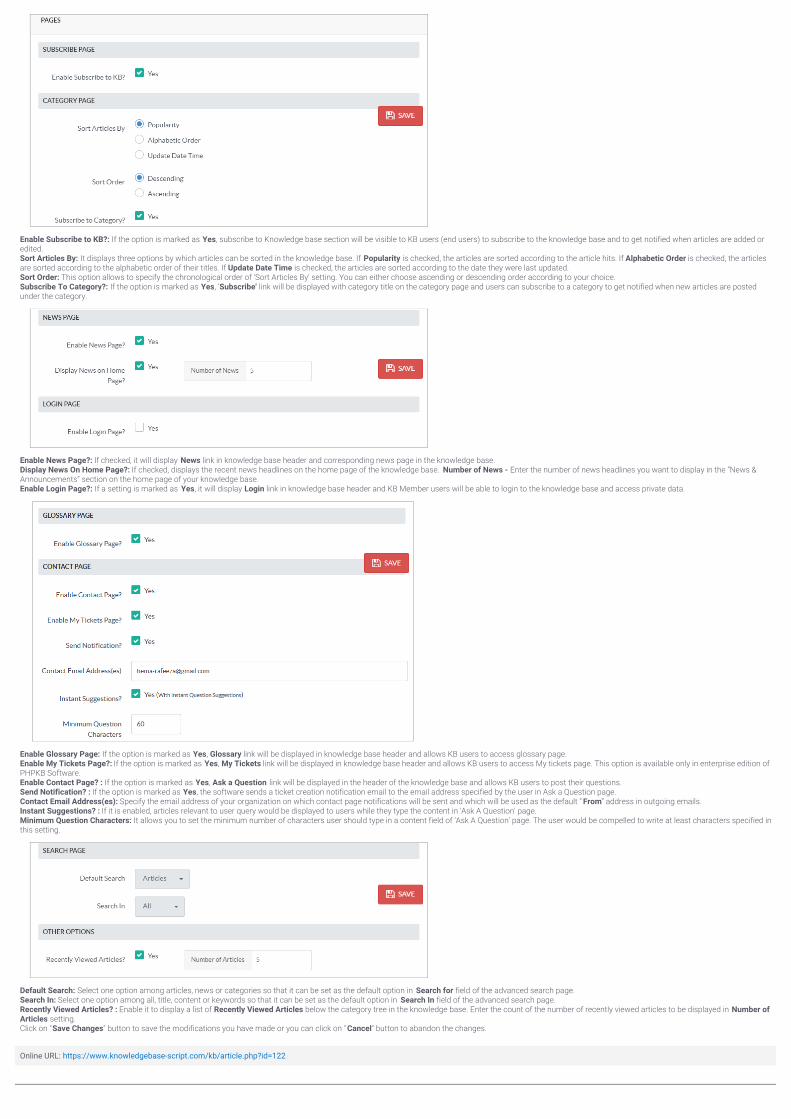
Enable Subscribe to KB?: If the option is marked as Yes, subscribe to Knowledge base section will be visible to KB users (end users) to subscribe to the knowledge base and to get notified when articles are added oredited.Sort Articles By: It displays three options by which articles can be sorted in the knowledge base. If Popularity is checked, the articles are sorted according to the article hits. If Alphabetic Order is checked, the articlesare sorted according to the alphabetic order of their titles. If Update Date Time is checked, the articles are sorted according to the date they were last updated.Sort Order: This option allows to specify the chronological order of 'Sort Articles By' setting. You can either choose ascending or descending order according to your choice.Subscribe To Category?: If the option is marked as Yes, 'Subscribe' link will be displayed with category title on the category page and users can subscribe to a category to get notified when new articles are postedunder the category.
Enable News Page?: If checked, it will display News link in knowledge base header and corresponding news page in the knowledge base.Display News On Home Page?: If checked, displays the recent news headlines on the home page of the knowledge base. Number of News - Enter the number of news headlines you want to display in the “News &Announcements” section on the home page of your knowledge base.Enable Login Page?: If a setting is marked as Yes, it will display Login link in knowledge base header and KB Member users will be able to login to the knowledge base and access private data.
Enable Glossary Page: If the option is marked as Yes, Glossary link will be displayed in knowledge base header and allows KB users to access glossary page.Enable My Tickets Page?: If the option is marked as Yes, My Tickets link will be displayed in knowledge base header and allows KB users to access My tickets page. This option is available only in enterprise edition ofPHPKB Software.Enable Contact Page? : If the option is marked as Yes, Ask a Question link will be displayed in the header of the knowledge base and allows KB users to post their questions.Send Notification? : If the option is marked as Yes, the software sends a ticket creation notification email to the email address specified by the user in Ask a Question page.Contact Email Address(es): Specify the email address of your organization on which contact page notifications will be sent and which will be used as the default “ From” address in outgoing emails.Instant Suggestions? : If it is enabled, articles relevant to user query would be displayed to users while they type the content in 'Ask A Question' page.Minimum Question Characters: It allows you to set the minimum number of characters user should type in a content field of 'Ask A Question' page. The user would be compelled to write at least characters specified inthis setting.
Default Search: Select one option among articles, news or categories so that it can be set as the default option in Search for field of the advanced search page.Search In: Select one option among all, title, content or keywords so that it can be set as the default option in Search In field of the advanced search page.Recently Viewed Articles? : Enable it to display a list of Recently Viewed Articles below the category tree in the knowledge base. Enter the count of the number of recently viewed articles to be displayed in Number ofArticles setting.Click on "Save Changes" button to save the modifications you have made or you can click on " Cancel" button to abandon the changes.
Online URL: https://www.knowledgebase-script.com/kb/article.php?id=122
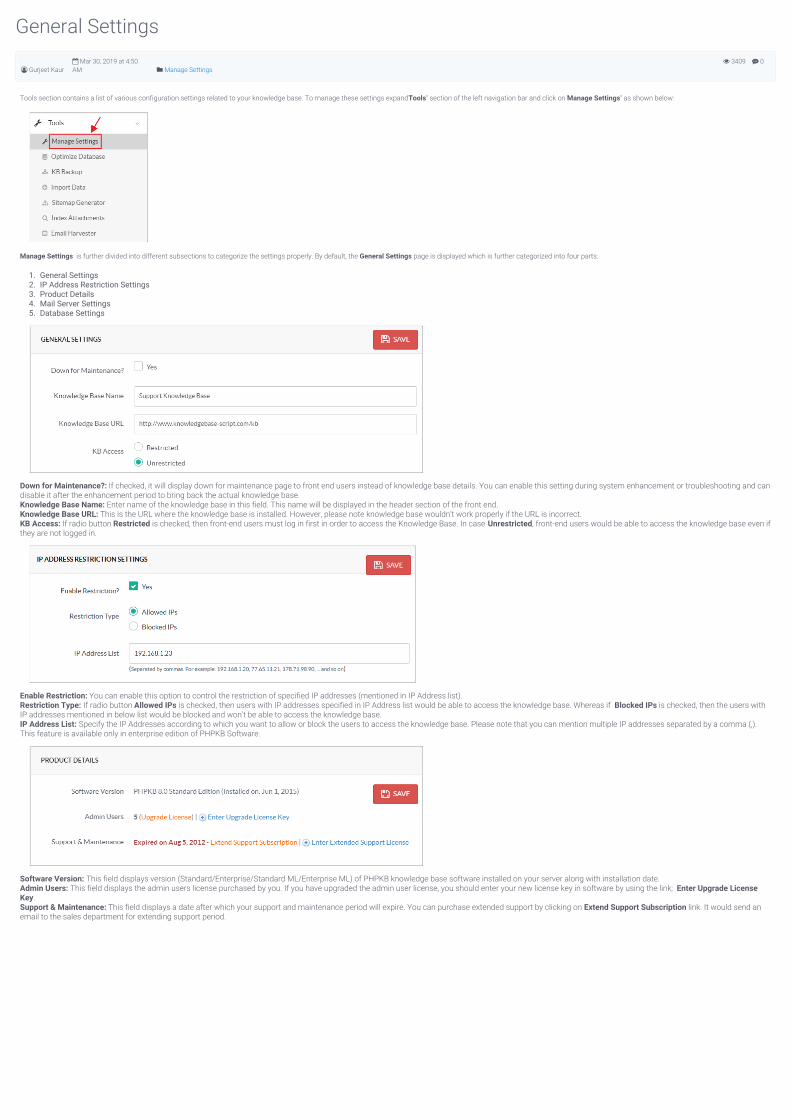
0 3409
General Settings
Gurjeet Kaur Mar 30, 2019 at 4:50AM Manage Settings
Tools section contains a list of various configuration settings related to your knowledge base. To manage these settings expand "Tools" section of the left navigation bar and click on "Manage Settings" as shown below:
Manage Settings is further divided into different subsections to categorize the settings properly. By default, the General Settings page is displayed which is further categorized into four parts:
1. General Settings2. IP Address Restriction Settings3. Product Details4. Mail Server Settings5. Database Settings
Down for Maintenance?: If checked, it will display down for maintenance page to front end users instead of knowledge base details. You can enable this setting during system enhancement or troubleshooting and candisable it after the enhancement period to bring back the actual knowledge base.Knowledge Base Name: Enter name of the knowledge base in this field. This name will be displayed in the header section of the front end. Knowledge Base URL: This is the URL where the knowledge base is installed. However, please note knowledge base wouldn’t work properly if the URL is incorrect.KB Access: If radio button Restricted is checked, then front-end users must log in first in order to access the Knowledge Base. In case Unrestricted, front-end users would be able to access the knowledge base even ifthey are not logged in.
Enable Restriction: You can enable this option to control the restriction of specified IP addresses (mentioned in IP Address list).Restriction Type: If radio button Allowed IPs is checked, then users with IP addresses specified in IP Address list would be able to access the knowledge base. Whereas if Blocked IPs is checked, then the users withIP addresses mentioned in below list would be blocked and won't be able to access the knowledge base.IP Address List: Specify the IP Addresses according to which you want to allow or block the users to access the knowledge base. Please note that you can mention multiple IP addresses separated by a comma (,).This feature is available only in enterprise edition of PHPKB Software.
Software Version: This field displays version (Standard/Enterprise/Standard ML/Enterprise ML) of PHPKB knowledge base software installed on your server along with installation date.Admin Users: This field displays the admin users license purchased by you. If you have upgraded the admin user license, you should enter your new license key in software by using the link; Enter Upgrade LicenseKey.Support & Maintenance: This field displays a date after which your support and maintenance period will expire. You can purchase extended support by clicking on Extend Support Subscription link. It would send anemail to the sales department for extending support period.
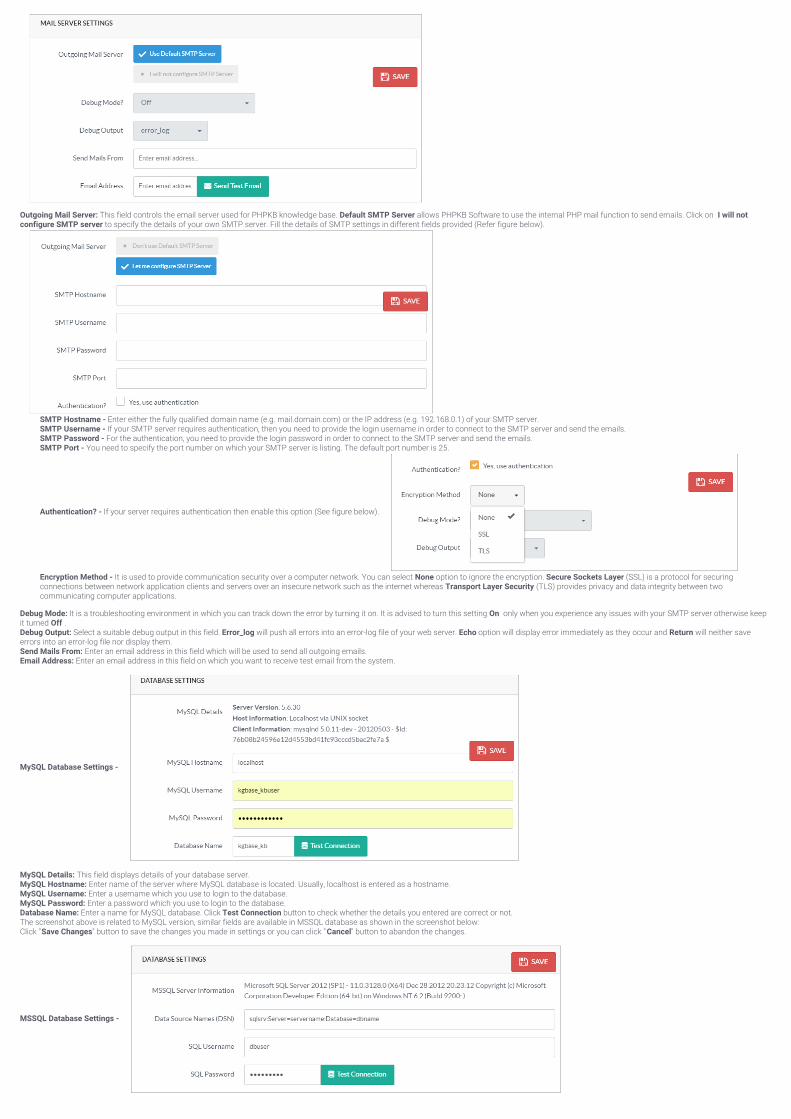
Outgoing Mail Server: This field controls the email server used for PHPKB knowledge base. Default SMTP Server allows PHPKB Software to use the internal PHP mail function to send emails. Click on I will notconfigure SMTP server to specify the details of your own SMTP server. Fill the details of SMTP settings in different fields provided (Refer figure below).
SMTP Hostname - Enter either the fully qualified domain name (e.g. mail.domain.com) or the IP address (e.g. 192.168.0.1) of your SMTP server.SMTP Username - If your SMTP server requires authentication, then you need to provide the login username in order to connect to the SMTP server and send the emails.SMTP Password - For the authentication, you need to provide the login password in order to connect to the SMTP server and send the emails.SMTP Port - You need to specify the port number on which your SMTP server is listing. The default port number is 25.
Authentication? - If your server requires authentication then enable this option (See figure below).
Encryption Method - It is used to provide communication security over a computer network. You can select None option to ignore the encryption. Secure Sockets Layer (SSL) is a protocol for securingconnections between network application clients and servers over an insecure network such as the internet whereas Transport Layer Security (TLS) provides privacy and data integrity between twocommunicating computer applications.
Debug Mode: It is a troubleshooting environment in which you can track down the error by turning it on. It is advised to turn this setting On only when you experience any issues with your SMTP server otherwise keepit turned Off .Debug Output: Select a suitable debug output in this field. Error_log will push all errors into an error-log file of your web server. Echo option will display error immediately as they occur and Return will neither saveerrors into an error-log file nor display them. Send Mails From: Enter an email address in this field which will be used to send all outgoing emails.Email Address: Enter an email address in this field on which you want to receive test email from the system.
MySQL Database Settings -
MySQL Details: This field displays details of your database server.MySQL Hostname: Enter name of the server where MySQL database is located. Usually, localhost is entered as a hostname.MySQL Username: Enter a username which you use to login to the database.MySQL Password: Enter a password which you use to login to the database.Database Name: Enter a name for MySQL database. Click Test Connection button to check whether the details you entered are correct or not.The screenshot above is related to MySQL version, similar fields are available in MSSQL database as shown in the screenshot below:Click "Save Changes" button to save the changes you made in settings or you can click " Cancel" button to abandon the changes.
MSSQL Database Settings -

MSSQL Server Information: It displays the information of SQL server. Data Source Name: It is a string that has an associated Data Structure used to describe a connection to a data source. Data Source Name is entered as <DRIVER>:host=<HOSTNAME>;dbname=<DB-NAME>. SQL Username: Enter your login username which you use to login to the database. SQL Password: Enter login password which you use to login to the database. Click Test Connection button to check whether the details you entered are correct or not.
Online URL: https://www.knowledgebase-script.com/kb/article.php?id=162

0 3499
Miscellaneous Settings
Gurjeet Kaur Feb 19, 2020 at 3:53AM Manage Settings
Click on "Miscellaneous Settings" tab in Manage Settings section to manage security settings such as login attempts allowed, search settings, file upload settings etc. The miscellaneous settings are further categorized as follows:
# Wrong Login Attempts: Enter the number of times a user can try to login before he is locked out in the case of wrong credentials.Prevent Login For: Select the time (in minutes) for which users remain locked out once they are blocked. After this time, the user can try to login again.
php.ini Configuration: Outputs information about PHP compilation options and extensions, the PHP version, server information and environment (if compiled as a module), the PHP environment, OS versioninformation, master and local values of different configuration options, HTTP headers, and the PHP License.Maximum File Size Allowed: Select a maximum file size length from the drop-down list. Admin users are not allowed to upload files larger than the size selected. If you select the Unlimited option, users can uploadfiles of unlimited size. However, the size of upload file also depends upon different php.ini settings (Refer article: {Article-ID:73} for details).Enable Compression: If enabled, the software will compress the image files pasted through clipboard into WYSIWYG article editor.
Searching Method: The front end search is performed on the basis of the value chosen in this field. By default LIKE search is performed, however, you can also select the Full-text Search option.Search Results Per Page: Enter the number of records you want to display per page for search results, news and favourites. In the screenshot, value for this setting is 10, so ten results will be displayed on one page.Search Custom Fields?: If this option is enabled, KB users can look for keywords in a custom field on the advanced search page.Search Attached Files?: If this option is enabled, KB Users can search keywords in article attachments on the advanced search page.
antiword: Type in the path where antiword plugin is installed on your server. Antiword is an MS Word reader which converts binary files from word to plain text.ppthtml: Type in the path where ppthtml plugin is installed on your server. PPTHTML is a PowerPoint HTML presentation which converts Microsoft PowerPoint files (.ppt) to HTML (.html) files.xlhtml: Type in the path where xlhtml plugin is installed on your server. xlhtml converts excel spreadsheets files (.xls) to highly-optimized HTML files.pdftotext: Type in the path where pdftotext plugin is installed on your server. pdftotext is an open source utility for converting PDF files to plain text files.Refer article: {Article-ID:47} for more details of these plugins.
Enable Autosave: If this is enabled, the software will automatically save the articles and news in progress after few minutes. Refer article {Article-ID:81} for more details.Autosave Interval: The time span after which software will autosave the work in progress. You can choose the interval between 1 to 5 minutes from the select drop-down available next to this setting. In thescreenshot above, 2 is selected that means after every 2 minutes software will generate the backup copy of article/news.Use WYSIWYG Editor: If enabled, the software will display What You See Is What You Get editor to admin users while they are creating articles/news.Allowed Files: Type-in a list of file extensions, separated by a comma; which admin users are allowed to upload with articles.
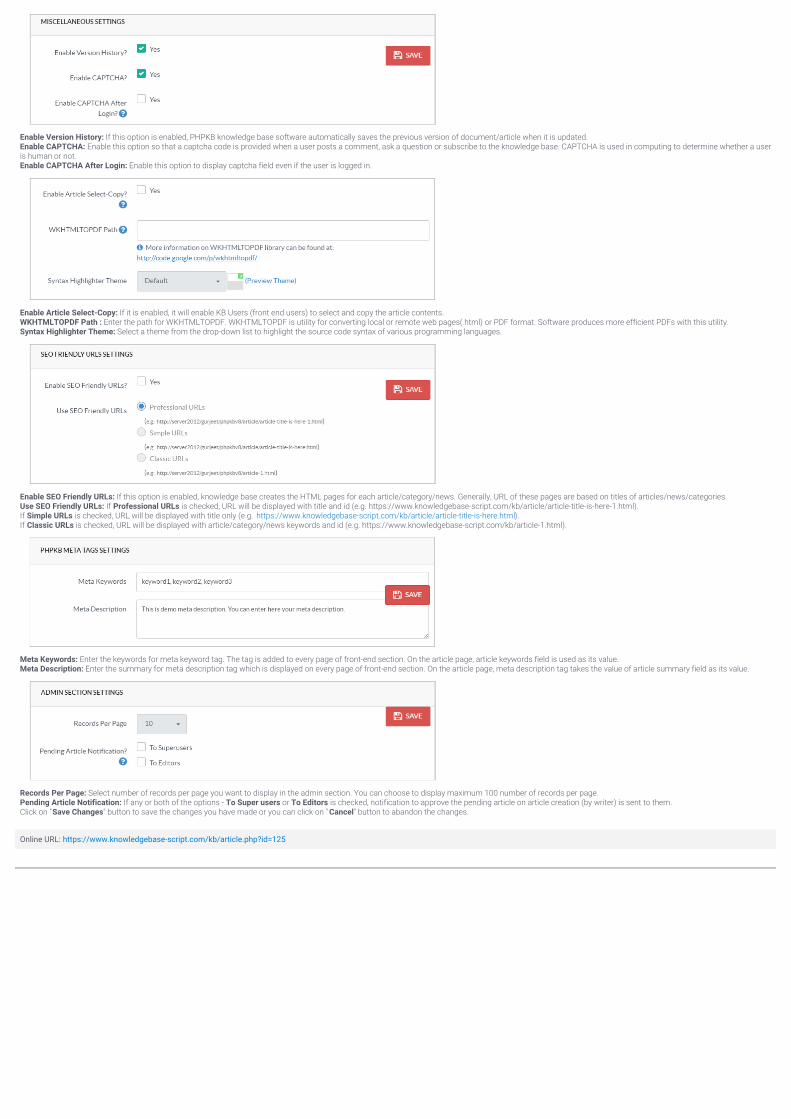
Enable Version History: If this option is enabled, PHPKB knowledge base software automatically saves the previous version of document/article when it is updated.Enable CAPTCHA: Enable this option so that a captcha code is provided when a user posts a comment, ask a question or subscribe to the knowledge base. CAPTCHA is used in computing to determine whether a useris human or not.Enable CAPTCHA After Login: Enable this option to display captcha field even if the user is logged in.
Enable Article Select-Copy: If it is enabled, it will enable KB Users (front end users) to select and copy the article contents.WKHTMLTOPDF Path : Enter the path for WKHTMLTOPDF. WKHTMLTOPDF is utility for converting local or remote web pages(.html) or PDF format. Software produces more efficient PDFs with this utility.Syntax Highlighter Theme: Select a theme from the drop-down list to highlight the source code syntax of various programming languages.
Enable SEO Friendly URLs: If this option is enabled, knowledge base creates the HTML pages for each article/category/news. Generally, URL of these pages are based on titles of articles/news/categories.Use SEO Friendly URLs: If Professional URLs is checked, URL will be displayed with title and id (e.g. https://www.knowledgebase-script.com/kb/article/article-title-is-here-1.html).If Simple URLs is checked, URL will be displayed with title only (e.g. https://www.knowledgebase-script.com/kb/article/article-title-is-here.html).If Classic URLs is checked, URL will be displayed with article/category/news keywords and id (e.g. https://www.knowledgebase-script.com/kb/article-1.html).
Meta Keywords: Enter the keywords for meta keyword tag. The tag is added to every page of front-end section. On the article page, article keywords field is used as its value.Meta Description: Enter the summary for meta description tag which is displayed on every page of front-end section. On the article page, meta description tag takes the value of article summary field as its value.
Records Per Page: Select number of records per page you want to display in the admin section. You can choose to display maximum 100 number of records per page.Pending Article Notification: If any or both of the options - To Super users or To Editors is checked, notification to approve the pending article on article creation (by writer) is sent to them.Click on "Save Changes" button to save the changes you have made or you can click on " Cancel" button to abandon the changes.
Online URL: https://www.knowledgebase-script.com/kb/article.php?id=125

CATEGORY
Statistics & Reports4 Articles
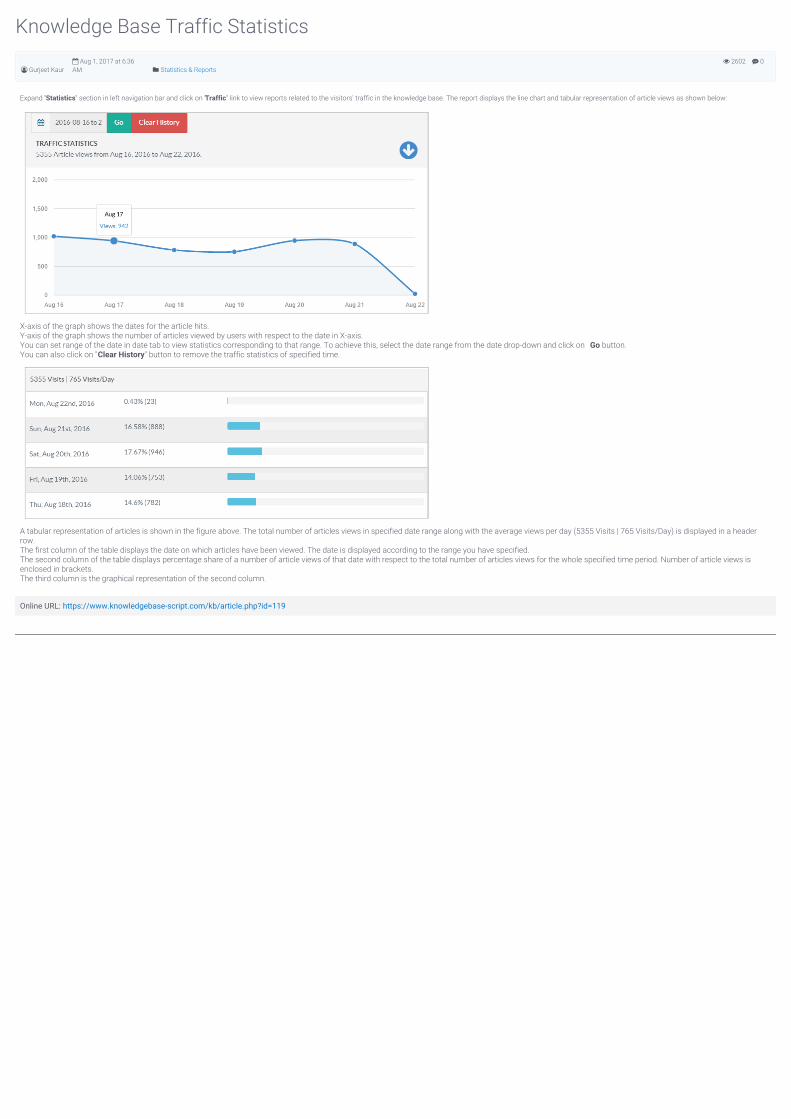
0 2602
Knowledge Base Traffic Statistics
Gurjeet Kaur Aug 1, 2017 at 6:36AM Statistics & Reports
Expand "Statistics" section in left navigation bar and click on "Traffic" link to view reports related to the visitors' traffic in the knowledge base. The report displays the line chart and tabular representation of article views as shown below:
X-axis of the graph shows the dates for the article hits.Y-axis of the graph shows the number of articles viewed by users with respect to the date in X-axis.You can set range of the date in date tab to view statistics corresponding to that range. To achieve this, select the date range from the date drop-down and click on Go button.You can also click on "Clear History" button to remove the traffic statistics of specified time.
A tabular representation of articles is shown in the figure above. The total number of articles views in specified date range along with the average views per day (5355 Visits | 765 Visits/Day) is displayed in a headerrow.The first column of the table displays the date on which articles have been viewed. The date is displayed according to the range you have specified.The second column of the table displays percentage share of a number of article views of that date with respect to the total number of articles views for the whole specified time period. Number of article views isenclosed in brackets.The third column is the graphical representation of the second column.
Online URL: https://www.knowledgebase-script.com/kb/article.php?id=119
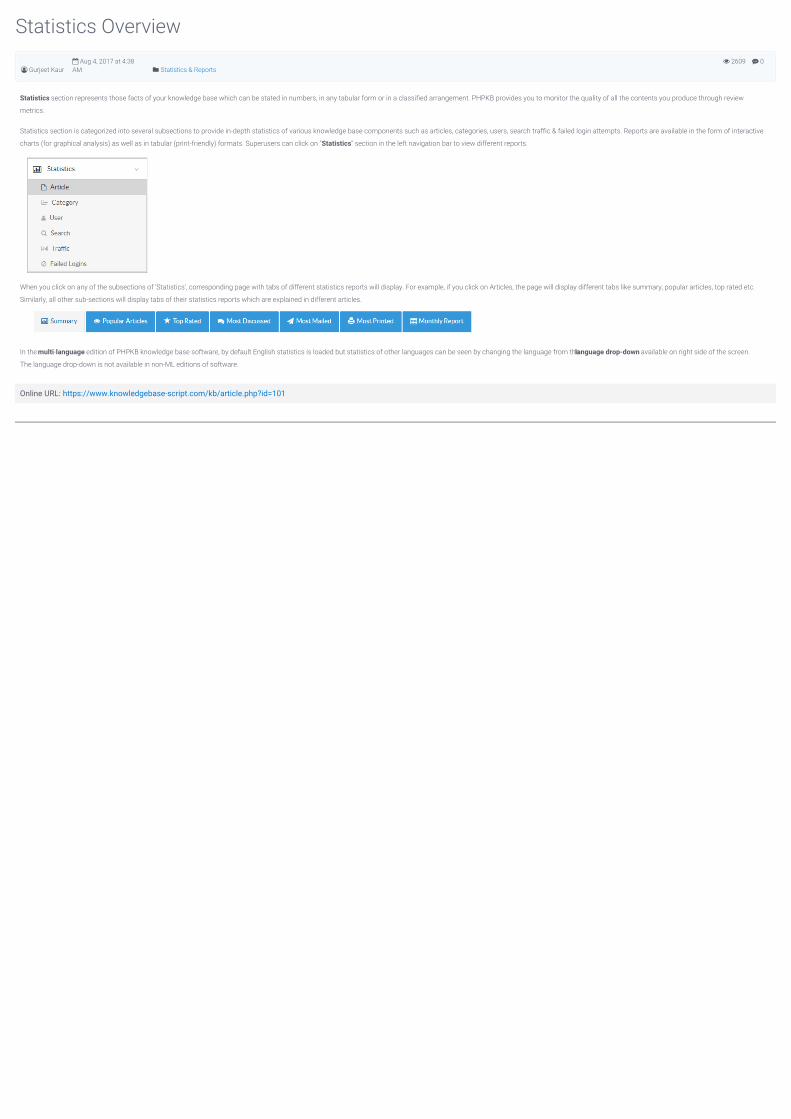
0 2609
Statistics Overview
Gurjeet Kaur Aug 4, 2017 at 4:38AM Statistics & Reports
Statistics section represents those facts of your knowledge base which can be stated in numbers, in any tabular form or in a classified arrangement. PHPKB provides you to monitor the quality of all the contents you produce through review
metrics.
Statistics section is categorized into several subsections to provide in-depth statistics of various knowledge base components such as articles, categories, users, search traffic & failed login attempts. Reports are available in the form of interactive
charts (for graphical analysis) as well as in tabular (print-friendly) formats. Superusers can click on "Statistics" section in the left navigation bar to view different reports.
When you click on any of the subsections of 'Statistics', corresponding page with tabs of different statistics reports will display. For example, if you click on Articles, the page will display different tabs like summary, popular articles, top rated etc.
Similarly, all other sub-sections will display tabs of their statistics reports which are explained in different articles.
In the multi-language edition of PHPKB knowledge base software, by default English statistics is loaded but statistics of other languages can be seen by changing the language from the language drop-down available on right side of the screen.
The language drop-down is not available in non-ML editions of software.
Online URL: https://www.knowledgebase-script.com/kb/article.php?id=101
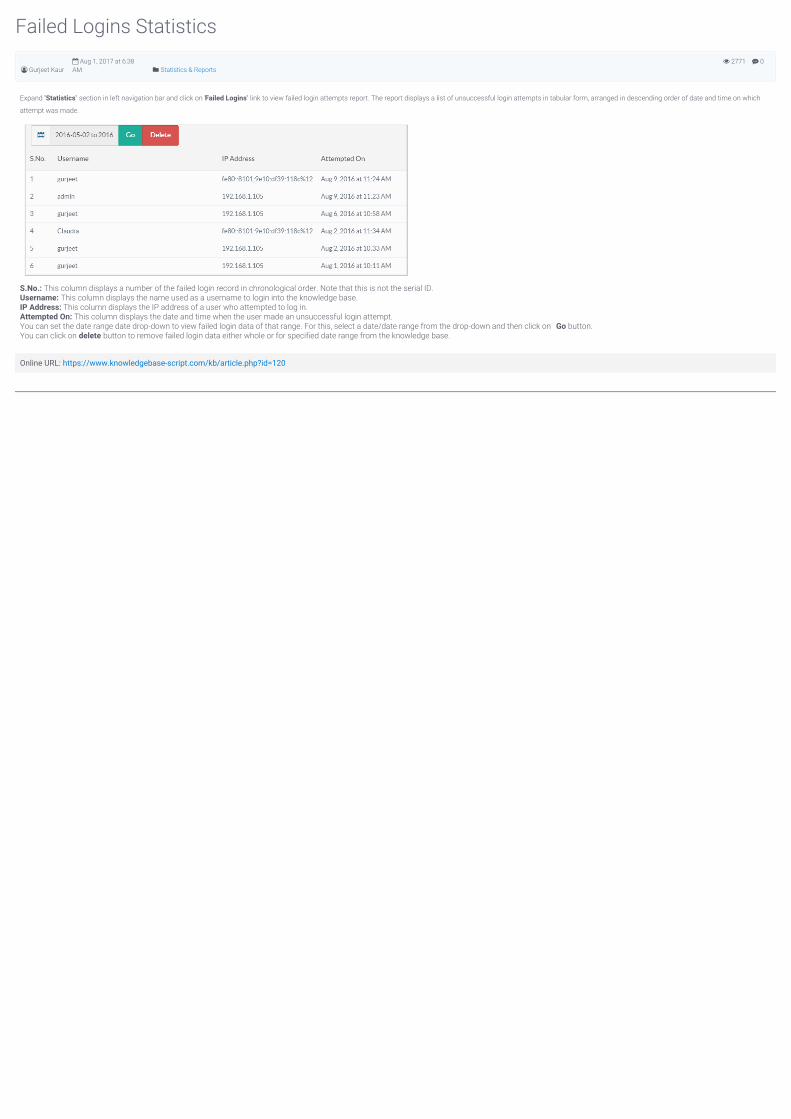
0 2771
Failed Logins Statistics
Gurjeet Kaur Aug 1, 2017 at 6:38AM Statistics & Reports
Expand "Statistics" section in left navigation bar and click on "Failed Logins" link to view failed login attempts report. The report displays a list of unsuccessful login attempts in tabular form, arranged in descending order of date and time on which
attempt was made.
S.No.: This column displays a number of the failed login record in chronological order. Note that this is not the serial ID.Username: This column displays the name used as a username to login into the knowledge base.IP Address: This column displays the IP address of a user who attempted to log in.Attempted On: This column displays the date and time when the user made an unsuccessful login attempt.You can set the date range date drop-down to view failed login data of that range. For this, select a date/date range from the drop-down and then click on Go button.You can click on delete button to remove failed login data either whole or for specified date range from the knowledge base.
Online URL: https://www.knowledgebase-script.com/kb/article.php?id=120
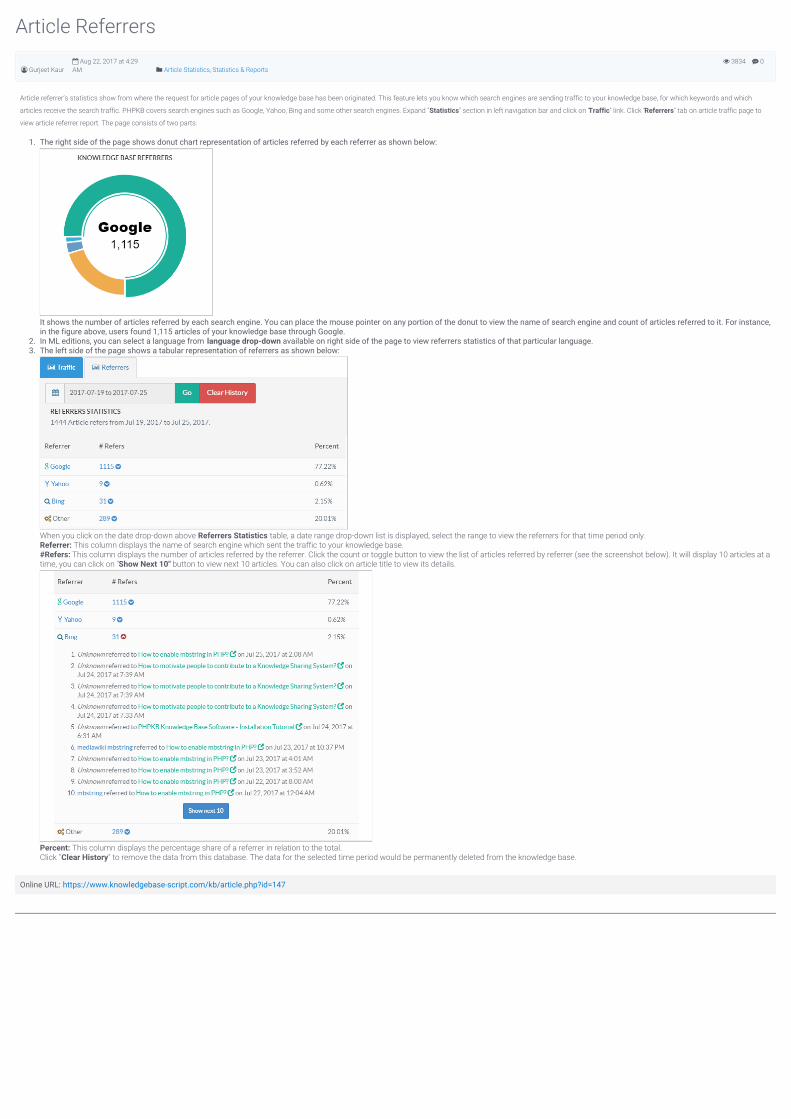
0 3834
Article Referrers
Gurjeet Kaur Aug 22, 2017 at 4:29AM Article Statistics, Statistics & Reports
Article referrer’s statistics show from where the request for article pages of your knowledge base has been originated. This feature lets you know which search engines are sending traffic to your knowledge base, for which keywords and which
articles receive the search traffic. PHPKB covers search engines such as Google, Yahoo, Bing and some other search engines. Expand "Statistics" section in left navigation bar and click on "Traffic" link. Click "Referrers" tab on article traffic page to
view article referrer report. The page consists of two parts:
1. The right side of the page shows donut chart representation of articles referred by each referrer as shown below:
It shows the number of articles referred by each search engine. You can place the mouse pointer on any portion of the donut to view the name of search engine and count of articles referred to it. For instance,in the figure above, users found 1,115 articles of your knowledge base through Google.
2. In ML editions, you can select a language from language drop-down available on right side of the page to view referrers statistics of that particular language.3. The left side of the page shows a tabular representation of referrers as shown below:
When you click on the date drop-down above Referrers Statistics table, a date range drop-down list is displayed, select the range to view the referrers for that time period only.Referrer: This column displays the name of search engine which sent the traffic to your knowledge base.#Refers: This column displays the number of articles referred by the referrer. Click the count or toggle button to view the list of articles referred by referrer (see the screenshot below). It will display 10 articles at atime, you can click on "Show Next 10" button to view next 10 articles. You can also click on article title to view its details.
Percent: This column displays the percentage share of a referrer in relation to the total.Click "Clear History" to remove the data from this database. The data for the selected time period would be permanently deleted from the knowledge base.
Online URL: https://www.knowledgebase-script.com/kb/article.php?id=147

CATEGORY
Search Statistics2 Articles
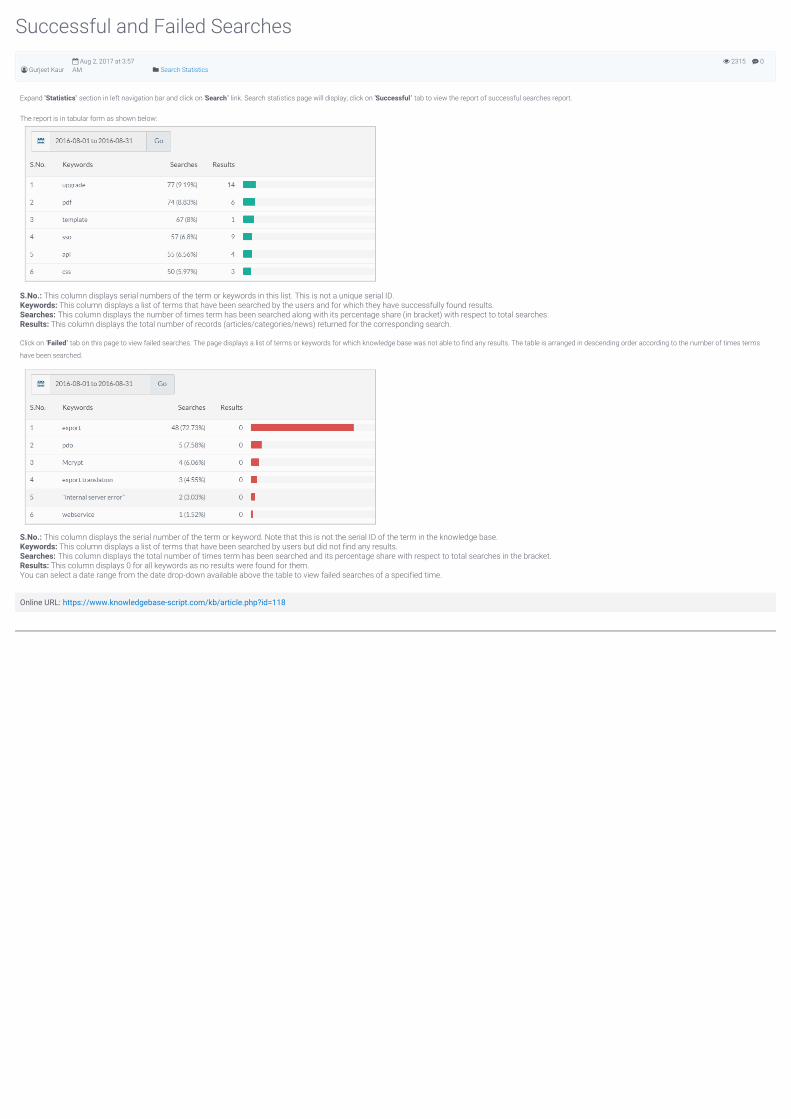
0 2315
Successful and Failed Searches
Gurjeet Kaur Aug 2, 2017 at 3:57AM Search Statistics
Expand "Statistics" section in left navigation bar and click on "Search" link. Search statistics page will display; click on "Successful" tab to view the report of successful searches report.
The report is in tabular form as shown below:
S.No.: This column displays serial numbers of the term or keywords in this list. This is not a unique serial ID.Keywords: This column displays a list of terms that have been searched by the users and for which they have successfully found results.Searches: This column displays the number of times term has been searched along with its percentage share (in bracket) with respect to total searches.Results: This column displays the total number of records (articles/categories/news) returned for the corresponding search.
Click on "Failed" tab on this page to view failed searches. The page displays a list of terms or keywords for which knowledge base was not able to find any results. The table is arranged in descending order according to the number of times terms
have been searched.
S.No.: This column displays the serial number of the term or keyword. Note that this is not the serial ID of the term in the knowledge base.Keywords: This column displays a list of terms that have been searched by users but did not find any results.Searches: This column displays the total number of times term has been searched and its percentage share with respect to total searches in the bracket.Results: This column displays 0 for all keywords as no results were found for them.You can select a date range from the date drop-down available above the table to view failed searches of a specified time.
Online URL: https://www.knowledgebase-script.com/kb/article.php?id=118
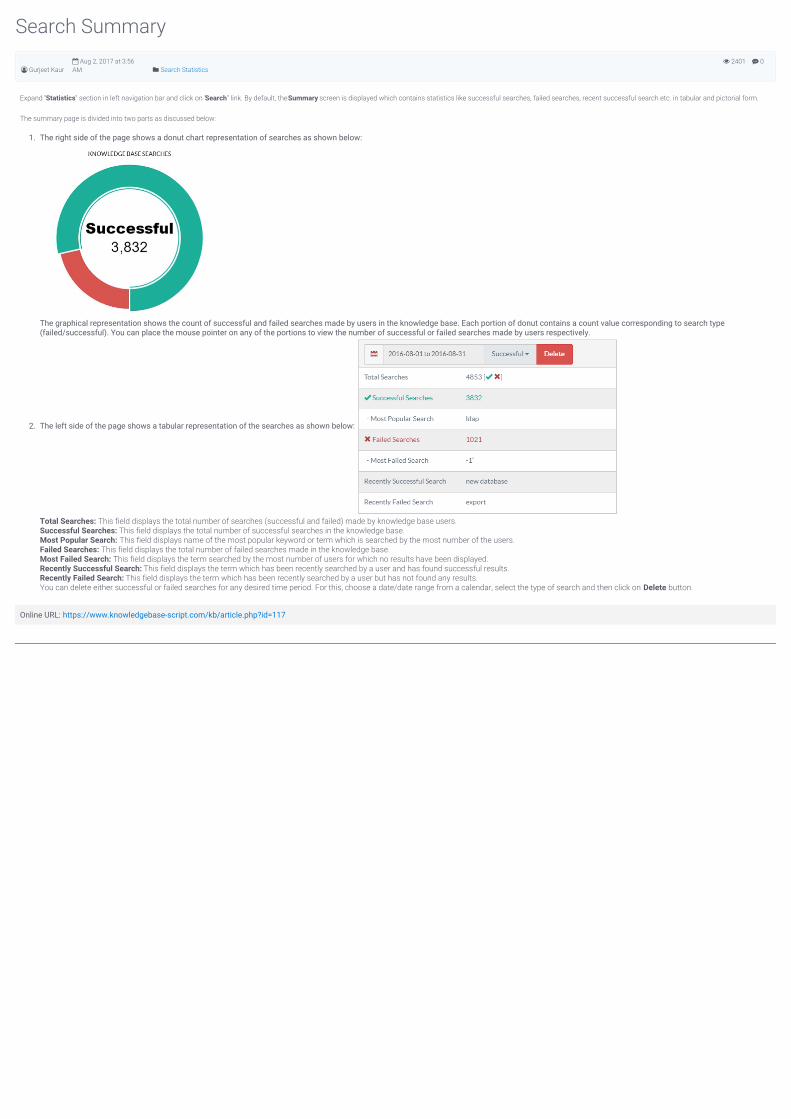
0 2401
Search Summary
Gurjeet Kaur Aug 2, 2017 at 3:56AM Search Statistics
Expand "Statistics" section in left navigation bar and click on "Search" link. By default, the Summary screen is displayed which contains statistics like successful searches, failed searches, recent successful search etc. in tabular and pictorial form.
The summary page is divided into two parts as discussed below:
1. The right side of the page shows a donut chart representation of searches as shown below:
The graphical representation shows the count of successful and failed searches made by users in the knowledge base. Each portion of donut contains a count value corresponding to search type(failed/successful). You can place the mouse pointer on any of the portions to view the number of successful or failed searches made by users respectively.
2. The left side of the page shows a tabular representation of the searches as shown below:
Total Searches: This field displays the total number of searches (successful and failed) made by knowledge base users.Successful Searches: This field displays the total number of successful searches in the knowledge base.Most Popular Search: This field displays name of the most popular keyword or term which is searched by the most number of the users.Failed Searches: This field displays the total number of failed searches made in the knowledge base.Most Failed Search: This field displays the term searched by the most number of users for which no results have been displayed.Recently Successful Search: This field displays the term which has been recently searched by a user and has found successful results.Recently Failed Search: This field displays the term which has been recently searched by a user but has not found any results.You can delete either successful or failed searches for any desired time period. For this, choose a date/date range from a calendar, select the type of search and then click on Delete button.
Online URL: https://www.knowledgebase-script.com/kb/article.php?id=117

CATEGORY
User Statistics4 Articles
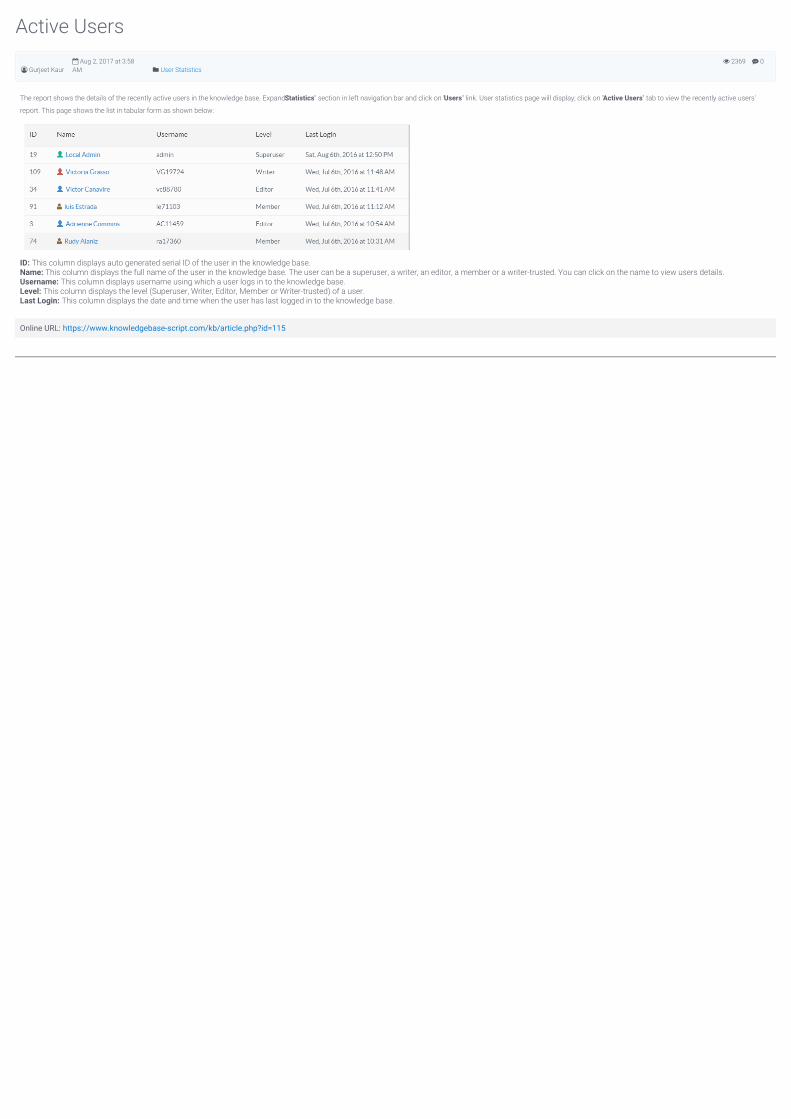
0 2369
Active Users
Gurjeet Kaur Aug 2, 2017 at 3:58AM User Statistics
The report shows the details of the recently active users in the knowledge base. Expand "Statistics" section in left navigation bar and click on "Users" link. User statistics page will display; click on "Active Users" tab to view the recently active users'
report. This page shows the list in tabular form as shown below:
ID: This column displays auto generated serial ID of the user in the knowledge base.Name: This column displays the full name of the user in the knowledge base. The user can be a superuser, a writer, an editor, a member or a writer-trusted. You can click on the name to view users details.Username: This column displays username using which a user logs in to the knowledge base.Level: This column displays the level (Superuser, Writer, Editor, Member or Writer-trusted) of a user.Last Login: This column displays the date and time when the user has last logged in to the knowledge base.
Online URL: https://www.knowledgebase-script.com/kb/article.php?id=115
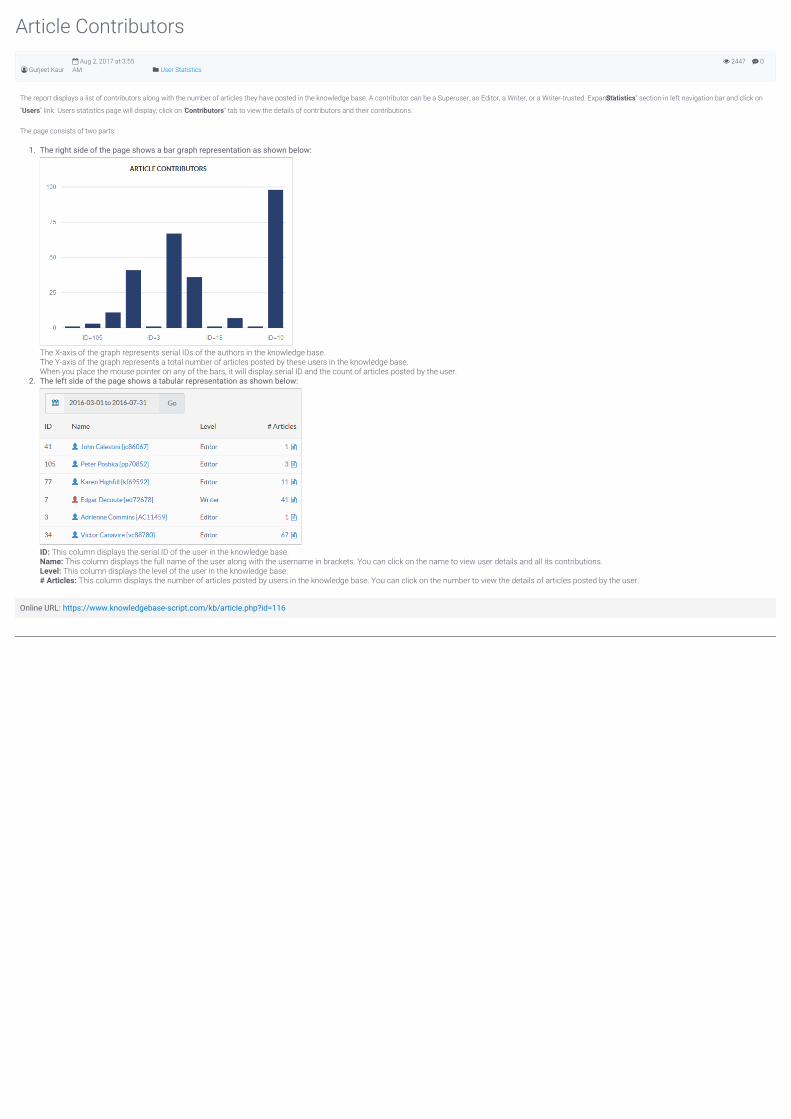
0 2447
Article Contributors
Gurjeet Kaur Aug 2, 2017 at 3:55AM User Statistics
The report displays a list of contributors along with the number of articles they have posted in the knowledge base. A contributor can be a Superuser, an Editor, a Writer, or a Writer-trusted. Expand "Statistics" section in left navigation bar and click on
"Users" link. Users statistics page will display; click on "Contributors" tab to view the details of contributors and their contributions.
The page consists of two parts:
1. The right side of the page shows a bar graph representation as shown below:
The X-axis of the graph represents serial IDs of the authors in the knowledge base.The Y-axis of the graph represents a total number of articles posted by these users in the knowledge base.When you place the mouse pointer on any of the bars, it will display serial ID and the count of articles posted by the user.
2. The left side of the page shows a tabular representation as shown below:
ID: This column displays the serial ID of the user in the knowledge base.Name: This column displays the full name of the user along with the username in brackets. You can click on the name to view user details and all its contributions.Level: This column displays the level of the user in the knowledge base.# Articles: This column displays the number of articles posted by users in the knowledge base. You can click on the number to view the details of articles posted by the user.
Online URL: https://www.knowledgebase-script.com/kb/article.php?id=116
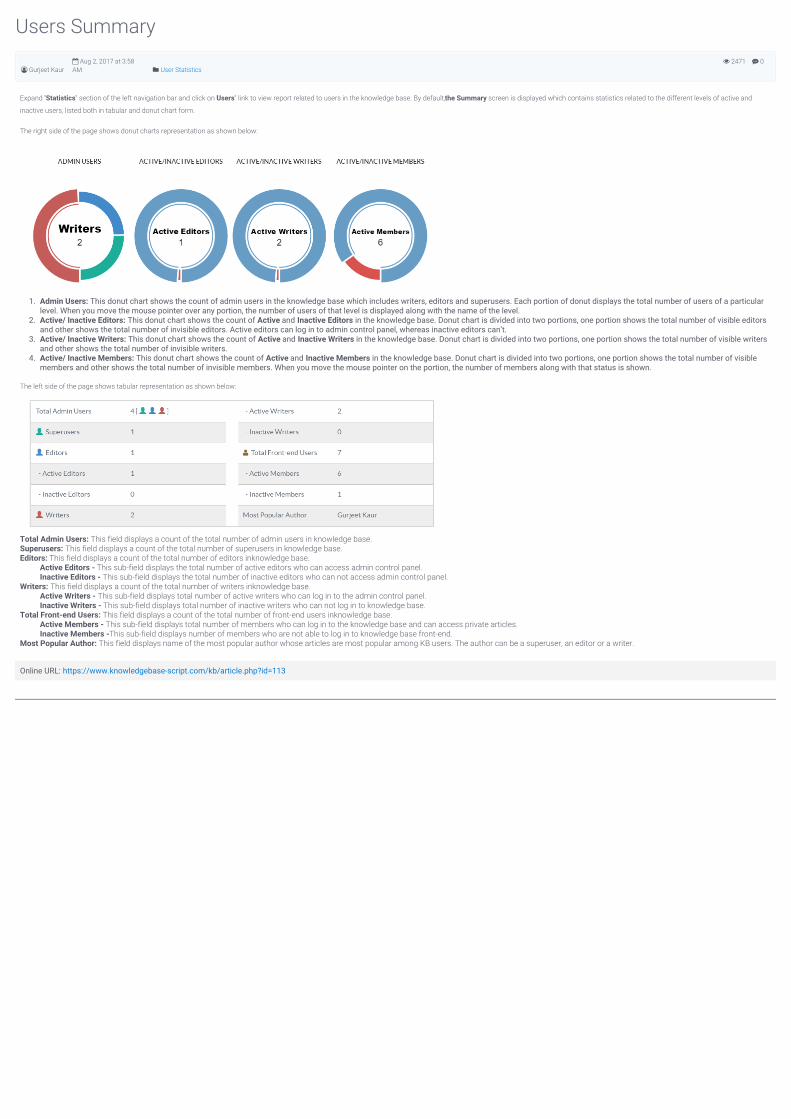
0 2471
Users Summary
Gurjeet Kaur Aug 2, 2017 at 3:58AM User Statistics
Expand "Statistics" section of the left navigation bar and click on "Users" link to view report related to users in the knowledge base. By default, the Summary screen is displayed which contains statistics related to the different levels of active and
inactive users, listed both in tabular and donut chart form.
The right side of the page shows donut charts representation as shown below:
1. Admin Users: This donut chart shows the count of admin users in the knowledge base which includes writers, editors and superusers. Each portion of donut displays the total number of users of a particularlevel. When you move the mouse pointer over any portion, the number of users of that level is displayed along with the name of the level.
2. Active/ Inactive Editors: This donut chart shows the count of Active and Inactive Editors in the knowledge base. Donut chart is divided into two portions, one portion shows the total number of visible editorsand other shows the total number of invisible editors. Active editors can log in to admin control panel, whereas inactive editors can’t.
3. Active/ Inactive Writers: This donut chart shows the count of Active and Inactive Writers in the knowledge base. Donut chart is divided into two portions, one portion shows the total number of visible writersand other shows the total number of invisible writers.
4. Active/ Inactive Members: This donut chart shows the count of Active and Inactive Members in the knowledge base. Donut chart is divided into two portions, one portion shows the total number of visiblemembers and other shows the total number of invisible members. When you move the mouse pointer on the portion, the number of members along with that status is shown.
The left side of the page shows tabular representation as shown below:
Total Admin Users: This field displays a count of the total number of admin users in knowledge base.Superusers: This field displays a count of the total number of superusers in knowledge base.Editors: This field displays a count of the total number of editors inknowledge base.
Active Editors - This sub-field displays the total number of active editors who can access admin control panel.Inactive Editors - This sub-field displays the total number of inactive editors who can not access admin control panel.
Writers: This field displays a count of the total number of writers inknowledge base.Active Writers - This sub-field displays total number of active writers who can log in to the admin control panel.Inactive Writers - This sub-field displays total number of inactive writers who can not log in to knowledge base.
Total Front-end Users: This field displays a count of the total number of front-end users inknowledge base.Active Members - This sub-field displays total number of members who can log in to the knowledge base and can access private articles.Inactive Members -This sub-field displays number of members who are not able to log in to knowledge base front-end.
Most Popular Author: This field displays name of the most popular author whose articles are most popular among KB users. The author can be a superuser, an editor or a writer.
Online URL: https://www.knowledgebase-script.com/kb/article.php?id=113
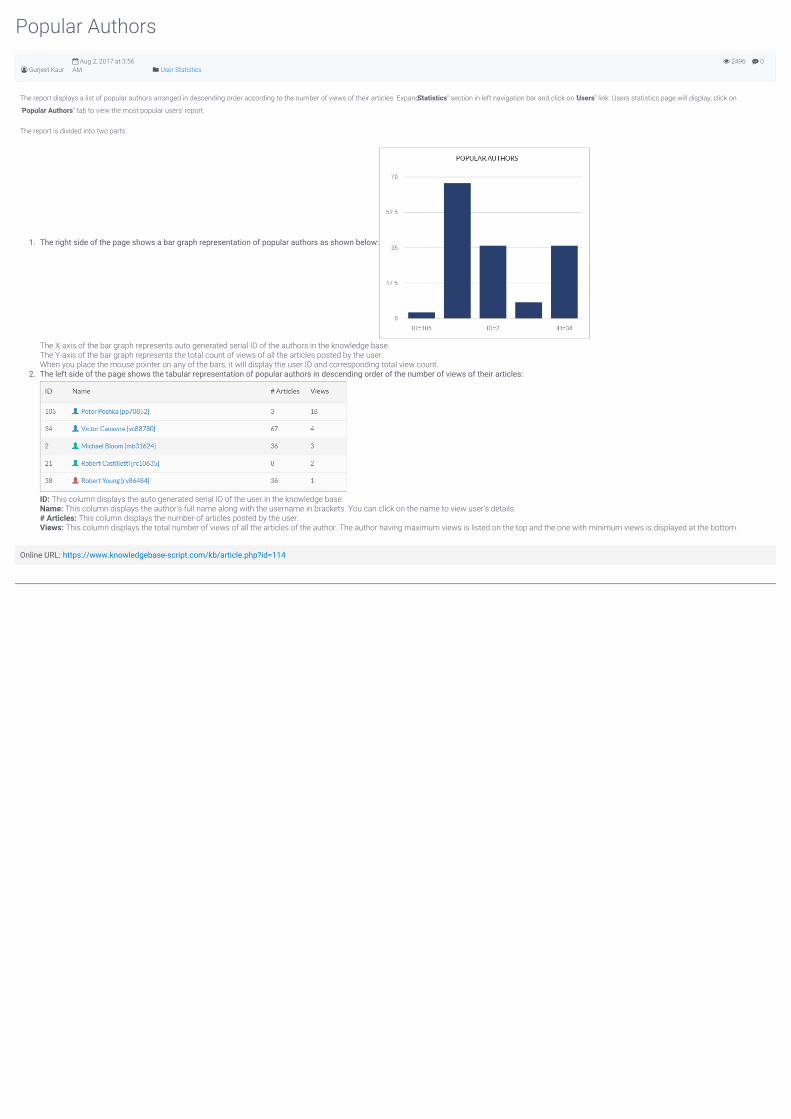
0 2496
Popular Authors
Gurjeet Kaur Aug 2, 2017 at 3:56AM User Statistics
The report displays a list of popular authors arranged in descending order according to the number of views of their articles. Expand "Statistics" section in left navigation bar and click on "Users" link. Users statistics page will display; click on
"Popular Authors" tab to view the most popular users' report.
The report is divided into two parts:
1. The right side of the page shows a bar graph representation of popular authors as shown below:
The X-axis of the bar graph represents auto generated serial ID of the authors in the knowledge base.The Y-axis of the bar graph represents the total count of views of all the articles posted by the user.When you place the mouse pointer on any of the bars, it will display the user ID and corresponding total view count.
2. The left side of the page shows the tabular representation of popular authors in descending order of the number of views of their articles:
ID: This column displays the auto generated serial ID of the user in the knowledge base.Name: This column displays the author's full name along with the username in brackets. You can click on the name to view user's details.# Articles: This column displays the number of articles posted by the user.Views: This column displays the total number of views of all the articles of the author. The author having maximum views is listed on the top and the one with minimum views is displayed at the bottom.
Online URL: https://www.knowledgebase-script.com/kb/article.php?id=114

CATEGORY
Category Statistics3 Articles
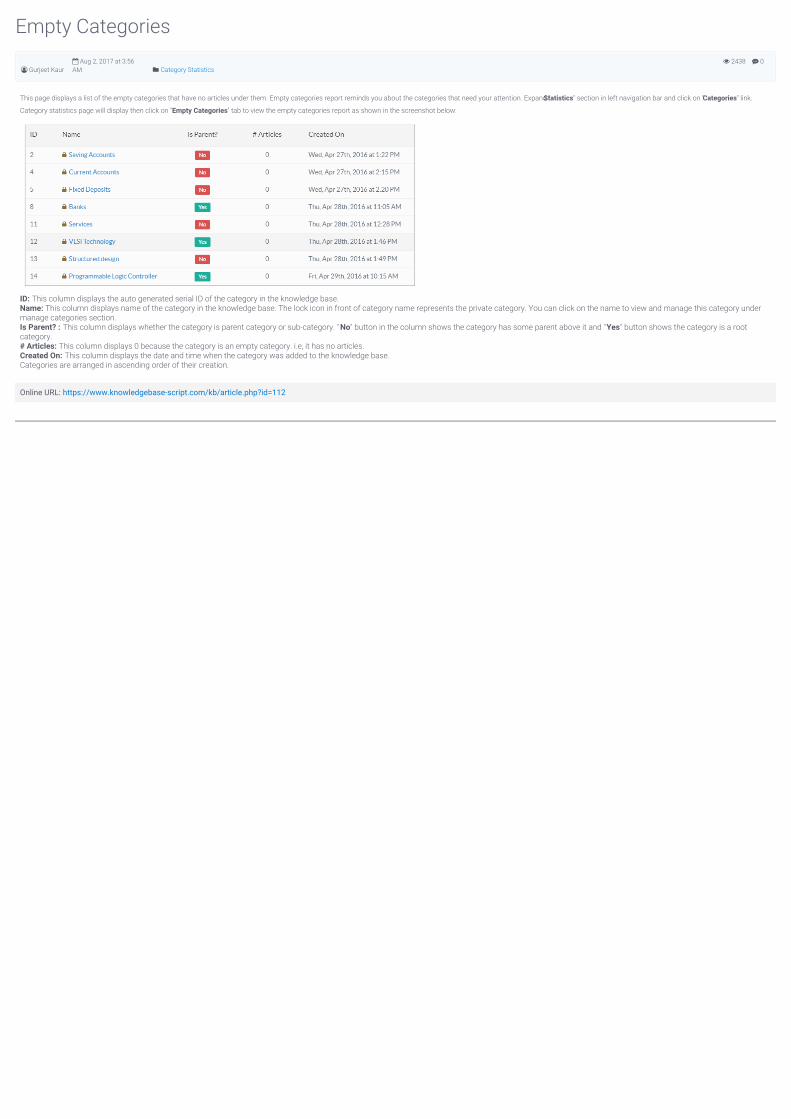
0 2438
Empty Categories
Gurjeet Kaur Aug 2, 2017 at 3:56AM Category Statistics
This page displays a list of the empty categories that have no articles under them. Empty categories report reminds you about the categories that need your attention. Expand "Statistics" section in left navigation bar and click on "Categories" link.
Category statistics page will display then click on "Empty Categories" tab to view the empty categories report as shown in the screenshot below:
ID: This column displays the auto generated serial ID of the category in the knowledge base.Name: This column displays name of the category in the knowledge base. The lock icon in front of category name represents the private category. You can click on the name to view and manage this category undermanage categories section.Is Parent? : This column displays whether the category is parent category or sub-category. " No" button in the column shows the category has some parent above it and "Yes" button shows the category is a rootcategory.# Articles: This column displays 0 because the category is an empty category. i.e, it has no articles.Created On: This column displays the date and time when the category was added to the knowledge base.Categories are arranged in ascending order of their creation.
Online URL: https://www.knowledgebase-script.com/kb/article.php?id=112
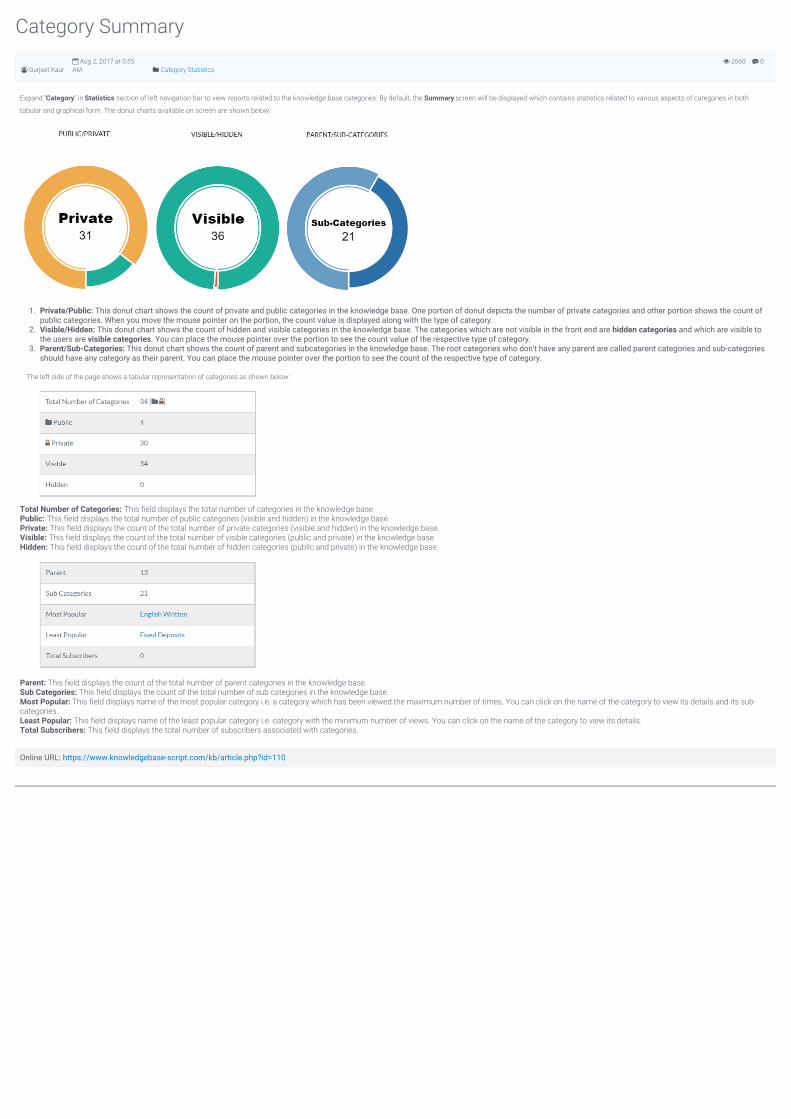
0 2660
Category Summary
Gurjeet Kaur Aug 2, 2017 at 3:55AM Category Statistics
Expand "Category" in Statistics section of left navigation bar to view reports related to the knowledge base categories. By default, the Summary screen will be displayed which contains statistics related to various aspects of categories in both
tabular and graphical form. The donut charts available on screen are shown below:
1. Private/Public: This donut chart shows the count of private and public categories in the knowledge base. One portion of donut depicts the number of private categories and other portion shows the count ofpublic categories. When you move the mouse pointer on the portion, the count value is displayed along with the type of category.
2. Visible/Hidden: This donut chart shows the count of hidden and visible categories in the knowledge base. The categories which are not visible in the front end are hidden categories and which are visible tothe users are visible categories. You can place the mouse pointer over the portion to see the count value of the respective type of category.
3. Parent/Sub-Categories: This donut chart shows the count of parent and subcategories in the knowledge base. The root categories who don't have any parent are called parent categories and sub-categoriesshould have any category as their parent. You can place the mouse pointer over the portion to see the count of the respective type of category.
The left side of the page shows a tabular representation of categories as shown below:
Total Number of Categories: This field displays the total number of categories in the knowledge base.Public: This field displays the total number of public categories (visible and hidden) in the knowledge base.Private: This field displays the count of the total number of private categories (visible and hidden) in the knowledge base.Visible: This field displays the count of the total number of visible categories (public and private) in the knowledge base.Hidden: This field displays the count of the total number of hidden categories (public and private) in the knowledge base.
Parent: This field displays the count of the total number of parent categories in the knowledge base.Sub Categories: This field displays the count of the total number of sub categories in the knowledge base.Most Popular: This field displays name of the most popular category i.e. a category which has been viewed the maximum number of times. You can click on the name of the category to view its details and its sub-categories.Least Popular: This field displays name of the least popular category i.e. category with the minimum number of views. You can click on the name of the category to view its details.Total Subscribers: This field displays the total number of subscribers associated with categories.
Online URL: https://www.knowledgebase-script.com/kb/article.php?id=110
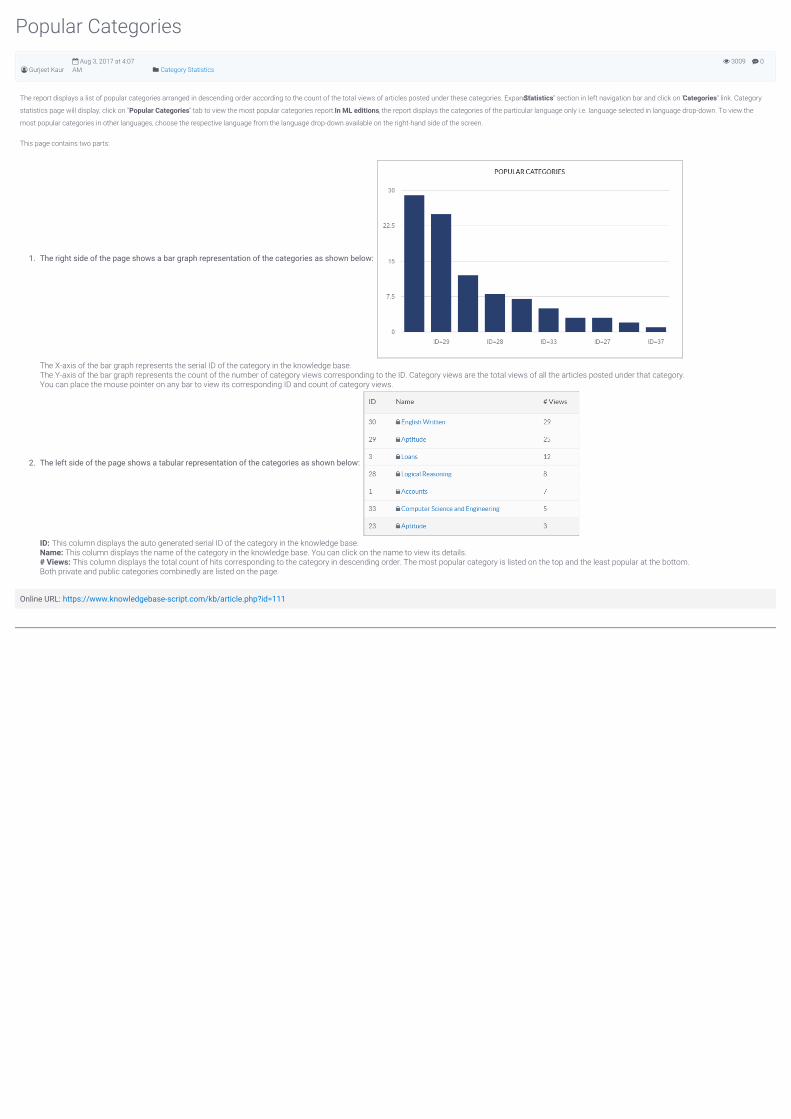
0 3009
Popular Categories
Gurjeet Kaur Aug 3, 2017 at 4:07AM Category Statistics
The report displays a list of popular categories arranged in descending order according to the count of the total views of articles posted under these categories. Expand "Statistics" section in left navigation bar and click on "Categories" link. Category
statistics page will display; click on "Popular Categories" tab to view the most popular categories report. In ML editions, the report displays the categories of the particular language only i.e. language selected in language drop-down. To view the
most popular categories in other languages, choose the respective language from the language drop-down available on the right-hand side of the screen.
This page contains two parts:
1. The right side of the page shows a bar graph representation of the categories as shown below:
The X-axis of the bar graph represents the serial ID of the category in the knowledge base.The Y-axis of the bar graph represents the count of the number of category views corresponding to the ID. Category views are the total views of all the articles posted under that category.You can place the mouse pointer on any bar to view its corresponding ID and count of category views.
2. The left side of the page shows a tabular representation of the categories as shown below:
ID: This column displays the auto generated serial ID of the category in the knowledge base.Name: This column displays the name of the category in the knowledge base. You can click on the name to view its details.# Views: This column displays the total count of hits corresponding to the category in descending order. The most popular category is listed on the top and the least popular at the bottom.Both private and public categories combinedly are listed on the page.
Online URL: https://www.knowledgebase-script.com/kb/article.php?id=111

CATEGORY
Article Statistics8 Articles
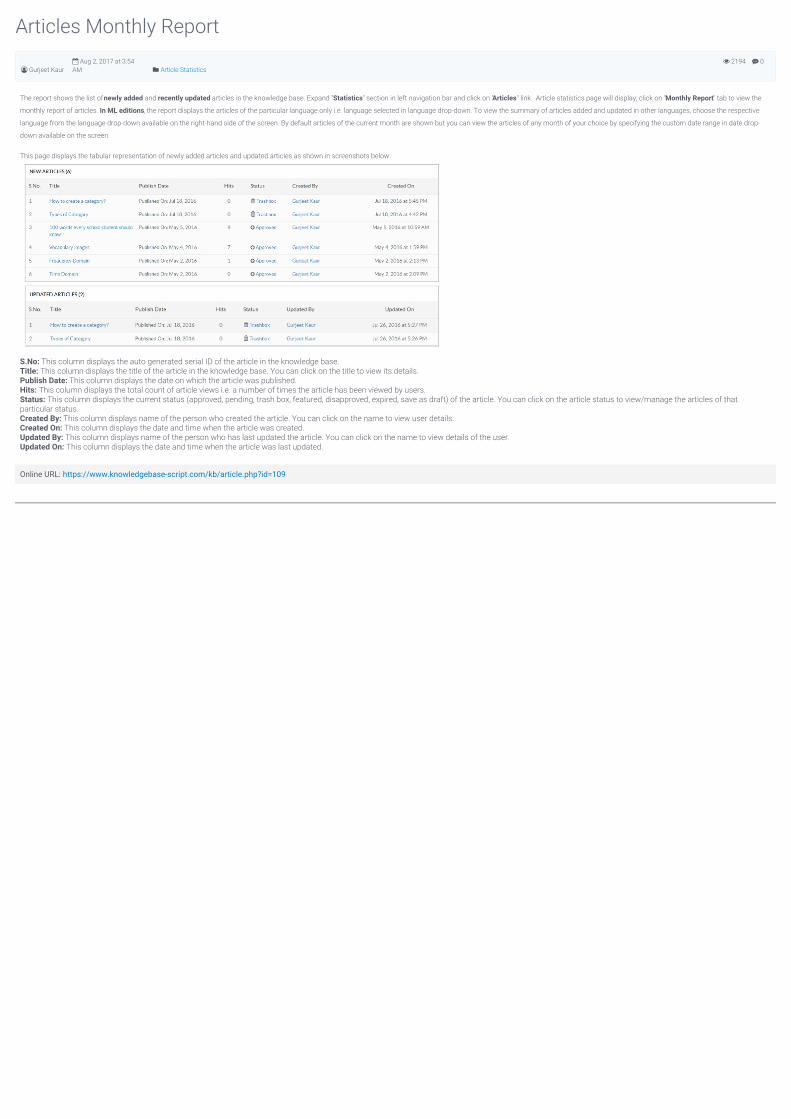
0 2194
Articles Monthly Report
Gurjeet Kaur Aug 2, 2017 at 3:54AM Article Statistics
The report shows the list of newly added and recently updated articles in the knowledge base. Expand "Statistics" section in left navigation bar and click on "Articles" link. Article statistics page will display; click on "Monthly Report" tab to view the
monthly report of articles. In ML editions, the report displays the articles of the particular language only i.e. language selected in language drop-down. To view the summary of articles added and updated in other languages, choose the respective
language from the language drop-down available on the right-hand side of the screen. By default articles of the current month are shown but you can view the articles of any month of your choice by specifying the custom date range in date drop-
down available on the screen.
This page displays the tabular representation of newly added articles and updated articles as shown in screenshots below:
S.No: This column displays the auto generated serial ID of the article in the knowledge base.Title: This column displays the title of the article in the knowledge base. You can click on the title to view its details.Publish Date: This column displays the date on which the article was published.Hits: This column displays the total count of article views i.e. a number of times the article has been viewed by users.Status: This column displays the current status (approved, pending, trash box, featured, disapproved, expired, save as draft) of the article. You can click on the article status to view/manage the articles of thatparticular status.Created By: This column displays name of the person who created the article. You can click on the name to view user details.Created On: This column displays the date and time when the article was created.Updated By: This column displays name of the person who has last updated the article. You can click on the name to view details of the user.Updated On: This column displays the date and time when the article was last updated.
Online URL: https://www.knowledgebase-script.com/kb/article.php?id=109
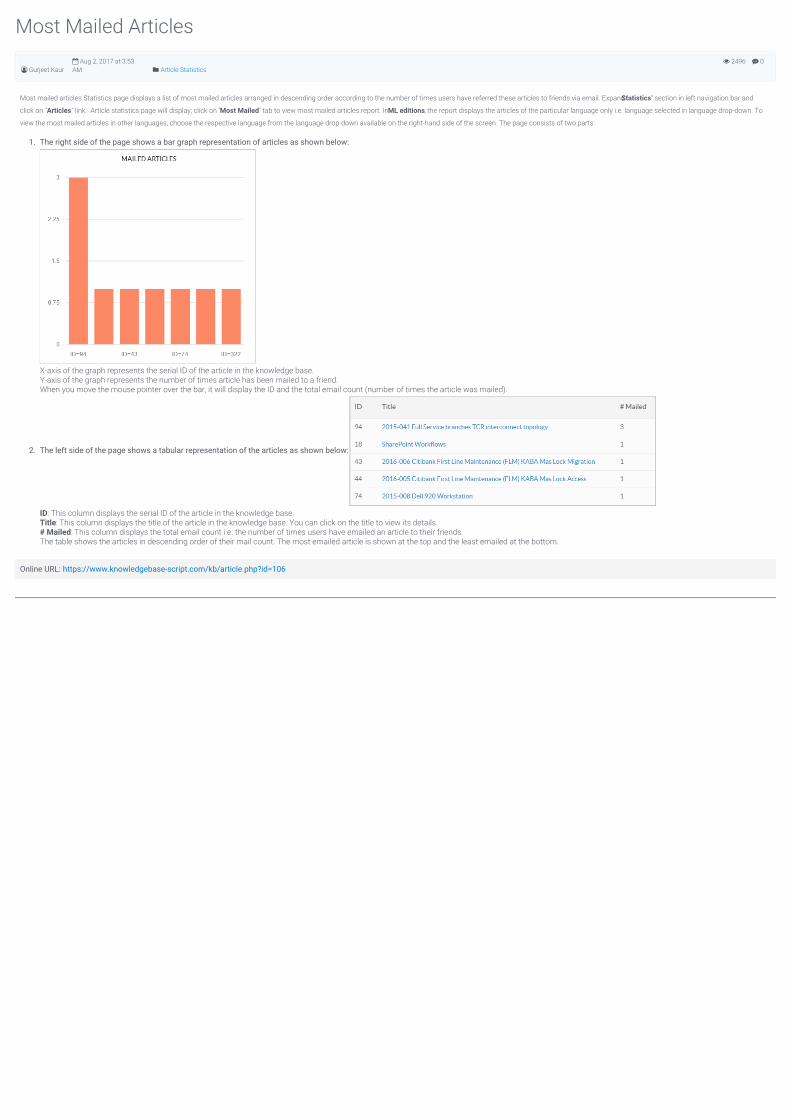
0 2496
Most Mailed Articles
Gurjeet Kaur Aug 2, 2017 at 3:53AM Article Statistics
Most mailed articles Statistics page displays a list of most mailed articles arranged in descending order according to the number of times users have referred these articles to friends via email. Expand "Statistics" section in left navigation bar and
click on "Articles" link. Article statistics page will display; click on "Most Mailed" tab to view most mailed articles report. In ML editions, the report displays the articles of the particular language only i.e. language selected in language drop-down. To
view the most mailed articles in other languages, choose the respective language from the language drop-down available on the right-hand side of the screen. The page consists of two parts:
1. The right side of the page shows a bar graph representation of articles as shown below:
X-axis of the graph represents the serial ID of the article in the knowledge base.Y-axis of the graph represents the number of times article has been mailed to a friend.When you move the mouse pointer over the bar, it will display the ID and the total email count (number of times the article was mailed).
2. The left side of the page shows a tabular representation of the articles as shown below:
ID: This column displays the serial ID of the article in the knowledge base.Title: This column displays the title of the article in the knowledge base. You can click on the title to view its details.# Mailed: This column displays the total email count i.e. the number of times users have emailed an article to their friends.The table shows the articles in descending order of their mail count. The most emailed article is shown at the top and the least emailed at the bottom.
Online URL: https://www.knowledgebase-script.com/kb/article.php?id=106
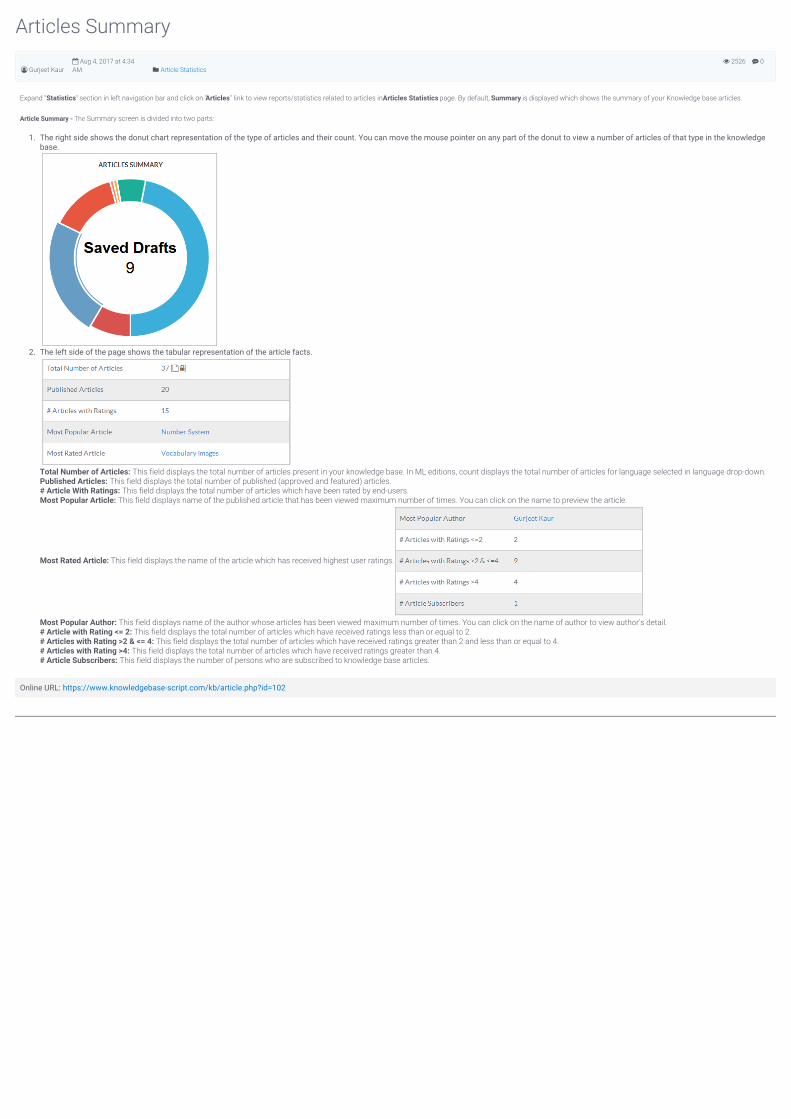
0 2526
Articles Summary
Gurjeet Kaur Aug 4, 2017 at 4:34AM Article Statistics
Expand "Statistics" section in left navigation bar and click on "Articles" link to view reports/statistics related to articles in Articles Statistics page. By default, Summary is displayed which shows the summary of your Knowledge base articles.
Article Summary - The Summary screen is divided into two parts:
1. The right side shows the donut chart representation of the type of articles and their count. You can move the mouse pointer on any part of the donut to view a number of articles of that type in the knowledgebase.
2. The left side of the page shows the tabular representation of the article facts.
Total Number of Articles: This field displays the total number of articles present in your knowledge base. In ML editions, count displays the total number of articles for language selected in language drop-down.Published Articles: This field displays the total number of published (approved and featured) articles.# Article With Ratings: This field displays the total number of articles which have been rated by end-users.Most Popular Article: This field displays name of the published article that has been viewed maximum number of times. You can click on the name to preview the article.
Most Rated Article: This field displays the name of the article which has received highest user ratings.
Most Popular Author: This field displays name of the author whose articles has been viewed maximum number of times. You can click on the name of author to view author's detail.# Article with Rating <= 2: This field displays the total number of articles which have received ratings less than or equal to 2.# Articles with Rating >2 & <= 4: This field displays the total number of articles which have received ratings greater than 2 and less than or equal to 4.# Articles with Rating >4: This field displays the total number of articles which have received ratings greater than 4.# Article Subscribers: This field displays the number of persons who are subscribed to knowledge base articles.
Online URL: https://www.knowledgebase-script.com/kb/article.php?id=102
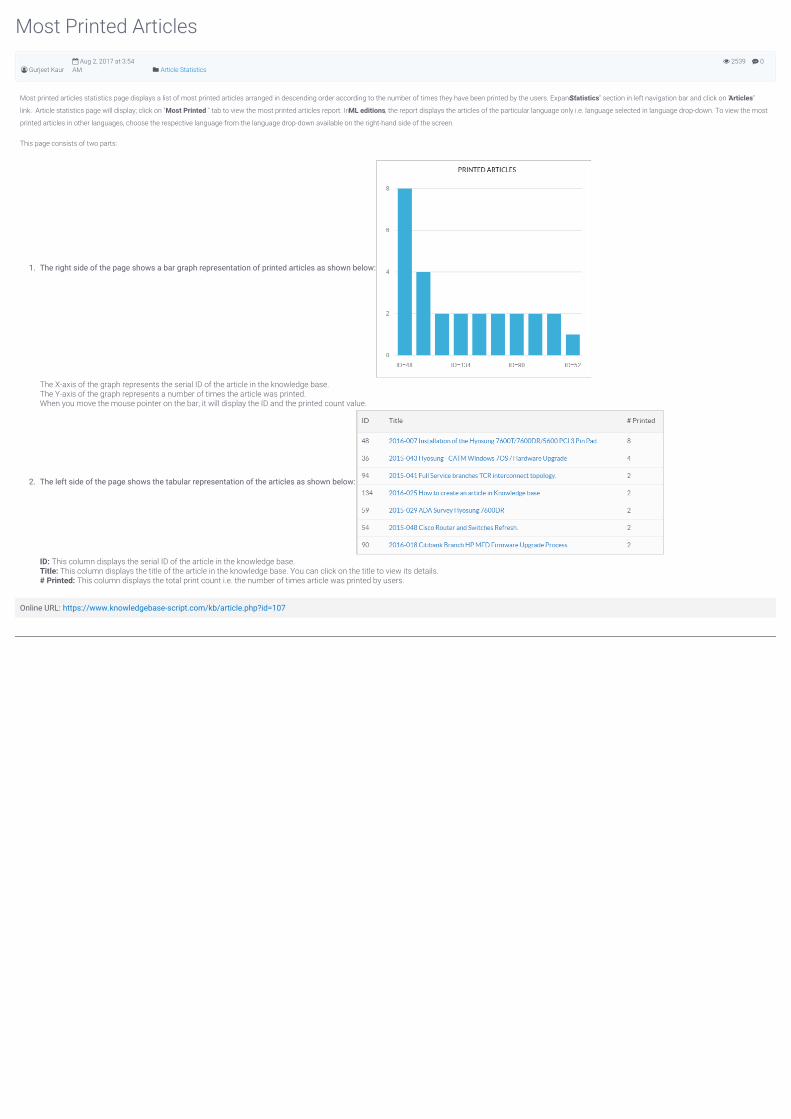
0 2539
Most Printed Articles
Gurjeet Kaur Aug 2, 2017 at 3:54AM Article Statistics
Most printed articles statistics page displays a list of most printed articles arranged in descending order according to the number of times they have been printed by the users. Expand "Statistics" section in left navigation bar and click on "Articles"
link. Article statistics page will display; click on "Most Printed " tab to view the most printed articles report. In ML editions, the report displays the articles of the particular language only i.e. language selected in language drop-down. To view the most
printed articles in other languages, choose the respective language from the language drop-down available on the right-hand side of the screen.
This page consists of two parts:
1. The right side of the page shows a bar graph representation of printed articles as shown below:
The X-axis of the graph represents the serial ID of the article in the knowledge base.The Y-axis of the graph represents a number of times the article was printed.When you move the mouse pointer on the bar, it will display the ID and the printed count value.
2. The left side of the page shows the tabular representation of the articles as shown below:
ID: This column displays the serial ID of the article in the knowledge base.Title: This column displays the title of the article in the knowledge base. You can click on the title to view its details.# Printed: This column displays the total print count i.e. the number of times article was printed by users.
Online URL: https://www.knowledgebase-script.com/kb/article.php?id=107

0 2618
Popular Articles
Gurjeet Kaur Aug 24, 2017 at 7:29AM Article Statistics
Popular article statistics page displays a list of popular articles arranged in descending order according to the number of times they have been viewed. Expand "Statistics" section in left navigation bar and click on "Articles" link. Article statistics page
will display; click on "Popular Articles" tab to view reports related to popular articles. In ML editions, the report displays the articles of the particular language only i.e. language selected in language drop-down. To view the popular articles in other
languages, choose the respective language from the language drop-down available on the right-hand side of the screen.
This page is divided into two parts:
1. The right side of the page shows a bar graph representation of popular articles as shown below:
The x-axis represents the auto generated serial ID of the article in the knowledge base.Y-axis represents the total count of views corresponding to the serial ID.
2. The left side of the page shows a tabular representation of popular articles as shown in the screenshot below:
ID: This column displays the serial ID of the article in the knowledge base.Title: This column displays the title of the article. You can click on the article title to view its details.Views: This column displays the total count of the views corresponding to the article. The most popular article is listed on the top and the least one at the bottom.You can use the date drop-down under different statistics screens to specify the period for which you want to see the statistics. A number of ready made range selectors like yesterday, last 7 days etc. arealready available. However, you can specify the custom range of your choice from the drop-down.
Online URL: https://www.knowledgebase-script.com/kb/article.php?id=103
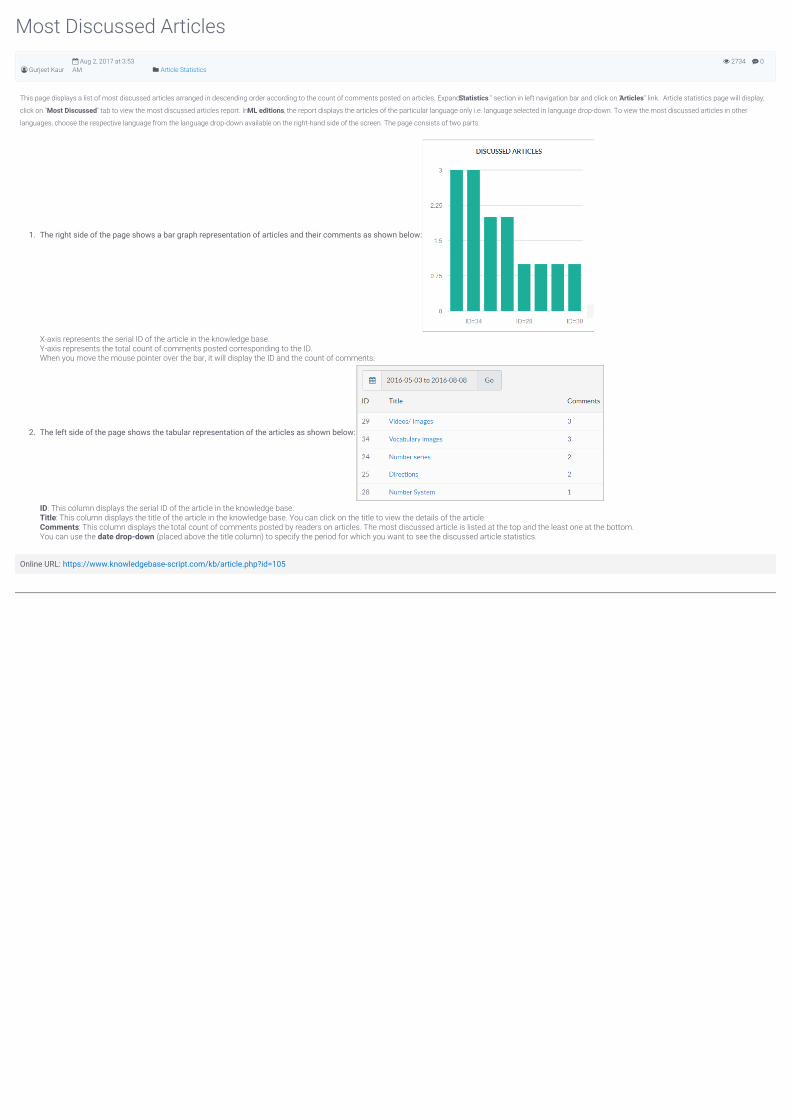
0 2734
Most Discussed Articles
Gurjeet Kaur Aug 2, 2017 at 3:53AM Article Statistics
This page displays a list of most discussed articles arranged in descending order according to the count of comments posted on articles. Expand "Statistics " section in left navigation bar and click on "Articles" link. Article statistics page will display;
click on "Most Discussed" tab to view the most discussed articles report. In ML editions, the report displays the articles of the particular language only i.e. language selected in language drop-down. To view the most discussed articles in other
languages, choose the respective language from the language drop-down available on the right-hand side of the screen. The page consists of two parts:
1. The right side of the page shows a bar graph representation of articles and their comments as shown below:
X-axis represents the serial ID of the article in the knowledge base.Y-axis represents the total count of comments posted corresponding to the ID.When you move the mouse pointer over the bar, it will display the ID and the count of comments.
2. The left side of the page shows the tabular representation of the articles as shown below:
ID: This column displays the serial ID of the article in the knowledge base.Title: This column displays the title of the article in the knowledge base. You can click on the title to view the details of the article.Comments: This column displays the total count of comments posted by readers on articles. The most discussed article is listed at the top and the least one at the bottom.You can use the date drop-down (placed above the title column) to specify the period for which you want to see the discussed article statistics.
Online URL: https://www.knowledgebase-script.com/kb/article.php?id=105

0 2867
Top Rated Articles
Gurjeet Kaur Aug 4, 2017 at 4:29AM Article Statistics
The report displays a list of top rated articles arranged in descending order according to the average ratings given by users. Expand "Statistics" section in left navigation bar and click on "Articles" link. Article statistics page will display; click on "Top
Rated" tab to view the top rated articles report. In ML editions, the report displays the articles of the particular language only i.e. language selected in language drop-down. To view the top rated articles in other languages, choose the respective
language from the language drop-down available on the right-hand side of the screen. The page consists of two parts:
1. The right side of the page shows a donut chart representation of the articles as shown below:
You can move the mouse pointer on any portion of donut to view the article ID and its average rating.
2. The left side of the page shows the tabular representation of rated articles as shown below:
ID: This column displays the serial ID of the article in the knowledge base.Title: This column displays the title of articles. You can click on the title to view the details of the article.Ratings: This column displays the average rating of the article. The most rated article is present at the top and the least one at the bottom.
Online URL: https://www.knowledgebase-script.com/kb/article.php?id=104

0 3834
Article Referrers
Gurjeet Kaur Aug 22, 2017 at 4:29AM Article Statistics, Statistics & Reports
Article referrer’s statistics show from where the request for article pages of your knowledge base has been originated. This feature lets you know which search engines are sending traffic to your knowledge base, for which keywords and which
articles receive the search traffic. PHPKB covers search engines such as Google, Yahoo, Bing and some other search engines. Expand "Statistics" section in left navigation bar and click on "Traffic" link. Click "Referrers" tab on article traffic page to
view article referrer report. The page consists of two parts:
1. The right side of the page shows donut chart representation of articles referred by each referrer as shown below:
It shows the number of articles referred by each search engine. You can place the mouse pointer on any portion of the donut to view the name of search engine and count of articles referred to it. For instance,in the figure above, users found 1,115 articles of your knowledge base through Google.
2. In ML editions, you can select a language from language drop-down available on right side of the page to view referrers statistics of that particular language.3. The left side of the page shows a tabular representation of referrers as shown below:
When you click on the date drop-down above Referrers Statistics table, a date range drop-down list is displayed, select the range to view the referrers for that time period only.Referrer: This column displays the name of search engine which sent the traffic to your knowledge base.#Refers: This column displays the number of articles referred by the referrer. Click the count or toggle button to view the list of articles referred by referrer (see the screenshot below). It will display 10 articles at atime, you can click on "Show Next 10" button to view next 10 articles. You can also click on article title to view its details.
Percent: This column displays the percentage share of a referrer in relation to the total.Click "Clear History" to remove the data from this database. The data for the selected time period would be permanently deleted from the knowledge base.
Online URL: https://www.knowledgebase-script.com/kb/article.php?id=147

CATEGORY
User Groups2 Articles
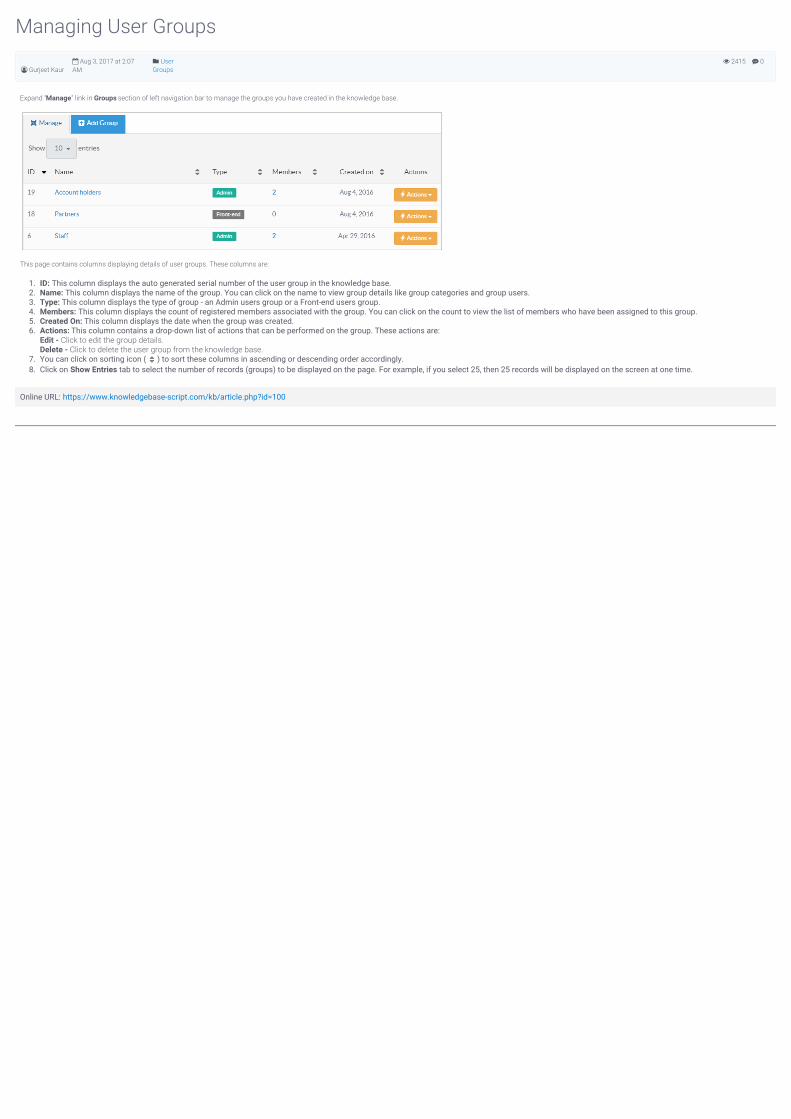
0 2415
Managing User Groups
Gurjeet Kaur Aug 3, 2017 at 2:07AM
UserGroups
Expand "Manage" link in Groups section of left navigation bar to manage the groups you have created in the knowledge base.
This page contains columns displaying details of user groups. These columns are:
1. ID: This column displays the auto generated serial number of the user group in the knowledge base.2. Name: This column displays the name of the group. You can click on the name to view group details like group categories and group users.3. Type: This column displays the type of group - an Admin users group or a Front-end users group.4. Members: This column displays the count of registered members associated with the group. You can click on the count to view the list of members who have been assigned to this group.5. Created On: This column displays the date when the group was created.6. Actions: This column contains a drop-down list of actions that can be performed on the group. These actions are:
Edit - Click to edit the group details.Delete - Click to delete the user group from the knowledge base.
7. You can click on sorting icon ( ) to sort these columns in ascending or descending order accordingly.8. Click on Show Entries tab to select the number of records (groups) to be displayed on the page. For example, if you select 25, then 25 records will be displayed on the screen at one time.
Online URL: https://www.knowledgebase-script.com/kb/article.php?id=100
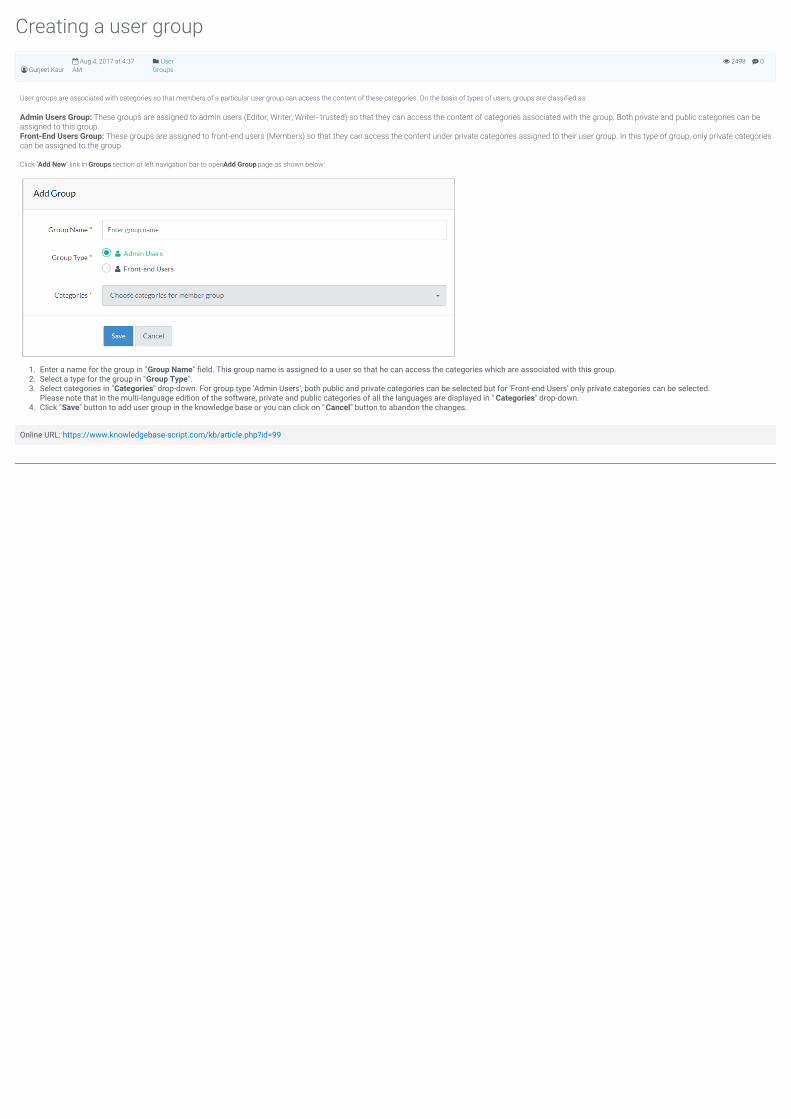
0 2498
Creating a user group
Gurjeet Kaur Aug 4, 2017 at 4:37AM
UserGroups
User groups are associated with categories so that members of a particular user group can access the content of these categories. On the basis of types of users, groups are classified as:
Admin Users Group: These groups are assigned to admin users (Editor, Writer, Writer- trusted) so that they can access the content of categories associated with the group. Both private and public categories can beassigned to this group.Front-End Users Group: These groups are assigned to front-end users (Members) so that they can access the content under private categories assigned to their user group. In this type of group, only private categoriescan be assigned to the group.
Click "Add New" link in Groups section of left navigation bar to open Add Group page as shown below:
1. Enter a name for the group in "Group Name" field. This group name is assigned to a user so that he can access the categories which are associated with this group.2. Select a type for the group in "Group Type".3. Select categories in "Categories" drop-down. For group type 'Admin Users', both public and private categories can be selected but for 'Front-end Users' only private categories can be selected.
Please note that in the multi-language edition of the software, private and public categories of all the languages are displayed in " Categories" drop-down.4. Click "Save" button to add user group in the knowledge base or you can click on " Cancel" button to abandon the changes.
Online URL: https://www.knowledgebase-script.com/kb/article.php?id=99

CATEGORY
Users4 Articles
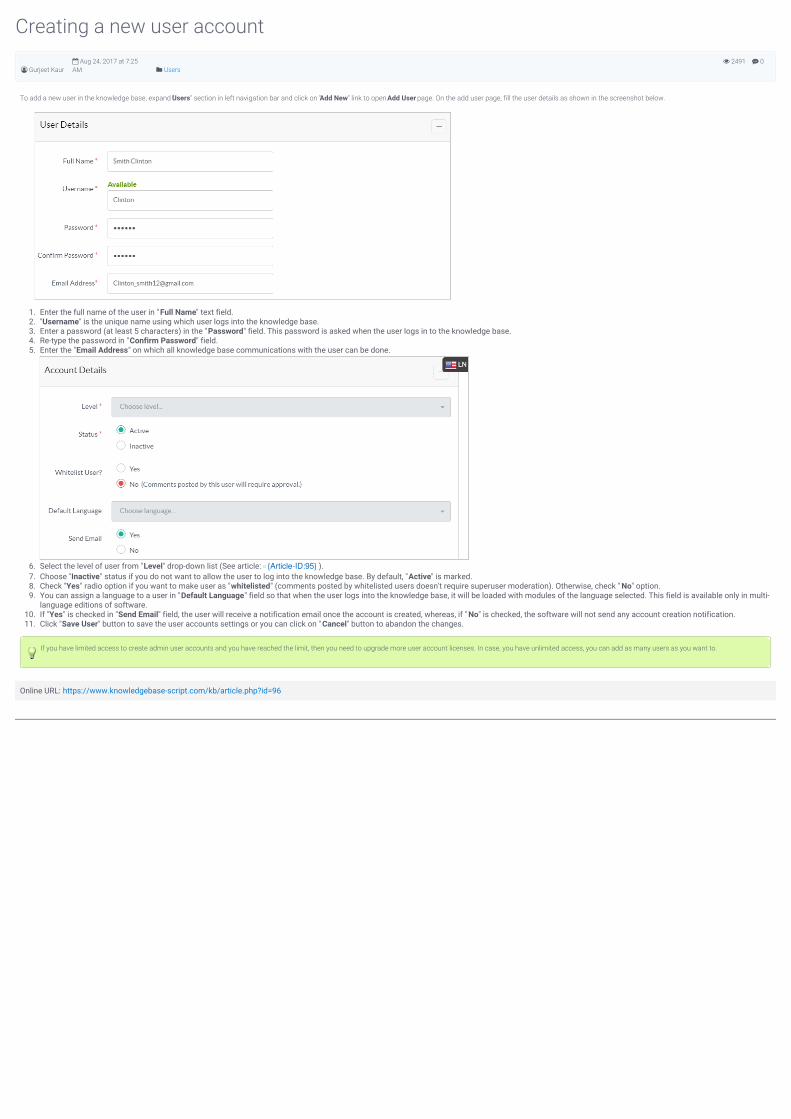
0 2491
Creating a new user account
Gurjeet Kaur Aug 24, 2017 at 7:25AM Users
To add a new user in the knowledge base, expand "Users" section in left navigation bar and click on "Add New" link to open Add User page. On the add user page, fill the user details as shown in the screenshot below.
1. Enter the full name of the user in "Full Name" text field.2. "Username" is the unique name using which user logs into the knowledge base.3. Enter a password (at least 5 characters) in the "Password" field. This password is asked when the user logs in to the knowledge base.4. Re-type the password in "Confirm Password" field.5. Enter the "Email Address" on which all knowledge base communications with the user can be done.
6. Select the level of user from "Level" drop-down list (See article: {Article-ID:95} ).7. Choose "Inactive" status if you do not want to allow the user to log into the knowledge base. By default, "Active" is marked.8. Check "Yes" radio option if you want to make user as "whitelisted" (comments posted by whitelisted users doesn't require superuser moderation). Otherwise, check " No" option.9. You can assign a language to a user in "Default Language" field so that when the user logs into the knowledge base, it will be loaded with modules of the language selected. This field is available only in multi-
language editions of software.10. If "Yes" is checked in "Send Email" field, the user will receive a notification email once the account is created, whereas, if " No" is checked, the software will not send any account creation notification.11. Click "Save User" button to save the user accounts settings or you can click on " Cancel" button to abandon the changes.
If you have limited access to create admin user accounts and you have reached the limit, then you need to upgrade more user account licenses. In case, you have unlimited access, you can add as many users as you want to.
Online URL: https://www.knowledgebase-script.com/kb/article.php?id=96
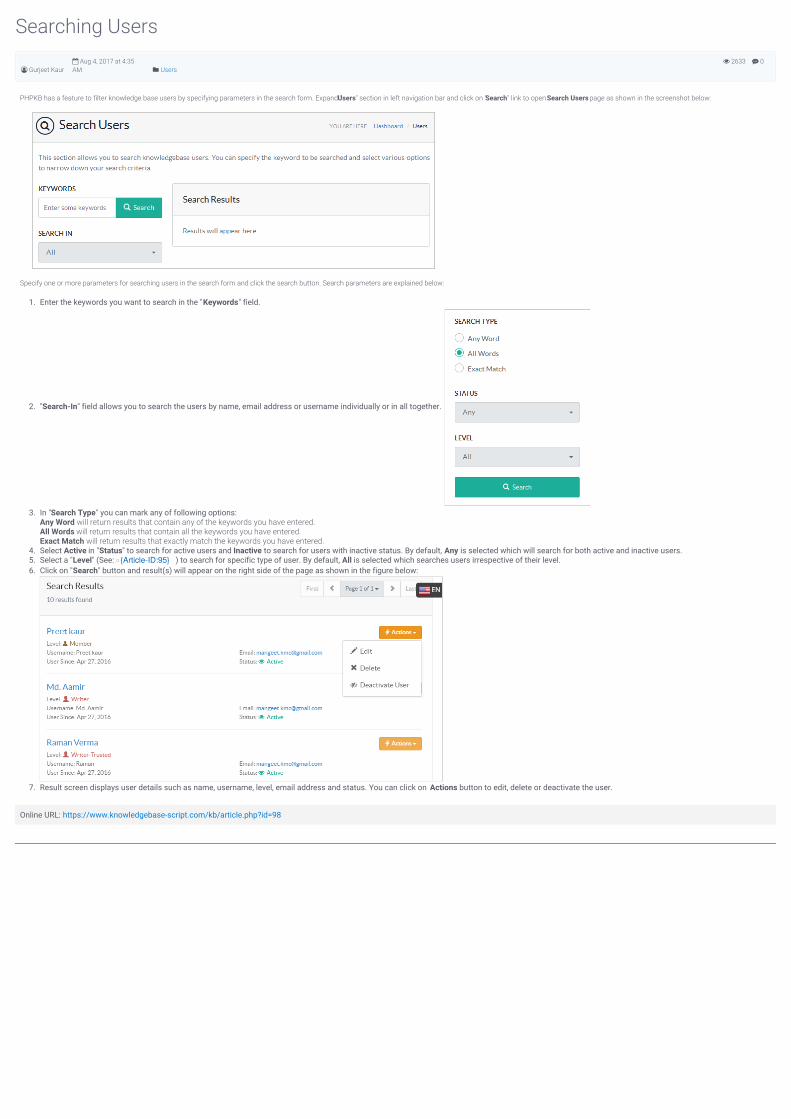
0 2633
Searching Users
Gurjeet Kaur Aug 4, 2017 at 4:35AM Users
PHPKB has a feature to filter knowledge base users by specifying parameters in the search form. Expand "Users" section in left navigation bar and click on "Search" link to open Search Users page as shown in the screenshot below:
Specify one or more parameters for searching users in the search form and click the search button. Search parameters are explained below:
1. Enter the keywords you want to search in the "Keywords" field.
2. "Search-In" field allows you to search the users by name, email address or username individually or in all together.
3. In "Search Type" you can mark any of following options:Any Word will return results that contain any of the keywords you have entered.All Words will return results that contain all the keywords you have entered.Exact Match will return results that exactly match the keywords you have entered.
4. Select Active in "Status" to search for active users and Inactive to search for users with inactive status. By default, Any is selected which will search for both active and inactive users.5. Select a "Level" (See: {Article-ID:95} ) to search for specific type of user. By default, All is selected which searches users irrespective of their level.6. Click on "Search" button and result(s) will appear on the right side of the page as shown in the figure below:
7. Result screen displays user details such as name, username, level, email address and status. You can click on Actions button to edit, delete or deactivate the user.
Online URL: https://www.knowledgebase-script.com/kb/article.php?id=98
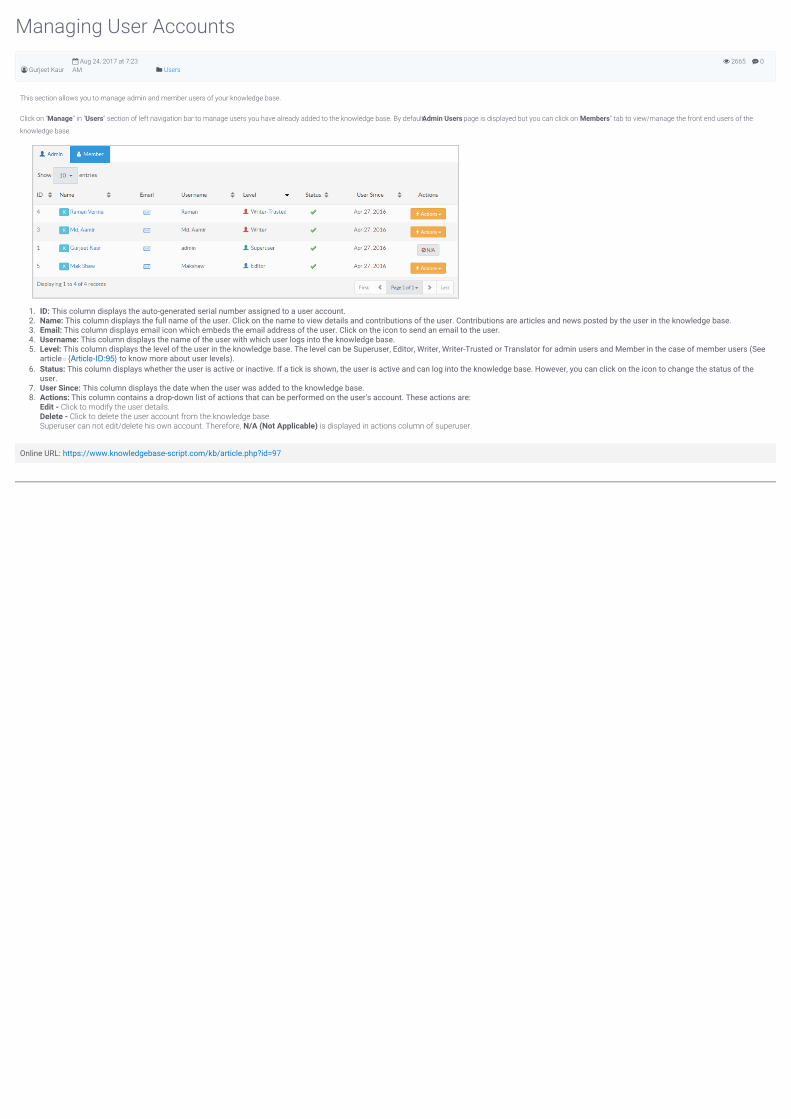
0 2665
Managing User Accounts
Gurjeet Kaur Aug 24, 2017 at 7:23AM Users
This section allows you to manage admin and member users of your knowledge base.
Click on "Manage" in "Users" section of left navigation bar to manage users you have already added to the knowledge base. By default, Admin Users page is displayed but you can click on "Members" tab to view/manage the front end users of the
knowledge base.
1. ID: This column displays the auto-generated serial number assigned to a user account.2. Name: This column displays the full name of the user. Click on the name to view details and contributions of the user. Contributions are articles and news posted by the user in the knowledge base.3. Email: This column displays email icon which embeds the email address of the user. Click on the icon to send an email to the user.4. Username: This column displays the name of the user with which user logs into the knowledge base.5. Level: This column displays the level of the user in the knowledge base. The level can be Superuser, Editor, Writer, Writer-Trusted or Translator for admin users and Member in the case of member users (See
article {Article-ID:95} to know more about user levels).6. Status: This column displays whether the user is active or inactive. If a tick is shown, the user is active and can log into the knowledge base. However, you can click on the icon to change the status of the
user.7. User Since: This column displays the date when the user was added to the knowledge base.8. Actions: This column contains a drop-down list of actions that can be performed on the user's account. These actions are:
Edit - Click to modify the user details.Delete - Click to delete the user account from the knowledge base.Superuser can not edit/delete his own account. Therefore, N/A (Not Applicable) is displayed in actions column of superuser.
Online URL: https://www.knowledgebase-script.com/kb/article.php?id=97
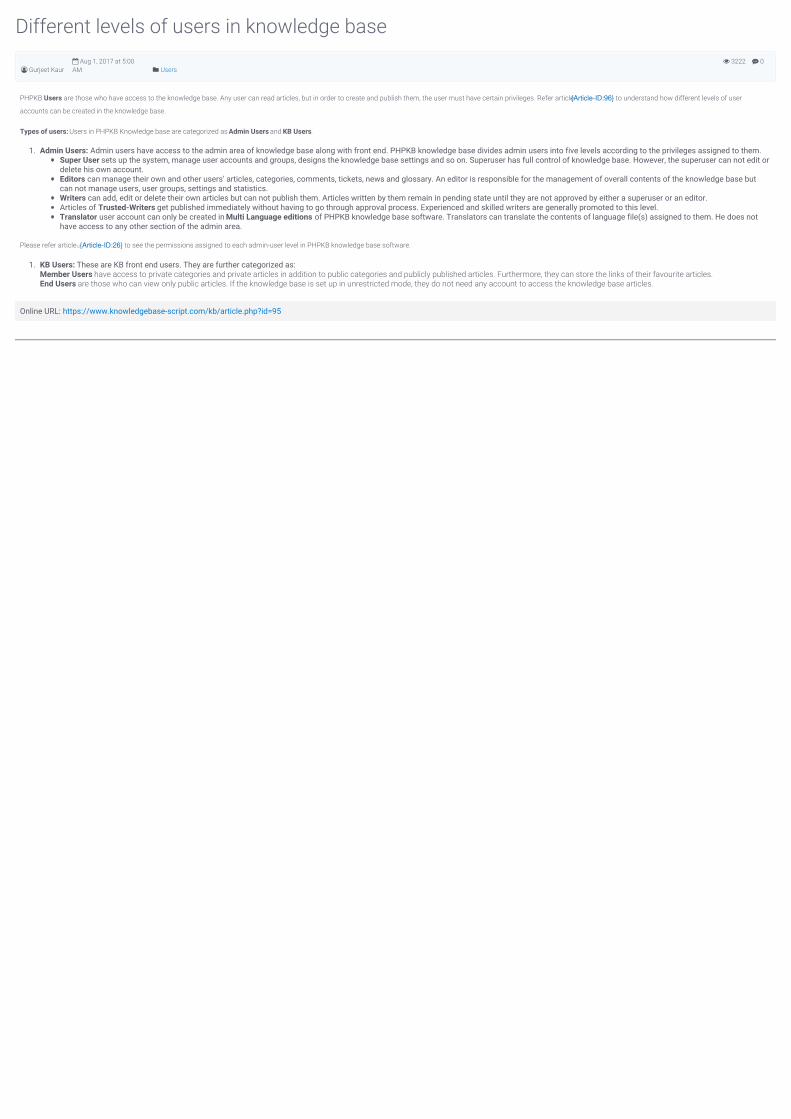
0 3222
Different levels of users in knowledge base
Gurjeet Kaur Aug 1, 2017 at 5:00AM Users
PHPKB Users are those who have access to the knowledge base. Any user can read articles, but in order to create and publish them, the user must have certain privileges. Refer article {Article-ID:96} to understand how different levels of user
accounts can be created in the knowledge base.
Types of users: Users in PHPKB Knowledge base are categorized as Admin Users and KB Users.
1. Admin Users: Admin users have access to the admin area of knowledge base along with front end. PHPKB knowledge base divides admin users into five levels according to the privileges assigned to them.Super User sets up the system, manage user accounts and groups, designs the knowledge base settings and so on. Superuser has full control of knowledge base. However, the superuser can not edit ordelete his own account.Editors can manage their own and other users’ articles, categories, comments, tickets, news and glossary. An editor is responsible for the management of overall contents of the knowledge base butcan not manage users, user groups, settings and statistics.Writers can add, edit or delete their own articles but can not publish them. Articles written by them remain in pending state until they are not approved by either a superuser or an editor.Articles of Trusted-Writers get published immediately without having to go through approval process. Experienced and skilled writers are generally promoted to this level.Translator user account can only be created in Multi Language editions of PHPKB knowledge base software. Translators can translate the contents of language file(s) assigned to them. He does nothave access to any other section of the admin area.
Please refer article {Article-ID:26} to see the permissions assigned to each admin-user level in PHPKB knowledge base software.
1. KB Users: These are KB front end users. They are further categorized as:Member Users have access to private categories and private articles in addition to public categories and publicly published articles. Furthermore, they can store the links of their favourite articles.End Users are those who can view only public articles. If the knowledge base is set up in unrestricted mode, they do not need any account to access the knowledge base articles.
Online URL: https://www.knowledgebase-script.com/kb/article.php?id=95

CATEGORY
News & Announcements3 Articles
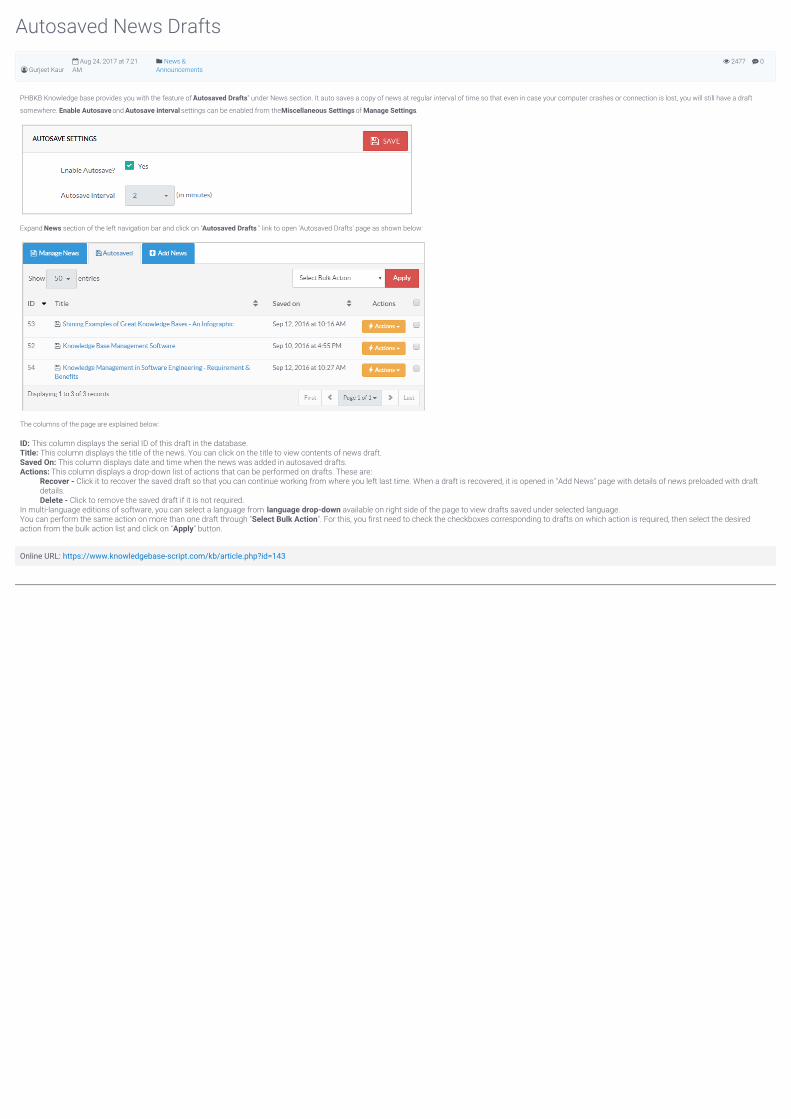
0 2477
Autosaved News Drafts
Gurjeet Kaur Aug 24, 2017 at 7:21AM
News &Announcements
PHBKB Knowledge base provides you with the feature of "Autosaved Drafts" under News section. It auto saves a copy of news at regular interval of time so that even in case your computer crashes or connection is lost, you will still have a draft
somewhere. Enable Autosave and Autosave interval settings can be enabled from the Miscellaneous Settings of Manage Settings.
Expand News section of the left navigation bar and click on " Autosaved Drafts " link to open 'Autosaved Drafts' page as shown below:
The columns of the page are explained below:
ID: This column displays the serial ID of this draft in the database.Title: This column displays the title of the news. You can click on the title to view contents of news draft.Saved On: This column displays date and time when the news was added in autosaved drafts.Actions: This column displays a drop-down list of actions that can be performed on drafts. These are:
Recover - Click it to recover the saved draft so that you can continue working from where you left last time. When a draft is recovered, it is opened in "Add News" page with details of news preloaded with draftdetails.Delete - Click to remove the saved draft if it is not required.
In multi-language editions of software, you can select a language from language drop-down available on right side of the page to view drafts saved under selected language.You can perform the same action on more than one draft through "Select Bulk Action". For this, you first need to check the checkboxes corresponding to drafts on which action is required, then select the desiredaction from the bulk action list and click on "Apply" button.
Online URL: https://www.knowledgebase-script.com/kb/article.php?id=143
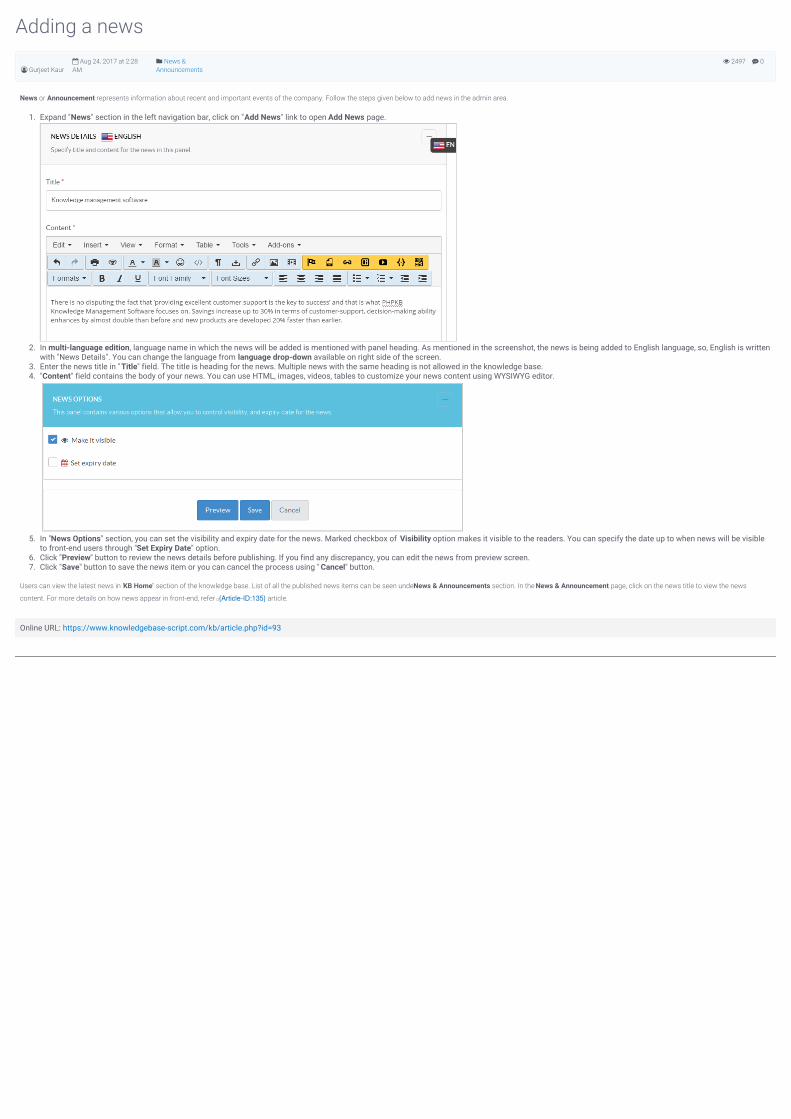
0 2497
Adding a news
Gurjeet Kaur Aug 24, 2017 at 2:28AM
News &Announcements
News or Announcement represents information about recent and important events of the company. Follow the steps given below to add news in the admin area.
1. Expand "News" section in the left navigation bar, click on "Add News" link to open Add News page.
2. In multi-language edition, language name in which the news will be added is mentioned with panel heading. As mentioned in the screenshot, the news is being added to English language, so, English is writtenwith "News Details". You can change the language from language drop-down available on right side of the screen.
3. Enter the news title in "Title" field. The title is heading for the news. Multiple news with the same heading is not allowed in the knowledge base.4. "Content" field contains the body of your news. You can use HTML, images, videos, tables to customize your news content using WYSIWYG editor.
5. In "News Options" section, you can set the visibility and expiry date for the news. Marked checkbox of Visibility option makes it visible to the readers. You can specify the date up to when news will be visibleto front-end users through "Set Expiry Date" option.
6. Click "Preview" button to review the news details before publishing. If you find any discrepancy, you can edit the news from preview screen.7. Click "Save" button to save the news item or you can cancel the process using " Cancel" button.
Users can view the latest news in "KB Home" section of the knowledge base. List of all the published news items can be seen under News & Announcements section. In the News & Announcement page, click on the news title to view the news
content. For more details on how news appear in front-end, refer {Article-ID:135} article.
Online URL: https://www.knowledgebase-script.com/kb/article.php?id=93
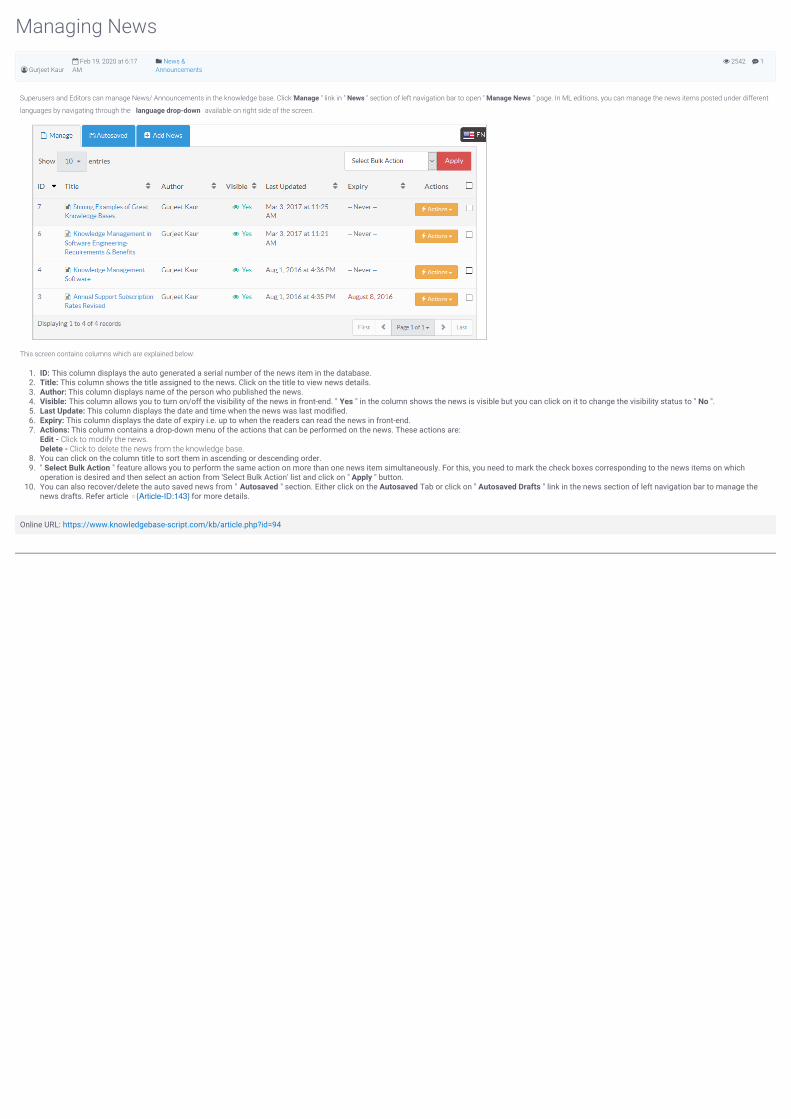
1 2542
Managing News
Gurjeet Kaur Feb 19, 2020 at 6:17AM
News &Announcements
Superusers and Editors can manage News/ Announcements in the knowledge base. Click " Manage " link in " News " section of left navigation bar to open " Manage News " page. In ML editions, you can manage the news items posted under different
languages by navigating through the language drop-down available on right side of the screen.
This screen contains columns which are explained below:
1. ID: This column displays the auto generated a serial number of the news item in the database.2. Title: This column shows the title assigned to the news. Click on the title to view news details.3. Author: This column displays name of the person who published the news.4. Visible: This column allows you to turn on/off the visibility of the news in front-end. " Yes " in the column shows the news is visible but you can click on it to change the visibility status to " No ".5. Last Update: This column displays the date and time when the news was last modified.6. Expiry: This column displays the date of expiry i.e. up to when the readers can read the news in front-end.7. Actions: This column contains a drop-down menu of the actions that can be performed on the news. These actions are:
Edit - Click to modify the news.Delete - Click to delete the news from the knowledge base.
8. You can click on the column title to sort them in ascending or descending order.9. " Select Bulk Action " feature allows you to perform the same action on more than one news item simultaneously. For this, you need to mark the check boxes corresponding to the news items on which
operation is desired and then select an action from 'Select Bulk Action' list and click on " Apply " button.10. You can also recover/delete the auto saved news from " Autosaved " section. Either click on the Autosaved Tab or click on " Autosaved Drafts " link in the news section of left navigation bar to manage the
news drafts. Refer article {Article-ID:143} for more details.
Online URL: https://www.knowledgebase-script.com/kb/article.php?id=94

CATEGORY
Glossary2 Articles
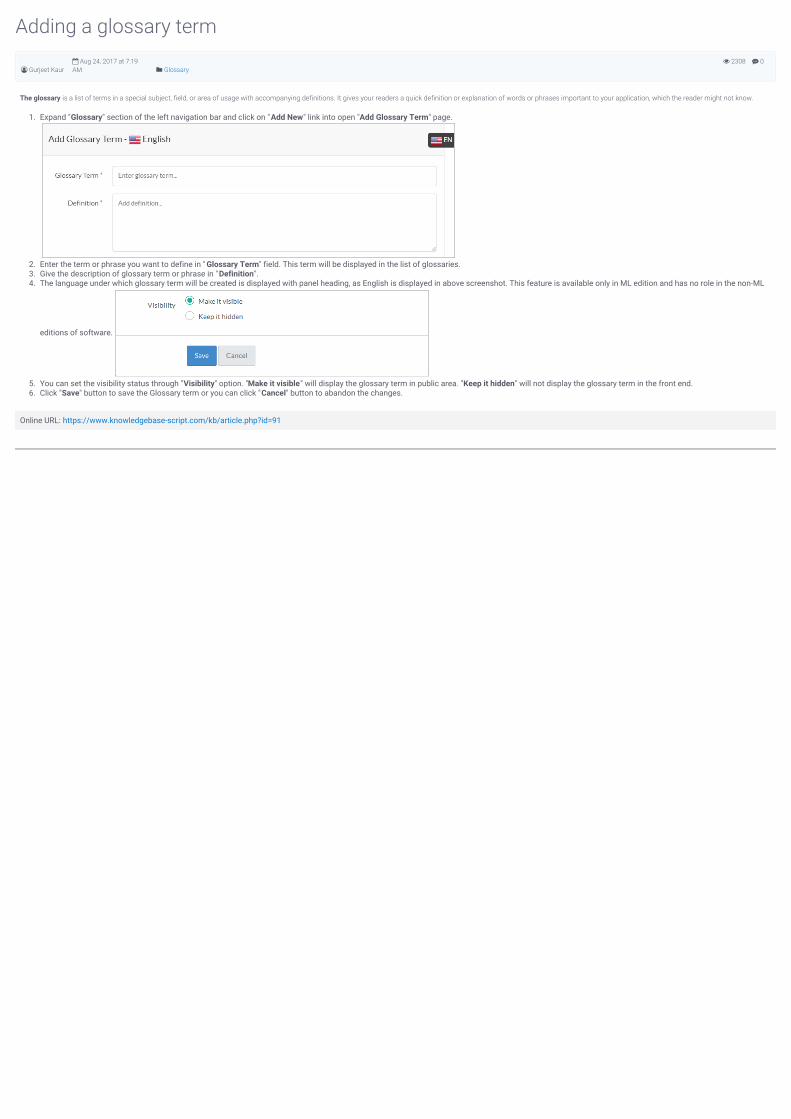
0 2308
Adding a glossary term
Gurjeet Kaur Aug 24, 2017 at 7:19AM Glossary
The glossary is a list of terms in a special subject, field, or area of usage with accompanying definitions. It gives your readers a quick definition or explanation of words or phrases important to your application, which the reader might not know.
1. Expand "Glossary" section of the left navigation bar and click on "Add New" link into open "Add Glossary Term" page.
2. Enter the term or phrase you want to define in " Glossary Term" field. This term will be displayed in the list of glossaries.3. Give the description of glossary term or phrase in "Definition".4. The language under which glossary term will be created is displayed with panel heading, as English is displayed in above screenshot. This feature is available only in ML edition and has no role in the non-ML
editions of software.
5. You can set the visibility status through "Visibility" option. "Make it visible" will display the glossary term in public area. "Keep it hidden" will not display the glossary term in the front end.6. Click "Save" button to save the Glossary term or you can click "Cancel" button to abandon the changes.
Online URL: https://www.knowledgebase-script.com/kb/article.php?id=91
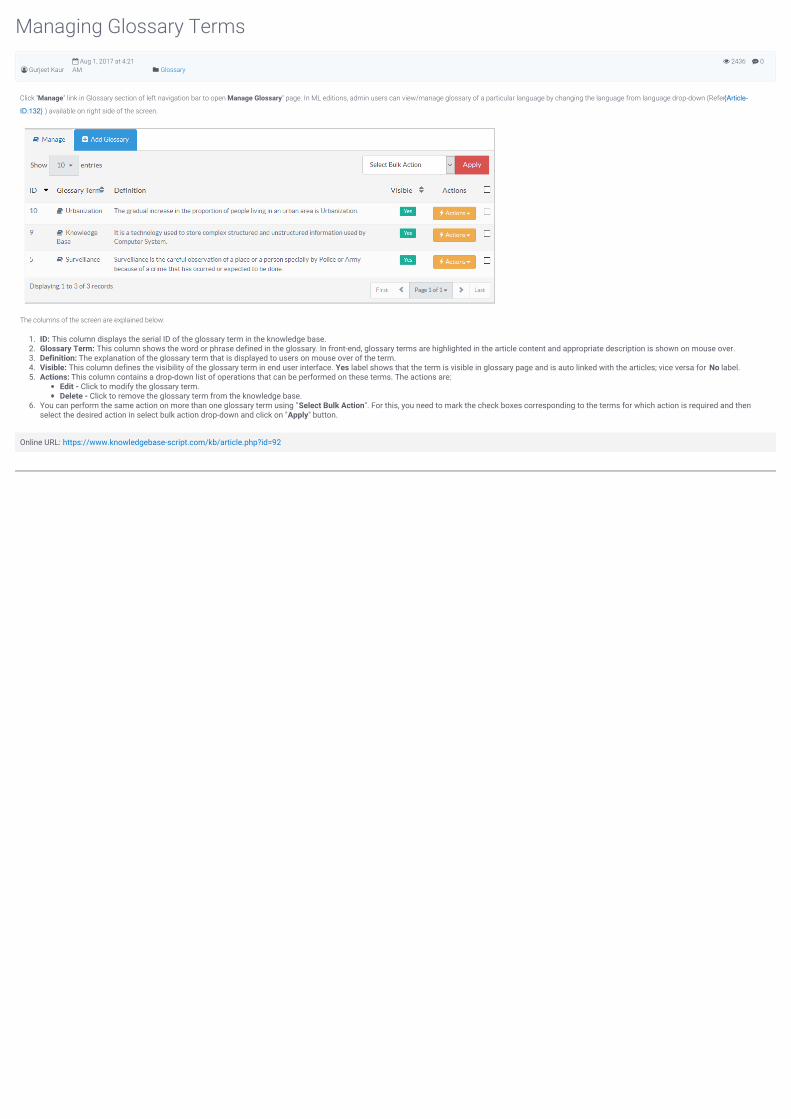
0 2436
Managing Glossary Terms
Gurjeet Kaur Aug 1, 2017 at 4:21AM Glossary
Click "Manage" link in Glossary section of left navigation bar to open "Manage Glossary" page. In ML editions, admin users can view/manage glossary of a particular language by changing the language from language drop-down (Refer {Article-
ID:132} ) available on right side of the screen.
The columns of the screen are explained below:
1. ID: This column displays the serial ID of the glossary term in the knowledge base.2. Glossary Term: This column shows the word or phrase defined in the glossary. In front-end, glossary terms are highlighted in the article content and appropriate description is shown on mouse over.3. Definition: The explanation of the glossary term that is displayed to users on mouse over of the term.4. Visible: This column defines the visibility of the glossary term in end user interface. Yes label shows that the term is visible in glossary page and is auto linked with the articles; vice versa for No label.5. Actions: This column contains a drop-down list of operations that can be performed on these terms. The actions are:
Edit - Click to modify the glossary term.Delete - Click to remove the glossary term from the knowledge base.
6. You can perform the same action on more than one glossary term using "Select Bulk Action". For this, you need to mark the check boxes corresponding to the terms for which action is required and thenselect the desired action in select bulk action drop-down and click on "Apply" button.
Online URL: https://www.knowledgebase-script.com/kb/article.php?id=92

CATEGORY
Support Tickets6 Articles
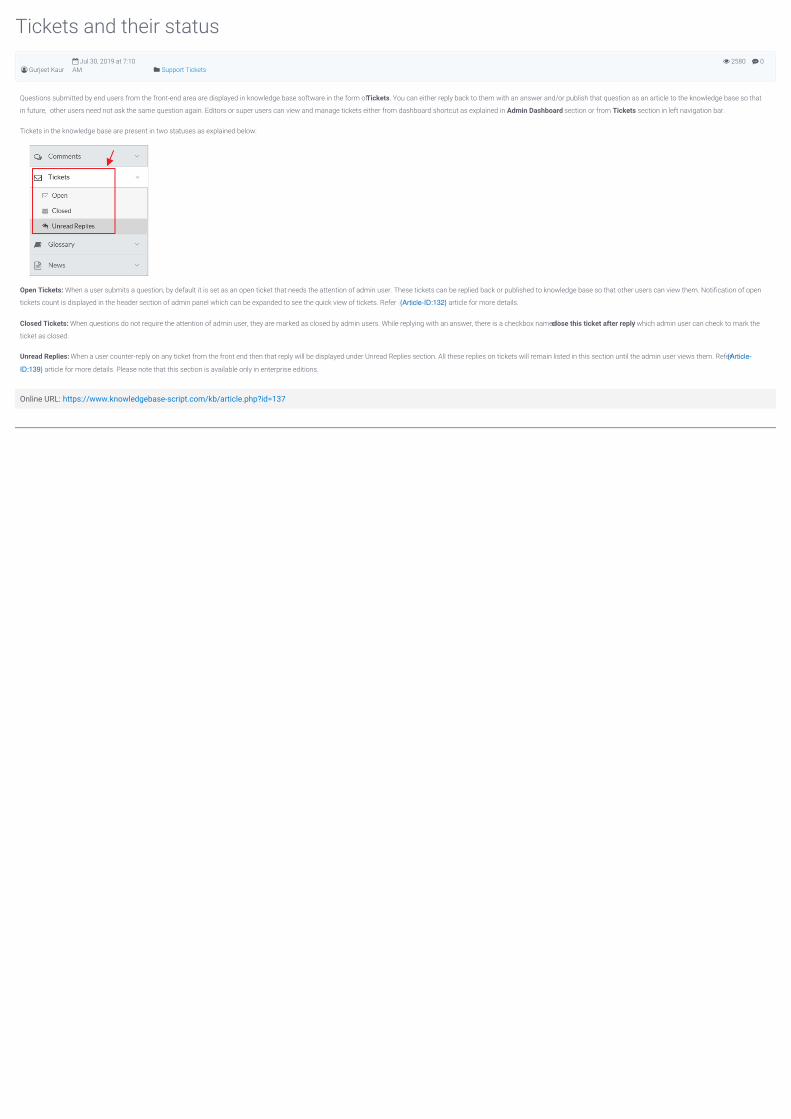
0 2580
Tickets and their status
Gurjeet Kaur Jul 30, 2019 at 7:10AM Support Tickets
Questions submitted by end users from the front-end area are displayed in knowledge base software in the form of Tickets. You can either reply back to them with an answer and/or publish that question as an article to the knowledge base so that
in future, other users need not ask the same question again. Editors or super users can view and manage tickets either from dashboard shortcut as explained in Admin Dashboard section or from Tickets section in left navigation bar.
Tickets in the knowledge base are present in two statuses as explained below:
Open Tickets: When a user submits a question, by default it is set as an open ticket that needs the attention of admin user. These tickets can be replied back or published to knowledge base so that other users can view them. Notification of open
tickets count is displayed in the header section of admin panel which can be expanded to see the quick view of tickets. Refer {Article-ID:132} article for more details.
Closed Tickets: When questions do not require the attention of admin user, they are marked as closed by admin users. While replying with an answer, there is a checkbox named 'close this ticket after reply' which admin user can check to mark the
ticket as closed.
Unread Replies: When a user counter-reply on any ticket from the front end then that reply will be displayed under Unread Replies section. All these replies on tickets will remain listed in this section until the admin user views them. Refer {Article-
ID:139} article for more details. Please note that this section is available only in enterprise editions.
Online URL: https://www.knowledgebase-script.com/kb/article.php?id=137
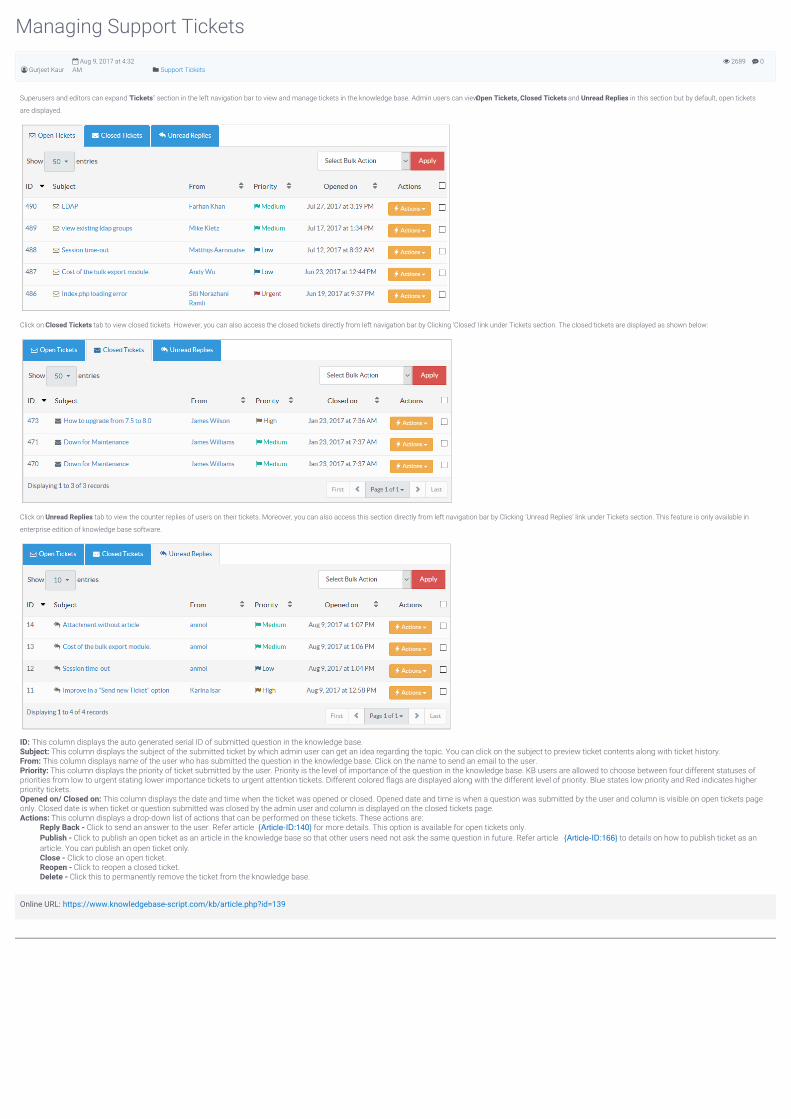
0 2689
Managing Support Tickets
Gurjeet Kaur Aug 9, 2017 at 4:32AM Support Tickets
Superusers and editors can expand "Tickets" section in the left navigation bar to view and manage tickets in the knowledge base. Admin users can view Open Tickets, Closed Tickets and Unread Replies in this section but by default, open tickets
are displayed.
Click on Closed Tickets tab to view closed tickets. However, you can also access the closed tickets directly from left navigation bar by Clicking ’Closed’ link under Tickets section. The closed tickets are displayed as shown below:
Click on Unread Replies tab to view the counter replies of users on their tickets. Moreover, you can also access this section directly from left navigation bar by Clicking ’Unread Replies’ link under Tickets section. This feature is only available in
enterprise edition of knowledge base software.
ID: This column displays the auto generated serial ID of submitted question in the knowledge base.Subject: This column displays the subject of the submitted ticket by which admin user can get an idea regarding the topic. You can click on the subject to preview ticket contents along with ticket history.From: This column displays name of the user who has submitted the question in the knowledge base. Click on the name to send an email to the user.Priority: This column displays the priority of ticket submitted by the user. Priority is the level of importance of the question in the knowledge base. KB users are allowed to choose between four different statuses ofpriorities from low to urgent stating lower importance tickets to urgent attention tickets. Different colored flags are displayed along with the different level of priority. Blue states low priority and Red indicates higherpriority tickets.Opened on/ Closed on: This column displays the date and time when the ticket was opened or closed. Opened date and time is when a question was submitted by the user and column is visible on open tickets pageonly. Closed date is when ticket or question submitted was closed by the admin user and column is displayed on the closed tickets page.Actions: This column displays a drop-down list of actions that can be performed on these tickets. These actions are:
Reply Back - Click to send an answer to the user. Refer article {Article-ID:140} for more details. This option is available for open tickets only.Publish - Click to publish an open ticket as an article in the knowledge base so that other users need not ask the same question in future. Refer article {Article-ID:166} to details on how to publish ticket as anarticle. You can publish an open ticket only.Close - Click to close an open ticket.Reopen - Click to reopen a closed ticket.Delete - Click this to permanently remove the ticket from the knowledge base.
Online URL: https://www.knowledgebase-script.com/kb/article.php?id=139

0 2714
Sending reply to a ticket
Gurjeet Kaur Aug 10, 2017 at 1:16AM Support Tickets
Click "Reply Back" option from Actions column of Open Tickets page under Tickets section of left navigation bar.
You can send reply for the ticket and/or publish it as an article in the knowledge base.
Title: Enter the title that will be the subject of email notification. By default, the subject of a question submitted by KB user (end user) is displayed in this field.Answer: Type-in the contents of the answer in this field which you want to send to the user. For convenience, the content of question submitted by the user (inscribed in rectangular box) is displayed in the text area.
Check "Publish this question answer as an article in knowledge base" if you want to send the reply to a user as well as publish the answer as an article in the knowledge base. The published article will help otherusers if they have the same question. Refer article {Article-ID:166} for more details.Check "Close this ticket after reply" if you want to close the ticket after sending a reply.Click on "Send Reply" button to send the reply to a user. Otherwise, you can click on " Cancel" button to abandon the process.
Online URL: https://www.knowledgebase-script.com/kb/article.php?id=140
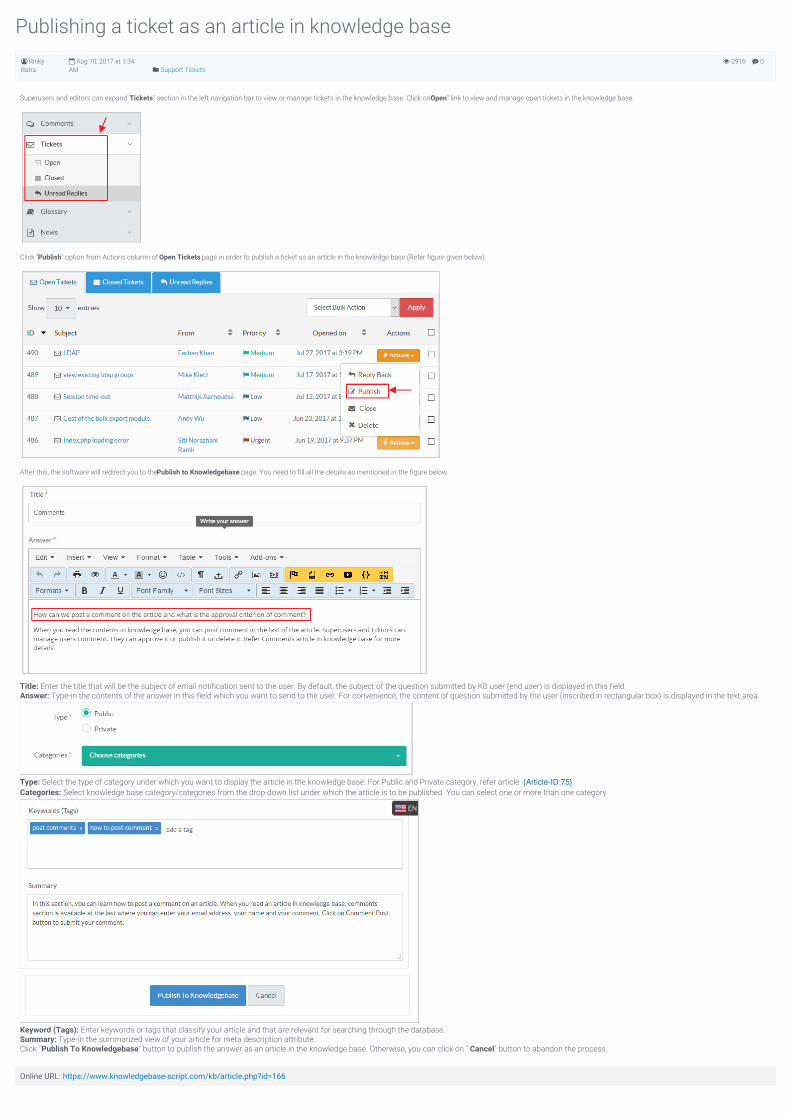
0 2916
Publishing a ticket as an article in knowledge base RinkyBatra
Aug 10, 2017 at 1:34AM Support Tickets
Superusers and editors can expand "Tickets" section in the left navigation bar to view or manage tickets in the knowledge base. Click on "Open" link to view and manage open tickets in the knowledge base.
Click "Publish" option from Actions column of Open Tickets page in order to publish a ticket as an article in the knowledge base (Refer figure given below).
After this, the software will redirect you to the Publish to Knowledgebase page. You need to fill all the details as mentioned in the figure below.
Title: Enter the title that will be the subject of email notification sent to the user. By default, the subject of the question submitted by KB user (end user) is displayed in this field.Answer: Type-in the contents of the answer in this field which you want to send to the user. For convenience, the content of question submitted by the user (inscribed in rectangular box) is displayed in the text area.
Type: Select the type of category under which you want to display the article in the knowledge base. For Public and Private category, refer article {Article-ID:75}.Categories: Select knowledge base category/categories from the drop-down list under which the article is to be published. You can select one or more than one category.
Keyword (Tags): Enter keywords or tags that classify your article and that are relevant for searching through the database.Summary: Type-in the summarized view of your article for meta description attribute.Click "Publish To Knowledgebase" button to publish the answer as an article in the knowledge base. Otherwise, you can click on " Cancel" button to abandon the process.
Online URL: https://www.knowledgebase-script.com/kb/article.php?id=166

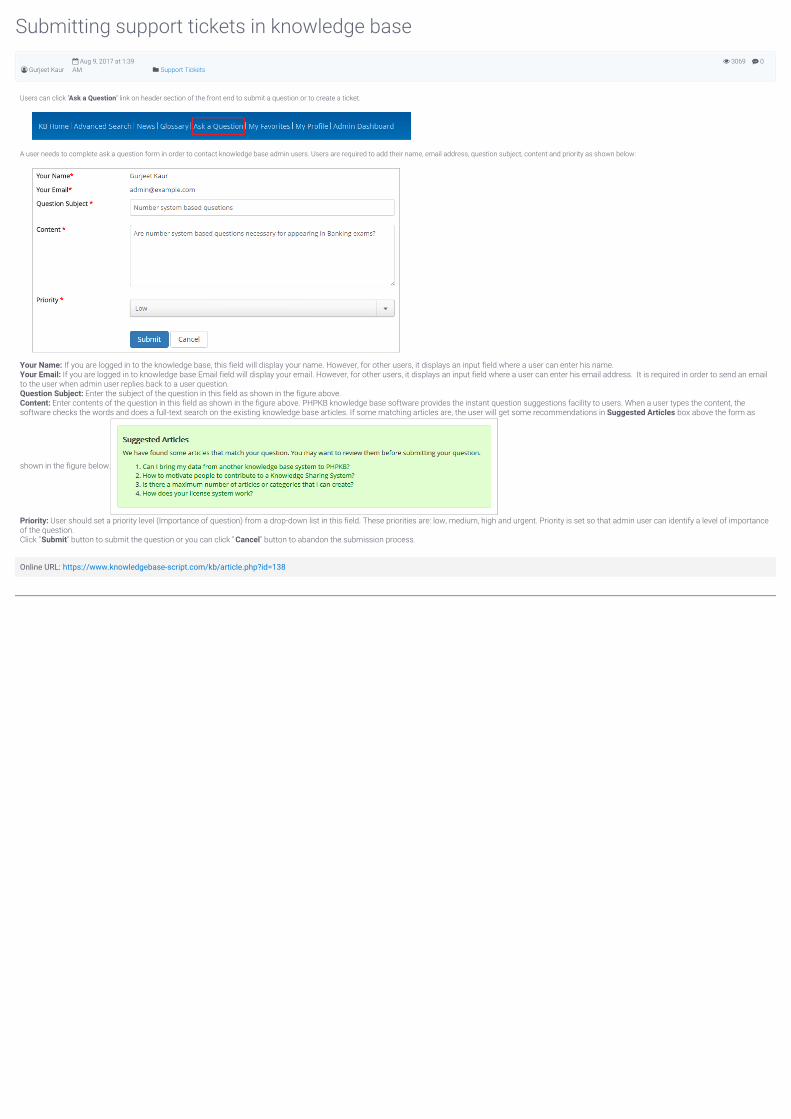
0 3069
Submitting support tickets in knowledge base
Gurjeet Kaur Aug 9, 2017 at 1:39AM Support Tickets
Users can click "Ask a Question" link on header section of the front end to submit a question or to create a ticket.
A user needs to complete ask a question form in order to contact knowledge base admin users. Users are required to add their name, email address, question subject, content and priority as shown below:
Your Name: If you are logged in to the knowledge base, this field will display your name. However, for other users, it displays an input field where a user can enter his name.Your Email: If you are logged in to knowledge base Email field will display your email. However, for other users, it displays an input field where a user can enter his email address. It is required in order to send an emailto the user when admin user replies back to a user question.Question Subject: Enter the subject of the question in this field as shown in the figure above.Content: Enter contents of the question in this field as shown in the figure above. PHPKB knowledge base software provides the instant question suggestions facility to users. When a user types the content, thesoftware checks the words and does a full-text search on the existing knowledge base articles. If some matching articles are, the user will get some recommendations in Suggested Articles box above the form as
shown in the figure below.
Priority: User should set a priority level (Importance of question) from a drop-down list in this field. These priorities are: low, medium, high and urgent. Priority is set so that admin user can identify a level of importanceof the question.Click "Submit" button to submit the question or you can click " Cancel" button to abandon the submission process.
Online URL: https://www.knowledgebase-script.com/kb/article.php?id=138
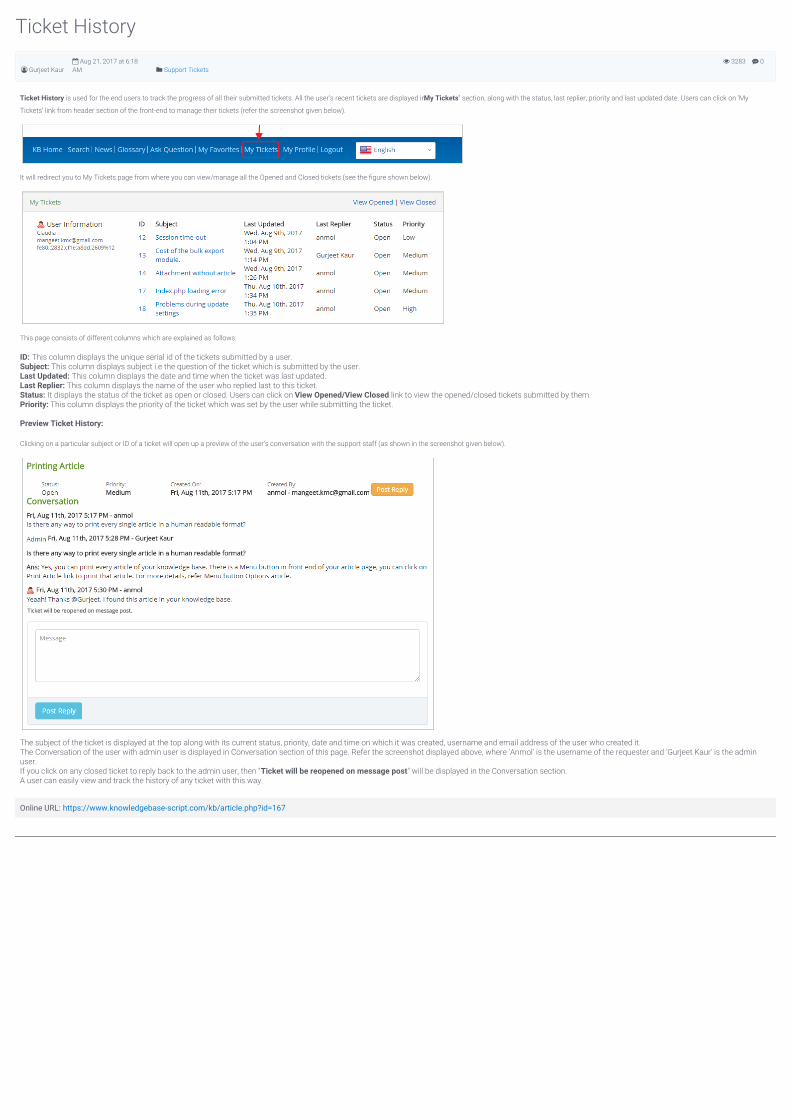
0 3283
Ticket History
Gurjeet Kaur Aug 21, 2017 at 6:18AM Support Tickets
Ticket History is used for the end users to track the progress of all their submitted tickets. All the user’s recent tickets are displayed in "My Tickets" section, along with the status, last replier, priority and last updated date. Users can click on ’My
Tickets’ link from header section of the front-end to manage their tickets (refer the screenshot given below).
It will redirect you to My Tickets page from where you can view/manage all the Opened and Closed tickets (see the figure shown below).
This page consists of different columns which are explained as follows:
ID: This column displays the unique serial id of the tickets submitted by a user.Subject: This column displays subject i.e the question of the ticket which is submitted by the user.Last Updated: This column displays the date and time when the ticket was last updated.Last Replier: This column displays the name of the user who replied last to this ticket.Status: It displays the status of the ticket as open or closed. Users can click on View Opened/View Closed link to view the opened/closed tickets submitted by them.Priority: This column displays the priority of the ticket which was set by the user while submitting the ticket.
Preview Ticket History:
Clicking on a particular subject or ID of a ticket will open up a preview of the user’s conversation with the support staff (as shown in the screenshot given below).
The subject of the ticket is displayed at the top along with its current status, priority, date and time on which it was created, username and email address of the user who created it.The Conversation of the user with admin user is displayed in Conversation section of this page. Refer the screenshot displayed above, where 'Anmol' is the username of the requester and 'Gurjeet Kaur' is the adminuser.If you click on any closed ticket to reply back to the admin user, then "Ticket will be reopened on message post" will be displayed in the Conversation section.A user can easily view and track the history of any ticket with this way.
Online URL: https://www.knowledgebase-script.com/kb/article.php?id=167

CATEGORY
Comments2 Articles
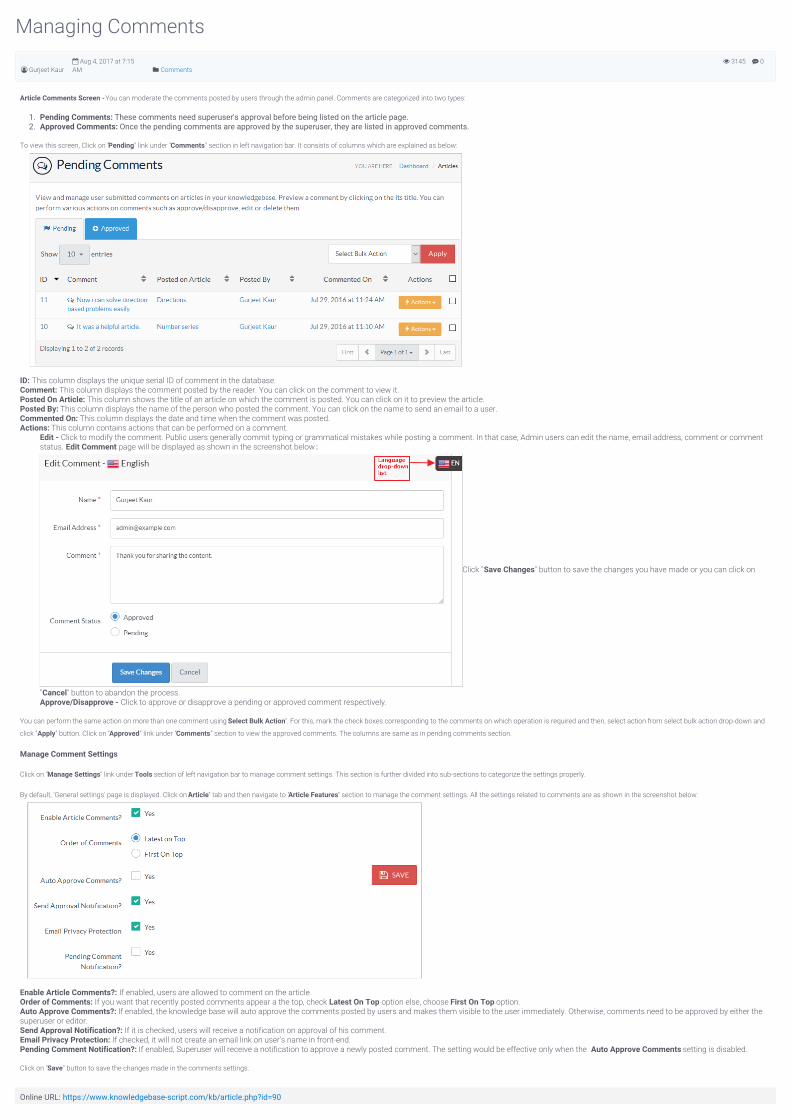
0 3145
Managing Comments
Gurjeet Kaur Aug 4, 2017 at 7:15AM Comments
Article Comments Screen - You can moderate the comments posted by users through the admin panel. Comments are categorized into two types:
1. Pending Comments: These comments need superuser's approval before being listed on the article page.2. Approved Comments: Once the pending comments are approved by the superuser, they are listed in approved comments.
To view this screen, Click on "Pending" link under "Comments" section in left navigation bar. It consists of columns which are explained as below:
ID: This column displays the unique serial ID of comment in the database.Comment: This column displays the comment posted by the reader. You can click on the comment to view it.Posted On Article: This column shows the title of an article on which the comment is posted. You can click on it to preview the article.Posted By: This column displays the name of the person who posted the comment. You can click on the name to send an email to a user.Commented On: This column displays the date and time when the comment was posted.Actions: This column contains actions that can be performed on a comment.
Edit - Click to modify the comment. Public users generally commit typing or grammatical mistakes while posting a comment. In that case, Admin users can edit the name, email address, comment or commentstatus. Edit Comment page will be displayed as shown in the screenshot below :
Click "Save Changes" button to save the changes you have made or you can click on
"Cancel" button to abandon the process.Approve/Disapprove - Click to approve or disapprove a pending or approved comment respectively.
You can perform the same action on more than one comment using "Select Bulk Action". For this, mark the check boxes corresponding to the comments on which operation is required and then, select action from select bulk action drop-down and
click "Apply" button. Click on "Approved" link under "Comments" section to view the approved comments. The columns are same as in pending comments section.
Manage Comment Settings
Click on "Manage Settings" link under Tools section of left navigation bar to manage comment settings. This section is further divided into sub-sections to categorize the settings properly.
By default, 'General settings' page is displayed. Click on "Article" tab and then navigate to "Article Features" section to manage the comment settings. All the settings related to comments are as shown in the screenshot below:
Enable Article Comments?: If enabled, users are allowed to comment on the article.Order of Comments: If you want that recently posted comments appear a the top, check Latest On Top option else, choose First On Top option.Auto Approve Comments?: If enabled, the knowledge base will auto approve the comments posted by users and makes them visible to the user immediately. Otherwise, comments need to be approved by either thesuperuser or editor.Send Approval Notification?: If it is checked, users will receive a notification on approval of his comment.Email Privacy Protection: If checked, it will not create an email link on user's name in front-end.Pending Comment Notification?: If enabled, Superuser will receive a notification to approve a newly posted comment. The setting would be effective only when the Auto Approve Comments setting is disabled.
Click on "Save" button to save the changes made in the comments settings.
Online URL: https://www.knowledgebase-script.com/kb/article.php?id=90

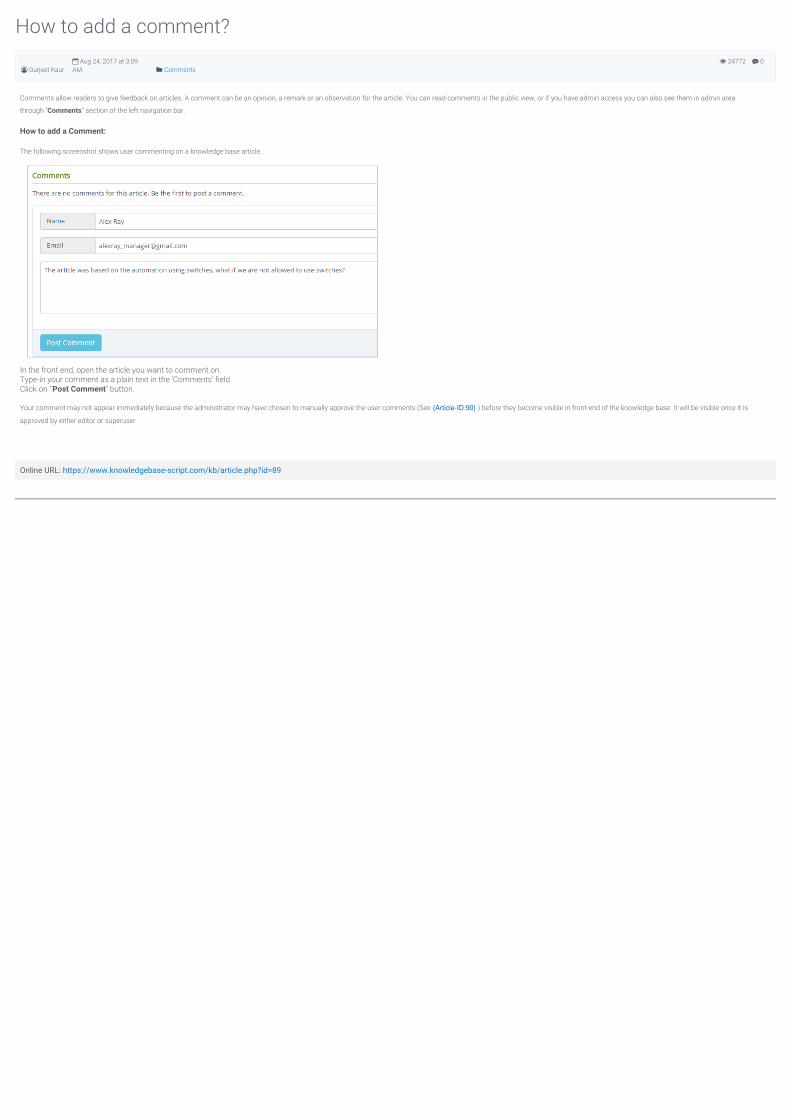
0 24772
How to add a comment?
Gurjeet Kaur Aug 24, 2017 at 3:09AM Comments
Comments allow readers to give feedback on articles. A comment can be an opinion, a remark or an observation for the article. You can read comments in the public view, or if you have admin access you can also see them in admin area
through "Comments" section of the left navigation bar.
How to add a Comment:
The following screenshot shows user commenting on a knowledge base article.
In the front end, open the article you want to comment on.Type-in your comment as a plain text in the 'Comments' field.Click on "Post Comment" button.
Your comment may not appear immediately because the administrator may have chosen to manually approve the user comments (See {Article-ID:90} ) before they become visible in front-end of the knowledge base. It will be visible once it is
approved by either editor or superuser.
Online URL: https://www.knowledgebase-script.com/kb/article.php?id=89

CATEGORY
Articles12 Articles

0 0
Article Locking
Gurjeet Kaur May 21, 2018 at 5:09AM Articles
Article locking is available only in enterprise edition of software.
Online URL: https://www.knowledgebase-script.com/kb/article.php?id=174

0 555
What are the differences between public and private articles in a knowledge base?
Ajay Chadha Jan 20, 2020 at 4:04AM Articles
Public articles — The documents that are accessible or open/available to people at large/general public. These are not confidential. Every person is free to access it without permission of any kind. In context of a knowledge base, public articles are
saved/presented under public categories.
Private articles — Contrary to the above, these are privileged and proprietary documents belonging to a particular user or group of users. This is the prerogative of the person to whom they belong to show/disclose or not to any other person.
Unauthorized access request is denied to prevent the breach of confidentiality/privacy. In context of a knowledge base, private articles are saved/presented under private categories and access to such categories is provided via user groups.
Online URL: https://www.knowledgebase-script.com/kb/article.php?id=191
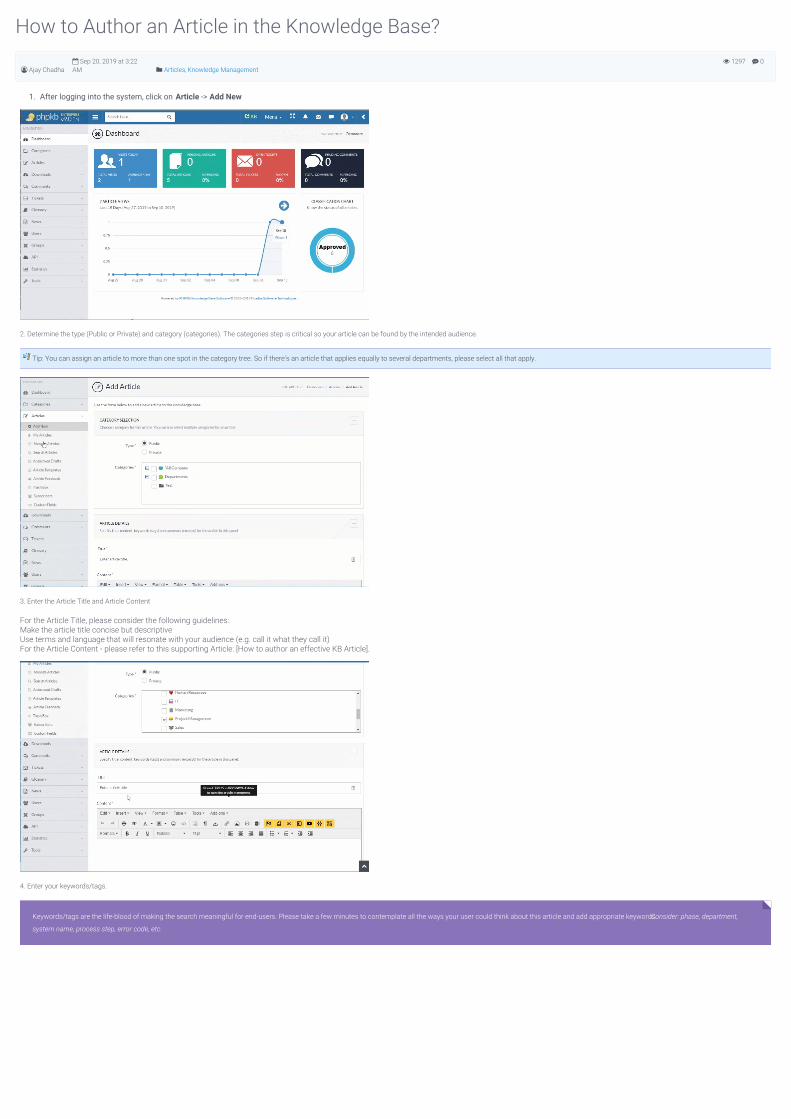
0 1297
How to Author an Article in the Knowledge Base?
Ajay Chadha Sep 20, 2019 at 3:22AM Articles, Knowledge Management
1. After logging into the system, click on Article -> Add New
2. Determine the type (Public or Private) and category (categories). The categories step is critical so your article can be found by the intended audience.
Tip: You can assign an article to more than one spot in the category tree. So if there's an article that applies equally to several departments, please select all that apply.
3. Enter the Article Title and Article Content
For the Article Title, please consider the following guidelines:Make the article title concise but descriptiveUse terms and language that will resonate with your audience (e.g. call it what they call it)For the Article Content - please refer to this supporting Article: [How to author an effective KB Article].
4. Enter your keywords/tags.
Keywords/tags are the life-blood of making the search meaningful for end-users. Please take a few minutes to contemplate all the ways your user could think about this article and add appropriate keywords. Consider: phase, department,
system name, process step, error code, etc.
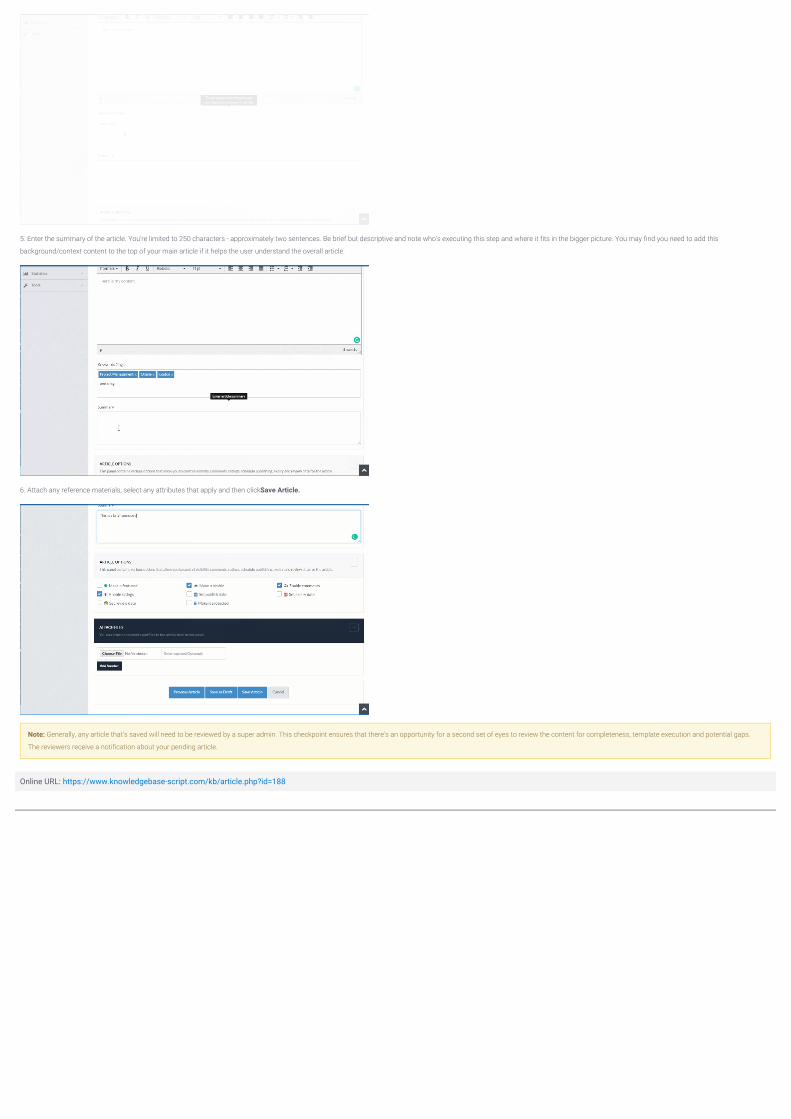
5. Enter the summary of the article. You're limited to 250 characters - approximately two sentences. Be brief but descriptive and note who's executing this step and where it fits in the bigger picture. You may find you need to add this
background/context content to the top of your main article if it helps the user understand the overall article.
6. Attach any reference materials, select any attributes that apply and then click Save Article.
Note: Generally, any article that's saved will need to be reviewed by a super admin. This checkpoint ensures that there's an opportunity for a second set of eyes to review the content for completeness, template execution and potential gaps.
The reviewers receive a notification about your pending article.
Online URL: https://www.knowledgebase-script.com/kb/article.php?id=188
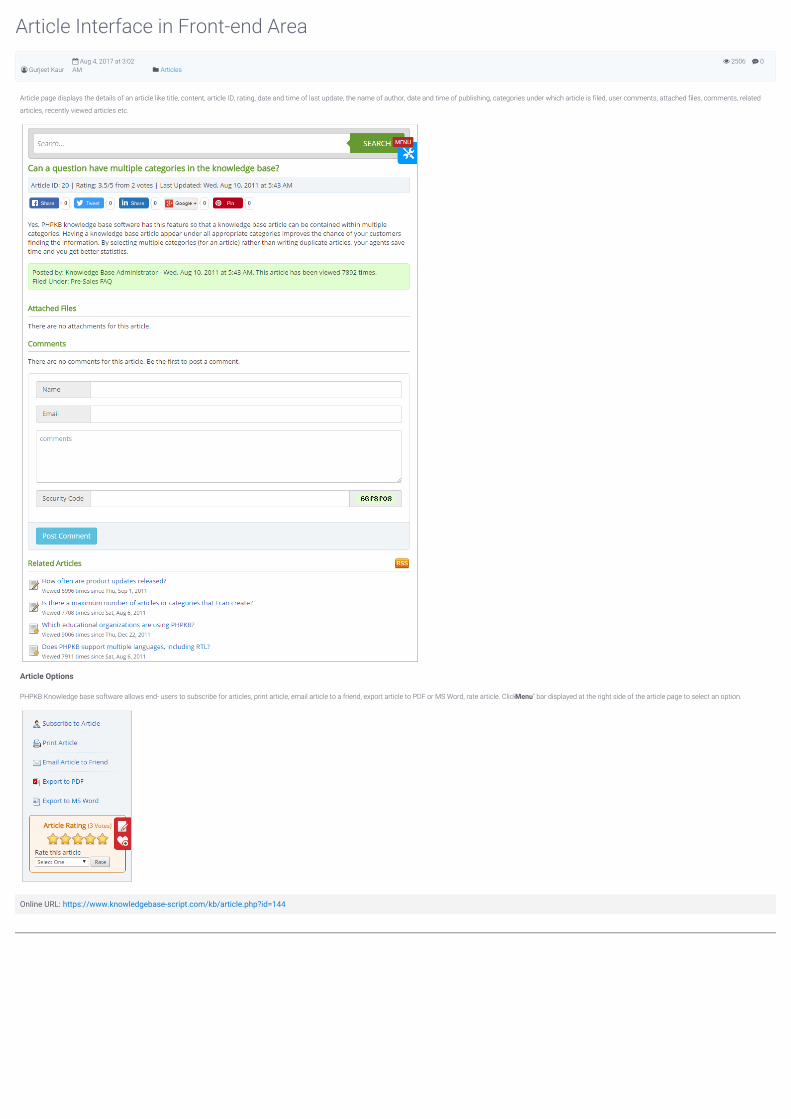
0 2506
Article Interface in Front-end Area
Gurjeet Kaur Aug 4, 2017 at 3:02AM Articles
Article page displays the details of an article like title, content, article ID, rating, date and time of last update, the name of author, date and time of publishing, categories under which article is filed, user comments, attached files, comments, related
articles, recently viewed articles etc.
Article Options
PHPKB Knowledge base software allows end- users to subscribe for articles, print article, email article to a friend, export article to PDF or MS Word, rate article. Click "Menu" bar displayed at the right side of the article page to select an option.
Online URL: https://www.knowledgebase-script.com/kb/article.php?id=144

0 2698
My Articles
Gurjeet Kaur Aug 24, 2017 at 3:15AM Articles
Users can expand "My Articles" link under Articles section of left navigation bar to view their own articles to update them. 'My Articles' page will be displayed which contain several columns as shown in the figure below:
ID: This column displays unique serial ID of the article in the knowledge base.Title: This column displays the title of an article in the knowledge base. You can click on article title to preview the article contents.Category: This column displays categories under which article is posted. Superusers and editors can click on the category name to view its details. Multiple is displayed if the article is posted under more than onecategory.Location: This column displays the location or status of the article in the knowledge base, i.e, whether the article is pending, approved, disapproved, featured or expired.Updated: This column displays the date on which the article was last updated.Actions: This column displays a drop-down list of actions that can be performed on the article. These actions are:
Edit - Click to modify the article.Delete - Click to delete the selected article. The deleted article is sent to 'Trash Box' section which behaves similarly to Recycle Bin.Attachments - Click to add or delete an attachment in the selected article.Disapprove - Superusers or editors can click this to disapprove the article.Mark Featured - Superusers or editors can click this to make this article featured.Reset rating - Superusers or editors can click this to set the rating of an article to 0.Subscribers - Superusers or editors can click this to view the list of subscribers associated with this article.Revisions - Superusers or editors can click this to view the old versions or revisions of the corresponding article.Collaboration - Superusers or editors can click post notes on articles for other admin users.
You can click on sorting icon ( ) to sort the articles in ascending or descending order accordingly. You can also select the no. of entries (articles) to be displayed at one time in show entries field."Select Bulk Action" allows you to perform the same function on more than one article. For this, you need to mark the articles on which operation is required and then select a function from a drop-down list of actions.At last, click on "Apply" button.
Online URL: https://www.knowledgebase-script.com/kb/article.php?id=149
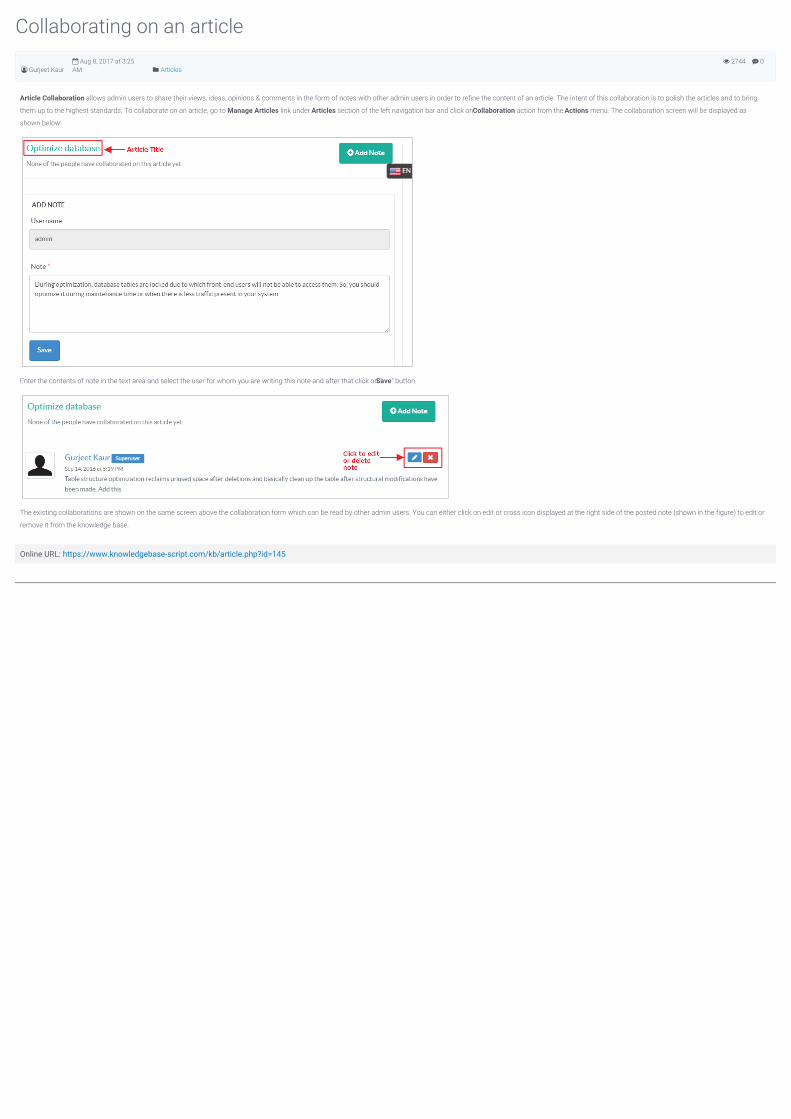
0 2744
Collaborating on an article
Gurjeet Kaur Aug 8, 2017 at 3:25AM Articles
Article Collaboration allows admin users to share their views, ideas, opinions & comments in the form of notes with other admin users in order to refine the content of an article. The intent of this collaboration is to polish the articles and to bring
them up to the highest standards. To collaborate on an article, go to Manage Articles link under Articles section of the left navigation bar and click on Collaboration action from the Actions menu. The collaboration screen will be displayed as
shown below:
Enter the contents of note in the text area and select the user for whom you are writing this note and after that click on "Save" button.
The existing collaborations are shown on the same screen above the collaboration form which can be read by other admin users. You can either click on edit or cross icon displayed at the right side of the posted note (shown in the figure) to edit or
remove it from the knowledge base.
Online URL: https://www.knowledgebase-script.com/kb/article.php?id=145
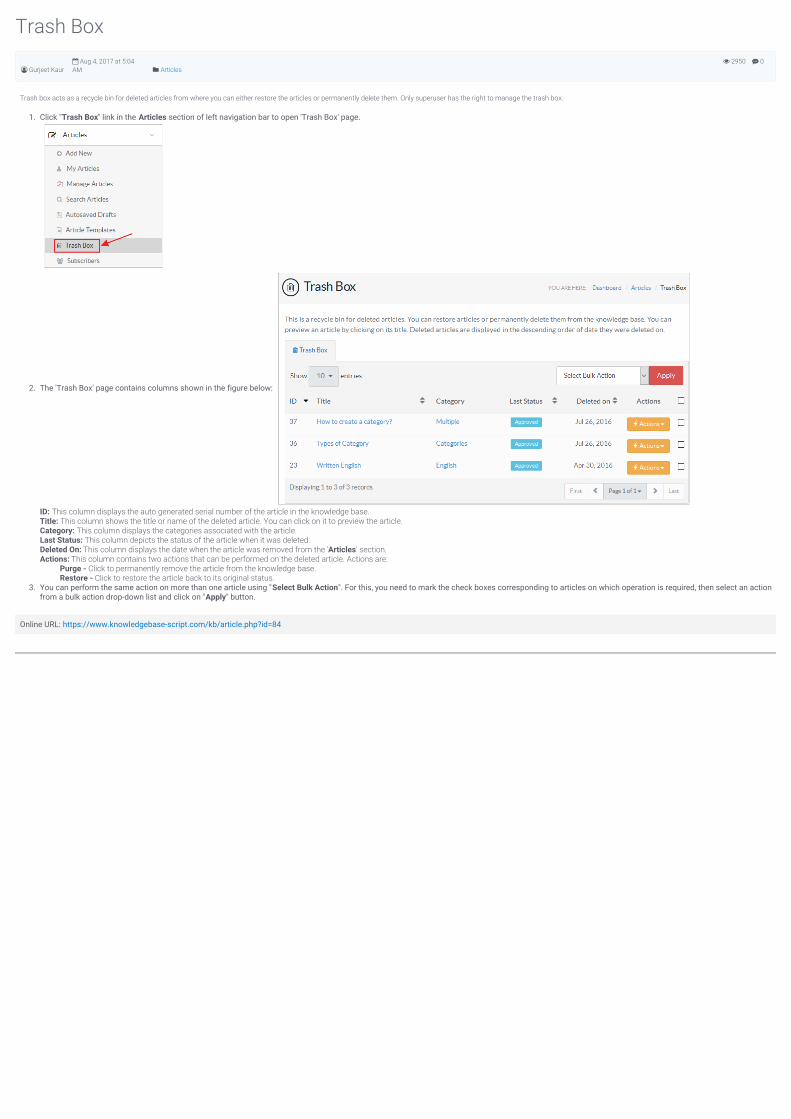
0 2950
Trash Box
Gurjeet Kaur Aug 4, 2017 at 5:04AM Articles
Trash box acts as a recycle bin for deleted articles from where you can either restore the articles or permanently delete them. Only superuser has the right to manage the trash box.
1. Click "Trash Box" link in the Articles section of left navigation bar to open 'Trash Box' page.
2. The 'Trash Box' page contains columns shown in the figure below:
ID: This column displays the auto generated serial number of the article in the knowledge base.Title: This column shows the title or name of the deleted article. You can click on it to preview the article.Category: This column displays the categories associated with the article.Last Status: This column depicts the status of the article when it was deleted.Deleted On: This column displays the date when the article was removed from the 'Articles' section.Actions: This column contains two actions that can be performed on the deleted article. Actions are:
Purge - Click to permanently remove the article from the knowledge base.Restore - Click to restore the article back to its original status.
3. You can perform the same action on more than one article using "Select Bulk Action". For this, you need to mark the check boxes corresponding to articles on which operation is required, then select an actionfrom a bulk action drop-down list and click on "Apply" button.
Online URL: https://www.knowledgebase-script.com/kb/article.php?id=84
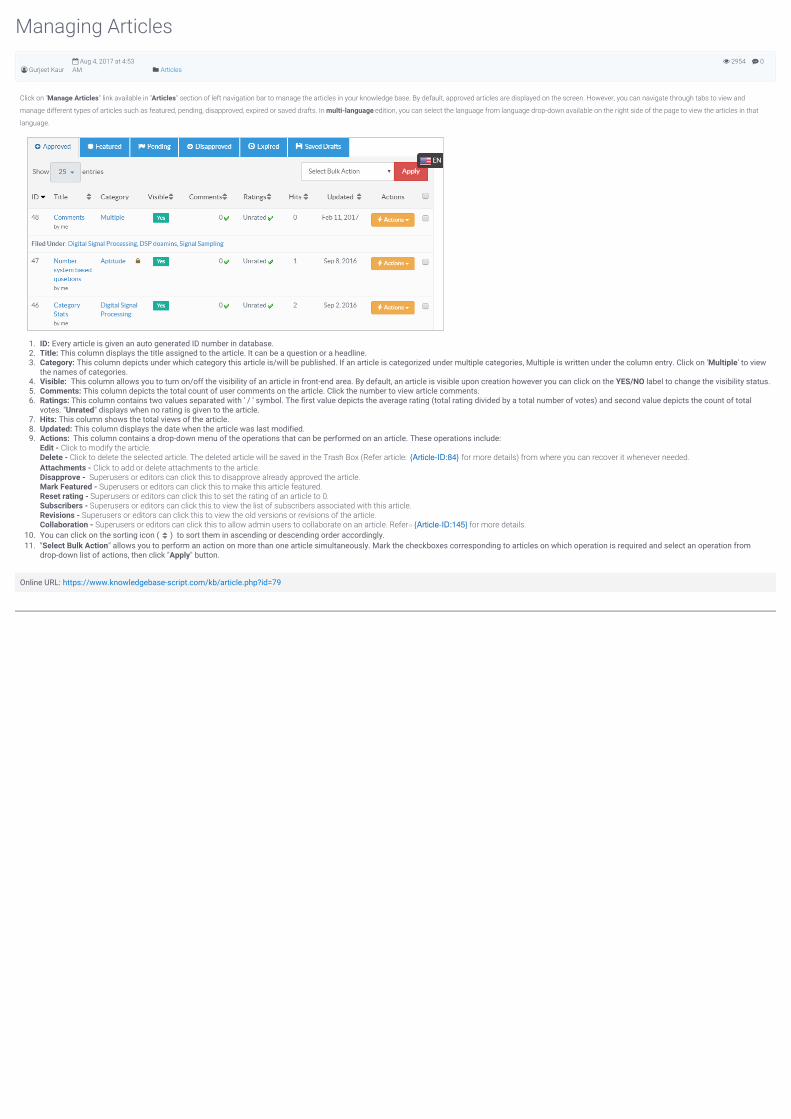
0 2954
Managing Articles
Gurjeet Kaur Aug 4, 2017 at 4:53AM Articles
Click on "Manage Articles" link available in "Articles" section of left navigation bar to manage the articles in your knowledge base. By default, approved articles are displayed on the screen. However, you can navigate through tabs to view and
manage different types of articles such as featured, pending, disapproved, expired or saved drafts. In multi-language edition, you can select the language from language drop-down available on the right side of the page to view the articles in that
language.
1. ID: Every article is given an auto generated ID number in database.2. Title: This column displays the title assigned to the article. It can be a question or a headline.3. Category: This column depicts under which category this article is/will be published. If an article is categorized under multiple categories, Multiple is written under the column entry. Click on 'Multiple' to view
the names of categories.4. Visible: This column allows you to turn on/off the visibility of an article in front-end area. By default, an article is visible upon creation however you can click on the YES/NO label to change the visibility status.5. Comments: This column depicts the total count of user comments on the article. Click the number to view article comments.6. Ratings: This column contains two values separated with ' / ' symbol. The first value depicts the average rating (total rating divided by a total number of votes) and second value depicts the count of total
votes. "Unrated" displays when no rating is given to the article.7. Hits: This column shows the total views of the article.8. Updated: This column displays the date when the article was last modified.9. Actions: This column contains a drop-down menu of the operations that can be performed on an article. These operations include:
Edit - Click to modify the article.Delete - Click to delete the selected article. The deleted article will be saved in the Trash Box (Refer article: {Article-ID:84} for more details) from where you can recover it whenever needed.Attachments - Click to add or delete attachments to the article.Disapprove - Superusers or editors can click this to disapprove already approved the article.Mark Featured - Superusers or editors can click this to make this article featured.Reset rating - Superusers or editors can click this to set the rating of an article to 0.Subscribers - Superusers or editors can click this to view the list of subscribers associated with this article.Revisions - Superusers or editors can click this to view the old versions or revisions of the article.Collaboration - Superusers or editors can click this to allow admin users to collaborate on an article. Refer {Article-ID:145} for more details.
10. You can click on the sorting icon ( ) to sort them in ascending or descending order accordingly.11. "Select Bulk Action" allows you to perform an action on more than one article simultaneously. Mark the checkboxes corresponding to articles on which operation is required and select an operation from
drop-down list of actions, then click "Apply" button.
Online URL: https://www.knowledgebase-script.com/kb/article.php?id=79
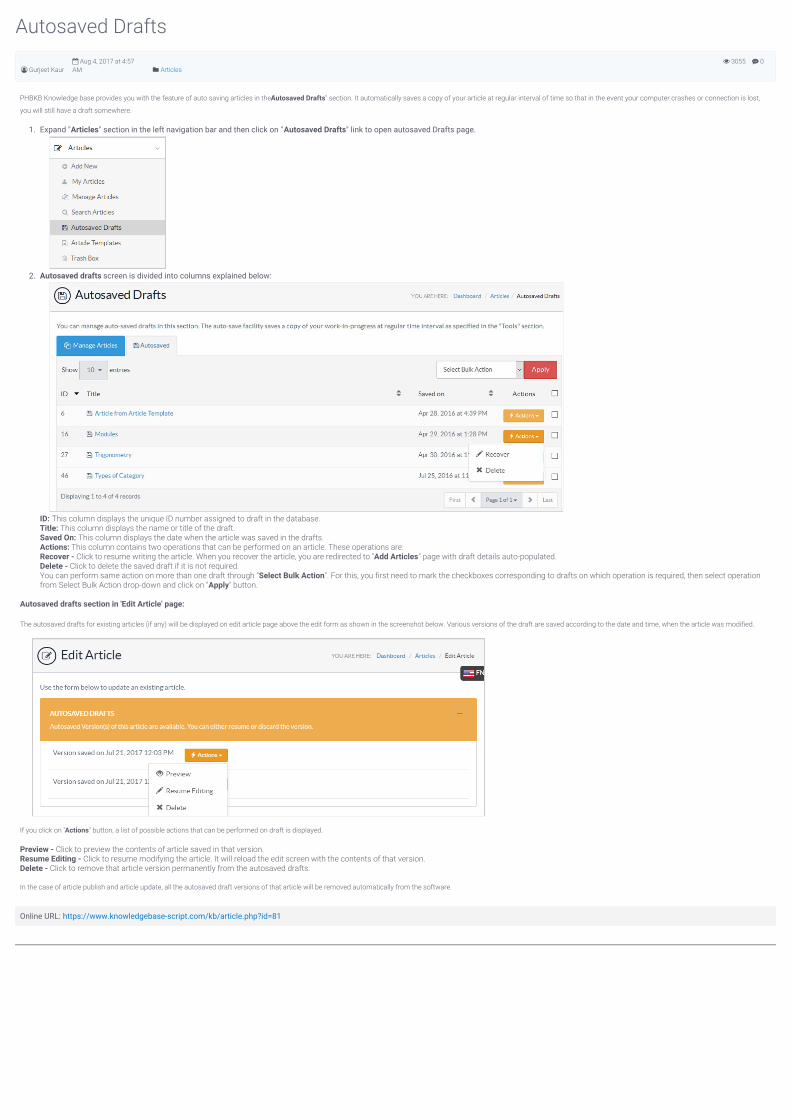
0 3055
Autosaved Drafts
Gurjeet Kaur Aug 4, 2017 at 4:57AM Articles
PHBKB Knowledge base provides you with the feature of auto saving articles in the "Autosaved Drafts" section. It automatically saves a copy of your article at regular interval of time so that in the event your computer crashes or connection is lost,
you will still have a draft somewhere.
1. Expand "Articles" section in the left navigation bar and then click on "Autosaved Drafts" link to open autosaved Drafts page.
2. Autosaved drafts screen is divided into columns explained below:
ID: This column displays the unique ID number assigned to draft in the database.Title: This column displays the name or title of the draft.Saved On: This column displays the date when the article was saved in the drafts.Actions: This column contains two operations that can be performed on an article. These operations are: Recover - Click to resume writing the article. When you recover the article, you are redirected to "Add Articles" page with draft details auto-populated.Delete - Click to delete the saved draft if it is not required.You can perform same action on more than one draft through "Select Bulk Action". For this, you first need to mark the checkboxes corresponding to drafts on which operation is required, then select operationfrom Select Bulk Action drop-down and click on "Apply" button.
Autosaved drafts section in 'Edit Article' page:
The autosaved drafts for existing articles (if any) will be displayed on edit article page above the edit form as shown in the screenshot below. Various versions of the draft are saved according to the date and time, when the article was modified.
If you click on "Actions" button, a list of possible actions that can be performed on draft is displayed.
Preview - Click to preview the contents of article saved in that version.Resume Editing - Click to resume modifying the article. It will reload the edit screen with the contents of that version.Delete - Click to remove that article version permanently from the autosaved drafts.
In the case of article publish and article update, all the autosaved draft versions of that article will be removed automatically from the software.
Online URL: https://www.knowledgebase-script.com/kb/article.php?id=81
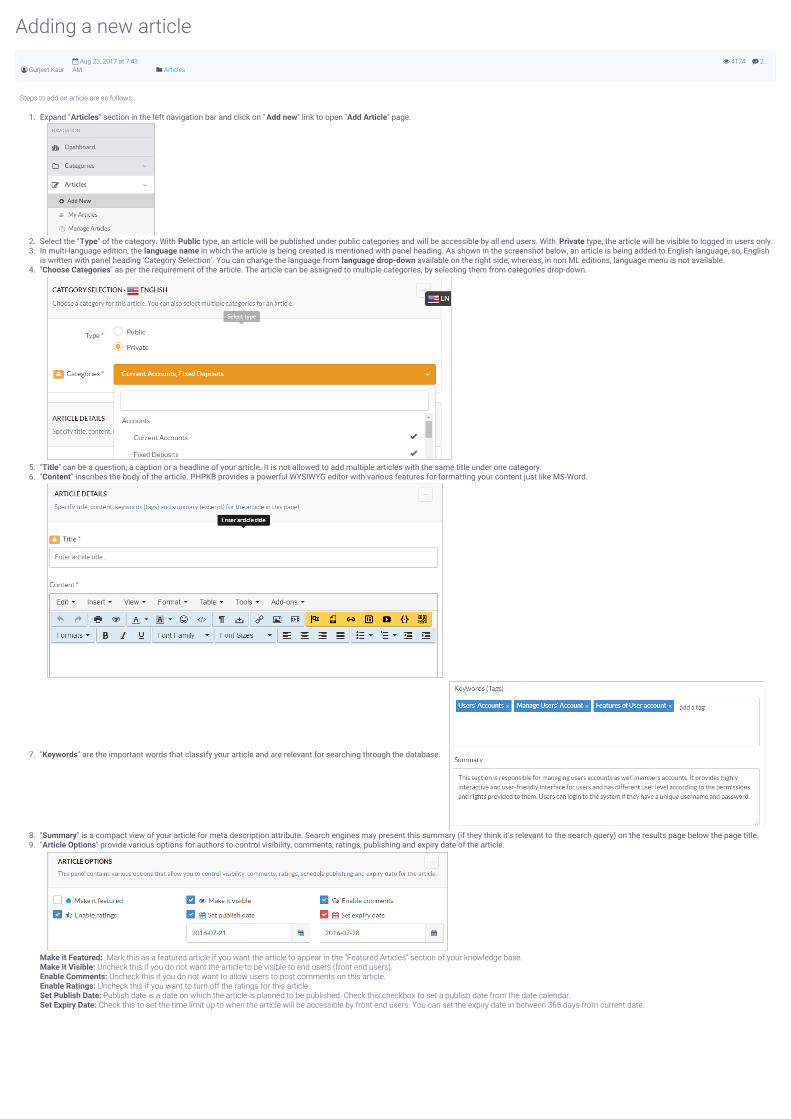
2 4174
Adding a new article
Gurjeet Kaur Aug 23, 2017 at 7:43AM Articles
Steps to add an article are as follows:
1. Expand "Articles" section in the left navigation bar and click on "Add new" link to open "Add Article" page.
2. Select the "Type" of the category. With Public type, an article will be published under public categories and will be accessible by all end users. With Private type, the article will be visible to logged in users only.3. In multi-language edition, the language name in which the article is being created is mentioned with panel heading. As shown in the screenshot below, an article is being added to English language, so, English
is written with panel heading 'Category Selection'. You can change the language from language drop-down available on the right side, whereas, in non ML editions, language menu is not available.4. "Choose Categories" as per the requirement of the article. The article can be assigned to multiple categories, by selecting them from categories drop-down.
5. "Title" can be a question, a caption or a headline of your article. It is not allowed to add multiple articles with the same title under one category.6. "Content" inscribes the body of the article. PHPKB provides a powerful WYSIWYG editor with various features for formatting your content just like MS-Word.
7. "Keywords" are the important words that classify your article and are relevant for searching through the database.
8. "Summary" is a compact view of your article for meta description attribute. Search engines may present this summary (if they think it's relevant to the search query) on the results page below the page title.9. "Article Options" provide various options for authors to control visibility, comments, ratings, publishing and expiry date of the article.
Make it Featured: Mark this as a featured article if you want the article to appear in the “Featured Articles” section of your knowledge base.Make it Visible: Uncheck this if you do not want the article to be visible to end users (front end users).Enable Comments: Uncheck this if you do not want to allow users to post comments on this article.Enable Ratings: Uncheck this if you want to turn off the ratings for this article.Set Publish Date: Publish date is a date on which the article is planned to be published. Check this checkbox to set a publish date from the date calendar.Set Expiry Date: Check this to set the time limit up to when the article will be accessible by front end users. You can set the expiry date in between 365 days from current date.
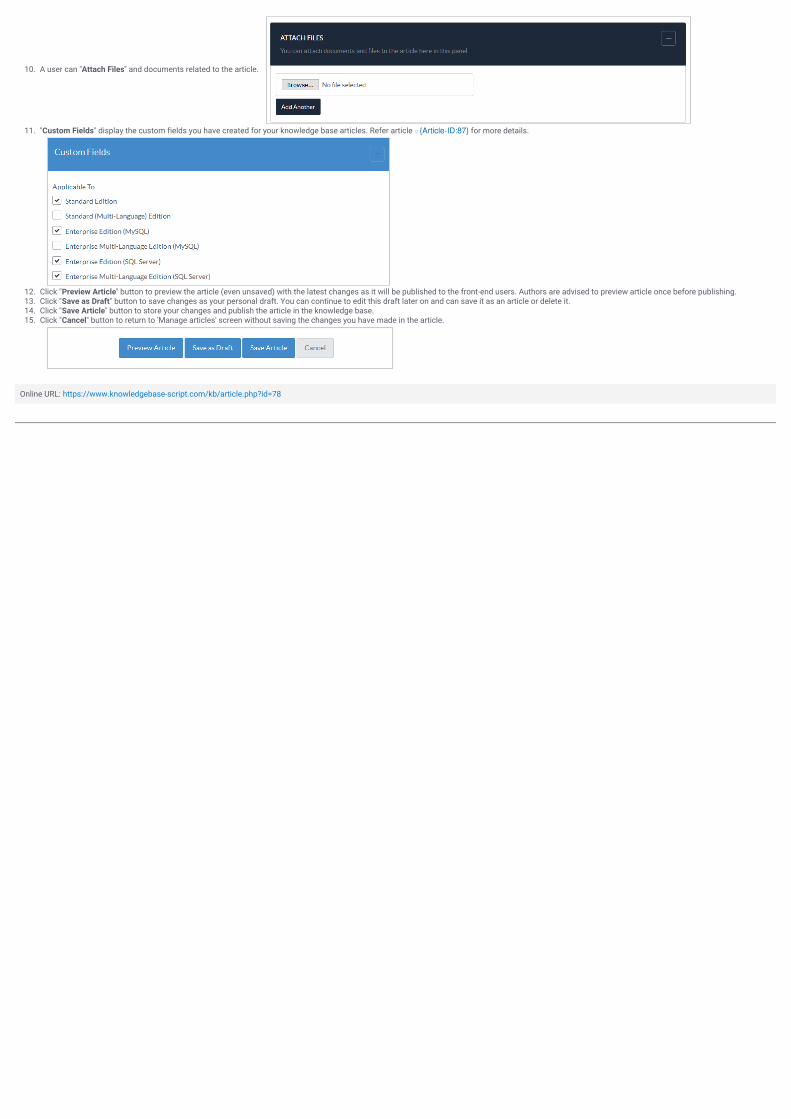
10. A user can "Attach Files" and documents related to the article.
11. "Custom Fields" display the custom fields you have created for your knowledge base articles. Refer article {Article-ID:87} for more details.
12. Click "Preview Article" button to preview the article (even unsaved) with the latest changes as it will be published to the front-end users. Authors are advised to preview article once before publishing.13. Click "Save as Draft" button to save changes as your personal draft. You can continue to edit this draft later on and can save it as an article or delete it.14. Click "Save Article" button to store your changes and publish the article in the knowledge base.15. Click "Cancel" button to return to 'Manage articles' screen without saving the changes you have made in the article.
Online URL: https://www.knowledgebase-script.com/kb/article.php?id=78

0 7110
Types of articles
Gurjeet Kaur Aug 1, 2017 at 1:32AM Articles
An article can have any of the statuses from the following list in PHPKB knowledge base software.
1. Approved: Published articles in the knowledge base are called approved articles.2. Featured: They are same as approved articles but have more priority over them in the sense that featured articles appear on top of other approved articles in category page and search results. If you wish to
give more exposure to certain articles in your knowledge base, you can mark them as featured. They will also appear on the home page under "Featured" section.3. Pending: Articles that are pending for approval. These are generally submitted by Writers and need the approval of either an editor or a superuser.4. Disapproved: Articles that were pending for approval but disapproved by editors or super users. They are not displayed in the front end.5. Expired: Articles that have passed their expiry date. PHPKB has a facility to set an expiry date for the article to control the life-cycle of an article. Once the expiry date is over, the article automatically stops
appearing in the knowledge base. The expiry date can be changed/extended/removed from the "Edit Article" screen.6. Saved Drafts: Saved drafts are those articles that are in-progress and are not ready to be published yet.7. Deleted: Articles that have been removed from the knowledge base are sent to "Trash Box". You can recover or purge (permanently delete) them from "Trash Box".
Online URL: https://www.knowledgebase-script.com/kb/article.php?id=77
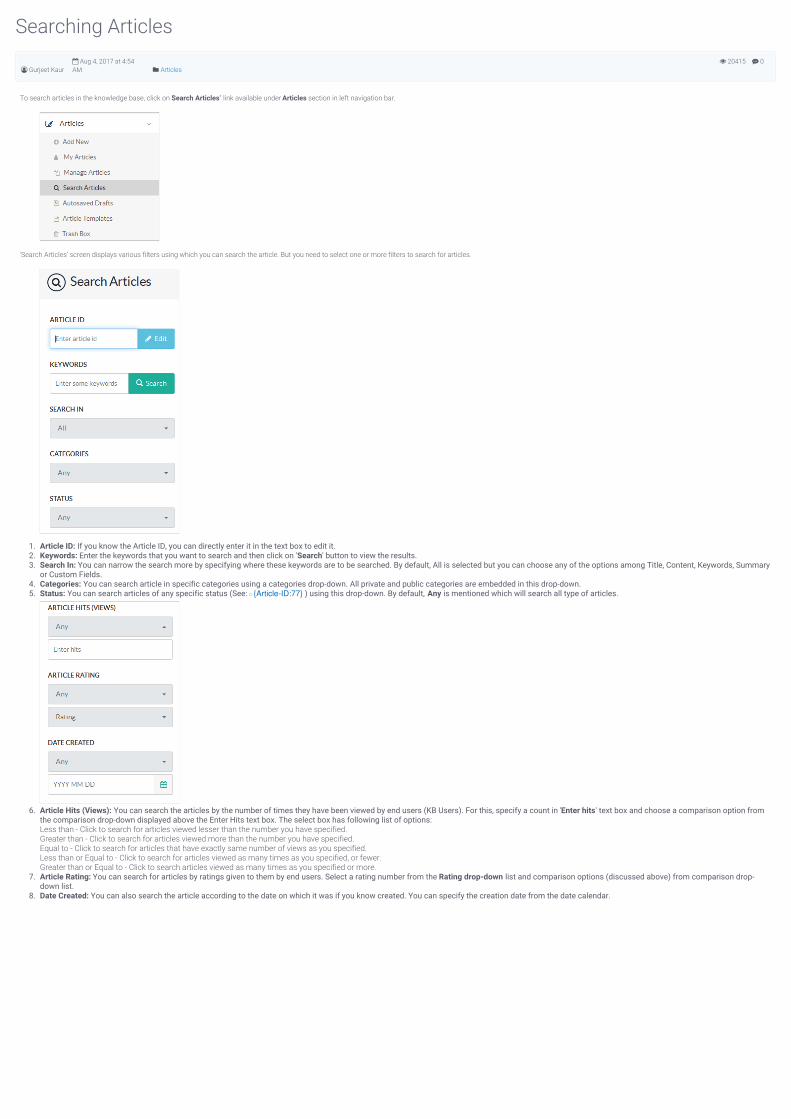
0 20415
Searching Articles
Gurjeet Kaur Aug 4, 2017 at 4:54AM Articles
To search articles in the knowledge base, click on "Search Articles" link available under Articles section in left navigation bar.
'Search Articles' screen displays various filters using which you can search the article. But you need to select one or more filters to search for articles.
1. Article ID: If you know the Article ID, you can directly enter it in the text box to edit it.2. Keywords: Enter the keywords that you want to search and then click on 'Search' button to view the results.3. Search In: You can narrow the search more by specifying where these keywords are to be searched. By default, All is selected but you can choose any of the options among Title, Content, Keywords, Summary
or Custom Fields.4. Categories: You can search article in specific categories using a categories drop-down. All private and public categories are embedded in this drop-down.5. Status: You can search articles of any specific status (See: {Article-ID:77} ) using this drop-down. By default, Any is mentioned which will search all type of articles.
6. Article Hits (Views): You can search the articles by the number of times they have been viewed by end users (KB Users). For this, specify a count in 'Enter hits' text box and choose a comparison option fromthe comparison drop-down displayed above the Enter Hits text box. The select box has following list of options:Less than - Click to search for articles viewed lesser than the number you have specified.Greater than - Click to search for articles viewed more than the number you have specified.Equal to - Click to search for articles that have exactly same number of views as you specified.Less than or Equal to - Click to search for articles viewed as many times as you specified, or fewer.Greater than or Equal to - Click to search articles viewed as many times as you specified or more.
7. Article Rating: You can search for articles by ratings given to them by end users. Select a rating number from the Rating drop-down list and comparison options (discussed above) from comparison drop-down list.
8. Date Created: You can also search the article according to the date on which it was if you know created. You can specify the creation date from the date calendar.
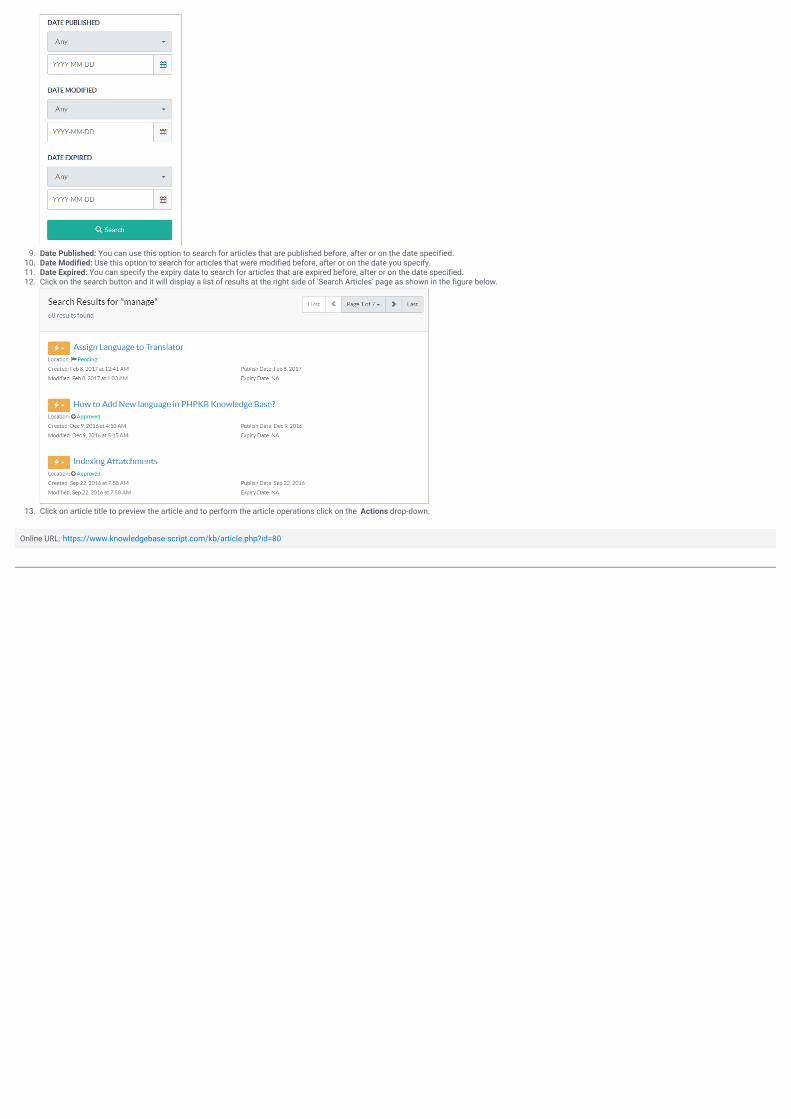
9. Date Published: You can use this option to search for articles that are published before, after or on the date specified.10. Date Modified: Use this option to search for articles that were modified before, after or on the date you specify.11. Date Expired: You can specify the expiry date to search for articles that are expired before, after or on the date specified.12. Click on the search button and it will display a list of results at the right side of 'Search Articles' page as shown in the figure below.
13. Click on article title to preview the article and to perform the article operations click on the Actions drop-down.
Online URL: https://www.knowledgebase-script.com/kb/article.php?id=80

CATEGORY
Article Subscribers2 Articles
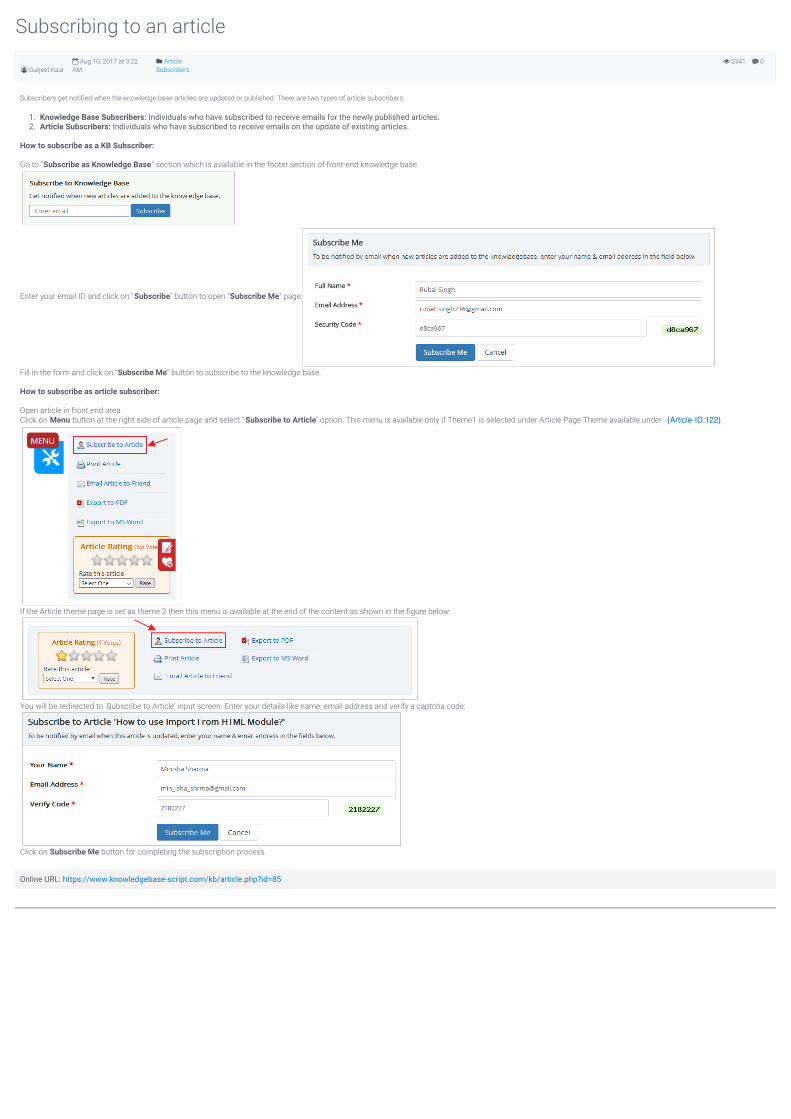
0 2341
Subscribing to an article
Gurjeet Kaur Aug 10, 2017 at 3:22AM
ArticleSubscribers
Subscribers get notified when the knowledge base articles are updated or published. There are two types of article subscribers:
1. Knowledge Base Subscribers: Individuals who have subscribed to receive emails for the newly published articles.2. Article Subscribers: Individuals who have subscribed to receive emails on the update of existing articles.
How to subscribe as a KB Subscriber:
Go to "Subscribe as Knowledge Base" section which is available in the footer section of front-end knowledge base.
Enter your email ID and click on "Subscribe" button to open "Subscribe Me" page.
Fill in the form and click on "Subscribe Me" button to subscribe to the knowledge base.
How to subscribe as article subscriber:
Open article in front end area.Click on Menu button at the right side of article page and select " Subscribe to Article" option. This menu is available only if Theme1 is selected under Article Page Theme available under {Article-ID:122}.
If the Article theme page is set as theme 2 then this menu is available at the end of the content as shown in the figure below:
You will be redirected to ’Subscribe to Article’ input screen. Enter your details like name, email address and verify a captcha code:
Click on Subscribe Me button for completing the subscription process.
Online URL: https://www.knowledgebase-script.com/kb/article.php?id=85
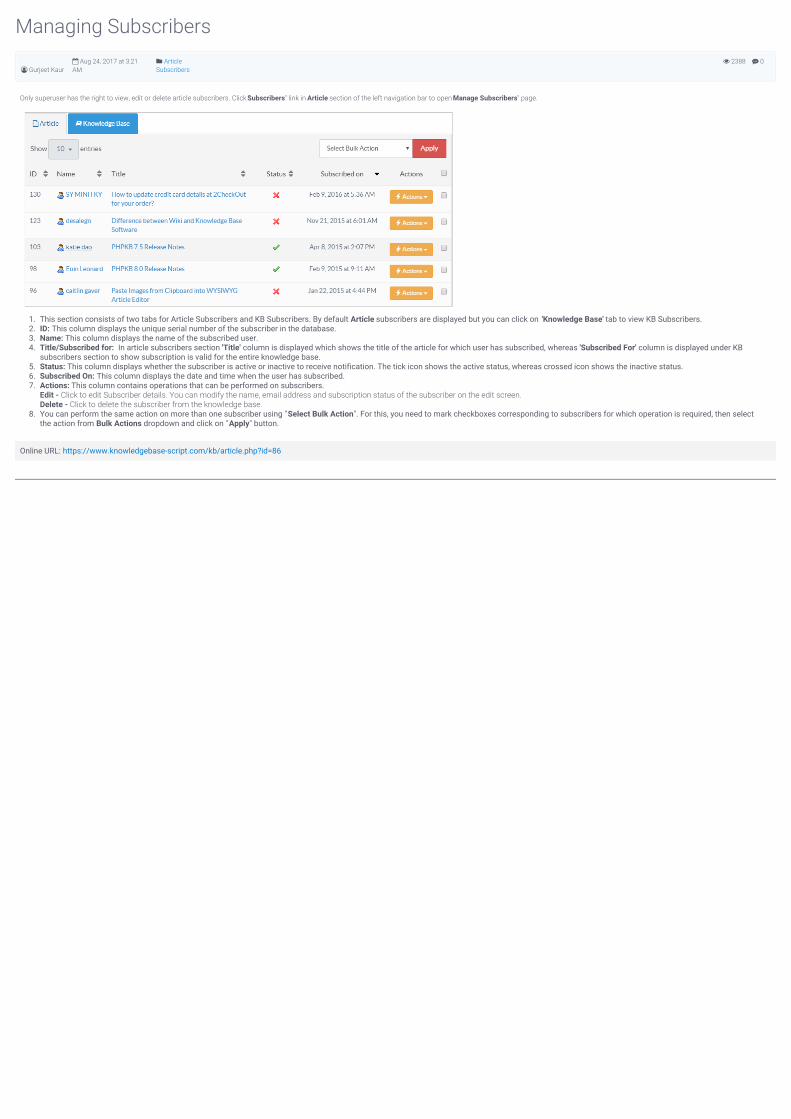
0 2388
Managing Subscribers
Gurjeet Kaur Aug 24, 2017 at 3:21AM
ArticleSubscribers
Only superuser has the right to view, edit or delete article subscribers. Click "Subscribers" link in Article section of the left navigation bar to open "Manage Subscribers" page.
1. This section consists of two tabs for Article Subscribers and KB Subscribers. By default Article subscribers are displayed but you can click on 'Knowledge Base' tab to view KB Subscribers.2. ID: This column displays the unique serial number of the subscriber in the database.3. Name: This column displays the name of the subscribed user.4. Title/Subscribed for: In article subscribers section 'Title' column is displayed which shows the title of the article for which user has subscribed, whereas 'Subscribed For' column is displayed under KB
subscribers section to show subscription is valid for the entire knowledge base.5. Status: This column displays whether the subscriber is active or inactive to receive notification. The tick icon shows the active status, whereas crossed icon shows the inactive status.6. Subscribed On: This column displays the date and time when the user has subscribed.7. Actions: This column contains operations that can be performed on subscribers.
Edit - Click to edit Subscriber details. You can modify the name, email address and subscription status of the subscriber on the edit screen.Delete - Click to delete the subscriber from the knowledge base.
8. You can perform the same action on more than one subscriber using "Select Bulk Action". For this, you need to mark checkboxes corresponding to subscribers for which operation is required, then selectthe action from Bulk Actions dropdown and click on "Apply" button.
Online URL: https://www.knowledgebase-script.com/kb/article.php?id=86

CATEGORY
Article WYSIWYG Editor2 Articles
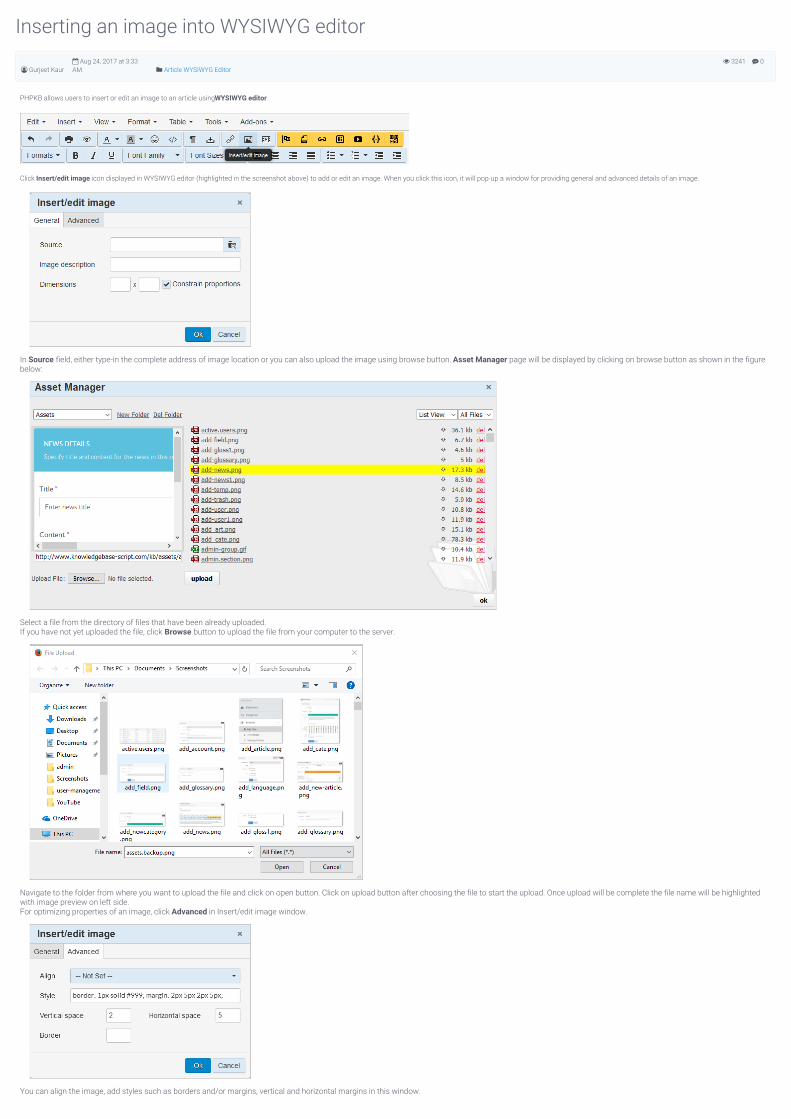
0 3241
Inserting an image into WYSIWYG editor
Gurjeet Kaur Aug 24, 2017 at 3:33AM Article WYSIWYG Editor
PHPKB allows users to insert or edit an image to an article using WYSIWYG editor.
Click Insert/edit image icon displayed in WYSIWYG editor (highlighted in the screenshot above) to add or edit an image. When you click this icon, it will pop-up a window for providing general and advanced details of an image.
In Source field, either type-in the complete address of image location or you can also upload the image using browse button. Asset Manager page will be displayed by clicking on browse button as shown in the figurebelow:
Select a file from the directory of files that have been already uploaded.If you have not yet uploaded the file, click Browse button to upload the file from your computer to the server.
Navigate to the folder from where you want to upload the file and click on open button. Click on upload button after choosing the file to start the upload. Once upload will be complete the file name will be highlightedwith image preview on left side.For optimizing properties of an image, click Advanced in Insert/edit image window.
You can align the image, add styles such as borders and/or margins, vertical and horizontal margins in this window.

After specifying the features, click OK button to apply the properties.
Online URL: https://www.knowledgebase-script.com/kb/article.php?id=148
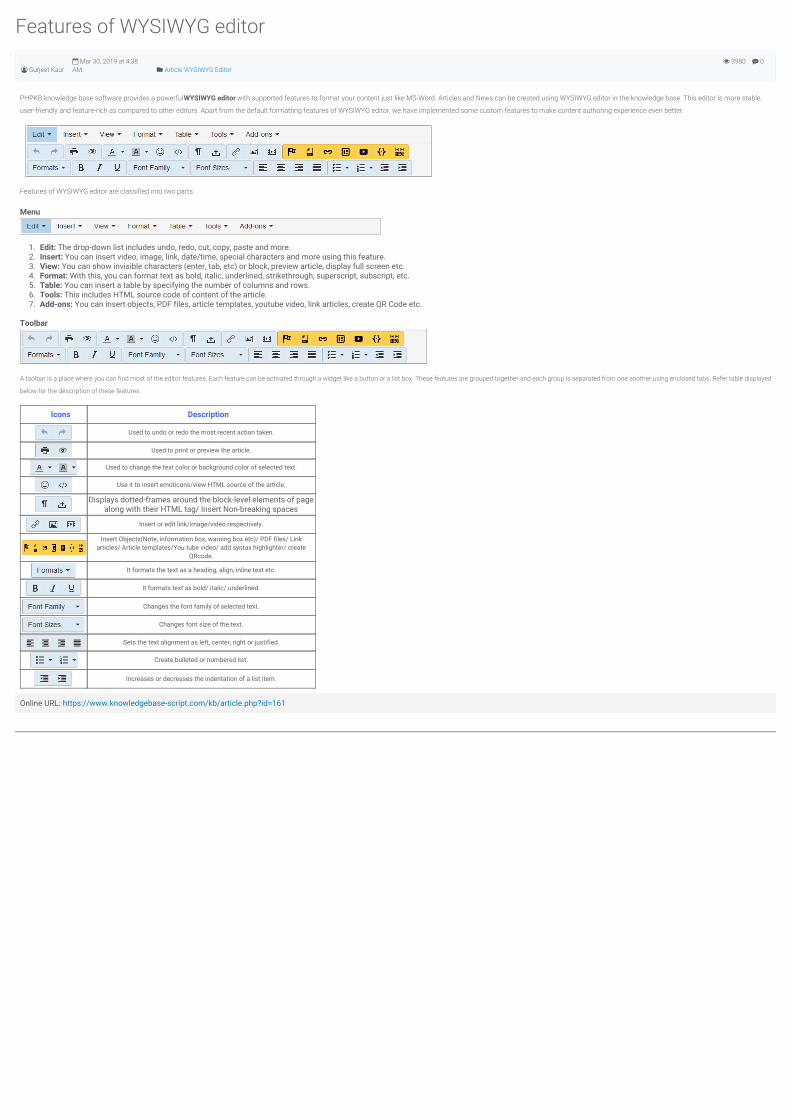
0 3980
Icons Description
Used to undo or redo the most recent action taken.
Used to print or preview the article.
Used to change the text color or background color of selected text.
Use it to insert emoticons/view HTML source of the article.
Displays dotted-frames around the block-level elements of pagealong with their HTML tag/ Insert Non-breaking spaces
Insert or edit link/image/video respectively.
Insert Objects(Note, information box, warning box etc)/ PDF files/ Linkarticles/ Article templates/You tube video/ add syntax highlighter/ create
QRcode.
It formats the text as a heading, align, inline text etc.
It formats text as bold/ italic/ underlined.
Changes the font family of selected text.
Changes font size of the text.
Sets the text alignment as left, center, right or justified.
Create bulleted or numbered list.
Increases or decreases the indentation of a list item.
Features of WYSIWYG editor
Gurjeet Kaur Mar 30, 2019 at 4:38AM Article WYSIWYG Editor
PHPKB knowledge base software provides a powerful WYSIWYG editor with supported features to format your content just like MS-Word. Articles and News can be created using WYSIWYG editor in the knowledge base. This editor is more stable,
user-friendly and feature-rich as compared to other editors. Apart from the default formatting features of WYSIWYG editor, we have implemented some custom features to make content authoring experience even better.
Features of WYSIWYG editor are classified into two parts:
Menu
1. Edit: The drop-down list includes undo, redo, cut, copy, paste and more.2. Insert: You can insert video, image, link, date/time, special characters and more using this feature.3. View: You can show invisible characters (enter, tab, etc) or block, preview article, display full screen etc.4. Format: With this, you can format text as bold, italic, underlined, strikethrough, superscript, subscript, etc.5. Table: You can insert a table by specifying the number of columns and rows.6. Tools: This includes HTML source code of content of the article.7. Add-ons: You can insert objects, PDF files, article templates, youtube video, link articles, create QR Code etc.
Toolbar
A toolbar is a place where you can find most of the editor features. Each feature can be activated through a widget like a button or a list box. These features are grouped together and each group is separated from one another using enclosed tabs. Refer table displayed
below for the description of these features.
Online URL: https://www.knowledgebase-script.com/kb/article.php?id=161

CATEGORY
Document Versioning2 Articles
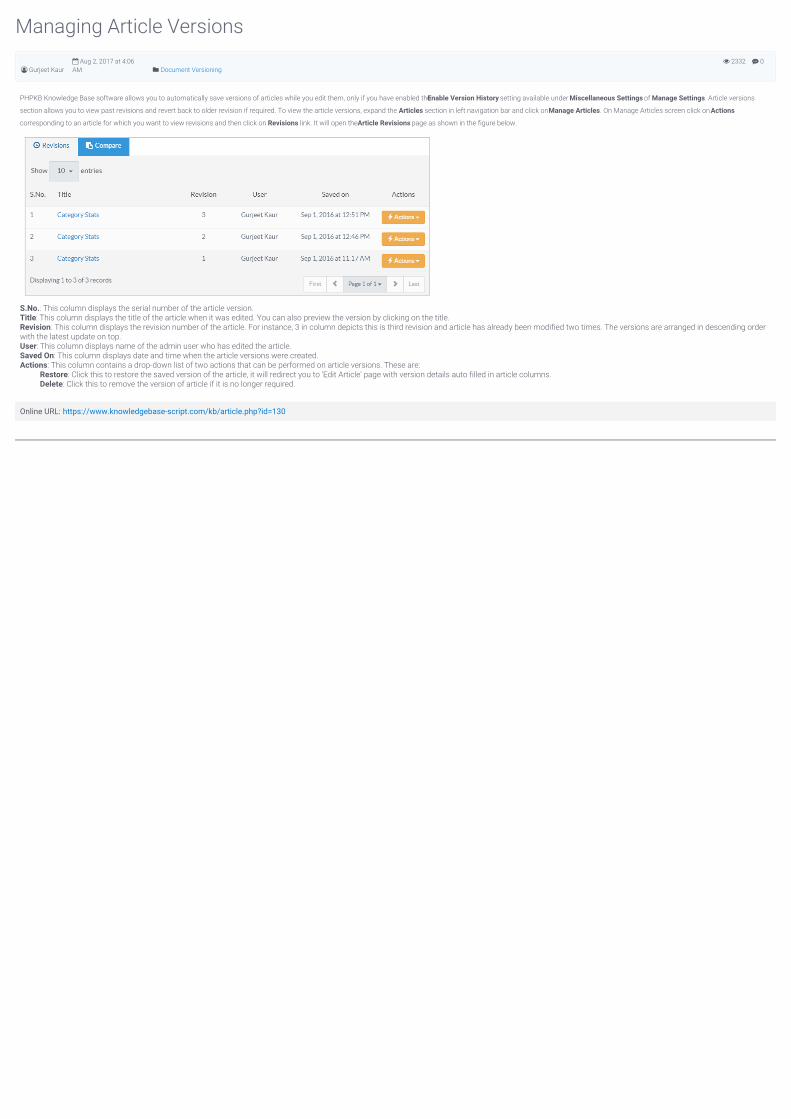
0 2332
Managing Article Versions
Gurjeet Kaur Aug 2, 2017 at 4:06AM Document Versioning
PHPKB Knowledge Base software allows you to automatically save versions of articles while you edit them, only if you have enabled the Enable Version History setting available under Miscellaneous Settings of Manage Settings. Article versions
section allows you to view past revisions and revert back to older revision if required. To view the article versions, expand the Articles section in left navigation bar and click on Manage Articles. On Manage Articles screen click on Actions
corresponding to an article for which you want to view revisions and then click on Revisions link. It will open the Article Revisions page as shown in the figure below.
S.No.: This column displays the serial number of the article version.Title: This column displays the title of the article when it was edited. You can also preview the version by clicking on the title.Revision: This column displays the revision number of the article. For instance, 3 in column depicts this is third revision and article has already been modified two times. The versions are arranged in descending orderwith the latest update on top.User: This column displays name of the admin user who has edited the article.Saved On: This column displays date and time when the article versions were created.Actions: This column contains a drop-down list of two actions that can be performed on article versions. These are:
Restore: Click this to restore the saved version of the article, it will redirect you to 'Edit Article' page with version details auto filled in article columns.Delete: Click this to remove the version of article if it is no longer required.
Online URL: https://www.knowledgebase-script.com/kb/article.php?id=130
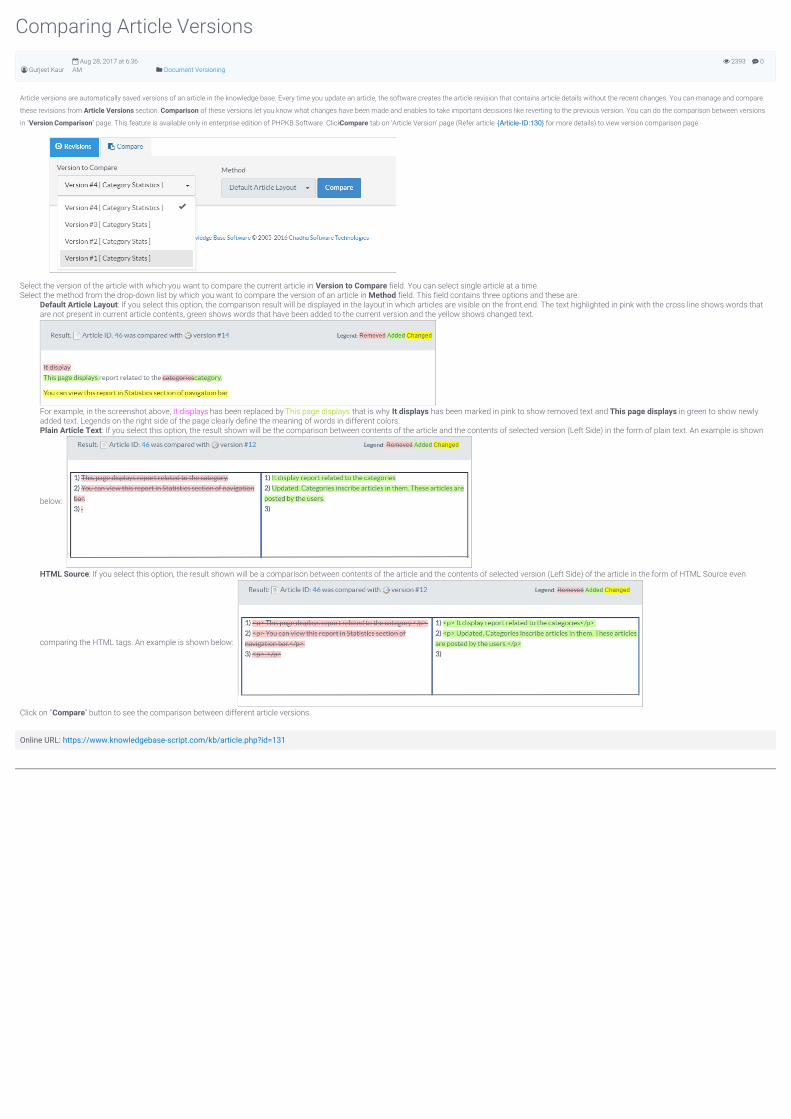
0 2393
Comparing Article Versions
Gurjeet Kaur Aug 28, 2017 at 6:36AM Document Versioning
Article versions are automatically saved versions of an article in the knowledge base. Every time you update an article, the software creates the article revision that contains article details without the recent changes. You can manage and compare
these revisions from Article Versions section. Comparison of these versions let you know what changes have been made and enables to take important decisions like reverting to the previous version. You can do the comparison between versions
in "Version Comparison" page. This feature is available only in enterprise edition of PHPKB Software. Click Compare tab on 'Article Version' page (Refer article {Article-ID:130} for more details) to view version comparison page.
Select the version of the article with which you want to compare the current article in Version to Compare field. You can select single article at a time.Select the method from the drop-down list by which you want to compare the version of an article in Method field. This field contains three options and these are:
Default Article Layout: If you select this option, the comparison result will be displayed in the layout in which articles are visible on the front end. The text highlighted in pink with the cross line shows words thatare not present in current article contents, green shows words that have been added to the current version and the yellow shows changed text.
For example, in the screenshot above, It displays has been replaced by This page displays that is why It displays has been marked in pink to show removed text and This page displays in green to show newlyadded text. Legends on the right side of the page clearly define the meaning of words in different colors.Plain Article Text: If you select this option, the result shown will be the comparison between contents of the article and the contents of selected version (Left Side) in the form of plain text. An example is shown
below:
HTML Source: If you select this option, the result shown will be a comparison between contents of the article and the contents of selected version (Left Side) of the article in the form of HTML Source even
comparing the HTML tags. An example is shown below:
Click on "Compare" button to see the comparison between different article versions.
Online URL: https://www.knowledgebase-script.com/kb/article.php?id=131

CATEGORY
Custom Fields2 Articles
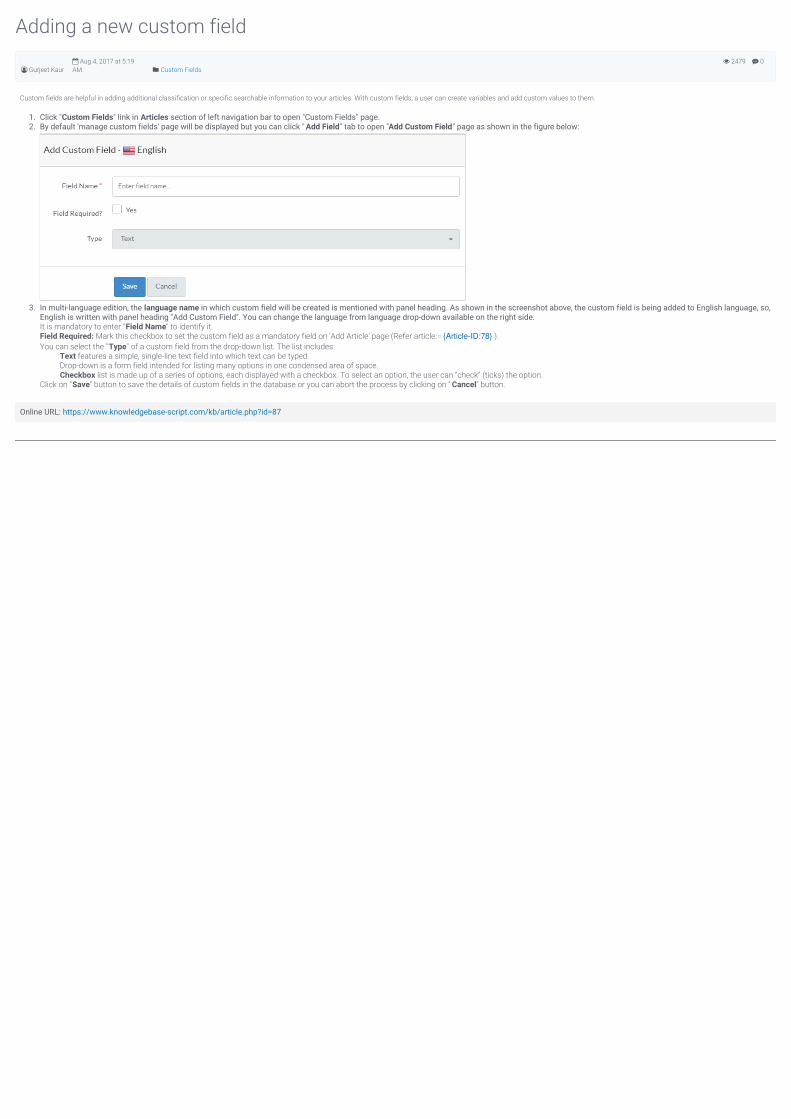
0 2479
Adding a new custom field
Gurjeet Kaur Aug 4, 2017 at 5:19AM Custom Fields
Custom fields are helpful in adding additional classification or specific searchable information to your articles. With custom fields, a user can create variables and add custom values to them.
1. Click "Custom Fields" link in Articles section of left navigation bar to open "Custom Fields" page.2. By default 'manage custom fields' page will be displayed but you can click " Add Field" tab to open "Add Custom Field" page as shown in the figure below:
3. In multi-language edition, the language name in which custom field will be created is mentioned with panel heading. As shown in the screenshot above, the custom field is being added to English language, so,English is written with panel heading "Add Custom Field". You can change the language from language drop-down available on the right side. It is mandatory to enter "Field Name" to identify it.Field Required: Mark this checkbox to set the custom field as a mandatory field on 'Add Article' page (Refer article: {Article-ID:78} ).You can select the "Type" of a custom field from the drop-down list. The list includes:
Text features a simple, single-line text field into which text can be typed.Drop-down is a form field intended for listing many options in one condensed area of space.Checkbox list is made up of a series of options, each displayed with a checkbox. To select an option, the user can “check” (ticks) the option.
Click on "Save" button to save the details of custom fields in the database or you can abort the process by clicking on " Cancel" button.
Online URL: https://www.knowledgebase-script.com/kb/article.php?id=87

0 2518
Managing Custom Fields
Gurjeet Kaur Aug 28, 2017 at 6:34AM Custom Fields
Superusers can manage custom fields in the admin area. Click "Custom Fields" link in Articles section of left navigation bar to open "Custom Fields" page.
You can create, edit or delete custom fields in this section. This section contains columns which are explained below:
1. ID: This column displays serial ID of the custom field in the database.2. Field Name: This column displays the name of the custom field. This name is displayed along with its values on article page in the front end of the knowledge base.3. Type: This column displays whether the custom field is of type text, drop-down or check box.4. Required: Yes label represents that this field is mandatory and article creator has to fill value for this field while article creation/update, whereas, no represents an optional field. You can click on the label to
change its value.5. Actions: This column contains two operations that can be performed on custom fields:
Edit - Click to modify the details of a custom field.Delete - Click to remove the custom field from the knowledge base. After that, this custom field will no longer display with published articles.
6. You can perform the same action on more than one custom fields using "Select Bulk Action" drop-down. For this, mark the check boxes corresponding to custom fields on which operation is required andthen select the desired bulk action and click on "Apply" button.
Online URL: https://www.knowledgebase-script.com/kb/article.php?id=88

CATEGORY
Article Templates2 Articles
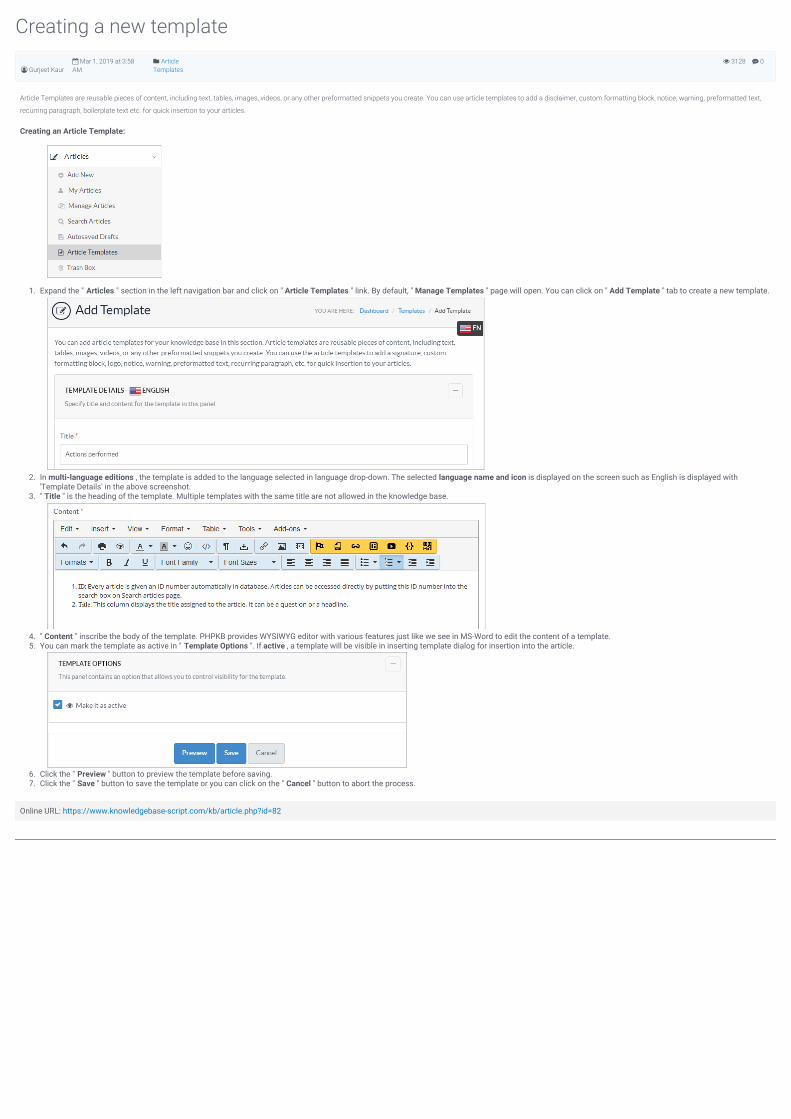
0 3128
Creating a new template
Gurjeet Kaur Mar 1, 2019 at 3:58AM
ArticleTemplates
Article Templates are reusable pieces of content, including text, tables, images, videos, or any other preformatted snippets you create. You can use article templates to add a disclaimer, custom formatting block, notice, warning, preformatted text,
recurring paragraph, boilerplate text etc. for quick insertion to your articles.
Creating an Article Template:
1. Expand the " Articles " section in the left navigation bar and click on " Article Templates " link. By default, " Manage Templates " page will open. You can click on " Add Template " tab to create a new template.
2. In multi-language editions , the template is added to the language selected in language drop-down. The selected language name and icon is displayed on the screen such as English is displayed with'Template Details' in the above screenshot.
3. " Title " is the heading of the template. Multiple templates with the same title are not allowed in the knowledge base.
4. " Content " inscribe the body of the template. PHPKB provides WYSIWYG editor with various features just like we see in MS-Word to edit the content of a template.5. You can mark the template as active in " Template Options ". If active , a template will be visible in inserting template dialog for insertion into the article.
6. Click the " Preview " button to preview the template before saving.7. Click the " Save " button to save the template or you can click on the " Cancel " button to abort the process.
Online URL: https://www.knowledgebase-script.com/kb/article.php?id=82
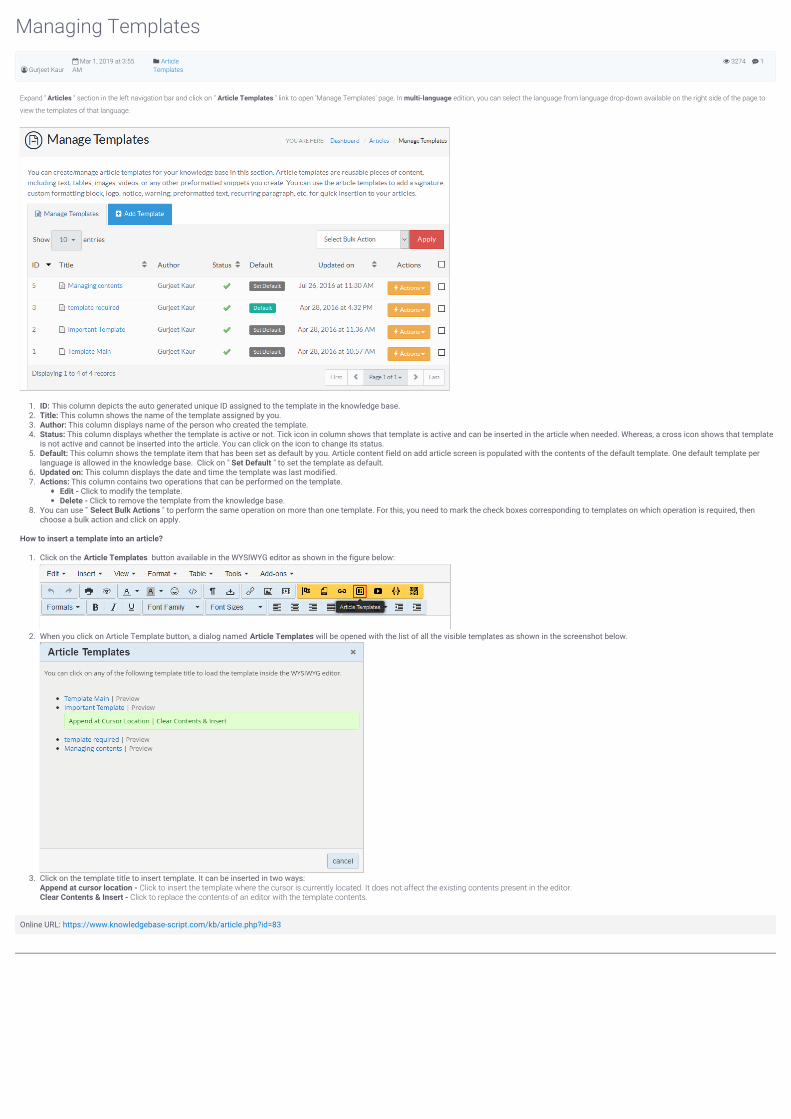
1 3274
Managing Templates
Gurjeet Kaur Mar 1, 2019 at 3:55AM
ArticleTemplates
Expand " Articles " section in the left navigation bar and click on " Article Templates " link to open 'Manage Templates' page. In multi-language edition, you can select the language from language drop-down available on the right side of the page to
view the templates of that language.
1. ID: This column depicts the auto generated unique ID assigned to the template in the knowledge base.2. Title: This column shows the name of the template assigned by you.3. Author: This column displays name of the person who created the template.4. Status: This column displays whether the template is active or not. Tick icon in column shows that template is active and can be inserted in the article when needed. Whereas, a cross icon shows that template
is not active and cannot be inserted into the article. You can click on the icon to change its status.5. Default: This column shows the template item that has been set as default by you. Article content field on add article screen is populated with the contents of the default template. One default template per
language is allowed in the knowledge base. Click on " Set Default " to set the template as default.6. Updated on: This column displays the date and time the template was last modified.7. Actions: This column contains two operations that can be performed on the template.
Edit - Click to modify the template.Delete - Click to remove the template from the knowledge base.
8. You can use " Select Bulk Actions " to perform the same operation on more than one template. For this, you need to mark the check boxes corresponding to templates on which operation is required, thenchoose a bulk action and click on apply.
How to insert a template into an article?
1. Click on the Article Templates button available in the WYSIWYG editor as shown in the figure below:
2. When you click on Article Template button, a dialog named Article Templates will be opened with the list of all the visible templates as shown in the screenshot below.
3. Click on the template title to insert template. It can be inserted in two ways:Append at cursor location - Click to insert the template where the cursor is currently located. It does not affect the existing contents present in the editor.Clear Contents & Insert - Click to replace the contents of an editor with the template contents.
Online URL: https://www.knowledgebase-script.com/kb/article.php?id=83

CATEGORY
Categories2 Articles
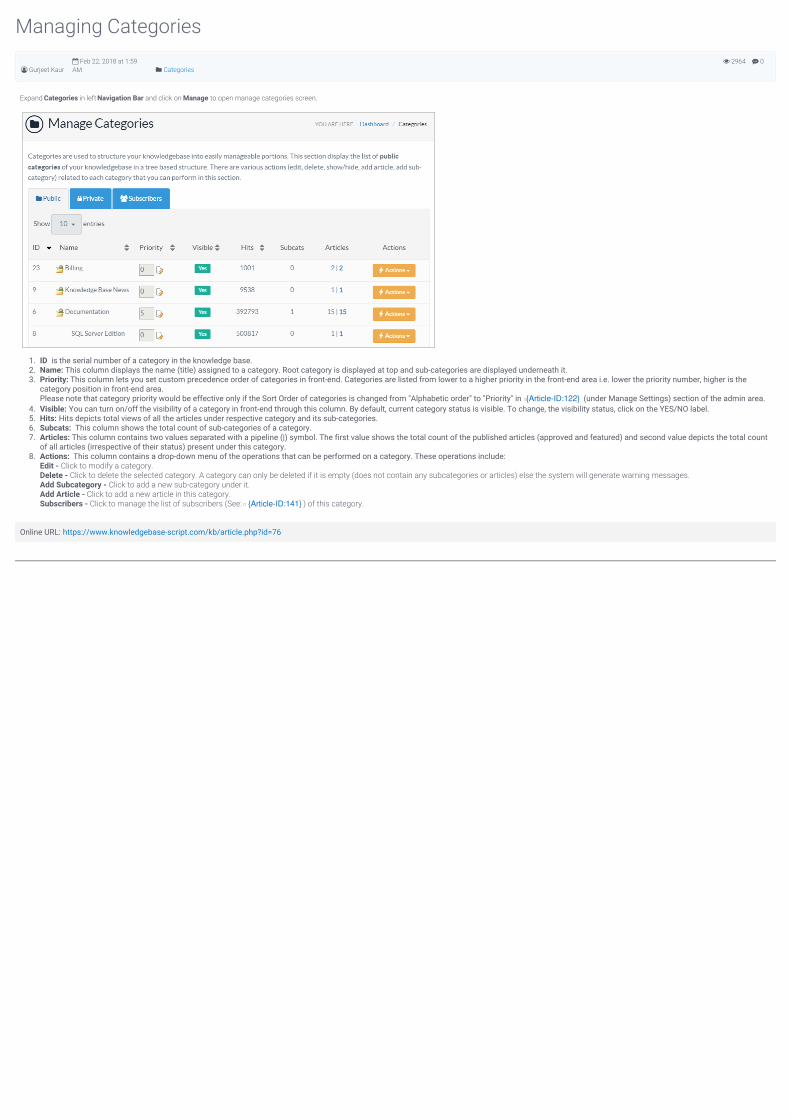
0 2964
Managing Categories
Gurjeet Kaur Feb 22, 2018 at 1:59AM Categories
Expand Categories in left Navigation Bar and click on Manage to open manage categories screen.
1. ID is the serial number of a category in the knowledge base.2. Name: This column displays the name (title) assigned to a category. Root category is displayed at top and sub-categories are displayed underneath it.3. Priority: This column lets you set custom precedence order of categories in front-end. Categories are listed from lower to a higher priority in the front-end area i.e. lower the priority number, higher is the
category position in front-end area.Please note that category priority would be effective only if the Sort Order of categories is changed from "Alphabetic order" to "Priority" in {Article-ID:122} (under Manage Settings) section of the admin area.
4. Visible: You can turn on/off the visibility of a category in front-end through this column. By default, current category status is visible. To change, the visibility status, click on the YES/NO label.5. Hits: Hits depicts total views of all the articles under respective category and its sub-categories.6. Subcats: This column shows the total count of sub-categories of a category.7. Articles: This column contains two values separated with a pipeline (|) symbol. The first value shows the total count of the published articles (approved and featured) and second value depicts the total count
of all articles (irrespective of their status) present under this category.8. Actions: This column contains a drop-down menu of the operations that can be performed on a category. These operations include:
Edit - Click to modify a category.Delete - Click to delete the selected category. A category can only be deleted if it is empty (does not contain any subcategories or articles) else the system will generate warning messages.Add Subcategory - Click to add a new sub-category under it.Add Article - Click to add a new article in this category.Subscribers - Click to manage the list of subscribers (See: {Article-ID:141} ) of this category.
Online URL: https://www.knowledgebase-script.com/kb/article.php?id=76
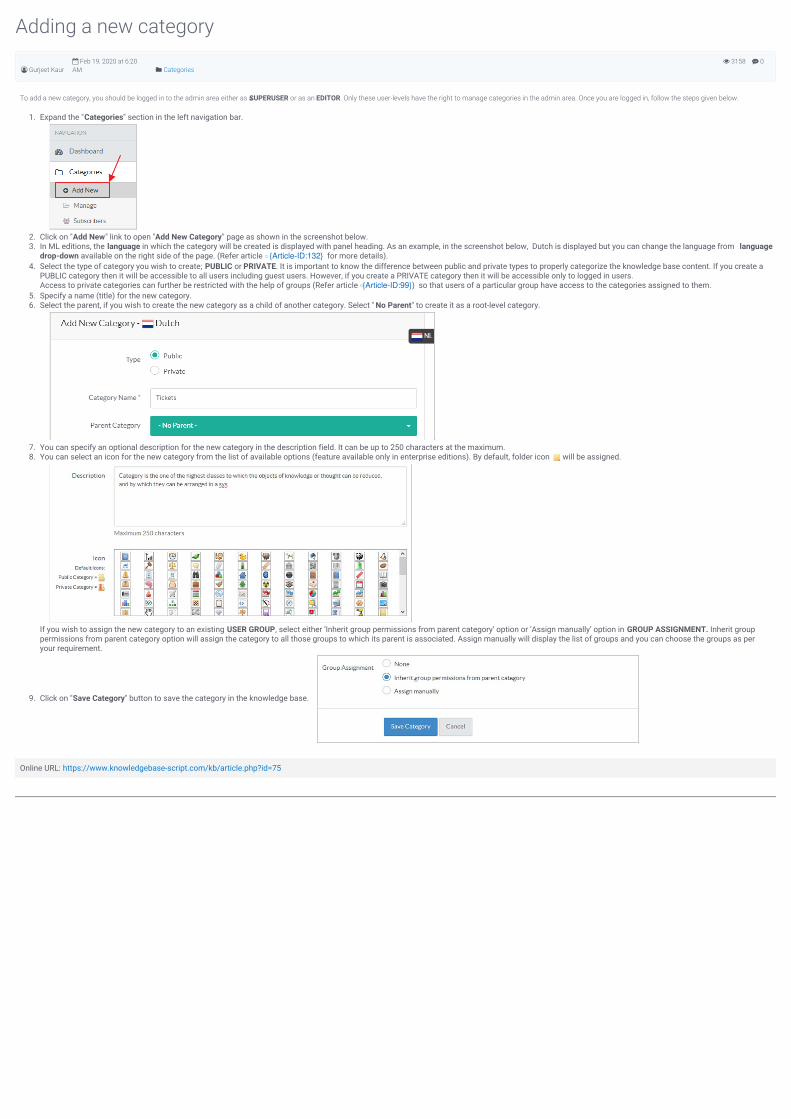
0 3158
Adding a new category
Gurjeet Kaur Feb 19, 2020 at 6:20AM Categories
To add a new category, you should be logged in to the admin area either as a SUPERUSER or as an EDITOR. Only these user-levels have the right to manage categories in the admin area. Once you are logged in, follow the steps given below.
1. Expand the "Categories" section in the left navigation bar.
2. Click on "Add New" link to open "Add New Category" page as shown in the screenshot below.3. In ML editions, the language in which the category will be created is displayed with panel heading. As an example, in the screenshot below, Dutch is displayed but you can change the language from language
drop-down available on the right side of the page. (Refer article {Article-ID:132} for more details).4. Select the type of category you wish to create; PUBLIC or PRIVATE. It is important to know the difference between public and private types to properly categorize the knowledge base content. If you create a
PUBLIC category then it will be accessible to all users including guest users. However, if you create a PRIVATE category then it will be accessible only to logged in users.Access to private categories can further be restricted with the help of groups (Refer article {Article-ID:99}) so that users of a particular group have access to the categories assigned to them.
5. Specify a name (title) for the new category.6. Select the parent, if you wish to create the new category as a child of another category. Select " No Parent" to create it as a root-level category.
7. You can specify an optional description for the new category in the description field. It can be up to 250 characters at the maximum.8. You can select an icon for the new category from the list of available options (feature available only in enterprise editions). By default, folder icon will be assigned.
If you wish to assign the new category to an existing USER GROUP, select either ’Inherit group permissions from parent category’ option or ’Assign manually’ option in GROUP ASSIGNMENT. Inherit grouppermissions from parent category option will assign the category to all those groups to which its parent is associated. Assign manually will display the list of groups and you can choose the groups as peryour requirement.
9. Click on "Save Category" button to save the category in the knowledge base.
Online URL: https://www.knowledgebase-script.com/kb/article.php?id=75

CATEGORY
Category Subscribers2 Articles
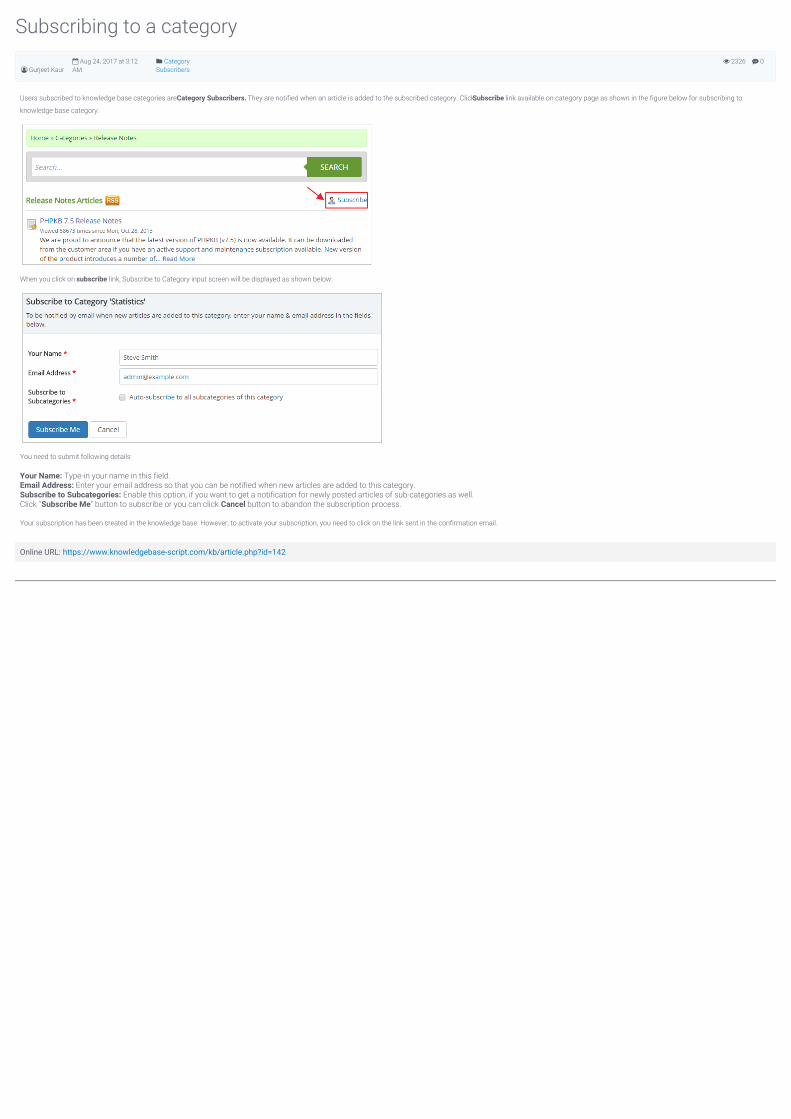
0 2326
Subscribing to a category
Gurjeet Kaur Aug 24, 2017 at 3:12AM
CategorySubscribers
Users subscribed to knowledge base categories are Category Subscribers. They are notified when an article is added to the subscribed category. Click Subscribe link available on category page as shown in the figure below for subscribing to
knowledge base category.
When you click on subscribe link, Subscribe to Category input screen will be displayed as shown below:
You need to submit following details:
Your Name: Type-in your name in this field. Email Address: Enter your email address so that you can be notified when new articles are added to this category.Subscribe to Subcategories: Enable this option, if you want to get a notification for newly posted articles of sub-categories as well.Click "Subscribe Me" button to subscribe or you can click Cancel button to abandon the subscription process.
Your subscription has been created in the knowledge base. However, to activate your subscription, you need to click on the link sent in the confirmation email.
Online URL: https://www.knowledgebase-script.com/kb/article.php?id=142
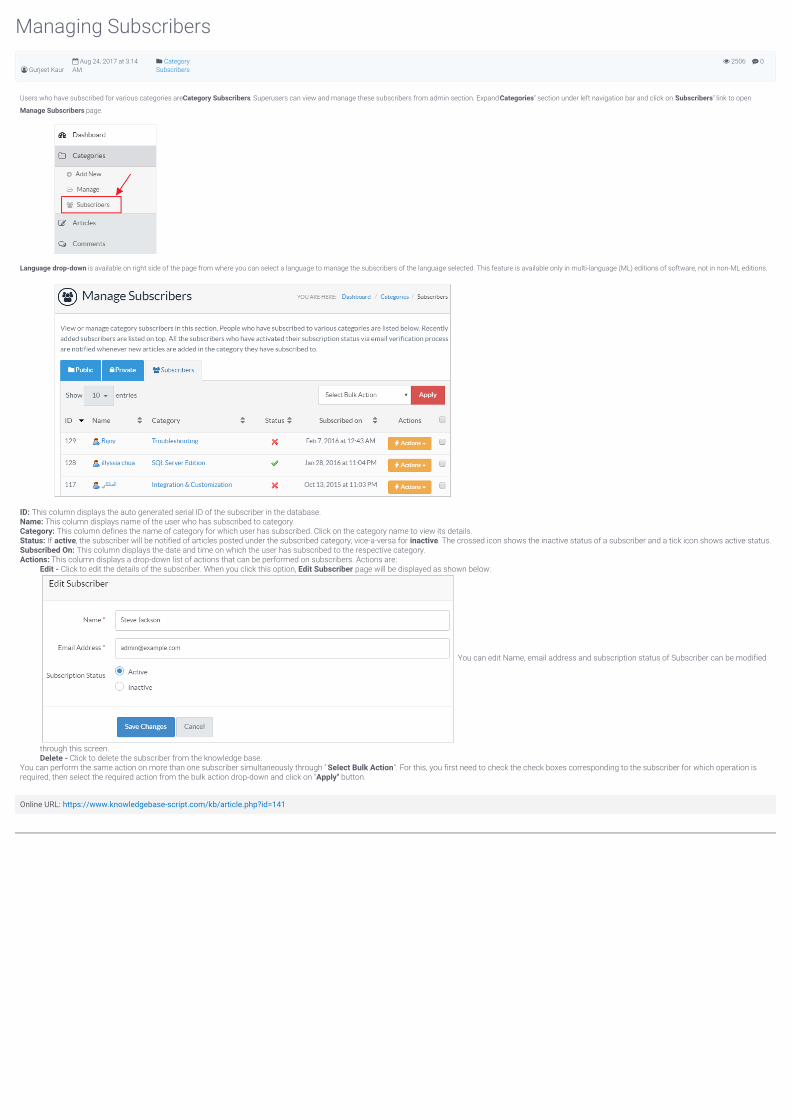
0 2506
Managing Subscribers
Gurjeet Kaur Aug 24, 2017 at 3:14AM
CategorySubscribers
Users who have subscribed for various categories are Category Subscribers. Superusers can view and manage these subscribers from admin section. Expand "Categories" section under left navigation bar and click on "Subscribers" link to open
Manage Subscribers page.
Language drop-down is available on right side of the page from where you can select a language to manage the subscribers of the language selected. This feature is available only in multi-language (ML) editions of software, not in non-ML editions.
ID: This column displays the auto generated serial ID of the subscriber in the database.Name: This column displays name of the user who has subscribed to category.Category: This column defines the name of category for which user has subscribed. Click on the category name to view its details.Status: If active, the subscriber will be notified of articles posted under the subscribed category, vice-a-versa for inactive. The crossed icon shows the inactive status of a subscriber and a tick icon shows active status.Subscribed On: This column displays the date and time on which the user has subscribed to the respective category.Actions: This column displays a drop-down list of actions that can be performed on subscribers. Actions are:
Edit - Click to edit the details of the subscriber. When you click this option, Edit Subscriber page will be displayed as shown below:
You can edit Name, email address and subscription status of Subscriber can be modified
through this screen.Delete - Click to delete the subscriber from the knowledge base.
You can perform the same action on more than one subscriber simultaneously through " Select Bulk Action". For this, you first need to check the check boxes corresponding to the subscriber for which operation isrequired, then select the required action from the bulk action drop-down and click on "Apply" button.
Online URL: https://www.knowledgebase-script.com/kb/article.php?id=141
CATEGORY
End User Interface2 Articles

0 1
Front End at a Glance
Gurjeet Kaur Aug 21, 2017 at 7:49AM
End UserInterface
Front End programs allow direct access by the user of a certain program to have access to further devices, programs, or databases. In the case of PHPKB, they are able to access articles written directly through the programs and they can change
them if needed. Users and the company can both access the front end to read and edit the same articles that are on there.
Articles are published under certain categories on the front end. All of the end users can view each article page by clicking on the specific article title from the list of all the articles displayed under each category. The article page contains
certain article details like; title or sometimes a question, the content or the answers to that question, the article’s author, a rating, number of views, user comments, any attachments, custom fields, categories under which it is filed etc. There are
many article options on the right side of your screen. All you need to do is specify the various actions that can be done with or on a certain article. The article page also contains any related articles or basically, articles that are like the article in
question.
There are a few different types of articles that can appear on the front end. You can have pending articles which are basically in a pending state because they have not been reviewed and published yet. After that, you get the Approved Articles which
are written by a super user, editor or they can be accepted articles of a writer. On the other hand, you can have Disapproved Articles which have been disapproved by an editor or a superuser.
Featured articles are very important articles and will always be shown on the knowledge base front end home page under the title of featured articles. These can be made featured articles if they are very important for your whole knowledge base.
Featured Articles also appear at the top positions of the lists of articles.
Expired articles have a certain life cycle. This means that the knowledge base controls their life cycle. You as the programmer can set a certain time limit for articles that will give them limits they will be accessible by KB end users. The article will
automatically stop appearing in the list of published articles when it has reached its expiration date.
Saved Draft articles come in a list of incomplete articles that can either be completed or deleted later on.
Online URL: https://www.knowledgebase-script.com/kb/article.php?id=133
0 2880
End User Interface at a glance
Gurjeet Kaur Aug 25, 2017 at 8:16AM
End UserInterface
PHPKB knowledge base software provides very interactive and user-friendly interface for KB users to view articles, news/announcements on the home page. The PHPKB knowledge base software has been designed and organized in such a
manner to provide maximum ease of use to visitors without any learning. Superusers can have control on the display (On/Off) of almost every possible feature of the knowledge base.
The header section is available which contain links to KB Home, Advanced Search, News, Glossary, Ask a Question, My Favorites, My Profile, Admin Dashboard features through which users can navigate. These links are explained below:
KB Home - This page is displayed when a user logs in to the knowledge base. Category tree, news and announcements, search tab and articles are displayed on the Home page. News and Announcements will bedisplayed if you have marked "Enable News Page" to be enabled. You can click on news headlines to expand the news. You can set the number of news to be displayed in KB home page in "Manage Settings" sectionunder Tools.
PHPKB 7 offers a tree-view display of categories and articles on the end user interface to display them in a hierarchical manner for better presentation. When you click the category title, a list of article titles will bedisplayed (see figure below). You can click on article title to view its content on the page.
A list of articles is displayed in KB home page which contains recently added, featured, popular and top rated articles. By default, recently added articles are displayed. You can navigate through different article links toexpand respective articles. Article contents can be viewed if you click the article titles.
Advanced Search - Knowledge base has advanced search option where KB users can click this link and refine the search using various search options.
Search For: You can select in between Articles/News/Categories from the drop-down list.By ID: If you know the ID of article/news/category you are searching for, type in the ID number.That Contains: Type-in the keywords in this field if you know the keywords.But Not: Type-in the word(s) that does not belong to your search.
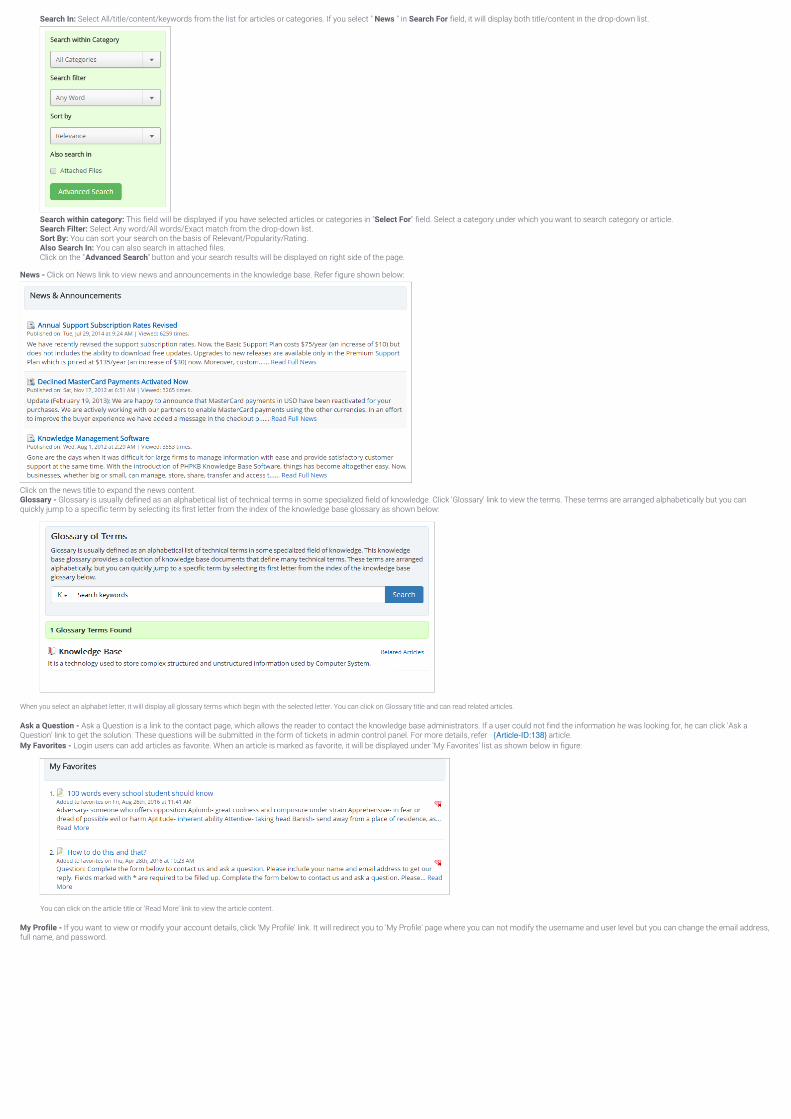
Search In: Select All/title/content/keywords from the list for articles or categories. If you select " News " in Search For field, it will display both title/content in the drop-down list.
Search within category: This field will be displayed if you have selected articles or categories in "Select For" field. Select a category under which you want to search category or article.Search Filter: Select Any word/All words/Exact match from the drop-down list.Sort By: You can sort your search on the basis of Relevant/Popularity/Rating.Also Search In: You can also search in attached files.Click on the "Advanced Search" button and your search results will be displayed on right side of the page.
News - Click on News link to view news and announcements in the knowledge base. Refer figure shown below:
Click on the news title to expand the news content.Glossary - Glossary is usually defined as an alphabetical list of technical terms in some specialized field of knowledge. Click 'Glossary' link to view the terms. These terms are arranged alphabetically but you canquickly jump to a specific term by selecting its first letter from the index of the knowledge base glossary as shown below:
When you select an alphabet letter, it will display all glossary terms which begin with the selected letter. You can click on Glossary title and can read related articles.
Ask a Question - Ask a Question is a link to the contact page, which allows the reader to contact the knowledge base administrators. If a user could not find the information he was looking for, he can click 'Ask aQuestion' link to get the solution. These questions will be submitted in the form of tickets in admin control panel. For more details, refer {Article-ID:138} article.My Favorites - Login users can add articles as favorite. When an article is marked as favorite, it will be displayed under 'My Favorites' list as shown below in figure:
You can click on the article title or 'Read More' link to view the article content.
My Profile - If you want to view or modify your account details, click 'My Profile' link. It will redirect you to 'My Profile' page where you can not modify the username and user level but you can change the email address,full name, and password.
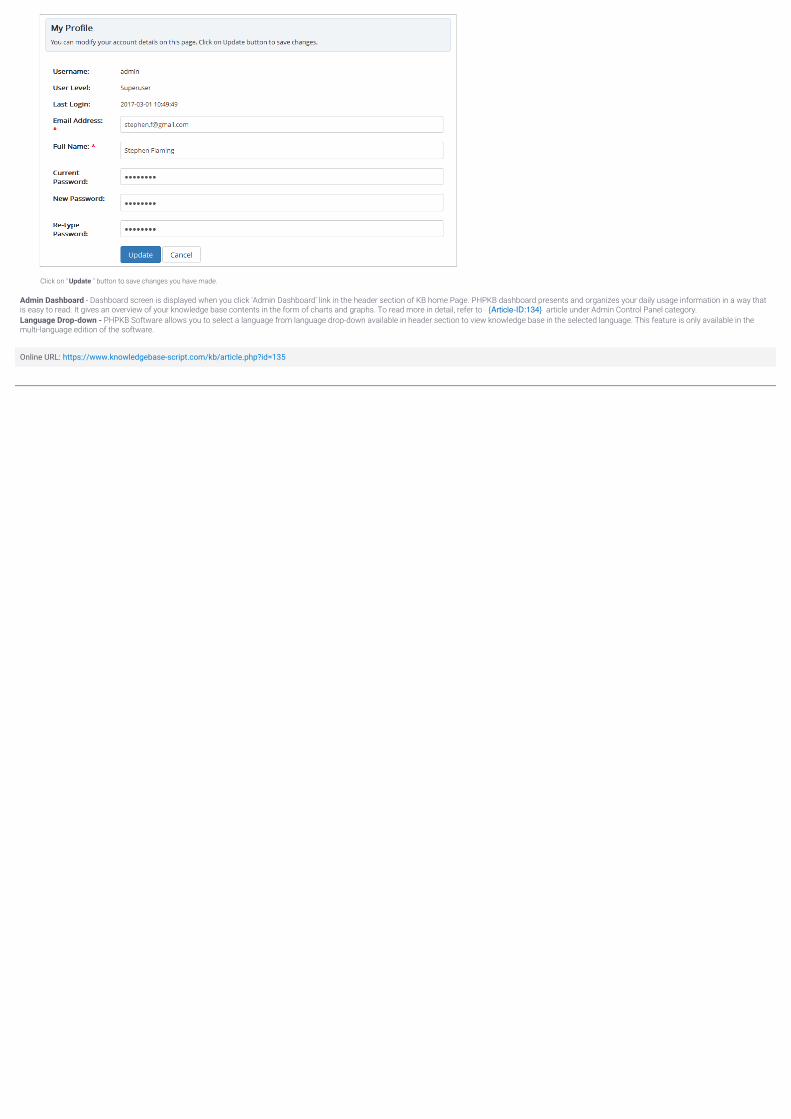
Click on " Update " button to save changes you have made.
Admin Dashboard - Dashboard screen is displayed when you click 'Admin Dashboard' link in the header section of KB home Page. PHPKB dashboard presents and organizes your daily usage information in a way thatis easy to read. It gives an overview of your knowledge base contents in the form of charts and graphs. To read more in detail, refer to {Article-ID:134} article under Admin Control Panel category.Language Drop-down - PHPKB Software allows you to select a language from language drop-down available in header section to view knowledge base in the selected language. This feature is only available in themulti-language edition of the software.
Online URL: https://www.knowledgebase-script.com/kb/article.php?id=135