Embed Size (px)
Citation preview

1 | P a g e
LAB A 40 POINTS SERVER 2012 R2 REV. A
Several screenshots are required for grading. No points will be given without screenshots so READ the entire Lab prior to completing! You might want to put post-it notes in your lab manual over each step where you need to create a screenshot or there are additional steps so that you do not miss it. I recommend that you use the Snipping Tool that comes with Windows 7 to create the screenshots. Click on Start, Snipping Tool, click and drag a square on the screen around the area you want to take a screenshot of. (Screenshots are sometimes called printscreens too.) Click on the Copy button. Go into your answer document in Word and paste in the screenshot. To get the next screenshot, click on New. If you have any issues inserting screenshots such as only a small portion of the capture appears, follow the instructions below to clear the document formatting:
1. Select the visible portion of the screen shot that you want to clear the formatting from. 2. On the Home tab, in the Font group, do one of the following:
a. In Word 2007, click Clear Formatting .
Be sure to read all of the submission requirements in each Activity before completing the activity. Note: It is highly recommended that you upgrade your home computer to the version of VMware Workstation that is installed in the computer lab for compatibility reasons. See your instructor for assistance.
Before completing this lab, you will need the following:
(1) VMware Workstation if using your own computer. (2) ISO for Server 201R22: server_2012r2_180day_eval.iso - available on the “Z” share.
Lab 1 - Installing Servers
Exercise 1.1 – Clean Install of Server 2012
Overview In this exercise, you install Windows Server 2012 R2 on a new computer with no previously installed operating system.
Mindset In many cases, organizations purchase servers without operating systems installed—sometimes called bare metal servers—either because they have an existing license agreement or because they intend to purchase the OS through another channel. In these cases, you perform what is known as a clean operating system installation, which is a procedure that creates a new server with its default operating system settings.

2 | P a g e
1. Before beginning step 1 first create a VM for Server 2012R2 in VMware Workstation.
a. Do a Custom install rather than typical. b. Choose to install the operating system later. c. Select Microsoft Windows - Version Windows Server 2012 d. Name the VM: SERVERA e. Install to your USB drive in a folder named: SERVERA f. You can take most of the default hardware values for everything as they appear. g. Set VMware Network Adapter to NAT h. In customize connect the ISO: server_2012r2_180day_eval.iso to the CDROM.
Ex 1.1 Question
1
What should you do if the drive on which you want to install Windows Server 2012 R2 already
has a partition on it containing an operating system and data you do not need?
I will delete it if there is no use for it also I would create a partition if necessary.
Ex 1.1 Question
2
What should you do if the Where do you want to install Windows? page appears, but it does not list any drives or partitions? I will click on the option “Where do you want to install Windows? Ten click “Load Driver”, click/Select browse, look for driver for my hardware, then click next.
16. Before the restart in step 15 install VMware Tools by clicking on VM, Install VMware
tools and do a complete install. (If the install does not auto-start, minimize all applications and use the file explorer to browse to the D: drive and double click on Setup.
17. When the VM tools are finished installing do a RESTART and SHUTDOWN the VM. 18. Change VM settings so that it will run faster
Make sure the virtual machine is shutdown
Close VMware
From the HOST computer, click start and type in notepad and then press <enter>
click File -> Open; change Text Documents (*.txt) to All Files (*.*)
Browse to a virtual machine folder on your USB drive. Select the file in that folder that has a .vmx extension.
You should see a list of settings appear in notepad. Go to the end and add this setting: (I suggest copying & pasting the entire line so that you do not type it incorrectly.) mainMem.useNamedFile = "FALSE"
Save the file in Notepad and close.
19. Start up your VM.
Login & open up Powershell command prompt and update the help files: o In Powershell run this command: update-help
Then run this command to license your Server 2012 R2 slmgr -180 day demo: o In Powershell run this command: slmgr -ato
After a few seconds you SHOULD get back a response that indicates the server has been activated
IF you don't...make sure you are connected to the Internet by pinging something out on the Internet
20. Change VM settings VMware Network Adapter configured to Custom: (VMnet2)

3 | P a g e
Make snapshot of VM - See the VMware Tips document for the steps to create snapshots. Shutdown your VM. (Click on VM, Power, Shutdown Guest) *NOTE: Power off is the same as unplugging the computer from the wall Click on VM, Snapshot and Take Snapshot Name It: Install Complete
Exercise A – Promote SERVERA to Domain Controller Overview In this exercise, you configure your Server 2012 as a Domain Controller
Mindset Most business environments have a multi server environment. We are creating that environment to use in future assignments. We will discuss Active Directory and the installation of a Domain Controller in detail in future chapters. This exercise is only to set up and configure it for use in our labs until we have covered that material.
1. Power on your SERVERA server. 2. The Server Manager should start up automatically. In the left pane, click on Local Server. 3. On the right side of the screen, click on the link to the right of Time Zone and change it to
(UTC-06:00) Central Time (US & Canada) Change the date and time if necessary. 4. Click on the link to the right of Ethernet and configure the IPv4 address:
a. IP address: 10.0.0.1 b. Subnet Mask: 255.255.255.0 c. Preferred DNS Server: 10.0.0.1
5. Verify the computer name is: SERVERA 6. Click on Manage, Add Roles and Features, click on Next to bypass the Before you begin page 7. Click on Next to take the default installation type 8. Click on Next to select the default destination server 9. Check Active Directory Domain Services then click on Add Features, then click on Next 10. Click on Next to accept the default features 11. Click on Next on the Active Directory Domain Services page 12. Click on Install to start the installation of Active Directory Domain Services. 13. After the installation is complete, click on Close. 14. Click on AD DS in the left pane. Note the warning message at the top of the page. (See the
printscreen below)
15. Click on More 16. Under Action click on Promote this server to a domain controller. 17. Select Add a new forest 18. Type in the Root domain name of: adatum.com then click on Next 19. Type in your password and confirm password of Pa$$w0rd then click on Next 20. Click on Next to accept the DNS Options 21. Click on Next to accept the default Additional Options 22. Click on Next to accept the default Paths 23. Click on Next after Review Options 24. Click Install. The server will automatically reboot after the install is complete. 25. After the reboot completes login, then shut down your VM

4 | P a g e
Make snapshot of VM Shutdown your VM. (Click on VM, Power, Shutdown Guest) *NOTE: Power off is the same as unplugging the computer from the wall Click on VM, Snapshot and Take Snapshot… Type in the name: adatum.com Installed then click on OK.
Exercise B – Performing a Clean Installation & Sysprep (SERVERB) Overview In this exercise, you install Windows Server 2012 on a new computer with
no previously installed operating system.
Mindset This is a repeat of Exercise 1.1. So that you have a second server in your environment. You will finish the install by running sysprep. This will configure your server so that it runs like a pre-installed server that you would order from a manufacturer so you can experience this type of an install.
Use the steps for Exercise 1.1 in the lab manual to perform this install, but change the name to
SERVERB 1. Before beginning step 1 (in 1.1) first create a VM for Server 2012R2 in VMware Workstation.
a. Do a Custom install rather than typical. b. Choose to install the operating system later. c. Select Microsoft Windows - Version Windows Server 2012 d. Name the VM: SERVERB e. Install to your USB drive in a folder named: SERVERB f. You can take most of the default hardware values for everything as they appear. g. Set VMware Network Adapter to NAT h. In customize connect the ISO: server_2012r2_180day_eval.iso to the CDROM.
13. You can SKIP the naming step for now as the sysprep we are about to do below would
wipe the name out – we’ll do it in lab 2.1. 16. After step 15, login to the VM, then install the VM Tools by clicking on VM, Install
VMware tools and do a complete install. (If the install does not auto-start, minimize all applications and use the file explorer to browse to the D: drive and double click on Setup.
17. When the VM tools are finished installing, shutdown the VM 18. Change VM settings so that it will run faster
Make sure the virtual machine is shutdown
Close VMware
From the HOST computer, click start and type in notepad and then press <enter>
click File -> Open; change Text Documents (*.txt) to All Files (*.*)
Browse to a virtual machine folder on your USB drive. Select the file in that folder that has a .vmx extension.

5 | P a g e
You should see a list of settings appear in notepad. Go to the end and add this setting: (I suggest copying & pasting the entire line so that you do not type it incorrectly.) mainMem.useNamedFile = "false"
Save the file in Notepad and close.
19. After starting up your VM again, hold down the WINDOWS Key and type “r” to bring up the run windows and type sysprep.
20. Double click on sysprep 21. Select Enter System Out-of-Box Experience (OOBE) check Generalize, and change the
shutdown option to Shutdown then click on OK. Make snapshot of VM Shutdown all of your VMs.. (Click on VM, Power, Shutdown Guest) *NOTE: Power off is the same as unplugging the computer from the wall Click on VM, Snapshot and Take Snapshot… Type in the name: Sysprep Complete then click on OK.
Exercise C – Creating & Using Clones in VMs Overview The objective of this lab is to gain familiarity with VMware Workstation
and Virtual Machines
Mindset You will be using a Windows Server VM. With this VM, you will be cloning your VM to make copies to use for other exercises. This project is not in the textbook.
1. Before starting this exercise, you’ll be working with SERVERB and starting with it turned off. 2. Clone your VM of your SERVERB server. Click on VM, Manage, Clone, then click on Next on the
Welcome to the Clone Virtual Machine Wizard page. 3. Select the clone source The current state in the Virtual Machine, and click on Next. 4. We will use this VM separately from our original VM, so select Create a full clone and click on Next. 5. Type in the name of the new virtual machine SERVERC and select the location on your USB drive to
save the new virtual machine to. 6. Click on Finish. It should take about 5-10 minutes to copy files and finish. Compare the files of your
original VM and the cloned VM on your USB drive. Notice that it makes an identical copy of the .vmdk file, but it changes the name of the new VM to match the name SERVERC that you typed in above.
7. In VMware click on File, Open, browse to the location of your new Cloned VM on your USB drive and click on Open. Don't click on play to actually open it yet.
Attach a after this step. PasteScreenshotHere
6 | P a g e
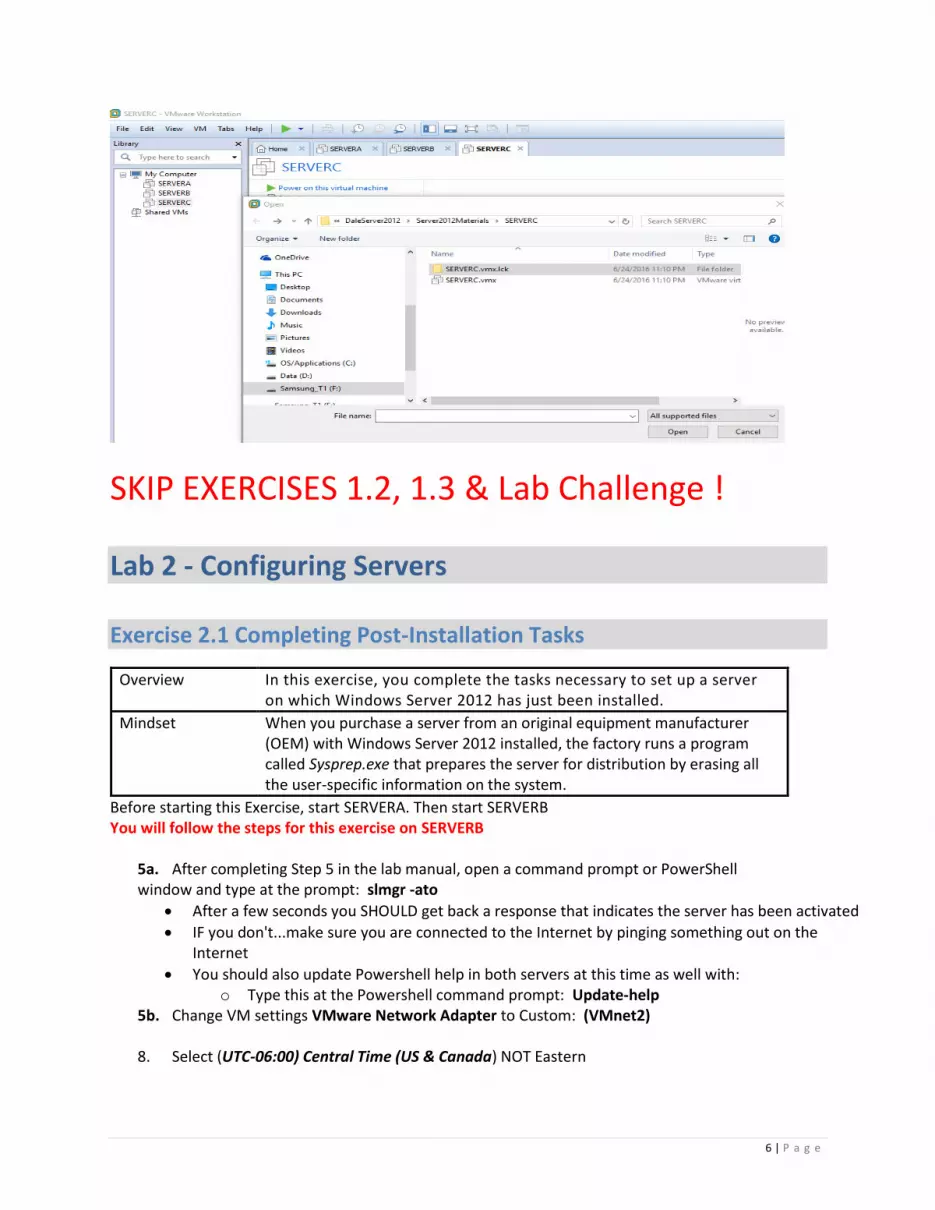
SKIP EXERCISES 1.2, 1.3 & Lab Challenge !
Lab 2 - Configuring Servers
Exercise 2.1 Completing Post-Installation Tasks
Overview In this exercise, you complete the tasks necessary to set up a server on which Windows Server 2012 has just been installed.
Mindset When you purchase a server from an original equipment manufacturer (OEM) with Windows Server 2012 installed, the factory runs a program called Sysprep.exe that prepares the server for distribution by erasing all the user-specific information on the system.
Before starting this Exercise, start SERVERA. Then start SERVERB You will follow the steps for this exercise on SERVERB
5a. After completing Step 5 in the lab manual, open a command prompt or PowerShell window and type at the prompt: slmgr -ato
After a few seconds you SHOULD get back a response that indicates the server has been activated
IF you don't...make sure you are connected to the Internet by pinging something out on the Internet
You should also update Powershell help in both servers at this time as well with: o Type this at the Powershell command prompt: Update-help
5b. Change VM settings VMware Network Adapter to Custom: (VMnet2)
8. Select (UTC-06:00) Central Time (US & Canada) NOT Eastern

7 | P a g e
Ex 2.1 Question
1
Why must you set the time zone to Eastern time, even if that is not where you are currently located?
The clock needs to be set up based on the domain controller. Members servers should macth
28. Log on to SERVERB using the Administrator account and the password Pa$$w0rd. When Server Manager opens, click Local Server in the left pane, take a screen shot of the Properties window. PasteScreenshotHere
Exercise 2.2 Adding Roles and Features Overview
In this exercise, you use the Add Roles and Features Wizard to install additional components to a server running Windows Server 2012 R2.
Mindset One of the most basic tasks that administrators perform when setting up a server is to install the roles and features providing the software the server needs to perform its basic functions.
Before starting this Exercise, start SERVERA. Then start SERVERB You will follow the steps for this exercise on SERVERB
Ex 2.2 Question
2
How can you install these same roles and features on SERVERB by using tools on the SERVERA server?
The first thing to do is to “add the remote server” to the Manager Interface using the “Add Servers Wizard” then go for the “remote server on the Select destination server page on the “add Roles” and FeaturesWizard”
Ex 2.2 Question
3
How would the installation of the roles and features selected in this exercise differ if the server was running Windows Server 2008 R2? The big differences are: (1) in 2008 you need to set it up by using two separe wizards. Additionally, roles are install separately.

8 | P a g e
Ex 2.2 Question
4
How can you prove that the Web Server (IIS) role is installed on the server? By will need to open Internet Explorer and brose into the local system.
Exercise 2.3 Converting the GUI Interface to Server Core Overview Windows Server 2012 R2 enables you to convert a server installed
using the full graphical user interface to one that uses Server Core. This enables administrators who are less familiar with the Windows PowerShell interface to install and configure a server using the familiar GUI tools, and then convert it to Server Core to minimize hardware resource utilization.
Mindset What advantages does Server Core provide over the full Windows Server 2012 R2 interface?
Before starting this Exercise, start SERVERA. Then start SERVERB You will follow the steps for this exercise on SERVERB
13. Take a screen shot of the Server Core interface. PasteScreenshotHere

9 | P a g e
Exercise D –Configuring SERVERC and Adding Hard Disks to VMs Overview
The objective of this lab is to gain familiarity with VMware Workstation and Virtual Machines
Mindset You will be using a Windows Server VM. With this VM, you will be configuring another VM, joining it to the domain adatum.com and adding hardware to the VM. This project is not in the textbook.
Before starting this Exercise, start SERVERA. Then start SERVERB, .Then start SERVERC You will follow the steps for this exercise on SERVERC!
1. Follow the steps in Exercise 2.1 Completing Post-Installation (but remember to do them on SERVERC
this time – NOT SERVERB as indicated in the book). Keep in mind that there will be changes in the following steps:
Step 5a. After completing Step 5 in the lab manual, complete these additional steps. Open a PowerShell window and type at the prompt: slmgr -ato
i. After a few seconds you SHOULD get back a response that indicates the server has been activated
ii. IF you don't...make sure you are connected to the Internet by pinging something out on the Internet
Steb 5b Go ahead and update the Powershell Help file as well at the Powershell prompt with update-help (same as we have done on the other two servers).
Step 5c. Change VM settings VMware Network Adapter configured to Custom: (VMnet2)
Step 8 – Set to Central Time
Step 13 – use IP address: 10.0.0.3 (the rest is the same)
Step 20 – Make sure to change the name to: SERVERC 2. Shutdown your VM and take a snapshot with SERVERC joined to the DC. 3. Before starting up your SERVERC VM, add 3 separate 40 GB Hard Drives to your VM (of type SCSI).
Refer to the VMWare Tips document in Blackboard under Course Documents for more information on adding additional hard drives
4. Once added, you will need to power SERVERC back on.
Exercise 2.4 Using Desired State Configuration
Overview
Windows Server 2012 R2 enables you to deploy system configurations using Windows PowerShell scripts.
Mindset How do you use the Windows PowerShell ISE interface?
Completion time 10 minutes
Before starting this Exercise, start SERVERA. Then start SERVERC You will follow the steps for this exercise on SERVERC. 8. Take a screen shot of the Windows PowerShell ISE console showing the results of the configuration.

10 | P a g e
PasteScreenshotHere

11 | P a g e
Ch 2 Lab Challenge Using the Server Core Interface Overview
After completing Exercise 2.3, the SERVERB server is left in the Server Core interface. Users must work from the command line to perform administrative tasks.
Mindset Microsoft now recommends Server Core as the default installation option for Windows Server 2012. Users should become familiar with the basic command prompt and Windows PowerShell tools, because it might not be practical to install the GUI whenever additional server configuration is required.
Before starting this Exercise, start SERVERA. Then start SERVERB You will follow the steps for this exercise on SERVERB You will need to research these commands on the internet if you are unable to figure them out from the textbook. After figuring the commands out, you will need to run them on SERVERB to uninstall roles & features from Ex 2.2 and to reinstall the GUI interface. PowerShell adding & removing features help: http://technet.microsoft.com/en-us/library/ee662311.aspx Specify the commands you used here:
In Command Prompt:
Powershell.exe
In PowerShell:
Uninstall-WindowsFeature –Name Web-Server
Uninstall-WindowsFeature –Name Print-Services
Uninstall-WindowsFeature –Name GPMC
Uninstall-WindowsFeature –Name Windows-Server-Backup
Install-WindowsFeature Server-Gui-Mgmt-Infra,Server-Gui-Shell –Restart
Make snapshot of VM Shutdown all of your VMs. (Click on VM, Power, Shutdown Guest) *NOTE: Power off is the same as unplugging the computer from the wall Click on VM, Snapshot and Take Snapshot… Type in the name: Lab 2 Complete then click on OK.

12 | P a g e
Lab 3 Configuring Local Storage PowerShell commands for local storage: http://technet.microsoft.com/en-us/library/hh848705.aspx http://www.thomasmaurer.ch/2012/04/replace-diskpart-with-windows-powershell-basic-storage-cmdlets/ http://blogs.msdn.com/b/san/archive/2012/07/03/managing-storage-with-windows-powershell-on-windows-server-2012.aspx
Exercise 3.1 Initializing Disks Overview In this exercise, you use two different tools to bring three new disks
online and initialize them in preparation for creating storage volumes.
Mindset Adding disk drives is a common server hardware upgrade, requiring an administrator to prepare them for use.
Before starting this Exercise, start SERVERA, SERVERB and SERVERC. You will follow the steps for this exercise on SERVERC.
Ex 3.1 Question
1
The three offline disks all use the SCSI bus type, whereas the online disk uses the ATA bus. Why can’t the three offline disks use the ATA bus as well?
AtA only supports a maximum of four devices so to add three more disks another interface is needed.
Ex 3.1
Question 2
What advantage is there to using the Disk Management snap-in to initialize new disks, rather than Server Manager? In the Disk Management you are able to select 2 options to create a (1) GPT or (2) MBR
Exercise 3.2 Creating Simple Volumes Overview In this exercise, you use two methods to create simple volumes, using
Server Manager and the Disk Management snap-in.
Mindset Server Manager and Disk Management both provide wizards for creating simple volumes, with similar capabilities.
Before starting this Exercise, start SERVERA, SERVERB and SERVERC. You will follow the steps for this exercise on SERVERC.
Ex 3.2 Question
3
What Windows PowerShell commands should you use to create a simple volume of the same size on disk 3 using the drive letter G:? TypeAnswerHere New-Partition –DiskNumber 3 –DriveLetter G –Size 10GB (After I was done typing the above a small GUI interface show up asking to press start to format) This is the rest of the command needed according website: Format-Volume –DriveLetter G –FileSystem NTFS Form
18. Take a screen shot of the Disk Management snap-in, showing the three volumes you created. PasteScreenshotHere

13 | P a g e
Exercise 3.3 Creating a Storage Pool Overview In this exercise, you use the Server Manager console to create a
storage pool, which consists of space from multiple physical disks.
Mindset Storage pools are a new feature in Windows Server 2012, which enable you to create a flexible storage subsystem with various types of fault tolerance.
Before starting this Exercise, start SERVERA, SERVERB and SERVERC. You will follow the steps for this exercise on SERVERC.
Ex 3.3
Question 4
Why can’t the wizard create a virtual disk using the Parity layout when there are only two physical disks in the storage pool?

14 | P a g e
Parity layout requires the pool to contain at least three physical disks to protect you from a single disk failure and provides fault tolerance by stripping information along with data.
19. Take a screen shot of the Storage Pools page, showing the storage pool and the virtual disk you created. PasteScreenshotHere
Ex 3.3 Question
5
At this point in the lab, what would happen to any data stored on the E:, F:, G:, and J: drives if Disk 2 on the server was to fail? Data in three drives will be kept. Data in one drive will be lost (drive F)
Ch 3 Lab Challenge Removing Storage Components Overview In addition to the graphical tools provided with Windows Server 2012,
you can also manipulate the storage subsystem using Windows PowerShell commands.
To complete this challenge, list the Windows PowerShell commands needed to delete all of the storage components you created during this lab on the SCSI disks of SERVERC. Then, restart SERVERC and take a screen shot of the Storage Pools page, showing the removal of the storage pool and the virtual disk you created.
ListPowerShellCommandsHere Remove-VirtualDisk –FriendlyName data1 Remove-StoragePool –FriendlyName pool1 Remove-Partition –DriveLetter g Remove-Partition –DriveLetter f Remove-Partition –DriveLetter e PasteScreenshotHere

15 | P a g e
Make snapshot of VM Shutdown all of your VMs. (Click on VM, Power, Shutdown Guest) *NOTE: Power off is the same as unplugging the computer from the wall Click on VM, Snapshot and Take Snapshot… Type in the name: Ch 3 Lab Challenge Complete then click on OK.
Exercise E – Create Student User & E Volume (Pre Lab 4) 1. Right click on the Network Icon in the notification area of SERVERC, and then click on Open Network
and Sharing Center. 2. Click on Change advanced sharing settings 3. Select Turn on network discovery and select Turn on file and printer sharing for the Domain profile
and click on Save changes. Close out of the Network and Sharing Center. 4. Repeat steps 5-7 on SERVERB. 5. Switch to the SERVERA server. In the Server manager, click on Tools, Active Directory Users and
Computers. 6. Open adatum.com, then open Users 7. Click on Action, New, User, then type in the following information:
a. Last Name: Student b. User logon name: student
8. Click on Next 9. Type in the password and confirm password of: Pa$$w0rd, then uncheck User must change
password at next logon 10. Click on Next, then click on Finish

16 | P a g e
11. Create disk volume E on SERVERC via any method you choose on any of the 3 available drives on SERVERC. You can size it at the full capacity of the disk.
12. Create disk volume F on SERVERC via any method you choose on one of the two remaining drives on SERVERC. You can size it at the full capacity of the disk.
Make snapshot of VM Shutdown all of your VMs. (Click on VM, Power, Shutdown Guest) *NOTE: Power off is the same as unplugging the computer from the wall Click on VM, Snapshot and Take Snapshot… Type in the name: Lab 3 Complete then click on OK.
Lab 4 Configuring File and Share Access
Exercise 4.1 Sharing a Folder Overview In this exercise, you create a folder share using the File Explorer
interface.
Mindset How familiar are you with the traditional tools for creating and managing shares?
Before starting this Exercise, start SERVERA, SERVERB and SERVERC. You will follow the steps for this exercise on SERVERC.
Ex 4.1 Question
1
What share permissions does a newly added group receive by default? Read permission only
15. Take a screen shot of the Permissions For Spreadsheets dialog box. PasteScreenshotHere

17 | P a g e
Exercise 4.2 Testing Share Access Overview In this exercise, you demonstrate the use of share permissions to limit
access to file system shares.
Mindset What are the capabilities of share permissions, and do you as an administrator want to make use of them?
Before starting this Exercise, start SERVERA, SERVERB and SERVERC. You will follow the steps for this exercise on SERVERB.
Ex 4.2 Question
2
Why are you unable to modify or delete the Budget file? Because I am only having read permission.
Ex 4.2
Question 3
Why are you now able to modify the Budget file? In this case I am in the admin account and I have full control permission.
Exercise 4.3 Working with NTFS Permissions Overview In this exercise, you demonstrate the use of NTFS permissions in
combination with share permissions.
Mindset The use of share permissions and NTFS permissions together can be confusing, especially when there are multiple administrators working on the same servers. Permissions should, therefore, be dictated by a company policy adhered to by everyone.
Before starting this Exercise, start SERVERA, SERVERB and SERVERC. You will follow the steps for this exercise on SERVERC.
Ex 4.3
Question 4
For the purposes of this lab, you assign permissions directly to the Student user account. How does this differ from standard enterprise networking practice? Administrators gives NTFS permissions to groups rather than to individually user.
Ex 4.3
Question 5
Why are you unable to modify the Budget file, when you have the Allow Full Control NTFS permission? Because there is previous permission that was set before.
Ex 4.3
Question 6
Why are you able to modify the Budget file on this computer, when you were unable to modify it on the other computer? Share permissions do not apply when you access a file on the local drive.
14. Take a screen shot of the Security tab on the Accounting Properties sheet, showing the NTFS permissions assigned to the Student user. PasteScreenshotHere

18 | P a g e
Exercise 4.4 Creating Shares with Server Manager Overview In Windows Server 2012 R2, you can create shares directly within the
Server Manager console, once you have installed the file and iSCSI Services role service. In this exercise, you install that role service and create a new share.

19 | P a g e
Mindset Windows Server 2012 R2 is all about providing administrators with new ways to perform familiar tasks. Which method for creating shares do you find preferable?
Before starting this Exercise, start SERVERA, SERVERB and SERVERC. You will follow the steps for this exercise on SERVERC.
Ex 4.4 Question
7
What access will the Student user have to the Documents share you are creating? How will the users receive that access? Student will be able to read and execute fileson the share. Student is member of the Domain Users group.
10. Take a screen shot of the Shares home page in Server Manager, showing the two shares you created in this lab. PasteScreenshotHere
Exercise 4.5 Creating Work Folders Overview In Windows Server 2012 R2, Work Folders enable users to store their
files on a server and easily access them using any type of connected device.
Mindset Windows Server 2012 R2 is all about providing administrators with new ways to perform familiar tasks. Which method for creating shares do you find preferable?
Before starting this Exercise, start SERVERA, SERVERB and SERVERC. You will follow the steps for this exercise on SERVERC. <NO SCREENSHOTS REQUIRED FOR THIS LAB>
Ch 4 Lab Challenge Creating Shares Overview
In addition to the graphical tools provided with Windows Server 2012 R2, you can also manipulate the storage subsystem using Windows PowerShell commands.

20 | P a g e
To complete this challenge, specify the Windows PowerShell command you must use to create a new share called Xfer out of the Users folder on the C: drive. Configure the share permissions so that members of the Domain Admins group have Full Access and the members of the Domain Users group have Read access.
List the PowerShell commands you used to complete this challenge: New-SmbShare –Name Xfer –Path c:\Users –FullAccess “adatum\Domain Admins” –ReadAccess “adatum\Domain Users”
Make snapshot of VM Shutdown all of your VMs. (Click on VM, Power, Shutdown Guest) *NOTE: Power off is the same as unplugging the computer from the wall Click on VM, Snapshot and Take Snapshot… Type in the name: After Lab 4 Complete then click on OK.
Lab 5 - Configuring Print and Document Services
Exercise 5.1 Installing a Printer Overview In this exercise, you install the Print and Document Services role and
use the Print Management console included in Windows Server 2012 R2.
Mindset The Print Management console enables administrators to deploy and manage printers all over the network.
Before starting this Exercise, start SERVERA. Then start SERVERB. You will not need SERVERC, so you can shutdown SERVERC if you want.
Ex 5.1 Question
1
Why is the wizard able to install the printer when an actual print device is not connected to the computer? The computer is not able to detect print devices connected to LPT ports. But, the wizard installs the printer without confirming the existence of the physical print device
23. Take a screen shot of the Print Management console showing the contents of the Printers node. PasteScreenshotHere
21 | P a g e
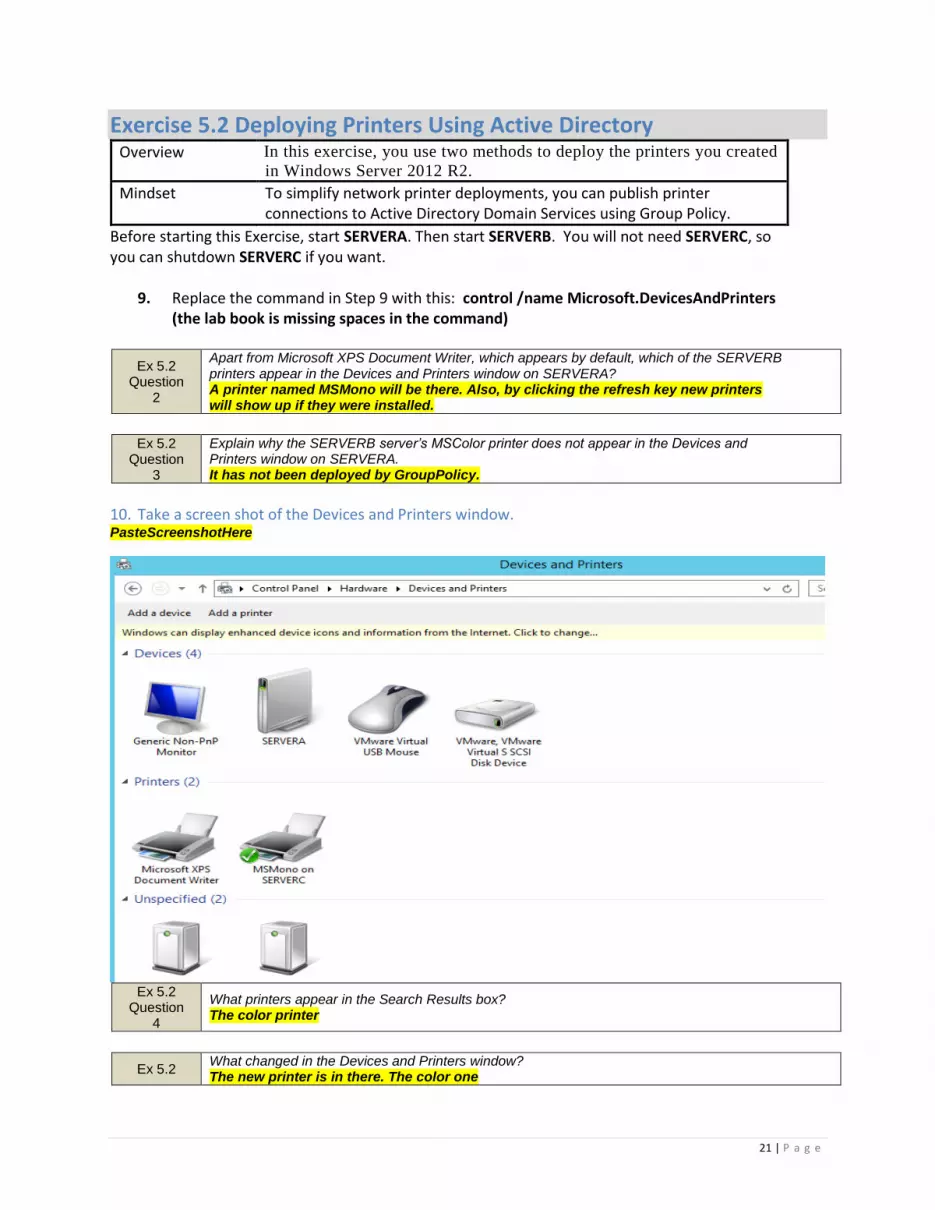
Exercise 5.2 Deploying Printers Using Active Directory Overview In this exercise, you use two methods to deploy the printers you created
in Windows Server 2012 R2.
Mindset To simplify network printer deployments, you can publish printer connections to Active Directory Domain Services using Group Policy.
Before starting this Exercise, start SERVERA. Then start SERVERB. You will not need SERVERC, so you can shutdown SERVERC if you want.
9. Replace the command in Step 9 with this: control /name Microsoft.DevicesAndPrinters (the lab book is missing spaces in the command)
Ex 5.2 Question
2
Apart from Microsoft XPS Document Writer, which appears by default, which of the SERVERB printers appear in the Devices and Printers window on SERVERA? A printer named MSMono will be there. Also, by clicking the refresh key new printers will show up if they were installed.
Ex 5.2
Question3
Explain why the SERVERB server’s MSColor printer does not appear in the Devices and Printers window on SERVERA. It has not been deployed by GroupPolicy.
10. Take a screen shot of the Devices and Printers window. PasteScreenshotHere
Ex 5.2
Question4
What printers appear in the Search Results box? The color printer
Ex 5.2 What changed in the Devices and Printers window? The new printer is in there. The color one

22 | P a g e
Question 5
17. Take a screen shot of the Devices and Printers window showing the latest change. PasteScreenshotHere
Exercise 5.3 Scheduling Printer Access Overview In this exercise, you configure a printer you installed previously to
limit its access to specific individuals and times.
Mindset Consumables for the color printer you installed in Exercise 5.1 are expensive, so you want to prevent users from running personal jobs or printing after hours. However, you want selected users to be able to access the printer at all times. You also want to prioritize those users’ print jobs, printing them before other users’ jobs.

23 | P a g e
Before starting this Exercise, start SERVERA. Then start SERVERB. You will not need SERVERC, so you can shutdown SERVERC if you want.
Ex 5.3
Question6
Which of the problems described in the Exercise 5.3 overview will this setting prevent? How is it prevented? It put regulations an basically limits usage
Ex 5.3 Question
7
In some instances, a user deliberately or accidently interrupts a print job, stalling the queue until the partial job is removed. Which of the parameters on the Advanced page of a printer’s Properties sheet can prevent these interruptions from occurring? Selecting the Start printing after last page is spooled option prevents partial jobs from holding up the print queue.
Ex 5.3 Question
8
When users send print jobs requiring a paper size that is not available, the entire print queue halts until someone inserts the correct paper for that job. Which of the parameters on the Advanced page of a printer’s Properties sheet can prevent the queue from being halted? Selecting the Hold mismatched documents option prevents errors resulting from documents that use paper sizes different from Letter size.
Ex 5.3 Question
9
Which of the problems described in the Exercise 5.3 overview is prevented by modifying the Priority value? How is it prevented? Setting the Color-PM printer’s Priority value higher than the other printer means that jobs sent to this printer will print before those sent to Color one.
Ex 5.3
Question10
How do these permission modifications achieve the goals stated in the exercise overview? The permissions prevent everyone except members of the Domain Admins and Administrators groups from sending print jobs to the color printer.
15. Take a screen shot of the Security tab in the MSColor-PM Properties sheet. PasteScreenshotHere

24 | P a g e
Ch 5 Lab Challenge Creating a Printer Pool Overview
To process a large quantity of print jobs with a single printer, you can create a printer pool, which distributes the print jobs among multiple print devices.
To support the Legal department at Contoso, Ltd., your supervisor purchased five identical HP LaserJet 4250 printers to be used as a printer pool. Unlike the printers you installed previously in this lab, which connected to the server using LPT ports, these two printers have Hewlett Packard JetDirect network interface adapters that have already been assigned the following IP addresses:
10.0.0.220
10.0.0.221
To complete this challenge, add a printer on your server, and share it using the name HPLJ4250 Pool. Then, configure the printer to function as a printer pool using the IP addresses cited previously. Write the procedure you use to create and configure the printer pool, and then take a screen shot of the Ports tab in the HPLJ4250 Pool Properties sheet. Paste the image in the Lab 5 worksheet file.
Write the procedure you use to create and configure the printer pool. TypeAnswerHere

25 | P a g e
Open the Print Management console, select the Printers node, and launch the Network Printer
Installation Wizard.
On the Printer Installation page, select the Add a TCP/IP or Web Services Printer by IP Address or
Hostname option, and click Next. The Printer Address page appears.
From the Type of Address drop-down list, select TCP/IP Device.
In the Host Name or IP Address text box, key 10.00.0.220, and click Next. The Detecting TCP/IP
Port page appears.
When the Additional Port Information Required page appears, select Hewlett Packard Jet Direct
from the Standard drop-down list, and click Next. The Printer Driver page appears.
Select the Install a New Driver option, and click Next. The Printer Installation page appears.
In the Manufacturers list, select HP.
In the Printers list, select HP LaserJet 4250 PCL 6 Class Driver, and click Next. The Printer Name
and Sharing Settings page appears.
In the Printer Name text box, key HPLJ4250 Pool.
In the Share Name text box, key HPLJ4250 Pool, and click Next. The Printer Found page appears.
Click Next. The Completing the Network Printer Installation Wizard page appears.
Click Finish.
Open the HPLJ4250 Pool Properties sheet, and click the Ports tab.
Click Add Port. The Printer Ports dialog box appears.
Select Standard TCP/IP Port, and click New Port. The Add Standard TCP/IP Printer Port Wizard
appears.
Click Next to bypass the Welcome page. The Add Port page appears.
In the Printer Name Or IP Address text box, key 10.0.00.221, and click Next. The Additional Port
Information Required page appears.
Select Hewlett Packard Jet Direct from the Standard drop-down list, and click Next. The
Completing the Add Standard TCP/IP Printer Port Wizard appears.
Click Finish. The Printer Ports page is displayed.
Click Close to close the Printer Ports page. The port appears on the Ports tab.
Repeat steps 14 to 20 to add three more ports using the remaining three IP addresses.
Select the Enable Printer Pooling check box, and then select the check boxes for the five TCP/IP ports you
created. Then click Close.
Take a screen shot of the Ports tab in the HPLJ4250 Pool Properties sheet. PasteScreenshotHere

26 | P a g e
Make snapshot of VM Shutdown all of your VMs. (Click on VM, Power, Shutdown Guest) *NOTE: Power off is the same as unplugging the computer from the wall Click on VM, Snapshot and Take Snapshot… Type in the name: Lab 5 Complete then click on OK. Submit assignment to blackboard When your assignment is complete, you must submit this file to Blackboard under Assignments by the due date listed on your syllabus for full credit. After you have submitted, from inside blackboard, click on Tools, My Grades
Submitted, but not graded NOT submitted. This shows that either your computer locked up or you lost connection to the
internet OR you clicked on Save instead of Submit. Your instructor can clear this indicator if you email them.


![Around the lab in 40 days [indoor robot navigation]](https://img.pdfslide.net/doc/110x75/634bc751913672970c093be9/around-the-lab-in-40-days-indoor-robot-navigation.jpg)