Embed Size (px)
Citation preview

TX-4100 TX-3100 TX-2100TX-5410 TX-5310 TX-5210
Online Manual
English

ContentsUsing This Online Manual. . . . . . . . . . . . . . . . . . . . . . . . . . . . . . . . . . . . . . . . . . . . . . . . . . 21
Trademarks and Licenses. . . . . . . . . . . . . . . . . . . . . . . . . . . . . . . . . . . . . . . . . . . . . . . . . 22
Basic Operation. . . . . . . . . . . . . . . . . . . . . . . . . . . . . . . . . . . . . . . . . . . . . . . . . . 40
Printer Parts. . . . . . . . . . . . . . . . . . . . . . . . . . . . . . . . . . . . . . . . . . . . . . . . . . . . . . . . . . . . 41
Printer Parts. . . . . . . . . . . . . . . . . . . . . . . . . . . . . . . . . . . . . . . . . . . . . . . . . . . . . . . . . . . . . . . . . . . . . . . 42
Front. . . . . . . . . . . . . . . . . . . . . . . . . . . . . . . . . . . . . . . . . . . . . . . . . . . . . . . . . . . . . . . . . . . . . . . . 43
Back. . . . . . . . . . . . . . . . . . . . . . . . . . . . . . . . . . . . . . . . . . . . . . . . . . . . . . . . . . . . . . . . . . . . . . . . . 45
Top Cover (Inside). . . . . . . . . . . . . . . . . . . . . . . . . . . . . . . . . . . . . . . . . . . . . . . . . . . . . . . . . . . . . . 47
Carriage. . . . . . . . . . . . . . . . . . . . . . . . . . . . . . . . . . . . . . . . . . . . . . . . . . . . . . . . . . . . . . . . . . . . . . 48
Ink Tank Cover (Inside). . . . . . . . . . . . . . . . . . . . . . . . . . . . . . . . . . . . . . . . . . . . . . . . . . . . . . . . . . 49
Operation Panel. . . . . . . . . . . . . . . . . . . . . . . . . . . . . . . . . . . . . . . . . . . . . . . . . . . . . . . . . . . . . . . . 50
Optional accessories. . . . . . . . . . . . . . . . . . . . . . . . . . . . . . . . . . . . . . . . . . . . . . . . . . . . . . . . . . . . . . . . 52
Stand. . . . . . . . . . . . . . . . . . . . . . . . . . . . . . . . . . . . . . . . . . . . . . . . . . . . . . . . . . . . . . . . . . . . . . . . 53
Stand Parts. . . . . . . . . . . . . . . . . . . . . . . . . . . . . . . . . . . . . . . . . . . . . . . . . . . . . . . . . . . . . . . . . . . 54
Stacker. . . . . . . . . . . . . . . . . . . . . . . . . . . . . . . . . . . . . . . . . . . . . . . . . . . . . . . . . . . . . . . . . . . . . . . 56
Parts of the Stacker. . . . . . . . . . . . . . . . . . . . . . . . . . . . . . . . . . . . . . . . . . . . . . . . . . . . . . . . . . . . . 57
Roll Unit. . . . . . . . . . . . . . . . . . . . . . . . . . . . . . . . . . . . . . . . . . . . . . . . . . . . . . . . . . . . . . . . . . . . . . 58
Parts of the Roll Unit. . . . . . . . . . . . . . . . . . . . . . . . . . . . . . . . . . . . . . . . . . . . . . . . . . . . . . . . . . . . 59
Roll Holder Set. . . . . . . . . . . . . . . . . . . . . . . . . . . . . . . . . . . . . . . . . . . . . . . . . . . . . . . . . . . . . . . . . 61
Printing procedure. . . . . . . . . . . . . . . . . . . . . . . . . . . . . . . . . . . . . . . . . . . . . . . . . . . . . . . 62
Printing Options Using Rolls and Sheets. . . . . . . . . . . . . . . . . . . . . . . . . . . . . . . . . . . . . . . . . . . . . . . . . 63
Turning the Printer On and Off. . . . . . . . . . . . . . . . . . . . . . . . . . . . . . . . . . . . . . . . . . . . . . . . . . . . . . . . . 65
Loading and Printing on Rolls. . . . . . . . . . . . . . . . . . . . . . . . . . . . . . . . . . . . . . . . . . . . . . . . . . . . . . . . . 68
Loading and Printing on Sheets. . . . . . . . . . . . . . . . . . . . . . . . . . . . . . . . . . . . . . . . . . . . . . . . . . . . . . . . 71
Printing in Windows. . . . . . . . . . . . . . . . . . . . . . . . . . . . . . . . . . . . . . . . . . . . . . . . . . . . . . . . . . . . . . . . . 73
Printing from macOS. . . . . . . . . . . . . . . . . . . . . . . . . . . . . . . . . . . . . . . . . . . . . . . . . . . . . . . . . . . . . . . . 75
Canceling print jobs. . . . . . . . . . . . . . . . . . . . . . . . . . . . . . . . . . . . . . . . . . . . . . . . . . . . . . 77
Canceling Print Jobs from the Control Panel. . . . . . . . . . . . . . . . . . . . . . . . . . . . . . . . . . . . . . . . . . . . . . 78
Canceling Print Jobs from Windows. . . . . . . . . . . . . . . . . . . . . . . . . . . . . . . . . . . . . . . . . . . . . . . . . . . . 79
Canceling Print Jobs from macOS. . . . . . . . . . . . . . . . . . . . . . . . . . . . . . . . . . . . . . . . . . . . . . . . . . . . . . 81
Pausing Printing. . . . . . . . . . . . . . . . . . . . . . . . . . . . . . . . . . . . . . . . . . . . . . . . . . . . . . . . . 82
Pausing Printing. . . . . . . . . . . . . . . . . . . . . . . . . . . . . . . . . . . . . . . . . . . . . . . . . . . . . . . . . . . . . . . . . . . . 83

Handling and Use of Paper. . . . . . . . . . . . . . . . . . . . . . . . . . . . . . . . . . . . . . . . . 84
Paper. . . . . . . . . . . . . . . . . . . . . . . . . . . . . . . . . . . . . . . . . . . . . . . . . . . . . . . . . . . . . . . . . 86
Types of Paper. . . . . . . . . . . . . . . . . . . . . . . . . . . . . . . . . . . . . . . . . . . . . . . . . . . . . . . . . . . . . . . . . . . . . 87
Paper Sizes. . . . . . . . . . . . . . . . . . . . . . . . . . . . . . . . . . . . . . . . . . . . . . . . . . . . . . . . . . . . . . . . . . . . . . . 88
Using Paper Other Than Genuine Paper and feed confirmed Paper. . . . . . . . . . . . . . . . . . . . . . . . . . . 90
Printing on Paper Other Than Genuine Paper and feed confirmed Paper Using Existing Settings. . . . . . . . . . . . . . . . . . . . . . . . . . . . . . . . . . . . . . . . . . . . . . . . . . . . . . . . . . . . . . . . . . . . . . . . . . . . . . . . 91
Printing on Paper Other Than Genuine Paper and feed confirmed Paper by Adding a Media Type. . . . . . . . . . . . . . . . . . . . . . . . . . . . . . . . . . . . . . . . . . . . . . . . . . . . . . . . . . . . . . . . . . . . . . . . . . . . . . . 92
Updating paper information. . . . . . . . . . . . . . . . . . . . . . . . . . . . . . . . . . . . . . . . . . . . . . . . . . . . . . . . . . . 93
Handling rolls. . . . . . . . . . . . . . . . . . . . . . . . . . . . . . . . . . . . . . . . . . . . . . . . . . . . . . . . . . . 94
Loading Rolls on the Roll Holder. . . . . . . . . . . . . . . . . . . . . . . . . . . . . . . . . . . . . . . . . . . . . . . . . . . . . . . 95
Loading the Upper Roll on the Printer. . . . . . . . . . . . . . . . . . . . . . . . . . . . . . . . . . . . . . . . . . . . . . . . . . . 98
Loading the Lower Roll on the Roll Unit (Option). . . . . . . . . . . . . . . . . . . . . . . . . . . . . . . . . . . . . . . . . . 104
Changing the Type of Paper. . . . . . . . . . . . . . . . . . . . . . . . . . . . . . . . . . . . . . . . . . . . . . . . . . . . . . . . . 111
Specifying the Paper Length. . . . . . . . . . . . . . . . . . . . . . . . . . . . . . . . . . . . . . . . . . . . . . . . . . . . . . . . . 115
Removing the Upper Roll from the Printer. . . . . . . . . . . . . . . . . . . . . . . . . . . . . . . . . . . . . . . . . . . . . . . 118
Removing the Lower Roll from the Roll Unit (Option). . . . . . . . . . . . . . . . . . . . . . . . . . . . . . . . . . . . . . 121
Removing Rolls From the Roll Holder. . . . . . . . . . . . . . . . . . . . . . . . . . . . . . . . . . . . . . . . . . . . . . . . . . 124
Feeding Roll Paper Manually. . . . . . . . . . . . . . . . . . . . . . . . . . . . . . . . . . . . . . . . . . . . . . . . . . . . . . . . . 126
Keeping Track of the Amount of Roll Paper Left. . . . . . . . . . . . . . . . . . . . . . . . . . . . . . . . . . . . . . . . . . 127
Specifying the Amount of Extension for Borderless Printing. . . . . . . . . . . . . . . . . . . . . . . . . . . . . . . . . 130
Specifying the Ink Drying Time for Rolls. . . . . . . . . . . . . . . . . . . . . . . . . . . . . . . . . . . . . . . . . . . . . . . . 133
Specifying the Cutting Method for Rolls. . . . . . . . . . . . . . . . . . . . . . . . . . . . . . . . . . . . . . . . . . . . . . . . . 138
Cutting the Leading Edge of Roll Paper Automatically. . . . . . . . . . . . . . . . . . . . . . . . . . . . . . . . . . . . . 146
Reducing Dust from Cutting Rolls. . . . . . . . . . . . . . . . . . . . . . . . . . . . . . . . . . . . . . . . . . . . . . . . . . . . . 148
Automatically Switch Rolls. . . . . . . . . . . . . . . . . . . . . . . . . . . . . . . . . . . . . . . . . . . . . . . . . . . . . . . . . . . 150
Handling sheets. . . . . . . . . . . . . . . . . . . . . . . . . . . . . . . . . . . . . . . . . . . . . . . . . . . . . . . . 151
Loading Sheets in the Printer. . . . . . . . . . . . . . . . . . . . . . . . . . . . . . . . . . . . . . . . . . . . . . . . . . . . . . . . . 152
Printing From a Desired Starting Point. . . . . . . . . . . . . . . . . . . . . . . . . . . . . . . . . . . . . . . . . . . . . . . . . 157
Removing Sheets. . . . . . . . . . . . . . . . . . . . . . . . . . . . . . . . . . . . . . . . . . . . . . . . . . . . . . . . . . . . . . . . . . 161
Basket. . . . . . . . . . . . . . . . . . . . . . . . . . . . . . . . . . . . . . . . . . . . . . . . . . . . . . . . . . . . . . . . 163
Using the Basket. . . . . . . . . . . . . . . . . . . . . . . . . . . . . . . . . . . . . . . . . . . . . . . . . . . . . . . . . . . . . . . . . . 164
Example Basket Configurations. . . . . . . . . . . . . . . . . . . . . . . . . . . . . . . . . . . . . . . . . . . . . . . . . . . . . . . 169
Storing the Basket. . . . . . . . . . . . . . . . . . . . . . . . . . . . . . . . . . . . . . . . . . . . . . . . . . . . . . . . . . . . . . . . . 173

Stacker. . . . . . . . . . . . . . . . . . . . . . . . . . . . . . . . . . . . . . . . . . . . . . . . . . . . . . . . . . . . . . . 175
Using the Stacker. . . . . . . . . . . . . . . . . . . . . . . . . . . . . . . . . . . . . . . . . . . . . . . . . . . . . . . . . . . . . . . . . . 176
Example Stacker Configurations. . . . . . . . . . . . . . . . . . . . . . . . . . . . . . . . . . . . . . . . . . . . . . . . . . . . . . 179
Roll Unit. . . . . . . . . . . . . . . . . . . . . . . . . . . . . . . . . . . . . . . . . . . . . . . . . . . . . . . . . . . . . . 183
Switching Roll Unit Modes. . . . . . . . . . . . . . . . . . . . . . . . . . . . . . . . . . . . . . . . . . . . . . . . . . . . . . . . . . . 184
Using the Roll Unit In Take-Up Mode. . . . . . . . . . . . . . . . . . . . . . . . . . . . . . . . . . . . . . . . . . . . . . . . . . 186
Removing Printed Paper from the Roll Unit. . . . . . . . . . . . . . . . . . . . . . . . . . . . . . . . . . . . . . . . . . . . . . 197
Changing Printer's Setting. . . . . . . . . . . . . . . . . . . . . . . . . . . . . . . . . . . . . . . . . 201
Changing Settings from Operation Panel. . . . . . . . . . . . . . . . . . . . . . . . . . . . . . . . . . . . . 202
Home Screen Menu Composition. . . . . . . . . . . . . . . . . . . . . . . . . . . . . . . . . . . . . . . . . . . . . . . . . . . . . 203
Menu Structure. . . . . . . . . . . . . . . . . . . . . . . . . . . . . . . . . . . . . . . . . . . . . . . . . . . . . . . . . . . . . . . . . . . 207
Advanced (Paper settings). . . . . . . . . . . . . . . . . . . . . . . . . . . . . . . . . . . . . . . . . . . . . . . . . . . . . . 231
Advanced (LAN settings). . . . . . . . . . . . . . . . . . . . . . . . . . . . . . . . . . . . . . . . . . . . . . . . . . . . . . . . 233
Setting Items on Operation Panel. . . . . . . . . . . . . . . . . . . . . . . . . . . . . . . . . . . . . . . . . . . . . . . . . . . . . 236
Maintenance. . . . . . . . . . . . . . . . . . . . . . . . . . . . . . . . . . . . . . . . . . . . . . . . . . . . . . . . . . . . . . . . . 238
Job management. . . . . . . . . . . . . . . . . . . . . . . . . . . . . . . . . . . . . . . . . . . . . . . . . . . . . . . . . . . . . . 240
LAN settings. . . . . . . . . . . . . . . . . . . . . . . . . . . . . . . . . . . . . . . . . . . . . . . . . . . . . . . . . . . . . . . . . 241
Test print. . . . . . . . . . . . . . . . . . . . . . . . . . . . . . . . . . . . . . . . . . . . . . . . . . . . . . . . . . . . . . . . . . . . 250
Print settings. . . . . . . . . . . . . . . . . . . . . . . . . . . . . . . . . . . . . . . . . . . . . . . . . . . . . . . . . . . . . . . . . 251
Paper-related settings. . . . . . . . . . . . . . . . . . . . . . . . . . . . . . . . . . . . . . . . . . . . . . . . . . . . . . . . . . 253
Auto maintenance settings. . . . . . . . . . . . . . . . . . . . . . . . . . . . . . . . . . . . . . . . . . . . . . . . . . . . . . 257
Hard disk settings. . . . . . . . . . . . . . . . . . . . . . . . . . . . . . . . . . . . . . . . . . . . . . . . . . . . . . . . . . . . . 258
Monitoring service settings. . . . . . . . . . . . . . . . . . . . . . . . . . . . . . . . . . . . . . . . . . . . . . . . . . . . . . 260
Other printer settings. . . . . . . . . . . . . . . . . . . . . . . . . . . . . . . . . . . . . . . . . . . . . . . . . . . . . . . . . . . 261
Language selection. . . . . . . . . . . . . . . . . . . . . . . . . . . . . . . . . . . . . . . . . . . . . . . . . . . . . . . . . . . . 263
Firmware update. . . . . . . . . . . . . . . . . . . . . . . . . . . . . . . . . . . . . . . . . . . . . . . . . . . . . . . . . . . . . . 264
Security settings. . . . . . . . . . . . . . . . . . . . . . . . . . . . . . . . . . . . . . . . . . . . . . . . . . . . . . . . . . . . . . 265
Printer information. . . . . . . . . . . . . . . . . . . . . . . . . . . . . . . . . . . . . . . . . . . . . . . . . . . . . . . . . . . . . 266
Setting Administrator Password on Operation Panel. . . . . . . . . . . . . . . . . . . . . . . . . . . . . . . . . . . . . . . 267
Erasing Data on Printer's Hard Disk. . . . . . . . . . . . . . . . . . . . . . . . . . . . . . . . . . . . . . . . . . . . . . . . . . . 269
HP-GL/2 Settings. . . . . . . . . . . . . . . . . . . . . . . . . . . . . . . . . . . . . . . . . . . . . . . . . . . . . . . . . . . . . . . . . . 271
Menus on HP-GL/2 print settings. . . . . . . . . . . . . . . . . . . . . . . . . . . . . . . . . . . . . . . . . . . . . . . . . . 272
Color mode. . . . . . . . . . . . . . . . . . . . . . . . . . . . . . . . . . . . . . . . . . . . . . . . . . . . . . . . . . . . . . 274
Print quality. . . . . . . . . . . . . . . . . . . . . . . . . . . . . . . . . . . . . . . . . . . . . . . . . . . . . . . . . . . . . . 275
Input resolution. . . . . . . . . . . . . . . . . . . . . . . . . . . . . . . . . . . . . . . . . . . . . . . . . . . . . . . . . . . 276

Print target. . . . . . . . . . . . . . . . . . . . . . . . . . . . . . . . . . . . . . . . . . . . . . . . . . . . . . . . . . . . . . . 277
Paper src. . . . . . . . . . . . . . . . . . . . . . . . . . . . . . . . . . . . . . . . . . . . . . . . . . . . . . . . . . . . . . . . 278
Margin. . . . . . . . . . . . . . . . . . . . . . . . . . . . . . . . . . . . . . . . . . . . . . . . . . . . . . . . . . . . . . . . . . 279
Oversize. . . . . . . . . . . . . . . . . . . . . . . . . . . . . . . . . . . . . . . . . . . . . . . . . . . . . . . . . . . . . . . . . 280
Save paper. . . . . . . . . . . . . . . . . . . . . . . . . . . . . . . . . . . . . . . . . . . . . . . . . . . . . . . . . . . . . . 284
Rotate. . . . . . . . . . . . . . . . . . . . . . . . . . . . . . . . . . . . . . . . . . . . . . . . . . . . . . . . . . . . . . . . . . 286
Auto rotation. . . . . . . . . . . . . . . . . . . . . . . . . . . . . . . . . . . . . . . . . . . . . . . . . . . . . . . . . . . . . 287
Enlarge/Reduce. . . . . . . . . . . . . . . . . . . . . . . . . . . . . . . . . . . . . . . . . . . . . . . . . . . . . . . . . . . 289
Print centered. . . . . . . . . . . . . . . . . . . . . . . . . . . . . . . . . . . . . . . . . . . . . . . . . . . . . . . . . . . . 292
Cut to standard size. . . . . . . . . . . . . . . . . . . . . . . . . . . . . . . . . . . . . . . . . . . . . . . . . . . . . . . . 294
Standard Size Table. . . . . . . . . . . . . . . . . . . . . . . . . . . . . . . . . . . . . . . . . . . . . . . . . . . 296
Use nesting function. . . . . . . . . . . . . . . . . . . . . . . . . . . . . . . . . . . . . . . . . . . . . . . . . . . . . . . 298
Nesting WaitTime. . . . . . . . . . . . . . . . . . . . . . . . . . . . . . . . . . . . . . . . . . . . . . . . . . . . . . . . . 300
Print cut lines. . . . . . . . . . . . . . . . . . . . . . . . . . . . . . . . . . . . . . . . . . . . . . . . . . . . . . . . . . . . . 301
Mirror. . . . . . . . . . . . . . . . . . . . . . . . . . . . . . . . . . . . . . . . . . . . . . . . . . . . . . . . . . . . . . . . . . . 302
Merge. . . . . . . . . . . . . . . . . . . . . . . . . . . . . . . . . . . . . . . . . . . . . . . . . . . . . . . . . . . . . . . . . . . 304
Select palette. . . . . . . . . . . . . . . . . . . . . . . . . . . . . . . . . . . . . . . . . . . . . . . . . . . . . . . . . . . . . 305
Define palette. . . . . . . . . . . . . . . . . . . . . . . . . . . . . . . . . . . . . . . . . . . . . . . . . . . . . . . . . . . . . 306
Pen 0 to Pen 15. . . . . . . . . . . . . . . . . . . . . . . . . . . . . . . . . . . . . . . . . . . . . . . . . . . . . . . . . . . 307
Reset palette. . . . . . . . . . . . . . . . . . . . . . . . . . . . . . . . . . . . . . . . . . . . . . . . . . . . . . . . . . . . . 308
Smoothing. . . . . . . . . . . . . . . . . . . . . . . . . . . . . . . . . . . . . . . . . . . . . . . . . . . . . . . . . . . . . . . 310
Thicken fine lines. . . . . . . . . . . . . . . . . . . . . . . . . . . . . . . . . . . . . . . . . . . . . . . . . . . . . . . . . . 311
Adjust faint lines. . . . . . . . . . . . . . . . . . . . . . . . . . . . . . . . . . . . . . . . . . . . . . . . . . . . . . . . . . . 312
Width correction. . . . . . . . . . . . . . . . . . . . . . . . . . . . . . . . . . . . . . . . . . . . . . . . . . . . . . . . . . . 313
Print color list for palettes. . . . . . . . . . . . . . . . . . . . . . . . . . . . . . . . . . . . . . . . . . . . . . . . . . . 315
Warning display. . . . . . . . . . . . . . . . . . . . . . . . . . . . . . . . . . . . . . . . . . . . . . . . . . . . . . . . . . . 316
Detect image size. . . . . . . . . . . . . . . . . . . . . . . . . . . . . . . . . . . . . . . . . . . . . . . . . . . . . . . . . 317
Frame control. . . . . . . . . . . . . . . . . . . . . . . . . . . . . . . . . . . . . . . . . . . . . . . . . . . . . . . . . . . . . 320
Menu Setting Combinations. . . . . . . . . . . . . . . . . . . . . . . . . . . . . . . . . . . . . . . . . . . . . . . . . . . . . . 321
Save paper and Auto rotation. . . . . . . . . . . . . . . . . . . . . . . . . . . . . . . . . . . . . . . . . . . . . . . . 322
Enlarge/Reduce (Scaling) and Auto rotation. . . . . . . . . . . . . . . . . . . . . . . . . . . . . . . . . . . . . 324
Print centered and Cut to standard size. . . . . . . . . . . . . . . . . . . . . . . . . . . . . . . . . . . . . . . . 325
Cut to standard size and Auto rotation and Enlarge/Reduce (Fit paper size). . . . . . . . . . . . 327
Use nesting function and Auto rotation. . . . . . . . . . . . . . . . . . . . . . . . . . . . . . . . . . . . . . . . . 330
Paper switching on a DOUBLE-roll printer model and Auto rotation. . . . . . . . . . . . . . . . . . . 332
Paper switching on a DOUBLE-roll printer model and Enlarge/Reduce (Specify scaling). . 334
Detect image size and Oversize. . . . . . . . . . . . . . . . . . . . . . . . . . . . . . . . . . . . . . . . . . . . . . 335
Detect image size and Print centered. . . . . . . . . . . . . . . . . . . . . . . . . . . . . . . . . . . . . . . . . . 338
Status Print. . . . . . . . . . . . . . . . . . . . . . . . . . . . . . . . . . . . . . . . . . . . . . . . . . . . . . . . . . . . . . . . . . . . . . 340
Changing Printer's Setting Using Web Browser. . . . . . . . . . . . . . . . . . . . . . . . . . . . . . . . 342
Start up Remote UI. . . . . . . . . . . . . . . . . . . . . . . . . . . . . . . . . . . . . . . . . . . . . . . . . . . . . . . . . . . . . . . . 343
Changeable Setting Items Using Remote UI. . . . . . . . . . . . . . . . . . . . . . . . . . . . . . . . . . . . . . . . . . . . . 346
Security. . . . . . . . . . . . . . . . . . . . . . . . . . . . . . . . . . . . . . . . . . . . . . . . . . . . . . . . . . . . . . . . . . . . . 348
LAN settings. . . . . . . . . . . . . . . . . . . . . . . . . . . . . . . . . . . . . . . . . . . . . . . . . . . . . . . . . . . . . . . . . 349
Setting Password using Remote UI. . . . . . . . . . . . . . . . . . . . . . . . . . . . . . . . . . . . . . . . . . . . . . . . . . . . 351
Registering Printer's Root Certificate to Web Browser for SSL Communication. . . . . . . . . . . . . . . . . . 353
Registering Printer's Root Certificate to Local Computer for SSL Communication. . . . . . . . . . . . . . . . 357
Generating Server Certificate. . . . . . . . . . . . . . . . . . . . . . . . . . . . . . . . . . . . . . . . . . . . . . . . . . . . . . . . 363
Setting Mail Server. . . . . . . . . . . . . . . . . . . . . . . . . . . . . . . . . . . . . . . . . . . . . . . . . . . . . . . . . . . . . . . . . 366
Receiving Printer Status by E-mail. . . . . . . . . . . . . . . . . . . . . . . . . . . . . . . . . . . . . . . . . . . . . . . . . . . . 368
Migrating Printer's Setting. . . . . . . . . . . . . . . . . . . . . . . . . . . . . . . . . . . . . . . . . . . . . . . . . 370
Initializing Printer's Setting. . . . . . . . . . . . . . . . . . . . . . . . . . . . . . . . . . . . . . . . . . . . . . . . 372
Network Setting. . . . . . . . . . . . . . . . . . . . . . . . . . . . . . . . . . . . . . . . . . . . . . . . . 373
Network Connection Tips. . . . . . . . . . . . . . . . . . . . . . . . . . . . . . . . . . . . . . . . . . . . . . . . . 374
Printer Connection Methods. . . . . . . . . . . . . . . . . . . . . . . . . . . . . . . . . . . . . . . . . . . . . . . . . . . . . . . . . 375
Connecting Smartphone/Tablet to Printer via Wireless Router. . . . . . . . . . . . . . . . . . . . . . . . . . . 379
Connecting Smartphone/Tablet to Printer Directly (Wireless Direct). . . . . . . . . . . . . . . . . . . . . . . 381
Default Network Settings. . . . . . . . . . . . . . . . . . . . . . . . . . . . . . . . . . . . . . . . . . . . . . . . . . . . . . . . . . . . 385
Another Printer Found with Same Name. . . . . . . . . . . . . . . . . . . . . . . . . . . . . . . . . . . . . . . . . . . . . . . . 387
Connecting to Another Computer via LAN/Changing from USB to LAN Connection. . . . . . . . . . . . . . . 388
Printing Network Settings. . . . . . . . . . . . . . . . . . . . . . . . . . . . . . . . . . . . . . . . . . . . . . . . . . . . . . . . . . . . 389
Reconfiguration Method of LAN Connection/Reconfiguration Method of Wi-Fi Connection. . . . . . . . . 406
Reconfiguration of Network Settings using the Remote UI. . . . . . . . . . . . . . . . . . . . . . . . . . . . . . . . . . 408
Countermeasures against Unauthorized Access. . . . . . . . . . . . . . . . . . . . . . . . . . . . . . . . . . . . . . . . . . 409
Network Status and Troubleshooting. . . . . . . . . . . . . . . . . . . . . . . . . . . . . . . . . . . . . . . . . . . . . . . . . . . 411
Sharing the Printer on a Network (Windows). . . . . . . . . . . . . . . . . . . . . . . . . . . . . . . . . . 413
Setting Up a Shared Printer. . . . . . . . . . . . . . . . . . . . . . . . . . . . . . . . . . . . . . . . . . . . . . . . . . . . . . . . . . 414
Restrictions on Printer Sharing. . . . . . . . . . . . . . . . . . . . . . . . . . . . . . . . . . . . . . . . . . . . . . . . . . . . . . . 416
Adjustments for Better Print Quality. . . . . . . . . . . . . . . . . . . . . . . . . . . . . . . . . 417
Adjusting the Print Head. . . . . . . . . . . . . . . . . . . . . . . . . . . . . . . . . . . . . . . . . . . . . . . . . . 418

Adjusting the Print Head. . . . . . . . . . . . . . . . . . . . . . . . . . . . . . . . . . . . . . . . . . . . . . . . . . . . . . . . . . . . 419
Adjusting Line Misalignment. . . . . . . . . . . . . . . . . . . . . . . . . . . . . . . . . . . . . . . . . . . . . . . . . . . . . 420
Automatic Adjustment to Straighten Lines and Colors. . . . . . . . . . . . . . . . . . . . . . . . . . . . . . . . . 424
Manual Adjustment to Straighten Lines and Colors. . . . . . . . . . . . . . . . . . . . . . . . . . . . . . . . . . . . 426
Troubleshooting Paper Abrasion and Blurry Images. . . . . . . . . . . . . . . . . . . . . . . . . . . . . . . . . . . . . . . 428
Adjusting Feed Amount. . . . . . . . . . . . . . . . . . . . . . . . . . . . . . . . . . . . . . . . . . . . . . . . . . 430
Adjusting Feed Amount. . . . . . . . . . . . . . . . . . . . . . . . . . . . . . . . . . . . . . . . . . . . . . . . . . . . . . . . . . . . . 431
Selecting Feed Amount Adjustment Method. . . . . . . . . . . . . . . . . . . . . . . . . . . . . . . . . . . . . . . . . 432
Automatic Banding Adjustment. . . . . . . . . . . . . . . . . . . . . . . . . . . . . . . . . . . . . . . . . . . . . . . . . . . 433
Manual Banding Adjustment. . . . . . . . . . . . . . . . . . . . . . . . . . . . . . . . . . . . . . . . . . . . . . . . . . . . . 435
Fine-Tuning Paper Feed Amount. . . . . . . . . . . . . . . . . . . . . . . . . . . . . . . . . . . . . . . . . . . . . . . . . 437
Adjusting Line Length. . . . . . . . . . . . . . . . . . . . . . . . . . . . . . . . . . . . . . . . . . . . . . . . . . . . . . . . . . 438
Adjusting Vacuum Strength. . . . . . . . . . . . . . . . . . . . . . . . . . . . . . . . . . . . . . . . . . . . . . . . . . . . . . . . . . 440
Maintenance and Consumables. . . . . . . . . . . . . . . . . . . . . . . . . . . . . . . . . . . . 441
Ink Tanks. . . . . . . . . . . . . . . . . . . . . . . . . . . . . . . . . . . . . . . . . . . . . . . . . . . . . . . . . . . . . 443
Ink Tanks. . . . . . . . . . . . . . . . . . . . . . . . . . . . . . . . . . . . . . . . . . . . . . . . . . . . . . . . . . . . . . . . . . . . . . . . 444
Replacing Ink Tanks. . . . . . . . . . . . . . . . . . . . . . . . . . . . . . . . . . . . . . . . . . . . . . . . . . . . . . . . . . . . . . . 446
Checking Ink Tank Levels. . . . . . . . . . . . . . . . . . . . . . . . . . . . . . . . . . . . . . . . . . . . . . . . . . . . . . . . . . . 460
When to Replace Ink Tanks. . . . . . . . . . . . . . . . . . . . . . . . . . . . . . . . . . . . . . . . . . . . . . . . . . . . . . . . . . 462
Print Head. . . . . . . . . . . . . . . . . . . . . . . . . . . . . . . . . . . . . . . . . . . . . . . . . . . . . . . . . . . . . 463
Print Head. . . . . . . . . . . . . . . . . . . . . . . . . . . . . . . . . . . . . . . . . . . . . . . . . . . . . . . . . . . . . . . . . . . . . . . 464
Checking for Nozzle Clogging. . . . . . . . . . . . . . . . . . . . . . . . . . . . . . . . . . . . . . . . . . . . . . . . . . . . . . . . 465
Cleaning the Print Head. . . . . . . . . . . . . . . . . . . . . . . . . . . . . . . . . . . . . . . . . . . . . . . . . . . . . . . . . . . . . 467
Replacing the Print Head. . . . . . . . . . . . . . . . . . . . . . . . . . . . . . . . . . . . . . . . . . . . . . . . . . . . . . . . . . . . 469
Maintenance Cartridge. . . . . . . . . . . . . . . . . . . . . . . . . . . . . . . . . . . . . . . . . . . . . . . . . . . 477
Maintenance Cartridge. . . . . . . . . . . . . . . . . . . . . . . . . . . . . . . . . . . . . . . . . . . . . . . . . . . . . . . . . . . . . . 478
Replacing the Maintenance Cartridge. . . . . . . . . . . . . . . . . . . . . . . . . . . . . . . . . . . . . . . . . . . . . . . . . . 479
Checking the Remaining Maintenance Cartridge Capacity. . . . . . . . . . . . . . . . . . . . . . . . . . . . . . . . . . 484
When to Replace the Maintenance Cartridge. . . . . . . . . . . . . . . . . . . . . . . . . . . . . . . . . . . . . . . . . . . . 485
Cutter Blade. . . . . . . . . . . . . . . . . . . . . . . . . . . . . . . . . . . . . . . . . . . . . . . . . . . . . . . . . . . 486
Cutter Blade. . . . . . . . . . . . . . . . . . . . . . . . . . . . . . . . . . . . . . . . . . . . . . . . . . . . . . . . . . . . . . . . . . . . . . 487
Replacing the Cutter Blade. . . . . . . . . . . . . . . . . . . . . . . . . . . . . . . . . . . . . . . . . . . . . . . . . . . . . . . . . . 488
Performing Maintenance Functions from Your Computer (Windows). . . . . . . . . . . . . . . 493

Cleaning the Print Heads. . . . . . . . . . . . . . . . . . . . . . . . . . . . . . . . . . . . . . . . . . . . . . . . . . . . . . . . . . . . 494
Printing a Nozzle Check Pattern. . . . . . . . . . . . . . . . . . . . . . . . . . . . . . . . . . . . . . . . . . . . . . . . . . . . . . 495
Cleaning the Printer. . . . . . . . . . . . . . . . . . . . . . . . . . . . . . . . . . . . . . . . . . . . . . . . . . . . . 497
Cleaning the Printer Exterior. . . . . . . . . . . . . . . . . . . . . . . . . . . . . . . . . . . . . . . . . . . . . . . . . . . . . . . . . 498
Cleaning Inside the Top Cover. . . . . . . . . . . . . . . . . . . . . . . . . . . . . . . . . . . . . . . . . . . . . . . . . . . . . . . 500
Cleaning the Roll Unit. . . . . . . . . . . . . . . . . . . . . . . . . . . . . . . . . . . . . . . . . . . . . . . . . . . . . . . . . . . . . . 504
Other Maintenance. . . . . . . . . . . . . . . . . . . . . . . . . . . . . . . . . . . . . . . . . . . . . . . . . . . . . . 506
Preparing to Transfer the Printer. . . . . . . . . . . . . . . . . . . . . . . . . . . . . . . . . . . . . . . . . . . . . . . . . . . . . . 507
Reinstalling the Printer. . . . . . . . . . . . . . . . . . . . . . . . . . . . . . . . . . . . . . . . . . . . . . . . . . . . . . . . . . . . . . 512
Firmware update. . . . . . . . . . . . . . . . . . . . . . . . . . . . . . . . . . . . . . . . . . . . . . . . . . . . . . . . . . . . . . . . . . 518
Specifications. . . . . . . . . . . . . . . . . . . . . . . . . . . . . . . . . . . . . . . . . . . . . . . . . . 519
Specifications. . . . . . . . . . . . . . . . . . . . . . . . . . . . . . . . . . . . . . . . . . . . . . . . . . . . . . . . . . 520
Print Area. . . . . . . . . . . . . . . . . . . . . . . . . . . . . . . . . . . . . . . . . . . . . . . . . . . . . . . . . . . . . 527
Manuals and Their Contents. . . . . . . . . . . . . . . . . . . . . . . . . . . . . . . . . . . . . . . . . . . . . . . 529
Safety. . . . . . . . . . . . . . . . . . . . . . . . . . . . . . . . . . . . . . . . . . . . . . . . . . . . . . . . . . . . . . . . 530
Safety Precautions. . . . . . . . . . . . . . . . . . . . . . . . . . . . . . . . . . . . . . . . . . . . . . . . . . . . . . . . . . . . . . . . . 531
Regulatory Information. . . . . . . . . . . . . . . . . . . . . . . . . . . . . . . . . . . . . . . . . . . . . . . . . . . . . . . . . . . . . . 533
WEEE (EU&EEA). . . . . . . . . . . . . . . . . . . . . . . . . . . . . . . . . . . . . . . . . . . . . . . . . . . . . . . . . . . . . . . . . 535
When Repairing, Lending, or Disposing of the Printer. . . . . . . . . . . . . . . . . . . . . . . . . . . . . . . . . . . . . . 548
Online Manual. . . . . . . . . . . . . . . . . . . . . . . . . . . . . . . . . . . . . . . . . . . . . . . . . . . . . . . . . . 549
Enhanced Printing Options. . . . . . . . . . . . . . . . . . . . . . . . . . . . . . . . . . . . . . . . 550
Printing from Your Computer (Windows). . . . . . . . . . . . . . . . . . . . . . . . . . . . . . . . . . . . . 554
Printing with Easy Setup. . . . . . . . . . . . . . . . . . . . . . . . . . . . . . . . . . . . . . . . . . . . . . . . . . . . . . . . . . . . 555
Setting the Number of Copies and Printing Order. . . . . . . . . . . . . . . . . . . . . . . . . . . . . . . . . . . . . . . . . 560
Using Roll Unit to Use 2-Level Rolls. . . . . . . . . . . . . . . . . . . . . . . . . . . . . . . . . . . . . . . . . . . . . . . . . . . 561
About 2-Level Roll Switching. . . . . . . . . . . . . . . . . . . . . . . . . . . . . . . . . . . . . . . . . . . . . . . . . . . . . 562
Setting the Paper Rolls in the Printer According to the Intended Use. . . . . . . . . . . . . . . . . . . . . . 563
Printing by Automatically Switching Upper-level and Lower-level Roll Papers. . . . . . . . . . . . . . . 565
How to Switch Paper Rolls. . . . . . . . . . . . . . . . . . . . . . . . . . . . . . . . . . . . . . . . . . . . . . . . . . . . . . 571
Reflect Roll Unit Settings in the Printer Driver. . . . . . . . . . . . . . . . . . . . . . . . . . . . . . . . . . . . . . . . 576
Printing Photos and Business Documents. . . . . . . . . . . . . . . . . . . . . . . . . . . . . . . . . . . . . . . . . . . . . . . 577
Printing By Setting Print Purpose. . . . . . . . . . . . . . . . . . . . . . . . . . . . . . . . . . . . . . . . . . . . . . . . . 578
Edit in PosterArtist and Print. . . . . . . . . . . . . . . . . . . . . . . . . . . . . . . . . . . . . . . . . . . . . . . . . . . . . 581

Printing CAD Drawings. . . . . . . . . . . . . . . . . . . . . . . . . . . . . . . . . . . . . . . . . . . . . . . . . . . . . . . . . . . . . 583
Printing By Setting Print Purpose. . . . . . . . . . . . . . . . . . . . . . . . . . . . . . . . . . . . . . . . . . . . . . . . . 578
Printing from AutoCAD. . . . . . . . . . . . . . . . . . . . . . . . . . . . . . . . . . . . . . . . . . . . . . . . . . . . . . . . . 587
Changing the Print Quality and Correcting Image Data. . . . . . . . . . . . . . . . . . . . . . . . . . . . . . . . . . . . . 588
Adjusting Color Balance. . . . . . . . . . . . . . . . . . . . . . . . . . . . . . . . . . . . . . . . . . . . . . . . . . . . . . . . 589
Setting the Print Quality Level (Custom). . . . . . . . . . . . . . . . . . . . . . . . . . . . . . . . . . . . . . . . . . . . 591
Printing a Color Document in Monochrome. . . . . . . . . . . . . . . . . . . . . . . . . . . . . . . . . . . . . . . . . . 593
Specifying Color Correction. . . . . . . . . . . . . . . . . . . . . . . . . . . . . . . . . . . . . . . . . . . . . . . . . . . . . . 595
Optimal Photo Printing of Image Data. . . . . . . . . . . . . . . . . . . . . . . . . . . . . . . . . . . . . . . . . . 598
Adjusting Colors with the Printer Driver. . . . . . . . . . . . . . . . . . . . . . . . . . . . . . . . . . . . . . . . . 599
Printing with ICC Profiles. . . . . . . . . . . . . . . . . . . . . . . . . . . . . . . . . . . . . . . . . . . . . . . . . . . . 602
Adjusting Brightness. . . . . . . . . . . . . . . . . . . . . . . . . . . . . . . . . . . . . . . . . . . . . . . . . . . . . . . . . . . 607
Adjusting Contrast. . . . . . . . . . . . . . . . . . . . . . . . . . . . . . . . . . . . . . . . . . . . . . . . . . . . . . . . . . . . . 609
Printing Using Detailed Setting Mode. . . . . . . . . . . . . . . . . . . . . . . . . . . . . . . . . . . . . . . . . . . . . . 611
Scaled Printing. . . . . . . . . . . . . . . . . . . . . . . . . . . . . . . . . . . . . . . . . . . . . . . . . . . . . . . . . . . . . . . . . . . . 614
Printing to Oversized Paper Sizes. . . . . . . . . . . . . . . . . . . . . . . . . . . . . . . . . . . . . . . . . . . . . . . . . . . . . 617
Setting Paper Dimensions (Custom Size). . . . . . . . . . . . . . . . . . . . . . . . . . . . . . . . . . . . . . . . . . . . . . . 620
Set a Custom Size Roll Width. . . . . . . . . . . . . . . . . . . . . . . . . . . . . . . . . . . . . . . . . . . . . . . . . . . . . . . . 624
Printing without Edges Based on the Scenarios. . . . . . . . . . . . . . . . . . . . . . . . . . . . . . . . . . . . . . . . . . 626
Printing without Margins to Match Paper Size. . . . . . . . . . . . . . . . . . . . . . . . . . . . . . . . . . . . . . . . 627
Printing without Margins to Match Roll Paper Width. . . . . . . . . . . . . . . . . . . . . . . . . . . . . . . . . . . 630
Printing Full-Size without Margins. . . . . . . . . . . . . . . . . . . . . . . . . . . . . . . . . . . . . . . . . . . . . . . . . 633
Three-sided Borderless Printing on Roll Paper. . . . . . . . . . . . . . . . . . . . . . . . . . . . . . . . . . . . . . . 636
Printing Hanging and Horizontal Banners (Large-Format Printing). . . . . . . . . . . . . . . . . . . . . . . . . . . . 641
Printing by Dividing/Joining Documents. . . . . . . . . . . . . . . . . . . . . . . . . . . . . . . . . . . . . . . . . . . . . . . . . 643
Lining Up and Printing Multiple Documents to Cut Sheets. . . . . . . . . . . . . . . . . . . . . . . . . . . . . . 644
Printing by Connecting Multiple Pages. . . . . . . . . . . . . . . . . . . . . . . . . . . . . . . . . . . . . . . . . . . . . 646
Printing Multiple Pages All on One Page. . . . . . . . . . . . . . . . . . . . . . . . . . . . . . . . . . . . . . . . . . . . 648
Dividing and Printing Posters. . . . . . . . . . . . . . . . . . . . . . . . . . . . . . . . . . . . . . . . . . . . . . . . . . . . . 650
Printing Document in Center of Paper. . . . . . . . . . . . . . . . . . . . . . . . . . . . . . . . . . . . . . . . . . . . . . . . . . 653
Printing by Saving Roll Paper. . . . . . . . . . . . . . . . . . . . . . . . . . . . . . . . . . . . . . . . . . . . . . . . . . . . . . . . 656
Saving Roll Paper by Rotating Document 90 Degrees. . . . . . . . . . . . . . . . . . . . . . . . . . . . . . . . . 657
Saving Roll Paper by Eliminating Upper and Lower Margins on Document. . . . . . . . . . . . . . . . . 660
Switching the Paper Source to Match the Purpose. . . . . . . . . . . . . . . . . . . . . . . . . . . . . . . . . . . . . . . . 663
Displaying the Print Results before Printing. . . . . . . . . . . . . . . . . . . . . . . . . . . . . . . . . . . . . . . . . . . . . . 665

Other Convenient Settings. . . . . . . . . . . . . . . . . . . . . . . . . . . . . . . . . . . . . . . . . . . . . . . . . . . . . . . . . . . 666
Stamp Printing. . . . . . . . . . . . . . . . . . . . . . . . . . . . . . . . . . . . . . . . . . . . . . . . . . . . . . . . . . . . . . . . 667
Registering a Stamp. . . . . . . . . . . . . . . . . . . . . . . . . . . . . . . . . . . . . . . . . . . . . . . . . . . . . . . 668
Setting a Page Size and Orientation. . . . . . . . . . . . . . . . . . . . . . . . . . . . . . . . . . . . . . . . . . . . . . . 671
Registering a Frequently Used Printing Profile. . . . . . . . . . . . . . . . . . . . . . . . . . . . . . . . . . . . . . . 672
Cutting Roll Paper after Printing. . . . . . . . . . . . . . . . . . . . . . . . . . . . . . . . . . . . . . . . . . . . . . . . . . 674
HP-GL/2 Printing. . . . . . . . . . . . . . . . . . . . . . . . . . . . . . . . . . . . . . . . . . . . . . . . . . . . . . . . 676
Printing from Printer. . . . . . . . . . . . . . . . . . . . . . . . . . . . . . . . . . . . . . . . . . . . . . . . . . . . . 677
Printing Data Saved on USB Flash Drive. . . . . . . . . . . . . . . . . . . . . . . . . . . . . . . . . . . . . . . . . . . . . . . 678
Printing from Smartphone/Tablet. . . . . . . . . . . . . . . . . . . . . . . . . . . . . . . . . . . . . . . . . . . 681
Enlarging Copy with imageRUNNER ADVANCE. . . . . . . . . . . . . . . . . . . . . . . . . . . . . . . 682
Fitting to Paper Width. . . . . . . . . . . . . . . . . . . . . . . . . . . . . . . . . . . . . . . . . . . . . . . . . . . . . . . . . . . . . . 688
Specifying Magnification Level. . . . . . . . . . . . . . . . . . . . . . . . . . . . . . . . . . . . . . . . . . . . . . . . . . . . . . . . 689
Printer Driver. . . . . . . . . . . . . . . . . . . . . . . . . . . . . . . . . . . . . . . . . . . . . . . . . . . 693
Windows Printer Driver. . . . . . . . . . . . . . . . . . . . . . . . . . . . . . . . . . . . . . . . . . . . . . . . . . . 694
Overview of the Printer Driver. . . . . . . . . . . . . . . . . . . . . . . . . . . . . . . . . . . . . . . . . . . . . . . . . . . . . . . . 695
Canon IJ Printer Driver. . . . . . . . . . . . . . . . . . . . . . . . . . . . . . . . . . . . . . . . . . . . . . . . . . . . . . . . . 696
Changing the Print Options. . . . . . . . . . . . . . . . . . . . . . . . . . . . . . . . . . . . . . . . . . . . . . . . . . . . . . 697
Canon imagePROGRAF Preview. . . . . . . . . . . . . . . . . . . . . . . . . . . . . . . . . . . . . . . . . . . . . . . . . 698
How to Open the Printer Driver Setup Window. . . . . . . . . . . . . . . . . . . . . . . . . . . . . . . . . . . . . . . 699
Updating Media Information in Printer Driver. . . . . . . . . . . . . . . . . . . . . . . . . . . . . . . . . . . . . . . . . 700
Setting Accounting Information. . . . . . . . . . . . . . . . . . . . . . . . . . . . . . . . . . . . . . . . . . . . . . . . . . . 701
Set a PIN Code for Print Jobs. . . . . . . . . . . . . . . . . . . . . . . . . . . . . . . . . . . . . . . . . . . . . . . . . . . . 704
Deleting the Undesired Print Job. . . . . . . . . . . . . . . . . . . . . . . . . . . . . . . . . . . . . . . . . . . . . . . . . . 705
Canon IJ Status Monitor. . . . . . . . . . . . . . . . . . . . . . . . . . . . . . . . . . . . . . . . . . . . . . . . . . . . . . . . 706
Checking the Ink Status from Your Computer. . . . . . . . . . . . . . . . . . . . . . . . . . . . . . . . . . . . 708
Instructions for Use (Printer Driver). . . . . . . . . . . . . . . . . . . . . . . . . . . . . . . . . . . . . . . . . . . . . . . . 709
Printer Driver Description. . . . . . . . . . . . . . . . . . . . . . . . . . . . . . . . . . . . . . . . . . . . . . . . . . . . . . . . . . . . 712
Main Tab Description. . . . . . . . . . . . . . . . . . . . . . . . . . . . . . . . . . . . . . . . . . . . . . . . . . . . . . . . . . . 713
Page Setup Tab Description. . . . . . . . . . . . . . . . . . . . . . . . . . . . . . . . . . . . . . . . . . . . . . . . . . . . . 721
Layout Tab Description. . . . . . . . . . . . . . . . . . . . . . . . . . . . . . . . . . . . . . . . . . . . . . . . . . . . . . . . . 727
Favorites Tab Description. . . . . . . . . . . . . . . . . . . . . . . . . . . . . . . . . . . . . . . . . . . . . . . . . . . . . . . 734
Utility Tab Description. . . . . . . . . . . . . . . . . . . . . . . . . . . . . . . . . . . . . . . . . . . . . . . . . . . . . . . . . . 736
Device Settings Tab Description. . . . . . . . . . . . . . . . . . . . . . . . . . . . . . . . . . . . . . . . . . . . . . . . . . 738

Canon IJ Status Monitor Description. . . . . . . . . . . . . . . . . . . . . . . . . . . . . . . . . . . . . . . . . . . . . . . 741
Updating the Printer Driver. . . . . . . . . . . . . . . . . . . . . . . . . . . . . . . . . . . . . . . . . . . . . . . . . . . . . . . . . . 744
Obtaining the Latest Printer Driver. . . . . . . . . . . . . . . . . . . . . . . . . . . . . . . . . . . . . . . . . . . . . . . . 745
Deleting the Unnecessary Printer Driver. . . . . . . . . . . . . . . . . . . . . . . . . . . . . . . . . . . . . . . . . . . . 746
Before Installing the Printer Driver. . . . . . . . . . . . . . . . . . . . . . . . . . . . . . . . . . . . . . . . . . . . . . . . . 747
Installing the Printer Driver. . . . . . . . . . . . . . . . . . . . . . . . . . . . . . . . . . . . . . . . . . . . . . . . . . . . . . 748
Application Software. . . . . . . . . . . . . . . . . . . . . . . . . . . . . . . . . . . . . . . . . . . . . 749
Managing Print Jobs. . . . . . . . . . . . . . . . . . . . . . . . . . . . . . . . . . . . . . . . . . . . . 750
Basic Print Job Operations. . . . . . . . . . . . . . . . . . . . . . . . . . . . . . . . . . . . . . . . . . . . . . . . 751
Using Printer Hard Disk. . . . . . . . . . . . . . . . . . . . . . . . . . . . . . . . . . . . . . . . . . . . . . . . . . . . . . . . . . . . . 752
Saving Print Jobs in Personal Job Boxes. . . . . . . . . . . . . . . . . . . . . . . . . . . . . . . . . . . . . . . . . . . . . . . 754
Priority printing. . . . . . . . . . . . . . . . . . . . . . . . . . . . . . . . . . . . . . . . . . . . . . . . . . . . . . . . . . . . . . . . . . . . 759
Printing Pending Jobs. . . . . . . . . . . . . . . . . . . . . . . . . . . . . . . . . . . . . . . . . . . . . . . . . . . . . . . . . . . . . . 761
Printing Security Print Jobs. . . . . . . . . . . . . . . . . . . . . . . . . . . . . . . . . . . . . . . . . . . . . . . . . . . . . . . . . . 763
Deleting Print Jobs. . . . . . . . . . . . . . . . . . . . . . . . . . . . . . . . . . . . . . . . . . . . . . . . . . . . . . . . . . . . . . . . . 765
Printing Saved Jobs. . . . . . . . . . . . . . . . . . . . . . . . . . . . . . . . . . . . . . . . . . . . . . . . . . . . . . . . . . . . . . . . 767
Deleting Saved Jobs. . . . . . . . . . . . . . . . . . . . . . . . . . . . . . . . . . . . . . . . . . . . . . . . . . . . . . . . . . . . . . . 769
Moving Saved Jobs. . . . . . . . . . . . . . . . . . . . . . . . . . . . . . . . . . . . . . . . . . . . . . . . . . . . . . . . . . . . . . . . 771
Advanced Print Job Operations. . . . . . . . . . . . . . . . . . . . . . . . . . . . . . . . . . . . . . . . . . . . 772
Saving Print Jobs Sent from Sources Other than Printer Driver. . . . . . . . . . . . . . . . . . . . . . . . . . . . . . 773
Printing without Saving Jobs in Common Job Box. . . . . . . . . . . . . . . . . . . . . . . . . . . . . . . . . . . . . . . . 775
Setting Passwords for Personal Job Boxes. . . . . . . . . . . . . . . . . . . . . . . . . . . . . . . . . . . . . . . . . . . . . . 776
Naming Personal Job Boxes. . . . . . . . . . . . . . . . . . . . . . . . . . . . . . . . . . . . . . . . . . . . . . . . . . . . . . . . . 777
Printing List of Saved Jobs. . . . . . . . . . . . . . . . . . . . . . . . . . . . . . . . . . . . . . . . . . . . . . . . . . . . . . . . . . 778
Renaming Saved Jobs. . . . . . . . . . . . . . . . . . . . . . . . . . . . . . . . . . . . . . . . . . . . . . . . . . . . . . . . . . . . . . 779
Printer Hard Disk Operations. . . . . . . . . . . . . . . . . . . . . . . . . . . . . . . . . . . . . . . . . . . . . . . . . . . . . . . . . 780
Checking Free Hard Disk Space. . . . . . . . . . . . . . . . . . . . . . . . . . . . . . . . . . . . . . . . . . . . . . . . . . . . . . 781
Frequently Asked Questions. . . . . . . . . . . . . . . . . . . . . . . . . . . . . . . . . . . . . . . 782
I want to easily create vertical or horizontal banners. . . . . . . . . . . . . . . . . . . . . . . . . . . . 786
Does this printer support sub-ink tank system. . . . . . . . . . . . . . . . . . . . . . . . . . . . . . . . . 787
I want to know how to configure roll cutting. . . . . . . . . . . . . . . . . . . . . . . . . . . . . . . . . . . 788
I want to configure so that the roll is cut automatically after waiting for the ink to dry. . . 789
How do I print without borders. . . . . . . . . . . . . . . . . . . . . . . . . . . . . . . . . . . . . . . . . . . . . 790
I want to know the paper types that can be used in this printer. . . . . . . . . . . . . . . . . . . . 791

The paper type that I want to print is not displayed on the Touch Screen. . . . . . . . . . . . 792
Can I perform duplex printing. . . . . . . . . . . . . . . . . . . . . . . . . . . . . . . . . . . . . . . . . . . . . . 793
I want to perform enlargement printing. . . . . . . . . . . . . . . . . . . . . . . . . . . . . . . . . . . . . . . 794
Network Settings and Common Problems. . . . . . . . . . . . . . . . . . . . . . . . . . . . . . . . . . . . 795
Problems Regarding Paper. . . . . . . . . . . . . . . . . . . . . . . . . . . . . . . . . . . . . . . . . . . . . . . 796
Remove Jammed Roll Paper. . . . . . . . . . . . . . . . . . . . . . . . . . . . . . . . . . . . . . . . . . . . . . . . . . . . . . . . . 797
Remove a Jammed Sheet. . . . . . . . . . . . . . . . . . . . . . . . . . . . . . . . . . . . . . . . . . . . . . . . . . . . . . . . . . . 801
Roll paper cannot be inserted into the Paper Feed Slot. . . . . . . . . . . . . . . . . . . . . . . . . . . . . . . . . . . . 804
Paper is not fed automatically. . . . . . . . . . . . . . . . . . . . . . . . . . . . . . . . . . . . . . . . . . . . . . . . . . . . . . . . 805
Roll Paper Is not Switched Automatically. . . . . . . . . . . . . . . . . . . . . . . . . . . . . . . . . . . . . . . . . . . . . . . 806
Roll Paper Is not Fed Automatically. . . . . . . . . . . . . . . . . . . . . . . . . . . . . . . . . . . . . . . . . . . . . . . . . . . . 807
Paper Source Does Not Switch When Roll Paper Is Used Up. . . . . . . . . . . . . . . . . . . . . . . . . . . . . . . 808
Roll Paper Remains/Lacks under Quantity Management. . . . . . . . . . . . . . . . . . . . . . . . . . . . . . . . . . . 809
Cannot load sheets. . . . . . . . . . . . . . . . . . . . . . . . . . . . . . . . . . . . . . . . . . . . . . . . . . . . . . . . . . . . . . . . 810
Paper is not cut straight. . . . . . . . . . . . . . . . . . . . . . . . . . . . . . . . . . . . . . . . . . . . . . . . . . . . . . . . . . . . . 811
Paper is not cut. . . . . . . . . . . . . . . . . . . . . . . . . . . . . . . . . . . . . . . . . . . . . . . . . . . . . . . . . . . . . . . . . . . 813
Cutter Blade Does Not Work While Cutting Is in Progress. . . . . . . . . . . . . . . . . . . . . . . . . . . . . . . . . . 814
The size of clear film cannot be detected. . . . . . . . . . . . . . . . . . . . . . . . . . . . . . . . . . . . . . . . . . . . . . . 815
Margins are wide. . . . . . . . . . . . . . . . . . . . . . . . . . . . . . . . . . . . . . . . . . . . . . . . . . . . . . . . . . . . . . . . . . 816
When printing on roll paper, the printed surface becomes scratched. . . . . . . . . . . . . . . . . . . . . . . . . . 817
Printing Does Not Start. . . . . . . . . . . . . . . . . . . . . . . . . . . . . . . . . . . . . . . . . . . . . . . . . . . 818
Printer Suddenly Stopped Working for Some Reason. . . . . . . . . . . . . . . . . . . . . . . . . . . . . . . . . . . . . . 819
The Data lamp on the Operation Panel does not light up. . . . . . . . . . . . . . . . . . . . . . . . . . . . . . . . . . . 824
The printer does not respond even if print jobs are sent. . . . . . . . . . . . . . . . . . . . . . . . . . . . . . . . . . . . 825
"Preparing the ink system." is displayed. . . . . . . . . . . . . . . . . . . . . . . . . . . . . . . . . . . . . . . . . . . . . . . . 826
"Agitating the ink" is displayed. . . . . . . . . . . . . . . . . . . . . . . . . . . . . . . . . . . . . . . . . . . . . . . . . . . . . . . . 827
Message Is Displayed and Borderless Printing Fails. . . . . . . . . . . . . . . . . . . . . . . . . . . . . . . . . . . . . . . 828
The Printer Stops During a Print Job. . . . . . . . . . . . . . . . . . . . . . . . . . . . . . . . . . . . . . . . 830
Printing stops and an error message is displayed. . . . . . . . . . . . . . . . . . . . . . . . . . . . . . . . . . . . . . . . . 831
The printer ejects blank, unprinted paper. . . . . . . . . . . . . . . . . . . . . . . . . . . . . . . . . . . . . . . . . . . . . . . 832
Problems with the Printing Quality. . . . . . . . . . . . . . . . . . . . . . . . . . . . . . . . . . . . . . . . . . 833
Printing is faint. . . . . . . . . . . . . . . . . . . . . . . . . . . . . . . . . . . . . . . . . . . . . . . . . . . . . . . . . . . . . . . . . . . . 834
Paper rubs against the Print Head. . . . . . . . . . . . . . . . . . . . . . . . . . . . . . . . . . . . . . . . . . . . . . . . . . . . . 836
The edges of the paper are dirty. . . . . . . . . . . . . . . . . . . . . . . . . . . . . . . . . . . . . . . . . . . . . . . . . . . . . . 838
The surface of the paper is dirty. . . . . . . . . . . . . . . . . . . . . . . . . . . . . . . . . . . . . . . . . . . . . . . . . . . . . . 841

The back side of the paper is dirty. . . . . . . . . . . . . . . . . . . . . . . . . . . . . . . . . . . . . . . . . . . . . . . . . . . . . 842
Immediately after borderless printing, the trailing edge margin is soiled during regular printing. . . . . . 844
Printed colors are inaccurate. . . . . . . . . . . . . . . . . . . . . . . . . . . . . . . . . . . . . . . . . . . . . . . . . . . . . . . . . 845
Banding in different colors occurs. . . . . . . . . . . . . . . . . . . . . . . . . . . . . . . . . . . . . . . . . . . . . . . . . . . . . 847
Colors in printed images are uneven. . . . . . . . . . . . . . . . . . . . . . . . . . . . . . . . . . . . . . . . . . . . . . . . . . . 850
Image edges are blurred or white banding occurs. . . . . . . . . . . . . . . . . . . . . . . . . . . . . . . . . . . . . . . . . 853
The length of the printed image in the paper ejection direction is not accurate. . . . . . . . . . . . . . . . . . . 855
Images are printed crooked. . . . . . . . . . . . . . . . . . . . . . . . . . . . . . . . . . . . . . . . . . . . . . . . . . . . . . . . . . 857
Documents are printed in monochrome. . . . . . . . . . . . . . . . . . . . . . . . . . . . . . . . . . . . . . . . . . . . . . . . . 858
Line thickness is not uniform. . . . . . . . . . . . . . . . . . . . . . . . . . . . . . . . . . . . . . . . . . . . . . . . . . . . . . . . . 859
Lines or colors are misaligned. . . . . . . . . . . . . . . . . . . . . . . . . . . . . . . . . . . . . . . . . . . . . . . . . . . . . . . . 861
Borders appear in borderless printing. . . . . . . . . . . . . . . . . . . . . . . . . . . . . . . . . . . . . . . . . . . . . . . . . . 863
Cannot Print over Network. . . . . . . . . . . . . . . . . . . . . . . . . . . . . . . . . . . . . . . . . . . . . . . . 864
Cannot Connect Printer to Network. . . . . . . . . . . . . . . . . . . . . . . . . . . . . . . . . . . . . . . . . . . . . . . . . . . . 865
Cannot Print over TCP/IP Network. . . . . . . . . . . . . . . . . . . . . . . . . . . . . . . . . . . . . . . . . . . . . . . . . . . . 866
Cannot Print over Bonjour networks. . . . . . . . . . . . . . . . . . . . . . . . . . . . . . . . . . . . . . . . . . . . . . . . . . . 867
Cannot Find Printer on Network. . . . . . . . . . . . . . . . . . . . . . . . . . . . . . . . . . . . . . . . . . . . 868
Cannot Find Printer on Check Printer Settings Screen (Windows). . . . . . . . . . . . . . . . . . . . . . . . . . . . 869
Cannot Proceed beyond Printer Connection Screen/Connect Cable Screen. . . . . . . . . . . . . . . . . . . . 870
Searching Printer by IP Address or Host Name During Setup. . . . . . . . . . . . . . . . . . . . . . . . . . . . . . . . 872
Cannot Find Printer while Using Wi-Fi. . . . . . . . . . . . . . . . . . . . . . . . . . . . . . . . . . . . . . . . . . . . . . . . . . 875
Cannot Find Printer while Using Wired LAN. . . . . . . . . . . . . . . . . . . . . . . . . . . . . . . . . . . . . . . . . . . . . 878
Cannot Print Using AirPrint. . . . . . . . . . . . . . . . . . . . . . . . . . . . . . . . . . . . . . . . . . . . . . . . . . . . . . . . . . 879
Installation Problems. . . . . . . . . . . . . . . . . . . . . . . . . . . . . . . . . . . . . . . . . . . . . . . . . . . . 880
Removing Printer Software. . . . . . . . . . . . . . . . . . . . . . . . . . . . . . . . . . . . . . . . . . . . . . . . . . . . . . . . . . 881
Taking Time to Setup Process (Windows). . . . . . . . . . . . . . . . . . . . . . . . . . . . . . . . . . . . . . . . . . . . . . . 883
Failed to Printer Driver Installation (Windows). . . . . . . . . . . . . . . . . . . . . . . . . . . . . . . . . . . . . . . . . . . . 884
HP-GL/2 problems. . . . . . . . . . . . . . . . . . . . . . . . . . . . . . . . . . . . . . . . . . . . . . . . . . . . . . 886
With HP-GL/2, printing is misaligned. . . . . . . . . . . . . . . . . . . . . . . . . . . . . . . . . . . . . . . . . . . . . . . . . . . 887
Lines or images are missing in printed HP-GL/2 jobs.. . . . . . . . . . . . . . . . . . . . . . . . . . . . . . . . . . . . . . 888
Lines are printed too thick or thin in HP-GL/2 print jobs. . . . . . . . . . . . . . . . . . . . . . . . . . . . . . . . . . . . 889
HP-GL/2 jobs are printed in monochrome (or color). . . . . . . . . . . . . . . . . . . . . . . . . . . . . . . . . . . . . . . 890
Printed colors of lines are inaccurate during HP-GL/2 printing. . . . . . . . . . . . . . . . . . . . . . . . . . . . . . . 891
HP-GL/2 jobs are printed 6 mm larger than specified. . . . . . . . . . . . . . . . . . . . . . . . . . . . . . . . . . . . . . 892
HP-GL/2 jobs are printed at maximum size, even if a standard size is specified. . . . . . . . . . . . . . . . . 893
HP-GL/2 printing takes a long time. . . . . . . . . . . . . . . . . . . . . . . . . . . . . . . . . . . . . . . . . . . . . . . . . . . . 894
The printer stops when printing a HP-GL/2 job (the carriage stops moving). . . . . . . . . . . . . . . . . . . . . 895
Other Problems. . . . . . . . . . . . . . . . . . . . . . . . . . . . . . . . . . . . . . . . . . . . . . . . . . . . . . . . . 896
Printer does not turn on. . . . . . . . . . . . . . . . . . . . . . . . . . . . . . . . . . . . . . . . . . . . . . . . . . . . . . . . . . . . . 897
If the Printer Makes a Strange Sound. . . . . . . . . . . . . . . . . . . . . . . . . . . . . . . . . . . . . . . . . . . . . . . . . . 898
Messages advising to check the maintenance cartridge are not cleared. . . . . . . . . . . . . . . . . . . . . . . 900
Printer consumes a lot of ink. . . . . . . . . . . . . . . . . . . . . . . . . . . . . . . . . . . . . . . . . . . . . . . . . . . . . . . . . 901
Printed pages are not collected cleanly in the basket. . . . . . . . . . . . . . . . . . . . . . . . . . . . . . . . . . . . . . 902
Printed pages are not collected cleanly in the stacker. . . . . . . . . . . . . . . . . . . . . . . . . . . . . . . . . . . . . . 903
Basket Lurches. . . . . . . . . . . . . . . . . . . . . . . . . . . . . . . . . . . . . . . . . . . . . . . . . . . . . . . . . . . . . . . . . . . 904
When Trim edge first is set, the trimmed paper is drawn into the roll unit. . . . . . . . . . . . . . . . . . . . . . . 905
Ink Level Detection. . . . . . . . . . . . . . . . . . . . . . . . . . . . . . . . . . . . . . . . . . . . . . . . . . . . . . . . . . . . . . . . 906
Media Type Selection does not Match Loaded Media Type. . . . . . . . . . . . . . . . . . . . . . . . . . . . . . . . . 907
List of Support Code for Error. . . . . . . . . . . . . . . . . . . . . . . . . . . . . . . . . . . . . . 908
1005. . . . . . . . . . . . . . . . . . . . . . . . . . . . . . . . . . . . . . . . . . . . . . . . . . . . . . . . . . . . . . . . . 911
100A. . . . . . . . . . . . . . . . . . . . . . . . . . . . . . . . . . . . . . . . . . . . . . . . . . . . . . . . . . . . . . . . . 912
100B. . . . . . . . . . . . . . . . . . . . . . . . . . . . . . . . . . . . . . . . . . . . . . . . . . . . . . . . . . . . . . . . . 913
100E. . . . . . . . . . . . . . . . . . . . . . . . . . . . . . . . . . . . . . . . . . . . . . . . . . . . . . . . . . . . . . . . . 914
100F. . . . . . . . . . . . . . . . . . . . . . . . . . . . . . . . . . . . . . . . . . . . . . . . . . . . . . . . . . . . . . . . . 915
1012. . . . . . . . . . . . . . . . . . . . . . . . . . . . . . . . . . . . . . . . . . . . . . . . . . . . . . . . . . . . . . . . . 916
1018. . . . . . . . . . . . . . . . . . . . . . . . . . . . . . . . . . . . . . . . . . . . . . . . . . . . . . . . . . . . . . . . . 917
1019. . . . . . . . . . . . . . . . . . . . . . . . . . . . . . . . . . . . . . . . . . . . . . . . . . . . . . . . . . . . . . . . . 918
1021. . . . . . . . . . . . . . . . . . . . . . . . . . . . . . . . . . . . . . . . . . . . . . . . . . . . . . . . . . . . . . . . . 919
1022. . . . . . . . . . . . . . . . . . . . . . . . . . . . . . . . . . . . . . . . . . . . . . . . . . . . . . . . . . . . . . . . . 920
1023. . . . . . . . . . . . . . . . . . . . . . . . . . . . . . . . . . . . . . . . . . . . . . . . . . . . . . . . . . . . . . . . . 921
1024. . . . . . . . . . . . . . . . . . . . . . . . . . . . . . . . . . . . . . . . . . . . . . . . . . . . . . . . . . . . . . . . . 922
1025. . . . . . . . . . . . . . . . . . . . . . . . . . . . . . . . . . . . . . . . . . . . . . . . . . . . . . . . . . . . . . . . . 923
1034. . . . . . . . . . . . . . . . . . . . . . . . . . . . . . . . . . . . . . . . . . . . . . . . . . . . . . . . . . . . . . . . . 924
1035. . . . . . . . . . . . . . . . . . . . . . . . . . . . . . . . . . . . . . . . . . . . . . . . . . . . . . . . . . . . . . . . . 925
1036. . . . . . . . . . . . . . . . . . . . . . . . . . . . . . . . . . . . . . . . . . . . . . . . . . . . . . . . . . . . . . . . . 926
1039. . . . . . . . . . . . . . . . . . . . . . . . . . . . . . . . . . . . . . . . . . . . . . . . . . . . . . . . . . . . . . . . . 927
1040. . . . . . . . . . . . . . . . . . . . . . . . . . . . . . . . . . . . . . . . . . . . . . . . . . . . . . . . . . . . . . . . . 928
1051. . . . . . . . . . . . . . . . . . . . . . . . . . . . . . . . . . . . . . . . . . . . . . . . . . . . . . . . . . . . . . . . . 929
1052. . . . . . . . . . . . . . . . . . . . . . . . . . . . . . . . . . . . . . . . . . . . . . . . . . . . . . . . . . . . . . . . . 930

1054. . . . . . . . . . . . . . . . . . . . . . . . . . . . . . . . . . . . . . . . . . . . . . . . . . . . . . . . . . . . . . . . . 931
1056. . . . . . . . . . . . . . . . . . . . . . . . . . . . . . . . . . . . . . . . . . . . . . . . . . . . . . . . . . . . . . . . . 932
1057. . . . . . . . . . . . . . . . . . . . . . . . . . . . . . . . . . . . . . . . . . . . . . . . . . . . . . . . . . . . . . . . . 933
1058. . . . . . . . . . . . . . . . . . . . . . . . . . . . . . . . . . . . . . . . . . . . . . . . . . . . . . . . . . . . . . . . . 934
1059. . . . . . . . . . . . . . . . . . . . . . . . . . . . . . . . . . . . . . . . . . . . . . . . . . . . . . . . . . . . . . . . . 935
1061. . . . . . . . . . . . . . . . . . . . . . . . . . . . . . . . . . . . . . . . . . . . . . . . . . . . . . . . . . . . . . . . . 936
1200. . . . . . . . . . . . . . . . . . . . . . . . . . . . . . . . . . . . . . . . . . . . . . . . . . . . . . . . . . . . . . . . . 937
1201. . . . . . . . . . . . . . . . . . . . . . . . . . . . . . . . . . . . . . . . . . . . . . . . . . . . . . . . . . . . . . . . . 938
1210. . . . . . . . . . . . . . . . . . . . . . . . . . . . . . . . . . . . . . . . . . . . . . . . . . . . . . . . . . . . . . . . . 939
1213. . . . . . . . . . . . . . . . . . . . . . . . . . . . . . . . . . . . . . . . . . . . . . . . . . . . . . . . . . . . . . . . . 940
1214. . . . . . . . . . . . . . . . . . . . . . . . . . . . . . . . . . . . . . . . . . . . . . . . . . . . . . . . . . . . . . . . . 941
1300. . . . . . . . . . . . . . . . . . . . . . . . . . . . . . . . . . . . . . . . . . . . . . . . . . . . . . . . . . . . . . . . . 942
1306. . . . . . . . . . . . . . . . . . . . . . . . . . . . . . . . . . . . . . . . . . . . . . . . . . . . . . . . . . . . . . . . . 943
1317. . . . . . . . . . . . . . . . . . . . . . . . . . . . . . . . . . . . . . . . . . . . . . . . . . . . . . . . . . . . . . . . . 944
1318. . . . . . . . . . . . . . . . . . . . . . . . . . . . . . . . . . . . . . . . . . . . . . . . . . . . . . . . . . . . . . . . . 945
1322. . . . . . . . . . . . . . . . . . . . . . . . . . . . . . . . . . . . . . . . . . . . . . . . . . . . . . . . . . . . . . . . . 946
1323. . . . . . . . . . . . . . . . . . . . . . . . . . . . . . . . . . . . . . . . . . . . . . . . . . . . . . . . . . . . . . . . . 947
1324. . . . . . . . . . . . . . . . . . . . . . . . . . . . . . . . . . . . . . . . . . . . . . . . . . . . . . . . . . . . . . . . . 948
1325. . . . . . . . . . . . . . . . . . . . . . . . . . . . . . . . . . . . . . . . . . . . . . . . . . . . . . . . . . . . . . . . . 949
1326. . . . . . . . . . . . . . . . . . . . . . . . . . . . . . . . . . . . . . . . . . . . . . . . . . . . . . . . . . . . . . . . . 950
1327. . . . . . . . . . . . . . . . . . . . . . . . . . . . . . . . . . . . . . . . . . . . . . . . . . . . . . . . . . . . . . . . . 951
1328. . . . . . . . . . . . . . . . . . . . . . . . . . . . . . . . . . . . . . . . . . . . . . . . . . . . . . . . . . . . . . . . . 952
1329. . . . . . . . . . . . . . . . . . . . . . . . . . . . . . . . . . . . . . . . . . . . . . . . . . . . . . . . . . . . . . . . . 953
1401. . . . . . . . . . . . . . . . . . . . . . . . . . . . . . . . . . . . . . . . . . . . . . . . . . . . . . . . . . . . . . . . . 954
1403. . . . . . . . . . . . . . . . . . . . . . . . . . . . . . . . . . . . . . . . . . . . . . . . . . . . . . . . . . . . . . . . . 955
1408. . . . . . . . . . . . . . . . . . . . . . . . . . . . . . . . . . . . . . . . . . . . . . . . . . . . . . . . . . . . . . . . . 956
1409. . . . . . . . . . . . . . . . . . . . . . . . . . . . . . . . . . . . . . . . . . . . . . . . . . . . . . . . . . . . . . . . . 957
140A. . . . . . . . . . . . . . . . . . . . . . . . . . . . . . . . . . . . . . . . . . . . . . . . . . . . . . . . . . . . . . . . . 958
140B. . . . . . . . . . . . . . . . . . . . . . . . . . . . . . . . . . . . . . . . . . . . . . . . . . . . . . . . . . . . . . . . . 959
140C. . . . . . . . . . . . . . . . . . . . . . . . . . . . . . . . . . . . . . . . . . . . . . . . . . . . . . . . . . . . . . . . . 960
140F. . . . . . . . . . . . . . . . . . . . . . . . . . . . . . . . . . . . . . . . . . . . . . . . . . . . . . . . . . . . . . . . . 961
1468. . . . . . . . . . . . . . . . . . . . . . . . . . . . . . . . . . . . . . . . . . . . . . . . . . . . . . . . . . . . . . . . . 962
1477. . . . . . . . . . . . . . . . . . . . . . . . . . . . . . . . . . . . . . . . . . . . . . . . . . . . . . . . . . . . . . . . . 963

1478. . . . . . . . . . . . . . . . . . . . . . . . . . . . . . . . . . . . . . . . . . . . . . . . . . . . . . . . . . . . . . . . . 964
1480. . . . . . . . . . . . . . . . . . . . . . . . . . . . . . . . . . . . . . . . . . . . . . . . . . . . . . . . . . . . . . . . . 965
1481. . . . . . . . . . . . . . . . . . . . . . . . . . . . . . . . . . . . . . . . . . . . . . . . . . . . . . . . . . . . . . . . . 966
1485. . . . . . . . . . . . . . . . . . . . . . . . . . . . . . . . . . . . . . . . . . . . . . . . . . . . . . . . . . . . . . . . . 967
1492. . . . . . . . . . . . . . . . . . . . . . . . . . . . . . . . . . . . . . . . . . . . . . . . . . . . . . . . . . . . . . . . . 968
1494. . . . . . . . . . . . . . . . . . . . . . . . . . . . . . . . . . . . . . . . . . . . . . . . . . . . . . . . . . . . . . . . . 969
1495. . . . . . . . . . . . . . . . . . . . . . . . . . . . . . . . . . . . . . . . . . . . . . . . . . . . . . . . . . . . . . . . . 970
1500. . . . . . . . . . . . . . . . . . . . . . . . . . . . . . . . . . . . . . . . . . . . . . . . . . . . . . . . . . . . . . . . . 971
1551. . . . . . . . . . . . . . . . . . . . . . . . . . . . . . . . . . . . . . . . . . . . . . . . . . . . . . . . . . . . . . . . . 972
1552. . . . . . . . . . . . . . . . . . . . . . . . . . . . . . . . . . . . . . . . . . . . . . . . . . . . . . . . . . . . . . . . . 973
1570. . . . . . . . . . . . . . . . . . . . . . . . . . . . . . . . . . . . . . . . . . . . . . . . . . . . . . . . . . . . . . . . . 974
1571. . . . . . . . . . . . . . . . . . . . . . . . . . . . . . . . . . . . . . . . . . . . . . . . . . . . . . . . . . . . . . . . . 975
1660. . . . . . . . . . . . . . . . . . . . . . . . . . . . . . . . . . . . . . . . . . . . . . . . . . . . . . . . . . . . . . . . . 976
168B. . . . . . . . . . . . . . . . . . . . . . . . . . . . . . . . . . . . . . . . . . . . . . . . . . . . . . . . . . . . . . . . . 977
1720. . . . . . . . . . . . . . . . . . . . . . . . . . . . . . . . . . . . . . . . . . . . . . . . . . . . . . . . . . . . . . . . . 978
1721. . . . . . . . . . . . . . . . . . . . . . . . . . . . . . . . . . . . . . . . . . . . . . . . . . . . . . . . . . . . . . . . . 979
1722. . . . . . . . . . . . . . . . . . . . . . . . . . . . . . . . . . . . . . . . . . . . . . . . . . . . . . . . . . . . . . . . . 980
1730. . . . . . . . . . . . . . . . . . . . . . . . . . . . . . . . . . . . . . . . . . . . . . . . . . . . . . . . . . . . . . . . . 981
1731. . . . . . . . . . . . . . . . . . . . . . . . . . . . . . . . . . . . . . . . . . . . . . . . . . . . . . . . . . . . . . . . . 982
1752. . . . . . . . . . . . . . . . . . . . . . . . . . . . . . . . . . . . . . . . . . . . . . . . . . . . . . . . . . . . . . . . . 983
1753. . . . . . . . . . . . . . . . . . . . . . . . . . . . . . . . . . . . . . . . . . . . . . . . . . . . . . . . . . . . . . . . . 984
1756. . . . . . . . . . . . . . . . . . . . . . . . . . . . . . . . . . . . . . . . . . . . . . . . . . . . . . . . . . . . . . . . . 985
1757. . . . . . . . . . . . . . . . . . . . . . . . . . . . . . . . . . . . . . . . . . . . . . . . . . . . . . . . . . . . . . . . . 986
1875. . . . . . . . . . . . . . . . . . . . . . . . . . . . . . . . . . . . . . . . . . . . . . . . . . . . . . . . . . . . . . . . . 987
2001. . . . . . . . . . . . . . . . . . . . . . . . . . . . . . . . . . . . . . . . . . . . . . . . . . . . . . . . . . . . . . . . . 988
2002. . . . . . . . . . . . . . . . . . . . . . . . . . . . . . . . . . . . . . . . . . . . . . . . . . . . . . . . . . . . . . . . . 989
2130. . . . . . . . . . . . . . . . . . . . . . . . . . . . . . . . . . . . . . . . . . . . . . . . . . . . . . . . . . . . . . . . . 990
2131. . . . . . . . . . . . . . . . . . . . . . . . . . . . . . . . . . . . . . . . . . . . . . . . . . . . . . . . . . . . . . . . . 991
2132. . . . . . . . . . . . . . . . . . . . . . . . . . . . . . . . . . . . . . . . . . . . . . . . . . . . . . . . . . . . . . . . . 992
3000. . . . . . . . . . . . . . . . . . . . . . . . . . . . . . . . . . . . . . . . . . . . . . . . . . . . . . . . . . . . . . . . . 993
3001. . . . . . . . . . . . . . . . . . . . . . . . . . . . . . . . . . . . . . . . . . . . . . . . . . . . . . . . . . . . . . . . . 994
3200. . . . . . . . . . . . . . . . . . . . . . . . . . . . . . . . . . . . . . . . . . . . . . . . . . . . . . . . . . . . . . . . . 995
3201. . . . . . . . . . . . . . . . . . . . . . . . . . . . . . . . . . . . . . . . . . . . . . . . . . . . . . . . . . . . . . . . . 996

3250. . . . . . . . . . . . . . . . . . . . . . . . . . . . . . . . . . . . . . . . . . . . . . . . . . . . . . . . . . . . . . . . . 997
3300. . . . . . . . . . . . . . . . . . . . . . . . . . . . . . . . . . . . . . . . . . . . . . . . . . . . . . . . . . . . . . . . . 998
3301. . . . . . . . . . . . . . . . . . . . . . . . . . . . . . . . . . . . . . . . . . . . . . . . . . . . . . . . . . . . . . . . . 999
3302. . . . . . . . . . . . . . . . . . . . . . . . . . . . . . . . . . . . . . . . . . . . . . . . . . . . . . . . . . . . . . . . 1000
3303. . . . . . . . . . . . . . . . . . . . . . . . . . . . . . . . . . . . . . . . . . . . . . . . . . . . . . . . . . . . . . . . 1001
3304. . . . . . . . . . . . . . . . . . . . . . . . . . . . . . . . . . . . . . . . . . . . . . . . . . . . . . . . . . . . . . . . 1002
3306. . . . . . . . . . . . . . . . . . . . . . . . . . . . . . . . . . . . . . . . . . . . . . . . . . . . . . . . . . . . . . . . 1003
3311. . . . . . . . . . . . . . . . . . . . . . . . . . . . . . . . . . . . . . . . . . . . . . . . . . . . . . . . . . . . . . . . 1004
3312. . . . . . . . . . . . . . . . . . . . . . . . . . . . . . . . . . . . . . . . . . . . . . . . . . . . . . . . . . . . . . . . 1005
3313. . . . . . . . . . . . . . . . . . . . . . . . . . . . . . . . . . . . . . . . . . . . . . . . . . . . . . . . . . . . . . . . 1006
3314. . . . . . . . . . . . . . . . . . . . . . . . . . . . . . . . . . . . . . . . . . . . . . . . . . . . . . . . . . . . . . . . 1007
3315. . . . . . . . . . . . . . . . . . . . . . . . . . . . . . . . . . . . . . . . . . . . . . . . . . . . . . . . . . . . . . . . 1008
3316. . . . . . . . . . . . . . . . . . . . . . . . . . . . . . . . . . . . . . . . . . . . . . . . . . . . . . . . . . . . . . . . 1009
3317. . . . . . . . . . . . . . . . . . . . . . . . . . . . . . . . . . . . . . . . . . . . . . . . . . . . . . . . . . . . . . . . 1010
3331. . . . . . . . . . . . . . . . . . . . . . . . . . . . . . . . . . . . . . . . . . . . . . . . . . . . . . . . . . . . . . . . 1011
3332. . . . . . . . . . . . . . . . . . . . . . . . . . . . . . . . . . . . . . . . . . . . . . . . . . . . . . . . . . . . . . . . 1012
3333. . . . . . . . . . . . . . . . . . . . . . . . . . . . . . . . . . . . . . . . . . . . . . . . . . . . . . . . . . . . . . . . 1013
3334. . . . . . . . . . . . . . . . . . . . . . . . . . . . . . . . . . . . . . . . . . . . . . . . . . . . . . . . . . . . . . . . 1014
3335. . . . . . . . . . . . . . . . . . . . . . . . . . . . . . . . . . . . . . . . . . . . . . . . . . . . . . . . . . . . . . . . 1015
3336. . . . . . . . . . . . . . . . . . . . . . . . . . . . . . . . . . . . . . . . . . . . . . . . . . . . . . . . . . . . . . . . 1016
3338. . . . . . . . . . . . . . . . . . . . . . . . . . . . . . . . . . . . . . . . . . . . . . . . . . . . . . . . . . . . . . . . 1017
3341. . . . . . . . . . . . . . . . . . . . . . . . . . . . . . . . . . . . . . . . . . . . . . . . . . . . . . . . . . . . . . . . 1018
3342. . . . . . . . . . . . . . . . . . . . . . . . . . . . . . . . . . . . . . . . . . . . . . . . . . . . . . . . . . . . . . . . 1019
3350. . . . . . . . . . . . . . . . . . . . . . . . . . . . . . . . . . . . . . . . . . . . . . . . . . . . . . . . . . . . . . . . 1020
3351. . . . . . . . . . . . . . . . . . . . . . . . . . . . . . . . . . . . . . . . . . . . . . . . . . . . . . . . . . . . . . . . 1021
3352. . . . . . . . . . . . . . . . . . . . . . . . . . . . . . . . . . . . . . . . . . . . . . . . . . . . . . . . . . . . . . . . 1022
3414. . . . . . . . . . . . . . . . . . . . . . . . . . . . . . . . . . . . . . . . . . . . . . . . . . . . . . . . . . . . . . . . 1023
3415. . . . . . . . . . . . . . . . . . . . . . . . . . . . . . . . . . . . . . . . . . . . . . . . . . . . . . . . . . . . . . . . 1024
3416. . . . . . . . . . . . . . . . . . . . . . . . . . . . . . . . . . . . . . . . . . . . . . . . . . . . . . . . . . . . . . . . 1025
3417. . . . . . . . . . . . . . . . . . . . . . . . . . . . . . . . . . . . . . . . . . . . . . . . . . . . . . . . . . . . . . . . 1026
3418. . . . . . . . . . . . . . . . . . . . . . . . . . . . . . . . . . . . . . . . . . . . . . . . . . . . . . . . . . . . . . . . 1027
3419. . . . . . . . . . . . . . . . . . . . . . . . . . . . . . . . . . . . . . . . . . . . . . . . . . . . . . . . . . . . . . . . 1028
3420. . . . . . . . . . . . . . . . . . . . . . . . . . . . . . . . . . . . . . . . . . . . . . . . . . . . . . . . . . . . . . . . 1029

3421. . . . . . . . . . . . . . . . . . . . . . . . . . . . . . . . . . . . . . . . . . . . . . . . . . . . . . . . . . . . . . . . 1030
3422. . . . . . . . . . . . . . . . . . . . . . . . . . . . . . . . . . . . . . . . . . . . . . . . . . . . . . . . . . . . . . . . 1031
3423. . . . . . . . . . . . . . . . . . . . . . . . . . . . . . . . . . . . . . . . . . . . . . . . . . . . . . . . . . . . . . . . 1032
3424. . . . . . . . . . . . . . . . . . . . . . . . . . . . . . . . . . . . . . . . . . . . . . . . . . . . . . . . . . . . . . . . 1033
3448. . . . . . . . . . . . . . . . . . . . . . . . . . . . . . . . . . . . . . . . . . . . . . . . . . . . . . . . . . . . . . . . 1034
3451. . . . . . . . . . . . . . . . . . . . . . . . . . . . . . . . . . . . . . . . . . . . . . . . . . . . . . . . . . . . . . . . 1035
4107. . . . . . . . . . . . . . . . . . . . . . . . . . . . . . . . . . . . . . . . . . . . . . . . . . . . . . . . . . . . . . . . 1036
4111. . . . . . . . . . . . . . . . . . . . . . . . . . . . . . . . . . . . . . . . . . . . . . . . . . . . . . . . . . . . . . . . 1037
4112. . . . . . . . . . . . . . . . . . . . . . . . . . . . . . . . . . . . . . . . . . . . . . . . . . . . . . . . . . . . . . . . 1038
4113. . . . . . . . . . . . . . . . . . . . . . . . . . . . . . . . . . . . . . . . . . . . . . . . . . . . . . . . . . . . . . . . 1039
4114. . . . . . . . . . . . . . . . . . . . . . . . . . . . . . . . . . . . . . . . . . . . . . . . . . . . . . . . . . . . . . . . 1040
4116. . . . . . . . . . . . . . . . . . . . . . . . . . . . . . . . . . . . . . . . . . . . . . . . . . . . . . . . . . . . . . . . 1041
4117. . . . . . . . . . . . . . . . . . . . . . . . . . . . . . . . . . . . . . . . . . . . . . . . . . . . . . . . . . . . . . . . 1042
4118. . . . . . . . . . . . . . . . . . . . . . . . . . . . . . . . . . . . . . . . . . . . . . . . . . . . . . . . . . . . . . . . 1043
4119. . . . . . . . . . . . . . . . . . . . . . . . . . . . . . . . . . . . . . . . . . . . . . . . . . . . . . . . . . . . . . . . 1044
4120. . . . . . . . . . . . . . . . . . . . . . . . . . . . . . . . . . . . . . . . . . . . . . . . . . . . . . . . . . . . . . . . 1045
4121. . . . . . . . . . . . . . . . . . . . . . . . . . . . . . . . . . . . . . . . . . . . . . . . . . . . . . . . . . . . . . . . 1046
4122. . . . . . . . . . . . . . . . . . . . . . . . . . . . . . . . . . . . . . . . . . . . . . . . . . . . . . . . . . . . . . . . 1047
4801. . . . . . . . . . . . . . . . . . . . . . . . . . . . . . . . . . . . . . . . . . . . . . . . . . . . . . . . . . . . . . . . 1048
4803. . . . . . . . . . . . . . . . . . . . . . . . . . . . . . . . . . . . . . . . . . . . . . . . . . . . . . . . . . . . . . . . 1049
4804. . . . . . . . . . . . . . . . . . . . . . . . . . . . . . . . . . . . . . . . . . . . . . . . . . . . . . . . . . . . . . . . 1050
4805. . . . . . . . . . . . . . . . . . . . . . . . . . . . . . . . . . . . . . . . . . . . . . . . . . . . . . . . . . . . . . . . 1051
4806. . . . . . . . . . . . . . . . . . . . . . . . . . . . . . . . . . . . . . . . . . . . . . . . . . . . . . . . . . . . . . . . 1052
4900. . . . . . . . . . . . . . . . . . . . . . . . . . . . . . . . . . . . . . . . . . . . . . . . . . . . . . . . . . . . . . . . 1053
4901. . . . . . . . . . . . . . . . . . . . . . . . . . . . . . . . . . . . . . . . . . . . . . . . . . . . . . . . . . . . . . . . 1054
4903. . . . . . . . . . . . . . . . . . . . . . . . . . . . . . . . . . . . . . . . . . . . . . . . . . . . . . . . . . . . . . . . 1055
4905. . . . . . . . . . . . . . . . . . . . . . . . . . . . . . . . . . . . . . . . . . . . . . . . . . . . . . . . . . . . . . . . 1056
4909. . . . . . . . . . . . . . . . . . . . . . . . . . . . . . . . . . . . . . . . . . . . . . . . . . . . . . . . . . . . . . . . 1057
4910. . . . . . . . . . . . . . . . . . . . . . . . . . . . . . . . . . . . . . . . . . . . . . . . . . . . . . . . . . . . . . . . 1058
4911. . . . . . . . . . . . . . . . . . . . . . . . . . . . . . . . . . . . . . . . . . . . . . . . . . . . . . . . . . . . . . . . 1059
4913. . . . . . . . . . . . . . . . . . . . . . . . . . . . . . . . . . . . . . . . . . . . . . . . . . . . . . . . . . . . . . . . 1060
4920. . . . . . . . . . . . . . . . . . . . . . . . . . . . . . . . . . . . . . . . . . . . . . . . . . . . . . . . . . . . . . . . 1061
4922. . . . . . . . . . . . . . . . . . . . . . . . . . . . . . . . . . . . . . . . . . . . . . . . . . . . . . . . . . . . . . . . 1063

4931. . . . . . . . . . . . . . . . . . . . . . . . . . . . . . . . . . . . . . . . . . . . . . . . . . . . . . . . . . . . . . . . 1064
4932. . . . . . . . . . . . . . . . . . . . . . . . . . . . . . . . . . . . . . . . . . . . . . . . . . . . . . . . . . . . . . . . 1065
4933. . . . . . . . . . . . . . . . . . . . . . . . . . . . . . . . . . . . . . . . . . . . . . . . . . . . . . . . . . . . . . . . 1066
4934. . . . . . . . . . . . . . . . . . . . . . . . . . . . . . . . . . . . . . . . . . . . . . . . . . . . . . . . . . . . . . . . 1067
4935. . . . . . . . . . . . . . . . . . . . . . . . . . . . . . . . . . . . . . . . . . . . . . . . . . . . . . . . . . . . . . . . 1068
4937. . . . . . . . . . . . . . . . . . . . . . . . . . . . . . . . . . . . . . . . . . . . . . . . . . . . . . . . . . . . . . . . 1069
4950. . . . . . . . . . . . . . . . . . . . . . . . . . . . . . . . . . . . . . . . . . . . . . . . . . . . . . . . . . . . . . . . 1070
4951. . . . . . . . . . . . . . . . . . . . . . . . . . . . . . . . . . . . . . . . . . . . . . . . . . . . . . . . . . . . . . . . 1071
4952. . . . . . . . . . . . . . . . . . . . . . . . . . . . . . . . . . . . . . . . . . . . . . . . . . . . . . . . . . . . . . . . 1072
4953. . . . . . . . . . . . . . . . . . . . . . . . . . . . . . . . . . . . . . . . . . . . . . . . . . . . . . . . . . . . . . . . 1073
4954. . . . . . . . . . . . . . . . . . . . . . . . . . . . . . . . . . . . . . . . . . . . . . . . . . . . . . . . . . . . . . . . 1074
4955. . . . . . . . . . . . . . . . . . . . . . . . . . . . . . . . . . . . . . . . . . . . . . . . . . . . . . . . . . . . . . . . 1075
4956. . . . . . . . . . . . . . . . . . . . . . . . . . . . . . . . . . . . . . . . . . . . . . . . . . . . . . . . . . . . . . . . 1076
5106. . . . . . . . . . . . . . . . . . . . . . . . . . . . . . . . . . . . . . . . . . . . . . . . . . . . . . . . . . . . . . . . 1077
5200. . . . . . . . . . . . . . . . . . . . . . . . . . . . . . . . . . . . . . . . . . . . . . . . . . . . . . . . . . . . . . . . 1078
5A60. . . . . . . . . . . . . . . . . . . . . . . . . . . . . . . . . . . . . . . . . . . . . . . . . . . . . . . . . . . . . . . . 1079
5A61. . . . . . . . . . . . . . . . . . . . . . . . . . . . . . . . . . . . . . . . . . . . . . . . . . . . . . . . . . . . . . . . 1080
5B10. . . . . . . . . . . . . . . . . . . . . . . . . . . . . . . . . . . . . . . . . . . . . . . . . . . . . . . . . . . . . . . . 1081
5B16. . . . . . . . . . . . . . . . . . . . . . . . . . . . . . . . . . . . . . . . . . . . . . . . . . . . . . . . . . . . . . . . 1082
5B20. . . . . . . . . . . . . . . . . . . . . . . . . . . . . . . . . . . . . . . . . . . . . . . . . . . . . . . . . . . . . . . . 1083
5B21. . . . . . . . . . . . . . . . . . . . . . . . . . . . . . . . . . . . . . . . . . . . . . . . . . . . . . . . . . . . . . . . 1084
5C00. . . . . . . . . . . . . . . . . . . . . . . . . . . . . . . . . . . . . . . . . . . . . . . . . . . . . . . . . . . . . . . . 1085
6502. . . . . . . . . . . . . . . . . . . . . . . . . . . . . . . . . . . . . . . . . . . . . . . . . . . . . . . . . . . . . . . . 1086
6700. . . . . . . . . . . . . . . . . . . . . . . . . . . . . . . . . . . . . . . . . . . . . . . . . . . . . . . . . . . . . . . . 1087
6702. . . . . . . . . . . . . . . . . . . . . . . . . . . . . . . . . . . . . . . . . . . . . . . . . . . . . . . . . . . . . . . . 1088
6820. . . . . . . . . . . . . . . . . . . . . . . . . . . . . . . . . . . . . . . . . . . . . . . . . . . . . . . . . . . . . . . . 1089
6900. . . . . . . . . . . . . . . . . . . . . . . . . . . . . . . . . . . . . . . . . . . . . . . . . . . . . . . . . . . . . . . . 1090
6901. . . . . . . . . . . . . . . . . . . . . . . . . . . . . . . . . . . . . . . . . . . . . . . . . . . . . . . . . . . . . . . . 1091
6902. . . . . . . . . . . . . . . . . . . . . . . . . . . . . . . . . . . . . . . . . . . . . . . . . . . . . . . . . . . . . . . . 1092
6910. . . . . . . . . . . . . . . . . . . . . . . . . . . . . . . . . . . . . . . . . . . . . . . . . . . . . . . . . . . . . . . . 1093
6920. . . . . . . . . . . . . . . . . . . . . . . . . . . . . . . . . . . . . . . . . . . . . . . . . . . . . . . . . . . . . . . . 1094
6921. . . . . . . . . . . . . . . . . . . . . . . . . . . . . . . . . . . . . . . . . . . . . . . . . . . . . . . . . . . . . . . . 1095
6930. . . . . . . . . . . . . . . . . . . . . . . . . . . . . . . . . . . . . . . . . . . . . . . . . . . . . . . . . . . . . . . . 1096

6931. . . . . . . . . . . . . . . . . . . . . . . . . . . . . . . . . . . . . . . . . . . . . . . . . . . . . . . . . . . . . . . . 1097
6932. . . . . . . . . . . . . . . . . . . . . . . . . . . . . . . . . . . . . . . . . . . . . . . . . . . . . . . . . . . . . . . . 1098
6933. . . . . . . . . . . . . . . . . . . . . . . . . . . . . . . . . . . . . . . . . . . . . . . . . . . . . . . . . . . . . . . . 1099
6940. . . . . . . . . . . . . . . . . . . . . . . . . . . . . . . . . . . . . . . . . . . . . . . . . . . . . . . . . . . . . . . . 1100
6941. . . . . . . . . . . . . . . . . . . . . . . . . . . . . . . . . . . . . . . . . . . . . . . . . . . . . . . . . . . . . . . . 1101
6942. . . . . . . . . . . . . . . . . . . . . . . . . . . . . . . . . . . . . . . . . . . . . . . . . . . . . . . . . . . . . . . . 1102
6943. . . . . . . . . . . . . . . . . . . . . . . . . . . . . . . . . . . . . . . . . . . . . . . . . . . . . . . . . . . . . . . . 1103
6944. . . . . . . . . . . . . . . . . . . . . . . . . . . . . . . . . . . . . . . . . . . . . . . . . . . . . . . . . . . . . . . . 1104
6945. . . . . . . . . . . . . . . . . . . . . . . . . . . . . . . . . . . . . . . . . . . . . . . . . . . . . . . . . . . . . . . . 1105
6946. . . . . . . . . . . . . . . . . . . . . . . . . . . . . . . . . . . . . . . . . . . . . . . . . . . . . . . . . . . . . . . . 1106
7050. . . . . . . . . . . . . . . . . . . . . . . . . . . . . . . . . . . . . . . . . . . . . . . . . . . . . . . . . . . . . . . . 1107
7051. . . . . . . . . . . . . . . . . . . . . . . . . . . . . . . . . . . . . . . . . . . . . . . . . . . . . . . . . . . . . . . . 1108
7052. . . . . . . . . . . . . . . . . . . . . . . . . . . . . . . . . . . . . . . . . . . . . . . . . . . . . . . . . . . . . . . . 1109
8200. . . . . . . . . . . . . . . . . . . . . . . . . . . . . . . . . . . . . . . . . . . . . . . . . . . . . . . . . . . . . . . . 1110
9000. . . . . . . . . . . . . . . . . . . . . . . . . . . . . . . . . . . . . . . . . . . . . . . . . . . . . . . . . . . . . . . . 1111
9001. . . . . . . . . . . . . . . . . . . . . . . . . . . . . . . . . . . . . . . . . . . . . . . . . . . . . . . . . . . . . . . . 1112
9110. . . . . . . . . . . . . . . . . . . . . . . . . . . . . . . . . . . . . . . . . . . . . . . . . . . . . . . . . . . . . . . . 1113
B20A. . . . . . . . . . . . . . . . . . . . . . . . . . . . . . . . . . . . . . . . . . . . . . . . . . . . . . . . . . . . . . . . 1114
B510. . . . . . . . . . . . . . . . . . . . . . . . . . . . . . . . . . . . . . . . . . . . . . . . . . . . . . . . . . . . . . . . 1115

Using This Online Manual
Symbols Used in This DocumentTouch-enabled Device Users (Windows)
Symbols Used in This Document
WarningInstructions that, if ignored, could result in death, serious personal injury, or property damage causedby incorrect operation of the equipment. These must be observed for safe operation.
CautionInstructions that, if ignored, could result in personal injury or property damage caused by incorrectoperation of the equipment. These must be observed for safe operation.
ImportantInstructions including important information that must be observed to avoid damage and injury orimproper use of the product. Be sure to read these instructions.
NoteInstructions including notes for operation and additional explanations.
Basics
Instructions explaining basic operations of your product.
Note• Icons may vary depending on your product.
Touch-enabled Device Users (Windows)For touch actions, you need to replace "right-click" in this document with the action set on the operatingsystem. For example, if the action is set to "press and hold" on your operating system, replace "right-click"with "press and hold."
21

Trademarks and Licenses
• Microsoft is a registered trademark of Microsoft Corporation.• Windows is a trademark or registered trademark of Microsoft Corporation in the U.S. and/or other
countries.• Windows Vista is a trademark or registered trademark of Microsoft Corporation in the U.S. and/or other
countries.• Internet Explorer is a trademark or registered trademark of Microsoft Corporation in the U.S. and/or
other countries.• Mac, Mac OS, macOS, OS X, AirPort, App Store, AirPrint, the AirPrint logo, Safari, Bonjour, iPad, iPad
Air, iPad mini, iPhone and iPod touch are trademarks of Apple Inc., registered in the U.S. and othercountries.
• IOS is a trademark or registered trademark of Cisco in the U.S. and other countries and is used underlicense.
• Google Cloud Print, Google Chrome, Chrome OS, Chromebook, Android, Google Drive, Google Appsand Google Analytics are either registered trademarks or trademarks of Google Inc. Google Play andGoogle Play Logo are trademarks of Google LLC.
• Adobe, Acrobat, Flash, Photoshop, Photoshop Elements, Lightroom, Adobe RGB and Adobe RGB(1998) are either registered trademarks or trademarks of Adobe Systems Incorporated in the UnitedStates and/or other countries.
• Bluetooth is a trademark of Bluetooth SIG, Inc., U.S.A. and licensed to Canon Inc.• Autodesk and AutoCAD are registered trademarks or trademarks of Autodesk, Inc., and/or its
subsidiaries and/or affiliates in the USA and/or other countries.• USB Type-C™ is a trademark of USB Implementers Forum.
Note• The formal name of Windows Vista is Microsoft Windows Vista operating system.
Copyright (c) 2003-2015 Apple Inc. All rights reserved.
Redistribution and use in source and binary forms, with or without modification, are permitted providedthat the following conditions are met:
1. Redistributions of source code must retain the above copyright notice, this list of conditions and thefollowing disclaimer.
2. Redistributions in binary form must reproduce the above copyright notice, this list of conditions andthe following disclaimer in the documentation and/or other materials provided with the distribution.
3. Neither the name of Apple Inc. ("Apple") nor the names of its contributors may be used to endorse orpromote products derived from this software without specific prior written permission.
THIS SOFTWARE IS PROVIDED BY APPLE AND ITS CONTRIBUTORS "AS IS" AND ANY EXPRESSOR IMPLIED WARRANTIES, INCLUDING, BUT NOT LIMITED TO, THE IMPLIED WARRANTIESOF MERCHANTABILITY AND FITNESS FOR A PARTICULAR PURPOSE ARE DISCLAIMED. INNO EVENT SHALL APPLE OR ITS CONTRIBUTORS BE LIABLE FOR ANY DIRECT, INDIRECT,INCIDENTAL, SPECIAL, EXEMPLARY, OR CONSEQUENTIAL DAMAGES (INCLUDING, BUT NOTLIMITED TO, PROCUREMENT OF SUBSTITUTE GOODS OR SERVICES; LOSS OF USE, DATA,OR PROFITS; OR BUSINESS INTERRUPTION) HOWEVER CAUSED AND ON ANY THEORY OFLIABILITY, WHETHER IN CONTRACT, STRICT LIABILITY, OR TORT (INCLUDING NEGLIGENCE OR
22

OTHERWISE) ARISING IN ANY WAY OUT OF THE USE OF THIS SOFTWARE, EVEN IF ADVISED OFTHE POSSIBILITY OF SUCH DAMAGE.
Apache License
Version 2.0, January 2004
http://www.apache.org/licenses/TERMS AND CONDITIONS FOR USE, REPRODUCTION, AND DISTRIBUTION
1. Definitions.1.
"License" shall mean the terms and conditions for use, reproduction, and distribution as defined bySections 1 through 9 of this document.
"Licensor" shall mean the copyright owner or entity authorized by the copyright owner that is grantingthe License.
"Legal Entity" shall mean the union of the acting entity and all other entities that control, are controlledby, or are under common control with that entity. For the purposes of this definition, "control" means(i) the power, direct or indirect, to cause the direction or management of such entity, whether bycontract or otherwise, or (ii) ownership of fifty percent (50%) or more of the outstanding shares, or (iii)beneficial ownership of such entity.
"You" (or "Your") shall mean an individual or Legal Entity exercising permissions granted by thisLicense.
"Source" form shall mean the preferred form for making modifications, including but not limited tosoftware source code, documentation source, and configuration files.
"Object" form shall mean any form resulting from mechanical transformation or translation of a Sourceform, including but not limited to compiled object code, generated documentation, and conversions toother media types.
"Work" shall mean the work of authorship, whether in Source or Object form, made available underthe License, as indicated by a copyright notice that is included in or attached to the work (an exampleis provided in the Appendix below).
"Derivative Works" shall mean any work, whether in Source or Object form, that is based on (orderived from) the Work and for which the editorial revisions, annotations, elaborations, or othermodifications represent, as a whole, an original work of authorship. For the purposes of this License,Derivative Works shall not include works that remain separable from, or merely link (or bind by name)to the interfaces of, the Work and Derivative Works thereof.
"Contribution" shall mean any work of authorship, including the original version of the Workand any modifications or additions to that Work or Derivative Works thereof, that is intentionallysubmitted to Licensor for inclusion in the Work by the copyright owner or by an individual orLegal Entity authorized to submit on behalf of the copyright owner. For the purposes of thisdefinition, "submitted" means any form of electronic, verbal, or written communication sent to theLicensor or its representatives, including but not limited to communication on electronic mailing lists,source code control systems, and issue tracking systems that are managed by, or on behalf of,the Licensor for the purpose of discussing and improving the Work, but excluding communicationthat is conspicuously marked or otherwise designated in writing by the copyright owner as "Not aContribution."
23

"Contributor" shall mean Licensor and any individual or Legal Entity on behalf of whom a Contributionhas been received by Licensor and subsequently incorporated within the Work.
2. Grant of Copyright License. Subject to the terms and conditions of this License, each Contributorhereby grants to You a perpetual, worldwide, non-exclusive, no-charge, royalty-free, irrevocablecopyright license to reproduce, prepare Derivative Works of, publicly display, publicly perform,sublicense, and distribute the Work and such Derivative Works in Source or Object form.
3. Grant of Patent License. Subject to the terms and conditions of this License, each Contributor herebygrants to You a perpetual, worldwide, non-exclusive, no-charge, royalty-free, irrevocable (exceptas stated in this section) patent license to make, have made, use, offer to sell, sell, import, andotherwise transfer the Work, where such license applies only to those patent claims licensable bysuch Contributor that are necessarily infringed by their Contribution(s) alone or by combination oftheir Contribution(s) with the Work to which such Contribution(s) was submitted. If You institutepatent litigation against any entity (including a cross-claim or counterclaim in a lawsuit) alleging thatthe Work or a Contribution incorporated within the Work constitutes direct or contributory patentinfringement, then any patent licenses granted to You under this License for that Work shall terminateas of the date such litigation is filed.
4. Redistribution. You may reproduce and distribute copies of the Work or Derivative Works thereof in4.any medium, with or without modifications, and in Source or Object form, provided that You meet thefollowing conditions:
1. You must give any other recipients of the Work or Derivative Works a copy of this License; and2. You must cause any modified files to carry prominent notices stating that You changed the files;
and3. You must retain, in the Source form of any Derivative Works that You distribute, all copyright,
patent, trademark, and attribution notices from the Source form of the Work, excluding thosenotices that do not pertain to any part of the Derivative Works; and
4. If the Work includes a "NOTICE" text file as part of its distribution, then any Derivative Works4.that You distribute must include a readable copy of the attribution notices contained within suchNOTICE file, excluding those notices that do not pertain to any part of the Derivative Works, inat least one of the following places: within a NOTICE text file distributed as part of the DerivativeWorks; within the Source form or documentation, if provided along with the Derivative Works;or, within a display generated by the Derivative Works, if and wherever such third-party noticesnormally appear. The contents of the NOTICE file are for informational purposes only and do notmodify the License. You may add Your own attribution notices within Derivative Works that Youdistribute, alongside or as an addendum to the NOTICE text from the Work, provided that suchadditional attribution notices cannot be construed as modifying the License.
You may add Your own copyright statement to Your modifications and may provide additional ordifferent license terms and conditions for use, reproduction, or distribution of Your modifications,or for any such Derivative Works as a whole, provided Your use, reproduction, and distribution ofthe Work otherwise complies with the conditions stated in this License.
5. Submission of Contributions. Unless You explicitly state otherwise, any Contribution intentionallysubmitted for inclusion in the Work by You to the Licensor shall be under the terms and conditionsof this License, without any additional terms or conditions. Notwithstanding the above, nothing hereinshall supersede or modify the terms of any separate license agreement you may have executed withLicensor regarding such Contributions.
24

6. Trademarks. This License does not grant permission to use the trade names, trademarks, servicemarks, or product names of the Licensor, except as required for reasonable and customary use indescribing the origin of the Work and reproducing the content of the NOTICE file.
7. Disclaimer of Warranty. Unless required by applicable law or agreed to in writing, Licensor providesthe Work (and each Contributor provides its Contributions) on an "AS IS" BASIS, WITHOUTWARRANTIES OR CONDITIONS OF ANY KIND, either express or implied, including, withoutlimitation, any warranties or conditions of TITLE, NON-INFRINGEMENT, MERCHANTABILITY,or FITNESS FOR A PARTICULAR PURPOSE. You are solely responsible for determining theappropriateness of using or redistributing the Work and assume any risks associated with Yourexercise of permissions under this License.
8. Limitation of Liability. In no event and under no legal theory, whether in tort (including negligence),contract, or otherwise, unless required by applicable law (such as deliberate and grossly negligentacts) or agreed to in writing, shall any Contributor be liable to You for damages, including any direct,indirect, special, incidental, or consequential damages of any character arising as a result of thisLicense or out of the use or inability to use the Work (including but not limited to damages for loss ofgoodwill, work stoppage, computer failure or malfunction, or any and all other commercial damagesor losses), even if such Contributor has been advised of the possibility of such damages.
9. Accepting Warranty or Additional Liability. While redistributing the Work or Derivative Works thereof,You may choose to offer, and charge a fee for, acceptance of support, warranty, indemnity, or otherliability obligations and/or rights consistent with this License. However, in accepting such obligations,You may act only on Your own behalf and on Your sole responsibility, not on behalf of any otherContributor, and only if You agree to indemnify, defend, and hold each Contributor harmless for anyliability incurred by, or claims asserted against, such Contributor by reason of your accepting anysuch warranty or additional liability.END OF TERMS AND CONDITIONS
---- Part 1: CMU/UCD copyright notice: (BSD like) -----
Copyright 1989, 1991, 1992 by Carnegie Mellon University
Derivative Work - 1996, 1998-2000
Copyright 1996, 1998-2000 The Regents of the University of California
All Rights Reserved
Permission to use, copy, modify and distribute this software and its documentation for any purpose andwithout fee is hereby granted, provided that the above copyright notice appears in all copies and that boththat copyright notice and this permission notice appear in supporting documentation, and that the name ofCMU and The Regents of the University of California not be used in advertising or publicity pertaining todistribution of the software without specific written permission.
CMU AND THE REGENTS OF THE UNIVERSITY OF CALIFORNIA DISCLAIM ALL WARRANTIESWITH REGARD TO THIS SOFTWARE, INCLUDING ALL IMPLIED WARRANTIES OFMERCHANTABILITY AND FITNESS. IN NO EVENT SHALL CMU OR THE REGENTS OF THEUNIVERSITY OF CALIFORNIA BE LIABLE FOR ANY SPECIAL, INDIRECT OR CONSEQUENTIALDAMAGES OR ANY DAMAGES WHATSOEVER RESULTING FROM THE LOSS OF USE, DATA ORPROFITS, WHETHER IN AN ACTION OF CONTRACT, NEGLIGENCE OR OTHER TORTIOUS ACTION,ARISING OUT OF OR IN CONNECTION WITH THE USE OR PERFORMANCE OF THIS SOFTWARE.
25

---- Part 2: Networks Associates Technology, Inc copyright notice (BSD) -----
Copyright (c) 2001-2003, Networks Associates Technology, Inc
All rights reserved.
Redistribution and use in source and binary forms, with or without modification, are permitted providedthat the following conditions are met:
* Redistributions of source code must retain the above copyright notice, this list of conditions and thefollowing disclaimer.* Redistributions in binary form must reproduce the above copyright notice, this list of conditions and thefollowing disclaimer in the documentation and/or other materials provided with the distribution.* Neither the name of the Networks Associates Technology, Inc nor the names of its contributors may beused to endorse or promote products derived from this software without specific prior written permission.
THIS SOFTWARE IS PROVIDED BY THE COPYRIGHT HOLDERS AND CONTRIBUTORS ``ASIS'' AND ANY EXPRESS OR IMPLIED WARRANTIES, INCLUDING, BUT NOT LIMITED TO, THEIMPLIED WARRANTIES OF MERCHANTABILITY AND FITNESS FOR A PARTICULAR PURPOSEARE DISCLAIMED. IN NO EVENT SHALL THE COPYRIGHT HOLDERS OR CONTRIBUTORS BELIABLE FOR ANY DIRECT, INDIRECT, INCIDENTAL, SPECIAL, EXEMPLARY, OR CONSEQUENTIALDAMAGES (INCLUDING, BUT NOT LIMITED TO, PROCUREMENT OF SUBSTITUTE GOODS ORSERVICES; LOSS OF USE, DATA, OR PROFITS; OR BUSINESS INTERRUPTION) HOWEVERCAUSED AND ON ANY THEORY OF LIABILITY, WHETHER IN CONTRACT, STRICT LIABILITY, ORTORT (INCLUDING NEGLIGENCE OR OTHERWISE) ARISING IN ANY WAY OUT OF THE USE OFTHIS SOFTWARE, EVEN IF ADVISED OF THE POSSIBILITY OF SUCH DAMAGE.
---- Part 3: Cambridge Broadband Ltd. copyright notice (BSD) -----
Portions of this code are copyright (c) 2001-2003, Cambridge Broadband Ltd.
All rights reserved.
Redistribution and use in source and binary forms, with or without modification, are permitted providedthat the following conditions are met:
* Redistributions of source code must retain the above copyright notice, this list of conditions and thefollowing disclaimer.* Redistributions in binary form must reproduce the above copyright notice, this list of conditions and thefollowing disclaimer in the documentation and/or other materials provided with the distribution.* The name of Cambridge Broadband Ltd. may not be used to endorse or promote products derived fromthis software without specific prior written permission.
THIS SOFTWARE IS PROVIDED BY THE COPYRIGHT HOLDER ``AS IS'' AND ANY EXPRESSOR IMPLIED WARRANTIES, INCLUDING, BUT NOT LIMITED TO, THE IMPLIED WARRANTIES OFMERCHANTABILITY AND FITNESS FOR A PARTICULAR PURPOSE ARE DISCLAIMED. IN NOEVENT SHALL THE COPYRIGHT HOLDER BE LIABLE FOR ANY DIRECT, INDIRECT, INCIDENTAL,SPECIAL, EXEMPLARY, OR CONSEQUENTIAL DAMAGES (INCLUDING, BUT NOT LIMITED TO,PROCUREMENT OF SUBSTITUTE GOODS OR SERVICES; LOSS OF USE, DATA, OR PROFITS; ORBUSINESS INTERRUPTION) HOWEVER CAUSED AND ON ANY THEORY OF LIABILITY, WHETHERIN CONTRACT, STRICT LIABILITY, OR TORT (INCLUDING NEGLIGENCE OR OTHERWISE) ARISINGIN ANY WAY OUT OF THE USE OF THIS SOFTWARE, EVEN IF ADVISED OF THE POSSIBILITY OFSUCH DAMAGE.
26

---- Part 4: Sun Microsystems, Inc. copyright notice (BSD) -----
Copyright c 2003 Sun Microsystems, Inc., 4150 Network Circle, Santa Clara, California 95054, U.S.A. Allrights reserved.
Use is subject to license terms below.
This distribution may include materials developed by third parties.
Sun, Sun Microsystems, the Sun logo and Solaris are trademarks or registered trademarks of SunMicrosystems, Inc. in the U.S. and other countries.
Redistribution and use in source and binary forms, with or without modification, are permitted providedthat the following conditions are met:
* Redistributions of source code must retain the above copyright notice, this list of conditions and thefollowing disclaimer.* Redistributions in binary form must reproduce the above copyright notice, this list of conditions and thefollowing disclaimer in the documentation and/or other materials provided with the distribution.* Neither the name of the Sun Microsystems, Inc. nor the names of its contributors may be used toendorse or promote products derived from this software without specific prior written permission.
THIS SOFTWARE IS PROVIDED BY THE COPYRIGHT HOLDERS AND CONTRIBUTORS ``ASIS'' AND ANY EXPRESS OR IMPLIED WARRANTIES, INCLUDING, BUT NOT LIMITED TO, THEIMPLIED WARRANTIES OF MERCHANTABILITY AND FITNESS FOR A PARTICULAR PURPOSEARE DISCLAIMED. IN NO EVENT SHALL THE COPYRIGHT HOLDERS OR CONTRIBUTORS BELIABLE FOR ANY DIRECT, INDIRECT, INCIDENTAL, SPECIAL, EXEMPLARY, OR CONSEQUENTIALDAMAGES (INCLUDING, BUT NOT LIMITED TO, PROCUREMENT OF SUBSTITUTE GOODS ORSERVICES; LOSS OF USE, DATA, OR PROFITS; OR BUSINESS INTERRUPTION) HOWEVERCAUSED AND ON ANY THEORY OF LIABILITY, WHETHER IN CONTRACT, STRICT LIABILITY, ORTORT (INCLUDING NEGLIGENCE OR OTHERWISE) ARISING IN ANY WAY OUT OF THE USE OFTHIS SOFTWARE, EVEN IF ADVISED OF THE POSSIBILITY OF SUCH DAMAGE.
---- Part 5: Sparta, Inc copyright notice (BSD) -----
Copyright (c) 2003-2012, Sparta, Inc
All rights reserved.
Redistribution and use in source and binary forms, with or without modification, are permitted providedthat the following conditions are met:
* Redistributions of source code must retain the above copyright notice, this list of conditions and thefollowing disclaimer.* Redistributions in binary form must reproduce the above copyright notice, this list of conditions and thefollowing disclaimer in the documentation and/or other materials provided with the distribution.* Neither the name of Sparta, Inc nor the names of its contributors may be used to endorse or promoteproducts derived from this software without specific prior written permission.
THIS SOFTWARE IS PROVIDED BY THE COPYRIGHT HOLDERS AND CONTRIBUTORS ``ASIS'' AND ANY EXPRESS OR IMPLIED WARRANTIES, INCLUDING, BUT NOT LIMITED TO, THEIMPLIED WARRANTIES OF MERCHANTABILITY AND FITNESS FOR A PARTICULAR PURPOSEARE DISCLAIMED. IN NO EVENT SHALL THE COPYRIGHT HOLDERS OR CONTRIBUTORS BELIABLE FOR ANY DIRECT, INDIRECT, INCIDENTAL, SPECIAL, EXEMPLARY, OR CONSEQUENTIALDAMAGES (INCLUDING, BUT NOT LIMITED TO, PROCUREMENT OF SUBSTITUTE GOODS OR
27

SERVICES; LOSS OF USE, DATA, OR PROFITS; OR BUSINESS INTERRUPTION) HOWEVERCAUSED AND ON ANY THEORY OF LIABILITY, WHETHER IN CONTRACT, STRICT LIABILITY, ORTORT (INCLUDING NEGLIGENCE OR OTHERWISE) ARISING IN ANY WAY OUT OF THE USE OFTHIS SOFTWARE, EVEN IF ADVISED OF THE POSSIBILITY OF SUCH DAMAGE.
---- Part 6: Cisco/BUPTNIC copyright notice (BSD) -----
Copyright (c) 2004, Cisco, Inc and Information Network Center of Beijing University of Posts andTelecommunications.
All rights reserved.
Redistribution and use in source and binary forms, with or without modification, are permitted providedthat the following conditions are met:
* Redistributions of source code must retain the above copyright notice, this list of conditions and thefollowing disclaimer.* Redistributions in binary form must reproduce the above copyright notice, this list of conditions and thefollowing disclaimer in the documentation and/or other materials provided with the distribution.* Neither the name of Cisco, Inc, Beijing University of Posts and Telecommunications, nor the names oftheir contributors may be used to endorse or promote products derived from this software without specificprior written permission.
THIS SOFTWARE IS PROVIDED BY THE COPYRIGHT HOLDERS AND CONTRIBUTORS ``ASIS'' AND ANY EXPRESS OR IMPLIED WARRANTIES, INCLUDING, BUT NOT LIMITED TO, THEIMPLIED WARRANTIES OF MERCHANTABILITY AND FITNESS FOR A PARTICULAR PURPOSEARE DISCLAIMED. IN NO EVENT SHALL THE COPYRIGHT HOLDERS OR CONTRIBUTORS BELIABLE FOR ANY DIRECT, INDIRECT, INCIDENTAL, SPECIAL, EXEMPLARY, OR CONSEQUENTIALDAMAGES (INCLUDING, BUT NOT LIMITED TO, PROCUREMENT OF SUBSTITUTE GOODS ORSERVICES; LOSS OF USE, DATA, OR PROFITS; OR BUSINESS INTERRUPTION) HOWEVERCAUSED AND ON ANY THEORY OF LIABILITY, WHETHER IN CONTRACT, STRICT LIABILITY, ORTORT (INCLUDING NEGLIGENCE OR OTHERWISE) ARISING IN ANY WAY OUT OF THE USE OFTHIS SOFTWARE, EVEN IF ADVISED OF THE POSSIBILITY OF SUCH DAMAGE.
---- Part 7: Fabasoft R&D Software GmbH & Co KG copyright notice (BSD) -----
Copyright (c) Fabasoft R&D Software GmbH & Co KG, 2003 [email protected]
Author: Bernhard Penz <[email protected]>
Redistribution and use in source and binary forms, with or without modification, are permitted providedthat the following conditions are met:
* Redistributions of source code must retain the above copyright notice, this list of conditions and thefollowing disclaimer.* Redistributions in binary form must reproduce the above copyright notice, this list of conditions and thefollowing disclaimer in the documentation and/or other materials provided with the distribution.* The name of Fabasoft R&D Software GmbH & Co KG or any of its subsidiaries, brand or product namesmay not be used to endorse or promote products derived from this software without specific prior writtenpermission.
THIS SOFTWARE IS PROVIDED BY THE COPYRIGHT HOLDER ``AS IS'' AND ANY EXPRESSOR IMPLIED WARRANTIES, INCLUDING, BUT NOT LIMITED TO, THE IMPLIED WARRANTIES OF
28

MERCHANTABILITY AND FITNESS FOR A PARTICULAR PURPOSE ARE DISCLAIMED. IN NOEVENT SHALL THE COPYRIGHT HOLDER BE LIABLE FOR ANY DIRECT, INDIRECT, INCIDENTAL,SPECIAL, EXEMPLARY, OR CONSEQUENTIAL DAMAGES (INCLUDING, BUT NOT LIMITED TO,PROCUREMENT OF SUBSTITUTE GOODS OR SERVICES; LOSS OF USE, DATA, OR PROFITS; ORBUSINESS INTERRUPTION) HOWEVER CAUSED AND ON ANY THEORY OF LIABILITY, WHETHERIN CONTRACT, STRICT LIABILITY, OR TORT (INCLUDING NEGLIGENCE OR OTHERWISE) ARISINGIN ANY WAY OUT OF THE USE OF THIS SOFTWARE, EVEN IF ADVISED OF THE POSSIBILITY OFSUCH DAMAGE.
---- Part 8: Apple Inc. copyright notice (BSD) -----
Copyright (c) 2007 Apple Inc. All rights reserved.
Redistribution and use in source and binary forms, with or without modification, are permitted providedthat the following conditions are met:
1. Redistributions of source code must retain the above copyright notice, this list of conditions and thefollowing disclaimer.
2. Redistributions in binary form must reproduce the above copyright notice, this list of conditions andthe following disclaimer in the documentation and/or other materials provided with the distribution.
3. Neither the name of Apple Inc. ("Apple") nor the names of its contributors may be used to endorse orpromote products derived from this software without specific prior written permission.
THIS SOFTWARE IS PROVIDED BY APPLE AND ITS CONTRIBUTORS "AS IS" AND ANY EXPRESSOR IMPLIED WARRANTIES, INCLUDING, BUT NOT LIMITED TO, THE IMPLIED WARRANTIESOF MERCHANTABILITY AND FITNESS FOR A PARTICULAR PURPOSE ARE DISCLAIMED. INNO EVENT SHALL APPLE OR ITS CONTRIBUTORS BE LIABLE FOR ANY DIRECT, INDIRECT,INCIDENTAL, SPECIAL, EXEMPLARY, OR CONSEQUENTIAL DAMAGES (INCLUDING, BUT NOTLIMITED TO, PROCUREMENT OF SUBSTITUTE GOODS OR SERVICES; LOSS OF USE, DATA,OR PROFITS; OR BUSINESS INTERRUPTION) HOWEVER CAUSED AND ON ANY THEORY OFLIABILITY, WHETHER IN CONTRACT, STRICT LIABILITY, OR TORT (INCLUDING NEGLIGENCE OROTHERWISE) ARISING IN ANY WAY OUT OF THE USE OF THIS SOFTWARE, EVEN IF ADVISED OFTHE POSSIBILITY OF SUCH DAMAGE.
---- Part 9: ScienceLogic, LLC copyright notice (BSD) -----
Copyright (c) 2009, ScienceLogic, LLC
All rights reserved.
Redistribution and use in source and binary forms, with or without modification, are permitted providedthat the following conditions are met:
* Redistributions of source code must retain the above copyright notice, this list of conditions and thefollowing disclaimer.* Redistributions in binary form must reproduce the above copyright notice, this list of conditions and thefollowing disclaimer in the documentation and/or other materials provided with the distribution.* Neither the name of ScienceLogic, LLC nor the names of its contributors may be used to endorse orpromote products derived from this software without specific prior written permission.
THIS SOFTWARE IS PROVIDED BY THE COPYRIGHT HOLDERS AND CONTRIBUTORS "ASIS" AND ANY EXPRESS OR IMPLIED WARRANTIES, INCLUDING, BUT NOT LIMITED TO, THE
29

IMPLIED WARRANTIES OF MERCHANTABILITY AND FITNESS FOR A PARTICULAR PURPOSEARE DISCLAIMED. IN NO EVENT SHALL THE COPYRIGHT HOLDERS OR CONTRIBUTORS BELIABLE FOR ANY DIRECT, INDIRECT, INCIDENTAL, SPECIAL, EXEMPLARY, OR CONSEQUENTIALDAMAGES (INCLUDING, BUT NOT LIMITED TO, PROCUREMENT OF SUBSTITUTE GOODS ORSERVICES; LOSS OF USE, DATA, OR PROFITS; OR BUSINESS INTERRUPTION) HOWEVERCAUSED AND ON ANY THEORY OF LIABILITY, WHETHER IN CONTRACT, STRICT LIABILITY, ORTORT (INCLUDING NEGLIGENCE OR OTHERWISE) ARISING IN ANY WAY OUT OF THE USE OFTHIS SOFTWARE, EVEN IF ADVISED OF THE POSSIBILITY OF SUCH DAMAGE.
LEADTOOLS
Copyright (C) 1991-2009 LEAD Technologies, Inc.
CMap Resources
-----------------------------------------------------------
Copyright 1990-2009 Adobe Systems Incorporated.All rights reserved.
Copyright 1990-2010 Adobe Systems Incorporated.All rights reserved.
Redistribution and use in source and binary forms, with orwithout modification, are permitted provided that thefollowing conditions are met:
Redistributions of source code must retain the abovecopyright notice, this list of conditions and the followingdisclaimer.
Redistributions in binary form must reproduce the abovecopyright notice, this list of conditions and the followingdisclaimer in the documentation and/or other materialsprovided with the distribution.
Neither the name of Adobe Systems Incorporated nor the namesof its contributors may be used to endorse or promoteproducts derived from this software without specific priorwritten permission.
THIS SOFTWARE IS PROVIDED BY THE COPYRIGHT HOLDERS ANDCONTRIBUTORS "AS IS" AND ANY EXPRESS OR IMPLIED WARRANTIES,INCLUDING, BUT NOT LIMITED TO, THE IMPLIED WARRANTIES OFMERCHANTABILITY AND FITNESS FOR A PARTICULAR PURPOSE AREDISCLAIMED. IN NO EVENT SHALL THE COPYRIGHT HOLDER ORCONTRIBUTORS BE LIABLE FOR ANY DIRECT, INDIRECT, INCIDENTAL,SPECIAL, EXEMPLARY, OR CONSEQUENTIAL DAMAGES (INCLUDING, BUTNOT LIMITED TO, PROCUREMENT OF SUBSTITUTE GOODS OR SERVICES;LOSS OF USE, DATA, OR PROFITS; OR BUSINESS INTERRUPTION)HOWEVER CAUSED AND ON ANY THEORY OF LIABILITY, WHETHER INCONTRACT, STRICT LIABILITY, OR TORT (INCLUDING NEGLIGENCE OR
30

OTHERWISE) ARISING IN ANY WAY OUT OF THE USE OF THISSOFTWARE, EVEN IF ADVISED OF THE POSSIBILITY OF SUCH DAMAGE.
-----------------------------------------------------------
MIT License
Copyright (c) 1998, 1999, 2000 Thai Open Source Software Center Ltd
Permission is hereby granted, free of charge, to any person obtaining a copy of this software andassociated documentation files (the "Software"), to deal in the Software without restriction, includingwithout limitation the rights to use, copy, modify, merge, publish, distribute, sublicense, and/or sell copiesof the Software, and to permit persons to whom the Software is furnished to do so, subject to the followingconditions:
The above copyright notice and this permission notice shall be included in all copies or substantialportions of the Software.
THE SOFTWARE IS PROVIDED "AS IS", WITHOUT WARRANTY OF ANY KIND, EXPRESS ORIMPLIED, INCLUDING BUT NOT LIMITED TO THE WARRANTIES OF MERCHANTABILITY, FITNESSFOR A PARTICULAR PURPOSE AND NONINFRINGEMENT. IN NO EVENT SHALL THE AUTHORSOR COPYRIGHT HOLDERS BE LIABLE FOR ANY CLAIM, DAMAGES OR OTHER LIABILITY,WHETHER IN AN ACTION OF CONTRACT, TORT OR OTHERWISE, ARISING FROM, OUT OF ORIN CONNECTION WITH THE SOFTWARE OR THE USE OR OTHER DEALINGS IN THE SOFTWARE.
Copyright 2000 Computing Research Labs, New Mexico State University
Copyright 2001-2015 Francesco Zappa Nardelli
Permission is hereby granted, free of charge, to any person obtaining a copy of this software andassociated documentation files (the "Software"), to deal in the Software without restriction, includingwithout limitation the rights to use, copy, modify, merge, publish, distribute, sublicense, and/or sell copiesof the Software, and to permit persons to whom the Software is furnished to do so, subject to the followingconditions:
The above copyright notice and this permission notice shall be included in all copies or substantialportions of the Software.
THE SOFTWARE IS PROVIDED "AS IS", WITHOUT WARRANTY OF ANY KIND, EXPRESS ORIMPLIED, INCLUDING BUT NOT LIMITED TO THE WARRANTIES OF MERCHANTABILITY, FITNESSFOR A PARTICULAR PURPOSE AND NONINFRINGEMENT. IN NO EVENT SHALL THE COMPUTINGRESEARCH LAB OR NEW MEXICO STATE UNIVERSITY BE LIABLE FOR ANY CLAIM, DAMAGESOR OTHER LIABILITY, WHETHER IN AN ACTION OF CONTRACT, TORT OR OTHERWISE, ARISINGFROM, OUT OF OR IN CONNECTION WITH THE SOFTWARE OR THE USE OR OTHER DEALINGS INTHE SOFTWARE.
Written by Joel Sherrill <[email protected]>.
COPYRIGHT (c) 1989-2000.
On-Line Applications Research Corporation (OAR).
31

Permission to use, copy, modify, and distribute this software for any purpose without fee is herebygranted, provided that this entire notice is included in all copies of any software which is or includes acopy or modification of this software.
THIS SOFTWARE IS BEING PROVIDED "AS IS", WITHOUT ANY EXPRESS OR IMPLIED WARRANTY.IN PARTICULAR, THE AUTHOR MAKES NO REPRESENTATION OR WARRANTY OF ANY KINDCONCERNING THE MERCHANTABILITY OF THIS SOFTWARE OR ITS FITNESS FOR ANYPARTICULAR PURPOSE.
(1) Red Hat Incorporated
Copyright (c) 1994-2009 Red Hat, Inc. All rights reserved.
This copyrighted material is made available to anyone wishing to use, modify, copy, or redistribute itsubject to the terms and conditions of the BSD License. This program is distributed in the hope that itwill be useful, but WITHOUT ANY WARRANTY expressed or implied, including the implied warranties ofMERCHANTABILITY or FITNESS FOR A PARTICULAR PURPOSE. A copy of this license is available athttp://www.opensource.org/licenses. Any Red Hat trademarks that are incorporated in the source code ordocumentation are not subject to the BSD License and may only be used or replicated with the expresspermission of Red Hat, Inc.
(2) University of California, Berkeley
Copyright (c) 1981-2000 The Regents of the University of California.
All rights reserved.
Redistribution and use in source and binary forms, with or without modification, are permitted providedthat the following conditions are met:
* Redistributions of source code must retain the above copyright notice, this list of conditions and thefollowing disclaimer.* Redistributions in binary form must reproduce the above copyright notice, this list of conditions and thefollowing disclaimer in the documentation and/or other materials provided with the distribution.* Neither the name of the University nor the names of its contributors may be used to endorse or promoteproducts derived from this software without specific prior written permission.
THIS SOFTWARE IS PROVIDED BY THE COPYRIGHT HOLDERS AND CONTRIBUTORS "ASIS" AND ANY EXPRESS OR IMPLIED WARRANTIES, INCLUDING, BUT NOT LIMITED TO, THEIMPLIED WARRANTIES OF MERCHANTABILITY AND FITNESS FOR A PARTICULAR PURPOSE AREDISCLAIMED. IN NO EVENT SHALL THE COPYRIGHT OWNER OR CONTRIBUTORS BE LIABLE FORANY DIRECT, INDIRECT, INCIDENTAL, SPECIAL, EXEMPLARY, OR CONSEQUENTIAL DAMAGES(INCLUDING, BUT NOT LIMITED TO, PROCUREMENT OF SUBSTITUTE GOODS OR SERVICES;LOSS OF USE, DATA, OR PROFITS; OR BUSINESS INTERRUPTION) HOWEVER CAUSED AND ONANY THEORY OF LIABILITY, WHETHER IN CONTRACT, STRICT LIABILITY, OR TORT (INCLUDINGNEGLIGENCE OR OTHERWISE) ARISING IN ANY WAY OUT OF THE USE OF THIS SOFTWARE,EVEN IF ADVISED OF THE POSSIBILITY OF SUCH DAMAGE.
The FreeType Project LICENSE
----------------------------
2006-Jan-27
Copyright 1996-2002, 2006 by
32

David Turner, Robert Wilhelm, and Werner Lemberg
Introduction
============
The FreeType Project is distributed in several archive packages; some of them may contain, in addition tothe FreeType font engine, various tools and contributions which rely on, or relate to, the FreeType Project.
This license applies to all files found in such packages, and which do not fall under their own explicitlicense. The license affects thus the FreeType font engine, the test programs, documentation andmakefiles, at the very least.
This license was inspired by the BSD, Artistic, and IJG (Independent JPEG Group) licenses, whichall encourage inclusion and use of free software in commercial and freeware products alike. As aconsequence, its main points are that:
o We don't promise that this software works. However, we will be interested in any kind of bug reports.(`as is' distribution)
o You can use this software for whatever you want, in parts or full form, without having to pay us.(`royalty-free' usage)
o You may not pretend that you wrote this software. If you use it, or only parts of it, in a program, youmust acknowledge somewhere in your documentation that you have used the FreeType code. (`credits')
We specifically permit and encourage the inclusion of this software, with or without modifications, incommercial products.
We disclaim all warranties covering The FreeType Project and assume no liability related to The FreeTypeProject.
Finally, many people asked us for a preferred form for a credit/disclaimer to use in compliance with thislicense. We thus encourage you to use the following text:
"""
Portions of this software are copyright © <year> The FreeType
Project (www.freetype.org). All rights reserved.
"""
Please replace <year> with the value from the FreeType version you actually use.
Legal Terms
===========
0. Definitions
--------------
Throughout this license, the terms `package', `FreeType Project', and `FreeType archive' refer to the setof files originally distributed by the authors (David Turner, Robert Wilhelm, and Werner Lemberg) as the`FreeType Project', be they named as alpha, beta or final release.
`You' refers to the licensee, or person using the project, where `using' is a generic term includingcompiling the project's source code as well as linking it to form a `program' or `executable'.
This program is referred to as `a program using the FreeType engine'.
33

This license applies to all files distributed in the original FreeType Project, including all source code,binaries and documentation, unless otherwise stated in the file in its original, unmodified form asdistributed in the original archive.
If you are unsure whether or not a particular file is covered by this license, you must contact us to verifythis.
The FreeType Project is copyright (C) 1996-2000 by David Turner, Robert Wilhelm, and Werner Lemberg.All rights reserved except as specified below.
1. No Warranty
--------------
THE FREETYPE PROJECT IS PROVIDED `AS IS' WITHOUT WARRANTY OF ANY KIND, EITHEREXPRESS OR IMPLIED, INCLUDING, BUT NOT LIMITED TO, WARRANTIES OF MERCHANTABILITYAND FITNESS FOR A PARTICULAR PURPOSE. IN NO EVENT WILL ANY OF THE AUTHORS ORCOPYRIGHT HOLDERS BE LIABLE FOR ANY DAMAGES CAUSED BY THE USE OR THE INABILITYTO USE, OF THE FREETYPE PROJECT.
2. Redistribution
-----------------
This license grants a worldwide, royalty-free, perpetual and irrevocable right and license to use, execute,perform, compile, display, copy, create derivative works of, distribute and sublicense the FreeType Project(in both source and object code forms) and derivative works thereof for any purpose; and to authorizeothers to exercise some or all of the rights granted herein, subject to the following conditions:
o Redistribution of source code must retain this license file (`FTL.TXT') unaltered; any additions, deletionsor changes to the original files must be clearly indicated in accompanying documentation. The copyrightnotices of the unaltered, original files must be preserved in all copies of source files.
o Redistribution in binary form must provide a disclaimer that states that the software is based in part ofthe work of the FreeType Team, in the distribution documentation. We also encourage you to put an URLto the FreeType web page in your documentation, though this isn't mandatory.
These conditions apply to any software derived from or based on the FreeType Project, not just theunmodified files. If you use our work, you must acknowledge us. However, no fee need be paid to us.
3. Advertising
--------------
Neither the FreeType authors and contributors nor you shall use the name of the other for commercial,advertising, or promotional purposes without specific prior written permission.
We suggest, but do not require, that you use one or more of the following phrases to refer to this softwarein your documentation or advertising materials: `FreeType Project', `FreeType Engine', `FreeType library',or `FreeType Distribution'.
As you have not signed this license, you are not required to accept it. However, as the FreeType Projectis copyrighted material, only this license, or another one contracted with the authors, grants you the rightto use, distribute, and modify it.
Therefore, by using, distributing, or modifying the FreeType Project, you indicate that you understand andaccept all the terms of this license.
4. Contacts
34

-----------
There are two mailing lists related to FreeType:
Discusses general use and applications of FreeType, as well as future and wanted additions to the libraryand distribution.
If you are looking for support, start in this list if you haven't found anything to help you in thedocumentation.
Discusses bugs, as well as engine internals, design issues, specific licenses, porting, etc.
Our home page can be found at
http://www.freetype.org
--- end of FTL.TXT ---
The TWAIN Toolkit is distributed as is. The developer and distributors of the TWAIN Toolkit expresslydisclaim all implied, express or statutory warranties including, without limitation, the implied warrantiesof merchantability, noninfringement of third party rights and fitness for a particular purpose. Neither thedevelopers nor the distributors will be liable for damages, whether direct, indirect, special, incidental, orconsequential, as a result of the reproduction, modification, distribution or other use of the TWAIN Toolkit.
JSON for Modern C++
Copyright (c) 2013-2017 Niels Lohmann
Permission is hereby granted, free of charge, to any person obtaining a copy of this software andassociated documentation files (the "Software"), to deal in the Software without restriction, includingwithout limitation the rights to use, copy, modify, merge, publish, distribute, sublicense, and/or sell copiesof the Software, and to permit persons to whom the Software is furnished to do so, subject to the followingconditions:
The above copyright notice and this permission notice shall be included in all copies or substantialportions of the Software.
THE SOFTWARE IS PROVIDED "AS IS", WITHOUT WARRANTY OF ANY KIND, EXPRESS ORIMPLIED, INCLUDING BUT NOT LIMITED TO THE WARRANTIES OF MERCHANTABILITY, FITNESSFOR A PARTICULAR PURPOSE AND NONINFRINGEMENT. IN NO EVENT SHALL THE AUTHORSOR COPYRIGHT HOLDERS BE LIABLE FOR ANY CLAIM, DAMAGES OR OTHER LIABILITY,WHETHER IN AN ACTION OF CONTRACT, TORT OR OTHERWISE, ARISING FROM, OUT OF ORIN CONNECTION WITH THE SOFTWARE OR THE USE OR OTHER DEALINGS IN THE SOFTWARE.
Copyright (c) 2011 - 2015 ARM LIMITED
All rights reserved.
Redistribution and use in source and binary forms, with or without modification, are permitted providedthat the following conditions are met:
- Redistributions of source code must retain the above copyright notice, this list of conditions and thefollowing disclaimer.
35

- Redistributions in binary form must reproduce the above copyright notice, this list of conditions and thefollowing disclaimer in the documentation and/or other materials provided with the distribution.- Neither the name of ARM nor the names of its contributors may be used to endorse or promote productsderived from this software without specific prior written permission.
THIS SOFTWARE IS PROVIDED BY THE COPYRIGHT HOLDERS AND CONTRIBUTORS "ASIS" AND ANY EXPRESS OR IMPLIED WARRANTIES, INCLUDING, BUT NOT LIMITED TO, THEIMPLIED WARRANTIES OF MERCHANTABILITY AND FITNESS FOR A PARTICULAR PURPOSE AREDISCLAIMED. IN NO EVENT SHALL COPYRIGHT HOLDERS AND CONTRIBUTORS BE LIABLE FORANY DIRECT, INDIRECT, INCIDENTAL, SPECIAL, EXEMPLARY, OR CONSEQUENTIAL DAMAGES(INCLUDING, BUT NOT LIMITED TO, PROCUREMENT OF SUBSTITUTE GOODS OR SERVICES;LOSS OF USE, DATA, OR PROFITS; OR BUSINESS INTERRUPTION) HOWEVER CAUSED AND ONANY THEORY OF LIABILITY, WHETHER IN CONTRACT, STRICT LIABILITY, OR TORT (INCLUDINGNEGLIGENCE OR OTHERWISE) ARISING IN ANY WAY OUT OF THE USE OF THIS SOFTWARE,EVEN IF ADVISED OF THE POSSIBILITY OF SUCH DAMAGE.
Copyright (c) 2014, Kenneth MacKay
All rights reserved.
Redistribution and use in source and binary forms, with or without modification, are permitted providedthat the following conditions are met:
* Redistributions of source code must retain the above copyright notice, this list of conditions and thefollowing disclaimer.* Redistributions in binary form must reproduce the above copyright notice, this list of conditions and thefollowing disclaimer in the documentation and/or other materials provided with the distribution.
THIS SOFTWARE IS PROVIDED BY THE COPYRIGHT HOLDERS AND CONTRIBUTORS "ASIS" AND ANY EXPRESS OR IMPLIED WARRANTIES, INCLUDING, BUT NOT LIMITED TO, THEIMPLIED WARRANTIES OF MERCHANTABILITY AND FITNESS FOR A PARTICULAR PURPOSEARE DISCLAIMED. IN NO EVENT SHALL THE COPYRIGHT HOLDER OR CONTRIBUTORS BELIABLE FOR ANY DIRECT, INDIRECT, INCIDENTAL, SPECIAL, EXEMPLARY, OR CONSEQUENTIALDAMAGES (INCLUDING, BUT NOT LIMITED TO, PROCUREMENT OF SUBSTITUTE GOODS ORSERVICES; LOSS OF USE, DATA, OR PROFITS; OR BUSINESS INTERRUPTION) HOWEVERCAUSED AND ON ANY THEORY OF LIABILITY, WHETHER IN CONTRACT, STRICT LIABILITY, ORTORT (INCLUDING NEGLIGENCE OR OTHERWISE) ARISING IN ANY WAY OUT OF THE USE OFTHIS SOFTWARE, EVEN IF ADVISED OF THE POSSIBILITY OF SUCH DAMAGE.
Copyright (c) 2006, CRYPTOGAMS by <[email protected]> All rights reserved.
Redistribution and use in source and binary forms, with or without modification, are permitted providedthat the following conditions are met:
* Redistributions of source code must retain copyright notices, this list of conditions and the followingdisclaimer.* Redistributions in binary form must reproduce the above copyright notice, this list of conditions and thefollowing disclaimer in the documentation and/or other materials provided with the distribution.* Neither the name of the CRYPTOGAMS nor the names of its copyright holder and contributors may beused to endorse or promote products derived from this software without specific prior written permission.
36

ALTERNATIVELY, provided that this notice is retained in full, this product may be distributed under theterms of the GNU General Public License (GPL), in which case the provisions of the GPL apply INSTEADOF those given above.
THIS SOFTWARE IS PROVIDED BY THE COPYRIGHT HOLDER AND CONTRIBUTORS "AS IS"AND ANY EXPRESS OR IMPLIED WARRANTIES, INCLUDING, BUT NOT LIMITED TO, THEIMPLIED WARRANTIES OF MERCHANTABILITY AND FITNESS FOR A PARTICULAR PURPOSE AREDISCLAIMED. IN NO EVENT SHALL THE COPYRIGHT OWNER OR CONTRIBUTORS BE LIABLE FORANY DIRECT, INDIRECT, INCIDENTAL, SPECIAL, EXEMPLARY, OR CONSEQUENTIAL DAMAGES(INCLUDING, BUT NOT LIMITED TO, PROCUREMENT OF SUBSTITUTE GOODS OR SERVICES;LOSS OF USE, DATA, OR PROFITS; OR BUSINESS INTERRUPTION) HOWEVER CAUSED AND ONANY THEORY OF LIABILITY, WHETHER IN CONTRACT, STRICT LIABILITY, OR TORT (INCLUDINGNEGLIGENCE OR OTHERWISE) ARISING IN ANY WAY OUT OF THE USE OF THIS SOFTWARE,EVEN IF ADVISED OF THE POSSIBILITY OF SUCH DAMAGE.
ISC License
Copyright (c) 2013-2017
Frank Denis <j at pureftpd dot org>
Permission to use, copy, modify, and/or distribute this software for any purpose with or without fee ishereby granted, provided that the above copyright notice and this permission notice appear in all copies.
THE SOFTWARE IS PROVIDED "AS IS" AND THE AUTHOR DISCLAIMS ALL WARRANTIES WITHREGARD TO THIS SOFTWARE INCLUDING ALL IMPLIED WARRANTIES OF MERCHANTABILITYAND FITNESS. IN NO EVENT SHALL THE AUTHOR BE LIABLE FOR ANY SPECIAL, DIRECT,INDIRECT, OR CONSEQUENTIAL DAMAGES OR ANY DAMAGES WHATSOEVER RESULTING FROMLOSS OF USE, DATA OR PROFITS, WHETHER IN AN ACTION OF CONTRACT, NEGLIGENCEOR OTHER TORTIOUS ACTION, ARISING OUT OF OR IN CONNECTION WITH THE USE ORPERFORMANCE OF THIS SOFTWARE.
Copyright (c) 2008 The NetBSD Foundation, Inc.
All rights reserved.
This code is derived from software contributed to The NetBSD Foundationby Lennart Augustsson ([email protected]) atCarlstedt Research & Technology.
Redistribution and use in source and binary forms, with or withoutmodification, are permitted provided that the following conditionsare met:
1. Redistributions of source code must retain the above copyrightnotice, this list of conditions and the following disclaimer.
2. Redistributions in binary form must reproduce the above copyrightnotice, this list of conditions and the following disclaimer in thedocumentation and/or other materials provided with the distribution.
THIS SOFTWARE IS PROVIDED BY THE NETBSD FOUNDATION, INC. AND CONTRIBUTORS``AS IS'' AND ANY EXPRESS OR IMPLIED WARRANTIES, INCLUDING, BUT NOT LIMITEDTO, THE IMPLIED WARRANTIES OF MERCHANTABILITY AND FITNESS FOR A PARTICULAR
37

PURPOSE ARE DISCLAIMED. IN NO EVENT SHALL THE FOUNDATION OR CONTRIBUTORSBE LIABLE FOR ANY DIRECT, INDIRECT, INCIDENTAL, SPECIAL, EXEMPLARY, ORCONSEQUENTIAL DAMAGES (INCLUDING, BUT NOT LIMITED TO, PROCUREMENT OFSUBSTITUTE GOODS OR SERVICES; LOSS OF USE, DATA, OR PROFITS; OR BUSINESSINTERRUPTION) HOWEVER CAUSED AND ON ANY THEORY OF LIABILITY, WHETHER INCONTRACT, STRICT LIABILITY, OR TORT (INCLUDING NEGLIGENCE OR OTHERWISE)ARISING IN ANY WAY OUT OF THE USE OF THIS SOFTWARE, EVEN IF ADVISED OF THEPOSSIBILITY OF SUCH DAMAGE.
Copyright (c) 2000 Intel Corporation
All rights reserved.
Redistribution and use in source and binary forms, with or withoutmodification, are permitted provided that the following conditions are met:
* Redistributions of source code must retain the above copyright notice,this list of conditions and the following disclaimer.* Redistributions in binary form must reproduce the above copyright notice,this list of conditions and the following disclaimer in the documentationand/or other materials provided with the distribution.* Neither name of Intel Corporation nor the names of its contributorsmay be used to endorse or promote products derived from this softwarewithout specific prior written permission.
THIS SOFTWARE IS PROVIDED BY THE COPYRIGHT HOLDERS AND CONTRIBUTORS"AS IS" AND ANY EXPRESS OR IMPLIED WARRANTIES, INCLUDING, BUT NOTLIMITED TO, THE IMPLIED WARRANTIES OF MERCHANTABILITY AND FITNESS FORA PARTICULAR PURPOSE ARE DISCLAIMED. IN NO EVENT SHALL INTEL ORCONTRIBUTORS BE LIABLE FOR ANY DIRECT, INDIRECT, INCIDENTAL, SPECIAL,EXEMPLARY, OR CONSEQUENTIAL DAMAGES (INCLUDING, BUT NOT LIMITED TO,PROCUREMENT OF SUBSTITUTE GOODS OR SERVICES; LOSS OF USE, DATA, ORPROFITS; OR BUSINESS INTERRUPTION) HOWEVER CAUSED AND ON ANY THEORYOF LIABILITY, WHETHER IN CONTRACT, STRICT LIABILITY, OR TORT (INCLUDINGNEGLIGENCE OR OTHERWISE) ARISING IN ANY WAY OUT OF THE USE OF THISSOFTWARE, EVEN IF ADVISED OF THE POSSIBILITY OF SUCH DAMAGE.
The following applies only to products supporting Wi-Fi.
(c) 2009-2013 by Jeff Mott. All rights reserved.
Redistribution and use in source and binary forms, with or without modification, are permitted providedthat the following conditions are met:
* Redistributions of source code must retain the above copyright notice, this list of conditions, and thefollowing disclaimer.* Redistributions in binary form must reproduce the above copyright notice, this list of conditions, and thefollowing disclaimer in the documentation or other materials provided with the distribution.* Neither the name CryptoJS nor the names of its contributors may be used to endorse or promoteproducts derived from this software without specific prior written permission.
38

THIS SOFTWARE IS PROVIDED BY THE COPYRIGHT HOLDERS AND CONTRIBUTORS "ASIS," AND ANY EXPRESS OR IMPLIED WARRANTIES, INCLUDING, BUT NOT LIMITED TO, THEIMPLIED WARRANTIES OF MERCHANTABILITY AND FITNESS FOR A PARTICULAR PURPOSE,ARE DISCLAIMED. IN NO EVENT SHALL THE COPYRIGHT HOLDER OR CONTRIBUTORS BELIABLE FOR ANY DIRECT, INDIRECT, INCIDENTAL, SPECIAL, EXEMPLARY, OR CONSEQUENTIALDAMAGES (INCLUDING, BUT NOT LIMITED TO, PROCUREMENT OF SUBSTITUTE GOODS ORSERVICES; LOSS OF USE, DATA, OR PROFITS; OR BUSINESS INTERRUPTION) HOWEVERCAUSED AND ON ANY THEORY OF LIABILITY, WHETHER IN CONTRACT, STRICT LIABILITY, ORTORT (INCLUDING NEGLIGENCE OR OTHERWISE) ARISING IN ANY WAY OUT OF THE USE OFTHIS SOFTWARE, EVEN IF ADVISED OF THE POSSIBILITY OF SUCH DAMAGE.
39

Basic Operation
Printer Parts
Printer Parts
Optional accessories
Printing procedure
Canceling print jobs
Pausing Printing
40

Printer Parts
Printer Parts
Front
Back
Top Cover (Inside)
Carriage
Ink Tank Cover (Inside)
Operation Panel
Optional accessories
Stand
Stand Parts
Stacker
Parts of the Stacker
Roll Unit
Parts of the Roll Unit
Roll Holder Set
41

Printer Parts
Front
Back
Top Cover (Inside)
Carriage
Ink Tank Cover (Inside)
Operation Panel
42

Front
(A) Top CoverOpen this cover to install the print head, load paper, and remove any jammed paper from inside theprinter as needed. (See "Top Cover (Inside).")
(B) Output GuideGuides printed documents as they are ejected. Open this guide when loading a roll.
(C) Roll holder SlotSlide the Roll Holder into this slot.
(D) Roll HolderLoad the roll on this holder.
(E) Holder StopperSecure the roll on the Roll Holder with this part.
(F) Release LeverTo release paper retainer, lift the lever.
(G) Maintenance Cartridge CoverOpen this cover to replace the maintenance cartridge.
43

(H) Maintenance CartridgeInk used for maintenance purposes such as head cleaning is absorbed. (Replace the cartridge when itis full.)
(I) StandA stand that holds the printer. Equipped with casters to facilitate moving it. (See "Stand Parts.")
(J) USB flash drive portInsert a USB flash drive to this port.
(K) Touch ScreenUse this screen to operate the printer and check the printer status. (See "Operation Panel.")
(L) Ink Tank CoverOpen this cover to replace the ink tank. (See "Ink Tank Cover (Inside).")
44

Back
• TX-4100 / TX-5410•
• TX-3100 / TX-2100 / TX-5310 / TX-5210•
45

(A) Carrying GripsWhen carrying the printer, have six people hold it by these handles under both sides.
(B) USB PortConnect a USB cable to this port. The printer is compatible with Hi-Speed USB connections.
(C) Wired LAN ConnectorConnect an Ethernet cable to this port. The lamp is lit if the Ethernet cable is connected correctly andcommunication is possible between the computer and printer.
(D) Power Cord ConnectorConnect the power cord to this connector.
(E) Roll Unit Power Supply InletConnect the connection cord for the roll unit.
(F) Spare Ink BoxStores the ink tank that is not used.
46

Top Cover (Inside)
(A) Top Cover RollerPrevents paper from rising when ejected.
(B) Cleaning BrushWhen cleaning inside the printer under the top cover, use this brush to sweep away paper dust on theplaten.
(C) Cutter BladeA round-bladed cutter for automatic paper cutting.
(D) Paper Alignment LineAlign paper with this line when loading it.
(E) CarriageMoves the print head. It serves a key role in printing. (See "Carriage.")
(F) Carriage ShaftThe Carriage slides along this shaft.
(G) PlatenThe print head moves across the platen to print. Vacuum holes on the platen hold paper in place.
(H) Borderless Printing Ink GroovesFor catching ink outside the edges of paper during borderless printing.
(I) Paper RetainerImportant in supplying the paper. This retainer holds paper as it is fed.
47

Carriage
(A) Angle Adjustment LeverFine-tunes the line misalignment when printing.
(B) Print Head Locking CoverSecures the print head.
(C) Print HeadThe printhead is equipped with ink nozzles. The carriage serves a key role in printing.
(D) Print Head Lock LeverLock print head locking cover.
48

Ink Tank Cover (Inside)
*1:The figure shows the printer as loaded with a 23.7 fl oz (700 ml) ink tank.
(A) Ink Color LabelLoad an ink tank that matches the color and name on this label.
(B) Ink Lamp (red)Indicates the state of the ink tank as follows when the ink tank cover is opened.
• On•
The ink tank is installed correctly.
• Off•
No ink tank is installed, or the ink level detection function is disabled.
• Flashing•
Ink tank is empty.
Note
• When there is little ink left, the ink lamp is lit and appears on the touch screen.•
(C) Ink TankCartridges of ink in various colors.
(D) Ink Tank Lock LeverA lever that locks the ink tank in place and protects it. Lift and lower the lever when replacing an inktank. To open it, lift the stopper of the lever until it stops, and then push it down toward the front. Toclose it, push it down until it clicks into place.
49

Operation Panel
A: ON button/ON lampTurns the printer on and off.
Turning the Printer On and Off
The ON lamp is lit when the printer is on or in Sleep mode.
B: Load buttonLoads the paper when it is set or replaced.
Loading the Upper Roll on the PrinterLoading the Lower Roll on the Roll Unit (Option)Loading Sheets in the Printer
C: Feed buttonChanges the paper position when the roll paper is loaded.
Feeding Roll Paper Manually
D: Cut buttonCuts the paper when the roll paper is loaded.
Specifying the Cutting Method for Rolls
E: Touch ScreenShows printer menus, as well as the printer status and messages. You can select menu items anddisplay buttons by gently touching the screen with your fingertip.
Home Screen Menu Composition
F: Status lamp• Flashing (white)•
During printing, this lamp flashes when the printer is receiving or processing print jobs. Otherwise,this lamp flashes when the print job is paused or the printer is updating the firmware.
50

• Lit (orange)•
A warning message is displayed.
• Flashing (orange)•
An error message is displayed.
• Off•
There are no active print jobs, warnings, or errors.
Note• When the printer is in Sleep mode, to restore the display, press the buttons on the operation panel or
touch the touch screen.• When Operation panel lock is enabled, touch screen operations are invalid. For details on Operation
panel lock, see Changeable Setting Items Using Remote UI.
51
Optional accessories
Stand
Stand Parts
Stacker
Parts of the Stacker
Roll unit
Parts of the Roll Unit
Roll Holder Set
52

Stand
The following Stand can be used with the printer.
• TX-2100 / TX-5210 : Printer Stand SD-21•
The TX-4100, TX-3100, TX-5410, TX-5310 models come with the stand included.
For more information on the main parts of the stand, see "Stand Parts".
Important• When moving the stand, be sure to set the locking caster lock to the OFF position to release the lock.•
If you move it while the locking caster are locked, the floor may become scratched.
Note• For instructions on installing the stand, see the Setup Guide provided with the stand.•
53

Stand Parts
(A) Stand UnitA stand that holds the printer. Equipped with casters to facilitate moving the printer.
(B) BasketCatches the ejected printed documents. (See "Parts of the Basket.")
(C) Locking CasterA locking caster that, when the lock is in the ON position, immobilizes the printer.
When moving the stand, be sure to set the locking caster lock to the OFF position to release the lock.
If you move it while the locking casters are locked, the floor may become scratched.
(D) Accessory PocketStore printer manuals, assembly tools, and other items in this pocket.
54

Parts of the Basket
(A) Basket Rod (tag side)Secures the cloth basket to the tips of the basket arm.
(B) Basket ArmRetains the basket rod (tag side).
By changing the length and the angle, you can make the basket suitable for various conditions.
(C) BasketA cloth tray that catches ejected documents.
(D) White TagMarks indicating basket attachment orientation.
(E) Basket Rewind ButtonPress this button when rewinding the basket after it has been wound on the basket rod (tag side).
(F) Basket Rod (cord side)Secures the cloth basket on the rod holder.
(G) Rod HolderRetains the basket rod (cord side).
For instructions on how to use the basket, see "Using the Basket" and "Example Basket Configurations".When not using the basket, you can lower it and store alongside of the stand. (See "Storing the Basket.")
55

Stacker
The following stacker can be used in this printer.
• TX-4100 / TX-5410 : Stacker SS-41•
• TX-3100 / TX-5310 : Stacker SS-31•
• TX-2100 / TX-5210 : Stacker SS-21•
For details on the main parts of the stacker, see "Parts of the Stacker."
Important• When moving the stacker, be sure to set the locking caster lock to the OFF position to release the lock.•
If you move it while the locking casters are locked, the floor may become scratched.
Note• For instructions on installing the stacker, see Setup Guide provided with the stacker.•
• Depending on your region, these might be included as standard or they might be available as optional•accessories.
56

Parts of the Stacker
(A) Rod (fixed)Move it forward and back to switch the position of the stacker.
(B) BasketA cloth tray that catches ejected documents.
(C) ArmWhen using the stacker with the Position 1, attach the rod (adjustable) to the lower of the arm.
Example Stacker Configurations
(D) Rod (adjustable)Changes the position of the stacker by moving the rod (adjustable) to the lower of the arm or the upperof the stand.
(E) StandA stand that holds the stacker. Equipped with casters to facilitate moving the printer.
When using the stacker with the Position 2, the Position 3 or the Position 4, attach the rod (adjustable)to the upper of the stand.
Example Stacker Configurations
(F) Paper StopperWhen using the stacker with the Position 3, attach paper stopper to the lower of the second part fromthe right of the flapper.
Store the paper stopper in the accessory pocket of the stand when not in use.
(G) FlapperChanges the position of the stacker by setting the flapper vertically or horizontally.
57
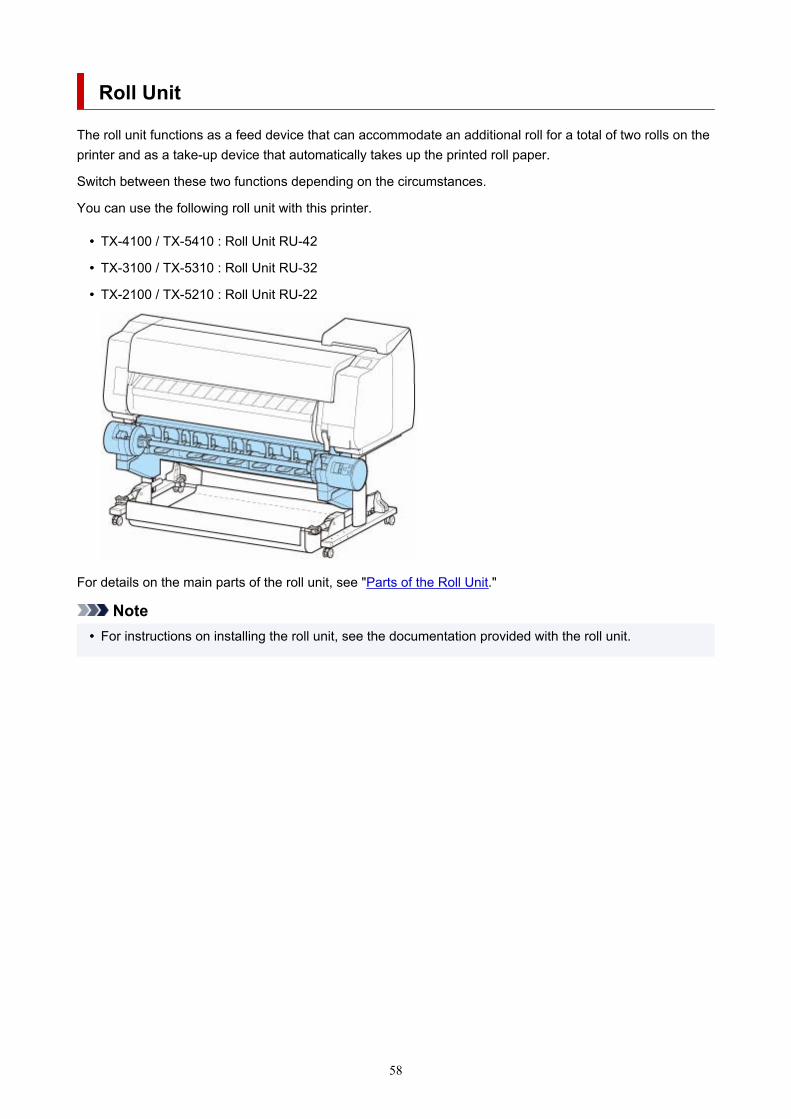
Roll Unit
The roll unit functions as a feed device that can accommodate an additional roll for a total of two rolls on theprinter and as a take-up device that automatically takes up the printed roll paper.
Switch between these two functions depending on the circumstances.
You can use the following roll unit with this printer.
• TX-4100 / TX-5410 : Roll Unit RU-42•
• TX-3100 / TX-5310 : Roll Unit RU-32•
• TX-2100 / TX-5210 : Roll Unit RU-22•
For details on the main parts of the roll unit, see "Parts of the Roll Unit."
Note• For instructions on installing the roll unit, see the documentation provided with the roll unit.•
58

Parts of the Roll Unit
(A) Roll Holder Lock SwitchLocks and releases the Roll Holder loaded in the roll unit.
(B) Feed Mode LampLights up when you have selected the feed mode on the roll unit.
(C) Auto Take-up LampLights up when the paper is being taken up.
(D) Pause LampLights up when the paper winding is paused.
(E) Take-up ButtonYou can rotate the roll unit the desired amount as long as winding is not in progress. When the windingdirection is set to inward winding, the unit takes up the paper; when it is set to outward winding, the unitrewinds the paper.
(F) Rewind ButtonYou can rotate the roll unit the desired amount as long as winding is not in progress. When the windingdirection is set to inward winding, the unit rewinds the paper; when it is set to outward winding, the unittakes up the paper.
(G) Auto Take-up/Pause ButtonPauses and resumes the taking up of paper.
(H) Inward/Outward Winding Changeover SwitchChanges the winding direction when the paper is wound (inward winding and outward winding).
(I) Take-up Mode LampLights up when you have selected the take-up mode on the roll unit.
(J) Roll Holder SlotSlide the Roll Holder into these guide grooves.
(K) 3-Inch Paper Core AttachmentAttaches to the Roll Holder when you are using a roll paper with a 3-inch paper core.
59

(L) Feed Flap SwitchChange the feed flap position depending on the roll unit mode.
(M) Roll HolderLoad the roll on this holder.
(N) Holder StopperThis part secures the roll paper on the Roll Holder.
60

Roll Holder Set
Load roll paper on the roll holder and then load the holder in the printer. You can use the roll holder withboth 2-inch and 3-inch paper cores. However, if using 3-inch core roll paper, attach the 3-inch paper coreattachment. (See "Loading Rolls on the Roll Holder.").
• TX-4100 / TX-5410 : Roll Holder Set RH2-46•
• TX-3100 / TX-5310 : Roll Holder Set RH2-34•
• TX-2100 / TX-5210 : Roll Holder Set RH2-29•
◦ Roll Holder (for 2- and 3-inch paper cores)◦
◦ 3-Inch Paper Core Attachment (×2)◦
61

Printing procedure
Printing Options Using Rolls and Sheets
Turning the Printer On and Off
Loading and Printing on Rolls
Loading and Printing on Sheets
Printing in Windows
Printing from macOS
62

Printing Options Using Rolls and Sheets
The printer supports both rolls and sheets.
This section introduces the main features of each, as well as the main printing methods available. Selectrolls or sheets to suit your particular printing application.
Note• For information on the types of paper the printer supports, see "Types of Paper."•
• A variety of other ways to print are available besides those introduced here. For details, see "Enhanced•Printing Options."
Roll printingMedia in spooled rolls is generally called Roll Media. Rolls are loaded on the Roll Holder, which are in turnloaded in the printer.
Rolls can be used to print large photos or create posters or banners that cannot be printed on regularsheets.
• Large-format printing•
Easily print vertical or horizontal banners from familiar applications such as Microsoft Officeapplications.
(See "Printing Hanging and Horizontal Banners (Large-Format Printing)" (Windows).)
(See "Printing Hanging and Horizontal Banners (Large-Format Printing)" (macOS).)
• Borderless printing•
Print without a margin (border) around posters or photos.
(See "Printing without Edges Based on the Scenarios" (Windows).)
(See "Printing without Edges Based on the Scenarios" (macOS).)
• Banner printing•
You can print multiple pages as a single continuous image, without margins between pages.
(See "Printing by Connecting Multiple Pages" (Windows).)
(See "Printing by Connecting Multiple Pages" (macOS).)
• 90-degree rotation before printing•
Originals in portrait orientation are rotated 90 degrees when possible to use paper more efficiently.
(See "Saving Roll Paper by Rotating Document 90 Degrees" (Windows).)
(See "Saving Roll Paper by Rotating Document 90 Degrees" (macOS).)
• Enlarged/reduced printing•
You can freely adjust the size of originals by enlarging or reducing originals before printing.
(See "Scaled Printing" (Windows).)
(See "Scaled Printing" (macOS).)
63

• Free Layout (Windows) and imagePROGRAF Free Layout (macOS)•
Print multiple documents from multiple applications (such as word-processing programs, spreadsheetprograms, and so on) next to each other.
(See "Lining Up and Printing Multiple Documents" (Windows).)
(See "Lining Up and Printing Multiple Documents" (macOS).)
Note• Setting the roll unit to feed mode and loading roll paper in both the Roll 1 (Upper) and Roll 2 (Lower)•
holders offers the following advantages.
Save the time and effort of switching paper
By loading roll paper of different media types or paper sizes on the upper and lower rolls, you canselect the roll paper in Paper Source in the printer driver when printing, eliminating the effort ittakes to replace the roll.
(See "Page Setup Tab Description" (Windows).)
(See "Quality & Media" (macOS).)
Automatic selection of the right paper for the print job
Selecting Roll Paper (Auto) in Paper Source in the printer driver enables automatic selection andprinting on the roll that suits the print job from the loaded rolls.
(See "Printing by Automatically Switching Upper-level and Lower-level Roll Papers" (Windows).)
(See "Printing by Automatically Switching Upper-level and Lower-level Roll Papers" (macOS).)
Sheet printingSheets refer to individual sheets of paper.
Insert the sheet between the platen and the paper retainer.
• Enlarged/reduced printing•
You can freely adjust the size of originals by enlarging or reducing originals before printing.
(See "Scaled Printing" (Windows).)
(See "Scaled Printing" (macOS).)
• Free Layout (Windows) and imagePROGRAF Free Layout (macOS)•
Print multiple documents from multiple applications (such as word-processing programs, spreadsheetprograms, and so on) next to each other.
(See "Lining Up and Printing Multiple Documents" (Windows).)
(See "Lining Up and Printing Multiple Documents" (macOS).)
64

Turning the Printer On and Off
Turning the printer on
1. Press ON button to turn on printer.1.
The printer will now start up.
The Canon logo appears on the touch screen, and then "Starting the system Please wait." appears.
When startup is finished, ON button lights up, and printer enters standby mode.
65

The printer will not enter standby mode in the following situations. Take action as necessary.
• The top cover is open•
Close the top cover.
• The ink tank cover is open•
Close the ink tank cover.
• The print head is not installed•
Replacing the Print Head
• The ink tank is not installed•
Replacing Ink Tanks
• Error appears on touch screen•
Check the message on the touch screen and take action as necessary.
• The ON button and Status lamp never light up, and nothing appears on the touch screen•
Make sure the printer is plugged in correctly. Check the connection at the plug and electricaloutlet.
• No paper is loaded•
Load paper. (See "Loading and Printing on Rolls.") (See "Loading and Printing on Sheets.")
Turning the printer off
Important• Never disconnect the printer's power supply or unplug it during a print job. This may damage the•
printer.
1. Make sure no print jobs are in progress.1.
While the Status lamp is flashing, the printer is running. The color of the lamp indicates the followingstates.
66

If the Status lamp is flashing orange, check the message on the touch screen and take action asnecessary.
If the Status lamp is flashing white, the printer is receiving a print job. Turn off the printer after printingis finished.
2. Hold down the ON button for more than a second.2.
"Turning off... Please wait momentarily" appears on the touch screen, and the printer turns off.
67

Loading and Printing on Rolls
These are the basic steps for loading and printing on rolls.
Follow these steps to load and print on rolls.
Note• For details on roll paper sizes and types that can be used, see "Paper Sizes" or "Paper Information•
List".
• To wait until the ink dries after printing before cutting the roll, set Drying Time in the printer driver. (See•"Specifying the Ink Drying Time for Rolls.")
• Once you have used all the paper on a roll, clean the platen. If the platen inside the top cover becomes•dirty, it may soil the underside of paper. (See "Cleaning Inside the Top Cover.")
1. Turn the printer on. (See "Turning the Printer On and Off.")1.
2. Load a roll on the Roll Holder. (See "Loading Rolls on the Roll Holder.")2.
68

3. Load roll paper in printer or roll unit. (See "Loading the Upper Roll on the Printer.") (See3."Loading the Lower Roll on the Roll Unit (Option).")
4. Select the type of paper. (See "Changing the Type of Paper.")4.
Note• If no barcode has been printed on the roll paper and you have set Manage remaining roll•
amount to Barcodes, specify the roll length after selecting the media type. (See "Specifying thePaper Length.")
5. Complete settings in the printer driver for the type of paper and other details.5.
How to Open the Printer Driver Setup Window (Windows)
How to Open the Printer Driver Setup Dialog (macOS)
69

6. Send the print job.6.
Printing in Windows
Printing from macOS
The printer now starts printing the print job.
70

Loading and Printing on Sheets
These are the basic steps for loading sheets and then printing.
Follow the steps below to load and print on sheets.
Note• For details on paper sizes and types that can be loaded, see "Paper Sizes" or "Paper Information List".•
• Borderless printing is not supported on sheets. For the features and the main printing methods available•for sheet printing, see "Printing Options Using Rolls and Sheets."
1. Turn the printer on. (See "Turning the Printer On and Off.")1.
2. Load the sheet. (See "Loading Sheets in the Printer.")2.
3. Complete settings in the printer driver for the type of paper and other details.3.
How to Open the Printer Driver Setup Window (Windows)
How to Open the Printer Driver Setup Dialog (macOS)
71

4. Send the print job.4.
Printing in Windows
Printing from macOS
Start printing.
72
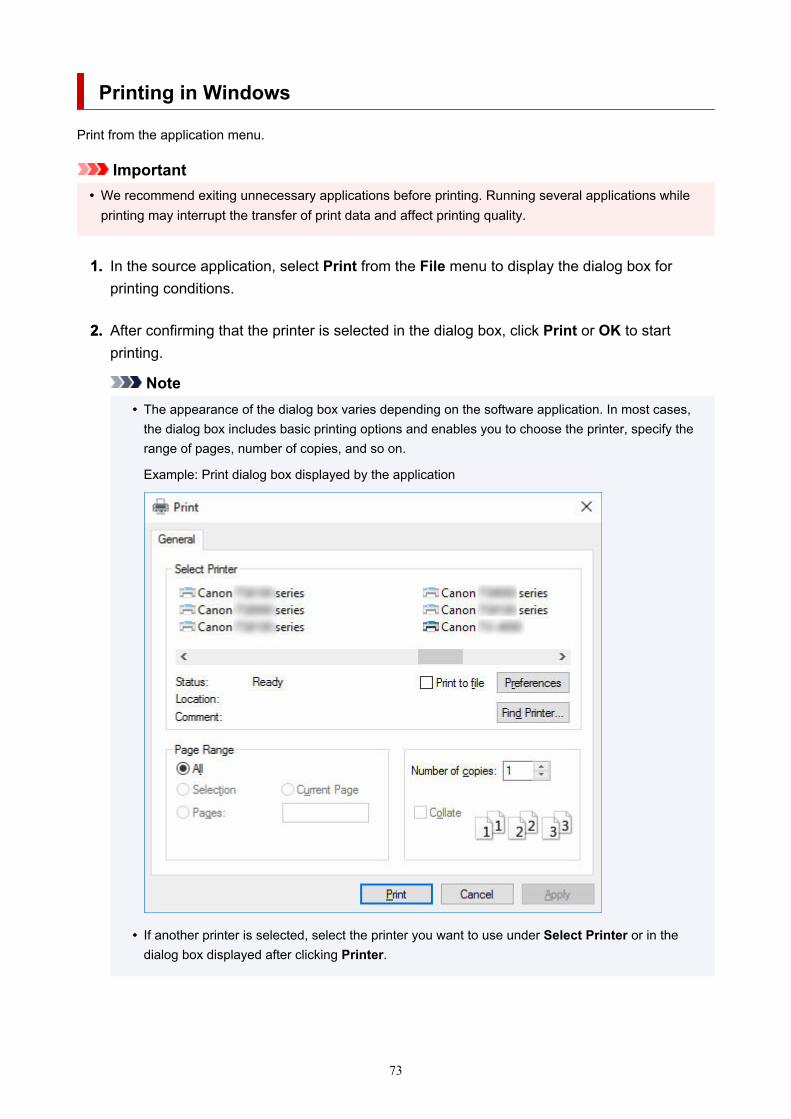
Printing in Windows
Print from the application menu.
Important• We recommend exiting unnecessary applications before printing. Running several applications while•
printing may interrupt the transfer of print data and affect printing quality.
1. In the source application, select Print from the File menu to display the dialog box for1.printing conditions.
2. After confirming that the printer is selected in the dialog box, click Print or OK to start2.printing.
Note• The appearance of the dialog box varies depending on the software application. In most cases,•
the dialog box includes basic printing options and enables you to choose the printer, specify therange of pages, number of copies, and so on.
Example: Print dialog box displayed by the application
• If another printer is selected, select the printer you want to use under Select Printer or in the•dialog box displayed after clicking Printer.
73

You can use the printer driver dialog box to configure various printing settings such as for enlarged orreduced printing and borderless printing. You can open the printer driver dialog box from the applicationsoftware or from the operating system menu. For details, see "How to Open the Printer Driver SetupWindow" (Windows) or "How to Open the Printer Driver Setup Dialog" (macOS).
74

Printing from macOS
Print from the application menu after registering the printer.
Important• We recommend exiting unnecessary applications before printing. Running several applications while•
printing may interrupt the transfer of print data and affect printing quality.
Registering the printerThe printer needs to be registered in Print & Scan (identified as Printers & Scanners or Print & Fax inother versions of macOS X) in System Preferences before printing.
For instructions on registering printers, see "Sharing the Printer on a Network (macOS)."
Important• During this setup process, the printer will not be listed among available printers if it is off or•
disconnected.
Printing from the application software
1. In the application software, select Print from the File menu to display the dialog box for1.printing conditions.
Note• This dialog box includes basic printing options and enables you to choose the printer, specify•
the range of pages, number of copies, and so on.
2. Select the printer in the Printer list.2.
3. Click Print to start printing.3.
75

As shown in the following illustration, you can switch to other panes in this dialog box to completesettings for various methods of printing, including enlarged and reduced printing, borderless printing,and so on.
76

Canceling print jobs
Canceling Print Jobs from the Control Panel
Canceling Print Jobs from Windows
Canceling Print Jobs from macOS
77

Canceling Print Jobs from the Control Panel
To cancel printing or reception of print jobs, press the Stop button on the operation panel.
When you press the Stop button during printing, the printer operation varies depending on the currentstatus.
• You press the Stop button before printing starts•
Pressing the Stop button before printing starts displays a confirmation message. To cancel the print job,select Yes.
• You press the Stop button during printing•
Pressing the Stop button during printing displays a confirmation message. To cancel the print jobimmediately, select Yes.
78

Canceling Print Jobs from Windows
In the printer window, you can cancel jobs that are being sent to the printer.
Using Canon IJ Status Monitor, you can cancel print jobs that have already been received by the printer orthat are currently being printed.
1. Click the printer icon in the taskbar to display the printer window.1.
Note• You can proceed from the folder for configuring the printer settings in the OS you are using.•
For example, in Windows 7, open the Devices and Printers window from the start menu anddouble-click the printer icon.
2. Right-click the job to cancel and select Cancel.2.
3. If job to be canceled is not shown in printer window (that is, if print data has already been3.received by printer), click taskbar icon to display Canon IJ Status Monitor.
4. Click Cancel Printing.4.
79

Note• The screen may differ slightly depending on the model you are using.•
80

Canceling Print Jobs from macOS
In the printer window, you can cancel jobs that are being sent to the printer.
Note• Print jobs are shown in the printer window while they are being sent from the computer. After•
transmission, jobs are not displayed even during printing.
1. Click the printer icon in the Dock to display the printer window.1.
2. Either click × for the job to cancel printing or select the job to cancel printing and then click2.Delete to delete the job.
Note• If the job to be canceled is not shown in the printer window (that is, if the print data has already•
been received by the printer), you can cancel printing from the operation panel on the printer orfrom RemoteUI. For details, "Canceling Print Jobs from the Control Panel" or see "Deleting PrintJobs."
81

Pausing Printing
Pausing Printing
82

Pausing Printing
During printing, if you set Pause printing to Enable, the printer enters a state in which printing is paused,after the completion of the printing process when this setting was made.
In this state, all printing is not executed.
To restore normal operation after pausing printing, set Pause printing to Disable.
Note• In the following cases, the status is cleared even if you do not set Pause printing to Disable.•
When paper is advanced
If you changed the media type from the paper settings display area
1. Tap Job management on Home screen during printing.1.
Note• If the Home screen does not appear, tap the HOME button.•
2. Tap Pause printing.2.
3. Tap Enable or Disable.3.
83

Handling and Use of Paper
Paper
Types of Paper
Paper Sizes
Using Paper Other Than Genuine Paper and feed confirmed Paper
Printing on Paper Other Than Genuine Paper and feed confirmed Paper Using ExistingSettings
Printing on Paper Other Than Genuine Paper and feed confirmed Paper by Adding aMedia Type
Paper Information List
Updating paper information
Handling rolls
Loading Rolls on the Roll Holder
Loading the Upper Roll on the Printer
Loading the Lower Roll on the Roll Unit (Option)
Changing the Type of Paper
Specifying the Paper Length
Removing the Upper Roll from the Printer
Removing the Lower Roll from the Roll Unit (Option)
Removing Rolls From the Roll Holder
Remove Jammed Roll Paper
Feeding Roll Paper Manually
Keeping Track of the Amount of Roll Paper Left
Specifying the Amount of Extension for Borderless Printing
Specifying the Ink Drying Time for Rolls
Specifying the Cutting Method for Rolls
Cutting the Leading Edge of Roll Paper Automatically
Reducing Dust from Cutting Rolls
84

Automatically Switch Rolls
Handling sheets
Loading Sheets in the Printer
Changing the Type of Paper
Printing From a Desired Starting Point
Removing Sheets
Remove a Jammed Sheet
Basket
Using the Basket
Example Basket Configurations
Storing the Basket
Stacker
Using the Stacker
Example Stacker Configurations
Roll Unit
Switching Roll Unit Modes
Using the Roll Unit In Take-Up Mode
Removing Printed Paper from the Roll Unit
Adding/Editing Media Information
85

Paper
Types of Paper
Paper Sizes
Using Paper Other Than Genuine Paper and feed confirmed Paper
Printing on Paper Other Than Genuine Paper and feed confirmed Paper UsingExisting Settings
Printing on Paper Other Than Genuine Paper and feed confirmed Paper by Addinga Media Type
Paper Information List
Updating paper information
86

Types of Paper
The following media types are supported by the printer. For details on the media types supported by theprinter, see "Paper Information List."
• Plain Paper•
• Coated Paper•
• Photo Paper•
• Glossy Paper•
• Proofing Paper•
• CAD-dedicated Paper Etc.•
The Paper Information List includes the following information.
• Types of paper•
• Paper handling•
• Paper product specifications•
• Use precautions•
• Setting of printer driver, control panel etc.•
Note• For instructions on using paper not included in the Paper Information List, see "Using Paper Other Than•
Genuine Paper and feed confirmed Paper."
• Method of Updating Supported Paper•
Paper that is supported by the printer may be newly released on the Canon website.
To use newly released paper, register the latest paper information on the printer with the MediaConfiguration Tool. (See "Updating paper information.")
Important• Even if you are not using the printer driver, you should install the Media Configuration Tool in order•
to register the media types for your region in the printer.
(See "Media Configuration Tool Guide" .)
87

Paper Sizes
RollsRolls that meet the following conditions are supported.
• Outer diameter is 6.7 inches (170 mm) or less•
• Inner diameter of paper core: 2 or 3 inches•
• Printing side out•
Roll Paper Width TX-4100 / TX-5410 : 44.02 in. (1118.0 mm) to 6.00 in. (152.4 mm)
TX-3100 / TX-5310 : 36.11 in. (917.0 mm) to 6.00 in. (152.4 mm)
TX-2100 / TX-5210 : 24.02 in. (610.0 mm) to 6.00 in. (152.4 mm)
Roll paper width recommended forborderless printing(*1,*2)
44 in Roll (1117.6mm)
42 in Roll (1066.8mm)
B0/B1 Roll (1030.0mm)
36 in Roll (914.4mm)
A0/A1 Roll (841.0mm)
B1/B2 Roll (728.0mm)
24 in Roll (609.6mm)
A1/A2 Roll (594.0mm)
B2/B3 Roll (515.0mm)
17 in Roll (431.8mm)
14 in Roll (355.6mm)
10 in Roll (254.0mm)
Minimum Paper Length 4.00 in. (101.6 mm)
Excludes cloth/canvas paper.
Maximum Printable Length 59 feet (18 m)
depends on the OS and application.
Thickness 3 mil (0.07 mm) to 31 mil (0.8 mm)
*1:Borderless printing may not be available depending on the media type. For details on media types thatcan be used for borderless printing, see "Paper Information List."*2:You can perform borderless printing without specifying Roll paper width recommended for it. Asopposed to standard borderless printing, there will be a small margin on the left and right because thepaper width is set a little bit smaller than the width of the document.
SheetsSheets of the following sizes are supported.
Sheet Width TX-4100 / TX-5410 : 44.02 in. (1118.0 mm) to 6.00 in. (152.4 mm)
88

TX-3100 / TX-5310 : 36.11 in. (917.0 mm) to 6.00 in. (152.4 mm)
TX-2100 / TX-5210 : 24.02 in. (610.0 mm) to 6.00 in. (152.4 mm)
Sheet Length 84.00 in. (2133.6 mm) to 8.00 in. (203.2 mm)
Thickness 3 mil (0.07 mm) to 31 mil (0.8 mm)
Note• For details on non-standard sizes, see "Setting Paper Dimensions (Custom Size)" (Windows) or•
"Setting Paper Dimensions (Custom Size)" (macOS).
• Borderless printing is not supported on sheets.•
89
Using Paper Other Than Genuine Paper and feed confirmedPaper
When using this printer to print on paper other than genuine Canon paper and feed confirmed paper, usepaper that meets the following conditions.
Note• For Canon genuine paper/feed confirmed paper, see "Paper Information List."•
• Paper where the size is described in "Paper Sizes" (See "Paper Sizes.")•
• Paper where bleeding and ink overflow does not occur when printing•
• Paper that does not warp severely when loading the paper or printing•
Important• If you use paper other than Canon genuine paper and feed confirmed paper, Canon provides•
absolutely no guarantees regarding print quality or paper feed properties. For Canon genuine paper/feed confirmed paper, see "Paper Information List."
After loading the paper in the printer, select the media type in the control panel and printer driver and thenperform the printing. For the media type, you can select easily from existing settings or you can create anduse settings for the paper you are using.
Printing Using Existing SettingsYou can print easily by selecting from existing settings provided in the printer control panel and printerdriver. (See "Printing on Paper Other Than Genuine Paper and feed confirmed Paper Using ExistingSettings.")
Printing Using Additional SettingsYou can use the Media Configuration Tool function for adding custom paper to create settings suitablefor non-Canon genuine paper/feed confirmed paper and add as a new media type to the printer's ControlPanel and the printer driver for printing. (See "Printing on Paper Other Than Genuine Paper and feedconfirmed Paper by Adding a Media Type.")
90

Printing on Paper Other Than Genuine Paper and feedconfirmed Paper Using Existing Settings
You can easily print on paper other than genuine Canon paper and feed confirmed paper without makingcomplicated settings by selecting the existing settings provided in the printer control panel and printer driverdepending on the media type you are using. The existing settings consist of general-purpose paper settingsprovided for different media types.
Important• The Canon genuine paper settings provided in the printer control panel and printer driver are optimized•
for Canon genuine paper. If these settings are selected for printing on paper other than Canon genuinepaper, the ink may bleed or the print head may rub against the paper. To easily print on paper otherthan Canon genuine paper and feed confirmed paper, we recommend that you select one of thefollowing general-purpose paper settings.
Note• For an overview of the media types, see "Types of Paper."•
• For instructions on selecting the media type with the control panel, see "Types of Paper". For•instructions on selecting the media type with the printer driver, see "How to Open the Printer DriverSetup Window" (Windows) or "How to Open the Printer Driver Setup Dialog" (macOS).
Choosing General-Purpose Paper SettingsThese settings anticipate a wide variety of paper other than Canon genuine paper and feed confirmedpaper, and, therefore, these settings make it difficult for bleeding ink and print head rubbing to occur. Fordetails on the relationships between the conditions of paper other than Canon genuine paper and feedconfirmed paper and the media type to select, see "Paper Information List."
Note• If you cannot obtain the desired results by selecting the general-purpose paper settings, use the•
custom paper adding function in Media Configuration Tool to create settings suitable for the paperyou are using. For details, see "Printing on Paper Other Than Genuine Paper and feed confirmedPaper by Adding a Media Type."
91

Printing on Paper Other Than Genuine Paper and feedconfirmed Paper by Adding a Media Type
Media Configuration Tool provides a function for adding custom paper for better print quality and improvedpaper feed properties when printing on paper other than Canon genuine paper/feed confirmed paper thanwhen printing with general-purpose settings. You can use this function to configure settings such as theamount of ink used and the height of the print head according to the characteristics of the paper being used,and thereby realize higher print quality. Also, you can add the settings created with this function as a newmedia type to the printer control panel and printer driver.
For details on Media Configuration Tool, refer as follows.
Media Configuration Tool Guide
Important• For details on how to select the added media type in the control panel, see "Changing the Type of•
Paper."
• You can select the media type to be used in printing from Media Type in the Main sheet (Windows) or•Quality & Media (macOS) in the printer driver. For details, see "Main Tab Description" (Windows) or"Quality & Media" (macOS).
• We recommend that you use an ICC profile created using commercially available profile creation•software to perform color management accurately on paper other than Canon genuine paper and feedconfirmed paper. You can register the ICC profile you created when creating a custom paper withMedia Configuration Tool. See "Adding Custom Paper" in Media Configuration Tool Guide.
92

Updating paper information
You can update the printer's media information to the latest information by applying the latest version of theMedia Information File.
For details on the procedure for applying the Media Information File, refer to the following.
Media Configuration Tool Guide
Important• If you are using the Media Configuration Tool, the new Media Information File is downloaded•
automatically when released on the Canon website. A computer connected to the Internet is required todownload the Media Information File.
93

Handling rolls
Loading Rolls on the Roll Holder
Loading the Upper Roll on the Printer
Loading the Lower Roll on the Roll Unit (Option)
Changing the Type of Paper
Specifying the Paper Length
Removing the Upper Roll from the Printer
Removing the Lower Roll from the Roll Unit (Option)
Removing Rolls From the Roll Holder
Remove Jammed Roll Paper
Feeding Roll Paper Manually
Keeping Track of the Amount of Roll Paper Left
Specifying the Amount of Extension for Borderless Printing
Specifying the Ink Drying Time for Rolls
Specifying the Cutting Method for Rolls
Cutting the Leading Edge of Roll Paper Automatically
Reducing Dust from Cutting Rolls
Automatically Switch Rolls
94

Loading Rolls on the Roll Holder
When printing on roll paper, attach the roll paper to the Roll Holder.
Roll paper comes in two types: 2-inch and 3-inch cores. If using 3-inch core roll paper, attach the 3-InchPaper Core Attachment to the Roll Holder and holder stopper.
Caution• Set the roll on its side on a table or other flat surface so that it does not roll or fall. Rolls are heavy, and•
dropping a roll may cause injury.
Important• When handling the roll, be careful not to soil the printing surface. This may affect the printing quality.•
We recommend wearing clean cloth gloves when handling rolls to protect the printing surface.
• Cut the edge of the roll paper if it is uneven, dirty, or has tape residue. Otherwise, it may cause feeding•problems and affect the printing quality. Be careful not to cut through any barcodes printed on the roll.
• Align the edges of the paper on both ends of the roll. This may cause feeding problems.•
Note• For details on roll paper sizes and types that can be used, see "Paper Sizes" or "Paper Information•
List".
95

1. Rotate the holder stopper lever (A) towards to release the lock, and while holding it in1.position (B), remove holder stopper from the roll holder.
2. If using 3-inch core paper, align 3-Inch Paper Core Attachment tabs (A) with Roll Holder2.holes (B) and insert firmly.
3. With leading edge of roll paper facing forward as shown, insert Roll Holder from right side of3.roll. Insert firmly until roll paper touches flange (A) of Roll Holder.
Important• When loading a roll, be careful to avoid hitting the printer hard with the roll. This may damage the•
Roll Holder.
96

• If you stand the roll holder vertically and set the roll paper by dropping, the roll holder may be•damaged.
4. If using 3-inch core roll paper, attach 3-Inch Paper Core Attachment to holder stopper.4.
Align the tabs (A) of the attachment with the holes (B) of the holder stopper, and insert firmly.
5. Insert holder stopper from left into roll holder as shown, and then while holding in position5.(B), push firmly until holder stopper flange (A) touches roll paper. Lock the holder stopper
lever (C) by rotating it towards .
97
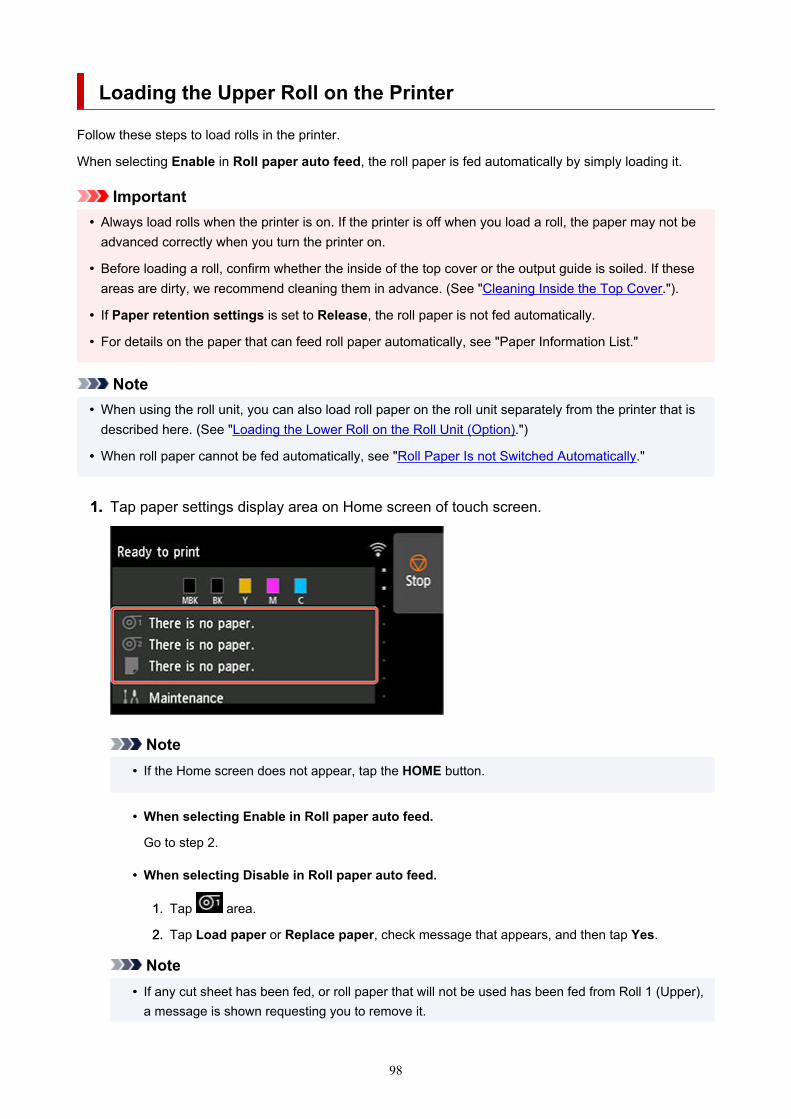
Loading the Upper Roll on the Printer
Follow these steps to load rolls in the printer.
When selecting Enable in Roll paper auto feed, the roll paper is fed automatically by simply loading it.
Important• Always load rolls when the printer is on. If the printer is off when you load a roll, the paper may not be•
advanced correctly when you turn the printer on.
• Before loading a roll, confirm whether the inside of the top cover or the output guide is soiled. If these•areas are dirty, we recommend cleaning them in advance. (See "Cleaning Inside the Top Cover.").
• If Paper retention settings is set to Release, the roll paper is not fed automatically.•
• For details on the paper that can feed roll paper automatically, see "Paper Information List."•
Note• When using the roll unit, you can also load roll paper on the roll unit separately from the printer that is•
described here. (See "Loading the Lower Roll on the Roll Unit (Option).")
• When roll paper cannot be fed automatically, see "Roll Paper Is not Switched Automatically."•
1. Tap paper settings display area on Home screen of touch screen.1.
Note• If the Home screen does not appear, tap the HOME button.•
• When selecting Enable in Roll paper auto feed.•
Go to step 2.
• When selecting Disable in Roll paper auto feed.•
1. Tap area.1.
2. Tap Load paper or Replace paper, check message that appears, and then tap Yes.2.
Note• If any cut sheet has been fed, or roll paper that will not be used has been fed from Roll 1 (Upper),•
a message is shown requesting you to remove it.
98

After following the instructions on the screen to remove the paper, redo the operation.
• If roll paper is loaded in Roll 1 (Upper) but Roll 1 (Upper) is not selected as the paper source, a•message asking you whether or not to change paper is displayed.
Tap Replace paper, remove the paper, and go to the next step.
2. Open top cover and lift output guide.2.
3. Hold flanges (A) so that holder stopper is on left, align roll holder shaft with roll holder slot3.left and right guide grooves (B), and load.
Caution• Be careful not to drop the roll and hurt yourself when loading it.•
99

• Be careful not to pinch your fingers between the Roll Holder shaft and the guide grooves (B) when•loading the roll paper.
Important• If the leading edge of the roll paper is secured with tape or a paper band so that it will not unravel,•
remove the tape or paper band before loading the roll paper into the roll holder slot.
If you load the paper into the roll holder slot with the leading edge secured, only part of the rollpaper is fed to the paper feed slot, resulting in damage to the roll paper.
• If the leading edge of the roll paper is cut crooked or folded, it may not be fed correctly. Cut the•leading edge of the roll paper with scissors or the like and straighten it.
• Load the roll paper so that it is not loaded in the opposite direction.•
• Make sure there is no slack in the roll paper, and then load it.•
• Depending on the surrounding environment, the leading edge of roll paper is stuck because of•static electricity or humidity so that the roll paper may not be able to be fed correctly. In this case,set Roll paper auto feed to Disable, and then feed the roll paper.
• If the roll paper is decentered, it may not be able to be fed correctly. In this case, set Roll paper•auto feed to Disable, and then feed the roll paper.
• When Roll paper auto feed is Enable and if you attach the roll holder without the roll paper•loaded on the roll holder, Preparing to feed the paper... appears on the operation panel. In thiscase, press the Stop button on the operation panel to cancel feeding.
Note• For the procedure for attaching the roll paper to the Roll Holder, see "Loading Rolls on the Roll•
Holder."
• When selecting Enable in Roll paper auto feed.•
Go to step 4.
• When selecting Disable in Roll paper auto feed.•
Pull out roll paper evenly, insert leading edge between roll paper and arrows (A) directly beneathit, and feed roll paper until you hear a sound.
100

Important• If the roll paper has become unwound, remove the slack before loading the roll paper.•
• When feeding the leading edge of the roll paper, make sure the entire width of the roll paper•is separating and feeding from the roll. If the roll paper is fed with some of the roll paper stillstuck to the roll, the roll paper will be damaged.
• Be careful not to soil the printing surface of roll paper as you insert it in the slot. This may•affect the printing quality. We recommend wearing clean cloth gloves when handling rolls toprotect the printing surface.
• If the paper is wrinkled or warped, straighten it out before loading it.•
• Load the roll so that there is no gap between the right edge of the paper and the Roll Holder.•
• Depending on the paper, the roll paper may be scratched when being fed and not feed well.•In this case, you must feed the paper manually after setting Paper retention settings toRelease on the touch screen. Lift the release lever, advance the roll paper until its leading
101

edge appears on platen, lower the release lever, and then proceed to the next step. However,if Paper retention settings is set to Release, automatic switching of the upper and lowerrolls is not possible.
3. Lower output guide.3.
4. Close top cover.4.
• When selecting Enable in Roll paper auto feed.•
The roll paper is fed.
• When selecting Disable in Roll paper auto feed.•
Tap Start feeding, and then the roll paper is fed.
Once paper feeding starts, you will need to do the following, based on the Manage remaining rollamount setting, the barcode printed on rolls, and the Media type selection method setting. (See"Keeping Track of the Amount of Roll Paper Left.")
• When selecting Disable or Auto estimate in Manage remaining roll amount.•
◦ When selecting Manual or Auto with confirmation in Media type selection method.◦
A menu for selecting the media type appears on the touch screen. Operate the touch screenand select the media type to be used.
◦ When selecting Auto detect in Media type selection method.◦
You'll see candidate for the media type you've estimated to the touch screen. After 5 seconds,the paper type of the first item is selected. If you choose a different candidate, you can use thetouch screen to select the type of paper you want.
102

◦ When selecting Use current media type in Media type selection method.◦
A menu for selecting the media type appears on the touch screen. After 5 seconds, the mediatype will be selected with the fixed media kind.
• When selecting Barcodes in Manage remaining roll amount and if the barcode is printed.•
The type and amount of paper left is automatically detected based on the barcode printed on theroll. There is no need to specify the type and length of the paper.
• When selecting Barcodes in Manage remaining roll amount and if the barcode is not•printed.
◦ When selecting Manual in Media type selection method.◦
A menu for selection of the media type and length is shown on the touch screen.Operate thetouch screen, select the media type to be used, and enter its length.
◦ When selecting Auto with confirmation in Media type selection method.◦
A menu for selecting the estimated media type candidates and the paper length. Interact withthe touch screen, select the media type you want to use, and enter the length.
◦ When selecting Auto detect in Media type selection method.◦
A menu for selecting the estimated media type candidates and the paper length.After 5seconds, the paper type of the first item is selected. If you choose a different candidate, youcan use the touch screen to select the type of paper you want.
◦ When selecting Use current media type in Media type selection method.◦
A menu for selecting the media type and the paper length appears on the touch screen. After 5seconds, the media type will be selected with the fixed paper kind.
Important• Cut the edge of the roll using the Cut paper function if the edge is creased or soiled. (See•
"Specifying the Cutting Method for Rolls.")
• When selecting the media type on the touch screen, make sure the media type set in the printer•driver and the media type loaded on the printer match.
Note• If you have selected Auto with confirmation or Auto detect in the Media type selection•
method and you are using the barcode to manage the remaining roll paper, the barcode is readfirst. If it fails to read the barcode, it will detect the media type from the estimated result anddisplay the candidate.
• For details on media types that you can select, see "Paper Information List."•
• Adjusting the printhead alignment with the type of paper to be used in printing may enhance•printing quality. (See "Automatic Adjustment to Straighten Lines and Colors.")
103

Loading the Lower Roll on the Roll Unit (Option)
Follow these steps to load roll paper in the roll unit (Roll 2 (Lower)).
When selecting Enable in Roll paper auto feed, the roll paper is fed automatically by simply loading it.
Important• Always load rolls when the printer is on. If the printer is off when you load a roll, the paper may not be•
advanced correctly when you turn the printer on.
• Before loading a roll, confirm whether the inside of the top cover or the output guide is soiled. If these•areas are dirty, we recommend cleaning them in advance. (See "Cleaning Inside the Top Cover.").
• If using the roll unit as the feed device, depending on the basket position, the ejected roll paper's cut•end enters the roll unit and may cause a paper jam or affect the print quality when set to "BorderlessPrinting" or "Trim Edge First" when loading the paper. In this case, change the basket position, andthen print. (See "Example Basket Configurations.")
• If Paper retention settings is set to Release, the roll paper is not fed automatically.•
• For details on the paper that can feed roll paper automatically, see "Paper Information List."•
Note• When roll paper cannot be fed automatically, see "Roll Paper Is not Switched Automatically."•
1. Tap paper settings display area on Home screen of touch screen.1.
Note• If the Home screen does not appear, tap the HOME button.•
• When selecting Enable in Roll paper auto feed.•
Go to step 2.
• When selecting Disable in Roll paper auto feed.•
1. Tap area.1.
2. Tap Load paper or Replace paper, check message that appears, and then tap Yes.2.
104

Note• If any cut sheet has been fed, or roll paper that will not be used has been fed from Roll 2 (Lower),•
a message is shown requesting you to remove it.
After following the instructions on the screen to remove the paper, redo the operation.
• If roll paper is loaded in Roll 2 (Lower) but Roll 2 (Lower) is not selected as the paper source, a•message asking you whether or not to change paper is displayed.
Tap Replace paper, remove the paper, and go to the next step.
2. Change Roll Holder Lock switch on roll unit to release position.2.
3. Hold flanges (A) so that holder stopper is on left, align roll holder shaft with roll holder slot3.left and right guide grooves (B), and load.
105

Caution• Be careful not to drop the roll and hurt yourself when loading it.•
• Be careful not to pinch your fingers between the Roll Holder shaft and the guide grooves (B) when•loading the roll paper.
Important• If the leading edge of the roll paper is secured with tape or a paper band so that it will not unravel,•
remove the tape or paper band before loading the roll paper into the roll holder slot.
If you load the paper into the roll holder slot with the leading edge secured, only part of the rollpaper is fed to the paper feed slot, resulting in damage to the roll paper.
• If the leading edge of the roll paper is cut crooked or folded, it may not be fed correctly. Cut the•leading edge of the roll paper with scissors or the like and straighten it.
• Load the roll paper so that it is not loaded in the opposite direction.•
• Make sure there is no slack in the roll paper, and then load it.•
• Depending on the surrounding environment, the leading edge of roll paper is stuck because of•static electricity or humidity so that the roll paper may not be able to be fed correctly. In this case,set Roll paper auto feed to Disable, and then feed the roll paper.
• If the roll paper is decentered, it may not be able to be fed correctly. In this case, set Roll paper•auto feed to Disable, and then feed the roll paper.
106

• When Roll paper auto feed is Enable and if you attach the roll holder without the roll paper•loaded on the roll holder, Preparing to feed the paper... appears on the operation panel. In thiscase, press the Stop button on the operation panel to cancel feeding.
Note• For the procedure for attaching the roll paper to the Roll Holder, see "Loading Rolls on the Roll•
Holder."
4. Change Roll Holder Lock switch on roll unit to locked position.4.
Important• If you do not change Roll Holder Lock switch to locked position, the roll paper cannot be fed•
automatically.
5. Change feed flap switch on top of roll unit to feed icon position on the left.5.
107
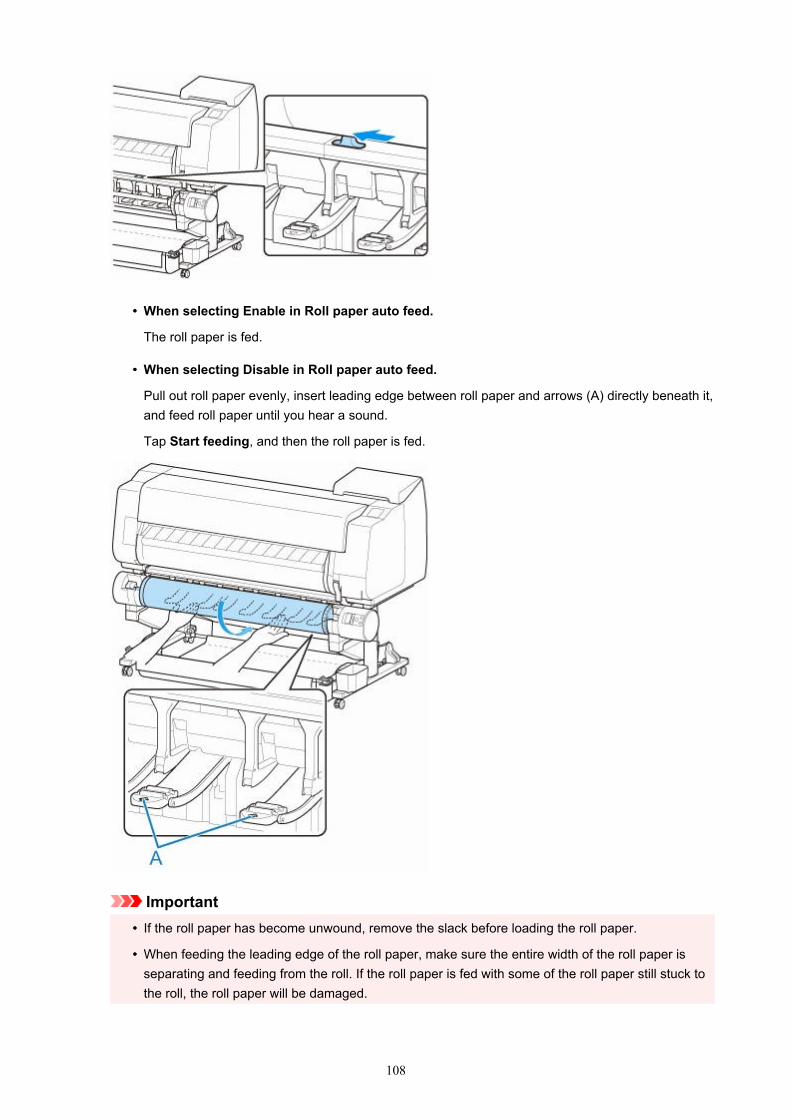
• When selecting Enable in Roll paper auto feed.•
The roll paper is fed.
• When selecting Disable in Roll paper auto feed.•
Pull out roll paper evenly, insert leading edge between roll paper and arrows (A) directly beneath it,and feed roll paper until you hear a sound.
Tap Start feeding, and then the roll paper is fed.
Important• If the roll paper has become unwound, remove the slack before loading the roll paper.•
• When feeding the leading edge of the roll paper, make sure the entire width of the roll paper is•separating and feeding from the roll. If the roll paper is fed with some of the roll paper still stuck tothe roll, the roll paper will be damaged.
108

• Be careful not to soil the printing surface of roll paper as you insert it in the slot. This may affect•the printing quality. We recommend wearing clean cloth gloves when handling rolls to protect theprinting surface.
• If the paper is wrinkled or warped, straighten it out before loading it.•
• Load the roll so that there is no gap between the right edge of the paper and the Roll Holder.•
• Depending on the paper, the roll paper may be scratched when being fed and not feed well. In•this case, you must feed the paper manually after setting Paper retention settings to Release onthe touch screen. Lift the release lever, advance the roll paper until its leading edge appears onplaten, lower the release lever, and then proceed to the next step. However, if Paper retentionsettings is set to Release, automatic switching of the upper and lower rolls is not possible.
Once paper feeding starts, you will need to do the following, based on the Manage remaining rollamount setting, the barcode printed on rolls, and the Media type selection method setting. (See"Keeping Track of the Amount of Roll Paper Left.")
• When selecting Disable or Auto estimate in Manage remaining roll amount.•
◦ When selecting Manual or Auto with confirmation in Media type selection method.◦
A menu for selecting the media type appears on the touch screen. Operate the touch screenand select the media type to be used.
◦ When selecting Auto detect in Media type selection method.◦
You'll see candidate for the media type you've estimated to the touch screen. After 5 seconds,the paper type of the first item is selected. If you choose a different candidate, you can use thetouch screen to select the type of paper you want.
◦ When selecting Use current media type in Media type selection method.◦
A menu for selecting the media type appears on the touch screen. After 5 seconds, the mediatype will be selected with the fixed media kind.
• When selecting Barcodes in Manage remaining roll amount and if the barcode is printed.•
The type and amount of paper left is automatically detected based on the barcode printed on theroll. There is no need to specify the type and length of the paper.
109

• When selecting Barcodes in Manage remaining roll amount and if the barcode is not•printed.
◦ When selecting Manual in Media type selection method.◦
A menu for selection of the media type and length is shown on the touch screen.Operate thetouch screen, select the media type to be used, and enter its length.
◦ When selecting Auto with confirmation in Media type selection method.◦
A menu for selecting the estimated media type candidates and the paper length. Interact withthe touch screen, select the media type you want to use, and enter the length.
◦ When selecting Auto detect in Media type selection method.◦
A menu for selecting the estimated media type candidates and the paper length.After 5seconds, the paper type of the first item is selected. If you choose a different candidate, youcan use the touch screen to select the type of paper you want.
◦ When selecting Use current media type in Media type selection method.◦
A menu for selecting the media type and the paper length appears on the touch screen. After 5seconds, the media type will be selected with the fixed paper kind.
Important• Cut the edge of the roll using the Cut paper function if the edge is creased or soiled. (See•
"Specifying the Cutting Method for Rolls.")
• When selecting the media type on the touch screen, make sure the media type set in the printer•driver and the media type loaded on the printer match.
Note• If you have selected Auto with confirmation or Auto detect in the Media type selection•
method and you are using the barcode to manage the remaining roll paper, the barcode is readfirst. If it fails to read the barcode, it will detect the media type from the estimated result anddisplay the candidate.
• For details on media types that you can select, see "Paper Information List."•
• Adjusting the printhead alignment with the type of paper to be used in printing may enhance•printing quality. (See "Automatic Adjustment to Straighten Lines and Colors.")
110

Changing the Type of Paper
Follow these steps to change the type of paper specified on the printer after you have loaded paper.
If you continue using the same type of paper and set Keep media type to Enable, when you load paper, themedia type selected before Enable was set is selected automatically, eliminating the need to set the mediatype. (See "Using the Same Type of Paper Regularly.")
Note• This printer has the ability to estimate the media type by the data read by the sensor when the paper•
is set. If you continue to use this feature, you will learn the data that you read and the accuracy of themedia type estimation. If you continue to use multiple media types, this feature will reduce the need toselect the media type each time you set the paper. (See "Paper-related settings.")
Important• For best printing results, the printer fine-tunes the print head height and the feed amount for each type•
of paper. Be sure to select the type of paper to use correctly before printing.
• Because the printer fine-tunes the feed amount for each type of paper, the margins and the size of•printed images may vary depending on the type of paper used. If margins and the size of images arenot as you expected, adjust the paper feed amount.
(See "Adjusting Feed Amount.")
• Rolls and sheets have different printing areas, and sheets having a larger bottom margin than rolls.•
(See "Print Area.")
Changing the Type of Paper
Note• When you load roll paper, a menu for selecting the media type appears on the touch screen. Tap the•
media type.
If no barcode has been printed on the roll paper and you have set Manage remaining roll amount toBarcodes, specify the roll length after selecting the media type. (See "Specifying the Paper Length.")
1. Tap paper settings display area on Home screen of touch screen.1.
111

Note• If the Home screen does not appear, tap the HOME button.•
2. Tap paper feed slot where paper whose type you want to change is loaded.2.
3. Tap Paper settings.3.
4. Tap Type.4.
5. Tap media type of roll paper loaded in printer.5.
112

Important• Be sure to select the correct paper type. If this setting does not match the loaded paper, it may•
cause feed errors and affect printing quality.
Note• For details on media types, see "Paper Information List." At the factory default settings, Plain•
Paper is selected for the media type.
• When the release lever is operated, the settings automatically return to the last selected media•type.
Using the Same Type of Paper RegularlyConfigure this setting so that current media type settings will be automatically selected when you load thesame type of paper later.
1. Tap Printer settings on Home screen of touch screen.1.
Note• If the Home screen does not appear, tap the HOME button.•
2. Tap Paper-related settings.2.
113

3. Tap Media type selection method.3.
4. Tap Use current media type.4.
Note• The specified media type setting is updated in the following situations.•
When using sheets, if you send a print job before loading a sheet, the media type setting isupdated to match the type of paper specified by the print job.
If a barcode is printed on the roll paper and you have set Manage remaining roll amount toBarcodes in the operation panel menu, the media type setting is updated to match the mediatype specified by the barcode.
• To change the media type setting, see "Changing the Type of Paper."•
114
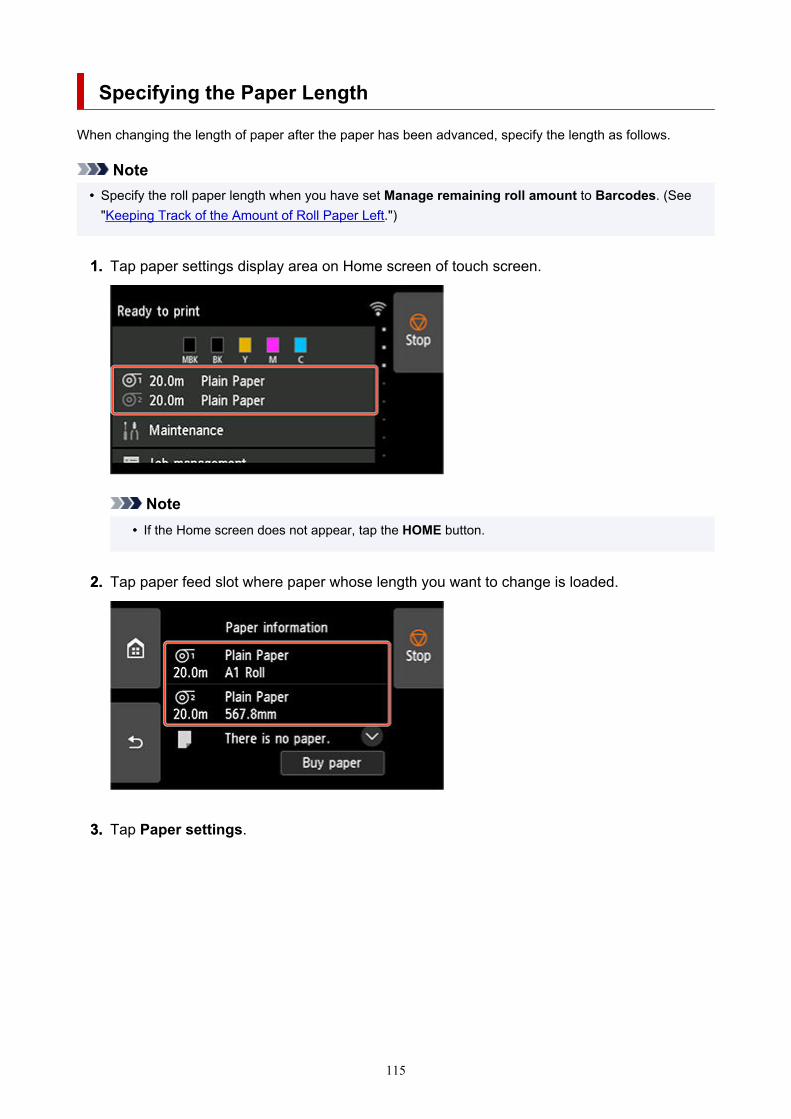
Specifying the Paper Length
When changing the length of paper after the paper has been advanced, specify the length as follows.
Note• Specify the roll paper length when you have set Manage remaining roll amount to Barcodes. (See•
"Keeping Track of the Amount of Roll Paper Left.")
1. Tap paper settings display area on Home screen of touch screen.1.
Note• If the Home screen does not appear, tap the HOME button.•
2. Tap paper feed slot where paper whose length you want to change is loaded.2.
3. Tap Paper settings.3.
115

4. Tap Length.4.
5. Enter roll paper length.5.
Specify the roll length as follows.
1. Tap the gray numerical input field.1.
2. Tap the keypad appearing on the touch screen, enter the roll paper length, and then tap OK.2.
116

3. Check the entered length and tap OK.3.
117

Removing the Upper Roll from the Printer
Remove rolls from the printer as follows.
Note• If you need to cut a printed roll, select Feed/cut in the printer menu and cut the roll paper at the desired•
position. (See "Specifying the Cutting Method for Rolls.")
1. Tap paper settings display area on Home screen of touch screen.1.
Note• If the Home screen does not appear, tap the HOME button.•
2. Tap area.2.
3. Tap Remove paper.3.
4. Tap Yes.4.
The roll is rewound.
Important• If Manage remaining roll amount is set to Barcodes in the operation panel menu, a barcode is•
printed on the leading edge of the roll paper.
Do not remove the roll before the barcode is printed. You will be unable to keep track of theamount of roll paper left. (See "Keeping Track of the Amount of Roll Paper Left.")
5. Open top cover and lift output guide.5.
118

6. Using both hands, rotate the Roll Holder in the direction of the arrow to rewind the roll.6.
7. Hold Roll Holder by its flanges (A) and remove from roll holder slot.7.
Note• For instructions on removing the Roll Holder from rolls, see "Removing Rolls From the Roll•
Holder."
8. Lower output guide and close top cover.8.
119

Note• To load new paper in the printer at this point, see "Loading the Upper Roll on the Printer."•
• Clean inside the top cover before loading paper.•
(See "Cleaning Inside the Top Cover.")
120

Removing the Lower Roll from the Roll Unit (Option)
Follow these steps to remove roll paper from the roll unit.
Note• If you need to cut a printed roll, select Feed/cut in the printer menu and cut the roll paper at the desired•
position. (See "Specifying the Cutting Method for Rolls.")
1. Tap paper settings display area on Home screen of touch screen.1.
Note• If the Home screen does not appear, tap the HOME button.•
2. Tap area.2.
3. Tap Remove paper.3.
4. Check touch screen message and tap Yes.4.
The roll is rewound.
Important• If Manage remaining roll amount is set to Barcodes in the operation panel menu, a barcode is•
printed on the leading edge of the roll paper.
Do not remove the roll before the barcode is printed. You will be unable to keep track of theamount of roll paper left. (See "Keeping Track of the Amount of Roll Paper Left.")
5. Using both hands, rotate roll holder in direction of arrow to rewind roll paper.5.
121

6. Change Roll Holder Lock switch on roll unit to release position.6.
7. Hold roll holder by its flanges (A) and remove from roll holder slot.7.
122

Note• For instruction on removing the roll paper from the roll holder, see "Removing Rolls From the Roll•
Holder."
• To load new paper in the printer at this point, see "Loading the Lower Roll on the Roll Unit•(Option)."
123

Removing Rolls From the Roll Holder
1. Rotate the holder stopper lever (A) towards to release the lock, and while holding it in1.position (B), remove holder stopper from the roll holder.
2. Remove roll holder from roll paper.2.
3. To remove 3-Inch Paper Core Attachment, press tabs (A) inward and remove attachment.3.
• roll holder Side•
• holder stopper Side•
124

Important• Store the roll in the original bag or box, away from high temperature, humidity, and direct sunlight. If•
paper is not stored properly, the printing surface may become scratched, which may affect the printingquality when you use it again.
125

Feeding Roll Paper Manually
After feeding the roll paper, you can move it forward and back.
1. Tap paper settings display area on Home screen of touch screen.1.
Note• If the Home screen does not appear, tap the HOME button.•
2. Tap or area.2.
3. Tap Feed/cut.3.
4. Tap or touch Advance and Rewind to move roll paper forward or back.4.
Note• Tapping Advance or Rewind moves the roll paper approximately 0.04 inch (1 mm).•
Touching Advance or Rewind moves the roll paper until you release the key. If "Cannot advancethe paper any further." appears on the touch screen, release the key.
5. Tap OK when you have determined position of roll paper.5.
126

Keeping Track of the Amount of Roll Paper Left
There are two methods of managing the amount of roll paper left: by using the barcode and by estimatingthe amount of roll paper left.
Managing by the Barcode for the Amount of Roll Paper LeftWhen you set Manage remaining roll amount to Barcodes in Printer settings on the Home screen, theamount of remaining roll paper and the media type information are printed as a barcode and text when thepaper is removed. When Manage remaining roll amount is set to Barcodes and you load roll paper witha printed barcode, the media type and remaining amount are automatically detected after the roll paper isloaded. The barcode will be cut off after it has been read.
Important• If the barcode on the roll paper is not detected, enter the media type and length on the touch screen.•
The length of the paper at this time can be set in Roll length (change default).
Setting the Length of the Roll Paper when Managing by the Barcode
Follow the steps below when setting Manage remaining roll amount to Barcodes.
1. Tap Printer settings on Home screen of touch screen.1.
Note• If the Home screen does not appear, tap the HOME button.•
2. Tap Paper-related settings.2.
3. Tap Manage remaining roll amount.3.
4. Tap Barcodes.4.
5. Check the length of the roll paper.5.
127

Important• When selecting Enable in Roll paper auto feed, the screen for checking the length of the roll•
paper is displayed for only 5 seconds.
Note• The length of the roll paper to be displayed can be set in Roll length (change default).•
Setting the Length of the Roll Paper when Managing by the Barcode
• If the length of the roll paper to be displayed is different from the length of the roll paper actually•used, set the actual length.
6. Select the timing when the warning message appears.6.
Setting the Length of the Roll Paper when Managing by the BarcodeWhen you select Barcodes in Manage remaining roll amount and if you feed roll paper on which nobarcode is printed, such as new roll paper, the screen to enter the roll paper length (remaining amount)appears.
In this screen, the length (remaining amount) of default value appears. If the length is not correct, tap thescreen and enter a correct length.
When you want to change the length (remaining amount) of default value, follow the steps below.
1. Tap paper settings display area on Home screen of touch screen.1.
Note• If the Home screen does not appear, tap the HOME button.•
2. Tap paper feed slot where roll paper for which you want to set the roll paper length is2.loaded.
3. Tap Paper settings.3.
4. Tap Advanced.4.
128

5. Tap Roll length (change default).5.
Managing by Estimating the Amount of Roll Paper LeftWhen you set the Manage remaining roll amount to Auto estimate in Print settings of the homescreen, the remaining amount of roll paper is estimated and displayed in the Operation panel. Thebarcode is not printed.
Important• If the type of paper is not selected correctly, the amount of roll paper left may not be estimated•
correctly.
• There is an error in the estimated amount of paper remaining, and it may be out of paper during•printing.
• When using the types of paper which are not displayed on "Paper Information List," set the paper•thickness and the size of paper core with Media Configuration Tool.
Media Configuration Tool Guide
129

Specifying the Amount of Extension for Borderless Printing
Borderless printing may leave margins on the left and right sides of the paper or soil the back of the paper.Adjusting the amount of extension may improve these problems.
Each paper width is shown as being a recommended width for borderless printing ( Paper withrecommended width ), or as having sufficient width for borderless printing ( Paper of sufficient width ).The procedure for specifying the amount of extension differs depending on Paper with recommendedwidth and Paper of sufficient width.
Specifying Amount of Extension for Paper with recommended width.Specifying Amount of Extension for Paper of sufficient width.
For more information on a paper width recommended for borderless printing, see Paper Sizes.
Specifying Amount of Extension for Paper with recommended width.
1. Tap paper setting display area on HOME screen.1.
2. Tap area.2.
3. Tap Paper settings.3.
4. Tap Advanced setup.4.
5. Tap Extension for borderless printing.5.
6. Tap Paper with recommended width.6.
7. Select amount of extension.7.
Select Large, Standard, or Small.
Note• When selecting Large, the printed area will be wider. Select this if there are margins.•
• When selecting Small, the printed area will be narrower. Select this if there are stains.•
130

Specifying Amount of Extension for Paper of sufficient width.In case of Paper of sufficient width, the width of the original is set to be slightly smaller than the paper,and there are margins on the left and right. You can reduce the margins by increasing the amount ofextension.
On the other hand, if the amount of extension is too large, the back side of the paper will be easily soiledwith the overflowed ink. When performing borderless printing with specifying the amount of extension forPaper of sufficient width, clean the platen regularly.
Cleaning Inside the Top Cover
1. Tap paper setting display area on HOME screen.1.
2. Tap area.2.
3. Tap Paper settings.3.
4. Tap Advanced setup.4.
5. Tap Extension for borderless printing.5.
6. Tap Paper of sufficient width.6.
7. Tap Sample of extension amounts.7.
8. Confirm displayed message and tap Yes.8.
The alignment pattern for each adjustment value is printed.
9. Select the adjustment value.9.
131

Check the paper edge (A) of the 1st to 8th on the output pattern and select the number that has theappropriate amount of extension.
Note• After setting, we recommend to perform borderless printing to check the margin status.•
If the margin remains, set a larger adjustment value. If the back of the paper is soiled, set asmaller adjustment value.
• After printing alignment pattern and borderless printing for confirmation, we recommend to•clean the platen.
Cleaning Inside the Top Cover
132

Specifying the Ink Drying Time for Rolls
When you are using paper that takes longer for ink to adhere, ink may be transferred onto the paper surfaceduring ejection, soiling it. In that case, you may be able to improve the condition by setting the time to waitfor the ink to dry after printing.
Note• If the Cutter touches the print surface on which the ink is not dry, the paper surface may become•
scratched or soiled, or the paper surface may rub when the paper falls and the surface may becomesoiled.
To wait for the ink to dry without allowing printed materials to fall after printing, set Cutting mode on theprinter menu to Eject cut. (See "Specifying the Cutting Method for Rolls.")
Set on the Printer SideSet with the touch screen of the printer.
In addition to Pause between scans and Pause between pages, which you can set in the printer driver,You can set the Pause on last page take-up and Pause timing priority when you use the Roll unit as aTake-up mode.
1. Tap paper settings display area on Home screen of touch screen.1.
The Paper settings screen appears.
2. Tap or area.2.
The Roll paper 1 or Roll paper 2 screen appears.
133

3. Tap Paper settings.3.
The Paper settings screen appears.
4. Tap Advanced.4.
The Advanced paper settings screen appears.
Scroll the screen to set Pause between scans, Pause between pages, Pause on last page take-up, and Pause timing priority.
134

Pause between scansPrint one scan on the page and then set the wait time for the next one scan to print.
Pause between pagesPrint one page and then set the wait time for paper to be ejected.
If you have the next page, when print it after the ink drying time has elapsed.
Pause on last page take-upWhen you use a roll unit mode as a take-up, you set the wait time after you print the last page.
If you have the next page to print, cancel the drying time waiting and print.
Pause timing priorityYou can specify a preferred pause time when using a roll unit as a take-up mode.
Select Between pages if you want to print on a per-page basis, and if you prefer the wait timebefore paper is discharged, select On last page if you want to prioritize the wait times after youprint the final pages.
Windows
1. Display the printer driver dialog box.1.
(See "How to Open the Printer Driver Setup Window.")
2. Select Main sheet and click Specify... for Media Type.2.
135

3. In the Paper Detailed Settings dialog box displayed next, select the desired values from3.the lists for Between Pages and Between Scans in Drying Time, and then click OK.
(See "Main Tab Description.")
136

macOS
1. Choose Print in the application menu.1.
2. Select Advanced Paper Settings panel.2.
3. Select desired values from lists for Dry Time (Between Pages) and Dry Time (Between3.Scans).
(See "Paper Detailed Settings.")
137

Specifying the Cutting Method for Rolls
How rolls are cut after ejection varies depending on printer settings.
• Automatic cut•
The roll is automatically cut by the cutter blade according to the printer driver settings.
◦ Printer Setting◦
Roll Paper 1/Roll Paper 2 > Paper settings > Advanced > Cutting mode > Automatic cut
◦ Driver Setting◦
Automatic Cutting > Yes
See "Cutting Roll Paper after Printing" (Windows).
See "Cutting Roll Paper after Printing" (macOS).
• Eject (when the paper surface is being scratched / to wait for ink to dry)•
Select this to move the cutter by touch screen operation and cut paper. With Automatic cut, the paperdrops and may rub against the basket, resulting in damage to the print surface, but you can cut usingthis method and supporting the paper so that it does not drop to avoid damage to the paper. Also, youcan prevent paper that has not dried from dropping by visually checking the ink has dried, and thencutting the paper.
After printing, tap Cut paper and cut the roll paper on the cutter blade.
◦ Printer Setting◦
Roll Paper 1/Roll Paper 2 > Paper settings > Advanced > Cutting mode > Eject cut
◦ Driver Setting◦
Automatic Cutting > Yes
See "Cutting Roll Paper after Printing" (Windows).
See "Cutting Roll Paper after Printing" (macOS).
• Manual (when using media that cannot be cut with the cutter blade)•
Select this if the paper cannot be cut on the cutter blade.
Cut each page from the roll using scissors. For continuous printing (if you will cut each page later),select Automatic Cutting > Yes or select Print Cut Guideline.
◦ Printer Setting◦
Roll Paper 1/Roll Paper 2 > Paper settings > Advanced > Cutting mode > User cut
◦ Driver Setting◦
Automatic Cutting > No, Yes, Print Cut Guideline
See "Cutting Roll Paper after Printing" (Windows).
See "Cutting Roll Paper after Printing" (macOS).
138

• Paper cutting (to have the roll cut at your specified position)•
Select this when you want to cut the roll paper by operating the cutter blade using the touch screen afterprinting with No or Print Cut Guideline selected in Automatic Cutting in the printer driver.
Otherwise choose this option if you want to cut the roll edge after loading a roll.
◦ Printer Setting◦
Roll Paper 1/Roll Paper 2 > Feed/cut > Cut paper > Yes
◦ Driver Setting◦
Automatic Cutting > No, Print Cut Guideline
See "Cutting Roll Paper after Printing" (Windows).
See "Cutting Roll Paper after Printing" (macOS).
Note• Automatic and Eject are valid only when you have selected Automatic Cutting > Yes in the printer•
driver.
• With Eject, printing does not resume after a series of jobs have been printed continuously until the roll is•cut.
• Eject cut is the preset selection in Cutting mode for some types of paper. For this paper, we•recommend keeping the preset cutting mode.
• If documents printed using Automatic, Eject, or manual cutting are short, rolls are advanced a specific•amount before cutting to prevent problems with cutting and paper ejection. This may create a widerbottom margin, in some cases.
Cut rolls manually in the following cases:
Eject (when the paper surface is being scratched / to wait for ink to dry)
Important• When cutting wide printed documents after ejection, have two people support the documents. If the•
paper drops, printed documents may be damaged.
• Do not lift the paper when holding printed documents before cutting. If the paper rises, it may affect•the printing quality or cause rough cut edges.
Note• Once the following step has been performed, the procedure can be started from step 7 the next time.•
Printing the second and subsequent times
Printing after replacing with the same type of paper
1. Tap paper settings display area on Home screen of touch screen.1.
139

Note• If the Home screen does not appear, tap the HOME button.•
2. Tap paper feed slot where roll paper for which you want to set cutting method is loaded.2.
3. Tap Paper settings.3.
4. Tap Advanced.4.
5. Tap Cutting mode.5.
6. Tap Eject cut.6.
7. Print the job.7.
When printing is finished, the printer will stop without cutting.
8. While holding printed document to prevent it from dropping, tap Cut paper to cut roll8.paper.
Manual (when using media that cannot be cut with the cutter blade)
Note• Once the following step has been performed, the procedure can be started from step 8 the next time.•
Printing the second and subsequent times
Printing after replacing with the same type of paper
1. Tap paper settings display area on Home screen of touch screen.1.
140

Note• If the Home screen does not appear, tap the HOME button.•
2. Tap paper feed slot where roll paper for which you want to set cutting method is loaded.2.
3. Tap Paper settings.3.
4. Tap Advanced.4.
5. Tap Cutting mode.5.
6. Tap User cut.6.
7. When Do you want to set to detect the leading edge of the paper? is displayed, select7.Detect (recommended).
8. Print the job.8.
The printer stops advancing the paper after printing.
9. Tap Advance paper.9.
Roll paper is fed to the specified cut position and then automatically stopped.
10. Cut the roll paper manually with scissors or the like.10.
141

11. Tap OK.11.
After the roll is rewound, it stops automatically.
Manual (for paper of which the leading edge rubs the printhead)
Note• Once the following step has been performed, the procedure can be started from step 8 the next time.•
Printing the second and subsequent times
Printing after replacing with the same type of paper
1. Tap paper settings display area on Home screen of touch screen.1.
Note• If the Home screen does not appear, tap the HOME button.•
2. Tap paper feed slot where roll paper for which you want to set cutting method is loaded.2.
3. Tap Paper settings.3.
4. Tap Advanced.4.
142

5. Tap Cutting mode.5.
6. Tap User cut.6.
7. When Do you want to set to detect the leading edge of the paper? is displayed, select7.Do not detect.
Note• If you set the detection of paper leading edge to Do not detect, a margin of about 4.0 inches•
(10 cm) is created at the paper leading edge when printing starts.
• When the detection of paper leading edge is set to Do not detect, printing will start at the•position at which the roll was set for the first printing after replacing a roll. Thus, the margin ofthe paper leading edge will enlarge.
(See "Loading the Upper Roll on the Printer.")
8. Tap Back button twice to display roll paper screen.8.
9. Tap Feed/cut.9.
10. Tap or touch Advance or Rewind and align paper's leading edge with position (A).10.
11. Print the job.11.
The printer stops advancing the paper after printing.
12. Tap Advance paper.12.
Roll paper is fed to the specified cut position and then automatically stopped.
143

13. Cut the roll paper manually with scissors or the like.13.
14. Tap OK.14.
After the roll is rewound, it stops automatically.
Paper cutting (to have the roll cut at your specified position)
1. Tap paper settings display area on Home screen of touch screen.1.
Note• If the Home screen does not appear, tap the HOME button.•
2. Tap paper feed slot where roll paper you want to cut is loaded.2.
3. Tap Feed/cut.3.
4. Tap or touch Advance or Rewind to feed roll paper to desired cutting position.4.
5. Tap Cut paper.5.
6. Tap Yes.6.
144

After the roll paper is cut, it is rewound automatically.
145
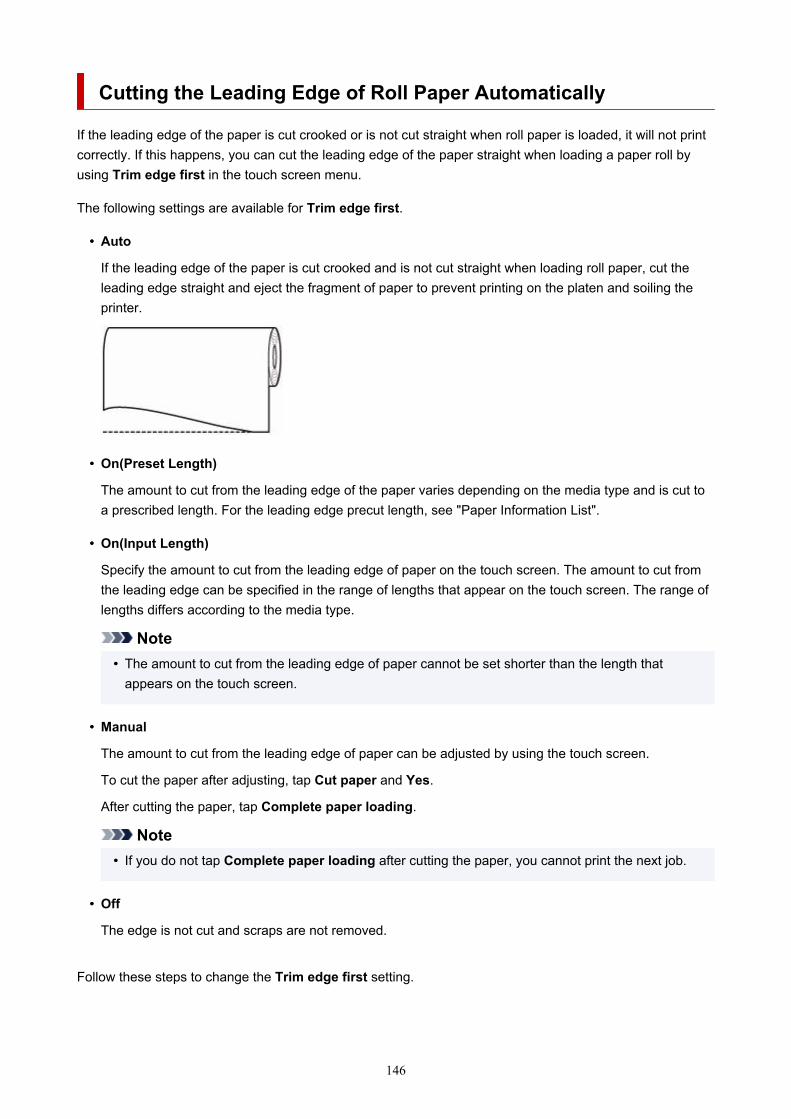
Cutting the Leading Edge of Roll Paper Automatically
If the leading edge of the paper is cut crooked or is not cut straight when roll paper is loaded, it will not printcorrectly. If this happens, you can cut the leading edge of the paper straight when loading a paper roll byusing Trim edge first in the touch screen menu.
The following settings are available for Trim edge first.
• Auto•
If the leading edge of the paper is cut crooked and is not cut straight when loading roll paper, cut theleading edge straight and eject the fragment of paper to prevent printing on the platen and soiling theprinter.
• On(Preset Length)•
The amount to cut from the leading edge of the paper varies depending on the media type and is cut toa prescribed length. For the leading edge precut length, see "Paper Information List".
• On(Input Length)•
Specify the amount to cut from the leading edge of paper on the touch screen. The amount to cut fromthe leading edge can be specified in the range of lengths that appear on the touch screen. The range oflengths differs according to the media type.
Note• The amount to cut from the leading edge of paper cannot be set shorter than the length that•
appears on the touch screen.
• Manual•
The amount to cut from the leading edge of paper can be adjusted by using the touch screen.
To cut the paper after adjusting, tap Cut paper and Yes.
After cutting the paper, tap Complete paper loading.
Note• If you do not tap Complete paper loading after cutting the paper, you cannot print the next job.•
• Off•
The edge is not cut and scraps are not removed.
Follow these steps to change the Trim edge first setting.
146

1. Tap paper settings display area on Home screen of touch screen.1.
Note• If the Home screen does not appear, tap the HOME button.•
2. Tap or .2.
3. Tap Paper settings.3.
4. Tap Advanced.4.
5. Tap Trim edge first.5.
6. Tap desired Trim edge first settings.6.
This setting takes effect the next time you load a roll.
147

Reducing Dust from Cutting Rolls
If the paper tends to generate dust when cut, such as with Backlit Film, you can reduce flying dust by settingCut-dust reduction to ON from the touch screen menu, which will coat the leading and trailing edges of theprinted document with ink. As a result, you can reduce problems with the print head. You can set Cut-dustreduction according to the media type.
Important• Do not set Cut-dust reduction to ON for paper that wrinkles easily, such as Plain Paper or lightweight•
paper. If not cut properly, the paper may jam.
• Borderless printing is not available when Cut-dust reduction is set to ON. When performing borderless•printing, set Cut-dust reduction to OFF.
Follow these steps to set Cut-dust reduction to ON.
1. Tap paper settings display area on Home screen of touch screen.1.
Note• If the Home screen does not appear, tap the HOME button.•
2. Tap or area.2.
3. Tap Paper settings.3.
4. Tap Advanced.4.
148

5. Tap Cut-dust reduction.5.
6. Tap ON.6.
149

Automatically Switch Rolls
By using the roll unit as a roll paper feed device, you can load an upper roll (Roll 1 on printer) and a lowerroll (Roll 2 on the roll unit), and print on while automatically changing between Roll 1 and Roll 2 dependingon the print job.
For details on how to switch between Roll 1 and Roll 2, see "How to Switch Paper Rolls" (Windows) or "Howto Switch Paper Rolls" (macOS).
Important• If Paper retention settings is set to Release, automatic switching of roll paper cannot be used.•
150

Handling sheets
Loading Sheets in the Printer
Changing the Type of Paper
Printing From a Desired Starting Point
Removing Sheets
Remove a Jammed Sheet
151

Loading Sheets in the Printer
Follow these steps to load sheets in the printer.
Important• Paper that is wrinkled or warped may jam. If necessary, straighten the paper and reload it.•
• Load the paper straight. Loading paper askew will cause an error. (See "1317.")•
• If you are not using the stand, make sure there is no object under the printer. If there is any object•under the printer, it may cause damage of the paper or jamming.
Note• Before loading cut sheets, check whether or not the inside of the top cover or the output guide is•
soiled. If these areas are dirty, we recommend cleaning them in advance. (See "Cleaning Inside theTop Cover.").
• Store unused paper in the original package, away from high temperature, humidity, and direct sunlight.•
1. Select sheets as the paper source.1.
• If a print job was received•
Sheets are automatically selected, and the media type and size specified by the print job areshown on the touch screen.
Tap OK and Load paper.
• If no print job was received•
1. Tap paper settings display area on touch screen.1.
Note• If the Home screen does not appear, tap the HOME button.•
2. Tap area.2.
3. Tap Load paper or Replace paper.3.
152

Note• If any paper has been advanced that will not be used, a message is shown requesting you to•
remove it.
Follow the instructions on the screen to remove the paper, and redo the operation.
2. Open top cover and lift release lever.2.
Important• Do not touch Linear Scale (A), carriage shaft (B), or Ink Tube Stabilizer (C). Touching these parts•
may damage them.
153

3. Place cut sheet with the print side up, insert in portrait orientation between platen (A) and3.paper retainer (B), and align paper's far edge using the following steps.
1. Load while aligning with right side paper alignment line (C).1.
2. Align far edge of inserted sheet with leading edge of paper alignment line (D) as shown.2.
When you insert the sheet, it will adhere automatically to the surface of the platen.
Important• Load the sheet so that it is parallel to the right paper alignment line (C). Loading paper askew will•
cause an error.
• Warped paper may rub against the print head. Straighten paper if it is warped before loading.•
Note• You can also align the cut sheet based on its near edge. In this case, load the cut sheet aligning•
its near edge with marks (E) on the platen and the right edge with the right-side paper alignmentline (F).
154

• You can adjust the vacuum strength holding the paper against the platen when the release lever•is up. If it is difficult to load the paper, tap Suction on the touch screen and adjust the vacuumstrength. You can adjust the vacuum strength to 5 levels.
However, even if you increase the suction, it may not be sufficient to hold some types of paperagainst the platen well. In this case, use your hand to load the paper.
• Sheets are held in place by suction through holes on the platen. Although the suction may•produce a noise when paper is loaded in some positions, it does not indicate a problem. If thenoise is distracting, try moving the paper over slightly to the left or right (up to 0.04 inch (1 mm))while keeping it parallel to the paper alignment line.
• The suction remains on for about 30 seconds during loading. If you cannot finish loading a sheet•during this time, pull the sheet away and reinsert it to start the suction again.
4. Lower release lever and close top cover.4.
155

• If a print job was received•
Tap OK to feed the paper and begin printing.
• If no print job was received•
A menu for selecting the media type appears.
Select the media type loaded and tap OK.
The printer now starts feeding the paper.
Note• For details on media types that you can select, see "Paper Information List."•
156

Printing From a Desired Starting Point
Print on sheets from a desired starting point as follows.
Setting Detect paper width to Disable
1. Tap paper settings display area on Home screen of touch screen.1.
Note• If the Home screen does not appear, tap the HOME button.•
2. Tap area.2.
3. Tap Paper settings.3.
4. Tap Advanced.4.
5. Select Detect paper width and tap Disable.5.
Load paper in the desired position to start printing fromFollow these instructions to load paper at the desired starting position for printing when Detect paperwidth is set to Disable.
1. If you did not send a print job in advance, a menu for selection of the type of paper is1.displayed.
Tap media type loaded.
Note• If a print job was received before the paper was fed, the media type and size specified by the•
job are shown on the touch screen.
Go to step 2.
157

2. When "[Detect paper width] is disabled. Do you want to keep it disabled and2.continue?" appears on touch screen, tap Keep it disabled and continue.
3. Open top cover and check position where paper is loaded.3.
To start printing from the current position, close the top cover.
To reposition the paper, lift the release lever.
158
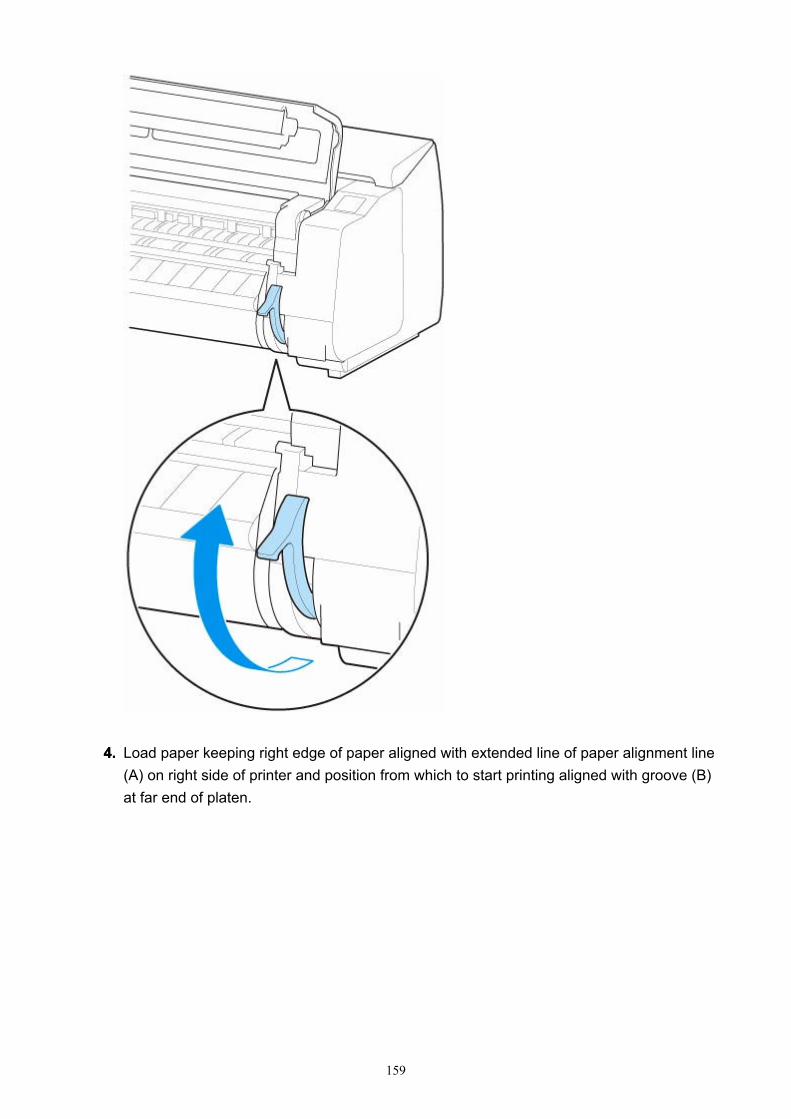
4. Load paper keeping right edge of paper aligned with extended line of paper alignment line4.(A) on right side of printer and position from which to start printing aligned with groove (B)at far end of platen.
159

5. Lower release lever and close top cover.5.
6. When screen for selecting paper size appears, select size of paper loaded.6.
160

Removing Sheets
Remove sheets from the printer as follows.
1. Tap paper settings display area on Home screen of touch screen.1.
Note• If the Home screen does not appear, tap the HOME button.•
2. Tap area.2.
3. Tap Remove paper.3.
4. Check touch screen message and tap Yes.4.
5. When instructions for removing sheet appear on touch screen, lift release lever while5.holding sheet, and remove sheet.
161

6. Lower release lever.6.
162

Basket
Using the Basket
Example Basket Configurations
Storing the Basket
163

Using the Basket
By changing the following four items for the basket, you can use the basket in various ways to suit yourapplication.
• Length of basket arm•
• Tilt of basket arm•
• Attachment position of basket•
• Length of basket•
This section describes how to change the basket.
For specific examples of basket use, see "Example Basket Configurations."
Important• When changing the position of the basket, first return the basket to a unwound state while pressing the•
basket rewind button on the right end of the basket rod (tag side), and then make the change.
• If the basket rod (tag side) has come off the basket arm, attach it by inserting the projections on both•ends of the basket rod (tag side) into oval holes on the tip of the basket arm.
• When moving the printer, remove the basket.•
• Do not apply excessive force to the basket. Doing so may damage the basket.•
• If the cloth part of the basket becomes dirty, wipe off the dirt without washing. Washing it may affect the•performance of the basket.
Changing Length of basket armYou can change the length of the basket arm in two steps.
To lengthen, expand the left/right basket arm in the direction of the arrow.
To shorten, contract the left/right basket arm in the opposite direction of the arrow.
164
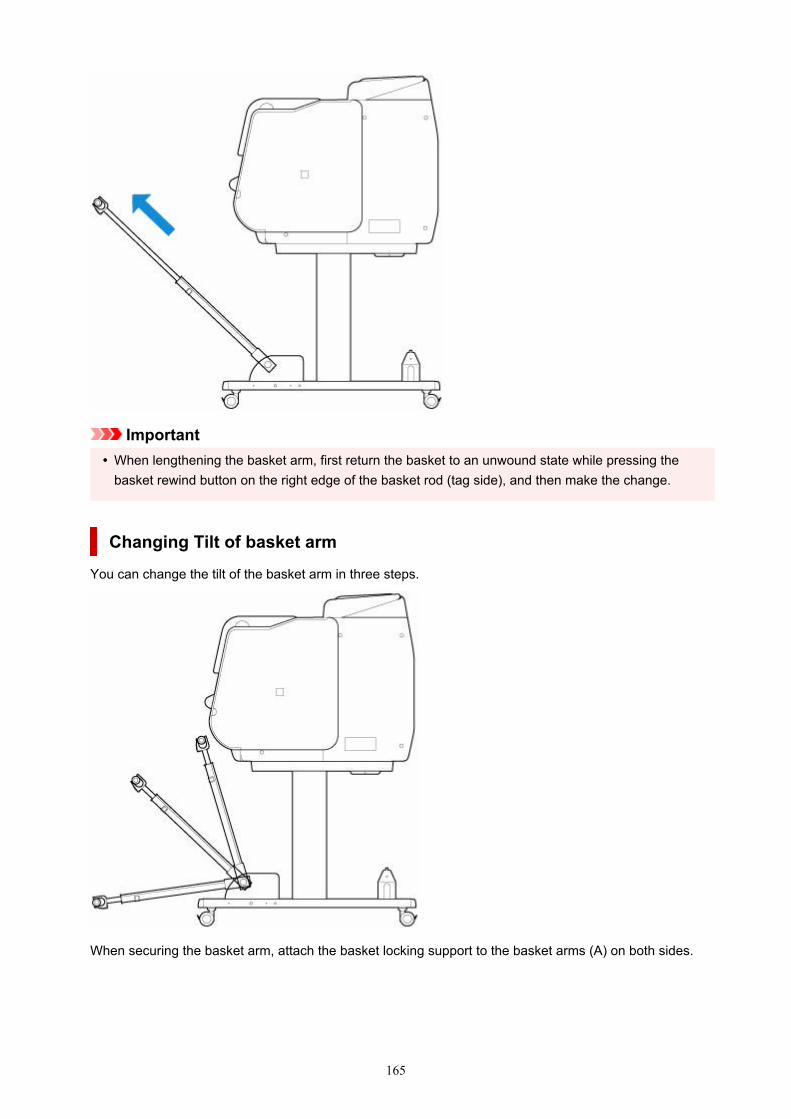
Important• When lengthening the basket arm, first return the basket to an unwound state while pressing the•
basket rewind button on the right edge of the basket rod (tag side), and then make the change.
Changing Tilt of basket armYou can change the tilt of the basket arm in three steps.
When securing the basket arm, attach the basket locking support to the basket arms (A) on both sides.
165
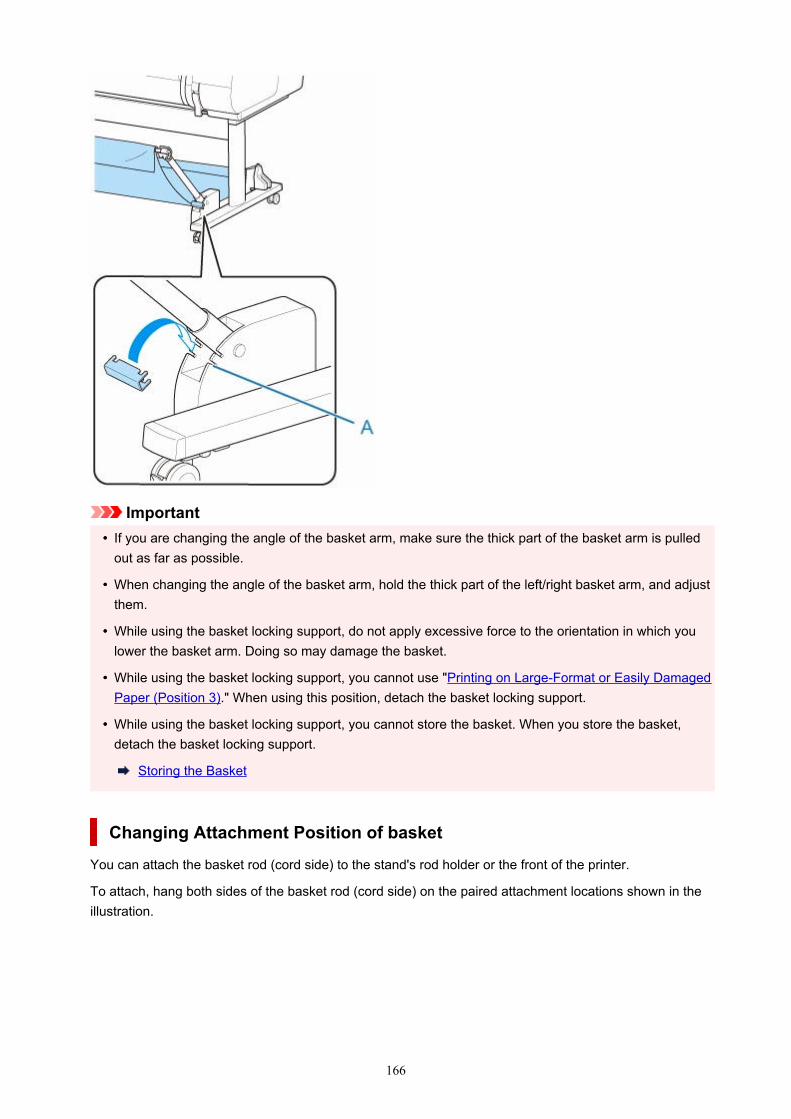
Important• If you are changing the angle of the basket arm, make sure the thick part of the basket arm is pulled•
out as far as possible.
• When changing the angle of the basket arm, hold the thick part of the left/right basket arm, and adjust•them.
• While using the basket locking support, do not apply excessive force to the orientation in which you•lower the basket arm. Doing so may damage the basket.
• While using the basket locking support, you cannot use "Printing on Large-Format or Easily Damaged•Paper (Position 3)." When using this position, detach the basket locking support.
• While using the basket locking support, you cannot store the basket. When you store the basket,•detach the basket locking support.
Storing the Basket
Changing Attachment Position of basketYou can attach the basket rod (cord side) to the stand's rod holder or the front of the printer.
To attach, hang both sides of the basket rod (cord side) on the paired attachment locations shown in theillustration.
166

Important• When attaching the basket rod (cord side) to the front of the printer, make sure both ends of the rod•
(A) are securely hooked onto the attachment parts.
167

Changing Length of basketYou can adjust the basket length by rotating the basket rod (tag side).
To shorten, rotate the basket rod (tag side) in the direction of the arrow to wind the basket.
To lengthen, rotate the basket rod (tag side) in the opposite direction of the arrow while pressing thebasket rewind button (A) on the right end of the basket rod (tag side). You can return the wound basket toits original position.
168

Example Basket Configurations
Various positions are possible for the basket that collects the printed materials.
In this section, we present the following five positions as examples of using the basket. Switch the positionof the basket to suit to the media type and the print job.
Using Without roll unit (Position 1)
Using With roll unit (Position 2)
Printing on Large-Format or Easily Damaged Paper (Position 3)
Stacking Printed Materials (Position 4)
Moving Printed Materials to Next Work Area Immediately (Position 5)
For instructions on switching the basket position, see "Using the Basket."
Important• If replacing the roll paper or using the roll unit as a take-up device, you must store the basket. For•
instructions on storing the basket, see "Storing the Basket."
• If the printed materials collected are damaged or folded, select Eject cut in Cutting mode or use the•basket in a different position. (See "Specifying the Cutting Method for Rolls.")
Note• For details on the printer dimensions when using the basket, see "Specifications."•
Using Without roll unit (Position 1)You can use the basket in the following positions when not using the roll unit.
Important• The number of sheets that can be collected in the basket is one. If printing multiple pages, print after•
removing each sheet.
• If using the roll unit as a feed device, we recommend using it as described in "Using With roll unit•(Position 2)".
169

• If using the roll unit and using the Position 1 basket, the printed materials may come in contact with•the roll unit depending on the paper, resulting in damage.
• If using the roll unit as a feed device and using the Position 1 basket, the ejected roll paper's cut•end enters the roll unit and may cause a paper jam or affect the print quality when set to BorderlessPrinting or Trim edge first when loading the paper.
• Roll paper up to 62 inches (1,575 mm) in length can be collected in the basket. If printing on longer•roll paper, use as described in "Printing on Large-Format or Easily Damaged Paper (Position 3)" oruse with the roll unit as the take-up device.
Using With roll unit (Position 2)You can use the basket in the following positions when using the roll unit as a feed device.
This position is useful also when rewinding printed roll paper by hand.
Move the basket rod (cord side) to the upper of the two pairs of attachment locations on the front of theprinter, and extend the basket arm as far as possible at the angle shown to achieve this position.
You can adjust the basket length so that it is easy to use.
Important• You can place up to approximately 4.41 lbs (2 kg) of printed materials in the basket. If the weight of•
the printed materials is greater than that, the basket may fall over.
Printing on Large-Format or Easily Damaged Paper (Position 3)If printing on large-format or easily damaged paper, you can use the basket in the following position.
Move the basket rod (cord side) to the upper of the two pairs of attachment locations on the front of theprinter, extend the basket arm as far as possible, and lower it to the angle shown. Next, adjust the lengthso that the basket is pulled into this position.
170

Important• Always select Eject cut in Cutting mode when used in this position. If you select Automatic cut, the•
printed materials may be damaged. (See "Specifying the Cutting Method for Rolls.")
• Be extra careful when using paper that tends to curl or is damaged easily in this position.•
• With some types of paper, the leading edge may curl or bend during ejection. In this case, straighten•out the paper. Printed documents may be damaged if the paper is curled or bent.
• Depending on the paper, the paper may be caught between the output guide and the basket when•being ejected. In this case, fix the paper that is caught. If the paper is caught, printed documents maybe damaged.
Stacking Printed Materials (Position 4)You can use the basket in following positions when you want to stack printed materials.
Move the basket rod (cord side) to the lower of the two pairs of attachment locations on the front of theprinter, extend the basket arm as far as possible in the angle shown. Next, adjust the length so that thebasket is pulled into this position.
Important• In the following cases, use as described in "Using Without roll unit (Position 1)" or "Using With roll•
unit (Position 2)". If printing multiple pages in these positions, print after removing each sheet.
171

Printed materials other than A2 portrait
Paper curls an extreme amount due to paper characteristics and printing environment
If there is not much paper remaining on the roll, and the paper curls an extreme amount
Moving Printed Materials to Next Work Area Immediately (Position 5)You can use the basket in the following position when moving the printed materials to the next work areaimmediately.
Move the basket rod (cord side) to the upper of the two pairs of attachment locations on the front of theprinter, extend the basket arm as far as possible in the angle shown. Next, adjust the length so that thebasket is pulled into this position.
Important• Be extra careful when using paper that tends to curl or is damaged easily in this position.•
• With some types of paper, the leading edge may curl or bend during ejection. In this case, straighten•out the paper. Printed documents may be damaged if the paper is curled or bent.
• Depending on the paper, the paper may be caught between the output guide and the basket when•being ejected. In this case, fix the paper that is caught. If the paper is caught, printed documents maybe damaged.
172

Storing the Basket
Store the basket in the following two positions when not in use. Select the position to suit the circumstances.
If Changing Roll Paper or Using roll unit as Take-up Device
Using Without basket (Only When roll unit Is Not Used)
If Changing Roll Paper or Using roll unit as Take-up DeviceIf replacing the roll paper or using the roll unit as a take-up device, store the basket.
You can store the basket, by attaching the basket rod (cord side) to the rod holder, lowering the basketarm until level, and then pushing as far back as possible.
Important• If changing the basket position, first release and rewind the basket. If it is not released and rewound,•
the change may not be performed smoothly, or the basket may be damaged. (See "Using theBasket.").
• If you are changing the angle of the basket arm, make sure the thick part of the basket arm is pulled•out as far as possible.
• If the basket rod (tag side) has come off the basket arm, attach it by inserting the projections on both•ends of the basket rod (tag side) into oval holes on the tip of the basket arm.
• Do not apply excessive force to the basket. Doing so may damage the basket.•
Using Without basket (Only When roll unit Is Not Used)If you are not using the roll unit, you can easily store the basket by holding the thick parts of the left/rightbasket arm in the Position 1 (See "Example Basket Configurations.") state, and moving them in thedirection of the arrow.
173

174

Stacker
Using the Stacker
Example Stacker Configurations
175
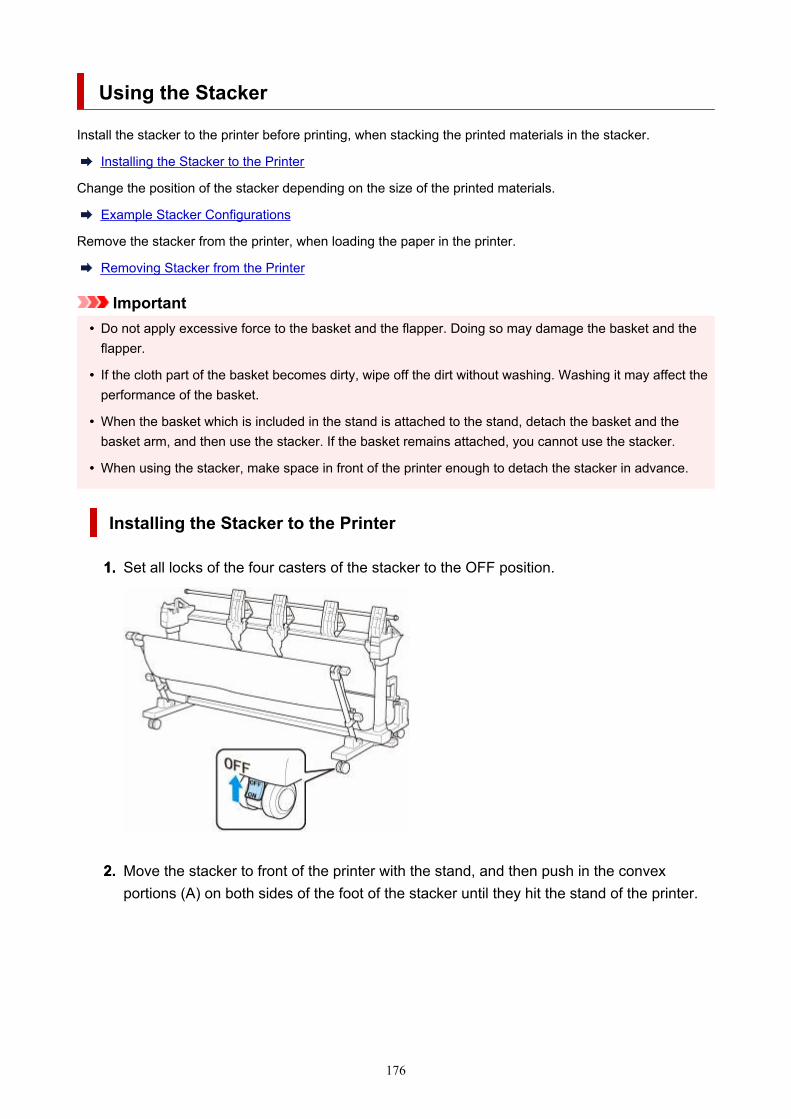
Using the Stacker
Install the stacker to the printer before printing, when stacking the printed materials in the stacker.
Installing the Stacker to the Printer
Change the position of the stacker depending on the size of the printed materials.
Example Stacker Configurations
Remove the stacker from the printer, when loading the paper in the printer.
Removing Stacker from the Printer
Important• Do not apply excessive force to the basket and the flapper. Doing so may damage the basket and the•
flapper.
• If the cloth part of the basket becomes dirty, wipe off the dirt without washing. Washing it may affect the•performance of the basket.
• When the basket which is included in the stand is attached to the stand, detach the basket and the•basket arm, and then use the stacker. If the basket remains attached, you cannot use the stacker.
• When using the stacker, make space in front of the printer enough to detach the stacker in advance.•
Installing the Stacker to the Printer
1. Set all locks of the four casters of the stacker to the OFF position.1.
2. Move the stacker to front of the printer with the stand, and then push in the convex2.portions (A) on both sides of the foot of the stacker until they hit the stand of the printer.
176
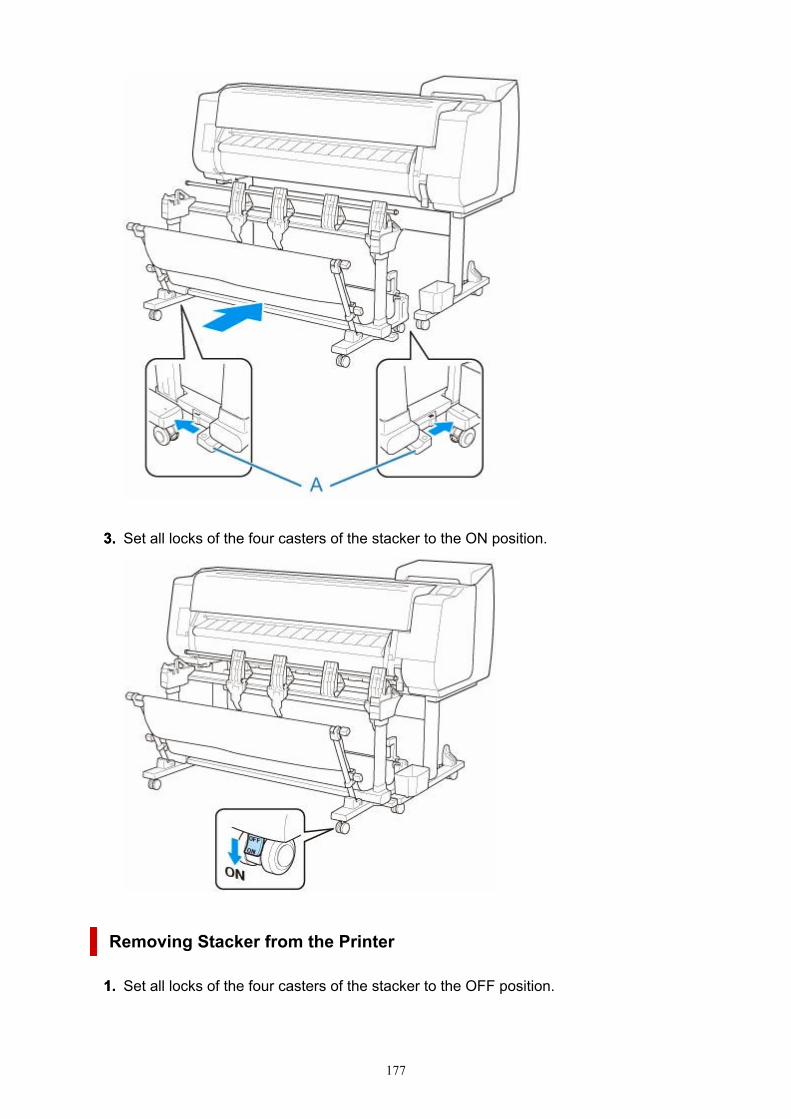
3. Set all locks of the four casters of the stacker to the ON position.3.
Removing Stacker from the Printer
1. Set all locks of the four casters of the stacker to the OFF position.1.
177

2. Pull out the stacker toward you to remove the stacker from the printer.2.
178

Example Stacker Configurations
The stacker is used by changing the position depending on the paper size of the printed materials.
Important• Depending on the types of paper, it cannot be stacked in the Position 2, Position 3, or Position 4. In this•
case, use the Position 1.
• Depending on the printer model, the paper size may not be supported.•
Storing Printed Materials (Position 1)Pull down the rod (fixed) (C) toward you. Set the rod (adjustable) in the groove (B) at the lower of the arm,and then set the flapper (A) vertically so that the stacker configuration is the Position 1.
Stacking Printed Materials with ARCH E Portrait or A0 Portrait (Position2)
• Supported paper size•
◦ 36"x48" (ARCH E) 36.00 x 48.00 inches (914.4 x 1219.2 mm)◦ A0 33.11 x 46.81 inches (841.0 x 1189.0 mm)
Set the rod (adjustable) in the groove (B) at the upper of the stand, and then push down the rod (fixed) (C)to the printer side. Then set the flapper (A) vertically so that the stacker configuration is the Position 2.
179
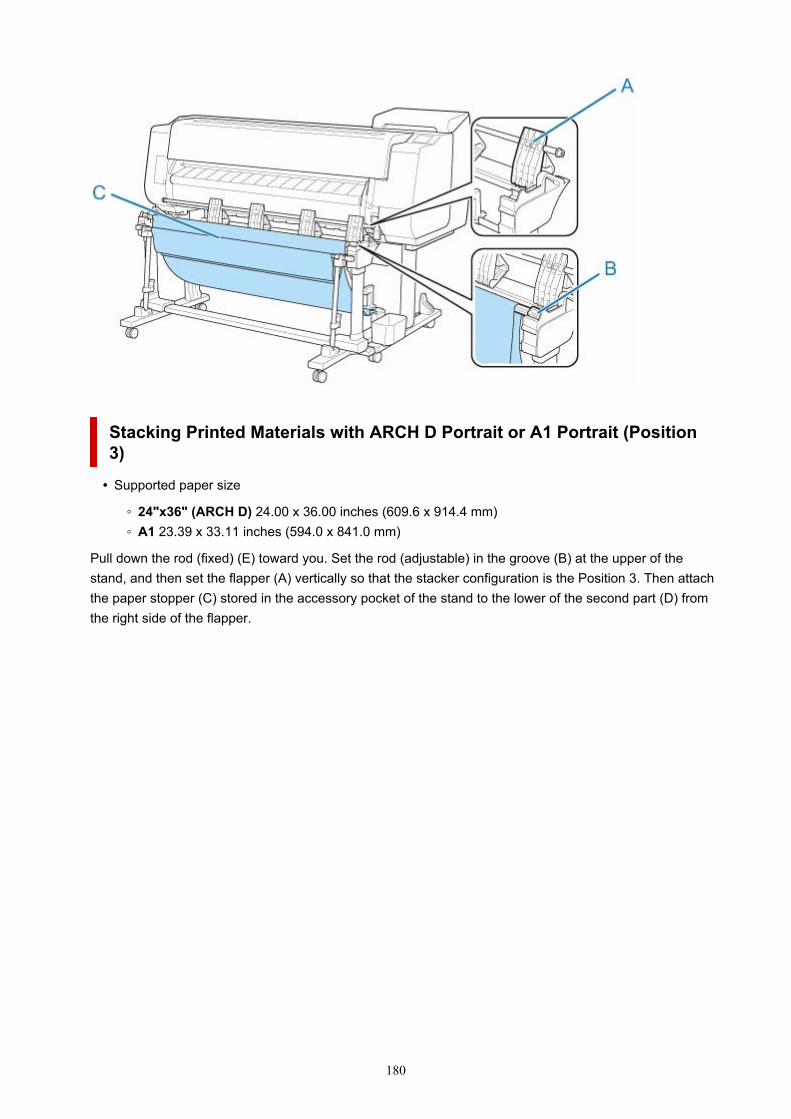
Stacking Printed Materials with ARCH D Portrait or A1 Portrait (Position3)
• Supported paper size•
◦ 24"x36" (ARCH D) 24.00 x 36.00 inches (609.6 x 914.4 mm)◦ A1 23.39 x 33.11 inches (594.0 x 841.0 mm)
Pull down the rod (fixed) (E) toward you. Set the rod (adjustable) in the groove (B) at the upper of thestand, and then set the flapper (A) vertically so that the stacker configuration is the Position 3. Then attachthe paper stopper (C) stored in the accessory pocket of the stand to the lower of the second part (D) fromthe right side of the flapper.
180

Stacking Printed Materials with ARCH D Landscape, ARCH CLandscape, A1 Landscape or A2 Landscape (Position 4)
• Supported paper size•
◦ 24"x36" (ARCH D) 24.00 x 36.00 inches (609.6 x 914.4 mm)◦ 18"x24" (ARCH C) 18.00 x 24.00 inches (457.2 x 609.6 mm)◦ A1 23.39 x 33.11 inches (594.0 x 841.0 mm)◦ A2 16.54 x 23.39 inches (420.0 x 594.0 mm)
Pull down the rod (fixed) (C) toward you. Set the rod (adjustable) in the groove (B) at the upper of thestand, and then set the flapper (A) horizontally so that the stacker configuration is the Position 4.
181

182

Roll Unit
Switching Roll Unit Modes
Using the Roll Unit In Take-Up Mode
Removing Printed Paper from the Roll Unit
183

Switching Roll Unit Modes
Before using the roll unit, follow these steps to select the mode you want to use.
Important• After switching the roll unit function, you must use a separate computer to apply the roll unit settings to•
the printer driver. For details, see "Reflect Roll Unit Settings in the Printer Driver" (Windows) or "ReflectRoll Unit Settings in the Printer Driver" (macOS).
• If you change the roll unit from a take-up device to a feed device, first cut the paper that has been taken•up.
1. Tap paper settings display area on Home screen of touch screen.1.
Important• If the Home screen does not appear, tap the HOME button.•
2. Tap or area.2.
3. Change function of roll unit.3.
• Using as feed device•
1. Tap Roll unit use settings.1.
2. Tap ON when message confirming roll unit's change to feed mode appears.2.
184

Note• If you change the mode without cutting the roll paper with the printer's cutter, a screen•
confirming whether or not the paper taken up has been cut appears after you tap ON. Ifthe paper has not been cut, select No and cut the paper that has been taken up first.
3. Load roll paper on roll unit.3.
For details, see "Loading the Lower Roll on the Roll Unit (Option)."
• Using as take-up device•
1. Tap Roll unit use settings.1.
2. Tap ON when message confirming roll unit's change to take-up mode appears.2.
3. Tap to select paper cutting settings when using take-up mode.3.
Note• If you selected Do not cut, the roll paper will not be cut after printing regardless of the•
Cutting mode setting (See "Specifying the Cutting Method for Rolls.") on the printer.Select this option when you want to print multiple pages consecutively without cutting.
• If you selected Use the cutting mode setting, cutting for each page will be performed•according to the Cutting mode setting (See "Specifying the Cutting Method for Rolls.") onthe printer.
• If you select Use the cutting mode setting, and Automatic Cutting is set in the•Cutting mode settings (See "Specifying the Cutting Method for Rolls.")on the printer,we recommend setting Wind up after cutting to Enable. When set to Disable, a printeddocument that has been taken up is cut automatically without being pressed, resulting infraying.
• If roll paper is loaded from the roll unit to the printer, a screen confirming whether or not to•remove the roll paper appears. If you select Yes, the roll paper is positioned so that it canbe removed and the roll unit changes to a take-up device.
4. Tap Yes or No when message confirming whether roll unit will be used immediately in take-up4.mode appears.
If you tap Yes, the steps for loading the paper on the roll unit appear on the touch screen.
If you tap No, the operation ends here. Load the paper on the roll unit when printing. However,in this case, you must load the paper while printing is progressing, so instructions will notappear on the touch screen.
For details on loading paper on the roll unit set as a take-up device, see "Using the Roll Unit InTake-Up Mode."
Note• If you select Yes, a margin of approximately 23.62 inches (600 mm) is generated at the•
leading edge because the roll paper advances to the roll unit before printing.
185

Using the Roll Unit In Take-Up Mode
Important• For details on the roll paper compatible with winding, see "Paper Information List.".•
• Before loading the roll paper to be taken up on the roll unit, set the roll unit mode to take-up device on•the printer touch screen. (See "Switching Roll Unit Modes.")
• The following operation assumes that the roll holder is not installed on the roll unit and that roll paper is•not loaded on the roll holder. If the roll holder is installed on the roll unit, first remove the roll holder fromthe roll unit, and then remove the roll paper loaded on the roll holder. (See "Removing the Lower Rollfrom the Roll Unit (Option).") (See "Removing Rolls From the Roll Holder.")
• Paper winding is possible until the outer diameter of the wound paper is the same as the outer diameter•of the holder stopper.
1. Store basket. (See "Storing the Basket.")1.
2. Rotate the holder stopper lever (A) towards to release the lock, and while holding it in2.position (B), remove holder stopper from the roll holder.
3. If taking up roll paper whose paper core has an inner diameter of 3 inches (76.2 mm), insert3.3-Inch Paper Core Attachment in roll holder and holder stopper.
Align the 3-Inch Paper Core Attachment tabs (A) with the holes on the roll holder or holder stopper (B)and insert firmly.
• roll holder Side•
186

• holder stopper Side•
4. Insert paper core, which is for winding roll paper, into roll holder.4.
Important• We recommend using a paper core that is wider than the paper to be wound when winding paper.•
If you use a narrower paper core, use with a gap between the holder stopper and the paper.
• Always use a paper core for winding that is the same thickness or is thicker than the roll paper's•paper core. If you use a paper core that is thinner, it may affect take up.
5. Insert holder stopper from left into roll holder as shown, and then while holding in position5.(B), push firmly until holder stopper flange (A) touches paper core. Lock the holder stopper
lever (C) by rotating it towards .
187

6. Change Roll Holder Lock switch on roll unit to release direction.6.
7. Hold flanges (A) so that holder stopper is on left, align roll holder shaft with roll holder slot7.left and right guide grooves (B), and load.
188

8. Change Roll Holder Lock switch on roll unit to lock direction.8.
189
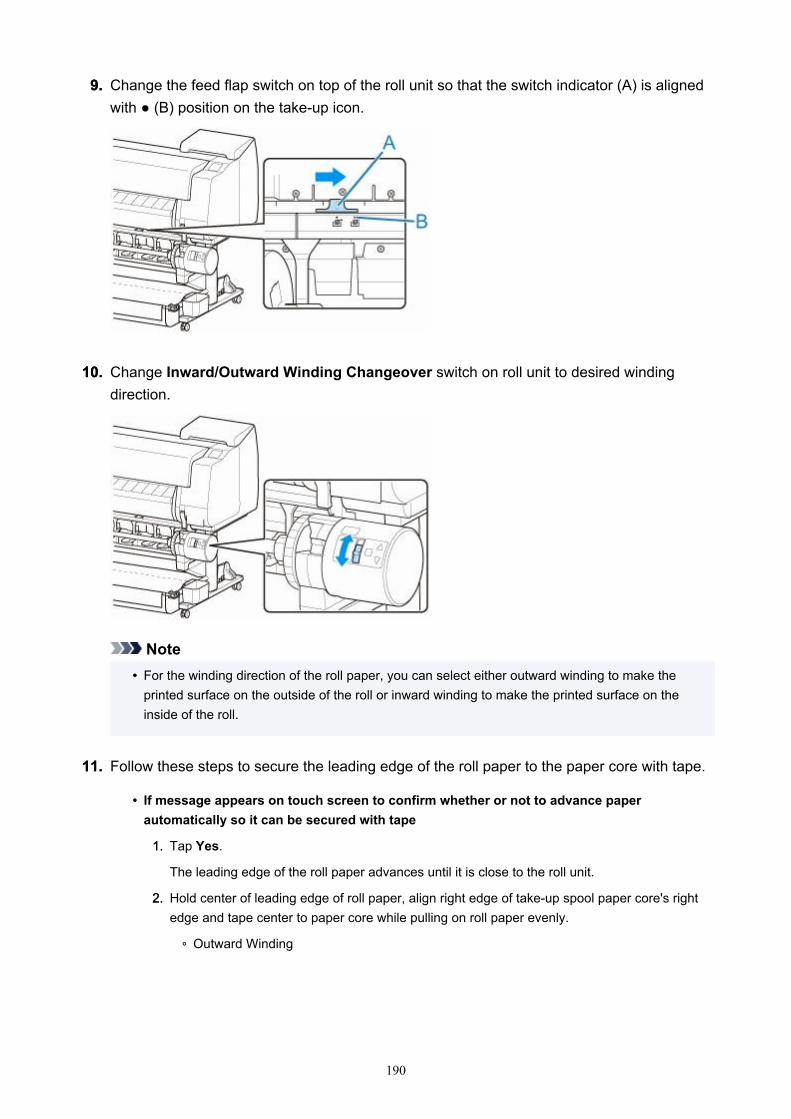
9. Change the feed flap switch on top of the roll unit so that the switch indicator (A) is aligned9.with ● (B) position on the take-up icon.
10. Change Inward/Outward Winding Changeover switch on roll unit to desired winding10.direction.
Note• For the winding direction of the roll paper, you can select either outward winding to make the•
printed surface on the outside of the roll or inward winding to make the printed surface on theinside of the roll.
11. Follow these steps to secure the leading edge of the roll paper to the paper core with tape.11.
• If message appears on touch screen to confirm whether or not to advance paper•automatically so it can be secured with tape
1. Tap Yes.1.
The leading edge of the roll paper advances until it is close to the roll unit.
2. Hold center of leading edge of roll paper, align right edge of take-up spool paper core's right2.edge and tape center to paper core while pulling on roll paper evenly.
◦ Outward Winding◦
190

◦ Inward Winding◦
Important• If winding with inward winding, you must pass the leading edge of the roll paper to the•
back of the paper core and secure with tape. If this operation is difficult, you can alsoremove the roll holder, push the roll paper into the back, reinstall the roll holder, and passthe roll paper to the back of the paper core.
3. Align right edge of roll paper to right edge of paper core while pulling on roll paper evenly, and3.secure with tape.
4. While making sure that roll paper is flat, secure left edge of roll paper to paper core with tape.4.
◦ Outward Winding◦
191

◦ Inward Winding◦
Important• Secure the left and right edges of the roll paper with tape within 1.97 inches (50 mm) of•
the edges so that neither end of the roll paper lift up.
• When rewinding heavyweight paper, use strong adhesive tape to fasten it. Otherwise, a•rewinding problem may result.
• If you use a paper core narrower than the paper to be wound, adjust the position of the•holder stopper, so that there is a gap between the holder stopper and the paper.
5. Make sure the leading edge of the roll paper is not lifting up from the paper core, and if there5.are places lifting up, tape in additional places so that the paper does not lift up.
6. Push roll holder downward, check that roll holder is not lifting up, and tap OK.6.
◦ Outward Winding◦
192

◦ Inward Winding◦
Important• If the roll holder lifts up, it may cause an error.•
7. To stabilize operations when starting taking up, advance roll paper with operation panel and7.wind roll paper approximately one revolution. (See "Feeding Roll Paper Manually.")
8. Push roll holder downward again, and check that roll holder is not lifting up.8.
The winding preparation is complete. When printing to the roll starts, the roll paper can beautomatically wound.
• If Ready to print appears on touch screen•
1. Manually advance roll paper (See "Feeding Roll Paper Manually.") or start printing, and wait1.for leading edge of roll paper to reach roll unit.
2. Hold center of leading edge of roll paper, align right edge of take-up spool paper core's right2.edge and tape center to paper core while pulling on roll paper evenly.
◦ Outward Winding◦
193

◦ Inward Winding◦
Important• If winding with inward winding, you must pass the leading edge of the roll paper to the•
back of the paper core and secure with tape. If this operation is difficult, you can alsoremove the roll holder, push the roll paper into the back, reinstall the roll holder, and passthe roll paper to the back of the paper core.
3. Align right edge of roll paper to right edge of paper core while pulling on roll paper evenly, and3.secure with tape.
4. While making sure that roll paper is flat, secure left edge of roll paper to paper core with tape.4.
◦ Outward Winding◦
194

◦ Inward Winding◦
Important• Secure the left and right edges of the roll paper with tape within 1.97 inches (50 mm) of•
the edges so that neither end of the roll paper lift up.
• When rewinding heavyweight paper, use strong adhesive tape to fasten it. Otherwise, a•rewinding problem may result.
• If you use a paper core narrower than the paper to be wound, adjust the position of the•holder stopper, so that there is a gap between the holder stopper and the paper.
5. Make sure the leading edge of the roll paper is not lifting up from the paper core, and if there5.are places lifting up, tape in additional places so that the paper does not lift up.
6. Push roll holder downward and check that roll holder is not lifting up.6.
◦ Outward Winding◦
195

◦ Inward Winding◦
Important• If the roll holder lifts up, it may cause an error.•
7. Make sure Inward/Outward Winding Changeover switch on roll unit is in desired direction7.and press Auto Take-up/Pause button.
The Pause lamp, which has been lighted up to this point, turns off, and the Auto Take-uplamp lights up instead.
The winding preparation is complete. During printing, the winding starts. Before printing, thewinding starts at the same time as the printing.
Important• When winding inwardly, loosening of the wound paper can be prevented by pressing the•
roll paper with the arm. However, doing so may produce pressure traces on the paper.In this case, tap the roll unit area of the media information display area and set Paperretention settings to Release.
196

Removing Printed Paper from the Roll Unit
Note
• By tapping the paper settings display area and then area when setting Take-up mode and setting•Wind up after cutting to Enable in advance, you can omit steps 6 and 7 below, because when thepaper is cut after printing, the next paper will be automatically taken up after that. However, be carefulwhen using easily damaged roll paper because the roll paper touches the roller when paper is cut.
1. Tap paper settings display area on Home screen of touch screen.1.
Important• If the Home screen does not appear, tap the HOME button.•
2. Tap area.2.
3. Tap Feed/cut.3.
4. Tap Advance or Rewind to advance roll paper a little.4.
With the winding direction set to outward winding, advance the length of one circumference of the roll ormore to protect the print side.
5. Tap Cut paper.5.
197

6. Hold printed paper between output guide and roll unit, then tap Yes.6.
The roll is now cut.
Important• When cutting the roll paper, always hold the printed paper. If cut without holding the printed paper,•
the paper may fall to the floor and become soiled.
7. While holding trailing edge of printed paper, press Take-up or Rewind button to wind7.printed paper.
Apply adhesive tape to the rewound paper to hold it in place, if necessary.
Important• Be careful not to scratch the printed surface.•
8. Change Roll Holder Lock switch on roll unit to release side.8.
198

9. Hold roll holder by its flanges (A), and remove from roll unit.9.
10. Rotate the holder stopper lever (A) towards to release the lock, and while holding it in10.position (B), remove holder stopper from the roll holder.
199

11. Remove printed material that has been taken up, from roll holder for each paper core.11.
200

Changing Printer's Setting
Changing Settings from Operation Panel
Home Screen Menu Composition
Menu Structure
Setting Items on Operation Panel
Setting Administrator Password on Operation Panel
Erasing Data on Printer's Hard Disk
HP-GL/2 Settings
Status Print
Changing Printer's Setting Using Web Browser
Start up Remote UI
Changeable Setting Items Using Remote UI
Setting Passwords Using Remote UI
Registering Printer's Root Certificate to Web Browser for SSL Communication
Registering Printer's Root Certificate to Local Computer for SSL Communication
Generating Server Certificate
Setting Mail Server
Receiving Printer Status by E-mail
Migrating Printer's Setting
Initializing Printer's Setting
201

Changing Settings from Operation Panel
Home Screen Menu Composition
Menu Structure
Setting Items on Operation Panel
Setting Administrator Password on Operation Panel
Erasing Data on Printer's Hard Disk
HP-GL/2 Settings
Status Print
202

Home Screen Menu Composition
After the printer starts up, the HOME screen appears on the touch screen.
From the HOME screen, you can check the printer status and select the maintenance, paper operations,settings, and other menus.
Basic Touch Screen OperationsIcons on Touch Screen
A: Printer Information Display AreaDisplays the printer status, messages, and other information. Tap this item when a message appears toview the message on the list screen and to jump to the screen with detailed information and operations.
Notification Messages
B: Ink Display AreaDisplays the ink status. Tap this item to view the remaining amount of ink and how to replace the inktanks.
C: Paper Setting Display AreaDisplays the media information for each feeding location. Tap this item to configure the size and type ofthe paper loaded.
D: MaintenancePerform maintenance settings.
E: Job managementPerform job management settings.
F: Print from USB flash drivePerform print settings when you print data on a USB flash drive.
G: LAN settingsPerform LAN settings.
H: Printer settingsPerform various printer settings.
203

I: Printer informationDisplays various printer information.
Note• By default, menu settings apply to all print jobs. However, for settings that are also available in the•
printer driver, the values specified in the printer driver take priority.
Basic Touch Screen OperationsYou can select various functions and settings by gently touching and swiping the touch screen with yourfingertip.
Important• Take the following precautions when operating the touch screen. Otherwise, the touch screen may•
malfunction or become damaged.
Do not forcibly press the touch screen with your finger.Do not press the touch screen with an object other than your finger (such as a ballpoint pen,pencil, fingernail, or other object with a sharp tip).Do not operate the touch screen with wet or dirty hands.Do not place objects on top of the touch screen.
• Do not place a protective film over the touch screen. Removing it can damage the touch screen.
Tap
Gently touch with your fingertip and then release.
Use this when selecting an item on the screen.
Touch
Gently touch with your fingertip.
To go (or return) to a menu or list, touch the directional mark.
204

Flick
Drag and release your finger up, down, left, or right.
Use this to quickly scroll through a menu or list.
Drag
Move your finger up, down, left, or right while gently keeping it in contact with the touch screen.
Use this to move a menu or list while viewing it.
Notification MessagesWhen the ink is low or there is another notification, New notice appears in the printer information displayarea. Tap this to display the Notice list screen to view messages with the newest one appearing first. Tapa message to display the message details screen to view the details and take action.
Example: Notices on the maintenance cartridge
205
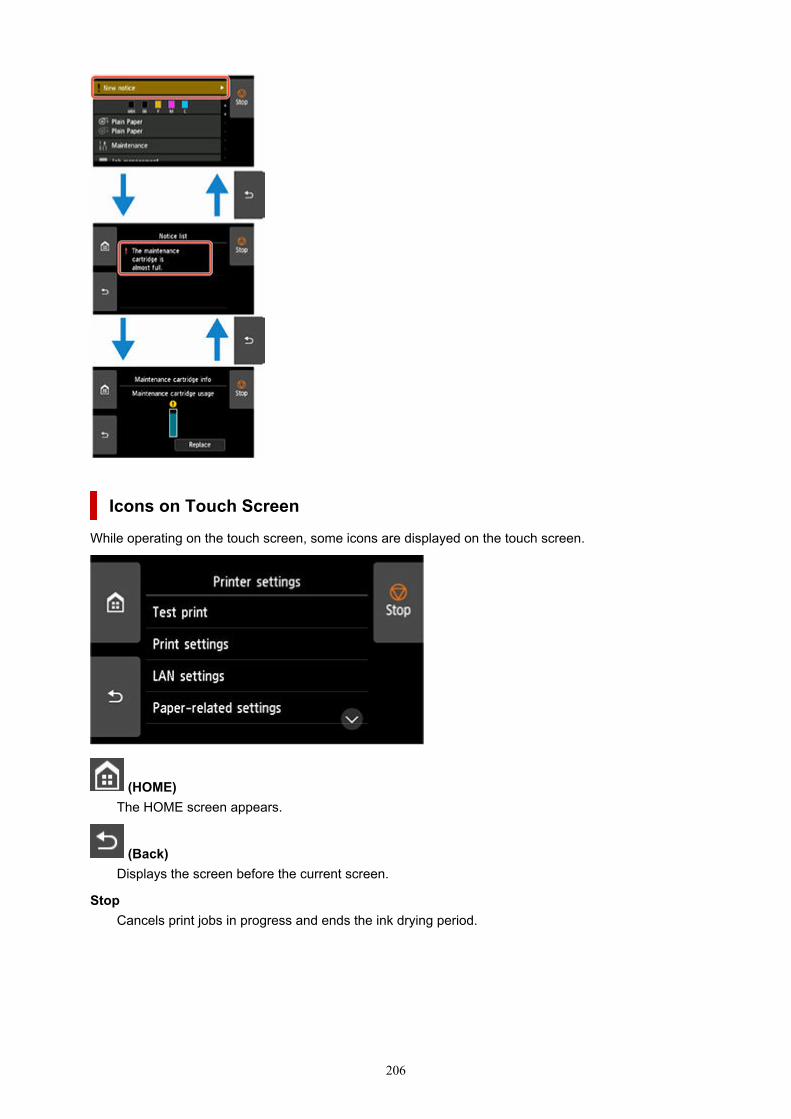
Icons on Touch ScreenWhile operating on the touch screen, some icons are displayed on the touch screen.
(HOME)The HOME screen appears.
(Back)Displays the screen before the current screen.
StopCancels print jobs in progress and ends the ink drying period.
206

Menu Structure
The * on the right side of an item indicates the default value.
Values may vary depending on your model and firmware version.
• Ink information•
This menu is displayed by tapping Ink icon.
Current estimated ink levels
Replace
Order ink now
• Paper settings•
This menu is displayed by tapping paper information area.
Roll paper 1
Replace paper
Feed/cut
Remove paper
Paper settings
Width / Type / Advanced / Register
Roll paper 2
Replace paper
Feed/cut
Remove paper
Roll unit use settings
Paper settings
Width / Type / Advanced / Register
Take-up mode
Roll unit use settings
Auto feed to take-up position
Skip errors during take-up
ON / OFF
Wind up after cutting
Enable / Disable
Paper retention settings
Release / Retain
Use in take-up mode
207

Use / Do not use
Manual
Replace paper
Remove paper
Paper settings
Page size / Type / Advanced / Register
• Maintenance•
Troubleshooting
Nozzle Check
Print Head Cleaning
Cleaning
All colors / Pattern 1 / Pattern 2
Deep Cleaning
All colors / Pattern 1 / Pattern 2
System Cleaning
All colors / Pattern 1 / Pattern 2
Print Head Alignment
Auto (standard)
Roll paper 1 / Roll paper 2 / Manual
Auto (advanced)
Roll paper 1 / Roll paper 2 / Manual
Manual
Roll paper 1 / Roll paper 2 / Manual
Print head angle adjustment
Paper feed adjustment
Set priority
Auto / Prioritize print quality / Prioritize length accuracy
Adjust print quality
Auto
Roll paper 1 / Roll paper 2 / Manual
Manual
Roll paper 1 / Roll paper 2 / Manual
Adjust feed length
Print alignment pattern
208

Roll paper 1 / Roll paper 2 / Manual
Change adjustment values
-0.70% / -0.68% / ... / 0.68% / 0.70%
Maintenance cartridge info
Maintenance cartridge usage
Replace
Head Replacement
Start head replacement.
Replace cutter blade unit
Platen cleaning
Prepare to move
Move indoors on the same floor
Move indoors to a different floor
Transport outdoors
• Job management•
Print job
List of print jobs
Saved job
Job box list
Job list
Print the job list
Job history
Display job history
Print job history
Pause printing
Enable / Disable*
Delete all print jobs
• Print from USB flash drive•
Folder/file list
Number of copies
Preview
Print settings
The lower items of this menu are the same as the lower items of Print from USB flash settings.
209

• LAN settings•
Wi-Fi
Connection
Network name (SSID)
Communication mode
Channel
Wi-Fi security
IPv4 address
IPv4 subnet mask
IPv4 default gateway
IPv4 DNS dynamic settings
IPv4 DNS host name
IPv4 DNS domain name
IPv6 link-local address
IPv6 link-local prefix length
IPv6 manual address
IPv6 manual prefix length
IPv6 stateless address 1
IPv6 stateless prefix length 1
IPv6 stateless address 2
IPv6 stateless prefix length 2
IPv6 stateless address 3
IPv6 stateless prefix length 3
IPv6 stateless address 4
IPv6 stateless prefix length 4
DHCPv6
DHCPv6 stateful address
DHCPv6 stateful prefix length
IPv6 default gateway 1
IPv6 default gateway 2
IPv6 default gateway 3
IPv6 default gateway 4
IPv6 primary DNS server address
IPv6 secondary DNS server add.
IPv6 DNS dyn. update: manual
210
IPv6 DNS dyn. update: stateless
IPv6 DNS dyn. update: stateful
IPv6 Use IPv4 host/domain name
IPv6 DNS host name
IPv6 DNS domain name
MAC address
IPsec settings
Printer name
Bonjour service name
Settings
Enable/disable Wi-Fi
Enable / Disable
Wi-Fi setup
Easy wireless connect
Manual connect
WPS (Push button method)
Other connection types
Manual connect (adv.)
WPS (PIN code method)
Advanced
Wireless Direct
Connection
Network name (SSID)
Password
Communication mode
Channel
Wi-Fi security
IPv4 address
IPv4 subnet mask
IPv4 default gateway
IPv4 DNS dynamic settings
IPv4 DNS host name
IPv4 DNS domain name
IPv6 link-local address
IPv6 link-local prefix length
MAC address
211
IPsec settings
Printer name
Bonjour service name
Settings
Enable/disable Wireless Direct
Yes / No
Update SSID/password
Yes / No
Wireless Direct network (SSID)
Connection request confirmation
ON* / OFF
Advanced
Wired LAN
Connection
IPv4 address
IPv4 subnet mask
IPv4 default gateway
IPv4 DNS dynamic settings
IPv4 DNS host name
IPv4 DNS domain name
IPv6 link-local address
IPv6 link-local prefix length
IPv6 manual address
IPv6 manual prefix length
IPv6 stateless address 1
IPv6 stateless prefix length 1
IPv6 stateless address 2
IPv6 stateless prefix length 2
IPv6 stateless address 3
IPv6 stateless prefix length 3
IPv6 stateless address 4
IPv6 stateless prefix length 4
DHCPv6
DHCPv6 stateful address
DHCPv6 stateful prefix length
IPv6 default gateway 1
212

IPv6 default gateway 2
IPv6 default gateway 3
IPv6 default gateway 4
IPv6 primary DNS server address
IPv6 secondary DNS server add.
IPv6 DNS dyn. update: manual
IPv6 DNS dyn. update: stateless
IPv6 DNS dyn. update: stateful
IPv6 Use IPv4 host/domain name
IPv6 DNS host name
IPv6 DNS domain name
MAC address
IPsec settings
Printer name
Bonjour service name
Settings
Enable/disable Wired LAN
Enable / Disable
Advanced
Print details
• Printer settings•
Test print
Nozzle Check
Status print
Status print (administrator)
Print LAN details
Print the print settings
Print advanced paper settings
Print job history
Print menu map
Print color list for palettes
Print settings
Print head movable width setting
Data width* / Maximum movable width / Paper width
213
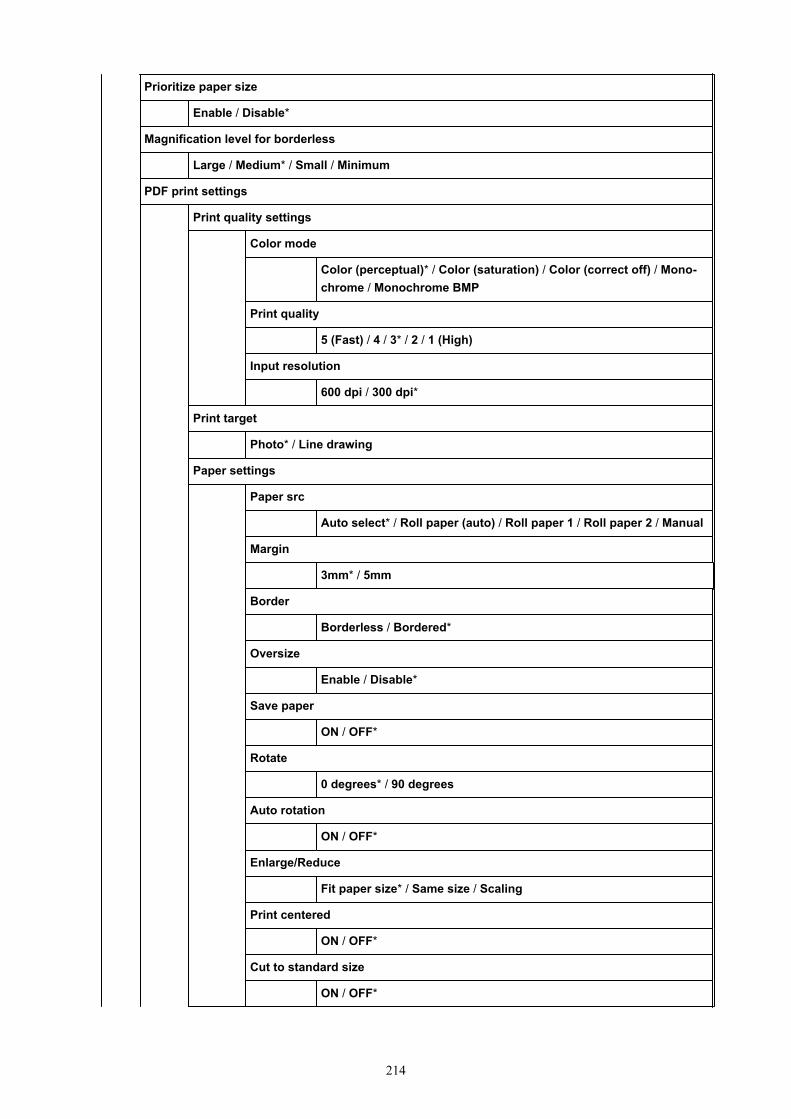
Prioritize paper size
Enable / Disable*
Magnification level for borderless
Large / Medium* / Small / Minimum
PDF print settings
Print quality settings
Color mode
Color (perceptual)* / Color (saturation) / Color (correct off) / Mono-chrome / Monochrome BMP
Print quality
5 (Fast) / 4 / 3* / 2 / 1 (High)
Input resolution
600 dpi / 300 dpi*
Print target
Photo* / Line drawing
Paper settings
Paper src
Auto select* / Roll paper (auto) / Roll paper 1 / Roll paper 2 / Manual
Margin
3mm* / 5mm
Border
Borderless / Bordered*
Oversize
Enable / Disable*
Save paper
ON / OFF*
Rotate
0 degrees* / 90 degrees
Auto rotation
ON / OFF*
Enlarge/Reduce
Fit paper size* / Same size / Scaling
Print centered
ON / OFF*
Cut to standard size
ON / OFF*
214

Line & pen manager
Width correction
Black/gray
Color
Processing options
Warning display
Enable / Disable*
JPEG print settings
Print quality settings
Color (perceptual)
Color (perceptual) / Color (saturation)* / Color (correct off) / Mono-chrome / Monochrome BMP
Print quality
5 (Fast) / 4 / 3* / 2 / 1 (High)
Input resolution
600 dpi / 300 dpi* / Specify print job
Print target
Photo* / Line drawing
Paper settings
Paper src
Auto select* / Roll paper (auto) / Roll paper 1 / Roll paper 2 / Manual
Margin
3mm* / 5mm
Border
Borderless / Bordered*
Rotate
0 degrees* / 90 degrees
Auto rotation
ON / OFF*
Enlarge/Reduce
Fit paper size* / Same size / Scaling
Print centered
ON / OFF*
Cut to standard size
ON / OFF*
HP-GL/2 print settings
215
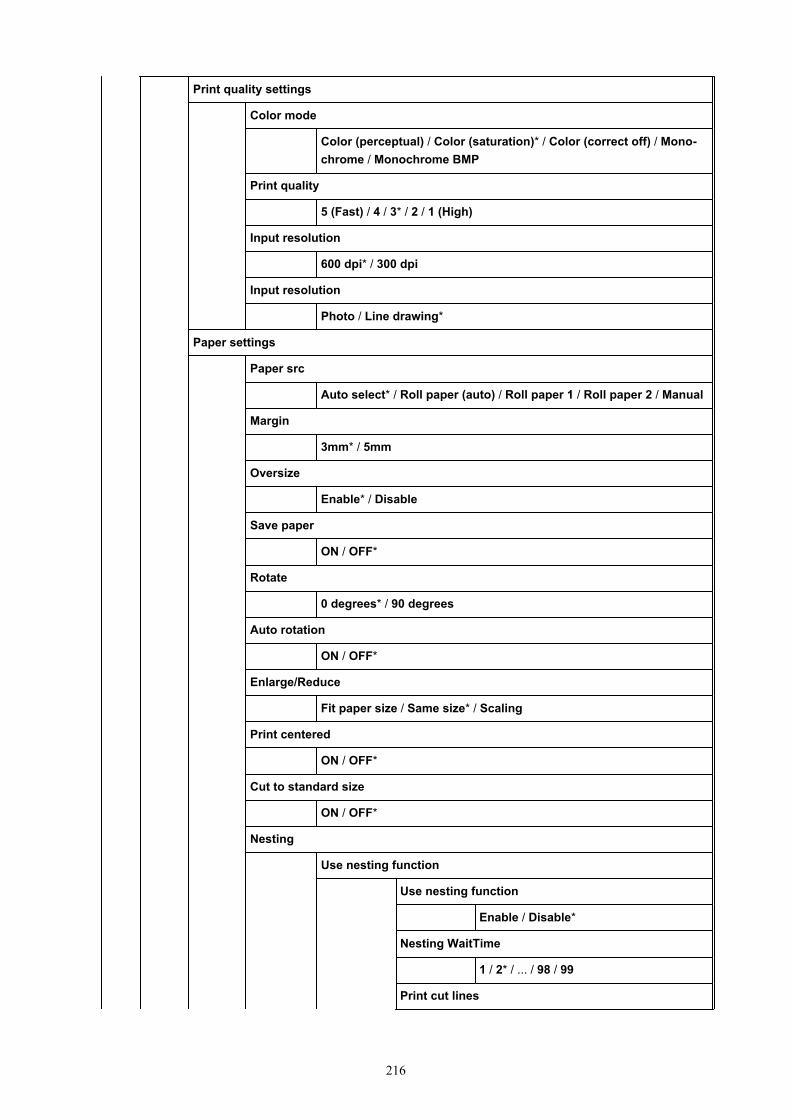
Print quality settings
Color mode
Color (perceptual) / Color (saturation)* / Color (correct off) / Mono-chrome / Monochrome BMP
Print quality
5 (Fast) / 4 / 3* / 2 / 1 (High)
Input resolution
600 dpi* / 300 dpi
Input resolution
Photo / Line drawing*
Paper settings
Paper src
Auto select* / Roll paper (auto) / Roll paper 1 / Roll paper 2 / Manual
Margin
3mm* / 5mm
Oversize
Enable* / Disable
Save paper
ON / OFF*
Rotate
0 degrees* / 90 degrees
Auto rotation
ON / OFF*
Enlarge/Reduce
Fit paper size / Same size* / Scaling
Print centered
ON / OFF*
Cut to standard size
ON / OFF*
Nesting
Use nesting function
Use nesting function
Enable / Disable*
Nesting WaitTime
1 / 2* / ... / 98 / 99
Print cut lines
216

Enable / Disable*
Mirror
ON / OFF*
Line & pen manager
Merge
ON / OFF*
Pen setup
Select palette
Software* / Palette A / Palette B / Default
Define palette
Palette A
Pen 0 to Pen 15
*Pen 0 to Pen 15 have the same menustructure.
Width
0.04mm /0.08mm /0.13mm /0.18mm
0.25mm /0.35mm /0.50mm /0.65mm
0.70mm /0.80mm /0.90mm /1.0mm
1.4mm /2.0mm /3.0mm /5.0mm
8.0mm /12.0mm
Color
0 to 255
Line attributes
No setting /Circle set-tings
Palette B
Menu structure same as Palette A
217

Default
Here to Defaults
Reset palette
All palettes
Palette A
Palette B
Smoothing
Software* / Smoothing
Thicken fine lines
ON / OFF*
Adjust faint lines
ON / OFF*
Width correction
Black/gray
Color
Print color list for palettes
Processing options
Warning display
Enable / Disable*
Detect image size
OFF* / Command priority / Detected size
Frame control
Enable / Disable*
Print from USB flash settings
Print quality settings
Color mode
Color (perceptual) / Color (saturation)* / Color (correct off) / Mono-chrome / Monochrome BMP
Print quality
5 (Fast) / 4 / 3* / 2 / 1 (High)
Print target
Photo* / Line drawing
Paper settings
Paper src
Auto select* / Roll paper (auto) / Roll paper 1 / Roll paper 2 / Manual
Margin
218

3mm* / 5mm
Border
Borderless / Bordered*
Rotate
0 degrees* / 90 degrees
Auto rotation
ON / OFF*
Enlarge/Reduce
Fit paper size* / Same size / Scaling
Print centered
ON / OFF*
Cut to standard size
ON / OFF*
AirPrint print settings
Print quality settings
Color mode
Color (perceptual) / Color (saturation)* / Color (correct off) / Mono-chrome / Monochrome BMP
Print quality
Standard* / Speed priority / Print priority
Print target
Photo* / Line drawing
Paper src
No Top/Btm Space (Save Paper)
ON / OFF*
Unidirectional printing
Enable / Disable*
Direct print settings from FTP
Print settings 1
Print quality settings
Color mode
Color (perceptual) / Color (saturation)* / Color (correctoff) / Monochrome / Monochrome BMP
Print quality
5 (Fast) / 4 / 3* / 2 / 1 (High)
Input resolution
219

600 dpi / 300 dpi* / Specify print job
Print target
Photo* / Line drawing
Paper settings
Paper src
Auto select* / Roll paper (auto) / Roll paper 1 / Rollpaper 2 / Manual
Margin
3mm* / 5mm
Border
Borderless / Bordered*
Oversize
Enable* / Disable
Save paper
ON / OFF*
Rotate
0 degrees* / 90 degrees
Auto rotation
ON / OFF*
Enlarge/Reduce
Fit paper size* / Same size / Scaling
Print centered
ON / OFF*
Cut to standard size
ON / OFF*
Mirror
ON / OFF*
Line & pen manager
Merge
ON / OFF*
Smoothing
Software* / Smoothing
Thicken fine lines
ON / OFF*
Adjust faint lines
ON / OFF*
220

Width correction
Black/gray
Color
Print color list for palettes
Processing options
Warning display
Enable / Disable*
Detect image size
OFF* / Command priority / Detected size
Frame control
Enable / Disable*
Print settings 2
Print quality settings
Color mode
Color (perceptual) / Color (saturation)* / Color (correctoff) / Monochrome / Monochrome BMP
Print quality
5 (Fast) / 4 / 3* / 2 / 1 (High)
Input resolution
600 dpi / 300 dpi* / Specify print job
Print target
Photo* / Line drawing
Paper settings
Paper src
Auto select* / Roll paper (auto) / Roll paper 1 / Rollpaper 2 / Manual
Margin
3mm* / 5mm
Border
Borderless / Bordered*
Oversize
Enable* / Disable
Save paper
ON / OFF*
Rotate
0 degrees* / 90 degrees
221

Auto rotation
ON / OFF*
Enlarge/Reduce
Fit paper size* / Same size / Scaling
Print centered
ON / OFF*
Cut to standard size
ON / OFF*
Mirror
ON / OFF*
Line & pen manager
Merge
ON / OFF*
Smoothing
Software* / Smoothing
Thicken fine lines
ON / OFF*
Adjust faint lines
ON / OFF*
Width correction
Black/gray
Color
Print color list for palettes
Processing options
Warning display
Enable / Disable*
Detect image size
OFF* / Command priority / Detected size
Frame control
Enable / Disable*
Print settings 3
Print quality settings
Color mode
Color (perceptual) / Color (saturation)* / Color (correctoff) / Monochrome / Monochrome BMP
Print quality
222
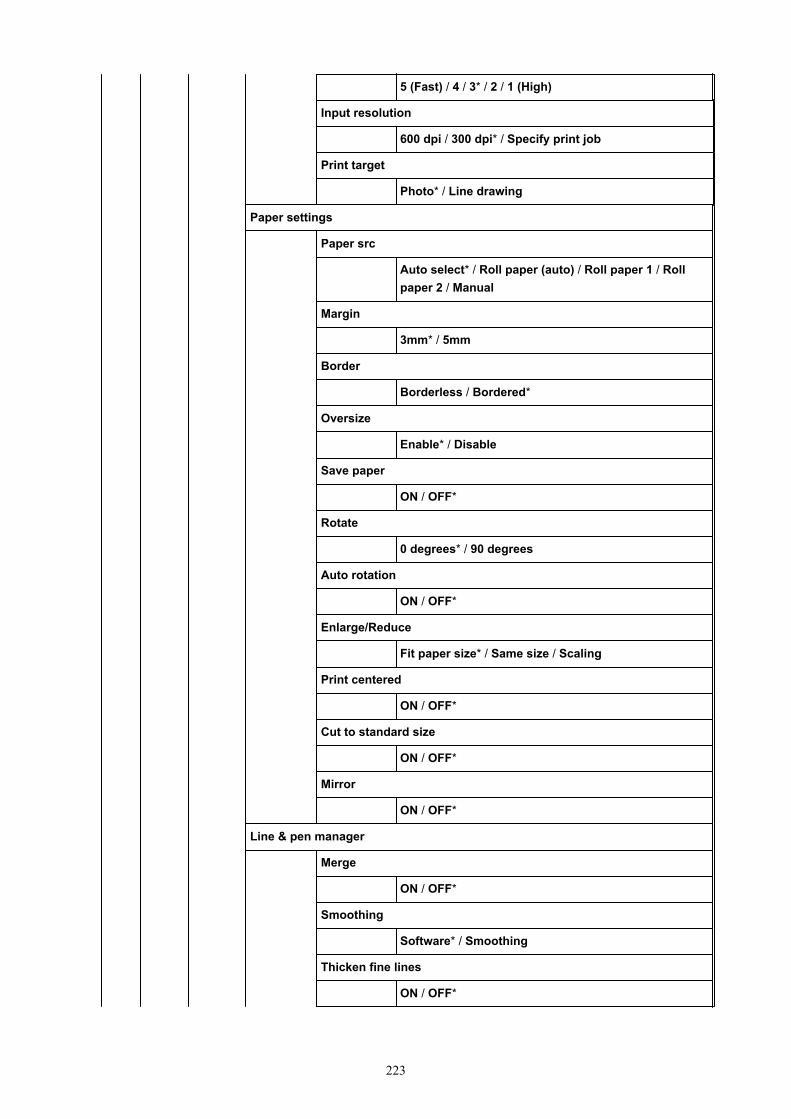
5 (Fast) / 4 / 3* / 2 / 1 (High)
Input resolution
600 dpi / 300 dpi* / Specify print job
Print target
Photo* / Line drawing
Paper settings
Paper src
Auto select* / Roll paper (auto) / Roll paper 1 / Rollpaper 2 / Manual
Margin
3mm* / 5mm
Border
Borderless / Bordered*
Oversize
Enable* / Disable
Save paper
ON / OFF*
Rotate
0 degrees* / 90 degrees
Auto rotation
ON / OFF*
Enlarge/Reduce
Fit paper size* / Same size / Scaling
Print centered
ON / OFF*
Cut to standard size
ON / OFF*
Mirror
ON / OFF*
Line & pen manager
Merge
ON / OFF*
Smoothing
Software* / Smoothing
Thicken fine lines
ON / OFF*
223

Adjust faint lines
ON / OFF*
Width correction
Black/gray
Color
Print color list for palettes
Processing options
Warning display
Enable / Disable*
Detect image size
OFF* / Command priority / Detected size
Frame control
Enable / Disable*
Print settings 4
Print quality settings
Color mode
Color (perceptual) / Color (saturation)* / Color (correctoff) / Monochrome / Monochrome BMP
Print quality
5 (Fast) / 4 / 3* / 2 / 1 (High)
Input resolution
600 dpi / 300 dpi / Specify print job*
Print target
Photo* / Line drawing
Paper settings
Paper src
Auto select* / Roll paper (auto) / Roll paper 1 / Rollpaper 2 / Manual
Margin
3mm* / 5mm
Border
Borderless / Bordered*
Oversize
Enable* / Disable
Save paper
ON / OFF*
224

Rotate
0 degrees* / 90 degrees
Auto rotation
ON / OFF*
Enlarge/Reduce
Fit paper size* / Same size / Scaling
Print centered
ON / OFF*
Cut to standard size
ON / OFF*
Mirror
ON / OFF*
Line & pen manager
Merge
ON / OFF*
Smoothing
Software* / Smoothing
Thicken fine lines
ON / OFF*
Adjust faint lines
ON / OFF*
Width correction
Black/gray
Color
Print color list for palettes
Processing options
Warning display
Enable / Disable*
Detect image size
OFF* / Command priority / Detected size
Frame control
Enable / Disable*
Default print settings
Print quality settings
Color mode
225

Color (perceptual) / Color (saturation)* / Color (correct off) / Mono-chrome / Monochrome BMP
Print quality
5 (Fast) / 4 / 3* / 2 / 1 (High)
Print target
Photo* / Line drawing
Print the print settings
LAN settingsThe lower items of this menu are the same as the lower items of LAN settings.
Paper-related settings
Roll paper auto feed
Enable* / Disable
Media type selection method
Manual / Auto detect / Auto with confirmation* / Use current media type
Manage remaining roll amount
Barcodes / Auto estimate* / Disable
Roll amount warning settings
11m/36ft. / 9m/30ft. / 7m/23ft. / 5m/16ft.* / 3m/10ft. / 1m/3ft.
Switch roll paper when low
Enable / Disable*
Roll paper auto switching
Identify size* / Do not identify size
Detect paper setting mismatch
Pause / Display warning* / Do not detect / Hold job
Paper retention settings
Release / While feeding*
Advanced paper settings
Paper size recognition settings
Cut sheet setting 1
Cut sheet setting 2
Roll paper setting 1
Roll paper setting 2
Roll paper setting 3
Roll paper setting 4
Roll paper setting 5
Roll paper setting 6
226

Roll paper setting 7
Adjust roll unit
Keep margin at cut sheet end
Enable / Disable*
Print advanced paper settings
Add priority roll paper width
Setting 1
Setting 2
Setting 3
Reset all detection priority data
Reset paper settings for all paper
Auto maintenance settings
Auto nozzle check
Standard* / 1 page / 10 pages / Disable
Nozzle check error display
Enable / Disable*
System Cleaning frequency
Standard* / Short
Print pattern after new head
ON* / OFF
Hard disk settings
Output method
Print* / Print (auto delete) / Save to job box
Save first and print
ON / OFF*
Common job box settings
Print* / Print (auto delete)
File deletion settings
Fast* / Fast secure / Secure / Secure (VSITR)
Data deletion
Fast / Fast secure / Secure / Secure (VSITR)
Monitoring service settings
Enable/disable monitoring service
Enable / Disable*
Communication test
Communication log
227

Warning notification settings
Enable* / Disable
Other printer settings
Energy saving settings
Auto power off
5 minutes / 10 min. / 30 min. / 1 hour / 4 hours / 8 hours / 12 hours / OFF
Sleep timer
5 minutes* / 10 min. / 15 min. / 20 min. / 30 min. / 40 min. / 50 min. / 60 min.
Use USB connection
Use* / Do not use
Date/time settings
Date display format
YYYY/MM/DD / MM/DD/YYYY / DD/MM/YYYY
Time zone (GMT)
0 / +1 / … / +12 / -12 / … / -1
Length unit settings
Meters* / Feet/inches
Buzzer settings
Enable* / Disable
EOP timer settings
1 minute / 2 minutes / 5 minutes / 10 minutes* / 30 minutes / 60 minutes
Job history sending settings
Send / Do not send*
Menu row height
Wide* / Standard
Language selection
Firmware update
Install update
Check current version
Update notification settings
Yes* / No
DNS server setup
Auto setup* / Manual setup
Proxy server setup
Use / Do not use*
Security settings
228

Administrator password settings
Remote UI and other tools / LCD, Remote UI, and other tools
Operation restrictions
Job history
Restrict / Do not restrict*
Remote UI
Restrict / Do not restrict*
Print from USB flash drive
Restrict / Do not restrict*
IEEE802.1X settings
Authentication
Do not use* / TLS / TTLS / PEAP
EAP-TTLS internal auth. method
MSCHAPv2* / PAP
Weak encryption restriction
Restrict* / Do not restrict
Weak certificate restriction
Restrict* / Do not restrict
Advanced setup
User-ID
Username
Password
Authentication server name
Verify auth. server name
Enable* / Disable
Verify auth. server certificates
Enable* / Disable
Last authentication result
Import/export settings
Import
Export
Initialize printer settings
• Printer information•
System information
229

Hard disk information
Error history
Hardware error
Recoverable error
Paper feed/transfer error
Usage
Total print area
Ink consumed
Duty counter
Head information
Head alignment performance log
Values applied with auto settings
Paper thickness (head height)
Transport unit vacuum strength
230

Advanced (Paper settings)
Tap the paper information area and tap Paper settings to display this menu.
Advanced
Roll length (change default)
Head height
Auto / -4(Low) / -3 / -2 / -1 / 0(Standard) / +1 / +2 /+3(High)
Skew detection accuracy
Standard / Loose / OFF
Cutting mode
Automatic cut / Eject cut / User cut
Cut speed
Fast / Standard / Slow
Trim edge first
Auto / Off / On(Preset Length) / On(Input Length) / Manual
Cut-dust reduction
ON / OFF
Transport unit vacuum strength
Auto / Strong / Medium-strong / Standard / Medium-weak / Weak
Guide arm retention pressure
High / Low
Roll paper tension (printing)
High / Standard / Low
Roll paper tension (feeding)
High / Standard / Low
Roll paper tension (winding up)
High / Standard / Low
Pause between scans
Ink drying wait time
OFF / 0.5 seconds / 1 second / 3 seconds / 5 seconds / 7 seconds / 9 seconds
Ink drying target area
Overall / Leading edge
Pause between pages
OFF / 30 seconds / 1 minute / 3 minutes / 5 minutes / 10 minutes / 30 minutes / 60 minutes
Pause on last page take-up
231

OFF / 5 minutes / 10 minutes / 30 minutes / 60 minutes / 120 minutes / 240 minutes / 480minutes / 960 minutes
Pause timing priority
Between pages / On last page
Leading edge margin (roll)
3mm / 20mm
Leading edge margin (sheet)
3mm / 20mm
Extension for borderless printing
Paper with recommended width
Large / Standard / Small
Paper of sufficient width
Select extension amount
1 (min) / 2 / 3 / 4 / 5 / 6 / 7 / 8 (max)
Sample of extension amounts
Detect paper width
Enable / Disable
Paper core outer diameter
Paper thickness
Auto-rewind roll paper at sleep
Enable / Disable
Reset detection priority data
Reset paper settings by paper
232
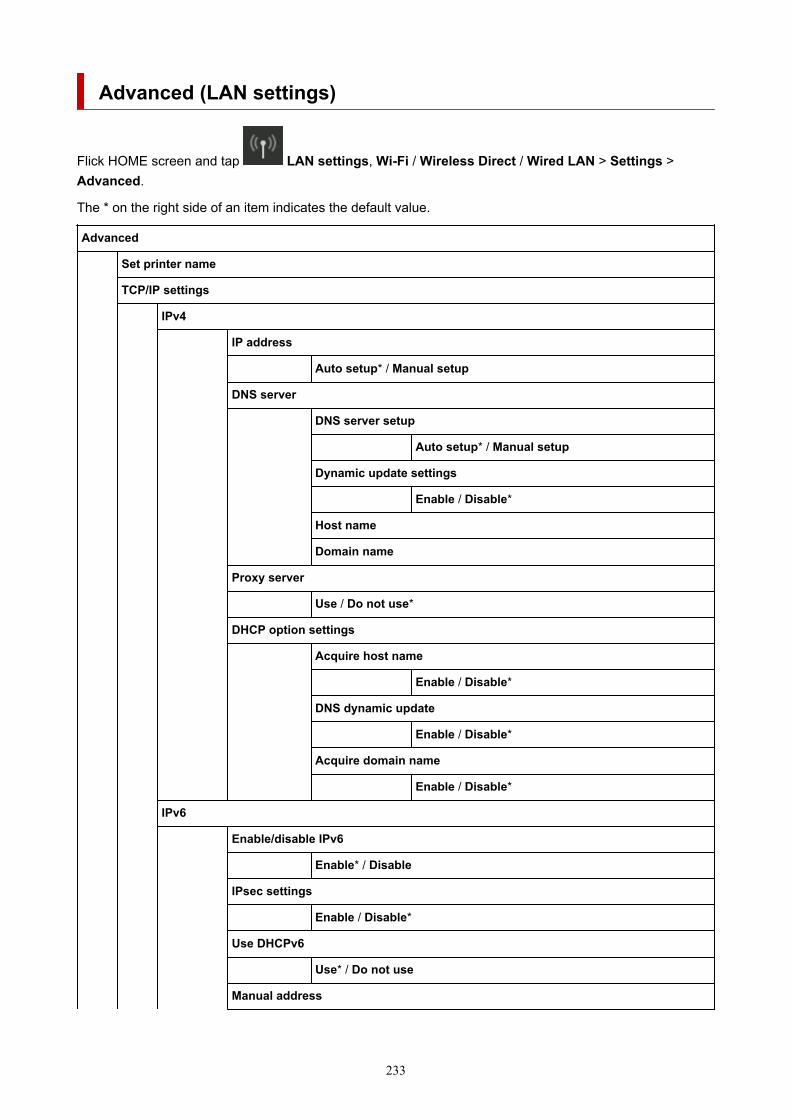
Advanced (LAN settings)
Flick HOME screen and tap LAN settings, Wi-Fi / Wireless Direct / Wired LAN > Settings >Advanced.
The * on the right side of an item indicates the default value.
Advanced
Set printer name
TCP/IP settings
IPv4
IP address
Auto setup* / Manual setup
DNS server
DNS server setup
Auto setup* / Manual setup
Dynamic update settings
Enable / Disable*
Host name
Domain name
Proxy server
Use / Do not use*
DHCP option settings
Acquire host name
Enable / Disable*
DNS dynamic update
Enable / Disable*
Acquire domain name
Enable / Disable*
IPv6
Enable/disable IPv6
Enable* / Disable
IPsec settings
Enable / Disable*
Use DHCPv6
Use* / Do not use
Manual address
233

Use / Do not use*
DNS server
DNS server setup
Auto setup* / Manual setup
Dynamic update settings
IPv6 DNS dyn. update: manual
Enable / Disable*
IPv6 DNS dyn. update: stateless
Enable / Disable*
IPv6 DNS dyn. update: stateful
Enable / Disable*
IPv6 Use IPv4 host/domain name
Enable / Disable*
IPv6 DNS host name
IPv6 DNS domain name
DHCP option settings
Acquire host name
Enable / Disable*
DNS dynamic update
Enable / Disable*
Acquire domain name
Enable / Disable*
WSD settings
Enable/disable WSD
Enable / Disable*
Optimize inbound WSD
Enable* / Disable
Timeout settings
20 minutes / 15 minutes* / 10 minutes / 5 minutes / 1 minute
Bonjour settings
Enable/disable Bonjour
Enable* / Disable
Service name
SNTP settings
Client operation status
Enable / Disable*
234

NTP server address
Polling interval
Spanning tree settings
Enable / Disable*
LPR protocol settings
Enable* / Disable
RAW protocol
ON* / OFF
LLMNR
ON* / OFF
Gigabit Ethernet settings
Autonegotiation* / 10 Mbps half duplex / 10 Mbps full duplex / 100 Mbps half duplex / 100 Mbpsfull duplex / 1 Gbps full duplex
Use Dedicated Port
ON* / OFF
IPP settings
Enable/disable IPP
Enable* / Disable
Security Print
Enable* / Disable
Wi-Fi DRX settings
Enable* / Disable
Wired LAN DRX settings
Enable* / Disable
Reset SSL certificates
Reset LAN settings
235

Setting Items on Operation Panel
Note• The administrator password is required to change some setting items if it is enabled for changing•
settings using the operation panel.
For more on setting items which the administrator password is required:
Setting Administrator Password on Operation Panel
Maintenance
Job management
Print from USB flash drivePrinting Data Saved on USB Flash Drive
236

LAN settings
Printer settings• Test print•
• Print settings•
• LAN settings•
• Paper-related settings•
• Auto maintenance settings•
• Hard disk settings•
• Monitoring service settings•
• Other printer settings•
• Language selection•
• Firmware update•
• Security settings•
• Import/export settings•
Migrating Printer's Setting
• Initialize printer settings•
Initializing Printer's Setting
Printer information
237

Maintenance
Select this setting item from Home screen.
• Nozzle Check•
Prints out the nozzle check pattern.
Checking for Nozzle Clogging
• Print Head Cleaning•
Select this to clean the print head.
Cleaning the Print Head
• Print Head Alignment•
Adjusts the alignment of print head.
Automatic Adjustment to Straighten Lines and ColorsManual Adjustment to Straighten Lines and Colors
• Print head angle adjustment•
Adjusts the print head angle.
Adjusting Line Misalignment
• Paper feed adjustment•
Adjusts the paper feed amount.
Adjusting Feed Amount
• Maintenance cartridge info•
Displays the estimated usage of maintenance cartridge. Select Replace to replace the maintenancecartridge.
Replacing the Maintenance Cartridge
• Head Replacement•
Select this to replace the print head.
Replacing the Print Head
• Replace cutter blade unit•
Select this to replace the cutter blade.
Replacing the Cutter Blade
• Platen cleaning•
Select this to clean inside the top cover.
Cleaning Inside the Top Cover
• Prepare to move•
Select this to prepare for transporting the printer.
238

Preparing to Transfer the Printer
239
Job management
Select this setting item from HOME screen.
• Print job•
Displays the print job list. Tapping a job displays the details. You can also delete or preempt jobs on thismenu.
• Saved job•
Displays the saved print job list. You can print / delete saved jobs and print job list on each job box.
Note• Enter the password if it is enabled for a personal job box using Remote UI.
• Job history•
Important• The administrator password is required to display the job history if it is enabled for changing
settings using the operation panel.
◦ Display job history◦
Displays the print job history. Tapping a print job displays the details.
◦ Print job history◦
Prints out the print job history.
• Pause printing•
Selecting Enable while a print job is in progress pauses the print job after the current job is completed.
• Delete all print jobs•
Deletes all jobs in the job queue.
240
LAN settings
Select this setting item from HOME screen.
Important• The administrator password is required to change settings if it is enabled for changing settings using the
operation panel.
• Wi-Fi•
The following setting information on the Wi-Fi connection is displayed. (Some items are not displayeddepending on printer settings.)
Items Setting
Connection Enable (connected) / Enabled (disconnected) / Disable
Network name (SSID) XXXXXXXXXXXXXXXXXXXXXXXXXXXXXXXX (up to 32 characters)
Communication mode Infrastructure
Channel XX (up to 2 digits)
Wi-Fi security Disable / WEP (64 bit) / WEP (128 bit) / WPA-PSK(TKIP) / WPA-PSK (AES) / WPA2-PSK (TKIP) / WPA2-PSK (AES)
IPv4 address XXX. XXX. XXX. XXX (12 characters)
IPv4 subnet mask XXX. XXX. XXX. XXX (12 characters)
IPv4 default gateway XXX. XXX. XXX. XXX (12 characters)
IPv4 DNS dynamic settings Enable / Disable
IPv4 DNS host name XXXXXXXXXXXX
IPv4 DNS domain name XXXXXXXXXXXXXXXXXXXXXXXXXXXXXXXXXXXXXXXXXXXXXXXXXXXXXXXXXXXXXXXX (up to 64 characters)
IPv6 link-local address XXXX: XXXX: XXXX: XXXX:XXXX: XXXX: XXXX: XXXX (32 characters)
IPv6 link-local prefix length XXX (up to 3 digits)
IPv6 manual address XXXX: XXXX: XXXX: XXXX:XXXX: XXXX: XXXX: XXXX (32 characters)
IPv6 manual prefix length XXX (up to 3 digits)
IPv6 stateless address 1 XXXX: XXXX: XXXX: XXXX:XXXX: XXXX: XXXX: XXXX (32 characters)
IPv6 stateless prefix length 1 XXX (up to 3 digits)
IPv6 stateless address 2 XXXX: XXXX: XXXX: XXXX:XXXX: XXXX: XXXX: XXXX (32 characters)
241

IPv6 stateless prefix length 2 XXX (up to 3 digits)
IPv6 stateless address 3 XXXX: XXXX: XXXX: XXXX:XXXX: XXXX: XXXX: XXXX (32 characters)
IPv6 stateless prefix length 3 XXX (up to 3 digits)
IPv6 stateless address 4 XXXX: XXXX: XXXX: XXXX:XXXX: XXXX: XXXX: XXXX (32 characters)
IPv6 stateless prefix length 4 XXX (up to 3 digits)
DHCPv6 Enable / Disable
DHCPv6 stateful address XXXX: XXXX: XXXX: XXXX:XXXX: XXXX: XXXX: XXXX (32 characters)
DHCPv6 stateful prefix length XXX (up to 3 digits)
IPv6 default gateway 1 XXXX: XXXX: XXXX: XXXX:XXXX: XXXX: XXXX: XXXX (32 characters)
IPv6 default gateway 2 XXXX: XXXX: XXXX: XXXX:XXXX: XXXX: XXXX: XXXX (32 characters)
IPv6 default gateway 3 XXXX: XXXX: XXXX: XXXX:XXXX: XXXX: XXXX: XXXX (32 characters)
IPv6 default gateway 4 XXXX: XXXX: XXXX: XXXX:XXXX: XXXX: XXXX: XXXX (32 characters)
IPv6 primary DNS server address XXXXXXXXXXXXXXXXXXXXXXXXXXXXXXXXXXXXXXX (up to 39 characters)
IPv6 secondary DNS server add. XXXXXXXXXXXXXXXXXXXXXXXXXXXXXXXXXXXXXXX (up to 39 characters)
IPv6 DNS dyn. update: manual Enable / Disable
IPv6 DNS dyn. update: stateless Enable / Disable
IPv6 DNS dyn. update: stateful Enable / Disable
IPv6 Use IPv4 host/domain name Enable / Disable
IPv6 DNS host name XXXXXXXXXXXXXXXXXXXXXXXXXXXXXXXXXXXXXXXXXXXXXXXXXXXXXXXXXXXXXXX (up to 63 characters)
IPv6 DNS domain name XXXXXXXXXXXXXXXXXXXXXXXXXXXXXXXXXXXXXXXXXXXXXXXXXXXXXXXXXXXXXXXX (up to 64 characters)
MAC address XX:XX:XX:XX:XX:XX (12 characters)
IPsec settings Enable (ESP) / Enable (ESP & AH) / Enable (AH) / Disa-ble
242

Printer name XXXXXXXXXXXXXXX (up to 15 characters)
Bonjour service name XXXXXXXXXXXXXXXXXXXXXXXXXXXXXXXXXXXXXXXXXXXXXXXXXXXX (up to 52 characters)
("XX" represents alphanumeric characters.)
To change the setting, tap Settings.
◦ Enable/disable Wi-Fi◦
Select Enable to wirelessly connect via wireless router.
◦ Wi-Fi setup◦
Select how to setup Wi-Fi.
▪ Easy wireless connect▪
Select if you specify the settings of the access point information to the printer directly from adevice (e.g. smartphone, or tablet) without operating the wireless router. Follow the on-screeninstructions of the connecting device for the setup procedure.
▪ Manual connect▪
Select when you perform settings for Wi-Fi manually using the operation panel of the printer.
▪ WPS (Push button method)▪
Select when you perform settings for Wi-Fi using a wireless router supporting a Wi-Fi ProtectedSetup (WPS) push button method. Follow the on-screen instructions during setup.
▪ Other connection types▪
▪ Advanced setup▪
Select when you perform settings for Wi-Fi manually. You can specify multiple WEP keys.
▪ WPS (PIN code method)▪
Select when you perform settings for Wi-Fi using a wireless router supporting a Wi-FiProtected Setup (WPS) PIN code method. Follow the on-screen instructions during setup.
Note• By tapping Advanced, you can set LAN in detail.•
For the items that can be set, see the following.
Advanced
• Wireless Direct•
The following setting information on the Wireless Direct connection is displayed. (Some items are notdisplayed depending on printer settings.)
Items Setting
Connection Enable / Disable
Network name (SSID) DIRECT-XXXX-TX-NNNN※1
Password XXXXXXXXXX (10 characters)
243

Communication mode Wireless Direct
Channel 3
Wi-Fi security WPA2-PSK (AES)
IPv4 address XXX. XXX. XXX. XXX (12 characters)
IPv4 subnet mask XXX. XXX. XXX. XXX (12 characters)
IPv4 default gateway XXX. XXX. XXX. XXX (12 characters)
IPv4 DNS dynamic settings Enable / Disable
IPv4 DNS host name XXXXXXXXXXXX
IPv4 DNS domain name XXXXXXXXXXXXXXXXXXXXXXXXXXXXXXXXXXXXXXXXXXXXXXXXXXXXXXXXXXXXXXXX (up to 64 characters)
IPv6 link-local address XXXX: XXXX: XXXX: XXXX:XXXX: XXXX: XXXX: XXXX (32 characters)
IPv6 link-local prefix length XXX (up to 3 digits)
MAC address XX:XX:XX:XX:XX:XX (12 characters)
IPsec settings Disable
Printer name XXXXXXXXXXXXXXX (up to 15 characters)
Bonjour service name XXXXXXXXXXXXXXXXXXXXXXXXXXXXXXXXXXXXXXXXXXXXXXXXXXXX (up to 52 characters)
※1 means printer's model name
("XX" represents alphanumeric characters.)
To change the setting, tap Settings.
◦ Enable/disable Wireless Direct◦
Select Yes to wirelessly connect without wireless router.
◦ Update SSID/password◦
Updates the identifier (SSID) and password.
◦ Wireless Direct network (SSID)◦
Changes the name (device name) of the printer displayed on Wi-Fi Direct compatible device.
◦ Connection request confirmation◦
Changes the display / non-display of the confirmation screen when Wi-Fi Direct compatible devicesare connected to the printer.
Note• By tapping Advanced, you can set LAN in detail.•
For the items that can be set, see the following.
244

Advanced
• Wired LAN•
The following setting information on the Wired LAN connection is displayed. (Some items are notdisplayed depending on printer settings.)
Items Setting
Connection Enable (connected) / Enabled (disconnected) / Disable
IPv4 address XXX. XXX. XXX. XXX (12 characters)
IPv4 subnet mask XXX. XXX. XXX. XXX (12 characters)
IPv4 default gateway XXX. XXX. XXX. XXX (12 characters)
IPv4 DNS dynamic settings Enable / Disable
IPv4 DNS host name XXXXXXXXXXXX
IPv4 DNS domain name XXXXXXXXXXXXXXXXXXXXXXXXXXXXXXXXXXXXXXXXXXXXXXXXXXXXXXXXXXXXXXXX (up to 64 characters)
IPv6 link-local address XXXX: XXXX: XXXX: XXXX:XXXX: XXXX: XXXX: XXXX (32 characters)
IPv6 link-local prefix length XXX (up to 3 digits)
IPv6 manual address XXXX: XXXX: XXXX: XXXX:XXXX: XXXX: XXXX: XXXX (32 characters)
IPv6 manual prefix length XXX (up to 3 digits)
IPv6 stateless address 1 XXXX: XXXX: XXXX: XXXX:XXXX: XXXX: XXXX: XXXX (32 characters)
IPv6 stateless prefix length 1 XXX (up to 3 digits)
IPv6 stateless address 2 XXXX: XXXX: XXXX: XXXX:XXXX: XXXX: XXXX: XXXX (32 characters)
IPv6 stateless prefix length 2 XXX (up to 3 digits)
IPv6 stateless address 3 XXXX: XXXX: XXXX: XXXX:XXXX: XXXX: XXXX: XXXX (32 characters)
IPv6 stateless prefix length 3 XXX (up to 3 digits)
IPv6 stateless address 4 XXXX: XXXX: XXXX: XXXX:XXXX: XXXX: XXXX: XXXX (32 characters)
IPv6 stateless prefix length 4 XXX (up to 3 digits)
DHCPv6 Enable / Disable
DHCPv6 stateful address XXXX: XXXX: XXXX: XXXX:XXXX: XXXX: XXXX: XXXX (32 characters)
DHCPv6 stateful prefix length XXX (up to 3 digits)
245

IPv6 default gateway 1 XXXX: XXXX: XXXX: XXXX:XXXX: XXXX: XXXX: XXXX (32 characters)
IPv6 default gateway 2 XXXX: XXXX: XXXX: XXXX:XXXX: XXXX: XXXX: XXXX (32 characters)
IPv6 default gateway 3 XXXX: XXXX: XXXX: XXXX:XXXX: XXXX: XXXX: XXXX (32 characters)
IPv6 default gateway 4 XXXX: XXXX: XXXX: XXXX:XXXX: XXXX: XXXX: XXXX (32 characters)
IPv6 primary DNS server address XXXXXXXXXXXXXXXXXXXXXXXXXXXXXXXXXXXXXXX (up to 39 characters)
IPv6 secondary DNS server add. XXXXXXXXXXXXXXXXXXXXXXXXXXXXXXXXXXXXXXX (up to 39 characters)
IPv6 DNS dyn. update: manual Enable / Disable
IPv6 DNS dyn. update: stateless Enable / Disable
IPv6 DNS dyn. update: stateful Enable / Disable
IPv6 Use IPv4 host/domain name Enable / Disable
IPv6 DNS host name XXXXXXXXXXXXXXXXXXXXXXXXXXXXXXXXXXXXXXXXXXXXXXXXXXXXXXXXXXXXXXX (up to 63 characters)
IPv6 DNS domain name XXXXXXXXXXXXXXXXXXXXXXXXXXXXXXXXXXXXXXXXXXXXXXXXXXXXXXXXXXXXXXXX (up to 64 characters)
MAC address XX:XX:XX:XX:XX:XX (12 characters)
IPsec settings Enable (ESP) / Enable (ESP & AH) / Enable (AH) / Disa-ble
Printer name XXXXXXXXXXXXXXX (up to 15 characters)
Bonjour service name XXXXXXXXXXXXXXXXXXXXXXXXXXXXXXXXXXXXXXXXXXXXXXXXXXXX (up to 52 characters)
("XX" represents alphanumeric characters.)
To change the setting, tap Settings.
◦ Enable/disable Wired LAN◦
Select Enable when connecting to wired LAN.
Note• By tapping Advanced, you can set LAN in detail.•
246

For the items that can be set, see the following.
Advanced
• Print details•
Prints out the LAN setting information of the printer with Wi-Fi connection, wired LAN connection,wireless direct connection.
For the items that can be checked, see the following.
Printing Network Settings
Important• Important information on your computer is stated on the paper on which the LAN setting information
is printed. Please handle with care enough.
Note• You can also print out the LAN setting information by tapping in the following order.•
Printer settings > Test print > Print LAN details
• Advanced•
By tapping Advanced on each setting screen of Wi-Fi connection, wired LAN connection, wireless directconnection, LAN information can be set in detail.
Important• If the LAN is disabled, the following items can not be selected.
◦ Set printer name◦
Specifies the printer name. You can use 2 to 15 characters for the name.
Note• You cannot use the same printer name as that already used for other LAN connected devices.• You cannot use a hyphen for the initial or last character of the printer name.
◦ TCP/IP settings◦
Performs IPv4 or IPv6 setting.
◦ WSD settings◦
Setting items when you use WSD (one of the network protocols supported in Windows 10, Windows8.1, and Windows 7).
▪ Enable/disable WSD▪
Selects whether WSD is enabled or disabled.
Note• When this setting is enabled, the printer icon is displayed on the Network Explorer in
Windows 10, Windows 8.1, and Windows 7.
▪ Optimize inbound WSD▪
247

Selecting Enable allows you to receive the WSD printing data faster.
▪ Timeout settings▪
Specifies the timeout length.
◦ Bonjour settings◦
Setting items when you use Bonjour.
▪ Enable/disable Bonjour▪
Selecting Enable allows you to use Bonjour to perform the network settings.
▪ Service name▪
Specifies the Bonjour service name. You can use up to 48 characters for the name.
Note• You cannot use the same service name as that already used for other LAN connected
devices.
◦ SNTP settings◦
Performs various settings for SNTP (Simple Network Time Protocol).
◦ Spanning tree settings◦
Enables/Disables spanning tree. Selecting Enable avoids circulating data on a network.
◦ LPR protocol settings◦
Enables/Disables the LPR setting.
◦ RAW protocol◦
Enables/Disables RAW printing.
◦ LLMNR◦
Specifies ON/OFF of LLMNR (Link-Local Multicast Name Resolution). Selecting ON allows theprinter to detect printer's IP address from the printer name without a DNS server.
◦ Gigabit Ethernet settings◦
Specifies the communication speed and communication method when using Gigabit Ethernet.
◦ Use Dedicated Port◦
Selects whether to use a dedicated port for a command sent from a Canon application to the printer.
Selecting ON allows you to use the dedicated port.
◦ IPP settings◦
Selecting Enable allows you to print via the network with the IPP protocol.
If you use the security print function when printing using IPP protocol in AirPrint etc., select Enablefor Security Print.
◦ Wi-Fi DRX settings◦
Selecting Enable allows you to activate discontinuous reception when using Wi-Fi.
◦ Wired LAN DRX settings◦
248

Selecting Enable allows you to activate discontinuous reception when the printer is connected to adevice compatible with wired LAN.
◦ Reset SSL certificates◦
Initializes SSL certificate information.
◦ Reset LAN settings◦
Initializes the network settings on the printer.
After resetting, perform setup again as necessary.
249

Test print
Select this setting item from Printer settings.
• Nozzle Check•
Prints out the nozzle check pattern.
Checking for Nozzle Clogging
• Status print•
Prints out the printer status and setting value information.
Note• Status print (administrator) is also displayed if the administrator password is enabled for
changing settings using the operation panel.
Status Print
• Print LAN details•
Prints out the network setting information.
Printing Network Settings
• Print the print settings•
Prints out the print settings list.
• Print advanced paper settings•
Prints out the setting values specified by Advanced paper settings.
• Print job history•
Prints out a record of print jobs, including the paper type and size, amount of ink consumed, and so on.Ink consumption indicates a rough estimate of the amount of ink consumed per print job.
Job management
• Print menu map•
Prints out the menu list.
• Print color list for palettes•
Prints out color pallet information.
250
Print settings
Select this setting item from Printer settings.
• Print head movable width setting•
Adjusts the print head movable width.
• Prioritize paper size•
This is a setting item for roll paper.
Select Enable to use the paper size setting as the basis for printing instead of other settings. The text orimages in the margin are not printed.
Select Disable to give priority to printing text or images.
Note• The printed paper length is longer than the actual paper length. This is because the printed paper
includes the upper/lower margins specified by Roll Paper Safety Margin and Near End Margin inthe printer driver and excludes the paper margins.
• Magnification level for borderless•
Sets magnification level when performing borderless printing in the following print method.
Normally, the image is enlarged slightly and printed so that there is no border. If the border remains,change this setting.
◦ Printing JPEG file◦
◦ Printing using AirPrint◦
◦ Printing PDF file◦
◦ Printing data saved on the USB flash drive directly◦
◦ Printing directly from FTP◦
• PDF print settings•
Performs PDF print settings.
• JPEG print settings•
Performs JPEG print settings.
• HP-GL/2 print settings•
Performs various settings for HP-GL/2 print.
HP-GL/2 Settings
• Print from USB flash settings•
Performs settings for printing data saved on the USB flash drive.
• AirPrint print settings•
Performs AirPrint print settings when printing with AirPrint.
251

• Direct print settings from FTP•
Performs print settings when printing directly from FTP. You can perform four settings individually.
• Default print settings•
Prints out the default values of print settings.
• Print the print settings•
Prints out the print settings list.
252

Paper-related settings
Select this setting item from Printer settings.
• Roll paper auto feed•
Enables/disables feeding roll paper automatically when you load it on the roll unit.
Selecting Enable detects the paper edge automatically and paper is loaded automatically only byputting roll paper on the roll unit.
Select Disable if you load roll paper manually, or if you have any problem in feeding roll paperautomatically.
Note• Roll paper with a width of less than 250 mm cannot be fed automatically.•
Select Disable and feed paper manually.
• Media type selection method•
Specifies a method to select the media type when paper is loaded.
◦ Manual◦
You need to select a media type from the registered media types manually.
◦ Auto detect◦
The media type estimated by the printer's sensor is set automatically.
As the estimation accuracy increases, it will be not necessary to select the media type each time.
◦ Auto with confirmation◦
Among the media types estimated by the printer's sensor, the most likely ones are listed at the top.
You need to select a media type from the listed media types manually.
◦ Use current media type◦
Select this to continue using the same type of paper.
Note• When using the paper estimation function, the paper width detection function is enabled even if you•
set Detect paper width to Disable.
• If the loaded paper is used by your printer for the first time, or if there is no applicable media type,•No selection log entry will be displayed.
If No selection log entry is displayed, select a media type manually.
At this time, the printer learns the data of the selected media type.
The next time the same paper is loaded, the media type is estimated from this data.
• When using a paper that is not listed in the paper information list, perform Create Custom Paper•in Media Configuration Tool. After create the paper information, we recommend to perform Paperfeed adjustment.
253

• If the created custom paper does not appear as a candidate in the paper information list even if it is•fed many times, perform Paper feed adjustment again.
• Errors may occur in the estimation results.•
• Manage remaining roll amount•
Selects the method to manage remaining roll amount and that to display warning when the roll isrunning short.
◦ Barcodes◦
Manages remaining roll amount by using a barcode.
By using the barcode every time you replace a roll, you can manage remaining roll amount properly.Specify the roll length properly when you load a new roll.
◦ Auto estimate◦
Estimates and manages the remaining amount of roll paper.
The estimated remaining roll amount is displayed on the HOME screen.
The barcode is not printed when Auto estimate is selected.
To estimate the remaining roll amount, Paper thickness and Paper core outer diameter have tobe set correctly.
When using a paper that is not listed in the paper information list, set Thickness and Paper TubeSize in Advanced paper settings or in Media Configuration Tool.
For paper thickness and paper tube outer diameter size, contact the paper manufacturer.
Important• If you do not select the media type correctly, the remaining roll amount may not be estimated•
correctly.
• There is an error in the estimated remaining roll amount, and paper may run out during printing.•
◦ Disable◦
Select to disable managing remaining roll amount.
• Roll amount warning settings•
Specifies when to warn the remaining roll paper amount.
Note• This setting is enabled when Barcodes or Auto estimate is selected for Manage remaining roll•
amount.
• Switch roll paper when low•
Switches the roll paper for printing automatically when the roll is running out while printing is in progress.
◦ Enable◦
This setting is valid only when Barcodes is selected for Manage remaining roll amount.
The roll paper for printing is switched with several rolls remaining.
254

◦ Disable◦
Switches the roll paper for printing by estimating the remaining amount based on the roll amountvalue you entered.
In addition, if the roll length is not specified properly, paper may remain when switching, or it mayhave run out while printing is in progress.
• Roll paper auto switching•
Enables/Disables switching roll paper feed position by detecting the paper size.
• Detect paper setting mismatch•
Selects printer action when you start printing with the paper size, the media type, and print settingsdifferent from those registered.
• Paper retention settings•
Selects whether to contact the roll nip with the rolls in feeding paper.
◦ If you select While feeding, the roll nip contacts with the rolls and automatic feeding is enabled.◦
◦ If you select Release, the roll nip does not contact with the rolls.◦
If you select Release, automatic feed and automatic switching of top and bottom roll paper can notbe performed. Feed paper manually.
• Advanced paper settings•
Performs advanced paper settings for each media types.
• Paper size recognition settings•
Selects which size is preferred when paper size detection is enabled.
◦ Cut sheet setting 1◦
Select whether ISO A3+ or 13"x19"(Super B) is applied when a sheet of an intermediate size isdetected.
◦ Cut sheet setting 2*1◦
Select whether ISO B1 or 28"x40" (ANSI F) is applied when a sheet of an intermediate size isdetected.
*1: Not displayed on TX-2100 and TX-5210.
◦ Roll paper setting 1◦
Select whether A3 or 300 mm is applied when a roll of an intermediate size is detected.
◦ Roll paper setting 2◦
Select whether B4 or 10 in. is applied when a roll of an intermediate size is detected.
◦ Roll paper setting 3◦
Select whether 300 mm or 12 in. is applied when a roll of an intermediate size is detected.
◦ Roll paper setting 4◦
Select whether 500 mm or 20"x24" is applied when a roll of an intermediate size is detected.
◦ Roll paper setting 5◦
255
Select whether B2 or 20"x24" is applied when a roll of an intermediate size is detected.
◦ Roll paper setting 6◦
Select whether A1 or 600 mm is applied when a roll of an intermediate size is detected.
◦ Roll paper setting 7◦
Select whether 600 mm or 24 in. is applied when a roll of an intermediate size is detected.
• Adjust roll unit•
Select this setting item when you replace the roll unit.
• Keep margin at cut sheet end•
When printing on the sheet using AirPrint, selecting Enable sets the trailing edge of the paper to 20 mm.Select Enable if printing on the trailing edge of the paper is disturbed.
• Print advanced paper settings•
Tapping Yes prints out each setting specified in Advanced paper settings.
• Add priority roll paper width•
When paper size is detected, set the width of the roll paper to be recognized first. Judge in order from 1in the list.
• Reset all detection priority data•
Resets estimated data for all learned paper when Auto detect or Auto with confirmation is selected inMedia type selection method.
• Reset paper settings for all paper•
Tapping Yes initializes each setting specified in Advanced paper settings.
Entering the administrator password is required if it is enabled.
Important• Estimated data for all learned paper when Auto detect or Auto with confirmation is selected in•
Media type selection method
• Selection log in paper type.•
256

Auto maintenance settings
Select this setting item from Printer settings.
Important• The administrator password is required to change settings if it is enabled for changing settings using the
operation panel.
• Auto nozzle check•
Enables/Disables automatic nozzle checking. You can also select the page interval to perform automaticnozzle checking.
• Nozzle check error display•
Enables/Disables displaying the nozzle check error.
• System Cleaning frequency•
Specifies the frequency of automatic system cleaning.
Note• To maintain print quality, we recommend you select Short if you use the printer at a higher place.
• Print pattern after new head•
Selects whether you print an adjustment pattern after replacing the Print head.
257

Hard disk settings
Select this setting item from Printer settings.
Important• The administrator password is required to change settings if it is enabled for changing settings using the
operation panel.
• Output method•
Selects the printing method for jobs received from software other than the printer driver. When using theprinter driver, configure settings on the printer driver.
◦ Print◦
Performs printing as usual.
◦ Print (auto delete)◦
Deletes the data from the printer's hard disk after printing is completed.
◦ Save to job box◦
Only saves the print job in job box without printing it.
• Save first and print•
A setting for jobs received from software other than the printer driver. When using the printer driver,configure settings on the printer driver. Select ON to print the job after it has been saved.
• Common job box settings•
Select Print (auto delete) to print without saving jobs in common job box.
• File deletion settings•
Selects the data erasing method when deleting a Print job or Saved job, or when Print (auto delete) isselected in Output method or Common job box settings.
FastErases file management data for print job data stored on the printer's hard disk.
Choose this method for relatively fast erasure.
Because only the file management data is erased, the print job data itself is not erased.
Fast secureErases the data encryption key specified for the hard disk drive.
Specifying the encryption key again does not allow you to read and use data saved in the pastsafely and fast.
Select to erase highly confidential data.
SecureOverwrites the entire hard disk with 00, FF, and random data (one time each) after the dataencryption key specified for the hard disk drive is erased.
Verification is performed to check if the data was correctly written.
Choose this method to erase especially confidential data.
258

It is virtually impossible to recover the overwritten data.
Conforms to the DoD5220.22-M standard of the U.S. Department of Defense.
Secure (VSITR)Overwrites the entire hard disk with 00 next overwrites with FF after the data encryption keyspecified for the hard disk drive is erased.
After repeating this process three times, the entire hard disk is overwritten with AA.
It is virtually impossible to recover the overwritten data.
Conforms to the guidelines of German Federal Government (VS-ITR).
• Data deletion•
Selects the method to delete data on printer's hard disk.
Erasing Data on Printer's Hard Disk
259

Monitoring service settings
Select this setting item from Printer settings.
Important• The administrator password is required to change settings if it is enabled for changing settings using the
operation panel.
• Enable/disable monitoring service•
Selecting Enable allows the printer to send error details to the service center.
When selecting Enable, perform a communication test.
• Communication test•
Performs a communication test with the service center.
• Communication log•
Displays the list of error numbers (up to 30), error code, and time the error occurs. Tapping an itemdisplays the error details.
Main errors and countermeasures
Error code Error detail Countermeasure
0xxx0003 Communication test is not performed. Perform the communication test.
8xxx0003 E-RDS switch is setting OFF. Enable monitoring service.
8xxx2003 Network is not ready, try later. Check the network settings.
8xxx200A Server connection error Check the network settings.
8xxx2014 Proxy connection error Check the proxy server address etc.
8xxx201E Proxy authentication error Check the user name and password to log in to the proxyserver.
8xxx2046 Server certificate expired The server certificate has expired. Set the correct dateand time on the printer.
8xxx2047 Server response time out Check the network settings. Check the proxy server ad-dress. Make sure that the correct date and time is set onthe printer.
8xxx2058 Unknown error Wait a while, and then try the communication test again.
• Warning display•
Selecting Enable, the touch screen displays a message when communication with the service centerfails.
260

Other printer settings
Select this setting item from Printer settings.
Important• The administrator password is required to change settings if it is enabled for changing settings using the
operation panel.
• Energy saving settings•
To save electricity, enable this setting to turn off the printer automatically or to enter sleep mode whenspecified length of time has elapsed.
◦ Auto power off◦
Sets the time until the printer turns off automatically. If no operations are performed on the printer forthe specified duration of the time after entering Sleep mode, the printer automatically turns off.
◦ Sleep timer◦
Specifies the length of time to enter sleep mode automatically when no operation is made.
NoteIf the print job contains a pending job or a security print job, the printer does not enter sleepmode.
• Use USB connection•
Use / Do not use USB connection.
• Date/time settings•
Sets the current date and time.
• Date display format•
Sets the format of dates displayed on the touch screen and printed on photos.
• Time zone (GMT)•
Specifies the time zone according to a country or region you live in.
Specifying the time zone allows you to display the correct time and date an e-mail was sent on your mailsoftware.
Select the time difference from GMT (Greenwich mean time) according to a country or region you live in.
• Length unit settings•
Selects the length unit (meter or feet/inch).
• Buzzer settings•
The printer beeps once for warnings and 3 times for errors when Enable is selected.
• EOP timer settings•
Specify the timeout period before cancellation of print jobs that cannot be received by the printer.
261

• Job history sending settings•
Select Send to send the information to the printer management and job management systems.
• Menu row height•
Adjusts the line spacing of some setting items displayed on the touch screen.
262

Language selection
Select this setting item from Printer settings.
Important• The administrator password is required to change settings if it is enabled for changing settings using the
operation panel.
Changes the language for the messages and menus on the touch screen.
263

Firmware update
Select this setting item from Printer settings.
Important• The administrator password is required to change settings if it is enabled for changing settings using the
operation panel.
You can update the firmware of the printer, check the firmware version, or perform settings of a notificationscreen, a DNS server and a proxy server.
Note• If LAN is disabled, you can not use Install update, DNS server setup, Proxy server setup.•
• Install update•
Performs the firmware update of the printer.
Firmware update
• Check current version•
You can check the current firmware version.
• Update notification settings•
When Yes is selected and the firmware update is available, the screen to inform you of the firmwareupdate is displayed on the touch screen.
• DNS server setup•
Performs settings for a DNS server. Select Auto setup or Manual setup. If you select Manual setup,follow the display on the touch screen to perform settings.
• Proxy server setup•
Performs settings for a proxy server. Follow the display on the touch screen to perform settings.
264
Security settings
Select this setting item from Printer settings.
Important• The administrator password is required to change settings if it is enabled for changing settings using the
operation panel.
• Administrator password settings•
You can specify or disable the administrator password.
If you specify the administrator password, select the range and specify the administrator password.
Remote UI and other toolsEntering the administrator password is required to change the setting items using Remote UI orsome software.
LCD, Remote UI, and other toolsEntering the administrator password is required to change the setting items using the operationpanel of the printer, Remote UI, or some software.
For details:
Setting Administrator Password on Operation Panel
• Operation restrictions•
Restricts the following operations.
◦ Job history◦
Restricts to display or print the print job history.
◦ Remote UI◦
Restricts to use Remote UI.
◦ Print from USB flash drive◦
Restricts to print data on USB flash drive.
• IEEE802.1X settings•
Performs various settings for IEEE802.1X.
265

Printer information
Select this setting item from HOME screen.
• System information•
Displays printer's system information.
• Hard disk information•
Displays the total or free space of the printer hard disk.
• Error history•
Displays the error history.
◦ Hardware error◦
Displays the hardware error codes (up to 5).
◦ Recoverable error◦
Displays the recoverable error (e.g. paper or ink related error) codes (up to 5).
◦ Paper feed/transfer error◦
Displays the error codes for errors which occur during paper feed/transfer (up to 5).
Tapping an error code displays the error details.
For more on the error code, refer to List of Support Code for Error.
• Usage•
Displays the printer's record of use such as total print area or the amount of ink consumption.
• Head information•
Displays the Print head serial number, elapsed days since the current Print head was installed, and dotcount.
• Head alignment performance log•
Displays the Print head alignment performance log (up to 5).
• Values applied with auto settings•
Displays the print settings applied the last print job.
266

Setting Administrator Password on Operation Panel
You can specify or disable the administrator password.
Specifying the administrator password requires you to enter the password to use the items or change thesettings below.
• LAN settings• Auto maintenance settings• Hard disk settings• Monitoring service settings• Other printer settings• Language selection• Firmware update• Security settings• Import/export settings• Initialize printer settings• Status print (administrator)
Follow the procedure below to specify the administrator password.
1. Flick HOME screen and tap Printer settings.1.
Home Screen Menu Composition
2. Tap Security settings.2.
3. Enter the password on the administrator password input screen and tap OK.3.
Important• The administrator password is set at the time of purchase.•
The printer's serial number is used as the password.
4. Tap Administrator password settings.4.
5. Tap Change administrator password.5.
6. Tap range where administrator password is valid.6.
Remote UI and other toolsEntering the administrator password is required to change the setting items using Remote UI orsome software.
LCD, Remote UI, and other toolsEntering the administrator password is required to change the setting items using the operationpanel of the printer, Remote UI, or some software.
7. Enter administrator password.7.
267

Important• The following character restrictions apply to the password:•
Set the password by using 4 to 32 characters.The allowed characters are single-byte alphanumeric characters, blank space, umlautcharacters, and the below characters.- ! @ # $ % ^ & * _ ; : , . / ` = + ' " ( ) { } [ ] < > |
For security reasons, we recommend you use 8 and more alphanumeric characters.
8. Tap Apply.8.
9. Enter administrator password you specified again.9.
10. Tap Apply.10.
The administrator password is enabled.
When You Want to Disable the Administrator Password:When the administrator password is enabled, tapping Printer settings, Security settings andAdministrator password settings in this order and entering the administrator password displaysChange administrator password and Remove administrator password on the touch screen. Selecteither item and follow the on-screen instructions to perform settings.
268

Erasing Data on Printer's Hard Disk
Important• The administrator password is required to change settings if it is enabled for changing settings using the
operation panel.• For a more secure method of preventing data recovery, we recommend physically or magnetically
destroying the hard disk. In this case, the hard disk can no longer be used.• You cannot erase HDD data if there is a job queue. Additionally, print jobs are not processed while data
erasing is in progress.
1. Flick HOME screen and tap Printer settings.1.
Home Screen Menu Composition
2. Tap Hard disk settings.2.
3. Enter administrator password if it is enabled.3.
4. Tap Data deletion.4.
5. Tap erasing method.5.
FastErases file management data for print job data stored on the printer's hard disk.
Choose this method for relatively fast erasure.
Because only the file management data is erased, the print job data itself is not erased.
Fast secureErases the data encryption key specified for the hard disk drive.
Specifying the encryption key again does not allow you to read and use data saved in the pastsafely and fast.
Select to erase highly confidential data.
SecureOverwrites the entire hard disk with 00, FF, and random data (one time each) after the dataencryption key specified for the hard disk drive is erased.
Verification is performed to check if the data was correctly written.
Choose this method to erase especially confidential data.
It is virtually impossible to recover the overwritten data.
Conforms to the DoD5220.22-M standard of the U.S. Department of Defense.
Secure (VSITR)Overwrites the entire hard disk with 00 next overwrites with FF after the data encryption keyspecified for the hard disk drive is erased.
After repeating this process three times, the entire hard disk is overwritten with AA.
269

It is virtually impossible to recover the overwritten data.
Conforms to the guidelines of German Federal Government (VS-ITR).
6. Confirm displayed message and tap Yes.6.
Data on the hard disk are erased.
270

HP-GL/2 Settings
Menus on HP-GL/2 print settings
Menu Setting Combinations
271

Menus on HP-GL/2 print settings
Color mode
Print quality
Input resolution
Print target
Paper src
Margin
Oversize
Save paper
Rotate
Auto rotation
Enlarge/Reduce
Print centered
Cut to standard size
Use nesting function
Nesting WaitTime
Print cut lines
Mirror
Merge
Select palette
Define palette
Pen 0 to Pen 15
Reset palette
Smoothing
Thicken fine lines
Adjust faint lines
Width correction
272

Print color list for palettes
Warning display
Detect image size
Frame control
273

Color mode
Lets you specify the color(s) to use when printing HP-GL/2 data.
This setting item is displayed by tapping in the following order.
Printer settings > Print settings > HP-GL/2 print settings > Print quality settings
• Color (perceptual)•
◦ If you select Line drawing for Print target:◦
Reproduces colors of general images naturally and features smooth gradation. In addition, selectingthis setting allows you to adjust colors easily using an application software.
◦ If you select Photo for Print target:◦
Reproduces colors of general photos naturally and features smooth gradation. In addition, selectingthis setting allows you to adjust colors easily using an application software.
• Color (saturation) (Initial setting)•
◦ If you select Line drawing for Print target:◦
Prints in easy-to-see colors suitable for line drawing.
◦ If you select Photo for Print target:◦
Reproduces vivid colors on data such as a poster.
• Color (correct off)•
Performs printing without color matching.
• Monochrome•
◦ If you select Line drawing for Print target:◦
Select this setting to print a line drawing using black ink.
◦ If you select Photo for Print target:◦
Prints color data converting to monochrome. Continuous tones are reproduced using gray halftones.
• Monochrome BMP•
The colors other than white are printed in black.
274

Print quality
Lets you specify print quality.
This setting item is displayed by tapping in the following order.
Printer settings > Print settings > HP-GL/2 print settings > Print quality settings
• 5 (Fast)•
Select this setting for faster printing.
• 4•
Printing speed is faster than that in selecting 3.
• 3 (Initial setting)•
Select this setting for standard printing that balances print quality and printing speed.
• 2•
Printing quality is higher than that in selecting 3.
• 1 (High)•
Select this setting to give print quality priority.
This causes printing to take longer than other settings, but print quality is higher.
275

Input resolution
Specifies the resolution for internal rendering process.
This setting item is displayed by tapping in the following order.
Printer settings > Print settings > HP-GL/2 print settings > Print quality settings
• 600 dpi (Initial setting)•
Specifies 600 dpi for internal rendering resolution.
This setting raises the accuracy of internal processes for finer printing.
• 300 dpi•
Specifies 300 dpi for internal rendering resolution.
This setting increases the speed of internal processes for faster printing.
276

Print target
Specifies the print target of HP-GL/2 data.
This setting item is displayed by tapping in the following order.
Printer settings > Print settings > HP-GL/2 print settings > Print quality settings
• Photo•
Select this setting to print a data which includes illustration or photo.
• Line drawing (Initial setting)•
Select this setting to print a drawing data which includes lines.
277
Paper src
Specifies the paper type (sheet or roll) for HP-GL/2 data printing.
This setting item is displayed by tapping in the following order.
Printer settings > Print settings > HP-GL/2 print settings > Paper settings
• Auto select (Initial setting)•
Select an appropriate paper source automatically.
• Roll paper (auto)•
Select a roll paper source (upper or lower) automatically.
• Roll paper 1•
Select this setting to print on the upper roll paper.
• Roll paper 2•
Select this setting to print on the lower roll paper.
• Manual•
Select this setting to print on the sheets.
278

Margin
Specifies the margins for HP-GL/2 data printing.
This setting item is displayed by tapping in the following order.
Printer settings > Print settings > HP-GL/2 print settings > Paper settings
Note• If the Leading edge margin (roll) and/or Leading edge margin (sheet) settings on Advanced paper
settings are different from the settings here, the larger of the settings is given priority.
• 3mm (Initial setting)•
Specifies 3 mm margin.
However, the trailing edge margin for cut sheet paper is 20 mm.
• 5mm•
Specifies 5 mm margin.
However, the trailing edge margin for cut sheet paper is 20 mm.
279

Oversize
Specifies whether margins are within or outside the HP-GL/2 data image drawing range.
This setting item is displayed by tapping in the following order.
Printer settings > Print settings > HP-GL/2 print settings > Paper settings
• Enable (Initial setting)•
Specifies margins outside the HP-GL/2 data image drawing range.
Adding margins outside the image drawing range will not cause part of the image to be cut off.
However, you will need to print on paper of a size that is greater than the size of the image drawingrange specified by the HP-GL/2 data plus the top, bottom, left, and right margins.
• Disable•
Specifies margins inside the HP-GL/2 data image drawing range.
Depending on the layout, adding margins inside the image drawing range may cause part of the imageto be cut off.
Note• Some CAD applications can cause the origin to be out of position and part of the image to be cut
off. Experiment with the Disable and Enable settings of this function to find the one that worksbest.
OVERSIZE SETTING EXAMPLES
A. Printed page sizeB. Image drawing range
When you print an image above, using Oversize allows you to select where to apply margins (outside/inside the image) based on the image drawing range.
Select Enable to apply margins outside the image, or select Disable to apply those inside.
• When Disable is selected:•
Printing is performed based on the image drawing range. The origin is specified on the upper left ofthe paper.
Margins are added to the inside of the image drawing range.
280

B. Image drawing range
C. Margins
If the actual drawing image is smaller than the specified image drawing range, the image is not cut offby the margins.
• When Enable is selected:•
Printing is performed based on the image drawing range. The origin is specified on the upper left ofthe paper.
Margins are added to the outside of the image drawing range.
B. Image drawing range
C. Margins
When you specify the paper size for printing, select the size which covers both the image drawingrange and margins.
281

D. Paper for printing
E. Image drawing range with margins
If you select the paper size which cannot cover the margins, the image may be cut off.
282

F. Range which cannot be printed
G. Paper for printing
283

Save paper
When printing on roll paper, eliminates blank space (margins) above and/or below the image (if there is any)to save paper.
This setting item is displayed by tapping in the following order.
Printer settings > Print settings > HP-GL/2 print settings > Paper settings
• ON•
Blank space above and below the image is eliminated when printing.
• OFF (Initial setting)•
Paper is not saved.
SAVE PAPER SETTING EXAMPLESPrint data (image drawing range)
• When OFF is selected:•
• When ON is selected:•
284

285

Rotate
Rotates the image according to the specified setting.
This setting item is displayed by tapping in the following order.
Printer settings > Print settings > HP-GL/2 print settings > Paper settings
• 0 degrees (Initial setting)•
Image is not rotated.
• 90 degrees•
Specified image is rotated by 90 degrees.
If the part of rotated image is out of the paper width, the part is not printed.
Note• When the print data includes HP RTL, the HP RTL image part is not rotated.
Note• If ON is selected for Auto rotation, priority is given to the Auto rotation setting.
286

Auto rotation
Printing on paper while Auto rotation is set to ON causes the image to be rotated automatically inaccordance with the most efficient image layout in order to save paper and avoid images running off theedges of the paper.
This setting item is displayed by tapping in the following order.
Printer settings > Print settings > HP-GL/2 print settings > Paper settings
• ON•
Image is rotated by 90 degrees in the cases described below.
◦ When the output page is in portrait orientation and the long side is shorter than the roll paper width◦ When the output page is in landscape orientation, and the long side is longer than the paper width◦
and the short side is shorter than the paper width
Even if the long edge and short edge of the output page are both longer than the paper width, andthe output page is in landscape orientation, the image is rotated to expand the print range.
Note• The length that the roll paper will be cut to depends on rotation.• The desired printing results may not be obtained when HP-GL/2 data that does not include•
image drawing range information is received.
In this case, select Command priority or Detected size for Detect image size.
• When the print data includes HP RTL, the HP RTL image part is not rotated.
• OFF (Initial setting)•
Images are not rotated automatically.
AUTO ROTATE EXAMPLES• Efficient layout•
• Prevents image from running off edge.•
287

• Even if the image runs off the edge of the paper, it is rotated to expand the print range.•
288

Enlarge/Reduce
Enlarges or reduces images
This setting item is displayed by tapping in the following order.
Printer settings > Print settings > HP-GL/2 print settings > Paper settings
• Fit paper size•
Enlarges or reduces the image for printing to fit to the paper loaded in the printer.
Note• Data line widths are not enlarged or reduced.• Margin widths are not enlarged or reduced. Because of this, paper size scaling and post-processing
image scaling may not be the same.• Nesting cannot be performed while Fit paper size is selected.• The maximum enlarge/reduce rate for this setting is calculated by (maximum width/1 inch x 100 %).
Therefore, the maximum rate is 2400 % for 24 inch model, 3600 % for 36 inch model, and 4400% for 44 inch model. If the calculation result exceeds the maximum rate, the image is enlargedaccording to the maximum rate for each model.
• Same size (Initial setting)•
Image is not enlarged/reduced.
• Scaling•
Enlarges or reduces the image to the specified scaling value for printing.
Scaling can be specified within a range of 25 % to 400 %.
Note• Data line or margin widths are not enlarged or reduced.
ENLARGE/REDUCE Scaling SETTING EXAMPLEThe output object area is enlarged or reduced as specified by the Scaling setting. The origin is in theupper-left corner.
For example, doubling the length and width of A4 size paper results in A2 size paper.
If there are margins of 3 mm, the A4 size output object area measures 291 mm x 204 mm.
Specify a value of 200% for the Scaling setting to produce a post-processing size of 582 mm x 408 mm.
(Note that ambient conditions may cause paper to expand and contract.)
289

A. Output object areaB. 200% post-processing size
ENLARGE/REDUCE Fit paper size SETTING EXAMPLEFit paper size expands or reduces the long side of the print data's output object area so it matches thelong side of the output page size output object area. The origin is in the upper-left corner.
Margin widths are not enlarged or reduced. Because of this, paper size scaling and post-processingimage scaling may not be the same.
For example, doubling the length and width of A4 size paper results in A2 size paper.
If there are margins of 3 mm, the A4 size output object area measures 291 mm x 204 mm.
Specifying Fit paper size will result in a post-processing size of approximately 588 mm x 412 mm.
(Note that ambient conditions may cause paper to expand and contract.)
290

A. Output object areaB. Fit to long side post-processing size
291

Print centered
Prints the output object area in the center of the paper.
This setting item is displayed by tapping in the following order.
Printer settings > Print settings > HP-GL/2 print settings > Paper settings
• ON•
◦ For cut sheet paper◦
Prints the output object area in the center of the paper.
◦ For roll paper◦
Prints the output object area in the horizontal center of the paper.
Note• The output object area is not printed in the center when the paper size is smaller than the
output page size.• Nesting cannot be performed while ON is selected.
• OFF (Initial setting)•
The output object area is not printed in the center of the paper.
PRINT CENTERED EXAMPLES• OFF is selected when printing on sheet•
• ON is selected when printing on sheet•
• OFF is selected when printing on roll•
292

• ON is selected when printing on roll•
293

Cut to standard size
Specifies standard size as the output page size when printing on roll paper.
This setting item is displayed by tapping in the following order.
Printer settings > Print settings > HP-GL/2 print settings > Paper settings
• ON•
Cuts to standard size in accordance with the roll paper width.
When there are two lengths/widths applicable for a given roll paper width, the optimum size is selectedautomatically.
Note• Nesting cannot be performed while ON is selected.• If ON is selected for Save paper and there is blank space above/below the image, the size will not
be standard size.• When ON is selected for Print centered, printing will be in the center of the standard size.• If there is no standard size corresponding to the roll paper width, operation is the same as if OFF is
selected. No message is displayed.• For information about supported standard sizes, see Standard Size Table.
• OFF (Initial setting)•
Cutting according to standard size is not performed.
STANDARD CUT EXAMPLES• A3-size width roll paper•
A. Position of cut when OFFB. Position of cut when ON
• A3-size width roll paper•
294

A. Position of cut when OFFB. Position of cut when ON
295

Standard Size Table
The table below shows the standard sizes supported by Cut to standard size.
For details on the page size supported by your printer, refer to Paper Sizes.
Roll paper width Standard Size (Landscape) Standard Size (Portrait)
841.0 mm A1 (841.0 mm x 594.0 mm) A0 (841.0 mm x 1189.0 mm)
594.0 mm A2 (594.0 mm x 420.0 mm) A1 (594.0 mm x 841.0 mm)
420.0 mm A3 (420.0 mm x 297.0 mm) A2 (420.0 mm x 594.0 mm)
329.0 mm – A3+ (329.0 mm x 483.0 mm)
297.0 mm A4 (297.0 mm x 210.0 mm) A3 (297.0 mm x 420.0 mm)
210.0 mm – A4 (210.0 mm x 297.0 mm)
Roll paper width Standard Size (Landscape) Standard Size (Portrait)
1000.0 mm ISO B1 (1000.0 mm x 707.0 mm) ISO B0 (1000.0 mm x 1414.0 mm)
707.0 mm ISO B2 (707.0 mm x 500.0 mm) ISO B1 (707.0 mm x 1000.0 mm)
500.0 mm ISO B3 (500.0 mm x 353.0 mm) ISO B2 (500.0 mm x 707.0 mm)
250.0 mm – ISO B4 (250.0 mm x 353.0 mm)
Roll paper width Standard Size (Landscape) Standard Size (Portrait)
1030.0 mm JIS B1 (1030.0 mm x 728.0 mm) JIS B0 (1030.0 mm x 1456.0 mm)
728.0 mm JIS B2 (728.0 mm x 515.0 mm) JIS B1 (728.0 mm x 1030.0 mm)
515.0 mm JIS B3 (515.0 mm x 364.0 mm) JIS B2 (515.0 mm x 728.0 mm)
364.0 mm JIS B4 (364.0 mm x 257.0 mm) JIS B3 (364.0 mm x 515.0 mm)
257.0 mm – JIS B4 (257.0 mm x 364.0 mm)
Roll paper width Standard Size (Landscape) Standard Size (Portrait)
1117.6 mm ANSI E (1117.6 mm x 863.6 mm) –
863.6 mm ANSI D (863.6 mm x 558.8 mm) ANSI E (863.6 mm x 1117.6 mm)
711.2 mm – ANSI F1 (711.2 mm x 1016.0 mm)
558.8 mm ANSI C (558.8 mm x 431.8 mm) ANSI D (558.8 mm x 863.6 mm)
431.8 mm Ledger (431.8 mm x 279.4 mm) ANSI C (431.8 mm x 558.8 mm)
279.4 mm Letter (279.4 mm x 215.9 mm) Ledger (279.4 mm x 431.8 mm)
215.9 mm – Letter (215.9 mm x 279.4 mm)
355.6 mm Legal (355.6 mm x 215.9 mm) –
Roll paper width Standard Size (Landscape) Standard Size (Portrait)
914.4 mm ARCH D (914.4 mm x 609.6 mm) ARCH E (914.4 mm x 1219.2 mm)
762.0 mm – ARCH E1 (762.0 mm x 1066.8 mm)
660.4 mm – ARCH E2 (660.4 mm x 965.2 mm)
296

685.8 mm – ARCH E3 (685.8 mm x 990.6 mm)
609.6 mm ARCH C (609.6 mm x 457.2 mm) ARCH D (609.6 mm x 914.4 mm)
457.2 mm ARCH B (457.2 mm x 304.8 mm) ARCH C (457.2 mm x 609.6 mm)
304.8 mm ARCH A (304.8 mm x 228.6 mm) ARCH B (304.8 mm x 457.2 mm)
228.6 mm – ARCH A (228.6 mm x 304.8 mm)
Roll paper width Standard Size (Landscape) Standard Size (Portrait)
917.0 mm DIN C1 (917.0 mm x 648.0 mm) DIN C0 (917.0 mm x 1297.0 mm)
648.0 mm DIN C2 (648.0 mm x 458.0 mm) DIN C1 (648.0 mm x 917.0 mm)
458.0 mm DIN C3 (458.0 mm x 324.0 mm) DIN C2 (458.0 mm x 648.0 mm)
324.0 mm DIN C4 (324.0 mm x 229.0 mm) DIN C3 (324.0 mm x 458.0 mm)
229.0 mm – DIN C4 (229.0 mm x 324.0 mm)
297

Use nesting function
When printing on roll paper, this function can be used to print multiple pages sequentially across the side ofthe paper.
This setting item is displayed by tapping in the following order.
Printer settings > Print settings > HP-GL/2 print settings > Paper settings > Nesting
• Enable•
Print data is temporarily stored as a nesting wait page, and printed in a layout that arranges the pagesso they fill the width of the roll paper. Pages are aligned in the sequence they are received.
Up to 24 pages can be aligned across the paper. Pages are laid out in the next line from the 25th page.
Cutting is performed in accordance with the longest page among the aligned pages.
Note• The desired printing results may not be obtained when HP-GL/2 data that does not include image•
drawing range information is received.
In this case, select Command priority or Detected size for Detect image size.
• When the printer is being used in a network environment, nesting can be performed on HP-GL/2data from multiple users.
• Nesting cannot be performed while any of the items below are specified.•
When Fit paper is selected for Enlarge/ReduceWhen ON is selected for Print centeredWhen ON is selected for Cut to standard size
• In the cases below, printing starts even if the nesting wait page does not fill the entire width of the•roll paper.
When data other than HP-GL/2 or HP RTL data is received.When data which you will print on paper other than a roll is received.
When the printer is being used in a network environment, the above types of data may be sentfrom another user and preempt other jobs in the print queue.
When the wait time specified by Nesting WaitTime elapses.During nesting wait, when Start print is selected on the touch screen and then tapping OK.When data with different print settings is received.
• Disable (Initial setting)•
Nesting is not performed.
NESTING EXAMPLE• When Disable is selected:•
298

• When Enable is selected:•
299

Nesting WaitTime
Can be used to set the wait time until printing starts after nesting wait page receipt is paused.
Time can be specified in the range of 1 to 99 minutes. (The initial value is 2 minutes.)
The wait time is counted from the point the last page was completed, and counted from the beginning everytime new nesting job is received.
This setting item is displayed by tapping in the following order.
Printer settings > Print settings > HP-GL/2 print settings > Paper settings > Nesting
300

Print cut lines
Prints cut lines to separate nested data.
This setting item is displayed by tapping in the following order.
Printer settings > Print settings > HP-GL/2 print settings > Paper settings > Nesting
• Enable•
Cut lines that separate pages are printed.
• Disable (Initial setting)•
Cut lines are not printed.
CUT LINES EXAMPLE• When Disable is selected:•
• When Enable is selected:•
301

Mirror
Flip the image horizontally and print.
This setting item is displayed by tapping in the following order.
Printer settings > Print settings > HP-GL/2 print settings > Paper settings
• ON•
Flip the image horizontally and print.
Depending on the paper to be printed, the position where the horizontally flipped image is printed varies.
• OFF (Initial setting)•
Horizontal flip of the image is not performed.
HORIZONTAL FLIP (MIRROR) EXAMPLE• When OFF is selected when printing on roll paper:•
• When ON is selected when printing on roll paper:•
Do not move the position to print the image on the paper, flip the image horizontally.
• When OFF is selected when printing on cut paper or roll paper cut to standard size:•
302
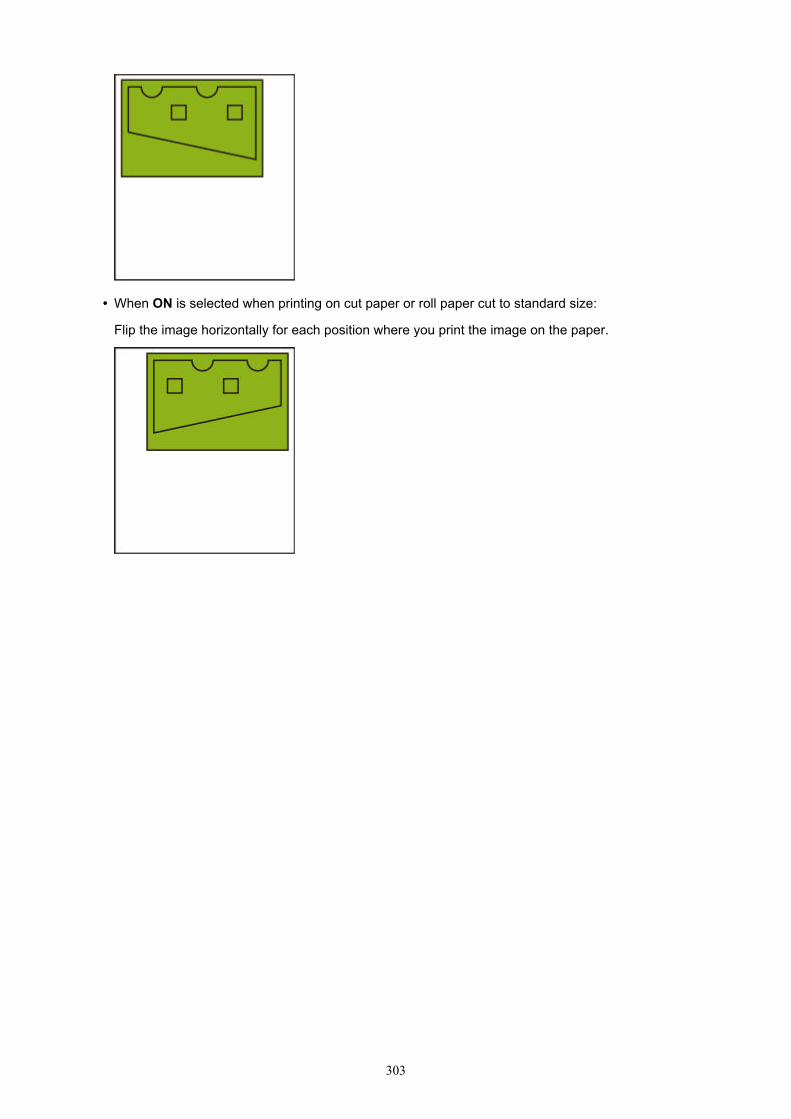
• When ON is selected when printing on cut paper or roll paper cut to standard size:•
Flip the image horizontally for each position where you print the image on the paper.
303

Merge
Specifies how colors should be processed when lines overlap.
This setting item is displayed by tapping in the following order.
Printer settings > Print settings > HP-GL/2 print settings > Line & pen manager
Note• The data is given priority when a specification command is included in the HP-GL/2 data.• If the HP-GL/2 data does not include a specification command, the operation is performed using the
specified selection value.
• ON•
The section where lines overlap becomes the mixed color of the intersecting lines.
• OFF (Initial setting)•
The section where lines overlap becomes the same color as one of the intersecting lines.
ENABLE MERGE EXAMPLE• When OFF is selected:•
A. Data drawn previouslyB. Data drawn later than A
• When ON is selected:•
304

Select palette
Selects a palette to use when printing HP-GL/2 data.
According to the setting of the selected palette, the line width, line color, and line attributes are specified.
This setting item is displayed by tapping in the following order.
Printer settings > Print settings > HP-GL/2 print settings > Line & pen manager > Pen setup
• Software (Initial setting)•
Performs printing with the setting of HP-GL/2 data.
• Palette A•
Performs printing with the setting of Palette A.
• Palette B•
Performs printing with the setting of Palette B.
• Default•
Performs printing with the predefined settings.
Note• When you select a palette other than Software, the printer performs printing with the pen setting of the
specified palette even if the image data has the pen setting.• Palette A and Palette B have the same settings as Default in the initial state.
305

Define palette
Specifies each pen setting in Palette A and Palette B.
The pen setting in Default cannot be changed.
This setting item is displayed by tapping in the following order.
Printer settings > Print settings > HP-GL/2 print settings > Line & pen manager > Pen setup
• Palette A•
Specifies the line width, line color, and line attributes from Pen 0 to Pen 15.
Each initial pen setting in Palette A is same setting as Default.
• Palette B•
Specifies the line width, line color, and line attributes from Pen 0 to Pen 15.
Each initial pen setting in Palette B is same setting as Default.
• Default•
Performs printing with the predefined settings (line width/line color/line attributes).
The pen setting cannot be changed.
306

Pen 0 to Pen 15
Specifies Width, Color, and Line attributes settings for each of the 16 pens (numbered 0 to 15) that makeup each palette.
This setting item is displayed by tapping in the following order.
Printer settings > Print settings > HP-GL/2 print settings > Line & pen manager > Pen setup > Definepalette > Palette A or Palette B
• Width•
Specifies the line width as one of the values below.
0.04mm/0.08mm/0.13mm/0.18mm/0.25mm/0.35mm
0.50mm/0.65mm/0.70mm/0.80mm/0.90mm/1.0mm
1.4mm/2.0mm/3.0mm/5.0mm/8.0mm/12.0mm
• Color•
Specifies the line color from the color palette number from 0 to 255 indicated by the color sample printedwith Print color list for palettes.
• Line attributes•
Specifies line cap and joint attributes.
◦ No setting◦
Leaves line caps unchanged.
Leaves line joints mitered.
◦ Circle settings◦
Rounds line caps and line joints.
307

Reset palette
Resets palette pen parameters configured using Define palette.
This setting item sets the palette pen parameters back to the default.
This setting item is displayed by tapping in the following order.
Printer settings > Print settings > HP-GL/2 print settings > Line & pen manager > Pen setup
• All palettes•
Resets all palette pen parameters.
• Palette A•
Resets Palette A pen parameters.
• Palette B•
Resets Palette B pen parameters.
PALETTE DEFAULTSPalette defaults are the same settings as Default in the initial state.
Pen number Line Width (mm) Colors (R, G, B) Line Attributes Tip Connecting Line
0 0.13 0 (255, 255, 255) Rounds Rounds Rounds
1 0.18 1 (0, 0, 0) Rounds Rounds Rounds
2 0.25 2 (255, 0, 0) Rounds Rounds Rounds
3 0.35 3 (0, 255, 0) Rounds Rounds Rounds
4 0.50 4 (255, 255, 0) No setting No setting Miter
5 0.65 5 (0, 0, 255) No setting No setting Miter
6 0.70 6 (255, 0, 255) No setting No setting Miter
7 0.80 7 (0, 255, 255) No setting No setting Miter
8 0.90 8 (233, 233, 233) No setting No setting Miter
9 1.0 12 (127, 127, 127) No setting No setting Miter
10 1.4 19 (255, 214, 0) No setting No setting Miter
11 2.0 27 (0, 255, 214) No setting No setting Miter
12 3.0 35 (214, 0, 255) No setting No setting Miter
13 5.0 68 (205, 205, 0) No setting No setting Miter
14 8.0 100 (0, 168, 168) No setting No setting Miter
308

15 12.0 110 (168, 0, 115) No setting No setting Miter
309

Smoothing
Makes arc drawing smoother.
This setting item is displayed by tapping in the following order.
Printer settings > Print settings > HP-GL/2 print settings > Line & pen manager
• Software (Initial setting)•
Draws arcs using HP-GL/2 data settings.
Default value of the central angle of an arc in HP-GL/2 is 5° (Regular 72-sided polygon) if the angle isnot specified using a HP-GL/2 command.
• Smoothing•
Draws curves that are smoother than arcs with a central angle of 1°.
SMOOTHING EXAMPLES• When Software is selected:•
• When Smoothing is selected:•
310

Thicken fine lines
Performs correction to avoid breaks in fine lines.
This setting item is displayed by tapping in the following order.
Printer settings > Print settings > HP-GL/2 print settings > Line & pen manager
• ON•
Corrects line widths so fine lines are drawn more sharply, without breaking.
The line color is not changed.
• OFF (Initial setting)•
Thin lines are not corrected.
Some line thicknesses may cause them to become broken.
311

Adjust faint lines
Performs correction so that bright colored fine lines are printed more clearly.
This setting item is displayed by tapping in the following order.
Printer settings > Print settings > HP-GL/2 print settings > Line & pen manager
• ON•
Adjusts the colors of brightly colored fine lines so they are drawn more clearly.
• OFF (Initial setting)•
Fine lines are not corrected.
312

Width correction
Corrects pen widths in accordance with a specific correction setting. Correction settings can be configuredfor two groups: Black/gray and Color.
Select and apply the correction amount according to the pen color when performing a line drawingcommand of HP-GL/2 data.
This setting item is displayed by tapping in the following order.
Printer settings > Print settings > HP-GL/2 print settings > Line & pen manager
Note• This setting is not applied for the white pen, which has the same RGB values (255).• This setting is applied to vector data line widths.• When this setting is a minus value, it is not applied to fine lines of widths that are less than the minimum
line width of the printer.• If the setting value is smaller than 1 dot, the value of 1 dot width is applied.• When ON is selected for Thicken fine lines, the resulting line may be thicker than the specified setting.
• Black/gray•
For configuring the correction setting of black and gray line widths.
A value within the range of -20 to +20 can be specified. 1 unit of the correction value is equivalent to0.025 mm.
• Color•
For configuring the correction setting of color line widths.
A value within the range of -20 to +20 can be specified. 1 unit of the correction value is equivalent to0.025 mm.
LINE WIDTH CORRECTION EXAMPLE• Negative (-) setting•
• Positive (+) setting•
313

314

Print color list for palettes
Prints out the sample (256 colors) of the color specified in each pen number. The coloring also changesdepending on the paper type to be printed.
This setting item is displayed by tapping in the following order.
Printer settings > Print settings > HP-GL/2 print settings > Line & pen manager
315

Warning display
Displays HP-GL/2 warnings.
The display is switched when two GL/2 warnings below occur.
• Warnings when the printer's parameter setting specification does not support the parameter settings ofcreated HP-GL/2 data
• HP-GL/2 warning commands when the printer does not support the created HP-GL/2 data
This setting item is displayed by tapping in the following order.
Printer settings > Print settings > HP-GL/2 print settings > Processing options
Note• Warning is always displayed when one of the errors below occurs regardless of the setting.•
When virtual GL/2 memory exceeds acceptable levelWhen GL/2 display list memory is insufficientWhen the number of polygon vertexes which GL/2 data has exceeds acceptable level
• Warning is always displayed on the status monitor or Remote UI regardless of the setting.
• Enable•
Displays specific GL/2 warning on the touch screen.
• Disable (Initial setting)•
Does not display specific GL/2 warning on the touch screen.
316

Detect image size
Specifies the output object area method that provides efficient printing, which avoids parts of images beingcut off when a HP-GL/2 data does not include image drawing range information.
This setting item is displayed by tapping in the following order.
Printer settings > Print settings > HP-GL/2 print settings > Processing options
• OFF (Initial setting)•
◦ If image drawing range information is included in HP-GL/2 data:◦
The output object area is in accordance with the image drawing range information.
The origin specified by the image drawing range information is drawn in the upper-left corner of thepaper.
◦ If image drawing range information is not included in HP-GL/2 data:◦
The output object area uses the printer's maximum roll paper width as the horizontal dimension and1.5 times the maximum roll paper width as the vertical dimension.
Even though the particular page included in multiple pages does not contain a command whichspecifies the image drawing range, note that the image drawing range specified for the just previouspage is applied if previous pages contain the command.
• Command priority•
◦ If image drawing range information is included in HP-GL/2 data:◦
The output object area is in accordance with the image drawing range information.
The origin specified by the image drawing range information is drawn in the upper-left corner of thepaper.
◦ If image drawing range information is not included in HP-GL/2 data:◦
Applies the minimum image range detected as the output object area.
The upper left corner of the detected minimum image range is drawn in the upper left corner of thepaper.
• Detected size•
Applies the minimum image range detected as the output object area.
Image drawing range information included in HP-GL/2 data is not used.
The upper left corner of the detected minimum image range is drawn in the upper left corner of thepaper.
Note• If part of an image is being cut off or if an image is out of alignment, try using each of the settings in the
following sequence: OFF, Command priority, Detected size.
317

DETECT IMAGE SIZE EXAMPLE
A. Image drawing range specified by the commandA.
B. Graphic data rangeB.
Though the image drawing range is specified for this kind of drawing image above, the part of the imagemay be cut off if you do not specify the image drawing range.
Select Detected size if the image drawing range is not specified.
This section describes Detect image size settings and printed images for when the drawing range is setor not set.
• When the image drawing range is specified:•
◦ When OFF (Initial setting) or Command priority is selected:◦
The printing area is specified based on the image drawing range. The origin is specified on theupper left of the paper.
The figure below shows the printed image.
A. Image drawing range specified by the command
C. Paper cut position
◦ When Detected size is selected:◦
The graphic data is detected for printing without using the image drawing range.
318

The printed image is the same as "When Detected size is selected:" on "When the imagedrawing range is not specified:".
• When the image drawing range is not specified:•
◦ When OFF is selected:◦
The maximum roll paper width is applied as the width of printed area, and the 1.5 times of themaximum roll paper width is applied as the length of it. The paper cut position is specified outsideof the printed area.
◦ When Command priority is selected:◦
Since the minimum image area is applied as the printed area, the result is the same as whenDetected size is selected.
The printed image is the same as "When Detected size is selected:".
◦ When Detected size is selected:◦
The minimum image range including images is detected based on image data in HP-GL2 data.
In addition, if the image drawing range is not specified by Command priority , the minimumimage range including images is detected, as the area cannot be specified.
The figure below shows the printing image.
B. Graphic data range
C. Paper cut position
319

Frame control
Perform this setting to print the HP-GL/2 data including the FR command.
This setting item is displayed by tapping in the following order.
Printer settings > Print settings > HP-GL/2 print settings > Processing options
• Enable•
Images are printed side by side on the same page.
Note• If Enable is selected, the image size detection is not performed.•
• Disable (Initial setting)•
Each image is printed on every single page.
320

Menu Setting Combinations
Save paper and Auto rotation
Enlarge/Reduce (Scaling) and Auto rotation
Print centered and Cut to standard size
Cut to standard size and Auto rotation and Enlarge/Reduce (Fit paper size)
Use nesting function and Auto rotation
Paper switching on a DOUBLE-roll printer model and Auto rotation
Paper switching on a DOUBLE-roll printer model and Enlarge/Reduce (Specifyscaling)
Detect image size and Oversize
Detect image size and Print centered
321

Save paper and Auto rotation
When Save paper and Auto rotation are both specified, Auto rotation is performed first, followed by theSave paper process.
After Auto rotation is applied to the print data, the image is printed with upper and lower blank areasremoved.
Save paper AND Auto rotation EXAMPLE
Print data (image drawing range)
Image after auto rotation
A. Blank area
Printed image
322

Printed without upper/lower blank area.
323
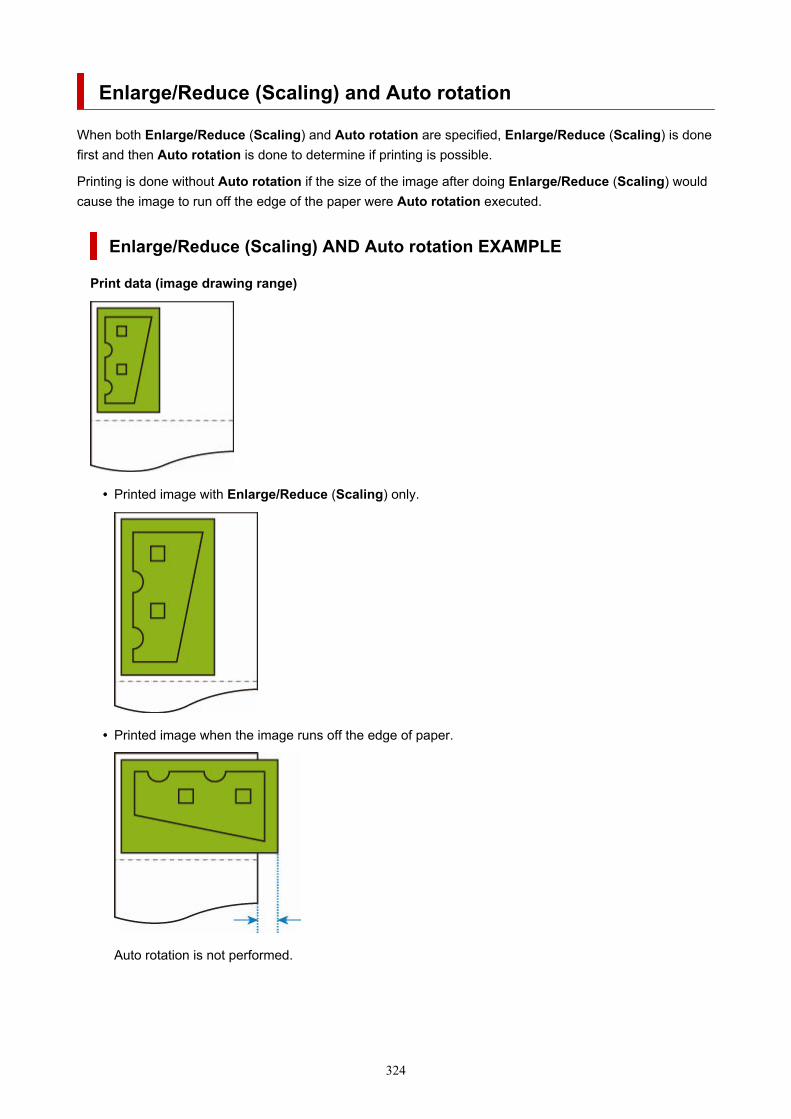
Enlarge/Reduce (Scaling) and Auto rotation
When both Enlarge/Reduce (Scaling) and Auto rotation are specified, Enlarge/Reduce (Scaling) is donefirst and then Auto rotation is done to determine if printing is possible.
Printing is done without Auto rotation if the size of the image after doing Enlarge/Reduce (Scaling) wouldcause the image to run off the edge of the paper were Auto rotation executed.
Enlarge/Reduce (Scaling) AND Auto rotation EXAMPLE
Print data (image drawing range)
• Printed image with Enlarge/Reduce (Scaling) only.•
• Printed image when the image runs off the edge of paper.•
Auto rotation is not performed.
324

Print centered and Cut to standard size
When both Print centered and Cut to standard size are specified, first the optimum standard size isdetermined based on the HP-GL/2 data and the roll paper loaded on the printer.
Next, Print centered is performed in accordance with the standard size.
Print centered AND Cut to standard size EXAMPLEWhen A3 width roll paper is loaded, A3 portrait is chosen as the optimal standard size based on the rollpaper width and image size.
Next, Print centered is performed in accordance with the A3 portrait.
Print data (image drawing range)
A. Virtual area for A3 size (portrait)B. Virtual area for A4 size (landscape)
• Printed image when ON is selected for Print centered and OFF is selected for Cut to standard size•
325

A. Position of cut
• Printed image when ON is selected for Print centered and ON is selected for Cut to standard size•
A. Position of cut for A3 size (portrait)
326

Cut to standard size and Auto rotation and Enlarge/Reduce (Fitpaper size)
When Cut to standard size, Auto rotation, and Enlarge/Reduce (Fit paper size) are all specified, firstsuitable standard size candidates are determined based on the roll paper loaded on the printer.
Next, it decides the optimum standard size and rotation direction from the matching result between the datato which Auto rotation is applied and all candidate sizes.
Finally, Enlarge/Reduce (Fit paper size) process is performed according to the decided standard size.
SMALL IMAGE EXAMPLEWhen A3 width roll paper is loaded, A4 landscape is chosen as the optimal standard size based on theroll paper width and image size.
Next, Auto rotation is performed in accordance with the A4 landscape. Finally, the image is enlarged andprinted to match A4 size paper.
Print data (image drawing range)
A. Virtual area for A4 size
Since the image fits on A4 size paper, A4 landscape is chosen as the standard size.
• Image after auto rotation•
• Printed image after fit to paper•
327

A. Position of cut for A4 size
LARGE IMAGE EXAMPLEWhen A3 width roll paper is loaded, A3 portrait is chosen as the optimal standard size based on the rollpaper width and image size.
Next, Auto rotation is performed in accordance with the A3 portrait. Finally, the image is reduced andprinted to match A3 size paper.
Print data (image drawing range)
A. Virtual area for A3 size
Since the image does not fit on A3 size paper, A3 portrait is chosen as the maximum standard size.
• Image after auto rotation•
328

• Printed image after reduced•
A. Position of cut for A3 size
329

Use nesting function and Auto rotation
When both Use nesting function and Auto rotation are specified, Auto rotation is performed as eachpage is received and then the nesting process is performed.
The image on each received page is rotated as required to achieve an efficient layout that save paper or toprevent the image from running off the edges of the paper, the images are laid out to fill the width of the rollpaper, and then printing is performed.
Use nesting function AND Auto rotation EXAMPLE
Print data (image drawing range)
The printing data images above are rotated for better paper usage (auto rotation).
The images above are positioned as shown below.
330

If an image is running off the edge of the paper as shown above, the subsequent images are printed onthe next sheet.
331

Paper switching on a DOUBLE-roll printer model and Autorotation
When ON is selected for Auto rotation, first a decision is made about performing Auto rotation and thepaper with less margin in the width direction is selected and starts printing.
At this point, it is decided whether to apply Auto rotation and then the paper source is selected consideringthe condition such as whether the image is cut off or not, margin of paper width, and paper consumption.
This function is available when the paper settings of the printer are specified.
• Both upper and lower roll paper loaded, with paper fed from the upper roll.• Identify size is selected for Printer settings > Paper-related settings > Roll paper auto switching.• Auto select is selected for Printer settings > Print settings > HP-GL/2 print settings > Paper
settings > Paper src.
When the output page is in portrait orientation, image rotation is done first to save paper.
For a rotated image that is in landscape orientation, either the upper or lower paper roll is selected forprinting based on which roll results in the narrower side margins.
EXAMPLE OF PAPER SWITCHING ON A DOUBLE-ROLL PRINTERMODEL AND Auto rotation
Print data (image drawing range)
Image after auto rotation
Image printed on upper roll paper already fed (Not printed)
332

Image printed on lower roll paper already fed (Actually printed)
If the lower roll of paper has smaller margins than the upper roll of paper, from which the paper has beenfed, then paper is switched automatically, and the image is printed on the lower roll paper.
333

Paper switching on a DOUBLE-roll printer model and Enlarge/Reduce (Specify scaling)
The example below shows printing when Enlarge/Reduce (Specify scaling) is specified on a double-rollprinter model.
This function is available when the paper settings of the printer are specified.
• Different size of roll paper is loaded on the upper/lower roll, with paper source switching enabled.• Identify size is selected for Printer settings > Paper-related settings > Roll paper auto switching.• Auto select is selected for Printer settings > Print settings > HP-GL/2 print settings > Paper
settings > Paper src.
EXAMPLE OF PAPER SWITCHING ON A DOUBLE-ROLL PRINTERMODEL AND Enlarge/Reduce (Specify scaling)
A4 size image
First, the image is enlarged and then the paper that can be used for printing the enlarged image isselected.
A4 size image enlarged by 160 %
When the A1 width roll paper is loaded on the upper roll, A3 width roll paper on the lower, and thepaper source can be switched, and when an A4 size image is enlarged by 160 % specified in Scaling onEnlarge/Reduce, the A1 width roll paper is selected, as the image width exceeds that of A3.
334

Detect image size and Oversize
Operation is as described below when both Detect image size and Oversize are specified.
• When OFF or Command priority is selected for Detect image size and Disable is selected for•Oversize:
Oversize is disabled in accordance with the command-specified image drawing range.
Margins are added within the command-specified image drawing range.
Depending on the layout, part of the image may be cut off.
• When OFF or Command priority is selected for Detect image size and Enable is selected for•Oversize:
Oversize is enabled in accordance with the command-specified image drawing range.
Margins are added outside the command-specified image drawing range.
The image is not cut off by the margins.
However, you will need to print on paper of a size that is greater than the size of the image drawingrange specified by the HP-GL/2 data plus the top, bottom, left, and right margins.
• When Detected size is selected for Detect image size and Disable is selected for Oversize:•
Oversize is disabled and processing of the detected minimum image range is performed.
Margins are added within the detected minimum image range and parts of the image are cut off.
• When Detected size is selected for Detect image size and Enable is selected for Oversize:•
Oversize is enabled and processing of the detected minimum image range is performed.
Margins are added outside the detected minimum image range.
The image is not cut off by the margins.
Detect image size AND Oversize EXAMPLE
The example below shows printing of data in which a figure is located in the upper left cornerwith margins below and to the right, on roll paper that is larger than the command-specified imagedrawing range (size normally specified by the application).
A. Command-specified image drawing range (when OFF or Command priority is selected for Detectimage size)
B. Minimum image range detected (when Detected size is selected for Detect image size)
335

• When OFF or Command priority is selected for Detect image size and Disable is selected for•Oversize:
C: Position of cut
Cut at length of command-specified image drawing range.
• When OFF or Command priority is selected for Detect image size and Enable is selected for•Oversize:
D: Position of cut
Cut at length of upper and lower margins added to length of command-specified image drawingrange.
• When Detected size is selected for Detect image size and Disable is selected for Oversize:•
E: Position of cut
Cut at length of minimum image range detected.
336
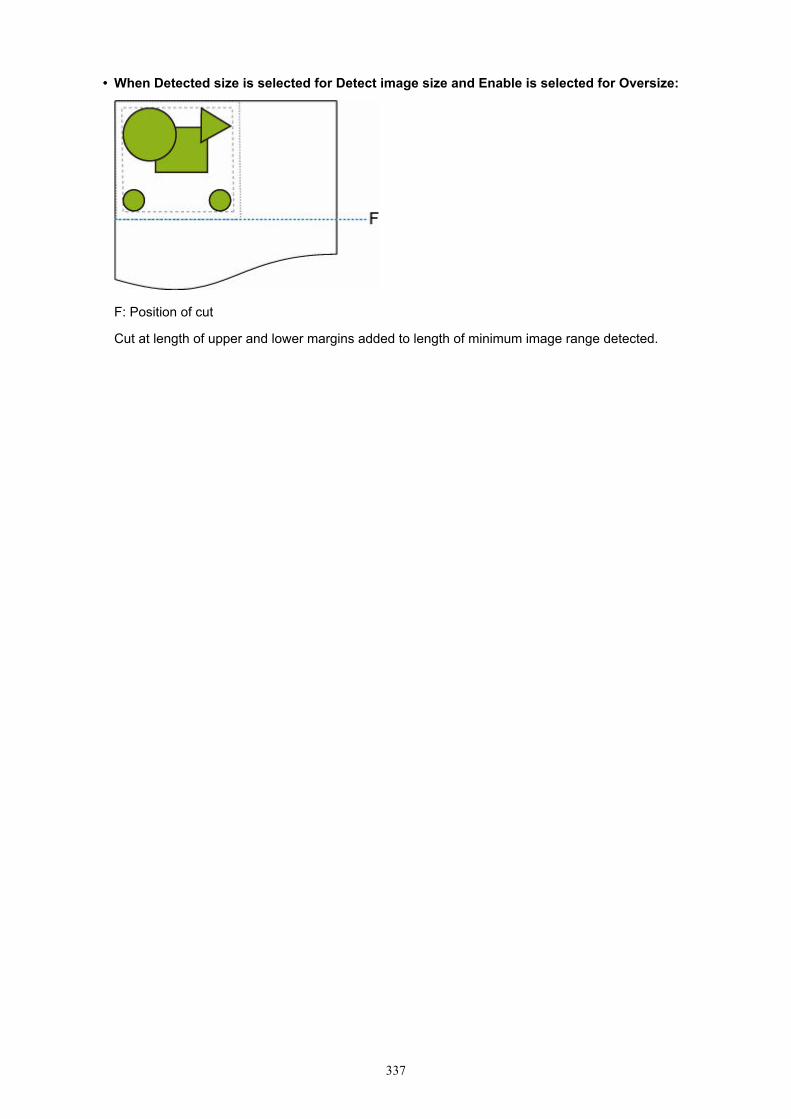
• When Detected size is selected for Detect image size and Enable is selected for Oversize:•
F: Position of cut
Cut at length of upper and lower margins added to length of minimum image range detected.
337

Detect image size and Print centered
Operation is as described below when both Detect image size and Print centered are specified.
• When OFF or Command priority is selected for Detect image size and ON is selected for Print•centered:
Print centered is performed in accordance with the command-specified image drawing range.
• When Detected size is selected for Detect image size and ON is selected for Print centered:•
Print centered is performed in accordance with the detected minimum image range.
Detect image size AND Print centered EXAMPLE
• When OFF or Command priority is selected for Detect image size and ON is selected for Print•centered:
A. Command-specified image drawing range
Printed image
A. Position of cut
Prints the command-specified image drawing range in the horizontal center of the roll paper.
• When Detected size is selected for Detect image size and ON is selected for Print centered:•
A. Minimum image range detected
338

Printed image
A. Position of cut
Prints the minimum image range in the horizontal center of the paper.
339

Status Print
You can print a "Status Print" report indicating the current status of the printer.
With "Status Print", information is printed regarding the printer firmware version, various settings, and thestatus of consumables.
Follow the procedure below to print.
1. Flick HOME screen and tap Printer settings.1.
Home Screen Menu Composition
2. Tap Test print.2.
3. Tap Status print.3.
Note• If you specify the administrator password, tap Status print (administrator).
4. Tap Yes.4.
The printer starts printing.
The following information is included.
Canon xxxxxxxxxxxxxxxxxxxx Status Print Printer model
S/N Printer serial number
Firm Firmware version
Boot Boot ROM version
Date Date and time when the status print was output
Paper Info
Roll Media Type of roll paper
Cut Sheet Type of cut sheet
Job Menu
Job History
Log *1 Details of up to 5 jobs (Job name is printed as "*".)
*1Printed only when Status print (administrator) is selected.
Settings
Printer settings
Print settings Setting values of Print head movable width setting andPrioritize paper size
Paper-related settings Setting values of Paper-related settings
340

Device settings
Auto maintenance settings Setting values of Auto maintenance settings
Hard disk settings Each setting value of Hard disk settings
Device user settings Setting values of Other printer settings
Language selection Setting value of Language selection
Firmware update notification Setting values of Update notification settings
Monitoring service settings Setting values of Enable/disable monitoringservice
Roll unit use setting *2 Each setting value of Take-up mode
*2 Printed only when you select ON.
Usage Condition
Hard disk information Hard disk capacity and Job box free space
Hardware error History information of Hardware error
Error History information of Recoverable error
Warning Warning history information
Jam History information of Paper feed/transfer error
Maintenance cartridge usage / Remaining ink level Values of Ink consumed
Duty counter Values of Duty counter
PARTS STATUS
COUNTER Part status
Head information
HEAD LOT NUMBER/ DATE OF INSTALLATION Information of Head information
Head alignment performance log History information of Head alignment performance log
COUNTER
MEDIA Usage status by media
THE NUMBER OF CUTS Total number of cuts
AFTER INSTALLATION Number of days from the use start date
341

Changing Printer's Setting Using Web Browser
Start up Remote UI
Changeable Setting Items Using Remote UI
Setting Password
Registering Printer's Root Certificate to Web Browser for SSL Communication
Registering Printer's Root Certificate to Local Computer for SSL Communication
Generating Server Certificate
Setting Mail Server
Receiving Printer Status by E-mail
342

Start up Remote UI
You can check the printer status and change the printer settings using the web browser on yoursmartphone, tablet, or computer.
To check the printer status and to change the printer settings, display "Remote UI" on the web browser.
Note• Remote UI is a software that enables you to perform operations, which are usually performed on the•
printer's operation panel, using a Web browser over a network.
LAN connection with the printer is required to use Remote UI.
• You can use Remote UI on the following OS and the web browser.•
iOS device
OS: iOS 12.0 or later
Web browser: iOS standard Web browser (Mobile Safari)
Android device
OS: Android 5.1 or later
Web browser: Android standard Web browser (Browser or Chrome)
macOS device
OS: macOS Sierra 10.12 or later
Web browser: Safari 10.12 or later
Windows device
OS: Windows 7 SP1 or later
Web browser: Microsoft Edge, Internet Explorer 11, Mozilla Firefox, Google Chrome
1. Check printer's IP address.1.
1. Flick HOME screen and tap LAN settings.1.
Home Screen Menu Composition
2. Tap the enabled LAN.2.
Diagonal lines are displayed for disabled LAN icons.
3. Check IPv4 address.3.
2. Open web browser on your smartphone, tablet, or computer and enter IP address.2.
Enter as following in the URL field of the web browser.
http://XXX.XX.X.XXX
Enter the IP address of the printer in "XXX.XX.X.XXX".
343

When you access, "Remote UI" will be displayed on the web browser on your smartphone, tablet, orcomputer.
Note• If you display Remote UI for the first time on your smartphone, tablet, or computer, download the
root certificate, and then register it.Registering Printer's Root Certificate to Web Browser for SSL Communication
• If the root certificate is not registered, a message to warn you that the secure connection is notguaranteed may appear.
3. Select Log in.3.
The password authentication screen appears.
Note• When the standard user mode is enabled, choose either administrator mode or standard user•
mode to log on.
After choosing a mode and selecting Log in, the password authentication screen of each modeappears.
4. Enter password.4.
When the password authentication is complete, the menus that can be utilized are displayed on the webbrowser.
Important• The password is set at the time of purchase. The password is the printer serial number. The•
printer serial number is printed on the sticker attached on the printer. It consists of 9 alphanumericcharacters (four alphabets followed by five numbers).
For details on setting password, see Setting Passwords Using Remote UI.
5. Confirm that the main screen of Remote UI is displayed.5.
For changeable setting items, see below.
344

Changeable Setting Items Using Remote UI
When you finish checking printer status and changing printer settings, select Log out.
345

Changeable Setting Items Using Remote UI
Note• The item which can be used is different in administrator mode or in standard user mode.
Printer statusThis function displays printer information such as the remaining ink amount, the status, and detailederror information.
You can also connect to the ink purchase site or support page, and use Web Services.
UtilitiesThis function allows you to set and perform maintenance such as cleaning.
Printer settingsThis function allows you to change the printer settings such as the energy saving settings and theprint settings.
Additionally, this function allows you to receive the printer status information such as the remainingink level and the error.
Setting Mail ServerReceiving Printer Status by E-mail
You can disable any operations using the operation panel from Operation panel lock on Customsettings.
Note• Some of the menu is available only when you logged on in administrator mode.
AirPrint settingsThis function allows you to specify the AirPrint settings when printing with AirPrint.
Job managementThis function allows you to display the job history and print it.
In addition, you can delete jobs from this item.
346

Note• When you are logging on in administrator mode, you can restrict this function in standard user
mode.
Security (Item for administrator)This function allows you to specify the password, the standard user mode settings, the operationrestrictions, and SSL/TLS settings of certificate for encrypted communication.
System info and LAN settings• Confirm system information• LAN settings(Item for administrator)
Firmware updateYou can update the firmware of the printer, check the firmware version, or perform settings of a DNSserver and a proxy server.
Firmware update
Language selection (Item for administrator)This function allows you to change the language on the display.
Manual (Online)This function displays the Online Manual.
347

Security
• Administrator password setting•
Setting Passwords Using Remote UI
• Operation restrictions•
Restricts the following operations.
◦ Job history◦
Restricts to display or print the print job history.
◦ Print from USB flash drive◦
Restricts to print data on USB flash drive.
• SSL/TLS settings•
Perform settings of a certificate for encrypted communication.
Available TLS settings enables you to specify the range of the version used for SSL/TLScommunication.
• IEEE802.1X settings•
◦ Authentication◦
Enables/Disables IEEE802.1X certificate.
Note• In the case of using IEEE802.1X certificate, Security > IEEE802.1X settings > CA certificate,•
and register the CA certificate.
• Supported authentication method•
EAP-TLS(Extensible Authentication Protocol-Transport Level Security)
EAP-TTLS(EAP-Tunneled TLS)
PEAP(Protected EAP)
◦ Weak encryption restriction◦
Selecting Do not restrict enables communication using the 3DES or RC4 encryption algorithm.
◦ Weak certificate restriction◦
Selecting Do not restrict enables certificate authentication using the public key algorithm of RSA(512 bit) or RSA (1024 bit).
◦ Key and certificate settings◦
Perform settings for key and client certificate.
◦ CA certificate◦
Perform settings for the CA certificate that verifies a server certificate.
348

LAN settings
• Wi-Fi•
Enables/Disables Wi-Fi.
• Wireless Direct•
Enables/Disables Wireless Direct.
• Wired LAN•
Enables/Disables Wired LAN.
• Confirm LAN settings•
The LAN setting information is displayed.
• Advanced setup•
◦ Set printer name◦
Specifies the printer name. You can use 2 to 15 characters for the name.
Note• You cannot use the same printer name as that already used for other LAN connected devices.• You cannot use a hyphen for the initial or last character of the printer name.
◦ TCP/IP settings◦
Performs IPv4 or IPv6 setting.
◦ WSD settings◦
Perform settings to use WSD.
◦ Bonjour settings◦
Perform settings to use Bonjour.
◦ LPD print◦
Perform settings for printing with LPD.
◦ SNMP settings◦
Perform settings for using SNMP to manage and control the printer.
◦ SNTP settings◦
Perform settings for using SNTP to adjust the time on the printer.
◦ FTP settings◦
Perform settings for printing with FTP.
◦ IPP Settings◦
Perform settings for printing with IPP.
◦ CHMP settings◦
Perform settings for communication at the time when printer drivers or applications acquire theinformation on status, paper, and job log, from the printer.
349
Selecting Enable HTTPS redirection redirects the communication using CHMP to encryptedcommunication.
Note• To use CHMP for encrypted communication, you need to register the printer's root certificate to
your computer.Registering Printer's Root Certificate to Local Computer for SSL Communication
• CHMP is a Canon proprietary protocol.
◦ Network interface settings◦
To connect to a hub that supports STP, select Enable.
Selecting Enable perform the intermittent data reception when connecting to the network.
◦ DRX settings◦
Selecting Enable perform the intermittent data reception when connecting to the network.
◦ IP filtering◦
Allows or denies access for specific IP addresses.
Settings for both IPv4 and IPv6 addresses can be specified.
Important• If the device address for administrator has been set to rejection by mistake, tap on the•
operation panel, LAN settings > Wi-Fi/Wireless Direct/Wired LAN > Settings > Advancedsetup > Reset LAN settings, and initialize network information of the printer.
After resetting, perform setup again as necessary.
◦ MAC address filtering settings◦
Allows or denies access for specific MAC addresses.
Important• If the device address for administrator has been set to rejection by mistake, tap on the•
operation panel, LAN settings > Wi-Fi/Wireless Direct/Wired LAN > Settings > Advancedsetup > Reset LAN settings, and initialize network information of the printer.
After resetting, perform setup again as necessary.
◦ Reset LAN settings◦
Initializes the network settings on the printer.
After resetting, perform setup again as necessary.
350

Setting Password using Remote UI
Each of passwords for administrator and standard user can be set.
When logging on with password for administrator, all settings can be changed.
When logging on with password for standard user, some of the settings can be changed.
When logging on with password for administrator, you can restrict the function for standard user.
Setting Administrator PasswordSetting Standard User Password
Note• Password can be set only when you are logged in administrator mode.
Setting Administrator PasswordChange the administrator password by following the steps below.
Important• The password is set at the time of purchase. The password is the printer serial number.
The printer serial number is printed on the sticker attached on the printer.
It consists of 9 alphanumeric characters (four alphabets followed by five numbers).
1. Start up Remote UI.1.
Start up Remote UI
2. Select Security.2.
3. Select Administrator password setting.3.
4. Select Change administrator password.4.
If an administrator password is not specified, the confirmation message appears. Confirm themessage and select Yes. When message appears again, confirm it and select OK.
5. Select range where administrator password is valid and select OK.5.
Remote UI and other toolsEntering the administrator password is required to change the setting items using the Remote UIor some software.
Operation panel/Remote UI/other toolsEntering the administrator password is required to change the setting items using the operationpanel of the printer, the Remote UI, or some software.
6. Enter password and select OK.6.
351

Important• The following character restrictions apply to the password:•
Set the password by using 4 to 32 characters.The allowed characters are single-byte alphanumeric characters, blank space, umlautcharacters, and the below characters.- ! @ # $ % ^ & * _ ; : , . / ` = + ' " ( ) { } [ ] < > |
For security reasons, we recommend you use 8 and more alphanumeric characters.
7. When completion message appears, select OK.7.
Setting Standard User PasswordFor restricting the function for standard user, enable the standard user mode and set a standard userpassword by following the steps below.
1. Start up Remote UI.1.
Start up Remote UI
2. Select Security.2.
The menus appear.
3. Select Standard user mode settings.3.
4. When confirmation message appears, select Yes.4.
5. Enter password and select OK.5.
Important• The following character restrictions apply to the password:•
Set the password by using 4 to 32 characters.The allowed characters are single-byte alphanumeric characters, blank space, umlautcharacters, and the below characters.- ! @ # $ % ^ & * _ ; : , . / ` = + ' " ( ) { } [ ] < > |
For security reasons, we recommend you use 8 and more alphanumeric characters.
6. When completion message appears, select OK.6.
352

Registering Printer's Root Certificate to Web Browser for SSLCommunication
If the printer's root certificate has not been registered to the web browser, a message to warn you that thesecure connection is not guaranteed may appear.
When you display Remote UI for the first time on your smartphone, tablet, or computer, download the rootcertificate, and then register it to the web browser.
The secure connection will be confirmed and a message will not appear.
However, the message may appear depending on a web browser even after you have registered the rootcertificate.
How to register the root certificate varies depending on the web browser.
For Microsoft EdgeFor SafariFor Chrome on AndroidFor Mobile Safari on iOS
Operating procedure may differ depending on the version of your web browser. For other web browser, referto each help.
Important• Make sure that you have accessed to the printer IP address correctly by checking the URL field of the•
web browser before registering the root certificate.
• If the printer is connected via IPv6 using Windows, you need to generate a server certificate using•Remote UI.
For details, see Generating Server Certificate.
For Microsoft Edge
1. Select For secure communication on Remote UI.1.
2. Select Download.2.
Downloading the root certificate is started.
3. If confirmation screen appears, select Open.3.
Certificate screen is displayed.
Note• To save the certificate file and register it, select Save. To register, select Control Panel >•
Network and Internet > Internet Options, and register the root certificate from Certificates onContent sheet.
4. Select Install Certificate.4.
353

Certificate Import Wizard screen is displayed.
5. Select Next.5.
6. Select Place all certificates in the following store.6.
7. Select Browse.7.
Select Certificate Store screen is displayed.
8. Select Trusted Root Certification Authorities and OK.8.
9. Select Next on Certificate Import Wizard screen.9.
10. If Completing the Certificate Import Wizard appears, select Finish.10.
Security Warning screen is displayed.
11. Make sure that thumbprint on Security Warning screen matches printer's thumbprint.11.
The printer's thumbprint is displayed in Root cert. thumbprint (SHA-1) column or Root cert.thumbprint (SHA-256) column when tapped in the following order.
(Printer information) > System information
12. If thumbprint on Security Warning screen matches printer's thumbprint, select Yes.12.
13. Select OK on Certificate Import Wizard screen.13.
The root certificate registration is completed.
For Safari
1. Select For secure communication on Remote UI.1.
2. Select Download.2.
Downloading the root certificate is started.
3. Open the downloaded file.3.
Keychain access starts up and Add Certificates screen is displayed.
4. Select Add.4.
Information on the certificate is displayed.
354

Note• You can also add the certificate by selecting Show Certificate, checking certificate name to
add, and then selecting the same certificate on Keychain access.
5. Make sure that fingerprint of certificate detail information matches printer's thumbprint.5.
The printer's thumbprint is displayed in Root cert. thumbprint (SHA-1) column or Root cert.thumbprint (SHA-256) column when tapped in the following order.
(Printer information) > System information
6. If fingerprint of certificate detail information matches printer's thumbprint, display6.information on certificate from the menu or by double-clicking the certificate, and selectAlways Trust on Trust.
The root certificate registration is completed.
Note• If a password is set on your device, entering a password may be required.
For Chrome on Android
1. Select For secure communication on Remote UI.1.
2. Select Download.2.
Downloading the root certificate is started and then Name the certificate screen is displayed.
3. As entering the root certificate name is required, enter an arbitrary certificate name and3.select OK.
The root certificate registration is completed.
Note• If PIN or password is not set as security type, the attention screen may appear. Select OK, and
then set the security type to PIN or password.
After Root Certificate RegistrationWe recommend that you make sure that the correct root certificate has been registered.
To make sure that the correct root certificate has been registered, make sure that thumbprint ofcertificate information matches printer's thumbprint. Follow the steps below.
Note• Some Android devices cannot be checked the thumbprint of a registered route certificate.
1. From Settings menu on your device, select Security, Trust credentials, and USER.1.
355

The list of downloaded certificates appears.
2. Select downloaded certificate.2.
The certificate information appears.
3. Make sure that thumbprint of certificate information matches printer's thumbprint.3.
The printer's thumbprint is displayed in Root cert. thumbprint (SHA-1) column or Root cert.thumbprint (SHA-256) column when tapped in the following order.
(Printer information) > System information
4. If thumbprint of certificate information screen matches printer's thumbprint, select OK.4.
The root certificate registration is completed.
If the message to warn you that the secure connection is not guaranteed appears when you selectLog in on Remote UI after registering the root certificate, restart the web browser. The message willnot appear on the web browser.
Note• Depending on the Android device, a warning may appear even after registering the proper root
certificate.
For Mobile Safari on iOS
1. Select For secure communication on Remote UI.1.
2. Select Download.2.
Downloading the root certificate is started and then Install Profile screen is displayed.
3. Select Install.3.
Warning screen is displayed.
Note• If a password is set on your device, entering a password may be required.
4. Select Install.4.
5. Select Install on displayed dialog.5.
The root certificate registration is completed.
356

Registering Printer's Root Certificate to Local Computer forSSL Communication
To use Device Management Console or Accounting Manager, etc. when you connect the printer to acomputer using SSL encrypted communication, you need to register (import) the printer's root certificate toyour computer.
Procedure to register the certificate varies depending on your operation environment.
Important• If the printer is connected via IPv6 using Windows, you need to generate a server certificate using•
Remote UI.
For details, see Generating Server Certificate.
For Windows 10/Windows 8.1For Windows 7For macOS
Operation procedure may differ depending on your OS version.
For Windows 10/Windows 8.1The procedure below describes how to import a root certificate in Windows 10/Windows 8.1.
1. Start up Remote UI.1.
Start up Remote UI
2. Select For secure communication.2.
Note• You can download a certificate from Status Monitor.•
1. Open status monitor.1.
Open the Printing Preferance, and select Status Monitor... on Main.
2. Download a certificate.2.
Select Download Security Certificate from the Remote UI menu.
3. Select Download.3.
The root certificate will be downloaded.
4. When download confirmation screen is displayed, select Open.4.
The Certificate screen appears.
5. Select Install Certificate.5.
357

The Certificate Import Wizard screen appears.
6. Select Local Machine.6.
1. Select Local Machine on the startup screen of Certificate Import Wizard.1.
2. Select Next.2.
3. Select Yes on the displayed screen.3.
The Certificate Store screen appears.
7. Select Place all certificates in the following store.7.
8. Select Trusted Root Certificate Authorities.8.
1. Select Browse to open the Select Certificate Store screen.1.
2. Select Trusted Root Certificate Authorities from the list and select OK.2.
3. Select Next on the Certificate Store screen.3.
9. Select Finish.9.
When the Completing the Certificate Import Wizard screen appears, check the settings and selectFinish.
For Windows 7The procedure below describes how to import a root certificate in Windows 7.
358

Important• Be sure to create a certificate snap-in before importing a root certificate.•
The root certificate will be registered to the local user if you import it without creating a certificatesnap-in.
Creating Certificate Snap-in
1. Start up Microsoft Management Console.1.
Enter MMC on Search programs and files in the Start menu and press the Enter key.
2. Select Yes on displayed screen.2.
3. Select Add/Remove Snap-in from File menu.3.
The Add or Remove Snap-ins screen appears.
4. Add Certificate snap-in.4.
1. Select Certificates from Available snap-ins list and select Add.1.
2. Select Computer account for This snap-in will always manage certificates for on the Certificates2.snap-in screen and select Next.
3. Select Local computer on the Select computer screen and select Finish.3.
4. Select OK on the Add or Remove Snap-ins screen.4.
Downloading Certificate
1. Start up Remote UI.1.
Start up Remote UI
359
2. Select For secure communication.2.
Note• You can download a certificate from Status Monitor.•
1. Open status monitor.1.
Open the Printing Preferance, and select Status Monitor... on Main.
2. Download a certificate.2.
Select Download Security Certificate from the Remote UI menu.
3. Select Download.3.
4. Select Save.4.
Importing Certificate
1. Open Certificate Import Wizard.1.
1. On the left window, open Trusted Root Certificate from Certificate on Console Root.1.
2. Right-click Certificates and select Import from All tasks.2.
2. Specify certificate file to import.2.
1. Select Next.1.
2. Specify the certificate file to import on File name and select Next.2.
3. Specify certificate store.3.
1. Select Place all certificates in the following store.1.
2. Select Trusted Root Certificate Authorities for Certificates Store.2.
4. Finish certificate import wizard.4.
1. Select Next and check the specified settings.1.
2. Select Finish to finish the wizard.2.
3. Select OK on the displayed screen.3.
Checking Imported CertificateMake sure the imported certificate has been registered to your computer.
360

1. Display certificate list.1.
On the left window of Microsoft Management Console, select Console Root > Certificates (LocalComputer) > Trusted Root Certificate Authorities in this order, and Select Certificates to displaythe certificate list.
2. Check registered certificate.2.
Make sure the imported certificate name is displayed on the list.
Note• Make sure you can see the registered certificate from Current user by creating the Current
user snap-in.
Note• When you finish Microsoft Management Console, a message asking you whether to save the console
setting. If you continue to apply the same settings next, select Yes to save.
For macOSThe procedure below describes how to import a root certificate in macOS.
1. Start up Remote UI.1.
Start up Remote UI
2. Select For secure communication.2.
3. Select Download.3.
The root certificate will be downloaded.
4. Open downloaded certificate file.4.
When the download procedure is completed, a downloaded item pops up on the right of the screen.
Double-click the downloaded certificate on the list starts up Keychain Access and the AddCertificates screen appears.
Note
• If the downloaded item does not pop up, select the Show Downloads button on theright.
• Selecting the magnifying glass icon on the right of download list displays the folder containingthe certificate.
5. Select Add.5.
Select the destination for the certificate on Keychain.
Selecting Add displays information on the certificate.
361

Note• You can add the certificate by selecting the same certificate on Keychain Access. Check the
name of certification to add after selecting View Certificates.
6. Check certificate.6.
Make sure the fingerprint of certificate shown on Details corresponds with the root certificatethumbprint of the printer.
The printer's thumbprint is displayed in Root cert. thumbprint (SHA-1) column or Root cert.thumbprint (SHA-256) column when tapped in the following order.
(Printer information) > System information
7. Select Always Trust.7.
If the fingerprint of certificate detail information matches printer's thumbprint, display information oncertificate from the menu or by double-clicking the certificate, and select Always Trust on Trust.
The root certificate has been registered.
Note• Entering the password may be required if you specify it for your printer.
362

Generating Server Certificate
When you use SSL connection via IPv6 network, you need to generate an IPv6 server certificate using theprinter.
Generate the server certificate from Remote UI.
Follow the procedure below.
1. Checking Printer's IP Address1.
2. Generating Server Certificate2.
3. Checking Generated Server Certificate3.
Important• To reset the IPv6 server certificate, tap in the following order from the operation panel.•
LAN settings > Wi-Fi / Wireless Direct / Wired LAN > Settings > Advanced > Reset SSLcertificates > Yes
Checking Printer's IP Address
1. Flick HOME screen and tap LAN settings.1.
Home Screen Menu Composition
2. Tap the enabled LAN.2.
Diagonal lines are displayed for disabled LAN icons.
3. Flick the screen, check the value on IPv6 link-local address.3.
Write down the value on IPv6 link-local address for your reference when you open Remote UI andgenerate a server certificate.
Generating Server Certificate
1. Open web browser on your smartphone, tablet, or computer and enter the printer IP1.address.
Enter as following in the URL field of the web browser.
http://[XXXX::XXXX:XXXX:XXXX:XXXX]
On "XXXX::XXXX:XXXX:XXXX:XXXX", enter the IPv6 link-local address in abbreviated form.
The top screen of Remote UI appears.
2. Select Log in on Remote UI.2.
363

Note• If you specify the administrator password, enter the password.
3. Select Security.3.
4. Select SSL/TLS settings.4.
5. Select Generate key and certificate.5.
6. Select Generate self-signed cert.6.
7. Specify each setting item.7.
• Signature algorithm•
Select SHA256.
• Public key length (bits)•
Select 2048 bits.
• Specify the expiration date.•
Enter the date you generated the server certificate on Valid from.
Enter the date the server certificate expires on Valid to.
• Enter the common name.•
On Common name, enter the IPv6 link-local address you checked in abbreviated form.
Note• When you enter the common name, add [ ] to each end of the abbreviation value of the
printer's IPv6 address.• Do not use a comma or make a space for the common name.
8. Select Next.8.
You need not enter anything on Country, State or province, Locality, Organization, orOrganizational unit.
9. Select Generate.9.
The server certificate starts to be generated.
When the server certificate has been generated, Generated a self-signed certificate. appears.
10. Select Restart LAN.10.
LAN will be restarted.
When LAN has been restarted, Printer status on Remote UI appears.
Note• If you cannot access to Remote UI after you restart LAN, reload your web browser.
364

Checking Generated Server Certificate
1. Select Security on Remote UI.1.
2. Select SSL/TLS settings.2.
3. Select Check key and certificate.3.
Make sure the issuer of the root certificate is displayed on Issued by, and the value you entered isdisplayed on Common name on Subject.
365
Setting Mail Server
To use mail function, specify the mail server settings.
*This function may not be available depending on the country or region of purchase.
Note• If you did not specify the time zone setting using the printer's operation panel, a message to inform you•
that the correct time may not be reflected on the sent e-mail appears. We recommended that you setthe time zone setting using the printer's operation panel.
For the time zone setting, see Other printer settings.
• These functions can be set only when you are logged in administrator mode.
1. Start up Remote UI.1.
Start up Remote UI
2. Select Printer settings.2.
3. Select Set mail server.3.
The setting items for mail server appear.
4. Specify mail server settings.4.
Specify the following items.
Sender addressEnter the e-mail address of the sender (this printer).
Outgoing mail server (SMTP)Enter the address of your SMTP server.
Port number (SMTP)Enter the port number of your SMTP server.
Secure connection (SSL)Select if you use the secure connection (SSL).
Don't verify certificatesSelect if you do not verify the certificate.
AuthenticationSelect one of the following authentication methods.
SMTP authenticationSelect if you send e-mail with SMTP authentication.
Then select OK, and then make the following settings.
Outgoing accountEnter the account name for sending to perform the authentication.
366

Outgoing passwordTo set / change the password for sending in order to perform the authentication, check theSet/change password and then enter the password.
POP before SMTPSelect if you send e-mail with POP before SMTP authentication.
Then select OK, and then make the following settings.
Incoming mail server (POP3)Enter the address of your POP3 server.
Port number (POP3)Enter the port number of your POP3 server.
Incoming accountEnter the account name for receiving to perform the authentication.
Incoming passwordTo set / change the password for receiving in order to perform the authentication, check theSet/change password and then enter the password.
Use APOP authenticationSelect if you send the password by the encryption transmission.
Clear mailboxSelect if you delete the e-mails that remain in the POP3 server.
Important• When this setting is enabled, e-mail in the Inbox on the server will have all been
removed. If you specify the e-mail address of your everyday, be sure to disable thissetting as unread e-mail is not deleted. We recommended that you prepare this printerdedicated e-mail account not to accidentally delete the unread e-mail.
5. Select OK.5.
The setting operation is completed.
367

Receiving Printer Status by E-mail
You receive the printer status information such as the remaining ink level and the error from the printer.
*This function may not be available depending on the country or region of purchase.
Note• Specify the mail server settings in advance.•
Setting Mail Server
• If you did not specify the date and time setting using the printer's operation panel, the date and time•may not be reflected on the sent e-mail. We recommended that you set the date and time setting usingthe printer's operation panel.
For the date and time setting, see Other printer settings.
• These functions can be set only when you are logged in administrator mode.
1. Start up Remote UI.1.
Start up Remote UI
2. Select Printer settings.2.
3. Select Status notification email.3.
4. Select Notification recipients.4.
5. Specify destination settings.5.
Up to 5 destinations can be registered by following the steps below.
1. Select number of destination.1.
2. Select Add.2.
3. Enter e-mail address, and then select printer status to send information.3.
4. Select OK.4.
The registration for destination is completed.
6. Select Printer settings > Status notification email > Retry settings.6.
7. Specify resending settings.7.
The number of resending can be specified by following the steps below.
1. Specify number of resending.1.
2. Specify interval of resending.2.
368

3. Select OK.3.
The resending setting is completed.
369

Migrating Printer's Setting
Migrates the printer settings to another one of the same model.
This operation is available using Remote UI or USB flash drive.
Using Remote UIUsing USB Flash Drive
Note• The printers must be running the same firmware version.•
The target data to be migrated is fixed.
Using Remote UI
1. Exporting settings1.
1. Start up Remote UI.1.
Start up Remote UI
2. Select Printer settings.2.
3. Select Import/Export printer settings.3.
4. Select Export printer settings.4.
5. Enter password and select OK.5.
2. Importing settings2.
1. Start up Remote UI1.
Start up Remote UI
2. SelectPrinter settings.2.
3. Select Import/Export printer settings.3.
4. Select Import printer settings.4.
5. Select a file to import.5.
6. Enter password and select OK.6.
Using USB Flash Drive
1. Exporting settings1.
370
1. Insert a USB flash drive to USB flash drive port.1.
2. Tap Printer settings on Home screen.2.
Home Screen Menu Composition
3. Tap Import/export settings.3.
If you specify the administrator password, enter the password.
4. Tap Export.4.
5. Enter password and Tap OK.5.
6. Enter password again.6.
2. Importing settings2.
1. Insert a USB flash drive to USB flash drive port.1.
2. Tap Printer settings on Home screen.2.
Home Screen Menu Composition
3. Tap Import/export settings.3.
If you specify the administrator password, enter the password.
4. Tap Import.4.
5. Enter password and Tap OK.5.
371

Initializing Printer's Setting
Initializes the following settings.
• Paper setting information• Detection priority data of paper• SSL certificate• LAN setting• Administrator password• Hard drive data• Job history• Operation panel lock
This operation is available using the operation panel or Remote UI.
Using operation panelUsing Remote UI
Using operation panel
1. Tap Printer settings on Home screen.1.
Home Screen Menu Composition
2. Tap Initialize printer settings.2.
If you specify the administrator password, enter the password.
3. Confirm displayed message and tap Yes.3.
Using Remote UI
1. Start up Remote UI.1.
Start up Remote UI.
2. Select Printer settings.2.
3. Select Initialize printer settings.3.
4. Confirm displayed message and select Yes.4.
The Remote UI is disconnected.
372

Network Setting
Network Connection Tips
Printer Connection Methods
Connecting Smartphone/Tablet to Printer via Wireless Router
Connecting Smartphone/Tablet to Printer Directly (Wireless Direct)
Default Network Settings
Another Printer Found with Same Name
Connecting to Another Computer via LAN/Changing from USB to LAN Connection
Printing Network Settings
Reconfiguration Method of LAN Connection/Reconfiguration Method of Wi-FiConnection
Reconfiguration of Network Settings using the Remote UI
Countermeasures against Unauthorized Access
Network Status and Troubleshooting
Checking Printer Connection Status Using IJ Network Device Setup Utility
Sharing the Printer on a Network (Windows)
Setting Up a Shared Printer
Restrictions on Printer Sharing
Sharing the Printer on a Network (macOS)
Settings on Print Server
Settings on Client PC
Restrictions on Printer Sharing
373

Network Connection Tips
Printer Connection Methods
Connecting Smartphone/Tablet to Printer via Wireless Router
Connecting Smartphone/Tablet to Printer Directly (Wireless Direct)
Default Network Settings
Another Printer Found with Same Name
Connecting to Another Computer via LAN/Changing from USB to LANConnection
Printing Network Settings
Reconfiguration Method of LAN Connection/Reconfiguration Method of Wi-FiConnection
Reconfiguration of Network Settings using the Remote UI
Countermeasures against Unauthorized Access
Network Status and Troubleshooting
374

Printer Connection Methods
4 connection methods are available on the printer.
Wi-Fi Connection
• Using Wi-Fi Router•
• Without Using Wi-Fi Router (Wireless Direct)•
LAN Connection
USB Connection
375

Different types of network connections cannot be used at the same time.
When connecting another device while the devices are already connected to the printer, connect it using thesame connection method as the connected device or connect via USB connection.
If you connect using a different connection method, the connection to the devices in use will be disabled.
Restrictions
Wi-Fi ConnectionThere are two methods for connecting the printer to your device (e.g. smartphone or tablet). One methodis to connect using a wireless router, and the other method is to connect without using a wireless router.
The two connection methods cannot be used at the same time.
If you have a wireless router, we recommend you use the method using a wireless Router.
• Connection Using a Wireless Router•
◦ Connect the printer and the devices using a wireless router.◦ Connection methods vary depending on the wireless router type.◦ You can change network settings such as the SSID and security protocol on the printer.
◦ When the connection between a device and a wireless router is completed and (Wi-Fi icon)is displayed in the device's screen, you can connect the device to the printer using the wirelessrouter.
Connecting Smartphone/Tablet to Printer via Wireless Router
Note• If you connect using a wireless router, the printer and the device must be connected to the same•
network.
Advantages of Connecting Printer over Wi-Fi
376

• Connection without Using a Wireless Router (Wireless Direct)•
◦ Connect the printer and a device without using a wireless router. Connect the device and theprinter directly using the printer's wireless direct.
◦ In the wireless direct, you can connect up to five devices at the same time. If you try to connectanother device while five devices are already connected, disconnect a device you do not use andconfigure settings again.
◦ Network settings such as the SSID and security protocol are specified automatically.
Connecting Smartphone/Tablet to Printer Directly (Wireless Direct)
LAN ConnectionConnect the printer and a computer or a router with an Ethernet cable. If your router supports wirelessconnection, you can connect the device via wireless connection.
Note• Devices connected to the router must be connected to the same network.
What Is Ethernet Cable?Advantages of Connecting Printer via Wired LAN
USB ConnectionConnect the printer to a computer using a USB cable.
377
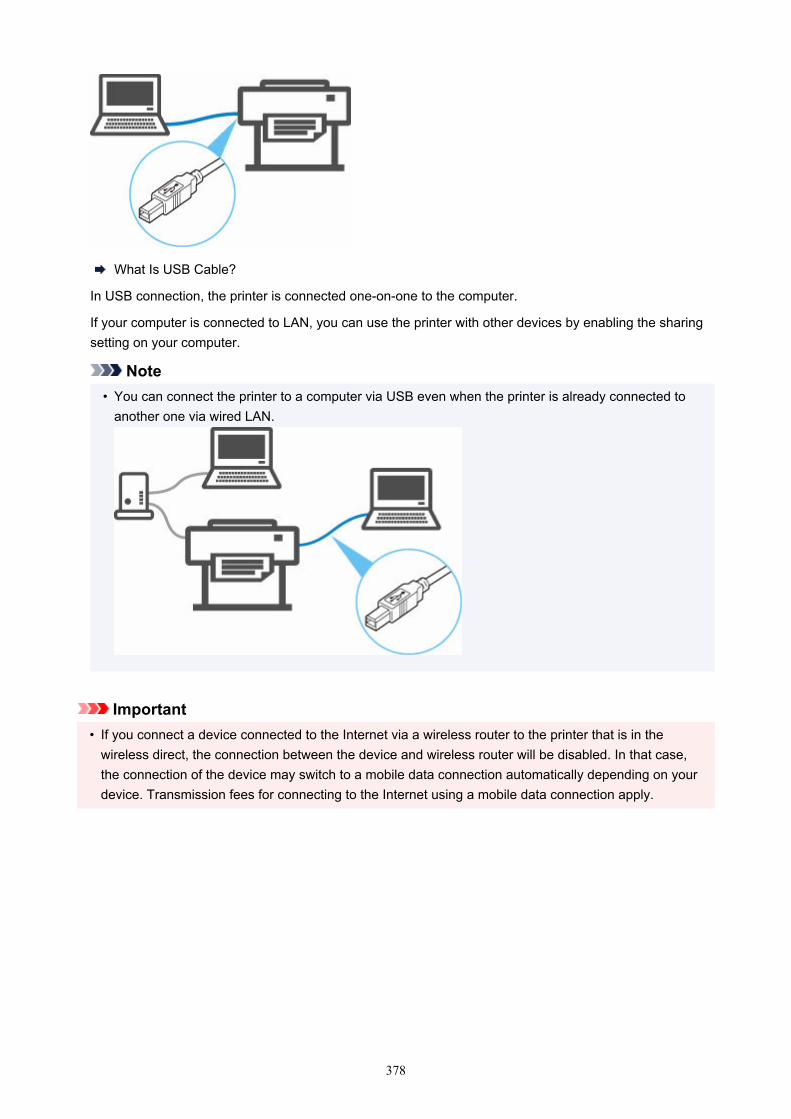
What Is USB Cable?
In USB connection, the printer is connected one-on-one to the computer.
If your computer is connected to LAN, you can use the printer with other devices by enabling the sharingsetting on your computer.
Note• You can connect the printer to a computer via USB even when the printer is already connected to
another one via wired LAN.
Important• If you connect a device connected to the Internet via a wireless router to the printer that is in the
wireless direct, the connection between the device and wireless router will be disabled. In that case,the connection of the device may switch to a mobile data connection automatically depending on yourdevice. Transmission fees for connecting to the Internet using a mobile data connection apply.
378

Connecting Smartphone/Tablet to Printer via Wireless Router
You can connect devices (e.g. smartphone, or tablet) to the printer by two methods below.
• Wi-Fi connection (connecting devices via a wireless router)• Wireless Direct connection (connecting devices without using a wireless router)
This section describes Wi-Fi connection via a wireless router.
Follow the procedure below to connect via a wireless router.
1. Enable Printer's Wi-Fi connection1.
2. Connect Smartphones and Tablets to the Printer2.
Important• Check the usage restrictions and change the printer LAN setting.•
Restrictions
• The administrator password is required to change settings if it is enabled for changing settings using theoperation panel.
Enable Printer's Wi-Fi connection
1. Flick HOME screen and tap LAN settings.1.
Home Screen Menu Composition
2. Tap Wi-Fi.2.
3. Check Enable is displayed in Connection.3.
If Connection is displayed as Disable, follow the steps below to enable Wi-Fi.
1. Tap Settings.1.
2. Tap Enable/disable Wi-Fi.2.
3. Tap Enable.3.
The printer's Wi-Fi is enabled and you can connect the Wi-Fi you connected previously.
Connect Smartphones and Tablets to the PrinterFor Android deviceFor iOS device
For Android device
1. Open "Settings" menu on your device.1.
379

2. Enable "Wi-Fi".2.
3. Select wireless router SSID you use from detected device list.3.
4. Enter wireless LAN router password.4.
Your device is connected to the printer.
5. Start printing from application.5.
For iOS device
1. Open "Settings" menu on your device.1.
2. Enable "Wi-Fi".2.
3. Select wireless router SSID you use from detected device list.3.
4. Enter wireless LAN router password.4.
Your device is connected to the printer.
5. Start printing from application.5.
380

Connecting Smartphone/Tablet to Printer Directly (WirelessDirect)
You can connect devices (e.g. smartphone, or tablet) to the printer by two methods below.
• Wi-Fi connection (connecting devices using a wireless router)• Wireless Direct connection (connecting devices without using a wireless router)
This section describes wireless direct, which allows you to print by connecting the devices to the printerdirectly.
Important• Check the usage restrictions and switch the printer to the wireless direct.•
Restrictions
• The administrator password is required to change settings if it is enabled for changing settings using theoperation panel.
• If a device has already been connected to the printer directly and you want to add a device to connect,connect it to the printer directly. You can connect up to 5 devices to the printer at the same time.
Connect with Wireless DirectChange settings below to prepare for wireless direct.
• Printer's LAN settings•
Changing Printer Setting
• Settings of a device to connect•
Connecting Smartphone/Tablet to Printer
Changing Printer Setting
1. Make sure printer is turned on.1.
2. Flick HOME screen and tap LAN settings.2.
Home Screen Menu Composition
3. Tap Wireless Direct.3.
4. Tap Settings.4.
5. Tap Enable/disable Wireless Direct and tap Yes.5.
6. Confirm displayed message and tap OK.6.
After Wireless Direct is enabled, the identifier (SSID), etc. when using the printer with wireless directconnection are displayed.
381

By flicking the touch screen, you can check various settings of wireless direct.
Connecting Smartphone/Tablet to Printer
1. Turn on wireless communication on your device.1.
Enable "Wi-Fi" on your device's "Setting" menu.
For more on turning on wireless communication, see your device's instruction manual.
2. Select "DIRECT-XXXX-TX-NNNN" ("X" represents alphanumeric characters, NNNN2.means your printer model name.) from list displayed on device.
Note• If "DIRECT-XXXX-TX-NNNN" does not appear on the list, wireless direct is not enabled.•
See Changing Printer Setting to enable wireless direct.
3. Enter password.3.
Your device is connected to the printer.
Note• Check the password for the wireless direct.•
1. Flick HOME screen and tap LAN settings.1.
2. Tap Wireless Direct.2.
3. Tap Show password.3.
• Depending on the device you are using, entering the password is required to connect a•device to the printer via Wi-Fi connection. Enter the password specified for the printer.
• If your Wi-Fi Direct compatible device is set to prioritize using Wi-Fi Direct and it is connecting•to the printer, the printer displays a confirmation screen asking if you allow the device toconnect to the printer.
Make sure the name on the touch screen is the same as that of your wireless communicationdevice and tap Yes.
Changing Direct Connection SettingChange the settings for the wireless direct following the procedure below.
1. Make sure printer is turned on.1.
2. Flick HOME screen and tap LAN settings.2.
Home Screen Menu Composition
382

3. Tap Wireless Direct.3.
4. Tap Settings.4.
5. Change settings as necessary.5.
Note• Tap Advanced, open the detailed settings of the network.
LAN settings
• To update the identifier (SSID) and the password for wireless direct•
Tap A to display the confirmation screen. To update the identifier (SSID) and the password, tapYes.
To check the security setting and the updated password, tap Yes on the screen displayed next.
To check the updated password, tap Show password.
• To change the printer's name displayed on the Wi-Fi Direct compatible device•
Tap B to display the printer's name (device name) displayed on a Wi-Fi Direct compatibledevice.
Follow the procedure below to change the name.
1. Tap touch screen.1.
2. Enter device name (up to 32 characters).2.
3. Tap OK to finish entering device name.3.
4. Tap OK to finish specifying device name.4.
383

• To change the confirmation screen setting when a Wi-Fi Direct compatible device is connecting•to the printer
Tap C to display the confirmation screen. If you want the printer to display the screen to informyou a Wi-Fi direct compatible device is connecting to the printer, tap Yes.
Important• To prevent an unauthorized access, we recommend you should not change the setting from
the default.
When you finished performing the settings, the printer returns to the Wireless Direct settingsscreen.
4. Tap HOME.4.
The HOME screen appears.
Note• If you change the wireless direct setting of the printer, also change the wireless router setting of the
device.
384

Default Network Settings
LAN Connection Defaults
Item Default
Enable/Disable LAN Wired LAN enabled
Network name (SSID) BJNPSETUP
Communication mode Infrastructure
Wi-Fi security Disable
IP address (IPv4) DHCP
IP address (IPv6) Auto setup
Set printer name *1 XXXXXXXXXXXX
Enable/disable IPv6 Enable
Enable/disable WSD Disable
Timeout settings 15 minutes
Enable/disable Bonjour Enable
Service name Canon TX-NNNN *2
LPR protocol settings Enable
Wi-Fi DRX settings Enable
Wired LAN DRX settings Enable
("XX" represents alphanumeric characters.)
*1 Default value depends on printer. To check value, use operation panel.
LAN settings
*2 NNNN means your printer model name.
Wireless Direct Defaults
Item Default
Network name (SSID) DIRECT-abXX-TX-NNNN *1
Password YYYYYYYYYY *2
Wi-Fi security WPA2-PSK (AES)
Connection request confirmation Displayed
385

*1 "ab" is specified at random and "XX" represents last two digits of printer's wireless MAC address.NNNN means your printer model.
*2 The password is specified automatically when the printer is turned on for the first time.
386

Another Printer Found with Same Name
When the printer is found during setup, other printers with the same name may appear on the resultsscreen.
Select a printer with checking the printer settings against those on detection result screen.
Check the printer's MAC address or serial to select the correct printer from the results.
Note• Serial number may not appear on result screen.
Check the printer's MAC address and the serial number by one of the following methods.
• Display on the touch screen.•
MAC address
LAN settings
Serial number
Printer information
• Print the network settings.•
Printing Network Settings
387

Connecting to Another Computer via LAN/Changing from USBto LAN Connection
For Windows:To add a computer to connect to the printer on a LAN or to change from USB to LAN connection, performsetup using the Setup CD-ROM or from Setup Guide.
For macOS:To connect an additional computer to the printer via LAN, or to change from USB to LAN connection,perform setup from Setup Guide.
388

Printing Network Settings
Use the operation panel to print the printer's current network settings.
Important• The network settings printout contains important information about your network. Handle it with care.
1. Check that printer is turned on.1.
2. Load plain paper.2.
Loading the Upper Roll on the PrinterLoading the Lower Roll on the Roll Unit (Option)
If you use sheets, prepare at least 11 sheets (A4 or Letter-sized).
Loading Sheets in the Printer
3. Select Printer settings on HOME screen.3.
4. Select LAN settings.4.
5. Select Print details.5.
6. Select Yes on displayed screen.6.
7. Select Yes or No on displayed screen.7.
The printer starts printing network settings information.
Note• You can also print the printer's network settings. Select Printer settings > Test print > Print LAN
details > Yes > Yes.
The printed network settings information is as follows: (Some setting values are not displayed depending onthe printer settings.)
Item Description Setting
LAN Setting Basic setting information -
Basic Info IPv4 setting information (Wired LAN) -
LAN Interface Mode Current interface Wired LAN/Wireless LAN(Infra)/Wire-less LAN(AP)/Wireless(Direct connec-tion)/Disabled
Link Active Operation status Active/Inactive
389
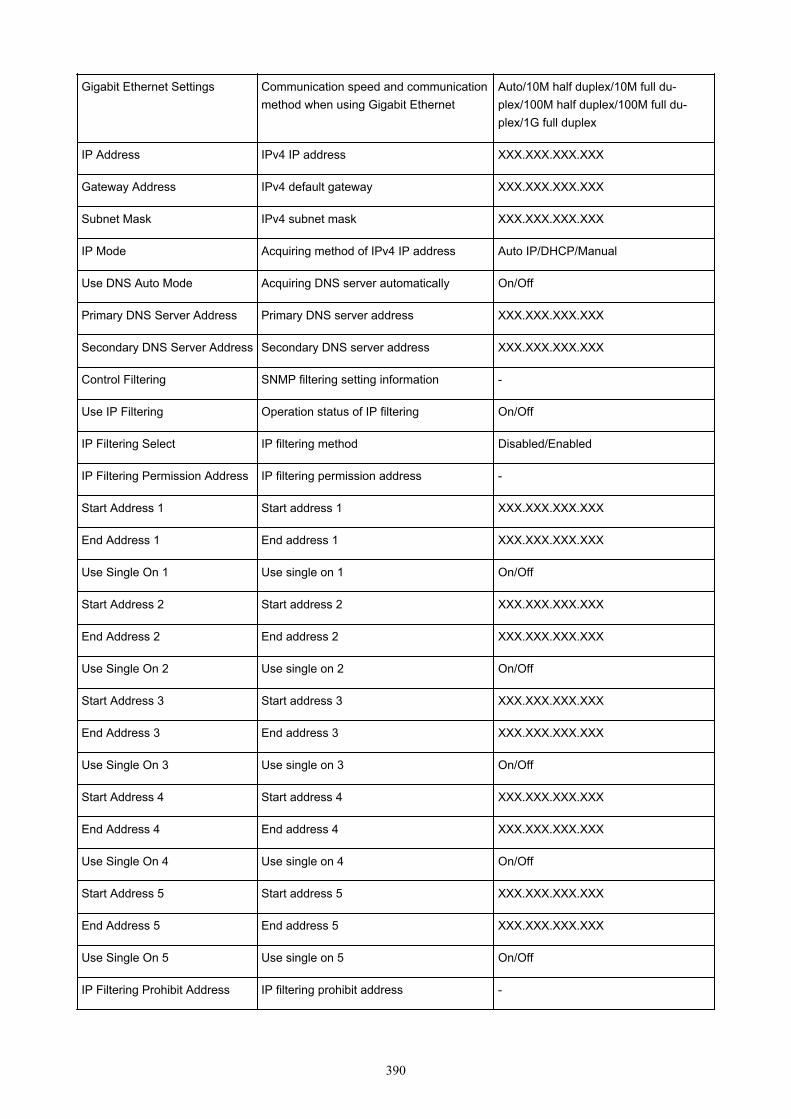
Gigabit Ethernet Settings Communication speed and communicationmethod when using Gigabit Ethernet
Auto/10M half duplex/10M full du-plex/100M half duplex/100M full du-plex/1G full duplex
IP Address IPv4 IP address XXX.XXX.XXX.XXX
Gateway Address IPv4 default gateway XXX.XXX.XXX.XXX
Subnet Mask IPv4 subnet mask XXX.XXX.XXX.XXX
IP Mode Acquiring method of IPv4 IP address Auto IP/DHCP/Manual
Use DNS Auto Mode Acquiring DNS server automatically On/Off
Primary DNS Server Address Primary DNS server address XXX.XXX.XXX.XXX
Secondary DNS Server Address Secondary DNS server address XXX.XXX.XXX.XXX
Control Filtering SNMP filtering setting information -
Use IP Filtering Operation status of IP filtering On/Off
IP Filtering Select IP filtering method Disabled/Enabled
IP Filtering Permission Address IP filtering permission address -
Start Address 1 Start address 1 XXX.XXX.XXX.XXX
End Address 1 End address 1 XXX.XXX.XXX.XXX
Use Single On 1 Use single on 1 On/Off
Start Address 2 Start address 2 XXX.XXX.XXX.XXX
End Address 2 End address 2 XXX.XXX.XXX.XXX
Use Single On 2 Use single on 2 On/Off
Start Address 3 Start address 3 XXX.XXX.XXX.XXX
End Address 3 End address 3 XXX.XXX.XXX.XXX
Use Single On 3 Use single on 3 On/Off
Start Address 4 Start address 4 XXX.XXX.XXX.XXX
End Address 4 End address 4 XXX.XXX.XXX.XXX
Use Single On 4 Use single on 4 On/Off
Start Address 5 Start address 5 XXX.XXX.XXX.XXX
End Address 5 End address 5 XXX.XXX.XXX.XXX
Use Single On 5 Use single on 5 On/Off
IP Filtering Prohibit Address IP filtering prohibit address -
390

Start Address 1 Start address 1 XXX.XXX.XXX.XXX
End Address 1 End address 1 XXX.XXX.XXX.XXX
Use Single On 1 Use single on 1 On/Off
Start Address 2 Start address 2 XXX.XXX.XXX.XXX
End Address 2 End address 2 XXX.XXX.XXX.XXX
Use Single On 2 Use single on 2 On/Off
Start Address 3 Start address 3 XXX.XXX.XXX.XXX
End Address 3 End address 3 XXX.XXX.XXX.XXX
Use Single On 3 Use single on 3 On/Off
Start Address 4 Start address 4 XXX.XXX.XXX.XXX
End Address 4 End address 4 XXX.XXX.XXX.XXX
Use Single On 4 Use single on 4 On/Off
LAN Setting Basic setting information -
Basic Info IPv4 setting information (Wired LAN) -
Control Filtering SNMP filtering setting information -
IP Filtering Prohibit Address IP filtering prohibit address -
Start Address 5 Start address 5 XXX.XXX.XXX.XXX
End Address 5 End address 5 XXX.XXX.XXX.XXX
Use Single On 5 Use single on 5 On/Off
Print Filtering Print filtering setting information -
Use IP Filtering Operation status of IP filtering On/Off
IP Filtering Select IP filtering method Disabled/Enabled
IP Filtering Permission Address IP filtering permission address -
Start Address 1 Start address 1 XXX.XXX.XXX.XXX
End Address 1 End address 1 XXX.XXX.XXX.XXX
Use Single On 1 Use single on 1 On/Off
Start Address 2 Start address 2 XXX.XXX.XXX.XXX
End Address 2 End address 2 XXX.XXX.XXX.XXX
Use Single On 2 Use single on 2 On/Off
391

Start Address 3 Start address 3 XXX.XXX.XXX.XXX
End Address 3 End address 3 XXX.XXX.XXX.XXX
Use Single On 3 Use single on 3 On/Off
Start Address 4 Start address 4 XXX.XXX.XXX.XXX
End Address 4 End address 4 XXX.XXX.XXX.XXX
Use Single On 4 Use single on 4 On/Off
Start Address 5 Start address 5 XXX.XXX.XXX.XXX
End Address 5 End address 5 XXX.XXX.XXX.XXX
Use Single On 5 Use single on 5 On/Off
IP Filtering Prohibit Address IP filtering prohibit address -
Start Address 1 Start address 1 XXX.XXX.XXX.XXX
End Address 1 End address 1 XXX.XXX.XXX.XXX
Use Single On 1 Use single on 1 On/Off
Start Address 2 Start address 2 XXX.XXX.XXX.XXX
End Address 2 End address 2 XXX.XXX.XXX.XXX
Use Single On 2 Use single on 2 On/Off
Start Address 3 Start address 3 XXX.XXX.XXX.XXX
End Address 3 End address 3 XXX.XXX.XXX.XXX
Use Single On 3 Use single on 3 On/Off
Start Address 4 Start address 4 XXX.XXX.XXX.XXX
End Address 4 End address 4 XXX.XXX.XXX.XXX
Use Single On 4 Use single on 4 On/Off
Start Address 5 Start address 5 XXX.XXX.XXX.XXX
End Address 5 End address 5 XXX.XXX.XXX.XXX
Use Single On 5 Use single on 5 On/Off
LAN Setting Basic setting information -
IPv6 Info IPv6 setting information (Wired LAN) -
Link Local Address Link local address -
IP Address IPv6 IP address XXXX:XXXX:XXXX:XXXX
392
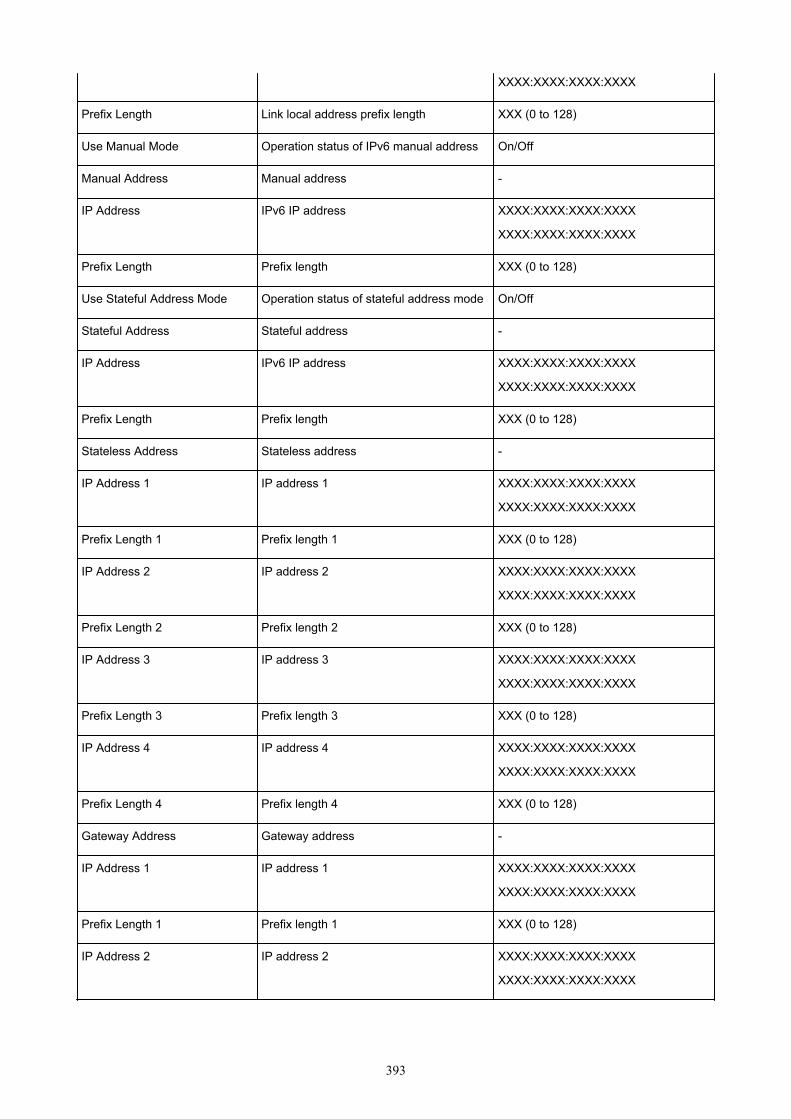
XXXX:XXXX:XXXX:XXXX
Prefix Length Link local address prefix length XXX (0 to 128)
Use Manual Mode Operation status of IPv6 manual address On/Off
Manual Address Manual address -
IP Address IPv6 IP address XXXX:XXXX:XXXX:XXXX
XXXX:XXXX:XXXX:XXXX
Prefix Length Prefix length XXX (0 to 128)
Use Stateful Address Mode Operation status of stateful address mode On/Off
Stateful Address Stateful address -
IP Address IPv6 IP address XXXX:XXXX:XXXX:XXXX
XXXX:XXXX:XXXX:XXXX
Prefix Length Prefix length XXX (0 to 128)
Stateless Address Stateless address -
IP Address 1 IP address 1 XXXX:XXXX:XXXX:XXXX
XXXX:XXXX:XXXX:XXXX
Prefix Length 1 Prefix length 1 XXX (0 to 128)
IP Address 2 IP address 2 XXXX:XXXX:XXXX:XXXX
XXXX:XXXX:XXXX:XXXX
Prefix Length 2 Prefix length 2 XXX (0 to 128)
IP Address 3 IP address 3 XXXX:XXXX:XXXX:XXXX
XXXX:XXXX:XXXX:XXXX
Prefix Length 3 Prefix length 3 XXX (0 to 128)
IP Address 4 IP address 4 XXXX:XXXX:XXXX:XXXX
XXXX:XXXX:XXXX:XXXX
Prefix Length 4 Prefix length 4 XXX (0 to 128)
Gateway Address Gateway address -
IP Address 1 IP address 1 XXXX:XXXX:XXXX:XXXX
XXXX:XXXX:XXXX:XXXX
Prefix Length 1 Prefix length 1 XXX (0 to 128)
IP Address 2 IP address 2 XXXX:XXXX:XXXX:XXXX
XXXX:XXXX:XXXX:XXXX
393

Prefix Length 2 Prefix length 2 XXX (0 to 128)
IP Address 3 IP address 3 XXXX:XXXX:XXXX:XXXX
XXXX:XXXX:XXXX:XXXX
Prefix Length 3 Prefix length 3 XXX (0 to 128)
IP Address 4 IP address 4 XXXX:XXXX:XXXX:XXXX
XXXX:XXXX:XXXX:XXXX
Prefix Length 4 Prefix length 4 XXX (0 to 128)
Use DNS Auto Mode Acquiring DNS server automatically On/Off
Primary DNS Server Address Primary DNS server address XXXX:XXXX:XXXX:XXXX
XXXX:XXXX:XXXX:XXXX
Secondary DNS Server Address Secondary DNS server address XXXX:XXXX:XXXX:XXXX
XXXX:XXXX:XXXX:XXXX
Control Filtering SNMP filtering setting information -
Use IP Filtering Operation status of IP filtering On/Off
IP Filtering Select IP filtering method Disabled/Enabled
IPv6 Filtering Permission Info IPv6 filtering permission information -
IP Filtering Start Address 1 IP filtering start address 1 XXXX:XXXX:XXXX:XXXX
XXXX:XXXX:XXXX:XXXX
IP Filtering End Address 1 IP filtering end address 1 XXXX:XXXX:XXXX:XXXX
XXXX:XXXX:XXXX:XXXX
Use Single On 1 Use single on 1 On/Off
LAN Setting Basic setting information -
IPv6 Info IPv6 setting information (Wired LAN) -
Control Filtering SNMP filtering setting information -
IP Filtering Start Address 2 IP filtering start address 2 XXXX:XXXX:XXXX:XXXX
XXXX:XXXX:XXXX:XXXX
IP Filtering End Address 2 IP filtering end address 2 XXXX:XXXX:XXXX:XXXX
XXXX:XXXX:XXXX:XXXX
Use Single On 2 Use single on 2 On/Off
IP Filtering Start Address 3 IP filtering start address 3 XXXX:XXXX:XXXX:XXXX
XXXX:XXXX:XXXX:XXXX
394

IP Filtering End Address 3 IP filtering end address 3 XXXX:XXXX:XXXX:XXXX
XXXX:XXXX:XXXX:XXXX
Use Single On 3 Use single on 3 On/Off
IP Filtering Start Address 4 IP filtering start address 4 XXXX:XXXX:XXXX:XXXX
XXXX:XXXX:XXXX:XXXX
IP Filtering End Address 4 IP filtering end address 4 XXXX:XXXX:XXXX:XXXX
XXXX:XXXX:XXXX:XXXX
Use Single On 4 Use single on 4 On/Off
IP Filtering Start Address 5 IP filtering start address 5 XXXX:XXXX:XXXX:XXXX
XXXX:XXXX:XXXX:XXXX
IP Filtering End Address 5 IP filtering end address 5 XXXX:XXXX:XXXX:XXXX
XXXX:XXXX:XXXX:XXXX
Use Single On 5 Use single on 5 On/Off
IPv6 Filtering Prohibit Info IPv6 Filtering prohibit information -
IP Filtering Start Address 1 IP filtering start address 1 XXXX:XXXX:XXXX:XXXX
XXXX:XXXX:XXXX:XXXX
IP Filtering End Address 1 IP filtering end address 1 XXXX:XXXX:XXXX:XXXX
XXXX:XXXX:XXXX:XXXX
Use Single On 1 Use single on 1 On/Off
IP Filtering Start Address 2 IP filtering start address 2 XXXX:XXXX:XXXX:XXXX
XXXX:XXXX:XXXX:XXXX
IP Filtering End Address 2 IP filtering end address 2 XXXX:XXXX:XXXX:XXXX
XXXX:XXXX:XXXX:XXXX
Use Single On 2 Use single on 2 On/Off
IP Filtering Start Address 3 IP filtering start address 3 XXXX:XXXX:XXXX:XXXX
XXXX:XXXX:XXXX:XXXX
IP Filtering End Address 3 IP filtering end address 3 XXXX:XXXX:XXXX:XXXX
XXXX:XXXX:XXXX:XXXX
Use Single On 3 Use single on 3 On/Off
IP Filtering Start Address 4 IP filtering start address 4 XXXX:XXXX:XXXX:XXXX
XXXX:XXXX:XXXX:XXXX
IP Filtering End Address 4 IP filtering end address 4 XXXX:XXXX:XXXX:XXXX
395

XXXX:XXXX:XXXX:XXXX
Use Single On 4 Use single on 4 On/Off
IP Filtering Start Address 5 IP filtering start address 5 XXXX:XXXX:XXXX:XXXX
XXXX:XXXX:XXXX:XXXX
IP Filtering End Address 5 IP filtering end address 5 XXXX:XXXX:XXXX:XXXX
XXXX:XXXX:XXXX:XXXX
Use Single On 5 Use single on 5 On/Off
Print Filtering Print filtering setting information -
Use IP Filtering Operation status of IP filtering On/Off
IP Filtering Select IP filtering method Disabled/Enabled
IP Filtering Permission Info IP filtering permission information -
IP Filtering Start Address 1 IP filtering start address 1 XXXX:XXXX:XXXX:XXXX
XXXX:XXXX:XXXX:XXXX
IP Filtering End Address 1 IP filtering end address 1 XXXX:XXXX:XXXX:XXXX
XXXX:XXXX:XXXX:XXXX
Use Single On 1 Use single on 1 On/Off
IP Filtering Start Address 2 IP filtering start address 2 XXXX:XXXX:XXXX:XXXX
XXXX:XXXX:XXXX:XXXX
IP Filtering End Address 2 IP filtering end address 2 XXXX:XXXX:XXXX:XXXX
XXXX:XXXX:XXXX:XXXX
Use Single On 2 Use single on 2 On/Off
LAN Setting Basic setting information -
IPv6 Info IPv6 setting information (Wired LAN) -
Print Filtering Print filtering setting information -
IP Filtering Start Address 3 IP filtering start address 3 XXXX:XXXX:XXXX:XXXX
XXXX:XXXX:XXXX:XXXX
IP Filtering End Address 3 IP filtering end address 3 XXXX:XXXX:XXXX:XXXX
XXXX:XXXX:XXXX:XXXX
Use Single On 3 Use single on 3 On/Off
IP Filtering Start Address 4 IP filtering start address 4 XXXX:XXXX:XXXX:XXXX
XXXX:XXXX:XXXX:XXXX
396

IP Filtering End Address 4 IP filtering end address 4 XXXX:XXXX:XXXX:XXXX
XXXX:XXXX:XXXX:XXXX
Use Single On 4 Use single on 4 On/Off
IP Filtering Start Address 5 IP filtering start address 5 XXXX:XXXX:XXXX:XXXX
XXXX:XXXX:XXXX:XXXX
IP Filtering End Address 5 IP filtering end address 5 XXXX:XXXX:XXXX:XXXX
XXXX:XXXX:XXXX:XXXX
Use Single On 5 Use single on 5 On/Off
IPv6 Filtering Prohibit Info IPv6 Filtering prohibit information -
IP Filtering Start Address 1 IP filtering start address 1 XXXX:XXXX:XXXX:XXXX
XXXX:XXXX:XXXX:XXXX
IP Filtering End Address 1 IP filtering end address 1 XXXX:XXXX:XXXX:XXXX
XXXX:XXXX:XXXX:XXXX
Use Single On 1 Use single on 1 On/Off
IP Filtering Start Address 2 IP filtering start address 2 XXXX:XXXX:XXXX:XXXX
XXXX:XXXX:XXXX:XXXX
IP Filtering End Address 2 IP filtering end address 2 XXXX:XXXX:XXXX:XXXX
XXXX:XXXX:XXXX:XXXX
Use Single On 2 Use single on 2 On/Off
IP Filtering Start Address 3 IP filtering start address 3 XXXX:XXXX:XXXX:XXXX
XXXX:XXXX:XXXX:XXXX
IP Filtering End Address 3 IP filtering end address 3 XXXX:XXXX:XXXX:XXXX
XXXX:XXXX:XXXX:XXXX
Use Single On 3 Use single on 3 On/Off
IP Filtering Start Address 4 IP filtering start address 4 XXXX:XXXX:XXXX:XXXX
XXXX:XXXX:XXXX:XXXX
IP Filtering End Address 4 IP filtering end address 4 XXXX:XXXX:XXXX:XXXX
XXXX:XXXX:XXXX:XXXX
Use Single On 4 Use single on 4 On/Off
IP Filtering Start Address 5 IP filtering start address 5 XXXX:XXXX:XXXX:XXXX
XXXX:XXXX:XXXX:XXXX
IP Filtering End Address 5 IP filtering end address 5 XXXX:XXXX:XXXX:XXXX
397

XXXX:XXXX:XXXX:XXXX
Use Single On 5 Use single on 5 On/Off
MAC Info MAC address setting information (Wired/Wi-Fi)
-
MAC Address(Wired) MAC address (Wired LAN) XX:XX:XX:XX:XX:XX
MAC Address(Wireless) MAC address (Wi-Fi) XX:XX:XX:XX:XX:XX
Use MAC Address Filtering Operation status of MAC address filtering On/Off
MAC Filtering Select MAC address filtering method Disabled/Enabled
MAC Filtering Permission Info MAC filtering permission information -
MAC Address 1 MAC address 1 XX:XX:XX:XX:XX:XX
MAC Address 2 MAC address 2 XX:XX:XX:XX:XX:XX
MAC Address 3 MAC address 3 XX:XX:XX:XX:XX:XX
MAC Address 4 MAC address 4 XX:XX:XX:XX:XX:XX
MAC Address 5 MAC address 5 XX:XX:XX:XX:XX:XX
LAN Setting Basic setting information -
MAC Info MAC address setting information (Wired/Wi-Fi)
-
MAC Filtering Prohibit Info MAC filtering prohibit information -
MAC Address 1 MAC address 1 XX:XX:XX:XX:XX:XX
MAC Address 2 MAC address 2 XX:XX:XX:XX:XX:XX
MAC Address 3 MAC address 3 XX:XX:XX:XX:XX:XX
MAC Address 4 MAC address 4 XX:XX:XX:XX:XX:XX
MAC Address 5 MAC address 5 XX:XX:XX:XX:XX:XX
Proxy Setting Proxy server setting information -
Use Proxy Use proxy server On/Off
Proxy Server Address Proxy server address XXXXXXXXXXXXXXXX (up to 128characters)
Proxy Port Number Proxy port specification 1 to 65535
Use User Authority Mode Use user authority mode On/Off
Proxy Server User Name Proxy server user name XXXXXXXXXXXXXXXX (up to 64 char-acters)
398
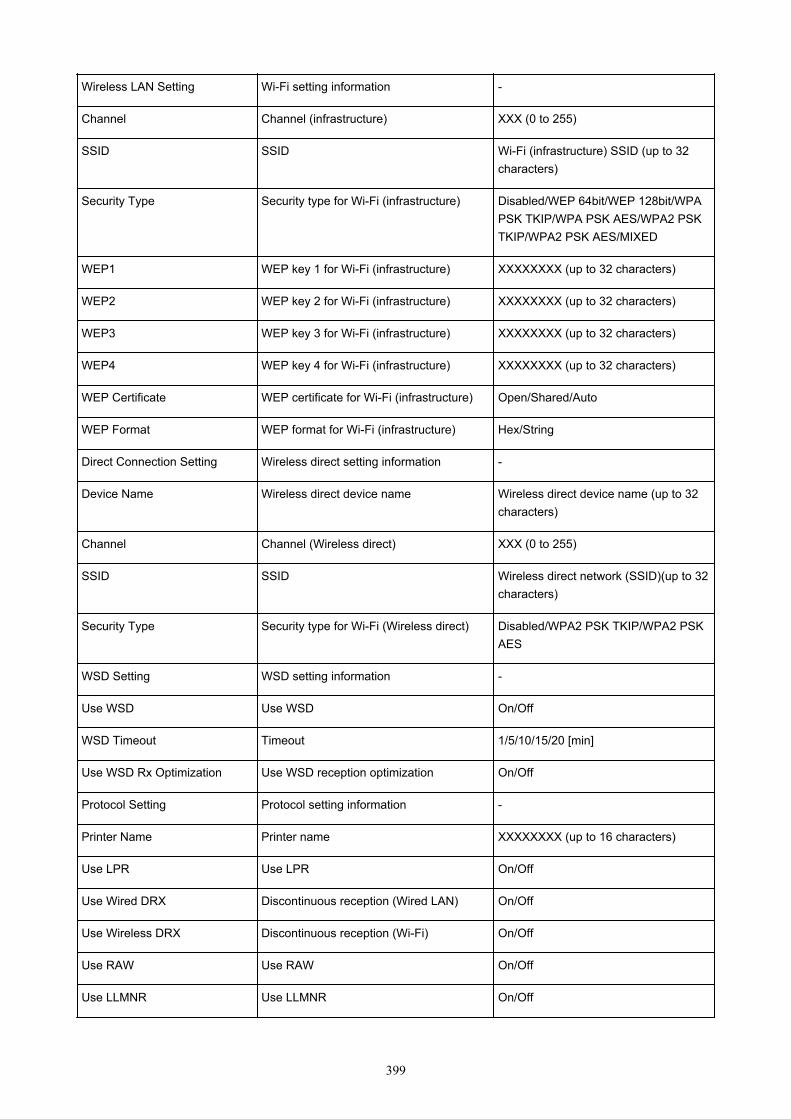
Wireless LAN Setting Wi-Fi setting information -
Channel Channel (infrastructure) XXX (0 to 255)
SSID SSID Wi-Fi (infrastructure) SSID (up to 32characters)
Security Type Security type for Wi-Fi (infrastructure) Disabled/WEP 64bit/WEP 128bit/WPAPSK TKIP/WPA PSK AES/WPA2 PSKTKIP/WPA2 PSK AES/MIXED
WEP1 WEP key 1 for Wi-Fi (infrastructure) XXXXXXXX (up to 32 characters)
WEP2 WEP key 2 for Wi-Fi (infrastructure) XXXXXXXX (up to 32 characters)
WEP3 WEP key 3 for Wi-Fi (infrastructure) XXXXXXXX (up to 32 characters)
WEP4 WEP key 4 for Wi-Fi (infrastructure) XXXXXXXX (up to 32 characters)
WEP Certificate WEP certificate for Wi-Fi (infrastructure) Open/Shared/Auto
WEP Format WEP format for Wi-Fi (infrastructure) Hex/String
Direct Connection Setting Wireless direct setting information -
Device Name Wireless direct device name Wireless direct device name (up to 32characters)
Channel Channel (Wireless direct) XXX (0 to 255)
SSID SSID Wireless direct network (SSID)(up to 32characters)
Security Type Security type for Wi-Fi (Wireless direct) Disabled/WPA2 PSK TKIP/WPA2 PSKAES
WSD Setting WSD setting information -
Use WSD Use WSD On/Off
WSD Timeout Timeout 1/5/10/15/20 [min]
Use WSD Rx Optimization Use WSD reception optimization On/Off
Protocol Setting Protocol setting information -
Printer Name Printer name XXXXXXXX (up to 16 characters)
Use LPR Use LPR On/Off
Use Wired DRX Discontinuous reception (Wired LAN) On/Off
Use Wireless DRX Discontinuous reception (Wi-Fi) On/Off
Use RAW Use RAW On/Off
Use LLMNR Use LLMNR On/Off
399

Use Spanning Tree Use spanning tree On/Off
Use Dedicated Port Dedicated port setting On/Off
SNMP Setting SNMP setting information -
Use SNMPv1 Use SNMPv1 On/Off
Use SNMPv3 Use SNMPv3 On/Off
SNMP Community Name1 SNMPv1 community name 1 XXXXXXXX (up to 32 characters)
SNMP Community Name2 SNMPv1 community name 2 XXXXXXXX (up to 32 characters)
SNMP Extra Access Authority SNMPv1 extra access authority Disable/Read Only/Read Write
SNMP Access Authority1 SNMPv1 community1/2 access authority Disable/Read Only/Read Write
SNMP Access Authority2 SNMPv1 community1/2 access authority Disable/Read Only/Read Write
SNMPv3 Setting SNMPv3 setting information -
User1 User 1 -
User Name User name XXXXXXXX (up to 32 characters)
Use SNMPv3 Use SNMPv3 On/Off
MIB Access Restriction MIB access restriction Disable/Read Only/Read Write
Security Setting Security setting No Auth No Priv/Auth No Priv/Auto Priv
Authority Algorithm Authority algorithm Null/MD5/SHA1
Encryption Algorithm Encryption algorithm Null/AES/DES
User2 User 2 -
User Name User name XXXXXXXX (up to 32 characters)
Use SNMPv3 Use SNMPv3 On/Off
MIB Access Restriction MIB access restriction Disable/Read Only/Read Write
Security Setting Security setting No Auth No Priv/Auth No Priv/Auto Priv
Authority Algorithm Authority algorithm Null/MD5/SHA1
Encryption Algorithm Encryption algorithm Null/AES/DES
User3 User 3 -
User Name User name XXXXXXXX (up to 32 characters)
Use SNMPv3 Use SNMPv3 On/Off
MIB Access Restriction MIB access restriction Disable/Read Only/Read Write
400
Security Setting Security setting No Auth No Priv/Auth No Priv/Auto Priv
Authority Algorithm Authority algorithm Null/MD5/SHA1
Encryption Algorithm Encryption algorithm Null/AES/DES
User4 User 4 -
User Name User name XXXXXXXX (up to 32 characters)
Use SNMPv3 Use SNMPv3 On/Off
MIB Access Restriction MIB access restriction Disable/Read Only/Read Write
Security Setting Security setting No Auth No Priv/Auth No Priv/Auto Priv
Authority Algorithm Authority algorithm Null/MD5/SHA1
Encryption Algorithm Encryption algorithm Null/AES/DES
User5 User 5 -
User Name User name XXXXXXXX (up to 32 characters)
Use SNMPv3 Use SNMPv3 On/Off
MIB Access Restriction MIB access restriction Disable/Read Only/Read Write
Security Setting Security setting No Auth No Priv/Auth No Priv/Auto Priv
Authority Algorithm Authority algorithm Null/MD5/SHA1
Encryption Algorithm Encryption algorithm Null/AES/DES
Dynamic DNS Setting Dynamic DNS setting -
IPv4 IPv4 -
Use Dynamic DNS Operation status of Dynamic DNS On/Off
Host Name Host name XXXXXXXX (up to 64 characters)
Domain Name Domain name XXXXXXXX (up to 254 characters)
IPv6 IPv6 -
Use Manual Address DNS dynamic setting of manual address On/Off
Use Stateless Address DNS dynamic setting of stateless address On/Off
Use Stateful Address DNS dynamic setting of stateful address On/Off
Use Name As IPv4 Use same host name/domain name as thatused for IPv4
On/Off
Host Name Host name XXXXXXXX (up to 64 characters)
Domain Name Domain name XXXXXXXX (up to 254 characters)
401

SNTP Setting SNTP setting information -
Use SNTP Use SNTP On/Off
SNTP Polling Interval SNTP polling interval 1 to 48 [hrs]
SNTP Server Name SNTP server name XXXXXXXX (up to 256 characters)
FTP Setting FTP setting information -
Use FTP Use FTP On/Off
Use FTP Authority Use FTP authority On/Off
FTP User Name FTP user name XXXXXXXX (up to 33 characters)
Bonjour Setting Bonjour setting information -
Use Bonjour Use Bonjour On/Off
Bonjour Service Name Bonjour service name Bonjour service name (Up to 49 alpha-numeric characters)
DHCP option settings DHCP option settings -
IPv4 IPv4 -
Acquire host name Acquire host name On/Off
DNS dynamic update DNS dynamic update On/Off
Acquire Domain Name Acquire Domain Name On/Off
IPv6 IPv6 -
Acquire host name Acquire host name On/Off
DNS dynamic update DNS dynamic update On/Off
Acquire Domain Name Acquire Domain Name On/Off
802.1X Setting 802.1X setting information -
Authority Type Enable/disable 802.1X and authority type Do not use/EAP-TLS/EAP-TTLS/PEAP
EAP TTLS Type Internal authority type for EAP-TTLS MSCHAPv2/PAP
Weak Encryption Restriction Weak encryption restriction Do not restrict/Restrict
Weak Certificate Restriction Weak certificate restriction Do not restrict/Restrict
Login Name Login name XXXXXXXX (up to 97 characters)
User Name User name XXXXXXXX (up to 97 characters)
Server Name Server name XXXXXXXX (up to 43 characters)
402

Verify Authentication ServerName
Verify Authentication Server Name On/Off
Verify Authentication ServerCertificate
Verify Authentication Server Certificate On/Off
IPsec Setting IPsec setting information -
Use IPsec Use IPsec On/Off
Phase2 Protocol IPsec phase2 protocol AH/ESP/AH & ESP
IPP Setting IPP confirmation setting -
Enable/disable IPP Enable/disable IPP Enable/Disable
Secure print Secure print Enable/Disable
Use IPP Authority Use IPP authority On/Off
IPP User Setting IPP confirmation user setting -
User1 User 1 -
User Name User name XXXXXXXX (up to 32 characters)
User2 User 2 -
User Name User name XXXXXXXX (up to 32 characters)
User3 User 3 -
User Name User name XXXXXXXX (up to 32 characters)
User4 User 4 -
User Name User name XXXXXXXX (up to 32 characters)
User5 User 5 -
User Name User name XXXXXXXX (up to 32 characters)
User6 User 6 -
User Name User name XXXXXXXX (up to 32 characters)
User7 User 7 -
User Name User name XXXXXXXX (up to 32 characters)
User8 User 8 -
User Name User name XXXXXXXX (up to 32 characters)
User9 User 9 -
User Name User name XXXXXXXX (up to 32 characters)
403

User10 User 10 -
User Name User name XXXXXXXX (up to 32 characters)
Email Setting E-mail setting information -
Retry Count E-mail retry count 0 to 5
Retry Interval E-mail retry interval 1 to 60 (min)
Use Email Notification Use E-mail notification On/Off
Use SSL Use SSL On/Off
Use SSL Cert No Check Use SSL certification On/Off
Use Mailbox Delete Use mailbox delete On/Off
SMTP Server Address SMTP server address XXXXXXXX (up to 256 characters)
SMTP Server Port No SMTP server port number 0 to 65535
SMTP State SMTP state Invalid/Authorized/POP before SMTP
From Address From address XXXXXXXX (up to 128 characters)
To Address 1 To address 1 XXXXXXXX (up to 128 characters)
Reply Address 1 Reply address 1 XXXXXXXX (up to 128 characters)
Notice Conditions 1 Notice conditions 1 -
Job End Job end On/Off
Error Occurred Error occurred On/Off
Warning Occurred Warning occurred On/Off
Signature 1 Signature 1 XXXXXXXX (up to 128 characters)
To Address 2 To address 2 XXXXXXXX (up to 128 characters)
Reply Address 2 Reply address 2 XXXXXXXX (up to 128 characters)
Notice Conditions 2 Notice conditions 2 -
Job End Job end On/Off
Error Occurred Error occurred On/Off
Warning Occurred Warning occurred On/Off
Signature 2 Signature 2 XXXXXXXX (up to 128 characters)
RUI Setting Remote UI setting information -
Use RUI Use Remote UI On/Off
404

("XX" represents alphanumeric characters.)
405

Reconfiguration Method of LAN Connection/ReconfigurationMethod of Wi-Fi Connection
Changing LAN Connection MethodChanging Wi-Fi Connection Method
Changing LAN Connection MethodFollow either procedure below to change LAN connection method (wired or wireless).
• For Windows:•
◦ Redo setup using the Setup CD-ROM or from Setup Guide.◦ Select Enable for Enable/disable Wired LAN or Enable/disable Wi-Fi in the touch screen◦
menu.
After that, perform settings on the Network Settings screen on IJ Network Device Setup Utility.
For details, refer to Performing/Changing Wi-Fi Settings or Performing/Changing Wired LANConnection (Ethernet Cable) Settings.
• For macOS:•
Redo setup from Setup Guide.
Changing Wi-Fi Connection MethodFollow either procedure below to change Wi-Fi connection method (infrastructure or wireless direct).
• For Windows:•
◦ Redo setup using the Setup CD-ROM or from Setup Guide.◦ Perform settings on the Network Settings screen on IJ Network Device Setup Utility.◦
Important• Before you perform settings using IJ Network Device Setup Utility, change the printer settings•
following the procedure below.
1. Select Printer settings on HOME screen.1.
Home Screen Menu Composition
If you specify the administrator password, enter the password.
2. Select Wi-Fi.2.
3. Select Settings.3.
4. Select Wi-Fi setup.4.
5. Select Easy wireless connect.5.
406

6. Check message and select OK.6.
Follow instructions on your smartphone or tablet.
7. If message saying setup is completed appears, select OK.7.
• For macOS:•
Redo setup from Setup Guide.
407

Reconfiguration of Network Settings using the Remote UI
You can use Remote UI on the following OS and the web browser.
• iOS device•
OS: iOS 12.0 or later
Web browser: iOS standard Web browser (Mobile Safari)
• Android device•
OS: Android 5.1 or later
Web browser: Android standard Web browser (Browser or Chrome)
• macOS device•
OS: macOS Sierra 10.12 or later
Web browser: Safari 10.0 or later
• Windows device•
OS: Windows 7 SP1 or later
Web browser: Microsoft Edge, Internet Explorer 11, Mozilla Firefox, Google Chrome
For more on Remote UI, refer to Start up Remote UI.
Important• Enable JavaScript and cookies in the web browser.• If you access Remote UI with the printer name instead of its IP address, make sure the DNS settings
are correctly configured.• Depending on the network environment, you may not be able to start Remote UI.• On the HOME screen, select Printer settings > Other printer settings > Operation restrictions, and
then make sure Do not restrict is selected for Remote UI.
Note• Remote UI also offers many other features. You can display the ink levels, check error messages and
other status information, and cancel print jobs.
408

Countermeasures against Unauthorized Access
This section describes countermeasures against an unauthorized access to the printer from outside. Whenyou use the printer via a network or you are an administrator, we recommend you read this section beforeusing the printer.
Four countermeasures below can be helpful against an unauthorized access.
Specify a Private IP AddressRestrict Communication Using Firewall or Wi-Fi RouterSpecify a Password for the PrinterApply higher security level for Wi-Fi connection
Note• As the setting procedure described below is an example, it may be different from that of your printer.
For details, refer to your printer's manual.
Specify a Private IP AddressAn IP address is a numeric label assigned to each device on the network. There are two types of IPaddress. One is used for internet connection ("global IP address"), and the other is used for a local areanetwork such as an inhouse LAN ("private IP address").
If a global IP address is specified for the printer, many and unspecified users on internet can access tothe printer. As a result, you will face an increased risk of information leakage caused by an unauthorizedaccess from outside. On the other hand, if a private IP address is specified for the printer, users who canaccess to the printer are confined to those on a local area network such as an inhouse LAN. Therefore,we recommend you specify a private IP address for the printer.
The range of addresses used as a private IP address is shown below. Make sure whether a private IPaddress is specified for your printer.
Range of private IP address
• 10.0.0.0 to 10.255.255.255• 172.16.0.0 to 172.31.255.255• 192.168.0.0 to 192.168.255.255
Procedure to check the IP address
Select Setup > Device settings > LAN settings on your printer to select a network connection methodand check the IP address. For the procedure to check and specify the IP address, refer to your printer'smanual.
Note• Establishing an environment to protect an access from outside using a firewall can reduce a risk of an
unauthorized access even though a global IP address is specified for your printer.
409

Restrict Communication Using Firewall or Wi-Fi RouterFirewall is a system which prevents an unauthorized access from an external network user to protect aninhouse network against attack or intrusion.
Firewall enables your network to be protected against an unauthorized access by restricting acommunication from the specific external IP address which seems to have a risk.
A home use Wi-Fi router has a similar function. Be careful when you change the settings.
Specify a Password for the PrinterEven if a malicious third party accesses to your printer by any chance, you can reduce a risk ofinformation leakage drastically by specifying a password to protect various information on your printer.
In addition, though the printer can be protected by specifying a password, it is important to manage thespecified password for security. Manage your password referring to the four points below. For details,refer to your printer's manual.
• Be sure to change the default password.• Change the password periodically.• Do not use a password easy to guess for a third party.• Do not tell a third party about the specified password casually.
Note• A password is not specified for some printers at the time of purchase. In this case, specify the
password for the printer.• A password cannot be specified for some printers.
Password management using Remote UI (User Interface)
Remote UI is a software to access to the printer via a network by using a web browser. You can check theprinter status or settings on Remote UI, which allows you to perform operations almost the same as thoseyou can on the operation panel of the printer.
Entering the printer's IP address or host name on the web browser displays the portal page of Remote UI.
For the procedure to start up or operations of Remote UI, refer to your printer's manual.
Important• Do not access to a website while you are using Remote UI on the web browser.•
In addition, be sure to close the web browser when you leave your seat before you finish performingsettings, or when you have finished performing settings.
Apply higher security level for Wi-Fi connectionWhen you use the printer via Wi-Fi, we recommend you apply a security method with higher security level(e.g. WPA/WPA2).
For more on operations, refer to your printer's manual.
410

Network Status and Troubleshooting
Check the network status referring to LAN setting information on the touch screen.
Printing Network Settings
Network Status What to Do
Connected normally.
If you are unable toprint, see 1 on Whatto Do.
1. If you are unable to print, check the items below:1.
• whether the computer is connected to Wi-Fi• whether the firewall of your security software is enabled• whether a privacy separator, SSID separator, or Network separation function is ena-•
bled on your wireless router
If one of the above is enabled, disable it before setup.
• whether the network name (SSID) of the printer (see "3-2-6" of network setting infor-mation printout) matches that of the router to connect
2. To change the network connection method (wired/wireless), change it on the printer'snetwork setting screen.
Wi-Fi is disabled onthe printer.
Perform printer setup following the instructions of the manual.
Wired LAN connec-tion is disabled.
• Make sure the printer is connected to the router with the LAN cable.•
If the LAN cable is loose, connect the cable properly.
If the LAN cable is connected to the WAN side of the router, connect the cable to the LANside of the router.
• Make sure the network devices (e.g. hub or router) are turned on.•
IP address is not as-signed.
• If you specify the printer's IP address automatically, enable DHCP on the router.•
• If you specify the printer's IP address manually, the address is disabled because it is out of•the valid range. You specified (0.0.0.0) as the IP address, for example.
Specify the valid IP address.
The default gatewayis not specified.
Check the items below to communicate by hopping routers (e.g. using a cloud application).
• Make sure the device specified as the default gateway is turned on.•
• Specify the default gateway address correctly.•
To check the default gateway, print out the network settings information.
Note• For some printers, you can check the default gateway on the operation panel.
Cannot connect tothe specified net-work.
Check the status of the printer, network devices (e.g. wireless router), or smartphone/tablet.
• If they are turned off, turn them on.• Make sure wireless signal is strong.•
Monitor signal status and move the printer and wireless router as necessary.
• The security key specified for the wireless router may not match that you entered.•
The security key is case-sensitive.
411

Enter the correct security key.
Make sure wirelesssignal is strong.
• Make sure the printer is not placed too far away from the wireless router.•
• Monitor signal status and move the printer and wireless router as necessary.•
The number of con-nected clients rea-ches the upper limit.
• Wireless Direct does not allow more than 5 devices to be connected.•
If you add a device to connect, disconnect a device you do not use before adding thedevice.
The signal to noiseratio (S/N ratio) islow.
• There is a lot of noise from other devices.•
Move the printer apart from other devices.
A link local addressis assigned.
• Perform printer setup again.• The security key specified for the wireless router may not match that you entered.•
The security key is case-sensitive.
Enter the correct security key.
The specified net-work name (SSID) isleft default value.
The network name (SSID) is not specified.
Enter the network name (SSID) specified for the destination.
412

Sharing the Printer on a Network (Windows)
When computers are used in a network environment, documents can be printed from multiple computersthat share a single printer.
• Setting Up a Shared Printer•
This section describes how to set up the print server and the client.
Note• The Windows versions of the computers connected to the network do not necessarily have to be the
same.
Related TopicRestrictions on Printer Sharing
413

Setting Up a Shared Printer
On the print server, set up sharing of the printer driver. Then from the client, set up the connection to theprint server.
1. Install the printer driver on the print server system1.
2. Display the Devices and Printers window2.
Select the Control Panel -> Hardware and Sound (Hardware) -> Devices and Printers.The Devices and Printers window is displayed.
3. Click the icon for the model name of printer to be shared3.
Press the Alt key, and from the displayed File menu, select Printer properties -> Sharing tab.
Important• When starting up the software and performing install or uninstall, a confirmation or warning dialog
box may appear.This dialog box appears when administrative rights are required to perform a task.When you are logged on to an administrator account, click Yes (or Continue, Allow) to continue.Some applications require an administrator account to continue. In such cases, switch to anadministrator account, and restart the operation from the beginning.
4. Set sharing4.
On the Sharing tab, check (or select) Share this printer, set the shared name as necessary, and thenclick OK.
5. If the print server and the client have different architectures (32 bit or 64 bit), install an5.additional driver
1. Display the Devices and Printers, Printers, or Printers and Faxes window.1.
2. Select the printer icon, click Print server properties, and select the Drivers tab.2.
3. Click Add....3.
4. When the Add Printer Driver Wizard window is displayed, click Next.4.
5. If the print server has a 32-bit architecture, select x64. If the print server has a 64-bit5.architecture, select x86. Then click Next.
6. Click Have Disk....6.
7. In the Install From Disk window, open the "Driver" folder of the downloaded printer driver,7.specify the "inf" file, and click OK.
414

Note• If the printer server is 32-bit, specify it as "xxxxxxx3.INF". If it is 64-bit, specify it as "xxxxxxx6.INF".
8. Select the printer to be used, and click Next.8.
Note• If an error message is displayed, select the other printer.
9. Click Finish9.
The setup on the print server system is complete. Next, set up the client systems.
6. On the client, open Explorer, and double-click the icon of the printer to be shared6.
7. Follow the window instructions, and install the printer driver7.
The setup on the client system is complete.Even when you perform the setup on a different client, follow the same steps 6 and 7.
415

Restrictions on Printer Sharing
These are restrictions that apply when you are using a printer in a network environment. Check therestrictions for the environment you are using.
Restriction on setting up printer sharing• If "ntprint.inf" is requested when you install the driver from Add Printer, specify the file as follows:
1. Start Explorer on the print server and on the client with the different architecture, paste thefollowing path in the address bar, and press Enter on the keyboard:%windir%\system32\driverstore\
2. Right-click the FileRepository folder, and click Properties.3. On the Sharing tab, click Share.4. In the message window displayed on the print server, specify "ntprint.inf_xxxxxxxx" in the folder
that was shared in step 3, and click OK.If there are multiples copies, select the file with the latest update date and time.
Restrictions on sharing and using a printer• A print completion message may be displayed. To disable the message display, follow the procedure
below.1. In the Control Panel -> Hardware and Sound (Hardware) -> Devices and Printers window of
the client system, select the printer, and click Print server properties on the command bar.2. Uncheck Show informational notifications for network printers on the Advanced tab, and
then restart the computer.
• The bi-directional communication function is disabled and the correct printer status may not berecognized.If a client user opens the printer driver properties and then clicks OK with the Enable bidirectionalsupport check box cleared on the Ports tab, the bidirectional communication function of the printserver may also be disabled.In this case, check Enable bidirectional support check box on both the print server system and theclient system.
• When you print from a client system, the following functions cannot be used.◦ The Free Layout and the Edit Using PosterArtist features of Page Layout in the Layout tab
• When the functions on the Device Settings tab cannot be set properly from a client system, they maybe grayed out. In this case, change the settings from the print server.When you change the settings of the print server, you should delete the icon of the shared printerfrom the client system, and then specify the shared settings again in the client system.
• If the same driver installed on the print server is also installed on the client, the network printer iconmay be created automatically.
• If an error occurs when you print a document on a shared printer from a client, the error messageof the Canon IJ status monitor is displayed on both the client and the print server. If a document isprinted out normally, the Canon IJ status monitor is displayed only on the client.
416

Adjustments for Better Print Quality
Adjusting the Print Head
Adjusting the Print Head
Troubleshooting Paper Abrasion and Blurry Images
Adjusting Feed Amount
Adjusting Feed Amount
Adjusting Vacuum Strength
417

Adjusting the Print Head
Adjusting the Print Head
Troubleshooting Paper Abrasion and Blurry Images
418
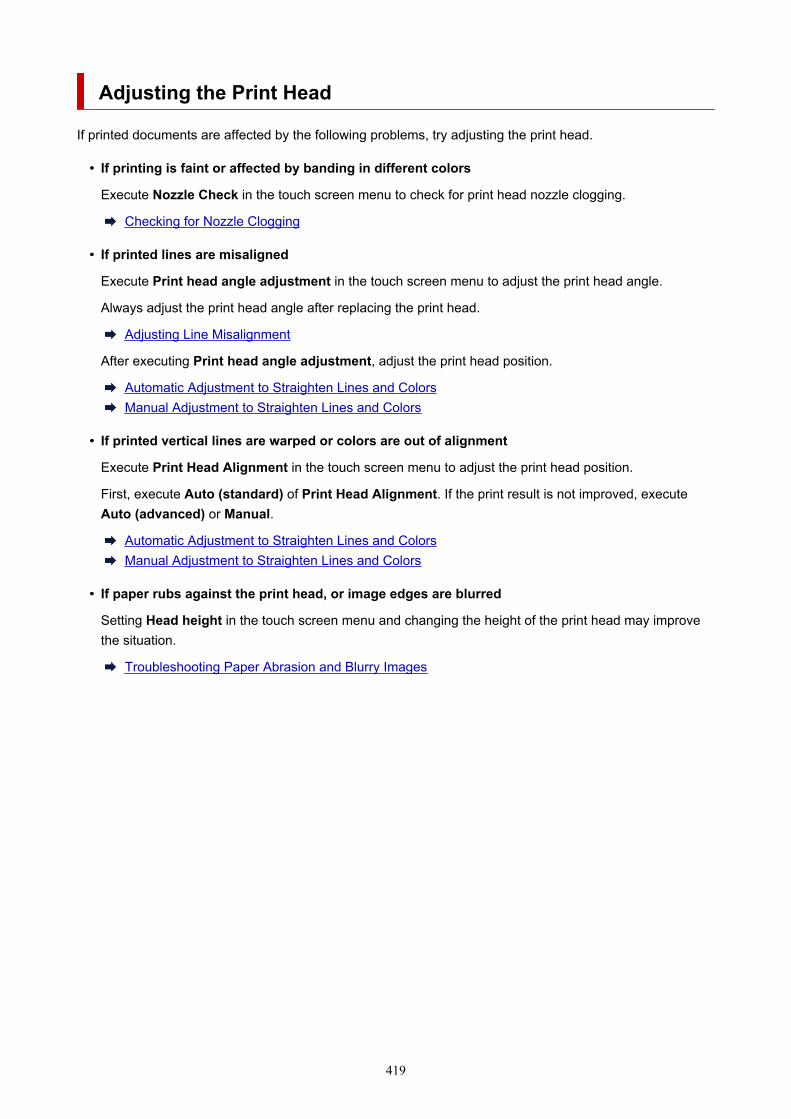
Adjusting the Print Head
If printed documents are affected by the following problems, try adjusting the print head.
• If printing is faint or affected by banding in different colors•
Execute Nozzle Check in the touch screen menu to check for print head nozzle clogging.
Checking for Nozzle Clogging
• If printed lines are misaligned•
Execute Print head angle adjustment in the touch screen menu to adjust the print head angle.
Always adjust the print head angle after replacing the print head.
Adjusting Line Misalignment
After executing Print head angle adjustment, adjust the print head position.
Automatic Adjustment to Straighten Lines and ColorsManual Adjustment to Straighten Lines and Colors
• If printed vertical lines are warped or colors are out of alignment•
Execute Print Head Alignment in the touch screen menu to adjust the print head position.
First, execute Auto (standard) of Print Head Alignment. If the print result is not improved, executeAuto (advanced) or Manual.
Automatic Adjustment to Straighten Lines and ColorsManual Adjustment to Straighten Lines and Colors
• If paper rubs against the print head, or image edges are blurred•
Setting Head height in the touch screen menu and changing the height of the print head may improvethe situation.
Troubleshooting Paper Abrasion and Blurry Images
419

Adjusting Line Misalignment
If printed lines are misaligned, execute Print head angle adjustment to adjust the print head angle. Printhead angle adjustment requires you to examine a printed test pattern and adjust the angle using the angleadjustment lever.
Always adjust the print head angle after replacing the print head.
Important• Because the results of adjustment vary depending on the type of paper used for adjustment, use the
same type of paper as you will use for printing.
Paper to Prepare
When using rollsAn unused roll at least 10.00 in. (254.0 mm) wide
When using sheetsOne sheet of unused paper of at least A4/Letter size
Perform adjustment as follows.
1. Load paper.1.
Loading the Upper Roll on the PrinterLoading the Lower Roll on the Roll Unit (Option)Loading Sheets in the Printer
Important• Always make sure the loaded paper matches the type of paper specified on the printer.
Adjustment cannot be completed correctly unless the loaded paper matches the settings.
2. Tap Maintenance on HOME screen.2.
Home Screen Menu Composition
The Maintenance screen appears.
3. Tap Print head angle adjustment.3.
A confirmation message appears.
4. Tap Yes.4.
The carriage moves and instructions for the print head angle adjustment procedure appears on the touchscreen.
5. Open the top cover.5.
420

6. Align the angle adjustment lever with the red square and close the top cover.6.
A test pattern is printed for adjustment.
Important• Do not touch the linear scale (A), carriage shaft (B), or ink tube stabilizer (C). Touching these may•
cause malfunction.
421
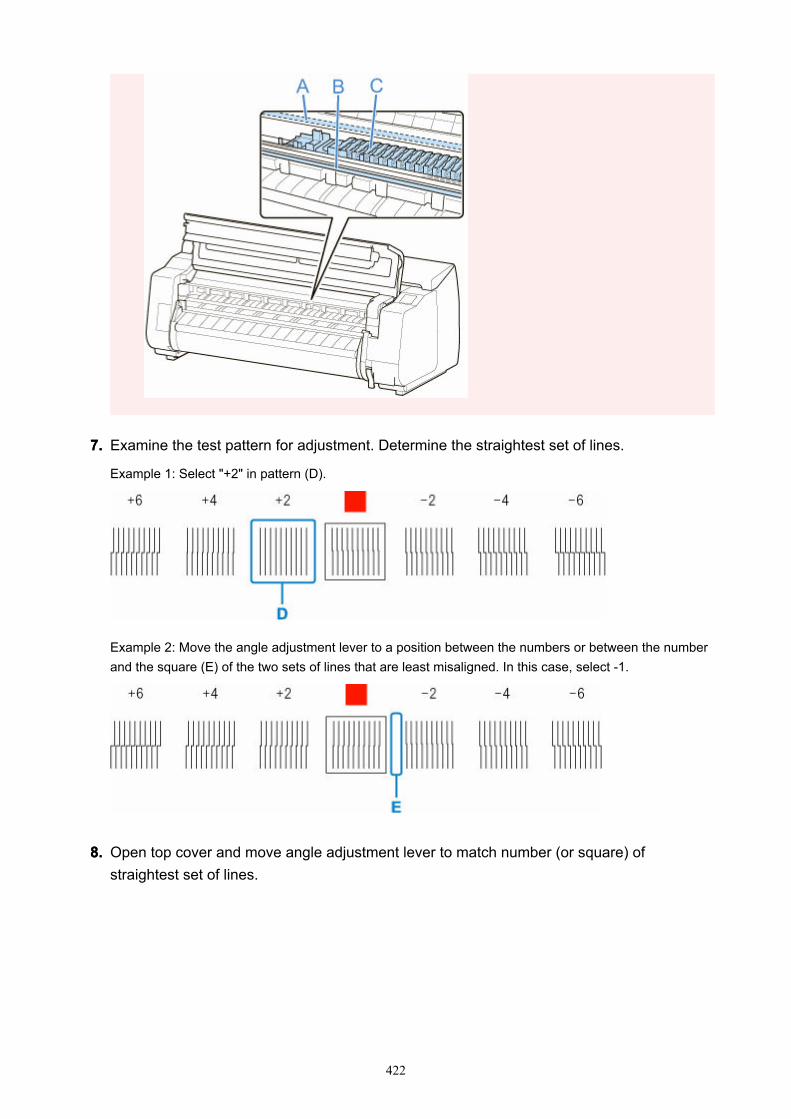
7. Examine the test pattern for adjustment. Determine the straightest set of lines.7.
Example 1: Select "+2" in pattern (D).
Example 2: Move the angle adjustment lever to a position between the numbers or between the numberand the square (E) of the two sets of lines that are least misaligned. In this case, select -1.
8. Open top cover and move angle adjustment lever to match number (or square) of8.straightest set of lines.
422

9. Close the top cover.9.
The print head is now straight, and adjustment is complete.
Note• If the problem, such as misaligned lines or color unevenness, is not solved after adjustment, execute
Print head angle adjustment and move the angle adjustment lever in the front or the rear of the lastposition. When finished, execute Print Head Alignment again.
423
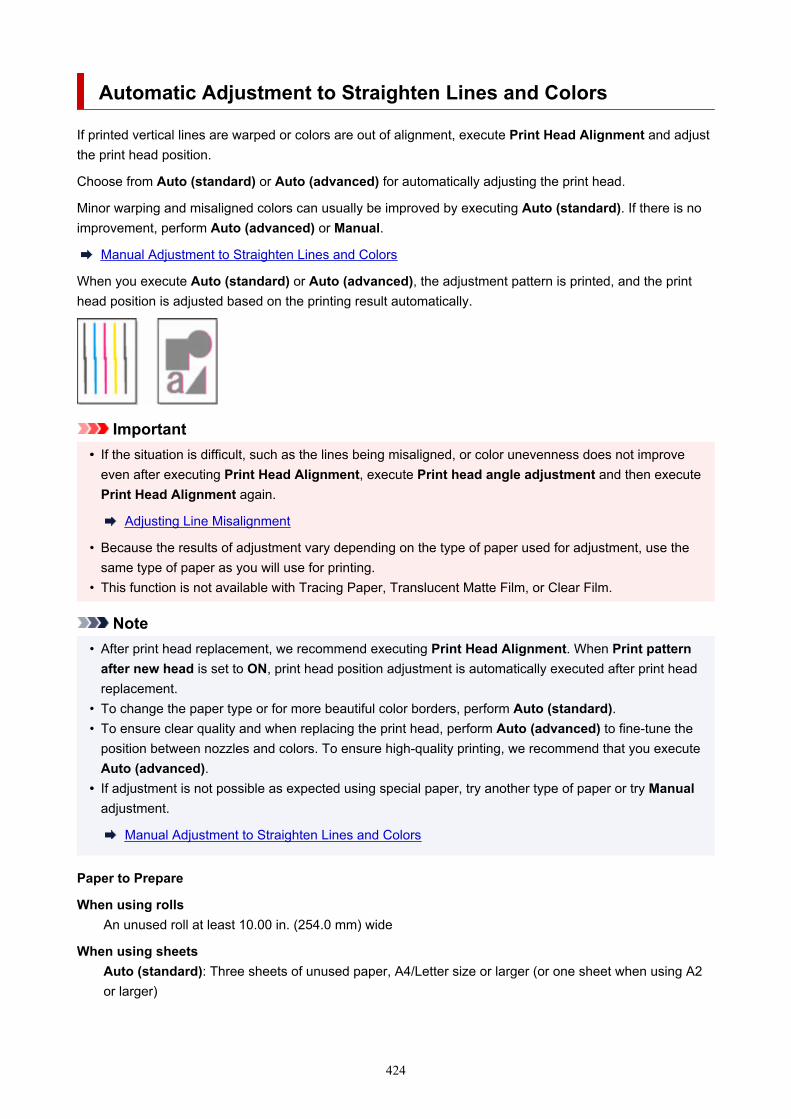
Automatic Adjustment to Straighten Lines and Colors
If printed vertical lines are warped or colors are out of alignment, execute Print Head Alignment and adjustthe print head position.
Choose from Auto (standard) or Auto (advanced) for automatically adjusting the print head.
Minor warping and misaligned colors can usually be improved by executing Auto (standard). If there is noimprovement, perform Auto (advanced) or Manual.
Manual Adjustment to Straighten Lines and Colors
When you execute Auto (standard) or Auto (advanced), the adjustment pattern is printed, and the printhead position is adjusted based on the printing result automatically.
Important• If the situation is difficult, such as the lines being misaligned, or color unevenness does not improve•
even after executing Print Head Alignment, execute Print head angle adjustment and then executePrint Head Alignment again.
Adjusting Line Misalignment
• Because the results of adjustment vary depending on the type of paper used for adjustment, use thesame type of paper as you will use for printing.
• This function is not available with Tracing Paper, Translucent Matte Film, or Clear Film.
Note• After print head replacement, we recommend executing Print Head Alignment. When Print pattern
after new head is set to ON, print head position adjustment is automatically executed after print headreplacement.
• To change the paper type or for more beautiful color borders, perform Auto (standard).• To ensure clear quality and when replacing the print head, perform Auto (advanced) to fine-tune the
position between nozzles and colors. To ensure high-quality printing, we recommend that you executeAuto (advanced).
• If adjustment is not possible as expected using special paper, try another type of paper or try Manual•adjustment.
Manual Adjustment to Straighten Lines and Colors
Paper to Prepare
When using rollsAn unused roll at least 10.00 in. (254.0 mm) wide
When using sheetsAuto (standard): Three sheets of unused paper, A4/Letter size or larger (or one sheet when using A2or larger)
424

Auto (advanced): Five sheets of unused paper, A4/Letter size or larger (or one sheet when using A2 orlarger)
Perform adjustment as follows.
1. Load paper.1.
Loading the Upper Roll on the PrinterLoading the Lower Roll on the Roll Unit (Option)Loading Sheets in the Printer
Important• Always make sure the loaded paper matches the type of paper specified on the printer.
Adjustment cannot be completed correctly unless the loaded paper matches the settings.
2. Tap Maintenance on HOME screen.2.
Home Screen Menu Composition
The Maintenance screen appears.
3. Tap Print Head Alignment.3.
4. Tap Auto (standard) or Auto (advanced).4.
A confirmation message appears.
5. Tap Yes.5.
The paper source setting screen appears.
6. Tap Roll paper 1, Roll paper 2 or Manual.6.
A test pattern is printed for adjustment.
Note• If you are printing on sheets smaller than A2 size, a confirmation message prompting you to
continue printing appears on the touch screen. Tap Yes and follow the instructions on the touchscreen.
425

Manual Adjustment to Straighten Lines and Colors
If printed vertical lines are warped or colors are out of alignment, execute Print Head Alignment and adjustthe print head position.
Normally, execute Auto (standard).
Automatic Adjustment to Straighten Lines and Colors
However, when printing on special paper or if printing is not improved after Auto (advanced), try Manual.
Manual adjustment requires you to examine the printed test pattern and enter an adjustment value.
Important• Because the results of adjustment vary depending on the type of paper used for adjustment, use the
same type of paper as you will use for printing.
Paper to Prepare
When using rollsAn unused roll at least 10.00 in. (254.0 mm) wide
When using sheetsFour sheets of unused paper, A4/Letter size or larger (or a sheet when using A2 or larger)
Perform adjustment as follows.
1. Load paper.1.
Loading the Upper Roll on the PrinterLoading the Lower Roll on the Roll Unit (Option)Loading Sheets in the Printer
Important• Always make sure the loaded paper matches the type of paper specified on the printer.
Adjustment cannot be completed correctly unless the loaded paper matches the settings.
2. Tap Maintenance on HOME screen.2.
Home Screen Menu Composition
The Maintenance screen appears.
3. Tap Print Head Alignment.3.
4. Tap Manual.4.
A confirmation message appears.
426

Note• If you do not execute Auto (advanced), a confirmation message prompting you to execute Auto•
(advanced) appears. In this case, tap Yes and execute Auto (advanced).
5. Tap Yes.5.
The paper source setting screen appears.
6. Tap Roll paper 1, Roll paper 2 or Manual.6.
A test pattern is printed for adjustment.
7. Tap D-1.7.
8. Examine adjustment test pattern D-1 and determine the number with straight lines.8.
A: Example with straight linesB: Example with misaligned lines
Note• If two patterns seem equally good and you cannot decide which one is better, choose an•
intermediate value. For example, choose 11 if you cannot decide whether pattern 10 or 12 isbetter.
9. Repeat steps 7–8 to specify adjustment value for D-2 to D-41.9.
Note that D-6, D-12, D-18, D-24, D-30, and D-36 cannot be configured.
10. Tap OK.10.
The adjustment value is now registered, and adjustment is complete.
427

Troubleshooting Paper Abrasion and Blurry Images
The print head height setting affects printing quality.
Specifying a low print head height makes images clearer and enhances printing quality but may cause paperto rub against the print head.
On the other hand, specifying a high print head height will prevent paper from rubbing against the print headbut may reduce the printing quality.
Important• Paper rubbing against or becoming caught on the print head may jam or result in printed documents
that are soiled.
Note• Raise or lower print head, depending on nature of the problem.•
Paper rubs against the Print HeadThe edges of the paper are dirtyImage edges are blurred or white banding occurs
1. Tap paper setting display area on HOME screen.1.
Home Screen Menu Composition
2. Select paper source for setting height of print head and tap Paper settings.2.
The Paper settings screen appears.
3. Tap Advanced.3.
The Advanced paper settings screen appears.
4. Tap Head height.4.
5. Select and tap the setting.5.
428

Note• When set to Auto, the printer automatically adjusts the print head height during printing to the•
level optimal for the ambient temperature and humidity. You can check the setting for the previousprint job in Values applied with auto settings.
Printer information
• When the setting other than Auto is selected, the setting selected during this procedure isapplied.
• Depending on the type of paper, some setting values may not be available.
429

Adjusting Feed Amount
Adjusting Feed Amount
Adjusting Vacuum Strength
430

Adjusting Feed Amount
Selecting Feed Amount Adjustment Method
Automatic Banding Adjustment
Manual Banding Adjustment
Fine-Tuning Paper Feed Amount
Adjusting Line Length
431

Selecting Feed Amount Adjustment Method
There are two methods of adjusting the paper feed amount, Prioritize print quality and Prioritize lengthaccuracy, either of which will be applied during printing.
Since the method that is applied during printing is determined from the value of the Set priority setting,configure Set priority to match the print target.
Follow the procedure below to perform settings.
1. Flick HOME screen and tap Maintenance.1.
Home Screen Menu Composition
2. Tap Paper feed adjustment.2.
3. Tap Set priority.3.
4. Tap paper to adjust.4.
5. Tap setting.5.
AutoPrioritize print quality or Prioritize length accuracy is automatically selected depending on thesettings selected in the printer driver.
Prioritize print qualityAdjusts the feed amount to reduce banding across the sheet in printed documents. Adjust printquality settings are applied.
When Paper feed fine adjustment is executed, the Paper feed fine adjustment settings areapplied in addition to the Adjust print quality settings.
Prioritize length accuracyAdjusts the feed amount for better accuracy of lines in printed documents. The value of Changeadjustment values in Adjust feed length is applied.
6. Tap OK.6.
432

Automatic Banding Adjustment
If printed images are affected by banding in different colors across the sheet, execute Adjust print qualityfor automatic adjustment of the paper feed amount.
The printer prints and reads a test pattern for automatic adjustment of the feed amount.
Important• When using highly transparent media, use manual adjustment.•
Manual Banding Adjustment
Note• We recommend executing the adjustment if you have changed the paper type or paper size.• Always check the Set priority values.•
Selecting Feed Amount Adjustment Method
• If additional fine-tuning is necessary, execute Paper feed fine adjustment.•
Fine-Tuning Paper Feed Amount
• Use Adjust feed length to ensure that lines in CAD drawings are printed at exactly the right length.•
Adjusting Line Length
• This may take some time, depending on the type of paper.
Items to Prepare
When Using Rolls An unused roll at least 254.0 mm (10.00 in) wide
When Using Sheets One sheet of unused paper of at least A4/Letter size
Follow the procedure below to adjust.
1. Load paper.1.
Loading the Upper Roll on the PrinterLoading the Lower Roll on the Roll Unit (Option)Loading Sheets in the Printer
2. Flick HOME screen and tap Maintenance.2.
Home Screen Menu Composition
3. Tap Paper feed adjustment.3.
4. Tap Adjust print quality.4.
5. Tap Auto.5.
6. Tap paper to adjust.6.
433

A test pattern is printed for adjustment and adjustment is finished.
434

Manual Banding Adjustment
If printed images are affected by banding in different colors, execute Adjust print quality for adjustment ofthe paper feed amount.
Use manual adjustment with highly transparent media.
Manual adjustment requires you to enter an adjustment value after a test pattern is printed.
Note• We recommend executing the adjustment if you have changed the paper type or paper size.• Always check the Set priority values.•
Selecting Feed Amount Adjustment Method
• If additional fine-tuning is necessary, execute Paper feed fine adjustment.•
Fine-Tuning Paper Feed Amount
• Use Adjust feed length to ensure that lines in CAD drawings are printed at exactly the right length.•
Adjusting Line Length
Items to Prepare
When Using Rolls An unused roll at least 254.0 mm (10.00 in) wide
When Using Sheets Two sheets of unused paper of at least A4/Letter size
Follow the procedure below to adjust.
1. Load paper.1.
Loading the Upper Roll on the PrinterLoading the Lower Roll on the Roll Unit (Option)Loading Sheets in the Printer
Important• Always make sure the loaded paper matches the type of paper specified.•
Adjustment cannot be completed correctly unless the loaded paper matches the settings.
2. Flick HOME screen and tap Maintenance.2.
Home Screen Menu Composition
3. Tap Paper feed adjustment.3.
4. Tap Adjust print quality.4.
5. Tap Manual.5.
6. Tap paper to adjust.6.
435

Test pattern A is printed for manual adjustment.
Note• When printing on sheets, follow the instructions on the screen and remove the sheet.
7. Examine test pattern A for adjustment.7.
Determine pattern in which banding is least noticeable.
Note• If banding seems least noticeable in two patterns but you cannot decide which one is better,•
choose an intermediate value.
For example, choose 11 if you cannot decide whether pattern 10 or 12 is better.
8. Tap number you decided.8.
Test pattern B is printed for manual adjustment.
Note• If you printed test pattern A on a sheet, follow the instructions on the screen and use another•
sheet of the same type of paper.
Additionally, after test pattern B is printed, follow the instructions on the screen and remove thesheet.
9. Examine test pattern B for adjustment. Determine pattern in which banding is least9.noticeable.
10. Tap number you decided.10.
The adjustment value is now registered, and adjustment is complete.
436

Fine-Tuning Paper Feed Amount
If the contrast is uneven or banding in different colors appears at 30 mm (1.2 in) intervals in printeddocuments, try executing Paper feed fine adjustment during printing to fine-tune the feed amount.
Note• The Paper feed fine adjustment menu is only displayed during printing.•
Additionally, it is displayed when you have selected Auto or Prioritize print quality in Set priority inPaper feed adjustment.
• Always execute Adjust print quality before Paper feed fine adjustment.•
Once you execute Adjust print quality, the Paper feed fine adjustment value will revert to 0.
Automatic Banding AdjustmentManual Banding Adjustment
Follow the procedure below to adjust.
1. Flick HOME screen and tap Maintenance.1.
Home Screen Menu Composition
2. Tap Paper feed fine adjustment.2.
3. Tap value.3.
At this time, if banding in dark colors appears, select a setting value in the range 1 to 5, and if banding inlight colors appears, select a setting value in the range -1 to -5.
437

Adjusting Line Length
To ensure that lines in CAD drawings are printed at exactly the right length, use Adjust feed length toadjust the amount that paper is advanced.
There are two options in Adjust feed length : Print alignment pattern and Change adjustment values.
Note• We recommend executing the adjustment if you have changed the paper type or paper size.• Always check the Set priority values before adjustment.•
Selecting Feed Amount Adjustment Method
Items to Prepare
When Using Rolls • An unused roll at least 254.0 mm (10.00 in) wide• High-precision ruler
When Using Sheets • One sheet of unused paper of at least A4/Letter size• High-precision ruler
Follow the procedure below to adjust.
1. Load paper.1.
Loading the Upper Roll on the PrinterLoading the Lower Roll on the Roll Unit (Option)Loading Sheets in the Printer
Important• Always make sure the loaded paper matches the type of paper specified.•
Adjustment cannot be completed correctly unless the loaded paper matches the settings.
2. Flick HOME screen and tap Maintenance.2.
Home Screen Menu Composition
3. Tap Paper feed adjustment.3.
4. Tap Adjust feed length.4.
5. Tap Print alignment pattern or Change adjustment values.5.
• If you tap Print alignment pattern:•
The test pattern is printed for you to measure the scale and calculate the discrepancy.
The scale bar prints "Millimeter" in 50 mm increments and "Inch" in 1-inch increments.
438

• If you tap Change adjustment values:•
No test pattern is printed.
Instead, you will measure a document already printed to determine the discrepancy.
6. Tap amount of discrepancy.6.
If the scale is shorter than the actual size, use a positive setting value.
If it is longer, use a negative value.
The feed amount can be adjusted in 0.02% increments.
439

Adjusting Vacuum Strength
When printing on heavyweight paper or paper that curls or wrinkles easily, if the Print head rubs againstpaper, adjusting the level of suction against paper on the platen may improve results.
Important• Paper rubbing against or becoming caught on the Print head may jam or result in printed documents
that are soiled.
1. On the HOME screen, tap paper information area.1.
2. Select paper source and tap Paper settings.2.
3. Tap Advanced.3.
4. Tap Transport unit vacuum strength.4.
5. Tap vacuum strength.5.
440

Maintenance and Consumables
Ink Tanks
Ink Tanks
Replacing Ink Tanks
Checking Ink Tank Levels
When to Replace Ink Tanks
Print Head
Print Head
Checking for Nozzle Clogging
Cleaning the Print Head
Replacing the Print Head
Maintenance Cartridge
Maintenance Cartridge
Replacing the Maintenance Cartridge
Checking the Remaining Maintenance Cartridge Capacity
When to Replace the Maintenance Cartridge
Cutter Blade
Cutter Blade
Replacing the Cutter Blade
Performing Maintenance Functions from Your Computer (Windows)
Cleaning the Print Heads
Printing a Nozzle Check Pattern
Performing Maintenance Functions from Your Computer (macOS)
Opening Remote UI for Maintenance
Cleaning the Print Heads
Printing a Nozzle Check Pattern
Cleaning the Printer
441

Cleaning the Printer Exterior
Cleaning Inside the Top Cover
Cleaning the Roll Unit
Cleaning the Print Head
Other Maintenance
Preparing to Transfer the Printer
Reinstalling the Printer
Firmware update
442

Ink Tanks
Ink Tanks
Replacing Ink Tanks
Checking Ink Tank Levels
When to Replace Ink Tanks
443

Ink Tanks
The printer supports the following ink tanks.
When purchasing, check the Model number.
• 160 ml(5.4 fl oz)•
• 330 ml(11.2 fl oz)•
• 700 ml(23.7 fl oz)•
Checking Ink Model Number
Checking Using Web Browser
1. Start up Remote UI.1.
Start up Remote UI
2. Select Ink model number.2.
444

Checking Using Canon IJ Status Monitor ( Windows )
1. Start up Canon IJ Status Monitor.1.
Canon IJ Status Monitor
2. Click Estimated ink levels.2.
3. Click Ink Model Number.3.
Note• For instructions on replacing the ink tanks, see Replacing Ink Tanks.
445

Replacing Ink Tanks
Compatible Ink TanksFor details on compatible ink tanks, see Ink Tanks.
You can replace ink tanks in 5.4 fl oz (160 ml), 11.2 fl oz (330 ml), and 23.7 fl oz (700 ml) capacities.
Note• Depending on the color, you can also use an ink tank with a different capacity.
Precautions When Handling Ink TanksTake the following precautions when handling ink tanks.
Caution• For safety, keep ink tanks out of the reach of children.• If ink is accidentally ingested, contact a physician immediately.
Important• There may be ink around the ink holes of an ink tank you removed. Handle the ink tanks carefully
during replacement. The ink may stain clothing.• Do not install ink tanks used in this printer in another printer. This will prevent correct ink level
detection, which may damage the printer or cause other problems.• We recommend using up an ink tank in the course of printing within six months after breaking the
seal. Printing quality may be affected if you use older ink tanks.• Do not leave the printer without ink tanks installed for extended periods (a month or more). Residual
ink may become clogged inside the printer and affect printing quality.
How to Replace an Ink TankIf a message indicates you should replace an ink tank, check the message details and go to step 2.
1. Selecting Ink Tank Replacement from Menu2. Removing Ink Tanks2.
Removing ink tank (5.4 fl oz (160 ml) / 11.2 fl oz (330 ml))Removing ink tank (23.7 fl oz (700 ml))
3. Loading New Ink Tanks3.
Loading ink tank (5.4 fl oz (160 ml) / 11.2 fl oz (330 ml))Loading ink tank (23.7 fl oz (700 ml))
Important• Do not remove an ink tank during initialization immediately after turning on the printer, or during print
head cleaning. Ink may leak out.
446

Note• Ink tank replacement is possible even during printing, when print jobs are being canceled, or when
paper is being advanced.
Selecting Ink Tank Replacement from Menu
1. Tap ink display area on HOME screen.1.
Home Screen Menu Composition
The Current estimated ink levels screen appears.
2. Tap Replace.2.
Instructions for the ink tank replacement procedure appear on the touch screen.
Removing ink tank (5.4 fl oz (160 ml) / 11.2 fl oz (330 ml))
1. Open ink tank cover and check ink lamp.1.
The ink lamp flashes if there is no ink left.
Important• Avoid jarring the printer a lot when replacing an ink tank. Handle the printer gently when
replacing tanks. Jarring the printer during printing may affect printing quality.
447

2. Pull forward handle part (A) of ink tank lock lever of color to replace while pressing button2.at B.
3. Pull out ink tank lock lever.3.
1. Pull ink tank lock lever straight up.1.
2. Pull ink tank lock lever toward the front.2.
3. Push ink tank lock lever firmly down until it does not return.3.
448

Note• Check that the ink tank lock lever does not return.
4. Remove ink tank by grips (C), and then tap OK.4.
Important• Do not turn off the power of the printer with the ink tank removed except in the case of the•
preparation for transportation. Otherwise, inside of the ink tank cover may be stained.
• Store the removed ink tank with ink remaining with the ink holes (D) facing up. Otherwise, ink•may leak and cause stains. Put the removed ink tank in a plastic bag and close the bag.
Note• Dispose of the used ink tank in accordance with local regulations.
449

Removing ink tank (23.7 fl oz (700 ml))
1. Open ink tank cover and check ink lamp.1.
The ink lamp flashes if there is no ink left.
Important• Avoid jarring the printer a lot when replacing an ink tank. Handle the printer gently when
replacing tanks. Jarring the printer during printing may affect printing quality.
2. Pull forward handle part (A) of ink tank lock lever of color to replace while pressing button2.at B.
3. Pull out ink tank lock lever.3.
1. Pull ink tank lock lever straight up.1.
450
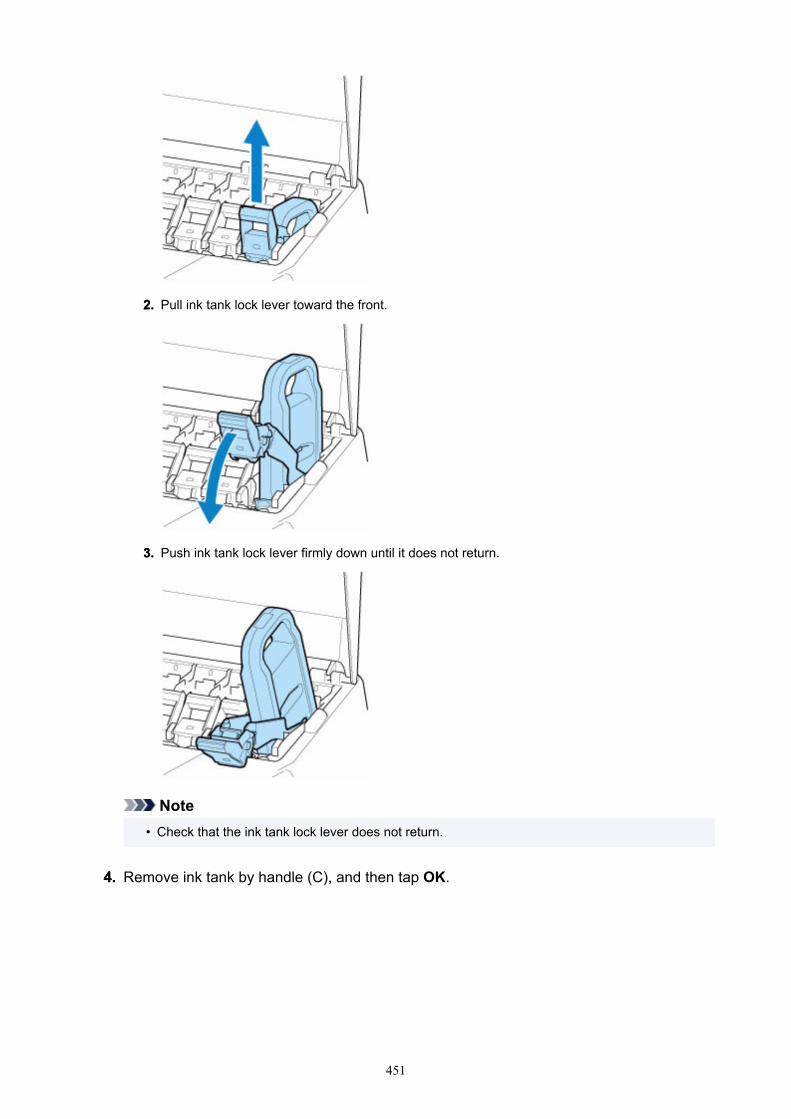
2. Pull ink tank lock lever toward the front.2.
3. Push ink tank lock lever firmly down until it does not return.3.
Note• Check that the ink tank lock lever does not return.
4. Remove ink tank by handle (C), and then tap OK.4.
451

Important• Do not turn off the power of the printer with the ink tank removed except in the case of the•
preparation for transportation. Otherwise, inside of the ink tank cover may be stained.
• Store the removed ink tank with ink remaining in the box with the ink holes (D) facing up.•Otherwise, ink may leak and cause stains.
Note• Dispose of the used ink tank in accordance with local regulations.
Loading ink tank (5.4 fl oz (160 ml) / 11.2 fl oz (330 ml))
1. Before opening the pouch, tilt the ink tank to the left and right gently seven or eight times.1.
452

Important• Do not remove and agitate an ink tank that has already been installed in the printer. Ink may
leak out.• Failure to agitate the ink tank may cause the ink components to precipitate and may affect
printing quality.
Note• If the ink tank is at a low temperature, allow it to warm up to room temperature before installing.
2. Open the pouch and remove the ink tank.2.
Important• Never touch the ink holes (D) or the metal contacts (E). This may cause stains, damage the ink•
tank, and affect printing quality.
• Avoid dropping the ink tank after removing it from the pouch. Otherwise, ink may leak andcause stains.
3. Tap OK and insert ink tank into holder with ink holes down and metal contacts at rear.3.
453

Important• An ink tank cannot be loaded in the holder if the color or orientation is incorrect.•
If the ink tank does not fit in the holder, do not force it into the holder. Reinstall while checkingthe label color display, ink tank color, and ink tank orientation.
4. Lift up ink tank lock lever, and then push it down.4.
5. Push handle part of ink tank lock lever firmly all the way in.5.
454

6. Make sure ink lamp is lit.6.
Note• If the ink lamp is not lit, reload the tank.
7. Close ink tank cover.7.
455

Loading ink tank (23.7 fl oz (700 ml))
1. Before opening the pouch, hold the new ink tank with both hands and tilt it to the left and1.right as shown, shaking it gently seven or eight times.
Caution• A 23.7 fl oz (700 ml) ink tank is heavy, so use your whole arm to agitate it instead of just your
wrist. If you agitate the ink tank using just your wrist, you may injure your wrist.
Important• Do not remove and agitate an ink tank that has already been installed in the printer. Ink may
leak out.• Failure to agitate the ink tank may cause the ink components to precipitate and may affect
printing quality.
Note• If the ink tank is at a low temperature, allow it to warm up to room temperature before installing.
2. Open the pouch and remove the ink tank.2.
456

Important• Never touch the ink holes (D) or the metal contacts (E). This may cause stains, damage the ink•
tank, and affect printing quality.
• Avoid dropping the ink tank after removing it from the pouch. Otherwise, ink may leak andcause stains.
3. Tap OK and insert ink tank into holder with ink holes down and metal contacts at rear.3.
457

Important• An ink tank cannot be loaded in the holder if the color or orientation is incorrect.•
If the ink tank does not fit in the holder, do not force it into the holder. Reinstall while checkingthe label color display, ink tank color, and ink tank orientation.
4. Lift up ink tank lock lever, and then push it down.4.
5. Push handle part of ink tank lock lever firmly all the way in.5.
6. Make sure ink lamp is lit.6.
458

Note• If the ink lamp is not lit, reload the tank.
7. Close ink tank cover.7.
459

Checking Ink Tank Levels
On the touch screen, you can check how much ink is left in the ink tank.
1. Tap ink display area on HOME screen.1.
Home Screen Menu Composition
The Current estimated ink levels screen appears.
This printer has ink tanks (A) and sub-ink tanks (B). Even if ink runs out, printing can continue with ink inthe sub-ink tanks.
When the remaining ink is low, will appear on the remaining ink level. When ink runs out, willappear. See the figure below.
If the touch screen indicates to replace the ink tank, replace the ink tank. If a message is displayedindicating to check the remaining ink levels, or after tasks that consume a lot of ink such as large-formatprinting or head cleaning, check the remaining levels and replace ink tank as needed.
Replacing Ink Tanks
460

Note• Tap Order ink now to view the ink supplier information.• When the ink tank is replaced, the sub-ink tank will be filled with ink.•
During this time, is displayed above the ink level.
461

When to Replace Ink Tanks
Replace or prepare to replace ink tanks in the following situations.
• If ink confirmation message appears on touch screen•
If ink is low, the Status lamp lights orange and a notification message will appear on the touch screen.You can continue to print, but prepare the ink tanks.
Checking Ink Tank Levels
• Before print jobs and maintenance that consume a lot of ink•
If little ink is left, there may not be enough for large-format printing, head cleaning, and maintenance,which require a lot of ink. Replace or prepare to replace the ink tanks in the following situations.
Checking Ink Tank Levels
• If message for ink replacement appears on touch screen•
When the ink runs out, the Status lamp flashes orange, a message regarding ink tanks replacementappears on the touch screen, and printing is disabled. Replace the ink tank.
Replacing Ink Tanks
462

Print Head
Print Head
Checking for Nozzle Clogging
Cleaning the Print Head
Replacing the Print Head
463

Print Head
When purchasing, check the Model number.
Model number: PF-06
Note• For instructions on replacing the print head, see Replacing the Print Head.
464

Checking for Nozzle Clogging
If printing is faint or affected by banding in different colors, make sure the print head nozzles are clear byprinting a test pattern to check the nozzles.
Note• By default, nozzles are checked at fixed intervals.•
Auto maintenance settings
Paper to Prepare
When using rollsAn unused roll at least 10.00 in. (254.0 mm) wide
When using sheetsOne sheet of unused paper of at least A4/Letter size
1. Load paper.1.
Loading the Upper Roll on the PrinterLoading the Lower Roll on the Roll Unit (Option)Loading Sheets in the Printer
2. Tap Maintenance on HOME screen.2.
Home Screen Menu Composition
The Maintenance screen appears.
3. Tap Nozzle Check.3.
A confirmation message appears.
4. Tap Yes.4.
The printer now prints a test pattern for checking the nozzles.
5. Check the printing results.5.
If the horizontal lines are not faint or incomplete, the nozzles are clear.
If some sections of the horizontal lines are faint or incomplete, the nozzles for those colors are clogged.
If horizontal lines are faint or incomplete, execute print head cleaning.
465

Cleaning the Print Head
466

Cleaning the Print Head
If printing is faint, cleaning the print head may improve results.
Choose one of three print head cleaning modes (Cleaning, Deep Cleaning, or System Cleaning),depending on the problem to resolve.
• Cleaning•
Use this mode if printing is faint or contains foreign substances. This method of cleaning consumes theleast amount of ink.
It takes about 3 to 4 minutes.
• Deep Cleaning•
Use this mode if no ink is ejected at all or if Cleaning does not solve the problem.
It takes about 3 to 4 minutes.
• System Cleaning•
Use this mode if printing is not improved after Deep Cleaning. System Cleaning consumes a verylarge amount of ink. Performing this frequently consumes the ink faster. Perform this only when needed.
It takes about 4 to 5 minutes.
Important• Do not remove the maintenance cartridge or ink tanks during Cleaning, Deep Cleaning, or System•
Cleaning.
Ink may leak or an error may occur.
• If printing is not improved after System Cleaning, the print head may be at the end of its service life.Contact your Canon dealer for assistance.
Note• Check the nozzle check pattern and select an ink group for which to perform cleaning as needed. You•
can clean all print head or select the pattern below to clean the print head with a clogged nozzle.
467

• By default, nozzles are checked at fixed intervals.•
Auto maintenance settings
Perform cleaning as follows.
1. Tap Maintenance on HOME screen.1.
Home Screen Menu Composition
The Maintenance screen appears.
2. Tap Print Head Cleaning.2.
3. Tap Cleaning, Deep Cleaning, or System Cleaning.3.
4. Tap ink group to be cleaned.4.
• All colors• Pattern 1: MBK / BK• Pattern 2: Y / M / C
A confirmation message appears.
5. Tap Yes.5.
Head cleaning is now executed.
6. Print a test pattern to check the nozzles and determine whether cleaning has cleared the6.nozzles.
Checking for Nozzle Clogging
468

Replacing the Print Head
If the touch screen indicates to replace the print head or if instructed to do so by your Canon dealer, replacethe print head.
Compatible Print HeadFor details on compatible print head, see Print Head.
Precautions When Handling Print HeadTake the following precautions when handling the print head.
Caution• For safety, keep print head out of the reach of children.• If ink is accidentally ingested, contact a physician immediately.• Do not touch the print head immediately after printing. The print head becomes extremely hot, and
there is a risk of burns.
Important• There may be ink around the nozzles of the print head you remove. Handle the print head carefully
during replacement. The ink may stain clothing.• Do not open the print head pouch until immediately before installation. After removing the print head
from the pouch, install it right away. If the print head is left as is after the pouch is opened, thenozzles may dry out, which may affect printing quality.
How to Replace Print Head
Caution• When replacing the print head immediately after printing, wait a few minutes before replacing it. The
metal parts of the print head become hot during printing, and there is a risk of burns from touchingthese parts.
Important• Your hands may become dirty during print head replacement. Use the gloves provided in the box with
the new print head for replacement.
Note• Prepare a new ink tank when ink levels are low.• Prepare a new maintenance cartridge when the remaining capacity of the maintenance cartridge is
low.
1. Remove any paper that has been fed.1.
• When using a roll, rewind it.•
Removing the Upper Roll from the Printer
469

Removing the Lower Roll from the Roll Unit (Option)
• When using sheets, remove the sheet.•
Removing Sheets
2. Clean inside top cover.2.
Cleaning Inside the Top Cover
3. Tap Maintenance on HOME screen.3.
Home Screen Menu Composition
The Maintenance screen appears.
4. Tap Head Replacement.4.
A confirmation message appears.
5. Tap Start head replacement..5.
Ink begins being drawn in. When it finishes, instructions for the print head replacement procedureappear on the touch screen.
It takes about 3 minutes for ink to be drawn into the system and remove ink from the print head.
6. Open top cover.6.
7. If the print head locking cover and print head lock lever are dirty, use a damp cloth that7.you have wrung out completely to wipe them clean.
470
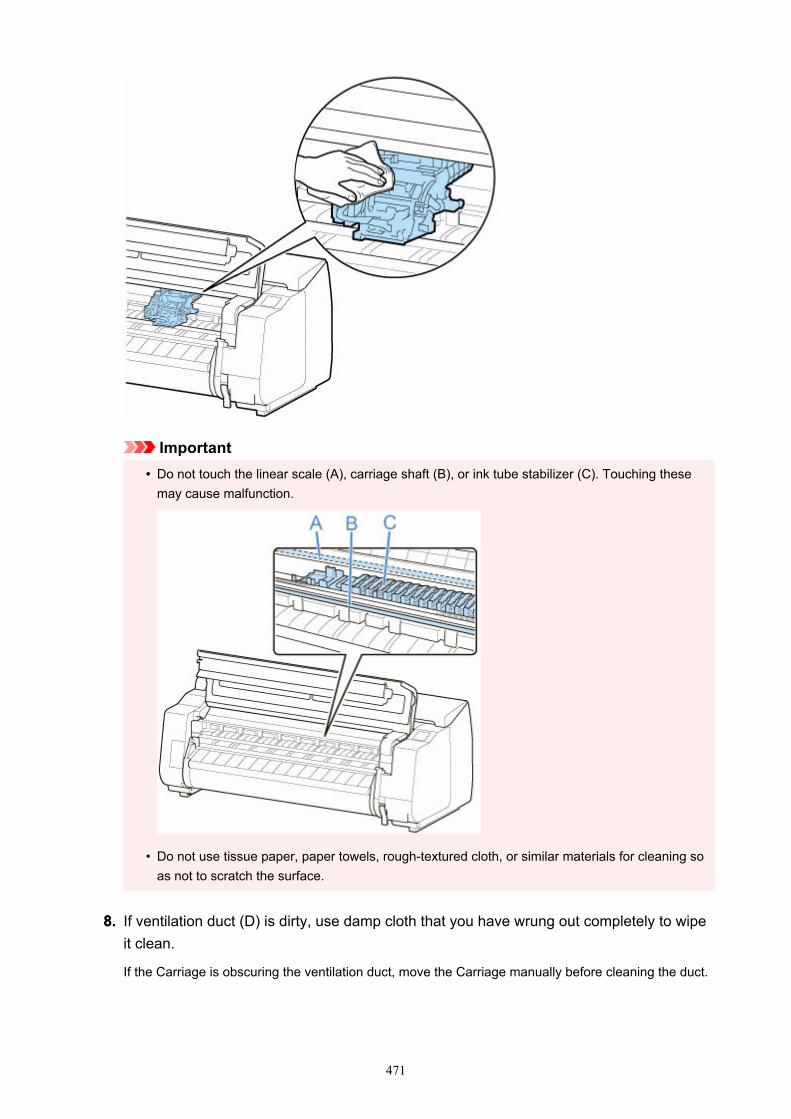
Important• Do not touch the linear scale (A), carriage shaft (B), or ink tube stabilizer (C). Touching these•
may cause malfunction.
• Do not use tissue paper, paper towels, rough-textured cloth, or similar materials for cleaning soas not to scratch the surface.
8. If ventilation duct (D) is dirty, use damp cloth that you have wrung out completely to wipe8.it clean.
If the Carriage is obscuring the ventilation duct, move the Carriage manually before cleaning the duct.
471

9. Put your finger on center part (E) of print head lock lever and tilt it toward the front.9.
10. Grab grip (F) and open print head locking cover.10.
11. Remove print head by grabbing grip (G), and then tap OK.11.
472

Important• Never touch the metal contacts of the carriage. Furthermore, do not allow any dirt or debris to
become adhered to the metal contacts of the carriage. These may damage the printer.
Note• Dispose of the used print head in accordance with local regulations.
12. Take print head out of pouch by grabbing the grip (G).12.
13. Remove orange protective caps (H,I).13.
Hold grip (J) and remove protective cap (I).
473

Important• Always handle the print head by the right and left grips. Never touch nozzle (K) or metal
contacts (L). This may damage the print head and affect printing quality.• Never touch the ink holes (M). This may affect printing quality.•
• The inside surface of the protective cap is coated with ink to protect the nozzle. Be careful notto touch these surfaces when removing the caps.
• The print head contains ink to protect the nozzle. We recommend removing the protective capwhile holding it over the pouch that contained the print head or otherwise safely out of the wayto avoid spilling ink and staining your clothes or the surrounding area. If ink accidentally spills,wipe off the ink with a dry cloth.
• If you need to put a print head somewhere temporarily before installation, do not set it downwith the nozzles and metal contacts facing down. If the nozzles or metal contacts are damaged,it may affect the printing quality.
• Do not reattach the removed protective part. Dispose of these materials in accordance withlocal regulations.
14. Turn ink holes (M) toward the front and insert print head into carriage.14.
Insert the print head all the way into the carriage, while taking care to keep parts that were protectedby the protective caps from touching the carriage.
474

15. Grasp tab (F) of print head locking cover and lower it to front to lock print head.15.
16. While holding center part (E) of print head lock lever, lower it toward back.16.
17. Adjust angle adjustment lever to the position of the red square.17.
475

18. Close top cover.18.
Ink now fills the print head. It takes about 12 minutes.
Important• While ink is being filled, definitely do not remove the ink tank or maintenance cartridge. Ink may
leak out.
Note• Print head position adjustment is executed when Print pattern after new head is set to ON.•
Follow the instructions on the touch screen to load paper.
Auto maintenance settings
476

Maintenance Cartridge
Maintenance Cartridge
Replacing the Maintenance Cartridge
Checking the Remaining Maintenance Cartridge Capacity
When to Replace the Maintenance Cartridge
477

Maintenance Cartridge
When purchasing, check the Model number.
Model number: MC-30
Note• For instructions on replacing the maintenance cartridge, see Replacing the Maintenance Cartridge.
478

Replacing the Maintenance Cartridge
Compatible Maintenance CartridgesFor details on compatible maintenance cartridge, see Maintenance Cartridge.
Precautions When Handling Maintenance CartridgeTake the following precautions when handling the maintenance cartridge.
Caution• For safety, keep maintenance cartridge out of the reach of children.• If ink is accidentally ingested, contact a physician immediately.
Important• Do not remove the maintenance cartridge except to replace it. Ink may leak out.• Do not remove a maintenance cartridge during initialization immediately after turning on the printer,•
during print head cleaning, while ink is being drawn out, or during initialization immediately afterreplacing the maintenance cartridge.
The maintenance cartridge may become damaged or ink may leak out.
• To prevent ink from leaking from a used maintenance cartridge, avoid dropping the cartridge orstoring it at an angle. Otherwise, ink may leak and cause stains.
• Ink adheres to the top of the maintenance cartridge after it has been used. Handle the maintenancecartridge carefully during replacement. The ink may stain clothing.
How to Replace a Maintenance CartridgeIf a message indicates you should replace a maintenance cartridge, check the message details and go tostep 4.
1. Tap Maintenance on HOME screen.1.
Home Screen Menu Composition
The Maintenance screen appears.
2. Tap Maintenance cartridge info.2.
The Maintenance cartridge info screen appears.
3. Tap Replace.3.
Instructions for the maintenance cartridge replacement procedure appear on the touch screen.
4. Open box, and remove plastic bag and maintenance cartridge.4.
479

Important• Never touch the metal contacts (A). This may damage the maintenance cartridge.•
5. Open maintenance cartridge cover.5.
6. Hold the used maintenance cartridge by the grip (B) with one hand and put your other6.hand under the maintenance cartridge to hold it firmly on the bottom, keeping it level asyou pull it out.
480

Important• A used maintenance cartridge is heavy. Always grasp the cartridge firmly and keep the
cartridge level during removal. If you drop a used maintenance cartridge or store it at an angle,ink may leak and cause stains.
7. Put used maintenance cartridge in supplied plastic bag and store on flat surface.7.
8. Check the top and bottom of the maintenance cartridge, place in the box, and store the8.box on a flat surface.
Important• Always put the used maintenance cartridge back in the box and store the box on a flat surface.
Note• Dispose of the used maintenance cartridge in accordance with local regulations.
9. Wipe away any soiling on the maintenance cartridge cover.9.
481

Important• Support the maintenance cartridge cover from underneath as you wipe it.
10. Keeping the new maintenance cartridge level, insert it all the way in.10.
The maintenance cartridge is initialized.
Important• Do not remove the maintenance cartridge during initialization immediately after replacing the
maintenance cartridge. The maintenance cartridge may become damaged.
11. Close maintenance cartridge cover.11.
482

483

Checking the Remaining Maintenance Cartridge Capacity
The maintenance cartridge absorbs excess ink from borderless printing and print head cleaning. You canconfirm the remaining capacity of the maintenance cartridge by checking the touch screen.
1. Tap Maintenance on HOME screen.1.
Home Screen Menu Composition
The Maintenance screen appears.
2. Tap Maintenance cartridge info.2.
The Maintenance cartridge info screen appears.
If the touch screen indicates to replace the maintenance cartridge, replace the maintenance cartridge.
If a message appears indicating to check the remaining capacity of the maintenance cartridge, or beforetasks that deplete much of the capacity such as head cleaning or preparations to move the printer, checkthe remaining maintenance cartridge capacity and prepare a new maintenance cartridge as needed.
Replacing the Maintenance Cartridge
484

When to Replace the Maintenance Cartridge
Replace or prepare to replace the maintenance cartridge in the following situations.
• If maintenance cartridge confirmation message appears on touch screen•
When the maintenance cartridge is almost used up, the Status lamp lights orange and a notificationmessage will appear on the touch screen. You can continue to print, but check the remainingmaintenance cartridge capacity and prepare to replace the maintenance cartridge with a new one.
Checking the Remaining Maintenance Cartridge Capacity
• When the maintenance cartridge capacity is drastically depleted•
Print head cleaning, print head replacement, and preparations to transfer the printer deplete much ofthe maintenance cartridge capacity. (In particular, preparing to move the printer depletes a lot of thecapacity.)
Check the remaining maintenance cartridge capacity before this maintenance and replace themaintenance cartridge if necessary.
Checking the Remaining Maintenance Cartridge Capacity
• If message for maintenance cartridge replacement appears on touch screen•
When the maintenance cartridge is used up, the Status lamp blinks orange, a message regardingmaintenance cartridge replacement appears on the touch screen, and printing is disabled. Replace themaintenance cartridge with a new one.
Replacing the Maintenance Cartridge
485

Cutter Blade
Cutter Blade
Replacing the Cutter Blade
486

Cutter Blade
When purchasing, check the Model number.
This cutter blade comes with a part for securing the cutter blade during installation.
Model number: CT-07
Note• For instructions on replacing the cutter blade, see Replacing the Cutter Blade.
487

Replacing the Cutter Blade
Compatible Cutter BladeFor details on compatible cutter blade, see Cutter Blade.
How to Replace Cutter Blade
Important• The cutter blade can not be replaced if there is paper in the moving range of the cutter. Remove the
paper.
1. Tap Maintenance on HOME screen.1.
Home Screen Menu Composition
The Maintenance screen appears.
2. Tap Replace cutter blade unit.2.
A confirmation message appears.
3. Tap Yes.3.
The carriage moves and after it stops moving, instructions for the cutter blade replacement procedureappear on the touch screen.
Note• If you do not take action within 2 minutes, cutter blade replacement is canceled. In this case,
start over replacement from the beginning.
4. Open top cover.4.
5. If cutter blade is dirty, use damp cloth that you have wrung out completely to wipe it5.clean.
488

Important• Do not use tissue paper, paper towels, rough-textured cloth, or similar materials for cleaning so
as not to scratch the surface.• Do not touch the linear scale (A), carriage shaft (B), or ink tube stabilizer (C). Touching these•
may cause malfunction.
6. Turn hex screw with hex wrench until loose.6.
7. Remove cutter blade while holding D.7.
489

Caution• Never touch any part other than D. This may stain your hands or cause injury. Additionally, this
may damage the printer.• Do not disassemble the cutter blade. Touching the blade may cause injury.
Note• Dispose of the used cutter blade in accordance with local regulations.
8. Install new cutter blade while aligning E to F and G to H.8.
9. Install while aligning fixing part included with replacement cutter blade with center of9.cutter blade.
490

10. Turn hex screw until securely fixed.10.
Important• After the cutter blade is secured, check that the cutter blade does not come off. If the cutter
blade comes off, this may damage the printer.
11. Remove fixing part.11.
491

Important• Always remove the fixing part. Operating with the part installed may damage the printer.
12. Close top cover.12.
A confirmation message will appear.
13. Tap Yes.13.
492

Performing Maintenance Functions from Your Computer(Windows)
Cleaning the Print Heads
Printing a Nozzle Check Pattern
493

Cleaning the Print Heads
The print head cleaning function allows you to clear up clogged print head nozzle. Perform print headcleaning if printing is faint or a specific color fails to print, even though there is enough ink.
The procedure for print head cleaning is as follows:
Print Head Cleaning
1. Open the printer driver setup window1.
2. Click Print Head Cleaning on the Utility tab2.
When the Print Head Cleaning dialog box opens, select the head cleaning to be performed from thefollowing:
CleaningPerform Cleaning if printing is faint or a specific color fails to print, even though there is enoughink.
System CleaningSystem Cleaning is a more powerful cleaning function. Perform System Cleaning if there is noimprovement even after repeating Cleaning several times.
Important• System Cleaning consumes an extremely large amount of ink.
Executing system cleaning frequently will rapidly deplete your printer's ink supply. Therefore,execute system cleaning only when necessary.
3. Execute cleaning3.
Make sure that the printer is on and then click OK.
Print head cleaning starts.
Note• After Cleaning or System Cleaning is complete, perform Print Nozzle Check Pattern and check the
cleaning results.
Related TopicPrinting a Nozzle Check Pattern
494

Printing a Nozzle Check Pattern
The nozzle check function allows you to check whether the print head is working properly by printing anozzle check pattern. Print the pattern if printing becomes faint, or if a specific color fails to print.
The procedure for printing a nozzle check pattern is as follows:
Print Nozzle Check Pattern
1. Open the printer driver setup window1.
2. Load paper in the printer2.
3. Click Print Nozzle Check Pattern on the Utility tab3.
The Print Nozzle Check Pattern dialog box opens.
4. Select the paper source4.
Select the paper source from the displayed dialog box.
5. Print a nozzle check pattern5.
Make sure that the printer is on and click OK.Printing of the nozzle check pattern begins.
Click OK when the confirmation message appears.
6. Check the print result6.
Check the print results.
(A) As long as the horizontal lines are in line, and not missing, the nozzle is working normally.(B) Where the horizontal lines are not in line or are missing, the color nozzle is blocked.
Note• From the nozzle check pattern printing results, if it becomes patchy or there are areas that
cannot be printed, use Print Head Cleaning to clean the print heads.Once cleaning is complete, print the nozzle check pattern again and check the results.
495

Related TopicCleaning the Print Heads
496

Cleaning the Printer
Cleaning the Printer Exterior
Cleaning Inside the Top Cover
Cleaning the Roll Unit
Cleaning the Print Head
497

Cleaning the Printer Exterior
Clean the printer regularly to maintain better printing quality and help prevent problems.
To ensure a comfortable working environment, clean the printer exterior about once a month.
Important• When the sensor of the feed slot is dirty, the printer might not perform auto feeding properly. Even if the
sensor seems clean, we recommend cleaning it because it may have paper dust on it.
1. Turn printer off.1.
Turning the Printer On and Off
2. Unplug power cord from outlet.2.
Caution• Always turn off the printer and unplug the power cord before cleaning or maintenance.
Accidentally leaving the printer on poses a risk of injury if you touch moving parts inside theprinter.
3. Wring out soft cloth with water or watered-down neutral detergent, and use it to wipe off dirt.3.
Clean the printer exterior and the power cord plug.
Open the top cover and output guide and clean parts that come in contact with paper (A, B), sensor (C)and window on the back side of the top cover.
498

Warning• Never use flammable solvents such as alcohol, benzine, or thinner. If these substances come into
contact with electrical components inside the printer, there is a risk of fire or electrical shock.
Important• If the output guide is dirty, it may soil the edge of the paper when the paper is cut. We recommend•
cleaning the output guide even if it does not appear dirty, because it may actually be covered withpaper dust.
Cleaning Inside the Top Cover
• Do not use tissue paper, paper towels, rough-textured cloth, or similar materials for cleaning so asnot to scratch the surface.
• When neutral detergent is used, be sure to wipe off the detergent with soft cloth with water.
4. When dirt is wiped off, wipe off water with dry soft cloth.4.
5. Plug power cord into outlet.5.
499

Cleaning Inside the Top Cover
Clean inside the top cover about once a month to maintain better printing quality and help prevent problems.
Also clean inside the top cover in the following situations to ensure optimal operation.
• If the printed surface or the underside of paper is dirty after printing• After you have used up a roll• After borderless printing• After printing on small paper• After printing on paper that generates a lot of cutting debris• If you have replaced the roll• After printing on paper that generates a lot of paper dust• After printing on adhesive paper
Important• If the platen inside the top cover becomes dirty, it may soil the underside of paper. We recommend
cleaning the platen after borderless printing or printing on small paper.• If the output guide is dirty, it may soil the edge of the paper when the paper is cut. We recommend
cleaning the output guide even if it does not appear dirty, because it may actually be covered withpaper dust.
• Printing on adhesive paper may leave adhesive on the platen, paper retainer, or other parts. To preventpaper jams, we recommend cleaning inside the top cover after printing.
• Cleaning may not be performed if there is paper in the cleaning area. Remove the paper.
1. Tap Maintenance on HOME screen.1.
Home Screen Menu Composition
The Maintenance screen appears.
2. Tap Platen cleaning.2.
A confirmation message appears.
3. Tap Yes.3.
The carriage moves and after it stops moving, instructions appear on the touch screen.
4. Open top cover.4.
500

5. If paper dust has accumulated in vacuum holes (A) on platen or in borderless printing ink5.grooves (B), use cleaning brush (C), provided with printer, to wipe it away.
Important• Do not touch the linear scale (D), carriage shaft (E), or ink tube stabilizer (F). Touching these may•
cause malfunction.
Note• If the cleaning brush is dirty, rinse it in water.
501

6. Using a damp cloth that you have wrung out completely, wipe inside the top cover to clean6.it.
Wipe away any ink residue and paper dust (debris from cutting) on top cover roller (G), paper retainer(H), entire platen (I), borderless printing ink grooves (J), periphery of left and right ink suction holes (K,L), and output guide (M), and so on.
Warning• Never use flammable solvents such as alcohol, benzine, or thinner. If these substances come into
contact with electrical components inside the printer, there is a risk of fire or electrical shock.
Important• Do not use a dry cloth to wipe inside the top cover. This may create a static charge, which may
attract dust and affect the printing quality.• Do not use tissue paper, paper towels, rough-textured cloth, or similar materials for cleaning so as
not to scratch the surface.
7. Close top cover.7.
502

503

Cleaning the Roll Unit
About once a month, clean the roll unit to ensure optimal operation.
Important• When the sensor of the feed slot is dirty, the printer might not perform auto feeding properly. Even if the
sensor seems clean, we recommend cleaning it because it may have paper dust on it.
1. Remove any roll paper loaded in roll unit.1.
Removing the Lower Roll from the Roll Unit (Option)
2. Turn printer off.2.
Turning the Printer On and Off
3. Unplug power cord from outlet.3.
Caution• Always turn off the printer and unplug the power cord before cleaning or maintenance.
Accidentally leaving the printer on poses a risk of injury if you touch moving parts inside theprinter.
4. Wipe away any residue and paper dust from areas (A, B) that come in contact with paper4.and sensor (C) with a thoroughly wrung out damp cloth, and wipe dry with a dry cloth.
504

Warning• Never use flammable solvents such as alcohol, benzine, or thinner. If these substances come into
contact with electrical components inside the roll unit, there is a risk of fire or electrical shock.
5. Plug power cord into outlet.5.
505

Other Maintenance
Preparing to Transfer the Printer
Reinstalling the Printer
Firmware update
506

Preparing to Transfer the Printer
To protect the internal parts in transit, always follow these steps before transferring the printer to a newlocation.
For details on installing the printer after transfer, see Reinstalling the Printer.
Important• Be sure to contact your Canon dealer before transferring the printer to a new location. Ink may leak and
damage the printer if you do not prepare the printer correctly and it is tipped or stood on end in transit.• When moving the printer, make sure that the basket does not rub against the floor. If the basket rubs on
the floor, it may get dirty or damaged.
Note• The maintenance cartridge replacement may be required when you execute the Prepare to
move menu. Prepare the maintenance cartridge in advance while referring below. The numberof maintenance cartridge required varies depending on the amount remaining in the maintenancecartridge being used.
• If you can move the printer in a level state using casters or something similar, you do not need toexecute Prepare to move.
• Always follow the instructions of the service representative when preparing to transfer the printer.•
The following lists transport restrictions by type of transport.
Move indoors on the same floor
Usage Examples: Move indoors by carrying
Transport and storage in low temperature environments: NoPermitted angle of inclination: All directions: within 30°Required maintenance cartridges: 1-2
Move indoors to a different floor
Usage Examples: Moving the printer while temporarily tilting it such as when using the stairs
Transport and storage in low temperature environments: NoPermitted angle of inclination: All directions: within 90°Required maintenance cartridges: 1-2
Transport outdoors
Usage Examples: Transport By Vehicle
Transport and storage in low temperature environments: YesPermitted angle of inclination: All directions: within 90°Required maintenance cartridges: 2
Preparing for Transportation
1. Remove the paper.1.
• Rolls•
507

Removing the Upper Roll from the PrinterRemoving the Lower Roll from the Roll Unit (Option)
• Sheet•
Removing Sheets
2. If touch screen indicates to replace maintenance cartridge, replace maintenance2.cartridge.
Replacing the Maintenance Cartridge
3. Tap Maintenance on HOME screen.3.
Home Screen Menu Composition
The Maintenance screen appears.
4. Tap Prepare to move.4.
5. Tap Move indoors on the same floor, Move indoors to a different floor or Transport5.outdoors.
A confirmation message appears.
6. Tap Yes.6.
The printer is now prepared for transfer.
When the preparation is finished, a message prompting you to open the ink tank cover appears on thetouch screen.
Important• If consumables must be replaced, a message appears on the touch screen, and preparation is
disabled. If the message appears, tap OK and contact your Canon dealer for assistance.
7. Open ink tank cover to remove all ink tanks.7.
Replacing Ink Tanks
8. Push down release lever (A) as shown as you gently return all ink tank lock levers to their8.original positions.
508

9. Close ink tank cover.9.
Ink is now drawn into the maintenance cartridge.
A confirmation message will appear when the process is finished.
Important• Do not remove the maintenance cartridge except when the message indicating replacement is•
displayed.
If you remove the maintenance cartridge while ink is being removed, the ink may leak out.
10. Press ON button and turn off printer.10.
Packing Printer
1. Disconnect power cord and interface cable.1.
Important• Turn off the printer before you unplug it. Unplugging the printer before it is off and moving it may
damage the printer. If you accidentally unplug the printer, plug it in again, reinstall the ink tanks,and follow this procedure again.
2. Open top cover.2.
509

3. Grasp Belt and insert Belt Stopper into position shown.3.
Important• Attach the Belt Stopper that was removed and stored after initial installation. Neglecting to
attach the Belt Stopper may damage the printer.• Do not touch the linear scale (B), carriage shaft (C), or ink tube stabilizer (D). Touching these•
may cause malfunction.
4. Close top cover.4.
510

5. Tape down printer covers to secure them, in the reverse order of tape removal during5.installation.
6. Remove basket or stacker by reversing installation procedure.6.
7. Remove roll unit by reversing installation procedure.7.
8. Remove the Stand by reversing the installation procedure, when it was attached to the8.printer.
9. Disassemble and repackage the stand by following the installation procedure in reverse.9.
10. Repack roll holder, holder stopper, and printer in shipping materials, and then package10.them in shipping box.
511

Reinstalling the Printer
The basic workflow for reinstalling the printer is as follows.
For detailed instructions, see the Setup Guide.
Assemble the stand
1. Referring to the Printer Stand Setup Guide, assemble the Stand.1.
Caution• The Stand must be assembled by at least two people on a flat surface. Attempting assembly by•
yourself poses a risk of injury or bending the Stand.
• When assembling the Stand, lock the casters. In addition, always unlock the casters before•moving the assembled Stand. Attempting to move the stand when the casters are locked posesa risk of injury or damage to the location site.
Install the printer
1. Mount the printer on the assembled Stand and tighten the screws firmly.1.
Caution• Moving the printer requires at least six people, holding it on both sides. Be careful to avoid back•
strain and other injuries.
• When carrying the printer, hold it securely by the carrying grips on the bottom left, right, and•rear. The printer may be unsteady if you hold it at other positions, which poses a risk of injuryfrom dropping the printer.
512

2. Remove tape and packaging material attached to the printer. Also open the top cover and2.remove stoppers and spacers inside the printer.
3. If using roll unit, refer to Setup Guide provided with roll unit and attach roll unit to Stand.3.
4. If using stacker, refer to Stacker Setup Guide and attach stacker to the printer.4.
513

5. If using basket, refer to Printer Stand Setup Guide and attach basket to Stand.5.
Important• The basket included with the stand cannot be used while using the stacker.•
6. Connect the power cord to the power cord connector on the back of the printer.6.
• TX-4100 / TX-5410•
• TX-3100 / TX-2100 / TX-5310 / TX-5210•
514
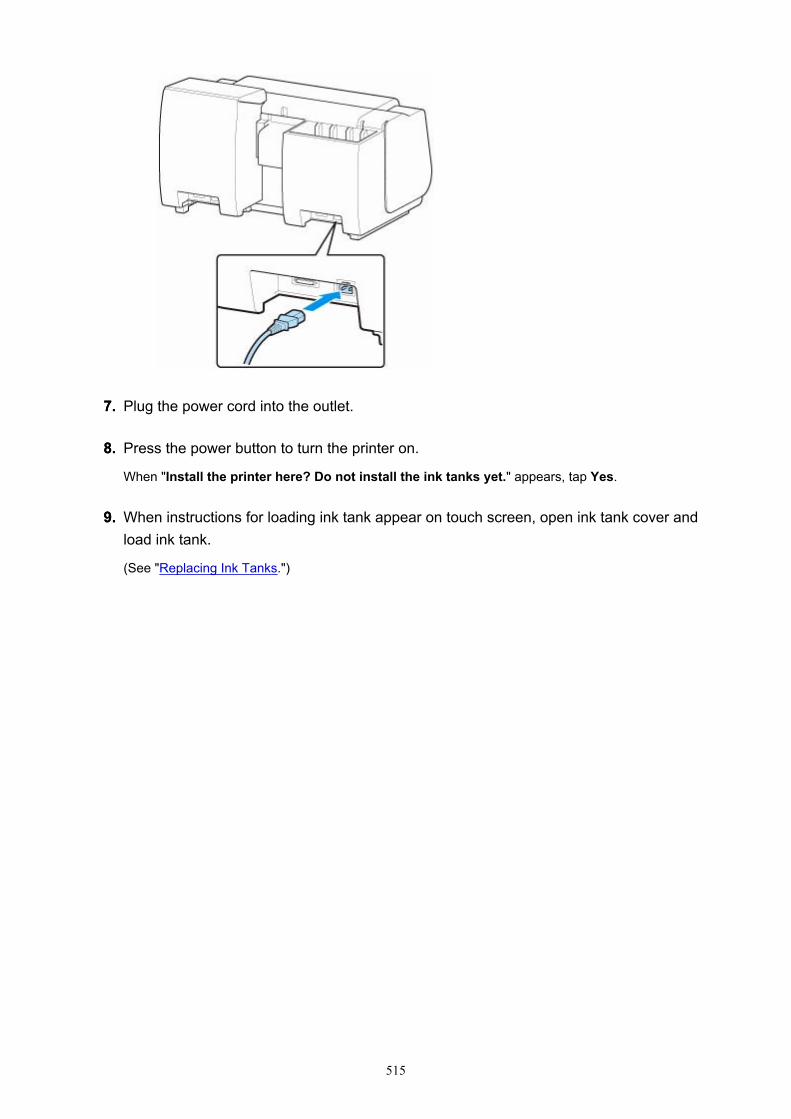
7. Plug the power cord into the outlet.7.
8. Press the power button to turn the printer on.8.
When "Install the printer here? Do not install the ink tanks yet." appears, tap Yes.
9. When instructions for loading ink tank appear on touch screen, open ink tank cover and9.load ink tank.
(See "Replacing Ink Tanks.")
515

10. Attach the Roll Holder to the Roll Media.10.
(See "Loading Rolls on the Roll Holder.")
11. Load the Roll Media in the printer.11.
(See "Loading the Upper Roll on the Printer.")
516

12. Install the software.12.
Note that the driver installation procedure varies depending on the type of connection.
(See "Installing the Printer Driver" (Windows).)
(See "Installing the Printer Driver" (macOS).)
517

Firmware update
Important• When you use this function, make sure the printer is connected to the Internet.• The administrator password is required to change settings if it is enabled for changing settings using the
operation panel.
Using Operation Panel
1. Tap Printer settings on home screen.1.
Home Screen Menu Composition
2. Tap Firmware update.2.
Enter the password if it is enabled.
3. Tap Install update.3.
4. Tap Yes.4.
5. Confirm displayed message and tap Start update.5.
Using Remote UI
1. Start up Remote UI.1.
Start up Remote UI
2. Select Firmware update.2.
3. Select Install update.3.
4. Confirm displayed message and select Update.4.
Note• If the firmware update is not complete, check the following and take an appropriate action.•
Check the network settings such as a wireless router.
If Cannot connect to the server. is displayed on the touch screen, select OK and try againafter a while.
518

Specifications
Specifications
Print Area
519

Specifications
Printer specifications
TX-4100 / TX-5410TX-3100 / TX-5310TX-2100 / TX-5210
Printing performanceMemory and hard diskInterfaceNetwork SpecificationsOperating ConditionsInkPaper
Important• The following values may vary depending on the operating environment.
Printer specifications
TX-4100 / TX-5410
Power supply 100-240 V AC (50/60 Hz)
Power consumption When printing: 116 W max. *1
In Sleep mode: 2.0 W max. *1
When power is off: 0.3 W max. *2
*1 Wired LAN connection
*2 The printer uses a trace amount of power even when turned off. To stop allpower consumption, turn off the printer and unplug the power cord.
Operating environment Temperature: 59 to 86 °F (15 to 30 °C)
Humidity: 10 to 80 % RH (with no condensation)
Dimensions (W x D x H) Printer only:
Approx. 62.8 x 28.9 x 24.8 in. (1593 x 734 x 628 mm)
Printer and Stand (when basket is not used):
Approx. 62.8 x 30.2 x 46 in. (1593 x 766 x 1168 mm)
Printer and Stand (when using basket: basket position 1) *1:
Approx. 62.8 x 38.8 x 46 in. (1593 x 984 x 1168 mm)
Printer and Stand (when using basket: basket position 2/4/5) *1:
Approx. 62.8 x 48.2 x 46 in. (1593 x 1222 x 1168 mm)
Printer and Stand (when using basket: basket position 3) *1:
Approx. 62.8 x 56.5 x 46 in. (1593 x 1434 x 1168 mm)
Printer and Stacker (Stacker position closed) *2:
520

Approx. 62.8 x 44.2 x 46 in. (1593 x 1122 x 1168 mm)
Printer and Stacker (Stacker position open) *2:
Approx. 62.8 x 46.8 x 46 in. (1593 x 1188 x 1168 mm)
*1 For details on the Basket Position, see Example Basket Configurations.
*2 For details on the Stacker Position, see Example Stacker Configurations.
Stand may not be provided depending on the region where the printer ispurchased.
Weight Printer only (without print head and ink tanks):
Approx. 211 lb (96 kg)
Stand and basket: Approx. 40 lb (18 kg)
Roll unit: Approx. 44 lb (20 kg)
Stacker: Approx. 31 lb (14 kg)
Space for installation (W x D xH)
Printer and Stand (without basket):
Approx. 78.5 x 57.8 x 61.5 in. (1993 x 1466 x 1560 mm)
Printer and Stand (when using basket) *1:
Approx. 78.5 x 66.3 x 61.5 in. (1993 x 1684 x 1560 mm)
Printer and Stacker *2:
Approx. 78.5 x 74.4 x 61.5 in. (1993 x 1888 x 1560 mm)
*1 For details on the Basket Position, see Example Basket Configurations.
*2 For details on the Stacker Position, see Example Stacker Configurations.
TX-3100 / TX-5310
Power supply 100-240 V AC (50/60 Hz)
Power consumption When printing: 115 W max. *1
In Sleep mode: 2.0 W max. *1
When power is off: 0.3 W max. *2
*1 Wired LAN connection
*2 The printer uses a trace amount of power even when turned off. To stop allpower consumption, turn off the printer and unplug the power cord.
Operating environment Temperature: 59 to 86 °F (15 to 30 °C)
Humidity: 10 to 80 % RH (with no condensation)
Dimensions (W x D x H) Printer only:
Approx. 54.8 x 28.9 x 24.8 in. (1390 x 734 x 628 mm)
Printer and Stand (when basket is not used):
Approx. 54.8 x 30.2 x 46 in. (1390 x 766 x 1168 mm)
Printer and Stand (when using basket: basket position 1) *1:
Approx. 54.8 x 38.8 x 46 in. (1390 x 984 x 1168 mm)
Printer and Stand (when using basket: basket position 2/4/5) *1:
521

Approx. 54.8 x 48.2 x 46 in. (1390 x 1222 x 1168 mm)
Printer and Stand (when using basket: basket position 3) *1:
Approx. 54.8 x 56.5 x 46 in. (1390 x 1434 x 1168 mm)
Printer and Stacker (Stacker position closed) *2:
Approx. 54.8 x 44.2 x 46 in. (1390 x 1122 x 1168 mm)
Printer and Stacker (Stacker position open) *2:
Approx. 54.8 x 46.8 x 46 in. (1390 x 1188 x 1168 mm)
*1 For details on the Basket Position, see Example Basket Configurations.
*2 For details on the Stacker Position, see Example Stacker Configurations.
Stand may not be provided depending on the region where the printer ispurchased.
Weight Printer only (without print head and ink tanks):
Approx. 191 lb (87 kg)
Stand and basket: Approx. 40 lb (18 kg)
Roll unit: Approx. 42 lb (19 kg)
Stacker: Approx. 31 lb (14 kg)
Space for installation (W x D xH)
Printer and Stand (without basket):
Approx. 70.5 x 57.8 x 61.5 in. (1790 x 1466 x 1560 mm)
Printer and Stand (when using basket) *1:
Approx. 70.5 x 66.3 x 61.5 in. (1790 x 1684 x 1560 mm)
Printer and Stacker *2:
Approx. 70.5 x 74.4 x 61.5 in. (1790 x 1888 x 1560 mm)
*1 For details on the Basket Position, see Example Basket Configurations.
*2 For details on the Stacker Position, see Example Stacker Configurations.
TX-2100 / TX-5210
Power supply 100-240 V AC (50/60 Hz)
Power consumption When printing: 87 W max. *1
In Sleep mode: 2.0 W max. *1
When power is off: 0.3 W max. *2
*1 Wired LAN connection
*2 The printer uses a trace amount of power even when turned off. To stop allpower consumption, turn off the printer and unplug the power cord.
Operating environment Temperature: 59 to 86 °F (15 to 30 °C)
Humidity: 10 to 80 % RH (with no condensation)
Dimensions (W x D x H) Printer only:
Approx. 43.8 x 28.9 x 24.8 in. (1110 x 734 x 629 mm)
Printer and Stand (when basket is not used):
522

Approx. 43.8 x 30.2 x 46 in. (1110 x 766 x 1168 mm)
Printer and Stand (when using basket: basket position 1) *1:
Approx. 43.8 x 38.8 x 46 in. (1110 x 984 x 1168 mm)
Printer and Stand (when using basket: basket position 2/4/5) *1:
Approx. 43.8 x 48.2 x 46 in. (1110 x 1222 x 1168 mm)
Printer and Stand (when using basket: basket position 3) *1:
Approx. 43.8 x 56.5 x 46 in. (1110 x 1434 x 1168 mm)
Printer and Stacker (Stacker position closed) *2:
Approx. 43.8 x 44.2 x 46 in. (1110 x 1122 x 1168 mm)
Printer and Stacker (Stacker position open) *2:
Approx. 43.8 x 46.8 x 46 in. (1110 x 1188 x 1168 mm)
*1 For details on the Basket Position, see Example Basket Configurations.
*2 For details on the Stacker Position, see Example Stacker Configurations.
Stand may not be provided depending on the region where the printer ispurchased.
Weight Printer only (without print head and ink tanks):
Approx. 163 lb (74 kg)
Stand and basket: Approx. 37 lb (17 kg)
Roll unit: Approx. 35 lb (16 kg)
Stacker: Approx. 26 lb (12 kg)
Space for installation (W x D xH)
Printer only:
Approx. 59.5 x 56.5 x 40.2 in. (1510 x 1434 x1020 mm)
Printer and Stand (without basket):
Approx. 59.5 x 57.8 x 61.5 in. (1510 x 1466 x 1560 mm)
Printer and Stand (when using basket) *1:
Approx. 59.5 x 66.3 x 61.5 in. (1510 x 1684 x 1560 mm)
Printer and Stacker *2:
Approx. 59.5 x 74.4 x 61.5 in. (1510 x 1888 x 1560 mm)
*1 For details on the Basket Position, see Example Basket Configurations.
*2 For details on the Stacker Position, see Example Stacker Configurations.
Printing performance
Print method Bubblejet
Maximum resolution 2400 dpi (horizontally) * x 1200 dpi (vertically)
* Prints with a minimum 1/2400 inch dot pitch between ink droplets.
Print head PF-06
Number of nozzles MBK: 5120 nozzles, others: each 2560 nozzles
523
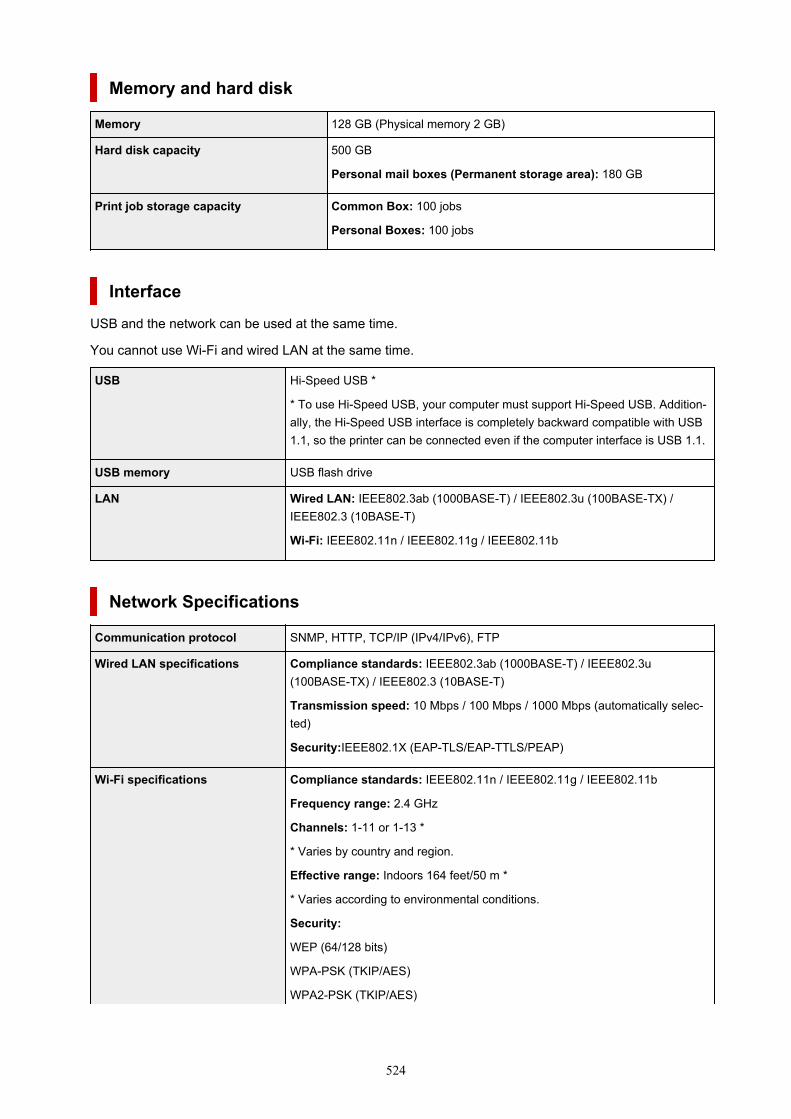
Memory and hard disk
Memory 128 GB (Physical memory 2 GB)
Hard disk capacity 500 GB
Personal mail boxes (Permanent storage area): 180 GB
Print job storage capacity Common Box: 100 jobs
Personal Boxes: 100 jobs
InterfaceUSB and the network can be used at the same time.
You cannot use Wi-Fi and wired LAN at the same time.
USB Hi-Speed USB *
* To use Hi-Speed USB, your computer must support Hi-Speed USB. Addition-ally, the Hi-Speed USB interface is completely backward compatible with USB1.1, so the printer can be connected even if the computer interface is USB 1.1.
USB memory USB flash drive
LAN Wired LAN: IEEE802.3ab (1000BASE-T) / IEEE802.3u (100BASE-TX) /IEEE802.3 (10BASE-T)
Wi-Fi: IEEE802.11n / IEEE802.11g / IEEE802.11b
Network Specifications
Communication protocol SNMP, HTTP, TCP/IP (IPv4/IPv6), FTP
Wired LAN specifications Compliance standards: IEEE802.3ab (1000BASE-T) / IEEE802.3u(100BASE-TX) / IEEE802.3 (10BASE-T)
Transmission speed: 10 Mbps / 100 Mbps / 1000 Mbps (automatically selec-ted)
Security:IEEE802.1X (EAP-TLS/EAP-TTLS/PEAP)
Wi-Fi specifications Compliance standards: IEEE802.11n / IEEE802.11g / IEEE802.11b
Frequency range: 2.4 GHz
Channels: 1-11 or 1-13 *
* Varies by country and region.
Effective range: Indoors 164 feet/50 m *
* Varies according to environmental conditions.
Security:
WEP (64/128 bits)
WPA-PSK (TKIP/AES)
WPA2-PSK (TKIP/AES)
524

Setup:
WPS (push button method/PIN code method)
Easy wireless connect
Operating ConditionsIf operating conditions of the operating system are high, follow those.
Windows
Compatible Operating System (Standard suppliedprinter driver)
Windows 10
Windows 8.1
Windows 7
Windows Server 2019
Windows Server 2016
Windows Server 2012 R2
Windows Server 2012
Windows Server 2008 R2
Use the latest Service Pack available.
Free hard disk space 20 GB or more
macOS
Compatible Operating System (Standard suppliedprinter driver)
macOS 10.12.6 - macOS 10.15
Free hard disk space 20 GB or more
Other Supported OS
iOS, iPadOS, Android
Some functions may not be available with the supported OS.
• An Internet connection is required to use the Online Manual.• To install the software while using Windows, you must have a CD-ROM drive or a network
connection.• To install the software while using macOS, you must have a network connection.
InkFor information on the ink the printer supports, see Ink Tanks.
525

PaperFor details on the compatible media types, see Paper Information List.
For details on the paper widths supported by the printer, see Paper Sizes.
For details about Print Area, see Print Area.
526

Print Area
A margin required by the printer is added with respect to the size of paper loaded in the printer. Except inborderless printing, the actual printing area corresponds to the paper size minus the space for this margin.
Note• Printable Area: The area that can be printed.• For borderless printing with roll paper, the margin is 0 in. (0 mm).•
Printing without Edges Based on the Scenarios (Windows)Printing without Edges Based on the Scenarios (macOS)
• Recommended Print Area: We recommend printing within this area.• To match the document size with the actual printing area, print on oversize paper with the required•
margin added.
Printing to Oversized Paper Sizes (Windows)Printing to Oversized Paper Sizes (macOS)
Sheets
Printable Area:
A margin of 0.2 in. (3 mm) on top, 0.5 in. (12.7 mm) on bottom*, and 0.2 in. (3 mm) on left and right sidesis required.
Recommended Print Area:
A margin of 0.8 in. (20 mm) on top, 0.8 in. (20 mm) on bottom*, and 0.2 in. (3 mm) on left and right sidesis required.
* The bottom margin for cut sheet depends on an OS and applications.
A: Top EdgeB: Bottom EdgeC: Left EdgeD: Right Edge
527

Rolls
Printable Area:
A margin of 0.2 in. (3 mm) on top and bottom and 0.2 in. (3 mm) on left and right sides is required. Forborderless printing, the margins on top, bottom, left, and right are 0 in. (0 mm). For paper that supportsborderless printing, see Paper Information List.
Recommended Print Area:
A margin of 0.8 in. (20 mm) on top, 0.2 in. (3 mm) on bottom, and 0.2 in. (3 mm) on left and right sides isrequired.
A: Top EdgeB: Bottom EdgeC: Left EdgeD: Right Edge
528

Manuals and Their Contents
Quick Guide Replacing paper, ink tanks, and print head.
Setup Guide Installing the printer and software.
Printer Stand Setup Guide Assembling the stand.
Roll Unit Setup Guide Assembling the roll unit.
Stacker Setup Guide Assembling the stacker.
529

Safety
Safety Precautions
Regulatory Information
WEEE (EU&EEA)
When Repairing, Lending, or Disposing of the Printer
530

Safety Precautions
Choosing a location• Never install the printer on an unstable or vibrating surface.• Do not install the printer in locations that are very humid or dusty, in direct sunlight, outdoors, or close
to a heating source.To avoid the risk of fire or electric shocks, use the printer under the operating environment specified inthe Specifications.
• Do not place the printer on a thick rug or carpet.• Do not place the printer with its back attached to the wall.• We recommend ensuring ample space for installation.• Do not install the printer near sources of strong electromagnetic fields, whether equipment that
generates such fields or places where such fields occur.
Power Supply• Ensure that the area around the power outlet is kept clear at all times so you can easily unplug the
power cord if necessary.• Never remove the plug by pulling on the cord.
Pulling the cord may damage the power cord, leading to possible fire or electrical shock.• Do not use an extension lead/cord.
Working Around the Printer• Never put your hands or fingers in the printer while it is printing.• Firmly grasp the carrying grips on each side in the base. Holding the printer at other positions is
dangerous and cause injury and damage if the printer is dropped.• Use the following number of people to hold the printer when transporting the printer by carrying it. The
weight may cause pain such as back pain.For the TX-4100, TX-5410 : 6 people or moreFor the TX-3100, TX-5310 : 6 people or moreFor the TX-2100, TX-5210 : 6 people or more
• When using and transferring the printer, do not tilt it, stand it on its side, or turn it upside down. Thereis a risk of the ink spilling.
• When transferring the printer tilted, always perform the steps in "Preparing to Transfer the Printer" inorder to protect the internal structure.
• Do not place any object on the printer. Especially do not place metal objects (paper clips, staples,etc.) or containers of flammable solvents (alcohol, thinners, etc.) on top of the printer.
Print Heads/Ink Tanks/Maintenance Cartridges• Keep ink tanks out of the reach of children. In case ink is accidentally licked or swallowed, rinse out
mouth or give one or two glasses of water to drink. If irritation or discomfort occurs, obtain medicaladvice immediately.
531

• In case ink gets in contact with eyes, rinse with water immediately. In case ink gets in contact withskin, wash with soap and water immediately. If irritation to eyes or skin persists, obtain medical adviceimmediately.
• Never touch the electrical contacts on a print head after printing.The metal parts may be very hot and could cause burns.
• Do not throw ink tanks and maintenance cartridges into fire.• Do not attempt to disassemble or modify the print head, ink tanks, and maintenance cartridges.• Avoid dropping or shaking print head, ink tanks, and maintenance cartridges.
532

Regulatory Information
Users in the U.S.A.FCC Notice (U.S.A. Only)For 120V, 60Hz modelModel Number: K10538/K10539 (Contains FCC Approved WLAN Module K30374)
Optional parts: Roll Unit RU-32 for TX-3100(K10538)Optional parts: Roll Unit RU-42 for TX-4100(K10539)
This device complies with Part 15 of the FCC Rules. Operation is subject to the following two conditions:(1) This device may not cause harmful interference, and (2) this device must accept any interferencereceived, including interference that may cause undesired operation.
Note: This equipment has been tested and found to comply with the limits for a Class B digital device,pursuant to Part 15 of the FCC Rules. These limits are designed to provide reasonable protection againstharmful interference in a residential installation. This equipment generates, uses and can radiate radiofrequency energy and, if not installed and used in accordance with the instructions, may cause harmfulinterference to radio communications.However, there is no guarantee that interference will not occur in a particular installation. If this equipmentdoes cause harmful interference to radio or television reception, which can be determined by turning theequipment off and on, the user is encouraged to try to correct the interference by one or more of thefollowing measures:
• Reorient or relocate the receiving antenna.• Increase the separation between the equipment and receiver.• Connect the equipment into an outlet on a circuit different from that to which the receiver is
connected.• Consult the dealer or an experienced radio/TV technician for help.
Use of a shielded cable is required to comply with Class B limits in Subpart B of Part 15 of the FCC Rules.
Do not make any changes or modifications to the equipment unless otherwise specified in the manual. Ifsuch changes or modifications should be made, you could be required to stop operation of the equipment.
Changes or modifications not expressly approved by the party responsible for compliance could void theuser's authority to operate equipment.
This transmitter must not be co-located or operating in conjunction with any other antenna or transmitter.
The equipment complies with FCC radiation exposure limits for at uncontrolled equipment. Thisequipment should be installed and operated with minimum distance at least 20cm between the radiatorand persons body (excluding extremities: hands, wrists, feet and ankles) and must not be colocated oroperated with any other antenna or transmitter.
Canon U.S.A., Inc.One Canon ParkMelville, New York 117471-800-652-2666
533

InterferenceDo not use the printer around medical equipment or other electronic devices. Signals from the printer mayinterfere with the correct operation of these devices.
534

WEEE (EU&EEA)
Only for European Union and EEA (Norway, Iceland and Liechtenstein)
These symbols indicate that this product is not to be disposed of with your household waste, accordingto the WEEE Directive (2012/19/EU), the Battery Directive (2006/66/EC) and/or national legislationimplementing those Directives. If a chemical symbol is printed beneath the symbol shown above,in accordance with the Battery Directive, this indicates that a heavy metal (Hg = Mercury, Cd =Cadmium, Pb = Lead) is present in this battery or accumulator at a concentration above an applicablethreshold specified in the Battery Directive. This product should be handed over to a designatedcollection point, e.g., on an authorized one-for-one basis when you buy a new similar product or to anauthorized collection site for recycling waste electrical and electronic equipment (EEE) and batteries andaccumulators. Improper handling of this type of waste could have a possible impact on the environmentand human health due to potentially hazardous substances that are generally associated with EEE.Your cooperation in the correct disposal of this product will contribute to the effective usage of naturalresources. For more information about the recycling of this product, please contact your local cityoffice, waste authority, approved scheme or your household waste disposal service or visit www.canon-europe.com/weee, or www.canon-europe.com/battery.
Nur für Europäische Union und EWR (Norwegen, Island undLiechtenstein)
Diese Symbole weisen darauf hin, dass dieses Produkt gemäß WEEE-Richtlinie (2012/19/EU; Richtlinieüber Elektro- und Elektronik-Altgeräte), Batterien-Richtlinie (2006/66/EG) und nationalen Gesetzenzur Umsetzung dieser Richtlinien nicht über den Hausmüll entsorgt werden darf. Falls sich unterdem oben abgebildeten Symbol ein chemisches Symbol befindet, bedeutet dies gemäß der Batterien-Richtlinie, dass in dieser Batterie oder diesem Akkumulator ein Schwermetall (Hg = Quecksilber, Cd =Cadmium, Pb = Blei) in einer Konzentration vorhanden ist, die über einem in der Batterien-Richtlinieangegebenen Grenzwert liegt. Dieses Produkt muss bei einer dafür vorgesehenen Sammelstelleabgegeben werden. Dies kann z. B. durch Rückgabe beim Kauf eines neuen ähnlichen Produktsoder durch Abgabe bei einer autorisierten Sammelstelle für die Wiederaufbereitung von Elektro- undElektronik-Altgeräten sowie Batterien und Akkumulatoren geschehen. Der unsachgemäße Umgangmit Altgeräten kann aufgrund potenziell gefährlicher Stoffe, die generell mit Elektro- und Elektronik-Altgeräten in Verbindung stehen, negative Auswirkungen auf die Umwelt und die menschliche Gesundheithaben. Durch Ihre Mitarbeit bei der umweltgerechten Entsorgung dieses Produkts tragen Sie zu einereffektiven Nutzung natürlicher Ressourcen bei. Um weitere Informationen über die Wiederverwertungdieses Produkts zu erhalten, wenden Sie sich an Ihre Stadtverwaltung, den öffentlich-rechtlichenEntsorgungsträger, eine autorisierte Stelle für die Entsorgung von Elektro- und Elektronik-Altgeräten
535

oder Ihr örtliches Entsorgungsunternehmen oder besuchen Sie www.canon-europe.com/weee, oderwww.canon-europe.com/battery.
Union Européenne, Norvège, Islande et Liechtenstein uniquement.
Ces symboles indiquent que ce produit ne doit pas être mis au rebut avec les ordures ménagères, commele spécifient la Directive européenne DEEE (2012/19/UE), la Directive européenne relative à l'éliminationdes piles et des accumulateurs usagés (2006/66/CE) et les lois en vigueur dans votre pays appliquantces directives. Si un symbole de toxicité chimique est imprimé sous le symbole illustré ci-dessusconformément à la Directive relative aux piles et aux accumulateurs, il indique la présence d'un métallourd (Hg = mercure, Cd = cadmium, Pb = plomb) dans la pile ou l'accumulateur à une concentrationsupérieure au seuil applicable spécifié par la Directive. Ce produit doit être confié au distributeur àchaque fois que vous achetez un produit neuf similaire, ou à un point de collecte mis en place par lescollectivités locales pour le recyclage des Déchets des Équipements Électriques et Électroniques (DEEE).Le traitement inapproprié de ce type de déchet risque d'avoir des répercussions sur l'environnementet la santé humaine, du fait de la présence de substances potentiellement dangereuses généralementassociées aux équipements électriques et électroniques. Votre entière coopération dans le cadre dela mise au rebut correcte de ce produit favorisera une meilleure utilisation des ressources naturelles.Pour plus d'informations sur le recyclage de ce produit, contactez vos services municipaux, votre éco-organisme ou les autorités locales compétentes, ou consultez le site www.canon-europe.com/weee, ouwww.canon-europe.com/battery.
Uitsluitend bestemd voor de Europese Unie en EER (Noorwegen,IJsland en Liechtenstein)
Met deze symbolen wordt aangegeven dat dit product in overeenstemming met de AEEA-richtlijn(2012/19/EU), de richtlijn 2006/66/EG betreffende batterijen en accu's en/of de plaatselijk geldendewetgeving waarin deze richtlijnen zijn geïmplementeerd, niet bij het normale huisvuil mag wordenweggegooid. Indien onder het hierboven getoonde symbool een chemisch symbool gedrukt staat, geeftdit in overeenstemming met de richtlijn betreffende batterijen en accu's aan dat deze batterij of accu eenzwaar metaal bevat (Hg = kwik, Cd = cadmium, Pb = lood) waarvan de concentratie de toepasselijkedrempelwaarde in overeenstemming met de genoemde richtlijn overschrijdt. Dit product dient te wordeningeleverd bij een hiervoor aangewezen inzamelpunt, bijv. door dit in te leveren bij een hiertoe erkendverkooppunt bij aankoop van een gelijksoortig product, of bij een officiële inzameldienst voor de recyclingvan elektrische en elektronische apparatuur (EEA) en batterijen en accu's. Door de potentieel gevaarlijkestoffen die gewoonlijk gepaard gaan met EEA, kan onjuiste verwerking van dit type afval mogelijknadelige gevolgen hebben voor het milieu en de menselijke gezondheid. Uw medewerking bij het opjuiste wijze weggooien van dit product draagt bij tot effectief gebruik van natuurlijke hulpbronnen. Voorverdere informatie over recycling van dit product kunt u contact opnemen met uw plaatselijke gemeente,
536

afvaldienst, officiële dienst voor klein chemisch afval of afvalstortplaats, of kunt u terecht op www.canon-europe.com/weee, of www.canon-europe.com/battery.
Sólo para la Unión Europea y el Área Económica Europea (Noruega,Islandia y Liechtenstein)
Estos iconos indican que este producto no debe desecharse con los residuos domésticos de acuerdocon la Directiva sobre RAEE (2012/19/UE) y la Directiva sobre Pilas y Acumuladores (2006/66/CE) y/o lalegislación nacional. Si aparece un símbolo químico bajo este icono, de acuerdo con la Directiva sobrePilas y Acumuladores, significa que la pila o el acumulador contiene metales pesados (Hg = Mercurio,Cd = Cadmio, Pb = Plomo) en una concentración superior al límite especificado en dicha directiva.Este producto deberá entregarse en un punto de recogida designado, por ejemplo, entregándolo enel lugar de venta al adquirir un producto nuevo similar o en un centro autorizado para la recogida deresiduos de aparatos eléctricos y electrónicos (RAEE), baterías y acumuladores. La gestión incorrectade este tipo de residuos puede afectar al medio ambiente y a la salud humana debido a las sustanciaspotencialmente nocivas que suelen contener estos aparatos. Su cooperación en la correcta eliminaciónde este producto contribuirá al correcto aprovechamiento de los recursos naturales. Los usuarios tienenderecho a devolver pilas, acumuladores o baterías usados sin coste alguno. El precio de venta de pilas,acumuladores y baterías incluye el coste de la gestión medioambiental de su desecho, y no es necesariomostrar la cuantía de dicho coste en la información y la factura suministradas a los usuarios finales. Sidesea más información sobre el reciclado de este producto, póngase en contacto con su municipio, elservicio o el organismo encargado de la gestión de residuos domésticos o visite www.canon-europe.com/weee, o www.canon-europe.com/battery.
Només per a la Unió Europea i a l’Espai Econòmic Europeu (Noruega,Islàndia i Liechtenstein)
Aquests símbols indican que aquest producte no s’ha de llençar amb les escombraries de la llar,d’acord amb la RAEE (2012/19/UE), la Directiva relativa a piles i acumuladors (2006/66/CE) i lalegislació nacional que implementi aquestes directives. Si al costat d’aquest símbol hi apareix imprèsun símbol químic, segons especifica la Directiva relativa a piles i acumuladors, significa que la bateria ol’acumulador conté un metall pesant (Hg = mercuri, Cd = cadmi, Pb = plom) en una concentració superioral límit aplicable especificat en la Directiva. Aquest producte s’hauria de lliurar en un dels punts derecollida designats, com per exemple, intercanviant un per un en comprar un producte similar o lliurant-loen un lloc de recollida autoritzat per al reciclatge de residus d’aparells elèctrics i electrònics (RAEE) ipiles i acumuladors. La manipulació inadequada d’aquest tipus de residus podria tenir un impacte negatiuen l’entorn i en la salut humana, a causa de les substàncies potencialment perilloses que normalmentestan associades a l'RAEE. La vostra cooperació a l’hora de rebutjar correctament aquest productecontribuirà a la utilització efectiva dels recursos naturals. Els usuaris tenen dret a retornar les bateries o
537

els acumuladors usats sense cap càrrec. El preu de venda de les bateries i els acumuladors inclou el costde la gestió ambiental dels residus i no es necessari mostrar l’import d’aquest cost en aquest fullet o en lafactura que es lliuri a l’usuari final. Per a més informació sobre el reciclatge d’aquest producte, contacteuamb l’oficina municipal, les autoritats encarregades dels residus, el pla de residus homologat o el serveide recollida d’escombraries domèstiques de la vostra localitat o visiteu www.canon-europe.com/weee, owww.canon-europe.com/battery.
Solo per Unione Europea e SEE (Norvegia, Islanda e Liechtenstein)
Questi simboli indicano che il prodotto non può essere smaltito con i rifiuti domestici, ai sensi dellaDirettiva RAEE (2012/19/UE), della Direttiva sulle Batterie (2006/66/CE) e/o delle leggi nazionali cheattuano tali Direttive. Se sotto il simbolo indicato sopra è riportato un simbolo chimico, in osservanzadella Direttiva sulle batterie, tale simbolo indica la presenza di un metallo pesante (Hg = Mercurio, Cd= Cadmio, Pb = Piombo) nella batteria o nell'accumulatore con un livello di concentrazione superiorea una soglia applicabile specificata nella Direttiva sulle batterie. Il prodotto deve essere conferito aun punto di raccolta designato, ad esempio il rivenditore in caso di acquisto di un nuovo prodottosimile oppure un centro di raccolta autorizzato per il riciclaggio di rifiuti di apparecchiature elettricheed elettroniche (RAEE) nonché di batterie e accumulatori. Un trattamento improprio di questo tipo dirifiuti può avere conseguenze negative sull'ambiente e sulla salute umana a causa delle sostanzepotenzialmente nocive solitamente contenute in tali rifiuti. La collaborazione dell'utente per il correttosmaltimento di questo prodotto contribuirà a un utilizzo efficace delle risorse naturali ed eviterà diincorrere in sanzioni amministrative ai sensi dell'art. 255 e successivi del Decreto Legislativo n. 152/06.Per ulteriori informazioni sul riciclaggio di questo prodotto, contattare le autorità locali, l'ente responsabiledella raccolta dei rifiuti, un rivenditore autorizzato o il servizio di raccolta dei rifiuti domestici, oppurevisitare il sito www.canon-europe.com/weee, o www.canon-europe.com/battery.
Apenas para a União Europeia e AEE (Noruega, Islândia eLiechtenstein)
Estes símbolos indicam que este produto não deve ser eliminado juntamente com o seu lixo doméstico,segundo a Diretiva REEE de 2012/19/UE, a Diretiva de Baterias (2006/66/CE) e/ou a sua legislaçãonacional que transponha estas Diretivas. Se houver um símbolo químico impresso como mostradoabaixo, de acordo com a Diretiva de Baterias, isto indica que um metal pesado (Hg = Mercúrio, Cd =Cádmio, Pb = Chumbo) está presente nesta pilha ou acumulador, numa concentração acima de um limiteaplicável especificado na Diretiva. Este produto deve ser entregue num ponto de recolha designado, porexemplo num local autorizado de troca quando compra um equipamento novo idêntico, ou num localde recolha autorizado para reciclar equipamento elétrico e eletrónico (EEE) em fim de vida, bem comopilhas e baterias. O tratamento inadequado deste tipo de resíduos pode ter um impacto negativo noambiente e na saúde humana, devido a substâncias potencialmente perigosas que estão associadas
538

com equipamentos do tipo EEE. A sua cooperação no tratamento correto deste produto irá contribuirpara a utilização mais eficaz dos recursos naturais. Para obter mais informações acerca de comoreciclar este produto, por favor contacte as suas autoridades locais responsáveis pela matéria, serviçode recolha aprovado para pilhas e baterias ou serviço de recolha de resíduos sólidos domésticos da suamunicipalidade, ou visite www.canon-europe.com/weee, ou www.canon-europe.com/battery.
Gælder kun i Europæiske Union og EØS (Norge, Island ogLiechtenstein)
Disse symboler betyder, at produktet ikke må bortskaffes sammen med dagrenovation i henhold tilWEEE-direktivet (2012/19/EU), batteridirektivet (2006/66/EF) og/eller den lokale lovgivning, som dissedirektiver er gennemført i. Hvis der i overensstemmelse med batteridirektivet er trykt et kemisk symbolunder det symbol, der er vist ovenfor, betyder det, at batteriet eller akkumulatoren indeholder tungmetaller(Hg = kviksølv, Cd = cadmium, Pb = bly) i en koncentration, som ligger over de grænseværdier,der er beskrevet i batteridirektivet. Produktet skal afleveres på et godkendt indsamlingssted, f.eks. ioverensstemmelse med en godkendt én-til-én-procedure, når du indkøber et nyt tilsvarende produkt,eller på et godkendt indsamlingssted for elektronikaffald samt for batterier og akkumulatorer. Forkerthåndtering af denne type affald kan medføre negative konsekvenser for miljøet og menneskershelbred på grund af de potentielt sundhedsskadelige stoffer, der generelt kan forefindes i elektrisk ogelektronisk udstyr. Når du foretager korrekt bortskaffelse af produktet, bidrager du til effektiv brug afnaturressourcerne. Kontakt din kommune, den lokale affaldsmyndighed, det lokale affaldsanlæg, ellerbesøg www.canon-europe.com/weee, eller www.canon-europe.com/battery for at få flere oplysninger omgenbrug af dette produkt.
Μόνο για την Ευρωπαϊκή Ένωση και τον ΕΟΧ (Νορβηγία, Ισλανδία καιΛιχτενστάιν)
Αυτά τα σύμβολα υποδεικνύουν ότι αυτό το προϊόν δεν πρέπει να απορρίπτεται μαζί με τα οικιακάαπορρίμματα, σύμφωνα με την Οδηγία για τα Απόβλητα Ηλεκτρικού και Ηλεκτρονικού Εξοπλισμού(ΑΗΗΕ) (2012/19/ΕΕ), την Οδηγία για τις Ηλεκτρικές Στήλες (2006/66/ΕΚ) ή/και την εθνική νομοθεσίαπου εφαρμόζει τις Οδηγίες εκείνες. Εάν κάποιο χημικό σύμβολο είναι τυπωμένο κάτω από το σύμβολοπου φαίνεται παραπάνω, σύμφωνα με την Οδηγία για τις Ηλεκτρικές Στήλες, υποδηλώνει ότι κάποιο βαρύμέταλλο (Hg = Υδράργυρος, Cd = Κάδμιο, Pb = Μόλυβδος) υπάρχει στην μπαταρία ή τον συσσωρευτή σεσυγκέντρωση μεγαλύτερη από το ισχύον επίπεδο που καθορίζεται στην Οδηγία για τις Ηλεκτρικές Στήλες.Αυτό το προϊόν πρέπει να παραδίδεται σε καθορισμένο σημείο συλλογής, π.χ. σε μια εξουσιοδοτημένηβάση ανταλλαγής όταν αγοράζετε ένα νέο παρόμοιο προϊόν ή σε μια εξουσιοδοτημένη θέση συλλογής γιατην ανακύκλωση των αποβλήτων ηλεκτρικού και ηλεκτρονικού εξοπλισμού (ΗΗE) και των ηλεκτρικώνστηλών και συσσωρευτών. Ο ακατάλληλος χειρισμός αυτού του τύπου αποβλήτων μπορεί να έχειαρνητικό αντίκτυπο στο περιβάλλον και την υγεία του ανθρώπου, λόγω δυνητικά επικίνδυνων ουσιών
539

που γενικά συνδέονται με τον ΗΗΕ. Η συνεργασία σας για τη σωστή απόρριψη αυτού του προϊόντος θασυμβάλει στην αποτελεσματική χρήση των φυσικών πόρων. Για περισσότερες πληροφορίες σχετικά μεανακύκλωση αυτού του προϊόντος, επικοινωνήστε με το τοπικό γραφείο της πόλης σας, την υπηρεσίααπορριμμάτων, το εγκεκριμένο σχήμα ή την υπηρεσία απόρριψης οικιακών αποβλήτων ή επισκεφθείτε τηδιεύθυνση www.canon-europe.com/weee ή www.canon-europe.com/battery.
Gjelder kun den europeiske union og EØS (Norge, Island ogLiechtenstein)
Disse symbolene indikerer at dette produktet ikke skal kastes sammen med husholdningsavfall, ihenhold til WEEE-direktivet (2012/19/EU), batteridirektivet (2006/66/EF) og/eller nasjonal lov som harimplementert disse direktivene. Hvis et kjemisk symbol vises under symbolet vist ovenfor, i samsvarmed batteridirektivet, indikerer dette at et tungmetall (Hg = kvikksølv, Cd = kadmium, Pb = bly) finnesi batteriet eller akkumulatoren i en konsentrasjon over en gjeldende øvre grense som er spesifisert ibatteridirektivet. Produktet må leveres til et dertil egnet innsamlingspunkt, det vil si på en autoriserten-til-en-basis når en kjøper et nytt lignende produkt, eller til et autorisert innsamlingssted for resirkuleringav avfall fra elektrisk og elektronisk utstyr (EE-utstyr) og batterier og akkumulatorer. Feil håndteringav denne typen avfall kan være miljø- og helseskadelig på grunn av potensielt skadelige stoffer somofte brukes i EE-utstyr. Din innsats for korrekt avhending av produktet vil bidra til effektiv bruk avnaturressurser. Du kan få mer informasjon om resirkulering av dette produktet ved å kontakte lokalemyndigheter, avfallsadministrasjonen, et godkjent program eller husholdningens renovasjonsselskap, ellergå til www.canon-europe.com/weee, eller www.canon-europe.com/battery.
Vain Euroopan unionin sekä ETA:n (Norja, Islanti ja Liechtenstein)alueelle.
Nämä tunnukset osoittavat, että sähkö- ja elektroniikkalaiteromua koskeva direktiivi (SER-direktiivi,2012/19/EU), paristoista ja akuista annettu direktiivi (2006/66/EY) sekä kansallinen lainsäädäntö kieltävättuotteen hävittämisen talousjätteen mukana. Jos yllä olevan symbolin alapuolelle on paristodirektiivinmukaisesti painettu kemiallisen aineen tunnus, kyseinen paristo tai akku sisältää raskasmetalleja (Hg= elohopea, Cd = kadmium, Pb = lyijy) enemmän kuin paristodirektiivin salliman määrän. Tuote onvietävä asianmukaiseen keräyspisteeseen, esimerkiksi kodinkoneliikkeeseen uutta vastaavaa tuotettaostettaessa tai viralliseen sähkö- ja elektroniikkalaiteromun tai paristojen ja akkujen keräyspisteeseen.Sähkö- ja elektroniikkalaiteromun virheellinen käsittely voi vahingoittaa ympäristöä ja ihmisten terveyttä,koska laitteet saattavat sisältää ympäristölle ja terveydelle haitallisia aineita. Tuotteen asianmukainenhävittäminen säästää myös luonnonvaroja. Jos haluat lisätietoja tämän tuotteen kierrätyksestä, otayhteys kunnan jätehuoltoviranomaisiin tai käyttämääsi jätehuoltoyhtiöön tai käy osoitteessa www.canon-europe.com/weee, tai www.canon-europe.com/battery.
540

Endast för Europeiska unionen och EES (Norge, Island ochLiechtenstein)
De här symbolerna visar att produkten inte får sorteras och slängas som hushållsavfall enligt WEEE-direktivet (2012/19/EU), batteridirektivet (2006/66/EG) och/eller nationell lagstiftning som implementerardessa direktiv. Om en kemisk symbol förekommer under ovanstående symbol innebär detta enligtBatteridirektivet att en tungmetall (Hg = Kvicksilver, Cd = Kadmium, Pb = Bly) förekommer i batterieteller ackumulatorn med en koncentration som överstiger tillämplig gräns som anges i Batteridirektivet.Produkten ska lämnas in på en avsedd insamlingsplats, t.ex. på en återvinningsstation auktoriseradatt hantera elektrisk och elektronisk utrustning (EE-utrustning) samt batterier och ackumulatorer ellerhos handlare som är auktoriserade att byta in varor då nya, motsvarande köps (en mot en). Olämplighantering av avfall av den här typen kan ha negativ inverkan på miljön och människors hälsa på grundav de potentiellt farliga ämnen som kan återfinnas i elektrisk och elektronisk utrustning. Din medverkantill en korrekt avfallshantering av produkten bidrar till effektiv användning av naturresurserna. Om du villha mer information om var du kan lämna in den här produkten, kontakta ditt lokala kommunkontor, berördmyndighet eller företag för avfallshantering eller se www.canon-europe.com/weee, eller www.canon-europe.com/battery.
Pouze Evropská unie a EHP (Norsko, Island a Lichtenštejnsko)
Tento symbol znamená, že podle směrnice OEEZ (2012/19/EU), směrnice o bateriích (2006/66/ES) a/nebo podle vnitrostátních právních prováděcích předpisů k těmto směrnicím nemá být tento výrobeklikvidován s odpadem z domácností. Je-li v souladu s požadavky směrnice o bateriích vytištěna pod výšeuvedeným symbolem chemická značka, udává, že tato baterie nebo akumulátor obsahuje těžké kovy (Hg= rtuť, Cd = kadmium, Pb = olovo) v koncentraci vyšší, než je příslušná hodnota předepsaná směrnicí.Tento výrobek má být vrácen do určeného sběrného místa, např. v rámci autorizovaného systémuodběru jednoho výrobku za jeden nově prodaný podobný výrobek, nebo do autorizovaného sběrnéhomísta pro recyklaci odpadních elektrických a elektronických zařízení (OEEZ), baterií a akumulátorů.Nevhodné nakládání s tímto druhem odpadu by mohlo mít negativní dopad na životní prostředí alidské zdraví, protože elektrická a elektronická zařízení zpravidla obsahují potenciálně nebezpečnélátky. Vaše spolupráce na správné likvidaci tohoto výrobku napomůže efektivnímu využívání přírodníchzdrojů. Chcete-li získat podrobné informace týkající se recyklace tohoto výrobku, obraťte se prosímna místní úřad, orgán pro nakládání s odpady, schválený systém nakládání s odpady či společnostzajišťující likvidaci domovního odpadu, nebo navštivte webové stránky www.canon-europe.com/weeenebo www.canon-europe.com/battery.
541

Csak az Európai Unió és az EGT (Norvégia, Izland és Liechtenstein)országaiban
Ezek a szimbólumok azt jelzik, hogy a termék hulladékkezelése a háztartási hulladéktól különválasztva,az elektromos és elektronikus berendezések hulladékairól (WEEE) szóló (2012/19/EU) irányelvnek és azelemekről és akkumulátorokról, valamint a hulladék elemekről és akkumulátorokról szóló (2006/66/EK)irányelvnek megfelelően és/vagy ezen irányelveknek megfelelő helyi előírások szerint történik.Amennyiben a fent feltüntetett szimbólum alatt egy vegyjel is szerepel, az elemekről és akkumulátorokrólszóló irányelvben foglaltak értelmében ez azt jelzi, hogy az elem vagy az akkumulátor az irányelvbenmeghatározott határértéknél nagyobb mennyiségben tartalmaz nehézfémet (Hg = higany, Cd = kadmium,Pb = ólom). E terméket az arra kijelölt gyűjtőhelyre kell juttatni – pl. hasonló termék vásárlásakora régi becserélésére vonatkozó hivatalos program keretében, vagy az elektromos és elektronikusberendezések (EEE) hulladékainak gyűjtésére, valamint a hulladék elemek és hulladék akkumulátorokgyűjtésére kijelölt hivatalos gyűjtőhelyre. Az ilyen jellegű hulladékok nem előírásszerű kezelése azelektromos és elektronikus berendezésekhez (EEE) általánosan kapcsolható potenciálisan veszélyesanyagok révén hatással lehet a környezetre és az egészségre. E termék megfelelő leselejtezésévelÖn is hozzájárul a természeti források hatékony használatához. A termék újrahasznosítását illetőeninformálódjon a helyi polgármesteri hivatalnál, a helyi közterület-fenntartó vállalatnál, a hivataloshulladéklerakó telephelyen vagy a háztartási hulladék begyűjtését végző szolgáltatónál, illetve látogassonel a www.canon-europe.com/weee, vagy www.canon-europe.com/battery internetes oldalra.
Tylko dla krajów Unii Europejskiej oraz EOG (Norwegia, Islandia iLiechtenstein)
Te symbole oznaczają, że produktu nie należy wyrzucać razem z odpadami gospodarstwa domowego,zgodnie z dyrektywą WEEE w sprawie zużytego sprzętu elektrycznego i elektronicznego (2012/19/UE)lub dyrektywą w sprawie baterii (2006/66/WE) bądź przepisami krajowymi wdrażającymi te dyrektywy.Jeśli pod powyższym symbolem znajduje się symbol chemiczny, zgodnie z dyrektywą w sprawiebaterii oznacza to, że bateria lub akumulator zawiera metal ciężki (Hg = rtęć, Cd = kadm, Pb= ołów) w stężeniu przekraczającym odpowiedni poziom określony w dyrektywie w sprawie baterii.Użytkownicy baterii i akumulatorów mają obowiązek korzystać z dostępnego programu zwrotu, recyklingui utylizacji baterii oraz akumulatorów. Niewłaściwe postępowanie z tego typu odpadami może miećwpływ na środowisko i zdrowie ludzi ze względu na substancje potencjalnie niebezpieczne, związaneze zużytym sprzętem elektrycznym i elektronicznym. Państwa współpraca w zakresie właściwej utylizacjitego produktu przyczyni się do efektywnego wykorzystania zasobów naturalnych. W celu uzyskaniainformacji o sposobie recyklingu tego produktu prosimy o kontakt z właściwym urzędem miejskimlub zakładem gospodarki komunalnej bądź zapraszamy na stronę www.canon-europe.com/weee, lubwww.canon-europe.com/battery.
542

Platí len pre štáty Európskej únie a EHP (Nórsko, Island aLichtenštajnsko)
Tieto symboly označujú, že podľa Smernice o odpade z elektrických a elektronických zariadení (OEEZ)2012/19/EÚ, Smernice o batériách (2006/66/ES) a podľa platnej legislatívy Slovenskej republiky sa tentoprodukt nesmie likvidovať spolu s komunálnym odpadom. Ak je chemická značka vytlačená pod vyššieuvedeným symbolom, znamená to, že táto batéria alebo akumulátor obsahuje ťažký kov (Hg = ortuť,Cd = kadmium, Pb = olovo) v koncentrácii vyššej, ako je príslušná povolená hodnota stanovená vSmernici o batériách. Produkt je potrebné odovzdať do určenej zberne, napr. prostredníctvom výmenyza kúpu nového podobného produktu, alebo na autorizované zberné miesto, ktoré spracúva odpad zelektrických a elektronických zariadení (EEZ), batérií a akumulátorov. Nesprávna manipulácia s takýmtotypom odpadu môže mať negatívny vplyv na životné prostredie a ľudské zdravie, pretože elektrickéa elektronické zariadenia obsahujú potenciálne nebezpečné látky. Spoluprácou na správnej likvidáciitohto produktu prispejete k účinnému využívaniu prírodných zdrojov. Ďalšie informácie o recyklácii tohtoproduktu získate od miestneho úradu, úradu životného prostredia, zo schváleného plánu OEEZ alebo odspoločnosti, ktorá zaisťuje likvidáciu komunálneho odpadu. Viac informácií nájdete aj na webovej stránke:www.canon-europe.com/weee, alebo www.canon-europe.com/battery.
Üksnes Euroopa Liit ja EMP (Norra, Island ja Liechtenstein)
Antud sümbolid viitavad sellele, et vastavalt elektri- ja elektroonikaseadmete jäätmeid käsitlevaledirektiivile (2012/19/EL), patareisid ja akusid ning patarei- ja akujäätmeid käsitlevale direktiivile(2006/66/EÜ) ja/või nimetatud direktiive rakendavatele riiklikele õigusaktidele ei või seda toodet koosolmejäätmetega ära visata. Kui keemiline sümbol on trükitud eespool toodud sümboli alla, siis tähendabsee, et antud patareis või akus leiduva raskemetalli (Hg = elavhõbe, Cd = kaadmium, Pb = plii)kontsentratsioonitase on kõrgem kui patareisid ja akusid ning patarei- ja akujäätmeid käsitlevasdirektiivis sätestatud piirmäär. Antud tootest tekkinud jäätmed tuleb anda vastavasse kogumispunkti,nt müügipunkti, mis on volitatud üks ühe vastu vahetama, kui ostate uue sarnase toote, võivastavasse elektri- ja lektroonikaseadmete jäätmete ning patareide ja akude ümbertöötlemiseks mõeldudkogumispunkti. Antud liiki jäätmete vale käitlemine võib kahjustada keskkonda ja inimeste tervist elektri-ja elektroonikajäätmetes tavaliselt leiduvate potentsiaalselt ohtlike ainete tõttu. Antud tootest tekkinudjäätmete nõuetekohase kõrvaldamisega aitate kasutada loodusvarasid efektiivselt. Täiendava teabesaamiseks elektri- ja elektroonikaseadmetest tekkinud jäätmete ning patarei- ja akujäätmete tagastamiseja ümbertöötlemise kohta võtke ühendust kohaliku omavalitsusega, asjakohase valitsusasutusega,asjakohase tootjavastutusorganisatsiooniga või olmejäätmete käitlejaga. Lisateavet leitate ka Interneti-leheküljelt www.canon-europe.com/weee või www.canon-europe.com/battery.
543

Tikai Eiropas Savienībai un EEZ (Norvēģijai, Islandei un Lihtenšteinai)
Šie simboli norāda, ka atbilstoši ES Direktīvai (2012/19/ES) par elektrisko un elektronisko iekārtuatkritumiem (EEIA), Direktīvai (2006/66/EK) par baterijām un akumulatoriem, un akumulatoru atkritumiem,ar ko atceļ Direktīvu 91/157/EEK, un vietējiem tiesību aktiem šo izstrādājumu nedrīkst izmest kopāar sadzīves atkritumiem. Ja zem iepriekš norādītā simbola ir uzdrukāts ķīmiskais simbols, saskaņā ardirektīvu par baterijām un akumulatoriem tas nozīmē, ka šīs baterijas vai akumulatori satur smagosmetālus (Hg = dzīvsudrabs, Cd = kadmijs, Pb = svins) un to koncentrācijas līmenis pārsniedz direktīvāpar baterijām un akumulatoriem minēto piemērojamo slieksni. Šis izstrādājums ir jānodod piemērotāsavākšanas vietā, piemēram, apstiprinātā veikalā, kur iegādājaties līdzīgu jaunu produktu un atstājatveco, vai apstiprinātā vietā izlietotu elektrisko un elektronisko iekārtu un bateriju un akumulatorupārstrādei. Nepareiza šāda veida atkritumu apsaimniekošana var apdraudēt vidi un cilvēka veselībutādu iespējami bīstamu vielu dēļ, kas parasti ir elektriskajās un elektroniskajās iekārtās. Jūsu atbalstspareizā šāda veida atkritumu apsaimniekošanā sekmēs efektīvu dabas resursu izmantošanu. Lai saņemtupilnīgāku informāciju par šāda veida izstrādājumu nodošanu otrreizējai pārstrādei, sazinieties ar vietējopašvaldību, atkritumu savākšanas atbildīgo dienestu, pilnvaroto organizāciju vai iestādi, kas veic sadzīvesatkritumu apsaimniekošanu, vai apmeklējiet tīmekļa vietni www.canon-europe.com/weee, vai www.canon-europe.com/battery.
Tik Europos Sąjungai ir EEE (Norvegijai, Islandijai ir Lichtenšteinui)
Šie simboliai reiškia, kad šio gaminio negalima išmesti į buitines atliekas, kaip reikalaujama WEEEDirektyvoje (2012/19/ES) ir Baterijų direktyvoje (2006/66/EB) ir (ar) jūsų šalies nacionaliniuoseįstatymuose, kuriais šios Direktyvos yra įgyvendinamos. Jeigu cheminio ženklo simbolis yra nurodytasžemiau šio ženklo, tai reiškia, kad vadovaujantis Baterijų direktyvą, baterijų ar akumuliatorių sudėtyjeyra sunkiųjų metalų (Hg = gyvsidabrio, Cd = kadmio, Pb = švino), kurių koncentracija viršija Baterijųdirektyvoje nurodytas leistinas ribas. Šį gaminį reikia pristatyti į specialųjį surinkimo punktą, pavyzdžiui,mainais, kai jūs perkate naują panašų gaminį, arba į specialiąją surinkimo vietą, kurioje perdirbamoselektrinės ir elektroninės įrangos atliekos bei naudotos baterijos ir akumuliatoriai. Dėl netinkamo šiotipo atliekų tvarkymo gali nukentėti aplinka ir iškilti grėsmė žmogaus sveikatai dėl galimai kenksmingųmedžiagų, iš esmės susijusių su elektrine ir elektronine įranga. Bendradarbiaudami ir teisingaiutilizuodami šiuos gaminius, jūs padėsite efektyviai naudoti gamtinius išteklius. Daugiau informacijosapie gaminio perdirbimą jums gali suteikti vietinis biuras, atliekų tvarkymo bendrovė, sertifikuoti organaiar buitinių atliekų surinkimo įmonės. Taip pat siūloma apsilankyti interneto svetainėje www.canon-europe.com/weee, arba www.canon-europe.com/battery.
544

Samo za Evropsko unijo in EGP (Norveška, Islandija in Lihtenštajn)
Ti simboli pomenijo, da tega izdelka skladno z Direktivo OEEO (2012/19/EU), Direktivo 2006/66/ES in/alinacionalno zakonodajo, ki uvaja ti direktivi, ne smete odlagati z nesortiranimi gospodinjskimi odpadki.Če je pod zgoraj prikazanim simbolom natisnjen kemijski simbol, to v skladu z Direktivo pomeni, da jev tej bateriji ali akumulatorju prisotna težka kovina (Hg = živo srebro, Cd = kadmij, Pb = svinec), insicer v koncentraciji, ki je nad relevantno mejno vrednostjo, določeno v Direktivi. Ta izdelek je potrebnoodnesti na izbrano zbirno mesto, t. j. pooblaščeno trgovino, kjer ob nakupu novega (podobnega) izdelkavrnete starega, ali na pooblaščeno zbirno mesto za ponovno uporabo odpadne električne in elektronskeopreme (EEO) ter baterij in akumulatorjev. Neustrezno ravnanje s to vrsto odpadkov lahko negativnovpliva na okolje in človeško zdravje zaradi potencialno nevarnih snovi, ki so pogosto povezane z EEO.Vaše sodelovanje pri pravilnem odlaganju tega izdelka predstavlja pomemben prispevek k smotrni izrabinaravnih virov. Za več informacij o ponovni uporabi tega izdelka se obrnite na lokalen mestni urad,pristojno službo za odpadke, predstavnika pooblaščenega programa za obdelavo odpadkov ali na lokalnokomunalo. Lahko pa tudi obiščete našo spletno stran www.canon-europe.com/weee, ali www.canon-europe.com/battery.
Само за Европейския съюз и ЕИП (Норвегия, Исландия иЛихтенщайн)
Тези символи показват, че този продукт не трябва да се изхвърля заедно с битовите отпадъцисъгласно Директивата за ИУЕЕО (2012/19/ЕC), Директивата за батерии (2006/66/ЕО) и/или Вашетонационално законодателство, прилагащо тези Директиви. Ако под показания горе символ еотпечатан символ за химически елемент, съгласно разпоредбите на Директивата за батерии,този втори символ означава наличието на тежък метал (Hg = живак, Cd = кадмий, Pb = олово)в батерията или акумулатора в концентрация над указаната граница за съответния елемент вДирективата. Този продукт трябва да бъде предаден в предназначен за целта пункт за събиране,например на база размяна, когато купувате нов подобен продукт, или в одобрен събирателенпункт за рециклиране на излязло от употреба електрическо и електронно оборудване (ИУЕЕО),батерии и акумулатори. Неправилното третиране на този тип отпадъци може да доведе доевентуални отрицателни последствия за околната среда и човешкото здраве поради потенциалноопасните вещества, които обикновено са свързани с ЕЕО. В същото време Вашето съдействие заправилното изхвърляне на този продукт ще допринесе за ефективното използване на природнитересурси. За повече информация относно това къде можете да предадете за рециклиране натози продукт, моля свържете се с Вашите местни власти, с органа, отговорен за отпадъците, содобрената система за ИУЕЕО или с Вашата местна служба за битови отпадъци, или посететеwww.canon-europe.com/weee, или www.canon-europe.com/battery.
545

Doar pentru Uniunea Europeană şi EEA (Norvegia, Islanda şiLiechtenstein)
Aceste simboluri indică faptul că acest produs nu trebuie aruncat împreună cu deşeurile menajere, înconformitate cu Directiva DEEE (2012/19/UE), Directiva referitoare la baterii (2006/66/CE) şi/sau legiledvs. naţionale ce implementează aceste Directive. Dacă un simbol chimic este imprimat sub simbolul demai sus, în conformitate cu Directiva referitoare la baterii, acest simbol indică prezenţa în baterie sauacumulator a unui metal greu (Hg = Mercur, Cd = Cadmiu, Pb = Plumb) într-o concentraţie mai maredecât pragul admis specificat în Directiva referitoare la baterii. Acest produs trebuie înmânat punctului decolectare adecvat, ex: printr-un schimb autorizat unu la unu atunci când cumpăraţi un produs nou similarsau la un loc de colectare autorizat pentru reciclarea reziduurilor de echipament electric şi electronic(EEE) şi baterii şi acumulatori. Administrarea neadecvată a acestui tip de deşeuri, ar putea avea unimpact asupra mediului şi asupra sănătăţii umane datorită substanţelor cu potenţial de risc care sunt îngeneral asociate cu EEE. Cooperarea dvs. în direcţia reciclării corecte a acestui produs va contribui lao utilizare eficientă a resurselor naturale. Pentru mai multe informaţii despre reciclarea acestui produs,vă rugăm să contactaţi biroul dvs. local, autorităţile responsabile cu deşeurile, schema aprobată sauserviciul dvs. responsabil cu deşeurile menajere sau vizitaţi-ne la www.canon-europe.com/weee, sauwww.canon-europe.com/battery.
Samo za Europsku uniju i EEA (Norveška, Island i Lihtenštajn)
Oznaka pokazuje da se ovaj proizvod ne smije odlagati s komunalnim i ostalim vrstama otpada, u skladus direktivom WEEE (2012/19/EC), Direktivom o baterijama (2006/66/EC) i Pravilnikom o gospodarenjuotpadnim baterijama i akumulatorima te Pravilnikom o gospodarenju otpadnim električnim i elektroničkimuređajima i opremom. Ako je ispod prethodno prikazane oznake otisnut kemijski simbol, u skladu sDirektivom o baterijama, to znači da se u ovoj bateriji ili akumulatoru nalazi teški metal (Hg = živa, Cd= kadmij, Pb = olovo) i da je njegova koncentracija iznad razine propisane u Direktivi o baterijama. Ovajbi proizvod trebalo predati ovlašenom skupljaču EE otpada ili prodavatelju koji je dužan preuzeti otpadniproizvod po sistemu jedan za jedan, ukoliko isti odgovara vrsti te je obavljao primarne funkcije kao iisporučena EE oprema. Otpadne baterije i akumulatori predaju se ovlaštenom skupljaču otpadnih baterijaili akumulatora ili prodavatelju bez naknade i obveze kupnje za krajnjeg korisnika. Neodgovarajućerukovanje ovom vrstom otpada može utjecati na okoliš i ljudsko zdravlje zbog potencijalno opasnihsupstanci koje se najčešće nalaze na takvim mjestima. Vaša suradnja u pravilnom zbrinjavanju ovogproizvoda pridonijet će djelotvornom iskorištavanju prirodnih resursa. Dodatne informacije o recikliranjuovog proizvoda zatražite od svog lokalnog gradskog ureda, službe za zbrinjavanje otpada, odobrenogprograma ili komunalne službe za uklanjanje otpada ili pak na stranicama www.canon-europe.com/weeeili www.canon-europe.com/battery.
546
Korisnici u Srbiji
Ovaj simbol označava da ovaj proizvod ne sme da se odlaže sa ostalim kućnim otpadom, u skladu saWEEE Direktivom (2012/19/EU), Direktivom o baterijama (2006/66/EC) i nacionalnim zakonima. Ukolikoje ispod gore navedenog simbola odštampan hemijski simbol, u skladu sa Direktivom o baterijama, ovajsimbol označava da su u ovoj bateriji ili akumulatoru prisutni teški metali (Hg – živa, Cd – kadmijum, Pb -olovo) u koncentracijama koje premašuju prihvatljivi prag naveden u Direktivi o baterijama. Ovaj proizvodtreba predati određenom centru za prikupljanje, npr. po principu „jedan-za-jedan“ kada kupujete sličannovi proizvod, ili ovlašćenom centru za prikupljanje za reciklažu istrošene električne i elektronske opreme(EEE), baterija i akumulatora. Nepravilno rukovanje ovom vrstom otpada može imati negativne posledicepo životnu sredinu i ljudsko zdravlje usled potencijalno opasnih materijala koji se uglavnom vezuju zaEEE. Vaša saradnja na ispravnom odlaganju ovog proizvoda će doprineti efikasnom korišćenju prirodnihresursa. Više informacija o tome kako možete da reciklirate ovaj proizvod potražite od lokalnih gradskihvlasti, komunalne službe, odobrenog plana reciklaže ili servisa za odlaganje kućnog otpada, ili posetitestranicu www.canon-europe.com/weee, ili www.canon-europe.com/battery.
547

When Repairing, Lending, or Disposing of the Printer
If you have entered personal data, passwords and/or other security settings on the printer, such informationmay be stored in the printer.
When sending the printer for repair, lending or transferring the printer to another person, or disposing of theprinter, please be sure to follow the steps below in order to delete such information and prevent third partiesfrom accessing it.
Initializing Printer's Setting
548
Online Manual
This manual has been confirmed to be displayed on the following web browsers (latest version).
• WindowsMicrosoft Edge and Google Chrome
• macOSSafari
• iOSOS default browser
• AndroidOS default browser
* Set your browser to allow cookies and enable JavaScript.
Screenshots in This ManualFor Windows:The screenshots used in this manual are taken with Windows 10.
For macOS:The screenshots used in this manual are taken with macOS Catalina 10.15.
549

Enhanced Printing Options
Printing from Your Computer (Windows)
Printing with Easy Setup Basics
Changing the Type of Paper
Setting the Number of Copies and Printing Order
Using Roll Unit to Use 2-Level Rolls
About 2-Level Roll Switching
Setting the Paper Rolls in the Printer According to the Intended Use
Printing by Automatically Switching Upper-level and Lower-level Roll Papers
How to Switch Paper Rolls
Reflect Roll Unit Settings in the Printer Driver
Printing Photos and Business Documents
Printing By Setting Print Purpose
Edit in PosterArtist and Print
Printing CAD Drawings
Printing By Setting Print Purpose
Printing from AutoCAD
Changing the Print Quality and Correcting Image Data
Adjusting Color Balance
Setting the Print Quality Level (Custom)
Printing a Color Document in Monochrome
Specifying Color Correction
Optimal Photo Printing of Image Data
Adjusting Colors with the Printer Driver
Printing with ICC Profiles
Adjusting Brightness
Adjusting Contrast
Printing Using Detailed Setting Mode
Scaled Printing
550

Printing to Oversized Paper Sizes
Setting Paper Dimensions (Custom Size)
Set a Custom Size Roll Width
Printing without Edges Based on the Scenarios
Printing without Margins to Match Paper Size
Printing without Margins to Match Roll Paper Width
Printing Full-Size without Margins
Three-sided Borderless Printing on Roll Paper
Printing Hanging and Horizontal Banners (Large-Format Printing)
Printing by Dividing/Joining Documents
Inputting Multiple-file Documents into Free Layout plus
Lining Up and Printing Multiple Documents to Cut Sheets
Printing by Connecting Multiple Pages
Printing Multiple Pages All on One Page
Dividing and Printing Posters
Printing Document in Center of Paper
Printing by Saving Roll Paper
Saving Roll Paper by Rotating Document 90 Degrees
Saving Roll Paper by Eliminating Upper and Lower Margins on Document
Switching the Paper Source to Match the Purpose
Displaying the Print Results before Printing
Other Convenient Settings
Stamp Printing
Registering a Stamp
Setting a Page Size and Orientation
Registering a Frequently Used Printing Profile
Cutting Roll Paper after Printing
Printing from Computer (macOS)
551

Printing with Easy Setup Basics
Changing the Type of Paper
Setting the Number of Copies and Printing Order
Using Roll Unit to Use 2-Level Rolls
About 2-Level Roll Switching
Setting the Paper Rolls in the Printer According to the Intended Use
Printing by Automatically Switching Upper-level and Lower-level Roll Papers
How to Switch Paper Rolls
Reflect Roll Unit Settings in the Printer Driver
Changing the Print Quality and Correcting Image Data
Adjusting Color Balance
Setting the Print Quality Level (Custom)
Printing a Color Document in Monochrome
Specifying Color Correction
Optimal Photo Printing of Image Data
Adjusting Colors with the Printer Driver
Printing with ICC Profiles (Specifying an ICC Profile from the Application Software)
Printing with ICC Profiles (Specifying an ICC Profile from the Printer Driver)
Adjusting Brightness
Adjusting Contrast
Scaled Printing
Printing to Oversized Paper Sizes
Setting Paper Dimensions (Custom Size)
Set a Custom Size Roll Width
Print Area
Printing without Edges Based on the Scenarios
Printing without Margins to Match Roll Paper Width
Printing Full-Size without Margins
Three-sided Borderless Printing on Roll Paper
552

Printing Hanging and Horizontal Banners (Large-Format Printing)
Printing by Dividing/Joining Documents
Lining Up and Printing Multiple Documents
Printing by Connecting Multiple Pages
Printing Multiple Pages All on One Page
Printing Document in Center of Paper
Printing by Saving Roll Paper
Saving Roll Paper by Rotating Document 90 Degrees
Saving Roll Paper by Eliminating Upper and Lower Margins on Document
Switching the Paper Source to Match the Purpose
Cutting Roll Paper after Printing
Printing Using AirPrint
HP-GL/2 Printing
Printing from Printer
Printing Data Saved on USB Flash Drive
Printing from Smartphone/Tablet
Print Easily from a Smartphone or Tablet with Canon PRINT Inkjet/SELPHY
Printing from iOS Device (AirPrint)
Enlarging Copy with imageRUNNER ADVANCE
553

Printing from Your Computer (Windows)
Printing with Easy Setup Basic
Setting the Number of Copies and Printing Order
Using Roll Unit to Use 2-Level Rolls
Printing Photos and Business Documents
Printing CAD Drawings
Changing the Print Quality and Correcting Image Data
Scaled Printing
Printing to Oversized Paper Sizes
Setting Paper Dimensions (Custom Size)
Set a Custom Size Roll Width
Printing without Edges Based on the Scenarios
Printing Hanging and Horizontal Banners (Large-Format Printing)
Printing by Dividing/Joining Documents
Printing Document in Center of Paper
Printing by Saving Roll Paper
Switching the Paper Source to Match the Purpose
Displaying the Print Results before Printing
Other Convenient Settings
554

Printing with Easy Setup
This section describes the simple setting procedure so that you can carry out appropriate printing on thisprinter.
Printing with Easy Setup
1. Check that printer is turned on1.
2. Load paper on the printer2.
Set roll paper or cut paper to a printer.
3. Open the printer driver setup window3.
4. Select the media type4.
Select the type of paper loaded in the printer from the Media Type list on the Main tab.If Auto (Use Printer Settings) is selected, the paper configured in printer settings is printed.
Important• See "Paper Information List" for Canon authentic paper or Canon output check paper.
Note• Click Get Information... to display the Paper Information on Printer dialog box. The Paper
Information on Printer dialog box allows you to get the paper information from the printer andto set the paper source and the media type on the printer driver.If Roll Paper (Auto) is selected for the paper source, it will remain as Roll Paper (Auto) even ifyou get the paper information from the printer.
555

• For instructions on changing the media type from the printer's operation panel, see "Changingthe Type of Paper."
5. Select print target5.
From the pull-down menu, select Easy Settings, and then select the setting that matches yourpurpose from the Print Target list.
6. Select the print quality6.
For Print Quality, select High, Standard or Fast according to your purpose.
Important• The print quality settings that can be selected may differ depending on a printing profile.
556

7. Select the paper size7.
From the Page Size list on the Page Setup tab, select the same size as that of the document that wascreated with the application software.
8. Select the paper source8.
For Paper Source, select the setting that matches your purpose.
Important• The paper feed method will differ depending on the lower level (roll paper 2) settings or roll unit
option settings.
9. Select roll paper width9.
557
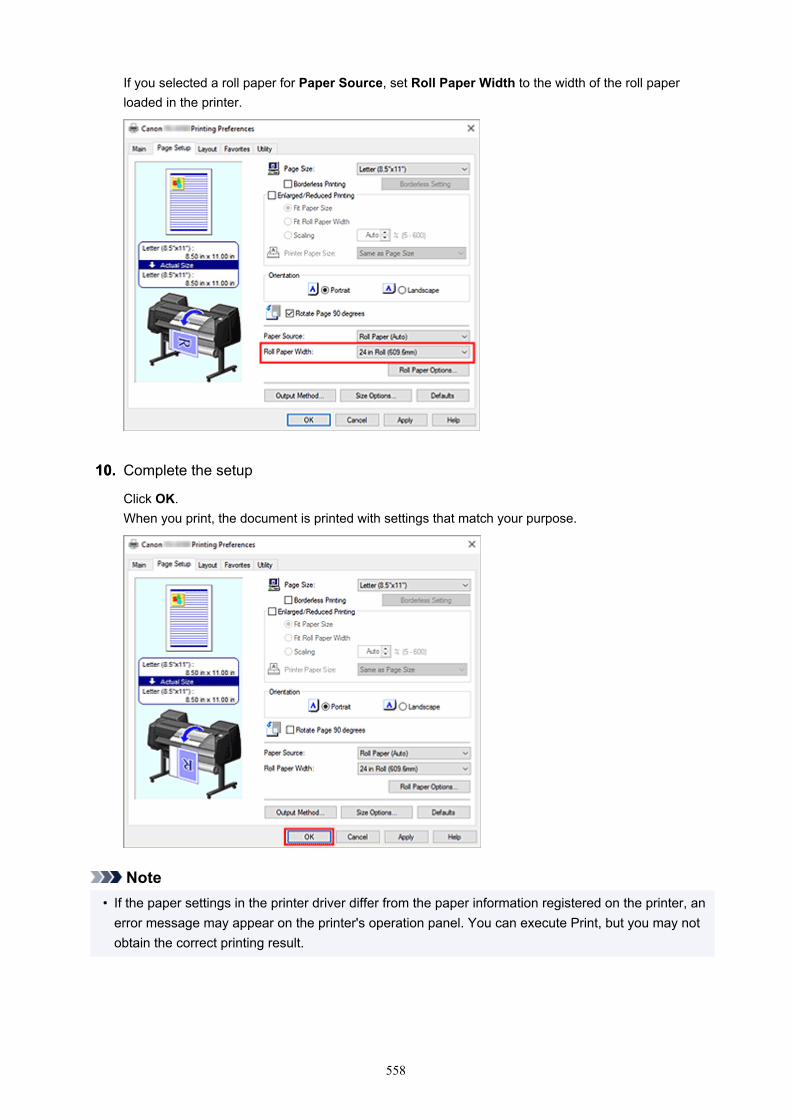
If you selected a roll paper for Paper Source, set Roll Paper Width to the width of the roll paperloaded in the printer.
10. Complete the setup10.
Click OK.When you print, the document is printed with settings that match your purpose.
Note• If the paper settings in the printer driver differ from the paper information registered on the printer, an
error message may appear on the printer's operation panel. You can execute Print, but you may notobtain the correct printing result.
558

Checking Printer Settings and Applying Settings to Printer Driver
1. Open printer driver setup window1.
2. Click Get Information... on Main tab2.
The Paper Information on Printer dialog box appears.
3. Select the paper source3.
From Paper Source, check the setting or select a new paper source.The current printer settings appear in Media Type and Roll Paper Width.
4. Apply settings4.
To apply the printer settings to the printer driver, click OK.
Note• If the media type and the output paper size are not set on the printer, OK will be grayed out and
cannot be clicked.• If communication with the printer is disabled, the Get Information... does not appear or printer
media information from the printer cannot be obtained.
559

Setting the Number of Copies and Printing Order
The procedure for specifying the number of copies and printing order is as follows:
1. Open the printer driver setup window1.
2. Specify the number of copies to be printed2.
For Copies on the Layout tab, specify the number of copies to be printed.
3. Specify the print order3.
Check the Print from Last Page check box when you want to print from the last page in order, anduncheck the check box when you want to print from the first page.
4. Complete the setup4.
Click OK.When you execute print, the specified number of copies will be printed with the specified printing order.
Important• When the application software that you used to create the document has the same function, specify
the settings on the printer driver. However, if the print results are not acceptable, specify the functionsettings on the application software. When you specify the number of copies and the printing order withboth the application software and this printer driver, the number of copies may be multiplied numbers ofthe two settings or the specified printing order may not be enabled.
560
Using Roll Unit to Use 2-Level Rolls
About 2-Level Roll Switching
Setting the Paper Rolls in the Printer According to the Intended Use
Printing by Automatically Switching Upper-level and Lower-level Roll Papers
How to Switch Paper Rolls
Reflect Roll Unit Settings in the Printer Driver
561

About 2-Level Roll Switching
This printer allows you to load roll paper in two levels. The upper level (Roll 1) and the lower level (Roll 2)can be automatically switched depending on the print job.
Printing by automatically switching Roll 1 and Roll 2 in this way is called "2-level roll switching."
• For instructions on setting the paper, see "Setting the Paper Rolls in the Printer According to theIntended Use."
• For the 2-level roll switching procedure, see "Printing by Automatically Switching Upper-level and Lower-level Roll Papers."
• Guidelines on how to switch Roll 1 and Roll 2 for certain cases are summarized in "How to Switch PaperRolls."Refer to this section if a document cannot be printed as intended or as necessary.
562

Setting the Paper Rolls in the Printer According to the IntendedUse
If you want to switch the 2-level rolls, set the paper rolls on the upper and lower level of the printer in one ofthe ways described below depending on the intended use.
• When automatically switching from paper roll 1 to paper roll 2 to match the paper size specified for the•print job
Set two paper rolls of the same type of paper but of different width on the upper and on the lower trays.Example of how to set the paper
Paper-feeding tray Roll Width Media Type
Upper-level 24 in Roll (609.6mm) Plain Paper
Lower-level A1/A2 Roll (594.0mm) Plain Paper
• When automatically switching from paper roll 1 to paper roll 2 role to match the paper type specified for•the print job
Set two paper rolls of the same width but of different types of paper on the upper and on the lower trays.Alternatively, set two paper rolls of different width and different types of paper on the upper and on thelower trays.Setting the paper (Example 1)
Paper-feeding tray Roll Width Media Type
Upper-level A1/A2 Roll (594.0mm) Plain Paper
Lower-level A1/A2 Roll (594.0mm) Canon Coated Paper
Setting the paper (Example 2)Paper-feeding tray Roll Width Media Type
Upper-level 36 in Roll (914.4mm) Plain Paper
Lower-level A1/A2 Roll (594.0mm) Canon Coated Paper
Important• 2-level roll switching is not possible when the paper rolls being fed on the platen are not compatible with
automatic cut-off. For checking which types of paper are compatible with automatic cut-off, look up thepaper you want to use on the "Paper Information List."
• If Auto (Use Printer Settings) is selected for Media Type in the Main sheet, you cannot switchbetween upper and lower rolls corresponding to the media type specified by the print job. If differenttypes of roll paper are set for the upper and lower rolls, specify the media type, such as plain paper orenameled paper, in Media Type.
Note• For information on how to set the paper rolls in the printer, see "Handling rolls."• When rolls of different types of paper and of different width are set in the upper and lower trays, the
paper roll matching the type of paper specified for the print job will be used.Depending on the settings, an error may occur causing the wrong paper roll to be used; in such cases,
563

it is recommended that, instead of using 2-level roll switching, you specify which one is best betweenpaper roll 1 and paper roll 2 and print.
DocumentSize: A3
Media Type: Plain Paper
Roll 1:ISO A1/A2Plain Paper
Roll 2:ISO A3/A4
Glossy Paper
• To learn how to switch paper- feeding trays, see "How to switch paper rolls."
564

Printing by Automatically Switching Upper-level and Lower-level Roll Papers
You can print by automatically switching Roll 1 and Roll 2 depending on the media type or your purpose.
The procedure for printing by switching the roll papers is as follows:
1. Load roll papers in upper and lower levels of printer1.
2. Open the printer driver setup window2.
3. Select the media type3.
Select the type of paper loaded in the printer from the Media Type list on the Main tab.If Auto (Use Printer Settings) is selected, the paper configured in printer settings is printed.
Note• If Automatically switch paper sources (paper size priority) is grayed out, refer to "Reflect Roll
Unit Settings in the Printer Driver" and set Roll Unit in the Device Information dialog box to Yes.
4. Select the paper size4.
From the Page Size list on the Page Setup tab, select the same size as that of the document that wascreated with the application software.
5. For Paper Source, select Roll Paper (Auto)5.
565

6. Select roll paper width6.
For Roll Paper Width, select the width of the roll paper loaded in the printer.
7. Selecting the printing method for the roll paper7.
When performing enlarged/reduced printing in accordance with the roll width, place a checkmark next toEnlarged/Reduced Printing and select the Fit Roll Paper Width.
8. Set the other items8.
To rotate the document 90 degrees and print it, select the Rotate Page 90 degrees check box.The current settings are displayed in the settings preview on the left side of the Page Setup tab.
Note• If you rotate a portrait document 90 degrees and print it at that horizontally, you may be able to
save paper depending on the paper size.
Important• When you select the Rotate Page 90 degrees check box and print the document, the document
will be rotated 90 degrees only if the vertical length of the document fits in the width set in RollPaper Width.Therefore to use this function, correctly set Roll Paper Width to the width of one of the roll papersloaded in the printer.
DocumentRoll Width:
ISO A1/A2 Roll (594.0 mm)
566

• If the roll papers loaded in the upper and lower levels are different media types, the document isprinted on the roll paper that matches the media type specified in the print job.If the document is being rotated 90 degrees for printing and the roll papers loaded in the upperand lower levels have different widths and different media types, set the correct combination ofwidth and media type so that they match one of the roll papers loaded in the printer.
9. Complete the setup9.
Click OK.When you print, the paper source is switched automatically to roll paper.
Important• On the operation panel, if Printer settings -> Paper-related settings -> Roll paper auto switching
is set to Do not identify size, the document may be printed on the unintended roll paper. Canonrecommends that you set this setting to Identify size before you print.
• 2-level roll switching is not possible when the paper rolls being fed on the platen are not compatible withautomatic cut-off. For checking which types of paper are compatible with automatic cut-off, look up thepaper you want to use on the "Paper Information List."
• If Auto (Use Printer Settings) is selected for Media Type in the Main sheet, you cannot switchbetween upper and lower rolls corresponding to the media type specified by the print job. If differenttypes of roll paper are set for the upper and lower rolls, specify the media type, such as plain paper orenameled paper, in Media Type.
Note• For details about how to switch the source levels depending on the print job, see "How to Switch Paper
Rolls."
Printing by Saving PaperDepending on the paper size that was specified in the print job, the printer automatically identifies the rollpaper that will produce the smaller margins.Whether or not the page is rotated 90 degrees, the printer prints using conditions that produce thesmallest paper margins from among the Roll1 and Roll2 combinations.
Document
567

Roll 1: ISO A1/A2 Roll 2: ISO A3/A4
1. Display the Devices and Printers window1.
Select the Control Panel -> Hardware and Sound (Hardware) -> Devices and Printers.The Devices and Printers window is displayed.
2. Display setup window2.
Right-click the "Your model name" icon, and select Printer properties.The printer's Properties window appears.
3. Set automatic paper source switching3.
On the Device Settings tab, select the Automatically switch paper sources (paper size priority)check box.
568

4. Click Get Information...4.
When the confirmation message appears, click Yes.Your computer gets the paper size information from the printer and displays the width of the roll paperthat is actually loaded in the printer.
Important• When you replace the roll paper loaded in the printer, always click Get Information... to obtain
the roll paper width information. If the roll paper width is not set correctly, you may not be ableto print the document as intended.
5. Open the printer driver setup window5.
6. Select the media type6.
Select the type of paper loaded in the printer from the Media Type list on the Main tab.If Auto (Use Printer Settings) is selected, the paper configured in printer settings is printed.
7. Select the paper size7.
From the Page Size list on the Page Setup tab, select the same size as that of the document that wascreated with the application software.
8. For Paper Source, select Roll Paper (Auto)8.
9. Select roll paper width9.
For Roll Paper Width, select the width of the roll paper loaded in the printer.
10. Set the other items10.
To rotate the document 90 degrees and print it, select the Rotate Page 90 degrees check box.
569

11. Complete the setup11.
Click OK.When you print, the paper source is switched automatically to roll paper.
Important• This method switches the upper and lower levels depending on the paper size specified in the print
job. Always load the same media type for the roll papers in the upper and lower levels of the printer.If different types of paper are loaded, an error could occur and you may not be able to print thedocument as intended.
• If roll papers of the same width and type are loaded in the upper and lower levels and you wantto automatically switch the roll papers, clear the Automatically switch paper sources (paper sizepriority) check box.
Note• If Roll 1 and Roll 2 produce the same margins, Roll 1 is used for printing.
570
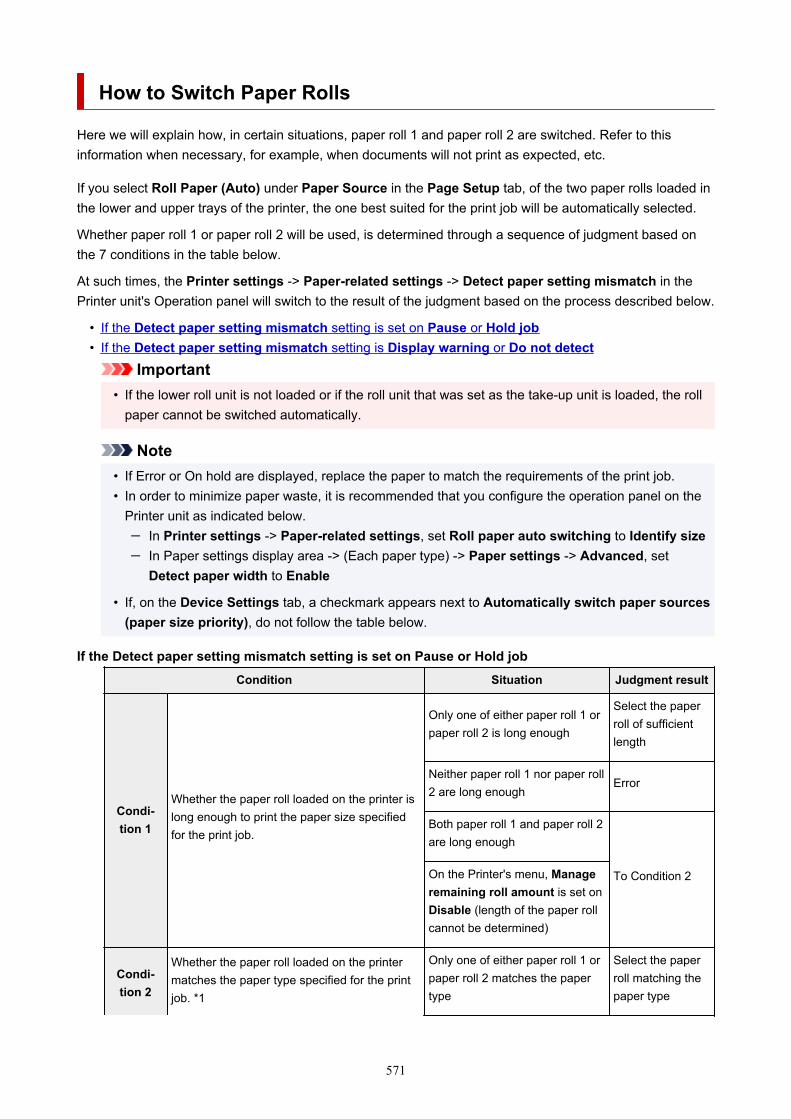
How to Switch Paper Rolls
Here we will explain how, in certain situations, paper roll 1 and paper roll 2 are switched. Refer to thisinformation when necessary, for example, when documents will not print as expected, etc.
If you select Roll Paper (Auto) under Paper Source in the Page Setup tab, of the two paper rolls loaded inthe lower and upper trays of the printer, the one best suited for the print job will be automatically selected.
Whether paper roll 1 or paper roll 2 will be used, is determined through a sequence of judgment based onthe 7 conditions in the table below.
At such times, the Printer settings -> Paper-related settings -> Detect paper setting mismatch in thePrinter unit's Operation panel will switch to the result of the judgment based on the process described below.
• If the Detect paper setting mismatch setting is set on Pause or Hold job• If the Detect paper setting mismatch setting is Display warning or Do not detect
Important• If the lower roll unit is not loaded or if the roll unit that was set as the take-up unit is loaded, the roll
paper cannot be switched automatically.
Note• If Error or On hold are displayed, replace the paper to match the requirements of the print job.• In order to minimize paper waste, it is recommended that you configure the operation panel on the
Printer unit as indicated below.In Printer settings -> Paper-related settings, set Roll paper auto switching to Identify sizeIn Paper settings display area -> (Each paper type) -> Paper settings -> Advanced, setDetect paper width to Enable
• If, on the Device Settings tab, a checkmark appears next to Automatically switch paper sources(paper size priority), do not follow the table below.
If the Detect paper setting mismatch setting is set on Pause or Hold jobCondition Situation Judgment result
Condi-tion 1
Whether the paper roll loaded on the printer islong enough to print the paper size specifiedfor the print job.
Only one of either paper roll 1 orpaper roll 2 is long enough
Select the paperroll of sufficientlength
Neither paper roll 1 nor paper roll2 are long enough
Error
Both paper roll 1 and paper roll 2are long enough
To Condition 2On the Printer's menu, Manageremaining roll amount is set onDisable (length of the paper rollcannot be determined)
Condi-tion 2
Whether the paper roll loaded on the printermatches the paper type specified for the printjob. *1
Only one of either paper roll 1 orpaper roll 2 matches the papertype
Select the paperroll matching thepaper type
571

Neither roll 1 nor roll 2 match thepaper type
Error / On hold
Both paper roll 1 and paper roll 2match the paper type
To Condition 3
Condi-tion 3
In the Printer menu, how has the Roll paperauto switching setting changed?
It has changed to Do not identi-fy size
Select the paperroll currently be-ing fed into theplaten *2
It has changed to Identify size To Condition 4
Condi-tion 4
If borderless printing has been indicated forthe print job (if it has not, on to condition 5)
Only one of either paper roll 1or paper roll 2 is compatible withborderless printing
Select the paperroll compatiblewith borderlessprinting
Neither paper roll 1 nor paper roll2 are compatible with borderlessprinting
Error
Both paper roll 1 and paper roll2 are compatible with borderlessprinting
To Condition 5
Condi-tion 5
Whether the width of the paper roll loaded onthe printer matches the paper width specifiedfor the print job (only when printing borderlessor enlarging/reducing)
Only one of either paper roll 1 orpaper roll 2 has the width speci-fied for the print job
Select the paperroll of the match-ing width
Neither paper roll 1 nor paper roll2 have a width matching the onespecified for the print job
Error / On hold
Both paper roll 1 and paper roll2 have a width matching the onespecified for the print job To Condition 6
Paper roll width has not beenspecified for the print job
Condi-tion 6
Whether the width of the paper size specifiedfor the print job fits within the width of the pa-per roll loaded on the printer.
The width of the paper sizespecified for the print job only fitswithin the width of paper roll 1 orpaper roll 2
Select the paperroll in which thewidth of the papersize fits comforta-bly
The width of the paper sizespecified for the print job doesnot fit within the width of eitherpaper roll 1 or paper roll 2
Error
The width of the paper sizespecified for the print job fits
To Condition 7
572

within the width of both paper roll1 and paper roll 2
Condi-tion 7
Is the width of paper roll 1 different from thewidth of paper roll 2?
Roll width is different
Select the paperroll whose widthis closer to thewidth specified forthe print job
Roll width is the same
Select the paperroll currently be-ing fed into theplaten *2
*1 If Auto (Use Printer Settings) is selected for Media Type in the Main sheet, the media type set inthe printer is recognized as being consistent with the media type specified in the print job.*2 In the following cases, neither roll 1 nor roll 2 are being fed onto the platen. In such cases, paper roll1 is selected.
• When the printer has switched to sleep mode and has returned to the initial position• When the printer has been turned on• When cut paper has been fed into the printer and has exited it
If the Detect paper setting mismatch setting is set on Display warning or Do not detectCondition Situation Judgment result
Condi-tion 1
Whether the paper roll loaded on the printer islong enough to print the paper size specifiedfor the print job.
Only one of either paper roll 1 orpaper roll 2 is long enough
Select the paperroll of sufficientlength
Neither paper roll 1 nor paper roll2 are long enough
Error
Both paper roll 1 and paper roll 2are long enough
To Condition 2On the Printer's menu, Manageremaining roll amount is set onDisable (length of the paper rollcannot be determined)
Condi-tion 2
Whether the paper roll loaded on the printermatches the paper type specified for the printjob.
Only one of either paper roll 1 orpaper roll 2 matches the papertype
Select the paperroll matching thepaper type
Neither roll 1 nor roll 2 match thepaper type
To Condition 3Both paper roll 1 and paper roll 2match the paper type
Condi-tion 3
In the Printer menu, how has the Roll paperauto switching setting changed?
It has changed to Do not identi-fy size
Select the paperroll currently beingfed into the platen*1
573
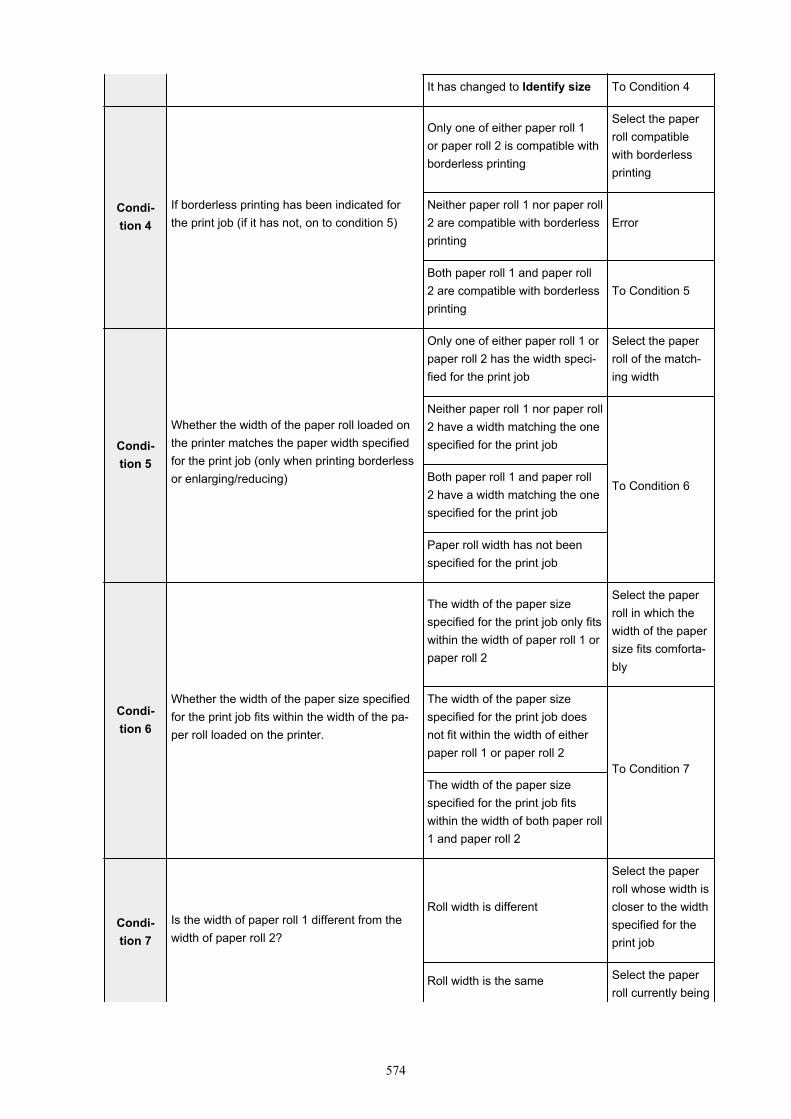
It has changed to Identify size To Condition 4
Condi-tion 4
If borderless printing has been indicated forthe print job (if it has not, on to condition 5)
Only one of either paper roll 1or paper roll 2 is compatible withborderless printing
Select the paperroll compatiblewith borderlessprinting
Neither paper roll 1 nor paper roll2 are compatible with borderlessprinting
Error
Both paper roll 1 and paper roll2 are compatible with borderlessprinting
To Condition 5
Condi-tion 5
Whether the width of the paper roll loaded onthe printer matches the paper width specifiedfor the print job (only when printing borderlessor enlarging/reducing)
Only one of either paper roll 1 orpaper roll 2 has the width speci-fied for the print job
Select the paperroll of the match-ing width
Neither paper roll 1 nor paper roll2 have a width matching the onespecified for the print job
To Condition 6Both paper roll 1 and paper roll2 have a width matching the onespecified for the print job
Paper roll width has not beenspecified for the print job
Condi-tion 6
Whether the width of the paper size specifiedfor the print job fits within the width of the pa-per roll loaded on the printer.
The width of the paper sizespecified for the print job only fitswithin the width of paper roll 1 orpaper roll 2
Select the paperroll in which thewidth of the papersize fits comforta-bly
The width of the paper sizespecified for the print job doesnot fit within the width of eitherpaper roll 1 or paper roll 2
To Condition 7The width of the paper sizespecified for the print job fitswithin the width of both paper roll1 and paper roll 2
Condi-tion 7
Is the width of paper roll 1 different from thewidth of paper roll 2?
Roll width is different
Select the paperroll whose width iscloser to the widthspecified for theprint job
Roll width is the same Select the paperroll currently being
574

fed into the platen*1
*1 In the following cases, neither roll 1 nor roll 2 are being fed onto the platen. In such cases, paper roll1 is selected.
• When the printer has switched to sleep mode and has returned to the initial position• When the printer has been turned on• When cut paper has been fed into the printer and has exited it
575

Reflect Roll Unit Settings in the Printer Driver
Reflect printer unit's Roll Unit settings in the printer driver.
If the printer unit settings are reflected in the printer driver, the paper that can be set in the printer driversettings will change to a status suitable to the printer unit status.
The following explains the procedure to reflect Roll Unit settings in the printer driver.
1. Display the Devices and Printers window1.
Select the Control Panel -> Hardware and Sound (Hardware) -> Devices and Printers.The Devices and Printers window is displayed.
2. Display setup window2.
Right-click the "Your model name" icon, and select Printer properties.The printer's Properties window appears.
3. Click the Device Settings tab's Device Information3.
Click Acquire Status in the displayed Device Information dialog box, and then click Yes.Printer unit settings will be reflected in the printer driver.
Important• In the event the lower roll unit is not set or the roll unit is being used as a wrapping device, the value
of Roll Unit will be set to No. In this case, Automatically switch paper sources (paper size priority)will be grayed out and cannot be selected. Also, the Paper Source items that can be selected in thePage Setup tab will change.
576

Printing Photos and Business Documents
Printing By Setting Print Purpose
Edit in PosterArtist and Print
577

Printing By Setting Print Purpose
The print settings that are generally used frequently are pre-registered as print purposes. By using a printpurpose to print, you can print with settings that match the document.
The procedure for printing by using a print purpose is as follows:
1. Open the printer driver setup window1.
2. Select the media type2.
Select the type of paper loaded in the printer from the Media Type list on the Main tab.If Auto (Use Printer Settings) is selected, the paper configured in printer settings is printed.
3. Select print setting mode3.
From the pull-down menu, select Easy Settings.
578

4. Select print purpose4.
For Print Target, select the setting that matches the document.
Default SettingsSelect this setting to print a general document such as a business documents.
Photo (Color)Select this setting to print a color illustration or a photo.
PosterSelect this setting to print a poster.
CAD (Color Line Drawing)Select when printing data such as drawings.
CAD (Monochrome Line Drawing)Select when printing data such as drawings in monochrome.
Perspective, GISSelect when printing data such as perspectives and GIS.
Note• To check the settings of the items that are set by Print Target, click View Settings.
5. Select the paper size5.
From the Page Size list on the Page Setup tab, select the same size as that of the document that wascreated with the application software.The current settings are displayed in the settings preview on the left side of the window.
579

6. Select the paper source6.
For Paper Source, select the setting that matches your purpose.
Important• The paper feed method will differ depending on the lower level (roll paper 2) settings or roll unit
option settings.
7. Set the other items7.
Set the other items as necessary.
8. Complete the setup8.
Click OK.When you print, the document is printed with settings to match the specified print purpose.
580

Edit in PosterArtist and Print
Word processing and spreadsheet software documents and web browser screens, etc. can be edited a printfrom PosterArtist.
The following explains the procedure for editing original documents made in multiple application software inPosterArtist and printing in a poster layout.
1. Open the printer driver setup window1.
2. Select edit in PosterArtist2.
Check Page Layout in the Layout tab and select Edit Using PosterArtist from the pull-down menu.
Note• Edit Using PosterArtist may not be available for use depending on the usage environment.
3. Start up PosterArtist3.
Click OK.When printing is executed, PosterArtist starts up and PageCapture window opens.
4. Select page to get in PosterArtist4.
5. Edit page in PosterArtist5.
Image editing and sorting is implemented in PosterArtist.By repeating steps 1 through 4 without closing the PosterArtist window, documents made in multipleapplication software can be arranged on one page.After editing is complete, please print from PosterArtist menu.
581

Note• For instructions on how to edit and rearrange images, refer to the PosterArtist manual.
582

Printing CAD Drawings
Printing By Setting Print Purpose
Printing from AutoCAD
583

Printing By Setting Print Purpose
The print settings that are generally used frequently are pre-registered as print purposes. By using a printpurpose to print, you can print with settings that match the document.
The procedure for printing by using a print purpose is as follows:
1. Open the printer driver setup window1.
2. Select the media type2.
Select the type of paper loaded in the printer from the Media Type list on the Main tab.If Auto (Use Printer Settings) is selected, the paper configured in printer settings is printed.
3. Select print setting mode3.
From the pull-down menu, select Easy Settings.
584

4. Select print purpose4.
For Print Target, select the setting that matches the document.
Default SettingsSelect this setting to print a general document such as a business documents.
Photo (Color)Select this setting to print a color illustration or a photo.
PosterSelect this setting to print a poster.
CAD (Color Line Drawing)Select when printing data such as drawings.
CAD (Monochrome Line Drawing)Select when printing data such as drawings in monochrome.
Perspective, GISSelect when printing data such as perspectives and GIS.
Note• To check the settings of the items that are set by Print Target, click View Settings.
5. Select the paper size5.
From the Page Size list on the Page Setup tab, select the same size as that of the document that wascreated with the application software.The current settings are displayed in the settings preview on the left side of the window.
585

6. Select the paper source6.
For Paper Source, select the setting that matches your purpose.
Important• The paper feed method will differ depending on the lower level (roll paper 2) settings or roll unit
option settings.
7. Set the other items7.
Set the other items as necessary.
8. Complete the setup8.
Click OK.When you print, the document is printed with settings to match the specified print purpose.
586

Printing from AutoCAD
Printer Driver Optimization Module for AutoCAD is software for printing optimally from AutoCAD with theprinter driver.
By optimally controlling the processing resolution of raster data and the memory to be used in imageprocessing of AutoCAD, printing superior in reliability and productivity is realized.
If you install Printer Driver Optimization Module for AutoCAD on a computer on which supported AutoCAD isinstalled, it will be installed automatically.
Note• Printer Driver Optimization Module for AutoCAD is applied automatically when you print from AutoCAD,
and optimal printing is performed.
Confirming the Installation of Printer Driver Optimization Module forAutoCAD
You can confirm whether Printer Driver Optimization Module for AutoCAD is installed by the followingmethod.
1. From the File menu of AutoCAD, select Print1.
The Plot dialog box is displayed.
2. Confirm if the device name in use is displayed2.
Printer Driver Optimization Module for AutoCAD is installed if "XXX - Optimized driver - by Canon Inc."(where "XXX" is your model name) is displayed in Plotter of Printer/plotter.
587

Changing the Print Quality and Correcting Image Data
Adjusting Color Balance
Setting the Print Quality Level (Custom)
Printing a Color Document in Monochrome
Specifying Color Correction
Adjusting Brightness
Adjusting Contrast
Printing Using Detailed Setting Mode
588

Adjusting Color Balance
You can adjust the color tints when printing.Since this function adjusts color balance of the output by changing the ink ratios of each color, it changesthe total color balance of the document. Use the application software when you want to change the colorbalance significantly. Use the printer driver only when you want to adjust the color balance slightly.The following sample shows the case when color balance is used to intensify cyan and to diminish yellow sothat the overall colors are more uniform.
No adjustment Adjust color balance
The procedure for adjusting color balance is as follows:
1. Open the printer driver setup window1.
2. Select the advanced settings2.
Select Advanced Settings from the pull-down menu on the Main tab.
3. Select color mode3.
For Color Mode, select Color, and then click Color Settings....The Color Settings dialog box appears.
589

4. Adjust color balance4.
The Color Adjustment tab has individual sliders for Cyan, Magenta, and Yellow. Each color becomesstronger when the corresponding slider is moved to the right, and becomes weaker when thecorresponding slider is moved to the left. For example, when cyan becomes weaker, the color redbecomes stronger.You can also directly enter a value linked to the slider. Enter a value in the range from -50 to 50. Thecurrent settings are displayed in the settings preview on the left side of the printer driver.
After adjusting each color, click OK.
5. Complete the setup5.
Click OK on the Main tab.When you execute print, the document is printed with the adjusted color balance.
Related TopicsSetting the Print Quality Level (Custom)Specifying Color CorrectionAdjusting BrightnessAdjusting Contrast
590

Setting the Print Quality Level (Custom)
Custom on the Print Quality tab allows you to set detailed print quality levels.
The procedure for setting the print quality level is as follows:
1. Open the printer driver setup window1.
2. Select advanced settings2.
From the Main tab pull-down menu, select Advanced Settings.
3. Select the print quality3.
For Print Quality, select Custom.The Custom dialog box opens.
Important• If Auto (Use Printer Settings) is selected for Media Type, Custom cannot be selected.
4. Setting the print quality level4.
Drag the slider bar to select the print quality level and click OK.
591

Important• Certain print quality levels cannot be selected depending on the settings of Media Type.
5. Complete the setup5.
Click OK on the Main tab.When you execute print, the image data is printed with the selected print quality level.
Related TopicsSpecifying Color CorrectionAdjusting Color BalanceAdjusting BrightnessAdjusting Contrast
592

Printing a Color Document in Monochrome
The procedure for printing a color document in monochrome is as follows:
1. Open the printer driver setup window1.
2. Select advanced settings2.
From the Main tab pull-down menu, select Advanced Settings.
3. Select color mode3.
For Color Mode, select Monochrome or Monochrome Bitmap.
Note• The selectable Color Mode depends on the media type selected for Media Type on the Main tab.• You can select Monochrome Bitmap for Color Mode only if Line Drawing/Text is selected in
Print Priority.
4. Complete the setup4.
Click OK.When you execute print, the document is converted to grayscale data. It allows you to print the colordocument in monochrome.
593

Important• When Monochrome or Monochrome Bitmap are selected, the printer driver processes image data as
sRGB data. In this case, actual colors printed may differ from those in the original image data.When using the grayscale printing function to print Adobe RGB data, convert the data to sRGB datausing an application software.
Note• With Monochrome or Monochrome Bitmap inks other than black ink may be used as well.
594

Specifying Color Correction
You can specify the color correction method suited to the type of document to be printed.Normally, when data is printed, the printer driver automatically adjusts the colors.
When you want to print by using the color space of the image data effectively, select ICM or, ICC ProfileMatching. When you want to use an application software to specify a printing ICC profile, select Off.
The procedure for specifying color correction is as follows:
1. Open the printer driver setup window1.
2. Select advanced settings2.
From the Main tab pull-down menu, select Advanced Settings.
3. Select color mode3.
For Color Mode, select Color, and then click Color Settings....The Color Settings dialog box appears.
4. Select color correction4.
Click Matching tab, select Color Correction setting that matches your purpose from the following, andclick OK.
595

Driver MatchingPrint with the optimal color using the printer driver's original color profile. Normally, you shouldchoose this mode.
ICC Profile MatchingCarry out color matching using the ICC profile. Specify the input profile, printer profile and matchingmethod in detail, and select when printing. You can use the digital camera or scanner ICC profile, orthe ICC profile created using the profile creation tool.
ICMPerform color matching on the host computer using the Windows ICM function. Select when printingfrom an ICM function-compatible application.
OffPrint without performing color matching on the printer driver. Select this when performing colormatching using applications such as Adobe Photoshop, or printing a color chart using a profilecreation tool.
5. Complete the setup5.
Click OK on the Main tab.When you execute print, the document data is printed with the specified color correction.
Important• When ICM is disabled in the application software, ICM is unavailable for Color Correction and the
printer may not be able to print the image data properly.• If Auto (Use Printer Settings) is selected for Media Type, the Matching sheet is not displayed, and
color correction occurs according to printer settings.
596

Related TopicsOptimal Photo Printing of Image DataAdjusting Colors with the Printer DriverPrinting with ICC Profiles
597

Optimal Photo Printing of Image Data
When people print images taken with digital cameras, they sometimes feel that the printed color tones differfrom those of actual image or those displayed on the monitor.To get the print results as close as possible to the desired color tones, you must select a printing methodthat is best suited to the application software used or to your purpose.
Color ManagementDevices such as digital cameras, scanners, monitors, and printers handle color differently. Colormanagement (color matching) is a method that manages device-dependent "colors" as a common colorspace.
For Windows, a color management system called "ICM" is built into the operating system.sRGB is one of the common color spaces that is frequently used.
ICC profiles convert device-dependent "colors" into a common color space. By using an ICC profile andcarrying out color management, you can draw out the color space of the image data within the colorreproduction area that the printer can express.
Note• Normally, image files are saved in JPEG format. Some digital cameras allow you to save images in a
format called RAW. RAW data refers to an image saving format that requires a computer to developthe image. You can embed an input ICC profile tag into a RAW file by using special applicationsoftware.
Selecting a Printing Method Suited to the Image DataThe recommended printing method depends on the color space of the image data or the applicationsoftware to be used.
There are two typical printing methods.Check the color space of the image data and the application software to be used, and then select theprinting method suited to your purpose.
Adjusting Colors with the Printer DriverThis section describes the procedure for printing data by using the color correction function of theprinter driver.Select this function when you want to print impressions that are close to those displayed on themonitor, for example, if you corrected the colors while checking the print image on the monitor.
Printing with ICC ProfilesDescribes the procedure for printing by using the color space of the image data effectively.You can print with a common color space by setting up the application software and the printer driverso that the color management matches the input ICC profile of the image data.The method for setting up the printer driver differs depending on the application software to be used.
598
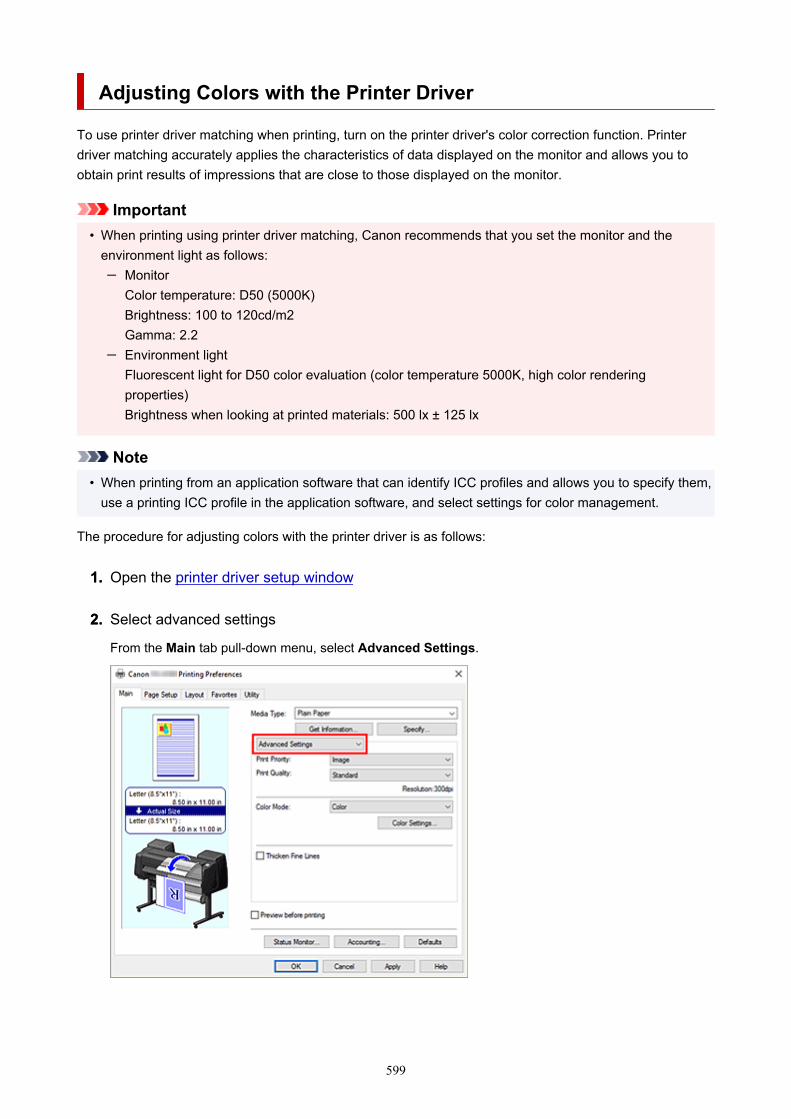
Adjusting Colors with the Printer Driver
To use printer driver matching when printing, turn on the printer driver's color correction function. Printerdriver matching accurately applies the characteristics of data displayed on the monitor and allows you toobtain print results of impressions that are close to those displayed on the monitor.
Important• When printing using printer driver matching, Canon recommends that you set the monitor and the
environment light as follows:MonitorColor temperature: D50 (5000K)Brightness: 100 to 120cd/m2Gamma: 2.2Environment lightFluorescent light for D50 color evaluation (color temperature 5000K, high color renderingproperties)Brightness when looking at printed materials: 500 lx ± 125 lx
Note• When printing from an application software that can identify ICC profiles and allows you to specify them,
use a printing ICC profile in the application software, and select settings for color management.
The procedure for adjusting colors with the printer driver is as follows:
1. Open the printer driver setup window1.
2. Select advanced settings2.
From the Main tab pull-down menu, select Advanced Settings.
599

3. Select color mode3.
For Color Mode, select Color, and then click Color Settings....The Color Settings dialog box appears.
4. Select color correction4.
Click Matching tab, and select Driver Matching for Color Correction.
5. Select the rendering intent5.
Select the coloring adjustment method in Rendering Intent.
Perceptual (Photo)Reproduces colors of general photos naturally and features smooth gradation. In addition, selectingthis setting allows you to adjust colors easily using an application software.
Saturation (Poster/CAD)Reproduces vivid colors on data such as a poster. In addition, prints in easy-to-see colors suitablefor line drawing.
6. Set the other items6.
If necessary, click Color Adjustment tab, and adjust the color balance (Cyan, Magenta, Yellow) andadjust Brightness, and Contrast settings, and then click OK.
7. Complete the setup7.
Click OK on the Main tab.When you print, the colors get adjusted by the printer driver when printing the data.
600

Related TopicsSetting the Print Quality Level (Custom)Specifying Color CorrectionAdjusting Color BalanceAdjusting BrightnessAdjusting Contrast
601

Printing with ICC Profiles
When the image data has a specified input ICC profile, you can print by using the color space of the dataeffectively.
The printer driver setting procedure varies depending on the application software used to print.
Specify an ICC Profile from the Application Software and Print the DataWhen you print the editing and touch-up results of Adobe Photoshop, Canon Digital Photo Professional,or any application software that allows you to specify input and printing ICC profiles, you print byeffectively using the color space of the input ICC profile specified in the image data.
To use this printing method, use your application software to select color management items and specifyan input ICC profile and a printing ICC profile in the image data.Even if you print using a printing ICC profile that you created yourself, be sure to select color managementitems from your application software.For instructions, refer to the manual of the application software you are using.
1. Open the printer driver setup window1.
2. Select advanced settings2.
From the Main tab pull-down menu, select Advanced Settings.
3. Select color mode3.
For Color Mode, select Color, and then click Color Settings....The Color Settings dialog box appears.
4. Select color correction4.
Click Matching tab, and select Off for Color Correction.
602

5. Set the other items5.
If necessary, click Color Adjustment tab, and adjust the color balance (Cyan, Magenta, Yellow) andadjust Brightness, and Contrast settings, and then click OK.
6. Complete the setup6.
Click OK on the Main tab.When you execute print, the printer uses the color space of the image data.
Specify an ICC Profile with the Printer Driver, and then PrintWhen you print from application software that cannot identity input ICC profiles or does not allow you tospecify one, the data color space is printed as sRGB.
1. Open the printer driver setup window1.
2. Select advanced settings2.
From the Main tab pull-down menu, select Advanced Settings.
603

3. Select color mode3.
For Color Mode, select Color, and then click Color Settings....The Color Settings dialog box appears.
4. Select color correction4.
Click Matching tab, and select ICC Profile Matching for Color Correction.
5. Select Input Profile5.
Select the input profile you want to use.
604
Important• When the application software specifies an input profile, the input profile setting of the printer
driver becomes invalid.
6. Select the printer profile6.
Select Printer Profile as follows:
• To set the printer profile automatically:•Select Auto Settings.
• To set the printer profile manually:•Select a printer profile that matches the media type to be used.
7. Select the rendering intent7.
Select the coloring adjustment method in Rendering Intent.
PerceptualReproduces colors of general photos naturally and features smooth gradation. In addition,selecting this setting allows you to adjust colors easily using an application software.
Important• When you select Perceptual to print images, Canon recommends that you set the monitor
and the environment light as follows:MonitorColor temperature: D50 (5000K)Brightness: 100 to 120cd/m2Gamma: 2.2Environment lightFluorescent light for D50 color evaluation (color temperature 5000K, high color renderingproperties)Brightness when looking at printed materials: 500 lx ± 125 lx
SaturationReproduces vivid colors on data such as a poster. In addition, prints in easy-to-see colors suitablefor line drawing.
Relative ColorimetricWhen image data is converted to the color space of the printer, this method converts the imagedata so the color reproduction approximates the shared color regions. Select this method to printimage data with colors that are close to the original colors.
Absolute ColorimetricWhen Relative Colorimetric is selected, white spots are reproduced as white spots of the paper(background color). However, when Absolute Colorimetric is selected, how the white spots arereproduced depends on the image data.
Important• Depending on the media type, you may obtain the same print results even when you change
the Rendering Intent setting.
605

8. Set the other items8.
If necessary, click Color Adjustment tab, and adjust the color balance (Cyan, Magenta, Yellow) andadjust Brightness, and Contrast settings, and then click OK.
9. Complete the setup9.
Click OK on the Main tab.When you execute print, the printer uses the color space of the image data.
Related TopicsSetting the Print Quality Level (Custom)Specifying Color CorrectionAdjusting Color BalanceAdjusting BrightnessAdjusting Contrast
606

Adjusting Brightness
You can brighten or darken the colors of the overall image data during printing.The following sample shows the case when light colors are darkened when the image data is printed.
No adjustment Darken light colors
The procedure for adjusting brightness is as follows:
1. Open the printer driver setup window1.
2. Select advanced settings2.
From the Main tab pull-down menu, select Advanced Settings.
3. Select color mode3.
For Color Mode, select Color, and then click Color Settings....The Color Settings dialog box appears.
4. Adjust brightness4.
On the Color Adjustment tab, moving the Brightness slider to the right brightens (dilutes) the colors,and moving the slider to the left darkens (intensifies) the colors.You can also directly enter a value linked to the slider. Enter a value in the range from -50 to 50. Thecurrent settings are displayed in the settings preview on the left side of the printer driver.
607

5. Complete the setup5.
Click OK on the Main tab.When you execute print, the data is printed at the adjusted brightness.
Related TopicsSetting the Print Quality Level (Custom)Specifying Color CorrectionAdjusting Color BalanceAdjusting Contrast
608

Adjusting Contrast
You can adjust the image contrast during printing.To make the differences between the light and dark portions of images greater and more distinct, increasethe contrast. On the other hand, to make the differences between the light and dark portions of imagessmaller and less distinct, reduce the contrast.
No adjustment Adjust the contrast
The procedure for adjusting contrast is as follows:
1. Open the printer driver setup window1.
2. Select advanced settings2.
From the Main tab pull-down menu, select Advanced Settings.
3. Select color mode3.
For Color Mode, select Color, and then click Color Settings....The Color Settings dialog box appears.
4. Adjust the contrast4.
On the Color Adjustment tab, moving the Contrast slider to the right increases the contrast, andmoving the slider to the left decreases the contrast.
609

You can also directly enter a value linked to the slider. Enter a value in the range from -50 to 50. Thecurrent settings are displayed in the settings preview on the left side of the printer driver.
After adjusting each color, click OK.
5. Complete the setup5.
Click OK on the Main tab.When you execute print, the image is printed with the adjusted contrast.
Related TopicsSetting the Print Quality Level (Custom)Specifying Color CorrectionAdjusting Color BalanceAdjusting Brightness
610

Printing Using Detailed Setting Mode
You can print by using your own settings instead of the pre-registered Print Target settings.
The procedure for using the detailed setting mode and printing is as follows:
1. Open the printer driver setup window1.
2. Select the media type2.
Select the type of paper loaded in the printer from the Media Type list on the Main tab.If Auto (Use Printer Settings) is selected, the paper configured in printer settings is printed.
3. Select advanced settings3.
From the Main tab pull-down menu, select Advanced Settings.
611

4. Set print conditions4.
Set the following items as necessary.
Print PrioritySelect elements to prioritize for print results.
Print QualitySelects your desired printing quality.Select one of the following to set the print quality level that is appropriate for the purpose.
Color ModeSelects color adjustment method.
Thicken Fine LinesAdd a check mark if you want to print thin lines thicker for easy viewing.
5. Select the paper size5.
From the Page Size list on the Page Setup tab, select the same size as that of the document that wascreated with the application software.The current settings are displayed in the settings preview on the left side of the window.
612

6. Select the paper source6.
For Paper Source, select the setting that matches your purpose.
Important• The paper feed method will differ depending on the lower level (roll paper 2) settings or roll unit
option settings.
7. Set the other items7.
Set the other items as necessary.
8. Complete the setup8.
Click OK.When you print, the document is printed with the print conditions you set.
Related TopicsAdjusting Color BalanceSetting the Print Quality Level (Custom)Specifying Color CorrectionAdjusting BrightnessAdjusting Contrast
613

Scaled Printing
The procedure for printing a document with pages enlarged or reduced is as follows:
1. Open the printer driver setup window1.
2. Select the paper size of the document2.
Using Page Size on the Page Setup tab, select the page size that is set with your application software.
3. Select the paper source3.
For Paper Source, select the setting that matches your purpose.
Important• The paper feed method will differ depending on the lower level (roll paper 2) settings or roll unit
option settings.
4. Select roll paper width4.
If you selected a roll paper for Paper Source, set Roll Paper Width to the width of the roll paper loadedin the printer.
5. Select scaled printing5.
Check the Enlarged/Reduced Printing check box.
6. Set one of scaling methods described below6.
From the items listed below, select the setting that matches your purpose and select the correspondingcheck box.The current settings are displayed in the settings preview on the left side of the window.
614
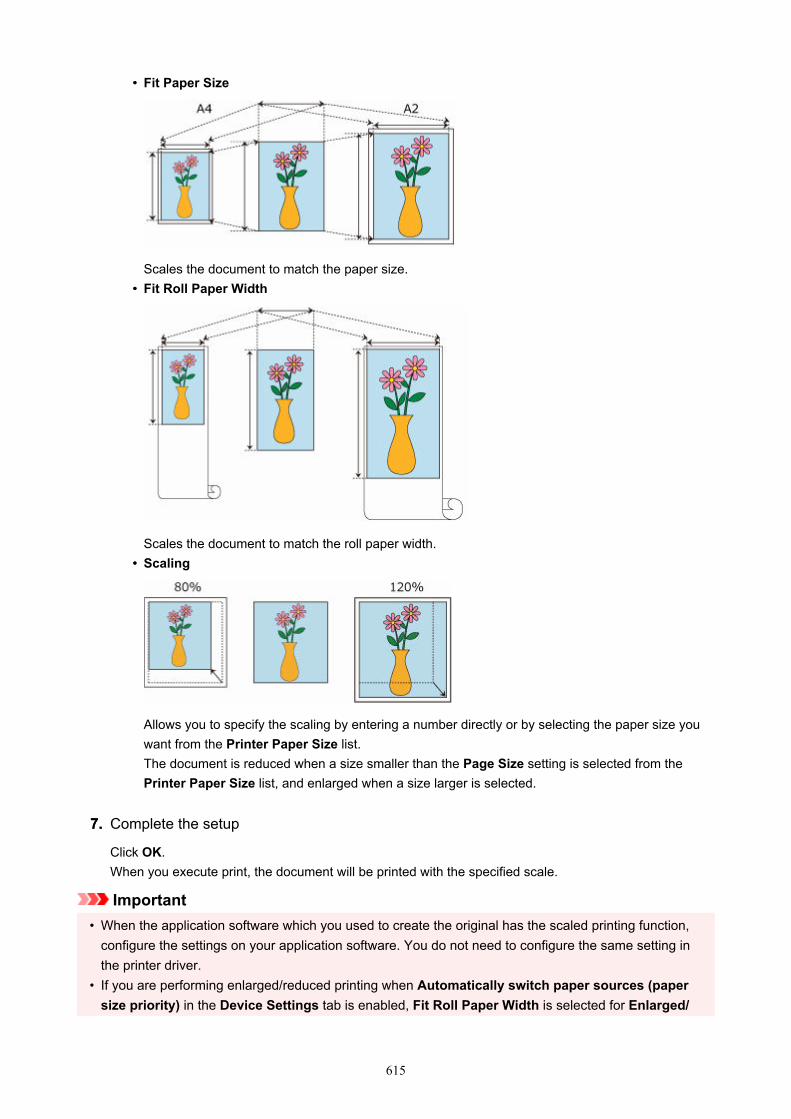
• Fit Paper Size•
Scales the document to match the paper size.• Fit Roll Paper Width•
Scales the document to match the roll paper width.• Scaling•
Allows you to specify the scaling by entering a number directly or by selecting the paper size youwant from the Printer Paper Size list.The document is reduced when a size smaller than the Page Size setting is selected from thePrinter Paper Size list, and enlarged when a size larger is selected.
7. Complete the setup7.
Click OK.When you execute print, the document will be printed with the specified scale.
Important• When the application software which you used to create the original has the scaled printing function,
configure the settings on your application software. You do not need to configure the same setting inthe printer driver.
• If you are performing enlarged/reduced printing when Automatically switch paper sources (papersize priority) in the Device Settings tab is enabled, Fit Roll Paper Width is selected for Enlarged/
615

Reduced Printing on the Page Setup tab, and Roll Paper (Auto) is selected for Paper Source, Roll 1(upper level roll paper) is always used for printing.
Note• Selecting Enlarged/Reduced Printing changes the printable area of the document.
616

Printing to Oversized Paper Sizes
When printing a created document so that it fills the entire paper width, select a paper size from theOversize list (sizes resulting from adding margins necessary for printer operation to the document sizes) sothat all areas of the document are printed at their actual size.
A printout that has the same area as the document can be obtained by trimming the outer margins afterprinting.
The procedure for printing with oversize is as follows:
1. Open the printer driver setup window1.
2. Select the paper size2.
From the Page Size list on the Page Setup tab, select the same size as that of the document that wascreated with the application software.
3. Click Size Options...3.
The Paper Size Options dialog box opens.
4. Select oversize4.
Select the Oversize check box, and click OK.
617

The current settings are displayed in the settings preview on the left side of the Page Setup tab.
5. Select the paper source5.
For Paper Source, select the setting that matches your purpose.
Important• The paper feed method will differ depending on the lower level (roll paper 2) settings or roll unit
option settings.
6. Select roll paper width6.
If you selected a roll paper for Paper Source, set Roll Paper Width to the width of the roll paperloaded in the printer.
7. Set the other items7.
Set the other items as necessary.
8. Complete the setup8.
Click OK.When you print, the document is printed using oversize.
Important• When printing to oversized paper sizes, use paper that has the following necessary margins added to
the document size.Cut sheet: 6 mm or more added to width and 23 mm or more added to height of document sizeRoll paper: 6 mm or more added to width and 6 mm or more added to height of document size
Note• An oversized paper size cannot be used for the largest paper size that can be loaded in the printer.
618

• To set an oversized paper size for a non-standard paper size, register the paper size in the PaperSize Options dialog box. An oversized paper size cannot be set for paper sizes that were set in theCustom Size Settings dialog box.
619

Setting Paper Dimensions (Custom Size)
You can specify the height and width of paper when its size cannot be selected from the Page Size. Such apaper size is called "custom size."
There are two ways of setting a user-defined paper, setting the paper from Size Options... on the PageSetup tab and setting the paper from Custom Size of Page Size.
If you will be using a user-defined paper repeatedly, setting it from Size Options... is convenient because itbecomes registered to Page Size and can be selected any time after that.
If you want to use a user-defined paper temporarily, setting it from Custom Size is suitable.
The procedure for specifying a custom size is as follows:
Setting from Paper Size Options
1. Open the printer driver setup window1.
2. Click Size Options... on the Page Setup tab2.
The Paper Size Options dialog box opens.
3. Set user-defined paper3.
Set Custom Paper Size Name, Units, and Size, and then click Add.For Size, specify an size or select the paper size to be used from Paper Size List.To narrow down the paper sizes displayed in Paper Size List, select the Display Series check box.
620

Note• By selecting the Borderless Printing Size check box for Paper Size, you can select a size
from the paper sizes that support Borderless Printing. By selecting the Fix the Ratio of theWidth to Height check box, you can change the size while keeping the Width and Height ratio.
4. Set user-defined paper4.
Click OK, then it returns to Page Setup tab.The paper size registered by using Custom Paper Size Name is registered to Custom Paper Size ofPage Size and can be selected at any time.
Setting from Custom Size
1. Open the printer driver setup window1.
2. Select the paper size2.
For Page Size on the Page Setup tab, select Custom Size from the Custom Paper Size list.
621

The Custom Size Settings dialog box opens.
3. Set the custom paper size3.
Enter the Width and Height values of the paper to be used, specify the Units, and then click OK.
4. Complete the setup4.
Click OK on the Page Setup tab.When you execute print, the data is printed with the specified paper size.
Important• If the application software that created the document has a function for specifying height and width
values, use the application software to set the values. If the application software does not have such afunction or if the document does not print correctly, perform the above procedure from the printer driverto set the values.
• Printing may be disabled depending on the size of the specified user-defined media.For information about printable sizes for user-defined media, see "Paper Sizes."
• Any paper size that was set by using Custom Size can no longer be used after the application softwareis closed.
622

Note• If the paper settings in the printer driver differ from the paper information registered on the printer, an
error message may appear on the printer's operation panel. You can still print but you may not be ableto obtain correct print results.
• The maximum configurable size with Custom Size is 3.2m.
623

Set a Custom Size Roll Width
By specifying the roll paper width with a value, you can use roll paper with a width that cannot be selected inRoll Paper Width.
The procedure for setting custom size roll width is described below.
1. Open the printer driver setup window1.
2. Select the paper source2.
From the Paper Source list on the Page Setup tab, choose the best option for your purposes betweenRoll Paper (Auto), Roll 1 and Roll 2.
3. Select paper roll width3.
In Roll Paper Width, select User-defined1 (XXXX) / User-defined2 (XXXX).The Custom Size Settings dialog box opens.
4. Set paper roll width4.
Specify Units, enter the roll width you want to use, and then click OK.
624

Note• If the value you entered is the same as the other roll widths, a message will be displayed, and the
other roll paper sizes will be set.
5. Complete the setup5.
Click OK on the Page Setup tab.If you perform the print, the roll paper with the specified width will be used for printing with each settingapplied.
Note• If the paper settings in the printer driver differ from the paper information registered on the printer, an
error message may appear on the printer's operation panel. You can execute Print, but you may notobtain the correct printing result.
• If you select a paper feed method for the custom size roll paper in Get Information... in the Main tab,Roll Paper Width is set to Custom Size (XXXX).However, if the same custom size is already set in User-defined1 (XXXX) or User-defined2 (XXXX),it will not be set to Custom Size (XXXX), and User-defined1 (XXXX) or User-defined2 (XXXX) will beselected instead.
625

Printing without Edges Based on the Scenarios
Printing without Margins to Match Paper Size
Printing without Margins to Match Roll Paper Width
Printing Full-Size without Margins
Three-sided Borderless Printing on Roll Paper
626

Printing without Margins to Match Paper Size
The procedure for borderless printing by enlarging or reducing documents to match paper size is describedbelow.
1. In the printer driver, open the settings screen1.
2. Select the paper source2.
From the Paper Source list on the Page Setup tab, choose the best option for your purposes betweenRoll Paper (Auto), Roll 1 and Roll 2.
Important• The paper feed method will differ depending on the lower level (roll paper 2) settings or roll unit
option settings.
3. Select paper roll width3.
For paper roll width, enter the same value set in the printer under Roll Paper Width.
4. Select borderless printing4.
Place a checkmark next to the Borderless Printing option.
627
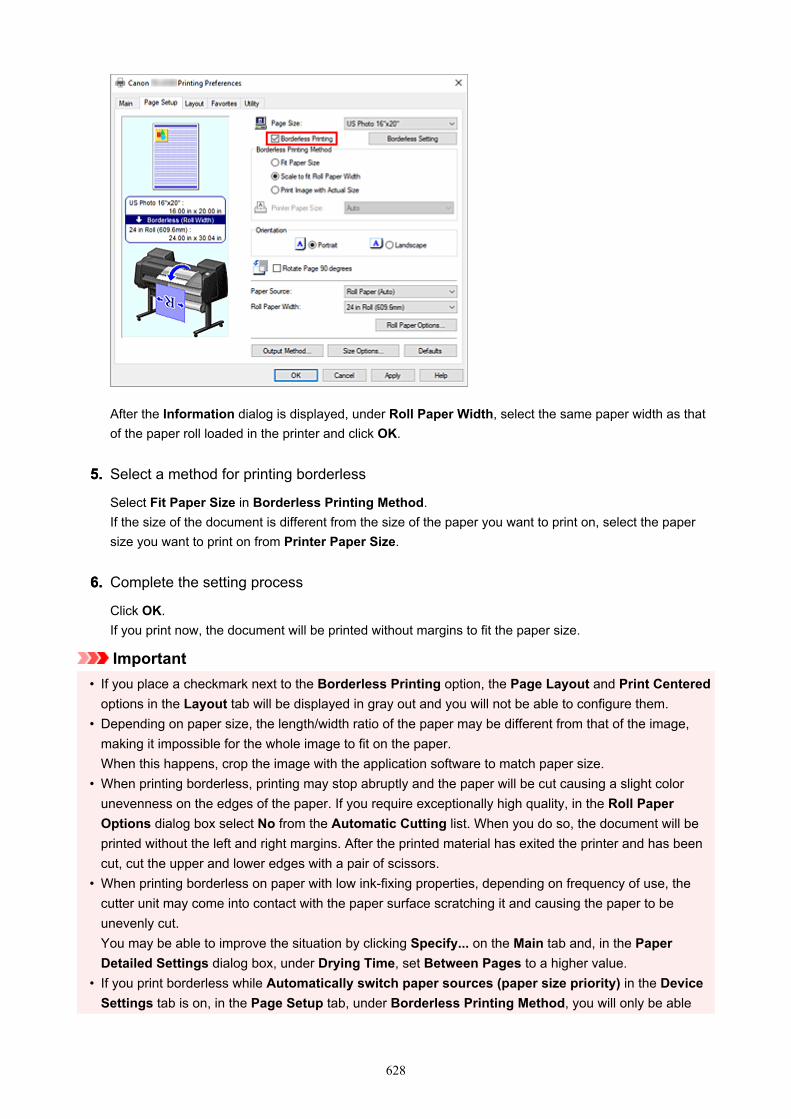
After the Information dialog is displayed, under Roll Paper Width, select the same paper width as thatof the paper roll loaded in the printer and click OK.
5. Select a method for printing borderless5.
Select Fit Paper Size in Borderless Printing Method.If the size of the document is different from the size of the paper you want to print on, select the papersize you want to print on from Printer Paper Size.
6. Complete the setting process6.
Click OK.If you print now, the document will be printed without margins to fit the paper size.
Important• If you place a checkmark next to the Borderless Printing option, the Page Layout and Print Centered
options in the Layout tab will be displayed in gray out and you will not be able to configure them.• Depending on paper size, the length/width ratio of the paper may be different from that of the image,
making it impossible for the whole image to fit on the paper.When this happens, crop the image with the application software to match paper size.
• When printing borderless, printing may stop abruptly and the paper will be cut causing a slight colorunevenness on the edges of the paper. If you require exceptionally high quality, in the Roll PaperOptions dialog box select No from the Automatic Cutting list. When you do so, the document will beprinted without the left and right margins. After the printed material has exited the printer and has beencut, cut the upper and lower edges with a pair of scissors.
• When printing borderless on paper with low ink-fixing properties, depending on frequency of use, thecutter unit may come into contact with the paper surface scratching it and causing the paper to beunevenly cut.You may be able to improve the situation by clicking Specify... on the Main tab and, in the PaperDetailed Settings dialog box, under Drying Time, set Between Pages to a higher value.
• If you print borderless while Automatically switch paper sources (paper size priority) in the DeviceSettings tab is on, in the Page Setup tab, under Borderless Printing Method, you will only be able
628
to select Scale to fit Roll Paper Width. In such cases, paper roll 1 (the paper roll in the upper tray)will be normally used for printing. If the size, or the type, of the paper set in roll 1 is not compatible withborderless printing, you will not be able to print borderless.
• If the following paper is selected for Roll Paper Width, margins may be formed on the left and right ofthe document even when borderless printing is set.1000mm Roll (1000.0mm)34 in Roll (863.6mm)800mm Roll (800.0mm)30 in Roll (762.0mm)600mm Roll (600.0mm)22 in Roll (558.8mm)20 in Roll (508.0mm)500mm Roll (500.0mm)18 in Roll (457.2mm)A2/A3 Roll (420.0mm)16 in Roll (406.4mm)15 in Roll (381.0mm)A3+ Roll (329.0mm)12 in Roll (304.8mm)300mm Roll (300.0mm)A3/A4 Roll (297.0mm)B4 Roll (257.0mm)8 in Roll (203.2mm)6 in Roll (152.4mm)Also, stains may appear on the back of the paper.
• If margins are formed on the left and right of the document, adjust the amount extending off paperduring borderless printing from the printer's operation panel.See "Borders appear in borderless printing" for details on how to set the amount extending off paper.
Note• When using applications like Microsoft Word which allow you to set margins, set margins to 0 mm.
629

Printing without Margins to Match Roll Paper Width
Procedure for printing borderless by enlarging/reducing documents to match roll paper width.
1. In the printer driver, open the settings screen1.
2. Select the paper source2.
From the Paper Source list on the Page Setup tab, choose the best option for your purposes betweenRoll Paper (Auto), Roll 1 and Roll 2.
Important• The paper feed method will differ depending on the lower level (roll paper 2) settings or roll unit
option settings.
3. Select paper roll width3.
For paper roll width, enter the same value set in the printer under Roll Paper Width.
4. Select borderless printing4.
Place a checkmark next to the Borderless Printing option.
630

After the Information dialog is displayed, under Roll Paper Width, select the same paper width as thatof the paper roll loaded in the printer and click OK.
5. Select a method for printing borderless5.
Select Scale to fit Roll Paper Width in Borderless Printing Method.
6. Complete the setting process6.
Click OK.Job will print to the entire roll width without a white border.
Important• If you place a checkmark next to the Borderless Printing option, the Page Layout and Print Centered
options in the Layout tab will be displayed in gray out and you will not be able to configure them.• Depending on paper size, the length/width ratio of the paper may be different from that of the image,
making it impossible for the whole image to fit on the paper.When this happens, crop the image with the application software to match paper size.
• When printing borderless, printing may stop abruptly and the paper will be cut causing a slight colorunevenness on the edges of the paper. If you require exceptionally high quality, in the Roll PaperOptions dialog box select No from the Automatic Cutting list. When you do so, the document will beprinted without the left and right margins. After the printed material has exited the printer and has beencut, cut the upper and lower edges with a pair of scissors.
• When printing borderless on paper with low ink-fixing properties, depending on frequency of use, thecutter unit may come into contact with the paper surface scratching it and causing the paper to beunevenly cut.You may be able to improve the situation by clicking Specify... on the Main tab and, in the PaperDetailed Settings dialog box, under Drying Time, set Between Pages to a higher value.
• If you print borderless while Automatically switch paper sources (paper size priority) in the DeviceSettings tab is on, in the Page Setup tab, under Borderless Printing Method, you will only be ableto select Scale to fit Roll Paper Width. In such cases, paper roll 1 (the paper roll in the upper tray)
631

will be normally used for printing. If the size, or the type, of the paper set in roll 1 is not compatible withborderless printing, you will not be able to print borderless.
• If the following paper is selected for Roll Paper Width, margins may be formed on the left and right ofthe document even when borderless printing is set.1000mm Roll (1000.0mm)34 in Roll (863.6mm)800mm Roll (800.0mm)30 in Roll (762.0mm)600mm Roll (600.0mm)22 in Roll (558.8mm)20 in Roll (508.0mm)500mm Roll (500.0mm)18 in Roll (457.2mm)A2/A3 Roll (420.0mm)16 in Roll (406.4mm)15 in Roll (381.0mm)A3+ Roll (329.0mm)12 in Roll (304.8mm)300mm Roll (300.0mm)A3/A4 Roll (297.0mm)B4 Roll (257.0mm)8 in Roll (203.2mm)6 in Roll (152.4mm)Also, stains may appear on the back of the paper.
• If margins are formed on the left and right of the document, adjust the amount extending off paperduring borderless printing from the printer's operation panel.See "Borders appear in borderless printing" for details on how to set the amount extending off paper.
Note• When using applications like Microsoft Word which allow you to set margins, set margins to 0 mm.
632

Printing Full-Size without Margins
Procedure for printing borderless images in the same size as the original document without enlarging/reducing them.
1. In the printer driver, open the settings screen1.
2. Select the paper source2.
From the Paper Source list on the Page Setup tab, choose the best option for your purposes betweenRoll Paper (Auto), Roll 1 and Roll 2.
Important• The paper feed method will differ depending on the lower level (roll paper 2) settings or roll unit
option settings.
3. Select paper roll width3.
For paper roll width, enter the same value set in the printer under Roll Paper Width.
4. Select borderless printing4.
Place a checkmark next to the Borderless Printing option.
633

After the Information dialog is displayed, under Roll Paper Width, select the same paper width as thatof the paper roll loaded in the printer and click OK.
5. Select a method for printing borderless5.
Select Print Image with Actual Size in Borderless Printing Method.
6. Complete the setting process6.
Click OK.If you print, the document is printed in the original size without white borders.
Important• If Amount of Extension is set to the second from the right, create the source document with a
size 2mm larger on each of the top, bottom, left and right sides than the size of the paper you wishto print.
Important• If you place a checkmark next to the Borderless Printing option, the Page Layout and Print Centered
options in the Layout tab will be displayed in gray out and you will not be able to configure them.• Depending on paper size, the length/width ratio of the paper may be different from that of the image,
making it impossible for the whole image to fit on the paper.When this happens, crop the image with the application software to match paper size.
• When printing borderless, printing may stop abruptly and the paper will be cut causing a slight colorunevenness on the edges of the paper. If you require exceptionally high quality, in the Roll PaperOptions dialog box select No from the Automatic Cutting list. When you do so, the document will beprinted without the left and right margins. After the printed material has exited the printer and has beencut, cut the upper and lower edges with a pair of scissors.
• When printing borderless on paper with low ink-fixing properties, depending on frequency of use, thecutter unit may come into contact with the paper surface scratching it and causing the paper to beunevenly cut.You may be able to improve the situation by clicking Specify... on the Main tab and, in the PaperDetailed Settings dialog box, under Drying Time, set Between Pages to a higher value.
• If you print borderless while Automatically switch paper sources (paper size priority) in the DeviceSettings tab is on, in the Page Setup tab, under Borderless Printing Method, you will only be ableto select Scale to fit Roll Paper Width. In such cases, paper roll 1 (the paper roll in the upper tray)will be normally used for printing. If the size, or the type, of the paper set in roll 1 is not compatible withborderless printing, you will not be able to print borderless.
• If the following paper is selected for Roll Paper Width, margins may be formed on the left and right ofthe document even when borderless printing is set.1000mm Roll (1000.0mm)34 in Roll (863.6mm)800mm Roll (800.0mm)30 in Roll (762.0mm)600mm Roll (600.0mm)22 in Roll (558.8mm)20 in Roll (508.0mm)500mm Roll (500.0mm)
634

18 in Roll (457.2mm)A2/A3 Roll (420.0mm)16 in Roll (406.4mm)15 in Roll (381.0mm)A3+ Roll (329.0mm)12 in Roll (304.8mm)300mm Roll (300.0mm)A3/A4 Roll (297.0mm)B4 Roll (257.0mm)8 in Roll (203.2mm)6 in Roll (152.4mm)Also, stains may appear on the back of the paper.
• If margins are formed on the left and right of the document, adjust the amount extending off paperduring borderless printing from the printer's operation panel.See "Borders appear in borderless printing" for details on how to set the amount extending off paper.
Note• When using applications like Microsoft Word which allow you to set margins, set margins to 0 mm.
635

Three-sided Borderless Printing on Roll Paper
In normal borderless printing, paper sizes that match the width of the roll paper are combined to print withoutborders on all four sides.If you use the three-sided borderless printing feature, you can combine paper sizes that don't match theroll paper width, and print with no borders on three sides. However, if you perform three-sided borderlessprinting, you need to cut the right side of the paper after printing.
Three-sided Borderless Printing to Match Paper SizeThe procedure for three-sided borderless printing by enlarging or reducing documents to match paper sizeis described below.
1. Open the printer driver setup window1.
2. Select the paper source2.
From the Paper Source list on the Page Setup tab, choose the best option for your purposesbetween Roll Paper (Auto), Roll 1 and Roll 2.
Important• The paper feed method will differ depending on the lower level (roll paper 2) settings or roll unit
option settings.
3. Select paper roll width3.
For paper roll width, enter the same value set in the printer under Roll Paper Width.
4. Select borderless printing4.
In the Page Setup tab, place a checkmark next to the Borderless Printing option.
636

After the Information dialog is displayed, under Roll Paper Width, select the same paper width asthat of the paper roll loaded in the printer and click OK.
5. Click Borderless Setting5.
When the Borderless Setting dialog box is displayed, place a checkmark next to Three-sidedBorderless, and then click OK.
6. Select a method for printing borderless6.
In the Borderless Printing Method tab, place a checkmark next to the Fit Paper Size option.If the size of the document is different from the size of the paper you want to print on, select the papersize you want to print on from Printer Paper Size.
7. Complete the setting process7.
Click OK.If you print now, the document will be printed without margins on three sides to fit the paper size.
8. Cut the right side of the paper8.
Cut the margin on the right side of the paper with scissors after printing. Cut slightly to the inside of themargin as the document is enlarged to extend slightly beyond the specified size.To get the document to standard size, it is recommended to take measurements and cut in the correctpositions.
637

Printing Full-Size without Margins on Three SidesThe procedure for three-sided borderless printing in the same size as the original document withoutenlarging or reducing the size is described below.
1. Open the printer driver setup window1.
2. Select the paper source2.
From the Paper Source list on the Page Setup tab, choose the best option for your purposesbetween Roll Paper (Auto), Roll 1 and Roll 2.
Important• The paper feed method will differ depending on the lower level (roll paper 2) settings or roll unit
option settings.
3. Select paper roll width3.
For paper roll width, enter the same value set in the printer under Roll Paper Width.
4. Select borderless printing4.
In the Page Setup tab, place a checkmark next to the Borderless Printing option.
After the Information dialog is displayed, under Roll Paper Width, select the same paper width asthat of the paper roll loaded in the printer and click OK.
638

5. Click Borderless Setting5.
When the Borderless Setting dialog box is displayed, place a checkmark next to Three-sidedBorderless, and then click OK.
6. Select a method for printing borderless6.
In the Borderless Printing Method tab, place a checkmark next to the Print Image with Actual Sizeoption.
7. Complete the setting process7.
Click OK.If you print now, the document will be printed without margins on three sides while retaining the samedocument size.
8. Cut the right side of the paper8.
Cut the margin on the right side of the paper with scissors after printing.To get the document to standard size, it is recommended to take measurements and cut in the correctpositions.
Important• If you place a checkmark next to the Borderless Printing option, the Page Layout and Print Centered
options in the Layout tab will be displayed in gray out and you will not be able to configure them.• Depending on paper size, the length/width ratio of the paper may be different from that of the image,
making it impossible for the whole image to fit on the paper.When this happens, crop the image with the application software to match paper size.
• When printing borderless, printing may stop abruptly and the paper will be cut causing a slight colorunevenness on the edges of the paper. If you require exceptionally high quality, in the Roll PaperOptions dialog box select No from the Automatic Cutting list. When you do so, the document will beprinted without the left margin. After the printed material has exited the printer and has been cut, cut theupper, lower, and right edges with a pair of scissors.
• When printing borderless on paper with low ink-fixing properties, depending on frequency of use, thecutter unit may come into contact with the paper surface scratching it and causing the paper to beunevenly cut.
639

You may be able to improve the situation by clicking Specify... on the Main tab and, in the PaperDetailed Settings dialog box, under Drying Time, set Between Pages to a higher value.
• If the following paper is selected for Roll Paper Width, margins may be formed on the left of thedocument even when borderless printing is set.1000mm Roll (1000.0mm)34 in Roll (863.6mm)800mm Roll (800.0mm)30 in Roll (762.0mm)600mm Roll (600.0mm)22 in Roll (558.8mm)20 in Roll (508.0mm)500mm Roll (500.0mm)18 in Roll (457.2mm)A2/A3 Roll (420.0mm)16 in Roll (406.4mm)15 in Roll (381.0mm)A3+ Roll (329.0mm)12 in Roll (304.8mm)300mm Roll (300.0mm)A3/A4 Roll (297.0mm)B4 Roll (257.0mm)8 in Roll (203.2mm)6 in Roll (152.4mm)Also, stains may appear on the back of the paper.
• If margins are formed on the left of the document, adjust the amount extending off paper duringborderless printing from the printer's operation panel.See "Borders appear in borderless printing" for details on how to set the amount extending off paper.
Note• When using applications like Microsoft Word which allow you to set margins, set margins to 0 mm.
640

Printing Hanging and Horizontal Banners (Large-FormatPrinting)
A drapery or banner up to 18.0m can be made by enlarging or reducing original documents made onapplication software.However, there are cases in which an 18.0 meter banner cannot be printed because the applicationsoftware used has limits on the document size that can be set.
The procedure for printing hanging and horizontal banners is as follows:
Print for width of roll
1. Create document by using application software1.
2. Open the printer driver setup window2.
3. Select the paper size3.
Select the same original paper size created in the application soft in the Page Setup tab's Page Size.In the event an optional size is set in the application software, select Custom Size from CustomPaper Size in Page Size and designate size in the dialog box that appears.
4. Select roll width4.
Select the equivalent to the paper width of the roll set in the printer under Roll Paper Width.
5. Set Enlarged/Reduced Printing5.
Check Enlarged/Reduced Printing and select Fit Roll Paper Width.When the Information dialog box appears, select the equivalent to the paper width of the roll set inthe printer.
641
6. Complete the setup6.
Click OK.When printing is executed, a drapery or banner can be printed according to the roll.
Enlarge and print
1. Register user-defined paper1.
Register both the actual desired print size (user-defined paper 1) and original document size createdin application (user-defined document size 2) in the Size Options... under the Page Setup tab.
Note• Please set user-defined paper 2 to the same aspect ratio as user-defined paper 1. If the aspect
ratio differs, the enlarged image may not turn out to be the expected size.After creating user-defined paper 1, if user-defined paper 2 is created after checking Fix theRatio of the Width to Height, settings can be set to the same aspect ratio.Also set user-defined paper 2 to a size that doesn't exceed the maximum size supported by theapplication.For example, when printing on paper 600mm wide and 3,000mm long, use the followingsettings.(when setting length to 1/6 the user-defined paper)
User-defined paper 1: Width 600mm, Height 3,000mmUser-defined paper 2: Width 100mm, Height 500mm
2. Create original document in application software2.
Use the registered user-defined paper 2 size to create original document using an application.
3. Open printer driver settings screen3.
4. Select Paper Size4.
Select registered user-defined paper 1 from Custom Paper Size in Page Setup tab's Page Size.
5. Complete the setup5.
Click OK.When you print, the hanging or horizontal banner is printed by using the user-defined size.
Note• Maximum printable length is 18.0m. In the event the enlarged length exceeds 18.0m, the part of the
image exceeding the length will not be printed.• If printing cannot be performed correctly, you may be able to improve printing by using the Special
Settings dialog box on the Layout tab to change FineZoom Settings to Yes.
642

Printing by Dividing/Joining Documents
Inputting Multiple-file Documents into Free Layout plus
Lining Up and Printing Multiple Documents to Cut Sheets
Printing by Connecting Multiple Pages
Printing Multiple Pages All on One Page
Dividing and Printing Posters
643

Lining Up and Printing Multiple Documents to Cut Sheets
You can line up multiple documents that were created separately and print them together on one page.
You must install imagePROGRAF Printer Driver Extra Kit to use this function. Go to the Canon website,download imagePROGRAF Printer Driver Extra Kit, and then install it
The procedure for lining up and printing multiple documents to cut sheets is as follows:
1. Open the printer driver setup window1.
2. Select Free Layout2.
On the Layout tab, select the Page Layout check box, and then from the pull-down menu, select FreeLayout.
3. Complete the setup3.
Click OK.When you print, Canon imagePROGRAF Free Layout starts. Canon imagePROGRAF Free Layoutallows you to edit and rearrange images.
644

Note• To lay out multiple application software documents onto one page, repeat steps 1 to 3 without
closing the Canon imagePROGRAF Free Layout window.
645

Printing by Connecting Multiple Pages
Print documents with several pages as one continuous document. When you do this, the spaces betweenthe pages will be removed.
The procedure for printing by connecting multiple pages is as follows:
1. Open the printer driver setup window1.
2. Select the paper source2.
For Paper Source on the Page Setup tab, select the setting that matches your purpose from Roll Paper(Auto), Roll 1, and Roll 2.
Important• The paper feed method will differ depending on the lower level (roll paper 2) settings or roll unit
option settings.
3. Set roll paper options3.
Click Roll Paper Options to display the Roll Paper Options dialog box.Select the Banner Printing check box, and then click OK.The current settings are displayed in the settings preview on the left side of the Page Setup tab.
4. Complete the setup4.
646

Click OK on the Page Setup tab.When you print, the document is printed with the print conditions you set.
647

Printing Multiple Pages All on One Page
The page layout printing function allows you to print more than one page image on a single sheet of paper.
The procedure for printing multiple pages all on one page is as follows:
1. Open the printer driver setup window1.
2. Select the print paper size2.
From the Page Size list on the Page Setup tab, select the size of the paper loaded in the printer.
3. Set number of pages to be printed per sheet3.
On the Layout tab, select the Page Layout check box, and from the pull-down menu, select 2 Pages/Sheet, 4 Pages/Sheet, 6 Pages/Sheet, 8 Pages/Sheet, 9 Pages/Sheet, or 16 Pages/Sheet.The current settings are displayed in the settings preview on the left side of the window.
648

4. Set the number of pages to be printed on one sheet and the page order4.
If necessary, click Set..., specify the following settings in the Page Layout Printing dialog box, and clickOK.
Page OrderTo change the page arrangement order, select a placement method from the list.
Page BorderTo print a page border around each document page, select something other than None from the list.
5. Complete the setup5.
Click OK on the Layout tab.When you execute print, the specified number of pages will be arranged on each sheet of paper in thespecified order.
Important• When there is a checkmark next to Banner Printing under Roll Paper Options dialog box on the
Page Setup tab, Page Layout is grayed out and cannot be set.• If Spooling at Printer Driver in Special Settings dialog box is set to No (Use RAW Spooling),
Page Layout is grayed out and cannot be set.
649

Dividing and Printing Posters
The tiling/poster printing function allows you to enlarge image data, divide it into several pages, and printthese pages on separate sheets of paper. You can also paste the pages together to create a large print likea poster.
The procedure for dividing and printing posters is as follows:
Setting for Dividing and Printing Posters
1. Open the printer driver setup window1.
2. Select the print paper size2.
From the Page Size list on the Page Setup tab, select the size of the paper loaded in the printer.
3. Set number of divisions3.
On the Layout tab, select the Page Layout check box, and from the pull-down menu, select Poster (1x 2) or Poster (2 x 2).The current settings are displayed in the settings preview on the left side of the window.
650

4. Complete the setup4.
Click OK on the Layout tab.When you execute print, the document will be divided into several pages during printing.
Important• When there is a checkmark next to Banner Printing under Roll Paper Options dialog box on
the Page Setup tab, Page Layout is grayed out and cannot be set.• If Spooling at Printer Driver in Special Settings dialog box is set to No (Use RAW
Spooling), Page Layout is grayed out and cannot be set.
Printing Only Specific PagesIf ink becomes faint or runs out during printing, you can reprint only the specific pages by following theprocedure below:
1. Display Pages to Print dialog box1.
For Page Layout, click Set... to display the Pages to Print dialog box.
2. Set print range2.
Clear the check boxes of the pages you do not want to print.In the setting view, the pages that you cleared are deleted and only the pages to be printed aredisplayed.Check the pages to be printed, and then click OK.
651

Note• In the setting view on the left side of the Pages to Print dialog box, you can also clear the
display by clicking the pages you do not want to print.To redisplay a cleared page, click that page again.
• To switch the pages to display/hide, click Invert in the Pages to Print dialog box.
3. Complete the setup3.
Click OK on the Layout tab.When you print, only the specified pages are printed.
Important• If you partition and print as a poster, the source document will be printed in enlarged form, so the print
results may become rough.
652

Printing Document in Center of Paper
When you want to position the source document in the middle of the cut paper and print, or print with evenmargins on the right and left in relation to the width of the roll paper, use the Print Centered function.The print results when setting with Print Centered are as follows. Normally, if Print Centered is set whenprinted as in (A), it will be printed as in (B) for cut paper and (C) for roll paper.
Note• When setting the magnification using Scaling from Enlarged/Reduced Printing on the Page Setup
tab and printing, the start point for enlarge/reduce will always be fixed based on the top left corner ofthat page. For that reason, for reduced printing, the bottom and right margins of the paper will increase.At this time, if you place a checkmark next to Print Centered on the Layout tab, the top, bottom, leftand right margins can all be printed evenly.
The procedure for printing in the center of the paper is as follows:
1. Open the printer driver setup window1.
2. Select the media type2.
Select the type of paper loaded in the printer from the Media Type list on the Main tab.If Auto (Use Printer Settings) is selected, the paper configured in printer settings is printed.
653

3. Select the paper size3.
Select the size of the paper you want to print from Page Size on the Page Setup tab.
4. Set magnification as necessary4.
Where necessary, attach a checkmark next to Enlarged/Reduced Printing, and set according to theobjective.
5. Select the paper source5.
For Paper Source, select the setting that matches your purpose.
654

Important• The paper feed method will differ depending on the lower level (roll paper 2) settings or roll unit
option settings.
6. Select roll paper width6.
If you selected a roll paper for Paper Source, set Roll Paper Width to the width of the roll paper loadedin the printer.
7. Print document in the center of paper7.
Select the Print Centered check box on the Layout tab.
8. Complete the setup8.
Click OK.When you print, the document is printed in the center of the paper.
655

Printing by Saving Roll Paper
Saving Roll Paper by Rotating Document 90 Degrees
Saving Roll Paper by Eliminating Upper and Lower Margins on Document
656

Saving Roll Paper by Rotating Document 90 Degrees
When printing a portrait document on roll paper, you can save paper by rotating the document 90 degreesand printing the document so that it is oriented horizontally relative to the paper.
The procedure for saving paper by rotating the document 90 degrees is as follows:
1. Open the printer driver setup window1.
2. Select the media type2.
Select the type of paper loaded in the printer from the Media Type list on the Main tab.If Auto (Use Printer Settings) is selected, the paper configured in printer settings is printed.
3. Select the paper size3.
From the Page Size list on the Page Setup tab, select the same size as that of the document that wascreated with the application software.
4. Select the paper source4.
From the Paper Source list on the Page Setup tab, choose the best option for your purposes betweenRoll Paper (Auto), Roll 1 and Roll 2.
Important• The paper feed method will differ depending on the lower level (roll paper 2) settings or roll unit
option settings.
5. Selecting Paper Saving5.
Select the Rotate Page 90 degrees check box.The current settings are displayed in the settings preview on the left side of the window.
657

6. Select roll paper width6.
For Roll Paper Width, select the width of the roll paper loaded in the printer.
7. Complete the setup7.
Click OK.When you print, you can rotate a portrait document 90 degrees to save paper.
Important• When there is a checkmark attached to Banner Printing on the Page Setup tab, Rotate Page 90
degrees is grayed out and cannot be set.
658

• When selecting paper in portrait format as the Page Size from the Page Setup tab, if the length in thevertical direction is longer than the width selected in Roll Paper Width, even if a checkmark is placednext to Rotate Page 90 degrees, the page will not be rotated.
659

Saving Roll Paper by Eliminating Upper and Lower Margins onDocument
When printing on roll paper, you can save paper by reducing the upper and lower margins when printing.
The procedure for saving paper by reducing the upper and lower margins is as follows:
1. Open the printer driver setup window1.
2. Select the media type2.
Select the type of paper loaded in the printer from the Media Type list on the Main tab.If Auto (Use Printer Settings) is selected, the paper configured in printer settings is printed.
3. Select the paper size3.
From the Page Size list on the Page Setup tab, select the same size as that of the document that wascreated with the application software.
660
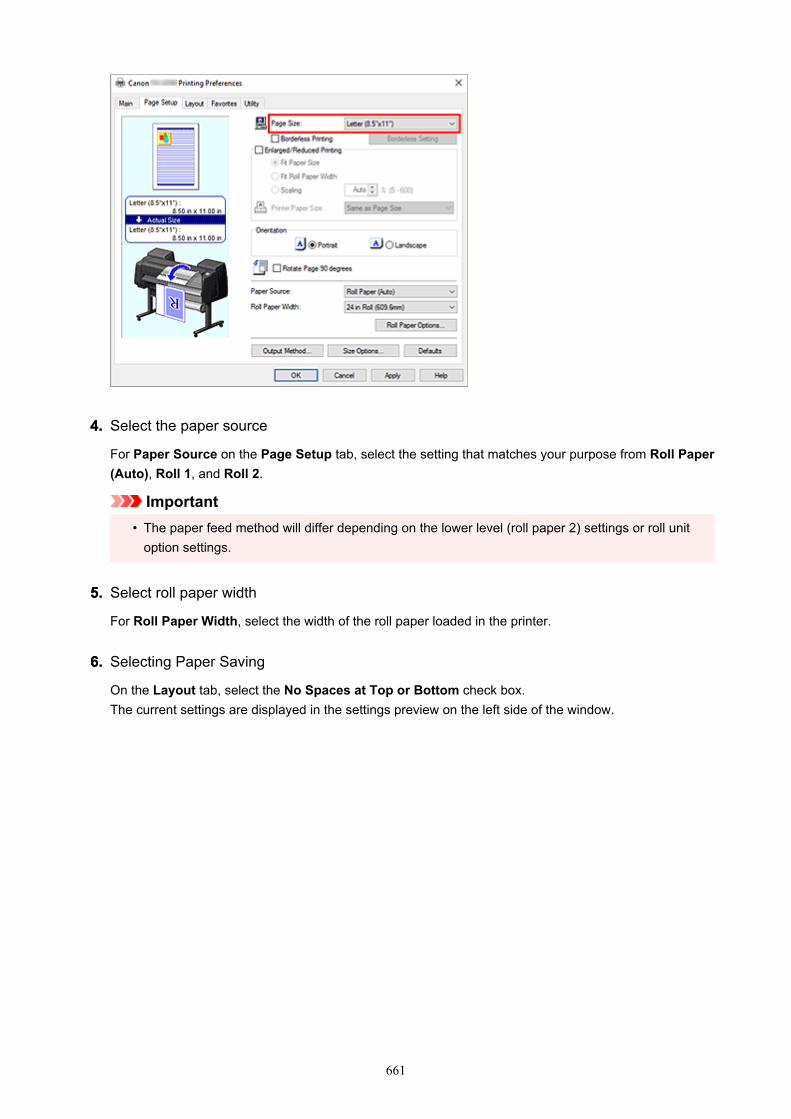
4. Select the paper source4.
For Paper Source on the Page Setup tab, select the setting that matches your purpose from Roll Paper(Auto), Roll 1, and Roll 2.
Important• The paper feed method will differ depending on the lower level (roll paper 2) settings or roll unit
option settings.
5. Select roll paper width5.
For Roll Paper Width, select the width of the roll paper loaded in the printer.
6. Selecting Paper Saving6.
On the Layout tab, select the No Spaces at Top or Bottom check box.The current settings are displayed in the settings preview on the left side of the window.
661

7. Complete the setup7.
Click OK.When you print, the upper and lower margins are reduced so that you can save paper.
662

Switching the Paper Source to Match the Purpose
This printer has three paper sources: Roll 1, Roll 2, and Cut Sheet.You can facilitate printing by selecting a paper source setting that matches your media type or purpose.
The procedure for setting paper source is as follows:
1. Open the printer driver setup window1.
2. Select the media type2.
Select the type of paper loaded in the printer from the Media Type list on the Main tab.If Auto (Use Printer Settings) is selected, the paper configured in printer settings is printed.
3. Select the paper source3.
From the Paper Source list on the Page Setup tab, select the paper source that matches your purpose.
Roll Paper (Auto)Feeds paper by automatically switching between Roll 1 and Roll 2 according to the print job.
Roll 1Feeds paper from Roll 1.
Roll 2Feeds paper from Roll 2.
Cut SheetFeeds paper using the cut paper.
Important• The paper feed method will differ depending on the lower level (roll paper 2) settings or roll unit
option settings.
4. Complete the setup4.
663

Click OK.When you execute print, the printer uses the specified paper source to print the data.
Note• If the paper settings in the printer driver differ from the paper information registered on the printer,
an error message may appear on the printer's operation panel. You can still print but you may notbe able to obtain correct print results.
664

Displaying the Print Results before Printing
You can display and check the print result before printing.
The procedure for displaying the print result before printing is as follows:
1. Open the printer driver setup window1.
2. Set the preview2.
Check the Preview before printing check box on the Main tab.
3. Complete the setup3.
Click OK.When you execute print, the Canon imagePROGRAF Preview opens and displays the print results.
Related TopicCanon imagePROGRAF Preview
665

Other Convenient Settings
Stamp Printing
Setting a Page Size and Orientation
Registering a Frequently Used Printing Profile
Cutting Roll Paper after Printing
666

Stamp Printing
The Stamp function allows you to print a stamp text over or behind document data."DRAFT," "CONFIDENTIAL," and other stamps that are used often in companies are pre-registered.
The procedure for printing with a stamp is as follows:
1. Open the printer driver setup window1.
2. Select stamp2.
On the Layout tab, select the Stamp check box, and then select the stamp to use from the list.The current settings are displayed in the settings preview on the left side of the Layout tab.
3. Complete the setup3.
Click OK.When you execute print, the data is printed with the specified stamp.
Important• Depending on your usage environment, you may not be able to use the Stamp function. In this case,
set Spooling at Printer Driver in the Special Settings dialog box to Yes.
667

Registering a Stamp
You can create and register a new stamp. You can also change and re-register some of the settings of anexisting stamp. Unnecessary stamps can be deleted at any time.
The procedure for registering a new stamp is as follows:
Registering a New Stamp
1. Open the printer driver setup window1.
2. Select stamp2.
On the Layout tab, select the Stamp check box, and click Define Stamp....
The Define Stamp dialog box opens.
668

3. Set stamp details3.
Click Add to add a new stamp (Untitled) to the list.In Name, enter the name of the stamp to register, and in Text, enter the character string you want asthe stamp.Change the Font, Style, Size, and Color settings as necessary.
4. Set the other items4.
Set the following items as necessary.
OutlineSelects a frame that encloses the stamp text string.
Print StyleSelect the stamp print method.Select Transparent to print the stamp on the back of the document, and select Overlap to print iton the front.
PositionSpecifies the stamp position on the page.Enter numbers in X and Y to set the coordinates, or drag the horizontal and vertical slide bars tothe left/right or up/down to change the settings.
AngleSet the stamp placement angle.Enter a number in Set Angle to set the angle, or drag the slide bar to the left/right to change thesetting.Set the angle by entering a number in range of -180 to 180.
Stamp first page onlyTo print the stamp on the first page only, select this check box.
669

5. Complete the setup5.
Click OK to return to the Layout tab.The registered title appears in the Stamp list.
Changing and Registering Some of Stamp Settings
1. Select stamp1.
On the Layout tab, select the Stamp check box, and click Define Stamp....The Define Stamp dialog box opens.
2. Select the stamp for which the settings are to be changed2.
From Stamps, select the title of the stamp you want to change the settings for.
3. Configure each setting while viewing the preview3.
4. Complete the setup4.
Click OK to return to the Layout tab.The registered title appears in the Stamp list.
Note• The stamp registered as the default setting cannot be changed.
Deleting an Unnecessary Stamp
1. Select stamp1.
On the Layout tab, select the Stamp check box, and click Define Stamp....The Define Stamp dialog box opens.
2. Select the stamp to be deleted2.
Select the title that you wish to delete from the Stamps and click Delete.Click Yes when the confirmation message appears.
3. Complete the setup3.
Click OK to return to the Layout tab.
Note• The stamp registered as the default setting cannot be deleted.
670

Setting a Page Size and Orientation
The paper size and orientation are essentially determined by the application software. When the page sizeand orientation set for Page Size and Orientation on the Page Setup tab are same as those set with theapplication software, you do not need to select them on the Page Setup tab.
When you are not able to specify them with the application software, the procedure for selecting a page sizeand orientation is as follows:
1. Open the printer driver setup window1.
2. Select the paper size2.
Select a page size from the Page Size list on the Page Setup tab.
3. Set Orientation3.
Select Portrait or Landscape for Orientation. Check Rotate Page 90 degrees check box when youwant to perform printing with the original being rotated 90 degrees.
4. Complete the setup4.
Click OK.When you execute print, the document will be printed with the selected page size and the orientation.
671

Registering a Frequently Used Printing Profile
You can register the frequently used printing settings to Favorites. Unnecessary printing profiles can bedeleted at any time.
The procedure for registering a printing profile is as follows:
Registering a Printing Profile
1. Open the printer driver setup window1.
2. Set the necessary items2.
On the Main tab, the Page Setup tab, and the Layout tab, specify the print settings you want toregister.
3. Display Add dialog box3.
On the Favorites tab, click Add....
The Add dialog box opens.
4. Register favorite setting4.
672

In Name, enter the name of the favorite. Set the Icon and Comment fields as necessary, and thenclick OK.The name and the icon appear in the Favorites list.To check the settings of the registered favorite, click Settings Details.
Note• To save the settings of the favorite to a file, click Export... on the Favorites tab.
Printing Using Favorite Settings
1. Open the printer driver setup window1.
2. Apply favorite2.
From the Favorites list on the Favorites tab, select the favorite you want to use.Click Apply Favorite to replace the registered print settings.
3. Complete the setup3.
Click OK.When you print, the document is printed with the settings of the registered favorite.
Deleting Unnecessary Printing Profile
1. Select favorite to be deleted1.
Select the favorite you want to delete from the Favorites list on the Favorites tab.
2. Delete setting2.
Click Delete. When the confirmation message appears, click OK.The selected favorite is deleted from the Favorites list.
Note• Printing profiles that are registered in the initial settings cannot be deleted.• The settings of the favorite being applied to the current print settings cannot be deleted. To delete
that favorite, select another favorite from the Favorites list, click Apply Favorite to apply the settingsof that other favorite, and then delete the target favorite.
673

Cutting Roll Paper after Printing
The procedure for cutting roll paper automatically and printing cut guidelines is as follows:
1. Open the printer driver setup window1.
2. Select the paper source2.
For Paper Source on the Page Setup tab, select the setting that matches your purpose from Roll Paper(Auto), Roll 1, and Roll 2.
Important• The paper feed method will differ depending on the lower level (roll paper 2) settings or roll unit
option settings.
3. Display Roll Paper Options dialog box3.
Click Roll Paper Options to display the Roll Paper Options dialog box.
4. Set auto cut4.
From Automatic Cutting, select the item that matches your purpose.The current settings are displayed in the settings preview on the left side of the Page Setup tab.
• Yes•
The roll paper is cut automatically after printing.• No•
674

The roll paper is not cut after printing.• Print Cut Guideline•
Cut guidelines are printed for cutting the roll paper manually after printing.
Note• The default setting for automatic cutting is Yes.
After completing the setting, click OK to return to the Page Setup tab.
5. Complete the setup5.
Click OK on the Page Setup tab.When you print, the status after printing is set to whatever was set in Automatic Cutting.
675

HP-GL/2 Printing
When printing from applications that support HP-GL/2 or HP RTL output, specify HP-GL/2 or HP RTL in theplotter output printer language settings.
HP-GL/2 and HP RTL emulation related settings are configured from the printer operation panel. For furtherdetails, refer to "HP-GL/2 Settings."
Note• For instructions on configuring these settings, refer to the software documentation.
It may not be possible to print jobs with excessively large amounts of data correctly.
676

Printing from Printer
Printing Data Saved on USB Flash Drive
677

Printing Data Saved on USB Flash Drive
You can print photo data (JPEG file) or document data (PDF file) saved on the USB flash drive easily.
Note• Restrictions on printable PDF/JPEG files•
PDF file:
Files which conforms to V 1.7
-Does not support overprint or some of transparent processing.
-Font embedding is recommended. If a font is not embedded, it is replaced with one of the built-infonts below.
Times-Roman, Helvetica, Courier, Symbol, Times-Bold, Helvetica-Bold, Courier-Bold,ZapfDingbats, Times-Italic, Helvetica-Oblique, Courier-Oblique, Times-BoldItalic, Helvetica-BoldOblique, Courier-BoldOblique
JPEG file:
Files which conforms to JFIF 1.02
Supports the files with the following conditions.
-Processing method: Basic DCT
-Color mode: RGB/GrayScale
-Number of colors: 24bit/8bit
-Number of pixels: 38400 or less vertically and horizontally
Does not support some samplings
1. Load paper.1.
Loading the Upper Roll on the PrinterLoading the Lower Roll on the Roll Unit (Option)Loading Sheets in the Printer
2. Insert USB flash drive into USB flash drive port.2.
3. Flick HOME screen and tap Print from USB flash drive.3.
Home Screen Menu Composition
Note• When the message informing you that the operation restriction is enabled, ask the administrator of
the printer you are using.• If no printable data is saved on the USB flash drive, There are no files that can be printed. is
displayed on the touch screen.
4. In the list, tap folder or data to print.4.
678

Tapping a folder displays the data list. Tap the data to print.
Note• If no printable data is saved on the folder you tapped, There are no files that can be printed. is
displayed on the touch screen.
The screen below appears.
A. Number of copiesA.
Tap to display the screen below and specify the number of copies.
B. PreviewB.
Tap to preview an image of the printout on the preview screen.
Specify the pages to preview and print only specific pages.
C. Print settingsC.
Tap to display the Print settings screen. You can check and change the print settings.
679

5. Tap Start.5.
The printer starts printing.
Note• Tapping Yes on the displayed screen returns to step 4. Tapping No returns to HOME screen.•
680

Printing from Smartphone/Tablet
For more on printing from a device, refer to the device's or application's instruction manual.
Print Easily from a Smartphone or Tablet with Canon PRINT Inkjet/SELPHY
Printing from iOS Device (AirPrint)
681

Enlarging Copy with imageRUNNER ADVANCE
Copy scanned with imageRUNNER ADVANCE can be sent to the printer via FTP.
Enable FTP from Remote UI.
1. Start up Remote UI.1.
Start up Remote UI
2. Select System info and LAN settings.2.
3. Select LAN settings.3.
4. Select Advanced setup.4.
5. Confirm displayed message and tap Yes.5.
6. Select FTP settings.6.
7. Select Enable.7.
682
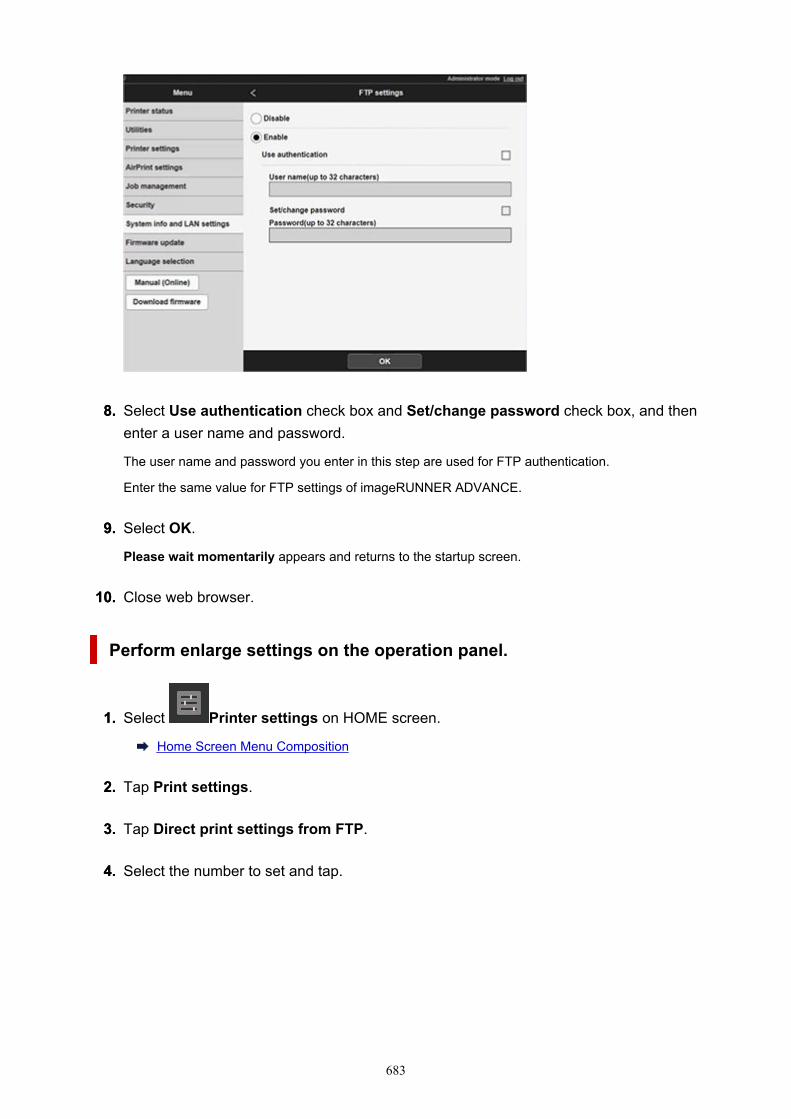
8. Select Use authentication check box and Set/change password check box, and then8.enter a user name and password.
The user name and password you enter in this step are used for FTP authentication.
Enter the same value for FTP settings of imageRUNNER ADVANCE.
9. Select OK.9.
Please wait momentarily appears and returns to the startup screen.
10. Close web browser.10.
Perform enlarge settings on the operation panel.
1. Select Printer settings on HOME screen.1.
Home Screen Menu Composition
2. Tap Print settings.2.
3. Tap Direct print settings from FTP.3.
4. Select the number to set and tap.4.
683

See the following two types of enlargement setting methods.
Fitting to Paper WidthSpecifying Magnification Level
Scan and enlarge copy
1. Place the copy on the platen glass or feeder of imageRUNNER ADVANCE.1.
2. Select Scan and Send.2.
3. Tap New Destination.3.
4. Tap File.4.
684

5. Tap FTP from the Protocol drop-down list.5.
6. Enter setting items.6.
Enter the printer's IP address as the Host Name.
Note• We recommend that you set a fixed IP address for your printer.
Enter "./folderN" in Folder Path. ("N" represents the print setting number specified in the Direct printsettings from FTP screen on the printer.) For example, to enter the pathname for Print settings 1,enter "./folder1". For Print settings 2, enter "./folder2".
Use the same User Name and Password that you set for FTP authentication in the Remote UI.
7. Tap OK.7.
8. Tap the setting button for file format.8.
685

9. Select File Format.9.
Select PDF or JPEG.
Note• If you select PDF, remove the check from the Compact and Encrypt check boxes.
10. Specify the settings as necessary.10.
Important• Select 300x300 dpi or 600x600 dpi as the resolution.
11. Press (Start).11.
If you are placing your originals on the platen glass, press (Start) to scan each original.
12. When scanning is complete, tap Start Sending.12.
686

Scanned originals are sent to the printer and printing starts.
Note• It is recommended to register the setting contents in Favorite Settings.
687

Fitting to Paper Width
1. Tap Paper settings.1.
2. Tap Enlarge/Reduce.2.
3. Tap Fit paper size.3.
Note• Change the image quality in Print quality settings if necessary.• You can specify the orientation of the image from Rotate.
688

Specifying Magnification Level
Setting Input resolution
1. Tap Print quality settings.1.
2. Tap Input resolution.2.
Select the input resolution that matches your output requirements.
• 600 dpi•
Select when printing at 600 dpi.• 300 dpi•
Select when printing at 300 dpi.• Specify print job•
Select to match the input resolution of the printer with the scanning resolution when scanning theoriginal in JPEG format.
Important• When scanning the original in JPEG format with imageRUNNER ADVANCE, match the
scanning resolution with the input resolution of the printer. If the resolution is different, it willnot be printed at the specified magnification level.
689

Setting scale percentage
1. Tap Paper settings.1.
2. Tap Enlarge/Reduce.2.
3. Tap Scaling.3.
4. Tap A on the displayed screen.4.
690

5. Enter the scale percentage, and then tap OK.5.
For commonly used magnification conversions, refer to Reference for Magnification.
6. Select OK on the displayed screen.6.
Note• Change the image quality in Print quality settings if necessary.• You can specify the orientation of the image from Rotate.
Reference for Magnification• ISO A format•
Original size
691
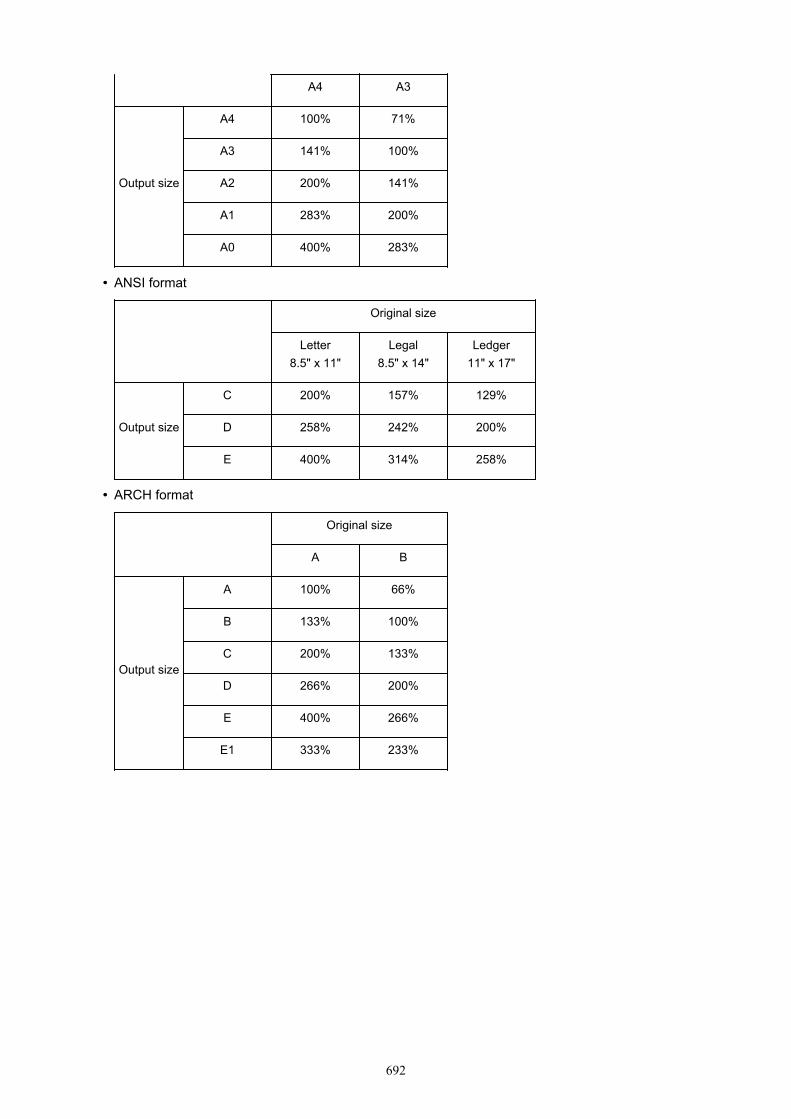
A4 A3
Output size
A4 100% 71%
A3 141% 100%
A2 200% 141%
A1 283% 200%
A0 400% 283%
• ANSI format•
Original size
Letter8.5" x 11"
Legal8.5" x 14"
Ledger11" x 17"
Output size
C 200% 157% 129%
D 258% 242% 200%
E 400% 314% 258%
• ARCH format•
Original size
A B
Output size
A 100% 66%
B 133% 100%
C 200% 133%
D 266% 200%
E 400% 266%
E1 333% 233%
692

Printer Driver
Windows Printer Driver
macOS Printer Driver
693

Windows Printer Driver
Overview of the Printer Driver
Printer Driver Description
Updating the Printer Driver
694

Overview of the Printer Driver
Canon IJ Printer Driver
Changing the Print Options
Canon imagePROGRAF Preview
How to Open the Printer Driver Setup Window
Updating Media Information in Printer Driver
Setting Accounting Information
Set a PIN Code for Print Jobs
Deleting the Undesired Print Job
Canon IJ Status Monitor
Instructions for Use (Printer Driver)
695
Canon IJ Printer Driver
The Canon IJ printer driver (called printer driver below) is a software that is installed on your computer forprinting data with this printer.
The printer driver converts the print data created by your application software into data that your printer canunderstand, and sends the converted data to the printer.
Because different models support different print data formats, you need a printer driver for the specificmodel you are using.
Installing the Printer DriverTo install the printer driver, install the driver from the Setup CD-ROM or our website.
Specifying the Printer DriverTo specify the printer driver, open the Print dialog box of the application software you are using, andselect "XXX" (where "XXX" is your model name).
Displaying the Manual from the Printer DriverTo display a description of a tab in the printer driver setup window, click the Help button found on the tab.
Related TopicHow to Open the Printer Driver Setup Window
696

Changing the Print Options
You can change the detailed printer driver settings for print data that is sent from an application software.
Check this check box if part of the image data is cut off, the paper source during printing differs from thedriver settings, or printing fails.
The procedure for changing the print options is as follows:
1. Open the printer driver setup window1.
2. Click Special Settings... on the Layout tab2.
The Special Settings dialog box opens.
3. Change the individual settings3.
If necessary, change the setting of each item, and then click OK.
The Layout tab is displayed again.
697

Canon imagePROGRAF Preview
The Canon imagePROGRAF Preview is an application software that displays what the print result will looklike before a document is actually printed.
The preview reflects the information that is set within the printer driver and allows you to check thedocument layout, print order, and number of pages. You can also change the media type and paper sourcesettings.
When you want to display a preview before printing, open the printer driver setup window, click the Maintab, and check the Preview before printing check box.
When you do not want to display a preview before printing, uncheck the check box.
Related TopicDisplaying the Print Results before Printing
698

How to Open the Printer Driver Setup Window
You can display the printer driver setup window from the application software in use or from the printer icon.
Open the Printer Driver Setup Window through the Application SoftwareFollow the procedure below to configure printing profile when printing.
1. Select the command that you perform printing on the application software1.
In general, select Print on the File menu to open the Print dialog box.
2. Select your model name and click Preferences (or Properties)2.
The printer driver setup window appears.
Note• Depending on application software you use, command names or menu names may vary and
there may be more steps. For details, refer to the user's manual of your application software.
Opening the Printer Driver Setup Window from the Printer IconFollow the procedure below to perform printer maintenance operations such as print head cleaning, or toconfigure a printing profile that is common to all application software.
1. Display the Devices and Printers window1.
Select the Control Panel -> Hardware and Sound (Hardware) -> Devices and Printers.
2. Right-click your model name icon, and then select Printing preferences from the2.displayed menu
The printer driver setup window appears.
Important• Opening the printer driver setup window through Printer properties displays such tabs
regarding the Windows functions as the Ports (or Advanced) tab. Those tabs do not appearwhen opening through Printing preferences or application software. For tabs regardingWindows functions, refer to the user's manual for the Windows.
699

Updating Media Information in Printer Driver
This function gets the latest media information from the printer and updates the media information in theprinter driver.When the media information is updated, the media displayed for Media Type on the Main tab is updated tothe latest information.
The procedure for updating media information is described below.
1. Display the Devices and Printers window1.
Select the Control Panel -> Hardware and Sound (Hardware) -> Devices and Printers.The Devices and Printers window is displayed.
2. Display setup window2.
Right-click the "Your model name" icon, and select Printer properties.The printer's Properties window appears.
3. Update media information3.
Click Update Media Information the Device Settings tab.When a confirmation message appears, click Start.If the paper information on the driver cannot be updated, click Initial Check Items and check thedisplayed information.The printer driver media information will update.
Important• It may take some time to update the media information.
4. Finish updating media information4.
When a confirmation message appears, click OK.The media information will be updated.
Important• Restart the printer driver after updating media information.• Do not change media information on the printer while you are updating media information on
the driver.
Important• Ensure that a user with administrative privileges carries out the media information update.
Users other than administrators can check if a media information update is required, but cannot carryout the update itself.
• When you have added, deleted, or edited media using administrative tools (the Media ConfigurationTool) but have not updated the media information, issues may arise such as the inability to print.
700

Setting Accounting Information
By setting accounting information, you add IDs to print jobs, and use the printer and cost management toolto tabulate print history information for any ID.
The procedure for setting accounting information is described below.
Setting Accounting Information
1. Open the printer driver setup window1.
2. Click Accounting... on the Main tab2.
The Accounting dialog box opens.
3. If necessary, complete the following settings:3.
Account ID/Department/Project numberEnter the account ID, department, and project number that you want to set. Enter the ID by usingup to 20 alphanumeric characters (0 to 9, a to z, and A to Z).
701

Fix Accounting
1. Display the Devices and Printers window1.
Select the Control Panel -> Hardware and Sound (Hardware) -> Devices and Printers.The Devices and Printers window is displayed.
2. Display setup window2.
Right-click the "Your model name" icon, and select Printer properties.The printer's properties window appears.
3. Click Accounting on the Device Settings tab3.
The Accounting dialog box opens.
4. If necessary, complete the following settings:4.
Use a fixed Account ID./Use a fixed Department name./Use a fixed Project number.Prohibits changes to account ID, department, and project number that have already been set.Check this check box to prevent other users from changing IDs.
702

Account ID/Department/Project numberEnter the account ID, department, and project number that you want to set. Enter the ID byusing up to 20 alphanumeric characters (0 to 9, a to z, and A to Z).If you've added checkmarks to Use a fixed Account ID., Use a fixed Department name., orUse a fixed Project number., you'll be able to configure each setting.
After completing the setting, click OK to return to the Device Settings tab.
5. Apply the settings5.
Click OK or Apply.The settings are enabled hereafter.
Important• If you fix the Accounting value in the Device Settings tab, the setting items in the Accounting dialog
box in the Main tab will be grayed out and disabled.
703

Set a PIN Code for Print Jobs
If you set a PIN code to your print jobs, the print jobs remain in standby status until the PIN code is enteredon the printer operation panel.As the material is printed immediately after entering the PIN code, issues such as retrieving the wrongdocuments and allowing others to peek at your documents can be prevented.
The procedure for setting a PIN code to your print jobs is explained here.
1. Open the printer driver setup window1.
2. Set the output method2.
Click Output Method... in the Page Setup tab.
3. Set the PIN code3.
Place a checkmark next to Set PIN for printing, and enter a one to seven-digit number in PIN.
4. Complete the setup4.
Click OK.When you print, the print job is set to standby status on the printer unit.If you enter the PIN code you set on the printer operation panel, the print job will be printed.
Note• See "Printing Security Print Jobs" for instructions on how to operate using the printer operation panel.• Print jobs with a PIN code set are not saved on the printer hard disk.
704

Deleting the Undesired Print Job
If the printer does not start printing, canceled or failed print job data may be remaining.Delete the undesired print job by using the Canon IJ Status Monitor.
1. Open the printer driver setup window1.
2. Display the Canon IJ Status Monitor2.
Click Status Monitor... on the Main tab.The Canon IJ Status Monitor appears.
3. Display the print jobs3.
Click Display Send Queue.The print queue window opens.
4. Delete the print jobs4.
Select the print jobs you want to delete, and select Cancel from the Document menu.When the confirmation message appears, click Yes.
The deletion of the print job is complete.
Important• Users who have not been granted access permission for printer management cannot delete the print
job of another user.
705

Canon IJ Status Monitor
The Canon IJ Status Monitor is an application software that shows the status of the printer and the progressof printing. You will know the status of the printer with graphics, icons, and messages.
Launching the Canon IJ Status MonitorThe Canon IJ Status Monitor launches automatically when print data is sent to the printer. Whenlaunched, the Canon IJ Status Monitor appears as a button on the task bar.
Click the button of the status monitor displayed on the task bar. The Canon IJ Status Monitor appears.
Note• To open the Canon IJ Status Monitor when the printer is not printing, open the printer driver setup
window and click Status Monitor... on the Main tab.• The information displayed on the Canon IJ Status Monitor may differ depending on the country or
region where you are using your printer.
When Errors OccurIf an error occurs (e.g., if the printer runs out of paper or if the ink is low), the Canon IJ Status Monitordisplays an error information dialog box.
706

In such cases, take the appropriate action as described.
707

Checking the Ink Status from Your Computer
You can check the remaining ink level and the ink tank types for your model.
1. Open the printer driver setup window1.
2. Launching the Canon IJ Status Monitor2.
On the Main tab, click Status Monitor....The Canon IJ Status Monitor opens.
3. Display Estimated ink levels3.
Ink status is displayed as an illustration.
Note• The information displayed on the Canon IJ Status Monitor may differ depending on the country or
region where you are using your printer.
708

Instructions for Use (Printer Driver)
This printer driver is subject to the following restrictions. Keep the following points in mind when using theprinter driver.
Restrictions on the Printer Driver• Before installing, log on to Windows as user with administrator rights.• Always check the following before installing the software.
1. Quit the application software while it is running.2. If you are printing a document, abort printing or wait for it to finish.3. Close all the printer driver's dialog boxes.
• If you can set the number of copies with the application software, set them either with the printerdriver or the application software.
• If you can configure enlarging/reducing settings with the application software, set the normal size(100%) in the printer driver, and then configure the magnification factor with the application software.
• Depending on the application software used, it may be possible to print collated copies; however,please do not use this feature when configuring layout printing with the Page Layout option in theLayout tab.This may cause incorrect layout.
• When printing enlarged/reduced documents, printed results may come out different due to adiscrepancy between the image data resolution and the enlarging/reducing ratio.
• When printing reduced color images, 1-dot wide lines or points may disappear from the color images.• Depending on the application software, lines drawn at almost horizontal angles may not print
correctly.If that should happen, re-draw the line horizontally and print one more time.
• Immediately after installing (or updating) the printer driver, you might not be able to visualize newfeatures in some of the application software.In all application software provided with printing features, choose Print from the File menu and, afterselecting the printer you are using, click the Properties.After the Properties dialog box has opened, immediately close it by clicking OK.
• If you update the model name of your printer through the General tab in the printer's Properties, theFavorites settings registered in the printer driver will be disabled.In such cases, save the Favorites settings as a file before changing the name of the printer and reloadthe saved file after you have updated the printer's name.
• Printing at high resolution requires a large amount of memory on your computer.When your computer is low on memory or you are using a large number of application software, theapplication software may not work correctly.In such cases, re-start Windows and, before resuming printing, close all the applications you are notusing. Also, when the printer is not printing correctly, switch the Print Quality setting in the Main tabto a lower resolution.
• When using a local connection, if you do not see a check mark next to the Enable bidirectionalsupport option in the Ports tab in the printer's Properties, it will not be possible to acquire printer anddevice information correctly.
• If you are you are using your printer with a USB connection, refrain from using standby mode. Youcan set standby mode through the Power Options on the Control Panel.
709

• In case of a large amount of print data, the printer may time-out during printing and you may no longerbe able to print.In such cases, in the Advanced tab in the printer's Properties, choose Spool print documents soprogram finishes printing faster and place a check mark next to Start printing after last page isspooled.
• Fine lines and gradients may not print correctly.In such cases, choose Print from the File menu of the application, and after opening from there theproperty dialog box of the printer driver, follow the procedure below and then run printing.
1. In the Main tab, uncheck Preview before printing.2. In the Layout tab, uncheck Page Layout.3. If you are using a 32-bit driver, open the Layout tab and click Special Settings....
Turn off Fast Graphic Process.
• In case of a large amount of print data, the printer may time-out during printing and you may no longerbe able to print.In such cases, you may be able to print by increasing the time set in Job timeout in the printer'soperation panel.
• Depending on the application used, if you print using features like enlarging/reducing, layout printing,page borders and so on, some of the data in the resulting printed document, for example graphics,may differ from the source document.
• If you print very large images from your computer when it's running low on memory, you may not beable to print correctly; for example, it may take a very long time to print or parts of the image may endup missing.In such cases, try printing after following the procedure indicated below.
◦ If you are using a 32-bit driver, open the Layout tab and click Special Settings....Turn off Fast Graphic Process.
◦ Increase your computer memory.◦ Increase the virtual memory of your operating system.
• To print to cut sheets by lining up multiple documents, you must use the Free Layout function. Go tothe Canon website, download imagePROGRAF Printer Driver Extra Kit, and then install it.
• Do not change the Print Processor... settings in the Advanced tab in the printer Properties.If you change them, you will not be able to use some of the features correctly, such as the PageLayout feature in the Layout tab.
• In the cases described below, you will not be able to use the Free Layout and the Edit UsingPosterArtist features of Page Layout in the Layout tab as well as the Canon imagePROGRAFPreview feature.
◦ When right-clicking on the printer icon and choosing from See what's printing: Printer -> PausePrinting, or when right-clicking on the printer icon and choosing Pause Printing
◦ When right-clicking on the printer icon and choosing from See what's printing: Printer -> UsePrinter Offline, or when right-clicking on the printer icon and choosing Use Printer Offline
◦ When printing during hours other than those set in Available from and To in the Advanced tab inthe printer's Properties
◦ When printing with the Enable advanced printing features turned off in the Advanced tab in theprinter's Properties
◦ When printing with Print directly to the printer enabled in the Advanced tab in printer'sProperties
710

◦ When printing after the printing port in the Ports tab in the printer's Properties has changed toFILE:
◦ When printing after choosing Output to file in the Print dialog box in the application software
• If you perform a point-and-print installation, you will not be able to use the Free Layout and the EditUsing PosterArtist features of Page Layout in the Layout tab.
• If you print after setting Free Layout and Edit Using PosterArtist, refrain from printing from otherdrivers.
• If you combine specific Print Quality with large paper sizes, you may not be able to correctly printstamps and borders.
• In the Canon imagePROGRAF Preview, characters and fine lines visualized in the View screen maylook differ from printed results. In such cases, try choosing the Layout tab, opening the SpecialSettings dialog and turning on Preview Switching.
• If you are using a model supporting Automatically switch paper sources (paper size priority) inthe Device Settings tab, or if you have chosen Automatically switch paper sources (paper sizepriority), you may not be able to get the desired printing results.In such cases, uncheck Automatically switch paper sources (paper size priority).
Points to Note About Applications with Restrictions• If, in Microsoft Excel, you place a checkmark next to the Collate and then you print more than one
copy, or if you do Entire workbook after configuring different settings in each tab, you may not beable to perform layout printing nor to get the intended printing results.
• If you try to print data on a very large-size paper through applications like Adobe Illustrator, you maynot be able to print.In such cases, try printing after following the procedure indicated below.
◦ Open the Main tab and uncheck Preview before printing.◦ If you are using a 32-bit driver, open the Layout tab and click Special Settings....
Turn off Fast Graphic Process.◦ Increase the virtual memory of your operating system.◦ If you are using Adobe Illustrator, turn off/on Bitmap printing in the Print dialog box.
• In the cases described below, you will not be able to use the Free Layout and the Edit UsingPosterArtist features of Page Layout in the Layout tab.
◦ When printing from application software which do not allow EMF spooling, like Adobe PhotoshopLE, MS Photo Editor, Ace Draw and others.
• When printing from Adobe Photoshop, tone jumps may occur in the gradation of black and whitephotographs.
• When printing data created with Microsoft Word using Enlarged/Reduced Printing or BorderlessPrinting, you may not be able to print correctly.In such cases, try printing after following the procedure indicated below.
◦ Open the printer folder from the start menu, right click on the printer icon and select Printingpreferences. Launch the application after setting, in the Page Setup tab, Page Size, Enlarged/Reduced Printing and Borderless Printing.
◦ Open Microsoft Word's Page setup dialog box and close it by clicking OK.◦ After configuring the printer driver, close momentarily the Print dialog box without printing. Then,
open the printer driver's set up screen once again, close it by clicking OK, and run printing.
711

Printer Driver Description
Main Tab Description
Page Setup Tab Description
Layout Tab Description
Favorites Tab Description
Utility Tab Description
Device Settings Tab Description
Canon IJ Status Monitor Description
712
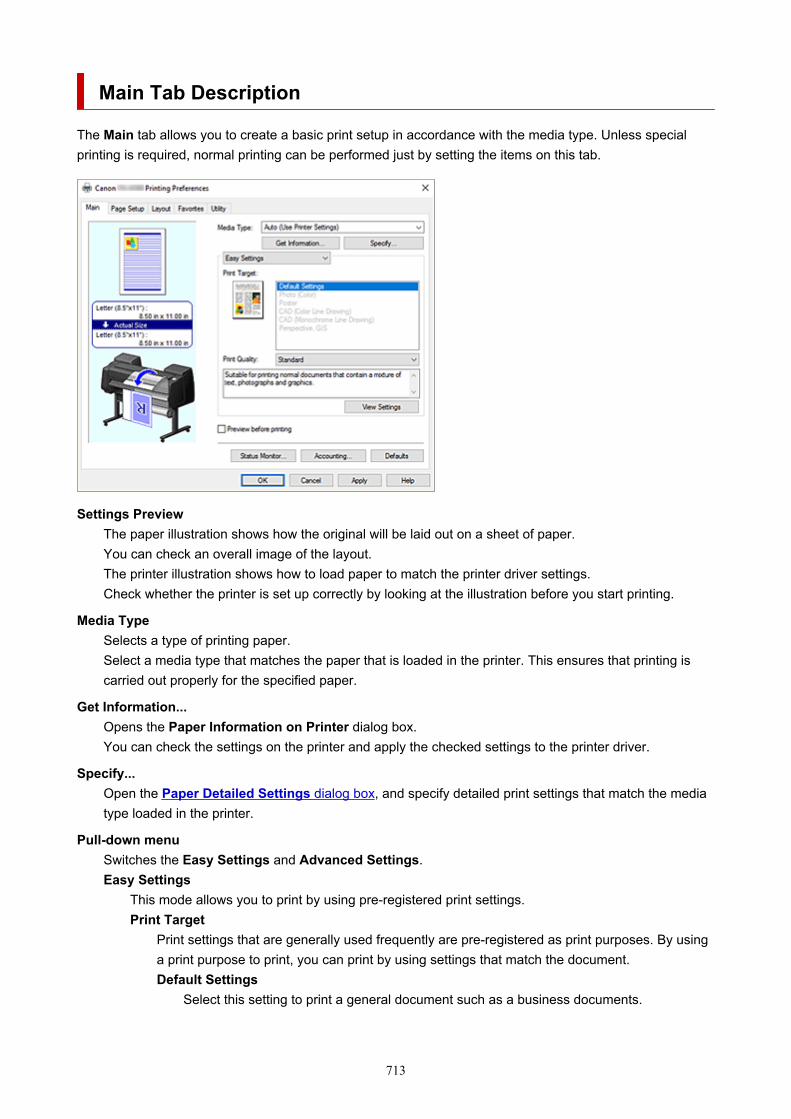
Main Tab Description
The Main tab allows you to create a basic print setup in accordance with the media type. Unless specialprinting is required, normal printing can be performed just by setting the items on this tab.
Settings PreviewThe paper illustration shows how the original will be laid out on a sheet of paper.You can check an overall image of the layout.The printer illustration shows how to load paper to match the printer driver settings.Check whether the printer is set up correctly by looking at the illustration before you start printing.
Media TypeSelects a type of printing paper.Select a media type that matches the paper that is loaded in the printer. This ensures that printing iscarried out properly for the specified paper.
Get Information...Opens the Paper Information on Printer dialog box.You can check the settings on the printer and apply the checked settings to the printer driver.
Specify...Open the Paper Detailed Settings dialog box, and specify detailed print settings that match the mediatype loaded in the printer.
Pull-down menuSwitches the Easy Settings and Advanced Settings.Easy Settings
This mode allows you to print by using pre-registered print settings.Print Target
Print settings that are generally used frequently are pre-registered as print purposes. By usinga print purpose to print, you can print by using settings that match the document.Default Settings
Select this setting to print a general document such as a business documents.
713

Photo (Color)Select this when printing a color illustration or a photograph.
PosterSelect this when printing a poster.
CAD (Color Line Drawing)Select when printing data such as drawings.
CAD (Monochrome Line Drawing)Select when printing data such as drawings in monochrome.
Perspective, GISSelect when printing data such as perspectives and GIS.
Print QualitySelects your desired printing quality.Select one of the following to set the print quality level that is appropriate for the purpose.
Important• Depending on the Media Type settings, the same print results may be produced even if
the Print Quality is changed.
HighGives priority to print quality over printing speed.
StandardPrints with average speed and quality. Resolution settings depend on media type.
FastGives priority to printing speed over print quality.
CustomOpens the Custom dialog box.Select this when you want to set the printing quality level individually.
View SettingsOpens the View Settings dialog box.
Advanced SettingsThis mode allows you to print by specifying detailed settings that match your purpose.Print Priority
Select elements to prioritize for print results.Image
Prioritize image results when printing.
Line Drawing/TextPrioritize detailed lines and text when printing.
Auto (Use Printer Settings)Use printer settings when printing.
Print QualitySelects your desired printing quality.Select one of the following to set the print quality level that is appropriate for the purpose.
714

Important• Depending on the Media Type settings, the same print results may be produced even if
the Print Quality is changed.
HighGives priority to print quality over printing speed.
StandardPrints with average speed and quality. Resolution settings depend on media type.
FastGives priority to printing speed over print quality.
CustomOpens the Custom dialog box.Select this when you want to set the printing quality level individually.
Color ModeSelect the color to print.Color
Prints with the number of colors in the document.
MonochromeSelect this setting to print a line drawing using black ink.
Monochrome BitmapPrint all non-white parts in black.
Color SettingsOpens the Color Settings dialog box.You can adjust individual color settings such as Cyan, Magenta, Yellow, Brightness,and Contrast on the Color Adjustment tab, and select the Color Correction method onthe Matching tab.
Thicken Fine LinesAdd a check mark if you want to print thin lines thicker for easy viewing.
Preview before printingYou can start up the Canon imagePROGRAF Preview, and check what the printing results will bebefore executing the print.Check this check box to display a preview before printing.
Status Monitor...Displays the status monitor.
Accounting...Opens the Accounting dialog box.By setting Accounting information, you add IDs to print jobs, and use the printer and cost managementtool to tabulate print history information for any ID.
Note• To set accounting information, see "Setting Accounting Information."
715

DefaultsRestores all the settings you have changed to their default values.Clicking this button restores all the settings on the current screen to their default values (factorysettings).
Paper Detailed Settings dialog boxDrying Time
Wait time can be set to allow ink to dry. Between Pages settings are only enabled for roll paper.Between Pages
The wait time until outputting paper can be set after printing one page. Time is taken beforecutting roll paper to allow the ink to dry, so even when Automatic Cutting in the Roll PaperOptions dialog box of the Page Setup tab is set to Yes, page may be dropped into the basketwith dried ink.Printer Default
Settings in printer unit operation panel are applied.
NonePage will be output immediately after printing
30 sec. / 1 min. / 3 min. / 5 min. / 10 min. / 30 min. / 60 min.Page will be output after set amount of time has passed after printing.
Between ScansThe wait time until printing next scan can be set after printing one scan in page. Set in the eventsmudging occurs in the page, unevenness occurs in borderless printing, etc., and you would liketo avoid this smudging and unevenness.Printer Default
Settings in printer unit operation panel are applied.
NoneNext scan will be print immediately after first scan is print.
0.5 sec. / 1 sec. / 3 sec. / 5 sec. / 7 sec. / 9 sec.Next scan will be print after the set amount of time has passed after printing one scan.* If smudges and/or unevenness occur, please increase time.
Roll Paper Safety MarginIn order for heavily curling paper to absorb well in platen, length of margin established on edge ofpaper can be selected.Near End Margin
Roll Near End Margin length can be set.Printer Default
Settings in printer unit operation panel are applied.
3mmWill be print in standard size.* Please select when there are no particular problems with printing.
20mmPlease select when rubbing of the print heads occurs, such as when heavily curling paper isbeing used.
716

Cut SpeedSelect auto-cut speed. This can be adjusted when paper cannot be cut precisely with auto-cut.Printer Default
Settings in printer unit operation panel are applied.
FastSelect when cut is not smooth with Standard settings.
StandardSelect when there are no particular problems with auto-cut.
SlowIf this is selected for paper with adhesive, the cutter will not stick to the adhesive easily and it willslow deterioration of the cutter's capabilities.
Unidirectional PrintingControls color unevenness and unaligned ruled lines.Please check when printing in one direction.
MirrorSelect whether to print reflected image or not. When you select this check box, text and images willbe printed as if reflected in a mirror.
Custom dialog boxSet the quality level, and select the desired print quality.
QualityYou can use the slider bar to adjust the print quality level.
Important• Certain print quality levels cannot be selected depending on the settings of Media Type.
Note• The High, Standard, or Fast print quality modes are linked with the slider bar. Therefore when
the slider bar is moved, the corresponding quality and value are displayed on the left. This is thesame as when the corresponding quality is selected for Print Quality on the Main tab.
View Settings dialog boxPrint Target
Select the print purpose. The settings of the selected print purpose are displayed in Details.
NameDisplays the name of the selected print purpose.
DetailsDisplays the settings of the print purpose that was selected for Print Target.
717

Color Settings dialog box
Color Adjustment TabThis tab allows you to adjust the color balance by changing the settings of the Cyan, Magenta, Yellow,Brightness, and Contrast options.
PreviewShows the effect of color adjustment.The color and brightness change when each item is adjusted.
View Color PatternDisplays a pattern for checking color changes produced by color adjustment.If you want to display the preview image with a color pattern, check this check box.
Cyan / Magenta / YellowAdjusts the strengths of Cyan, Magenta, and Yellow.Moving the slider to the right makes a color stronger, and moving the slider to the left makes a colorweaker.You can also directly enter a value linked to the slider. Enter a value in the range from -50 to 50.This adjustment changes the relative amount of ink of each color used, which alters the totalcolor balance of the document. Use your application if you want to change the total color balancesignificantly. Use the printer driver only if you want to adjust the color balance slightly.
Important• When Monochrome is selected for Color Mode, the color balance (Cyan, Magenta, and
Yellow) can't be set.
BrightnessAdjusts the brightness of your print. You cannot change the levels of pure white and black.However, the brightness of the colors between white and black can be changed. Colors becomebrighter as you drag the slider toward the right and darker as you drag the slider toward the left.You can also directly enter brightness values that are linked to the slider bar. Enter a value in therange from -50 to 50.
ContrastAdjusts the contrast between light and dark in the image to be printed.Moving the slider to the right increases the contrast, moving the slider to the left decreases thecontrast.You can also directly enter a value linked to the slider. Enter a value in the range from -50 to 50.
Matching TabAllows you to select the method for adjusting colors to match the type of document to be printed.
Color CorrectionAllows you to select Driver Matching, ICC Profile Matching, ICM, or Off to match the purpose of theprint operation.Driver Matching
Print with the optimal color using the driver's original color profile. Normally, you should choosethis mode.
718

ICC Profile MatchingCarry out color matching using the ICC profile. Specify the input profile, printer profile andmatching method in detail, and select when printing. You can use the digital camera or scannerICC profile, or the ICC profile created using the profile creation tool.
ICMPerform color matching on the host computer using the Windows ICM function. Select whenprinting from an ICM function-compatible application.
OffPrint without performing color matching on the printer driver. Select this when performing colormatching using applications such as Adobe Photoshop, or printing using a profile creation tool orcolor chart.
Important• When setting not to use ICM in the application software, ICC Profile Matching and ICM of
Color Correction do not function. There are also times when it does not print correctly.
Input ProfileSpecifies the input profile to be used when you select ICC Profile Matching for Color Correction.
Printer ProfileSpecifies the printer profile to be used when ICC Profile Matching is selected for Color Correction.Normally Auto is selected but you can also select a printer profile manually.
Rendering IntentSpecifies the matching method to be used when you select Driver Matching, ICC Profile Matching,or ICM, for Color Correction.Perceptual (Photo) / Perceptual
Reproduces colors of general photos naturally and features smooth gradation. In addition,selecting this setting allows you to adjust colors easily using an application software.
Saturation (Poster/CAD) / SaturationReproduces vivid colors on data such as a poster. In addition, prints in easy-to-see colorssuitable for line drawing.
Relative ColorimetricWhen image data is converted to the color space of the printer, this method converts the imagedata so the color reproduction approximates the shared color regions. Select this method to printimage data with colors that are close to the original colors.The white spots are reproduced as white spots (background color) on the paper.
Absolute ColorimetricThis method uses the white spot definitions in the input and output ICC profiles to convert theimage data.Although the color and color balance of the white spots change, you may not be able to get thedesired output results because of the profile combination.
Important• Depending on the media type, you may obtain the same print results even when you change the
Rendering Intent setting.• If Driver Matching is selected for Color Correction, then Relative Colorimetric and Absolute
Colorimetric are not displayed.
719

Accounting dialog boxClick Accounting... to display the Accounting dialog box.
The Accounting dialog box allows you to add IDs to print jobs. You can then use the IDs, along with theprinter and cost management tool, to tabulate print history information.
Account ID/Department/Project numberEnter the account ID, department, and project number that you want to set. Enter the ID by using upto 20 alphanumeric characters (0 to 9, a to z, and A to Z).
720

Page Setup Tab Description
The Page Setup tab allows you to set borderless printing for a document and specify the scaling.
Settings PreviewThe paper illustration shows how the original will be laid out on a sheet of paper.You can check an overall image of the layout.The printer illustration shows how to load paper to match the printer driver settings.Check whether the printer is set up correctly by looking at the illustration before you start printing.
Page SizeSelects a page size.Ensure that you select the same page size as you selected within the application.When you select Custom Size from Custom Paper Size, the Custom Size Settings dialog boxappears, and you can specify any vertical and horizontal dimensions for the paper.
Borderless PrintingChooses whether you are printing on a full page without any page margins or printing with pagemargins.In borderless printing, originals are enlarged to extend slightly off the paper. Thus, printing can beperformed without any margins (border).
Important• When Cut Sheet is selected for Paper Source, Borderless Printing is grayed out and cannot be
set.
Borderless SettingSelect Borderless Printing to enable it for clicking.Open the Borderless Setting dialog box, so that you can adjust Amount of Extension.
Borderless Printing MethodThis appears when you select Borderless Printing.Set the borderless printing method.
721

Fit Paper SizeEnlarge or reduce the document to match the size of the paper to be printed, and then print thedocument.
Scale to fit Roll Paper WidthYou can enlarge or reduce the document to match the roll paper width and then print thedocument.When you select this radio button, the Information dialog box appears, and you can select RollPaper Width.
Print Image with Actual SizePrints the document at its actual size.
Printer Paper SizeWhen you select Fit Paper Size, you can specify the setting.Select the size of the paper to be printed.The list displays the paper sizes that support borderless printing.
Enlarged/Reduced PrintingYou can enlarge or reduce a document and then print it.When you select Enlarged/Reduced Printing, you can then set Fit Paper Size, Fit Roll Paper Width,or Scaling.Fit Paper Size
Enlarge/reduce the document to match the size of the paper to be printed, and then print thedocument.
Fit Roll Paper WidthYou can enlarge/reduce the document to match the roll paper width and then print the document.When you select this radio button, the Information dialog box appears, and you can select RollPaper Width.
ScalingEnlarge or reduce the document to a specified scale before printing.
Printer Paper SizeWhen you select Fit Paper Size, or Scaling, you can specify the setting.Select the size of the paper to be printed.
OrientationSelects the printing orientation.If the application used to create your document has a similar function, select the same orientation thatyou selected in that application.Portrait
Prints the document so that its top and bottom positions are unchanged relative to the paper feeddirection. This is the default setting.
LandscapePrints the document by rotating it 90 degrees relative to the paper feed direction.
Rotate Page 90 degreesRotate the long edge of the document 90 degrees, match it to the width of the roll paper, and then printthe document.When you print a portrait document onto roll paper, you can save paper by rotating the document 90degrees and print the document horizontally relative to the paper.
722

Paper SourceShows the source from which paper is supplied.You may be able to switch the paper source with the printer driver.Roll Paper (Auto)
Depending on the paper settings on the printer driver and the paper information registered to theprinter, the printer automatically determines which roll paper to use and then feeds that paper.
Roll 1Paper is fed from Roll 1.
Roll 2Paper is fed from Roll 2.
Cut SheetFeeds paper using the cut paper.
Important• Depending on the media type and size, the Paper Source settings that can be selected may differ.
Roll Paper WidthSelect the roll paper width.Select the width that matches the width of the roll paper loaded in the printer.If you select Custom Size (XXXX), the paper size set in the printer will be used.The paper information set in the printer can be confirmed in Get Information... in the Main sheet.If you select User-defined1 (XXXX) or User-defined2 (XXXX), the Custom Size Settings dialog box isdisplayed, where you can specify the paper length and width.
Roll Paper Options...Displays the Roll Paper Options dialog box.You can specify auto cut, banner printing, and other settings for printing on roll paper.
Output Method...Displays the Output Method dialog box.You can select Output Method and specify save settings for saving documents to a box.
Size Options...Displays the Paper Size Options dialog box.The Paper Size Options dialog box allows you to create and register any user-defined paper.
Custom Size Settings dialog box (Paper Size)This dialog box allows you to specify the size (width and height) of the custom paper.
Paper SizeSpecifies the Width and the Height of the custom paper. Measurement is shown according to theunits specified in Units.
UnitsSelect the unit for entering a user-defined paper size.
723

Borderless Setting dialog boxAdjust how much of the document extends off the paper during borderless printing, and configure thethree-sided borderless setting.
Amount of ExtensionAdjusts how much of the document extends off the paper during borderless printing.Moving the slider to the right increases the amount of extension and allows you to perform borderlessprinting with no problems.Moving the slider to the left reduces the amount of extension and expands the range of the documentto print.
Three-sided BorderlessIf you check this check box, and the width or the length of the output paper size is smaller than theroll width, a margin will be created on the right of the document, and the remaining three sides (top,bottom, and left) will be borderless when printing.
Custom Size Settings dialog box (Roll Paper Width)Enter the roll width you want to use.
Roll Paper WidthSpecify the Width of the roll paper. Measurement is shown according to the units specified in Units.
UnitsSelect the unit for entering a user-defined paper size.
Roll Paper Options dialog boxYou can specify settings for printing on roll paper.
Automatic CuttingYou can print cut guidelines for cutting the roll paper automatically or manually after printing.Yes
Cut the roll paper automatically after printing.
NoDo not cut the roll paper automatically after printing.
Print Cut GuidelinePrints cut guidelines for cutting the roll paper manual after printing.
Banner PrintingSelect this check box to print documents with several pages as one continuous document. When youdo this, the spaces between the pages will be removed.
Output Method dialog boxSet the method for exporting the print job to the printer's hard disk drive.
724

Output MethodPrint
After the printing ends, the print job is not saved to the printer's hard disk drive.Set PIN for printing
Set a PIN code for print jobs to prevent issues such as retrieving the wrong documents andallowing others to peek at your documents.PIN
Enter a one to seven-digit number.
Print after reception is completeWhen you select this check box, you can prevent the print quality from dropping if the printjob reception is cut off or if printing is interrupted.
Save in Job BoxThe print job is saved to the printer's hard disk drive. If you selected Save in Job Box, select anindividual box number as the save destination from the Job Box list.
Name of data to be savedUse file name
The file name is used as-is.
Enter nameYou can set a new name. Enter the save name in Name.
Job BoxThe box list appears. If you selected Save in Job Box, select an individual box number as the savedestination from the list.Acquire Job Box Name
When you click this, Job Box displays the box name that was obtained from the printer.
Paper Size Options dialog boxYou can create and register any user-defined paper. You can then select the defined paper size fromCustom Paper Size of Page Size.
Paper Size ListThe names and sizes of the paper sizes that the printer driver can use are displayed.
DeleteFrom Paper Size List, you can delete a user-defined paper that a user created.
Note• Paper deletion is not possible in the following case:
When a standard paper size of the printer driver is selectedWhen an oversized paper size is selectedWhen a paper size with a red circle is selected
Custom Paper Size NameYou can specify the name of a user-defined paper.
UnitsYou can specify the units for the height and width dimensions of the user-defined paper.
725

Page SizeYou can specify the Width and Height settings of the paper.Borderless Printing Size
When you select this check box, you can select a size from the paper sizes that supportBorderless Printing.
Fix the Ratio of the Width to HeightWhen you select this check box, you can change the size while keeping the Width and Heightratio.
WidthSpecify the paper width.
HeightSpecify the paper height.
Register with the OSRegister the set user-defined paper in the OS.By registering in the OS, any user sharing the use of the printer or PC can use the set user -definedpaper.
AddYou can register a user-defined paper that was set and overwrite the existing user-defined paper.
Display SeriesYou can narrow down the paper sizes to be displayed in Paper Size List.
OversizeWhen you select this check box, add appropriate margins so that the document contents will not getcut off, and then print the document.
726

Layout Tab Description
The Layout tab allows you to specify how to arrange the document onto the paper. You can also set thenumber of copies to be printed and the print sequence. If the application software that you used to createthe document features the same functions, specify the settings from the application software.
Settings PreviewThe paper illustration shows how the original will be laid out on a sheet of paper.You can check an overall image of the layout.The printer illustration shows how to load paper to match the printer driver settings.Check whether the printer is set up correctly by looking at the illustration before you start printing.
Page LayoutSelects the size of the document you want to print and the type of printing.
Poster (1 x 2)/Poster (2 x 2)Printing is performed with poster settings.The value in parentheses represents the ratio of the vertical x horizontal lengths. As the number ofdivisions increases, the number of sheets used for printing increases. If you are pasting pages togetherto create a poster, increasing the number of divisions allows you to create a larger poster.Set...
Opens the Pages to Print dialog box.Specify this setting when you want to print only specific pages.
Free LayoutYou can freely position and print any document created with an application software.You must install imagePROGRAF Printer Driver Extra Kit to use this function. Go to the Canon website,download imagePROGRAF Printer Driver Extra Kit, and then install it.Set...
Opens the Free Layout Settings dialog box.You can freely specify detailed settings for free layout.
727

2 Pages/Sheet / 4 Pages/Sheet / 6 Pages/Sheet / 8 Pages/Sheet / 9 Pages/Sheet / 16 Pages/SheetMultiple pages are assigned to one sheet of paper and printed. The number presents the number ofpages assigned to one sheet.Set...
Opens the Page Layout Printing dialog box.You can freely specify detailed settings for assigned printing.
Edit Using PosterArtistWord processing and spreadsheet software documents and web browser screens, etc. can be editeda print from PosterArtist. You must install PosterArtist to use this function. Go to the Canon website,download PosterArtist, and then install it.
StampThe Stamp function prints a specific character string over the document pages. You can select thecharacters to be printed from a list or use the Define Stamp dialog box to set any characters.Define Stamp...
Opens the Define Stamp dialog box.You can specify detailed stamp settings or register any stamp.
Print CenteredPrints document in center of paper.
Rotate 180 degreesRotates document 180 degrees and prints it.
No Spaces at Top or BottomWhen printing on roll paper, you can save paper by reducing the upper and lower margins whenprinting.
CopiesSpecifies the number of copies you want to print. You can specify a value from 1 to 999.
Important• If the application used to create your document has a similar function, specify the number of copies
with the application without specifying it here.
Print from Last PageCheck this check box when you want to print from the last page in order. If you do this, you do notneed to sort the pages into their correct order after printing.Uncheck this check box to print your document in normal order, starting from the first page.
Page Options...Opens the Page Options dialog box.You specify settings for printing information such as date, user name, and page number.
Important• Depending on your usage environment, you may not be able to use the Page Options function. In
this case, set Spooling at Printer Driver in the Special Settings dialog box to Yes.
Special Settings...Opens the Special Settings dialog box.If you are unable to obtained the desired print results, you can change the print processing method.
728

Pages to Print dialog boxWhen printing a poster that has been divided into several pages, you can specify which pages to print andjust print those pages.Simply clear the check boxes of the pages you do not want to print.In the setting view, the pages that were unchecked are hidden, and only the pages to be printed aredisplayed.
InvertSwitches the pages to be displayed or hidden.
Note• The Pages to Print dialog box appears only when Poster (1 x 2) or Poster (2 x 2) is selected
for Page Layout.
Free Layout Settings dialog boxYou can specify detailed settings for free layout.
Paper OrientationSelects the printing orientation.If the application used to create your document has a similar function, select the same orientation thatyou selected in that application.Portrait
Prints the document so that its top and bottom positions are unchanged relative to the paper feeddirection.
LandscapePrints the document by rotating it 90 degrees relative to the paper feed direction.
Roll Paper LengthSets the roll paper length.Auto
Automatically determines the roll paper length and prints.
Manual SettingsDetermines and specifies the roll paper length.
Page OrderSpecifies the document orientation to be printed on a sheet of paper.
Note• The Free Layout Settings dialog box appears only when Free Layout is selected for Page
Layout.
Page Layout Printing dialog boxThis dialog box allows you to select the number of document pages to be placed on one sheet of paper,the page order, and whether a page border line is to be printed around each document page.The settings specified in this dialog box can be confirmed in the settings preview on the printer driver.
729

Preview IconShows the settings made on the Page Layout Printing dialog box.You can check what the print result will look like before you actually print the data.
Page OrderSpecifies the document orientation to be printed on a sheet of paper.
Page BorderPrints a page border line around each document page.Select something other than None from the list to print the page border line.
Note• The Page Layout Printing dialog box appears only when 2 Pages/Sheet, 4 Pages/Sheet, 6
Pages/Sheet, 8 Pages/Sheet, 9 Pages/Sheet, or 16 Pages/Sheet is selected for Page Layout.
Define Stamp dialog boxThe Define Stamp dialog box allows you to specify settings for printing a stamp over the documentpages. In addition to the pre-registered ones, you can register and use your original stamp.
StampsThis is a list of the pre-registered stamps.
AddCreates an original stamp.Click this item to set Name, Text, Font, Style, Size, and Color.Name
Enter the stamp name to be registered.
TextEnter the characters to be used in the stamp.
FontSelects the font for the stamp text string.
StyleSelects the font style for the stamp text string.
SizeSelects the font size for the stamp text string.
ColorSelect the color of the stamp text string.
DeleteDeletes an unnecessary stamp.Specify the title of an unnecessary stamp from the Stamps, and click this button.
OutlineSelects a frame that encloses the stamp text string.
Print StyleSelect the stamp printing method.Select Transparent to print the stamp on the back of the document, and select Overlap to print thestamp on the front.
730

PositionSpecifies the stamp position on the page.You can specify values in X and Y to set the coordinates, or you can drag the horizontal and verticalslide bars to the left/right or up/down to change the coordinates.Move to Center
Moves the stamp to the center of the paper.
AngleSet the stamp positioning angle.You can specify a value in Set Angle to set the angle, or you can drag the slide bar left/right tochange the angle.When specifying an angle value, set a value in the range of -180 to 180.
Stamp first page onlySelect this check box if you want to print a stamp only on the first page.
Page Options dialog boxSpecify the print settings, such as date, user name, and page number.
Print DateSelect the position for printing the date.
Print Time AlsoPrints the time along with the date.
Print User NameSelect the position for printing the user name.
Print Page NumberSelect the position for printing the page number.
Note• It will be displayed if you select Yes in Spooling at Printer Driver in the Special Settings dialog
box.
Format SettingsThe Format Settings dialog box opens, and you can set the format.
Format Settings dialog boxSet the format to be used when printing the contents set in the Page Options dialog box.
FontSelect the font type.
StyleSelect the font style.
SizeSelect the font size.
ColorSelect the font color.
731

Special Settings dialog boxThe Special Settings dialog box allows you to change the print processing method if you do not get theprint results you want.
Settings SummaryThis is a list of items that you can set in the Special Settings dialog box.When you click an item that you want to set, the setting contents are displayed outside the box.Spooling at Printer Driver
Set whether print jobs are to be spooled in the print driver or whether PageComposer processingis to be performed.Setting No (Use RAW Spooling) or Yes may improve the print results or the printing speed.Also, depending on the setting, you may not be able to use some of the driver functions.FineZoom Settings
Use this function to print on long paper.Yes
The print problem may be corrected.Select this in usual cases.
NoImage distortions may be corrected (for example, small lines may be eliminated).
Preview SwitchingIf you check the Preview before printing check box on the Main tab and then print,PageComposer starts.
Application Color Matching PriorityYou can assign higher priority to color management by the application software.
Fast Graphic ProcessIf image colors or line thicknesses are printed incorrectly, you may be able to get the printresults you want by setting this function to off.This is only displayed when using a 32-bit driver.
Disable the color profile setting of the application softwareIf the color profile information set in the application software is output to the printer driver,the printing results may include an unexpected tint. You can resolve the problem in this caseby setting Disable the color profile setting of the application software to On.
Important• Even if this is set to On, it will only disable some of the color profile information, and it is
still possible to print using the color profile.This should normally be set to Off when using.
Adjust Faint LinesThis function prevents thin lines from fading when printing by darkening light colored lines.
Sharpen TextSet this to print fine text clearly.
732

Specify Pattern ResolutionThis function is for switching the rendering resolution for drawings using the hatch brush orpattern brush.
733

Favorites Tab Description
The Favorites tab allows you to register frequently used print settings as favorites.
FavoritesA list of the registered favorite settings appears. The Default Settings are registered in the initialsettings.
Settings DetailsThe settings of the favorite that you selected from Favorites appear.
CommentThe comment registered to the favorite appears.
Apply FavoriteYou can change the print settings to the settings of the favorite that you selected from the Favoriteslist.
DeleteYou can delete favorites that have become unnecessary.
Edit...The Edit dialog box opens.You can change the name and icon settings of the favorite that you selected from the Favorites list.
Add...The Add dialog box opens.You can register the current settings as a favorite.
Application Settings PriorityThe setting in the application software will take priority over the favorites setting set on the printer driver.The setting in the application software is only prioritized for Page Size, Orientation and Copies.Place a checkmark to prioritize the settings for the application software.
Import...You can read the settings of the favorite that was saved to a file (.cfg).
734

Export...You can save the settings of a favorite to a file (.cfg).
Edit dialog boxYou can change the name and icon of the favorite that you selected from the Favorites list.
NameChanges name to be displayed in Favorites list.
IconChanges icon to be displayed in Favorites list.
CommentChanges information to be displayed in Comment.
Add dialog boxYou can save the current print settings as the settings of a favorite.
NameSet the name to be displayed in Favorites list.
IconSet the icon to be displayed in Favorites list.
CommentEnter information to be displayed in Comment.
735

Utility Tab Description
The Utility tab allows you to perform printer maintenance or check the settings of the printer.
Print Nozzle Check PatternPrints a nozzle check pattern.Perform this function if printing becomes faint or a specific color fails to print. Print a nozzle checkpattern, and check whether the print head is working properly.If the print result for a specific color is fainted, or if there are any unprinted sections, use Print HeadCleaning to clean the print head.Paper Source
Displayed using the Media Type, Page Size and Roll Paper Width for each currently set paperfeed position.
Print Head CleaningPerforms print head cleaning.Print head cleaning removes any blockage in the print head nozzles.Perform cleaning when printing becomes faint, or a specific color fails to print, even though all ink levelsare sufficiently high.There are two head cleaning functions, which are described below.Cleaning
Perform cleaning when printing becomes faint, or a specific color fails to print, even though all inklevels are sufficiently high.
System CleaningSystem Cleaning is a more powerful cleaning function. Execute this function if the condition doesnot improve even after you repeat Cleaning several times.
736

Important• System Cleaning consumes an extremely large amount of ink.
Executing system cleaning frequently will rapidly deplete your printer's ink supply. Therefore,execute system cleaning only when necessary.
Paper Feed Amount AdjustmentThis function adjusts the paper feed amount if the print result is faint or contains streaks.
View StatusThis function copies printer information and setting values to the clipboard.
AboutOpens the About dialog box.You can check information such as the version and copyright of the printer driver.
Settings Summaries...The Settings Summaries dialog box is displayed.You can confirm the list of items set in the printer driver.If you click the tab of each sheet, you can confirm the setting details of each item.
Related TopicsCleaning the Print HeadsPrinting a Nozzle Check Pattern
737

Device Settings Tab Description
Many of the tabs in the Properties windows of the printer are controlled by Windows. However, the DeviceSettings tab is for specifying printer configuration-related settings and is part of the printer driver.The Device Settings tab allows you to specify settings related to the printer unit.
Automatically switch paper sources (paper size priority)Prints after automatically switching between roll paper 1 and roll paper 2 depending on the size of thepaper to be printed.This will save paper as the roll paper that will give the smallest margin when printing is automaticallyselected.
Important• Make sure that the same type of paper is used in the upper level and lower level of the printer.
Printing is not possible when different types of paper are used.• Be sure to click Get Information... from the Device Settings tab to get information on the roll
paper width. You may not be able to print correctly if the roll paper width is not correctly set.• Be sure to select Roll Paper (Auto) as Paper Source from Page Setup. This function cannot be
used unless Roll Paper (Auto) is selected.
Roll Paper Width 1Sets the width of the roll paper loaded in the upper level (Roll 1).
Roll Paper Width 2Sets the width of the roll paper loaded in the lower level (Roll 2).
Get Information...Acquire information on the attachment of the roll unit or roll paper 1 or roll paper 2 paper width fromthe printer.Based on this information, the Roll Unit and Automatically switch paper sources (paper sizepriority), and roll width settings are automatically switched.
738

Update Media InformationOpens the Update Media Information dialog box.Gets the latest media information from the printer and updates the media information in the printerdriver.
AccountingOpens the Accounting dialog box.By setting Accounting information, you add IDs to print jobs, and use the printer and cost managementtool to tabulate print history information for any ID.
Note• Accounting can be set only by users with Administrator rights.
Users without Administrator rights may not be able to set Accounting information.• To set accounting information, see "Setting Accounting Information."• If you set accounting information in the Device Settings sheet, the items in the Accounting dialog
in the Main sheet will be greyed out, and you won't be able to configure them.
Device InformationOpens the Device Information dialog box.You can obtain the device information of the connected printer, and change the configuration to matchthe printer that is connected to the driver function.
AboutOpens the About dialog box.You can check information such as the version and copyright of the printer driver.
Accounting dialog boxClick Accounting to display the Accounting dialog box.The Accounting dialog box allows you to add IDs to print jobs. You can then use the IDs, along with theprinter and cost management tool, to tabulate print history information.
Use a fixed Account ID./Use a fixed Department name./Use a fixed Project number.Prohibits changes to account ID, department, and project number that have already been set.Check this check box to prevent other users from changing IDs.Account ID/Department/Project number
Enter the account ID, department, and project number that you want to set. Enter the ID by usingup to 20 alphanumeric characters (0 to 9, a to z, and A to Z).If you've added checkmarks to Use a fixed Account ID., Use a fixed Department name., orUse a fixed Project number., you'll be able to configure each setting.
Device Information dialog boxThe Device Information dialog box allows you to obtain the device information of the connected printer,and change the configuration to match the printer that is connected to the driver function.
Settings SummaryThis is a list of items that you can set in the Device Information dialog box.When you click an item that you want to set, the setting contents are displayed outside the box.
739

Device TypeThe maximum supported roll paper width will be set to the initial value.
Roll UnitIf the lower roll unit is equipped, it is set to Yes.
Note• If a roll unit set as a wrapping device is equipped, it is set to No.
Hard diskIf a hard disc is equipped, it will be set to Yes.
Acquire StatusObtain device type, roll unit, and hard disk information from the printer.
740

Canon IJ Status Monitor Description
The Canon IJ Status Monitor displays the status of the printer and the printing progress. The monitor usesgraphics, icons, and messages to let you know the printer status.
Canon IJ Status Monitor FeaturesThe Canon IJ Status Monitor offers the following advantages:
You can check the status of the printer on the screen.The status of the printer is shown on the screen in real time.You can check the printing progress of each printing document (print job).
Error types and solutions are shown on the screen.Shown when a printer error occurs.You can immediately check how to respond.
You can check the ink status.This function displays graphics showing the ink tank type and the estimated ink levels.Icons and messages are displayed when ink is running low (ink level warning).
Canon IJ Status Monitor OverviewCanon IJ Status Monitor allows you to check the status of the printer and ink with graphics and messages.You can check the information on the printing document and the printing progress during printing.When a printer error occurs, it shows the cause and solution. Follow the instruction in the message.
PrinterCanon IJ Status Monitor shows an icon when a warning or error occurs to the printer.
: A warning is being displayed.
: An operation error has occurred.
: You are being informed of remaining ink levels, etc.
: There has been an error which requires a service.
741

Document NameShows the name of the document to be printed.
OwnerShows the owner's name of the document to be printed.
Printing PageShows the number of printing page and total printing pages.
Remaining Printing Time of Current PageDisplays the remaining print time of the pages being printed.
Display Send QueueShows the print window used to manage the print job that is being printed or being in the print queue.
Cancel PrintingCancels the current print job.
Estimated ink levelsDisplays icons to report a remaining ink level warning and an ink depletion error.
Click (the disclosure triangle) to display a pictorial representation of the estimated ink level in theink tank.Ink Model Number
You can look up the correct ink tank for your printer.
Estimated Maintenance Cartridge UsageDisplays icons to report that the available space in the maintenance cartridge is low or the cartridge isfull.
Click (the disclosure triangle) to display a pictorial representation of the estimated usage amountin the maintenance cartridge.
Paper FeedDisplays the size and type of paper loaded in each feeder.
Click (the disclosure triangle) to check the remaining amount of paper.
Option MenuIf you select Enable Status Monitor, when a printer related message is generated the Canon IJStatus Monitor starts.When Enable Status Monitor is selected, following commands are available.Always Display Current Job
Displays the Canon IJ Status Monitor during printing.
Always Display on TopDisplays the Canon IJ Status Monitor in front of other windows.
Display Warning AutomaticallyWhen a Low Ink Warning Occurs
Starts the Canon IJ Status Monitor window automatically and displays it in front of the otherwindows when a low ink warning occurs.
When a Maintenance Cartridge Warning OccursWhen a maintenance cartridge remaining space warning occurs, the Canon IJ statusmonitor starts automatically and appears in front of all other windows.
742

Other WarningsWhen any other warning occurs, the Canon IJ Status Monitor will open automatically and bedisplayed in front of other windows.
Start when Windows is StartedStarts the Canon IJ Status Monitor automatically when you start Windows.
Remote UI menuYou are able to open the printer's Remote User Interface.You are able to check the printer status and run maintenance functions on the printer whenconnected to and using it through a network.
Note• When the printer is being used via USB connection Remote UI will not display.
Printer InformationAllows you check detailed information, such as the printer status, the print progress, andremaining ink levels.
MaintenanceAllows you to run printer maintenance and change printer settings.
Job LogDisplays the Job history window.
Job ListDisplays the Print job window.
HDD InformationDisplays the Saved job window.This window allows you to check each box of the information saved on the printer's hard disk.
Ink Supplier Display SettingsDisplays the Ink supplier information window.
Paper Supplier Display SettingsDisplays the Paper supplier information window.
Download Security CertificateDisplays the For secure communication window.This window allows you to download the root certificate, register it to the browser, and disablewarning displays.
Help MenuWhen you select this menu item, the Help window for Canon IJ Status Monitor is displayed, and youcan check the version and copyright information.
743

Updating the Printer Driver
Obtaining the Latest Printer Driver
Deleting the Unnecessary Printer Driver
Before Installing the Printer Driver
Installing the Printer Driver
744

Obtaining the Latest Printer Driver
By updating the printer driver to the latest version of the printer driver, unresolved problems may be solved.
You can check the version of the printer driver by clicking the About button on the Utility tab.
You can access our website and download the latest printer driver for your model.
Important• You can download the printer driver for free, but any Internet access charges incurred are your
responsibility.
Related TopicsBefore Installing the Printer DriverInstalling the Printer Driver
745

Deleting the Unnecessary Printer Driver
The printer driver which you no longer use can be deleted.When deleting the printer driver, first exit all programs that are running.
The procedure to delete the unnecessary printer driver is as follows:
1. Start the uninstaller1.
Select the Control Panel -> Programs -> Uninstall a program (Programs and Features).From the program list, select "XXX Printer Driver" (where "XXX" is your model name) and then clickUninstall.
The confirmation window for uninstalling the model appears.
Important• A confirmation/warning dialog box may appear when starting, installing or uninstalling software.
This dialog box appears when administrative rights are required to perform a task.When you are logged on to an administrator account, click Yes (or Continue, Allow) to continue.Some applications require an administrator account to continue. In such cases, switch to anadministrator account, and restart the operation from the beginning.
2. Execute the uninstaller2.
Click Start. When the confirmation message appears, click Yes.When all the files have been deleted, click Complete.
The deletion of the printer driver is complete.
746
Before Installing the Printer Driver
This section describes the items that you should check before installing the printer driver. You should alsorefer to this section if the printer driver cannot be installed.
Checking the Printer Status• Turn on the printer.
Checking the Personal Computer Settings• Terminate all running applications.• Log on as a user who has the administrator account.
Related TopicsObtaining the Latest Printer DriverInstalling the Printer Driver
747

Installing the Printer Driver
You can access our web site through the Internet and download the latest printer driver for your model.
The procedure for installing the downloaded printer driver is as follows:
1. Turn on the printer1.
2. Start the installer2.
Double-click the icon of the downloaded file.The installation program starts.
Important• A confirmation/warning dialog box may appear when starting, installing or uninstalling software.
This dialog box appears when administrative rights are required to perform a task.When you are logged on to an administrator account, click Yes (or Continue, Allow) to continue.Some applications require an administrator account to continue. In such cases, switch to anadministrator account, and restart the operation from the beginning.
3. Install the printer driver3.
Take the appropriate action as described on the screen.
4. Complete the installation4.
Click Exit.
Depending on the environment you are using, a message prompting you to restart the computer may bedisplayed. To complete the installation properly, restart the computer.
Important• You can download the printer driver for free, but any Internet access charges incurred are your
responsibility.
Related TopicsObtaining the Latest Printer DriverDeleting the Unnecessary Printer DriverBefore Installing the Printer Driver
748

Application Software
Easy-PhotoPrint Editor Guide
Preview Guide (Windows)
Preview Guide (macOS)
Free Layout plus Guide (Windows)
Free Layout Guide (macOS)
Direct Print & Share Guide
Quick Utility Toolbox Guide
IJ Network Device Setup Utility Guide
Media Configuration Tool Guide
Device Management Console Guide
Accounting Manager Guide
PosterArtist Guide
Firmware Update Tool
749

Managing Print Jobs
Basic Print Job Operations
Using Printer Hard Disk
Saving Print Jobs on Personal Job Boxes
Performing a priority printing
Printing Pending Jobs
Printing Security Print Jobs
Deleting Print Jobs
Printing Saved Jobs
Deleting Saved Jobs
Moving Saved Jobs
Advanced Print Job Operations
Saving Print Jobs Sent from Sources Other than Printer Driver
Printing without Saving Jobs in Common Job Box
Setting Passwords for Personal Job Boxes
Naming Personal Job Boxes
Printing List of Saved Jobs
Renaming Saved Jobs
Printer Hard Disk Operations
Checking Free Hard Disk Space
Collecting Printer Job Logs Using Accounting Manager
750

Basic Print Job Operations
Using Printer Hard Disk
Saving Print Jobs in Personal Job Boxes
Performing a priority printing
Printing Pending Jobs
Printing Security Print Jobs
Deleting Print Jobs
Printing Saved Jobs
Deleting Saved Jobs
Moving Saved Jobs
751

Using Printer Hard Disk
The printer can save print jobs on the built-in hard disk.
Saving print jobs offers the following benefits.
• Save the time spent using a computer•
When you send a print job to the printer, you can save it on the printer after printing or simply save it onthe printer without printing it yet. Saved print jobs can be printed in the required quantity later without theneed to use a computer again.
• Simplify reprinting, if any errors occur•
If errors occur in the middle of printing (as when paper runs out), you can resume printing after clearingthe error without resending the print job from a computer.
• Streamline printing work•
Without using a computer, you can select print jobs and print in the desired quantity. You can alsoselect multiple print jobs to print during the same period. This enables unattended operation at night, forexample.
Output MethodTo save print jobs on the printer's hard disk, configure the printer driver.
In Windows, this is set using the Output Method dialog box.
In macOS, this is set by selecting Additional Settings in the pop-up menu of the printer properties dialog.
PrintPerform printing while saving the print job on the temporary storage area of the printer's hard disk.
Set PIN for printingSet a 7 digit security code.
To start printing, enter the PIN set here using the operation panel.
If the entered PIN does not match the set PIN, the printing does not start.
Print after reception is completeThis option is available in combination with Print. You can prevent degradation of print quality thatoccurs when receiving a print job is interrupted and printing is aborted in the middle.
Save in Job BoxSave print jobs on the permanent storage area of the printer's hard disk. Selecting this does not startprinting.
Storage DestinationThe storage area on the printer's hard disk is divided into a temporary storage area and a permanentstorage area. The temporary storage area stores print jobs in the job queue or common job box. Thepermanent storage area stores jobs in personal job boxes.
752

Job queueThe job queue refers to print jobs that are being processed by the printer (saved, received, preparedfor processing, printed, deleted, or held). Up to 100 jobs can be stored in the temporary storage area.However, the number of jobs available as queued jobs is up to 64.
When the maximum number of job queues are saved, the print job sent from the computer is in astate of waiting for processing.
However, if all saved job queue states are pending, the oldest job queue of the saved date and timewill be deleted and the print job sent from the computer will be processed.
Common job boxJobs for which you have specified Print in Output Method are saved in common job box andclassified as saved jobs.
There is one common job box, numbered "00". A password cannot be set for common job box.
Up to 100 print jobs can be saved here. However, they will be deleted one after another starting withthe oldest job in the following situations.
• If there are over 101 jobs queued and saved in common job box combined• If no more temporary storage space is available when jobs for which you have selected Print in
Output Method are received• If there is not enough space in the temporary or permanent storage area when jobs for which you
have selected Save in Job Box in Output Method are received.
Personal job boxesIn the following cases, the job is classified as saved job and saved in a personal job box on thepermanent storage area.
• When a saved job stored in common job box is moved to a personal job box• When you have selected Save in Job Box in Output Method
There are 29 personal job boxes, numbered "01" to "29". You can specify a name and password foreach personal job box.
Up to 100 print jobs can be saved in all personal job boxes combined.
753

Saving Print Jobs in Personal Job Boxes
To save print jobs in personal job boxes, configure the printer driver.
Configuring Printer Driver (Windows)
1. Open printer properties dialog box.1.
How to Open the Printer Driver Setup Window
2. Select Page Setup tab.2.
3. Select Output Method.3.
4. Select Save in Job Box in Output Method.4.
754

5. In Name of data to be saved, specify how to name saved print jobs.5.
To use the file name, select Use file name.
Otherwise select Enter name and enter a name in Name.
6. Select a personal job box in Job Box.6.
755

Note• Select Acquire Job Box Name to display personal job box names in the Job Box list, as
acquired from the printer.
7. Select OK.7.
Configuring Printer Driver (macOS)
1. Open printer properties dialog.1.
How to Open the Printer Driver Setup Dialog
2. Select Additional Settings in pop-up menu.2.
756

3. Select Save in Job Box in Output Method.3.
757

758

Priority printing
You can change the print order (Priority printing) by specifying the print job that is being received.
This operation is available using the operation panel or Remote UI.
Using Operation PanelUsing Remote UI
Note
• For the operation of the print job with the icon (pending print job), see Printing Pending Jobs.
• For the operation of the print job with the icon (security print job), see Printing Security PrintJobs.
Using Operation Panel
1. Flick HOME screen and tap Job management.1.
Home Screen Menu Composition
2. Tap Print job.2.
3. In the list, tap the target job.3.
4. Tap Priority printing.4.
5. Confirm displayed message and tap Yes.5.
Using Remote UI
1. Start up Remote UI.1.
759

Start up Remote UI
2. Select Job management.2.
3. Select Print job.3.
4. In the list, select the target job.4.
5. Select Prioritize.5.
760

Printing Pending Jobs
If the type or size of paper loaded does not match the settings in the print job received when you have setDetect paper setting mismatch to Hold job in the operation panel, the print job is held on the printer as apending job in the job queue.
To print held jobs, replace the loaded paper with the paper specified in the print job.
Loading the Upper Roll on the PrinterLoading the Lower Roll on the Roll Unit (Option)Loading Sheets in the Printer
This operation is available using the operation panel or Remote UI.
Using Operation PanelUsing Remote UI
Note• As long as you do not manage held jobs from the operation panel, they will remain in the job queue. In
this case, the printer processes the next job in the queue without pausing.
Using Operation Panel
1. Flick HOME screen and tap Job management.1.
Home Screen Menu Composition
2. Tap Print job.2.
3. In the list, tap print job with icon on the left.3.
4. Tap Release hold.4.
5. Confirm displayed message and tap Yes.5.
761

Using Remote UI
1. Start up Remote UI.1.
Start up Remote UI
2. Select Job management.2.
3. Select Print job.3.
4. In the list, select print job with icon on the left.4.
5. Select Release.5.
762

Printing Security Print Jobs
A security print job is a print job that requires you to enter the PIN code set in the printer driver whenprinting.
The print job specified for the security print job has a lock icon to the left of the job name in the list such asList of print jobs.
Note• The security print job remains saved as a normal pending job until you enter the PIN code using the•
operation panel or Remote UI.
In this case, the printer processes the next job in the queue without pausing.
• When deleting a security print job, you do not need to enter a PIN code.•
1. Flick HOME screen and tap Job management.1.
Home Screen Menu Composition
2. Tap Job management.2.
3. In the list, tap print job with icon on the left.3.
4. Tap Print.4.
5. Enter PIN code you set and tap OK.5.
763

6. Tap OK.6.
PIN authentication successful. is displayed and printing starts.
Note• The security print job is deleted after printing.•
764

Deleting Print Jobs
You can delete a print job as needed.
This operation is available using the operation panel or Remote UI.
Using Operation PanelUsing Remote UI
Using Operation Panel
1. Flick HOME screen and tap Job management.1.
Home Screen Menu Composition
2. Tap Print job.2.
3. In the list, tap the target job.3.
Note• Tap Del. selected to delete multiple jobs at one time.•
4. Tap Delete.4.
5. Confirm displayed message and tap Yes.5.
Note• Select Delete all print jobs on Job management to delete all jobs in the job queue•
Job management
Using Remote UI
1. Start up Remote UI.1.
Start up Remote UI
765

2. Select Job management.2.
3. Select Print job.3.
4. In the list, select the target job.4.
5. Select Delete.5.
6. Confirm displayed message and tap Yes.6.
766

Printing Saved Jobs
Print saved print jobs stored on the printer's hard disk as follows.
This operation is available using the operation panel or Remote UI.
Using Operation PanelUsing Remote UI
Using Operation Panel
1. Flick HOME screen and tap Job management.1.
Home Screen Menu Composition
2. Tap Saved job.2.
3. In the list, tap the target job box.3.
Note• Enter the password if it is enabled.
4. Tap Job list.4.
5. In the list, tap the target job.5.
6. Tap Print settings.6.
7. Specify the number of copies.7.
1. To change the number of copies, tap A.1.
2. Specify the number of copies and tap OK.2.
767

8. Tap Start.8.
Using Remote UI
1. Start up Remote UI.1.
Start up Remote UI
2. Select Job management.2.
3. Select Saved job.3.
4. In the list, select the target job box.4.
Note• Enter the password if it is enabled.
5. In the list, select the target job.5.
6. Select Print.6.
7. Enter the number of copies and select Yes.7.
8. select Yes.8.
768

Deleting Saved Jobs
Delete saved print jobs stored on the printer's hard disk as follows.
This operation is available using the operation panel or Remote UI.
Using Operation PanelUsing Remote UI
Using Operation Panel
1. Flick HOME screen and tap Job management.1.
Home Screen Menu Composition
2. Tap Saved job.2.
3. In the list, tap the target job box.3.
Note• Enter the password if it is enabled.
4. Tap Job list.4.
5. In the list, tap the target job.5.
6. Tap Delete.6.
7. Confirm displayed message and tap Yes.7.
Using Remote UI
1. Start up Remote UI.1.
Start up Remote UI
2. Select Job management.2.
3. Select Saved job.3.
4. In the list, select the target job box.4.
Note• Enter the password if it is enabled.
769

5. In the list, select the target job.5.
6. Select Edit.6.
7. Select Delete.7.
8. Select Yes.8.
770

Moving Saved Jobs
Print jobs stored on the printer's hard disk (saved jobs) can be moved from the current job box to another jobbox as follows.
However, jobs saved in personal job boxes cannot be moved to common job box.
Important• Jobs stored in common job box may be automatically deleted under some conditions. To prevent jobs•
from being deleted, move them from common job box to personal job boxes.
Using Printer Hard Disk
1. Start up Remote UI.1.
Start up Remote UI
2. Select Job management.2.
3. Select Saved job.3.
4. In the list, select the target job box.4.
Note• Enter the password if it is enabled.
5. In the list, select the target job.5.
6. Select Edit.6.
7. Select Move.7.
8. Select Destination job box.8.
9. In the list, select the personal job box to move to and select OK.9.
Note• Enter the password if it is enabled.
771

Advanced Print Job Operations
Saving Print Jobs Sent from Sources Other than Printer Driver
Printing without Saving Jobs in Common Job Box
Setting Passwords for Personal Job Boxes
Naming Personal Job Boxes
Printing List of Saved Jobs
Renaming Saved Jobs
Printer Hard Disk Operations
Checking Free Hard Disk Space
772

Saving Print Jobs Sent from Sources Other than Printer Driver
To save print jobs sent from software or systems other than the printer driver or applications provided withthe printer, specify the output method and select the setting to perform printing after saving printing datausing the operation panel.
Note• Contact the software or system developer for information about support for this printer function.
Important• The administrator password is required to change settings if it is enabled for changing settings using the
operation panel.
Specifying Output MethodPrinting after Saving Printing Data
Specifying Output MethodPerform settings for printing or saving print job.
1. Flick HOME screen and tap Printer settings.1.
Home Screen Menu Composition
2. Tap Hard disk settings.2.
3. Enter administrator password if it is enabled.3.
4. Tap Output method.4.
5. Tap the output method you want to set up.5.
PrintSave print jobs automatically at the same time they are printed. (This is the default format.)
Print (auto delete)Save print jobs temporarily at the same time they are printed and delete them after printing.
Save to job boxSave print jobs on in the personal job box.
Printing after Saving Printing DataTo save print jobs on the hard disk before printing, select ON for Save first and print.
Printing will start when Save first and print is set to ON, even if you have selected Save to job box forOutput method.
773

1. Flick HOME screen and tap Printer settings.1.
Home Screen Menu Composition
2. Tap Hard disk settings.2.
3. Enter administrator password if it is enabled.3.
4. Tap Save first and print.4.
5. Tap ON.5.
774

Printing without Saving Jobs in Common Job Box
Jobs sent from a computer for which you have selected Print in Output Method in the printer driver aresaved in common job box.
Using Printer Hard Disk
When Common job box settings is set to Print (auto delete) in the operation panel menu, print jobs forwhich you have selected Print in Output Method in the printer driver are deleted from common job box afterprinting.
Use this function when printing highly confidential documents.
Important• The administrator password is required to change settings if it is enabled for changing settings using the
operation panel.
1. Flick HOME screen and tap Printer settings.1.
Home Screen Menu Composition
2. Tap Hard disk settings.2.
3. Enter administrator password if it is enabled.3.
4. Tap Common job box settings.4.
5. Tap Print (auto delete).5.
775

Setting Passwords for Personal Job Boxes
For greater security, you can specify a password for personal job boxes. After setting the password, it isnecessary to enter the password when performing the following operations.
• Change personal job box settings• Display / print the list of jobs saved in personal job box, print / delete / move /rename jobs saved in
personal job box
Note• By default, no passwords are set for personal job boxes.• A password cannot be set for common job box.• Enter a seven-digit number as the password, in the range 0000001 to 9999999.• Even if you have set passwords, they are not required to access personal job boxes in Administrator
Mode in Remote UI.
1. Start up Remote UI.1.
Start up Remote UI
2. Select Job management.2.
3. Select Saved job.3.
4. In the list, tap the target job box.4.
5. Select Edit.5.
6. Select Set/change password check box and enter password. (This field is limited to seven6.digits in the range 0000001 to 9999999.)
7. Select OK.7.
776

Naming Personal Job Boxes
For easier identification, you can assign names to personal job boxes.
1. Start up Remote UI.1.
Start up Remote UI
2. Select Job management.2.
3. Select Saved job.3.
4. In the list, select the target job box.4.
Note• Enter the password if the personal job box has it.
5. Select Edit.5.
6. Enter name and select OK.6.
777
Printing List of Saved Jobs
The list of print jobs stored on the printer's hard disk (saved jobs) can be printed by job box as follows.
1. Flick HOME screen and tap Job management.1.
Home Screen Menu Composition
2. Tap Saved job.2.
3. In the list, tap the target job box.3.
Note• Enter the password if the personal job box has it.
4. Tap Print the job list.4.
For each job box, a list of saved jobs is printed.
778

Renaming Saved Jobs
Print jobs stored on the printer's hard disk (saved jobs) can be renamed as follows.
1. Start up Remote UI.1.
Start up Remote UI
2. Select Job management.2.
3. Select Saved job.3.
4. In the list, tap the target job box.4.
Note• Enter the password if the personal job box has it.
5. In the list, tap the target job.5.
6. Select Edit.6.
7. Select Change.7.
8. Enter name and select OK.8.
779

Printer Hard Disk Operations
Printer hard disk operations are available from the following programs and interfaces.
• Printer driver•
• Remote UI•
• Operation panel•
The hard disk operations available through each interface are as follows.
Operation Printer driv-er
Remote UI Operationpanel
Saving print jobs Save to job box ✓ - -
Print without saving jobs in common job box - - ✓
Save print jobs sent from sources other thanprinter driver
- - ✓
Operations with saved jobs Print saved jobs - ✓ ✓
Delete saved jobs - ✓ ✓
Job queue management Display job queue - ✓ ✓
Delete - ✓ ✓
Priority printing - ✓ ✓
Operations with pending jobs - ✓ ✓
Operations with security print jobs - - ✓
Delete Operations with security jobs - ✓ ✓
Job box management Move saved jobs - ✓ -
Modify saved jobs - ✓ -
Modify job boxes - ✓ -
Print a list of saved jobs - - ✓
Display a list of saved jobs - ✓ ✓
Other operations Display free hard disk space - ✓ ✓
Initialize hard disk - - ✓
Display the time of printing - ✓ ✓
Display error messages - ✓ ✓
780

Checking Free Hard Disk Space
Check the space available on the printer's hard disk as follows.
This operation is available using the operation panel or Remote UI.
Using Operation PanelUsing Remote UI
Using Operation Panel
1. Flick HOME screen and tap Printer information.1.
Home Screen Menu Composition
2. Tap Hard disk information.2.
The free hard disk space (job box free space) appears.
Using Remote UI
1. Start up Remote UI.1.
Start up Remote UI
2. Select Job management.2.
3. Select Hard disk information.3.
The free hard disk space (job box free space) appears.
781

Printing is faintBanding in different colors occursColors in printed images are unevenImage edges are blurred or white banding occurs
Paper rubs against the Print HeadThe edges of the paper are dirtyThe surface of the paper is dirtyThe back side of the paper is dirtyImmediately after borderless printing, the trailing edge margin is soiled during regularprinting
Frequently Asked Questions
Problems with the Printing Quality
Unevenness, Banding, Faint
dirt
782

Printed colors are inaccurateDocuments are printed in monochrome
Line thickness is not uniformLines or colors are misaligned
The length of the printed image in the paper ejection direction is not accurateImages are printed crookedBorders appear in borderless printing
colors are inaccurate
Line
Others
General FAQI want to easily create vertical or horizontal bannersDoes this printer support sub-ink tank systemI want to know how to configure roll cuttingI want to configure so that the roll is cut automatically after waiting for the ink to dryHow do I print without bordersI want to know the paper types that can be used in this printerThe paper type that I want to print is not displayed on the Touch ScreenCan I perform duplex printingI want to perform enlargement printingNetwork Settings and Common Problems
Solve Problems
Problems Regarding Paper
Remove Jammed Roll Paper
783

Remove a Jammed SheetRoll paper cannot be inserted into the Paper Feed SlotPaper is not fed automaticallyRoll Paper Is not Switched AutomaticallyRoll Paper Is not Fed AutomaticallyPaper Source Does Not Switch When Roll Paper Is Used UpRoll Paper Remains/Lacks under Quantity ManagementCannot load sheetsPaper is not cut straightPaper is not cutCutter Blade Does Not Work While Cutting Is in ProgressThe size of clear film cannot be detectedMargins are wideWhen printing on roll paper, the printed surface becomes scratched
Printing Does Not Start
Printer Suddenly Stopped Working for Some ReasonThe Data lamp on the Operation Panel does not light upThe printer does not respond even if print jobs are sent"Preparing the ink system." is displayed"Agitating the ink" is displayedMessage Is Displayed and Borderless Printing Fails
The Printer Stops During a Print Job
Printing stops and an error message is displayedThe printer ejects blank, unprinted paper
Cannot Print over Network
Cannot Connect Printer to NetworkCannot Print over TCP/IP NetworkCannot Print over Bonjour networks
Cannot Find Printer on Network
Cannot Find Printer on Check Printer Settings Screen (Windows)Cannot Proceed beyond Printer Connection Screen/Connect Cable ScreenSearching Printer by IP Address or Host Name During SetupCannot Find Printer while Using Wi-FiCannot Find Printer while Using Wired LANCannot Print Using AirPrint
Installation Problems
Removing Printer SoftwareTaking Time to Setup Process (Windows)Failed to Printer Driver Installation (Windows)
HP-GL/2 problems
With HP-GL/2, printing is misalignedLines or images are missing in printed HP-GL/2 jobsLines are printed too thick or thin in HP-GL/2 print jobs
784

HP-GL/2 jobs are printed in monochrome (or color)Printed colors of lines are inaccurate during HP-GL/2 printingHP-GL/2 jobs are printed 6 mm larger than specifiedHP-GL/2 jobs are printed at maximum size, even if a standard size is specifiedHP-GL/2 printing takes a long timeThe printer stops when printing a HP-GL/2 job (the carriage stops moving)
Other Problems
Printer does not turn onIf the Printer Makes a Strange SoundMessages advising to check the maintenance cartridge are not clearedPrinter consumes a lot of inkPrinted pages are not collected cleanly in the basketBasket LurchesWhen Trim edge first is set, the trimmed paper is drawn into the roll unitInk Level DetectionMedia Type Selection does not Match Loaded Media Type
785

I want to easily create vertical or horizontal banners
You can print originals that are in landscape (or portrait) orientation automatically enlarged to fit the rollwidth. This is an easy way to create vertical or horizontal banners.
Printing Hanging and Horizontal Banners (Large-Format Printing) (Windows)Printing Hanging and Horizontal Banners (Large-Format Printing) (macOS)
786

Does this printer support sub-ink tank system
This printer supports hot-swap ink tank replacement.
Even if an ink tank becomes empty during printing, since a certain amount of ink always is stored in asub-ink tank, you can replace the ink tank while printing.
Replacing Ink Tanks
787
I want to know how to configure roll cutting
Cutting methods can be selected in the printer settings and printer driver settings.
To automatically cut roll paper after printing, open the Cutting mode settings on the printer, and then underAutomatic cut set Automatic Cutting in the printer driver to Yes.
When using paper that is easily scratched, or paper where the ink requires extra time to fix, we recommendsetting Cutting mode on the printer to Eject cut.
Specifying the Cutting Method for RollsCutting Roll Paper after Printing (Windows)Cutting Roll Paper after Printing (macOS)
If using the Media Take-up Unit, see the pages below for cutting settings and rolling settings after cutting.
Switching Roll Unit ModesRemoving Printed Paper from the Roll Unit
788

I want to configure so that the roll is cut automatically after waitingfor the ink to dry
You can set an ink drying time in the printer driver.
You can also configure the same settings on the printer itself.
Specifying the Ink Drying Time for Rolls
789

How do I print without borders
If printing on roll paper, you can set borderless printing in the printer driver settings. (If printing on sheets,borderless printing is not possible)
Printing without Edges Based on the Scenarios (Windows)Printing without Edges Based on the Scenarios (macOS)
790
I want to know the paper types that can be used in this printer
For information about paper that can be used with this printer, refer to the media information list.
Paper Information List
791

The paper type that I want to print is not displayed on the TouchScreen
If using a new paper type, start the Media Configuration Tool to get the latest media information.
Updating paper information
792

Can I perform duplex printing
This printer cannot print double-sided.
An alternative to double-sided printing is to use the Folded Duplex function of the Windows software FreeLayout plus, which prints two pages on one side, folds the sheet back from the center, and hangs it.
Laying Out Documents Freely Using Free Layout plus
793

I want to perform enlargement printing
Use the printer driver to adjust the original to the paper size and width, or print enlarged or reduced byspecifying a magnification factor.
Scaled Printing (Windows)Scaled Printing (macOS)
794

Network Settings and Common Problems
Here are frequently asked questions on network.
Cannot Find Printer
Cannot Find Printer on Check Printer Settings Screen (Windows)Cannot Proceed beyond Printer Connection Screen/Connect Cable ScreenSearching Printer by IP Address or Host Name During SetupCannot Find Printer while Using Wi-FiCannot Find Printer while Using Wired LANCannot Print Using AirPrint
Cannot Print or Connect
Cannot Connect Printer to NetworkCannot Print over TCP/IP NetworkCannot Print over Bonjour networksPrinter Suddenly Stopped Working for Some Reason
LAN Setting Tips/Changing LAN Settings
Printer Connection MethodsDefault Network SettingsAnother Printer Found with Same NameConnecting to Another Computer via LAN/Changing from USB to LAN ConnectionPrinting Network SettingsReconfiguration Method of LAN Connection/Reconfiguration Method of Wi-Fi ConnectionReconfiguration of Network Settings using the Remote UINetwork Status and Troubleshooting
795

Problems Regarding Paper
Remove Jammed Roll Paper
Remove a Jammed Sheet
Roll paper cannot be inserted into the Paper Feed Slot
Paper is not fed automatically
Roll Paper Is not Switched Automatically
Roll Paper Is not Fed Automatically
Paper Source Does Not Switch When Roll Paper Is Used Up
Roll Paper Remains/Lacks under Quantity Management
Cannot load sheets
Paper is not cut straight
Paper is not cut
Cutter Blade Does Not Work While Cutting Is in Progress
The size of clear film cannot be detected
Margins are wide
When printing on roll paper, the printed surface becomes scratched
796

Remove Jammed Roll Paper
If roll paper jams, follow the steps below to remove jams.
Note• If "The paper is jammed. Lift the release lever and remove the paper." appears on the touch screen,
Step 1 and Step 9 can be skipped.
1. Turn off the power to the printer.1.
Turning the Printer On and Off
2. Open the top cover.2.
Note• If the roll paper is very curled or the leading edge of the roll paper blocks the Carriage, setting the•
cutting method for the roll paper to User cut and leading edge detection to Do not detect maystop the paper from blocking the carriage.
Specifying the Cutting Method for Rolls
3. If the Carriage is out, move the Carriage to the left or right side, away from the jammed3.paper.
797

Important• Do not touch the linear scale (A), carriage shaft (B), or ink tube stabilizer (C). Touching these may•
cause malfunction.
4. Lift up the release lever.4.
5. Holding the paper on both sides, pull the jammed portion out toward the front. Use scissors5.or a cutting tool to cut away the printed or wrinkled portion.
798

Caution• Be careful not to injure yourself or scratch the printer when cutting.
6. If the Carriage is on the left, move the Carriage to the right until it stops.6.
Important• Always move the Carriage to the right side. If the Carriage is on the left, an error message may
appear on the touch screen when you turn on the printer.
7. Hold the leading edge of the roll paper in the middle and pull it gently and evenly until it7.reaches the output guide (A) position. At this time, align the right edge of the roll paperparallel to the paper alignment line (B). When the paper is parallel to the line, lower therelease lever.
799

Important• Align the roll paper with the paper alignment line (B) and make sure to keep the paper tension.• Do not pull the roll paper forcefully. This might cause the roll paper to feed at an angle.
8. Close the top cover.8.
9. Turn on the power to the printer.9.
Turning the Printer On and Off
The roll is advanced and the printer is ready to print.
Note• To trim the leading edge cleanly, select the paper being fed on the touch screen, and then cut the•
leading edge by selecting Cut paper in Feed/cut.
Specifying the Cutting Method for Rolls
800

Remove a Jammed Sheet
If a sheet jams, follow the steps below to remove it.
1. Turn off the power to the printer.1.
Turning the Printer On and Off
2. Open the top cover.2.
3. If the Carriage is out, move the Carriage to the left or right side, away from the jammed3.paper.
Important• Do not touch the linear scale (A), carriage shaft (B), or ink tube stabilizer (C). Touching these may•
cause malfunction.
801

4. Lift up the release lever.4.
5. Hold the paper and pull it out toward the front.5.
After removing the paper, inspect the interior to ensure paper fragments or other objects do not remain.
802

6. If the Carriage is on the left, move the Carriage to the right until it stops.6.
Important• Always move the Carriage to the right side. If the Carriage is on the left, an error message may
appear on the touch screen when you turn on the printer.
7. Lower the release lever and close the top cover.7.
8. Turn on the power to the printer.8.
Turning the Printer On and Off
803

Roll paper cannot be inserted into the Paper Feed Slot
Check 1 Is the roll paper curled?
Straighten out curls and reload the roll.
Check 2 Is paper jammed in the feed slot?
Remove the jammed paper.
Remove Jammed Roll PaperRemove a Jammed Sheet
Note• You cannot load a roll paper and sheets on the printer at the same time.
Check 3 Check that the correct paper source has been selected.
Tap Paper Setting Display in the touch screen menu, and then select the paper source.
Check 4 Is the roll unit in Take-up mode when feeding from the roll unit?
Select Roll unit use settings in the touch screen menu, and set it to paper feed mode.
Switching Roll Unit Modes
804

Paper is not fed automatically
Check 1 This paper cannot be fed automatically.
Set Paper retention settings to Release in the touch screen menu and feed the paper manually.
Menu StructureLoading the Upper Roll on the PrinterLoading the Lower Roll on the Roll Unit (Option)
Note• While this setting is selected, you cannot use automatic roll paper switching.
Check 2 Are you using an old roll holder?
Be sure to use the roll holder supplied with the printer.
805

Roll Paper Is not Switched Automatically
When using certain paper types and widths under certain temperature and humidity conditions, roll paperauto switching may not be possible.
Set Paper retention settings to Release in the touch screen menu and feed the paper manually.
Menu StructureLoading the Upper Roll on the PrinterLoading the Lower Roll on the Roll Unit (Option)
Note• Roll paper cannot be fed or switched automatically until you change this setting.
If the roll cannot be switched at the end, make sure Switch roll paper when low is set to Enable.
Paper Source Does Not Switch When Roll Paper Is Used Up
806

Roll Paper Is not Fed Automatically
Check 1 Check the paper settings.
Select Enable for Roll paper auto feed on Paper-related settings.
Paper-related settings
Check 2 Check the setting for Paper retention settings.
Select While feeding for Paper retention settings on Paper-related settings.
Paper-related settings
Check 3 Make sure automatic paper feed can be used for the roll you are using.
Refer to "Paper Setting List(Roll Paper)" to make sure automatic paper feed can be used for the roll you areusing.
Paper Information List
Check 4 Make sure the roll is being fed.
If not, feed the roll manually.
Loading the Upper Roll on the PrinterLoading the Lower Roll on the Roll Unit (Option)
Check 5 Make sure the paper width of the roll is 250 mm or more.
The auto feed function does not support paper with a width of less than 250 mm.
If you use the roll with paper width less than 250 mm, select Disable for Roll paper auto feed on Paper-relatedsettings and feed paper manually.
Loading the Upper Roll on the PrinterLoading the Lower Roll on the Roll Unit (Option)
Check 6 Are you using an old roll holder?
Be sure to use the roll holder supplied with the printer.
If the problem is not solved after trying Checks 1 to 6, select Disable for Roll paper auto feed and feed thepaper manually.
Paper-related settings
807

Paper Source Does Not Switch When Roll Paper Is Used Up
Check Check the paper settings.
Check the following setting items on Paper-related settings and perform settings.
• Select Enable for Switch roll paper when low.• Select Barcodes or Auto estimate for Manage remaining roll amount.• Select While feeding for Paper retention settings.
Paper-related settings
808

Roll Paper Remains/Lacks under Quantity Management
Check 1 Is the remaining amount of loaded roll paper set correctly?
If all the following three conditions are met, you can specify the remaining amount of the loaded roll papermanually when you load it.
• Barcodes is selected for Manage remaining roll amount.• Enable is selected for Roll paper auto feed.• Auto detect or Use current media type is selected for Media type selection method.
You must specify the remaining amount of roll within about five seconds. If you do not, the roll length specifiedon Advanced paper settings is regarded as the default value.
The difference between the value and actual length of loaded roll paper makes the remaining amount large orsmall.
Check 2 Check the setting of Manage remaining roll amount.
• If Barcodes is selected for Manage remaining roll amount:•
1. Enter Length of roll paper 1 and Length of roll paper 2, and then tap OK.1.
2. Select the timing when the warning message appears for Roll unit use settings.2.
• If Auto estimate is selected for Manage remaining roll amount:•
Make sure the media type is configured correctly.
Make sure Paper core outer diameter and Paper thickness are configured correctly for Advanced papersettings.
Note• The paper core outer diameter and the paper thickness must be set correctly for auto estimation to be
accurate.• Contact the media manufacturer for paper core outer diameter and paper thickness.• For pre-registered paper, the paper core outer diameter and paper thickness are set, but they may be
changed at the convenience of the media manufacturer.• If you want to use paper that is not displayed in the paper information list, set the paper thickness and
paper core outer diameter in the Media Configuration Tool.Media Configuration Tool Guide
Paper-related settings
809

Cannot load sheets
Check Check that the correct paper source has been selected
Tap Paper Settings Display area in the touch screen menu, and then select the paper source.
Select Load paper and load the paper.
Loading Sheets in the Printer
810

Paper is not cut straight
Check 1 Is the edge of the paper cutting position creased?
Straighten out any curling by the edges of the paper.
Check 2 Is the edge of the paper cutting position lifting up when cutting?
Reload the paper correctly.
Check 3 Is the paper a type that can be cut with the cutter blade?
Set Cutting mode in the touch screen menu to User cut, then and cut the roll paper with a cutting implementsuch as scissors.
Specifying the Cutting Method for Rolls
Check 4 Are you using the basket properly?
Make sure that you are using the basket properly.
Using the Basket
Check 5 Are you using the stacker properly?
Make sure that you are using the stacker properly.
Using the Stacker
Check 6 Check that the Cut speed setting is correct.
Tap paper settings display area on Home screen of touch screen, tap the feed slot where the paper to change isset, then tap Paper settings > Advanced and, change the setting value of Cut speed.
If the paper edge cannot be cut straight at the cut starting position, it may be improved by selecting slower cutspeed than that selected currently.
If the paper edge cannot be cut straight at the cut ending position, it may be improved by selecting faster cutspeed than that selected currently.
Check 7 Did the printing material slip diagonally while being cut?
Set the Cutting mode in the touch screen menu to Eject cut, and then hold and cut the material after it hasprinted.
Specifying the Cutting Method for Rolls
Check 8 Is the cutter blade attached properly?
Attach the cutter blade properly.
811

Replacing the Cutter Blade
Check 9 Is the edge of the cutter blade blunt?
Replace the cutter blade.
Replacing the Cutter Blade
Check 10 Are you printing on Large-Format?
Change the position of the basket.
Printing on Large-Format or Easily Damaged Paper (Position 3)
812

Paper is not cut
Check 1 Is Automatic Cutting in the printer driver set to No or Print Cut Guideline?
Set the printer driver Automatic Cutting setting to Yes.
Page Setup Tab Description (Windows)Paper Detailed Settings (macOS)
Check 2 Is Cutting mode in the touch screen menu set to Eject cut or User cut?
If Cutting mode is set to Eject cut, select Feed/cut in the touch screen menu and cut the paper.
If Cutting mode is set to User cut, cut the roll paper with a cutting implement such as scissors.
Specifying the Cutting Method for Rolls
Check 3 Is the cutter blade attached?
Attach the cutter blade.
Replacing the Cutter Blade
Check 4 Is the cutting method for paper ejected after printing set to Do not cut whenthe roll unit is set to Take-up mode?
Follow the steps below to change the settings.
1. Select the roll unit on the touch screen.1.
2. Select Use in take-up mode, and then select Use the cutting mode setting.2.
3. Set the Cutting mode for Roll paper 1 on the touch screen to Automatic cut.3.
813

Cutter Blade Does Not Work While Cutting Is in Progress
Check 1 Does a message appear on the touch screen?
If the cutter blade failed to cut the paper, it stops moving and a message appears on the touch screen.
Remove the paper and try printing again.
Remove Jammed Roll Paper
Check 2 Make sure the cutter blade can cut paper used currently.
Select User cut for Cutting mode in the touch screen menu and cut the roll paper with a cutting implement suchas scissors.
Specifying the Cutting Method for Rolls
Check 3 Check the setting value for Cut speed.
Selecting slower value may enable the cutter blade to cut paper.
Tap paper settings display area on Home screen of touch screen, tap the feed slot where the paper to change isset, then tap Paper settings > Advanced and, change the setting value of Cut speed.
Menu StructurePaper-related settings
Check 4 Is the edge of the cutter blade blunt?
Replace the cutter blade.
Replacing the Cutter Blade
814

The size of clear film cannot be detected
Check Is the platen dirty with ink?
Open the top cover and clean the entire platen area.
Cleaning Inside the Top Cover
815

Margins are wide
Check 1 Is auto cut being used on printed material with a wide margin on the trailingedge only?
Rolls are advanced a specific amount before cutting to prevent problems with cutting and paper ejection.
This operation is normal.
Check 2 Is leading edge detection set to Do not detect?
Do not detect may have been set by responding to the message Do you want to set to detect the leadingedge of the paper? when Cutting mode was set to User cut in the touch screen menu.
If the message Do you want to set to detect the leading edge of the paper? appears when setting Cuttingmode to User cut, select Detect (recommended).
Please note that if Detect (recommended) is selected and the paper has a strong curl, the Print head may rubagainst the edge of the paper when printing starts.
Specifying the Cutting Method for Rolls
816

When printing on roll paper, the printed surface becomesscratched
Check 1 Depending on the paper, the printed surface may become scratched when thepaper is fed.
In this case, you must set Paper retention settings to Release on the touch screen, and then manually feed thepaper. Lift the release lever, feed the roll paper until the leading edge is visible on the platen, lower the releaselever, and then proceed to the next step.
If Paper retention settings is set to Release, you will no longer be able to automatically switch between theupper and lower roll paper.
Check 2 Has the roll paper lost tension during printing?
If the roll paper loses tension, the paper surface could be damaged and the paper could wrinkle or fold.
Set Roll paper tension (printing) in the touch screen menu to High.
Menu Structure
Note• Carrying out Adjust print quality is recommended when changing Roll paper tension (printing)•
settings.
817

Printing Does Not Start
Printer Suddenly Stopped Working for Some Reason
The Data lamp on the Operation Panel does not light up
The printer does not respond even if print jobs are sent
"Preparing the ink system." is displayed
"Agitating the ink" is displayed
Message Is Displayed and Borderless Printing Fails
818

Printer Suddenly Stopped Working for Some Reason
Cannot Connect to a Printer after Network Configuration ChangesCannot Connect to a Printer via Wi-FiCannot Connect to a Printer through Wireless DirectCannot Connect to a Printer via Wired LANCannot Print through Network
Cannot Connect to a Printer after Network Configuration Changes
It may take a while for the computer to obtain an IP address, or you may need to restart your computer.
Make sure the computer has obtained a valid IP address, and try again to find the printer.
Cannot Connect to a Printer via Wi-Fi
Check 1 Check the power status of printer and devices (e.g. wireless router orcomputer) connected to the network.
Turn on the printer or devices.
If the power is already turned on, turn it off and on again.
It may be necessary to resolve wireless router problems (e.g. update interval of a key, problems of DHCPupdate interval, energy saving mode, etc.) or to update the wireless router firmware.
For details, contact the manufacturer of your wireless router.
Check 2 Can you view any web pages on your computer?
Make sure your computer is connected to the wireless router properly.
For more on checking computer settings or connection status, see the instruction manual supplied with thecomputer or contact the manufacturer.
Check 3 Is the printer connected to the wireless router?
Use the icon on the touch screen to check the connection status between the printer and wireless router. If the
icon is not displayed, Wi-Fi is disabled. Turn on wireless communication on the printer.
Check 4 Make sure the printer and wireless router network settings match.
Make sure the network settings of the printer (e.g. wireless router name, SSID, network key, etc.) are identicalwith those of the wireless router.
819

To check the settings of the wireless router, refer to the instruction manual provided with it or contact itsmanufacturer.
To check the current network settings of the printer, print out the network setting information.
Printing Network Settings
Note• IJ Network Device Setup Utility allows you to diagnose and repair the network status.•
Select the link below to download IJ Network Device Setup Utility and install it.
Checking Printer Connection Status Using IJ Network Device Setup Utility
Check 5 Make sure the printer is not placed too far away from the wireless router.
If the distance between the printer and wireless router is too far, wireless communication becomes poor. Placethe printer and wireless router close to each other.
Note• Though an antenna is attached to most wireless routers, note that some of them have it inside.
Check 6 Make sure wireless signal is strong. Monitor signal status and move printerand wireless router as necessary.
Place the printer and wireless router where there are no obstacles between them. Wireless communicationbetween different rooms or floors is generally poor. Wireless communication can be impeded by buildingmaterials containing metal or concrete. If the printer cannot communicate with the computer over a Wi-Fi dueto a wall, place the printer and the computer in the same room.
In addition, if a device like a microwave oven that emits radio waves of the same frequency bandwidth as awireless router is nearby, it may cause interference. Place the wireless router as far away from interferencesources as possible.
Note• IJ Network Device Setup Utility allows you to diagnose and repair the network status.•
Select the link below to download IJ Network Device Setup Utility and install it.
Checking Printer Connection Status Using IJ Network Device Setup Utility
See below for starting up IJ Network Device Setup Utility.
For Windows:
Starting Up IJ Network Device Setup Utility
For macOS:
Starting Up IJ Network Device Setup Utility
Check 7 Make sure of the Wi-Fi channel numbers used for your computer.
You need to have the same Wi-Fi channel number that you are using for the wireless router as your computer.It is normally set in the way that you can use all the Wi-Fi channels. However, when the channels that you areusing are restricted, the Wi-Fi channels do not match.
820

See the instruction manual provided with your computer and check the Wi-Fi channel number available foryour computer.
Check 8 Make sure channel set on wireless router is a usable channel as confirmed inCheck 7.
If it is not, change the channel set on the wireless router.
Check 9 Make sure security software's firewall is off.
If your security software's firewall is on, a message may appear warning you that Canon software is attemptingto access the network. If this warning message appears, set security software to always allow access.
If you are using any programs that switch between network environments, check their settings.
Check 10 If printer is connected to an AirPort Base Station via LAN, make sure youuse alphanumeric characters for network identifier (SSID). (macOS)
If the problem is not resolved, redo setup.
• For Windows:•
Perform setup using the Setup CD-ROM or from Setup Guide.
• For macOS:•
Perform setup from Setup Guide.
Cannot Connect to a Printer through Wireless Direct
Check 1 Check the power status of printer and other devices (smartphone or tablet).
Turn on the printer or devices.
If the power is already turned on, turn it off and on again.
Check 2 Is the icon displayed on the touch screen?
If not, Wireless Direct is disabled. Turn on Wireless Direct.
Check 3 Check the settings of your device (smartphone/tablet).
Make sure Wi-Fi is enabled on your device.
For details, refer to your device's instruction manual.
Check 4 Make sure printer is selected as connection for device (e.g. smartphone ortablet).
821

Select the identifier for Wireless Direct (SSID) specified for the printer as the connection destination fordevices.
Check the destination on your device.
For details, refer to your device's instruction manual or visit the manufacturer's website.
To check the identifier for wireless direct (SSID) specified for the printer, display it using the operation panel ofthe printer or print out the network setting information of the printer.
• Display on the touch screen.•
LAN settings
• Print the network settings.•
Printing Network Settings
Check 5 Have you entered the proper password specified for the Wireless Direct?
To check the password specified for the printer, display it using the operation panel of the printer or print outthe network setting information of the printer.
• Display on the touch screen.•
LAN settings
• Print the network settings.•
Printing Network Settings
Check 6 Make sure the printer is not placed too far away from the device.
If the distance between the printer and device is too far, wireless communication becomes poor. Place theprinter and device close to each other.
Check 7 Make sure 5 devices are already connected.
Wireless Direct does not allow more than 5 devices to be connected.
Cannot Connect to a Printer via Wired LAN
Check 1 Make sure the printer is turned on.
Check 2 Make sure the LAN cable is connected properly.
Make sure the printer is connected to the router with the LAN cable. If the LAN cable is loose, connect thecable properly.
If the LAN cable is connected to the WAN side of the router, connect the cable to the LAN side of the router.
If the problem is not resolved, redo setup.
• For Windows:•
Perform setup using the Setup CD-ROM or from Setup Guide.
822

• For macOS:•
Perform setup from Setup Guide.
Cannot Print through Network
Check 1 Make sure the computer is connected to the wireless router.
For more on how to check the computer settings or connection status, see your computer instruction manualor contact its manufacturer.
Check 2 If the printer driver is not installed, install it. (Windows)
Install the printer driver using the Setup CD-ROM or install it from here.
Check 3 When using Wi-Fi, make sure wireless router does not restrict whichcomputers can access it.
For more on connecting to and setting up your wireless router, see the wireless router instruction manual orcontact its manufacturer.
823
The Data lamp on the Operation Panel does not light up
Check 1 Does the printer have power?
Check that the power cord is firmly plugged all the way in. Turn on the power to the printer.
Check 2 Was the correct printer selected?
In Windows, select the printer by clicking Select Printer or Printer in the printing dialog box and try printingagain.
In macOS, open the dialog box of the printer driver, select the printer from the list of Printer, and try printingagain.
Check 3 Is the print job paused?
In Windows, restart the print job as follows.
1. Select the printer icon in the Devices and Printers window.1.
2. Clear Pause Printing in the Printer menu to restart the print job.2.
In macOS, restart the print job as follows.
1. Click Print & Scan (or Print & Fax).1.
2. Select the printer, and then Resume Printer (or Start Jobs) in the Printers menu to2.restart the print job.
824
The printer does not respond even if print jobs are sent
Check 1 Is Pause printing set to Enable?
Set Pause printing on the touch screen menu to Disable.
Pausing Printing
Check 2 Is USB or LAN connection disabled?
• For USB connection:•
Set Use USB connection on the touch screen menu to Use.
• For LAN connection (wired/Wi-Fi/Wireless Direct):•
Set Enable/disable Wired LAN, Enable/disable Wi-Fi, or Enable/disable Wireless Direct on the touchscreen menu to Enable.
Note• You cannot enable wired LAN and Wi-Fi or Wireless Direct at the same time.
Check 3 Is Save to job box selected as the printer Output method?
Print the job saved on the printer's hard disk.
Printing Saved Jobs
Check 4 Is the print job pending?
Manage the jobs on hold and print as needed.
Printing Pending Jobs
825

"Preparing the ink system." is displayed
The Print head and sub-ink tank are being filled with ink.
Wait until the system has been filled with ink.
Note• This message might appear if you force the power off while the printer is operating.•
Always follow the correct procedure when turning off the power.
Turning the Printer On and Off
826
"Agitating the ink" is displayed
Ink agitation is in progress.
Please wait until ink agitation is finished.
Agitation time varies depending on time elapsed since powering off (approximately 1 to 20 minutes).
827

Message Is Displayed and Borderless Printing Fails
For information on possible solutions, refer to the link for each messages.
4114
4116
4121
828

4913
829

The Printer Stops During a Print Job
Printing stops and an error message is displayed
The printer ejects blank, unprinted paper
830

Printing stops and an error message is displayed
The last portion of roll paper was used during a print job, and paper could not be advanced because thetrailing edge is taped to the roll.
Remove the used roll and insert a new roll.
Removing the Upper Roll from the PrinterLoading the Lower Roll on the Roll Unit (Option)Loading and Printing on Rolls
831

The printer ejects blank, unprinted paper
Check 1 The leading edge of the roll paper may have been trimmed.
The leading edge of the roll paper may be trimmed if Trim edge first is not set to Off or Manual in the touchscreen menu.
Cutting the Leading Edge of Roll Paper Automatically
Check 2 Is the Print head nozzle blocked?
Print a nozzle check pattern to check the Print head status.
Checking for Nozzle Clogging
Check 3 Is the correct printer driver selected?
Print again using the correct printer driver for your printer.
Check 4 When you print data including HP RTL command, check the settings below inthe touch screen menu.
• Set Auto rotation to OFF.• If Rotate is set to 90 degrees, select 0 degrees and start printing.
Menu Structure
If none of the above apply, there may be a printer malfunction.
Contact your Canon dealer for assistance.
832

Problems with the Printing Quality
Printing is faint
Paper rubs against the Print Head
The edges of the paper are dirty
The surface of the paper is dirty
The back side of the paper is dirty
Immediately after borderless printing, the trailing edge margin is soiled duringregular printing
Printed colors are inaccurate
Banding in different colors occurs
Colors in printed images are uneven
Image edges are blurred or white banding occurs
The length of the printed image in the paper ejection direction is not accurate
Images are printed crooked
Documents are printed in monochrome
Line thickness is not uniform
Lines or colors are misaligned
Borders appear in borderless printing
833

Printing is faint
Check 1 Is the reverse side of the paper being used for printing?
Print on the printing surface.
Check 2 Is the Print head nozzle blocked?
Print a test pattern to check the nozzles and see if they are clogged.
Checking for Nozzle Clogging
Note• To automatically check for nozzle blockages after printing, set Auto nozzle check in the touch screen•
menu to a setting other than Disable.
To show warnings based on nozzle check results, set Nozzle check error display in the touch screenmenu to Enable.
However, printing may be stopped by warnings if this setting is set to Enable.
Menu Structure
Check 3 Was the printer left with the ink tank out?
The ink supply may become blocked by ink if the ink tank is left out.
If this happens, leave the printer for at least 24 hours with the ink tank in, and then carry out Print HeadCleaning.
Cleaning the Print Head
Check 4 Are paper scraps stuck in the top cover?
Follow the steps below to remove paper scraps left inside the top cover.
834

1. Open the top cover and make sure that the carriage is not over the platen.1.
2. Remove any paper scraps left inside the top cover.2.
Remove Jammed Roll PaperRemove a Jammed Sheet
3. Close the top cover.3.
Check 5 Was the paper cut before the ink dried?
Set a longer Ink drying wait time in Advanced paper settings in the touch screen menu.
Menu Structure
Check 6 Is the printer driver Print Quality set to the lowest quality setting?
Follow the steps below to set Print Quality to higher quality settings, and then print.
• Windows•
Change the Print Quality settings in the printer driver Advanced Settings.
Changing the Print Quality and Correcting Image Data (Windows)
• macOS•
Change the Print Quality in the printer driver Quality & Media settings.
Changing the Print Quality and Correcting Image Data (macOS)
Check 7 Does the paper used for printing create a lot of cutting dust?
Set Cut-dust reduction in the touch screen menu Advanced paper settings to ON.
Reducing Dust from Cutting Rolls
835

Paper rubs against the Print Head
Check 1 Is the media type specified in the printer driver the same as the media typeloaded in the printer?
When printing with the media type specified in the printer driver, load the specified media type in the printer.
Loading the Upper Roll on the PrinterLoading the Lower Roll on the Roll Unit (Option)Loading Sheets in the Printer
When printing with the media type loaded in the printer, specify the same media type in the printer driver.
1. To stop printing, tap the Stop.1.
2. Change the paper type in the printer driver and try printing again.2.
Note• When Auto (Use Printer Settings) is selected for the media type, printing is performed with the media•
type loaded in the printer.
• Click Get Information to reflect the paper information set in the printer to the printer driver.•
Printing with Easy Setup
Check 2 When loading paper in the printer, is the media loaded the same as the mediatype selected on the touch screen?
Select the correct media type in the touch screen menu when loading paper in the printer.
Loading the Upper Roll on the PrinterLoading the Lower Roll on the Roll Unit (Option)Loading Sheets in the Printer
836

Check 3 Is the paper loaded properly?
If not loaded properly, paper can buckle and rub against the Print head.
Reload the paper.
Loading the Upper Roll on the PrinterLoading the Lower Roll on the Roll Unit (Option)Loading Sheets in the Printer
Check 4 Is the Print head height set too low?
Set Paper thickness (head height) in the touch screen menu to Auto.
Troubleshooting Paper Abrasion and Blurry Images
Check 5 Is the paper thick, or a type that curls easily or is prone to buckling afterabsorbing ink?
If using paper-based printing material such as Heavyweight Coated Paper, set Transport unit vacuum strengthin the touch screen menu to Medium-strong or Strong.
If that does not resolve the problem, increase the Paper thickness (head height) setting in the touch screenmenu.
Adjusting Vacuum StrengthTroubleshooting Paper Abrasion and Blurry Images
If using film-based printing material such as CAD Tracing Paper, set the Transport unit vacuum strength in thetouch screen menu to Standard, Medium-strong, or Strong.
If that does not resolve the problem, increase the Paper thickness (head height) setting in the touch screenmenu.
Adjusting Vacuum StrengthTroubleshooting Paper Abrasion and Blurry Images
If using paper thinner than 0.004 inches (0.1 mm), set Transport unit vacuum strength in the touch screenmenu to Weak.
If that does not resolve the problem, increase the Paper thickness (head height) setting in the touch screenmenu.
Adjusting Vacuum StrengthTroubleshooting Paper Abrasion and Blurry Images
Check 6 Does the paper have a strong curl at the front edge or is it buckled?
Set Cutting mode in the touch screen menu to User cut, and set leading edge detection to Do not detect.
To keep track of the amount of roll paper remaining, set Manage remaining roll amount to Auto estimate orDisable before loading the roll paper, and then restore the setting of Manage remaining roll amount to Autoestimate or Barcodes after the roll paper is loaded.
In addition, set Media type selection method to Manual or Use current media type.
Specifying the Cutting Method for RollsKeeping Track of the Amount of Roll Paper Left
837

The edges of the paper are dirty
Check 1 Was printing borderless or on small paper?
The platen may become dirtied by borderless printing or on small paper sizes.
Open the top cover and clean the platen.
Cleaning Inside the Top Cover
Check 2 Is Extension for borderless printing set to a large value?
The platen may become dirtied by setting a large amount of extension.
Reduce the value of Extension for borderless printing.
Specifying the Amount of Extension for Borderless Printing
Check 3 Is the media type specified in the printer driver the same as the media type inthe printer?
When printing with the media type specified in the printer driver, load the specified media type in the printer.
Loading the Upper Roll on the PrinterLoading the Lower Roll on the Roll Unit (Option)Loading Sheets in the Printer
When printing with the media type loaded in the printer, specify the same media type in the printer driver.
1. To stop printing, tap the Stop.1.
2. Change the type of paper in the printer driver and try printing again.2.
Note• When Auto (Use Printer Settings) is selected for the media type, printing is performed with the media•
type loaded in the printer.
838

• Click Get Information to reflect the paper information set in the printer to the printer driver.•
Printing with Easy Setup
Check 4 When loading paper in the printer, is the media loaded the same as the mediatype selected on the touch screen?
Select the correct media type in the touch screen menu when loading paper in the printer.
Loading the Upper Roll on the PrinterLoading the Lower Roll on the Roll Unit (Option)Loading Sheets in the Printer
Check 5 Is the paper creased or curled?
Straighten out the wrinkles or curls and reload the paper.
Loading the Upper Roll on the PrinterLoading the Lower Roll on the Roll Unit (Option)Loading Sheets in the Printer
Check 6 Is Cut-dust reduction in the touch screen menu Advanced paper settingsset to ON?
A cut dust reduction line is printed at the paper cut position when Cut-dust reduction is set to ON.
If cutting dust reduction is not required, set Cut-dust reduction to OFF.
Menu Structure
Check 7 Is the Print head height set too low in the touch screen menu?
Set Paper thickness (head height) to Auto.
Troubleshooting Paper Abrasion and Blurry Images
Check 8 Is the paper thick, or a type that curls easily or is prone to buckling afterabsorbing ink?
If using paper-based printing material such as thick-coat paper, set Transport unit vacuum strength in thetouch screen menu to Medium-strong or Strong.
If that does not resolve the problem, increase the Paper thickness (head height) setting in the touch screenmenu.
Adjusting Vacuum StrengthTroubleshooting Paper Abrasion and Blurry Images
If using film-based printing material such as tracing paper, set the Transport unit vacuum strength in the touchscreen menu to Standard, Medium-strong, or Strong.
If that does not resolve the problem, increase the Paper thickness (head height) setting in the touch screenmenu.
Adjusting Vacuum StrengthTroubleshooting Paper Abrasion and Blurry Images
839

Check 9 Is the output guide clean?
Clean the output guide.
Cleaning the Printer Exterior
840

The surface of the paper is dirty
Check 1 Is the paper retainer clean?
Clean the paper retainer.
Cleaning Inside the Top Cover
Check 2 Does this paper take longer to dry?
Set the Pause between pages in the touch screen menu to approximately 1 minute.
Menu Structure
Note• When printing on paper that takes longer to dry, the paper may curl during printing and come in contact•
with the output tray.
In such situations, set an Ink drying wait time and an Ink drying target area for Pause between scansin the touch screen menu.
However, note that printing will now take longer.
Menu Structure
Note• In a hot and humid environment, rolling paper printed with images containing areas of saturated color•
may transfer ink to the contact surface, affecting print quality.
Move the printer to a different environment, or let the paper dry before rolling it.
841

The back side of the paper is dirty
Check 1 Was the previous print job borderless, or printed on small paper?
Open the top cover and clean the platen.
Cleaning Inside the Top Cover
Check 2 Is Detect paper width in the touch screen menu set to Disable?
Printing with Detect paper width set to Disable may cause the platen to be dirtied.
Set Detect paper width in the touch screen menu to Enable, and then open the top cover and clean the platen.
Cleaning Inside the Top Cover
To continue printing with Detect paper width set to Disable, first open the top cover and clean the platen, andthen manually feed roll paper over the platen when printing.
Cleaning Inside the Top CoverFeeding Roll Paper Manually
Check 3 Paper may be gripped weakly over the platen.
Set a higher Transport unit vacuum strength in the touch screen menu.
Adjusting Vacuum Strength
Check 4 Is the setting of Extension for borderless printing in the touch screen menularge?
The platen may become dirtied by setting a large amount of extension.
Reduce the setting of Extension for borderless printing in the touch screen menu to less than the currentsetting.
Menu Structure
842

Note• If the platen is dirty, open the top cover and clean the platen.•
• In a hot and humid environment, rolling paper printed with images containing areas of saturated color•may transfer ink to the contact surface, affecting print quality.
Move the printer to a different environment, or let the paper dry before rolling it.
843

Immediately after borderless printing, the trailing edge margin issoiled during regular printing
In some situations, borderless printing with automatic cutting of the leading and trailing edges on roll papermay transfer ink on the cutter blade to the next item printed.
Follow the steps below to change Between Pages in Drying Time to between 30 seconds and 3 minutesand perform borderless printing.
• Windows•
1. Click Specify for Media Type on the Main sheet of the printer driver.1.
2. Select an ink drying time from the Between Pages list in Drying Time.2.
• macOS•
Select an ink drying time from the Drying Time list on the Advanced Paper Settings sheet of theprinter driver.
844

Printed colors are inaccurate
Check 1 Is the Print head nozzle blocked?
Print a test pattern to check the nozzles and see if they are clogged.
Checking for Nozzle Clogging
Check 2 Has color been adjusted in the printer driver?
Follow the steps below to adjust color settings.
• Windows•
Adjust the color settings with Color Mode > Color Settings in Advanced Settings in the printer driver.
Main Tab Description (Windows)
• macOS•
Adjust the color settings in the printer driver Color Options.
Color Options (macOS)
Check 3 Is Application Color Matching Priority set to Off in a Windows printer driver?
In the printer driver Layout sheet, click Special Settings, and then set Application Color Matching Priority toOn in the dialog box that appears.
Layout Tab Description (Windows)
Check 4 Has the computer or monitor color been adjusted?
Take the actions below.
• Refer to the computer and monitor documentation to adjust the colors.•
845

• Adjust the settings of the color management software, referring to the software documentation as needed.•
Check 5 Color varies even between printers of the same model due to differences infirmware and printer driver versions, settings, or environment.
Follow these steps to prepare the printing environment.
1. Use the same version of firmware or printer driver.1.
2. Specify the same value for all settings items.2.
846
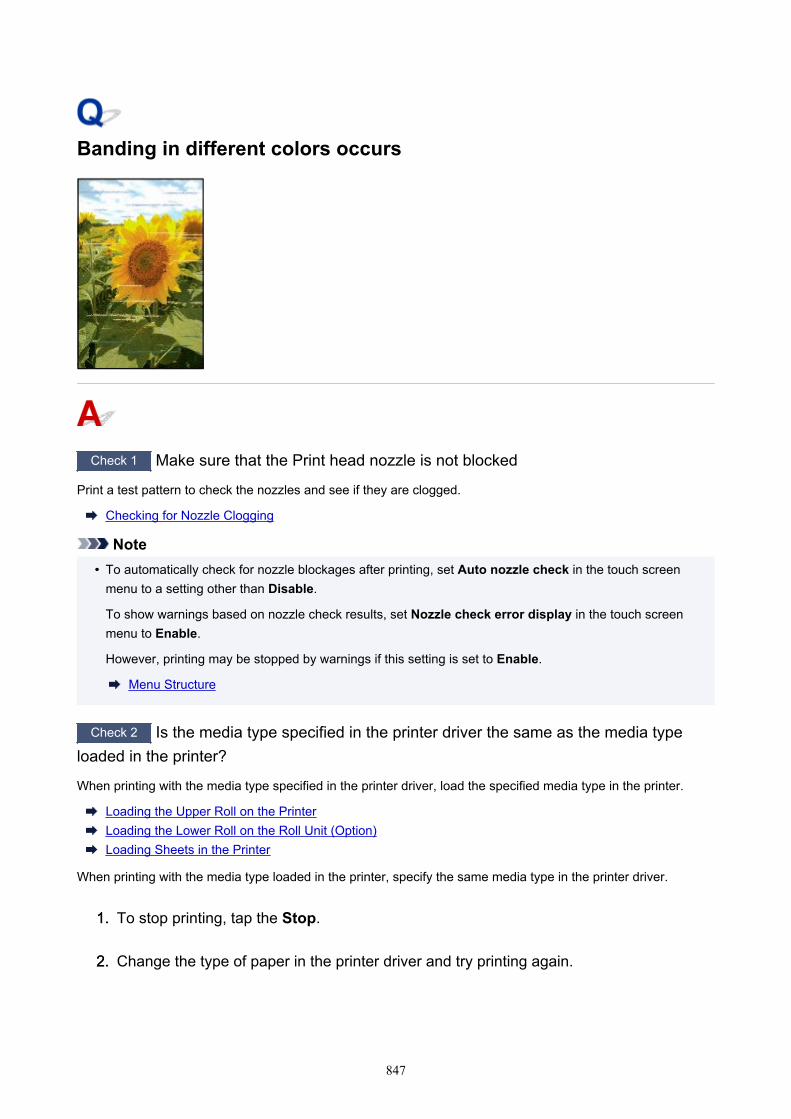
Banding in different colors occurs
Check 1 Make sure that the Print head nozzle is not blocked
Print a test pattern to check the nozzles and see if they are clogged.
Checking for Nozzle Clogging
Note• To automatically check for nozzle blockages after printing, set Auto nozzle check in the touch screen•
menu to a setting other than Disable.
To show warnings based on nozzle check results, set Nozzle check error display in the touch screenmenu to Enable.
However, printing may be stopped by warnings if this setting is set to Enable.
Menu Structure
Check 2 Is the media type specified in the printer driver the same as the media typeloaded in the printer?
When printing with the media type specified in the printer driver, load the specified media type in the printer.
Loading the Upper Roll on the PrinterLoading the Lower Roll on the Roll Unit (Option)Loading Sheets in the Printer
When printing with the media type loaded in the printer, specify the same media type in the printer driver.
1. To stop printing, tap the Stop.1.
2. Change the type of paper in the printer driver and try printing again.2.
847

Note• When Auto (Use Printer Settings) is selected for the media type, printing is performed with the media•
type loaded in the printer.
• Click Get Information to reflect the paper information set in the printer to the printer driver.•
Printing with Easy Setup
Check 3 Does the paper loaded on the printer match the media type selected on thetouch screen?
Select the correct media type in the touch screen menu when loading paper in the printer.
Loading the Upper Roll on the PrinterLoading the Lower Roll on the Roll Unit (Option)Loading Sheets in the Printer
Check 4 Has the paper feed rate been calibrated properly?
Adjust the feed amount.
Adjusting Feed Amount
Check 5 Low Print Quality setting causing lines in the printing
Follow the steps below to set Print Quality to the highest quality setting, and then print.
• Windows•
Change the Print Quality settings in the printer driver Advanced Settings.
Changing the Print Quality and Correcting Image Data (Windows)
• macOS•
Change the Print Quality in the printer driver Quality & Media settings.
Changing the Print Quality and Correcting Image Data (macOS)
Check 6 Is Set priority in the touch screen menu set to Prioritize length accuracy?
Setting Set priority to Prioritize print quality and adjusting the feed amount can help.
Adjusting Feed Amount
Check 7 Check if the Print head is in the right position
Adjust the Print head position.
Automatic Adjustment to Straighten Lines and Colors
Check 8 Print job may have been interrupted while receiving, and therefore not printedat a fast frame rate
Exit other applications and cancel other print jobs.
Check 9 Make sure that lines are not printed around 100 mm from the paper edges.
848

If the printer is on standby or if you leave paper as it is for approximately over 30 minutes, paper may be curledor wrinkled.
Set Sleep timer on Energy saving settings to a value shorter than 30 minutes, so that you can prevent paperfrom being curled or wrinkled.
Other printer settings
849

Colors in printed images are uneven
Check 1 Does the paper loaded on the printer match the media type selected in theprinter driver?
When printing with the media type specified in the printer driver, load the specified media type in the printer.
Loading the Upper Roll on the PrinterLoading the Lower Roll on the Roll Unit (Option)Loading Sheets in the Printer
When printing with the media type specified in the printer driver, load the specified media type in the printer.
1. To stop printing, tap Stop.1.
2. Change the paper type in the printer driver and try printing again.2.
Note• When Auto (Use Printer Settings) is selected for the media type, printing is performed with the media•
type loaded in the printer.
• Click Get Information to reflect the paper information set in the printer to the printer driver.•
Printing with Easy Setup
Check 2 When loading paper in the printer, is the media loaded the same as the mediatype selected on the touch screen?
Select the correct media type in the touch screen menu when loading paper in the printer.
Loading the Upper Roll on the PrinterLoading the Lower Roll on the Roll Unit (Option)Loading Sheets in the Printer
850

Check 3 Is the Print head position adjusted correctly?
Adjust the Print head position.
Automatic Adjustment to Straighten Lines and Colors
Check 4 Is the Feed Amount adjusted correctly?
Adjust Feed Amount.
Adjusting Feed Amount
Check 5 Colors in printed images may be uneven if the Print Quality setting is too low
If using Windows, select Advanced Settings from the Main tab of the printer driver, and then select a higherPrint Quality setting.
If using macOS, select Quality & Media in the printer driver, and then select a higher Print Quality setting.
Changing the Print Quality and Correcting Image Data (Windows)Changing the Print Quality and Correcting Image Data (macOS)
Check 6 Colors in printed images may be uneven on the boundary between shades ifthere are dark and light areas in an image
Prints on the same page while switching between Bidirectional printing and Unidirectional printing. Therefore,color unevenness may occur when switching. Using the unidirectional printing function may reduce colorunevenness in this situation.
Follow the steps below for unidirectional printing.
• Windows•
Open Paper Detailed Settings from the Main tab of the printer driver, and then select UnidirectionalPrinting.
• macOS•
Open Advanced Paper Settings in the printer driver, and then select Unidirectional Printing.
Check 7 If printing borderless, colors in printed images may be a little uneven at theleading edge of the paper because printing is interrupted to cut the paper
Set the printer driver Automatic Cutting settings to No, and then print. Doing this prints only the left and rightsides borderless. Cut the top and bottom borders with a cutting implement such as scissors after the printedmaterials are output and cut.
Note• Selecting a higher Print Quality in the printer driver Advanced Settings may resolve the problem.•
Changing the Print Quality and Correcting Image Data (Windows)Changing the Print Quality and Correcting Image Data (macOS)
Check 8 Does this paper curl easily?
Colors in printed images may be uneven at the leading edge of paper that curls easily. Change the Transportunit vacuum strength in the touch screen to increase the grip on the paper, or set a margin of at least 0.8inches (20 mm) at the front edge of the paper.
851

Adjusting Vacuum Strength
Check 9 Color may be uneven if printing materials were stacked while drying
To avoid uneven colors, we recommend drying each sheet separately.
Check 10 Is Ink drying target area for Pause between scans in the touch screenmenu set to Leading edge?
If the Ink drying target area for Pause between scans is set to Leading edge, color may be unevenapproximately 4.3 to 6.3 inches (110 to 160 mm) from the front edge of the paper. (The position dependson the Print Quality settings)
On the home screen of the touch screen, tap the paper setting display area, tap the paper feed slot where thepaper whose settings to change is set, and then tap Paper settings > Advanced > Pause between scans >Ink drying target area and set to Overall.
However, note that printing will now take longer.
Menu Structure
Check 11 Make sure you are not printing cut sheet with AirPrint (macOS)
When you print cut sheets with AirPrint, uneven or streaked colors may occur at the trailing edge of the sheet.To print cut sheets with AirPrint, from the touch screen menu, tap Printer settings > Paper-related settings >Keep margin at cut sheet end.
Menu Structure
Note• Set Keep margin at cut sheet end to Enable to increase the margin at the trailing edge of the sheet.
852

Image edges are blurred or white banding occurs
Check 1 Paper may be gripped too strongly over the platen.
Set a lower Transport unit vacuum strength in the touch screen menu.
Adjusting Vacuum Strength
Check 2 Check if the Print head is in the right position.
For detailed printing of small text or fine lines on glossy or semi-gloss photo paper or proof paper, etc., set thePrint head to the optimal height and then adjust the position of the Print head.
Adjusting the Print Head
Setting a lower value for Paper thickness (head height) in the touch screen menu may resolve the problem.
Troubleshooting Paper Abrasion and Blurry Images
Check 3 Is the media type specified in the printer driver the same as the media typeloaded in the printer?
When printing with the media type specified in the printer driver, load the specified media type in the printer.
Loading the Upper Roll on the PrinterLoading the Lower Roll on the Roll Unit (Option)Loading Sheets in the Printer
When printing with the media type specified in the printer driver, load the specified media type in the printer.
1. To stop printing, tap Stop.1.
2. Change the paper type in the printer driver and try printing again.2.
853

Note• When Auto (Use Printer Settings) is selected for the media type, printing is performed with the media•
type loaded in the printer.
• Click Get Information to reflect the paper information set in the printer to the printer driver.•
Printing with Easy Setup
Check 4 When loading paper in the printer, is the media loaded the same as the mediatype selected on the touch screen?
Select the correct media type in the touch screen menu when loading paper in the printer.
Loading the Upper Roll on the Printer(Loading the Lower Roll on the Roll Unit (Option)Loading Sheets in the Printer
854

The length of the printed image in the paper ejection direction isnot accurate
Check 1 Is the media type specified in the printer driver the same as the media typeloaded in the printer?
When printing with the media type specified in the printer driver, load the specified media type in the printer.
Loading the Upper Roll on the PrinterLoading the Lower Roll on the Roll Unit (Option)Loading Sheets in the Printer
When printing with the media type specified in the printer driver, load the specified media type in the printer.
1. To stop printing, tap Stop.1.
2. Change the paper type in the printer driver and try printing again.2.
Note• When Auto (Use Printer Settings) is selected for the media type, printing is performed with the media•
type loaded in the printer.
• Click Get Information to reflect the paper information set in the printer to the printer driver.•
Printing with Easy Setup
Check 2 When loading paper in the printer, is the media loaded the same as the mediatype selected on the touch screen?
Select the correct media type in the touch screen menu when loading paper in the printer.
Loading the Upper Roll on the Printer(Loading the Lower Roll on the Roll Unit (Option)Loading Sheets in the Printer
855

Check 3 Perform print quality adjustment to automatically adjust the feed amount.
Perform Adjust print quality from Paper feed adjustment and Print alignment pattern to automatically adjustthe feed amount.
Automatic Banding Adjustment
Check 4 Is Set priority for Paper feed adjustment in the touch screen menu set toPrioritize print quality?
Set Set priority for Paper feed adjustment to Prioritize length accuracy, and then carry out Adjust feedlength.
Adjusting Feed Amount
856

Images are printed crooked
Check 1 Has the roll paper been loaded at an angle?
If there is a gap between the roll paper and roll holder, reload the roll on the roll holder.
Loading Rolls on the Roll Holder
Check 2 Paper may have been fed at an angle.
When Roll paper auto feed is set to Disable, feed the roll paper into the printer so that there is no gap betweenthe right edge of the roll paper and the roll holder.
Loading Rolls on the Roll HolderLoading the Lower Roll on the Roll Unit (Option)Loading the Upper Roll on the Printer
Check 3 Is Detect paper width set to Disable?
Set Detect paper width in the touch screen menu to Enable to load the paper.
Menu Structure
Check 4 Is Skew detection accuracy in the touch screen menu set to Loose or OFF?
Set Skew detection accuracy to Standard, and then reload the paper.
Menu Structure
857

Documents are printed in monochrome
Check 1 Is Color Mode set to Monochrome, or Print Target set to Monochrome(Photo) in a Windows printer driver?
In the Advanced Settings of the printer driver, specify Color in Color Mode and try printing again.
Check 2 Is Black and White Photo Print selected in a macOS printer driver?
Deselect Black and White Photo Print in the printer driver Quality & Media settings, and then print again.
Check 3 The print head nozzle may be blocked
Print a test pattern to check the color ink nozzles and see if they are clogged.
Checking for Nozzle Clogging
858

Line thickness is not uniform
Check 1 Is the media type specified in the printer driver the same as the media typeloaded in the printer?
When printing with the media type specified in the printer driver, load the specified media type in the printer.
Loading the Upper Roll on the PrinterLoading the Lower Roll on the Roll Unit (Option)Loading Sheets in the Printer
When printing with the media type specified in the printer driver, load the specified media type in the printer.
1. To stop printing, tap Stop.1.
2. Change the paper type in the printer driver and try printing again.2.
Note• When Auto (Use Printer Settings) is selected for the media type, printing is performed with the media•
type loaded in the printer.
• Click Get Information to reflect the paper information set in the printer to the printer driver.•
Printing with Easy Setup
Check 2 When loading paper in the printer, is the media loaded the same as the mediatype selected on the touch screen?
Select the correct media type in the touch screen menu when loading paper in the printer.
Loading the Upper Roll on the PrinterLoading the Lower Roll on the Roll Unit (Option)
859

Loading Sheets in the Printer
Check 3 Adjust the position of the Print head
If the printed result does not look uniform, such as when the lines are misaligned, adjust the position of PrintHead.
Automatic Adjustment to Straighten Lines and ColorsManual Adjustment to Straighten Lines and Colors
For photo paper and proof paper, it may be improved by setting Paper thickness (head height) to a value lowerthan the current setting and then adjust the position of the Print head.
Troubleshooting Paper Abrasion and Blurry Images
Check 1 Is Fast Graphic Process set to On in the 32-bit Windows printer driverSpecial Settings dialog box?
Access the printer driver Properties dialog box from Print in the File menu of the source application, and followthese steps to print.
1. Deselect Preview before printing in the Main sheet.1.
2. Deselect Page Layout in the Layout sheet.2.
3. Click the Special Settings button in the Layout sheet, and then set Fast Graphic3.Process to Off in the Special Settings dialog box that opens.
860

Lines or colors are misaligned
Check 1 Adjust the position of the Print head
If borders are misaligned or the print results are not uniform, adjust the position of the Print head.
Automatic Adjustment to Straighten Lines and ColorsManual Adjustment to Straighten Lines and Colors
For photo paper and proof paper, it may be improved by setting Paper thickness (head height) to a value lowerthan the current setting and then adjust the position of the Print head.
Troubleshooting Paper Abrasion and Blurry Images
Check 2 Is the media type specified in the printer driver the same as the media typeloaded in the printer?
When printing with the media type specified in the printer driver, load the specified media type in the printer.
Loading the Upper Roll on the PrinterLoading the Lower Roll on the Roll Unit (Option)Loading Sheets in the Printer
When printing with the media type specified in the printer driver, load the specified media type in the printer.
1. To stop printing, tap Stop.1.
2. Change the paper type in the printer driver and try printing again.2.
Note• When Auto (Use Printer Settings) is selected for the media type, printing is performed with the media•
type loaded in the printer.
• Click Get Information to reflect the paper information set in the printer to the printer driver.•
Printing with Easy Setup
Check 3 When loading paper in the printer, is the media loaded the same as the mediatype selected on the touch screen?
Select the correct media type in the touch screen menu when loading paper in the printer.
861

Loading the Upper Roll on the PrinterLoading the Lower Roll on the Roll Unit (Option)Loading Sheets in the Printer
Check 4 Adjust the angle of the Print head
Select Print head angle adjustment from the touch screen menu to adjust the Print head angle.
Adjusting Line Misalignment
Check 5 Is the Roll Paper loaded at an angle?
If there is a gap between the roll paper and the roll holder, reload the roll paper.
Loading the Upper Roll on the PrinterLoading the Lower Roll on the Roll Unit (Option)
862
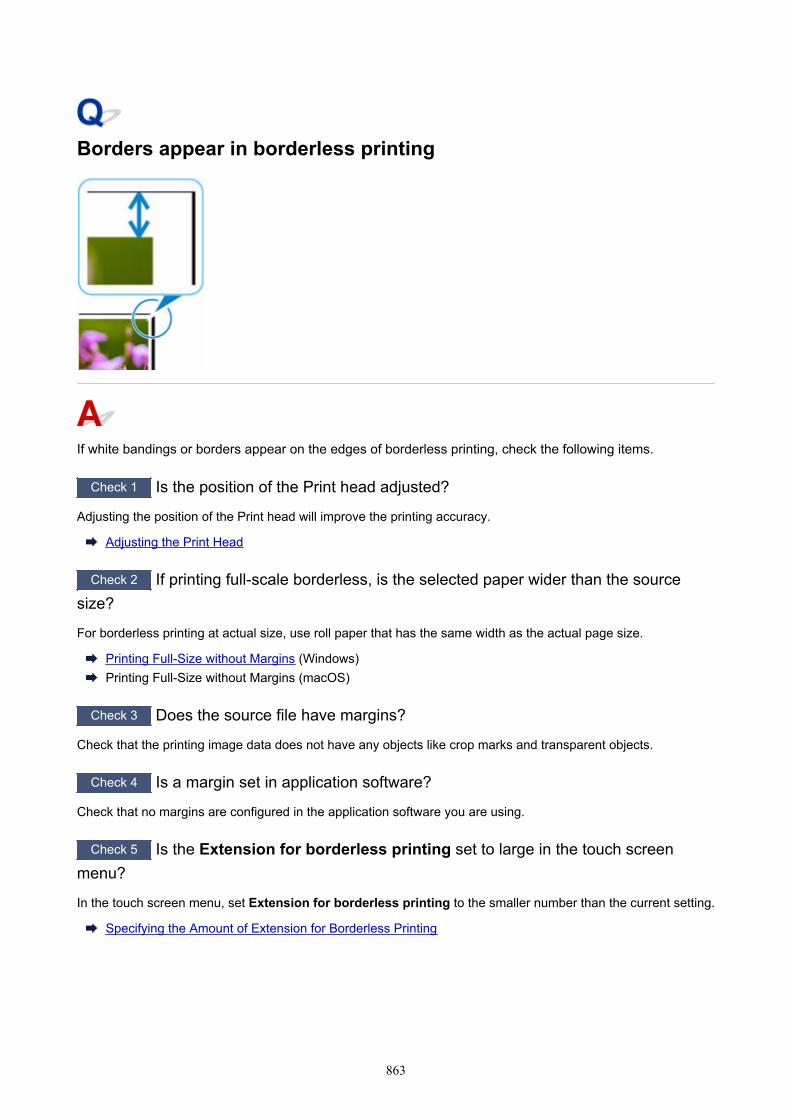
Borders appear in borderless printing
If white bandings or borders appear on the edges of borderless printing, check the following items.
Check 1 Is the position of the Print head adjusted?
Adjusting the position of the Print head will improve the printing accuracy.
Adjusting the Print Head
Check 2 If printing full-scale borderless, is the selected paper wider than the sourcesize?
For borderless printing at actual size, use roll paper that has the same width as the actual page size.
Printing Full-Size without Margins (Windows)Printing Full-Size without Margins (macOS)
Check 3 Does the source file have margins?
Check that the printing image data does not have any objects like crop marks and transparent objects.
Check 4 Is a margin set in application software?
Check that no margins are configured in the application software you are using.
Check 5 Is the Extension for borderless printing set to large in the touch screenmenu?
In the touch screen menu, set Extension for borderless printing to the smaller number than the current setting.
Specifying the Amount of Extension for Borderless Printing
863

Cannot Print over Network
Cannot Connect Printer to Network
Cannot Print over TCP/IP Network
Cannot Print over Bonjour networks
864

Cannot Connect Printer to Network
Check 1 Is the Ethernet cable connected correctly to the printer's wired LAN connector?
Make sure the printer is connected to the network with the correct Ethernet cable, and then turn the printer on.For instructions on connecting the cable, refer to the Setup Guide.
Check 2 Make sure the Link indicator is lit.
The top and bottom indicators are lit if the printer is connected via 1000Base-T.
The top indicator is green if the printer is connected via 100Base-TX, and the bottom indicator is orange ifconnected via 10Base-T.
If the Link indicator is not lit, check the following points.
• The hub is on.• The end of the Ethernet cable is connected correctly.•
Insert the Ethernet cable until it clicks and locks in place.
• There is no problem with the Ethernet cable.•
If there is any problem, replace the Ethernet cable.
865

Cannot Print over TCP/IP Network
Check 1 Is the printer's IP address configured correctly?
Make sure the printer's IP address is configured correctly.
Note• For Windows, you can configure the printer's IP address using IJ Network Device Setup Utility.•
For wired LAN:
Performing/Changing Wired LAN Connection (Ethernet Cable) Settings
For Wi-Fi:
Performing/Changing Wi-Fi Settings
Check 2 Are the printer's TCP/IP network settings configured correctly?
Make sure the printer's TCP/IP network settings are configured correctly.
Check 3 Is the computer you are trying to print from configured correctly?
Make sure the computer's TCP/IP network settings are configured correctly.
866

Cannot Print over Bonjour networks
Check 1 Is the computer you are trying to print from configured correctly?
Make sure the computer is configured correctly.
Check 2 Are the computer and printer on the same network?
Due to the nature of Bonjour, printing may not be possible if the printer is on another network behind a router.Make sure the computer and printer are on the same network. For information about network settings, ask yournetwork administrator.
Check 3 Are the printer's Bonjour settings configured correctly?
Make sure the Bonjour settings are configured correctly.
867

Cannot Find Printer on Network
Cannot Find Printer on Check Printer Settings Screen (Windows)
Cannot Proceed beyond Printer Connection Screen/Connect Cable Screen
Searching Printer by IP Address or Host Name During Setup
Cannot Find Printer while Using Wi-Fi
Cannot Find Printer while Using Wired LAN
Cannot Print Using AirPrint
868

Cannot Find Printer on Check Printer Settings Screen (Windows)
If the printer cannot be found and the Check Printer Settings screen appears after searching the printer byAutomatic search on the Search for Printers screen, click Redetect and search for the printer again bythe IP address on the Search for Printers screen.
If the printer has not been found after searching it by the IP address, check network settings.
869

Cannot Proceed beyond Printer Connection Screen/Connect CableScreen
If you cannot proceed beyond the Printer Connection screen or the Connect Cable screen, check thefollowing.
Check 1 Make sure USB cable is securely plugged in to printer and computer.
Connect the printer and the computer using a USB cable as the illustration below. The USB port is located at theback side of the printer.
Check the items below only if you cannot proceed beyond the Printer Connection screen.
Check 2 Follow procedure below to connect printer and computer again.
Important• For macOS, make sure the lock icon is on the lower left of the Printers & Scanners screen.•
If the icon (locked) is displayed, click the icon to unlock. (The administrator name and the passwordare necessary to unlock.)
1. Turn off printer.1.
2. Unplug USB cable from printer and computer and connect it again.2.
870

3. Turn on printer.3.
Check 3 If you cannot resolve problem, follow procedure below to reinstall printer driver.
1. Exit setup.1.
2. Turn off printer.2.
3. Restart computer.3.
4. Make sure you have no application software running.4.
5. Click here and perform setup.5.
Note• You can use the Setup CD-ROM to redo setup.
871

Searching Printer by IP Address or Host Name During Setup
If the printer cannot be found on the Select Printer screen, search for the printer by an IP address or hostname. Click Specify the IP address and run the search on the screen which appears by clicking PrinterNot Found. The screen to select searching criteria appears.
1. Check printer's IP address or host name.1.
To check the printer's IP Address or host name, print out the network settings information or use thetouch screen to display it.
• Display on the touch screen.•
LAN settings
• Print the network settings.•
Printing Network Settings
Note• If you use the printer in an office, ask the network administrator.
2. Specify searching method.2.
Select one of the methods below.
A: Search by IPv4 addressSelect to search for printers by IPv4 address.
B: Search by IPv6 addressSelect to search for printers by IPv6 address.
872

C: Search by host nameSelect to search for printers by host name. A host name is referred to as LLMNR host name orBonjour name.
3. Enter IP address or host name and click Next.3.
Printer search starts.
If an error screen appears:Resolve the error according to the instruction on the screen.
If the IP address you entered is already used for another device, follow the procedure below to specifyprinter's IP address.
1. Select LAN settings on HOME screen.1.
Home Screen Menu Composition
If you specify the administrator password, enter the password.
2. Select Wi-Fi.2.
3. Select Settings.3.
4. Select Advanced.4.
5. Select TCP/IP settings.5.
• If you specify IPv4 address:•
1. Select IPv4.1.
2. Select Yes on the displayed screen.2.
3. Select IP address.3.
4. Select Manual setup.4.
Selecting Auto setup specifies the IP address automatically.
5. Enter IP address.5.
6. Select OK.6.
7. Enter subnet mask.7.
8. Select OK.8.
9. Enter default gateway.9.
873

10. Select OK.10.
The IPv4 address has been specified.
• If you specify IPv6 address:•
1. Select IPv6.1.
2. Select Yes on the displayed screen.2.
3. Select Enable/disable IPv6.3.
4. Select Enable.4.
The IPv6 address has been specified.
Important• If firewall is enabled on the computer, printers on a different subnet may not be detected.
Disable firewall.
If firewall interferes with printer search:
• If a firewall message appears:•
If a firewall message appears warning that Canon software is attempting to access the network, setthe security software to allow access.
After allowing the software to access, specify the IP address or host name and search for printersagain.
If the printer is found, follow the instructions on the screen to continue to set up the networkcommunication.
• If no firewall message appears:•
Temporarily disable the firewall and specify the IP address or host name to search for printers again.
After the setup is complete, re-enable the firewall.
Note• For more on firewall settings of your operating system or security software, see instruction manual or
contact its manufacturer.
874

Cannot Find Printer while Using Wi-Fi
Check 1 Make sure printer is turned on.
If not, make sure the printer is securely plugged in and press ON button to turn on.
The ON lamp flashes while the printer is initializing. Wait until the ON lamp stops flashing and remains lit.
Check 2 Check the network status on the touch screen.
If the icon is displayed, Wi-Fi is disabled.
Set Enable/disable Wi-Fi in the touch screen menu to Enable.
If the icon is displayed, see Check 3 or later checking items to make sure whether printer setup iscomplete or the settings of wireless router to connect are correct.
Check 3 Make sure printer setup is complete on the computer.
If it is not, perform setup.
• For Windows:•
Perform setup using the Setup CD-ROM or from Setup Guide.
• For macOS:•
Perform setup from Setup Guide.
Note• IJ Network Device Setup Utility allows you to diagnose and repair the network status. Download it from the•
web page.
For WindowsFor macOS
Check 4 Make sure printer and wireless router network settings match.
Make sure the network settings of the printer (e.g. wireless router name, SSID, network key, etc.) are identicalwith those of the wireless router.
To check the settings of the wireless router, refer to the instruction manual provided with it or contact itsmanufacturer.
Note• Use 2.4 GHz frequency band to connect to a wireless router. Match the SSID set for the printer with that for
2.4 GHz frequency band of the wireless router.
875
To check the SSID set for the printer, print out the network setting information or use the operation panel todisplay it.
• Display on the touch screen.•
LAN settings
• Print the network settings.•
Printing Network Settings
Note• IJ Network Device Setup Utility allows you to diagnose and repair the network status.•
Select the link below to download IJ Network Device Setup Utility and install it.
Checking Printer Connection Status Using IJ Network Device Setup Utility
Check 5 Make sure the printer is not placed too far away from the wireless router.
If the distance between the printer and wireless router is too far, wireless communication becomes poor. Placethe printer and wireless router close to each other.
Note• Though an antenna is attached to most wireless routers, note that some of them have it inside.
Check 6 Make sure wireless signal is strong. Monitor signal strength and move printerand wireless router as necessary.
Place the printer and wireless router where there are no obstacles between them. Wireless communicationbetween different rooms or floors is generally poor. Wireless communication can be impeded by buildingmaterials containing metal or concrete. If the printer cannot communicate with the computer over a Wi-Fi due toa wall, place the printer and the computer in the same room.
In addition, if a device like a microwave oven that emits radio waves of the same frequency bandwidth as awireless router is nearby, it may cause interference. Place the wireless router as far away from interferencesources as possible.
Note• IJ Network Device Setup Utility allows you to diagnose and repair the network status.•
Select the link below to download IJ Network Device Setup Utility and install it.
Checking Printer Connection Status Using IJ Network Device Setup Utility
Check 7 Make sure the computer is connected to the wireless router.
For more on how to check the computer settings or connection status, see your computer instruction manual orcontact its manufacturer.
Note• If you use a smartphone or tablet, make sure the Wi-Fi is enabled on the device.
Check 8 Make sure Enable bidirectional support is selected in the Ports sheet of theproperties dialog box of the printer driver. (Windows)
876

If not, select it to enable bidirectional support.
Check 9 Make sure security software's firewall is off.
If your security software's firewall is on, a message may appear warning you that Canon software is attemptingto access the network. If this warning message appears, set security software to always allow access.
If you are using any programs that switch between network environments, check their settings.
Check 10 If printer is connected to an AirPort Base Station via LAN, make sure you usealphanumeric characters for network identifier (SSID). (macOS)
If the problem is not resolved, redo setup.
• For Windows:•
Perform setup using the Setup CD-ROM or from Setup Guide.
• For macOS:•
Perform setup from Setup Guide.
877

Cannot Find Printer while Using Wired LAN
Check 1 Make sure printer is turned on.
If not, make sure the printer is securely plugged in and press ON button to turn on.
The ON lamp flashes while the printer is initializing. Wait until the ON lamp stops flashing and remains lit.
Check 2 Make sure LAN cable is connected properly.
Make sure the printer is connected to the router with the LAN cable. If the LAN cable is loose, connect the cableproperly.
If the LAN cable is connected to the WAN side of the router, connect the cable to the LAN side of the router.
Check 3 Is icon displayed on touch screen?
If the icon is not displayed, wired LAN is disabled.
If not, select LAN settings, Wired LAN, Settings, and then select Enable for Enable/disable Wired LAN.
878

Cannot Print Using AirPrint
Check 1 Make sure printer is turned on.
If the printer is turned on, turn it off and back on, and then check whether the issue is resolved.
Check 2 Make sure printer is registered to your computer.
Check 3 Make sure printer is connected by LAN to same network subnet as AirPrintcompliant device when printing over LAN.
Check 4 Make sure printer has enough paper and ink.
Check 5 Make sure no error message is displayed on printer's touch screen.
879

Installation Problems
Removing Printer Software
Taking Time to Setup Process (Windows)
Failed to Printer Driver Installation (Windows)
880

Removing Printer Software
Follow the steps below to remove utility software installed on the computer.
Important• You must log in as an administrator or have administrator permissions.
Note• See the pages below for how to remove printer drivers.•
Deleting the Unnecessary Printer Driver (Windows)Delete the Unnecessary Canon IJ Printer from the Printer List (macOS)
Removing the IJ Network Device Setup Utility (Windows)Follow the steps below to remove the IJ Network Device Setup Utility.
• Windows 10•
1. Click start, select Windows System, and then select Control Panel.1.
2. Under Programs, select Programs and Features, select IJ Network Device Setup2.Utility from the list of programs, and then click Uninstall.
• Windows 8.1•
1. Use the Settings charm on the desktop to open the Control Panel.1.
2. Under Programs, select Programs and Features, select IJ Network Device Setup2.Utility from the list of programs, and then click the Uninstall button.
• Windows 7•
1. Select Control Panel from the start menu.1.
2. Select Uninstall a program.2.
3. Select IJ Network Device Setup Utility, and then click the Uninstall button.3.
Note• If the User Account Control dialog box is displayed, click Yes.
881

Removing the IJ Network Device Setup Utility (macOS)Follow the steps below to remove the IJ Network Device Setup Utility.
1. Select Applications from Go menu of Finder, double-click Canon Utilities > IJ Network1.Device Setup Utility, and then drag Canon IJ Network Device Setup Utility icon intoTrash.
2. Restart computer.2.
Empty the Trash and restart your computer.
Note• To reinstall IJ Network Device Setup Utility, uninstall IJ Network Device Setup Utility and install it•
again from the Canon website.
882

Taking Time to Setup Process (Windows)
If Windows update starts during setup, or if you perform setup while Windows update is in progress, it maytake a while to register the printer or to perform other processes.
Wait for a while. This is not a malfunction.
883

Failed to Printer Driver Installation (Windows)
• If installation does not start when you insert Setup CD-ROM:•
Follow the instructions below to start the installation.
1. Make the following settings.1.
◦ In Windows 10, click Start button > File Explorer, and then click This PC from list on left.◦
◦ In Windows 8.1, select Explorer icon in Taskbar on Desktop, and then select This PC from◦list on left.
◦ In Windows 7, click Start, and then click Computer.◦
2. Double-click the CD-ROM icon in the window that appears.2.
If the contents of the CD-ROM appear, double-click MSETUP4.EXE.
If you cannot install the printer driver with the Setup CD-ROM, install it from the Canon website.
Note• If the CD-ROM icon does not appear, try the following:•
Remove the CD-ROM from your computer and reinsert it.
Restart your computer.
If the icon still does not appear, try a different disc and see if it appears. If it does, there is aproblem with the Setup CD-ROM. Contact your nearest Canon service center to request a repair.
884

• If you cannot get past the Printer Connection screen:•
Cannot Proceed beyond Printer Connection Screen/Connect Cable Screen
• Other cases:•
Reinstall the printer driver.
If the printer driver was not installed correctly, uninstall the printer driver, restart your computer, and thenreinstall the printer driver.
Deleting the Unnecessary Printer Driver
Reinstall the printer driver with the Setup CD-ROM or install it from the Canon website.
Note• If the installer was stopped due to a Windows error, Windows operation may be unstable, and you•
may not be able to install the drivers. Restart your computer and then reinstall the drivers.
885

HP-GL/2 problems
With HP-GL/2, printing is misaligned
Lines or images are missing in printed HP-GL/2 jobs
Lines are printed too thick or thin in HP-GL/2 print jobs
HP-GL/2 jobs are printed in monochrome (or color)
Printed colors of lines are inaccurate during HP-GL/2 printing
HP-GL/2 jobs are printed 6 mm larger than specified
HP-GL/2 jobs are printed at maximum size, even if a standard size is specified
HP-GL/2 printing takes a long time
The printer stops when printing a HP-GL/2 job (the carriage stops moving)
886

With HP-GL/2, printing is misaligned
Check 1 Make sure the plotter origin is correct.
Check the printing commands.
Set Detect image size to Command priority or Detected size in the touch screen menu.
Print settings
Check 2 Check the Margin setting.
Adjust the Margin setting values in the touch screen menu.
Print settings
887

Lines or images are missing in printed HP-GL/2 jobs.
Check 1 Is the memory full?
Check the size of the data in the print job.
Check 2 Is the printer receiving an HP-GL/2 command not supported by this printer?
Check the print job and settings.
Check 3 Has the printer received print data that includes HP RTL commands whenAuto rotation is ON?
Set Auto rotation to OFF in the touch screen menu and print again.
Print settings
Check 4 Make sure the plotter origin is correct.
Check the printing commands.
Set Detect image size to Command priority or Detected size in the touch screen menu.
Print settings
Check 5 Is Oversize set to Disable?
Set Oversize to Enable in the touch screen menu.
Print settings
888

Lines are printed too thick or thin in HP-GL/2 print jobs
Check 1 Check the Width setting in Pen setup menu.
Select Pen setup, then select Define palette, and change the Width setting of each pen in each palette.
Print settings
Check 2 Check the Width correction setting.
Change the Width correction setting in the touch screen menu.
Print settings
Check 3 Is Adjust faint lines set to OFF?
If fine lines are printed faintly, setting Adjust faint lines to ON will print the lines more distinctly.
Print settings
889
HP-GL/2 jobs are printed in monochrome (or color)
Check Check the Color mode setting.
Check the Color mode setting in the touch screen menu.
Print settings
However, for optimal Print head performance, the printer consumes trace amounts of color ink even whenMonochrome is selected as Color mode.
890

Printed colors of lines are inaccurate during HP-GL/2 printing
Check Is Adjust faint lines set to ON?
Setting Adjust faint lines to OFF in the touch screen menu may help produce the expected results. However,lines in some colors may appear broken.
Print settings
891

HP-GL/2 jobs are printed 6 mm larger than specified
Check Check the page size of the HP-GL/2 print job, as created in the sourceapplication.
Set Oversize to Disable in the touch screen menu.
Print settings
892

HP-GL/2 jobs are printed at maximum size, even if a standardsize is specified
Check Check the page size of the HP-GL/2 print job, as created in the sourceapplication.
Set Detect image size to Command priority or Detected size in the touch screen menu.
Set Save paper to ON in the touch screen menu.
Print settings
893

HP-GL/2 printing takes a long time
Check 1 Is the print data size large?
Large print jobs with a lot of data take longer to print. Please wait a while until printing is finished.
Check 2 Is Input resolution set to 600 dpi?
Set Input resolution to 300 dpi.
Adjusting Feed Amount
894

The printer stops when printing a HP-GL/2 job (the carriage stopsmoving)
Check 1 The printer is analyzing the print job.
Please wait a while until printing is finished.
Check 2 Is Input resolution set to 600 dpi?
Set Input resolution to 300 dpi.
Adjusting Feed Amount
895

Other Problems
Printer does not turn on
If the Printer Makes a Strange Sound
Messages advising to check the maintenance cartridge are not cleared
Printer consumes a lot of ink
Printed pages are not collected cleanly in the basket
Printed pages are not collected cleanly in the stacker
Basket Lurches
When Trim edge first is set, the trimmed paper is drawn into the roll unit
Ink Level Detection
Media Type Selection does not Match Loaded Media Type
896

Printer does not turn on
Check 1 Is the power cord plugged in?
Plug the power cord into the outlet, and then turn on the printer.
Check 2 Is the specified voltage being supplied?
Check the voltage of the outlet and breaker.
Specifications
897

If the Printer Makes a Strange Sound
Check 1 Has an unusual noise been produced from the vicinity of the roll holder?
If dust accumulates on the gear (A) at the end of the roll holder, a noise may be produced from that area.
When the noise starts, clean the gear with the following procedure.
1. Remove the roll holder from the printer.1.
2. Wipe the dust off the gear with a damp, tightly wrung cloth, and then dry with a dry cloth.2.
3. Insert the roll holder in the printer.3.
Check 2 Operating noise may be heard from the printer even when not printing.
The following sounds do not indicate a problem with the printer.
• A suction sound can be heard from the platen•
To prevent the paper from rising, the surface of the platen has vacuum holes that create suction on thepaper.
• Roll paper makes a fluttering sound during printing.•
There may be a fluttering sound when large paper is advanced.
• You suddenly hear the sound of cleaning operations.•
Cleaning is automatically performed at specified intervals in order to keep the printer maintained.
• You suddenly hear the sound of ink agitation.•
898

Ink is automatically agitated after specified intervals to maintain optimal print quality. Agitation takesapproximately 1 minute 30 seconds.
Ink is also agitated automatically at the following times. Please note that no other operations can beperformed while "Agitating the ink" is on the touch screen.
◦ After the printer is turned on◦ After data transmission◦ After ink tank replacement
In other cases, contact your Canon dealer.
899

Messages advising to check the maintenance cartridge are notcleared
The newly replaced maintenance cartridge is not recognized.
Remove the newly replaced maintenance cartridge, and then reinsert it again firmly.
Replacing the Maintenance Cartridge
900

Printer consumes a lot of ink
Check 1 Are lots of full-color materials being printed?
In print jobs such as photos, images are filled with color. This consumes a lot of ink. This does not indicate aproblem with the printer.
Check 2 Is System Cleaning being carried out frequently?
System Cleaning uses a lot of ink. This is normal. We recommend that you only carry out System Cleaningafter the printer has been transported, if it has not been used for a long time, or if there is a problem with thePrint head.
Check 3 You have just finished initial installation, when more ink is consumed to fill thesystem.
If using the printer for the first time, or using it after transport, the ink tank will supply an initial fill of ink to thePrint head.
Although the amount of remaining ink may drop as a result, it does not indicate a problem.
Check 4 Is the Print head nozzle blocked?
Check for nozzle clogging.
Checking for Nozzle Clogging
901

Printed pages are not collected cleanly in the basket
Check 1 Is the roll unit in place?
The basket may not be able to catch printed paper properly if the roll unit is in place.
Refer to Example Basket Configurations and try another basket position.
Example Basket Configurations
Check 2 Is the basket in the right position for the media size?
The optimal basket position depends on factors such as media size and the conditions the printer is being usedunder.
Refer to Example Basket Configurations and try another basket position.
Example Basket Configurations
902

Printed pages are not collected cleanly in the stacker
Check Is the stacker in the right position for the media size?
The optimal stacker position depends on factors such as media size and the conditions the printer is being usedunder.
Refer to Example Stacker Configurations and try another stacker position.
Example Stacker Configurations
903

Basket Lurches
Make sure a Basket Locking Support is attached to the Basket Arm. The basket may lurch if a force isapplied to the one without the Basket Locking Support. To prevent the basket from lurching, attach theBasket Locking Supports to both sides of the Basket Arm.
Using the Basket
904

When Trim edge first is set, the trimmed paper is drawn into theroll unit
Check Is the basket in position 1?
If the roll unit is being used as a paper feeder and the basket is in position 1, the paper strip discarded by Trimedge first for borderless printing or paper loading may get drawn into the roll unit.
In this situation, refer to Example Basket Configurations and try another position.
Example Basket Configurations
905

Ink Level Detection
The printer ink tank detects the amount of ink remaining to prevent running out of ink while printing and toavoid printer failure.
Ink Tanks
When using an ink tank refilled with ink, the function for detecting the remaining ink level may not operateproperly and printing may stop. If you want to use an ink tank refilled with ink, you need to disable thefunction for detecting the remaining ink level.
Important• Printing with the ink level detection canceled may lead to printer damage and printing problems. Canon•
Inc. is not liable for any damage that may occur as a result of refilling ink.
• Once the function for detecting the remaining ink level is disabled, it cannot be restored for that ink tank.•To restore the function for detecting the remaining ink level, replace the ink tank with a new ink tank forthat printer.
• Repeatedly removing and inserting the same ink tank can cause the contacts between the ink tank and•printer to malfunction, ink may leak from the ink tank, and the printer may become damaged.
Releasing ink level detectionInk level detection will be deactivated if you load ink tanks once emptied.
If "The above ink tank may be an ink tank that ran out of genuine Canon ink or a counterfeit Canon inktank." appears on the touch screen, follow the steps below.
1. Move through the screens, performing the actions described in the messages that appear1.on the touch screen.
2. If an instruction to disable detection of remaining ink appears, touch Stop on the printer2.for at least 5 seconds, and then release it.
Ink level detection is now released.
906

Media Type Selection does not Match Loaded Media Type
Check 1 Is this paper being used for the first time?
If this is the first time to use the paper, it may not be selected correctly. In the media type selection, manuallyselect the correct paper type.
Check 2 Is the paper you set genuine paper or recommended paper?
If you want to use a paper that is not in the paper information list, register the media type in the MediaConfiguration Tool.
Paper Information ListMedia Configuration Tool Guide
Check 3 Is there any unevenness in the gloss and color of the paper surface?
Some media types may not be suitable for paper type estimation. If the paper type is not recognized correctly,manually select the correct paper in the media type selection.
907

List of Support Code for Error
Support codes appear on the PC when an error occurs.
Support codes are error identification numbers that appear alongside error messages.
If an error occurs, check the support code and follow the recommended steps to resolve the issue.
Support code displayed
• 1000 to 1ZZZ•
1005 100A 100B 100E 100F 1012
1018 1019 1021 1022 1023 1024
1025 1034 1035 1036 1039 1040
1051 1052 1054 1056 1057 1058
1059 1061 1200 1201 1210 1213
1214 1300 1306 1317 1318 1322
1323 1324 1325 1326 1327 1328
1329 1401 1403 1408 1409 140A
140B 140C 140F 1468 1477 1478
1480 1481 1485 1492 1494 1495
1500 1551 1552 1570 1571 1660
168B 1720 1721 1722 1730 1731
1752 1753 1756 1757 1875
• 2000 to 2ZZZ•
2001 2002 2130 2131 2132
• 3000 to 3ZZZ•
3000 3001 3200 3201 3250 3300
3301 3302 3303 3304 3306 3311
3312 3313 3314 3315 3316 3317
3331 3332 3333 3334 3335 3336
3338 3341 3342 3350 3351 3352
908

3414 3415 3416 3417 3418 3419
3420 3421 3422 3423 3424 3448
3451
• 4000 to 4ZZZ•
4107 4111 4112 4113 4114 4116
4117 4118 4119 4120 4121 4122
4801 4803 4804 4805 4806 4900
4901 4903 4905 4909 4910 4911
4913 4920 4922 4931 4932 4933
4934 4935 4937 4950 4951 4952
4953 4954 4955 4956
• 5000 to 5ZZZ•
5106 5200 5A60 5A61 5B10 5B16
5B20 5B21 5C00
• 6000 to 6ZZZ•
6502 6700 6702 6820 6900 6901
6902 6910 6920 6921 6930 6931
6932 6933 6940 6941 6942 6943
6944 6945 6946
• 7000 to 7ZZZ•
7050 7051 7052
• 8000 to 8ZZZ•
8200
• 9000 to 9ZZZ•
9000 9001 9110
909

• A000 to ZZZZ•
B20A B510
910

1005
CauseYou have attempted to print on a sheet, but no sheet is loaded.
What to DoCheck the media size and type for the print job on the touch screen, and then tap OK.
• Continuing to print•
Tap Load paper, and then load the paper.
Loading and Printing on Sheets
• Stopping printing•
To stop printing, tap Cancel or Stop on the touch screen.
911

100A
CauseYou have attempted to print from Roll 1 (Upper), but no roll is loaded.
What to DoTap Load paper on the touch screen, and then load the paper roll and print.
Loading the Upper Roll on the Printer
Note• To stop printing, tap Cancel or Stop on the touch screen.
912

100B
CauseTried to print from Roll 2 (Lower) but no paper roll has been loaded.
What to DoTap Load paper on the touch screen, and then load the paper roll and print.
Loading the Lower Roll on the Roll Unit (Option)
Note• To stop printing, tap Cancel or Stop on the touch screen.
913

100E
CauseA printer error has occurred.
What to DoTurn off the power, wait a moment, and then turn it back on.
If the error appears again, make a note of the detailed error code (ECxx-xxxx) that appears on the touchscreen, and then turn off the power and contact a Canon customer service center.
Detailed error codesEC16-202E
914

100F
CauseA printer error has occurred.
What to DoTurn off the power, wait a moment, and then turn it back on.
If the error appears again, make a note of the detailed error code (ECxx-xxxx) that appears on the touchscreen, and then turn off the power and contact a Canon customer service center.
Detailed error codesEC17-202F
915

1012
CauseYou have attempted to print on a sheet, but no sheet is loaded.
What to DoTap Load paper on the touch screen, and then load cut paper and print.
Loading and Printing on Sheets
Note• To stop printing, tap Cancel or Stop on the touch screen.
916

1018
CauseRoll 1 (Upper) feeder has not been calibrated.
What to DoCalibrating, please remove the upper roll holder.
Removing the Upper Roll from the Printer
917

1019
CauseThe roll unit feeder has not been calibrated.
What to DoCalibrating, please remove the roll holder on the roll unit.
Removing the Lower Roll from the Roll Unit (Option)
918

1021
CauseThe printer has received a print job longer than the amount of roll paper left.
What to Do
• Continuing to print•
To continue printing, tap Print with the loaded paper. on the touch screen.
However, the roll paper may run out during the print job and you may not be able to print all of thedocument.
• Replacing paper•
Tap Replace the paper and print on the touch screen.
Change the Paper Source in the printer driver, or replace the paper with paper of the right length forthe print job, and then try again.
If using the Media Take-up Unit, tap Cancel on the touch screen to stop printing.
Remove the printed paper from the Media Take-up Unit, replace the paper with paper of the rightlength for the print job, and then try again.
Removing the Upper Roll from the PrinterLoading the Upper Roll on the PrinterRemoving Printed Paper from the Roll Unit
• Stopping printing•
To stop printing, tap Cancel or Stop on the touch screen.
919

1022
CauseReceived print job that is longer than paper length remaining on Roll 1 (Upper).
What to Do
• Continuing to print•
To continue printing, tap Print with the loaded paper. on the touch screen.
However, the roll paper may run out during the print job and you may not be able to print all of thedocument.
• Replacing paper•
Tap Replace the paper and print on the touch screen.
Change the Paper Source in the printer driver, or replace the paper with paper of the right length forthe print job, and then try again.
Removing the Upper Roll from the PrinterLoading the Upper Roll on the Printer
• Stopping printing•
To stop printing, tap Cancel or Stop on the touch screen.
920

1023
CauseReceived print job that is longer than paper length remaining on Roll 2 (Lower).
What to Do
• Continuing to print•
To continue printing, tap Print with the loaded paper. on the touch screen.
However, the roll paper may run out during the print job and you may not be able to print all of thedocument.
• Replacing paper•
Tap Replace the paper and print on the touch screen.
Change the Paper Source in the printer driver, or replace the paper with paper of the right length forthe print job, and then try again.
Removing the Lower Roll from the Roll Unit (Option)Loading the Lower Roll on the Roll Unit (Option)
• Stopping printing•
To stop printing, tap Cancel or Stop on the touch screen.
921

1024
CausePossible causes include the following.
• Roll paper is empty in Roll 1 (Upper).• There is remaining roll paper in Roll 1 (Upper), but because it could not be advanced, it could not be
detected.
What to Do
• The roll paper has run out•
Follow the steps below to replace the used roll with a new roll of the same type and size.
1. Lift up the release lever and remove the roll paper.1.
Removing the Upper Roll from the Printer
2. Load the new roll.2.
Loading the Upper Roll on the Printer
3. If "There is a job which has not been printed yet. Do you want to print this job?" appears on3.the touch screen, tap Yes.
Printing will resume, starting from the page on which the error occurred.
• Feed stopped because the end of the paper roll is attached to the core with tape•
Remove the used roll paper and insert a new roll paper.
Removing the Upper Roll from the PrinterLoading and Printing on Rolls
• Feed stopped because the remaining paper roll is too heavy•
It may be helpful to change the printing mode, which will change the paper feed timing.
If using Windows, select a higher Print Quality setting under Advanced Settings in the printer driver.
If using macOS, select Quality & Media in the printer driver, and then select a higher Print Qualitysetting.
Setting the Print Quality Level (Custom) (Windows)Setting the Print Quality Level (Custom) (macOS)
Note• To stop printing, tap Stop.
922

1025
CauseRoll paper in Roll 2 (Lower) is empty.
What to DoFollow the steps below to replace the used roll with a new roll of the same type and size.
1. Lift up the release lever and remove the roll paper.1.
Removing the Lower Roll from the Roll Unit (Option)
2. Load the new roll.2.
Loading the Lower Roll on the Roll Unit (Option)
3. If "There is a job which has not been printed yet. Do you want to print this job?" appears on the3.touch screen, tap Yes.
Printing will resume, starting from the page on which the error occurred.
Note• To stop printing, tap Stop.
923

1034
CauseNo upper roll is loaded in printer.
What to Do
• Continuing to print•
Load an upper roll in the printer and print.
If an upper roll is loaded in the printer, feed the roll paper manually.
Loading the Upper Roll on the Printer
• Stopping printing•
To stop printing, tap OK on the touch screen.
Note• When Roll paper auto feed is set to Disable, roll paper is not fed automatically. Check the settings.
924

1035
CauseNo lower roll is loaded in roll unit.
What to Do
• Continuing to print•
Load a lower roll in the roll unit and print.
If a lower roll is loaded in the roll unit, feed the roll paper manually.
Loading the Lower Roll on the Roll Unit (Option)
• Stopping printing•
To stop printing, tap OK on the touch screen.
Note• When Roll paper auto feed is set to Disable, roll paper is not fed automatically. Check the settings.
925

1036
CausePrinter tried printing from Roll 2 (Lower), but optional roll unit is not installed in lower position of printer.
What to DoCheck if the roll unit is properly installed on the printer following the steps below.
1. Tap OK on the touch screen to stop printing.2. Turn off the power and make sure the roll unit is properly installed on the printer.
Note• For instructions on installing the roll unit, see the Roll Unit Setup Guide provided with the roll unit.• Make sure the roll unit's connection cable is inserted all the way in.
If the error appears again, the printer may be damaged. Contact a Canon customer service center.
926

1039
CauseUnsupported roll unit is installed on printer.
What to DoTurn off the power and remove the roll unit.
Check the model number of the roll unit. Install a roll unit supported by the printer.
Roll Unit
Note• For instructions on installing the roll unit, see the Roll Unit Setup Guide provided with the roll unit.
If the error appears again, the printer may be damaged. Contact a Canon customer service center.
927

1040
CauseUnsupported roll unit is installed on printer.
What to DoTurn off the power and remove the roll unit.
Check the model number of the roll unit. Install a roll unit supported by the printer.
Roll Unit
Note• For instructions on installing the roll unit, see the Roll Unit Setup Guide provided with the roll unit.
If the error appears again, the printer may be damaged. Contact a Canon customer service center.
928

1051
CauseThe media type specified in the printer driver is not the same as the media type loaded in the printer.
What to DoYou can continue to print, but note that this error may cause problems in the printing results.
929

1052
CauseThe width of the roll paper set in Fit Roll Paper Width in the printer driver is not the same as the width ofthe roll paper loaded in the printer.
What to DoYou can continue to print, but note that this error may cause problems in the printing results.
930

1054
CauseThe paper in the printer is smaller than the paper size set in the printer driver.
What to DoYou can continue to print, but note that this error may cause problems in the printing results.
931

1056
CauseThe paper position is not suitable for borderless printing.
What to DoYou can continue to print, but note that this error may cause problems in the printing results.
932

1057
CauseThe paper position is not suitable for borderless printing.
What to DoYou can continue to print, but note that this error may cause problems in the printing results.
933

1058
CauseRoll paper in Roll 1 (Upper) has almost run out.
What to DoPrinting will continue. Replace the upper roll in the printer with one that has enough paper for printing assoon as possible.
Removing the Upper Roll from the PrinterLoading the Upper Roll on the Printer
Note• To stop printing, tap Stop.
934

1059
CauseRoll paper in Roll 2 (Lower) has almost run out.
What to DoPrinting will continue. Replace the lower roll in the roll unit with one that has enough paper for printing assoon as possible.
Removing the Lower Roll from the Roll Unit (Option)Loading the Lower Roll on the Roll Unit (Option)
Note• To stop printing, tap Stop.
935
1061
CauseThe media type specified in the print job is not the same as the media type loaded in the printer.
What to DoTap OK on the touch screen to go to the next screen.
Check the displayed media type and size, and tap OK.
• Printing again according to the media type•
Follow the steps below to match the media type in the print job and the media type loaded in theprinter.
◦ Changing the media type in the print job◦
1. Tap Cancel to stop printing.2. Change the media type in the print job settings to the media type loaded in the printer, and2.
then try again.
Loading and Printing on RollsLoading and Printing on Sheets
◦ Replacing paper◦
1. Tap Replace the paper and print.2. Load the paper with the media type specified in the print job, and then try again.2.
Loading and Printing on RollsLoading and Printing on Sheets
• Printing with the current print settings•
To continue printing, tap Print with the loaded paper. on the touch screen.
However, note that this error may cause paper jams and affect the printing quality.
936

1200
CauseTop cover or print head lock lever is open.
What to DoOpen the top cover and make sure the print head lock lever is closed properly.
Make sure there are no foreign objects caught in the top cover, and then close the top cover.
If this error appears again, close the top cover, turn the power off, wait a moment, and then turn the powerback on.
Note• If installing a print head, close the top cover after finishing.
937

1201
CauseThe ink tank cover is open.
What to DoClose the ink tank cover.
938

1210
CauseThe ink tank cover is open.
What to DoClose the ink tank cover.
939

1213
CauseRelease lever is lifted up.
What to DoLower the release lever.
If the error occurs again, turn off the printer and wait a while before restoring power.
940

1214
CauseA printer error has occurred.
What to DoTurn off the power, wait a moment, and then turn it back on.
If the error appears again, make a note of the detailed error code (ECxx-xxxx) that appears on the touchscreen, and then turn off the power and contact a Canon customer service center.
Detailed error codesEC19-2F21 EC51-2F38
941

1300
CausePaper jammed inside the printer while printing.
What to DoFollow the steps below to remove jammed paper.
1. Lift up the release lever and remove the jammed paper.1.
Remove Jammed Roll PaperRemove a Jammed Sheet
2. Load the paper.2.
Loading the Upper Roll on the PrinterLoading the Lower Roll on the Roll Unit (Option)Loading Sheets in the Printer
3. If "There is a job which has not been printed yet. Do you want to print this job?" appears on the3.touch screen, tap Yes.
Printing will resume, starting from the page on which the error occurred.
If the error appears again, the printer may be damaged. Contact a Canon customer service center.
942

1306
CauseA print job for rolls was received when a sheet is loaded.
What to DoFollow these steps to load and print on a roll.
1. To remove the cut paper, tap Remove paper on the touch screen.1.
Removing Sheets
2. Load a new roll.2.
Loading the Upper Roll on the PrinterLoading the Lower Roll on the Roll Unit (Option)
Note• To stop printing, tap Cancel or Stop on the touch screen.
943

1317
CausePaper loaded crooked was detected when the paper was advanced.
What to DoLift up the release lever and reload the paper.
Loading the Upper Roll on the PrinterLoading the Lower Roll on the Roll Unit (Option)Loading Sheets in the Printer
If this error appears again even after reloading the paper roll, remove the roll holder from the printer, insertthe paper roll firmly into the roll holder until it is up against the flange, and then insert the roll holder intothe printer.
Loading Rolls on the Roll Holder
Important• If this message continues to appear even after taking the steps above, or if you do not want this
message to appear, set Skew detection accuracy in the printer menu to OFF or Loose. However,note that the paper will be printed skewed, which could cause paper jams and abnormal print results,or dirty the platen and the reverse of the next printed sheet.
944

1318
CauseA printer error has occurred.
What to DoTurn off the power, wait a moment, and then turn it back on.
If the error appears again, make a note of the detailed error code (ECxx-xxxx) that appears on the touchscreen, and then turn off the power and contact a Canon customer service center.
Detailed error codesEC0F-2F93
945

1322
CauseCannot detect paper size because paper is not in the correct position or because curled paper has beenloaded.
What to DoLift up the release lever and reload the paper.
Loading the Upper Roll on the PrinterLoading the Lower Roll on the Roll Unit (Option)Loading Sheets in the Printer
If "There is a job which has not been printed yet. Do you want to print this job?" appears on thetouch screen, tap Yes.
Printing will resume, starting from the page on which the error occurred.
Note• If this error appears again even after reloading the paper roll, remove the roll holder from the printer,•
insert the paper roll firmly into the roll holder until it is up against the flange, and then insert the rollholder into the printer.
Loading Rolls on the Roll Holder
• This error might also appear if the platen has been dirtied by ink or another substance, or if the size•of clear film could not be detected. In this case, open the top cover and clean the entire platen area.
Cleaning Inside the Top Cover
946

1323
CauseAn unsuitable paper size has been loaded.
What to DoLift up the release lever and reload paper of suitable size.
Paper Sizes
Note• Load unused A4/letter size or larger paper if printing calibration and nozzle check patterns. Each
calibration may take several sheets of paper.
947
1324
CauseA print job for printing on sheets was sent when a roll is loaded.
What to DoFollow the steps below to print again.
1. Tap Remove paper on the touch screen to stop printing.2. Remove the paper roll, load cut paper of the size and type specified in the printer driver, and then try2.
again.
Removing the Upper Roll from the PrinterRemoving the Lower Roll from the Roll Unit (Option)Loading and Printing on Sheets
Note• To stop printing, tap Cancel or Stop on the touch screen.
948

1325
CauseReceived cut paper print data when using roll unit on Media Take-up Unit.
What to DoFollow the steps below to print again.
1. Tap Cancel on the touch screen to stop printing.2. Remove the paper roll, load cut paper of the size and type specified in the printer driver, and then try2.
again.
Removing Printed Paper from the Roll UnitLoading and Printing on Sheets
949

1326
CausePrinter could not feed upper roll.
What to DoFully rewind the upper roll in the printer manually, check the following, and then tap OK on the touchscreen.
• Is the edge of the roll paper at a slant or folded?•
If the edge of the roll paper is at a slant or is folded, use scissors or a cutting tool to cut it away andstraighten the edge of the roll paper.
• Is the roll paper loaded in the opposite orientation?•
Load the roll paper in correct orientation.
• Is the roll paper loose?•
If the roll paper is loose, remove the slack before loading the roll paper.
• Is the paper wrinkled or curled?•
If the paper is wrinkled or curled, straighten it out before loading it.
To continue paper feeding, tap OK on the touch screen and feed the paper manually.
Loading the Upper Roll on the Printer
950

1327
CausePrinter could not feed roll paper from roll unit (lower).
What to DoFully rewind the roll paper in the roll unit (lower) manually, check the following, and then tap OK on thetouch screen.
• Is the edge of the roll paper at a slant or folded?•
If the edge of the roll paper is at a slant or is folded, use scissors or a cutting tool to cut it away andstraighten the edge of the roll paper.
• Is the roll paper loaded in the opposite orientation?•
Load the roll paper in correct orientation.
• Is the roll paper loose?•
If the roll paper is loose, remove the slack before loading the roll paper.
• Is the paper wrinkled or curled?•
If the paper is wrinkled or curled, straighten it out before loading it.
To continue paper feeding, tap OK on the touch screen and feed the paper manually.
Loading the Lower Roll on the Roll Unit (Option)
951

1328
CauseUpper roll jammed.
What to DoFully rewind the upper roll in the printer manually, check the following, and then tap OK on the touchscreen.
• Is the edge of the roll paper at a slant or folded?•
If the edge of the roll paper is at a slant or is folded, use scissors or a cutting tool to cut it away andstraighten the edge of the roll paper.
• Is the roll paper loaded in the opposite orientation?•
Load the roll paper in correct orientation.
• Is the roll paper loose?•
If the roll paper is loose, remove the slack before loading the roll paper.
• Is the paper wrinkled or curled?•
If the paper is wrinkled or curled, straighten it out before loading it.
To continue paper feeding, tap OK on the touch screen and feed paper manually.
Loading the Upper Roll on the Printer
If the error appears again, the printer may be damaged. Contact a Canon customer service center.
952

1329
CauseRoll paper jammed in roll unit (lower).
What to DoFully rewind the roll paper in the roll unit (lower) manually, check the following, and then tap OK on thetouch screen.
• Is the edge of the roll paper at a slant or folded?•
If the edge of the roll paper is at a slant or is folded, use scissors or a cutting tool to cut it away andstraighten the edge of the roll paper.
• Is the roll paper loaded in the opposite orientation?•
Load the roll paper in correct orientation.
• Is the roll paper loose?•
If the roll paper is loose, remove the slack before loading the roll paper.
• Is the paper wrinkled or curled?•
If the paper is wrinkled or curled, straighten it out before loading it.
To continue paper feeding, tap OK on the touch screen and feed paper manually.
Loading the Lower Roll on the Roll Unit (Option)
If the error appears again, the printer may be damaged. Contact a Canon customer service center.
953

1401
CauseFailed to recognize print head.
What to DoOpen the top cover and reattach the print head.
Replacing the Print Head
954

1403
CauseThere is a problem with the print head.
What to DoTap OK on the touch screen, and then replace the current print head with a new one.
Replacing the Print Head
If you do not have a replacement print head ready, turn off the power and replace the print head once youhave the new one.
955

1408
CauseThere is a problem with the print head.
What to DoTap OK on the touch screen, and then replace the current print head with a new one.
Replacing the Print Head
If you do not have a replacement print head ready, turn off the power and replace the print head once youhave the new one.
956

1409
CauseThere is a problem with the print head.
What to DoTap OK on the touch screen, and then replace the current print head with a new one.
Replacing the Print Head
If you do not have a replacement print head ready, turn off the power and replace the print head once youhave the new one.
957

140A
CauseThere is a problem with the print head.
What to DoTap OK on the touch screen, and then replace the current print head with a new one.
Replacing the Print Head
If you do not have a replacement print head ready, turn off the power and replace the print head once youhave the new one.
958

140B
CauseFailed to recognize print head.
What to DoOpen the top cover and reattach the print head.
Replacing the Print Head
959

140C
CauseThere is a problem with the print head.
What to DoTurn off the power, wait a moment, and then turn it back on.
960

140F
CauseThere is a problem with the print head.
What to DoTap OK on the touch screen, and then replace the current print head with a new one.
Replacing the Print Head
If you do not have a replacement print head ready, turn off the power and replace the print head once youhave the new one.
961

1468
CausePrinter error has occurred.
What to DoTurn off the power, wait a moment, and then turn it back on.
If the error appears again, make a note of the detailed error code (ECxx-xxxx) that appears on the touchscreen, and then turn off the power and contact a Canon customer service center.
Detailed error codesEC55-2F24
962

1477
CauseThere is a problem with the print head.
What to DoOpen the top cover and replace the print head with a new one.
Replacing the Print Head
963

1478
CauseThere is a problem with the print head.
What to DoTap OK on the touch screen, and then replace the current print head with a new one.
Replacing the Print Head
If you do not have a replacement print head ready, turn off the power and replace the print head once youhave the new one.
964

1480
CauseThe attached print head was previously used in a different model.
What to DoAttach the correct print head.
Replacing the Print Head
965

1481
CauseThe attached print head was previously used in a model that uses a different ink set.
What to DoAttach the correct print head.
Replacing the Print Head
966

1485
CauseCannot use attached print head.
What to DoAttach the correct print head.
Replacing the Print Head
967

1492
CauseA printer error has occurred.
What to DoTurn off the power, wait a moment, and then turn it back on.
If the error appears again, make a note of the detailed error code (ECxx-xxxx) that appears on the touchscreen, and then turn off the power and contact a Canon customer service center.
Detailed error codesEC02-2F42 EC21-2F44 EC3F-2F40 EC3F-2F41
968

1494
CauseThere may be a problem with the print head.
What to DoTurn off the power, wait a moment, and then turn it back on.
If the error appears again, remove and reattach the print head.
Replacing the Print Head
If that does not get rid of the error, replace the print head with a new one.
969

1495
CauseThe print head nozzle is blocked.
What to DoFollow the steps below to clean the print head.
1. Tap Cancel on the touch screen to stop printing.2. Clean the print head.2.
Cleaning the Print Head
If this message still appears when printing, replace the print head.
Replacing the Print Head
Important• To continue printing, use the touch screen and tap Continue printing. However, the print results may
not be satisfactory.
970

1500
CauseThe ink in the ink tank is running low.
What to DoPrepare a new ink tank.
971

1551
CauseA genuine Canon ink tank with a history of past use has been detected.
What to DoTo dismiss the message, tap OK on the touch screen.
972

1552
CauseA genuine Canon ink tank has been inserted.
What to DoTo dismiss the message, tap OK on the touch screen.
973

1570
CauseThe ink in the ink tank has run out.
What to DoOpen the ink tank cover, and then replace the ink tank before the ink in the sub-ink tank of this printerbecomes insufficient.
Replacing Ink Tanks
Note• You can replace the ink tank even while printing.
974

1571
CauseInk tank removed during printing.
What to DoIf replacing the ink tank, insert a new ink tank.
Replacing Ink Tanks
975

1660
CauseInk tank not inserted.
What to DoInsert the ink tank correctly.
Replacing Ink Tanks
976

168B
CauseThe ink tank cannot be recognized.
Printing cannot be executed because the ink tank may not be compatible with this printer.
What to DoInstall the appropriate ink tank.
977

1720
CauseThe maintenance cartridge is full.
It needs to be replaced.
What to DoReplace the maintenance cartridge.
Replacing the Maintenance Cartridge
978

1721
CauseThe maintenance cartridge is not installed.
What to DoInstall the maintenance cartridge.
Replacing the Maintenance Cartridge
979

1722
CauseIncorrect type of maintenance cartridge.
What to DoInsert the correct maintenance cartridge.
Replacing the Maintenance Cartridge
If this error continues to appear, contact a Canon customer service center.
980
1730
CauseThe ink tank may be an ink tank that ran out of genuine Canon ink or a counterfeit Canon ink tank.
What to DoTo print, you must replace the ink tank or disable the function for detecting the remaining ink level.
Replacing Ink Tanks
To disable the function for detecting the remaining ink level, touch Stop on the printer for at least 5seconds, and then release it.
By this operation, the fact that you have disabled the function for detecting the remaining ink level will bememorized. Please be advised that Canon shall not be liable for any malfunction or trouble caused bycontinuation of printing under the ink out condition or by using refilled ink tanks.
Note• If the function for detecting the remaining ink level is disabled, the ink tank in gray is displayed on the
touch screen when checking the current ink level.
To report the counterfeit ink tank, access Canon website from the following link.
Report Counterfeit
981

1731
CauseNon-genuine Canon ink tank has been detected.
What to DoTo print, you must replace the ink tank or disable the function for detecting the remaining ink level.
Replacing Ink Tanks
To disable the function for detecting the remaining ink level, touch Stop on the printer for at least 5seconds, and then release it.
By this operation, the fact that you have disabled the function for detecting the remaining ink level will bememorized. Please be advised that Canon shall not be liable for any malfunction or trouble caused byusing a non-genuine Canon ink tank.
Note• If the function for detecting the remaining ink level is disabled, the ink tank in gray is displayed on the
touch screen when checking the current ink level.
To report the counterfeit ink tank, access Canon website from the following link.
Report Counterfeit
982

1752
CauseThe ink has run out.
What to DoOpen the ink tank cover, and then replace the ink tank.
Replacing Ink Tanks
983

1753
CauseThe remaining level of the ink cannot be correctly detected.
What to DoReplace the ink tank. Printing will restart.
Replacing Ink Tanks
An ink tank that was once empty is installed.
If you want to continue printing, you need to disable the function for detecting the remaining ink level.
To disable this function, touch Stop on the printer for at least 5 seconds, and then release it.
With this operation, disabling the function for detecting the remaining ink level is memorized.
Please be advised that Canon shall not be liable for any malfunction or trouble caused by continuation ofprinting under the ink out condition or by using refilled ink tanks.
984

1756
CauseThe ink may become insufficient.
What to DoTo perform the next process or to continue the specified process, replace the ink tank.
Replacing Ink Tanks
985

1757
CauseCannot fill sub ink tank.
What to DoCheck the touch screen, remove the ink tank for the affected color, and then reinsert it.
If the inserted ink tank is empty, replace it with a new ink tank.
Replacing Ink Tanks
986

1875
CauseAttempted to print on roll unit roll paper, but roll unit is not powered on or has been removed.
What to DoTurn off the power and check the connection with the roll unit.
For instructions on installing the roll unit, see the Roll Unit Setup Guide provided with the roll unit.
987

2001
CauseAn incompatible device is connected.
What to DoCheck the device connected to the USB flash drive port.
Only USB flash drive can be connected to this device for direct printing.
988

2002
CauseAn incompatible USB hub is connected.
What to DoIf USB flash drive is connected to this device through a USB hub, remove the USB hub.
Connect the USB flash drive directly to this device.
989

2130
CauseThe roll paper width set in the print job is not the same as the width of the roll paper in the printer.
What to DoTap OK on the touch screen to go to the next screen.
Check the media type and size that appear and tap OK.
• Stopping printing•
Tap Cancel or Stop on the touch screen.
• Replacing the roll paper•
Follow the steps below to replace the paper with roll paper of the width set in the printer driver.
1. Tap Replace the paper and print, then remove the roll paper.1.
Removing the Upper Roll from the PrinterRemoving the Lower Roll from the Roll Unit (Option)
2. Replace the paper with paper of the width set in the printer driver.2.
Loading the Upper Roll on the PrinterLoading the Lower Roll on the Roll Unit (Option)
Printing begins.
• Printing without changes•
Tap Print with the loaded paper..
However, note that this error may cause paper jams and affect the printing quality.
Note• To change print settings in Windows, select Fit Roll Paper Width in the printer driver and set the roll
paper width in the dialog box that appears.• To change print settings in macOS, open the printer driver and select Fit Roll Paper Width, and then
set the roll paper width in that panel to the width of the paper loaded in the printer.• To suppress this message, set Detect paper setting mismatch in the touch screen menu to Do not•
detect. However, note that this error may affect the printing quality.
Menu Structure
990

2131
CauseThe roll paper loaded in the printer is narrower than the roll paper width in the print job.
What to DoTap OK on the touch screen to go to the next screen.
Check the media type and size that appear and tap OK.
• Stopping printing•
Tap Cancel or Stop on the touch screen.
• Replacing the roll paper•
Follow the steps below to replace the paper with roll paper of the width specified in the print job papersize settings.
1. Tap Replace the paper and print, then remove the roll paper.1.
Removing the Upper Roll from the PrinterRemoving the Lower Roll from the Roll Unit (Option)
2. Replace the paper with paper of the width set in the printer driver.2.
Loading the Upper Roll on the PrinterLoading the Lower Roll on the Roll Unit (Option)
Printing begins.
• Printing without changes•
Tap Print with the loaded paper..
However, note that this error may cause paper jams and affect the printing quality.
Note• To change print settings in Windows, select Fit Roll Paper Width in the printer driver and set the roll
paper width in the dialog box that appears.• To change print settings in macOS, open the printer driver and select Fit Roll Paper Width, and then
set the roll paper width in that panel to the width of the paper loaded in the printer.• To suppress this message, set Detect paper setting mismatch in the touch screen menu to Do not•
detect. However, note that this error may affect the printing quality.
Menu Structure
991
2132
CauseCannot print internal printer data, such as test prints, for the following reasons.
• The paper roll loaded in the printer is too small.• The cut paper loaded in the printer is the wrong size or type.
What to Do
• Roll•
Tap Replace the paper and print on the touch screen, or lift up the release lever and replace thepaper with paper of the correct size.
To stop printing, tap Cancel or Stop on the touch screen.
• Sheet•
Lift up the release lever and load paper of the same size and type as the first page.
To stop printing, tap Stop.
992

3000
CauseThe print head has not been calibrated.
What to DoPrint Head Alignment is recommended.
Adjusting the Print Head
Note• This message will appear until Print Head Alignment is carried out.
993

3001
CauseThe print head nozzle is becoming blocked.
What to DoCheck the printed materials.
If the printed materials are scratched, clean the print head.
Cleaning the Print Head
994

3200
CauseIt is almost time to replace consumables for which service is required.
What to DoThis can used for a little while, until the message "A part needs to be replaced." appears.
Contact your Canon dealer for assistance.
995

3201
CauseIt is past the recommended time to replace consumables for which service is required.
What to DoContact your Canon dealer for assistance.
996

3250
CauseThe maintenance cartridge is almost full.
What to DoPrepare a new maintenance cartridge because an error may occur if you continue to use the printer whilethe maintenance cartridge is full.
Replacing the Maintenance Cartridge
997

3300
CausePrinter memory is full in HP-GL/2 emulation mode.
What to DoCheck the print data.
Printing will continue, but you may not obtain correct printing results.
Check the printing results.
998

3301
CauseParameter specified in HP-GL/2 command is not supported.
What to DoCheck the print data.
Printing will continue, but you may not obtain correct printing results.
Check the printing results.
999

3302
CauseUnsupported HP-GL/2 command was used.
What to DoCheck the print data.
Printing will continue, but you may not obtain correct printing results.
Check the printing results.
1000

3303
CausePrinter memory is full in HP-GL/2 emulation mode.
What to DoCheck the print data.
Printing will continue, but you may not obtain correct printing results.
Check the printing results.
1001

3304
CausePrinter memory is full in HP-GL/2 emulation mode.
What to DoCheck the print data.
Printing will continue, but you may not obtain correct printing results.
Check the printing results.
1002

3306
CauseMedia information cannot be recognized because the printer media information is corrupt.
What to DoStart the Media Configuration Tool, and then recover the media information.
Media Configuration Tool Guide
To set the Media Configuration Tool to recovery mode, open the Media Configuration Tool, select thisdevice and then click OK.
Select and load the media information backup file.
If you do not have a media information backup file, contact a Canon customer service center.
1003

3311
CauseIncorrect print data.
Illegal number of parameters.
What to DoDefective print data, please check the print results.
If using printing software such as RIP (Raster Image Processor), contact the software manufacturer.
1004

3312
CauseIncorrect print data.
Required items have been omitted.
What to DoDefective print data, please check the print results.
If using printing software such as RIP (Raster Image Processor), contact the software manufacturer.
1005

3313
CauseIncorrect print data.
Data out of range.
What to DoDefective print data, please check the print results.
If using printing software such as RIP (Raster Image Processor), contact the software manufacturer.
1006

3314
CauseIncorrect print data.
Resolution value out of range.
What to DoDefective print data, please check the print results.
If using printing software such as RIP (Raster Image Processor), contact the software manufacturer.
1007

3315
CauseIncorrect print data.
Compression method value out of range.
What to DoDefective print data, please check the print results.
If using printing software such as RIP (Raster Image Processor), contact the software manufacturer.
1008

3316
CauseIncorrect print data.
Incorrect data formatting (color sequence, bit count).
What to DoDefective print data, please check the print results.
If using printing software such as RIP (Raster Image Processor), contact the software manufacturer.
1009

3317
CauseIncorrect print data.
Illegal combination of resolution and image data format.
What to DoDefective print data, please check the print results.
If using printing software such as RIP (Raster Image Processor), contact the software manufacturer.
1010

3331
CausePrint results may be abnormal as there is a large volume of print data.
What to DoCheck the print job.
1011

3332
CauseUnsupported JPEG data format.
What to DoCheck the JPEG data.
Printable file formats are as follows.
• Files which conforms to JFIF 1.02•
◦ Processing method: Basic DCT◦
◦ Color mode: RGB/GrayScale◦
◦ Number of colors: 24bit/8bit◦
◦ Number of pixels: 38400 or less vertically and horizontally◦
* Does not support some samplings.
1012

3333
CauseUnsupported JPEG data format.
What to DoCheck the JPEG data.
Printable file formats are as follows.
• Files which conforms to JFIF 1.02•
◦ Processing method: Basic DCT◦
◦ Color mode: RGB/GrayScale◦
◦ Number of colors: 24bit/8bit◦
◦ Number of pixels: 38400 or less vertically and horizontally◦
* Does not support some samplings.
1013

3334
CausePDF data is print protected.
What to DoOpen the PDF file in Adobe Acrobat and make sure it can be printed.
1014

3335
CauseCorrupt PDF file.
What to DoOpen the PDF file in Adobe Acrobat and check it.
The file can also be printed from Acrobat.
1015

3336
CauseToo many fonts are used in the PDF file, causing a memory shortage.
Printing will continue but some incorrect characters will be printed.
What to DoPrint the PDF file from a computer or convert the PDF file to JPEG and then print it.
1016

3338
CauseResolution of JPEG data and printer settings are mismatched.
What to DoCheck the print results.
When the print results have problems, print using a printer driver.
1017

3341
CausePrint data contains illegal image processing table.
What to DoCheck the print job image processing table.
If using printing software such as RIP (Raster Image Processor), contact the software manufacturer.
1018

3342
CauseIncorrect resolution value.
What to DoCheck the print settings.
If using printing software such as RIP (Raster Image Processor), contact the software manufacturer.
1019

3350
CauseFree space on the personal box on the printer hard disk is running low.
What to DoDelete unneeded jobs stored in personal boxes.
Deleting Saved Jobs
1020

3351
Cause100 jobs are stored in the personal box.
What to DoDelete any unneeded jobs saved in the personal box.
Deleting Saved Jobs
1021

3352
CauseThe printer hard disk is full, so the job will only be printed.
(The print job will not be saved to the hard disk.)
What to DoTo save the print job, delete any unneeded jobs saved in the personal box.
Deleting Saved Jobs
1022

3414
CauseCommunication with mail server failed.
What to DoTap OK on the touch screen to dismiss the error.
Check that the address and port numbers of the sending mail server (SMTP server) are correct in theRemote UI mail server settings.
Setting Mail Server
If this does not resolve the error, check the status of the mail server.
Contact the mail server administrator to check the server settings and status.
1023

3415
CauseCommunication with mail server failed.
What to DoTap OK on the touch screen to dismiss the error.
Check that the address and port numbers of the receiving mail server (POP3 server) are correct in theRemote UI mail server settings.
Setting Mail Server
If this does not resolve the error, check the status of the mail server.
Contact the mail server administrator to check the server settings and status.
1024

3416
CauseCommunication with mail server failed.
What to DoTap OK on the touch screen to dismiss the error.
Check that the mail server and device secure connection (SSL) settings match.
Check the secure connection (SSL) settings in Remote UI.
Setting Mail Server
Contact the mail server administrator to configure a secure connection (SSL) to the mail server.
1025

3417
CauseCommunication with mail server failed.
What to DoTap OK on the touch screen to dismiss the error.
Check that the mail server and device secure connection (SSL) settings match.
Check the secure connection (SSL) settings in Remote UI.
Setting Mail Server
Contact the mail server administrator to configure a secure connection (SSL) to the mail server.
1026

3418
CauseCommunication with mail server failed.
What to DoTap OK on the touch screen to dismiss the error.
Check that the sending mail server (SMTP server) is correctly configured in the Remote UI mail serversettings.
Setting Mail Server
If this does not resolve the error, check the status of the mail server.
Contact the mail server administrator to check the server settings and status.
1027

3419
CauseCommunication with mail server failed.
What to DoTap OK on the touch screen to dismiss the error.
Check that the sending account and password are correctly configured in the Remote UI mail serversettings.
Setting Mail Server
If this does not resolve the error, check the status of the mail server.
Contact the mail server administrator to check the server settings and status.
1028

3420
CauseCommunication with mail server failed.
What to DoTap OK on the touch screen to dismiss the error.
Check that the receiving mail server (POP3 server) is correctly configured in the Remote UI mail serversettings.
Setting Mail Server
If this does not resolve the error, check the status of the mail server.
Contact the mail server administrator to check the server settings and status.
1029

3421
CauseCommunication with mail server failed.
What to DoTap OK on the touch screen to dismiss the error.
Check that the receiving account and password are correctly configured in the Remote UI mail serversettings.
Setting Mail Server
If this does not resolve the error, check the status of the mail server.
Contact the mail server administrator to check the server settings and status.
1030

3422
CauseCommunication with mail server failed.
What to DoTap OK on the touch screen to dismiss the error.
Check that the settings on the mail server and the APOP settings on this device match.
Check this device's APOP settings in Remote UI.
Setting Mail Server
Contact the mail server administrator for configuring APOP on the mail server.
1031

3423
CauseCommunication with mail server failed.
What to DoTap OK on the touch screen to dismiss the error.
Check if the Remote UI mail server settings are correct.
Setting Mail Server
If this does not resolve the error, check the status of the mail server.
Contact the mail server administrator to check the server settings and status.
1032

3424
CauseSending mail failed.
What to DoTap OK on the touch screen to dismiss the error.
Specify the correct destination mail address and try again.
1033

3448
CauseIP address is conflicting.
What to DoTap OK on the touch screen to dismiss the error.
Check the network configuration and change the network configuration to prevent a conflict with othernetwork devices.
For details on changing the network configuration, refer to the documentation for your network device.
1034

3451
CauseFailed to communicate with the monitoring service center.
What to DoCheck the network connection and perform a communication test.
For details on changing the network configuration, refer to the documentation for your network device.
1035

4107
CausePossible causes include the following.
• Received print job for Roll 1 (Upper) while Roll 2 (Lower) is in use.• Received print job for Roll 2 (Lower) while Roll 1 (Upper) is in use.
What to DoTap OK on the touch screen to dismiss the error.
Remove the printed matter, and then try again.
1036

4111
CauseThe media type specified is incompatible with this device.
What to DoTap Stop on the touch screen to stop printing.
Check the media type settings, and then try again.
1037

4112
CauseReceived a print job specifying paper feed from the roll unit, but the roll unit use setting is not set to paperfeed.
What to DoTo stop printing, tap OK or Stop on the touch screen.
Check the roll unit settings, and then try again.
Switching Roll Unit Modes
1038
4113
CauseCannot print borderless for the following reasons.
• Printer driver is not set to Fit Roll Paper Width.• Roll paper is not wide enough, or the paper is out of position.
What to Do
• Stopping printing•
Tap Cancel on the touch screen.
• Replacing paper•
Follow the steps below to replace the printer paper with paper that can be printed borderless.
1. Tap Replace the paper and print on the touch screen, then remove the roll paper.1.
Removing the Upper Roll from the PrinterRemoving the Lower Roll from the Roll Unit (Option)
2. Replace the printer paper with paper that can be printed borderless.2.
Loading the Upper Roll on the PrinterLoading the Lower Roll on the Roll Unit (Option)
• Printing with the loaded paper•
Tap Print with the loaded paper. on the touch screen.
Paper is printed borderless with the document width set slightly smaller than the paper.
1039

4114
CauseThe paper position is not suitable for borderless printing.
What to DoTap OK on the touch screen, then reload the paper.
Insert the roll paper firmly until it is against the roll holder flange.
Loading Rolls on the Roll Holder
1040

4116
CauseThe paper is loaded askew.
What to Do
• Reloading paper•
Tap Replace the paper and print on the touch screen, then reload the paper.
Insert the roll paper firmly until it is against the roll holder flange.
Loading Rolls on the Roll Holder
• Printing with the loaded paper•
Tap Print with the loaded paper. on the touch screen.
Paper is printed borderless with the document width set slightly smaller than the paper.
• Stopping printing•
Tap Cancel on the touch screen to stop printing.
Note• To force the printer to print, set Detect paper setting mismatch in the touch screen menu to Do not•
detect.
However, note that this error may affect the printing quality.
1041

4117
CauseThe print job received contains settings not compatible with borderless printing.
What to Do
• Changing the print job settings•
Follow these steps to change the settings of the print job to enable borderless printing.
1. Tap Cancel on the touch screen to stop printing.2. Check that the paper source is set to Roll Paper in your application.3. Check that banner printing is not set, and then try again.3.
See the media information list for media types compatible with borderless printing.
Paper Information List
• Printing with a border•
Tap Print with border on the touch screen.
Printing with a border is now enabled.
Note• To force the printer to print, set Detect paper setting mismatch in the touch screen menu to Do not•
detect.
However, note that this error may affect the printing quality.
1042

4118
CauseThe paper size in the printer cannot be printed borderless.
What to Do
• Stopping printing•
Tap Cancel on the touch screen to stop printing.
• Printing with a border•
Tap Print with border on the touch screen.
Printing with a border is now enabled.
Note• See the media information list for media types compatible with borderless printing.•
Paper Information List
1043

4119
CauseCannot print borderless because the paper is out of position.
What to Do
• Reloading paper•
Lift up the release lever and reload the roll paper.
Loading the Upper Roll on the PrinterLoading the Lower Roll on the Roll Unit (Option)
• Printing with the loaded paper•
Tap Print with the loaded paper. on the touch screen.
Paper is printed borderless with the document width set slightly smaller than the paper.
• Stopping printing•
Tap Cancel on the touch screen to stop printing.
1044

4120
CauseThe print job received specifies a type or width of paper that is not compatible with borderless printing.
What to Do
• Changing the print job settings•
Follow these steps to change the settings of the print job to enable borderless printing.
1. Tap Cancel on the touch screen to stop printing.2. Check that the printer driver for the printer has been selected, and then try again.2.
See the media information list for media types compatible with borderless printing.
Paper Information List
• Printing with a border•
Tap Print with border on the touch screen.
Printing with a border is now enabled.
Note• To force the printer to print, set Detect paper setting mismatch in the touch screen menu to Do not•
detect.
However, note that this error may affect the printing quality.
1045

4121
CauseCannot print borderless for the following reasons.
• Fit Roll Paper Width is not specified in the printer driver.• Roll paper is not wide enough, or the paper is out of position.
What to Do
• Stopping printing•
Tap Cancel on the touch screen to stop printing.
• Printing with the loaded paper•
Tap Print with the loaded paper. on the touch screen.
Paper is printed borderless with the document width set slightly smaller than the paper.
1046

4122
CauseThe media type in the printer cannot be printed borderless.
What to DoTap Cancel on the touch screen to stop printing.
Note• See the media information list for media types compatible with borderless printing.•
Paper Information List
1047

4801
CauseA printer error has occurred.
What to DoTurn off the power, wait a moment, and then turn it back on.
If the error appears again, make a note of the detailed error code (ECxx-xxxx) that appears on the touchscreen, and then turn off the power and contact a Canon customer service center.
Detailed error codesEC01-2F90 EC01-2F95 EC04-2F31 EC04-2F91 EC05-2F92 EC06-2F9A EC06-2F9B EC06-2F9CEC07-2F19 EC0F-2F96 EC11-2F2A EC12-2F29 EC12-2F2B EC12-2F2C EC13-2F17 EC15-2E23EC16-2021 EC16-2022 EC16-2027 EC16-202A EC16-2038 EC17-2023 EC17-2024 EC17-2028EC17-2029 EC17-2039 EC1B-2030 EC1B-2031 EC1B-2032 EC1B-2033 EC1C-2034 EC1C-2035EC1C-2036 EC1C-2037 EC21-2F51 EC21-2F54 EC21-2F57 EC21-2F59 EC21-2F61 EC21-2F67EC21-2F70 EC21-2F71 EC21-2F72 EC22-2F30 EC22-2F47 EC23-260E EC23-2F11 EC23-2F18EC23-2F32 EC25-2F16 EC31-2F09 EC31-2F10 EC31-2F1B EC31-2F1C EC31-2F1D EC31-2F1EEC31-2F1F EC31-2F22 EC31-2F23 EC31-2F94 EC33-2F3E EC34-2602 EC34-2605 EC34-2F3BEC51-2F14 EC51-2F15 EC51-2FDE EC51-3301 EC51-3302 EC51-3303 EC54-290A EC54-290DEC54-2910 EC54-2911 EC54-2912 EC54-2913 EC54-2914 EC55-2F20 EC55-2F6C EC58-2F12
1048

4803
CausePrinter error has occurred.
What to DoTurn off the power, wait a moment, and then turn it back on.
If the error appears again, make a note of the detailed error code (ECxx-xxxx) that appears on the touchscreen, and then turn off the power and contact a Canon customer service center.
Detailed error codesEC51-203C
1049

4804
CausePrinter error has occurred.
What to DoTurn off the power, wait a moment, and then turn it back on.
If the error appears again, make a note of the detailed error code (ECxx-xxxx) that appears on the touchscreen, and then turn off the power and contact a Canon customer service center.
Detailed error codesEC17-203D
1050

4805
CausePrinter error has occurred.
What to DoTurn off the power, wait a moment, and then turn it back on.
If the error appears again, make a note of the detailed error code (ECxx-xxxx) that appears on the touchscreen, and then turn off the power and contact a Canon customer service center.
Detailed error codesEC1D-2050
1051

4806
CausePrinter error has occurred.
What to DoTurn off the power, wait a moment, and then turn it back on.
If the error appears again, make a note of the detailed error code (ECxx-xxxx) that appears on the touchscreen, and then turn off the power and contact a Canon customer service center.
Detailed error codesEC1E-2053
1052

4900
CauseThe printer hard disk is full.
What to Dotap Stop to stop printing, and then take the following action.
• Cancel the print job in the job queue.•
Deleting Print Jobs
• Delete unneeded jobs stored in personal boxes.•
Deleting Saved Jobs
1053

4901
CauseThe printer hard disk has not been formatted.
What to DoTap OK on the touch screen to begin formatting the hard disk.
When formatting is complete, the data on the hard disc will be erased and the printer will automaticallyrestart.
1054

4903
CauseThe maximum number of jobs have been saved in the box.
What to DoTake the actions below.
• Cancel the print job in the job queue.•
Deleting Print Jobs
• Delete unneeded jobs stored in personal boxes.•
Deleting Saved Jobs
Note• To stop printing, tap Stop.
1055

4905
CauseA printer error has occurred.
What to DoTurn off the power, wait a moment, and then turn it back on.
If the error appears again, make a note of the detailed error code (ECxx-xxxx) that appears on the touchscreen, and then turn off the power and contact a Canon customer service center.
Detailed error codesEC51-3304 EC51-3306 EC51-3307 EC51-3308 EC51-3309 EC51-330A
1056

4909
CausePrinter error has occurred.
What to DoTurn off the power, wait a moment, and then turn it back on.
If the error appears again, make a note of the detailed error code (ECxx-xxxx) that appears on the touchscreen, and then turn off the power and contact a Canon customer service center.
Detailed error codesEC54-290C
1057

4910
CauseThe width of the roll paper set in Fit Roll Paper Width in the printer driver is not the same as the width ofthe roll paper loaded in the printer.
What to DoTap OK on the touch screen to go to the next screen.
Check the media type and size that appear and tap OK.
• Stopping printing•
Tap Cancel or Stop on the touch screen.
• Replacing the roll paper•
Follow the steps below to replace the paper with roll paper of the width set in the printer driver.
1. Tap Replace the paper and print, then remove the roll paper.1.
Removing the Upper Roll from the PrinterRemoving the Lower Roll from the Roll Unit (Option)
2. Replace the paper with paper of the width set in the printer driver.2.
Loading the Upper Roll on the PrinterLoading the Lower Roll on the Roll Unit (Option)
Printing begins.
• Printing without changes•
Tap Print with the loaded paper..
However, note that this error may cause paper jams and affect the printing quality.
Note• To change print settings in Windows, select Fit Roll Paper Width in the printer driver and set the roll
paper width in the dialog box that appears.• To change print settings in macOS, open the printer driver and select Fit Roll Paper Width, and then
set the roll paper width in that panel to the width of the paper loaded in the printer.
1058

4911
CauseThe media type specified in the printer driver is not the same as the media type loaded in the printer.
What to DoTap OK on the touch screen to go to the next screen.
Check the media type and size that appear and tap OK.
• Changing the printer driver print settings•
Follow the steps below to match the media type in the printer driver and the media type specified forthe printer.
1. Tap Cancel on the touch screen to stop printing.2. Change the media type in the printer driver settings to the media type loaded in the printer, and
then try again.
• Replacing paper•
Follow the steps below to match the media type in the printer driver and the media type specified forthe printer.
1. Tap Cancel on the touch screen to stop printing.2. Load the paper with the media type set in the printer driver, and then try again.2.
Loading and Printing on RollsLoading and Printing on Sheets
• Printing without changes•
To continue printing, tap Print with the loaded paper. on the touch screen.
However, note that this error may cause paper jams and affect the printing quality.
1059

4913
CauseCannot print borderless for one of the following reasons.
• The paper size in the printer cannot be printed borderless.• The paper is loaded askew.
What to Do
• Replacing paper•
Follow the steps below to replace the printer paper with paper that can be printed borderless.
1. Tap Replace the paper and print on the touch screen, then remove the roll paper.1.
Removing the Upper Roll from the PrinterRemoving the Lower Roll from the Roll Unit (Option)
2. Replace the printer paper with paper that can be printed borderless.2.
Loading the Upper Roll on the PrinterLoading the Lower Roll on the Roll Unit (Option)
Printing begins.
NoteSee the media information list for media types compatible with borderless printing.
Paper Information List
• Reloading paper•
Tap Replace the paper and print on the touch screen, and then load the paper so that the edges areinside the borderless printing ink grooves.
Insert the roll paper firmly until it is against the roll holder flange.
Loading Rolls on the Roll Holder
• Printing with the loaded paper•
Tap Print with the loaded paper. on the touch screen.
Paper is printed borderless with the document width set slightly smaller than the paper.
• Stopping printing•
Tap Cancel on the touch screen to stop printing.
1060

4920
CauseCannot cut paper for one of the following reasons.
• Paper that has been cut remains on the output guide.• There is a foreign object near the output slot that is obstructing the cutter blade.• The paper is not being used under the recommended usage conditions.• The paper in use cannot be used with Automatic cut.
What to Do
• Paper that has been cut remains on the output guide•
Follow the steps below to resume printing.
1. Lift up the release lever and remove the paper.2. Load the paper.3. Lower the release lever.4. If "There is a job which has not been printed yet. Do you want to print this job?" appears on4.
the touch screen, tap Yes.
Printing will resume, starting from the page on which the error occurred.
Loading the Upper Roll on the PrinterLoading the Lower Roll on the Roll Unit (Option)
• A foreign object near the output slot is obstructing the cutter blade•
Follow the steps below to resume printing.
1. Open the top cover and remove any foreign objects.2. If "There is a job which has not been printed yet. Do you want to print this job?" appears on2.
the touch screen, tap Yes.
Printing will resume, starting from the page on which the error occurred.
• Paper not being used under the recommended usage conditions•
Every paper type has different recommended conditions of use. Use all paper under its recommendedusage conditions.
See the media information list for recommended usage conditions.
Paper Information List
• The paper in use cannot be used with Automatic cut•
Set the roll paper cutting method to User cut and cut the roll paper with a cutting implement such asscissors.
Specifying the Cutting Method for Rolls
See the media information list for paper types that can be used with Automatic cut.
Paper Information List
1061

If this does not apply, there may be a cutter blade malfunction.
Contact your Canon dealer for assistance.
1062

4922
CauseThe Media Take-up Unit cannot roll the paper for one of the following reasons.
• A paper jam has occurred and the roll cannot be rewound.• The Media Take-up Unit malfunctioned.
What to Do
• The take-up unit's permitted capacity is exceeded•
Remove paper from the take-up unit.
Tap OK on the touch screen to dismiss the error.
Note• You can wind the paper until the outer diameter of the wound paper is the same as the outer
diameter of the paper core.
• Paper is jammed or could not be rolled•
Remove the paper from the Media Take-up Unit.
Tap OK on the touch screen to dismiss the error.
• Media Take-up Unit malfunction•
Contact your Canon dealer for assistance.
Important• Printing will pause if there is a Media Take-up Unit error. If you do not want to printing to stop, set
Skip errors during take-up to ON. However, note that this error may cause paper jams and affectthe printing quality.
1063

4931
CausePaper feed adjustment may have failed for the following reasons.
• The paper for printing a test pattern is soiled. Otherwise, you have loaded colored paper.• The printer may be exposed to strong light, such as direct sunlight, which can cause the sensors to
malfunction.• The test pattern was printed too faintly.
What to DoTap OK on the touch screen to dismiss the error, and then take the following actions.
• Load unused paper.• Make adjustments to ensure that the printer is not exposed to strong light.• Print a nozzle check pattern to check the print head status.•
If the pattern has gaps or horizontal white lines, the print head nozzle is blocked. Clean the print head.
Checking for Nozzle Clogging
1064

4932
CauseThe print head cannot be calibrated because the printer is loaded with very transparent film-type paper.
What to DoTap OK on the touch screen to dismiss the error.
We recommend calibrating the print head with a frequently used, non-film paper.
Automatic Adjustment to Straighten Lines and Colors
1065

4933
CauseThe print head nozzle may be blocked.
What to DoFollow the steps below to repeat Print Head Alignment.
1. Tap OK on the touch screen to dismiss the error.2. Print a test pattern to check the nozzles.2.
Checking for Nozzle Clogging
3. If the nozzle is blocked, clean the print head.3.
Cleaning the Print Head
4. Repeat Print Head Alignment.4.
Automatic Adjustment to Straighten Lines and Colors
1066

4934
CauseThe print head nozzle may be blocked.
What to DoFollow the steps below to repeat Print Head Alignment.
1. Tap OK on the touch screen to dismiss the error.2. Print a test pattern to check the nozzles.2.
Checking for Nozzle Clogging
3. If the nozzle is blocked, clean the print head.3.
Cleaning the Print Head
4. Repeat Print Head Alignment.4.
Automatic Adjustment to Straighten Lines and Colors
1067

4935
CauseThe print head nozzle may be blocked.
What to DoFollow the steps below to repeat Print Head Alignment.
1. Tap OK on the touch screen to dismiss the error.2. Print a test pattern to check the nozzles.2.
Checking for Nozzle Clogging
3. If the nozzle is blocked, clean the print head.3.
Cleaning the Print Head
4. Repeat Print Head Alignment.4.
Automatic Adjustment to Straighten Lines and Colors
1068
4937
CausePrint head position adjustment failed.
What to DoTap OK on the touch screen to dismiss the error and retry Print Head Alignment following the stepsbelow.
1. Print a test pattern to check the nozzles.1.
Checking for Nozzle Clogging
2. If the nozzle is blocked, clean the print head.2.
Cleaning the Print Head
3. Retry Print Head Alignment.3.
Automatic Adjustment to Straighten Lines and Colors
If any print head nozzles are still blocked, replace the print head.
Replacing the Print Head
If the error appears again, the printer may be damaged. Contact a Canon customer service center.
1069

4950
CauseWPS (Push button method) connection failed.
What to DoFollow the instructions on the touch screen to try connecting to the wireless router again.
1070

4951
CauseAOSS (BUFFALO) connection failed.
What to DoFollow the instructions on the touch screen to try connecting to the wireless router again.
1071

4952
CauseFailed to connect to the wireless router.
What to DoFollow the instructions on the touch screen to try connecting to the wireless router again.
1072

4953
CauseFailed to acquire IP address.
What to DoCheck the information that appears on the touch screen, and then try connecting again.
1073

4954
CauseFailed to set up Wi-Fi using Easy wireless connect.
What to DoTap OK on the touch screen to dismiss the error, and then configure the settings again.
1074

4955
CauseIPv4/IPv6 settings were changed, but wired LAN and Wi-Fi are disabled.
What to DoTap OK on the touch screen to dismiss the error, and then enable wired LAN or Wi-Fi.
1075

4956
CauseAttempted to change LAN settings, but they cannot be changed for the following reasons.
• Printer is operating• Printer currently being configured using Remote UI
What to DoTap OK on the touch screen to dismiss the error, exit other processes and then configure the settingsagain.
1076

5106
CauseA printer error has occurred.
What to DoMake a note of the detailed error code (ECxx-xxxx) that appears on the touch screen, and then turn offthe power and unplug the power cord.
Contact your Canon dealer for assistance.
Detailed error codesEC03-4061
1077

5200
CauseA printer error has occurred.
What to DoTurn off the power and unplug the power cord.
Wait a moment and turn the power back on.
If the error appears again, make a note of the detailed error code (ECxx-xxxx) that appears on the touchscreen, and then contact a Canon customer service center.
Detailed error codesEC21-2F7E
1078

5A60
CauseA printer error has occurred.
What to DoMake a note of the detailed error code (ECxx-xxxx) that appears on the touch screen, and then turn offthe power and unplug the power cord.
Contact your Canon dealer for assistance.
Detailed error codesEC33-4020 EC33-4021 EC33-4022 EC33-4023 EC33-4026
1079

5A61
CauseA printer error has occurred.
What to DoMake a note of the detailed error code (ECxx-xxxx) that appears on the touch screen, and then turn offthe power and unplug the power cord.
Contact your Canon dealer for assistance.
Detailed error codesEC3F-4120 EC3F-4121 EC3F-4122 EC3F-4123 EC3F-4126
1080

5B10
CauseA printer error has occurred.
What to DoMake a note of the detailed error code (ECxx-xxxx) that appears on the touch screen, and then turn offthe power and unplug the power cord.
Contact your Canon dealer for assistance.
Detailed error codesEC4A-4001
1081

5B16
CauseA printer error has occurred.
What to DoMake a note of the detailed error code (ECxx-xxxx) that appears on the touch screen, and then turn offthe power and unplug the power cord.
Contact your Canon dealer for assistance.
Detailed error codesEC22-4001
1082

5B20
CauseA printer error has occurred.
What to DoMake a note of the detailed error code (ECxx-xxxx) that appears on the touch screen, and then turn offthe power and unplug the power cord.
Contact your Canon dealer for assistance.
Detailed error codesEC25-4001 EC41-4001 EC43-4001 EC44-4001 EC45-4001 EC47-4001 EC49-4001
1083
5B21
CauseA printer error has occurred.
What to DoMake a note of the detailed error code (ECxx-xxxx) that appears on the touch screen, and then turn offthe power and unplug the power cord.
Contact your Canon dealer for assistance.
Detailed error codesEC48-4001
1084

5C00
CauseA printer error has occurred.
What to DoMake a note of the detailed error code (ECxx-xxxx) that appears on the touch screen, and then turn offthe power and unplug the power cord.
Contact your Canon dealer for assistance.
Detailed error codesEC31-4001
1085

6502
CauseA printer error has occurred.
What to DoTurn off the power and unplug the power cord.
Wait a moment and turn the power back on.
If the error appears again, make a note of the detailed error code (ECxx-xxxx) that appears on the touchscreen, and then contact a Canon customer service center.
Detailed error codesEC56-2FE0
1086

6700
CauseA printer error has occurred.
What to DoMake a note of the detailed error code (ECxx-xxxx) that appears on the touch screen, and then turn offthe power and unplug the power cord.
Contact your Canon dealer for assistance.
Detailed error codesEC57-404F
1087

6702
CauseA printer error has occurred.
What to DoMake a note of the detailed error code (ECxx-xxxx) that appears on the touch screen, and then turn offthe power and unplug the power cord.
Contact your Canon dealer for assistance.
Detailed error codesEC57-4040
1088

6820
CauseA printer error has occurred.
What to DoMake a note of the detailed error code (ECxx-xxxx) that appears on the touch screen, and then turn offthe power and unplug the power cord.
Contact your Canon dealer for assistance.
Detailed error codesEC07-4060 EC51-4041 EC51-4042 EC51-4045 EC51-4046 EC51-4047 EC51-404C EC51-404DEC51-404E EC51-4070 EC51-4071 EC51-4072
1089

6900
CauseA printer error has occurred.
What to DoTurn off the power and unplug the power cord.
Wait a moment and turn the power back on.
If the error appears again, make a note of the detailed error code (ECxx-xxxx) that appears on the touchscreen, and then contact a Canon customer service center.
Detailed error codesEC51-3000
1090

6901
CauseA printer error has occurred.
What to DoTurn off the power and unplug the power cord.
Wait a moment and turn the power back on.
If the error appears again, make a note of the detailed error code (ECxx-xxxx) that appears on the touchscreen, and then contact a Canon customer service center.
Detailed error codesEC51-3001
1091

6902
CauseA printer error has occurred.
What to DoTurn off the power and unplug the power cord.
Wait a moment and turn the power back on.
If the error appears again, make a note of the detailed error code (ECxx-xxxx) that appears on the touchscreen, and then contact a Canon customer service center.
Detailed error codesEC51-3006
1092

6910
CauseA printer error has occurred.
What to DoTurn off the power and unplug the power cord.
Wait a moment and turn the power back on.
If the error appears again, make a note of the detailed error code (ECxx-xxxx) that appears on the touchscreen, and then contact a Canon customer service center.
Detailed error codesEC51-3002
1093

6920
CauseA printer error has occurred.
What to DoTurn off the power and unplug the power cord.
Wait a moment and turn the power back on.
If the error appears again, make a note of the detailed error code (ECxx-xxxx) that appears on the touchscreen, and then contact a Canon customer service center.
Detailed error codesEC51-3004
1094

6921
CauseA printer error has occurred.
What to DoTurn off the power and unplug the power cord.
Wait a moment and turn the power back on.
If the error appears again, make a note of the detailed error code (ECxx-xxxx) that appears on the touchscreen, and then contact a Canon customer service center.
Detailed error codesEC51-3005
1095

6930
CauseA printer error has occurred.
What to DoTurn off the power and unplug the power cord.
Wait a moment and turn the power back on.
If the error appears again, make a note of the detailed error code (ECxx-xxxx) that appears on the touchscreen, and then contact a Canon customer service center.
Detailed error codesEC51-3100
1096

6931
CauseA printer error has occurred.
What to DoTurn off the power and unplug the power cord.
Wait a moment and turn the power back on.
If the error appears again, make a note of the detailed error code (ECxx-xxxx) that appears on the touchscreen, and then contact a Canon customer service center.
Detailed error codesEC51-3101
1097

6932
CauseA printer error has occurred.
What to DoTurn off the power and unplug the power cord.
Wait a moment and turn the power back on.
If the error appears again, make a note of the detailed error code (ECxx-xxxx) that appears on the touchscreen, and then contact a Canon customer service center.
Detailed error codesEC51-3102
1098

6933
CauseA printer error has occurred.
What to DoTurn off the power and unplug the power cord.
Wait a moment and turn the power back on.
If the error appears again, make a note of the detailed error code (ECxx-xxxx) that appears on the touchscreen, and then contact a Canon customer service center.
Detailed error codesEC51-3103
1099

6940
CauseA printer error has occurred.
What to DoTurn off the power and unplug the power cord.
Wait a moment and turn the power back on.
If the error appears again, make a note of the detailed error code (ECxx-xxxx) that appears on the touchscreen, and then contact a Canon customer service center.
Detailed error codesEC51-3104
1100

6941
CauseA printer error has occurred.
What to DoTurn off the power and unplug the power cord.
Wait a moment and turn the power back on.
If the error appears again, make a note of the detailed error code (ECxx-xxxx) that appears on the touchscreen, and then contact a Canon customer service center.
Detailed error codesEC51-3105
1101

6942
CauseA printer error has occurred.
What to DoTurn off the power and unplug the power cord.
Wait a moment and turn the power back on.
If the error appears again, make a note of the detailed error code (ECxx-xxxx) that appears on the touchscreen, and then contact a Canon customer service center.
Detailed error codesEC51-3106
1102

6943
CauseA printer error has occurred.
What to DoTurn off the power and unplug the power cord.
Wait a moment and turn the power back on.
If the error appears again, make a note of the detailed error code (ECxx-xxxx) that appears on the touchscreen, and then contact a Canon customer service center.
Detailed error codesEC51-3107
1103
6944
CauseA printer error has occurred.
What to DoTurn off the power and unplug the power cord.
Wait a moment and turn the power back on.
If the error appears again, make a note of the detailed error code (ECxx-xxxx) that appears on the touchscreen, and then contact a Canon customer service center.
Detailed error codesEC51-3108
1104

6945
CauseA printer error has occurred.
What to DoTurn off the power and unplug the power cord.
Wait a moment and turn the power back on.
If the error appears again, make a note of the detailed error code (ECxx-xxxx) that appears on the touchscreen, and then contact a Canon customer service center.
Detailed error codesEC51-3109
1105

6946
CauseA printer error has occurred.
What to DoTurn off the power and unplug the power cord.
Wait a moment and turn the power back on.
If the error appears again, make a note of the detailed error code (ECxx-xxxx) that appears on the touchscreen, and then contact a Canon customer service center.
Detailed error codesEC51-3110
1106

7050
CauseA printer error has occurred.
What to DoMake a note of the detailed error code (ECxx-xxxx) that appears on the touch screen, and then turn offthe power and unplug the power cord.
Contact your Canon dealer for assistance.
Detailed error codesEC51-5001
1107

7051
CauseA printer error has occurred.
What to DoMake a note of the detailed error code (ECxx-xxxx) that appears on the touch screen, and then turn offthe power and unplug the power cord.
Contact your Canon dealer for assistance.
Detailed error codesEC51-5002
1108

7052
CauseA printer error has occurred.
What to DoMake a note of the detailed error code (ECxx-xxxx) that appears on the touch screen, and then turn offthe power and unplug the power cord.
Contact your Canon dealer for assistance.
Detailed error codesEC51-5003
1109

8200
CauseA printer error has occurred.
What to DoMake a note of the detailed error code (ECxx-xxxx) that appears on the touch screen, and then turn offthe power and unplug the power cord.
Contact your Canon dealer for assistance.
Detailed error codesEC24-4049 EC24-404A EC24-404B
1110

9000
CauseA printer error has occurred.
What to DoMake a note of the detailed error code (ECxx-xxxx) that appears on the touch screen, and then turn offthe power and unplug the power cord.
Contact your Canon dealer for assistance.
Detailed error codesEC51-2F07
1111

9001
CauseA printer error has occurred.
What to DoTurn off the power, wait a moment, and then turn it back on.
If the error appears again, make a note of the detailed error code (ECxx-xxxx) that appears on the touchscreen, and then turn off the power and contact a Canon customer service center.
Detailed error codesEC51-2F06
1112

9110
CauseA printer error has occurred.
What to DoMake a note of the detailed error code (ECxx-xxxx) that appears on the touch screen, and then turn offthe power and unplug the power cord.
Contact your Canon dealer for assistance.
Detailed error codesEC52-4038 EC52-4039
1113

B20A
CauseA printer error has occurred.
What to DoMake a note of the detailed error code (ECxx-xxxx) that appears on the touch screen, and then turn offthe power and unplug the power cord.
Contact your Canon dealer for assistance.
Detailed error codesEC03-403A
1114

B510
CauseA printer error has occurred.
What to DoMake a note of the detailed error code (ECxx-xxxx) that appears on the touch screen, and then turn offthe power and unplug the power cord.
Contact your Canon dealer for assistance.
Detailed error codesEC32-4001
1115


![Unlocked] Mind Power Seduction Online Manual](https://img.pdfslide.net/doc/110x75/6361782328d79112c8019e1a/unlocked-mind-power-seduction-online-manual.jpg)


