Embed Size (px)
Citation preview
Oracle Zero Downtime Migration 21.2
Step-by-Step Guide – Logical Migration from On-Premises to ADB
February 2022 | Version 1.1 Copyright © 2022, Oracle and/or its affiliates
DISCLAIMER This document in any form, software or printed matter, contains proprietary information that is the exclusive property of Oracle. Your access to and use of this confidential material is subject to the terms and conditions of your Oracle software license and service agreement, which has been executed and with which you agree to comply. This document and information contained herein may not be disclosed, copied, reproduced or distributed to anyone outside Oracle without prior written consent of Oracle. This document is not part of your license agreement nor can it be incorporated into any contractual agreement with Oracle or its subsidiaries or affiliates.
This document is for informational purposes only and is intended solely to assist you in planning for the implementation and upgrade of the product features described. It is not a commitment to deliver any material, code, or functionality, and should not be relied upon in making purchasing decisions. The development, release, and timing of any features or functionality described in this document remains at the sole discretion of Oracle.
Due to the nature of the product architecture, it may not be possible to safely include all features described in this document without risking significant destabilization of the code.
1 Step by Step Guide – Logical Migration from On-Premises to ADB | Oracle Zero Downtime Migration| Version 1.1 Copyright © 2022, Oracle and/or its affiliates | Public
TABLE OF CONTENTS Disclaimer 1
Introduction 3
Zero Downtime Migration 4 Architecture 4
Supported Configurations 5
Zero Downtime Migration Service Host 5 Zero Downtime Migration Service Host Requirements 5
ZDM Service Host Installation 6
ZDM Service Host Port Requirements 8
Source Database 8 Source Database Requirements 8
Source Database Port Requirements 12
Target Database 13 Target Database Requirements 13
Target Database Port Requirements 15
Connectivity 16 SSH Key Pair 16
Authentication Token 17
OCI CLI Command Line Tool 17
API Signing Public Key and Configuration File 17
GoldenGate Hub 19
Verify Virtual Cloud Network (VCN) Configuration 19
Setup of the GoldenGate Image from the Oracle Cloud Infrastructure Market Place 20
Unlocking the GoldenGate User in the Target Autonomous Database 22
Connectivity between ZDM Service Host, Source, Target and GoldenGate Hub 23
Backup Location 23 Object Storage Requirements 23
Preparing the Response File 25 Response File Parameters used in this Guide 25
Logical Migration with ZDM 30 Performing a Test Database Migration on Evaluation Mode 30
Performing a Database Migration 31
Known Issues 33
Troubleshooting & Other Resources 33
2 Step by Step Guide – Logical Migration from On-Premises to ADB | Oracle Zero Downtime Migration| Version 1.1 Copyright © 2022, Oracle and/or its affiliates | Public
Figure 0 – ZDM 21c Logo
INTRODUCTION Oracle customers are moving Oracle workloads into the Oracle Cloud or onto Engineered Systems at a growingly rapid pace. However, migrating workloads has been a source of challenges for many years. In particular, migrating database workloads from one system to another or into the Cloud is easier said than done.
Based on years of experience migrating Oracle workloads, Oracle has developed Zero Downtime Migration (ZDM). ZDM is Oracle’s premier solution for a simplified and automated migration experience, providing zero to negligible downtime for the production system and depending on the migration scenario. ZDM allows you to directly and seamlessly migrate your on-premises Oracle Databases to and between any Oracle-owned infrastructure, including Exadata Database Machine On-Premises, Exadata Cloud at Customer (ExaC@C), and Oracle Cloud Infrastructure. Oracle ZDM supports a wide range of Oracle Database versions and, as the name implies, ensures minimal to no production database impact during the migration.
ZDM follows Oracle Maximum Availability Architecture (MAA) principles1 and incorporates products such as GoldenGate and Data Guard to ensure High Availability and an online migration workflow that leverages technologies such as the Recovery Manager, Data Pump, and Database Links.
This technical brief is a step-by-step guide for migrating your on-premises Oracle Databases to the Oracle Cloud with Zero Downtime Migration’s Logical Online workflow. The scenario used for this migration comprises a Source Database running on OCI Database Cloud Service to emulate an On-Premises environment and a Target Database running on Oracle Autonomous Database.
Oracle ZDM will run on a separate node and connect to both Source and Target to perform the migration. This guide will cover all requirements related to installing the Oracle ZDM Service Host, the Source Database, the Target Database recipient of the migration process, the backup and networking used. The migration process will be dissected and done in a step-by-step fashion. This guide will answer the most frequently asked questions regarding the product and the overall migration process.
For more information on Oracle Zero Downtime Migration, please visit ZDM’s product website.2
1 http://oracle.com/goto/maa
2 Http://www.oracle.com/goto/zdm
3 Step by Step Guide – Logical Migration from On-Premises to ADB | Oracle Zero Downtime Migration| Version 1.1 Copyright © 2022, Oracle and/or its affiliates | Public
ZERO DOWNTIME MIGRATION
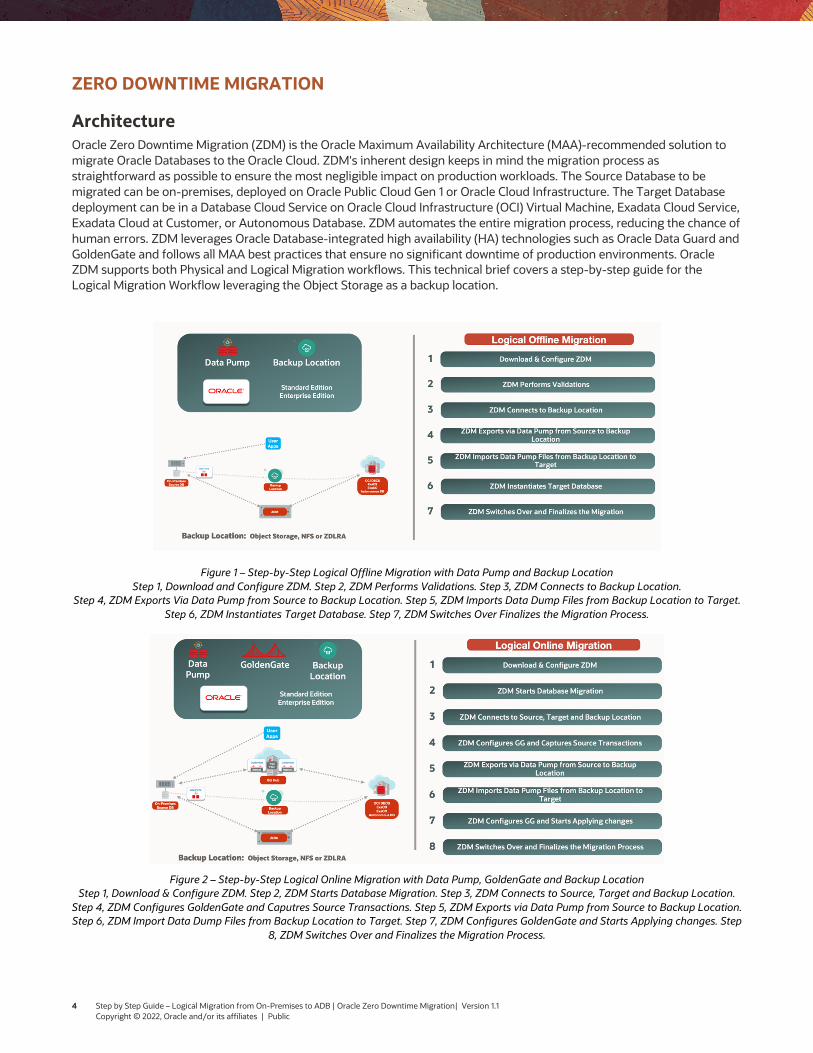
Architecture Oracle Zero Downtime Migration (ZDM) is the Oracle Maximum Availability Architecture (MAA)-recommended solution to migrate Oracle Databases to the Oracle Cloud. ZDM's inherent design keeps in mind the migration process as straightforward as possible to ensure the most negligible impact on production workloads. The Source Database to be migrated can be on-premises, deployed on Oracle Public Cloud Gen 1 or Oracle Cloud Infrastructure. The Target Database deployment can be in a Database Cloud Service on Oracle Cloud Infrastructure (OCI) Virtual Machine, Exadata Cloud Service, Exadata Cloud at Customer, or Autonomous Database. ZDM automates the entire migration process, reducing the chance of human errors. ZDM leverages Oracle Database-integrated high availability (HA) technologies such as Oracle Data Guard and GoldenGate and follows all MAA best practices that ensure no significant downtime of production environments. Oracle ZDM supports both Physical and Logical Migration workflows. This technical brief covers a step-by-step guide for the Logical Migration Workflow leveraging the Object Storage as a backup location.
Figure 1 – Step-by-Step Logical Offline Migration with Data Pump and Backup Location Step 1, Download and Configure ZDM. Step 2, ZDM Performs Validations. Step 3, ZDM Connects to Backup Location.
Step 4, ZDM Exports Via Data Pump from Source to Backup Location. Step 5, ZDM Imports Data Dump Files from Backup Location to Target. Step 6, ZDM Instantiates Target Database. Step 7, ZDM Switches Over Finalizes the Migration Process.
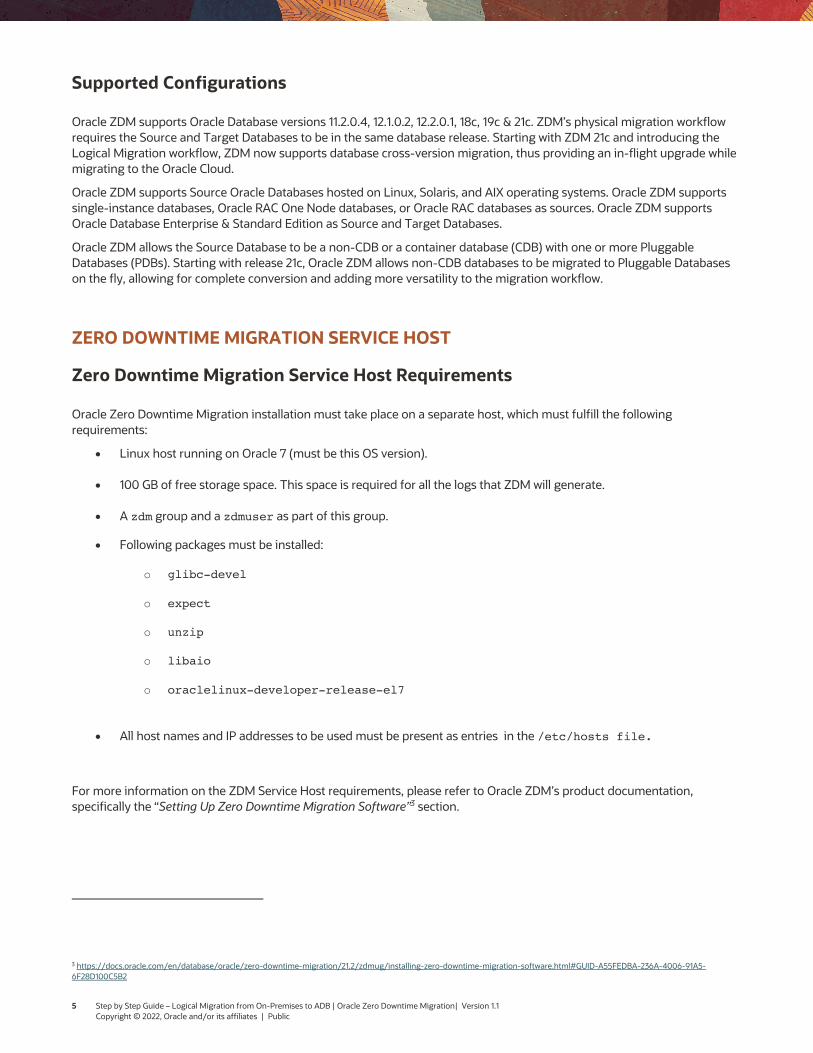
Figure 2 – Step-by-Step Logical Online Migration with Data Pump, GoldenGate and Backup Location Step 1, Download & Configure ZDM. Step 2, ZDM Starts Database Migration. Step 3, ZDM Connects to Source, Target and Backup Location.
Step 4, ZDM Configures GoldenGate and Caputres Source Transactions. Step 5, ZDM Exports via Data Pump from Source to Backup Location. Step 6, ZDM Import Data Dump Files from Backup Location to Target. Step 7, ZDM Configures GoldenGate and Starts Applying changes. Step
8, ZDM Switches Over and Finalizes the Migration Process.
4 Step by Step Guide – Logical Migration from On-Premises to ADB | Oracle Zero Downtime Migration| Version 1.1 Copyright © 2022, Oracle and/or its affiliates | Public
Supported Configurations
Oracle ZDM supports Oracle Database versions 11.2.0.4, 12.1.0.2, 12.2.0.1, 18c, 19c & 21c. ZDM’s physical migration workflow requires the Source and Target Databases to be in the same database release. Starting with ZDM 21c and introducing the Logical Migration workflow, ZDM now supports database cross-version migration, thus providing an in-flight upgrade while migrating to the Oracle Cloud.
Oracle ZDM supports Source Oracle Databases hosted on Linux, Solaris, and AIX operating systems. Oracle ZDM supports single-instance databases, Oracle RAC One Node databases, or Oracle RAC databases as sources. Oracle ZDM supports Oracle Database Enterprise & Standard Edition as Source and Target Databases.
Oracle ZDM allows the Source Database to be a non-CDB or a container database (CDB) with one or more Pluggable Databases (PDBs). Starting with release 21c, Oracle ZDM allows non-CDB databases to be migrated to Pluggable Databases on the fly, allowing for complete conversion and adding more versatility to the migration workflow.
ZERO DOWNTIME MIGRATION SERVICE HOST
Zero Downtime Migration Service Host Requirements
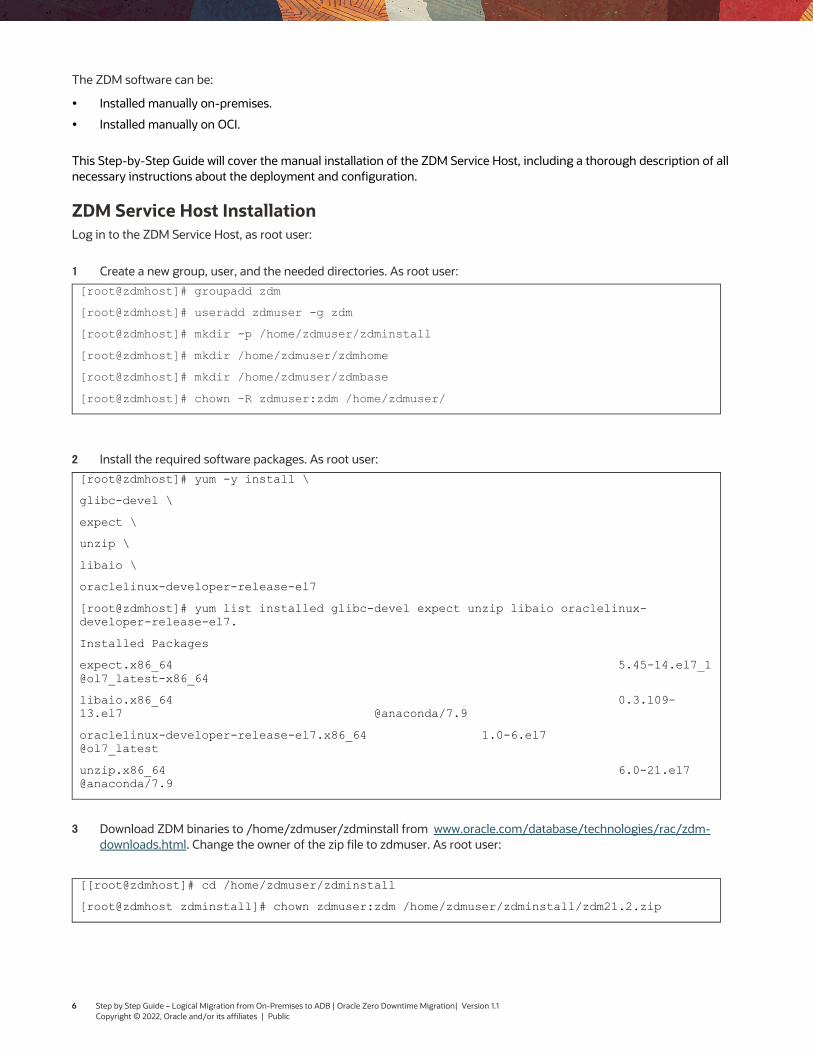
Oracle Zero Downtime Migration installation must take place on a separate host, which must fulfill the following requirements:
• Linux host running on Oracle 7 (must be this OS version).
• 100 GB of free storage space. This space is required for all the logs that ZDM will generate.
• A zdm group and a zdmuser as part of this group.
• Following packages must be installed:
o glibc-devel
o expect
o unzip
o libaio
o oraclelinux-developer-release-el7
• All host names and IP addresses to be used must be present as entries in the /etc/hosts file.
For more information on the ZDM Service Host requirements, please refer to Oracle ZDM’s product documentation, specifically the “Setting Up Zero Downtime Migration Software”3 section.
3 https://docs.oracle.com/en/database/oracle/zero-downtime-migration/21.2/zdmug/installing-zero-downtime-migration-software.html#GUID-A55FEDBA-236A-4006-91A5-6F28D100C5B2
5 Step by Step Guide – Logical Migration from On-Premises to ADB | Oracle Zero Downtime Migration| Version 1.1 Copyright © 2022, Oracle and/or its affiliates | Public
The ZDM software can be:
• Installed manually on-premises.
• Installed manually on OCI.
This Step-by-Step Guide will cover the manual installation of the ZDM Service Host, including a thorough description of all necessary instructions about the deployment and configuration.
ZDM Service Host Installation Log in to the ZDM Service Host, as root user:
1 Create a new group, user, and the needed directories. As root user:
[root@zdmhost]# groupadd zdm
[root@zdmhost]# useradd zdmuser -g zdm
[root@zdmhost]# mkdir -p /home/zdmuser/zdminstall
[root@zdmhost]# mkdir /home/zdmuser/zdmhome
[root@zdmhost]# mkdir /home/zdmuser/zdmbase
[root@zdmhost]# chown -R zdmuser:zdm /home/zdmuser/
2 Install the required software packages. As root user:
[root@zdmhost]# yum -y install \
glibc-devel \
expect \
unzip \
libaio \
oraclelinux-developer-release-el7
[root@zdmhost]# yum list installed glibc-devel expect unzip libaio oraclelinux-developer-release-el7.
Installed Packages
expect.x86_64@ol7_latest-x86_64
5.45-14.el7_1
libaio.x86_64 13.el7 @anaconda/7.9
0.3.109-
oraclelinux-developer-release-el7.x86_64 @ol7_latest
1.0-6.el7
unzip.x86_64@anaconda/7.9
6.0-21.el7
3 Download ZDM binaries to /home/zdmuser/zdminstall from www.oracle.com/database/technologies/rac/zdm-downloads.html. Change the owner of the zip file to zdmuser. As root user:
[[root@zdmhost]# cd /home/zdmuser/zdminstall
[root@zdmhost zdminstall]# chown zdmuser:zdm /home/zdmuser/zdminstall/zdm21.2.zip
6 Step by Step Guide – Logical Migration from On-Premises to ADB | Oracle Zero Downtime Migration| Version 1.1 Copyright © 2022, Oracle and/or its affiliates | Public
---------------------------------------
---------------------------------------
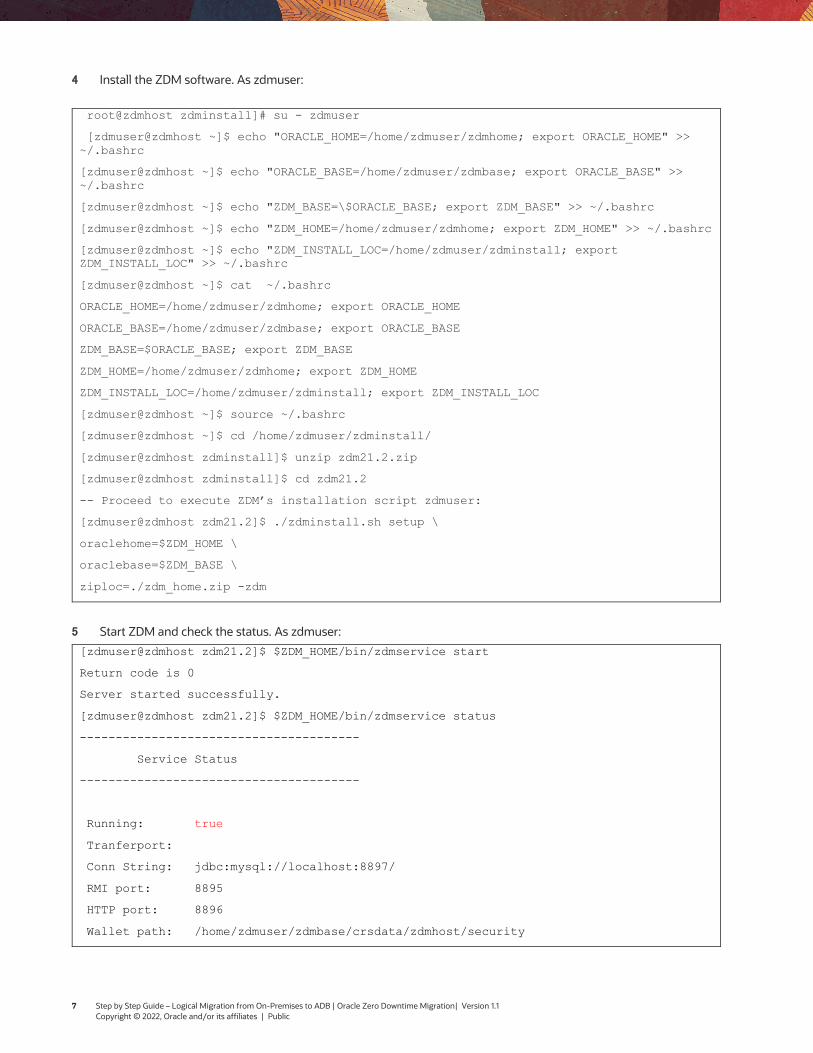
4 Install the ZDM software. As zdmuser:
[root@zdmhost zdminstall]# su - zdmuser
[zdmuser@zdmhost ~]$ echo "ORACLE_HOME=/home/zdmuser/zdmhome; export ORACLE_HOME" >> ~/.bashrc
[zdmuser@zdmhost ~]$ echo "ORACLE_BASE=/home/zdmuser/zdmbase; export ORACLE_BASE" >>~/.bashrc
[zdmuser@zdmhost ~]$ echo "ZDM_BASE=\$ORACLE_BASE; export ZDM_BASE" >> ~/.bashrc
[zdmuser@zdmhost ~]$ echo "ZDM_HOME=/home/zdmuser/zdmhome; export ZDM_HOME" >> ~/.bashrc
[zdmuser@zdmhost ~]$ echo "ZDM_INSTALL_LOC=/home/zdmuser/zdminstall; exportZDM_INSTALL_LOC" >> ~/.bashrc
[zdmuser@zdmhost ~]$ cat ~/.bashrc
ORACLE_HOME=/home/zdmuser/zdmhome; export ORACLE_HOME
ORACLE_BASE=/home/zdmuser/zdmbase; export ORACLE_BASE
ZDM_BASE=$ORACLE_BASE; export ZDM_BASE
ZDM_HOME=/home/zdmuser/zdmhome; export ZDM_HOME
ZDM_INSTALL_LOC=/home/zdmuser/zdminstall; export ZDM_INSTALL_LOC
[zdmuser@zdmhost ~]$ source ~/.bashrc
[zdmuser@zdmhost ~]$ cd /home/zdmuser/zdminstall/
[zdmuser@zdmhost zdminstall]$ unzip zdm21.2.zip
[zdmuser@zdmhost zdminstall]$ cd zdm21.2
-- Proceed to execute ZDM’s installation script zdmuser:
[zdmuser@zdmhost zdm21.2]$ ./zdminstall.sh setup \
oraclehome=$ZDM_HOME \
oraclebase=$ZDM_BASE \
ziploc=./zdm_home.zip -zdm
5 Start ZDM and check the status. As zdmuser:
[zdmuser@zdmhost zdm21.2]$ $ZDM_HOME/bin/zdmservice start
Return code is 0
Server started successfully.
[zdmuser@zdmhost zdm21.2]$ $ZDM_HOME/bin/zdmservice status
Service Status
Running: true
Tranferport:
Conn String: jdbc:mysql://localhost:8897/
RMI port: 8895
HTTP port: 8896
Wallet path: /home/zdmuser/zdmbase/crsdata/zdmhost/security
7 Step by Step Guide – Logical Migration from On-Premises to ADB | Oracle Zero Downtime Migration| Version 1.1 Copyright © 2022, Oracle and/or its affiliates | Public
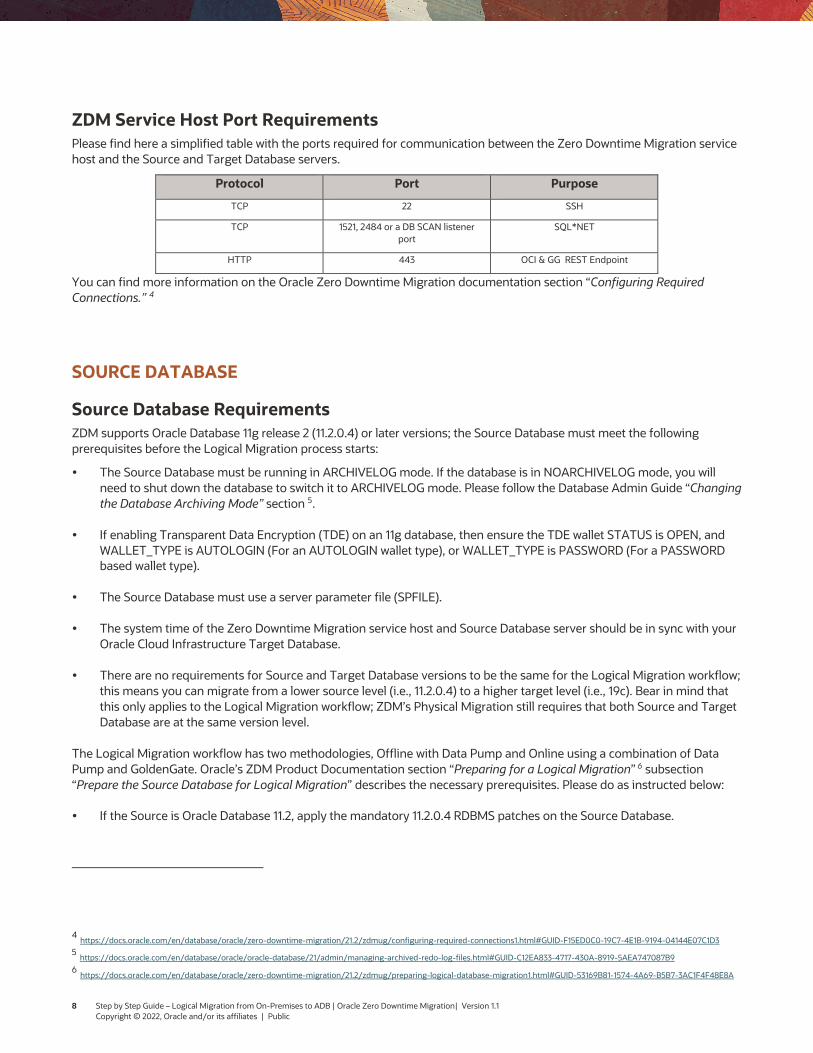
ZDM Service Host Port Requirements Please find here a simplified table with the ports required for communication between the Zero Downtime Migration service host and the Source and Target Database servers.
Protocol Port Purpose
TCP 22 SSH
TCP 1521, 2484 or a DB SCAN listener port
SQL*NET
HTTP 443 OCI & GG REST Endpoint
You can find more information on the Oracle Zero Downtime Migration documentation section “Configuring Required Connections.” 4
SOURCE DATABASE
Source Database Requirements ZDM supports Oracle Database 11g release 2 (11.2.0.4) or later versions; the Source Database must meet the following prerequisites before the Logical Migration process starts:
• The Source Database must be running in ARCHIVELOG mode. If the database is in NOARCHIVELOG mode, you will need to shut down the database to switch it to ARCHIVELOG mode. Please follow the Database Admin Guide “Changing the Database Archiving Mode” section 5.
• If enabling Transparent Data Encryption (TDE) on an 11g database, then ensure the TDE wallet STATUS is OPEN, and WALLET_TYPE is AUTOLOGIN (For an AUTOLOGIN wallet type), or WALLET_TYPE is PASSWORD (For a PASSWORD based wallet type).
• The Source Database must use a server parameter file (SPFILE).
• The system time of the Zero Downtime Migration service host and Source Database server should be in sync with your Oracle Cloud Infrastructure Target Database.
• There are no requirements for Source and Target Database versions to be the same for the Logical Migration workflow; this means you can migrate from a lower source level (i.e., 11.2.0.4) to a higher target level (i.e., 19c). Bear in mind that this only applies to the Logical Migration workflow; ZDM’s Physical Migration still requires that both Source and Target Database are at the same version level.
The Logical Migration workflow has two methodologies, Offline with Data Pump and Online using a combination of Data Pump and GoldenGate. Oracle’s ZDM Product Documentation section “Preparing for a Logical Migration” 6 subsection “Prepare the Source Database for Logical Migration” describes the necessary prerequisites. Please do as instructed below:
• If the Source is Oracle Database 11.2, apply the mandatory 11.2.0.4 RDBMS patches on the Source Database.
4 https://docs.oracle.com/en/database/oracle/zero-downtime-migration/21.2/zdmug/configuring-required-connections1.html#GUID-F15ED0C0-19C7-4E1B-9194-04144E07C1D3
5 https://docs.oracle.com/en/database/oracle/oracle-database/21/admin/managing-archived-redo-log-files.html#GUID-C12EA833-4717-430A-8919-5AEA747087B9
6 https://docs.oracle.com/en/database/oracle/zero-downtime-migration/21.2/zdmug/preparing-logical-database-migration1.html#GUID-53169B81-1574-4A69-B5B7-3AC1F4F48E8A
8 Step by Step Guide – Logical Migration from On-Premises to ADB | Oracle Zero Downtime Migration| Version 1.1 Copyright © 2022, Oracle and/or its affiliates | Public
------------
-------- ---
• See My Oracle Support note “Oracle GoldenGate -- Oracle RDBMS Server Recommended Patches” (Doc ID 1557031.1)7
• Database PSU 11.2.0.4.210720 includes a fix for Oracle GoldenGate performance bug 28849751 - IE PERFORMANCE DEGRADES WHEN NETWORK LATENCY BETWEEN EXTRACT AND CAPTURE IS MORE THAN 8MS.
• OGG RDBMS patch 32248879 MERGE REQUEST ON TOP OF DATABASE PSU 11.2.0.4.201020 FOR BUGS 32048478 20448066 - This patch contains mandatory fix for Oracle GoldenGate Microservices bug 20448066 DBMS_XSTREAM_GG APIS SHOULD BE ALLOWED FOR SCA PROCESSES.
• If the source is Oracle Database 12.1.0.2 or a later release, apply mandatory RDBMS patches on the Source Database.
• See My Oracle Support note “Latest GoldenGate/Database (OGG/RDBMS) Patch recommendations” (Doc ID 2193391.1), which lists the additional RDBMS patches needed on top of the latest DBBP/RU for Oracle Database 12c and later.
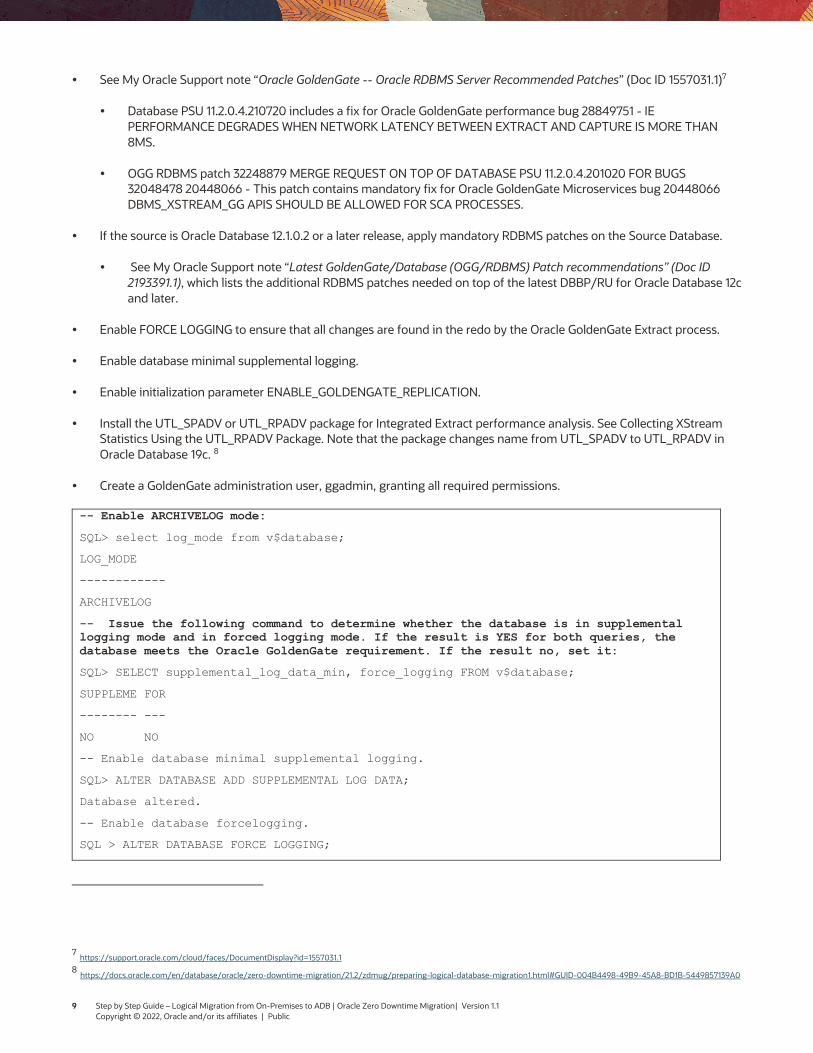
• Enable FORCE LOGGING to ensure that all changes are found in the redo by the Oracle GoldenGate Extract process.
• Enable database minimal supplemental logging.
• Enable initialization parameter ENABLE_GOLDENGATE_REPLICATION.
• Install the UTL_SPADV or UTL_RPADV package for Integrated Extract performance analysis. See Collecting XStream Statistics Using the UTL_RPADV Package. Note that the package changes name from UTL_SPADV to UTL_RPADV in Oracle Database 19c. 8
• Create a GoldenGate administration user, ggadmin, granting all required permissions.
-- Enable ARCHIVELOG mode:
SQL> select log_mode from v$database;
LOG_MODE
ARCHIVELOG
-- Issue the following command to determine whether the database is in supplementallogging mode and in forced logging mode. If the result is YES for both queries, thedatabase meets the Oracle GoldenGate requirement. If the result no, set it:
SQL> SELECT supplemental_log_data_min, force_logging FROM v$database;
SUPPLEME FOR
NO NO
-- Enable database minimal supplemental logging.
SQL> ALTER DATABASE ADD SUPPLEMENTAL LOG DATA;
Database altered.
-- Enable database forcelogging.
SQL > ALTER DATABASE FORCE LOGGING;
7 https://support.oracle.com/cloud/faces/DocumentDisplay?id=1557031.1
8 https://docs.oracle.com/en/database/oracle/zero-downtime-migration/21.2/zdmug/preparing-logical-database-migration1.html#GUID-004B4498-49B9-45A8-BD1B-5449857139A0
9 Step by Step Guide – Logical Migration from On-Premises to ADB | Oracle Zero Downtime Migration| Version 1.1 Copyright © 2022, Oracle and/or its affiliates | Public
-------- ---
------------------------------------ ----------- ------------------------------
------------------------------------ ----------- ------------------------------
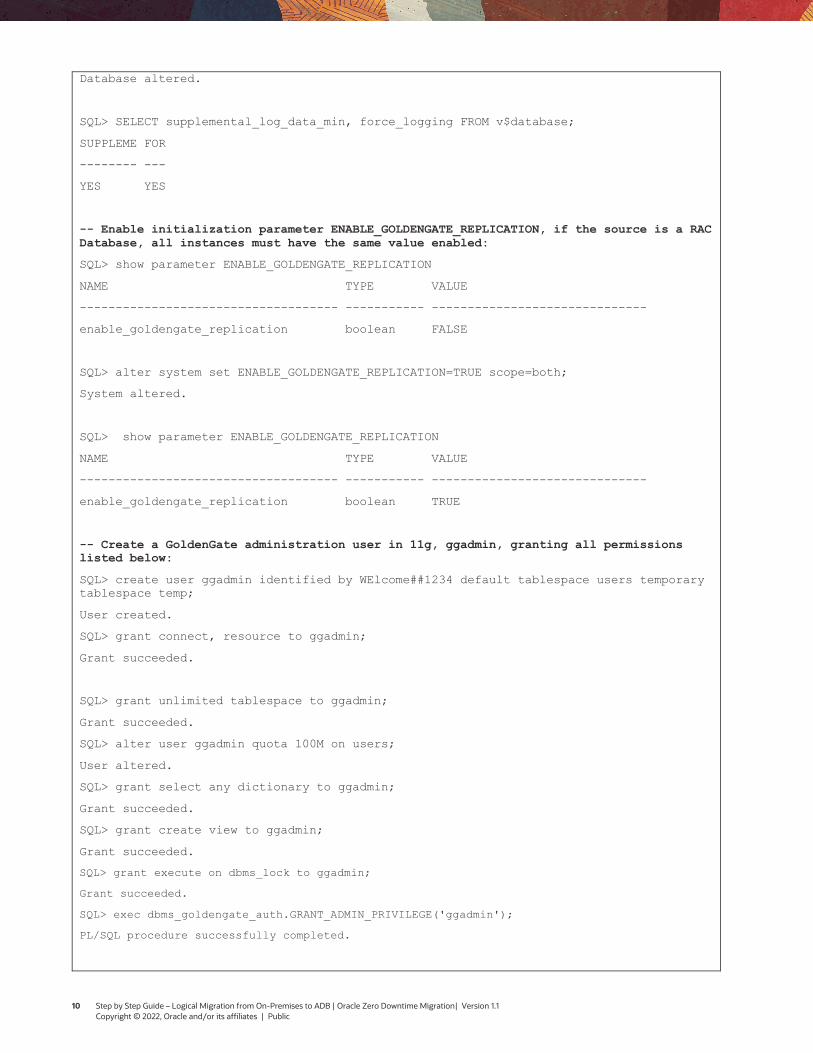
Database altered.
SQL> SELECT supplemental_log_data_min, force_logging FROM v$database;
SUPPLEME FOR
YES YES
-- Enable initialization parameter ENABLE_GOLDENGATE_REPLICATION, if the source is a RAC Database, all instances must have the same value enabled:
SQL> show parameter ENABLE_GOLDENGATE_REPLICATION
NAME TYPE VALUE
enable_goldengate_replication boolean FALSE
SQL> alter system set ENABLE_GOLDENGATE_REPLICATION=TRUE scope=both;
System altered.
SQL> show parameter ENABLE_GOLDENGATE_REPLICATION
NAME TYPE VALUE
enable_goldengate_replication boolean TRUE
-- Create a GoldenGate administration user in 11g, ggadmin, granting all permissionslisted below:
SQL> create user ggadmin identified by WElcome##1234 default tablespace users temporary tablespace temp;
User created.
SQL> grant connect, resource to ggadmin;
Grant succeeded.
SQL> grant unlimited tablespace to ggadmin;
Grant succeeded.
SQL> alter user ggadmin quota 100M on users;
User altered.
SQL> grant select any dictionary to ggadmin;
Grant succeeded.
SQL> grant create view to ggadmin;
Grant succeeded.
SQL> grant execute on dbms_lock to ggadmin;
Grant succeeded.
SQL> exec dbms_goldengate_auth.GRANT_ADMIN_PRIVILEGE('ggadmin');
PL/SQL procedure successfully completed.
10 Step by Step Guide – Logical Migration from On-Premises to ADB | Oracle Zero Downtime Migration| Version 1.1 Copyright © 2022, Oracle and/or its affiliates | Public
-------------------- ----------
--------------------------------------------------------------------------------
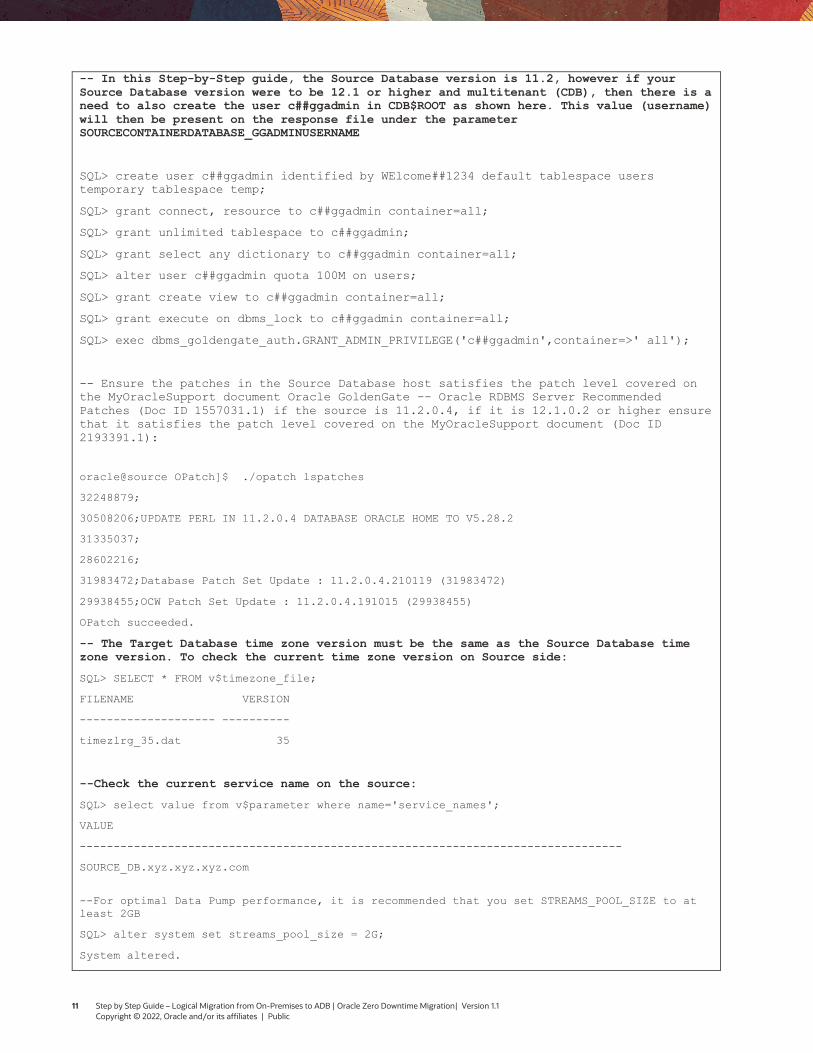
-- In this Step-by-Step guide, the Source Database version is 11.2, however if yourSource Database version were to be 12.1 or higher and multitenant (CDB), then there is aneed to also create the user c##ggadmin in CDB$ROOT as shown here. This value (username) will then be present on the response file under the parameterSOURCECONTAINERDATABASE_GGADMINUSERNAME
SQL> create user c##ggadmin identified by WElcome##1234 default tablespace userstemporary tablespace temp;
SQL> grant connect, resource to c##ggadmin container=all;
SQL> grant unlimited tablespace to c##ggadmin;
SQL> grant select any dictionary to c##ggadmin container=all;
SQL> alter user c##ggadmin quota 100M on users;
SQL> grant create view to c##ggadmin container=all;
SQL> grant execute on dbms_lock to c##ggadmin container=all;
SQL> exec dbms_goldengate_auth.GRANT_ADMIN_PRIVILEGE('c##ggadmin',container=>' all');
-- Ensure the patches in the Source Database host satisfies the patch level covered onthe MyOracleSupport document Oracle GoldenGate -- Oracle RDBMS Server Recommended Patches (Doc ID 1557031.1) if the source is 11.2.0.4, if it is 12.1.0.2 or higher ensure that it satisfies the patch level covered on the MyOracleSupport document (Doc ID2193391.1):
oracle@source OPatch]$ ./opatch lspatches
32248879;
30508206;UPDATE PERL IN 11.2.0.4 DATABASE ORACLE HOME TO V5.28.2
31335037;
28602216;
31983472;Database Patch Set Update : 11.2.0.4.210119 (31983472)
29938455;OCW Patch Set Update : 11.2.0.4.191015 (29938455)
OPatch succeeded.
-- The Target Database time zone version must be the same as the Source Database time zone version. To check the current time zone version on Source side:
SQL> SELECT * FROM v$timezone_file;
FILENAME VERSION
timezlrg_35.dat 35
--Check the current service name on the source:
SQL> select value from v$parameter where name='service_names';
VALUE
SOURCE_DB.xyz.xyz.xyz.com
--For optimal Data Pump performance, it is recommended that you set STREAMS_POOL_SIZE to at least 2GB
SQL> alter system set streams_pool_size = 2G;
System altered.
11 Step by Step Guide – Logical Migration from On-Premises to ADB | Oracle Zero Downtime Migration| Version 1.1 Copyright © 2022, Oracle and/or its affiliates | Public
• SSL/TLS: in case the source is configured with TLS and self-signed database server certificates, please add the self-signed certificate to the ZDM server home by executing the following command:
keytool -import -keystore ZDM_HOME/jdk/jre/lib/security/cacerts -trustcacerts -alias "src ca cert" -file source_db_server-certificate
• SSL/TLS: please store the wallet that contains the TLS authentication certificates in the correct location on the GoldenGate hub: /u02/deployments/deployment_name/etc
For the purposes of this guide, a 11.2.0.4 Source Database was configured. For more information, please refer to Oracle’s ZDM Product Documentation section “Preparing for a Logical Migration”, subsection “Prepare the Source Database for Logical Migration” 9.
Source Database Port Requirements Find here a simplified table with the ports required for communication between the Source Database, the Zero Downtime Migration service host, the Target Database server, and the Oracle Cloud Object Storage.
Protocol Port Purpose
TCP 22 SSH
TCP 1521, 2484 or a DB SCAN listener port
SQL*NET
HTTP 443 Database Backup Store. OCI OSS.
You can find more information on the Oracle Zero Downtime Migration documentation section “Zero Downtime Migration Port Requirements” 10 .
9 https://docs.oracle.com/en/database/oracle/zero-downtime-migration/21.2/zdmug/preparing-for-database-migration.html#GUID-004B4498-49B9-45A8-BD1B-5449857139A0
10 https://docs.oracle.com/en/database/oracle/zero-downtime-migration/21.2/zdmug/zero-downtime-migration-port-requirements.html#GUID-E6F8EF13-03A5-43DD-8F98-
182632C83CB3
12 Step by Step Guide – Logical Migration from On-Premises to ADB | Oracle Zero Downtime Migration| Version 1.1 Copyright © 2022, Oracle and/or its affiliates | Public
TARGET DATABASE
Target Database Requirements Zero Downtime Migration will migrate the Source Database to an Oracle Cloud Infrastructure database. This step-by-step guide covers the basics of migrating to an Oracle Autonomous Database.
Create a placeholder database on the Target Cloud service before starting the migration process. This placeholder Target Database must comply with the following requirements:
• Sizing: please ensure that the shape chosen will suffice for the Source Database sizing and any future increment in size.
• Version: Target Database must be of the same version or higher than the Source Database version. Migration to a lower version database is not supported.
• Character set: the character set on the Source and Target Database must be the same.
• SSL/TLS: for Target Databases configured to use SSL/TLS, store the wallet containing the TLS authentication certificates in the correct location on the GoldenGate hub:
o /u02/deployments/deployment_name/etc/adb
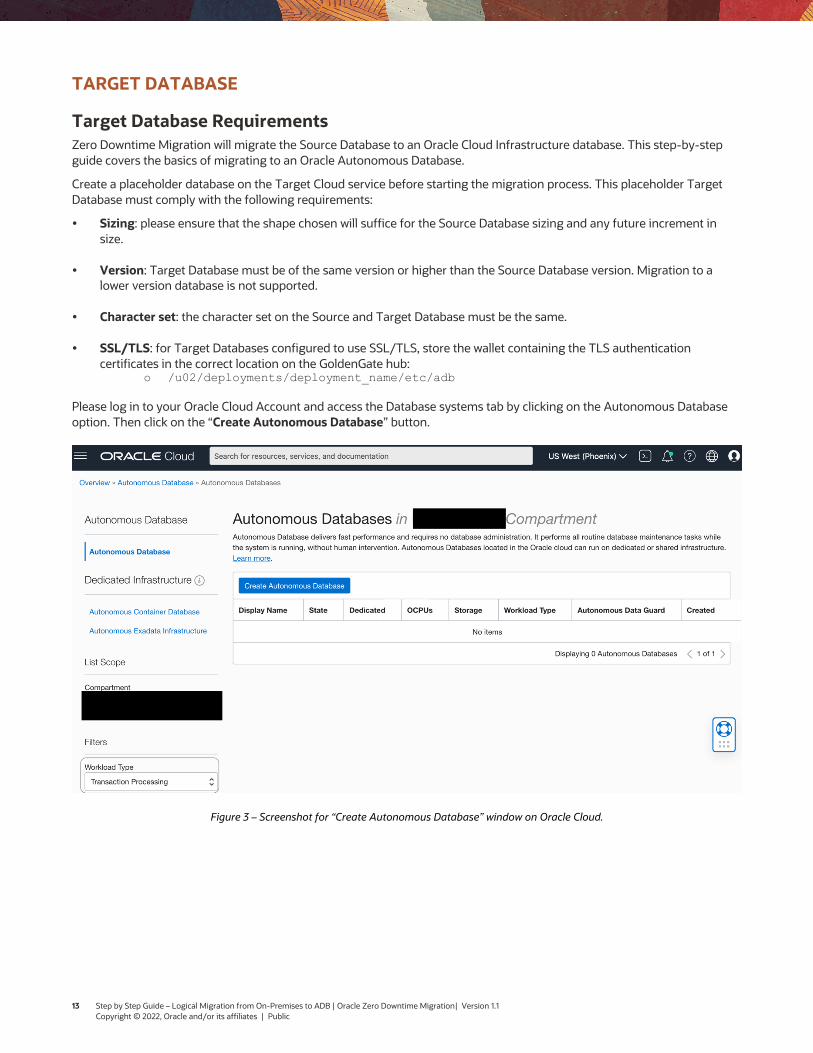
Please log in to your Oracle Cloud Account and access the Database systems tab by clicking on the Autonomous Database option. Then click on the “Create Autonomous Database” button.
Figure 3 – Screenshot for “Create Autonomous Database” window on Oracle Cloud.
13 Step by Step Guide – Logical Migration from On-Premises to ADB | Oracle Zero Downtime Migration| Version 1.1 Copyright © 2022, Oracle and/or its affiliates | Public
Provide basic information for the Oracle Autonomous Database:
• Choose a compartment: Use the same compartment as your compute instance.
• Display Name: Enter a memorable name for the database for display purposes. For this step-by-step guide, use TargetATP1.
• Database Name: Use letters and numbers only, starting with a letter. The Maximum length is 14 characters. (Underscores not initially supported.) For this step-by-step guide, we will use TargetATP1. Please remember that there must not be another database with the same name; otherwise, creating and provisioning will be an issue.
Choose a workload type. Select the workload type for your database from the following choices:
• Transaction Processing: For this step-by-step guide, we will be migrating to a Transaction Processing database as the workload type.
• Data Warehouse: Alternatively, you could choose Data Warehouse as the workload type.
Choose a deployment type. Select the deployment type for your database from the following choices:
• Shared Infrastructure: Autonomous Database on shared Exadata infrastructure
• Dedicated Infrastructure: Autonomous Database on dedicated Exadata infrastructure
Configure the database according to your specific use case:
• Always Free: If your Cloud Account is an Always Free account, you can select this option to create an always free autonomous database. An always free database comes with 1 CPU and 20 GB of storage.
• Choose database version: Select a database version from the available versions. For this step-by-step guide we will be migrating to a 19c database.
• OCPU count: Number of CPUs for your service. For this step-by-step guide, specify 1 CPU. If you choose an Always Free database, it comes with 1 CPU.
• Storage (TB): Select your storage capacity, if you choose an Always Free database, it comes with 20 GB of storage.
• Auto Scaling: – Auto-scaling allows the system to automatically use up to three times more CPU and IO resources to meet workload demand.
Create administrator credentials:
• Password and Confirm Password: Specify the password for ADMIN user of the service instance.
Choose network access:
• Accept the default, "Allow secure access from everywhere".
• If you want to use Private Endpoint to allow traffic only from the VCN you specify, then select "Virtual cloud network" in the “Choose network access” area.
• You can control and restrict access to your Autonomous Database by setting network Access Control Lists (ACLs). You can select from four IP notation types: IP Address, CIDR Block, Virtual Cloud Network, and Virtual Cloud Network OCID.
14 Step by Step Guide – Logical Migration from On-Premises to ADB | Oracle Zero Downtime Migration| Version 1.1 Copyright © 2022, Oracle and/or its affiliates | Public
Choose a license type:
• Bring Your Own License (BYOL): Select this type when your organization has existing database licenses.
• License Included: Select this type when you want to subscribe to new database software licenses and the database cloud service.
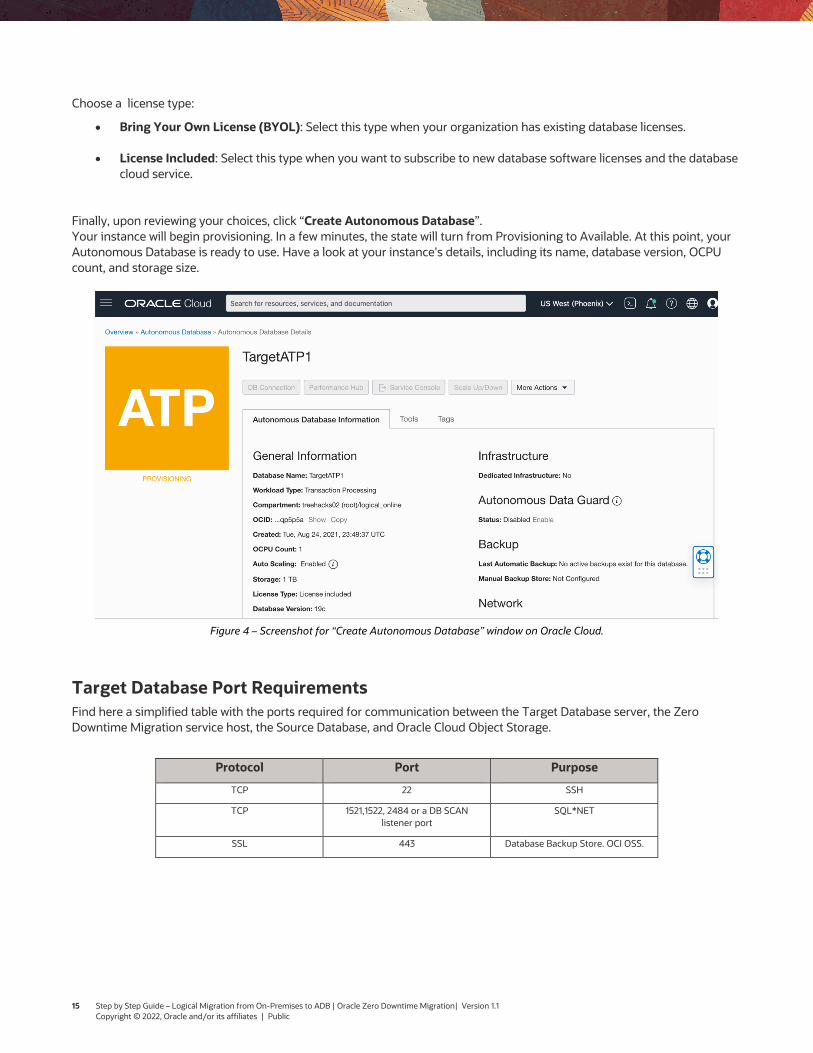
Finally, upon reviewing your choices, click “Create Autonomous Database”. Your instance will begin provisioning. In a few minutes, the state will turn from Provisioning to Available. At this point, your Autonomous Database is ready to use. Have a look at your instance's details, including its name, database version, OCPU count, and storage size.
Figure 4 – Screenshot for “Create Autonomous Database” window on Oracle Cloud.
Target Database Port Requirements Find here a simplified table with the ports required for communication between the Target Database server, the Zero Downtime Migration service host, the Source Database, and Oracle Cloud Object Storage.
Protocol Port Purpose
TCP 22 SSH
TCP 1521,1522, 2484 or a DB SCAN listener port
SQL*NET
SSL 443 Database Backup Store. OCI OSS.
15 Step by Step Guide – Logical Migration from On-Premises to ADB | Oracle Zero Downtime Migration| Version 1.1 Copyright © 2022, Oracle and/or its affiliates | Public
You can find more information on the Oracle Zero Downtime Migration documentation section “Zero Downtime Migration Port Requirements”. 11
CONNECTIVITY
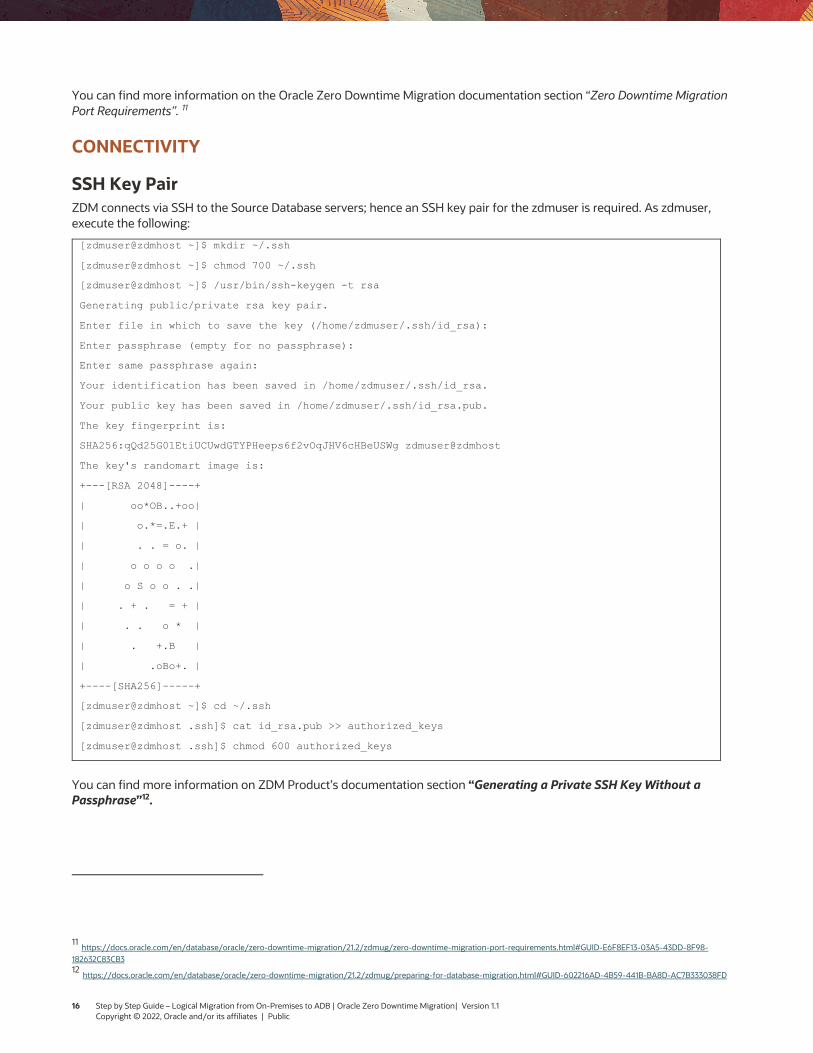
SSH Key Pair ZDM connects via SSH to the Source Database servers; hence an SSH key pair for the zdmuser is required. As zdmuser, execute the following:
[zdmuser@zdmhost ~]$ mkdir ~/.ssh
[zdmuser@zdmhost ~]$ chmod 700 ~/.ssh
[zdmuser@zdmhost ~]$ /usr/bin/ssh-keygen -t rsa
Generating public/private rsa key pair.
Enter file in which to save the key (/home/zdmuser/.ssh/id_rsa):
Enter passphrase (empty for no passphrase):
Enter same passphrase again:
Your identification has been saved in /home/zdmuser/.ssh/id_rsa.
Your public key has been saved in /home/zdmuser/.ssh/id_rsa.pub.
The key fingerprint is:
SHA256:qQd25G01EtiUCUwdGTYPHeeps6f2vOqJHV6cHBeUSWg zdmuser@zdmhost
The key's randomart image is:
+---[RSA 2048]----+
| oo*OB..+oo|
| o.*=.E.+ |
| . . = o. |
| o o o o .|
| o S o o . .|
| . + . = + |
| . . o * |
| . +.B |
| .oBo+. |
+----[SHA256]-----+
[zdmuser@zdmhost ~]$ cd ~/.ssh
[zdmuser@zdmhost .ssh]$ cat id_rsa.pub >> authorized_keys
[zdmuser@zdmhost .ssh]$ chmod 600 authorized_keys
You can find more information on ZDM Product’s documentation section “Generating a Private SSH Key Without a Passphrase”12.
11 https://docs.oracle.com/en/database/oracle/zero-downtime-migration/21.2/zdmug/zero-downtime-migration-port-requirements.html#GUID-E6F8EF13-03A5-43DD-8F98-
182632C83CB3 12
https://docs.oracle.com/en/database/oracle/zero-downtime-migration/21.2/zdmug/preparing-for-database-migration.html#GUID-602216AD-4B59-441B-BA8D-AC7B333038FD
16 Step by Step Guide – Logical Migration from On-Premises to ADB | Oracle Zero Downtime Migration| Version 1.1 Copyright © 2022, Oracle and/or its affiliates | Public
Before continuing with the migration environment setup, rename the id_rsa.pub file to <zdm_service_host_name>.ppk on the ZDM Service Host.
[zdmuser@zdmhost .ssh]$ cd /home/zdmuser/.ssh
[zdmuser@zdmhost .ssh]$ mv id_rsa zdm.ppk
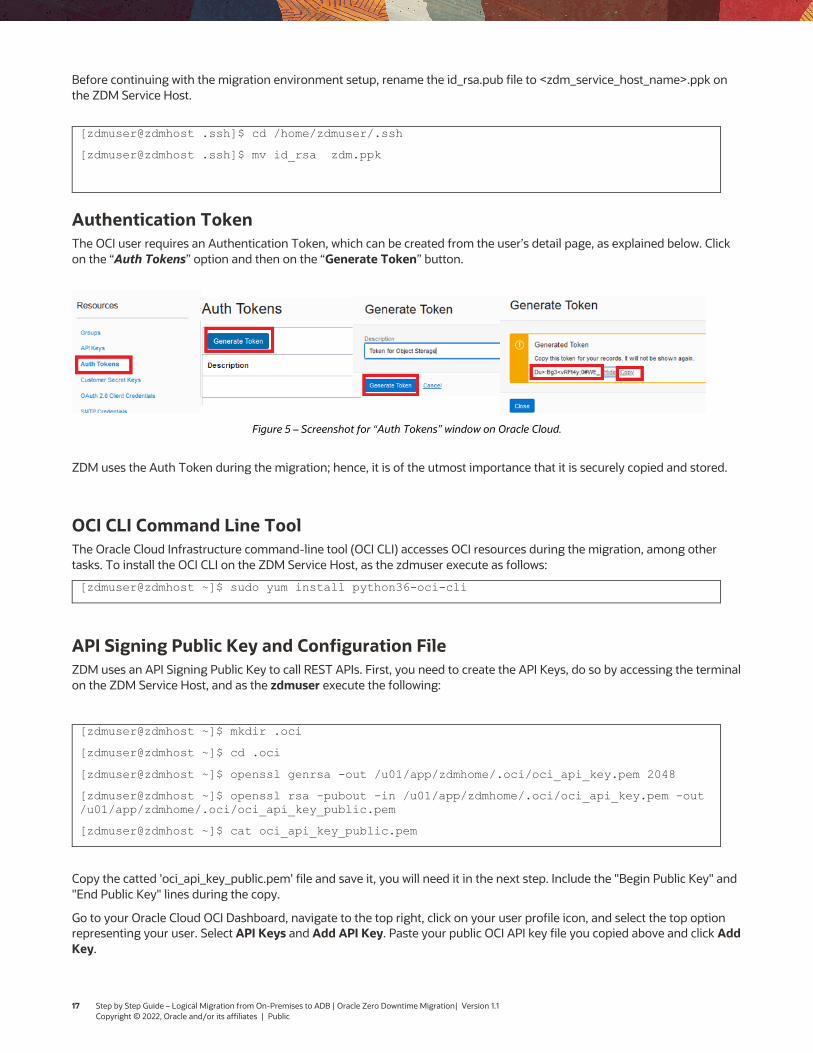
Authentication Token The OCI user requires an Authentication Token, which can be created from the user’s detail page, as explained below. Click on the “Auth Tokens” option and then on the “Generate Token” button.
Figure 5 – Screenshot for “Auth Tokens” window on Oracle Cloud.
ZDM uses the Auth Token during the migration; hence, it is of the utmost importance that it is securely copied and stored.
OCI CLI Command Line Tool The Oracle Cloud Infrastructure command-line tool (OCI CLI) accesses OCI resources during the migration, among other tasks. To install the OCI CLI on the ZDM Service Host, as the zdmuser execute as follows:
[zdmuser@zdmhost ~]$ sudo yum install python36-oci-cli
API Signing Public Key and Configuration File ZDM uses an API Signing Public Key to call REST APIs. First, you need to create the API Keys, do so by accessing the terminal on the ZDM Service Host, and as the zdmuser execute the following:
[zdmuser@zdmhost ~]$ mkdir .oci
[zdmuser@zdmhost ~]$ cd .oci
[zdmuser@zdmhost ~]$ openssl genrsa -out /u01/app/zdmhome/.oci/oci_api_key.pem 2048
[zdmuser@zdmhost ~]$ openssl rsa -pubout -in /u01/app/zdmhome/.oci/oci_api_key.pem -out /u01/app/zdmhome/.oci/oci_api_key_public.pem
[zdmuser@zdmhost ~]$ cat oci_api_key_public.pem
Copy the catted 'oci_api_key_public.pem' file and save it, you will need it in the next step. Include the "Begin Public Key" and "End Public Key" lines during the copy.
Go to your Oracle Cloud OCI Dashboard, navigate to the top right, click on your user profile icon, and select the top option representing your user. Select API Keys and Add API Key. Paste your public OCI API key file you copied above and click Add Key.
17 Step by Step Guide – Logical Migration from On-Premises to ADB | Oracle Zero Downtime Migration| Version 1.1 Copyright © 2022, Oracle and/or its affiliates | Public
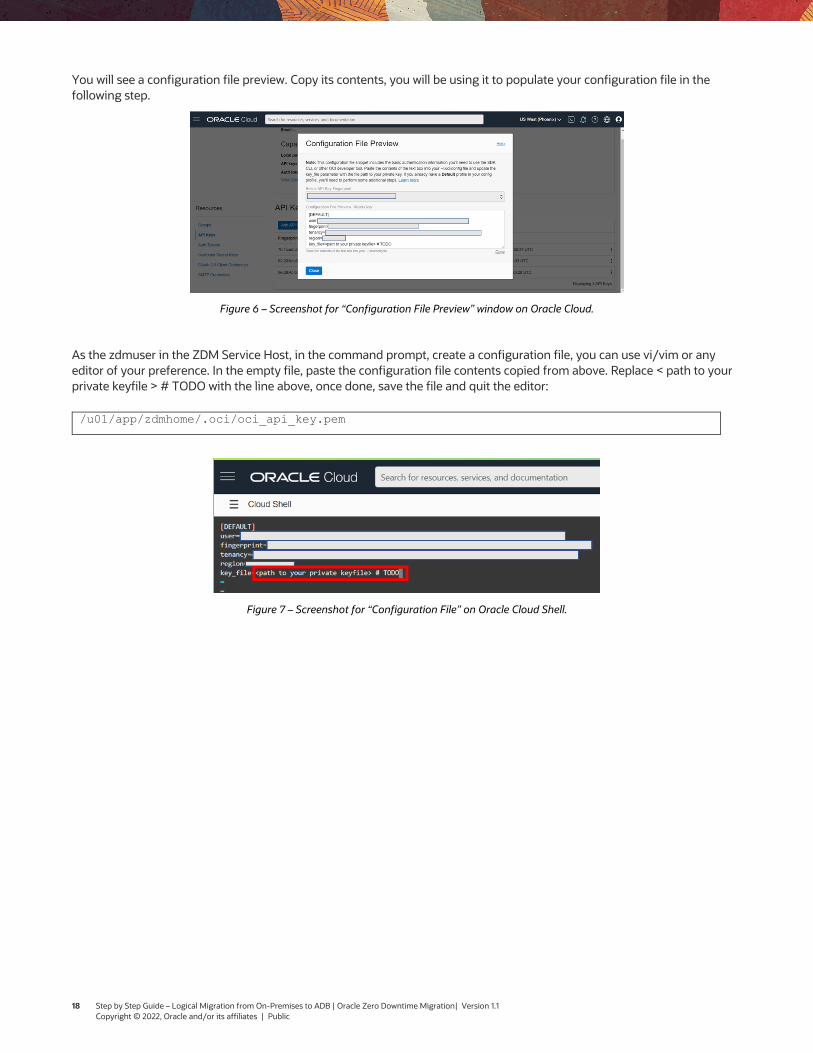
You will see a configuration file preview. Copy its contents, you will be using it to populate your configuration file in the following step.
Figure 6 – Screenshot for “Configuration File Preview” window on Oracle Cloud.
As the zdmuser in the ZDM Service Host, in the command prompt, create a configuration file, you can use vi/vim or any editor of your preference. In the empty file, paste the configuration file contents copied from above. Replace < path to your private keyfile > # TODO with the line above, once done, save the file and quit the editor:
/u01/app/zdmhome/.oci/oci_api_key.pem
Figure 7 – Screenshot for “Configuration File” on Oracle Cloud Shell.
18 Step by Step Guide – Logical Migration from On-Premises to ADB | Oracle Zero Downtime Migration| Version 1.1 Copyright © 2022, Oracle and/or its affiliates | Public
GoldenGate Hub ZDM's Logical Online Migration workflow requires a GoldenGate Hub with two GoldenGate Microservices, one Extract, and one Replicat. These two microservices' tasks keep both source and Target Databases in sync during the migration and the graceful switchover.
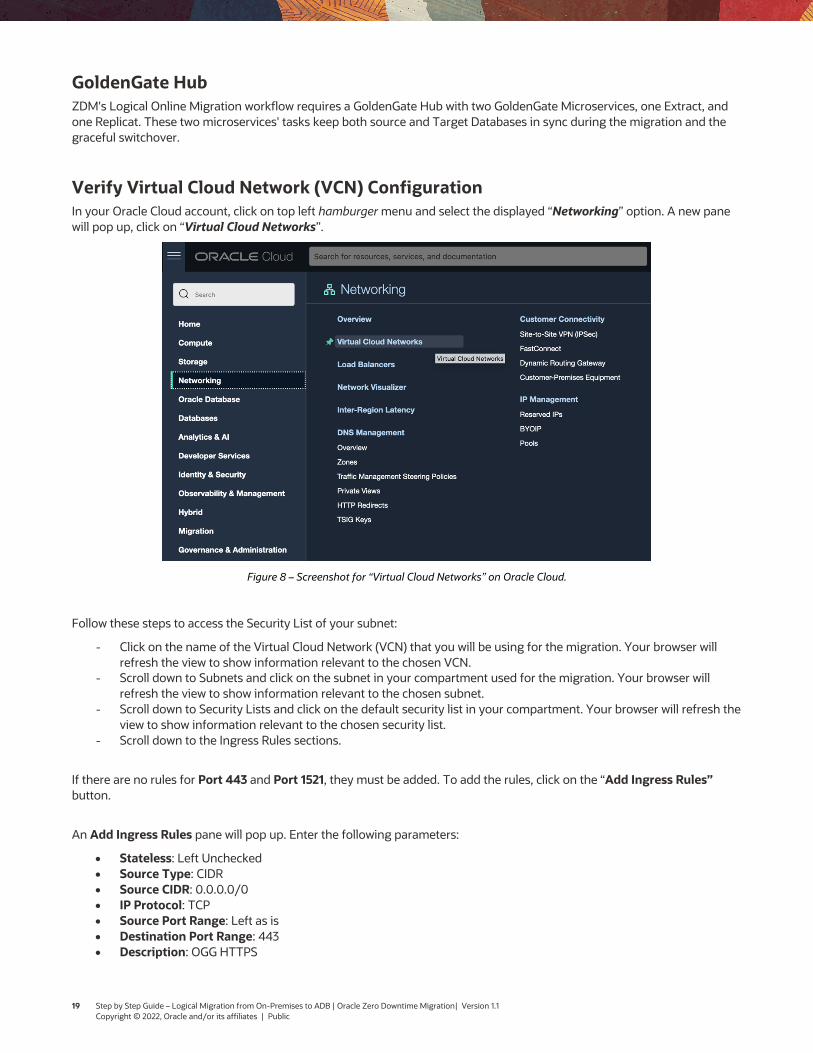
Verify Virtual Cloud Network (VCN) Configuration In your Oracle Cloud account, click on top left hamburger menu and select the displayed “Networking” option. A new pane will pop up, click on “Virtual Cloud Networks”.
Figure 8 – Screenshot for “Virtual Cloud Networks” on Oracle Cloud.
Follow these steps to access the Security List of your subnet:
- Click on the name of the Virtual Cloud Network (VCN) that you will be using for the migration. Your browser will refresh the view to show information relevant to the chosen VCN.
- Scroll down to Subnets and click on the subnet in your compartment used for the migration. Your browser will refresh the view to show information relevant to the chosen subnet.
- Scroll down to Security Lists and click on the default security list in your compartment. Your browser will refresh the view to show information relevant to the chosen security list.
- Scroll down to the Ingress Rules sections.
If there are no rules for Port 443 and Port 1521, they must be added. To add the rules, click on the “Add Ingress Rules” button.
An Add Ingress Rules pane will pop up. Enter the following parameters:
• Stateless: Left Unchecked • Source Type: CIDR • Source CIDR: 0.0.0.0/0 • IP Protocol: TCP • Source Port Range: Left as is • Destination Port Range: 443 • Description: OGG HTTPS
19 Step by Step Guide – Logical Migration from On-Premises to ADB | Oracle Zero Downtime Migration| Version 1.1 Copyright © 2022, Oracle and/or its affiliates | Public
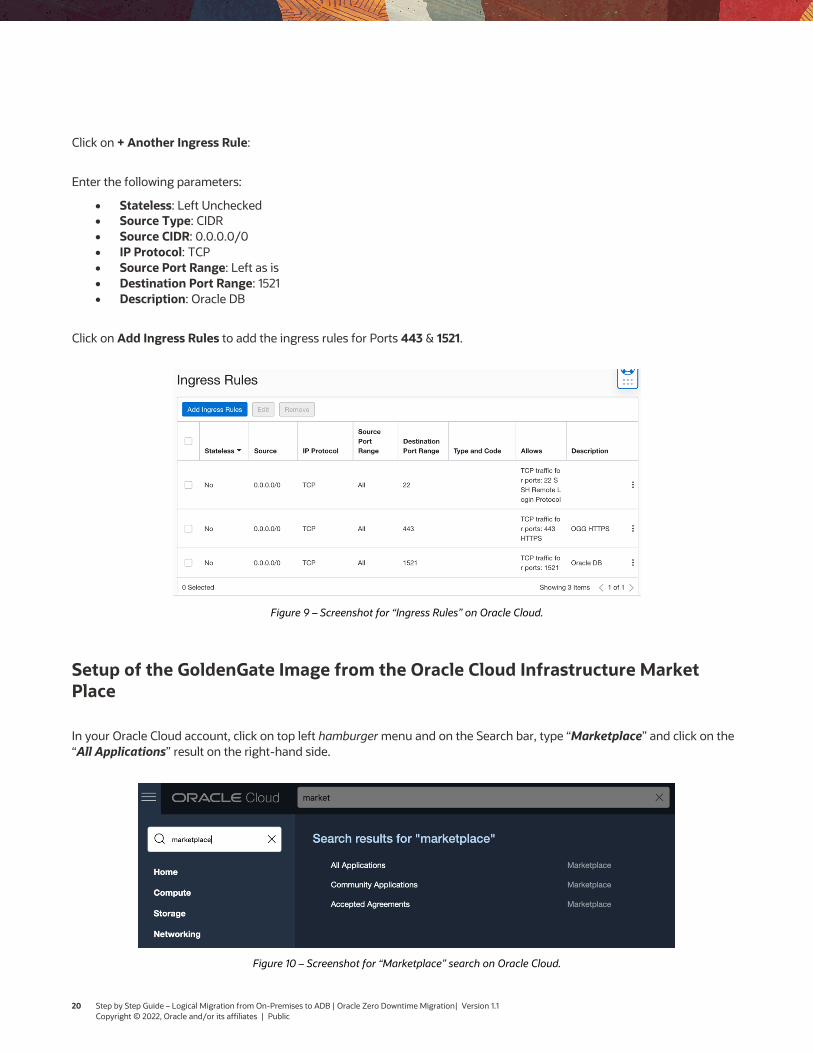
Click on + Another Ingress Rule:
Enter the following parameters:
• Stateless: Left Unchecked • Source Type: CIDR • Source CIDR: 0.0.0.0/0 • IP Protocol: TCP • Source Port Range: Left as is • Destination Port Range: 1521 • Description: Oracle DB
Click on Add Ingress Rules to add the ingress rules for Ports 443 & 1521.
Figure 9 – Screenshot for “Ingress Rules” on Oracle Cloud.
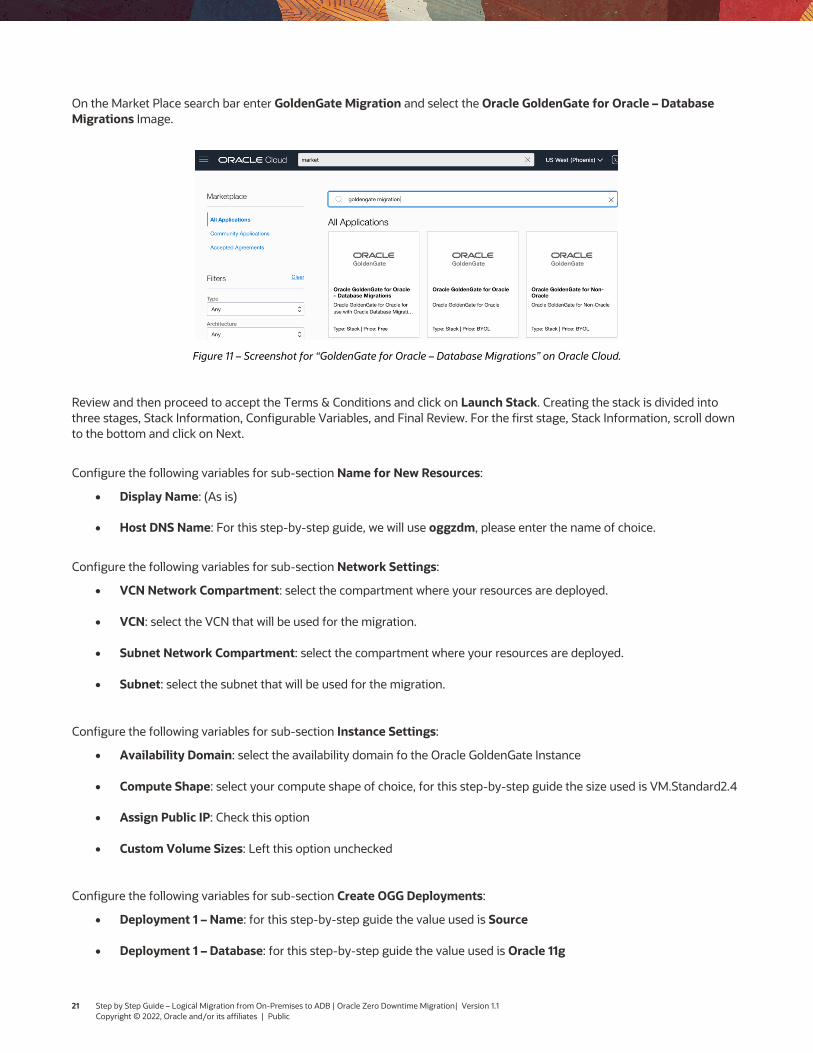
Setup of the GoldenGate Image from the Oracle Cloud Infrastructure Market Place
In your Oracle Cloud account, click on top left hamburger menu and on the Search bar, type “Marketplace” and click on the “All Applications” result on the right-hand side.
Figure 10 – Screenshot for “Marketplace” search on Oracle Cloud.
20 Step by Step Guide – Logical Migration from On-Premises to ADB | Oracle Zero Downtime Migration| Version 1.1 Copyright © 2022, Oracle and/or its affiliates | Public
On the Market Place search bar enter GoldenGate Migration and select the Oracle GoldenGate for Oracle – Database Migrations Image.
Figure 11 – Screenshot for “GoldenGate for Oracle – Database Migrations” on Oracle Cloud.
Review and then proceed to accept the Terms & Conditions and click on Launch Stack. Creating the stack is divided into three stages, Stack Information, Configurable Variables, and Final Review. For the first stage, Stack Information, scroll down to the bottom and click on Next.
Configure the following variables for sub-section Name for New Resources:
• Display Name: (As is)
• Host DNS Name: For this step-by-step guide, we will use oggzdm, please enter the name of choice.
Configure the following variables for sub-section Network Settings:
• VCN Network Compartment: select the compartment where your resources are deployed.
• VCN: select the VCN that will be used for the migration.
• Subnet Network Compartment: select the compartment where your resources are deployed.
• Subnet: select the subnet that will be used for the migration.
Configure the following variables for sub-section Instance Settings:
• Availability Domain: select the availability domain fo the Oracle GoldenGate Instance
• Compute Shape: select your compute shape of choice, for this step-by-step guide the size used is VM.Standard2.4
• Assign Public IP: Check this option
• Custom Volume Sizes: Left this option unchecked
Configure the following variables for sub-section Create OGG Deployments:
• Deployment 1 – Name: for this step-by-step guide the value used is Source
• Deployment 1 – Database: for this step-by-step guide the value used is Oracle 11g
21 Step by Step Guide – Logical Migration from On-Premises to ADB | Oracle Zero Downtime Migration| Version 1.1 Copyright © 2022, Oracle and/or its affiliates | Public

• Deployment 2 – Name: for this step-by-step guide the value used is Target
• Deployment 2 – Database: select Oracle 19c (19.x)
• Deployment 2 - Automomous Database: Check this option
• Deployment 2 - Autonomous Database Compartment: select the compartment where your resources are deployed in.
• Deployment 2 - Autonomous Database Instance: select the Target Database created earlier
Configure the following variables for sub-section Shell Access:
• SSH Public Key: enter the key saved for the opc user.
Review your entries and click Next. Proceed to do a final review & Click Create when ready. Upon creation, scroll down to the bottom of the logs and copy the following values and save them for later use, you will require them during the migration:
• ogg_image_id • ogg_instance__id • ogg_public_ip
Upon creating the Oracle GoldenGate Hub, open CloudShell from within your Oracle Cloud account and connect to it. To do so, replace ogg_public_ip with the GoldenGate Hub public ip copied above and replace sshkeyname with the SSH Key name used previously. Enter yes at the prompt. Please remember that the instance creation might still be wrapping up, so the connection might be refused. If this is the case, please wait for a couple of minutes and try again.
ssh -i ~/.ssh/<sshkeyname> opc@<ogg_public_ip>
Once logged in, execute the following command, and copy its output. It will be required during the migration:
cat ./ogg-credentials.json
The output consists of the username and credential/password for the OGG Service Manager. These values will be required further on during the migration process. Additionally, for an extra layer of security, you can update the credential/password for the overall OGG Service Manager and for each one of the microservices (Extract for the Source Database and Replicat for the Target Database; to do so, open a browser tab and enter the Oracle GoldenGate Hub Public IP copied above. You need to enter the username and credential/password provided by the ogg-credentials.json file, once logged in, you can update the authentication parameters as desired.
Unlocking the GoldenGate User in the Target Autonomous Database The Target Autonomous Database has a pre-created GoldenGate user named ggadmin, it is required that this user is unlocked. To do so, in your OCI Dashboard, select the hamburger menu in the top left, click on Oracle Database and click on Autonomous Database. Select the Target Database by clicking on its name, on this step-by-step guide the Target Database is named TargetATP1, this could be different from your environment, please select accordingly.
New content will be shown in your browser tab, displaying overall Target Database information. Click on the Tools menu, then click on Database Actions. A new browser tab will open, it will request credentials. Fill in ADMIN for the username (as created in this step-by-step previously and the password you have created for the admin user).
Under the Development area, click on the SQL option. Your browser tab will refresh and show you a Database Action | SQL window, here, you can execute SQL statements on the Target Database. Copy the statement below and execute it by clicking on the Run Script icon as shown below:
22 Step by Step Guide – Logical Migration from On-Premises to ADB | Oracle Zero Downtime Migration| Version 1.1 Copyright © 2022, Oracle and/or its affiliates | Public
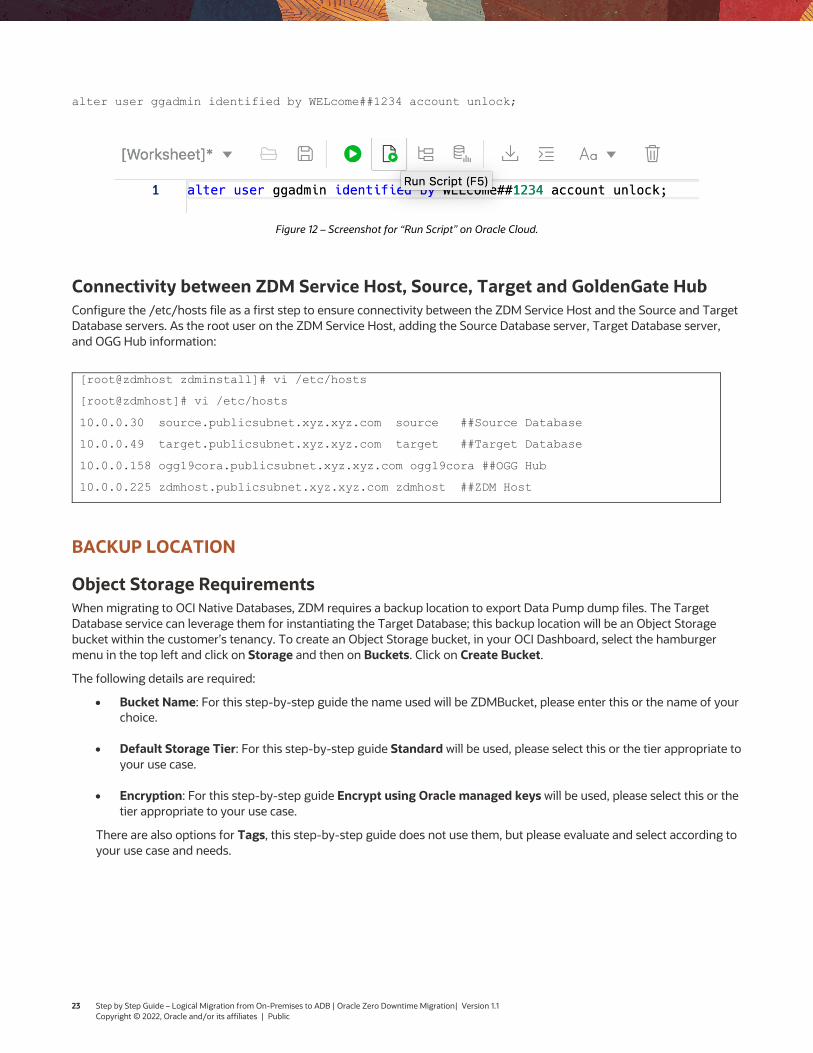
alter user ggadmin identified by WELcome##1234 account unlock;
Figure 12 – Screenshot for “Run Script” on Oracle Cloud.
Connectivity between ZDM Service Host, Source, Target and GoldenGate Hub Configure the /etc/hosts file as a first step to ensure connectivity between the ZDM Service Host and the Source and Target Database servers. As the root user on the ZDM Service Host, adding the Source Database server, Target Database server, and OGG Hub information:
[root@zdmhost zdminstall]# vi /etc/hosts
[root@zdmhost]# vi /etc/hosts
10.0.0.30 source.publicsubnet.xyz.xyz.com source ##Source Database
10.0.0.49 target.publicsubnet.xyz.xyz.com target ##Target Database
10.0.0.158 ogg19cora.publicsubnet.xyz.xyz.com ogg19cora ##OGG Hub
10.0.0.225 zdmhost.publicsubnet.xyz.xyz.com zdmhost ##ZDM Host
BACKUP LOCATION
Object Storage Requirements When migrating to OCI Native Databases, ZDM requires a backup location to export Data Pump dump files. The Target Database service can leverage them for instantiating the Target Database; this backup location will be an Object Storage bucket within the customer’s tenancy. To create an Object Storage bucket, in your OCI Dashboard, select the hamburger menu in the top left and click on Storage and then on Buckets. Click on Create Bucket.
The following details are required:
• Bucket Name: For this step-by-step guide the name used will be ZDMBucket, please enter this or the name of your choice.
• Default Storage Tier: For this step-by-step guide Standard will be used, please select this or the tier appropriate to your use case.
• Encryption: For this step-by-step guide Encrypt using Oracle managed keys will be used, please select this or the tier appropriate to your use case.
There are also options for Tags, this step-by-step guide does not use them, but please evaluate and select according to your use case and needs.
23 Step by Step Guide – Logical Migration from On-Premises to ADB | Oracle Zero Downtime Migration| Version 1.1 Copyright © 2022, Oracle and/or its affiliates | Public
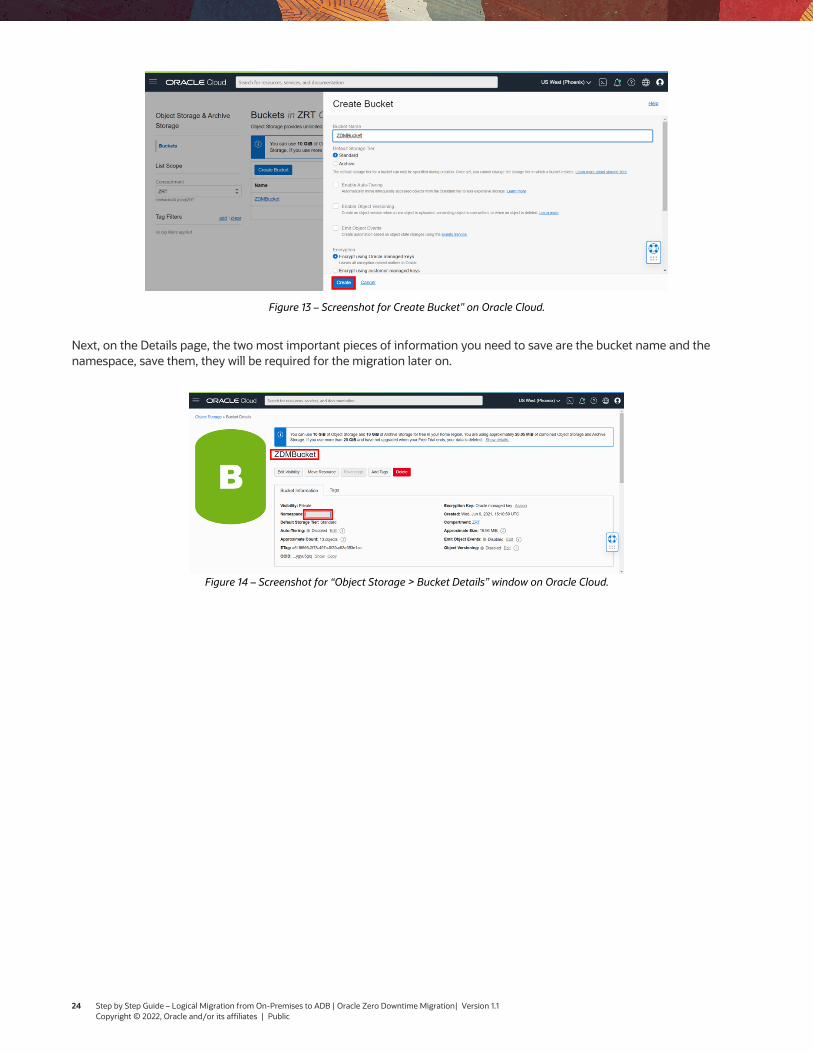
Figure 13 – Screenshot for Create Bucket” on Oracle Cloud.
Next, on the Details page, the two most important pieces of information you need to save are the bucket name and the namespace, save them, they will be required for the migration later on.
Figure 14 – Screenshot for “Object Storage > Bucket Details” window on Oracle Cloud.
24 Step by Step Guide – Logical Migration from On-Premises to ADB | Oracle Zero Downtime Migration| Version 1.1 Copyright © 2022, Oracle and/or its affiliates | Public
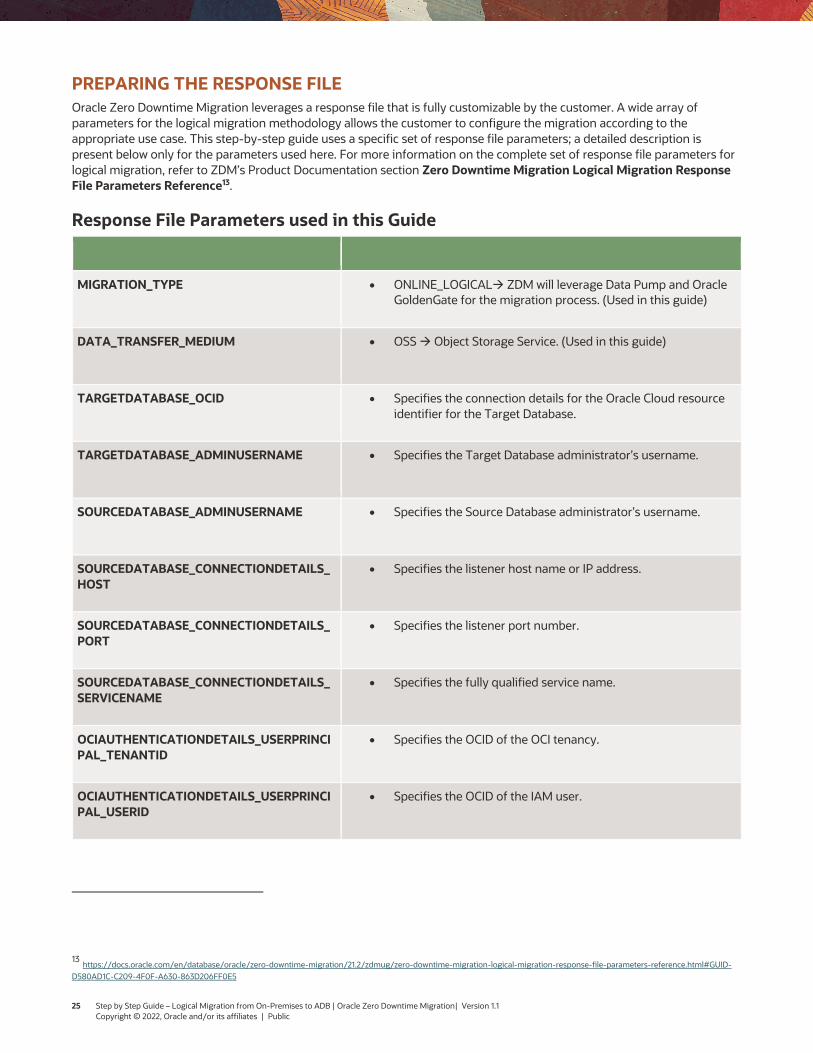
PREPARING THE RESPONSE FILE Oracle Zero Downtime Migration leverages a response file that is fully customizable by the customer. A wide array of parameters for the logical migration methodology allows the customer to configure the migration according to the appropriate use case. This step-by-step guide uses a specific set of response file parameters; a detailed description is present below only for the parameters used here. For more information on the complete set of response file parameters for logical migration, refer to ZDM’s Product Documentation section Zero Downtime Migration Logical Migration Response File Parameters Reference13 .
Response File Parameters used in this Guide
PARAMETER DESCRIPTION
MIGRATION_TYPE • ONLINE_LOGICAL• ZDM will leverage Data Pump and Oracle GoldenGate for the migration process. (Used in this guide)
DATA_TRANSFER_MEDIUM • OSS • Object Storage Service. (Used in this guide)
TARGETDATABASE_OCID • Specifies the connection details for the Oracle Cloud resource identifier for the Target Database.
TARGETDATABASE_ADMINUSERNAME • Specifies the Target Database administrator’s username.
SOURCEDATABASE_ADMINUSERNAME • Specifies the Source Database administrator’s username.
SOURCEDATABASE_CONNECTIONDETAILS_ HOST
• Specifies the listener host name or IP address.
SOURCEDATABASE_CONNECTIONDETAILS_ PORT
• Specifies the listener port number.
SOURCEDATABASE_CONNECTIONDETAILS_ SERVICENAME
• Specifies the fully qualified service name.
OCIAUTHENTICATIONDETAILS_USERPRINCI PAL_TENANTID
• Specifies the OCID of the OCI tenancy.
OCIAUTHENTICATIONDETAILS_USERPRINCI PAL_USERID
• Specifies the OCID of the IAM user.
13 https://docs.oracle.com/en/database/oracle/zero-downtime-migration/21.2/zdmug/zero-downtime-migration-logical-migration-response-file-parameters-reference.html#GUID-
D580AD1C-C209-4F0F-A630-863D206FF0E5
25 Step by Step Guide – Logical Migration from On-Premises to ADB | Oracle Zero Downtime Migration| Version 1.1 Copyright © 2022, Oracle and/or its affiliates | Public
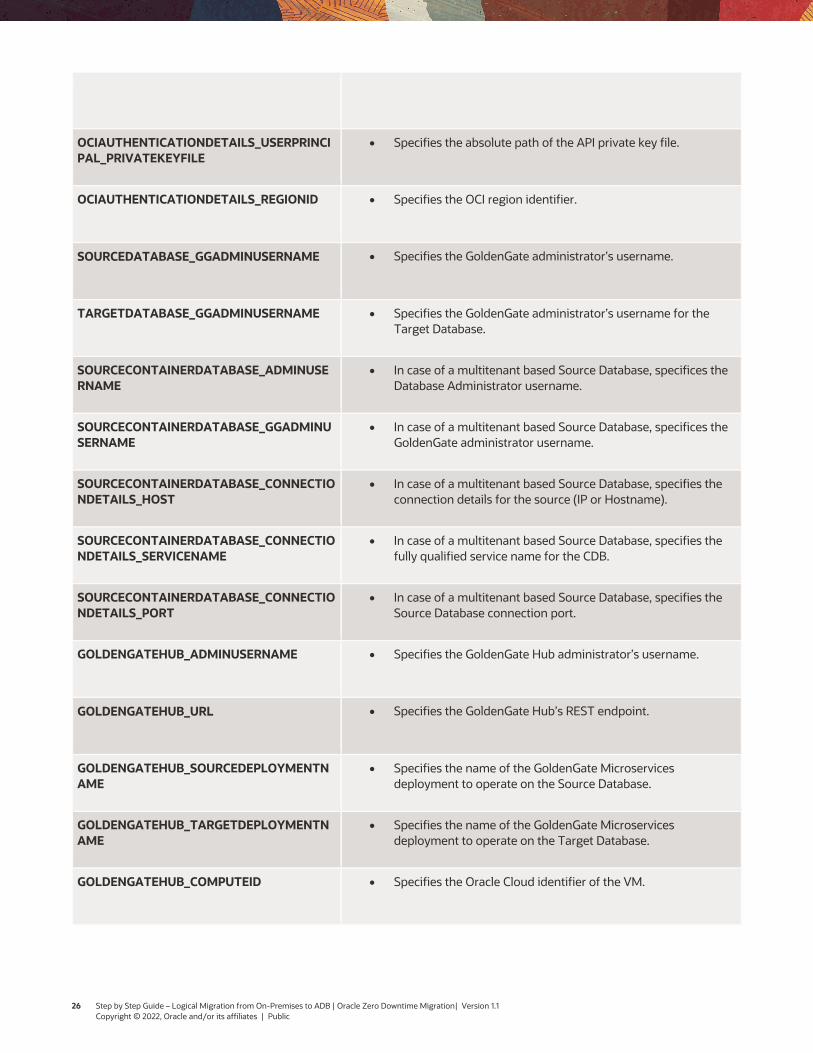
OCIAUTHENTICATIONDETAILS_USERPRINCI PAL_FINGERPRINT
• Specifies the fingerprint of the public API key.
OCIAUTHENTICATIONDETAILS_USERPRINCI PAL_PRIVATEKEYFILE
• Specifies the absolute path of the API private key file.
OCIAUTHENTICATIONDETAILS_REGIONID • Specifies the OCI region identifier.
SOURCEDATABASE_GGADMINUSERNAME • Specifies the GoldenGate administrator’s username.
TARGETDATABASE_GGADMINUSERNAME • Specifies the GoldenGate administrator’s username for the Target Database.
SOURCECONTAINERDATABASE_ADMINUSE RNAME
• In case of a multitenant based Source Database, specifices the Database Administrator username.
SOURCECONTAINERDATABASE_GGADMINU SERNAME
• In case of a multitenant based Source Database, specifices the GoldenGate administrator username.
SOURCECONTAINERDATABASE_CONNECTIO NDETAILS_HOST
• In case of a multitenant based Source Database, specifies the connection details for the source (IP or Hostname).
SOURCECONTAINERDATABASE_CONNECTIO NDETAILS_SERVICENAME
• In case of a multitenant based Source Database, specifies the fully qualified service name for the CDB.
SOURCECONTAINERDATABASE_CONNECTIO NDETAILS_PORT
• In case of a multitenant based Source Database, specifies the Source Database connection port.
GOLDENGATEHUB_ADMINUSERNAME • Specifies the GoldenGate Hub administrator’s username.
GOLDENGATEHUB_URL • Specifies the GoldenGate Hub’s REST endpoint.
GOLDENGATEHUB_SOURCEDEPLOYMENTN AME
• Specifies the name of the GoldenGate Microservices deployment to operate on the Source Database.
GOLDENGATEHUB_TARGETDEPLOYMENTN AME
• Specifies the name of the GoldenGate Microservices deployment to operate on the Target Database.
GOLDENGATEHUB_COMPUTEID • Specifies the Oracle Cloud identifier of the VM.
26 Step by Step Guide – Logical Migration from On-Premises to ADB | Oracle Zero Downtime Migration| Version 1.1 Copyright © 2022, Oracle and/or its affiliates | Public
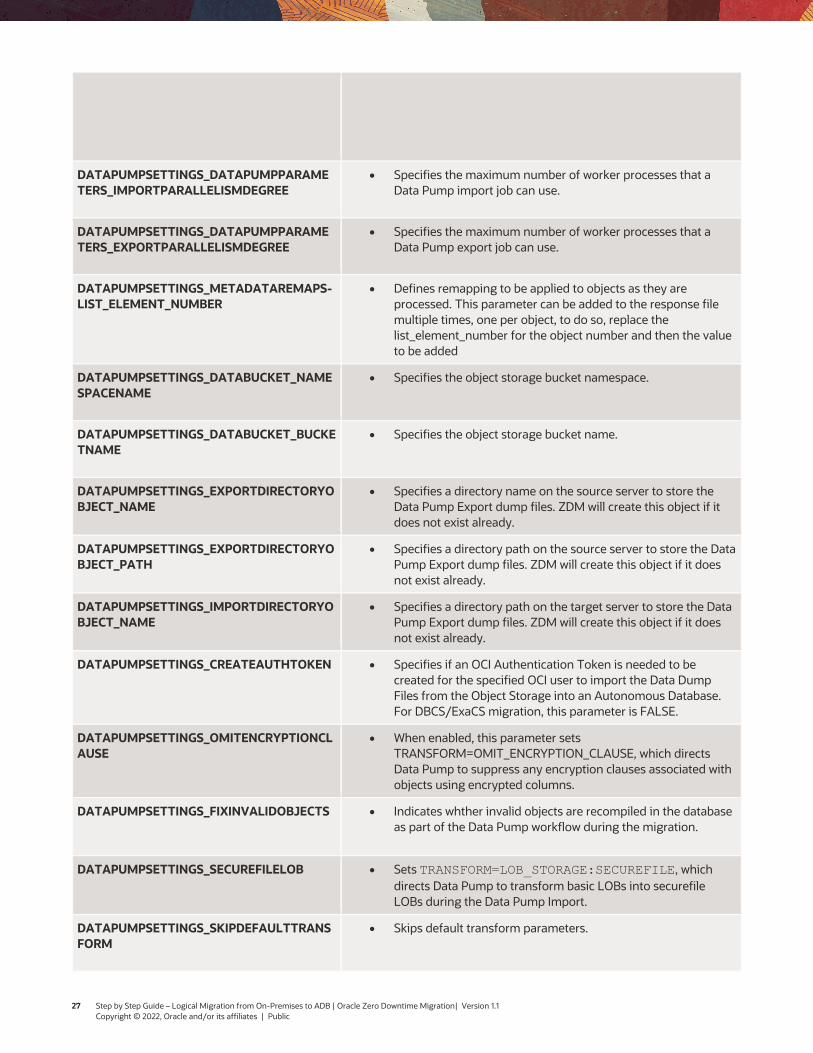
DATAPUMPSETTINGS_JOBMODE • Specifies the Data Pump export mode: • FULL • SCHEMA • TABLE • TRANSPORTABLE (not supported by ZDM)
DATAPUMPSETTINGS_DATAPUMPPARAME TERS_IMPORTPARALLELISMDEGREE
• Specifies the maximum number of worker processes that a Data Pump import job can use.
DATAPUMPSETTINGS_DATAPUMPPARAME TERS_EXPORTPARALLELISMDEGREE
• Specifies the maximum number of worker processes that a Data Pump export job can use.
DATAPUMPSETTINGS_METADATAREMAPS-LIST_ELEMENT_NUMBER
• Defines remapping to be applied to objects as they are processed. This parameter can be added to the response file multiple times, one per object, to do so, replace the list_element_number for the object number and then the value to be added
DATAPUMPSETTINGS_DATABUCKET_NAME SPACENAME
• Specifies the object storage bucket namespace.
DATAPUMPSETTINGS_DATABUCKET_BUCKE TNAME
• Specifies the object storage bucket name.
DATAPUMPSETTINGS_EXPORTDIRECTORYO BJECT_NAME
• Specifies a directory name on the source server to store the Data Pump Export dump files. ZDM will create this object if it does not exist already.
DATAPUMPSETTINGS_EXPORTDIRECTORYO BJECT_PATH
• Specifies a directory path on the source server to store the Data Pump Export dump files. ZDM will create this object if it does not exist already.
DATAPUMPSETTINGS_IMPORTDIRECTORYO BJECT_NAME
• Specifies a directory path on the target server to store the Data Pump Export dump files. ZDM will create this object if it does not exist already.
DATAPUMPSETTINGS_CREATEAUTHTOKEN • Specifies if an OCI Authentication Token is needed to be created for the specified OCI user to import the Data Dump Files from the Object Storage into an Autonomous Database. For DBCS/ExaCS migration, this parameter is FALSE.
DATAPUMPSETTINGS_OMITENCRYPTIONCL AUSE
• When enabled, this parameter sets TRANSFORM=OMIT_ENCRYPTION_CLAUSE, which directs Data Pump to suppress any encryption clauses associated with objects using encrypted columns.
DATAPUMPSETTINGS_FIXINVALIDOBJECTS • Indicates whther invalid objects are recompiled in the database as part of the Data Pump workflow during the migration.
DATAPUMPSETTINGS_SECUREFILELOB • Sets TRANSFORM=LOB_STORAGE:SECUREFILE, which directs Data Pump to transform basic LOBs into securefile LOBs during the Data Pump Import.
DATAPUMPSETTINGS_SKIPDEFAULTTRANS FORM
• Skips default transform parameters.
27 Step by Step Guide – Logical Migration from On-Premises to ADB | Oracle Zero Downtime Migration| Version 1.1 Copyright © 2022, Oracle and/or its affiliates | Public
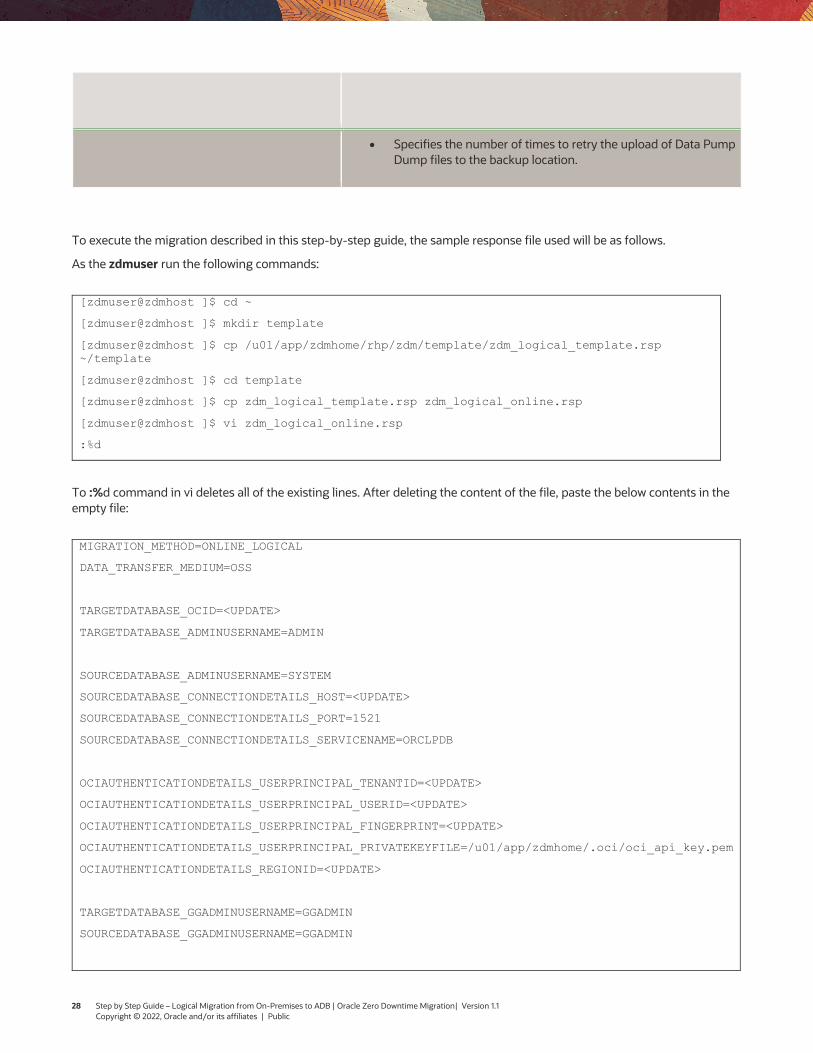
DUMPTRANSFERDETAILS_PARALLELCOUNT • Specifies the # of Export Dump files to transfer to the backup location in parallel.
DUMPTRANSFERDETAILS_RETRYCOUNT • Specifies the number of times to retry the upload of Data Pump Dump files to the backup location.
To execute the migration described in this step-by-step guide, the sample response file used will be as follows.
As the zdmuser run the following commands:
[zdmuser@zdmhost ]$ cd ~
[zdmuser@zdmhost ]$ mkdir template
[zdmuser@zdmhost ]$ cp /u01/app/zdmhome/rhp/zdm/template/zdm_logical_template.rsp ~/template
[zdmuser@zdmhost ]$ cd template
[zdmuser@zdmhost ]$ cp zdm_logical_template.rsp zdm_logical_online.rsp
[zdmuser@zdmhost ]$ vi zdm_logical_online.rsp
:%d
To :%d command in vi deletes all of the existing lines. After deleting the content of the file, paste the below contents in the empty file:
MIGRATION_METHOD=ONLINE_LOGICAL
DATA_TRANSFER_MEDIUM=OSS
TARGETDATABASE_OCID=<UPDATE>
TARGETDATABASE_ADMINUSERNAME=ADMIN
SOURCEDATABASE_ADMINUSERNAME=SYSTEM
SOURCEDATABASE_CONNECTIONDETAILS_HOST=<UPDATE>
SOURCEDATABASE_CONNECTIONDETAILS_PORT=1521
SOURCEDATABASE_CONNECTIONDETAILS_SERVICENAME=ORCLPDB
OCIAUTHENTICATIONDETAILS_USERPRINCIPAL_TENANTID=<UPDATE>
OCIAUTHENTICATIONDETAILS_USERPRINCIPAL_USERID=<UPDATE>
OCIAUTHENTICATIONDETAILS_USERPRINCIPAL_FINGERPRINT=<UPDATE>
OCIAUTHENTICATIONDETAILS_USERPRINCIPAL_PRIVATEKEYFILE=/u01/app/zdmhome/.oci/oci_api_key.pem
OCIAUTHENTICATIONDETAILS_REGIONID=<UPDATE>
TARGETDATABASE_GGADMINUSERNAME=GGADMIN
SOURCEDATABASE_GGADMINUSERNAME=GGADMIN
28 Step by Step Guide – Logical Migration from On-Premises to ADB | Oracle Zero Downtime Migration| Version 1.1 Copyright © 2022, Oracle and/or its affiliates | Public
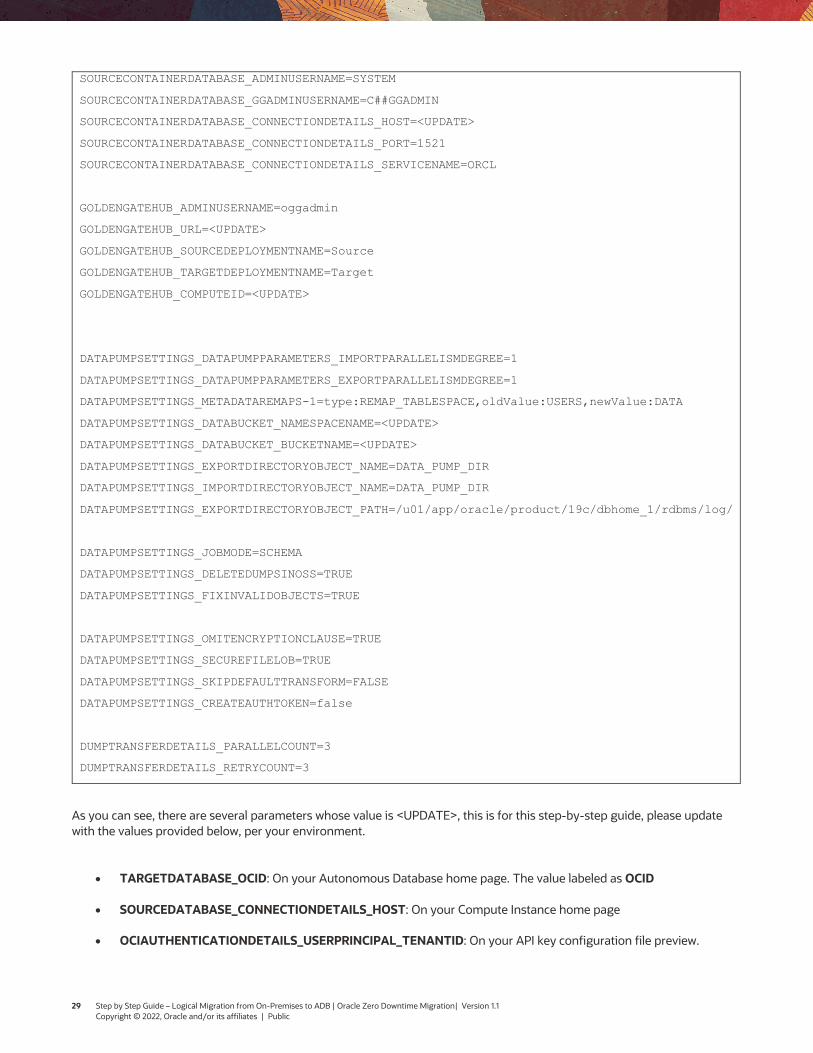
SOURCECONTAINERDATABASE_ADMINUSERNAME=SYSTEM
SOURCECONTAINERDATABASE_GGADMINUSERNAME=C##GGADMIN
SOURCECONTAINERDATABASE_CONNECTIONDETAILS_HOST=<UPDATE>
SOURCECONTAINERDATABASE_CONNECTIONDETAILS_PORT=1521
SOURCECONTAINERDATABASE_CONNECTIONDETAILS_SERVICENAME=ORCL
GOLDENGATEHUB_ADMINUSERNAME=oggadmin
GOLDENGATEHUB_URL=<UPDATE>
GOLDENGATEHUB_SOURCEDEPLOYMENTNAME=Source
GOLDENGATEHUB_TARGETDEPLOYMENTNAME=Target
GOLDENGATEHUB_COMPUTEID=<UPDATE>
DATAPUMPSETTINGS_DATAPUMPPARAMETERS_IMPORTPARALLELISMDEGREE=1
DATAPUMPSETTINGS_DATAPUMPPARAMETERS_EXPORTPARALLELISMDEGREE=1
DATAPUMPSETTINGS_METADATAREMAPS-1=type:REMAP_TABLESPACE,oldValue:USERS,newValue:DATA
DATAPUMPSETTINGS_DATABUCKET_NAMESPACENAME=<UPDATE>
DATAPUMPSETTINGS_DATABUCKET_BUCKETNAME=<UPDATE>
DATAPUMPSETTINGS_EXPORTDIRECTORYOBJECT_NAME=DATA_PUMP_DIR
DATAPUMPSETTINGS_IMPORTDIRECTORYOBJECT_NAME=DATA_PUMP_DIR
DATAPUMPSETTINGS_EXPORTDIRECTORYOBJECT_PATH=/u01/app/oracle/product/19c/dbhome_1/rdbms/log/
DATAPUMPSETTINGS_JOBMODE=SCHEMA
DATAPUMPSETTINGS_DELETEDUMPSINOSS=TRUE
DATAPUMPSETTINGS_FIXINVALIDOBJECTS=TRUE
DATAPUMPSETTINGS_OMITENCRYPTIONCLAUSE=TRUE
DATAPUMPSETTINGS_SECUREFILELOB=TRUE
DATAPUMPSETTINGS_SKIPDEFAULTTRANSFORM=FALSE
DATAPUMPSETTINGS_CREATEAUTHTOKEN=false
DUMPTRANSFERDETAILS_PARALLELCOUNT=3
DUMPTRANSFERDETAILS_RETRYCOUNT=3
As you can see, there are several parameters whose value is <UPDATE>, this is for this step-by-step guide, please update with the values provided below, per your environment.
• TARGETDATABASE_OCID: On your Autonomous Database home page. The value labeled as OCID
• SOURCEDATABASE_CONNECTIONDETAILS_HOST: On your Compute Instance home page
• OCIAUTHENTICATIONDETAILS_USERPRINCIPAL_TENANTID: On your API key configuration file preview.
29 Step by Step Guide – Logical Migration from On-Premises to ADB | Oracle Zero Downtime Migration| Version 1.1 Copyright © 2022, Oracle and/or its affiliates | Public
• OCIAUTHENTICATIONDETAILS_USERPRINCIPAL_USERID: On your API key configuration file preview.
• OCIAUTHENTICATIONDETAILS_USERPRINCIPAL_FINGERPRINT: On your API key configuration file preview.
• OCIAUTHENTICATIONDETAILS_REGIONID: On your API key configuration file preview.
• GOLDENGATEHUB_URL: On your GG Hub Compute Instance home page copy the Internal FQDN, as an example, it should look something like this: https://oggzdm.subnet1.labvcn.oraclevcn.com
• GOLDENGATEHUB_COMPUTEID: On your GG Hub Compute Instance home page. Copy the OCID value.
• DATAPUMPSETTINGS_DATABUCKET_NAMESPACENAME: On your object storage bucket homepage.
• DATAPUMPSETTINGS_DATABUCKET_BUCKETNAME: On your object storage bucket homepage.
LOGICAL MIGRATION WITH ZDM
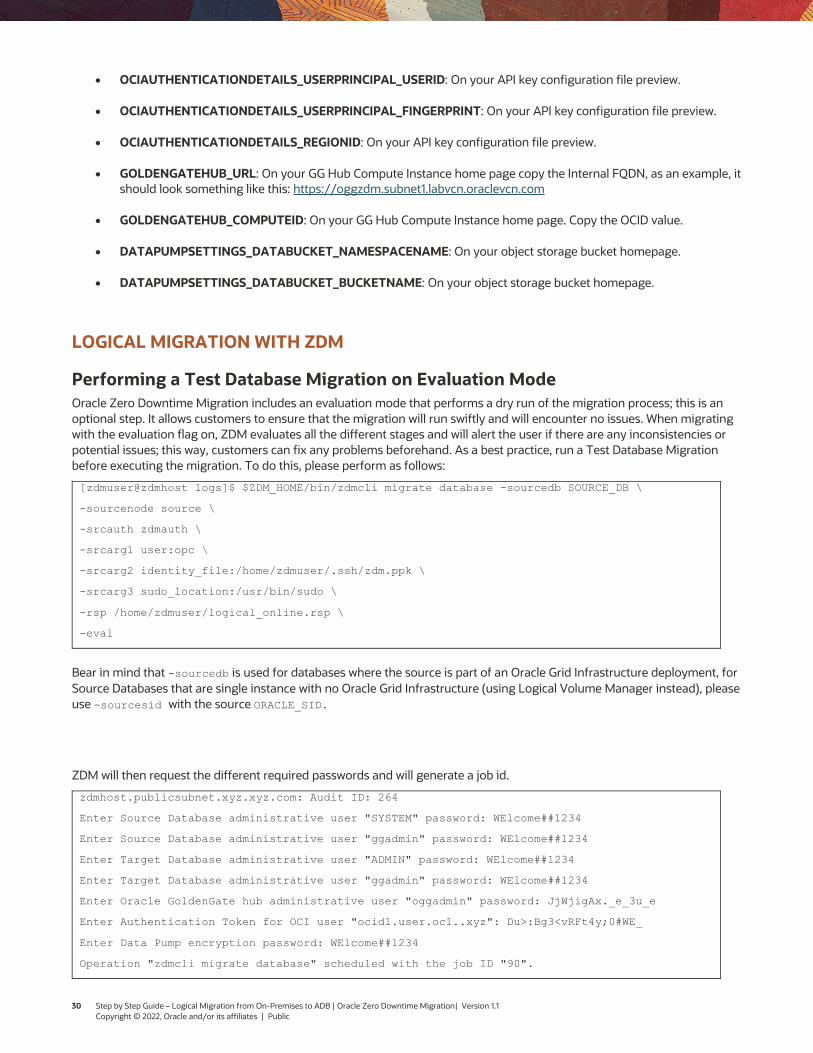
Performing a Test Database Migration on Evaluation Mode Oracle Zero Downtime Migration includes an evaluation mode that performs a dry run of the migration process; this is an optional step. It allows customers to ensure that the migration will run swiftly and will encounter no issues. When migrating with the evaluation flag on, ZDM evaluates all the different stages and will alert the user if there are any inconsistencies or potential issues; this way, customers can fix any problems beforehand. As a best practice, run a Test Database Migration before executing the migration. To do this, please perform as follows:
[zdmuser@zdmhost logs]$ $ZDM_HOME/bin/zdmcli migrate database -sourcedb SOURCE_DB \
-sourcenode source \
-srcauth zdmauth \
-srcarg1 user:opc \
-srcarg2 identity_file:/home/zdmuser/.ssh/zdm.ppk \
-srcarg3 sudo_location:/usr/bin/sudo \
-rsp /home/zdmuser/logical_online.rsp \
-eval
Bear in mind that -sourcedb is used for databases where the source is part of an Oracle Grid Infrastructure deployment, for Source Databases that are single instance with no Oracle Grid Infrastructure (using Logical Volume Manager instead), please use -sourcesid with the source ORACLE_SID.
ZDM will then request the different required passwords and will generate a job id.
zdmhost.publicsubnet.xyz.xyz.com: Audit ID: 264
Enter Source Database administrative user "SYSTEM" password: WElcome##1234
Enter Source Database administrative user "ggadmin" password: WElcome##1234
Enter Target Database administrative user "ADMIN" password: WElcome##1234
Enter Target Database administrative user "ggadmin" password: WElcome##1234
Enter Oracle GoldenGate hub administrative user "oggadmin" password: JjWjigAx._e_3u_e
Enter Authentication Token for OCI user "ocid1.user.oc1..xyz": Du>:Bg3<vRFt4y;0#WE_
Enter Data Pump encryption password: WElcome##1234
Operation "zdmcli migrate database" scheduled with the job ID "90".
30 Step by Step Guide – Logical Migration from On-Premises to ADB | Oracle Zero Downtime Migration| Version 1.1 Copyright © 2022, Oracle and/or its affiliates | Public
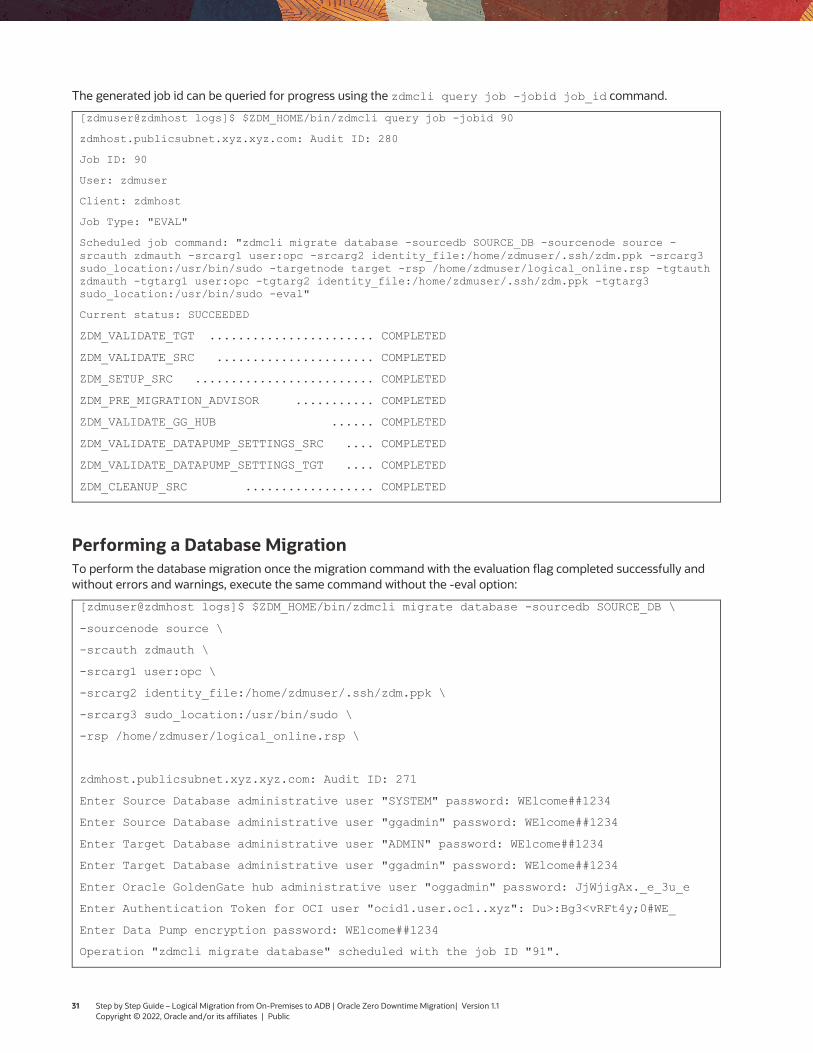
The generated job id can be queried for progress using the zdmcli query job -jobid job_id command.
[zdmuser@zdmhost logs]$ $ZDM_HOME/bin/zdmcli query job -jobid 90
zdmhost.publicsubnet.xyz.xyz.com: Audit ID: 280
Job ID: 90
User: zdmuser
Client: zdmhost
Job Type: "EVAL"
Scheduled job command: "zdmcli migrate database -sourcedb SOURCE_DB -sourcenode source -srcauth zdmauth -srcarg1 user:opc -srcarg2 identity_file:/home/zdmuser/.ssh/zdm.ppk -srcarg3 sudo_location:/usr/bin/sudo -targetnode target -rsp /home/zdmuser/logical_online.rsp -tgtauth zdmauth -tgtarg1 user:opc -tgtarg2 identity_file:/home/zdmuser/.ssh/zdm.ppk -tgtarg3 sudo_location:/usr/bin/sudo -eval"
Current status: SUCCEEDED
ZDM_VALIDATE_TGT ....................... COMPLETED
ZDM_VALIDATE_SRC ...................... COMPLETED
ZDM_SETUP_SRC ......................... COMPLETED
ZDM_PRE_MIGRATION_ADVISOR ........... COMPLETED
ZDM_VALIDATE_GG_HUB ...... COMPLETED
ZDM_VALIDATE_DATAPUMP_SETTINGS_SRC .... COMPLETED
ZDM_VALIDATE_DATAPUMP_SETTINGS_TGT .... COMPLETED
ZDM_CLEANUP_SRC .................. COMPLETED
Performing a Database Migration To perform the database migration once the migration command with the evaluation flag completed successfully and without errors and warnings, execute the same command without the -eval option:
[zdmuser@zdmhost logs]$ $ZDM_HOME/bin/zdmcli migrate database -sourcedb SOURCE_DB \
-sourcenode source \
-srcauth zdmauth \
-srcarg1 user:opc \
-srcarg2 identity_file:/home/zdmuser/.ssh/zdm.ppk \
-srcarg3 sudo_location:/usr/bin/sudo \
-rsp /home/zdmuser/logical_online.rsp \
zdmhost.publicsubnet.xyz.xyz.com: Audit ID: 271
Enter Source Database administrative user "SYSTEM" password: WElcome##1234
Enter Source Database administrative user "ggadmin" password: WElcome##1234
Enter Target Database administrative user "ADMIN" password: WElcome##1234
Enter Target Database administrative user "ggadmin" password: WElcome##1234
Enter Oracle GoldenGate hub administrative user "oggadmin" password: JjWjigAx._e_3u_e
Enter Authentication Token for OCI user "ocid1.user.oc1..xyz": Du>:Bg3<vRFt4y;0#WE_
Enter Data Pump encryption password: WElcome##1234
Operation "zdmcli migrate database" scheduled with the job ID "91".
31 Step by Step Guide – Logical Migration from On-Premises to ADB | Oracle Zero Downtime Migration| Version 1.1 Copyright © 2022, Oracle and/or its affiliates | Public
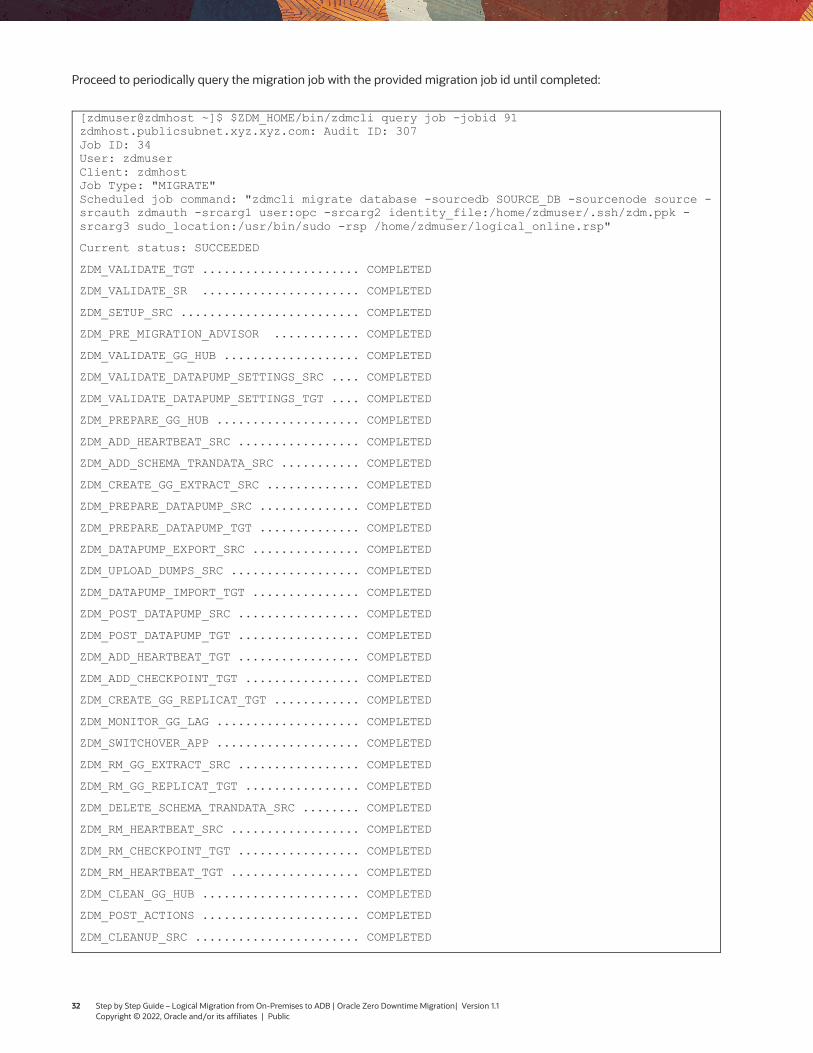
Proceed to periodically query the migration job with the provided migration job id until completed:
[zdmuser@zdmhost ~]$ $ZDM_HOME/bin/zdmcli query job -jobid 91 zdmhost.publicsubnet.xyz.xyz.com: Audit ID: 307Job ID: 34 User: zdmuser Client: zdmhost Job Type: "MIGRATE"Scheduled job command: "zdmcli migrate database -sourcedb SOURCE_DB -sourcenode source -srcauth zdmauth -srcarg1 user:opc -srcarg2 identity_file:/home/zdmuser/.ssh/zdm.ppk -srcarg3 sudo_location:/usr/bin/sudo -rsp /home/zdmuser/logical_online.rsp"
Current status: SUCCEEDED
ZDM_VALIDATE_TGT ...................... COMPLETED
ZDM_VALIDATE_SR ...................... COMPLETED
ZDM_SETUP_SRC ......................... COMPLETED
ZDM_PRE_MIGRATION_ADVISOR ............ COMPLETED
ZDM_VALIDATE_GG_HUB ................... COMPLETED
ZDM_VALIDATE_DATAPUMP_SETTINGS_SRC .... COMPLETED
ZDM_VALIDATE_DATAPUMP_SETTINGS_TGT .... COMPLETED
ZDM_PREPARE_GG_HUB .................... COMPLETED
ZDM_ADD_HEARTBEAT_SRC ................. COMPLETED
ZDM_ADD_SCHEMA_TRANDATA_SRC ........... COMPLETED
ZDM_CREATE_GG_EXTRACT_SRC ............. COMPLETED
ZDM_PREPARE_DATAPUMP_SRC .............. COMPLETED
ZDM_PREPARE_DATAPUMP_TGT .............. COMPLETED
ZDM_DATAPUMP_EXPORT_SRC ............... COMPLETED
ZDM_UPLOAD_DUMPS_SRC .................. COMPLETED
ZDM_DATAPUMP_IMPORT_TGT ............... COMPLETED
ZDM_POST_DATAPUMP_SRC ................. COMPLETED
ZDM_POST_DATAPUMP_TGT ................. COMPLETED
ZDM_ADD_HEARTBEAT_TGT ................. COMPLETED
ZDM_ADD_CHECKPOINT_TGT ................ COMPLETED
ZDM_CREATE_GG_REPLICAT_TGT ............ COMPLETED
ZDM_MONITOR_GG_LAG .................... COMPLETED
ZDM_SWITCHOVER_APP .................... COMPLETED
ZDM_RM_GG_EXTRACT_SRC ................. COMPLETED
ZDM_RM_GG_REPLICAT_TGT ................ COMPLETED
ZDM_DELETE_SCHEMA_TRANDATA_SRC ........ COMPLETED
ZDM_RM_HEARTBEAT_SRC .................. COMPLETED
ZDM_RM_CHECKPOINT_TGT ................. COMPLETED
ZDM_RM_HEARTBEAT_TGT .................. COMPLETED
ZDM_CLEAN_GG_HUB ...................... COMPLETED
ZDM_POST_ACTIONS ...................... COMPLETED
ZDM_CLEANUP_SRC ....................... COMPLETED
32 Step by Step Guide – Logical Migration from On-Premises to ADB | Oracle Zero Downtime Migration| Version 1.1 Copyright © 2022, Oracle and/or its affiliates | Public
KNOWN ISSUES
All common issues are documented and updated periodically in Oracle Zero Downtime Migration’s product documentation, specifically on the Product Release Note’s, Known Issues section:
• https://docs.oracle.com/en/database/oracle/zero-downtime-migration/21.2/zdmrn/#GUID-1F4D8423-BCF5-4B97-972E-9C97C99F9482
TROUBLESHOOTING & OTHER RESOURCES
For Oracle ZDM log review:
• ZDM Server host logs:
o Check - $ZDM_BASE/crsdata/zdmserver.log.0
• ZDM source node Data Pump logs:
o DATAPUMPSETTINGS_EXPORTDIRECTORYOBJECT_PATH
• ZDM target node logs:
o DATAPUMPSETTINGS_IMPORTDIRECTORYOBJECT_NAME
• Import Log o OSS Bucket
• OGG hub logs:
o /u02/deployments/<ogg_deployment_name>/var/log
For all Oracle Support Service Requests related to Zero Downtime Migration, please be sure to follow the instructions in My Oracle Support Document:
- SRDC – Data Collection for Database Migration Using Zero Downtime Migration (ZDM) (DOC ID 2595205.1) - https://support.oracle.com/epmos/faces/DocContentDisplay?id=2595205.1
Please review our Maximum Availability Architecture document for best practices related to Zero Downtime Migration.
- MAA Practices for Cloud Migration Using ZDM (Doc ID 2562063.1) - https://support.oracle.com/epmos/faces/DocContentDisplay?id=2562063.1
33 Step by Step Guide – Logical Migration from On-Premises to ADB | Oracle Zero Downtime Migration| Version 1.1 Copyright © 2022, Oracle and/or its affiliates | Public

CONNECT WITH US
Call +1.800.ORACLE1 or visit oracle.com. Outside North America, find your local office at oracle.com/contact.
blogs.oracle.com facebook.com/oracle twitter.com/oracle
Copyright © 2022, Oracle and/or its affiliates. All rights reserved. This document is provided for information purposes only, and the contents hereof are subject to change without notice. This document is not warranted to be error-free, nor subject to any other warranties or conditions, whether expressed orally or implied in law, including implied warranties and conditions of merchantability or fitness for a particular purpose. We specifically disclaim any liability with respect to this document, and no contractual obligations are formed either directly or indirectly by this document. This document may not be reproduced or transmitted in any form or by any means, electronic or mechanical, for any purpose, without our prior written permission.
Oracle and Java are registered trademarks of Oracle and/or its affiliates. Other names may be trademarks of their respective owners.
Intel and Intel Xeon are trademarks or registered trademarks of Intel Corporation. All SPARC trademarks are used under license and are trademarks or registered trademarks of SPARC International, Inc. AMD, Opteron, the AMD logo, and the AMD Opteron logo are trademarks or registered trademarks of Advanced Micro Devices. UNIX is a registered trademark of The Open Group. 0120
Oracle Zero Downtime Migration – Logical Migration from On-Premises to ADB February, 2022 Authors: Ameet Kumar Nihalani, Ricardo Gonzalez Contributing Authors: Oracle ZDM Development Team, Oracle RACPack Team, Oracle MAA Team


