Embed Size (px)
Citation preview
Faculty Core Facility LKS Faculty of Medicine PerkinElmer Vectra Polaris™ 2019
1
PerkinElmer Vectra Polaris™ Automated Quantitative Pathology Imaging System
Standard Operating Protocol
I. Preparation of slides 1. Prepare sample and library slides using high quality glass slides with even thickness of 1 mm and No.
1.5 glass coverslip. 2. For DAPI and each fluorescent dye stained in a multiplex slide, 1 library slide should be prepared.
e.g. A 7 color multiplex assay involves 15 slides: i. 6 monoplex optimization slides (with DAPI) ii. 1 library slide per dye, as well as 1 DAPI and 1 autofluorescence slide iii. 1 optimized 7-color multiplex slide
3. Starting with a dilution of 1:100 to determine an optimal signal intensity if using dye-linked tyramide reagent.
For the detailed protocol of immunolabeling please refer to the following link: http://www.perkinelmer.com/lab-products-and-services/application-support-knowledgebase/opal/opal-multiplex-ihc-assay.html
II. Initialization of Vectra Polaris 1. Sign in on the log book. 2. Log on the computer with Account: Polaris User, and Password: perkinelmer. 3. Power ON the Vectra Polaris with the System Power Switch on the right side of the instrument
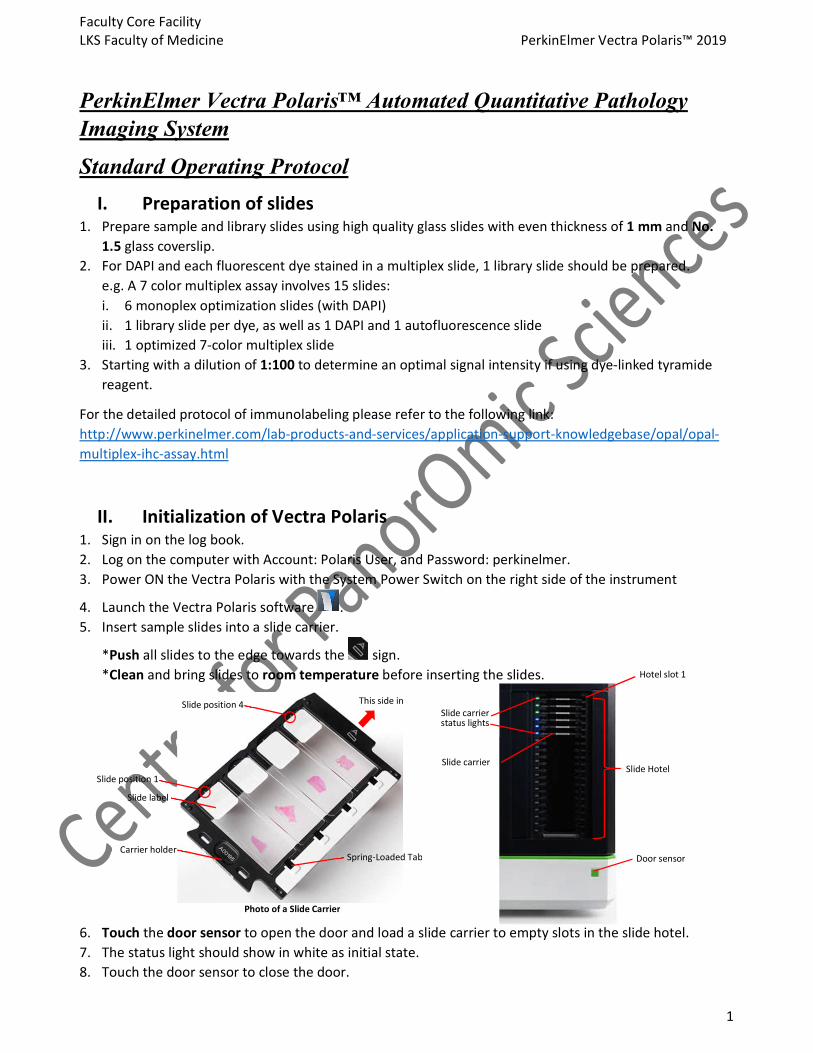
4. Launch the Vectra Polaris software . 5. Insert sample slides into a slide carrier.
*Push all slides to the edge towards the sign. *Clean and bring slides to room temperature before inserting the slides.
6. Touch the door sensor to open the door and load a slide carrier to empty slots in the slide hotel. 7. The status light should show in white as initial state. 8. Touch the door sensor to close the door.
Slide label
Slide position 1
Slide position 4
Carrier holder
This side in
Spring-Loaded Tab
Photo of a Slide Carrier
Hotel slot 1
Slide carrier
Slide carrier status lights
Slide Hotel
Door sensor
Faculty Core Facility LKS Faculty of Medicine PerkinElmer Vectra Polaris™ 2019
2
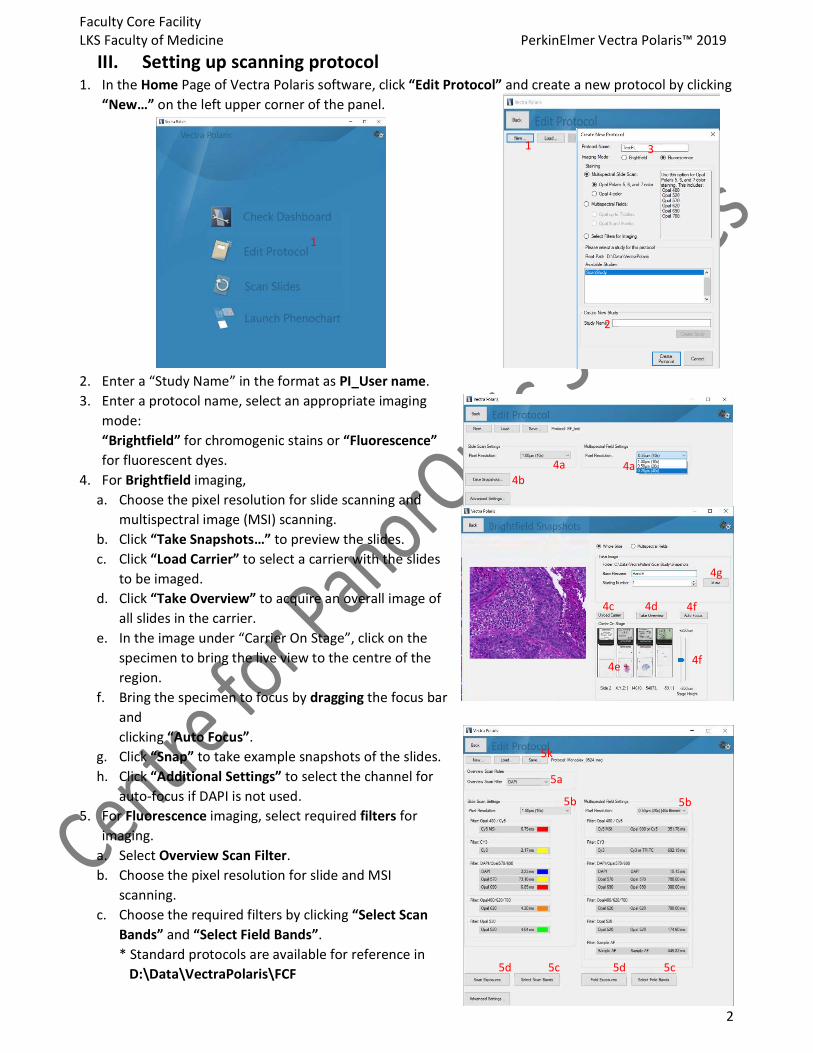
III. Setting up scanning protocol 1. In the Home Page of Vectra Polaris software, click “Edit Protocol” and create a new protocol by clicking
“New…” on the left upper corner of the panel. 2. Enter a “Study Name” in the format as PI_User name. 3. Enter a protocol name, select an appropriate imaging
mode: “Brightfield” for chromogenic stains or “Fluorescence” for fluorescent dyes.
4. For Brightfield imaging, a. Choose the pixel resolution for slide scanning and
multispectral image (MSI) scanning. b. Click “Take Snapshots…” to preview the slides. c. Click “Load Carrier” to select a carrier with the slides
to be imaged. d. Click “Take Overview” to acquire an overall image of
all slides in the carrier. e. In the image under “Carrier On Stage”, click on the
specimen to bring the live view to the centre of the region.
f. Bring the specimen to focus by dragging the focus bar and clicking “Auto Focus”.
g. Click “Snap” to take example snapshots of the slides. h. Click “Additional Settings” to select the channel for
auto-focus if DAPI is not used. 5. For Fluorescence imaging, select required filters for
imaging. a. Select Overview Scan Filter. b. Choose the pixel resolution for slide and MSI
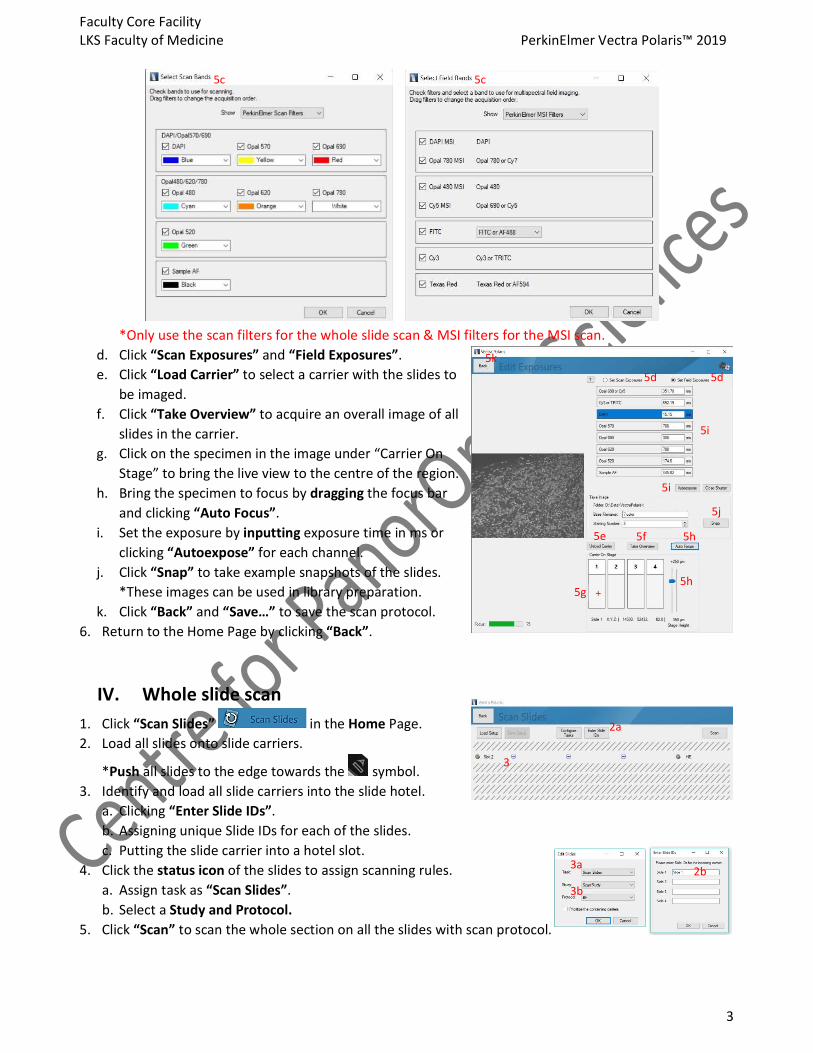
scanning. c. Choose the required filters by clicking “Select Scan
Bands” and “Select Field Bands”. * Standard protocols are available for reference in D:\Data\VectraPolaris\FCF
1
1 3
2
4a 4a 4b
4c 4d 4f
4e 4f
4g
5a
5b 5b
5c 5c
5k
5d 5d
Faculty Core Facility LKS Faculty of Medicine PerkinElmer Vectra Polaris™ 2019
3
*Only use the scan filters for the whole slide scan & MSI filters for the MSI scan.
d. Click “Scan Exposures” and “Field Exposures”. e. Click “Load Carrier” to select a carrier with the slides to
be imaged. f. Click “Take Overview” to acquire an overall image of all
slides in the carrier. g. Click on the specimen in the image under “Carrier On
Stage” to bring the live view to the centre of the region. h. Bring the specimen to focus by dragging the focus bar
and clicking “Auto Focus”. i. Set the exposure by inputting exposure time in ms or
clicking “Autoexpose” for each channel. j. Click “Snap” to take example snapshots of the slides.
*These images can be used in library preparation. k. Click “Back” and “Save…” to save the scan protocol.
6. Return to the Home Page by clicking “Back”.
IV. Whole slide scan
1. Click “Scan Slides” in the Home Page. 2. Load all slides onto slide carriers.
*Push all slides to the edge towards the symbol. 3. Identify and load all slide carriers into the slide hotel.
a. Clicking “Enter Slide IDs”. b. Assigning unique Slide IDs for each of the slides. c. Putting the slide carrier into a hotel slot.
4. Click the status icon of the slides to assign scanning rules. a. Assign task as “Scan Slides”. b. Select a Study and Protocol.
5. Click “Scan” to scan the whole section on all the slides with scan protocol.
5d 5d
5g
5f 5e 5h
5h
5i
5i
5j
5k
2b 3a
3b
2a
3
5c 5c
Faculty Core Facility LKS Faculty of Medicine PerkinElmer Vectra Polaris™ 2019
4
V. Scanning multispectral (MSI) regions of Interest
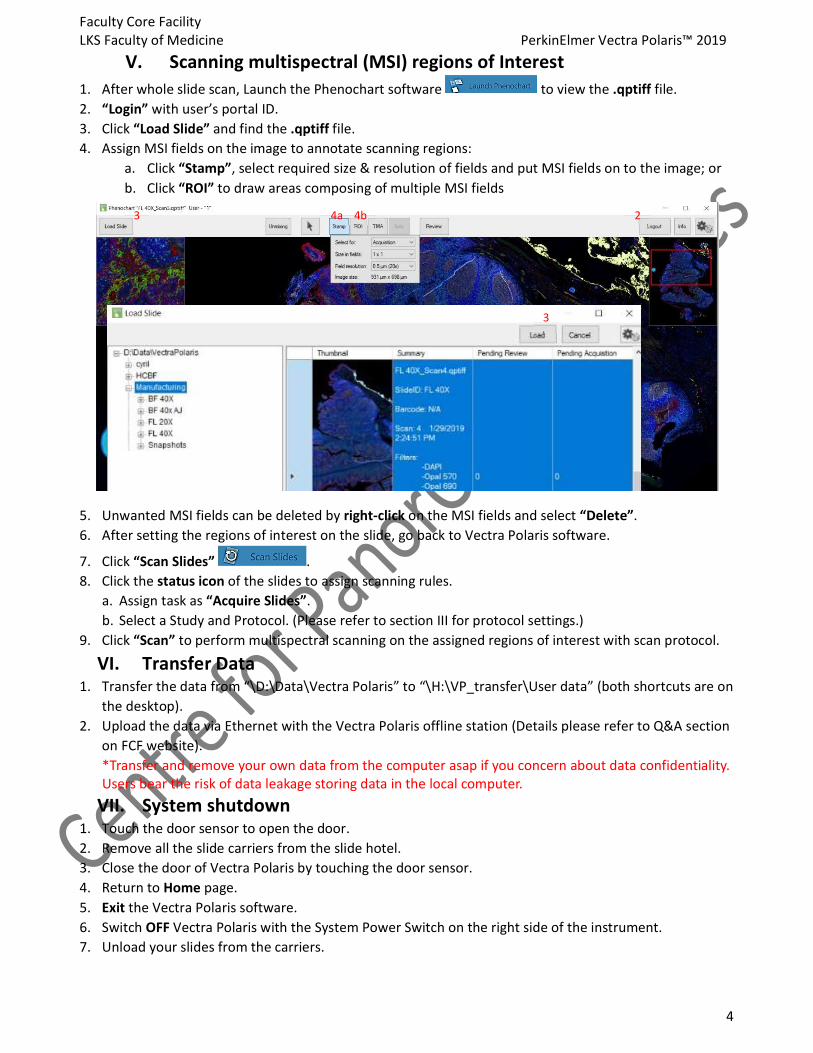
1. After whole slide scan, Launch the Phenochart software to view the .qptiff file. 2. “Login” with user’s portal ID. 3. Click “Load Slide” and find the .qptiff file. 4. Assign MSI fields on the image to annotate scanning regions:
a. Click “Stamp”, select required size & resolution of fields and put MSI fields on to the image; or b. Click “ROI” to draw areas composing of multiple MSI fields
5. Unwanted MSI fields can be deleted by right-click on the MSI fields and select “Delete”. 6. After setting the regions of interest on the slide, go back to Vectra Polaris software.
7. Click “Scan Slides” . 8. Click the status icon of the slides to assign scanning rules.
a. Assign task as “Acquire Slides”. b. Select a Study and Protocol. (Please refer to section III for protocol settings.)
9. Click “Scan” to perform multispectral scanning on the assigned regions of interest with scan protocol.
VI. Transfer Data 1. Transfer the data from “\D:\Data\Vectra Polaris” to “\H:\VP_transfer\User data” (both shortcuts are on
the desktop). 2. Upload the data via Ethernet with the Vectra Polaris offline station (Details please refer to Q&A section
on FCF website). *Transfer and remove your own data from the computer asap if you concern about data confidentiality. Users bear the risk of data leakage storing data in the local computer.
VII. System shutdown 1. Touch the door sensor to open the door. 2. Remove all the slide carriers from the slide hotel. 3. Close the door of Vectra Polaris by touching the door sensor. 4. Return to Home page. 5. Exit the Vectra Polaris software. 6. Switch OFF Vectra Polaris with the System Power Switch on the right side of the instrument. 7. Unload your slides from the carriers.
2 3 4a 4b
3
Faculty Core Facility LKS Faculty of Medicine PerkinElmer Vectra Polaris™ 2019
5
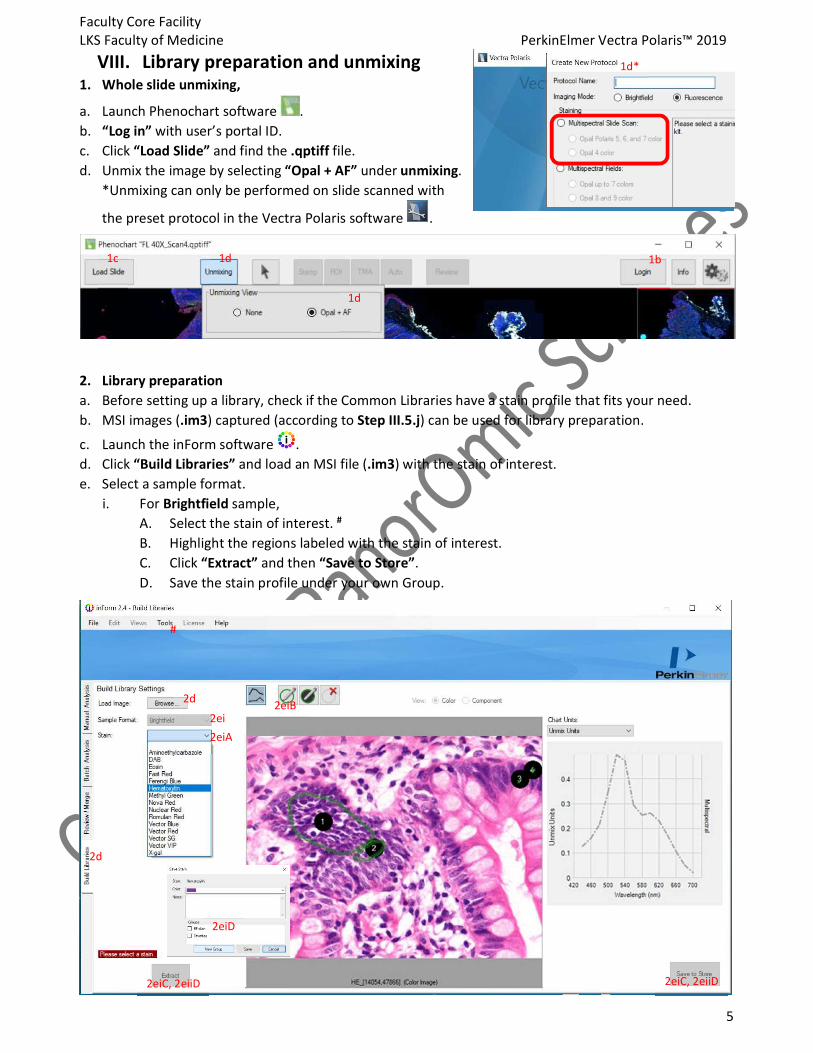
VIII. Library preparation and unmixing 1. Whole slide unmixing,
a. Launch Phenochart software . b. “Log in” with user’s portal ID. c. Click “Load Slide” and find the .qptiff file. d. Unmix the image by selecting “Opal + AF” under unmixing.
*Unmixing can only be performed on slide scanned with
the preset protocol in the Vectra Polaris software .
2. Library preparation a. Before setting up a library, check if the Common Libraries have a stain profile that fits your need. b. MSI images (.im3) captured (according to Step III.5.j) can be used for library preparation.
c. Launch the inForm software . d. Click “Build Libraries” and load an MSI file (.im3) with the stain of interest. e. Select a sample format.
i. For Brightfield sample, A. Select the stain of interest. # B. Highlight the regions labeled with the stain of interest. C. Click “Extract” and then “Save to Store”. D. Save the stain profile under your own Group.
1d*
2d
2d
2ei 2eiA
2eiB
2eiC, 2eiiD 2eiC, 2eiiD
2eiD
#
1b 1d 1c
1d
Faculty Core Facility LKS Faculty of Medicine PerkinElmer Vectra Polaris™ 2019
6
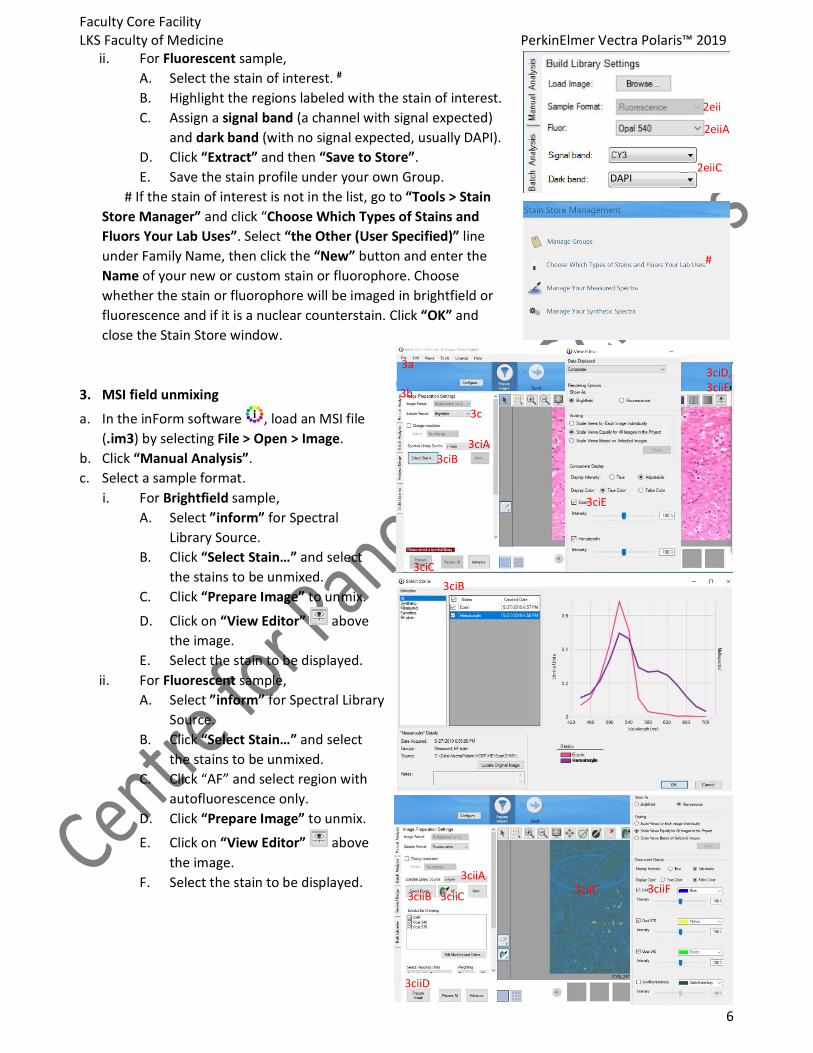
ii. For Fluorescent sample, A. Select the stain of interest. # B. Highlight the regions labeled with the stain of interest. C. Assign a signal band (a channel with signal expected)
and dark band (with no signal expected, usually DAPI). D. Click “Extract” and then “Save to Store”. E. Save the stain profile under your own Group.
# If the stain of interest is not in the list, go to “Tools > Stain Store Manager” and click “Choose Which Types of Stains and Fluors Your Lab Uses”. Select “the Other (User Specified)” line under Family Name, then click the “New” button and enter the Name of your new or custom stain or fluorophore. Choose whether the stain or fluorophore will be imaged in brightfield or fluorescence and if it is a nuclear counterstain. Click “OK” and close the Stain Store window.
3. MSI field unmixing
a. In the inForm software , load an MSI file (.im3) by selecting File > Open > Image.
b. Click “Manual Analysis”. c. Select a sample format.
i. For Brightfield sample, A. Select ”inform” for Spectral
Library Source. B. Click “Select Stain…” and select
the stains to be unmixed. C. Click “Prepare Image” to unmix.
D. Click on “View Editor” above the image.
E. Select the stain to be displayed. ii. For Fluorescent sample,
A. Select ”inform” for Spectral Library Source.
B. Click “Select Stain…” and select the stains to be unmixed.
C. Click “AF” and select region with autofluorescence only.
D. Click “Prepare Image” to unmix.
E. Click on “View Editor” above the image.
F. Select the stain to be displayed.
DAPI
2eii
2eiiA
2eiiC
3b
3c
3ciA 3ciB
3ciC
3ciD, 3ciiE
3ciE
3a
3ciB
3ciiA
3ciiB 3ciiC 3ciiC
3ciiD
3ciiF
#
Faculty Core Facility LKS Faculty of Medicine PerkinElmer Vectra Polaris™ 2019
7
IX. Analysis
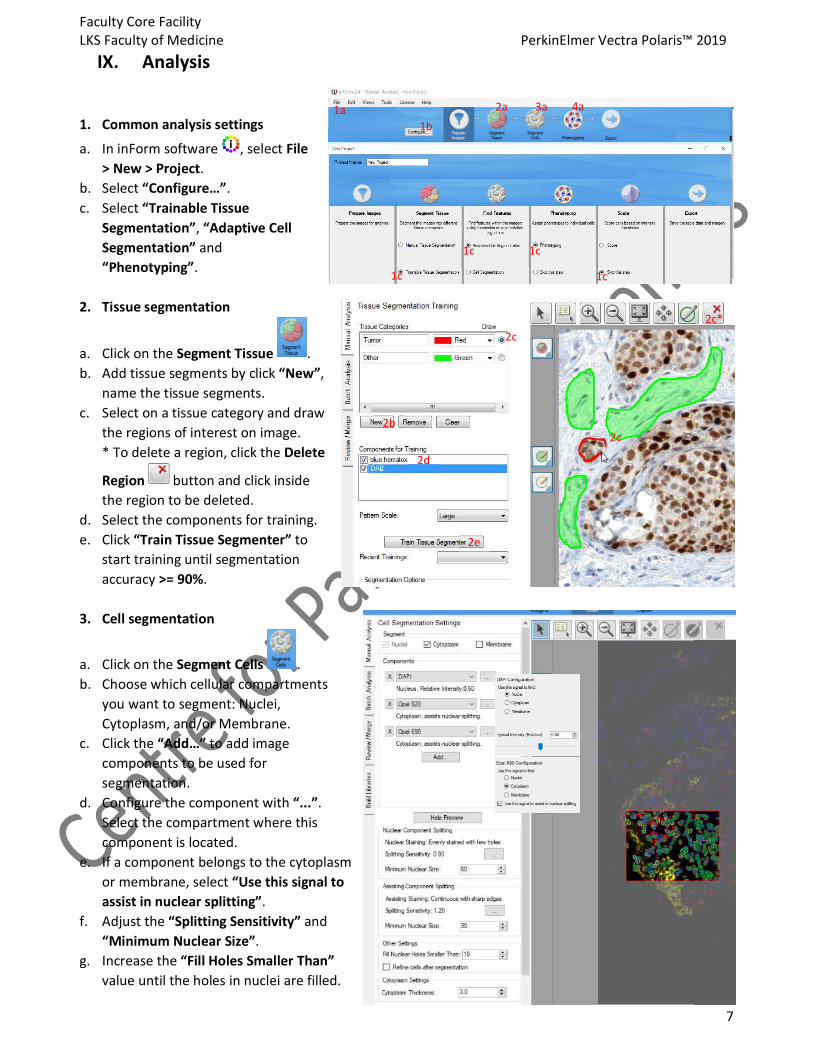
1. Common analysis settings
a. In inForm software , select File > New > Project.
b. Select “Configure…”. c. Select “Trainable Tissue
Segmentation”, “Adaptive Cell Segmentation” and “Phenotyping”.
2. Tissue segmentation
a. Click on the Segment Tissue . b. Add tissue segments by click “New”,
name the tissue segments. c. Select on a tissue category and draw
the regions of interest on image. * To delete a region, click the Delete
Region button and click inside the region to be deleted.
d. Select the components for training. e. Click “Train Tissue Segmenter” to
start training until segmentation accuracy >= 90%.
3. Cell segmentation
a. Click on the Segment Cells . b. Choose which cellular compartments
you want to segment: Nuclei, Cytoplasm, and/or Membrane.
c. Click the “Add…” to add image components to be used for segmentation.
d. Configure the component with “...”. Select the compartment where this component is located.
e. If a component belongs to the cytoplasm or membrane, select “Use this signal to assist in nuclear splitting”.
f. Adjust the “Splitting Sensitivity” and “Minimum Nuclear Size”.
g. Increase the “Fill Holes Smaller Than” value until the holes in nuclei are filled.
2b
2c* 2c
2e
2c
2d
1a 1b
1c 1c
1c 1c
2a 3a 4a

Faculty Core Facility LKS Faculty of Medicine PerkinElmer Vectra Polaris™ 2019
8
4. Phenotyping cells
a. Click on the Phenotyping . b. Add phenotypes by click “New”, name the phenotypes. c. Select on a phenotype and right-click the cell of interest on
image. *To remove a cell from a phenotype, click “Remove” and click the cell to be removed. *Select >=5 cells for each phenotype.
d. Click “Train Classifier” to start training. e. Review the phenotyping, “Add…” and “Remove” cells if necessary.
5. Export data
a. Click on the Export . b. Click the “Browse…” and select the Export Directory to “I:\USER_DATA\(PI_User name)”. c. Select the required output files.
Composite Image for the unmixed image. Component Images (multi-image TIFF) for analysis using third party analysis software, e.g.
ImageJ. Tissue Segmentation Data, Cell Segmentation Data and Phenotyping Data for quantitative
analysis.
4e
4d
4b, 4e
4c
4c*, 4e
4c


