Embed Size (px)
Citation preview
���R������� �������������
2
1 2 3 4
567
en | 3
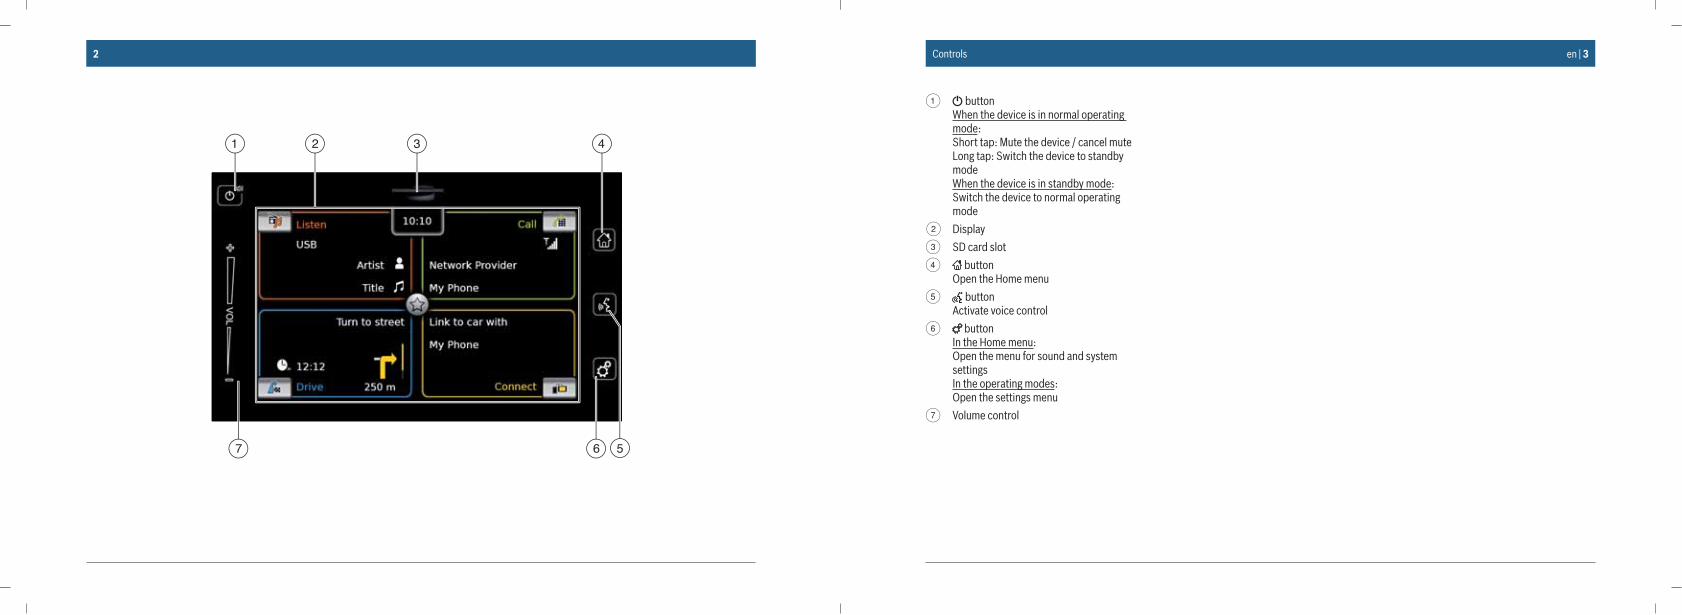
1 buttonWhen the device is in normal operating mode:Short tap: Mute the device / cancel muteLong tap: Switch the device to standby modeWhen the device is in standby mode:Switch the device to normal operating mode
2 Display
3 SD card slot
4 buttonOpen the Home menu
5 buttonActivate voice control
6 buttonIn the Home menu:Open the menu for sound and system settingsIn the operating modes:Open the settings menu
7 Volume control
Controls
4 | en
Contents
1 Features ....................................... 8
2 Symbols used in this document .. 8
3 Important information ................. 93.1 Cleaning information ......................... 9
4 Operation ................................... 104.1 Touchscreen controls ...................... 10
4.1.1 Tapping ........................................... 104.1.2 Swiping ........................................... 104.1.3 Zooming the map view .................... 104.1.4 Scrolling the visible map area ......... 11
4.2 Switching the device on/off ............. 114.2.1 Switching on/off ............................. 114.2.2 Standby mode ................................. 114.2.3 Map care registration ...................... 11
4.3 Adjusting the volume ....................... 114.3.1 Increasing/decreasing the volume .. 114.3.2 Muting the device ............................ 11
4.4 Home menu ..................................... 114.4.1 Calling up the display of a main
operating mode ............................... 124.4.2 Directly selecting functions ............. 134.4.3 Quick-access feature ....................... 14
4.5 The displays of the main operating modes .............................................. 14
4.5.1 Radio listening and playing media ... 144.5.2 Telephone ........................................ 154.5.3 Navigation ....................................... 154.5.4 Smartphone integration .................. 154.5.5 Switching between the displays of
the main operating modes .............. 15
4.6 Enabling the keypad lock while driving .............................................. 15
4.6.1 Keypad lock setting during active Apple CarPlay session ..................... 16
4.7 Entering the security PIN ................. 16
4.8 Sound settings ................................. 174.8.1 Adjusting the bass and treble ......... 174.8.2 Adjusting the balance ...................... 174.8.3 Adjusting the fader .......................... 174.8.4 Selecting an equalizer preset .......... 174.8.5 Adjusting the speed dependent
volume ............................................. 174.8.6 Volume adjustment for the AUX
source ............................................. 184.8.7 Volume adjustment for an external
DVD source ..................................... 184.8.8 System beep – on/off ...................... 18
4.9 Setting the time and date ................ 184.9.1 Selecting the date format ............... 194.9.2 Selecting the time format ............... 194.9.3 Setting the time via GPS ................. 194.9.4 Setting the time manually ............... 20
4.10 Further system settings ................... 204.10.1 Adjusting the display brightness ..... 204.10.2 Setting the language ....................... 214.10.3 Selecting the system of
measurement .................................. 214.10.4 Security PIN protection – on/off ..... 214.10.5 Changing the device’s security PIN . 224.10.6 Displaying information about open-
source software .............................. 234.10.7 Reset to the factory settings ........... 23
4.11 Connecting/inserting external devices and data storage devices .... 23
4.11.1 General information ........................ 234.11.2 SD card ........................................... 244.11.3 USB storage device/Apple ............... 244.11.4 AUX audio source ............................ 254.11.5 Enabling the external DVD input ..... 254.11.6 Connecting a device via Bluetooth® 254.11.7 Connecting a smartphone via
smartphone integration .................. 27
Contents en | 5
5 FM/AM radio mode ................... 285.1 Listening to the radio....................... 28
5.2 The tuner display ............................. 29
5.3 Calling up the tuner display ............. 29
5.4 Selecting the waveband/memory bank ................................................. 29
5.5 Tuning stations ................................ 295.5.1 Tuning stations manually ................. 295.5.2 Starting seek tuning ........................ 295.5.3 Scanning receivable stations........... 29
5.6 Storing stations ............................... 295.6.1 Storing stations manually ................ 295.6.2 Storing stations automatically ......... 30
5.7 Listening to a stored station ............ 30
6 DRM radio mode ........................ 306.1 Listening to DRM ............................. 30
6.2 The DRM display .............................. 30
6.3 Calling up the DRM display .............. 31
6.4 DRM features ................................... 31
6.5 DRM service list ............................... 31
6.6 Selecting services ............................ 31
6.7 Storing services ............................... 316.7.1 Storing services manually ............... 316.7.2 Storing services automatically ........ 31
6.8 Listening to a stored service ............ 31
6.9 Preselecting programme types ........ 31
6.10 Displaying DRM extra information ... 32
6.11 DRM frequency display .................... 32
7 Playing media ............................ 337.1 Selecting a media source ................. 33
7.2 Calling up the audio/video display .. 33
7.3 Audio playback ................................ 337.3.1 The audio display ............................ 337.3.2 Pausing playback ............................. 347.3.3 Skipping to the next/previous title .. 347.3.4 Selecting titles in the media
browser ........................................... 347.3.5 Fast forward/rewind ........................ 347.3.6 Skipping forwards/backwards in
the current title ............................... 347.3.7 Repeat function ............................... 347.3.8 Shuffle function ............................... 34
7.4 Video playback ................................. 347.4.1 The video display ............................ 357.4.2 Pausing playback ............................. 357.4.3 Skipping to the next/previous title .. 357.4.4 Selecting titles in the media
browser ........................................... 357.4.5 Fast forward/rewind ........................ 357.4.6 Skipping forwards/backwards in
the current title ............................... 357.4.7 Full-screen mode – on/off ............... 35
7.5 Media browser ................................. 357.5.1 The browser display ........................ 367.5.2 Selecting titles ................................ 367.5.3 Closing the browser without
selecting a title ................................ 36
Contents
6 | en
8 Navigation .................................. 378.1 Starting navigation .......................... 37
8.2 Entering a destination ..................... 378.2.1 Opening the Destinations menu ...... 378.2.2 Entering an address ........................ 388.2.3 Selecting a point of interest ............ 398.2.4 Entering coordinates ....................... 408.2.5 Selecting one of the previous
destinations or a destination stored as a favourite ................................... 40
8.3 Location details view ....................... 418.3.1 Areas of the location details view ... 418.3.2 Options in the location details view 41
8.4 Storing the home address ............... 42
8.5 Entering a waypoint ......................... 42
8.6 Changing the destination while route guidance is active ................... 42
8.7 Map view and map options .............. 438.7.1 Opening the map view .................... 438.7.2 The map view during an active
route guidance session ................... 438.7.3 Repeating the current navigation
announcement ................................ 438.7.4 Changing the map scale .................. 438.7.5 Changing the map view mode ......... 438.7.6 Changing the displayed section of
the map ........................................... 448.7.7 Selecting a destination or waypoint
from the map .................................. 44
8.7.8 Viewing details of a location on the map ................................................. 44
8.7.9 Selecting a point of interest from the map ........................................... 44
8.8 Route guidance settings in the Route menu ..................................... 45
8.8.1 Opening the Route menu ................ 458.8.2 Cancelling route guidance ............... 458.8.3 Muting navigation announcements . 458.8.4 Displaying destination information . 458.8.5 Displaying the route list .................. 458.8.6 Displaying the list of waypoints ...... 458.8.7 Searching for a point of interest on
the route or near the destination .... 458.8.8 Blocking route sections ................... 46
8.9 Specifying guidance and map settings ............................................ 46
8.9.1 Opening the guidance and map set-tings ................................................ 46
8.9.2 Displaying points of interest on the map ................................................. 46
8.9.3 Selecting the map orientation ......... 478.9.4 3D map view – on/off ...................... 478.9.5 Enabling automatic zoom ................ 478.9.6 Lane guidance – on/off ................... 488.9.7 Voice guidance – on/off .................. 488.9.8 Visual driving recommendations in
other operating modes– on/off ....... 48
8.10 Specifying custom route options ..... 488.10.1 Opening the route options .............. 498.10.2 Selecting the basic type of route .... 498.10.3 Avoiding certain types of road and
transport ......................................... 49
8.11 Displaying information on the current position ............................... 50
8.12 Your own points of interest ............. 508.12.1 Data format ..................................... 508.12.2 Loading your own points of interest
onto the device ............................... 518.12.3 Point of interest warnings displayed
during the journey – on/off ............. 518.12.4 Deleting your own points of interest
from the device ............................... 52
8.13 Enabling the keypad lock while driving .............................................. 52
8.14 Selecting the geo coordinate format 52
8.15 Updating the map data .................... 528.15.1 Registration process for the first
time user ......................................... 53
8.16 Retrofitting the navigation function . 53
Contents en | 7Contents
9 Telephone .................................. 549.1 Starting phone mode ....................... 54
9.1.1 Opening the phone menu................ 54
9.2 Answering/rejecting a call ............... 559.2.1 Answering a call .............................. 559.2.2 Rejecting a call ................................ 55
9.3 During the current call ..................... 559.3.1 Ending the call ................................ 559.3.2 Muting the call ................................ 559.3.3 Switching the call to the mobile
phone .............................................. 55
9.4 Dialling a number ............................. 55
9.5 Calling a contact from the phone book ................................................. 55
9.6 Calling an entry in the call list ......... 559.6.1 Tone dial feature (DTMF) ................ 55
9.7 Second call ...................................... 559.7.1 A second incoming call ................... 569.7.2 Switching between two calls .......... 56
9.8 SMS text messages .......................... 569.8.1 Reading an incoming text message . 569.8.2 Incoming text message display –
on/off .............................................. 57
9.9 Activating the voice control system of the connected mobile phone ....... 57
9.10 Further settings ............................... 579.10.1 Ringtone of the mobile phone ......... 579.10.2 Phone-book sort order .................... 58
10 Smartphone integration ............ 5810.1 Calling up the smartphone display .. 60
10.2 Selecting a particular application on a smartphone .................................. 60
10.3 Smartphone integration settings ..... 6010.3.1 Android™ connection priority .......... 6010.3.2 Enabling the keypad lock while
driving ............................................. 60
11 Rear-view camera ...................... 6111.1 Picture settings for the rear-view
camera ............................................. 6111.1.1 Guide lines – on/off ........................ 6111.1.2 Adjusting the picture brightness
and contrast .................................... 61
12 Voice control .............................. 6212.1 Voice control – start/stop ................ 62
12.2 How voice control works ................. 6212.2.1 The main menu ................................ 6212.2.2 Saying voice commands .................. 6312.2.3 Opening the menu for an operating
mode ............................................... 6312.2.4 Selecting from a list ........................ 63
12.3 Help for voice control ...................... 63
13 Steering wheel remote control . 64
14 Bluetooth® remote control APP 65
15 Points of interest – symbol overview..................................... 65
8 | en
1 Features � AM/FM tuner
– 18 FM and 12 AM manual presets � DRM tuner (optional)
– 12 manual presets � USB/SD/iPod
– Supports MP3, WMA, AAC, WAV, 3GPP, audiobooks, MPG, AVI
– Playlists – Browsing – Shuffle/repeat
� Aux audio input & DVD video input � Bluetooth® phone
– Hands free – Phone book access – Music streaming
� Smartphone integration – Apple CarPlay – MirrorLink™ – Android Auto™
� Sound adjustments – Bass, treble, balance, fader – 6 equalizer presets
� Voice control � GPS navigation � Steering wheel control � Bluetooth® remote control APP
2 Symbols used in this document
Symbols linked with text within a grey box are warnings and always indicate an immediate or potential hazard to the user and/or other per-sons and/or damage of objects:
Safety notice � Immediate danger that could cause serious personal injury or death.
� Potentially dangerous situation that could cause serious personal injury or death.
� Potentially dangerous situation that could cause personal injury or dam-age to property.
Important note:Warns of a potentially hazardous situa-tion in which the device or any other object in the vicinity could be dam-aged.
In addition to these warnings, the following symbols are also used:
Note:Additional details for the application and further useful information.
� Single-step procedure – instructions for a procedure that can be completed in just one step.
� Bulleted list.
Italic letters like Balance indicate such elements as the name of a menu or menu item.
Bold letters like Language indicate a button or menu item that you can tap in order to access a function or to display further options.
Features | Symbols used in this document en | 9Important information
3 Important informa-tion
Road safety � Operating the device is only permit-ted when the driving and traffic situation allow you to do so. Before starting to use the device, make sure that you, your passengers and other road users are not put in danger, hindered or inconven-ienced. The road traffic regulations apply at all times.
� The device has to be used so that the vehicle can be driven safely at all times. If in doubt, stop your vehicle and operate the device while the vehicle is stationary.
� You must always be able to hear police, fire service and ambulance sirens in good time from inside your vehicle. For this reason, when using your device, make sure the volume is set at a level that is appropriate for the particular driving and traffic situation.
� The usage of the navigation system does not absolve the driver of the responsibility of a correct and vigi-lant attitude. The relevant traffic
regulations must always be fol-lowed. If a navigation instruction contradicts traffic regulations, the traffic regulations always apply.
� The route guidance provided by the device may not be completely accu-rate. Ensure that all driving manoeu-vres are legal and safe in order to avoid accidents.
Risk of electrical shock or fireIf you disassemble the device, it might result in electrical shock or fire.Do not open the device.
MalfunctionsDo not use the device if you notice any malfunctions such as a frozen screen or poor audio quality. Continued use of a malfunctioning system may result in accidents, fire or electrical shock.
Important note:In standby mode, the device may drain the battery when the vehicle’s engine is not running.For further details on this, please read the section entitled “Switching the device on/off” (page 11).
� Only use appropriate connecting cables and external devices in regard to safety, electro-magnetic compatibility and grade of shield-ing.
� The device must not come into contact with hot or burning objects (e.g. cigarettes).
Note:Some pixels in the display are darker or brighter than others. This condition is an inherent characteristic of liquid crystal displays, and it is not a malfunc-tion.
3.1 Cleaning information � To clean the device, never use hard or sharp objects that could damage the protective pane or housing.
� Do not use aggressive cleaning agents, such as thinners, benzine, abrasive cleaners, spray cleaners, acidic or alkaline solutions, or wax.
� Do not spray any liquids onto the device. � To clean the housing and protective pane / display, moisten a soft cloth with tepid water and wipe off the dirt. Make sure that no liquid enters the inside of the display. Afterwards, wipe the cleaned surface with a clean, dry cloth.
10 | en
Note:Dust on the display may impair the functioning of the touchscreen. If the device detects that the display is dirty, a corresponding notification will appear. In this case, clean the display to ensure reliable functioning of the touchscreen.
4 Operation
4.1 Touchscreen controls
Important note:Do not use pointed or hard items such as ball-point pens or pencils for touch screen operation.
Note:The figures in this manual depicting the device’s displays and front panel are for reference purposes only. The dis-plays shown here may differ from the actual displays on the device.
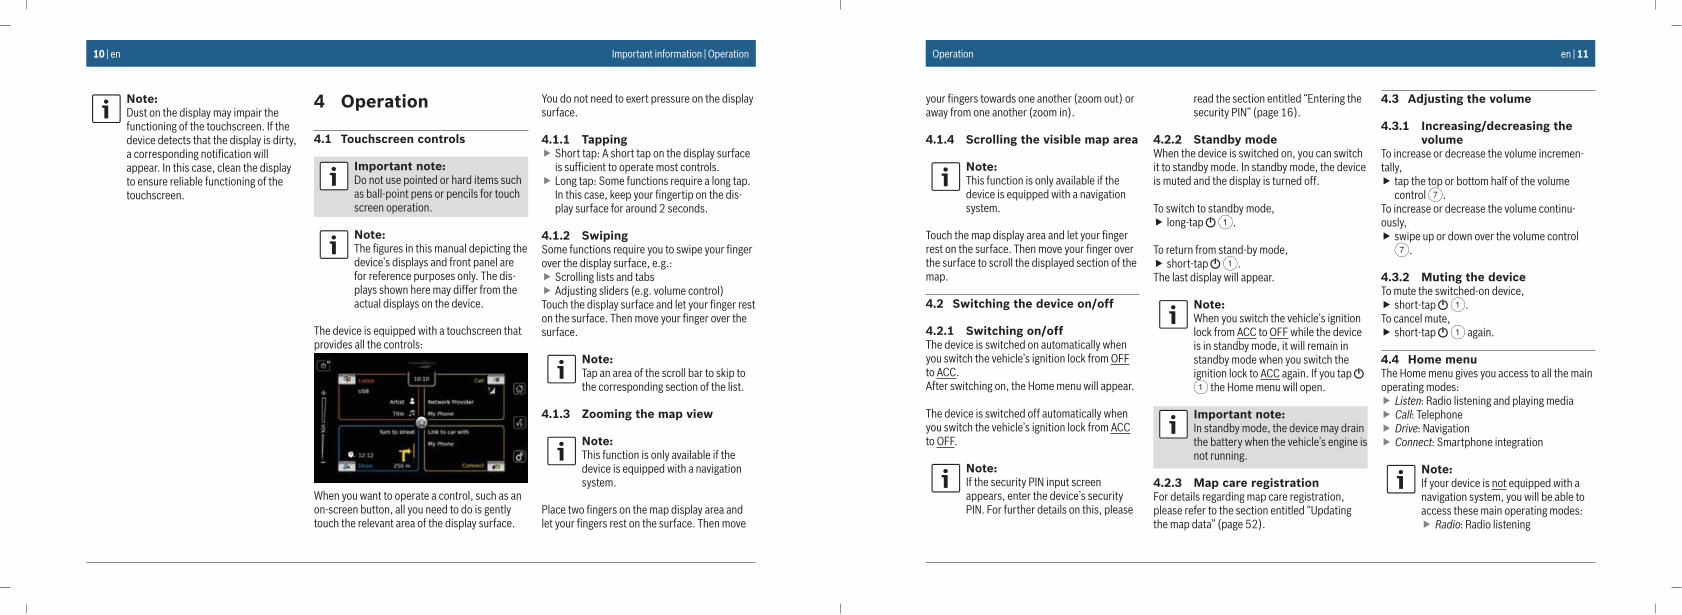
The device is equipped with a touchscreen that provides all the controls:
When you want to operate a control, such as an on-screen button, all you need to do is gently touch the relevant area of the display surface.
You do not need to exert pressure on the display surface.
4.1.1 Tapping � Short tap: A short tap on the display surface is sufficient to operate most controls.
� Long tap: Some functions require a long tap. In this case, keep your fingertip on the dis-play surface for around 2 seconds.
4.1.2 SwipingSome functions require you to swipe your finger over the display surface, e.g.:
� Scrolling lists and tabs � Adjusting sliders (e.g. volume control)
Touch the display surface and let your finger rest on the surface. Then move your finger over the surface.
Note:Tap an area of the scroll bar to skip to the corresponding section of the list.
4.1.3 Zooming the map view
Note:This function is only available if the device is equipped with a navigation system.
Place two fingers on the map display area and let your fingers rest on the surface. Then move
Important information | Operation en | 11
your fingers towards one another (zoom out) or away from one another (zoom in).
4.1.4 Scrolling the visible map area
Note:This function is only available if the device is equipped with a navigation system.
Touch the map display area and let your finger rest on the surface. Then move your finger over the surface to scroll the displayed section of the map.
4.2 Switching the device on/off
4.2.1 Switching on/offThe device is switched on automatically when you switch the vehicle’s ignition lock from OFF to ACC.After switching on, the Home menu will appear.
The device is switched off automatically when you switch the vehicle’s ignition lock from ACC to OFF.
Note:If the security PIN input screen appears, enter the device’s security PIN. For further details on this, please
read the section entitled “Entering the security PIN” (page 16).
4.2.2 Standby modeWhen the device is switched on, you can switch it to standby mode. In standby mode, the device is muted and the display is turned off.
To switch to standby mode, � long-tap 1.
To return from stand-by mode, � short-tap 1.
The last display will appear.
Note:When you switch the vehicle’s ignition lock from ACC to OFF while the device is in standby mode, it will remain in standby mode when you switch the ignition lock to ACC again. If you tap 1 the Home menu will open.
Important note:In standby mode, the device may drain the battery when the vehicle’s engine is not running.
4.2.3 Map care registrationFor details regarding map care registration, please refer to the section entitled “Updating the map data” (page 52).
4.3 Adjusting the volume
4.3.1 Increasing/decreasing the volume
To increase or decrease the volume incremen-tally,
� tap the top or bottom half of the volume control 7.
To increase or decrease the volume continu-ously,
� swipe up or down over the volume control 7.
4.3.2 Muting the deviceTo mute the switched-on device,
� short-tap 1.To cancel mute,
� short-tap 1 again.
4.4 Home menuThe Home menu gives you access to all the main operating modes:
� Listen: Radio listening and playing media � Call: Telephone � Drive: Navigation � Connect: Smartphone integration
Note:If your device is not equipped with a navigation system, you will be able to access these main operating modes:
� Radio: Radio listening
Operation
12 | en
� Call: Telephone � Media: Playing media � Connect: Smartphone integration
Notes: � Information about which smart-phones the device supports is available at www.suzuki-slda.com.
� If your device is not equipped with a navigation system you may be able to retrofit the navigation function (see the section entitled “Retrofit-ting the navigation function” (page 53)). Please contact your MARUTI SUZUKI dealer regarding this.
The most important information for each main operating mode is displayed:
� Listen: – Current tuner or media source (e.g. USB) – Details about the current radio pro-
gramme or media title � Call:
– Phone status indication (e.g. signal strength)
– Missed call indication – Name of network provider – Name of the connected mobile phone
� Drive: – Name of the current or next street – Distance to next driving manoeuvre – Symbol of the next driving manoeuvre – Estimated time of arrival
� Connect: – Type of smartphone integration
Note:Artist and title names must be provided by the media source.
You can open the Home menu at any time: � Tap 4.
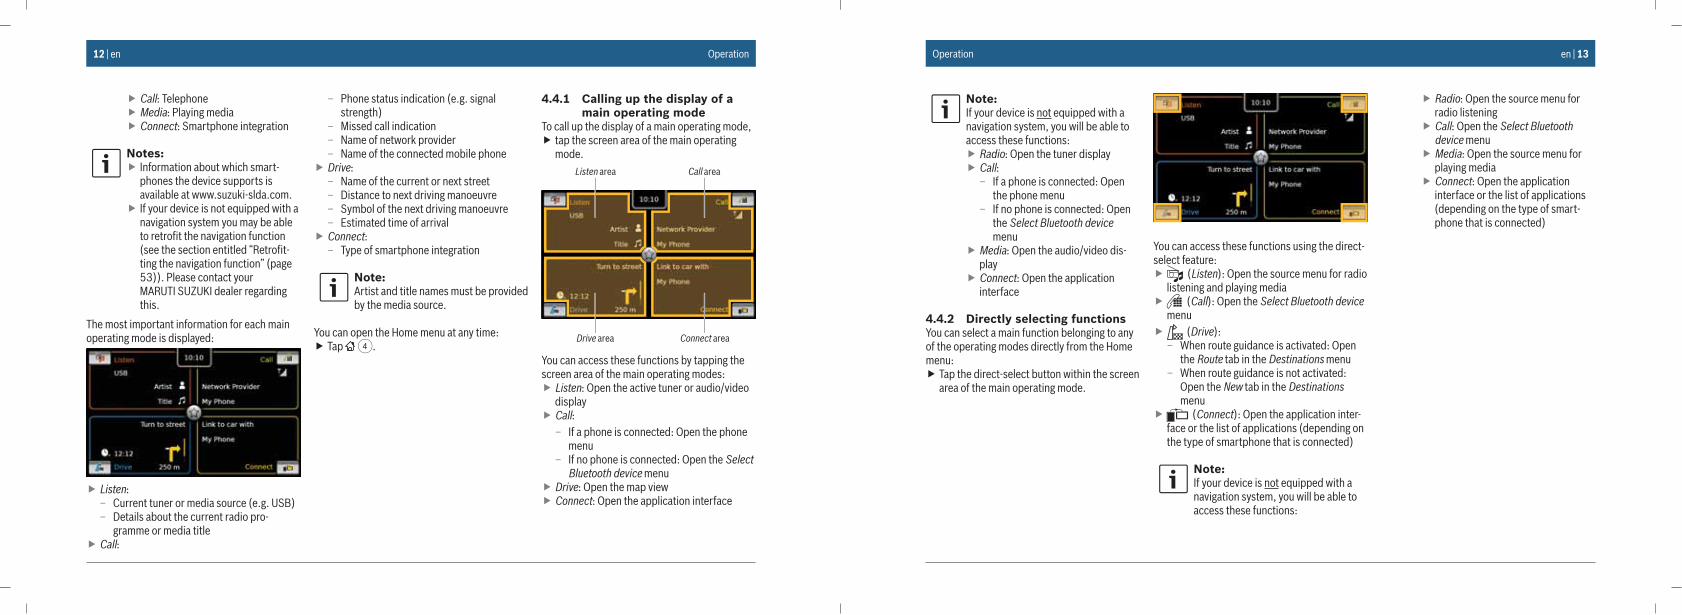
4.4.1 Calling up the display of a main operating mode
To call up the display of a main operating mode, � tap the screen area of the main operating mode.
Listen area Call area
Drive area Connect area
You can access these functions by tapping the screen area of the main operating modes:
� Listen: Open the active tuner or audio/video display
� Call: – If a phone is connected: Open the phone
menu – If no phone is connected: Open the Select
Bluetooth device menu � Drive: Open the map view � Connect: Open the application interface
Operation en | 13
Note:If your device is not equipped with a navigation system, you will be able to access these functions:
� Radio: Open the tuner display � Call:
– If a phone is connected: Open the phone menu
– If no phone is connected: Open the Select Bluetooth device menu
� Media: Open the audio/video dis-play
� Connect: Open the application interface
4.4.2 Directly selecting functionsYou can select a main function belonging to any of the operating modes directly from the Home menu:
� Tap the direct-select button within the screen area of the main operating mode.
You can access these functions using the direct-select feature:
� (Listen): Open the source menu for radio listening and playing media
� (Call): Open the Select Bluetooth device menu
� (Drive): – When route guidance is activated: Open
the Route tab in the Destinations menu – When route guidance is not activated:
Open the New tab in the Destinations menu
� (Connect): Open the application inter-face or the list of applications (depending on the type of smartphone that is connected)
Note:If your device is not equipped with a navigation system, you will be able to access these functions:
� Radio: Open the source menu for radio listening
� Call: Open the Select Bluetooth device menu
� Media: Open the source menu for playing media
� Connect: Open the application interface or the list of applications (depending on the type of smart-phone that is connected)
Operation
14 | en
4.4.3 Quick-access featureYou can access further functions for each main operating mode using the quick-access feature:
� Tap the quick-access button in the centre of the Home menu.
The quick-access wheel appears.
� Tap the desired function.
You can access these functions using the quick-access feature:
� Listen: – Radio: Start ascending/descending seek
tuning – Playing media:
Short tap: Skip to the next/previous title Touch and hold: Fast forward/rewind
� Call: Open the Contacts menu / open the Calls menu
� Drive: Open the Favourites menu / open the Previous menu
� Connect: Quit the running smartphone appli-cation
Note:If your device is not equipped with a navigation system, you will be able to access these functions:
� Radio: Start ascending/descending seek tuning
� Call: Open the Contacts menu / open the Calls menu
� Media: – Short tap: Skip to the next/
previous title – Touch and hold: Fast forward/
rewind � Connect: Quit the running smart-phone application
4.5 The displays of the main operat-ing modes
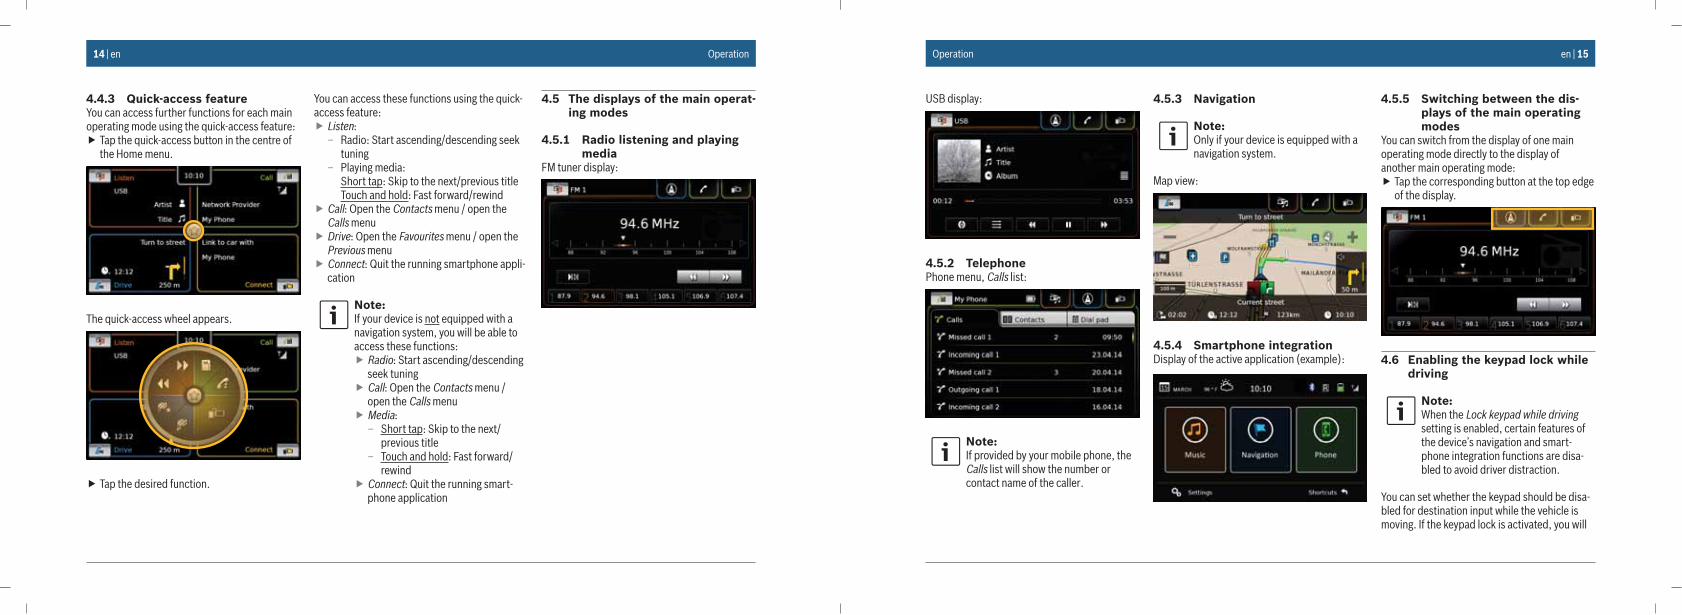
4.5.1 Radio listening and playing media
FM tuner display:
Operation en | 15
USB display:
4.5.2 TelephonePhone menu, Calls list:
Note:If provided by your mobile phone, the Calls list will show the number or contact name of the caller.
4.5.3 Navigation
Note:Only if your device is equipped with a navigation system.
Map view:
4.5.4 Smartphone integrationDisplay of the active application (example):
4.5.5 Switching between the dis-plays of the main operating modes
You can switch from the display of one main operating mode directly to the display of another main operating mode:
� Tap the corresponding button at the top edge of the display.
4.6 Enabling the keypad lock while driving
Note:When the Lock keypad while driving setting is enabled, certain features of the device’s navigation and smart-phone integration functions are disa-bled to avoid driver distraction.
You can set whether the keypad should be disa-bled for destination input while the vehicle is moving. If the keypad lock is activated, you will
Operation

16 | en
only be able to use the keypad while the vehicle is stationary.To enable the Lock keypad while driving setting,
� first switch to the Home menu, if necessary. � Tap 6.
The system settings are displayed.
� Tap Lock keypad while driving.The keypad lock is activated when the check mark is displayed in the checkbox.
Note:Tap 6 to close the options display.
4.6.1 Keypad lock setting during active Apple CarPlay session
If you change the Lock keypad while driving setting during an active Apple CarPlay session, the setting will not take effect immediately. You will need to reconnect the iPhone manually in order for the keypad setting change to take effect.
Note:A pop-up appears to inform the user to reconnect the iPhone after the keypad setting has been changed while an Apple CarPlay session is active.
To enable the Lock keypad while driving setting, � first switch to the Home menu, if necessary. � Tap 6.
The system settings are displayed. � Tap Lock keypad while driving.
A pop-up appears to inform the user to recon-nect the iPhone after the keypad setting has been changed.
Note:Tap 6 to close the options display.
4.7 Entering the security PIN
Note:You can enable or disable security PIN protection and change the device’s security PIN. For further details on this, please read the section entitled “Fur-ther system settings” (page 20).
If security PIN protection has been enabled, the security PIN input screen will appear whenever the device has been separated from the operat-ing voltage of the vehicle (e.g. in case of the replacement of the vehicle battery):
Note:You have 5 attempts at entering the security PIN correctly.
� Enter the device’s four-digit security PIN.
Operation en | 17
Note:If you enter a wrong digit, you can delete it by tapping .
� Tap .
Notes: � If you have not entered the correct security PIN for the device, the “Wrong security PIN” notification appears briefly and the number of remaining input attempts is dis-played.
� If you enter an incorrect security PIN 5 times, the device will be blocked and an appropriate notification displayed. Please contact your dealer to get the device unblocked.
4.8 Sound settingsTo adjust the sound settings,
� tap 6.The system settings are displayed.
� Tap Sound settings.
Notes: � To scroll through the available sound settings, touch the list area and swipe up or down.
� Tap 6 to close the sound set-tings or tap to return to the system settings.
4.8.1 Adjusting the bass and treble � In the Bass or Treble item, tap or to decrease or increase the value.
4.8.2 Adjusting the balance � In the Balance item, tap or to shift the sound towards the left or right.
4.8.3 Adjusting the fader � In the Fader item, tap or to shift the sound towards the front or rear.
4.8.4 Selecting an equalizer preset � Tap Equalizer presets.
� Tap the desired preset.
Note:Tap to return to the sound settings.
4.8.5 Adjusting the speed depend-ent volume
This function automatically adjusts the volume of the car sound system to the speed driven and the associated driving noises. For example, at an increased speed, the volume is automatically increased to compensate for the increased driving noise (e.g. due to the airstream).The automatic increase in volume can be adjusted in 4 increments (OFF, 1-3).
� Tap Speed dependent volume control.
Operation

18 | en
� Tap the desired option: Off or Level 1 - 3.
Note:Tap to return to the sound settings.
4.8.6 Volume adjustment for the AUX source
� Tap Aux level.
� Tap the desired option: Quiet, Normal or Loud.
4.8.7 Volume adjustment for an external DVD source
(if connected with compatible device) � Tap External DVD level.
� Tap the desired option: Quiet, Normal or Loud.
4.8.8 System beep – on/offThe system confirms certain actions with a beep. You can enable or disable this confirma-tion beep.
� Tap System beep.The system beep is enabled when the check mark is displayed in the checkbox.
4.9 Setting the time and dateTo adjust the time and date settings,
� first switch to the Home menu, if necessary. � Tap 6.
The system settings are displayed.
� Tap Clock.
Operation en | 19
Notes: � To scroll through the available set-tings, touch the list area and swipe up or down.
� Tap 6 to close the settings or tap to return to the system settings.
4.9.1 Selecting the date formatThe selected date format refers to the display of the date, e.g. in the Calls list of the phone mode.
� Tap Date format.
� Tap the desired date format.
Note:To scroll through the available date formats, touch the list area and swipe up or down.
� Tap to return to the time and date set-tings.
4.9.2 Selecting the time formatThe selected time format refers to the display of the time, e.g. in the Home menu.
� Tap Time format.
� Tap the desired option: 12 h or 24 h.
4.9.3 Setting the time via GPSFirst select “GPS” as the time setting, if neces-sary:
� Tap Clock setting mode.
� Tap GPS.
The options for setting the time via GPS are displayed.
Select your time zone: � Tap Time zone.
� Tap the desired time zone.
Note:To scroll through the available time zones, if necessary, touch the list area and swipe up or down.
Operation
20 | en
� Tap to return to the time and date set-tings.
Activate or deactivate summer time: � Tap Summer time.
Summer time is activated when the check mark is displayed in the checkbox.
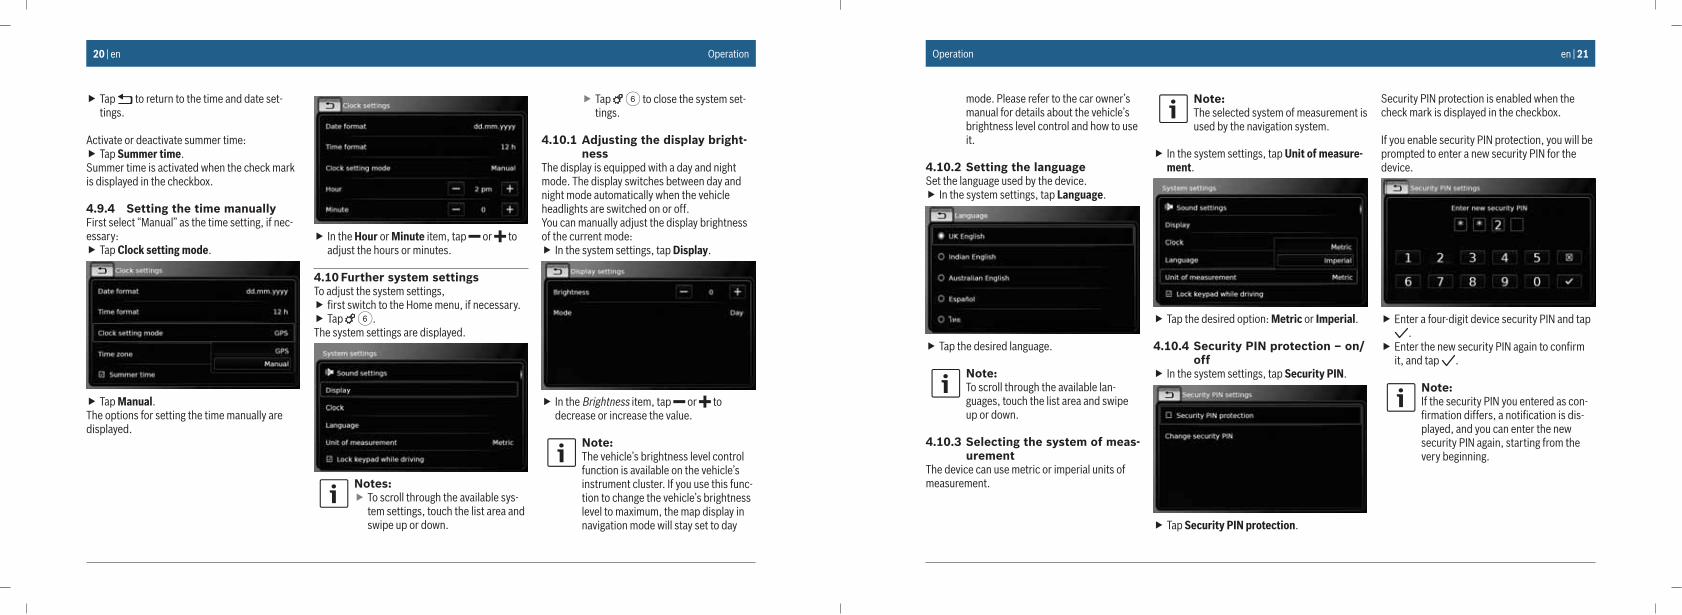
4.9.4 Setting the time manuallyFirst select “Manual” as the time setting, if nec-essary:
� Tap Clock setting mode.
� Tap Manual.The options for setting the time manually are displayed.
� In the Hour or Minute item, tap or to adjust the hours or minutes.
4.10 Further system settingsTo adjust the system settings,
� first switch to the Home menu, if necessary. � Tap 6.
The system settings are displayed.
Notes: � To scroll through the available sys-tem settings, touch the list area and swipe up or down.
� Tap 6 to close the system set-tings.
4.10.1 Adjusting the display bright-ness
The display is equipped with a day and night mode. The display switches between day and night mode automatically when the vehicle headlights are switched on or off.You can manually adjust the display brightness of the current mode:
� In the system settings, tap Display.
� In the Brightness item, tap or to decrease or increase the value.
Note:The vehicle’s brightness level control function is available on the vehicle’s instrument cluster. If you use this func-tion to change the vehicle’s brightness level to maximum, the map display in navigation mode will stay set to day
Operation en | 21
mode. Please refer to the car owner’s manual for details about the vehicle’s brightness level control and how to use it.
4.10.2 Setting the languageSet the language used by the device.
� In the system settings, tap Language.
� Tap the desired language.
Note:To scroll through the available lan-guages, touch the list area and swipe up or down.
4.10.3 Selecting the system of meas-urement
The device can use metric or imperial units of measurement.
Note:The selected system of measurement is used by the navigation system.
� In the system settings, tap Unit of measure-ment.
� Tap the desired option: Metric or Imperial.
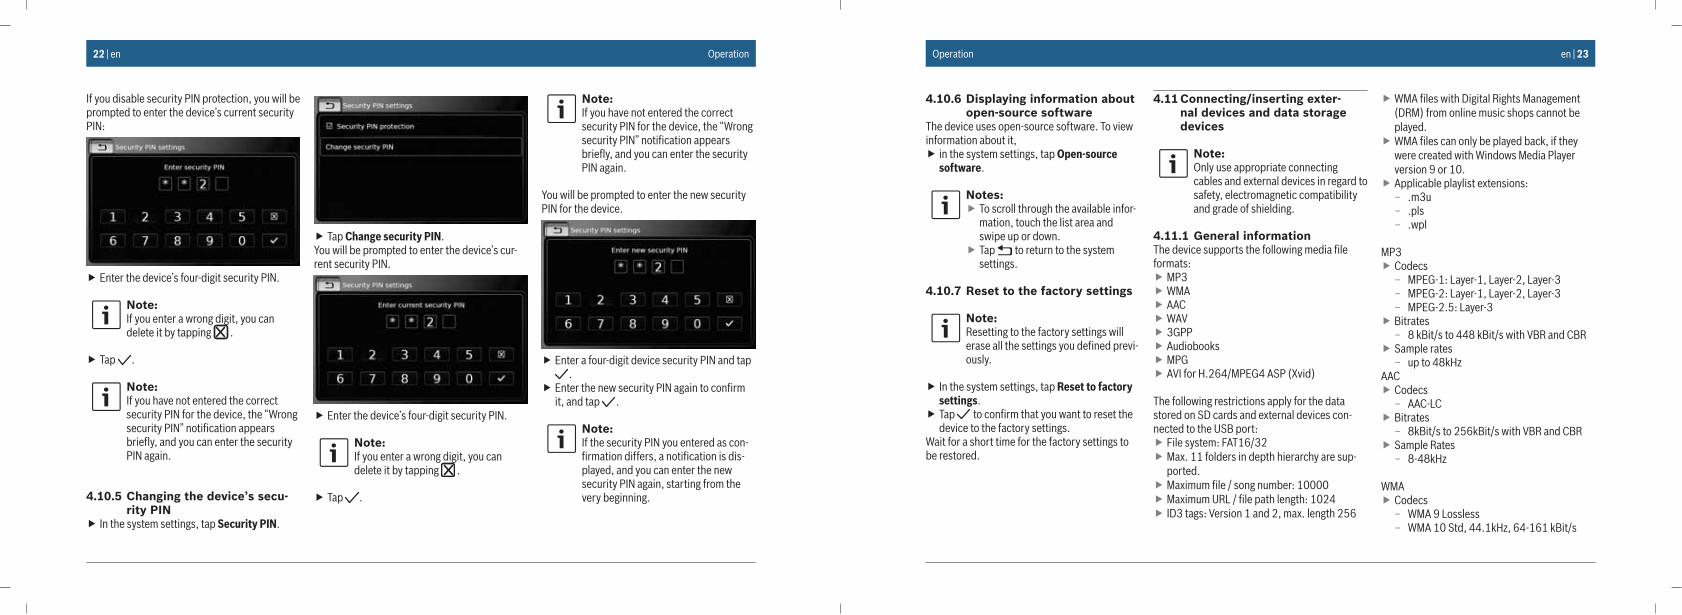
4.10.4 Security PIN protection – on/off
� In the system settings, tap Security PIN.
� Tap Security PIN protection.
Security PIN protection is enabled when the check mark is displayed in the checkbox.
If you enable security PIN protection, you will be prompted to enter a new security PIN for the device.
� Enter a four-digit device security PIN and tap .
� Enter the new security PIN again to confirm it, and tap .
Note:If the security PIN you entered as con-firmation differs, a notification is dis-played, and you can enter the new security PIN again, starting from the very beginning.
Operation
22 | en
If you disable security PIN protection, you will be prompted to enter the device’s current security PIN:
� Enter the device’s four-digit security PIN.
Note:If you enter a wrong digit, you can delete it by tapping .
� Tap .
Note:If you have not entered the correct security PIN for the device, the “Wrong security PIN” notification appears briefly, and you can enter the security PIN again.
4.10.5 Changing the device’s secu-rity PIN
� In the system settings, tap Security PIN.
� Tap Change security PIN.You will be prompted to enter the device’s cur-rent security PIN.
� Enter the device’s four-digit security PIN.
Note:If you enter a wrong digit, you can delete it by tapping .
� Tap .
Note:If you have not entered the correct security PIN for the device, the “Wrong security PIN” notification appears briefly, and you can enter the security PIN again.
You will be prompted to enter the new security PIN for the device.
� Enter a four-digit device security PIN and tap .
� Enter the new security PIN again to confirm it, and tap .
Note:If the security PIN you entered as con-firmation differs, a notification is dis-played, and you can enter the new security PIN again, starting from the very beginning.
Operation en | 23
4.10.6 Displaying information about open-source software
The device uses open-source software. To view information about it,
� in the system settings, tap Open-source software.
Notes: � To scroll through the available infor-mation, touch the list area and swipe up or down.
� Tap to return to the system settings.
4.10.7 Reset to the factory settings
Note:Resetting to the factory settings will erase all the settings you defined previ-ously.
� In the system settings, tap Reset to factory settings.
� Tap to confirm that you want to reset the device to the factory settings.
Wait for a short time for the factory settings to be restored.
4.11 Connecting/inserting exter-nal devices and data storage devices
Note:Only use appropriate connecting cables and external devices in regard to safety, electromagnetic compatibility and grade of shielding.
4.11.1 General informationThe device supports the following media file formats:
� MP3 � WMA � AAC � WAV � 3GPP � Audiobooks � MPG � AVI for H.264/MPEG4 ASP (Xvid)
The following restrictions apply for the data stored on SD cards and external devices con-nected to the USB port:
� File system: FAT16/32 � Max. 11 folders in depth hierarchy are sup-ported.
� Maximum file / song number: 10000 � Maximum URL / file path length: 1024 � ID3 tags: Version 1 and 2, max. length 256
� WMA files with Digital Rights Management (DRM) from online music shops cannot be played.
� WMA files can only be played back, if they were created with Windows Media Player version 9 or 10.
� Applicable playlist extensions: – .m3u – .pls – .wpl
MP3 � Codecs
– MPEG-1: Layer-1, Layer-2, Layer-3 – MPEG-2: Layer-1, Layer-2, Layer-3 – MPEG-2.5: Layer-3
� Bitrates – 8 kBit/s to 448 kBit/s with VBR and CBR
� Sample rates – up to 48kHz
AAC � Codecs
– AAC-LC � Bitrates
– 8kBit/s to 256kBit/s with VBR and CBR � Sample Rates
– 8-48kHz
WMA � Codecs
– WMA 9 Lossless – WMA 10 Std, 44.1kHz, 64-161 kBit/s
Operation
24 | en
– WMA 10 Pro, 48 - 192kBit/s
4.11.2 SD card
Inserting and removing an SD card
Important notes: � Never insert anything other than an SD card into the SD card slot. Doing so could damage the device.
� Never use excessive force when removing an SD card or else the card slot or the card itself may be damaged.
� When inserting an SD card into the device, make sure the card is aligned and positioned correctly (the correct side must be facing upwards, and you must insert the correct end of the card). If you use force to insert an incorrectly aligned and positioned SD card into the slot, you may damage the card and the slot.
� If the “No Card” notification appears in the display despite your having inserted an SD card into the SD card slot, this means that the device does not recognize the card for some reason. Try removing the card and inserting it again. Please bear in mind, however, that some SD cards
may not be compatible with this device.
� Ensure the label on the SD card is fully attached. Otherwise the SD card may become stuck in the slot or particles from the label may be left inside the device leading to the possible failure of SD-card function-ality.
� Do not use an SD card that has been cracked, deformed or repaired using adhesive tape. Use of a dam-aged SD card may damage the device.
Note:If your device is equipped with a navi-gation system:If you want to insert a media SD card, you may have to remove the SD card containing the navigation system’s map data first.As long as the SD card containing the navigation system’s map data is removed, you will not be able to use the navigation function.
To insert an SD card, � slide the SD card with its printed side facing upwards and its contacts pointing towards the device into the SD card slot 3.
A notification appears briefly in the display when the device detects the SD card.
To remove an SD card, � press the SD card gently with your fingertip into the SD card slot 3.
The SD card is released and ejected, and a corresponding notification appears briefly in the display.
� Pull the SD card out of the SD card slot 3.
Note:Remove the SD card as soon as it is ejected. If an ejected SD card remains in the card slot, it may lead to the touchscreen not functioning properly.
4.11.3 USB storage device/Apple
Note:Information about which Apple devices the device supports is available at www.suzuki-slda.com.
General information � The external devices connected to the USB port must comply with the USB Mass Storage Class specification (USB MSC).
� Devices connected via USB are supported according to USB specification V 2.0. Devices with USB specification 1.0 and 3.0 are compatible.
� Devices without FAT16 / FAT32 file system are not supported.
Operation en | 25
� Hard Disk Drives (HDD) are not generally supported.
� USB hubs are not supported.
Connecting and removing a USB storage device or Apple deviceTo connect a USB storage device or Apple device,
� connect it to the USB port.A notification appears briefly in the display when the device detects the USB storage device or Apple device.To remove a USB storage device or Apple device,
� pull it out of the USB port.An appropriate notification appears briefly in the display.
4.11.4 AUX audio source
Note:Only applicable if your vehicle is fitted with an AUX input.
Connecting an AUX source � Use a suitable cable to connect the AUX source to the AUX input.
Note:If you want to play a connected AUX source, you must first enable the AUX input (see below).
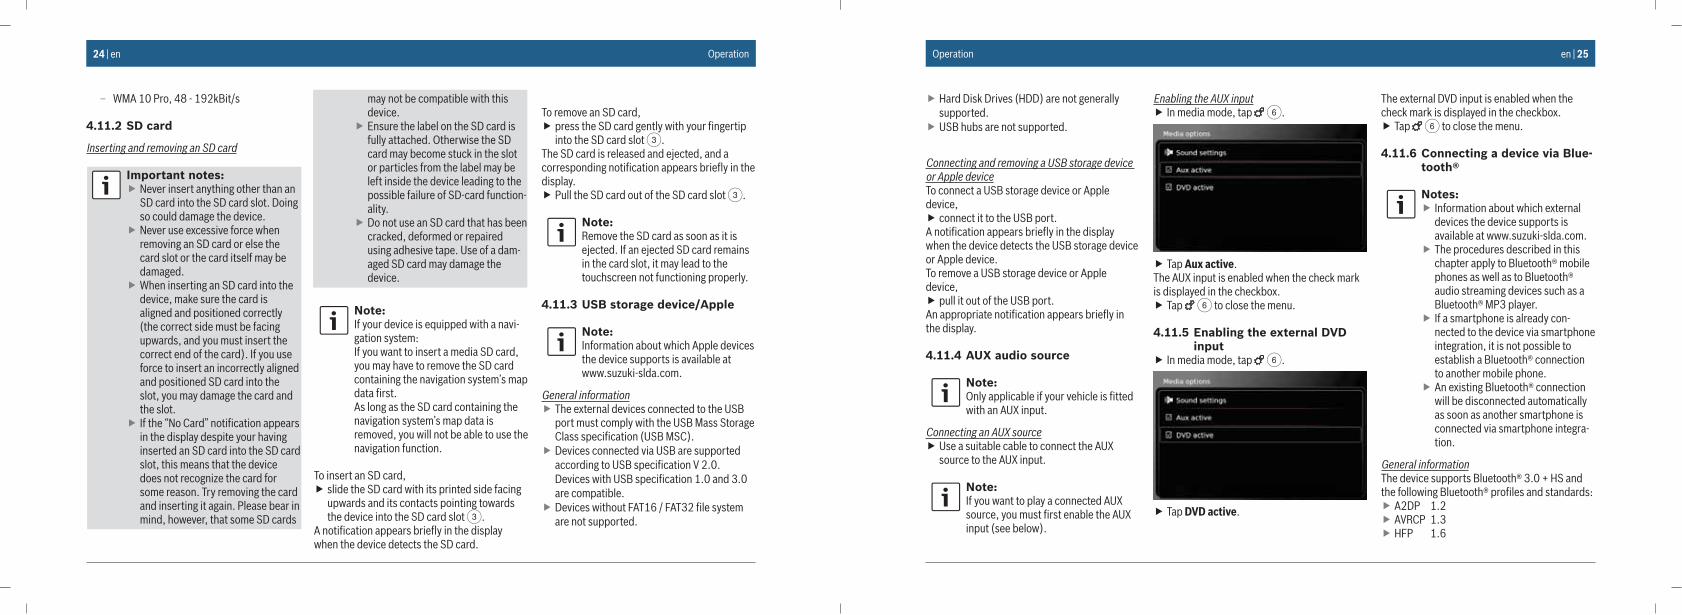
Enabling the AUX input � In media mode, tap 6.
� Tap Aux active.The AUX input is enabled when the check mark is displayed in the checkbox.
� Tap 6 to close the menu.
4.11.5 Enabling the external DVD input
� In media mode, tap 6.
� Tap DVD active.
The external DVD input is enabled when the check mark is displayed in the checkbox.
� Tap 6 to close the menu.
4.11.6 Connecting a device via Blue-tooth®
Notes: � Information about which external devices the device supports is available at www.suzuki-slda.com.
� The procedures described in this chapter apply to Bluetooth® mobile phones as well as to Bluetooth® audio streaming devices such as a Bluetooth® MP3 player.
� If a smartphone is already con-nected to the device via smartphone integration, it is not possible to establish a Bluetooth® connection to another mobile phone.
� An existing Bluetooth® connection will be disconnected automatically as soon as another smartphone is connected via smartphone integra-tion.
General informationThe device supports Bluetooth® 3.0 + HS and the following Bluetooth® profiles and standards:
� A2DP 1.2 � AVRCP 1.3 � HFP 1.6
Operation
26 | en
� MAP 1.0 � PBAP 1.1 � SPP 1.1 � Vcards 2.1, 3.0
Note:Please refer to www.suzuki-slda.com for details on which Bluetooth® devices are supported.
Opening the Select Bluetooth device menu � Tap the direct-select button in the Home menu.
or: � Tap the Call area in the Home menu. � Tap .
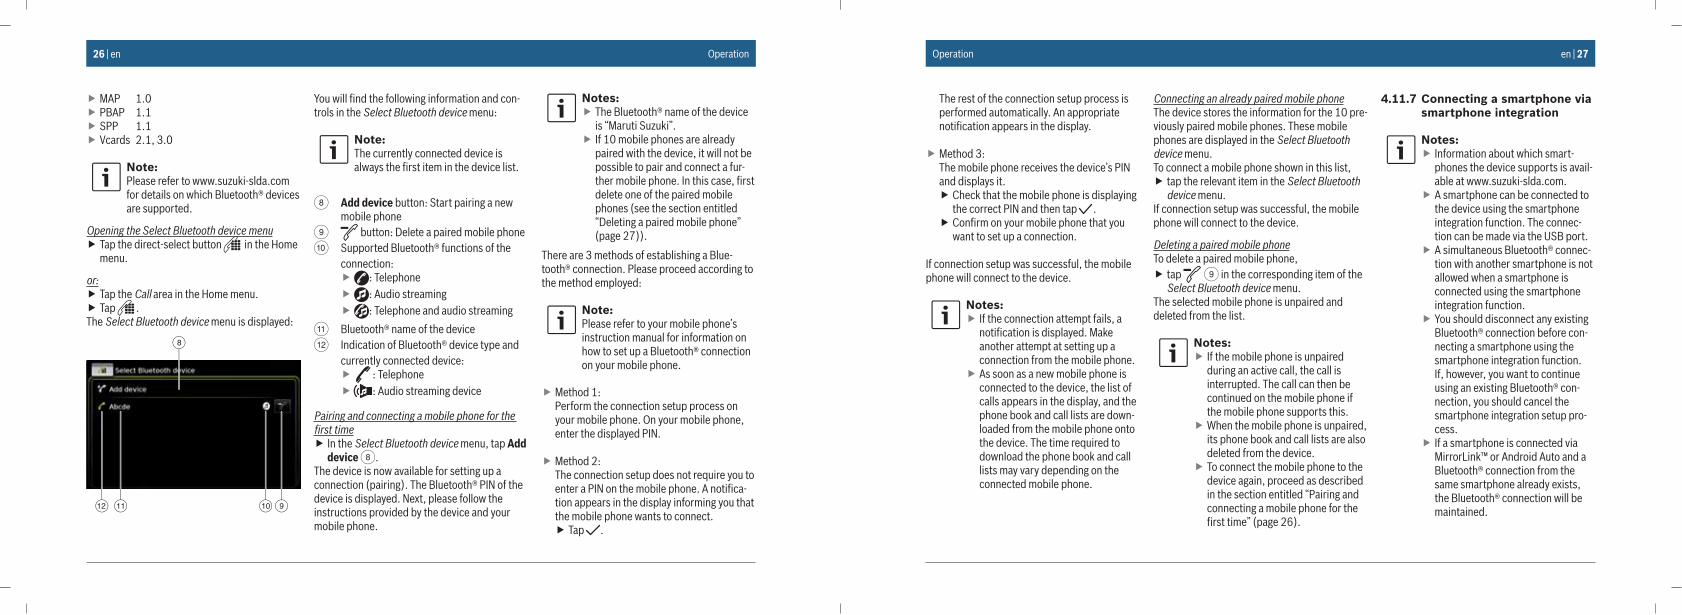
The Select Bluetooth device menu is displayed:
8
9101112
You will find the following information and con-trols in the Select Bluetooth device menu:
Note:The currently connected device is always the first item in the device list.
8 Add device button: Start pairing a new mobile phone
9 button: Delete a paired mobile phone: Supported Bluetooth® functions of the
connection: � : Telephone � : Audio streaming � : Telephone and audio streaming
; Bluetooth® name of the device< Indication of Bluetooth® device type and
currently connected device: � : Telephone � : Audio streaming device
Pairing and connecting a mobile phone for the first time
� In the Select Bluetooth device menu, tap Add device 8.
The device is now available for setting up a connection (pairing). The Bluetooth® PIN of the device is displayed. Next, please follow the instructions provided by the device and your mobile phone.
Notes: � The Bluetooth® name of the device is “Maruti Suzuki”.
� If 10 mobile phones are already paired with the device, it will not be possible to pair and connect a fur-ther mobile phone. In this case, first delete one of the paired mobile phones (see the section entitled “Deleting a paired mobile phone” (page 27)).
There are 3 methods of establishing a Blue-tooth® connection. Please proceed according to the method employed:
Note:Please refer to your mobile phone’s instruction manual for information on how to set up a Bluetooth® connection on your mobile phone.
� Method 1: Perform the connection setup process on your mobile phone. On your mobile phone, enter the displayed PIN.
� Method 2:The connection setup does not require you to enter a PIN on the mobile phone. A notifica-tion appears in the display informing you that the mobile phone wants to connect.
� Tap .
Operation en | 27
The rest of the connection setup process is performed automatically. An appropriate notification appears in the display.
� Method 3:The mobile phone receives the device’s PIN and displays it.
� Check that the mobile phone is displaying the correct PIN and then tap .
� Confirm on your mobile phone that you want to set up a connection.
If connection setup was successful, the mobile phone will connect to the device.
Notes: � If the connection attempt fails, a notification is displayed. Make another attempt at setting up a connection from the mobile phone.
� As soon as a new mobile phone is connected to the device, the list of calls appears in the display, and the phone book and call lists are down-loaded from the mobile phone onto the device. The time required to download the phone book and call lists may vary depending on the connected mobile phone.
Connecting an already paired mobile phoneThe device stores the information for the 10 pre-viously paired mobile phones. These mobile phones are displayed in the Select Bluetooth device menu.To connect a mobile phone shown in this list,
� tap the relevant item in the Select Bluetooth device menu.
If connection setup was successful, the mobile phone will connect to the device.
Deleting a paired mobile phoneTo delete a paired mobile phone,
� tap 9 in the corresponding item of the Select Bluetooth device menu.
The selected mobile phone is unpaired and deleted from the list.
Notes: � If the mobile phone is unpaired during an active call, the call is interrupted. The call can then be continued on the mobile phone if the mobile phone supports this.
� When the mobile phone is unpaired, its phone book and call lists are also deleted from the device.
� To connect the mobile phone to the device again, proceed as described in the section entitled “Pairing and connecting a mobile phone for the first time” (page 26).
4.11.7 Connecting a smartphone via smartphone integration
Notes: � Information about which smart-phones the device supports is avail-able at www.suzuki-slda.com.
� A smartphone can be connected to the device using the smartphone integration function. The connec-tion can be made via the USB port.
� A simultaneous Bluetooth® connec-tion with another smartphone is not allowed when a smartphone is connected using the smartphone integration function.
� You should disconnect any existing Bluetooth® connection before con-necting a smartphone using the smartphone integration function. If, however, you want to continue using an existing Bluetooth® con-nection, you should cancel the smartphone integration setup pro-cess.
� If a smartphone is connected via MirrorLink™ or Android Auto and a Bluetooth® connection from the same smartphone already exists, the Bluetooth® connection will be maintained.
Operation
28 | en
� Smartphones that are integrated via MirrorLink™ or Android Auto require a Bluetooth® connection in addition to smartphone integration via USB in order to provide full support for the telephone functions. Users can use the non-phone fea-tures of MirrorLink™ or Android Auto without a Bluetooth® connec-tion. If there is no Bluetooth® connection established before you integrate a MirrorLink™ or Android Auto smart-phone, you will have to establish the Bluetooth® connection manually (see the section entitled “Connect-ing a device via Bluetooth®” (page 25)).
� Smartphone integration via Apple CarPlay does not allow any parallel Bluetooth® connection. If an Apple CarPlay smartphone is already connected via Bluetooth®, this Bluetooth® connection will be canceled.
To connect a smartphone, � connect it to the USB port.
The smartphone is detected automatically and connected via smartphone integration.
To disconnect the smartphone from the device, � unplug the smartphone from the USB port.
An appropriate notification appears briefly in the display.
5 FM/AM radio mode
Notes: � AM reception: Generally, strong AM signals provide stable sound quality with low signal noise. At night, however, atmospheric conditions may sometimes lead to interference from other stations.
� FM reception: The FM waveband offers the highest sound quality; however, the signal may be suscep-tible to noise due to:
– The limited reach of some trans-mitters.
– Distortion caused by signals reflected off local buildings and other obstructions.
– “Shadow zones” wherein the signal reception is obstructed or restricted.
5.1 Listening to the radio � Tap the direct-select button in the Home menu.
Note:You will also find the button in the display of the currently playing media.
� Tap the Radio tab, if necessary.
Operation | FM/AM radio mode en | 29
� Tap the memory bank of the desired wave-band.
The tuner display for the selected memory bank is displayed and you can hear the radio broad-cast.
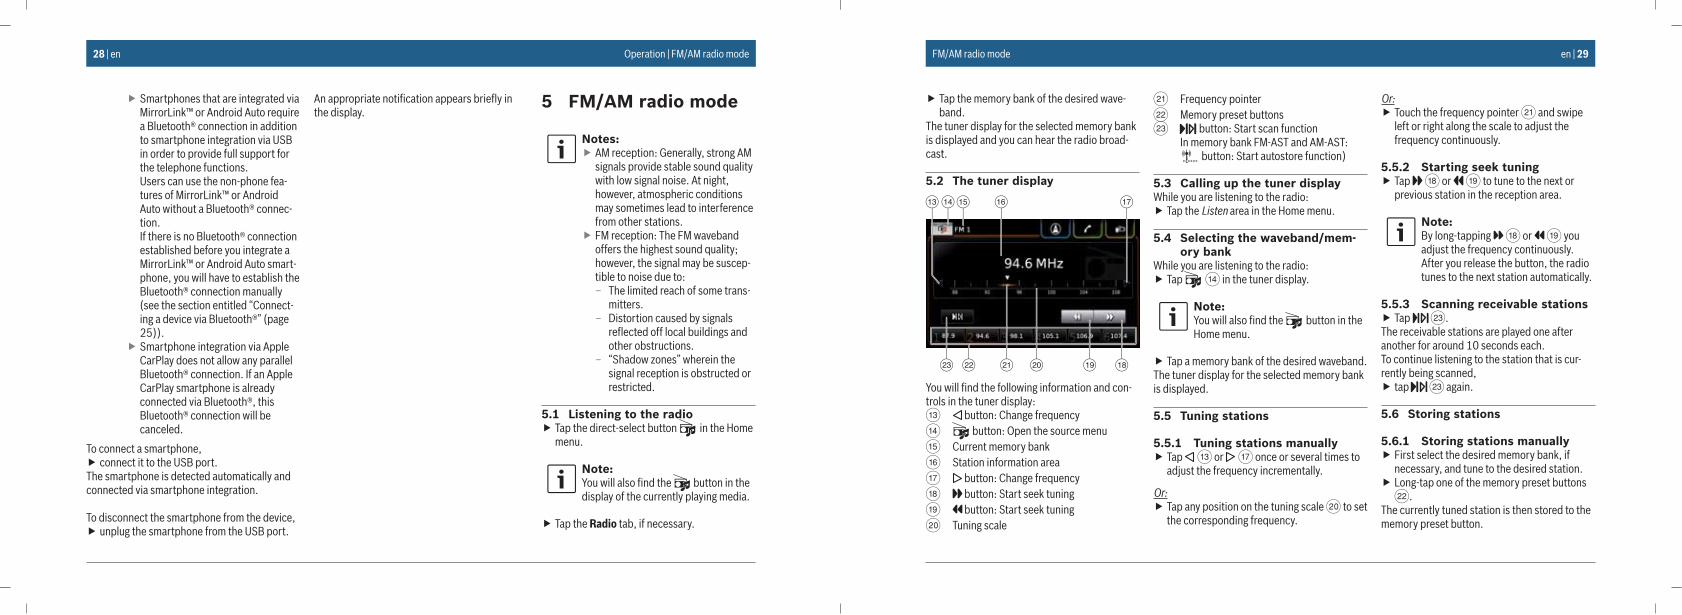
5.2 The tuner display
15 161413 17
23 22 19 182021
You will find the following information and con-trols in the tuner display:= button: Change frequency> button: Open the source menu? Current memory bank@ Station information areaA button: Change frequencyB button: Start seek tuningC button: Start seek tuningD Tuning scale
E Frequency pointerF Memory preset buttonsG button: Start scan function
In memory bank FM-AST and AM-AST: button: Start autostore function)
5.3 Calling up the tuner displayWhile you are listening to the radio:
� Tap the Listen area in the Home menu.
5.4 Selecting the waveband/mem-ory bank
While you are listening to the radio: � Tap > in the tuner display.
Note:You will also find the button in the Home menu.
� Tap a memory bank of the desired waveband.The tuner display for the selected memory bank is displayed.
5.5 Tuning stations
5.5.1 Tuning stations manually � Tap = or A once or several times to adjust the frequency incrementally.
Or: � Tap any position on the tuning scale D to set the corresponding frequency.
Or: � Touch the frequency pointer E and swipe left or right along the scale to adjust the frequency continuously.
5.5.2 Starting seek tuning � Tap B or C to tune to the next or previous station in the reception area.
Note:By long-tapping B or C you adjust the frequency continuously. After you release the button, the radio tunes to the next station automatically.
5.5.3 Scanning receivable stations � Tap G.
The receivable stations are played one after another for around 10 seconds each.To continue listening to the station that is cur-rently being scanned,
� tap G again.
5.6 Storing stations
5.6.1 Storing stations manually � First select the desired memory bank, if necessary, and tune to the desired station.
� Long-tap one of the memory preset buttons F.
The currently tuned station is then stored to the memory preset button.
FM/AM radio mode
30 | en
5.6.2 Storing stations automatically � Select the autostore memory bank FM-AST or AM-AST.
� Tap G.The six stations offering the strongest reception in the current waveband are stored automati-cally. The stations are sorted according to their reception strength; the station with the strong-est reception is stored on memory preset 1.Afterwards, the station stored on memory pre-set 1 will be played.
5.7 Listening to a stored station � First select the desired memory bank, if necessary.
� Short-tap one of the memory preset buttons F.
The stored station is played.
6 DRM radio mode
Note:This function is only available if the device supports DRM reception.
6.1 Listening to DRM � Tap the direct-select button in the Home menu.
Note:You will also find the button in the display of the currently playing media.
� Tap the Radio tab, if necessary. � Tap a DRM memory bank.
The DRM display for the selected memory bank is displayed and you hear the DRM broadcast.
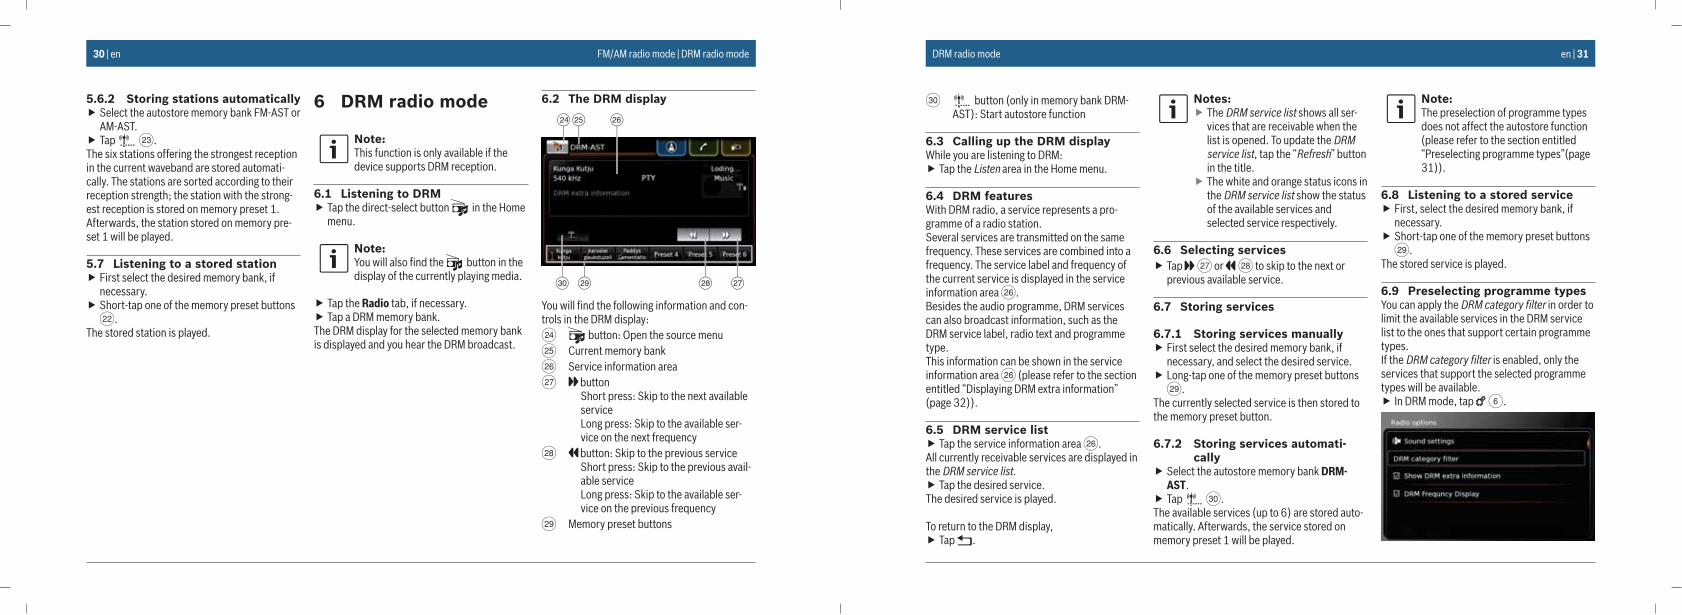
6.2 The DRM display
25 2624
30 29 28 27
You will find the following information and con-trols in the DRM display:H button: Open the source menuI Current memory bankJ Service information areaK button
Short press: Skip to the next available serviceLong press: Skip to the available ser-vice on the next frequency
L button: Skip to the previous serviceShort press: Skip to the previous avail-able serviceLong press: Skip to the available ser-vice on the previous frequency
M Memory preset buttons
FM/AM radio mode | DRM radio mode en | 31
N button (only in memory bank DRM-AST): Start autostore function
6.3 Calling up the DRM displayWhile you are listening to DRM:
� Tap the Listen area in the Home menu.
6.4 DRM featuresWith DRM radio, a service represents a pro-gramme of a radio station.Several services are transmitted on the same frequency. These services are combined into a frequency. The service label and frequency of the current service is displayed in the service information area J.Besides the audio programme, DRM services can also broadcast information, such as the DRM service label, radio text and programme type.This information can be shown in the service information area J (please refer to the section entitled “Displaying DRM extra information” (page 32)).
6.5 DRM service list � Tap the service information area J.
All currently receivable services are displayed in the DRM service list.
� Tap the desired service.The desired service is played.
To return to the DRM display, � Tap .
Notes: � The DRM service list shows all ser-vices that are receivable when the list is opened. To update the DRM service list, tap the “Refresh” button in the title.
� The white and orange status icons in the DRM service list show the status of the available services and selected service respectively.
6.6 Selecting services � Tap K or L to skip to the next or previous available service.
6.7 Storing services
6.7.1 Storing services manually � First select the desired memory bank, if necessary, and select the desired service.
� Long-tap one of the memory preset buttons M.
The currently selected service is then stored to the memory preset button.
6.7.2 Storing services automati-cally
� Select the autostore memory bank DRM-AST.
� Tap N.The available services (up to 6) are stored auto-matically. Afterwards, the service stored on memory preset 1 will be played.
Note:The preselection of programme types does not affect the autostore function (please refer to the section entitled “Preselecting programme types”(page 31)).
6.8 Listening to a stored service � First, select the desired memory bank, if necessary.
� Short-tap one of the memory preset buttons M.
The stored service is played.
6.9 Preselecting programme typesYou can apply the DRM category filter in order to limit the available services in the DRM service list to the ones that support certain programme types.If the DRM category filter is enabled, only the services that support the selected programme types will be available.
� In DRM mode, tap 6.
DRM radio mode
32 | en
� Tap DRM category filter.The available programme types are displayed.
To select programme types, � Tap the desired programme type.
A programme type is selected when the check mark is displayed in the checkbox.
To enable or disable the DRM PTY filter, � tap Enable DRM category filter.
The DRM category filter is enabled when thecheck mark is displayed in the checkbox.
� Tap 6 to close the options display.
Notes: � If the DRM category filter is enabled, the PTY symbol is displayed in the DRM display.
� A service that is selected via the DRM category filter remains selected even if the DRM PTY filter is later disabled.
6.10 Displaying DRM extra informa-tion
You can preset whether DRM extra information is shown or hidden on the DRM display screen.
� In DRM mode, tap 6.
� Tap Show DRM extra information.Displaying of DRM extra information is enabled when the check mark is displayed in the check-box.
� Tap 6 to close the options display.
6.11 DRM frequency displayIf you enable the DRM frequency display setting in the Radio options, the frequency of the par-ticular service will be displayed on the DRM display screen.
Note:When there is no reception, the fre-quency will not be displayed even if the
DRM frequency display setting in the Radio options is enabled.
� In DRM mode, tap 6.
� Tap DRM frequency display.Displaying of the DRM frequency information is enabled when the check mark is displayed in the checkbox.
� Tap 6 to close the options display.
DRM radio mode en | 33
7 Playing media
Note:To connect or insert an external device, please refer to the section entitled “Connecting/inserting external devices and data storage devices” (page 23).
7.1 Selecting a media source � Tap the direct-select button in the Home menu.
Note:You will also find the button in the display of the currently playing media.
� Tap the Media tab, if necessary. � Tap the desired media source.
The audio or video display for the selected media source is displayed and playback begins.
Note:A notification appears briefly in the display
� if the selected audio source is not connected or inserted.
� if it is not possible to play all the tracks on the selected audio source due to the maximum number of manageable tracks being exceeded.
7.2 Calling up the audio/video dis-play
While you are playing media: � Tap the Listen area in the Home menu.
7.3 Audio playback
Note:The control options that are available depend on the current audio source:
� Bluetooth® devices may employ communication protocols that do not support all control options.
� No control options are available for AUX playback.
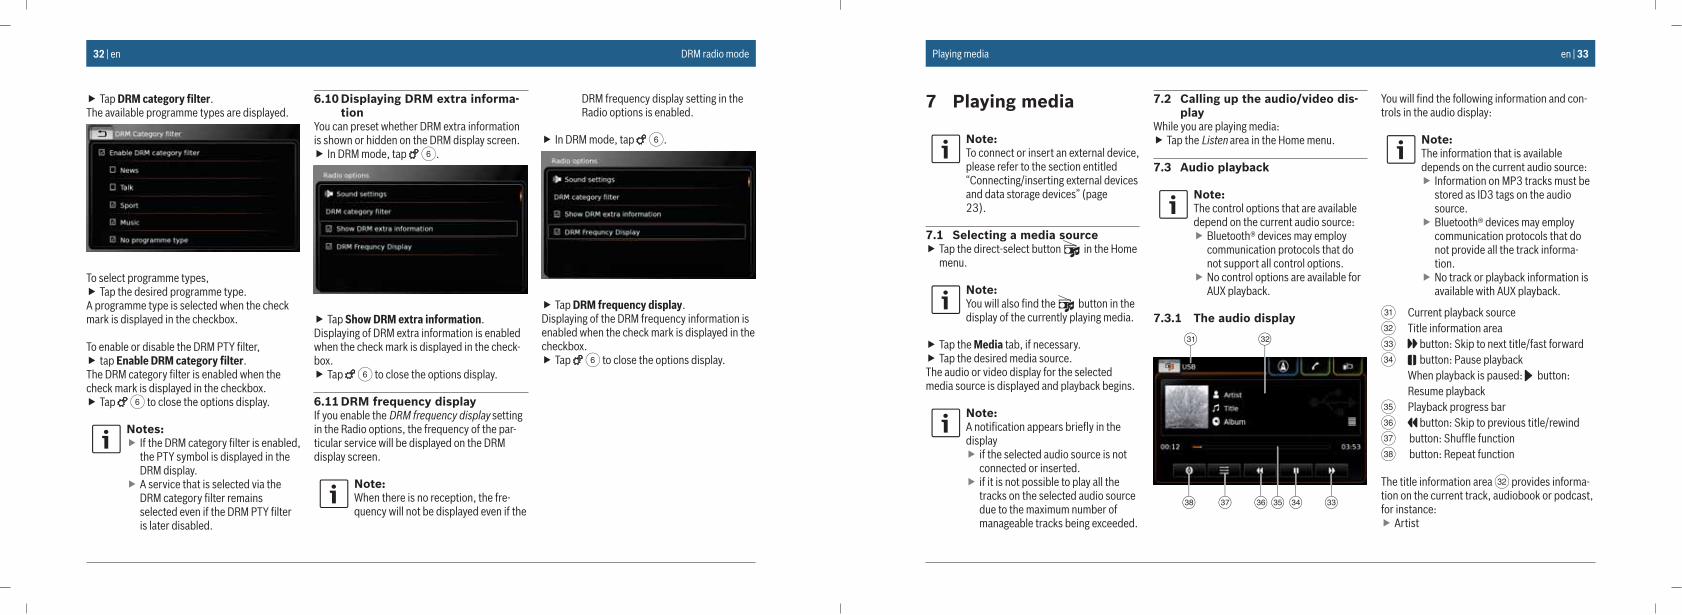
7.3.1 The audio display
31 32
333435363738
You will find the following information and con-trols in the audio display:
Note:The information that is available depends on the current audio source:
� Information on MP3 tracks must be stored as ID3 tags on the audio source.
� Bluetooth® devices may employ communication protocols that do not provide all the track informa-tion.
� No track or playback information is available with AUX playback.
O Current playback sourceP Title information areaQ button: Skip to next title/fast forwardR button: Pause playback
When playback is paused: button: Resume playback
S Playback progress barT button: Skip to previous title/rewindU button: Shuffle functionV button: Repeat function
The title information area P provides informa-tion on the current track, audiobook or podcast, for instance:
� Artist
Playing media
34 | en
� Title � Album
The playback progress bar S displays the playback position in the current title and the elapsed and total playing time of the title.
7.3.2 Pausing playback � Tap R.
Playback is paused. � Tap R.
Playback resumes.
7.3.3 Skipping to the next/previous title
� Tap Q or Q.The next or previous title is played.
7.3.4 Selecting titles in the media browser
� Tap the title information area P.The media browser opens. For further details on this, please read the section entitled “Media browser” (page 35).
7.3.5 Fast forward/rewind � Touch and hold Q or Q until you reach the desired position.
Or: � Touch the playback progress bar S and swipe left or right along the bar to alter the position in the title continuously.
7.3.6 Skipping forwards/back-wards in the current title
� Tap the desired position in the playback progress bar S.
7.3.7 Repeat function � Tap the toggle button V to switch between Repeat off, Repeat track and Repeat selec-tion.
– Repeat track : Repeat the current title – Repeat selection : Repeat the current
playback category (e.g. album, artist, folder)
– Repeat off : Deactivate the repeat function
7.3.8 Shuffle function � Tap the toggle button U to switch between Shuffle off and Shuffle selection.
– Shuffle selection : Shuffle the tracks in the current playback category (e.g. album, artist, folder)
– Shuffle off : Deactivate the shuffle function
7.4 Video playback
Safety noticeThe displaying of video images is only possible while the vehicle’s parking brake is applied. As soon as the park-ing brake is released, the video image of a running video file or external DVD is hidden and the following notification appears in the display: “For your safety, the video is off while the vehicle is in motion.” Playback of the video file or external DVD (if connected with com-patible device) continues, and the audio output can still be heard.
Note:No control options are available when playing an external DVD.
Playing media en | 35
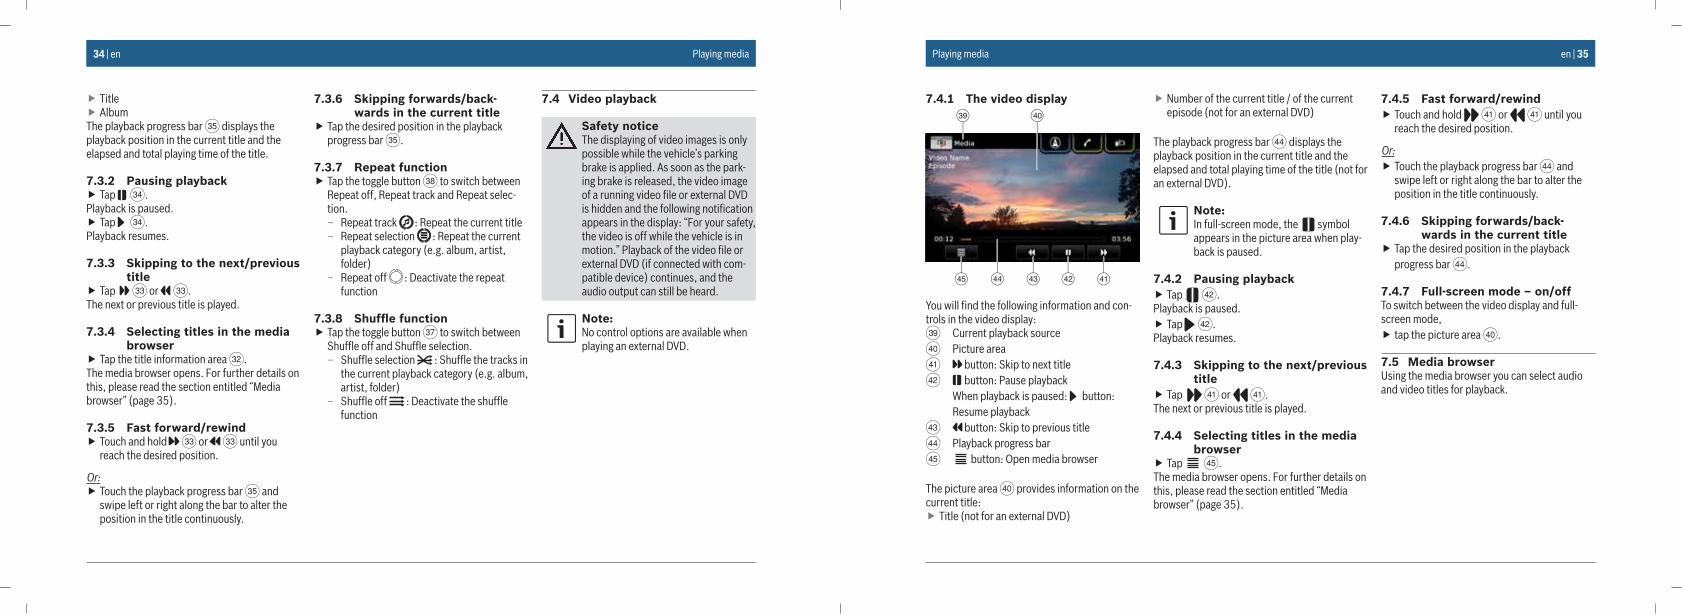
7.4.1 The video display39 40
4142434445
You will find the following information and con-trols in the video display:W Current playback sourceX Picture areaY button: Skip to next titleZ button: Pause playback
When playback is paused: button: Resume playback
[ button: Skip to previous title\ Playback progress bar] button: Open media browser
The picture area X provides information on the current title:
� Title (not for an external DVD)
� Number of the current title / of the current episode (not for an external DVD)
The playback progress bar \ displays the playback position in the current title and the elapsed and total playing time of the title (not for an external DVD).
Note:In full-screen mode, the symbol appears in the picture area when play-back is paused.
7.4.2 Pausing playback � Tap Z.
Playback is paused. � Tap Z.
Playback resumes.
7.4.3 Skipping to the next/previous title
� Tap Y or Y.The next or previous title is played.
7.4.4 Selecting titles in the media browser
� Tap ].The media browser opens. For further details on this, please read the section entitled “Media browser” (page 35).
7.4.5 Fast forward/rewind � Touch and hold Y or Y until you reach the desired position.
Or: � Touch the playback progress bar \ and swipe left or right along the bar to alter the position in the title continuously.
7.4.6 Skipping forwards/back-wards in the current title
� Tap the desired position in the playback progress bar \.
7.4.7 Full-screen mode – on/offTo switch between the video display and full-screen mode,
� tap the picture area X.
7.5 Media browserUsing the media browser you can select audio and video titles for playback.
Playing media
36 | en
7.5.1 The browser display
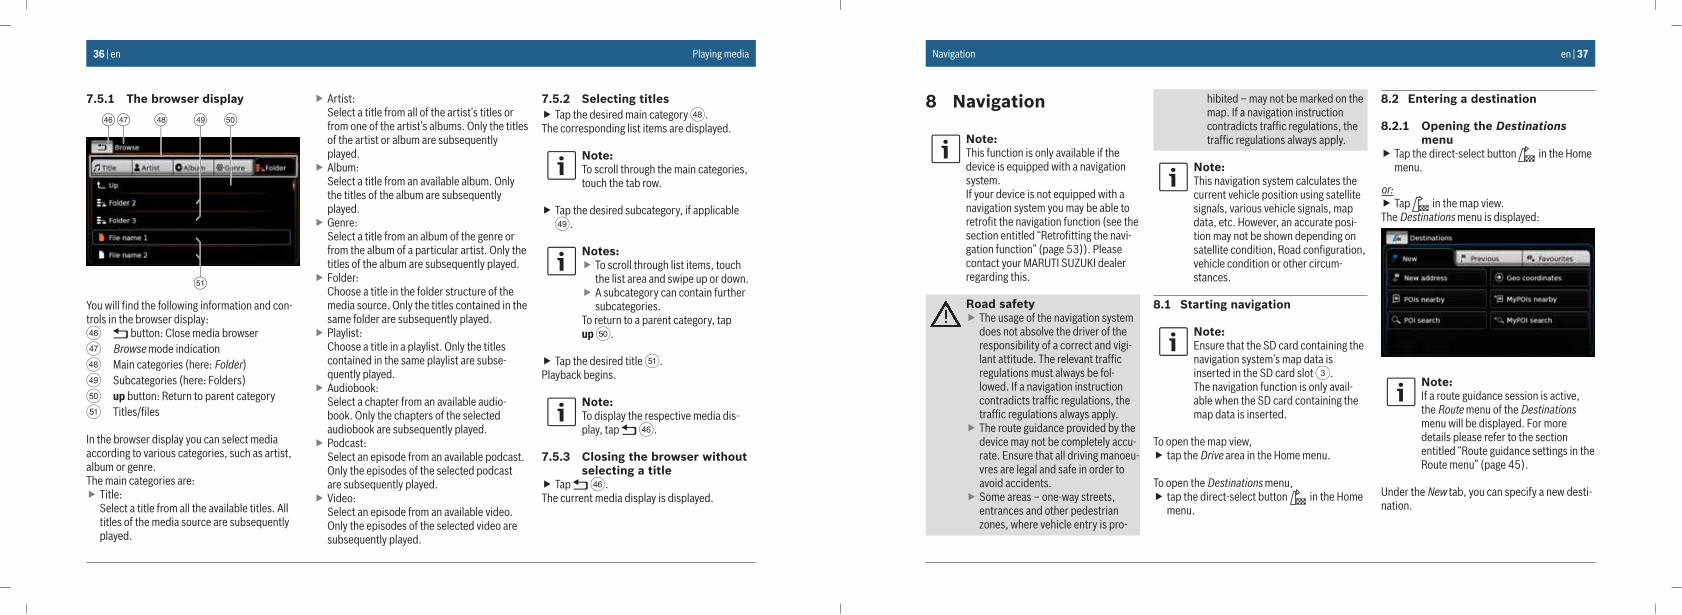
47 4846
51
5049
You will find the following information and con-trols in the browser display:a button: Close media browserb Browse mode indicationc Main categories (here: Folder)d Subcategories (here: Folders)e up button: Return to parent categoryf Titles/files
In the browser display you can select media according to various categories, such as artist, album or genre. The main categories are:
� Title: Select a title from all the available titles. All titles of the media source are subsequently played.
� Artist: Select a title from all of the artist’s titles or from one of the artist’s albums. Only the titles of the artist or album are subsequently played.
� Album: Select a title from an available album. Only the titles of the album are subsequently played.
� Genre: Select a title from an album of the genre or from the album of a particular artist. Only the titles of the album are subsequently played.
� Folder: Choose a title in the folder structure of the media source. Only the titles contained in the same folder are subsequently played.
� Playlist: Choose a title in a playlist. Only the titles contained in the same playlist are subse-quently played.
� Audiobook: Select a chapter from an available audio-book. Only the chapters of the selected audiobook are subsequently played.
� Podcast: Select an episode from an available podcast. Only the episodes of the selected podcast are subsequently played.
� Video: Select an episode from an available video. Only the episodes of the selected video are subsequently played.
7.5.2 Selecting titles � Tap the desired main category c.
The corresponding list items are displayed.
Note:To scroll through the main categories, touch the tab row.
� Tap the desired subcategory, if applicable d.
Notes: � To scroll through list items, touch the list area and swipe up or down.
� A subcategory can contain further subcategories.
To return to a parent category, tap up e.
� Tap the desired title f.Playback begins.
Note:To display the respective media dis-play, tap a.
7.5.3 Closing the browser without selecting a title
� Tap a.The current media display is displayed.
Playing media en | 37
8 Navigation
Note:This function is only available if the device is equipped with a navigation system.If your device is not equipped with a navigation system you may be able to retrofit the navigation function (see the section entitled “Retrofitting the navi-gation function” (page 53)). Please contact your MARUTI SUZUKI dealer regarding this.
Road safety � The usage of the navigation system does not absolve the driver of the responsibility of a correct and vigi-lant attitude. The relevant traffic regulations must always be fol-lowed. If a navigation instruction contradicts traffic regulations, the traffic regulations always apply.
� The route guidance provided by the device may not be completely accu-rate. Ensure that all driving manoeu-vres are legal and safe in order to avoid accidents.
� Some areas – one-way streets, entrances and other pedestrian zones, where vehicle entry is pro-
hibited – may not be marked on the map. If a navigation instruction contradicts traffic regulations, the traffic regulations always apply.
Note:This navigation system calculates the current vehicle position using satellite signals, various vehicle signals, map data, etc. However, an accurate posi-tion may not be shown depending on satellite condition, Road configuration, vehicle condition or other circum-stances.
8.1 Starting navigation
Note:Ensure that the SD card containing the navigation system’s map data is inserted in the SD card slot 3.The navigation function is only avail-able when the SD card containing the map data is inserted.
To open the map view, � tap the Drive area in the Home menu.
To open the Destinations menu, � tap the direct-select button in the Home menu.
8.2 Entering a destination
8.2.1 Opening the Destinations menu
� Tap the direct-select button in the Home menu.
or: � Tap in the map view.
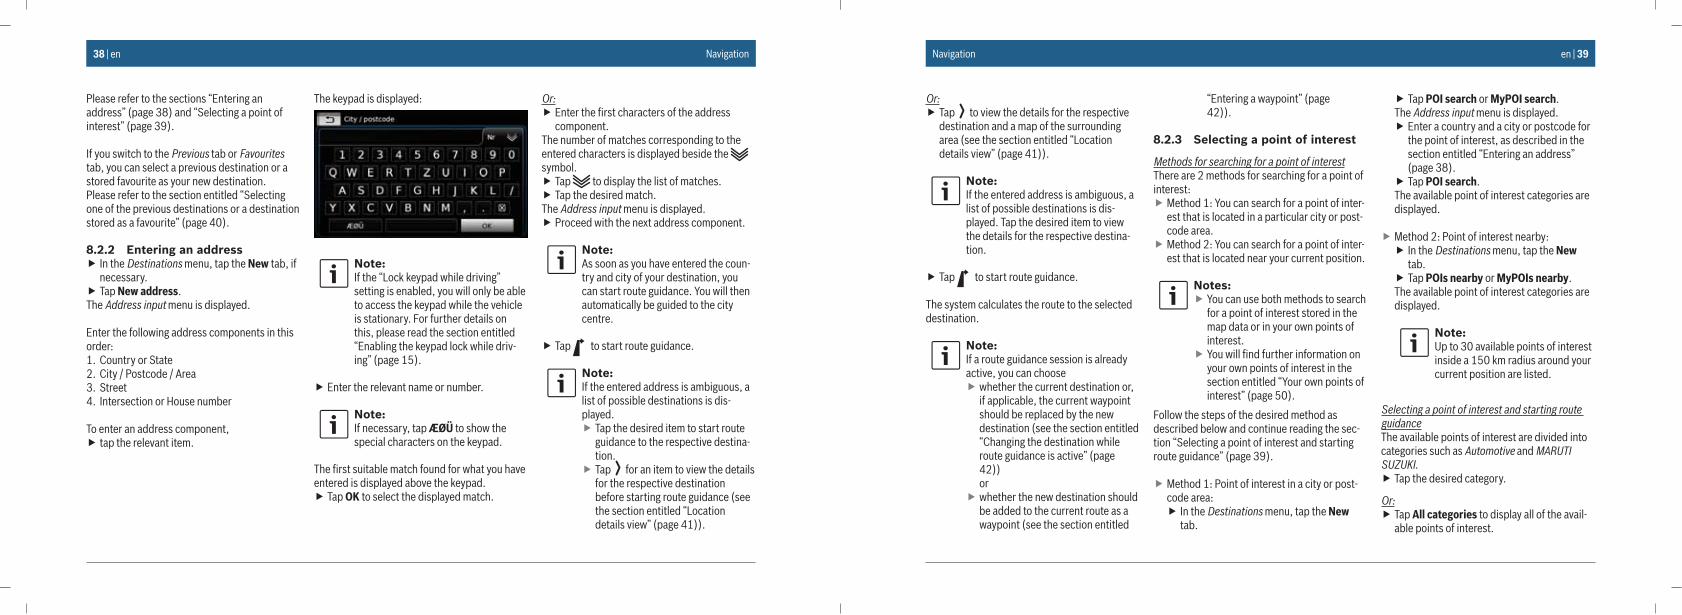
The Destinations menu is displayed:
Note:If a route guidance session is active, the Route menu of the Destinations menu will be displayed. For more details please refer to the section entitled “Route guidance settings in the Route menu” (page 45).
Under the New tab, you can specify a new desti-nation.
Navigation
38 | en
Please refer to the sections “Entering an address” (page 38) and “Selecting a point of interest” (page 39).
If you switch to the Previous tab or Favourites tab, you can select a previous destination or a stored favourite as your new destination. Please refer to the section entitled “Selecting one of the previous destinations or a destination stored as a favourite” (page 40).
8.2.2 Entering an address � In the Destinations menu, tap the New tab, if necessary.
� Tap New address.The Address input menu is displayed.
Enter the following address components in this order:1. Country or State2. City / Postcode / Area3. Street4. Intersection or House number
To enter an address component, � tap the relevant item.
The keypad is displayed:
Note:If the “Lock keypad while driving” setting is enabled, you will only be able to access the keypad while the vehicle is stationary. For further details on this, please read the section entitled “Enabling the keypad lock while driv-ing” (page 15).
� Enter the relevant name or number.
Note:If necessary, tap ÆØÜ to show the special characters on the keypad.
The first suitable match found for what you have entered is displayed above the keypad.
� Tap OK to select the displayed match.
Or: � Enter the first characters of the address component.
The number of matches corresponding to the entered characters is displayed beside the symbol.
� Tap to display the list of matches. � Tap the desired match.
The Address input menu is displayed. � Proceed with the next address component.
Note:As soon as you have entered the coun-try and city of your destination, you can start route guidance. You will then automatically be guided to the city centre.
� Tap to start route guidance.
Note:If the entered address is ambiguous, a list of possible destinations is dis-played.
� Tap the desired item to start route guidance to the respective destina-tion.
� Tap for an item to view the details for the respective destination before starting route guidance (see the section entitled “Location details view” (page 41)).
Navigation en | 39
Or: � Tap to view the details for the respective destination and a map of the surrounding area (see the section entitled “Location details view” (page 41)).
Note:If the entered address is ambiguous, a list of possible destinations is dis-played. Tap the desired item to view the details for the respective destina-tion.
� Tap to start route guidance.
The system calculates the route to the selected destination.
Note:If a route guidance session is already active, you can choose
� whether the current destination or, if applicable, the current waypoint should be replaced by the new destination (see the section entitled “Changing the destination while route guidance is active” (page 42)) or
� whether the new destination should be added to the current route as a waypoint (see the section entitled
“Entering a waypoint” (page 42)).
8.2.3 Selecting a point of interest
Methods for searching for a point of interestThere are 2 methods for searching for a point of interest:
� Method 1: You can search for a point of inter-est that is located in a particular city or post-code area.
� Method 2: You can search for a point of inter-est that is located near your current position.
Notes: � You can use both methods to search for a point of interest stored in the map data or in your own points of interest.
� You will find further information on your own points of interest in the section entitled “Your own points of interest” (page 50).
Follow the steps of the desired method as described below and continue reading the sec-tion “Selecting a point of interest and starting route guidance” (page 39).
� Method 1: Point of interest in a city or post-code area:
� In the Destinations menu, tap the New tab.
� Tap POI search or MyPOI search.The Address input menu is displayed.
� Enter a country and a city or postcode for the point of interest, as described in the section entitled “Entering an address” (page 38).
� Tap POI search.The available point of interest categories are displayed.
� Method 2: Point of interest nearby: � In the Destinations menu, tap the New tab.
� Tap POIs nearby or MyPOIs nearby.The available point of interest categories are displayed.
Note:Up to 30 available points of interest inside a 150 km radius around your current position are listed.
Selecting a point of interest and starting route guidanceThe available points of interest are divided into categories such as Automotive and MARUTI SUZUKI.
� Tap the desired category.
Or: � Tap All categories to display all of the avail-able points of interest.
Navigation
40 | en
Notes: � A category may contain further subcategories. For example, the MARUTI SUZUKI category is divided into subcategories such as Dealer-ships, Service Centre and Plants and Offices. Keep selecting the desired subcategories until the points of interest are displayed.
� You can also use a search term to find one or more particular points of interest. To do so, tap Search, enter the desired search term and confirm by tapping OK.
� Tap the desired point of interest.Details about the point of interest and a map of the surrounding area are displayed (see the section entitled “Location details view” (page 41)).
� Tap to start route guidance.
The system calculates the route to the selected destination.
Note:If a route guidance session is already active, you can choose
� whether the current destination or, if applicable, the current waypoint should be replaced by the new destination (see the section entitled “Changing the destination while
route guidance is active” (page 42)) or
� whether the new destination should be added to the current route as a waypoint (see the section entitled “Entering a waypoint” (page 42)).
8.2.4 Entering coordinates � In the Destinations menu, tap the New tab, if necessary.
� Tap Geo coordinates.The Enter Geo coordinates menu is displayed.
� Enter the coordinates.
Notes: � You can select in which format coordinates are specified (see the section entitled “Selecting the geo coordinate format” (page 52)).
� In order to enter the values of a cordinate, first tap the respective input field. Then enter the value by tapping the respective digit on the numeric keypad.
� If you want to enter coordinates for the southern or eastern hemi-sphere, tap N or W.
� If you enter a wrong digit, you can delete it by tapping .
� Tap .
Details about the location and a map of the surrounding area are displayed (see the section entitled “Location details view” (page 41)).
� Tap to start route guidance.
8.2.5 Selecting one of the previous destinations or a destination stored as a favourite
� In the Destinations menu, tap the Previous tab or Favourites tab.
The available destinations are displayed.
Note:Under the Favourites tab, you will find your Home address at the top of the list. To specify and store the home address, please read the section enti-tled “Storing the home address” (page 42).
� Tap the desired destination to start route guidance.
Note:Tap for an item to view the details for the respective destination before starting route guidance (see the sec-tion entitled “Location details view” (page 41)).
The system calculates the route to the selected destination.
Navigation en | 41
Note:If a route guidance session is already active, you can choose
� whether the current destination or, if applicable, the current waypoint should be replaced by the new destination (see the section entitled “Changing the destination while route guidance is active” (page 42)) or
� whether the new destination should be added to the current route as a waypoint (see the section entitled “Entering a waypoint” (page 42)).
8.3 Location details viewFor the following locations or destinations you can display a details view:
� Points of interest � Previous destinations � Favourites � New destinations
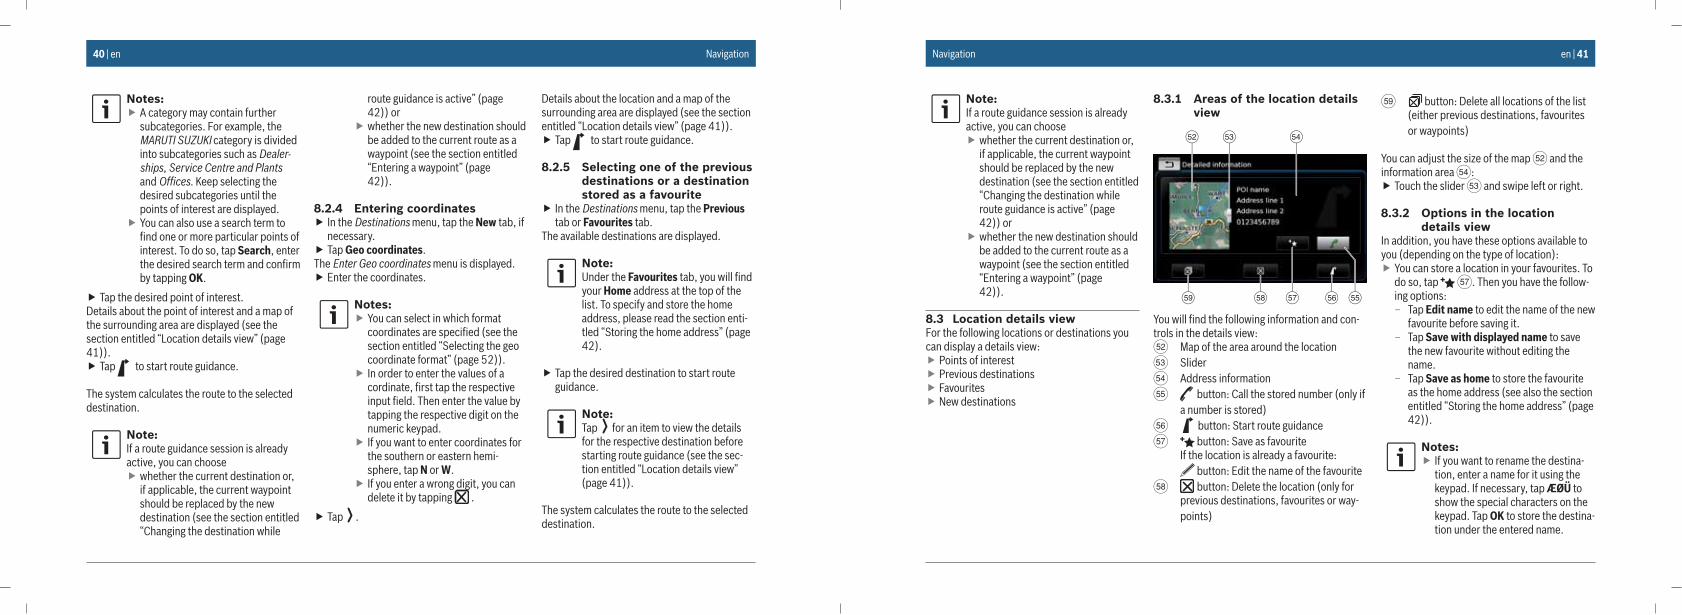
8.3.1 Areas of the location details view
53 5452
59 58 5657 55
You will find the following information and con-trols in the details view:g Map of the area around the locationh Slideri Address informationj button: Call the stored number (only if
a number is stored)k button: Start route guidancel button: Save as favourite
If the location is already a favourite: button: Edit the name of the favourite
m button: Delete the location (only for previous destinations, favourites or way-points)
n button: Delete all locations of the list (either previous destinations, favourites or waypoints)
You can adjust the size of the map g and the information area i:
� Touch the slider h and swipe left or right.
8.3.2 Options in the location details view
In addition, you have these options available to you (depending on the type of location):
� You can store a location in your favourites. To do so, tap l. Then you have the follow-ing options:
– Tap Edit name to edit the name of the new favourite before saving it.
– Tap Save with displayed name to save the new favourite without editing the name.
– Tap Save as home to store the favourite as the home address (see also the section entitled “Storing the home address” (page 42)).
Notes: � If you want to rename the destina-tion, enter a name for it using the keypad. If necessary, tap ÆØÜ to show the special characters on the keypad. Tap OK to store the destina-tion under the entered name.
Navigation
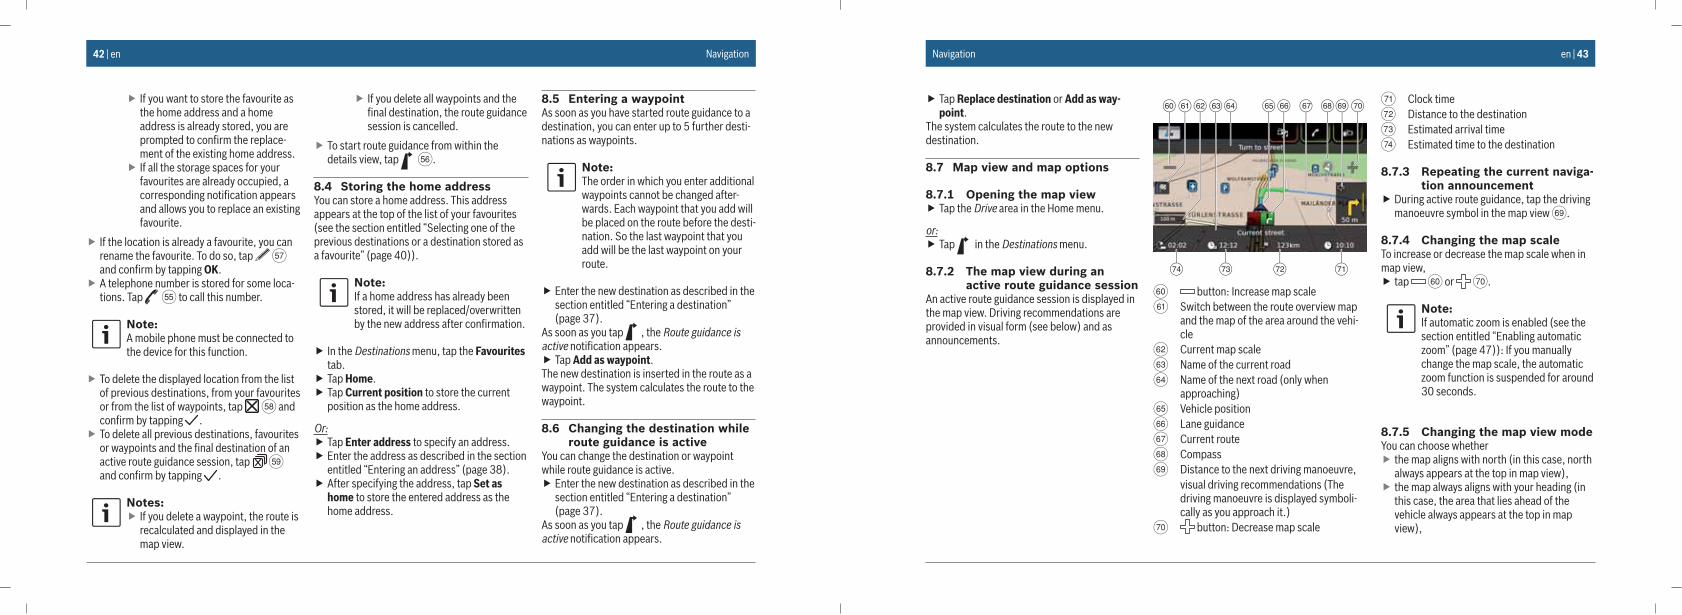
42 | en
� If you want to store the favourite as the home address and a home address is already stored, you are prompted to confirm the replace-ment of the existing home address.
� If all the storage spaces for your favourites are already occupied, a corresponding notification appears and allows you to replace an existing favourite.
� If the location is already a favourite, you can rename the favourite. To do so, tap l and confirm by tapping OK.
� A telephone number is stored for some loca-tions. Tap j to call this number.
Note:A mobile phone must be connected to the device for this function.
� To delete the displayed location from the list of previous destinations, from your favourites or from the list of waypoints, tap m and confirm by tapping .
� To delete all previous destinations, favourites or waypoints and the final destination of an active route guidance session, tap n and confirm by tapping .
Notes: � If you delete a waypoint, the route is recalculated and displayed in the map view.
� If you delete all waypoints and the final destination, the route guidance session is cancelled.
� To start route guidance from within the details view, tap k.
8.4 Storing the home addressYou can store a home address. This address appears at the top of the list of your favourites (see the section entitled “Selecting one of the previous destinations or a destination stored as a favourite” (page 40)).
Note:If a home address has already been stored, it will be replaced/overwritten by the new address after confirmation.
� In the Destinations menu, tap the Favourites tab.
� Tap Home. � Tap Current position to store the current position as the home address.
Or: � Tap Enter address to specify an address. � Enter the address as described in the section entitled “Entering an address” (page 38).
� After specifying the address, tap Set as home to store the entered address as the home address.
8.5 Entering a waypointAs soon as you have started route guidance to a destination, you can enter up to 5 further desti-nations as waypoints.
Note:The order in which you enter additional waypoints cannot be changed after-wards. Each waypoint that you add will be placed on the route before the desti-nation. So the last waypoint that you add will be the last waypoint on your route.
� Enter the new destination as described in the section entitled “Entering a destination” (page 37).
As soon as you tap , the Route guidance is active notification appears.
� Tap Add as waypoint.The new destination is inserted in the route as a waypoint. The system calculates the route to the waypoint.
8.6 Changing the destination while route guidance is active
You can change the destination or waypoint while route guidance is active.
� Enter the new destination as described in the section entitled “Entering a destination” (page 37).
As soon as you tap , the Route guidance is active notification appears.
Navigation en | 43
� Tap Replace destination or Add as way-point.
The system calculates the route to the new destination.
8.7 Map view and map options
8.7.1 Opening the map view � Tap the Drive area in the Home menu.
or: � Tap in the Destinations menu.
8.7.2 The map view during an active route guidance session
An active route guidance session is displayed in the map view. Driving recommendations are provided in visual form (see below) and as announcements.
64 686360 61 62 706665 6967
71727374
o button: Increase map scalep Switch between the route overview map
and the map of the area around the vehi-cle
q Current map scaler Name of the current roads Name of the next road (only when
approaching)t Vehicle positionu Lane guidancev Current routew Compassx Distance to the next driving manoeuvre, visual driving recommendations (The
driving manoeuvre is displayed symboli-cally as you approach it.)
y button: Decrease map scale
z Clock time{ Distance to the destination| Estimated arrival time! Estimated time to the destination
8.7.3 Repeating the current naviga-tion announcement
� During active route guidance, tap the driving manoeuvre symbol in the map view x.
8.7.4 Changing the map scaleTo increase or decrease the map scale when in map view,
� tap o or y.
Note:If automatic zoom is enabled (see the section entitled “Enabling automatic zoom” (page 47)): If you manually change the map scale, the automatic zoom function is suspended for around 30 seconds.
8.7.5 Changing the map view modeYou can choose whether
� the map aligns with north (in this case, north always appears at the top in map view),
� the map always aligns with your heading (in this case, the area that lies ahead of the vehicle always appears at the top in map view),
Navigation
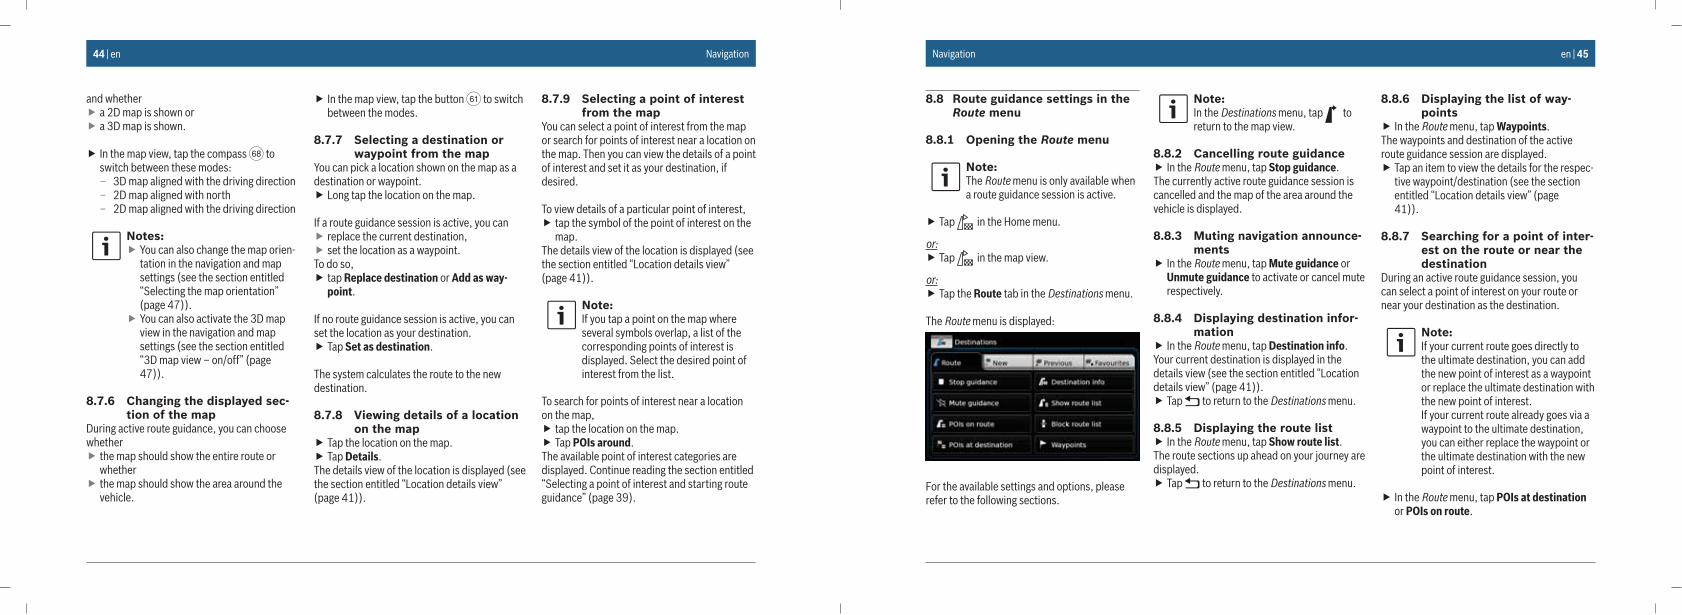
44 | en
and whether � a 2D map is shown or � a 3D map is shown.
� In the map view, tap the compass w to switch between these modes:
– 3D map aligned with the driving direction – 2D map aligned with north – 2D map aligned with the driving direction
Notes: � You can also change the map orien-tation in the navigation and map settings (see the section entitled “Selecting the map orientation” (page 47)).
� You can also activate the 3D map view in the navigation and map settings (see the section entitled “3D map view – on/off” (page 47)).
8.7.6 Changing the displayed sec-tion of the map
During active route guidance, you can choose whether
� the map should show the entire route or whether
� the map should show the area around the vehicle.
� In the map view, tap the button p to switch between the modes.
8.7.7 Selecting a destination or waypoint from the map
You can pick a location shown on the map as a destination or waypoint.
� Long tap the location on the map.
If a route guidance session is active, you can � replace the current destination, � set the location as a waypoint.
To do so, � tap Replace destination or Add as way-point.
If no route guidance session is active, you can set the location as your destination.
� Tap Set as destination.
The system calculates the route to the new destination.
8.7.8 Viewing details of a location on the map
� Tap the location on the map. � Tap Details.
The details view of the location is displayed (see the section entitled “Location details view” (page 41)).
8.7.9 Selecting a point of interest from the map
You can select a point of interest from the map or search for points of interest near a location on the map. Then you can view the details of a point of interest and set it as your destination, if desired.
To view details of a particular point of interest, � tap the symbol of the point of interest on the map.
The details view of the location is displayed (see the section entitled “Location details view” (page 41)).
Note:If you tap a point on the map where several symbols overlap, a list of the corresponding points of interest is displayed. Select the desired point of interest from the list.
To search for points of interest near a location on the map,
� tap the location on the map. � Tap POIs around.
The available point of interest categories are displayed. Continue reading the section entitled “Selecting a point of interest and starting route guidance” (page 39).
Navigation en | 45
8.8 Route guidance settings in the Route menu
8.8.1 Opening the Route menu
Note:The Route menu is only available when a route guidance session is active.
� Tap in the Home menu.
or: � Tap in the map view.
or: � Tap the Route tab in the Destinations menu.
The Route menu is displayed:
For the available settings and options, please refer to the following sections.
Note:In the Destinations menu, tap to return to the map view.
8.8.2 Cancelling route guidance � In the Route menu, tap Stop guidance.
The currently active route guidance session is cancelled and the map of the area around the vehicle is displayed.
8.8.3 Muting navigation announce-ments
� In the Route menu, tap Mute guidance or Unmute guidance to activate or cancel mute respectively.
8.8.4 Displaying destination infor-mation
� In the Route menu, tap Destination info.Your current destination is displayed in the details view (see the section entitled “Location details view” (page 41)).
� Tap to return to the Destinations menu.
8.8.5 Displaying the route list � In the Route menu, tap Show route list.
The route sections up ahead on your journey are displayed.
� Tap to return to the Destinations menu.
8.8.6 Displaying the list of way-points
� In the Route menu, tap Waypoints.The waypoints and destination of the active route guidance session are displayed.
� Tap an item to view the details for the respec-tive waypoint/destination (see the section entitled “Location details view” (page 41)).
8.8.7 Searching for a point of inter-est on the route or near the destination
During an active route guidance session, you can select a point of interest on your route or near your destination as the destination.
Note:If your current route goes directly to the ultimate destination, you can add the new point of interest as a waypoint or replace the ultimate destination with the new point of interest.If your current route already goes via a waypoint to the ultimate destination, you can either replace the waypoint or the ultimate destination with the new point of interest.
� In the Route menu, tap POIs at destination or POIs on route.
Navigation
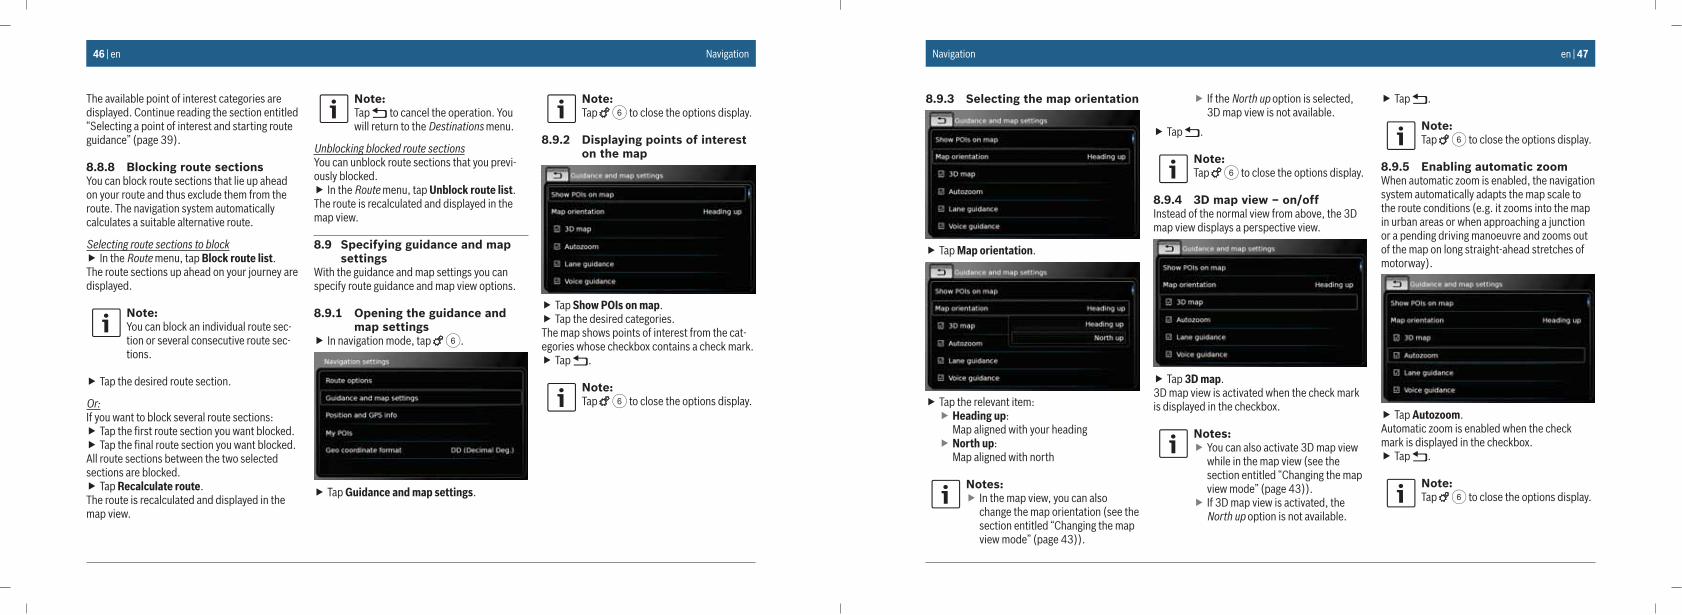
46 | en
The available point of interest categories are displayed. Continue reading the section entitled “Selecting a point of interest and starting route guidance” (page 39).
8.8.8 Blocking route sectionsYou can block route sections that lie up ahead on your route and thus exclude them from the route. The navigation system automatically calculates a suitable alternative route.
Selecting route sections to block � In the Route menu, tap Block route list.
The route sections up ahead on your journey are displayed.
Note:You can block an individual route sec-tion or several consecutive route sec-tions.
� Tap the desired route section.
Or:If you want to block several route sections:
� Tap the first route section you want blocked. � Tap the final route section you want blocked.
All route sections between the two selected sections are blocked.
� Tap Recalculate route.The route is recalculated and displayed in the map view.
Note:Tap to cancel the operation. You will return to the Destinations menu.
Unblocking blocked route sectionsYou can unblock route sections that you previ-ously blocked.
� In the Route menu, tap Unblock route list.The route is recalculated and displayed in the map view.
8.9 Specifying guidance and map settings
With the guidance and map settings you can specify route guidance and map view options.
8.9.1 Opening the guidance and map settings
� In navigation mode, tap 6.
� Tap Guidance and map settings.
Note:Tap 6 to close the options display.
8.9.2 Displaying points of interest on the map
� Tap Show POIs on map. � Tap the desired categories.
The map shows points of interest from the cat-egories whose checkbox contains a check mark.
� Tap .
Note:Tap 6 to close the options display.
Navigation en | 47
8.9.3 Selecting the map orientation
� Tap Map orientation.
� Tap the relevant item: � Heading up: Map aligned with your heading
� North up: Map aligned with north
Notes: � In the map view, you can also change the map orientation (see the section entitled “Changing the map view mode” (page 43)).
� If the North up option is selected, 3D map view is not available.
� Tap .
Note:Tap 6 to close the options display.
8.9.4 3D map view – on/offInstead of the normal view from above, the 3D map view displays a perspective view.
� Tap 3D map.3D map view is activated when the check mark is displayed in the checkbox.
Notes: � You can also activate 3D map view while in the map view (see the section entitled “Changing the map view mode” (page 43)).
� If 3D map view is activated, the North up option is not available.
� Tap .
Note:Tap 6 to close the options display.
8.9.5 Enabling automatic zoomWhen automatic zoom is enabled, the navigation system automatically adapts the map scale to the route conditions (e.g. it zooms into the map in urban areas or when approaching a junction or a pending driving manoeuvre and zooms out of the map on long straight-ahead stretches of motorway).
� Tap Autozoom.Automatic zoom is enabled when the check mark is displayed in the checkbox.
� Tap .
Note:Tap 6 to close the options display.
Navigation
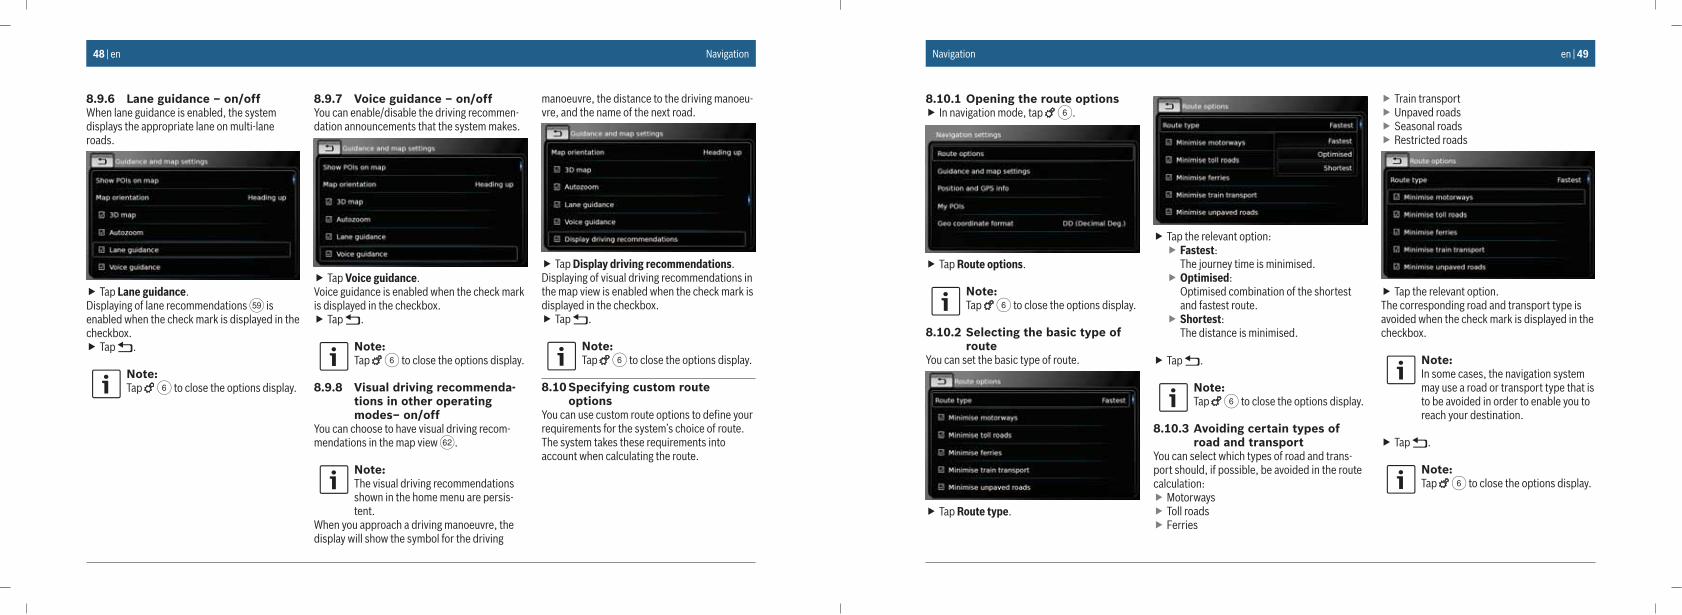
48 | en
8.9.6 Lane guidance – on/offWhen lane guidance is enabled, the system displays the appropriate lane on multi-lane roads.
� Tap Lane guidance.Displaying of lane recommendations n is enabled when the check mark is displayed in the checkbox.
� Tap .
Note:Tap 6 to close the options display.
8.9.7 Voice guidance – on/offYou can enable/disable the driving recommen-dation announcements that the system makes.
� Tap Voice guidance.Voice guidance is enabled when the check mark is displayed in the checkbox.
� Tap .
Note:Tap 6 to close the options display.
8.9.8 Visual driving recommenda-tions in other operating modes– on/off
You can choose to have visual driving recom-mendations in the map view q.
Note:The visual driving recommendations shown in the home menu are persis-tent.
When you approach a driving manoeuvre, the display will show the symbol for the driving
manoeuvre, the distance to the driving manoeu-vre, and the name of the next road.
� Tap Display driving recommendations.Displaying of visual driving recommendations in the map view is enabled when the check mark is displayed in the checkbox.
� Tap .
Note:Tap 6 to close the options display.
8.10 Specifying custom route options
You can use custom route options to define your requirements for the system’s choice of route. The system takes these requirements into account when calculating the route.
Navigation en | 49
8.10.1 Opening the route options � In navigation mode, tap 6.
� Tap Route options.
Note:Tap 6 to close the options display.
8.10.2 Selecting the basic type of route
You can set the basic type of route.
� Tap Route type.
� Tap the relevant option: � Fastest: The journey time is minimised.
� Optimised: Optimised combination of the shortest and fastest route.
� Shortest: The distance is minimised.
� Tap .
Note:Tap 6 to close the options display.
8.10.3 Avoiding certain types of road and transport
You can select which types of road and trans-port should, if possible, be avoided in the route calculation:
� Motorways � Toll roads � Ferries
� Train transport � Unpaved roads � Seasonal roads � Restricted roads
� Tap the relevant option.The corresponding road and transport type is avoided when the check mark is displayed in the checkbox.
Note:In some cases, the navigation system may use a road or transport type that is to be avoided in order to enable you to reach your destination.
� Tap .
Note:Tap 6 to close the options display.
Navigation
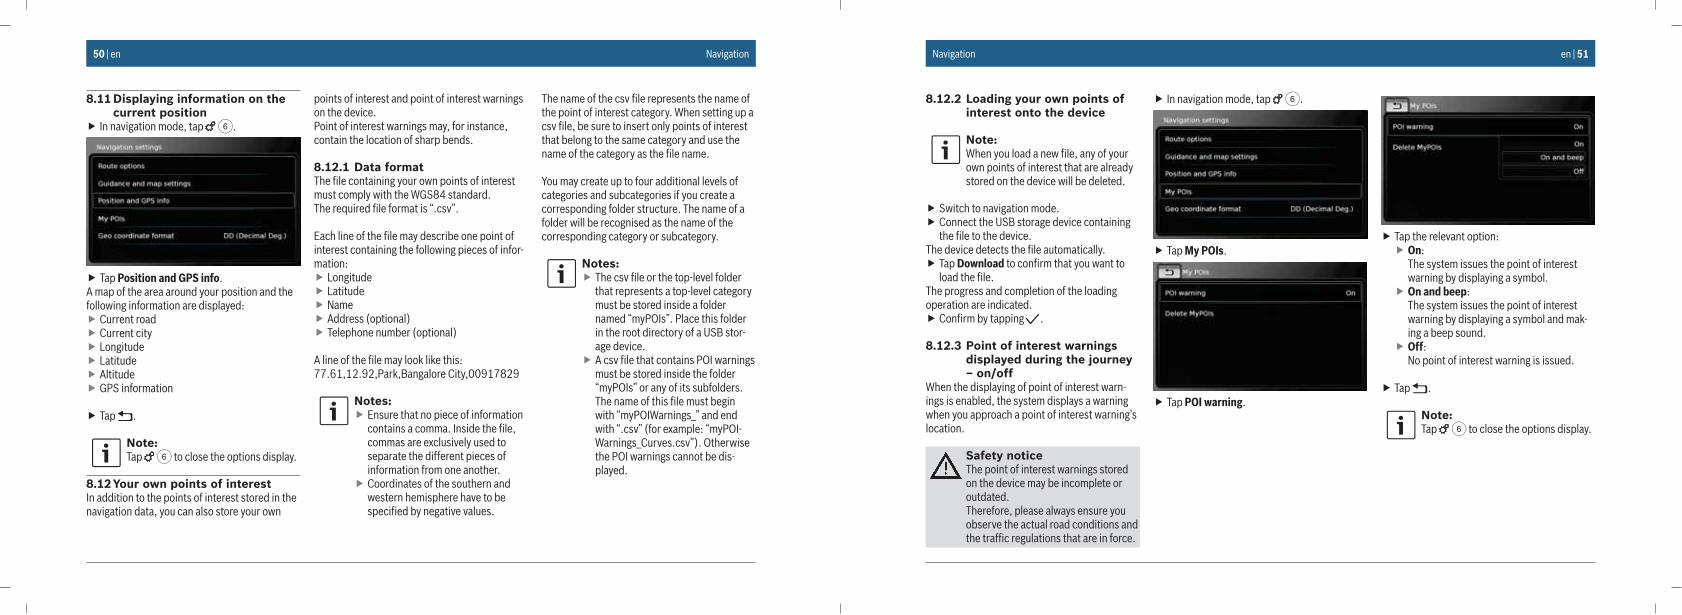
50 | en
8.11 Displaying information on the current position
� In navigation mode, tap 6.
� Tap Position and GPS info.A map of the area around your position and the following information are displayed:
� Current road � Current city � Longitude � Latitude � Altitude � GPS information
� Tap .
Note:Tap 6 to close the options display.
8.12 Your own points of interestIn addition to the points of interest stored in the navigation data, you can also store your own
points of interest and point of interest warnings on the device.Point of interest warnings may, for instance, contain the location of sharp bends.
8.12.1 Data formatThe file containing your own points of interest must comply with the WGS84 standard.The required file format is “.csv”.
Each line of the file may describe one point of interest containing the following pieces of infor-mation:
� Longitude � Latitude � Name � Address (optional) � Telephone number (optional)
A line of the file may look like this:77.61,12.92,Park,Bangalore City,00917829
Notes: � Ensure that no piece of information contains a comma. Inside the file, commas are exclusively used to separate the different pieces of information from one another.
� Coordinates of the southern and western hemisphere have to be specified by negative values.
The name of the csv file represents the name of the point of interest category. When setting up a csv file, be sure to insert only points of interest that belong to the same category and use the name of the category as the file name.
You may create up to four additional levels of categories and subcategories if you create a corresponding folder structure. The name of a folder will be recognised as the name of the corresponding category or subcategory.
Notes: � The csv file or the top-level folder that represents a top-level category must be stored inside a folder named “myPOIs”. Place this folder in the root directory of a USB stor-age device.
� A csv file that contains POI warnings must be stored inside the folder “myPOIs” or any of its subfolders. The name of this file must begin with “myPOIWarnings_” and end with “.csv” (for example: “myPOI-Warnings_Curves.csv”). Otherwise the POI warnings cannot be dis-played.
Navigation en | 51
8.12.2 Loading your own points of interest onto the device
Note:When you load a new file, any of your own points of interest that are already stored on the device will be deleted.
� Switch to navigation mode. � Connect the USB storage device containing the file to the device.
The device detects the file automatically. � Tap Download to confirm that you want to load the file.
The progress and completion of the loading operation are indicated.
� Confirm by tapping .
8.12.3 Point of interest warnings displayed during the journey – on/off
When the displaying of point of interest warn-ings is enabled, the system displays a warning when you approach a point of interest warning’s location.
Safety noticeThe point of interest warnings stored on the device may be incomplete or outdated.Therefore, please always ensure you observe the actual road conditions and the traffic regulations that are in force.
� In navigation mode, tap 6.
� Tap My POIs.
� Tap POI warning.
� Tap the relevant option: � On: The system issues the point of interest warning by displaying a symbol.
� On and beep: The system issues the point of interest warning by displaying a symbol and mak-ing a beep sound.
� Off: No point of interest warning is issued.
� Tap .
Note:Tap 6 to close the options display.
Navigation

52 | en
8.12.4 Deleting your own points of interest from the device
� In navigation mode, tap 6.
� Tap My POIs.
� Tap Delete MyPOIs and confirm by tapping .
� Tap .
Note:Tap 6 to close the options display.
8.13 Enabling the keypad lock while driving
You can set the keypad lock in the system set-tings.If the Lock keypad while driving setting is ena-bled, you will only be able to access the keypad while the vehicle is stationary.For further details on this, please read the sec-tion entitled “Enabling the keypad lock while driving” (page 15).
Note:When the Lock keypad while driving setting is enabled, certain features of the device’s navigation and smart-phone integration functions are disa-bled to avoid driver distraction.
8.14 Selecting the geo coordinate format
You can set the format in which geo coordinates are specified.
� In navigation mode, tap 6.
� Tap Geo coordinate format.
� Tap the relevant option: � DD: Decimal degrees � DM: Degrees and minutes � DMS: Degrees, minutes and seconds
Note:Tap 6 to close the options display.
8.15 Updating the map data
Note:For information about map data updates please refer to www.suzuki-slda.com.
You can update the map data by loading new map data onto the device from an SD card.
Note:For details on handling SD cards, please read the section entitled “Con-
Navigation en | 53
necting/inserting external devices and data storage devices” (page 23).
� Insert the SD card containing the map data into the SD card slot 3.
The compatibility of the map data is checked and confirmed.
Note:If the map data is incompatible, the device will not respond.
The map data is loaded onto the device.
Notes: � Please do not remove the SD card from the device. If the SD card containing the navigation system’s map data is removed, you will not be able to use the navigation function.
� If the map data was not loaded successfully, please contact your MARUTI SUZUKI dealer.
8.15.1 Registration process for the first time user
For Map care registration, you will need the Device ID (DID) number. Tap the settings symbol from home screen and scroll down to get your DID.For more details on registration process and Map care, please refer to www.suzuki-slda.com.
8.16 Retrofitting the navigation func-tion
If the device is not originally equipped with the navigation function, it may be possible for you to have it retrofitted. Please contact your MARUTI SUZUKI dealer regarding this.The navigation software for your device is sup-plied on an SD card. Please follow the instruc-tions below to install the navigation software:
Note:For details on handling SD cards, please read the section entitled “Con-necting/inserting external devices and data storage devices” (page 23).
� Insert the SD card containing the navigation software into the SD card slot 3.
The compatibility of the navigation software is checked and confirmed.
Note:If the navigation software is incompat-ible, the device will not respond.
The navigation software is loaded onto the device.
Note:If the navigation software was not loaded successfully, the device will restart without the navigation function.
In this case, please try again. If the problem persists, please contact your MARUTI SUZUKI dealer.
Navigation
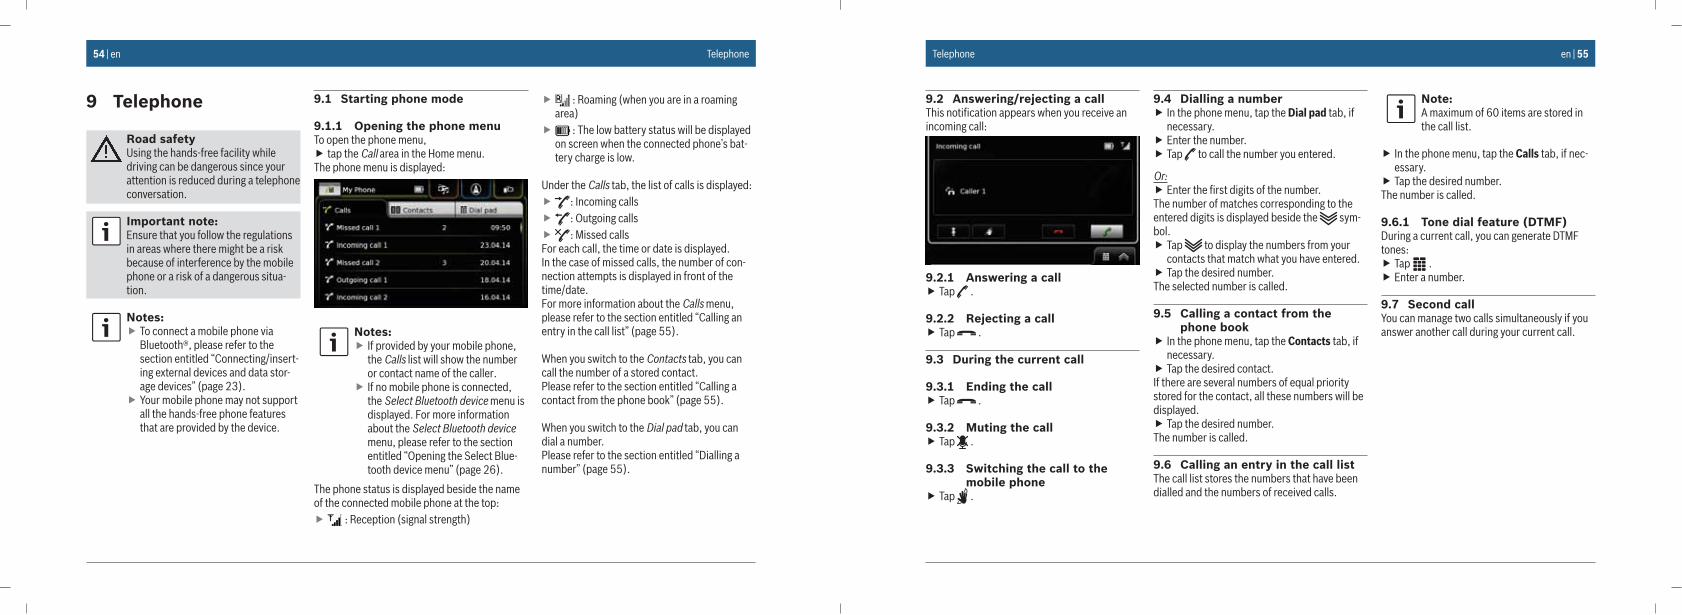
54 | en
9 Telephone
Road safetyUsing the hands-free facility while driving can be dangerous since your attention is reduced during a telephone conversation.
Important note:Ensure that you follow the regulations in areas where there might be a risk because of interference by the mobile phone or a risk of a dangerous situa-tion.
Notes: � To connect a mobile phone via Bluetooth®, please refer to the section entitled “Connecting/insert-ing external devices and data stor-age devices” (page 23).
� Your mobile phone may not support all the hands-free phone features that are provided by the device.
9.1 Starting phone mode
9.1.1 Opening the phone menuTo open the phone menu,
� tap the Call area in the Home menu.The phone menu is displayed:
Notes: � If provided by your mobile phone, the Calls list will show the number or contact name of the caller.
� If no mobile phone is connected, the Select Bluetooth device menu is displayed. For more information about the Select Bluetooth device menu, please refer to the section entitled “Opening the Select Blue-tooth device menu” (page 26).
The phone status is displayed beside the name of the connected mobile phone at the top:
� : Reception (signal strength)
� : Roaming (when you are in a roaming area)
� : The low battery status will be displayed on screen when the connected phone’s bat-tery charge is low.
Under the Calls tab, the list of calls is displayed: � : Incoming calls � : Outgoing calls � : Missed calls
For each call, the time or date is displayed.In the case of missed calls, the number of con-nection attempts is displayed in front of the time/date.For more information about the Calls menu, please refer to the section entitled “Calling an entry in the call list” (page 55).
When you switch to the Contacts tab, you can call the number of a stored contact. Please refer to the section entitled “Calling a contact from the phone book” (page 55).
When you switch to the Dial pad tab, you can dial a number. Please refer to the section entitled “Dialling a number” (page 55).
Telephone en | 55
9.2 Answering/rejecting a callThis notification appears when you receive an incoming call:
9.2.1 Answering a call � Tap .
9.2.2 Rejecting a call � Tap .
9.3 During the current call
9.3.1 Ending the call � Tap .
9.3.2 Muting the call � Tap .
9.3.3 Switching the call to the mobile phone
� Tap .
9.4 Dialling a number � In the phone menu, tap the Dial pad tab, if necessary.
� Enter the number. � Tap to call the number you entered.
Or: � Enter the first digits of the number.
The number of matches corresponding to the entered digits is displayed beside the sym-bol.
� Tap to display the numbers from your contacts that match what you have entered.
� Tap the desired number.The selected number is called.
9.5 Calling a contact from the phone book
� In the phone menu, tap the Contacts tab, if necessary.
� Tap the desired contact.If there are several numbers of equal priority stored for the contact, all these numbers will be displayed.
� Tap the desired number.The number is called.
9.6 Calling an entry in the call listThe call list stores the numbers that have been dialled and the numbers of received calls.
Note:A maximum of 60 items are stored in the call list.
� In the phone menu, tap the Calls tab, if nec-essary.
� Tap the desired number.The number is called.
9.6.1 Tone dial feature (DTMF)During a current call, you can generate DTMF tones:
� Tap . � Enter a number.
9.7 Second callYou can manage two calls simultaneously if you answer another call during your current call.
Telephone
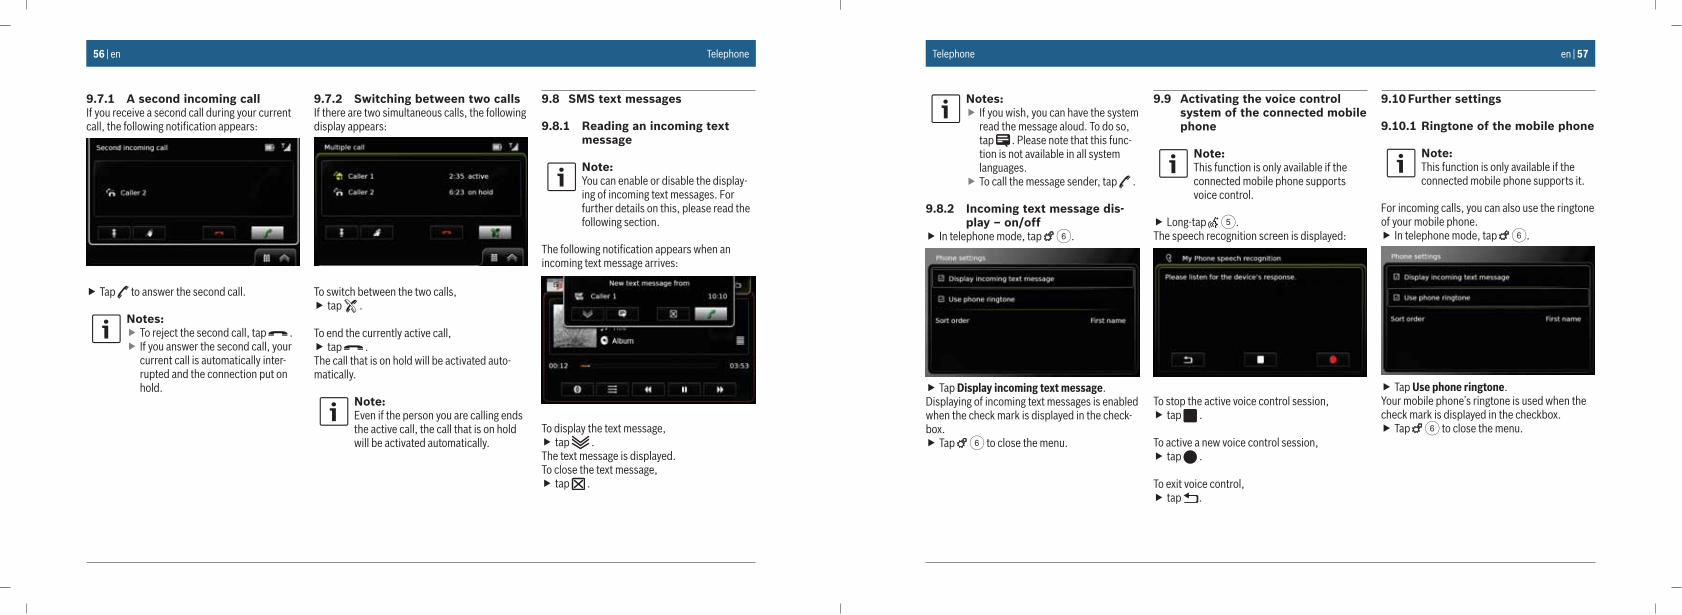
56 | en
9.7.1 A second incoming callIf you receive a second call during your current call, the following notification appears:
� Tap to answer the second call.
Notes: � To reject the second call, tap . � If you answer the second call, your current call is automatically inter-rupted and the connection put on hold.
9.7.2 Switching between two callsIf there are two simultaneous calls, the following display appears:
To switch between the two calls, � tap .
To end the currently active call, � tap .
The call that is on hold will be activated auto-matically.
Note:Even if the person you are calling ends the active call, the call that is on hold will be activated automatically.
9.8 SMS text messages
9.8.1 Reading an incoming text message
Note:You can enable or disable the display-ing of incoming text messages. For further details on this, please read the following section.
The following notification appears when an incoming text message arrives:
To display the text message, � tap .
The text message is displayed.To close the text message,
� tap .
Telephone en | 57
Notes: � If you wish, you can have the system read the message aloud. To do so, tap . Please note that this func-tion is not available in all system languages.
� To call the message sender, tap .
9.8.2 Incoming text message dis-play – on/off
� In telephone mode, tap 6.
� Tap Display incoming text message.Displaying of incoming text messages is enabled when the check mark is displayed in the check-box.
� Tap 6 to close the menu.
9.9 Activating the voice control system of the connected mobile phone
Note:This function is only available if the connected mobile phone supports voice control.
� Long-tap 5.The speech recognition screen is displayed:
To stop the active voice control session, � tap .
To active a new voice control session, � tap .
To exit voice control, � tap .
9.10 Further settings
9.10.1 Ringtone of the mobile phone
Note:This function is only available if the connected mobile phone supports it.
For incoming calls, you can also use the ringtone of your mobile phone.
� In telephone mode, tap 6.
� Tap Use phone ringtone.Your mobile phone’s ringtone is used when the check mark is displayed in the checkbox.
� Tap 6 to close the menu.
Telephone
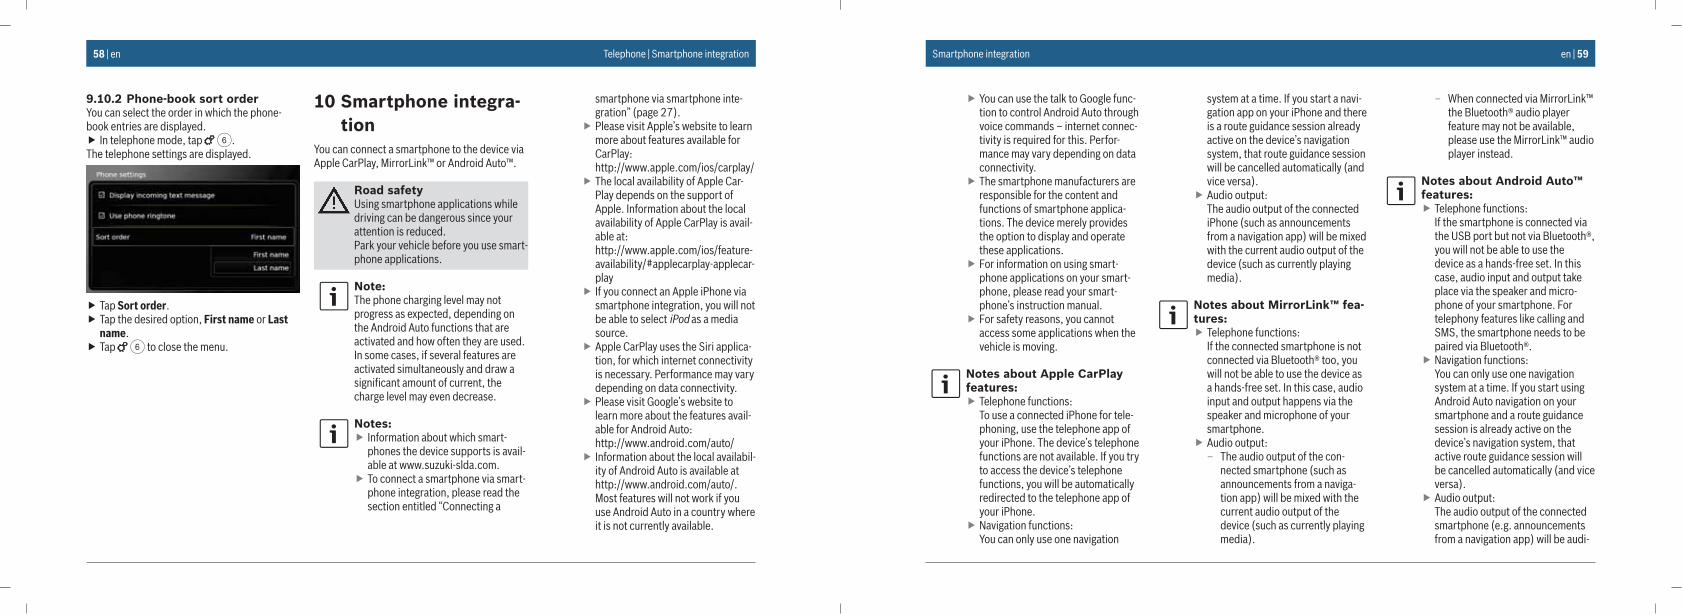
58 | en
9.10.2 Phone-book sort orderYou can select the order in which the phone-book entries are displayed.
� In telephone mode, tap 6.The telephone settings are displayed.
� Tap Sort order. � Tap the desired option, First name or Last name.
� Tap 6 to close the menu.
10 Smartphone integra-tion
You can connect a smartphone to the device via Apple CarPlay, MirrorLink™ or Android Auto™.
Road safetyUsing smartphone applications while driving can be dangerous since your attention is reduced. Park your vehicle before you use smart-phone applications.
Note:The phone charging level may not progress as expected, depending on the Android Auto functions that are activated and how often they are used. In some cases, if several features are activated simultaneously and draw a significant amount of current, the charge level may even decrease.
Notes: � Information about which smart-phones the device supports is avail-able at www.suzuki-slda.com.
� To connect a smartphone via smart-phone integration, please read the section entitled “Connecting a
smartphone via smartphone inte-gration” (page 27).
� Please visit Apple’s website to learn more about features available for CarPlay: http://www.apple.com/ios/carplay/
� The local availability of Apple Car-Play depends on the support of Apple. Information about the local availability of Apple CarPlay is avail-able at: http://www.apple.com/ios/feature-availability/#applecarplay-applecar-play
� If you connect an Apple iPhone via smartphone integration, you will not be able to select iPod as a media source.
� Apple CarPlay uses the Siri applica-tion, for which internet connectivity is necessary. Performance may vary depending on data connectivity.
� Please visit Google’s website to learn more about the features avail-able for Android Auto: http://www.android.com/auto/
� Information about the local availabil-ity of Android Auto is available at http://www.android.com/auto/. Most features will not work if you use Android Auto in a country where it is not currently available.
Telephone | Smartphone integration en | 59
� You can use the talk to Google func-tion to control Android Auto through voice commands – internet connec-tivity is required for this. Perfor-mance may vary depending on data connectivity.
� The smartphone manufacturers are responsible for the content and functions of smartphone applica-tions. The device merely provides the option to display and operate these applications.
� For information on using smart-phone applications on your smart-phone, please read your smart-phone’s instruction manual.
� For safety reasons, you cannot access some applications when the vehicle is moving.
Notes about Apple CarPlay features:
� Telephone functions: To use a connected iPhone for tele-phoning, use the telephone app of your iPhone. The device’s telephone functions are not available. If you try to access the device’s telephone functions, you will be automatically redirected to the telephone app of your iPhone.
� Navigation functions: You can only use one navigation
system at a time. If you start a navi-gation app on your iPhone and there is a route guidance session already active on the device’s navigation system, that route guidance session will be cancelled automatically (and vice versa).
� Audio output: The audio output of the connected iPhone (such as announcements from a navigation app) will be mixed with the current audio output of the device (such as currently playing media).
Notes about MirrorLink™ fea-tures:
� Telephone functions: If the connected smartphone is not connected via Bluetooth® too, you will not be able to use the device as a hands-free set. In this case, audio input and output happens via the speaker and microphone of your smartphone.
� Audio output: – The audio output of the con-
nected smartphone (such as announcements from a naviga-tion app) will be mixed with the current audio output of the device (such as currently playing media).
– When connected via MirrorLink™ the Bluetooth® audio player feature may not be available, please use the MirrorLink™ audio player instead.
Notes about Android Auto™ features:
� Telephone functions: If the smartphone is connected via the USB port but not via Bluetooth®, you will not be able to use the device as a hands-free set. In this case, audio input and output take place via the speaker and micro-phone of your smartphone. For telephony features like calling and SMS, the smartphone needs to be paired via Bluetooth®.
� Navigation functions: You can only use one navigation system at a time. If you start using Android Auto navigation on your smartphone and a route guidance session is already active on the device’s navigation system, that active route guidance session will be cancelled automatically (and vice versa).
� Audio output: The audio output of the connected smartphone (e.g. announcements from a navigation app) will be audi-
Smartphone integration
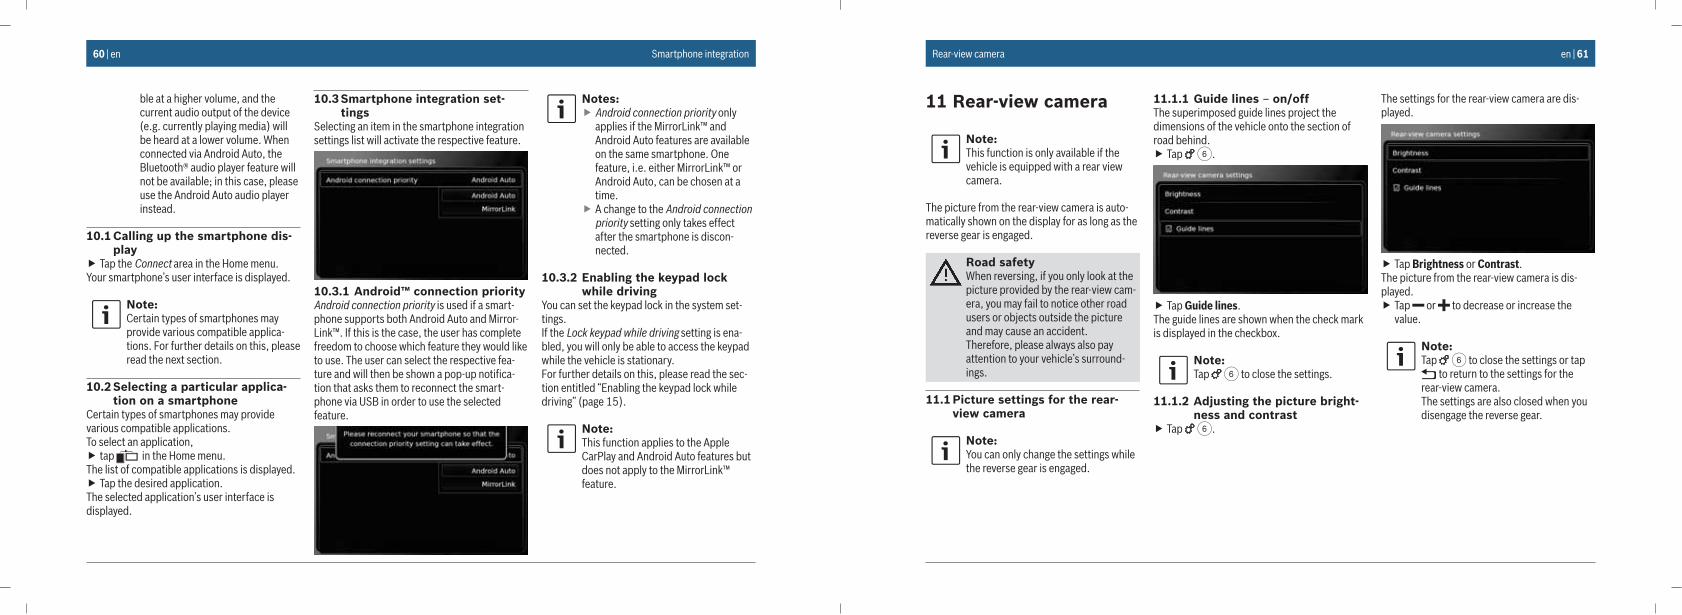
60 | en
ble at a higher volume, and the current audio output of the device (e.g. currently playing media) will be heard at a lower volume. When connected via Android Auto, the Bluetooth® audio player feature will not be available; in this case, please use the Android Auto audio player instead.
10.1 Calling up the smartphone dis-play
� Tap the Connect area in the Home menu.Your smartphone’s user interface is displayed.
Note:Certain types of smartphones may provide various compatible applica-tions. For further details on this, please read the next section.
10.2 Selecting a particular applica-tion on a smartphone
Certain types of smartphones may provide various compatible applications.To select an application,
� tap in the Home menu.The list of compatible applications is displayed.
� Tap the desired application.The selected application’s user interface is displayed.
10.3 Smartphone integration set-tings
Selecting an item in the smartphone integration settings list will activate the respective feature.
10.3.1 Android™ connection priorityAndroid connection priority is used if a smart-phone supports both Android Auto and Mirror-Link™. If this is the case, the user has complete freedom to choose which feature they would like to use. The user can select the respective fea-ture and will then be shown a pop-up notifica-tion that asks them to reconnect the smart-phone via USB in order to use the selected feature.
Notes: � Android connection priority only applies if the MirrorLink™ and Android Auto features are available on the same smartphone. One feature, i.e. either MirrorLink™ or Android Auto, can be chosen at a time.
� A change to the Android connection priority setting only takes effect after the smartphone is discon-nected.
10.3.2 Enabling the keypad lock while driving
You can set the keypad lock in the system set-tings.If the Lock keypad while driving setting is ena-bled, you will only be able to access the keypad while the vehicle is stationary.For further details on this, please read the sec-tion entitled “Enabling the keypad lock while driving” (page 15).
Note:This function applies to the Apple CarPlay and Android Auto features but does not apply to the MirrorLink™ feature.
Smartphone integration en | 61
11 Rear-view camera
Note:This function is only available if the vehicle is equipped with a rear view camera.
The picture from the rear-view camera is auto-matically shown on the display for as long as the reverse gear is engaged.
Road safetyWhen reversing, if you only look at the picture provided by the rear-view cam-era, you may fail to notice other road users or objects outside the picture and may cause an accident.Therefore, please always also pay attention to your vehicle’s surround-ings.
11.1 Picture settings for the rear-view camera
Note:You can only change the settings while the reverse gear is engaged.
11.1.1 Guide lines – on/offThe superimposed guide lines project the dimensions of the vehicle onto the section of road behind.
� Tap 6.
� Tap Guide lines.The guide lines are shown when the check mark is displayed in the checkbox.
Note:Tap 6 to close the settings.
11.1.2 Adjusting the picture bright-ness and contrast
� Tap 6.
The settings for the rear-view camera are dis-played.
� Tap Brightness or Contrast.The picture from the rear-view camera is dis-played.
� Tap or to decrease or increase the value.
Note:Tap 6 to close the settings or tap
to return to the settings for the rear-view camera.The settings are also closed when you disengage the reverse gear.
Rear-view camera
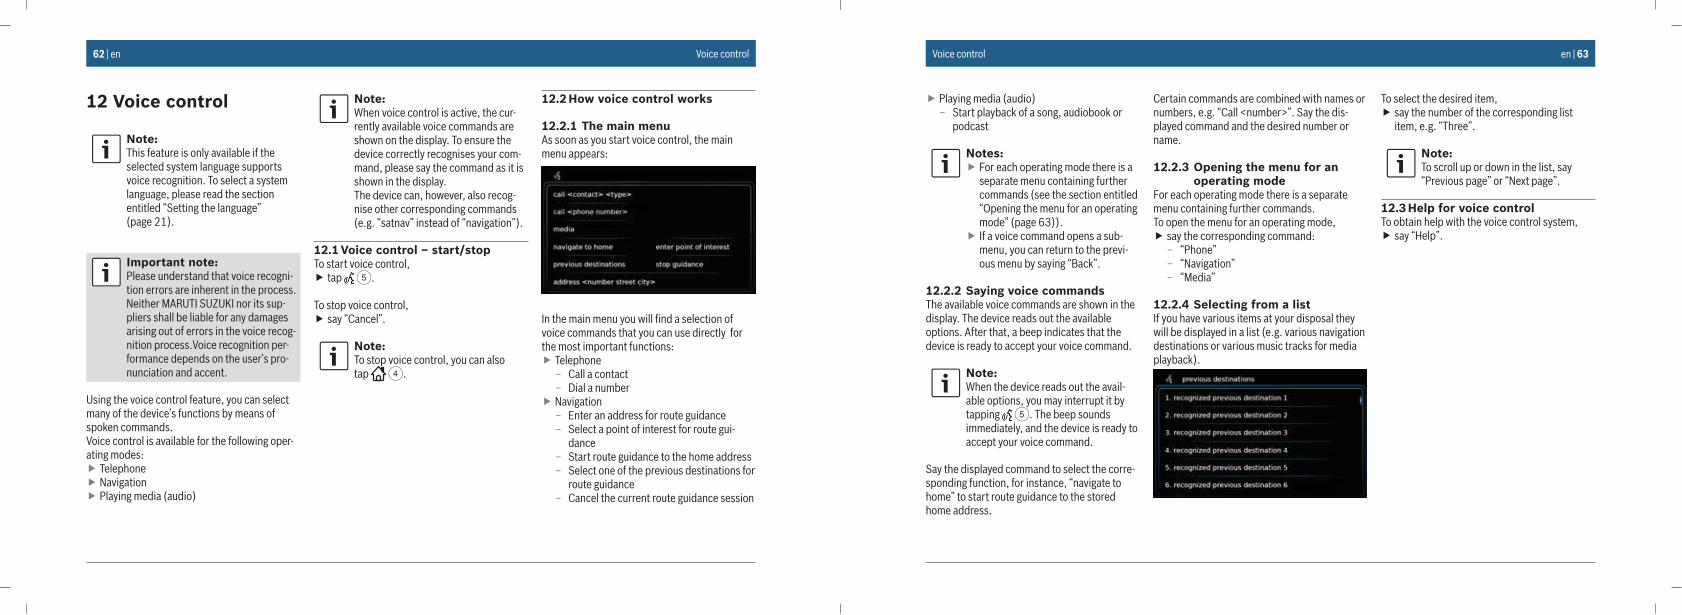
62 | en
12 Voice control
Note:This feature is only available if the selected system language supports voice recognition. To select a system language, please read the section entitled “Setting the language” (page 21).
Important note:Please understand that voice recogni-tion errors are inherent in the process. Neither MARUTI SUZUKI nor its sup-pliers shall be liable for any damages arising out of errors in the voice recog-nition process.Voice recognition per-formance depends on the user’s pro-nunciation and accent.
Using the voice control feature, you can select many of the device’s functions by means of spoken commands.Voice control is available for the following oper-ating modes:
� Telephone � Navigation � Playing media (audio)
Note:When voice control is active, the cur-rently available voice commands are shown on the display. To ensure the device correctly recognises your com-mand, please say the command as it is shown in the display. The device can, however, also recog-nise other corresponding commands (e.g. “satnav” instead of “navigation”).
12.1 Voice control – start/stopTo start voice control,
� tap 5.
To stop voice control, � say “Cancel”.
Note:To stop voice control, you can also tap 4.
12.2 How voice control works
12.2.1 The main menuAs soon as you start voice control, the main menu appears:
In the main menu you will find a selection of voice commands that you can use directly for the most important functions:
� Telephone – Call a contact – Dial a number
� Navigation – Enter an address for route guidance – Select a point of interest for route gui-
dance – Start route guidance to the home address – Select one of the previous destinations for
route guidance – Cancel the current route guidance session
Voice control en | 63
� Playing media (audio) – Start playback of a song, audiobook or
podcast
Notes: � For each operating mode there is a separate menu containing further commands (see the section entitled “Opening the menu for an operating mode” (page 63)).
� If a voice command opens a sub-menu, you can return to the previ-ous menu by saying “Back”.
12.2.2 Saying voice commandsThe available voice commands are shown in the display. The device reads out the available options. After that, a beep indicates that the device is ready to accept your voice command.
Note:When the device reads out the avail-able options, you may interrupt it by tapping 5. The beep sounds immediately, and the device is ready to accept your voice command.
Say the displayed command to select the corre-sponding function, for instance, “navigate to home” to start route guidance to the stored home address.
Certain commands are combined with names or numbers, e.g. “Call <number>”. Say the dis-played command and the desired number or name.
12.2.3 Opening the menu for an operating mode
For each operating mode there is a separate menu containing further commands.To open the menu for an operating mode,
� say the corresponding command: – “Phone” – “Navigation” – “Media”
12.2.4 Selecting from a listIf you have various items at your disposal they will be displayed in a list (e.g. various navigation destinations or various music tracks for media playback).
To select the desired item, � say the number of the corresponding list item, e.g. “Three”.
Note:To scroll up or down in the list, say “Previous page” or “Next page”.
12.3 Help for voice controlTo obtain help with the voice control system,
� say “Help”.
Voice control
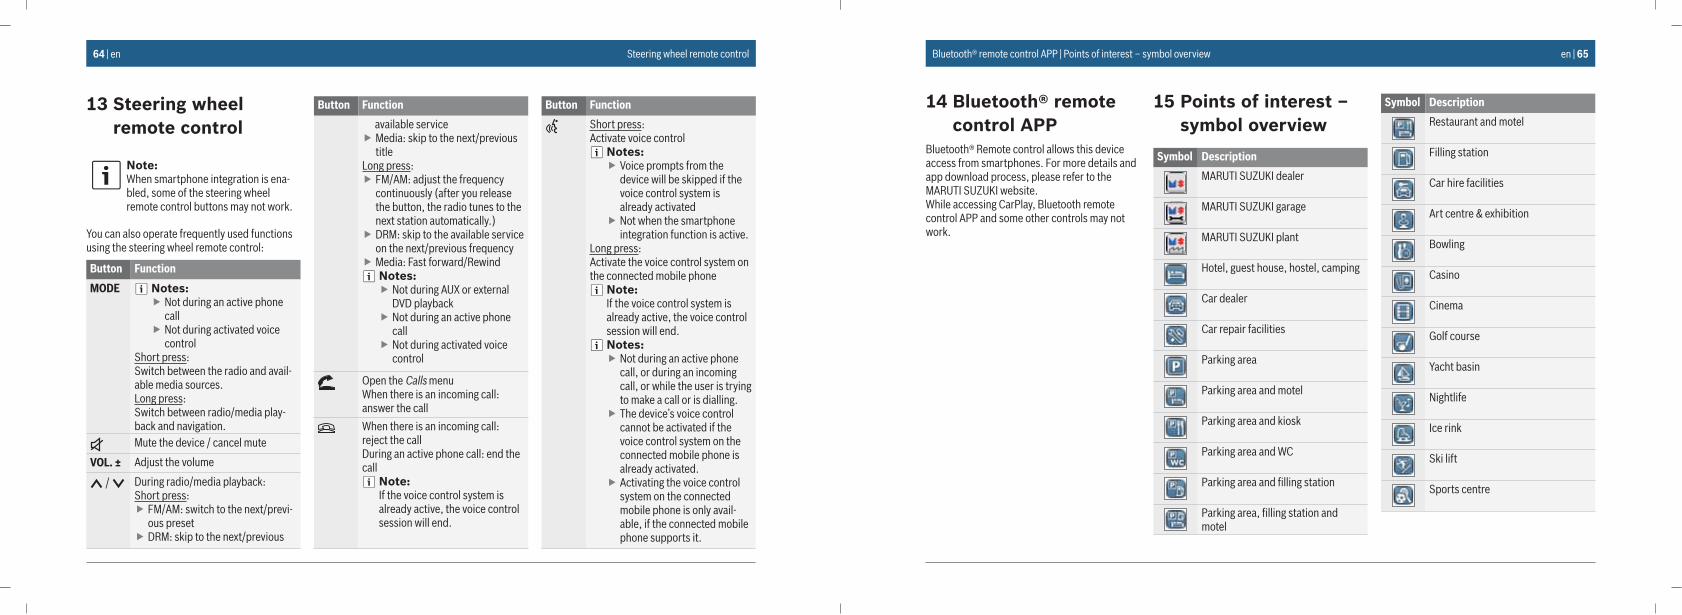
64 | en
13 Steering wheel remote control
Note:When smartphone integration is ena-bled, some of the steering wheel remote control buttons may not work.
You can also operate frequently used functions using the steering wheel remote control:
Button Function
MODE Notes: � Not during an active phone call
� Not during activated voice control
Short press:Switch between the radio and avail-able media sources.Long press:Switch between radio/media play-back and navigation.Mute the device / cancel mute
VOL. ± Adjust the volume
/ During radio/media playback:Short press:
� FM/AM: switch to the next/previ-ous preset
� DRM: skip to the next/previous
Button Function
available service � Media: skip to the next/previous title
Long press: � FM/AM: adjust the frequency continuously (after you release the button, the radio tunes to the next station automatically.)
� DRM: skip to the available service on the next/previous frequency
� Media: Fast forward/RewindNotes:
� Not during AUX or external DVD playback
� Not during an active phone call
� Not during activated voice control
Open the Calls menuWhen there is an incoming call: answer the call
When there is an incoming call: reject the callDuring an active phone call: end the call
Note:If the voice control system is already active, the voice control session will end.
Button Function
Short press:Activate voice control
Notes: � Voice prompts from the device will be skipped if the voice control system is already activated
� Not when the smartphone integration function is active.
Long press:Activate the voice control system on the connected mobile phone
Note:If the voice control system is already active, the voice control session will end.Notes:
� Not during an active phone call, or during an incoming call, or while the user is trying to make a call or is dialling.
� The device’s voice control cannot be activated if the voice control system on the connected mobile phone is already activated.
� Activating the voice control system on the connected mobile phone is only avail-able, if the connected mobile phone supports it.
Steering wheel remote control en | 65
14 Bluetooth® remote control APP
Bluetooth® Remote control allows this device access from smartphones. For more details and app download process, please refer to the MARUTI SUZUKI website.While accessing CarPlay, Bluetooth remote control APP and some other controls may not work.
15 Points of interest – symbol overview
Symbol Description
MARUTI SUZUKI dealer
MARUTI SUZUKI garage
MARUTI SUZUKI plant
Hotel, guest house, hostel, camping
Car dealer
Car repair facilities
Parking area
Parking area and motel
Parking area and kiosk
Parking area and WC
Parking area and filling station
Parking area, filling station and motel
Symbol Description
Restaurant and motel
Filling station
Car hire facilities
Art centre & exhibition
Bowling
Casino
Cinema
Golf course
Yacht basin
Nightlife
Ice rink
Ski lift
Sports centre
Bluetooth® remote control APP | Points of interest – symbol overview
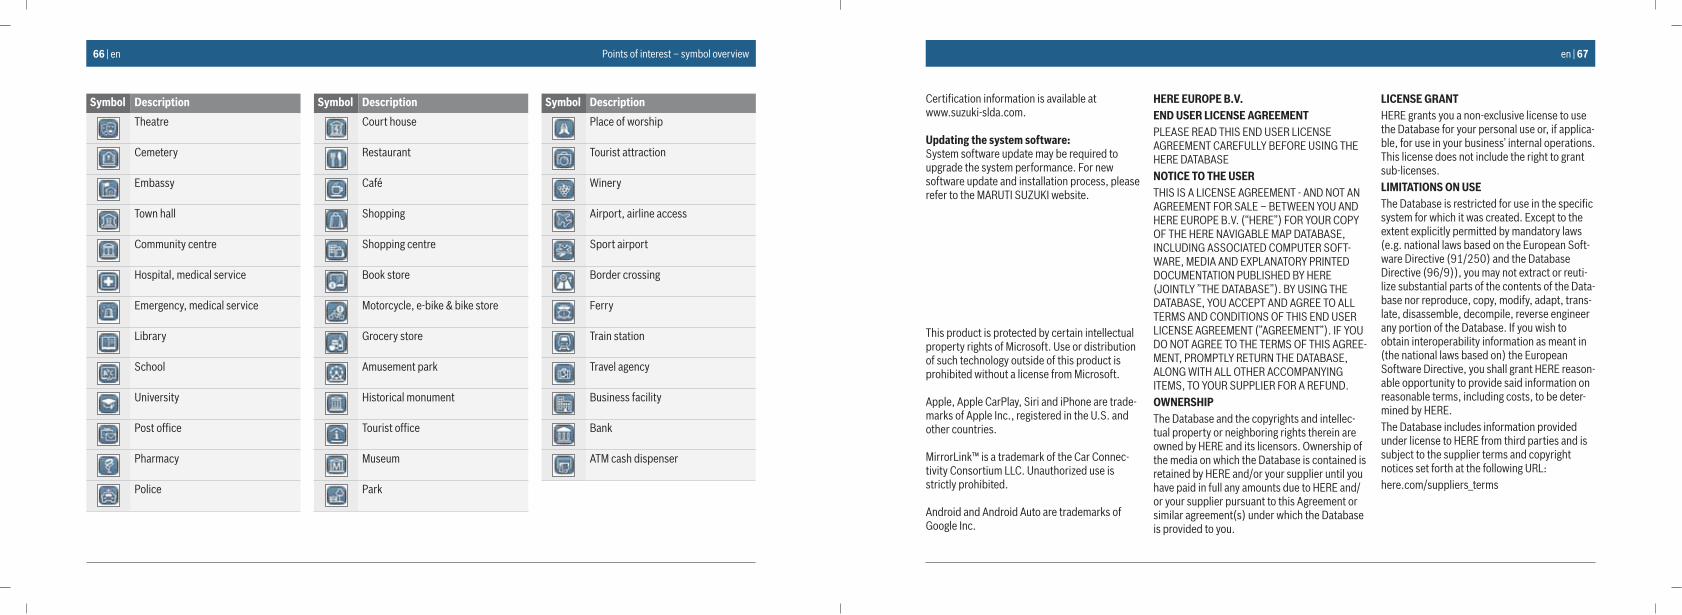
66 | en
Symbol Description
Theatre
Cemetery
Embassy
Town hall
Community centre
Hospital, medical service
Emergency, medical service
Library
School
University
Post office
Pharmacy
Police
Symbol Description
Court house
Restaurant
Café
Shopping
Shopping centre
Book store
Motorcycle, e-bike & bike store
Grocery store
Amusement park
Historical monument
Tourist office
Museum
Park
Symbol Description
Place of worship
Tourist attraction
Winery
Airport, airline access
Sport airport
Border crossing
Ferry
Train station
Travel agency
Business facility
Bank
ATM cash dispenser
Points of interest – symbol overview en | 67
Certification information is available at www.suzuki-slda.com.
Updating the system software:System software update may be required to upgrade the system performance. For new software update and installation process, please refer to the MARUTI SUZUKI website.
This product is protected by certain intellectual property rights of Microsoft. Use or distribution of such technology outside of this product is prohibited without a license from Microsoft.
Apple, Apple CarPlay, Siri and iPhone are trade-marks of Apple Inc., registered in the U.S. and other countries.
MirrorLink™ is a trademark of the Car Connec-tivity Consortium LLC. Unauthorized use is strictly prohibited.
Android and Android Auto are trademarks of Google Inc.
HERE EUROPE B.V.END USER LICENSE AGREEMENTPLEASE READ THIS END USER LICENSE AGREEMENT CAREFULLY BEFORE USING THE HERE DATABASENOTICE TO THE USERTHIS IS A LICENSE AGREEMENT - AND NOT AN AGREEMENT FOR SALE – BETWEEN YOU AND HERE EUROPE B.V. (“HERE”) FOR YOUR COPY OF THE HERE NAVIGABLE MAP DATABASE, INCLUDING ASSOCIATED COMPUTER SOFT-WARE, MEDIA AND EXPLANATORY PRINTED DOCUMENTATION PUBLISHED BY HERE (JOINTLY ”THE DATABASE”). BY USING THE DATABASE, YOU ACCEPT AND AGREE TO ALL TERMS AND CONDITIONS OF THIS END USER LICENSE AGREEMENT (”AGREEMENT”). IF YOU DO NOT AGREE TO THE TERMS OF THIS AGREE-MENT, PROMPTLY RETURN THE DATABASE, ALONG WITH ALL OTHER ACCOMPANYING ITEMS, TO YOUR SUPPLIER FOR A REFUND.OWNERSHIPThe Database and the copyrights and intellec-tual property or neighboring rights therein are owned by HERE and its licensors. Ownership of the media on which the Database is contained is retained by HERE and/or your supplier until you have paid in full any amounts due to HERE and/or your supplier pursuant to this Agreement or similar agreement(s) under which the Database is provided to you.
LICENSE GRANTHERE grants you a non-exclusive license to use the Database for your personal use or, if applica-ble, for use in your business’ internal operations. This license does not include the right to grant sub-licenses.LIMITATIONS ON USEThe Database is restricted for use in the specific system for which it was created. Except to the extent explicitly permitted by mandatory laws (e.g. national laws based on the European Soft-ware Directive (91/250) and the Database Directive (96/9)), you may not extract or reuti-lize substantial parts of the contents of the Data-base nor reproduce, copy, modify, adapt, trans-late, disassemble, decompile, reverse engineer any portion of the Database. If you wish to obtain interoperability information as meant in (the national laws based on) the European Software Directive, you shall grant HERE reason-able opportunity to provide said information on reasonable terms, including costs, to be deter-mined by HERE.The Database includes information provided under license to HERE from third parties and is subject to the supplier terms and copyright notices set forth at the following URL:here.com/suppliers_terms
68 | en
TRANSFER OF LICENSEYou may not transfer the Database to third par-ties, except when installed in the system for which it was created or when you do not retain any copy of the Database, and provided that the transferee agrees to all terms and conditions of this Agreement and confirms this in writing to HERE. Multi-disc sets may only be transferred or sold as a complete set as provided by HERE and not as subset thereof.LIMITED WARRANTYHERE warrants that, subject to the warnings set out below, for a period of 12 months after acqui-sition of your copy of the Database, it will per-form substantially in accordance with HERE’s Criteria for Accuracy and Completeness existing on the date you acquired the Database; these criteria are available from HERE at your request. If the Database does not perform in accordance with this limited warranty, HERE will use reason-able efforts to repair or replace your noncon-forming copy of the Database. If these efforts do not lead to performance of the Database in accordance with the warranties set out herein, you will have the option to either receive a rea-sonable refund of the price you paid for the Database or to rescind this Agreement. This shall be HERE’s entire liability and your sole rem-edy against HERE. Except as expressly provided in this section, HERE does not warrant nor make any representations regarding the use of results
of the use of the Database in terms of its cor-rectness, accuracy, reliability, or otherwise. HERE does not warrant that the Database is or will be error free. No oral or written information or advice provided by HERE, your supplier or any other person shall create a warranty or in any way increase the scope of the limited war-ranty described above. The limited warranty set forth in this Agreement does not affect or preju-dice any statutory legal rights that you may have under the legal warranty against hidden defects.If you did not acquire the Database from HERE directly, you may have statutory rights against the person from whom you have acquired the Database in addition to the rights granted by HERE hereunder according to the law of your jurisdiction. The above warranty of HERE shall not affect such statutory rights and you may assert such rights in addition to the warranty rights granted herein.LIMITATION OF LIABILITYThe price of the Database does not include any consideration for assumption of risk of conse-quential, indirect or unlimited direct damages which may arise in connection with your use of the Database. Accordingly, in no event shall HERE be liable for any consequential or indirect damages, including without limitation, loss of revenue, data, or use, incurred by you or any third party arising out of your use of the Data-base, whether in an action in contract or tort or
based on a warranty, even if HERE has been advised of the possibility of such damages. In any event HERE’s liability for direct damages is limited to the price of your copy of the Data-base.THE LIMITED WARRANTY AND LIMITATION OF LIABILITY, SET FORTH IN THIS AGREEMENT, DO NOT AFFECT OR PREJUDICE YOUR STATUTORY RIGHTS WHERE YOU HAVE ACQUIRED THE DATABASE OTHERWISE THAN IN THE COURSE OF A BUSINESS.WARNINGSThe Database may contain inaccurate or incom-plete information due to the passage of time, changing circumstances, sources used and the nature of collecting comprehensive geographic data, any of which may lead to incorrect results. The Database does not include or reflect infor-mation on - inter alia - travel time and may not include neighborhood safety; law enforcement; emergency assistance; construction work; road or lane closures; road slope or grade; bridge height, weight or other limits; road conditions; special events depending on the navigation system brand you possess.GOVERNING LAWThis Agreement shall be governed by the laws of the jurisdiction, in which you reside at the date of acquisition of the Database. Should you at that moment reside outside the European Union or Switzerland, the law of the jurisdiction within
en | 69
the European Union or Switzerland where you acquired the Database shall apply. In all other cases, or if the jurisdiction where you acquired the Database cannot be defined, the laws of the Netherlands shall apply. The courts competent at your place of residence at the time you acquired the Database shall have jurisdiction over any dispute arising out of, or relating to this Agreement, without prejudice to HERE’ right to bring claims at your then current place of resi-dence.
© 1987 HERE. All rights reserved.For more information on HERE productsand maps, please visit www.here.com
© 2014 SUZUKI MOTOR CORPORATION All rights reserved.No part of this document may be reproduced or transmitted in any form or by any means, elec-tronic or mechanical, for any purpose, without the express written permission of Suzuki Motor Corporation.