Embed Size (px)
Citation preview
SteelHead™ Installation and Configuration Guide
SteelHead™ CX (xx70), (x70), (xx55)SteelHead™ (xx50)
Version 9.0
May 2015

© 2015 Riverbed Technology, Inc. All rights reserved.
Riverbed and any Riverbed product or service name or logo used herein are trademarks of Riverbed. All other trademarks used herein belong to their respective owners. The trademarks and logos displayed herein cannot be used without the prior written consent of Riverbed or their respective owners.
Akamai® and the Akamai wave logo are registered trademarks of Akamai Technologies, Inc. SureRoute is a service mark of Akamai. Apple and Mac are registered trademarks of Apple, Incorporated in the United States and in other countries. Cisco is a registered trademark of Cisco Systems, Inc. and its affiliates in the United States and in other countries. EMC, Symmetrix, and SRDF are registered trademarks of EMC Corporation and its affiliates in the United States and in other countries. IBM, iSeries, and AS/400 are registered trademarks of IBM Corporation and its affiliates in the United States and in other countries. Juniper Networks and Junos are registered trademarks of Juniper Networks, Incorporated in the United States and other countries. Linux is a trademark of Linus Torvalds in the United States and in other countries. Microsoft, Windows, Vista, Outlook, and Internet Explorer are trademarks or registered trademarks of Microsoft Corporation in the United States and in other countries. Oracle and JInitiator are trademarks or registered trademarks of Oracle Corporation in the United States and in other countries. UNIX is a registered trademark in the United States and in other countries, exclusively licensed through X/Open Company, Ltd. VMware, ESX, ESXi are trademarks or registered trademarks of VMware, Inc. in the United States and in other countries.
This product includes Windows Azure Linux Agent developed by the Microsoft Corporation (http://www.microsoft.com/). Copyright 2012 Microsoft Corporation.
This product includes software developed by the University of California, Berkeley (and its contributors), EMC, and Comtech AHA Corporation. This product is derived from the RSA Data Security, Inc. MD5 Message-Digest Algorithm.
The SteelHead (virtual edition) Mobile Controller includes VMware Tools. Portions Copyright © 1998-2013 VMware, Inc. All Rights Reserved.
NetApp Manageability Software Development Kit (NM SDK), including any third-party software available for review with such SDK which can be found at http://communities.netapp.com/docs/DOC-1152, and are included in a NOTICES file included within the downloaded files.
For a list of open source software (including libraries) used in the development of this software along with associated copyright and license agreements, see the Riverbed Support site at https//support.riverbed.com.
This documentation is furnished “AS IS” and is subject to change without notice and should not be construed as a commitment by Riverbed. This documentation may not be copied, modified or distributed without the express authorization of Riverbed and may be used only in connection with Riverbed products and services. Use, duplication, reproduction, release, modification, disclosure or transfer of this documentation is restricted in accordance with the Federal Acquisition Regulations as applied to civilian agencies and the Defense Federal Acquisition Regulation Supplement as applied to military agencies. This documentation qualifies as “commercial computer software documentation” and any use by the government shall be governed solely by these terms. All other use is prohibited. Riverbed assumes no responsibility or liability for any errors or inaccuracies that may appear in this documentation.
Riverbed Technology 680 Folsom StreetSan Francisco, CA 94107
Fax: 415-247-8801Web: http://www.riverbed.com
Phone: 415-247-8800
Part Number712-00001-20
Part Number712-00001-20
Contents
Preface.........................................................................................................................................................1
About This Guide ..........................................................................................................................................1Audience ..................................................................................................................................................1Document Conventions .........................................................................................................................2
Documentation and Release Notes .............................................................................................................2
Safety Guidelines ...........................................................................................................................................2
Contacting Riverbed......................................................................................................................................3
Chapter 1 - Product Overview ...................................................................................................................5
Prerequisites ...................................................................................................................................................5Hardware and Software Dependencies...............................................................................................6SCC Compatibility..................................................................................................................................6Virtual Services Platform (VSP) Support ............................................................................................7Firewall Requirements ...........................................................................................................................7Ethernet Network Compatibility .........................................................................................................7SNMP-Based Management Compatibility..........................................................................................8
Overview of the SteelHead...........................................................................................................................8Autodiscovery Process.........................................................................................................................10Configuring Optimization...................................................................................................................10Fail-to-Wire (Bypass) Mode.................................................................................................................11Fail-to-Block (Disconnect) Mode ........................................................................................................12
New Features in Version 9.0.0b..................................................................................................................13
New Features in Version 9.0 .......................................................................................................................13
Upgrading RiOS to Version 9.0 ..................................................................................................................15Upgrade Considerations......................................................................................................................15Recommended Upgrade Paths ...........................................................................................................18Upgrading the RiOS Software Version ..............................................................................................18Downgrading the RiOS Software Version.........................................................................................19
Chapter 2 - Managing Riverbed Licenses ..............................................................................................21
Riverbed Licensing Methods .....................................................................................................................21
SteelHead Installation and Configuration Guide iii
Contents
Automatic Licensing ...................................................................................................................................22
Manual Licensing Using the Riverbed Licensing Portal........................................................................23Retrieving Licenses Using the Riverbed Licensing Portal..............................................................23
Installing Your License Keys ......................................................................................................................24
Chapter 3 - Installing and Configuring the SteelHead ..........................................................................25
Choosing a Network Deployment ............................................................................................................25
Checking Your Inventory............................................................................................................................27
Preparing Your Site for Installation...........................................................................................................28Site Requirements .................................................................................................................................28SteelHead Ports.....................................................................................................................................28Avoiding Duplex Mismatch................................................................................................................29Bypass Card Interface Naming Conventions ...................................................................................29Completing the Configuration Checklist .........................................................................................30
Powering On the System ............................................................................................................................31Securing the Power Cord on Desktop Systems................................................................................31
Configuring In-Path SteelHeads................................................................................................................32Connecting the SteelHead to Your Network ....................................................................................32Running the Configuration Wizard ...................................................................................................34Verifying You Are Connected to the SteelHead ...............................................................................38Connecting to the Management Console ..........................................................................................40Verifying WAN Optimization .............................................................................................................41Checking for Speed and Duplex Errors.............................................................................................41
Configuring Out-of-Path SteelHeads........................................................................................................42Connecting Out-of-Path SteelHeads to Your Network ...................................................................42Configuring the Server-Side SteelHead ............................................................................................42Configuring the Client-Side SteelHead .............................................................................................45
Chapter 4 - Troubleshooting....................................................................................................................49
Cables ............................................................................................................................................................49Solution ..................................................................................................................................................50
Duplex Mismatch.........................................................................................................................................50Possible Cause.......................................................................................................................................50
In-Path SteelHeads Connection .................................................................................................................51Possible Cause.......................................................................................................................................51
Oplock Issues................................................................................................................................................51Possible Causes .....................................................................................................................................52
CIFS Overlapping Open Optimization Denies Multi-User Access ......................................................52Solution ..................................................................................................................................................53
IP Address Configuration...........................................................................................................................54Solutions.................................................................................................................................................54
Asymmetric Routing ...................................................................................................................................55Possible Cause.......................................................................................................................................55
iv SteelHead Installation and Configuration Guide
Contents
Packet Ricochet.............................................................................................................................................55Possible Cause.......................................................................................................................................56
Packet Ricochet: ICMP Redirects...............................................................................................................56Possible Causes .....................................................................................................................................56
Simplified Routing.......................................................................................................................................56
Autodiscovery Failure.................................................................................................................................57Possible Causes .....................................................................................................................................57
Protocol Optimization Errors.....................................................................................................................58Solutions.................................................................................................................................................58
Server-Side Out-of-Path Connection Caveats..........................................................................................58
Specific Problems .........................................................................................................................................59
Resetting a Lost Password..........................................................................................................................59
Network Integration Checklist ..................................................................................................................61
Appendix A - SteelHead CX xx70 Appliance Specifications ................................................................63
CX3070 Specifications .................................................................................................................................63Status Lights and Ports ........................................................................................................................64Technical Specifications .......................................................................................................................66Power Requirements and Consumption...........................................................................................67Environmental Specifications .............................................................................................................67
CX5070 and CX7070 Specifications ...........................................................................................................67Status Lights and Ports ........................................................................................................................68Technical Specifications .......................................................................................................................71Power Requirements and Consumption...........................................................................................71Environmental Specifications .............................................................................................................72
Appendix B - SteelHead CX x70 Desktop Appliance Specifications ...................................................73
CX570 and CX770 Specifications ...............................................................................................................73Status Lights and Ports ........................................................................................................................73Technical Specifications .......................................................................................................................75Environmental Specifications .............................................................................................................75
Appendix C - SteelHead CX xx55 Appliance Specifications ................................................................77
CX255 Specifications ...................................................................................................................................77Status Lights and Ports ........................................................................................................................77Technical Specifications .......................................................................................................................79Environmental Specifications .............................................................................................................79
CX555 and CX755 Specifications ...............................................................................................................80Status Lights and Ports ........................................................................................................................80Technical Specifications .......................................................................................................................81Environmental Specifications .............................................................................................................82
CX1555 Specifications .................................................................................................................................82Status Lights and Ports ........................................................................................................................82
SteelHead Installation and Configuration Guide v

Contents
Technical Specifications .......................................................................................................................83Power Requirements and Consumption...........................................................................................84Environmental Specifications .............................................................................................................84
CX5055 and CX7055 Specifications ...........................................................................................................85Status Lights and Ports ........................................................................................................................85Technical Specifications .......................................................................................................................87Power Requirements and Consumption...........................................................................................87Environmental Specifications .............................................................................................................88
Appendix D - SteelHead CX xx50 Appliance Specifications ................................................................89
150, 250, and 550 Specifications .................................................................................................................89Status Lights and Ports ........................................................................................................................89Technical Specifications .......................................................................................................................91Environmental Specifications .............................................................................................................91
1050 and 2050 Specifications ......................................................................................................................92Status Lights and Ports ........................................................................................................................92Technical Specifications .......................................................................................................................94Environmental Specifications .............................................................................................................95
5050 and 6050 Specifications ......................................................................................................................95Status Lights and Ports ........................................................................................................................95Technical Specifications .......................................................................................................................97Environmental Specifications .............................................................................................................97
7050 Specifications .......................................................................................................................................98Status Lights and Ports ........................................................................................................................98Technical Specifications .....................................................................................................................100Environmental Specifications ...........................................................................................................101
Index ........................................................................................................................................................103
vi SteelHead Installation and Configuration Guide
Preface
Welcome to the SteelHead Installation and Configuration Guide (SteelHead, SteelHead CX). Read this preface for an overview of the information provided in this guide and for an understanding of the documentation conventions used throughout. This preface includes the following sections:
“About This Guide” on page 1
“Documentation and Release Notes” on page 2
“Safety Guidelines” on page 2
“Contacting Riverbed” on page 3
About This Guide
The SteelHead Installation and Configuration Guide describes how to install and configure the SteelHead. It also describes the status lights and specifications for the system.
This guide includes information relevant to these products:
Riverbed Optimization System (RiOS)
Riverbed SteelHead (SteelHead)
Riverbed SteelHead CX (SteelHead CX)
Riverbed SteelHead (Virtual Appliance) (SteelHead-v)
Riverbed SteelHead (in the cloud) (SteelHead-c)
Riverbed Command-Line Interface (CLI)
Riverbed Services Platform (RSP)
Audience
This guide is written for storage and network administrators familiar with administering and managing WANs using common network protocols such as TCP, CIFS, HTTP, FTP, and NFS.
This guide is also for users who are using the Riverbed Command-Line Interface as described in the Riverbed Command-Line Interface Reference Manual.
SteelHead Installation and Configuration Guide 1
Preface Documentation and Release Notes
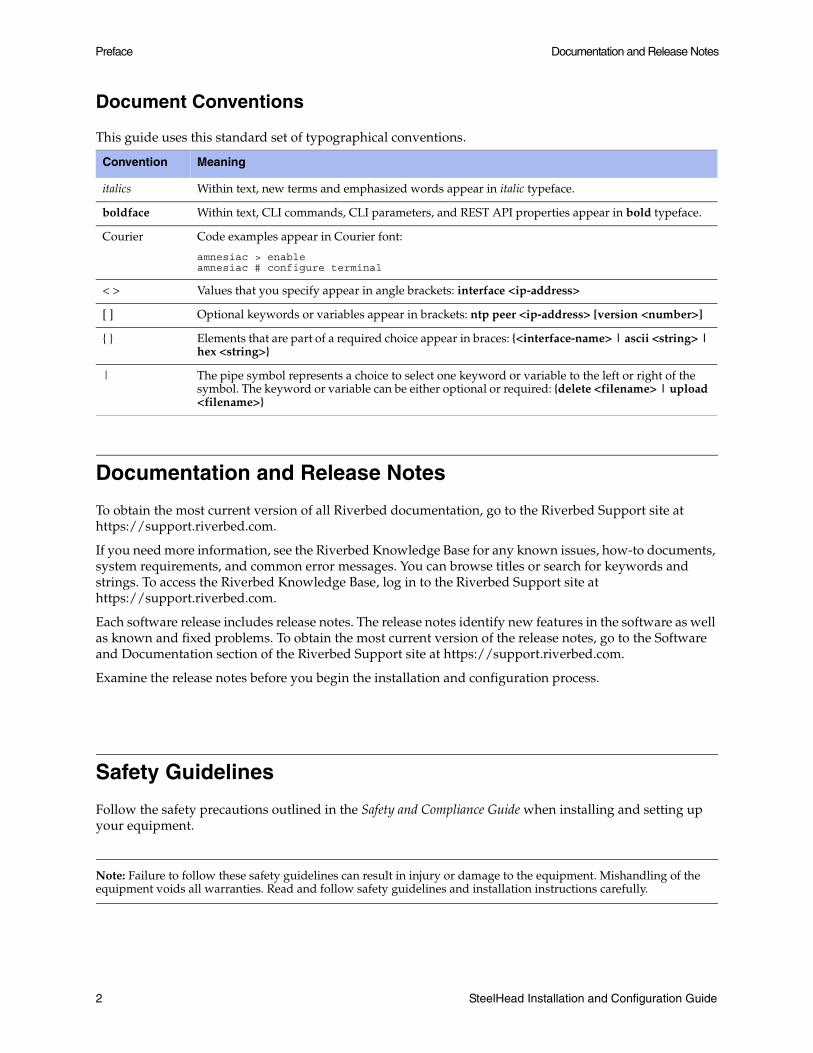
Document Conventions
This guide uses this standard set of typographical conventions.
Documentation and Release Notes
To obtain the most current version of all Riverbed documentation, go to the Riverbed Support site at https://support.riverbed.com.
If you need more information, see the Riverbed Knowledge Base for any known issues, how-to documents, system requirements, and common error messages. You can browse titles or search for keywords and strings. To access the Riverbed Knowledge Base, log in to the Riverbed Support site at https://support.riverbed.com.
Each software release includes release notes. The release notes identify new features in the software as well as known and fixed problems. To obtain the most current version of the release notes, go to the Software and Documentation section of the Riverbed Support site at https://support.riverbed.com.
Examine the release notes before you begin the installation and configuration process.
Safety Guidelines
Follow the safety precautions outlined in the Safety and Compliance Guide when installing and setting up your equipment.
Note: Failure to follow these safety guidelines can result in injury or damage to the equipment. Mishandling of the equipment voids all warranties. Read and follow safety guidelines and installation instructions carefully.
Convention Meaning
italics Within text, new terms and emphasized words appear in italic typeface.
boldface Within text, CLI commands, CLI parameters, and REST API properties appear in bold typeface.
Courier Code examples appear in Courier font:
amnesiac > enableamnesiac # configure terminal
< > Values that you specify appear in angle brackets: interface <ip-address>
[ ] Optional keywords or variables appear in brackets: ntp peer <ip-address> [version <number>]
{ } Elements that are part of a required choice appear in braces: {<interface-name> | ascii <string> | hex <string>}
| The pipe symbol represents a choice to select one keyword or variable to the left or right of the symbol. The keyword or variable can be either optional or required: {delete <filename> | upload <filename>}
2 SteelHead Installation and Configuration Guide
Contacting Riverbed Preface
Many countries require the safety information to be presented in their national languages. If this requirement applies to your country, consult the Safety and Compliance Guide. Before you install, operate, or service the Riverbed products, you must be familiar with the safety information. Refer to the Safety and Compliance Guide if you do not clearly understand the safety information provided in the product documentation.
Contacting Riverbed
This section describes how to contact departments within Riverbed.
Technical support - If you have problems installing, using, or replacing Riverbed products, contact Riverbed Support or your channel partner who provides support. To contact Riverbed Support, open a trouble ticket by calling 1-888-RVBD-TAC (1-888-782-3822) in the United States and Canada or +1 415-247-7381 outside the United States. You can also go to https://support.riverbed.com.
Professional services - Riverbed has a staff of professionals who can help you with installation, provisioning, network redesign, project management, custom designs, consolidation project design, and custom coded solutions. To contact Riverbed Professional Services, email [email protected] or go to http://www.riverbed.com/services-training/Services-Training.html.
Documentation - The Riverbed Technical Publications team continually strives to improve the quality and usability of Riverbed documentation. Riverbed appreciates any suggestions you might have about its online documentation or printed materials. Send documentation comments to [email protected].
SteelHead Installation and Configuration Guide 3

Preface Contacting Riverbed
4 SteelHead Installation and Configuration Guide
CHAPTER 1 Product Overview
This chapter provides an overview of common terms, new features, upgrade instructions, technical and environmental specifications, and a description of the status lights for the system. This chapter includes these sections:
“Prerequisites” on page 5
“Overview of the SteelHead” on page 8
“New Features in Version 9.0.0b” on page 13
“New Features in Version 9.0” on page 13
“Upgrading RiOS to Version 9.0” on page 15
Prerequisites
This section provides information about product dependencies and compatibility.
SteelHead Installation and Configuration Guide 5
Product Overview Prerequisites
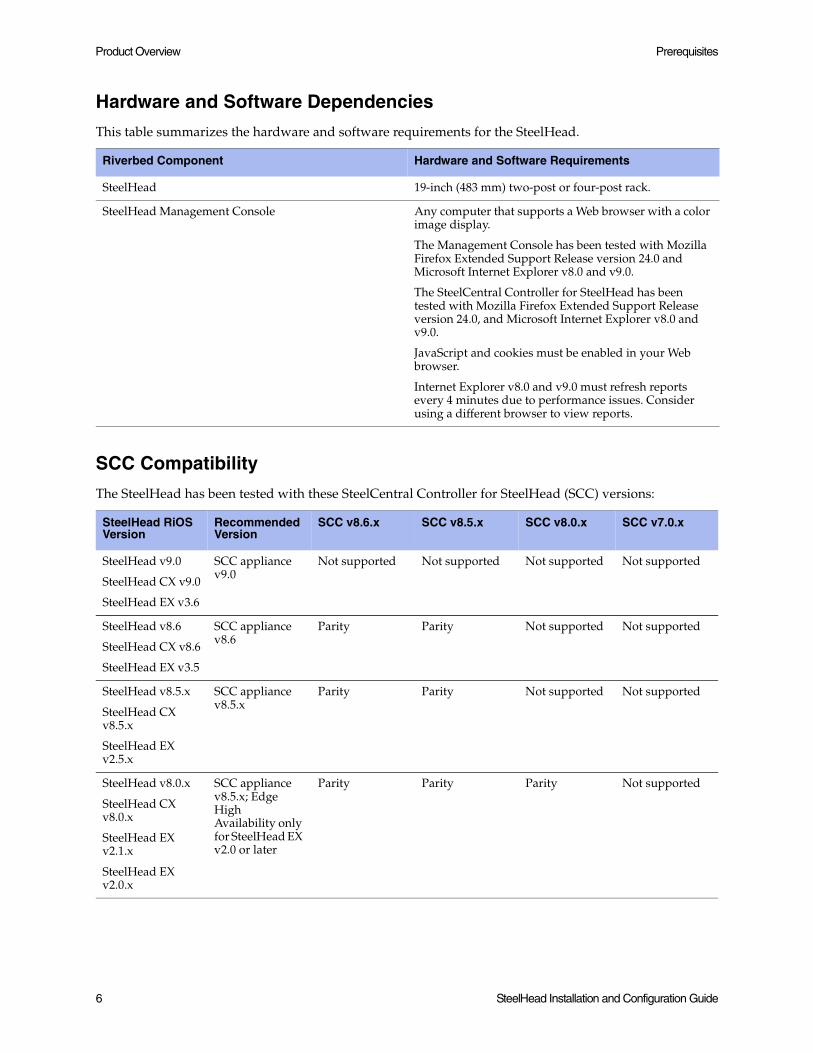
Hardware and Software Dependencies
This table summarizes the hardware and software requirements for the SteelHead.
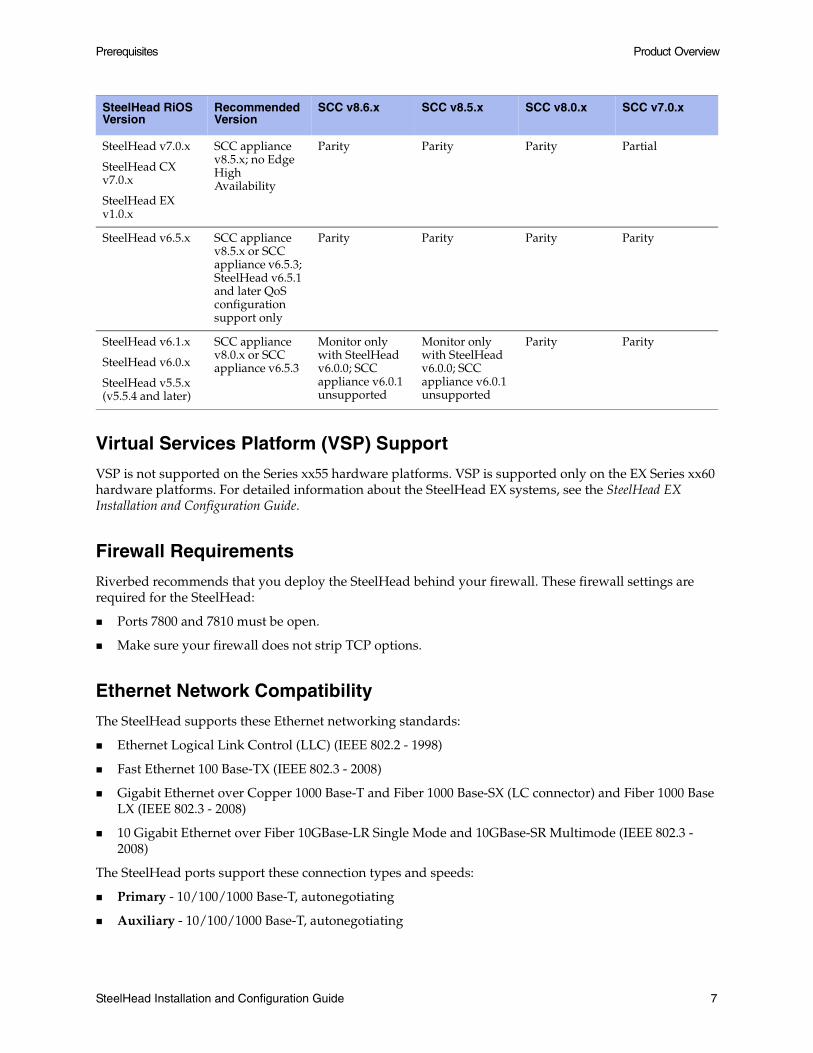
SCC Compatibility
The SteelHead has been tested with these SteelCentral Controller for SteelHead (SCC) versions:
Riverbed Component Hardware and Software Requirements
SteelHead 19-inch (483 mm) two-post or four-post rack.
SteelHead Management Console Any computer that supports a Web browser with a color image display.
The Management Console has been tested with Mozilla Firefox Extended Support Release version 24.0 and Microsoft Internet Explorer v8.0 and v9.0.
The SteelCentral Controller for SteelHead has been tested with Mozilla Firefox Extended Support Release version 24.0, and Microsoft Internet Explorer v8.0 and v9.0.
JavaScript and cookies must be enabled in your Web browser.
Internet Explorer v8.0 and v9.0 must refresh reports every 4 minutes due to performance issues. Consider using a different browser to view reports.
SteelHead RiOS Version
Recommended Version
SCC v8.6.x SCC v8.5.x SCC v8.0.x SCC v7.0.x
SteelHead v9.0
SteelHead CX v9.0
SteelHead EX v3.6
SCC appliance v9.0
Not supported Not supported Not supported Not supported
SteelHead v8.6
SteelHead CX v8.6
SteelHead EX v3.5
SCC appliance v8.6
Parity Parity Not supported Not supported
SteelHead v8.5.x
SteelHead CX v8.5.x
SteelHead EX v2.5.x
SCC appliance v8.5.x
Parity Parity Not supported Not supported
SteelHead v8.0.x
SteelHead CX v8.0.x
SteelHead EX v2.1.x
SteelHead EX v2.0.x
SCC appliance v8.5.x; Edge High Availability only for SteelHead EX v2.0 or later
Parity Parity Parity Not supported
6 SteelHead Installation and Configuration Guide
Prerequisites Product Overview
Virtual Services Platform (VSP) Support
VSP is not supported on the Series xx55 hardware platforms. VSP is supported only on the EX Series xx60 hardware platforms. For detailed information about the SteelHead EX systems, see the SteelHead EX Installation and Configuration Guide.
Firewall Requirements
Riverbed recommends that you deploy the SteelHead behind your firewall. These firewall settings are required for the SteelHead:
Ports 7800 and 7810 must be open.
Make sure your firewall does not strip TCP options.
Ethernet Network Compatibility
The SteelHead supports these Ethernet networking standards:
Ethernet Logical Link Control (LLC) (IEEE 802.2 - 1998)
Fast Ethernet 100 Base-TX (IEEE 802.3 - 2008)
Gigabit Ethernet over Copper 1000 Base-T and Fiber 1000 Base-SX (LC connector) and Fiber 1000 Base LX (IEEE 802.3 - 2008)
10 Gigabit Ethernet over Fiber 10GBase-LR Single Mode and 10GBase-SR Multimode (IEEE 802.3 - 2008)
The SteelHead ports support these connection types and speeds:
Primary - 10/100/1000 Base-T, autonegotiating
Auxiliary - 10/100/1000 Base-T, autonegotiating
SteelHead v7.0.x
SteelHead CX v7.0.x
SteelHead EX v1.0.x
SCC appliance v8.5.x; no Edge High Availability
Parity Parity Parity Partial
SteelHead v6.5.x SCC appliance v8.5.x or SCC appliance v6.5.3; SteelHead v6.5.1 and later QoS configuration support only
Parity Parity Parity Parity
SteelHead v6.1.x
SteelHead v6.0.x
SteelHead v5.5.x (v5.5.4 and later)
SCC appliance v8.0.x or SCC appliance v6.5.3
Monitor only with SteelHead v6.0.0; SCC appliance v6.0.1 unsupported
Monitor only with SteelHead v6.0.0; SCC appliance v6.0.1 unsupported
Parity Parity
SteelHead RiOS Version
Recommended Version
SCC v8.6.x SCC v8.5.x SCC v8.0.x SCC v7.0.x
SteelHead Installation and Configuration Guide 7
Product Overview Overview of the SteelHead
LAN - 10/100 Base-TX, 1000 Base-T, 1000 Base-SX, 1000 Base-LX, 10GBase-LR, or 10GBase-SR, depending on configuration
WAN - 10/100 Base-TX, 1000 Base-T, 1000 Base-SX, 1000 Base-LX, 10GBase-LR, or 10GBase-SR, depending on configuration
1000 Base-SX and 1000 Base-LX interface options are not available for the SteelHead 150, 250, and 550 models.
The SteelHead supports VLAN Tagging (IEEE 802.3 - 2008). It does not support the ISL protocol.
All copper interfaces are autosensing for speed and duplex (IEEE 802.3 - 2008).
The SteelHead autonegotiates speed and duplex mode for all data rates and supports full duplex mode and flow control (IEEE 802.3 - 2008).
The SteelHead with a Gigabit Ethernet card supports jumbo frames on in-path and primary ports.
SNMP-Based Management Compatibility
This product supports a proprietary Riverbed MIB accessible through SNMP. SNMPv1 (RFCs 1155, 1157, 1212, and 1215), SNMPv2c (RFCs 1901, 2578, 2579, 2580, 3416, 3417, and 3418), and SNMPv3 are supported, although some MIB items might only be accessible through SNMPv2 and SNMPv3.
SNMP support enables the product to be integrated into network management systems such as Hewlett-Packard OpenView Network Node Manager, BMC Patrol, and other SNMP-based network management tools.
Overview of the SteelHead
The causes for slow throughput in WANs are well known: high delay (round-trip time or latency), limited bandwidth, and chatty application protocols. Large enterprises spend a significant portion of their information technology budgets on storage and networks, much of it spent to compensate for slow throughput, by deploying redundant servers and storage, and the required backup equipment. SteelHeads enable you to consolidate and centralize key IT resources to save money, reduce capital expenditures, simplify key business processes, and improve productivity.
With the SteelHead, you can solve a range of problems affecting WANs and application performance, including:
Insufficient WAN bandwidth
Inefficient transport protocols in high-latency environments
Inefficient application protocols in high-latency environments
The Riverbed Optimization System (RiOS) intercepts client-server connections without interfering with normal client-server interactions, file semantics, or protocols. All client requests are passed through to the server normally, while relevant traffic is optimized to improve performance.
8 SteelHead Installation and Configuration Guide
Overview of the SteelHead Product Overview
The optimization techniques RiOS utilizes are:
Data Streamlining - SteelHeads and SteelCentral Controller for SteelHead Mobile can reduce WAN bandwidth utilization by 65% to 98% for TCP-based applications using data streamlining. In addition to traditional techniques like data compression, RiOS also uses a Riverbed proprietary algorithm called scalable data referencing (SDR). SDR breaks up TCP data streams into unique data chunks that are stored in the hard disk (RiOS data store) of the device running RiOS (a SteelHead or SteelCentral Controller for SteelHead Mobile host system). Each data chunk is assigned a unique integer label (reference) before it is sent to a peer RiOS device across the WAN. When the same byte sequence is seen again in future transmissions from clients or servers, the reference is sent across the WAN instead of the raw data chunk. The peer RiOS device (a SteelHead or SteelCentral Controller for SteelHead Mobile host system) uses this reference to find the original data chunk on its RiOS data store, and reconstruct the original TCP data stream.
Transport Streamlining - SteelHeads use a generic latency optimization technique called transport streamlining. Transport streamlining uses a set of standards and proprietary techniques to optimize TCP traffic between SteelHeads. These techniques:
– ensure that efficient retransmission methods, such as TCP selective acknowledgements, are used.
– negotiate optimal TCP window sizes to minimize the impact of latency on throughput.
– maximize throughput across a wide range of WAN links.
Application Streamlining - In addition to data and transport streamlining optimizations, RiOS can apply application-specific optimizations for certain application protocols. For example, CIFS, MAPI, NFS, TDS, HTTP, and Oracle Forms.
Management Streamlining - Management streamlining refers to the methods that Riverbed has developed to simplify the deployment and management of RiOS devices. These methods include:
– Autodiscovery Process - Autodiscovery enables SteelHeads and SteelCentral Controller for SteelHead Mobile to automatically find remote SteelHeads, and to then optimize traffic using them. Autodiscovery relieves you from having to manually configure large amounts of network information. The autodiscovery process enables administrators to control and secure connections, specify which traffic is to be optimized, and specify peers for optimization.
– SteelCentral Controller for SteelHead (SCC) - The SCC automatically configures and monitors remote SteelHeads. It also gives you a single view of the overall benefit and health of the SteelHead network.
– SteelHead Mobile Controller - The Mobile Controller is the management appliance you use to track the individual health and performance of each deployed software client, and to manage enterprise client licensing. The Mobile Controller enables you to see who is connected, view their data reduction statistics, and perform support operations such as resetting connections, pulling logs, and automatically generating traces for troubleshooting. You can perform all of these management tasks without end user input.
SteelHead Installation and Configuration Guide 9
Product Overview Overview of the SteelHead
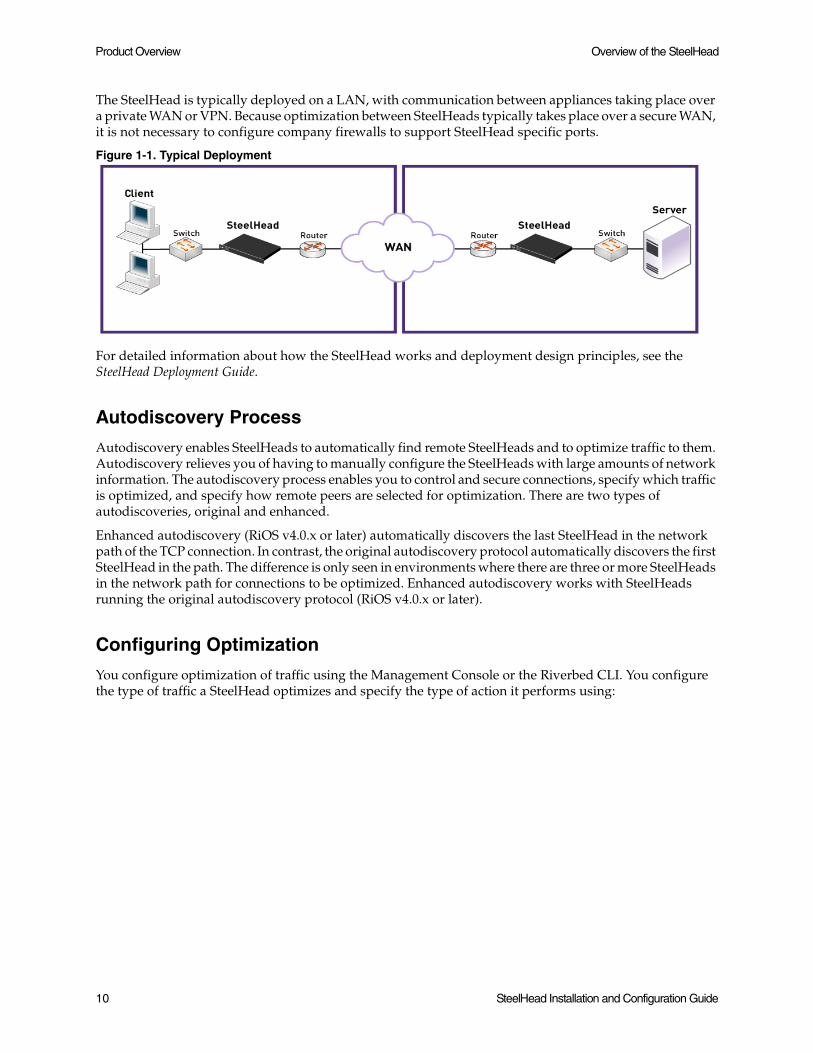
The SteelHead is typically deployed on a LAN, with communication between appliances taking place over a private WAN or VPN. Because optimization between SteelHeads typically takes place over a secure WAN, it is not necessary to configure company firewalls to support SteelHead specific ports.
Figure 1-1. Typical Deployment
For detailed information about how the SteelHead works and deployment design principles, see the SteelHead Deployment Guide.
Autodiscovery Process
Autodiscovery enables SteelHeads to automatically find remote SteelHeads and to optimize traffic to them. Autodiscovery relieves you of having to manually configure the SteelHeads with large amounts of network information. The autodiscovery process enables you to control and secure connections, specify which traffic is optimized, and specify how remote peers are selected for optimization. There are two types of autodiscoveries, original and enhanced.
Enhanced autodiscovery (RiOS v4.0.x or later) automatically discovers the last SteelHead in the network path of the TCP connection. In contrast, the original autodiscovery protocol automatically discovers the first SteelHead in the path. The difference is only seen in environments where there are three or more SteelHeads in the network path for connections to be optimized. Enhanced autodiscovery works with SteelHeads running the original autodiscovery protocol (RiOS v4.0.x or later).
Configuring Optimization
You configure optimization of traffic using the Management Console or the Riverbed CLI. You configure the type of traffic a SteelHead optimizes and specify the type of action it performs using:
10 SteelHead Installation and Configuration Guide
Overview of the SteelHead Product Overview
In-Path rules - In-path rules determine the action a SteelHead takes when a connection is initiated, usually by a client. In-path rules are used only when a connection is initiated. Because connections are usually initiated by clients, in-path rules are configured for the initiating, or client-side SteelHead. You configure one of these types of in-path rule actions:
– Auto Discover - Use the autodiscovery process to determine if a remote SteelHead is able to optimize the connection attempting to be created by this SYN packet.
– Fixed-Target - Skip the autodiscovery process and use a specified remote SteelHead as an optimization peer. Fixed-target rules require the input of at least one remote target SteelHead; an optional backup SteelHead might also be specified.
– Fixed-Target (Packet Mode Optimization) - Skip the autodiscovery process and uses a specified remote SteelHead as an optimization peer to perform bandwidth optimization on TCPv4, TCPv6, UDPv4, or UDPv6 connections. Packet-mode optimization rules support both physical in-path and master/backup SteelHead configurations. For details, see the SteelHead Management Console User’s Guide.
– Pass-Through - Allow the SYN packet to pass through the SteelHead. No optimization is performed on the TCP connection initiated by this SYN packet.
– Discard - Drop the SYN packet silently.
– Deny - Drop the SYN packet and send a message back to its source.
Peering rules - Peering rules determine how a SteelHead reacts when it sees a probe query. Peering rules are an ordered list of fields a SteelHead uses to match with incoming SYN packet fields. For example, source or destination subnet, IP address, VLAN, or TCP port, as well as the IP address of the probing SteelHead. This is especially useful in complex networks. These types of peering rule are available:
– Auto - If the receiving SteelHead is not using enhanced autodiscovery, this has the same effect as the Accept peering rule action. If enhanced autodiscovery is enabled, the SteelHead only becomes the optimization peer if it is the last SteelHead in the path to the server.
– Accept - The receiving SteelHead responds to the probing SteelHead and becomes the remote-side SteelHead (that is, the peer SteelHead) for the optimized connection.
– Passthrough - The receiving SteelHead does not respond to the probing SteelHead, and allows the SYN+ probe packet to continue through the network.
For detailed information about in-path and peering rules and how to configure them, see the SteelHead Management Console User’s Guide.
Fail-to-Wire (Bypass) Mode
All SteelHead models and in-path network interface cards support a fail-to-wire mode. In the event of a failure or loss of power, the SteelHead goes into bypass mode and the traffic passes through uninterrupted.
Many in-path network interface cards (NICs) also support a fail-to-block mode in which case if there is a failure or loss of power, the SteelHead LAN and WAN interfaces power down and stop bridging traffic. The default failure mode is fail-to-wire mode.
If there is a serious problem with the SteelHead or it is not powered on, it goes into bypass mode to prevent a single point of failure. If the SteelHead is in bypass mode, you are notified in these ways:
The Intercept/Bypass status light on the bypass card is triggered. For detailed information about bypass card status lights, see the appendices that follow.
SteelHead Installation and Configuration Guide 11

Product Overview Overview of the SteelHead
The Dashboard of the Management Console displays the Critical health icon next to the appliance name.
SNMP traps are sent (if you have set this option).
The event is logged to system logs (syslog).
Email notifications are sent (if you have set this option).
When the fault is corrected, new connections that are made receive optimization; however, connections made during the fault are not. To force all connections to be optimized, enable the kickoff feature. Generally, connections are short-lived and kickoff is not necessary. For detailed information about enabling the kickoff feature, see the SteelHead Management Console User’s Guide and the SteelHead Deployment Guide.
When the SteelHead is in bypass mode the traffic passes through uninterrupted. Traffic that was optimized might be interrupted, depending on the behavior of the application-layer protocols. When connections are restored, they succeed, although without optimization.
In an out-of-path deployment, if the server-side SteelHead fails, the first connection from the client fails. After detecting that the SteelHead is not functioning, a ping channel is setup from the client-side SteelHead to the server-side SteelHead. Subsequent connections are passed through unoptimized. When the ping succeeds, processing is restored and subsequent connections are intercepted and optimized.
For detailed information about the ping command, see the Riverbed Command-Line Interface Reference Manual.
Fail-to-Block (Disconnect) Mode
In fail-to-block mode, if the SteelHead has an internal software failure or power loss, the SteelHead LAN and WAN interfaces power down and stop bridging traffic.
When fail-to-block is enabled, a failed SteelHead blocks traffic along its path, forcing traffic to be rerouted onto other paths (where the remaining SteelHeads are deployed). This is only useful if the network has a routing or switching infrastructure that can automatically divert traffic off of the link once the failed SteelHead blocks it.
Note: You can use this with connection-forwarding, the allow-failure CLI command, and an additional SteelHead on another path to the WAN to achieve redundancy. For more information, see the Riverbed Command-Line Interface Reference Manual.
You set fail-to-block mode in the SteelHead CLI. For detailed information, see the SteelHead Deployment Guide.
12 SteelHead Installation and Configuration Guide
New Features in Version 9.0.0b Product Overview
New Features in Version 9.0.0b
This section provides an overview of the new features available in RiOS v9.0.0.b.
New Appliance Models - RiOS v9.0.0b supports the CX3070, CX5070, and CX7070 appliances.
New Features in Version 9.0
This section provides an overview of the new features available in RiOS v9.0. For details, see the SteelHead Management Console User’s Guide, the SteelHead Deployment Guide, the SteelHead Deployment Guide - Protocols, the Riverbed Command-Line Interface Reference Manual, the SteelCentral Controller for SteelHead User’s Guide, and the SteelCentral Controller for SteelHead Deployment Guide.
Secure Transport Service - Enables simple, manageable group encryption for path selection deployments. Automatically encrypts data regardless of the path (including optimized and nonoptimized traffic). Secures traffic flowing between any two SteelHeads for private (MPLS) and Internet links by directing it to a secured uplink using path selection service rules. Secure transport uses standards-based encryption for added security and regulatory compliance.
SteelCentral Controller v9.0 or later is required to enable and configure secure transport for path selection.
Hybrid Network Topology, Application, and Site Definitions - Introduces a topology-oriented management approach aimed at simplifying the configuration and administrative upkeep of hybrid network services. Define a simplified virtual representation of your network WAN topology to help the SteelHead and SteelCentral Controller for SteelHead (formerly the Central Management Console) manage the connectivity relationships and WAN capacities. The topology and site definitions are important for path selection, secure transport, and QoS, because these features have site-dependent rules and dependencies.
RiOS v9.0 also changes the way you define and manage application classification criteria. Applications are now defined as objects that you can use in QoS and path selection rules and view in dashboards. In addition to the 1100+ Riverbed application flow engine (AFE) defined application objects, you can define custom application objects based on any number of IP header criteria and AFE named applications. Each application object includes three new properties based on business-level groupings: application group, functional category, and business criticality level. These properties are a useful way to organize a large number of application objects into a smaller number of objects to manage in rules.
Streamlined QoS Configuration - Simplifies QoS configuration and leverages the previous basic QoS model with the added ability to create custom QoS profiles and classes on a per-site exception basis. This improved QoS user interface includes an easy-to-use QoS class hierarchy editor.
Enhanced Inbound QoS - Inbound QoS now supports hierarchical QoS classes. This provides more granular control over inbound traffic usage. The same QoS rules can now be applied to both inbound or outbound traffic.
QoS Migration - This release supports the option to migrate RiOS v8.5.x or v8.6.x basic and advanced QoS configurations to v9.0 QoS profiles. However, Riverbed recommends rebuilding your QoS configuration rather than migrating an old configuration to take advantage of the v9.0 powerful QoS profiles, application objects, simplified topology model, and path selection features.
Note that to preserve the underlying behavior of the original QoS configuration when migrating a legacy advanced QoS configuration, the result might be an overtly verbose and suboptimal set of QoS profiles, classes, and topology model.
SteelHead Installation and Configuration Guide 13
Product Overview New Features in Version 9.0
For complex QoS migration assistance, please contact your local Riverbed representative.
Easy-to-Use Path Selection Capabilities - Enables you to more accurately control traffic flow across multiple WAN circuits within hybrid networks. RiOS v9.0 uses the concept of application groups to define path selection rules that include the global performance for an application, including the latency priority. Simplified configuration lets you define path selection rules for application groups such as business bulk (file transfer applications and protocols), business critical (low latency, transactional applications and protocols), business productivity (general business-level applications and protocols), business standard (intranetwork traffic going within local subnets), business video, and so on.
Expanded Exchange Server Qualifications - Expands the Exchange 2013 server qualifications. The qualifications include:
– All Exchange 2013 Cumulative Updates
– Windows Server 2012 R2 with Exchange 2013 SP1 (CU4)
– Win 2012 R2 with Exchange 2010 SP3
– Win 2008 R2 with Exchange 2010 SP3
Improved SMB2/3 Performance - Includes SMB2/3 resiliency and graceful recovery for signed and unsigned connections from NULL pointer dereference and invalid packet handling, significantly reducing SteelHead optimization service interruption or downtime.
SMB3.02 Support - Includes SMB3.02 dialect support when enabling SMB3 on a SteelHead. SMB3.02 was introduced by Microsoft in Windows 8.1 and Windows Server 2012 R2. SMB3.02 is only negotiated when systems of these operating system versions are directly connected. SMB3.02 is qualified with SMB3.02 signed and unsigned traffic over IPv4 and IPv6, and encrypted connections over IPv4 and IPv6. Authenticated connections between a server-side SteelHead and a domain controller are only supported over IPv4.
SteelCentral AppResponse with SteelHead Integration - Extends end-user visibility and troubleshooting to SteelHead-optimized and nonoptimized enterprise Web and software as a service (SaaS) applications. In SteelHead-based deployments where a SteelCentral AppResponse version 9.5 appliance is present, you can use the SteelCentral Controller for SteelHead version 9.0 to configure the communication between the SteelHeads and the AppResponse appliances. This integrated solution provides visibility into a wide variety of issues such as where the service delays are occurring on the network and how well the SteelHead is performing.
Redesigned User Experience, New Dashboard, and Streamlined Work Flows - Improves configuration work flows, usability, and readability. The new design refreshes the SteelHead Management Console with these changes and more:
– The Home page is now called the Dashboard. The new Dashboard highlights the product name, appliance name, and appliance health status along with the optimized throughput and bandwidth optimization statistics.
– The previous cascading, hierarchical menu structure is now flat to provide easier navigation. This new structure also makes specific content more accessible.
– The new UI design focuses on the minimalist use of common controls, typography, and flat colors for better readability and attractiveness.
Improved User Permissions Page - Includes permission for all other RBM roles and permission to perform appliance administration, minimizing the need to assign an administrator role that grants full read-write access to all areas of the appliance. The page now merges the capability-based and role-based user tables into one Accounts table. In addition, the default user setting has been relocated from the General Security Settings page to the User Permissions page.
14 SteelHead Installation and Configuration Guide

Upgrading RiOS to Version 9.0 Product Overview
Improved SSL - Enhances SSL optimization performance and scalability in these ways:
– Decreases the amount of memory used per SSL connection.
– Increases the number of connections per second for a SteelHead running in the Federal Information Processing Standard (FIPS) mode.
Improved TCP Dump Diagnostic Tool - Includes a more resilient SNAP length configuration from the Management Console.
SteelHead (Virtual Edition) Performance and Benchmarking Tests - Provides a way to qualify and validate the performance of a target SteelHead-v model in your virtualization environment. Tests include validating CPU performance and disk throughput.
SteelHead (Virtual Edition) Support for ESXi 5.5 - Updates the approved ESXi version to 5.5 Update 2.
SteelHead SaaS GeoDNS Support for Office365 - Enables location-based optimization for Office365 Outlook and Outlook Web Access (OWA) Webmail.
Office365 DNS requests from users are directed to a Client Access server (CAS) closest to the user. This might be different from where the user's mailbox is located. A user traveling or working from a different branch could create a condition where the transactions between the user CAS and mailbox incur a significantly higher latency than their usual use case; for example, if the user is in Melbourne trying to get email from a mailbox located in Chicago.
GeoDNS, a feature fully supported in RiOS v9.0, overcomes this problem by detecting the user mailbox location and mapping subsequent flows to a CAS closest to the user mailbox and optimizing the route to that CAS. GeoDNS leverages Akamai’s SRIP network to find the fastest route to the CAS. The SteelHead optimizes traffic from the user to the CAS, which then is located at a negligible latency to the Mailbox. GeoDNS is also supported for Outlook Web Access Webmail and public folder access.
Merged SteelHead CX and SteelHead DX - Merges the CX and DX SteelHead models into one image; the appliance is automatically configured to the correct product model during installation.
Upgrading RiOS to Version 9.0
RiOS version 9.0 is backward compatible with previous RiOS versions. However, to obtain the full benefits of the new features in RiOS version 9.0, you must upgrade the client-side and server-side SteelHeads on any given WAN link. After you have upgraded all appliances, all the benefits of the version 9.0 features and enhancements are available.
Upgrade Considerations
Consider the following before upgrading RiOS:
Upgrading from RiOS v8.6.x (or earlier) to v9.0 requires additional user permissions for path selection and QoS. For example, a user with QoS read/write permission in a previous version will no longer have permission to configure a QoS rule. In v9.0, a user needs read/write permission for Network Settings in addition to read/write permission for QoS.
SteelHead Installation and Configuration Guide 15
Product Overview Upgrading RiOS to Version 9.0
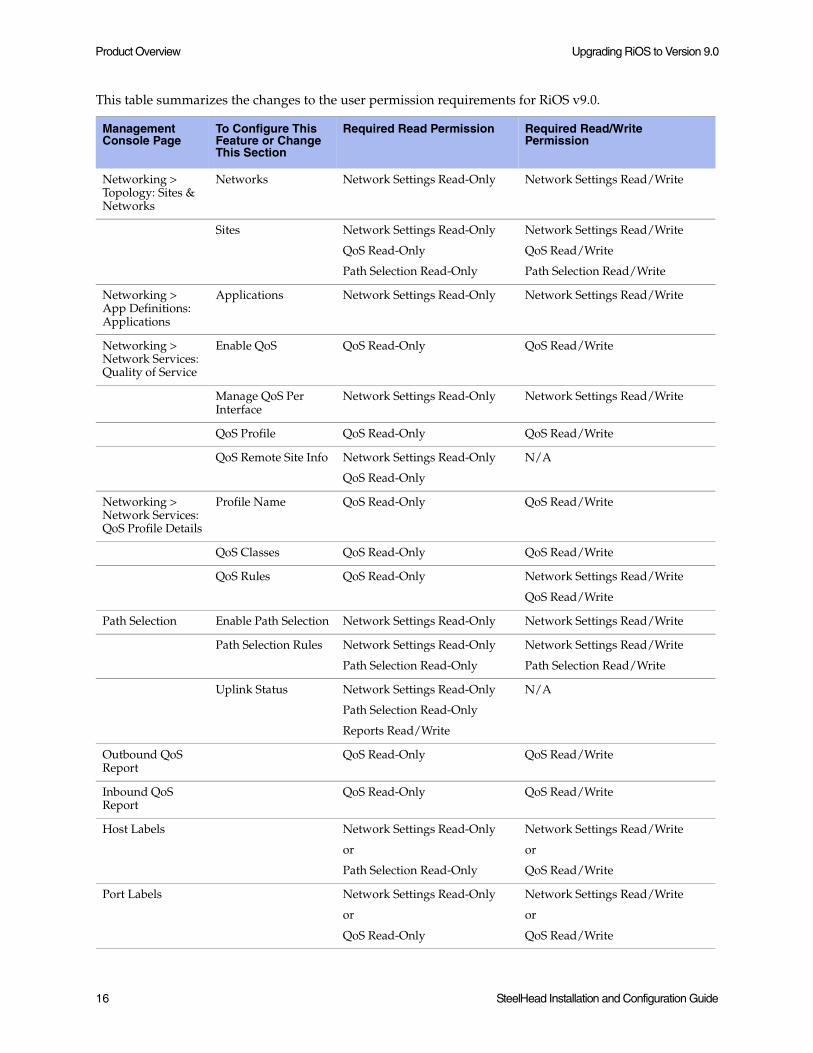
This table summarizes the changes to the user permission requirements for RiOS v9.0.
Management Console Page
To Configure This Feature or Change This Section
Required Read Permission Required Read/Write Permission
Networking > Topology: Sites & Networks
Networks Network Settings Read-Only Network Settings Read/Write
Sites Network Settings Read-Only
QoS Read-Only
Path Selection Read-Only
Network Settings Read/Write
QoS Read/Write
Path Selection Read/Write
Networking > App Definitions: Applications
Applications Network Settings Read-Only Network Settings Read/Write
Networking > Network Services: Quality of Service
Enable QoS QoS Read-Only QoS Read/Write
Manage QoS Per Interface
Network Settings Read-Only Network Settings Read/Write
QoS Profile QoS Read-Only QoS Read/Write
QoS Remote Site Info Network Settings Read-Only
QoS Read-Only
N/A
Networking > Network Services: QoS Profile Details
Profile Name QoS Read-Only QoS Read/Write
QoS Classes QoS Read-Only QoS Read/Write
QoS Rules QoS Read-Only Network Settings Read/Write
QoS Read/Write
Path Selection Enable Path Selection Network Settings Read-Only Network Settings Read/Write
Path Selection Rules Network Settings Read-Only
Path Selection Read-Only
Network Settings Read/Write
Path Selection Read/Write
Uplink Status Network Settings Read-Only
Path Selection Read-Only
Reports Read/Write
N/A
Outbound QoS Report
QoS Read-Only QoS Read/Write
Inbound QoS Report
QoS Read-Only QoS Read/Write
Host Labels Network Settings Read-Only
or
Path Selection Read-Only
Network Settings Read/Write
or
QoS Read/Write
Port Labels Network Settings Read-Only
or
QoS Read-Only
Network Settings Read/Write
or
QoS Read/Write
16 SteelHead Installation and Configuration Guide
Upgrading RiOS to Version 9.0 Product Overview
Upgrading from RiOS v8.6.x (or earlier) to version 9.0 automatically migrates a previous QoS configuration to a new configuration. The migration process is transparent and happens during the first boot-up of RiOS v9.0 on a SteelHead. During the migration, RiOS creates one QoS profile for each service policy.
The QoS concepts and resulting configuration in RiOS v9.0 are very different from those of earlier RiOS versions. In some cases it might be easier to create a new QoS configuration in RiOS v9.0 than to migrate an existing QoS configuration. You must handle any migration of an advanced QoS configuration from earlier RiOS versions with care. Riverbed strongly recommends that you closely analyze a migrated QoS configuration after you upgrade a SteelHead to RiOS v9.0.
To prevent an automatic QoS migration, you must delete the existing QoS configuration before upgrading to RiOS v9.0.
You can also disable QoS prior to upgrading, migrate the QoS configuration, and analyze it before reenabling QoS. This allows you to edit the migrated configuration or delete it and create a new one.
The QoS migration to RiOS v9.0 does not include the packet-order queue method, because it is not supported in v9.0.
Upgrading from RiOS v8.6.x (or earlier) to version 9.0 changes the QoS statistics data. The Outbound QoS report will not display statistics from a previous configuration.
The Outbound QoS report might display this message for a traffic class even when QoS is shaping it:
This is because the report limits the data sample display to only the first 1000 classes. When a class falls beyond the first 1000 lines of classes, the report displays no data.
Path selection is an existing feature in RiOS v8.6.x. Upon upgrading a SteelHead to v9.0, existing path selection rules are not automatically migrated. You need to create new path selection rules that will only apply for RiOS v9.0 and later. Path selection rules existing in previous RiOS versions will apply to RiOS versions below v9.0.
You cannot upgrade Series xx20 hardware to RiOS version 9.0.
If you mix RiOS software versions in your network, the releases might support different optimization features and you cannot take full advantage of the features that are not part of the older software versions.
To use terminated TCP optimization after upgrading from RiOS v8.0.x to version 9.0, you must change any existing in-path rule used for packet-mode IPv4 or IPv6 optimization to a terminated optimization rule.
Upgrading from RiOS v8.0.x (or earlier) to version 9.0 might require a configuration modification to deployments optimizing only the server-to-client direction of a TCPv6 connection using packet mode.
Consider a deployment running RiOS v8.0 with packet-mode optimization enabled on the client and server-side SteelHead. The server-side SteelHead is configured with server-to-client fixed-target packet-mode rules. As a result, any traffic flowing from the server to the client for connections that originated at the client receive packet-mode optimization.
The packet-mode rules exist only on the server-side SteelHead. No other rules are configured on the client or server-side SteelHeads.
Because the client-side SteelHead does not have fixed-target rules matching the client to server traffic, it passes it through according to the default TCPv6 rule.
SteelHead Installation and Configuration Guide 17
Product Overview Upgrading RiOS to Version 9.0
After upgrading the client and server-side SteelHeads to RiOS version 9.0 in this deployment scenario, connections originating from the client toward the server now receive terminated TCP optimization. This happens because RiOS version 9.0 supports terminated optimization for TCPv6 and the connections originating from the client now match the default optimization (terminated-mode) rule on the client-side SteelHead. As a result, the server-to-client traffic of these connections also receives terminated TCP optimization.
To continue passing through the client-to-server traffic and optimizing the server-to-client traffic using packet-mode, as before the upgrade, you need to configure a pass-through in-path rule on the client-side SteelHead.
Recommended Upgrade Paths
To find allowed upgrades between RiOS versions and recommended upgrade paths, use the Software Upgrade tool on the Riverbed Support site at https://support.riverbed.com. The tool includes all of the recommended intermediate RiOS versions.
Upgrading the RiOS Software Version
Follow these steps to upgrade your RiOS software. These instructions assume you are familiar with the SteelHead, the CLI, and the Management Console.
To upgrade the RiOS software version
1. Download the software image from the Riverbed Support site to a location such as your desktop. Optionally, in RiOS version 9.0, you can download a delta image directly from the Riverbed Support site to the SteelHead. The downloaded image includes only the incremental changes. The smaller file size means a faster download and less load on the network. To download a delta image, skip to step 2.
2. Log in to the Management Console using the Administrator account (admin).
3. Choose Administration > Maintenance: Software Upgrade page and choose one of these options:
– From URL - Type the URL that points to the software image. Use one of these formats:
http://host/path/to/file
https://host/path/to/file
ftp://user:password@host/path/to/file
scp://user:password@host/path/to/file
– From Riverbed Support Site - Select the target release number from the drop-down list to download a delta image directly to the appliance from the Riverbed Support site. The downloaded image includes only the incremental changes. You do not need to download the entire image. The system downloads and installs the new image immediately after you click Install. To download and install the image later, schedule another date or time before you click Install.
– From Local File - Browse your file system and select the software image.
– Schedule Upgrade for Later. - Select this check box to schedule an upgrade for a later time. Type the date and time in the Date and Time text boxes using these formats: YYYY/MM/DD and HH:MM:SS.
4. Click Install to immediately upload and install the software upgrade on your system, unless you schedule it for later.
18 SteelHead Installation and Configuration Guide
Upgrading RiOS to Version 9.0 Product Overview
The software image can be quite large; uploading the image to the system can take a few minutes. Downloading a delta image directly from the Riverbed Support site is faster because the downloaded image includes only the incremental changes and is downloaded directly to the appliance.
As the upgrade progresses, status messages appear.
After the installation is complete, you are reminded to reboot the system to switch to the new version of the software.
5. Choose Administration > Maintenance: Reboot/Shutdown and click Reboot.
The appliance can take a few minutes to reboot. This is normal behavior as the software is configuring the recovery flash device. Do not press Ctrl-C, unplug, or otherwise shut down the system during this first boot. There is no indication displayed during the system boot that the recovery flash device is being configured.
After the reboot, the Dashboard, Software Upgrade, and Help pages of the Management Console display the RiOS version upgrade.
Downgrading the RiOS Software Version
If you are downgrading to a previous version of the RiOS software, you must downgrade to a version of the software that has previously run on your system.
Note: When downgrading from an image that supports four 10 GigE cards to an older image that does not, the message Updating BIOS. Do not interrupt or reboot till the command completes appears. This message indicates that the appropriate BIOS for your software image is being installed.
SteelHead Installation and Configuration Guide 19

Product Overview Upgrading RiOS to Version 9.0
20 SteelHead Installation and Configuration Guide

CHAPTER 2 Managing Riverbed Licenses
This chapter describes the Riverbed licensing methods and how to manage Riverbed licenses. It includes these sections:
“Riverbed Licensing Methods” on page 21
“Automatic Licensing” on page 22
“Retrieving Licenses Using the Riverbed Licensing Portal” on page 23
“Installing Your License Keys” on page 24
Riverbed Licensing Methods
A license is a string issued by Riverbed that embeds information that ties the license to data to prevent tampering. After you install the license, the system saves it in the configuration database and enables the functionality associated with the license. Riverbed employs these licensing methods:
Automatic Licensing - After you connect your SteelHead to the network, the SteelHead automatically contacts the Riverbed Licensing Portal and downloads and installs the licenses.
Manual Licensing - You can manually fetch and activate licenses for Riverbed products using the Riverbed Licensing Portal. Go to https://licensing.riverbed.com/index.htm and follow the instructions to retrieve and activate license keys.
Factory Licensing - You can have all your Riverbed licenses installed at the factory for a small fee.
Token Method - You use tokens to activate Riverbed software, such as the Virtual SteelCentral Controller for SteelHead Mobile, Virtual SteelStore, SteelHead (virtual edition), and HP ProCurve. For detailed information, see the respective installation guides for these products.
SteelHead Installation and Configuration Guide 21
Managing Riverbed Licenses Automatic Licensing
Automatic Licensing
Automatic licensing allows the SteelHead, once connected to the network, to automatically contact the Riverbed Licensing Portal to retrieve and install license keys onto the appliance. Automatic licensing simplifies inventory management and provides an automated mechanism of fetching licenses for Riverbed products without having to manually activate individual appliances and licenses.
If you are behind a firewall you can retrieve licenses at the Riverbed Licensing Portal using the email option or by downloading and XML file to the SteelCentral Controller for SteelHead. For detailed information, see “Retrieving Licenses Using the Riverbed Licensing Portal” on page 23.
Automatic licensing also works over a web proxy. For details on setting up a web proxy, see the SteelHead Management Console User’s Guide.
Note: If automatic licensing fails, an error message appears in the Management Console. Go to the Riverbed Licensing Portal and follow the instructions for retrieving your licenses.
To view licenses on a new SteelHead
Connect the new SteelHead to the network.
The SteelHead automatically contacts the Riverbed Licensing Portal which downloads and installs the licenses. The Management Console Licensing page displays a success message or the Alarm Status page reports an actionable error message.
To replace expired licenses
Purchase new downloadable licenses to replace the expired license.
At the time of the next scheduled automatic license fetch, the SteelHead automatically contacts the Riverbed License Portal and downloads the new licenses. The Management Console Licensing page displays a success message or the Alarm Status page reports an actionable error message. You do not need to delete the expired license. The system uses the license with the latest expiration date.
To fetch a license on demand
1. In the Management Console choose Administration > Maintenance: Licenses to display the Licenses page.
2. Click Fetch Updates Now.
The Management Console Licensing page displays a success message or the Alarm Status page reports an actionable error message.
Note: Only administrator users can fetch and install licenses. For detailed information on administrator and monitor users, see the SteelHead Management Console User’s Guide.
22 SteelHead Installation and Configuration Guide

Manual Licensing Using the Riverbed Licensing Portal Managing Riverbed Licenses
Manual Licensing Using the Riverbed Licensing Portal
You can retrieve and manage Riverbed licenses using the Riverbed Licensing Portal. Once you retrieve a license from the Riverbed Licensing Portal, you need to install it.
Retrieving Licenses Using the Riverbed Licensing Portal
The licensing portal requires a unique product identifier to retrieve a license. Depending on the product, the identifier can be a serial number, a license request key (activation code), or a token. The steps to retrieve a license vary based on the product identifier. Online instructions guide you through the process.
To retrieve your licenses for an appliance using a serial number
1. Go to the License Activation page in the Riverbed Licensing Portal at https://licensing.riverbed.com/index.htm
2. Enter your appliance serial number as your unique product identifier.
The serial number is on a label located on your appliance and it also appears in the Support tab of the Management Console.
3. Click Next.
4. Provide the contact information for the license, including your name and email.
5. Click Submit.
The Licensing Portal displays license information for all the products purchased with the serial number you specified.
6. Click a serial number to see license details.
7. Optionally, if you are behind a firewall, type the email address in the Email address text box and click Email Keys to have the license keys emailed to you.
8. Optionally, if you are behind a firewall, click Download XML to download an XML file. The XML file can be imported by the SteelCentral Controller for SteelHead.
Note: Click New Search to look for additional license records.
SteelHead Installation and Configuration Guide 23

Managing Riverbed Licenses Installing Your License Keys
Installing Your License Keys
Because each license key is generated for a specific appliance, ensure that you install your license key on the appropriate appliance.
To install a license using the CLI
1. Connect to the CLI of the appliance and enter configuration mode.
For details see the Riverbed Command-Line Interface Reference Manual.
2. At the system prompt, enter these commands:
license install <the license key you retrieved from Riverbed Licensing Portal>write memory
To install a license using the Management Console
1. Connect to the Management Console of the appliance.
For details, see the SteelHead Management Console User’s Guide.
2. Choose Administration > Maintenance: Licenses to display the Licenses Page.
3. Copy and paste the license key provided by Riverbed Licensing Portal into the text box. Separate multiple license keys with a space, Tab, or Enter.
24 SteelHead Installation and Configuration Guide
CHAPTER 3 Installing and Configuring the SteelHead
This chapter describes how to install and configure the SteelHead in an in-path and out-of-path network deployment. This chapter includes these sections:
“Choosing a Network Deployment” on page 25
“Checking Your Inventory” on page 27
“Preparing Your Site for Installation” on page 28
“Powering On the System” on page 31
“Configuring In-Path SteelHeads” on page 32
“Configuring Out-of-Path SteelHeads” on page 42
Note: Read and follow the safety guidelines described in the Safety and Compliance Guide. Failure to follow these safety guidelines can result in damage to the equipment.
Choosing a Network Deployment
Typically, you deploy the SteelHead on a LAN, with communication between appliances taking place over a private WAN or VPN. Because optimization between SteelHeads typically takes place over a secure WAN, you do not need to configure company firewalls to support SteelHead-specific ports.
Note: If there are one or more firewalls between two SteelHeads, ports 7800 and 7810 must be passed through firewall devices located between the pair of SteelHeads. Also, SYN and SYN/ACK packets with the TCP option 76 must be passed through firewalls for auto-discovery to function properly.
For optimal performance, you should minimize latency between SteelHeads and their respective clients and servers. SteelHeads should be as close as possible to your network end points (client-side SteelHeads should be as close to your clients as possible and server-side SteelHeads should be as close to your servers as possible).
Ideally, SteelHeads optimize only traffic that is initiated or terminated at their local site. The best and easiest way to achieve this is to deploy the SteelHeads where the LAN connects to the WAN, and not where any LAN-to-LAN or WAN-to-WAN traffic can pass through (or be redirected to) the SteelHead.
SteelHead Installation and Configuration Guide 25
Installing and Configuring the SteelHead Choosing a Network Deployment
For detailed information about your deployment options and best practices for deploying SteelHeads, see the SteelHead Deployment Guide.
Before you begin the installation and configuration process, you must select a network deployment:
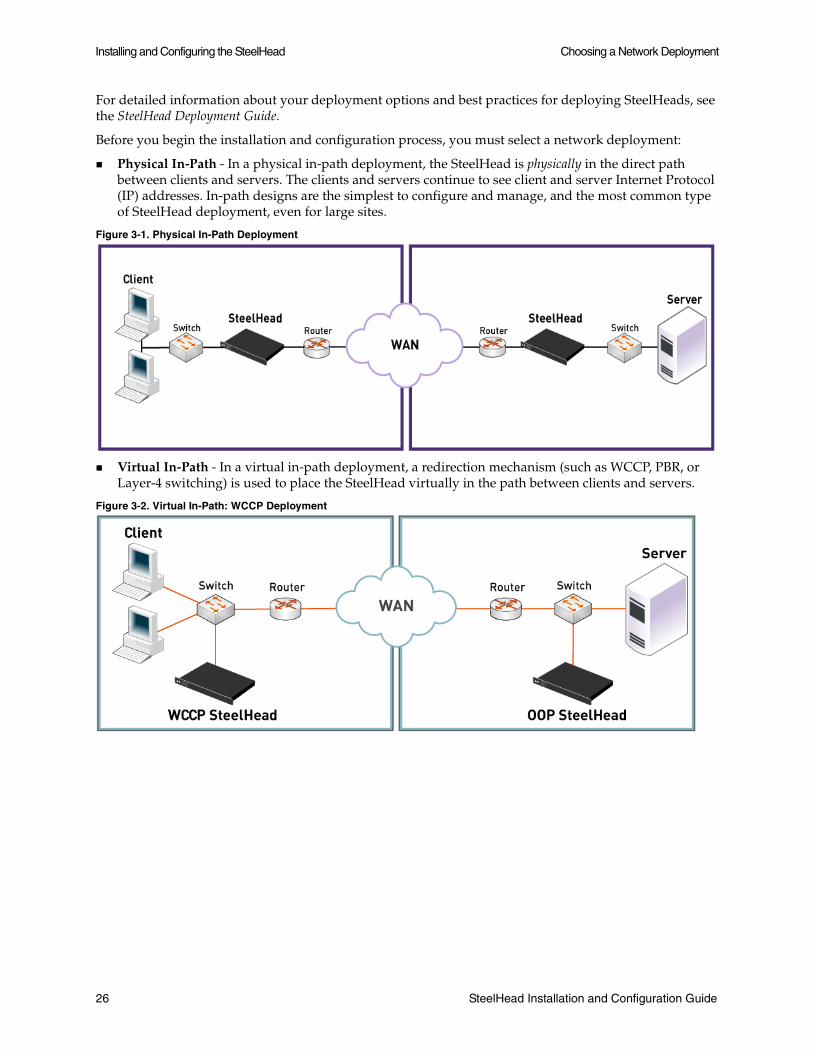
Physical In-Path - In a physical in-path deployment, the SteelHead is physically in the direct path between clients and servers. The clients and servers continue to see client and server Internet Protocol (IP) addresses. In-path designs are the simplest to configure and manage, and the most common type of SteelHead deployment, even for large sites.
Figure 3-1. Physical In-Path Deployment
Virtual In-Path - In a virtual in-path deployment, a redirection mechanism (such as WCCP, PBR, or Layer-4 switching) is used to place the SteelHead virtually in the path between clients and servers.
Figure 3-2. Virtual In-Path: WCCP Deployment
26 SteelHead Installation and Configuration Guide
Checking Your Inventory Installing and Configuring the SteelHead
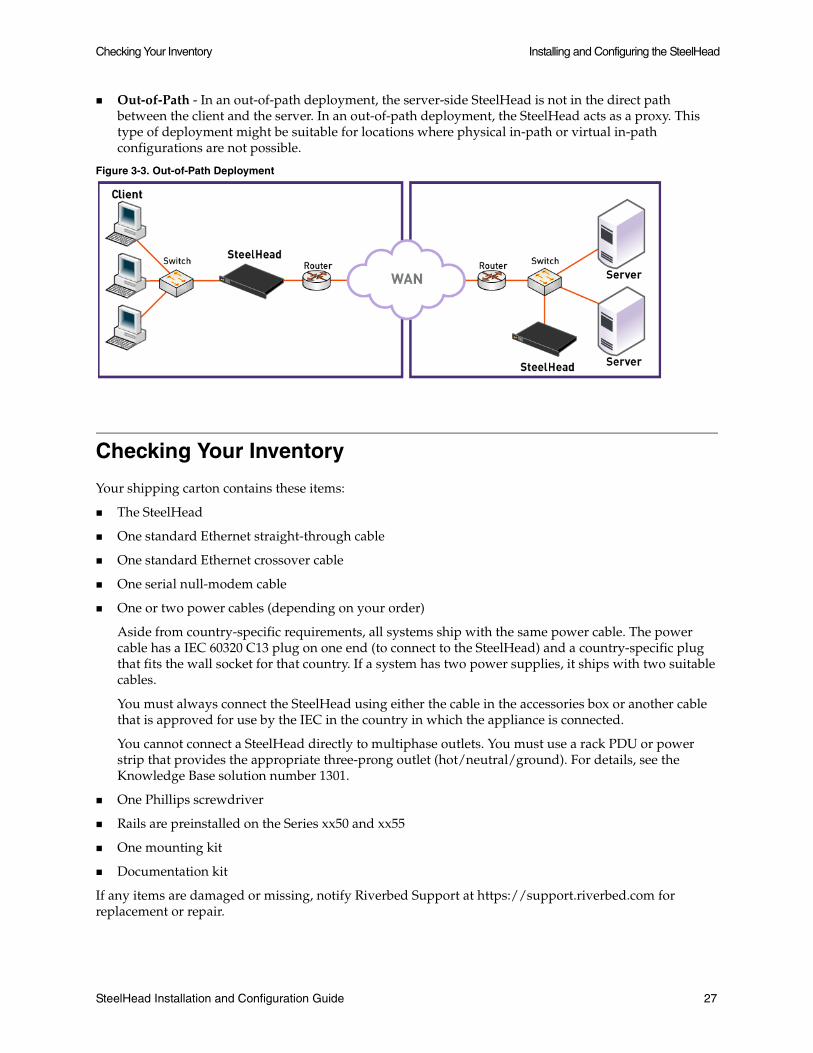
Out-of-Path - In an out-of-path deployment, the server-side SteelHead is not in the direct path between the client and the server. In an out-of-path deployment, the SteelHead acts as a proxy. This type of deployment might be suitable for locations where physical in-path or virtual in-path configurations are not possible.
Figure 3-3. Out-of-Path Deployment
Checking Your Inventory
Your shipping carton contains these items:
The SteelHead
One standard Ethernet straight-through cable
One standard Ethernet crossover cable
One serial null-modem cable
One or two power cables (depending on your order)
Aside from country-specific requirements, all systems ship with the same power cable. The power cable has a IEC 60320 C13 plug on one end (to connect to the SteelHead) and a country-specific plug that fits the wall socket for that country. If a system has two power supplies, it ships with two suitable cables.
You must always connect the SteelHead using either the cable in the accessories box or another cable that is approved for use by the IEC in the country in which the appliance is connected.
You cannot connect a SteelHead directly to multiphase outlets. You must use a rack PDU or power strip that provides the appropriate three-prong outlet (hot/neutral/ground). For details, see the Knowledge Base solution number 1301.
One Phillips screwdriver
Rails are preinstalled on the Series xx50 and xx55
One mounting kit
Documentation kit
If any items are damaged or missing, notify Riverbed Support at https://support.riverbed.com for replacement or repair.
SteelHead Installation and Configuration Guide 27
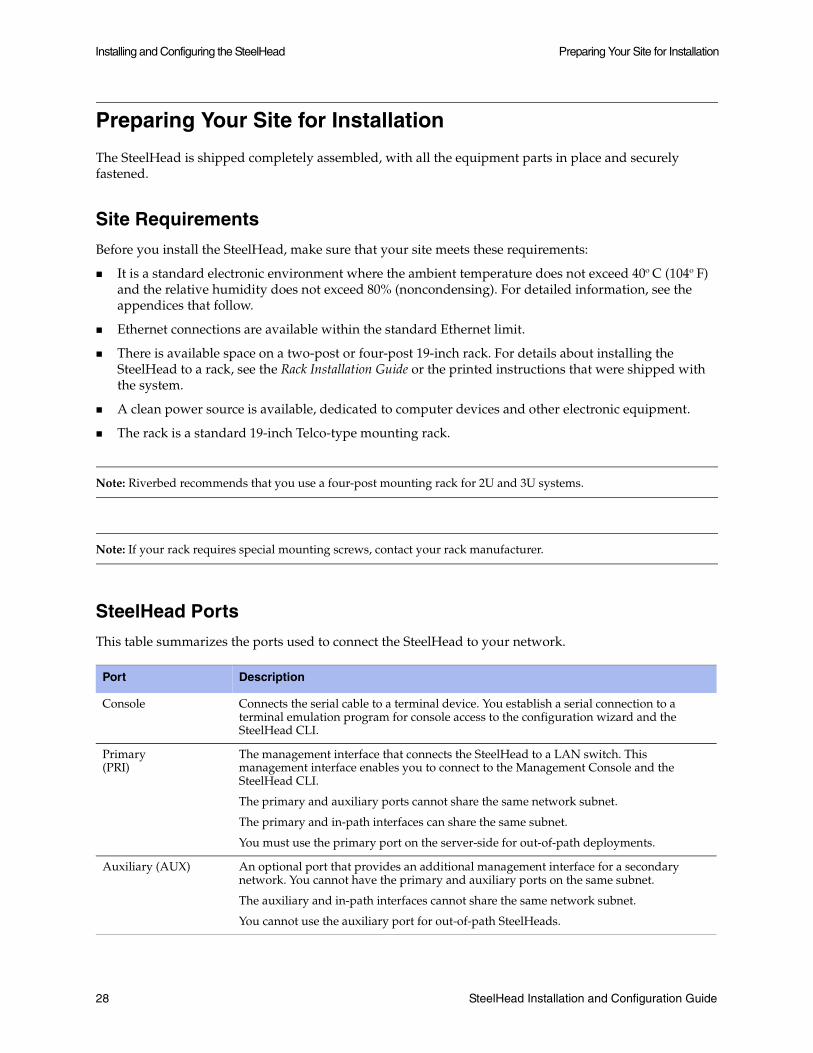
Installing and Configuring the SteelHead Preparing Your Site for Installation
Preparing Your Site for Installation
The SteelHead is shipped completely assembled, with all the equipment parts in place and securely fastened.
Site Requirements
Before you install the SteelHead, make sure that your site meets these requirements:
It is a standard electronic environment where the ambient temperature does not exceed 40º C (104º F) and the relative humidity does not exceed 80% (noncondensing). For detailed information, see the appendices that follow.
Ethernet connections are available within the standard Ethernet limit.
There is available space on a two-post or four-post 19-inch rack. For details about installing the SteelHead to a rack, see the Rack Installation Guide or the printed instructions that were shipped with the system.
A clean power source is available, dedicated to computer devices and other electronic equipment.
The rack is a standard 19-inch Telco-type mounting rack.
Note: Riverbed recommends that you use a four-post mounting rack for 2U and 3U systems.
Note: If your rack requires special mounting screws, contact your rack manufacturer.
SteelHead Ports
This table summarizes the ports used to connect the SteelHead to your network.
Port Description
Console Connects the serial cable to a terminal device. You establish a serial connection to a terminal emulation program for console access to the configuration wizard and the SteelHead CLI.
Primary(PRI)
The management interface that connects the SteelHead to a LAN switch. This management interface enables you to connect to the Management Console and the SteelHead CLI.
The primary and auxiliary ports cannot share the same network subnet.
The primary and in-path interfaces can share the same subnet.
You must use the primary port on the server-side for out-of-path deployments.
Auxiliary (AUX) An optional port that provides an additional management interface for a secondary network. You cannot have the primary and auxiliary ports on the same subnet.
The auxiliary and in-path interfaces cannot share the same network subnet.
You cannot use the auxiliary port for out-of-path SteelHeads.
28 SteelHead Installation and Configuration Guide
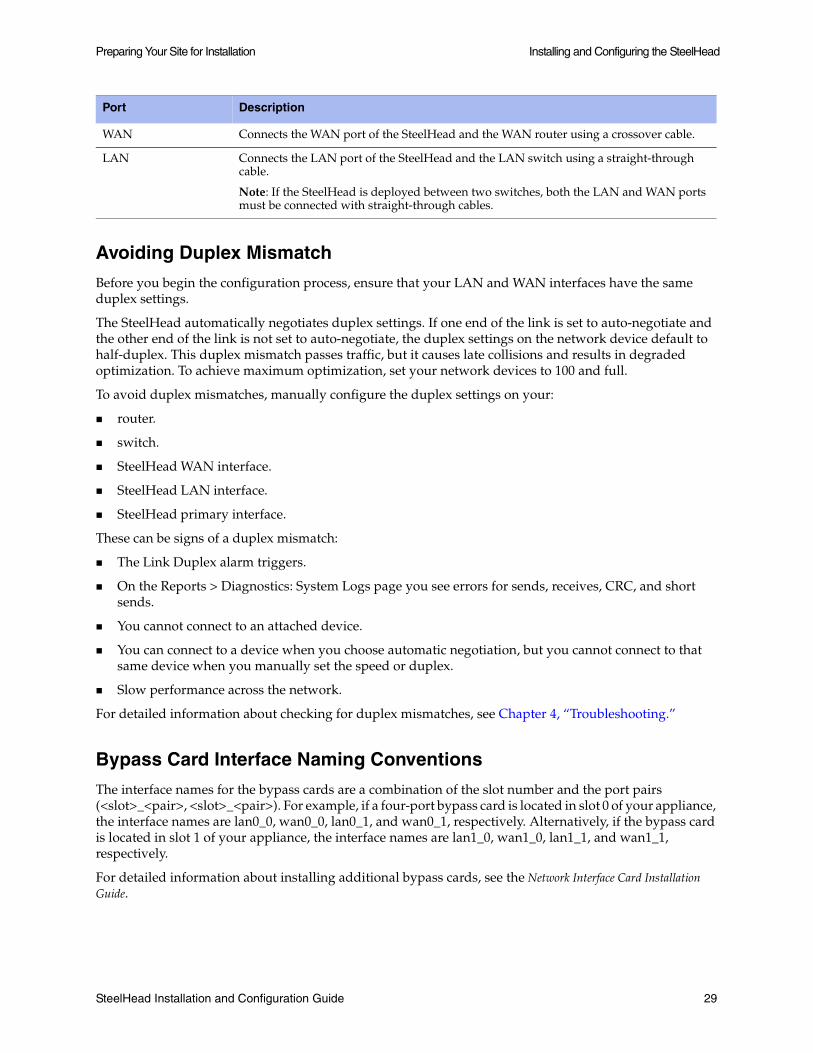
Preparing Your Site for Installation Installing and Configuring the SteelHead
Avoiding Duplex Mismatch
Before you begin the configuration process, ensure that your LAN and WAN interfaces have the same duplex settings.
The SteelHead automatically negotiates duplex settings. If one end of the link is set to auto-negotiate and the other end of the link is not set to auto-negotiate, the duplex settings on the network device default to half-duplex. This duplex mismatch passes traffic, but it causes late collisions and results in degraded optimization. To achieve maximum optimization, set your network devices to 100 and full.
To avoid duplex mismatches, manually configure the duplex settings on your:
router.
switch.
SteelHead WAN interface.
SteelHead LAN interface.
SteelHead primary interface.
These can be signs of a duplex mismatch:
The Link Duplex alarm triggers.
On the Reports > Diagnostics: System Logs page you see errors for sends, receives, CRC, and short sends.
You cannot connect to an attached device.
You can connect to a device when you choose automatic negotiation, but you cannot connect to that same device when you manually set the speed or duplex.
Slow performance across the network.
For detailed information about checking for duplex mismatches, see Chapter 4, “Troubleshooting.”
Bypass Card Interface Naming Conventions
The interface names for the bypass cards are a combination of the slot number and the port pairs (<slot>_<pair>, <slot>_<pair>). For example, if a four-port bypass card is located in slot 0 of your appliance, the interface names are lan0_0, wan0_0, lan0_1, and wan0_1, respectively. Alternatively, if the bypass card is located in slot 1 of your appliance, the interface names are lan1_0, wan1_0, lan1_1, and wan1_1, respectively.
For detailed information about installing additional bypass cards, see the Network Interface Card Installation Guide.
WAN Connects the WAN port of the SteelHead and the WAN router using a crossover cable.
LAN Connects the LAN port of the SteelHead and the LAN switch using a straight-through cable.
Note: If the SteelHead is deployed between two switches, both the LAN and WAN ports must be connected with straight-through cables.
Port Description
SteelHead Installation and Configuration Guide 29
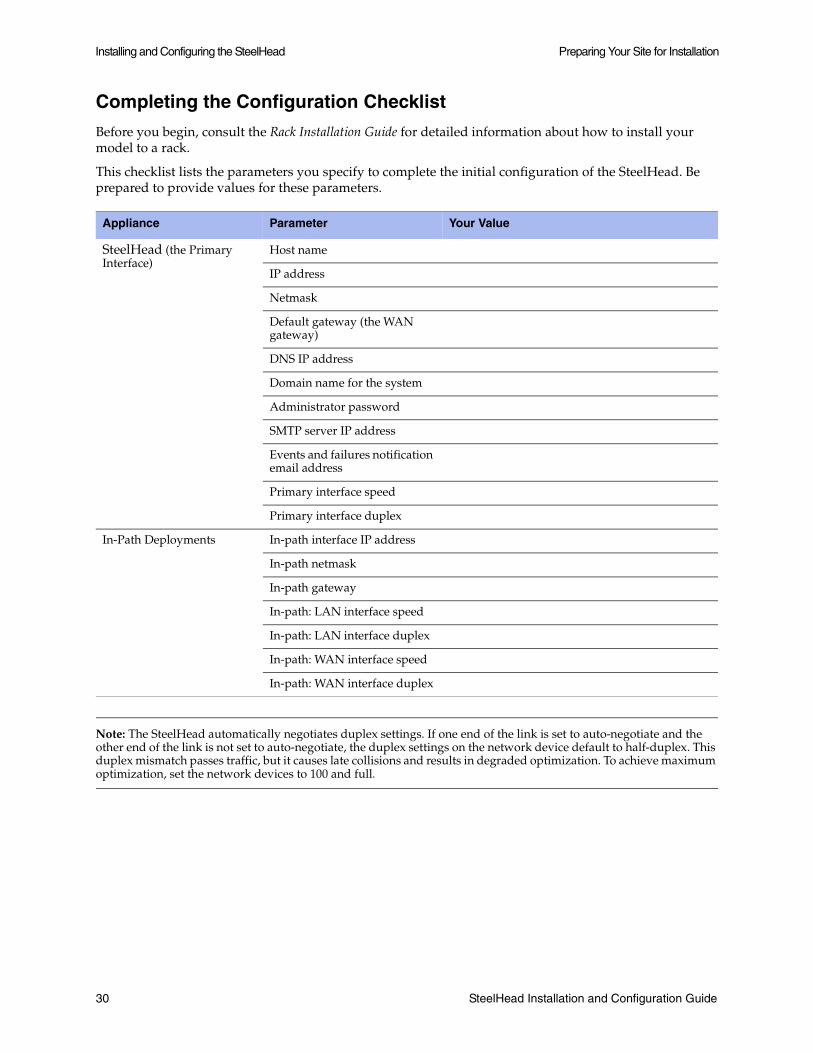
Installing and Configuring the SteelHead Preparing Your Site for Installation
Completing the Configuration Checklist
Before you begin, consult the Rack Installation Guide for detailed information about how to install your model to a rack.
This checklist lists the parameters you specify to complete the initial configuration of the SteelHead. Be prepared to provide values for these parameters.
Note: The SteelHead automatically negotiates duplex settings. If one end of the link is set to auto-negotiate and the other end of the link is not set to auto-negotiate, the duplex settings on the network device default to half-duplex. This duplex mismatch passes traffic, but it causes late collisions and results in degraded optimization. To achieve maximum optimization, set the network devices to 100 and full.
Appliance Parameter Your Value
SteelHead (the Primary Interface)
Host name
IP address
Netmask
Default gateway (the WAN gateway)
DNS IP address
Domain name for the system
Administrator password
SMTP server IP address
Events and failures notification email address
Primary interface speed
Primary interface duplex
In-Path Deployments In-path interface IP address
In-path netmask
In-path gateway
In-path: LAN interface speed
In-path: LAN interface duplex
In-path: WAN interface speed
In-path: WAN interface duplex
30 SteelHead Installation and Configuration Guide

Powering On the System Installing and Configuring the SteelHead
Powering On the System
This section describes how to connect the AC power and how to power on the system.
Caution: In European electrical environments you must ground (earth) the Green/Yellow tab on the power cord, or risk electrical shock.
To power on the system
1. If your system has a master power switch, ensure that the system and master power switch is in the off position on the rear of the SteelHead.
2. Plug the AC power cord into the SteelHead.
Note: If your model has multiple power supplies, you must plug in all the power cords or you will hear an alarm.
Figure 3-4. Connecting the AC Power
3. Plug the AC power cord into an uninterrupted AC power source.
4. Press the system power switch on. If the SteelHead does not immediately power on, press the power switch off, then press the power switch on again.
5. Check the status lights on the SteelHead. For detailed information about the status lights, see the appendices that follow.
Note: The SteelHead CX (Series xx55) takes approximately 10 minutes to boot.
Securing the Power Cord on Desktop Systems
The CX255 models include a power cord retention module. You can install this to reduce the risk of accidentally unplugging the power.
To install the power cord retention module
1. Push the retention module into the socket near the power connection.
SteelHead Installation and Configuration Guide 31
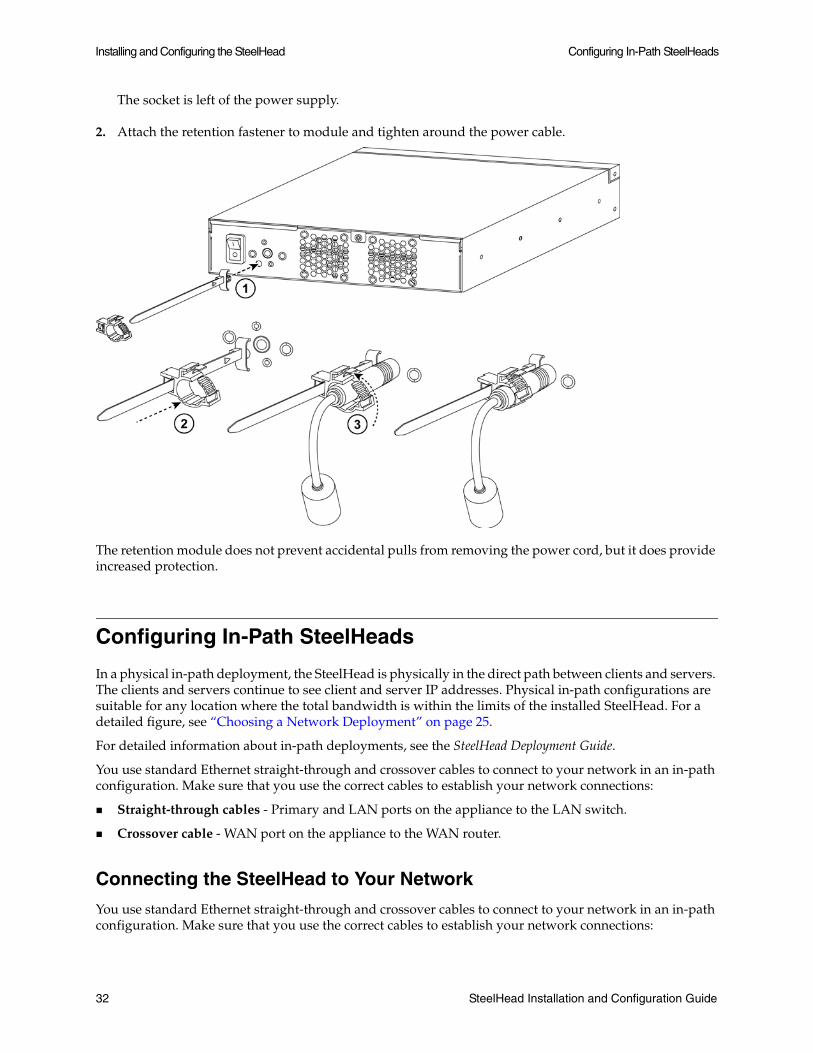
Installing and Configuring the SteelHead Configuring In-Path SteelHeads
The socket is left of the power supply.
2. Attach the retention fastener to module and tighten around the power cable.
The retention module does not prevent accidental pulls from removing the power cord, but it does provide increased protection.
Configuring In-Path SteelHeads
In a physical in-path deployment, the SteelHead is physically in the direct path between clients and servers. The clients and servers continue to see client and server IP addresses. Physical in-path configurations are suitable for any location where the total bandwidth is within the limits of the installed SteelHead. For a detailed figure, see “Choosing a Network Deployment” on page 25.
For detailed information about in-path deployments, see the SteelHead Deployment Guide.
You use standard Ethernet straight-through and crossover cables to connect to your network in an in-path configuration. Make sure that you use the correct cables to establish your network connections:
Straight-through cables - Primary and LAN ports on the appliance to the LAN switch.
Crossover cable - WAN port on the appliance to the WAN router.
Connecting the SteelHead to Your Network
You use standard Ethernet straight-through and crossover cables to connect to your network in an in-path configuration. Make sure that you use the correct cables to establish your network connections:
32 SteelHead Installation and Configuration Guide
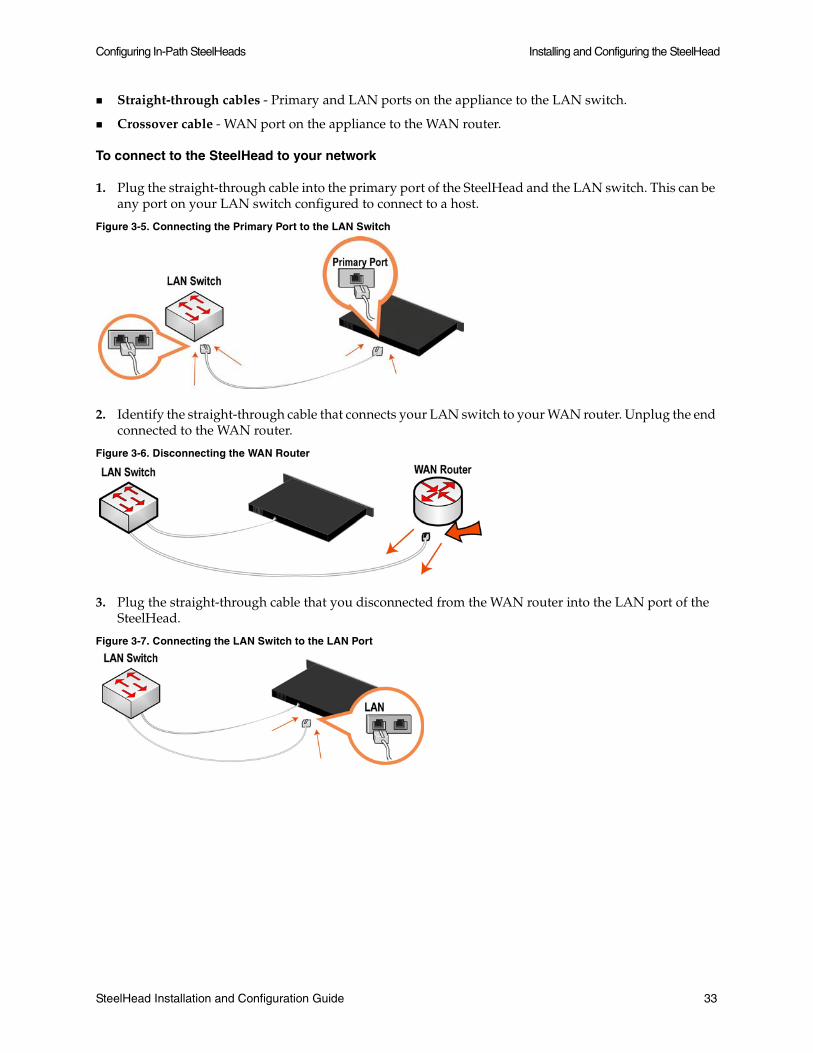
Configuring In-Path SteelHeads Installing and Configuring the SteelHead
Straight-through cables - Primary and LAN ports on the appliance to the LAN switch.
Crossover cable - WAN port on the appliance to the WAN router.
To connect to the SteelHead to your network
1. Plug the straight-through cable into the primary port of the SteelHead and the LAN switch. This can be any port on your LAN switch configured to connect to a host.
Figure 3-5. Connecting the Primary Port to the LAN Switch
2. Identify the straight-through cable that connects your LAN switch to your WAN router. Unplug the end connected to the WAN router.
Figure 3-6. Disconnecting the WAN Router
3. Plug the straight-through cable that you disconnected from the WAN router into the LAN port of the SteelHead.
Figure 3-7. Connecting the LAN Switch to the LAN Port
SteelHead Installation and Configuration Guide 33
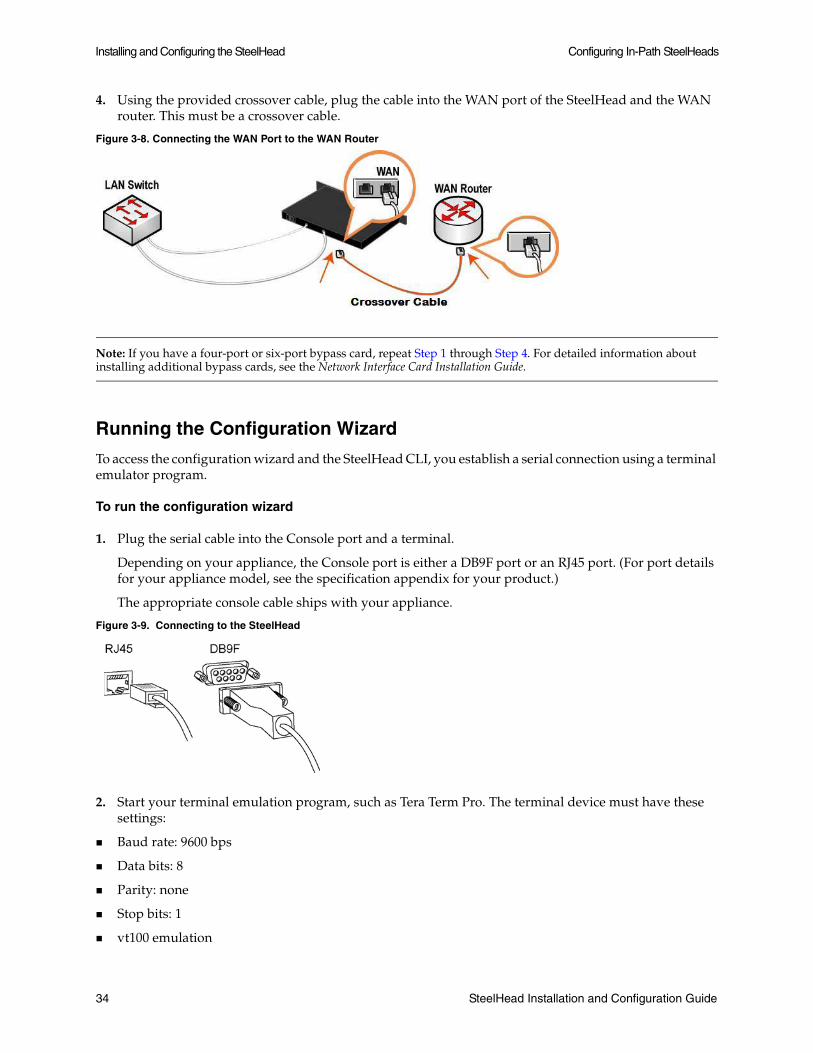
Installing and Configuring the SteelHead Configuring In-Path SteelHeads
4. Using the provided crossover cable, plug the cable into the WAN port of the SteelHead and the WAN router. This must be a crossover cable.
Figure 3-8. Connecting the WAN Port to the WAN Router
Note: If you have a four-port or six-port bypass card, repeat Step 1 through Step 4. For detailed information about installing additional bypass cards, see the Network Interface Card Installation Guide.
Running the Configuration Wizard
To access the configuration wizard and the SteelHead CLI, you establish a serial connection using a terminal emulator program.
To run the configuration wizard
1. Plug the serial cable into the Console port and a terminal.
Depending on your appliance, the Console port is either a DB9F port or an RJ45 port. (For port details for your appliance model, see the specification appendix for your product.)
The appropriate console cable ships with your appliance.
Figure 3-9. Connecting to the SteelHead
2. Start your terminal emulation program, such as Tera Term Pro. The terminal device must have these settings:
Baud rate: 9600 bps
Data bits: 8
Parity: none
Stop bits: 1
vt100 emulation
34 SteelHead Installation and Configuration Guide
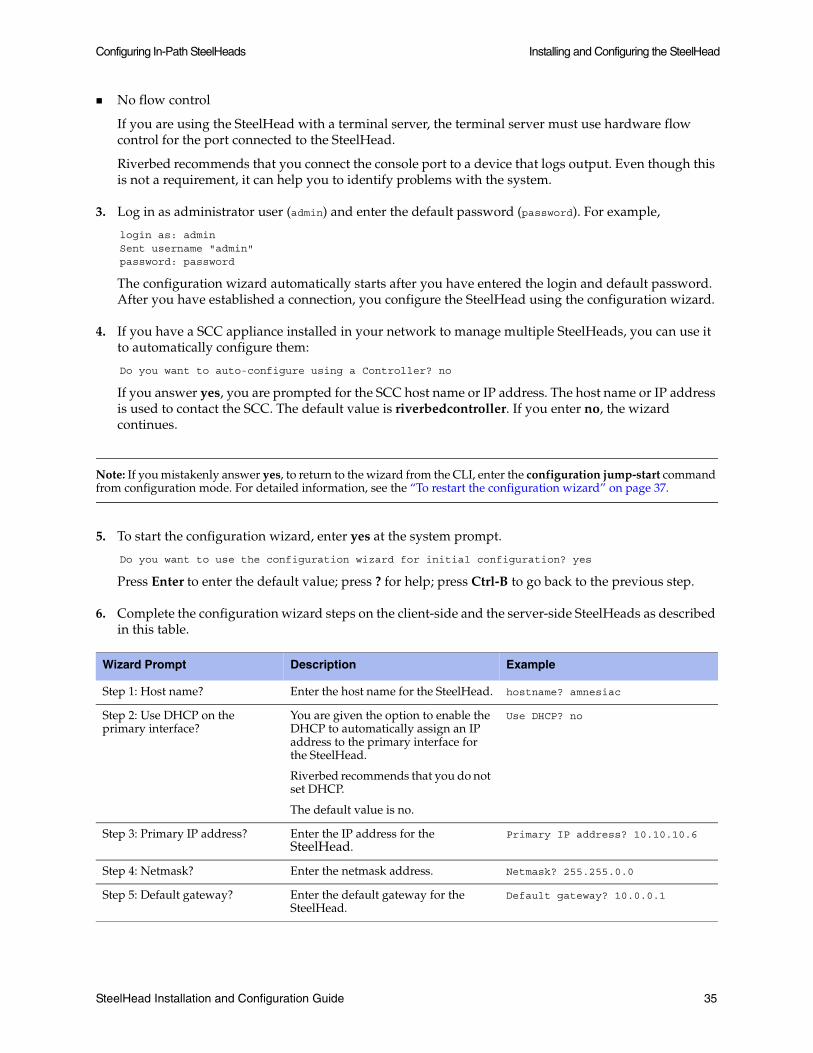
Configuring In-Path SteelHeads Installing and Configuring the SteelHead
No flow control
If you are using the SteelHead with a terminal server, the terminal server must use hardware flow control for the port connected to the SteelHead.
Riverbed recommends that you connect the console port to a device that logs output. Even though this is not a requirement, it can help you to identify problems with the system.
3. Log in as administrator user (admin) and enter the default password (password). For example,
login as: adminSent username "admin"password: password
The configuration wizard automatically starts after you have entered the login and default password. After you have established a connection, you configure the SteelHead using the configuration wizard.
4. If you have a SCC appliance installed in your network to manage multiple SteelHeads, you can use it to automatically configure them:
Do you want to auto-configure using a Controller? no
If you answer yes, you are prompted for the SCC host name or IP address. The host name or IP address is used to contact the SCC. The default value is riverbedcontroller. If you enter no, the wizard continues.
Note: If you mistakenly answer yes, to return to the wizard from the CLI, enter the configuration jump-start command from configuration mode. For detailed information, see the “To restart the configuration wizard” on page 37.
5. To start the configuration wizard, enter yes at the system prompt.
Do you want to use the configuration wizard for initial configuration? yes
Press Enter to enter the default value; press ? for help; press Ctrl-B to go back to the previous step.
6. Complete the configuration wizard steps on the client-side and the server-side SteelHeads as described in this table.
Wizard Prompt Description Example
Step 1: Host name? Enter the host name for the SteelHead. hostname? amnesiac
Step 2: Use DHCP on the primary interface?
You are given the option to enable the DHCP to automatically assign an IP address to the primary interface for the SteelHead.
Riverbed recommends that you do not set DHCP.
The default value is no.
Use DHCP? no
Step 3: Primary IP address? Enter the IP address for the SteelHead.
Primary IP address? 10.10.10.6
Step 4: Netmask? Enter the netmask address. Netmask? 255.255.0.0
Step 5: Default gateway? Enter the default gateway for the SteelHead.
Default gateway? 10.0.0.1
SteelHead Installation and Configuration Guide 35
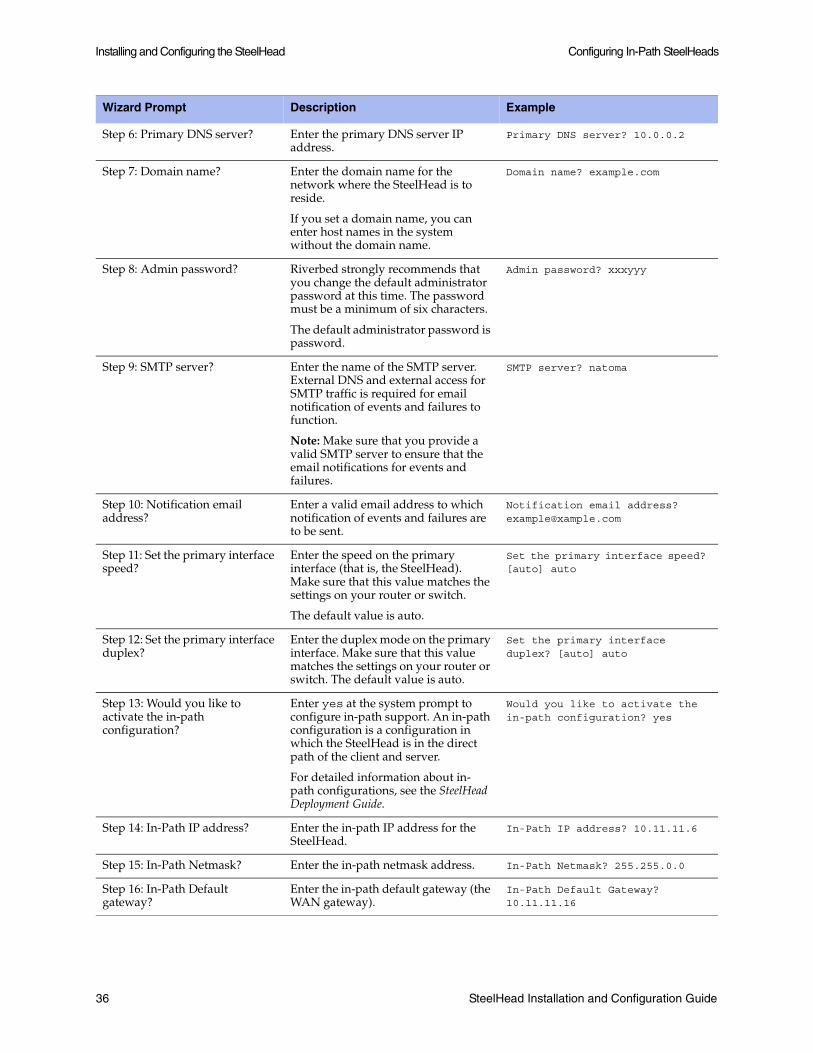
Installing and Configuring the SteelHead Configuring In-Path SteelHeads
Step 6: Primary DNS server? Enter the primary DNS server IP address.
Primary DNS server? 10.0.0.2
Step 7: Domain name? Enter the domain name for the network where the SteelHead is to reside.
If you set a domain name, you can enter host names in the system without the domain name.
Domain name? example.com
Step 8: Admin password? Riverbed strongly recommends that you change the default administrator password at this time. The password must be a minimum of six characters.
The default administrator password is password.
Admin password? xxxyyy
Step 9: SMTP server? Enter the name of the SMTP server. External DNS and external access for SMTP traffic is required for email notification of events and failures to function.
Note: Make sure that you provide a valid SMTP server to ensure that the email notifications for events and failures.
SMTP server? natoma
Step 10: Notification email address?
Enter a valid email address to which notification of events and failures are to be sent.
Notification email address? [email protected]
Step 11: Set the primary interface speed?
Enter the speed on the primary interface (that is, the SteelHead). Make sure that this value matches the settings on your router or switch.
The default value is auto.
Set the primary interface speed? [auto] auto
Step 12: Set the primary interface duplex?
Enter the duplex mode on the primary interface. Make sure that this value matches the settings on your router or switch. The default value is auto.
Set the primary interface duplex? [auto] auto
Step 13: Would you like to activate the in-path configuration?
Enter yes at the system prompt to configure in-path support. An in-path configuration is a configuration in which the SteelHead is in the direct path of the client and server.
For detailed information about in-path configurations, see the SteelHead Deployment Guide.
Would you like to activate the in-path configuration? yes
Step 14: In-Path IP address? Enter the in-path IP address for the SteelHead.
In-Path IP address? 10.11.11.6
Step 15: In-Path Netmask? Enter the in-path netmask address. In-Path Netmask? 255.255.0.0
Step 16: In-Path Default gateway?
Enter the in-path default gateway (the WAN gateway).
In-Path Default Gateway? 10.11.11.16
Wizard Prompt Description Example
36 SteelHead Installation and Configuration Guide
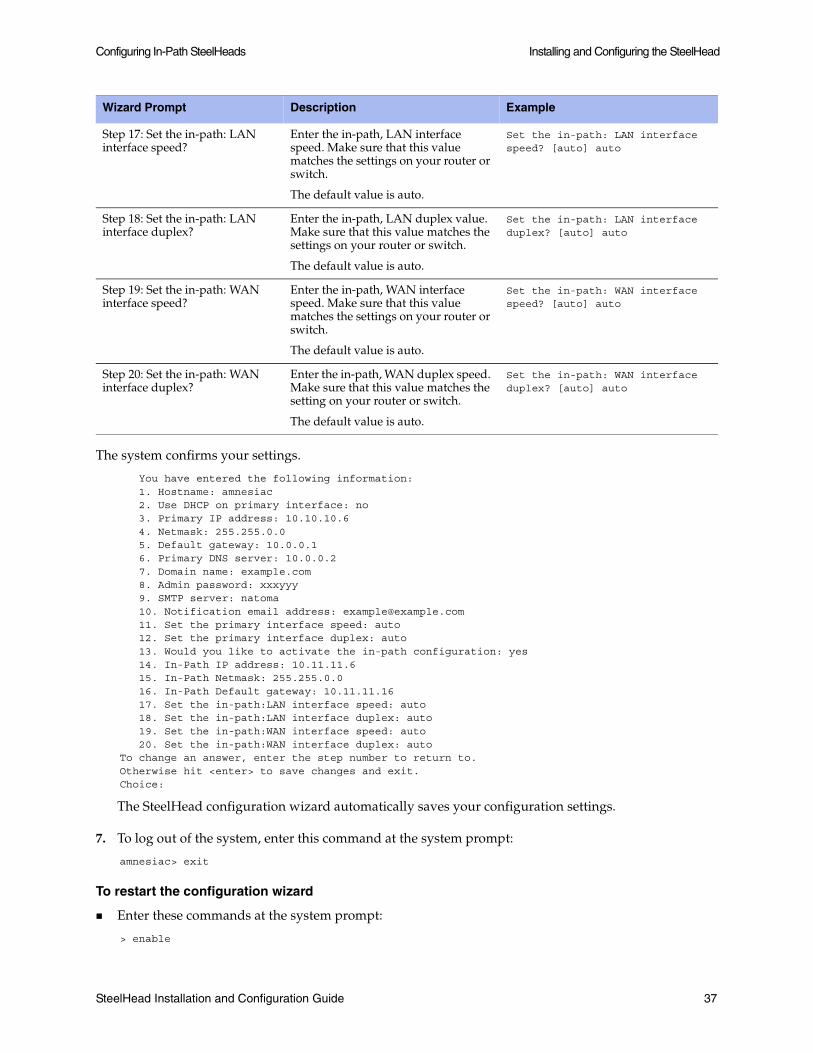
Configuring In-Path SteelHeads Installing and Configuring the SteelHead
The system confirms your settings.
You have entered the following information: 1. Hostname: amnesiac 2. Use DHCP on primary interface: no 3. Primary IP address: 10.10.10.6 4. Netmask: 255.255.0.0 5. Default gateway: 10.0.0.1 6. Primary DNS server: 10.0.0.2 7. Domain name: example.com 8. Admin password: xxxyyy 9. SMTP server: natoma 10. Notification email address: [email protected] 11. Set the primary interface speed: auto 12. Set the primary interface duplex: auto 13. Would you like to activate the in-path configuration: yes 14. In-Path IP address: 10.11.11.6 15. In-Path Netmask: 255.255.0.0 16. In-Path Default gateway: 10.11.11.16 17. Set the in-path:LAN interface speed: auto 18. Set the in-path:LAN interface duplex: auto 19. Set the in-path:WAN interface speed: auto 20. Set the in-path:WAN interface duplex: autoTo change an answer, enter the step number to return to.Otherwise hit <enter> to save changes and exit.Choice:
The SteelHead configuration wizard automatically saves your configuration settings.
7. To log out of the system, enter this command at the system prompt:
amnesiac> exit
To restart the configuration wizard
Enter these commands at the system prompt:
> enable
Step 17: Set the in-path: LAN interface speed?
Enter the in-path, LAN interface speed. Make sure that this value matches the settings on your router or switch.
The default value is auto.
Set the in-path: LAN interface speed? [auto] auto
Step 18: Set the in-path: LAN interface duplex?
Enter the in-path, LAN duplex value. Make sure that this value matches the settings on your router or switch.
The default value is auto.
Set the in-path: LAN interface duplex? [auto] auto
Step 19: Set the in-path: WAN interface speed?
Enter the in-path, WAN interface speed. Make sure that this value matches the settings on your router or switch.
The default value is auto.
Set the in-path: WAN interface speed? [auto] auto
Step 20: Set the in-path: WAN interface duplex?
Enter the in-path, WAN duplex speed. Make sure that this value matches the setting on your router or switch.
The default value is auto.
Set the in-path: WAN interface duplex? [auto] auto
Wizard Prompt Description Example
SteelHead Installation and Configuration Guide 37
Installing and Configuring the SteelHead Configuring In-Path SteelHeads
# configure terminal(config) # configuration jump-start
For detailed information about the CLI, see the Riverbed Command-Line Interface Reference Manual.
Verifying You Are Connected to the SteelHead
Perform these tasks to verify that you have properly connected the SteelHead.
To verify you are connected to the SteelHead
1. Verify that you can connect to the CLI using one of these devices:
An ASCII terminal or emulator that can connect to the serial console. It must have these settings: 9600 baud, 8 bits, no parity, 1 stop bit, vt100, and no flow control.
A computer with a Secure Shell (SSH) client that is connected to the SteelHead primary port.
2. At the system prompt, enter this command:
or
ssh admin@ipaddress
3. You are prompted for the administrator password. This is the password you set in the configuration wizard.
4. At the system prompt, ping from the management interface:
ping -I <primary-IP-address> <primary-default-gateway>
5. At the system prompt, ping from the in-path default gateway:
ping -I <in-path-IP-address> <in-path-default-gateway>
38 SteelHead Installation and Configuration Guide
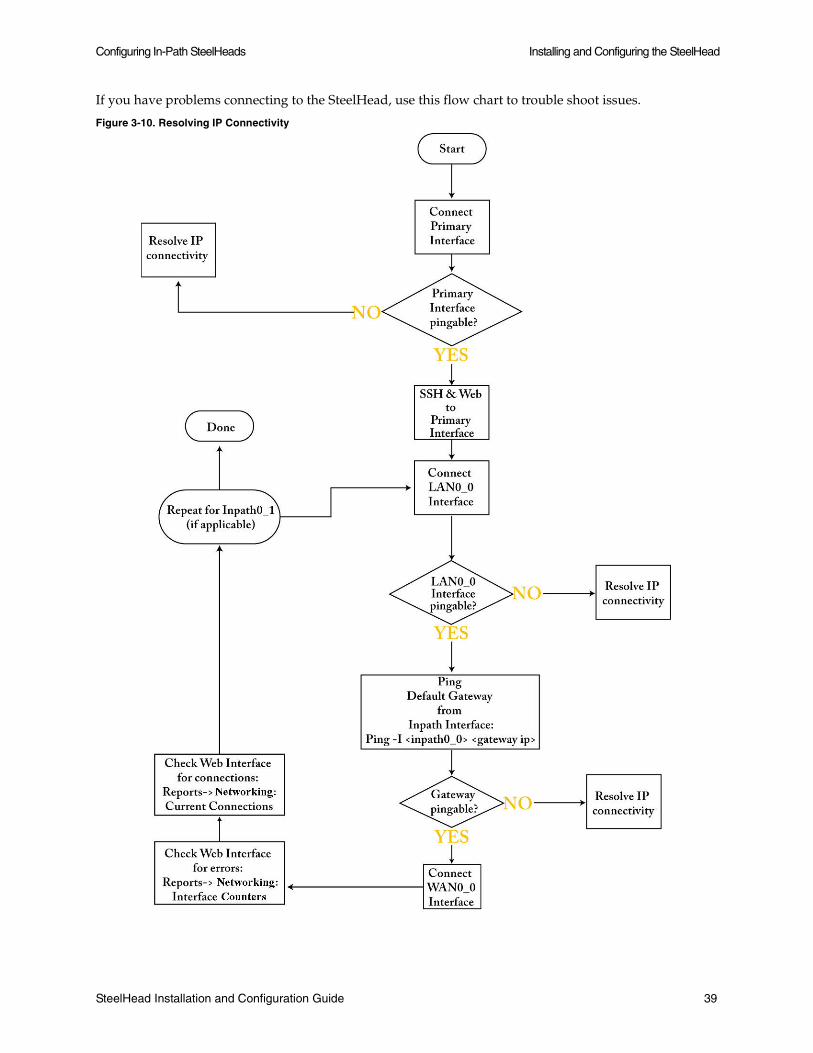
Configuring In-Path SteelHeads Installing and Configuring the SteelHead
If you have problems connecting to the SteelHead, use this flow chart to trouble shoot issues.
Figure 3-10. Resolving IP Connectivity
SteelHead Installation and Configuration Guide 39
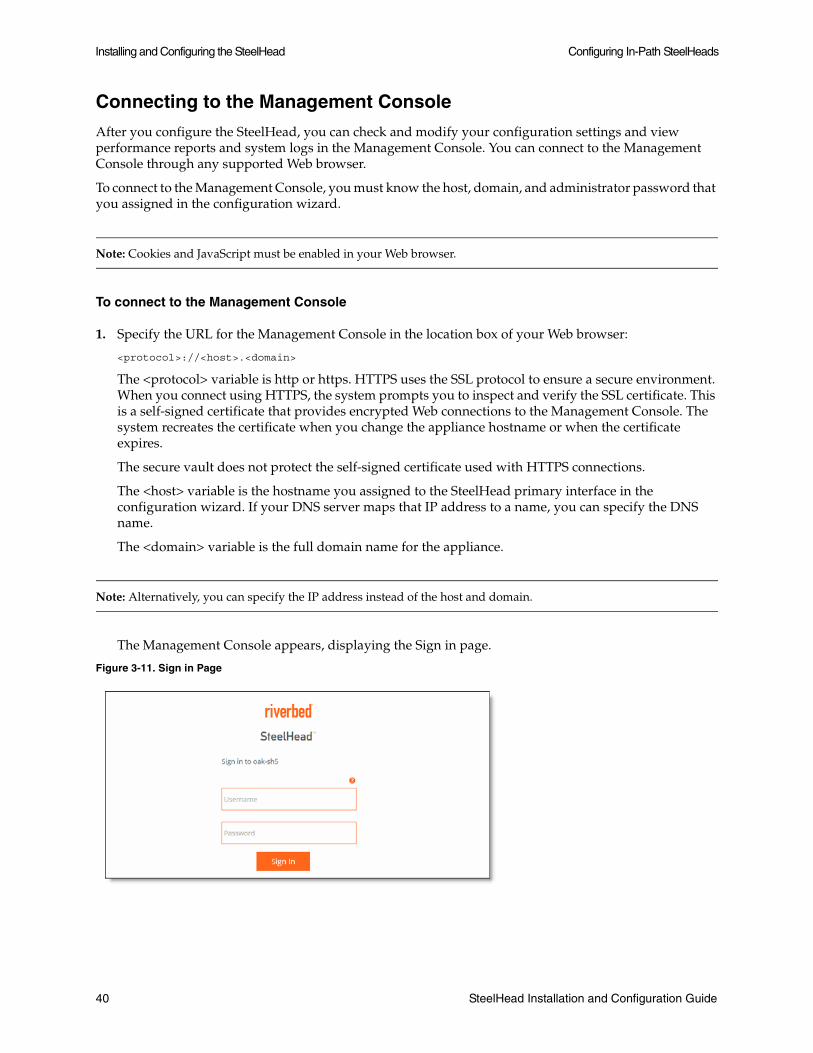
Installing and Configuring the SteelHead Configuring In-Path SteelHeads
Connecting to the Management Console
After you configure the SteelHead, you can check and modify your configuration settings and view performance reports and system logs in the Management Console. You can connect to the Management Console through any supported Web browser.
To connect to the Management Console, you must know the host, domain, and administrator password that you assigned in the configuration wizard.
Note: Cookies and JavaScript must be enabled in your Web browser.
To connect to the Management Console
1. Specify the URL for the Management Console in the location box of your Web browser:
<protocol>://<host>.<domain>
The <protocol> variable is http or https. HTTPS uses the SSL protocol to ensure a secure environment. When you connect using HTTPS, the system prompts you to inspect and verify the SSL certificate. This is a self-signed certificate that provides encrypted Web connections to the Management Console. The system recreates the certificate when you change the appliance hostname or when the certificate expires.
The secure vault does not protect the self-signed certificate used with HTTPS connections.
The <host> variable is the hostname you assigned to the SteelHead primary interface in the configuration wizard. If your DNS server maps that IP address to a name, you can specify the DNS name.
The <domain> variable is the full domain name for the appliance.
Note: Alternatively, you can specify the IP address instead of the host and domain.
The Management Console appears, displaying the Sign in page.
Figure 3-11. Sign in Page
40 SteelHead Installation and Configuration Guide

Configuring In-Path SteelHeads Installing and Configuring the SteelHead
2. In the Username text box, type the user login: admin, monitor, a signin from a RADIUS or TACACS+ database, or any local accounts created using the Role-Based Accounts feature. The default signin is admin.
Users with administrator (admin) privileges can configure and administer the SteelHead. Users with monitor privileges can view the SteelHead reports, view user logs, and change their own password. A monitor user cannot make configuration changes.
3. In the Password text box, type the password you assigned in the configuration wizard of the SteelHead. (The SteelHead is shipped with the default password: password.)
4. Click Sign In to display the Dashboard.
The Dashboard summarizes the current status of your system.
Verifying WAN Optimization
Perform these tasks to verify that you have properly configured the SteelHead.
To verify optimization
1. Go to the Reports > Optimization: Bandwidth Optimization in the Management Console to verify optimization.
2. Map a remote drive on a client machine.
3. Drag and drop a 1 MB file from the client to the remote server.
Ensure that the server is located across the WAN.
4. Drag and drop the 1 MB file again.
Performance improves significantly.
Checking for Speed and Duplex Errors
If you selected auto-negotiation (auto) for your in-path and primary interfaces, you must ensure that the SteelHead negotiated the speed and duplex at the rate your devices expect. For example, ensure settings are auto on the LAN and WAN and 100 FULL on the LAN and WAN. You can verify your speed and duplex settings in the Networking > Networking: In-path Interfaces page and the Networking > Networking: Base Interfaces page of the Management Console.
To check for speed and duplex errors
1. In the Management Console, go to the Reports > Diagnostics: System Logs page.
2. Check the system logs for duplex or speed errors (cyclic redundancy check (CRC) or frame errors).
3. Go to the Administration > System Settings: Alarms page.
4. Check the link duplex and link I/O alarms.
SteelHead Installation and Configuration Guide 41
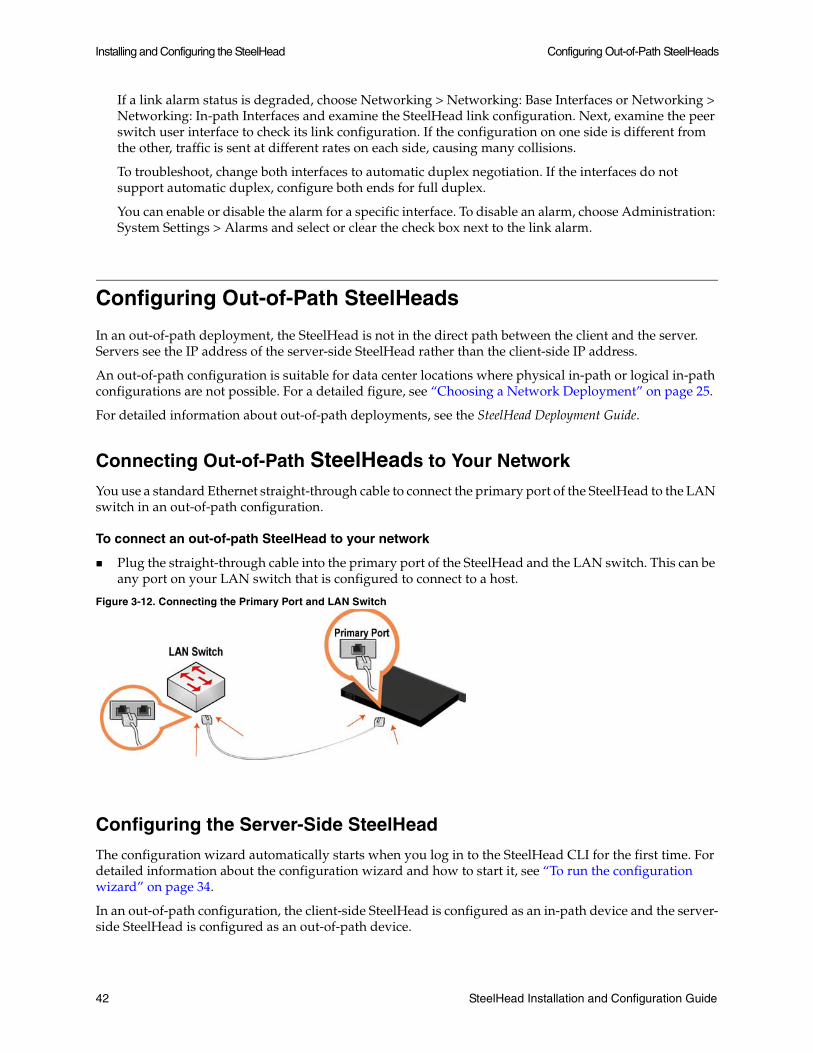
Installing and Configuring the SteelHead Configuring Out-of-Path SteelHeads
If a link alarm status is degraded, choose Networking > Networking: Base Interfaces or Networking > Networking: In-path Interfaces and examine the SteelHead link configuration. Next, examine the peer switch user interface to check its link configuration. If the configuration on one side is different from the other, traffic is sent at different rates on each side, causing many collisions.
To troubleshoot, change both interfaces to automatic duplex negotiation. If the interfaces do not support automatic duplex, configure both ends for full duplex.
You can enable or disable the alarm for a specific interface. To disable an alarm, choose Administration: System Settings > Alarms and select or clear the check box next to the link alarm.
Configuring Out-of-Path SteelHeads
In an out-of-path deployment, the SteelHead is not in the direct path between the client and the server. Servers see the IP address of the server-side SteelHead rather than the client-side IP address.
An out-of-path configuration is suitable for data center locations where physical in-path or logical in-path configurations are not possible. For a detailed figure, see “Choosing a Network Deployment” on page 25.
For detailed information about out-of-path deployments, see the SteelHead Deployment Guide.
Connecting Out-of-Path SteelHeads to Your Network
You use a standard Ethernet straight-through cable to connect the primary port of the SteelHead to the LAN switch in an out-of-path configuration.
To connect an out-of-path SteelHead to your network
Plug the straight-through cable into the primary port of the SteelHead and the LAN switch. This can be any port on your LAN switch that is configured to connect to a host.
Figure 3-12. Connecting the Primary Port and LAN Switch
Configuring the Server-Side SteelHead
The configuration wizard automatically starts when you log in to the SteelHead CLI for the first time. For detailed information about the configuration wizard and how to start it, see “To run the configuration wizard” on page 34.
In an out-of-path configuration, the client-side SteelHead is configured as an in-path device and the server-side SteelHead is configured as an out-of-path device.
42 SteelHead Installation and Configuration Guide
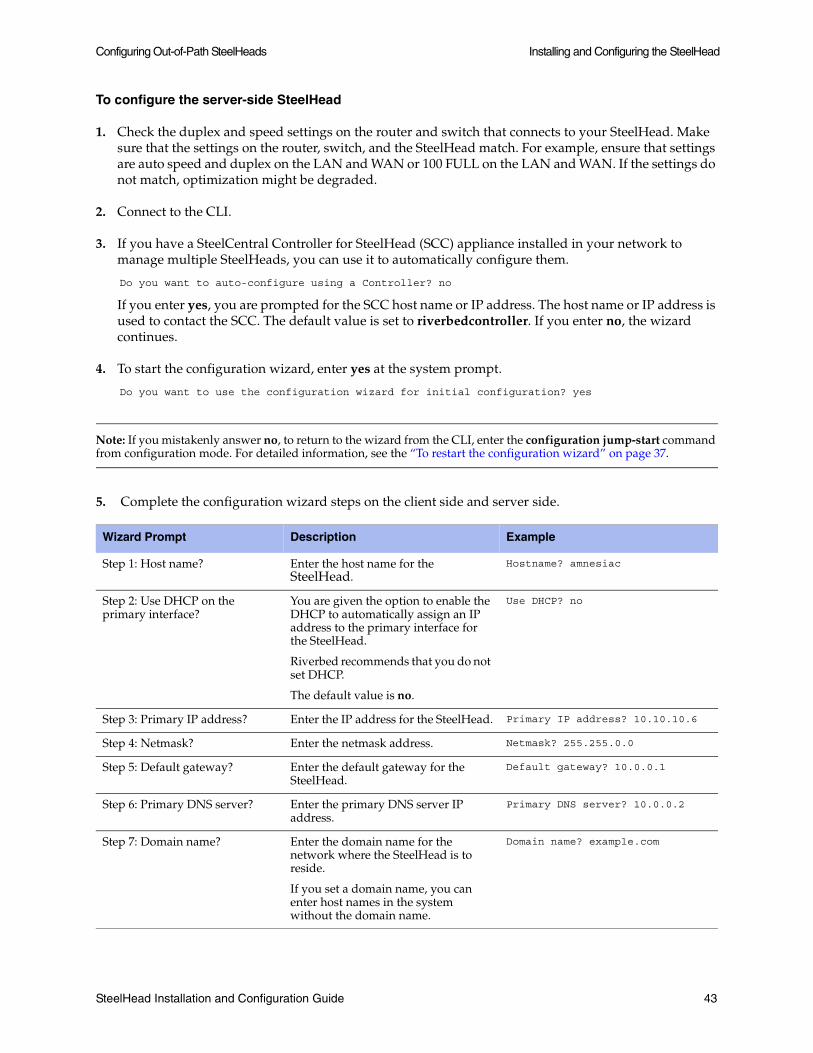
Configuring Out-of-Path SteelHeads Installing and Configuring the SteelHead
To configure the server-side SteelHead
1. Check the duplex and speed settings on the router and switch that connects to your SteelHead. Make sure that the settings on the router, switch, and the SteelHead match. For example, ensure that settings are auto speed and duplex on the LAN and WAN or 100 FULL on the LAN and WAN. If the settings do not match, optimization might be degraded.
2. Connect to the CLI.
3. If you have a SteelCentral Controller for SteelHead (SCC) appliance installed in your network to manage multiple SteelHeads, you can use it to automatically configure them.
Do you want to auto-configure using a Controller? no
If you enter yes, you are prompted for the SCC host name or IP address. The host name or IP address is used to contact the SCC. The default value is set to riverbedcontroller. If you enter no, the wizard continues.
4. To start the configuration wizard, enter yes at the system prompt.
Do you want to use the configuration wizard for initial configuration? yes
Note: If you mistakenly answer no, to return to the wizard from the CLI, enter the configuration jump-start command from configuration mode. For detailed information, see the “To restart the configuration wizard” on page 37.
5. Complete the configuration wizard steps on the client side and server side.
Wizard Prompt Description Example
Step 1: Host name? Enter the host name for the SteelHead.
Hostname? amnesiac
Step 2: Use DHCP on the primary interface?
You are given the option to enable the DHCP to automatically assign an IP address to the primary interface for the SteelHead.
Riverbed recommends that you do not set DHCP.
The default value is no.
Use DHCP? no
Step 3: Primary IP address? Enter the IP address for the SteelHead. Primary IP address? 10.10.10.6
Step 4: Netmask? Enter the netmask address. Netmask? 255.255.0.0
Step 5: Default gateway? Enter the default gateway for the SteelHead.
Default gateway? 10.0.0.1
Step 6: Primary DNS server? Enter the primary DNS server IP address.
Primary DNS server? 10.0.0.2
Step 7: Domain name? Enter the domain name for the network where the SteelHead is to reside.
If you set a domain name, you can enter host names in the system without the domain name.
Domain name? example.com
SteelHead Installation and Configuration Guide 43
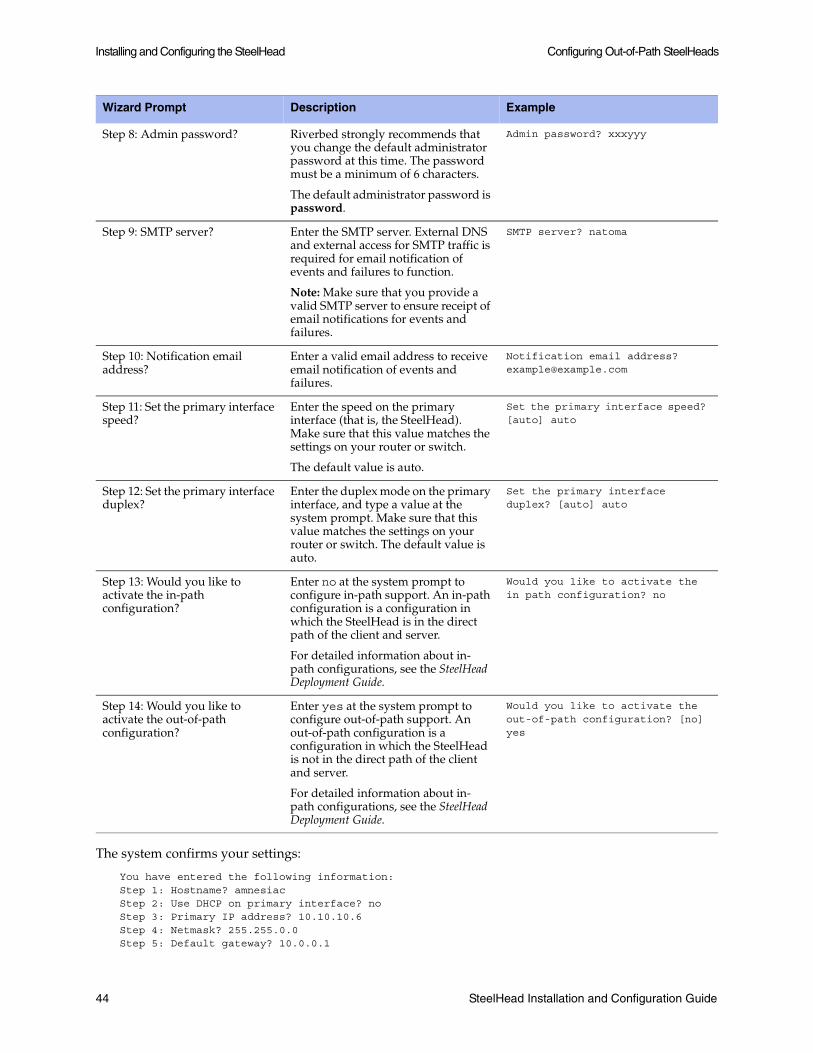
Installing and Configuring the SteelHead Configuring Out-of-Path SteelHeads
The system confirms your settings:
You have entered the following information:Step 1: Hostname? amnesiacStep 2: Use DHCP on primary interface? noStep 3: Primary IP address? 10.10.10.6Step 4: Netmask? 255.255.0.0Step 5: Default gateway? 10.0.0.1
Step 8: Admin password? Riverbed strongly recommends that you change the default administrator password at this time. The password must be a minimum of 6 characters.
The default administrator password is password.
Admin password? xxxyyy
Step 9: SMTP server? Enter the SMTP server. External DNS and external access for SMTP traffic is required for email notification of events and failures to function.
Note: Make sure that you provide a valid SMTP server to ensure receipt of email notifications for events and failures.
SMTP server? natoma
Step 10: Notification email address?
Enter a valid email address to receive email notification of events and failures.
Notification email address? [email protected]
Step 11: Set the primary interface speed?
Enter the speed on the primary interface (that is, the SteelHead). Make sure that this value matches the settings on your router or switch.
The default value is auto.
Set the primary interface speed? [auto] auto
Step 12: Set the primary interface duplex?
Enter the duplex mode on the primary interface, and type a value at the system prompt. Make sure that this value matches the settings on your router or switch. The default value is auto.
Set the primary interface duplex? [auto] auto
Step 13: Would you like to activate the in-path configuration?
Enter no at the system prompt to configure in-path support. An in-path configuration is a configuration in which the SteelHead is in the direct path of the client and server.
For detailed information about in-path configurations, see the SteelHead Deployment Guide.
Would you like to activate the in path configuration? no
Step 14: Would you like to activate the out-of-path configuration?
Enter yes at the system prompt to configure out-of-path support. An out-of-path configuration is a configuration in which the SteelHead is not in the direct path of the client and server.
For detailed information about in-path configurations, see the SteelHead Deployment Guide.
Would you like to activate the out-of-path configuration? [no] yes
Wizard Prompt Description Example
44 SteelHead Installation and Configuration Guide

Configuring Out-of-Path SteelHeads Installing and Configuring the SteelHead
Step 6: Primary DNS server? 10.0.0.2Step 7: Domain name? example.comStep 8: Admin password? xxxyyyyStep 9: SMTP server? natomaStep 10: Notification email address? [email protected] 11: Set the primary interface speed? autoStep 12: Set the primary interface duplex? autoStep 13. Would you like to activate the in-path configuration: noStep 14: Would you like to activate the out-of-path configuration? yes To change an answer, enter the step number to return to.Otherwise hit <enter> to save changes and exit.
The SteelHead configuration wizard automatically saves your settings.
6. To log out of the system, enter this command at the system prompt:
amnesiac> exit
For details on restarting the configuration wizard, see “To restart the configuration wizard” on page 37.
Configuring the Client-Side SteelHead
In an out-of-path configuration, you configure the client-side SteelHead in the same way as in an in-path configuration. For optimization to occur, you must define a fixed-target rule on the client-side SteelHead that points to the out-of-path, server-side SteelHead. You can define fixed-target rules using the Management Console or the CLI.
For detailed information about the Management Console, see the SteelHead Management Console User’s Guide.
For detailed information about the CLI, see the Riverbed Command-Line Interface Reference Manual.
These procedures describe how to configure in-path rules using the Management Console.
To configure the client-side SteelHead
1. Follow the procedures for an in-path configuration.
For details, see “Configuring In-Path SteelHeads” on page 32.
2. Connect to the Management Console.
For details, see “Connecting to the Management Console” on page 40.
SteelHead Installation and Configuration Guide 45
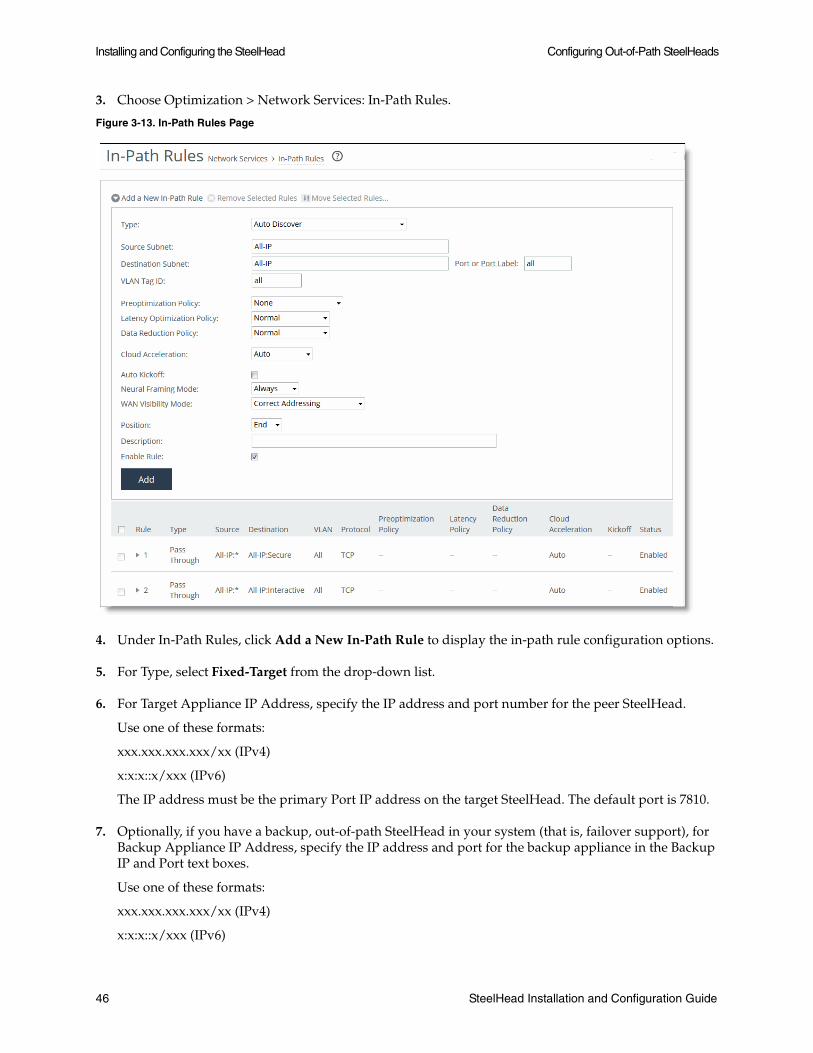
Installing and Configuring the SteelHead Configuring Out-of-Path SteelHeads
3. Choose Optimization > Network Services: In-Path Rules.
Figure 3-13. In-Path Rules Page
4. Under In-Path Rules, click Add a New In-Path Rule to display the in-path rule configuration options.
5. For Type, select Fixed-Target from the drop-down list.
6. For Target Appliance IP Address, specify the IP address and port number for the peer SteelHead.
Use one of these formats:
xxx.xxx.xxx.xxx/xx (IPv4)
x:x:x::x/xxx (IPv6)
The IP address must be the primary Port IP address on the target SteelHead. The default port is 7810.
7. Optionally, if you have a backup, out-of-path SteelHead in your system (that is, failover support), for Backup Appliance IP Address, specify the IP address and port for the backup appliance in the Backup IP and Port text boxes.
Use one of these formats:
xxx.xxx.xxx.xxx/xx (IPv4)
x:x:x::x/xxx (IPv6)
46 SteelHead Installation and Configuration Guide

Configuring Out-of-Path SteelHeads Installing and Configuring the SteelHead
The default port is 7810.
8. Click Add to apply the rule to the running configuration.
9. Click Save to write your settings to memory.
For detailed information about verifying your connections and configuration settings, see “Verifying You Are Connected to the SteelHead” on page 38 and “Verifying WAN Optimization” on page 41.
You can now optimize WAN traffic using the SteelHead.
SteelHead Installation and Configuration Guide 47

Installing and Configuring the SteelHead Configuring Out-of-Path SteelHeads
48 SteelHead Installation and Configuration Guide
CHAPTER 4 Troubleshooting
This chapter describes how to troubleshoot the SteelHead installation. This chapter describes how to troubleshoot these issues:
“Cables” on page 49
“Duplex Mismatch” on page 50
“In-Path SteelHeads Connection” on page 51
“Oplock Issues” on page 51
“CIFS Overlapping Open Optimization Denies Multi-User Access” on page 52
“IP Address Configuration” on page 54
“Asymmetric Routing” on page 55
“Packet Ricochet” on page 55
“Packet Ricochet: ICMP Redirects” on page 56
“Autodiscovery Failure” on page 57
“Protocol Optimization Errors” on page 58
“Server-Side Out-of-Path Connection Caveats” on page 58
“Specific Problems” on page 59
“Resetting a Lost Password” on page 59
“Network Integration Checklist” on page 61
Cables
Improper cabling prevents smooth traffic flows between the SteelHead and the router or switch.
SteelHead Installation and Configuration Guide 49
Troubleshooting Duplex Mismatch
Solution
To ensure that the traffic flows when the SteelHead is optimizing traffic, and when the SteelHead transitions to bypass mode, use the appropriate crossover or straight-through cable to connect the SteelHead to a router or switch. Verify the cable selection by removing the power cable from the appliance, and then test connectivity through it. Make sure that you have connected your cables as follows:
SteelHead to router: crossover cable
SteelHead to switch: straight-through cable
SteelHead to SteelHead: crossover cable
SteelHead to a host: crossover cable
Duplex Mismatch
These symptoms occur due to a duplex mismatch:
Access is not faster after configuring the SteelHead.
The Link Duplex alarm triggers.
The interface counters display error messages. An alarm or log message about error counts appears.
The pass-through rule is ineffective. (This is a definite indication of duplex mismatch.)
There are many retransmissions in packet traces.
You cannot connect to an attached device.
You can connect with a device when you choose auto-negotiation, but you cannot connect with the same device when you manually set the speed or duplex.
Good performance for one direction of data flow, but poor performance in the opposite direction.
Possible Cause
You have probably set the duplex value for your router to 100 Full (fixed) and set the duplex value for the SteelHead to Auto.
Example
This example shows applications that appear slower with SteelHeads configured in an in-path deployment. The timed performance numbers to transfer a 20-MB file over FTP are:
no SteelHead – 3:16
cold SteelHead – 5:08
warm SteelHead – 3:46
Adding a pass-through rule for an application does not help. Slow connections appear as optimized in the Management Console on the Current Connections report page. However, stopping the SteelHead service while leaving the system powered on and an in-path configuration returns performance to original levels.
50 SteelHead Installation and Configuration Guide
In-Path SteelHeads Connection Troubleshooting
Solutions
To resolve the duplex mismatch error:
Connect to the SteelHead CLI and enter the flood-ping command to check the duplex mismatch:
ping –f –I >in-path-ip> –s 1400 <clientIP>
Change the interface speed and duplex to match.
Ensure there is a speed and duplex match between each in-path interface and its peer network interface. If they do not match, you might have a large number of errors on the interface when it is in the bypass mode, because the switch and the router are not set with the same duplex settings. Also, ensure connectivity when service is down.
If matching speed and duplex do not reduce collisions or errors, try hard-setting one end and auto-setting the other. Try the half-duplex mode.
If all combinations fail, as a last resort, add an intermediary hub or switch that is more compatible with both network interfaces.
In-Path SteelHeads Connection
When there are SteelHeads with in-path connection issues, the two sites are connected in-path and you can ping them, but they cannot connect to each other to optimize data.
Possible Cause
The firewall is running port filtering and drops your probe packets. The firewall is filtering the IP and port address of the source and destination (bandwidth limitation) systems.
Solutions
To resolve the SteelHead connection issue:
open port 7800 on both firewalls.
use the port visibility mode.
if there is no encryption, place the SteelHead after the firewall.
Oplock Issues
These symptoms occur due to opportunistic lock (oplock) issues:
File access is not faster or tasks such as drag-and-drop are fast but applications might benefit from acceleration.
The Current Connections report page in the Management Console (select Reports > Networking: Current Connections) displays slow connections as optimized.
SteelHead Installation and Configuration Guide 51
Troubleshooting CIFS Overlapping Open Optimization Denies Multi-User Access
Possible Causes
The client is running an old antivirus software such as McAfee v4.5, the most common type, which competes with the application for an oplock instead of opening as read-only. The antivirus causes multiple file opens.
The server has oplocks disabled.
Example
You can open a previously-accessed file in 5 seconds on PC1, but you cannot open the same file under 24 seconds on PC2. If you close the file on PC1, you can open it in 5 seconds on PC2. However, it takes you 24 seconds to open the same file on PC1.
Solutions
Windows Common Internet File System (CIFS) uses oplock to determine the level of safety the OS or the application has in working with a file. Oplock is a lock that a client requests on a file in a remote server.
An oplock controls the consistency of optimizations such as read-ahead. Oplock levels are reduced when you make conflicting opens to a file.
To prevent any compromise to data integrity, the SteelHead only optimizes data when a client has exclusive access to the data.
When an oplock is not available, the SteelHead does not perform application-level latency optimization but still performs scalable data referencing (SDR) and data compression as well as TCP optimization. Therefore, even without the benefits of latency optimization, SteelHeads still increase WAN performance, but not as effectively as when application optimizations are available.
To resolve oplock issues:
Upgrade your antivirus software to the latest version.
Use Filemon (sysinternals) to check for file access.
Enable CIFS Overlapping Opens (by default, this function is enabled). For details, see “CIFS Overlapping Open Optimization Denies Multi-User Access” on page 52.
Ensure that the server has oplock enabled by verifying registry settings on Windows servers or the Filer configuration (for NetApp or EMC servers).
Run a network analyzer such as Riverbed SteelCentral Pilot, which is fully integrated with Wireshark, and determine that the server grants oplocks when the client opens a file.
Check whether the client is running an antivirus software that is scanning the files over the WAN or that the antivirus software does not break the oplock.
CIFS Overlapping Open Optimization Denies Multi-User Access
The CIFS overlapping open optimization issue prevents a client from accessing a file when different clients access the file at the same time.
52 SteelHead Installation and Configuration Guide

CIFS Overlapping Open Optimization Denies Multi-User Access Troubleshooting
Solution
To resolve the CIFS overlapping open optimization issue, configure CIFS overlapping open optimization on the client-side SteelHead as follows:
1. Connect to the SteelHead Management Console. For details, see “To connect to the Management Console” on page 40.
2. On the client-side SteelHead, choose Optimization: CIFS (SMB1) to display the CIFS (SMB1) page.
Figure 4-1. CIFS (SMB1) Page
SteelHead Installation and Configuration Guide 53
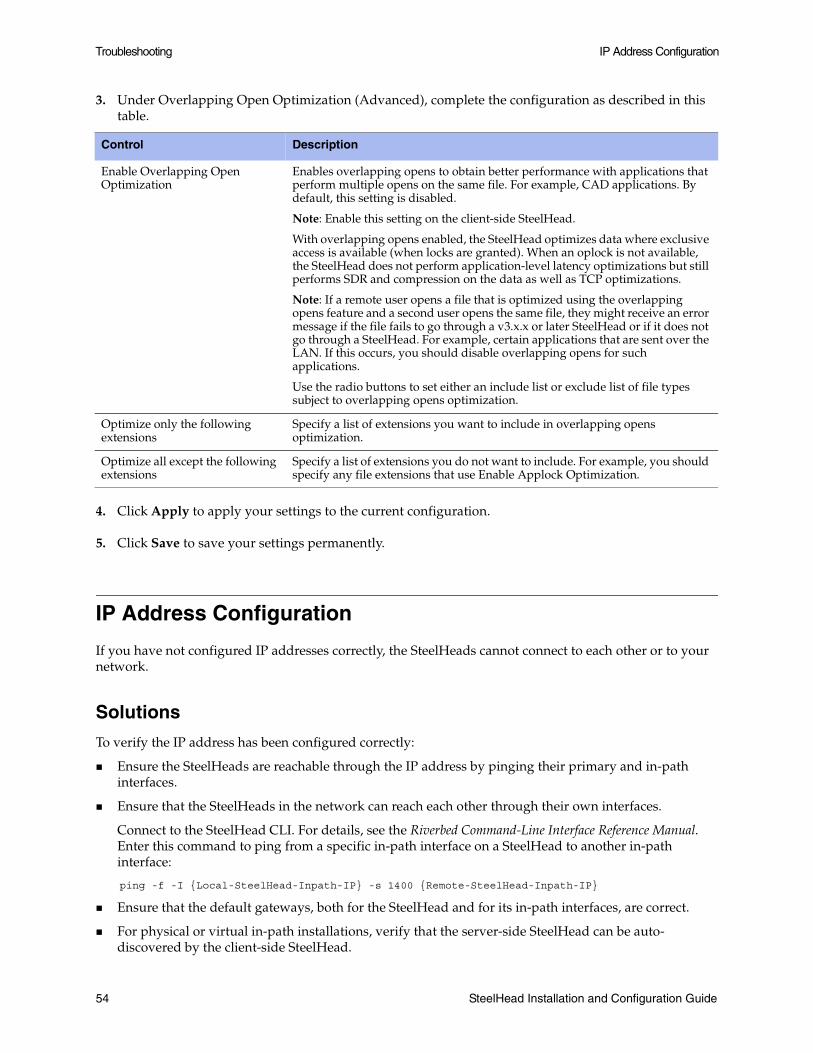
Troubleshooting IP Address Configuration
3. Under Overlapping Open Optimization (Advanced), complete the configuration as described in this table.
4. Click Apply to apply your settings to the current configuration.
5. Click Save to save your settings permanently.
IP Address Configuration
If you have not configured IP addresses correctly, the SteelHeads cannot connect to each other or to your network.
Solutions
To verify the IP address has been configured correctly:
Ensure the SteelHeads are reachable through the IP address by pinging their primary and in-path interfaces.
Ensure that the SteelHeads in the network can reach each other through their own interfaces.
Connect to the SteelHead CLI. For details, see the Riverbed Command-Line Interface Reference Manual. Enter this command to ping from a specific in-path interface on a SteelHead to another in-path interface:
ping -f -I {Local-SteelHead-Inpath-IP} -s 1400 {Remote-SteelHead-Inpath-IP}
Ensure that the default gateways, both for the SteelHead and for its in-path interfaces, are correct.
For physical or virtual in-path installations, verify that the server-side SteelHead can be auto-discovered by the client-side SteelHead.
Control Description
Enable Overlapping Open Optimization
Enables overlapping opens to obtain better performance with applications that perform multiple opens on the same file. For example, CAD applications. By default, this setting is disabled.
Note: Enable this setting on the client-side SteelHead.
With overlapping opens enabled, the SteelHead optimizes data where exclusive access is available (when locks are granted). When an oplock is not available, the SteelHead does not perform application-level latency optimizations but still performs SDR and compression on the data as well as TCP optimizations.
Note: If a remote user opens a file that is optimized using the overlapping opens feature and a second user opens the same file, they might receive an error message if the file fails to go through a v3.x.x or later SteelHead or if it does not go through a SteelHead. For example, certain applications that are sent over the LAN. If this occurs, you should disable overlapping opens for such applications.
Use the radio buttons to set either an include list or exclude list of file types subject to overlapping opens optimization.
Optimize only the following extensions
Specify a list of extensions you want to include in overlapping opens optimization.
Optimize all except the following extensions
Specify a list of extensions you do not want to include. For example, you should specify any file extensions that use Enable Applock Optimization.
54 SteelHead Installation and Configuration Guide
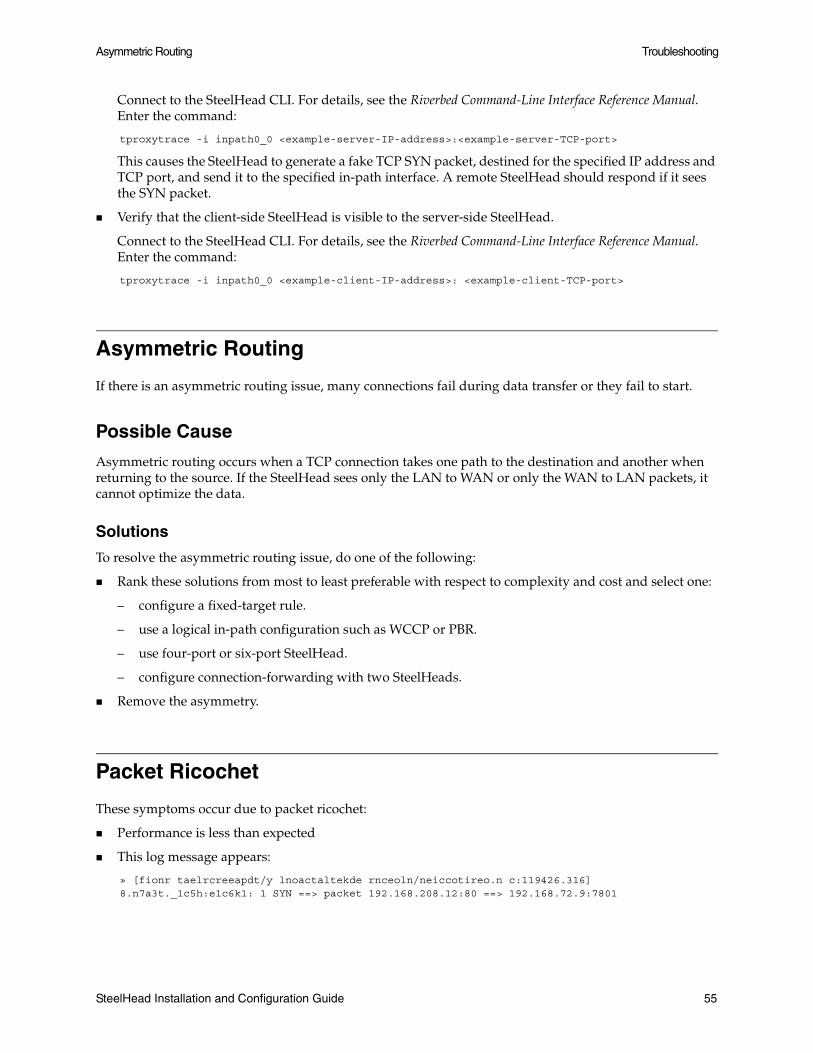
Asymmetric Routing Troubleshooting
Connect to the SteelHead CLI. For details, see the Riverbed Command-Line Interface Reference Manual. Enter the command:
tproxytrace -i inpath0_0 <example-server-IP-address>:<example-server-TCP-port>
This causes the SteelHead to generate a fake TCP SYN packet, destined for the specified IP address and TCP port, and send it to the specified in-path interface. A remote SteelHead should respond if it sees the SYN packet.
Verify that the client-side SteelHead is visible to the server-side SteelHead.
Connect to the SteelHead CLI. For details, see the Riverbed Command-Line Interface Reference Manual. Enter the command:
tproxytrace -i inpath0_0 <example-client-IP-address>: <example-client-TCP-port>
Asymmetric Routing
If there is an asymmetric routing issue, many connections fail during data transfer or they fail to start.
Possible Cause
Asymmetric routing occurs when a TCP connection takes one path to the destination and another when returning to the source. If the SteelHead sees only the LAN to WAN or only the WAN to LAN packets, it cannot optimize the data.
Solutions
To resolve the asymmetric routing issue, do one of the following:
Rank these solutions from most to least preferable with respect to complexity and cost and select one:
– configure a fixed-target rule.
– use a logical in-path configuration such as WCCP or PBR.
– use four-port or six-port SteelHead.
– configure connection-forwarding with two SteelHeads.
Remove the asymmetry.
Packet Ricochet
These symptoms occur due to packet ricochet:
Performance is less than expected
This log message appears:
» [fionr taelrcreeapdt/y lnoactaltekde rnceoln/neiccotireo.n c:119426.316] 8.n7a3t._1c5h:e1c6k1: 1 SYN ==> packet 192.168.208.12:80 ==> 192.168.72.9:7801
SteelHead Installation and Configuration Guide 55
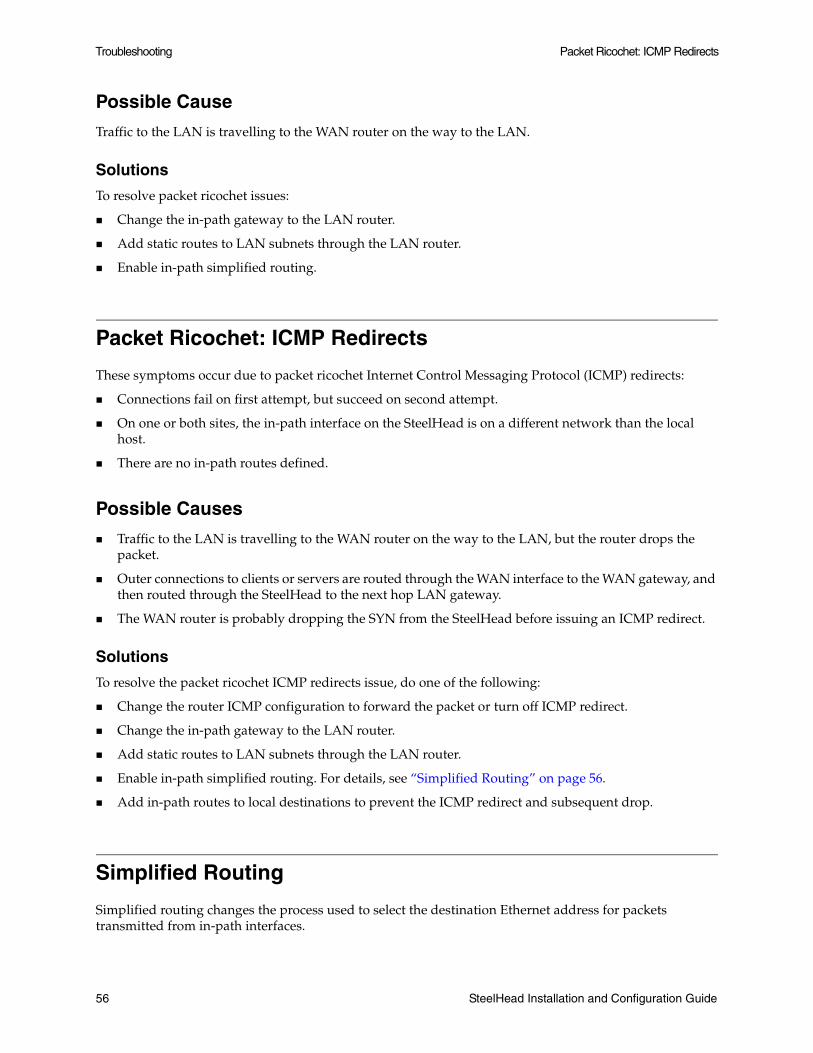
Troubleshooting Packet Ricochet: ICMP Redirects
Possible Cause
Traffic to the LAN is travelling to the WAN router on the way to the LAN.
Solutions
To resolve packet ricochet issues:
Change the in-path gateway to the LAN router.
Add static routes to LAN subnets through the LAN router.
Enable in-path simplified routing.
Packet Ricochet: ICMP Redirects
These symptoms occur due to packet ricochet Internet Control Messaging Protocol (ICMP) redirects:
Connections fail on first attempt, but succeed on second attempt.
On one or both sites, the in-path interface on the SteelHead is on a different network than the local host.
There are no in-path routes defined.
Possible Causes
Traffic to the LAN is travelling to the WAN router on the way to the LAN, but the router drops the packet.
Outer connections to clients or servers are routed through the WAN interface to the WAN gateway, and then routed through the SteelHead to the next hop LAN gateway.
The WAN router is probably dropping the SYN from the SteelHead before issuing an ICMP redirect.
Solutions
To resolve the packet ricochet ICMP redirects issue, do one of the following:
Change the router ICMP configuration to forward the packet or turn off ICMP redirect.
Change the in-path gateway to the LAN router.
Add static routes to LAN subnets through the LAN router.
Enable in-path simplified routing. For details, see “Simplified Routing” on page 56.
Add in-path routes to local destinations to prevent the ICMP redirect and subsequent drop.
Simplified Routing
Simplified routing changes the process used to select the destination Ethernet address for packets transmitted from in-path interfaces.
56 SteelHead Installation and Configuration Guide
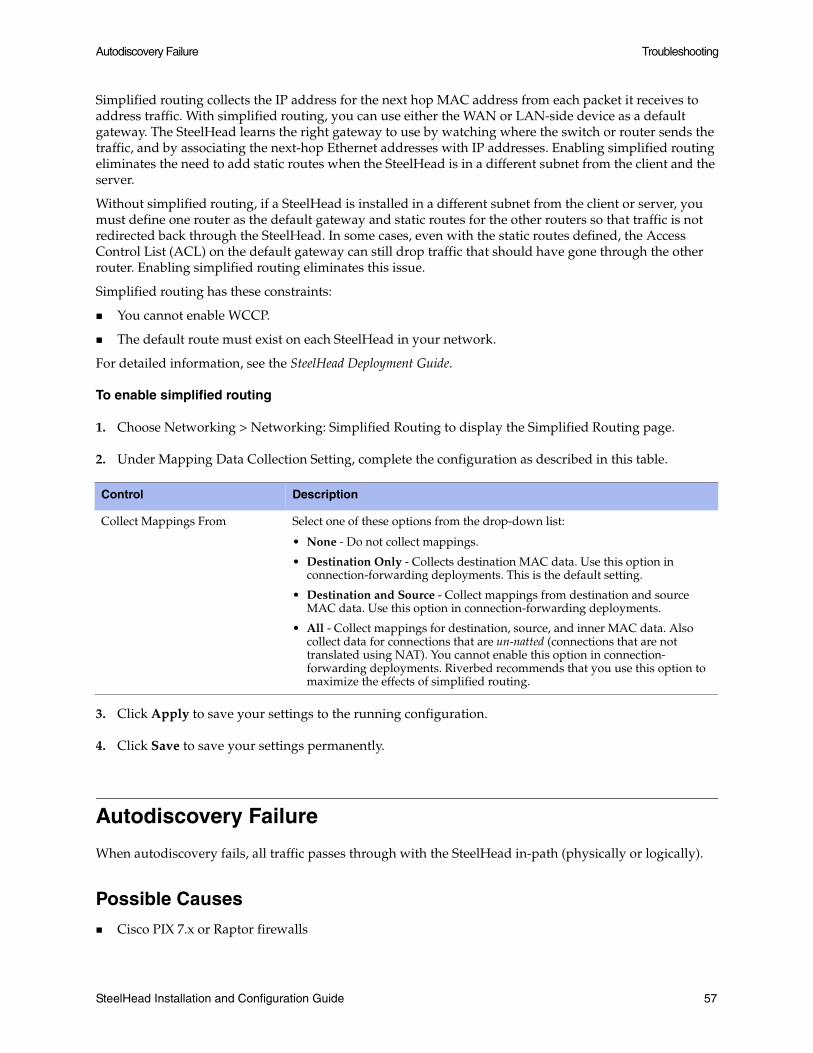
Autodiscovery Failure Troubleshooting
Simplified routing collects the IP address for the next hop MAC address from each packet it receives to address traffic. With simplified routing, you can use either the WAN or LAN-side device as a default gateway. The SteelHead learns the right gateway to use by watching where the switch or router sends the traffic, and by associating the next-hop Ethernet addresses with IP addresses. Enabling simplified routing eliminates the need to add static routes when the SteelHead is in a different subnet from the client and the server.
Without simplified routing, if a SteelHead is installed in a different subnet from the client or server, you must define one router as the default gateway and static routes for the other routers so that traffic is not redirected back through the SteelHead. In some cases, even with the static routes defined, the Access Control List (ACL) on the default gateway can still drop traffic that should have gone through the other router. Enabling simplified routing eliminates this issue.
Simplified routing has these constraints:
You cannot enable WCCP.
The default route must exist on each SteelHead in your network.
For detailed information, see the SteelHead Deployment Guide.
To enable simplified routing
1. Choose Networking > Networking: Simplified Routing to display the Simplified Routing page.
2. Under Mapping Data Collection Setting, complete the configuration as described in this table.
3. Click Apply to save your settings to the running configuration.
4. Click Save to save your settings permanently.
Autodiscovery Failure
When autodiscovery fails, all traffic passes through with the SteelHead in-path (physically or logically).
Possible Causes
Cisco PIX 7.x or Raptor firewalls
Control Description
Collect Mappings From Select one of these options from the drop-down list:
• None - Do not collect mappings.
• Destination Only - Collects destination MAC data. Use this option in connection-forwarding deployments. This is the default setting.
• Destination and Source - Collect mappings from destination and source MAC data. Use this option in connection-forwarding deployments.
• All - Collect mappings for destination, source, and inner MAC data. Also collect data for connections that are un-natted (connections that are not translated using NAT). You cannot enable this option in connection-forwarding deployments. Riverbed recommends that you use this option to maximize the effects of simplified routing.
SteelHead Installation and Configuration Guide 57
Troubleshooting Protocol Optimization Errors
Satellite
Intrusion Detection System (IDS) or Intrusion Prevention System (IPS)
Solutions
Create a fixed-target rule on the client-side SteelHead.
Specify the Target Appliance IP Address and its port as 7800 on the opposite SteelHead (in-path without autodiscovery).
Configure end nodes (firewalls) to allow your probe to pass through.
Configure the SteelHead IP address as the friendly IP address for IDS or IPS.
Cisco PIX Firewall IOS v7.0 might block the autodiscovery probe. Some firewall configurations strip TCP options or drop packets with these options. You can keep this configuration and switch to fixed-target rules or change the configuration on the firewall.
Protocol Optimization Errors
When there are protocol optimization errors, the SteelHead does not optimize expected protocols.
Solutions
To resolve protocol optimization errors, check:
that connections have been successfully established.
that SteelHeads on the other side of a connection are turned on.
for secure or interactive ports that are preventing protocol optimization.
for any pass-through rules that could be causing some protocols to pass through the SteelHeads unoptimized.
that the LAN and WAN cables are not inadvertently swapped.
Server-Side Out-of-Path Connection Caveats
Consider these the caveats for a server-side out-of-path (OOP) SteelHead connection:
OOP configuration does not support autodiscovery. You must create a fixed-target rule on the client-side SteelHead.
You must create an OOP connection from an in-path or logical in-path SteelHead and direct it to port 7810 on the primary interface of the server-side SteelHead. This setting is mandatory.
Interception is not supported on the primary interface.
58 SteelHead Installation and Configuration Guide
Specific Problems Troubleshooting
An OOP configuration provides nontransparent optimization from the server perspective. Clients connect to servers, but servers treat it like a server-side SteelHead connection. This affects:
– log files.
– server-side ACLs.
– bidirectional applications such as rsh.
You can use OOP configurations along with in-path or logical in-path configurations.
Specific Problems
This section describes specific problems you might encounter in the SteelHead.
Resetting a Lost Password
To reset your password, you must have access to the serial console or monitor and must be able to see the entire boot process to perform these steps:
1. Start or reboot the appliance.
Problem Solution
The show interfaces CLI command displays 4294967295 as the number of errors on an interface.
The bypass card is not properly installed; reinstall it. For details, see the Network Interface Card Installation Guide.
The SteelHead blocks traffic when going into bypass mode.
If a SteelHead blocks traffic when going into bypass mode, verify that connections to its neighboring devices are correctly configured. Ensure that the cable from the SteelHead to the switch is a straight-through cable and the cable from the SteelHead to the router is a crossover cable. Also, ensure that there are no network speed or duplex mismatches.
The SteelHead does not come out of bypass mode when the network connection is restored.
If a SteelHead does not come out of bypass mode, verify that:
• The in-path interface has an IP address. For example, at the system prompt, enter the show interfaces CLI command.
• In-path interception is enabled. For example, at the system prompt, enter the show in-path CLI command. Expected results are:
Enabled: yes
Optimizations Enabled On: inpath0_0
• The bypass service is running. For example, at the system prompt, enter the show service CLI command. To enable the SteelHead service if it is not running, use the CLI command service enable.
• You have a valid and active SH10BASE license. Your license file should also contain entries for SH10CIFS and SH10EXCH licenses, even if they have not been activated. For example, at the system prompt, enter the show licenses CLI command. For questions about licenses, contact Riverbed Support at https://support.riverbed.com.
The SteelHead fails to boot. Ensure that the power strip or the uninterruptable power supply (UPS) the SteelHead is plugged into is turned on and is functioning properly.
SteelHead Installation and Configuration Guide 59

Troubleshooting Resetting a Lost Password
2. When prompted, press any key to continue.
3. Immediately press E. A GNU GRUB menu appears.
For a SteelHead upgraded to 4.0 from 2.0 or 3.0, the menu prompts you to select the Riverbed SteelHead, diagnostics, or a restore/recovery image. Select Riverbed SteelHead and skip to Step 5.
For a SteelHead manufactured with 4.0 (that has not had previous versions), the menu prompts you to select the disk image to use. Continue with Step 4.
For software versions prior to 4.0, the menu displays root and kernel parameters. Skip to Step 6.
4. Press V or ^ to select the disk image to boot.
5. Press E.
A GRUB menu appears, with options similar to the following:
-----------------0: root (hd0,1)1: kernel /vmlinuz ro root=/dev/sda5 console=tty0 console=ttyS0,9600n8-----------------
6. Press V or ^ to select the kernel boot parameters entry.
7. Press E to edit the kernel boot parameters. The CLI displays a partially completed line of text similar to the following:
kernel /vmlinuz ro root=/dev/sda5 console=tty0 console=ttyS0,9600n8
8. The line of text contains two console= entries. Modify this line as follows:
– If you are accessing the SteelHead remotely, delete
console=tty0
– If you are accessing the SteelHead directly (through a keyboard and monitor connected to the appliance), delete
console=ttyS0
– At the end of the line, type a space and append the line with
single fastboot
– You must include a space before the word single.
Note: Use the arrow keys to access the entire command line.
9. Press Enter.
10. Press B to continue booting.
The system starts.
11. At the command prompt, enter /sbin/resetpw.sh.
The password is blank.
12. Type reboot and press Enter to reboot the appliance.
60 SteelHead Installation and Configuration Guide
Network Integration Checklist Troubleshooting
Network Integration Checklist
Before you begin configuring the SteelHead, check these configuration settings:
Speed and duplex.
QoS integration.
Multihop optimization.
Packet ricochet.
VPN: Ensure the encryption is on the WAN side of the SteelHead.
Firewall: Ensure probes are passed, especially Cisco PIX and Raptor. If inside the SteelHead, try probe caching for src IP rules; if outside, check firewall performance.
In-path: Is it a VLAN trunk? (Configure trunking).
Incorrectly designed load balancing implementations.
Remove or manage asymmetry.
Fail-to-wire or fail-to-block, you need Link State Protocol (LSP) for quicker convergence.
WCCP or VLAN bridge: Router model and IOS revision.
Does the network use Network Address Translation (NAT) or Port Address Translation (PAT)?
SteelHead Installation and Configuration Guide 61

Troubleshooting Network Integration Checklist
62 SteelHead Installation and Configuration Guide
APPENDIX A SteelHead CX xx70 Appliance Specifications
This appendix describes the status lights, ports, and the technical and environmental specifications for the xx70 appliances. It includes the following sections:
“CX3070 Specifications” on page 63
“CX5070 and CX7070 Specifications” on page 67
CX3070 Specifications
This section describes the status lights, ports, technical and environmental specifications.
SteelHead Installation and Configuration Guide 63
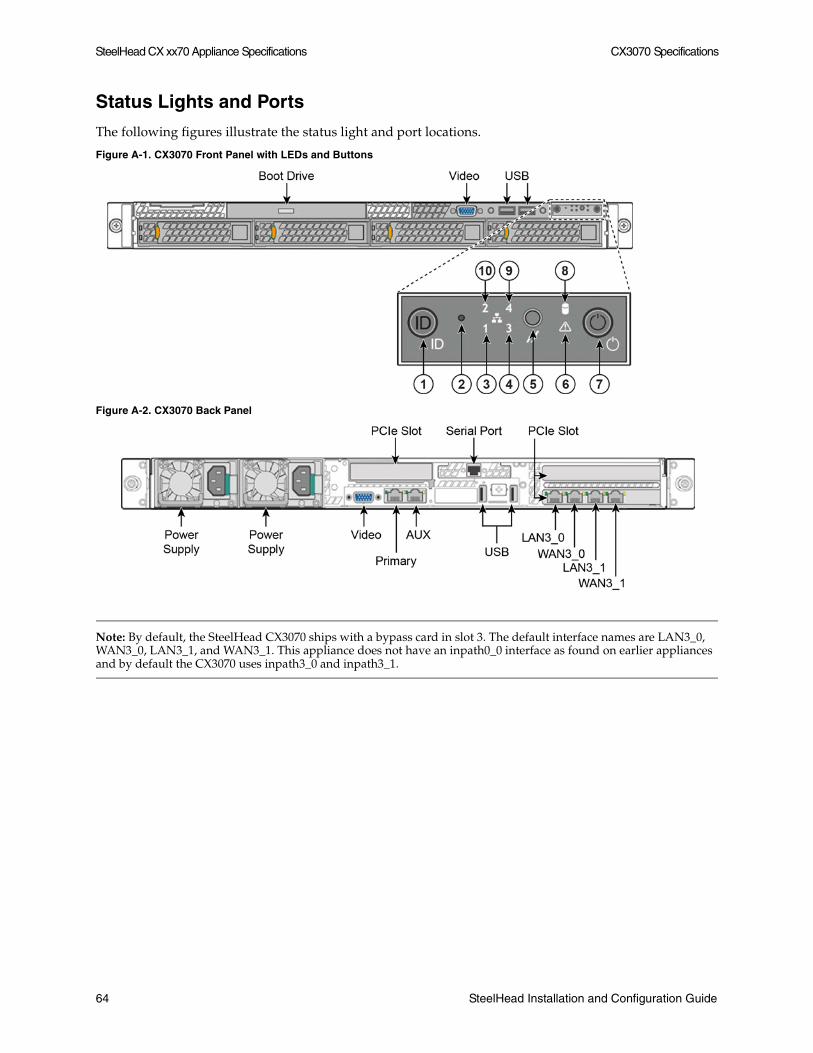
SteelHead CX xx70 Appliance Specifications CX3070 Specifications
Status Lights and Ports
The following figures illustrate the status light and port locations.
Figure A-1. CX3070 Front Panel with LEDs and Buttons
Figure A-2. CX3070 Back Panel
Note: By default, the SteelHead CX3070 ships with a bypass card in slot 3. The default interface names are LAN3_0, WAN3_0, LAN3_1, and WAN3_1. This appliance does not have an inpath0_0 interface as found on earlier appliances and by default the CX3070 uses inpath3_0 and inpath3_1.
64 SteelHead Installation and Configuration Guide
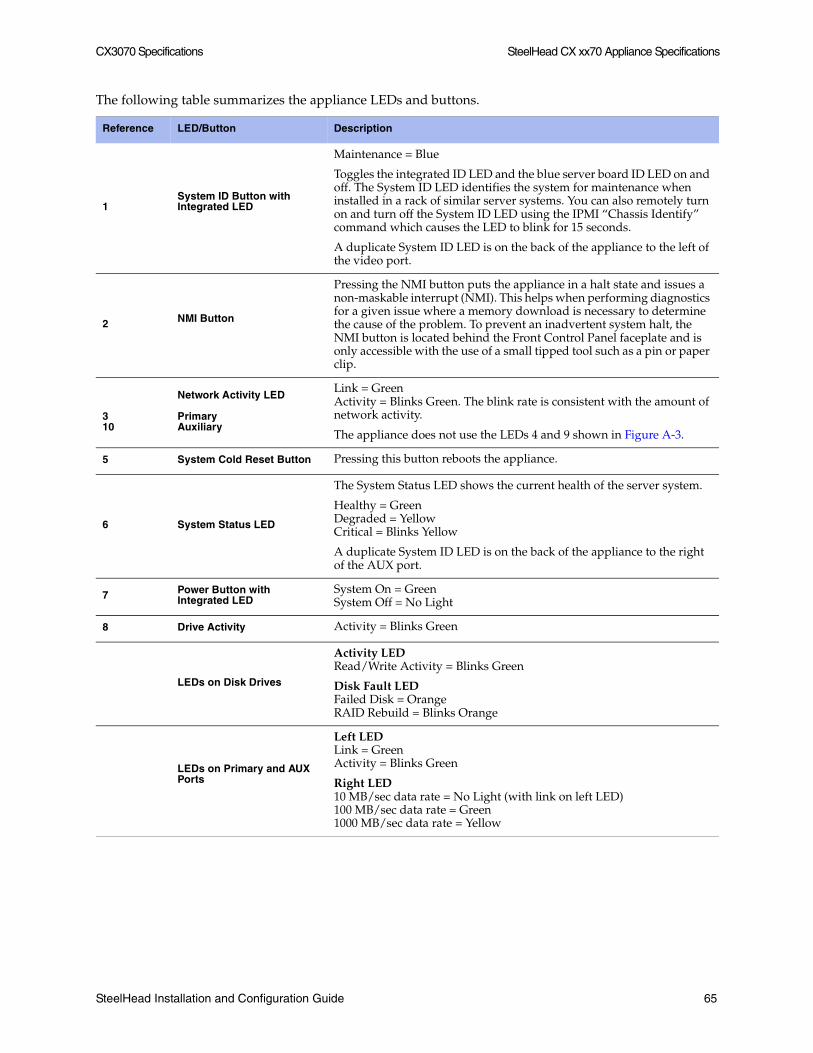
CX3070 Specifications SteelHead CX xx70 Appliance Specifications
The following table summarizes the appliance LEDs and buttons.
Reference LED/Button Description
1System ID Button with Integrated LED
Maintenance = Blue
Toggles the integrated ID LED and the blue server board ID LED on and off. The System ID LED identifies the system for maintenance when installed in a rack of similar server systems. You can also remotely turn on and turn off the System ID LED using the IPMI “Chassis Identify” command which causes the LED to blink for 15 seconds.
A duplicate System ID LED is on the back of the appliance to the left of the video port.
2 NMI Button
Pressing the NMI button puts the appliance in a halt state and issues a non-maskable interrupt (NMI). This helps when performing diagnostics for a given issue where a memory download is necessary to determine the cause of the problem. To prevent an inadvertent system halt, the NMI button is located behind the Front Control Panel faceplate and is only accessible with the use of a small tipped tool such as a pin or paper clip.
310
Network Activity LED
PrimaryAuxiliary
Link = GreenActivity = Blinks Green. The blink rate is consistent with the amount of network activity.
The appliance does not use the LEDs 4 and 9 shown in Figure A-3.
5 System Cold Reset Button Pressing this button reboots the appliance.
6 System Status LED
The System Status LED shows the current health of the server system.
Healthy = GreenDegraded = YellowCritical = Blinks Yellow
A duplicate System ID LED is on the back of the appliance to the right of the AUX port.
7 Power Button with Integrated LED
System On = GreenSystem Off = No Light
8 Drive Activity Activity = Blinks Green
LEDs on Disk Drives
Activity LEDRead/Write Activity = Blinks Green
Disk Fault LEDFailed Disk = OrangeRAID Rebuild = Blinks Orange
LEDs on Primary and AUX Ports
Left LEDLink = GreenActivity = Blinks Green
Right LED10 MB/sec data rate = No Light (with link on left LED)100 MB/sec data rate = Green1000 MB/sec data rate = Yellow
SteelHead Installation and Configuration Guide 65
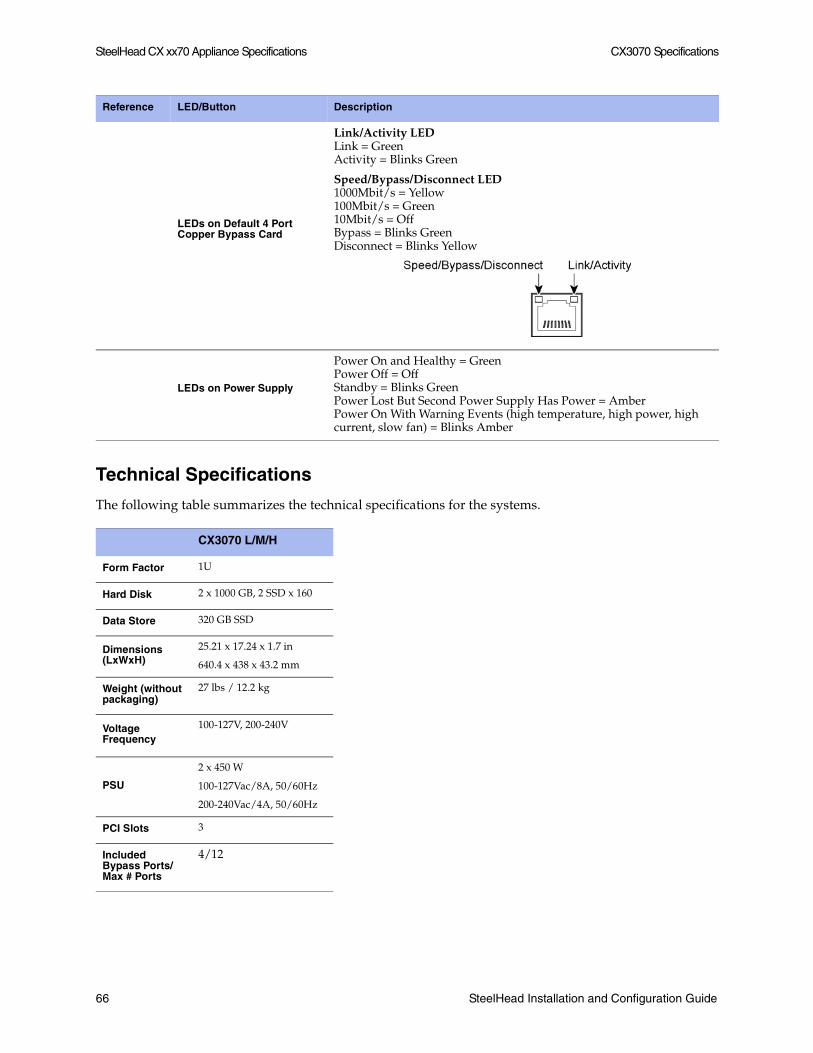
SteelHead CX xx70 Appliance Specifications CX3070 Specifications
Technical Specifications
The following table summarizes the technical specifications for the systems.
LEDs on Default 4 Port Copper Bypass Card
Link/Activity LEDLink = Green Activity = Blinks Green
Speed/Bypass/Disconnect LED1000Mbit/s = Yellow 100Mbit/s = Green10Mbit/s = OffBypass = Blinks GreenDisconnect = Blinks Yellow
LEDs on Power Supply
Power On and Healthy = Green Power Off = OffStandby = Blinks GreenPower Lost But Second Power Supply Has Power = AmberPower On With Warning Events (high temperature, high power, high current, slow fan) = Blinks Amber
CX3070 L/M/H
Form Factor 1U
Hard Disk 2 x 1000 GB, 2 SSD x 160
Data Store 320 GB SSD
Dimensions (LxWxH)
25.21 x 17.24 x 1.7 in
640.4 x 438 x 43.2 mm
Weight (without packaging)
27 lbs / 12.2 kg
Voltage Frequency
100-127V, 200-240V
PSU
2 x 450 W
100-127Vac/8A, 50/60Hz
200-240Vac/4A, 50/60Hz
PCI Slots 3
Included Bypass Ports/Max # Ports
4/12
Reference LED/Button Description
66 SteelHead Installation and Configuration Guide
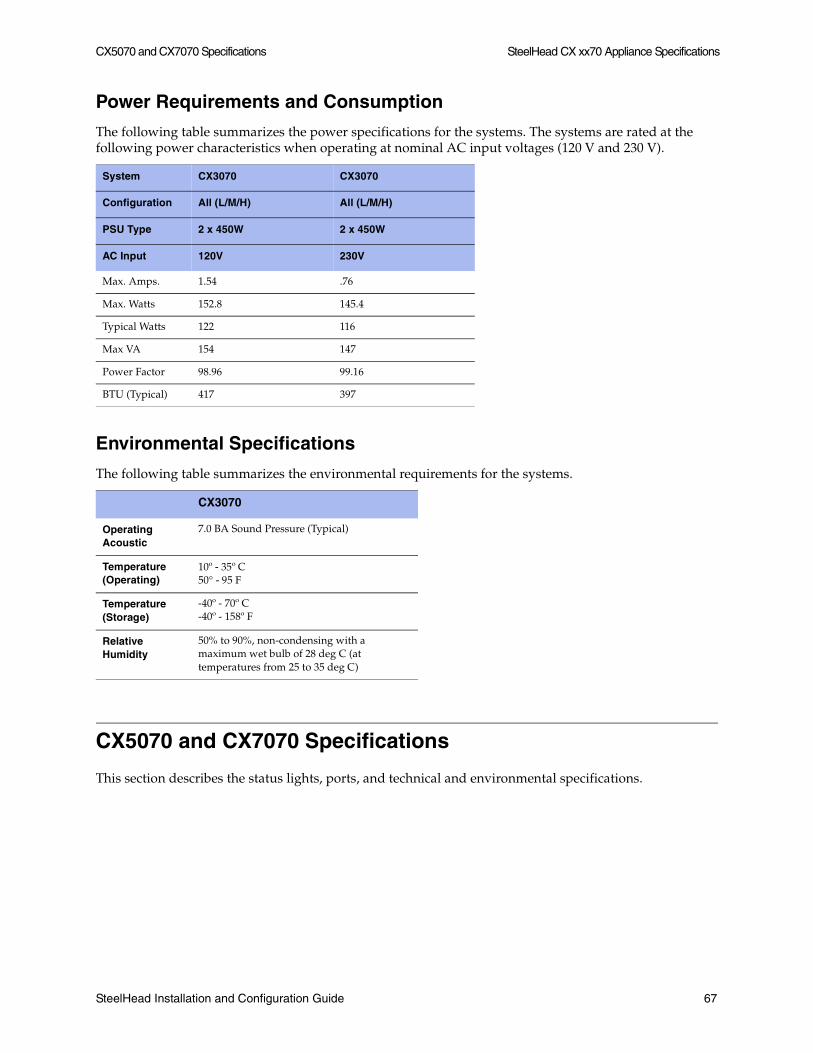
CX5070 and CX7070 Specifications SteelHead CX xx70 Appliance Specifications
Power Requirements and Consumption
The following table summarizes the power specifications for the systems. The systems are rated at the following power characteristics when operating at nominal AC input voltages (120 V and 230 V).
Environmental Specifications
The following table summarizes the environmental requirements for the systems.
CX5070 and CX7070 Specifications
This section describes the status lights, ports, and technical and environmental specifications.
System CX3070 CX3070
Configuration All (L/M/H) All (L/M/H)
PSU Type 2 x 450W 2 x 450W
AC Input 120V 230V
Max. Amps. 1.54 .76
Max. Watts 152.8 145.4
Typical Watts 122 116
Max VA 154 147
Power Factor 98.96 99.16
BTU (Typical) 417 397
CX3070
OperatingAcoustic
7.0 BA Sound Pressure (Typical)
Temperature (Operating)
10º - 35º C50° - 95 F
Temperature (Storage)
-40º - 70º C-40º - 158º F
Relative Humidity
50% to 90%, non-condensing with a maximum wet bulb of 28 deg C (at temperatures from 25 to 35 deg C)
SteelHead Installation and Configuration Guide 67
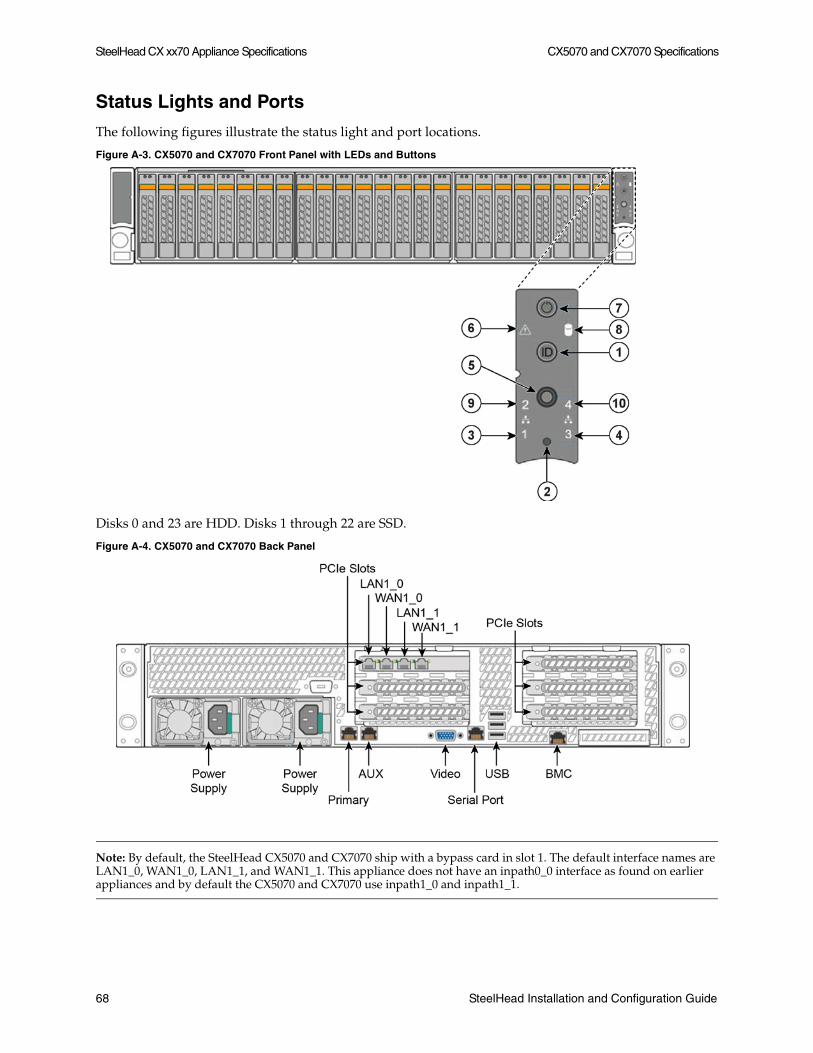
SteelHead CX xx70 Appliance Specifications CX5070 and CX7070 Specifications
Status Lights and Ports
The following figures illustrate the status light and port locations.
Figure A-3. CX5070 and CX7070 Front Panel with LEDs and Buttons
Disks 0 and 23 are HDD. Disks 1 through 22 are SSD.
Figure A-4. CX5070 and CX7070 Back Panel
Note: By default, the SteelHead CX5070 and CX7070 ship with a bypass card in slot 1. The default interface names are LAN1_0, WAN1_0, LAN1_1, and WAN1_1. This appliance does not have an inpath0_0 interface as found on earlier appliances and by default the CX5070 and CX7070 use inpath1_0 and inpath1_1.
68 SteelHead Installation and Configuration Guide
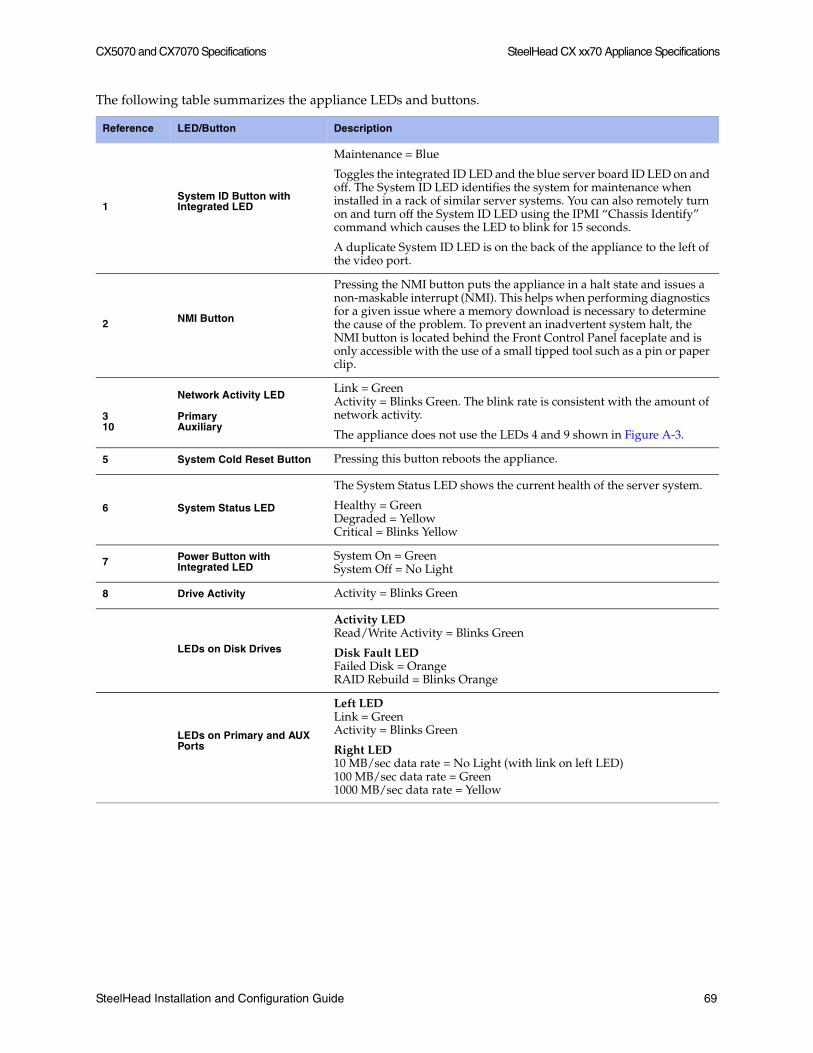
CX5070 and CX7070 Specifications SteelHead CX xx70 Appliance Specifications
The following table summarizes the appliance LEDs and buttons.
Reference LED/Button Description
1System ID Button with Integrated LED
Maintenance = Blue
Toggles the integrated ID LED and the blue server board ID LED on and off. The System ID LED identifies the system for maintenance when installed in a rack of similar server systems. You can also remotely turn on and turn off the System ID LED using the IPMI “Chassis Identify” command which causes the LED to blink for 15 seconds.
A duplicate System ID LED is on the back of the appliance to the left of the video port.
2 NMI Button
Pressing the NMI button puts the appliance in a halt state and issues a non-maskable interrupt (NMI). This helps when performing diagnostics for a given issue where a memory download is necessary to determine the cause of the problem. To prevent an inadvertent system halt, the NMI button is located behind the Front Control Panel faceplate and is only accessible with the use of a small tipped tool such as a pin or paper clip.
310
Network Activity LED
PrimaryAuxiliary
Link = GreenActivity = Blinks Green. The blink rate is consistent with the amount of network activity.
The appliance does not use the LEDs 4 and 9 shown in Figure A-3.
5 System Cold Reset Button Pressing this button reboots the appliance.
6 System Status LED
The System Status LED shows the current health of the server system.
Healthy = GreenDegraded = YellowCritical = Blinks Yellow
7 Power Button with Integrated LED
System On = GreenSystem Off = No Light
8 Drive Activity Activity = Blinks Green
LEDs on Disk Drives
Activity LEDRead/Write Activity = Blinks Green
Disk Fault LEDFailed Disk = OrangeRAID Rebuild = Blinks Orange
LEDs on Primary and AUX Ports
Left LEDLink = GreenActivity = Blinks Green
Right LED10 MB/sec data rate = No Light (with link on left LED)100 MB/sec data rate = Green1000 MB/sec data rate = Yellow
SteelHead Installation and Configuration Guide 69
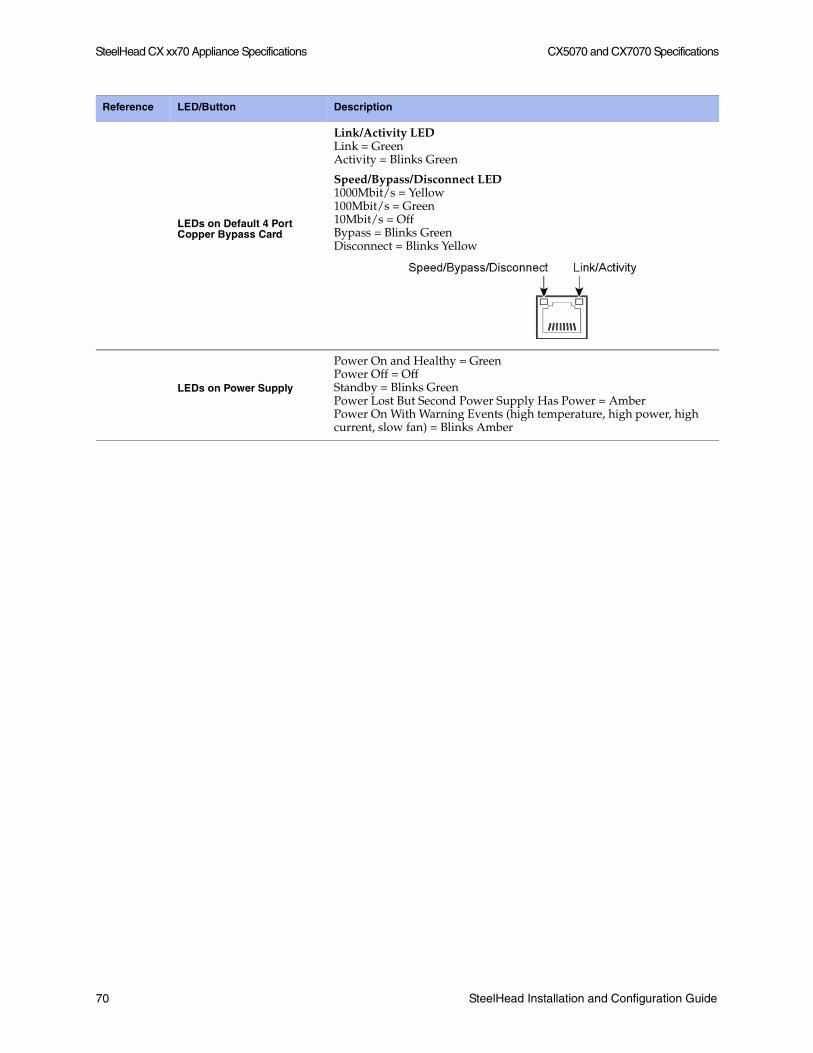
SteelHead CX xx70 Appliance Specifications CX5070 and CX7070 Specifications
LEDs on Default 4 Port Copper Bypass Card
Link/Activity LEDLink = Green Activity = Blinks Green
Speed/Bypass/Disconnect LED1000Mbit/s = Yellow 100Mbit/s = Green10Mbit/s = OffBypass = Blinks GreenDisconnect = Blinks Yellow
LEDs on Power Supply
Power On and Healthy = Green Power Off = OffStandby = Blinks GreenPower Lost But Second Power Supply Has Power = AmberPower On With Warning Events (high temperature, high power, high current, slow fan) = Blinks Amber
Reference LED/Button Description
70 SteelHead Installation and Configuration Guide
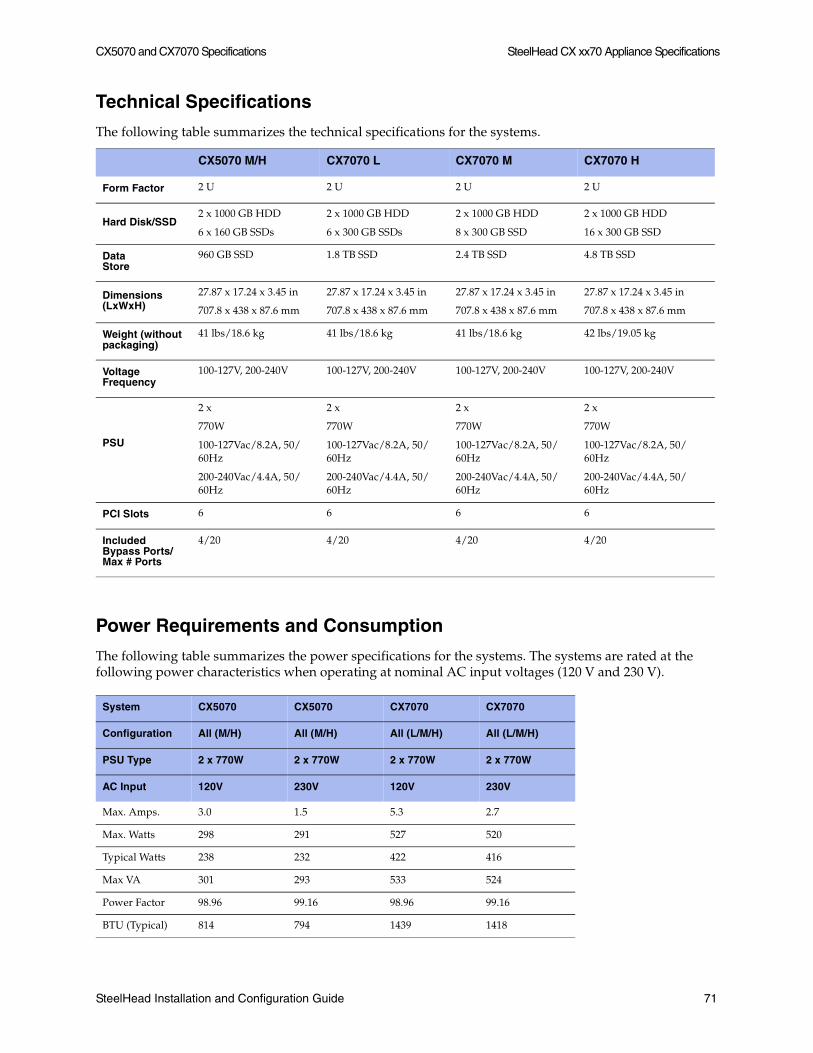
CX5070 and CX7070 Specifications SteelHead CX xx70 Appliance Specifications
Technical Specifications
The following table summarizes the technical specifications for the systems.
Power Requirements and Consumption
The following table summarizes the power specifications for the systems. The systems are rated at the following power characteristics when operating at nominal AC input voltages (120 V and 230 V).
CX5070 M/H CX7070 L CX7070 M CX7070 H
Form Factor 2 U 2 U 2 U 2 U
Hard Disk/SSD2 x 1000 GB HDD
6 x 160 GB SSDs
2 x 1000 GB HDD
6 x 300 GB SSDs
2 x 1000 GB HDD
8 x 300 GB SSD
2 x 1000 GB HDD
16 x 300 GB SSD
DataStore
960 GB SSD 1.8 TB SSD 2.4 TB SSD 4.8 TB SSD
Dimensions (LxWxH)
27.87 x 17.24 x 3.45 in
707.8 x 438 x 87.6 mm
27.87 x 17.24 x 3.45 in
707.8 x 438 x 87.6 mm
27.87 x 17.24 x 3.45 in
707.8 x 438 x 87.6 mm
27.87 x 17.24 x 3.45 in
707.8 x 438 x 87.6 mm
Weight (without packaging)
41 lbs/18.6 kg 41 lbs/18.6 kg 41 lbs/18.6 kg 42 lbs/19.05 kg
Voltage Frequency
100-127V, 200-240V 100-127V, 200-240V 100-127V, 200-240V 100-127V, 200-240V
PSU
2 x
770W
100-127Vac/8.2A, 50/60Hz
200-240Vac/4.4A, 50/60Hz
2 x
770W
100-127Vac/8.2A, 50/60Hz
200-240Vac/4.4A, 50/60Hz
2 x
770W
100-127Vac/8.2A, 50/60Hz
200-240Vac/4.4A, 50/60Hz
2 x
770W
100-127Vac/8.2A, 50/60Hz
200-240Vac/4.4A, 50/60Hz
PCI Slots 6 6 6 6
Included Bypass Ports/Max # Ports
4/20 4/20 4/20 4/20
System CX5070 CX5070 CX7070 CX7070
Configuration All (M/H) All (M/H) All (L/M/H) All (L/M/H)
PSU Type 2 x 770W 2 x 770W 2 x 770W 2 x 770W
AC Input 120V 230V 120V 230V
Max. Amps. 3.0 1.5 5.3 2.7
Max. Watts 298 291 527 520
Typical Watts 238 232 422 416
Max VA 301 293 533 524
Power Factor 98.96 99.16 98.96 99.16
BTU (Typical) 814 794 1439 1418
SteelHead Installation and Configuration Guide 71
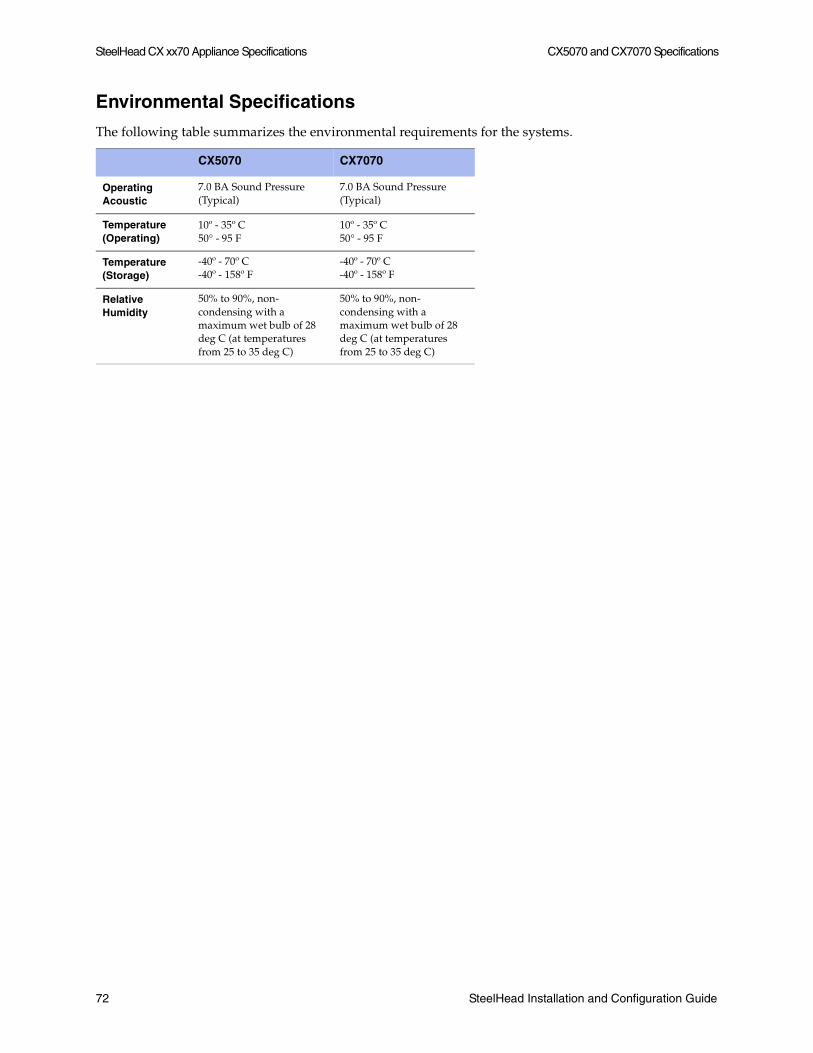
SteelHead CX xx70 Appliance Specifications CX5070 and CX7070 Specifications
Environmental Specifications
The following table summarizes the environmental requirements for the systems.
CX5070 CX7070
OperatingAcoustic
7.0 BA Sound Pressure (Typical)
7.0 BA Sound Pressure (Typical)
Temperature (Operating)
10º - 35º C50° - 95 F
10º - 35º C50° - 95 F
Temperature (Storage)
-40º - 70º C-40º - 158º F
-40º - 70º C-40º - 158º F
Relative Humidity
50% to 90%, non-condensing with a maximum wet bulb of 28 deg C (at temperatures from 25 to 35 deg C)
50% to 90%, non-condensing with a maximum wet bulb of 28 deg C (at temperatures from 25 to 35 deg C)
72 SteelHead Installation and Configuration Guide
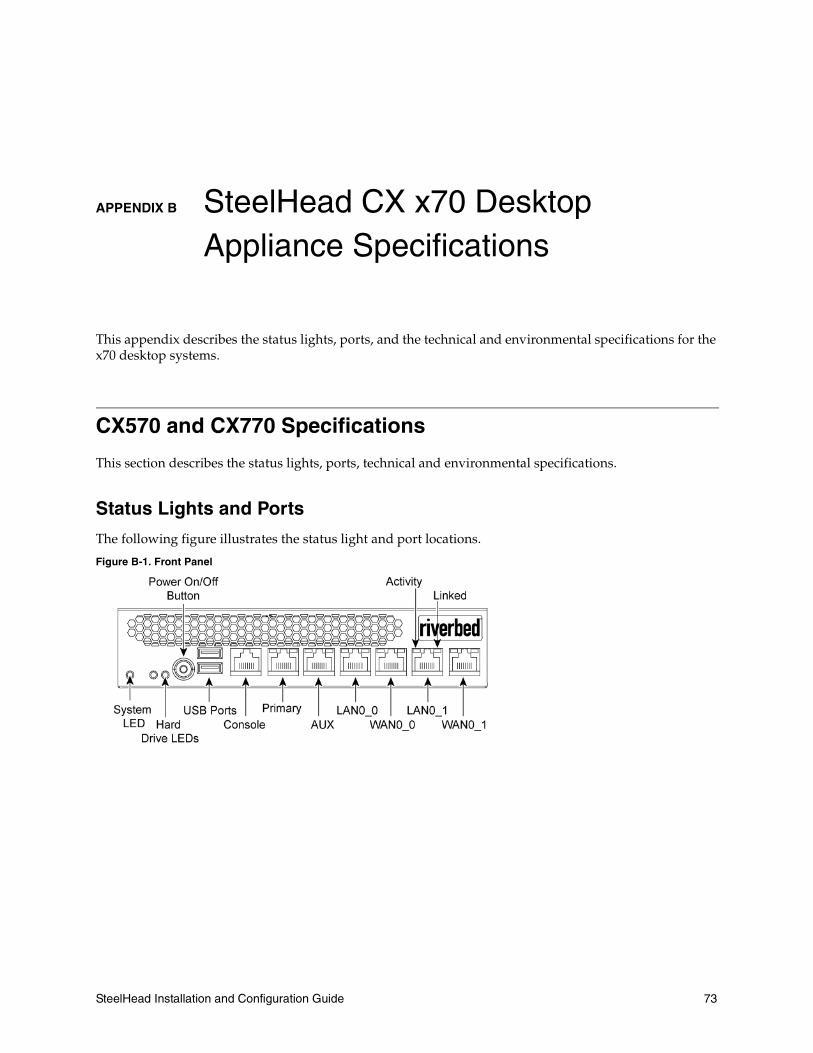
APPENDIX B SteelHead CX x70 Desktop Appliance Specifications
This appendix describes the status lights, ports, and the technical and environmental specifications for the x70 desktop systems.
CX570 and CX770 Specifications
This section describes the status lights, ports, technical and environmental specifications.
Status Lights and Ports
The following figure illustrates the status light and port locations.
Figure B-1. Front Panel
SteelHead Installation and Configuration Guide 73
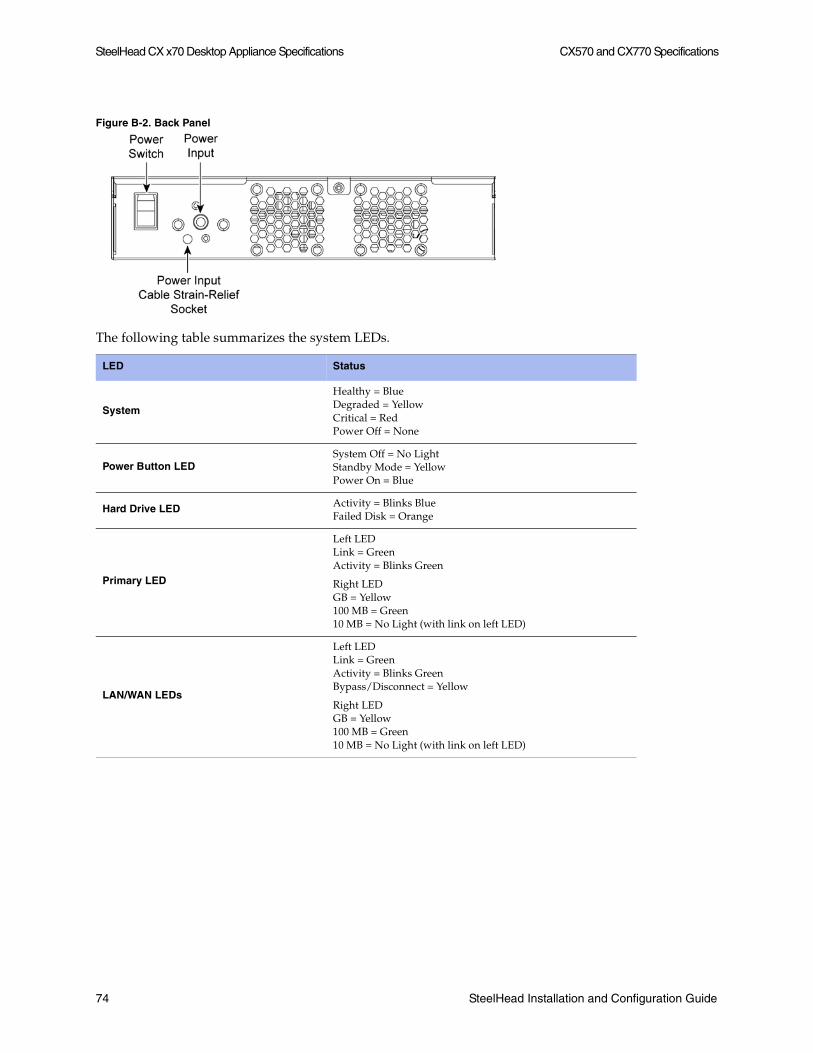
SteelHead CX x70 Desktop Appliance Specifications CX570 and CX770 Specifications
Figure B-2. Back Panel
The following table summarizes the system LEDs.
LED Status
System
Healthy = BlueDegraded = YellowCritical = RedPower Off = None
Power Button LEDSystem Off = No Light Standby Mode = YellowPower On = Blue
Hard Drive LED Activity = Blinks BlueFailed Disk = Orange
Primary LED
Left LEDLink = GreenActivity = Blinks Green
Right LEDGB = Yellow100 MB = Green10 MB = No Light (with link on left LED)
LAN/WAN LEDs
Left LEDLink = GreenActivity = Blinks GreenBypass/Disconnect = Yellow
Right LEDGB = Yellow100 MB = Green10 MB = No Light (with link on left LED)
74 SteelHead Installation and Configuration Guide
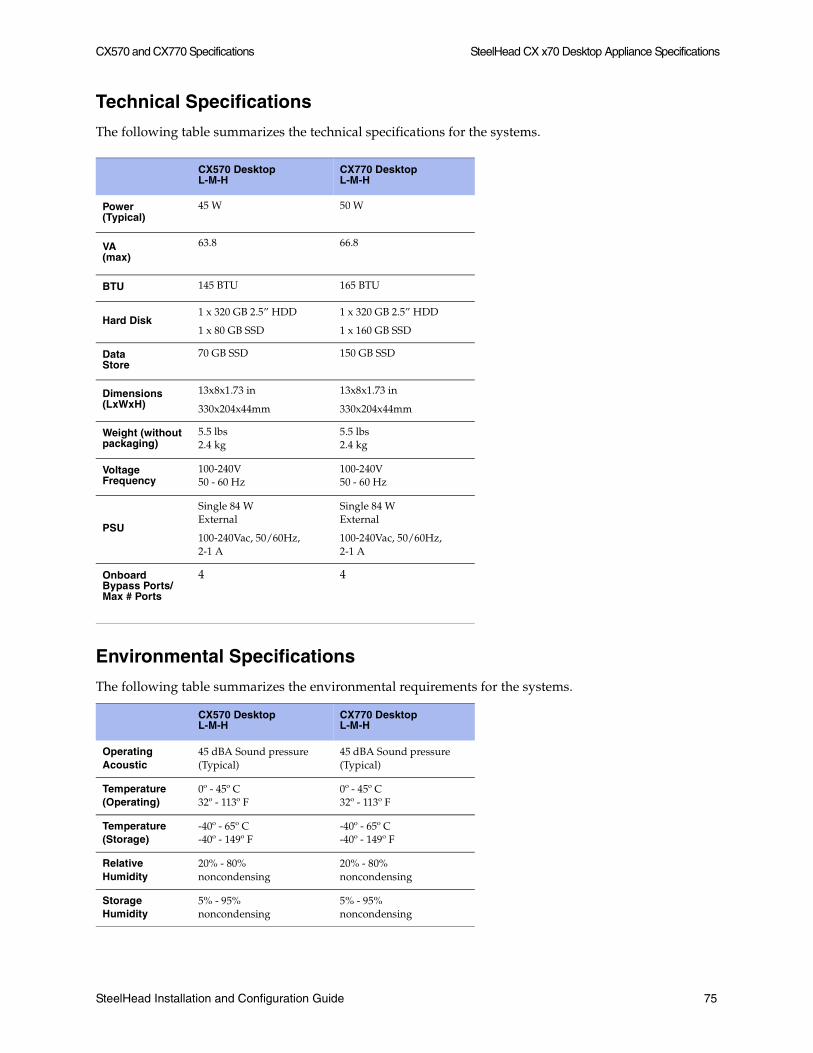
CX570 and CX770 Specifications SteelHead CX x70 Desktop Appliance Specifications
Technical Specifications
The following table summarizes the technical specifications for the systems.
Environmental Specifications
The following table summarizes the environmental requirements for the systems.
CX570 Desktop L-M-H
CX770 Desktop L-M-H
Power(Typical)
45 W 50 W
VA(max)
63.8 66.8
BTU 145 BTU 165 BTU
Hard Disk1 x 320 GB 2.5” HDD
1 x 80 GB SSD
1 x 320 GB 2.5” HDD
1 x 160 GB SSD
DataStore
70 GB SSD 150 GB SSD
Dimensions (LxWxH)
13x8x1.73 in
330x204x44mm
13x8x1.73 in
330x204x44mm
Weight (without packaging)
5.5 lbs2.4 kg
5.5 lbs2.4 kg
Voltage Frequency
100-240V50 - 60 Hz
100-240V50 - 60 Hz
PSU
Single 84 WExternal
100-240Vac, 50/60Hz, 2-1 A
Single 84 WExternal
100-240Vac, 50/60Hz, 2-1 A
Onboard Bypass Ports/Max # Ports
4 4
CX570 Desktop L-M-H
CX770 Desktop L-M-H
OperatingAcoustic
45 dBA Sound pressure (Typical)
45 dBA Sound pressure (Typical)
Temperature (Operating)
0º - 45º C 32º - 113º F
0º - 45º C 32º - 113º F
Temperature (Storage)
-40º - 65º C-40º - 149º F
-40º - 65º C-40º - 149º F
Relative Humidity
20% - 80% noncondensing
20% - 80% noncondensing
Storage Humidity
5% - 95% noncondensing
5% - 95% noncondensing
SteelHead Installation and Configuration Guide 75

SteelHead CX x70 Desktop Appliance Specifications CX570 and CX770 Specifications
76 SteelHead Installation and Configuration Guide
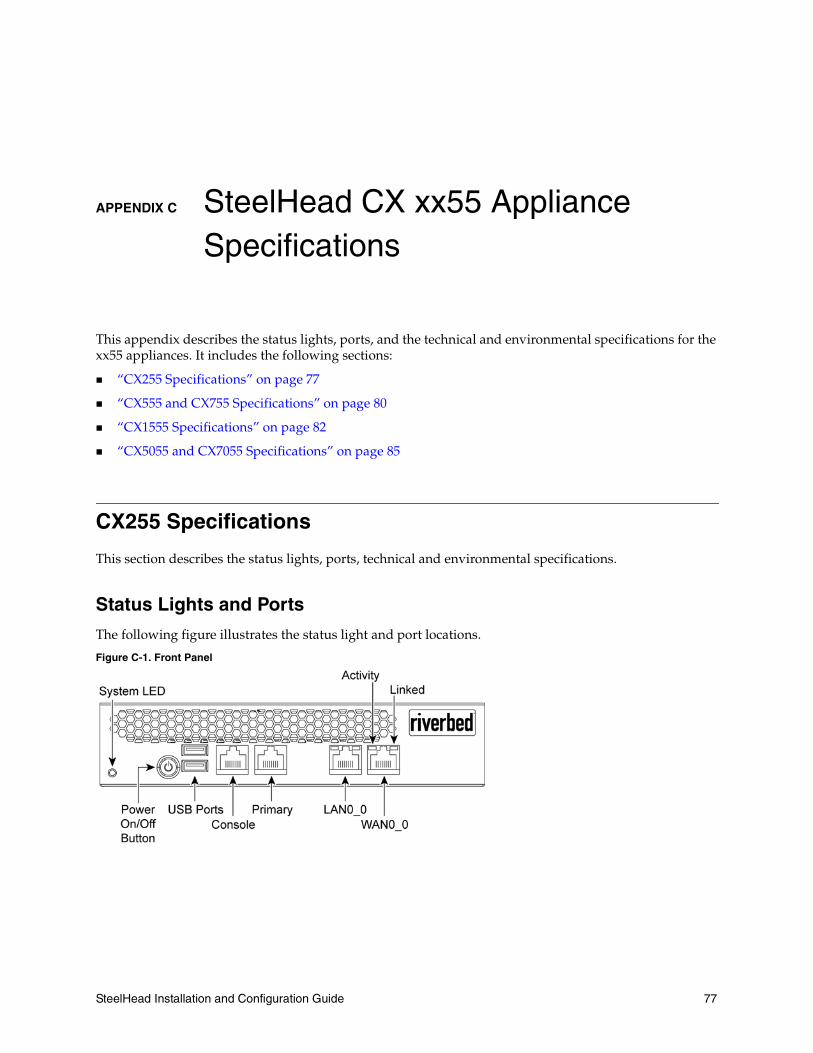
APPENDIX C SteelHead CX xx55 Appliance Specifications
This appendix describes the status lights, ports, and the technical and environmental specifications for the xx55 appliances. It includes the following sections:
“CX255 Specifications” on page 77
“CX555 and CX755 Specifications” on page 80
“CX1555 Specifications” on page 82
“CX5055 and CX7055 Specifications” on page 85
CX255 Specifications
This section describes the status lights, ports, technical and environmental specifications.
Status Lights and Ports
The following figure illustrates the status light and port locations.
Figure C-1. Front Panel
SteelHead Installation and Configuration Guide 77
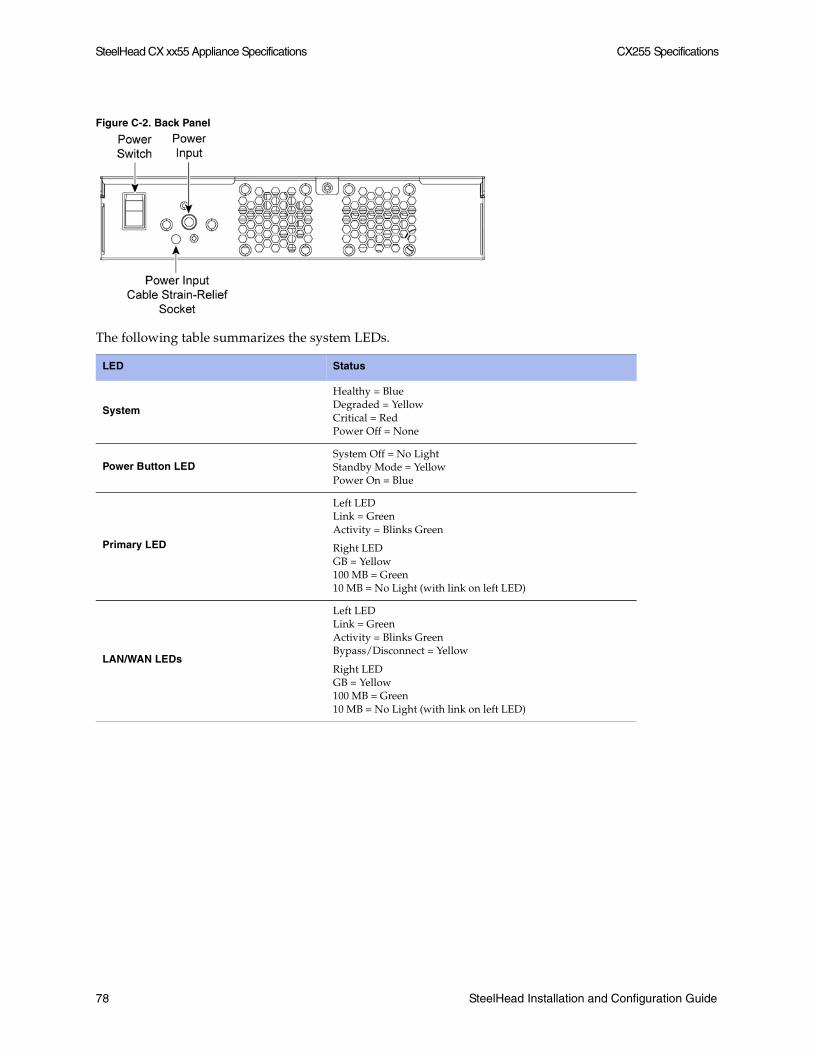
SteelHead CX xx55 Appliance Specifications CX255 Specifications
Figure C-2. Back Panel
The following table summarizes the system LEDs.
LED Status
System
Healthy = BlueDegraded = YellowCritical = RedPower Off = None
Power Button LEDSystem Off = No Light Standby Mode = YellowPower On = Blue
Primary LED
Left LEDLink = GreenActivity = Blinks Green
Right LEDGB = Yellow100 MB = Green10 MB = No Light (with link on left LED)
LAN/WAN LEDs
Left LEDLink = GreenActivity = Blinks GreenBypass/Disconnect = Yellow
Right LEDGB = Yellow100 MB = Green10 MB = No Light (with link on left LED)
78 SteelHead Installation and Configuration Guide
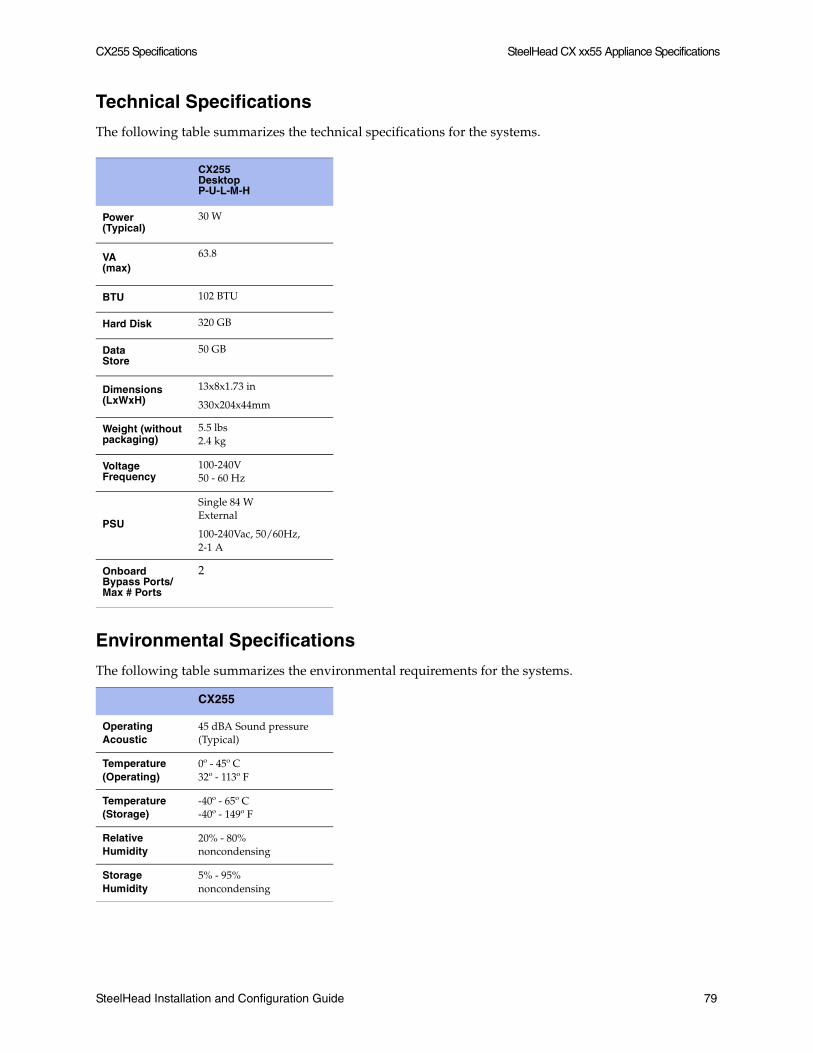
CX255 Specifications SteelHead CX xx55 Appliance Specifications
Technical Specifications
The following table summarizes the technical specifications for the systems.
Environmental Specifications
The following table summarizes the environmental requirements for the systems.
CX255DesktopP-U-L-M-H
Power(Typical)
30 W
VA(max)
63.8
BTU 102 BTU
Hard Disk 320 GB
DataStore
50 GB
Dimensions (LxWxH)
13x8x1.73 in
330x204x44mm
Weight (without packaging)
5.5 lbs2.4 kg
Voltage Frequency
100-240V50 - 60 Hz
PSU
Single 84 WExternal
100-240Vac, 50/60Hz, 2-1 A
Onboard Bypass Ports/Max # Ports
2
CX255
OperatingAcoustic
45 dBA Sound pressure (Typical)
Temperature (Operating)
0º - 45º C 32º - 113º F
Temperature (Storage)
-40º - 65º C-40º - 149º F
Relative Humidity
20% - 80% noncondensing
Storage Humidity
5% - 95% noncondensing
SteelHead Installation and Configuration Guide 79
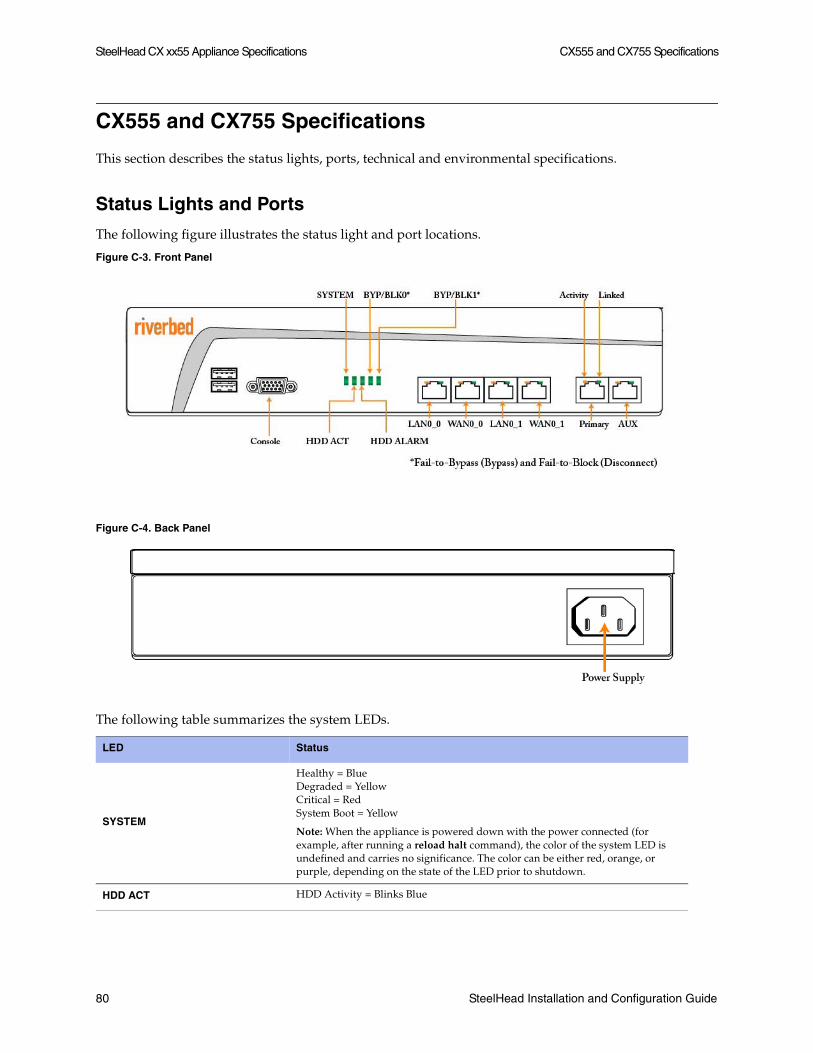
SteelHead CX xx55 Appliance Specifications CX555 and CX755 Specifications
CX555 and CX755 Specifications
This section describes the status lights, ports, technical and environmental specifications.
Status Lights and Ports
The following figure illustrates the status light and port locations.
Figure C-3. Front Panel
Figure C-4. Back Panel
The following table summarizes the system LEDs.
LED Status
SYSTEM
Healthy = BlueDegraded = YellowCritical = RedSystem Boot = Yellow
Note: When the appliance is powered down with the power connected (for example, after running a reload halt command), the color of the system LED is undefined and carries no significance. The color can be either red, orange, or purple, depending on the state of the LED prior to shutdown.
HDD ACT HDD Activity = Blinks Blue
80 SteelHead Installation and Configuration Guide
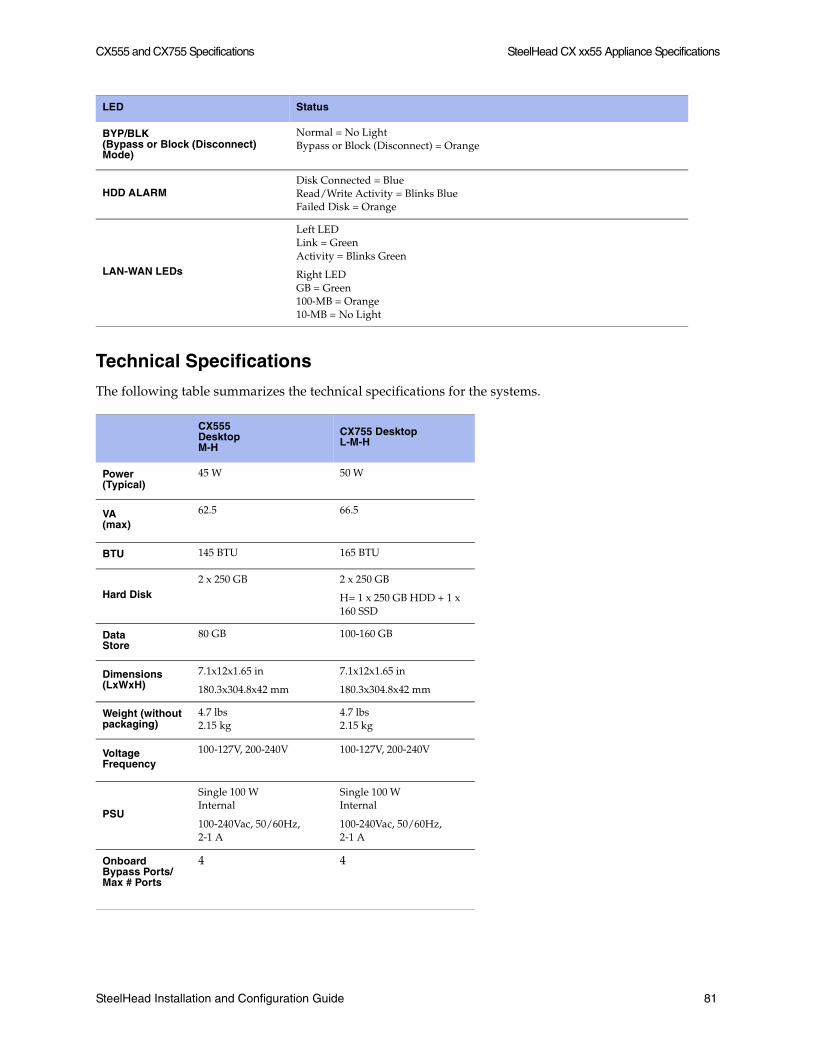
CX555 and CX755 Specifications SteelHead CX xx55 Appliance Specifications
Technical Specifications
The following table summarizes the technical specifications for the systems.
BYP/BLK(Bypass or Block (Disconnect) Mode)
Normal = No LightBypass or Block (Disconnect) = Orange
HDD ALARMDisk Connected = BlueRead/Write Activity = Blinks BlueFailed Disk = Orange
LAN-WAN LEDs
Left LEDLink = GreenActivity = Blinks Green
Right LEDGB = Green100-MB = Orange10-MB = No Light
CX555DesktopM-H
CX755 DesktopL-M-H
Power(Typical)
45 W 50 W
VA(max)
62.5 66.5
BTU 145 BTU 165 BTU
Hard Disk2 x 250 GB 2 x 250 GB
H= 1 x 250 GB HDD + 1 x 160 SSD
DataStore
80 GB 100-160 GB
Dimensions (LxWxH)
7.1x12x1.65 in
180.3x304.8x42 mm
7.1x12x1.65 in
180.3x304.8x42 mm
Weight (without packaging)
4.7 lbs 2.15 kg
4.7 lbs 2.15 kg
Voltage Frequency
100-127V, 200-240V 100-127V, 200-240V
PSU
Single 100 WInternal
100-240Vac, 50/60Hz, 2-1 A
Single 100 WInternal
100-240Vac, 50/60Hz, 2-1 A
Onboard Bypass Ports/Max # Ports
4 4
LED Status
SteelHead Installation and Configuration Guide 81
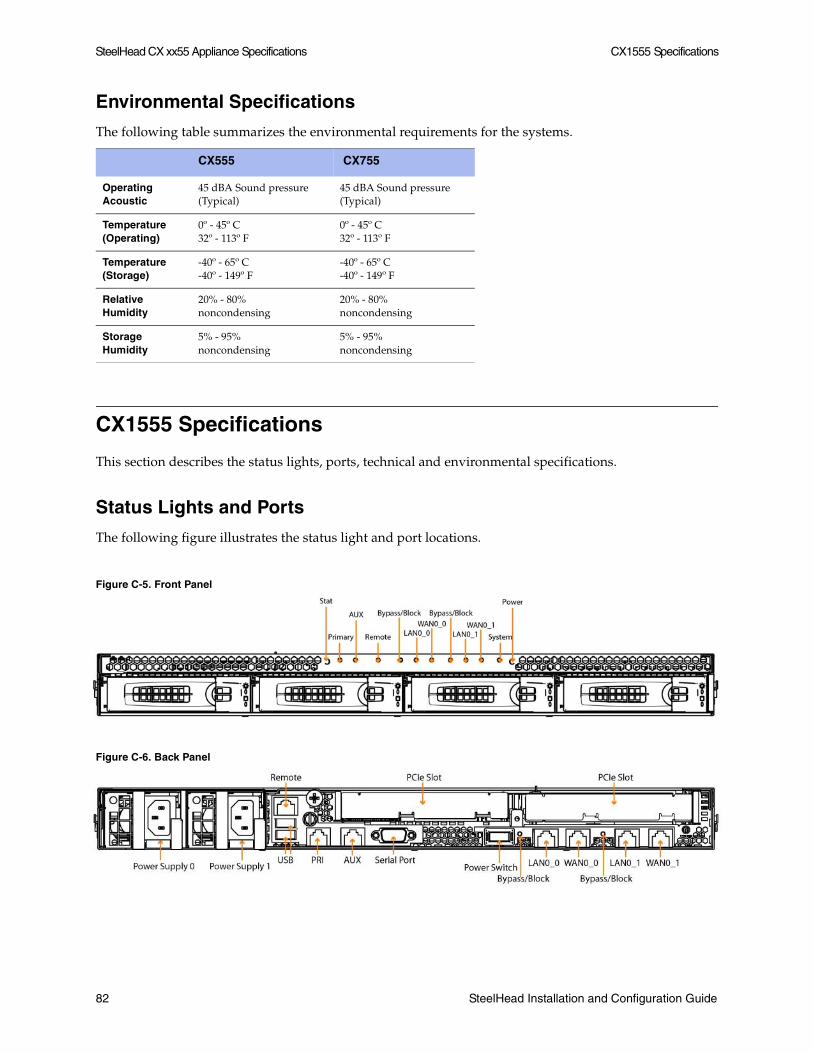
SteelHead CX xx55 Appliance Specifications CX1555 Specifications
Environmental Specifications
The following table summarizes the environmental requirements for the systems.
CX1555 Specifications
This section describes the status lights, ports, technical and environmental specifications.
Status Lights and Ports
The following figure illustrates the status light and port locations.
Figure C-5. Front Panel
Figure C-6. Back Panel
CX555 CX755
OperatingAcoustic
45 dBA Sound pressure (Typical)
45 dBA Sound pressure (Typical)
Temperature (Operating)
0º - 45º C 32º - 113º F
0º - 45º C 32º - 113º F
Temperature (Storage)
-40º - 65º C-40º - 149º F
-40º - 65º C-40º - 149º F
Relative Humidity
20% - 80% noncondensing
20% - 80% noncondensing
Storage Humidity
5% - 95% noncondensing
5% - 95% noncondensing
82 SteelHead Installation and Configuration Guide
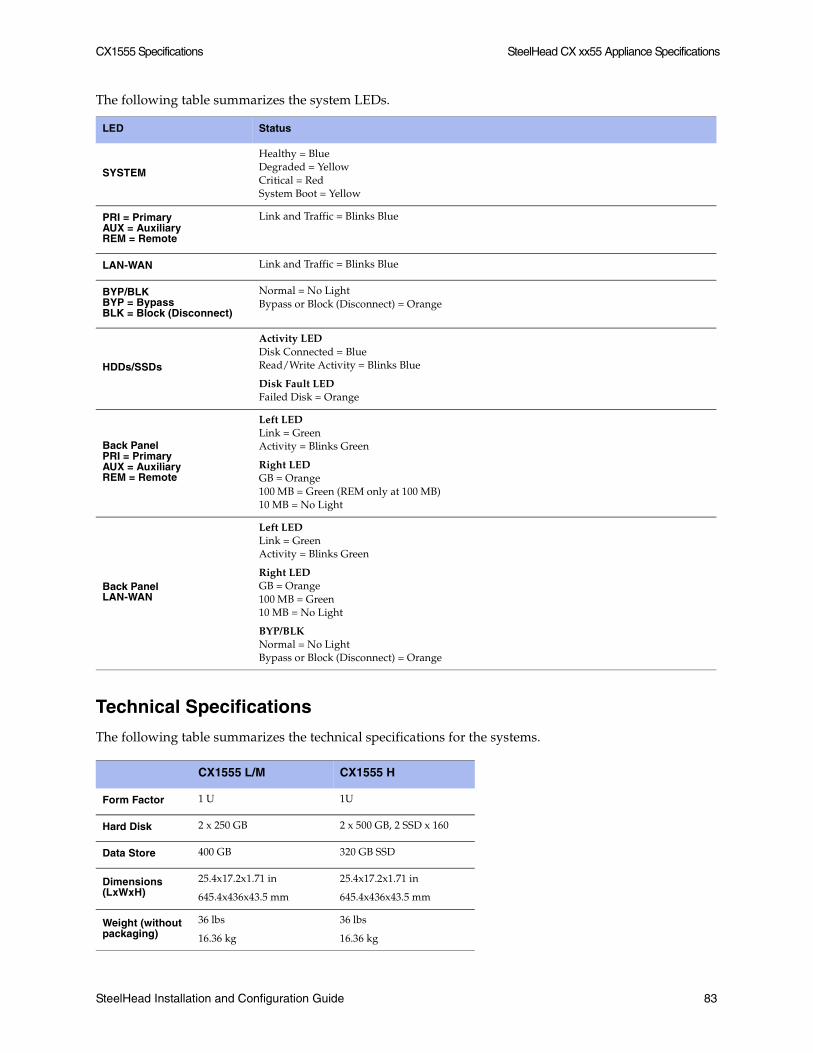
CX1555 Specifications SteelHead CX xx55 Appliance Specifications
The following table summarizes the system LEDs.
Technical Specifications
The following table summarizes the technical specifications for the systems.
LED Status
SYSTEM
Healthy = BlueDegraded = YellowCritical = RedSystem Boot = Yellow
PRI = PrimaryAUX = AuxiliaryREM = Remote
Link and Traffic = Blinks Blue
LAN-WAN Link and Traffic = Blinks Blue
BYP/BLKBYP = BypassBLK = Block (Disconnect)
Normal = No LightBypass or Block (Disconnect) = Orange
HDDs/SSDs
Activity LEDDisk Connected = BlueRead/Write Activity = Blinks Blue
Disk Fault LEDFailed Disk = Orange
Back PanelPRI = PrimaryAUX = AuxiliaryREM = Remote
Left LEDLink = GreenActivity = Blinks Green
Right LEDGB = Orange100 MB = Green (REM only at 100 MB)10 MB = No Light
Back PanelLAN-WAN
Left LEDLink = GreenActivity = Blinks Green
Right LEDGB = Orange100 MB = Green10 MB = No Light
BYP/BLK Normal = No LightBypass or Block (Disconnect) = Orange
CX1555 L/M CX1555 H
Form Factor 1 U 1U
Hard Disk 2 x 250 GB 2 x 500 GB, 2 SSD x 160
Data Store 400 GB 320 GB SSD
Dimensions (LxWxH)
25.4x17.2x1.71 in
645.4x436x43.5 mm
25.4x17.2x1.71 in
645.4x436x43.5 mm
Weight (without packaging)
36 lbs
16.36 kg
36 lbs
16.36 kg
SteelHead Installation and Configuration Guide 83
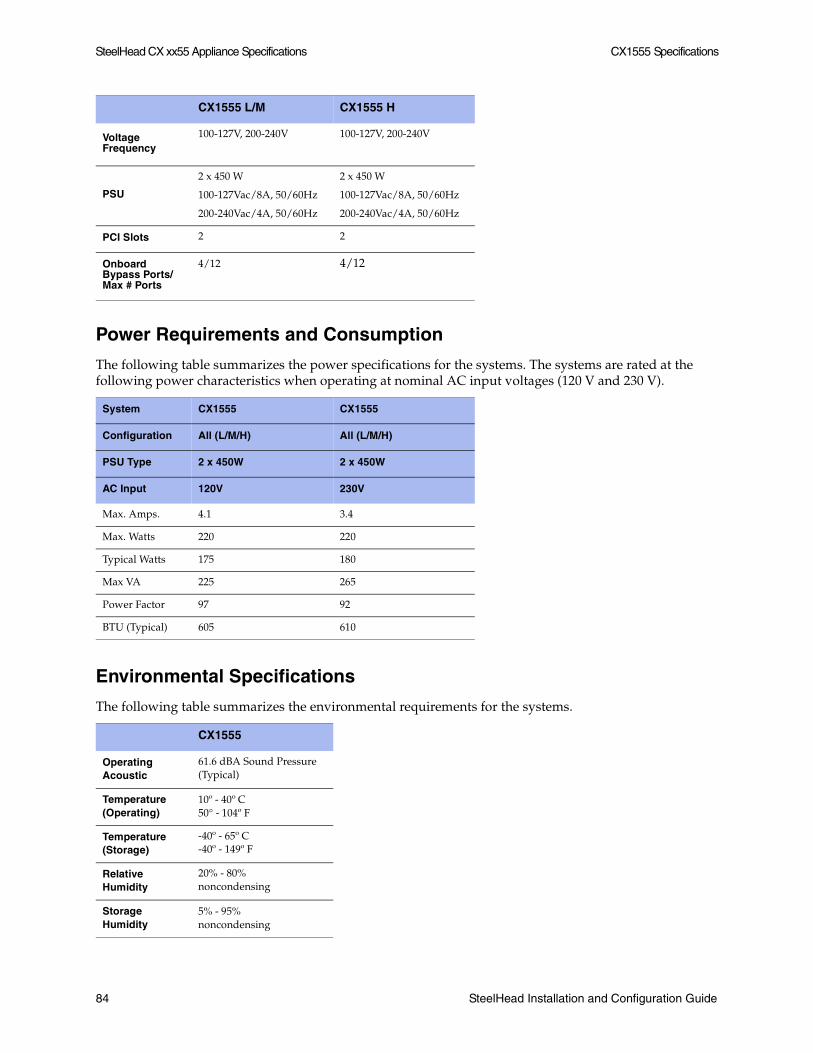
SteelHead CX xx55 Appliance Specifications CX1555 Specifications
Power Requirements and Consumption
The following table summarizes the power specifications for the systems. The systems are rated at the following power characteristics when operating at nominal AC input voltages (120 V and 230 V).
Environmental Specifications
The following table summarizes the environmental requirements for the systems.
Voltage Frequency
100-127V, 200-240V 100-127V, 200-240V
PSU
2 x 450 W
100-127Vac/8A, 50/60Hz
200-240Vac/4A, 50/60Hz
2 x 450 W
100-127Vac/8A, 50/60Hz
200-240Vac/4A, 50/60Hz
PCI Slots 2 2
Onboard Bypass Ports/Max # Ports
4/12 4/12
System CX1555 CX1555
Configuration All (L/M/H) All (L/M/H)
PSU Type 2 x 450W 2 x 450W
AC Input 120V 230V
Max. Amps. 4.1 3.4
Max. Watts 220 220
Typical Watts 175 180
Max VA 225 265
Power Factor 97 92
BTU (Typical) 605 610
CX1555
OperatingAcoustic
61.6 dBA Sound Pressure (Typical)
Temperature (Operating)
10º - 40º C50° - 104º F
Temperature (Storage)
-40º - 65º C-40º - 149º F
Relative Humidity
20% - 80% noncondensing
Storage Humidity
5% - 95% noncondensing
CX1555 L/M CX1555 H
84 SteelHead Installation and Configuration Guide
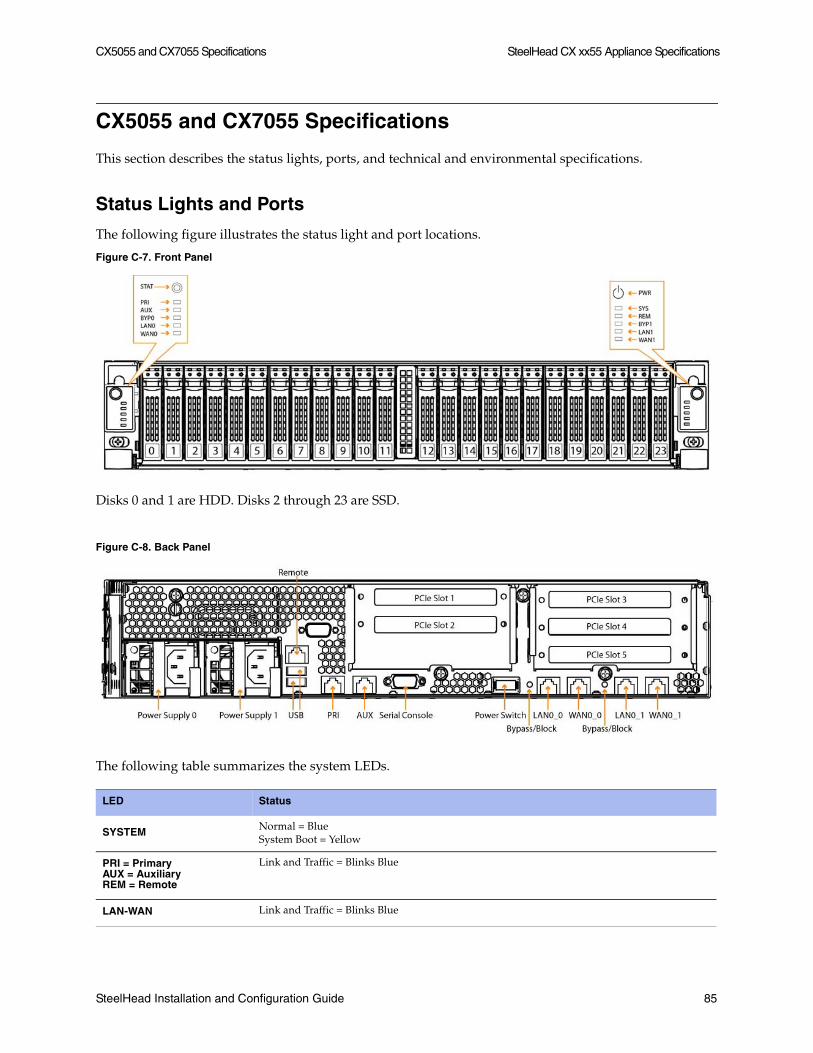
CX5055 and CX7055 Specifications SteelHead CX xx55 Appliance Specifications
CX5055 and CX7055 Specifications
This section describes the status lights, ports, and technical and environmental specifications.
Status Lights and Ports
The following figure illustrates the status light and port locations.
Figure C-7. Front Panel
Disks 0 and 1 are HDD. Disks 2 through 23 are SSD.
Figure C-8. Back Panel
The following table summarizes the system LEDs.
LED Status
SYSTEM Normal = BlueSystem Boot = Yellow
PRI = PrimaryAUX = AuxiliaryREM = Remote
Link and Traffic = Blinks Blue
LAN-WAN Link and Traffic = Blinks Blue
SteelHead Installation and Configuration Guide 85
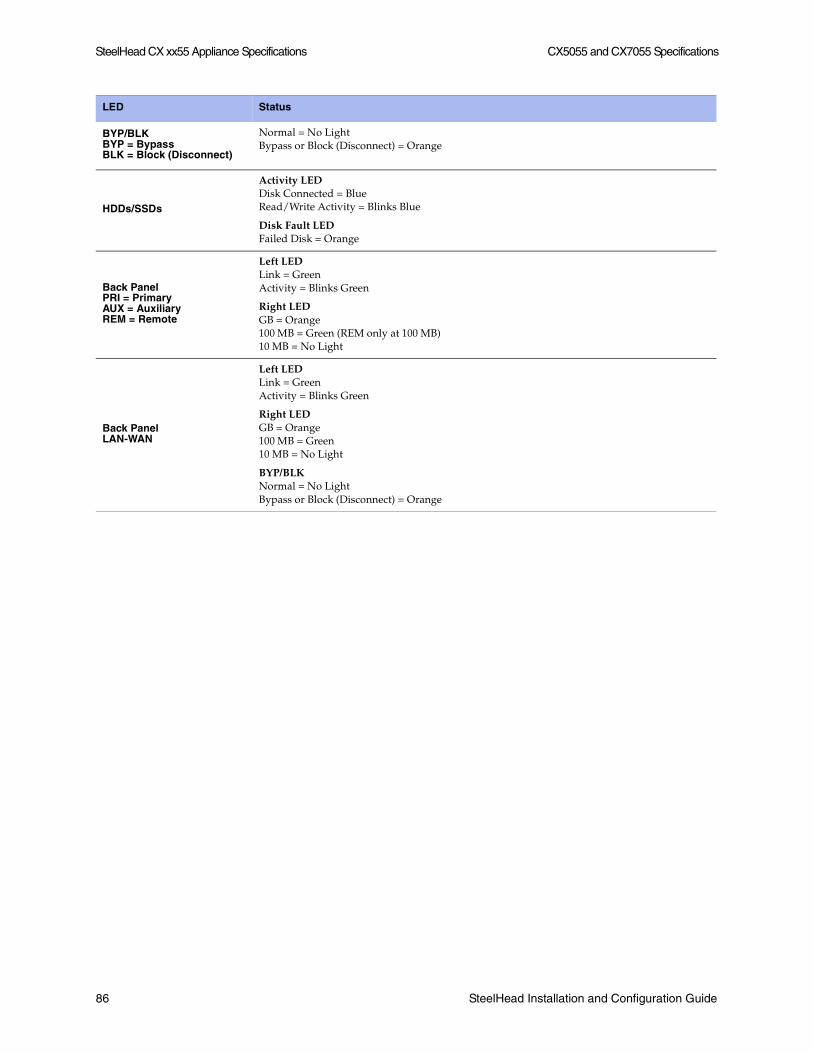
SteelHead CX xx55 Appliance Specifications CX5055 and CX7055 Specifications
BYP/BLKBYP = BypassBLK = Block (Disconnect)
Normal = No LightBypass or Block (Disconnect) = Orange
HDDs/SSDs
Activity LEDDisk Connected = BlueRead/Write Activity = Blinks Blue
Disk Fault LEDFailed Disk = Orange
Back PanelPRI = PrimaryAUX = AuxiliaryREM = Remote
Left LEDLink = GreenActivity = Blinks Green
Right LEDGB = Orange100 MB = Green (REM only at 100 MB)10 MB = No Light
Back PanelLAN-WAN
Left LEDLink = GreenActivity = Blinks Green
Right LEDGB = Orange100 MB = Green10 MB = No Light
BYP/BLK Normal = No LightBypass or Block (Disconnect) = Orange
LED Status
86 SteelHead Installation and Configuration Guide
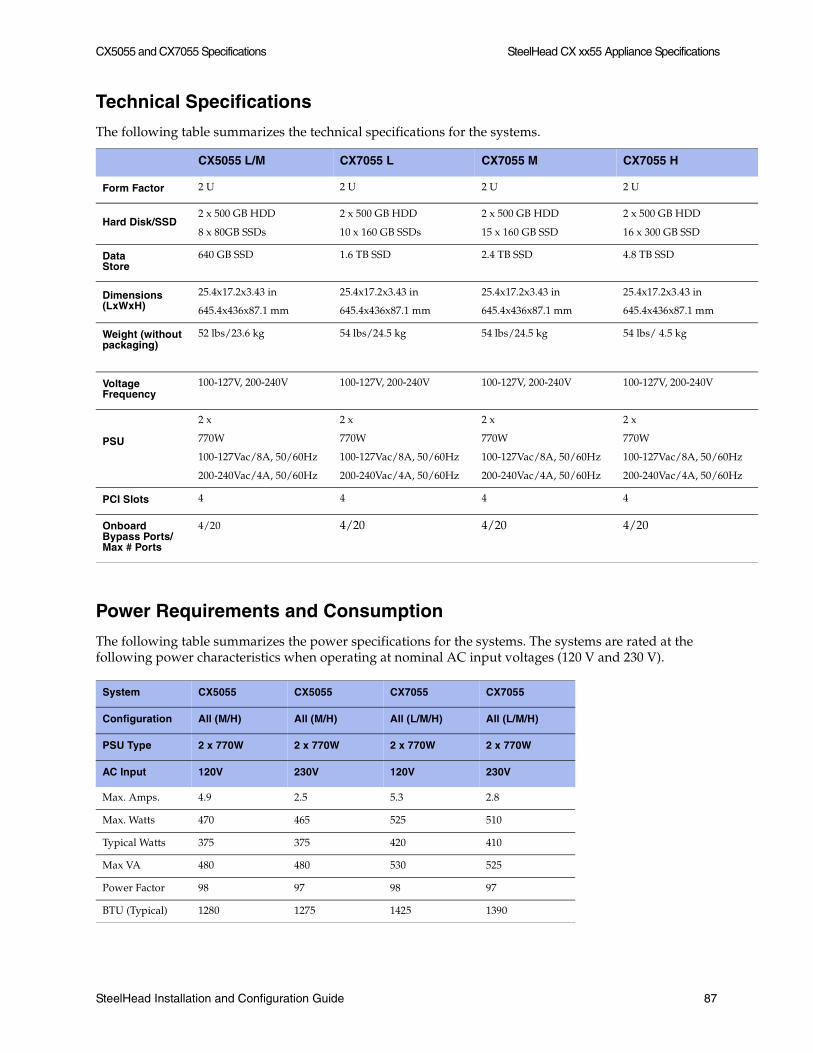
CX5055 and CX7055 Specifications SteelHead CX xx55 Appliance Specifications
z
z
Technical Specifications
The following table summarizes the technical specifications for the systems.
Power Requirements and Consumption
The following table summarizes the power specifications for the systems. The systems are rated at the following power characteristics when operating at nominal AC input voltages (120 V and 230 V).
CX5055 L/M CX7055 L CX7055 M CX7055 H
Form Factor 2 U 2 U 2 U 2 U
Hard Disk/SSD2 x 500 GB HDD
8 x 80GB SSDs
2 x 500 GB HDD
10 x 160 GB SSDs
2 x 500 GB HDD
15 x 160 GB SSD
2 x 500 GB HDD
16 x 300 GB SSD
DataStore
640 GB SSD 1.6 TB SSD 2.4 TB SSD 4.8 TB SSD
Dimensions (LxWxH)
25.4x17.2x3.43 in
645.4x436x87.1 mm
25.4x17.2x3.43 in
645.4x436x87.1 mm
25.4x17.2x3.43 in
645.4x436x87.1 mm
25.4x17.2x3.43 in
645.4x436x87.1 mm
Weight (without packaging)
52 lbs/23.6 kg 54 lbs/24.5 kg 54 lbs/24.5 kg 54 lbs/ 4.5 kg
Voltage Frequency
100-127V, 200-240V 100-127V, 200-240V 100-127V, 200-240V 100-127V, 200-240V
PSU
2 x
770W
100-127Vac/8A, 50/60Hz
200-240Vac/4A, 50/60Hz
2 x
770W
100-127Vac/8A, 50/60Hz
200-240Vac/4A, 50/60Hz
2 x
770W
100-127Vac/8A, 50/60Hz
200-240Vac/4A, 50/60Hz
2 x
770W
100-127Vac/8A, 50/60H
200-240Vac/4A, 50/60H
PCI Slots 4 4 4 4
Onboard Bypass Ports/Max # Ports
4/20 4/20 4/20 4/20
System CX5055 CX5055 CX7055 CX7055
Configuration All (M/H) All (M/H) All (L/M/H) All (L/M/H)
PSU Type 2 x 770W 2 x 770W 2 x 770W 2 x 770W
AC Input 120V 230V 120V 230V
Max. Amps. 4.9 2.5 5.3 2.8
Max. Watts 470 465 525 510
Typical Watts 375 375 420 410
Max VA 480 480 530 525
Power Factor 98 97 98 97
BTU (Typical) 1280 1275 1425 1390
SteelHead Installation and Configuration Guide 87
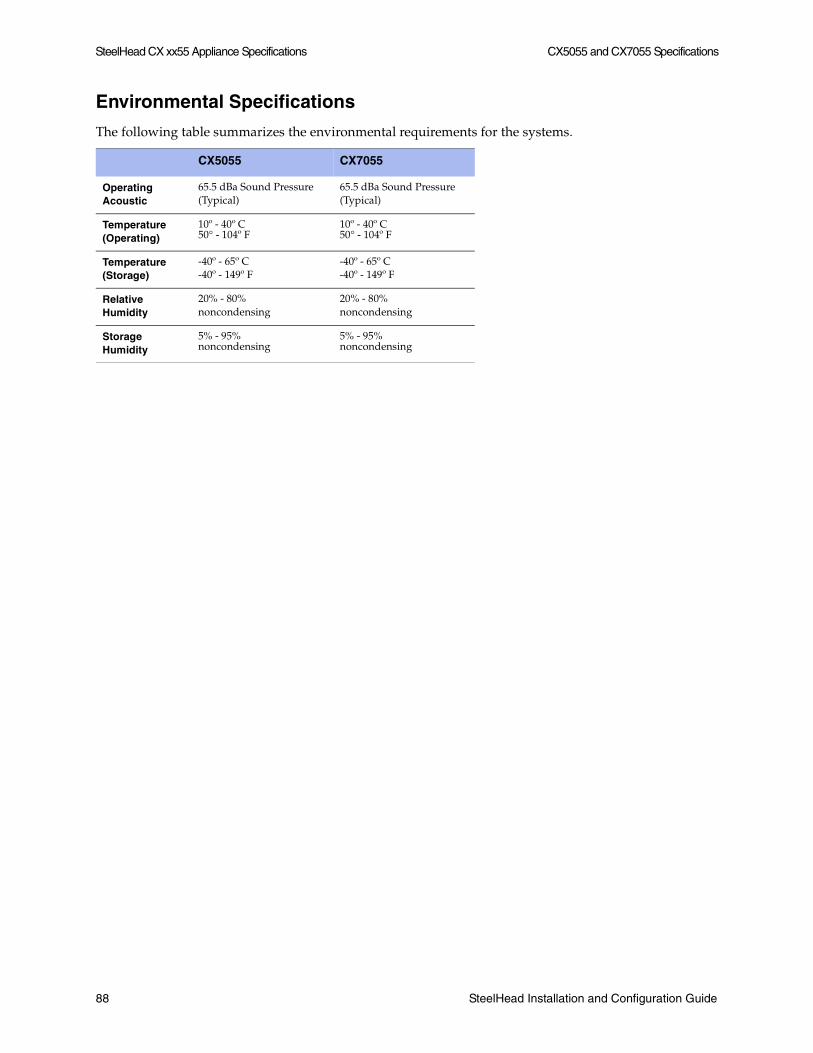
SteelHead CX xx55 Appliance Specifications CX5055 and CX7055 Specifications
Environmental Specifications
The following table summarizes the environmental requirements for the systems.
CX5055 CX7055
OperatingAcoustic
65.5 dBa Sound Pressure (Typical)
65.5 dBa Sound Pressure (Typical)
Temperature (Operating)
10º - 40º C50° - 104º F
10º - 40º C50° - 104º F
Temperature (Storage)
-40º - 65º C-40º - 149º F
-40º - 65º C-40º - 149º F
Relative Humidity
20% - 80% noncondensing
20% - 80% noncondensing
Storage Humidity
5% - 95% noncondensing
5% - 95% noncondensing
88 SteelHead Installation and Configuration Guide
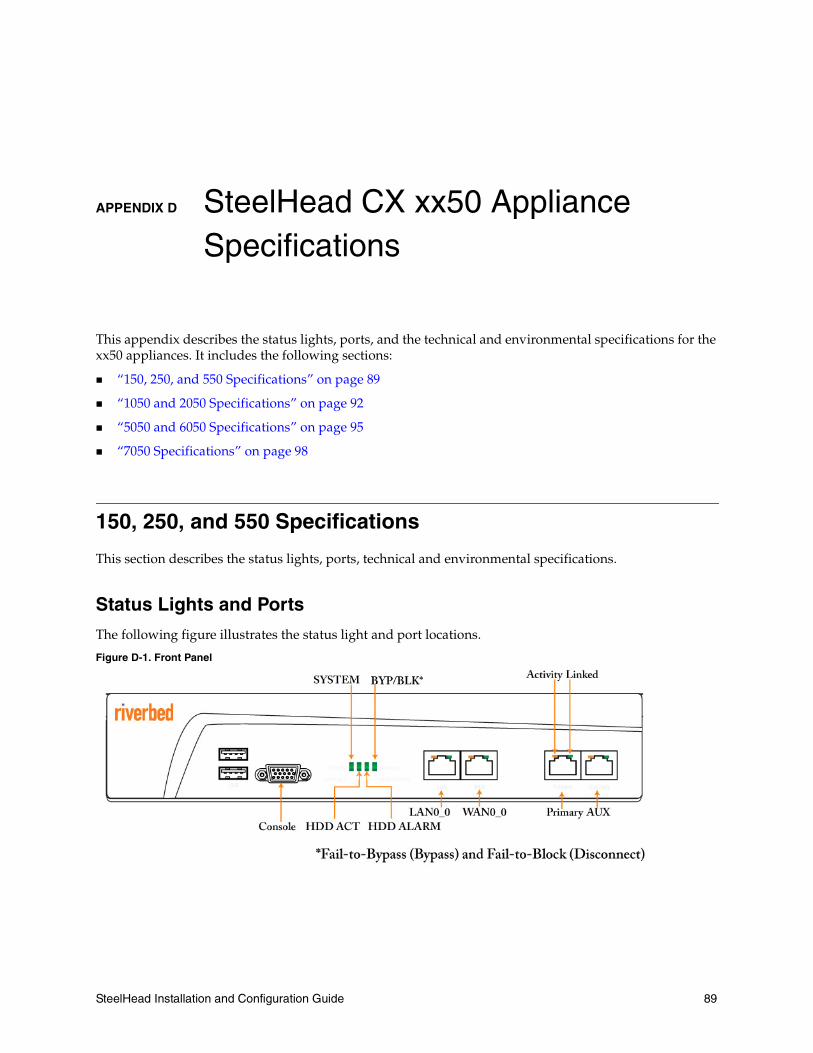
APPENDIX D SteelHead CX xx50 Appliance Specifications
This appendix describes the status lights, ports, and the technical and environmental specifications for the xx50 appliances. It includes the following sections:
“150, 250, and 550 Specifications” on page 89
“1050 and 2050 Specifications” on page 92
“5050 and 6050 Specifications” on page 95
“7050 Specifications” on page 98
150, 250, and 550 Specifications
This section describes the status lights, ports, technical and environmental specifications.
Status Lights and Ports
The following figure illustrates the status light and port locations.
Figure D-1. Front Panel
SteelHead Installation and Configuration Guide 89
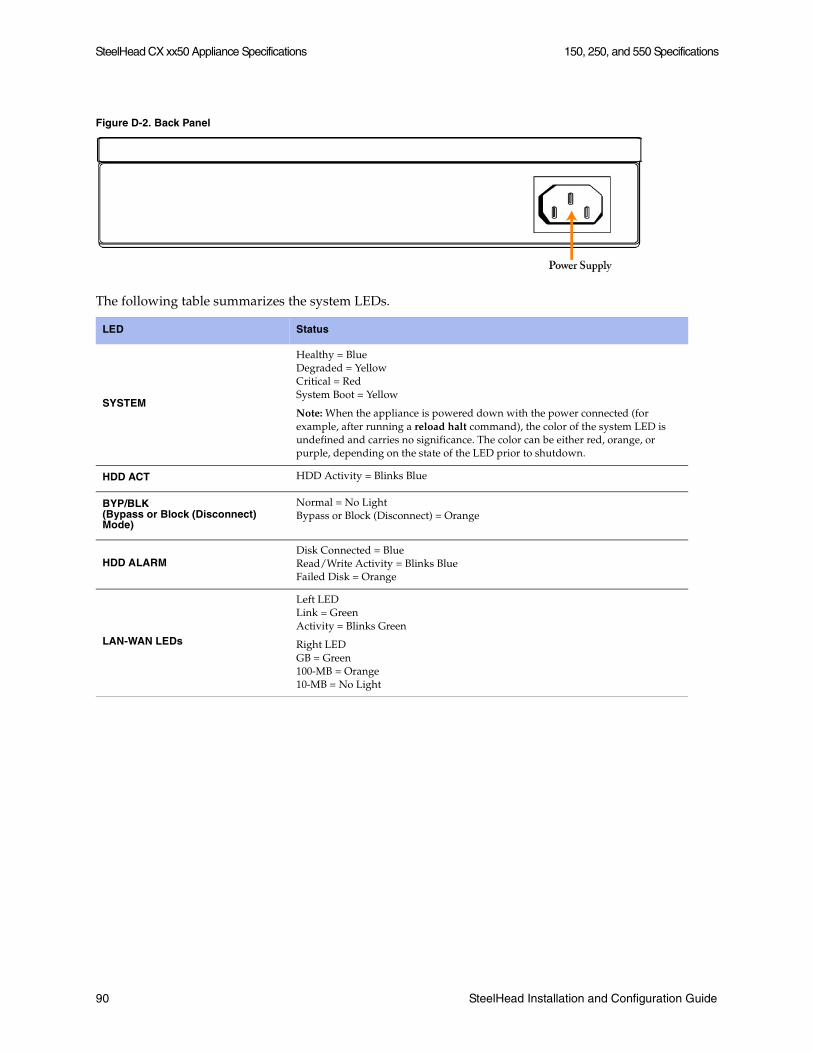
SteelHead CX xx50 Appliance Specifications 150, 250, and 550 Specifications
Figure D-2. Back Panel
The following table summarizes the system LEDs.
LED Status
SYSTEM
Healthy = BlueDegraded = YellowCritical = RedSystem Boot = Yellow
Note: When the appliance is powered down with the power connected (for example, after running a reload halt command), the color of the system LED is undefined and carries no significance. The color can be either red, orange, or purple, depending on the state of the LED prior to shutdown.
HDD ACT HDD Activity = Blinks Blue
BYP/BLK(Bypass or Block (Disconnect) Mode)
Normal = No LightBypass or Block (Disconnect) = Orange
HDD ALARMDisk Connected = BlueRead/Write Activity = Blinks BlueFailed Disk = Orange
LAN-WAN LEDs
Left LEDLink = GreenActivity = Blinks Green
Right LEDGB = Green100-MB = Orange10-MB = No Light
90 SteelHead Installation and Configuration Guide
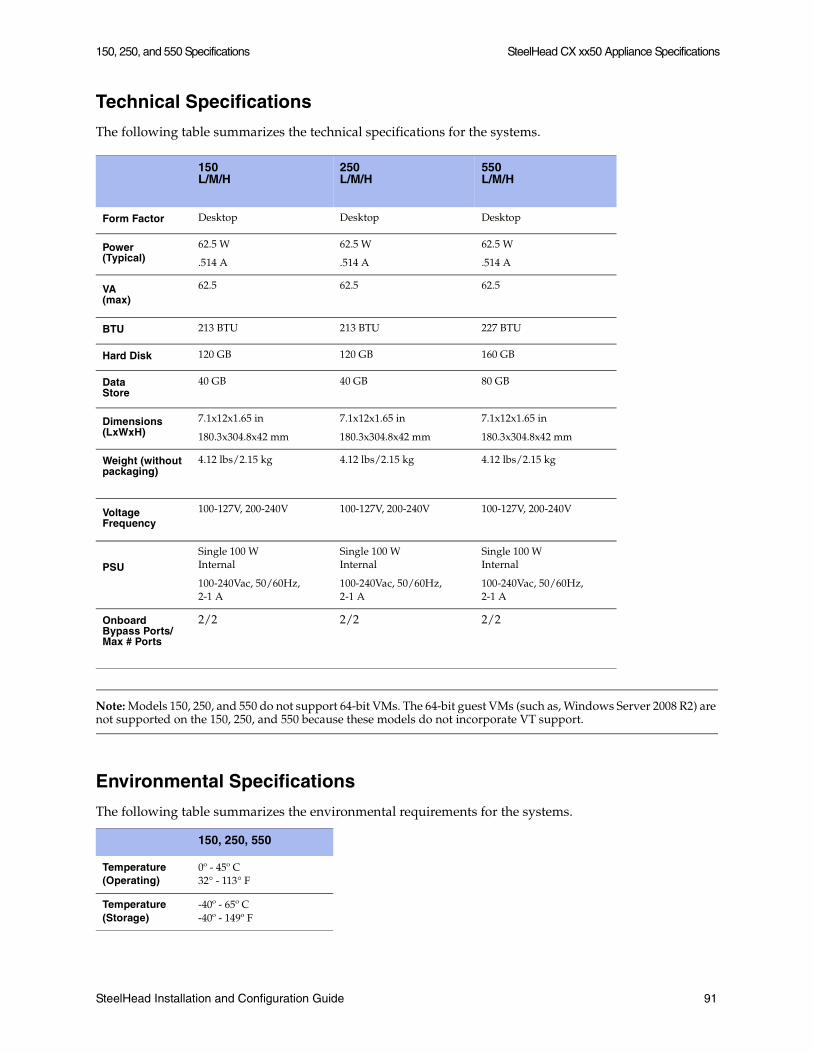
150, 250, and 550 Specifications SteelHead CX xx50 Appliance Specifications
Technical Specifications
The following table summarizes the technical specifications for the systems.
Note: Models 150, 250, and 550 do not support 64-bit VMs. The 64-bit guest VMs (such as, Windows Server 2008 R2) are not supported on the 150, 250, and 550 because these models do not incorporate VT support.
Environmental Specifications
The following table summarizes the environmental requirements for the systems.
150L/M/H
250L/M/H
550L/M/H
Form Factor Desktop Desktop Desktop
Power(Typical)
62.5 W
.514 A
62.5 W
.514 A
62.5 W
.514 A
VA(max)
62.5 62.5 62.5
BTU 213 BTU 213 BTU 227 BTU
Hard Disk 120 GB 120 GB 160 GB
DataStore
40 GB 40 GB 80 GB
Dimensions (LxWxH)
7.1x12x1.65 in
180.3x304.8x42 mm
7.1x12x1.65 in
180.3x304.8x42 mm
7.1x12x1.65 in
180.3x304.8x42 mm
Weight (without packaging)
4.12 lbs/2.15 kg 4.12 lbs/2.15 kg 4.12 lbs/2.15 kg
Voltage Frequency
100-127V, 200-240V 100-127V, 200-240V 100-127V, 200-240V
PSU
Single 100 WInternal
100-240Vac, 50/60Hz, 2-1 A
Single 100 WInternal
100-240Vac, 50/60Hz, 2-1 A
Single 100 WInternal
100-240Vac, 50/60Hz, 2-1 A
Onboard Bypass Ports/Max # Ports
2/2 2/2 2/2
150, 250, 550
Temperature (Operating)
0º - 45º C32° - 113° F
Temperature (Storage)
-40º - 65º C-40º - 149º F
SteelHead Installation and Configuration Guide 91
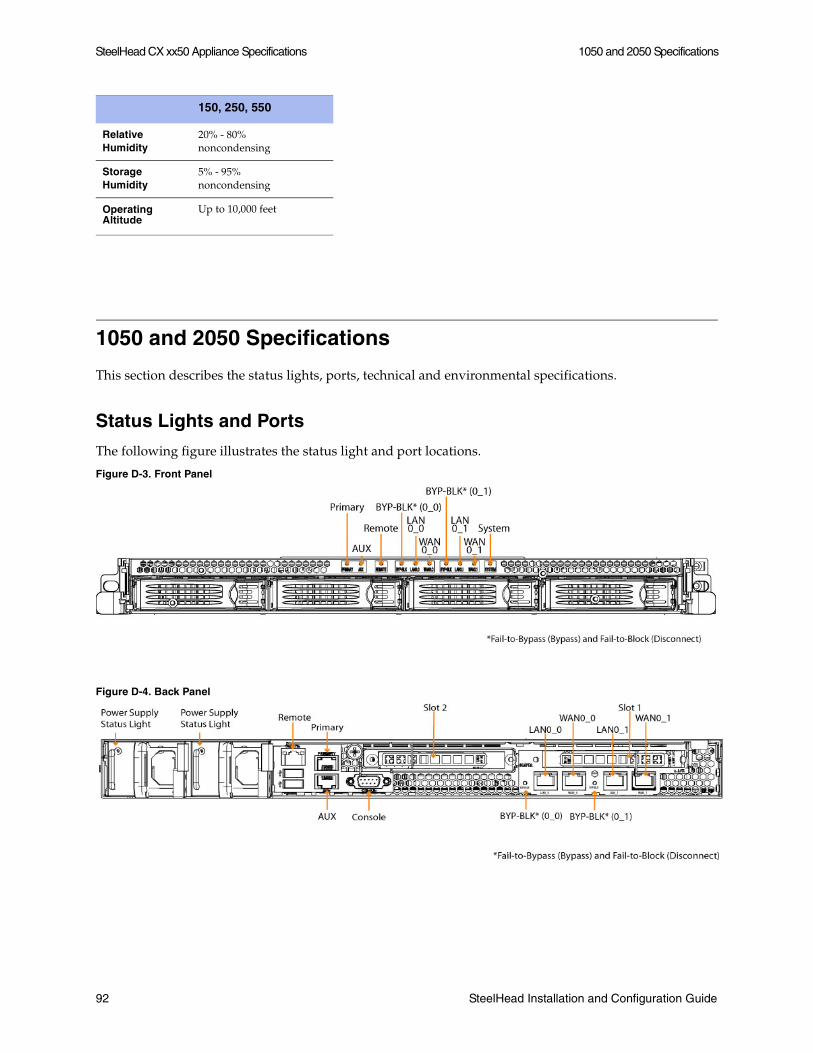
SteelHead CX xx50 Appliance Specifications 1050 and 2050 Specifications
1050 and 2050 Specifications
This section describes the status lights, ports, technical and environmental specifications.
Status Lights and Ports
The following figure illustrates the status light and port locations.
Figure D-3. Front Panel
Figure D-4. Back Panel
Relative Humidity
20% - 80% noncondensing
Storage Humidity
5% - 95% noncondensing
Operating Altitude
Up to 10,000 feet
150, 250, 550
92 SteelHead Installation and Configuration Guide
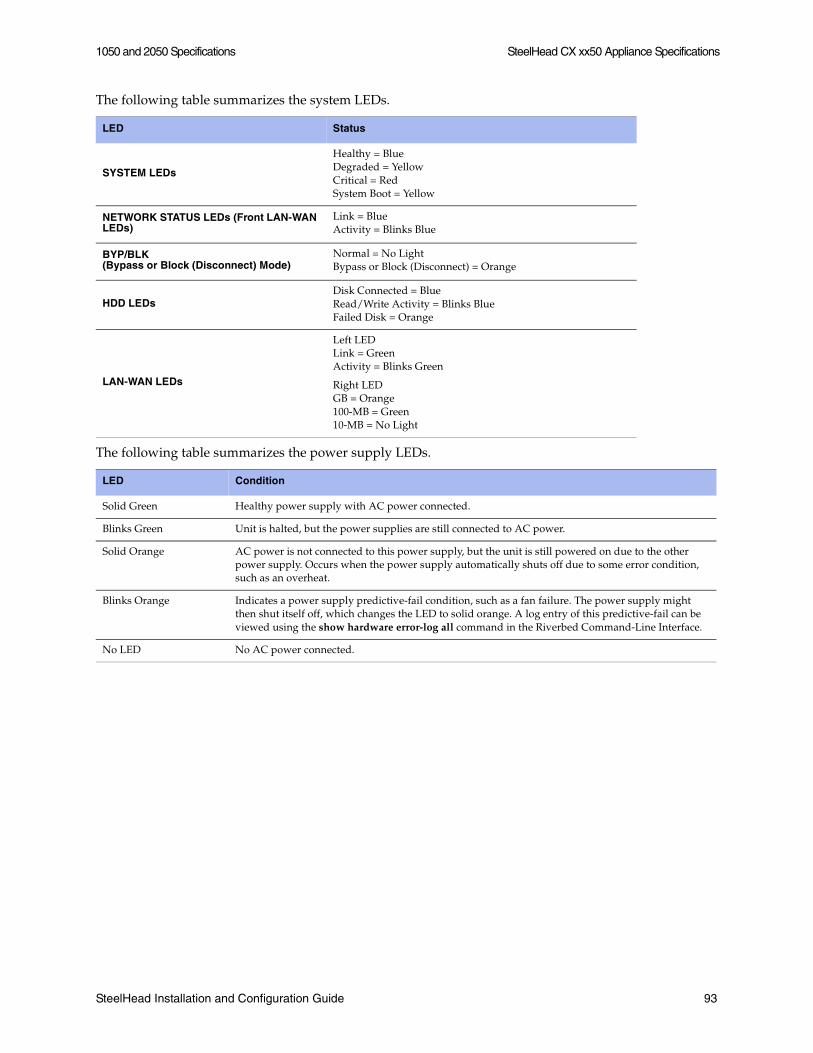
1050 and 2050 Specifications SteelHead CX xx50 Appliance Specifications
The following table summarizes the system LEDs.
The following table summarizes the power supply LEDs.
LED Status
SYSTEM LEDs
Healthy = BlueDegraded = YellowCritical = RedSystem Boot = Yellow
NETWORK STATUS LEDs (Front LAN-WAN LEDs)
Link = BlueActivity = Blinks Blue
BYP/BLK(Bypass or Block (Disconnect) Mode)
Normal = No LightBypass or Block (Disconnect) = Orange
HDD LEDsDisk Connected = BlueRead/Write Activity = Blinks BlueFailed Disk = Orange
LAN-WAN LEDs
Left LEDLink = GreenActivity = Blinks Green
Right LEDGB = Orange100-MB = Green10-MB = No Light
LED Condition
Solid Green Healthy power supply with AC power connected.
Blinks Green Unit is halted, but the power supplies are still connected to AC power.
Solid Orange AC power is not connected to this power supply, but the unit is still powered on due to the other power supply. Occurs when the power supply automatically shuts off due to some error condition, such as an overheat.
Blinks Orange Indicates a power supply predictive-fail condition, such as a fan failure. The power supply might then shut itself off, which changes the LED to solid orange. A log entry of this predictive-fail can be viewed using the show hardware error-log all command in the Riverbed Command-Line Interface.
No LED No AC power connected.
SteelHead Installation and Configuration Guide 93
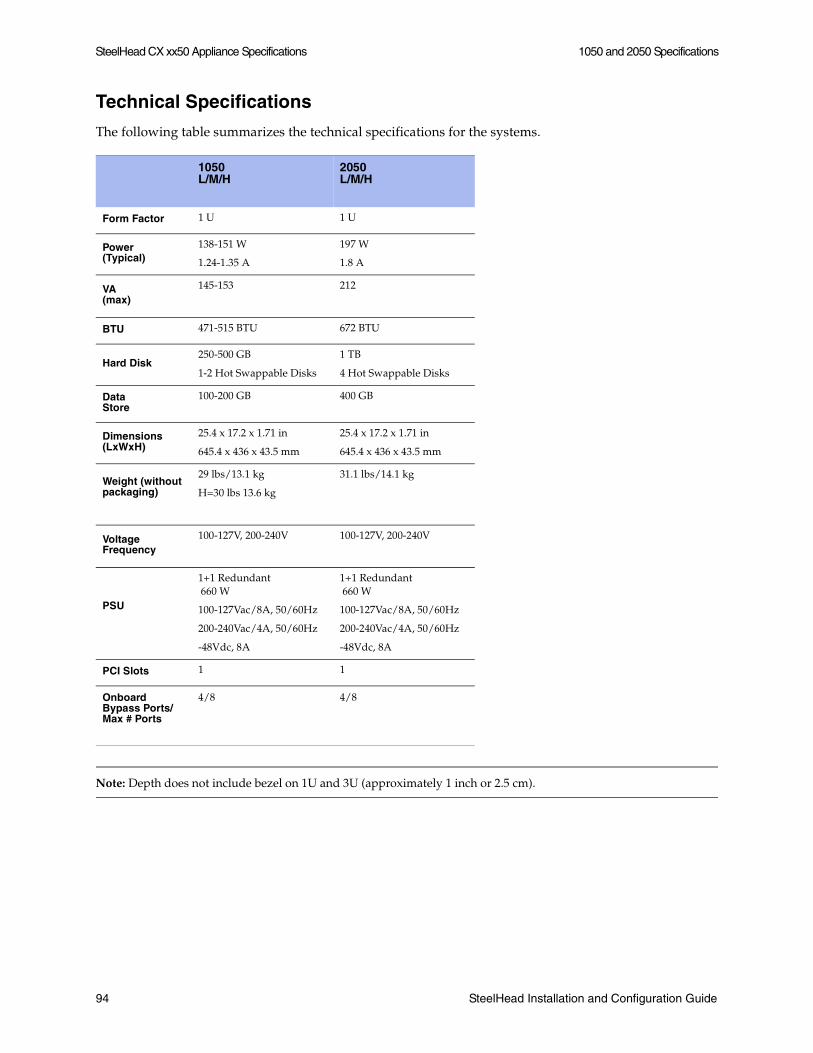
SteelHead CX xx50 Appliance Specifications 1050 and 2050 Specifications
Technical Specifications
The following table summarizes the technical specifications for the systems.
Note: Depth does not include bezel on 1U and 3U (approximately 1 inch or 2.5 cm).
1050L/M/H
2050L/M/H
Form Factor 1 U 1 U
Power(Typical)
138-151 W
1.24-1.35 A
197 W
1.8 A
VA(max)
145-153 212
BTU 471-515 BTU 672 BTU
Hard Disk250-500 GB
1-2 Hot Swappable Disks
1 TB
4 Hot Swappable Disks
DataStore
100-200 GB 400 GB
Dimensions (LxWxH)
25.4 x 17.2 x 1.71 in
645.4 x 436 x 43.5 mm
25.4 x 17.2 x 1.71 in
645.4 x 436 x 43.5 mm
Weight (without packaging)
29 lbs/13.1 kg
H=30 lbs 13.6 kg
31.1 lbs/14.1 kg
Voltage Frequency
100-127V, 200-240V 100-127V, 200-240V
PSU
1+1 Redundant 660 W
100-127Vac/8A, 50/60Hz
200-240Vac/4A, 50/60Hz
-48Vdc, 8A
1+1 Redundant 660 W
100-127Vac/8A, 50/60Hz
200-240Vac/4A, 50/60Hz
-48Vdc, 8A
PCI Slots 1 1
Onboard Bypass Ports/Max # Ports
4/8 4/8
94 SteelHead Installation and Configuration Guide
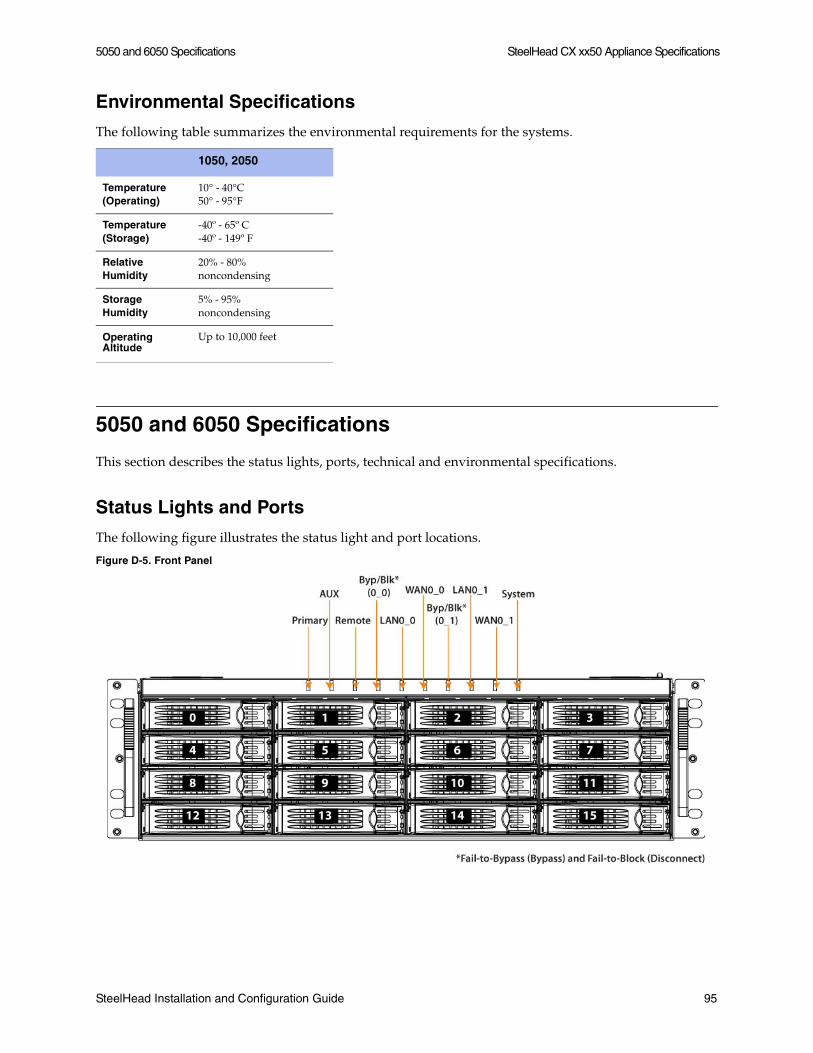
5050 and 6050 Specifications SteelHead CX xx50 Appliance Specifications
Environmental Specifications
The following table summarizes the environmental requirements for the systems.
5050 and 6050 Specifications
This section describes the status lights, ports, technical and environmental specifications.
Status Lights and Ports
The following figure illustrates the status light and port locations.
Figure D-5. Front Panel
1050, 2050
Temperature (Operating)
10° - 40°C 50° - 95°F
Temperature (Storage)
-40º - 65º C-40º - 149º F
Relative Humidity
20% - 80% noncondensing
Storage Humidity
5% - 95% noncondensing
Operating Altitude
Up to 10,000 feet
SteelHead Installation and Configuration Guide 95
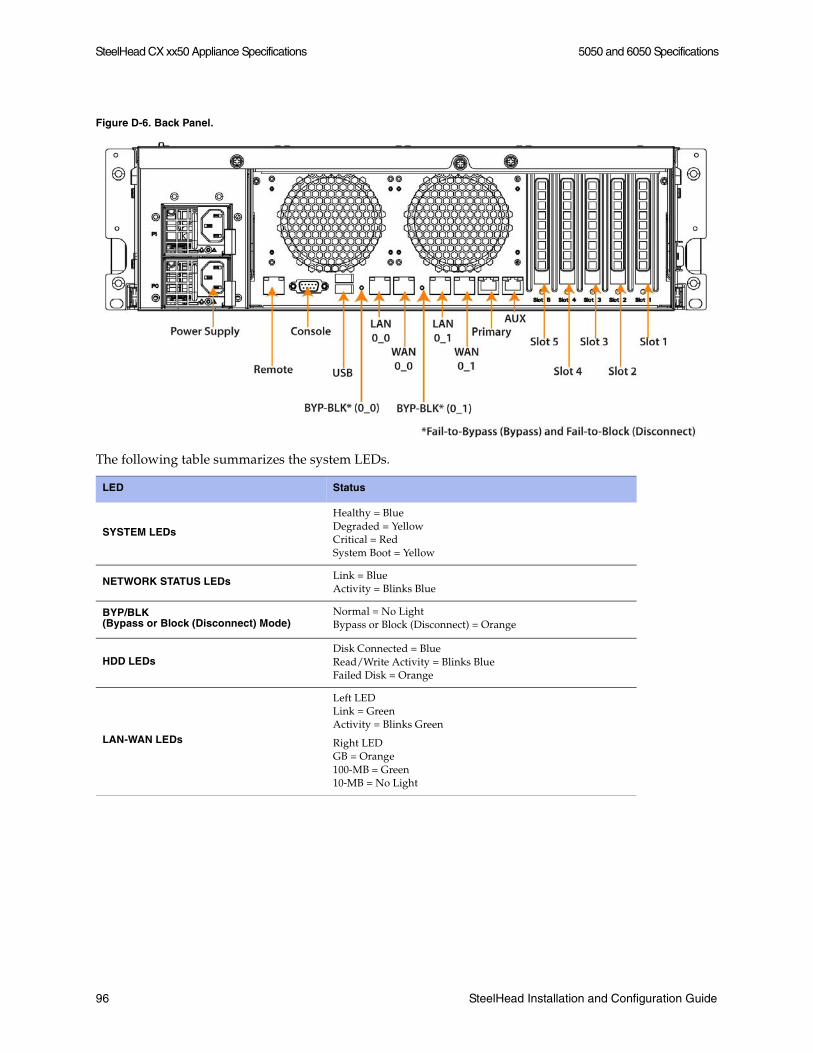
SteelHead CX xx50 Appliance Specifications 5050 and 6050 Specifications
Figure D-6. Back Panel.
The following table summarizes the system LEDs.
LED Status
SYSTEM LEDs
Healthy = BlueDegraded = YellowCritical = RedSystem Boot = Yellow
NETWORK STATUS LEDs Link = BlueActivity = Blinks Blue
BYP/BLK(Bypass or Block (Disconnect) Mode)
Normal = No LightBypass or Block (Disconnect) = Orange
HDD LEDsDisk Connected = BlueRead/Write Activity = Blinks BlueFailed Disk = Orange
LAN-WAN LEDs
Left LEDLink = GreenActivity = Blinks Green
Right LEDGB = Orange100-MB = Green10-MB = No Light
96 SteelHead Installation and Configuration Guide
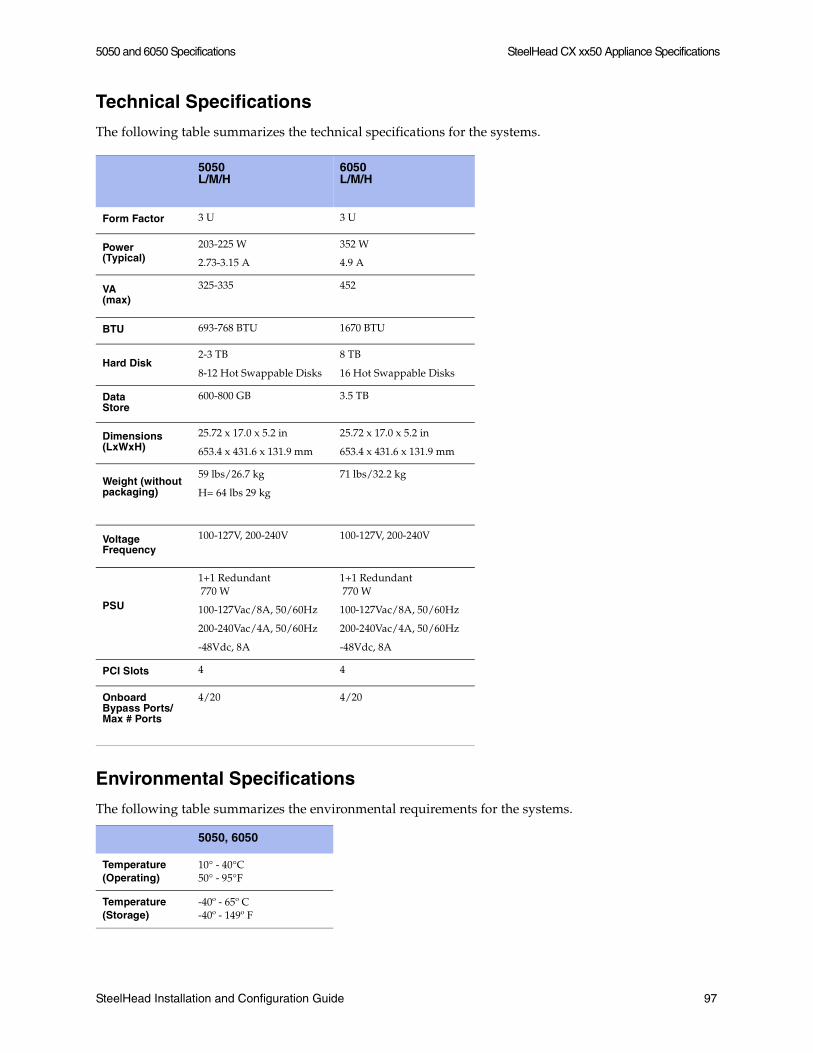
5050 and 6050 Specifications SteelHead CX xx50 Appliance Specifications
Technical Specifications
The following table summarizes the technical specifications for the systems.
Environmental Specifications
The following table summarizes the environmental requirements for the systems.
5050L/M/H
6050L/M/H
Form Factor 3 U 3 U
Power(Typical)
203-225 W
2.73-3.15 A
352 W
4.9 A
VA(max)
325-335 452
BTU 693-768 BTU 1670 BTU
Hard Disk2-3 TB
8-12 Hot Swappable Disks
8 TB
16 Hot Swappable Disks
DataStore
600-800 GB 3.5 TB
Dimensions (LxWxH)
25.72 x 17.0 x 5.2 in
653.4 x 431.6 x 131.9 mm
25.72 x 17.0 x 5.2 in
653.4 x 431.6 x 131.9 mm
Weight (without packaging)
59 lbs/26.7 kg
H= 64 lbs 29 kg
71 lbs/32.2 kg
Voltage Frequency
100-127V, 200-240V 100-127V, 200-240V
PSU
1+1 Redundant 770 W
100-127Vac/8A, 50/60Hz
200-240Vac/4A, 50/60Hz
-48Vdc, 8A
1+1 Redundant 770 W
100-127Vac/8A, 50/60Hz
200-240Vac/4A, 50/60Hz
-48Vdc, 8A
PCI Slots 4 4
Onboard Bypass Ports/Max # Ports
4/20 4/20
5050, 6050
Temperature (Operating)
10° - 40°C 50° - 95°F
Temperature (Storage)
-40º - 65º C-40º - 149º F
SteelHead Installation and Configuration Guide 97
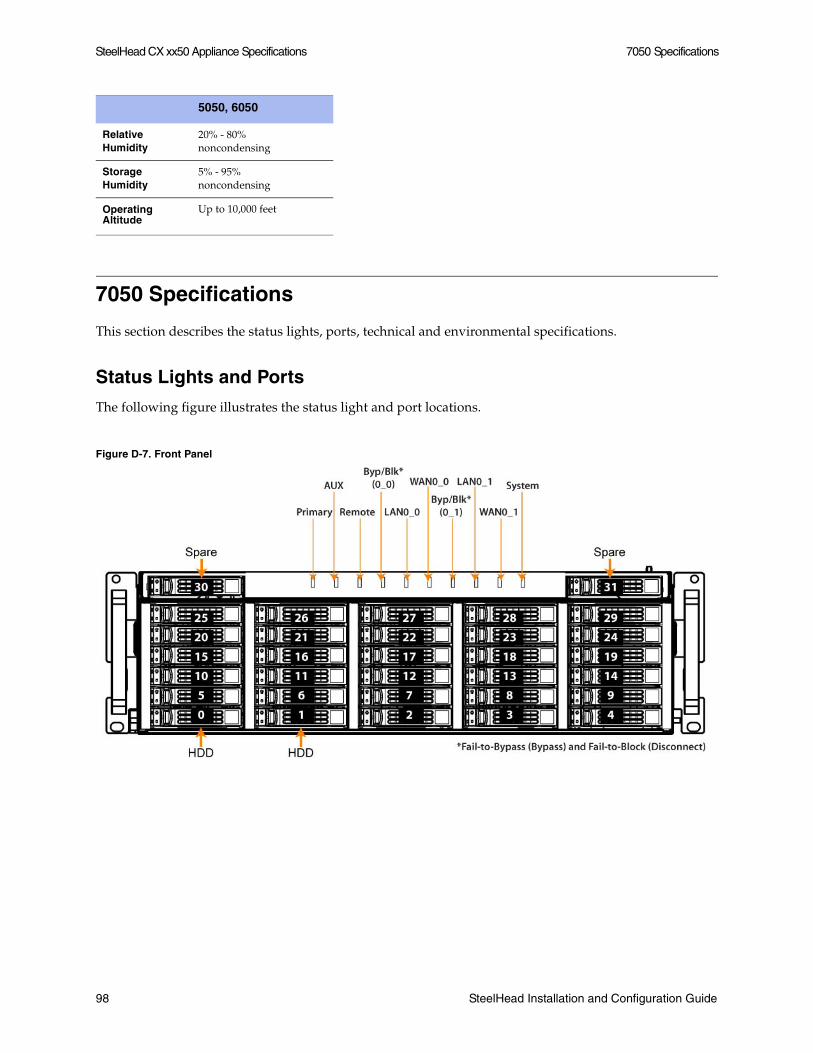
SteelHead CX xx50 Appliance Specifications 7050 Specifications
7050 Specifications
This section describes the status lights, ports, technical and environmental specifications.
Status Lights and Ports
The following figure illustrates the status light and port locations.
Figure D-7. Front Panel
Relative Humidity
20% - 80% noncondensing
Storage Humidity
5% - 95% noncondensing
Operating Altitude
Up to 10,000 feet
5050, 6050
98 SteelHead Installation and Configuration Guide
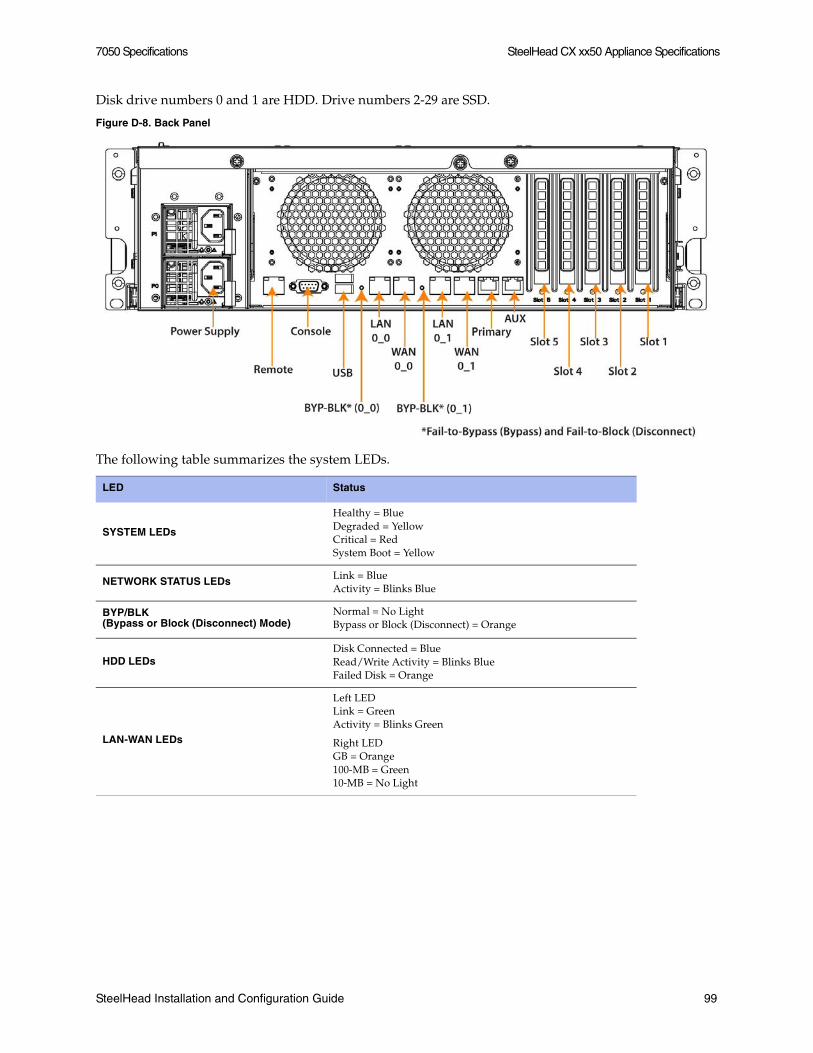
7050 Specifications SteelHead CX xx50 Appliance Specifications
Disk drive numbers 0 and 1 are HDD. Drive numbers 2-29 are SSD.
Figure D-8. Back Panel
The following table summarizes the system LEDs.
LED Status
SYSTEM LEDs
Healthy = BlueDegraded = YellowCritical = RedSystem Boot = Yellow
NETWORK STATUS LEDs Link = BlueActivity = Blinks Blue
BYP/BLK(Bypass or Block (Disconnect) Mode)
Normal = No LightBypass or Block (Disconnect) = Orange
HDD LEDsDisk Connected = BlueRead/Write Activity = Blinks BlueFailed Disk = Orange
LAN-WAN LEDs
Left LEDLink = GreenActivity = Blinks Green
Right LEDGB = Orange100-MB = Green10-MB = No Light
SteelHead Installation and Configuration Guide 99
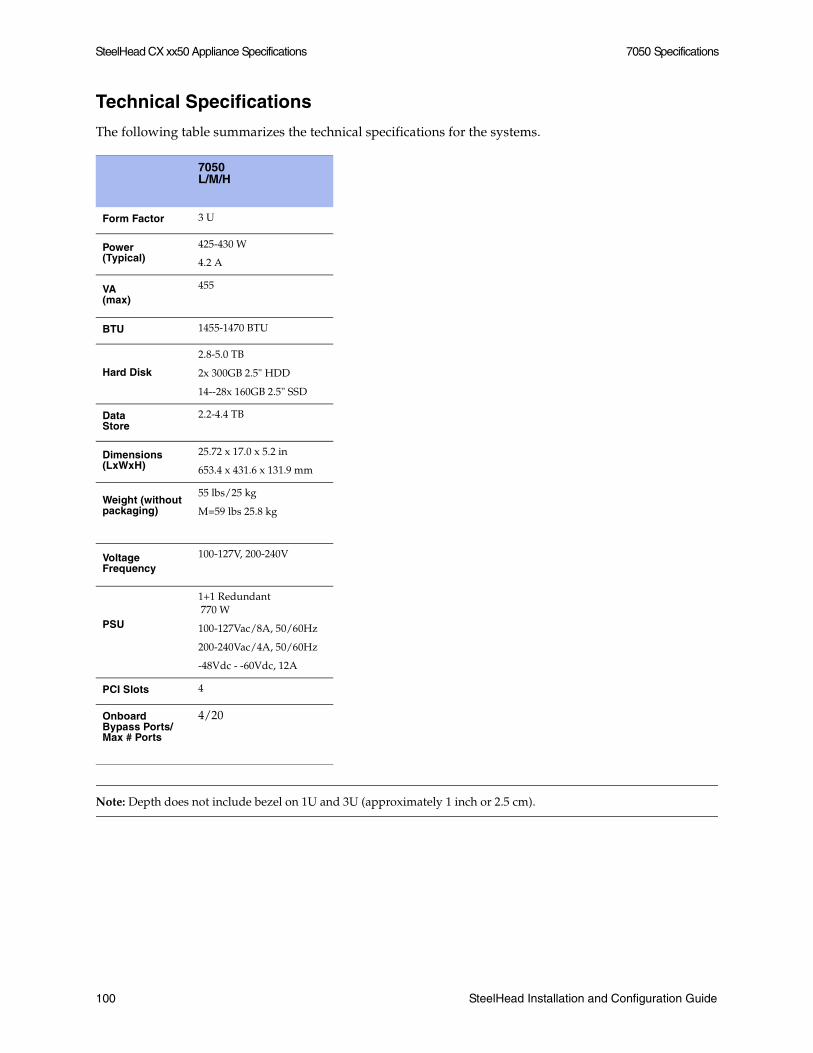
SteelHead CX xx50 Appliance Specifications 7050 Specifications
Technical Specifications
The following table summarizes the technical specifications for the systems.
Note: Depth does not include bezel on 1U and 3U (approximately 1 inch or 2.5 cm).
7050L/M/H
Form Factor 3 U
Power(Typical)
425-430 W
4.2 A
VA(max)
455
BTU 1455-1470 BTU
Hard Disk
2.8-5.0 TB
2x 300GB 2.5" HDD
14--28x 160GB 2.5" SSD
DataStore
2.2-4.4 TB
Dimensions (LxWxH)
25.72 x 17.0 x 5.2 in
653.4 x 431.6 x 131.9 mm
Weight (without packaging)
55 lbs/25 kg
M=59 lbs 25.8 kg
Voltage Frequency
100-127V, 200-240V
PSU
1+1 Redundant 770 W
100-127Vac/8A, 50/60Hz
200-240Vac/4A, 50/60Hz
-48Vdc - -60Vdc, 12A
PCI Slots 4
Onboard Bypass Ports/Max # Ports
4/20
100 SteelHead Installation and Configuration Guide
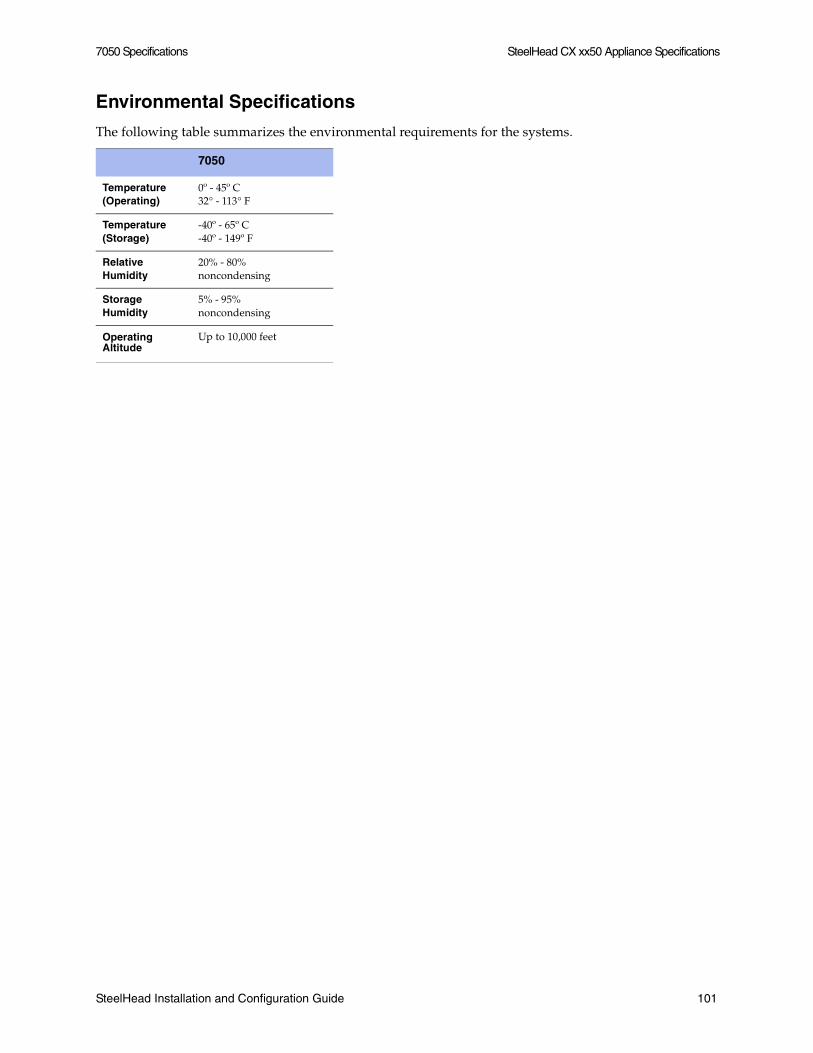
7050 Specifications SteelHead CX xx50 Appliance Specifications
Environmental Specifications
The following table summarizes the environmental requirements for the systems.
7050
Temperature (Operating)
0º - 45º C32° - 113° F
Temperature (Storage)
-40º - 65º C-40º - 149º F
Relative Humidity
20% - 80% noncondensing
Storage Humidity
5% - 95% noncondensing
Operating Altitude
Up to 10,000 feet
SteelHead Installation and Configuration Guide 101

SteelHead CX xx50 Appliance Specifications 7050 Specifications
102 SteelHead Installation and Configuration Guide

Index
AAC power, connecting 31Administrator account 18Appliance
installing 25, 49powering on 31
Appliance ports, definitions of 28Application streamlining, overview of 9Autodiscovery process, overview of 9Autodiscovery rule 11Autodiscovery, enhanced 10Automatic licensing 21
procedures 22Auxiliary port, definition of 28
BBlocked traffic in bypass mode 59Boot failure 59Bypass card
four-port or six-port 34Bypass cards
errors on 59interface naming convention 29
Bypass modetroubleshooting 59troubleshooting for 59
Bypass mode, definition 11
CCable
crossover 29, 32, 34Ethernet crossover 27Ethernet straight-through 27power 27serial 28, 34serial null-modem 27straight-through 29, 32
Client-side appliance, configuring 45CMC
see SCC 9Compatibility 5Configuration information, required 30Configuration jump-start command, restart-
ing the wizard 37Configuration wizard
restarting 37Configuration, verifying 41Connecting
LAN switch to LAN port, illustration
SteelHead Installation and Configuration Guide
of 33Primary port to LAN switch, illustra-
tion of 33, 42WAN port to WAN router, illustration
of 34Console port, definition of 28Crossover cable 32CX555, CX755, status lights and ports 77CX570, CX770, status lights and ports 73
DData Streamlining, overview of 9Deny rules, overview of 11Dependencies 5Discard rules, overview of 11Downgrading RiOS 19Duplex and speed, checking your
settings 43Duplex settings 29
EEnvironmental specifications
1050, 2050 95150, 250, 550 915050, 6050 977050 101CX1555 84CX255 79CX3070 67CX5055, CX7055 88CX5070, CX7070 72CX555, CX755 82CX570, CX770 75
Error 4294967295 59Ethernet network compatibility ii, 7
FFactory licensing 21Fail-to-block mode
overview of 12Failure modes
fail-to-block, overview of 12Firewall requirements 7Fixed-target rules, overview of 11
IIn-Path rules, overview of 11In-path, configuring 32Interface naming convention 29
103

Index
Inventory of shipping carton 27
JJavaScript 6
KKnown issues 2
LLAN port, definition of 29LAN switch, connecting 33LEDs
1050, 2050 93150, 250, 550 905050, 6050 967050 99CX1555 83CX255 78CX3070 65CX5055, CX7055 85CX5070 69CX555, CX755 80CX570 74CX7070 69CX770 74power supply for 1050, 2050 93
License keysinstalling 24
Licensingautomatic, overview 21automatic, procedures 22factory, overview 21methods 21Riverbed Licensing Portal
using 23Riverbed Licensing Portal, overview 21token, overview 21
Link Duplex alarm 29Logical in-path WCCP deployment, dia-
gram of 26
MManagement Streamlining, overview of 9Manual licensing 21
OOnline documentation 2Out-of-path deployment
caveats 58diagram of 27
Out-of-path, configuring 42
PPass-through rules, overview of 11Peering rules, overview of 11Physical in-path deployment, diagram
of 26Physical in-path, overview of 26Ports
1050, 2050 92150, 250, 550 895050, 6050 957050 98auxiliary 28console 28CX1555 82
104
CX255 77CX3070 64CX5055, CX7055 85CX5070, CX7070 68CX555, CX755 80CX570, CX770 73DB9F 34primary 28RJ45 34
Ports, definitions of 28Power requirements, consumption
CX1555 84CX3070 67CX5055, CX7055 87CX5070, CX7070 71
Preparing your site 28Primary port, connecting 33Primary port, definition of 28Product inventory 27
RRead permissions 15Related reading 2Required equipment 28Riverbed Licensing Portal
overview 21retrieving license keys 23
Riverbed, contacting 3
SSafety guidelines 2Scalable data referencing, overview of 9SCC compatibility 6SCC, overview of 9SDR, overview of 9Shipping carton inventory 27Site requirements 28SNMP
compatibility 8SNMP compatibility 8Speed and duplex, checking your
settings 43Status lights
1050, 2050 92150, 250, 550 895050, 6050 957050 98CX1555 82CX255 77CX3070 64CX5055, CX7055 85CX5070, CX7070 68CX555, CX755 80CX570, CX770 73
Status lights and portsCX555, CX755 77CX570, CX770 73
SteelHead Mobile Controller, overview of 9
TTechnical specifications
1050, 2050 94150, 250, 550 915050, 6050 97
Index
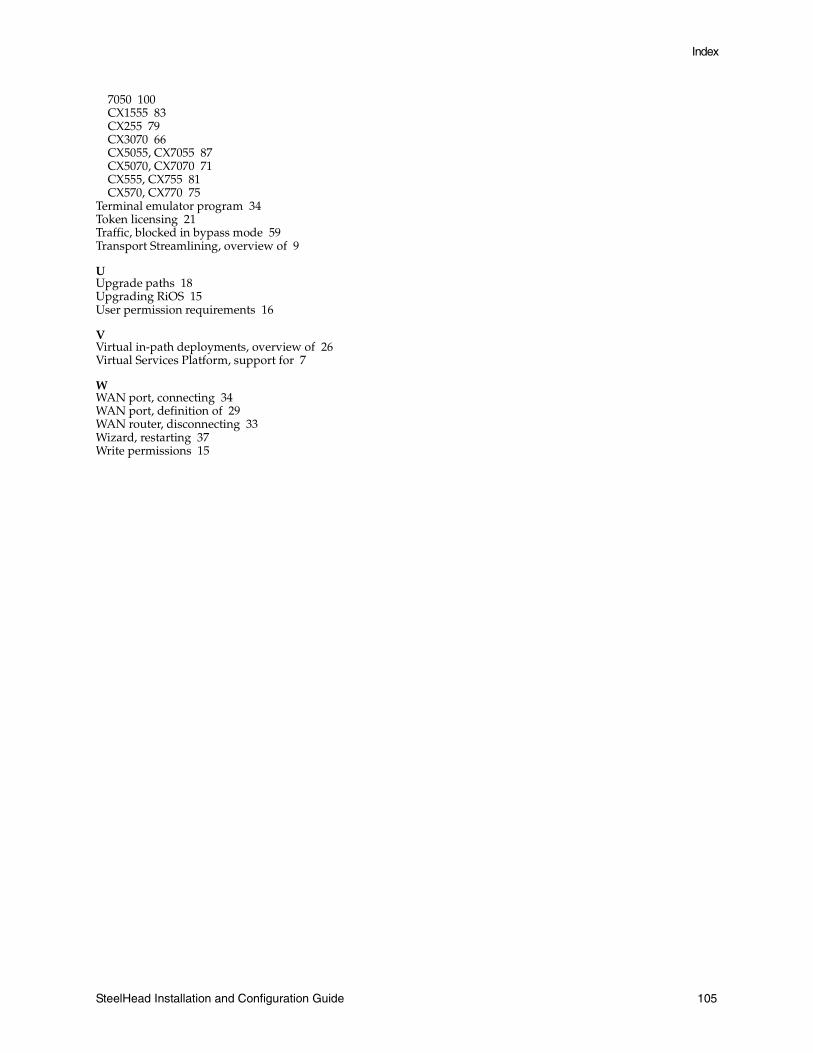
Index
7050 100CX1555 83CX255 79CX3070 66CX5055, CX7055 87CX5070, CX7070 71CX555, CX755 81CX570, CX770 75
Terminal emulator program 34Token licensing 21Traffic, blocked in bypass mode 59Transport Streamlining, overview of 9
UUpgrade paths 18Upgrading RiOS 15User permission requirements 16
VVirtual in-path deployments, overview of 26Virtual Services Platform, support for 7
WWAN port, connecting 34WAN port, definition of 29WAN router, disconnecting 33Wizard, restarting 37Write permissions 15
SteelHead Installation and Configuration Guide 105


