Embed Size (px)
Citation preview

USER
MANUAL
EN User ManualWashing Machine
L9FSC949R
CONTENTS1. SAFETY INFORMATION............................................................................................. 32. SAFETY INSTRUCTIONS.............................................................................................43. INSTALLATION............................................................................................................54. PRODUCT DESCRIPTION.........................................................................................105. THE WATER SOFTENER (SOFTWATER TECHNOLOGY)......................................116. BEFORE FIRST USE................................................................................................... 147. CONTROL PANEL..................................................................................................... 158. DIAL AND BUTTONS................................................................................................ 179. PROGRAMMES .........................................................................................................2010. SETTINGS................................................................................................................ 2411. DAILY USE................................................................................................................2512. HINTS AND TIPS..................................................................................................... 3013. CARE AND CLEANING.......................................................................................... 3114. TROUBLESHOOTING.............................................................................................3615. CONSUMPTION VALUES.......................................................................................4016. TECHNICAL DATA..................................................................................................4117. ACCESSORIES.........................................................................................................41
FOR PERFECT RESULTSThank you for choosing this AEG product. We have created it to give youimpeccable performance for many years, with innovative technologies that helpmake life simpler features you might not find on ordinary appliances. Pleasespend a few minutes reading to get the very best from it.Visit our website for:
Get usage advice, brochures, trouble shooter, service information:www.aeg.com/webselfservice
Register your product for better service:www.registeraeg.com
Buy Accessories, Consumables and Original spare parts for your appliance:www.aeg.com/shop
CUSTOMER CARE AND SERVICEAlways use original spare parts.When contacting our Authorised Service Centre, ensure that you have thefollowing data available: Model, PNC, Serial Number.The information can be found on the rating plate.
Warning / Caution-Safety information General information and tips Environmental information
Subject to change without notice.
www.aeg.com2
1. SAFETY INFORMATIONBefore the installation and use of the appliance,carefully read the supplied instructions. Themanufacturer is not responsible for any injuries ordamages that are the result of incorrect installation orusage. Always keep the instructions in a safe andaccessible location for future reference.
1.1 Children and vulnerable people safety• This appliance can be used by children aged from 8
years and above and persons with reduced physical,sensory or mental capabilities or lack of experienceand knowledge if they have been given supervision orinstruction concerning the use of the appliance in asafe way and understand the hazards involved.
• Do not let children play with the appliance.• Children aged 3 years and under must be kept away
from this appliance when it is in operation at all times.• Keep all packaging away from children and dispose of
it appropriately.• Keep detergents away from children.• Keep children and pets away from the appliance door
when it is open.• If the appliance has a child safety device, this should
be activated.• Children shall not carry out cleaning and user
maintenance of the appliance without supervision.
1.2 General Safety• Do not change the specification of this appliance.• Do not exceed the maximum load of 9 kg (refer to the
"Programme chart" chapter).• The operating water pressure at the water entry point
from the outlet connection must be between 0.5 bar(0.05 MPa) and 8 bar (0.8 MPa).
ENGLISH 3
• The ventilation opening in the base (if applicable)must not be covered by a carpet, mat, or any floorcovering.
• The appliance must be connected to the water mainsusing the new supplied hose sets, or other new hosesets supplied by the Authorised Service Centre.
• Old hose sets must not be reused.• If the mains power supply cable is damaged, it must
be replaced by the manufacturer, its AuthorisedService Centre or similarly qualified persons to avoidan electrical hazard.
• Before any maintenance operation, deactivate theappliance and disconnect the mains plug from thesocket.
• Do not use high pressure water sprays and/or steamto clean the appliance.
• Clean the appliance with a moist cloth. Use onlyneutral detergents. Do not use abrasive products,abrasive cleaning pads, solvents or metal objects.
2. SAFETY INSTRUCTIONS
2.1 Installation• Remove all the packaging and the
transit bolts.• Keep the transit bolts in a safe place.
If the appliance is to be moved infuture they must be reattached to lockthe drum to prevent internal damage.
• Always take care when moving theappliance as it is heavy. Always usesafety gloves and enclosed footwear.
• Do not install or use a damagedappliance.
• Follow the installation instructionsupplied with the appliance.
• Do not install or use the appliancewhere the temperature can be lessthan 0°C or where it is exposed to theweather.
• The floor area where the appliance isto be installed must be flat, stable,heat resistant and clean.
• Make sure that there is air circulationbetween the appliance and the floor.
• Adjust the feet to have the necessaryspace between the appliance and theflooring.
• Do not install the appliance where theappliance door cannot be fullyopened.
• Do not put a container to collectpossible water leakage under theappliance. Contact the AuthorisedService Centre to ensure whichaccessories can be used.
2.2 Electrical connection• The appliance must be earthed.• Always use a correctly installed
shockproof socket.• Make sure that the parameters on the
rating plate are compatible with theelectrical ratings of the mains powersupply.
• Do not use multi-plug adapters andextension cables.
• Make sure not to cause damage tothe mains plug and to the mains
www.aeg.com4
cable. Should the mains cable needto be replaced, this must be carriedout by our Authorised Service Centre.
• Connect the mains plug to the mainssocket only at the end of theinstallation. Make sure that there isaccess to the mains plug after theinstallation.
• Do not touch the mains cable or themains plug with wet hands.
• Do not pull the mains cable todisconnect the appliance. Always pullthe mains plug.
• UK and Ireland only. This appliance isfitted with a 13 A mains plug. If it isnecessary to change the mains plugfuse, use only a 13 A ASTA (BS 1362)fuse.
• This appliance complies with theE.E.C. Directives.
2.3 Water connection• Do not cause damage to the water
hoses.• Before connection to new pipes,
pipes not used for a long time, whererepair work has been carried out ornew devices fitted (water meters,etc.), let the water flow until it is cleanand clear.
• Ensure that there are no visible waterleaks during and after the first use ofthe appliance.
2.4 Use
WARNING!Risk of injury, electricalshock, fire, burns or damageto the appliance.
• This appliance is for household useonly.
• Follow the safety instructions on thedetergent packaging.
• Do not put flammable products oritems that are wet with flammableproducts in, near or on the appliance.
• Make sure that all metal objects areremoved from the laundry.
• Do not wash fabrics which are heavilysoiled with oil, grease or other greasysubstances. It can damage rubberparts of the washing machine.Prewash such fabrics by hand beforeloading them into the washingmachine.
• Do not touch the glass door while aprogramme is in operation. The glasscan get hot.
2.5 Service• To repair the appliance contact an
Authorised Service Centre.• Use original spare parts only.
2.6 Disposal
WARNING!Risk of injury or suffocation.
• Disconnect the appliance from themains electrical and water supplies.
• Cut off the mains electrical cableclose to the appliance and dispose ofit.
• Remove the door catch to preventchildren or pets from becomingtrapped in the drum.
• Dispose of the appliance inaccordance with local requirementsfor the disposal of Waste Electricaland Electronic Equipment (WEEE).
3. INSTALLATION
WARNING!Refer to Safety chapters.
3.1 Unpacking
WARNING!Remove all the packagingand the transit bolts beforeinstalling the appliance.
ENGLISH 5
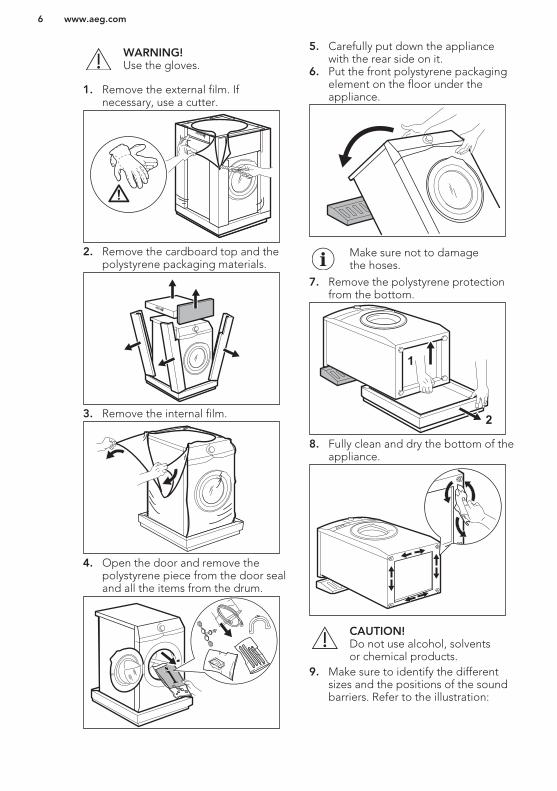
WARNING!Use the gloves.
1. Remove the external film. Ifnecessary, use a cutter.
2. Remove the cardboard top and thepolystyrene packaging materials.
3. Remove the internal film.
4. Open the door and remove thepolystyrene piece from the door sealand all the items from the drum.
5. Carefully put down the appliancewith the rear side on it.
6. Put the front polystyrene packagingelement on the floor under theappliance.
Make sure not to damagethe hoses.
7. Remove the polystyrene protectionfrom the bottom.
1
2
8. Fully clean and dry the bottom of theappliance.
CAUTION!Do not use alcohol, solventsor chemical products.
9. Make sure to identify the differentsizes and the positions of the soundbarriers. Refer to the illustration:
www.aeg.com6
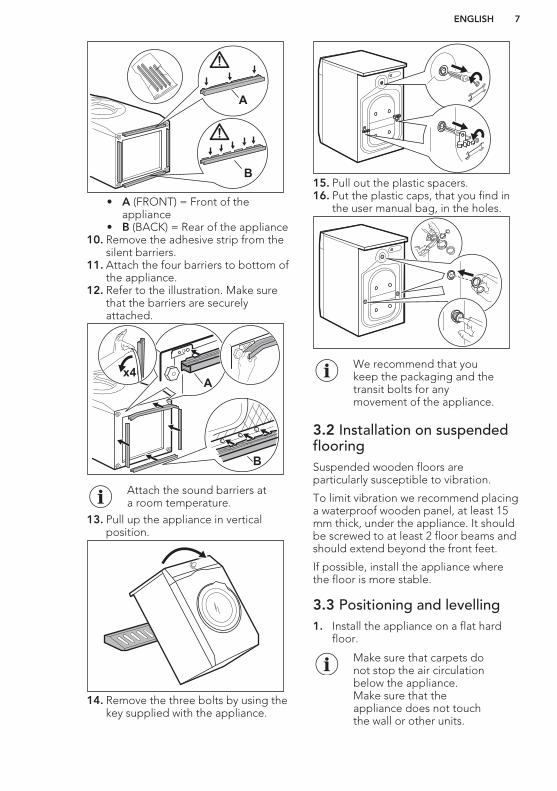
A
B
• A (FRONT) = Front of theappliance
• B (BACK) = Rear of the appliance10. Remove the adhesive strip from the
silent barriers.11. Attach the four barriers to bottom of
the appliance.12. Refer to the illustration. Make sure
that the barriers are securelyattached.
x4A
B
Attach the sound barriers ata room temperature.
13. Pull up the appliance in verticalposition.
14. Remove the three bolts by using thekey supplied with the appliance.
15. Pull out the plastic spacers.16. Put the plastic caps, that you find in
the user manual bag, in the holes.
We recommend that youkeep the packaging and thetransit bolts for anymovement of the appliance.
3.2 Installation on suspendedflooringSuspended wooden floors areparticularly susceptible to vibration.
To limit vibration we recommend placinga waterproof wooden panel, at least 15mm thick, under the appliance. It shouldbe screwed to at least 2 floor beams andshould extend beyond the front feet.
If possible, install the appliance wherethe floor is more stable.
3.3 Positioning and levelling1. Install the appliance on a flat hard
floor.
Make sure that carpets donot stop the air circulationbelow the appliance.Make sure that theappliance does not touchthe wall or other units.
ENGLISH 7
2. Loosen or tighten the feet to adjustthe level.
WARNING!Do not put cardboard, woodor equivalent materialsbelow the appliance feet toadjust the level.
x4
The appliance must be level and stable.
A correct adjustment of theappliance level prevents thevibration, noise and themovement of the appliancewhen in operation.
3.4 The inlet hose1. Connect the water inlet hose to the
back of the appliance.2. Position it toward left or right
depending on the position of thewater tap.
20O
20O
45O
45O
Make sure that the inlet hoseis not in vertical position.
3. If necessary, loose the ring nut to setit in the correct position.
4. Connect the water inlet hose to thecold water tap with 3/4" thread.
CAUTION!Make sure that there are noleaks from the couplings.
Do not use an extensionhose if the inlet hose is tooshort. Contact the servicecentre for the replacementof the inlet hose.
3.5 Water drainageThe drain hose should stay at a height ofnot less than 60 cm and not more than100 cm.
It is possible to connect the drain hose indifferent ways:
1. Make a U shape with the drain hoseand put it around the plastic hoseguide.
www.aeg.com8
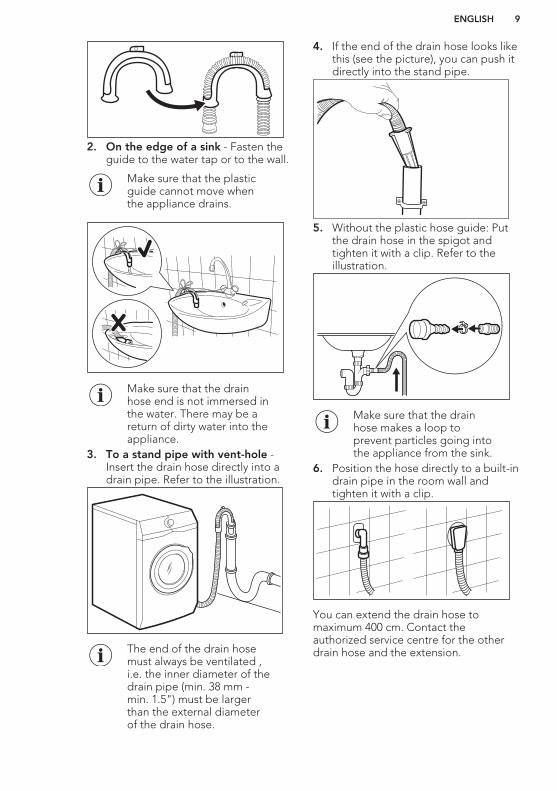
2. On the edge of a sink - Fasten theguide to the water tap or to the wall.
Make sure that the plasticguide cannot move whenthe appliance drains.
Make sure that the drainhose end is not immersed inthe water. There may be areturn of dirty water into theappliance.
3. To a stand pipe with vent-hole -Insert the drain hose directly into adrain pipe. Refer to the illustration.
The end of the drain hosemust always be ventilated ,i.e. the inner diameter of thedrain pipe (min. 38 mm -min. 1.5") must be largerthan the external diameterof the drain hose.
4. If the end of the drain hose looks likethis (see the picture), you can push itdirectly into the stand pipe.
5. Without the plastic hose guide: Putthe drain hose in the spigot andtighten it with a clip. Refer to theillustration.
Make sure that the drainhose makes a loop toprevent particles going intothe appliance from the sink.
6. Position the hose directly to a built-indrain pipe in the room wall andtighten it with a clip.
You can extend the drain hose tomaximum 400 cm. Contact theauthorized service centre for the otherdrain hose and the extension.
ENGLISH 9
4. PRODUCT DESCRIPTION
4.1 Special featuresYour new washing machine meets allmodern requirements for an effectivetreatment of laundry with low water,energy and detergent consumption andrespectful of fabric care.
• The SoftWater Technology acts as water softener and removes harshminerals from the inlet water andsupplies soft water for the washing.Wash after wash, fabric stiffness,shrinkage and colour fading areprevented.
• The Oko-Mix technology has beendesigned to protect the fabric fibresthanks to different pre-mixing phasesthat dissolves first the detergent andthen fabric softener in the waterbefore they are distributed in thelaundry. So every fibre is reached andcared for.
• The ProSense technology detectsthe laundry load size defining the
programme duration in 30 seconds.The washing programme is tailored tothe laundry load and the type of fabricwithout consuming more time, energyand water than necessary.
• The steam has a quick and easy wayto refresh the clothes. The gentlesteam programmes remove odoursand reduce creases in dry fabrics sothey need little ironing.The Plus Steam option, finishes everycycle with gentle steam that relaxesthe fibres and reduces fabric creasing.Ironing will be easier!
• The Stains option pre-treats stubbornstains optimizing the effectiveness ofthe stain remover.
• Thanks to the Soft Plus option, thefabric softener is uniformly spread outin the laundry and deeply penetratesthe fabric fibres favouring a perfectsoftness.
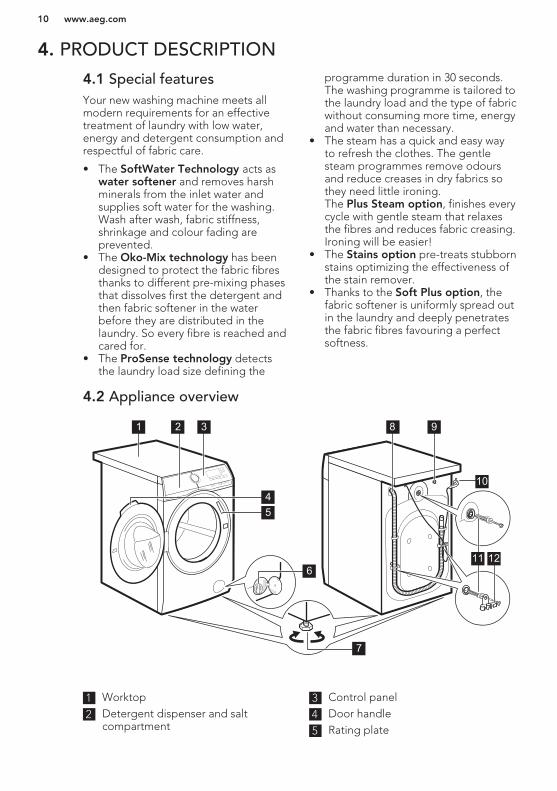
4.2 Appliance overview
1 2 3 9
5
6
7
4
10
8
11 12
1 Worktop
2 Detergent dispenser and saltcompartment
3 Control panel
4 Door handle
5 Rating plate
www.aeg.com10
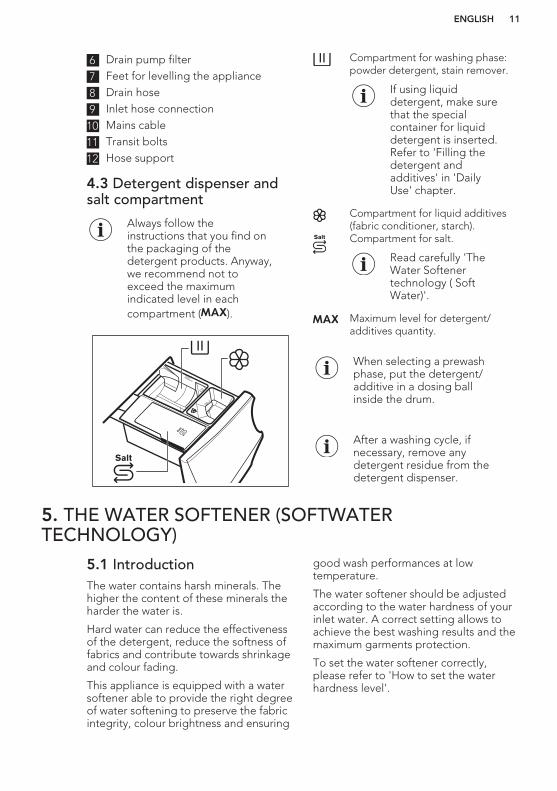
6 Drain pump filter
7 Feet for levelling the appliance
8 Drain hose
9 Inlet hose connection
10 Mains cable
11 Transit bolts
12 Hose support
4.3 Detergent dispenser andsalt compartment
Always follow theinstructions that you find onthe packaging of thedetergent products. Anyway,we recommend not toexceed the maximumindicated level in eachcompartment ( ).
Max▼
Max▼
Max▼
Salt
Salt
Compartment for washing phase:powder detergent, stain remover.
If using liquiddetergent, make surethat the specialcontainer for liquiddetergent is inserted.Refer to 'Filling thedetergent andadditives' in 'DailyUse' chapter.
Compartment for liquid additives(fabric conditioner, starch).
Salt Compartment for salt.
Read carefully 'TheWater Softenertechnology ( SoftWater)'.
Maximum level for detergent/additives quantity.
When selecting a prewashphase, put the detergent/additive in a dosing ballinside the drum.
After a washing cycle, ifnecessary, remove anydetergent residue from thedetergent dispenser.
5. THE WATER SOFTENER (SOFTWATERTECHNOLOGY)
5.1 IntroductionThe water contains harsh minerals. Thehigher the content of these minerals theharder the water is.
Hard water can reduce the effectivenessof the detergent, reduce the softness offabrics and contribute towards shrinkageand colour fading.
This appliance is equipped with a watersoftener able to provide the right degreeof water softening to preserve the fabricintegrity, colour brightness and ensuring
good wash performances at lowtemperature.
The water softener should be adjustedaccording to the water hardness of yourinlet water. A correct setting allows toachieve the best washing results and themaximum garments protection.
To set the water softener correctly,please refer to 'How to set the waterhardness level'.
ENGLISH 11
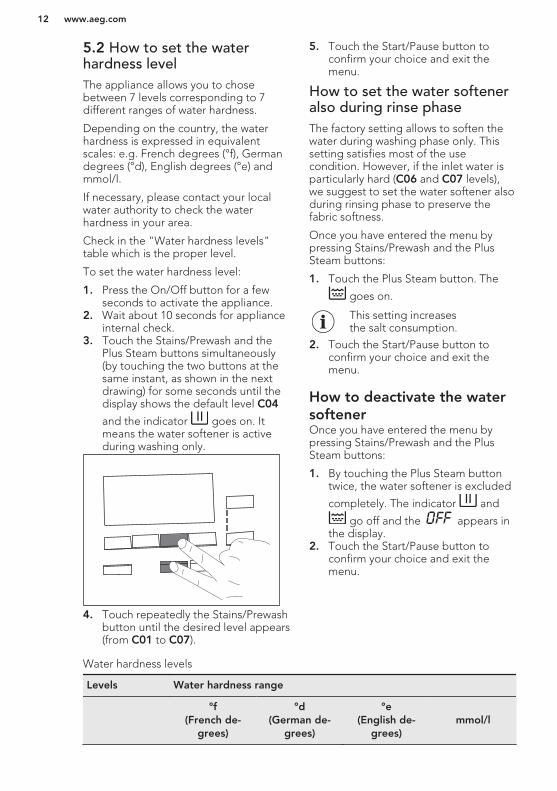
5.2 How to set the waterhardness levelThe appliance allows you to chosebetween 7 levels corresponding to 7different ranges of water hardness.
Depending on the country, the waterhardness is expressed in equivalentscales: e.g. French degrees (°f), Germandegrees (°d), English degrees (°e) andmmol/l.
If necessary, please contact your localwater authority to check the waterhardness in your area.
Check in the "Water hardness levels"table which is the proper level.
To set the water hardness level:
1. Press the On/Off button for a fewseconds to activate the appliance.
2. Wait about 10 seconds for applianceinternal check.
3. Touch the Stains/Prewash and thePlus Steam buttons simultaneously(by touching the two buttons at thesame instant, as shown in the nextdrawing) for some seconds until thedisplay shows the default level C04
and the indicator goes on. Itmeans the water softener is activeduring washing only.
4. Touch repeatedly the Stains/Prewashbutton until the desired level appears(from C01 to C07).
5. Touch the Start/Pause button toconfirm your choice and exit themenu.
How to set the water softeneralso during rinse phaseThe factory setting allows to soften thewater during washing phase only. Thissetting satisfies most of the usecondition. However, if the inlet water isparticularly hard (C06 and C07 levels),we suggest to set the water softener alsoduring rinsing phase to preserve thefabric softness.
Once you have entered the menu bypressing Stains/Prewash and the PlusSteam buttons:
1. Touch the Plus Steam button. The
goes on.
This setting increasesthe salt consumption.
2. Touch the Start/Pause button toconfirm your choice and exit themenu.
How to deactivate the watersoftenerOnce you have entered the menu bypressing Stains/Prewash and the PlusSteam buttons:
1. By touching the Plus Steam buttontwice, the water softener is excluded
completely. The indicator and
go off and the appears inthe display.
2. Touch the Start/Pause button toconfirm your choice and exit themenu.
Water hardness levels
Levels Water hardness range
°f
(French de-grees)
°d(German de-
grees)
°e(English de-
grees)mmol/l
www.aeg.com12
Levels Water hardness range
C01 ≤5 ≤3 ≤ 4 ≤0.5
C02 6 - 13 4 - 7 5 - 9 0.6 - 1.3
C03 14 - 21 8 - 11 10 -15 1.4 - 2.1
C041) 22 - 29 12 - 16 16 - 20 2.2 - 2.9
C05 30 - 37 17 - 20 21 - 26 3.0 - 3.7
C06 38 - 45 21 -25 27 - 32 3.8 - 4.5
C07 ≥46 ≥26 ≥33 ≥4.6
1) Factory setting, able to satisfy most of the use conditions.
5.3 Pouring saltThe water softener function acts throughspecial resins present in the appliance.
To regenerate the resins and make themready to soften the water pour a special
salt in the compartment Salt
:
1. Open the detergent dispenser.
Max▼
Max▼
Max▼
Salt
2. Open the compartment Salt
.
Max▼
Max▼
Max▼
3. Pour the special salt.
Max▼
Max▼
Max▼
SALT
4. Close the salt compartment and thedetergent dispenser.
Regularly check if there isenough salt.
The compartment Salt
can contain about600 gr of salt that are sufficient for about20 - 300 washing cycles (or 4 - 70 weeks)depending on the set water hardnesslevel and if the water softener isactivated during wash phase only. If thewater softener is activated also duringrinse phase, the salt refilling lasts 5 - 80washing cycles (or 1 - 18 weeks)depending on the set water hardnesslevel. Refer to 'How to set the waterhardness level'.
The display shows the indicator when
compartment Salt
needs to be refilledwith salt, even if a little salt still remains.
ENGLISH 13
WARNING!Pour the salt in the
compartment Salt
only.
WARNING!Do not put anything but salt
in the compartment Salt
. Ifany other detergent/additiveis poured inadvertently inthis compartment, pleaserefer to 'Eliminatingdetergent or other additivesfrom salt compartment' in'Troubleshooting' chapter.
Only use special salt fordishwasher and/or washingmachine. Other types ofsalts are less efficient andover time could damage thewater softener technologypermanently. Do not usefine salt!
The appliance worksnormally even without salt,but without exploiting its fullpotential. If using theappliance without salt for along time, once the salt isfinally refilled, the watersoftener function iscompletely restored after afew long washing cycles.
6. BEFORE FIRST USE1. Make sure that all transit bolts have
been removed from the appliance.2. Make sure that the electrical power is
available and the water tap is open.3. Make sure that there is salt in the
compartment marked by Salt
and setthe proper water hardness level.Refer to "How to set the waterhardness level".
4. Pour 2 litres of water into thedetergent compartment marked by
.
This action activates the drain system.5. Pour a small quantity of detergent
into the compartment marked by
.6. Set and start a programme for cotton
at the highest temperature withoutany laundry in the drum.
This removes all possible dirt from thedrum and the tub.
www.aeg.com14
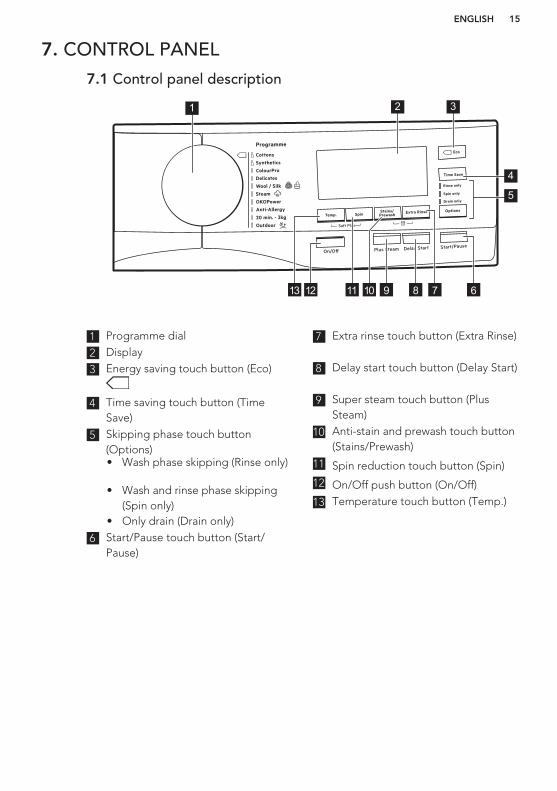
7. CONTROL PANEL
7.1 Control panel description
2 3
612 11 10 8
1
4
5
7913
1 Programme dial
2 Display
3 Energy saving touch button (Eco)
4 Time saving touch button (TimeSave)
5 Skipping phase touch button(Options) • Wash phase skipping (Rinse only)
• Wash and rinse phase skipping(Spin only)
• Only drain (Drain only)
6 Start/Pause touch button (Start/Pause)
7 Extra rinse touch button (Extra Rinse)
8 Delay start touch button (Delay Start)
9 Super steam touch button (PlusSteam)
10 Anti-stain and prewash touch button(Stains/Prewash)
11 Spin reduction touch button (Spin)
12 On/Off push button (On/Off)
13 Temperature touch button (Temp.)
ENGLISH 15
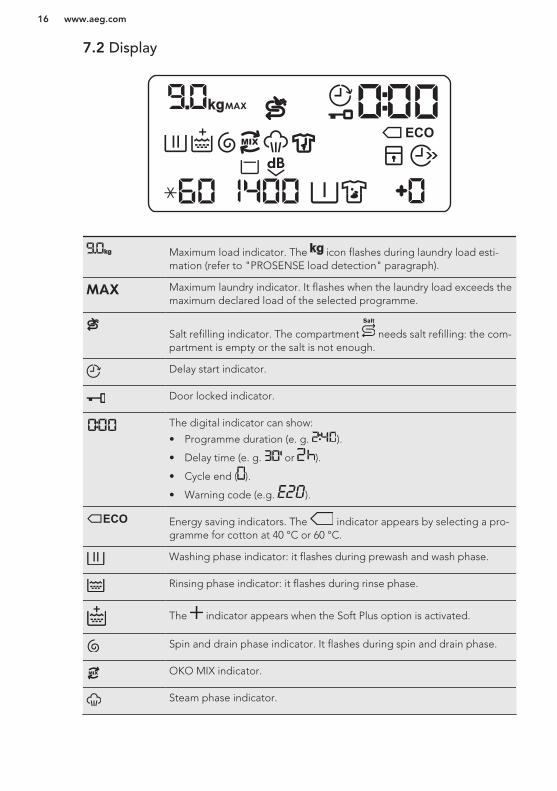
7.2 Display
MIX
Maximum load indicator. The icon flashes during laundry load esti-mation (refer to "PROSENSE load detection" paragraph).
Maximum laundry indicator. It flashes when the laundry load exceeds themaximum declared load of the selected programme.
Salt refilling indicator. The compartment Salt
needs salt refilling: the com-partment is empty or the salt is not enough.
Delay start indicator.
Door locked indicator.
The digital indicator can show:
• Programme duration (e. g. ).
• Delay time (e. g. or ).
• Cycle end ( ).
• Warning code (e.g. ).
Energy saving indicators. The indicator appears by selecting a pro-gramme for cotton at 40 °C or 60 °C.
Washing phase indicator: it flashes during prewash and wash phase.
Rinsing phase indicator: it flashes during rinse phase.
The indicator appears when the Soft Plus option is activated.
Spin and drain phase indicator. It flashes during spin and drain phase.
MIX OKO MIX indicator.
Steam phase indicator.
www.aeg.com16
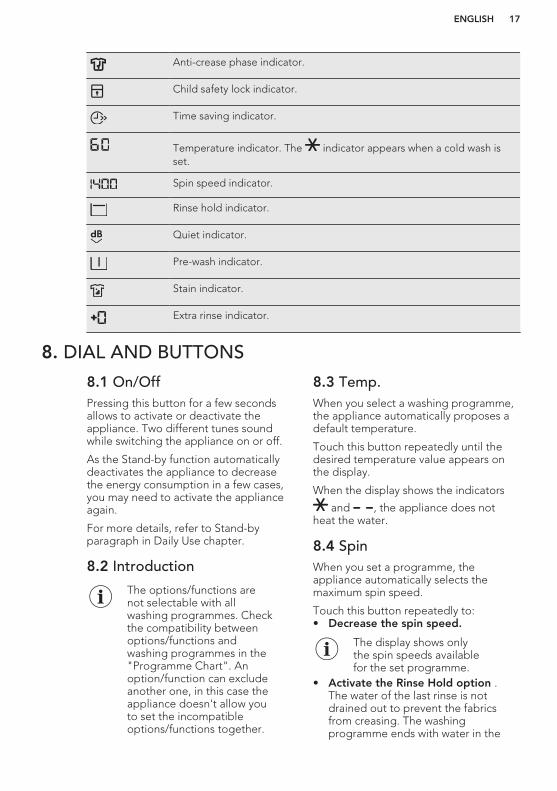
Anti-crease phase indicator.
Child safety lock indicator.
Time saving indicator.
Temperature indicator. The indicator appears when a cold wash isset.
Spin speed indicator.
Rinse hold indicator.
Quiet indicator.
Pre-wash indicator.
Stain indicator.
Extra rinse indicator.
8. DIAL AND BUTTONS
8.1 On/Off Pressing this button for a few secondsallows to activate or deactivate theappliance. Two different tunes soundwhile switching the appliance on or off.
As the Stand-by function automaticallydeactivates the appliance to decreasethe energy consumption in a few cases,you may need to activate the applianceagain.
For more details, refer to Stand-byparagraph in Daily Use chapter.
8.2 Introduction
The options/functions arenot selectable with allwashing programmes. Checkthe compatibility betweenoptions/functions andwashing programmes in the"Programme Chart". Anoption/function can excludeanother one, in this case theappliance doesn't allow youto set the incompatibleoptions/functions together.
8.3 Temp. When you select a washing programme,the appliance automatically proposes adefault temperature.
Touch this button repeatedly until thedesired temperature value appears onthe display.
When the display shows the indicators
and , the appliance does notheat the water.
8.4 Spin When you set a programme, theappliance automatically selects themaximum spin speed.
Touch this button repeatedly to:• Decrease the spin speed.
The display shows onlythe spin speeds availablefor the set programme.
• Activate the Rinse Hold option .The water of the last rinse is notdrained out to prevent the fabricsfrom creasing. The washingprogramme ends with water in the
ENGLISH 17
drum and the final spin phase is notperformed.
The display shows the indicator .The drum turns regularly to reducecreasing.The door stays locked. The drumturns regularly to reduce creasing.You must drain the water to unlockthe door.Touch Start/Pause button: theappliance performs the spinningphase and drains the water.
• Activate the Quiet option.All spinning phases (intermediate spinand final spin) are suppressed and theprogramme ends with water in thedrum. This helps to reduce creasing.As the programme is very quiet, it issuitable for use at night time whencheaper electricity tariffs are available.In some programmes the rinses areperformed with more water.
The display shows the indicator .The door stays locked. The drumturns regularly to reduce creasing.You must drain the water to unlockthe door.Touch the Start/Pause button: theappliance performs only the drainingphase.
The appliance empties thewater out automatically afterapproximately 18 hours.
8.5 Stains/Prewash The relevant indicator goes on in thedisplay.
• Stains Select this option to pre-treat heavilysoiled or stained laundry using stainremover.Pour the stain remover into
compartment . The stain removeris pre-mixed and heated withdetergent in order to improve itseffectiveness.
This option can increasethe programme duration.
This option is notavailable with atemperature lower than40 °C.
• Prewash Use this option to add a prewashphase at 30 °C before the washingphase.This option is recommended forheavily soiled laundry, especially ifcontaining sand, dust , mud and othersolid particles.
Put the detergent forprewash in a dosing ballinside the drum.
This option can increasethe programme duration.
8.6 Extra Rinse With this option you can add up to 3rinses accordingly to the selectedwashing programmes.
Useful for people allergic to detergentsand with sensitive skin.
The indicator shows the selectednumber of rinses.
This option increases the programmeduration.
If the Extra Rinse is set as adefault option and youselect a compatible washingprogramme, the display
shows . In this case, bypressing the Extra Rinsebutton , it is possible to addjust one rinse.
8.7 Plus Steam This option adds a steam phase followedby a short anti-crease phase at the endof the washing programme.
The steam phase reduces fabric creasingand facilitates the fabric ironing.
The indicator flashes on the displayduring steam phase.
www.aeg.com18
This option can increase theprogramme duration.
When the programme stops the display
shows a zero , the indicator is
steady on and the indicator startsflashing. The drum performs smoothmovements for about 30 minutes to keepthe steam benefit. By touching anybutton the anti-crease movements stopand the door unlocks.
A small laundry load helps toreach better results.
8.8 Eco Set this option for slightly or normallysoiled items washed at 30°C or highertemperatures.
The appliance decreases the washingtemperature and extends the washingtime to obtain a good washing efficiencyby saving energy. The display shows the
indicator .
If you select the Cottonprogramme at 40°C or 60°Cand no other options are set,the display shows the
indicator ; these arethe standard cottonprogrammes, the mostefficient programmes interms of combined energyand water consumption.
8.9 Time Save With this option you can decrease theprogramme duration.
• If your laundry is normally or lightlysoiled, it may be advisable to shortenthe washing programme. Touch thisbutton once to decrease the duration.
• In case of smaller load, touch thisbutton twice to set an extra quickprogramme.
The display shows the indicator .
This option can also be usedto shorten the Steamprogramme duration.
8.10 Skipping phase button(Options) By touching this button you can set:• Rinse only at first touch. The washing
programme starts from the rinsingphase by skipping the wash phase.
All set options (exceptpermanent extra rinse)are deselectedautomatically.
• Spin only at second touch. Theappliance skips wash and rinse phase.
• Drain only at third touch. Theappliance performs only the drainphase.
At firth touch the applianceproposes the default settingof the washing programmeagain.
8.11 Delay Start With this option you can delay the startof a programme in a more convenienttime.
Touch the button repeatedly to set therequired delay. The time increases bysteps of 30 minutes up to 90' and from 2hours up to 20 h.
After touching the Start/Pause button,
the display shows the indicator andthe selected delay time and theappliance begins the countdown.
8.12 Start/Pause Touch the Start/Pause button to start,pause the appliance or interrupt arunning programme.
ENGLISH 19
9. PROGRAMMES
9.1 Programme Chart
All washing programmes benefit from the softened water, if the watersoftener is active.
Washing programmes
Programme Programme description
Washing programmes
Cottons
White cotton and coloured cotton. Normal soil and light soil.Standard programmes for the Energy Label consumptionvalues. According to regulation 1061/2010, the programmeCottons at 60 °C and the programme Cottons at 40 °C with the
option are respectively the «Standard 60°C cotton pro-gramme» and the «Standard 40°C cotton programme». Theyare the most efficient programmes in terms of combined ener-gy and water consumption for washing normally soiled cottonlaundry.
The water temperature of the washing phasemay differ from the temperature declared forthe selected programme.
Synthetics
Synthetic items or mixed fabric items. Normal soil.
ColourPro
Coloured cottons and synthetics. Low-temperature cycle fora greater colour protection keeping good cleaning resultsthanks to softened water.
Delicates
Delicate fabrics such as acrylics, viscose, polyester items.Normal soil.
Wool/Silk
Machine washable wool, hand washable wool and delicate
fabrics with «hand washing» care symbol.1)
Steam programme
www.aeg.com20
Programme Programme description
Steam
Steam programme for cotton and synthetic items. Steam
can be used for dried2), washed or worn once laundry. This
programme reduce creases and odours3) and relaxes the fi-bres. When the programme is completed, quickly remove thelaundry from the drum. After a steam programme, ironing be-comes effortless. Do not use any detergent. If necessary, re-move stains by washing or using localized stain removal. Steamprogrammes do not perform any hygienic cycle. Do not set aSteam programme with these types of items:• Items that are not suitable for tumble drying.• All items with plastic, metal, wooden parts or alike.
Washing programmes
OKOPower
Cotton and fast-coloured synthetic items. Complete washingprogramme that, in only 59 minutes, washes the daily soiledlaundry intensively and ensures a good washing performancein a short time.
Anti-Allergy
White cotton items. This programme removes micro-organ-isms thanks to a washing phase with the temperature main-tained above 60°C for some minutes. This helps in removinggerms, bacteria, micro-organism and particles. An additionalrinsing phase ensures a proper removal of detergent residuesand pollens/allergenic items. In this way the wash is more ef-fective.
20 min. - 3 kg
Cotton and synthetic items lightly soiled or once worn.
ENGLISH 21
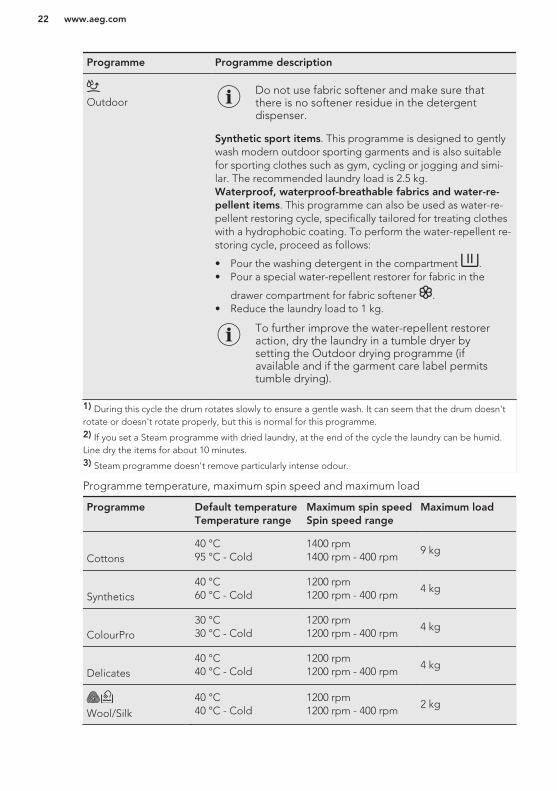
Programme Programme description
OutdoorDo not use fabric softener and make sure thatthere is no softener residue in the detergentdispenser.
Synthetic sport items. This programme is designed to gentlywash modern outdoor sporting garments and is also suitablefor sporting clothes such as gym, cycling or jogging and simi-lar. The recommended laundry load is 2.5 kg.Waterproof, waterproof-breathable fabrics and water-re-pellent items. This programme can also be used as water-re-pellent restoring cycle, specifically tailored for treating clotheswith a hydrophobic coating. To perform the water-repellent re-storing cycle, proceed as follows:
• Pour the washing detergent in the compartment .• Pour a special water-repellent restorer for fabric in the
drawer compartment for fabric softener .• Reduce the laundry load to 1 kg.
To further improve the water-repellent restoreraction, dry the laundry in a tumble dryer bysetting the Outdoor drying programme (ifavailable and if the garment care label permitstumble drying).
1) During this cycle the drum rotates slowly to ensure a gentle wash. It can seem that the drum doesn'trotate or doesn't rotate properly, but this is normal for this programme.2) If you set a Steam programme with dried laundry, at the end of the cycle the laundry can be humid.Line dry the items for about 10 minutes.3) Steam programme doesn't remove particularly intense odour.
Programme temperature, maximum spin speed and maximum load
Programme Default temperatureTemperature range
Maximum spin speedSpin speed range
Maximum load
Cottons40 °C95 °C - Cold
1400 rpm1400 rpm - 400 rpm
9 kg
Synthetics40 °C60 °C - Cold
1200 rpm1200 rpm - 400 rpm
4 kg
ColourPro30 °C30 °C - Cold
1200 rpm1200 rpm - 400 rpm
4 kg
Delicates40 °C40 °C - Cold
1200 rpm1200 rpm - 400 rpm
4 kg
Wool/Silk
40 °C40 °C - Cold
1200 rpm1200 rpm - 400 rpm
2 kg
www.aeg.com22
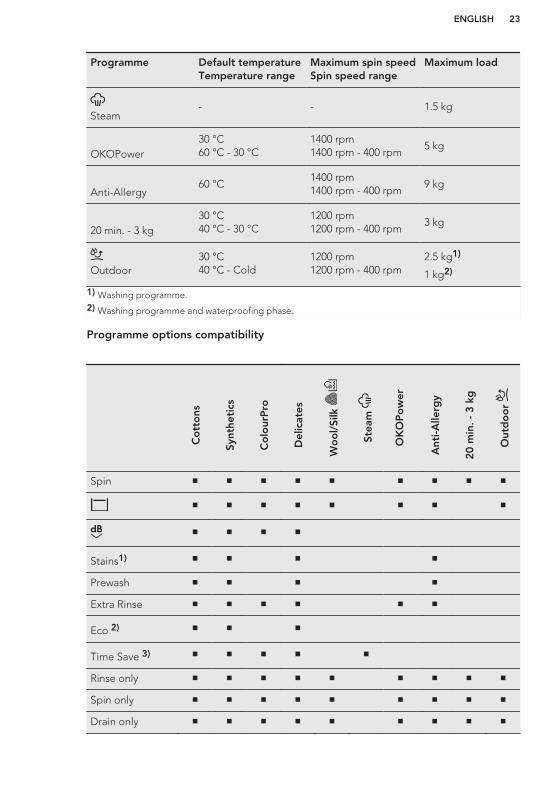
Programme Default temperatureTemperature range
Maximum spin speedSpin speed range
Maximum load
Steam- - 1.5 kg
OKOPower30 °C60 °C - 30 °C
1400 rpm1400 rpm - 400 rpm
5 kg
Anti-Allergy60 °C
1400 rpm1400 rpm - 400 rpm
9 kg
20 min. - 3 kg30 °C40 °C - 30 °C
1200 rpm1200 rpm - 400 rpm
3 kg
Outdoor30 °C40 °C - Cold
1200 rpm1200 rpm - 400 rpm
2.5 kg1)
1 kg2)
1) Washing programme.2) Washing programme and waterproofing phase.
Programme options compatibility
Co
tto
ns
Synt
heti
cs
Co
lour
Pro
Del
icat
es
Wo
ol/
Silk
Stea
m
OK
OP
ow
er
Ant
i-Alle
rgy
20 m
in. -
3 k
g
Out
do
or
Spin ■ ■ ■ ■ ■ ■ ■ ■ ■
■ ■ ■ ■ ■ ■ ■ ■
■ ■ ■ ■
Stains1) ■ ■ ■ ■
Prewash ■ ■ ■ ■
Extra Rinse ■ ■ ■ ■ ■ ■
Eco 2) ■ ■ ■
Time Save 3) ■ ■ ■ ■ ■
Rinse only ■ ■ ■ ■ ■ ■ ■ ■ ■
Spin only ■ ■ ■ ■ ■ ■ ■ ■ ■
Drain only ■ ■ ■ ■ ■ ■ ■ ■ ■
ENGLISH 23
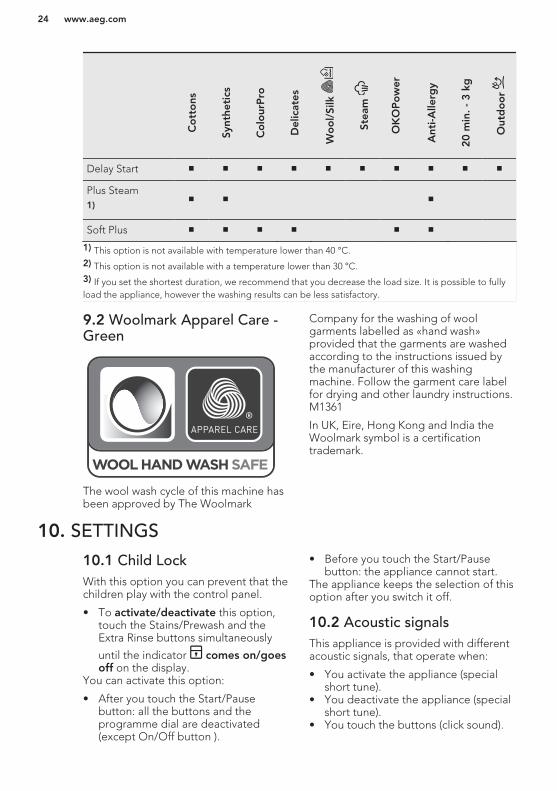
Co
tto
ns
Synt
heti
cs
Co
lour
Pro
Del
icat
es
Wo
ol/
Silk
Stea
m
OK
OP
ow
er
Ant
i-Alle
rgy
20 m
in. -
3 k
g
Out
do
or
Delay Start ■ ■ ■ ■ ■ ■ ■ ■ ■ ■
Plus Steam1) ■ ■ ■
Soft Plus ■ ■ ■ ■ ■ ■
1) This option is not available with temperature lower than 40 °C.2) This option is not available with a temperature lower than 30 °C.3) If you set the shortest duration, we recommend that you decrease the load size. It is possible to fullyload the appliance, however the washing results can be less satisfactory.
9.2 Woolmark Apparel Care -Green
The wool wash cycle of this machine hasbeen approved by The Woolmark
Company for the washing of woolgarments labelled as «hand wash»provided that the garments are washedaccording to the instructions issued bythe manufacturer of this washingmachine. Follow the garment care labelfor drying and other laundry instructions.M1361
In UK, Eire, Hong Kong and India theWoolmark symbol is a certificationtrademark.
10. SETTINGS
10.1 Child LockWith this option you can prevent that thechildren play with the control panel.
• To activate/deactivate this option,touch the Stains/Prewash and theExtra Rinse buttons simultaneously
until the indicator comes on/goesoff on the display.
You can activate this option:
• After you touch the Start/Pausebutton: all the buttons and theprogramme dial are deactivated(except On/Off button ).
• Before you touch the Start/Pausebutton: the appliance cannot start.
The appliance keeps the selection of thisoption after you switch it off.
10.2 Acoustic signalsThis appliance is provided with differentacoustic signals, that operate when:
• You activate the appliance (specialshort tune).
• You deactivate the appliance (specialshort tune).
• You touch the buttons (click sound).
www.aeg.com24
• You make a wrong selection (3 shortsounds).
• The programme is completed(sequence of sounds for about 2minutes).
• The appliance has a malfunction(sequence of short sounds for about 5minutes).
To deactivate/activate the acousticsignals, touch the Extra Rinse and theDelay Start buttons simultaneously forabout 6 seconds.
If you deactivate theacoustic signals, theycontinue operate when theappliance has a malfunction.
10.3 Permanent Extra RinseWith this option you can permanentlyhave an extra rinse when you set aprogramme where it is selectable.
• To activate/deactivate this optiontouch the Extra Rinse button and the
Options button simultaneously therelevant indicator comes on/goes off.This option adds two rinses and the
display shows .
10.4 Soft Plus Set the Soft Plus option to optimise thefabric softener distribution and improvethe fabric softness.
It is suggested when you use the fabricsoftener.
This option increases slightlythe programme duration.
To activate/deactivate this option touchthe Temp. button and the Spin buttonsimultaneously until the indicator
comes on/goes off above the indicator.
11. DAILY USE
WARNING!Refer to Safety chapters.
11.1 Activating the appliance1. Connect the mains plug to the mains
socket.2. Open the water tap.3. Press the On/Off button for a few
seconds to activate the appliance.A short tune sounds (if activated). Theprogramme dial is automatically set onCotton programme .
The display shows the maximum load,the default temperature, the maximumspin speed, the indicators of the phasesmaking up the programme and the cycleduration.
11.2 Loading the laundry1. Open the appliance door.2. Shake the items before you put them
in the appliance.3. Put the laundry in the drum, one item
at a time.
Make sure not to put too much laundryin the drum.4. Close the door firmly.
CAUTION!Make sure that no laundrystays between the seal andthe door. There is a risk ofwater leakage or damage tothe laundry.
ENGLISH 25
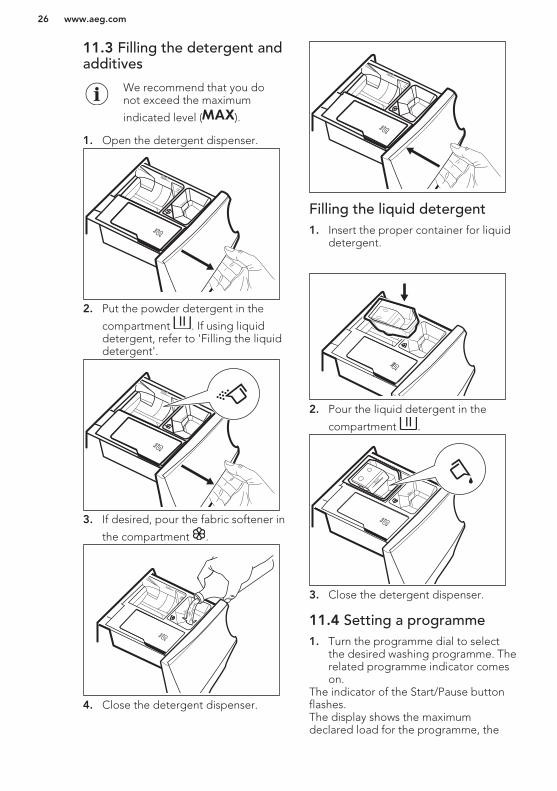
11.3 Filling the detergent andadditives
We recommend that you donot exceed the maximum
indicated level ( ).
1. Open the detergent dispenser.
Max▼
Max▼
Max▼
Salt
2. Put the powder detergent in the
compartment . If using liquiddetergent, refer to 'Filling the liquiddetergent'.
Max▼
Max▼
Max▼
Salt
3. If desired, pour the fabric softener in
the compartment .
Max▼
Max▼
Max▼
Salt
4. Close the detergent dispenser.
Max▼
Max▼
Max▼
Salt
Filling the liquid detergent1. Insert the proper container for liquid
detergent.
Max▼
Max▼
Max▼
Salt
2. Pour the liquid detergent in the
compartment .
Max▼
Max▼
Max▼
Salt
Liquid
Max▼
3. Close the detergent dispenser.
11.4 Setting a programme1. Turn the programme dial to select
the desired washing programme. Therelated programme indicator comeson.
The indicator of the Start/Pause buttonflashes.The display shows the maximumdeclared load for the programme, the
www.aeg.com26
default temperature, the maximum spinspeed, the washing phase indicators(when available) and an indicativeprogramme duration.2. To change the temperature and/or
the spin speed, touch the relatedbuttons.
3. If desired, set one or more optionsby touching the related buttons. Therelated indicators come on in thedisplay and the given informationchanges accordingly.
In case a selection is notpossible, no indicator comeson and an acoustic signalsounds.
11.5 Starting a programmeTouch the Start/Pause button to start theprogramme.The related indicator stops flashing andstays on.In the display, the indicator of theoperating phase starts flashing and themaximum load indicator goes off.The programme starts, the door islocked. The display shows the indicator
.
The drain pump can operateshortly before the appliancefills water.
11.6 Starting a programmewith the delay start1. Touch the Delay Start button
repeatedly until the display showsthe desired delay time. The indicator
comes on.2. Touch the Start/Pause button.The appliance starts the countdown ofthe delay start.When the countdown is completed, theprogramme starts.
The PROSENSE estimationstarts at the end of thecountdown.
Cancelling the delay start afterthe countdown has startedTo cancel the delay start:
1. Touch the Start/Pause button topause the appliance. The relatedindicator flashes.
2. Touch the Delay Start buttonrepeatedly until the display shows .
3. Touch the Start/Pause button againto start the programme immediately.
Changing the delay start afterthe countdown has startedTo change the delay start:
1. Touch the Start/Pause button topause the appliance. The relatedindicator flashes.
2. Touch the Delay Start buttonrepeatedly until the display showsthe desired delay time.
3. Touch the Start/Pause button againto start the new countdown.
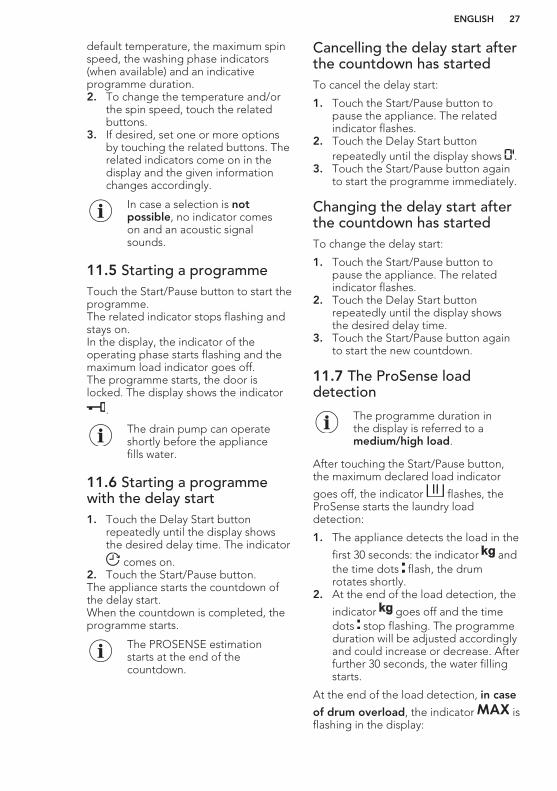
11.7 The ProSense loaddetection
The programme duration inthe display is referred to a medium/high load.
After touching the Start/Pause button,the maximum declared load indicator
goes off, the indicator flashes, theProSense starts the laundry loaddetection:
1. The appliance detects the load in the
first 30 seconds: the indicator andthe time dots flash, the drumrotates shortly.
2. At the end of the load detection, the
indicator goes off and the timedots stop flashing. The programmeduration will be adjusted accordinglyand could increase or decrease. Afterfurther 30 seconds, the water fillingstarts.
At the end of the load detection, in case
of drum overload, the indicator isflashing in the display:
ENGLISH 27
In this case, for 30 seconds, it is possibleto pause the appliance and remove theexceeding garments.
Once removed the exceeding garments,touch the Start/Pause button to start theprogramme again. The ProSense phasecan be repeated up to three times (seepoint 1).
Important! If the laundry amount will notbe reduced, the washing programmestarts anyway, despite the overload. Inthis case, it will be not possible toguarantee the best washing results.
About 20 minutes after theprogramme start, theprogramme duration couldbe adjusted againdepending on the capacityof water absorption of thefabrics.
The ProSense detection iscarried out with completewashing programmes only(no skipping phaseselected).
11.8 Programme phaseindicatorsWhen the programme starts the indicatorof the running phase flashes and theother phase indicators are steady on.
E.g. the washing or pre wash phase is
running: .
When the phase ends the relevantindicator stops flashing and is steady on.The next phase indicator starts flashing.
E.g. the rinse phase is running:
.
During the washing cycle, the appliancemixes the detergent, the stain removalfor fabric treatment and/or the fabricsoftener with water before introducing
them into the drum; the indicator MIX
appears and disappears on the displayaccording to the different programmephases (the arrows flash alternatively).
If you select the Plus Steam the steamphase indicators come on.
The steam phase is running: .
The anti-crease phase is running:
.
11.9 Interrupting aprogramme and changing theoptionsWhen the programme is running, youcan change only some options:
1. Touch the button Start/Pause.The related indicator flashes.2. Change the options. The given
information in the display changesaccordingly.
3. Touch the button Start/Pause again.The washing programme continues.
11.10 Cancelling a runningprogramme1. Press the button On/Off to cancel
the programme and to deactivatethe appliance.
2. Press the button On/Off again toactivate the appliance.
Now, you can set a new washingprogramme.
If the ProSense phase isalready carried out and thewater filling is alreadystarted, the new programmestarts without repeatingthe ProSense phase. Thewater and the detergent arenot drained out in order toavoid waste. The displayshows the maximumduration of the programme,updating it about 20 minutesafter the starting of the newprogramme.
www.aeg.com28
11.11 Opening the door
If the temperature and levelof the water in the drum aretoo high and/or the drumstill rotates you cannot openthe door.
While a programme or the delay startoperates, the appliance door is locked.
1. Touch the button Start/Pause.In the display the related door lockindicator goes off.2. Open the appliance door. If
necessary, add or remove the items.3. Close the door and touch the button
Start/Pause.The programme or the delay startcontinues.
11.12 End of the programmeWhen the programme has finished, theappliance stops automatically. Theacoustic signals operate (if they areactive).
In the display all washing phaseindicators become steady and the time
area shows .
The indicator of the Start/Pause buttongoes off.
The door unlocks and the indicator goes off.
1. Press the On/Off button todeactivate the appliance.
After five minutes from the end of theprogramme, the energy saving functionautomatically deactivates the appliance.
When you activate theappliance again, the displayshow the end of the lastselected programme. Turnthe programme dial to set anew cycle.
2. Remove the laundry from theappliance.
3. Make sure that the drum is empty.4. Keep the door and the detergent
dispenser slightly ajar to preventmildew and odours.
5. Close the water tap.
11.13 Draining water out afterend of cycleIf you have chosen a programme or anoption that does not empty out thewater of the last rinse, the programme iscompleted, but:
• The display shows the indicator , the
option indicator or and the
door locked indicator . The
indicator of the running phase flashes.
• The drum still turns at regular intervalsto prevent the creases in the laundry.
• The door stays locked.• You must drain the water to open the
door:
1. If necessary, touch the Spin button todecrease the spin speed proposedby the appliance.
2. Touch the Start/Pause button:
• If you have set , the appliancedrains the water and spins.
• If you have set , the applianceonly drains the water.
The option indicator or goes out,
while the indicator flashes and thengoes off.3. When the programme is completed
and the door locked indicator goes off, you can open the door.
4. Press the On/Off button a fewseconds to deactivate the appliance.
In any case, the applianceempties the water outautomatically afterapproximately 18 hours.
11.14 Stand-by optionThe Stand-by function automaticallydeactivates the appliance to decreasethe energy consumption when:
• You do not use the appliance for 5minutes before you touch the Start/Pause button.Press the button On/Off to activatethe appliance again.
• After 5 minutes from the end of thewashing programme
ENGLISH 29
Press the On/Off button to activatethe appliance again.The display shows the end of the lastset programme.Turn the programme dial to set a newcycle.
If you set a programme or anoption that ends with waterin the drum, the Stand-byfunction doesn't deactivatethe appliance to remind youto drain the water.
12. HINTS AND TIPS
WARNING!Refer to Safety chapters.
12.1 The laundry load• Divide the laundry into: white,
coloured, synthetics, delicates andwool.
• Follow the washing instructions on thelaundry care labels.
• Do not wash white and coloureditems together.
• Some coloured items can discolourwith the first wash. We recommendthat you wash them separately for thefirst couple of times.
• Button up pillowcases, close zippers,hooks and poppers. Tie up belts.
• Empty pockets and unfold.• Turn multilayered fabrics, wool and
items with printed illustrations insideout.
• Pre-treat tough stains.• Wash heavy soil stains with a special
detergent.• Be careful with curtains. Remove the
hooks and put the curtains in awashing bag or pillowcase.
• Do not wash laundry without hems orwith cuts. Use a washing bag to washsmall and/or delicate items (e.g.underwired bras, belts, tights, etc. ).
• A very small load can cause balanceproblems with the spin phase leadingto excessive vibration. If this occurs:a. interrupt the programme and
open the door (refer to"Opening the door when aprogramme or the delay startoperates");
b. manually redistribute the load sothat the items are spaced evenlyaround the tub;
c. press the Start/Pause button. Thespin phase continues.
12.2 Stubborn stainsFor some stains, water and detergent isnot sufficient.
We recommend that you pre-treat thesestains before you put the items in theappliance.
Special stain removers are available. Usethe special stain remover that isapplicable to the type of stain and fabric.
12.3 Detergents and othertreatments• Only use detergents and other
treatments specially made forwashing machines:– powder detergents for all types of
fabric,– powder detergents for delicate
fabrics (40 °C max) and woollens,– liquid detergents, preferably for
low temperature washprogrammes (60 °C max) for alltypes of fabric, or special ones forwoollens only.
• Do not mix different types ofdetergents.
• To help the environment, do not usemore than the recommended quantityof detergent.
• Follow the instructions that you findon packaging of the detergents orother treatments without exceeding
the indicated maximum level ( ).• Use the recommended detergents for
the type and colour of the fabric, theprogramme temperature and thelevel of soil.
12.4 Ecological hints• Set a programme without the
prewash phase to wash laundry withnormal soil.
www.aeg.com30
• Always start a washing programmewith the maximum load of laundryallowed.
• If you pre-treat the stains, you can usea stain remover when you set aprogramme with a low temperature.
• To use the correct quantity ofdetergent, refer to the quantitysuggested by the detergentproducer.
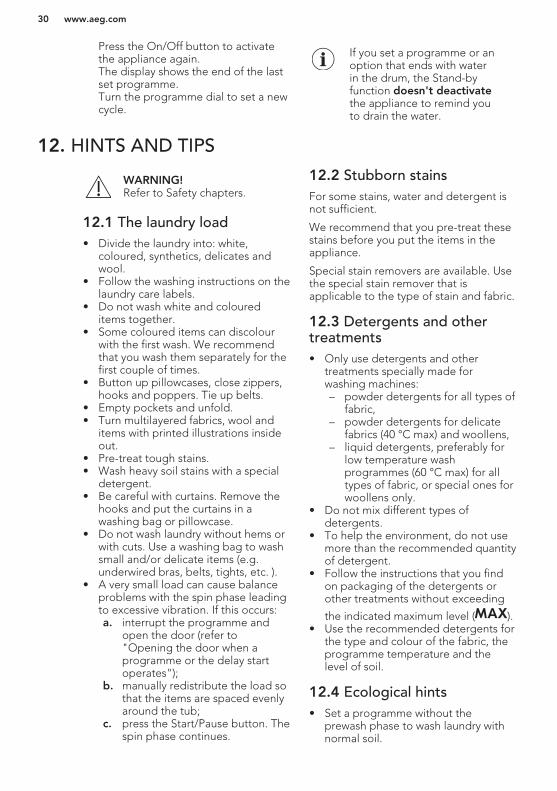
13. CARE AND CLEANING
WARNING!Refer to Safety chapters.
13.1 External cleaningClean the appliance with mild soap andwarm water only. Fully dry all thesurfaces.
CAUTION!Do not use alcohol, solventsor chemical products.
CAUTION!Do not clean the metalsurfaces with chlorine-baseddetergent.
13.2 Descaling
If the water hardness in yourarea is high or moderate, werecommend that you use awater descaling product forwashing machines.
Regularly examine the drum to check anylimescale.
The regular detergents already containwater softening agents, but werecommend to run a cycle with emptydrum and a descaling productoccasionally.
Always follow theinstructions that you find onthe packaging of theproduct.
13.3 Maintenance washThe repeated and prolonged use of lowtemperature and short programmes cancause detergent deposits, fluff residues,bacterial growth and biofilm formation
inside the drum and the tub. This couldgenerate bad odours and mildew.
To eliminate these deposits andhygienize the inner part of the appliance,run a maintenance wash at least once amonth:
1. Remove all laundry from the drum.2. Run a cotton programme with the
highest temperature with a smallquantity of powder detergent.
13.4 Door seal
Regularly examine the seal and removeall objects from the inner part.
13.5 Cleaning the drumRegularly examine the drum to preventrust particles.
For a complete cleaning:
1. Clean the drum with special productsfor stainless steel.
Always follow theinstructions that you find onthe packaging of theproduct.
2. Run a short cotton programme athigh temperature with empty drumand with a small quantity of powderdetergent , in order to rinse out anyleft residues.
ENGLISH 31
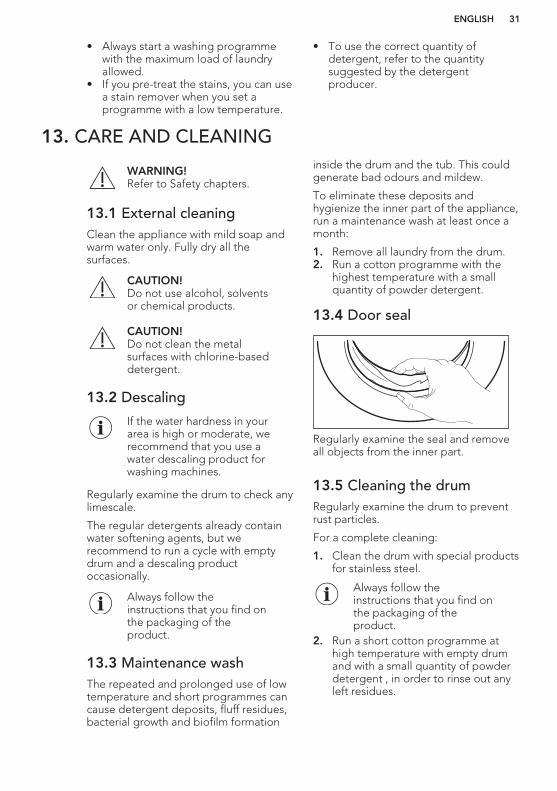
13.6 Cleaning the detergentdispenser and the saltcompartment
Before cleaning, make surethat the all compartmentsare empty.
To prevent possible deposits of drieddetergent, clotted fabric softener,formation of mould in the dispenserdrawer and/or salt fouling in the saltcompartment, once in a while carry outthe following cleaning procedure:
1. Open the drawer. Press the catch asindicated in the picture and pull thedrawer out.
Max▼
Max▼
Max▼
Salt
Max
2. Remove the insert for the softenerand, if inserted, the container forliquid detergent.
Max▼
Max▼
Max▼
Salt
Max▼
Max▼
Salt
Max▼
Max▼
Max▼
Max▼
Salt
3. Wash the drawer and all insertsunder running water.
Max▼
Max▼
4. Make sure that all detergent residueis removed from the detergentconveyor. Use a cloth.
5. Make sure that all detergent residueis removed from the upper and lowerpart of the recess. Use a small brushto clean the recess.
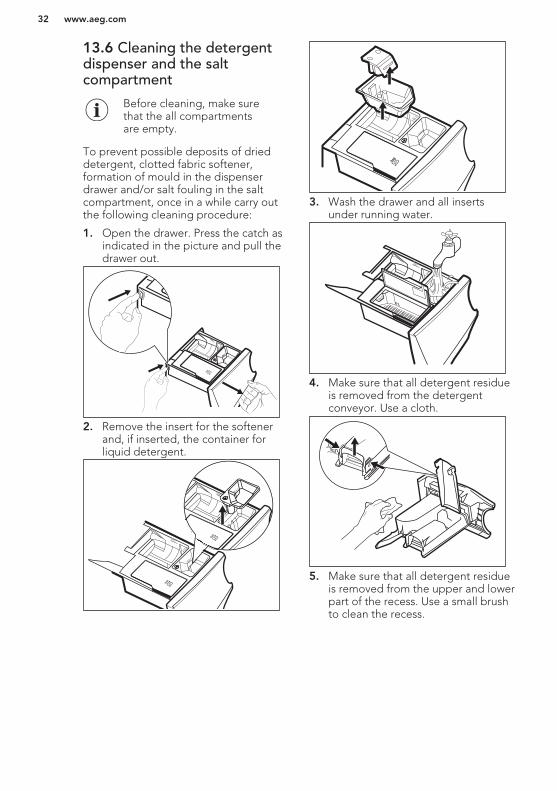
www.aeg.com32
6. Insert the detergent drawer into theguide rails and close it. Run therinsing programme without anyclothes in the drum.
Max▼
Max▼
Max▼
Salt
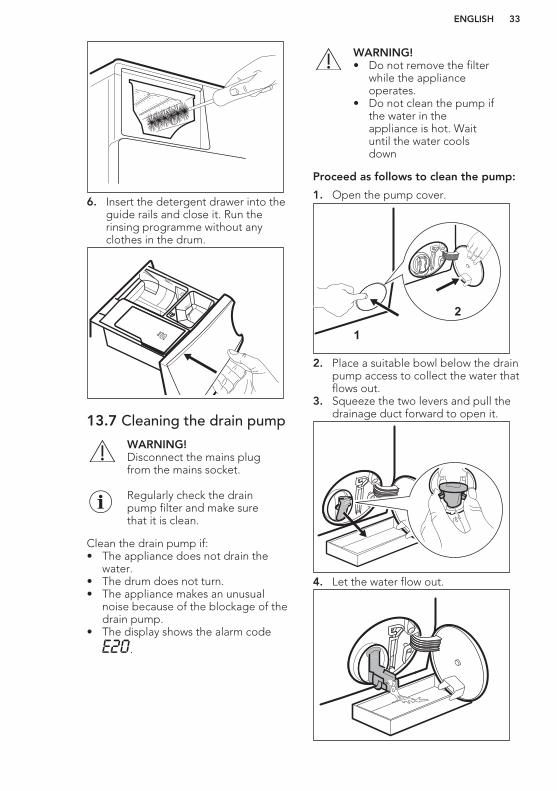
13.7 Cleaning the drain pump
WARNING!Disconnect the mains plugfrom the mains socket.
Regularly check the drainpump filter and make surethat it is clean.
Clean the drain pump if:• The appliance does not drain the
water.• The drum does not turn.• The appliance makes an unusual
noise because of the blockage of thedrain pump.
• The display shows the alarm code
.
WARNING!• Do not remove the filter
while the applianceoperates.
• Do not clean the pump ifthe water in theappliance is hot. Waituntil the water coolsdown
Proceed as follows to clean the pump:
1. Open the pump cover.
1
2
2. Place a suitable bowl below the drainpump access to collect the water thatflows out.
3. Squeeze the two levers and pull thedrainage duct forward to open it.
2
11
4. Let the water flow out.
ENGLISH 33
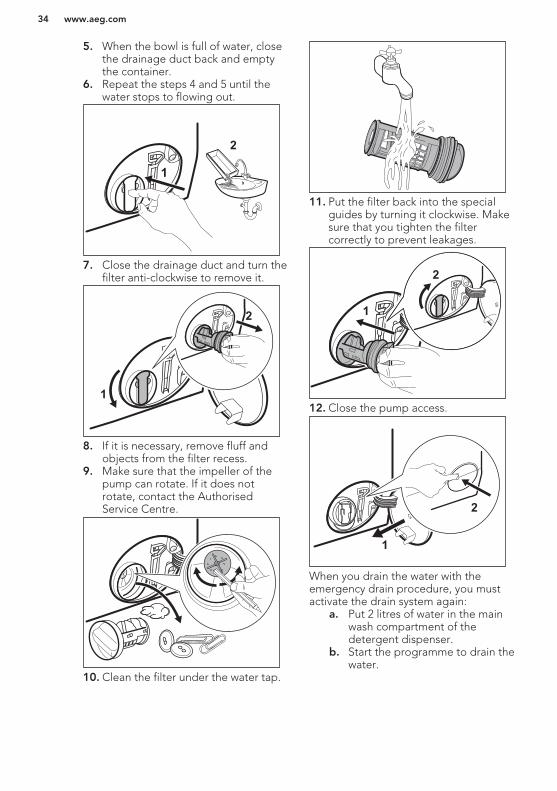
5. When the bowl is full of water, closethe drainage duct back and emptythe container.
6. Repeat the steps 4 and 5 until thewater stops to flowing out.
1
2
7. Close the drainage duct and turn thefilter anti-clockwise to remove it.
1
2
8. If it is necessary, remove fluff andobjects from the filter recess.
9. Make sure that the impeller of thepump can rotate. If it does notrotate, contact the AuthorisedService Centre.
10. Clean the filter under the water tap.
11. Put the filter back into the specialguides by turning it clockwise. Makesure that you tighten the filtercorrectly to prevent leakages.
1
2
12. Close the pump access.
2
1
When you drain the water with theemergency drain procedure, you mustactivate the drain system again:
a. Put 2 litres of water in the mainwash compartment of thedetergent dispenser.
b. Start the programme to drain thewater.
www.aeg.com34
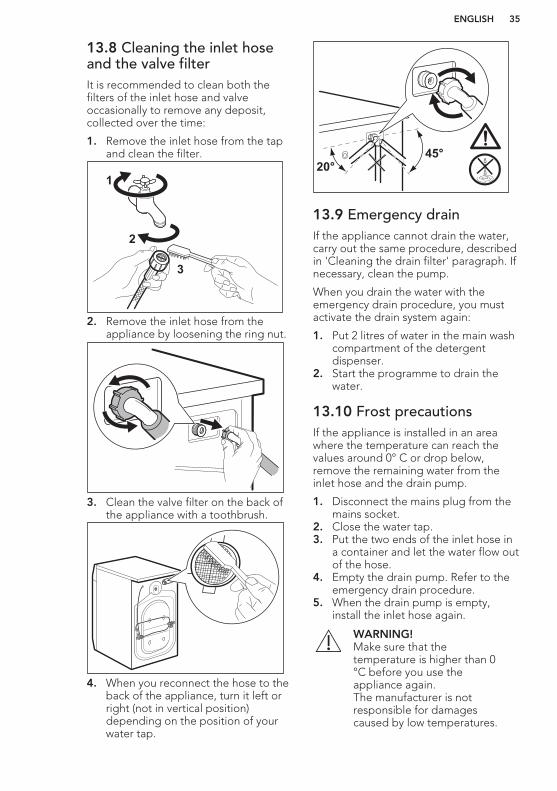
13.8 Cleaning the inlet hoseand the valve filterIt is recommended to clean both thefilters of the inlet hose and valveoccasionally to remove any deposit,collected over the time:
1. Remove the inlet hose from the tapand clean the filter.
1
2
3
2. Remove the inlet hose from theappliance by loosening the ring nut.
3. Clean the valve filter on the back ofthe appliance with a toothbrush.
4. When you reconnect the hose to theback of the appliance, turn it left orright (not in vertical position)depending on the position of yourwater tap.
45°
20°
13.9 Emergency drainIf the appliance cannot drain the water,carry out the same procedure, describedin 'Cleaning the drain filter' paragraph. Ifnecessary, clean the pump.
When you drain the water with theemergency drain procedure, you mustactivate the drain system again:
1. Put 2 litres of water in the main washcompartment of the detergentdispenser.
2. Start the programme to drain thewater.
13.10 Frost precautionsIf the appliance is installed in an areawhere the temperature can reach thevalues around 0° C or drop below,remove the remaining water from theinlet hose and the drain pump.
1. Disconnect the mains plug from themains socket.
2. Close the water tap.3. Put the two ends of the inlet hose in
a container and let the water flow outof the hose.
4. Empty the drain pump. Refer to theemergency drain procedure.
5. When the drain pump is empty,install the inlet hose again.
WARNING!Make sure that thetemperature is higher than 0°C before you use theappliance again.The manufacturer is notresponsible for damagescaused by low temperatures.
ENGLISH 35
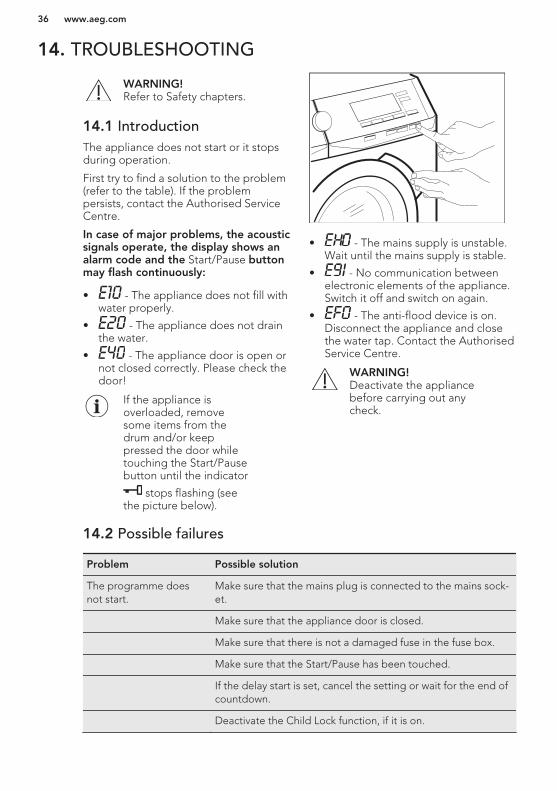
14. TROUBLESHOOTING
WARNING!Refer to Safety chapters.
14.1 IntroductionThe appliance does not start or it stopsduring operation.
First try to find a solution to the problem(refer to the table). If the problempersists, contact the Authorised ServiceCentre.
In case of major problems, the acousticsignals operate, the display shows analarm code and the Start/Pause buttonmay flash continuously:
• - The appliance does not fill withwater properly.
• - The appliance does not drainthe water.
• - The appliance door is open ornot closed correctly. Please check thedoor!
If the appliance isoverloaded, removesome items from thedrum and/or keeppressed the door whiletouching the Start/Pausebutton until the indicator
stops flashing (seethe picture below).
• - The mains supply is unstable.Wait until the mains supply is stable.
• - No communication betweenelectronic elements of the appliance.Switch it off and switch on again.
• - The anti-flood device is on.Disconnect the appliance and closethe water tap. Contact the AuthorisedService Centre.
WARNING!Deactivate the appliancebefore carrying out anycheck.
14.2 Possible failures
Problem Possible solution
The programme doesnot start.
Make sure that the mains plug is connected to the mains sock-et.
Make sure that the appliance door is closed.
Make sure that there is not a damaged fuse in the fuse box.
Make sure that the Start/Pause has been touched.
If the delay start is set, cancel the setting or wait for the end ofcountdown.
Deactivate the Child Lock function, if it is on.
www.aeg.com36
Problem Possible solution
The appliance does notfill with water properly.
Make sure that the water tap is open.
Make sure that the pressure of the water supply is not too low.For this information, contact your local water authority.
Make sure that the water tap is not clogged.
Make sure that the water inlet hose has no kinks, damages orbends.
Make sure that the connection of the water inlet hose is cor-rect.
The appliance fills withwater and drains immedi-ately.
Make sure that the drain hose is in the correct position. Thehose may be positioned too low (see 'Water drainage' para-graph).
The appliance does notdrain the water.
Make sure that the sink spigot is not clogged.
Make sure that the drain hose has no kinks or bends.
Make sure that the drain filter is not clogged. Clean the filter, ifnecessary. Refer to 'Care and cleaning'.
Make sure that the connection of the drain hose is correct.
Set the drain programme if you set a programme without drainphase.
Set the drain programme if you set an option which ends withwater in the tub.
The spin phase does notoperate or the washingcycle lasts longer thanusual.
Set the spin programme.
Make sure that the drain filter is not clogged. Clean the filter, ifnecessary. Refer to 'Care and cleaning'.
Adjust manually the items in the tub and start the spin phaseagain. This problem may be caused by balance problems.
There is water on thefloor.
Make sure that the couplings of the water hoses are tight andthere is not water leakages.
Make sure that the drain hose have no damages.
Make sure you use the correct detergent and the correct quan-tity of it.
You cannot open the ap-pliance door.
Make sure that a washing programme that ends with water intub, has been selected.
ENGLISH 37
Problem Possible solution
Make sure that the washing programme is finished.
Set the drain or the spin programme if there is water in thedrum.
Make sure that the appliance receives electrical power.
This problem may be caused by a failure of the appliance.Contact the Authorised Service Centre. If you need to openthe door, please read carefully «Emergency door opening».
The appliance makes anunusual noise and vi-brates.
Make sure the levelling of the appliance is correct. Refer to 'In-stallation'.
Make sure that the packaging and/or the transit bolts are re-moved. Refer to 'Installation'.
Add more laundry in the drum. The load may be too small.
The programme durationincreases or decreasesduring programme exe-cution.
The ProSense function is able to adjust the programme dura-tion according to the type and the laundry load size. Refer to'The ProSense load detection' in 'Daily Use' chapter.
The washing results arenot satisfactory.
Increase the detergent quantity or use a different detergent.
Use special products to remove the stubborn stains before youwash the laundry.
Make sure that you set the correct temperature.
Decrease the laundry load.
Make sure that no other type of detergent has been poured
the compartment Salt
. In this case, refer to 'Eliminating deter-gent or other additives from salt compartment'.
Make sure that no salt has been poured in the compartment
. If it happens, run a rinse cycle or run the washing cycleagain.
Too much foam in thedrum during the washingcycle.
Reduce the quantity of detergent.
Excessive consumptionof salt.
Check if the water softener has been set to act also duringrinse phase. Refer to 'How to set the water hardness level' in'The Water Softener technology (Soft Water)' chapter.
www.aeg.com38
After the check, activate the appliance. The programme continues from the point ofinterruption.If the problem occurs again, contact the Authorised Service Centre.If the display shows other alarm codes. Deactivate and activate the appliance. If theproblem continues, contact the Authorised Service Centre.
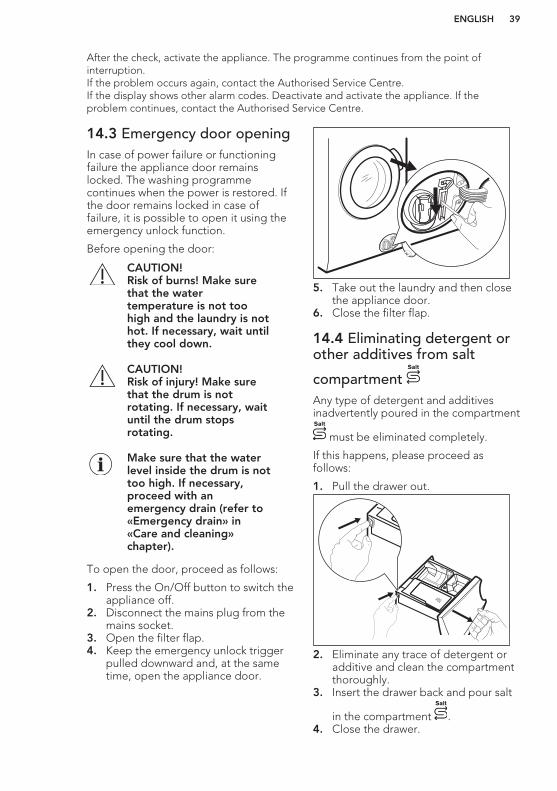
14.3 Emergency door openingIn case of power failure or functioningfailure the appliance door remainslocked. The washing programmecontinues when the power is restored. Ifthe door remains locked in case offailure, it is possible to open it using theemergency unlock function.
Before opening the door:
CAUTION!Risk of burns! Make surethat the watertemperature is not toohigh and the laundry is nothot. If necessary, wait untilthey cool down.
CAUTION!Risk of injury! Make surethat the drum is notrotating. If necessary, waituntil the drum stopsrotating.
Make sure that the waterlevel inside the drum is nottoo high. If necessary,proceed with anemergency drain (refer to«Emergency drain» in«Care and cleaning»chapter).
To open the door, proceed as follows:
1. Press the On/Off button to switch theappliance off.
2. Disconnect the mains plug from themains socket.
3. Open the filter flap.4. Keep the emergency unlock trigger
pulled downward and, at the sametime, open the appliance door.
5. Take out the laundry and then closethe appliance door.
6. Close the filter flap.
14.4 Eliminating detergent orother additives from salt
compartment Salt
Any type of detergent and additivesinadvertently poured in the compartmentSalt
must be eliminated completely.
If this happens, please proceed asfollows:
1. Pull the drawer out.
Max▼
Max▼
Max▼
Salt
Max
2. Eliminate any trace of detergent oradditive and clean the compartmentthoroughly.
3. Insert the drawer back and pour salt
in the compartment Salt
.4. Close the drawer.
ENGLISH 39
5. Run a cotton or synthetic cycle,without reducing time, to restore thewater softener function.
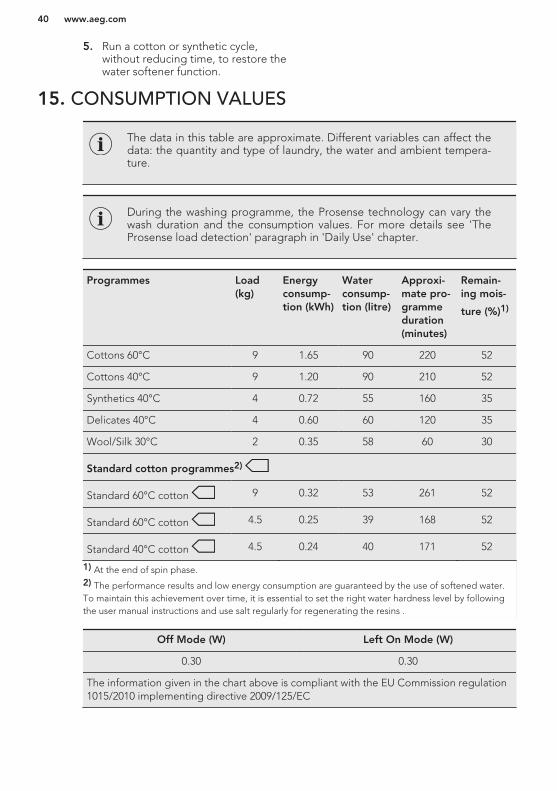
15. CONSUMPTION VALUES
The data in this table are approximate. Different variables can affect thedata: the quantity and type of laundry, the water and ambient tempera-ture.
During the washing programme, the Prosense technology can vary thewash duration and the consumption values. For more details see 'TheProsense load detection' paragraph in 'Daily Use' chapter.
Programmes Load(kg)
Energyconsump-tion (kWh)
Waterconsump-tion (litre)
Approxi-mate pro-grammeduration(minutes)
Remain-ing mois-
ture (%)1)
Cottons 60°C 9 1.65 90 220 52
Cottons 40°C 9 1.20 90 210 52
Synthetics 40°C 4 0.72 55 160 35
Delicates 40°C 4 0.60 60 120 35
Wool/Silk 30°C 2 0.35 58 60 30
Standard cotton programmes2)
Standard 60°C cotton 9 0.32 53 261 52
Standard 60°C cotton 4.5 0.25 39 168 52
Standard 40°C cotton 4.5 0.24 40 171 52
1) At the end of spin phase.2) The performance results and low energy consumption are guaranteed by the use of softened water.To maintain this achievement over time, it is essential to set the right water hardness level by followingthe user manual instructions and use salt regularly for regenerating the resins .
Off Mode (W) Left On Mode (W)
0.30 0.30
The information given in the chart above is compliant with the EU Commission regulation1015/2010 implementing directive 2009/125/EC
www.aeg.com40
16. TECHNICAL DATA
Dimension Width/ Height/ Depth/Total depth
600 mm/ 850 mm/ 630 mm/ 660 mm
Electrical connection VoltageOverall powerFuseFrequency
230-240 V2200 W13 A50 Hz
Level of protection against ingress of solid particlesand moisture ensured by the protective cover, ex-cept where the low voltage equipment has no pro-tection against moisture
IPX4
Water supply pressure1)
MinimumMaximum
0,5 bar (0,05 MPa)8 bar (0,8 MPa)
Water supply 2) Cold water
Maximum Load Cotton 9 kg
Energy Efficiency Class A+++
Spin Speed Maximum 1400 rpm
1) The appliance works correctly if the water pressure is not lower than 0.05 MPa (0.5 bar). If you cannotconnect the water inlet hose to the cold water tap of the primary hydraulic system, connect it to yourdomestic cold water storage system. Make sure not to exceed a distance of 5.02 m (16.5 ft) between theappliance inlet hose and the bottom of the water storage tank.2) Connect the water inlet hose to a water tap with a 3/4'' thread.
17. ACCESSORIES
17.1 Available inwww.aeg.com/shop or fromauthorised dealer
Only appropriateaccessories approved byAEG ensure the safetystandards of the appliance. Ifunapproved parts are used,any claims will beinvalidated.
17.2 Fixing plate kitIf you install the appliance on a plinth,secure the appliance in the fixing plates.
Read carefully the instructions suppliedwith the accessory.
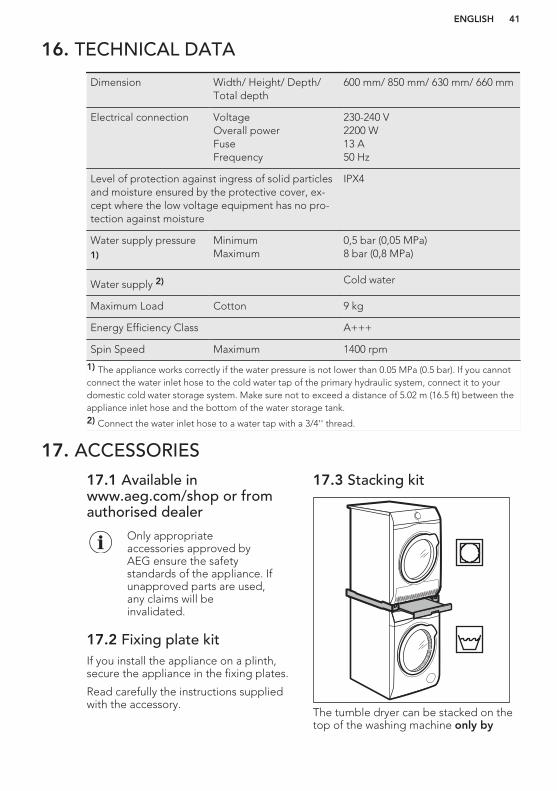
17.3 Stacking kit
The tumble dryer can be stacked on thetop of the washing machine only by
ENGLISH 41
using the correct stacking kitmanufactured and approved by AEG.
Verify the compatiblestacking kit by checking thedepth of your appliances.
The stacking kit can be used only withthe appliances specified in the leafletprovided with the accessory.
Read carefully the instructions suppliedwith the appliance and with theaccessory.
WARNING!Do not put the tumble dryerunder the washing machine.
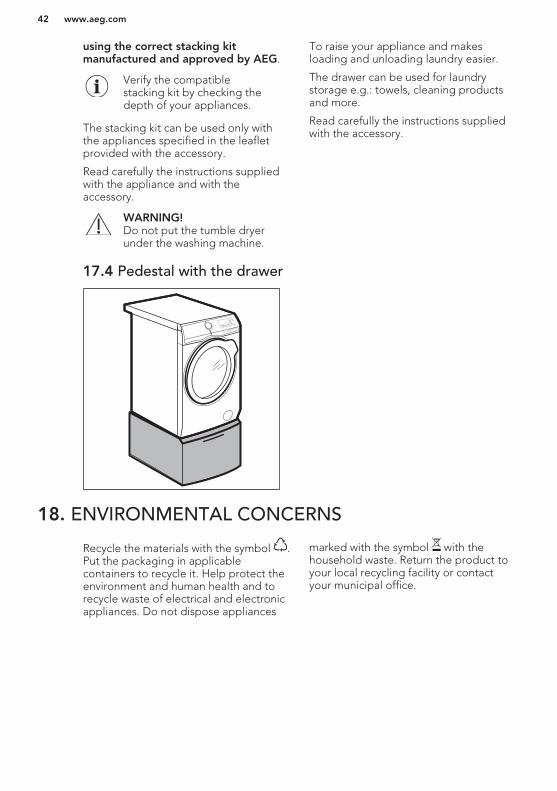
17.4 Pedestal with the drawer
To raise your appliance and makesloading and unloading laundry easier.
The drawer can be used for laundrystorage e.g.: towels, cleaning productsand more.
Read carefully the instructions suppliedwith the accessory.
18. ENVIRONMENTAL CONCERNS
Recycle the materials with the symbol .Put the packaging in applicablecontainers to recycle it. Help protect theenvironment and human health and torecycle waste of electrical and electronicappliances. Do not dispose appliances
marked with the symbol with thehousehold waste. Return the product toyour local recycling facility or contactyour municipal office.
*
www.aeg.com42

ENGLISH 43

www.aeg.com/shop
1570
0858
0-B
-032
017


