Embed Size (px)
Citation preview
1
THE ELISA ASSAY An Immunology Experiment
INFORMATION MANUAL
Kristi DeCourcy Fralin Life Sciences Institute
Virginia Tech January 2009
TABLE OF CONTENTS
2
Table of Contents Page List of kit contents ………….…………………………………….…………………….. 3 Abbreviations used in this manual …………….…………………………………. 3 Case studies ………………………….……………….…………………………………….. 4 Credits and thanks ……………….……………….…………………………………….. 4 Immuno 101
Diseases ……………………………………………………………………………… 5 Antibodies as tools ……………………………………………………………. 5 Epidemiology ……………………………………………………………………… 6 Real-life Example: Legionnaires’ Disease ………………………… 6 Further study ……………………………………………………………………. 8
The Enzyme-linked Immunosorbant Assay defined ……………….…… 8 Useful information ….....………………………………………………………………. 9 Nutshell version …………………………………………………………….……………… 10 Preparation
I. Items to be provided by the instructor …………………………. 11 II. Solutions included in the kit ………………..……………………… 11 III. Preparation for the laboratory ……………………………………. 12 IV. Teacher notes for the experiment ……………………………… 15 V. What to put on each lab bench ……………………………………. 16
Experimental Procedure Part I. Preparing the samples …………………………………………… 17 Part II. ELISA assay on shared samples ……………………………… 18 Questions …………………………………………………………………………… 20 Part III. ELISA assay on unshared samples (optional) ………. 21
Appendices Answers to questions and discussion points ……………………… 23 Notes on data analysis ………………………………………………………. 25 Immunological concepts
Immunity …………………………………………………………….… 27 Components of the Acquired Immune Response … 27 Immune Response …………………………………………………. 28 Why we need an immune system ……………………….… 29 Problems with the immune system …………………….… 29 Detecting infectious diseases ………………………………. 30 Boosting nature’s immune system with vaccination 31 Tapping nature’s tool kit: manufacturing antibodies ………………………………………………………………
32
Labeling and detecting antibodies ……………….……. 34 Putting antibodies to use ……………………….…………… 35
Immunoassay pre-lab background & questions ………………… 37 Sources of materials used in this kit ………………………………… 40 Solutions used in this kit …………………………………………………… 41 Steps for using fixed volume pipettors ………….………………… 43 References ………………………………………………………………………… 43 Graphics ……………………………………….………………………….………. 44
INTRODUCTION
3
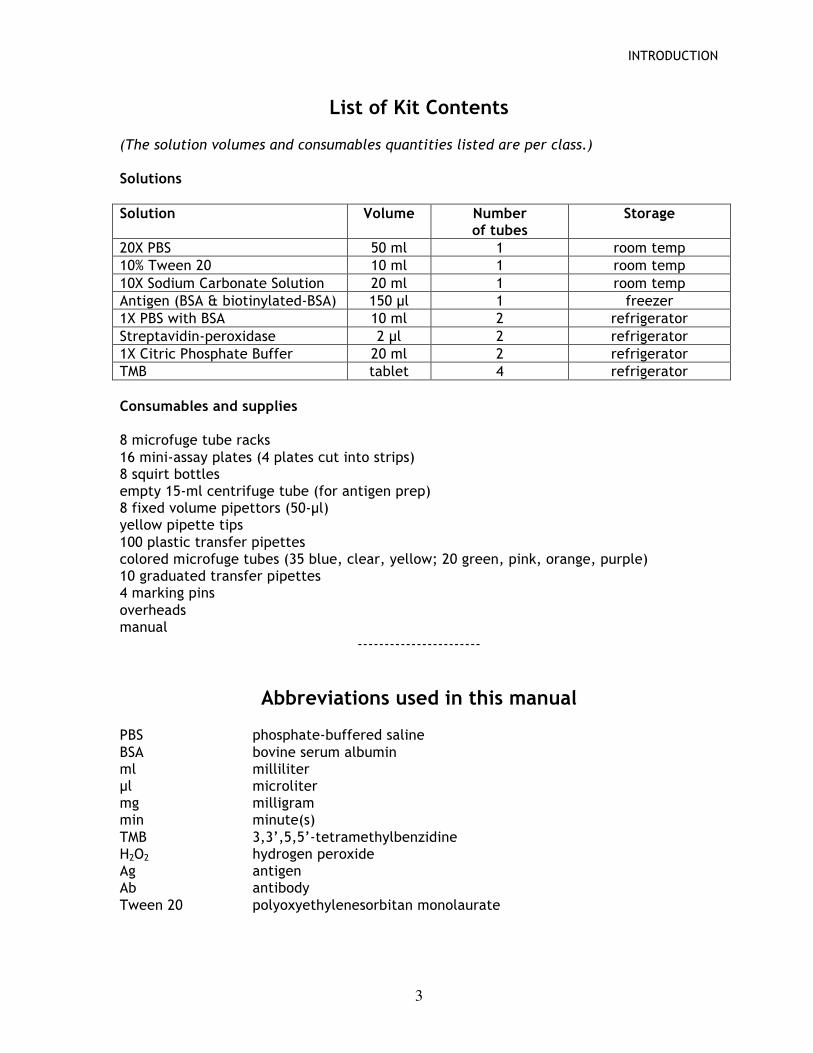
List of Kit Contents (The solution volumes and consumables quantities listed are per class.) Solutions Solution Volume Number
of tubes Storage
20X PBS 50 ml 1 room temp 10% Tween 20 10 ml 1 room temp 10X Sodium Carbonate Solution 20 ml 1 room temp Antigen (BSA & biotinylated-BSA) 150 µl 1 freezer 1X PBS with BSA 10 ml 2 refrigerator Streptavidin-peroxidase 2 µl 2 refrigerator 1X Citric Phosphate Buffer 20 ml 2 refrigerator TMB tablet 4 refrigerator Consumables and supplies 8 microfuge tube racks 16 mini-assay plates (4 plates cut into strips) 8 squirt bottles empty 15-ml centrifuge tube (for antigen prep) 8 fixed volume pipettors (50-µl) yellow pipette tips 100 plastic transfer pipettes colored microfuge tubes (35 blue, clear, yellow; 20 green, pink, orange, purple) 10 graduated transfer pipettes 4 marking pins overheads manual
-----------------------
Abbreviations used in this manual
PBS phosphate-buffered saline BSA bovine serum albumin ml milliliter µl microliter mg milligram min minute(s) TMB 3,3’,5,5’-tetramethylbenzidine H2O2 hydrogen peroxide Ag antigen Ab antibody Tween 20 polyoxyethylenesorbitan monolaurate
INTRODUCTION
4
Case studies for the classroom The U.S. Centers for Disease Control (CDC) has a website titled Excite: Epidemiology in the Classroom. From the website: “EXCITE was developed by CDC to teach students about the causes and prevention of disease and injury while improving their research and analytic skills.” The site has several excellent pages, including an introduction to epidemiology, featuring examples and suggestions for introducing the material in the classroom. The primary site is www.cdc.gov/excite/classroom/index.htm.
In addition, there are two complete epidemiological case studies (in pdf format) at the site: 1) Suspected Legionnaires’ Disease in Bogalusa; and 2) Cigarette Smoking and Lung Cancer. Both include student handouts and an extensive teacher’s guide.
Credits and thanks • This experiment was originally developed by Ken Kubo, then at the BIOTECH Project at
the University of Arizona. I’ve modified it the experiment somewhat, but the original idea and toil was theirs. The BIOTECH Project has a good website with other resources at: http://biotech.biology.arizona.edu/.
• The original reference for this work was published in 1998 in The American Biology Teacher (Volume 60, pp 362-367). The article is titled, “Transmission of a Viral Disease (AIDS) Detected by a Modified ELISA Reaction: A Laboratory Simulation” by William J. Grimes, Linda Chambers, Kenneth M. Kubo, and Martha L. Narro. If you would like a copy of this article, please let me know.
• Some of the figures and information in the Immunological Concepts section are used courtesy of Bio-Rad.
• Thanks to Erin Dolan for her excellent comments and suggestions for improving the manual.
• Thanks to Anne-Taylor Morris, formerly of Atlee High School, Mechanicsville, for sending her pre-lab background and questions handout.
• A special thanks go to the Virginia teachers and classes who served as guinea pigs for this kit. The teachers and students offered many useful suggestions for improving the kit, most of which I’ve incorporated in this manual.
Please send along any other material that you think other teachers might find useful, as well as any comments, questions, or criticisms of the experiment or the manual.
New sponsor!! The Fralin Outreach Program, specifically Biotech-in-a-Box, has received a grant from the Virginia Council on Advanced Technology Skills (VCATS), in partnership with the Virginia Biotechnology Association (VaBIO) and the Virginia Manufacturers Association (VMA). We are very grateful for their support, which will enable us to purchase new equipment and to expand the program.
Manuals on CD! Instead of hard copies, this manual (and the other three as well) has been sent to you on a CD. Since there are few changes in the manual from year-to-year, this seemed like the right time to make a change. This should make it easier to print materials from the manual. If you would infinitely prefer a hard copy, please contact me with a request.
INTRODUCTION: IMMUNO 101
5
Immuno 101 This section is a brief introduction to the concepts of epidemiology and the use of antibodies in disease detection. For a more detailed review of immunology, please see page 27 in the Appendix.
Diseases
Diseases can be roughly divided into three types:
1. Genetic diseases are those caused by mistakes or mutations in DNA inherited from your parents, for example, sickle cell anemia, Tay-Sachs disease, cystic fibrosis, and Down syndrome. Sometimes genetic diseases are caused by a combination of environmental and genetic factors, as in breast cancer, diabetes, and Alzheimer’s disease.
2. Immune system malfunctions can be divided into three categories: hypersensitivity, immuno-deficiency, and autoimmune diseases (see box at right).
3. Infectious diseases are invasions of the body by disease-causing microorganisms. Infections can be: 1) transmitted from person to person, like a cold or the flu; 2) transmitted from animals to people (zoonosis), like rabies; or 3) contracted from the environment, like parasites contracted from water or soil. The CDC and World Health Organization (WHO) state that infectious diseases are the leading cause of death worldwide.
Antibodies as tools (in our bodies and our labs)
Before we can understand how antibodies work, we need to understand what they are. About 15% of the proteins in your blood are antibodies. Antibodies are present in your body at all times, but they are produced in large quantities when the body is invaded by anything foreign, for example, viruses, bacteria, toxins, drugs, and other chemicals; these substances that provoke an immune response are called antigens. The invasion can be accidental (like when someone sneezes on you) or intentional (like when your doctor vaccinates you against a disease). Antibodies bind to the foreign invaders, but the binding is very specific. Each antibody binds only to a single small part of a single invader. This specificity is what makes antibodies so useful as tools.
In order for antibodies to be useful, we need to be able to produce them in large quantities. There are two ways that we can do this: in animals or in the lab. To make antibodies in an animal like a sheep, goat, or rabbit, the antigen of interest is injected into the animal, and then, some weeks later, the antigen is injected a second time (like having a vaccination and a booster shot). After several weeks, blood is drawn from the animal and the antibodies are purified from the blood.
There are several methods to produce antibodies in the laboratory. One method fuses antibody-producing cells with cancer cells, creating hybrid cell lines that grow well in the
Problems with the Immune System • Hypersensitivity occurs when the immune system overreacts to an antigen, e.g., allergies, graft rejections, and contact dermatitis (like poison ivy). • Immunodeficiency means that the body is unable to mount an effective immune response, making it more vulnerable to infections. Immunodeficiency can be either genetic (e.g., bubble boy disease) or secondary, with an external cause (e.g., from HIV/AIDS or immuno-suppressive drugs). • Autoimmunity occurs when the immune system makes a mistake, mounting an immune response to itself, e.g., lupus, rheumatoid arthritis, multiple sclerosis, and insulin-dependent diabetes.
INTRODUCTION: IMMUNO 101
6
lab and produce antibodies. The hybrid cell lines each produce a single type of antibody. More recent techniques for producing antibodies in the lab take advantage of molecular biology and genetic engineering to produce antibodies.
In order for antibodies to be useful tools, you must be able to detect them. Antibodies can be chemically labeled to make them detectable. Usually these labels will cause a color change to a chemical solution when they are present.
Epidemiology
Epidemiology is the study of the cause, distribution, and spread of disease in populations. It is part of the field of public health (public health deals with the health of populations rather than individuals). Epidemiology has been around since the 1700’s, when John Snow studied cholera epidemics in England. (UCLA has a wonderful multimedia website about John Snow at http://www.ph.ucla.edu/epi/snow.html.)
Epidemiologists are disease detectives. They ask specific questions when they are investigating a disease outbreak, such as:
• Who is sick? • How long have they been sick? • What are their symptoms? • Do the patients have anything in common? • How and where did they contract the illness?
Once they have these answers, the disease detectives then try to use the information to prevent any more people from getting sick.
Who are the disease detectives? They can be epidemiologists (trained specifically to investigate disease outbreaks), laboratory scientists, doctors, statisticians, and other health care or public health professionals. Even if you don’t want to be a doctor, there are lots of career opportunities in epidemiology.
Real-life Example: Legionnaires’ Disease
This information is from A Coming Plague: Newly Emerging Diseases in a World Out of Balance by Laurie Garrett. This 1994 book (published by Farrar, Straus, & Giroux, New York) is very readable and is an excellent resource for case studies in epidemiology, with chapters on everything from Ebola to Toxic Shock Syndrome to AIDS.
If you would like to use Legionnaires’ Disease as a case study in your classroom, the CDC has a super case study, with both student handouts and a teacher’s guide at www.cdc.gov/excite/classroom/index.htm. For more information on the CDC and their Excite website, please see page 4.
Outbreak: In July 1976, several hundred members of the Pennsylvania American Legion met in Philadelphia for a 4-day meeting. By the second day, two members were sick, with symptoms including fever, muscle ache, and pneumonia. Within a week, there were 182 cases, including 29 deaths.
Added complication: The United States was in the middle of a debate about whether there would be an outbreak of swine flu in the winter of 1976, similar to the outbreak that sickened over a billion people around the world in 1918-19, killing millions. There was already a lot of concern about influenza in the U.S., and news of the Philadelphia
INTRODUCTION: IMMUNO 101
7
outbreak raised the worry to the level of hysteria. The press started calling the disease Legionnaires’ disease.
Enter the disease detectives:
First, they went to the laboratory.
• Within 24 hours of learning of the outbreak in Philadelphia, scientists at the CDC determined that the disease was NOT influenza.
• Next, the disease detectives investigated and eliminated dozens of possible causes for Legionnaire’s disease, including plague, typhoid, Chlamydia, Lassa fever, and many more microbes.
• They then tested organ samples from the victims for the presence of toxic metals, such as cobalt, mercury, and arsenic, and found nothing. Tests for the presence of pesticides and other toxic chemicals also came up negative.
• After 3 weeks, the disease detectives did not even know if the disease culprit was a microbe or a toxic chemical.
So, they went to back to the scene of the outbreak.
• The disease detectives questioned all the surviving victims and their families. Disease victims were re-autopsied. The staffs at the hospitals that had treated the victims were questioned. The staffs of the hotels were questioned.
• They found that the only clue tying together all the victims was that they were all in at least one of the five hotels that hosted the convention. So, they investigated the hotels, collecting air, water, dirt, and fabric samples from every room. None of the samples yielded any unusual organisms.
Finally, the answer:
In January 1977, over six months after the Philadelphia outbreak, the source of Legionnaires’ disease was discovered. It was a bacterium in the genus, Legionella.
Why did it take so long to isolate and identify the cause of Legionnaires’ disease? There were several problems, but the biggest was that the Legionella bacteria will not grow in the laboratory. Most bacteria will grow in a nutrient medium in the lab. When this bug did not, the scientists assumed it was a virus and tried to grow it in viral growth media containing antibiotics (thus killing the very bacteria they were trying to grow!).
So, how did the Legionnaires get sick? The disease detectives went back to Philadelphia and found that most of the people who got sick had spent time in one of the five hotels in particular. They then found that the bacteria were growing in that hotel’s air conditioning cooling tower and being pumped into the hotel rooms in the cool air.
What did we learn?
Another job of epidemiologists, perhaps their most important, is to prevent other people from getting sick. After the 1976 outbreak, scientists discovered that there are multiple strains of Legionella bacteria; they can be found in the soil, ponds, steam turbines, cooling towers, hot tubs (see below), water misters above grocery store vegetables,
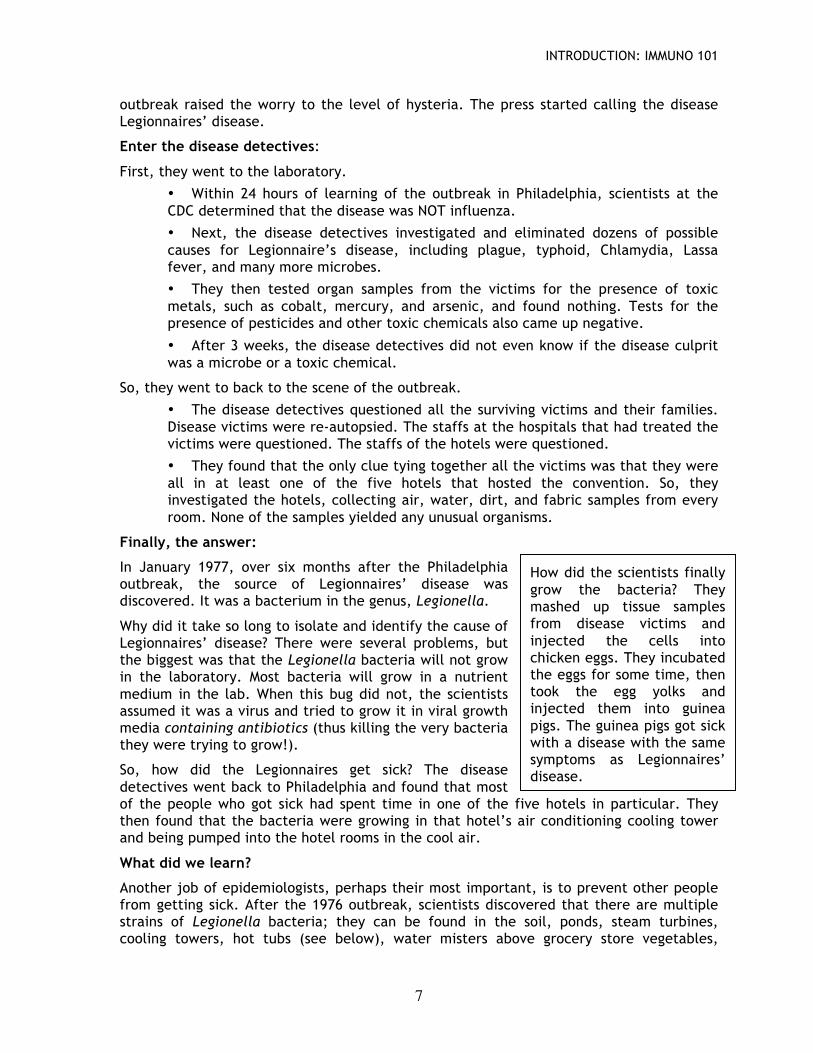
How did the scientists finally grow the bacteria? They mashed up tissue samples from disease victims and injected the cells into chicken eggs. They incubated the eggs for some time, then took the egg yolks and injected them into guinea pigs. The guinea pigs got sick with a disease with the same symptoms as Legionnaires’ disease.
INTRODUCTION: IMMUNO 101
8
shower heads, and other moist places. The bacteria are carried in aerosol droplets, so anywhere there is steam or mist, the bacteria can be carried into the air and can be inhaled.
Fortunately, most of us won’t get sick, even if we do inhale Legionella bacteria. The bacteria is most dangerous to cigarette smokers, people with chronic diseases, and people with suppressed immune systems. Legionella is not spread from person to person.
After 1976, new standards were implemented for air conditioning systems, making sure that they are kept clean, so that Legionella cannot grow in the towers.
Further study:
• For more details on Legionnaires’ Disease and the political climate in the U.S. in 1976, see Chapter 6 in The Coming Plague (reference above). The entire book is a great read. Each chapter deals with a different disease story. • The cause of Legionnaires’ Disease was announced by the CDC in January 1977 in Morbidity and Mortality Weekly Report (MMWR). To read the original report and some later comments, go to: www.cdc.gov/mmwr/preview/mmwrhtml/00045731.htm • Of particular interest to Virginians, there was an cluster of Legionnaires’ cases in southwest Virginia in 1996, and the outbreak was traced to aerosols generated by a hot tub display in a home improvement store. To read the CDC’s MMWR on the case, go to www.cdc.gov/mmwr/preview/mmwrhtml/00047291.htm • Finally, for an enjoyable (and entirely fictional) story of an epidemic in the U.S., watch the 1995 movie, Outbreak.
More Real-life Case Studies The CDC’s Epidemic Intelligence Service (EIS) has case studies available for download on their website at http://www.cdc.gov/eis/casestudies/casestudyex.htm. The downloads include instructor and student handouts. These case studies are more advanced than those on the classroom CDC page mentioned above (see page 4), but they may still be useful. The case studies are:
• An Epidemic of Thyrotoxicosis (hyperthyroidism, Graves' disease). Outbreak with unknown etiology and mode of transmission, crossing state lines.
• Cigarette Smoking and Lung Cancer. Based on the classic studies of Doll and Hill, 1950's; addresses study design, interpretation of measures of association and impact of association.
• Oral Contraceptive Use and Ovarian Cancer. Multicenter case-control study, 1980-1982; addresses bias, analysis of case-control studies.
• Oswego: An Outbreak of Gastrointestinal Illness Following a Church Supper. S. aureus outbreak among church picnic attendees, 1940; the classic, straightforward outbreak investigation in a defined population.
• Paralytic Illness in Ababo
• Screening for Antibody to the Human Immunodeficiency Virus. Hypothetical health department anticipating the release of the first HIV antibody test, 1985; focused on screening issues.
• Suspected Legionnaires’ Disease in Bogalusa. Community outbreak of Legionnaires' disease in Bogalusa, Louisiana in 1989, ultimately traced to grocery store mist
INTRODUCTION: IMMUNO 101
9
machine; addresses all the steps of a field investigation, plus statistical power of a case-control study.
• Surveillance for E. coli 0157:H7 - Information for Action
• Texarkana - Epidemic Measles in a Divided City
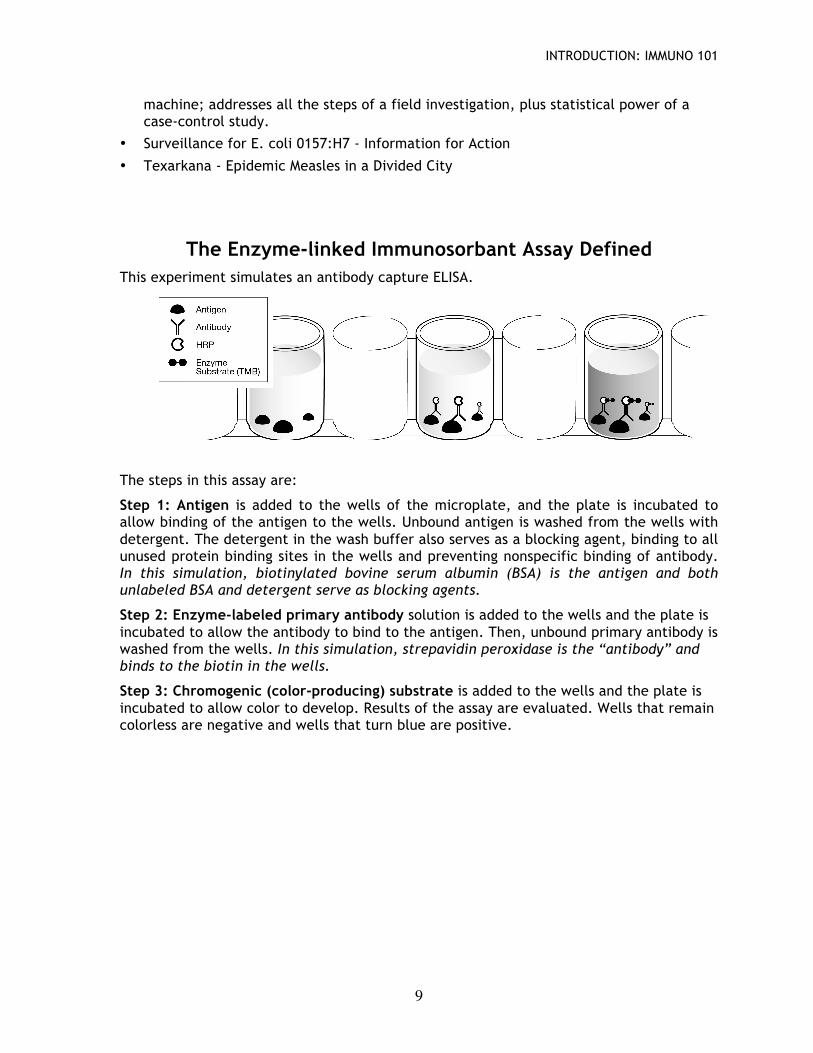
The Enzyme-linked Immunosorbant Assay Defined This experiment simulates an antibody capture ELISA.
The steps in this assay are:
Step 1: Antigen is added to the wells of the microplate, and the plate is incubated to allow binding of the antigen to the wells. Unbound antigen is washed from the wells with detergent. The detergent in the wash buffer also serves as a blocking agent, binding to all unused protein binding sites in the wells and preventing nonspecific binding of antibody. In this simulation, biotinylated bovine serum albumin (BSA) is the antigen and both unlabeled BSA and detergent serve as blocking agents.
Step 2: Enzyme-labeled primary antibody solution is added to the wells and the plate is incubated to allow the antibody to bind to the antigen. Then, unbound primary antibody is washed from the wells. In this simulation, strepavidin peroxidase is the “antibody” and binds to the biotin in the wells.
Step 3: Chromogenic (color-producing) substrate is added to the wells and the plate is incubated to allow color to develop. Results of the assay are evaluated. Wells that remain colorless are negative and wells that turn blue are positive.
INTRODUCTION: USEFUL INFORMATION
10
Useful Information Class time needed The experiment takes less than 1 hour to do. One way to do it is to introduce the material on one day and have the students share their fluids that day. Then, on the second day, do the assay and analysis. If you are time-crunched, the initial incubation time (the antigen incubation) can be done in 5 minutes rather than 15 minutes.
Size of student groups The kit includes materials for 8 student groups per class. Each group can have up to 6 students. Hopefully, with materials for 8 groups provided, you can have groups of 3 per plate. As always, please return all unused materials so that we can keep costs down.
The experiment This experiment is billed as an ELISA assay, but it isn’t really. It is a pseudo-ELISA. Instead of having an antibody binding to an antibody, we have one biological molecule, avidin, binding to a second biological molecule, biotin. Avidin is a protein found in egg white and biotin is a member of the vitamin B complex. Avidin binds very tightly to biotin. In fact, if you eat enough raw eggs, you can induce a biotin deficiency, as the avidin binds to biotin, making it unavailable for nutritional needs.
Avidin-biotin The avidin-biotin interaction is exploited in research and clinical laboratories. Biotin can be used to label molecules of interest. The labeling is chemical; in other words, there is a covalent bond between the biotin and the molecule of interest. The biotinylated molecule can then be detected using avidin that has been chemically tagged with a marker molecule. A variety of marker molecules can be used, but frequently the avidin is tagged with an enzyme. Then a chromogenic (color-producing) substrate of that enzyme can be used to detect the presence of the avidin.
In this experiment, BSA (bovine serum albumin, a protein from the blood of cows) is labeled with biotin. The biotinylated BSA is then bound by the avidin, which has been labeled with the enzyme peroxidase. Addition of a chromogenic substrate (TMB, or 3,3’,5,5’-tetramethylbenzidine) produces a blue color when the labeled avidin is present.
By the way, in this experiment we are using streptavidin. This means is that the avidin was not purified from egg whites. Instead it was produced by the bacteria Streptomyces avidinii, which is a recombinant bacteria derived from E. coli. Producing avidin from recombinant bacteria is easier and cheaper than purifying it from eggs. The streptavidin also binds more strongly to biotin than does the avidin derived from eggs.
Antibodies vs. avidin-biotin Why isn’t this kit a genuine ELISA assay? The primary reason is cost. Antibodies cost more than these reagents, and these reagents are more stable for shipping, etc. As far as the students are concerned, this assay functions exactly as an ELISA assay. Use your own judgment about whether to explain to your students that this is an avidin-biotin binding assay rather than an antibody assay (or ELISA). The point of the experiment, after all, is not what the molecules are, but how antibodies work, how an ELISA is done, and how disease spreads through a population.
Assay plates The assay plates that we use are made specifically for immunological experiments. The material (polyvinyl chloride, in this case) is selected specifically because it binds proteins very strongly. If protein doesn’t bind well to the plate, the assay would not work. Also, if
INTRODUCTION: USEFUL INFORMATION
11
the bound protein were to wash off the plate, the experiment wouldn’t work. Note: The plates are not reusable, and should be thrown away after use.
Why is there unlabeled BSA in the “antibody” solution? In the experimental procedure below, you’ll see that the “antibody” (streptavidin peroxidase) is in a solution containing unlabeled BSA (BSA with no biotin attached). This is because the BSA acts as a blocking agent, and blocks or occupies sites in the assay wells that are not already occupied. Both the BSA and the detergent Tween (found in the wash buffer) bind to the unoccupied sites on the assay plate, preventing subsequent non-specific binding of the streptavidin peroxidase. Without blocking agents, the experiment wouldn’t work, as the “antibody” would bind to the plate, regardless of whether there was any “antigen” present.
Assay principles are used in many test kits One more note: The principles used in this assay are exactly those used in a variety of test kits available at the drug store, e.g., pregnancy tests, drug tests, and disease test kits. The gist of this experiment and those tests is: 1) capture of a protein of interest, and 2) detection of that protein by a specific probe, with a colored reaction product indicating a positive reaction (i.e., that the molecule of interest is present in the test sample). For example, see the section on dipstick tests on page 36.
Nutshell Version Summary Students use an ELISA assay to determine whether they are carriers of an “infectious agent.” Note: No infectious agents or bodily fluids are used in this experiment!
Goals There are several points to this experiment. The overt lesson is the introduction to the ELISA assay procedure and the use of antibodies, both in research and in diagnostic and forensic tests. The secondary lesson is how infectious agents spread through sharing of “bodily fluids.” If you start with one “infected” individual in a class of 20, over half the class should be “infected” after they share fluids.
Procedure: Each student is given a sample of “bodily fluid.” Of these, only one student is given a
positive (“infected”) sample. (Note: If the class size is over 18-20, give 2 students positive samples.) Each student puts half of his or her sample aside for (optional) later testing.
Two students share their “bodily fluids” by combining them in a single tube, mixing, and splitting the “shared” fluid back into 2 tubes again.
Each student shares with 2 more students, so that each will have a sample that they have shared with 3 other students in total. (Note: If the class size is less than 10, have each student share with only 2 other students.)
Each group of 3-6 students shares an assay plate and tests their samples for the presence of the “infectious agent.” Positive and negative controls are also assayed on each plate.
Students tabulate their results on the board and try to determine who the original “infected” individual was. Discussion can include experimental error, infection, assay technique, etc.
To confirm the results of the first experiment, the unshared samples can be assayed.
INSTRUCTOR’S LAB PREP
12
Preparation
The background information for teachers in this manual is divided into 5 sections:
I. Items to be provided by the instructor.
II. Solutions included in the immunology kit. This is a list of the solutions plus some general comments.
III. Preparation for the laboratory. This is the actual prep. I don’t think it’s really as bad as it looks, but there are solutions to be made, and lots of aliquoting to be done. The prep is divided into sections based on when the work can be done. Some prep can be done at any time before the experiment, while other prep needs to be done on or near the day of the experiment.
IV. Teacher notes on the experiment. This section has general comments on the experimental procedure.
V. What to put on each lab bench.
I. Items to be Provided by Instructor
A. Hydrogen peroxide. Hydrogen peroxide can be purchased at most pharmacies and discount stores. You will need a very small quantity of 3% solution. Do not keep hydrogen peroxide from year to year; buy it fresh each time you use the kit.
B. Paper towels. Needed during washing of plates.
C. Distilled water. Needed to make solutions. A gallon will be more than enough.
II. Solutions Included in the Immunology Kit
A. Wash Solution (PBS with 0.1% Tween 20)
This solution is used to wash the plates after the additions of antigen and antibody.
This solution is sent as 2 concentrates, 20X PBS and 10% Tween 20, which are diluted into water for use.
B. 10X Sodium Carbonate buffer
This solution is used to simulate the “uninfected body fluid” and as the negative control for the ELISA assay.
C. 1X Citric Phosphate Buffer
This solution is used as diluent for the color substrate TMB.
D. “Antigen” (Biotinylated BSA): “Infected body fluid”
This solution is used to simulate the “infected body fluid” and as the positive control for the ELISA assay.
This solution is sent as a mixture of biotinylated BSA and unlabeled BSA. It is diluted into 1X Sodium Carbonate Buffer for use. The undiluted solution should be
INSTRUCTOR’S LAB PREP
13
stored at in the freezer if possible. After the dilution, the solution should be stored at in the refrigerator; the solution is stable for 1 week.
E. “Antibody” Solution (streptavidin peroxidase)
This streptavidin peroxidase solution is sent in 2 parts: a tube of streptavidin peroxidase and a tube of PBS/BSA solution. Both should be stored at in the refrigerator, both before and after mixing. The mixed solution should be stable for 1 week
F. Color Substrate Solution (TMB)
The TMB is in tablet form. Immediately before use, the tablets are dissolved in 1X Citric Phosphate Buffer and hydrogen peroxide is added. This solution should be used when made; it is stable for hours only (maybe as long as a day, but with decreased color product).
III. Preparation for the Laboratory
Notes on preparation:
• For aliquoting into the microfuge tubes for the students, you can use larger transfer pipettes (included with the kit) and fill the tubes based on the graduations on the side of the tubes.
• If you are going to run the second ELISA assay within a day or so of the first, keep your aliquots in the refrigerator and re-use them, except for the Color Reagent Solution. I’ve sent a second batch of TMB tablets and aliquot of buffer that can be made up for the second ELISA.
• I have allowed some extra solution for pipetting errors on the part of the students, but there are not unlimited amounts. This is particularly true of the antigen solution and the color substrate solution.
This prep can be done at any time before the lab.
A. Prepare Wash Solution. The Wash Solution is supplied as 2 pre-measured concentrates, 20X PBS and 10% Tween-20.
For each liter of Wash Solution, add 50 ml of 20X PBS and 10 ml of 10% Tween 20 to 940 ml of water (distilled, if possible) and mix. Use to fill the squirt bottles. Store at room temperature. This solution should be stable for months.
Note: The squirt bottles have a plastic tube that goes from the top down into the solution. Be careful not to lose these tubes, as they do come off!
B. 1X Sodium Carbonate Solution. This is supplied as a pre-measured 10X solution.
For each 200 ml, add 20 ml of 10X Sodium Carbonate Solution to 180 ml of water (distilled, if possible). Mix and store at room temperature. This solution should be stable for months.
INSTRUCTOR’S LAB PREP
14
This prep should be done close to the time of the experiment. Although the solutions are stable for up to a week, it is best if they are prepared no earlier than the day before you do the experiment.
C. Preparation of Antigen (biotinylated BSA). The “antigen” is biotinylated BSA mixed with unlabeled BSA and diluted in 1X Sodium Carbonate Solution. To prepare:
1. Place 10 ml of 1X Sodium Carbonate Solution into the empty 15-ml centrifuge tube.
2. Transfer ~1 ml of the Sodium Carbonate Solution into the microfuge tube of antigen.
3. Close the tube and invert gently several times to mix.
4. Transfer the solution from the small tube back into the larger tube.
5. Invert the larger tube gently to mix, then store in the refrigerator. The antigen solution should be stable for 1 week.
D. Preparation of Antibody (streptavidin peroxidase). The “antibody” is streptavidin peroxidase diluted in 1X PBS containing 0.5 mg/ml BSA. The streptavidin peroxidase volume in the microfuge tube is only 2 µl. To prepare:
1. Transfer ~1 ml of PBS/BSA into the microfuge tube of streptavidin peroxidase.
2. Close the tube and invert gently several times to mix.
3. Gently pipette up and down several times, then transfer the solution back into the larger tube. (The streptavidin peroxidase is in glycerol, so it is denser than the buffer solution.)
4. Invert the larger tube gently to mix, then store in the refrigerator. The antibody solution should be stable for 1 week.
This prep should be done immediately before the solution is to be used.
E. Color Substrate Solution. The color substrate is TMB (3,3’,5,5’-tetramethylbenzidine) diluted in Citric Phosphate Buffer with hydrogen peroxide added. To prepare:
1. Open two of the packets containing TMB tablets and dump the tablets into the tube containing 20 ml of Citric Phosphate Buffer. Cap the tube.
2. The tablets should dissolve in minutes. (You can invert the tube gently a few times to hurry it along.) After the tablet is dissolved, use a fixed volume pipettor to add 50 µl (microliters) of 3% hydrogen peroxide and invert to mix.
3. This solution can be stored for short periods (hours) in the refrigerator, but it will lose effectiveness with increasing storage time. It should be made close to the time that it is used.
Note: If your class size is small and you are preparing materials for 6 or fewer lab groups, you can pour off half of the Citric Phosphate Buffer (keeping 10 ml), and add one TMB tablet and 20 µl of hydrogen peroxide.
INSTRUCTOR’S LAB PREP
15
The aliquoting of solutions, except for the Color Substrate Solution, can be done at any time, although closer to the time the lab will be run is better. The Color Substrate Solution should be made and aliquoted within an hour or so of being used, if possible.
“Bodily fluids” (clear tubes). For most of the class, the “bodily fluids” will be 1X Sodium Carbonate Solution. Aliquot about 1 ml per tube into clear microfuge tubes. You will need 1 tube per student.
Negative control (pink tubes). The negative control will be 1X Sodium Carbonate Solution. Aliquot about 1 ml per tube into pink microfuge tubes. You will need 1 tube per group.
Positive control (green tubes) and “infected bodily fluids” (clear tubes).
The positive control and “infected bodily fluids” will be the antigen, the biotinylated-BSA solution. For the positive control, aliquot about 1 ml per tube into green microfuge tubes. You will need 1 tube per group.
For the “infected bodily fluids” you will aliquot one or two tubes of the positive control solution into clear tubes. In other words, you want these tubes to be indistinguishable from the other “bodily fluids” tubes as far as the students are concerned. Keep them separate from the other tubes, though, until you are ready to distribute them. You need to make sure that a student (or students) actually get this sample. (It would be really boring if there were no positive students.)
The number of students who should be given “infected” tubes depends on the number of students in the class. For 16 or fewer, only one student should be “infected” or the entire class would be positive. For more than that, you can use either 1 or 2 “infected” tubes. (The University of Arizona goes to 2 tubes when the class size is >18-20.) If you look at the cluster diagrams, you can see how many students will be infected with either one or two original “infections” and make up your mind from that.
“Antibody” solution (orange tubes). The “antibody” solution will be the streptavidin peroxidase. Aliquot about 1.5 ml per tube into orange microfuge tubes. You will need 1 tube per group.
Color substrate solution (purple tubes). The color substrate solution is the TMB solution. Aliquot 1.5 ml per tube into purple microfuge tubes. You will need 1 tube per group. Keep this on ice or in the refrigerator until needed, if possible.
INSTRUCTOR’S LAB PREP
16
IV. Teacher Notes for the Experiment
1. There are no actual “bodily fluids” or infectious materials involved in this lab.
2. Please follow the guidelines established by your school district for the use of protective eyewear.
3. The only known hazards with this experiment are the hydrogen peroxide and the color substrate solution. Only the instructor will be handling the hydrogen peroxide, so that shouldn’t be an issue. The TMB packet says to avoid skin contact. If the procedure is done correctly there should be no skin contact with any solution, except perhaps the Wash Solution (phosphate buffer with detergent). If you think that this is a concern, please have the students wear gloves.
4. Make sure that the student share fluids with students from other parts of the room, not just their own group. Logistically, the best way to do this and to be sure that the “infection” is widespread in the classroom is to have orderly sharing. In other words, tell the students to share fluids with one other person, then return to their lab station. After everyone is finished with the first sharing and back in place, then tell them to share with a different student. Again, after all students are finished with the second sharing, tell them to share with a third student.
If you don’t do this, it is possible that most students will share before the infected person even starts sharing! On the same note, keep an eye on the student (discreetly) to whom you gave the positive sample to be sure that he or she shares around.
5. Be sure that students dispose of the transfer pipettes or yellow pipette tips immediately after they use them with any reagent. Contaminating them with another reagent will confound the results!
6. The ELISA plates are not reusable and can be thrown away after use.
7. Directions for the fixed volume pipettors are on page 43.
INSTRUCTOR’S LAB PREP
17
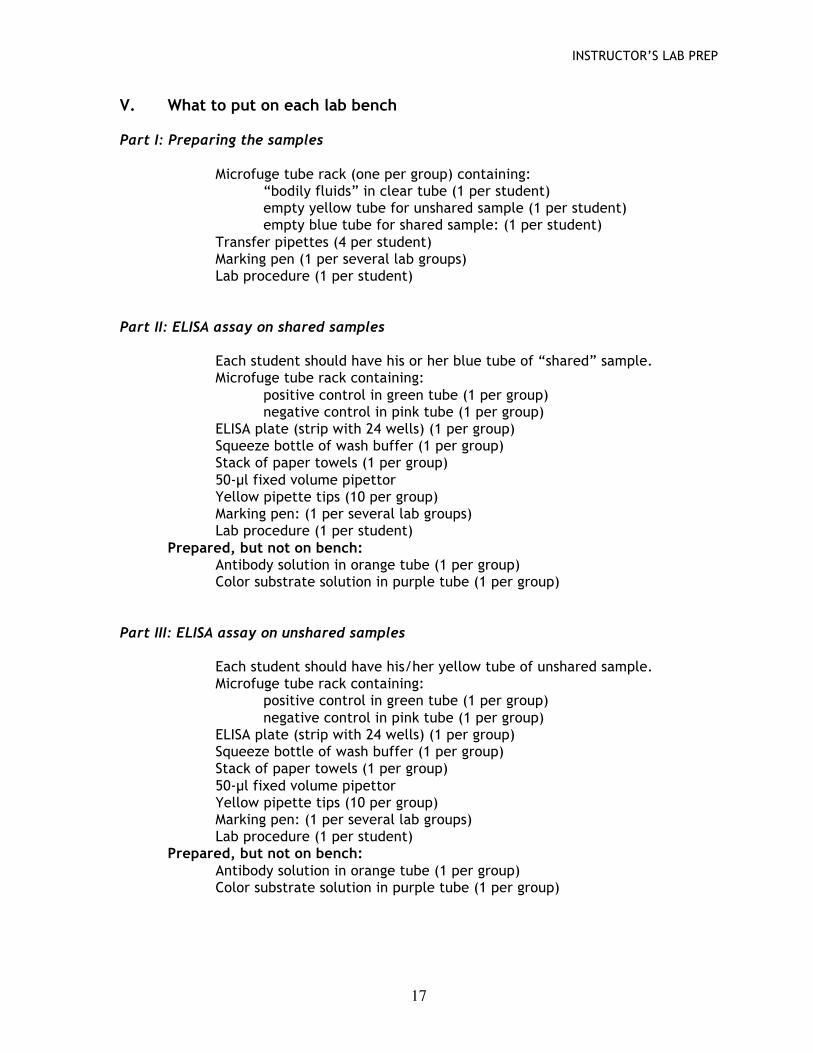
V. What to put on each lab bench Part I: Preparing the samples
Microfuge tube rack (one per group) containing: “bodily fluids” in clear tube (1 per student) empty yellow tube for unshared sample (1 per student) empty blue tube for shared sample: (1 per student) Transfer pipettes (4 per student) Marking pen (1 per several lab groups) Lab procedure (1 per student)
Part II: ELISA assay on shared samples
Each student should have his or her blue tube of “shared” sample. Microfuge tube rack containing: positive control in green tube (1 per group) negative control in pink tube (1 per group)
ELISA plate (strip with 24 wells) (1 per group) Squeeze bottle of wash buffer (1 per group) Stack of paper towels (1 per group) 50-µl fixed volume pipettor Yellow pipette tips (10 per group)
Marking pen: (1 per several lab groups) Lab procedure (1 per student)
Prepared, but not on bench: Antibody solution in orange tube (1 per group)
Color substrate solution in purple tube (1 per group) Part III: ELISA assay on unshared samples
Each student should have his/her yellow tube of unshared sample. Microfuge tube rack containing: positive control in green tube (1 per group) negative control in pink tube (1 per group)
ELISA plate (strip with 24 wells) (1 per group) Squeeze bottle of wash buffer (1 per group) Stack of paper towels (1 per group) 50-µl fixed volume pipettor Yellow pipette tips (10 per group)
Marking pen: (1 per several lab groups) Lab procedure (1 per student)
Prepared, but not on bench: Antibody solution in orange tube (1 per group)
Color substrate solution in purple tube (1 per group)
EXPERIMENTAL PROCEDURE
18
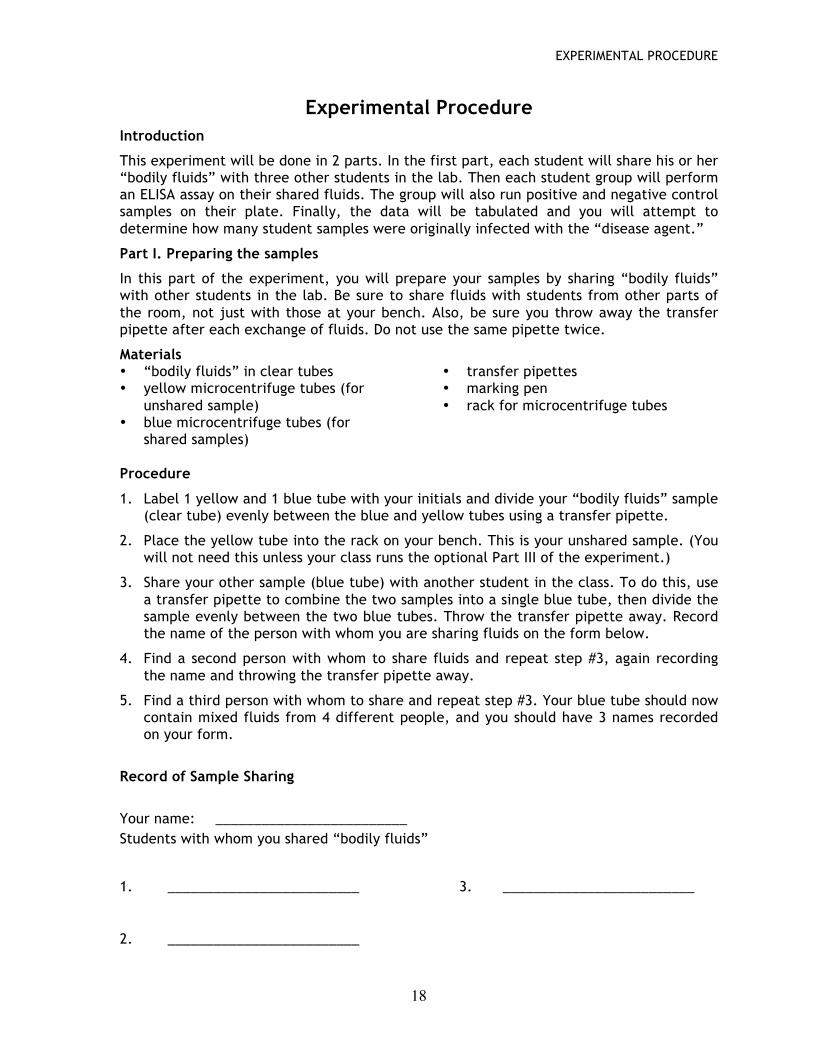
Experimental Procedure Introduction
This experiment will be done in 2 parts. In the first part, each student will share his or her “bodily fluids” with three other students in the lab. Then each student group will perform an ELISA assay on their shared fluids. The group will also run positive and negative control samples on their plate. Finally, the data will be tabulated and you will attempt to determine how many student samples were originally infected with the “disease agent.”
Part I. Preparing the samples
In this part of the experiment, you will prepare your samples by sharing “bodily fluids” with other students in the lab. Be sure to share fluids with students from other parts of the room, not just with those at your bench. Also, be sure you throw away the transfer pipette after each exchange of fluids. Do not use the same pipette twice.
Materials • “bodily fluids” in clear tubes • yellow microcentrifuge tubes (for
unshared sample) • blue microcentrifuge tubes (for
shared samples)
• transfer pipettes • marking pen • rack for microcentrifuge tubes
Procedure
1. Label 1 yellow and 1 blue tube with your initials and divide your “bodily fluids” sample (clear tube) evenly between the blue and yellow tubes using a transfer pipette.
2. Place the yellow tube into the rack on your bench. This is your unshared sample. (You will not need this unless your class runs the optional Part III of the experiment.)
3. Share your other sample (blue tube) with another student in the class. To do this, use a transfer pipette to combine the two samples into a single blue tube, then divide the sample evenly between the two blue tubes. Throw the transfer pipette away. Record the name of the person with whom you are sharing fluids on the form below.
4. Find a second person with whom to share fluids and repeat step #3, again recording the name and throwing the transfer pipette away.
5. Find a third person with whom to share and repeat step #3. Your blue tube should now contain mixed fluids from 4 different people, and you should have 3 names recorded on your form.
Record of Sample Sharing
Your name: _________________________
Students with whom you shared “bodily fluids”
1. _________________________ 3. _________________________
2. _________________________

EXPERIMENTAL PROCEDURE
19
Part II. ELISA Assay on Shared Samples
In this part of the experiment, you will run an ELISA test on your shared samples. Each sample will be assayed in triplicate and you will share an assay plate with your lab partners. Be sure that you discard your used yellow pipette tips after each step and use a fresh pipette tip each time the procedure calls for it.
Materials Quantity • mixed “bodily fluids” in blue tube 1 tube per student • ELISA plate 1 plate per group • positive control sample (green tube) 1 tube per group • negative control sample (pink tube) 1 tube per group • squeeze bottle with wash buffer 1 bottle per group • stack of paper towels 1 stack per group • 50-µl fixed volume pipette 1 per group • yellow pipette tips 10 per group • marking pen 1 per group • rack for microcentrifuge tubes 1 per student • antibody solution (orange tube) 1 per group • color substrate solution (purple tube) 1 per group
Procedure
1. Using the 50-µl fixed volume pipette with a fresh pipette tip, each person in your lab group should add 50 µl (microliters) of shared fluid (blue tube) into each of 3 wells. Record the location of each person’s wells on the ELISA assay form below.
2. Using a fresh pipette tip for each reagent, prepare 3 positive (green tube) and 3 negative (pink tube) control wells on your plate. Record the location of the controls on the ELISA assay form. Note: The control wells should be adjacent to the experimental wells, i.e., not separated by empty wells.
3. Let the plate sit undisturbed on the bench for 15 minutes. While the plates are incubating, write your name in the table on the board or the master list, as instructed by your teacher.
4. Shake off the fluid into the sink. To empty the wells completely, flick the plate (well side down) against the edge of the sink. (You can be pretty rough with these plates.)
5. Use the squeeze bottle of wash solution to wash the wells three times, shaking and flicking out the wash buffer between each wash. (It is only necessary to wash the wells that you used.)
6. After washing the wells, tap the plate firmly upside down on a stack of paper towels to remove any remaining fluid. When you finish the wash procedure, there should be no more liquid appearing on the paper towel when you tap the plate.
7. Using a new pipette tip, add 50 µl of antibody solution (orange tube) to each well. Let the plate sit on the bench for 5 minutes.
8. Shake off the fluid and wash the plate as in steps 4-6 above.
EXPERIMENTAL PROCEDURE
20
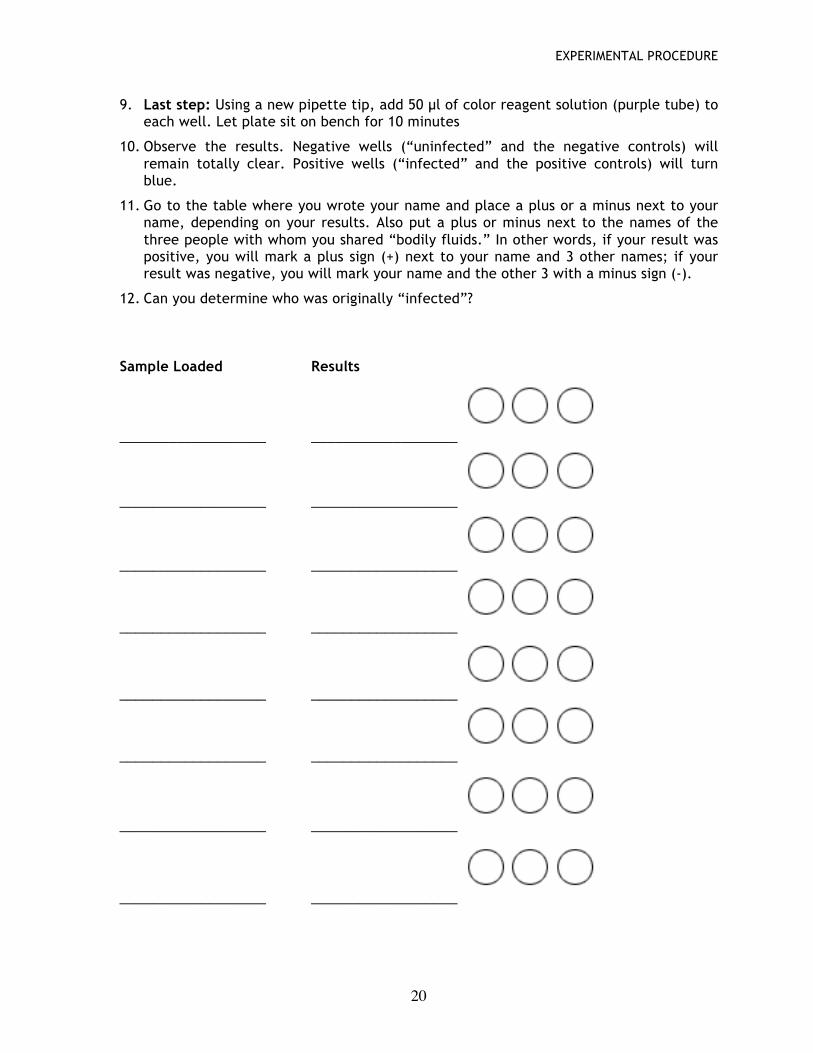
9. Last step: Using a new pipette tip, add 50 µl of color reagent solution (purple tube) to each well. Let plate sit on bench for 10 minutes
10. Observe the results. Negative wells (“uninfected” and the negative controls) will remain totally clear. Positive wells (“infected” and the positive controls) will turn blue.
11. Go to the table where you wrote your name and place a plus or a minus next to your name, depending on your results. Also put a plus or minus next to the names of the three people with whom you shared “bodily fluids.” In other words, if your result was positive, you will mark a plus sign (+) next to your name and 3 other names; if your result was negative, you will mark your name and the other 3 with a minus sign (-).
12. Can you determine who was originally “infected”? Sample Loaded Results
__________________ __________________
__________________ __________________
__________________ __________________
__________________ __________________
__________________ __________________
__________________ __________________
__________________ __________________
__________________ __________________
EXPERIMENTAL PROCEDURE
21
Questions:
1. Why did we run positive and negative controls with the assay? Why did we run them on every plate, instead of just one plate?
2. What is meant by a false positive result? What is one way you could get a false positive result?
3. What is meant by a false negative result? What is one way you could get a false negative result?
4. Why should the controls be in wells adjacent to the experimental wells?
5. Why did we assay each sample in triplicate? Did your 3 wells for each sample have exactly the same intensity of blue color?
6. Why did you wash the plate before you added a new reagent? What might happen if you didn’t wash the plate?
7. How many students in the class were “infected” by the disease agent?
8. How many students were originally infected, i.e., before you shared “bodily fluids”? Can you figure it out by comparing results? (You will not be able to determine who the original infected individual is until you run the second ELISA on the unshared samples, but you should be able to reduce the possibilities to a few students.)
9. What do your results say about the spread of disease through activities in which bodily fluids are shared?
10. After doing the lab, would you agree or disagree with the following statement: "When you have sex with someone, you are also having sex with everyone that they have previously had sex with." Explain your answer.
EXPERIMENTAL PROCEDURE
22
III. ELISA Assay on unshared samples (optional) If you cannot determine from the results of the first ELISA which student or students were originally infected, then an ELISA can be run on the unshared samples. Each sample will be assayed in triplicate. The result of this ELISA will tell us the number (and identity) of any “infected” individuals. Be sure that you discard your used yellow pipette tips after each step and use a fresh pipette tip each time the procedure calls for it. Materials Quantity • unshared “bodily fluids” in yellow tube 1 tube per student • ELISA plate 1 plate per group • positive control sample (green tube) 1 tube per group • negative control sample (pink tube) 1 tube per group • squeeze bottle with wash buffer 1 bottle per group • stack of paper towels 1 stack per group • 50-µl fixed volume pipette 1 per group • yellow pipette tips 10 per group • marking pen 1 per group • rack for microcentrifuge tubes 1 per student • antibody solution (orange tube) 1 per group • color substrate solution (purple tube) 1 per group Procedure
1. Using the 50-µl fixed volume pipette with a fresh pipette tip, each person in your lab group should add 50 µl (microliters) of unshared fluid (yellow tube) into each of 3 wells. Record the location of each person’s wells on the ELISA assay form below.
2. Using a fresh pipette tip for each reagent, prepare 3 positive (green tube) and 3 negative (pink tube) control wells on your plate. Record the location of the controls on the ELISA assay form. Note: The control wells should be adjacent to the experimental wells, i.e., not separated by empty wells.
3. Let the plate sit undisturbed on the bench for 15 minutes.
4. Shake off the fluid into the sink. To empty the wells completely, flick the plate (well side down) against the edge of the sink. (You can be pretty rough with these plates.)
5. Use the squeeze bottle of wash solution to wash the wells three times, shaking and flicking out the wash buffer between each wash. (It is only necessary to wash the wells that you used.)
6. After washing the wells, tap the plate firmly upside down on a stack of paper towels to remove any remaining fluid. When you finish the wash procedure, there should be no more liquid appearing on the paper towel when you tap the plate.
7. Using a new pipette tip, add 50 µl of antibody solution (orange tube) to each well. Let the plate sit on the bench for 5 minutes.
8. Shake off the fluid and wash the plate as in steps 4-6 above.
9. Last step: Using a new pipette tip, add 50 µl of color reagent solution (purple tube) to each well. Let plate sit on bench for 10 minutes
EXPERIMENTAL PROCEDURE
23
10. Observe the results. Sample Loaded Results
__________________ __________________
__________________ __________________
__________________ __________________
__________________ __________________
__________________ __________________
__________________ __________________
__________________ __________________
__________________ __________________
APPENDIX: DISCUSSION POINTS
24
Answers to Questions and Discussion Points
Questions 1-5: Controls
Controls are needed so that you can be sure that the experimental procedure worked. If you don’t run controls and you get a negative result, you cannot be sure whether the wells are clear because the sample is truly negative or because the assay didn’t work. This is called a false negative result. False negatives can be caused by:
• putting samples in the wrong wells, for example, putting a negative control into a well where you thought you were putting an experimental sample. This could also result from poor record-keeping.
• problems with reagents. For example, suppose you forgot to put hydrogen peroxide (H2O2, a necessary component for color development) in the color reagent solution. You would see no color in the wells, and without a positive control, you would have no way to know that the problem was in the experiment itself.
Conversely, without a negative control, you have no way of knowing whether or not all samples (“infected” or not) would have given a positive result.
When you get a positive result on a negative sample, this is called a false positive. A false positive can be caused by:
• putting samples in the wrong wells, for example, putting a positive control into a well where you thought you were putting an experimental sample. This could also result from poor record-keeping.
• splashing a positive sample or control into the wrong well.
• other experimental errors, such as failing to wash the unbound antibody out of the well completely before adding the color reagent solution. Other possible errors are mixing the wrong samples or picking up the wrong tube.
The positive and negative controls are only valid on the plate on which they are run. Many of the errors that the controls are designed to detect are individual errors, errors which one lab group might make, but not all. Hence, controls must be run on each plate. They must also be run each time the assay is performed. Just because your experiment worked earlier in the day there is no guarantee that it will work the same later in the day. Controls are run on every plate, every time an ELISA is performed.
The primary reason that controls should be in wells adjacent to the experimental wells is that it makes comparison of the color intensities easier. Another reason is that there could be differences between different parts of the assay plate. This actually should not be true with the ELISA plates, but it is a good principle to get across to students for other experiments.
Although there are not differences across the ELISA plates, it is true that students may wash one part of the plate differently than they do another part, just because of something like the way they hold the plate in their hand, and that could lead to variation in the results from one side of a plate to the other.
Assaying samples in triplicate is another control. If you make a mistake adding a reagent to a well, it is unlikely that you will make the mistake in all 3 wells. [If you do make a mistake in all 3 wells (like using the wrong sample), then it should be detected by the
APPENDIX: DISCUSSION POINTS
25
controls already discussed.] For example, if you mistakenly add less reagent to one well than you did in the other two, then that well may not get as blue as the other 2 wells of the same sample. You can see that it is different and disregard it, assuming that you made an experimental error. If all three wells are different colors, then you definitely have a problem with your experimental technique, and the experiment should be repeated.
Question 6
If you don’t wash out the previous reagent, you can affect the outcome of the experiment. If you do not wash out the unbound antigen in Steps 4-6 (the antigen that is still in solution, not bound to the plate), when you add the antibodies, they could bind to the free antigen instead of the bound antigen. If that happens, there will be fewer antibodies available to bind to the antigen on the plate, and the antibodies that bind to the free antigen will be washed away in the next wash step.
If you don’t wash away the antibodies that have not bound to antigens, then you can get a false positive result (see answers to Questions 1-5).
Questions 7-10
The results should be pretty impressive. With one original “infected” individual in a class of 20, up to 8 students should show positive results, i.e., be “infected.” This can lead into a discussion about the spread of disease. (With two “infected” individuals in a class of 20, up to 16 students could show positive results.)
You cannot determine who the original “infected” person is until the assay of the unshared samples. It is impossible to distinguish between the original “infected” student and the first person with whom he or she shares. Additionally, modeling the experiment has shown that it is possible to get more people with all pluses. So, though it is possible to get only a couple of “infected” individuals (all pluses), there may be more.
You may be able to construct a cluster diagram with the infected person at the center and track down who everyone shared with. This would be the kind of thing that an epidemiologist might do when investigating a disease outbreak. The originally “infected” person is Patient Zero. The 3 people that he or she shared with are Primary Contacts. The people that the Primary Contacts shared with would be Secondary Contacts. There may be some instances where students had contact with more than one infected individual.
APPENDIX: DATA ANALYSIS
26
Notes on Data Analysis 1. Any blue in a well indicates a positive test. It can help to look at the plate from the
side to see if wells are blue or to hold the plate over a white surface. If you do not see a reasonably dark blue in at least the positive control in 10 minutes, let the plates go longer and look again. The negatives should not turn blue at any point. You could even seal the plates with clear tape to prevent evaporation. (Most classes are seeing rapid development of color.)
2. This experiment is designed to give plus or minus results only. There are no degrees of infection, just “infected” or “not infected.” Although the students will have different amounts of “infectious agent” in their shared samples, depending on whether they share with Patient Zero, a Primary Contact, or a Secondary Contact, or some combination thereof, the amount of antigen present is enough to saturate the plate, even at the lowest possible concentration. (It’s sort of like the home pregnancy tests. You are either pregnant or not; there are no intermediate results, e.g., a little pregnant.)
3. That said, when I did this experiment in a workshop with high school students, there was a broad range of results, from faint blue to dark blue. This was due to variation in experimental techniques; we have done our best to reduce the variability.
4. In many experimental uses of the ELISA assay, there are degrees of results. You can use the ELISA to quantify, for example, how much of a protein is present in a sample. To do this, though, you must have controls with known concentrations of the protein. An example of this would be a clinical test for the presence and quantity of a protein named amylase in saliva. Beside the saliva sample, you would run a series of amylase samples of known concentrations. You can quantify the intensity of the blue color using a spectrophotometer. Increasing concentrations of amylase would give increasingly darker colors, which means greater absorbance, i.e., larger numbers. When the absorbance is plotted against concentration, you get a standard curve. From the standard curve, you can calculate the concentration of amylase in the saliva sample.
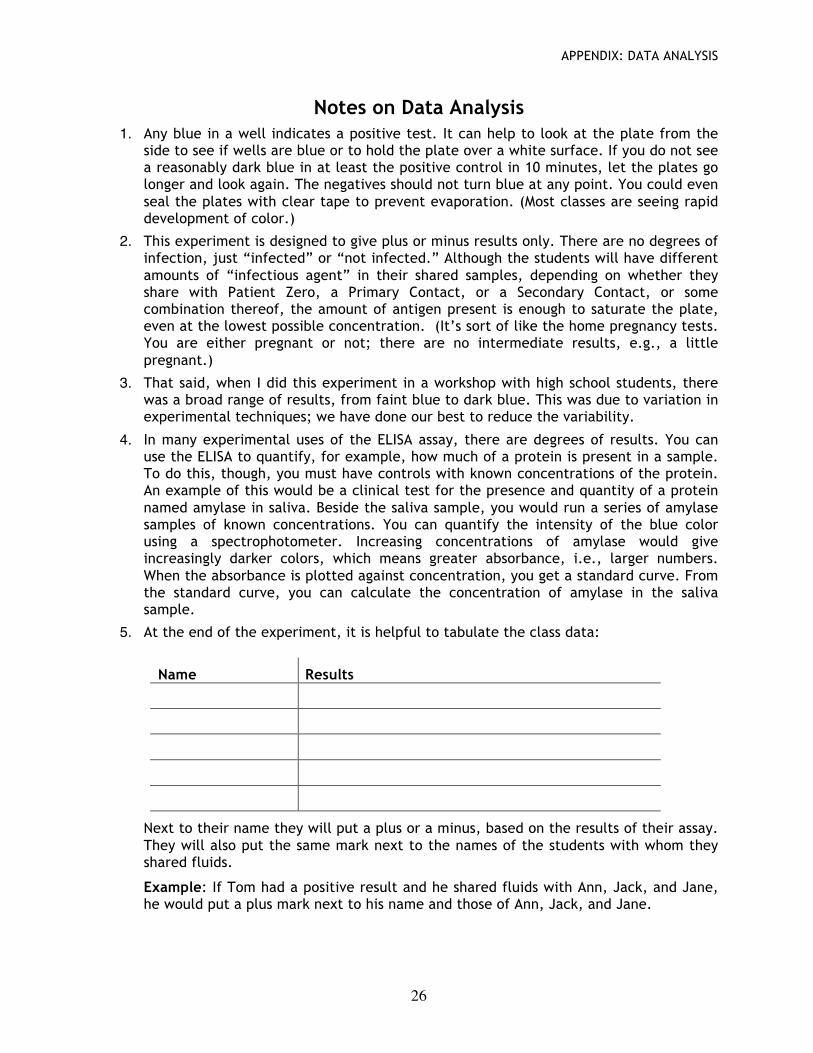
5. At the end of the experiment, it is helpful to tabulate the class data:
Name Results
Next to their name they will put a plus or a minus, based on the results of their assay. They will also put the same mark next to the names of the students with whom they shared fluids.
Example: If Tom had a positive result and he shared fluids with Ann, Jack, and Jane, he would put a plus mark next to his name and those of Ann, Jack, and Jane.
APPENDIX: DATA ANALYSIS
27
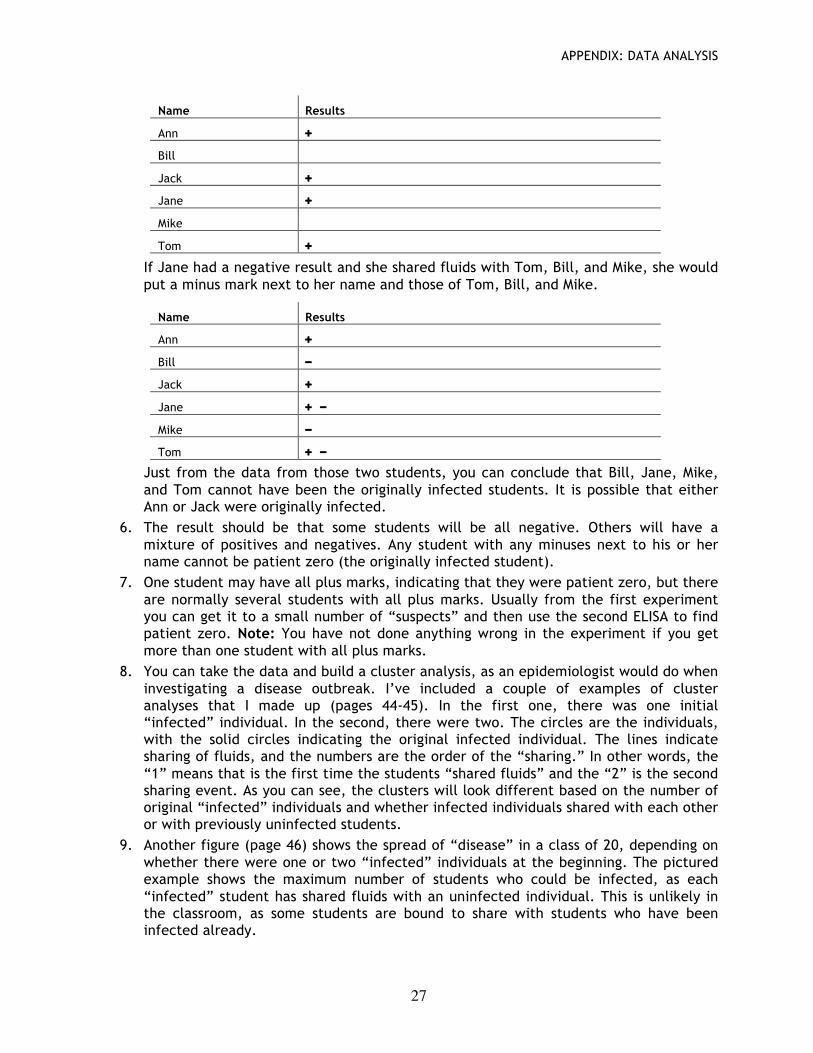
Name Results
Ann +
Bill
Jack +
Jane +
Mike
Tom +
If Jane had a negative result and she shared fluids with Tom, Bill, and Mike, she would put a minus mark next to her name and those of Tom, Bill, and Mike.
Name Results
Ann +
Bill −
Jack +
Jane + −
Mike −
Tom + −
Just from the data from those two students, you can conclude that Bill, Jane, Mike, and Tom cannot have been the originally infected students. It is possible that either Ann or Jack were originally infected.
6. The result should be that some students will be all negative. Others will have a mixture of positives and negatives. Any student with any minuses next to his or her name cannot be patient zero (the originally infected student).
7. One student may have all plus marks, indicating that they were patient zero, but there are normally several students with all plus marks. Usually from the first experiment you can get it to a small number of “suspects” and then use the second ELISA to find patient zero. Note: You have not done anything wrong in the experiment if you get more than one student with all plus marks.
8. You can take the data and build a cluster analysis, as an epidemiologist would do when investigating a disease outbreak. I’ve included a couple of examples of cluster analyses that I made up (pages 44-45). In the first one, there was one initial “infected” individual. In the second, there were two. The circles are the individuals, with the solid circles indicating the original infected individual. The lines indicate sharing of fluids, and the numbers are the order of the “sharing.” In other words, the “1” means that is the first time the students “shared fluids” and the “2” is the second sharing event. As you can see, the clusters will look different based on the number of original “infected” individuals and whether infected individuals shared with each other or with previously uninfected students.
9. Another figure (page 46) shows the spread of “disease” in a class of 20, depending on whether there were one or two “infected” individuals at the beginning. The pictured example shows the maximum number of students who could be infected, as each “infected” student has shared fluids with an uninfected individual. This is unlikely in the classroom, as some students are bound to share with students who have been infected already.
APPENDIX: IMMUNOLOGY CONCEPTS
28
Immunological concepts Immunity Immunology is the science of the immune system, the system that protects the body from foreign substances, cells, and tissues by producing an immune response. Resistance to infection, or immunity, the method used by the body to protect itself, is divided into two types: innate and acquired.
Innate immunity, also known as passive or non-adaptive immunity, is the immunity with which a person is born. Innate immunity includes physical barriers, such as the skin and mucous membranes, and cellular responses, such as circulating macrophages that attack foreign invaders. Innate immunity also includes antibodies passed from mother to child, which protect the child while its own immune response matures. Non-adaptive immunity is a nonspecific response to foreign substances, and the response does not change with multiple exposures to an invader.
Acquired or adaptive immunity is a specific response to specific foreign substances. Although individuals (except for those individuals who are immune-compromised) are born with the ability to respond to these invaders, the system must be activated by an initial contact with the invader. The initial contact, or immunization, begins a cascade of events that allows the body to mount a specific response on subsequent exposure to the invader, hence the term acquired immunity, as initial contact is necessary to acquire the immunity. Acquired immunity is split into two categories: humoral immunity involves production of antibodies that circulate in the bloodstream and lymph and bind specifically to foreign antigens, and cell-mediated immunity involves the production of specialized cells that react mainly with antibodies coating foreign antigens, inducing the specialized cells to engulf and destroy the invaders.
Acquired immunity is the basis for the barrage of vaccinations that we undergo as we grow up. In the 1790’s, long before we had any understanding of the immune system, Edward Jenner discovered that inoculation with pus from a cowpox lesion prevented infection with smallpox, a disease related to cowpox. The U.S. Centers for Disease Control (CDC) currently recommends childhood vaccination against 14 diseases: measles, mumps, rubella (German measles), diphtheria, tetanus (lockjaw), pertussis (whooping cough), polio, Haemophilus influenzae type b (Hib Disease), hepatitis B, varicella (Chickenpox), hepatitis A, meningococcal disease, influenza (annual inoculation), and pneumococcal disease. For travelers abroad, additional vaccinations are recommended (or required, in the case of the U.S. military). The recommendations are based on the traveler’s destination. For example, the CDC recommends that travelers to tropical South America be vaccinated against hepatitis A, hepatitis B, rabies (if the traveler will be exposed to animals), typhoid, and yellow fever, plus booster doses for tetanus, diphtheria, and measles.
Components of the Acquired Immune Response The immune response begins with an invasion by something foreign to the body (an antigen) that generates antibody production by B lymphocytes. Each B lymphocyte (or B cell) generates a unique antibody that recognizes a single shape on an antigen called an epitope and thus helps the immune cells (B cells, T cells, and macrophages) to recognize and attack foreign invaders. Everyone (except those with immune system dysfunction) has circulating antibodies and lymphocytes that recognize a huge number of antigenic substances.
Antigens can be any agents foreign to the body, for example, microorganisms (e.g., viruses and bacteria), microbial products (e.g., toxins produced by some bacteria or
APPENDIX: IMMUNOLOGY CONCEPTS
29
protein components of the microbes), foreign proteins, DNA and RNA molecules, drugs, and other chemicals. Small or very simple molecules (such as polymers) may not cause an immune response. In general, the bigger the antigen, the stronger the immune response.
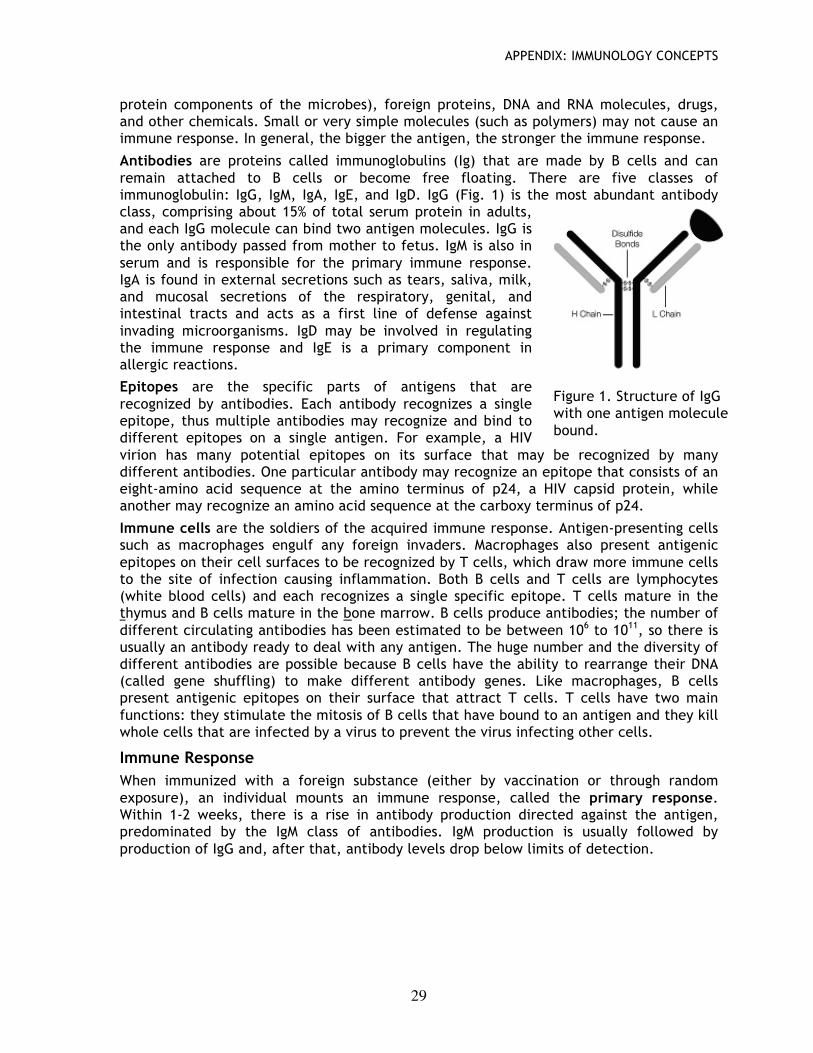
Antibodies are proteins called immunoglobulins (Ig) that are made by B cells and can remain attached to B cells or become free floating. There are five classes of immunoglobulin: IgG, IgM, IgA, IgE, and IgD. IgG (Fig. 1) is the most abundant antibody class, comprising about 15% of total serum protein in adults, and each IgG molecule can bind two antigen molecules. IgG is the only antibody passed from mother to fetus. IgM is also in serum and is responsible for the primary immune response. IgA is found in external secretions such as tears, saliva, milk, and mucosal secretions of the respiratory, genital, and intestinal tracts and acts as a first line of defense against invading microorganisms. IgD may be involved in regulating the immune response and IgE is a primary component in allergic reactions.
Epitopes are the specific parts of antigens that are recognized by antibodies. Each antibody recognizes a single epitope, thus multiple antibodies may recognize and bind to different epitopes on a single antigen. For example, a HIV virion has many potential epitopes on its surface that may be recognized by many different antibodies. One particular antibody may recognize an epitope that consists of an eight-amino acid sequence at the amino terminus of p24, a HIV capsid protein, while another may recognize an amino acid sequence at the carboxy terminus of p24. Immune cells are the soldiers of the acquired immune response. Antigen-presenting cells such as macrophages engulf any foreign invaders. Macrophages also present antigenic epitopes on their cell surfaces to be recognized by T cells, which draw more immune cells to the site of infection causing inflammation. Both B cells and T cells are lymphocytes (white blood cells) and each recognizes a single specific epitope. T cells mature in the thymus and B cells mature in the bone marrow. B cells produce antibodies; the number of different circulating antibodies has been estimated to be between 106 to 1011, so there is usually an antibody ready to deal with any antigen. The huge number and the diversity of different antibodies are possible because B cells have the ability to rearrange their DNA (called gene shuffling) to make different antibody genes. Like macrophages, B cells present antigenic epitopes on their surface that attract T cells. T cells have two main functions: they stimulate the mitosis of B cells that have bound to an antigen and they kill whole cells that are infected by a virus to prevent the virus infecting other cells.
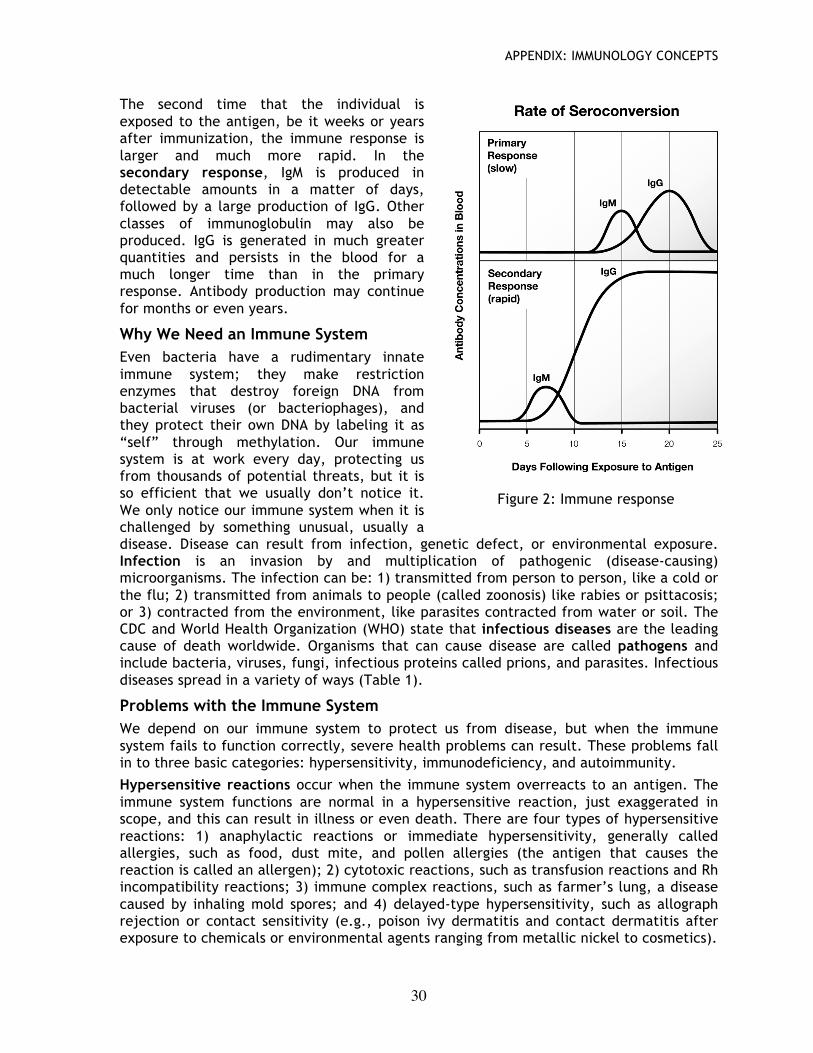
Immune Response When immunized with a foreign substance (either by vaccination or through random exposure), an individual mounts an immune response, called the primary response. Within 1-2 weeks, there is a rise in antibody production directed against the antigen, predominated by the IgM class of antibodies. IgM production is usually followed by production of IgG and, after that, antibody levels drop below limits of detection.
Figure 1. Structure of IgG with one antigen molecule bound.
APPENDIX: IMMUNOLOGY CONCEPTS
30
The second time that the individual is exposed to the antigen, be it weeks or years after immunization, the immune response is larger and much more rapid. In the secondary response, IgM is produced in detectable amounts in a matter of days, followed by a large production of IgG. Other classes of immunoglobulin may also be produced. IgG is generated in much greater quantities and persists in the blood for a much longer time than in the primary response. Antibody production may continue for months or even years.
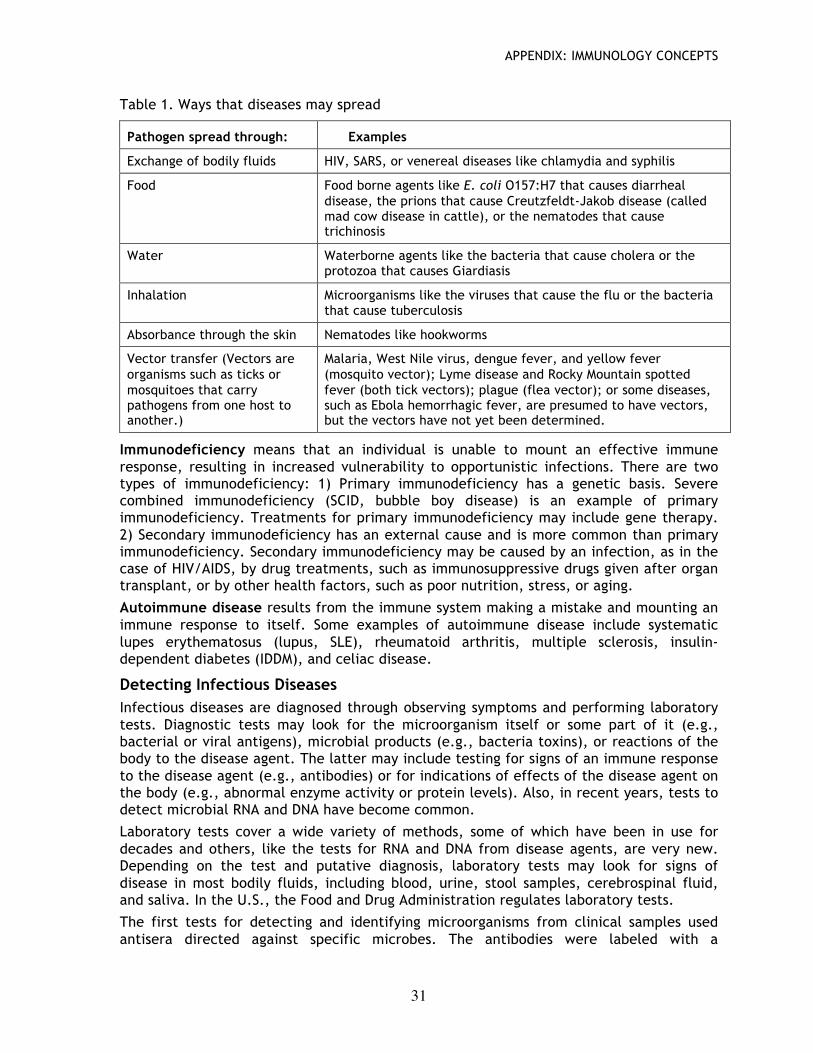
Why We Need an Immune System Even bacteria have a rudimentary innate immune system; they make restriction enzymes that destroy foreign DNA from bacterial viruses (or bacteriophages), and they protect their own DNA by labeling it as “self” through methylation. Our immune system is at work every day, protecting us from thousands of potential threats, but it is so efficient that we usually don’t notice it. We only notice our immune system when it is challenged by something unusual, usually a disease. Disease can result from infection, genetic defect, or environmental exposure. Infection is an invasion by and multiplication of pathogenic (disease-causing) microorganisms. The infection can be: 1) transmitted from person to person, like a cold or the flu; 2) transmitted from animals to people (called zoonosis) like rabies or psittacosis; or 3) contracted from the environment, like parasites contracted from water or soil. The CDC and World Health Organization (WHO) state that infectious diseases are the leading cause of death worldwide. Organisms that can cause disease are called pathogens and include bacteria, viruses, fungi, infectious proteins called prions, and parasites. Infectious diseases spread in a variety of ways (Table 1).
Problems with the Immune System We depend on our immune system to protect us from disease, but when the immune system fails to function correctly, severe health problems can result. These problems fall in to three basic categories: hypersensitivity, immunodeficiency, and autoimmunity.
Hypersensitive reactions occur when the immune system overreacts to an antigen. The immune system functions are normal in a hypersensitive reaction, just exaggerated in scope, and this can result in illness or even death. There are four types of hypersensitive reactions: 1) anaphylactic reactions or immediate hypersensitivity, generally called allergies, such as food, dust mite, and pollen allergies (the antigen that causes the reaction is called an allergen); 2) cytotoxic reactions, such as transfusion reactions and Rh incompatibility reactions; 3) immune complex reactions, such as farmer’s lung, a disease caused by inhaling mold spores; and 4) delayed-type hypersensitivity, such as allograph rejection or contact sensitivity (e.g., poison ivy dermatitis and contact dermatitis after exposure to chemicals or environmental agents ranging from metallic nickel to cosmetics).
Figure 2: Immune response
APPENDIX: IMMUNOLOGY CONCEPTS
31
Table 1. Ways that diseases may spread
Pathogen spread through: Examples
Exchange of bodily fluids HIV, SARS, or venereal diseases like chlamydia and syphilis
Food Food borne agents like E. coli O157:H7 that causes diarrheal disease, the prions that cause Creutzfeldt-Jakob disease (called mad cow disease in cattle), or the nematodes that cause trichinosis
Water Waterborne agents like the bacteria that cause cholera or the protozoa that causes Giardiasis
Inhalation Microorganisms like the viruses that cause the flu or the bacteria that cause tuberculosis
Absorbance through the skin Nematodes like hookworms
Vector transfer (Vectors are organisms such as ticks or mosquitoes that carry pathogens from one host to another.)
Malaria, West Nile virus, dengue fever, and yellow fever (mosquito vector); Lyme disease and Rocky Mountain spotted fever (both tick vectors); plague (flea vector); or some diseases, such as Ebola hemorrhagic fever, are presumed to have vectors, but the vectors have not yet been determined.
Immunodeficiency means that an individual is unable to mount an effective immune response, resulting in increased vulnerability to opportunistic infections. There are two types of immunodeficiency: 1) Primary immunodeficiency has a genetic basis. Severe combined immunodeficiency (SCID, bubble boy disease) is an example of primary immunodeficiency. Treatments for primary immunodeficiency may include gene therapy. 2) Secondary immunodeficiency has an external cause and is more common than primary immunodeficiency. Secondary immunodeficiency may be caused by an infection, as in the case of HIV/AIDS, by drug treatments, such as immunosuppressive drugs given after organ transplant, or by other health factors, such as poor nutrition, stress, or aging.
Autoimmune disease results from the immune system making a mistake and mounting an immune response to itself. Some examples of autoimmune disease include systematic lupes erythematosus (lupus, SLE), rheumatoid arthritis, multiple sclerosis, insulin-dependent diabetes (IDDM), and celiac disease.
Detecting Infectious Diseases Infectious diseases are diagnosed through observing symptoms and performing laboratory tests. Diagnostic tests may look for the microorganism itself or some part of it (e.g., bacterial or viral antigens), microbial products (e.g., bacteria toxins), or reactions of the body to the disease agent. The latter may include testing for signs of an immune response to the disease agent (e.g., antibodies) or for indications of effects of the disease agent on the body (e.g., abnormal enzyme activity or protein levels). Also, in recent years, tests to detect microbial RNA and DNA have become common.
Laboratory tests cover a wide variety of methods, some of which have been in use for decades and others, like the tests for RNA and DNA from disease agents, are very new. Depending on the test and putative diagnosis, laboratory tests may look for signs of disease in most bodily fluids, including blood, urine, stool samples, cerebrospinal fluid, and saliva. In the U.S., the Food and Drug Administration regulates laboratory tests.
The first tests for detecting and identifying microorganisms from clinical samples used antisera directed against specific microbes. The antibodies were labeled with a
APPENDIX: IMMUNOLOGY CONCEPTS
32
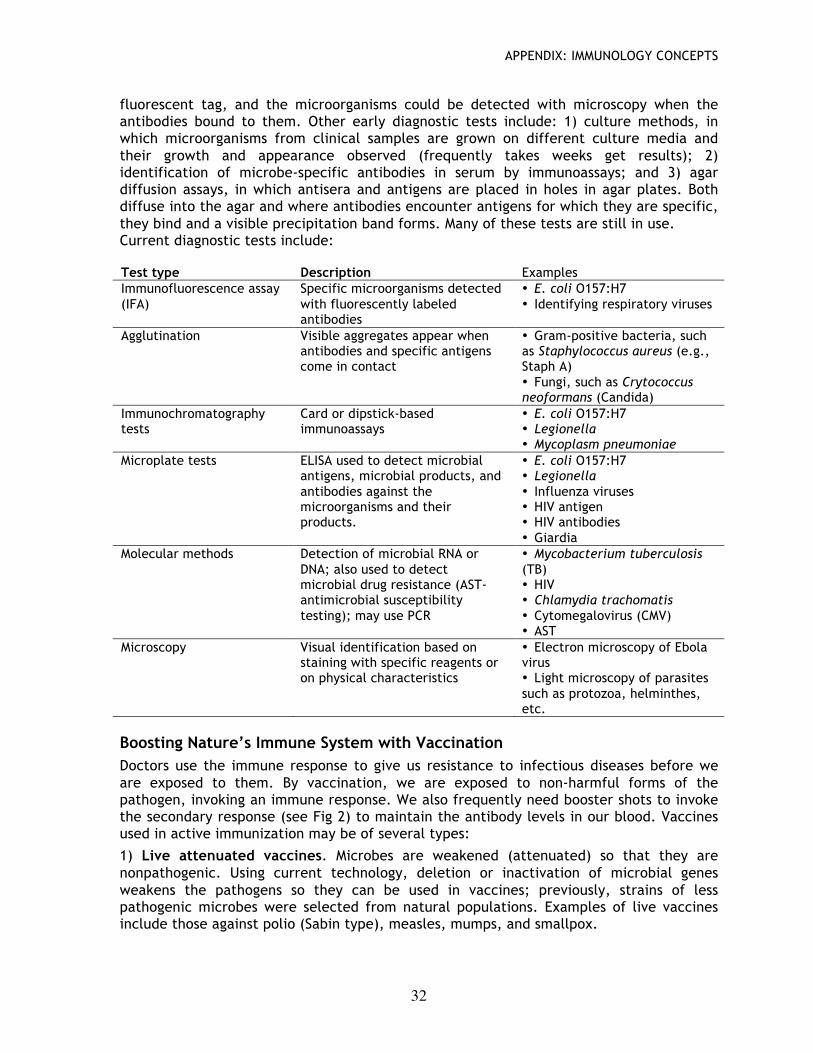
fluorescent tag, and the microorganisms could be detected with microscopy when the antibodies bound to them. Other early diagnostic tests include: 1) culture methods, in which microorganisms from clinical samples are grown on different culture media and their growth and appearance observed (frequently takes weeks get results); 2) identification of microbe-specific antibodies in serum by immunoassays; and 3) agar diffusion assays, in which antisera and antigens are placed in holes in agar plates. Both diffuse into the agar and where antibodies encounter antigens for which they are specific, they bind and a visible precipitation band forms. Many of these tests are still in use. Current diagnostic tests include:
Test type Description Examples Immunofluorescence assay (IFA)
Specific microorganisms detected with fluorescently labeled antibodies
• E. coli O157:H7 • Identifying respiratory viruses
Agglutination Visible aggregates appear when antibodies and specific antigens come in contact
• Gram-positive bacteria, such as Staphylococcus aureus (e.g., Staph A) • Fungi, such as Crytococcus neoformans (Candida)
Immunochromatography tests
Card or dipstick-based immunoassays
• E. coli O157:H7 • Legionella • Mycoplasm pneumoniae
Microplate tests ELISA used to detect microbial antigens, microbial products, and antibodies against the microorganisms and their products.
• E. coli O157:H7 • Legionella • Influenza viruses • HIV antigen • HIV antibodies • Giardia
Molecular methods Detection of microbial RNA or DNA; also used to detect microbial drug resistance (AST- antimicrobial susceptibility testing); may use PCR
• Mycobacterium tuberculosis (TB) • HIV • Chlamydia trachomatis • Cytomegalovirus (CMV) • AST
Microscopy Visual identification based on staining with specific reagents or on physical characteristics
• Electron microscopy of Ebola virus • Light microscopy of parasites such as protozoa, helminthes, etc.
Boosting Nature’s Immune System with Vaccination Doctors use the immune response to give us resistance to infectious diseases before we are exposed to them. By vaccination, we are exposed to non-harmful forms of the pathogen, invoking an immune response. We also frequently need booster shots to invoke the secondary response (see Fig 2) to maintain the antibody levels in our blood. Vaccines used in active immunization may be of several types:
1) Live attenuated vaccines. Microbes are weakened (attenuated) so that they are nonpathogenic. Using current technology, deletion or inactivation of microbial genes weakens the pathogens so they can be used in vaccines; previously, strains of less pathogenic microbes were selected from natural populations. Examples of live vaccines include those against polio (Sabin type), measles, mumps, and smallpox.
APPENDIX: IMMUNOLOGY CONCEPTS
33
2) Killed or inactivated vaccines. Vaccines made of microbes killed by heat or chemicals are much safer than live vaccines, particularly for individuals with compromised immune systems, but they do not usually provoke as strong an immune response as do live vaccines. Examples of killed vaccines include those against rabies, cholera, polio (Salk type), and influenza.
3) Subunit vaccines are made from pieces of microbes. They consist of one or more antigens from either the disease agent or a microbial product (e.g., a toxin), and they may be derived from the organisms or engineered using molecular biology. Examples of subunit vaccines include those against hepatitis B, anthrax, and tetanus.
4) DNA vaccines are a recent approach to vaccine development. DNA that codes for microbial antigens is cloned into a vector and the naked DNA is injected into the patient. The DNA is taken up by cells, transcribed, and translated, and the resulting antigenic protein elicits an immune response. No DNA vaccines are yet available, but there are DNA vaccines against HIV in clinical trials.
5) Antibody vaccines are another innovation in vaccine development. The ability to construct human monoclonal antibodies using recombinant DNA technology means that antibodies prepared against specific antigens may be used safely in humans. For example, a genetically-engineered antibody against anthrax is being tested in animals.
Immunotherapy is the use of vaccines to treat a disease, i.e., post-exposure. Some immunotherapies have been used for years (e.g., administering immune serum globulin after exposure to hepatitis and administering equine antivenin for snakebite), but there are not many other current vaccine-based immunotherapies. Probably the best known is post-exposure rabies vaccination, consisting of 5 doses of rabies vaccine over 30 days. If the vaccine regimen is begun promptly after exposure, it is 100% effective in preventing disease. Smallpox vaccination also provides protection even when administered 2-3 days post-exposure. If the smallpox vaccine is administered as late as 5 days after exposure, it may prevent smallpox from being fatal, although it will not prevent the disease.
Tapping Nature’s Tool Kit Manufacturing Antibodies Antibodies used in research can be manufactured in the laboratory, both in vivo and in vitro. In vivo techniques have been in use for over a hundred years. There are two types of traditionally produced antibodies: polyclonal antibodies, and, in the last thirty years, monoclonal antibodies. However, antibody production is being revolutionized by recombinant DNA technology and so, while most antibodies are still produced by the traditional methods using animals or animal cells, techniques for making antibodies using modern technology are becoming more common.
Polyclonal Antibodies Polyclonal antibodies are generated by immunizing an animal (usually a rabbit, goat, or sheep) and obtaining serum. For example, purified HIV gp120 protein can be injected into a goat, which will then generate antibodies directed against the many epitopes of gp120. (Remember that the goat will produce many different antibodies to the multiple epitopes of an antigen.) Blood containing the antibodies is drawn from the goat and the cells of the blood are removed, leaving the serum. The product is antiserum against gp120 and the antiserum can be used directly or the antibodies can be purified from it. The antibodies are called polyclonal because the antibodies are from many (poly) B cell clones (clonal) in
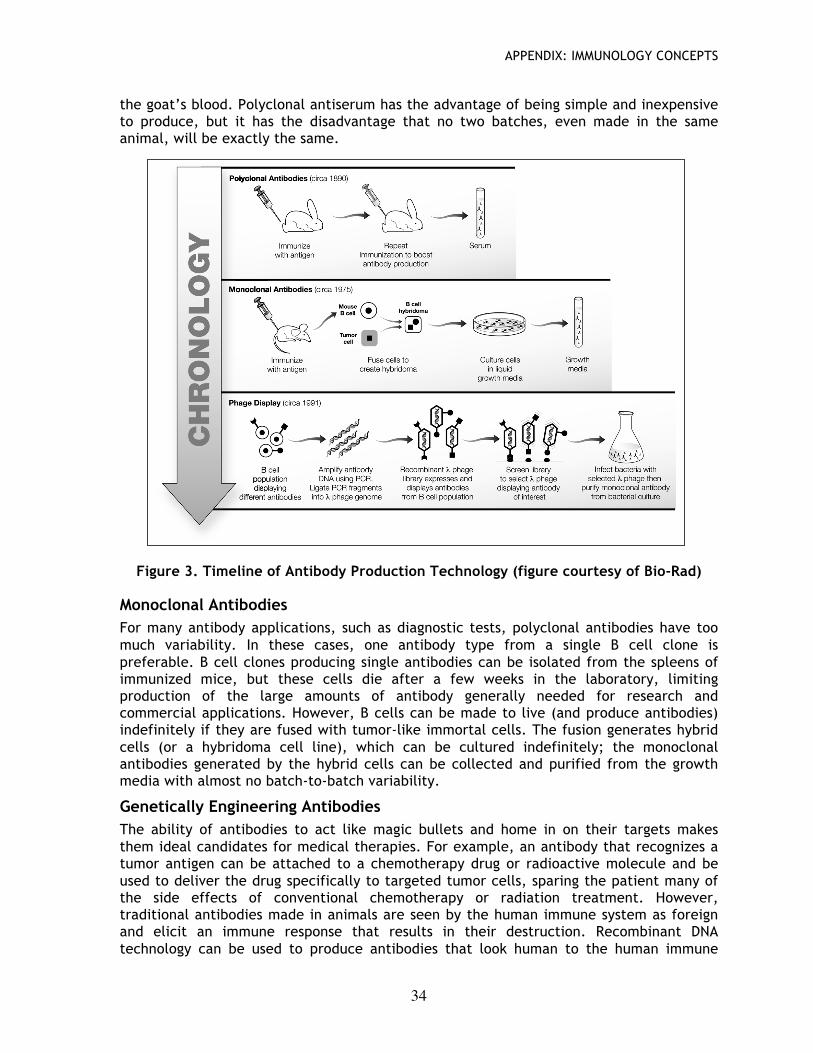
APPENDIX: IMMUNOLOGY CONCEPTS
34
the goat’s blood. Polyclonal antiserum has the advantage of being simple and inexpensive to produce, but it has the disadvantage that no two batches, even made in the same animal, will be exactly the same.
Figure 3. Timeline of Antibody Production Technology (figure courtesy of Bio-Rad)
Monoclonal Antibodies For many antibody applications, such as diagnostic tests, polyclonal antibodies have too much variability. In these cases, one antibody type from a single B cell clone is preferable. B cell clones producing single antibodies can be isolated from the spleens of immunized mice, but these cells die after a few weeks in the laboratory, limiting production of the large amounts of antibody generally needed for research and commercial applications. However, B cells can be made to live (and produce antibodies) indefinitely if they are fused with tumor-like immortal cells. The fusion generates hybrid cells (or a hybridoma cell line), which can be cultured indefinitely; the monoclonal antibodies generated by the hybrid cells can be collected and purified from the growth media with almost no batch-to-batch variability.
Genetically Engineering Antibodies The ability of antibodies to act like magic bullets and home in on their targets makes them ideal candidates for medical therapies. For example, an antibody that recognizes a tumor antigen can be attached to a chemotherapy drug or radioactive molecule and be used to deliver the drug specifically to targeted tumor cells, sparing the patient many of the side effects of conventional chemotherapy or radiation treatment. However, traditional antibodies made in animals are seen by the human immune system as foreign and elicit an immune response that results in their destruction. Recombinant DNA technology can be used to produce antibodies that look human to the human immune
APPENDIX: IMMUNOLOGY CONCEPTS
35
system and so can be used as therapeutic agents in people. (For example, HerceptinTM is a “humanized” antibody used to treat breast cancer.) Using genetic engineering to manufacture antibodies also relieves the requirement for the sacrifice of laboratory animals. Two of the methods used to engineer antibodies are described below.
Hybridoma Immortalization Recombinant DNA technology allows the antigen recognition site from a known mouse monoclonal antibody to be camouflaged within a human antibody by combining part of the mouse gene with the human antibody gene. Bacteria transformed with this DNA are capable of producing humanized monoclonal antibodies indefinitely, with the added bonus that culturing bacteria requires much less time and expense then the culture of a mouse hybridoma cell line.
Phage Display Novel antibodies to antigens are being generated using modern biotechnology. Libraries of billions of potentially useful antibodies are being created by inserting shuffled antibody genes from billions of people’s B cells into the genomes of bacteriophage lambda (bacteriophages or phages are viruses that infect bacteria; lambda phage is a specific species of phage), so that the lambda phages display the binding sites from human antibodies on their surfaces. This phage library is screened to find a phage that binds to a specific antigen. The phage can then be used directly as an antibody would be used. Alternatively, the DNA from the selected phage can be cloned into an expression vector; large amounts of the antibody can then be produced for therapeutic use. Phage display is on the cutting edge of immunotherapy.
Labeling and Detecting Antibodies Antibodies are used in diagnosis and research as labeling tools. As labels they have to be made visible. To this end antibodies are covalently linked (or conjugated) to chemical labels that emit detectable signals. Detection systems can be low tech or high tech, and the detection system determines the type of label used. For example, a fluorescently-labeled antibody allows you to localize an antigen in a cell using a high tech fluorescence microscope. Antibodies are also linked to enzymes that oxidize a chromogenic (color-producing) substrate, producing visual color only where the antibody-enzyme label has bound. Enzyme-linked antibodies are commonly used in Western blots, microscopy, and ELISA.
Antibody targets or antigens can be detected directly by labeling the antibody specific for the antigen and looking for signal. However, labeling every type of antibody scientists might wish to use is time-consuming and costly. Thus, a more common method to visualize antigens is called indirect detection. This technique relies on the use of polyclonal secondary antibodies. Secondary antibodies recognize primary antibodies. The primary antibody binds specifically to the antigen and secondary antibody binds specifically to the primary antibody. The indirect method means that only one type of labeled secondary antibody is needed to visualize all antibodies produced in one type of animal (e.g., in rabbits), reducing time and costs. In addition, indirect labeling adds a bonus, since the primary antibody is effectively an antigen to the secondary antibody. The primary antibody has many different epitopes and so is bound by multiple secondary antibodies. Thus more labels accumulate around the antigen, amplifying the signal.
Secondary antibodies are produced by injecting the antibodies of one animal into a different species of animal. For example, if the primary antibody is a mouse monoclonal antibody, secondary antibodies can be generated by immunizing a goat with any mouse
APPENDIX: IMMUNOLOGY CONCEPTS
36
antibody. Goat polyclonal anti-mouse IgG is purified from the goat serum and linked to an enzyme for detection. Secondary antibodies are commercially available, either unlabeled or with a wide variety of labels for any application (e.g., fluorescent, chromogenic, or radioactive).
Putting Antibodies to Use Antibodies have been used for decades as the workhorses of the laboratory, but in recent years the expansion of technology to produce antibodies has resulted in a myriad of new applications that take advantage of the specificity of antibody binding. The basis of all immunoassays is the binding of an antibody to its specific antigen, and there are many ways that binding can be utilized. Here are some of those uses:
Immunostaining localizes antigens in organelles, cells, tissues, or whole organisms, and can also be used to distinguish one cell type from another. For example, pathologists can identify cancer cells using immunostaining. Cancer cells frequently look identical to normal cells under the microscope but, when immunostained, variations in the amount and kinds of cell surface proteins (antigens) are revealed. Studying this information helps diagnose cancer and it can help in our understanding of how cancer cells cause harm.
Immunostaining tissues or organisms can tell us in what cell types a protein is normally found, information which can help us understand the protein’s function. For instance, immunostaining of seedlings at different stages of maturation allows us to follow how a protein’s abundance and localization change as the plant grows. Antibodies for immunostaining are labeled either with fluorescent molecules or with enzymes that produce colored signals upon addition of a substrate.
A special application of immunostaining is fluorescence-activated cell sorting or FACS, in which a population of cells is stained with a fluorescently-labeled antibody and then physically separated into stained and unstained cells. The cell sorter uses lasers to detect the fluorescent labels and an electrostatic charge to sort the cells in solution. Cell sorters can separate as many as 30,000 cells per second!
Immunoblotting or Western blotting tells us about a protein’s size and relative abundance in a given sample. In Western blotting, an antibody picks out a specific protein from a complex sample (usually lysed cells or tissues) that has been separated by size using SDS-polyacrylamide gel electrophoresis (SDS-PAGE). Proteins separated in SDS-PAGE gels are transferred (or electroblotted) from the gel to the surface of a nylon or nitrocellulose membrane using an electrical current. The membrane is probed with a primary antibody that is specific for the protein of interest, and then a labeled secondary antibody is used to visualize the protein. The label is usually an enzyme that oxidizes a colorimetric substrate, producing a colored band on the membrane. Alternatively, the oxidized substrate may emit light (chemiluminescent substrate) that is detected as a band on photographic film. The size of the protein is determined by comparing the position of the band to the position of known protein standards that are commonly run on SDS-PAGE gels. The abundance of the protein is determined by comparing band intensity to known amounts of protein standards run on the same gel.
A modification of immunoblotting is called dot blotting, in which a sample is spotted onto a membrane directly rather than being blotted to the membrane from a gel. Dot blotting is used for rapid screening of a large number of samples. This technique provides a rapid method for determining whether a particular protein or antigen is present, as many samples may be spotted on a membrane and processed simultaneously, but dot blotting provides no information about the size of the protein.

APPENDIX: IMMUNOLOGY CONCEPTS
37
wick test zone
control zone
capillary action
mouse anti-hCG labeled with colloidal gold (pink)
immobilized goat anti-hCG
human chorionic gonadotropin (hCG)
immobilized goat anti-mouse IgG
A.
B.
C.
D.
E.
Figure 4. There are many varieties of dipstick tests, including home pregnancy tests, tests for illegal drug use (e.g., marijuana, cocaine, and methamphetamines), and tests for infectious agents (e.g., HIV, plague, E. coli O157, and Legionella). These immunochromatography assays give positive or negative results in a matter of minutes and are called sandwich immunoassays because they rely on the use of multiple antibodies. One of the antibodies is labeled with a colored compound, such as colloidal gold, which produces a pink band on the test strip in positive assays.
For example, in home pregnancy dipstick tests, as illustrated in Fig. 4, detect levels of human chorionic gonadotropin (hCG), a hormone that appears in the blood and urine of pregnant women within days of fertilization. The wick area of the dipstick is coated with mouse monoclonal anti-hCG labeled with colloidal gold, a pink compound (A). When the strip is dipped in urine (B), if hCG is present it will be bound by the labeled antibody and the hCG-antibody complex will migrate up the strip via capillary action (C). When the complex reaches the test zone, a narrow strip containing an immobilized, unlabeled goat polyclonal anti-hCG, the complex will bind and concentrate there, making a pink stripe (D). The dipstick tests have a built-in control zone containing immobilized polyclonal goat anti-mouse IgG. The unbound labeled mouse anti-hCG (present in both positive and negative results) will continue to migrate up the strip, past the test zone, and bind in the control zone, giving a second (or first, if the test is negative for pregnancy) pink stripe (E). If no pink stripe appears in the control zone, the test did not function properly.
APPENDIX: PRE-LAB BACKGROUND & QUESTIONS
38
Immunoassay Pre-Lab Background and Questions
Anne-Taylor Morris (formerly at Atlee High School)
The purposes of this investigation are as follows:
1. Explore the components of an immunoassay (e.g. antibody-antigen binding and visualizing results).
2. Carry out the steps of an ELISA test for diagnosing carriers of HIV.
3. Highlight the ease with which infectious diseases, such as HIV, can spread through a population.
Enzyme-Linked Immunosorbant Assay (ELISA)
Portions of this excerpt were taken directly from the “ELISA Assay” manual produced by Dr. Kristi DeCourcy of the Fralin Biotechnology Center at Virginia Tech.
The production of monoclonal antibodies has made it possible for scientists to rely on the specific and sensitive interaction between antibodies and antigens in order to refine assay systems. The resultant assays can detect minute amounts of proteins (through antibody-antigen binding) and be used to quantify proteins, identify proteins, characterize proteins, etc. For this exercise, it is the protein-identification/detection capabilities of the immunoassay that we are interested in exploring. It is upon this characteristic that many diagnostic tests have been established. In this laboratory, we will be simulating a test for HIV, known as the ELISA test.
The enzyme-linked immunosorbant assay, ELISA, is an immunological approach used to detect and quantify specific antigens in a mixture. There are several variations of ELISA tests on the market that differ mainly in the sequence that the proteins (antigens and antibodies) are added to the test wells. Similarities between the ELISA tests include the use of assay plates containing wells of specific size; the plates are made of a material that binds proteins very strongly to the wells. Another important similarity is that there must be a label added to the antibody that will allow the researcher to detect antibody-antigen binding. Possible antibody-tags include molecules which fluoresce or radioactive molecules (radioimmunoassay). The ELISA utilizes an enzyme tag on the antibody (hence the name enzyme-linked) which will ultimately produce a color change when antigen-antibody binding has occurred. It is this color change, which is the result of the enzymatic reaction “linked” to the antibody, that allows researchers to detect the antigen-antibody binding complexes in the wells of the test plates. The ELISA technique that we will be simulating is called the antibody-capture assay.
In the antibody-capture assay, the sample that may contain the antigen of interest (remember the antigen of interest will be the protein or agent that we are trying to detect and/or quantify) is added to the well. The wells are made of a material to which the antigen will bind (see Figure 1). You don’t want the excess sample, so that portion is rinsed out of the plate; in other words, you only need the portion of the sample that has antigens which have bound to the wells. If the sample did not contain the antigen of interest there will be nothing left in the wells for the antibodies (which are added next) to react with. After this first rinsing step, the antibodies directed against the antigen of interest are added to the sample-treated wells in the plate. These antibodies are “special” in that they have been tagged with peroxidase (the enzyme-link). In those wells
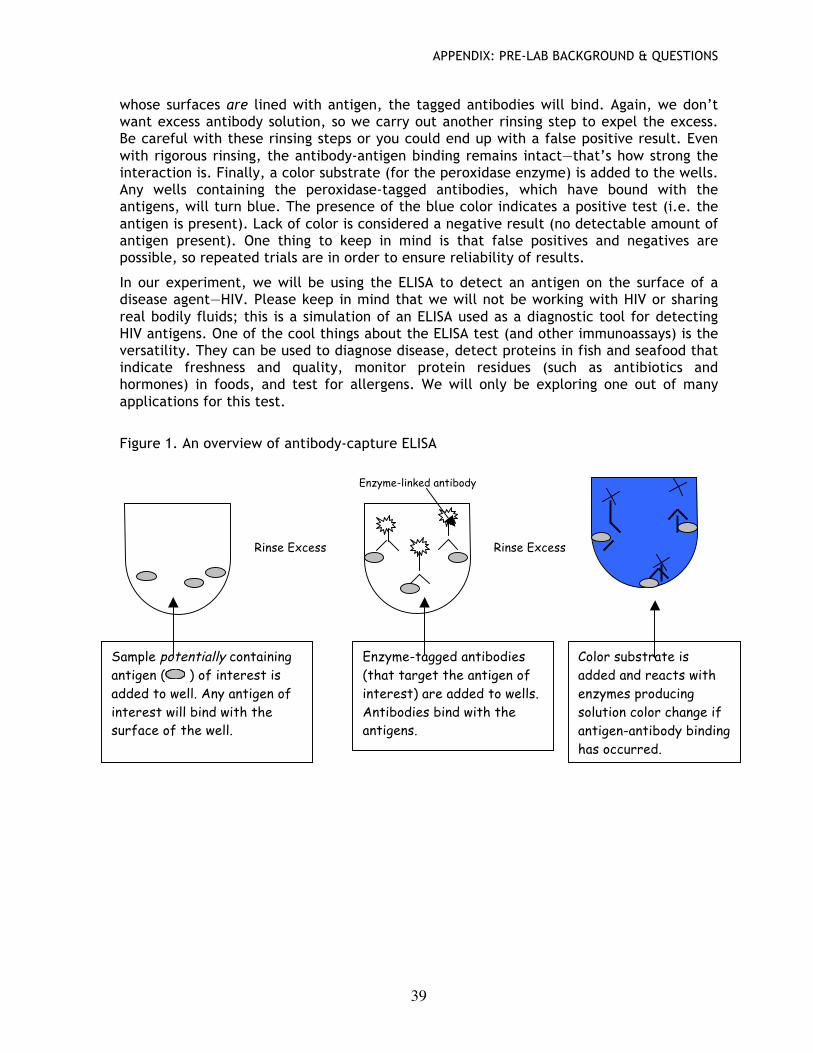
APPENDIX: PRE-LAB BACKGROUND & QUESTIONS
39
whose surfaces are lined with antigen, the tagged antibodies will bind. Again, we don’t want excess antibody solution, so we carry out another rinsing step to expel the excess. Be careful with these rinsing steps or you could end up with a false positive result. Even with rigorous rinsing, the antibody-antigen binding remains intact—that’s how strong the interaction is. Finally, a color substrate (for the peroxidase enzyme) is added to the wells. Any wells containing the peroxidase-tagged antibodies, which have bound with the antigens, will turn blue. The presence of the blue color indicates a positive test (i.e. the antigen is present). Lack of color is considered a negative result (no detectable amount of antigen present). One thing to keep in mind is that false positives and negatives are possible, so repeated trials are in order to ensure reliability of results.
In our experiment, we will be using the ELISA to detect an antigen on the surface of a disease agent—HIV. Please keep in mind that we will not be working with HIV or sharing real bodily fluids; this is a simulation of an ELISA used as a diagnostic tool for detecting HIV antigens. One of the cool things about the ELISA test (and other immunoassays) is the versatility. They can be used to diagnose disease, detect proteins in fish and seafood that indicate freshness and quality, monitor protein residues (such as antibiotics and hormones) in foods, and test for allergens. We will only be exploring one out of many applications for this test.
Figure 1. An overview of antibody-capture ELISA
Sample potentially containing antigen ( ) of interest is added to well. Any antigen of interest will bind with the surface of the well.
Enzyme-tagged antibodies (that target the antigen of interest) are added to wells. Antibodies bind with the antigens.
Rinse Excess Rinse Excess
Color substrate is added and reacts with enzymes producing solution color change if antigen-antibody binding has occurred.
Enzyme-linked antibody
APPENDIX: PRE-LAB BACKGROUND & QUESTIONS
40
Questions:
1. What is the source for the materials and background information for this lab?
2. What are the purposes of this exercise?
3. What development has allowed researchers to refine immunoassay techniques?
4. What information, using an immunoassay system, can be obtained about proteins?
5. What will this lab exercise tell us about the protein (in this case, the antigen) of interest?
6. What is the full name and abbreviation of the test we will be simulating in the laboratory?
7. In what way can ELISA tests differ?
8. What are some similarities between different types of ELISA tests?
9. How can the antigen-antibody binding be detected in the ELISA test?
10. What antibody tag or label does an ELISA use?
11. How does the enzyme allow for detection of antigen-antibody binding?
12. What type or category of ELISA will we be carrying out?
13. Describe and draw this ELISA test with labels.
14. What’s the difference between a positive and negative test?
15. Why are repeated trials or tests done per sample of an ELISA test?
16. What diagnostic test are we simulating with our ELISA test?
17. Will you be working with real body fluids and real HIV antigens?
18. Give other examples of tests for which the ELISA technique can be used.
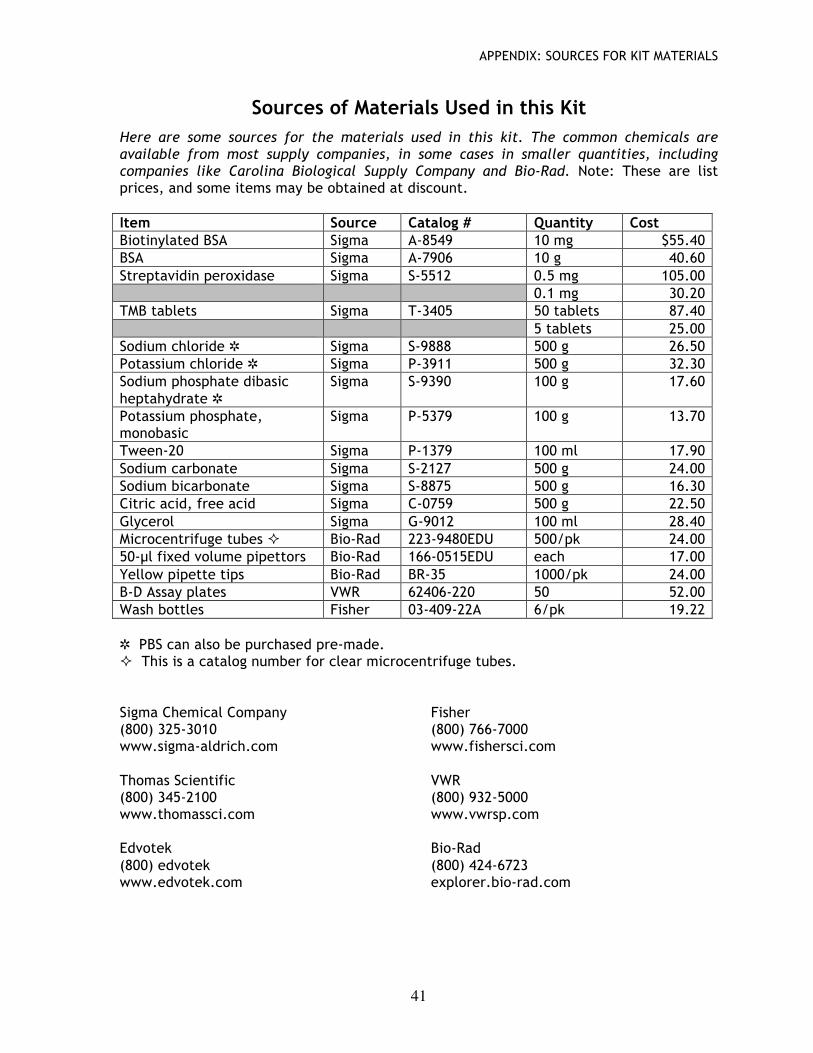
APPENDIX: SOURCES FOR KIT MATERIALS
41
Sources of Materials Used in this Kit
Here are some sources for the materials used in this kit. The common chemicals are available from most supply companies, in some cases in smaller quantities, including companies like Carolina Biological Supply Company and Bio-Rad. Note: These are list prices, and some items may be obtained at discount. Item Source Catalog # Quantity Cost Biotinylated BSA Sigma A-8549 10 mg $55.40 BSA Sigma A-7906 10 g 40.60 Streptavidin peroxidase Sigma S-5512 0.5 mg 105.00 0.1 mg 30.20 TMB tablets Sigma T-3405 50 tablets 87.40 5 tablets 25.00 Sodium chloride ✲ Sigma S-9888 500 g 26.50 Potassium chloride ✲ Sigma P-3911 500 g 32.30 Sodium phosphate dibasic heptahydrate ✲
Sigma S-9390 100 g 17.60
Potassium phosphate, monobasic
Sigma P-5379 100 g 13.70
Tween-20 Sigma P-1379 100 ml 17.90 Sodium carbonate Sigma S-2127 500 g 24.00 Sodium bicarbonate Sigma S-8875 500 g 16.30 Citric acid, free acid Sigma C-0759 500 g 22.50 Glycerol Sigma G-9012 100 ml 28.40 Microcentrifuge tubes Bio-Rad 223-9480EDU 500/pk 24.00 50-µl fixed volume pipettors Bio-Rad 166-0515EDU each 17.00 Yellow pipette tips Bio-Rad BR-35 1000/pk 24.00 B-D Assay plates VWR 62406-220 50 52.00 Wash bottles Fisher 03-409-22A 6/pk 19.22 ✲ PBS can also be purchased pre-made. This is a catalog number for clear microcentrifuge tubes. Sigma Chemical Company (800) 325-3010 www.sigma-aldrich.com Thomas Scientific (800) 345-2100 www.thomassci.com Edvotek (800) edvotek www.edvotek.com
Fisher (800) 766-7000 www.fishersci.com VWR (800) 932-5000 www.vwrsp.com Bio-Rad (800) 424-6723 explorer.bio-rad.com
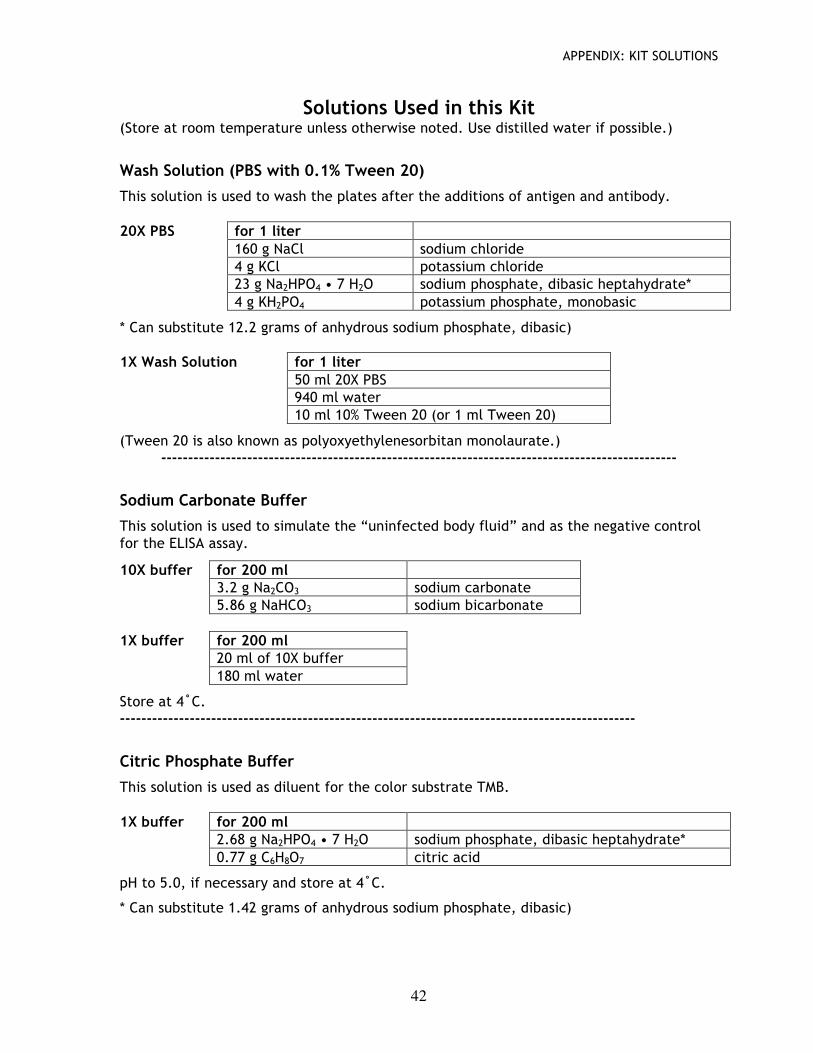
APPENDIX: KIT SOLUTIONS
42
Solutions Used in this Kit (Store at room temperature unless otherwise noted. Use distilled water if possible.)
Wash Solution (PBS with 0.1% Tween 20)
This solution is used to wash the plates after the additions of antigen and antibody.
20X PBS for 1 liter 160 g NaCl sodium chloride 4 g KCl potassium chloride 23 g Na2HPO4 • 7 H2O sodium phosphate, dibasic heptahydrate* 4 g KH2PO4 potassium phosphate, monobasic
* Can substitute 12.2 grams of anhydrous sodium phosphate, dibasic) 1X Wash Solution for 1 liter 50 ml 20X PBS 940 ml water 10 ml 10% Tween 20 (or 1 ml Tween 20)
(Tween 20 is also known as polyoxyethylenesorbitan monolaurate.) ------------------------------------------------------------------------------------------------
Sodium Carbonate Buffer
This solution is used to simulate the “uninfected body fluid” and as the negative control for the ELISA assay.
10X buffer for 200 ml 3.2 g Na2CO3 sodium carbonate 5.86 g NaHCO3 sodium bicarbonate 1X buffer for 200 ml 20 ml of 10X buffer 180 ml water
Store at 4˚C. ------------------------------------------------------------------------------------------------
Citric Phosphate Buffer
This solution is used as diluent for the color substrate TMB.
1X buffer for 200 ml 2.68 g Na2HPO4 • 7 H2O sodium phosphate, dibasic heptahydrate* 0.77 g C6H8O7 citric acid
pH to 5.0, if necessary and store at 4˚C.
* Can substitute 1.42 grams of anhydrous sodium phosphate, dibasic)
APPENDIX: KIT SOLUTIONS
43
“Antigen” (Biotinylated BSA): “Infected body fluid”
This solution is used to simulate the “infected body fluid” and as the positive control for the ELISA assay.
1. Dissolve 10 mg of biotinylated bovine serum albumin (BSA) in 20 ml of 1X sodium carbonate buffer, giving a final concentration of 0.5 mg/ml. Aliquot 1 ml/tube and store at -20˚C.
2. Prepare a 10 mg/ml solution of BSA (non-biotinylated) in water. Dissolve 0.5 g BSA in 50 ml of water. Aliquot 10 ml/tube and store at -20˚C. (This will also be used to prepare the antibody solution.)
3. To prepare 10 ml, add 100 µl of 0.5 mg/ml biotinylated BSA and 50 µl of 10 mg/ml BSA to 9.85 ml of 1X sodium carbonate buffer.
4. This solution should be stored at 4˚C and is stable for 1 week.
Note: For the kit, 100 µl of 0.5 mg/ml biotinylated BSA and 50 µl of 10 mg/ml BSA are mixed in a microcentrifuge tube and frozen at –20˚C. To prepare the antigen, the tube contents are added to 10 ml of 1X sodium carbonate buffer.
“Antibody” Solution (streptavidin peroxidase)
1. To prepare stock concentration (0.5 mg/ml) of streptavidin, add 1 ml of 50% glycerol to 0.5 mg of streptavidin peroxidase. Store at 4˚C. It should be stable for several years.
2. Add 0.5 ml of 20X PBS and 50 µl of 10 mg/ml BSA to 9.45 ml of water. To this solution, add 2 µl streptavidin peroxidase (1 µg), giving a final concentration of 100 ng/ml.
3. This solution should be stored at 4˚C and is stable for 1 week.
Color Reagent Solution (TMB)
1. To prepare color substrate solution, add 2 TMB (1 mg) tablet to 20 ml citric phosphate buffer.
2. Add 50 µl of 3% hydrogen peroxide (H2O2) to the solution and mix.
3. Use immediately. (Can be stored for brief periods at 4˚C.)
APPENDIX: PIPETTOR DIRECTIONS & REFERENCES
44
Steps For Using Fixed Volume Pipettors 1. Place a yellow tip on the pipettor by twisting the tip on while applying pressure. Be
sure the tip is on the pipettor tightly.
2. To draw liquid into the pipette tip, press the plunger down until it stops and place the pipette tip in the liquid to be pipetted. Smoothly release the plunger, drawing liquid into the tip. Do not allow the plunger to pop up, as this may draw liquids into the pipettor barrel.
3. Withdraw the tip from the sample solution and dispense the sample from the pipettor into the bottom of the assay plate well.
4. Without removing pressure from the plunger, withdraw the tip from the buffer, and then allow the plunger to return to the up position. If you release the pressure on the plunger while the tip is in the solution, you will pull solution into the tip again.
References & Useful Websites References Benjamini, E., Sunshine, G., and Leskowitz, S. (1996) Immunology: A Short Course. Wiley-Liss, New York.
Breitling, F., and Dübel, S. (1999) Recombinant Antibodies. Wiley, New York.
Harlow, E., and Lane, D. (1999) Using Antibodies: a Laboratory Manual. Cold Spring Harbor Laboratory, Cold Spring Harbor.
Kaufmann, S.H.E., Sher, A., and Ahmed, R. (eds.) (2002) Immunology of Infectious Diseases. ASM Press, Washington.
Lashley, F.R., and Durham, J.D. (eds.) (2002) Emerging Infections Diseases. Springer Publishing Company, New York.
Law, B. (ed.) (1996) Immunoassay: A Practical Guide. Taylor & Francis, Bristol.
Truant, A.L. (ed.) (2002) Manual of Commercial Methods in Clinical Microbiology. ASM Press, Washington.
The Merck Veterinary Manual (on line version) http://www.merckvetmanual.com/mvm/index.jsp
The Merck Manual of Diagnosis and Therapy (on line version) http://www.merck.com/pubs/mmanual/
Useful Websites
http://www.who.int/en/
http://www.cdc.gov/
http://www.niaid.nih.gov/
http://www.usamriid.army.mil/
http://www.fda.gov/cdrh/clia/index.html
http://www.bioterry.com/History_of_Biological_Terrorism.asp


![[Monoclonal antibodies in clinical immunology]](https://img.pdfslide.net/doc/110x75/63375eff20d9c9602f0b4441/monoclonal-antibodies-in-clinical-immunology.jpg)


