Embed Size (px)
Citation preview
8/10/2019 01 - Lecture Labview Basics.ppt
http://slidepdf.com/reader/full/01-lecture-labview-basicsppt 1/23
Digital Electronics and ComputerInterfacing
PH 534
Tim Mewes
Spring 2011

8/10/2019 01 - Lecture Labview Basics.ppt
http://slidepdf.com/reader/full/01-lecture-labview-basicsppt 2/23
01/11/2007 Digital Electronics and Computer Interfacing 2
Digital Electronics
• Binary systems with two possible values (logic states): – High/Low – ON/OFF – 1/0 – TRUE/FALSE
• First part of the course, after introduction to LabVIEW
8/10/2019 01 - Lecture Labview Basics.ppt
http://slidepdf.com/reader/full/01-lecture-labview-basicsppt 3/23
01/11/2007 Digital Electronics and Computer Interfacing 3
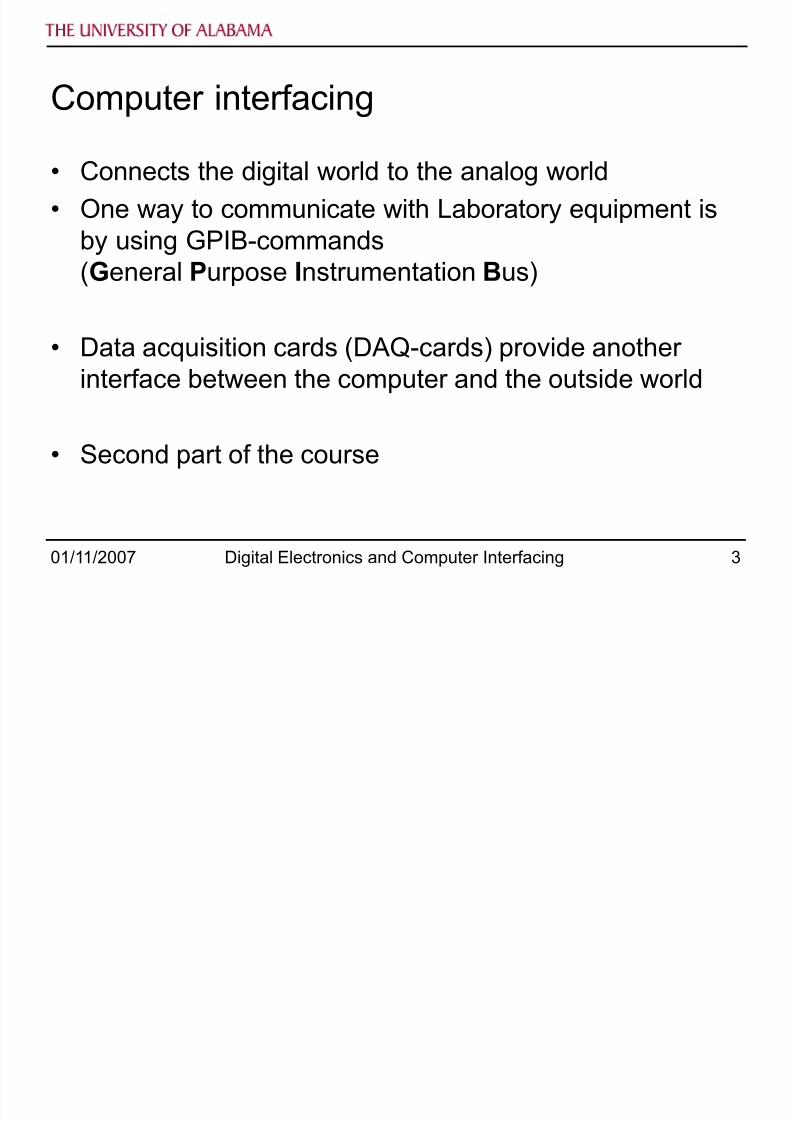
Computer interfacing
• Connects the digital world to the analog world• One way to communicate with Laboratory equipment is
by using GPIB-commands
(General P urpose Instrumentation Bus)
• Data acquisition cards (DAQ-cards) provide anotherinterface between the computer and the outside world
• Second part of the course
8/10/2019 01 - Lecture Labview Basics.ppt
http://slidepdf.com/reader/full/01-lecture-labview-basicsppt 4/23
01/11/2007 Digital Electronics and Computer Interfacing 4
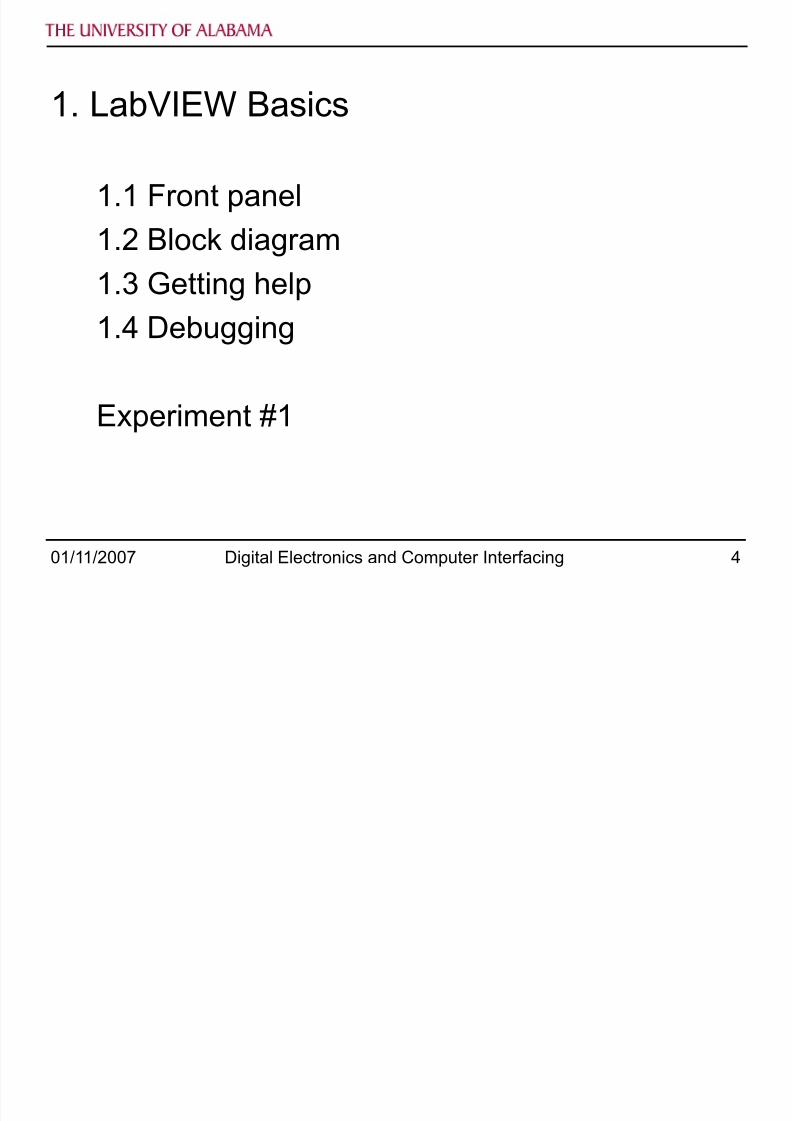
1. LabVIEW Basics
1.1 Front panel1.2 Block diagram
1.3 Getting help1.4 Debugging
Experiment #1
8/10/2019 01 - Lecture Labview Basics.ppt
http://slidepdf.com/reader/full/01-lecture-labview-basicsppt 5/23
01/11/2007 Digital Electronics and Computer Interfacing 5
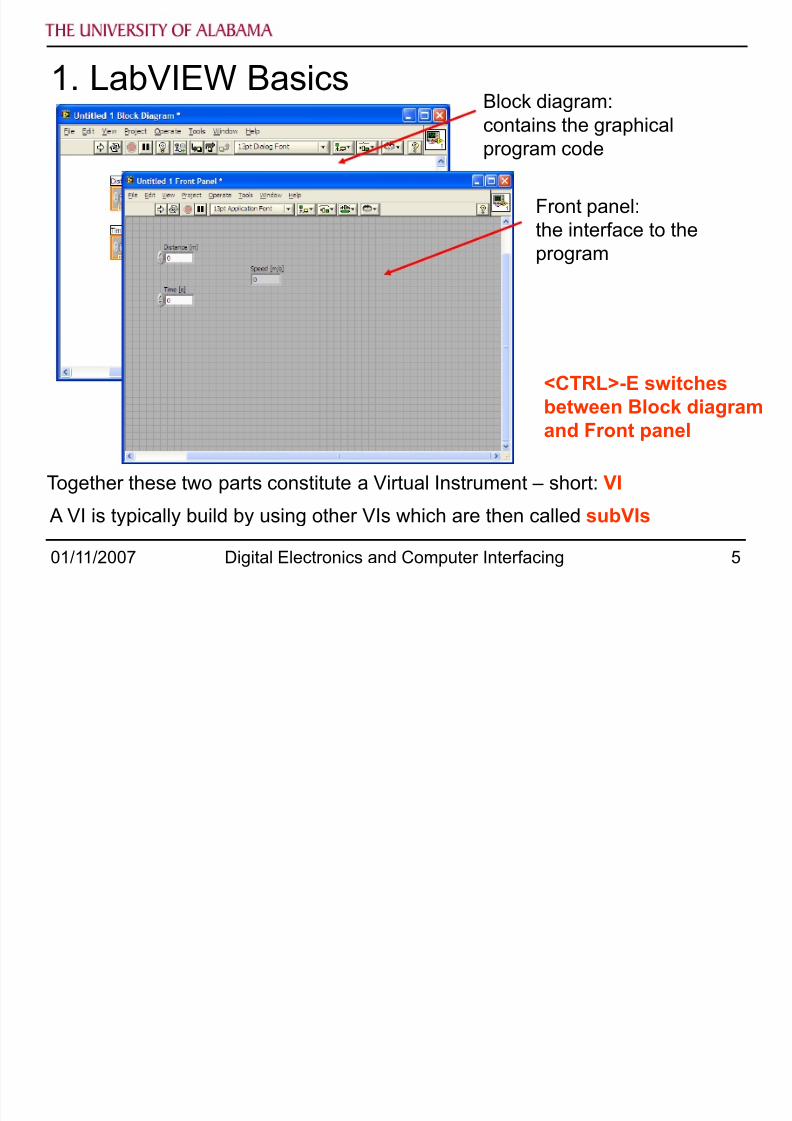
1. LabVIEW Basics
Together these two parts constitute a Virtual Instrument – short: VI
A VI is typically build by using other VIs which are then called subVIs
Block diagram:contains the graphicalprogram code
Front panel:the interface to theprogram
<CTRL>-E switches
between Block diagramand Front panel
8/10/2019 01 - Lecture Labview Basics.ppt
http://slidepdf.com/reader/full/01-lecture-labview-basicsppt 6/23
01/11/2007 Digital Electronics and Computer Interfacing 6
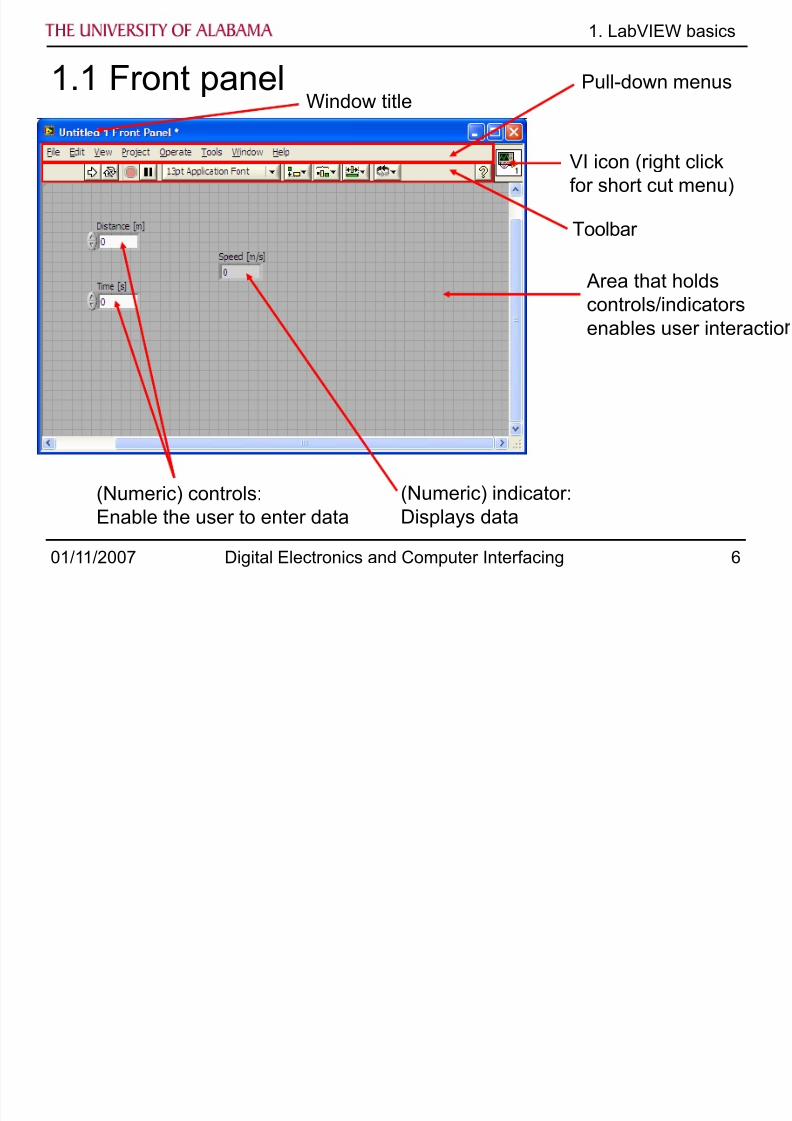
1.1 Front panel
1. LabVIEW basics
Toolbar
Pull-down menus
VI icon (right clickfor short cut menu)
Window title
Area that holdscontrols/indicatorsenables user interactio
(Numeric) controls:Enable the user to enter data
(Numeric) indicator:Displays data
8/10/2019 01 - Lecture Labview Basics.ppt
http://slidepdf.com/reader/full/01-lecture-labview-basicsppt 7/23
01/11/2007 Digital Electronics and Computer Interfacing 7
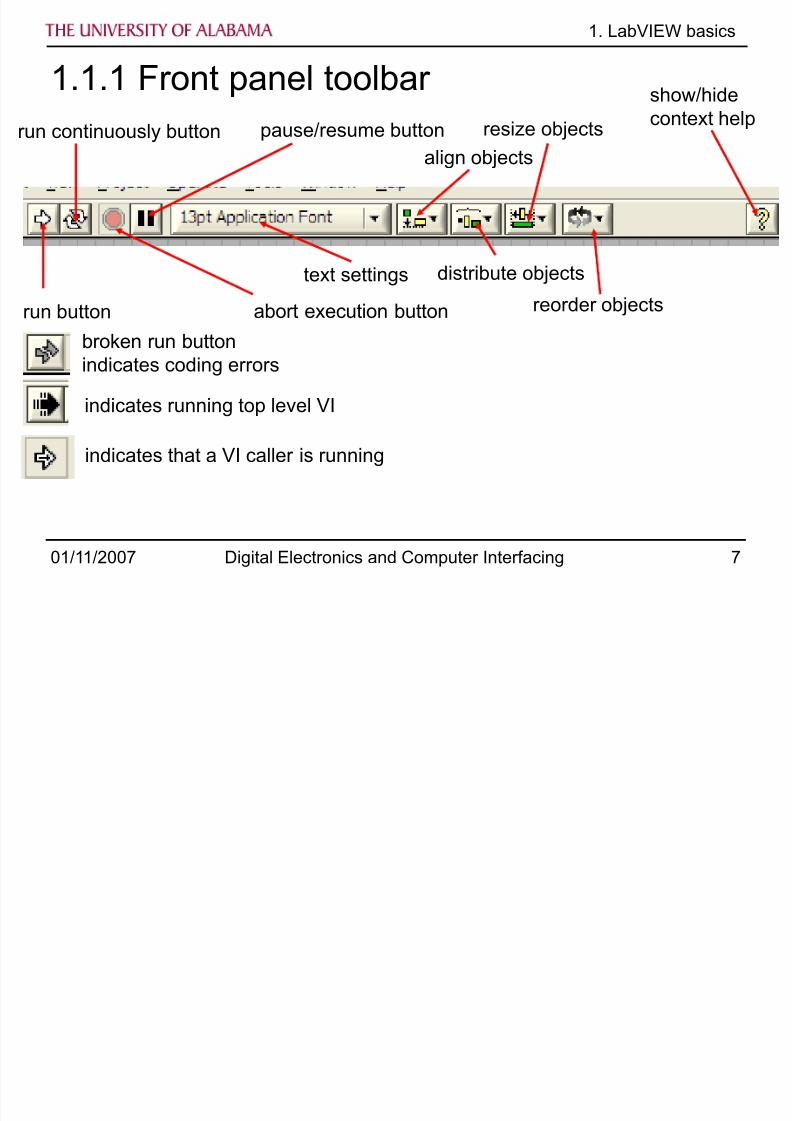
run button
broken run buttonindicates coding errors
run continuously button
abort execution button
pause/resume button
1. LabVIEW basics
text settings
align objects
distribute objects
resize objects
reorder objects
show/hidecontext help
1.1.1 Front panel toolbar
indicates running top level VI
indicates that a VI caller is running
8/10/2019 01 - Lecture Labview Basics.ppt
http://slidepdf.com/reader/full/01-lecture-labview-basicsppt 8/23
01/11/2007 Digital Electronics and Computer Interfacing 8
1. LabVIEW basics
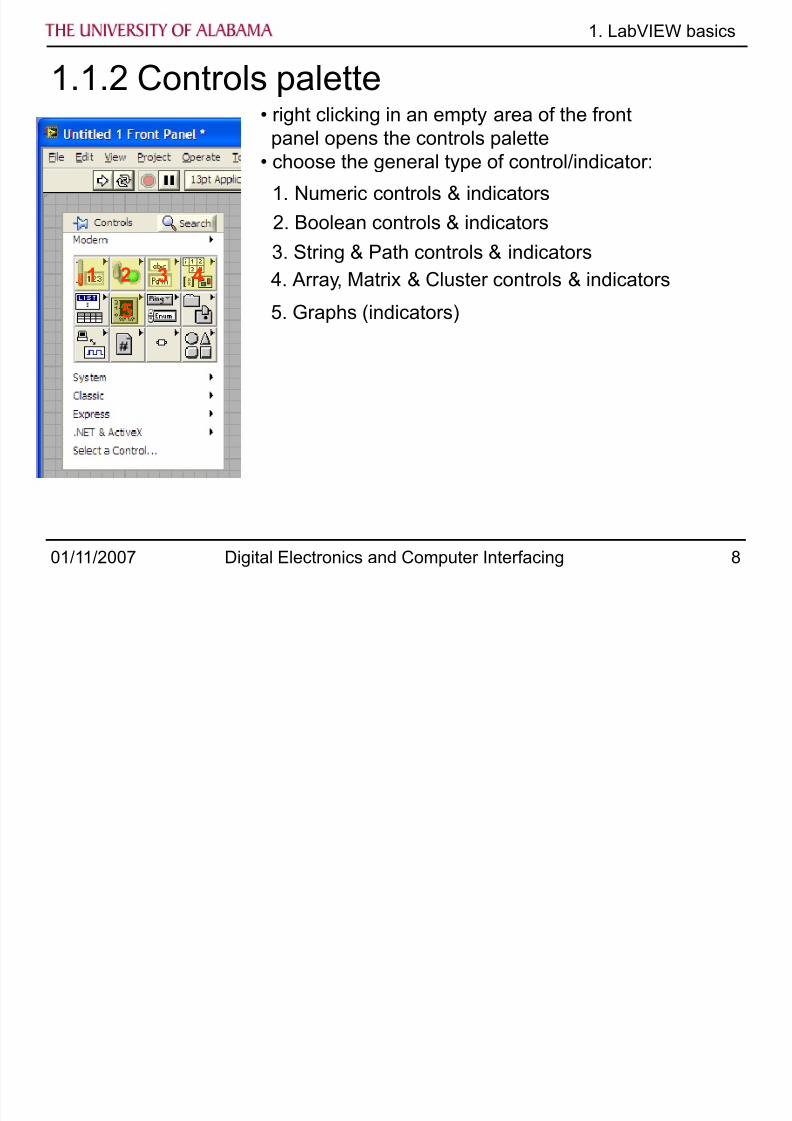
1.1.2 Controls palette• right clicking in an empty area of the front
panel opens the controls palette• choose the general type of control/indicator:
1
1. Numeric controls & indicators
2
2. Boolean controls & indicators
3
3. String & Path controls & indicators
4 4. Array, Matrix & Cluster controls & indicators5 5. Graphs (indicators)
8/10/2019 01 - Lecture Labview Basics.ppt
http://slidepdf.com/reader/full/01-lecture-labview-basicsppt 9/23
01/11/2007 Digital Electronics and Computer Interfacing 9
3 45
1 2
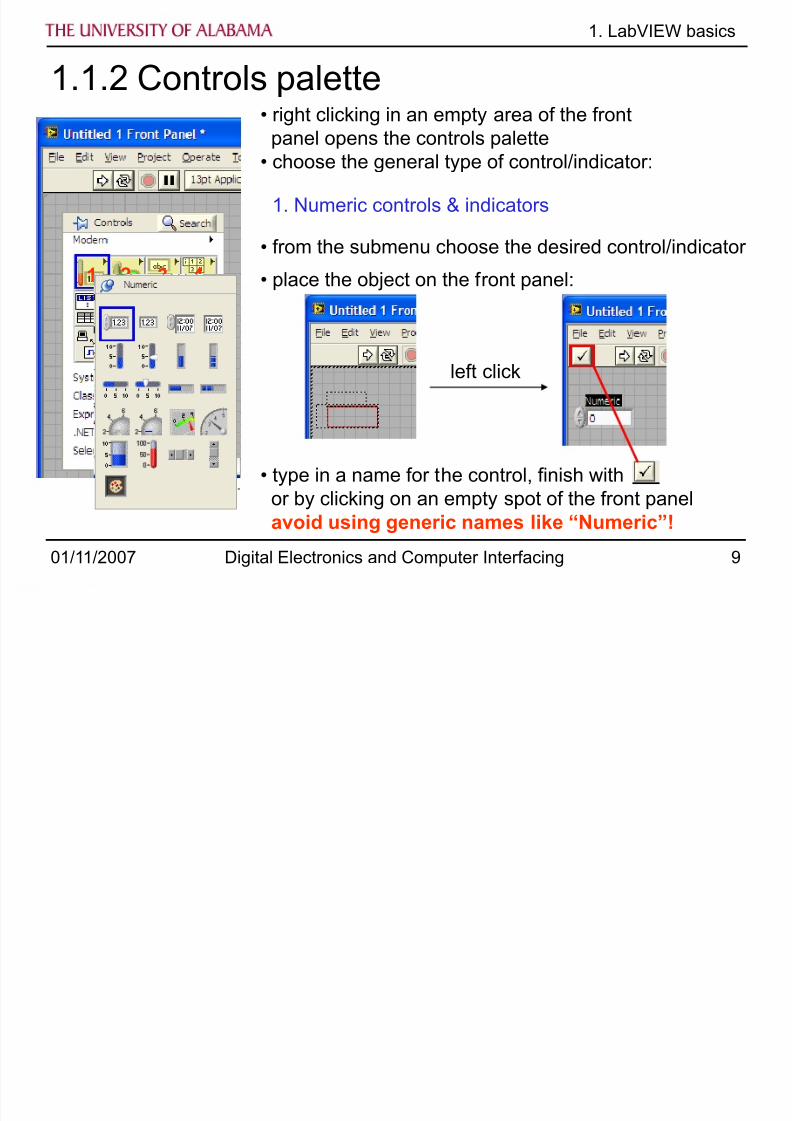
1. LabVIEW basics
1.1.2 Controls palette• right clicking in an empty area of the front
panel opens the controls palette• choose the general type of control/indicator:
• place the object on the front panel:
left click
• type in a name for the control, finish withor by clicking on an empty spot of the front panelavoid using generic names like “Numeric”!
1. Numeric controls & indicators
• from the submenu choose the desired control/indicator
8/10/2019 01 - Lecture Labview Basics.ppt
http://slidepdf.com/reader/full/01-lecture-labview-basicsppt 10/23
01/11/2007 Digital Electronics and Computer Interfacing 10
1. LabVIEW basics
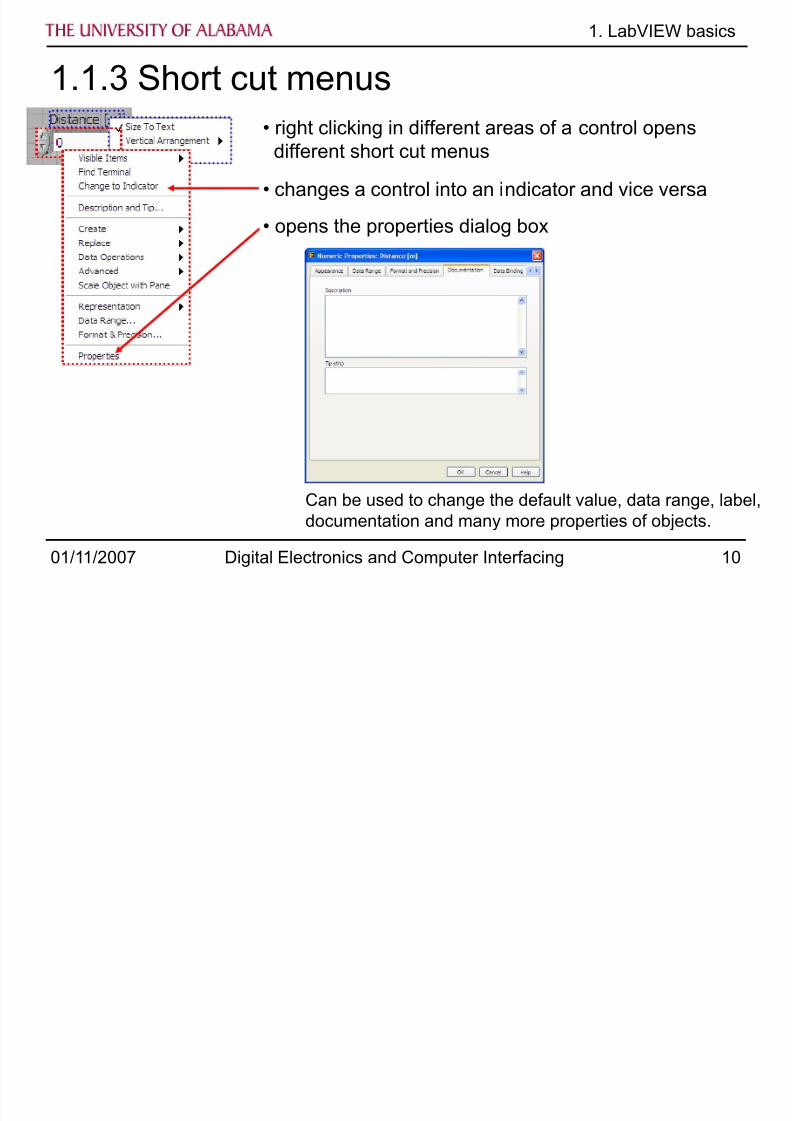
1.1.3 Short cut menus• right clicking in different areas of a control opens
different short cut menus
• changes a control into an indicator and vice versa
• opens the properties dialog box
Can be used to change the default value, data range, label,documentation and many more properties of objects.
8/10/2019 01 - Lecture Labview Basics.ppt
http://slidepdf.com/reader/full/01-lecture-labview-basicsppt 11/23
01/11/2007 Digital Electronics and Computer Interfacing 11
1. LabVIEW basics
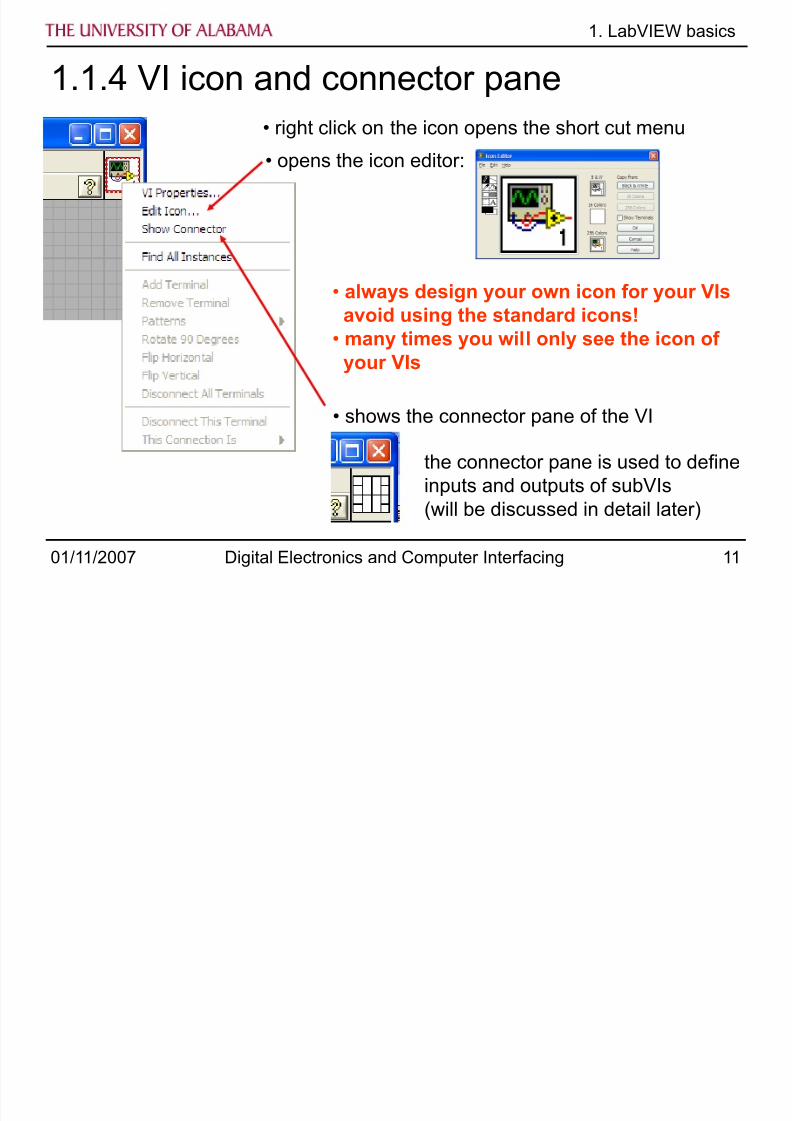
1.1.4 VI icon and connector pane• right click on the icon opens the short cut menu
• always design your own icon for your VIsavoid using the standard icons!
• many times you will only see the icon ofyour VIs
• opens the icon editor:
• shows the connector pane of the VI
the connector pane is used to defineinputs and outputs of subVIs(will be discussed in detail later)
8/10/2019 01 - Lecture Labview Basics.ppt
http://slidepdf.com/reader/full/01-lecture-labview-basicsppt 12/23
01/11/2007 Digital Electronics and Computer Interfacing 12
1. LabVIEW basics
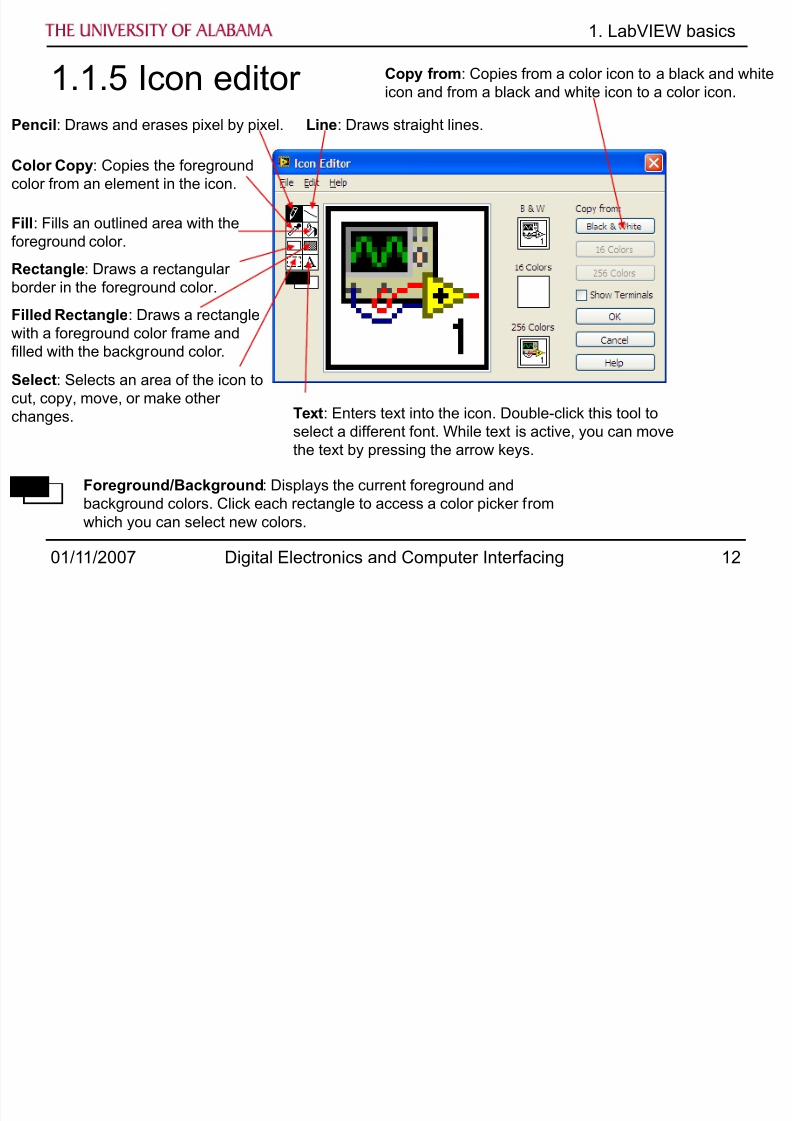
1.1.5 Icon editorPencil : Draws and erases pixel by pixel. Line : Draws straight lines.
Color Copy : Copies the foregroundcolor from an element in the icon.
Fill : Fills an outlined area with theforeground color.
Rectangle : Draws a rectangularborder in the foreground color.
Filled Rectangle : Draws a rectanglewith a foreground color frame andfilled with the background color.
Select : Selects an area of the icon tocut, copy, move, or make other
changes. Text : Enters text into the icon. Double-click this tool toselect a different font. While text is active, you can movethe text by pressing the arrow keys.
Copy from : Copies from a color icon to a black and whiteicon and from a black and white icon to a color icon.
Foreground/Background : Displays the current foreground andbackground colors. Click each rectangle to access a color picker fromwhich you can select new colors.
8/10/2019 01 - Lecture Labview Basics.ppt
http://slidepdf.com/reader/full/01-lecture-labview-basicsppt 13/23
01/11/2007 Digital Electronics and Computer Interfacing 13
1. LabVIEW basics
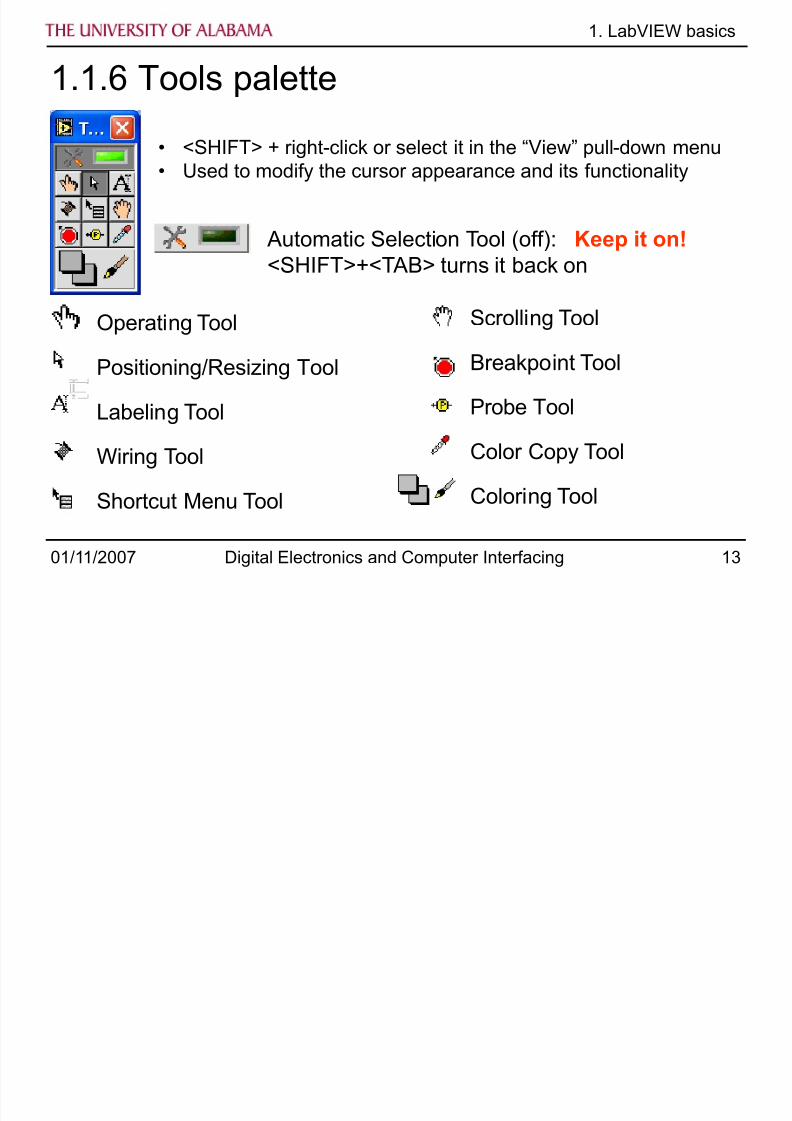
1.1.6 Tools palette
• <SHIFT> + right- click or select it in the “View” pull -down menu• Used to modify the cursor appearance and its functionality
Operating Tool
Positioning/Resizing Tool
Labeling ToolWiring Tool
Shortcut Menu Tool
Scrolling Tool
Breakpoint Tool
Probe ToolColor Copy Tool
Coloring Tool
Automatic Selection Tool (off): Keep it on!<SHIFT>+<TAB> turns it back on
8/10/2019 01 - Lecture Labview Basics.ppt
http://slidepdf.com/reader/full/01-lecture-labview-basicsppt 14/23
01/11/2007 Digital Electronics and Computer Interfacing 14
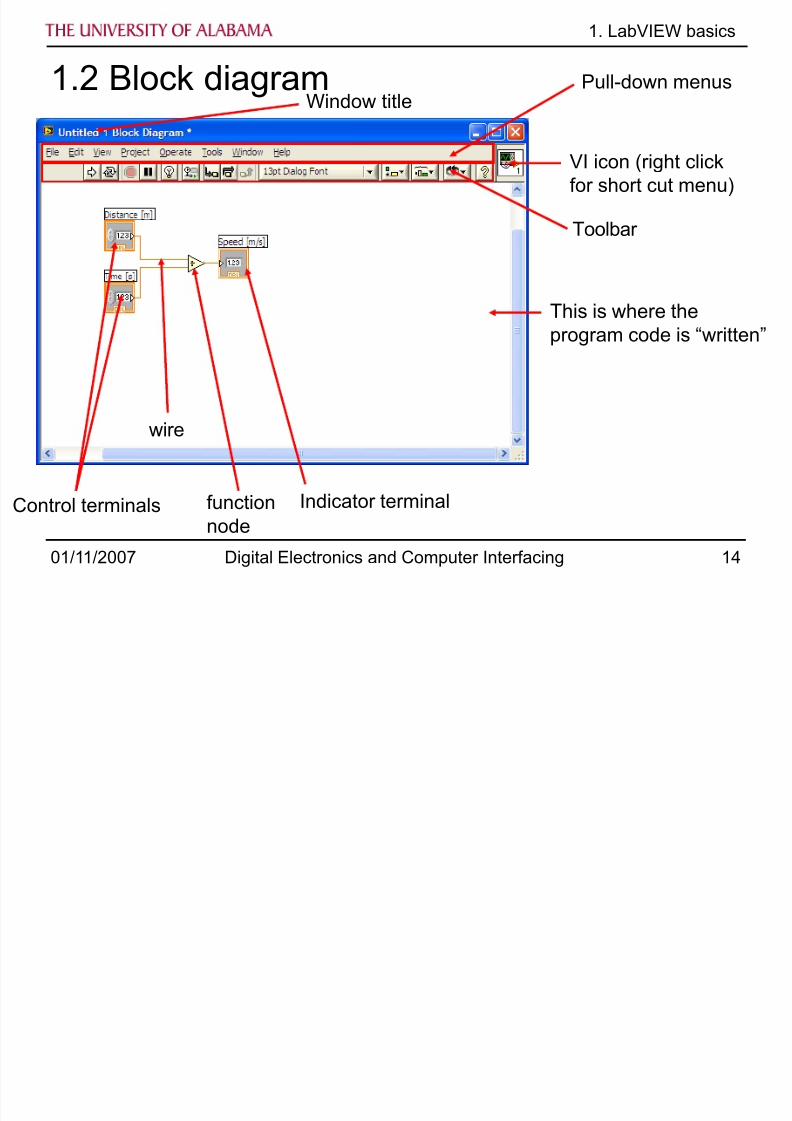
1.2 Block diagram
1. LabVIEW basics
Toolbar
Pull-down menus
VI icon (right clickfor short cut menu)
Window title
Control terminals
wire
functionnode
Indicator terminal
This is where theprogram code is “written”
8/10/2019 01 - Lecture Labview Basics.ppt
http://slidepdf.com/reader/full/01-lecture-labview-basicsppt 15/23
01/11/2007 Digital Electronics and Computer Interfacing 15
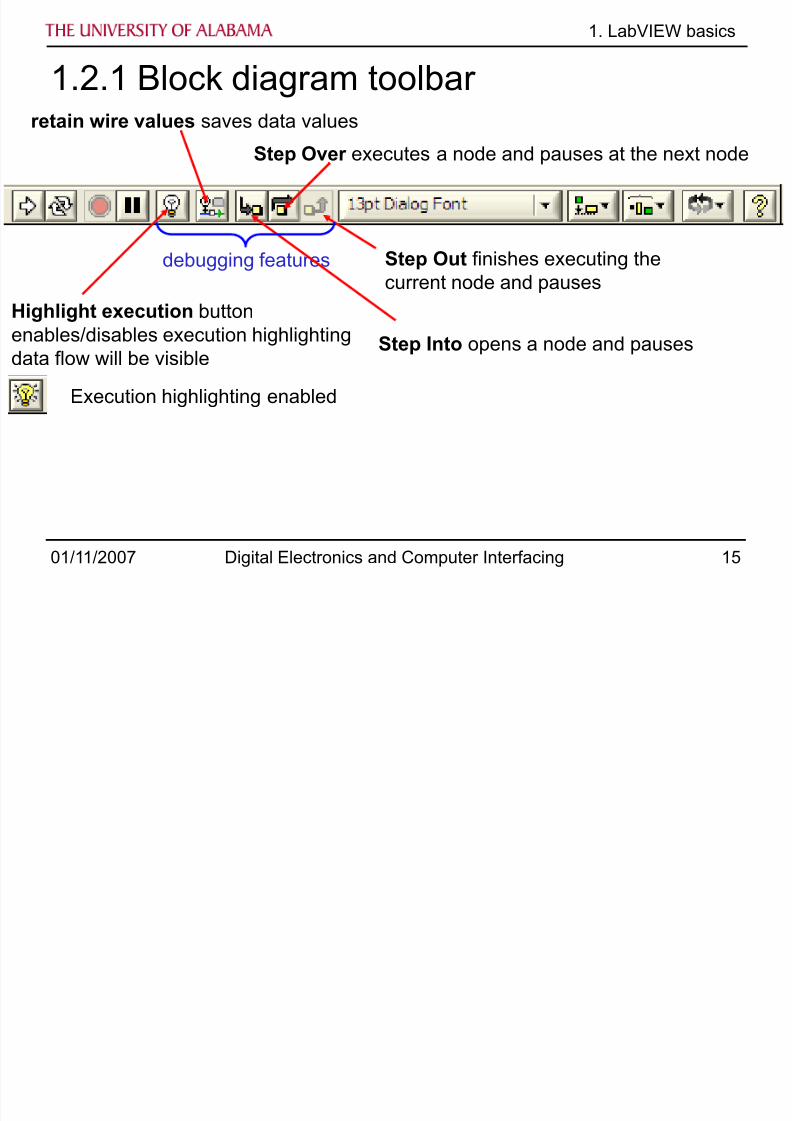
debugging features
Step Over executes a node and pauses at the next node
Execution highlighting enabled
retain wire values saves data values
1. LabVIEW basics
Highlight execution buttonenables/disables execution highlightingdata flow will be visible
Step Into opens a node and pauses
Step Out finishes executing thecurrent node and pauses
1.2.1 Block diagram toolbar
8/10/2019 01 - Lecture Labview Basics.ppt
http://slidepdf.com/reader/full/01-lecture-labview-basicsppt 16/23
01/11/2007 Digital Electronics and Computer Interfacing 16
1. LabVIEW basics
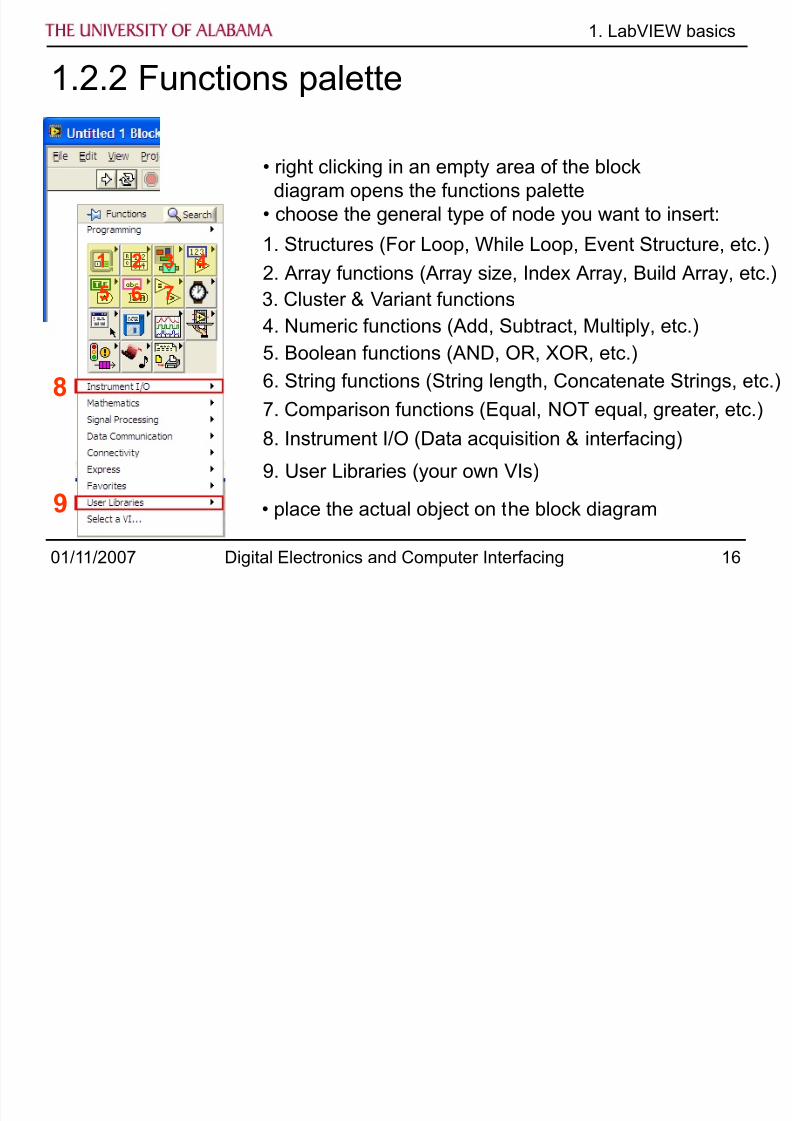
1.2.2 Functions palette
• right clicking in an empty area of the blockdiagram opens the functions palette
• choose the general type of node you want to insert:
1. Structures (For Loop, While Loop, Event Structure, etc.)1
2. Array functions (Array size, Index Array, Build Array, etc.)2
3. Cluster & Variant functions
3
4. Numeric functions (Add, Subtract, Multiply, etc.)
4
5. Boolean functions (AND, OR, XOR, etc.)
5
6. String functions (String length, Concatenate Strings, etc.)
6
7. Comparison functions (Equal, NOT equal, greater, etc.)
7
8. Instrument I/O (Data acquisition & interfacing)
8
9. User Libraries (your own VIs)
9 • place the actual object on the block diagram
8/10/2019 01 - Lecture Labview Basics.ppt
http://slidepdf.com/reader/full/01-lecture-labview-basicsppt 17/23
01/11/2007 Digital Electronics and Computer Interfacing 17
1. LabVIEW basics
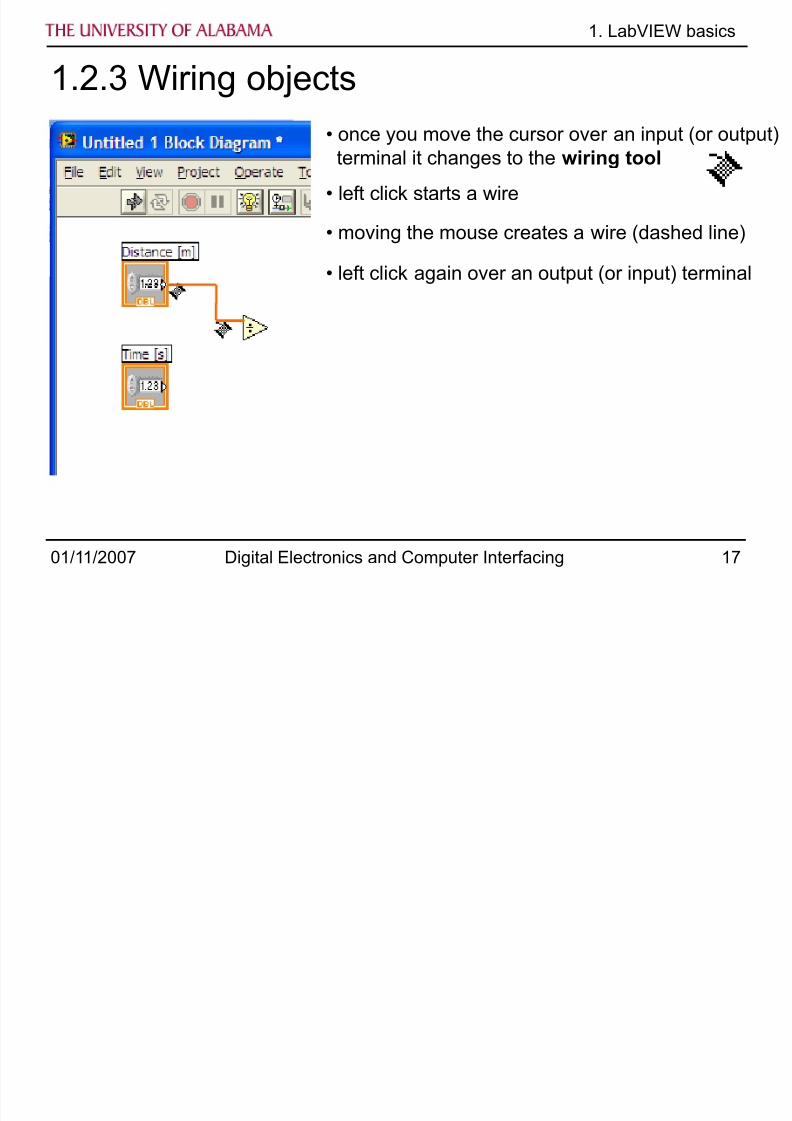
1.2.3 Wiring objects
• once you move the cursor over an input (or output)terminal it changes to the wiring tool
• left click starts a wire
• moving the mouse creates a wire (dashed line)
• left click again over an output (or input) terminal

8/10/2019 01 - Lecture Labview Basics.ppt
http://slidepdf.com/reader/full/01-lecture-labview-basicsppt 18/23
01/11/2007 Digital Electronics and Computer Interfacing 18
1. LabVIEW basics
1.2.3 Wiring objects
• wiring errors are indicated by broken wires
• moving the wiring tool over a broken wiredisplays a tip strip that describes why the
wire is broken
• <CTRL>-B removes all broken wires on theBlock diagram
8/10/2019 01 - Lecture Labview Basics.ppt
http://slidepdf.com/reader/full/01-lecture-labview-basicsppt 19/23
01/11/2007 Digital Electronics and Computer Interfacing 19
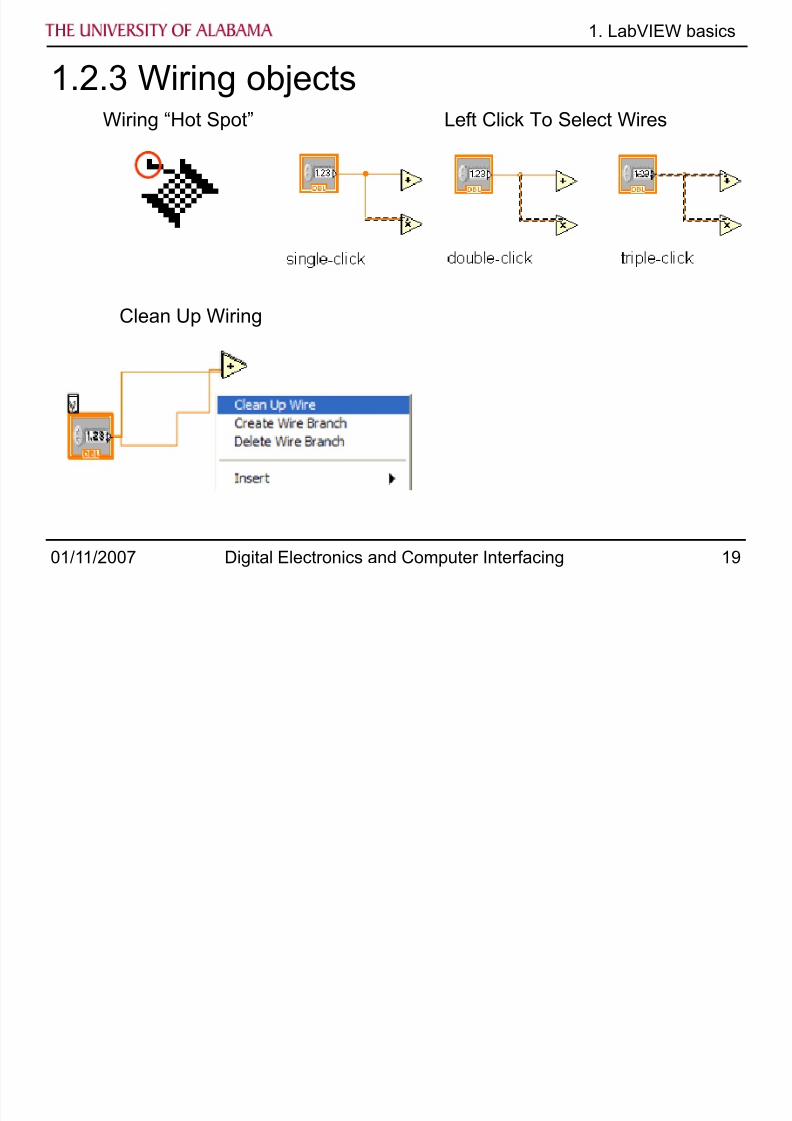
1. LabVIEW basics
1.2.3 Wiring objectsWiring “Hot Spot”
Clean Up Wiring
Left Click To Select Wires
8/10/2019 01 - Lecture Labview Basics.ppt
http://slidepdf.com/reader/full/01-lecture-labview-basicsppt 20/23
01/11/2007 Digital Electronics and Computer Interfacing 20
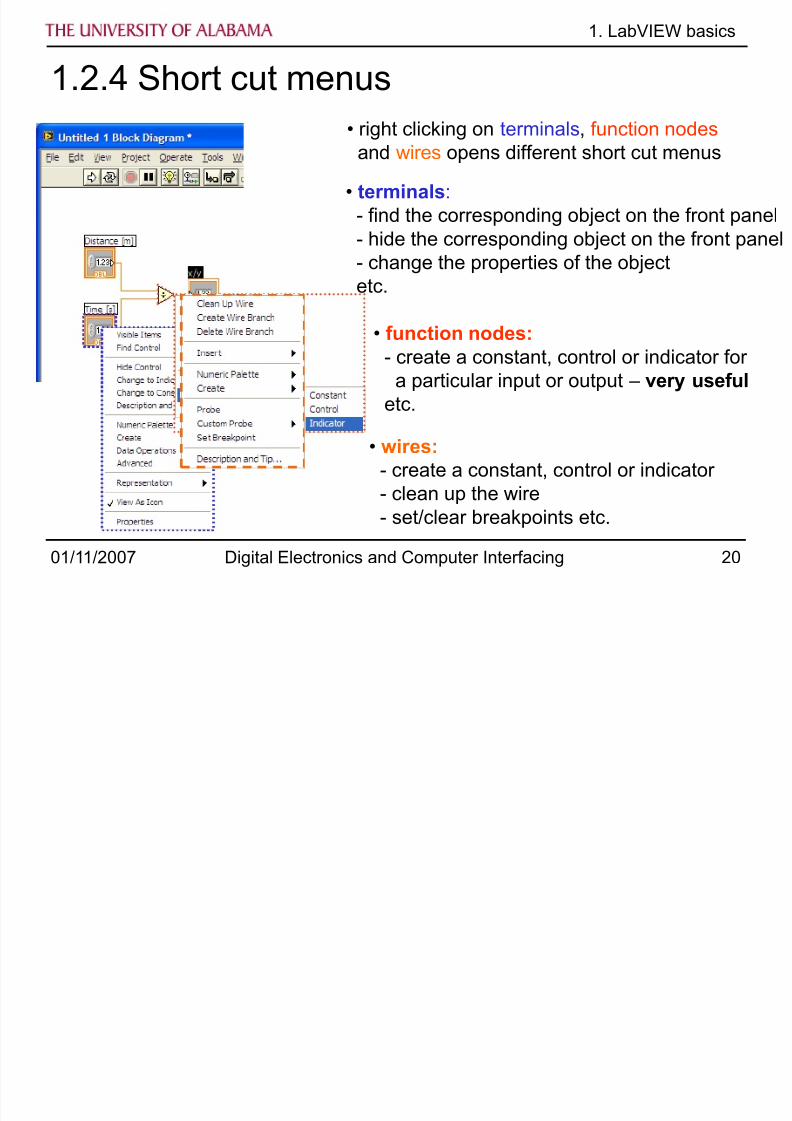
1. LabVIEW basics
1.2.4 Short cut menus• right clicking on terminals , function nodes
and wires opens different short cut menus
• terminals :- find the corresponding object on the front panel- hide the corresponding object on the front panel- change the properties of the objectetc.
• function nodes:- create a constant, control or indicator for
a particular input or output – very useful etc.
• wires: - create a constant, control or indicator- clean up the wire- set/clear breakpoints etc.
8/10/2019 01 - Lecture Labview Basics.ppt
http://slidepdf.com/reader/full/01-lecture-labview-basicsppt 21/23
01/11/2007 Digital Electronics and Computer Interfacing 21
1. LabVIEW basics
1.3 Help
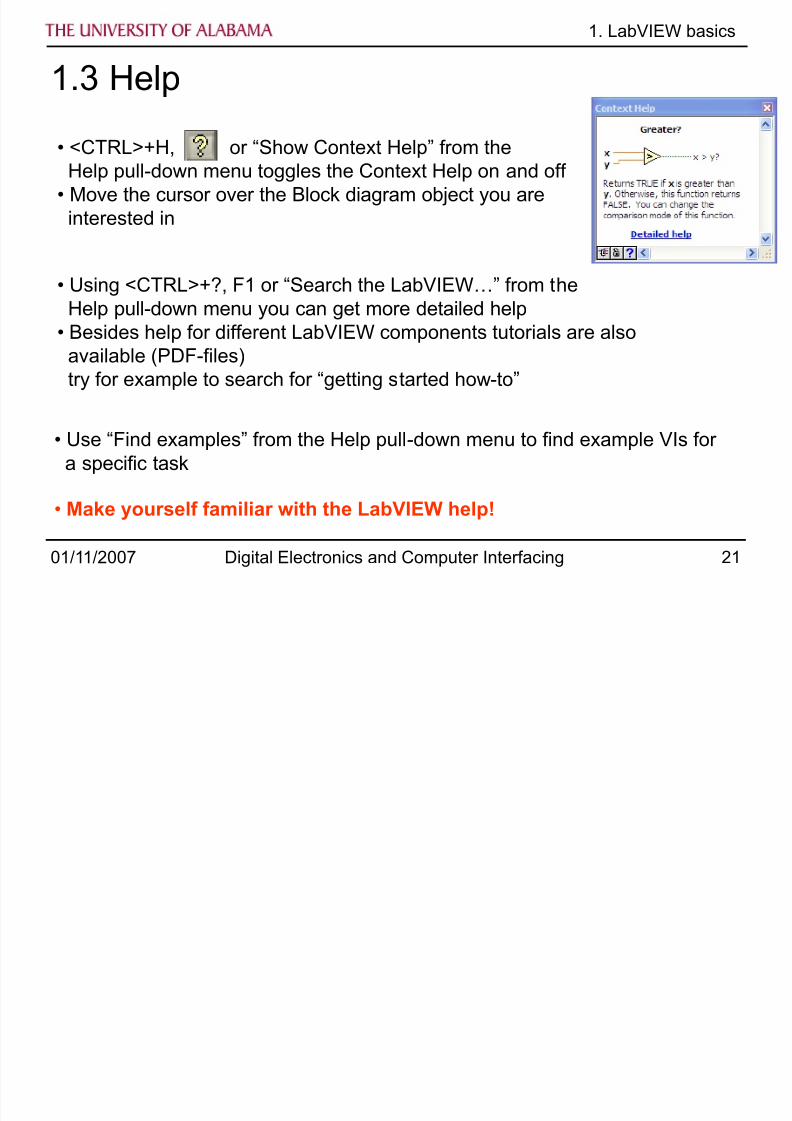
• <CTRL>+H, or “Show Context Help” from the Help pull-down menu toggles the Context Help on and off
• Move the cursor over the Block diagram object you areinterested in
• Using <CTRL>+?, F1 or “Search the LabVIEW…” from the Help pull-down menu you can get more detailed help
• Besides help for different LabVIEW components tutorials are alsoavailable (PDF-files)try for example to search for “getting started how -to”
• Use “Find examples” from the Help pull -down menu to find example VIs fora specific task
• Make yourself familiar with the LabVIEW help!
8/10/2019 01 - Lecture Labview Basics.ppt
http://slidepdf.com/reader/full/01-lecture-labview-basicsppt 22/23
01/11/2007 Digital Electronics and Computer Interfacing 22
1. LabVIEW basics
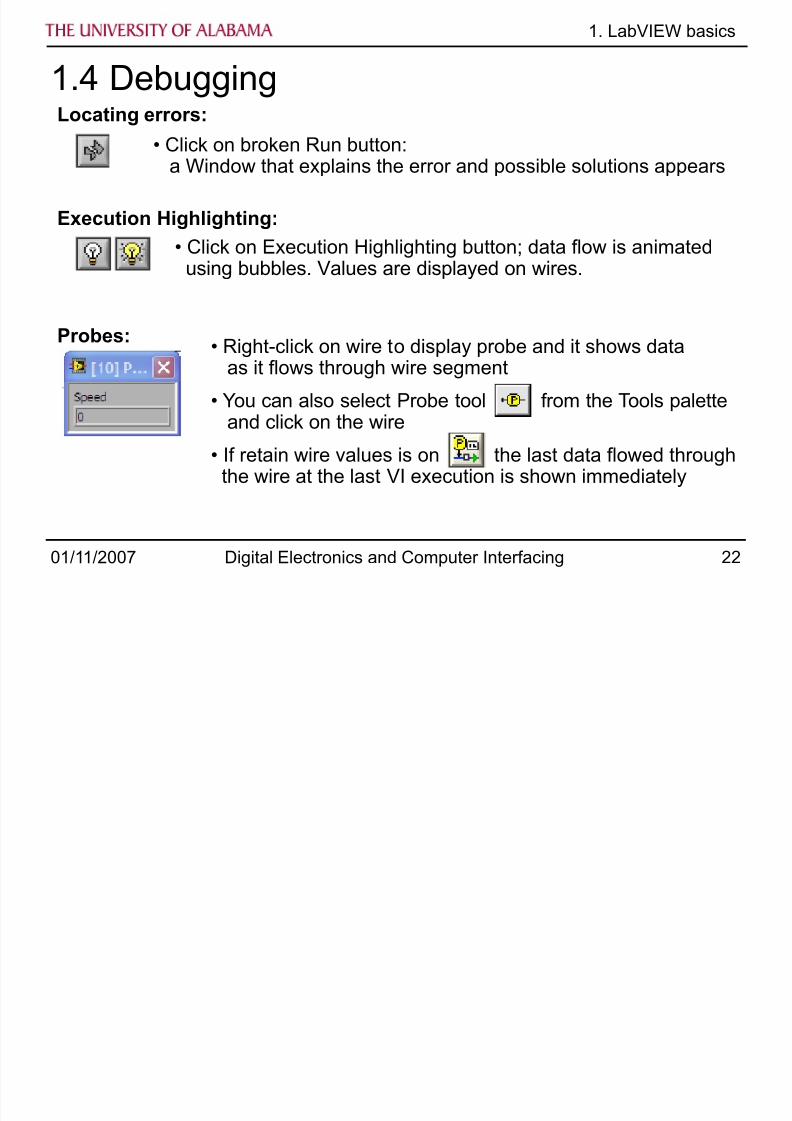
1.4 Debugging
• Click on broken Run button:a Window that explains the error and possible solutions appears
Locating errors:
• Click on Execution Highlighting button; data flow is animatedusing bubbles. Values are displayed on wires.
Execution Highlighting:
• Right-click on wire to display probe and it shows dataas it flows through wire segment
• You can also select Probe tool from the Tools paletteand click on the wire
• If retain wire values is on the last data flowed throughthe wire at the last VI execution is shown immediately
Probes:
8/10/2019 01 - Lecture Labview Basics.ppt
http://slidepdf.com/reader/full/01-lecture-labview-basicsppt 23/23
01/11/2007 Digital Electronics and Computer Interfacing 23
1. LabVIEW basics
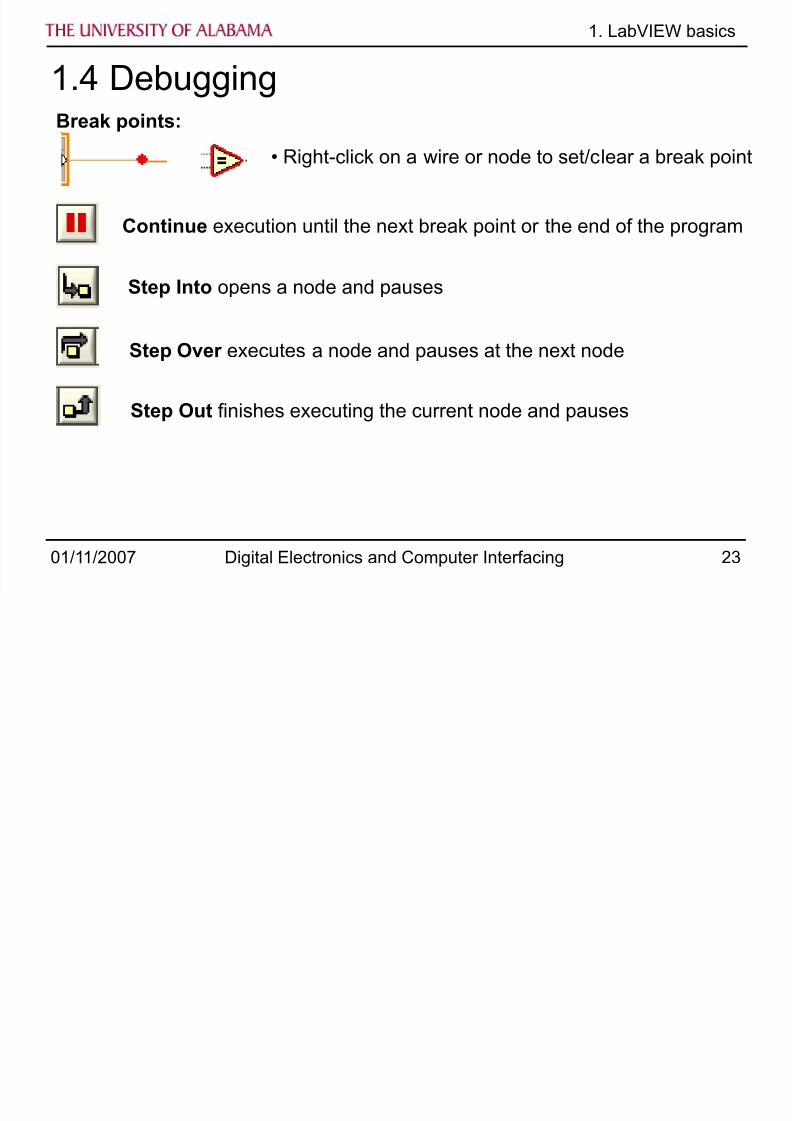
1.4 DebuggingBreak points:
• Right-click on a wire or node to set/clear a break point
Continue execution until the next break point or the end of the program
Step Over executes a node and pauses at the next node
Step Into opens a node and pauses
Step Out finishes executing the current node and pauses


![EKG Basics.ppt [Read-Only]](https://img.pdfslide.net/doc/110x75/615cd04d66f1ad2531041f36/ekg-read-only.jpg)