Embed Size (px)
Citation preview
300-6400 Roberts Street | Burnaby BC | V5G 4C9 160 - 6400 Roberts Street | Burnaby BC | V5G 4C9
Administration Guide Active Content Manager Version 11.1
Last revised December 9, 2011


Copyright 2011 The Active Network, Ltd. All rights reserved.
Microsoft, Windows, Internet Explorer, Active Directory and SQL
Server are registered trademarks of Microsoft Corporation.
Oracle is a registered trademark of Oracle Corporation.
The Active Network, Ltd.
160-6400 Roberts Street
Burnaby, BC
Canada V5G 4C9
Office telephone: 604.438.7361 or 1.800.661.1196
Fax: 1.604.432.9708
2 Administration Guide
Contents
Introduction to the Active CM .................................................... 12
Overview .............................................................................................................. 12 Technical Support ................................................................................................. 12
Important ACM Concepts ........................................................... 13
Admin Center ....................................................................................................... 13 Page Types: how pages look and function ............................................................. 13
Page Types ..................................................................................................... 13 Templates ...................................................................................................... 13 The Finished Page.......................................................................................... 13
System Editors ...................................................................................................... 14 Content Editor (Quick Edit mode) .................................................................. 14 Page Editor (Full Edit mode) .......................................................................... 14 Read Only Editor ........................................................................................... 14 Question Editor .............................................................................................. 14 Image Editor .................................................................................................. 15
Edit Locking ......................................................................................................... 15 Parent/Child Page Relationship ............................................................................. 15 Dynamic and Static (Exported) Sites ..................................................................... 16
Dynamic Sites ................................................................................................ 16 Static Sites ..................................................................................................... 16
Multiple Sites in a Single ACM Installation .......................................................... 16 User Roles ............................................................................................................ 17 Workflow .............................................................................................................. 17 Links .................................................................................................................... 17
Getting Started ............................................................................ 18
Logging on to the Active CM ................................................................................ 18 Changing Your Password...................................................................................... 19 Changing Your Editor Preference ......................................................................... 19 My Reports ........................................................................................................... 20 The Active CM toolbar ......................................................................................... 21 Online Help .......................................................................................................... 22
Admin Center Introduction ......................................................... 24
User Manager .............................................................................. 25
User Accounts ....................................................................................................... 25 Create a User Account.................................................................................... 25 Locate a User Account ................................................................................... 25
Administration Guide 3
Modify a User Account .................................................................................. 26 Copy a User Account...................................................................................... 27 Delete a User Account .................................................................................... 27
Mass User Import Tool ......................................................................................... 28 Import User List ............................................................................................. 28 Standard User List Template .......................................................................... 28 Public User List Template .............................................................................. 29 Considering Your User Data .......................................................................... 29 Importing Standard ACM Users ..................................................................... 30 Importing Public Users................................................................................... 31
Group Manager ............................................................................ 32
Plan the Groups .................................................................................................... 32 Group Folders ....................................................................................................... 32
Create Group Folder....................................................................................... 32 Locate Group Folder ...................................................................................... 33 Modify Group Folder ..................................................................................... 33 Delete Group Folder ....................................................................................... 33
Groups .................................................................................................................. 33 Create Group ................................................................................................. 34
Members Tab .......................................................................................... 35 Sites Tab ................................................................................................. 35 Tools Tab ................................................................................................ 36 User Domain Tab .................................................................................... 36 Asset Domain Tab ................................................................................... 36 Pagelet Domain Tab ................................................................................ 37 Page Types Tab ....................................................................................... 37 r.a.d. Editor Tab ...................................................................................... 37
Locate Group ................................................................................................. 37 Modify Group ................................................................................................ 38 Copy a Group ................................................................................................. 38 Delete Group .................................................................................................. 38
Workflow Manager ...................................................................... 40
Overview .............................................................................................................. 40 Workflow Folders ................................................................................................. 40
Create Workflow Folder ................................................................................. 40 Locate Workflow Folder ................................................................................. 41 Modify Workflow Folder ................................................................................ 41 Delete Workflow Folder ................................................................................. 41
Workflows ............................................................................................................ 41 Create a Workflow ......................................................................................... 42 Assign Providers ............................................................................................ 42 Assign Monitors............................................................................................. 42 Assign Approvers........................................................................................... 43 Locate Workflow ............................................................................................ 44 Copy Workflow .............................................................................................. 44 Modify Workflow ........................................................................................... 45 Delete Workflow ............................................................................................ 45
Applying Workflows ............................................................................................. 45
4 Administration Guide
Digital Asset Manager ................................................................. 47
Overview .............................................................................................................. 47 Digital Asset Folders............................................................................................. 47
Create Digital Asset Folder ............................................................................ 47 Locate Digital Asset Folder ............................................................................ 48 Modify Digital Asset Folder ........................................................................... 48 Delete Digital Asset Folder ............................................................................ 48
Digital Assets ....................................................................................................... 48 Add Assets ..................................................................................................... 48
Add a Single Digital Asset ...................................................................... 49 Add Multiple Digital Assets .................................................................... 49
Locate Digital Assets ..................................................................................... 50 Edit Digital Assets ......................................................................................... 51
Create a New Version.............................................................................. 51 Edit Properties ........................................................................................ 51
Edit Digital Asset Images ............................................................................... 52 Image Zoom ............................................................................................ 52 Resize Image ........................................................................................... 52 Crop Image ............................................................................................. 53 Flip/Rotate Image .................................................................................... 54 Save or Save As ...................................................................................... 54
Delete Digital Assets ...................................................................................... 54 Delete Digital Asset Versions ......................................................................... 55 Digital Asset Usage Information .................................................................... 55 Restore a Digital Asset ................................................................................... 55
Syndication Manager .................................................................. 57
Pagelets Overview ................................................................................................. 57 Pagelet Categories................................................................................................. 57
Create Pagelet Categories ............................................................................... 57 Move Pagelets ....................................................................................................... 58 Insert Pagelets on Pages ........................................................................................ 58 Pagelet Usage Report ............................................................................................ 58 Syndicated Pages .................................................................................................. 59 Manage Syndicated Page Settings ......................................................................... 59
Archive Manager ......................................................................... 60
Overview .............................................................................................................. 60 Restore a Page ................................................................................................ 60 Delete a Page ................................................................................................. 60
Page Lock Manager .................................................................... 62
Overview .............................................................................................................. 62 Unlock a Page ................................................................................................ 62
Email Broadcast Manager .......................................................... 63
Overview .............................................................................................................. 63 Required Groups ................................................................................................... 63
Broadcast Subscription Group ........................................................................ 63 User Manager Group ...................................................................................... 63
Administration Guide 5
Email Broadcast Manager Group ................................................................... 64 Create an Application Form .................................................................................. 64
Create Accounts as Public Accounts ............................................................... 65 Create and Send Broadcast Email ......................................................................... 65
Cache Policy Manager ................................................................ 66
Output Cache Configuration ................................................................................. 66 Create a New Cache Policy ............................................................................ 66 Edit a Cache Policy ........................................................................................ 67 Delete a Cache Policy ..................................................................................... 67
Cache Policy Manager Resources .......................................................................... 67 Assign Cache Policy to a Resource .......................................................... 67
LDAP Integration Manager ......................................................... 69
Diagnostic Manager .................................................................... 70
Displaying the Diagnostic Manager ...................................................................... 70 Running Diagnostic Tests ..................................................................................... 70 Restoring Default Test Scripts ............................................................................... 70
SSL Manager ............................................................................... 72
SSL Overview ....................................................................................................... 72 Certificates ..................................................................................................... 73
Enabling the SSL Manager ................................................................................... 73 Implementing SSL ................................................................................................ 74
Pagelets.......................................................................................................... 74
Sites Manager .............................................................................. 75
Create a site .......................................................................................................... 75 Publication Tab .............................................................................................. 75
Static Properties ...................................................................................... 75 Dynamic Properties ................................................................................. 76
Add User Profile Questions ............................................................................ 77 Set Site Variables ........................................................................................... 77 Configure Site for Translation ........................................................................ 78
Import/Export Sites ............................................................................................... 79 Overview ....................................................................................................... 79 Exporting Existing Sites ................................................................................ 80 Importing Sites .............................................................................................. 80
Site Groups Manager .................................................................. 82
Mobile Device Manager............................................................... 83
Export Manager ........................................................................... 84
Scheduled Export .................................................................................................. 84 Unscheduled Export .............................................................................................. 84 Unscheduled FTP .................................................................................................. 85
6 Administration Guide
Page Types Manager .................................................................. 86
Configuring Page Types ........................................................................................ 86 Adding Page Types ............................................................................................... 87 Deactivating Page Types ....................................................................................... 87 Activating Page Types .......................................................................................... 88
Site Design Manager ................................................................... 89
Overview .............................................................................................................. 89 Site Template Package .......................................................................................... 89
Download a Template Package ....................................................................... 89 Upload a Template Package ........................................................................... 90 Edit Template Packages ................................................................................. 90 Deleting Template Packages .......................................................................... 91 Deleting a Template from a Package .............................................................. 91
Page Design Details .............................................................................................. 92 Assign Templates ........................................................................................... 92 Assign Variable Values .................................................................................. 93 Include Pages in Section Menu....................................................................... 93 Include in Child Page List .............................................................................. 94 Include in Site Map ........................................................................................ 95 Include in Search ........................................................................................... 95 Turn off Form Tags ........................................................................................ 96
Meta Tags Manager ..................................................................... 97
Default Meta Tag Questions .................................................................................. 97 Site Specific Meta Tag Questions .......................................................................... 97
Global System Variables ............................................................ 98
User Profile ........................................................................................................... 98 Email .................................................................................................................... 98
Edit System Emails ........................................................................................ 98 System Variables .................................................................................................. 99
Users are inactive when created.................................................................... 100 Number of login attempts before lockout ...................................................... 100 Disable follow-up task options...................................................................... 100 Default number of days until follow-up task ................................................. 100 Default Follow-up Task ................................................................................ 100 Number of days until escalation ................................................................... 100 The maximum size of assets that can be uploaded to the system ................... 100 Maximum levels in site menu....................................................................... 101 Days before archive to warn ......................................................................... 101 Maximum log level for database ................................................................... 101 Maximum log level for email ....................................................................... 101 System-wide administration email address ................................................... 101 System-wide administration email name ...................................................... 101 Enable workflow notes ................................................................................. 101 Enable edit lock ........................................................................................... 101 Enable page owners ..................................................................................... 102 Enable strong passwords .............................................................................. 102 Strong password minimum length ................................................................ 102 Strong password maximum length ............................................................... 102
Administration Guide 7
Strong password minimum alphabetic characters ......................................... 102 Strong password minimum alphabetic characters ......................................... 102 Strong password minimum numeric characters ............................................ 102 Strong password minimum numeric characters ............................................ 102 Enable Edit Mode Tabs ................................................................................ 103 Load All Child Pages in Edit Mode .............................................................. 103
App Variables ..................................................................................................... 103 Meta Tags ........................................................................................................... 103
Create Meta Tag Questions .......................................................................... 103 Admin Toolbar ................................................................................................... 104 Support ............................................................................................................... 104 Digital Asset Tags .............................................................................................. 104 Objectionable Words ........................................................................................... 104
Configuration Files ................................................................... 106
Web.config ......................................................................................................... 106 Support for Different Extensions with 404 Page ........................................... 106
Ironpoint.config .................................................................................................. 106 Authority Redirects ...................................................................................... 106 301 Redirects ............................................................................................... 107 FQDN Mapping ........................................................................................... 107
Default.aspx ........................................................................................................ 108
System Events ........................................................................... 110
Filtering Log Messages ................................................................................ 110 Clearing Log Messages ................................................................................ 110 Displaying Log Messages ............................................................................. 110
System Information ................................................................... 111
Framework Software Version ....................................................................... 111 Page Type Extensions .................................................................................. 111 Web Server Information ............................................................................... 111 Job Queue Status .......................................................................................... 111 Cache Status ................................................................................................ 111 Tools ............................................................................................................ 111 Database Tools ............................................................................................. 112 Import/Export Configuration ........................................................................ 112 Export HTML Management ......................................................................... 112 HTML Editors ............................................................................................. 112 Browser Information .................................................................................... 112 Web.config Settings ..................................................................................... 113 Ironpoint.config Settings .............................................................................. 113 PhysicalPath Settings ................................................................................... 113 View Active Sessions ................................................................................... 113
Active CM Glossary ................................................................... 114
Action Menu ................................................................................................ 114 Archive ........................................................................................................ 114 Category Pages............................................................................................. 114 Child Links .................................................................................................. 114 Child Pages .................................................................................................. 114
8 Administration Guide
Content Approvers ....................................................................................... 114 Content Editor ............................................................................................. 114 Content Management System ....................................................................... 115 Content Monitors ......................................................................................... 115 Content Providers ........................................................................................ 115 Digital Assets ............................................................................................... 115 Dynamic Publication .................................................................................... 115 Follow-up Task ............................................................................................ 115 Hybrid .......................................................................................................... 115 My Page ....................................................................................................... 116 Navigation Section ....................................................................................... 116 Page Types ................................................................................................... 116 Pagelets........................................................................................................ 116 Parent Pages ................................................................................................ 116 Section Menu ............................................................................................... 116 Static Publication ......................................................................................... 116 Syndication .................................................................................................. 117 Templates .................................................................................................... 117 Workflows ................................................................................................... 117
Appendix A – Static Sites ......................................................... 118
Static (exported sites) .......................................................................................... 118
Appendix B – Group Types ...................................................... 119
Group Types ....................................................................................................... 119 System Administrators ................................................................................. 119 Designers ..................................................................................................... 119 Content Providers ........................................................................................ 119 Content Approvers ....................................................................................... 119 Content Monitors ......................................................................................... 119
Appendix C – Follow-up Tasks and Workflow ....................... 121
Follow-up Tasks and Workflows ......................................................................... 121 Review ......................................................................................................... 121 Inactive ........................................................................................................ 121 Archive ........................................................................................................ 121
Follow-Up Task Settings ..................................................................................... 122
Appendix D – Page Versions.................................................... 123
Page Versions ..................................................................................................... 123 Page Statuses ...................................................................................................... 123
Appendix E - Links .................................................................... 125
Links .................................................................................................................. 125 Content Links .............................................................................................. 125 Child Page Links ......................................................................................... 125 Section Menu Links ..................................................................................... 125 Navigation Links ......................................................................................... 125
Link Page Type ..................................................................................... 125 Attachment Page Type .......................................................................... 126
Administration Guide 9
Category Page Type............................................................................... 126 Quick Links Page/Pagelet ...................................................................... 126
Appendix F - Personalization ................................................... 127
Personalization ................................................................................................... 127 Overview ..................................................................................................... 127 Site Personalization Options ........................................................................ 127 Page Personalization Options ....................................................................... 127 User Group .................................................................................................. 127 Application Form ......................................................................................... 127
Appendix G – Page Types ........................................................ 128
Page Types.......................................................................................................... 128
Appendix H – Meta Data ........................................................... 138
Meta Tag Overview ............................................................................................ 138 Metadata Tag Types ..................................................................................... 138 For more information on metadata... ............................................................ 138
Appendix I – Question Editor ................................................... 139
Question Editor ................................................................................................... 139 Question Types ................................................................................................... 140
Adding Page and Section Breaks .................................................................. 143 Adding Questions ........................................................................................ 144 Copying Questions ....................................................................................... 144 Deleting and Deactivating Questions ............................................................ 145 Reordering Questions ................................................................................... 145
Appendix J – Multi-Language .................................................. 146
Enabling Multi-Language ................................................................................... 146 Multi-language Sites Overview ........................................................................... 146
Overview of the Process ............................................................................... 146 User Interface Changes for Translation Sites ....................................................... 147
Site Manager................................................................................................ 147 Page Configuration ...................................................................................... 147 Template Configuration ............................................................................... 147 Workflow Changes....................................................................................... 147 Child Pages .................................................................................................. 147 Page Type Localization Support ................................................................... 147 Section Menu Site-toggle Button .................................................................. 148 Friendly URLs ............................................................................................. 148
Translation Workflow Steps ................................................................................ 148 Configuring Sites for Translation ........................................................................ 149 Enabling the Multi-language Section Menu ........................................................ 150 Removing Sites from Translation Sets................................................................. 151
Appendix K – Friendly URLs .................................................... 152
Friendly URLs .................................................................................................... 152 Overview ..................................................................................................... 152
10 Administration Guide
Enabling Friendly URLs .............................................................................. 153 IIS Configuration .................................................................................. 153 Assets Folder ......................................................................................... 155 Friendly URL Folders ............................................................................ 155 Virtual Directories and HTML files ....................................................... 155
Friendly URL FileNotFound Errors .............................................................. 156
Appendix L – SFTP and FTPS .................................................. 157
SFTP and FTPS Support ..................................................................................... 157 Introduction ................................................................................................. 157 Protocol and Port ......................................................................................... 157 FTPS............................................................................................................ 157 SFTP............................................................................................................ 158
FTP Compatibility Flag ......................................................................... 158 Problem Diagnostic ...................................................................................... 158
Appendix M – Edit Lock ............................................................ 160
Edit Lock ............................................................................................................ 160 Locking and Unlocking ................................................................................ 160 Bypass Locking ............................................................................................ 160 Bypass Unlocking ........................................................................................ 160 StateServer and SQLServer Session ............................................................. 161
Appendix N – Public Users....................................................... 162
Public Users ........................................................................................................ 162 Application Form ......................................................................................... 162 Login Form .................................................................................................. 162 User Manager .............................................................................................. 162 Group Manager ............................................................................................ 163
Appendix O – Support Contact Information ........................... 164
Support Contact Information ............................................................................... 164
Appendix P – View Active Sessions ........................................ 165
View Active Sessions .......................................................................................... 165
Appendix Q – Form Tags.......................................................... 166
Disabled Form Tags ............................................................................................ 166
Appendix R – Google Analytics ............................................... 167
Google Analytics in a Mixed SSL Site ................................................................ 167
Appendix S – Internal Search and Replace ............................. 168
Search and Replace Utility .................................................................................. 168 Search and Replace ...................................................................................... 168 Search Result Settings .................................................................................. 169 Site and Section ........................................................................................... 170 Search Results .............................................................................................. 171
Administration Guide 11
Search and Replace Report ........................................................................... 172
Appendix T – Social Media Integration ................................... 173
Group Permissions .............................................................................................. 173 Social Media Accounts........................................................................................ 173
My Page ....................................................................................................... 174 Sharing Content .................................................................................................. 174
Appendix U – 404 Redirects using Multiple URLs ................. 175
Appendix V – Enabling Single Sign-On ................................... 177
Introduction ........................................................................................................ 177 Set-up Steps ........................................................................................................ 177
Appendix W – Robots.txt.......................................................... 179
12 Introduction to the Active CM Administration Guide
Introduction to the Active CM
Overview
The Active Content Manager (ACM) provides an easy-to-use interface that
allows you, the person who understands your business the best, to communicate
directly to your customers, partners, vendors and colleagues by enabling you to
input content to your website directly. If you can surf the web and type an
email, you can use the ACM to help you input, control and publish your
information.
Technical Support
Technical support is available through the online support center at:
http://customerportal.activenetwork.com
In order to use this site you must have a valid user name and password.
Support Telephone: 604.431.4636
Toll free Support: 1.800.663.4991
Support email: [email protected]
Administration Guide Important ACM Concepts 13
Important ACM Concepts
This section introduces key concepts to understanding how to use the Active
Content Manager to create and manage your sites. Review these concepts from
time to time; doing so will improve your understanding and ability to work with
the Active CM.
Admin Center
The Admin Center is where sites are created, maintained and monitored.
Features within the Admin Center are available to users based on their Group
settings. System Administrators have full access to the Admin Center.
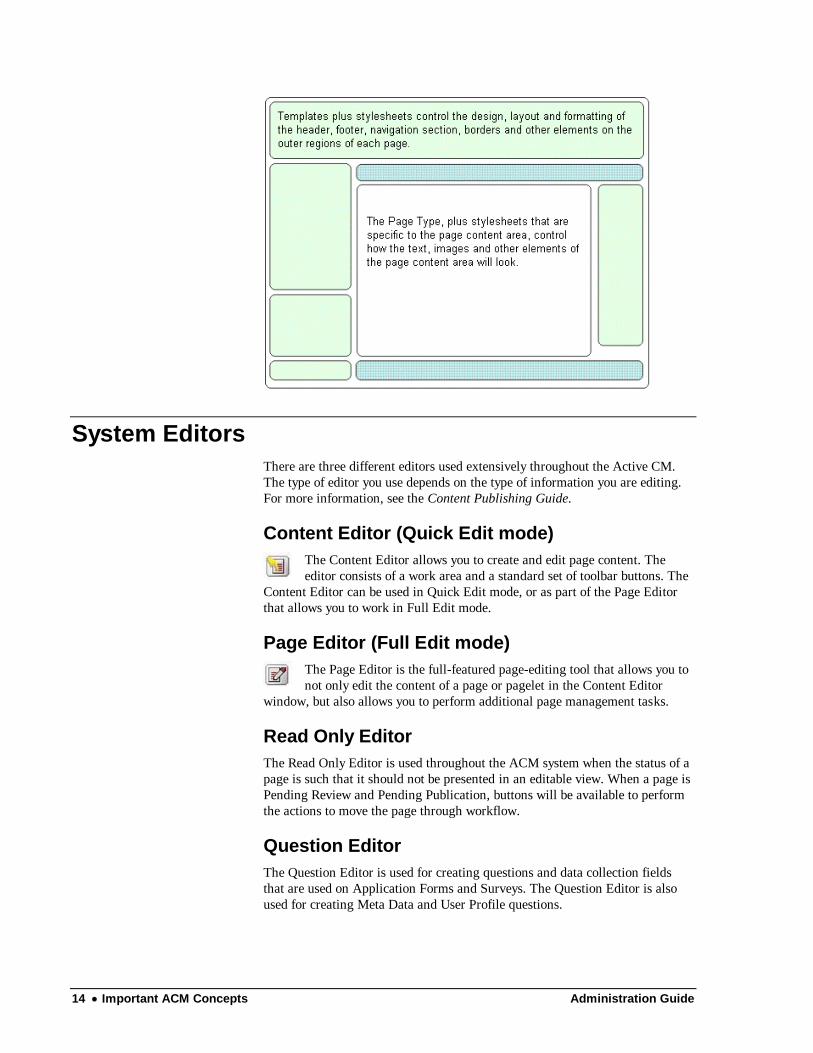
Page Types: how pages look and function
The published pages on your website appear as they do because of two main
components:
a Page Type that controls the functionality of the page
a Page Template that controls the formatting of the page
Page Types
Different formatting and functionality will appear in the content area of each
page type you select when creating content. For example, when you create a
Login page, the page automatically includes a pre-programmed, functional
Login box complete with username and password fields.
Each Page Type uses a style sheet located in the design package (pagetypes.css)
that is fully editable.
Templates
Templates contain layout, design and formatting information that determines
how your finished pages look. Templates control both the outer regions of your
web pages, defining how the header, footer, navigation panes and other aspects
of your site will look, as well as the central content area of each page.
By using templates to control site formatting, the Active CM keeps design and
content separate. This means that users focus on entering content, while
templates control how that content will look. If a change to the site's look and
feel is required, the template can simply be updated and the content will
automatically conform to the new template design.
The Finished Page
The final published web page is a combination of the template, the page type
and the content you enter.
14 Important ACM Concepts Administration Guide
System Editors
There are three different editors used extensively throughout the Active CM.
The type of editor you use depends on the type of information you are editing.
For more information, see the Content Publishing Guide.
Content Editor (Quick Edit mode)
The Content Editor allows you to create and edit page content. The
editor consists of a work area and a standard set of toolbar buttons. The
Content Editor can be used in Quick Edit mode, or as part of the Page Editor
that allows you to work in Full Edit mode.
Page Editor (Full Edit mode)
The Page Editor is the full-featured page-editing tool that allows you to
not only edit the content of a page or pagelet in the Content Editor
window, but also allows you to perform additional page management tasks.
Read Only Editor
The Read Only Editor is used throughout the ACM system when the status of a
page is such that it should not be presented in an editable view. When a page is
Pending Review and Pending Publication, buttons will be available to perform
the actions to move the page through workflow.
Question Editor
The Question Editor is used for creating questions and data collection fields
that are used on Application Forms and Surveys. The Question Editor is also
used for creating Meta Data and User Profile questions.

Administration Guide Important ACM Concepts 15
Image Editor
The image editor can be used to perform simple editing of digital asset images.
Resizing, cropping and flipping/rotating are available in the editor and images
can be saved with changes or saved as a new asset, preserving the format of the
original. Only images smaller than 2880 x 2880 pixels are supported in the
image editor.
Edit Locking
When Edit Locking is enabled as either a global or site setting, users will not be
able to edit any content or settings of a page while another user is doing so.
The Full Edit and Quick Edit Mode buttons are disabled when a user is editing
the page. When a page is being edited by one user, all subsequent users will see
a message beside the Full edit button stating that the page is ―Locked for
Editing‖.
Child pages can still be added from view mode to any parent page locked for
editing.
Pagelets that reside on a page locked for editing can be edited by another user.
A page remains locked for as long as the editing user‘s session remains active.
Publishing a page, submitting a page to workflow, closing the browser window
or navigating away from edit mode will remove the edit lock and allow others
to make changes.
When a page is locked for editing, the ability to change workflow and page
design settings are also locked. A Page Editing Status Report is available in the
System Information section of the Admin Center. For more information see
Appendix M – Edit Lock.
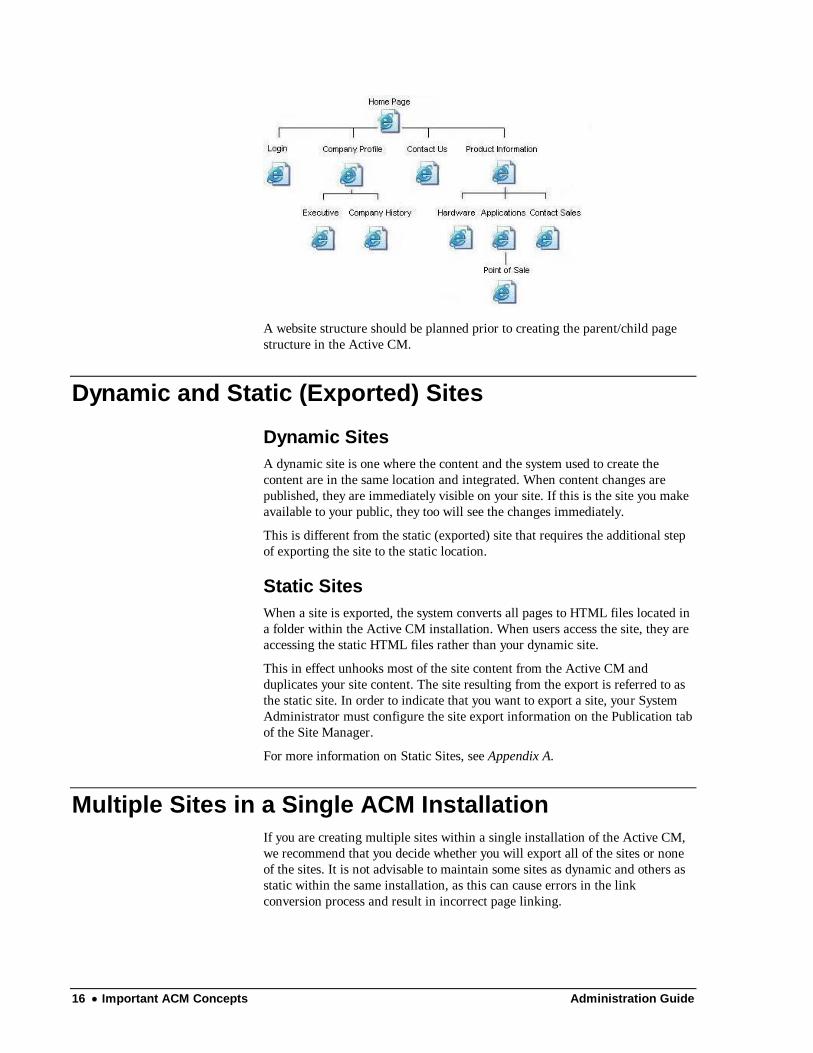
Parent/Child Page Relationship
The parent/child concept is central to understanding how websites are built
using the Active CM.
A parent page is any page within your website that has pages below it in the
website hierarchy. In order to create child pages, you edit a page and add a new
page using the Child Pages tab. Once you have added one child page, you can
continue to add child pages, creating a hierarchy as shown below.
16 Important ACM Concepts Administration Guide
A website structure should be planned prior to creating the parent/child page
structure in the Active CM.
Dynamic and Static (Exported) Sites
Dynamic Sites
A dynamic site is one where the content and the system used to create the
content are in the same location and integrated. When content changes are
published, they are immediately visible on your site. If this is the site you make
available to your public, they too will see the changes immediately.
This is different from the static (exported) site that requires the additional step
of exporting the site to the static location.
Static Sites
When a site is exported, the system converts all pages to HTML files located in
a folder within the Active CM installation. When users access the site, they are
accessing the static HTML files rather than your dynamic site.
This in effect unhooks most of the site content from the Active CM and
duplicates your site content. The site resulting from the export is referred to as
the static site. In order to indicate that you want to export a site, your System
Administrator must configure the site export information on the Publication tab
of the Site Manager.
For more information on Static Sites, see Appendix A.
Multiple Sites in a Single ACM Installation
If you are creating multiple sites within a single installation of the Active CM,
we recommend that you decide whether you will export all of the sites or none
of the sites. It is not advisable to maintain some sites as dynamic and others as
static within the same installation, as this can cause errors in the link
conversion process and result in incorrect page linking.
Administration Guide Important ACM Concepts 17
User Roles
The Active CM comes with a default set of suggested user roles that are
configured in the Group Manager. System Administrators can customize these
roles to suit the needs of each site.
For more information on group types, see Appendix B.
Workflow
Workflow encompasses a number of processes in the Active CM:
1. Workflow Groups are created and applied to Workflow processes that
are assigned to pages. This dictates who has rights to edit, monitor and
approve a page.
2. Follow-up Tasks which are set on the Workflow tab in full-edit mode.
These tasks are: Archive, Inactive, Review or None. For more
information on Follow-up tasks, see Appendix C.
3. ―Workflow‖ is the state a page is in perpetually once created. At any
time a page will be in one of any number of workflow statuses. For
more information on Page Versions and statuses, see Appendix D.
Links
There are a number of ways to create links within the Active CM. The method
you choose for creating a link depends on the types of links you want to group
together and where on your page, or site you wish to place them. For more
information on creating link see Appendix E.
18 Getting Started Administration Guide
Getting Started
Logging on to the Active CM
Open a Web browser and go to the login page for your site.
Site URL = _______________________________________________.
You should now see the login page.
Enter your Username and Password.
The first time you log in you will see your personal information page called My
Page. On My Page you can view your personal information and rights, and
change your password.
You should never change your password in the ACM if you are using LDAP
authentication for your user accounts.
Administration Guide Getting Started 19
If you don‘t want to see this page every time you log in to the ACM, uncheck
the ―Make this my home page‖ checkbox. Click Save. The next time you log
on, you will be directed to your site‘s Home Page instead of to My Page.
Changing Your Password
1. On My Page, click the Change Password button.
2. In the Old Password field, enter in your current password.
3. In the New Password field, enter a new password.
4. In the Retype New Password field, enter the password again.
5. Click Save.
6. When you are back on My Page, click Save again.
7. Click Logout and log back in again using your new password.
Changing Your Editor Preference
By default the system will provide you with the Telerik r.a.d. WYSIWYG
editor. If you prefer not to use this editor and work directly with HTML code,
you can change the option by selecting ―Plain Text‖ in the HTML Editor drop-
down. Additionally, the TinyMCE WYSIWYG editor has been added as an
option.
Note The TinyMCE Editor will always insert the <p> paragraph tag when a user
hits the Enter key. This is different than the default setting for the r.a.d. editor
which uses a <br> tag. If you prefer to use a <br> tag instead of <p> for paragraph
breaks, you can simply hit Shift+Enter in the TinyMCE editor or only make the
r.a.d. editor available to your users.
The non-WYSIWYG editor includes the following buttons: Insert Digital
Asset, Insert Link, Copy to Clipboard, and Paste from Clipboard.
20 Getting Started Administration Guide
Insert Digital Asset – This button provides the ability to directly
insert a digital asset into the plain text editor, providing the same
functionality as the WYSIWYG editor.
Insert Link – This button provides the ability to directly insert a page
link (internal, external, or anchor) into the plain text editor, providing
the same functionality as the WYSIWYG editor.
Copy to Clipboard – This button provides the ability to copy the text
in the plain text editor to the system clipboard.
o The system will correctly copy digital asset and internal page
links to the system clipboard (for the primary purpose of
correctly pasting them into Dreamweaver.)
o If the ability to copy text to the clipboard is not exposed by a
browser, the system will provide easy access to the tag as text
(for the primary purpose of be manually copying and pasting
into Dreamweaver.)
Paste from Clipboard – This button provides the ability to paste the
text into the plain text editor from the system clipboard.
o If the ability to paste text from the clipboard is not exposed by
a browser, the system will provide a location where the text
can be pasted.
o Pasted text will not be altered by the system when pasted into
the plain text editor.
My Reports
A set of MyPage reports have been provided in order to help System
Administrators have increased visibility into the system and help identify pages
which need attention by displaying the status of pages that User‘s are in some
way responsible for. Pagelets are included in the reports, exactly as all other
pages in the system are.
If you as the System Administrator also play other roles on the site, you may
utilize the following Content reports:
My Page Rights. Displays your rights within the ACM system and
what groups you obtain those rights from.
My Personalized Pages. To identify pages that the user has rights to
view. This report will identify the page title, site, hyperlink to view
mode, and location line of each page in the report.
My Draft Pages. To identify pages for Content Providers, the report
includes the page title, site, last modified date time, hyperlink to edit
mode, and location line of each page in the report.
My Pages Pending Approval. To identify pages for Content
Providers, the report includes the page title, site, page status, hyperlink
to edit mode, and location line of each page in the report.
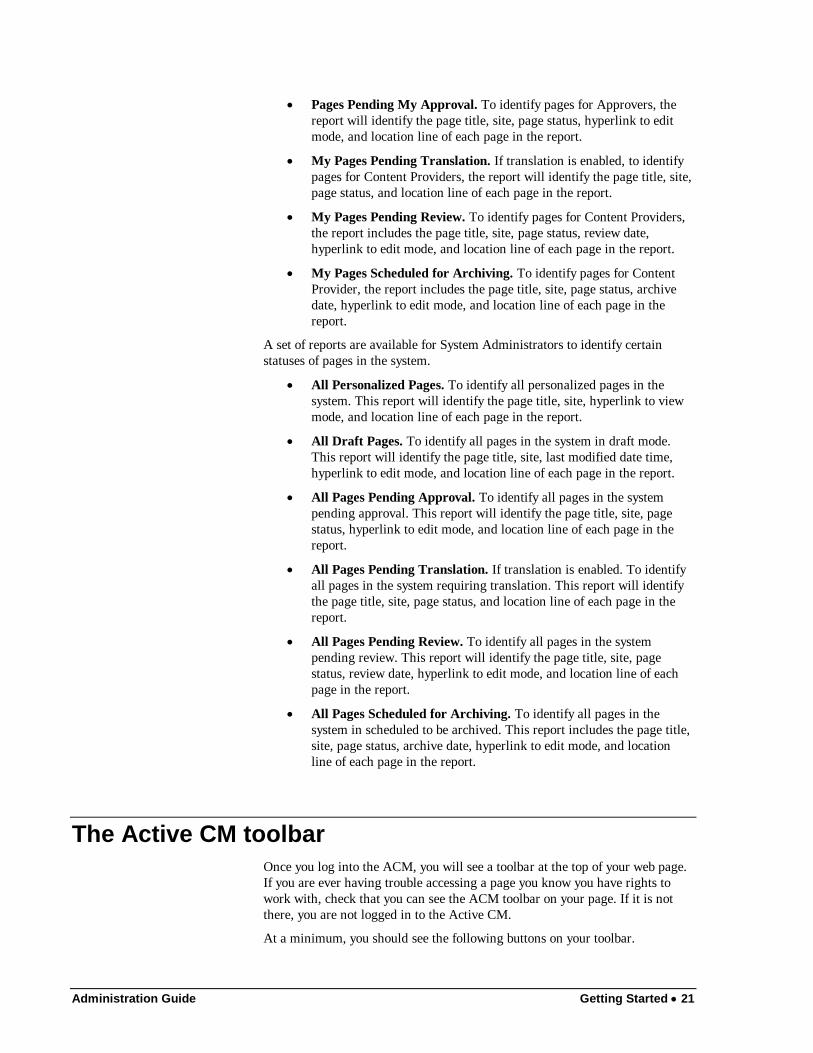
Administration Guide Getting Started 21
Pages Pending My Approval. To identify pages for Approvers, the
report will identify the page title, site, page status, hyperlink to edit
mode, and location line of each page in the report.
My Pages Pending Translation. If translation is enabled, to identify
pages for Content Providers, the report will identify the page title, site,
page status, and location line of each page in the report.
My Pages Pending Review. To identify pages for Content Providers,
the report includes the page title, site, page status, review date,
hyperlink to edit mode, and location line of each page in the report.
My Pages Scheduled for Archiving. To identify pages for Content
Provider, the report includes the page title, site, page status, archive
date, hyperlink to edit mode, and location line of each page in the
report.
A set of reports are available for System Administrators to identify certain
statuses of pages in the system.
All Personalized Pages. To identify all personalized pages in the
system. This report will identify the page title, site, hyperlink to view
mode, and location line of each page in the report.
All Draft Pages. To identify all pages in the system in draft mode.
This report will identify the page title, site, last modified date time,
hyperlink to edit mode, and location line of each page in the report.
All Pages Pending Approval. To identify all pages in the system
pending approval. This report will identify the page title, site, page
status, hyperlink to edit mode, and location line of each page in the
report.
All Pages Pending Translation. If translation is enabled. To identify
all pages in the system requiring translation. This report will identify
the page title, site, page status, and location line of each page in the
report.
All Pages Pending Review. To identify all pages in the system
pending review. This report will identify the page title, site, page
status, review date, hyperlink to edit mode, and location line of each
page in the report.
All Pages Scheduled for Archiving. To identify all pages in the
system in scheduled to be archived. This report includes the page title,
site, page status, archive date, hyperlink to edit mode, and location
line of each page in the report.
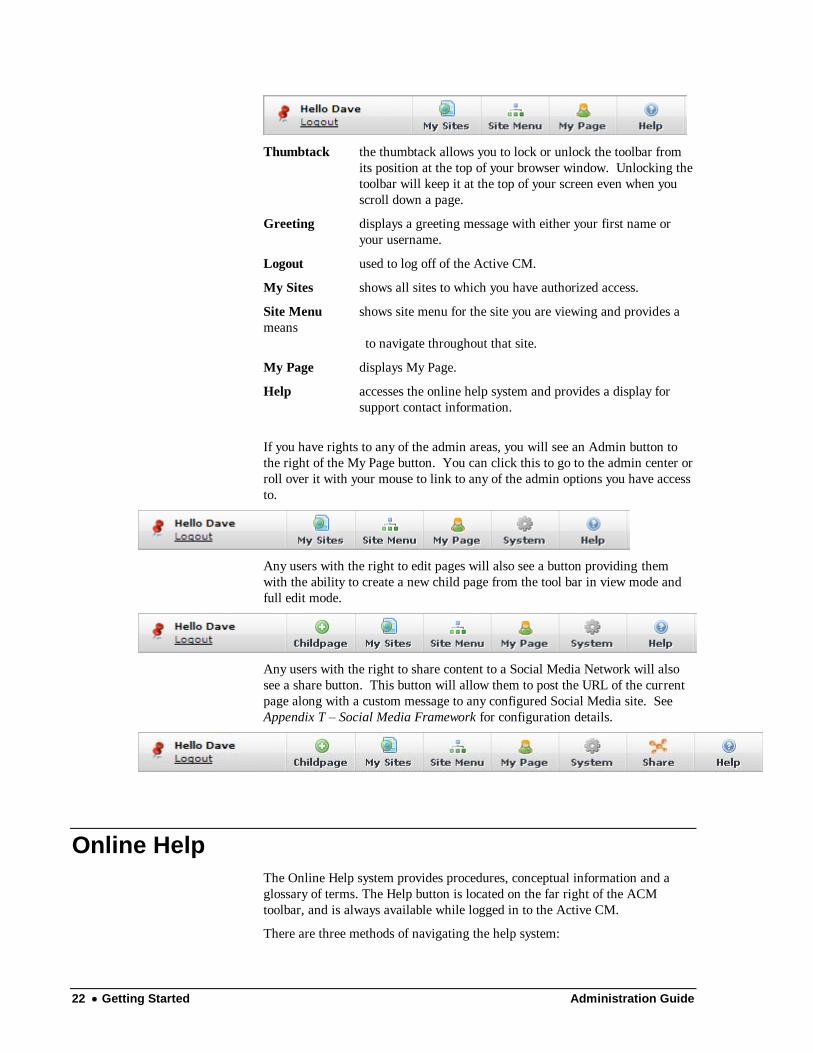
The Active CM toolbar
Once you log into the ACM, you will see a toolbar at the top of your web page.
If you are ever having trouble accessing a page you know you have rights to
work with, check that you can see the ACM toolbar on your page. If it is not
there, you are not logged in to the Active CM.
At a minimum, you should see the following buttons on your toolbar.
22 Getting Started Administration Guide
Thumbtack the thumbtack allows you to lock or unlock the toolbar from
its position at the top of your browser window. Unlocking the
toolbar will keep it at the top of your screen even when you
scroll down a page.
Greeting displays a greeting message with either your first name or
your username.
Logout used to log off of the Active CM.
My Sites shows all sites to which you have authorized access.
Site Menu shows site menu for the site you are viewing and provides a
means
to navigate throughout that site.
My Page displays My Page.
Help accesses the online help system and provides a display for
support contact information.
If you have rights to any of the admin areas, you will see an Admin button to
the right of the My Page button. You can click this to go to the admin center or
roll over it with your mouse to link to any of the admin options you have access
to.
Any users with the right to edit pages will also see a button providing them
with the ability to create a new child page from the tool bar in view mode and
full edit mode.
Any users with the right to share content to a Social Media Network will also
see a share button. This button will allow them to post the URL of the current
page along with a custom message to any configured Social Media site. See
Appendix T – Social Media Framework for configuration details.
Online Help
The Online Help system provides procedures, conceptual information and a
glossary of terms. The Help button is located on the far right of the ACM
toolbar, and is always available while logged in to the Active CM.
There are three methods of navigating the help system:
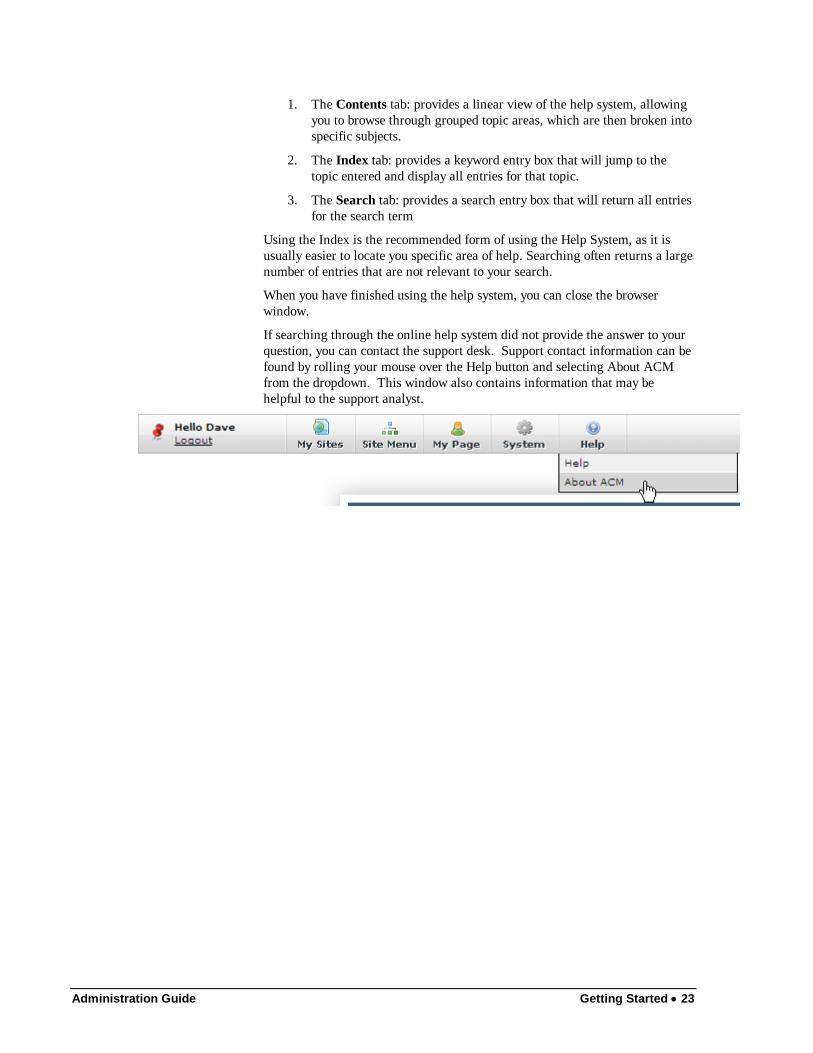
Administration Guide Getting Started 23
1. The Contents tab: provides a linear view of the help system, allowing
you to browse through grouped topic areas, which are then broken into
specific subjects.
2. The Index tab: provides a keyword entry box that will jump to the
topic entered and display all entries for that topic.
3. The Search tab: provides a search entry box that will return all entries
for the search term
Using the Index is the recommended form of using the Help System, as it is
usually easier to locate you specific area of help. Searching often returns a large
number of entries that are not relevant to your search.
When you have finished using the help system, you can close the browser
window.
If searching through the online help system did not provide the answer to your
question, you can contact the support desk. Support contact information can be
found by rolling your mouse over the Help button and selecting About ACM
from the dropdown. This window also contains information that may be
helpful to the support analyst.
24 Admin Center Introduction Administration Guide
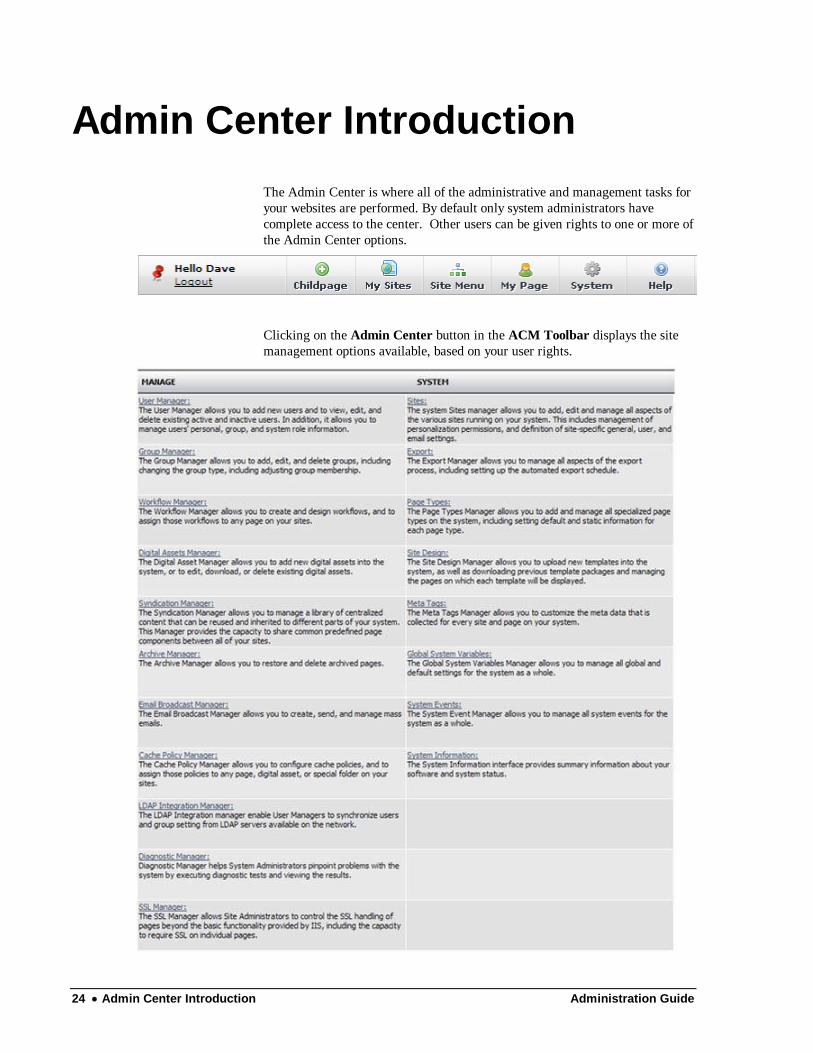
Admin Center Introduction
The Admin Center is where all of the administrative and management tasks for
your websites are performed. By default only system administrators have
complete access to the center. Other users can be given rights to one or more of
the Admin Center options.
Clicking on the Admin Center button in the ACM Toolbar displays the site
management options available, based on your user rights.

Administration Guide User Manager 25
User Manager
User Accounts
A User Account is made of the pre-defined questions required by the Active
CM and any System or Site User Profile questions defined by the System
Administrator.
The only field that must hold unique information in each User Account is
the Login User Name.
Create a User Account
Create new users and assign them to groups.
1. Open the User Manager.
2. Click Add User.
3. Check the Active checkbox if you want the user to be active. The
default is often set to Inactive; this is a good practice if you have
people using Application Forms applying to have a user account for
the site.
4. Leave the Locked Out checkbox blank. Only check this if you want to
keep someone from accessing your website.
5. Complete the User Details noting the required fields.
6. Click Save. The Personal Information and Groups tabs are displayed.
If you are adding multiple new users and completing personal
information and group assignments later, click Save & Add. This will
save the new user account and return you to a blank New User form.
7. Complete the questions on the Personal Information tab. The items
that appear on this tab come from the Site Manager User Profile,
Global System Variables User Profile or Application Forms used on a
site.
8. On the Groups tab, assign the user to groups they need to be members
of by checking the box beside the group name(s).
9. Click Save.
Note You can now create a Public User by selecting the Public checkbox on a user
record. A Public User account requires only the use of an email address, password
and preferred full name and cannot be assigned to groups with permissions,
providing added security for your website. See Appendix N for further details.
Locate a User Account
There are a number of ways you can locate user records in the User Manager.
26 User Manager Administration Guide
Note Users marked with a ―P‖ are public users.
Open the User Manager.
Choose one of the following methods to locate the user record:
First letter of last name
1. Click on the first letter of the last name.
2. Locate the name in the search results.
3. Click on the Name.
Use the search
1. Enter a portion (must be more than one character or the ACM will
return all users with that character) of the user‘s first name or last
name or their email address, in the User Search field.
2. Click Search.
3. Locate the name in the search results.
4. Click on the Name.
By group name
1. From the Group/Folder drop-down, select a group that you know the
user belongs to.
2. When the members of the group are displayed, locate the user name in
the list.
3. Click on the Name.
Public Users Only
1. Check the ―Public Only‖ checkbox to search for only users that are
flagged as public users.
When viewing search results in the User Manager, you can sort the information
by clicking on a Column Header.
Modify a User Account
All fields in a User Account can be modified and saved. Changing a User
Password is unique; an additional dialog box will open, requiring both it and
the Edit User page to be saved.
Change a User Password
1. Open the User Manager.
2. Locate the User Account to edit.
Administration Guide User Manager 27
3. Click Change Password.
4. On the Change Password dialog, enter the new password.
5. Enter the password again in the Retype New Password field.
6. Click Save.
7. When returned to the Edit User page, click Save again.
Copy a User Account
When you need to create a new user account and many of the settings will be
the same as another user already in the system you can open an existing user
record and copy it as a template for a new record.
1. Open the User Manager.
2. Open the User Account to copy or create a new user and save.
3. Click Save & Copy.
The original user account will be saved and closed and a new user
record is opened. The new account will not be a permanent record
until it is saved.
4. A new inactive user record is created. The user details will display a
copied First Name, the previous record‘s last name, and a copied
preferred full name. You will need to update these fields, and
complete all the required fields before the new record can be saved.
5. The Group assignments will remain the same as the original record.
6. Click Save.
7. Any Personal Information questions created for the user records will
now be available to be completed, any required questions must be
answered prior to saving the record.
8. Make any edits that may be required for the new user account.
9. Click Save again to close the record, or Save & Copy to create
another user record based on the same user information.
Delete a User Account
Deletes a user from the ACM but retains the record in the database. If you want
to temporarily suspend a user's access, you should deactivate the user.
1. Open the User Manager.
2. Locate the User account.
3. Once the User record is displayed, click Delete.
4. A confirmation screen will display. Click OK to delete user.

28 User Manager Administration Guide
Note As of version 8.9, a deleted username can now be reused within the CMS.
Mass User Import Tool
An administrator has the ability to import a full list of users through the ACM
UI. In a CSV file, users can be assigned a username, password and added to
any number of pre-existing groups. Both normal ACM users and public users
can be added.
Import User List
1. In the User Manager, click the Import User List button to be directed
to the user import screen.
2. Depending on what type of users you wish to import, download either
the standard user template or the public user template by selecting the
corresponding link. The format for each is as follows:
Standard User List Template
Column A – Preferred Full Name (required)
Column B – First Name (required)
Column C – Middle Name (optional)
Column D – Last Name (required)
Column E – Username (unique, required)
Tip If you attempt to delete a User Account and the User is a member of a group
that is assigned to an active Workflow (assigned to pages). You will receive a
message warning of this fact and the account will not be deleted.
You must first remove the User from any Groups currently assigned to a
Workflow. You will then be able to delete the account.
If the User you are removing from the Group is the last member of the Group, you
will need to add a User to the Group before you will be permitted to delete the
original user.
Administration Guide User Manager 29
Column F – Email (required)
Column G – Password (required)
Column H – Group (optional)
Column ? – Group (optional)
Public User List Template
Column A – Preferred Full Name (required)
Column B – First Name (optional)
Column C – Middle Name (optional)
Column D – Last Name (optional)
Column E – Email (unique, required)
Column F – Password (required)
Column G – Group (optional)
Column ? – Group (optional)
Considering Your User Data
When you are building your user information and are required to create unique
usernames and a password formula, have MS Excel do the work for you.
Assuming you have the first and last name of a user already in the spreadsheet,
you can build the following information with the appropriate excel formula.
For the person John Smith:
Preferred Full Name:
In the A2 cell, enter: =B2&‖ ―&D2
Output = ―John Smith‖
Username
In the E2 cell, enter: =Left(B2,1)&D2&Row(B2)
Output = ―JSmith2‖
Password
In the F2 cell, enter: =Left(B2,1)&D2&Row(B2)
Output = ―JSmith2‖
After you have created each of these formulas, copy it into the rest of the cells
in that column. This will generate a new value for each user.
Since this data is only a reference to other cells in the spreadsheet, you
must select each of the columns to which you added the formulas, copy
those columns (Ctrl+C) and under the paste option, select “Paste Values”.
This will copy the output of the formula and actually paste it as the real
value.
30 User Manager Administration Guide
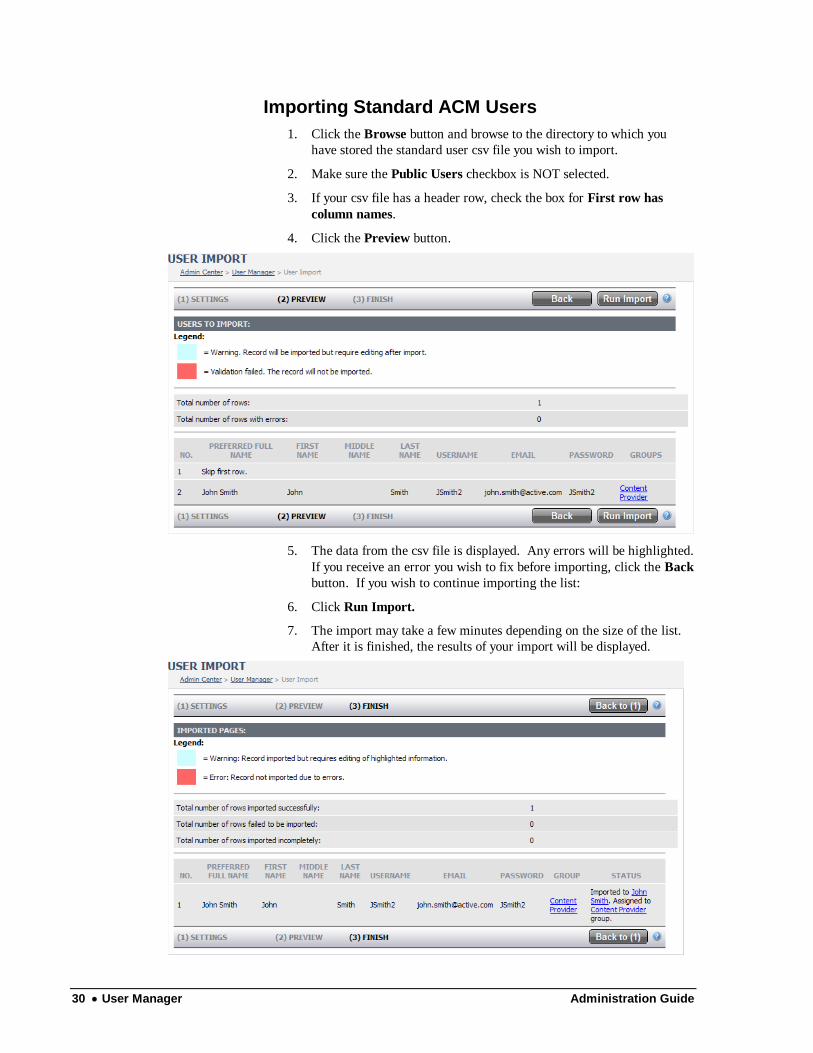
Importing Standard ACM Users
1. Click the Browse button and browse to the directory to which you
have stored the standard user csv file you wish to import.
2. Make sure the Public Users checkbox is NOT selected.
3. If your csv file has a header row, check the box for First row has
column names.
4. Click the Preview button.
5. The data from the csv file is displayed. Any errors will be highlighted.
If you receive an error you wish to fix before importing, click the Back
button. If you wish to continue importing the list:
6. Click Run Import.
7. The import may take a few minutes depending on the size of the list.
After it is finished, the results of your import will be displayed.
Administration Guide User Manager 31
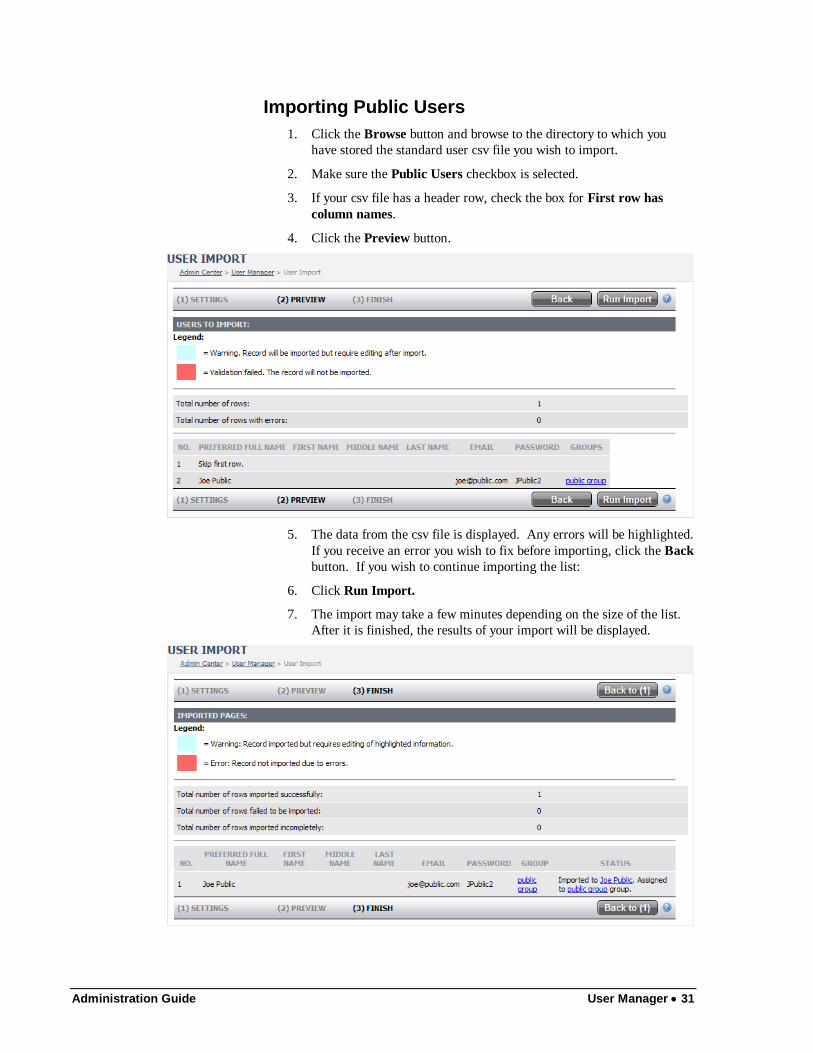
Importing Public Users
1. Click the Browse button and browse to the directory to which you
have stored the standard user csv file you wish to import.
2. Make sure the Public Users checkbox is selected.
3. If your csv file has a header row, check the box for First row has
column names.
4. Click the Preview button.
5. The data from the csv file is displayed. Any errors will be highlighted.
If you receive an error you wish to fix before importing, click the Back
button. If you wish to continue importing the list:
6. Click Run Import.
7. The import may take a few minutes depending on the size of the list.
After it is finished, the results of your import will be displayed.
32 Group Manager Administration Guide
Group Manager
Plan the Groups
ACM users are assigned to groups. Group settings are used to control user
access to management tools, editor tools and establish workflow functionality.
It is important to plan how to best group users. Consider the following when
creating groups:
Your organizational chart - break users into
departments/functional areas; think about who will be performing
tasks within each of those areas; for example:
Mary will be creating content for the Human Resources
department. She will not be performing any other functions. So
she will be assigned to a Human Resources content provider
group.
Organize the users into groups based on their rights to do certain
things within the department, for example:
Mary will also need to access the Digital Assets Manager, the
Pagelets (Syndication) Manager but no other Admin Center
functions.
For more information on groups, see Appendix B.
Group Folders
Group folders provide a method of organizing your groups into smaller,
manageable, functional areas. When working in the Manage Folders area of the
Group Manager you can only create, modify and delete folders. There is no
access to groups.
Create Group Folder
1. Open the Group Manager.
2. Click Manage Folders.
3. Click Add Folder.
4. Enter the Name for the folder.
5. Provide a Description of the folder that others will see when viewing
folders.
Administration Guide Group Manager 33
6. Select the Parent Folder for the new folder. This will determine the
folder's location in the folder hierarchy.
7. Click Save. Repeat for all folders you wish to create.
Locate Group Folder
1. Open the Group Manager.
2. Click Manage Folders.
3. Using the Parent Folder dropdown expand the folder view until the
folder is located.
Modify Group Folder
1. Open the Group Manager.
2. Click Manage Folders.
3. Select the Parent Folder of the folder you want to modify.
4. Click the Folder Name to view the folder details.
5. Modify the Name or Descriptions fields, or select a new parent folder.
6. Click Save.
Delete Group Folder
1. Open the Group manager.
2. Click Manage Folders.
3. Select the Parent Folder of the folder you want to modify.
4. Check the Delete box to the right of the Folder you want to delete.
Click Save.
OR
Click the Folder Name to view the folder details. Click Delete.
5. Click OK in the confirmation dialog box.
Tip If you attempt to delete a Group Folder and there is still Groups or other
Folders in it, you will receive a message warning of this fact and the folder will not
be deleted.
You must cancel the action and remove any dependencies from the folder. You
will then be able to delete the folder.
Groups
Group are used to control user access to management tools, editor tools and
establish workflow functionality.
34 Group Manager Administration Guide
Users can belong to multiple groups with different permissions. A user‘s rights
within the ACM are created from all the groups they belong to.
Create Group
1. Open the Group Manager.
2. Click Add Group.
3. Add the Group Details for the group.
Name: Enter the group name. Make sure you have given some thought to your
group naming conventions prior to creating groups.
Description: Enter a description that provides information about the group
such as the department(s), access rights or other pertinent information. This
information is useful for understanding the group's purpose.
Group Folder: Select the folder you want to place this group in. The default is
the root level Groups folder.
Group Type: Select the Group Type(s) for the group. (A group can be both a
permission and workflow group.)
Permission: Select this group type if you are going to restrict group members'
access to certain Admin Center functions.
Public: Select this group type if you are going to support the use of Public
Users and wish to make certain that no permissions can be inadvertently
applied to the group. This will disable all other group options. See Appendix N
for further details.
Eligible for Workflow: Select one or more workflow group types if users in
this group will be performing the workflow functions listed.
Providers: Select this option if members of this group will be
responsible for creating/editing content.
Approvers: Select this option if members of this group will be
responsible for approving content.
Monitors: Select this option if members of this group will be
responsible for monitoring content changes.
Page Owner: (This option is only visible if set in the Global System
Variables.) Select this option to create a group of users that will be assigned as
page owners throughout a sign. When used in combination with page owner
template tag, page owner contact information is displayed on published pages.
Personalization: select this option for groups that will access restricted areas of
your website(s). Check the option Make available for External Applications and
PageTypes if you want the group to be available in Custom Group questions on
Application Forms.
For more information on Personalization, see Appendix F.
4. Click Save.
5. Complete the information on each of the tabs. You can save the group
at any time during the following steps; you will leave the Edit Group
page and return to the Group Manager.
Administration Guide Group Manager 35
Note The next settings will only be displayed when you are working with a group
that is eligible for workflow (approver, provider or system administrator).
See the System Information section in this guide for more information on
registering HTML editors for use in the ACM.
HTML Editor: Check one or more boxes of the editor types you want to make
available to this group. This setting will determine the editors a user can choose
from on their own ―My Page‖ settings.
If a user has no HTML editor rights due to belonging to groups where no
editors are selected, the only available option in their ―My Page‖ settings will
be the read-only editor. This view will display the content entered on a page
without any capacity for the viewer to change or otherwise adjust what is
shown.
If a user has the editor on their ―My Page‖ set to a value that they no longer
have rights to (either due to deselecting of the editor in the group settings, or
due to the user‘s removal from a group), they will instead have the read-only
editor selected.
Members Tab
Assign users to the group.
1. Open the Group Manager.
2. Add or edit the group you want to select users for.
3. Click on the Members tab
4. Use the Add Members area to search for or list Users to add to the
group.
5. Click the Check Box to the left of the User Name(s) you want
assigned to the group.
6. Click the Add Selected button to add the Users to the Group.
Sites Tab
Give group access to one or more of your websites. The default setting is access
to all sites.
1. Open the Group Manager.
2. Add or edit the group you want to set site access for.
3. Click on the Sites tab.
4. If you want the group to have access to all sites, leave the Available in
all sites checkbox checked.
If you want the group to have access to some sites but not others,
uncheck Available in all sites and select individual sites.
36 Group Manager Administration Guide
Tools Tab
Give group access to Admin Center Management areas.
1. Open the Group Manager.
2. Add or edit the group you want to set Admin Center access for.
3. Click on the Tools tab.
4. Check the box of each Management Tool you want the group to have
access to.
Note At a minimum, groups usually require the Admin Toolbar and My Page
tools.
User Domain Tab
Set restrictions on User Manager Groups for any group permitted to manage
users. The User Domain tab limits access to the User Accounts within the
selected folder and its sub-folders.
1. Open the Group Manager.
2. Add or edit the group you want to set user access for.
3. Click on the User Domain tab.
4. Select the folder you want this group to have access to. Group
members will be able to access only the users found in the selected
folder.
Asset Domain Tab
Set restrictions on Provider Groups that can insert Digital Assets in to pages.
The Asset Domain tab limits access to the digital assets within the selected
folder and its sub-folders.
1. Open the Group Manager.
2. Add or edit the group you want to set Digital Asset folder access for.
3. Click on the Asset Domain tab.
4. Select the folder you want this group to have access to. Group
members will be able to access only the Digital Assets in the selected
folder.
5. Click Save.
Note In ACM versions prior to 9.4, Asset Domains were ignored when a group
was given permission to the Digital Asset Manager (DAM). As of ACM version
9.4, users within groups that are given access to the DAM and have either no
defined asset domain or have an asset domain other than the root, will find their
access to the DAM restricted to the defined domain of their group. This change
allows the enforcement of Asset Domains while still providing users with access to
a specified sections and tools of the DAM.
Administration Guide Group Manager 37
Pagelet Domain Tab
Set restrictions on groups that have rights to insert Pagelets into pages. The
Pagelet Domain tab limits access to pagelets within the selected folder and its
sub-folders.
1. Open the Group Manager.
2. Add or edit the group you want to set Pagelet folder access for.
3. Click on the Pagelets Domain tab.
4. Select the folder you want this group to have access to.
Page Types Tab
Restrict group access (the ability to add to the site) selected Page Types.
1. Open the Group Manager.
2. Add or edit the group you want to set Page Type access for.
3. Click on the Page Types tab.
4. Select the page types you want this group to have access to.
5. For more information on Page Types, see Appendix G.
r.a.d. Editor Tab
Note The Telerik r.a.d. editor is the default editor of the ACM software, therefore it is
the only editor where this level of access can be restricted. This tab will only display if
the r.a.d. editor is selected as one of the HTML editors available to the group.
Restrict group access to r.a.d Editor tools.
1. Open the Group Manager.
2. Add or edit the group you want to set r.a.d. editor tool access for.
3. Click on the r.a.d. Editor tab.
4. Select the tools you want this group to have access to.
Locate Group
1. Open the Group Manager.
2. Enter a partial or full group name; select a folder using the Choose a
Folder dropdown. Click Search.
All groups matching the search term will be displayed.
OR
3. Browse groups by selecting a folder using the Choose a Folder
dropdown.
All groups within the selected folder will be displayed.
Note Groups marked with a ―P‖ have been flagged as Public Groups.
38 Group Manager Administration Guide
Modify Group
1. Open the Group Manager.
2. Locate the group you want to modify.
3. Click View Summary for a group report of all of the characteristics of
the group.
4. Modify the group as required.
5. Click Save.
Copy a Group
When you need to create a new group and many of the settings will be the same
as another group already in the system you can open an existing group record
and copy it as a template for a new group record.
1. Open the Group Manager.
2. Open the Group to copy or create a new group and save.
3. Click Save & Copy.
The original group record will be saved and closed and a new group
record is opened. The new group will not be a permanent record until
it is saved.
4. The group details will display a copied Group Name. You can save
the new record as it is currently displayed, or enter the new name (if
known).
5. The Group type, HTML Editor, and all other settings will remain the
same as the original record.
6. Make any changes to the new group settings that may be required.
7. Click Save to close the record, or Save & Copy to create another
group based on the same group settings.
Delete Group
1. Open the Group Manager.
2. Locate the group you want to delete.
3. Check the Delete box to the right of the Group(s) you want to delete.
Click Save.
OR
Click the Group Name to view the group details. Click Delete.
4. Click OK in the confirmation dialog box.
Tip If you attempt to delete a group and the group has users assigned to it or the
group is assigned to an active workflow (assigned to pages). You will receive a
message warning of this fact and the group will not be deleted.
You must first remove the users from the group, or remove the group from the
workflow. You will then be able to delete the group.
If the group you are removing from the workflow is the last group assigned to the

Administration Guide Group Manager 39
workflow, you will need to add a group to the workflow before you will be
permitted to delete the original group.
40 Workflow Manager Administration Guide
Workflow Manager
Overview
Creating and applying Workflows within the Active CM is how you control
which users can edit, monitor and approve pages and sections of a site. A
Workflow corresponds to a series of steps involved in completing a process:
moving content through the edit, review and approval phase into publication.
Each step within a Workflow consists of a task, and of one or more people who
perform the task. For example:
1. Persons A, B, and C all create content (Content Providers) and submit
it for approval.
2. Person D then reviews and approves (Approver Level 1) their content.
3. Person E then gives the final stamp of approval (Approver Level 2) of
the content for publication.
4. Persons F and G simply receive email notification (Monitors) of the
new content.
When you create your groups, you will see the three different Workflow type
groups you can add users to: Provider, Approver and Monitor.
Once Workflows have groups or users assigned to them, they are applied to
pages and sections of your site.
A user will not be able to change the workflow of a page in the workflow
manager if the page is currently being edited by another user. The ―(Edit)‖
hyperlink will change to display ―(Locked for Editing)‖.
If a user, attempts to change the workflow of a group of pages that includes a
page being edited, a message must appear stating that the workflow change
cannot be applied because pages in the group are being edited.
Workflow Folders
It‘s good practise to organize the Workflow folders to correspond with the
group folders. Workflows will be saved within these folders.
Create Workflow Folder
1. Open the Workflow Manager.
2. Click Manage Folders.
3. Click Add Folder.
4. Enter the Name of the new folder.
Administration Guide Workflow Manager 41
5. Provide a Description of the folder that others will see when viewing
folders.
6. Select the Parent Folder for the new folder. This will determine the
folder's location in the folder hierarchy.
7. Click Save. Repeat for all folders you wish to create.
Locate Workflow Folder
1. Open the Workflow Manager.
2. Click Manage Folders.
3. Using the Parent Folder dropdown expand the folder view until the
folder is located.
Modify Workflow Folder
1. Open the Workflow Manager.
2. Click Manage Folders.
3. Select the Parent Folder of the folder you want to modify.
4. Click the Folder Name to view the folder details.
5. Modify the Name or Description fields, or select a new parent folder.
6. Click Save.
Delete Workflow Folder
1. Open the Workflow Manager.
2. Click Manage Folders.
3. Select the Parent Folder of the folder you want to modify.
4. Check the Delete box to the right of the Folder you want to delete.
Click Save.
OR
Click the Folder Name to view the folder details. Click Delete.
5. Click OK in the confirmation dialog box.
Workflows
Try to make Workflow names descriptive of who uses it. For example: HR
workflow for the Human Resources area of the site.
Once you have created a Workflow, if you need to create additional Workflows
that have the same member groups and properties, you can copy the Workflow
and save it with a new name.
42 Workflow Manager Administration Guide
Create a Workflow
1. Open the Workflow Manager.
2. Click Manage Workflows.
3. Click Add Workflow.
4. In the Workflow Details section, make sure the Active box is
checked.
5. Enter the Name of the workflow.
6. From the Folder drop-down, select the folder for the workflow to be
saved in.
7. If you want the group to have access to all sites, leave the Available in
all sites checkbox checked. If you want the group to have access to
some sites but not others, uncheck Available in all sites and select
individual sites.
Note Make sure your site settings are the same as the group site settings that will be
used in the workflow. If they are different you will not see the groups you intend to
set within the workflow.
8. Click Save or Save and Add to continue creating new Workflows
without assigning any User Groups to the Workflow.
Assign Providers
Providers are the users who are responsible for creating and editing content.
1. Click Manage Workflows and add or edit the Workflow you want to
assign Providers to.
2. Go to the Providers tab and under the ROLE column, click on the
Provider(s): link.
3. Select a group on the Groups tab or specific individuals from the
Individuals tab.
Note When adding individuals, you must place a checkmark beside each name you
wish to add and then scroll down and click Add Selected. Then click OK.
Group not there? If you do not see a group that you expected to, it means that you
did not set the Group Type to ―Provider,‖ or that that the Group and Workflow are
assigned to the different Site(s). You need to return to the Group Manager and check
the group settings.
4. Click Save.
Assign Monitors
Monitors are the individuals who will receive notification of content changes.
1. Click Manage Workflows and add or edit the workflow you want to
assign Monitors to.
Administration Guide Workflow Manager 43
2. Go to the Monitors tab and under the ROLE column, click on the
Monitor(s): link.
3. Select a group on the Groups tab or specific individuals from the
Individuals tab.
Note When adding individuals, you must place a checkmark beside each name you
wish to add and then scroll down and click Add Selected. Then click OK.
Group not there? If you do not see a group that you expected to, it means that you
did not set the group type to ―Monitor,‖ or that that the Group and Workflow are
assigned to the different Site(s). You need to return to the Group Manager and check
the group settings.
4. Click Save.
Assign Approvers
For each approval level that you create, you can add one or more Groups or
Users who will be responsible for approving content.
Note If you create a Workflow and do not add any Approvers, the Providers
assigned to that Workflow will be able to publish their own content.
1. Open the Workflow Manager.
2. Click Manage Workflows and add or edit the workflow you want to
assign Approvers to.
3. Go to the Approval Levels tab and click Add Approval Level.
4. In the LEVEL column, click on the Level 1 link.
5. Select a group on the Groups tab or specific individuals from the
Individuals tab.
Note When adding individuals, you must place a checkmark beside each name you
wish to add and then scroll down and click Add Selected. Then click OK.
Group not there? If you do not see a group that you expected to, it means that you
did not set the group type to ―Approver,‖ or that that the Group and Workflow are
assigned to the different site(s). You need to return to the Group Manager and check
the group settings.
6. Select an option from the Approval drop-down.
One: One vote needed to Approve. All votes needed to Reject.
All: All votes needed to Approve. One vote needed to Reject.
Majority: The majority of votes needed to Approve. 50% or more
needed to Reject.
First: The first action taken on the page is what occurs.
Understanding Approval Options: If only ―One‖ person is required
to approve a page, the ACM cannot know if the page has been
approved until either a) someone approves the page or b) everyone has
voted and rejected the page.
If the ―All‖ approval status is used, the ACM cannot know if the page
44 Workflow Manager Administration Guide
has been approved until either a) someone rejects the page or b)
everyone has voted and approved the page.
If the ―Majority‖ approval status is used, the workflow action will
occur as soon as a majority is reached. In the event that there is an
even number of approvers and the vote is 50/50, the page will be
rejected.
If the ―First‖ approval status is used, the first workflow action is the
one that is used, all subsequent actions are ignored. If the first vote is
for approval, the page will be approved. If the first action is for
rejection, the page will be rejected.
An Approver can vote multiple times if desired (only the latest vote
counts). If the action represents a changed vote, the user receives a
confirmation message and can add a new Note. After each vote, the
page's approval/rejection status is evaluated based on the current tally
of votes, the current rule for that level, and the current approval level
membership.
7. Use the default number of Escalation Days or change the setting.
When the escalation period is reached, notification that action is
required on the page is sent to the next level of approver and to the
Monitor and System Administrator groups.
8. Repeat this procedure to create additional Approval levels if required.
Each subsequent approval level will receive an email notification when
the previous level has finished their review.
9. Click Save.
Locate Workflow
1. Open the Workflow Manager.
2. Click Manage Workflows.
3. Enter a partial or full workflow name; select a folder using the Choose
a Folder dropdown. Click Search. All groups matching the search
term will be displayed.
OR
4. Browse workflows by selecting a folder using the Choose a Folder
dropdown. All workflows within the selected folder will be displayed.
Copy Workflow
This process can take place at any time while creating or editing a Workflow
while in the Workflow Details page.
1. Open the Workflow Manager.
2. Click Manage Workflows.
3. Locate the Workflow you want to copy.
4. Click the name of the Workflow you want to copy. Workflow Details
Page will open.
5. Click Save & Copy.
Administration Guide Workflow Manager 45
6. Workflow will be copied and default name created ―Copy of
Workflow‖.
7. Change the Workflow Name to something unique.
8. Click Save.
Modify Workflow
1. Open the Workflow Manager.
2. Locate the Workflow you want to modify.
3. Click View Usage for a report of what sites and pages the Workflow is
assigned to.
4. Modify the Workflow as required.
5. Click Save.
Delete Workflow
1. Open the Workflow Manager.
2. Locate the Workflow you want to delete.
3. Check the Delete box to the right of the Workflow(s) you want to
delete. Click Save.
OR
4. Click the Workflow Name to view the Workflow details. Click
Delete.
5. Click OK in the Confirmation Dialog box.
Tip If you attempt to delete or make a Workflow inactive and the Workflow is
assigned to pages, you will receive a message warning of this fact and the
Workflow will not be deleted.
You must first remove the Workflow from all assigned pages. You will then be
able to delete or make the Workflow inactive.
Applying Workflows
1. Open the Workflow Manager.
2. Make sure the correct site is selected in Site dropdown.
3. From the Page List, locate the page to assign a Workflow to and click
the (Edit) link at the end of the Title.
4. On the Select Workflow dialog, either:
Select Use Parent Page's Workflow if you want the page to use
the same Workflow assigned to its parent page.
Select the Workflow from the list if you want the page to have a
Workflow that is different than that of the parent page.
46 Workflow Manager Administration Guide
5. If you want to force all child pages of the page to use the same
workflow, click Set Child Workflows.
6. Click Save on the Select Workflow dialog. The name of the
Workflow you just assigned appears in brackets now at the end of the
page name.
Note If you force the Workflow to child pages by setting Child Workflows, the
assigned Workflow not appear on all the child pages, it will only appear in brackets
at the end of the parent page name.
Administration Guide Digital Asset Manager 47
Digital Asset Manager
Overview
The Digital Asset Manager is where digital files are organized and stored for
use throughout the Active CM. A digital asset is any file that you will want to
either insert to display on a page, such as images, flash files or video; or insert
as a link on a page, such as pdf, word or excel files. The Digital Assets Library
only displays 5 folder levels including the top-most level Digital Assets folder.
Only Digital Asset Managers can modify assets once they‘re in the system. By
definition, a Digital Asset Manager has rights to the entire library structure.
In ACM versions prior to 9.4, Asset Domains were ignored when a group was
given permission to the Digital Asset Manager (DAM). As of ACM version
9.4, users within groups that are given access to the DAM and have either no
defined asset domain or have an asset domain other than the root, will find
their access to the DAM restricted to the defined domain of their group. This
change allows the enforcement of Asset Domains while still providing users
with access to a specified sections and tools of the DAM.
Digital Asset Folders
It is good practise to create the Digital Assets folder structure to duplicate
either:
the structure of your User Group folders, or
the structure of your website.
This will make managing access to Digital Assets easier if you want to limit
Digital Assets rights at the group level.
Create Digital Asset Folder
1. Open the Digital Assets Manager.
2. Click Manage Folders.
3. Click Add Folder.
4. Enter the Name of the new folder.
5. Provide a Description of the folder that others will see when viewing
folders. This tells people what types of Digital Assets are in the folder.
6. Select the Parent Folder for the new folder. This will determine the
folder's location in the folder hierarchy.
7. Click Save. Repeat for all folders you wish to create.
48 Digital Asset Manager Administration Guide
Locate Digital Asset Folder
1. Open the Digital Asset Manager.
2. Click Manage Folders.
3. Using the Parent Folder dropdown expand the folder view until the
folder is located.
Modify Digital Asset Folder
1. Open the Digital Asset Manager.
2. Click Manage Folders.
3. Select the Parent Folder of the folder you want to modify.
4. Click the Folder Name to view the folder details.
5. Modify the Name or Description fields, or select a new parent folder.
6. Click Save.
Delete Digital Asset Folder
1. Open the Digital Asset Manager.
2. Click Manage Folders.
3. Select the Parent Folder of the folder you want to delete.
4. Check the Delete box to the right of the Folder you want to delete.
Click Save.
OR
5. Click the Folder Name to view the folder details. Click Delete.
6. Click OK in the Confirmation Dialog box.
Tip If you attempt to delete a Digital Asset folder and there is Assets in the folder,
you will receive a message warning of this fact and the folder will not be deleted.
You must first move the Assets to a different folder. You will then be able to delete
the folder.
Digital Assets
Digital assets include: images, PDF's, text files, PowerPoint presentations,
audio and video, etc.
Add Assets
Digital assets can also be uploaded to the Asset Library while using the Content
Editor. See the Content Providers Guide for more information.
Administration Guide Digital Asset Manager 49
Note It is good practice to correctly size all of you assets before making them
available for use.
If you are going to be creating Digital Asset Galleries this is especially important so
that your photos and images are consistently sized.
Add a Single Digital Asset
1. Open the Digital Asset Manager.
2. Click Add Asset.
3. Check the Active box to make the asset available for use.
4. Enter the Name of the digital asset. The name is used to create the file
name of the asset.
5. Enter the URL Title of the digital asset. This is the title that acts as a
file name for the page for friendly URL dynamic sites. For example a
PDF file‘s URL title : ―councilagenda‖ will create the file name
―councilagenda.pdf‖.
If you leave the URL Title field blank, the Title field is used for the
filename. If you are not sure what type of site you have, speak to your
System Administrator.
Use only alphanumeric characters in the URL Title field. All other
characters will be converted to the same replacement characters used
throughout friendly URL sites.
6. Enter the Description of the asset. This field allows a maximum of
1000 characters.
7. Enter an Alt Tag. Alt Tags are displayed in browsers when an image
or link is moused over.
Note Alt Tags are required as this is an attribute of the img tag and is meant to be
an alternative for non-visual browsers when they come across images. This means,
that the text is meant to be used when the image is not visible on the page. Instead,
what is displayed (or read) is the alternative text.
8. In the Assign to Folder field, select the Digital Asset folder you want
to put the asset into.
9. In the Upload field, click Browse and select the file to add to the
library.
10. Click Save.
Note Once an asset has been saved, the digital asset details must be viewed in
order to preview it, assign it to sites, and to view detailed information regarding its
usage, type and history. (See Edit Digital Assets for more information.)
Add Multiple Digital Assets
Multiple digital assets are uploaded using a .zip file. This feature is only
available within the Digital Asset Manager and is not available from within the
HTML editor.
50 Digital Asset Manager Administration Guide
You must select a single, pre-existing digital asset folder that the new digital
assets will be created in. If you do not select a digital asset folder, the default
location for all newly-uploaded digital assets will be in the root folder.
1. Open the Digital Asset Manager.
2. Click Add Multiple Asset.
3. Check the Active box to make the assets available for use.
4. From the Assign to Folder drop-down, select the location for the new
assets.
5. In the Upload field, click Browse and select a .zip file to upload.
6. Click Save to proceed with the file upload, or click Cancel to exit
from uploading the selected .zip file and return to the Digital Asset
Manager.
7. The zipped assets are opened and listed with their default names,
created from their original file name. Both the name and alt tag will be
created this way as digital assets require an alt tag to be saved. Digital
assets uploaded using this method will have no default description.
Note If a digital asset being uploaded has the same name as an existing digital
asset already in the selected folder, the new asset will not be uploaded. After the file
is processed, summary information is displayed, identifying the names of all
successfully created digital assets, as well as identifying those digital assets which
were not created and the reason why
8. At this point you have three options:
Choose to upload additional zip files
Cancel out of the multiple upload area and return to the Digital
Asset Manager.
Edit the properties of the assets you‘ve just uploaded.
9. Click the <<Edit Digital Assets Properties>> link to edit the Name
and Alt Tags; and add a description to the images contained in the zip
file.
10. Click Save to retain your edits, or Cancel to return to the Multiple
Asset upload area.
Locate Digital Assets
There are a number of ways you can locate Digital Assets.
1. Open the Digital Assets Manager.
2. Enter a partial or full digital asset name; select a folder using the
Choose a Folder dropdown. Click Search. All digital assets matching
the search term will be displayed.
OR
Administration Guide Digital Asset Manager 51
3. Enter the digital asset ID; select a folder using the Choose a Folder
dropdown. Click Search. The digital asset matching the ID will be
returned
OR
4. Browse digital assets by selecting a folder using the Choose a Folder
dropdown. All digital assets within the selected folder will be
displayed.
5. Check the Show Thumbnails checkbox to see a small version of the
image displayed in the search results.
6. Search results can be sorted by Name, Description, Folder or Status by
clicking on the column headers.
7. Click the Name of the asset to work with.
Edit Digital Assets
Create a New Version
1. Open the Digital Assets Manager.
2. Locate the asset to edit.
3. Download the asset file.
In the asset viewer window, click Download.
Click Save and select a folder location to save the asset to. You
can change the name of the file if you wish. The system will still
track the versions of the asset record in the ACM.
4. Edit the asset file.
5. Re-upload the edited file.
Beside the Re-Upload field, click Browse.
Locate the asset file you wish to re-upload.
Note You will not see the updated file in the asset view window until you save the
record and view the asset details again.
6. Click Save.
Edit Properties
1. Open the Digital Assets Manager.
2. Locate the asset to edit.
3. Change the Status (Active or not), Name, Description, Alt Tag, or
assign to new folder.
Note Updating the name and alt tag of the asset will not update the name and alt
tag values on the pages where an asset is currently published.
4. Click Save.
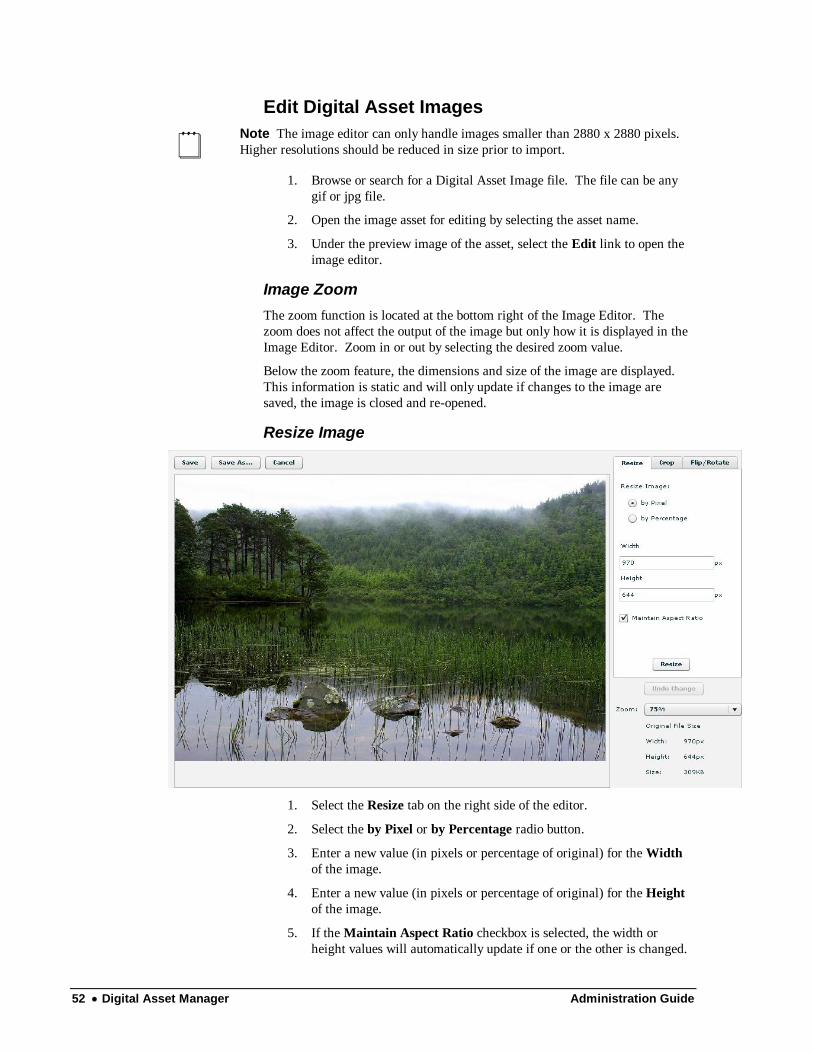
52 Digital Asset Manager Administration Guide
Edit Digital Asset Images
Note The image editor can only handle images smaller than 2880 x 2880 pixels.
Higher resolutions should be reduced in size prior to import.
1. Browse or search for a Digital Asset Image file. The file can be any
gif or jpg file.
2. Open the image asset for editing by selecting the asset name.
3. Under the preview image of the asset, select the Edit link to open the
image editor.
Image Zoom
The zoom function is located at the bottom right of the Image Editor. The
zoom does not affect the output of the image but only how it is displayed in the
Image Editor. Zoom in or out by selecting the desired zoom value.
Below the zoom feature, the dimensions and size of the image are displayed.
This information is static and will only update if changes to the image are
saved, the image is closed and re-opened.
Resize Image
1. Select the Resize tab on the right side of the editor.
2. Select the by Pixel or by Percentage radio button.
3. Enter a new value (in pixels or percentage of original) for the Width
of the image.
4. Enter a new value (in pixels or percentage of original) for the Height
of the image.
5. If the Maintain Aspect Ratio checkbox is selected, the width or
height values will automatically update if one or the other is changed.
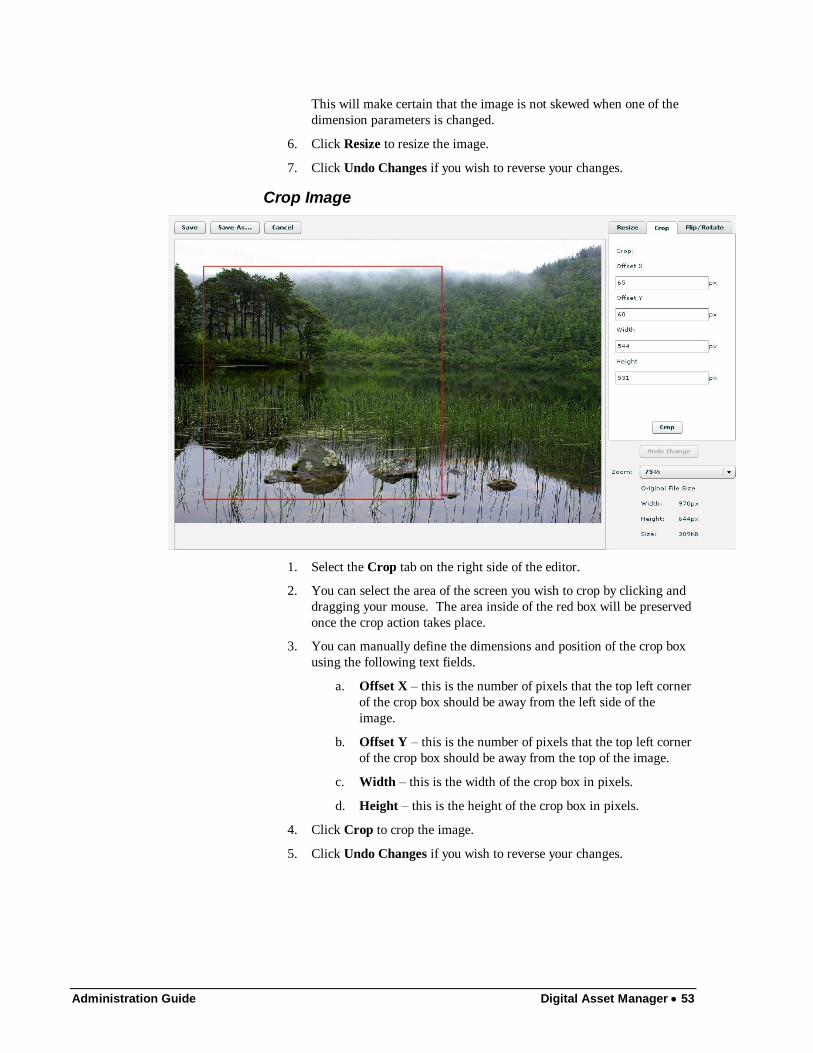
Administration Guide Digital Asset Manager 53
This will make certain that the image is not skewed when one of the
dimension parameters is changed.
6. Click Resize to resize the image.
7. Click Undo Changes if you wish to reverse your changes.
Crop Image
1. Select the Crop tab on the right side of the editor.
2. You can select the area of the screen you wish to crop by clicking and
dragging your mouse. The area inside of the red box will be preserved
once the crop action takes place.
3. You can manually define the dimensions and position of the crop box
using the following text fields.
a. Offset X – this is the number of pixels that the top left corner
of the crop box should be away from the left side of the
image.
b. Offset Y – this is the number of pixels that the top left corner
of the crop box should be away from the top of the image.
c. Width – this is the width of the crop box in pixels.
d. Height – this is the height of the crop box in pixels.
4. Click Crop to crop the image.
5. Click Undo Changes if you wish to reverse your changes.
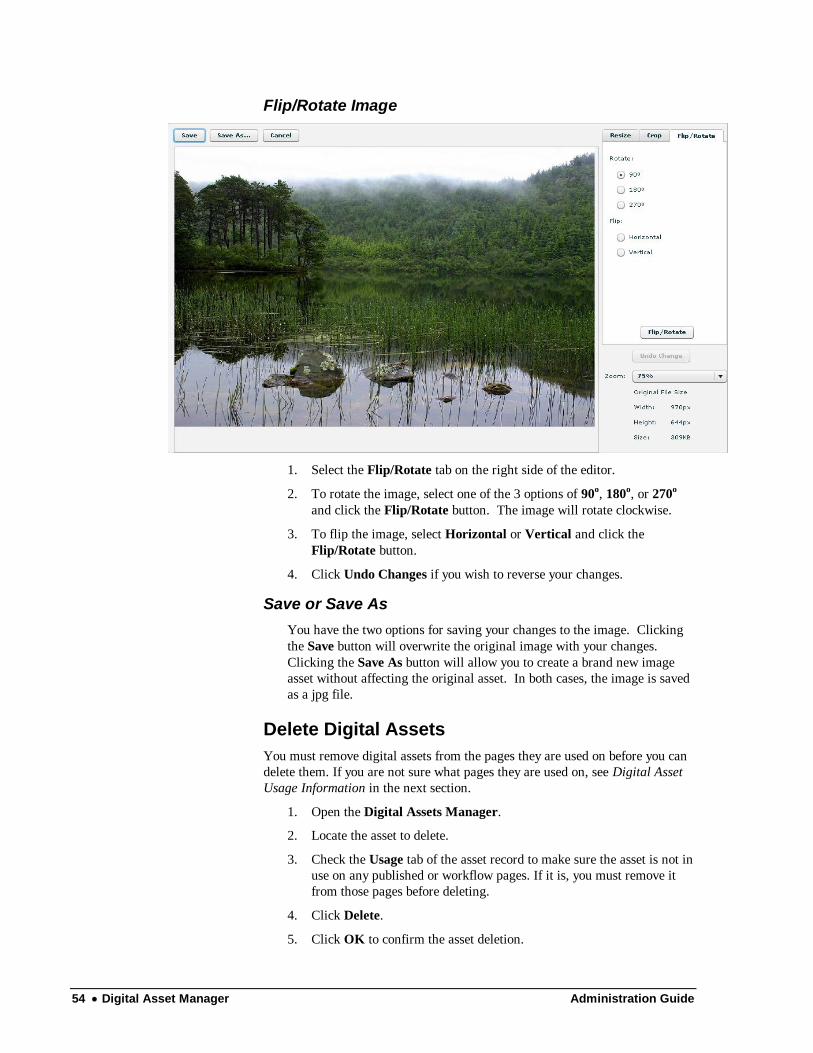
54 Digital Asset Manager Administration Guide
Flip/Rotate Image
1. Select the Flip/Rotate tab on the right side of the editor.
2. To rotate the image, select one of the 3 options of 90o, 180
o, or 270o
and click the Flip/Rotate button. The image will rotate clockwise.
3. To flip the image, select Horizontal or Vertical and click the
Flip/Rotate button.
4. Click Undo Changes if you wish to reverse your changes.
Save or Save As
You have the two options for saving your changes to the image. Clicking
the Save button will overwrite the original image with your changes.
Clicking the Save As button will allow you to create a brand new image
asset without affecting the original asset. In both cases, the image is saved
as a jpg file.
Delete Digital Assets
You must remove digital assets from the pages they are used on before you can
delete them. If you are not sure what pages they are used on, see Digital Asset
Usage Information in the next section.
1. Open the Digital Assets Manager.
2. Locate the asset to delete.
3. Check the Usage tab of the asset record to make sure the asset is not in
use on any published or workflow pages. If it is, you must remove it
from those pages before deleting.
4. Click Delete.
5. Click OK to confirm the asset deletion.
Administration Guide Digital Asset Manager 55
Delete Digital Asset Versions
Note You cannot delete the current version of a digital asset using this method.
Each time a new version of a digital asset is uploaded, the previous version is
retained within the history of the digital asset. Since digital assets can be large,
having multiple versions that are no longer on the site can use a significant
amount of server space. You can delete any previous versions of a digital asset
if you know they will not be restored and used again.
1. Open the Digital Assets Manager.
2. Locate the asset you want to delete versions of.
3. Click the History tab of the asset record to view the version list of the
asset.
4. In the Delete column, check the box of all the versions you want to
remove.
5. Click the Delete Selected Versions button.
6. Click OK to confirm the permanent deletion of the digital asset
versions.
OR
Click Cancel to close the confirmation and return to the Digital Asset
Detail window.
Digital Asset Usage Information
1. Open the Digital Assets Manager.
2. Locate the asset whose usage report you want to view.
3. Click the Usage tab of the asset record. The tab displays site, page and
location information for the asset.
4. To see a complete overview of the asset information, click Asset
Report beside the Active checkbox near the top of the asset record.
Restore a Digital Asset
Restore an earlier version of a Digital Asset.
1. Open the Digital Assets Manager.
2. Locate the digital asset you want to restore.
3. Click the History tab; all of the versions of the asset are displayed.
4. Locate the version you wish to restore and click on the Version link.
The page is refreshed and the version you selected is displayed in the
asset view window. The version links now display the word "Current".
You can click on the word Current if you wish to see how the current
version differs.
5. Click Restore Asset to restore the selected version.

56 Digital Asset Manager Administration Guide
6. Click Save. The restored version is added to the History with a new
version number, with the date and time of the restoration.
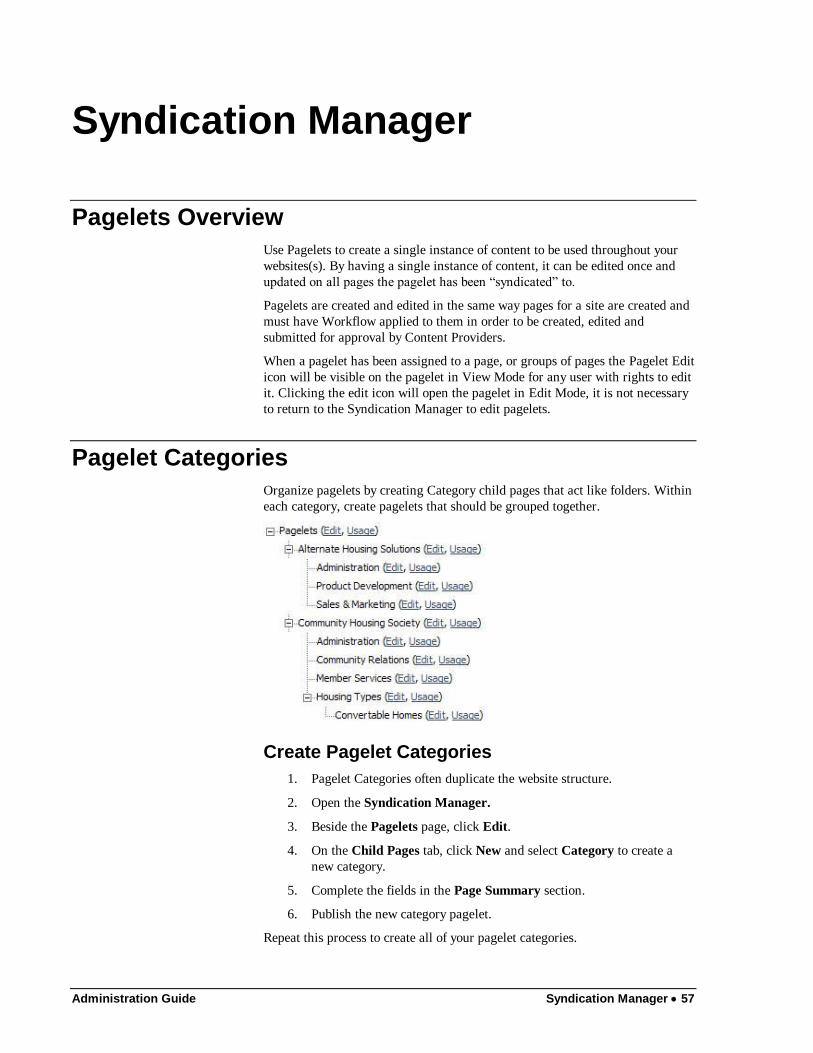
Administration Guide Syndication Manager 57
Syndication Manager
Pagelets Overview
Use Pagelets to create a single instance of content to be used throughout your
websites(s). By having a single instance of content, it can be edited once and
updated on all pages the pagelet has been ―syndicated‖ to.
Pagelets are created and edited in the same way pages for a site are created and
must have Workflow applied to them in order to be created, edited and
submitted for approval by Content Providers.
When a pagelet has been assigned to a page, or groups of pages the Pagelet Edit
icon will be visible on the pagelet in View Mode for any user with rights to edit
it. Clicking the edit icon will open the pagelet in Edit Mode, it is not necessary
to return to the Syndication Manager to edit pagelets.
Pagelet Categories
Organize pagelets by creating Category child pages that act like folders. Within
each category, create pagelets that should be grouped together.
Create Pagelet Categories
1. Pagelet Categories often duplicate the website structure.
2. Open the Syndication Manager.
3. Beside the Pagelets page, click Edit.
4. On the Child Pages tab, click New and select Category to create a
new category.
5. Complete the fields in the Page Summary section.
6. Publish the new category pagelet.
Repeat this process to create all of your pagelet categories.
58 Syndication Manager Administration Guide
Move Pagelets
When you move a category pagelet, all of the child pagelets are moved with it.
You can move complete categories of pagelets or an individual pagelet to a
different category.
1. If the pagelet you want to move is published, open it in full edit mode.
2. If the pagelet is not published, edit its parent category page, go to the
Child Pages tab and click on the pagelet you want to move.
3. In the Page Summary section, locate the Move Pagelet field.
4. Click on <<Select Page>>.
5. Select the new parent category pagelet and click OK. (Pagelets can
only be moved under a category pagelet, they are the only page types
that will be available in the tree view.
6. When the page is redisplayed, click Save and submit the page for
approval or publish it.
Note If the pagelet you are moving is due for Review, you cannot move it. You
must make sure the pagelet is reviewed and then move it. If a pagelet is due for
review, it will display this status in the child page list.
Insert Pagelets on Pages
In order for pagelets to be used on a page, the page template must contain
IronPoint tags that function as placeholders for positioning Pagelet content on a
page. For more information, see the Active Content Manager Design Guide.
In order for pagelets to be inserted on a page, Pagelet zones must be added to a
page while in Full Edit mode. For more information, see the Active Content
Manager Content Publishing Guide.
Pagelet Usage Report
The main page of the Syndication Manager provides a link to view usage
reports for every pagelet in the system.
By clicking the Usage link to the right of a pagelet title, you are able to view a
report that lists the sites the pagelet is available to be used on, the published
pages using the pagelet, and the pages in workflow using the pagelet.
The report opens in a new window, is in a printable format and lists the sites,
titles and location lines of each page where the pagelet is assigned.
Administration Guide Syndication Manager 59
Syndicated Pages
In a similar manner to pagelets, syndicated pages represent content that can be
reused in multiple places within a site or instance. In addition, there are web
services that allow for the syndication of this content across ACM instances or
to other web properties.
In the Syndication Manager, select ―Pages‖ from the syndication type
dropdown field. Any syndicated pages in the system will be presented. All of
the same controls used to manage pagelets in the syndication manager also
apply to syndicated pages. All syndicated pages have a container page that is
placed in the site hierarchy. This container page will typically provide a search
and results function for the Syndicated pages and will ultimately render the
content of the syndicated page. An example of this would be the new
Syndicated Calendar Pagetype. The Calendar Pagetype resides in the hierarchy
of your website and the calendar events (Syndicated Events) are stored in the
syndication manager. The Calendar page will render the event details on your
site when a visitor clicks on the event title in the calendar page.
Manage Syndicated Page Settings
NOTE: Prior to version 9.2, the Syndicated Page Settings resided in the
Page Type Manager. As of version 9.2, they have been moved to the
Syndication Manager.
The Syndicated Page Settings contain the default settings for the different
syndicated pages in ACM. For details on each of these settings, please refer to
the quick reference guides for the functionality you wish to better understand.
60 Archive Manager Administration Guide
Archive Manager
Overview
Pages are archived from the Child Page list, or through setting an archive
follow-up task on the Workflow tab., When a page is archived it no longer
appears in the Child Page list (unlike when a page is made ―Inactive‖ and
does). Archived pages do remain in the database which allows them to be
restored, or permanently deleted.
The Archive Manager provides the tools to restore or permanently delete pages
from the database.
Note When a page is deleted using the Archive Manager, the page and its‘ child
pages can no longer be restored.
Restore a Page
1. Open the Archive Manager.
2. From the Site drop-down, select the site to work with.
3. Locate a page or pages:
Enter a full or partial title as a search term.
Click Find All.
Pages matching search term will be highlighted in list.
OR
Browse the page list by clicking any column header to re-order the
pages.
4. To restore the page, select the checkbox in the corresponding row and
click Restore Selected.
5. The restored page will now be located in the Child Page list of its
original Parent Page. It will be Inactive and have no Workflow
assigned to it.
Delete a Page
1. Open the Archive Manager.
2. From the Site drop-down, select the site to work with.
3. Locate a page or pages:
Enter a full or partial title as a search term.
Click Find All.
Administration Guide Archive Manager 61
Pages matching search term will be highlighted in list.
OR
Browse the page list by clicking any column header to re-order the
pages.
4. To delete the page, select the checkbox in the corresponding row and
click Delete Selected
5. Click OK when asked if you want to delete the page and all of its child
pages.
Note When a page is deleted using the Archive Manager, the page and its‘ child
pages can no longer be restored.
Note As of version 8.9, archiving a page will also automatically archive all child
pages. This was done to maintain integrity between pages. In previous versions of
ACM, archiving a page orphaned the child pages, providing no automatic
navigation to those pages. When the parent page was deleted from the archive
manager, the child pages would be deleted from the site. Maintaining the integrity
of the parent/child relationship will remove the occurrence of surprise page
deletions.
62 Page Lock Manager Administration Guide
Page Lock Manager
Overview
If a site utilizes the Edit Lock feature of the ACM, a page will remain locked
for as long as the editing user‘s session remains active. Since there is a
possibility that a page will remain locked for extended periods of time with no
activity, the Page Lock Manager provides System Administrators with the
ability to unlock a page.
Unlock a Page
1. Open the Page Lock Manager.
2. From the Site drop-down, select the site to work with.
3. Locate a page:
Enter a full or partial title as a search term.
Click Find All.
Pages matching search term will be highlighted in list.
OR
Browse the page list by clicking any column header to re-order the
pages.
4. To unlock the page, check the Unlock checkbox and click Save.
5. The unlocked page will now be available to be edited or have workflow
or page design settings changed.
Administration Guide Email Broadcast Manager 63
Email Broadcast Manager
Overview
The Email Broadcast Manager is not part of the standard Active CM
installation; by default this feature extension is disabled. If you do not currently
have this management tool please contact your Account Executive. When you
have the appropriate license, the manager is enabled directly through a setting
in the IronPoint.config file.
The Email Broadcast Manager is used to send mass email to a selected user
group or individuals. There are currently no email logs; there will be no record
of emails sent using this tool.
Required Groups
It is not necessary to create all of the following groups individually if the same
person(s) are administering the complete function of email broadcasts. If that is
the case, use the following examples as guides for the settings required for the
one group.
Broadcast Subscription Group
Create the Subscription Group:
1. Create a Group with an appropriate name (the group name will display
on the application form if one is used).
In the Group Type area, select the option ―Make Available for
External Applications and PageTypes.‖
Under the Sites tab, select to make the group available to all sites,
or only specific sites.
2. Save the group settings.
User Manager Group
Users in this group will be responsible for receiving email notifications when a
subscription request has been received and for approving the applicants.
Note The Global System Variable setting ―Users are inactive when created‖ must
not be checked for emails to be generated and sent when request is submitted.
You may also want to edit the ―Account Approved‖ email to better reflect its use in
this process.
Set up the User Manager Group (or use existing group):
1. Create a new Group with an appropriate name
2. In the Group Type area, check the Permission box
64 Email Broadcast Manager Administration Guide
3. Save (tabs for additional options will now be displayed)
Under the Members tab, add users who will receive and approve
subscription applications.
Under the Sites tab, select to make the group available to all sites,
or only specific sites.
Under the Tools tab, select the options for ―Admin Toolbar‖ and
―User Manager‖ (you may provide other tools as you see
necessary).
Under the User Domain tab, change this from the default setting
only if the Users that will be managed by this group are contained
within a sub-folder area.
4. Save the Group settings.
Email Broadcast Manager Group
Add users to this group who will be responsible for sending Broadcast Emails.
(Not necessary if only Administrators perform this function):
Note When users send Broadcast Emails, their name and email address is used as
the sender information. You may want to set up a generic user account for sending
these emails
1. Create a new Group with an appropriate name
2. In the Group Type area, check the Permission box.
Under the Members tab, add users who will send the Email
Broadcasts.
Under the Sites tab, select to make the group available to all sites,
or only specific sites.
Under the Tools tab, select the options for ―Admin Toolbar‖ and
―Email Broadcast Manager‖ (you may provide other tools as you
see necessary)
3. Save the Group settings.
Create an Application Form
This form uses the fields from the ―Create a New User‖ form in the User
Manager; there is no need to create fields for First, Middle, Last Names,
Preferred Full Name, Login Username, Email or Password.
1. Open the site that requires the Application Form.
2. Navigate to the page that will be the parent page of the form, open the
page in Full Edit Mode.
3. Create a new Child Page using the Application Form pagetype.
a. Give the form a Title.
b. Scroll to the bottom of the page and add a Thank You
message.
Administration Guide Email Broadcast Manager 65
c. Save the page (required to add Questions to the form)
d. Under Site Profile Question, select New, and select ―Custom
Group (multi or single selection)‖.
Add the Question text
Select the appropriate Group(s) as the answers.
e. Add any additional questions for information you may want
to collect from subscribers.
f. Add any Introduction or Closing content that may be
required.
4. Publish or submit the page for approval.
Create Accounts as Public Accounts
If you wish to flag accounts from outside of your organization as public
accounts, you can select the ―Create Accounts as Public Accounts‖ checkbox in
edit mode. This will allow your public users to create an account with a little
information as an email address, password and preferred name. More
importantly, users flagged as ―Public Users‖ can only be assigned to Public
Groups that cannot have any permissions assigned to it. This adds an extra
level of protection by assuring a user that is not part of your organization is
never inadvertently given permissions on your site. See Appendix N for more
information.
Create and Send Broadcast Email
1. Open the Email Broadcast Manager
2. Click the Email To link and select the group or individuals that will
receive the Email Broadcast.
3. Enter a Subject
4. In the Content Editor, create the email content, or copy previously
created content and paste into the Editor (JavaScript cannot be used).
5. Send the Broadcast Email:
When logged in as a member of an Email Broadcast Manager
Group or System Administrator using the ―Send Email‖
button sends email using the current, logged-in user's name
and return email address.
When logged in as a System Administrator, there is the
additional option to "Send System Email". When used, the
email is sent as if it were being sent from the ACM system -
the system settings are used for the return email address and
"from" name.
66 Cache Policy Manager Administration Guide
Cache Policy Manager
Output Cache Configuration
If your use the ACM to run dynamic sites, using output caching enables you,
for pages that support it, to achieve enormous performance improvement &
CPU utilization reduction. Output cached pages are the only way ACM serves
pages close to raw-HTML speed.
For instance, it is possible to go from an unacceptable performance with the
CPU averaging 60% with long spikes to 100%; to averaging 3% with short
spikes to 50% and have page time reduced to 55% of the pre-output cache time
even when considering all requests (not just output cached ones).
The output cache is controlled by the Cache Policy Manager in version 8.2 and
up or by Web.config settings as described in White Paper - CMS 8.1 - Output
Caching.doc. In version 8.2 and up, a cache policy can be assigned to every
pagedef, digital asset category, and special folder.
The ACM default is no output caching and no cache headers. Cache headers
enable you to achieve a similar effect to what is described in White Paper -
General - How to Speed up ACM using IIS6 Cache Rules.doc but with the
configuration all handled in ACM.
Create a New Cache Policy
1. Click the Manage Cache Policies button.
2. Click the Add Cache Policy button.
3. Name the policy.
4. If you want to send Cache-Control: Public headers with responses that
use this cache policy check the Cache-Control: Public HTTP
Header box. Please refer to RFC 2616 for a detailed explanation.
5. If you want to enable ASP.NET Output Cache for page requests that
use this cache policy check the Enable ASP.NET Output Cache box.
This setting has no effect on Digital Assets or Special Folders.
6. Set the Cache Expiration Period in seconds. This setting is used for
both the Cache-Control and output cache periods.
7. Click Save to save the cache policy and return to the Manage Cache
Policies screen.
Or
Click Save & Add to save the cache policy and remain on the Add
Cache Policy screen to create another policy.
Administration Guide Cache Policy Manager 67
Edit a Cache Policy
1. Click the Manage Cache Policies button.
2. Click the link of the policy you want to edit.
3. Make any required changes to the policy.
4. Click Save to save the cache policy and return to the Manage Cache
Policies screen.
Or
Click Save & Add to save the cache policy and remain on the Add
Cache Policy screen to create another policy.
Delete a Cache Policy
1. Click the Manage Cache Policies button.
2. Check the Delete box for any policy you want to delete.
3. Click the Save button to confirm the policy deletion and return to the
Manage Cache Policies page.
Cache Policy Manager Resources
The Resources dropdown near the top of the window allows the user to pick
from each site in the system plus two additional items: Digital Assets and
Special Folders.
If a site is selected, the resource list will display a hierarchical view of
the site pages.
If Digital Assets is selected, the resource list will display a hierarchical
view of the digital asset folders and individual assets.
If Special Folders is selected, the resource list will display a list of
system folders.
Assign Cache Policy to a Resource
1. From the Resource List, click the (Edit) link beside the resource to
assign a policy to.
2. Check the Use Parent’s Cache Policy box if this policy is the one you
want applied to this resource. (if using the parent cache policy, go to
item 4)
Or
Uncheck the Use Parent’s Cache Policy box if a different policy
needs to be assigned.
3. From the Cache Policy drop-down select the policy to be applied to
the resource.
4. If the assigned policy should be used on all children of the resource
click the Save and Apply to Children link.
68 Cache Policy Manager Administration Guide
5. Click Save to update the cache policy assignment and return to the
Cache Policy Manger.
Or
Click Cancel to cancel any changes make within the Select Cache
Policy window and return to the Cache Policy Manager.
The default configuration assigns one cache policy at the root level and sets all
children to use parent policy. This allows the user to enable output caching for
the entire site simply by enabling output caching on the default cache policy.
Administration Guide LDAP Integration Manager 69
LDAP Integration Manager
The purpose of the Directory Integration manager is to perform a one-way
synchronization of User Accounts and optional User/Group membership, from
your Directory Service to the Active CM on a regularly scheduled basis (or as
needed when run manually).
This Manager is meant for IT staff and/or System Administrators who will be
installing, configuring and maintaining the Active CM. You should be skilled
at configuring Microsoft Servers (OS, IIS, SQL Server, etc.) and have a
thorough understanding of DNS, TCP/IP, and Directory Services (Active
Directory, eDirectory or LDAP).
For complete information on using the LDAP integration manager, please see
the Directory Integration Tool User Guide.

70 Diagnostic Manager Administration Guide
Diagnostic Manager
The Diagnostic Manager is a troubleshooting tool that System Administrators
can use to detect problems in the system, on a site-by-site basis. Sites are
analyzed by running a number of user-selected diagnostic tests.
Displaying the Diagnostic Manager
To display the Diagnostic Manager in the Admin Center, add the following
entry in the Ironpoint.config file, within the featureExtension section:
<featureExtension id="DiagnosticManager" enabled="True"
isMenu="True" category="Manage"
subcategory="SystemInformation">
<label>Diagnostic Manager</label>
<permissionGroup>SystemEvents</permissionGroup>
<url>/cm/diagnostic/webui/diagnosticmanager.aspx</url>
<description>Diagnostic Manager helps System
Administrators pinpoint problems with the system by
executing diagnostic tests and viewing the
results.</description>
</featureExtension>
Running Diagnostic Tests
1. Select the Diagnostic Manager.
2. Select the Site to run tests for.
3. If you only want results for failed tests, check the Only Display
Failures box. If you leave it blank, you will see a line entry for each
item that is tested.
4. Enter the Email Results To address. A report of the test results is
emailed to this address upon completion of the diagnostics.
5. For each test you wish to run, check the Active box.
6. Click Execute to run the tests.
The test results indicate the computer name and the build number that the tests
were run against. They will also itemize any errors that occur. If there are
errors, contact your Active CM Support Representative.
Restoring Default Test Scripts
Advanced users of the Diagnostic Manager can manually change the diagnostic
script files to alter system parameters and other test information.

Administration Guide Diagnostic Manager 71
If the test scripts are customized you can restore the default test scripts, by
clicking on the Restore Default Test Scripts button.
72 SSL Manager Administration Guide
SSL Manager
The SSL Manager is licensed - a license file is necessary in order to use the
feature.
Due to the fact that SSL is set from the web server, this functionality is not
supported in any way on exported HTML sites. Those sites will require SSL to
be configured through the web server, as normal.
SSL Overview
If you are unfamiliar with SSL (Secure Socket Layer) functionality or would
like to refresh your understanding of how SSL works and why it is used, you
can find a variety of good information sources on the internet that explain it.
There are differences between what your IIS can do in terms of SSL
configuration and what the Active Content Manager allows. IIS does not
provide the capacity to automatically redirect users to the https port if http is
used. In addition, due to how the ACM handles certain page requests, IIS does
not provide the capability to enforce SSL access on some pages while not
enforcing it on others. In order to address these shortcomings an SSL Manager
was added to the Active Content Manager.
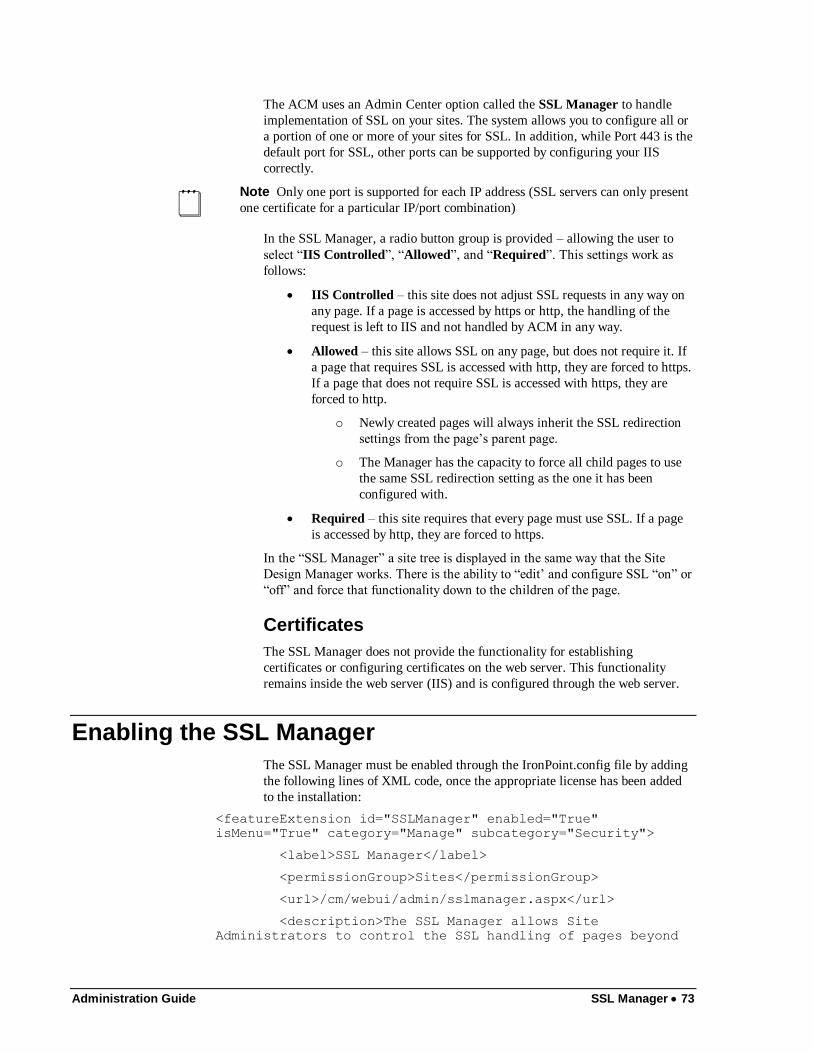
Administration Guide SSL Manager 73
The ACM uses an Admin Center option called the SSL Manager to handle
implementation of SSL on your sites. The system allows you to configure all or
a portion of one or more of your sites for SSL. In addition, while Port 443 is the
default port for SSL, other ports can be supported by configuring your IIS
correctly.
Note Only one port is supported for each IP address (SSL servers can only present
one certificate for a particular IP/port combination)
In the SSL Manager, a radio button group is provided – allowing the user to
select ―IIS Controlled‖, ―Allowed‖, and ―Required‖. This settings work as
follows:
IIS Controlled – this site does not adjust SSL requests in any way on
any page. If a page is accessed by https or http, the handling of the
request is left to IIS and not handled by ACM in any way.
Allowed – this site allows SSL on any page, but does not require it. If
a page that requires SSL is accessed with http, they are forced to https.
If a page that does not require SSL is accessed with https, they are
forced to http.
o Newly created pages will always inherit the SSL redirection
settings from the page‘s parent page.
o The Manager has the capacity to force all child pages to use
the same SSL redirection setting as the one it has been
configured with.
Required – this site requires that every page must use SSL. If a page
is accessed by http, they are forced to https.
In the ―SSL Manager‖ a site tree is displayed in the same way that the Site
Design Manager works. There is the ability to ―edit‘ and configure SSL ―on‖ or
―off‖ and force that functionality down to the children of the page.
Certificates
The SSL Manager does not provide the functionality for establishing
certificates or configuring certificates on the web server. This functionality
remains inside the web server (IIS) and is configured through the web server.
Enabling the SSL Manager
The SSL Manager must be enabled through the IronPoint.config file by adding
the following lines of XML code, once the appropriate license has been added
to the installation:
<featureExtension id="SSLManager" enabled="True"
isMenu="True" category="Manage" subcategory="Security">
<label>SSL Manager</label>
<permissionGroup>Sites</permissionGroup>
<url>/cm/webui/admin/sslmanager.aspx</url>
<description>The SSL Manager allows Site
Administrators to control the SSL handling of pages beyond
74 SSL Manager Administration Guide
the basic functionality provided by IIS, including the
capacity to require SSL on individual pages.</description>
</featureExtension>
Implementing SSL
Use this procedure to implement SSL functionality on one or more pages within
your site.
Be sure you have configured your ACM for SSL by adding the appropriate
XML code to the config file.
1. Open the SSL Manager.
2. From the Site drop-down, select the site to configure SSL for.
3. In the SSL field, select whether you want SSL settings to be controlled
by your IIS, or if you want to allow or require them within the ACM.
IIS Controlled site settings for SSL are controlled externally by
your IIS. No settings are required in the Active CM. Site
hierarchy is not displayed when you select this option.
Allowed this site allows SSL on any page, but does not require it.
If a page that requires SSL is accessed with http, they are forced to
https. If a page that does not require SSL is accessed with https,
they are forced to http.
Required this site requires that every page must use SSL. If a
page is accessed by http, they are forced to https.
4. If you selected Allowed or Required, you must configure the SSL
settings for each page or group of pages.
5. For each page you want to use SSL, click Require SSL. If you want
all children of that page, click Force Children.
Note If you want to force all children but not a parent, first set the parent to
Require SSL, then click on Force Children, then click on the parent's Require HTTP
link to turn off the SSL requirement for the parent.
Pagelets
Pagelets are not available for configuration in the SSL Manager. A pagelet
must respect the SSL access used by the housing page. Since it‘s embedded, the
pagelet is served as part of the HTTP or HTTPS request of the housing page,
regardless of whether a different housing page uses another method.
Administration Guide Sites Manager 75
Sites Manager
Used to define required Site information as well as configure the Export and
Publication requirements.
Create a site
The Home and Login pages are automatically created with each site.
1. Open the Sites Manager.
2. Click Add Site.
3. Active checkbox: A site can be active or inactive at anytime. For
example, you may wish to have a test site setup, but deactivate it when
not in use.
4. Site Name: Will be used as the name of the site throughout the
application, and must be unique. This name is not exposed for public
viewing.
5. Default Email address: Used as the ―From‖ email in correspondence
sent from the site, i.e. survey and application form emails.
6. Email Display Name. The name associated with the default email.
7. If you want to use Personalization on this site, select if you would like
to Allow it or Require it. (For more information on Personalization,
see Appendix F.)
8. Click Save.
Publication Tab
The settings on this tab are used by the ACM application when generating
links, search pages, and system emails. They must be correct for the software to
function correctly.
Click on the Site Name of the site you want to configure. Go to the Publication
tab.
Static Properties
In order to export HTML files to your HTMLSites folder for static publication,
make sure the Generate HTML Files checkbox is selected.
In order to export Search files to your SearchSites folder to enable search on
both static and dynamic sites, make sure the Generate Search Files checkbox
is selected.
Note Individual PageTypes can be disabled for static publication. If you are having
problems exporting your site, please check the Page Types Manager to see if all
PageTypes are enabled for static publication.
The FQDN field is used to enter the Fully Qualified Domain Name of the
website. For example: http://www.mydomain.com or http://209.2.23.11.
76 Sites Manager Administration Guide
The Virtual Directory (Alias) field is used if the exported site is going to be
referenced as part of a website‘s virtual directory.
Static URL is the public URL of an exported site. The Static URL is
automatically created based on what you enter in the FQDN and Virtual
Directory fields.
FTP URL is only for sites that get exported. It is the URL and directory where
the HTML files are FTP'd to after they are exported. Be sure to include the
‗ftp://'.
FTP Protocol establishes the file transfer protocol (FTP/FTPS/SFTP) and port
to use. (The fields following the FTP Protocol are dependent on the protocol
selected.) For more information on FTP Protocol settings, see Appendix L.
FTP Compatibility Flag [SFTP/FTPS] controls various server security
compatibility features.
FTP Server Validation Type [SFTP/FTPS] is the method by which the
server‘s certificate or public key is validated.
FTP Server Common Name [FTPS Only] is the name to be used when
performing a name-check during the validation of the server certificate.
FTP Known Hosts File: [SFTP Only] is the file which contains the list of
known hosts used to authenticate the server.
FTP Username is the username to use when connecting to the FTP server.
FTP Password is the password to use when connecting to the FTP server.
File Extension is the file extension to use for static exported files. This is
usually set to .htm or .html.
Dynamic Properties
In order to export Search files to your SearchSites folder to enable search on
dynamic sites, make sure the Generate Search Files checkbox is selected in
the Static Properties section.
The External FQDN is the Fully Qualified Domain Name (FQDN) used for
external links to dynamic pages. For example: http://acm.mydomain.com.
The Internal FQDN is the Fully Qualified Domain Name (FQDN) used when
an address behind the firewall is required for export. This setting is used by the
Active CM application to render pages on the Server. To clarify, the software
uses a virtual browser to generate the HTML files for static publication. If this
field is blank, the External FQDN will be used. If you use this setting, please
test the FQDN works in a browser on the Active CM Sever. An IP address may
be needed to get this to work; especially if your IIS server is behind a proxy
server. Virtual directories do not need to be defined here.
Enable Friendly URLs to replace the generic page number and .aspx
extension with more user-friendly URLs without having to lose the dynamic
site functionality. For example, a page: http://cms.mysite.com/page123.aspx
with friendly URLs enabled becomes http://cms.mysite.com/welcome.htm.
(For more information on Friendly URLs see Appendix K.)
Administration Guide Sites Manager 77
Add User Profile Questions
User information can be captured on a site-by-site basis. The information
gathered on each user record is stored centrally in the User Manager.
The questions you create in this section appear in the User Manager when users
are created, on each user‘s My Page and on Application forms you create.
1. Open the Sites Manager.
2. Add or locate the site you want to add user profile questions to.
3. Click on the User Profile tab.
4. Create User Profile questions referring to Appendix I for more
information.
5. Click Save.
Set Site Variables
If you do not set variables at the site level, the site will use the Global System
Variables. Some fields may not be visible if they are a system setting.
1. Open the Sites Manager.
2. Add or locate the site you want to configure variables for.
3. Click on the Site Variables tab.
4. If you want to review the global variables, click view system
variables.
5. Configure the individual site variables.
Number of Login Attempts Before Lockout
This is the number of times a user can attempt to login before the account
is locked.
Disable follow-up task options
Check this box to disable the use of follow-up tasks within the site. When
follow-up tasks are disabled here, the ability to disable the options as a
page type setting is removed. When follow-up tasks are disabled the ability
to set a follow-up task on a page is removed. Content providers will be
unable to set pages to be reviewed, archived, or made inactive.
Default Number of Days until Follow-up Task (for more information see
Appendix C.)
Set the default number of days to reflect the default period of time until a
page needs to be reviewed.
Number of Days until Escalation
If a task is not completed, an escalation email is sent to notify the
appropriate individuals that the task is outstanding. The escalation emails
are sent until the task is completed.
Maximum Levels in Site Menu
78 Sites Manager Administration Guide
This setting controls how many levels of your website hierarchy are
displayed on the Site Menu on the Admin toolbar. Setting this above one
level can slow down the ACM as your complete site menu renders.
Default Login Page
Click on the Login Page link to select the default login page for the site. By
default this will be set to the login page created with the site.
Enable Extended User Action Logging
When you select items for extended logging, the information gets logged in
the Internet Information Services (IIS) log files on your web server.
You can use a tool such as WebTrends (an external web stats software package)
to review log information.
Enable Workflow notes
Uncheck this box to disable the use of workflow notes within the site. When
workflow notes are disabled the pop-up window to enter notes no longer
appears during the workflow process.
Enable Edit Lock Check this box to provide the ability to lock down pages when they are being
edited. By enabling edit locking, users will not be able to edit any content or
settings of a page while another user is doing so.
Configure Site for Translation
This information applies only if you have the multi-language license. If you
require the multi-language license, please contact your Account Executive. For
more information on multi-language, see Appendix J.
This information applies only to users who will be maintaining multilingual
sites. Sites must be configured for translation and grouped into translation sets.
1. Open the Sites Manager.
2. Edit a site you want to include in the translation set.
3. Click on the Translation Set tab.
4. Be sure you have selected the correct Language for the site.
5. Decide if the site Requires Translation. Generally you would set your
primary language site to require translation and set your secondary
language sites to not require translation. So if you have English,
French and Spanish sites and the English site is your primary site, you
would set the English site to require translation and leave this
unchecked for the French and Spanish sites.
Note When you set a site to Requires Translation it means that no page on the
primary language site will be published until the same page on all secondary
language sites have been translated and published. However, emergency publishing
will temporarily bypass the need to translate before publishing.
If you choose to leave this checkbox blank, the requirement for translation can be
set on individual pages or groups of pages. A field on the Translation Tab in the
Page Editor allows a page and all of its children to require translation before the
page can be published.
Administration Guide Sites Manager 79
6. If the sites that will be included in your translation set already exist,
you can group them together by clicking on the Change Translation
Set button.
7. On the Add Sites to Translation Set dialog, select the sites you want
to group with this one and click OK.
8. On the Translation Set tab, review the sites you have added and make
sure the language settings for each site are correct.
9. If you have not created the sites to be grouped together in the
translation set, click Save and create the other sites. Then group them
into a translation set using step six.
Import/Export Sites
Overview
This feature allows you to create multiple sites quickly and easily. You can
create a ―site template‖ that includes pages, hierarchical relationships,
workflows and other site design information and then export/import the site,
creating as many new sites as you like from the existing one.
The following provides details of what is and is not exported:
Exported sites retain the root folder associated with the original site
Exported sites retain the default.aspx, Admin, and Templates folders
Exported sites do not retain other folders in the Sites hierarchy such as
HTMLSite, Preview, Archive, or SearchSite folders
The list of page types available in the exported site is also retained
All settings for all page types are retained for the exported site except
where explicitly noted
Page content is exported
Only active and inactive pages are exported. Archived pages are not
A page is exported regardless of whether or not it has ever been
published
HTML content and other page custom properties are exported
Pagelet associations and content are also exported. This includes
pagelets that have been hard-coded in to the template.
All pages in the Syndication Manager identified as parents of any
exported page will also be exported for later import.
Digital Asset associations and digital assets on pages are also exported
Digital asset categories necessary for the housing of digital assets
being exported are also exported for later import.
The sort order of child pages is retained as well as the sort order
method (numeric or alphabetic)
Exported pages do not retain workflow information
80 Sites Manager Administration Guide
Published version information is only exported for pages with an
existing published version.
Historical page data is not exported.
Questionnaire-based pages (survey, application form) do not export
questions or responses
Personalization groups and assignments are not exported.
Site-specific values other than those mentioned below are exported.
o Publication information
o Translation set information
o User profile information
o Metatag information
System configuration information is not exported.
Installation configuration information (Web.config, Ironpoint.config)
is not exported.
Global system variables are not exported
Once a site has been exported, a new site can be created by importing the
exported site. All site id references are adjusted for the new site and any other
relative information is adjusted accordingly for the new site. You can import
the site into the same ACM installation or into another ACM installation.
Exporting Existing Sites
The package generated from an export will be a .zip file using that standard
format, and the import process will only accept a .zip file with the appropriate
structure and files contained within.
To export a site:
1. Open the Sites Manager.
2. Edit the site you wish to export.
3. Click the Export Site button.
4. Click OK to continue, the system will prompt you to select a save
location for the exported site file.
5. Click Save and select the save location.
6. The resulting .zip file can now be imported and used to create other
sites.
Importing Sites
Importing of a site will be handled in a transaction context such that any failure
in the action will result in a full rollback of the site and any other imported data
out of the system.
All actions taken place during import will be associated with the current date
and time and associated with an ―Active CM‖ username, linked when
appropriate to the default administrator user.
Administration Guide Sites Manager 81
To import a site:
1. Open the Sites Manager.
2. On the main Sites Manager screen, click Import Site.
3. In the Package Location field on the Import Site dialog, select the
location of the .zip file that you exported.
4. In the Site Name field, enter a name for the new site. This is the name
that will become the Home page of the new site.
5. Click Import. Once the site has been imported, a record of imported
information is displayed:
6. Verify the imported material, and then click Close. The new site will
appear at the bottom of your sites list in the Sites Manager.
82 Site Groups Manager Administration Guide
Site Groups Manager
The Site Groups Manager will only be displayed if you are licensed for site
groups and the extension has been enabled in the Ironpoint.config. Site Groups
allow for the complete separation of sites within a single installation of ACM.
It is intended for those customers who wish to provide their own Web hosting
service for different groups within their organization such as faculties, student
groups, branches, etc. For more information on Site Groups, please contact
your Active Account Manager.
Administration Guide Mobile Device Manager 83
Mobile Device Manager
The Mobile Device Manager is only displayed if you are licensed for mobile
and the extension has been enabled in the Ironpoint.config. The Mobile device
manager allows you to import the WURFL (Wireless Universal Resource FiLe
- http://wurfl.sourceforge.net/) and provide mobile versions of your site design
based on specific mobile devices or resolutions. The Mobile Device Manager is
used in combination with html templates in the design package.
84 Export Manager Administration Guide
Export Manager
Used to create a remote HTML copy of a published Active CM site, the export
process is typically completed in three stages.
1. Modifying all paths in associated files. For example, JavaScript or
CSS.
2. Generating an HTML file for each published page.
3. FTP files to the remote or local Website directory.
The export process is set in motion by a Scheduled or Unscheduled Export.
Scheduled Export
In order to keep site content, links and search results current, an export should
be scheduled regularly. Be sure that you have already configured your site
publication information.
1. Open the Export Manager.
2. In the Scheduled Export section, click the link beside ―Pages to
Export‖ to define which pages on your site should be exported. You
can select the whole site or selected sections of your site.
3. Select the Days of the week to run the export.
4. Select a Time to export using the 24-hour clock. Schedule a time when
web traffic is anticipated to be low.
5. Check the File Deletion checkbox to remove any old page or asset
files from your web server during the export process. Archived or
inactivated pages will be removed along with any non-ACM files that
might be in the directory.
6. Click Save.
Unscheduled Export
Use this tool when it is necessary to export a portion or your entire site prior to
the scheduled export.
1. Open the Export Manager.
2. Scroll down to the Unscheduled Export section.
3. Select the Page(s) to Export. You can choose to export your whole
site or on specific sections of your site.
4. Check the File Deletion checkbox to remove any old page or asset
files from your web server during the export process. Archived or
inactivated pages will be removed along with any non-ACM files that
might be in the directory.

Administration Guide Export Manager 85
5. Click Export Now to run the unscheduled export.
Unscheduled FTP
Use this tool to run an unscheduled FTP.
1. Click FTP Now to run the unscheduled FTP.
86 Page Types Manager Administration Guide
Page Types Manager
The Pages Types Manger is where page types are added and configured for use
on a site. Information on available Page Types is located in Appendix G.
Configuring Page Types
Configure settings for each Page Type on a site-by-site basis.
1. Open the Page Types Manager.
2. From the Managed Site drop-down, select a site. The changes you
make will affect this site only.
3. In the list of Page Types, locate the page type you wish to configure
and click on the Pagetype Name.
4. Configure each of the page properties:
Active: Check this box to have the page type available on the site.
Description: The Description is displayed on the main page of the
Page Types Manager.
Include in Search: Check this box to have this page type included in
your search results. You may wish to uncheck this option for pages
such as the Login page type.
Show in Site Maps: Check this box to have this page type display in
site maps. You may wish to uncheck this option for pages such as the
Login page type.
Allow Static HTML Publishing: This setting allows the page type to
be published as an HTML file.
Allow Page Previewing: Most pages can be previewed but there are
instances where you may not wish to allow page previewing. For
example, Category page types cannot be previewed, they are
placeholders on the section menu and do not have any page content.
Allow Pagelets: Check this box to permit pagelets to be inserted on
any page created using this page type.
Show Location Line Independent of Template: The location line is
normally positioned by the use of an IronPoint tag in a design
template. However, if you want some page types to use location lines
and others not, you would leave the tag off of the design template.
When you check this box, the system inserts a location line above the
main body of the page content.
Show Child Links Independent of Template: Child links are
Administration Guide Page Types Manager 87
normally positioned by the use of an IronPoint tag in a design
template. However, if you want some page types to use child links and
others not, you would leave the tag off of the design template. When
you check this box, the system inserts the child links automatically
below the main body of the page content.
Include in child links lists: When this box is checked, pages created
using this page type will be displayed when configured to be included
in the child link list (either through the Site Design Manager or edit
mode of the parent page).
Note If follow-up tasks have been disabled as either a system or site setting, the
next two fields will not display in the page type settings.
Follow-up Task Options: These settings determine which follow up
tasks are available for the Page Type on the Workflow tab in full edit
mode.
If you do not include the ―None‖ option, users will be required to set a
Review, Inactive or Archive follow-up task.
Default Number of Days Until Follow-Up Tasks: This setting
controls the default number of days until a follow-up task is required.
If you leave the setting blank, the page will use the setting from either
the Site Variables or the Global System Variables. (For more
information see Appendix C.)
5. Click Save.
Adding Page Types
Add new page types to the ACM on a site-by-site basis.
1. Make sure the new page type file is in the directory where all of the
page types are stored.
2. Open the Page Types Manager.
3. Click Register Page Types.
4. Click Save.
If the pagetype does not display in the list, go to the System Information
Manager and review the Pagetype Extensions information to ensure the
license was found and registered.
Deactivating Page Types
Make a page type unavailable for use on a site-by-site basis.
1. Open the Page Types Manager.
2. From the Managed Site drop-down, select the site to deactivate the
page type on.
88 Page Types Manager Administration Guide
3. In the Page Types section of the page, locate the page type you wish to
deactivate.
4. Uncheck the Active checkbox.
5. Click Save.
Repeat this procedure for each site you want to deactivate this page type on.
Activating Page Types
To reactivate a page type on one or more sites where it has been deactivated.
1. Open the Page Types Manager.
2. From the Managed Site drop-down, select the site to activate the page
type on.
3. In the Page Types section of the page, locate the page type you wish to
activate.
4. Check the Active checkbox.
5. Click Save.
Repeat this procedure for each site you want to activate this page type on.
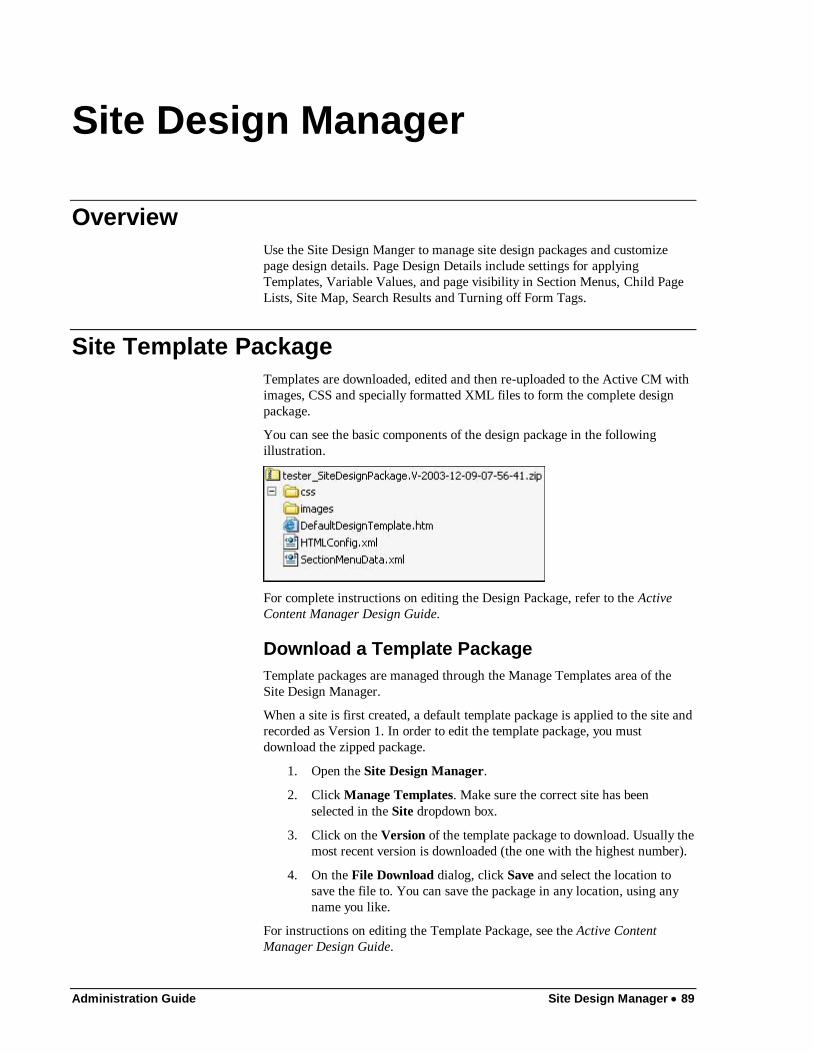
Administration Guide Site Design Manager 89
Site Design Manager
Overview
Use the Site Design Manger to manage site design packages and customize
page design details. Page Design Details include settings for applying
Templates, Variable Values, and page visibility in Section Menus, Child Page
Lists, Site Map, Search Results and Turning off Form Tags.
Site Template Package
Templates are downloaded, edited and then re-uploaded to the Active CM with
images, CSS and specially formatted XML files to form the complete design
package.
You can see the basic components of the design package in the following
illustration.
For complete instructions on editing the Design Package, refer to the Active
Content Manager Design Guide.
Download a Template Package
Template packages are managed through the Manage Templates area of the
Site Design Manager.
When a site is first created, a default template package is applied to the site and
recorded as Version 1. In order to edit the template package, you must
download the zipped package.
1. Open the Site Design Manager.
2. Click Manage Templates. Make sure the correct site has been
selected in the Site dropdown box.
3. Click on the Version of the template package to download. Usually the
most recent version is downloaded (the one with the highest number).
4. On the File Download dialog, click Save and select the location to
save the file to. You can save the package in any location, using any
name you like.
For instructions on editing the Template Package, see the Active Content
Manager Design Guide.
90 Site Design Manager Administration Guide
Upload a Template Package
Once Template Package edits are complete, upload the revised package to the
ACM.
It is important that the zip file contains the same hierarchy as it did when it
was originally downloaded – otherwise, the application will be unable to find
the files.
1. Zip the Template Package.
2. Open the Site Design Manager.
3. Click Manage Templates. Make sure the correct site has been
selected in the Site dropdown box.
4. Click Upload Template Package.
5. On the pop-up window, click Browse to find your zipped Design
Package.
6. Select the Design Package and click Upload.
You can now preview all of the templates in the package. If there is a problem,
click Cancel; if not, click Next until you get through all of your templates.
You may also bypass previewing the templates by clicking Skip Preview after
the first template has been previewed. This is only recommended if you have
made changes to the template package that will not adversely affect the
templates. When the preview process is bypassed, any errors in your templates
will not be identified.
Edit Template Packages
Edits can be made to files in the template package though the ACM UI without
downloading the template package. Any file can be edited except for javascript
files. To edit template files:
1. Open the Site Design Manager.
2. Click Manage Templates. Make sure the correct site has been
selected in the Site dropdown box.
3. Click the Edit icon in the grid beside the most recent template upload
to go to the Edit Template Package screen.
4. Depending on what file you wish to edit, use the dropdown to select
the folder.
5. Click on the file name to edit it.
6. Once you have finished editing, you can preview the change in any
page on the site.
7. Click Save to save your changes. You will be returned to the Edit
Template Package screen.
8. There are two options for saving the template package.
a. Save All – this option will overwrite the existing site design
package with the changes you just made. This option does
NOT save a historical record of the template package before
you made your changes
Administration Guide Site Design Manager 91
b. Save as New – this option will create a brand new template
package so you can roll back to the version prior to your
recent edits.
Deleting Template Packages
Once you have uploaded more than one template package you have the ability
to delete all previous packages. Deleting a template package will remove it
from the template package list and delete the file from your server.
1. Open the Site Design Manager.
2. Click Manage Templates. Make sure the correct site has been
selected in the Site dropdown box.
3. Check the Delete checkboxes of all the template packages you want to
delete.
4. Click Delete Selected Packages.
5. When the warning appears click OK to continue, or Cancel to return
to the list of template packages.
Deleting a Template from a Package
If a template is no longer used on your site, you can delete it from the template
package by removing the template entry from the site design manifest.
1. Open the SiteDesignManifest.xml document.
2. Remove the template entry by deleting the complete template entry:
<Template>
<ID>21</ID>
<Name>Template Name</Name>
<FileName>filename.htm</FileName>
</Template>
3. Save the SiteDesignManifest.xml document.
4. Deleting the template file is from the template package is optional.
5. Upload the template package following the directions above.
If the template whose entry you removed from the design manifest
is assigned to any pages you will receive notice to return to the
Site Design Manager and reassign the pages to a different
template. A printable list of pages will be provided.
If the template whose entry you removed from the design manifest
is not assigned to any pages, you will receive notice that
continuing will remove the template(s) from the database.
6. If you need to add the template back into the package using the
original template name, you need to add the full template entry,
including the original template ID, to the site design manifest. This is
due to the fact that the template is still maintained within the database
for archived pages it is assigned to.
If you add the template back into the package, and don‘t need the
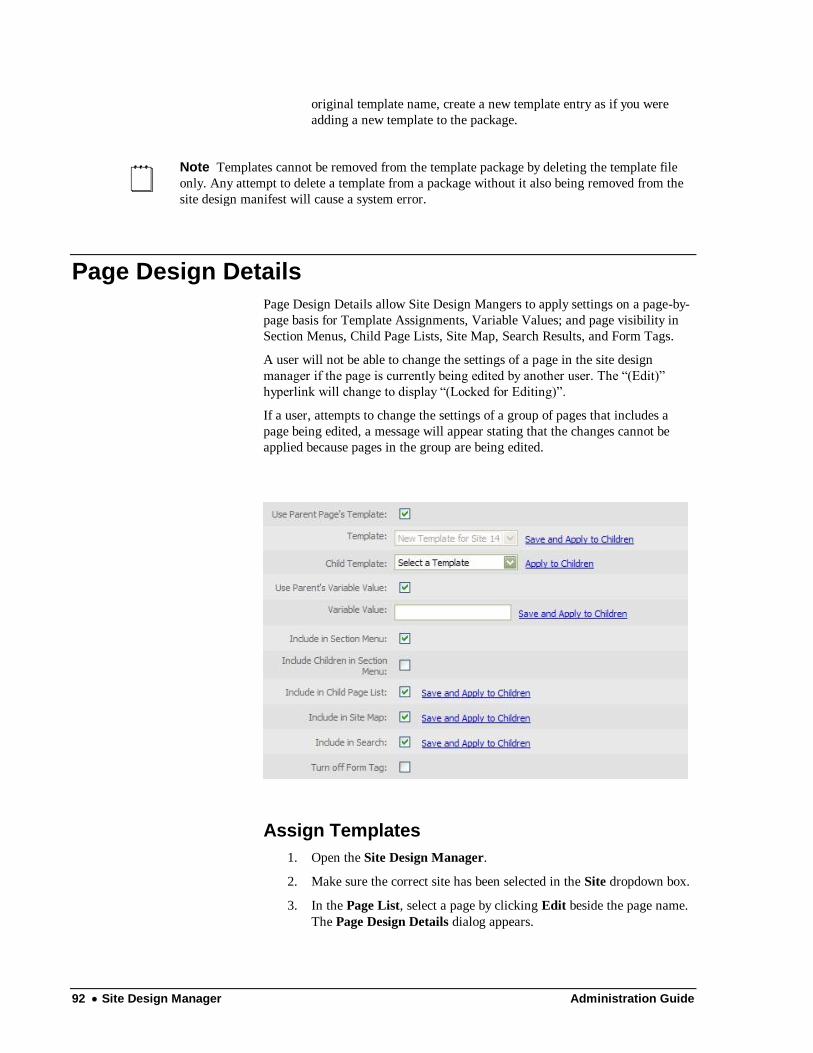
92 Site Design Manager Administration Guide
original template name, create a new template entry as if you were
adding a new template to the package.
Note Templates cannot be removed from the template package by deleting the template file
only. Any attempt to delete a template from a package without it also being removed from the
site design manifest will cause a system error.
Page Design Details
Page Design Details allow Site Design Mangers to apply settings on a page-by-
page basis for Template Assignments, Variable Values; and page visibility in
Section Menus, Child Page Lists, Site Map, Search Results, and Form Tags.
A user will not be able to change the settings of a page in the site design
manager if the page is currently being edited by another user. The ―(Edit)‖
hyperlink will change to display ―(Locked for Editing)‖.
If a user, attempts to change the settings of a group of pages that includes a
page being edited, a message will appear stating that the changes cannot be
applied because pages in the group are being edited.
Assign Templates
1. Open the Site Design Manager.
2. Make sure the correct site has been selected in the Site dropdown box.
3. In the Page List, select a page by clicking Edit beside the page name.
The Page Design Details dialog appears.
Administration Guide Site Design Manager 93
4. Use Parent Page’s Template is selected by default. Uncheck this box
to assign a different template to the page.
5. In the Template drop down box select the name of the template to
apply.
To have all child pages of this page use the same template, click Save
and Apply to Children.
6. To have the child pages of this page use a different template, select a
template in the Child Template drop-down, and click Apply to
Children.
7. Click OK when the confirmation window is displayed.
8. Click Save.
Assign Variable Values
Variable values allow Template Designers to embed Variable References in an
Active CM Template. When a page is rendered in the ACM the reference will
be substituted with a page specific Variable Value as defined in this process.
For more information on working with Variable References, see the Active
Content Manager Design Guide.
1. Open the Site Design Manager.
2. Make sure the correct site has been selected in the Site dropdown box.
3. In the Page List, select a page by clicking Edit beside the page name.
The Page Design Details dialog appears.
4. Use Parent’s Variable Value is selected by default. Uncheck this box
to assign a different variable to the page.
5. In the Variable field enter the variable name.
6. To have all Child Pages of this page use the same variable, click Save
and Apply to Children.
7. Click OK when the confirmation window is displayed.
8. Click Save.
Include Pages in Section Menu
This option can be set at both a parent and child page level. When the first
child page under a parent page is created, it will not automatically appear in the
site‘s dynamic navigation.
Setting option for one page:
1. Open the Site Design Manager.
2. Make sure the correct site has been selected in the Site dropdown box.
3. In the Page List, select a page by clicking Edit beside the page name.
The Page Design Details dialog appears.
4. Check Include in Section Menu if you want this page to show up in
the dynamic navigation of the site.
94 Site Design Manager Administration Guide
5. Click Save.
Setting option for child pages:
1. Open the Site Design Manager.
2. Make sure the correct site has been selected in the Site dropdown box.
3. In the Page List, select a page by clicking Edit beside the page name.
The Page Design Details dialog appears.
4. Check Include Children in Section Menu if you want the child pages
created under this page to appear in the dynamic navigation of the site.
All pages you create below this page in the hierarchy will now be
included in the Section Menu of your site.
5. Click Save.
Tip The "Include Children in Section Menu" flag identifies that all children and
all *new* children will be included in the section menu. If you create a page and
set this flag, then create five pages beneath it, all of them will also have the flag
set.
If you de-select the checkbox, the system doesn‘t make *any* modifications to the
child pages. What happens, however, is that the sixth page created beneath it will
*not* have the checkbox set and will *not* show up in the section menu unless
someone explicitly goes in to set it as such (or re-checks the parent's Include
Children... checkbox.)
Include in Child Page List
This switch allows you to show individual pages and their children in the Child
Link lists that are generated with the
<ironpoint>Childlinks</ironpoint> tag in the template, or on the
General Content 2 pagetype.
To change this setting:
1. Open the Site Design Manager.
2. Make sure the correct site has been selected in the Site dropdown box.
3. In the Page List, select a page by clicking Edit beside the page name.
The Page Design Details dialog appears.
4. Uncheck Include in Child Page if you do not want the page to appear
in the list.
5. Click Save and Apply to Children if you do not want any of the
existing child pages of this page to appear in a child page list.
Clicking this hyperlink does not enforce the setting to future child
pages.
6. Click Save.
This control was originally available only on a page-by-page basis on the Child
Pages tab of Full Edit mode, but was added to the Site Design Manger to
centralize the control. If you still want to provide this functionality on the Child
Pages tab, you must edit the IronPoint.config file to enable the Child List
Column as shown below:

Administration Guide Site Design Manager 95
<!-- Switch for enabling/disabling the ChildList
column in the pagetype Child Pages tab -->
<!--WISEMETA: value="[IP_CHILDLISTCOLUMN]"--
><featureExtension id="ChildListColumn" enabled="True"
isMenu="False" />
Include in Site Map
If checked, this checkbox will ensure that the identified page will appear in any
site map created in the system by default.
If this option is turned on for a page in the first level of pages (one step
down from the home page), then it means that the page will have
―Show top-level page only‖ selected by default on any newly created
sitemap page.
If this option is turned on for a page in any other level of page, it will
only display if the parent page‘s settings in the sitemap allow it to be
displayed. (For example, if the checkbox is selected but the sitemap
settings for the parent are ―Show top-level page only‖, then this page
will still not be displayed on the sitemap.)
To change this setting:
1. Open the Site Design Manager.
2. Make sure the correct site has been selected in the Site dropdown box.
3. In the Page List, select a page by clicking Edit beside the page name.
The Page Design Details dialog appears.
4. Uncheck the Include in Site Map if you do not want the page to
appear as part of a site map.
If this option is turned off for a page in the first level of pages
(one step down from the home page), then it means that the page
will have ―Do not show in sitemap‖ selected by default on any
newly created sitemap page.
If this option is turned off for a page in any other level of page, it
will not display even if the parent page‘s settings in the sitemap
allow it to be displayed. (For example, if the checkbox is not
checked but the sitemap setting of the page‘s parent is ―Show all
levels in sitemap‖, this page will still not appear in the sitemap.)
5. Click Save and Apply to Children if you do not want any of the
existing child pages of this page to appear as part of a site map.
Clicking this hyperlink does not enforce the setting to future child
pages.
6. Click Save.
Include in Search
If you have created any Search pages that utilize the Active CM search, all
pages will by default show up in the search results.
96 Site Design Manager Administration Guide
If checked, this checkbox will ensure that the identified page is not
being restricted specifically from being searched.
If this checkbox is checked but the page‘s page type has been
identified as being unavailable for search, or there is any other reason
why search is not enabled on the site, then the page will still be
unavailable for searching.
To change this setting:
1. Open the Site Design Manager.
2. Make sure the correct site has been selected in the Site dropdown box.
3. In the Page List, select a page by clicking Edit beside the page name.
The Page Design Details dialog appears.
4. Uncheck Include in Search if you do not want the page to be returned
in search results.
Even if the page‘s page type is available for search, and all other
settings on the site allow searching to be enabled, this specific
page should not have a page generated in the SearchSite folder.
This setting will not remove pages that have already been
generated into the SearchSite when it is deselected, but will only
prevent future versions from being created.
5. Click Save and Apply to Children if you do not want any of the
existing child pages of this page to be returned in search results.
Clicking this hyperlink does not enforce the setting to future child
pages.
6. Click Save.
Turn off Form Tags
This setting has been removed due to the form tag enhancement included with
version 8.6 of the CMS. All subsequent releases will include this enhancement.
Please see Appendix Q for details.
Administration Guide Meta Tags Manager 97
Meta Tags Manager
The Meta Tags Manager is used to create and apply Meta Tag questions to be
used on the Meta Data tab in Full Edit mode.
Meta tag questions can be applied to a site by either using the default questions
that have been set up in the Global System Variables, or by creating a question
set specifically for a site.
These methods cannot be combined. You cannot implement the questions from
the Global System Variables and add additional questions on a per-site basis.
Default Meta Tag Questions
1. Open the Meta Tag Manager.
2. Make sure the correct site has been selected in the Site dropdown box.
3. To use the question set from the Global System Variables, check Use
Default.
4. Click Save.
Site Specific Meta Tag Questions
1. Open the Meta Tag Manager.
2. Make sure the correct site has been selected in the Site dropdown box.
3. To create questions unique to this site, click New and select a question
type to add.
4. Complete the Question Text, Type, Placement and other question
properties fields.
5. From the Meta Tag Name drop-down, select the appropriate metadata
tag placeholder. Available meta tag names are: Description,
Keywords, Author, Robot and Custom.
7. Click Add Answer to add each possible answer to the question (if
required by question type).
8. Click Update to preview the question.
9. Click Save.
For more information on Meta Tags, see Appendix H.
For more information on editing questions and answers, see Appendix I.
98 Global System Variables Administration Guide
Global System Variables
Global System Variables affect all of the websites created in the Active CM.
Many of these variables can also be set at the Site level. For more information,
see the Site Manager section of this guide.
User Profile
Global User Profile questions are used to collect information on all users of the
ACM. Questions created here are displayed in the User Manager, on each
user‘s My Page, and are available to be added to Applications Forms.
Note Since these questions appear for every user in the ACM, try to keep questions
to a minimum to meet your required information needs. User Profile questions can
also be created on a site by site basis.
Create user profile questions, referring to Appendix I for full instructions on
creating questions.
The emails listed on this tab are the default set of system emails provided with
the Active CM. Each email is configured with default text that you can edit.
Email Column
This is the default name for the email. This name appears as the Subject line of
the email when it is sent. The brackets at the end of the name show which
groups will receive the email when the action associated with that email takes
place.
Description Column
The Description column explains the action that triggers the email to be sent.
Active Column
The Active checkbox indicates whether or not the email is currently used in the
ACM. By deselecting the Active checkbox an email is made inactive and no
longer sent. Ensure the appropriate parties are notified of any changes made to
a global setting such as email.
Edit System Emails
To customize the body or subject line of an email:
1. Click on the Email name.
2. Edit the Subject Line and the text, add or delete variables in the body
of the email.
3. Click Save.

Administration Guide Global System Variables 99
Following is a list of variables you can use in the system event emails. Some
variables are only available in the appropriate email templates. For example,
Password will only be valid in the Forgot Password email, but Username is
available in all.
$ActiveUserFullName$
$ActiveUserName$
$ActiveUserEmail$
<A href="$AdminURL$">$AdminURL$</A>
$ApprovalEscalationDate$
$ApprovalLevel$
$ApprovalRequestDate$
$ArchiveDate$
$Email$
$FinalApprovalLevelDate$
$FollowupAction$
$FollowupDate$
$HomePageURL$
$LocationLine$
$MostRecentApprovalLevelDate$
$PageContent$
$PageStatus$
$PageTitle$
$Password$
$PreferredFullName$
$PublicationDate$
$RegistrationDate$
$RejectionDate$
$ReviewEscalationDate$
$ReviewRequestDate$
$SiteName$
$UserID$
$UserName$
$UserPhone$
$WorkflowNotes$
System Variables
The system variables are set with default values:
100 Global System Variables Administration Guide
Users are inactive when created
If your site provides an application form to apply for a user account but you
want to approve new users, check this box. Users will have to wait until you
approve them before they can access the site. If you don’t need to approve new
users, be sure to uncheck this box.
Number of login attempts before lockout
The number of times a user can attempt to login before the account is locked.
Disable follow-up task options
Check this box to disable the use of follow-up tasks within the ACM
installation.
When follow-up tasks are disabled the ability to set a follow-up task on a page
is removed. Content providers will be unable to set pages to be reviewed,
archived, or made inactive.
Default number of days until follow-up task
Set the default number of days to reflect the period of time until a page needs to
be reviewed.
Number of days until follow-up task is also a site setting, page type setting, and
on the workflow tab of full edit mode of any page in full edit mode.
(For more information see Appendix C.)
Default Follow-up Task
Choose the system-wide default follow-up task from three options: 1) Review 2)
None or 3) Inherit. Any new pages created in ACM after the default value is
set will automatically use the default value. If set to ―Inherit‖ new pages will
automatically inherit the setting of the parent page. Only the setting will be
inherited, not the date of the follow-up task.
Number of days until escalation
If tasks such as approving or reviewing a page are not completed, an escalation
email is sent to notify the appropriate groups that the task is outstanding. The
escalation email is sent continually at this set period of time until the task is
completed.
Number of days until escalation is also a site setting,
The maximum size of assets that can be
uploaded to the system
If you want to limit the size of files uploaded into the Digital Assets Library,
you can do so here.
There is also a maximum asset size setting in the Web.config file, which
identifies the IIS acceptable input stream. If both are set properly, uploads are
handled correctly. In some cases, the time-out period needs to be adjusted, such
Administration Guide Global System Variables 101
that users trying to upload particularly large files aren't timed out before the file
completes uploading
Maximum levels in site menu
This setting controls how many levels of your website hierarchy are displayed
from the Site Menu on the Admin toolbar. Setting this above one level can slow
down the ACM as the complete site menu renders.
Days before archive to warn
This setting establishes how many days prior to the automatic archiving of a
page an email is sent to content providers and monitors to remind them of the
action about to take place.
Maximum log level for database
This drop-down lists the priority levels of messages logged by the system. The
setting determines what the lowest level of information is collected and
available for viewing in the System Events area of the Admin Center.
If set too high, information required for troubleshooting will not be recorded. If
set too low, log files will quickly fill to capacity will unnecessary information.
CriticalInfo messages are the most critical and Verbose, the least.
The default level is Err - indicating that the log files will track system errors
and other more critical events.
Maximum log level for email
Every time a system event occurs at the level indicated an email will be sent to
the system administrator.
System-wide administration email address
This is the email address used as the ―from‖ email address for system and
broadcast emails; and receives notification email from the ACM system.
System-wide administration email name
Enter the name to be associated with the email address entered in the field
above.
Enable workflow notes
Uncheck this box to disable the use of workflow notes within the ACM
installation.
When workflow notes are disabled the pop-up window to enter notes no longer
appears during the workflow process.
Enable edit lock
Check this box to provide the ability to lock down pages when they are being
edited. By enabling edit locking, users will not be able to edit any content or
settings of a page while another user is doing so.

102 Global System Variables Administration Guide
Enable page owners
Check this box to enable the use of page owner groups within the ACM
installation.
When page owners are enabled, administrators and group managers have the
ability to create page owner groups, and content providers have the ability to
assign a page owner to the page in edit mode.
Enable strong passwords
Check this box to enable the use of page owner groups within the ACM
installation.
When strong passwords are enabled, new passwords must meet the specified
criteria established in the following fields. If the password is not accepted, the
user is informed why their password is unacceptable.
Strong password minimum length
Enter the minimum amount of characters a password must contain.
Strong password maximum length
Enter the maximum amount of characters a password must contain.
Strong password minimum alphabetic
characters
Enter the minimum amount of alphabetic (A – Z) characters a password must
contain.
Strong password minimum alphabetic
characters
Enter the minimum amount of alphabetic (A – Z) characters a password must
contain.
Strong password minimum numeric characters
Enter the minimum amount of numeric (0 - 9) characters a password must
contain.
Strong password minimum numeric characters
Enter the minimum amount of numeric (0 - 9) characters a password must
contain.
If the criteria is set or changed, any users who do not meet the criteria will not
be forced to change their passwords, but the criteria will be enforced if they
change their passwords.
Administration Guide Global System Variables 103
Enable Edit Mode Tabs
As a system administrator you can decide what edit mode tabs are available in
edit mode of all pages. Further restrictions can be applied on the group level.
This setting allows you to control access to certain functionality. All tabs are
enabled by default except for the Design tab.
Load All Child Pages in Edit Mode
If a page has numerous child pages, it can take some time to load in edit mode
because it is loading the full list of child pages. This feature was added so that
by default, you can choose to have pages load the list of child pages or not. De-
selecting this checkbox will prevent the full child page list from loading in edit
mode and will place a link on the Child Pages tab that will allow a content
provider to display the list if they choose. This will increase overall edit mode
performance when editing pages with many children.
App Variables
In version 8.9 and higher, the App Variables tab has been moved and renamed.
It can now be found in the Configuration Files manager in the admin center
under the Web.config tab.
Meta Tags
Meta tag questions created as Global System Variables allows you to create a
standard set of questions for collecting Meta Data on any site created in the
ACM.
After creating the Meta Tag questions here, open the Meta Tag Manager and
following the instructions in the Meta Tag Manager section of this guide to use
the default Meta Tags.
Create Meta Tag Questions
1. Open Global System Variables.
2. Click on the Meta Tags tab.
3. To create questions, click New and select a question type to add.
4. Complete the Question Text, Type, Placement and other question
properties fields.
5. From the Meta Tag Name drop-down, select the appropriate metadata
tag placeholder. Available meta tag names are: Description,
Keywords, Author, Robot and Custom.
8. Click Add Answer to add each possible answer to the question (if
required by question type).
9. Click Update to preview the question.
104 Global System Variables Administration Guide
10. Click Save.
For more information on Meta Tags, see Appendix H.
For more information on editing questions and answers, see Appendix I.
Admin Toolbar
On this tab, you can configure the user greeting that appears on the Admin
toolbar when a user logs in to ACM.
1. To enable the user greeting, select the Welcome User Enabled
checkbox.
2. Enter the Welcome User Text that will precede the user‘s identity.
3. Select the Welcome user type of address. The options are None,
Firstname and Username.
4. Click Save.
Support
On the support tab, you can configure the information that should appear in the
Help > About ACM screen. These are the system wide settings and are
superseded by the settings defined in the Sites Manger, Support tab. By
default, the data is pre-populated with the Active Network‘s support
information. If you wish to offer your own internal support for your users, you
can change this information here or at the site level.
Digital Asset Tags
Digital Asset Tags allow you to assign meta tags to your assets. This is useful
in pages like the Media Center or Enhanced Photo Gallery where assets can be
searched and arranged by tags. There are two options for asset tagging.
1. Text – selecting this option allows your users to enter freeform text
tags to digital assets.
2. List – selecting this option allows you to add a predefined list of tags
that your users will be able to choose from when tagging assets.
a. Click the Add button to add any number of tags that will be
available for selection.
Objectionable Words
The Objectionable Words tab allows you to manage a list of objectionable
words that will be filtered or replaced when your site visitors enter
objectionable words in Blog Comments, Forums or in the comments pagelet
(filters need to be activated on each page). The words are either removed
completely or replaced with an alternate value of your choosing.
Administration Guide Global System Variables 105
There are a number of predefined bad word list available online for download.
Simply Google ―Bad word list‖ for a number of options.
1. To manually add a word to your objectionable word filter, type the
word into the provided text field and click Add. If the word is not
already on the list, it will be added.
2. Choose your Default Masking Character. This character will be
used to replace the letters of the objectionable word or phrase. The
number of masking characters used will match the number of letters in
the word. The default masking character is *.
3. If you wish to import a word list, you can import either a csv or txt
file. Each word in the file must be on a new line. Click the Import
Word List button to upload your word list. Your word list must not
have any duplicates. Use Excel to filter your word lists for unique
records only.
4. All of your objectionable words will be listed in a grid. You can
change both the objectionable word and its replacement value in the
grid.
5. To remove an objectionable word, check the box in the remove column
beside the word you wish to remove.
6. Click Save.
106 Configuration Files Administration Guide
Configuration Files
Web.config
The Web.config Settings are now accessible through the Configuration Files
manager in the Admin Center rather than being accessible as the App
Variables tab in the Global System Variables.
For a full description of all the settings in the Web.config, please refer to the
ACM Install and Configuration Guide.
Support for Different Extensions with 404 Page
The ACM HTTP Handler (IronPoint.CM.Framework.Custom404HttpHandler)
has been added to the ACM UI in the Configuration Files Manager on the
Web.config tab. It can be used for any extension that has been added to the
HttpHandlers section of the Web.config. The handler will send any request it
handles to custom404.htm found in ACM‘s root folder on the web server.
Ironpoint.config As of ACM version 8.9, the Ironpoint.config file is now stored in the database
and is accessible through the Configuration Files manager in the Admin
Center. If you have upgraded from a version prior to 9.0, please refer to the
ACM Upgrade Guide for instructions on updating the database with the
Ironpoint.config settings. Please refer to the ACM Install and Configuration
Guide for full details of all settings in the Ironpoint.config.
ACM allows you to create Authority Redirects, 301 Redirects and FQDN
Mappings. These settings can be configured in the Ironpoint.config tab located
in the Configuration Files section of the Admin Center. These 3 settings take
priority in the order mentioned. Examples of the new settings are below:
Authority Redirects Multiple authority redirects can be configured and each one takes an
‗authorityIn‘ and a ‗targetAuthority‘. Upon receiving a request, ACM will
check the authority of the request URL to see if a redirect has been configured.
If a match is found, it will rebuild the URL and do a 301 redirect. Using the
example below, ‗http://domain.com‘ would be 301 redirected to
‗http://www.domain.com‘.
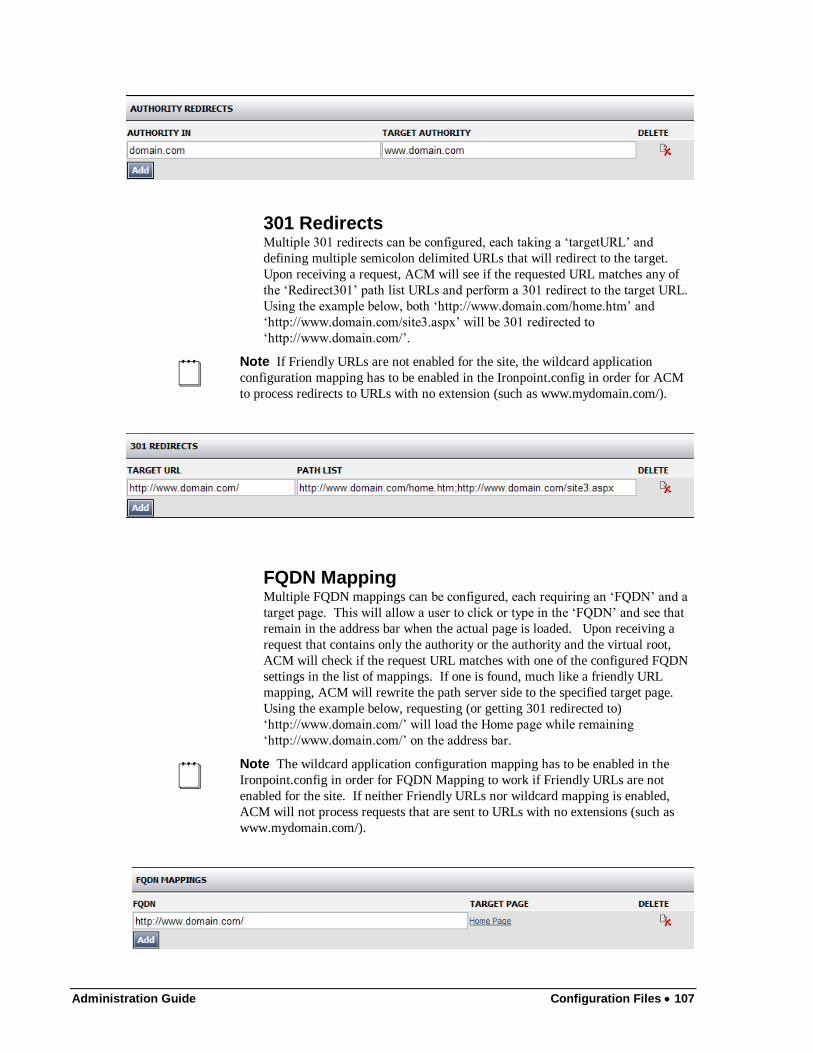
Administration Guide Configuration Files 107
301 Redirects Multiple 301 redirects can be configured, each taking a ‗targetURL‘ and
defining multiple semicolon delimited URLs that will redirect to the target.
Upon receiving a request, ACM will see if the requested URL matches any of
the ‗Redirect301‘ path list URLs and perform a 301 redirect to the target URL.
Using the example below, both ‗http://www.domain.com/home.htm‘ and
‗http://www.domain.com/site3.aspx‘ will be 301 redirected to
‗http://www.domain.com/‘.
Note If Friendly URLs are not enabled for the site, the wildcard application
configuration mapping has to be enabled in the Ironpoint.config in order for ACM
to process redirects to URLs with no extension (such as www.mydomain.com/).
FQDN Mapping Multiple FQDN mappings can be configured, each requiring an ‗FQDN‘ and a
target page. This will allow a user to click or type in the ‗FQDN‘ and see that
remain in the address bar when the actual page is loaded. Upon receiving a
request that contains only the authority or the authority and the virtual root,
ACM will check if the request URL matches with one of the configured FQDN
settings in the list of mappings. If one is found, much like a friendly URL
mapping, ACM will rewrite the path server side to the specified target page.
Using the example below, requesting (or getting 301 redirected to)
‗http://www.domain.com/‘ will load the Home page while remaining
‗http://www.domain.com/‘ on the address bar.
Note The wildcard application configuration mapping has to be enabled in the
Ironpoint.config in order for FQDN Mapping to work if Friendly URLs are not
enabled for the site. If neither Friendly URLs nor wildcard mapping is enabled,
ACM will not process requests that are sent to URLs with no extensions (such as
www.mydomain.com/).
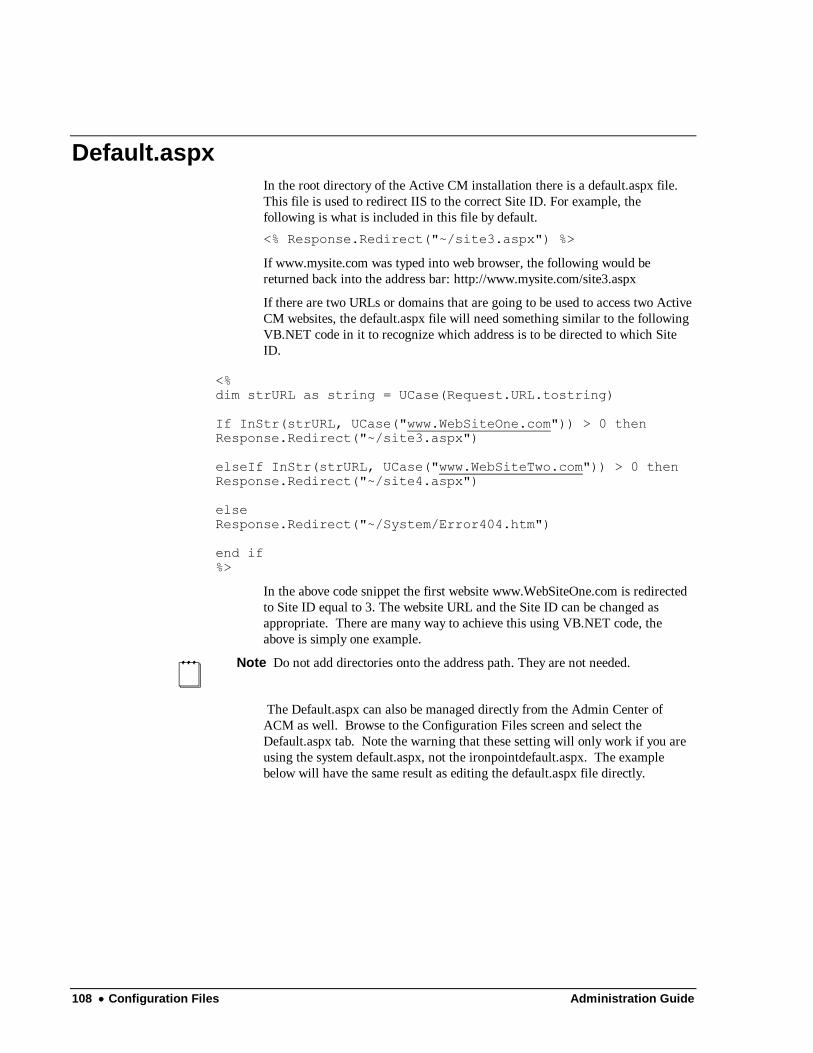
108 Configuration Files Administration Guide
Default.aspx
In the root directory of the Active CM installation there is a default.aspx file.
This file is used to redirect IIS to the correct Site ID. For example, the
following is what is included in this file by default.
<% Response.Redirect("~/site3.aspx") %>
If www.mysite.com was typed into web browser, the following would be
returned back into the address bar: http://www.mysite.com/site3.aspx
If there are two URLs or domains that are going to be used to access two Active
CM websites, the default.aspx file will need something similar to the following
VB.NET code in it to recognize which address is to be directed to which Site
ID.
<%
dim strURL as string = UCase(Request.URL.tostring)
If InStr(strURL, UCase("www.WebSiteOne.com")) > 0 then
Response.Redirect("~/site3.aspx")
elseIf InStr(strURL, UCase("www.WebSiteTwo.com")) > 0 then
Response.Redirect("~/site4.aspx")
else
Response.Redirect("~/System/Error404.htm")
end if
%>
In the above code snippet the first website www.WebSiteOne.com is redirected
to Site ID equal to 3. The website URL and the Site ID can be changed as
appropriate. There are many way to achieve this using VB.NET code, the
above is simply one example.
Note Do not add directories onto the address path. They are not needed.
The Default.aspx can also be managed directly from the Admin Center of
ACM as well. Browse to the Configuration Files screen and select the
Default.aspx tab. Note the warning that these setting will only work if you are
using the system default.aspx, not the ironpointdefault.aspx. The example
below will have the same result as editing the default.aspx file directly.
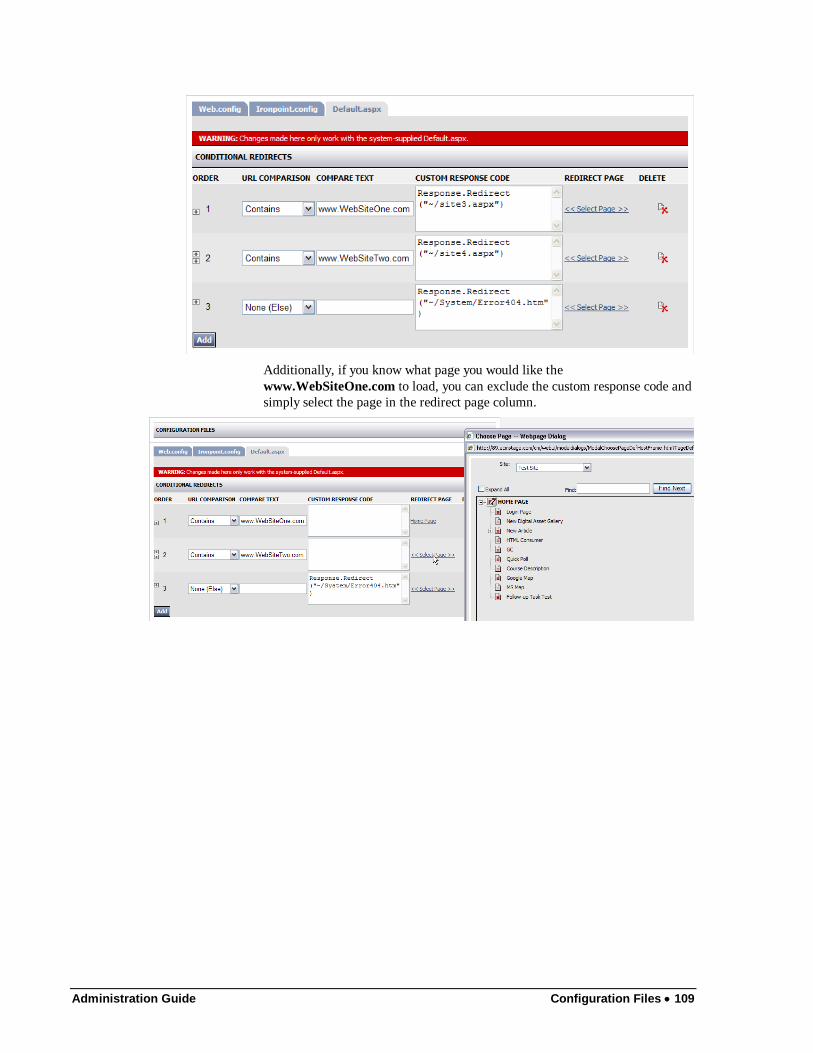
Administration Guide Configuration Files 109
Additionally, if you know what page you would like the
www.WebSiteOne.com to load, you can exclude the custom response code and
simply select the page in the redirect page column.
110 System Events Administration Guide
System Events
The System Events Manager provides access to system log files and is used by
System Administrators and Active CM support staff to track system events and
troubleshoot system errors.
This is the first place to look after a system error has occurred. You can locate
details regarding the event and provide Active with this information when
reporting the issue.
Note You should not change the default settings for the System Event Manager
unless you have consulted with Active CM support staff.
Filtering Log Messages
If a date is selected using the ―Filter from Date‖ option, the page refreshes to
display only those events that have been recorded from now back until the
selected date, inclusively.
Clearing Log Messages
The ―Clear <…> Log‖ button updates itself to whatever log is currently being
viewed (such as ―Clear Application Log‖ or ―Clear FTP Log‖.) When clicked,
this button will clear out the identified log.
The ―Clear All Logs‖ button completely clears out the logs in the system.
The ―Clear All Logs Before:‖ provide a date to delete all system event logs
prior to that date.
Displaying Log Messages
By default, the number of log messages displayed will include the default grid
number specified in the Global System Variables.
The ―Rows to Display‖ drop down list will include this default as well as 25,
50, 100, 150, 200, and 500.
Administration Guide System Information 111
System Information
System Information is used by System Administrators and Active CM support
staff to troubleshoot system issues and errors. To view each sub-section, click
the ―+‖ symbol in front of the sub-section title.
Framework Software Version
Information related to the installed version. This includes the Build Version,
Build Time, Assembly Version, Last Database Script Executed and Licenses.
Page Type Extensions
A list of all page types available in the software, the version of the page type,
and the License and Registration status of each page type as related to your
installation.
Web Server Information
View Tracing Information: Provides information on the trace of where you
connect from, etc. By default this option is not enabled.
View Session Objects: Displays the Session Key and Data Type contents of the
ASP.NET application session.
Job Queue Status
Identifies all system jobs that are scheduled, queued, in progress, completed
and the total of all these jobs. Completed jobs are cleared at regular intervals.
Cache Status
Provides information related to ACM caching. Displays how much memory is
used by cached items, the accuracy rate and average requests.
View Cache Contents: Shows you cached contents and allow you to remove
any one item.
Pre-Cache Site: Allows you to cache site contents of a new site, or after
clearing site cache. If this tool is not used, the first user has to wait for the site
to load into cache.
Clear All Items: When part of the site will not update correctly (for example a
template change) it is recommended to clear the cache to ensure old files are
not being referenced.
Reset the Cache Counters: When you want all the items in the Cache Status
table to be reset to zero.
Tools
Provides a link to tools and utilities available in ACM.
112 System Information Administration Guide
Database Tools
Clear All Log Entries: Clicking the ―Clear All Logs‖ button provides an easy
method of clearing all the log files that are available in the System Event
Manager.
Delete Page and All Children: Entering a page number into this field and
clicking ―Hard Delete‖ will remove a page and its child pages from both your
site and the database. Performing this action means there is no longer a record
of this page and it cannot be restored to your site.
Re-index HTML and asset/page paths: This tool goes through and repairs
any custom properties on a page. For example – properly associating digital
assets with pages. (Only valid for pre 7.2 sites)
Import/Export Configuration
Provides the functionally to import an existing static site into the ACM
software and should only be used with the assistance of an Active CM
developer.
Export HTML Management
Delete HTMLSite Folder: If you export a site to HTML (static site) your files
get generated inside an HTMLSite folder. If you experience problems with your
static site page versions, it is sometimes recommended to delete the HTMLSite
folder to ensure your files are being generated correctly.
Delete SearchSite Folder: The search pages for sites (dynamic and static) are
generated to a SearchSite folder. At this time the ACM does not remove
archived or inactive pages from the SearchSite folder. In order to update the
search results for your site it is recommended to delete the SearchSite folder on
a regular basis (prior to a site export) to ensure pages are not returned in
searches that are no longer part of your site.
HTML Editors
In order to use additional editors within the ACM you must register them for
use. Some external software applications may require that you own a license for
them.
When you click the Register HTML Editors button, the ACM will locate the
editors you can currently use. Note that with the 8.6 installation this will only
confirm your use of the Plain Text Editor, R.A.D. Editor, the new TinyMCE
Editor and a Read Only. Future development will allow you to integrate
external editors with the ACM.
See the Group Manager section in this guide for more information on
assigning HTML editors to user groups.
Browser Information
Browser information can be a useful tool when troubleshooting User problems
that may be related to cookie or JavaScript settings. Check this report from the
user‘s computer to confirm if cookies and/or JavaScript are enabled on their
browser.
Administration Guide System Information 113
Web.config Settings
The Web.config files are installed at the root of the Active CM installation and
contain a number of settings for the software to work correctly. This area allows
you to verify those settings without having to open them directly on the server.
As some of this information contains User Names and Passwords, you are
provided with the ability to Encrypt and Decrypt the Web.config settings. This
requires an additional external module; see the ACM Install & Configuration
guide for more information.
Ironpoint.config Settings
The Ironpoint.config files are installed at the root of the Active CM installation
and contain a number of settings for the software to work correctly. This area
allows you to verify those settings without having to open them directly on the
server.
PhysicalPath Settings
This information allows developers to verify where directories and files for the
ACM application and sites are located on the server.
View Active Sessions
This section allows you to view any users that are logged in to the system, what
page they are currently viewing and the mode of that page (view or edit). If
two users are editing the same page, an alert will appear in the grid. To
activate this section you must set the following value in the Web.config file to
true:
<add key="EnableActiveSessionsTracking" value="True" />
114 Active CM Glossary Administration Guide
Active CM Glossary
Action Menu
The action menu is available only when you use the Quick Edit mode to edit
your web pages. The button appears beside the edit buttons beside the page title.
The action menu includes: publishing, previewing, saving and canceling
functionality.
Archive
When you archive a web page or a survey/form question you permanently
remove the item from your website. If you want to keep a web page or question
but have it not be visible on your site, you must deactivate the page or question
by un-checking the Active checkbox.
Category Pages
Use category pages to create drop-down menus in your site's navigation area.
The category you create appears as a link on the navigation pane and when you
click on it, a list of pages that the user can go to are listed in the drop-down
menu. The pages that the user can go to are the child pages of the category
page. Using this page type adds an additional navigational tool for users of your
site.
Child Links
Child links refers to the links that appear in the main content area of a parent
page once it is published. The list of links, which generally appears at the
bottom of the page content, provides links to each of the child pages created
under that parent page. The child links area is created through an IronPoint tag
added to your template.
Child Pages
Child pages belong to a parent page and appear on the Child Pages tab of the
parent. Child pages can be created for all page types with the exception of the
Login pages. It is not recommended that you add child pages to Login page
types.
Content Approvers
Content approvers are users who have been given the rights and the
responsibility for approving page content created by other users. Content
approvers are part of the workflow of creating and publishing pages. Once a
page is created and saved, it gets submitted for approval. The Content approver
can then approve or reject the pages.
Content Editor
A content editor is a user within your organization who has been given rights to
edit content that others have created.
Administration Guide Active CM Glossary 115
Content Management System
A Content Management System (CMS) is software empowers users across an
organization to create and publish content in an organized and timely fashion.
A CMS makes content management easy by allowing non technical, front-end
content providers to create, edit, publish and maintain pages, sections or entire
sites, depending on the needs and size of the organization. Content
management systems keep design and content functionality separate which
facilitates easy changes to the design of your website.
Content Monitors
Content monitors are people within your organization that receive notification
when certain content has changed. Monitors are generally responsible for
monitoring portions or all of the website changes. They do not necessarily
contribute to the content but simply receive notification to be kept apprised of
changes to the site.
Content Providers
Content providers or content authors as they are sometimes called, are users
who are authorized to create web page content. Content providers can create
content only in the areas to which they have been given access by the system
administrator.
Digital Assets
This refers to photos, clipart, PDF, audio, video and other types of files that you
can insert on or attach to your web pages. Digital assets are stored in the digital
asset gallery which is a library of files available for use on your website. Only
authorized users can add digital assets to the library for use on the website.
Dynamic Publication
Dynamic publication exists when the published version of your website
integrates with the Active Content Manager. The other option is static
publication in which the website content is maintained in one location, then a
copy of it is exported to another server and made available on the Internet.
Follow-up Task
Each page must have a follow-up task. The follow-up tasks available for most
page types are Review, Inactive, Archive or None. The date by which the
follow-up tasks must be completed are entered on the Workflow tab for each
page. Your system administrator can set default follow-up dates to ensure pages
will be reviewed at appropriate intervals.
Hybrid
There are some page types that interface with the software database in order to
pull information from, or save information to the database. If you have a static
site these pages are considered to be ―Hybrid‖ pages and are identifiable by
―PageMode=Hybrid‖ at the end of the page address. The Login and Survey
page types are two examples of a hybrid page type.

116 Active CM Glossary Administration Guide
My Page
My Page is your personal information and user preferences page. You work
from My Page when making changes to your web pages. On My Page you can
view your personal information and rights, and change your password. My
Page can be set to be your default home page upon login.
Navigation Section
The navigation section of your website is the portion of your site, usually found
on the left-most side of each web page, which contains the menu structure for
your site or the navigational links that allow you to jump to other areas of the
site. Some websites place their navigation section along the top of the main
content area in a horizontal menu-like fashion.
Page Types
Page types are formatting functionality that defines how the central content
area of each page will look. There are a number of standard page types included
the standard ACM installation. Page types provide standard formatting for
creating the content for login pages, general content pages, links and
attachments, forms and surveys, photo gallery pages, user account application
pages, and more.
Pagelets
If there is content that is used repeatedly throughout your website, you can
create a single instance of the content that can then be used over and over
throughout your website. These single instances are referred to as Pagelets.
They are like mini-pages, hence the name "pagelets".
Parent Pages
A parent page is any page within your website that has pages below it in the
website hierarchy (there are pages on the Child Pages tab). When adding web
pages, you need to determine where in the hierarchy the new pages will be. You
then edit the parent page and add them on the Child Pages tab.
Section Menu
Section menus provide links to other major content areas within your site. You
can add section menu links to other pages or attachments. The links appear in
the navigation portion of your web pages, usually on all pages throughout your
site.
Static Publication
Static publication exists when your organization maintains two copies of your
website, one on a server that is used for creating and editing content, and
another that is used for your public website. When the site is edited in the
ACM, those changes do not appear on the website until the page is either
emergency published, or the site is exported.
Administration Guide Active CM Glossary 117
Syndication
If there is content that is used repeatedly throughout your website, you can
create a single instance of the content and then syndicate it, making it available
for use on any page throughout your website. Rather than retyping the text each
time it is needed, it can be syndicated (made available for use in multiple
places) using the Pagelet feature. If the text is later updated, it is changed
automatically wherever it occurs.
Templates
Templates define how the header, footer, navigation and other features of a site
are designed. By assigning templates to site pages consistency is maintained
across the site.
Workflows
A workflow consists of a number of steps required to successfully complete a
task. In the ACM, workflows are used to ensure that your web pages go through
a number of predefined controlled steps that ensure they will be edited,
reviewed and approved before being published on your website. Workflows are
generally maintained and assigned to pages by a small group of authorized
users within your organization.
118 Appendix A – Static Sites Administration Guide
Appendix A – Static Sites
Static (exported sites)
Be aware of the following when deciding to export to a static site:
HTML file names - the name entered in the URL Title field of the page is the
name that is used for creating the HTML file name. If this field is left blank,
the Title field of the page is used to create the HTML file name. This is also
true for Dynamic sites that use Friendly URL‘s.
Links - there are aspects of internal links that are important to understand. One
thing to note is that if you export a single page, the links on that page get
updated but pages that contain links to the exported page do not. For more
information about creating Links see Appendix E.
Digital Assets - in addition to pages, the system also exports digital assets that
are used by the exported pages.
Emergency Publishing - when you emergency publish a page, it is instantly
exported to your static site. However, links pointing to that page, dynamic
menus, and site search are not updated and may be out-dated by edits made on
the emergency published page. Other features are not updated until a full site
export takes place, either by way of your export schedule for by an unscheduled
complete site export. The only exception to this rule is that if a page has
pagelets attached to it, they too are exported.
Partial site export - the Export Manager allows you to select a page and its
children to export. If you export a portion of your site, the dynamic menus and
site search will not be updated. Again you must perform a complete site export
for these to be updated.
Scheduled and unscheduled exports - you can set your system to perform a
regular site export. When these scheduled exports occur, all aspects of your
static site are updated. Unscheduled exports can include partial or complete
exports. Complete exports update all aspects of your static site (menus, search
and templates). Partial exports update only the content of the pages that are
exported.
Hybrid pages - Pages, such as the Survey and Calendar pages, that require
user and ACM database interaction, are not fully converted to HTML. When
the user clicks on a link to one of these pages types, the HTML file that was
created with the export actually redirects them to the dynamic version of the
page. These types of pages exist across the static and the dynamic environment
- hence the name "hybrid".
Administration Guide Appendix B – Group Types 119
Appendix B – Group Types
Group Types
The Active CM is installed with some default groups set up in the Group
Manager. Use these groups as examples when setting up your groups.
System Administrators
System Administrators have complete administrator and publishing rights to
the entire ACM installation. This user group cannot be deleted or modified.
The System Administrator:
Can view and use all administrative tools
Acts as a reader, regular user, developer, design coordinator, group
coordinator, asset coordinator, user coordinator, and workflow
coordinator in all sites.
Designers
Site Design Managers are responsible for creating and maintaining the Design
Packages for all websites in the Active CM.
Using the Site Design Manager, Site Design Managers can:
Download and upload site design packages
Assign templates
Assign variable values
Set page visibility in Section Menus, Child Page Lists, Site Map and
Search Results.
Content Providers
Content providers are authorized to create and edit page content. Content
providers can create and edit content only on the pages to which they have been
given rights.
Content Approvers
Content Approvers have the rights and responsibility for approving the work of
Content Providers. Content Approvers can approve or reject content only on the
pages to which they have been given rights.
Content Monitors
Monitors receive notification of a number of Workflow processes. Monitors
monitor pages to which they have been given rights, but perform no actions,

120 Appendix B – Group Types Administration Guide
unless the User has been given additional rights though being a member of
another Workflow group.
Administration Guide Appendix C – Follow-up Tasks and Workflow 121
Appendix C – Follow-up Tasks
and Workflow
Follow-up Tasks and Workflows
When a page has been published, the next process it will undergo is dictated by
the follow-up actions (Review, Inactive, Archive or None) set on the Workflow
tab in Full Edit mode. As of version 8.9, the default follow-up task is defined
by the system setting in the Global System Variables. The default will either be
Review, None or Inherit where a new page will automatically inherit the
workflow task of the parent page.
Review
Scenario 1 – Page is published with a review date and edited
As of version 8.9, the scheduled review date is a rolling time period that is reset
each time a page is edited. Therefore if you create a page on January 1 and have
it set to be reviewed a year later, editing the page prior to the review date will
reset the date to one year from the date of editing.
Scenario 2 – Page is published without a review date and edited
If a page is created and not set to be reviewed, the default date will continue to
move forward according to the follow-up time period in the system settings.
Therefore if you create a page on January 1 and do not set it to be reviewed,
then edit it on February 1 and decide that it will be reviewed a year later, the
page will reach its review period a year later on February 1.
A page is reviewed by opening a page in Edit mode and either clicking
Reviewed – which will set a new Review date, or by clicking Edit - making
changes, and putting the new version through approval.
Inactive
When a page has an Inactive follow-up task it will no longer appear on a
dynamic site at the date and time setting for this action. Once a page is inactive
it will remain on the child page list of its parent page. All dynamic navigation
links to the page will be removed, such as dynamic menus, navigational trail,
etc. Links manually created to a page, must be manually removed.
If a site is published to a static location, an inactive page will remain on the
static site until the next publication time.
Archive
When a page has an Archive follow-up task it will no longer appear on a
dynamic site at the date and time setting for this action. Once a page is
archived it does not remain on the child page list of its parent page. All
122 Appendix C – Follow-up Tasks and Workflow Administration Guide
dynamic navigation links to the page will be removed, such as dynamic menus,
navigational trail, etc. Links manually created to a page, must be manually
removed.
If a site is published to a static location, an archived page will remain on the
static site until the next publication time. For more information about un-
archiving a page, see the Archive Manager section of this training guide.
Follow-Up Task Settings
The follow-up dates as they appear in full-edit mode are different depending on
the follow-up task set:
If a page has "None" as the setting, the review date moves forward through the
period as set in the Global System Variables, Site Manager or Page Manager.
When you create a new page, if your follow-up period is 90 days, the date
visible will be 90 days later. When that page is edited, the date will move
forward by 90 days.
If a page is set to be "Reviewed", the review date moves forward through the
period as set in the Global System Variables, Site Manager or Page Manager.
When you create a new page, if your follow-up period is 90 days, the date
visible will be 90 days later. When that page is edited, the date will move
forward by 90 days.
If you change the review period setting from 90 to 180 days, any pages
currently set to be reviewed will retain the original 90 day setting. They will
only change to the 180 day period after being edited or reviewed.
Administration Guide Appendix D – Page Versions 123
Appendix D – Page Versions
Page Versions
There are, at most, two current versions of a page: the Published (live) version
and the version in the Approval process.
Only one current Draft version of a page exists, when a change to a Draft
version is saved, no new version is created — users cannot roll back to previous
draft versions. A page version can be approved and pending publication (not
yet published) if a future publication date is set.
Once submitted, a page is pending approval until it is either approved, rejected
or is emergency published during the approval process. If a page is rejected, a
new version is created (a copy of the last workflow version) with draft status. If
an Approver makes a change to a page, the page is resubmitted for approval at
the current approval level.
While a page is in the approval process, only Approvers at the current level or
System Administrators can open a page in edit mode. Other users see a No-
Editing icon on the front end with a Pending Approval status message.
When a page is Pending Publication, only System Administrators can access
the page in Edit mode. Others see a No-Editing icon with a Pending
Publication status message.
The ability to publish is only available to Providers when the Workflow has no
Approvers. Otherwise, Providers must submit pages for Approval.
Monitors are not able to access Edit Mode of any pages. They only receive
email notifications about Workflow processes.
New pages that have not yet been published and inactive pages are accessible
only from the Child Pages tab in Full Edit mode of the parent page. The Child
Page table lists all child pages that are currently in workflow, even if there is no
current published version.
Page Statuses Draft
DraftNoApprovers
DraftHasApprovers
PendingApprovalLevel1
PendingAprovalLevel1EditClicked
PendingApprovalLevel2
PendingAprovalLeve2EditClicked
PendingApprovalLevel3
124 Appendix D – Page Versions Administration Guide
PendingAprovalLevel3EditClicked
PendingApprovalLevel4
PendingAprovalLevel4EditClicked
PendingApprovalLevel5
PendingAprovalLevel5EditClicked
PendingApprovalLevel6
PendingAprovalLevel6EditClicked
PendingApprovalLevel7
PendingAprovalLevel7EditClicked
PendingApprovalLevel8
PendingAprovalLevel8EditClicked
PendingApprovalLevel9
PendingAprovalLevel9EditClicked
PendingApprovalLevel10
PendingAprovalLevel10EditClicked
Rejected
PendingPublication
PendingPublicationtEditClicked
Published
PublishedReviewDue
PreviouslyPublished
Archived
Administration Guide Appendix E - Links 125
Appendix E - Links
Links
There are a number of ways to create links within the Active CM.
Content Links
Links within your page content are made using the Content Editor - Link tool.
Links created in the content editor window:
are displayed as a part of page content
cannot be displayed on the section menu
can be internal or external links
Child Page Links
Each Parent page will display a list of Child Page titles in the assigned location
(as set in the templates); can also be set to include page summary/teaser
information.
Section Menu Links
Section menus will display a list of Child Page titles reflecting the order from
the Child Page table. Child Pages appear in the section menu using the Page
Design Detail settings from the Site Design Manager.
Navigation Links
Some of the Active CM page types are used specifically to create a method of
navigation:
Link Page Type
Used to create a link to internal or external pages that can have a number of
different properties and characteristics. This link can be visible in both the
Child Page list and Section Menu.
It is good practice to not create child pages under a link page. The purpose of
the link page is simply to take the user to a different site or page within a site.
If you want to create a sub-menu type link on the Section Menu, use the
Category page type.
Links created using the Link page type:
Are often used to create a menu link to a page in a different section of
the website.
Can force one or more popups to be displayed and accepted or rejected
by the user prior to proceeding to the linked page (e.g. if you want a
126 Appendix E - Links Administration Guide
user to read a disclaimer or license agreement prior to reaching the
linked page). Only from a child page list.
Allow you the option of displaying a popup containing additional
descriptive information about the link. Only from a child page list.
Attachment Page Type
Used to create a link to Digital Assets that can have a number of different
properties and characteristics. This link can be visible in both the Child Page
List and Section Menu.
Links created using the Link page type:
Allow you the option of displaying a popup containing additional
descriptive information about the link. Only from a child page list.
Allow you to display size, type and icon associated with the Digital
Asset. Only from a child page list.
Category Page Type
Use to create a section menu place holder. This page type does no display
content, but provides a method for grouping child pages of similar content.
This link is not visible in the Child Page List.
Quick Links Page/Pagelet
The Quick Links page type is the most flexible link-building feature available
in the Active CM. It allows you to build a page of different kinds of links from
different sources. This is useful for creating lists of News items or What's New
links on your site.
Links created using the Quick Links page type:
Are displayed in the order you specify, in between the Introduction and
Conclusion text.
Cannot be displayed on the section menu.
Can include internal and external links.
Can be a combination of any number of child links from one page with
any number of child links from another page
Note The standard installation of the Active CM does not include the Quick Links
page functionality. If you would like more information about this page type, contact
your Active sales representative.
Administration Guide Appendix F - Personalization 127
Appendix F - Personalization
Personalization
Overview
Personalization is a tool for restricting pages to specific users or groups.
Personalization will only work in a dynamic environment. You may add a login
page within your static site for visitors to access personalized content, but the
personalized pages will remain within your dynamic URL.
Personalization only works within a dynamic environment due to its reliance on
database interaction. If Personalization is used in a static environment it will
forward site visitors to the dynamic site location.
Site Personalization Options
A site that is for the public viewing should have personalization set to ―None‖ –
this allows the ACM to skip user authentication checks and serve pages more
quickly. A site that requires personalization means that no page on the site is
accessible without first authenticating the user.
Page Personalization Options
Page personalization is set in the Personalization tab of Full Edit mode. A page
can be set to use its Parent page personalization settings, or the page can have
its own personalization settings by changing the group who will be able to view
the page.
User Group
A Personalization group must be created in the Group Manager in order for
users to access restricted areas of a site. Check the option Make available for
External Applications and PageTypes if you want the group to be available in
Custom Group questions.
Application Form
To allow site visitors to apply to view restricted areas of a site, an Application
form must be provided.
128 Appendix G – Page Types Administration Guide
Appendix G – Page Types
Page Types
The Active CM includes the following page types (some of these page types are
not standard page types and must be purchased). For detailed information on
page types see the individual Quick Reference guides.
Application Form Creates a form used to apply to become an authorized user of a site. The
Application Form page type automatically includes a number of fields that
collect user information.
Article Provides you with the ability to create content pages using standard field and
layout elements. Users are provided with fields to enter authors, dates, sources
and images with a by-line. Included is the flexibility to format articles in
different styles, customizing them to your needs using advanced layout options.
Article Index/Syndicated Article
To be included with the Article Pagetype License. The Article Index Page Type
comes packaged with the Article Page Type and can be used for both article
pages and syndicated article page. For the Article, it can act as a parent page
where a user can define how many of the latest article should be listed. The
page provides search functions and references the same categories used in edit
mode of the Article page. For Syndicated Article pages, this page becomes the
container in which the content is rendered.
Article Submission
The Article Submission Pagetype is included with the Article Pagetype License.
It allows for anyone visiting your website to submit editorial content for your
review and, if you approve, posting as an Article page. Articles of various
categories can be sent to various groups within your organization for approval
and publication. It allows your community of website visitors to add to your
site.
Attachment Creates a navigation link to a digital asset. This link can be displayed in your
section menu or child page list.
Blog/Blog Entry
A set of two page types provides the functionality for creating a blog (weblog)
and adding comments to it. The Blog is the root page for customizing the blog;
this is where the settings for customizing the layout, and comment
moderation/display are set. Each Blog Entry is then displayed on the Blog page
according to the entry settings.
Blog v2 The new blog page has many features of the web‘s leading blog engines. It
allows blog entries from many contributors, organizes blog posts by topic or
tags and allows a visitor to search by author, topic, tag or keyword. It also
Administration Guide Appendix G – Page Types 129
supports email and RSS subscription for each option so a user can be notified of
any new blog posts by author, topic or tag. Flexible layout and design allows
you to customize the look of your blog to match the rest of your site.
Calendar/Calendar Event Creates a calendar and the event pages to be displayed within the calendar. The
calendar can be displayed in a graphical or text-only format. Page features
include allowing visitors to add, edit and delete events. To be displayed on the
calendar, child pages must be created with the Event page type.
Category Creates a navigational ―place holder‖ in a section menu. The Category page
title appears in the menu, but has no content. The pages the user can visit are
the child pages of the Category page.
Comments Pagelet The Comment pagelet allows viewers of your page to comment on the contents
of the page. The same pagelet can be used on multiple ACM pages to allow a
page viewer to comment on the page‘s content. All the comments collected by
the pagelet from all pages on which the pagelet resides can be managed from
edit mode of the pagelet. However, only the comments submitted for a
particular page will be displayed in the comments pagelet on that page.
Comments can be recommended by other viewers and can be sorted by the
number of recommendations they have received.
Course/Course Search The Course and Course Search page types provide the functionality for an
organization to maintain a course or program listing.
Digital Asset Gallery Creates a list of non-graphic digital assets. By indicating which folder(s) in the
Digital Assets Library will be used, only assets in the designated folder(s) are
listed.
Dynamic Layout Dynamic Layout page type provides an easy way to layout page headlines and
content without needing extensive HTML knowledge. Content providers can
easily add, re-order and delete pages from a dynamic layout. The page includes
the flexibility to format layouts in different styles, customizing them to your
needs using advanced layout options.
eCard An eCard is similar to a postcard or a greeting card with the primary difference
being it is created using digital media instead of paper. The eCard page type
will allow a website visitor (the eCard sender) to choose from an online catalog
of ―cards‖. After selecting a card, the sender can personalize it by adding a
message. Finally, the sender specifies the number of recipients and their email
address and the website delivers the eCard within an email message on behalf
of the sender to the recipient.
Content providers have the ability to select and order the images to appear for
selection on the eCard and customize the text that will prompt the user
throughout the card creation process.
Email Updates Provides site visitors with the opportunity to self subscribe and unsubscribe to
emails when the page(s) they‘ve subscribed to are updated. Subscribers receive
130 Appendix G – Page Types Administration Guide
an email with a list of page links for updated and new pages with the date and
time of the update.
Enhanced Photo Gallery
The Enhanced Photo Gallery page type is meant to take the best features from
each of the existing Photo Gallery and Flash Photo Gallery page types and
combine them with a whole new set of added functions to make the page more
flexible and the output more configurable. The details are as follows:
a. Select specific images or DA folders – You can select the specific
images you wish to appear in your photo gallery or select from your Digital
Asset folders to display all images within the folder.
b. Customized Navigation Controls – You can use the default text for
navigating through the images in a slide show or you can upload and use
your own navigation images from the Digital Asset Manager
c. Alternate Gallery Styles – You can choose between displaying a grid of
thumbnails to display as your gallery layout or choose to render the page as
a slideshow with the thumbnails along the bottom.
d. Three Dimensional Image Search – Your images are now easy to find
with the ability to arrange them in albums (DA folders), tag them
appropriately and search using a keyword search.
e. Custom Display Properties – You have the ability to define the image
size, what text should appear with the image, disable right-click
functionality to protect your images, and allow for image sorting by tag and
album.
FAQ Allows users the ability to add FAQ question and answer pairs to the system.
This Page Type works as a container for all page types and provides various
design options to display its child pages. Question and answer pairs may be
dynamically anchor linked so that a user can link to a specific question or
answer without having to scroll.
Flash Photo Gallery
The Flash Photo Gallery page type allows you to display images in an album or
slide-show format. When you create the gallery, you indicate which Digital
Assets Library folders contain the images to display on the page. When the
page is published, all image files in the selected folders are displayed as your
photo gallery or slide show.
This page type differs from the Photo Gallery page type in that you are provided
with more display options, including the ability to size the presentation area of
your gallery, select background colors, and size the thumbnails and choose how
many thumbnails are visible.
Flickr
The Flickr page type allows you to display your favorite photos from Flickr on
your ACM website. You can search for images on Flickr in edit mode of the
page using a group name, tags or the name of the person who uploaded the
photos. Set the images to dynamically update or manually choose which
pictures to display. You can display them statically or in a slide show with
various effects.
Administration Guide Appendix G – Page Types 131
Forum
The Forum Page type provides Forum/Message/Discussion Board functionality
for your ACM Website. Create any number of sub-forums and allow
anonymous or authenticated users to post their messages. Assign moderators
from any of your ACM users (public users included) to help you manage your
online community. Forum administrators have full edit rights for all postings.
Gallery Main/Item/Search Creates a set of page types to be used as a virtual art gallery of select digital
assets and enter details such as the artist, medium, size and location of the art
piece. The Gallery Item page is used to publish individual images of works of
art and the associated information about the art. The Gallery Search page
allows visitors to your site to search Gallery items based on the information you
enter on the item pages.
General Content/2/2Ex/3 This is the most commonly used page type for adding basic content pages with
text, links and images. Use General Content 2 or 3 pages when you need
multiple editors for your users.
Google Map Provides directions, interactive maps, and satellite/aerial imagery of the world
directly integrated into the ACM. By creating site points on a map, each with
customized icons, site visitors can zoom in and out of the map, change views,
and enter addresses to get directions to any of the site points.
Google Mini Interfaces with the Google mini appliance (purchased separately) to provide the
quality of the Google web search. Designed to help small and medium-sized
businesses make the most of their digital assets, the Mini is a hardware and
software search appliance that delivers the power and productivity of Google
search across your organization‘s documents and websites.
Google Site Map An easy way to submit site URLs to the Google Index and get detailed reports
about the visibility of pages on Google. With Google Site Maps a site
administrator can automatically keep Google informed of all site web pages,
and when changes are made to these pages to help improve coverage in the
Google crawl.
Home Home pages are automatically created as the first page of a new site. They
function exactly like the General Content page type.
HTML Consumer
Copy and paste HTML to be displayed or point to a web page and use your own
custom regular expression (regex) to determine what content should be
displayed.
Job Center The new Job Center functionality takes advantage of the syndicated page
framework in ACM; that is the job center main page allows for search and
display of syndicated job posting pages. The page works in conjunction with the
standard ACM survey form to collect job application data and resumes. If you
wish, you can manage job openings on your internal website then allow certain
job postings to be displayed on your public website at a future date. The added
132 Appendix G – Page Types Administration Guide
functionality makes it far easier for job seekers to browse, search and apply for
your open positions.
Knowledgebase The easy-to-use interface of the Knowledgebase allows you to quickly create
and publish knowledge articles complete with features such as associated
articles, knowledge experts, attached documents and related links. Knowledge
articles can be easily emailed to others making the KnowledgeBase an ideal
complement to your other call centre products or a great stand-alone product.
Knowledgebase Article Suggest This page allows users to suggest a KB article if they cannot find information
related to their search. The article submission is sent to the KB Administrator
when he or she can add accept or reject the submission, add additional
information, properly categorize the article and publish it when ready.
Knowledgebase Bulletin Pagelet The Bulletin pagelet allows you to provide a scrolling list or ticker of all KB
Bulletins on any page in your knowledgebase site. This will ensure that
bulletins are always visible regardless of whether users are on your main
Knowledgebase page. The pagelet also allows you to highlight new bulletins of
different priorities for a defined period of time.
Knowledgebase Search Pagelet The KB Search functionality can now be made available on any page in your
knowledgebase site with the KB Search pagelet. Results are rendered in the
main KB results page.
Link Creates a navigation link to an internal or external web page and have it appear
in the section menu or child page list. Options allow you to specify if the linked
item opens in new window, is displayed in the current window or is displayed
within a frame on the page.
Listing Service
The Listing Service page type allows the public to contribute to a listing on
your web site. It is perfect for creating a business listing on your government
site and allowing local business to add and update their data. It can also be
used as a sales listing site with listed items expired after a period of time.
Allow anonymous contributions or require the contributor to create an account,
all data can be moderated and edited by the page admin.
Login A Login page is automatically created with a new site. If you use
Personalization on a site, you can create additional login pages.
Media Center
The Media Center Page Type provides a central location for uploading,
searching, viewing, rating and commenting on video content on you website. It
is supported as both a pagelet and a pagetype. The details are as follows:
a. Video conversion and compression – ACM uses the ffmpeg video
conversion and compression service. This service can be set up to run on a
separate machine from your web server if you expect to have a high volume
of videos. You can upload any video format to the Media Center Page Type
and it will be converted to FLV format. The system administrator can
adjust the compression settings to find the perfect mix between file size
Administration Guide Appendix G – Page Types 133
and video quality. There is a whitepaper explaining the installation of this
service.
b. Custom video lists – The Media Center Page Type can be configured to
display a variety of video lists. Not only can the content provider create a
―featured‖ list, the page will also automatically generate a ―relevant‖ list to
show videos similar to the one playing, a ―most viewed‖ list to display the
most watched videos, a ―highest rated‖ list to show the most popular
videos, a ―most discussed‖ list to show what videos viewers are talking
about and finally, a ―viewer defined‖ list where a logged in user can select
a series of videos to watch in order.
c. Three dimensional video search – Your videos are easy to find with the
ability to arrange them by category (DA folders), tag them appropriately
and search using a keyword search.
d. Comments and Ratings – The Comments and Ratings pagelets can be
associated with your media center page so that your viewers can rate and
discuss your video content. These pagelets help drive two of the custom
videos lists described above.
e. Embed Code – Each published video includes embed code that can be
copied and reused throughout your website. This will allow you to embed
video related to editorial content on any page in your site.
f. Full Screen Mode – Should viewers wish to do so, they can watch your
videos in full screen mode with the click of their mouse.
Microsoft Map The MS Map Page Type is an alternative to the Google map. It allows for such
features as Map, Satellite and Hybrid views as well as providing Bird's Eye
views of specific sports complexes, monuments and important landmarks.
Multi-Poll Pagelet This pagelet allows you to configure polls for you web site, much like the
QuickPoll. The difference is that you now have the ability to allow multi-
selection on a poll (checkboxes and radio buttons), mixed mode responses
("other" radio option with a text box to input a value) and customize the color
of the response bars. The results can also be displayed within the pagelet zone
that the poll resides... without reloading the page!
Multi-Site Map Since multiple sites can be managed in one installation of the ACM, the Multi-
Site Map allows a site map to be generated using multiple sites from a single
installation. Users have the option to select which sites from the installation are
selected to be shown in the site map using formats ranging from page titles to
full location lines.
Mylinks
The MyLinks Pagelet allows you to provide your users with a personal set of
links on any page in the site. Links can be tracked by persistent cookie on the
user‘s machine or by username. As soon as a user logs in, their defined links
will appear. The pagelet also works with an ―Add to Mylinks‖ ironpoint tag
that can be used in your template package. This way, users can easily add any
page on your site to their MyLinks pagelet with the click of a link. External
Links can also be added by the user.
Photo Gallery Creates a display of graphic digital assets. By indicating which folder(s) in the
134 Appendix G – Page Types Administration Guide
Digital Assets Library will be used, only assets in the designated folder(s) are
displayed.
Podcast The Podcast Page Type allows you to create any number of podcast channels on
your website by simply pointing to a digital asset folder. You can enable RSS
subscription as well as iTunes subscription and the podcast will syndicate any
mp3 or wma file added to the digital asset folder. Each podcast can have its
own associated image and any number of episodes.
Proposal Builder This page can be used to combine multiple word documents and apply specific
formatting to output a unified word document. Attaching various word
documents from the Digital Asset Manager allows a user to pick and choose
which documents to combine to create a custom document.
Quick Links
The Quick Links page type is the most flexible link-building feature available
in the Active CM. It allows you to build a page of different kinds of links from
different sources. This is useful for creating lists of News items or What's New
links on your site.
Quick Poll This page type is frequently used as a pagelet which lets you place a poll
anywhere on a website, even the homepage. When visitors vote on the poll they
get immediate feedback on the current voting status. You can also restrict the
number of times people are able to vote.
Randomizer
Use to create a pagelet that displays random content from a set of pagelets as
defined under a parent category pagelet. The content from other pagelets will
display within the randomizer pagelet area each time a page with a randomizer
pagelet assigned to it is visited or refreshed.
Rating Pagelet The Rating pagelet allows viewers of your page to rate the contents on the page
by clicking on the rating icons. An average overall rating score can be
displayed both graphically and numerically. You can customize the wording
and the icons to make the pagelet suit your own purposes. Rating results for all
pages can be managed centrally under edit mode of the rating pagelet. The
single pagelet can be reused across multiple pages with only the result specific
to each page being displayed. Results of the ratings on different pages can also
be rendered on a Rating Report Page.
Rating Report The Rating Report Page Type allows your users to view the ratings of all pages
in a central location. These ratings are organized by the pagelet through which
the rating was assigned. For instance, if a rating pagelet called ―Book Review‖
was assigned to multiple book pages, all of the ratings for each of the book
pages would be group under ―Book Review‖ on the rating report page type. The
ratings for all pages using a particular rating pagelet can be linked to directly
from the rating pagelet itself, however visiting the rating report page by
browsing to it will allow you to view results for a number of ratings pagelets.
Administration Guide Appendix G – Page Types 135
Regional Search
The Regional Search page searches specifically on the Region meta data field.
This allows you to tag your pages as being region specific. Use this
functionality to allow site visitors to search for a location near them.
Request for Proposal/Request for Proposal Search A set of two page types provide the functionality for posting and searching
Requests for Proposal. After logging in to the RFP area, a simple or advanced
search will return results from only the RFP pages. RFP pages include
summary and contact information; and links to complete RFP details and
addenda in document formats.
RSS Feed The RSS Feed page type allows you syndicate a group of child links in the form
of am RSS XML file. When you create the RSS Feed, you indicate which
internal link (page) or group of child links will be part of the RSS Feed. When
the page is published, a subscription link is automatically added to the page.
RSS Feed Reader Provides you with the ability to display updated links from internal or external
RSS feeds. A reading pane for the syndicated feed is not provided; the links
open the feed at its originating location.
Search Creates a site or section specific search on a website. The search results can be
returned for one site only or for all of the sites managed by the ACM.
Site Map Creates a site map for a complete website or smaller or sections. You can define
the display format of the links as well as how many page levels will be
available.
Survey (form) Creates simple forms such as surveys and order forms that are filled out and
submitted online. User account application forms should be created using the
Application page type.
Syndicated Calendar/Event The new ACM Calendar Pagetype is built on the Syndicated Page Framework.
This means that the Calendar itself sits in the hierarchy of your site (typical of
most ACM pagetypes) but the calendar events reside in the Syndication
Manager as syndicated pages. The features and advantages of the new calendar
are described below:
a. Calendar Performance and Scalability – Due the use of the Syndicated
Page Framework, the new calendar is highly scalable and not prone to the
performance issues of the previous Calendar. This is because events do not
reside as childpages of the Calendar but rather reside in the Syndication
Manager, to be dynamically loaded and displayed when an event is
selected. Any number of events can now be added to a calendar without
impacting performance.
b. Event sharing across multiple Calendars – Calendar Events are
individually tagged or assigned categories. An event will automatically
inherit the categories of the Calendar from which the event is created.
Calendars can be modified to display events with other categories, in effect
sharing events across multiple calendars. This will allow you to create
136 Appendix G – Page Types Administration Guide
departmental calendars but roll all events up into a single Master Calendar.
Not to worry though, certain categories can be made private so they only
appear on certain calendars.
c. List and Table Formats – Similar to the previous Calendar, the new
Calendar provides options for displaying events in a listing format (non-
graphical) or in a table format (graphical). Month, Week and Day views
are available for both formats. Additionally, an Event Listing view has
been added for the list format where the content provider can determine if
and when events should be removed from the listing display.
d. Highlighting Events and Dates – In an effort to provide you with a
means of customizing the look and feel of your calendar, highlighting has
been added to the new Calendar. You may choose the background color of
a selected date, the current date and any cells that have no date in the
tabular display. Additionally, you can highlight individual events or an
entire category of events with any background color of your choice.
e. Featured Event Display – The new Calendar supports Featured Events.
An event can be featured for a defined period, during which time the event
can be displayed at the top of the Calendar page. If you have multiple
featured events, you can have them cycle at a defined interval or change
with each reload of the page.
f. Event Locations and Mapping – If events are held at a specific
location, a user can enter the address for that location. Upon publishing the
event, viewers of the event will be provided with a link to view the address
using Google Maps. The map point is automatically generated based on the
event location‘s address.
g. Public Event Creation – As with the old calendar the new Calendar
supports the submission of events by public users. The events go through
the proper approval process before being added to the Calendar.
h. Calendar Search – The new calendar includes both a simple keyword
search as well as an advanced search screen where a user can search by
keyword, event category and date range.
i. Alternative Event Sources – in an effort to make the Calendar page more
flexible, support has been added for additional event sources. You can
display events from your current site, other sites in your instance, events
created on other ACM instances and you can connect to Active‘s Asset
Service to display local events in your area.
j. List all Featured Events – an option has been added to list all featured
events rather than only showing new featured events on each page reload
or using the slideshow feature. This option allows you to turn your
Calendar page into a featured event listing.
k. Hide Calendar Controls – This option allows you to suppress all
calendar controls in view mode of the page. In this manner, you can simply
display a static calendar view with no search or navigation options.
l. Hide Date/Time/Location details on Event Details screen – Should
you choose to only show the description of an event on the calendar, you
can now suppress the date, time and location information on an event page.
m. Document upload support during event submission – If you allow
event submission by public users, they may wish to upload an attachment
with their event submission. Support for this has been added by allowing

Administration Guide Appendix G – Page Types 137
files of familiar format (txt, doc, xls, pdf) to be submitted along with the
event. Approval of the event will save the asset in the Digital Asset
Manager.
Tab Display The Tab Display page type lets you create a pagelet that displays the content of
multiple pagelets in a tabbed format. You have the ability to configure which
pagelets are displayed, the order they appear and use an optional setting to have
the tabs rotate through the content at a period you determine. If tab cycling is
not enabled, visitors to the page will tab through the content manually.
Twitter Feed
The Twitter feed page allows you to connect to any number of twitterers and
have their tweets display on your website. You can configure how many tweets
should appear. This is a great way to bring social media content onto your
website.
User Action Tracking Pagelet The user action tracking pagelet works in two ways. For users with edit
permissions, it will provide information on pages in workflow that require
action by the user. Additionally, for user both internal and public users, the
pagelet will display any forum posts, comments, blog entries or article
submissions made by the user so the user can quickly jump to pages they may
be interested in.
User Profile
The user profile page is a view mode version of My Page that can be used for
standard ACM Users and Public Users alike. This page will be the basis for the
Active Citizen Portal, providing a user centric view of the website. To support
user-centric content on the user profile page, the General Content, RSS Feed
Reader and Twitter Feed pagelets have all been revised to allow users to their
content from view mode. Data for the pagelets are stored with the user profile
so that a single pagelet can render different information depending on the user
view it.
XML Transformer The XML Transformer page type allows you to receive or create content in the
form of XML mark-up and display it on your ACM site. You are provided with
the ability to enter XML content, reference an XML file, or connect to a
webpage as the XML source. The layout of the XML can be controlled through
the use of XSLT (Extensible Stylesheet Language Transformations) and CSS
(Cascading Style Sheets) by providing the XSLT, referencing an XSLT file, or
connecting to a webpage that provides the XSLT.
138 Appendix H – Meta Data Administration Guide
Appendix H – Meta Data
Meta Tag Overview
Meta tags are used to attach meaning to page content. The tags are inserted into
the HTML code of a page and help identify the page content. When search
engines search the page, the meta tags are read to identify the content and
return it in search results if it is relevant to a search query.
Metadata Tag Types
There are pre-defined meta tag types available in the Active CM.
Description - used for a summary description of the content.
Keywords - used to hold multiple keywords describing the content.
Author - holds the name of the content author.
ROBOT – contains directives for indexing robots. For more information see
http://www.w3.org/TR/REC-html40/appendix/notes.html
Custom - allows you to create your own custom meta tags for your site.
For more information on metadata...
For an introduction to metadata see:
http://www.library.uq.edu.au/iad/ctmeta4.html
For advanced information refer to the National Information Standards
Organization, or the World Wide Web Consortium.
http://www.niso.org/standards/resources/UnderstandingMetadata.pdf
http://www.w3.org/Metadata/
For Dublin Core Metadata Initiative (DCMI) Standards.
http://dublincore.org/
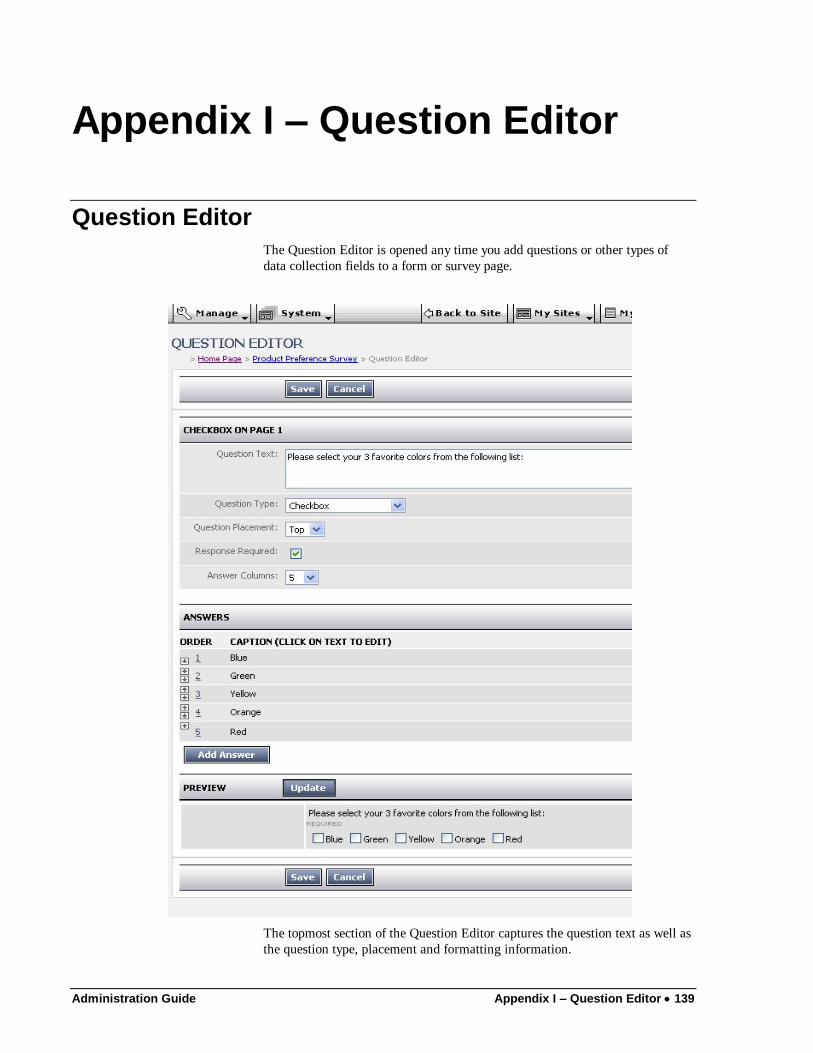
Administration Guide Appendix I – Question Editor 139
Appendix I – Question Editor
Question Editor
The Question Editor is opened any time you add questions or other types of
data collection fields to a form or survey page.
The topmost section of the Question Editor captures the question text as well as
the question type, placement and formatting information.
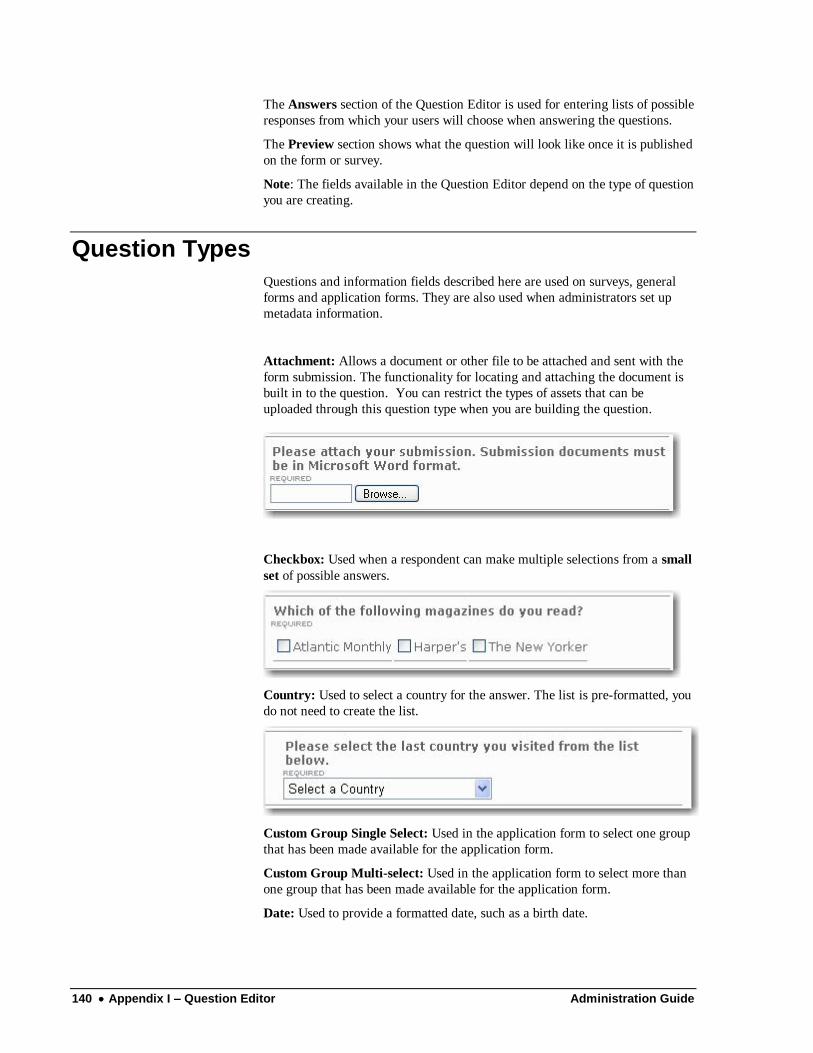
140 Appendix I – Question Editor Administration Guide
The Answers section of the Question Editor is used for entering lists of possible
responses from which your users will choose when answering the questions.
The Preview section shows what the question will look like once it is published
on the form or survey.
Note: The fields available in the Question Editor depend on the type of question
you are creating.
Question Types
Questions and information fields described here are used on surveys, general
forms and application forms. They are also used when administrators set up
metadata information.
Attachment: Allows a document or other file to be attached and sent with the
form submission. The functionality for locating and attaching the document is
built in to the question. You can restrict the types of assets that can be
uploaded through this question type when you are building the question.
Checkbox: Used when a respondent can make multiple selections from a small
set of possible answers.
Country: Used to select a country for the answer. The list is pre-formatted, you
do not need to create the list.
Custom Group Single Select: Used in the application form to select one group
that has been made available for the application form.
Custom Group Multi-select: Used in the application form to select more than
one group that has been made available for the application form.
Date: Used to provide a formatted date, such as a birth date.
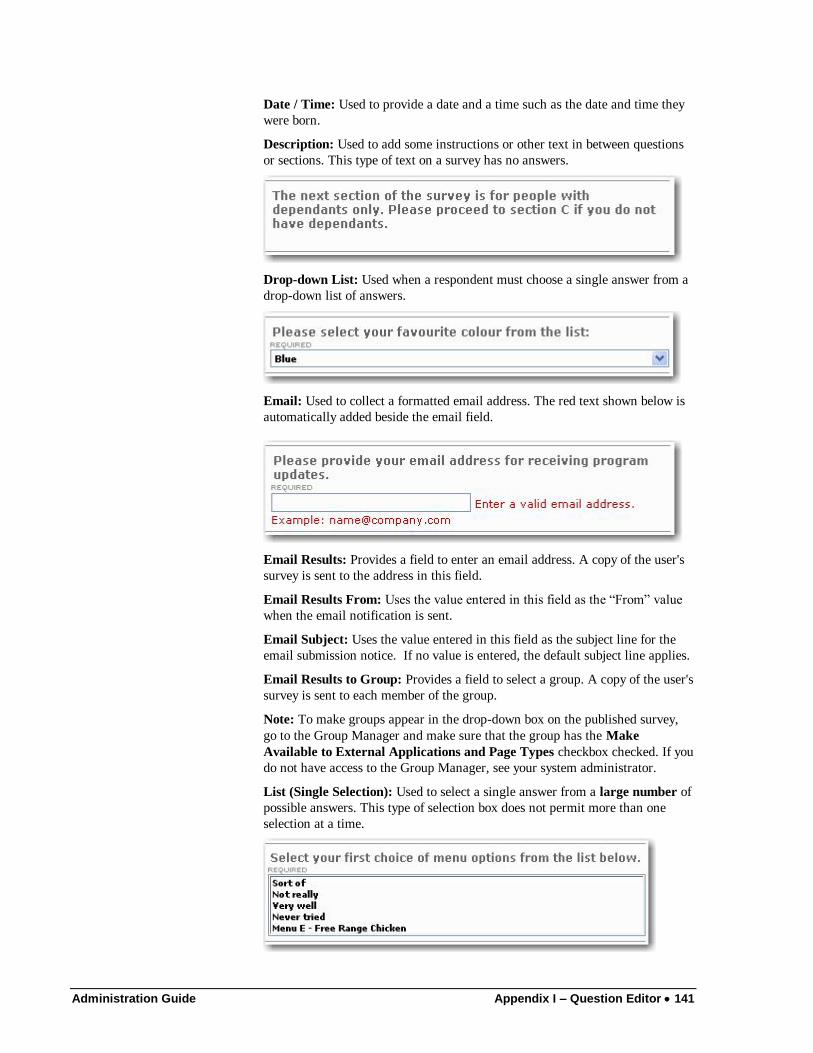
Administration Guide Appendix I – Question Editor 141
Date / Time: Used to provide a date and a time such as the date and time they
were born.
Description: Used to add some instructions or other text in between questions
or sections. This type of text on a survey has no answers.
Drop-down List: Used when a respondent must choose a single answer from a
drop-down list of answers.
Email: Used to collect a formatted email address. The red text shown below is
automatically added beside the email field.
Email Results: Provides a field to enter an email address. A copy of the user's
survey is sent to the address in this field.
Email Results From: Uses the value entered in this field as the ―From‖ value
when the email notification is sent.
Email Subject: Uses the value entered in this field as the subject line for the
email submission notice. If no value is entered, the default subject line applies.
Email Results to Group: Provides a field to select a group. A copy of the user's
survey is sent to each member of the group.
Note: To make groups appear in the drop-down box on the published survey,
go to the Group Manager and make sure that the group has the Make
Available to External Applications and Page Types checkbox checked. If you
do not have access to the Group Manager, see your system administrator.
List (Single Selection): Used to select a single answer from a large number of
possible answers. This type of selection box does not permit more than one
selection at a time.
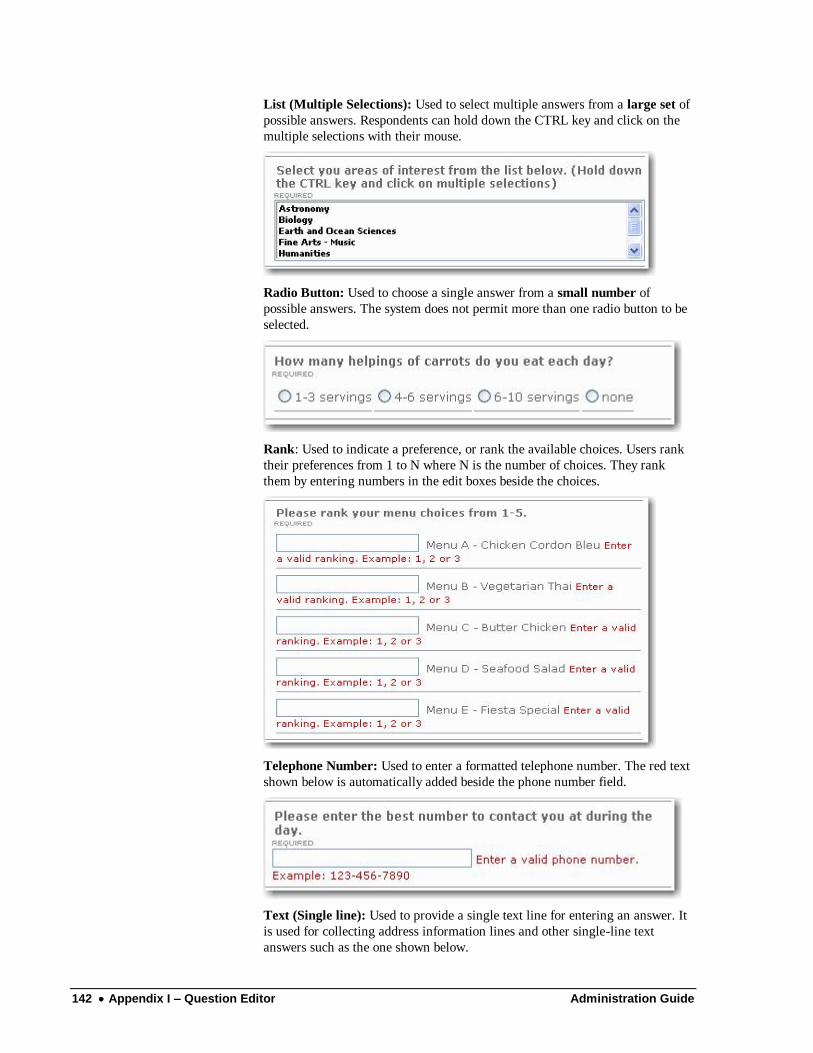
142 Appendix I – Question Editor Administration Guide
List (Multiple Selections): Used to select multiple answers from a large set of
possible answers. Respondents can hold down the CTRL key and click on the
multiple selections with their mouse.
Radio Button: Used to choose a single answer from a small number of
possible answers. The system does not permit more than one radio button to be
selected.
Rank: Used to indicate a preference, or rank the available choices. Users rank
their preferences from 1 to N where N is the number of choices. They rank
them by entering numbers in the edit boxes beside the choices.
Telephone Number: Used to enter a formatted telephone number. The red text
shown below is automatically added beside the phone number field.
Text (Single line): Used to provide a single text line for entering an answer. It
is used for collecting address information lines and other single-line text
answers such as the one shown below.
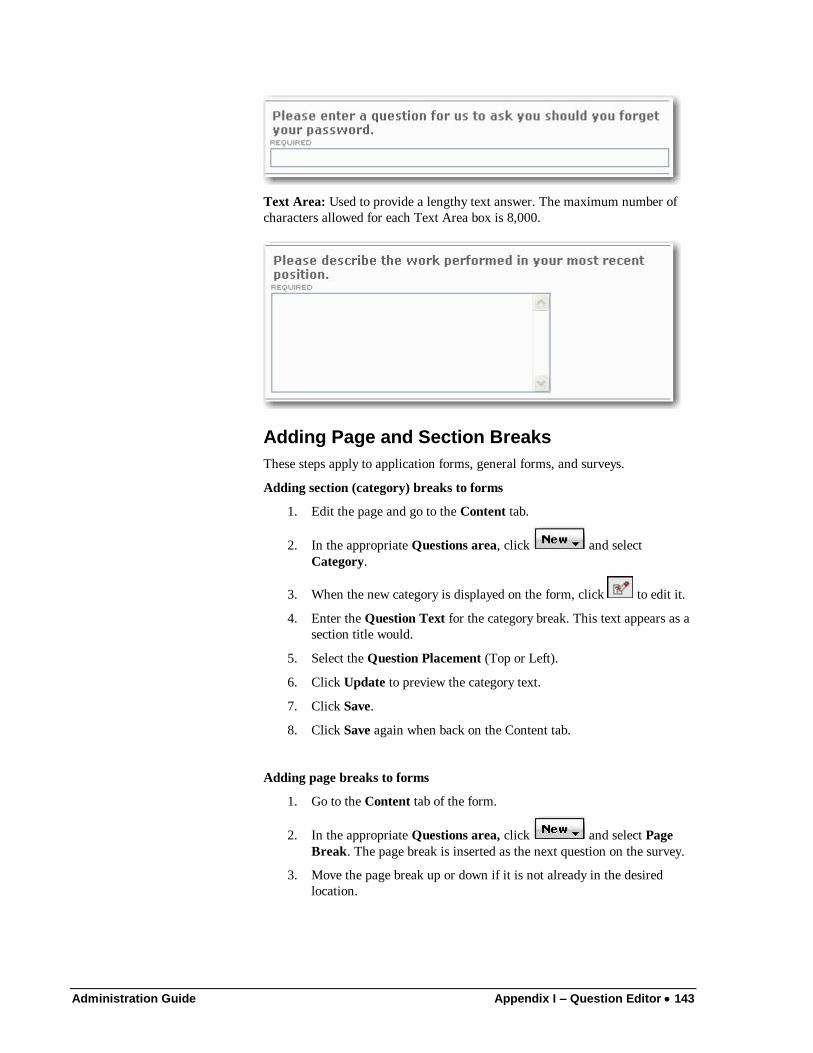
Administration Guide Appendix I – Question Editor 143
Text Area: Used to provide a lengthy text answer. The maximum number of
characters allowed for each Text Area box is 8,000.
Adding Page and Section Breaks
These steps apply to application forms, general forms, and surveys.
Adding section (category) breaks to forms
1. Edit the page and go to the Content tab.
2. In the appropriate Questions area, click and select
Category.
3. When the new category is displayed on the form, click to edit it.
4. Enter the Question Text for the category break. This text appears as a
section title would.
5. Select the Question Placement (Top or Left).
6. Click Update to preview the category text.
7. Click Save.
8. Click Save again when back on the Content tab.
Adding page breaks to forms
1. Go to the Content tab of the form.
2. In the appropriate Questions area, click and select Page
Break. The page break is inserted as the next question on the survey.
3. Move the page break up or down if it is not already in the desired
location.
144 Appendix I – Question Editor Administration Guide
Adding Questions
1. On the Content tab of the form/survey, make sure you are in the Site
Profile or Survey Questions section.
2. Click and select the desired question type.
3. Type in the Question Text.
4. Select the Question Placement (Left or Top).
5. Note: Selecting Left places the text of the question on the left and the
answer options on the right. Selecting Top places the question text on
one line and the answer options on the line below the question.
6. If a response is required, check Response Required.
7. Complete the remaining fields.
8. Click Update to preview the question.
9. Click Save.
Copying Questions
Use these procedures to copy questions within a single form or survey, or to
copy a question from one form to another. When you copy a question, the
answer set for the question is also copied.
Copying questions within the same survey or form
1. Edit the form or survey.
2. Locate the question you want to copy and click the button beside
it.
3. Position the cursor on the question below where you want to paste the
question.
4. Click to paste the question into the new location.
5. Edit the copied question and answers, and click Save.
Copying questions from one survey or form to another
1. Edit the form or survey.
2. Locate the question you want to copy and click button beside it.
3. Edit the survey you want to copy the question to. Be sure to edit the
survey in Full Edit mode.
4. Position the cursor on the question below where you want to paste the
question.
5. Click to paste the question into the new location.
6. Edit the copied question and answers, and click Save.
Administration Guide Appendix I – Question Editor 145
Deleting and Deactivating Questions
Use these procedures to delete permanently or temporarily deactivate questions
on surveys and forms. Be aware that deleting a question permanently removes
it and all historical data for that question from the database. This also holds
true if you have an answer set, such as checkboxes or radio buttons. If you
delete one of the answer options, it and the historical data for the option will
also be permanently deleted from the database.
Deleting Questions
1. In the Survey or Site Profile Questions section, locate the question to
delete.
2. Click to delete the question.
3. Click OK to confirm the deletion.
4. Click Save and submit for publication.
Inactivating Questions
When you deactivate a question or field, this prevents it from being displayed
on the published survey but it will still be visible on the survey in edit mode.
The question can be reactivated later should you wish to use it again.
1. In the Survey or Site Profile Questions section, locate the question to
deactivate.
2. Uncheck the Active checkbox beside the question. This will prevent
the question from being displayed on the published survey.
3. Click Save and submit for publication.
You can reactivate a question by editing the survey, locating the inactive
question and checking the Active checkbox again.
Reordering Questions
Use this procedure to change the order of the questions on your surveys and
forms.
1. Edit the form or survey.
2. Go to the section containing the questions you want to reorder.
3. In the Order column to the left of the question, click on the Up and
Down arrows to move the question up or down in the order. You can
also click on the Number and type in a new number that represents
where in the order you want that question to fall.
4. Click Save and submit for publication.
146 Appendix J – Multi-Language Administration Guide
Appendix J – Multi-Language
Enabling Multi-Language
Before the multi-language features can be accessed through the application, two
system changes need to be applied.
On the IronPoint.config tab located in the Admin Center > Configuration Files,
check the box in the Feature Extensions section to enable Multi-Language.
In addition to the IronPoint.config change, the multi-language license file must
be available in the ―bin‖ directory of the application. The filename for the
multi-language license is
IronPoint.CM.Framework.TranslationManagement.TranslationService.lic
Without this file, multi-language will not operate. If the feature extension is
enabled on the IronPoint.config tab, but the license is not available, an error
message will be logged inside the system but no multi-language functionality
will be available for use.
Multi-language Sites Overview
The Active CM allows you two connect one or more sites together in a Multi-
language grouping known as a Translation Set. Once the sites are linked
together, the publication of information on one site triggers events and
translation requirements on the other sites. In this way you can manage your
multi-language content across multiple sites, ensuring that all sites stay current
and are translated when content changes.
For information on working with Multi-language at the page level, see the
Content Publishing Guide.
Overview of the Process
The points below offer a brief outline of the steps involved in implementing
multi-language functionality with your ACM installation:
Install the correct licensing for multi-language support.
Group sites together, forming what is called a translation set (for
example your English, French and Spanish sites could be linked
together)
Determine which sites require translation; generally there will be a
primary site - perhaps your English web site, and a secondary site -
perhaps a French or Spanish site. The primary site would normally be
set to require translation while the secondary site would not.
Associate pages from your primary site with pages from your
secondary site - for example: you would associate the home page on
Administration Guide Appendix J – Multi-Language 147
your English web site with the Home page on your secondary site. This
association helps maintain the currency of all sites within the
translation set.
Edit pages and process translation pages through the additional
workflow steps required for translated sites.
User Interface Changes for Translation Sites
There are a number of components of the user interface that differ when multi-
language functionality is being used.
Site Manager
The Site Manager now includes a Translation Set tab. Use this tab to group
sites together into translation sets. A translation set will generally consist of
your primary language web site and one or more secondary language web sites.
For example, a translation set may consist of a primary English language site
and a secondary French language site that mirrors the same structure as the
primary site.
Page Configuration
When multi-language is implemented on a site, the Page Editor displays an
additional tab - the Translation tab. The settings on this tab control how the
page gets translated from another page, or to another page, depending on
whether the page is on your primary language or secondary language site.
Template Configuration
The page templates in the Design Package must be updated to include special
tags that facilitate the use of multi-language functionality.
Workflow Changes
Workflows now contain additional steps and workflow emails. For example:
when a page is set to require translation on the secondary site before it can be
published, publishing the page will display a Pending Translation message,
indicating that it cannot be published until the translation has been completed
and published.
There is also a Translation Required email that gets sent to the content
providers for the secondary site, indicating which pages require translation.
Child Pages
When child pages are created on the primary site, and the parent pages have
already been linked between the primary and secondary sites, a child page is
created automatically on the secondary site and is placed into Draft mode.
Page Type Localization Support
Multi-language buttons and labels are displayed in View mode only and for the
following page types only:
148 Appendix J – Multi-Language Administration Guide
Application Form
Calendar
Login
Photo Gallery
Search
Survey
Other page types were reviewed and did not require changes as they only
display content added by users.
Section Menu Site-toggle Button
In addition to page template changes in the Design Package, updates to the
section menu files must also be made. These updates place a toggle button in
the bottom area of the section menu. This buttons allows you to flip back and
forth from the current page to the translated version of that page on the
secondary site.
Friendly URLs
As of version 8.9, sites linked through Multi-Language can all be set to use
Friendly URLs with the same domain name. That means that you can use the
same domain for all of your multi-language sites. Please refer to the How to
Enable Friendly URLs for all Multi-Language Site whitepaper for steps on
setting this up.
Translation Workflow Steps
The process of creating and publishing your site content contains additional
steps when working in a multi-language environment. The table below provides
an example of the process of creating content on a primary language site and
translating it on a secondary language site.
Assumptions:
The primary site is set to require translation before its content can be
published
There is one primary language site and one secondary language site
The sites have been configured in a translation set and the Home pages
have been linked
Step Action taken on Primary site Action on Secondary site
1 Add textual content on
English home page and
Save.
No action occurs on the
secondary site.
Status: Draft
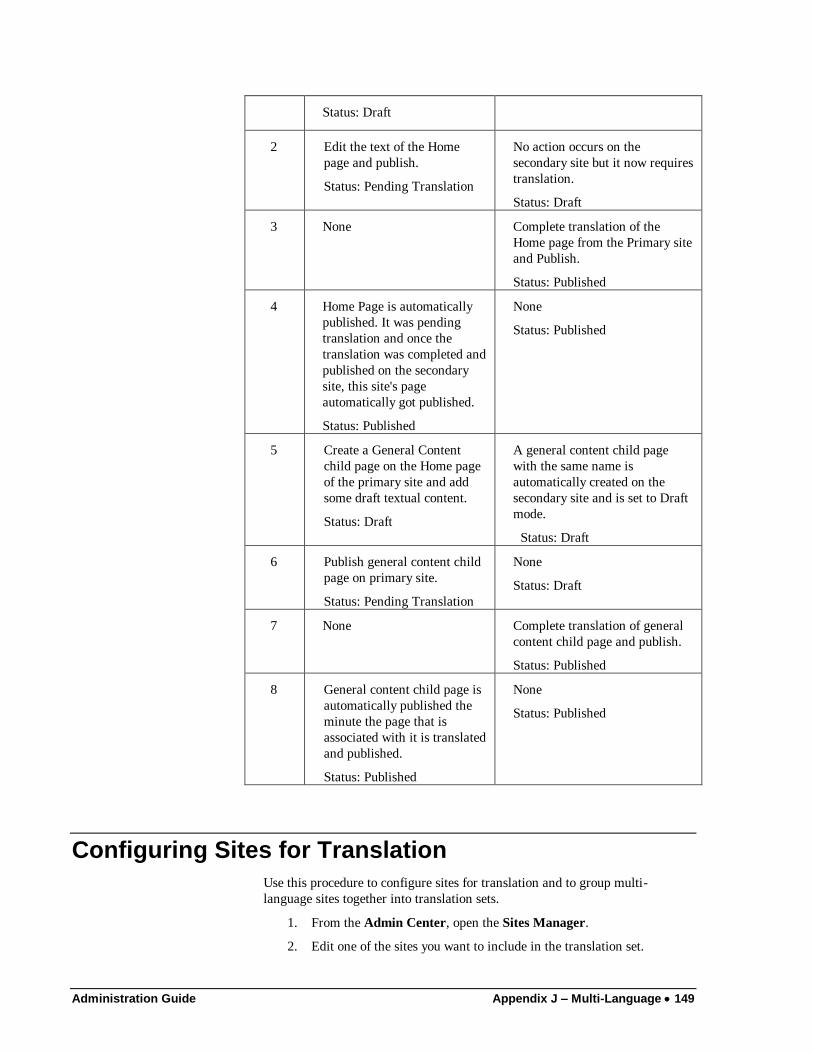
Administration Guide Appendix J – Multi-Language 149
Status: Draft
2 Edit the text of the Home
page and publish.
Status: Pending Translation
No action occurs on the
secondary site but it now requires
translation.
Status: Draft
3 None Complete translation of the
Home page from the Primary site
and Publish.
Status: Published
4 Home Page is automatically
published. It was pending
translation and once the
translation was completed and
published on the secondary
site, this site's page
automatically got published.
Status: Published
None
Status: Published
5 Create a General Content
child page on the Home page
of the primary site and add
some draft textual content.
Status: Draft
A general content child page
with the same name is
automatically created on the
secondary site and is set to Draft
mode.
Status: Draft
6 Publish general content child
page on primary site.
Status: Pending Translation
None
Status: Draft
7 None Complete translation of general
content child page and publish.
Status: Published
8 General content child page is
automatically published the
minute the page that is
associated with it is translated
and published.
Status: Published
None
Status: Published
Configuring Sites for Translation
Use this procedure to configure sites for translation and to group multi-
language sites together into translation sets.
1. From the Admin Center, open the Sites Manager.
2. Edit one of the sites you want to include in the translation set.
150 Appendix J – Multi-Language Administration Guide
3. Click on the Translation Set tab.
4. Be sure you have selected the appropriate Language for site.
5. Decide if you want to set this site to require translation. Generally you
would set your primary language site to require translation and set
your secondary language sites to not require translation. So if you have
English, French and Spanish sites and the English site is your primary
site, you would set the English site to require translation and leave this
unchecked for the French and Spanish sites.
When you set this to Requires Translation it means that no page on the
English site can be published until the same page on all other
language sites have been translated and published. However, even
when translation is set to required, emergency publishing will
temporarily bypass the need to translate before publishing.
If you choose to leave this checkbox blank, you can still set the
requirement for translation on individual pages or groups of pages. As
the site administrator you will see a special field on the Translation tab
in the Page Editor that allows you to force a page and all of its
children to be translated before the page can be published.
6. If you have already created all of the sites that will be included in your
translation set, you can group them together now by clicking on the
Change Translation Set button.
On the Add Sites to Translation Set dialog, select the sites you
want to group with this one and click OK.
On the Translation Set tab, review the sites you have added and
make sure the language settings for each site are correct.
7. If you have not already created the other sites to be grouped together in
the translation set, click Save and create the other sites. Then group
them into a translation set using the previous step.
Enabling the Multi-language Section Menu
Two components within the Design Package must contain special tags in order
to support multi-language functionality.
1. There is a new menu that can be added to page templates. This menu
displays bidirectional links between associated translation pages. For
example your English page and your French page would both contain
links to each other so that you can quickly view the page associated
with the page you are viewing.
To add the language menu to a page template, add an tag as follows:
<ironpoint>languagemenu</ironpoint>
2. In order to control the formatting and style of the new language menu,
copy your SectionMenuData.xml file to a new
LanguageMenuData.xml file. You can then optionally edit the
LanguageMenuData.xml file to alter how the menu items appear. The
LanguageMenuData.xml file permits the same functionality for the
Administration Guide Appendix J – Multi-Language 151
language menu as that permitted for the section menu. Refer to the
Design Guide for more information on working with xml files.
Important points to keep in mind:
If there are more than two sites in the translation set, you will get a
drop-down menu when you click on the link.
The links only appear if the linked pages have both been published.
If you emergency publish and break the link to the associated page, the
button will not be displayed.
Removing Sites from Translation Sets
Use this procedure to unhook a site from a translation set. The site will still be
in tact but the multi-language functionality will be removed. You can then use
the site or delete it.
1. Open the Sites Manager.
2. Edit one of the other sites in the translation set. Do not edit the site
you want to remove from the set. You can only remove a site from a
translation set by editing another site in the set.
3. Go to the Translation Set tab.
4. Click Change Translation Set.
5. In the popup list of sites, uncheck the site to remove from the
translation set.
6. Click OK.
7. Click Save.
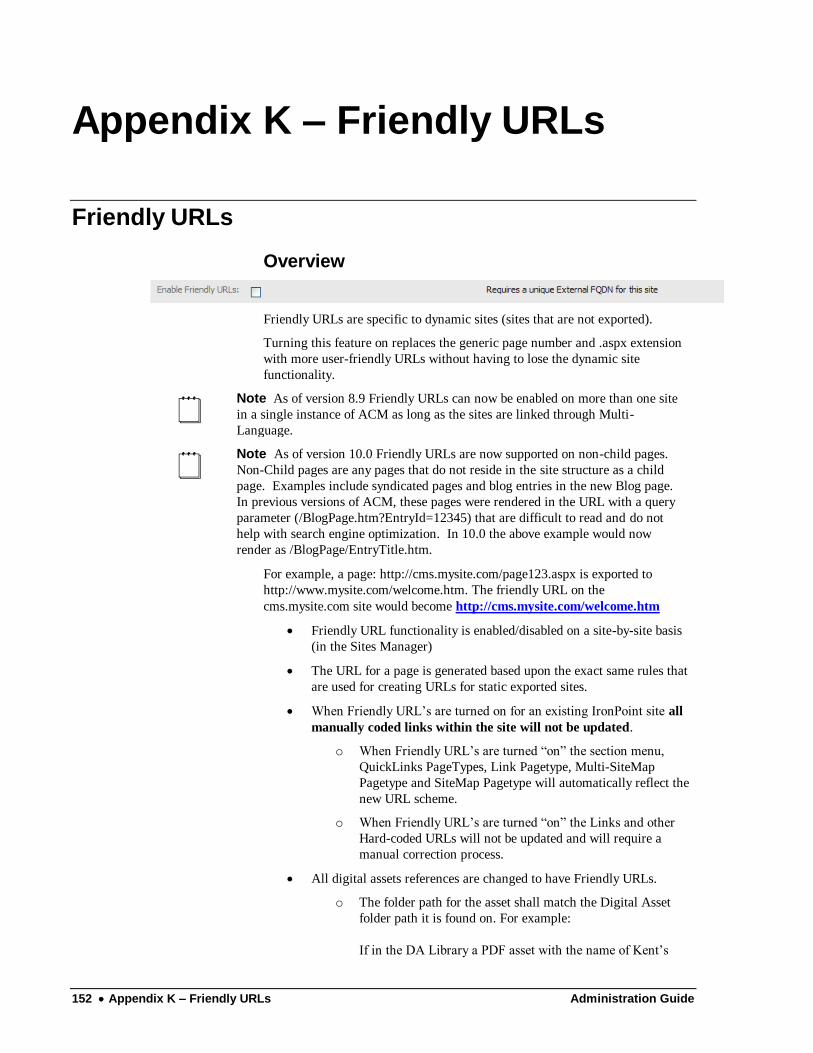
152 Appendix K – Friendly URLs Administration Guide
Appendix K – Friendly URLs
Friendly URLs
Overview
Friendly URLs are specific to dynamic sites (sites that are not exported).
Turning this feature on replaces the generic page number and .aspx extension
with more user-friendly URLs without having to lose the dynamic site
functionality.
Note As of version 8.9 Friendly URLs can now be enabled on more than one site
in a single instance of ACM as long as the sites are linked through Multi-
Language.
Note As of version 10.0 Friendly URLs are now supported on non-child pages.
Non-Child pages are any pages that do not reside in the site structure as a child
page. Examples include syndicated pages and blog entries in the new Blog page.
In previous versions of ACM, these pages were rendered in the URL with a query
parameter (/BlogPage.htm?EntryId=12345) that are difficult to read and do not
help with search engine optimization. In 10.0 the above example would now
render as /BlogPage/EntryTitle.htm.
For example, a page: http://cms.mysite.com/page123.aspx is exported to
http://www.mysite.com/welcome.htm. The friendly URL on the
cms.mysite.com site would become http://cms.mysite.com/welcome.htm
Friendly URL functionality is enabled/disabled on a site-by-site basis
(in the Sites Manager)
The URL for a page is generated based upon the exact same rules that
are used for creating URLs for static exported sites.
When Friendly URL‘s are turned on for an existing IronPoint site all
manually coded links within the site will not be updated.
o When Friendly URL‘s are turned ―on‖ the section menu,
QuickLinks PageTypes, Link Pagetype, Multi-SiteMap
Pagetype and SiteMap Pagetype will automatically reflect the
new URL scheme.
o When Friendly URL‘s are turned ―on‖ the Links and other
Hard-coded URLs will not be updated and will require a
manual correction process.
All digital assets references are changed to have Friendly URLs.
o The folder path for the asset shall match the Digital Asset
folder path it is found on. For example:
If in the DA Library a PDF asset with the name of Kent‘s
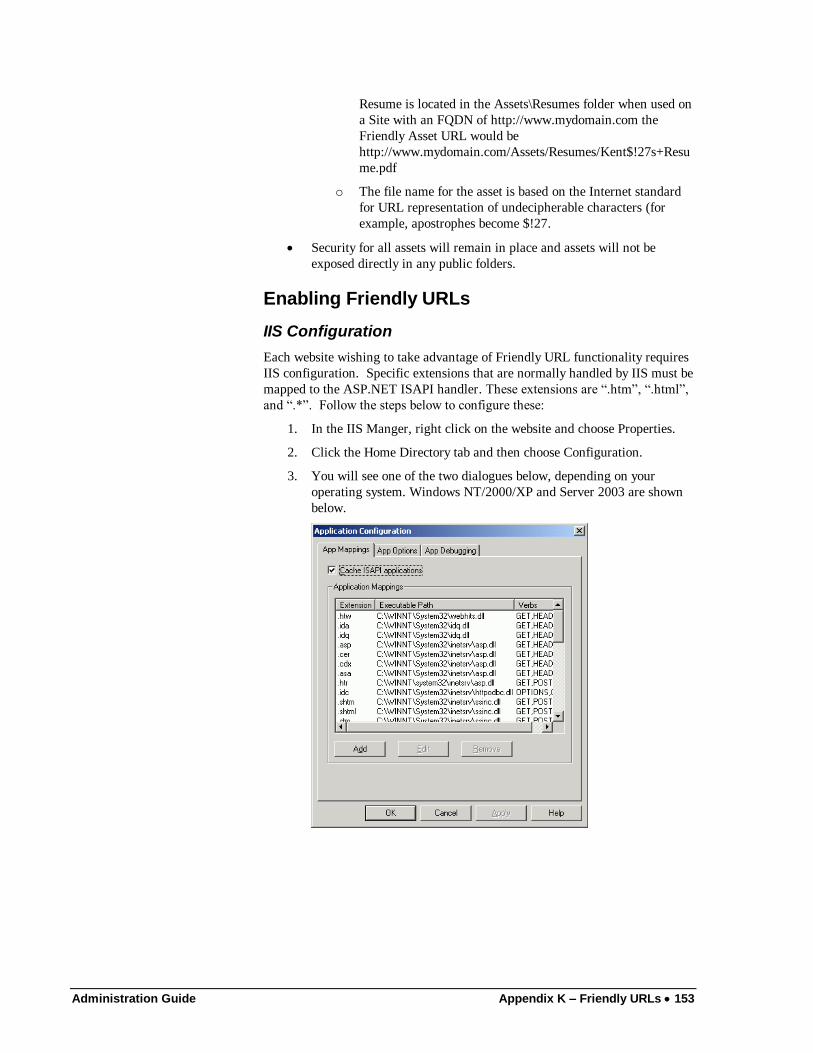
Administration Guide Appendix K – Friendly URLs 153
Resume is located in the Assets\Resumes folder when used on
a Site with an FQDN of http://www.mydomain.com the
Friendly Asset URL would be
http://www.mydomain.com/Assets/Resumes/Kent$!27s+Resu
me.pdf
o The file name for the asset is based on the Internet standard
for URL representation of undecipherable characters (for
example, apostrophes become $!27.
Security for all assets will remain in place and assets will not be
exposed directly in any public folders.
Enabling Friendly URLs
IIS Configuration
Each website wishing to take advantage of Friendly URL functionality requires
IIS configuration. Specific extensions that are normally handled by IIS must be
mapped to the ASP.NET ISAPI handler. These extensions are ―.htm‖, ―.html‖,
and ―.*‖. Follow the steps below to configure these:
1. In the IIS Manger, right click on the website and choose Properties.
2. Click the Home Directory tab and then choose Configuration.
3. You will see one of the two dialogues below, depending on your
operating system. Windows NT/2000/XP and Server 2003 are shown
below.
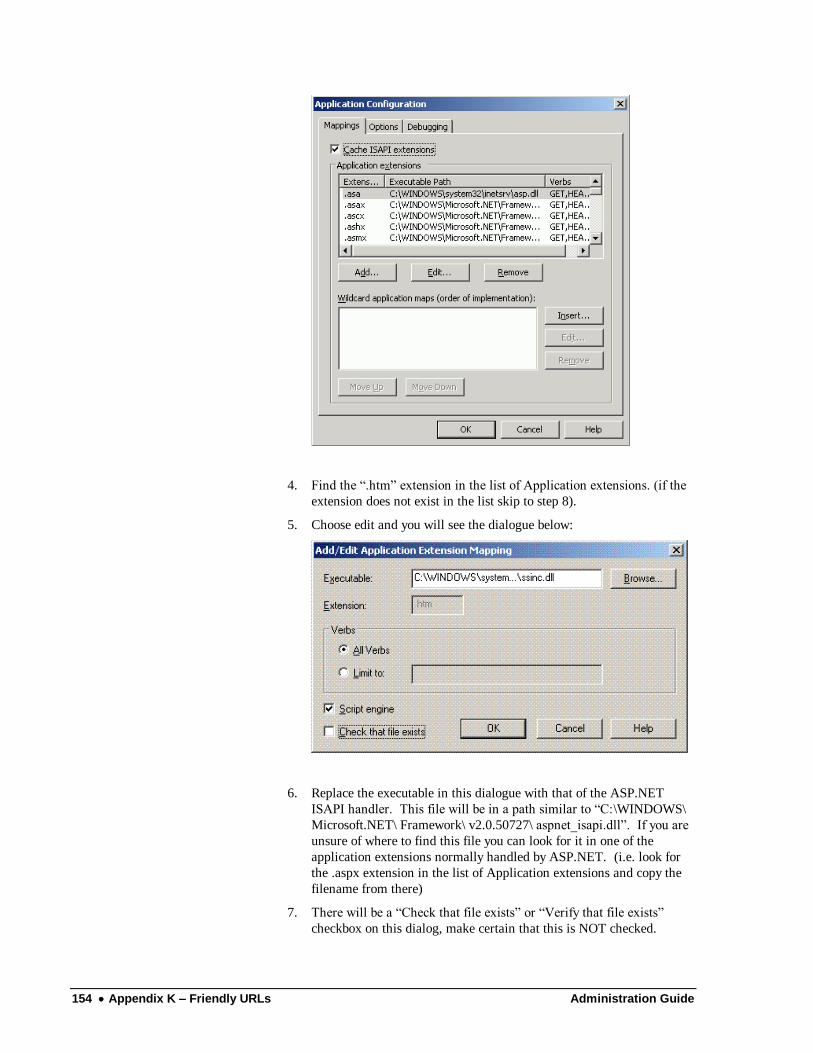
154 Appendix K – Friendly URLs Administration Guide
4. Find the ―.htm‖ extension in the list of Application extensions. (if the
extension does not exist in the list skip to step 8).
5. Choose edit and you will see the dialogue below:
6. Replace the executable in this dialogue with that of the ASP.NET
ISAPI handler. This file will be in a path similar to ―C:\WINDOWS\
Microsoft.NET\ Framework\ v2.0.50727\ aspnet_isapi.dll‖. If you are
unsure of where to find this file you can look for it in one of the
application extensions normally handled by ASP.NET. (i.e. look for
the .aspx extension in the list of Application extensions and copy the
filename from there)
7. There will be a ―Check that file exists‖ or ―Verify that file exists‖
checkbox on this dialog, make certain that this is NOT checked.
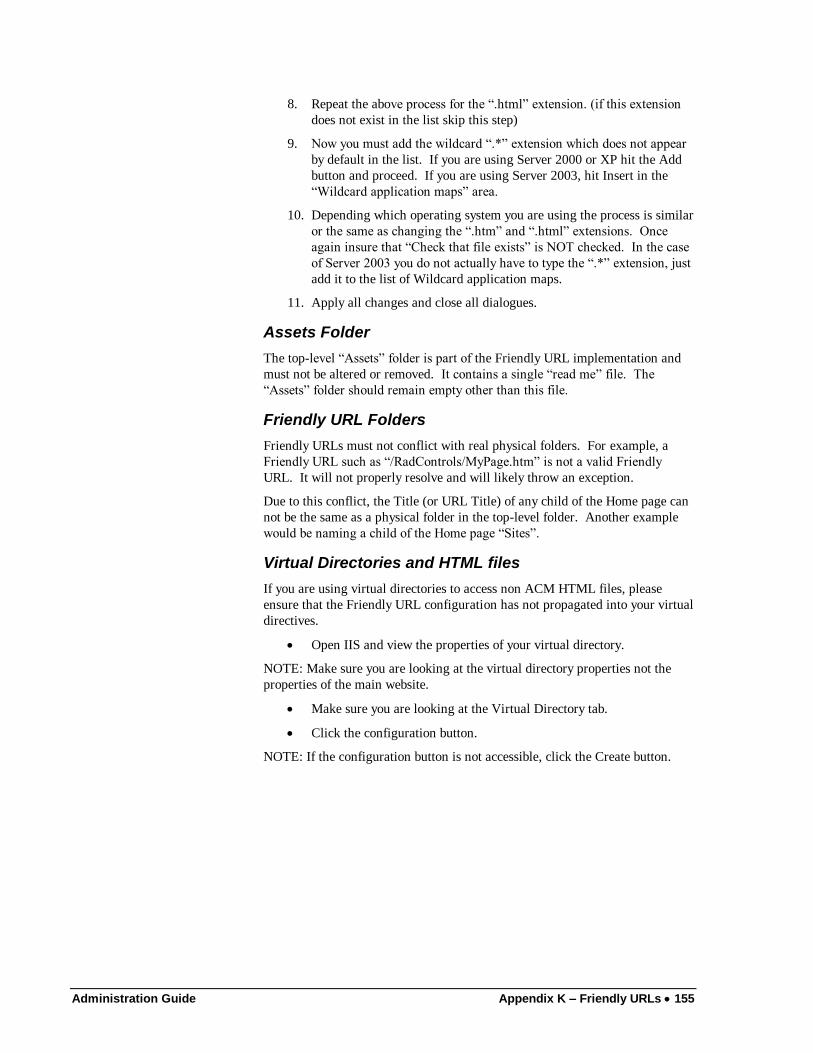
Administration Guide Appendix K – Friendly URLs 155
8. Repeat the above process for the ―.html‖ extension. (if this extension
does not exist in the list skip this step)
9. Now you must add the wildcard ―.*‖ extension which does not appear
by default in the list. If you are using Server 2000 or XP hit the Add
button and proceed. If you are using Server 2003, hit Insert in the
―Wildcard application maps‖ area.
10. Depending which operating system you are using the process is similar
or the same as changing the ―.htm‖ and ―.html‖ extensions. Once
again insure that ―Check that file exists‖ is NOT checked. In the case
of Server 2003 you do not actually have to type the ―.*‖ extension, just
add it to the list of Wildcard application maps.
11. Apply all changes and close all dialogues.
Assets Folder
The top-level ―Assets‖ folder is part of the Friendly URL implementation and
must not be altered or removed. It contains a single ―read me‖ file. The
―Assets‖ folder should remain empty other than this file.
Friendly URL Folders
Friendly URLs must not conflict with real physical folders. For example, a
Friendly URL such as ―/RadControls/MyPage.htm‖ is not a valid Friendly
URL. It will not properly resolve and will likely throw an exception.
Due to this conflict, the Title (or URL Title) of any child of the Home page can
not be the same as a physical folder in the top-level folder. Another example
would be naming a child of the Home page ―Sites‖.
Virtual Directories and HTML files
If you are using virtual directories to access non ACM HTML files, please
ensure that the Friendly URL configuration has not propagated into your virtual
directives.
Open IIS and view the properties of your virtual directory.
NOTE: Make sure you are looking at the virtual directory properties not the
properties of the main website.
Make sure you are looking at the Virtual Directory tab.
Click the configuration button.
NOTE: If the configuration button is not accessible, click the Create button.
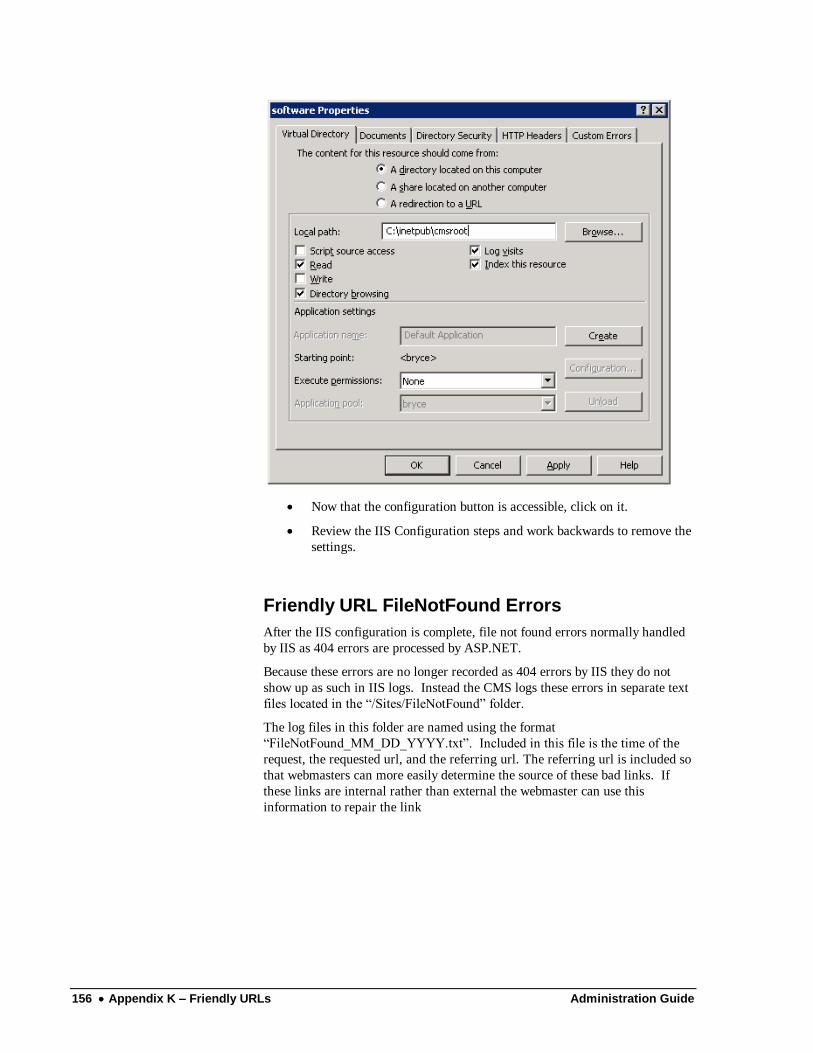
156 Appendix K – Friendly URLs Administration Guide
Now that the configuration button is accessible, click on it.
Review the IIS Configuration steps and work backwards to remove the
settings.
Friendly URL FileNotFound Errors
After the IIS configuration is complete, file not found errors normally handled
by IIS as 404 errors are processed by ASP.NET.
Because these errors are no longer recorded as 404 errors by IIS they do not
show up as such in IIS logs. Instead the CMS logs these errors in separate text
files located in the ―/Sites/FileNotFound‖ folder.
The log files in this folder are named using the format
―FileNotFound_MM_DD_YYYY.txt‖. Included in this file is the time of the
request, the requested url, and the referring url. The referring url is included so
that webmasters can more easily determine the source of these bad links. If
these links are internal rather than external the webmaster can use this
information to repair the link
Administration Guide Appendix L – SFTP and FTPS 157
Appendix L – SFTP and FTPS
SFTP and FTPS Support
Introduction
This information is intended to give an overview of the SFTP and the FTPS
and some details on its usage. From version 8.2 ACM supports FTPS (FTP over
SSL) and SFTP.
FTP traffic, including downloads and passwords, is usually passed as
unencrypted plain text across the Internet. This makes it theoretically
susceptible to capture by sniffers. One option to protect traffic is using SFTP or
FTPS.
All UI changes have been made in Sites Manager, Publication tab.
Protocol and Port
The ―FTP URL‖ field is kept in UI. It is recommended to use ftp:// prefix for all
protocols.
Three types of file transfer are available:
FTP
FTPS – FTP over SSL
SFTP – File Transfer over Secure Shell or SSH
Also new field ―Port‖ is available to set the port on the server to which to
connect to. FTP and FTPS are commonly run on Port 21. However SFTP uses
Port 22.
FTPS
FTPS (FTP over SSL) protocol can be used once secure file transfers are
required. The basic elements of configuring an FTPS connection are:
Protocol: The protocol may be chosen using FTP protocol drop-down.
Server Validation: It is the process of making sure that the server with which
the ACM is communicating is indeed the intended server. The Server
validation is an important issue in FTPS. By default an attempt will be made to
validation the server using the root certificates registered with the operating
system. Other validation methods may be selected by FTP Server Validation
Type drop-down. If the default validation method is used then it may be
necessary to set the FTP Server Common Name field. It should match the name
on the certificate that the server will present to the FTP client. If it does not,
then validation will fail. By default the Server Common Name is assumed to be
the same as the Server Address, which is often acceptable. Server validation
should always be used in a production environment, but disabling it is a good
way of getting started.
158 Appendix L – SFTP and FTPS Administration Guide
Client Authentication: It is the process by which ACM authenticates itself to
the server. For many FTP/FTPS/SFTP servers password authentication is
sufficient; it is configured through the FTP Username and FTP Password fields.
SFTP
SFTP protocol can be used once secure file transfers are required. The basic
elements of configuring an SFTP connection are:
Protocol: The protocol may be chosen using FTP protocol drop-down.
Server Validation: Ensuring the SSH server is validated is an important issue
in SFTP. By default an attempt will be made to validate the server using the
client's local store of server public keys. Typically, the server's public key is
stored in a file often called known_hosts which can contain a number of public
keys for different servers. When ACM connects to the server, the server's public
key is returned and compared with the available public keys stored in the client.
Client Authentication: Clients are authenticated by either username and
password, or private key and private key passphrase. In the first case, ACM
requires an account on the server that is set up for SFTP access. In the second
case, the ACM public key must be registered with the server (typically by
copying it into an authorized_keys file on the server), and the ACM private key
must be loaded by setting FTP Private Key File.
FTP Compatibility Flag
Common server incompatibility problems are caused by differing level of
adherence to the relevant standards. This is particularly applicable to FTPS.
For example, the standard dictates how SSL/TLS sockets should be closed. By
default ACM will attempt to close sockets in the standard-compliant way.
While this is the most secure, it occasionally will cause hanging as it waits for a
response from the client which never arrives. The FTP Server Compatibility
Flag is provided for controlling this behavior. If you experience hanging when
a data-transfer is complete using FTPS then you should first try
SSLDisableDataWaitOnClose and, if the problem still occurs,
SSLDisableDataClosure. If you experience hanging as you close your FTPS
session then you should first try SSLDisableControlWaitOnClose and, if the
problem still occurs, SSLDisableControlClosure.
For SFTP, some servers return an error saying the file does not exist after
creating it. By default, the client does a permission change after creating the
file, which is done to ensure the file permissions are correct. If this error is
encountered, try using SSHDisableChmodAfterPut to eliminate the problem.
Problem Diagnostic
There are a wide variety of FTP, FTPS and SFTP servers in existence, which
may or may not implement the relevant standards. If difficulties are
experienced in connecting to a server or performing operations, a number of
steps can be taken to try to resolve the problem.
Make sure you can connect using a standalone FTP application. Make sure you
select the correct protocol. If possible, obtain the server log file to see if it
contains any clues to the problem. Generate a log file revealing the error with
Administration Guide Appendix L – SFTP and FTPS 159
the level set to ALL. All commands sent to the FTP server and subsequent
replies are logged in the file. An application configuration setting should be
used to set it:
<configuration>
<appSettings>
<add key="edtftp.log.level" value="All"/>
<add key="edtftp.log.file"
value="C:\Logs\FTPLogFile.txt"/>
</appSettings>
</configuration>
160 Appendix M – Edit Lock Administration Guide
Appendix M – Edit Lock
Edit Lock
Locking and Unlocking
If Edit Lock is enabled, users will not be able to edit any content or settings of a
page while another user is doing so. A user locks a page for edit by going to
either full edit or quick edit mode of the page. The page is unlocked when any
of the following events occur:
1. The user navigates away from edit mode.
2. The user closes their browser.
3. The user‘s session times out.
4. The application is restarted.
Bypass Locking
If a user tries to access edit mode of a page locked by another user they will be
redirected to a page that informs them the page is locked. There is one
scenario where a user can bypass this and enter edit mode of a page while
another user has the page locked. This can potentially cause a concurrency
error if the page is saved.
If a user navigates away from edit mode the page will be unlocked. If they then
return to edit mode using the browser back (or forward) button after another
user has locked the page they will have bypassed the locking mechanism. This
is a scenario that is rare and can be avoided entirely if users are instructed not
to use the browser navigation buttons. As a rule the use of the browser
navigation buttons is discouraged in the ACM as it can cause form
submission and concurrency errors.
Bypass Unlocking
There are scenarios where a user can leave edit mode and have the page remain
locked. These are:
1. If the user adds/edits a question in either a Survey or Application
Form pagetype and does not return to edit mode (navigates away from
the edit question page without clicking save or cancel) the page will
remain locked.
2. If the user adds/edits a link in QuickLinks pagetype and does not
return to edit mode (navigates away from the edit link page without
clicking save or cancel)
Administration Guide Appendix M – Edit Lock 161
In any of these cases the page will still unlock when the user‘s session expires
or if they return to the page and unlock it. Regardless, users should be
instructed to avoid these scenarios.
StateServer and SQLServer Session
This section is only relevant for those installations that use StateServer or
SQLServer to persist session. The vast majority of ACM installs use InProc for
session and for these this section can be ignored. This section is especially
important for multi-server installations as they must use either StateServer or
SQLServer.
Due to the way ASP.Net handles session when using StateServer or SQLServer,
there is no way to unlock pages a user may have locked when their session
times out. Having locked pages when a session expires should be a relatively
rare occurrence and should only happen with the scenarios listed in the ―Bypass
Unlock‖ section of this document.
To deal with any pages that somehow remain locked in this scenario an expiry
on the lock is implemented. The settings that control this lock expiry are in the
IronPoint.config file and are shown below…
<!-- The number of minutes before a lock expires. -->
<add key="EditLockDuration" value="360" />
<!-- The number of seconds before a lock expires that
the lock expiry warning modal dialog -->
<!-- will be displayed -->
<add key="EditLockWarningCounter" value="60" />
The EditLockDuration setting is the number of minutes between locking the
page and when the lock will expire. If the locking user is still in edit mode of
the page when the lock expires they will be shown a modal dialog that gives
them the opportunity to extend the lock. The extension will be will be the
number of minutes specified in the EditLockDuration setting.
162 Appendix N – Public Users Administration Guide
Appendix N – Public Users
Public Users
Public Users are user accounts that can be can be created with as little
information as an email address, a password and a preferred name. A public
user account is separate from a typical ACM user account in that a Public User
can only belong to a public group that can have no assigned permissions.
Public User functionality will allow you to collect information from the public
in order to track access through pages like the RFP page type or allow for the
collection of email groups for email broadcast without the risk of inadvertently
giving access to critical parts of your system. A Public User login will only
persist for as long as their current session.
Public User functionality is supported by four main enhancements in the ACM
system. The enhancements can be found in the Application Form page type,
the Login page type, the User Manager and the Group Manager.
Application Form
When setting up an Application Form page type to allow for the application of
ACM user accounts, you can specify to create the accounts as public accounts.
This will change the default view of the Application Form to ask for only email
address, password and preferred full name by default. You can choose to
require other information such as firstname and lastname if you choose.
Users created through this form will be automatically flagged as public users
and cannot be assigned to a non-public group.
Login Form
Since public users only need to enter an email address when applying for an
account, they must use that email address to log in. You have the ability to
create a public login form by selecting a ―Public Login‖ checkbox on the login
form. Not only will this change the view mode text to say ―Email Address‖ and
―Password‖ but it will also force the login page to validate against the internal
validation engine even if you are using LDAP integration for your normal
users.
User Manager
Public Users are marked with a ―P‖ in the user manager. The accounts are
managed the same way as a typical non-public user account. You can easily
turn a Public User into a normal user by deselecting the public user flag on the
account. Doing this however, will require that you enter a first name and last
name for the user if that has not already been collected.
Changing a normal user to a public user is allowed only if the user is not
assigned to any groups with permissions. The system will warn you if this is
Administration Guide Appendix N – Public Users 163
the case. You have to remove the user from all non-public groups in order to
make them a public user.
Group Manager
Public Groups are also marked with a ―P‖ in the group manager. A group
marked as public cannot be given any permissions or roles within the system.
Public groups can be used for personalized sections of a site and can be made
available to external applications and page types.

164 Appendix O – Support Contact Information Administration Guide
Appendix O – Support Contact
Information
Support Contact Information
Support contact information has been added to ACM. When a user rolls their
mouse over the Help button on the Admin Toolbar, they have an option to
select ―About ACM‖. Selecting this option will expand the admin toolbar to
display some pertinent system information and the support contact information.
By default the support information displayed is that of The Active Network‘s
support desk. However, this information is configurable on both the System
level (Global System Variables, Support tab) and the Site level (Site Settings,
Support tab) so if you wish for your users to contact your system administrator
for internal support, you can enter custom support contact information in either
location. The site settings will supersede the system settings.
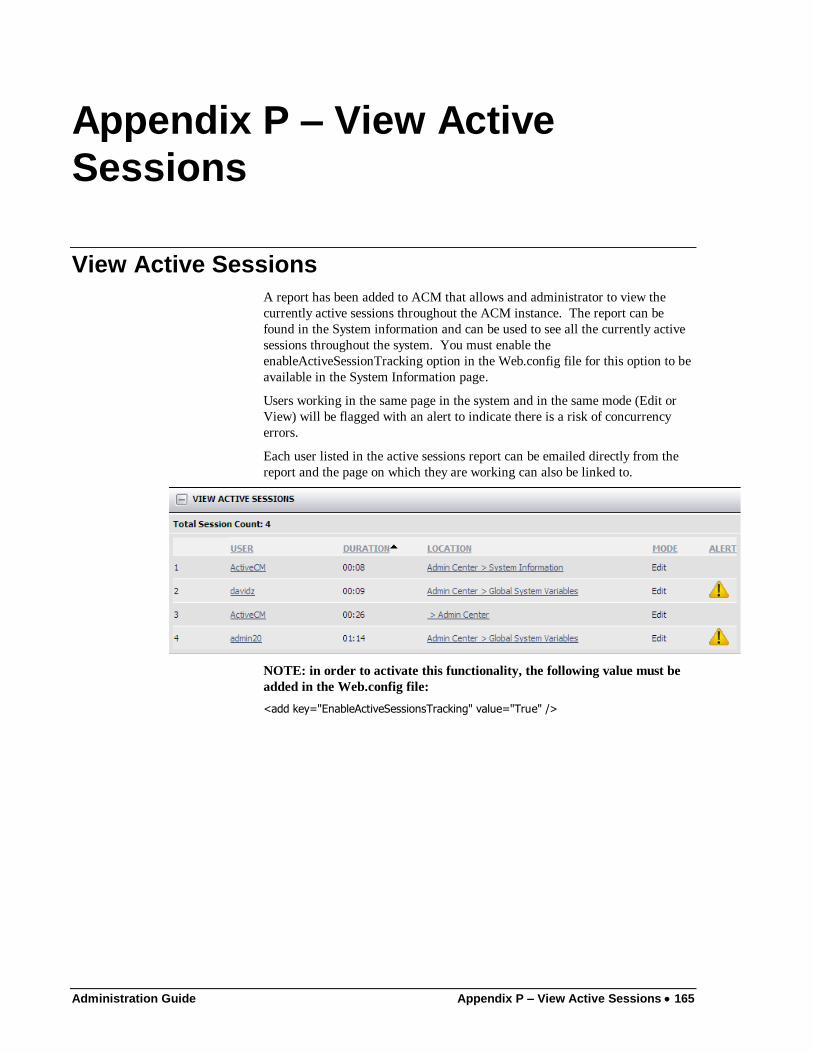
Administration Guide Appendix P – View Active Sessions 165
Appendix P – View Active
Sessions
View Active Sessions
A report has been added to ACM that allows and administrator to view the
currently active sessions throughout the ACM instance. The report can be
found in the System information and can be used to see all the currently active
sessions throughout the system. You must enable the
enableActiveSessionTracking option in the Web.config file for this option to be
available in the System Information page.
Users working in the same page in the system and in the same mode (Edit or
View) will be flagged with an alert to indicate there is a risk of concurrency
errors.
Each user listed in the active sessions report can be emailed directly from the
report and the page on which they are working can also be linked to.
NOTE: in order to activate this functionality, the following value must be
added in the Web.config file:
<add key="EnableActiveSessionsTracking" value="True" />
166 Appendix Q – Form Tags Administration Guide
Appendix Q – Form Tags
Disabled Form Tags
As of version 8.6, the CMS will now generate content tags only around content
that requires a form post to the database rather than wrapping a form tag
completely around each page and its content. This will allow for two things:
1. Form tags can now be inserted into the editor of a page if the page
itself does not require a form tag. If you are unsure if a page requires
a form tag, that‘s OK; all pages that require a form tag will validate to
make sure there is no tag in the content and will alert the user of there
is.
2. Form tags can now be introduced into a template applied to any page
in the system.
If you prefer to have your system operate the way it always has, you can simply
disable this feature in the Ironpoint.config file setting the following key value to
false.
<add key=‖ UseIndividualFormTags‖ value=‖True‖ />
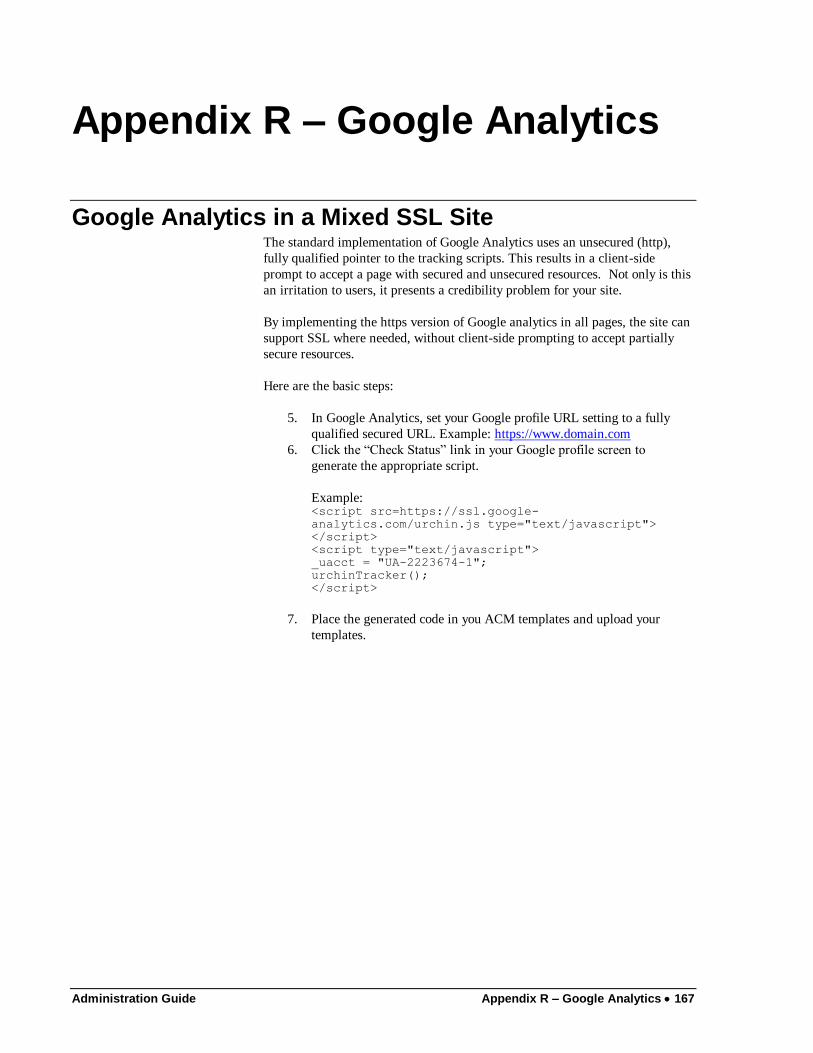
Administration Guide Appendix R – Google Analytics 167
Appendix R – Google Analytics
Google Analytics in a Mixed SSL Site The standard implementation of Google Analytics uses an unsecured (http),
fully qualified pointer to the tracking scripts. This results in a client-side
prompt to accept a page with secured and unsecured resources. Not only is this
an irritation to users, it presents a credibility problem for your site.
By implementing the https version of Google analytics in all pages, the site can
support SSL where needed, without client-side prompting to accept partially
secure resources.
Here are the basic steps:
5. In Google Analytics, set your Google profile URL setting to a fully
qualified secured URL. Example: https://www.domain.com
6. Click the ―Check Status‖ link in your Google profile screen to
generate the appropriate script.
Example: <script src=https://ssl.google-
analytics.com/urchin.js type="text/javascript">
</script>
<script type="text/javascript">
_uacct = "UA-2223674-1";
urchinTracker();
</script>
7. Place the generated code in you ACM templates and upload your
templates.
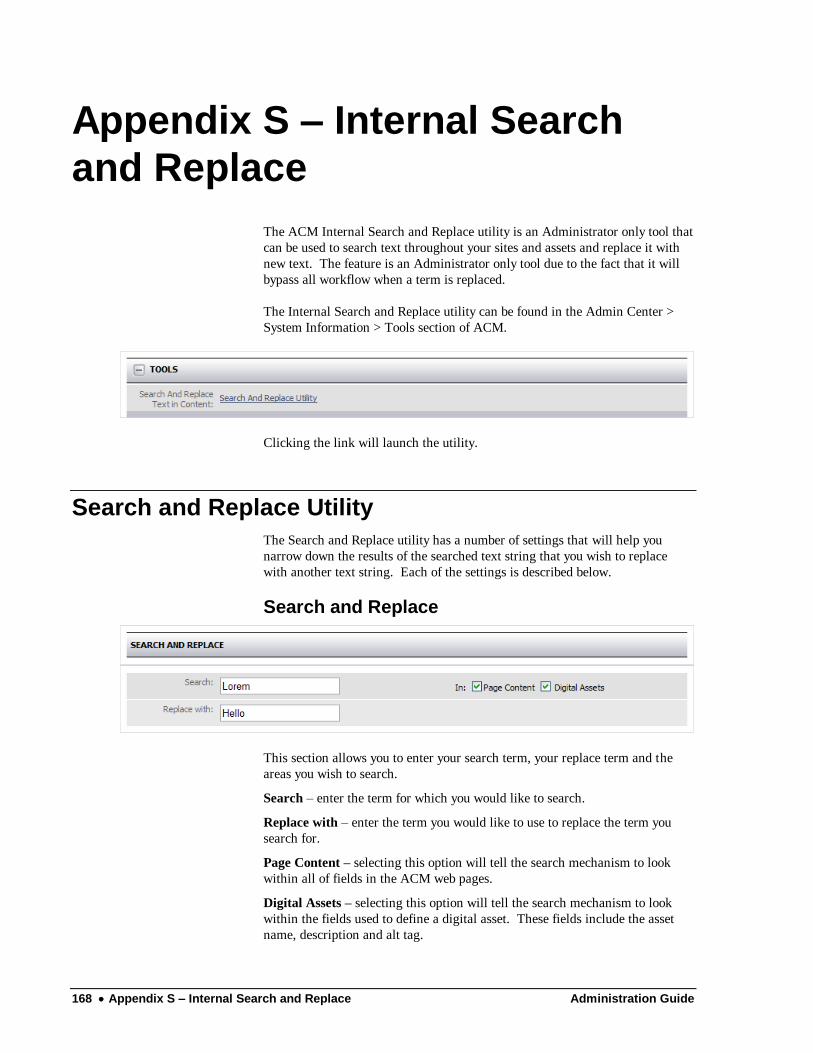
168 Appendix S – Internal Search and Replace Administration Guide
Appendix S – Internal Search
and Replace
The ACM Internal Search and Replace utility is an Administrator only tool that
can be used to search text throughout your sites and assets and replace it with
new text. The feature is an Administrator only tool due to the fact that it will
bypass all workflow when a term is replaced.
The Internal Search and Replace utility can be found in the Admin Center >
System Information > Tools section of ACM.
Clicking the link will launch the utility.
Search and Replace Utility
The Search and Replace utility has a number of settings that will help you
narrow down the results of the searched text string that you wish to replace
with another text string. Each of the settings is described below.
Search and Replace
This section allows you to enter your search term, your replace term and the
areas you wish to search.
Search – enter the term for which you would like to search.
Replace with – enter the term you would like to use to replace the term you
search for.
Page Content – selecting this option will tell the search mechanism to look
within all of fields in the ACM web pages.
Digital Assets – selecting this option will tell the search mechanism to look
within the fields used to define a digital asset. These fields include the asset
name, description and alt tag.
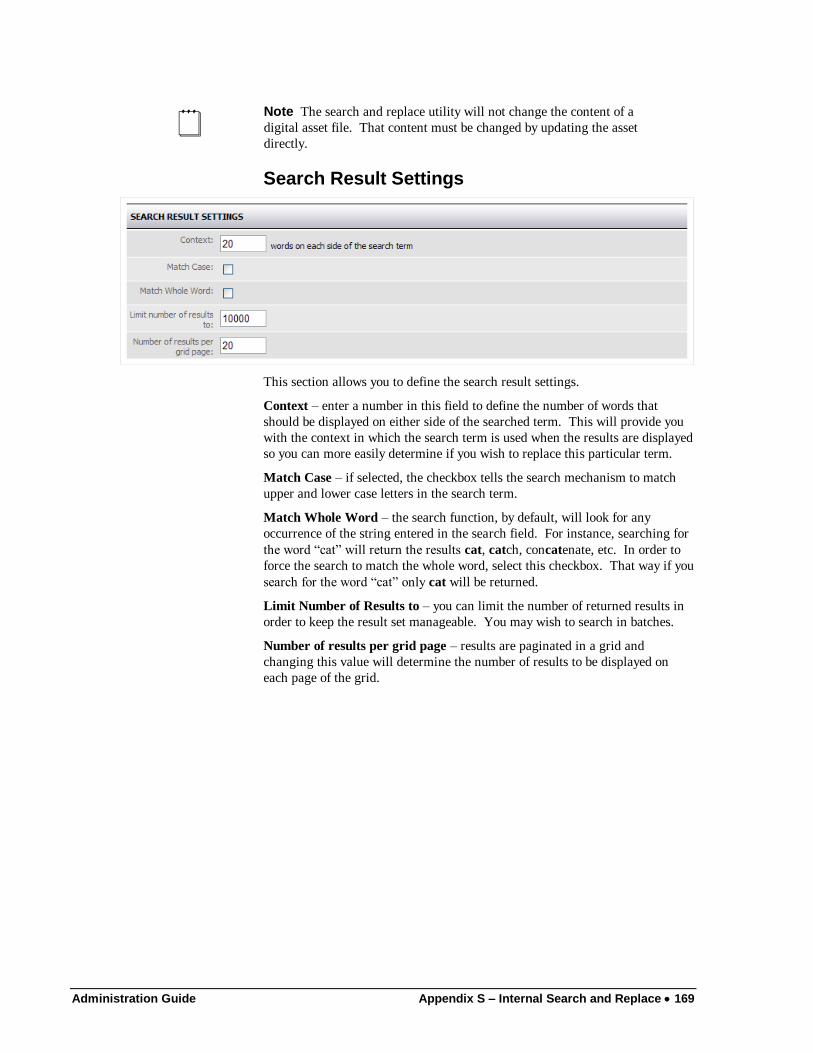
Administration Guide Appendix S – Internal Search and Replace 169
Note The search and replace utility will not change the content of a
digital asset file. That content must be changed by updating the asset
directly.
Search Result Settings
This section allows you to define the search result settings.
Context – enter a number in this field to define the number of words that
should be displayed on either side of the searched term. This will provide you
with the context in which the search term is used when the results are displayed
so you can more easily determine if you wish to replace this particular term.
Match Case – if selected, the checkbox tells the search mechanism to match
upper and lower case letters in the search term.
Match Whole Word – the search function, by default, will look for any
occurrence of the string entered in the search field. For instance, searching for
the word ―cat‖ will return the results cat, catch, concatenate, etc. In order to
force the search to match the whole word, select this checkbox. That way if you
search for the word ―cat‖ only cat will be returned.
Limit Number of Results to – you can limit the number of returned results in
order to keep the result set manageable. You may wish to search in batches.
Number of results per grid page – results are paginated in a grid and
changing this value will determine the number of results to be displayed on
each page of the grid.
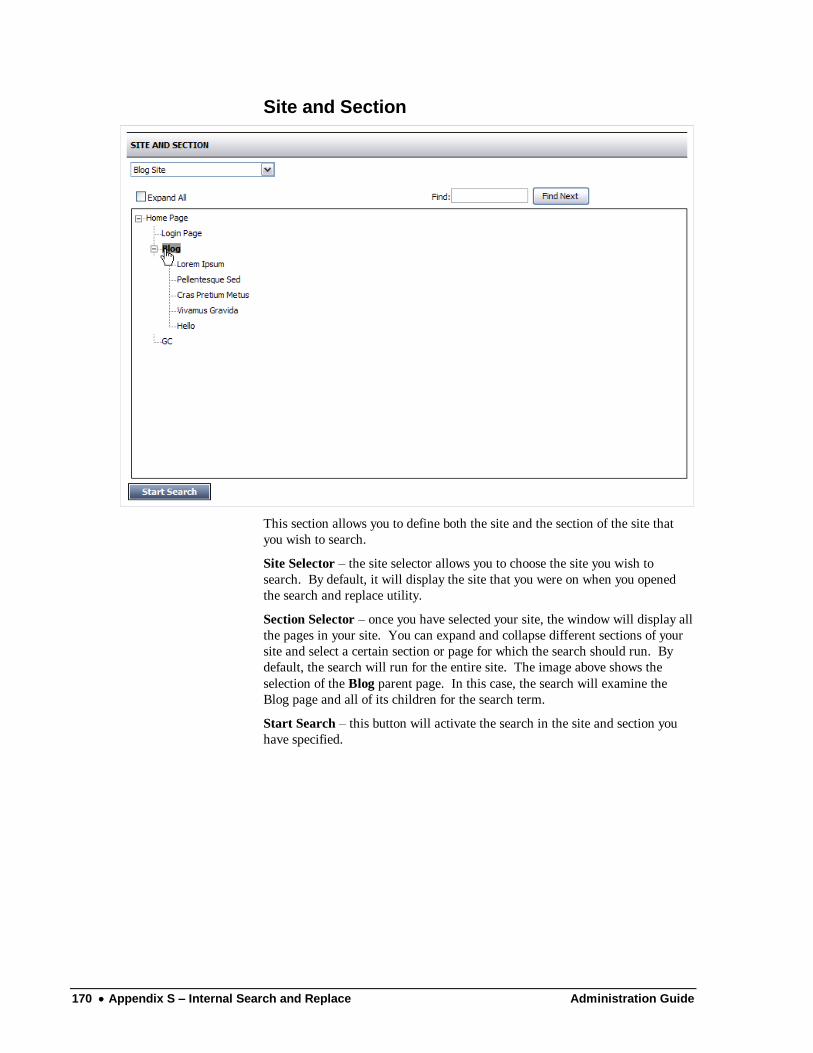
170 Appendix S – Internal Search and Replace Administration Guide
Site and Section
This section allows you to define both the site and the section of the site that
you wish to search.
Site Selector – the site selector allows you to choose the site you wish to
search. By default, it will display the site that you were on when you opened
the search and replace utility.
Section Selector – once you have selected your site, the window will display all
the pages in your site. You can expand and collapse different sections of your
site and select a certain section or page for which the search should run. By
default, the search will run for the entire site. The image above shows the
selection of the Blog parent page. In this case, the search will examine the
Blog page and all of its children for the search term.
Start Search – this button will activate the search in the site and section you
have specified.
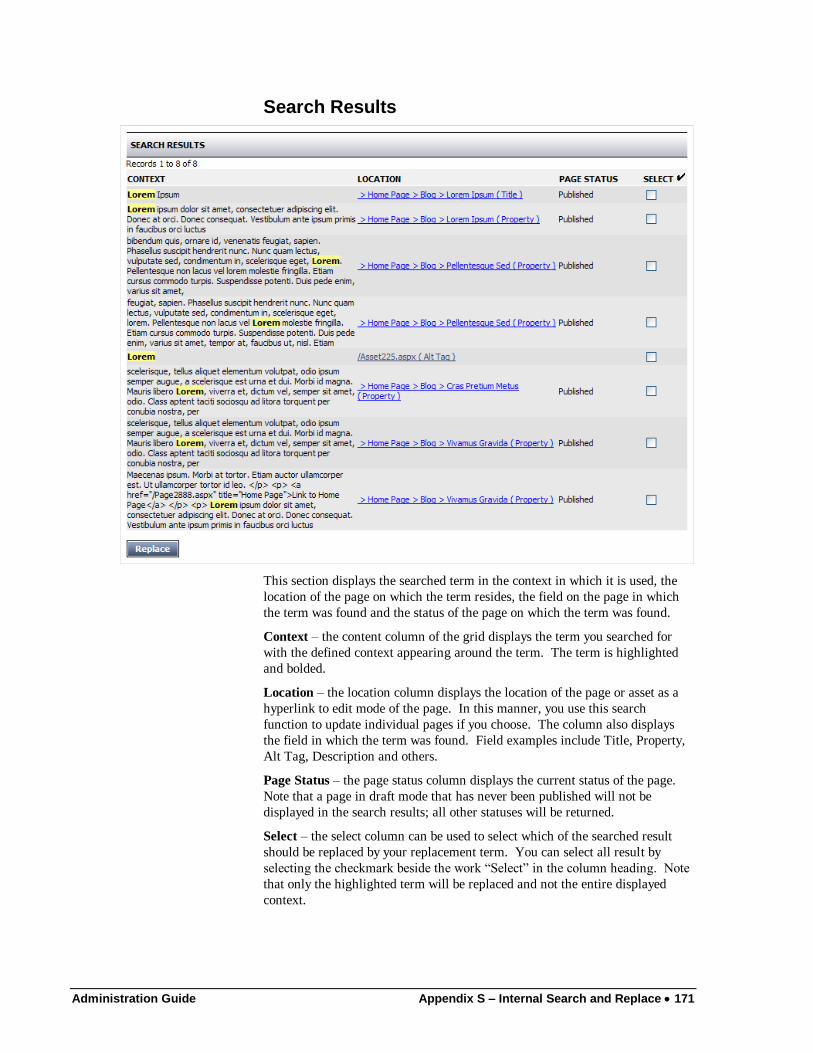
Administration Guide Appendix S – Internal Search and Replace 171
Search Results
This section displays the searched term in the context in which it is used, the
location of the page on which the term resides, the field on the page in which
the term was found and the status of the page on which the term was found.
Context – the content column of the grid displays the term you searched for
with the defined context appearing around the term. The term is highlighted
and bolded.
Location – the location column displays the location of the page or asset as a
hyperlink to edit mode of the page. In this manner, you use this search
function to update individual pages if you choose. The column also displays
the field in which the term was found. Field examples include Title, Property,
Alt Tag, Description and others.
Page Status – the page status column displays the current status of the page.
Note that a page in draft mode that has never been published will not be
displayed in the search results; all other statuses will be returned.
Select – the select column can be used to select which of the searched result
should be replaced by your replacement term. You can select all result by
selecting the checkmark beside the work ―Select‖ in the column heading. Note
that only the highlighted term will be replaced and not the entire displayed
context.

172 Appendix S – Internal Search and Replace Administration Guide
Replace – click the replace button when you want to start the replace action.
You will be presented with a confirmation box. Click OK to continue or cancel
to stop the replace action.
Search and Replace Report
The search and replace report shows the results of your search and replace
action. It displays the new term in the context of its location, a link to the page
itself and the status of the search and replace action.
Administration Guide Appendix T – Social Media Integration 173
Appendix T – Social Media
Integration
The Social Media Integration Framework is a license-able add-on to ACM that
allows for content producers to promote content to various social networking
platforms after they publish the content on their website. The framework
consists of a social networking tab in the user profile screen and a component
on the admin toolbar where a content provider can opt to promote content to
each social network.
Note that as of version 10.0, Twitter and Facebook are the only supported social
networks. Additional networks will be added in subsequent releases.
Group Permissions
Once you have licensed the Social Media Framework, you will be able to
provide the tool to your users through group settings.
1. Open the Group Manager and search for a group.
2. Select the group to edit the settings and select the Tools tab.
3. Check the box beside Social Networking to enable the social media
functionality for that group.
4. Click Save.
Social Media Accounts
In order to share content with a Social Media site, an account must be
configured for each site. In turn, users who post to these sites must have the
social media account associated with their ACM user account. Each user can
associate one account for each social media site.
The more links from various locations on the web to your website, the greater
your site will rank in search engine results. You can create different corporate
social media accounts and put different people in charge of posting to each of
them.
There are two recommended ways of doing this:
1. Allow each user to create his or her own social media account and link it to
his or her ACM account. This will essentially allow your users to post
links and comments to a number of personal social media accounts.
2. Create organizational social media accounts and allow any number of users
to associate them with their user accounts. Remember, only one account is
allowed per user.
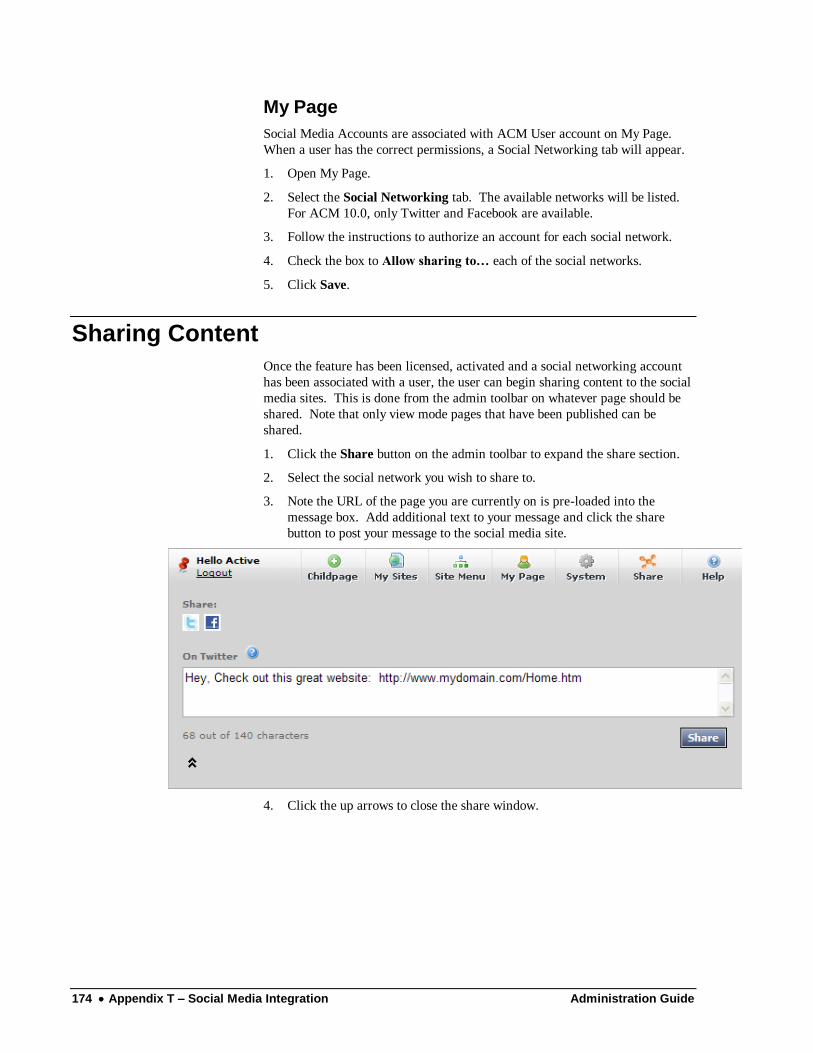
174 Appendix T – Social Media Integration Administration Guide
My Page
Social Media Accounts are associated with ACM User account on My Page.
When a user has the correct permissions, a Social Networking tab will appear.
1. Open My Page.
2. Select the Social Networking tab. The available networks will be listed.
For ACM 10.0, only Twitter and Facebook are available.
3. Follow the instructions to authorize an account for each social network.
4. Check the box to Allow sharing to… each of the social networks.
5. Click Save.
Sharing Content
Once the feature has been licensed, activated and a social networking account
has been associated with a user, the user can begin sharing content to the social
media sites. This is done from the admin toolbar on whatever page should be
shared. Note that only view mode pages that have been published can be
shared.
1. Click the Share button on the admin toolbar to expand the share section.
2. Select the social network you wish to share to.
3. Note the URL of the page you are currently on is pre-loaded into the
message box. Add additional text to your message and click the share
button to post your message to the social media site.
4. Click the up arrows to close the share window.
Administration Guide Appendix U – 404 Redirects using Multiple URLs 175
Appendix U – 404 Redirects
using Multiple URLs
NOTE: This method does not return a 404 status code:
This section describes setting up a site that will give a different error 404 page
depending on the URL that was used. For example, if you have multiple sites
set up in one instance of ACM, then you can have somebody that‘s trying to
access a page on site 1 (which does not exist) to bring up an error404 page
specific to site 1 which is different from the error pages on other sites.
This does not work for URL‘s with no extension (ie.
www.acm.com/pagenotthere)
o IIS will process this URL because it assumes it‘s a virtual directory, it
doesn‘t get to ACM yet, so if there is an error, it is handled by the
CustomErrors setup in IIS which you will need to configure separately in the
web site properties of IIS.
1. Create a 404.aspx file in the system folder, or somewhere else
accessible by the site. There is an example of a 404.aspx file below.
2. Update the Web.config file
o This handles requests to .NET (not ACM) that receive a 404 response:
<customErrors mode="Off"
defaultRedirect="~/System/AdminAppError.htm">
<error statusCode="404" redirect="/System/404.aspx" />
</customErrors>
o This handles 404 errors that ACM throws. It cannot catch errors
caught by .NET, or IIS. And this setting is available only in ACM 8.2
and above
<add key="System404Page" value="/System/404.aspx" />
3. The example below assumes you‘re using friendly URL‘s with .htm as
the extension, and that you‘ve created a page called 404 at the root of each site.
Please adjust the example below to your setup. (if you don‘t have friendly
URL‘s set up, you can point it to ~/pageXXX.aspx)
=================== 404.aspx Example ===================
<%
dim strURL as string = UCase(Request.URL.tostring)
If InStr(strURL, UCase("www.site1.com")) > 0 then
Response.Redirect("http://www.site1.com/404.htm")
elseif InStr(strURL, UCase("www.site2.com")) > 0 then
Response.Redirect("http://www.site2.com/404.htm")
If InStr(strURL, UCase("www.site3.com")) > 0 then
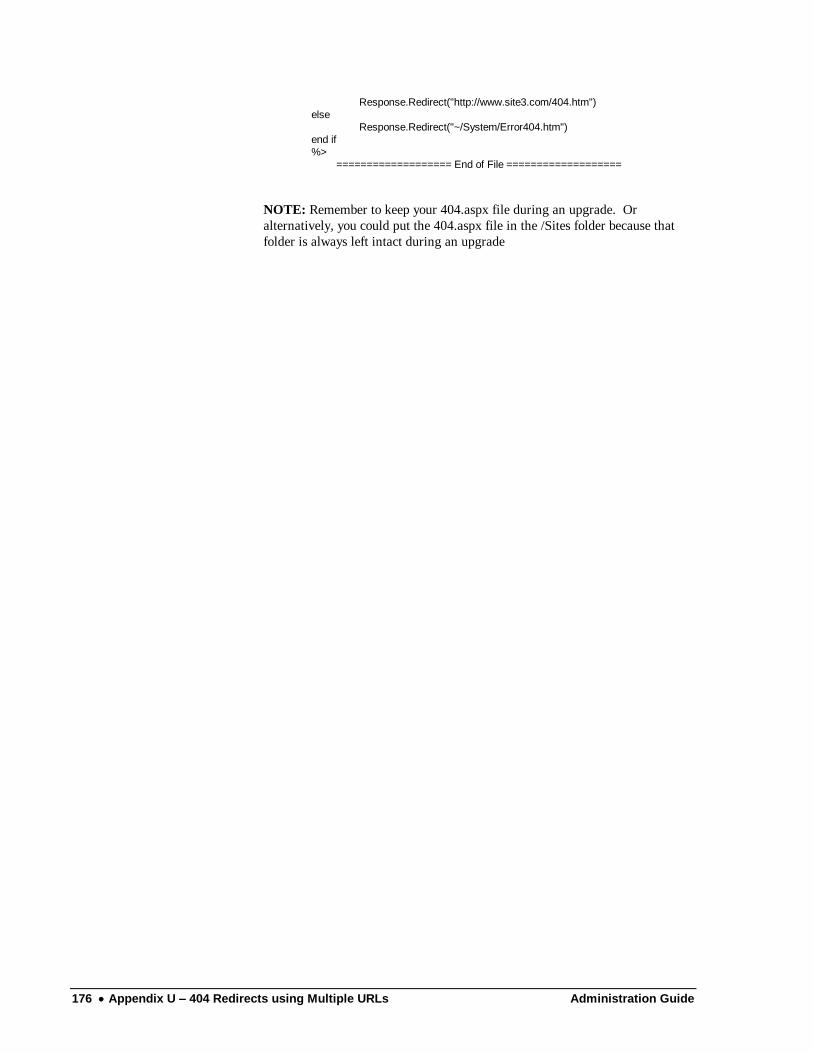
176 Appendix U – 404 Redirects using Multiple URLs Administration Guide
Response.Redirect("http://www.site3.com/404.htm")
else
Response.Redirect("~/System/Error404.htm")
end if
%>
=================== End of File ===================
NOTE: Remember to keep your 404.aspx file during an upgrade. Or
alternatively, you could put the 404.aspx file in the /Sites folder because that
folder is always left intact during an upgrade
Administration Guide Appendix V – Enabling Single Sign-On 177
Appendix V – Enabling Single
Sign-On
Introduction
The Single Sign-On feature is a solution that enables a user who is part of a
client Microsoft® Windows® domain from having to repeatedly authenticate
himself or herself to access Ironpoint CMS.
Set-up Steps The following steps are required in order to enable the Single Sign-On (SSO)
feature. Note that it‘s desirable to have all working users in the CMS user
roster.
1. Disable Anonymous access to the site:
a. In IIS Manager, expand the local computer node, expand the Web or
FTP Sites folder.
b. Right-click the Web site that contains the ACM application virtual
directory and then select ‗Properties‘.
c. Go to the ‗Directory Security Tab‘.
d. Click the ‗Edit‘ button in the ‗Anonymous access and authentication
control‘ section.
e. Uncheck the ‗Anonymous access‘ checkbox.
f. Make sure that ‗Integrated Windows authentication‘ is checked.
g. Click the ‗Ok‘ button. Click Ok again to commit the changes in the
IIS manager
2. In order to configure ACM to use the SSO feature, you must check the
―Enable Single Sign On‖ checkbox on the Ironpoint.config tab in the
Configuration Files Manager.
3. Configure a user account for the system to use when exporting the site
to HTML:
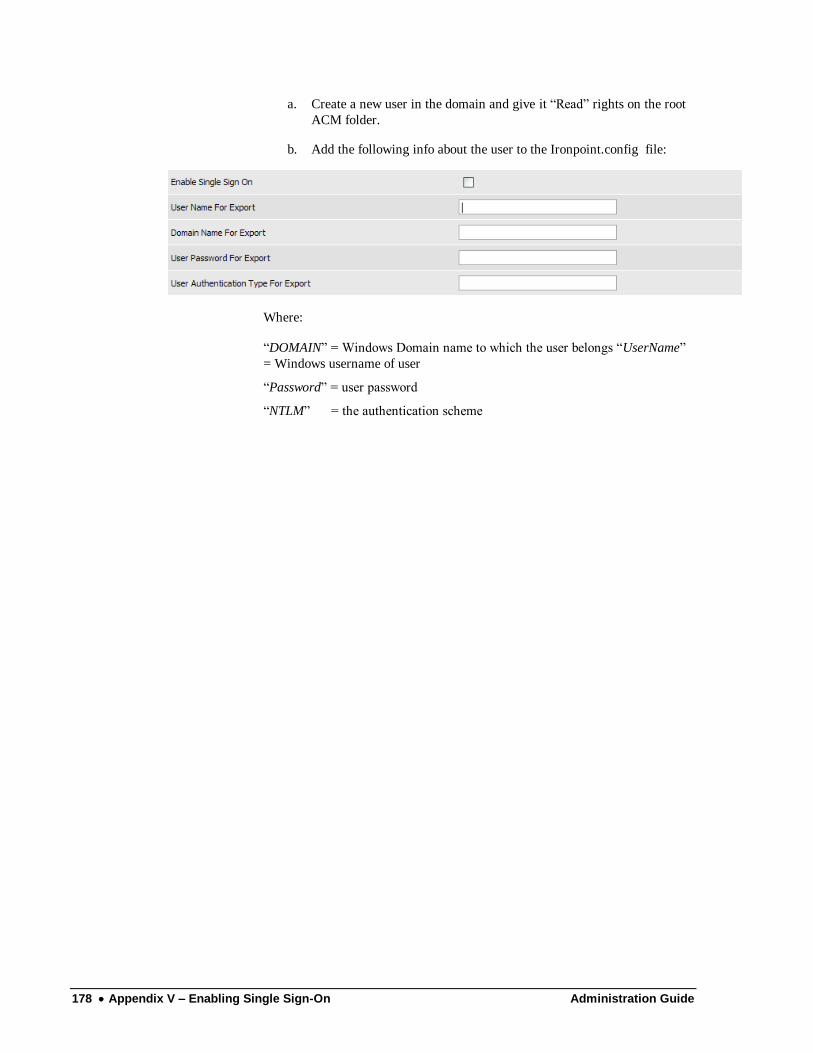
178 Appendix V – Enabling Single Sign-On Administration Guide
a. Create a new user in the domain and give it ―Read‖ rights on the root
ACM folder.
b. Add the following info about the user to the Ironpoint.config file:
Where:
―DOMAIN‖ = Windows Domain name to which the user belongs ―UserName‖
= Windows username of user
―Password‖ = user password
―NTLM‖ = the authentication scheme

Administration Guide Appendix W – Robots.txt 179
Appendix W – Robots.txt
Many search engines now ignore the ―no robots‖ meta value (Google for one).
In order to prevent search engine crawlers from indexing certain pages such as
your login pages, ACM now supports the use of a Robots.txt file. This file is
managed through the Site Design Manager and can be downloaded/uploaded
with your site design package.
Existing installations of ACM will not inherit this file upon upgrade. In order
to use the Robots.txt file, download your site design package and add the
Robots.txt to the root templates folder. Then zip and re-upload your template
package.
Each site will refer to its own robots.txt file. Once uploaded, you can edit the
Robots.txt file using the template editor available as of version 10.0.