Embed Size (px)
Citation preview
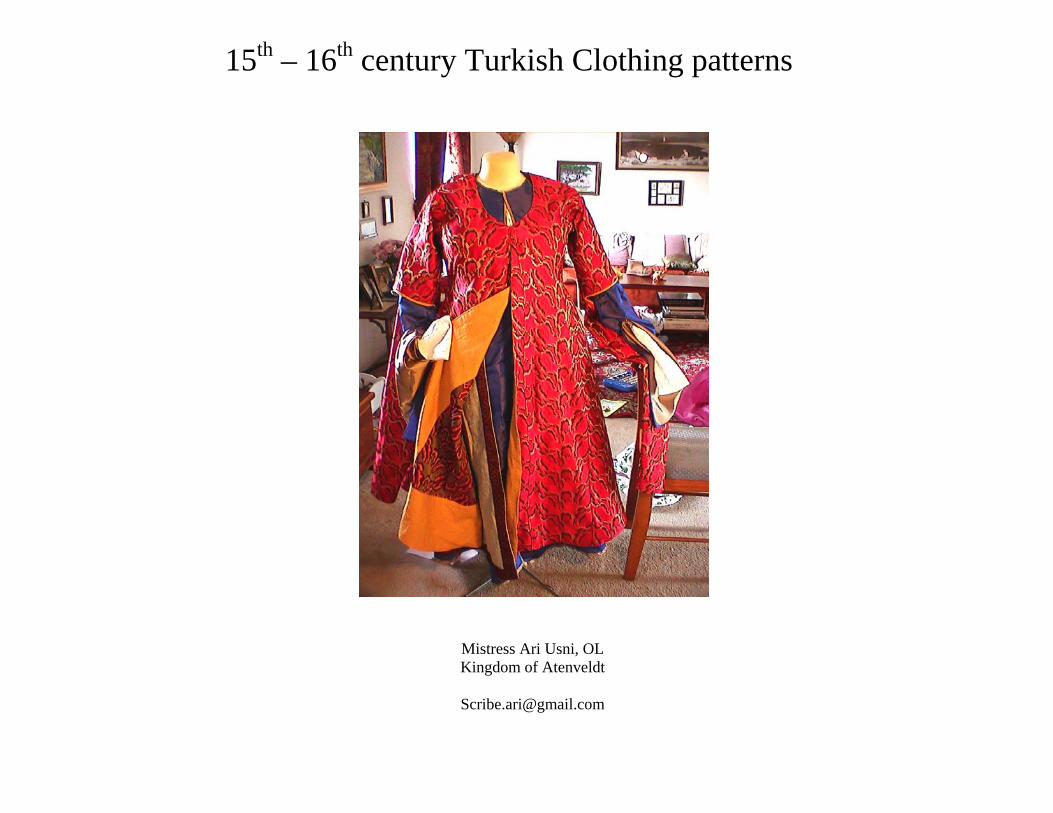
15th – 16th century Turkish Clothing patterns
Mistress Ari Usni, OL Kingdom of Atenveldt
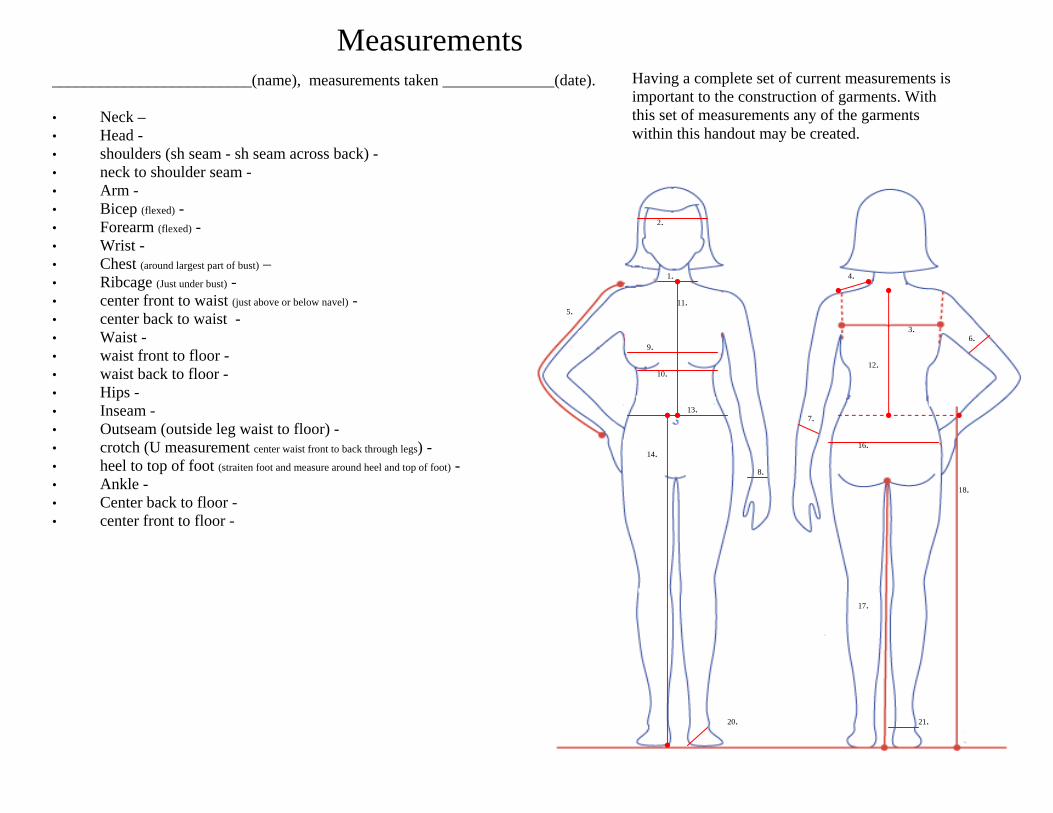
Measurements _________________________(name), measurements taken ______________(date). • Neck – • Head - • shoulders (sh seam - sh seam across back) - • neck to shoulder seam - • Arm - • Bicep (flexed) - • Forearm (flexed) - • Wrist - • Chest (around largest part of bust) – • Ribcage (Just under bust) - • center front to waist (just above or below navel) - • center back to waist - • Waist - • waist front to floor - • waist back to floor - • Hips - • Inseam - • Outseam (outside leg waist to floor) - • crotch (U measurement center waist front to back through legs) - • heel to top of foot (straiten foot and measure around heel and top of foot) -
• Ankle - • Center back to floor - • center front to floor -
Having a complete set of current measurements is important to the construction of garments. With this set of measurements any of the garments within this handout may be created.
1.
2.
3.
4.
5.
6.
7.
8.
9.
10.
11.
12.
13.
14.
18.
16.
17.
20. 21.

Pants (Shalwar)
Side view Sewn together
Waistband
waist
feet
Fold
Fold tube in half with seam on outside To produce pattern blank
Seam
Waist = hip measurement +10 inches
feet
Fold
Sew a tube as above
Outseam measurement
How to construct shalwar
1. 2.
Pattern blank
This pattern for pants is a different regional variant. I prefer to use this to construct my pants because it has an efficient use of fabric and produces a roomy and comfortable garment with minimal seaming that is easy to wear. Study of garments over time reveals consistencies in shape, but in the end there are as many patterns as there are tailors.
Seam
Fold
Sew together
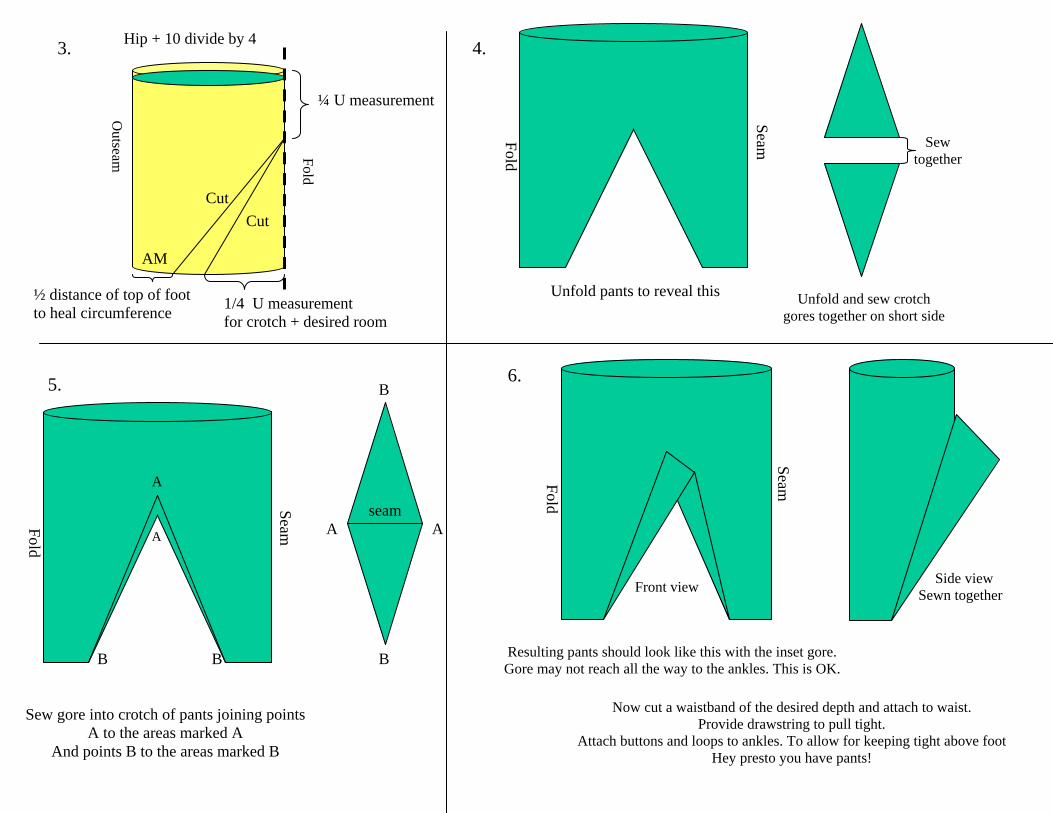
Unfold pants to reveal this Unfold and sew crotch gores together on short side
Seam
Fold
B
seam A
B
B
A
B
A
Sew gore into crotch of pants joining points A to the areas marked A
And points B to the areas marked B
A
5.
4.
1/4 U measurement for crotch + desired room
Hip + 10 divide by 4
Fold
Outseam
Cut
AM
Cut
¼ U measurement
½ distance of top of foot to heal circumference
3.
Seam
Fold
Resulting pants should look like this with the inset gore. Gore may not reach all the way to the ankles. This is OK.
Front view
Now cut a waistband of the desired depth and attach to waist. Provide drawstring to pull tight.
Attach buttons and loops to ankles. To allow for keeping tight above foot Hey presto you have pants!
6.
Side view Sewn together
Women’s Shirt (Gomlek)
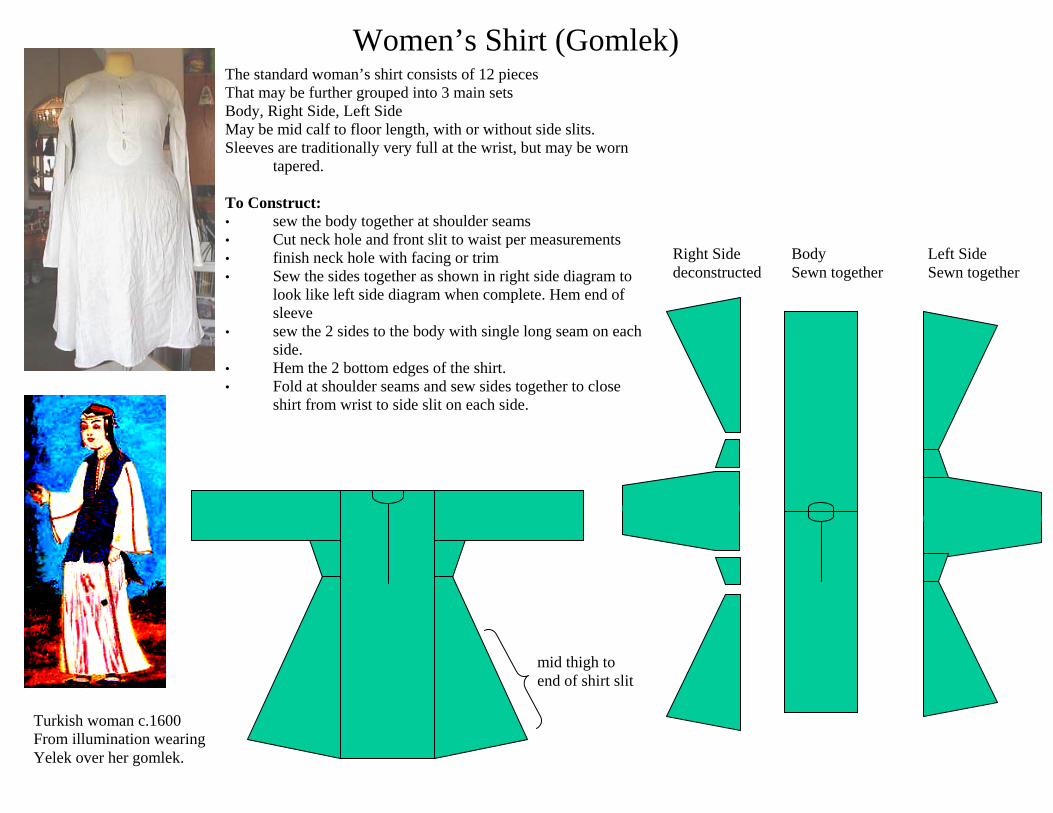
The standard woman’s shirt consists of 12 pieces That may be further grouped into 3 main sets Body, Right Side, Left Side May be mid calf to floor length, with or without side slits. Sleeves are traditionally very full at the wrist, but may be worn
tapered. To Construct: • sew the body together at shoulder seams • Cut neck hole and front slit to waist per measurements • finish neck hole with facing or trim • Sew the sides together as shown in right side diagram to
look like left side diagram when complete. Hem end of sleeve
• sew the 2 sides to the body with single long seam on each side.
• Hem the 2 bottom edges of the shirt. • Fold at shoulder seams and sew sides together to close
shirt from wrist to side slit on each side.
mid thigh to end of shirt slit
Right Side deconstructed
Left Side Sewn together
Body Sewn together
Turkish woman c.1600 From illumination wearing Yelek over her gomlek.
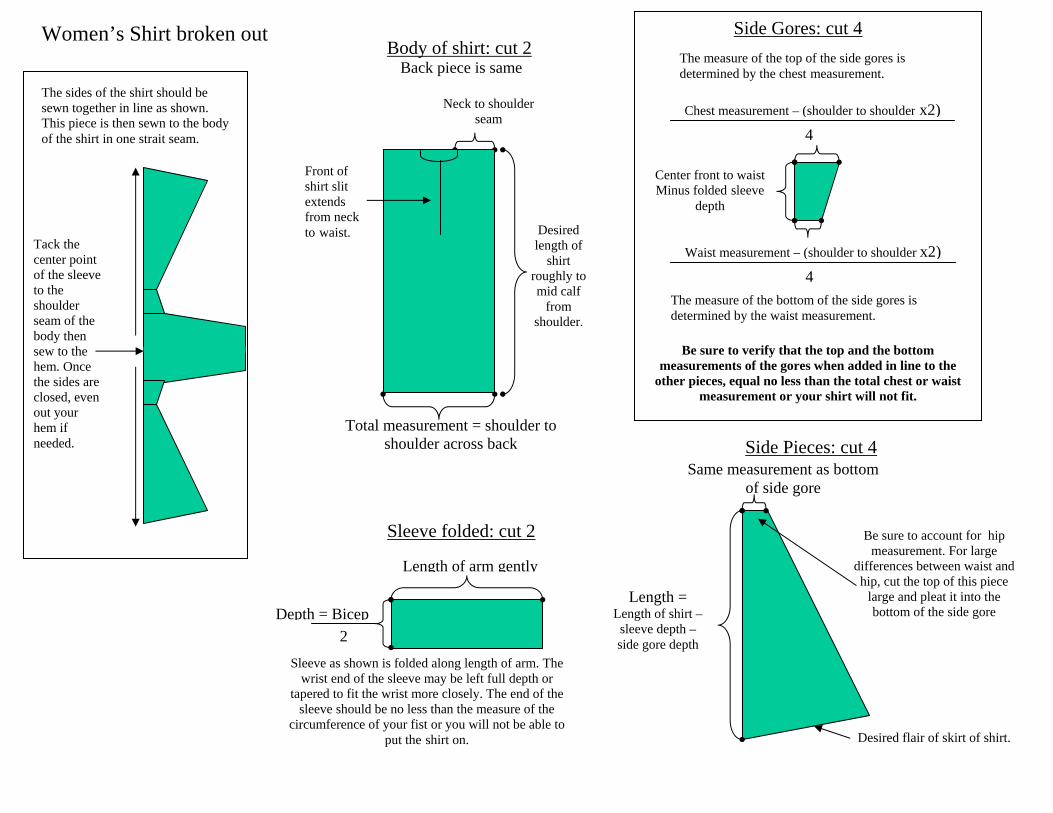
Women’s Shirt broken out
Front of shirt slit extends from neck to waist.
Total measurement = shoulder to shoulder across back
Desired length of
shirt roughly to mid calf
from shoulder.
Neck to shoulder seam
Body of shirt: cut 2 Back piece is same
Side Gores: cut 4
Center front to waist Minus folded sleeve
depth
The measure of the top of the side gores is determined by the chest measurement.
Chest measurement – (shoulder to shoulder x2)4
The measure of the bottom of the side gores is determined by the waist measurement.
Waist measurement – (shoulder to shoulder x2)4
Be sure to verify that the top and the bottom measurements of the gores when added in line to the
other pieces, equal no less than the total chest or waist measurement or your shirt will not fit.
Length of arm gently
Depth = Bicep 2
Sleeve folded: cut 2
Sleeve as shown is folded along length of arm. The wrist end of the sleeve may be left full depth or
tapered to fit the wrist more closely. The end of the sleeve should be no less than the measure of the
circumference of your fist or you will not be able to put the shirt on.
Side Pieces: cut 4 Same measurement as bottom
of side gore
Length = Length of shirt – sleeve depth – side gore depth
Be sure to account for hip measurement. For large
differences between waist and hip, cut the top of this piece
large and pleat it into the bottom of the side gore
Desired flair of skirt of shirt.
The sides of the shirt should be sewn together in line as shown. This piece is then sewn to the body of the shirt in one strait seam.
Tack the center point of the sleeve to the shoulder seam of the body then sew to the hem. Once the sides are closed, even out your hem if needed.
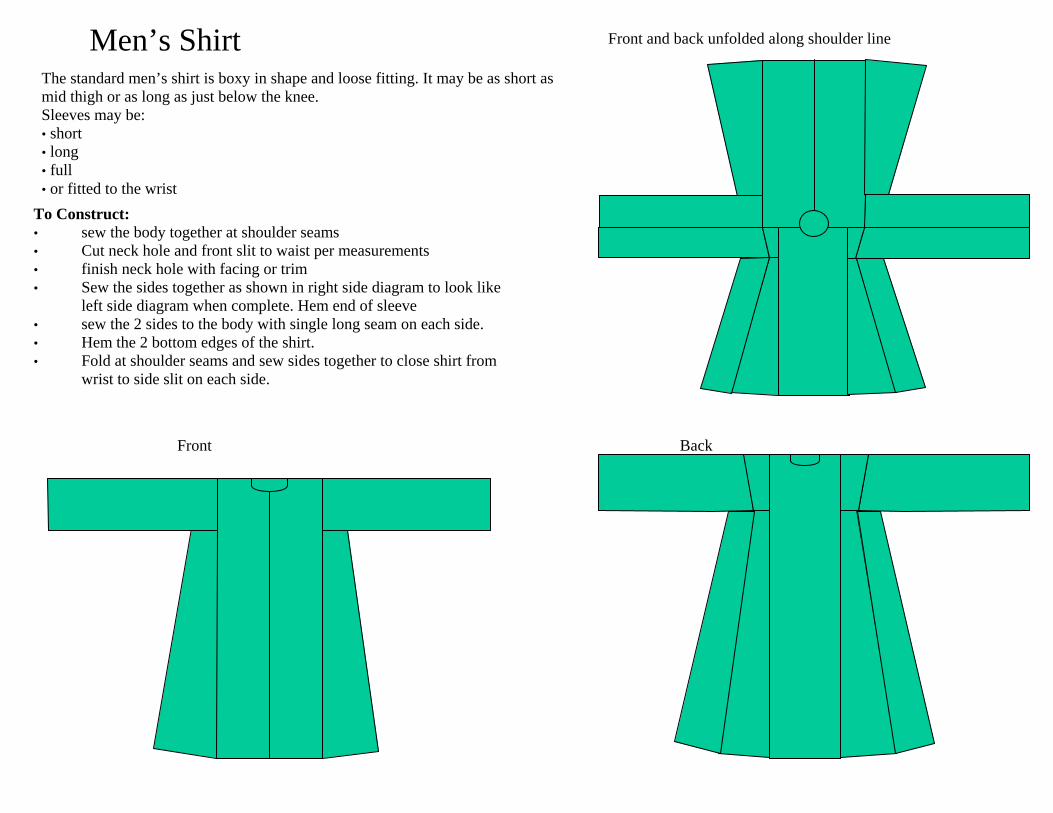
Men’s Shirt
To Construct: • sew the body together at shoulder seams • Cut neck hole and front slit to waist per measurements • finish neck hole with facing or trim • Sew the sides together as shown in right side diagram to look like
left side diagram when complete. Hem end of sleeve • sew the 2 sides to the body with single long seam on each side. • Hem the 2 bottom edges of the shirt. • Fold at shoulder seams and sew sides together to close shirt from
wrist to side slit on each side.
The standard men’s shirt is boxy in shape and loose fitting. It may be as short as mid thigh or as long as just below the knee. Sleeves may be: • short • long • full • or fitted to the wrist
Front Back
Front and back unfolded along shoulder line
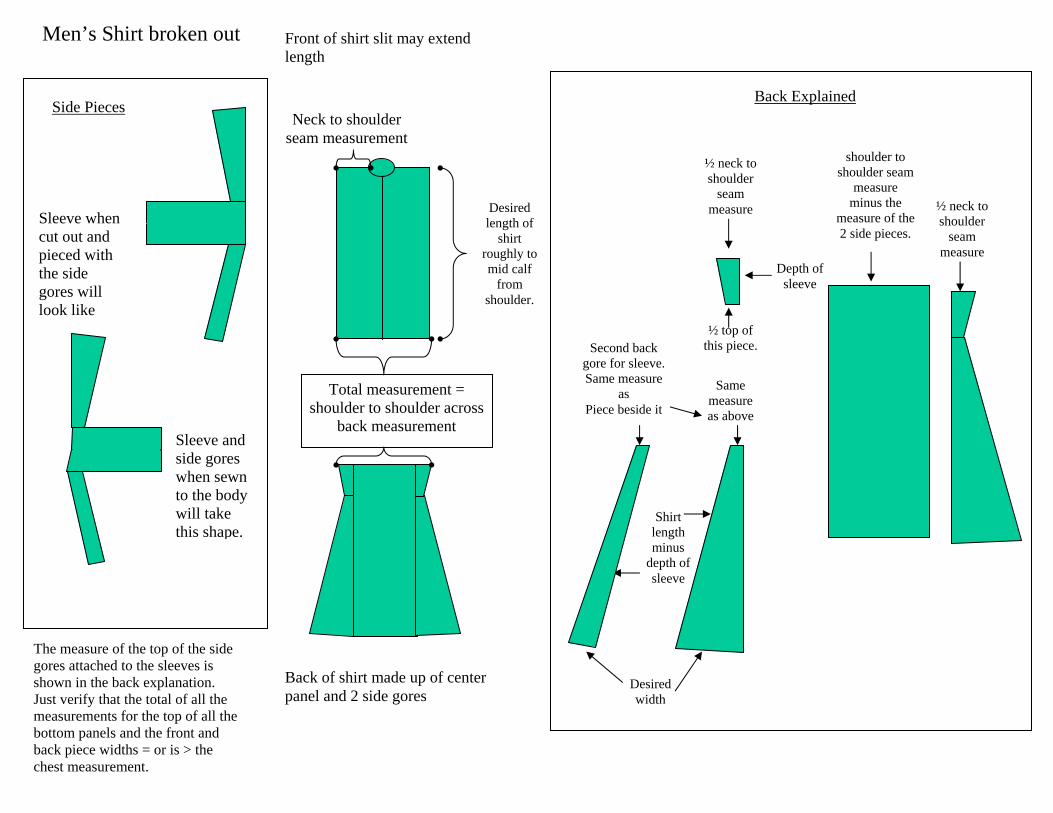
Front of shirt slit may extend length
Back of shirt made up of center panel and 2 side gores
Total measurement = shoulder to shoulder across
back measurement
Desired length of
shirt roughly to mid calf
from shoulder.
Neck to shoulder
seam measurement
Men’s Shirt broken out
Sleeve when cut out and pieced with the side gores will look like
Sleeve and side gores when sewn to the body will take this shape.
Side Pieces
The measure of the top of the side gores attached to the sleeves is shown in the back explanation. Just verify that the total of all the measurements for the top of all the bottom panels and the front and back piece widths = or is > the chest measurement.
Back Explained
½ neck to shoulder
seam measure
shoulder to shoulder seam
measure minus the
measure of the 2 side pieces.
½ neck to shoulder
seam measure
Depth of sleeve
Shirt length minus
depth of sleeve
½ top of this piece.
Same measure as above
Desired width
Second back gore for sleeve. Same measure
as Piece beside it
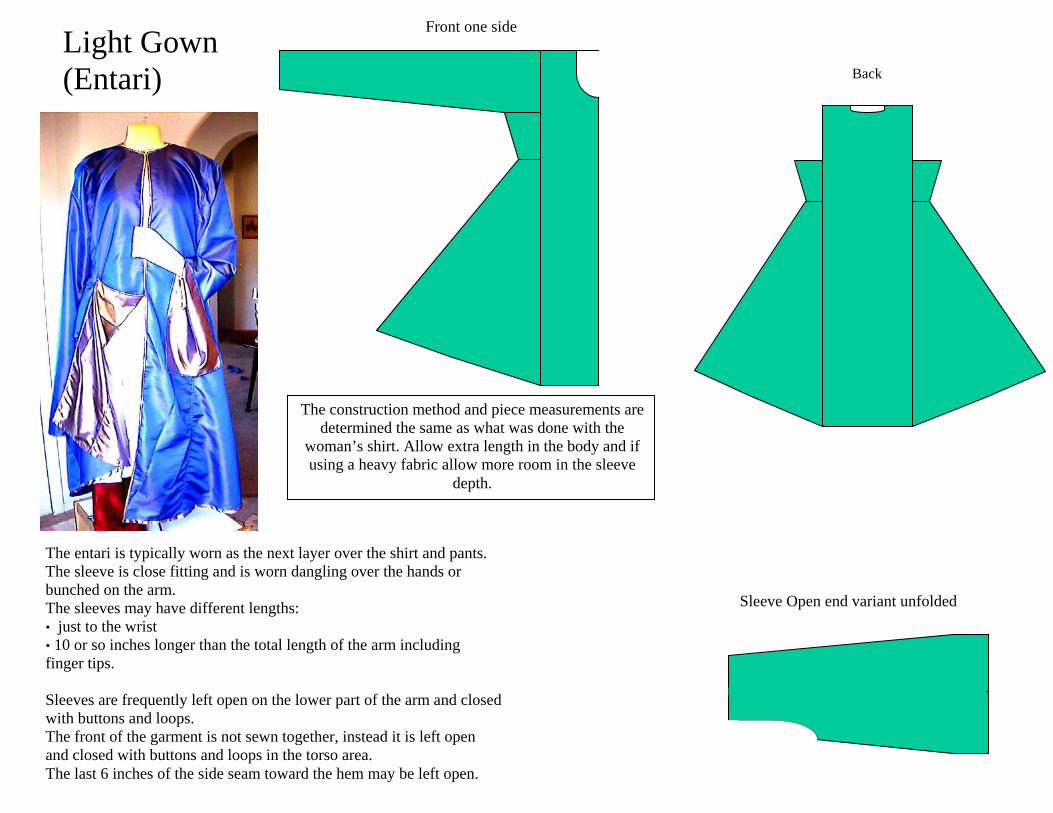
Light Gown (Entari)
The entari is typically worn as the next layer over the shirt and pants. The sleeve is close fitting and is worn dangling over the hands or bunched on the arm. The sleeves may have different lengths: • just to the wrist • 10 or so inches longer than the total length of the arm including finger tips. Sleeves are frequently left open on the lower part of the arm and closed with buttons and loops. The front of the garment is not sewn together, instead it is left open and closed with buttons and loops in the torso area. The last 6 inches of the side seam toward the hem may be left open.
Front one side
Back
Sleeve Open end variant unfolded
The construction method and piece measurements are determined the same as what was done with the
woman’s shirt. Allow extra length in the body and if using a heavy fabric allow more room in the sleeve
depth.
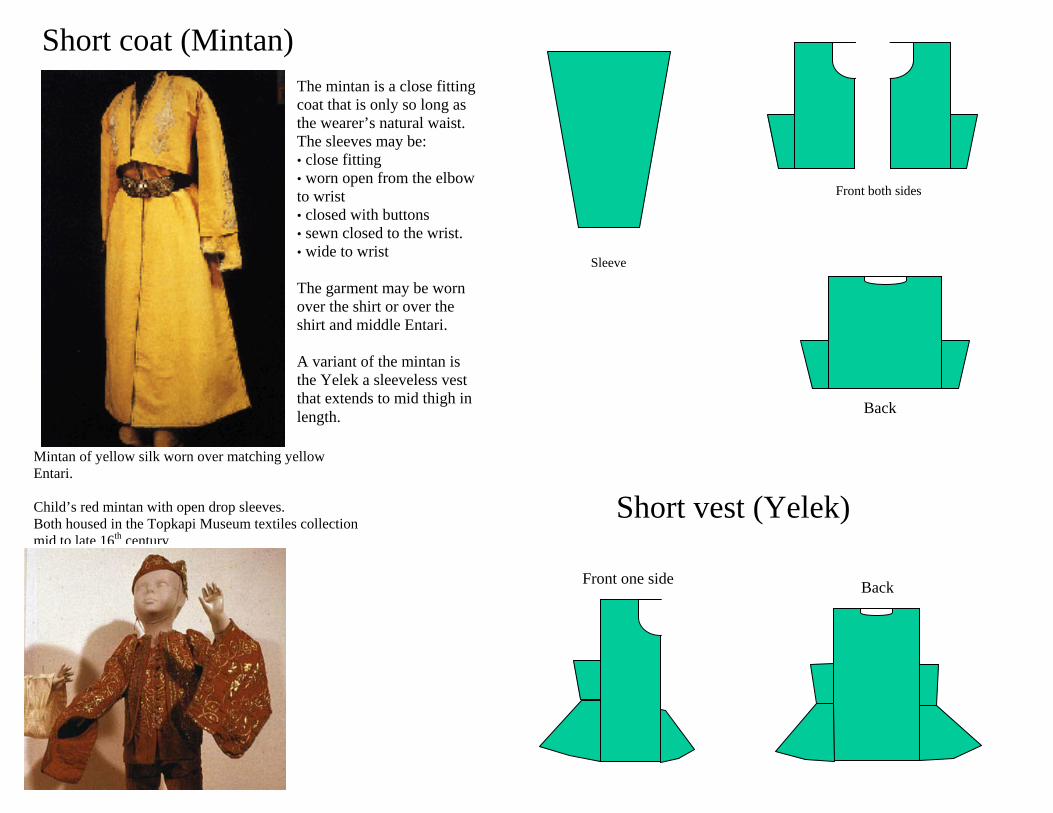
Short coat (Mintan)
The mintan is a close fitting coat that is only so long as the wearer’s natural waist. The sleeves may be: • close fitting • worn open from the elbow to wrist • closed with buttons • sewn closed to the wrist. • wide to wrist The garment may be worn over the shirt or over the shirt and middle Entari. A variant of the mintan is the Yelek a sleeveless vest that extends to mid thigh in length.
Sleeve
Back
Front both sides
Mintan of yellow silk worn over matching yellow Entari. Child’s red mintan with open drop sleeves. Both housed in the Topkapi Museum textiles collection mid to late 16th century
Back Front one side
Short vest (Yelek)
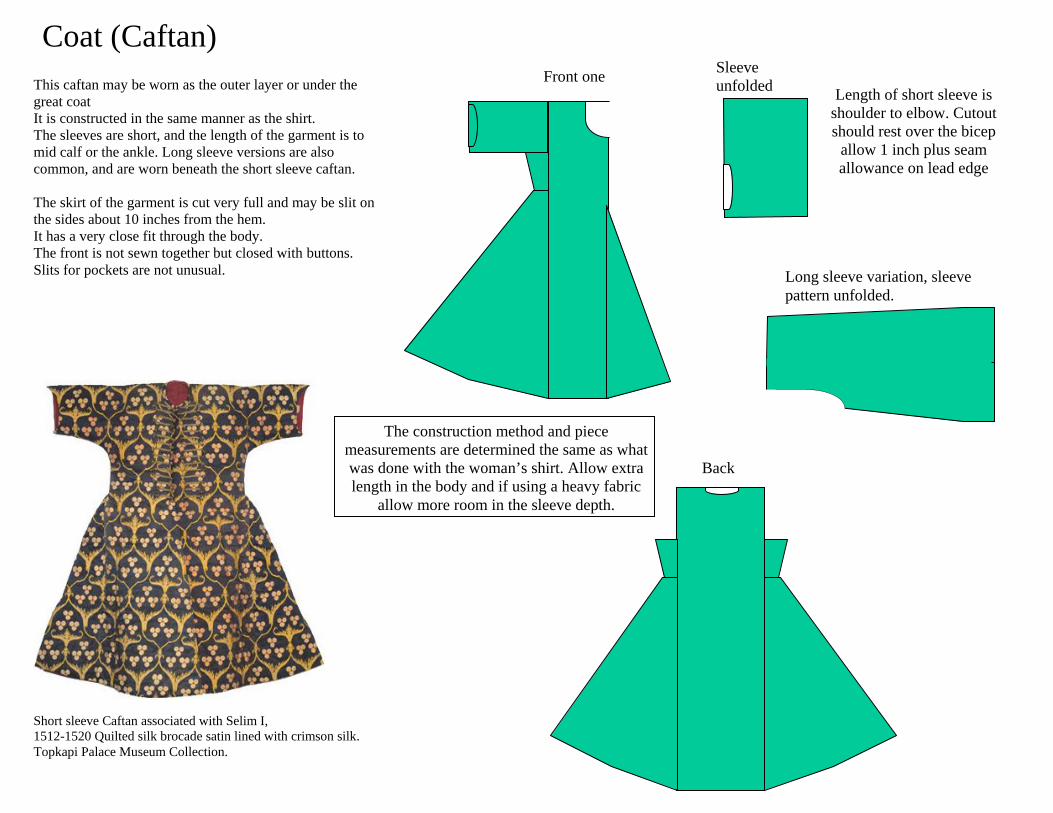
Coat (Caftan)
Short sleeve Caftan associated with Selim I, 1512-1520 Quilted silk brocade satin lined with crimson silk. Topkapi Palace Museum Collection.
This caftan may be worn as the outer layer or under the great coat It is constructed in the same manner as the shirt. The sleeves are short, and the length of the garment is to mid calf or the ankle. Long sleeve versions are also common, and are worn beneath the short sleeve caftan. The skirt of the garment is cut very full and may be slit on the sides about 10 inches from the hem. It has a very close fit through the body. The front is not sewn together but closed with buttons. Slits for pockets are not unusual.
Front one
Back
Sleeve unfolded
Long sleeve variation, sleeve pattern unfolded.
The construction method and piece measurements are determined the same as what was done with the woman’s shirt. Allow extra length in the body and if using a heavy fabric
allow more room in the sleeve depth.
Length of short sleeve is shoulder to elbow. Cutout should rest over the bicep
allow 1 inch plus seam allowance on lead edge
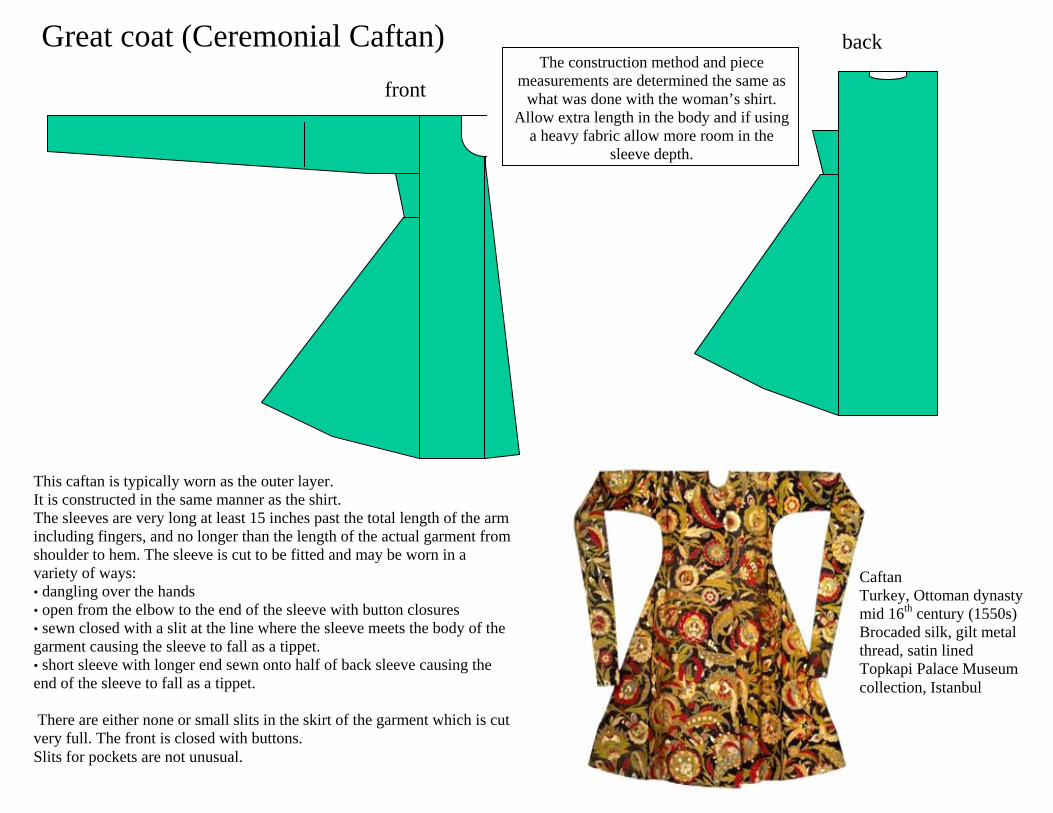
Great coat (Ceremonial Caftan) back
front
This caftan is typically worn as the outer layer. It is constructed in the same manner as the shirt. The sleeves are very long at least 15 inches past the total length of the arm including fingers, and no longer than the length of the actual garment from shoulder to hem. The sleeve is cut to be fitted and may be worn in a variety of ways: • dangling over the hands • open from the elbow to the end of the sleeve with button closures • sewn closed with a slit at the line where the sleeve meets the body of the garment causing the sleeve to fall as a tippet. • short sleeve with longer end sewn onto half of back sleeve causing the end of the sleeve to fall as a tippet. There are either none or small slits in the skirt of the garment which is cut very full. The front is closed with buttons. Slits for pockets are not unusual.
Caftan Turkey, Ottoman dynasty mid 16th century (1550s) Brocaded silk, gilt metal thread, satin lined Topkapi Palace Museum collection, Istanbul
The construction method and piece measurements are determined the same as
what was done with the woman’s shirt. Allow extra length in the body and if using
a heavy fabric allow more room in the sleeve depth.
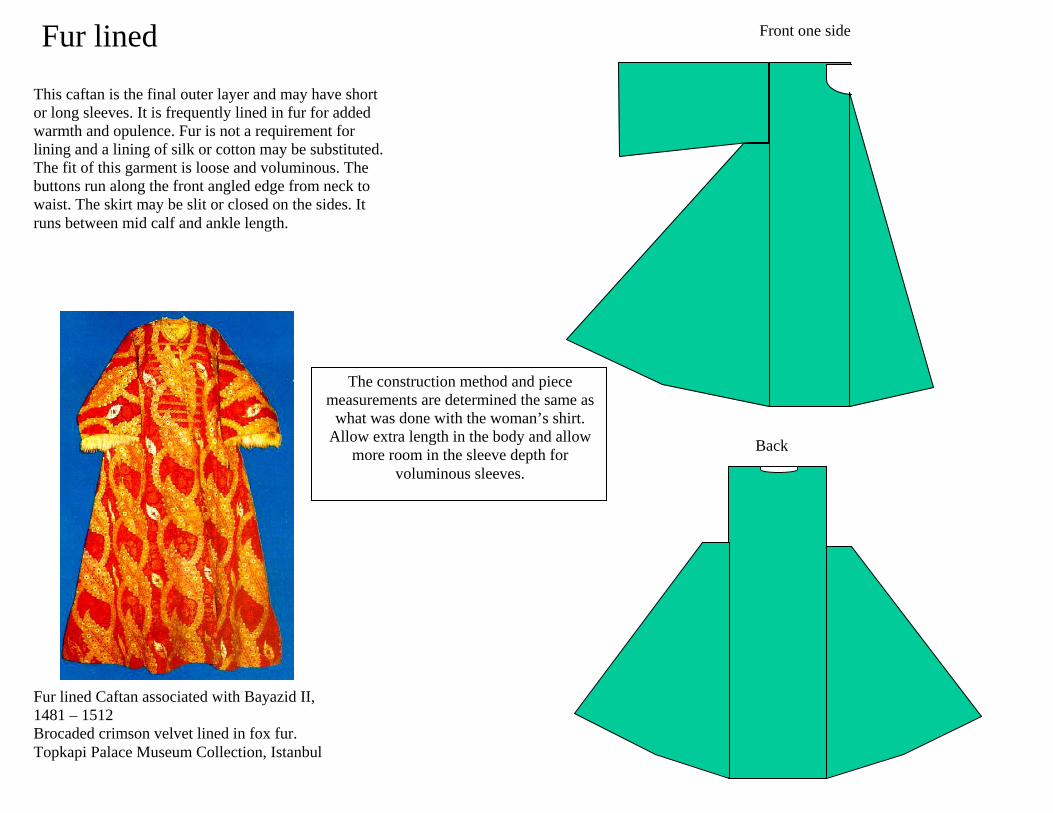
Fur lined
Fur lined Caftan associated with Bayazid II, 1481 – 1512 Brocaded crimson velvet lined in fox fur. Topkapi Palace Museum Collection, Istanbul
Front one side
Back
This caftan is the final outer layer and may have short or long sleeves. It is frequently lined in fur for added warmth and opulence. Fur is not a requirement for lining and a lining of silk or cotton may be substituted. The fit of this garment is loose and voluminous. The buttons run along the front angled edge from neck to waist. The skirt may be slit or closed on the sides. It runs between mid calf and ankle length.
The construction method and piece measurements are determined the same as
what was done with the woman’s shirt. Allow extra length in the body and allow
more room in the sleeve depth for voluminous sleeves.
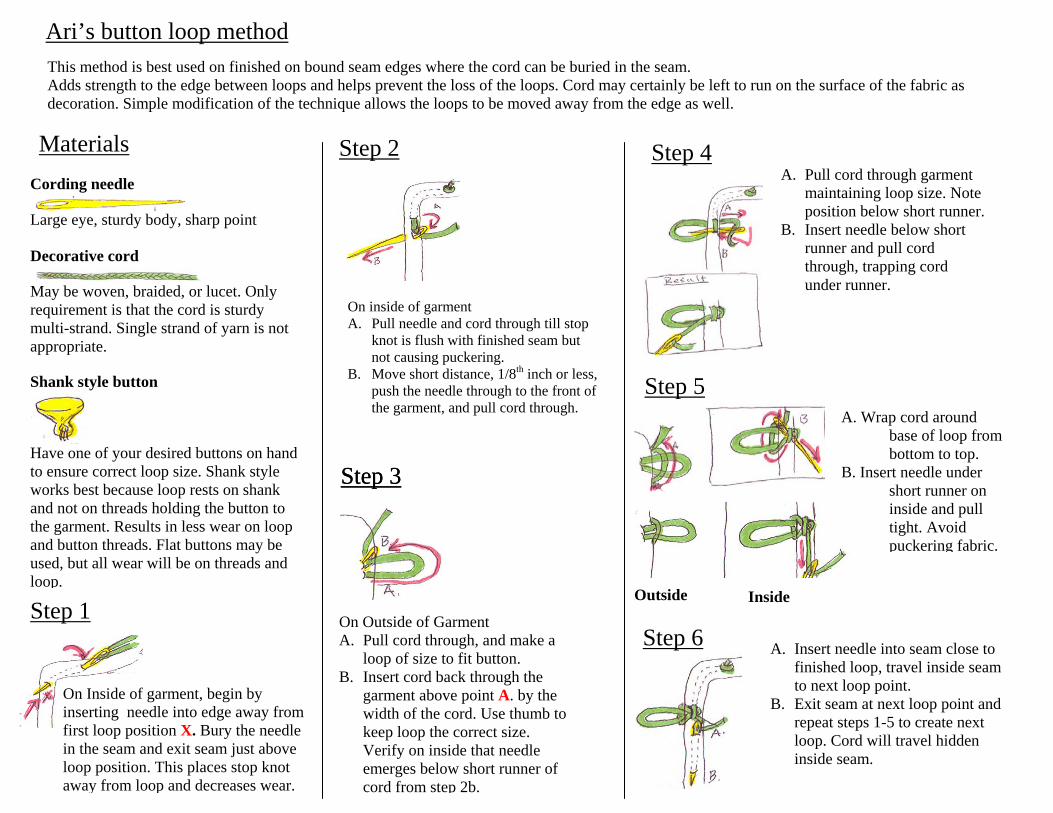
Ari’s button loop method This method is best used on finished on bound seam edges where the cord can be buried in the seam. Adds strength to the edge between loops and helps prevent the loss of the loops. Cord may certainly be left to run on the surface of the fabric as decoration. Simple modification of the technique allows the loops to be moved away from the edge as well.
Materials Cording needle
Large eye, sturdy body, sharp point
Decorative cord
May be woven, braided, or lucet. Only requirement is that the cord is sturdy multi-strand. Single strand of yarn is not appropriate.
Shank style button
Have one of your desired buttons on hand to ensure correct loop size. Shank style works best because loop rests on shank and not on threads holding the button to the garment. Results in less wear on loop and button threads. Flat buttons may be used, but all wear will be on threads and loop.
Step 1
On Inside of garment, begin by inserting needle into edge away from first loop position X. Bury the needle in the seam and exit seam just above loop position. This places stop knot away from loop and decreases wear.
Step 2
On inside of garment A. Pull needle and cord through till stop
knot is flush with finished seam but not causing puckering.
B. Move short distance, 1/8th inch or less, push the needle through to the front of the garment, and pull cord through.
Step 3
On Outside of Garment A. Pull cord through, and make a
loop of size to fit button. B. Insert cord back through the
garment above point A. by the width of the cord. Use thumb to keep loop the correct size. Verify on inside that needle emerges below short runner of cord from step 2b.
Step 3
Step 5
Outside Inside
A. Wrap cord around base of loop from bottom to top.
B. Insert needle under short runner on inside and pull tight. Avoid puckering fabric.
Step 4 A. Pull cord through garment
maintaining loop size. Note position below short runner.
B. Insert needle below short runner and pull cord through, trapping cord under runner.
Step 6 A. Insert needle into seam close to finished loop, travel inside seam to next loop point.
B. Exit seam at next loop point and repeat steps 1-5 to create next loop. Cord will travel hidden inside seam.

Suggested reading to get you started
The Topkapi Saray Museum: Costumes, Embroideries and other Textiles translated, expanded and edited by J.M.Rogers from the original Turkish by Hulye Tezcan and Selma Delibas. Little, Brown and Co. Boston 1986 (ISBN 0-8212-1634-1)
Style and Status: Imperial Costumes from Ottoman Turkey Catalog of exhibition Arthur M Sackler Gallery, Smithsonian Institution October 29, 2005
– January 22, 2006 (ISBN 0-934686-01-7) Ipek The Crescent & the Rose: Imperial Ottoman Silks and Velvets by Nurhan Atasoy, Walter B. Denny, Louise W. Mackie, Hulya Tezcan. Edited by
Julian Raby and Alison Effeny. Azimuth Editions Limited on behalf of TEB Iletisim ve Yayincilik A.S. (ISBN 1-898592-19-5) I also recommend you look at books of period illuminations to see how the garments layer and work together. Persian Miniature Painting, Norah M. Titley, University of Texas Press, Austin, 1984 A Jeweler’s Eye; Islamic arts of the book from the Vever Collection, G. Lowry and S. Nemazee, Arthur M. Sackler Gallery Smithsonian Institution in
association with the University of Washington Press, Seattle and London, 1988 Drawings of the Masters: Persian Drawings from the 14th through the 19th century, B.W. Robinson, Shorewood Publishers Inc., New York, NY, 1965 Persian Painting: Five royal Safavid Manuscripts of the 16th Century, Stuart Carey Welch, George Braziller Pub. New York, NY, 1976 A King’s Book of Kings: the Shah-nameh of Shah Tahmasp, Stuart Carey Welch, Metropolitan Museum of Art, New York, NY, 1972, 1976 Miniatures to Works, Alisher Navoi, Compiled by Hamid Suleiman, Uzbek Academy of Sciences, H.S. Suleimanov Institute of Manuscripts, Publishing
House of the Communist Party of Uzbekistan CC, Tashkent, 1981.