Embed Size (px)
Citation preview
2011 ElementOwner’s Manual
(Unlinked)
This document does not contain hyperlinks and may be formatted for printing instead of web use. This is due to changes
in content and specifications of the vehicle that happen throughout the model year. This manual will be replaced with a
hyperlinked version at the end of the model year.
P/N 00X31-SCV-© 2010 American Honda Motor Co., Inc. - All Rights Reserved 6800
OWNER _________________________________________________________
______________________________________________________________________________
ADDRESS _______________________________________________________STREET
_________________________________ _________________________________ ___________________CITY STATE ZIP CODE
V. I. N. ___________________________________________________________
DELIVERY DATE __________________________________________________(Date sold to original retail purchaser)
DEALER NAME ___________________ DEALER NO. ___________________ADDRESS _______________________________________________________
STREET
_________________________________ _________________________________ ___________________CITY STATE ZIP CODE
OWNER'S SIGNATURE ___________________________________________DEALER'S SIGNATURE ___________________________________________
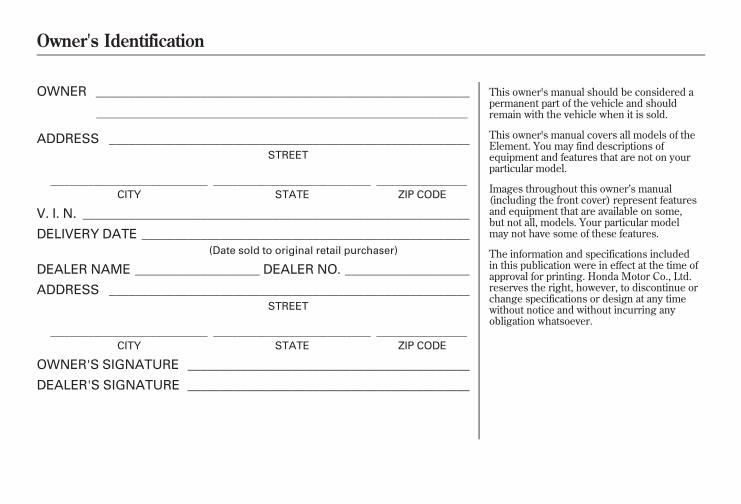
This owner's manual should be considered apermanent part of the vehicle and shouldremain with the vehicle when it is sold.
This owner's manual covers all models of theElement. You may find descriptions ofequipment and features that are not on yourparticular model.
Images throughout this owner’s manual(including the front cover) represent featuresand equipment that are available on some,but not all, models. Your particular modelmay not have some of these features.
The information and specifications includedin this publication were in effect at the time ofapproval for printing. Honda Motor Co., Ltd.reserves the right, however, to discontinue orchange specifications or design at any timewithout notice and without incurring anyobligation whatsoever.
Owner's Identification
10/08/06 08:34:41 11 ELEMENT MMC North America Owner's Man 50 31SCV680 enu
Congratulations! Your selection of a 2011 Honda Element was a wiseinvestment. It will give you years of driving pleasure.One of the best ways to enhance the enjoyment of your new vehicle is to readthis manual. In it, you will learn how to operate its driving controls andconvenience items. Afterwards, keep this owner's manual in your vehicle soyou can refer to it at any time.Several warranties protect your new vehicle. Read the warranty bookletthoroughly so you understand the coverages and are aware of your rightsand responsibilities.Maintaining your vehicle according to the Maintenance Minder™ shown inthe instrument panel helps to keep your driving trouble-free while itpreserves your investment. When your vehicle needs maintenance, keep inmind that your dealer's staff is specially trained in servicing the manysystems unique to your vehicle. Your dealer is dedicated to your satisfactionand will be pleased to answer any questions and concerns.
As you read this manual, you will findinformation that is preceded by a
symbol. This information isintended to help you avoid damage toyour vehicle, other property, or theenvironment.
Introduction
i
10/08/06 08:34:41 11 ELEMENT MMC North America Owner's Man 50 31SCV680 enu
California Proposition 65 Warning
WARNING: This product contains or emits chemicals known to the State of California to cause cancer and birthdefects or other reproductive harm.Event Data RecordersThis vehicle is equipped with one or more devices commonly referred to as event data recorders. Thesedevices record front seat belt use, front passenger seat occupancy, airbag deployment data, and the failure ofany airbag system component. This data belongs to the vehicle owner and may not be accessed by anyone elseexcept as legally required or with the permission of the vehicle owner.Service Diagnostic RecordersThis vehicle is equipped with service-related devices that record information about powertrain performance. The datacan be used to verify emissions law requirements and/or help technicians diagnose and solve service problems. Itmay also be combined with data from other sources for research purposes, but it remains confidential.California Perchlorate Contamination Prevention ActThe airbags, seat belt tensioners, and CR type batteries in this vehicle may contain perchlorate materials - specialhandling may apply. See www.dtsc.ca.gov/hazardouswaste/perchlorate/
Introduction
ii
10/08/06 08:34:41 11 ELEMENT MMC North America Owner's Man 50 31SCV680 enu
Your safety, and the safety of others,is very important. And operating thisvehicle safely is an importantresponsibility.To help you make informeddecisions about safety, we haveprovided operating procedures andother information on labels and inthis manual. This information alertsyou to potential hazards that couldhurt you or others.Of course, it is not practical orpossible to warn you about all thehazards associated with operating ormaintaining your vehicle. You mustuse your own good judgement.
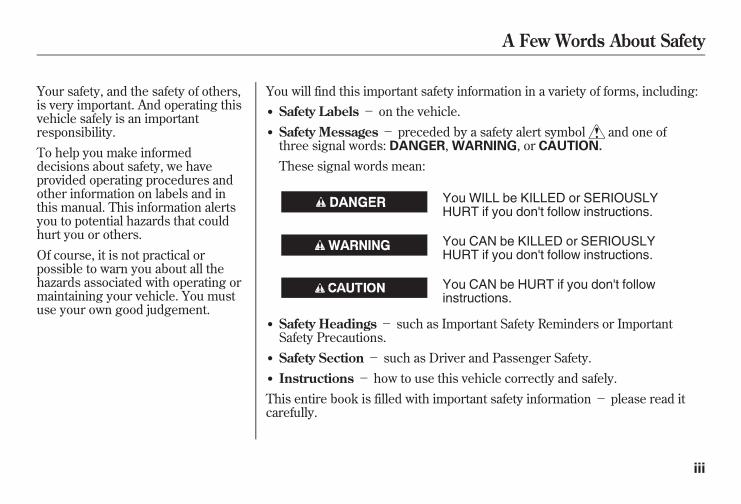
You will find this important safety information in a variety of forms, including:● Safety Labels- on the vehicle.● Safety Messages- preceded by a safety alert symbol and one ofthree signal words: DANGER,WARNING, or CAUTION.
These signal words mean:
You WILL be KILLED or SERIOUSLYHURT if you don't follow instructions.
You CAN be KILLED or SERIOUSLYHURT if you don't follow instructions.
You CAN be HURT if you don't followinstructions.
● Safety Headings- such as Important Safety Reminders or ImportantSafety Precautions.
● Safety Section- such as Driver and Passenger Safety.● Instructions - how to use this vehicle correctly and safely.This entire book is filled with important safety information - please read itcarefully.
A Few Words About Safety
iii
10/08/06 08:34:41 11 ELEMENT MMC North America Owner's Man 50 31SCV680 enu
Your Element has higher ground clearance than a passenger vehicle designed for use only on pavement. Higherground clearance has many advantages for off-highway driving. It allows you to travel over bumps, obstacles, andrough terrain. It also provides good visibility so you can anticipate problems earlier.These advantages come at some cost. Because your vehicle is taller and rides higher off the ground, it has a highcenter of gravity. This means your vehicle can tip or roll over if you make abrupt turns. Utility vehicles have asignificantly higher rollover rate than other types of vehicles. In a rollover crash, an unbelted person is significantlymore likely to die than a person wearing a seat belt. As a reminder, make sure you and your passengers always wearseat belts.For information on how to reduce the risk of rollover, read ‘‘Driving Guidelines’’ on page 158 of this manual and theOff-Highway Driving Guidelines section on page 180. Failure to operate your vehicle correctly might result in loss ofcontrol, a crash, or rollover.
Important Handling Information
iv
10/08/06 08:34:41 11 ELEMENT MMC North America Owner's Man 50 31SCV680 enu
Your Vehicle at a Glance (main controls) .................................................................................................................... 3
Driver and Passenger Safety (seat belts, SRS, and child protection)........................................................................... 5
Instruments and Controls (indicators, gauges, dashboard, and steering column) .................................................... 55
Features (heating and cooling, audio, steering wheel, cruise control, and other convenience items) ...................... 103
Before Driving (fuel, vehicle break-in, and cargo loading)....................................................................................... 141
Driving (engine and transmission operation) ........................................................................................................... 157
Maintenance (minder, fluid checking, minor services, and vehicle storage) ........................................................... 183
Taking Care of the Unexpected (flat tire, jump starting, overheating, and fuses) ................................................... 221
Technical Information (vehicle specifications, tires, and emissions controls) ........................................................ 247
Warranty and Customer Relations (warranty and contact information) ................................................................ 263
Index.............................................................................................................................................................................. I
INDEX
Service Information Summary (fluid capacities and tire pressures) ............................................................... last page
Contents
1
10/08/06 08:34:41 11 ELEMENT MMC North America Owner's Man 50 31SCV680 enu
ContentsA convenient reference to thesections in this manual.Your Vehicle at a GlanceA quick reference to the maincontrols in your vehicle.Driver and Passenger SafetyImportant information about theproper use and care of your vehicle'sseat belts, an overview of thesupplemental restraint system, andvaluable information on how toprotect children with child restraints.Instruments and ControlsExplains the purpose of eachinstrument panel indicator andgauge, and how to use the controlson the dashboard and steeringcolumn.FeaturesHow to operate the heating and airconditioning system, the audiosystem, and other conveniencefeatures.
Before DrivingWhat gasoline to use, how to break-in your new vehicle, and how to loadluggage and other cargo.DrivingThe proper way to start the engine,shift the transmission, and park; pluswhat you need to know if you'replanning to tow a trailer.MaintenanceThe Maintenance Minder™ showsyou when you need to take yourvehicle to the dealer for maintenanceservice. There is also a list of thingsto check and instructions on how tocheck them.Taking Care of the UnexpectedThis section covers several problemsmotorists sometimes experience, anddetails how to handle them.
Technical InformationID numbers, dimensions, capacities,and technical information.Warranty and Customer RelationsA summary of the warrantiescovering your new vehicle, and howto contact us for any reason. Refer toyour warranty manual for detailedinformation.IndexService Information SummaryA summary of the information youneed when you pull up to the fuelpump.
Overview of Contents
2
10/08/06 08:34:41 11 ELEMENT MMC North America Owner's Man 50 31SCV680 enu
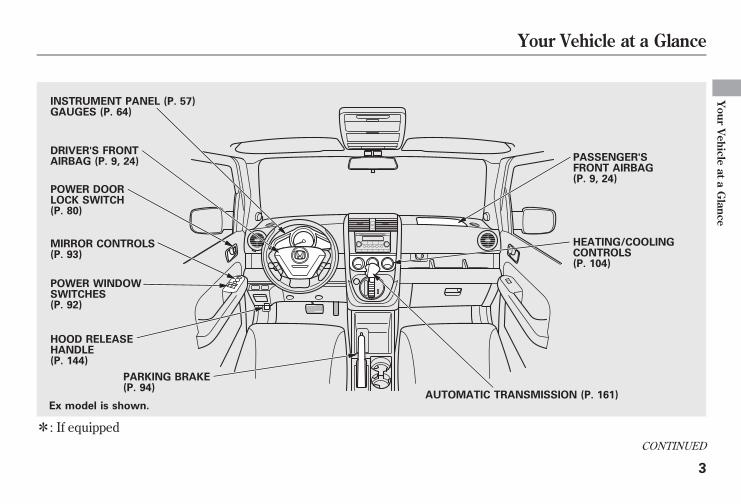
ꭧ: If equipped
POWER DOORLOCK SWITCH(P. 80)
POWER WINDOWSWITCHES(P. 92)
HOOD RELEASEHANDLE(P. 144)
Ex model is shown.AUTOMATIC TRANSMISSION (P. 161)
PARKING BRAKE(P. 94)
HEATING/COOLINGCONTROLS(P. 104)
PASSENGER'SFRONT AIRBAG(P. 9, 24)
DRIVER'S FRONTAIRBAG (P. 9, 24)
INSTRUMENT PANEL (P. 57)GAUGES (P. 64)
MIRROR CONTROLS(P. 93)
CONTINUED
Your Vehicle at a Glance
3
Your
Vehicleat
aGlance
10/08/06 08:34:41 11 ELEMENT MMC North America Owner's Man 50 31SCV680 enu
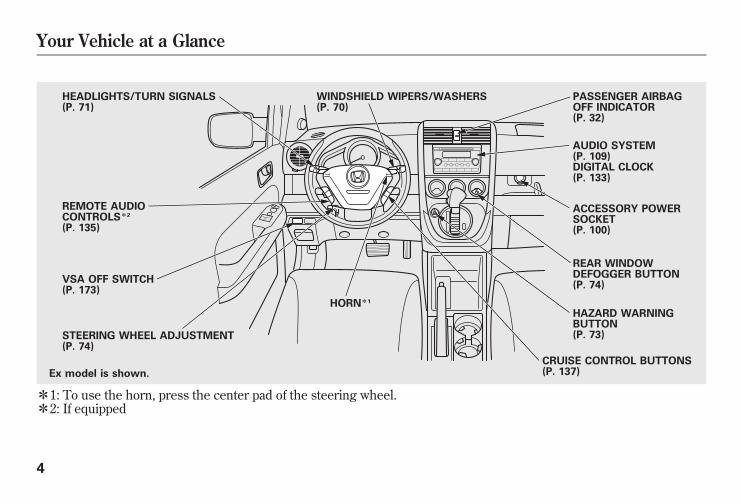
ꭧ1: To use the horn, press the center pad of the steering wheel.ꭧ2: If equipped
HEADLIGHTS/TURN SIGNALS(P. 71)
REMOTE AUDIOCONTROLSꭧ2
(P. 135)
Ex model is shown.
STEERING WHEEL ADJUSTMENT(P. 74)
CRUISE CONTROL BUTTONS(P. 137)
WINDSHIELD WIPERS/WASHERS(P. 70)
PASSENGER AIRBAGOFF INDICATOR(P. 32)
AUDIO SYSTEM(P. 109)DIGITAL CLOCK(P. 133)
REAR WINDOWDEFOGGER BUTTON(P. 74)
ACCESSORY POWERSOCKET(P. 100)
HORNꭧ1
VSA OFF SWITCH(P. 173)
HAZARD WARNINGBUTTON(P. 73)
Your Vehicle at a Glance
4
10/08/06 08:34:41 11 ELEMENT MMC North America Owner's Man 50 31SCV680 enu
This section gives you importantinformation about how to protectyourself and your passengers. It showsyou how to use seat belts. It explainshow your airbags work. And it tells youhow to properly restrain infants andchildren in your vehicle.
Important Safety Precautions............. 6Your Vehicle's Safety Features .......... 7
Seat Belts..................................... 8Airbags ........................................ 9
Protecting Adults and Teens ........... 111. Close and Lock the Doors........ 112. Adjust the Front Seats ............. 113. Adjust the Seat-Backs.............. 124. Adjust the Head Restraints ...... 135. Fasten and Position the Seat
Belts .................................. 146. Maintain a Proper Sitting
Position.............................. 15Advice for Pregnant Women........ 16Additional Safety Precautions ...... 16
Additional Information About YourSeat Belts ............................... 18
Seat Belt System Components ..... 18
Lap/Shoulder Belt ...................... 19Automatic Seat Belt
Tensioners ............................. 20Seat Belt Maintenance ................ 20
Additional Information About YourAirbags .................................. 22
Airbag System Components ........ 22How Your Front Airbags Work.... 24How Your Side Airbags Work...... 28How Your Side Curtain Airbags
Work ..................................... 29How the SRS Indicator Works ..... 30How the Side Airbag Off
Indicator Works ..................... 31How the Passenger Airbag Off
Indicator Works ..................... 32Airbag Service............................ 33Additional Safety Precautions ...... 33
Protecting Children - GeneralGuidelines.............................. 35
All Children Must BeRestrained.............................. 35
All Children Should Sit in a BackSeat ....................................... 36
The Passenger's Front AirbagCan Pose Serious Risks........... 36
If You Must Drive with SeveralChildren ................................ 38
If a Child Requires CloseAttention................................ 38
Additional Safety Precautions ...... 39Protecting Infants and Small
Children................................. 40Protecting Infants ....................... 40Protecting Small Children ........... 41
Selecting a Child Seat ..................... 42Installing a Child Seat ..................... 43Installing a Child Seat with
LATCH .................................. 44Installing a Child Seat with a
Lap/Shoulder Belt .................. 46Installing a Child Seat with a
Tether ................................... 48Protecting Larger Children ............. 49Checking Seat Belt Fit ................ 49Using a Booster Seat................... 50When Can a Larger Child Sit in
Front ..................................... 50Additional Safety Precautions ...... 51
Carbon Monoxide Hazard ............... 52Safety Labels .................................. 53
Driver and Passenger Safety
5
Driver
andPassenger
Safety
10/08/06 08:34:41 11 ELEMENT MMC North America Owner's Man 50 31SCV680 enu
You'll find many safetyrecommendations throughout thissection, and throughout this manual.The recommendations on this pageare the ones we consider to be themost important.Always Wear Your Seat BeltA seat belt is your best protection in alltypes of collisions. Airbags aredesigned to supplement seat belts, notreplace them. So even though yourvehicle is equipped with airbags, makesure you and your passengers alwayswear your seat belts, and wear themproperly (see page 14).Restrain All ChildrenChildren age 12 and under should rideproperly restrained in a back seat, notthe front seat. Infants and smallchildren should be restrained in achild seat. Larger children should usea booster seat and a lap/shoulder beltuntil they can use the belt properlywithout a booster seat (see pages35 - 51).
Be Aware of Airbag HazardsWhile airbags can save lives, they cancause serious or fatal injuries tooccupants who sit too close to them, orare not properly restrained. Infants,young children, and short adults are atthe greatest risk. Be sure to follow allinstructions and warnings in thismanual.Don't Drink and DriveAlcohol and driving don't mix. Even onedrink can reduce your ability to respondto changing conditions, and yourreaction time gets worse with everyadditional drink. So don't drink anddrive, and don't let your friends drinkand drive, either.Pay Appropriate Attention to theTask of Driving SafelyEngaging in mobile phone conversationor other activities that keep you frompaying close attention to the road, othervehicles and pedestrians could lead to acrash. Remember, situations canchange quickly, and only you candecide when it is safe to divert attentionaway from driving.
Control Your SpeedExcessive speed is a major factor incrash injuries and deaths. Generally, thehigher the speed, the greater the risk,but serious injuries can also occur atlower speeds. Never drive faster than issafe for current conditions, regardlessof the maximum speed posted.Keep Your Vehicle in Safe ConditionHaving a tire blowout or a mechanicalfailure can be extremely hazardous. Toreduce the possibility of such problems,check your tire pressures and conditionfrequently, and perform all regularlyscheduled maintenance (see page 185).
Important Safety Precautions
6
10/08/06 08:34:41 11 ELEMENT MMC North America Owner's Man 50 31SCV680 enu
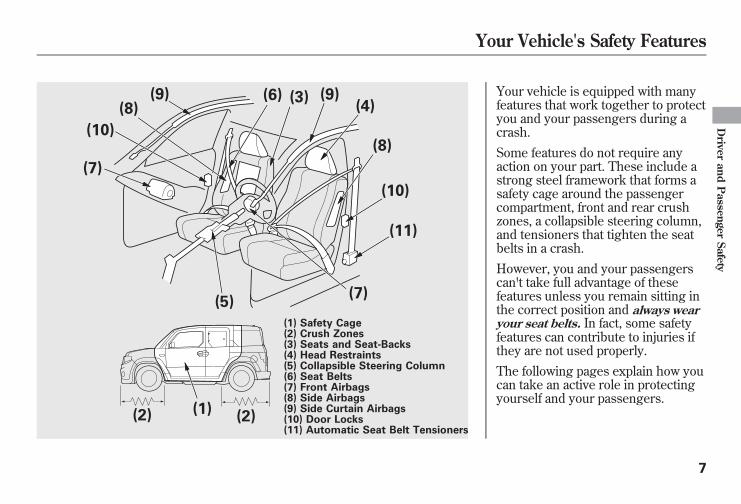
Your vehicle is equipped with manyfeatures that work together to protectyou and your passengers during acrash.Some features do not require anyaction on your part. These include astrong steel framework that forms asafety cage around the passengercompartment, front and rear crushzones, a collapsible steering column,and tensioners that tighten the seatbelts in a crash.However, you and your passengerscan't take full advantage of thesefeatures unless you remain sitting inthe correct position and always wearyour seat belts. In fact, some safetyfeatures can contribute to injuries ifthey are not used properly.The following pages explain how youcan take an active role in protectingyourself and your passengers.
(5)(7)
(11)
(8)
(3)(4)
(9)
(1)(2)
(8)
(10)
(2)
(1) Safety Cage(2) Crush Zones(3) Seats and Seat-Backs(4) Head Restraints(5) Collapsible Steering Column(6) Seat Belts(7) Front Airbags(8) Side Airbags(9) Side Curtain Airbags(10) Door Locks(11) Automatic Seat Belt Tensioners
(6)
(7)
(10)
(9)
Your Vehicle's Safety Features
7
Driver
andPassenger
Safety
10/08/06 08:34:41 11 ELEMENT MMC North America Owner's Man 50 31SCV680 enu
Seat BeltsYour vehicle is equipped with seatbelts in all seating positions.Your seat belt system also includesan indicator on the instrument paneland a beeper to remind you and yourpassengers to fasten your seat belts.Why Wear Seat BeltsSeat belts are the single mosteffective safety device for adults andlarger children. (Infants and smallerchildren must be properly restrainedin child seats.)Not wearing a seat belt properlyincreases the chance of seriousinjury or death in a crash, eventhough your vehicle has airbags.In addition, most states require youto wear seat belts.
Not wearing a seat belt properlyincreases the chance of seriousinjury or death in a crash, eventhough your vehicle hasairbags.
Be sure you and yourpassengers always wear seatbelts and wear them properly.
When properly worn, seat belts:● Keep you connected to the vehicleso you can take advantage of thevehicle's built-in safety features.
● Help protect you in almost everytype of crash, including:– frontal impacts– side impacts– rear impacts– rollovers
● Help keep you from being thrownagainst the inside of the vehicleand against other occupants.
● Keep you from being thrown out ofthe vehicle.
● Help keep you in a good positionshould the airbags ever deploy. Agood position reduces the risk ofinjury from an inflating airbag andallows you to get the bestadvantage from the airbag.
Of course, seat belts cannotcompletely protect you in everycrash. But in most cases, seat beltscan reduce your risk of seriousinjury.What You Should Do:Always wear your seat belt, andmake sure you wear it properly.
Your Vehicle's Safety Features
8
10/08/06 08:34:41 11 ELEMENT MMC North America Owner's Man 50 31SCV680 enu
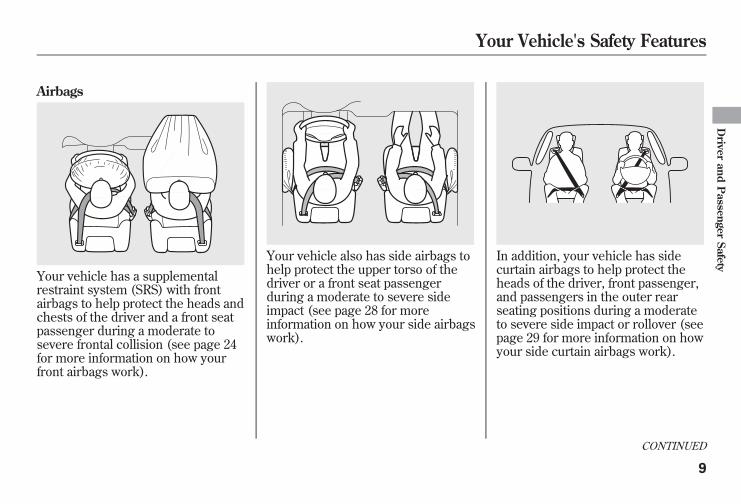
Airbags
Your vehicle has a supplementalrestraint system (SRS) with frontairbags to help protect the heads andchests of the driver and a front seatpassenger during a moderate tosevere frontal collision (see page 24for more information on how yourfront airbags work).
Your vehicle also has side airbags tohelp protect the upper torso of thedriver or a front seat passengerduring a moderate to severe sideimpact (see page 28 for moreinformation on how your side airbagswork).
In addition, your vehicle has sidecurtain airbags to help protect theheads of the driver, front passenger,and passengers in the outer rearseating positions during a moderateto severe side impact or rollover (seepage 29 for more information on howyour side curtain airbags work).
CONTINUED
Your Vehicle's Safety Features
9
Driver
andPassenger
Safety
10/08/06 08:34:41 11 ELEMENT MMC North America Owner's Man 50 31SCV680 enu
The most important things you needto know about your airbags are:● Airbags do not replace seat belts.They are designed to supplementthe seat belts.
● Airbags offer no protection in rearimpacts, or minor frontal or sidecollisions.
● Airbags can pose serious hazards.To do their job, airbags mustinflate with tremendous force. Sowhile airbags help save lives, theycan cause minor injuries or moreserious or even fatal injuries ifoccupants are not properlyrestrained or sitting properly.
What you should do: Always wearyour seat belt properly, and situpright and as far back from thesteering wheel as possible whileallowing full control of the vehicle. Afront passenger should move theirseat as far back from the dashboardas possible.
The rest of this section gives moredetailed information about how youcan maximize your safety.Remember however, that no safetysystem can prevent all injures ordeaths that can occur in a severecrash, even when seat belts areproperly worn and the airbagsdeploy.
Your Vehicle's Safety Features
10
10/08/06 08:34:41 11 ELEMENT MMC North America Owner's Man 50 31SCV680 enu
IntroductionThe following pages provideinstructions on how to properlyprotect the driver, adult passengers,and teenage children who are largeenough and mature enough to driveor ride in the front.See pages 35 - 51 for importantguidelines on how to properly protectinfants, small children, and largerchildren who ride in your vehicle.
1. Close and Lock the DoorsAfter everyone has entered thevehicle, be sure the doors, the hatch,and the tailgate are closed andlocked.
Your vehicle has a door andtailgate open indicator on
the instrument panel to indicatewhen a specific door, the tailgate orthe hatch is not tightly closed.Locking the doors, the hatch, and thetailgate reduces the chance ofsomeone being thrown out of thevehicle during a crash, and it helpsprevent passengers from accidentallyopening a door, the hatch, or thetailgate and falling out.Locking the doors, the hatch, or thetailgate also helps prevent anoutsider from unexpectedly openinga door when you come to a stop.See page 80 for how to lock thedoors, and page 61 for how the doorand tailgate indicator system works.
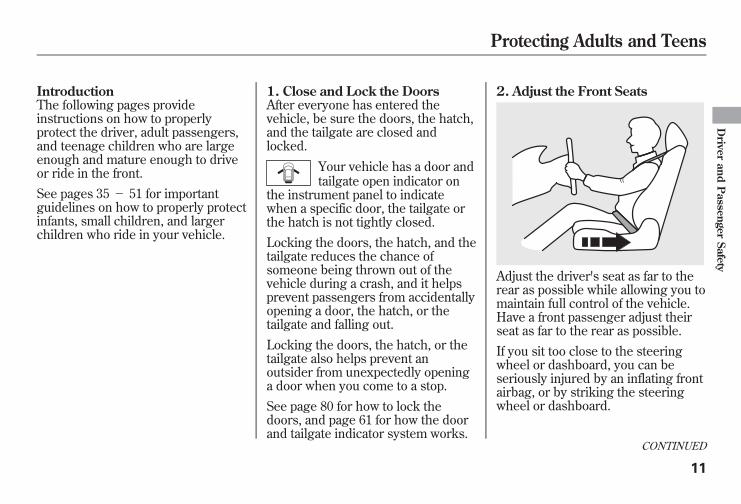
2. Adjust the Front Seats
Adjust the driver's seat as far to therear as possible while allowing you tomaintain full control of the vehicle.Have a front passenger adjust theirseat as far to the rear as possible.If you sit too close to the steeringwheel or dashboard, you can beseriously injured by an inflating frontairbag, or by striking the steeringwheel or dashboard.
CONTINUED
Protecting Adults and Teens
11
Driver
andPassenger
Safety
10/08/06 08:34:41 11 ELEMENT MMC North America Owner's Man 50 31SCV680 enu
The National Highway Traffic SafetyAdministration recommends thatdrivers allow at least 10 inches (25cm) between the center of thesteering wheel and the chest. Inaddition to adjusting the seat, youcan adjust the steering wheel up anddown (see page 74).If you cannot get far enough awayfrom the steering wheel and stillreach the controls, we recommendthat you investigate whether sometype of adaptive equipment may help.
Sitting too close to a frontairbag can result in seriousinjury or death if the frontairbags inflate.
Always sit as far back from thefront airbags as possible.
Once a seat is adjusted correctly,rock it back and forth to make sure itis locked in position.See page 83 for how to adjust thefront seats.
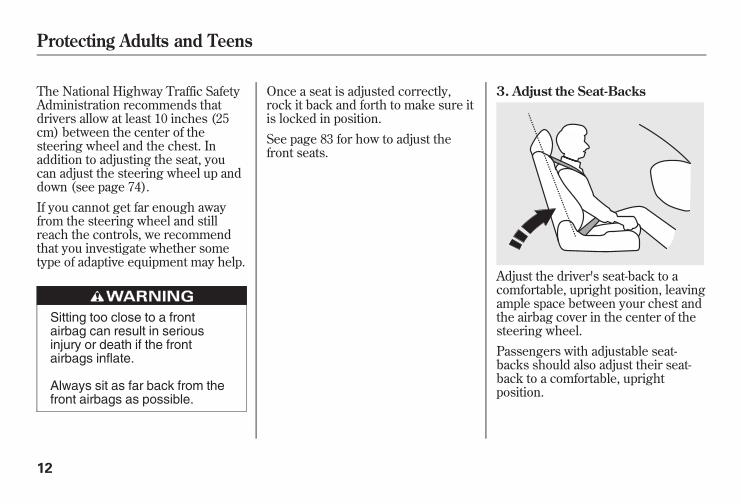
3. Adjust the Seat-Backs
Adjust the driver's seat-back to acomfortable, upright position, leavingample space between your chest andthe airbag cover in the center of thesteering wheel.Passengers with adjustable seat-backs should also adjust their seat-back to a comfortable, uprightposition.
Protecting Adults and Teens
12
10/08/06 08:34:41 11 ELEMENT MMC North America Owner's Man 50 31SCV680 enu
Reclining the seat-back too farcan result in serious injury ordeath in a crash.
Adjust the seat-back to anupright position, and sit wellback in the seat.
Reclining a seat-back so that theshoulder part of the belt no longerrests against the occupant's chestreduces the protective capability ofthe belt. It also increases the chanceof sliding under the belt in a crashand being seriously injured. Thefarther a seat-back is reclined, thegreater the risk of injury.See page 83 for how to adjust theseat-backs.
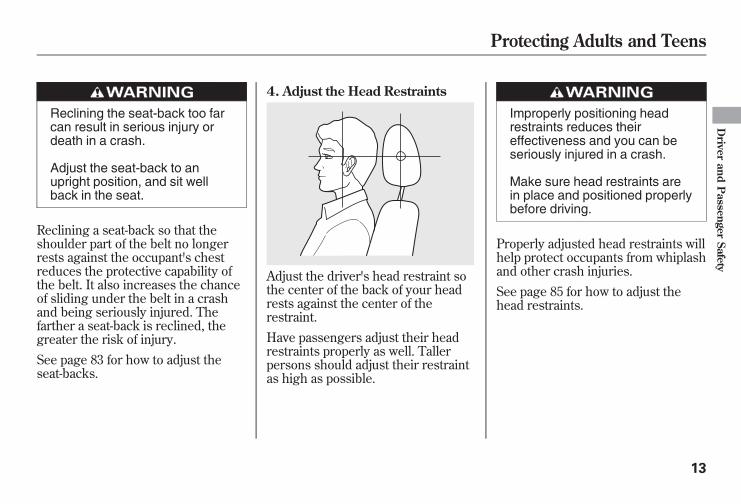
4. Adjust the Head Restraints
Adjust the driver's head restraint sothe center of the back of your headrests against the center of therestraint.Have passengers adjust their headrestraints properly as well. Tallerpersons should adjust their restraintas high as possible.
Improperly positioning headrestraints reduces theireffectiveness and you can beseriously injured in a crash.
Make sure head restraints arein place and positioned properlybefore driving.
Properly adjusted head restraints willhelp protect occupants from whiplashand other crash injuries.See page 85 for how to adjust thehead restraints.
Protecting Adults and Teens
13
Driver
andPassenger
Safety
10/08/06 08:34:41 11 ELEMENT MMC North America Owner's Man 50 31SCV680 enu
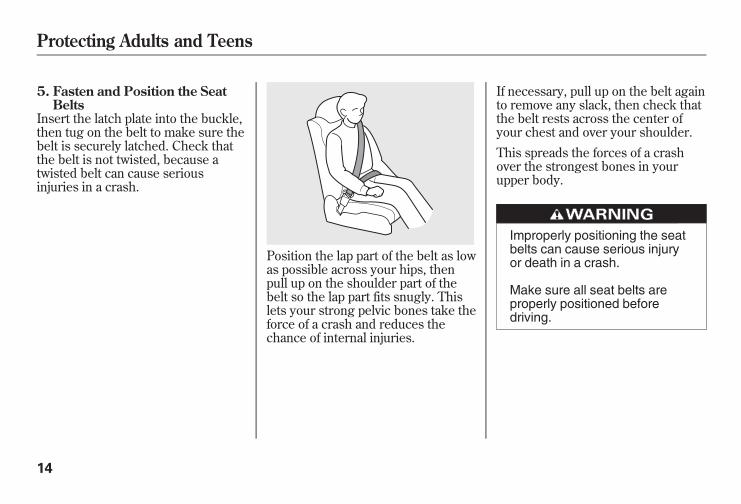
5. Fasten and Position the SeatBelts
Insert the latch plate into the buckle,then tug on the belt to make sure thebelt is securely latched. Check thatthe belt is not twisted, because atwisted belt can cause seriousinjuries in a crash.
Position the lap part of the belt as lowas possible across your hips, thenpull up on the shoulder part of thebelt so the lap part fits snugly. Thislets your strong pelvic bones take theforce of a crash and reduces thechance of internal injuries.
If necessary, pull up on the belt againto remove any slack, then check thatthe belt rests across the center ofyour chest and over your shoulder.This spreads the forces of a crashover the strongest bones in yourupper body.
Improperly positioning the seatbelts can cause serious injuryor death in a crash.
Make sure all seat belts areproperly positioned beforedriving.
Protecting Adults and Teens
14
10/08/06 08:34:41 11 ELEMENT MMC North America Owner's Man 50 31SCV680 enu
Never place the shoulder portion of alap/shoulder belt under your arm orbehind your back. This could causevery serious injuries in a crash.If a seat belt does not seem to workproperly, it may not protect theoccupant in a crash.No one should sit in a seat with aninoperative seat belt. Using a seatbelt that is not working properly canresult in serious injury or death.Have your dealer check the belt assoon as possible.See page 18 for additionalinformation about your seat belts andhow to take care of them.
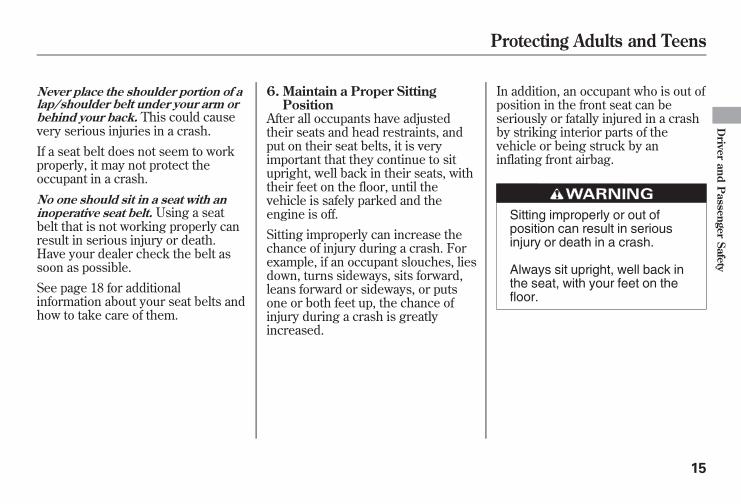
6. Maintain a Proper SittingPosition
After all occupants have adjustedtheir seats and head restraints, andput on their seat belts, it is veryimportant that they continue to situpright, well back in their seats, withtheir feet on the floor, until thevehicle is safely parked and theengine is off.Sitting improperly can increase thechance of injury during a crash. Forexample, if an occupant slouches, liesdown, turns sideways, sits forward,leans forward or sideways, or putsone or both feet up, the chance ofinjury during a crash is greatlyincreased.
In addition, an occupant who is out ofposition in the front seat can beseriously or fatally injured in a crashby striking interior parts of thevehicle or being struck by aninflating front airbag.
Sitting improperly or out ofposition can result in seriousinjury or death in a crash.
Always sit upright, well back inthe seat, with your feet on thefloor.
Protecting Adults and Teens
15
Driver
andPassenger
Safety
10/08/06 08:34:41 11 ELEMENT MMC North America Owner's Man 50 31SCV680 enu
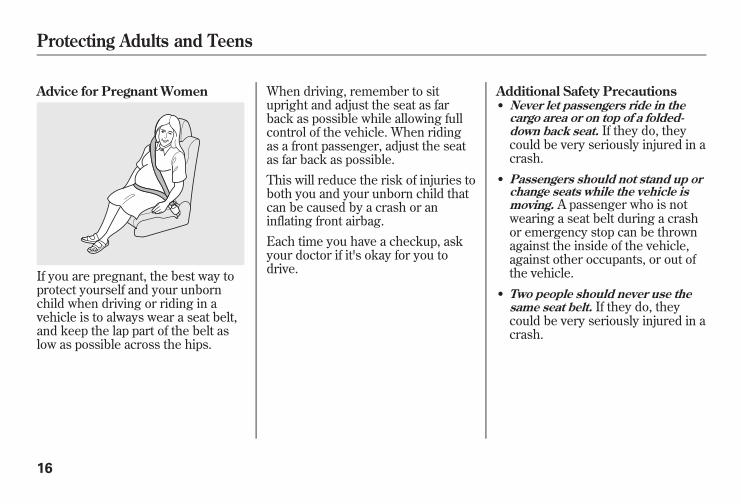
Advice for Pregnant Women
If you are pregnant, the best way toprotect yourself and your unbornchild when driving or riding in avehicle is to always wear a seat belt,and keep the lap part of the belt aslow as possible across the hips.
When driving, remember to situpright and adjust the seat as farback as possible while allowing fullcontrol of the vehicle. When ridingas a front passenger, adjust the seatas far back as possible.This will reduce the risk of injuries toboth you and your unborn child thatcan be caused by a crash or aninflating front airbag.Each time you have a checkup, askyour doctor if it's okay for you todrive.
Additional Safety Precautions● Never let passengers ride in thecargo area or on top of a folded-down back seat. If they do, theycould be very seriously injured in acrash.
● Passengers should not stand up orchange seats while the vehicle ismoving. A passenger who is notwearing a seat belt during a crashor emergency stop can be thrownagainst the inside of the vehicle,against other occupants, or out ofthe vehicle.
● Two people should never use thesame seat belt. If they do, theycould be very seriously injured in acrash.
Protecting Adults and Teens
16
10/08/06 08:34:41 11 ELEMENT MMC North America Owner's Man 50 31SCV680 enu
● Do not put any accessories on seatbelts. Devices intended to improveoccupant comfort or reposition theshoulder part of a seat belt canreduce the protective capability ofthe belt and increase the chance ofserious injury in a crash.
● Do not place hard or sharp objectsbetween yourself and a frontairbag. Carrying hard or sharpobjects on your lap, or driving witha pipe or other sharp object in yourmouth, can result in injuries if yourfront airbag inflates.
● Do not attach or place objects onthe front airbag covers. Objects onthe covers marked ‘‘SRS AIRBAG’’could interfere with the properoperation of the airbags or bepropelled inside the vehicle andhurt someone if the airbags inflate.
● Do not attach hard objects on ornear a door. If a side airbag or aside curtain airbag inflates, a cupholder or other hard objectattached on or near the door couldbe propelled inside the vehicle andhurt someone.
● Keep your hands and arms awayfrom the airbag covers. If yourhands or arms are close to anairbag cover, they could be injuredif the front airbag inflates.
● Do not cover or replace front seat-back covers without consultingyour dealer. Improperly replacingor covering front seat-back coverscan prevent your side airbags frominflating during a side impact.
Protecting Adults and Teens
17
Driver
andPassenger
Safety
10/08/06 08:34:41 11 ELEMENT MMC North America Owner's Man 50 31SCV680 enu
Seat Belt System ComponentsYour seat belt system includes lap/shoulder belts in all four seatingpositions. The front seat belts arealso equipped with automatic seatbelt tensioners.
The seat belt systemincludes an indicator on the
instrument panel and a beeper toremind you and your passengers tofasten your seat belts.This system monitors the front seatbelts. If you turn the ignition switchto the ON (II) position before yourseat belt is fastened, the beeper willsound and the indicator will flash. Ifyour seat belt is not fastened beforethe beeper stops, the indicator willstop flashing but remain on.If a front passenger does not fastentheir seat belt, the indicator willcome on about 6 seconds after theignition switch is turned to the ON(II) position.
If either the driver or a frontpassenger does not fasten their seatbelt while driving, the beeper willsound and the indicator will flashagain at regular intervals.When no one is sitting in the frontpassenger's seat, or a child or smalladult is riding there, the indicatorshould not come on and the beepershould not sound.
If the indicator comes on or thebeeper sounds when the driver's seatbelt is latched and there is no frontseat passenger and no items on thefront seat, something may beinterfering with the monitoringsystem. Look for and remove:● Any items under the frontpassenger's seat.
● Any object(s) hanging on the seator in the seat-back pocket.
● Any object(s) touching the rear ofthe seat-back.
If no obstructions are found, haveyour vehicle checked by a dealer.
Additional Information About Your Seat Belts
18
10/08/06 08:34:41 11 ELEMENT MMC North America Owner's Man 50 31SCV680 enu
Lap/Shoulder BeltThe lap/shoulder belt goes over yourshoulder, across your chest, andacross your hips.To fasten the belt, insert the latchplate into the buckle, then tug on thebelt to make sure the buckle islatched (see page 14 for how toproperly position the belt).
To unlock the belt, press the redPRESS button on the buckle. Guidethe belt across your body so that itretracts completely. After exiting thevehicle, be sure the belt is out of theway and will not get closed in thedoor.All seat belts have an emergencylocking retractor. In normal driving,the retractor lets you move freely inyour seat while it keeps some tensionon the belt. During a collision orsudden stop, the retractorautomatically locks the belt to helprestrain your body.
The seat belts in all positions exceptthe driver's have a lockable retractorthat must be activated to secure achild seat (see page 46).If the shoulder part of the belt ispulled all the way out, the lockableretractor will activate. The belt willretract, but it will not allow thepassenger to move freely.To deactivate the lockable retractor,unlatch the buckle and let the seatbelt fully retract. To refasten the seatbelt, pull it out only as far as needed.
Additional Information About Your Seat Belts
19
Driver
andPassenger
Safety
10/08/06 08:34:41 11 ELEMENT MMC North America Owner's Man 50 31SCV680 enu
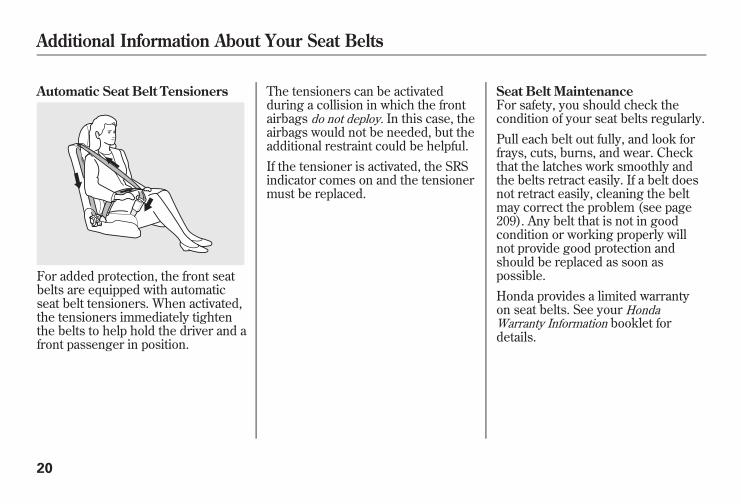
Automatic Seat Belt Tensioners
For added protection, the front seatbelts are equipped with automaticseat belt tensioners. When activated,the tensioners immediately tightenthe belts to help hold the driver and afront passenger in position.
The tensioners can be activatedduring a collision in which the frontairbags do not deploy. In this case, theairbags would not be needed, but theadditional restraint could be helpful.If the tensioner is activated, the SRSindicator comes on and the tensionermust be replaced.
Seat Belt MaintenanceFor safety, you should check thecondition of your seat belts regularly.Pull each belt out fully, and look forfrays, cuts, burns, and wear. Checkthat the latches work smoothly andthe belts retract easily. If a belt doesnot retract easily, cleaning the beltmay correct the problem (see page209). Any belt that is not in goodcondition or working properly willnot provide good protection andshould be replaced as soon aspossible.Honda provides a limited warrantyon seat belts. See your HondaWarranty Information booklet fordetails.
Additional Information About Your Seat Belts
20
10/08/06 08:34:41 11 ELEMENT MMC North America Owner's Man 50 31SCV680 enu
If a seat belt is worn during a crash,it must be replaced by your dealer. Abelt that has been worn during acrash may not provide the same levelof protection in a subsequent crash.The dealer should also inspect theanchors for damage and replacethem if needed. If the automatic seatbelt tensioners activate during acrash, they must be replaced.
Not checking or maintainingseat belts can result in seriousinjury or death if the seat beltsdo not work properly whenneeded.
Check your seat belts regularlyand have any problemcorrected as soon as possible.
Additional Information About Your Seat Belts
21
Driver
andPassenger
Safety
10/08/06 08:34:41 11 ELEMENT MMC North America Owner's Man 50 31SCV680 enu
Airbag System Components
(12)
(1)
(3)
(5)
(6)
(10)
(4)
(14)
(15)
(7)(4)
(5)(11)
(13)
(2)(9) (8)
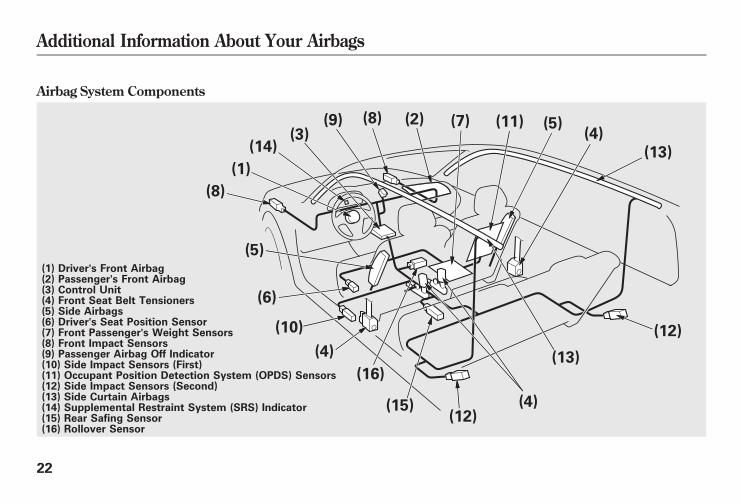
(1) Driver's Front Airbag(2) Passenger's Front Airbag(3) Control Unit(4) Front Seat Belt Tensioners(5) Side Airbags(6) Driver's Seat Position Sensor(7) Front Passenger's Weight Sensors(8) Front Impact Sensors(9) Passenger Airbag Off Indicator(10) Side Impact Sensors (First)(11) Occupant Position Detection System (OPDS) Sensors(12) Side Impact Sensors (Second)(13) Side Curtain Airbags(14) Supplemental Restraint System (SRS) Indicator(15) Rear Safing Sensor(16) Rollover Sensor
(13)
(8)
(12)
(16)
(4)
Additional Information About Your Airbags
22
10/08/06 08:34:41 11 ELEMENT MMC North America Owner's Man 50 31SCV680 enu
Your airbag system includes:● Two SRS (supplemental restraintsystem) front airbags. The driver'sairbag is stored in the center of thesteering wheel; the frontpassenger's airbag is stored in thedashboard. Both are marked ‘‘SRSAIRBAG’’ (see page 24).
● Two side airbags, one for thedriver and one for a frontpassenger. The airbags are storedin the outer edges of the seat-backs. Both are marked ‘‘SIDEAIRBAG’’ (see page 28).
● Two side curtain airbags, one foreach side of the vehicle. Theairbags are stored in the ceiling,above the side windows. The frontand rear pillars are marked ‘‘SIDECURTAIN AIRBAG’’ (see page 29).
● Automatic front seat belttensioners (see page 20).
● Sensors that can detect a moderateto severe front impact, side impact,or rollover.
● Sensors that can detect whether achild is in the passenger's sideairbag path and signal the controlunit to turn the airbag off (seepage 29).
● Sensors that can detect whetherthe driver's seat belt and the frontpassenger's seat belt are latched orunlatched (see page 18).
● A rollover sensor that can detect ifyour vehicle is about to roll overand signal the control unit todeploy both side curtain airbags(see page 29).
● A driver's seat position sensor thatmonitors the distance of the seatfrom the front airbag. If the seat istoo far forward, the airbag willinflate with less force (see page26).
● Weight sensors that monitor theweight on the front passenger'sseat. If the weight is about 65 lbs(29 kg) or less (the weight of aninfant or small child), thepassenger's front airbag will beturned off (see page 26).
● A sophisticated electronic systemthat continually monitors andrecords information about thesensors, the control unit, theairbag activators, the seat belttensioners, and driver and frontpassenger seat belt use when theignition switch is in the ON (II)position.
CONTINUED
Additional Information About Your Airbags
23
Driver
andPassenger
Safety
10/08/06 08:34:41 11 ELEMENT MMC North America Owner's Man 50 31SCV680 enu
● An indicator on the instrumentpanel that alerts you to a possibleproblem with your airbag systemcomponents (see page 30).
● An indicator on the instrumentpanel that alerts you that thepassenger's side airbag has beenturned off (see page 31).
● An indicator on the dashboard thatalerts you that the passenger'sfront airbag has been turned off(see page 32).
● Emergency backup power in caseyour vehicle's electrical system isdisconnected in a crash.
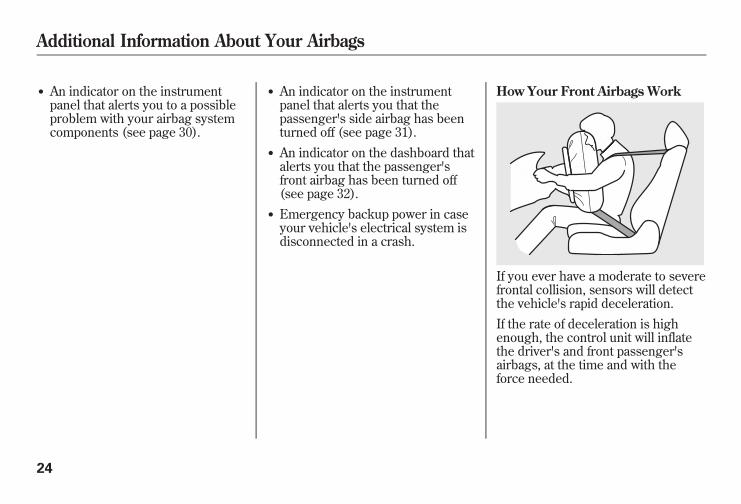
How Your Front Airbags Work
If you ever have a moderate to severefrontal collision, sensors will detectthe vehicle's rapid deceleration.If the rate of deceleration is highenough, the control unit will inflatethe driver's and front passenger'sairbags, at the time and with theforce needed.
Additional Information About Your Airbags
24
10/08/06 08:34:41 11 ELEMENT MMC North America Owner's Man 50 31SCV680 enu
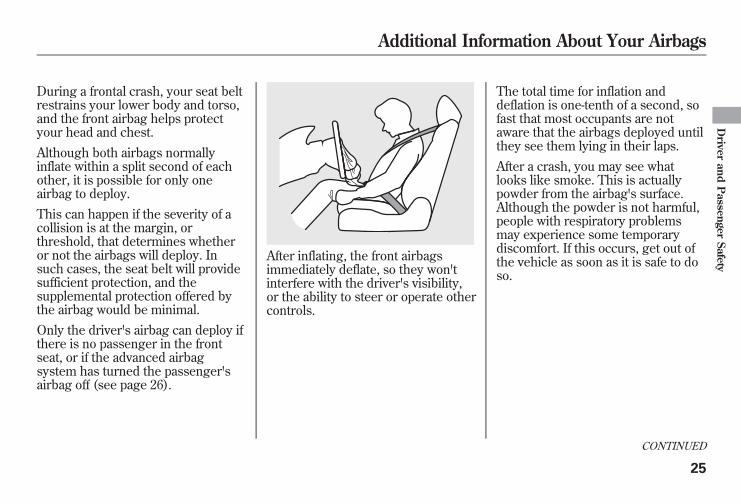
During a frontal crash, your seat beltrestrains your lower body and torso,and the front airbag helps protectyour head and chest.Although both airbags normallyinflate within a split second of eachother, it is possible for only oneairbag to deploy.This can happen if the severity of acollision is at the margin, orthreshold, that determines whetheror not the airbags will deploy. Insuch cases, the seat belt will providesufficient protection, and thesupplemental protection offered bythe airbag would be minimal.Only the driver's airbag can deploy ifthere is no passenger in the frontseat, or if the advanced airbagsystem has turned the passenger'sairbag off (see page 26).
After inflating, the front airbagsimmediately deflate, so they won'tinterfere with the driver's visibility,or the ability to steer or operate othercontrols.
The total time for inflation anddeflation is one-tenth of a second, sofast that most occupants are notaware that the airbags deployed untilthey see them lying in their laps.After a crash, you may see whatlooks like smoke. This is actuallypowder from the airbag's surface.Although the powder is not harmful,people with respiratory problemsmay experience some temporarydiscomfort. If this occurs, get out ofthe vehicle as soon as it is safe to doso.
CONTINUED
Additional Information About Your Airbags
25
Driver
andPassenger
Safety
10/08/06 08:34:41 11 ELEMENT MMC North America Owner's Man 50 31SCV680 enu
Dual-Stage, Multiple-Threshold FrontAirbags (SRS)Your vehicle is equipped with dual-stage, multiple-threshold frontairbags (SRS). During a frontal crashsevere enough to cause one or bothfront airbags to deploy, the airbagscan inflate at different rates,depending on the severity of thecrash, whether or not the seat beltsare latched, and / or other factors.Front airbags are designed tosupplement the seat belts to helpreduce the likelihood of head andchest injuries in frontal crashes.
Advanced AirbagsYour front airbags are also advancedairbags. The main purpose of thisfeature is to help prevent airbag-caused injuries to short drivers andchildren or small statured adults whoride in front.For both advanced airbags to workproperly:
● Occupants must sit upright andwear their seat belts properly.
● Do not spill any liquids on orunder the seats, cover the sensors,or put any objects or metal itemsunder the front seats.
● Objects placed or pushed underthe front passenger's seat maycause the sensor to malfunction,increasing the risk of injury in acrash.
Failure to follow these instructionscould damage the sensors or preventthem from working properly.
Additional Information About Your Airbags
26
10/08/06 08:34:41 11 ELEMENT MMC North America Owner's Man 50 31SCV680 enu
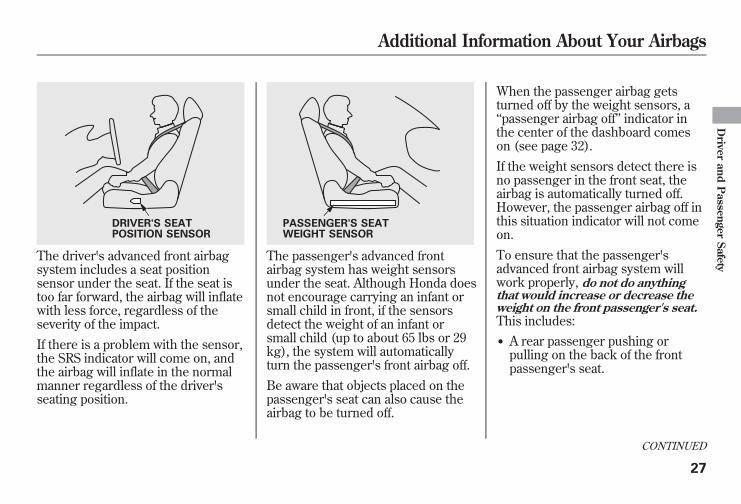
The driver's advanced front airbagsystem includes a seat positionsensor under the seat. If the seat istoo far forward, the airbag will inflatewith less force, regardless of theseverity of the impact.If there is a problem with the sensor,the SRS indicator will come on, andthe airbag will inflate in the normalmanner regardless of the driver'sseating position.
The passenger's advanced frontairbag system has weight sensorsunder the seat. Although Honda doesnot encourage carrying an infant orsmall child in front, if the sensorsdetect the weight of an infant orsmall child (up to about 65 lbs or 29kg), the system will automaticallyturn the passenger's front airbag off.Be aware that objects placed on thepassenger's seat can also cause theairbag to be turned off.
When the passenger airbag getsturned off by the weight sensors, a‘‘passenger airbag off’’ indicator inthe center of the dashboard comeson (see page 32).If the weight sensors detect there isno passenger in the front seat, theairbag is automatically turned off.However, the passenger airbag off inthis situation indicator will not comeon.To ensure that the passenger'sadvanced front airbag system willwork properly, do not do anythingthat would increase or decrease theweight on the front passenger's seat.This includes:● A rear passenger pushing orpulling on the back of the frontpassenger's seat.
DRIVER'S SEATPOSITION SENSOR
PASSENGER'S SEATWEIGHT SENSOR
CONTINUED
Additional Information About Your Airbags
27
Driver
andPassenger
Safety
10/08/06 08:34:41 11 ELEMENT MMC North America Owner's Man 50 31SCV680 enu
● Moving the front seat forcibly backagainst cargo on the seat or floorbehind it.
● Hanging heavy items on the frontpassenger seat, or placing heavyitems in the seat-back pocket.
● Moving the front seat or seat-backforcibly back against the foldedrear seat.
● Back seat passengers should notwedge objects or intentionallyforce their feet under frontpassenger seat.
If your vehicle has optional floormats, make sure the mat behind thefront passenger's seat is hooked tothe floor mat anchor (see page 209).If it is not, the mat may interfere withthe proper operation of the sensorsand operation of the seat.
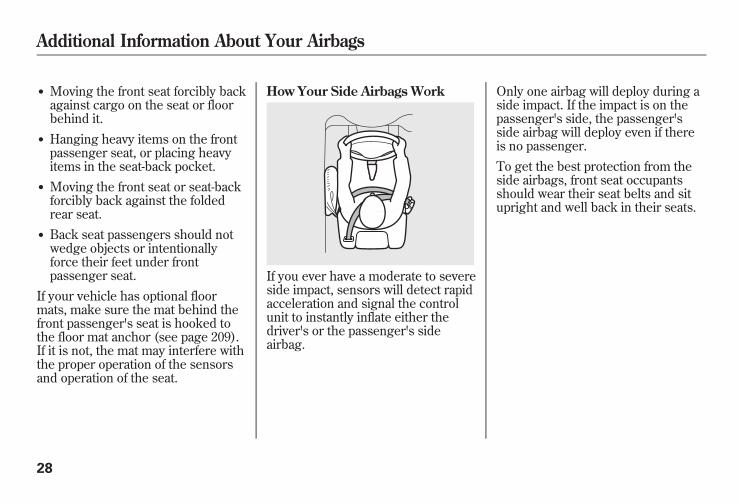
How Your Side Airbags Work
If you ever have a moderate to severeside impact, sensors will detect rapidacceleration and signal the controlunit to instantly inflate either thedriver's or the passenger's sideairbag.
Only one airbag will deploy during aside impact. If the impact is on thepassenger's side, the passenger'sside airbag will deploy even if thereis no passenger.To get the best protection from theside airbags, front seat occupantsshould wear their seat belts and situpright and well back in their seats.
Additional Information About Your Airbags
28
10/08/06 08:34:41 11 ELEMENT MMC North America Owner's Man 50 31SCV680 enu
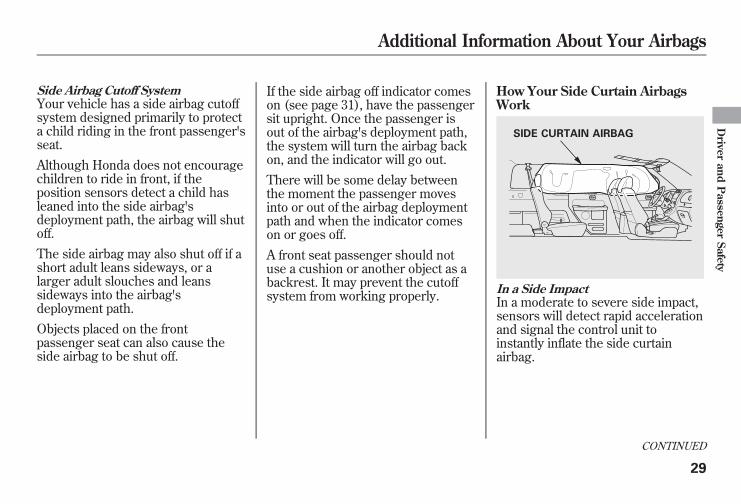
Side Airbag Cutoff SystemYour vehicle has a side airbag cutoffsystem designed primarily to protecta child riding in the front passenger'sseat.Although Honda does not encouragechildren to ride in front, if theposition sensors detect a child hasleaned into the side airbag'sdeployment path, the airbag will shutoff.The side airbag may also shut off if ashort adult leans sideways, or alarger adult slouches and leanssideways into the airbag'sdeployment path.Objects placed on the frontpassenger seat can also cause theside airbag to be shut off.
If the side airbag off indicator comeson (see page 31), have the passengersit upright. Once the passenger isout of the airbag's deployment path,the system will turn the airbag backon, and the indicator will go out.There will be some delay betweenthe moment the passenger movesinto or out of the airbag deploymentpath and when the indicator comeson or goes off.A front seat passenger should notuse a cushion or another object as abackrest. It may prevent the cutoffsystem from working properly.
How Your Side Curtain AirbagsWork
In a Side ImpactIn a moderate to severe side impact,sensors will detect rapid accelerationand signal the control unit toinstantly inflate the side curtainairbag.
SIDE CURTAIN AIRBAG
CONTINUED
Additional Information About Your Airbags
29
Driver
andPassenger
Safety
10/08/06 08:34:41 11 ELEMENT MMC North America Owner's Man 50 31SCV680 enu
If the impact is on the passenger'sside, the passenger's side curtainairbag will inflate even if there are nooccupants on that side of the vehicle.In a RolloverIf the rollover sensor detects yourvehicle is about to roll over, it signalsthe control unit, which immediatelydeploys both side curtain airbags andactivates both front seat belttensioners.The airbag on the passenger's sidewill deploy, and the seat belttensioner will activate, even if thereare no passengers on that side of thevehicle.
To get the best protection from theside curtain airbags, occupantsshould wear their seat belts and situpright and well back in their seats.
How the SRS Indicator WorksThe SRS indicator alertsyou to a potential problem
with your airbag system components.When you turn the ignition switch tothe ON (II) position, this indicatorcomes on briefly then goes off. Thistells you the system is workingproperly.
Additional Information About Your Airbags
30
10/08/06 08:34:41 11 ELEMENT MMC North America Owner's Man 50 31SCV680 enu
If the indicator comes on at any othertime, or does not come on at all, youshould have the system checked byyour dealer. For example:● If the SRS indicator does not comeon after you turn the ignitionswitch to the ON (II) position.
● If the indicator stays on after theengine starts.
● If the indicator comes on or flasheson and off while you drive.
If you see any of these indications,the airbag system components maynot work properly when you needthem.
Ignoring the SRS indicator canresult in serious injury or deathif the airbag systems ortensioners do not workproperly.
Have your vehicle checked by adealer as soon as possible ifthe SRS indicator alerts you toa possible problem.
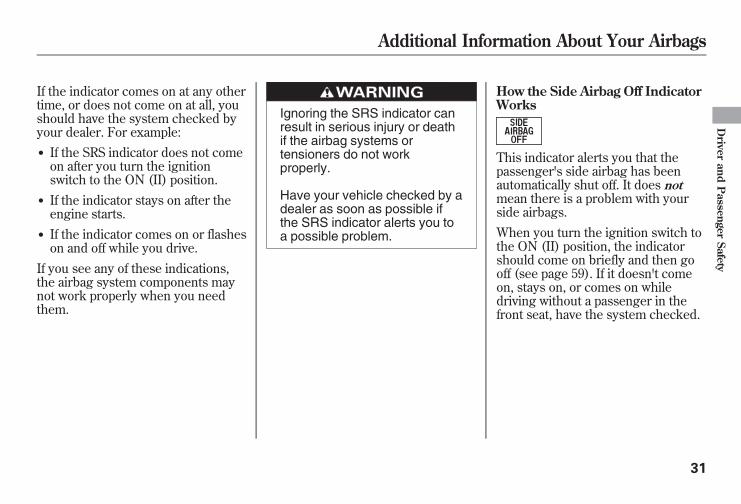
How the Side Airbag Off IndicatorWorks
This indicator alerts you that thepassenger's side airbag has beenautomatically shut off. It does notmean there is a problem with yourside airbags.When you turn the ignition switch tothe ON (II) position, the indicatorshould come on briefly and then gooff (see page 59). If it doesn't comeon, stays on, or comes on whiledriving without a passenger in thefront seat, have the system checked.
Additional Information About Your Airbags
31
Driver
andPassenger
Safety
10/08/06 08:34:41 11 ELEMENT MMC North America Owner's Man 50 31SCV680 enu
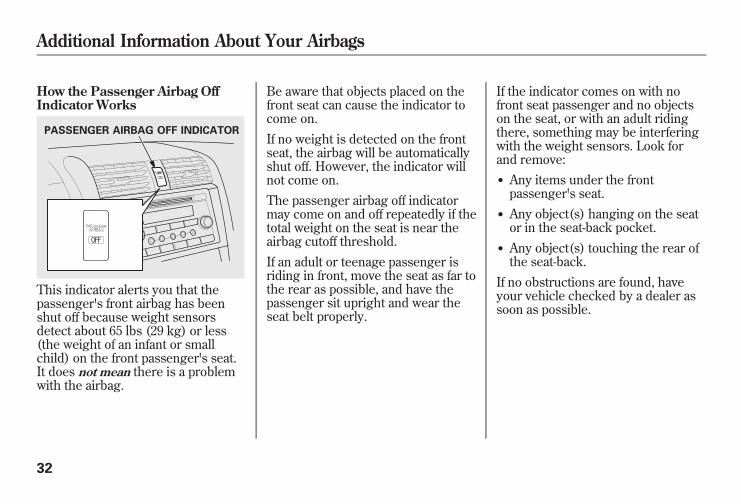
How the Passenger Airbag OffIndicator Works
This indicator alerts you that thepassenger's front airbag has beenshut off because weight sensorsdetect about 65 lbs (29 kg) or less(the weight of an infant or smallchild) on the front passenger's seat.It does not mean there is a problemwith the airbag.
Be aware that objects placed on thefront seat can cause the indicator tocome on.If no weight is detected on the frontseat, the airbag will be automaticallyshut off. However, the indicator willnot come on.The passenger airbag off indicatormay come on and off repeatedly if thetotal weight on the seat is near theairbag cutoff threshold.If an adult or teenage passenger isriding in front, move the seat as far tothe rear as possible, and have thepassenger sit upright and wear theseat belt properly.
If the indicator comes on with nofront seat passenger and no objectson the seat, or with an adult ridingthere, something may be interferingwith the weight sensors. Look forand remove:● Any items under the frontpassenger's seat.
● Any object(s) hanging on the seator in the seat-back pocket.
● Any object(s) touching the rear ofthe seat-back.
If no obstructions are found, haveyour vehicle checked by a dealer assoon as possible.
PASSENGER AIRBAG OFF INDICATOR
Additional Information About Your Airbags
32
10/08/06 08:34:41 11 ELEMENT MMC North America Owner's Man 50 31SCV680 enu
Airbag ServiceYour airbag systems are virtuallymaintenance free, and there are noparts you can safely service.However, you must have yourvehicle serviced if:● An airbag ever inflates. Any airbagthat has deployed must bereplaced along with the controlunit and other related parts. Anyseat belt tensioner that activatesmust also be replaced.Do not try to remove or replaceany airbag by yourself. This mustbe done by an authorized dealer ora knowledgeable body shop.
● The SRS indicator alerts you to aproblem. Take your vehicle to anauthorized dealer as soon aspossible. If you ignore thisindication, your airbags may notoperate properly.
● If your vehicle has a moderate tosevere impact. Even if your airbagsdo not inflate, your dealer shouldinspect the driver's seat positionsensor, the front passenger'sweight sensors, the front seat belttensioners, and all seat belts andtheir anchors worn during a crashto make sure they are operatingproperly.
Additional Safety Precautions● Do not attempt to deactivate yourairbags. Together, airbags andseat belts provide the bestprotection.
● Do not tamper with airbagcomponents or wiring for anyreason. Tampering could causethe airbags to deploy, possiblycausing very serious injury.
● Do not expose the frontpassenger's seat-back to liquid. Ifwater or another liquid soaks intothe seat-back, it can prevent theside airbag cutoff system fromworking properly.
CONTINUED
Additional Information About Your Airbags
33
Driver
andPassenger
Safety
10/08/06 08:34:41 11 ELEMENT MMC North America Owner's Man 50 31SCV680 enu
● Do not remove or modify a frontseat without consulting yourdealer. This could make thedriver's seat position sensor or thefront passenger's weight sensorsineffective. If it is necessary toremove or modify a front seat toaccommodate a person withdisabilities, first contact HondaAutomobile Customer Service at(800) 999-1009.
Additional Information About Your Airbags
34
10/08/06 08:34:41 11 ELEMENT MMC North America Owner's Man 50 31SCV680 enu
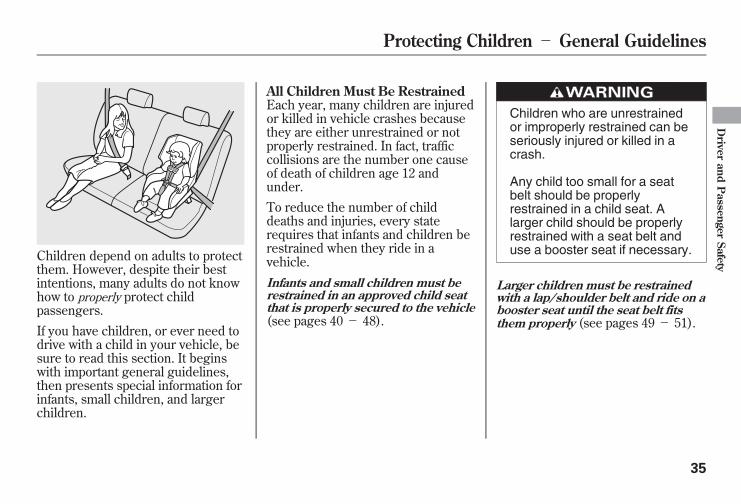
Children depend on adults to protectthem. However, despite their bestintentions, many adults do not knowhow to properly protect childpassengers.If you have children, or ever need todrive with a child in your vehicle, besure to read this section. It beginswith important general guidelines,then presents special information forinfants, small children, and largerchildren.
All Children Must Be RestrainedEach year, many children are injuredor killed in vehicle crashes becausethey are either unrestrained or notproperly restrained. In fact, trafficcollisions are the number one causeof death of children age 12 andunder.To reduce the number of childdeaths and injuries, every staterequires that infants and children berestrained when they ride in avehicle.Infants and small children must berestrained in an approved child seatthat is properly secured to the vehicle(see pages 40- 48).
Children who are unrestrainedor improperly restrained can beseriously injured or killed in acrash.
Any child too small for a seatbelt should be properlyrestrained in a child seat. Alarger child should be properlyrestrained with a seat belt anduse a booster seat if necessary.
Larger children must be restrainedwith a lap/shoulder belt and ride on abooster seat until the seat belt fitsthem properly (see pages 49- 51).
Protecting Children - General Guidelines
35
Driver
andPassenger
Safety
10/08/06 08:34:41 11 ELEMENT MMC North America Owner's Man 50 31SCV680 enu
All Children Should Sit in a BackSeatAccording to crash statistics,children of all ages and sizes aresafer when they are restrained in aback seat.The National Highway Traffic SafetyAdministration recommends that allchildren aged 12 and under beproperly restrained in a back seat.Some states have laws restrictingwhere children may ride.Children who ride in back are lesslikely to be injured by strikinginterior vehicle parts during acollision or hard braking. Also,children cannot be injured by aninflating front airbag when they ridein the back.
The Passenger's Front Airbag CanPose Serious RisksFront airbags have been designed tohelp protect adults in a moderate tosevere frontal collision. To do this,the passenger's front airbag is quitelarge, and it can inflate with enoughforce to cause very serious injuries.Even though your vehicle has anadvanced front airbag system thatautomatically turns the passenger'sfront airbag off under certaincircumstances (see page 32), pleasefollow these guidelines:InfantsNever put a rear-facing child seat inthe front seat of a vehicle equippedwith a passenger's front airbag. If theairbag inflates, it can hit the back ofthe child seat with enough force tokill or very seriously injure an infant.
Small ChildrenPlacing a forward-facing child seat inthe front seat of a vehicle equippedwith a passenger's front airbag can behazardous. If the vehicle seat is toofar forward, or the child's head isthrown forward during a collision, aninflating front airbag can strike thechild with enough force to kill orvery seriously injure a small child.Larger ChildrenChildren who have outgrown childseats are also at risk of being injuredor killed by an inflating passenger'sfront airbag. Whenever possible,larger children should sit in the backseat, on a booster seat if needed, andbe properly restrained with a seatbelt (see page 49 for importantinformation about protecting largerchildren).
Protecting Children - General Guidelines
36
10/08/06 08:34:41 11 ELEMENT MMC North America Owner's Man 50 31SCV680 enu
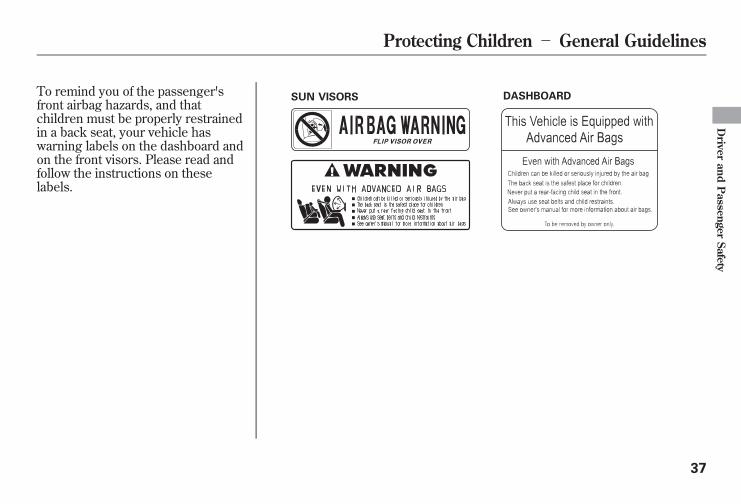
To remind you of the passenger'sfront airbag hazards, and thatchildren must be properly restrainedin a back seat, your vehicle haswarning labels on the dashboard andon the front visors. Please read andfollow the instructions on theselabels.
DASHBOARDSUN VISORS
Protecting Children - General Guidelines
37
Driver
andPassenger
Safety
10/08/06 08:34:41 11 ELEMENT MMC North America Owner's Man 50 31SCV680 enu
If You Must Drive with SeveralChildrenYour vehicle has two back seatswhere children can be properlyrestrained. If you ever have to carry agroup of children, and a child mustride in front:● Place the largest child in the frontseat, provided the child is largeenough to wear the lap/shoulderbelt properly (see page 49).
● Move the vehicle seat as far to therear as possible (see page 83).
● Have the child sit upright and wellback in the seat (see page 15).
● Make sure the seat belt is properlypositioned and secured (see page14).
If a Child Requires CloseAttentionMany parents say they prefer to putan infant or a small child in the frontpassenger seat so they can watch thechild, or because the child requiresattention.Placing a child in the front seatexposes the child to hazards in afrontal collision, and paying closeattention to a child distracts thedriver from the important tasks ofdriving, placing both of you at risk.
If a child requires physical attentionor frequent visual contact, westrongly recommend that anotheradult ride with the child in the backseat. The back seat is far safer for achild than the front.
Protecting Children - General Guidelines
38
10/08/06 08:34:41 11 ELEMENT MMC North America Owner's Man 50 31SCV680 enu
Additional Safety Precautions● Never hold an infant or child onyour lap. If you are not wearing aseat belt in a crash, you could bethrown forward and crush thechild against the dashboard or aseat-back. If you are wearing a seatbelt, the child can be torn fromyour arms and be seriously hurt orkilled.
● Never put a seat belt over yourselfand a child. During a crash, thebelt could press deep into the childand cause serious or fatal injuries.
● Never let two children use thesame seat belt. If they do, theycould be very seriously injured in acrash.
● Make sure any unused seat beltthat a child can reach is buckled,the lockable retractor is activated,and the belt is fully retracted andlocked. If a child wraps a looseseat belt around their neck, theycan be seriously or fatally injured.(See page 46 for how to activateand deactivate the lockableretractor.)
● Do not leave children alone in avehicle. Leaving children withoutadult supervision is illegal in moststates, and can be very hazardous.For example, infants and smallchildren left in a vehicle on a hotday can die from heatstroke. Achild left alone with the key in theignition switch can accidentally setthe vehicle in motion, possiblyinjuring themselves or others.
● Lock all doors, the tailgate and thehatch when your vehicle is not inuse. Children who play in vehiclescan accidentally get trapped inside.Teach your children not to play inor around vehicles.
● Keep vehicle keys and remotetransmitters out of the reach ofchildren. Even very youngchildren learn how to unlockvehicle doors, turn on the ignition,and open the tailgate or hatch,which can lead to accidental injuryor death.
Protecting Children - General Guidelines
39
Driver
andPassenger
Safety
10/08/06 08:34:41 11 ELEMENT MMC North America Owner's Man 50 31SCV680 enu
Protecting Infants
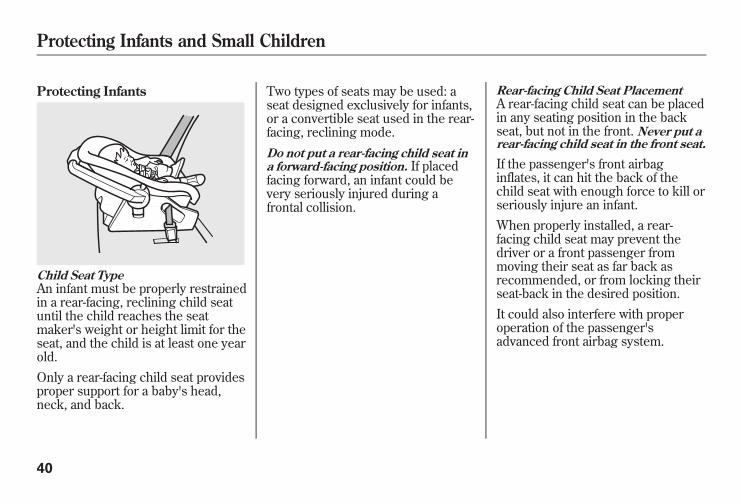
Child Seat TypeAn infant must be properly restrainedin a rear-facing, reclining child seatuntil the child reaches the seatmaker's weight or height limit for theseat, and the child is at least one yearold.Only a rear-facing child seat providesproper support for a baby's head,neck, and back.
Two types of seats may be used: aseat designed exclusively for infants,or a convertible seat used in the rear-facing, reclining mode.
Do not put a rear-facing child seat ina forward-facing position. If placedfacing forward, an infant could bevery seriously injured during afrontal collision.
Rear-facing Child Seat PlacementA rear-facing child seat can be placedin any seating position in the backseat, but not in the front. Never put arear-facing child seat in the front seat.
If the passenger's front airbaginflates, it can hit the back of thechild seat with enough force to kill orseriously injure an infant.When properly installed, a rear-facing child seat may prevent thedriver or a front passenger frommoving their seat as far back asrecommended, or from locking theirseat-back in the desired position.It could also interfere with properoperation of the passenger'sadvanced front airbag system.
Protecting Infants and Small Children
40
10/08/06 08:34:41 11 ELEMENT MMC North America Owner's Man 50 31SCV680 enu
In any of these situations, westrongly recommend that you installthe child seat directly behind thefront passenger's seat, move the seatas far forward as needed, and leave itunoccupied. Or, you may wish to geta smaller rear-facing child seat.
Placing a rear-facing child seatin the front seat can result inserious injury or death during acrash.
Always place a rear-facing childseat in the back seat, not thefront.
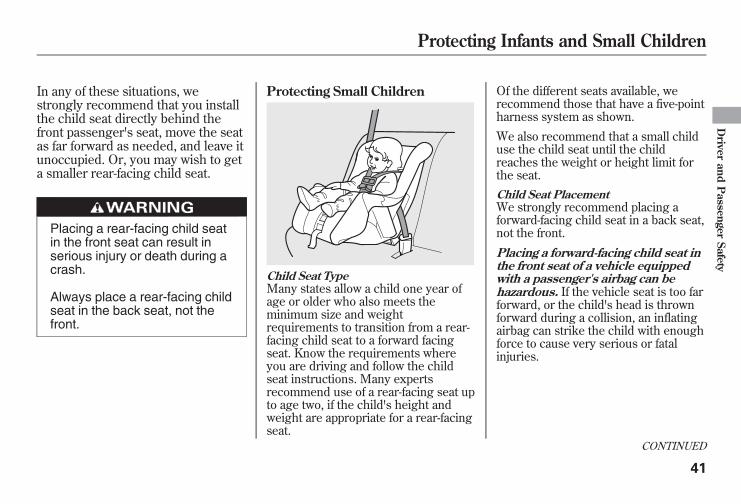
Protecting Small Children
Child Seat TypeMany states allow a child one year ofage or older who also meets theminimum size and weightrequirements to transition from a rear-facing child seat to a forward facingseat. Know the requirements whereyou are driving and follow the childseat instructions. Many expertsrecommend use of a rear-facing seat upto age two, if the child's height andweight are appropriate for a rear-facingseat.
Of the different seats available, werecommend those that have a five-pointharness system as shown.
We also recommend that a small childuse the child seat until the childreaches the weight or height limit forthe seat.Child Seat PlacementWe strongly recommend placing aforward-facing child seat in a back seat,not the front.
Placing a forward-facing child seat inthe front seat of a vehicle equippedwith a passenger's airbag can behazardous. If the vehicle seat is too farforward, or the child's head is thrownforward during a collision, an inflatingairbag can strike the child with enoughforce to cause very serious or fatalinjuries.
CONTINUED
Protecting Infants and Small Children
41
Driver
andPassenger
Safety
10/08/06 08:34:41 11 ELEMENT MMC North America Owner's Man 50 31SCV680 enu
Even with advanced front airbags thatautomatically turn the passenger's frontairbag off (see page 32), a back seat isthe safest place for a small child.
If it is necessary to put a forward-facingchild seat in the front, move the vehicleseat as far to the rear as possible, andbe sure the child seat is firmly securedto the vehicle and the child is properlystrapped in the seat.
Placing a forward-facing childseat in the front seat can result inserious injury or death if the frontairbag inflates.
If you must place a forward-facingchild seat in front, move thevehicle seat as far back aspossible, and properly restrainthe child.
Selecting a Child SeatWhen buying a child seat, you needto choose either a conventional childseat, or one designed for use withthe Lower Anchors and Tethers forCHildren (LATCH) system.Conventional child seats must besecured to a vehicle with a seat belt,whereas LATCH-compatible seatsare secured by attaching the seat tohardware built into the rear seats.Since LATCH-compatible child seatsare easier to install and reduce thepossibility of improper installation,we recommend selecting this style.
In seating positions and vehicles notequipped with LATCH, a LATCH-compatible child seat can be installedusing a seat belt.Whatever type of seat you choose, toprovide proper protection, a childseat should meet threerequirements:1. The child seat should meet Federal
Motor Vehicle Safety Standard213. Look for FMVSS 213 on thebox.
2. The child seat should be of theproper type and size to fit the child.Rear-facing for infants, forward-facing for small children.
Protecting Infants and Small Children, Selecting a Child Seat
42
10/08/06 08:34:41 11 ELEMENT MMC North America Owner's Man 50 31SCV680 enu
3. The child seat should fit the vehicleseating position (or positions)where it will be used.
Before purchasing a conventionalchild seat, or using a previouslypurchased one, we recommend thatyou test the seat in the specificvehicle seating position or positionswhere the seat will be used.
Installing a Child SeatAfter selecting a proper child seatand a good place to install the seat,there are three main steps ininstalling the seat:1. Properly secure the child seat to
the vehicle. All child seats must besecured to the vehicle with the lappart of a lap/shoulder belt or withthe LATCH (Lower Anchors andTethers for CHildren) system. Achild whose seat is not properlysecured to the vehicle can beendangered in a crash.
2. Make sure the child seat is firmlysecured. After installing a childseat, push and pull the seatforward and from side-to-side toverify that it is secure.
A child seat secured with a seat beltshould be installed as firmly aspossible. However, it does not needto be ‘‘rock solid.’’ Some side-to-sidemovement can be expected andshould not reduce the child seat'seffectiveness.If the child seat is not secure, tryinstalling it in a different seatingposition, or use a different style ofchild seat that can be firmly secured.3. Secure the child in the child seat.Make sure the child is properlystrapped in the child seataccording to the child seat maker'sinstructions. A child who is notproperly secured in a child seatcan be seriously injured in a crash.
The following pages provideguidelines on how to properly installa child seat. A forward-facing childseat is used in all examples, but theinstructions are the same for rear-facing child seats.
Selecting a Child Seat, Installing a Child Seat
43
Driver
andPassenger
Safety
10/08/06 08:34:41 11 ELEMENT MMC North America Owner's Man 50 31SCV680 enu
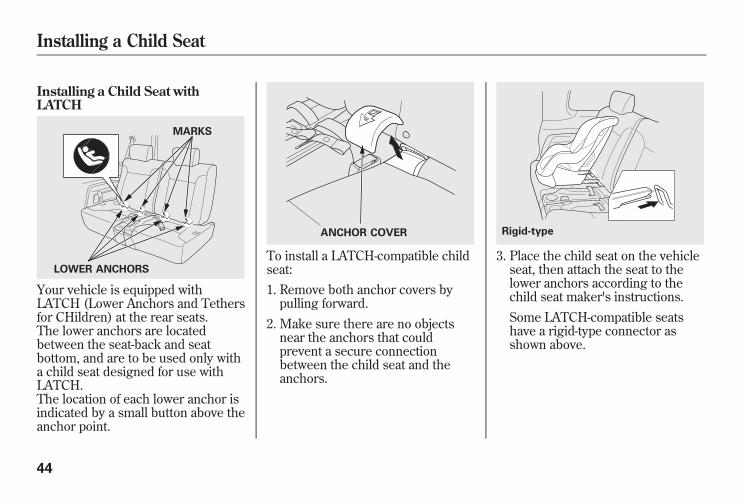
Installing a Child Seat withLATCH
Your vehicle is equipped withLATCH (Lower Anchors and Tethersfor CHildren) at the rear seats.The lower anchors are locatedbetween the seat-back and seatbottom, and are to be used only witha child seat designed for use withLATCH.The location of each lower anchor isindicated by a small button above theanchor point.
To install a LATCH-compatible childseat:1. Remove both anchor covers bypulling forward.
2. Make sure there are no objectsnear the anchors that couldprevent a secure connectionbetween the child seat and theanchors.
3. Place the child seat on the vehicleseat, then attach the seat to thelower anchors according to thechild seat maker's instructions.Some LATCH-compatible seatshave a rigid-type connector asshown above.
MARKS
LOWER ANCHORS
ANCHOR COVER Rigid-type
Installing a Child Seat
44
10/08/06 08:34:41 11 ELEMENT MMC North America Owner's Man 50 31SCV680 enu
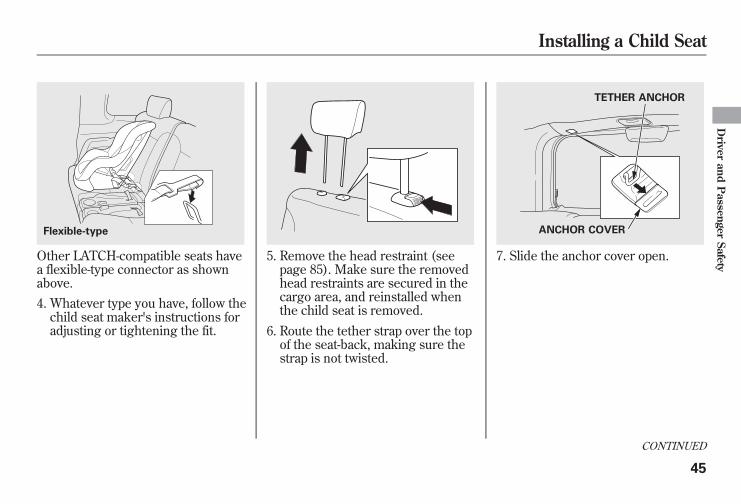
Other LATCH-compatible seats havea flexible-type connector as shownabove.4. Whatever type you have, follow thechild seat maker's instructions foradjusting or tightening the fit.
5. Remove the head restraint (seepage 85). Make sure the removedhead restraints are secured in thecargo area, and reinstalled whenthe child seat is removed.
6. Route the tether strap over the topof the seat-back, making sure thestrap is not twisted.
7. Slide the anchor cover open.
Flexible-type ANCHOR COVER
TETHER ANCHOR
CONTINUED
Installing a Child Seat
45
Driver
andPassenger
Safety
10/08/06 08:34:41 11 ELEMENT MMC North America Owner's Man 50 31SCV680 enu
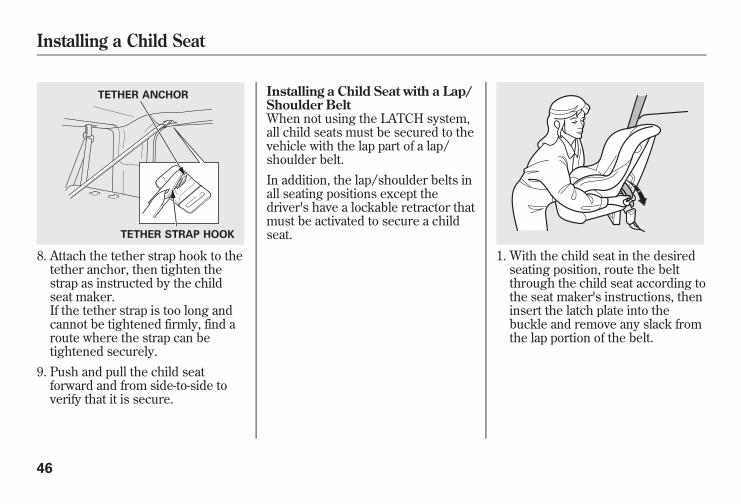
8. Attach the tether strap hook to thetether anchor, then tighten thestrap as instructed by the childseat maker.If the tether strap is too long andcannot be tightened firmly, find aroute where the strap can betightened securely.
9. Push and pull the child seatforward and from side-to-side toverify that it is secure.
Installing a Child Seat with a Lap/Shoulder BeltWhen not using the LATCH system,all child seats must be secured to thevehicle with the lap part of a lap/shoulder belt.In addition, the lap/shoulder belts inall seating positions except thedriver's have a lockable retractor thatmust be activated to secure a childseat.
1. With the child seat in the desiredseating position, route the beltthrough the child seat according tothe seat maker's instructions, theninsert the latch plate into thebuckle and remove any slack fromthe lap portion of the belt.
TETHER STRAP HOOK
TETHER ANCHOR
Installing a Child Seat
46
10/08/06 08:34:41 11 ELEMENT MMC North America Owner's Man 50 31SCV680 enu
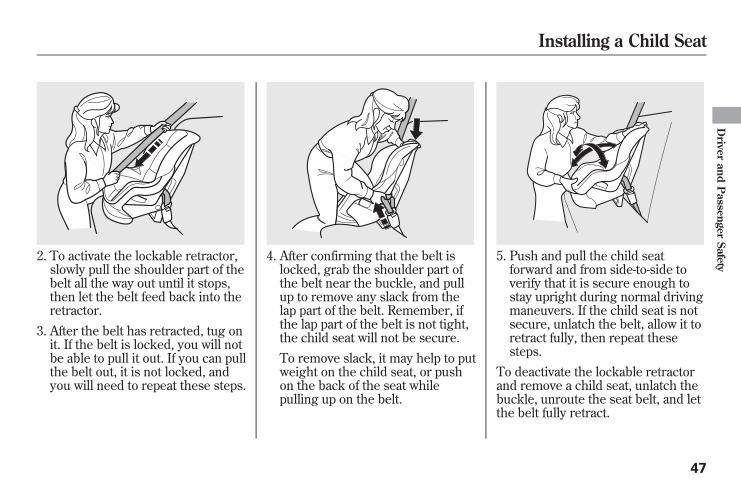
2. To activate the lockable retractor,slowly pull the shoulder part of thebelt all the way out until it stops,then let the belt feed back into theretractor.
3. After the belt has retracted, tug onit. If the belt is locked, you will notbe able to pull it out. If you can pullthe belt out, it is not locked, andyou will need to repeat these steps.
4. After confirming that the belt islocked, grab the shoulder part ofthe belt near the buckle, and pullup to remove any slack from thelap part of the belt. Remember, ifthe lap part of the belt is not tight,the child seat will not be secure.To remove slack, it may help to putweight on the child seat, or pushon the back of the seat whilepulling up on the belt.
5. Push and pull the child seatforward and from side-to-side toverify that it is secure enough tostay upright during normal drivingmaneuvers. If the child seat is notsecure, unlatch the belt, allow it toretract fully, then repeat thesesteps.
To deactivate the lockable retractorand remove a child seat, unlatch thebuckle, unroute the seat belt, and letthe belt fully retract.
Installing a Child Seat
47
Driver
andPassenger
Safety
10/08/06 08:34:41 11 ELEMENT MMC North America Owner's Man 50 31SCV680 enu
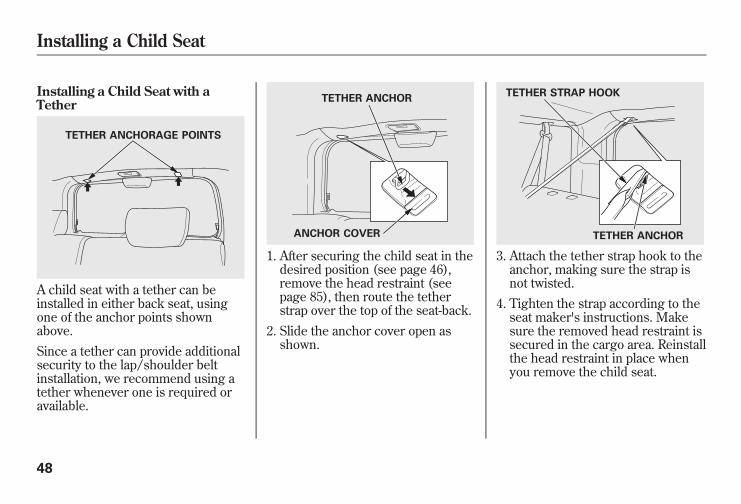
Installing a Child Seat with aTether
A child seat with a tether can beinstalled in either back seat, usingone of the anchor points shownabove.Since a tether can provide additionalsecurity to the lap/shoulder beltinstallation, we recommend using atether whenever one is required oravailable.
1. After securing the child seat in thedesired position (see page 46),remove the head restraint (seepage 85), then route the tetherstrap over the top of the seat-back.
2. Slide the anchor cover open asshown.
3. Attach the tether strap hook to theanchor, making sure the strap isnot twisted.
4. Tighten the strap according to theseat maker's instructions. Makesure the removed head restraint issecured in the cargo area. Reinstallthe head restraint in place whenyou remove the child seat.
TETHER ANCHORAGE POINTS
TETHER ANCHOR
ANCHOR COVER TETHER ANCHOR
TETHER STRAP HOOK
Installing a Child Seat
48
10/08/06 08:34:41 11 ELEMENT MMC North America Owner's Man 50 31SCV680 enu
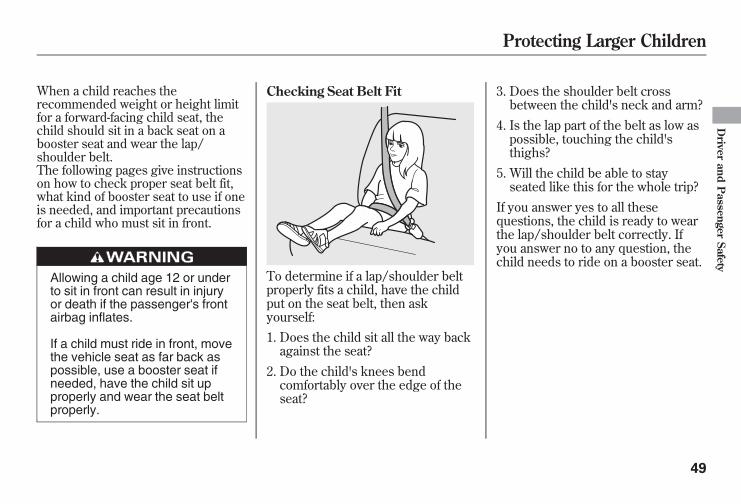
When a child reaches therecommended weight or height limitfor a forward-facing child seat, thechild should sit in a back seat on abooster seat and wear the lap/shoulder belt.The following pages give instructionson how to check proper seat belt fit,what kind of booster seat to use if oneis needed, and important precautionsfor a child who must sit in front.
Allowing a child age 12 or underto sit in front can result in injuryor death if the passenger's frontairbag inflates.
If a child must ride in front, movethe vehicle seat as far back aspossible, use a booster seat ifneeded, have the child sit upproperly and wear the seat beltproperly.
Checking Seat Belt Fit
To determine if a lap/shoulder beltproperly fits a child, have the childput on the seat belt, then askyourself:1. Does the child sit all the way backagainst the seat?
2. Do the child's knees bendcomfortably over the edge of theseat?
3. Does the shoulder belt crossbetween the child's neck and arm?
4. Is the lap part of the belt as low aspossible, touching the child'sthighs?
5. Will the child be able to stayseated like this for the whole trip?
If you answer yes to all thesequestions, the child is ready to wearthe lap/shoulder belt correctly. Ifyou answer no to any question, thechild needs to ride on a booster seat.
Protecting Larger Children
49
Driver
andPassenger
Safety
10/08/06 08:34:41 11 ELEMENT MMC North America Owner's Man 50 31SCV680 enu
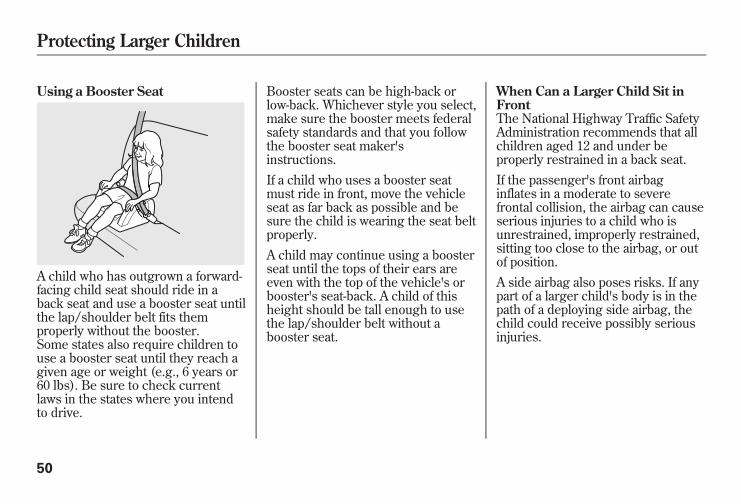
Using a Booster Seat
A child who has outgrown a forward-facing child seat should ride in aback seat and use a booster seat untilthe lap/shoulder belt fits themproperly without the booster.Some states also require children touse a booster seat until they reach agiven age or weight (e.g., 6 years or60 lbs). Be sure to check currentlaws in the states where you intendto drive.
Booster seats can be high-back orlow-back. Whichever style you select,make sure the booster meets federalsafety standards and that you followthe booster seat maker'sinstructions.If a child who uses a booster seatmust ride in front, move the vehicleseat as far back as possible and besure the child is wearing the seat beltproperly.A child may continue using a boosterseat until the tops of their ears areeven with the top of the vehicle's orbooster's seat-back. A child of thisheight should be tall enough to usethe lap/shoulder belt without abooster seat.
When Can a Larger Child Sit inFrontThe National Highway Traffic SafetyAdministration recommends that allchildren aged 12 and under beproperly restrained in a back seat.If the passenger's front airbaginflates in a moderate to severefrontal collision, the airbag can causeserious injuries to a child who isunrestrained, improperly restrained,sitting too close to the airbag, or outof position.A side airbag also poses risks. If anypart of a larger child's body is in thepath of a deploying side airbag, thechild could receive possibly seriousinjuries.
Protecting Larger Children
50
10/08/06 08:34:41 11 ELEMENT MMC North America Owner's Man 50 31SCV680 enu
Of course, children vary widely. Andwhile age may be one indicator ofwhen a child can safely ride in front,there are other important factors youshould consider.MaturityTo safely ride in front, a child mustbe able to follow the rules, includingsitting properly, and wearing the seatbelt properly throughout a ride.Physical SizePhysically, a child must be largeenough for the lap/shoulder belt toproperly fit (see pages 14 and 49). Ifthe seat belt does not fit properly,with or without the child sitting on abooster seat, the child should not sitin front.
If you decide that a child can safelyride up front, be sure to:● Carefully read the owner's manual,and make sure you understand allseat belt instructions and all safetyinformation.
● Move the vehicle seat to the rear-most position.
● Have the child sit up straight, backagainst the seat, and feet on ornear the floor.
● Check that the child's seat belt isproperly and securely positioned.
● Supervise the child. Even maturechildren sometimes need to bereminded to fasten the seat beltsor sit properly.
Additional Safety Precautions● Do not let a child wear a seat beltacross the neck. This could resultin serious neck injuries during acrash.
● Do not let a child put the shoulderpart of a seat belt behind the backor under the arm. This could causevery serious injuries during acrash. It also increases the chancethat the child will slide under thebelt in a crash and be injured.
● Two children should never use thesame seat belt. If they do, theycould be very seriously injured in acrash.
● Do not put any accessories on aseat belt. Devices intended toimprove a child's comfort orreposition the shoulder part of aseat belt can make the belt lesseffective and increase the chanceof serious injury in a crash.
Protecting Larger Children
51
Driver
andPassenger
Safety
10/08/06 08:34:41 11 ELEMENT MMC North America Owner's Man 50 31SCV680 enu
Your vehicle's exhaust containscarbon monoxide gas. Carbonmonoxide should not enter thevehicle in normal driving if youmaintain your vehicle properly andfollow the information on this page.Have the exhaust system inspectedfor leaks whenever:● The vehicle is raised for an oilchange.
● You notice a change in the soundof the exhaust.
● The vehicle was in a collision thatmay have damaged the underside.
Carbon monoxide gas is toxic.Breathing it can causeunconsciousness and even killyou.
Avoid any enclosed areas oractivities that expose you tocarbon monoxide.
High levels of carbon monoxide cancollect rapidly in enclosed areas,such as a garage. Do not run theengine with the garage door closed.Even with the door open, run theengine only long enough to move thevehicle out of the garage.
With the tailgate or hatch open, airflow can pull exhaust gas into yourvehicle's interior and create ahazardous condition. If you mustdrive with the tailgate or hatch open,open all the windows and set theheating and cooling system as shownbelow.If you must sit in your parked vehiclewith the engine running, even in anunconfined area, adjust the heatingand cooling system as follows:1. Select the fresh air mode.2. Select the mode.3. Turn the fan on high speed.4. Set the temperature control to acomfortable setting.
Carbon Monoxide Hazard
52
10/08/06 08:34:41 11 ELEMENT MMC North America Owner's Man 50 31SCV680 enu
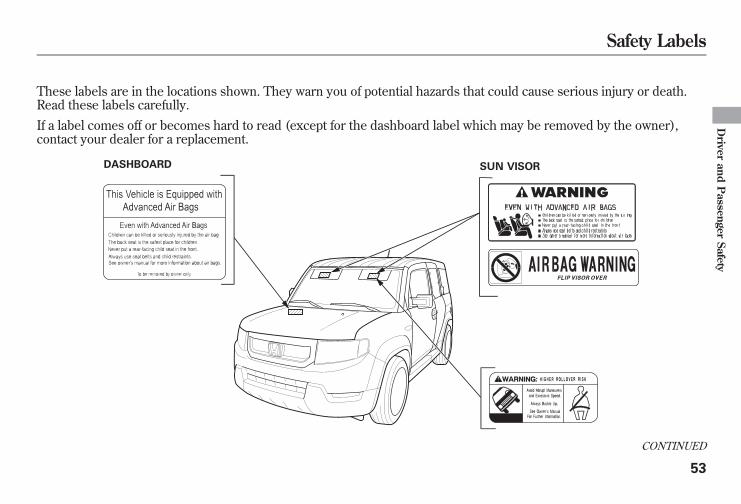
These labels are in the locations shown. They warn you of potential hazards that could cause serious injury or death.Read these labels carefully.If a label comes off or becomes hard to read (except for the dashboard label which may be removed by the owner),contact your dealer for a replacement.
DASHBOARD SUN VISOR
CONTINUED
Safety Labels
53
Driver
andPassenger
Safety
10/08/06 08:34:41 11 ELEMENT MMC North America Owner's Man 50 31SCV680 enu
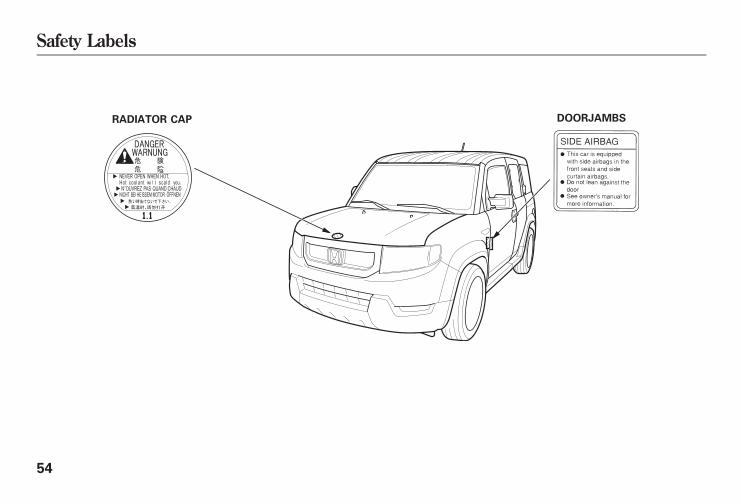
RADIATOR CAP DOORJAMBS
Safety Labels
54
10/08/06 08:34:41 11 ELEMENT MMC North America Owner's Man 50 31SCV680 enu
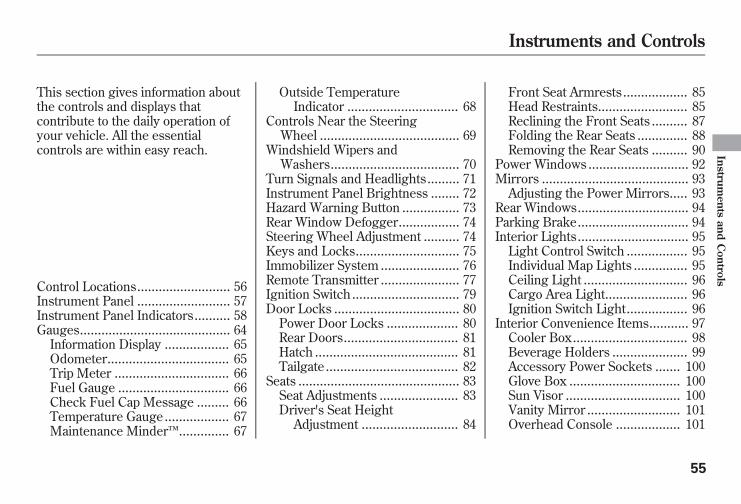
This section gives information aboutthe controls and displays thatcontribute to the daily operation ofyour vehicle. All the essentialcontrols are within easy reach.
Control Locations.......................... 56Instrument Panel .......................... 57Instrument Panel Indicators.......... 58Gauges.......................................... 64
Information Display .................. 65Odometer.................................. 65Trip Meter ................................ 66Fuel Gauge ............................... 66Check Fuel Cap Message ......... 66Temperature Gauge.................. 67Maintenance Minder™.............. 67
Outside TemperatureIndicator ............................... 68
Controls Near the SteeringWheel ....................................... 69
Windshield Wipers andWashers.................................... 70
Turn Signals and Headlights......... 71Instrument Panel Brightness ........ 72Hazard Warning Button ................ 73Rear Window Defogger................. 74Steering Wheel Adjustment .......... 74Keys and Locks............................. 75Immobilizer System ...................... 76Remote Transmitter ...................... 77Ignition Switch.............................. 79Door Locks ................................... 80Power Door Locks .................... 80Rear Doors................................ 81Hatch ........................................ 81Tailgate ..................................... 82
Seats ............................................. 83Seat Adjustments ...................... 83Driver's Seat Height
Adjustment ........................... 84
Front Seat Armrests.................. 85Head Restraints......................... 85Reclining the Front Seats .......... 87Folding the Rear Seats .............. 88Removing the Rear Seats .......... 90
Power Windows ............................ 92Mirrors ......................................... 93Adjusting the Power Mirrors..... 93
Rear Windows............................... 94Parking Brake............................... 94Interior Lights............................... 95Light Control Switch ................. 95Individual Map Lights ............... 95Ceiling Light ............................. 96Cargo Area Light....................... 96Ignition Switch Light................. 96
Interior Convenience Items........... 97Cooler Box................................ 98Beverage Holders ..................... 99Accessory Power Sockets ....... 100Glove Box ............................... 100Sun Visor ................................ 100Vanity Mirror .......................... 101Overhead Console .................. 101
Instruments and Controls
55
Instruments
andControls
10/08/06 08:34:41 11 ELEMENT MMC North America Owner's Man 50 31SCV680 enu
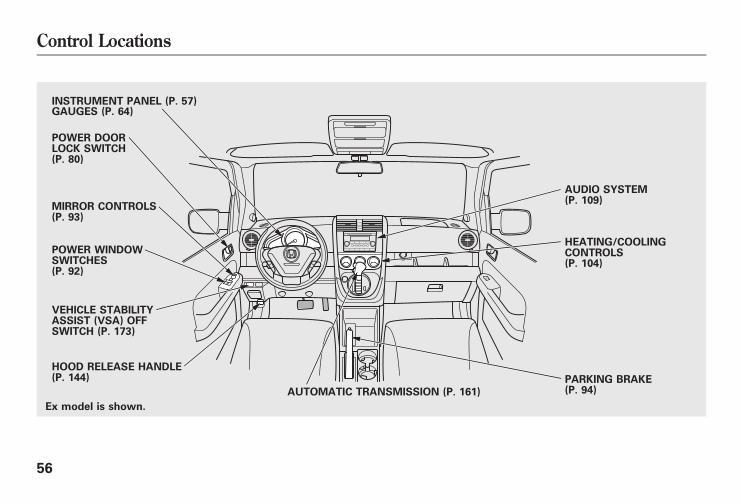
VEHICLE STABILITYASSIST (VSA) OFFSWITCH (P. 173)
PARKING BRAKE(P. 94)
AUDIO SYSTEM(P. 109)
HEATING/COOLINGCONTROLS(P. 104)
Ex model is shown.
POWER DOORLOCK SWITCH(P. 80)
MIRROR CONTROLS(P. 93)
POWER WINDOWSWITCHES(P. 92)
INSTRUMENT PANEL (P. 57)
HOOD RELEASE HANDLE(P. 144)
GAUGES (P. 64)
AUTOMATIC TRANSMISSION (P. 161)
Control Locations
56
10/08/06 08:34:41 11 ELEMENT MMC North America Owner's Man 50 31SCV680 enu
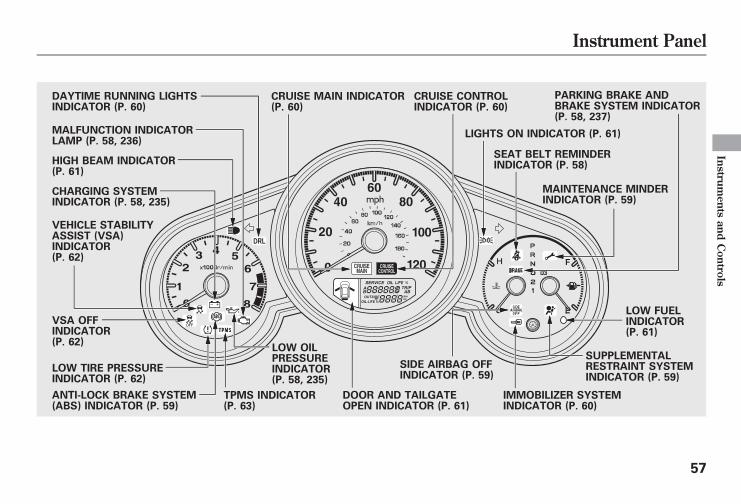
DRL
DAYTIME RUNNING LIGHTSINDICATOR (P. 60)
HIGH BEAM INDICATOR(P. 61)
CHARGING SYSTEMINDICATOR (P. 58, 235)
VEHICLE STABILITYASSIST (VSA)INDICATOR(P. 62)
VSA OFFINDICATOR(P. 62)
ANTI-LOCK BRAKE SYSTEM(ABS) INDICATOR (P. 59)
LOW OILPRESSUREINDICATOR(P. 58, 235)
DOOR AND TAILGATEOPEN INDICATOR (P. 61)
SIDE AIRBAG OFFINDICATOR (P. 59)
IMMOBILIZER SYSTEMINDICATOR (P. 60)
SUPPLEMENTALRESTRAINT SYSTEMINDICATOR (P. 59)
LOW FUELINDICATOR(P. 61)
MAINTENANCE MINDERINDICATOR (P. 59)
SEAT BELT REMINDERINDICATOR (P. 58)
LIGHTS ON INDICATOR (P. 61)
PARKING BRAKE ANDBRAKE SYSTEM INDICATOR(P. 58, 237)
CRUISE CONTROLINDICATOR (P. 60)
TPMS INDICATOR(P. 63)
CRUISE MAIN INDICATOR(P. 60)
MALFUNCTION INDICATORLAMP (P. 58, 236)
LOW TIRE PRESSUREINDICATOR (P. 62)
Instrument Panel
57
Instruments
andControls
10/08/06 08:34:41 11 ELEMENT MMC North America Owner's Man 50 31SCV680 enu
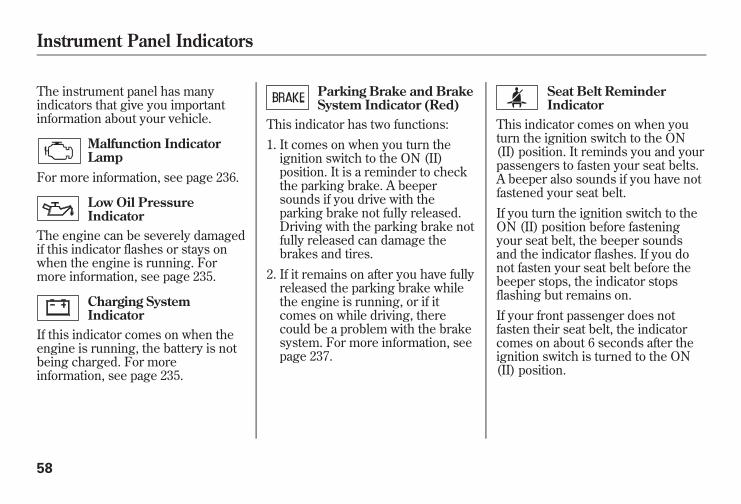
The instrument panel has manyindicators that give you importantinformation about your vehicle.
Malfunction IndicatorLamp
For more information, see page 236.
Low Oil PressureIndicator
The engine can be severely damagedif this indicator flashes or stays onwhen the engine is running. Formore information, see page 235.
Charging SystemIndicator
If this indicator comes on when theengine is running, the battery is notbeing charged. For moreinformation, see page 235.
Parking Brake and BrakeSystem Indicator (Red)
This indicator has two functions:1. It comes on when you turn theignition switch to the ON (II)position. It is a reminder to checkthe parking brake. A beepersounds if you drive with theparking brake not fully released.Driving with the parking brake notfully released can damage thebrakes and tires.
2. If it remains on after you have fullyreleased the parking brake whilethe engine is running, or if itcomes on while driving, therecould be a problem with the brakesystem. For more information, seepage 237.
Seat Belt ReminderIndicator
This indicator comes on when youturn the ignition switch to the ON(II) position. It reminds you and yourpassengers to fasten your seat belts.A beeper also sounds if you have notfastened your seat belt.If you turn the ignition switch to theON (II) position before fasteningyour seat belt, the beeper soundsand the indicator flashes. If you donot fasten your seat belt before thebeeper stops, the indicator stopsflashing but remains on.If your front passenger does notfasten their seat belt, the indicatorcomes on about 6 seconds after theignition switch is turned to the ON(II) position.
Instrument Panel Indicators
58
10/08/06 08:34:41 11 ELEMENT MMC North America Owner's Man 50 31SCV680 enu
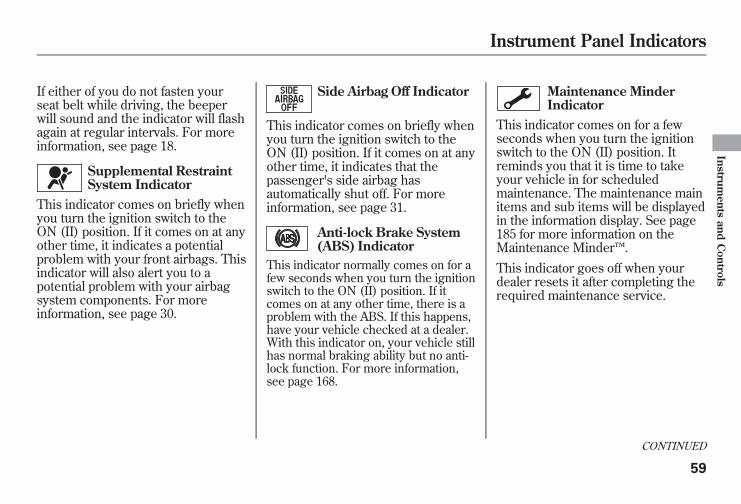
If either of you do not fasten yourseat belt while driving, the beeperwill sound and the indicator will flashagain at regular intervals. For moreinformation, see page 18.
Supplemental RestraintSystem Indicator
This indicator comes on briefly whenyou turn the ignition switch to theON (II) position. If it comes on at anyother time, it indicates a potentialproblem with your front airbags. Thisindicator will also alert you to apotential problem with your airbagsystem components. For moreinformation, see page 30.
Side Airbag Off Indicator
This indicator comes on briefly whenyou turn the ignition switch to theON (II) position. If it comes on at anyother time, it indicates that thepassenger's side airbag hasautomatically shut off. For moreinformation, see page 31.
Anti-lock Brake System(ABS) Indicator
This indicator normally comes on for afew seconds when you turn the ignitionswitch to the ON (II) position. If itcomes on at any other time, there is aproblem with the ABS. If this happens,have your vehicle checked at a dealer.With this indicator on, your vehicle stillhas normal braking ability but no anti-lock function. For more information,see page 168.
Maintenance MinderIndicator
This indicator comes on for a fewseconds when you turn the ignitionswitch to the ON (II) position. Itreminds you that it is time to takeyour vehicle in for scheduledmaintenance. The maintenance mainitems and sub items will be displayedin the information display. See page185 for more information on theMaintenance Minder™.This indicator goes off when yourdealer resets it after completing therequired maintenance service.
CONTINUED
Instrument Panel Indicators
59
Instruments
andControls
10/08/06 08:34:41 11 ELEMENT MMC North America Owner's Man 50 31SCV680 enu
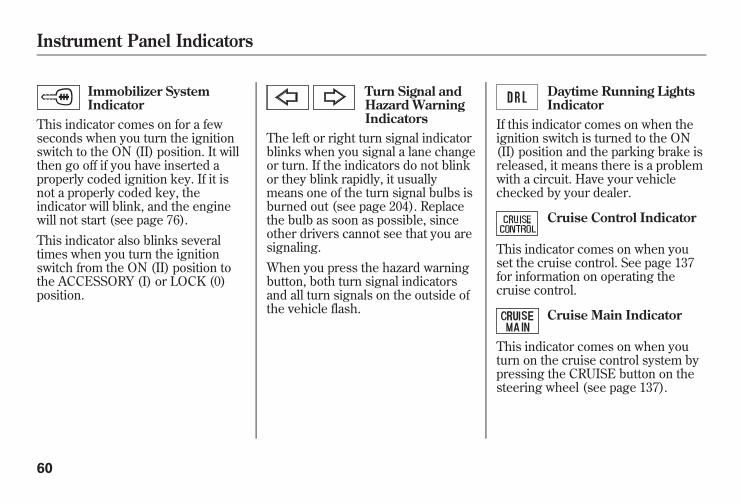
Immobilizer SystemIndicator
This indicator comes on for a fewseconds when you turn the ignitionswitch to the ON (II) position. It willthen go off if you have inserted aproperly coded ignition key. If it isnot a properly coded key, theindicator will blink, and the enginewill not start (see page 76).This indicator also blinks severaltimes when you turn the ignitionswitch from the ON (II) position tothe ACCESSORY (I) or LOCK (0)position.
Turn Signal andHazard WarningIndicators
The left or right turn signal indicatorblinks when you signal a lane changeor turn. If the indicators do not blinkor they blink rapidly, it usuallymeans one of the turn signal bulbs isburned out (see page 204). Replacethe bulb as soon as possible, sinceother drivers cannot see that you aresignaling.When you press the hazard warningbutton, both turn signal indicatorsand all turn signals on the outside ofthe vehicle flash.
Daytime Running LightsIndicator
If this indicator comes on when theignition switch is turned to the ON(II) position and the parking brake isreleased, it means there is a problemwith a circuit. Have your vehiclechecked by your dealer.
Cruise Control Indicator
This indicator comes on when youset the cruise control. See page 137for information on operating thecruise control.
Cruise Main Indicator
This indicator comes on when youturn on the cruise control system bypressing the CRUISE button on thesteering wheel (see page 137).
Instrument Panel Indicators
60
10/08/06 08:34:41 11 ELEMENT MMC North America Owner's Man 50 31SCV680 enu
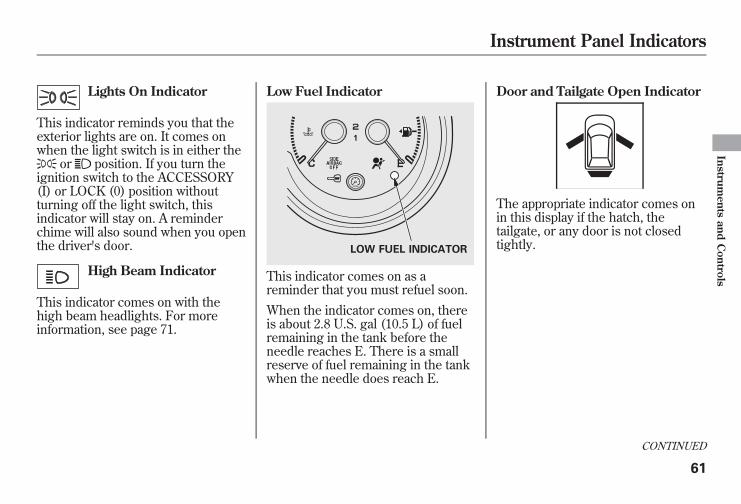
Lights On Indicator
This indicator reminds you that theexterior lights are on. It comes onwhen the light switch is in either the
or position. If you turn theignition switch to the ACCESSORY(I) or LOCK (0) position withoutturning off the light switch, thisindicator will stay on. A reminderchime will also sound when you openthe driver's door.
High Beam Indicator
This indicator comes on with thehigh beam headlights. For moreinformation, see page 71.
Low Fuel Indicator
This indicator comes on as areminder that you must refuel soon.When the indicator comes on, thereis about 2.8 U.S. gal (10.5 L) of fuelremaining in the tank before theneedle reaches E. There is a smallreserve of fuel remaining in the tankwhen the needle does reach E.
Door and Tailgate Open Indicator
The appropriate indicator comes onin this display if the hatch, thetailgate, or any door is not closedtightly.LOW FUEL INDICATOR
CONTINUED
Instrument Panel Indicators
61
Instruments
andControls
10/08/06 08:34:41 11 ELEMENT MMC North America Owner's Man 50 31SCV680 enu
Vehicle Stability Assist(VSA) System Indicator
This indicator normally comes on fora few seconds when you turn theignition switch to the ON (II)position.It flashes when VSA is active (seepage 172).If it comes on and stays on at anyother time, there is a problem withthe VSA system. Take your vehicle toa dealer to have it checked. WithoutVSA, your vehicle still has normaldriving ability, but will not have VSAtraction and stability enhancement.See page 172 for more informationon the VSA system.
VSA OFF Indicator
It comes on as a reminder that youhave turned off the vehicle stabilityassist (VSA) system.This indicator normally comes on fora few seconds when you turn theignition switch to the ON (II)position. See page 172 for moreinformation on the VSA system.
Low Tire PressureIndicator
This indicator normally comes on fora few seconds when you turn theignition switch to the ON (II)position.If it comes on while driving, itindicates that one or more of yourvehicle's tires are significantly low onpressure.
If this happens, pull to the side of theroad when it is safe, check which tirehas lost pressure, and determine thecause. If it is because of a flat tire,replace the flat tire with the compactspare (see page 222), and have theflat tire repaired as soon as possible.If two or more tires are underinflated,call a professional towing service(see page 244). For moreinformation, see page 169.
Instrument Panel Indicators
62
10/08/06 08:34:41 11 ELEMENT MMC North America Owner's Man 50 31SCV680 enu
Tire Pressure MonitoringSystem (TPMS) Indicator
This indicator normally comes on fora few seconds when you turn theignition switch to the ON (II)position.If this indicator comes on and stayson at any other time, or if it does notcome on when you turn the ignitionswitch to the ON (II) position, thereis a problem with the TPMS; thesystem that monitors tire pressure.With this indicator on, the low tirepressure indicator will not come onwhen a tire loses pressure. Take thevehicle to your dealer to have thesystem checked. For moreinformation, see page 170.
Instrument Panel Indicators
63
Instruments
andControls
10/08/06 08:34:41 11 ELEMENT MMC North America Owner's Man 50 31SCV680 enu
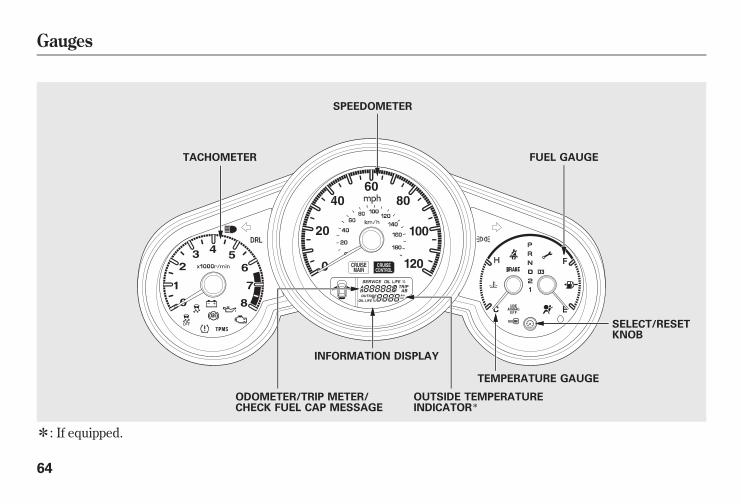
ꭧ: If equipped.
DRL
TACHOMETER
SPEEDOMETER
FUEL GAUGE
INFORMATION DISPLAY
ODOMETER/TRIP METER/CHECK FUEL CAP MESSAGE
TEMPERATURE GAUGE
SELECT/RESETKNOB
OUTSIDE TEMPERATUREINDICATORꭧ
Gauges
64
10/08/06 08:34:41 11 ELEMENT MMC North America Owner's Man 50 31SCV680 enu
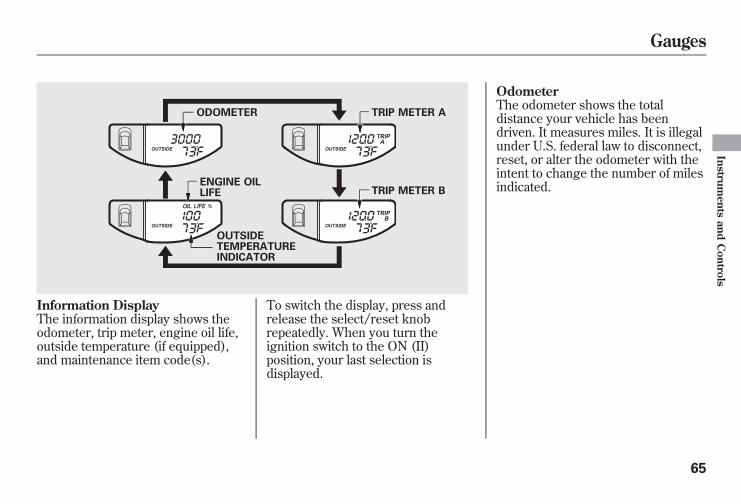
Information DisplayThe information display shows theodometer, trip meter, engine oil life,outside temperature (if equipped),and maintenance item code(s).
To switch the display, press andrelease the select/reset knobrepeatedly. When you turn theignition switch to the ON (II)position, your last selection isdisplayed.
OdometerThe odometer shows the totaldistance your vehicle has beendriven. It measures miles. It is illegalunder U.S. federal law to disconnect,reset, or alter the odometer with theintent to change the number of milesindicated.
OUTSIDETEMPERATUREINDICATOR
ODOMETER TRIP METER A
ENGINE OILLIFE TRIP METER B
Gauges
65
Instruments
andControls
10/08/06 08:34:41 11 ELEMENT MMC North America Owner's Man 50 31SCV680 enu
Trip MeterThis shows the number of milesdriven since you last reset it.There are two trip meters: Trip A andTrip B. Switch between thesedisplays by pressing the select/resetknob repeatedly.Each trip meter worksindependently, so you can keep trackof two different distances.When you turn the ignition switch tothe ON (II) position, the lastselection is displayed.To reset a trip meter, display it, andthen press and hold the select/resetknob until the number resets to‘‘0.0’’.
Fuel GaugeThis shows how much fuel you have.It may show slightly more or lessthan the actual amount. The needlereturns to the bottom after you turnoff the ignition.
Avoid driving with an extremely lowfuel level. Running out of fuel couldcause the engine to misfire, damagingthe catalytic converter.
Check Fuel Cap MessageYour vehicle's onboard diagnosticsystem will detect a loose or missingfuel fill cap as an evaporative systemleak. The first time a leak is detecteda ‘‘CHECK FUEL CAP’’ messageappears on the information display.Turn the engine off, and confirm thefuel fill cap is installed. If it is, loosenit, then retighten it until it clicks atleast once. The message should gooff after several days of normaldriving once you tighten or replacethe fuel fill cap. To scroll to anotherdisplay, press the select/reset knob.The ‘‘CHECK FUEL CAP’’ messagewill appear each time you restart theengine until the system turns themessage off.
Gauges
66
10/08/06 08:34:41 11 ELEMENT MMC North America Owner's Man 50 31SCV680 enu
If the system still detects a leak inyour vehicle's evaporative emissionssystem, the malfunction indicatorlamp (MIL) comes on. If the fuel fillcap was not already tightened, turnthe engine off, and check orretighten the fuel fill cap until itclicks at least once. The MIL shouldgo off after several days of normaldriving once the cap is tightened orreplaced. If the MIL does not go off,have your vehicle inspected by adealer. For more information, seepage 236.
Temperature GaugeThis shows the temperature of theengine's coolant. During normaloperation, the pointer should rise toabout the middle of the gauge. Insevere driving conditions, the pointermay rise to the upper zone. If itreaches the red (hot) mark, pullsafely to the side of the road. Turn topage 233 for instructions andprecautions on checking the engine'scooling system.
Maintenance Minder™The information display in theinstrument panel shows you theengine oil life and maintenanceservice items when the ignitionswitch is in the ON (II) position. Thisinformation helps to keep you awareof the periodic maintenance yourvehicle needs for continued trouble-free driving. Refer to page 185 formore information.
Gauges
67
Instruments
andControls
10/08/06 08:34:41 11 ELEMENT MMC North America Owner's Man 50 31SCV680 enu
Outside Temperature IndicatorOn EX modelThis indicator displays the outsidetemperature in Fahrenheit.The temperature sensor is in thefront bumper. The temperaturereading can be affected by heatreflection from the road surface,engine heat, and the exhaust fromsurrounding traffic. This can causean incorrect temperature readingwhen your vehicle speed is under 19mph (30 km/h). When you start yourtrip, the sensor is not fullyacclimatized, therefore it may takeseveral minutes until the propertemperature is displayed.
In certain weather conditions,temperature readings near freezing(32°F, 0°C) could mean that ice isforming on the road surface.If the outside temperature isincorrectly displayed, you can adjustit up toꭗ5°F warmer or cooler.NOTE: The temperature must bestabilized before doing thisprocedure.
To adjust the outside temperatureindicator, make sure the odometer isshown in the display, then press andhold the select/reset knob for 10seconds. The following sequence willappear for 1 second each: 0, 1, 2, 3, 4,5,-5,-4,-3,-2,-1, 0.When the temperature reaches thedesired value, release the select/reset knob. You should see the newoutside temperature displayed.
Gauges
68
10/08/06 08:34:41 11 ELEMENT MMC North America Owner's Man 50 31SCV680 enu
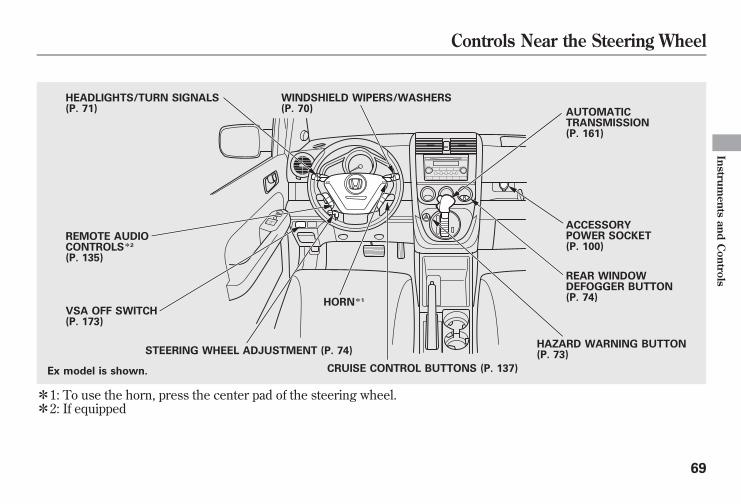
ꭧ1: To use the horn, press the center pad of the steering wheel.ꭧ2: If equipped
HAZARD WARNING BUTTON(P. 73)
CRUISE CONTROL BUTTONS (P. 137)
STEERING WHEEL ADJUSTMENT (P. 74)
HORNꭧ1
Ex model is shown.
VSA OFF SWITCH(P. 173)
REMOTE AUDIOCONTROLSꭧ2
(P. 135)
HEADLIGHTS/TURN SIGNALS(P. 71)
WINDSHIELD WIPERS/WASHERS(P. 70)
REAR WINDOWDEFOGGER BUTTON(P. 74)
AUTOMATICTRANSMISSION(P. 161)
ACCESSORYPOWER SOCKET(P. 100)
Controls Near the Steering Wheel
69
Instruments
andControls
10/08/06 08:34:41 11 ELEMENT MMC North America Owner's Man 50 31SCV680 enu
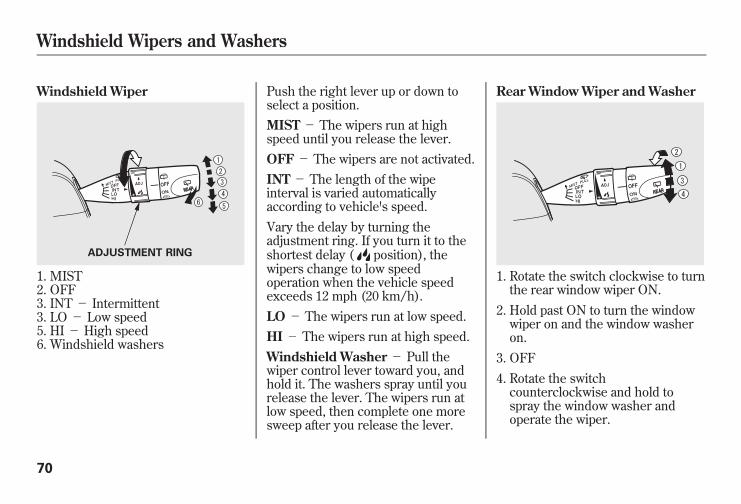
Windshield Wiper
1. MIST2. OFF3. INT - Intermittent3. LO - Low speed5. HI - High speed6. Windshield washers
Push the right lever up or down toselect a position.MIST - The wipers run at highspeed until you release the lever.OFF- The wipers are not activated.INT- The length of the wipeinterval is varied automaticallyaccording to vehicle's speed.Vary the delay by turning theadjustment ring. If you turn it to theshortest delay ( position), thewipers change to low speedoperation when the vehicle speedexceeds 12 mph (20 km/h).LO - The wipers run at low speed.HI- The wipers run at high speed.Windshield Washer- Pull thewiper control lever toward you, andhold it. The washers spray until yourelease the lever. The wipers run atlow speed, then complete one moresweep after you release the lever.
Rear Window Wiper and Washer
1. Rotate the switch clockwise to turnthe rear window wiper ON.
2. Hold past ON to turn the windowwiper on and the window washeron.
3. OFF4. Rotate the switchcounterclockwise and hold tospray the window washer andoperate the wiper.
ADJUSTMENT RING
Windshield Wipers and Washers
70
10/08/06 08:34:41 11 ELEMENT MMC North America Owner's Man 50 31SCV680 enu

1. Turn signal2. Off3. Parking and instrument panellights4. Headlights on5. High beams6. Flash high beams
Turn Signal- Push down on thelever to signal a left turn and up tosignal a right turn. To signal a lanechange, push lightly on the lever,and hold it. The lever will return tocenter when you release it orcomplete a turn.
Headlights- Turning the switch tothe ‘‘ ’’ position turns on theparking lights, taillights, instrumentpanel lights, side-marker lights, andrear license plate lights.Turning the switch to the ‘‘ ’’position turns on the headlights.When the light switch is in the‘‘ ’’ or ‘‘ ’’ position, the lightson indicator comes on as a reminder.This indicator stays on if you leavethe light switch on and turn theignition switch to the ACCESSORY(I) or the LOCK (0) position.If you leave the lights on with the keyremoved from the ignition switch,you will hear a reminder chime whenyou open the driver's door.
CONTINUED
Turn Signals and Headlights
71
Instruments
andControls
10/08/06 08:34:41 11 ELEMENT MMC North America Owner's Man 50 31SCV680 enu
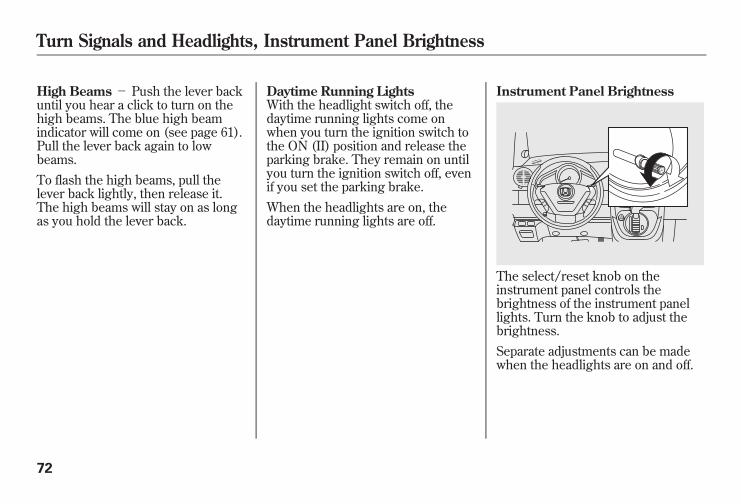
High Beams- Push the lever backuntil you hear a click to turn on thehigh beams. The blue high beamindicator will come on (see page 61).Pull the lever back again to lowbeams.To flash the high beams, pull thelever back lightly, then release it.The high beams will stay on as longas you hold the lever back.
Daytime Running LightsWith the headlight switch off, thedaytime running lights come onwhen you turn the ignition switch tothe ON (II) position and release theparking brake. They remain on untilyou turn the ignition switch off, evenif you set the parking brake.When the headlights are on, thedaytime running lights are off.
Instrument Panel Brightness
The select/reset knob on theinstrument panel controls thebrightness of the instrument panellights. Turn the knob to adjust thebrightness.Separate adjustments can be madewhen the headlights are on and off.
Turn Signals and Headlights, Instrument Panel Brightness
72
10/08/06 08:34:41 11 ELEMENT MMC North America Owner's Man 50 31SCV680 enu
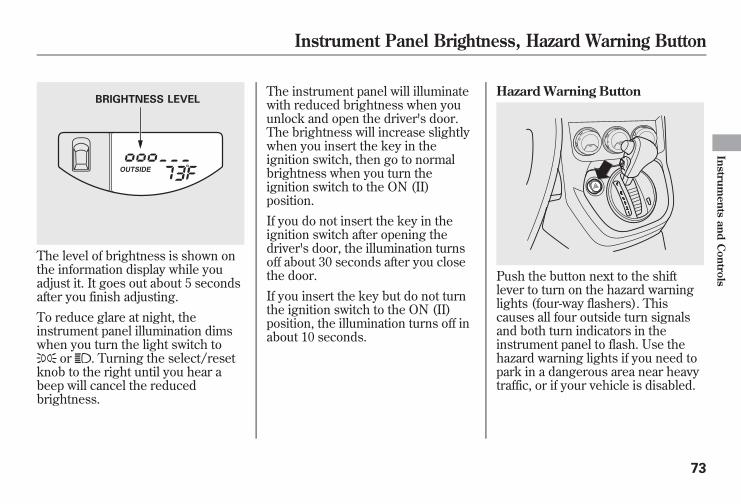
The level of brightness is shown onthe information display while youadjust it. It goes out about 5 secondsafter you finish adjusting.To reduce glare at night, theinstrument panel illumination dimswhen you turn the light switch to
or . Turning the select/resetknob to the right until you hear abeep will cancel the reducedbrightness.
The instrument panel will illuminatewith reduced brightness when youunlock and open the driver's door.The brightness will increase slightlywhen you insert the key in theignition switch, then go to normalbrightness when you turn theignition switch to the ON (II)position.If you do not insert the key in theignition switch after opening thedriver's door, the illumination turnsoff about 30 seconds after you closethe door.If you insert the key but do not turnthe ignition switch to the ON (II)position, the illumination turns off inabout 10 seconds.
Hazard Warning Button
Push the button next to the shiftlever to turn on the hazard warninglights (four-way flashers). Thiscauses all four outside turn signalsand both turn indicators in theinstrument panel to flash. Use thehazard warning lights if you need topark in a dangerous area near heavytraffic, or if your vehicle is disabled.
BRIGHTNESS LEVEL
Instrument Panel Brightness, Hazard Warning Button
73
Instruments
andControls
10/08/06 08:34:41 11 ELEMENT MMC North America Owner's Man 50 31SCV680 enu
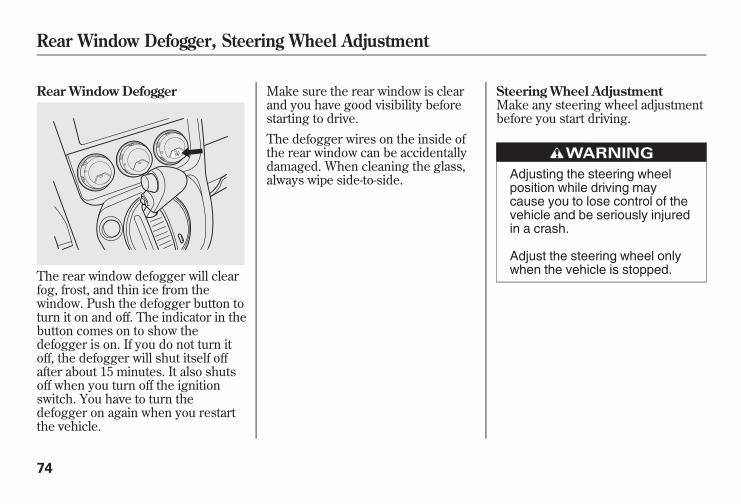
Rear Window Defogger
The rear window defogger will clearfog, frost, and thin ice from thewindow. Push the defogger button toturn it on and off. The indicator in thebutton comes on to show thedefogger is on. If you do not turn itoff, the defogger will shut itself offafter about 15 minutes. It also shutsoff when you turn off the ignitionswitch. You have to turn thedefogger on again when you restartthe vehicle.
Make sure the rear window is clearand you have good visibility beforestarting to drive.The defogger wires on the inside ofthe rear window can be accidentallydamaged. When cleaning the glass,always wipe side-to-side.
Steering Wheel AdjustmentMake any steering wheel adjustmentbefore you start driving.
Adjusting the steering wheelposition while driving maycause you to lose control of thevehicle and be seriously injuredin a crash.
Adjust the steering wheel onlywhen the vehicle is stopped.
Rear Window Defogger, Steering Wheel Adjustment
74
10/08/06 08:34:41 11 ELEMENT MMC North America Owner's Man 50 31SCV680 enu
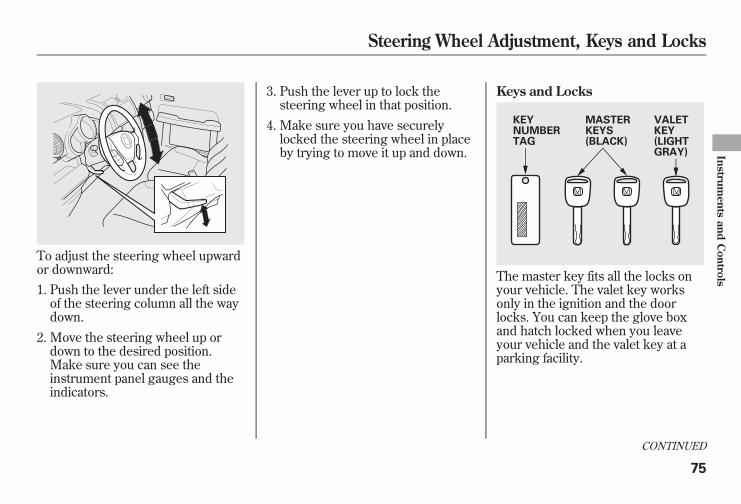
To adjust the steering wheel upwardor downward:1. Push the lever under the left sideof the steering column all the waydown.
2. Move the steering wheel up ordown to the desired position.Make sure you can see theinstrument panel gauges and theindicators.
3. Push the lever up to lock thesteering wheel in that position.
4. Make sure you have securelylocked the steering wheel in placeby trying to move it up and down.
Keys and Locks
The master key fits all the locks onyour vehicle. The valet key worksonly in the ignition and the doorlocks. You can keep the glove boxand hatch locked when you leaveyour vehicle and the valet key at aparking facility.
KEYNUMBERTAG
MASTERKEYS(BLACK)
VALETKEY(LIGHTGRAY)
CONTINUED
Steering Wheel Adjustment, Keys and Locks
75
Instruments
andControls
10/08/06 08:34:41 11 ELEMENT MMC North America Owner's Man 50 31SCV680 enu
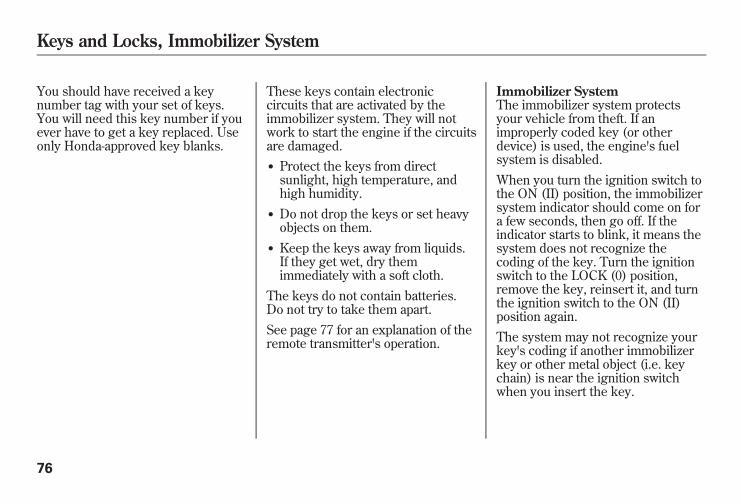
You should have received a keynumber tag with your set of keys.You will need this key number if youever have to get a key replaced. Useonly Honda-approved key blanks.
These keys contain electroniccircuits that are activated by theimmobilizer system. They will notwork to start the engine if the circuitsare damaged.● Protect the keys from directsunlight, high temperature, andhigh humidity.
● Do not drop the keys or set heavyobjects on them.
● Keep the keys away from liquids.If they get wet, dry themimmediately with a soft cloth.
The keys do not contain batteries.Do not try to take them apart.See page 77 for an explanation of theremote transmitter's operation.
Immobilizer SystemThe immobilizer system protectsyour vehicle from theft. If animproperly coded key (or otherdevice) is used, the engine's fuelsystem is disabled.When you turn the ignition switch tothe ON (II) position, the immobilizersystem indicator should come on fora few seconds, then go off. If theindicator starts to blink, it means thesystem does not recognize thecoding of the key. Turn the ignitionswitch to the LOCK (0) position,remove the key, reinsert it, and turnthe ignition switch to the ON (II)position again.The system may not recognize yourkey's coding if another immobilizerkey or other metal object (i.e. keychain) is near the ignition switchwhen you insert the key.
Keys and Locks, Immobilizer System
76
10/08/06 08:34:41 11 ELEMENT MMC North America Owner's Man 50 31SCV680 enu
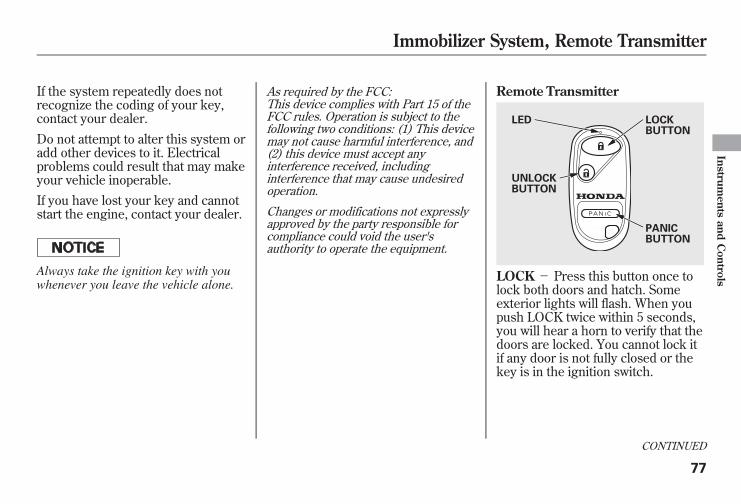
If the system repeatedly does notrecognize the coding of your key,contact your dealer.Do not attempt to alter this system oradd other devices to it. Electricalproblems could result that may makeyour vehicle inoperable.If you have lost your key and cannotstart the engine, contact your dealer.
Always take the ignition key with youwhenever you leave the vehicle alone.
As required by the FCC:This device complies with Part 15 of theFCC rules. Operation is subject to thefollowing two conditions: (1) This devicemay not cause harmful interference, and(2) this device must accept anyinterference received, includinginterference that may cause undesiredoperation.
Changes or modifications not expresslyapproved by the party responsible forcompliance could void the user'sauthority to operate the equipment.
Remote Transmitter
LOCK- Press this button once tolock both doors and hatch. Someexterior lights will flash. When youpush LOCK twice within 5 seconds,you will hear a horn to verify that thedoors are locked. You cannot lock itif any door is not fully closed or thekey is in the ignition switch.
LED
UNLOCKBUTTON
LOCKBUTTON
PANICBUTTON
CONTINUED
Immobilizer System, Remote Transmitter
77
Instruments
andControls
10/08/06 08:34:41 11 ELEMENT MMC North America Owner's Man 50 31SCV680 enu
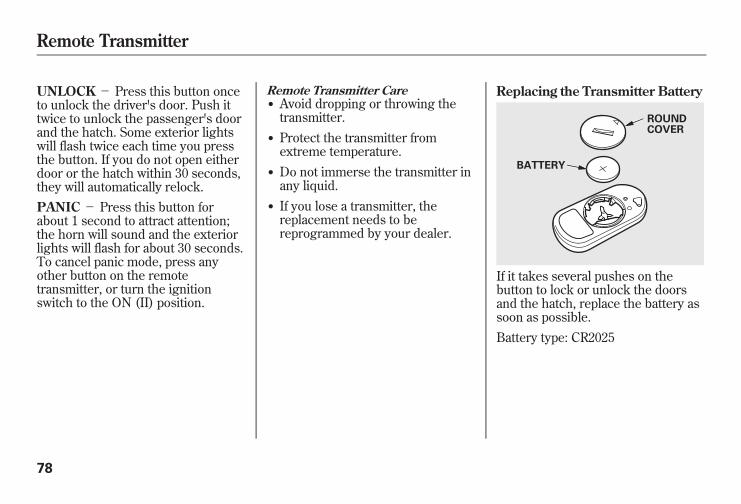
UNLOCK- Press this button onceto unlock the driver's door. Push ittwice to unlock the passenger's doorand the hatch. Some exterior lightswill flash twice each time you pressthe button. If you do not open eitherdoor or the hatch within 30 seconds,they will automatically relock.PANIC- Press this button forabout 1 second to attract attention;the horn will sound and the exteriorlights will flash for about 30 seconds.To cancel panic mode, press anyother button on the remotetransmitter, or turn the ignitionswitch to the ON (II) position.
Remote Transmitter Care● Avoid dropping or throwing thetransmitter.
● Protect the transmitter fromextreme temperature.
● Do not immerse the transmitter inany liquid.
● If you lose a transmitter, thereplacement needs to bereprogrammed by your dealer.
Replacing the Transmitter Battery
If it takes several pushes on thebutton to lock or unlock the doorsand the hatch, replace the battery assoon as possible.Battery type: CR2025
ROUNDCOVER
BATTERY
Remote Transmitter
78
10/08/06 08:34:41 11 ELEMENT MMC North America Owner's Man 50 31SCV680 enu
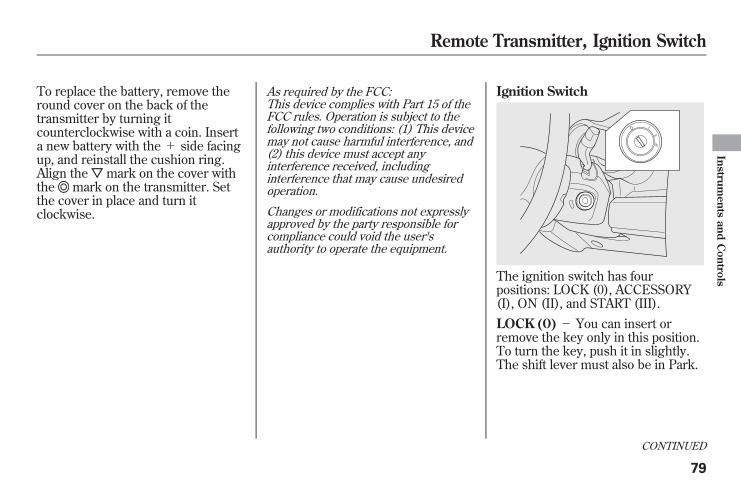
To replace the battery, remove theround cover on the back of thetransmitter by turning itcounterclockwise with a coin. Inserta new battery with the+ side facingup, and reinstall the cushion ring.Align the mark on the cover withthe mark on the transmitter. Setthe cover in place and turn itclockwise.
As required by the FCC:This device complies with Part 15 of theFCC rules. Operation is subject to thefollowing two conditions: (1) This devicemay not cause harmful interference, and(2) this device must accept anyinterference received, includinginterference that may cause undesiredoperation.
Changes or modifications not expresslyapproved by the party responsible forcompliance could void the user'sauthority to operate the equipment.
Ignition Switch
The ignition switch has fourpositions: LOCK (0), ACCESSORY(I), ON (II), and START (III).LOCK (0) - You can insert orremove the key only in this position.To turn the key, push it in slightly.The shift lever must also be in Park.
CONTINUED
Remote Transmitter, Ignition Switch
79
Instruments
andControls
10/08/06 08:34:41 11 ELEMENT MMC North America Owner's Man 50 31SCV680 enu
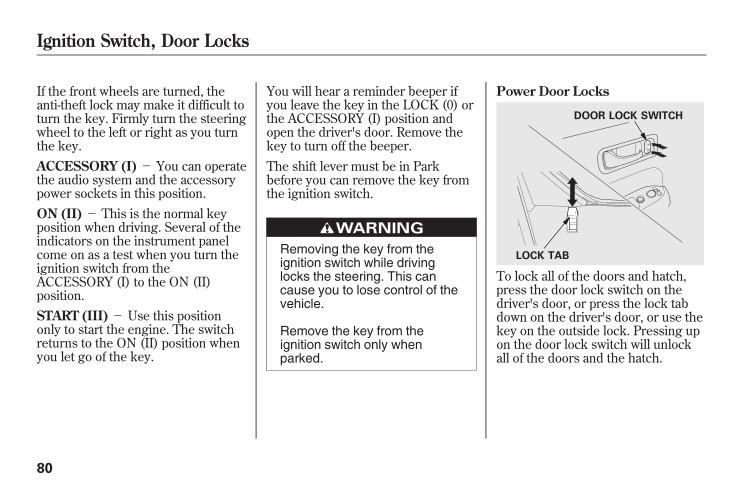
If the front wheels are turned, theanti-theft lock may make it difficult toturn the key. Firmly turn the steeringwheel to the left or right as you turnthe key.ACCESSORY (I)- You can operatethe audio system and the accessorypower sockets in this position.ON (II) - This is the normal keyposition when driving. Several of theindicators on the instrument panelcome on as a test when you turn theignition switch from theACCESSORY (I) to the ON (II)position.START (III) - Use this positiononly to start the engine. The switchreturns to the ON (II) position whenyou let go of the key.
You will hear a reminder beeper ifyou leave the key in the LOCK (0) orthe ACCESSORY (I) position andopen the driver's door. Remove thekey to turn off the beeper.The shift lever must be in Parkbefore you can remove the key fromthe ignition switch.
Removing the key from theignition switch while drivinglocks the steering. This cancause you to lose control of thevehicle.
Remove the key from theignition switch only whenparked.
Power Door Locks
To lock all of the doors and hatch,press the door lock switch on thedriver's door, or press the lock tabdown on the driver's door, or use thekey on the outside lock. Pressing upon the door lock switch will unlockall of the doors and the hatch.
LOCK TAB
DOOR LOCK SWITCH
Ignition Switch, Door Locks
80
10/08/06 08:34:41 11 ELEMENT MMC North America Owner's Man 50 31SCV680 enu
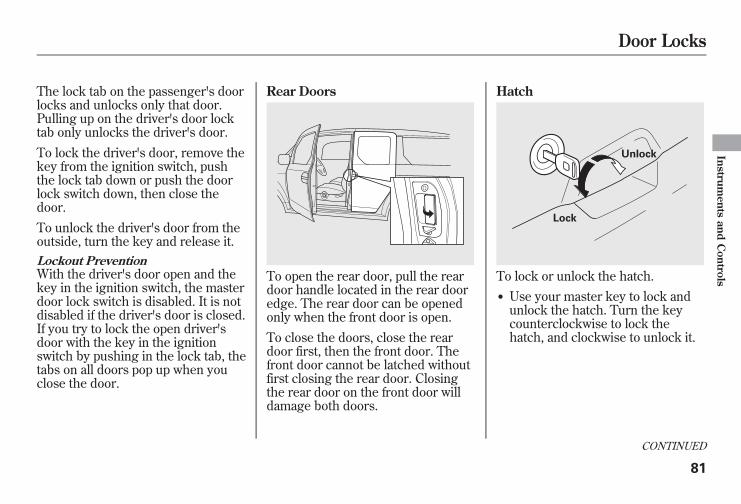
The lock tab on the passenger's doorlocks and unlocks only that door.Pulling up on the driver's door locktab only unlocks the driver's door.To lock the driver's door, remove thekey from the ignition switch, pushthe lock tab down or push the doorlock switch down, then close thedoor.To unlock the driver's door from theoutside, turn the key and release it.Lockout PreventionWith the driver's door open and thekey in the ignition switch, the masterdoor lock switch is disabled. It is notdisabled if the driver's door is closed.If you try to lock the open driver'sdoor with the key in the ignitionswitch by pushing in the lock tab, thetabs on all doors pop up when youclose the door.
Rear Doors
To open the rear door, pull the reardoor handle located in the rear dooredge. The rear door can be openedonly when the front door is open.To close the doors, close the reardoor first, then the front door. Thefront door cannot be latched withoutfirst closing the rear door. Closingthe rear door on the front door willdamage both doors.
Hatch
To lock or unlock the hatch.● Use your master key to lock andunlock the hatch. Turn the keycounterclockwise to lock thehatch, and clockwise to unlock it.
Unlock
Lock
CONTINUED
Door Locks
81
Instruments
andControls
10/08/06 08:34:41 11 ELEMENT MMC North America Owner's Man 50 31SCV680 enu
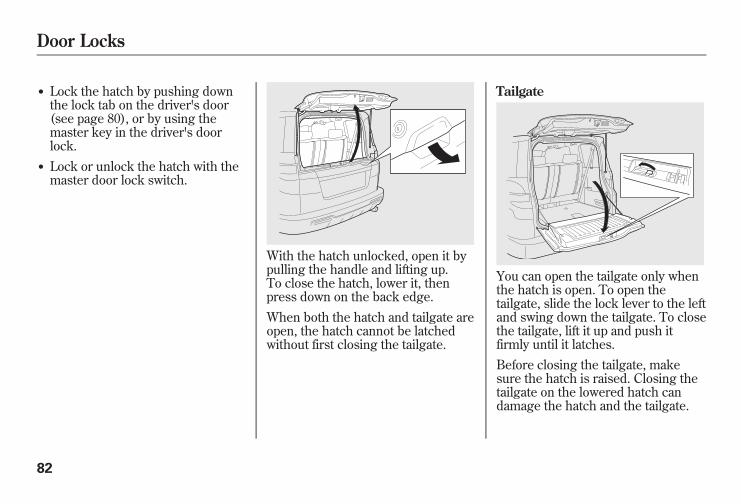
● Lock the hatch by pushing downthe lock tab on the driver's door(see page 80), or by using themaster key in the driver's doorlock.
● Lock or unlock the hatch with themaster door lock switch.
With the hatch unlocked, open it bypulling the handle and lifting up.To close the hatch, lower it, thenpress down on the back edge.When both the hatch and tailgate areopen, the hatch cannot be latchedwithout first closing the tailgate.
Tailgate
You can open the tailgate only whenthe hatch is open. To open thetailgate, slide the lock lever to the leftand swing down the tailgate. To closethe tailgate, lift it up and push itfirmly until it latches.Before closing the tailgate, makesure the hatch is raised. Closing thetailgate on the lowered hatch candamage the hatch and the tailgate.
Door Locks
82
10/08/06 08:34:41 11 ELEMENT MMC North America Owner's Man 50 31SCV680 enu
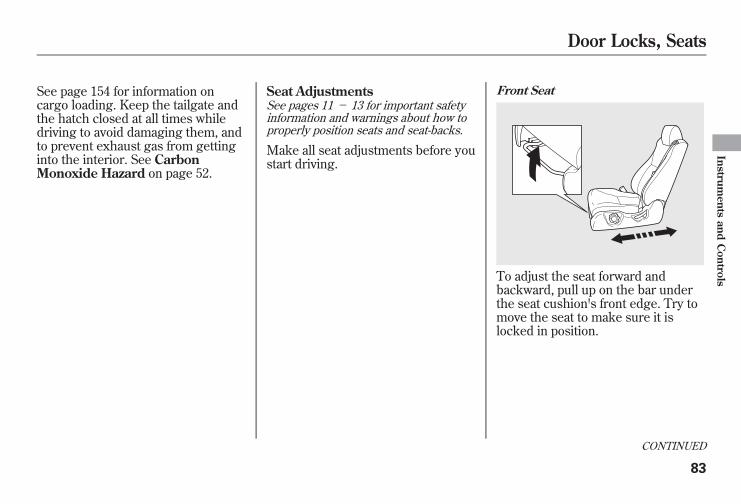
See page 154 for information oncargo loading. Keep the tailgate andthe hatch closed at all times whiledriving to avoid damaging them, andto prevent exhaust gas from gettinginto the interior. See CarbonMonoxide Hazard on page 52.
Seat AdjustmentsSee pages 11 - 13 for important safetyinformation and warnings about how toproperly position seats and seat-backs.
Make all seat adjustments before youstart driving.
Front Seat
To adjust the seat forward andbackward, pull up on the bar underthe seat cushion's front edge. Try tomove the seat to make sure it islocked in position.
CONTINUED
Door Locks, Seats
83
Instruments
andControls
10/08/06 08:34:41 11 ELEMENT MMC North America Owner's Man 50 31SCV680 enu
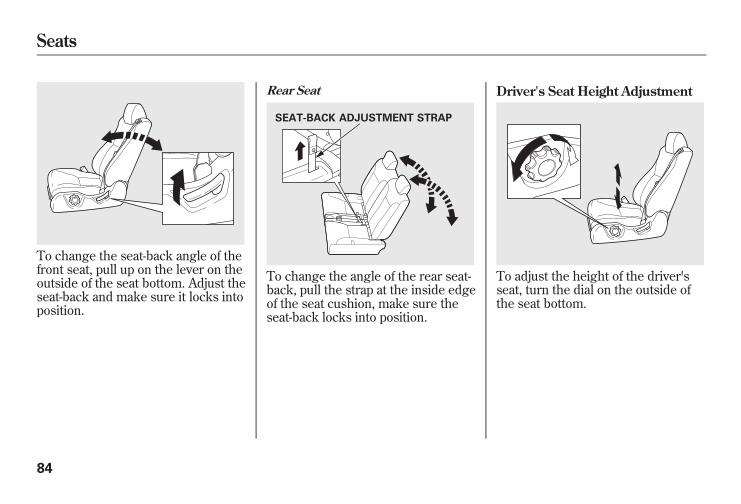
To change the seat-back angle of thefront seat, pull up on the lever on theoutside of the seat bottom. Adjust theseat-back and make sure it locks intoposition.
Rear Seat
To change the angle of the rear seat-back, pull the strap at the inside edgeof the seat cushion, make sure theseat-back locks into position.
Driver's Seat Height Adjustment
To adjust the height of the driver'sseat, turn the dial on the outside ofthe seat bottom.
SEAT-BACK ADJUSTMENT STRAP
Seats
84
10/08/06 08:34:41 11 ELEMENT MMC North America Owner's Man 50 31SCV680 enu
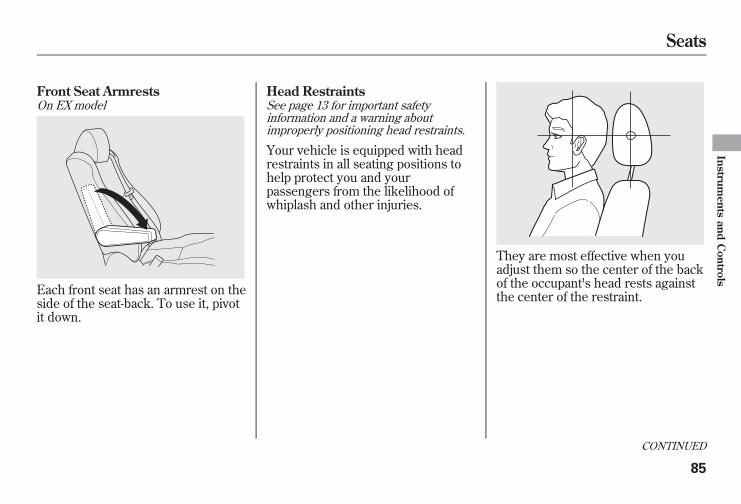
Front Seat ArmrestsOn EX model
Each front seat has an armrest on theside of the seat-back. To use it, pivotit down.
Head RestraintsSee page 13 for important safetyinformation and a warning aboutimproperly positioning head restraints.
Your vehicle is equipped with headrestraints in all seating positions tohelp protect you and yourpassengers from the likelihood ofwhiplash and other injuries.
They are most effective when youadjust them so the center of the backof the occupant's head rests againstthe center of the restraint.
CONTINUED
Seats
85
Instruments
andControls
10/08/06 08:34:41 11 ELEMENT MMC North America Owner's Man 50 31SCV680 enu
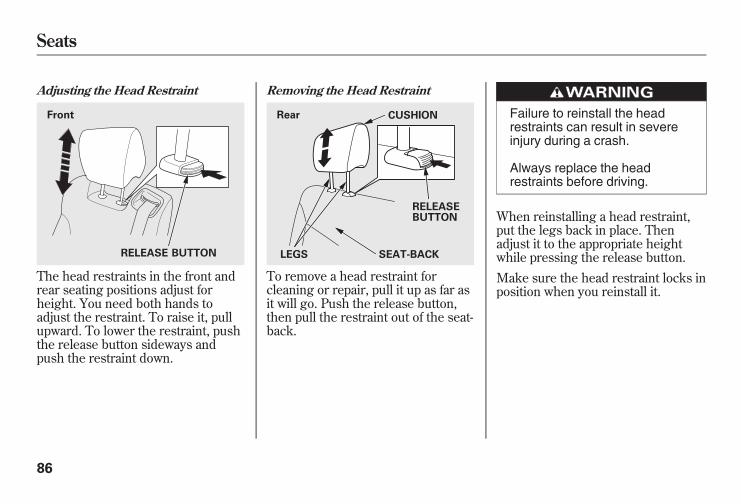
Adjusting the Head Restraint
The head restraints in the front andrear seating positions adjust forheight. You need both hands toadjust the restraint. To raise it, pullupward. To lower the restraint, pushthe release button sideways andpush the restraint down.
Removing the Head Restraint
To remove a head restraint forcleaning or repair, pull it up as far asit will go. Push the release button,then pull the restraint out of the seat-back.
Failure to reinstall the headrestraints can result in severeinjury during a crash.
Always replace the headrestraints before driving.
When reinstalling a head restraint,put the legs back in place. Thenadjust it to the appropriate heightwhile pressing the release button.Make sure the head restraint locks inposition when you reinstall it.
RELEASE BUTTON
Front Rear CUSHION
RELEASEBUTTON
SEAT-BACKLEGS
Seats
86
10/08/06 08:34:41 11 ELEMENT MMC North America Owner's Man 50 31SCV680 enu
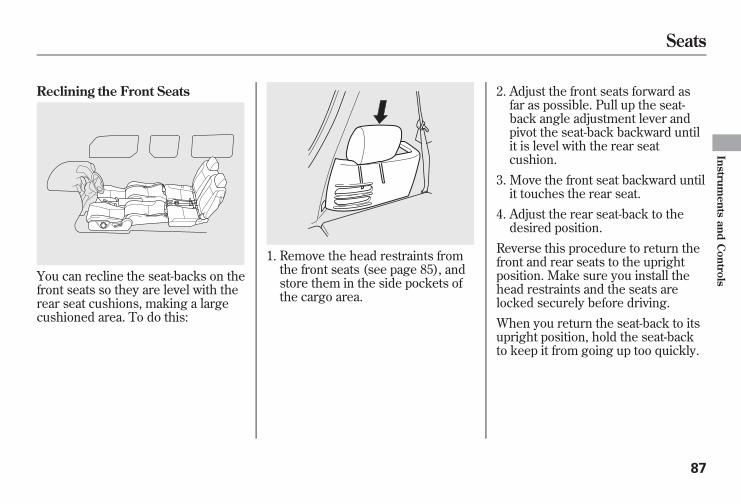
Reclining the Front Seats
You can recline the seat-backs on thefront seats so they are level with therear seat cushions, making a largecushioned area. To do this:
1. Remove the head restraints fromthe front seats (see page 85), andstore them in the side pockets ofthe cargo area.
2. Adjust the front seats forward asfar as possible. Pull up the seat-back angle adjustment lever andpivot the seat-back backward untilit is level with the rear seatcushion.
3. Move the front seat backward untilit touches the rear seat.
4. Adjust the rear seat-back to thedesired position.
Reverse this procedure to return thefront and rear seats to the uprightposition. Make sure you install thehead restraints and the seats arelocked securely before driving.When you return the seat-back to itsupright position, hold the seat-backto keep it from going up too quickly.
Seats
87
Instruments
andControls
10/08/06 08:34:41 11 ELEMENT MMC North America Owner's Man 50 31SCV680 enu

Folding the Rear SeatsTo create more cargo space, you canfold up each rear seat to each sidewall separately.1. Lower the head restraint to itslowest position.
2. Pull the seat-back adjustment strapat the inside edge of the seatcushion and push the seat-backbackward as far as it will go.
3. Pull the release strap on the seatsupport, and pivot the seat towardthe vehicle's side wall.
SEAT-BACK ADJUSTMENT STRAP RELEASE STRAP
Seats
88
10/08/06 08:34:41 11 ELEMENT MMC North America Owner's Man 50 31SCV680 enu
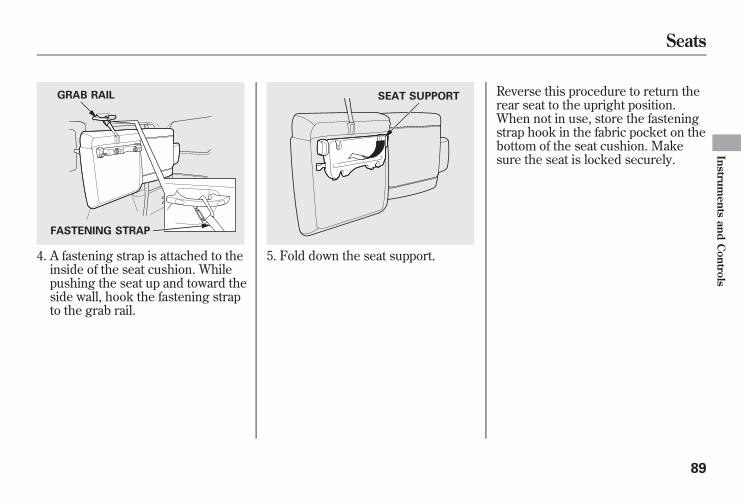
4. A fastening strap is attached to theinside of the seat cushion. Whilepushing the seat up and toward theside wall, hook the fastening strapto the grab rail.
5. Fold down the seat support.
Reverse this procedure to return therear seat to the upright position.When not in use, store the fasteningstrap hook in the fabric pocket on thebottom of the seat cushion. Makesure the seat is locked securely.
GRAB RAIL
FASTENING STRAP
SEAT SUPPORT
Seats
89
Instruments
andControls
10/08/06 08:34:41 11 ELEMENT MMC North America Owner's Man 50 31SCV680 enu
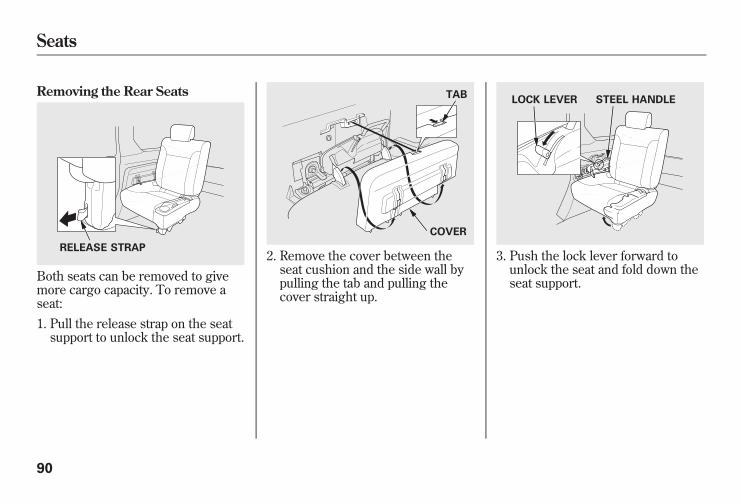
Removing the Rear Seats
Both seats can be removed to givemore cargo capacity. To remove aseat:1. Pull the release strap on the seatsupport to unlock the seat support.
2. Remove the cover between theseat cushion and the side wall bypulling the tab and pulling thecover straight up.
3. Push the lock lever forward tounlock the seat and fold down theseat support.
RELEASE STRAP
TAB
COVER
LOCK LEVER STEEL HANDLE
Seats
90
10/08/06 08:34:41 11 ELEMENT MMC North America Owner's Man 50 31SCV680 enu
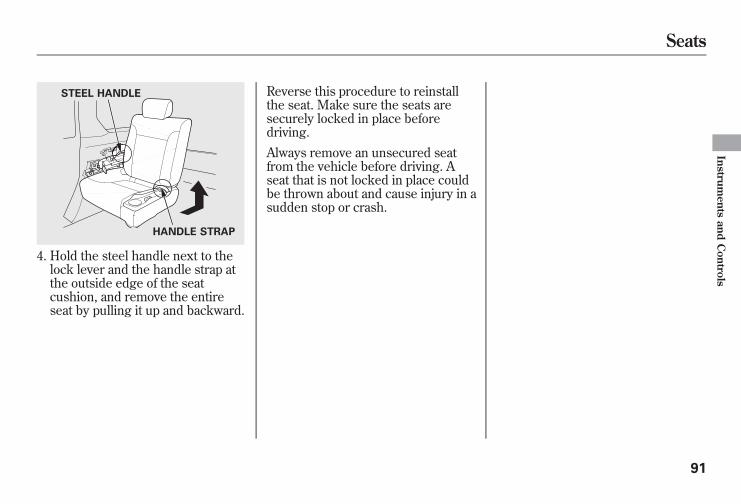
4. Hold the steel handle next to thelock lever and the handle strap atthe outside edge of the seatcushion, and remove the entireseat by pulling it up and backward.
Reverse this procedure to reinstallthe seat. Make sure the seats aresecurely locked in place beforedriving.Always remove an unsecured seatfrom the vehicle before driving. Aseat that is not locked in place couldbe thrown about and cause injury in asudden stop or crash.
STEEL HANDLE
HANDLE STRAP
Seats
91
Instruments
andControls
10/08/06 08:34:41 11 ELEMENT MMC North America Owner's Man 50 31SCV680 enu
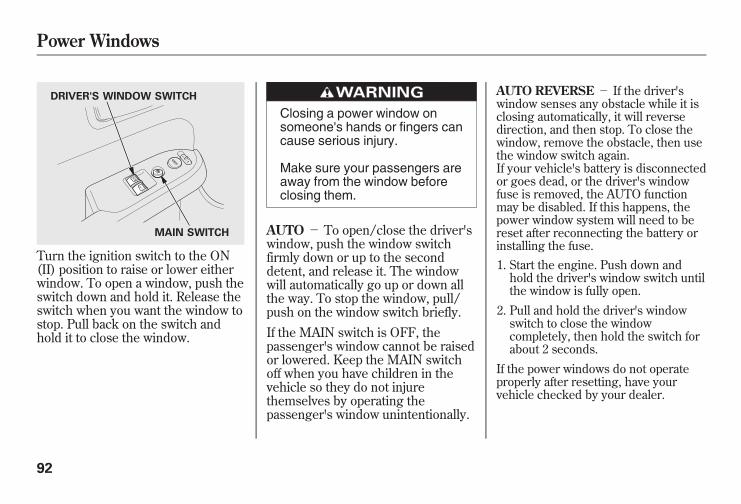
Turn the ignition switch to the ON(II) position to raise or lower eitherwindow. To open a window, push theswitch down and hold it. Release theswitch when you want the window tostop. Pull back on the switch andhold it to close the window.
Closing a power window onsomeone's hands or fingers cancause serious injury.
Make sure your passengers areaway from the window beforeclosing them.
AUTO - To open/close the driver'swindow, push the window switchfirmly down or up to the seconddetent, and release it. The windowwill automatically go up or down allthe way. To stop the window, pull/push on the window switch briefly.If the MAIN switch is OFF, thepassenger's window cannot be raisedor lowered. Keep the MAIN switchoff when you have children in thevehicle so they do not injurethemselves by operating thepassenger's window unintentionally.
AUTO REVERSE - If the driver'swindow senses any obstacle while it isclosing automatically, it will reversedirection, and then stop. To close thewindow, remove the obstacle, then usethe window switch again.If your vehicle's battery is disconnectedor goes dead, or the driver's windowfuse is removed, the AUTO functionmay be disabled. If this happens, thepower window system will need to bereset after reconnecting the battery orinstalling the fuse.1. Start the engine. Push down and
hold the driver's window switch untilthe window is fully open.
2. Pull and hold the driver's windowswitch to close the windowcompletely, then hold the switch forabout 2 seconds.
If the power windows do not operateproperly after resetting, have yourvehicle checked by your dealer.
DRIVER'S WINDOW SWITCH
MAIN SWITCH
Power Windows
92
10/08/06 08:34:41 11 ELEMENT MMC North America Owner's Man 50 31SCV680 enu
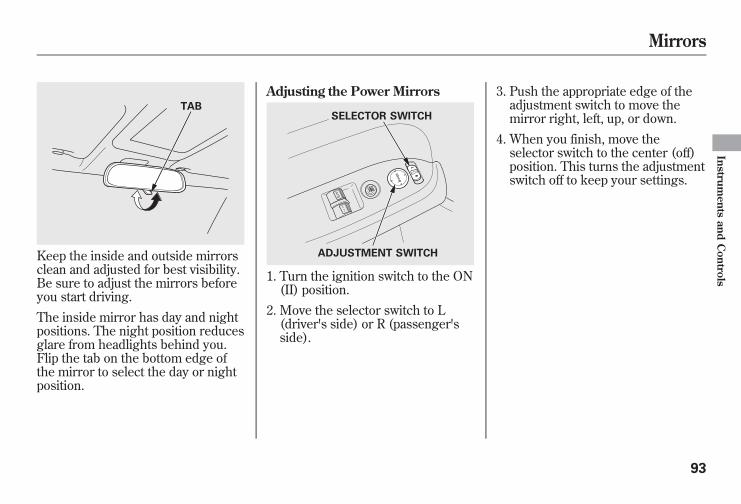
Keep the inside and outside mirrorsclean and adjusted for best visibility.Be sure to adjust the mirrors beforeyou start driving.The inside mirror has day and nightpositions. The night position reducesglare from headlights behind you.Flip the tab on the bottom edge ofthe mirror to select the day or nightposition.
Adjusting the Power Mirrors
1. Turn the ignition switch to the ON(II) position.
2. Move the selector switch to L(driver's side) or R (passenger'sside).
3. Push the appropriate edge of theadjustment switch to move themirror right, left, up, or down.
4. When you finish, move theselector switch to the center (off)position. This turns the adjustmentswitch off to keep your settings.
TABSELECTOR SWITCH
ADJUSTMENT SWITCH
Mirrors
93
Instruments
andControls
10/08/06 08:34:41 11 ELEMENT MMC North America Owner's Man 50 31SCV680 enu
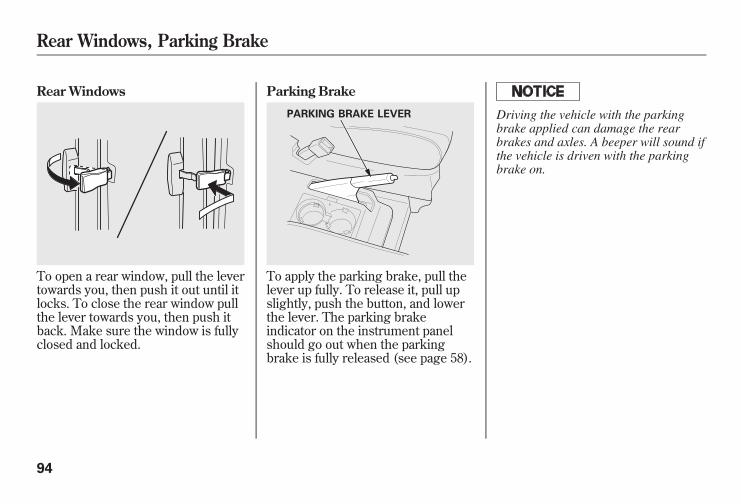
Rear Windows
To open a rear window, pull the levertowards you, then push it out until itlocks. To close the rear window pullthe lever towards you, then push itback. Make sure the window is fullyclosed and locked.
Parking Brake
To apply the parking brake, pull thelever up fully. To release it, pull upslightly, push the button, and lowerthe lever. The parking brakeindicator on the instrument panelshould go out when the parkingbrake is fully released (see page 58).
Driving the vehicle with the parkingbrake applied can damage the rearbrakes and axles. A beeper will sound ifthe vehicle is driven with the parkingbrake on.
PARKING BRAKE LEVER
Rear Windows, Parking Brake
94
10/08/06 08:34:41 11 ELEMENT MMC North America Owner's Man 50 31SCV680 enu
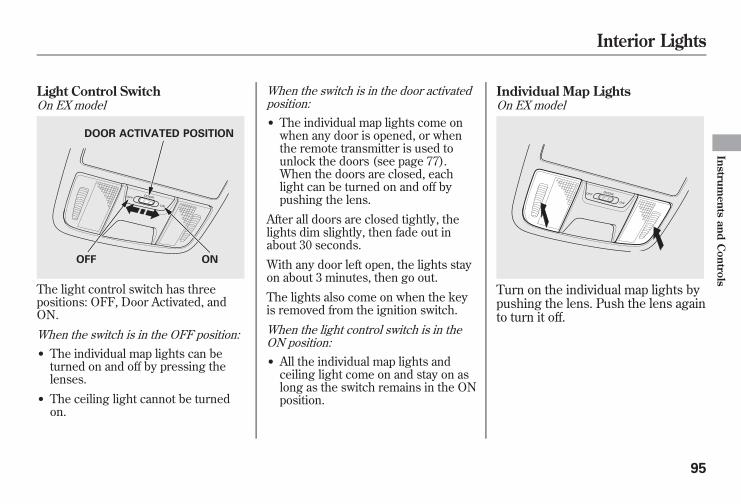
Light Control SwitchOn EX model
The light control switch has threepositions: OFF, Door Activated, andON.
When the switch is in the OFF position:● The individual map lights can beturned on and off by pressing thelenses.
● The ceiling light cannot be turnedon.
When the switch is in the door activatedposition:● The individual map lights come onwhen any door is opened, or whenthe remote transmitter is used tounlock the doors (see page 77).When the doors are closed, eachlight can be turned on and off bypushing the lens.
After all doors are closed tightly, thelights dim slightly, then fade out inabout 30 seconds.
With any door left open, the lights stayon about 3 minutes, then go out.
The lights also come on when the keyis removed from the ignition switch.
When the light control switch is in theON position:● All the individual map lights andceiling light come on and stay on aslong as the switch remains in the ONposition.
Individual Map LightsOn EX model
Turn on the individual map lights bypushing the lens. Push the lens againto turn it off.
OFF ON
DOOR ACTIVATED POSITION
Interior Lights
95
Instruments
andControls
10/08/06 08:34:41 11 ELEMENT MMC North America Owner's Man 50 31SCV680 enu
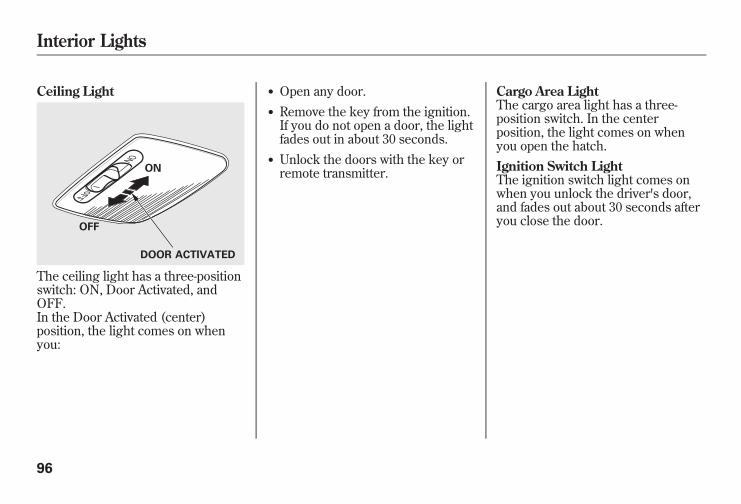
Ceiling Light
The ceiling light has a three-positionswitch: ON, Door Activated, andOFF.In the Door Activated (center)position, the light comes on whenyou:
● Open any door.● Remove the key from the ignition.If you do not open a door, the lightfades out in about 30 seconds.
● Unlock the doors with the key orremote transmitter.
Cargo Area LightThe cargo area light has a three-position switch. In the centerposition, the light comes on whenyou open the hatch.Ignition Switch LightThe ignition switch light comes onwhen you unlock the driver's door,and fades out about 30 seconds afteryou close the door.
ON
OFF
DOOR ACTIVATED
Interior Lights
96
10/08/06 08:34:41 11 ELEMENT MMC North America Owner's Man 50 31SCV680 enu
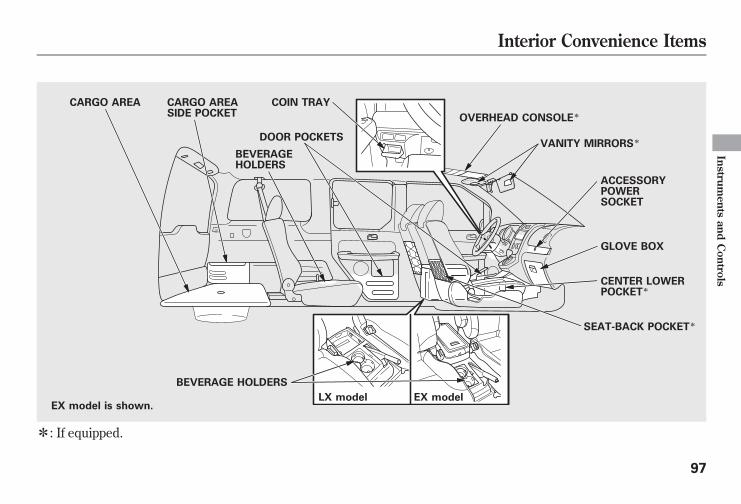
ꭧ: If equipped.
CARGO AREA CARGO AREASIDE POCKET
COIN TRAY
DOOR POCKETS
BEVERAGE HOLDERS
LX model EX model
OVERHEAD CONSOLEꭧ
ACCESSORYPOWERSOCKET
GLOVE BOX
CENTER LOWERPOCKETꭧ
SEAT-BACK POCKETꭧ
VANITY MIRRORSꭧ
BEVERAGEHOLDERS
EX model is shown.
Interior Convenience Items
97
Instruments
andControls
10/08/06 08:34:41 11 ELEMENT MMC North America Owner's Man 50 31SCV680 enu
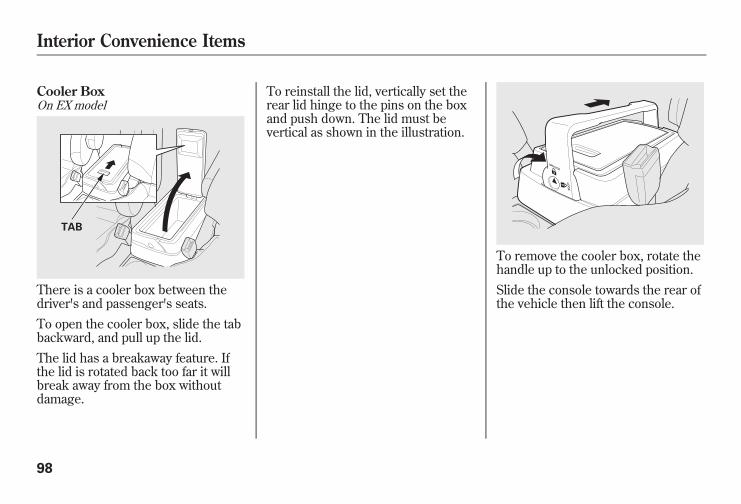
Cooler BoxOn EX model
There is a cooler box between thedriver's and passenger's seats.To open the cooler box, slide the tabbackward, and pull up the lid.The lid has a breakaway feature. Ifthe lid is rotated back too far it willbreak away from the box withoutdamage.
To reinstall the lid, vertically set therear lid hinge to the pins on the boxand push down. The lid must bevertical as shown in the illustration.
To remove the cooler box, rotate thehandle up to the unlocked position.Slide the console towards the rear ofthe vehicle then lift the console.
TAB
Interior Convenience Items
98
10/08/06 08:34:41 11 ELEMENT MMC North America Owner's Man 50 31SCV680 enu

To reinstall the cooler box, set thecooler box into the floor base, thenslide the cooler box forward.Rotate the handle down to the lockedposition.Make sure the cooler box is securelylocked in place. A cooler box that isnot locked in place could become aprojectile and cause injury in asudden stop or crash.If you take the cooler box out, put itin a safe place outside the vehicle.
NOTE: The cooler box must belocked to floor base while driving.
Beverage HoldersBe careful when you are using thebeverage holders. A spilled liquidthat is very hot can scald you or yourpassengers. Spilled liquids can alsodamage the upholstery, and electricalcomponents in the interior.The front beverage holder isremovable. To remove it, push thetab and pull it up.
Interior Convenience Items
99
Instruments
andControls
10/08/06 08:34:41 11 ELEMENT MMC North America Owner's Man 50 31SCV680 enu
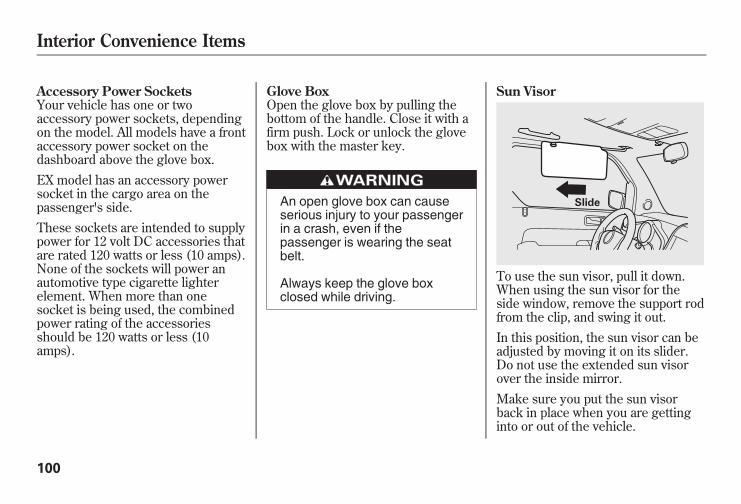
Accessory Power SocketsYour vehicle has one or twoaccessory power sockets, dependingon the model. All models have a frontaccessory power socket on thedashboard above the glove box.EX model has an accessory powersocket in the cargo area on thepassenger's side.These sockets are intended to supplypower for 12 volt DC accessories thatare rated 120 watts or less (10 amps).None of the sockets will power anautomotive type cigarette lighterelement. When more than onesocket is being used, the combinedpower rating of the accessoriesshould be 120 watts or less (10amps).
Glove BoxOpen the glove box by pulling thebottom of the handle. Close it with afirm push. Lock or unlock the glovebox with the master key.
An open glove box can causeserious injury to your passengerin a crash, even if thepassenger is wearing the seatbelt.
Always keep the glove boxclosed while driving.
Sun Visor
To use the sun visor, pull it down.When using the sun visor for theside window, remove the support rodfrom the clip, and swing it out.In this position, the sun visor can beadjusted by moving it on its slider.Do not use the extended sun visorover the inside mirror.Make sure you put the sun visorback in place when you are gettinginto or out of the vehicle.
Slide
Interior Convenience Items
100
10/08/06 08:34:41 11 ELEMENT MMC North America Owner's Man 50 31SCV680 enu
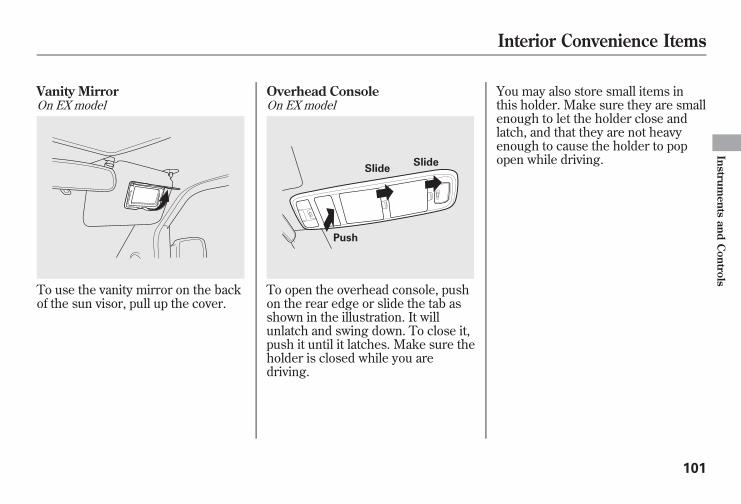
Vanity MirrorOn EX model
To use the vanity mirror on the backof the sun visor, pull up the cover.
Overhead ConsoleOn EX model
To open the overhead console, pushon the rear edge or slide the tab asshown in the illustration. It willunlatch and swing down. To close it,push it until it latches. Make sure theholder is closed while you aredriving.
You may also store small items inthis holder. Make sure they are smallenough to let the holder close andlatch, and that they are not heavyenough to cause the holder to popopen while driving.
Push
SlideSlide
Interior Convenience Items
101
Instruments
andControls
10/08/06 08:34:41 11 ELEMENT MMC North America Owner's Man 50 31SCV680 enu

102
10/08/06 08:34:41 11 ELEMENT MMC North America Owner's Man 50 31SCV680 enu
The heating and air conditioningsystem in your vehicle provides acomfortable driving environment inall weather conditions.
The standard audio system has manyfeatures. This section describesthose features and how to use them.(If you have an optional audiosystem, refer to the operatinginstructions that came with it.)
On EX modelYour vehicle has an anti-theft audiosystem that requires a code numberto enable it.
Vents, Heating, and A/C............. 104Air Flow Controls.................... 105Ventilation............................... 106Using the Heater..................... 106Using the A/C......................... 106Dehumidify the Interior .......... 107To Defog and Defrost.............. 107To Remove Exterior Frost or
Ice From the Windows........ 108To Turn Everything Off........... 108
Audio System.............................. 109Playing the AM/FM Radio.......... 110Playing the XM® Radio................ 113Playing a Disc ............................. 119Disc Player Error Messages ....... 125Disc Changer Error
Messages................................ 126Protecting Your Discs ................. 127FM/AM Radio Reception............ 130Radio Theft Protection ................ 132Setting the Clock......................... 133Remote Audio Controls ............... 135Auxiliary Input Jack .................... 136Cruise Control ............................ 137
Features
103
Features
10/08/06 08:34:41 11 ELEMENT MMC North America Owner's Man 50 31SCV680 enu

FAN CONTROL DIAL TEMPERATURECONTROL DIAL
MODE CONTROL DIAL
DEFROST POSITION
REAR WINDOW DEFOGGERBUTTON
MAX A/C POSITION
A/C (AIR CONDITIONING)BUTTON
RECIRCULATION BUTTON
Vents, Heating, and A/C
104
10/08/06 08:34:41 11 ELEMENT MMC North America Owner's Man 50 31SCV680 enu

Air Flow ControlsFan Control DialTurn this dial clockwise to increasethe fan speed and airflow.Temperature Control DialTurning this dial clockwise increasesthe temperature of the airflow.Air Conditioning (A/C) ButtonThis button turns the airconditioning on and off. Theindicator in the button is on when theA/C is on.Recirculation ButtonWhen the recirculation indicator ison, air from the vehicle's interior issent throughout the system again.When the indicator is off, air isbrought in from the outside of thevehicle (fresh air mode).
The outside air intakes for theheating and cooling system are at thebase of the windshield. Keep thisarea clear of leaves and other debris.The system should be left in fresh airmode under almost all conditions.Keeping the system in recirculationmode, particularly with the A/C off,can cause the windows to fog up.Switch to recirculation mode whendriving through dusty or smokyconditions, then return to fresh airmode.Rear Window Defogger ButtonThis button turns the rear windowdefogger on and off (see page 74).Mode Control DialUse the mode control dial to selectthe vents the air flows from. Some airwill flow from the dashboard vents inall modes.
The system automatically turnson the A/C and switches to
recirculation mode. Air flows fromthe center and side vents in thedashboard (see page 106).
Air flows from the center andcorner vents in the dashboard.
Airflow is divided between thevents in the dashboard and the floorvents.
Air flows from the floor vents.When you select , the systemautomatically switches to fresh airmode.
Airflow is divided between thefloor vents and the defroster vents atthe base of the windshield.
CONTINUED
Vents, Heating, and A/C
105
Features
10/08/06 08:34:41 11 ELEMENT MMC North America Owner's Man 50 31SCV680 enu
Air flows from the defrostervents at the base of the windshield.
When you select or , thesystem automatically switches tofresh air mode and turns on the A/C.The A/C indicator does not come on.VentilationThe flow-through ventilation systemdraws in outside air, circulates itthrough the interior, then dischargesit through vents near the tailgate.1. Set the temperature to the lowerlimit.
2. Make sure the A/C is off.3. Select and fresh air mode.4. Set the fan to the desired speed.
Using the HeaterThe heater uses engine coolant towarm the air. If the engine is cold, itwill be several minutes before youfeel warm air coming from thesystem.1. Select and fresh air mode.2. Set the fan to the desired speed.3. Adjust the warmth of the air withthe temperature control dial.
Using the A/CAir conditioning places an extra loadon the engine. Watch the enginecoolant temperature gauge (see page67). If it moves near the red zone,turn off the A/C until the gaugereading returns to normal.1. Turn on the A/C by pressing thebutton. The indicator in the buttoncomes on when a fan speed isselected.
2. Set the temperature to the lowerlimit.
3. Select .4. If the outside air is humid, selectrecirculation mode. If the outsideair is dry, select fresh air mode.
5. Set the fan to the desired speed.If the interior is very warm, you cancool it down more rapidly by partiallyopening the windows, turning on theA/C, and setting the fan to maximumspeed in fresh air mode.
To cool the interior with MAX A/C:
1. Set the mode control dial to MAXA/C.The system automatically turns onthe A/C, selects and switchesto recirculation mode.
2. Set the temperature to the lowerlimit.
3. Set the fan to the desired speed.
Vents, Heating, and A/C
106
10/08/06 08:34:41 11 ELEMENT MMC North America Owner's Man 50 31SCV680 enu

Dehumidify the InteriorAir conditioning, as it cools, removesmoisture from the air. When used incombination with the heater, itmakes the interior warm and dry andcan prevent the windows fromfogging up.1. Turn the fan on.2. Turn on the air conditioning.3. Select and fresh air mode.4. Adjust the temperature to yourpreference.
This setting is suitable for all drivingconditions whenever the outsidetemperature is above 32°F (0°C).
To Defog and DefrostTo remove fog from the inside of thewindows:1. Set the fan to the desired speed, orhigh for faster defrosting.
2. Select . The systemautomatically switches to fresh airmode and turns on the A/C. TheA/C indicator will not come on if itwas off to start with.
3. Adjust the temperature control dialso the airflow feels warm.
4. Select to help clear the rearwindow.
5. To increase airflow to thewindshield, close the corner vents.
When you select or , thesystem automatically turns on theA/C. This helps to dehumidify the airand to defog the windshield. In eithermode, you cannot turn off the A/C.When you switch to another mode,the A/C returns to its originalsetting, either on or off.
Vents, Heating, and A/C
107
Features
10/08/06 08:34:41 11 ELEMENT MMC North America Owner's Man 50 31SCV680 enu
To Remove Exterior Frost or IceFrom the Windows1. Select . The systemautomatically switches to fresh airmode and turns on the A/C. TheA/C indicator does not come on ifthe A/C was off to start with.
2. Select .3. Set the fan and temperaturecontrols to maximum level.
4. Select to help clear the rearwindow.
To clear the windows faster, you canclose the dashboard corner vents byrotating the tab below each vent.This sends more warm air to thewindshield defroster vents. Once thewindshield is clear, select fresh airmode to avoid fogging the windows.For your safety, make sure you havea clear view through all the windowsbefore driving.
To Turn Everything OffTurning the fan speed control dial allthe way to the left shuts the systemoff.● Keep the system off for shortperiods only.
● To keep stale air and mustinessfrom collecting, you should havethe fan running at all times.
Vents, Heating, and A/C
108
10/08/06 08:34:41 11 ELEMENT MMC North America Owner's Man 50 31SCV680 enu
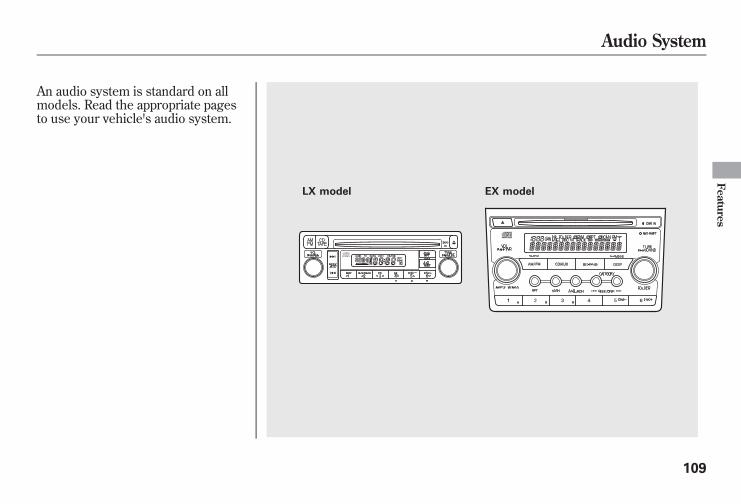
An audio system is standard on allmodels. Read the appropriate pagesto use your vehicle's audio system.
LX model EX model
Audio System
109
Features
10/08/06 08:34:41 11 ELEMENT MMC North America Owner's Man 50 31SCV680 enu
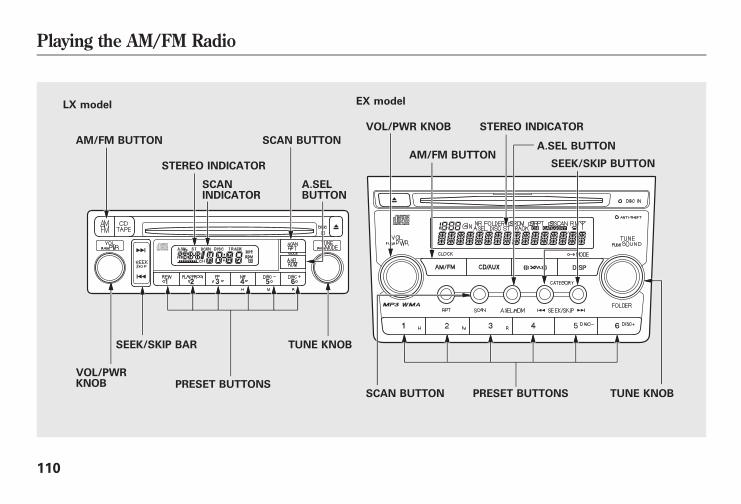
LX model EX model
AM/FM BUTTON
STEREO INDICATOR
SCAN BUTTON
SCANINDICATOR
VOL/PWRKNOB
SEEK/SKIP BAR
PRESET BUTTONS
TUNE KNOB
A.SELBUTTON
VOL/PWR KNOB
AM/FM BUTTON
STEREO INDICATOR
SCAN BUTTON PRESET BUTTONS TUNE KNOB
A.SEL BUTTON
SEEK/SKIP BUTTON
Playing the AM/FM Radio
110
10/08/06 08:34:41 11 ELEMENT MMC North America Owner's Man 50 31SCV680 enu
To Play the RadioThe ignition switch must be in theACCESSORY (I) or the ON (II)position. Turn the system on bypushing the VOL/PWR knob or theAM/FM button. Adjust the volumeby turning the same knob.The band and frequency that theradio was last tuned to is displayed.To change bands, press the AM/FMbutton. On the FM band, ST will bedisplayed if the station isbroadcasting in stereo. Stereoreproduction in AM is not available.To Select a StationYou can use any of five methods tofind radio stations on the selectedband: tune, seek, scan, the presetbuttons, and auto select.TUNE - Use the TUNE knob totune the radio to a desired frequency.Turn the knob right to tune to ahigher frequency, or left to tune to alower frequency.
SEEK- The seek function searchesup and down from the currentfrequency to find a station with astrong signal. To activate it, presseither ( or ), then release it.SCAN- The scan function samplesall stations with strong signals on theselected band. To activate it, pressthe SCAN button, then release it.You will see SCAN in the display.The system will scan for a stationwith a strong signal. When it findsone, it will stop and play that stationfor about 5 seconds (LX model) or 10seconds (EX model).If you do nothing, the system willthen scan for the next strong stationand play it for 5 seconds (LX model)or 10 seconds (EX model). When itplays a station you want to listen to,press the SCAN button again.
Preset- Each preset button canstore one frequency on AM and twofrequencies on FM.1. Select the desired band, AM orFM. FM1 and FM2 let you storesix stations each.
2. Use the tune, seek, or scanfunction to tune the radio to adesired station.
3. Pick a preset number (1-6), andhold it until you hear a beep.
4. Repeat steps 1 through 3 to store atotal of six stations on AM andtwelve stations on FM.
CONTINUED
Playing the AM/FM Radio
111
Features
10/08/06 08:34:41 11 ELEMENT MMC North America Owner's Man 50 31SCV680 enu
AUTO SELECT- If you aretraveling and can no longer receiveyour preset stations, you can use theauto select feature to find stations inthe local area.Press the A.SEL button. ‘‘A.SEL’’flashes in the display, and the systemgoes into scan mode for severalseconds. It stores the frequencies ofsix AM and twelve FM stations in thepreset buttons.You will see a ‘‘0’’ displayed afterpressing a preset button if auto selectcannot find a strong station for everypreset button.If you do not like the stations autoselect has stored, you can store otherfrequencies on the preset buttons aspreviously described.
To turn off auto select, press the A.SELbutton. This restores the presets youoriginally set.
For information on FM/AM radiofrequencies and reception, see page130.Adjusting the SoundPress the MODE or SOUND knobrepeatedly to display the bass (BAS),treble (TRE), balance (BAL), fader(FAD), and sub-woofer (SUB-W)ꭧsettings.ꭧ: If equippedEach mode is shown in the display asit changes. Turn the MODE orSOUND knob to adjust the setting toyour liking. When the level reachesthe center, you will see ‘‘C’’ in thedisplay. The system willautomatically return the display tothe selected audio mode about 5seconds after you stop adjusting amode.
Balance/Fader - These twomodes adjust the strength of thesound coming from each speaker.BAL adjusts the side-to-side strength,while FAD adjusts the front-to-backstrength.Treble/Bass/Sub-Woofer - Usethe TRE/BAS/SUB-W modes toadjust the tone to your liking.
Playing the AM/FM Radio
112
10/08/06 08:34:41 11 ELEMENT MMC North America Owner's Man 50 31SCV680 enu
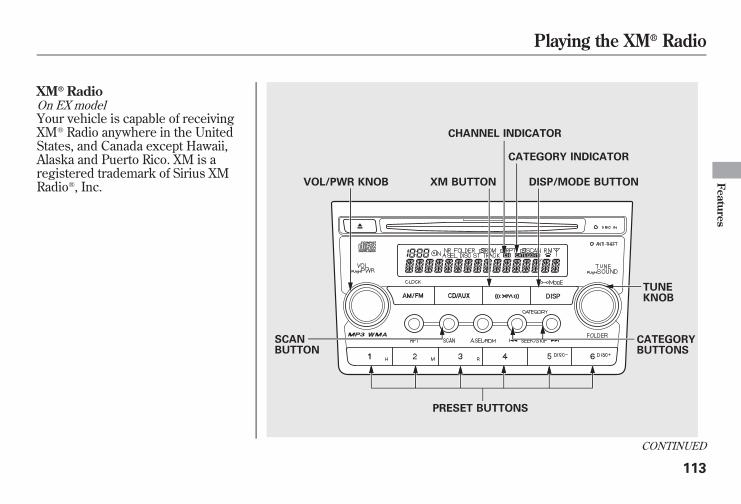
XM® RadioOn EX modelYour vehicle is capable of receivingXM® Radio anywhere in the UnitedStates, and Canada except Hawaii,Alaska and Puerto Rico. XM is aregistered trademark of Sirius XMRadio®, Inc.
PRESET BUTTONS
CATEGORYBUTTONS
TUNEKNOB
SCANBUTTON
VOL/PWR KNOB XM BUTTON
CHANNEL INDICATOR
CATEGORY INDICATOR
DISP/MODE BUTTON
CONTINUED
Playing the XM® Radio
113
Features
10/08/06 08:34:41 11 ELEMENT MMC North America Owner's Man 50 31SCV680 enu
XM Radio receives signals from twosatellites to produce clear, high-quality digital reception. It offersmany channels in several categories.Along with a large selection ofdifferent types of music, XM Radioallows you to view channel andcategory selections in the display.
Operating the XM RadioTo listen to the XM Radio, turn theignition switch to the ACCESSORY(I) or ON (II) position. Push theVOL/PWR knob to turn on the audiosystem, and press the XM button.Adjust the volume by turning theVOL/PWR knob. The last channelyou listened to will show in thedisplay.MODE- To switch betweenchannel mode and category mode,press and hold the DISP/MODEbutton until the mode changes.In the channel mode, you can selectall of the available channels. In thecategory mode, such as Jazz, Rock,Classical, etc., you can select all ofthe channels within that category.
Each time you press and release theDISP/MODE button, the displaychanges in the following sequence:channel name, channel number,category, artist name, and music title.You may experience periods whenXM Radio does not transmit theartist's name and song titleinformation. If this happens, there isnothing wrong with your system.TUNE- Turn the TUNE knob leftor right to select channels. In thecategory mode, you can only selectchannels within that category.CATEGORY ( or )- Presseither button to select anothercategory.
Playing the XM® Radio
114
10/08/06 08:34:41 11 ELEMENT MMC North America Owner's Man 50 31SCV680 enu

SCAN - The scan function givesyou sampling of all channels while inthe channel mode. In the categorymode, only the stations within thatcategory are scanned. To activatescan, press the SCAN button. Thesystem plays each channel innumerical order for a few seconds,then selects the next channel. Whenyou hear a channel you want tocontinue listening to, press thebutton.
Preset - You can store up to 12preset channels using the six presetbuttons. Each button stores onechannel from the XM1 band and onechannel from the XM2 band.To store a channel:1. Press the XM button. Either XM1or XM2 will show in the display.
2. Use the TUNE knob, theCATEGORY buttons, or the SCANbuttons to tune to a desiredchannel.In category mode, only channelswithin that category can beselected. In channel mode, allchannels can be selected.
3. Pick the preset button you want forthat channel. Press and hold thebutton until you hear a beep.
4. Repeat steps 2 and 3 to store thefirst six channels.
5. Press the XM button again. Theother XM band will show. Storethe next six channels using steps 2and 3.
Once a channel is stored, press andrelease the proper preset button totune to it.
CONTINUED
Playing the XM® Radio
115
Features
10/08/06 08:34:41 11 ELEMENT MMC North America Owner's Man 50 31SCV680 enu
XM Radio Display Messages
‘‘LOADING’’ - XM is loading theaudio or program information.‘‘OFF AIR’’- The channelcurrently selected is no longerbroadcasting.‘‘UPDATING’’ - The encryptioncode is being updated. Wait until theencryption code is fully updated.Channels 0 and 1 should still worknormally.
‘‘NO SIGNAL’’ - The signal iscurrently too weak. Move the vehicleto an area away from tall buildings,and with an unobstructed view of thesouthern horizon.‘‘ ’’- The selected channelnumber does not exist, is not part ofyour subscription, or this channelhas no artist or title information atthis time.‘‘ANTENNA’’ - There is a problemwith the XM antenna. Please consultyour dealer.
Playing the XM® Radio
116
10/08/06 08:34:41 11 ELEMENT MMC North America Owner's Man 50 31SCV680 enu

The XM satellites are in orbit overthe equator; therefore, objects southof the vehicle may cause satellitereception interruptions. To helpcompensate for this, ground-basedrepeaters are placed in majormetropolitan areas.Satellite signals are more likely to beblocked by tall buildings andmountains the farther north youtravel from the equator. Carryinglarge items on a roof rack can alsoblock the signal.
Signal may be blockedby mountains or largeobstacles to the south.
Signal weaker inthese areas.
SATELLITE
GROUND REPEATER
CONTINUED
Playing the XM® Radio
117
Features
10/08/06 08:34:41 11 ELEMENT MMC North America Owner's Man 50 31SCV680 enu
Depending on where you drive, youmay experience reception problems.Interference can be caused by any ofthese conditions:● Driving on the north side of aneast/west mountain road.
● Driving on the north side of a largecommercial truck on an east/westroad.
● Driving in tunnels.● Driving on a road beside a verticalwall, steep cliff, or hill to the southof you.
● Driving on the lower level of amulti-tiered road.
● Driving on a single lane roadalongside dense trees taller than50 ft. (15 m) to the south of you.
● Large items carried on a roof rack.There may be other geographicsituations that could affect XM Radioreception.
As required by the FCC:Changes or modifications not expresslyapproved by the party responsible forcompliance could void the user'sauthority to operate the equipment.Receiving XM Radio ServiceIf your XM Radio service has expired oryou purchased your vehicle from aprevious owner, you can listen to asampling of the broadcasts available onXM Radio. With the ignition switch in theACCESSORY (I) or ON (II) position,push the VOL/PWR knob to turn on theaudio system and press the XM button. Avariety of music types and styles willplay.
If you decide to purchase XM Radioservice, contact XM Radio atwww.xmradio.com, or at 1-800-852-9696.You will need to give them your radio I.D. number and your credit card number.To get your radio I.D. number, turn theTUNE knob until ‘‘0’’ appears in thedisplay. Your I.D. will appear in thedisplay.
After you've registered with XM Radio,keep your audio system in the XM Radiomode while you wait for activation. Thisshould take about 30 minutes.
While waiting for activation, make sureyour vehicle remains in an open areawith good reception. Once your audiosystem is activated, you'll be able tolisten to XM Radio broadcasts. XM Radiowill continue to send an activation signalto your vehicle for at least 12 hours fromthe activation request. If the service hasnot been activated after 36 hours, contactXM® Radio.
Playing the XM® Radio
118
10/08/06 08:34:41 11 ELEMENT MMC North America Owner's Man 50 31SCV680 enu
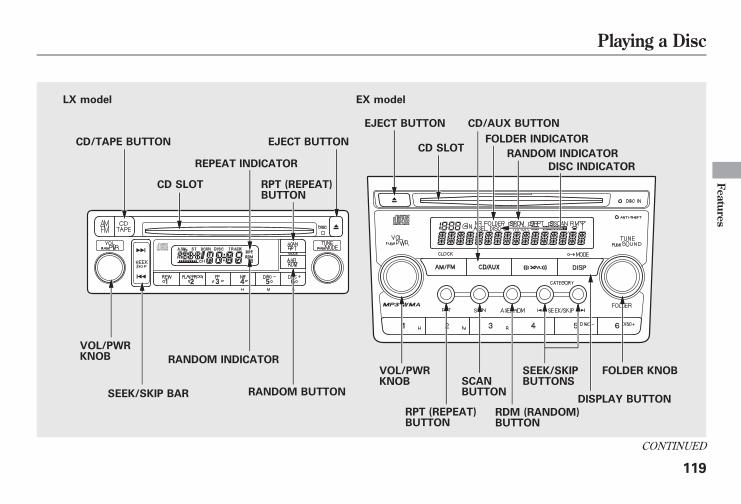
RDM (RANDOM)BUTTON
DISC INDICATOR
FOLDER KNOBSEEK/SKIPBUTTONS
RPT (REPEAT)BUTTON
RANDOM BUTTONSEEK/SKIP BAR
VOL/PWRKNOB RANDOM INDICATOR
REPEAT INDICATOR
EJECT BUTTONCD/TAPE BUTTON
CD SLOT
CD SLOT
EJECT BUTTON
FOLDER INDICATOR
EX modelLX model
RANDOM INDICATOR
DISPLAY BUTTON
RPT (REPEAT)BUTTON
SCANBUTTON
CD/AUX BUTTON
VOL/PWRKNOB
CONTINUED
Playing a Disc
119
Features
10/08/06 08:34:41 11 ELEMENT MMC North America Owner's Man 50 31SCV680 enu
To Play a DiscTo load or play discs, the ignitionswitch must be in the ACCESSORY(I) or ON (II) position.
Do not use discs with adhesive labels.The label can curl up and cause thedisc to jam in the unit.
You operate the disc player with thesame controls used for the radio. Toselect the disc player, press the CD/TAPE or the CD/AUX button. Youwill see ‘‘CD’’ in the display. Thenumber of the track playing is shownin the display. The system willcontinuously play a disc until youchange modes.Video CDs and DVDs do not work inthis unit.
On EX modelThe disc player can also play CD-Rsand CD-RWs compressed in MP3 orWMA formats.When playing a disc in MP3, you willsee ‘‘MP3’’ in the display. The folderand track numbers are displayed.Each disc can hold up to 400 playablefiles within 8 folder layers. A disc cansupport a maximum number of 100folders, and each folder can hold 255playable files.When playing a disc in WMA, youwill see ‘‘WMA’’ in the display. Thefolder and track numbers aredisplayed. Each disc can hold up to200 files within 16 subdirectories, 8folder layers. A disc can support amaximum number of 100 folders, andeach folder can hold 255 playablefiles.
NOTE: If a file on an MP3 or WMAdisc is protected by digital rightsmanagement (DRM), the audio unitdisplays FORMAT, and then skips tothe next file.Depending on the software the fileswere made with, it may not bepossible to play some files, or displaysome text data.Insert the disc about halfway into thedisc slot. The drive will pull the discin the rest of the way and begin toplay it. When the system reaches theend of the disc, it will return to thebeginning and play the disc again.To play the radio when a disc isplaying, press the AM/FM button.Press the CD/TAPE or CD/AUXbutton again to switch back to theCD player.
Playing a Disc
120
10/08/06 08:34:41 11 ELEMENT MMC North America Owner's Man 50 31SCV680 enu
If you turn the system off while a discis playing, either with the VOL/PWRknob or by turning off the ignitionswitch, the disc will stay in the drive.When you turn the system back on,the disc will begin playing where itleft off.On EX modelIf you press the DISP/MODE buttonwhile playing a disc, additionalinformation (track, album, artist, etc.)may be displayed.To Change or Select Tracks/FilesOn EX modelUse the SEEK/SKIP button while adisc is playing to select passages andchange tracks (files in MP3/WMAmode).In MP3/WMA mode, use theFOLDER knob to select folders inthe disc, and use the SEEK/SKIPbutton to change files.
SEEK/SKIP- Each time you pressand release the , the player skipsforward to the beginning of the nexttrack (files in MP3/WMA mode).Press and release the to skipbackward to the beginning of thecurrent track. Press it again to skip tothe beginning of the previous track.To move rapidly within a track, pressand hold or .On LX modelYou will see CUE or REW in thedisplay while moving within a track.
REPEAT (TRACK/FILE REPEAT)- To continuously replay a track(files in MP3/WMA mode), pressand release the RPT button. You willsee RPT in the display. Press theRPT button again to turn it off.On EX modelIn MP3/WMA modeFOLDER SELECTION- To selecta different folder, use the FOLDERknob to move to the beginning of thenext folder. Turn the knob right tomove to the beginning of the currentfolder. Turn the knob left to skip tothe beginning of the previous folder.
CONTINUED
Playing a Disc
121
Features
10/08/06 08:34:41 11 ELEMENT MMC North America Owner's Man 50 31SCV680 enu
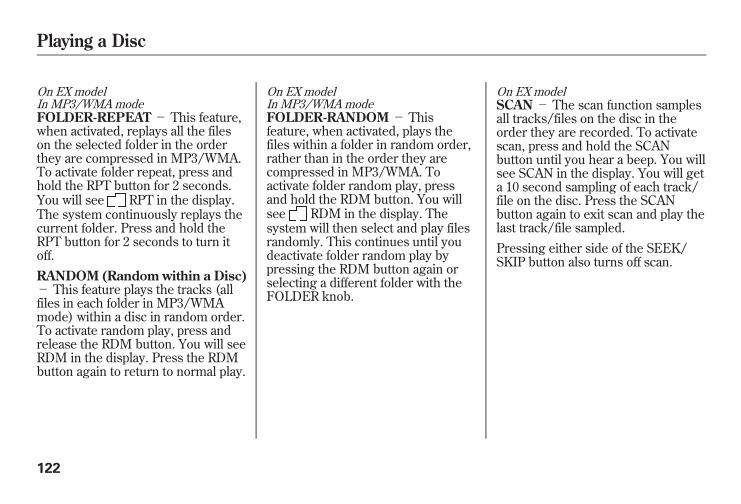
On EX modelIn MP3/WMA modeFOLDER-REPEAT - This feature,when activated, replays all the fileson the selected folder in the orderthey are compressed in MP3/WMA.To activate folder repeat, press andhold the RPT button for 2 seconds.You will see RPT in the display.The system continuously replays thecurrent folder. Press and hold theRPT button for 2 seconds to turn itoff.RANDOM (Random within a Disc)- This feature plays the tracks (allfiles in each folder in MP3/WMAmode) within a disc in random order.To activate random play, press andrelease the RDM button. You will seeRDM in the display. Press the RDMbutton again to return to normal play.
On EX modelIn MP3/WMA modeFOLDER-RANDOM - Thisfeature, when activated, plays thefiles within a folder in random order,rather than in the order they arecompressed in MP3/WMA. Toactivate folder random play, pressand hold the RDM button. You willsee RDM in the display. Thesystem will then select and play filesrandomly. This continues until youdeactivate folder random play bypressing the RDM button again orselecting a different folder with theFOLDER knob.
On EX modelSCAN- The scan function samplesall tracks/files on the disc in theorder they are recorded. To activatescan, press and hold the SCANbutton until you hear a beep. You willsee SCAN in the display. You will geta 10 second sampling of each track/file on the disc. Press the SCANbutton again to exit scan and play thelast track/file sampled.Pressing either side of the SEEK/SKIP button also turns off scan.
Playing a Disc
122
10/08/06 08:34:41 11 ELEMENT MMC North America Owner's Man 50 31SCV680 enu
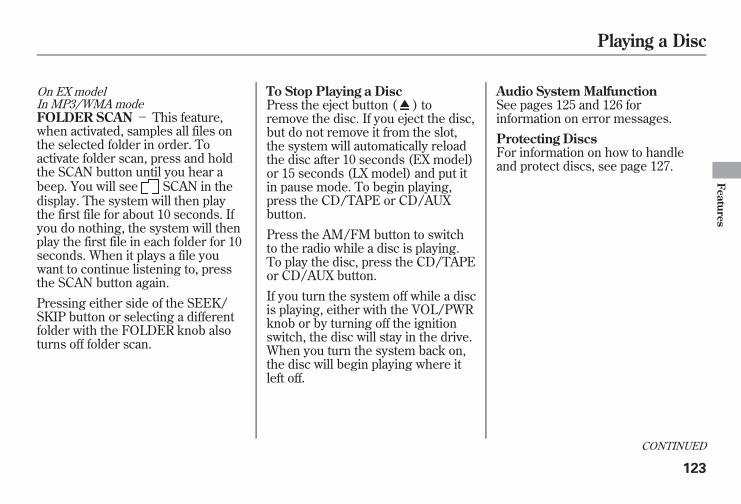
On EX modelIn MP3/WMA modeFOLDER SCAN- This feature,when activated, samples all files onthe selected folder in order. Toactivate folder scan, press and holdthe SCAN button until you hear abeep. You will see SCAN in thedisplay. The system will then playthe first file for about 10 seconds. Ifyou do nothing, the system will thenplay the first file in each folder for 10seconds. When it plays a file youwant to continue listening to, pressthe SCAN button again.Pressing either side of the SEEK/SKIP button or selecting a differentfolder with the FOLDER knob alsoturns off folder scan.
To Stop Playing a DiscPress the eject button ( ) toremove the disc. If you eject the disc,but do not remove it from the slot,the system will automatically reloadthe disc after 10 seconds (EX model)or 15 seconds (LX model) and put itin pause mode. To begin playing,press the CD/TAPE or CD/AUXbutton.Press the AM/FM button to switchto the radio while a disc is playing.To play the disc, press the CD/TAPEor CD/AUX button.If you turn the system off while a discis playing, either with the VOL/PWRknob or by turning off the ignitionswitch, the disc will stay in the drive.When you turn the system back on,the disc will begin playing where itleft off.
Audio SystemMalfunctionSee pages 125 and 126 forinformation on error messages.Protecting DiscsFor information on how to handleand protect discs, see page 127.
CONTINUED
Playing a Disc
123
Features
10/08/06 08:34:41 11 ELEMENT MMC North America Owner's Man 50 31SCV680 enu
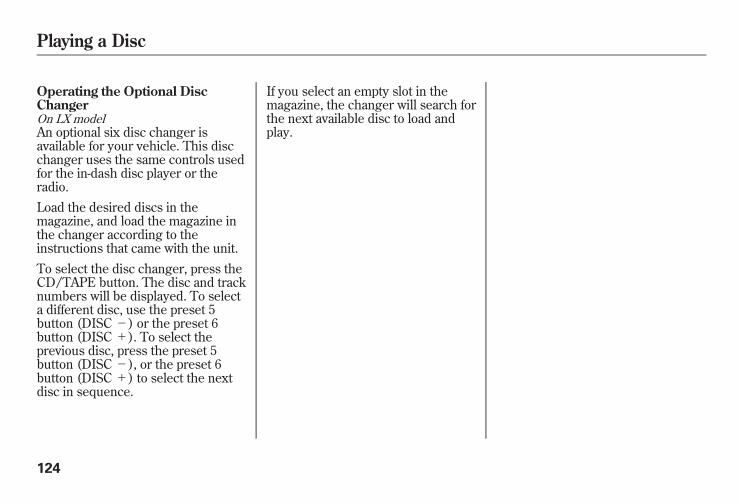
Operating the Optional DiscChangerOn LX modelAn optional six disc changer isavailable for your vehicle. This discchanger uses the same controls usedfor the in-dash disc player or theradio.Load the desired discs in themagazine, and load the magazine inthe changer according to theinstructions that came with the unit.To select the disc changer, press theCD/TAPE button. The disc and tracknumbers will be displayed. To selecta different disc, use the preset 5button (DISC-) or the preset 6button (DISC+). To select theprevious disc, press the preset 5button (DISC-), or the preset 6button (DISC+) to select the nextdisc in sequence.
If you select an empty slot in themagazine, the changer will search forthe next available disc to load andplay.
Playing a Disc
124
10/08/06 08:34:41 11 ELEMENT MMC North America Owner's Man 50 31SCV680 enu
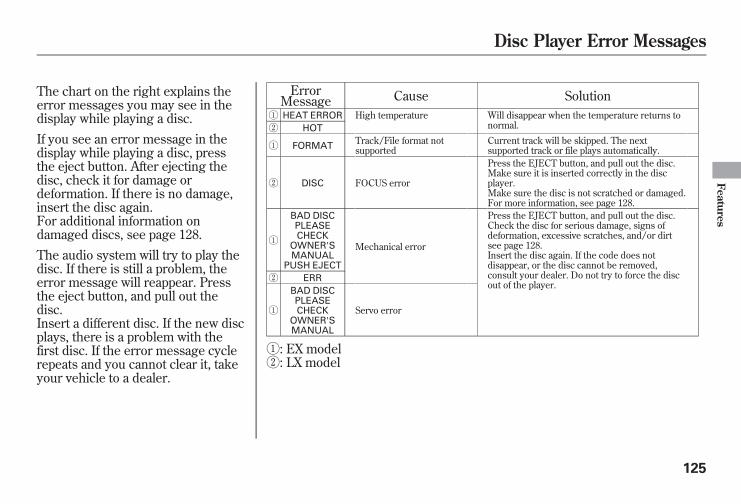
The chart on the right explains theerror messages you may see in thedisplay while playing a disc.If you see an error message in thedisplay while playing a disc, pressthe eject button. After ejecting thedisc, check it for damage ordeformation. If there is no damage,insert the disc again.For additional information ondamaged discs, see page 128.The audio system will try to play thedisc. If there is still a problem, theerror message will reappear. Pressthe eject button, and pull out thedisc.Insert a different disc. If the new discplays, there is a problem with thefirst disc. If the error message cyclerepeats and you cannot clear it, takeyour vehicle to a dealer.
ErrorMessage Cause Solution
ꐀ HEAT ERROR High temperature Will disappear when the temperature returns tonormal.ꐁ HOT
ꐀ FORMATTrack/File format notsupported
Current track will be skipped. The nextsupported track or file plays automatically.
ꐁ DISC FOCUS error
Press the EJECT button, and pull out the disc.Make sure it is inserted correctly in the discplayer.Make sure the disc is not scratched or damaged.For more information, see page 128.
ꐀ
BAD DISCPLEASECHECK
OWNER'SMANUAL
PUSH EJECT
Mechanical error
Press the EJECT button, and pull out the disc.Check the disc for serious damage, signs ofdeformation, excessive scratches, and/or dirtsee page 128.Insert the disc again. If the code does notdisappear, or the disc cannot be removed,consult your dealer. Do not try to force the discout of the player.
ꐁ ERR
ꐀ
BAD DISCPLEASECHECK
OWNER'SMANUAL
Servo error
ꐀ: EX modelꐁ: LX model
Disc Player Error Messages
125
Features
10/08/06 08:34:41 11 ELEMENT MMC North America Owner's Man 50 31SCV680 enu
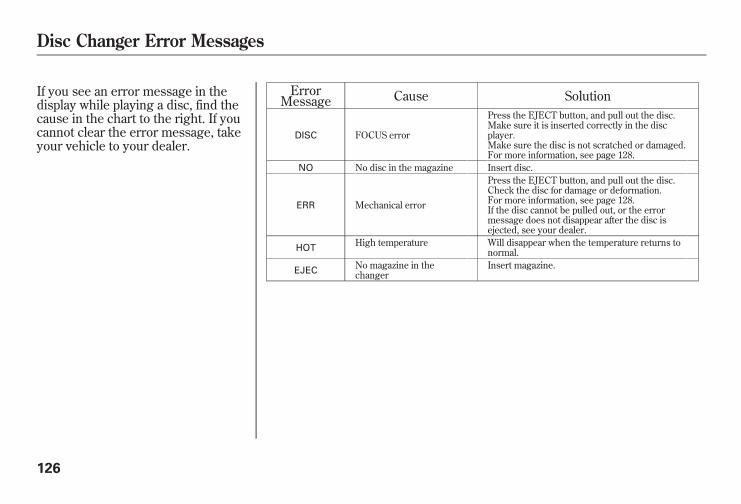
If you see an error message in thedisplay while playing a disc, find thecause in the chart to the right. If youcannot clear the error message, takeyour vehicle to your dealer.
ErrorMessage Cause Solution
DISC FOCUS error
Press the EJECT button, and pull out the disc.Make sure it is inserted correctly in the discplayer.Make sure the disc is not scratched or damaged.For more information, see page 128.
NO No disc in the magazine Insert disc.
ERR Mechanical error
Press the EJECT button, and pull out the disc.Check the disc for damage or deformation.For more information, see page 128.If the disc cannot be pulled out, or the errormessage does not disappear after the disc isejected, see your dealer.
HOTHigh temperature Will disappear when the temperature returns to
normal.
EJECNo magazine in thechanger
Insert magazine.
Disc Changer Error Messages
126
10/08/06 08:34:41 11 ELEMENT MMC North America Owner's Man 50 31SCV680 enu

General Information● When using CD-R or CD-RWdiscs, use only high quality CDslabeled for audio use.
● When recording a CD-R orCD-RW, the recording must beclosed for it to be used by thesystem.
● Play only standard round discs.Odd-shaped discs may jam in thedrive or cause other problems.
● Handle your discs properly toprevent damage and skipping.
Do not use discs with adhesive labels.The label can curl up and cause thedisc to jam in the unit.
Protecting DiscsWhen a disc is not being played,store it in its case to protect it fromdust and other contamination. Toprevent warpage, keep discs out ofdirect sunlight and extreme heat.To clean a disc, use a clean soft cloth.Wipe across the disc from the centerto the outside edge.A new disc may be rough on theinner and outer edges. The smallplastic pieces causing this roughnesscan flake off and fall on the recordedsurface of the disc, causing skippingor other problems. Remove thesepieces by rubbing the inner andouter edges with the side of a pencilor pen.Never try to insert foreign objects inthe CD player or the magazine.
Handle a disc by its edges; nevertouch either surface. Do not placestabilizer rings or labels on the disc.These, along with contaminationfrom finger prints, liquids, and felt-tippens, can cause the disc to not playproperly, or possibly jam in the drive.
CONTINUED
Protecting Your Discs
127
Features
10/08/06 08:34:41 11 ELEMENT MMC North America Owner's Man 50 31SCV680 enu
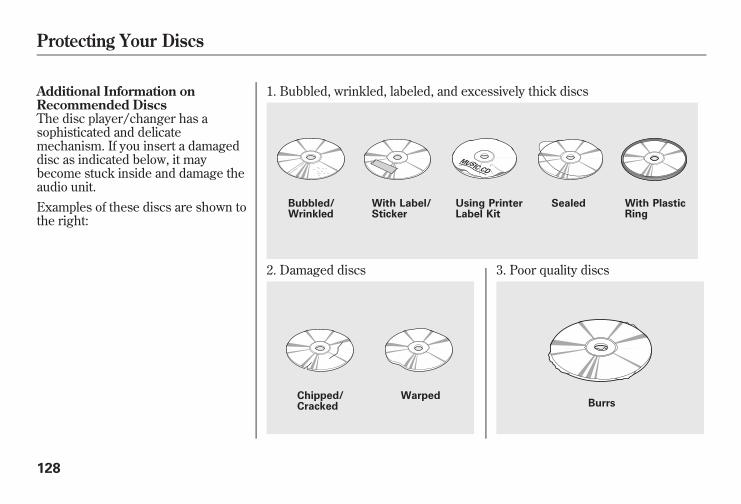
Additional Information onRecommended DiscsThe disc player/changer has asophisticated and delicatemechanism. If you insert a damageddisc as indicated below, it maybecome stuck inside and damage theaudio unit.Examples of these discs are shown tothe right:
1. Bubbled, wrinkled, labeled, and excessively thick discs
2. Damaged discs 3. Poor quality discs
Bubbled/Wrinkled
With Label/Sticker
Using PrinterLabel Kit
Sealed With PlasticRing
Chipped/Cracked
WarpedBurrs
Protecting Your Discs
128
10/08/06 08:34:41 11 ELEMENT MMC North America Owner's Man 50 31SCV680 enu
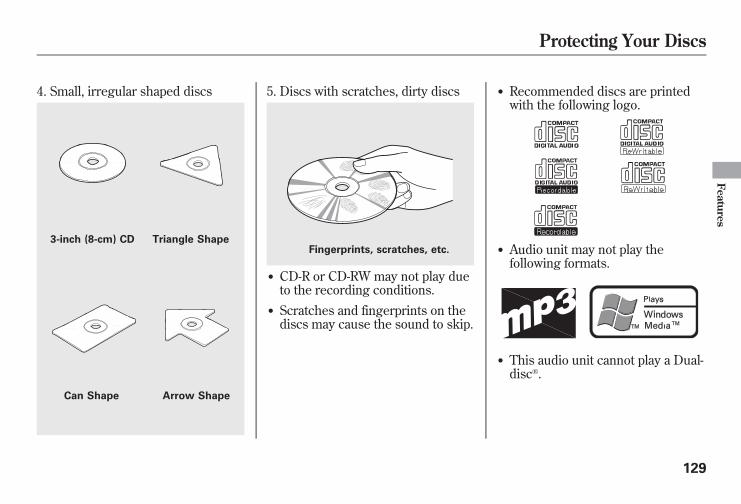
4. Small, irregular shaped discs 5. Discs with scratches, dirty discs
● CD-R or CD-RW may not play dueto the recording conditions.
● Scratches and fingerprints on thediscs may cause the sound to skip.
● Recommended discs are printedwith the following logo.
● Audio unit may not play thefollowing formats.
● This audio unit cannot play a Dual-disc®.
3-inch (8-cm) CD Triangle Shape
Can Shape Arrow Shape
Fingerprints, scratches, etc.
Protecting Your Discs
129
Features
10/08/06 08:34:41 11 ELEMENT MMC North America Owner's Man 50 31SCV680 enu
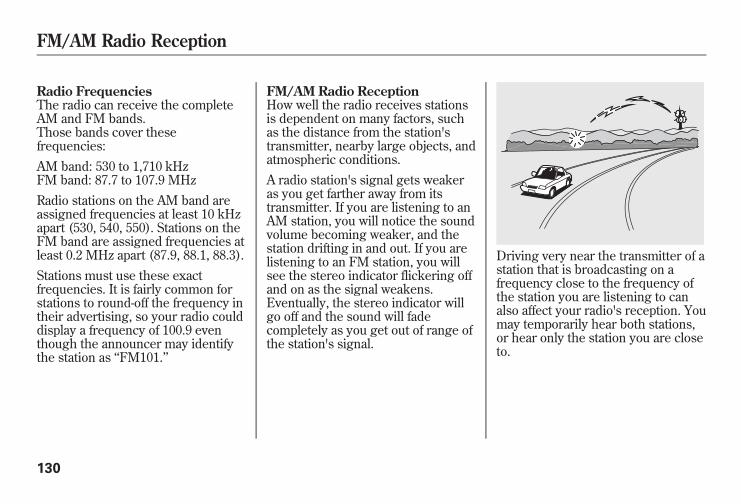
Radio FrequenciesThe radio can receive the completeAM and FM bands.Those bands cover thesefrequencies:AM band: 530 to 1,710 kHzFM band: 87.7 to 107.9 MHzRadio stations on the AM band areassigned frequencies at least 10 kHzapart (530, 540, 550). Stations on theFM band are assigned frequencies atleast 0.2 MHz apart (87.9, 88.1, 88.3).Stations must use these exactfrequencies. It is fairly common forstations to round-off the frequency intheir advertising, so your radio coulddisplay a frequency of 100.9 eventhough the announcer may identifythe station as ‘‘FM101.’’
FM/AM Radio ReceptionHow well the radio receives stationsis dependent on many factors, suchas the distance from the station'stransmitter, nearby large objects, andatmospheric conditions.A radio station's signal gets weakeras you get farther away from itstransmitter. If you are listening to anAM station, you will notice the soundvolume becoming weaker, and thestation drifting in and out. If you arelistening to an FM station, you willsee the stereo indicator flickering offand on as the signal weakens.Eventually, the stereo indicator willgo off and the sound will fadecompletely as you get out of range ofthe station's signal.
Driving very near the transmitter of astation that is broadcasting on afrequency close to the frequency ofthe station you are listening to canalso affect your radio's reception. Youmay temporarily hear both stations,or hear only the station you are closeto.
FM/AM Radio Reception
130
10/08/06 08:34:41 11 ELEMENT MMC North America Owner's Man 50 31SCV680 enu
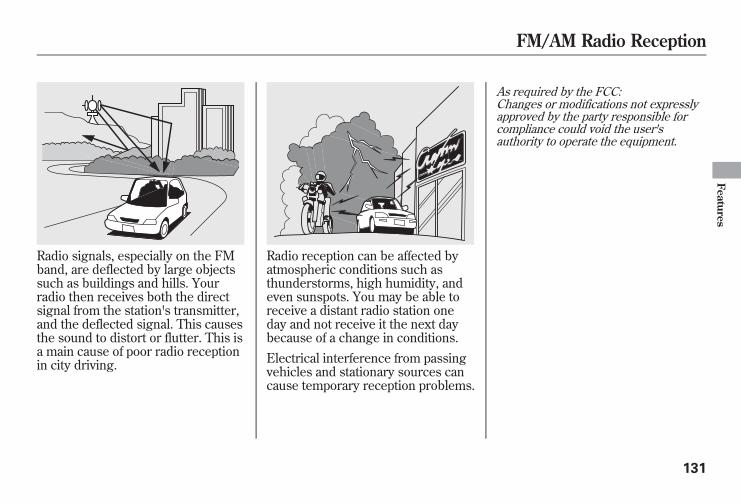
Radio signals, especially on the FMband, are deflected by large objectssuch as buildings and hills. Yourradio then receives both the directsignal from the station's transmitter,and the deflected signal. This causesthe sound to distort or flutter. This isa main cause of poor radio receptionin city driving.
Radio reception can be affected byatmospheric conditions such asthunderstorms, high humidity, andeven sunspots. You may be able toreceive a distant radio station oneday and not receive it the next daybecause of a change in conditions.Electrical interference from passingvehicles and stationary sources cancause temporary reception problems.
As required by the FCC:Changes or modifications not expresslyapproved by the party responsible forcompliance could void the user'sauthority to operate the equipment.
FM/AM Radio Reception
131
Features
10/08/06 08:34:41 11 ELEMENT MMC North America Owner's Man 50 31SCV680 enu
On EX modelYour vehicle's audio system willdisable itself if it is disconnectedfrom electrical power for any reason.To make it work again, you mustenter a specific code in the presetbuttons. Because there are hundredsof number combinations possiblefrom specific digits, making thesystem work without knowing theexact code is nearly impossible.You should have received a radiocode card that lists your audiosystem's code and serial numbers. Itis best to store this card in a safeplace at home. In addition, youshould write the audio system'sserial number in this owner'smanual.If you lose the card, you must obtainthe code number from a dealer. Todo this, you will need the system'sserial number.
If your vehicle's battery isdisconnected or goes dead, the audiosystem will disable itself. If thishappens, you will see ‘‘ENTERCODE’’ in the frequency display thenext time you turn on the system.Use the preset buttons to enter thecode. The code is on the radio codecard included in your owner'smanual kit. When it is enteredcorrectly, the radio will start playing.If you make a mistake entering thecode, do not start over; complete thesequence, then enter the correctcode. You have 10 tries to enter thecorrect code. If you are unsuccessfulin 10 attempts, you must then leavethe system on for 1 hour beforetrying again.
Radio Theft Protection
132
10/08/06 08:34:41 11 ELEMENT MMC North America Owner's Man 50 31SCV680 enu
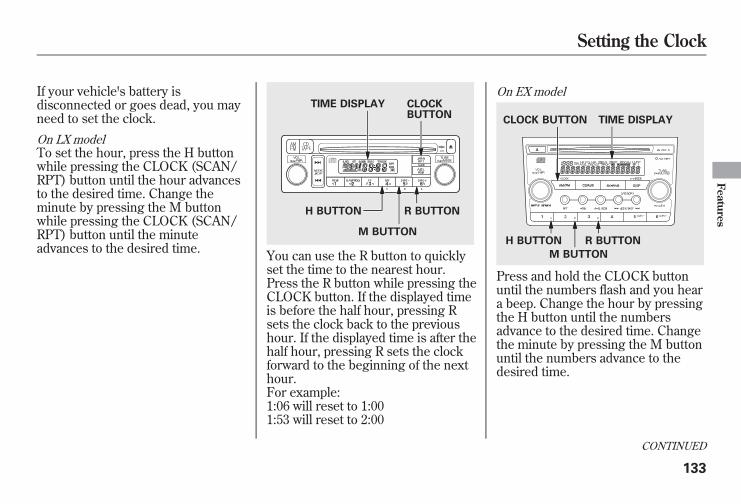
If your vehicle's battery isdisconnected or goes dead, you mayneed to set the clock.
On LX modelTo set the hour, press the H buttonwhile pressing the CLOCK (SCAN/RPT) button until the hour advancesto the desired time. Change theminute by pressing the M buttonwhile pressing the CLOCK (SCAN/RPT) button until the minuteadvances to the desired time. You can use the R button to quickly
set the time to the nearest hour.Press the R button while pressing theCLOCK button. If the displayed timeis before the half hour, pressing Rsets the clock back to the previoushour. If the displayed time is after thehalf hour, pressing R sets the clockforward to the beginning of the nexthour.For example:1:06 will reset to 1:001:53 will reset to 2:00
On EX model
Press and hold the CLOCK buttonuntil the numbers flash and you heara beep. Change the hour by pressingthe H button until the numbersadvance to the desired time. Changethe minute by pressing the M buttonuntil the numbers advance to thedesired time.
TIME DISPLAY CLOCKBUTTON
H BUTTON R BUTTON
M BUTTON
TIME DISPLAYCLOCK BUTTON
H BUTTON R BUTTON
M BUTTON
CONTINUED
Setting the Clock
133
Features
10/08/06 08:34:41 11 ELEMENT MMC North America Owner's Man 50 31SCV680 enu
You can quickly set the time to thenearest hour. If the displayed time isbefore the half hour, press the R(RESET) button to set the clock backto the previous hour. If the displayedtime is after the half hour, pressing Rsets the clock forward to thebeginning of the next hour.For example:1:06 will reset to 1:001:53 will reset to 2:00When you are finished, press theCLOCK button again.
Setting the Clock
134
10/08/06 08:34:41 11 ELEMENT MMC North America Owner's Man 50 31SCV680 enu
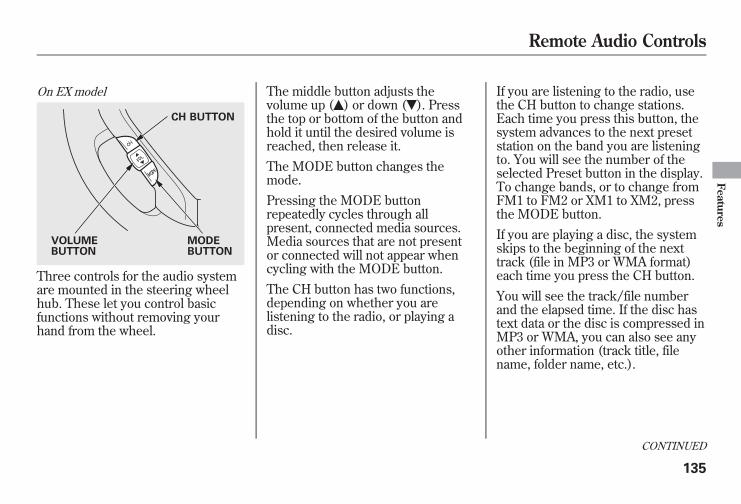
On EX model
Three controls for the audio systemare mounted in the steering wheelhub. These let you control basicfunctions without removing yourhand from the wheel.
The middle button adjusts thevolume up ( ) or down ( ). Pressthe top or bottom of the button andhold it until the desired volume isreached, then release it.The MODE button changes themode.Pressing the MODE buttonrepeatedly cycles through allpresent, connected media sources.Media sources that are not presentor connected will not appear whencycling with the MODE button.The CH button has two functions,depending on whether you arelistening to the radio, or playing adisc.
If you are listening to the radio, usethe CH button to change stations.Each time you press this button, thesystem advances to the next presetstation on the band you are listeningto. You will see the number of theselected Preset button in the display.To change bands, or to change fromFM1 to FM2 or XM1 to XM2, pressthe MODE button.If you are playing a disc, the systemskips to the beginning of the nexttrack (file in MP3 or WMA format)each time you press the CH button.You will see the track/file numberand the elapsed time. If the disc hastext data or the disc is compressed inMP3 or WMA, you can also see anyother information (track title, filename, folder name, etc.).
CH BUTTON
MODEBUTTON
VOLUMEBUTTON
CONTINUED
Remote Audio Controls
135
Features
10/08/06 08:34:41 11 ELEMENT MMC North America Owner's Man 50 31SCV680 enu
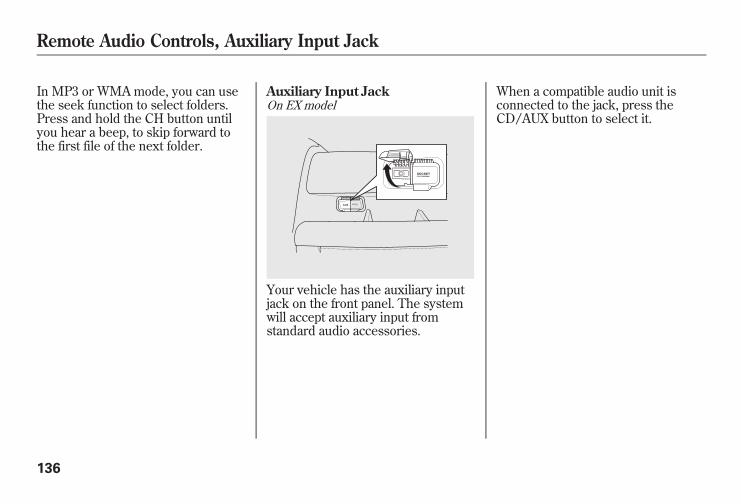
In MP3 or WMA mode, you can usethe seek function to select folders.Press and hold the CH button untilyou hear a beep, to skip forward tothe first file of the next folder.
Auxiliary Input JackOn EX model
Your vehicle has the auxiliary inputjack on the front panel. The systemwill accept auxiliary input fromstandard audio accessories.
When a compatible audio unit isconnected to the jack, press theCD/AUX button to select it.
Remote Audio Controls, Auxiliary Input Jack
136
10/08/06 08:34:41 11 ELEMENT MMC North America Owner's Man 50 31SCV680 enu
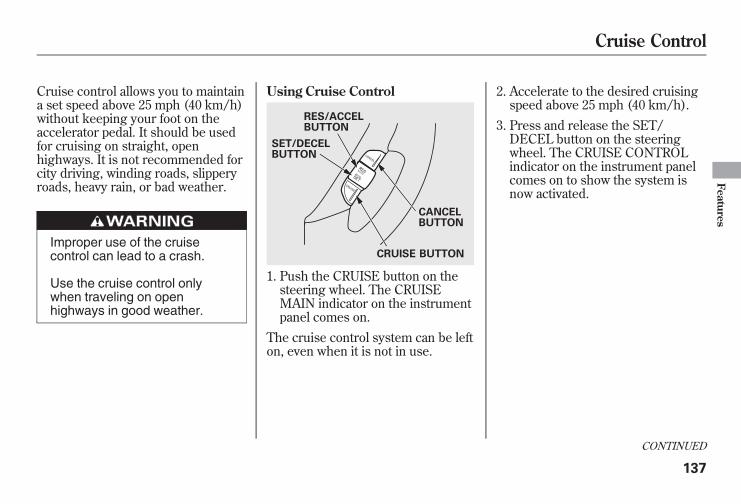
Cruise control allows you to maintaina set speed above 25 mph (40 km/h)without keeping your foot on theaccelerator pedal. It should be usedfor cruising on straight, openhighways. It is not recommended forcity driving, winding roads, slipperyroads, heavy rain, or bad weather.
Improper use of the cruisecontrol can lead to a crash.
Use the cruise control onlywhen traveling on openhighways in good weather.
Using Cruise Control
1. Push the CRUISE button on thesteering wheel. The CRUISEMAIN indicator on the instrumentpanel comes on.
The cruise control system can be lefton, even when it is not in use.
2. Accelerate to the desired cruisingspeed above 25 mph (40 km/h).
3. Press and release the SET/DECEL button on the steeringwheel. The CRUISE CONTROLindicator on the instrument panelcomes on to show the system isnow activated.
RES/ACCELBUTTON
CANCELBUTTON
SET/DECELBUTTON
CRUISE BUTTON
CONTINUED
Cruise Control
137
Features
10/08/06 08:34:41 11 ELEMENT MMC North America Owner's Man 50 31SCV680 enu

Cruise control may not hold the setspeed when you are going up anddown hills. If your speed increasesgoing down a hill, use the brakes toslow down. This will cancel cruisecontrol. To resume the set speed,press the RES/ACCEL button. TheCRUISE CONTROL indicator on theinstrument panel will come back on.
Changing the Set SpeedYou can increase the set cruisingspeed in any of these ways:● Press and hold the RES/ACCELbutton. When you reach thedesired cruising speed, release thebutton.
● To increase your speed in verysmall amounts, tap the RES/ACCEL button. Each time you dothis, the vehicle will speed upabout 1 mph (1.6 km/h).
● Push on the accelerator pedal.Accelerate to the desired cruisingspeed, then press the SET/DECEL button.
You can decrease the set cruisingspeed in any of these ways:NOTE: If you need to decrease yourspeed quickly, use the brakes as younormally would.
● Press and hold the SET/DECELbutton. Release the button whenyou reach the desired speed.
● To slow down in very smallamounts, tap the SET/DECELbutton. Each time you do this,your vehicle will slow down about1 mph (1.6 km/h).
● Tap the brake pedal lightly withyour foot. The CRUISE CONTROLindicator on the instrument panelwill go out. When the vehicleslows to the desired speed, pressthe SET/DECEL button.
Even with the cruise control turnedon, you can still use the acceleratorpedal to speed up for passing. Aftercompleting the pass, take your footoff the accelerator pedal. The vehiclewill return to the set cruising speed.Resting your foot on the brake pedalcauses the cruise control to cancel.
RES/ACCELBUTTON
CANCELBUTTON
SET/DECELBUTTON
Cruise Control
138
10/08/06 08:34:41 11 ELEMENT MMC North America Owner's Man 50 31SCV680 enu
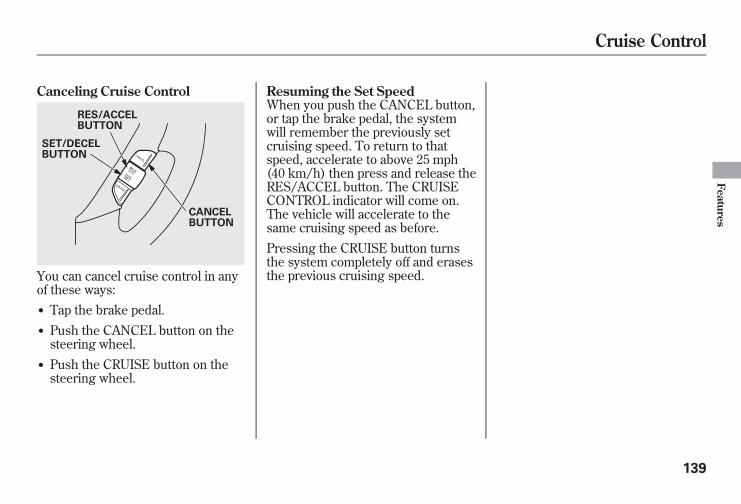
Canceling Cruise Control
You can cancel cruise control in anyof these ways:● Tap the brake pedal.● Push the CANCEL button on thesteering wheel.
● Push the CRUISE button on thesteering wheel.
Resuming the Set SpeedWhen you push the CANCEL button,or tap the brake pedal, the systemwill remember the previously setcruising speed. To return to thatspeed, accelerate to above 25 mph(40 km/h) then press and release theRES/ACCEL button. The CRUISECONTROL indicator will come on.The vehicle will accelerate to thesame cruising speed as before.Pressing the CRUISE button turnsthe system completely off and erasesthe previous cruising speed.
RES/ACCELBUTTON
CANCELBUTTON
SET/DECELBUTTON
Cruise Control
139
Features
10/08/06 08:34:41 11 ELEMENT MMC North America Owner's Man 50 31SCV680 enu

140
10/08/06 08:34:41 11 ELEMENT MMC North America Owner's Man 50 31SCV680 enu
Before you begin driving yourvehicle, you should know whatgasoline to use and how to check thelevels of important fluids. You alsoneed to know how to properly storecargo or packages. The informationin this section will help you. If youplan to add any accessories to yourvehicle, please read the informationin this section first.
Break-in Period ........................... 142Fuel Recommendation ................ 142Service Station Procedures ......... 143Refueling................................. 143Opening and Closing the
Hood................................... 144Oil Check................................ 145Engine Coolant Check ............ 145
Fuel Economy............................. 146Accessories and
Modifications .......................... 149Carrying Cargo ........................... 151
Before Driving
141
Before
Driving
10/08/06 08:34:41 11 ELEMENT MMC North America Owner's Man 50 31SCV680 enu
Break-in PeriodHelp assure your vehicle's futurereliability and performance by payingextra attention to how you driveduring the first 600 miles (1,000 km).During this period:● Avoid full-throttle starts and rapidacceleration.
● Do not change the oil until thescheduled maintenance time.
● Avoid hard braking for the first 200miles (300 km).
● Do not tow a trailer.You should also follow theserecommendations with anoverhauled or exchanged engine, orwhen the brakes are replaced.
Fuel RecommendationYour vehicle is designed to operateon unleaded gasoline with a pumpoctane number of 87 or higher. Useof a lower octane gasoline can causea persistent, heavy metallic rappingnoise that can lead to enginedamage.We recommend using qualitygasoline containing detergentadditives that help prevent fuelsystem and engine deposits.
In addition, in order to maintain goodperformance, fuel economy, andemissions control, we stronglyrecommend, in areas where it isavailable, the use of gasoline thatdoes NOT contain manganese-basedfuel additives such as MMT.Use of gasoline with these additivesmay adversely affect performance,and cause the malfunction indicatorlamp on your instrument panel tocome on. If this happens, contactyour authorized dealer for service.Some gasoline today is blended withoxygenates such as ethanol orMTBE. Your vehicle is designed tooperate on oxygenated gasolinecontaining up to 10% ethanol byvolume and up to 15% MTBE byvolume. Do not use gasolinecontaining methanol.
Break-in Period, Fuel Recommendation
142
10/08/06 08:34:41 11 ELEMENT MMC North America Owner's Man 50 31SCV680 enu
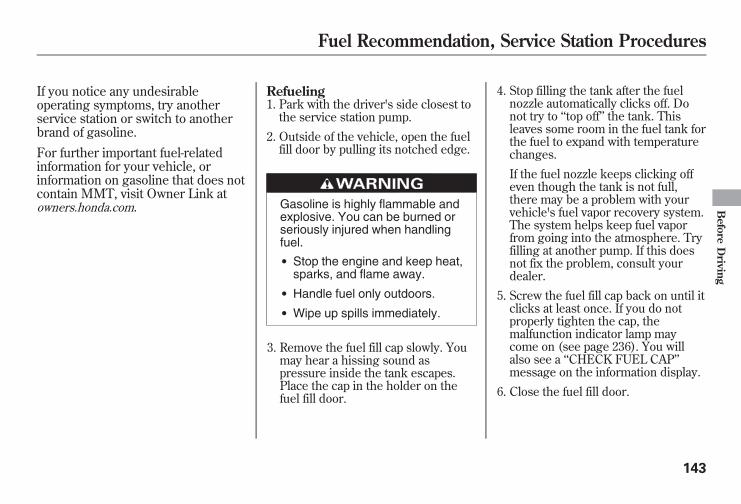
If you notice any undesirableoperating symptoms, try anotherservice station or switch to anotherbrand of gasoline.For further important fuel-relatedinformation for your vehicle, orinformation on gasoline that does notcontain MMT, visit Owner Link atowners.honda.com.
Refueling1. Park with the driver's side closest to
the service station pump.
2. Outside of the vehicle, open the fuelfill door by pulling its notched edge.
Gasoline is highly flammable andexplosive. You can be burned orseriously injured when handlingfuel.● Stop the engine and keep heat,sparks, and flame away.
● Handle fuel only outdoors.● Wipe up spills immediately.
3. Remove the fuel fill cap slowly. Youmay hear a hissing sound aspressure inside the tank escapes.Place the cap in the holder on thefuel fill door.
4. Stop filling the tank after the fuelnozzle automatically clicks off. Donot try to ‘‘top off’’ the tank. Thisleaves some room in the fuel tank forthe fuel to expand with temperaturechanges.
If the fuel nozzle keeps clicking offeven though the tank is not full,there may be a problem with yourvehicle's fuel vapor recovery system.The system helps keep fuel vaporfrom going into the atmosphere. Tryfilling at another pump. If this doesnot fix the problem, consult yourdealer.
5. Screw the fuel fill cap back on until itclicks at least once. If you do notproperly tighten the cap, themalfunction indicator lamp maycome on (see page 236). You willalso see a ‘‘CHECK FUEL CAP’’message on the information display.
6. Close the fuel fill door.
Fuel Recommendation, Service Station Procedures
143
Before
Driving
10/08/06 08:34:41 11 ELEMENT MMC North America Owner's Man 50 31SCV680 enu
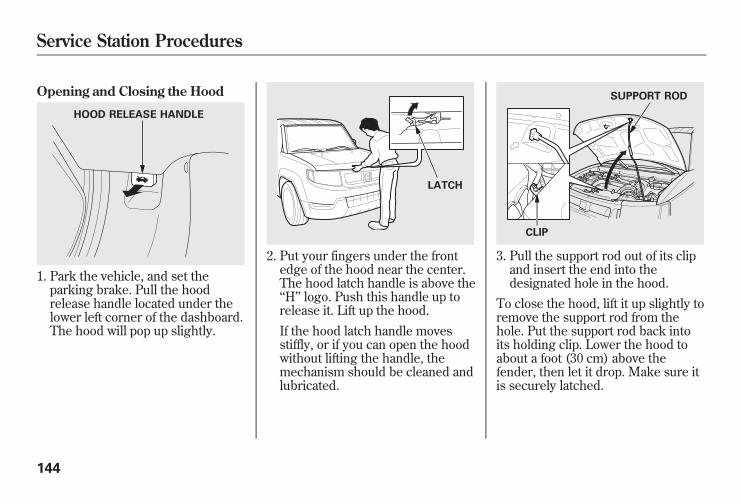
Opening and Closing the Hood
1. Park the vehicle, and set theparking brake. Pull the hoodrelease handle located under thelower left corner of the dashboard.The hood will pop up slightly.
2. Put your fingers under the frontedge of the hood near the center.The hood latch handle is above the‘‘H’’ logo. Push this handle up torelease it. Lift up the hood.If the hood latch handle movesstiffly, or if you can open the hoodwithout lifting the handle, themechanism should be cleaned andlubricated.
3. Pull the support rod out of its clipand insert the end into thedesignated hole in the hood.
To close the hood, lift it up slightly toremove the support rod from thehole. Put the support rod back intoits holding clip. Lower the hood toabout a foot (30 cm) above thefender, then let it drop. Make sure itis securely latched.
HOOD RELEASE HANDLE
LATCH
SUPPORT ROD
CLIP
Service Station Procedures
144
10/08/06 08:34:41 11 ELEMENT MMC North America Owner's Man 50 31SCV680 enu
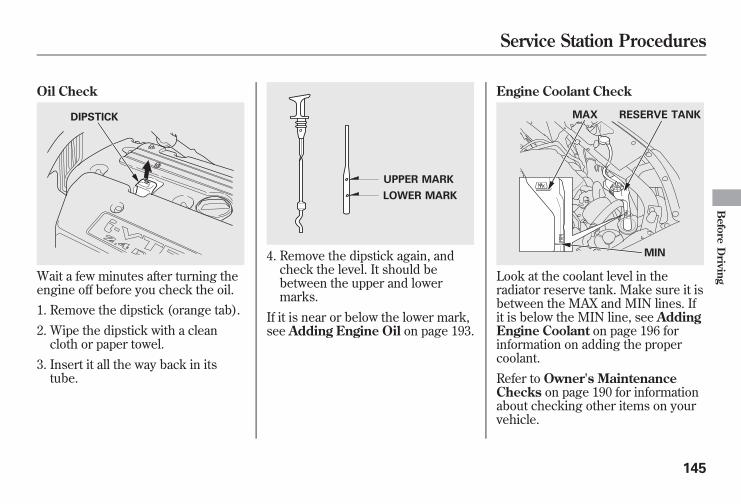
Oil Check
Wait a few minutes after turning theengine off before you check the oil.1. Remove the dipstick (orange tab).2. Wipe the dipstick with a cleancloth or paper towel.
3. Insert it all the way back in itstube.
4. Remove the dipstick again, andcheck the level. It should bebetween the upper and lowermarks.
If it is near or below the lower mark,see Adding Engine Oil on page 193.
Engine Coolant Check
Look at the coolant level in theradiator reserve tank. Make sure it isbetween the MAX and MIN lines. Ifit is below the MIN line, see AddingEngine Coolant on page 196 forinformation on adding the propercoolant.Refer to Owner's MaintenanceChecks on page 190 for informationabout checking other items on yourvehicle.
DIPSTICK
UPPER MARK
LOWER MARK
MIN
MAX RESERVE TANK
Service Station Procedures
145
Before
Driving
10/08/06 08:34:41 11 ELEMENT MMC North America Owner's Man 50 31SCV680 enu
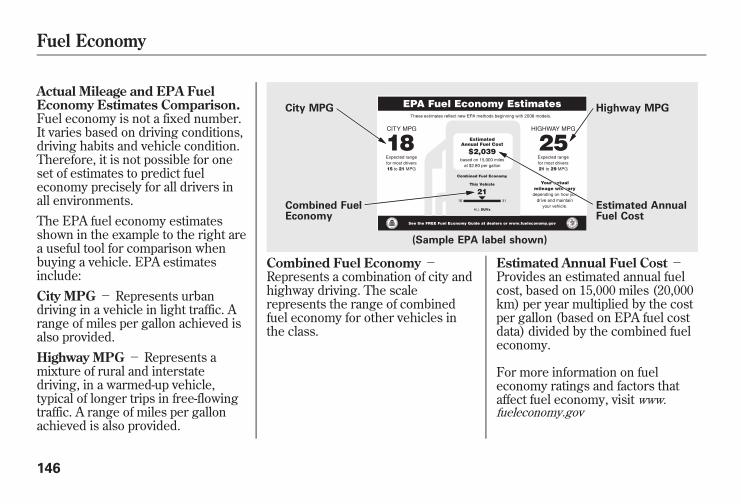
Actual Mileage and EPA FuelEconomy Estimates Comparison.Fuel economy is not a fixed number.It varies based on driving conditions,driving habits and vehicle condition.Therefore, it is not possible for oneset of estimates to predict fueleconomy precisely for all drivers inall environments.The EPA fuel economy estimatesshown in the example to the right area useful tool for comparison whenbuying a vehicle. EPA estimatesinclude:City MPG - Represents urbandriving in a vehicle in light traffic. Arange of miles per gallon achieved isalso provided.Highway MPG - Represents amixture of rural and interstatedriving, in a warmed-up vehicle,typical of longer trips in free-flowingtraffic. A range of miles per gallonachieved is also provided.
Combined Fuel Economy -Represents a combination of city andhighway driving. The scalerepresents the range of combinedfuel economy for other vehicles inthe class.
Estimated Annual Fuel Cost -Provides an estimated annual fuelcost, based on 15,000 miles (20,000km) per year multiplied by the costper gallon (based on EPA fuel costdata) divided by the combined fueleconomy.
For more information on fueleconomy ratings and factors thataffect fuel economy, visit www.fueleconomy.gov
City MPG
Combined FuelEconomy
Highway MPG
Estimated AnnualFuel Cost
(Sample EPA label shown)
Fuel Economy
146
10/08/06 08:34:41 11 ELEMENT MMC North America Owner's Man 50 31SCV680 enu
Fuel Economy FactorsThe following factors can lower yourvehicle's fuel economy:● Aggressive driving (hardacceleration and braking)
● Excessive idling, accelerating andbraking in stop-and-go traffic
● Cold engine operation (engines aremore efficient when warmed up)
● Driving with a heavy load or the airconditioner running
● Improperly inflated tires
Improving Fuel EconomyVehicle MaintenanceA properly maintained vehiclemaximizes fuel economy. Poormaintenance can significantly reducefuel economy. Always maintain yourvehicle according to the maintenancemessages displayed on theinformation display (see Owner'sMaintenance Checks on page 190).For example:
● Use the recommended viscositymotor oil, displaying the APICertification Seal (see page 193).
● Maintain proper tire inflation -An underinflated tire increases‘‘rolling resistance,’’ which reducesfuel economy.
● Avoid carrying excess weight inyour vehicle - It puts a heavierload on the engine, increasing fuelconsumption.
● Keep your vehicle clean - Inparticular, a build-up of snow ormud on your vehicle's undersideadds weight and rolling resistance.Frequent cleaning helps your fueleconomy.
Drive Efficiently● Drive moderately- Rapidacceleration, abrupt cornering, andhard braking increase fuelconsumption.
● Observe the speed limit -Aerodynamic drag has a big effecton fuel economy at speeds above45 mph (75 km/h). Reduce yourspeed and you reduce the drag.Trailers, car top carriers, roofracks and bike racks are also bigcontributors to increased drag.
● Avoid excessive idling- Idlingresults in 0 miles per gallon (0 kmsper liter).
● Minimize the use of the airconditioning system- The A/Cputs an extra load on the enginewhich makes it use more fuel. Usethe fresh-air ventilation whenpossible.
CONTINUED
Fuel Economy
147
Before
Driving
10/08/06 08:34:41 11 ELEMENT MMC North America Owner's Man 50 31SCV680 enu
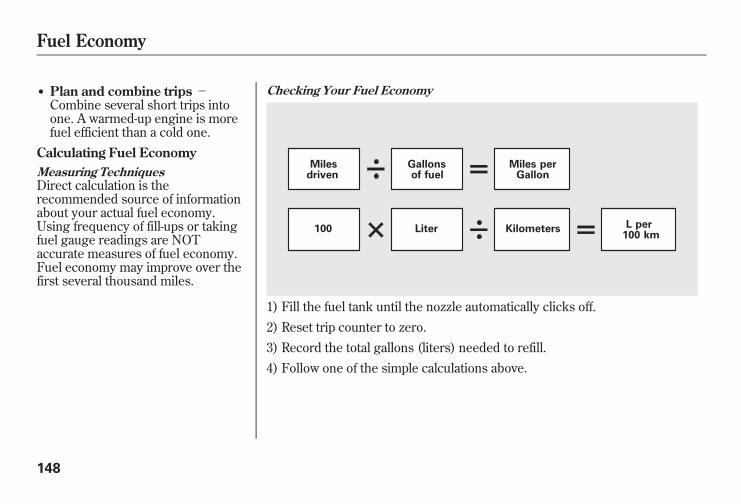
● Plan and combine trips -Combine several short trips intoone. A warmed-up engine is morefuel efficient than a cold one.
Calculating Fuel EconomyMeasuring TechniquesDirect calculation is therecommended source of informationabout your actual fuel economy.Using frequency of fill-ups or takingfuel gauge readings are NOTaccurate measures of fuel economy.Fuel economy may improve over thefirst several thousand miles.
Checking Your Fuel Economy
1) Fill the fuel tank until the nozzle automatically clicks off.2) Reset trip counter to zero.3) Record the total gallons (liters) needed to refill.4) Follow one of the simple calculations above.
100 Liter Kilometers L per100 km
Milesdriven
Gallonsof fuel
Miles perGallon
Fuel Economy
148
10/08/06 08:34:41 11 ELEMENT MMC North America Owner's Man 50 31SCV680 enu
Modifying your vehicle, or installingsome non-Honda accessories, canmake it unsafe. Before you make anymodifications or add any accessories,be sure to read the followinginformation.AccessoriesYour dealer has Honda accessoriesthat allow you to personalize yourvehicle. These accessories have beendesigned and approved for yourvehicle, and are covered by warranty.Although non-Honda accessoriesmay fit on your vehicle, they may notmeet factory specifications, and couldadversely affect your vehicle'shandling, stability, and reliability.
Improper accessories ormodifications can affect yourvehicle's handling, stability, andperformance, and cause acrash in which you can be hurtor killed.
Follow all instructions in thisowner's manual regardingaccessories and modifications.
When properly installed, cellularphones, alarms, two-way radios, andlow-powered audio systems shouldnot interfere with your vehicle'scomputer controlled systems, suchas your airbags, anti-lock brakes, andtire pressure monitoring system.
Before installing any accessory:● Make sure the accessory does notobscure any lights, or interferewith proper vehicle operation orperformance.
● Be sure electronic accessories donot overload electrical circuits (seepage 239) or interfere with theproper operation of your vehicle.
● Before installing any electronicaccessory, have the installercontact your dealer for assistance.If possible, have your dealerinspect the final installation.
● Do not install accessories on theside pillars or across the rearwindows. Accessories installed inthese areas may interfere withproper operation of the sidecurtain airbags.
CONTINUED
Accessories and Modifications
149
Before
Driving
10/08/06 08:34:41 11 ELEMENT MMC North America Owner's Man 50 31SCV680 enu
Modifying Your VehicleRemoving parts from your vehicle, orreplacing components with non-Honda components could seriouslyaffect your vehicle's handling,stability, and reliability.Some examples are:● Lowering the vehicle with a non-Honda suspension kit thatsignificantly reduces groundclearance can allow theundercarriage to hit speed bumpsor other raised objects, whichcould cause the airbags to deploy.
● Raising your vehicle with a non-Honda suspension kit can affectthe handling and stability.
● Non-Honda wheels, because theyare a universal design, can causeexcessive stress on suspensioncomponents, and are notcompatible with the tire pressuremonitoring system (TPMS).
● Larger or smaller wheels and tirescan interfere with the operation ofyour vehicle's anti-lock brakes andother systems.
● Modifying your steering wheel orany other part of your vehicle'ssafety features can make thesystems ineffective.
If you plan to modify your vehicle,consult your dealer.
Accessories and Modifications
150
10/08/06 08:34:41 11 ELEMENT MMC North America Owner's Man 50 31SCV680 enu
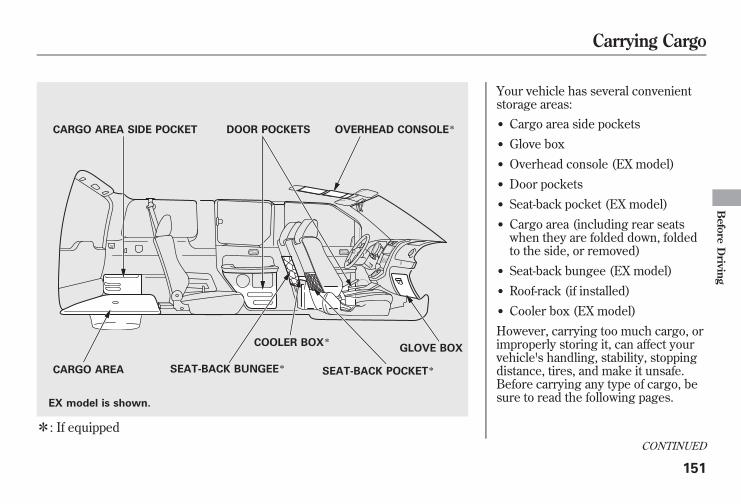
ꭧ: If equipped
Your vehicle has several convenientstorage areas:● Cargo area side pockets● Glove box● Overhead console (EX model)● Door pockets● Seat-back pocket (EX model)● Cargo area (including rear seatswhen they are folded down, foldedto the side, or removed)
● Seat-back bungee (EX model)● Roof-rack (if installed)● Cooler box (EX model)
However, carrying too much cargo, orimproperly storing it, can affect yourvehicle's handling, stability, stoppingdistance, tires, and make it unsafe.Before carrying any type of cargo, besure to read the following pages.
CARGO AREA
COOLER BOXꭧ
SEAT-BACK POCKETꭧ
GLOVE BOX
CARGO AREA SIDE POCKET DOOR POCKETS OVERHEAD CONSOLEꭧ
SEAT-BACK BUNGEEꭧ
EX model is shown.
CONTINUED
Carrying Cargo
151
Before
Driving
10/08/06 08:34:41 11 ELEMENT MMC North America Owner's Man 50 31SCV680 enu
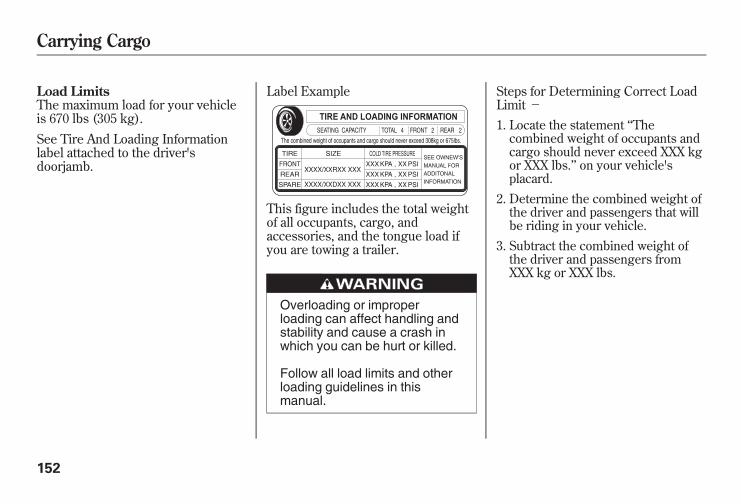
Load LimitsThe maximum load for your vehicleis 670 lbs (305 kg).See Tire And Loading Informationlabel attached to the driver'sdoorjamb.
Label Example
This figure includes the total weightof all occupants, cargo, andaccessories, and the tongue load ifyou are towing a trailer.
Overloading or improperloading can affect handling andstability and cause a crash inwhich you can be hurt or killed.
Follow all load limits and otherloading guidelines in thismanual.
Steps for Determining Correct LoadLimit-1. Locate the statement ‘‘Thecombined weight of occupants andcargo should never exceed XXX kgor XXX lbs.’’ on your vehicle'splacard.
2. Determine the combined weight ofthe driver and passengers that willbe riding in your vehicle.
3. Subtract the combined weight ofthe driver and passengers fromXXX kg or XXX lbs.
Carrying Cargo
152
10/08/06 08:34:41 11 ELEMENT MMC North America Owner's Man 50 31SCV680 enu

4. The resulting figure equals theavailable amount of cargo andluggage load capacity. Forexample, if the ‘‘XXX’’ amountequals 1,400 lbs. and there will befive 150 lb. passengers in yourvehicle, the amount of availablecargo and luggage load capacity is650 lbs.(1,400- 750 (5╳ 150)= 650 lbs.)
5. Determine the combined weight ofluggage and cargo being loaded onthe vehicle. That weight may notsafely exceed the available cargoand luggage load capacitycalculated in Step 4.
6. If your vehicle will be towing atrailer, load from your trailer will betransferred to your vehicle. Consultthis manual to determine how thisreduces the available cargo andluggage load capacity of yourvehicle.
Example 1
Example 2
Example 3
In addition, the total weight of the vehicle, all occupants, accessories, cargo, and trailertongue load must not exceed the Gross Vehicle Weight Rating (GVWR) or the GrossAxle Weight Rating (GAWR). Both are on a label on the driver's doorjamb.
Max Load (670 lbs)Passenger Weight(150 lbs x 2 = 300 lbs)(68 kg x 2 = 136 kg)
Cargo Weight(370 lbs)(169 kg)(305 kg)
Max Load (670 lbs) Cargo Weight(220 lbs)(101 kg)
Passenger Weight(150 lbs x 3 = 450 lbs)(68 kg x 3 = 204 kg)
(305 kg)
Max Load (670 lbs) Passenger Weight(150 lbs x 4 = 600 lbs)(68 kg x 4 = 272 kg)
Cargo Weight(70 lbs)(33 kg)(305 kg)
CONTINUED
Carrying Cargo
153
Before
Driving
10/08/06 08:34:41 11 ELEMENT MMC North America Owner's Man 50 31SCV680 enu
Carrying Items in the PassengerCompartment● Store or secure all items that couldbe thrown around and hurtsomeone during a crash.
● Be sure items placed on the floorbehind the front seats cannot rollunder the seats and interfere withthe pedals, the seat operation, orthe proper operation of the sensorsunder the seats.
● Keep the glove box closed whiledriving. If it is open, a passengercould injure their knees during acrash or sudden stop.
● If you fold the rear seats down orup, or remove them, tie downitems that could be thrown aboutthe vehicle during a crash orsudden stop. Also, keep all cargobelow the bottom of the windows.If it is higher, it could interferewith the proper operation of theside curtain airbags.
Carrying Cargo in the Cargo Areaor on a Roof Rack● Distribute cargo evenly on thefloor of the cargo area, placing theheaviest items on the bottom andas far forward as possible. Tiedown items that could be thrownabout the vehicle during a crash orsudden stop.
● If you carry large items thatprevent you from closing thetailgate or the hatch, exhaust gascan enter the passenger area. Toavoid the possibility of carbonmonoxide poisoning, follow theinstructions on page 52.
● If you carry any items on a roofrack, be sure the total weight ofthe rack and the items does notexceed 75 lbs (34 kg).If you use an accessory roof rack,the roof rack weight limit may belower. Refer to the information thatcame with your roof rack.
Carrying Cargo
154
10/08/06 08:34:41 11 ELEMENT MMC North America Owner's Man 50 31SCV680 enu
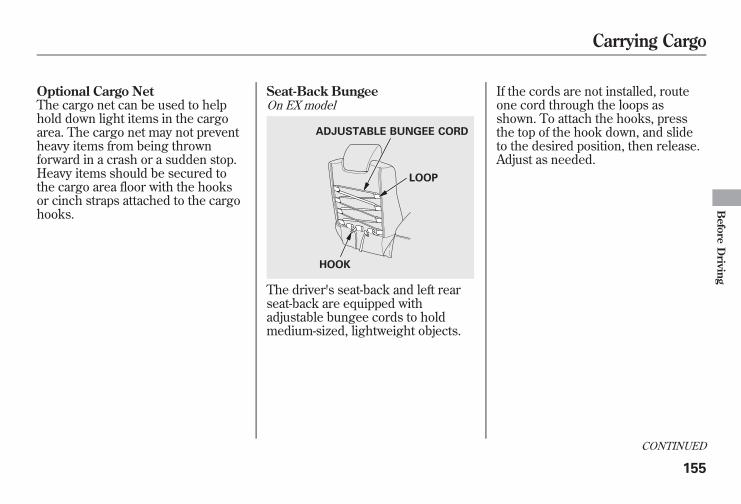
Optional Cargo NetThe cargo net can be used to helphold down light items in the cargoarea. The cargo net may not preventheavy items from being thrownforward in a crash or a sudden stop.Heavy items should be secured tothe cargo area floor with the hooksor cinch straps attached to the cargohooks.
Seat-Back BungeeOn EX model
The driver's seat-back and left rearseat-back are equipped withadjustable bungee cords to holdmedium-sized, lightweight objects.
If the cords are not installed, routeone cord through the loops asshown. To attach the hooks, pressthe top of the hook down, and slideto the desired position, then release.Adjust as needed.
ADJUSTABLE BUNGEE CORD
LOOP
HOOK
CONTINUED
Carrying Cargo
155
Before
Driving
10/08/06 08:34:41 11 ELEMENT MMC North America Owner's Man 50 31SCV680 enu
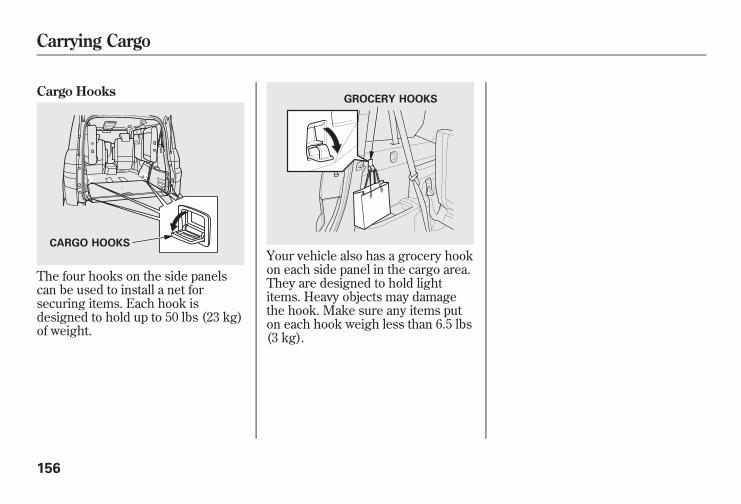
Cargo Hooks
The four hooks on the side panelscan be used to install a net forsecuring items. Each hook isdesigned to hold up to 50 lbs (23 kg)of weight.
Your vehicle also has a grocery hookon each side panel in the cargo area.They are designed to hold lightitems. Heavy objects may damagethe hook. Make sure any items puton each hook weigh less than 6.5 lbs(3 kg).
CARGO HOOKS
GROCERY HOOKS
Carrying Cargo
156
10/08/06 08:34:41 11 ELEMENT MMC North America Owner's Man 50 31SCV680 enu
This section gives you tips onstarting the engine under variousconditions, and how to operate theautomatic transmission. It alsoincludes important information onparking your vehicle, the brakingsystem, the vehicle stability assist(VSA®) system, the tire pressuremonitoring system (TPMS), andfacts you need if you are planning totow a trailer or drive off-highway.
Driving Guidelines...................... 158Preparing to Drive ...................... 159Starting the Engine ..................... 160Automatic Transmission ............. 161Parking ....................................... 165Braking System .......................... 166Anti-lock Brakes (ABS) ............... 167Tire Pressure Monitoring System
(TPMS)................................... 169Vehicle Stability Assist (VSA®),
aka Electronic Stability Control(ESC), System..................... 172
Towing a Trailer.......................... 174Off-Highway Driving
Guidelines............................... 180
Driving
157
Driving
10/08/06 08:34:41 11 ELEMENT MMC North America Owner's Man 50 31SCV680 enu
Your vehicle has a higher groundclearance that allows you to travelover bumps, obstacles, and roughterrain. It also provides goodvisibility so you can anticipateproblems earlier.Because your vehicle rides higher offthe ground, it has a high center ofgravity that can cause it to roll over ifyou make abrupt turns. Utilityvehicles have a significantly higherroll over rate than other types ofvehicles.To prevent rollovers or loss ofcontrol:● Take corners at slower speedsthan you would with a passengervehicle.
● Avoid sharp turns and abruptmaneuvers whenever possible.
● Do not modify your vehicle in anyway that would raise the center ofgravity.
● Do not carry heavy cargo on theroof.
Four-wheel drive modelsYour vehicle is equipped with a four-wheel drive (4WD) system. Whenthe system senses a loss of front-wheel traction, it automaticallytransfers some power to the rearwheels. This gives you better tractionand mobility.You still need to exercise the samecare when accelerating, steering, andbraking that you would in a two-wheel drive vehicle.
See page 180 for off-highway drivingguidelines.
Driving Guidelines
158
10/08/06 08:34:41 11 ELEMENT MMC North America Owner's Man 50 31SCV680 enu

You should do the following checksand adjustments before you driveyour vehicle.1. Make sure all windows, mirrors,and outside lights are clean andunobstructed. Remove frost, snow,or ice.
2. Check that the hood is fullyclosed.
3. Visually check the tires. If a tirelooks low, use a gauge to check itspressure.
4. Check that any items you may becarrying are stored properly orfastened down securely.
5. Check the seat adjustment (seepage 83).
6. Check the adjustment of the insideand outside mirrors (see page 93).
7. Check the steering wheeladjustment (see page 74).
8. Make sure the doors, the hatch,and the tailgate are securelyclosed and locked.
9. Fasten your seat belt. Check thatyour passengers have fastenedtheir seat belts (see page 14).
10. When you start the engine, checkthe gauges and indicators in theinstrument panel (see page 57).
Preparing to Drive
159
Driving
10/08/06 08:34:41 11 ELEMENT MMC North America Owner's Man 50 31SCV680 enu
1. Apply the parking brake.2. In cold weather, turn off allelectrical accessories to reduce thedrain on the battery.
3. Make sure the shift lever is inPark. Press on the brake pedal.
4. Without touching the acceleratorpedal, turn the ignition key to theSTART (III) position. Do not holdthe key in the START (III) positionfor more than 15 seconds at a time.If the engine does not start rightaway, pause for at least 10 secondsbefore trying again.
The immobilizer system protects yourvehicle from theft. If an improperlycoded key (or other device) is used, theengine's fuel system is disabled. Formore information, see page 76.
The engine is harder to start in coldweather. Also, the thinner air found ataltitudes above 8,000 feet (2,400meters) adds to this problem.
Starting the Engine
160
10/08/06 08:34:41 11 ELEMENT MMC North America Owner's Man 50 31SCV680 enu
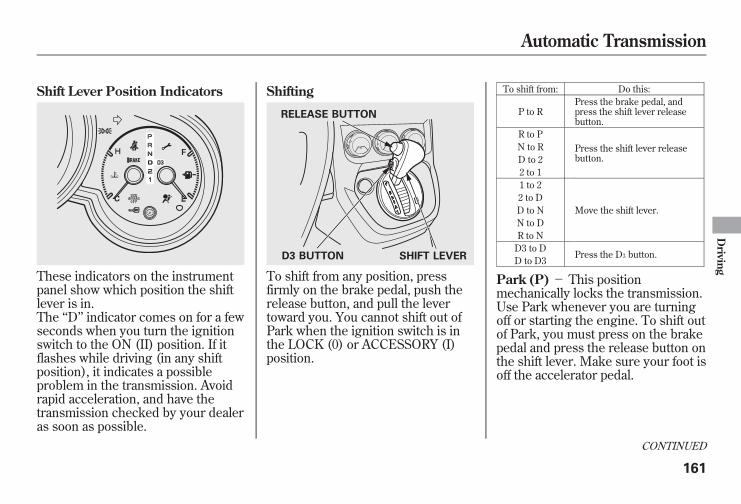
Shift Lever Position Indicators
These indicators on the instrumentpanel show which position the shiftlever is in.The ‘‘D’’ indicator comes on for a fewseconds when you turn the ignitionswitch to the ON (II) position. If itflashes while driving (in any shiftposition), it indicates a possibleproblem in the transmission. Avoidrapid acceleration, and have thetransmission checked by your dealeras soon as possible.
Shifting
To shift from any position, pressfirmly on the brake pedal, push therelease button, and pull the levertoward you. You cannot shift out ofPark when the ignition switch is inthe LOCK (0) or ACCESSORY (I)position.
To shift from: Do this:
P to RPress the brake pedal, andpress the shift lever releasebutton.
R to PPress the shift lever releasebutton.
N to RD to 22 to 11 to 2
Move the shift lever.2 to DD to NN to DR to ND3 to D
Press the D3 button.D to D3
Park (P) - This positionmechanically locks the transmission.Use Park whenever you are turningoff or starting the engine. To shift outof Park, you must press on the brakepedal and press the release button onthe shift lever. Make sure your foot isoff the accelerator pedal.
RELEASE BUTTON
D3 BUTTON SHIFT LEVER
CONTINUED
Automatic Transmission
161
Driving
10/08/06 08:34:41 11 ELEMENT MMC North America Owner's Man 50 31SCV680 enu
If you have done all of the above andstill cannot move the lever out ofPark, see Shift Lock Release onpage 163.To avoid transmission damage, cometo a complete stop before shiftinginto Park. You must also press therelease button to shift into Park. Theshift lever must be in Park beforeyou can remove the key from theignition switch.Reverse (R) - Press the brakepedal and press the release button toshift from Park to reverse. To shiftfrom reverse to neutral, come to acomplete stop, and then shift.
Neutral (N)- Use neutral if youneed to restart a stalled engine, or ifit is necessary to stop briefly with theengine idling. Shift to the Parkposition if you need to leave yourvehicle for any reason. Press on thebrake pedal when you are movingthe shift lever from neutral toanother gear.
Drive (D)- Use this position foryour normal driving. Thetransmission automatically selects asuitable gear (1 through 5) for yourspeed and acceleration. You maynotice the transmission shifting up athigher engine speeds when theengine is cold. This helps the enginewarm up faster.Drive (D3)- To use D3, press theD3 button when the shift lever is inthe ‘‘D’’ position. This position issimilar to D, except only the firstthree gears are selected instead of allfive. Use D3 when towing a trailer inhilly terrain, or to provide enginebraking when going down a steephill. D3 can also keep thetransmission from cycling betweenthird and fourth gears in stop-and-godriving.
Automatic Transmission
162
10/08/06 08:34:41 11 ELEMENT MMC North America Owner's Man 50 31SCV680 enu
Second (2) - This position locksthe transmission in second gear. Itdoes not downshift to first gear whenyou come to a stop.Use second gear:● For more power when climbing.● To increase engine braking whengoing down steep hills.
● For starting out on a slipperysurface or in deep snow.
● To help reduce wheel spin.● When driving downhill with atrailer.
First (1)- This position locks thetransmission in first gear. Byupshifting and downshifting through1, 2, D3, and D, you can operate thetransmission much like a manualtransmission without a clutch pedal.Engine Speed LimiterIf you exceed the maximum speedfor the gear you are in, the enginespeed will enter into thetachometer's red zone. If this occurs,you may feel the engine cut in andout. This is caused by a limiter in theengine's computer controls. Theengine will run normally when youreduce the rpm below the red zone.
Shift Lock ReleaseThis allows you to move the shiftlever out of Park if the normalmethod of pushing on the brakepedal and pressing the release buttondoes not work.1. Set the parking brake.2. Remove the key from the ignitionswitch.
CONTINUED
Automatic Transmission
163
Driving
10/08/06 08:34:41 11 ELEMENT MMC North America Owner's Man 50 31SCV680 enu
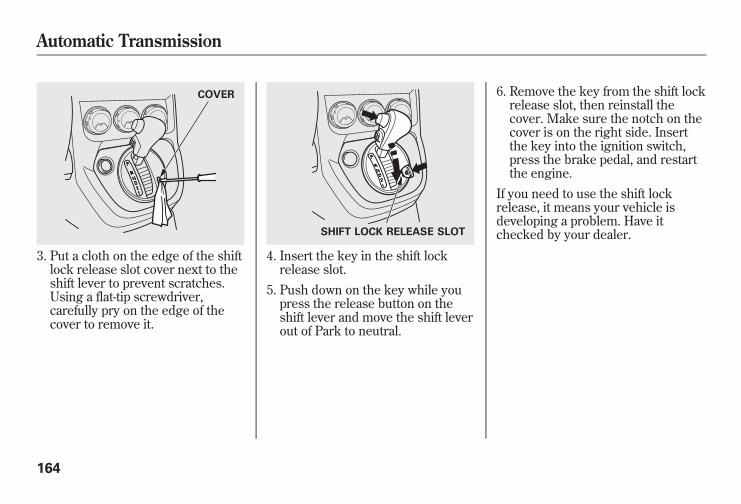
3. Put a cloth on the edge of the shiftlock release slot cover next to theshift lever to prevent scratches.Using a flat-tip screwdriver,carefully pry on the edge of thecover to remove it.
4. Insert the key in the shift lockrelease slot.
5. Push down on the key while youpress the release button on theshift lever and move the shift leverout of Park to neutral.
6. Remove the key from the shift lockrelease slot, then reinstall thecover. Make sure the notch on thecover is on the right side. Insertthe key into the ignition switch,press the brake pedal, and restartthe engine.
If you need to use the shift lockrelease, it means your vehicle isdeveloping a problem. Have itchecked by your dealer.
COVER
SHIFT LOCK RELEASE SLOT
Automatic Transmission
164
10/08/06 08:34:41 11 ELEMENT MMC North America Owner's Man 50 31SCV680 enu
Always use the parking brake whenyou park your vehicle. Make sure theparking brake is set firmly, or yourvehicle may roll if it is parked on anincline.Set the parking brake before you putthe transmission in Park. This keepsthe vehicle from moving and puttingpressure on the parking mechanismin the transmission.
Parking Tips● Make sure the windows areclosed.
● Turn off the lights.● Place any packages, valuables, etc.in the cargo area or take them withyou.
● Lock the doors and the hatch withthe key.
● Never park over dry leaves, tallgrass, or other flammablematerials. The hot three waycatalytic converter could causethese materials to catch on fire.
● If the vehicle is facing uphill, turnthe front wheels away from thecurb.
● If the vehicle is facing downhill,turn the front wheels toward thecurb.
● Make sure the parking brake isfully released before driving away.Driving with the parking brakepartially set can overheat ordamage the rear brakes.
Parking
165
Driving
10/08/06 08:34:41 11 ELEMENT MMC North America Owner's Man 50 31SCV680 enu
Your vehicle is equipped with discbrakes at all four wheels. A powerassist helps reduce the effort neededon the brake pedal. The emergencybrake assist system increases thestopping force when you depress thebrake pedal hard in an emergencysituation. The anti-lock brake system(ABS) helps you retain steeringcontrol when braking very hard.Resting your foot on the pedal keepsthe brakes applied lightly, builds upheat, reduces their effectiveness andreduces brake pad life. In addition,fuel economy can be reduced. It alsokeeps your brake lights on all thetime, confusing drivers behind you.
Constant application of the brakeswhen going down a long hill buildsup heat and reduces theireffectiveness. Use the engine toassist the brakes by taking your footoff the accelerator and downshiftingto a lower gear.Check your brakes after drivingthrough deep water. Apply thebrakes moderately to see if they feelnormal. If not, apply them gently andfrequently until they do. Be extracautious and alert in your driving.
Braking System DesignThe hydraulic system that operatesthe brakes has two separate circuits.Each circuit works diagonally acrossthe vehicle (the left-front brake isconnected with the right-rear brake,etc.). If one circuit should develop aproblem, you will still have brakingat two wheels.
Braking System
166
10/08/06 08:34:41 11 ELEMENT MMC North America Owner's Man 50 31SCV680 enu
Brake Pad Wear IndicatorsIf the brake pads need replacing, youwill hear a distinctive, metallicscreeching sound when you applythe brake pedal. If you do not havethe brake pads replaced, they willscreech all the time. It is normal forthe brakes to occasionally squeal orsqueak when you apply them.
Anti-lock Brakes (ABS)The anti-lock brake system (ABS)helps prevent the wheels fromlocking up, and helps you retainsteering control by pumping thebrakes rapidly, much faster than aperson can do it.The electronic brake distribution(EBD) system, which is part of theABS, also balances the front-to-rearbraking distribution according tovehicle loading.
You should never pump the brake pedal.Let the ABS work for you by alwayskeeping firm, steady pressure on thebrake pedal. This is sometimesreferred to as ‘‘stomp and steer.’’
You will feel a pulsation in the brakepedal when the ABS activates, andyou may hear some noise. This isnormal: it is the ABS rapidlypumping the brakes. On drypavement, you will need to press onthe brake pedal very hard before theABS activates. However, you mayfeel the ABS activate immediately ifyou are trying to stop on snow or ice.
CONTINUED
Braking System, Anti-lock Brakes (ABS)
167
Driving
10/08/06 08:34:41 11 ELEMENT MMC North America Owner's Man 50 31SCV680 enu
ABS Indicator
If this indicator comes on, the anti-lock function of the braking systemhas shut down. The brakes still worklike a conventional system, butwithout anti-lock. You should haveyour dealer inspect your vehicle assoon as possible.If the indicator comes on whiledriving, test the brakes as instructedon page 237.If the ABS indicator and the brakesystem indicator come on together,and the parking brake is fullyreleased, the EBD system may alsobe shut down.
Test your brakes as instructed onpage 237. If the brakes feel normal,drive slowly and have your vehiclerepaired by your dealer as soon aspossible. Avoid sudden hard brakingwhich could cause the rear wheels tolock up and possibly lead to a loss ofcontrol.Important Safety RemindersABS does not reduce the time ordistance it takes to stop thevehicle. It only helps with steeringcontrol during braking.
ABS will not prevent a skid thatresults from changing directionabruptly, such as trying to take acorner too fast or making a suddenlane change. Always drive at a safespeed for the road and weatherconditions.ABS cannot prevent a loss ofstability. Always steer moderatelywhen you are braking hard. Severeor sharp steering wheel movementcan still cause your vehicle to veerinto oncoming traffic or off the road.A vehicle with ABS may require alonger distance to stop on loose oruneven surfaces, such as gravel orsnow, than a vehicle without anti-lock.
Anti-lock Brakes (ABS)
168
10/08/06 08:34:41 11 ELEMENT MMC North America Owner's Man 50 31SCV680 enu
Your vehicle is equipped with a tirepressure monitoring system (TPMS)that turns on every time you start theengine and monitors the pressure inyour tires while driving.Each tire has its own pressure sensor(not including the spare tire). If theair pressure of a tire becomessignificantly low, the sensor in thattire immediately sends a signal thatcauses the low tire pressure indicatorto come on.
Low Tire PressureIndicator
When the low tire pressure indicatoris on, one or more of your tires issignificantly underinflated. Youshould stop and check your tires assoon as possible, and inflate them tothe proper pressure as indicated onthe vehicle's tire information placard.
If you think you can safely drive ashort distance to a service station,proceed slowly, and inflate the tire tothe recommended pressure shown onthe driver's doorjamb.
If the tire is flat, or if the tire pressureis too low to continue driving, replacethe tire with the compact spare tire(see page 222).
If you cannot make the low tirepressure indicator go out afterinflating the tires to the specifiedvalues, have your dealer check thesystem as soon as possible.
Driving on a significantlyunderinflated tire causes the tire tooverheat and can lead to tire failure.Underinflation also reduces fuelefficiency and tire tread life, and mayaffect the vehicle's handling andstopping ability.
Because tire pressure varies bytemperature and other conditions, thelow tire pressure indicator may comeon unexpectedly.
CONTINUED
Tire Pressure Monitoring System (TPMS)
169
Driving
10/08/06 08:34:41 11 ELEMENT MMC North America Owner's Man 50 31SCV680 enu
For example, if you check and fillyour tires in a warm area, then drivein extremely cold weather, the tirepressure will be lower than measuredand could be underinflated and causethe low tire pressure indicator tocome on. Or, if you check and adjustyour tire pressure in coolerconditions, and drive into extremelyhot conditions, the tire may becomeoverinflated. However, the low tirepressure indicator will not come on ifthe tires are overinflated.Refer to page 212 for tire inflationguidelines.
Although your tire pressure ismonitored, you must manually checkthe tire pressures monthly.
Each tire, including the spare, shouldbe checked monthly when cold andset to the recommended inflationpressure as specified in the vehicleplacard and this owner's manual (seepage 252).
Tire Pressure MonitoringSystem (TPMS) Indicator
This indicator comes on and stays onif there is a problem with the tirepressure monitoring system.If this happens, the system will shutoff and no longer monitor tirepressures. Have the system checkedby your dealer as soon as possible.When you restart the vehicle withthe compact spare tire, the TPMSindicator may also come on and stayon after driving several miles(kilometers).
Changing a Tire with TPMSIf you have a flat tire, the low tirepressure indicator will come on.Replace the flat tire with the compactspare tire (see page 222).Each wheel (except the compactspare tire wheel) is equipped with atire pressure sensor. You must useTPMS specific wheels. It isrecommended that you always haveyour tires serviced by your dealer orqualified technician.After you replace the flat tire with thecompact spare tire, the low tirepressure indicator stays on. This isnormal; the system is not monitoringthe spare tire pressure. Manuallycheck the spare tire pressure to besure it is correct. After several miles(kilometers) driving with thecompact spare tire, the TPMSindicator comes on and the low tirepressure indicator goes off.
Tire Pressure Monitoring System (TPMS)
170
10/08/06 08:34:41 11 ELEMENT MMC North America Owner's Man 50 31SCV680 enu
The low tire pressure indicator or theTPMS indicator will go off, afterseveral miles (kilometers) driving,when you replace the spare tire withthe specified regular tire equippedwith the tire pressure monitorsensor.Never use a puncture-repairing agentin a flat tire. If used, you will have toreplace the tire pressure sensor.Have the flat tire repaired by yourdealer as soon as possible.
As required by the FCC:This device complies with Part 15 of theFCC rules. Operation is subject to thefollowing two conditions: (1) This devicemay not cause harmful interference, and(2) this device must accept anyinterference received, includinginterference that may cause undesiredoperation.
Changes or modifications not expresslyapproved by the party responsible forcompliance could void the user'sauthority to operate the equipment.
Tire Pressure Monitoring System (TPMS)
171
Driving
10/08/06 08:34:41 11 ELEMENT MMC North America Owner's Man 50 31SCV680 enu
The vehicle stability assist (VSA)system helps to stabilize the vehicleduring cornering if the vehicle turnsmore or less than desired. It alsoassists you in maintaining tractionwhile accelerating on loose orslippery road surfaces. It does this byregulating the engine's output and byselectively applying the brakes.When VSA activates, you may noticethat the engine does not respond tothe accelerator in the same way itdoes at other times. You will also seethe VSA system indicator blink.The VSA system cannot enhance thevehicle's driving stability in allsituations and does not control yourvehicle's entire braking system. It isstill your responsibility to drive andcorner at reasonable speeds and toleave a sufficient margin of safety.
VSA OFF Indicator
When VSA is off, the VSA OFFindicator comes on as a reminder.
Vehicle Stability Assist(VSA) System Indicator
When VSA activates, you will see theVSA system indicator blink.If this indicator comes on whiledriving, pull to the side of the roadwhen it is safe, and turn off theengine. Reset the system byrestarting the engine. If the VSAsystem indicator stays on or comesback on while driving, have the VSAsystem inspected by your dealer.NOTE: The main function of the VSAsystem is generally known asElectronic Stability Control (ESC).The system also includes a tractioncontrol function.
If the indicator does not come onwhen the ignition switch is turned tothe ON (II) position, there may be aproblem with the VSA system. Haveyour dealer inspect your vehicle assoon as possible.Without VSA, your vehicle will havenormal braking and cornering ability,but it will not have VSA traction andstability enhancement.
Vehicle Stability Assist (VSA®), aka Electronic Stability Control (ESC), System
172
10/08/06 08:34:41 11 ELEMENT MMC North America Owner's Man 50 31SCV680 enu
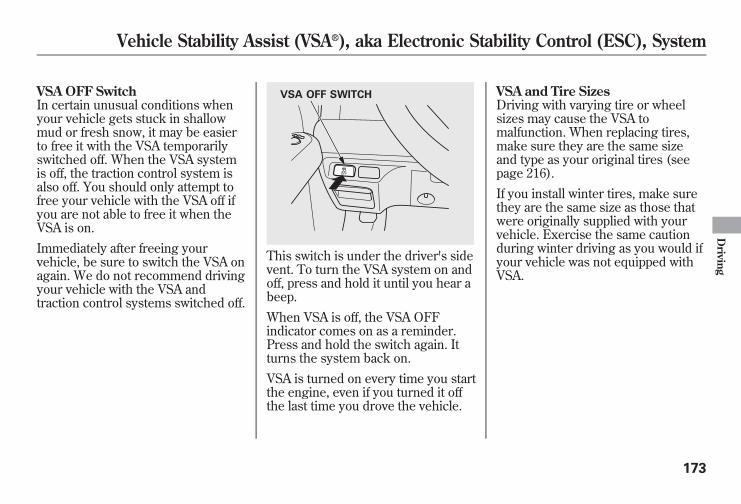
VSA OFF SwitchIn certain unusual conditions whenyour vehicle gets stuck in shallowmud or fresh snow, it may be easierto free it with the VSA temporarilyswitched off. When the VSA systemis off, the traction control system isalso off. You should only attempt tofree your vehicle with the VSA off ifyou are not able to free it when theVSA is on.Immediately after freeing yourvehicle, be sure to switch the VSA onagain. We do not recommend drivingyour vehicle with the VSA andtraction control systems switched off.
This switch is under the driver's sidevent. To turn the VSA system on andoff, press and hold it until you hear abeep.When VSA is off, the VSA OFFindicator comes on as a reminder.Press and hold the switch again. Itturns the system back on.VSA is turned on every time you startthe engine, even if you turned it offthe last time you drove the vehicle.
VSA and Tire SizesDriving with varying tire or wheelsizes may cause the VSA tomalfunction. When replacing tires,make sure they are the same sizeand type as your original tires (seepage 216).If you install winter tires, make surethey are the same size as those thatwere originally supplied with yourvehicle. Exercise the same cautionduring winter driving as you would ifyour vehicle was not equipped withVSA.
VSA OFF SWITCH
Vehicle Stability Assist (VSA®), aka Electronic Stability Control (ESC), System
173
Driving
10/08/06 08:34:41 11 ELEMENT MMC North America Owner's Man 50 31SCV680 enu
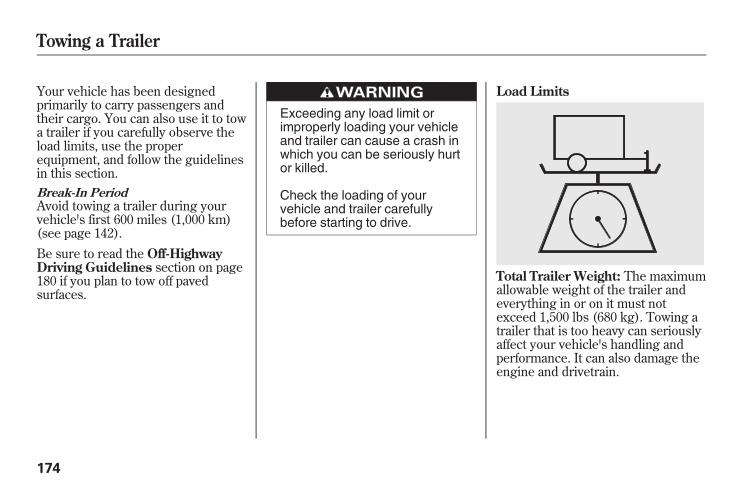
Your vehicle has been designedprimarily to carry passengers andtheir cargo. You can also use it to towa trailer if you carefully observe theload limits, use the properequipment, and follow the guidelinesin this section.Break-In PeriodAvoid towing a trailer during yourvehicle's first 600 miles (1,000 km)(see page 142).Be sure to read the Off-HighwayDriving Guidelines section on page180 if you plan to tow off pavedsurfaces.
Exceeding any load limit orimproperly loading your vehicleand trailer can cause a crash inwhich you can be seriously hurtor killed.
Check the loading of yourvehicle and trailer carefullybefore starting to drive.
Load Limits
Total Trailer Weight: The maximumallowable weight of the trailer andeverything in or on it must notexceed 1,500 lbs (680 kg). Towing atrailer that is too heavy can seriouslyaffect your vehicle's handling andperformance. It can also damage theengine and drivetrain.
Towing a Trailer
174
10/08/06 08:34:41 11 ELEMENT MMC North America Owner's Man 50 31SCV680 enu
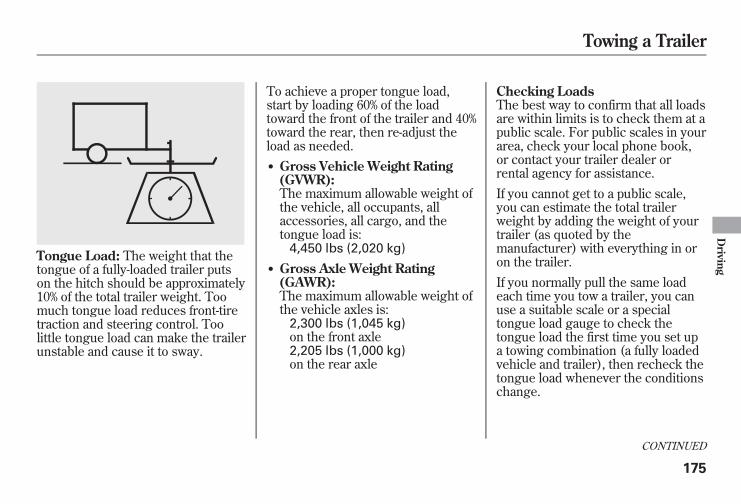
Tongue Load: The weight that thetongue of a fully-loaded trailer putson the hitch should be approximately10% of the total trailer weight. Toomuch tongue load reduces front-tiretraction and steering control. Toolittle tongue load can make the trailerunstable and cause it to sway.
To achieve a proper tongue load,start by loading 60% of the loadtoward the front of the trailer and 40%toward the rear, then re-adjust theload as needed.● Gross Vehicle Weight Rating(GVWR):The maximum allowable weight ofthe vehicle, all occupants, allaccessories, all cargo, and thetongue load is:4,450 lbs (2,020 kg)
● Gross Axle Weight Rating(GAWR):The maximum allowable weight ofthe vehicle axles is:2,300 lbs (1,045 kg)on the front axle2,205 lbs (1,000 kg)on the rear axle
Checking LoadsThe best way to confirm that all loadsare within limits is to check them at apublic scale. For public scales in yourarea, check your local phone book,or contact your trailer dealer orrental agency for assistance.If you cannot get to a public scale,you can estimate the total trailerweight by adding the weight of yourtrailer (as quoted by themanufacturer) with everything in oron the trailer.If you normally pull the same loadeach time you tow a trailer, you canuse a suitable scale or a specialtongue load gauge to check thetongue load the first time you set upa towing combination (a fully loadedvehicle and trailer), then recheck thetongue load whenever the conditionschange.
CONTINUED
Towing a Trailer
175
Driving
10/08/06 08:34:41 11 ELEMENT MMC North America Owner's Man 50 31SCV680 enu
Towing Equipment andAccessoriesTowing can require a variety ofequipment, depending on the size ofyour trailer, how it will be used, howmuch load you are towing, andwhere you tow. To ensure thehighest quality equipment, purchaseHonda equipment wheneverpossible.Discuss your needs with your trailersales or rental agency, and follow theguidelines in the rest of this section.Also make sure that all equipment isproperly installed and that it meetsfederal, state, provincial, territorialand local regulations.
HitchesAny hitch used on your vehicle mustbe properly bolted to the underbody.Safety ChainsAlways use safety chains when youtow a trailer. Make sure the chainsare secured to the trailer and hitch,and that they cross under the tongueand can catch the trailer if it becomesunhitched. Leave enough slack toallow the trailer to turn cornerseasily, but do not let the chains dragon the ground.
Trailer BrakesHonda recommends that any trailerwith a total weight of 1,000 lbs (450kg) or more has its own brake.There are two common types oftrailer brakes; surge and electric.Surge brakes are common for boattrailers, since the brakes will get wet.If you choose electric brakes, be surethey are electronically actuated. Donot attempt to tap into your vehicle'shydraulic system. No matter howsuccessful it may seem, any attemptto attach trailer brakes to yourvehicle's hydraulic system will lowerbraking effectiveness and create apotential hazard.See your trailer dealer or rentalagency for more information oninstalling electric brakes.
Towing a Trailer
176
10/08/06 08:34:41 11 ELEMENT MMC North America Owner's Man 50 31SCV680 enu
Trailer LightsTrailer lights and equipment mustcomply with federal, state, provincial,territorial, and local regulations.Check with your local trailer dealeror rental agency for the requirementsin the area where you plan to tow,and use only equipment designed foryour vehicle.Since lighting and wiring vary bytrailer type and brand, you shouldhave a qualified technician install asuitable connector between thevehicle and the trailer. Improperequipment or installation can causedamage to your vehicle's electricalsystem and affect your vehiclewarranty.
Additional Towing EquipmentMany states require special outsidemirrors when towing a trailer. Even ifthey don't, you should install specialmirrors if you cannot clearly seebehind you, or if the trailer creates ablind spot.
Ask your trailer sales or rentalagency if any other items arerecommended or required for yourtowing situation.
CONTINUED
Towing a Trailer
177
Driving
10/08/06 08:34:41 11 ELEMENT MMC North America Owner's Man 50 31SCV680 enu
Pre-Tow ChecklistWhen preparing to tow, and beforedriving away, be sure to check thefollowing:● The vehicle has been properlyserviced, and the tires, brakes,suspension, cooling system, andlights are in good operatingcondition.
● The trailer has been properlyserviced and is in good condition.
● All weights and loads are withinlimits (see pages 174 and 175).
● The hitch, safety chains, and anyother attachments are secure.
● All items in or on the trailer areproperly secured and cannot shiftwhile you drive.
● Your vehicle tires and spare areproperly inflated (see page 212),and the trailer tires and spare areinflated as recommended by thetrailer maker.
Driving Safely With a TrailerThe added weight, length, andheight of a trailer will affect yourvehicle's handling and performance,so driving with a trailer requiressome special driving skills andtechniques.For your safety and the safety ofothers, take time to practice drivingmaneuvers before heading for theopen road, and follow the guidelinesbelow.Towing Speeds and GearsDrive slower than normal in alldriving situations, and obey postedspeed limits for vehicles with trailers.Use the D position when towing atrailer on level roads. D3 is theproper shift lever position to usewhen towing a trailer in hilly terrain.(See ‘‘Driving on Hills’’ on the nextpage for additional gear information.)
Towing a Trailer
178
10/08/06 08:34:41 11 ELEMENT MMC North America Owner's Man 50 31SCV680 enu
Making Turns and BrakingMake turns more slowly and widerthan normal. The trailer tracks asmaller arc than your vehicle, and itcan hit or run over something thevehicle misses. Allow more time anddistance for braking. Do not brake orturn suddenly as this could cause thetrailer to jackknife or turn over.Driving on HillsWhen climbing hills, closely watchyour temperature gauge. If it nearsthe red (Hot) mark, turn the airconditioning off, reduce speed and, ifnecessary, pull to the side of the roadto let the engine cool.If the automatic transmission shiftsfrequently while going up a hill, shiftto D3.
If you must stop when facing uphill,use the foot brake or parking brake.Do not try to hold the vehicle in placeby pressing on the accelerator, asthis can cause the automatictransmission to overheat.When driving down hills, reduceyour speed, and shift down to secondgear. Do not ‘‘ride’’ the brakes, andremember, it will take longer to slowdown and stop when towing a trailer.Handling Crosswinds and BuffetingCrosswinds and air turbulencecaused by passing trucks can disruptyour steering and cause the trailer tosway. When being passed by a largevehicle, keep a constant speed, andsteer straight ahead. Do not try tomake quick steering or brakingcorrections.
Backing UpAlways drive slowly and havesomeone guide you when backingup. Grip the bottom of the steeringwheel, then turn the wheel to the leftto get the trailer to move to the left,and turn the wheel right to move thetrailer to the right.ParkingFollow all normal precautions whenparking, including firmly setting theparking brake and putting thetransmission in Park. Also, placewheel chocks at each of the trailer'stires.Towing Your VehicleYour vehicle is not designed to betowed behind a motor home. If yourvehicle needs to be towed in anemergency, see page 244.
Towing a Trailer
179
Driving
10/08/06 08:34:41 11 ELEMENT MMC North America Owner's Man 50 31SCV680 enu
General InformationYour vehicle has been designedprimarily for use on pavement. Butits higher ground clearance allowsyou to occasionally travel on unpavedroads, such as campgrounds, picnicsites, and similar locations. It is notdesigned for trail-blazing, mountainclimbing, or other challenging off-road activities.If you decide to drive on unpavedroads, you will find that it requiressomewhat different driving skills.Your vehicle will also handlesomewhat differently than it does onpavement. So be sure to read thisowner's manual, pay special attentionto the precautions and tips in thissection, and get acquainted with yourvehicle before you leave thepavement.
Improperly operating thisvehicle on or off pavement cancause a crash or rollover inwhich you and your passengerscould be seriously injured orkilled.● Follow all instructions andguidelines in this owner'smanual.
● Keep your speed low, anddon't drive faster thanconditions permit.
Important Safety PrecautionsTo avoid loss of control or rollover,be sure to follow all precautions andrecommendations.● Be sure to store cargo properly,and do not exceed your vehiclecargo load limits (see pages 152and 174).
● Wherever you drive, make sureyou and your passengers alwayswear seat belts.
● Keep your speed low, and never gofaster than the conditions allow.
● It's up to you to continually assessthe situation and drive within thelimits.
Off-Highway Driving Guidelines
180
10/08/06 08:34:41 11 ELEMENT MMC North America Owner's Man 50 31SCV680 enu
Check Out Your VehicleBefore you leave the pavement, besure to do all scheduled maintenanceand service, and inspect your vehiclefor any problems. Pay specialattention to the condition of the tires,and check the tire pressures.After you return to the pavement,carefully inspect your vehicle tomake sure there is no damage thatcould make driving it unsafe.Recheck the condition of the tiresand the tire pressures.RememberThe route presents limits (too steepor bumpy roads). You have limits(driving skill and comfort). And yourvehicle has limits (traction, stability,and power).Driving off-highway can behazardous if you fail to recognizelimits and take the properprecautions.
Accelerating and BrakingFor better traction on all surfaces,accelerate slowly and gradually buildup speed. If you try to start too faston wet soil, mud, snow, or ice, youmight not have enough traction toget underway, and you may digyourself a hole. Starting with the shiftlever in second (2) gear will help youhave a smoother start on snow or ice.Keep in mind that you will usuallyneed more time and distance tobrake to a stop on unpaved surfaces.Avoid hard braking. Do not ‘‘pump’’the brakes; let the anti-lock brakingsystem pump them for you.
Avoiding ObstaclesDebris on the road can damage yoursuspension or other components.Because your vehicle has a highcenter of gravity, driving over a largeobstacle, or allowing a wheel to dropinto a deep hole can cause yourvehicle to tip or roll over.Driving on SlopesIf you can't clearly see all conditionsor obstacles on a slope, walk theslope before you drive on it. If youhave any doubt whether or not youcan safely drive on the slope, don'tdo it. Find another route.If you are driving up a hill and findthat you cannot continue, do not try toturn around. Your vehicle could rollover. Slowly back down the hill,following the same route you took upthe hill.
CONTINUED
Off-Highway Driving Guidelines
181
Driving
10/08/06 08:34:41 11 ELEMENT MMC North America Owner's Man 50 31SCV680 enu
Crossing a StreamAvoid driving through deep water. Ifyou encounter water in your route (asmall stream or large puddle, forexample), evaluate it carefully beforegoing ahead. Make sure it is shallow,flowing slowly, and has firm groundunderneath. If you are not sure of thedepth or the ground, turn around andfind another route.Driving through deep water can alsodamage your vehicle. The water canget into the transmission anddifferential, diluting the lubricant andcausing an eventual failure. It canalso wash the grease out of the wheelbearings.
If You Get StuckAvoid driving on soft sand, deepmud, or other surfaces where youcould get stuck. If you do happen toget stuck because of inclementweather or other conditions, choosea safe and appropriate course ofaction.You should never use a jack to trygetting unstuck. A jack only workson firm, level ground. Also, yourvehicle could easily slip off the jackand hurt you or someone else.
4-Wheel Drive VehiclesIf you spin the wheels excessivelytrying to get unstuck, you mayoverheat the components of the 4-wheel drive system. If this happens,the 4-wheel drive system shuts offand only the front wheels receivepower. At this point, you must stopand allow everything to cool down.The 4-wheel drive system will workagain after its temperature drops.If you slip the clutch for a long timewhile trying to get unstuck, you mayoverheat and damage it.
Off-Highway Driving Guidelines
182
10/08/06 08:34:41 11 ELEMENT MMC North America Owner's Man 50 31SCV680 enu
This section explains why it is importantto keep your vehicle well maintained andhow to follow basic maintenance safetyprecautions.
This section also includes instructionson how to read the Maintenance Mindermessages on the information display,and instructions for simple maintenancetasks you may want to take care ofyourself.
If you have the skills and tools toperform more complex maintenancetasks on your vehicle, you may want topurchase the service manual. See page267 for information on how to obtain acopy, or see your dealer.
Maintenance, replacement, or repairof emissions control devices andsystems may be done by anyautomotive repair establishment orindividual using parts that are‘‘certified’’ to EPA standards.
Maintenance Safety..................... 184Maintenance MinderTM ............... 185Fluid Locations ........................... 192Adding Engine Oil ...................... 193Changing the Engine Oil and
Filter ....................................... 194Engine Coolant ........................... 196Windshield Washers................... 197Automatic Transmission Fluid .... 198Brake Fluid ................................. 199Power Steering Fluid .................. 200Cleaning the Body Panels ........... 201Lights.......................................... 201Cleaning the Seat Belts ............... 209Floor Mats .................................. 209Dust and Pollen Filter ................. 210Wiper Blades .............................. 210Wheels........................................ 212Tires ........................................... 212Checking the Battery .................. 218Vehicle Storage........................... 219
Maintenance
183
Maintenance
10/08/06 08:34:41 11 ELEMENT MMC North America Owner's Man 50 31SCV680 enu
All service items not detailed in thissection should be performed by acertified technician or other qualifiedmechanic.Important Safety PrecautionsTo eliminate potential hazards, readthe instructions before you begin,and make sure you have the toolsand skills required.● Make sure your vehicle is parkedon level ground, the parking brakeis set, and the engine is off.
● To clean parts, use a commerciallyavailable degreaser or partscleaner, not gasoline.
● To reduce the possibility of fire orexplosion, keep cigarettes, sparks,and flames away from the batteryand all fuel-related parts.
● Wear eye protection and protectiveclothing when working with thebattery or compressed air.
Improperly maintaining thisvehicle, or failing to correct aproblem before driving cancause a crash in which you canbe seriously hurt or killed.
Always follow the inspectionand maintenancerecommendations andschedules in this owner'smanual.
Potential Vehicle Hazards● Carbon Monoxide poison fromengine exhaust. Be sure there isadequate ventilation whenever youoperate the engine.
● Burns from hot parts. Let theengine and exhaust system cooldown before touching any parts.
● Injury from moving parts. Do notrun the engine unless instructed todo so.
Failure to properly followmaintenance instructions andprecautions can cause you to beseriously hurt or killed.
Always follow the proceduresand precautions in this owner'smanual.
Some of the most important safetyprecautions are given here. However,we cannot warn you of everyconceivable hazard that can arise inperforming maintenance. Only youcan decide whether or not you shouldperform a given task.
Maintenance Safety
184
10/08/06 08:34:41 11 ELEMENT MMC North America Owner's Man 50 31SCV680 enu
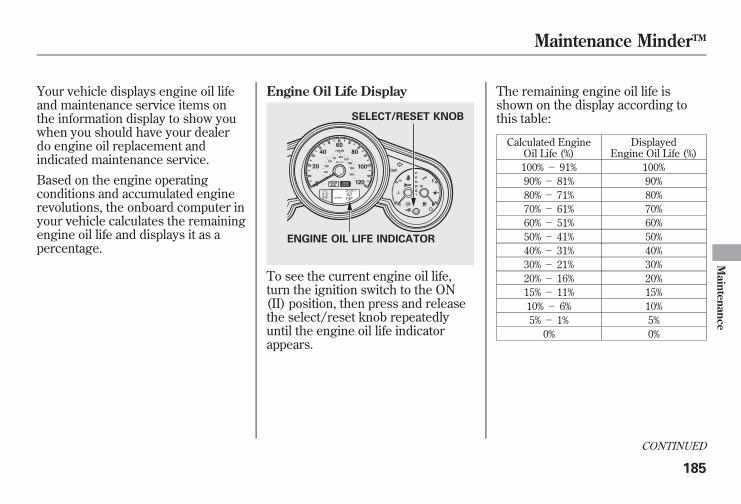
Your vehicle displays engine oil lifeand maintenance service items onthe information display to show youwhen you should have your dealerdo engine oil replacement andindicated maintenance service.Based on the engine operatingconditions and accumulated enginerevolutions, the onboard computer inyour vehicle calculates the remainingengine oil life and displays it as apercentage.
Engine Oil Life Display
To see the current engine oil life,turn the ignition switch to the ON(II) position, then press and releasethe select/reset knob repeatedlyuntil the engine oil life indicatorappears.
The remaining engine oil life isshown on the display according tothis table:
Calculated EngineOil Life (%)
DisplayedEngine Oil Life (%)
100% - 91% 100%90% - 81% 90%80% - 71% 80%70% - 61% 70%60% - 51% 60%50% - 41% 50%40% - 31% 40%30% - 21% 30%20% - 16% 20%15% - 11% 15%10% - 6% 10%5% - 1% 5%
0% 0%
ENGINE OIL LIFE INDICATOR
SELECT/RESET KNOB
CONTINUED
Maintenance MinderTM
185
Maintenance
10/08/06 08:34:41 11 ELEMENT MMC North America Owner's Man 50 31SCV680 enu
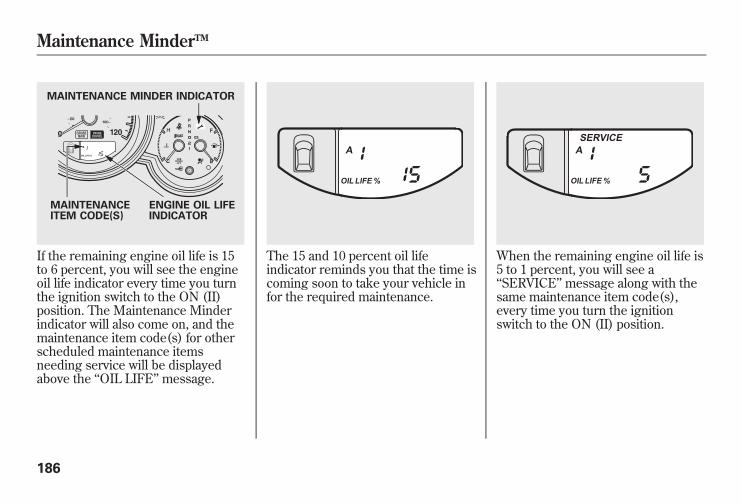
If the remaining engine oil life is 15to 6 percent, you will see the engineoil life indicator every time you turnthe ignition switch to the ON (II)position. The Maintenance Minderindicator will also come on, and themaintenance item code(s) for otherscheduled maintenance itemsneeding service will be displayedabove the ‘‘OIL LIFE’’ message.
The 15 and 10 percent oil lifeindicator reminds you that the time iscoming soon to take your vehicle infor the required maintenance.
When the remaining engine oil life is5 to 1 percent, you will see a‘‘SERVICE’’ message along with thesame maintenance item code(s),every time you turn the ignitionswitch to the ON (II) position.
MAINTENANCE MINDER INDICATOR
MAINTENANCEITEM CODE(S)
ENGINE OIL LIFEINDICATOR
Maintenance MinderTM
186
10/08/06 08:34:41 11 ELEMENT MMC North America Owner's Man 50 31SCV680 enu
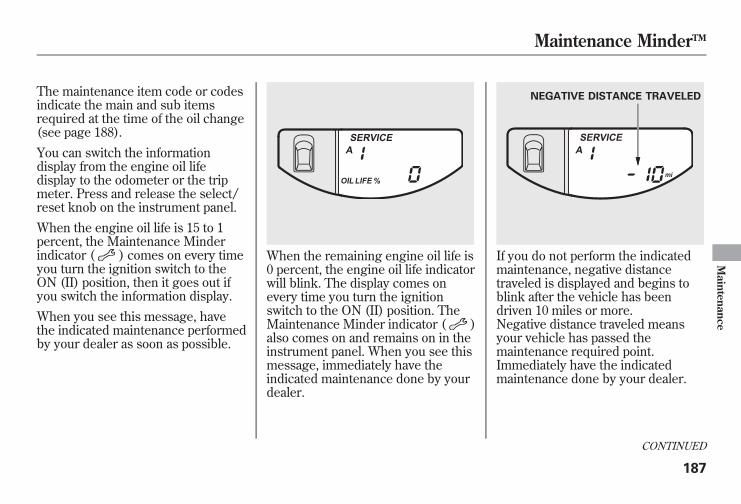
The maintenance item code or codesindicate the main and sub itemsrequired at the time of the oil change(see page 188).You can switch the informationdisplay from the engine oil lifedisplay to the odometer or the tripmeter. Press and release the select/reset knob on the instrument panel.When the engine oil life is 15 to 1percent, the Maintenance Minderindicator ( ) comes on every timeyou turn the ignition switch to theON (II) position, then it goes out ifyou switch the information display.When you see this message, havethe indicated maintenance performedby your dealer as soon as possible.
When the remaining engine oil life is0 percent, the engine oil life indicatorwill blink. The display comes onevery time you turn the ignitionswitch to the ON (II) position. TheMaintenance Minder indicator ( )also comes on and remains on in theinstrument panel. When you see thismessage, immediately have theindicated maintenance done by yourdealer.
If you do not perform the indicatedmaintenance, negative distancetraveled is displayed and begins toblink after the vehicle has beendriven 10 miles or more.Negative distance traveled meansyour vehicle has passed themaintenance required point.Immediately have the indicatedmaintenance done by your dealer.
NEGATIVE DISTANCE TRAVELED
CONTINUED
Maintenance MinderTM
187
Maintenance
10/08/06 08:34:41 11 ELEMENT MMC North America Owner's Man 50 31SCV680 enu
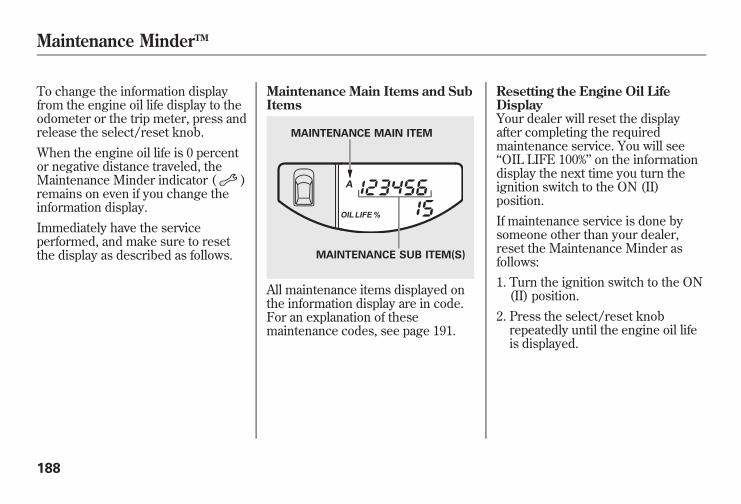
To change the information displayfrom the engine oil life display to theodometer or the trip meter, press andrelease the select/reset knob.When the engine oil life is 0 percentor negative distance traveled, theMaintenance Minder indicator ( )remains on even if you change theinformation display.Immediately have the serviceperformed, and make sure to resetthe display as described as follows.
Maintenance Main Items and SubItems
All maintenance items displayed onthe information display are in code.For an explanation of thesemaintenance codes, see page 191.
Resetting the Engine Oil LifeDisplayYour dealer will reset the displayafter completing the requiredmaintenance service. You will see‘‘OIL LIFE 100%’’ on the informationdisplay the next time you turn theignition switch to the ON (II)position.If maintenance service is done bysomeone other than your dealer,reset the Maintenance Minder asfollows:1. Turn the ignition switch to the ON(II) position.
2. Press the select/reset knobrepeatedly until the engine oil lifeis displayed.
MAINTENANCE MAIN ITEM
MAINTENANCE SUB ITEM(S)
Maintenance MinderTM
188
10/08/06 08:34:41 11 ELEMENT MMC North America Owner's Man 50 31SCV680 enu
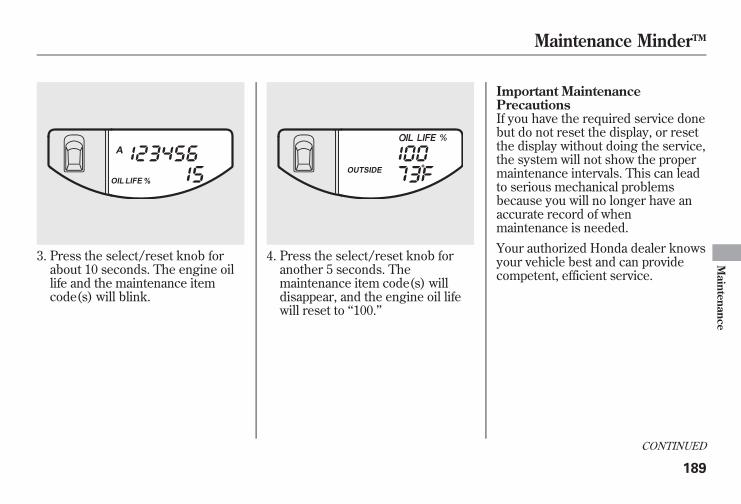
3. Press the select/reset knob forabout 10 seconds. The engine oillife and the maintenance itemcode(s) will blink.
4. Press the select/reset knob foranother 5 seconds. Themaintenance item code(s) willdisappear, and the engine oil lifewill reset to ‘‘100.’’
Important MaintenancePrecautionsIf you have the required service donebut do not reset the display, or resetthe display without doing the service,the system will not show the propermaintenance intervals. This can leadto serious mechanical problemsbecause you will no longer have anaccurate record of whenmaintenance is needed.Your authorized Honda dealer knowsyour vehicle best and can providecompetent, efficient service.
CONTINUED
Maintenance MinderTM
189
Maintenance
10/08/06 08:34:41 11 ELEMENT MMC North America Owner's Man 50 31SCV680 enu
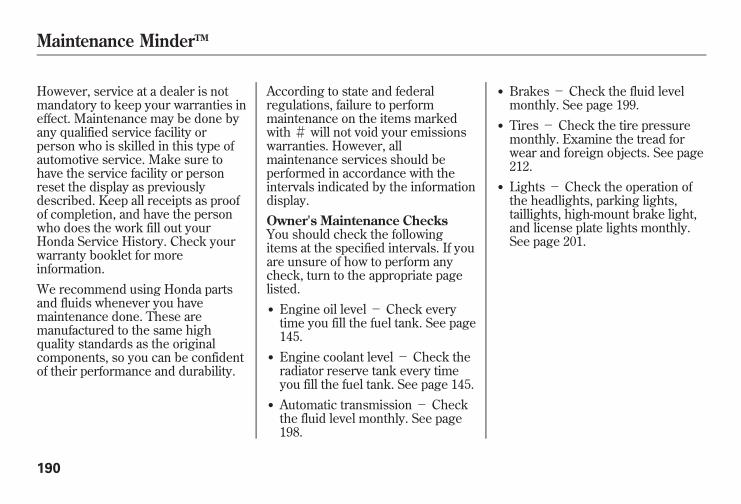
However, service at a dealer is notmandatory to keep your warranties ineffect. Maintenance may be done byany qualified service facility orperson who is skilled in this type ofautomotive service. Make sure tohave the service facility or personreset the display as previouslydescribed. Keep all receipts as proofof completion, and have the personwho does the work fill out yourHonda Service History. Check yourwarranty booklet for moreinformation.We recommend using Honda partsand fluids whenever you havemaintenance done. These aremanufactured to the same highquality standards as the originalcomponents, so you can be confidentof their performance and durability.
According to state and federalregulations, failure to performmaintenance on the items markedwith# will not void your emissionswarranties. However, allmaintenance services should beperformed in accordance with theintervals indicated by the informationdisplay.Owner's Maintenance ChecksYou should check the followingitems at the specified intervals. If youare unsure of how to perform anycheck, turn to the appropriate pagelisted.● Engine oil level- Check everytime you fill the fuel tank. See page145.
● Engine coolant level- Check theradiator reserve tank every timeyou fill the fuel tank. See page 145.
● Automatic transmission- Checkthe fluid level monthly. See page198.
● Brakes- Check the fluid levelmonthly. See page 199.
● Tires- Check the tire pressuremonthly. Examine the tread forwear and foreign objects. See page212.
● Lights- Check the operation ofthe headlights, parking lights,taillights, high-mount brake light,and license plate lights monthly.See page 201.
Maintenance MinderTM
190
10/08/06 08:34:41 11 ELEMENT MMC North America Owner's Man 50 31SCV680 enu
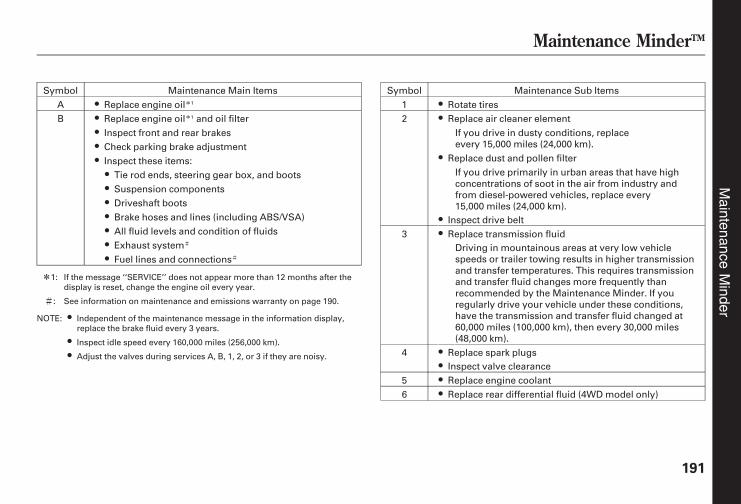
Symbol Maintenance Main Items
A ● Replace engine oilꭧ1
B ● Replace engine oilꭧ1 and oil filter
● Inspect front and rear brakes
● Check parking brake adjustment
● Inspect these items:
● Tie rod ends, steering gear box, and boots
● Suspension components
● Driveshaft boots
● Brake hoses and lines (including ABS/VSA)
● All fluid levels and condition of fluids
● Exhaust system#
● Fuel lines and connections#
ꭧ1: If the message ‘‘SERVICE’’ does not appear more than 12 months after the
display is reset, change the engine oil every year.
#: See information on maintenance and emissions warranty on page 190.
NOTE: ● Independent of the maintenance message in the information display,
replace the brake fluid every 3 years.
● Inspect idle speed every 160,000 miles (256,000 km).
● Adjust the valves during services A, B, 1, 2, or 3 if they are noisy.
Symbol Maintenance Sub Items
1 ● Rotate tires
2 ● Replace air cleaner element
If you drive in dusty conditions, replace
every 15,000 miles (24,000 km).
● Replace dust and pollen filter
If you drive primarily in urban areas that have high
concentrations of soot in the air from industry and
from diesel-powered vehicles, replace every
15,000 miles (24,000 km).
● Inspect drive belt
3 ● Replace transmission fluid
Driving in mountainous areas at very low vehicle
speeds or trailer towing results in higher transmission
and transfer temperatures. This requires transmission
and transfer fluid changes more frequently than
recommended by the Maintenance Minder. If you
regularly drive your vehicle under these conditions,
have the transmission and transfer fluid changed at
60,000 miles (100,000 km), then every 30,000 miles
(48,000 km).
4 ● Replace spark plugs
● Inspect valve clearance
5 ● Replace engine coolant
6 ● Replace rear differential fluid (4WDmodel only)
Maintenance MinderTMMaintenance
Minder
191
10/08/06 08:34:41 11 ELEMENT MMC North America Owner's Man 50 31SCV680 enu
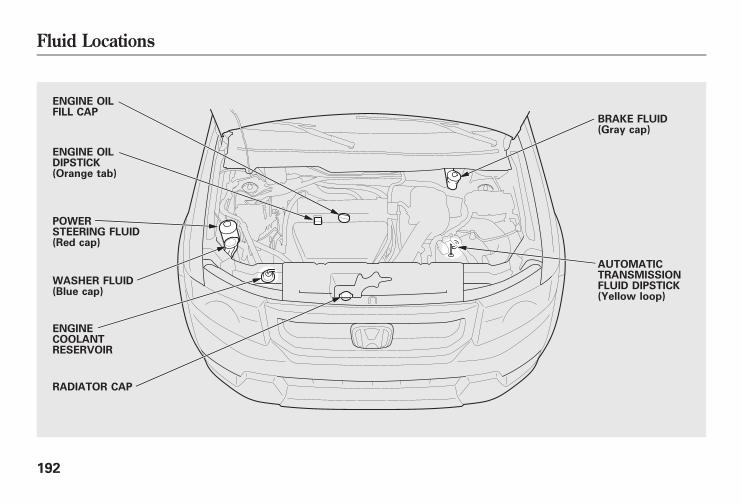
ENGINE OILFILL CAP
ENGINE OILDIPSTICK(Orange tab)
POWERSTEERING FLUID(Red cap)
WASHER FLUID(Blue cap)
ENGINECOOLANTRESERVOIR
RADIATOR CAP
BRAKE FLUID(Gray cap)
AUTOMATICTRANSMISSIONFLUID DIPSTICK(Yellow loop)
Fluid Locations
192
10/08/06 08:34:41 11 ELEMENT MMC North America Owner's Man 50 31SCV680 enu
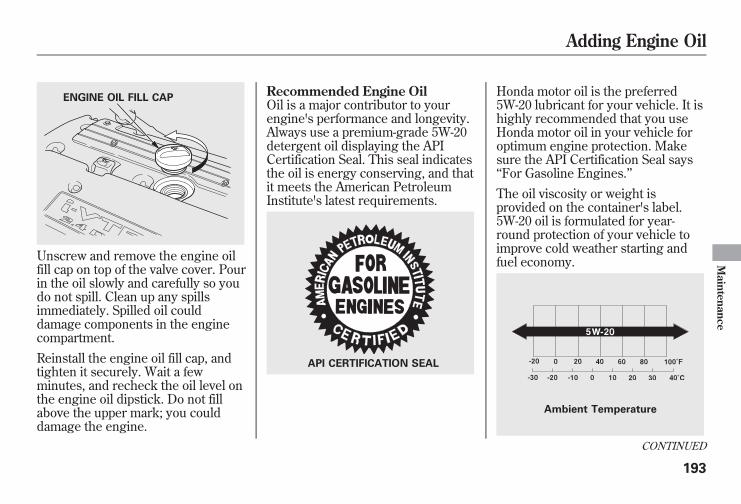
Unscrew and remove the engine oilfill cap on top of the valve cover. Pourin the oil slowly and carefully so youdo not spill. Clean up any spillsimmediately. Spilled oil coulddamage components in the enginecompartment.Reinstall the engine oil fill cap, andtighten it securely. Wait a fewminutes, and recheck the oil level onthe engine oil dipstick. Do not fillabove the upper mark; you coulddamage the engine.
Recommended Engine OilOil is a major contributor to yourengine's performance and longevity.Always use a premium-grade 5W-20detergent oil displaying the APICertification Seal. This seal indicatesthe oil is energy conserving, and thatit meets the American PetroleumInstitute's latest requirements.
Honda motor oil is the preferred5W-20 lubricant for your vehicle. It ishighly recommended that you useHonda motor oil in your vehicle foroptimum engine protection. Makesure the API Certification Seal says‘‘For Gasoline Engines.’’The oil viscosity or weight isprovided on the container's label.5W-20 oil is formulated for year-round protection of your vehicle toimprove cold weather starting andfuel economy.
ENGINE OIL FILL CAP
API CERTIFICATION SEAL
Ambient Temperature
CONTINUED
Adding Engine Oil
193
Maintenance
10/08/06 08:34:41 11 ELEMENT MMC North America Owner's Man 50 31SCV680 enu
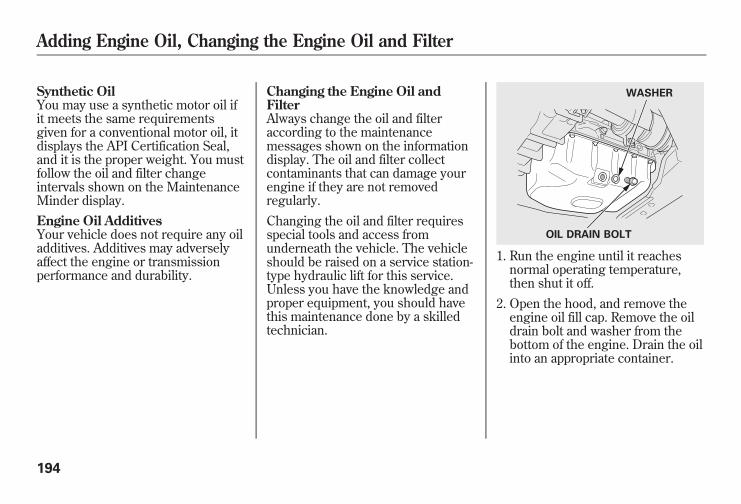
Synthetic OilYou may use a synthetic motor oil ifit meets the same requirementsgiven for a conventional motor oil, itdisplays the API Certification Seal,and it is the proper weight. You mustfollow the oil and filter changeintervals shown on the MaintenanceMinder display.Engine Oil AdditivesYour vehicle does not require any oiladditives. Additives may adverselyaffect the engine or transmissionperformance and durability.
Changing the Engine Oil andFilterAlways change the oil and filteraccording to the maintenancemessages shown on the informationdisplay. The oil and filter collectcontaminants that can damage yourengine if they are not removedregularly.Changing the oil and filter requiresspecial tools and access fromunderneath the vehicle. The vehicleshould be raised on a service station-type hydraulic lift for this service.Unless you have the knowledge andproper equipment, you should havethis maintenance done by a skilledtechnician.
1. Run the engine until it reachesnormal operating temperature,then shut it off.
2. Open the hood, and remove theengine oil fill cap. Remove the oildrain bolt and washer from thebottom of the engine. Drain the oilinto an appropriate container.
OIL DRAIN BOLT
WASHER
Adding Engine Oil, Changing the Engine Oil and Filter
194
10/08/06 08:34:41 11 ELEMENT MMC North America Owner's Man 50 31SCV680 enu
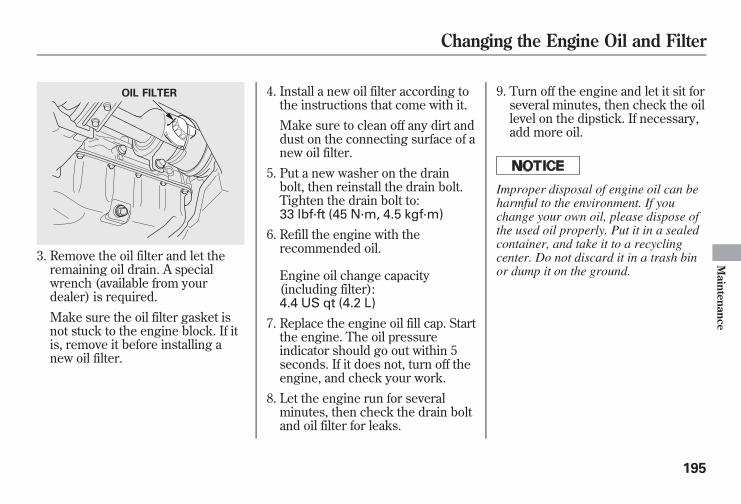
3. Remove the oil filter and let theremaining oil drain. A specialwrench (available from yourdealer) is required.Make sure the oil filter gasket isnot stuck to the engine block. If itis, remove it before installing anew oil filter.
4. Install a new oil filter according tothe instructions that come with it.Make sure to clean off any dirt anddust on the connecting surface of anew oil filter.
5. Put a new washer on the drainbolt, then reinstall the drain bolt.Tighten the drain bolt to:33 lbf·ft (45 N·m, 4.5 kgf·m)
6. Refill the engine with therecommended oil.
Engine oil change capacity(including filter):4.4 US qt (4.2 L)
7. Replace the engine oil fill cap. Startthe engine. The oil pressureindicator should go out within 5seconds. If it does not, turn off theengine, and check your work.
8. Let the engine run for severalminutes, then check the drain boltand oil filter for leaks.
9. Turn off the engine and let it sit forseveral minutes, then check the oillevel on the dipstick. If necessary,add more oil.
Improper disposal of engine oil can beharmful to the environment. If youchange your own oil, please dispose ofthe used oil properly. Put it in a sealedcontainer, and take it to a recyclingcenter. Do not discard it in a trash binor dump it on the ground.
OIL FILTER
Changing the Engine Oil and Filter
195
Maintenance
10/08/06 08:34:41 11 ELEMENT MMC North America Owner's Man 50 31SCV680 enu
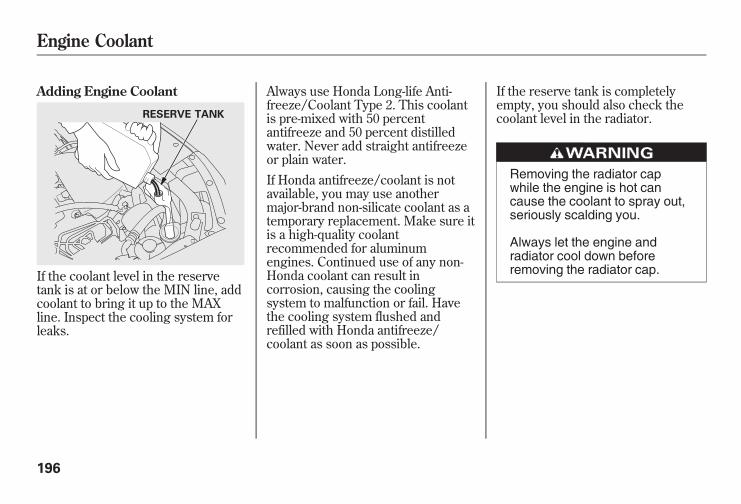
Adding Engine Coolant
If the coolant level in the reservetank is at or below the MIN line, addcoolant to bring it up to the MAXline. Inspect the cooling system forleaks.
Always use Honda Long-life Anti-freeze/Coolant Type 2. This coolantis pre-mixed with 50 percentantifreeze and 50 percent distilledwater. Never add straight antifreezeor plain water.If Honda antifreeze/coolant is notavailable, you may use anothermajor-brand non-silicate coolant as atemporary replacement. Make sure itis a high-quality coolantrecommended for aluminumengines. Continued use of any non-Honda coolant can result incorrosion, causing the coolingsystem to malfunction or fail. Havethe cooling system flushed andrefilled with Honda antifreeze/coolant as soon as possible.
If the reserve tank is completelyempty, you should also check thecoolant level in the radiator.
Removing the radiator capwhile the engine is hot cancause the coolant to spray out,seriously scalding you.
Always let the engine andradiator cool down beforeremoving the radiator cap.
RESERVE TANK
Engine Coolant
196
10/08/06 08:34:41 11 ELEMENT MMC North America Owner's Man 50 31SCV680 enu
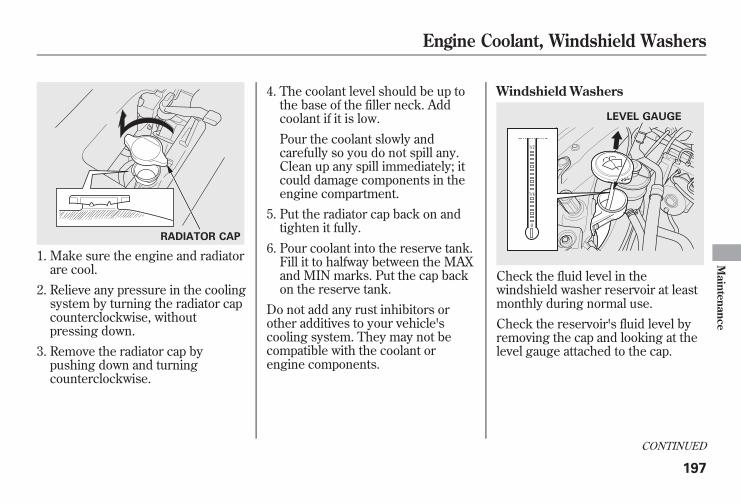
1. Make sure the engine and radiatorare cool.
2. Relieve any pressure in the coolingsystem by turning the radiator capcounterclockwise, withoutpressing down.
3. Remove the radiator cap bypushing down and turningcounterclockwise.
4. The coolant level should be up tothe base of the filler neck. Addcoolant if it is low.Pour the coolant slowly andcarefully so you do not spill any.Clean up any spill immediately; itcould damage components in theengine compartment.
5. Put the radiator cap back on andtighten it fully.
6. Pour coolant into the reserve tank.Fill it to halfway between the MAXand MIN marks. Put the cap backon the reserve tank.
Do not add any rust inhibitors orother additives to your vehicle'scooling system. They may not becompatible with the coolant orengine components.
Windshield Washers
Check the fluid level in thewindshield washer reservoir at leastmonthly during normal use.Check the reservoir's fluid level byremoving the cap and looking at thelevel gauge attached to the cap.
RADIATOR CAP
LEVEL GAUGE
CONTINUED
Engine Coolant, Windshield Washers
197
Maintenance
10/08/06 08:34:41 11 ELEMENT MMC North America Owner's Man 50 31SCV680 enu
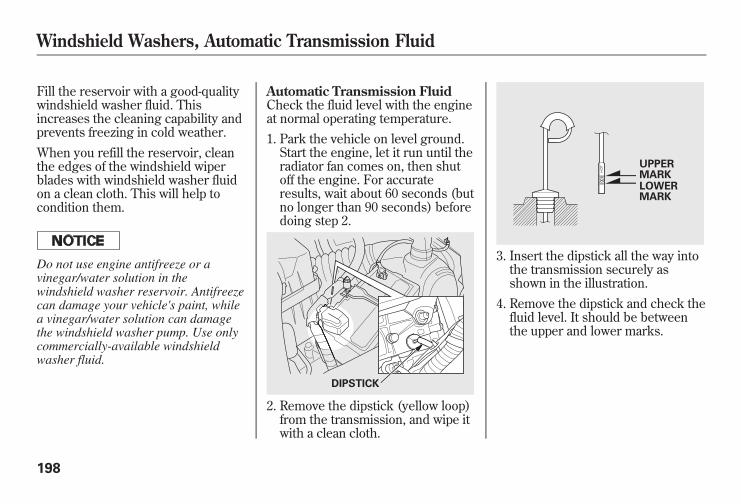
Fill the reservoir with a good-qualitywindshield washer fluid. Thisincreases the cleaning capability andprevents freezing in cold weather.When you refill the reservoir, cleanthe edges of the windshield wiperblades with windshield washer fluidon a clean cloth. This will help tocondition them.
Do not use engine antifreeze or avinegar/water solution in thewindshield washer reservoir. Antifreezecan damage your vehicle's paint, whilea vinegar/water solution can damagethe windshield washer pump. Use onlycommercially-available windshieldwasher fluid.
Automatic Transmission FluidCheck the fluid level with the engineat normal operating temperature.1. Park the vehicle on level ground.Start the engine, let it run until theradiator fan comes on, then shutoff the engine. For accurateresults, wait about 60 seconds (butno longer than 90 seconds) beforedoing step 2.
2. Remove the dipstick (yellow loop)from the transmission, and wipe itwith a clean cloth.
3. Insert the dipstick all the way intothe transmission securely asshown in the illustration.
4. Remove the dipstick and check thefluid level. It should be betweenthe upper and lower marks.
DIPSTICK
UPPERMARKLOWERMARK
Windshield Washers, Automatic Transmission Fluid
198
10/08/06 08:34:41 11 ELEMENT MMC North America Owner's Man 50 31SCV680 enu
5. If the level is below the lowermark, add fluid into the dipstickhole to bring it to the levelbetween the upper and lowermarks.Pour the fluid slowly and carefullyso you do not spill any. Clean upany spill immediately; it coulddamage components in the enginecompartment.Always use Honda ATF DW-1(automatic transmission fluid).
Use only Honda ATF DW-1 (automatictransmission fluid). Do not mix withother transmission fluids.Using transmission fluid other thanHonda ATF DW-1 may causedeterioration in transmission operationand durability, and could result indamage to the transmission.Damage resulting from the use oftransmission fluid other than HondaATF DW-1 is not covered by the Hondanew vehicle warranty.
6. Insert the dipstick all the way backinto the transmission securely asshown in the illustration.
The transmission should be drainedand refilled with new fluid accordingto the Maintenance Minder™ (seepage 185).If you are not sure how to add fluid,contact your dealer.
Brake FluidCheck the fluid level in the brakefluid reservoir monthly.Independent of the MaintenanceMinder display, replace the brakefluid every 3 years.Always use Honda Heavy DutyBrake Fluid DOT 3. If it is notavailable, you should use only DOT 3or DOT 4 fluid, from a sealedcontainer, as a temporaryreplacement.Using any non-Honda brake fluid cancause corrosion and decrease the lifeof the system. Have the brakesystem flushed and refilled withHonda Heavy Duty Brake Fluid DOT3 as soon as possible.Brake fluid marked DOT 5 is notcompatible with your vehicle'sbraking system and can causeextensive damage.
CONTINUED
Automatic Transmission Fluid, Brake Fluid
199
Maintenance
10/08/06 08:34:41 11 ELEMENT MMC North America Owner's Man 50 31SCV680 enu
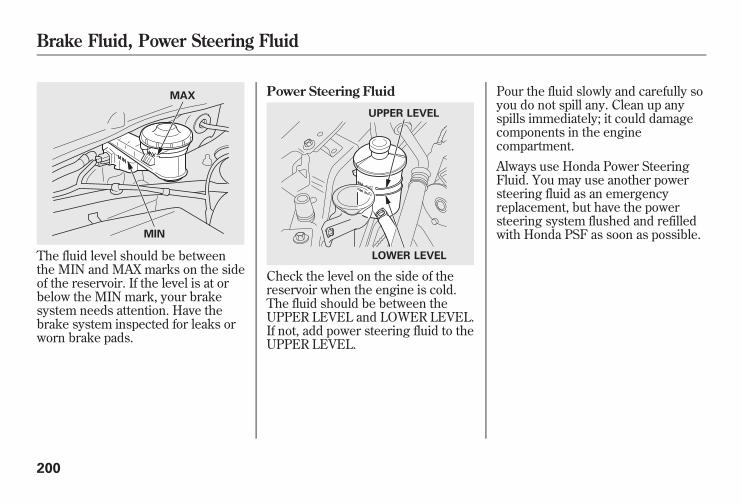
The fluid level should be betweenthe MIN and MAX marks on the sideof the reservoir. If the level is at orbelow the MIN mark, your brakesystem needs attention. Have thebrake system inspected for leaks orworn brake pads.
Power Steering Fluid
Check the level on the side of thereservoir when the engine is cold.The fluid should be between theUPPER LEVEL and LOWER LEVEL.If not, add power steering fluid to theUPPER LEVEL.
Pour the fluid slowly and carefully soyou do not spill any. Clean up anyspills immediately; it could damagecomponents in the enginecompartment.Always use Honda Power SteeringFluid. You may use another powersteering fluid as an emergencyreplacement, but have the powersteering system flushed and refilledwith Honda PSF as soon as possible.
MAX
MIN
UPPER LEVEL
LOWER LEVEL
Brake Fluid, Power Steering Fluid
200
10/08/06 08:34:41 11 ELEMENT MMC North America Owner's Man 50 31SCV680 enu
A low power steering fluid level canindicate a leak in the system. Checkthe fluid level frequently, and havethe system inspected as soon aspossible.If you are not sure how to add fluid,contact your dealer.
Turning the steering wheel to full left orright lock and holding it there candamage the power steering pump.
Cleaning the Body PanelsIf equipped with body panelsTo clean the gray composite bodypanels, wash them with soap andwater only. Do not apply wax to thepanels; it will cause discoloration.
Headlight AimingThe headlights were properly aimedwhen your vehicle was new. If youregularly carry heavy items in thecargo area or pull a trailer,readjustment may be required.Adjustments should be done by yourdealer or another qualifiedtechnician.
CONTINUED
Power Steering Fluid, Cleaning the Body Panels, Lights
201
Maintenance
10/08/06 08:34:41 11 ELEMENT MMC North America Owner's Man 50 31SCV680 enu
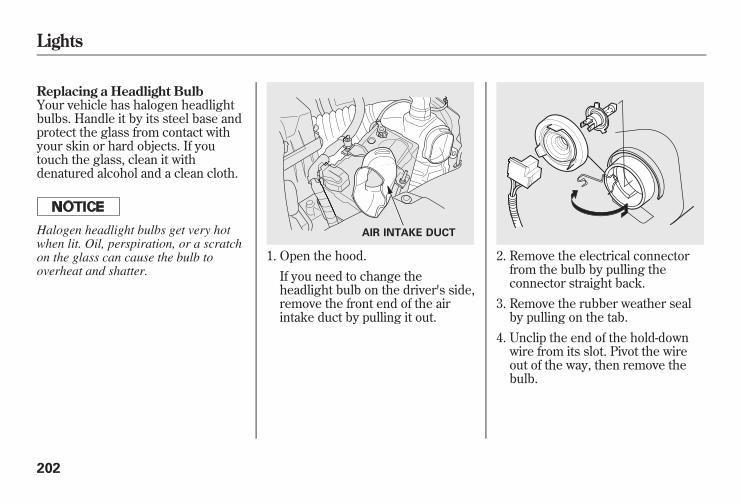
Replacing a Headlight BulbYour vehicle has halogen headlightbulbs. Handle it by its steel base andprotect the glass from contact withyour skin or hard objects. If youtouch the glass, clean it withdenatured alcohol and a clean cloth.
Halogen headlight bulbs get very hotwhen lit. Oil, perspiration, or a scratchon the glass can cause the bulb tooverheat and shatter.
1. Open the hood.If you need to change theheadlight bulb on the driver's side,remove the front end of the airintake duct by pulling it out.
2. Remove the electrical connectorfrom the bulb by pulling theconnector straight back.
3. Remove the rubber weather sealby pulling on the tab.
4. Unclip the end of the hold-downwire from its slot. Pivot the wireout of the way, then remove thebulb.
AIR INTAKE DUCT
Lights
202
10/08/06 08:34:41 11 ELEMENT MMC North America Owner's Man 50 31SCV680 enu
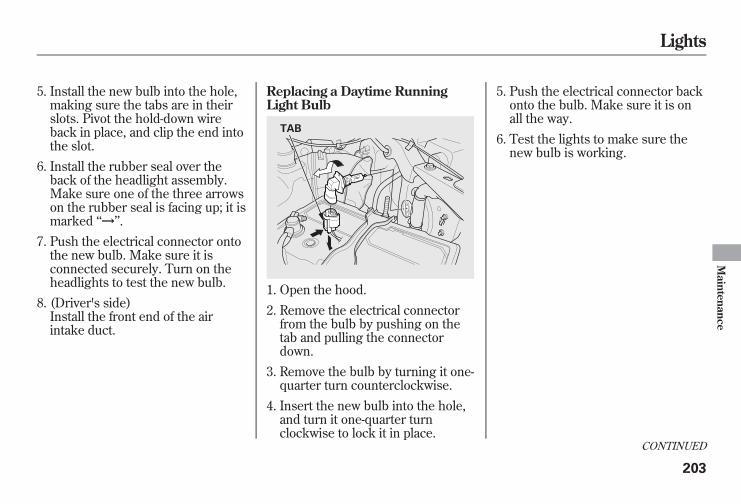
5. Install the new bulb into the hole,making sure the tabs are in theirslots. Pivot the hold-down wireback in place, and clip the end intothe slot.
6. Install the rubber seal over theback of the headlight assembly.Make sure one of the three arrowson the rubber seal is facing up; it ismarked ‘‘ ’’.
7. Push the electrical connector ontothe new bulb. Make sure it isconnected securely. Turn on theheadlights to test the new bulb.
8. (Driver's side)Install the front end of the airintake duct.
Replacing a Daytime RunningLight Bulb
1. Open the hood.2. Remove the electrical connectorfrom the bulb by pushing on thetab and pulling the connectordown.
3. Remove the bulb by turning it one-quarter turn counterclockwise.
4. Insert the new bulb into the hole,and turn it one-quarter turnclockwise to lock it in place.
5. Push the electrical connector backonto the bulb. Make sure it is onall the way.
6. Test the lights to make sure thenew bulb is working.
TAB
CONTINUED
Lights
203
Maintenance
10/08/06 08:34:41 11 ELEMENT MMC North America Owner's Man 50 31SCV680 enu
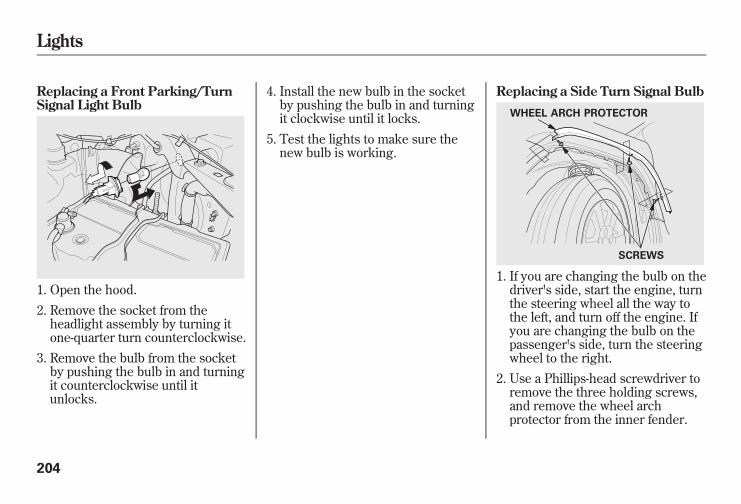
Replacing a Front Parking/TurnSignal Light Bulb
1. Open the hood.2. Remove the socket from theheadlight assembly by turning itone-quarter turn counterclockwise.
3. Remove the bulb from the socketby pushing the bulb in and turningit counterclockwise until itunlocks.
4. Install the new bulb in the socketby pushing the bulb in and turningit clockwise until it locks.
5. Test the lights to make sure thenew bulb is working.
Replacing a Side Turn Signal Bulb
1. If you are changing the bulb on thedriver's side, start the engine, turnthe steering wheel all the way tothe left, and turn off the engine. Ifyou are changing the bulb on thepassenger's side, turn the steeringwheel to the right.
2. Use a Phillips-head screwdriver toremove the three holding screws,and remove the wheel archprotector from the inner fender.
WHEEL ARCH PROTECTOR
SCREWS
Lights
204
10/08/06 08:34:41 11 ELEMENT MMC North America Owner's Man 50 31SCV680 enu
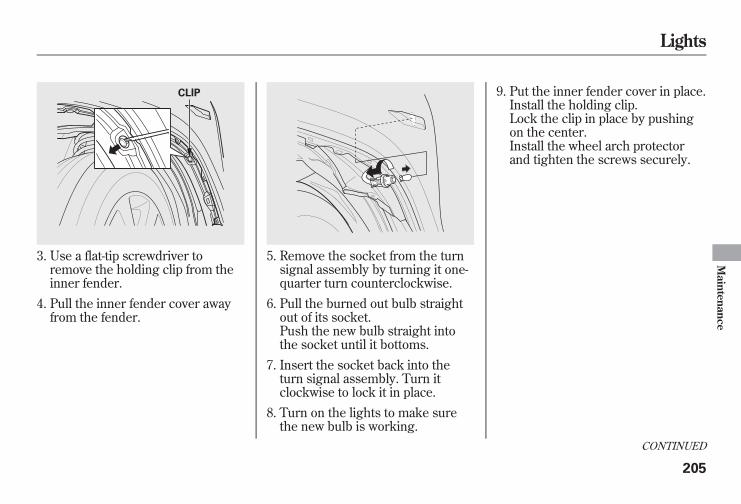
3. Use a flat-tip screwdriver toremove the holding clip from theinner fender.
4. Pull the inner fender cover awayfrom the fender.
5. Remove the socket from the turnsignal assembly by turning it one-quarter turn counterclockwise.
6. Pull the burned out bulb straightout of its socket.Push the new bulb straight intothe socket until it bottoms.
7. Insert the socket back into theturn signal assembly. Turn itclockwise to lock it in place.
8. Turn on the lights to make surethe new bulb is working.
9. Put the inner fender cover in place.Install the holding clip.Lock the clip in place by pushingon the center.Install the wheel arch protectorand tighten the screws securely.
CLIP
CONTINUED
Lights
205
Maintenance
10/08/06 08:34:41 11 ELEMENT MMC North America Owner's Man 50 31SCV680 enu
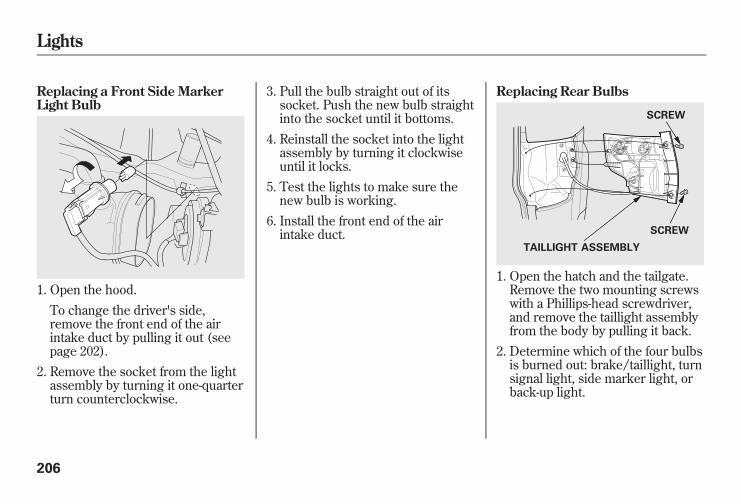
Replacing a Front Side MarkerLight Bulb
1. Open the hood.To change the driver's side,remove the front end of the airintake duct by pulling it out (seepage 202).
2. Remove the socket from the lightassembly by turning it one-quarterturn counterclockwise.
3. Pull the bulb straight out of itssocket. Push the new bulb straightinto the socket until it bottoms.
4. Reinstall the socket into the lightassembly by turning it clockwiseuntil it locks.
5. Test the lights to make sure thenew bulb is working.
6. Install the front end of the airintake duct.
Replacing Rear Bulbs
1. Open the hatch and the tailgate.Remove the two mounting screwswith a Phillips-head screwdriver,and remove the taillight assemblyfrom the body by pulling it back.
2. Determine which of the four bulbsis burned out: brake/taillight, turnsignal light, side marker light, orback-up light.
SCREW
SCREW
TAILLIGHT ASSEMBLY
Lights
206
10/08/06 08:34:41 11 ELEMENT MMC North America Owner's Man 50 31SCV680 enu
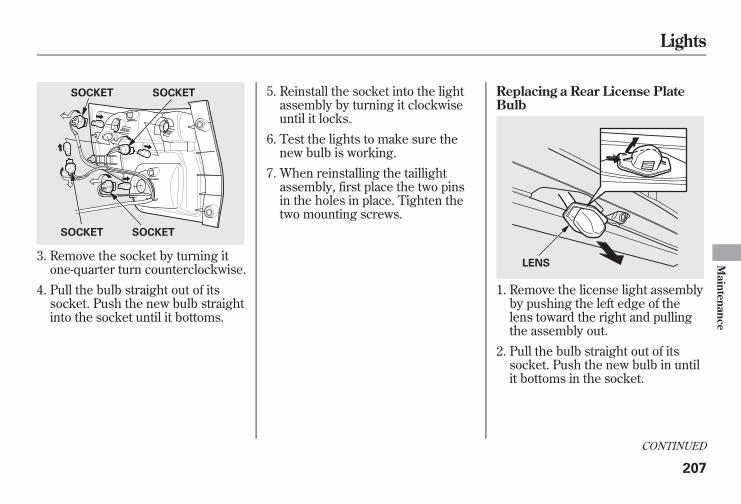
3. Remove the socket by turning itone-quarter turn counterclockwise.
4. Pull the bulb straight out of itssocket. Push the new bulb straightinto the socket until it bottoms.
5. Reinstall the socket into the lightassembly by turning it clockwiseuntil it locks.
6. Test the lights to make sure thenew bulb is working.
7. When reinstalling the taillightassembly, first place the two pinsin the holes in place. Tighten thetwo mounting screws.
Replacing a Rear License PlateBulb
1. Remove the license light assemblyby pushing the left edge of thelens toward the right and pullingthe assembly out.
2. Pull the bulb straight out of itssocket. Push the new bulb in untilit bottoms in the socket.
SOCKET SOCKET
SOCKETSOCKET
LENS
CONTINUED
Lights
207
Maintenance
10/08/06 08:34:41 11 ELEMENT MMC North America Owner's Man 50 31SCV680 enu
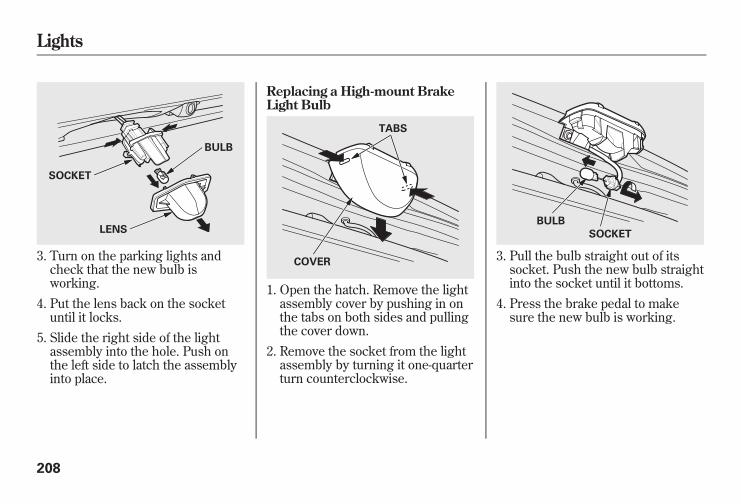
3. Turn on the parking lights andcheck that the new bulb isworking.
4. Put the lens back on the socketuntil it locks.
5. Slide the right side of the lightassembly into the hole. Push onthe left side to latch the assemblyinto place.
Replacing a High-mount BrakeLight Bulb
1. Open the hatch. Remove the lightassembly cover by pushing in onthe tabs on both sides and pullingthe cover down.
2. Remove the socket from the lightassembly by turning it one-quarterturn counterclockwise.
3. Pull the bulb straight out of itssocket. Push the new bulb straightinto the socket until it bottoms.
4. Press the brake pedal to makesure the new bulb is working.
SOCKET
BULB
LENS
TABS
COVER
BULB
SOCKET
Lights
208
10/08/06 08:34:41 11 ELEMENT MMC North America Owner's Man 50 31SCV680 enu
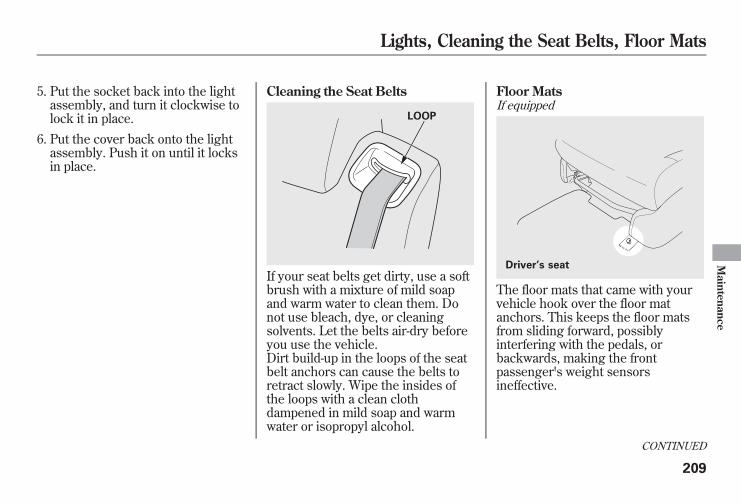
5. Put the socket back into the lightassembly, and turn it clockwise tolock it in place.
6. Put the cover back onto the lightassembly. Push it on until it locksin place.
Cleaning the Seat Belts
If your seat belts get dirty, use a softbrush with a mixture of mild soapand warm water to clean them. Donot use bleach, dye, or cleaningsolvents. Let the belts air-dry beforeyou use the vehicle.Dirt build-up in the loops of the seatbelt anchors can cause the belts toretract slowly. Wipe the insides ofthe loops with a clean clothdampened in mild soap and warmwater or isopropyl alcohol.
Floor MatsIf equipped
The floor mats that came with yourvehicle hook over the floor matanchors. This keeps the floor matsfrom sliding forward, possiblyinterfering with the pedals, orbackwards, making the frontpassenger's weight sensorsineffective.
LOOP
Driver’s seat
CONTINUED
Lights, Cleaning the Seat Belts, Floor Mats
209
Maintenance
10/08/06 08:34:41 11 ELEMENT MMC North America Owner's Man 50 31SCV680 enu
If you remove the driver's floor mat,make sure to re-anchor it when youput it back in your vehicle.If you use non-Honda floor mats,make sure they fit properly and thatthey can be used with the floor matanchors. Do not put additional floormats on top of the anchored mats.
Dust and Pollen FilterThis filter removes the dust andpollen that is brought in from theoutside through the heating andcooling system.Have your dealer replace the filterwhen this service is indicated by amaintenance message on theinformation display. It should bereplaced every 15,000 miles(24,000 km) if you drive primarily inurban areas that have highconcentrations of soot in the air, or ifthe flow from the heating and coolingsystem becomes less than usual.
Wiper BladesCheck the condition of the wiperblades at least every 6 months.Replace them if you find signs ofcracking in the rubber, areas that aregetting hard, or if they leave streaksand unwiped areas when used.1. Front:Raise the wiper arm off thewindshield.
Do not open the hood when the wiperarms are raised, or you will damage thehood and the arms.
Rear:Raise the wiper arm off the hatchglass and hold it.
Floor Mats, Dust and Pollen Filter, Wiper Blades
210
10/08/06 08:34:41 11 ELEMENT MMC North America Owner's Man 50 31SCV680 enu
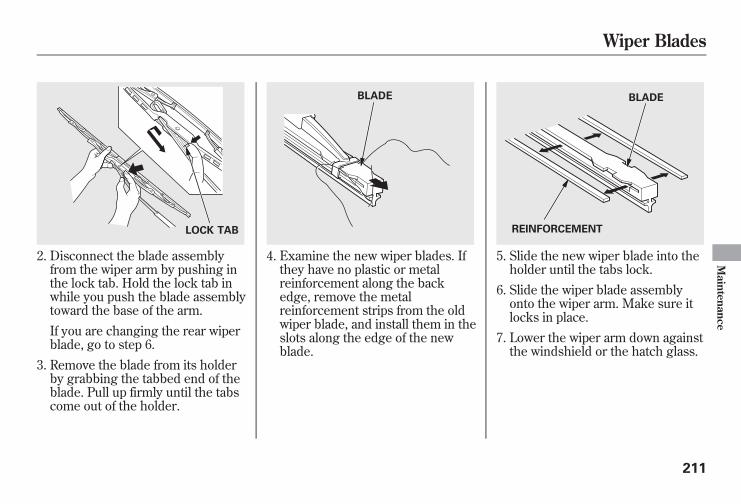
2. Disconnect the blade assemblyfrom the wiper arm by pushing inthe lock tab. Hold the lock tab inwhile you push the blade assemblytoward the base of the arm.If you are changing the rear wiperblade, go to step 6.
3. Remove the blade from its holderby grabbing the tabbed end of theblade. Pull up firmly until the tabscome out of the holder.
4. Examine the new wiper blades. Ifthey have no plastic or metalreinforcement along the backedge, remove the metalreinforcement strips from the oldwiper blade, and install them in theslots along the edge of the newblade.
5. Slide the new wiper blade into theholder until the tabs lock.
6. Slide the wiper blade assemblyonto the wiper arm. Make sure itlocks in place.
7. Lower the wiper arm down againstthe windshield or the hatch glass.
LOCK TAB
BLADE BLADE
REINFORCEMENT
Wiper Blades
211
Maintenance
10/08/06 08:34:41 11 ELEMENT MMC North America Owner's Man 50 31SCV680 enu

WheelsClean the wheels as you would therest of the exterior. Wash them withthe same solution, and rinse themthoroughly.If equippedAluminum alloy wheels have aprotective clear-coat that keeps thealuminum from corroding andtarnishing. Cleaning the wheels withharsh chemicals (including somecommercial wheel cleaners) or a stiffbrush can damage the clear-coat. Toclean the wheels, use a milddetergent and a soft brush or sponge.
TiresTo safely operate your vehicle, yourtires must be the proper type andsize, in good condition with adequatetread, and correctly inflated.The following pages give moredetailed information on how to takecare of your tires and what to dowhen they need to be replaced.
Using tires that are excessivelyworn or improperly inflated cancause a crash in which you canbe seriously hurt or killed.
Follow all instructions in thisowner's manual regarding tireinflation and maintenance.
Inflation GuidelinesKeeping the tires properly inflatedprovides the best combination ofhandling, tread life, and ridingcomfort.● Underinflated tires wear unevenly,adversely affect handling and fueleconomy, and are more likely tofail from being overheated.
● Overinflated tires can make yourvehicle ride more harshly, aremore prone to damage from roadhazards, and wear unevenly.
The tire pressure monitoring system(TPMS) will warn you when a tirepressure is low. See page 169 formore information on the TPMS.
Wheels, Tires
212
10/08/06 08:34:41 11 ELEMENT MMC North America Owner's Man 50 31SCV680 enu
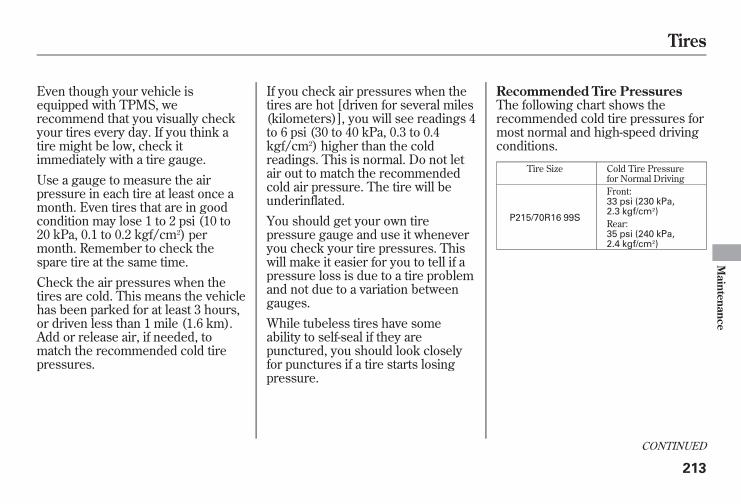
Even though your vehicle isequipped with TPMS, werecommend that you visually checkyour tires every day. If you think atire might be low, check itimmediately with a tire gauge.Use a gauge to measure the airpressure in each tire at least once amonth. Even tires that are in goodcondition may lose 1 to 2 psi (10 to20 kPa, 0.1 to 0.2 kgf/cm2) permonth. Remember to check thespare tire at the same time.Check the air pressures when thetires are cold. This means the vehiclehas been parked for at least 3 hours,or driven less than 1 mile (1.6 km).Add or release air, if needed, tomatch the recommended cold tirepressures.
If you check air pressures when thetires are hot [driven for several miles(kilometers)], you will see readings 4to 6 psi (30 to 40 kPa, 0.3 to 0.4kgf/cm2) higher than the coldreadings. This is normal. Do not letair out to match the recommendedcold air pressure. The tire will beunderinflated.You should get your own tirepressure gauge and use it wheneveryou check your tire pressures. Thiswill make it easier for you to tell if apressure loss is due to a tire problemand not due to a variation betweengauges.While tubeless tires have someability to self-seal if they arepunctured, you should look closelyfor punctures if a tire starts losingpressure.
Recommended Tire PressuresThe following chart shows therecommended cold tire pressures formost normal and high-speed drivingconditions.
Tire Size Cold Tire Pressurefor Normal Driving
P215/70R16 99S
Front:33 psi (230 kPa,2.3 kgf/cm2)
Rear:35 psi (240 kPa,2.4 kgf/cm2)
CONTINUED
Tires
213
Maintenance
10/08/06 08:34:41 11 ELEMENT MMC North America Owner's Man 50 31SCV680 enu
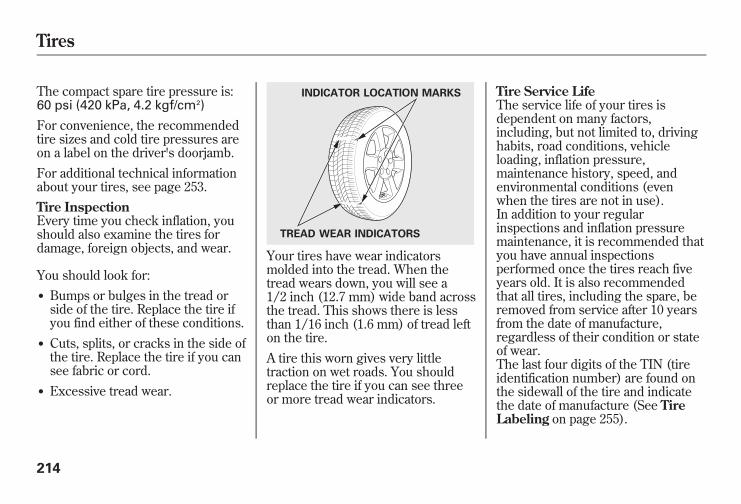
The compact spare tire pressure is:60 psi (420 kPa, 4.2 kgf/cm2)
For convenience, the recommendedtire sizes and cold tire pressures areon a label on the driver's doorjamb.For additional technical informationabout your tires, see page 253.Tire InspectionEvery time you check inflation, youshould also examine the tires fordamage, foreign objects, and wear.
You should look for:● Bumps or bulges in the tread orside of the tire. Replace the tire ifyou find either of these conditions.
● Cuts, splits, or cracks in the side ofthe tire. Replace the tire if you cansee fabric or cord.
● Excessive tread wear.
Your tires have wear indicatorsmolded into the tread. When thetread wears down, you will see a1/2 inch (12.7 mm) wide band acrossthe tread. This shows there is lessthan 1/16 inch (1.6 mm) of tread lefton the tire.A tire this worn gives very littletraction on wet roads. You shouldreplace the tire if you can see threeor more tread wear indicators.
Tire Service LifeThe service life of your tires isdependent on many factors,including, but not limited to, drivinghabits, road conditions, vehicleloading, inflation pressure,maintenance history, speed, andenvironmental conditions (evenwhen the tires are not in use).In addition to your regularinspections and inflation pressuremaintenance, it is recommended thatyou have annual inspectionsperformed once the tires reach fiveyears old. It is also recommendedthat all tires, including the spare, beremoved from service after 10 yearsfrom the date of manufacture,regardless of their condition or stateof wear.The last four digits of the TIN (tireidentification number) are found onthe sidewall of the tire and indicatethe date of manufacture (See TireLabeling on page 255).
INDICATOR LOCATION MARKS
TREAD WEAR INDICATORS
Tires
214
10/08/06 08:34:41 11 ELEMENT MMC North America Owner's Man 50 31SCV680 enu

Tire MaintenanceIn addition to proper inflation, correctwheel alignment helps to decreasetire wear. If you find a tire is wornunevenly, have your dealer check thewheel alignment.Have your dealer check the tires ifyou feel a consistent vibration whiledriving. A tire should always berebalanced if it is removed from thewheel. When you have new tiresinstalled, make sure they arebalanced. This increases ridingcomfort and tire life. For best results,have the installer perform a dynamicbalance.
On vehicles with aluminum wheels,improper wheel weights can damageyour vehicle's aluminum wheels. Useonly Honda wheel weights forbalancing.
Tire Rotation
To help increase tire life anddistribute wear more evenly, rotatethe tires according to themaintenance messages displayed onthe information display.Move the tires to the positionsshown in the illustration each timethey are rotated. If you purchasedirectional tires, rotate only front-to-back.
Replacing Tires and WheelsReplace your tires with radial tires ofthe same size, load range, speedrating, and maximum cold tirepressure rating (as shown on thetire's sidewall).Mixing radial and bias-ply tires onyour vehicle can reduce brakingability, traction, and steeringaccuracy. Using tires of a differentsize or construction can cause theABS and vehicle stability assistsystem (VSA) to work inconsistently.ABS and VSA system work bycomparing the speed of the wheels.When replacing tires, use the samesize originally supplied with thevehicle. Tire size and constructioncan affect wheel speed and maycause the ABS or VSA system toactivate.
Front Front
(For Non-directionalTires and Wheels)
(For DirectionalTires and Wheels)
CONTINUED
Tires
215
Maintenance
10/08/06 08:34:41 11 ELEMENT MMC North America Owner's Man 50 31SCV680 enu
It is best to replace all four tires atthe same time. If that is not possibleor necessary, replace the two fronttires or two rear tires as a pair.Replacing just one tire can seriouslyaffect your vehicle's handling.If you ever replace a wheel, makesure that the wheel's specificationsmatch those of the original wheels.Also be sure you use only TPMSspecific wheels. If you do not, the tirepressure monitoring system will notwork.Replacement wheels are available atyour dealer.
Installing improper tires on yourvehicle can affect handling andstability. This can cause a crashin which you can be seriouslyhurt or killed.
Always use the size and type oftires recommended in thisowner's manual.
Wheel and Tire SpecificationsWheels:16 x 6 1/2JJ
Tires:P215/70R16 99S
See page 253 for DOT tire qualitygrading information, and page 255for tire size and labeling information.
Winter DrivingTires marked ‘‘M + S’’ or ‘‘AllSeason’’ on the sidewall have an all-weather tread design suitable formost winter driving conditions.For the best performance in snowyor icy conditions, you should installsnow tires or tire chains. They maybe required by local laws undercertain conditions.
Tires
216
10/08/06 08:34:41 11 ELEMENT MMC North America Owner's Man 50 31SCV680 enu
Snow TiresIf you mount snow tires on yourvehicle, make sure they are radialtires of the same size and load rangeas original tires. Mount snow tires onall four wheels. The traction providedby snow tires on dry roads may belower than your original tires. Checkwith the tire dealer for maximumspeed recommendations.
Tire ChainsMount tire chains on your tires whenrequired by driving conditions or locallaws. Install them only on the fronttires.
Because your vehicle has limited tireclearance, use only SAE Class ‘‘S’’cable-type traction devices, withrubber chain tensioners, on the fronttires. Use traction devices only whenrequired by driving conditions or locallaws. Make sure they are the correctsize for your tires. Metal link-type‘‘chains’’ should not be used.
Traction devices that are the wrong sizeor improperly installed can damage yourvehicle's brake lines, suspension, body,and wheels. Stop driving if they arehitting any part of the vehicle.
When installing cables, follow themanufacturer's instructions, andmount them as tight as you can.Make sure they are not contactingthe brake lines or suspension. Driveslowly with them installed. If youhear them coming into contact withthe body or chassis, stop andinvestigate. Remove them as soon asyou begin driving on cleared roads.
Using the wrong chains, or notproperly installing chains, candamage the brake lines andcause a crash in which you canbe seriously injured or killed.
Follow all instructions in thisowner's manual regarding theselection and use of tire chains.
Tires
217
Maintenance
10/08/06 08:34:41 11 ELEMENT MMC North America Owner's Man 50 31SCV680 enu
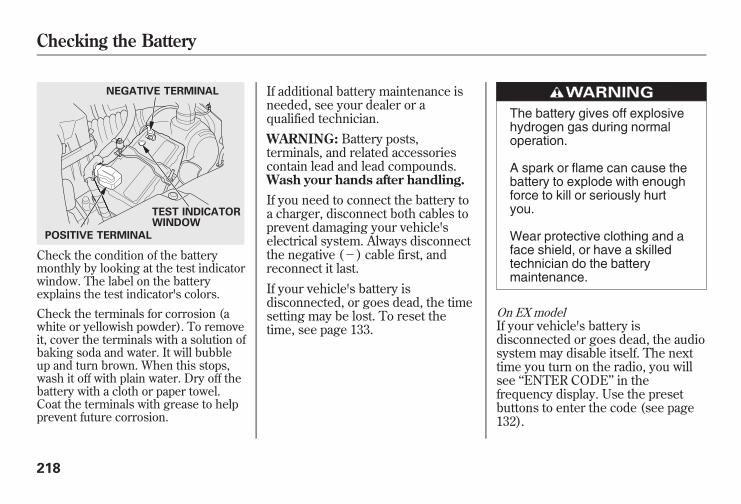
Check the condition of the batterymonthly by looking at the test indicatorwindow. The label on the batteryexplains the test indicator's colors.
Check the terminals for corrosion (awhite or yellowish powder). To removeit, cover the terminals with a solution ofbaking soda and water. It will bubbleup and turn brown. When this stops,wash it off with plain water. Dry off thebattery with a cloth or paper towel.Coat the terminals with grease to helpprevent future corrosion.
If additional battery maintenance isneeded, see your dealer or aqualified technician.WARNING: Battery posts,terminals, and related accessoriescontain lead and lead compounds.Wash your hands after handling.If you need to connect the battery toa charger, disconnect both cables toprevent damaging your vehicle'selectrical system. Always disconnectthe negative (-) cable first, andreconnect it last.If your vehicle's battery isdisconnected, or goes dead, the timesetting may be lost. To reset thetime, see page 133.
The battery gives off explosivehydrogen gas during normaloperation.
A spark or flame can cause thebattery to explode with enoughforce to kill or seriously hurtyou.
Wear protective clothing and aface shield, or have a skilledtechnician do the batterymaintenance.
On EX modelIf your vehicle's battery isdisconnected or goes dead, the audiosystem may disable itself. The nexttime you turn on the radio, you willsee ‘‘ENTER CODE’’ in thefrequency display. Use the presetbuttons to enter the code (see page132).
NEGATIVE TERMINAL
TEST INDICATORWINDOW
POSITIVE TERMINAL
Checking the Battery
218
10/08/06 08:34:41 11 ELEMENT MMC North America Owner's Man 50 31SCV680 enu
If you need to park your vehicle foran extended period (more than 1month), there are several things youshould do to prepare it for storage.Proper preparation helps preventdeterioration and makes it easier toget your vehicle back on the road. Ifpossible, store your vehicle indoors.● Fill the fuel tank.● Wash and dry the exteriorcompletely.
● Clean the interior. Make sure thecarpeting, floor mats, etc., arecompletely dry.
● Leave the parking brake off. Putthe transmission in Park.
● Block the rear wheels.● If the vehicle is to be stored for alonger period, it should besupported on jackstands so thetires are off the ground.
● Leave one window open slightly (ifthe vehicle is being storedindoors).
● Disconnect the battery.● Support the front and rear wiperblade arms with a folded towel orrag so they do not touch thewindshield.
● To minimize sticking, apply asilicone spray lubricant to all doorand tailgate seals. Also, apply avehicle body wax to the paintedsurfaces that mate with the doorand tailgate seals.
● Cover the vehicle with a‘‘breathable’’ cover, one made froma porous material such as cotton.Non-porous materials, such asplastic sheeting, trap moisture,which can damage the paint.
● If possible, periodically run theengine until it reaches fulloperating temperature (the coolingfans cycle on and off twice).Preferably, do this once a month.
Vehicle Storage
219
Maintenance
10/08/06 08:34:41 11 ELEMENT MMC North America Owner's Man 50 31SCV680 enu

220
10/08/06 08:34:41 11 ELEMENT MMC North America Owner's Man 50 31SCV680 enu
This section covers the morecommon problems that motoristsexperience with their vehicles. Itgives you information about how tosafely evaluate the problem and whatto do to correct it. If the problem hasstranded you on the side of the road,you may be able to get going again. Ifnot, you will also find instructions ongetting your vehicle towed.
Compact Spare Tire .................... 222Changing a Flat Tire ................... 223If the Engine Won't Start............. 229Jump Starting.............................. 231If the Engine Overheats .............. 233Low Oil Pressure Indicator ......... 235Charging System Indicator ......... 235Malfunction Indicator Lamp........ 236Brake System Indicator............... 237Fuses .......................................... 239Fuse Locations............................ 242Emergency Towing..................... 244
Taking Care of the Unexpected
221
TakingCare
oftheUnexpected
10/08/06 08:34:41 11 ELEMENT MMC North America Owner's Man 50 31SCV680 enu
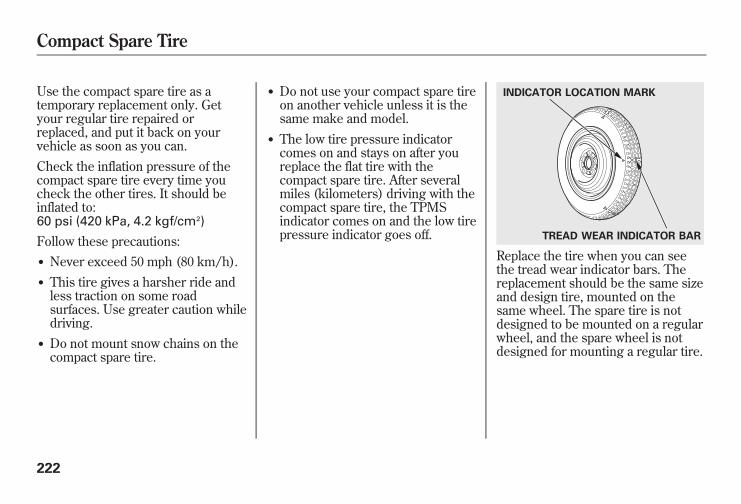
Use the compact spare tire as atemporary replacement only. Getyour regular tire repaired orreplaced, and put it back on yourvehicle as soon as you can.Check the inflation pressure of thecompact spare tire every time youcheck the other tires. It should beinflated to:60 psi (420 kPa, 4.2 kgf/cm2)
Follow these precautions:● Never exceed 50 mph (80 km/h).● This tire gives a harsher ride andless traction on some roadsurfaces. Use greater caution whiledriving.
● Do not mount snow chains on thecompact spare tire.
● Do not use your compact spare tireon another vehicle unless it is thesame make and model.
● The low tire pressure indicatorcomes on and stays on after youreplace the flat tire with thecompact spare tire. After severalmiles (kilometers) driving with thecompact spare tire, the TPMSindicator comes on and the low tirepressure indicator goes off.
Replace the tire when you can seethe tread wear indicator bars. Thereplacement should be the same sizeand design tire, mounted on thesame wheel. The spare tire is notdesigned to be mounted on a regularwheel, and the spare wheel is notdesigned for mounting a regular tire.
INDICATOR LOCATION MARK
TREAD WEAR INDICATOR BAR
Compact Spare Tire
222
10/08/06 08:34:41 11 ELEMENT MMC North America Owner's Man 50 31SCV680 enu

If you have a flat tire while driving,stop in a safe place to change it.Drive slowly along the shoulder untilyou get to an exit or an area to stopthat is far away from the traffic lanes.
The vehicle can easily roll offthe jack, seriously injuringanyone underneath.
Follow the directions forchanging a tire exactly, andnever get under the vehiclewhen it is supported only by thejack.
1. Park the vehicle on firm, level, andnon-slippery ground. Put thetransmission in Park. Apply theparking brake.If you are towing a trailer, unhitchthe trailer.
2. Turn on the hazard warning lights,and turn the ignition switch to theLOCK (0) position. Have allpassengers get out of the vehiclewhile you change the tire.
3. Open the hatch and the tailgate.4. The spare tire, jack, and tools areunder the cargo area floor.
TOOLS
SPARE TIRE
JACK
CONTINUED
Changing a Flat Tire
223
TakingCare
oftheUnexpected
10/08/06 08:34:41 11 ELEMENT MMC North America Owner's Man 50 31SCV680 enu
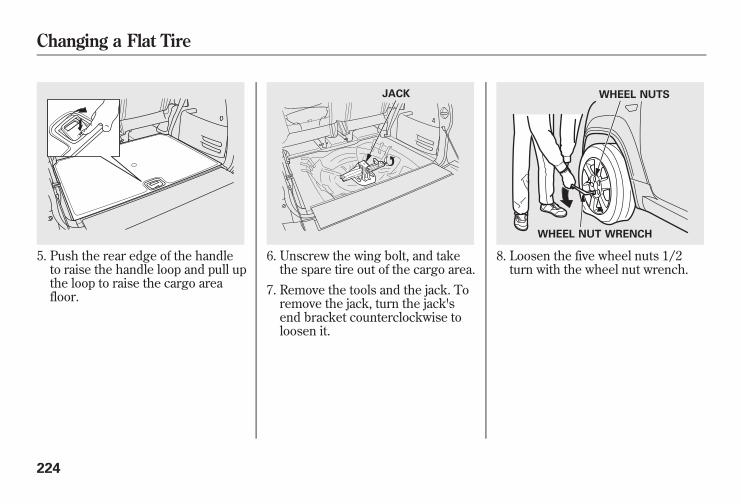
5. Push the rear edge of the handleto raise the handle loop and pull upthe loop to raise the cargo areafloor.
6. Unscrew the wing bolt, and takethe spare tire out of the cargo area.
7. Remove the tools and the jack. Toremove the jack, turn the jack'send bracket counterclockwise toloosen it.
8. Loosen the five wheel nuts 1/2turn with the wheel nut wrench.
JACK WHEEL NUTS
WHEEL NUT WRENCH
Changing a Flat Tire
224
10/08/06 08:34:41 11 ELEMENT MMC North America Owner's Man 50 31SCV680 enu
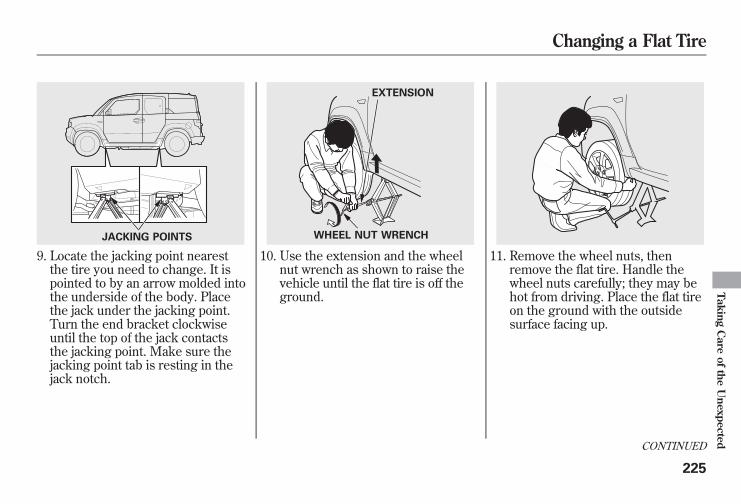
9. Locate the jacking point nearestthe tire you need to change. It ispointed to by an arrow molded intothe underside of the body. Placethe jack under the jacking point.Turn the end bracket clockwiseuntil the top of the jack contactsthe jacking point. Make sure thejacking point tab is resting in thejack notch.
10. Use the extension and the wheelnut wrench as shown to raise thevehicle until the flat tire is off theground.
11. Remove the wheel nuts, thenremove the flat tire. Handle thewheel nuts carefully; they may behot from driving. Place the flat tireon the ground with the outsidesurface facing up.
JACKING POINTS
EXTENSION
WHEEL NUT WRENCH
CONTINUED
Changing a Flat Tire
225
TakingCare
oftheUnexpected
10/08/06 08:34:41 11 ELEMENT MMC North America Owner's Man 50 31SCV680 enu
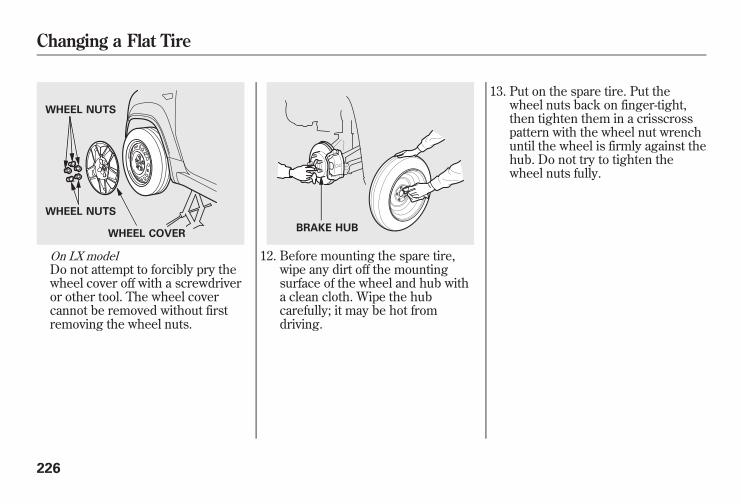
On LX modelDo not attempt to forcibly pry thewheel cover off with a screwdriveror other tool. The wheel covercannot be removed without firstremoving the wheel nuts.
12. Before mounting the spare tire,wipe any dirt off the mountingsurface of the wheel and hub witha clean cloth. Wipe the hubcarefully; it may be hot fromdriving.
13. Put on the spare tire. Put thewheel nuts back on finger-tight,then tighten them in a crisscrosspattern with the wheel nut wrenchuntil the wheel is firmly against thehub. Do not try to tighten thewheel nuts fully.
WHEEL NUTS
WHEEL NUTS
WHEEL COVERBRAKE HUB
Changing a Flat Tire
226
10/08/06 08:34:41 11 ELEMENT MMC North America Owner's Man 50 31SCV680 enu
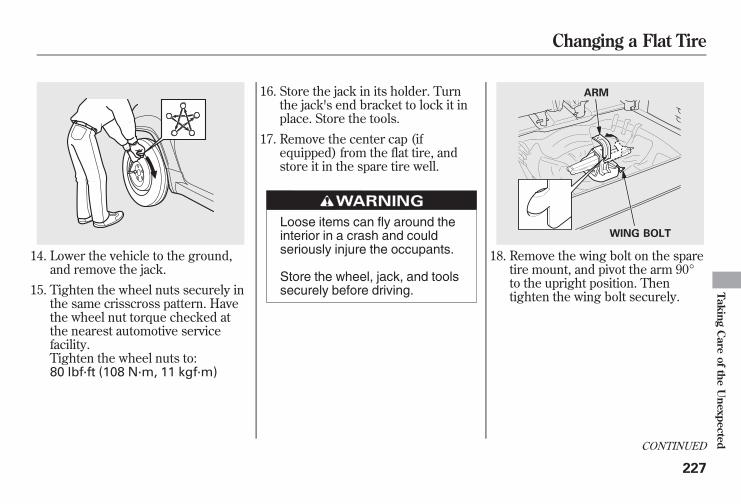
14. Lower the vehicle to the ground,and remove the jack.
15. Tighten the wheel nuts securely inthe same crisscross pattern. Havethe wheel nut torque checked atthe nearest automotive servicefacility.Tighten the wheel nuts to:80 lbf·ft (108 N·m, 11 kgf·m)
16. Store the jack in its holder. Turnthe jack's end bracket to lock it inplace. Store the tools.
17. Remove the center cap (ifequipped) from the flat tire, andstore it in the spare tire well.
Loose items can fly around theinterior in a crash and couldseriously injure the occupants.
Store the wheel, jack, and toolssecurely before driving.
18. Remove the wing bolt on the sparetire mount, and pivot the arm 90°to the upright position. Thentighten the wing bolt securely.
ARM
WING BOLT
CONTINUED
Changing a Flat Tire
227
TakingCare
oftheUnexpected
10/08/06 08:34:41 11 ELEMENT MMC North America Owner's Man 50 31SCV680 enu

19. Remove the small round plug fromthe cargo area floor by pushing itfrom the back side to make a hole.Store the removed plug in a placeyou can easily remember.
20. Reinstall the cargo area floor.Place the flat tire face down on thecargo area floor.
21. Align the center of the flat tire withthe hole in the cargo area floor.Remove the spacer cone from thewing bolt, turn it over, and put itback on the bolt.
22. Secure the flat tire by screwing thewing bolt to the spare tire mountthrough the hole in the cargo areafloor.
23. Your vehicle's original tire has atire pressure monitoring systemsensor. To replace a tire, refer toChanging a Tire with TPMS (seepage 170).
SPACER CONE
WING BOLT
Changing a Flat Tire
228
10/08/06 08:34:41 11 ELEMENT MMC North America Owner's Man 50 31SCV680 enu
Diagnosing why the engine won'tstart falls into two areas, dependingon what you hear when you turn theignition switch to the START (III)position:● You hear nothing, or almostnothing. The engine's startermotor does not operate at all, oroperates very slowly.
● You can hear the starter motoroperating normally, or the startermotor sounds like it is spinningfaster than normal, but the enginedoes not start up and run.
Nothing Happens or the StarterMotor Operates Very SlowlyWhen you turn the ignition switch tothe START (III) position, you do nothear the normal noise of the enginetrying to start. You may hear aclicking sound, a series of clicks, ornothing at all.Check these things:● Check the transmission interlock.The transmission must be in Parkor neutral or the starter will notoperate.
● Turn the ignition switch to the ON(II) position. Turn on theheadlights, and check theirbrightness. If the headlights arevery dim or do not come on at all,the battery is discharged (seeJump Starting on page 231).
● Turn the ignition switch to theSTART (III) position. If theheadlights do not dim, check thecondition of the fuses. If the fusesare OK, there is probablysomething wrong with theelectrical circuit for the ignitionswitch or starter motor. You willneed a qualified technician todetermine the problem. SeeEmergency Towing on page 244.
If the headlights dim noticeably or goout when you try to start the engine,either the battery is discharged orthe connections are corroded. Checkthe condition of the battery andterminal connections (see page 218).You can then try jump starting thevehicle from a booster battery (seepage 231).
CONTINUED
If the Engine Won't Start
229
TakingCare
oftheUnexpected
10/08/06 08:34:41 11 ELEMENT MMC North America Owner's Man 50 31SCV680 enu
The Starter Operates NormallyIn this case, the starter motor's speedsounds normal, or even faster thannormal, when you turn the ignitionswitch to the START (III) position,but the engine does not run.● Are you using a properly codedkey? An improperly coded key willcause the immobilizer systemindicator in the instrument panelto blink rapidly (see page 60).
● Are you using the proper startingprocedure? Refer to Starting theEngine on page 160.
● Do you have fuel? Check the fuelgauge; the low fuel indicator maynot be working.
● There may be an electricalproblem, such as no power to thefuel pump. Check all the fuses (seepage 239).
If you find nothing wrong, you willneed a qualified technician to find theproblem (see Emergency Towingon page 244).
If the Engine Won't Start
230
10/08/06 08:34:41 11 ELEMENT MMC North America Owner's Man 50 31SCV680 enu
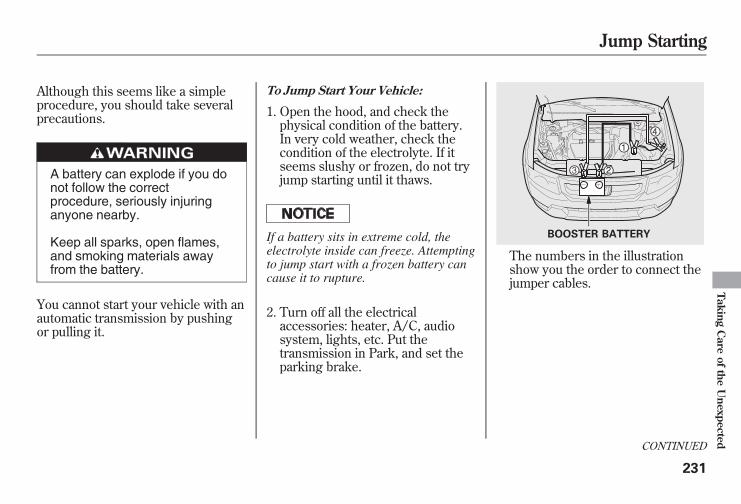
Although this seems like a simpleprocedure, you should take severalprecautions.
A battery can explode if you donot follow the correctprocedure, seriously injuringanyone nearby.
Keep all sparks, open flames,and smoking materials awayfrom the battery.
You cannot start your vehicle with anautomatic transmission by pushingor pulling it.
To Jump Start Your Vehicle:
1. Open the hood, and check thephysical condition of the battery.In very cold weather, check thecondition of the electrolyte. If itseems slushy or frozen, do not tryjump starting until it thaws.
If a battery sits in extreme cold, theelectrolyte inside can freeze. Attemptingto jump start with a frozen battery cancause it to rupture.
2. Turn off all the electricalaccessories: heater, A/C, audiosystem, lights, etc. Put thetransmission in Park, and set theparking brake.
The numbers in the illustrationshow you the order to connect thejumper cables.
BOOSTER BATTERY
CONTINUED
Jump Starting
231
TakingCare
oftheUnexpected
10/08/06 08:34:41 11 ELEMENT MMC North America Owner's Man 50 31SCV680 enu
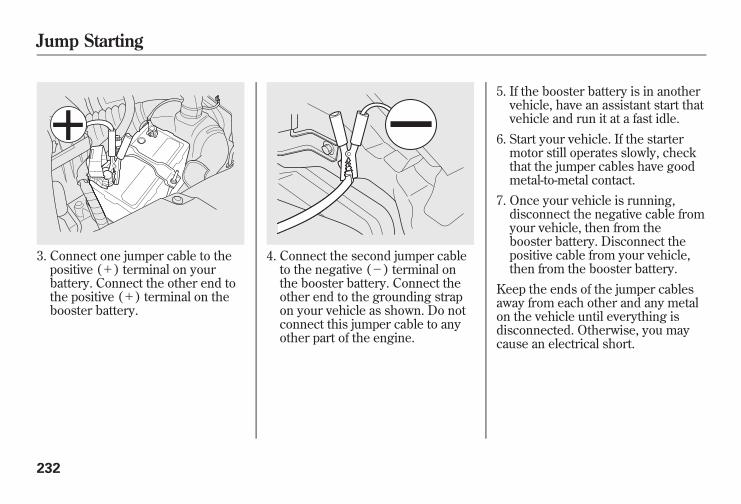
3. Connect one jumper cable to thepositive (+) terminal on yourbattery. Connect the other end tothe positive (+) terminal on thebooster battery.
4. Connect the second jumper cableto the negative (-) terminal onthe booster battery. Connect theother end to the grounding strapon your vehicle as shown. Do notconnect this jumper cable to anyother part of the engine.
5. If the booster battery is in anothervehicle, have an assistant start thatvehicle and run it at a fast idle.
6. Start your vehicle. If the startermotor still operates slowly, checkthat the jumper cables have goodmetal-to-metal contact.
7. Once your vehicle is running,disconnect the negative cable fromyour vehicle, then from thebooster battery. Disconnect thepositive cable from your vehicle,then from the booster battery.
Keep the ends of the jumper cablesaway from each other and any metalon the vehicle until everything isdisconnected. Otherwise, you maycause an electrical short.
Jump Starting
232
10/08/06 08:34:41 11 ELEMENT MMC North America Owner's Man 50 31SCV680 enu

The pointer of the vehicle'stemperature gauge should stay in themidrange. If it climbs to the redmark, you should determine thereason (hot day, driving up a steephill, etc.).If the vehicle overheats, you shouldtake immediate action. The onlyindication may be the temperaturegauge climbing to or above the redmark. Or you may see steam or spraycoming from under the hood.
Driving with the temperature gaugepointer at the red mark can causeserious damage to the engine.
Steam and spray from anoverheated engine canseriously scald you.
Do not open the hood if steamis coming out.
1. Safely pull to the side of the road.Put the transmission in Park, andset the parking brake. Turn off allthe accessories, and turn on thehazard lights.
2. If you see steam and/or spraycoming from under the hood, turnoff the engine. Wait until you seeno more signs of steam or spray,then open the hood.
3. If you do not see steam or spray,leave the engine running andwatch the temperature gauge. Ifthe high heat is due tooverloading, the engine shouldstart to cool down almostimmediately. If it does, wait untilthe temperature gauge comesdown to the midpoint, thencontinue driving.
4. If the temperature gauge stays atthe red mark, turn off the engine.
CONTINUED
If the Engine Overheats
233
TakingCare
oftheUnexpected
10/08/06 08:34:41 11 ELEMENT MMC North America Owner's Man 50 31SCV680 enu
5. Look for any obvious coolantleaks, such as a split radiator hose.Everything is still extremely hot,so use caution. If you find a leak, itmust be repaired before youcontinue driving (see EmergencyTowing on page 244).
6. If you don't find an obvious leak,check the coolant level in theradiator reserve tank. Add coolantif the level is below the MIN mark.
7. If there was no coolant in thereserve tank, you may need to addcoolant to the radiator. Let theengine cool down until the pointerreaches the middle of thetemperature gauge or lower beforechecking the radiator.
Removing the radiator capwhile the engine is hot cancause the coolant to spray out,seriously scalding you.
Always let the engine andradiator cool down beforeremoving the radiator cap.
8. Using gloves or a large heavycloth, turn the radiator capcounterclockwise, without pushingdown, to the first stop. After thepressure releases, push down onthe cap, and turn it until it comesoff.
9. Start the engine, and set thetemperature control dial tomaximum heat. Add coolant to theradiator up to the base of the fillerneck. If you do not have the propercoolant mixture available, you canadd plain water. Remember tohave the cooling system drainedand refilled with the propermixture as soon as you can.
10. Put the radiator cap back ontightly. Run the engine, and checkthe temperature gauge. If it goesback to the red mark, the engineneeds repair (see EmergencyTowing on page 244).
11. If the temperature stays normal,check the coolant level in theradiator reserve tank. If it has gonedown, add coolant to the MAXmark. Put the cap back on tightly.
If the Engine Overheats
234
10/08/06 08:34:41 11 ELEMENT MMC North America Owner's Man 50 31SCV680 enu
Low Oil Pressure IndicatorThis indicator should nevercome on when the engine is
running. If it starts flashing or stayson, the oil pressure has dropped verylow or lost pressure. Serious enginedamage is possible, and you shouldtake immediate action.
Running the engine with low oilpressure can cause serious mechanicaldamage almost immediately. Turn offthe engine as soon as you can safely getthe vehicle stopped.
1. Safely pull off the road, and shutoff the engine. Turn on the hazardwarning lights.
2. Let the vehicle sit for a minute.Open the hood, and check the oillevel (see page 145). An enginevery low on oil can lose pressureduring cornering and other drivingmaneuvers.
3. If necessary, add oil to bring thelevel back to the full mark on thedipstick (see page 193).
4. Start the engine, and watch the oilpressure indicator. If it does not goout within 10 seconds, turn off theengine. There is a mechanicalproblem that needs to be repairedbefore you can continue driving(see Emergency Towing on page244).
Charging System IndicatorIf the charging systemindicator comes on brightly
when the engine is running, thebattery is not being charged.Immediately turn off all electricalaccessories. Try not to use otherelectrically operated controls such asthe power windows. Keep the enginerunning; starting the engine willdischarge the battery rapidly.Go to a service station or garagewhere you can get technicalassistance.
Low Oil Pressure Indicator, Charging System Indicator
235
TakingCare
oftheUnexpected
10/08/06 08:34:41 11 ELEMENT MMC North America Owner's Man 50 31SCV680 enu
If this indicator comes onwhile driving, it means one
of the engine's emissions controlsystems may have a problem. Eventhough you may feel no difference inyour vehicle's performance, it canreduce your fuel economy and causeincreased emissions. Continuedoperation may cause serious damage.If you have recently refueled yourvehicle, the indicator coming oncould be due to a loose or missingfuel fill cap. You will also see a‘‘CHECK FUEL CAP’’ message onthe information display. Tighten thecap until it clicks at least once.Tightening the cap will not turn theindicator off immediately; it can takeseveral days of normal driving.
If the indicator comes on repeatedly,even though it may turn off as youcontinue driving, have your vehiclechecked by your dealer as soon aspossible.
If you keep driving with the malfunctionindicator lamp on, you can damageyour vehicle's emissions controls andengine. Those repairs may not becovered by your vehicle's warranties.
The malfunction indicator lamp mayalso come on with the ‘‘D’’ indicator.
Readiness CodesYour vehicle has certain ‘‘readinesscodes’’ that are part of the on-boarddiagnostics for the emissionssystems. In some states, part of theemissions testing is to make surethese codes are set. If they are notset, the test cannot be completed.If the battery in your vehicle hasbeen disconnected or gone dead,these codes may be erased. It cantake several days of driving undervarious conditions to set the codesagain.
Malfunction Indicator Lamp
236
10/08/06 08:34:41 11 ELEMENT MMC North America Owner's Man 50 31SCV680 enu
To check if they are set, turn theignition switch to the ON (II)position, without starting the engine.The malfunction indicator lamp willcome on for 20 seconds. If it thengoes off, the readiness codes are set.If it blinks five times, the readinesscodes are not set. If possible, do nottake your vehicle for an emissionstest until the readiness codes are set.Refer to Emissions Testing formore information (see page 261).
Brake System Indicator (Red)
The brake system indicator (red)normally comes on when you turnthe ignition switch to the ON (II)position, and as a reminder to checkthe parking brake. It will stay on ifyou do not fully release the parkingbrake.
If the brake system indicator (red)comes on while driving, the brakefluid level is probably low. Presslightly on the brake pedal to see if itfeels normal. If it does, check thebrake fluid level the next time youstop at a service station (see page199).If the fluid level is low, take yourvehicle to a dealer, and have thebrake system inspected for leaks orworn brake pads.
CONTINUED
Malfunction Indicator Lamp, Brake System Indicator
237
TakingCare
oftheUnexpected
10/08/06 08:34:41 11 ELEMENT MMC North America Owner's Man 50 31SCV680 enu
However, if the brake pedal does notfeel normal, you should takeimmediate action. A problem in onepart of the system's dual circuitdesign will still give you braking attwo wheels. You will feel the brakepedal go down much farther beforethe vehicle begins to slow down, andyou will have to press harder on thepedal.
Slow down by shifting to a lowergear, and pull to the side of the roadwhen it is safe. Because of the longdistance needed to stop, it ishazardous to drive the vehicle. Youshould have it towed and repaired assoon as possible (see EmergencyTowing on page 244).If you must drive the vehicle a shortdistance in this condition, driveslowly and carefully.
If the ABS indicator and the VSAsystem indicator come on with thebrake system indicator, have yourvehicle inspected by your dealerimmediately.
Brake System Indicator
238
10/08/06 08:34:41 11 ELEMENT MMC North America Owner's Man 50 31SCV680 enu
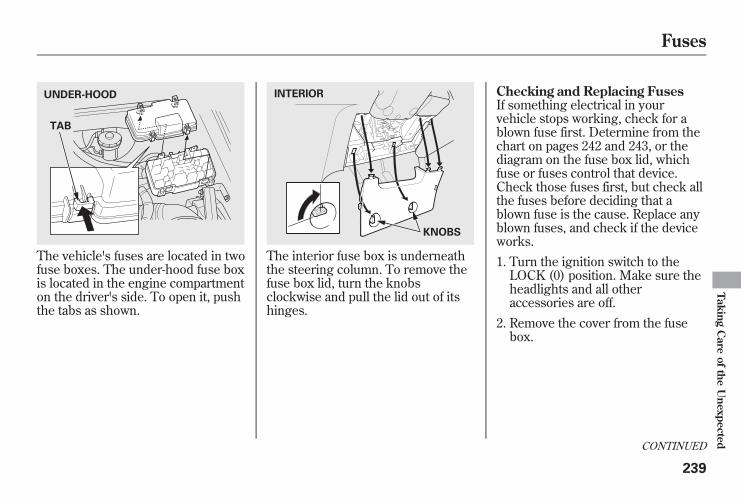
The vehicle's fuses are located in twofuse boxes. The under-hood fuse boxis located in the engine compartmenton the driver's side. To open it, pushthe tabs as shown.
The interior fuse box is underneaththe steering column. To remove thefuse box lid, turn the knobsclockwise and pull the lid out of itshinges.
Checking and Replacing FusesIf something electrical in yourvehicle stops working, check for ablown fuse first. Determine from thechart on pages 242 and 243, or thediagram on the fuse box lid, whichfuse or fuses control that device.Check those fuses first, but check allthe fuses before deciding that ablown fuse is the cause. Replace anyblown fuses, and check if the deviceworks.1. Turn the ignition switch to theLOCK (0) position. Make sure theheadlights and all otheraccessories are off.
2. Remove the cover from the fusebox.
UNDER-HOOD
TAB
INTERIOR
KNOBS
CONTINUED
Fuses
239
TakingCare
oftheUnexpected
10/08/06 08:34:41 11 ELEMENT MMC North America Owner's Man 50 31SCV680 enu
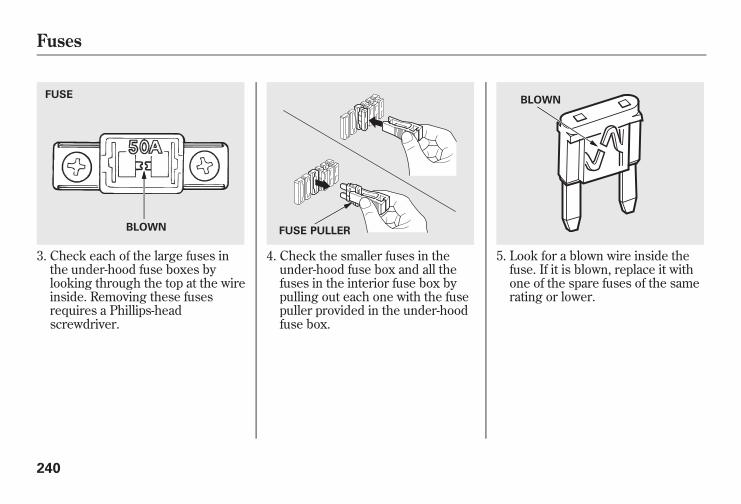
3. Check each of the large fuses inthe under-hood fuse boxes bylooking through the top at the wireinside. Removing these fusesrequires a Phillips-headscrewdriver.
4. Check the smaller fuses in theunder-hood fuse box and all thefuses in the interior fuse box bypulling out each one with the fusepuller provided in the under-hoodfuse box.
5. Look for a blown wire inside thefuse. If it is blown, replace it withone of the spare fuses of the samerating or lower.
FUSE
BLOWN FUSE PULLER
BLOWN
Fuses
240
10/08/06 08:34:41 11 ELEMENT MMC North America Owner's Man 50 31SCV680 enu
If you cannot drive the vehiclewithout fixing the problem, and youdo not have a spare fuse, take a fuseof the same rating or a lower ratingfrom one of the other circuits. Makesure you can do without that circuittemporarily (such as the accessorypower socket or radio).If you replace the blown fuse with aspare fuse that has a lower rating, itmight blow out again. This does notindicate anything wrong. Replace thefuse with one of the correct rating assoon as you can.
Replacing a fuse with one that has ahigher rating greatly increases thechances of damaging the electricalsystem. If you do not have areplacement fuse with the proper ratingfor the circuit, install one with a lowerrating.
6. If the replacement fuse of the samerating blows in a short time, thereis probably a serious electricalproblem in your vehicle. Leave theblown fuse in that circuit and haveyour vehicle checked by aqualified technician.
Fuses
241
TakingCare
oftheUnexpected
10/08/06 08:34:41 11 ELEMENT MMC North America Owner's Man 50 31SCV680 enu
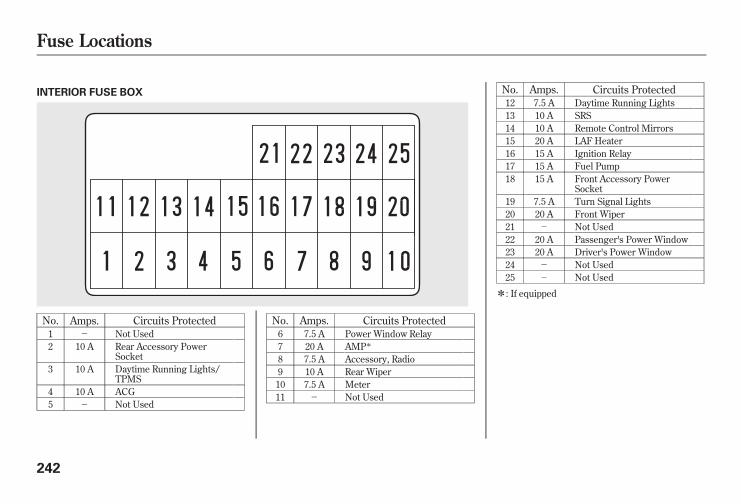
INTERIOR FUSE BOX
No. Amps. Circuits Protected1 - Not Used2 10 A Rear Accessory Power
Socket3 10 A Daytime Running Lights/
TPMS4 10 A ACG5 - Not Used
No. Amps. Circuits Protected6 7.5 A Power Window Relay7 20 A AMPꭧ
8 7.5 A Accessory, Radio9 10 A Rear Wiper10 7.5 A Meter11 - Not Used
No. Amps. Circuits Protected12 7.5 A Daytime Running Lights13 10 A SRS14 10 A Remote Control Mirrors15 20 A LAF Heater16 15 A Ignition Relay17 15 A Fuel Pump18 15 A Front Accessory Power
Socket19 7.5 A Turn Signal Lights20 20 A Front Wiper21 - Not Used22 20 A Passenger's Power Window23 20 A Driver's Power Window24 - Not Used25 - Not Used
ꭧ: If equipped
Fuse Locations
242
10/08/06 08:34:41 11 ELEMENT MMC North America Owner's Man 50 31SCV680 enu
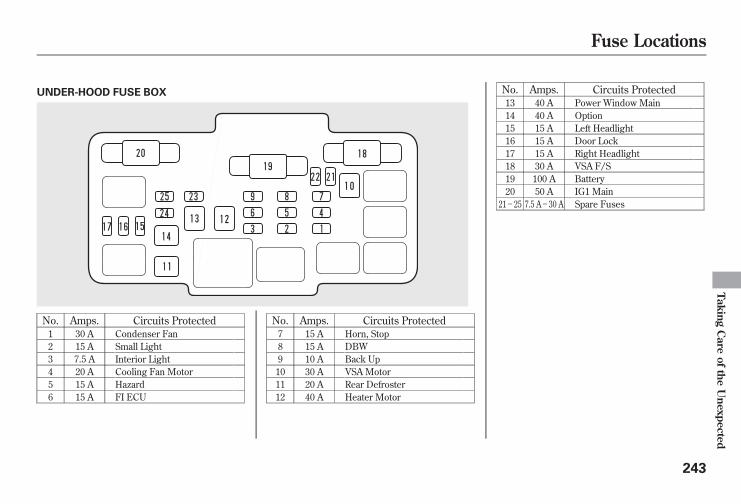
UNDER-HOOD FUSE BOX
No. Amps. Circuits Protected1 30 A Condenser Fan2 15 A Small Light3 7.5 A Interior Light4 20 A Cooling Fan Motor5 15 A Hazard6 15 A FI ECU
No. Amps. Circuits Protected7 15 A Horn, Stop8 15 A DBW9 10 A Back Up10 30 A VSA Motor11 20 A Rear Defroster12 40 A Heater Motor
No. Amps. Circuits Protected13 40 A Power Window Main14 40 A Option15 15 A Left Headlight16 15 A Door Lock17 15 A Right Headlight18 30 A VSA F/S19 100 A Battery20 50 A IG1 Main
21-25 7.5 A-30 A Spare Fuses
Fuse Locations
243
TakingCare
oftheUnexpected
10/08/06 08:34:41 11 ELEMENT MMC North America Owner's Man 50 31SCV680 enu
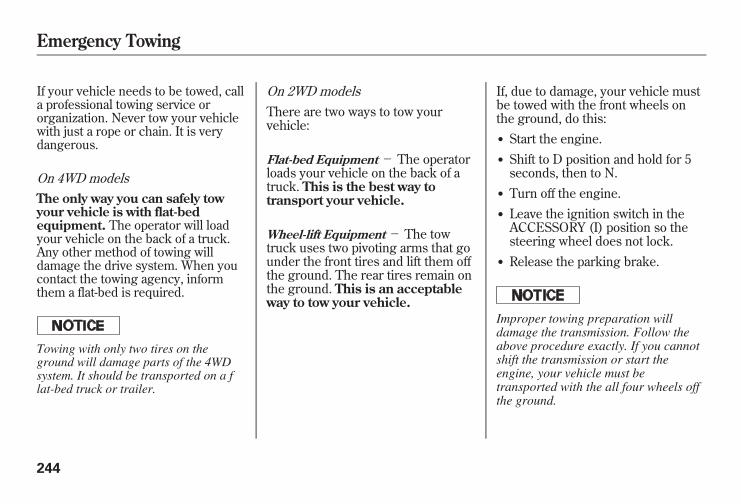
If your vehicle needs to be towed, calla professional towing service ororganization. Never tow your vehiclewith just a rope or chain. It is verydangerous.
On 4WD modelsThe only way you can safely towyour vehicle is with flat-bedequipment. The operator will loadyour vehicle on the back of a truck.Any other method of towing willdamage the drive system. When youcontact the towing agency, informthem a flat-bed is required.
Towing with only two tires on theground will damage parts of the 4WDsystem. It should be transported on a flat-bed truck or trailer.
On 2WD modelsThere are two ways to tow yourvehicle:
Flat-bed Equipment - The operatorloads your vehicle on the back of atruck. This is the best way totransport your vehicle.
Wheel-lift Equipment- The towtruck uses two pivoting arms that gounder the front tires and lift them offthe ground. The rear tires remain onthe ground. This is an acceptableway to tow your vehicle.
If, due to damage, your vehicle mustbe towed with the front wheels onthe ground, do this:● Start the engine.● Shift to D position and hold for 5seconds, then to N.
● Turn off the engine.● Leave the ignition switch in theACCESSORY (I) position so thesteering wheel does not lock.
● Release the parking brake.
Improper towing preparation willdamage the transmission. Follow theabove procedure exactly. If you cannotshift the transmission or start theengine, your vehicle must betransported with the all four wheels offthe ground.
Emergency Towing
244
10/08/06 08:34:41 11 ELEMENT MMC North America Owner's Man 50 31SCV680 enu
With the front wheels on the ground,it is best to tow the vehicle no fartherthan 50 miles (80 km), and keep thespeed below 35 mph (55 km/h).
The steering system can be damaged ifthe steering wheel is locked. Leave theignition switch in the ACCESSORY (I)position, and make sure the steeringwheel turns freely before you begintowing.
Emergency Towing
245
TakingCare
oftheUnexpected
10/08/06 08:34:41 11 ELEMENT MMC North America Owner's Man 50 31SCV680 enu

246
10/08/06 08:34:41 11 ELEMENT MMC North America Owner's Man 50 31SCV680 enu
The diagrams in this section give youthe dimensions and capacities ofyour vehicle and the locations of theidentification numbers. It alsoincludes information you shouldknow about your vehicle's tires andemissions control systems.
Identification Numbers ............... 248Specifications .............................. 250DOT Tire Quality Grading (U.S.
Vehicles) ............................. 253Uniform Tire Quality
Grading............................... 253Treadwear............................... 253Traction .................................. 253Temperature ........................... 254
Tire Labeling .............................. 255Tire Pressure Monitoring System
(TPMS)- Required FederalExplanation ......................... 256
Emissions Controls ..................... 258The Clean Air Act.................... 258Crankcase Emissions Control
System................................ 258Evaporative Emissions Control
System................................ 258Onboard Refueling Vapor
Recovery ............................. 258Exhaust Emissions
Controls .............................. 259
Three Way CatalyticConverter................................ 260
Emissions Testing....................... 261
Technical Information
247
TechnicalInformation
10/08/06 08:34:41 11 ELEMENT MMC North America Owner's Man 50 31SCV680 enu
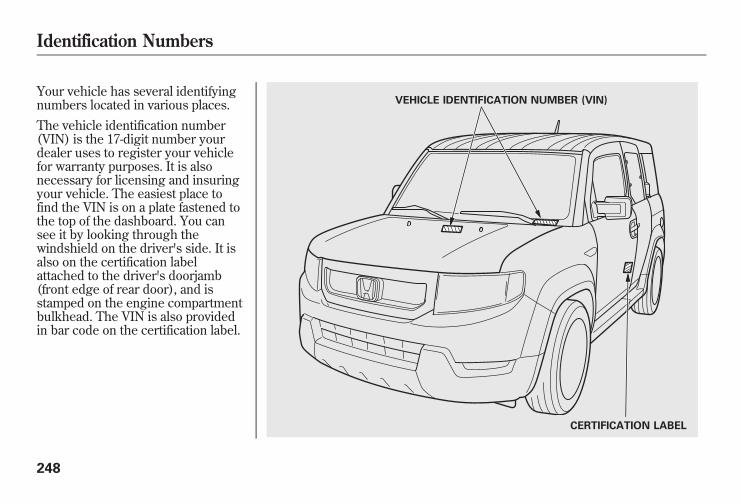
Your vehicle has several identifyingnumbers located in various places.The vehicle identification number(VIN) is the 17-digit number yourdealer uses to register your vehiclefor warranty purposes. It is alsonecessary for licensing and insuringyour vehicle. The easiest place tofind the VIN is on a plate fastened tothe top of the dashboard. You cansee it by looking through thewindshield on the driver's side. It isalso on the certification labelattached to the driver's doorjamb(front edge of rear door), and isstamped on the engine compartmentbulkhead. The VIN is also providedin bar code on the certification label.
VEHICLE IDENTIFICATION NUMBER (VIN)
CERTIFICATION LABEL
Identification Numbers
248
10/08/06 08:34:41 11 ELEMENT MMC North America Owner's Man 50 31SCV680 enu
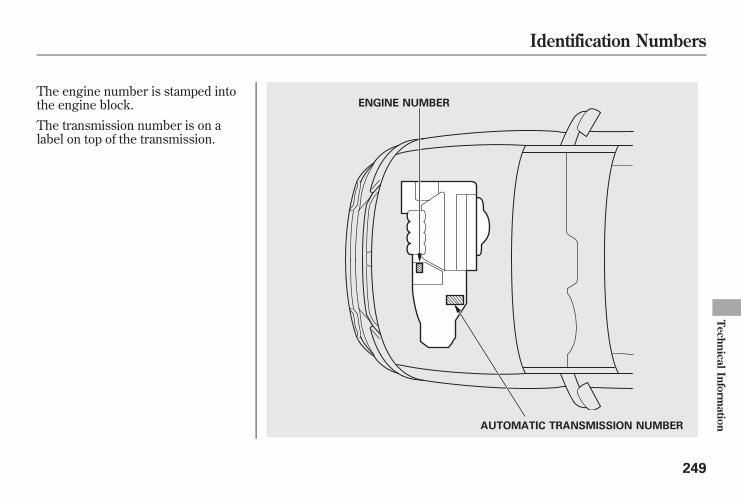
The engine number is stamped intothe engine block.The transmission number is on alabel on top of the transmission.
AUTOMATIC TRANSMISSION NUMBER
ENGINE NUMBER
Identification Numbers
249
TechnicalInformation
10/08/06 08:34:41 11 ELEMENT MMC North America Owner's Man 50 31SCV680 enu
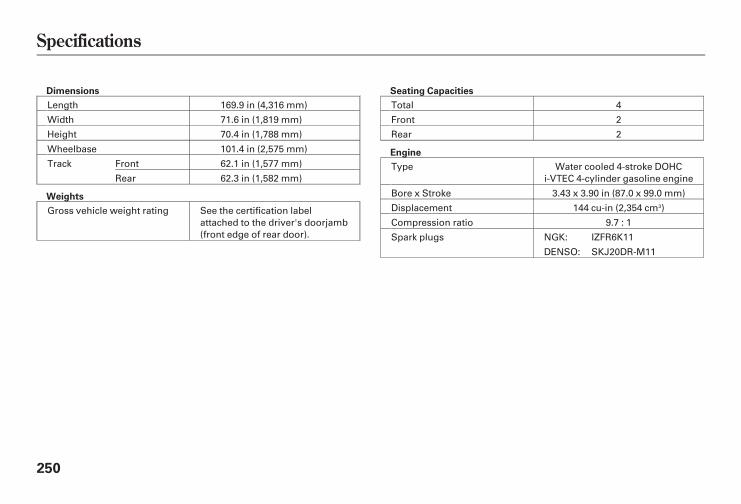
Dimensions
Length 169.9 in (4,316 mm)
Width 71.6 in (1,819 mm)
Height 70.4 in (1,788 mm)
Wheelbase 101.4 in (2,575 mm)
Track Front 62.1 in (1,577 mm)
Rear 62.3 in (1,582 mm)
Weights
Gross vehicle weight rating See the certification label
attached to the driver's doorjamb
(front edge of rear door).
Seating Capacities
Total 4
Front 2
Rear 2
Engine
Type Water cooled 4-stroke DOHC
i-VTEC 4-cylinder gasoline engine
Bore x Stroke 3.43 x 3.90 in (87.0 x 99.0 mm)
Displacement 144 cu-in (2,354 cm3)
Compression ratio 9.7 : 1
Spark plugs NGK: IZFR6K11
DENSO: SKJ20DR-M11
Specifications
250
10/08/06 08:34:41 11 ELEMENT MMC North America Owner's Man 50 31SCV680 enu
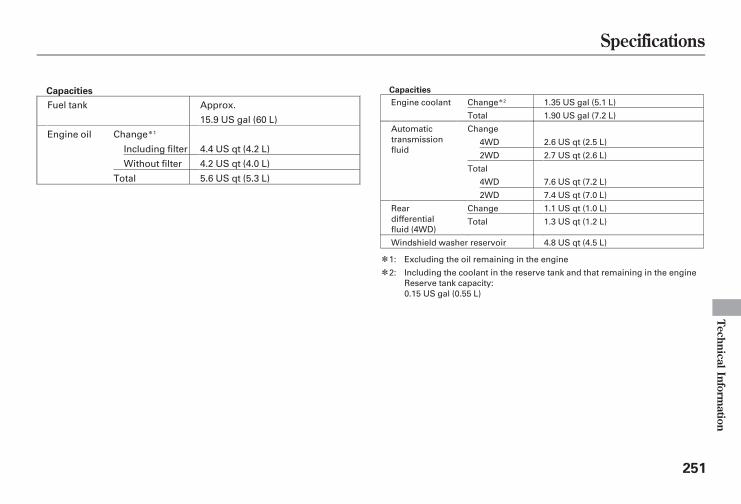
Capacities
Fuel tank Approx.
15.9 US gal (60 L)
Engine oil Changeꭧ1
Including filter 4.4 US qt (4.2 L)
Without filter 4.2 US qt (4.0 L)
Total 5.6 US qt (5.3 L)
Capacities
Engine coolant Changeꭧ2 1.35 US gal (5.1 L)
Total 1.90 US gal (7.2 L)
Automatic
transmission
fluid
Change
4WD 2.6 US qt (2.5 L)
2WD 2.7 US qt (2.6 L)
Total
4WD 7.6 US qt (7.2 L)
2WD 7.4 US qt (7.0 L)
Rear
differential
fluid (4WD)
Change 1.1 US qt (1.0 L)
Total 1.3 US qt (1.2 L)
Windshield washer reservoir 4.8 US qt (4.5 L)
ꭧ1: Excluding the oil remaining in the engine
ꭧ2: Including the coolant in the reserve tank and that remaining in the engine
Reserve tank capacity:
0.15 US gal (0.55 L)
Specifications
251
TechnicalInformation
10/08/06 08:34:41 11 ELEMENT MMC North America Owner's Man 50 31SCV680 enu
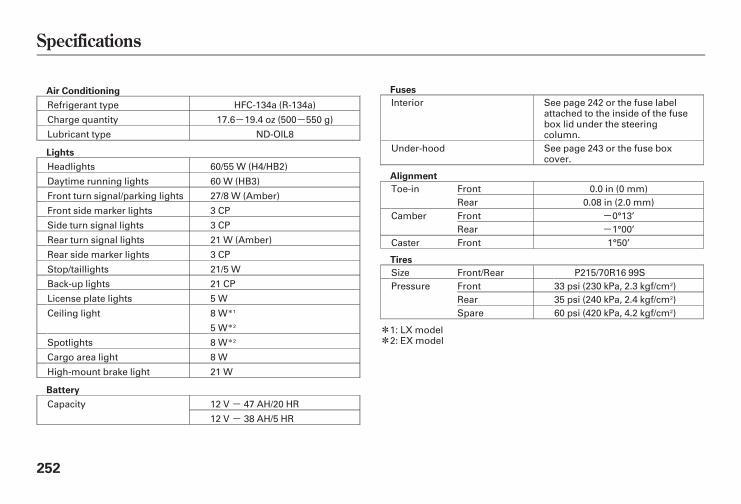
Air Conditioning
Refrigerant type HFC-134a (R-134a)
Charge quantity 17.6-19.4 oz (500-550 g)
Lubricant type ND-OIL8
Lights
Headlights 60/55 W (H4/HB2)
Daytime running lights 60 W (HB3)
Front turn signal/parking lights 27/8 W (Amber)
Front side marker lights 3 CP
Side turn signal lights 3 CP
Rear turn signal lights 21 W (Amber)
Rear side marker lights 3 CP
Stop/taillights 21/5 W
Back-up lights 21 CP
License plate lights 5 W
Ceiling light 8 Wꭧ1
5 Wꭧ2
Spotlights 8 Wꭧ2
Cargo area light 8 W
High-mount brake light 21 W
Battery
Capacity 12 V- 47 AH/20 HR
12 V- 38 AH/5 HR
Fuses
Interior See page 242 or the fuse labelattached to the inside of the fusebox lid under the steeringcolumn.
Under-hood See page 243 or the fuse boxcover.
Alignment
Toe-in Front 0.0 in (0 mm)
Rear 0.08 in (2.0 mm)
Camber Front -0°13’
Rear -1°00’
Caster Front 1°50’
Tires
Size Front/Rear P215/70R16 99S
Pressure Front 33 psi (230 kPa, 2.3 kgf/cm2)
Rear 35 psi (240 kPa, 2.4 kgf/cm2)
Spare 60 psi (420 kPa, 4.2 kgf/cm2)
ꭧ1: LX modelꭧ2: EX model
Specifications
252
10/08/06 08:34:41 11 ELEMENT MMC North America Owner's Man 50 31SCV680 enu
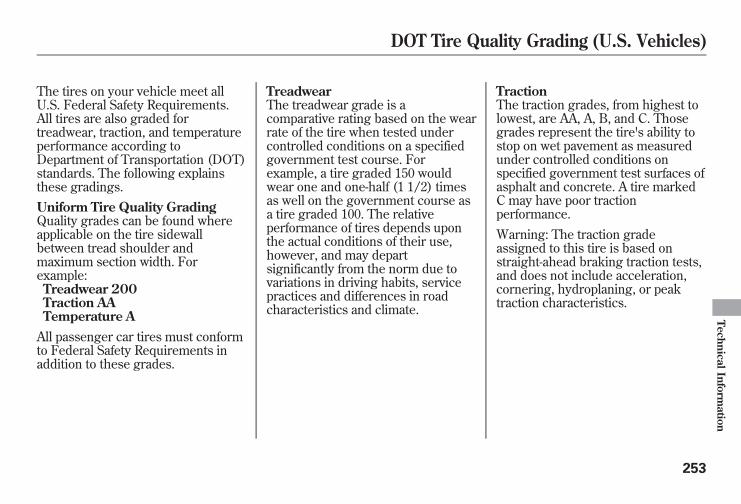
The tires on your vehicle meet allU.S. Federal Safety Requirements.All tires are also graded fortreadwear, traction, and temperatureperformance according toDepartment of Transportation (DOT)standards. The following explainsthese gradings.Uniform Tire Quality GradingQuality grades can be found whereapplicable on the tire sidewallbetween tread shoulder andmaximum section width. Forexample:Treadwear 200Traction AATemperature A
All passenger car tires must conformto Federal Safety Requirements inaddition to these grades.
TreadwearThe treadwear grade is acomparative rating based on the wearrate of the tire when tested undercontrolled conditions on a specifiedgovernment test course. Forexample, a tire graded 150 wouldwear one and one-half (1 1/2) timesas well on the government course asa tire graded 100. The relativeperformance of tires depends uponthe actual conditions of their use,however, and may departsignificantly from the norm due tovariations in driving habits, servicepractices and differences in roadcharacteristics and climate.
TractionThe traction grades, from highest tolowest, are AA, A, B, and C. Thosegrades represent the tire's ability tostop on wet pavement as measuredunder controlled conditions onspecified government test surfaces ofasphalt and concrete. A tire markedC may have poor tractionperformance.Warning: The traction gradeassigned to this tire is based onstraight-ahead braking traction tests,and does not include acceleration,cornering, hydroplaning, or peaktraction characteristics.
DOT Tire Quality Grading (U.S. Vehicles)
253
TechnicalInformation
10/08/06 08:34:41 11 ELEMENT MMC North America Owner's Man 50 31SCV680 enu
TemperatureThe temperature grades are A (thehighest), B, and C, representing thetire's resistance to the generation ofheat and its ability to dissipate heatwhen tested under controlledconditions on a specified indoorlaboratory test wheel. Sustained hightemperature can cause the materialof the tire to degenerate and reducetire life, and excessive temperaturecan lead to sudden tire failure. Thegrade C corresponds to a level ofperformance which all passenger cartires must meet under the FederalMotor Vehicle Safety Standard No.109. Grades B and A representhigher levels of performance on thelaboratory test wheel than theminimum required by law.
Warning: The temperature grade forthis tire is established for a tire thatis properly inflated and notoverloaded. Excessive speed,underinflation, or excessive loading,either separately or in combination,can cause heat buildup and possibletire failure.
DOT Tire Quality Grading (U.S. Vehicles)
254
10/08/06 08:34:41 11 ELEMENT MMC North America Owner's Man 50 31SCV680 enu
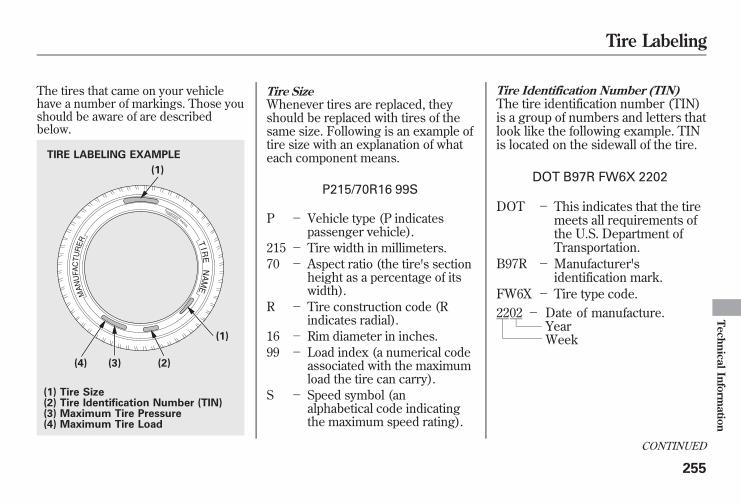
The tires that came on your vehiclehave a number of markings. Those youshould be aware of are describedbelow.
Tire SizeWhenever tires are replaced, theyshould be replaced with tires of thesame size. Following is an example oftire size with an explanation of whateach component means.
P215/70R16 99S
P - Vehicle type (P indicatespassenger vehicle).
215 - Tire width in millimeters.70 - Aspect ratio (the tire's section
height as a percentage of itswidth).
R - Tire construction code (Rindicates radial).
16 - Rim diameter in inches.99 - Load index (a numerical code
associated with the maximumload the tire can carry).
S - Speed symbol (analphabetical code indicatingthe maximum speed rating).
Tire Identification Number (TIN)The tire identification number (TIN)is a group of numbers and letters thatlook like the following example. TINis located on the sidewall of the tire.
DOT B97R FW6X 2202
DOT - This indicates that the tiremeets all requirements ofthe U.S. Department ofTransportation.
B97R - Manufacturer'sidentification mark.
FW6X - Tire type code.
TIRE LABELING EXAMPLE
(1) Tire Size(2) Tire Identification Number (TIN)(3) Maximum Tire Pressure(4) Maximum Tire Load
(1)
(2)
(1)
(3)(4)
2202 -YearWeek
Date of manufacture.
CONTINUED
Tire Labeling
255
TechnicalInformation
10/08/06 08:34:41 11 ELEMENT MMC North America Owner's Man 50 31SCV680 enu
Glossary of Tire TerminologyCold Tire Pressure - The tire airpressure when the vehicle has beenparked for at least three hours ordriven less than 1 mile (1.6km).Load Rating - Means the maximumload that a tire is rated to carry for agiven inflation pressure.Maximum Inflation Pressure - themaximum tire air pressure that thetire can hold.Maximum Load Rating - Means theload rating for a tire at the maximumpermissible inflation pressure for thattire.Recommended Inflation Pressure -The cold tire inflation pressurerecommended by the manufacturer.Treadwear Indicators (TWI) - Meansthe projections within the principalgrooves designed to give a visualindication of the degrees of wear ofthe tread.
Tire Pressure Monitoring System(TPMS)Each tire, including the spare (ifprovided), should be checkedmonthly when cold and inflated tothe inflation pressure recommendedby the vehicle manufacturer on thevehicle placard or tire inflationpressure label.(If your vehicle has tires of a differentsize than the size indicated on thevehicle placard or tire inflationpressure label, you should determinethe proper tire inflation pressure forthose tires.)
As an added safety feature, yourvehicle has been equipped with a tirepressure monitoring system (TPMS)that illuminates a low tire pressuretelltale
when one or more of your tires issignificantly under-inflated.Accordingly, when the low tirepressure telltale illuminates, youshould stop and check your tires assoon as possible, and inflate them tothe proper pressure.
Tire Labeling, Tire Pressure Monitoring System (TPMS) - Required Federal Explanation
256
10/08/06 08:34:41 11 ELEMENT MMC North America Owner's Man 50 31SCV680 enu
Driving on a significantly under-inflated tire causes the tire tooverheat and can lead to tire failure.Under-inflation also reduces fuelefficiency and tire tread life, and mayaffect the vehicle's handling andstopping ability.Please note that the TPMS is not asubstitute for proper tiremaintenance, and it is the driver'sresponsibility to maintain correct tirepressure, even if under-inflation hasnot reached the level to triggerillumination of the TPMS low tirepressure telltale.
Your vehicle has also been equippedwith a TPMS malfunction indicator toindicate when the system is notoperating properly. The TPMSmalfunction indicator is provided bya separate telltale, which displays thesymbol ‘‘TPMS’’ when illuminated.When the malfunction indicator isilluminated,
the system may not be able to detector signal low tire pressure asintended.TPMS malfunctions may occur for avariety of reasons, including theinstallation of replacement oralternate tires or wheels on thevehicle that prevent the TPMS fromfunctioning properly.
Always check the TPMS malfunctiontelltale after replacing one or moretires or wheels on your vehicle toensure that the replacement oralternate tires and wheels allow theTPMS to continue to functionproperly.
Tire Pressure Monitoring System (TPMS) - Required Federal Explanation
257
TechnicalInformation
10/08/06 08:34:41 11 ELEMENT MMC North America Owner's Man 50 31SCV680 enu
The burning of gasoline in yourvehicle's engine produces several by-products. Some of these are carbonmonoxide (CO), oxides of nitrogen(NOx), and hydrocarbons (HC).Gasoline evaporating from the tankalso produces hydrocarbons.Controlling the production of NOx,CO, and HC is important to theenvironment. Under certainconditions of sunlight and climate,NOx and HC react to formphotochemical ‘‘smog.’’ Carbonmonoxide does not contribute tosmog creation, but it is a poisonousgas.
The Clean Air ActThe United States Clean Air Act setsstandards for automobile emissions. Italso requires that automobilemanufacturers explain to owners howtheir emissions controls work andwhat to do to maintain them. Thissection summarizes how theemissions controls work.
Crankcase Emissions ControlSystemYour vehicle has a positive crankcaseventilation system. This keeps gassesthat build up in the engine's crankcasefrom going into the atmosphere. Thepositive crankcase ventilation valveroutes them from the crankcase backto the intake manifold. They are thendrawn into the engine and burned.
Evaporative Emissions ControlSystemAs gasoline evaporates in the fueltank, an evaporative emissionscontrol canister filled with charcoaladsorbs the vapor. It is stored in thiscanister while the engine is off. Afterthe engine is started and warmed up,the vapor is drawn into the engineand burned during driving.Onboard Refueling VaporRecoveryThe onboard refueling vaporrecovery (ORVR) system capturesthe fuel vapors during refueling. Thevapors are adsorbed in a canisterfilled with activated carbon. Whiledriving, the fuel vapors are drawninto the engine and burned off.
Emissions Controls
258
10/08/06 08:34:41 11 ELEMENT MMC North America Owner's Man 50 31SCV680 enu
Exhaust Emissions ControlsThe exhaust emissions controlsinclude three systems: PGM-FI,ignition timing control, and threeway catalytic converter. These threesystems work together to control theengine's combustion and minimizethe amount of HC, CO, and NOx thatcomes out the tailpipe. The exhaustemissions control systems areseparate from the crankcase andevaporative emissions controlsystems.
PGM-FI SystemThe PGM-FI system uses sequentialmultiport fuel injection. It has threesubsystems: air intake, enginecontrol, and fuel control. Thepowertrain control module (PCM)uses various sensors to determinehow much air is going into theengine. It then controls how muchfuel to inject under all operatingconditions.Ignition Timing Control SystemThis system constantly adjusts theignition timing, reducing the amountof HC, CO, and NOx produced.Three Way Catalytic ConverterThe three way catalytic converter isin the exhaust system. Throughchemical reactions, it converts HC,CO, and NOx in the engine's exhaustto carbon dioxide (CO2), nitrogen(N2), and water vapor.
Replacement PartsThe emissions control systems aredesigned and certified to worktogether in reducing emissions tolevels that comply with the Clean AirAct. To make sure the emissionsremain low, you should use only newHonda replacement parts or theirequivalent for repairs. Using lowerquality parts may increase theemissions from your vehicle.The emissions control systems arecovered by warranties separate fromthe rest of your vehicle. Read yourwarranty manual for moreinformation.
Emissions Controls
259
TechnicalInformation
10/08/06 08:34:41 11 ELEMENT MMC North America Owner's Man 50 31SCV680 enu
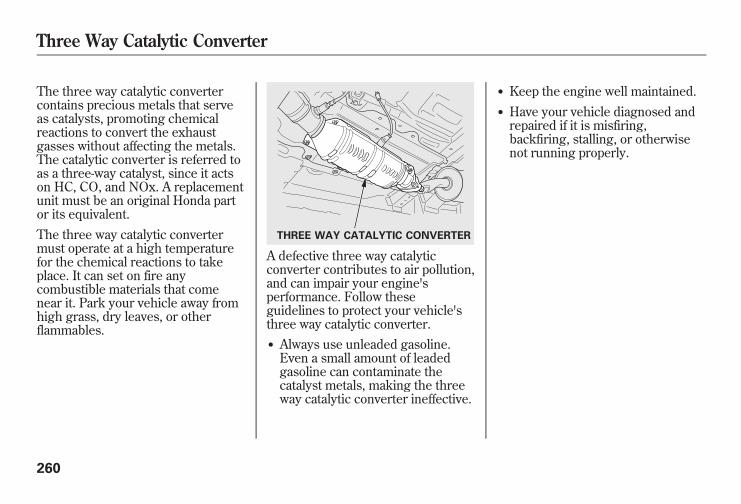
The three way catalytic convertercontains precious metals that serveas catalysts, promoting chemicalreactions to convert the exhaustgasses without affecting the metals.The catalytic converter is referred toas a three-way catalyst, since it actson HC, CO, and NOx. A replacementunit must be an original Honda partor its equivalent.The three way catalytic convertermust operate at a high temperaturefor the chemical reactions to takeplace. It can set on fire anycombustible materials that comenear it. Park your vehicle away fromhigh grass, dry leaves, or otherflammables.
A defective three way catalyticconverter contributes to air pollution,and can impair your engine'sperformance. Follow theseguidelines to protect your vehicle'sthree way catalytic converter.● Always use unleaded gasoline.Even a small amount of leadedgasoline can contaminate thecatalyst metals, making the threeway catalytic converter ineffective.
● Keep the engine well maintained.● Have your vehicle diagnosed andrepaired if it is misfiring,backfiring, stalling, or otherwisenot running properly.
THREE WAY CATALYTIC CONVERTER
Three Way Catalytic Converter
260
10/08/06 08:34:41 11 ELEMENT MMC North America Owner's Man 50 31SCV680 enu
Testing of Readiness CodesIf you take your vehicle for anemissions test shortly after thebattery has been disconnected orgone dead, it may not pass the test.This is because of certain ‘‘readinesscodes’’ that must be set in the on-board diagnostics for the emissionssystems. These codes are erasedwhen the battery is disconnected,and set again only after several daysof driving under a variety ofconditions.
If the testing facility determines thatthe readiness codes are not set, youwill be requested to return at a laterdate to complete the test. If you mustget the vehicle retested within thenext two or three days, you cancondition the vehicle for retesting bydoing the following.1. Make sure the fuel tank is nearly,but not completely full (around3/4).
2. Make sure the vehicle has beenparked with the engine off for 6hours or more.
3. Make sure the ambienttemperature is between 40° and95°F (4° and 35°C).
4. Without touching the acceleratorpedal, start the engine, and let itidle for 20 seconds.
5. Keep the vehicle in Park. Increasethe engine speed to 2,000 rpm, andhold it there until the temperaturegauge rises to at least 1/4 of thescale (about 3 minutes).
6. Without touching the acceleratorpedal, let the engine idle for 20seconds.
CONTINUED
Emissions Testing
261
TechnicalInformation
10/08/06 08:34:41 11 ELEMENT MMC North America Owner's Man 50 31SCV680 enu
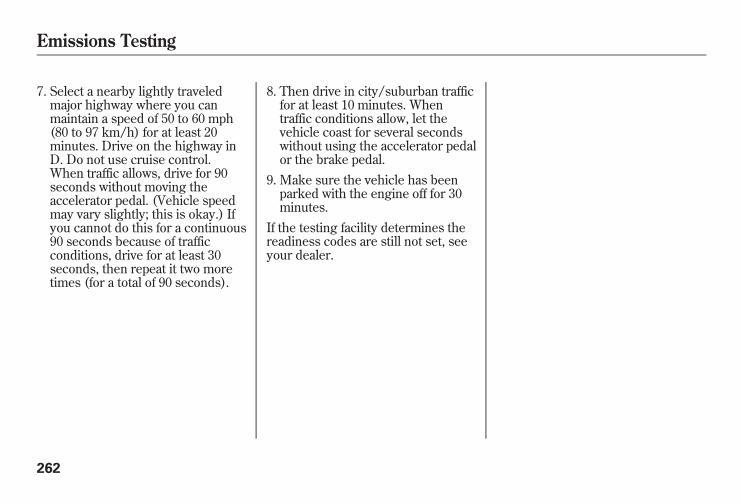
7. Select a nearby lightly traveledmajor highway where you canmaintain a speed of 50 to 60 mph(80 to 97 km/h) for at least 20minutes. Drive on the highway inD. Do not use cruise control.When traffic allows, drive for 90seconds without moving theaccelerator pedal. (Vehicle speedmay vary slightly; this is okay.) Ifyou cannot do this for a continuous90 seconds because of trafficconditions, drive for at least 30seconds, then repeat it two moretimes (for a total of 90 seconds).
8. Then drive in city/suburban trafficfor at least 10 minutes. Whentraffic conditions allow, let thevehicle coast for several secondswithout using the accelerator pedalor the brake pedal.
9. Make sure the vehicle has beenparked with the engine off for 30minutes.
If the testing facility determines thereadiness codes are still not set, seeyour dealer.
Emissions Testing
262
10/08/06 08:34:41 11 ELEMENT MMC North America Owner's Man 50 31SCV680 enu
Customer Service Information .... 264Warranty Coverages ................... 265Reporting Safety Defects............. 266Authorized Manuals.................... 267
Warranty and Customer Relations
263
Warranty
andCustom
erRelations
10/08/06 08:34:41 11 ELEMENT MMC North America Owner's Man 50 31SCV680 enu
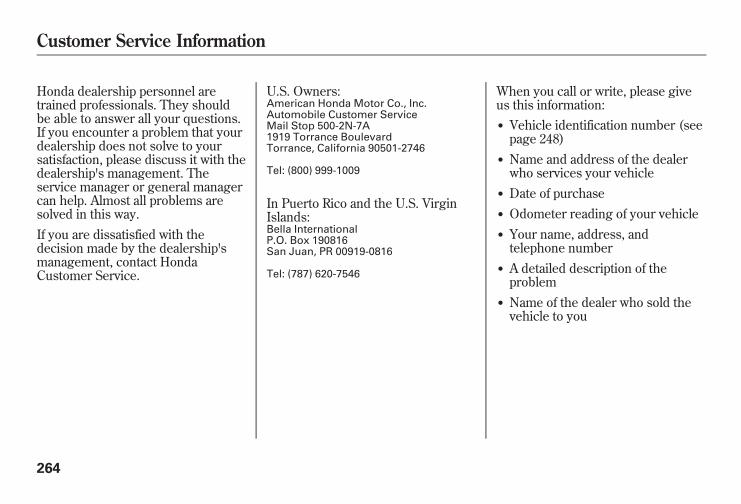
Honda dealership personnel aretrained professionals. They shouldbe able to answer all your questions.If you encounter a problem that yourdealership does not solve to yoursatisfaction, please discuss it with thedealership's management. Theservice manager or general managercan help. Almost all problems aresolved in this way.If you are dissatisfied with thedecision made by the dealership'smanagement, contact HondaCustomer Service.
U.S. Owners:American Honda Motor Co., Inc.Automobile Customer ServiceMail Stop 500-2N-7A1919 Torrance BoulevardTorrance, California 90501-2746
Tel: (800) 999-1009
In Puerto Rico and the U.S. VirginIslands:Bella InternationalP.O. Box 190816San Juan, PR 00919-0816
Tel: (787) 620-7546
When you call or write, please giveus this information:● Vehicle identification number (seepage 248)
● Name and address of the dealerwho services your vehicle
● Date of purchase● Odometer reading of your vehicle● Your name, address, andtelephone number
● A detailed description of theproblem
● Name of the dealer who sold thevehicle to you
Customer Service Information
264
10/08/06 08:34:41 11 ELEMENT MMC North America Owner's Man 50 31SCV680 enu
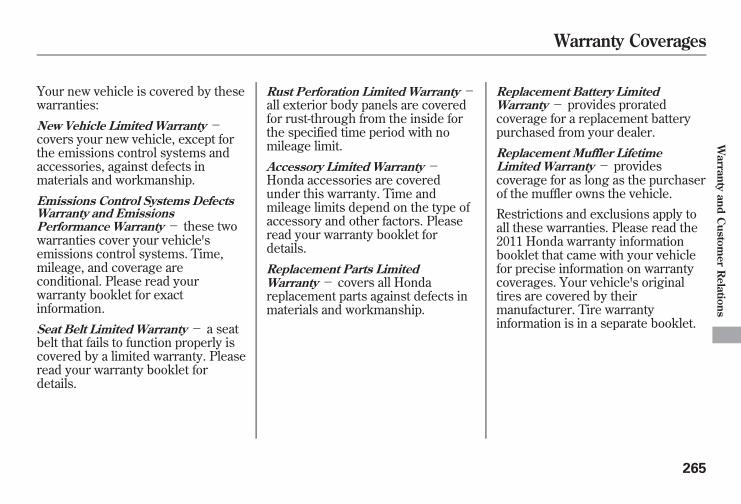
Your new vehicle is covered by thesewarranties:New Vehicle Limited Warranty -covers your new vehicle, except forthe emissions control systems andaccessories, against defects inmaterials and workmanship.Emissions Control Systems DefectsWarranty and EmissionsPerformance Warranty - these twowarranties cover your vehicle'semissions control systems. Time,mileage, and coverage areconditional. Please read yourwarranty booklet for exactinformation.Seat Belt Limited Warranty - a seatbelt that fails to function properly iscovered by a limited warranty. Pleaseread your warranty booklet fordetails.
Rust Perforation Limited Warranty -all exterior body panels are coveredfor rust-through from the inside forthe specified time period with nomileage limit.Accessory Limited Warranty -Honda accessories are coveredunder this warranty. Time andmileage limits depend on the type ofaccessory and other factors. Pleaseread your warranty booklet fordetails.
Replacement Parts LimitedWarranty - covers all Hondareplacement parts against defects inmaterials and workmanship.
Replacement Battery LimitedWarranty - provides proratedcoverage for a replacement batterypurchased from your dealer.Replacement Muffler LifetimeLimited Warranty - providescoverage for as long as the purchaserof the muffler owns the vehicle.Restrictions and exclusions apply toall these warranties. Please read the2011 Honda warranty informationbooklet that came with your vehiclefor precise information on warrantycoverages. Your vehicle's originaltires are covered by theirmanufacturer. Tire warrantyinformation is in a separate booklet.
Warranty Coverages
265
Warranty
andCustom
erRelations
10/08/06 08:34:41 11 ELEMENT MMC North America Owner's Man 50 31SCV680 enu
If you believe that your vehicle has adefect which could cause a crash orcould cause injury or death, youshould immediately inform theNational Highway Traffic SafetyAdministration (NHTSA) in additionto notifying American Honda MotorCo., Inc.
If NHTSA receives similarcomplaints, it may open aninvestigation, and if it finds that asafety defect exists in a group ofvehicles, it may order a recall andremedy campaign. However, NHTSAcannot become involved in individualproblems between you, your dealer,or American Honda Motor Co., Inc.
To contact NHTSA, you may call theVehicle Safety Hotline toll-free at1-888-327-4236(TTY: 1-800-424-9153); go tohttp://www.safercar.gov; or write to:Administrator, NHTSA, 1200 NewJersey Avenue, SE., Washington, DC20590.You can also obtain other informationabout motor vehicle safety fromhttp://www.safercar.gov.
Reporting Safety Defects
266
10/08/06 08:34:41 11 ELEMENT MMC North America Owner's Man 50 31SCV680 enu
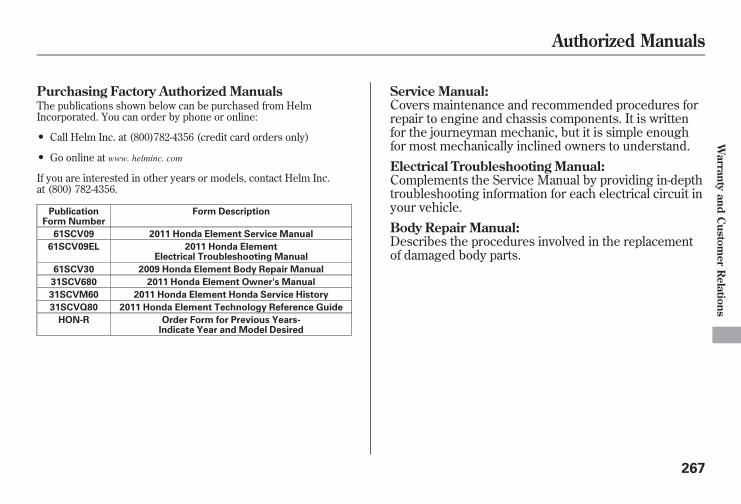
Purchasing Factory Authorized ManualsThe publications shown below can be purchased from HelmIncorporated. You can order by phone or online:
● Call Helm Inc. at (800)782-4356 (credit card orders only)
● Go online at www. helminc. com
If you are interested in other years or models, contact Helm Inc.at (800) 782-4356.
PublicationForm Number
Form Description
61SCV09 2011 Honda Element Service Manual
61SCV09EL 2011 Honda ElementElectrical Troubleshooting Manual
61SCV30 2009 Honda Element Body Repair Manual
31SCV680 2011 Honda Element Owner's Manual
31SCVM60 2011 Honda Element Honda Service History
31SCVQ80 2011 Honda Element Technology Reference Guide
HON-R Order Form for Previous Years-Indicate Year and Model Desired
Service Manual:Covers maintenance and recommended procedures forrepair to engine and chassis components. It is writtenfor the journeyman mechanic, but it is simple enoughfor most mechanically inclined owners to understand.Electrical Troubleshooting Manual:Complements the Service Manual by providing in-depthtroubleshooting information for each electrical circuit inyour vehicle.Body Repair Manual:Describes the procedures involved in the replacementof damaged body parts.
Authorized Manuals
267
Warranty
andCustom
erRelations

268
10/08/06 08:34:41 11 ELEMENT MMC North America Owner's Man 50 31SCV680 enu
A
Accessories andModifications .......................... 149
ACCESSORY (Ignition KeyPosition) ................................... 79
Accessory Power Sockets .......... 100Additives, Engine Oil ................. 194Adjusting the Steering Wheel ...... 74Advanced Airbags ........................ 26Airbag (SRS) ............................ 9, 22Air Conditioning System ............ 104Air Pressure, Tires .............. 212, 213Alcohol in Gasoline .................... 142Antifreeze ................................... 196Anti-lock Brakes (ABS)Indicator ............................ 59, 168Operation ................................ 167
Anti-theft, Audio System ............. 132Anti-theft Steering Column
Lock ......................................... 79Audio System ............................. 109Automatic Seat Belt Tensioners ... 20Automatic Speed Control ........... 137
Automatic Transmission ............ 161Capacity, Fluid ........................ 251Checking Fluid Level .............. 198Shifting ................................... 161Shift Lever PositionIndicators ............................ 161
Shift Lever Positions ............... 161Shift Lock Release ................... 163
Auxiliary Input Jack ................... 136
B
BatteryCharging SystemIndicator ........................ 58, 235
Jump Starting .......................... 231Maintenance ........................... 218Specifications .......................... 252
Before Driving ........................... 141Belts, Seat ................................ 8, 18Beverage Holders ........................ 99Booster Seats ............................... 50BrakesAnti-lock Brakes (ABS) ........... 167Break-in, New Linings ............. 142
Bulb Replacement ................... 206Fluid ....................................... 199Parking .................................... 94System Design ........................ 166System Indicator ............... 58, 237Wear Indicators ....................... 167
Braking System .......................... 166Break-in, New Vehicle ................ 142Brightness Control,Instruments .............................. 72
Bulb ReplacementBack-up Lights ........................ 206Brake Lights ........................... 206Daytime Running Lights ......... 203Front Parking/Turn Signal
Lights .................................. 204Front Side Marker Lights ........ 206Headlights .............................. 202High-mount Brake Light ......... 208Rear Bulbs .............................. 206Rear License Plate Lights ........ 207Side Turn Signal Lights ........... 204Specifications .......................... 252Taillights ................................. 206Turn Signal Lights .......... 204, 206
CONTINUED
Index
I
INDEX
10/08/06 08:34:41 11 ELEMENT MMC North America Owner's Man 50 31SCV680 enu
Bulbs, Halogen .......................... 202Bungee Cords ............................ 155
C
Capacities Chart ......................... 251Carbon Monoxide Hazard ............ 52Cargo ......................................... 151Cargo Area Light .......................... 96Cargo Hooks .............................. 156Cargo, How to Carry .................. 151Carrying Cargo .......................... 151CAUTION, Explanation of ............ iiiCD Care ..................................... 127Ceiling Light ................................ 96Certification Label ...................... 248Chains, Tires .............................. 217Changing a Flat Tire .................. 223Changing OilHow to .................................... 194When to .................................. 185
Charging SystemIndicator ........................... 58, 235
Check Fuel Cap Message ............ 66Checklist, Before Driving ........... 159
Child Safety .................................. 35Booster Seats ........................... 50Child Seats .................... 40, 41, 42Important Safety Reminders ..... 39Infants ...................................... 40Larger Children ....................... 49LATCH ..................................... 44Risks with Airbags ................... 36Small Children ......................... 41Tethers .................................... 48Warning Labels ........................ 37Where Should a Child Sit? ........ 36
Child Seats ............................. 35, 42LATCH Anchorage Points ........ 44Tether Anchorage Points ......... 48
Cleaning the Seat Belts .............. 209Clock .......................................... 133Code, Audio System ................... 132CO in the Exhaust ................ 52, 258Cold Weather, Starting in ........... 160Compact Spare Tire .................... 222Controls, Instruments and ............ 55CoolantAdding .................................... 196Checking ................................ 145Proper Solution ....................... 196
Temperature Gauge ................. 67Cooler Box ................................... 98Crankcase Emissions ControlSystem ................................... 258
Cruise Control Indicator ............... 60Cruise Control Operation ........... 137Cruise Main Indicator .................. 60Cup Holders ................................. 99Customer Service ....................... 264
D
DANGER, Explanation of ............. iiiDashboard ............................... 3, 56Daytime Running Lights .............. 72Daytime Running LightsIndicator ................................... 60
Dead Battery .............................. 231Defects, Reporting Safety ........... 266Defogger, Rear Window ............... 74Dimensions ................................ 250Dimming the Headlights .............. 71DipstickAutomatic Transmission ......... 198Engine Oil ............................... 145
Index
II
10/08/06 08:34:41 11 ELEMENT MMC North America Owner's Man 50 31SCV680 enu
Directional Signals ................. 60, 71Disc Brake Wear Indicators ....... 167Disc Care ................................... 127Disc Changer Error
Messages ............................... 126Disc Player Error Messages ...... 125Disposal of Used Oil ................... 195DoorsIndicator ................................... 11Locking and Unlocking ............ 80Power Door Locks ................... 80
DOT Tire Quality Grading (U.S.Vehicles) ................................ 253
Driver and Passenger Safety .......... 5Driving ....................................... 157Economy ................................. 146
Driving Guidelines ..................... 158Dust and Pollen Filter ................ 210
E
Economy, Fuel ........................... 146Emergencies on the Road .......... 221Battery, Jump Starting ............. 231Brake System Indicator ..... 58, 237
Changing a Flat Tire ............... 223Charging SystemIndicator ........................ 58, 235
Checking the Fuses ................ 239Driving with a Flat Tire ........... 223Hazard Warning Flashers ........ 73Jump Starting .......................... 231Low Oil PressureIndicator ........................ 58, 235
Malfunction IndicatorLamp ............................. 58, 236
Overheated Engine ................. 233Towing .................................... 244
Emergency Brake ........................ 94Emergency Flashers .................... 73Emergency Towing .................... 244Emissions Controls .................... 258Emissions Testing ...................... 261EngineAdding Engine Coolant ........... 196Coolant Temperature Gauge .... 67If it Won't Start ........................ 229Malfunction IndicatorLamp ............................. 58, 236
Oil Life Indicator ..................... 185Oil Pressure Indicator ....... 58, 235
Oil, What Kind to Use ............. 193Overheating ............................ 233Specifications .......................... 250Speed Limiter .......................... 163Starting ................................... 160
Engine Coolant .......................... 196Engine Number ......................... 249Ethanol in Gasoline .................... 142Evaporative EmissionsControls .................................. 258
Exhaust Fumes ............................ 52Expectant Mothers, Use of SeatBelts by .................................... 16
F
Fan, Interior ............................... 105Features ..................................... 103FiltersDust and Pollen ....................... 210Oil ........................................... 194
Flashers, Hazard Warning ........... 73Flat Tire, Changing a ................. 223Floor Mats ................................. 209
CONTINUED
Index
III
INDEX
10/08/06 08:34:41 11 ELEMENT MMC North America Owner's Man 50 31SCV680 enu
FluidsAutomatic Transmission ......... 198Brake ...................................... 199Location .................................. 192Power Steering ........................ 200Windshield Washer ................. 197
FM/AM Radio Reception ........... 130Folding the Rear Seats ................. 88Four-way Flashers ........................ 73Front Airbags ........................... 9, 24Front SeatAdjusting .................................. 83
Fuel ............................................ 142Check Fuel Cap Message ........ 66Economy ................................. 146Fill Door and Cap .................... 143Gauge ...................................... 66Low Fuel Indicator ................... 61Octane Requirement ............... 142Reserve Indicator ..................... 61Tank, Filling the ...................... 143
Fuel Economy ............................ 146Fuses, Checking the .................. 239
G
Gas Mileage, Improving ............. 147Gasoline ..................................... 142Gauge ...................................... 66Low Fuel Indicator ................... 61Octane Requirement ............... 142Tank, Refueling ....................... 143
Gas Station Procedures .............. 143GaugesEngine Coolant Temperature ... 67Fuel .......................................... 66Odometer ................................. 65Outside TemperatureIndicator ............................... 68
Speedometer ............................ 64Tachometer .............................. 64Trip meter ................................ 66
Gearshift Lever PositionsAutomaticTransmission ....................... 161
Glove Box .................................. 100Gross Axle Weight Rating(GAWR) ................................. 174
Gross Vehicle Weight Rating(GVWR) .......................... 153, 174
H
Halogen Headlight Bulbs ........... 202Hatch ........................................... 81Hazard Warning Flashers ............ 73HeadlightsAiming .................................... 201Daytime Running Lights .......... 72High Beam Indicator ................ 61High Beams, Turning on .......... 71Lights On Indicator .................. 61Low Beams, Turning on ........... 71Reminder Chime ...................... 71Replacing Halogen Bulbs ........ 202Turning on ............................... 71
Head Restraints ............................ 85Heating and Cooling .................. 104High Altitude, Starting at ............ 160Hood, Opening and Closingthe .......................................... 144
Horn ........................................ 4, 69
Index
IV
10/08/06 08:34:41 11 ELEMENT MMC North America Owner's Man 50 31SCV680 enu
I
Identification Number,Vehicle ................................... 248
IgnitionKeys ......................................... 75Switch ...................................... 79
Immobilizer System ..................... 76Important Safety Precautions ......... 6Indicators, Instrument Panel ........ 57ABS (Anti-lock Brake) ....... 59, 168Brake (Parking and BrakeSystem) ......................... 58, 237
Charging System .............. 58, 235Cruise Control .......................... 60Cruise Main ............................. 60Door and Tailgate Open ........... 61DRL (Daytime RunningLights) .................................. 60
High Beam ............................... 61Key (Immobilizer System) ....... 60Lights On ................................. 61Low Fuel .................................. 61Low Oil Pressure .............. 58, 235Low Tire Pressure ............. 62, 169
Maintenance MinderTM ..... 59, 185Malfunction IndicatorLamp ............................. 58, 236
Passenger Airbag Off ............... 32Seat Belt Reminder ............. 18, 58Side Airbag Off .................... 31, 59SRS ..................................... 30, 59TPMS ................................ 63, 170Turn Signal and HazardWarning ............................... 60
VSA OFF .................................. 62VSA System ............................. 62
Individual Map Lights .................. 95Infant Restraint ............................ 40Infant Seats .................................. 40Tether Anchorage Points ......... 48
Inflation, Proper Tire .................. 212Recommended Pressures ....... 213
Inside Mirror ............................... 93Inspection, Tire .......................... 214Installing a Child Seat .................. 43Instrument Panel .......................... 57Instrument Panel Brightness ....... 72Instruments and Controls ............. 55Interior Lights .............................. 95Introduction ................................... i
J
Jacking up the Vehicle ............... 223Jack, Tire ................................... 223Jump Starting ............................. 231
K
Keys ............................................. 75
L
Label, Certification ..................... 248Lane Change, Signaling ............... 71Lap/Shoulder Belt ................. 14, 19LATCH Anchorage System .......... 44Light Control Switch .................... 95LightsBulb Replacement ................... 202Indicator ................................... 57Interior ..................................... 95Parking .................................... 71Turn Signal .............................. 71
Load Limit .................................. 152
CONTINUED
Index
V
INDEX
10/08/06 08:34:41 11 ELEMENT MMC North America Owner's Man 50 31SCV680 enu
LOCK (Ignition Key Position) ...... 79LocksAnti-theft Steering Column ....... 79Fuel Fill Door .......................... 143Glove Box ............................... 100Hatch ....................................... 81Lockout Prevention .................. 81Power Door .............................. 80Tailgate .................................... 82
Low Coolant Level ...................... 145Lower Anchors ............................. 44Low Fuel Indicator ....................... 61Low Oil Pressure
Indicator ........................... 58, 235Lubricant Specifications Chart ... 251Luggage, Storing (cargo) ........... 151
M
Maintenance .............................. 183Main Items and Sub Items ...... 188Minder .................................... 185Minder Indicator ...................... 59Owner's MaintenanceChecks ................................ 190
Safety ...................................... 184Malfunction IndicatorLamp ................................ 58, 236
Meters, Gauges ............................ 64Methanol in Gasoline ................. 142Mirrors, Adjusting ........................ 93Modifications ............................. 150Modifying Your Vehicle ............. 150
N
Neutral Gear Position ................. 162New Vehicle Break-in ................. 142NOTICE, Explanation of ................ iNumbers, Identification ............. 248
O
Octane Requirement,Gasoline ................................. 142
Odometer ..................................... 65Off-Highway DrivingGuidelines .............................. 180
Off-Road Precautions .................. 180
OilChange, How to ...................... 194Change, When to .................... 185Checking Engine .................... 145Life, Engine ............................. 185Pressure Indicator ............. 58, 235Selecting Proper Viscosity
Chart ................................... 193Onboard Refueling VaporRecovery ................................ 258
ON (Ignition Key Position) .......... 79Opening the Tailgate .................... 82Outside Mirrors ........................... 93Outside Temperature Indicator .... 68Overhead Console ...................... 101Overheating, Engine .................. 233Owner's Maintenance Checks .... 190Oxygenated Fuels ...................... 142
P
Panel Brightness Control ............. 72Park Gear Position ..................... 161Parking ...................................... 165Parking Brake .............................. 94
Index
VI
10/08/06 08:34:41 11 ELEMENT MMC North America Owner's Man 50 31SCV680 enu
Parking Brake and Brake SystemIndicator ........................... 58, 237
Parking Over Things thatBurn ................................ 165, 260
Passenger Airbag Off Indicator .... 32PGM-FI System .......................... 259Playing a Disc ............................ 119Pollen Filter ............................... 210Power Door Locks ....................... 80Power Socket Locations ............. 100Power Steering Fluid ................. 200Power Windows ........................... 92Pregnancy, Using Seat Belts ........ 16Preparing to Drive ...................... 159Proper Seat Belt Usage ................ 14Protecting Adults and Teens ........ 11Additional Safety Precautions ... 16Advice for Pregnant Women .... 16
Protecting Children ...................... 35General Guidelines .................. 35Protecting Infants ..................... 40Protecting Larger Children ...... 49Protecting Small Children ........ 41Using Child Seats withTethers ................................. 48
Using LATCH .......................... 44
R
Radiator Overheating ................. 233Radio/CD Sound System ........... 109Radio Theft Protection ............... 132Readiness Codes ........................ 261Rear Lights, BulbReplacement ........................... 206
Rear Seat, Folding ........................ 88Rearview Mirror ........................... 93Rear Window Defogger ................ 74Rear Window Wiper andWasher ..................................... 70
Reclining the Front Seats ............. 87Refueling .................................... 143Reminder Indicators ..................... 58Remote Audio Controls .............. 135Remote Transmitter ..................... 77Replacement InformationDust and Pollen Filter ............. 210Engine Oil and Filter ............... 194Fuses ...................................... 239Light Bulbs ............................. 202Spark Plugs ............................. 250Tires ....................................... 215
Wiper Blades .......................... 210Replacing Seat Belts After aCrash ........................................ 20
Reporting Safety Defects ............ 266Reserve Tank, EngineCoolant ............................ 145, 196
Restraint, Child ............................ 35Reverse Gear Position ................ 162Rotation, Tire ............................. 215
S
Safety Belts .............................. 8, 18Safety Defects, Reporting ........... 266Safety Features .............................. 7Airbags ................................. 9, 22Door Locks .............................. 11Head Restraints ........................ 13Seat Belts ........................ 8, 14, 18Seats & Seat-Backs .............. 11, 12
Safety Labels, Location of ............. 53Safety Messages .......................... iiiSeat Adjustments ......................... 83
CONTINUED
Index
VII
INDEX
10/08/06 08:34:41 11 ELEMENT MMC North America Owner's Man 50 31SCV680 enu

Seat Belts ................................. 8, 18Additional Information ............. 18Advice for Pregnant Women .... 16Automatic Seat BeltTensioners ........................... 20
Cleaning .................................. 209Lap/Shoulder Belt .............. 14, 19Maintenance ............................ 20Reminder Indicator andBeeper ............................. 18, 58
System Components ................ 18Use During Pregnancy ............. 16Wearing a Lap/ShoulderBelt .................................. 14, 19
Seats ............................................ 83Head Restraints ........................ 85
Seats, Adjusting the ..................... 83SensorsDriver's Seat Position Sensor ... 26Front Passenger's WeightSensors ................................ 26
Impact Sensors ........................ 22Serial Number ............................ 248Service Intervals ......................... 185Service Manual .......................... 267Service Station Procedures ........ 143
Setting the Clock ........................ 133Shifting the AutomaticTransmission .......................... 161
Shift Lever Position Indicators ... 161Shift Lock Release ...................... 163Side Airbags ................................. 28How the Side Airbag OffIndicator Works ................... 31
How Your Side Airbags Work .. 28Side Curtain Airbags .................... 29How Your Side Curtain AirbagsWork .................................... 29
Side Marker Lights, BulbReplacement in ....................... 206
Signaling Turns ............................ 60Snow Tires ................................. 217Sound System ............................ 109Spare Tire .................................. 222Inflating ........................... 212, 222Specifications .......................... 252
Spark Plugs ................................ 250Specifications ............................. 250Speed Control ............................ 137Speed Limiter ............................. 163Speedometer ................................ 64
SRS, Additional Information ......... 22Additional Safety Precautions ... 33Airbag Service .......................... 33Airbag System Components ..... 22How the Side Airbag Off
Indicator Works ................... 31How the SRS Indicator Works .. 30How Your Front Airbags
Work .................................... 24How Your Side Airbags Work .. 28How Your Side Curtain Airbags
Work .................................... 29SRS Indicator ......................... 30, 59START (Ignition Key Position) ..... 79Starting the Engine .................... 160In Cold Weather at High
Altitude ................................ 160With a Dead Battery ................ 231
State Emissions Testing ............. 261Steam Coming from Engine ....... 233Steering WheelAdjustment ............................... 74Anti-theft Column Lock ............ 79Buttons ........................... 135, 137
Stereo Sound System .......... 109, 110Storing Your Vehicle .................. 219
Index
VIII
10/08/06 08:34:41 11 ELEMENT MMC North America Owner's Man 50 31SCV680 enu
Sun Visor ................................... 100Supplemental Restraint
System .............................. 9, 22Servicing .................................. 33SRS Indicator ...................... 30, 59System Components ................ 22
Synthetic Oil .............................. 194
T
Tachometer .................................. 64Tailgate ........................................ 82Open Indicator ......................... 61Opening the ............................. 82
Taillights, Changing Bulbs in ..... 206Taking Care of the
Unexpected ............................ 221Technical DescriptionsDOT Tire Quality Grading (U.S.Vehicles) ............................. 253
Emissions Control Systems ..... 258Three Way CatalyticConverter ............................ 260
Tire Labeling ........................... 255
Tire Pressure Monitoring System(TPMS)- Required FederalExplanation ...................... 256
Temperature Gauge ..................... 67Tensioners, Seat Belts .................. 20Tether Anchorage Points ............. 48Theft Protection, Radio .............. 132Three Way CatalyticConverter ............................... 260
Tilt the Steering Wheel ................ 74Time, Setting the ........................ 133Tire Chains ................................ 217Tire, How to Change a Flat ........ 223Tire Information ......................... 255Tire Labeling .............................. 255Tire Pressure Monitoring System(TPMS) ........................... 169, 256
Tires .......................................... 212Air Pressure ............................ 213Chains ..................................... 217Checking Wear ....................... 214Compact Spare ........................ 222DOT Tire Quality Grading (U.S.Vehicles) ............................. 253
Inflation ................................... 212Inspection ............................... 214
Labeling .................................. 255Low Tire Pressure
Indicator ........................ 62, 169Maintenance ........................... 215Pressure Monitoring System ... 169Replacing ................................ 215Rotating .................................. 215Snow ....................................... 217Specifications .......................... 252
Tools, Tire Changing ................. 223TowingA Trailer .................................. 174Emergency Wrecker ............... 244
TPMS (Tire Pressure MonitoringSystem) .............................. 169
Indicator ............................ 63, 170Required Federal
Explanation ......................... 256TransmissionChecking Fluid Level .............. 198Fluid Selection ........................ 198Identification Number ............. 248Shifting the Automatic ............. 161
Treadwear .................................. 253Trip Meter ................................... 66
CONTINUED
Index
IX
INDEX
10/08/06 08:34:41 11 ELEMENT MMC North America Owner's Man 50 31SCV680 enu
Turn Signals ................................. 60Turn Signals and Headlights ........ 71
U
Unexpected, Taking Care ofthe .......................................... 221
Uniform Tire Quality Grading(U.S. only) .............................. 253
Unleaded Gasoline ..................... 142Used Oil, How to Dispose of ...... 195
V
Vanity Mirror ............................. 101Vehicle Capacity Load ................ 152Vehicle Dimensions ................... 250Vehicle Identification Number ... 248Vehicle Stability Assist (VSA®),
aka Electronic StabilityControl (ESC), System
VSA OFF Indicator .................. 172Vehicle Stability Assist (VSA)
System ................................ 172VSA OFF Indicator ................... 62
VSA OFF Switch ..................... 173VSA System Indicator .............. 62
Vehicle Storage .......................... 219Ventilation .................................. 106VIN ............................................ 248Viscosity, Oil .............................. 193
W
WARNING, Explanation of ........... iiiWarning Labels, Location of ......... 53Warranty Coverages .................. 265Washer, WindshieldChecking the Fluid Level ........ 197Operation ................................. 70
Wheels ....................................... 212Adjusting the Steering .............. 74Alignment and Balance ........... 215Compact Spare ........................ 222Wrench, Nut ........................... 223
WindowsOperating the Power ................ 92Rear, Defogger ......................... 74
WindshieldCleaning ................................... 70
Defroster ................................. 107Washers ............................ 70, 197
Wipers, WindshieldChanging Blades ..................... 210Operation ................................. 70
Worn Tires ................................. 214Wrecker, Emergency Towing .... 244
Index
X
10/08/06 08:34:41 11 ELEMENT MMC North America Owner's Man 50 31SCV680 enu

10/08/06 08:34:41 11 ELEMENT MMC North America Owner's Man 50 31SCV680 enu
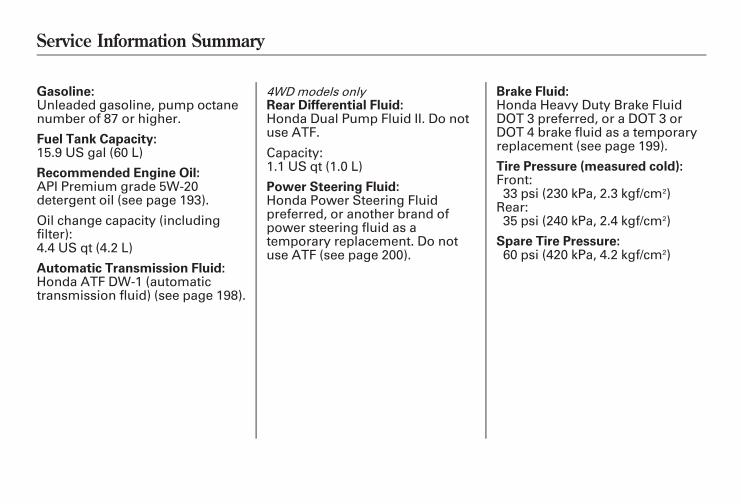
Gasoline:Unleaded gasoline, pump octanenumber of 87 or higher.
Fuel Tank Capacity:15.9 US gal (60 L)
Recommended Engine Oil:API Premium grade 5W-20detergent oil (see page 193).
Oil change capacity (includingfilter):4.4 US qt (4.2 L)
Automatic Transmission Fluid:Honda ATF DW-1 (automatictransmission fluid) (see page 198).
4WD models onlyRear Differential Fluid:Honda Dual Pump Fluid II. Do notuse ATF.
Capacity:1.1 US qt (1.0 L)
Power Steering Fluid:Honda Power Steering Fluidpreferred, or another brand ofpower steering fluid as atemporary replacement. Do notuse ATF (see page 200).
Brake Fluid:Honda Heavy Duty Brake FluidDOT 3 preferred, or a DOT 3 orDOT 4 brake fluid as a temporaryreplacement (see page 199).
Tire Pressure (measured cold):Front:33 psi (230 kPa, 2.3 kgf/cm2)
Rear:35 psi (240 kPa, 2.4 kgf/cm2)
Spare Tire Pressure:60 psi (420 kPa, 4.2 kgf/cm2)
Service Information Summary
10/08/06 08:34:41 11 ELEMENT MMC North America Owner's Man 50 31SCV680 enu