Embed Size (px)
Citation preview
ADVENTURE BADGE
NOTES FOR BOYS
1
CONTENTS Section A: The Compass
● Parts of a Compass 1 ● Compass Care 2 ● Telling Direction with a Compass 2 ● Finding Bearing 3
Section B: The Topographical Map
● Map Care 4 ● Key Information in a Topographical Map 4 ● Grid References 6
Section C: Using a Compass and Map
● The Three Norths 7 ● Setting a Map 7 ● Finding a Bearing from a Map 8
Section D: Knots, Hitches and Lashings
● Knots 9 ● Hitches 11 ● Lashings 13
Section E: Tents and Shelters
● Improvised Shelter – The Basha 14 ● Lightweight Tents 15
Section F: Choosing a Campsite & Behaviour at Camp
● Choosing a Campsite 19 ● Practices and Behaviour at Camp 19 ● Safety Considerations 20
Section G: The Country Code 21 Section H: Movement on Terrain
● Key Factors Affecting Speed 23 ● Estimating Distances 23 ● Global Positioning System 24
Section I: Compiling an Expedition Log
● Function of an Expedition Log 25 ● What and When Information should be Collected 25 ● How to Compile a Logbook 26
Section J: Packing for an Extended Expedition
● Equipment and Items needed on a Camp or Expedition 27 ● How to Pack a Haversack 28
Section K: Expedition Planning
● Elements of Expedition Planning 31 ● Aim of the Expedition 31 ● Situational Analysis 31 ● Planning and Execution 32 ● Command and Control 32
SECTION A: THE COMPASS
2
1. Introduction to the Compass
A compass is an instrument, which indicates directions. It contains a magnetised needle that aligns itself on a North-South axis. Since one end points towards magnetic North, this fixed reference point enables us to pinpoint our location relative to where North is. The main point is that by looking towards North, we can identify where the other cardinal points are: South is behind us (180º), while East is to our right (90º) and West (270º) is on our left.
This section will: a) Identify the parts of a compass b) List ways in which we can care for a compass and ensure that it continues
to be of service for as long a time as possible c) Explain how one tells direction using a compass
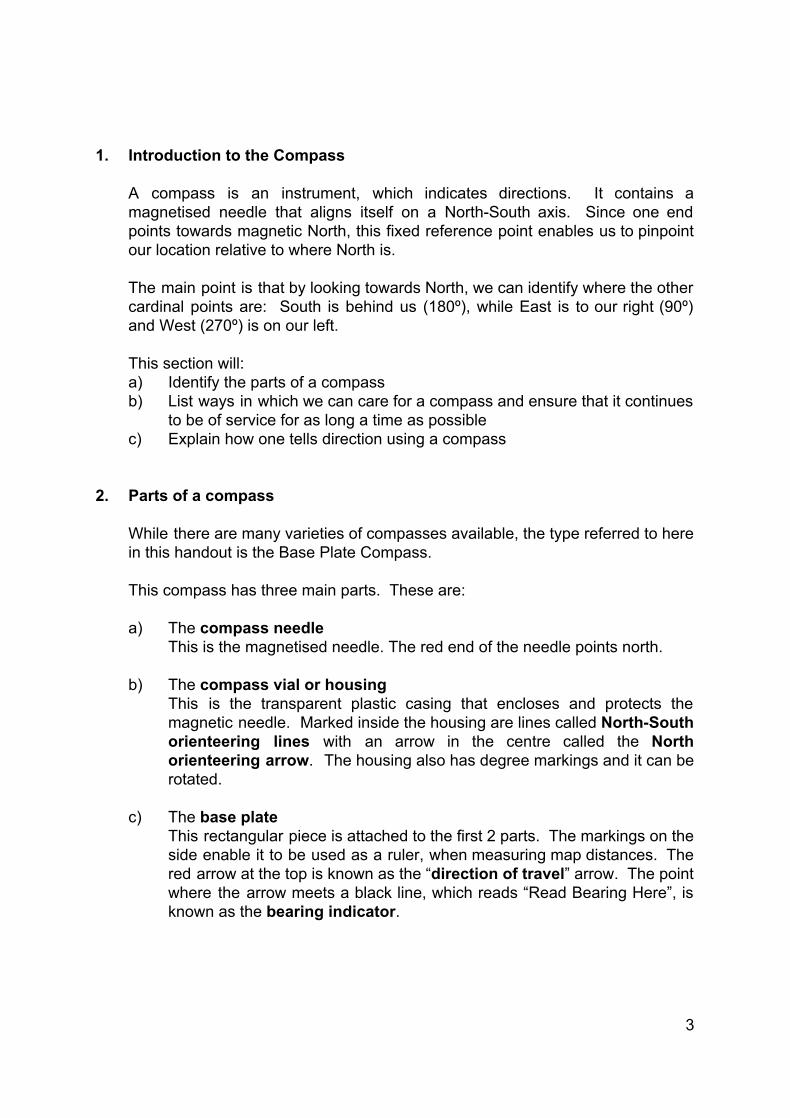
2. Parts of a compass
While there are many varieties of compasses available, the type referred to here in this handout is the Base Plate Compass.
This compass has three main parts. These are: a) The compass needle
This is the magnetised needle. The red end of the needle points north. b) The compass vial or housing
This is the transparent plastic casing that encloses and protects the magnetic needle. Marked inside the housing are lines called North-South orienteering lines with an arrow in the centre called the North orienteering arrow. The housing also has degree markings and it can be rotated.
c) The base plate
This rectangular piece is attached to the first 2 parts. The markings on the side enable it to be used as a ruler, when measuring map distances. The red arrow at the top is known as the “direction of travel” arrow. The point where the arrow meets a black line, which reads “Read Bearing Here”, is known as the bearing indicator.
3
3. Compass Care
When keeping compasses, lay them flat on their base plates, making sure that you do not bunch them up together. This ensures that they do not get demagnetised through close proximity with each other.
When using a compass, ensure that it is looped around your neck. This will prevent you from misplacing it or dropping it.
4. Telling Direction With a Compass 4.1 Setting Bearing
A bearing is the name given to each of the numbers around the edge of the housing from 0 to 360 degrees. For example, 120o can be called `a bearing of 120o'. Setting a bearing on your compass means lining your compass up with magnetic north so that you can then find out the direction of any bearing from 0 - 360.
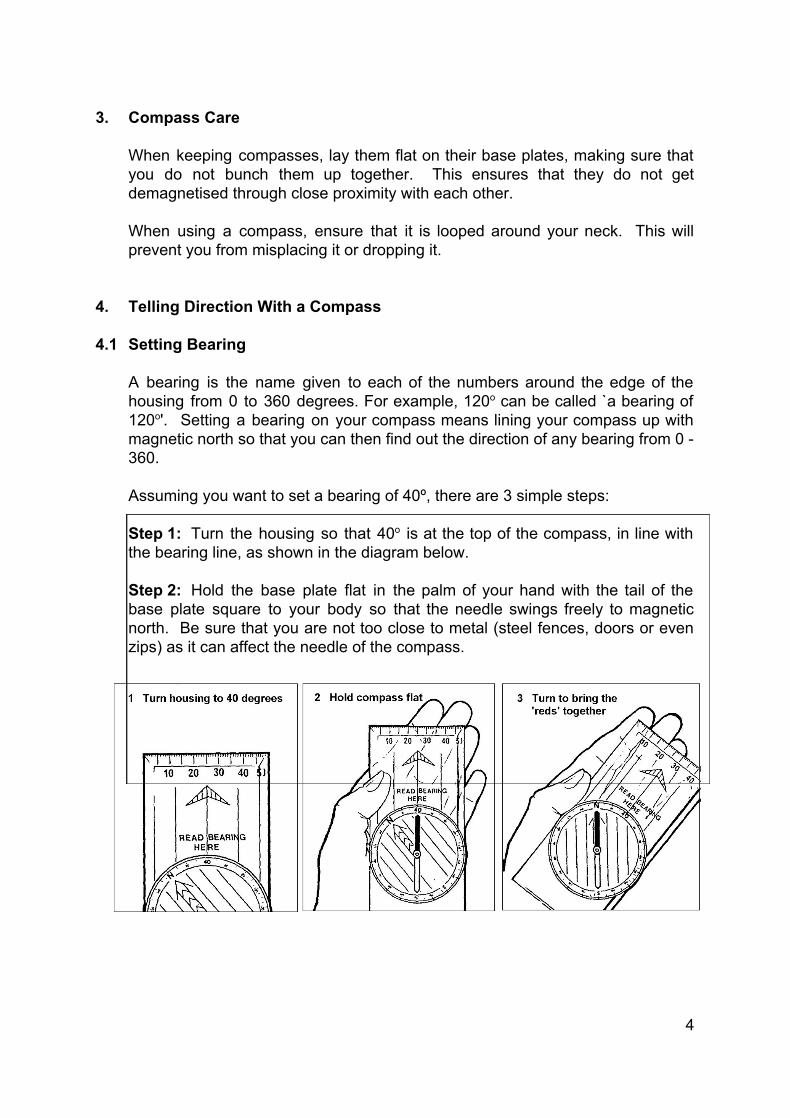
Assuming you want to set a bearing of 40º, there are 3 simple steps:
Step 1: Turn the housing so that 40o is at the top of the compass, in line with the bearing line, as shown in the diagram below. Step 2: Hold the base plate flat in the palm of your hand with the tail of the base plate square to your body so that the needle swings freely to magnetic north. Be sure that you are not too close to metal (steel fences, doors or even zips) as it can affect the needle of the compass.
4
Step 3: Now turn yourself around, still holding the compass in your hand until the red orienting arrow (on the bottom of the housing) is directly underneath, and covered by, the red end of the needle. We can call this `putting the two reds together'. You have now set a bearing of 40°. If you now look along the direction of travel arrow and then look up, everything that you see on this line is on a bearing of 40o. Ensure that the base plate tail is square to your body.
4.2 Finding Bearing
This is essentially the reverse process of setting bearing. Earlier, you determined the direction using the compass, having been given a bearing. Now, you will use the compass to determine your bearing.
This is done in 4 simple steps:
Step 1: Pick a landmark. Step 2: With the compass sitting flat in your palm, align the ‘direction of travel’ arrow with the chosen landmark. Step 3: While the ‘direction of travel’ arrow is in alignment with the chosen landmark, rotate the housing till the compass needle is aligned with it. The 2 reds are once again put together. Step 4: The number at the top is the bearing.
5
SECTION B: THE TOPOGRAPHICAL MAP 1. Introduction
A map is a 2-dimensional representation of 3-dimensional natural and man-made features found within a given area on the Earth’s surface. Its advantages are obvious: a map allows us to communicate ideas about locations of landmarks, characteristics of natural features etc. While there are many different types of maps, such as population and political maps, physical geography maps; the ones you will encounter in The Boys’ Brigade will usually be Topographical maps.
This section will: a) List ways of caring for the topographical map b) List the types of information captured in a topographical map c) Explain how to find a point on the map using grid references
2. Map Care
All maps should be treated as important documents. Before setting on a journey, it must be made sure that it is well backed with a hard cardboard and wrapped with plastic covering, which is to be used as a map-case to protect against dirt and dampness. The map should not be folded unnecessarily or rolled. Loss of maps should be reported immediately. Note that a reproduction of copyrighted maps without permission is illegal.
3. Key Information in a Topographical map 3.1 The Scale
This is one of the first pieces of information that you should discover from the map. The map scale is found usually at the prominent locations on the map; e.g. near the title, near the legend (which will be explained below). Being familiar with map scales allows you to convert
The scale is usually written in the following manner, similar to a ratio:
1:50000
6
This ratio means that 1 cm on the map represents 50000cm or 500m on the actual terrain.
If the distance on the map between 2 points is 3 cm, then the actual distance on terrain would be calculated as follows:
1: 50000 3: y (where x is the actual distance on terrain)
Thus y: 50000 x 3 y = 150000
In metres, y = 150000 / 100 y = 1500 m or 1.5km
The map scale can also be written in the form of a fraction; specifically, known as a Representative Fraction (RF for short). The RF takes on the form depicted below:
1
50,000
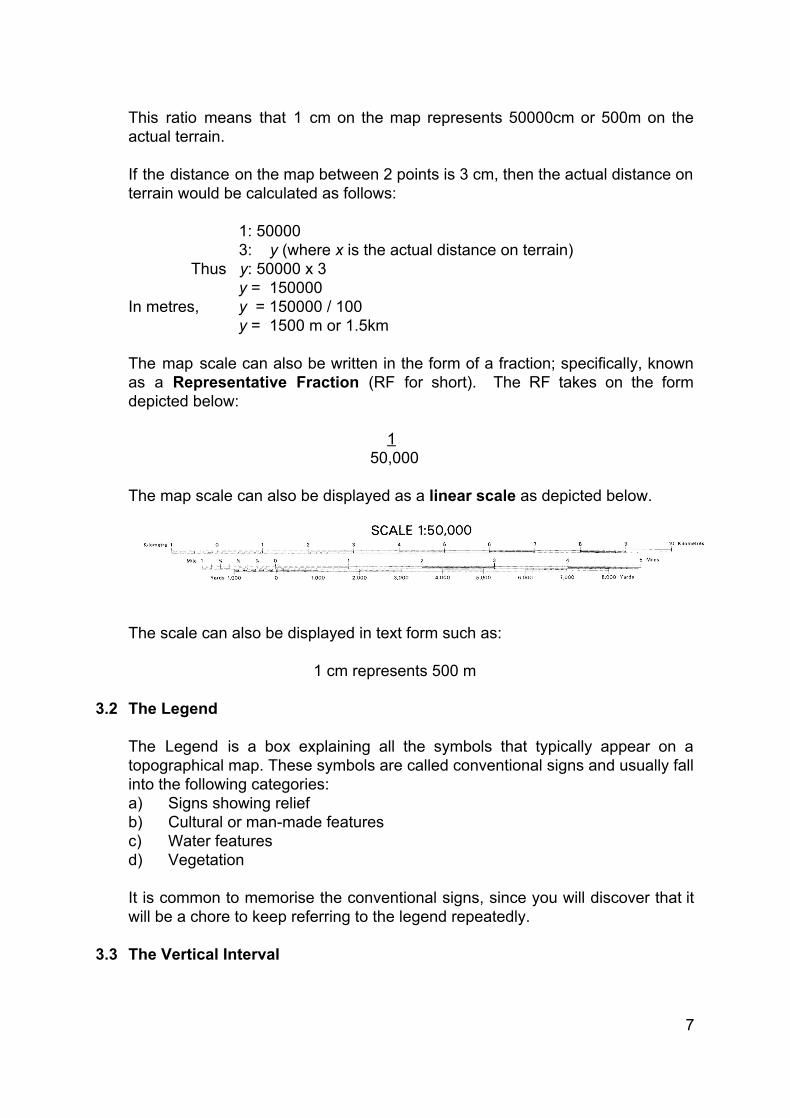
The map scale can also be displayed as a linear scale as depicted below.
The scale can also be displayed in text form such as:
1 cm represents 500 m 3.2 The Legend
The Legend is a box explaining all the symbols that typically appear on a topographical map. These symbols are called conventional signs and usually fall into the following categories: a) Signs showing relief b) Cultural or man-made features c) Water features d) Vegetation
It is common to memorise the conventional signs, since you will discover that it will be a chore to keep referring to the legend repeatedly.
3.3 The Vertical Interval
7

The Vertical Interval is the difference in height from one contour line to the next. This allows us to determine the terrain just by looking at the arrangement of the contour lines. If the contour lines are densely bunched together, then the terrain is essentially steeper than if the contour lines were more spread out. In the latter case, the gradient of the terrain is gentler.
8
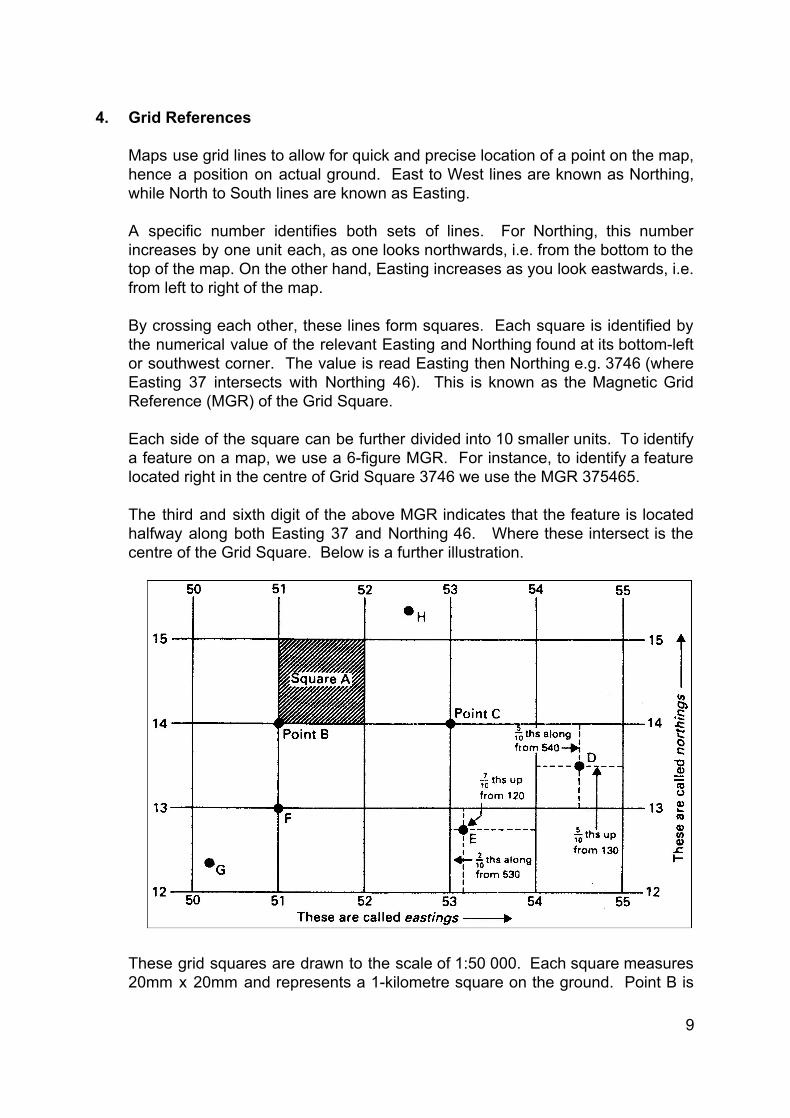
4. Grid References
Maps use grid lines to allow for quick and precise location of a point on the map, hence a position on actual ground. East to West lines are known as Northing, while North to South lines are known as Easting. A specific number identifies both sets of lines. For Northing, this number increases by one unit each, as one looks northwards, i.e. from the bottom to the top of the map. On the other hand, Easting increases as you look eastwards, i.e. from left to right of the map. By crossing each other, these lines form squares. Each square is identified by the numerical value of the relevant Easting and Northing found at its bottom-left or southwest corner. The value is read Easting then Northing e.g. 3746 (where Easting 37 intersects with Northing 46). This is known as the Magnetic Grid Reference (MGR) of the Grid Square. Each side of the square can be further divided into 10 smaller units. To identify a feature on a map, we use a 6-figure MGR. For instance, to identify a feature located right in the centre of Grid Square 3746 we use the MGR 375465. The third and sixth digit of the above MGR indicates that the feature is located halfway along both Easting 37 and Northing 46. Where these intersect is the centre of the Grid Square. Below is a further illustration.
These grid squares are drawn to the scale of 1:50 000. Each square measures 20mm x 20mm and represents a 1-kilometre square on the ground. Point B is
9
given the six-figure reference 510140. Point C is at 530140, Point D at 545135 and Point E at 532127. Try the other points yourself!
SECTION C: USING A MAP AND A COMPASS 1. Introduction
Having a map and a compass are essentially the 2 basic instruments with which navigation can take place. The map will identify the features and the distances one must travel, while the compass will determine the direction of travel.
This section will: a) Explain about the Three Norths b) Explain how to set or orientate a map with a compass c) Explain how to find a bearing from a map using a compass
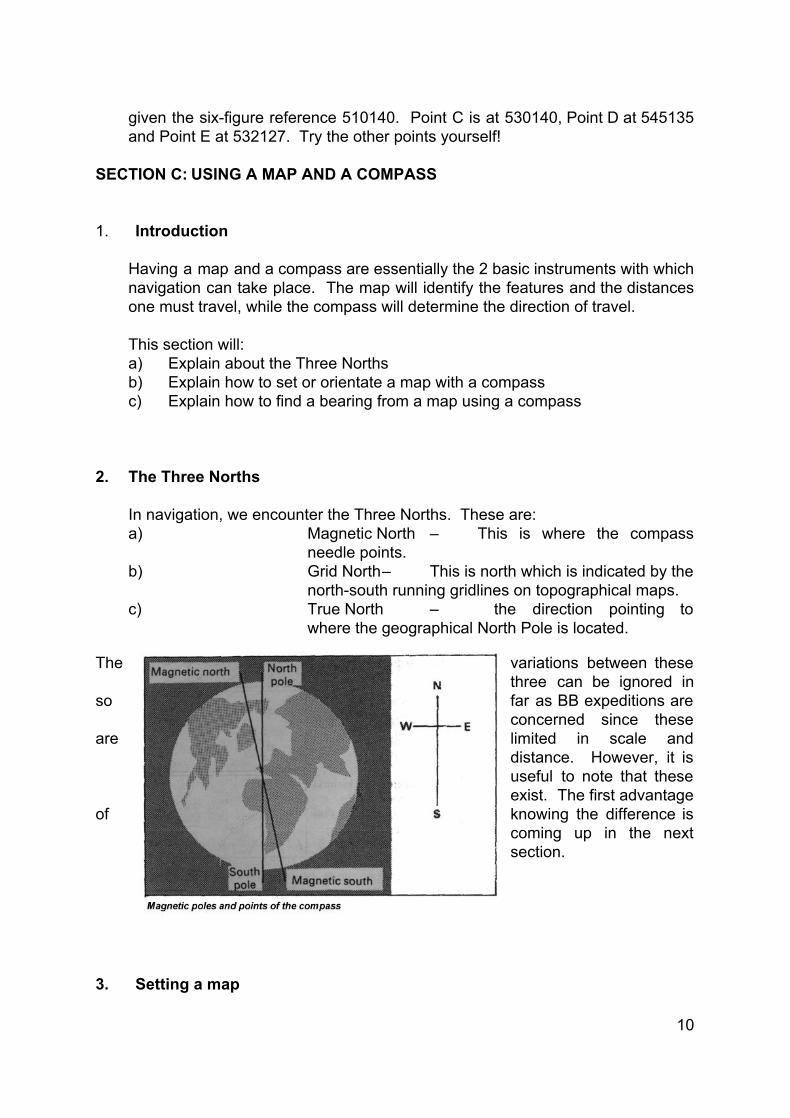
2. The Three Norths
In navigation, we encounter the Three Norths. These are: a) Magnetic North – This is where the compass
needle points. b) Grid North– This is north which is indicated by the
north-south running gridlines on topographical maps. c) True North – the direction pointing to
where the geographical North Pole is located.
The variations between these three can be ignored in
so far as BB expeditions are concerned since these
are limited in scale and distance. However, it is useful to note that these exist. The first advantage
of knowing the difference is coming up in the next section.
3. Setting a map
10

To set or orientate a map is simply to align the Grid North with the Magnetic North. Setting a map using a compass is particularly useful in conditions where there are no clear landmarks or where visibility is low such as at night or in densely wooded areas.
11
You can set your map in the following manner:
Step 1: Place the compass on the map and align the compass’ direction of travel arrow with the compass needle, i.e. Magnetic North. Step 2: Rotate the map till the blue grid lines are parallel to the orienting lines under the needle. The map is thus set.
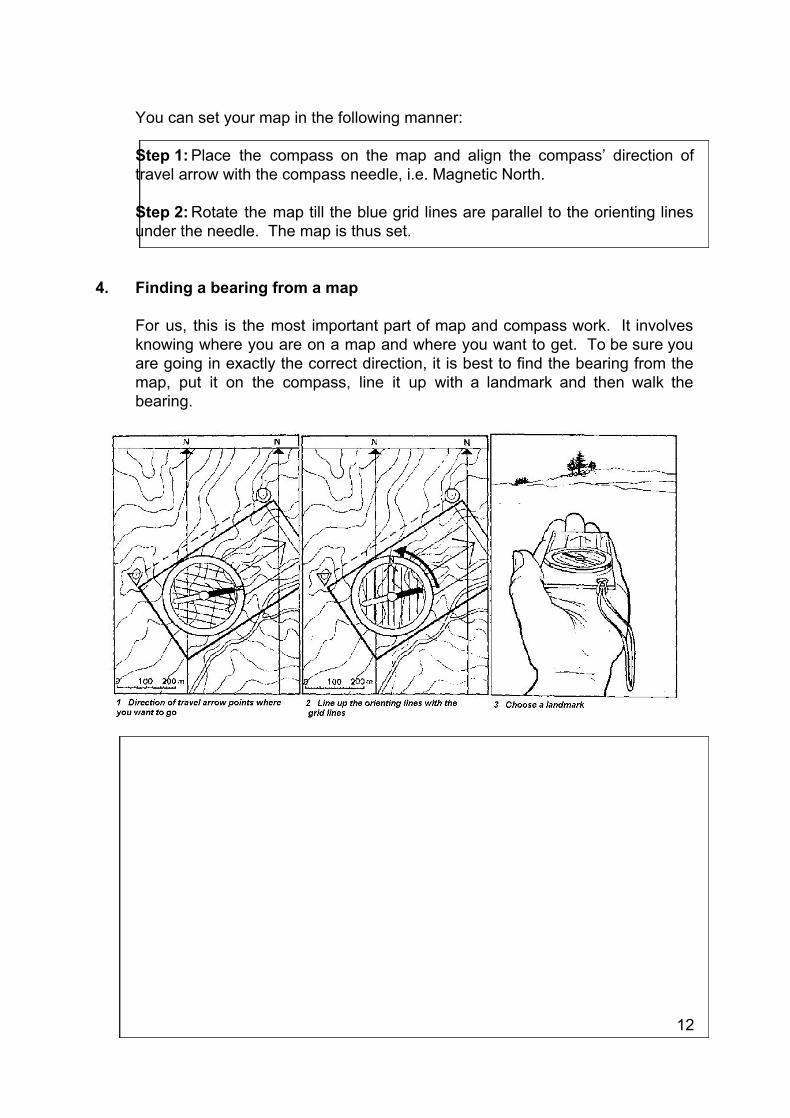
4. Finding a bearing from a map
For us, this is the most important part of map and compass work. It involves knowing where you are on a map and where you want to get. To be sure you are going in exactly the correct direction, it is best to find the bearing from the map, put it on the compass, line it up with a landmark and then walk the bearing.
12
Step 1: Place your compass on the map as shown below with the edge of the base plate along the way you wish to go, and the direction of travel arrow pointing in that direction (not the opposite direction). Step 2: Turn the housing until the orienting lines are parallel to the grid lines on the map. Make sure the orienting arrow is pointing to the top (north) of the map, not the bottom. Step 3: Now take the compass off the map, hold it in the palm of your hand and turn it round until the two reds are together (the needle and the orienting arrow). Look down the direction of travel arrow. This is the way to go! Note that it would be useful to identify a prominent landmark in the distance of the direction you are heading (the diagram above uses a tree as an example) and to simple walk towards it. This is so that you need not hold you compass up all the time to check if you are heading in the right direction.
13
SECTION D: KNOTS, HITCHES AND LASHINGS
1. Introduction
This section features knots, hitches and lashings that may prove to be useful at some point or another.
2. Knots
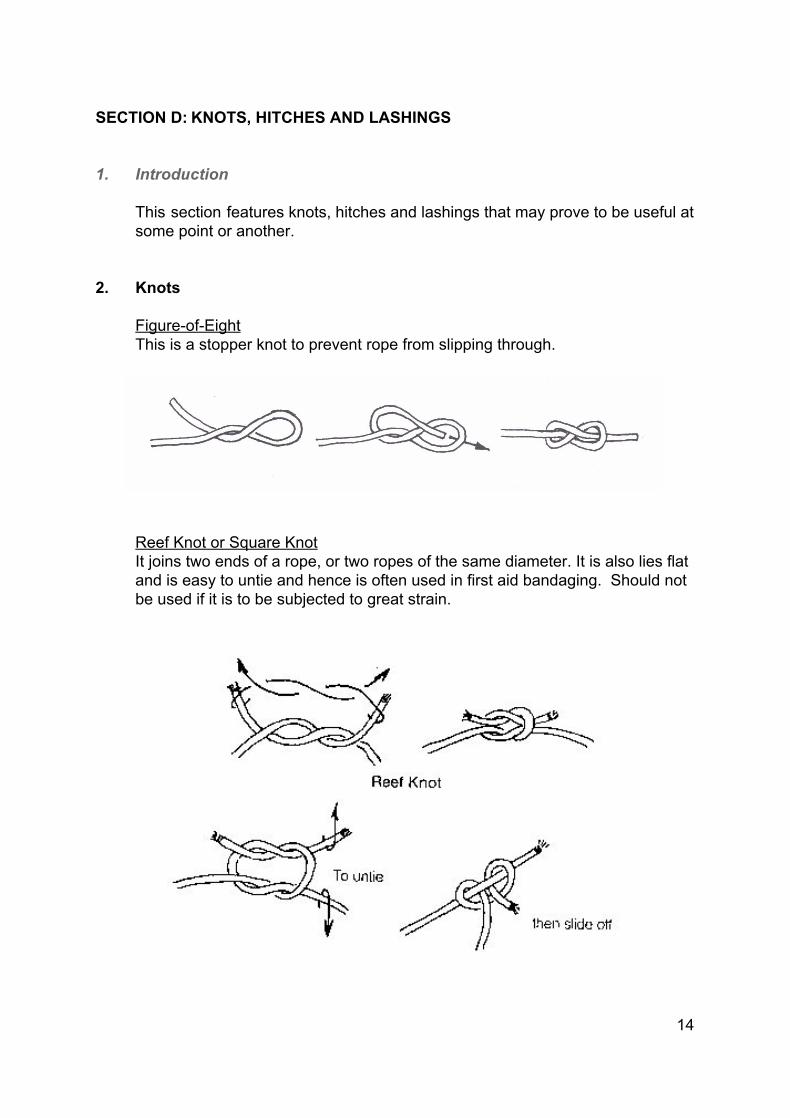
Figure-of-Eight This is a stopper knot to prevent rope from slipping through.
Reef Knot or Square Knot It joins two ends of a rope, or two ropes of the same diameter. It is also lies flat and is easy to untie and hence is often used in first aid bandaging. Should not be used if it is to be subjected to great strain.
14
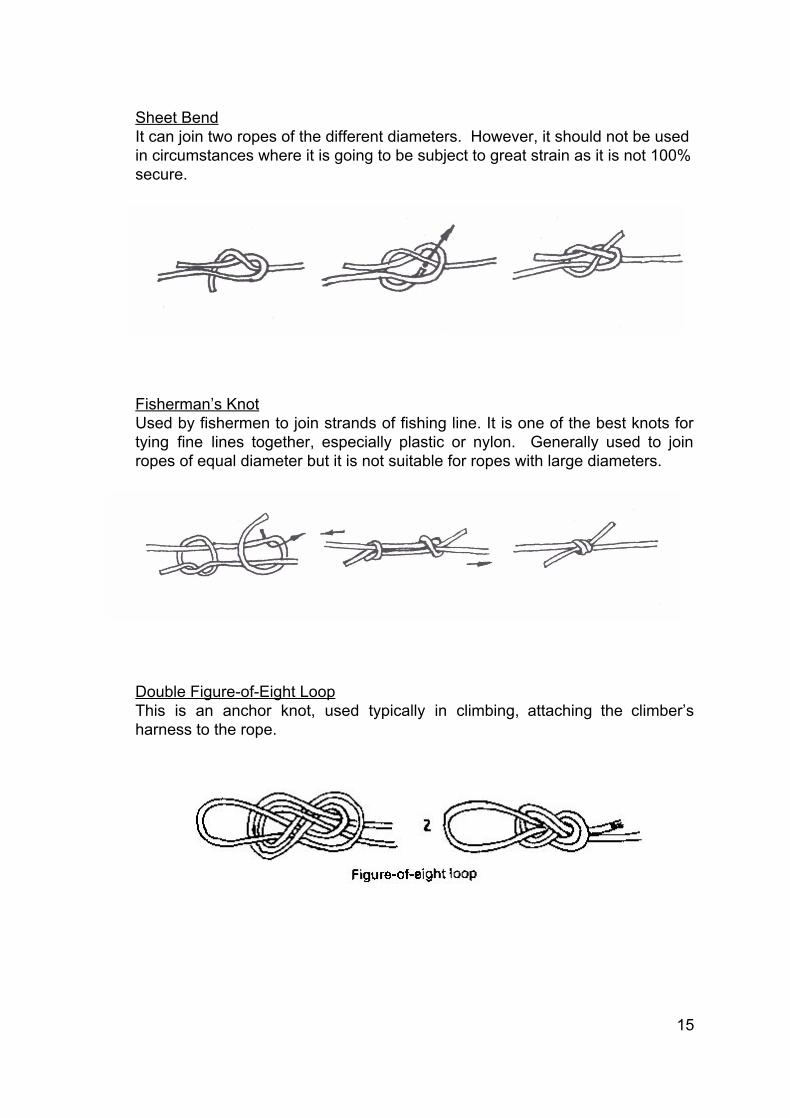
Sheet Bend It can join two ropes of the different diameters. However, it should not be used in circumstances where it is going to be subject to great strain as it is not 100% secure.
Fisherman’s Knot Used by fishermen to join strands of fishing line. It is one of the best knots for tying fine lines together, especially plastic or nylon. Generally used to join ropes of equal diameter but it is not suitable for ropes with large diameters.
Double Figure-of-Eight Loop This is an anchor knot, used typically in climbing, attaching the climber’s harness to the rope.
15
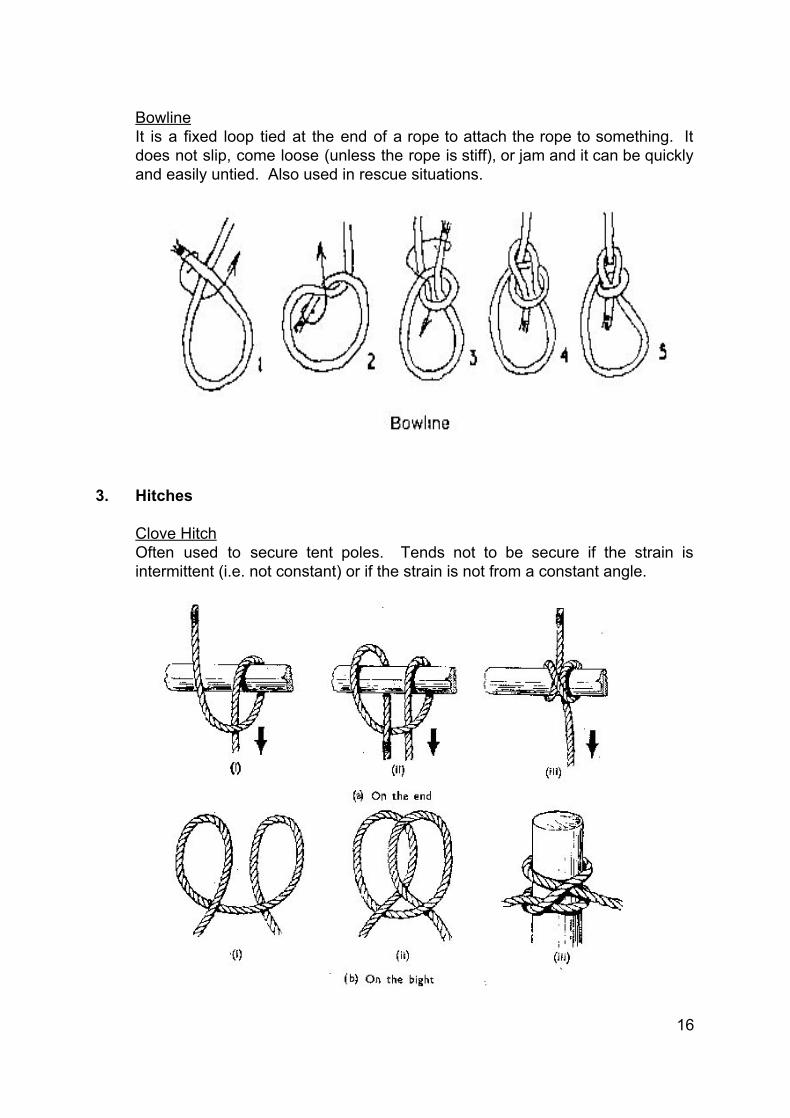
Bowline It is a fixed loop tied at the end of a rope to attach the rope to something. It does not slip, come loose (unless the rope is stiff), or jam and it can be quickly and easily untied. Also used in rescue situations.
3. Hitches
Clove Hitch Often used to secure tent poles. Tends not to be secure if the strain is intermittent (i.e. not constant) or if the strain is not from a constant angle.
16

Round Turn and 2 Half Hitches This knot is strong and dependable which never jams. It is versatile and can be used to fasten the rope to a ring, hook, handle, pole or beam. It is also often used to secure a rope to a tent peg.
Timber Hitch Used especially for dragging a heavy object like a log. It will hold firmly so long as there is a steady pull; slacking and jerking may loosen it. The timber hitch is also used to start a diagonal lashing.
When it is used for dragging, a simple hitch should also be added near the front end of the object to guide it.
17
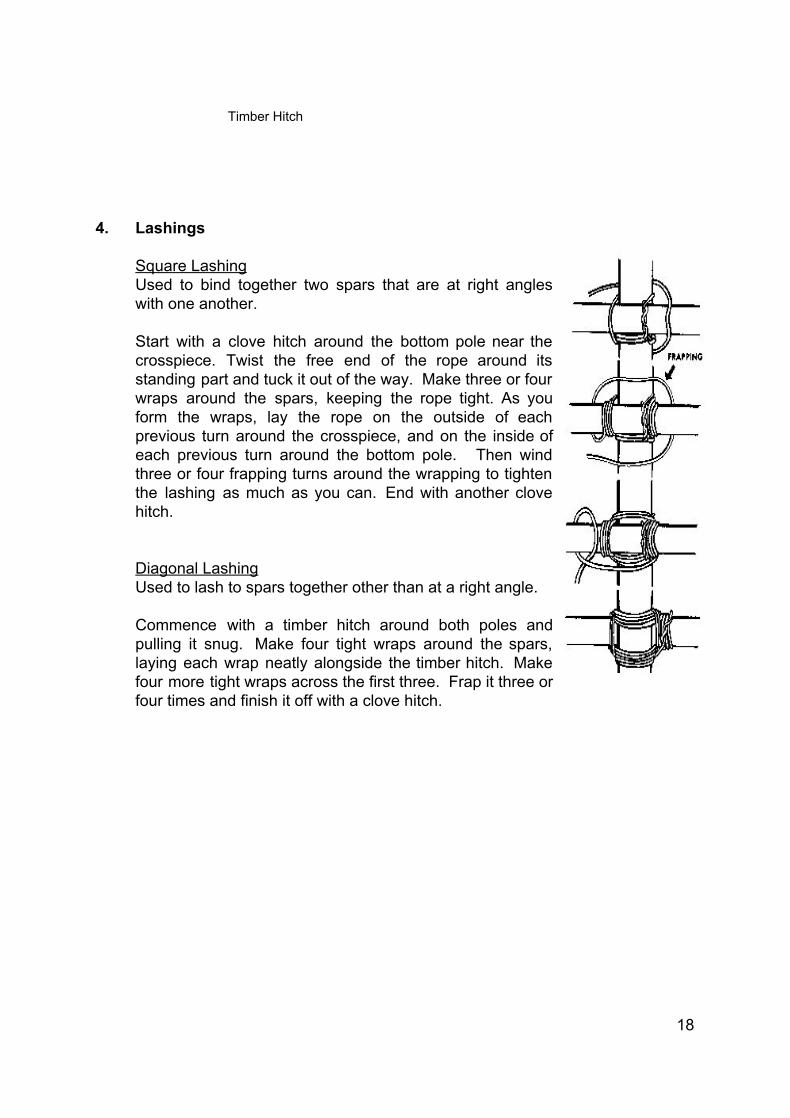
Timber Hitch 4. Lashings
Square Lashing Used to bind together two spars that are at right angles with one another. Start with a clove hitch around the bottom pole near the crosspiece. Twist the free end of the rope around its standing part and tuck it out of the way. Make three or four wraps around the spars, keeping the rope tight. As you form the wraps, lay the rope on the outside of each previous turn around the crosspiece, and on the inside of each previous turn around the bottom pole. Then wind three or four frapping turns around the wrapping to tighten the lashing as much as you can. End with another clove hitch.
Diagonal Lashing Used to lash to spars together other than at a right angle.
Commence with a timber hitch around both poles and pulling it snug. Make four tight wraps around the spars, laying each wrap neatly alongside the timber hitch. Make four more tight wraps across the first three. Frap it three or four times and finish it off with a clove hitch.
18
SECTION E: TENTS AND SHELTERS 1. Introduction
This section briefly explains the method of building shelter in the outdoors. A well-built shelter can offer you protection from the elements, as well as some degree of comfort, when you are on expedition. Such shelters offer a temporary shelter for both man and equipment.
This section will: a) Explain how to set up an improvised shelter commonly known as a Basha b) Introduce lightweight tents c) Explain how to pitch a ridge tent
2. Improvised Shelter – The Basha
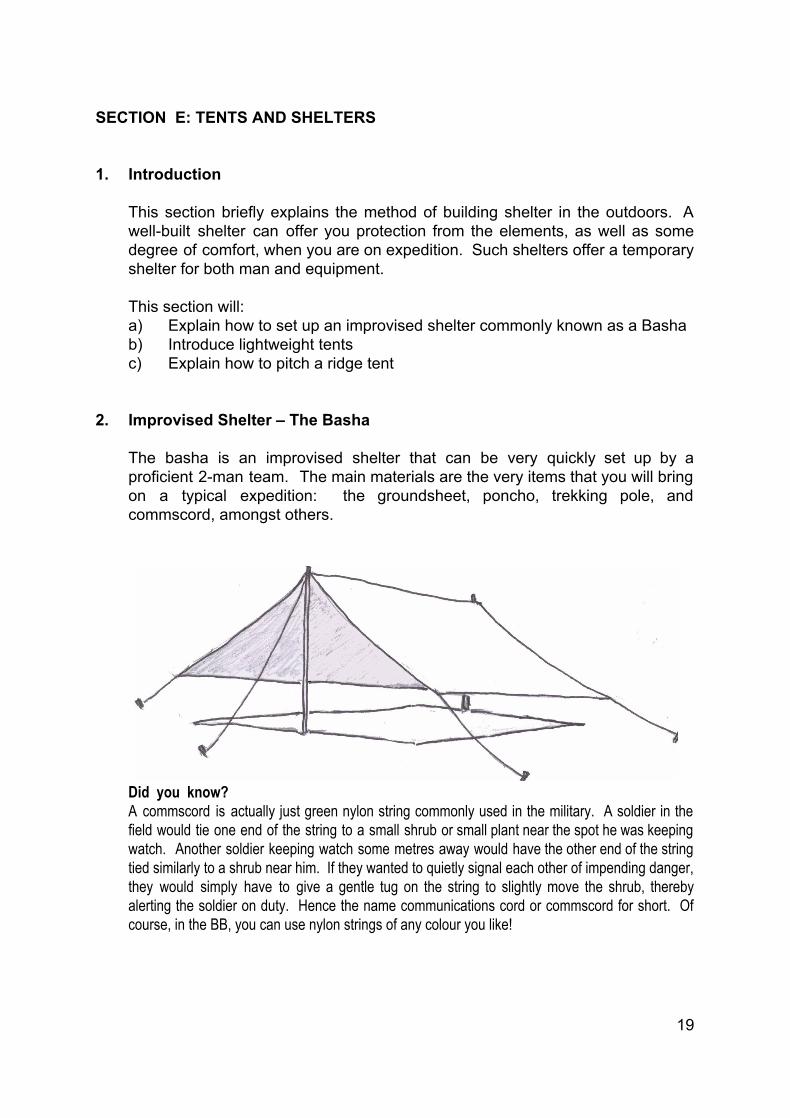
The basha is an improvised shelter that can be very quickly set up by a proficient 2-man team. The main materials are the very items that you will bring on a typical expedition: the groundsheet, poncho, trekking pole, and commscord, amongst others.
Did you know? A commscord is actually just green nylon string commonly used in the military. A soldier in the field would tie one end of the string to a small shrub or small plant near the spot he was keeping watch. Another soldier keeping watch some metres away would have the other end of the string tied similarly to a shrub near him. If they wanted to quietly signal each other of impending danger, they would simply have to give a gentle tug on the string to slightly move the shrub, thereby alerting the soldier on duty. Hence the name communications cord or commscord for short. Of course, in the BB, you can use nylon strings of any colour you like!
19
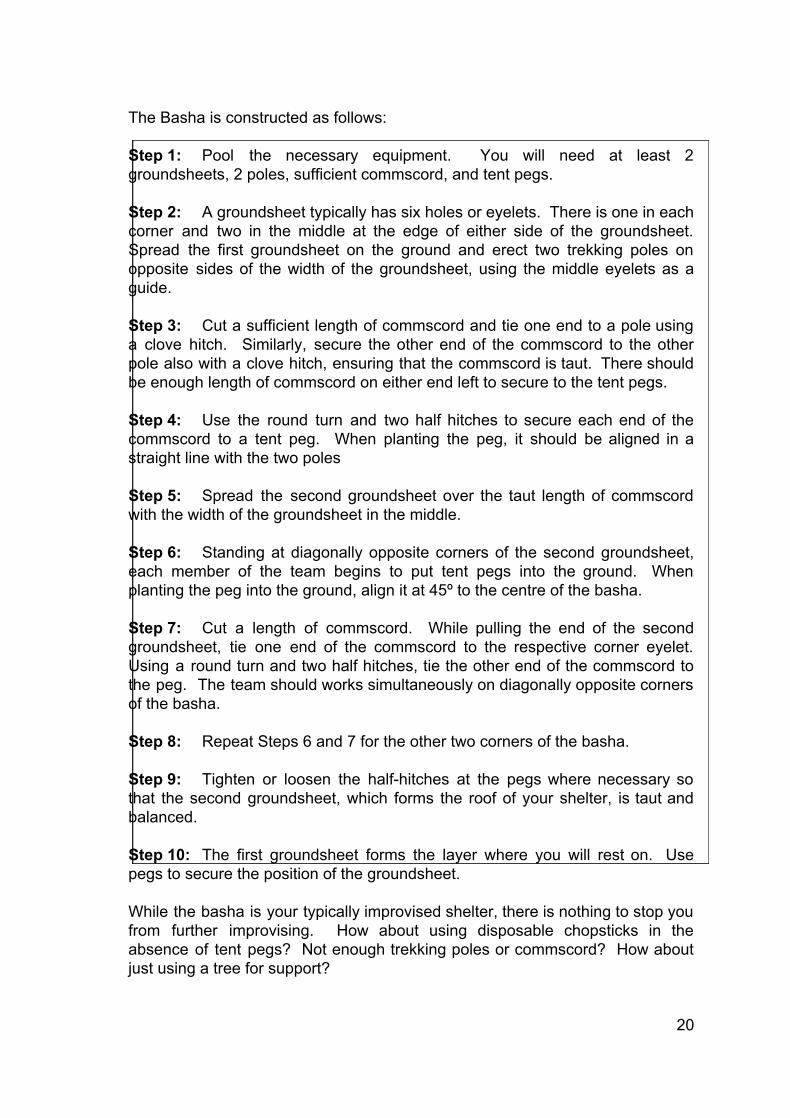
The Basha is constructed as follows:
Step 1: Pool the necessary equipment. You will need at least 2 groundsheets, 2 poles, sufficient commscord, and tent pegs. Step 2: A groundsheet typically has six holes or eyelets. There is one in each corner and two in the middle at the edge of either side of the groundsheet. Spread the first groundsheet on the ground and erect two trekking poles on opposite sides of the width of the groundsheet, using the middle eyelets as a guide. Step 3: Cut a sufficient length of commscord and tie one end to a pole using a clove hitch. Similarly, secure the other end of the commscord to the other pole also with a clove hitch, ensuring that the commscord is taut. There should be enough length of commscord on either end left to secure to the tent pegs. Step 4: Use the round turn and two half hitches to secure each end of the commscord to a tent peg. When planting the peg, it should be aligned in a straight line with the two poles Step 5: Spread the second groundsheet over the taut length of commscord with the width of the groundsheet in the middle.
Step 6: Standing at diagonally opposite corners of the second groundsheet, each member of the team begins to put tent pegs into the ground. When planting the peg into the ground, align it at 45º to the centre of the basha. Step 7: Cut a length of commscord. While pulling the end of the second groundsheet, tie one end of the commscord to the respective corner eyelet. Using a round turn and two half hitches, tie the other end of the commscord to the peg. The team should works simultaneously on diagonally opposite corners of the basha. Step 8: Repeat Steps 6 and 7 for the other two corners of the basha. Step 9: Tighten or loosen the half-hitches at the pegs where necessary so that the second groundsheet, which forms the roof of your shelter, is taut and balanced. Step 10: The first groundsheet forms the layer where you will rest on. Use pegs to secure the position of the groundsheet.
While the basha is your typically improvised shelter, there is nothing to stop you from further improvising. How about using disposable chopsticks in the absence of tent pegs? Not enough trekking poles or commscord? How about just using a tree for support?
20
3. Lightweight tents
Lightweight tents provide more protection than the basha, given the better materials used. In particular, the increasingly popular dome tent can be erected in quickly and without to much trouble. These days, there are many lightweight tents available commercially and they come in many shapes, colours and sizes. Some are designed for the extreme adventure enthusiasts and others for the recreational camper. These notes will introduce the two of the most common types.
3.1 Ridge Tent
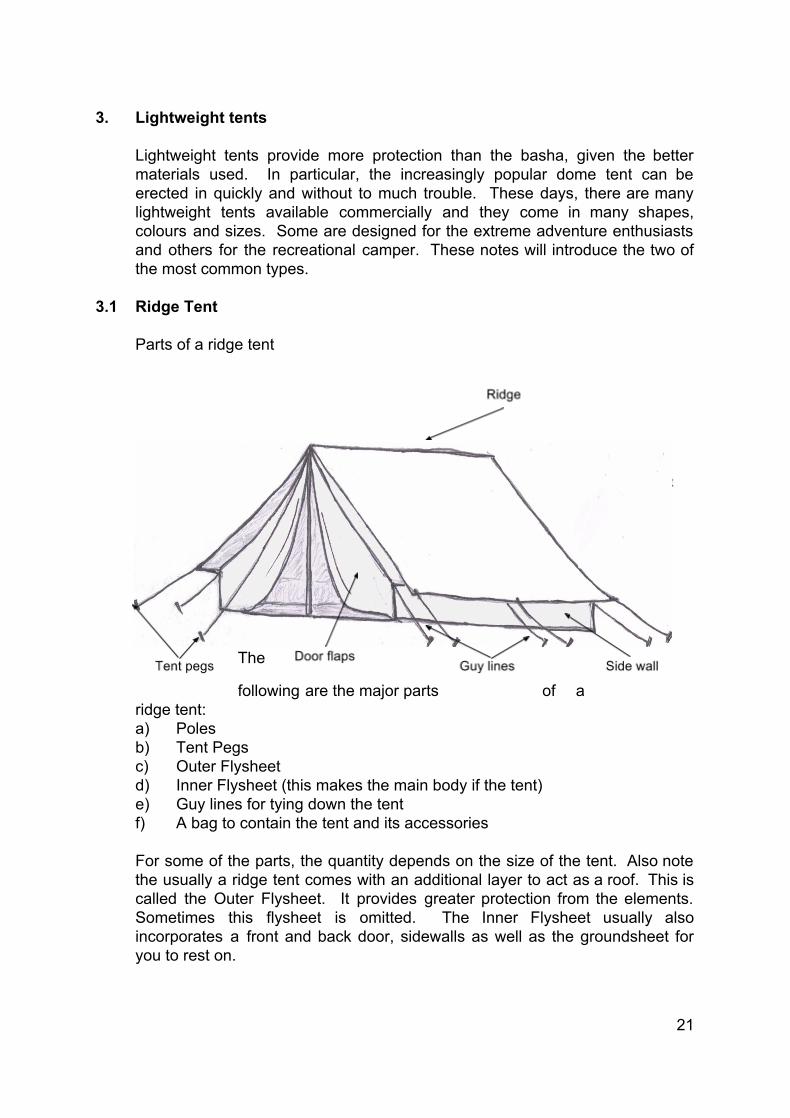
Parts of a ridge tent
The
following are the major parts of a ridge tent: a) Poles b) Tent Pegs c) Outer Flysheet d) Inner Flysheet (this makes the main body if the tent) e) Guy lines for tying down the tent f) A bag to contain the tent and its accessories
For some of the parts, the quantity depends on the size of the tent. Also note the usually a ridge tent comes with an additional layer to act as a roof. This is called the Outer Flysheet. It provides greater protection from the elements. Sometimes this flysheet is omitted. The Inner Flysheet usually also incorporates a front and back door, sidewalls as well as the groundsheet for you to rest on.
21
The Ridge tent is pitched as follows: Step 1: Take out the equipment from the bag that contains the tent and check that you have the equipment listed above. It would be a real bummer to start setting up the tent only to find out midway that something was missing! Report to your Officer or Quartermaster, should you be missing some items. Step 2: Lay out the tent and flysheet and distribute the equipment to where they are required. Poles to the front and back of the tent. Pegs and guy lines are needed at the front, back, corners and midsections of the tent (Check for eyelets on the tent). Step 3: Two members of the team will individually erect the tent poles at the front and back of the tent. The top end of the front tent pole has to be inserted through the eyelet in the middle. Step 4: While these two members continue holding onto the tent poles in an upright position, another two members will begin driving a peg at each end of the tent and in line with the tent poles. Step 5: Attach one end of a guy ine to a peg, using a round turn and 2 half hitches. The other end is tied to the pole. Some guy lines come with runners that take the place of the round turn and two half hitches. If your guy line comes with a runner, use this end to secure it to the peg. Repeat for the other tent pole. Step 6: Now go to two diagonally opposite corners of the tent and drive one peg at 45º in each corner. Attach one end of a guy line to a peg and the other end to the corner of the tent through the eyelet. When driving the peg into the ground, aim for the middle of the ridge tent. The team should works simultaneously on diagonally opposite corners of the tent. Step 7: Repeat Step 6 for the other two corners and midsections of the tent. Step 8: Tighten or loosen the half hitches or runners at the pegs where necessary so that the roof of your tent is taut and balanced. Step 9: Roll up the tent flaps and tie them up neatly.
In the case of the Ridge Tent or Basha where there are guy lines, note that the lines, flysheet or groundsheet may contract on a cold night. Therefore it is advisable to loosen all guy lines at night or when it is raining or else if the hitches are tight, the flysheet or groundsheet might rip.
22

The reverse is also true that in the day, the flysheet or groundsheet may expand in the heat and thus you would need to tighten the guy lines so that you do not lose the shape of the tent.
23
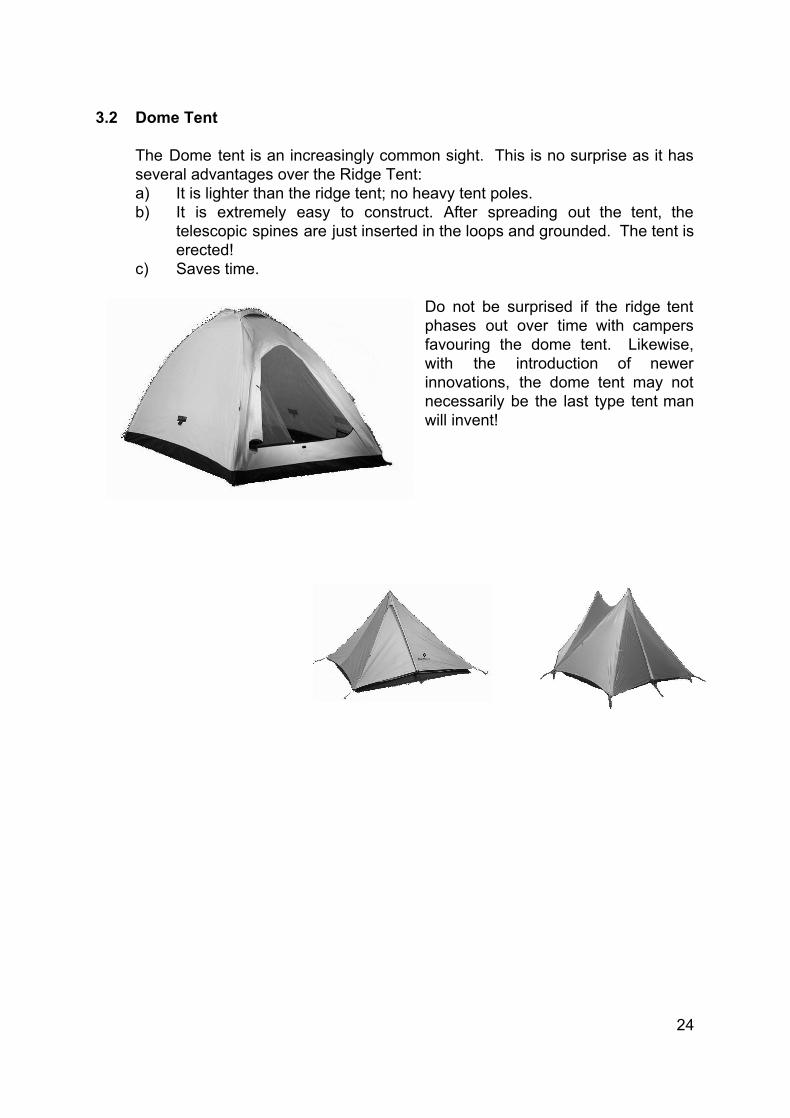
3.2 Dome Tent
The Dome tent is an increasingly common sight. This is no surprise as it has several advantages over the Ridge Tent: a) It is lighter than the ridge tent; no heavy tent poles. b) It is extremely easy to construct. After spreading out the tent, the
telescopic spines are just inserted in the loops and grounded. The tent is erected!
c) Saves time.
Do not be surprised if the ridge tent phases out over time with campers favouring the dome tent. Likewise, with the introduction of newer innovations, the dome tent may not necessarily be the last type tent man will invent!
24

SECTION F: CHOOSING A CAMPSITE AND BEHAVIOUR AT CAMP 1. Introduction
Having learnt to set up a tent or shelter, you need to know how to choose a suitable area to set up camp, as well as about the practices and behaviour at camp in order for things to be safe and organised. This section will: a) Explain how to choose a suitable campsite b) Present the practices and behaviour one should adopt while camping c) Highlight the safety considerations that every camper should know and
practice 2. Choosing a Campsite
25
Knowing how to build your shelter is one thing. Knowing where to place set up your shelter or tent is also important. There are 5 major considerations:
a) The area should preferably be in a partially shaded area that is sheltered
from strong wind. However, tents should not be pitched under trees. This is to prevent injury if a tree or its dead branches should fall due to high winds.
b) The ground chosen should be dry. Marshy or wet ground will surely get
your equipment dirty. Note the condition of the soil as well. For example, sandy ground tends not to hold tent pegs well. Clay soil drains poorly so you might get flooded if it rains.
c) The ground chosen should be as flat as possible. Do not pitch your tent
on a slope. d) The campsite should be near water sources e.g. a river, for ease of
collection of water. While proximity to water sources is good, do not camp on dry riverbeds or just by the river’s edge. Flash floods may occur during sudden storms.
e) Do you have permission to camp in the wilderness? Seek permission
from the owners of the land, regardless of whether it belongs to the state or private individuals.
3. Practices and Behaviour at Camp
a) Check the ground before you pitch your shelter; objects on the ground can tear your groundsheet or the bottom of your tent. You may even get injured.
b) As most tents will not afford you a lot of space, it is best to position all
bags neatly in a row in the tent. c) Leave all footwear neatly outside the tent to prevent soiling of the
groundsheet. d) Keep the area around your tent clean and free of rubbish, otherwise you
may attract unwanted guests like ants and flies. Also clear away other objects like rocks and fallen branches that might cause people to trip over.
e) Establish routines to be followed by everyone. If you have a schedule of
duties or a programme sheet, waterproof these and stick them at a prominent place, using masking tape.
26
f) If you anticipate rain, dig a trench all round each tent. Make sure the trench has an outlet away from the tents.
g) Do not site the camp toilet near to water sources and where food is
cooked. Ensure all biodegradable refuse is deposited into a small pit and covered. Non-biodegradable materials should be packed and brought back to civilisation for disposal.
h) When using water resources, spare a thought for other expedition teams
downstream. Do not defecate, urinate or use excessive detergent or soap in rivers.
4. Safety Considerations
a) Any injury should be reported to the Officer-in-Charge. Everyone should know where the first aid kit is.
b) Never light naked flames or cook in the tents. Your tent is made of
flammable material. c) If in an unfamiliar area, you may want to sprinkle sulphur powder around
the campsite to keep away snakes, scorpions etc. d) When putting on your shoes in the morning, invert them first to see if an
animal has made it its home in the night. Putting your foot straight in might cause the animal to bite or sting you.
e) At night, ensure that everyone is accounted for. All movement should be
in pairs and with illumination. Ensure that everyone knows evacuation routines before all turn in.
27
SECTION G: THE COUNTRY CODE
1. Introduction The Country Code is a guide to our behaviour in rural areas and natural environment. It highlights attitudes that should be prominent when we are in these areas. Be considerate for those whose living is made in the rural areas, as well as others who want to enjoy the natural environment. While it is true that Singapore is highly urbanised, the Country Code is all the more relevant, given the scarcity of natural areas in our country.
2. The Code 2.1 Guard against all risk of fire
We often hear that fire is a good servant, but a bad master. This is true in all cases. A fire endangers life. So in all cases do the following: a) Always gain permission before lighting a fire in the outdoors. b) Remove all flammable material from the fire’s immediate location c) If a fire is discovered, try to put it out or contact the authorities who are
able to do so. 2.2 Fasten all gates
When encountering the need to use gates, ensure that the last person always latches them after the entire party has entered. This will prevent a farmer’s animals from wandering off and other illegal entry.
2.3 Keep dogs under control
Dogs need to be leashed and not free roaming. Allow others to enjoy the natural environment without being unnecessarily harassed. Where necessary, they should also be muzzled to ensure that they do not injure other people or farm animals.
2.4 Keep to the paths across farmlands
Where paths exist, keep to them. They exist for your safety as well as to ensure that the surroundings and/or private property remain untouched or undamaged.
2.5 Avoid damaging fences, hedges and walls
These are erected for a purpose: to keep certain things in, but others out. Help their owners maintain them by not climbing over them.
2.6 Leave no litter All camp litter that cannot be destroyed should be removed from the site and deposited in a litterbin when possible. It should not be buried. For instance, modern plastic bags take up to 120 years, before they begin degrading.
2.7 Safeguard water supplies
28
Protect natural water supplies by preventing decontamination. So do your washing up away from the stream, and by pouring oil, fat and grease into the ground.
2.8 Protect wildlife, wild plants and trees
A protective attitude towards life in the natural environment is captured in the following saying: “Take only memories and photographs, leave only footprints”. Always note that there should be little or no evidence of the fact that an expedition has passed through or camped in an area.
2.9 Go carefully on country roads
Use country roads only when necessary. When absolutely necessary, walk in single file, keeping right.
2.10 Respect the life of the countryside
Show respect for the inhabitants of the countryside and their way of life. When appropriate, try to explain your purpose to local residents, and thank them for the assistance they render as well as their understanding. Permission to camp must always be obtained from the landowner or appropriate person.
29

SECTION H: MOVEMENT ON TERRAIN
1. Introduction
Being on expedition requires you to be on the move. This section will: a) Explain the key factors affecting your speed b) Show you how to estimate distances with your pace c) Introduce the Global Positioning System or GPS
2. Key Factors Affecting Speed
There are seven key factors, which can affect your speed while moving. They are: a) Moving uphill – movement tends to be slower b) Moving downhill – movement tends to be faster c) Personal level of fitness – if one is fitter, one tends to walk at a consistent
pace d) Equipment load – less weight allows people to walk faster e) Terrain type – Flat, gentle terrain allows people to walk at a more constant
pace. f) Weather conditions – It is obvious that extremes of weather tend to slow an
expedition team more. g) Off bearing – Speed is affected because one’s energy and capacity is
exhausted. Also, if the team is not certain of the direction, speed is decreased by the need to keep checking landmarks and locations.
How to do you optimise your speed?
There are some ways to improve on your speed. a) The impact of terrain factors can be reduced by choosing a route that will
maximise your time on flatter or gentler terrain. b) Prepare for expedition by keeping fit through regular exercise. c) Optimise your carrying load by distributing common equipment, according
to body size. d) Be accurate in setting bearing.
3. Estimating Distances
Estimation of distances is essential to the location of your checkpoints. While on the move, your knowledge of distances will help confirm if you are short of the intended destination or exceeded it. As seen, travelling according to an accurate bearing is only half the story.
30
The only hitch is that the team must be able to estimate distances as accurately as possible. To an extent, pacing can solve this. On average, a person will take 65 double paces to cover 100 metres. (A double pace is counted when the foot hits the ground twice.)
Before the expedition, measure out 100 metres and have the team members pace and note their number of paces. Do this several times, and choose the one who is the most consistent to be your team’s pacer. While on the move, the pacer should call out “100 metres”, each time he hits 65 paces (or whatever number is typical of his pacing). That way, the team leader will know how far they are from the checkpoint.
If the expedition is on bicycle, the job of the pacer can be taken over by electronic devices. However, it means that teams must measure their distances and bearings accurately.
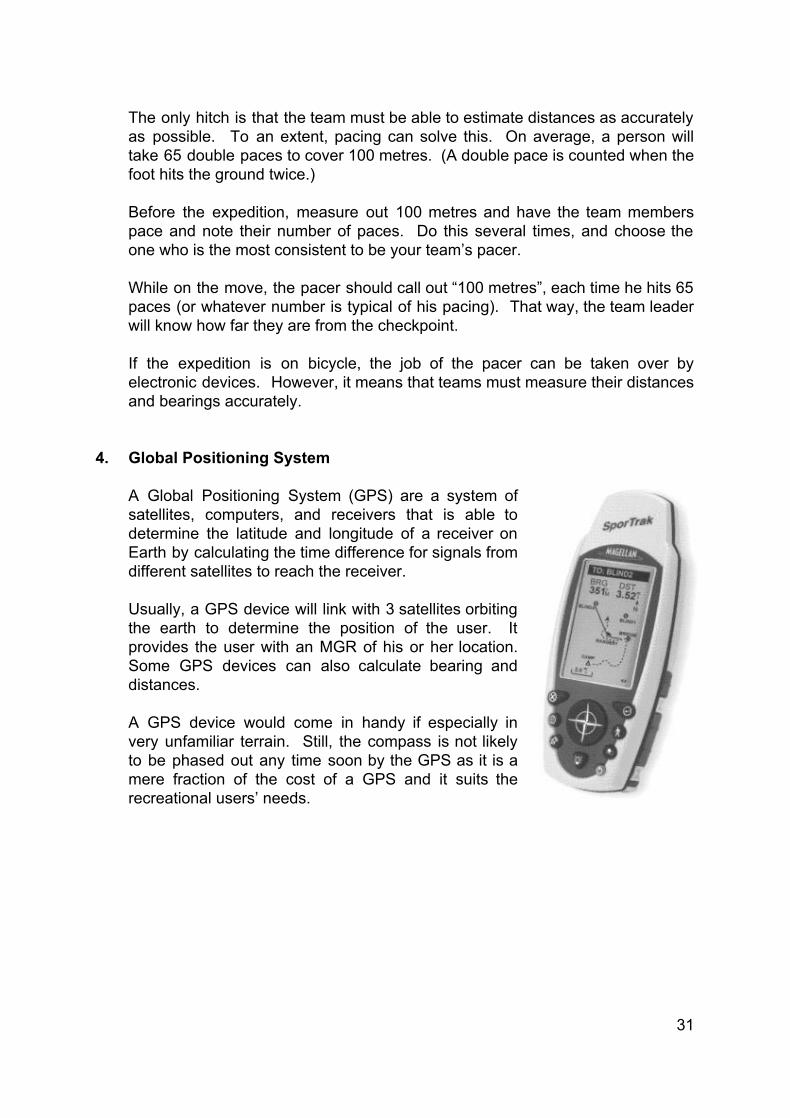
4. Global Positioning System
A Global Positioning System (GPS) are a system of satellites, computers, and receivers that is able to determine the latitude and longitude of a receiver on Earth by calculating the time difference for signals from different satellites to reach the receiver. Usually, a GPS device will link with 3 satellites orbiting the earth to determine the position of the user. It provides the user with an MGR of his or her location. Some GPS devices can also calculate bearing and distances. A GPS device would come in handy if especially in very unfamiliar terrain. Still, the compass is not likely to be phased out any time soon by the GPS as it is a mere fraction of the cost of a GPS and it suits the recreational users’ needs.
31

32

SECTION I: COMPILING AN EXPEDITION LOG
33
1. Introduction
When undertaking an expedition, it is useful for you to compile an Expedition Log. A log is a record of the expedition.
This section will: a) Explain the function of an Expedition Log b) Show what and when information should be collected for the Log c) How to compile the Log
2. Function of an Expedition Log
The Expedition Log provides a comprehensive record of the expedition that had been undertaken, including routes taken, distances travelled and incidents and situations encountered. This is useful for reflection and learning from experiences. It is also a reference for future expeditions where the same area is used. The Log would highlight possible hazards and danger areas, as well as note down things that no longer correspond to the map, for example, landmarks or structures that may have been demolished or newly erected.
3. What and When Information should be collected
To be useful, the log should contain: a) Moving from Magnetic Grid Reference – 345676 b) Going towards Magnetic Grid Reference c) Bearing - 47º d) Brief description of the location – “T-junction” e) A simple top-view diagram of the location f) Time – in 24-hour format, “1632 hrs” g) Prevailing Weather & lighting conditions – “Stormy” h) Miscellaneous information – “a pack of stray dogs chased us” Put these in columns using a pen. If the expedition log is to be kept in a notebook, then use two full pages.
When do you make a Logbook Entry?
One rule-of-thumb is to make an entry at checkpoints. However, you may miss out on the “more exciting” events, like getting chased by a pack of dogs. You should try striking a balance between your checkpoints and events that do happen without warning.
34

More importantly, another set of information that should be included would be specific landmarks that you come across. Landmarks need to be recorded because they will be more “permanent” than events. By recording them, your log becomes a reference for other expeditions in future.
4. How to Compile a Logbook
Ideally, everyone should have a chance to make a record in the expedition log. One simple way is to rotate each time the team reaches a checkpoint. When the team is moving from one checkpoint to another, the log-keeper should take note of landmarks and events along the way. Other members of the team can assist the log-keeper by prompting providing him with the details. Also, you can help him by being patient and carrying his equipment for him.
Keep the logbook protected from the elements by using a plastic bag that has a watertight seal to contain it. Also, logbooks tend to get lost, so keep them in a handy and accessible place.
A few days after the end of the expedition, the team needs to meet up. (You should be meeting anyway, because equipment needs to be maintained and cleaned) You will need to meet firm up details at each checkpoint together, in case the respective log-keepers forget. You may find it useful to refer to photographs you may have taken. Once the information is confirmed, it should be entered into a new book neatly. Check through once more before handing up to your Officer for inspection.
35

SECTION J: PACKING FOR A CAMP OR EXPEDITION 1. Introduction
Usually if your expedition does not involve an overnight in the wilderness, you will not find yourself packing a great deal of things to bring along for the trip. Sometimes you go on an extended expedition, which could be defined as an expedition that is longer than an overnight. Whatever the case, you need to know what to bring and how to pack your bag. This section will: a) Identify the critical items needed an expedition and give suggestions of other
needful equipment b) Show how to pack a haversack
2. Equipment and Items needed in a Camp or Expedition
Given below is a suggested list of items you may need to pack for your camp or expedition. Naturally, for some items, the quantity needed depends on the duration of the camp or expedition and the number of participants.
Individual Equipment ● Clothing and Footwear
T-shirt, Long pants, Shorts, Underwear, Socks, Shoes, Slippers, Swimming trucks (if going into water)
● Toiletries
Toothbrush, toothpaste, towel, soap, shampoo, toilet roll, comb, powder ● Cutlery and Cooking untensils
Spoon, fork, mess tins, cup, can-opener ● Camping & Expedition
Poncho, Ground sheet, Water-bottle & pouch, Torchlight (with spare batteries), jockey cap, trekking pole, commscord, insect repellent, sun block, lighter or matches
● Stationary & Others
Bible (if you have one), Notebook & pen, OHT Marker, utility knife Group Equipment
● Camping & Expedition
Map, compass, GPS (if available), tent, cookers, fuel
36
● Safety First aid kit, whistle
The dilemma: What to bring and what to leave behind? It is common for us to face the dilemma posed by packing – what to bring along and what to leave behind. Suddenly, everything seems to be important. But packing everything would mean additional weight.
You will need to prioritise what is really important. These would usually comprise: a) Water b) Food plus additional reserves c) Safety equipment d) First Aid equipment e) Illumination, a spare bulb and batteries f) A spare set of clothes g) Utility tools e.g. Swiss Army knife h) Stationery e.g. notebook, pen
3. HOW TO PACK A HAVERSACK
The term haversack is often used interchangeably with rucksack or backpack. Essentially for camps and expeditions we are looking at a bag with two shoulder slings, each going over one shoulder so that the weight is carried by both shoulders. The bag should also be built for outdoor use, as opposed to smaller haversacks made of less durable material for daily use to carry your school books and stationary.
Here are some guidelines for packing:
● Pack the things you will use frequently or need quickly in easily accessible
outside pockets or at the top of your pack. E.g. a raincoat or poncho in stormy weather or a water bottle on a hot day. Place less frequently used things like clothing at the bottom of your pack.
● Balance the pack as you load it. If you put a heavy water bottle on one
side, put something equally heavy on the other side so it will not sway as you walk.
● If you have to carry a large pot or bucket for cooking, fill it with clothing or
food and put it inside your pack. ● Keep your clothes dry in plastic bags inside your pack, to keep it dry in wet
weather. You can use bags with watertight seals. You may also want to waterproof the main compartment of your pack by placing using two huge trash bags. This will form a waterproof layer for the main compartment.
37
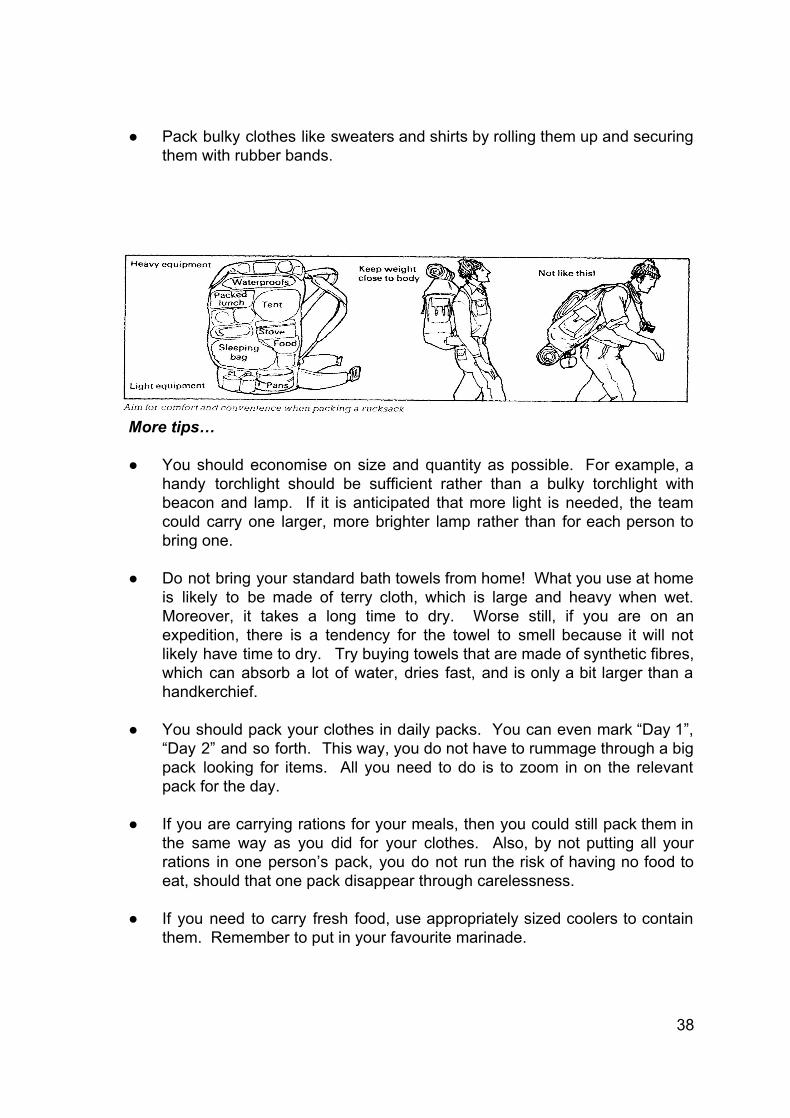
● Pack bulky clothes like sweaters and shirts by rolling them up and securing
them with rubber bands.
More tips…
● You should economise on size and quantity as possible. For example, a handy torchlight should be sufficient rather than a bulky torchlight with beacon and lamp. If it is anticipated that more light is needed, the team could carry one larger, more brighter lamp rather than for each person to bring one.
● Do not bring your standard bath towels from home! What you use at home
is likely to be made of terry cloth, which is large and heavy when wet. Moreover, it takes a long time to dry. Worse still, if you are on an expedition, there is a tendency for the towel to smell because it will not likely have time to dry. Try buying towels that are made of synthetic fibres, which can absorb a lot of water, dries fast, and is only a bit larger than a handkerchief.
● You should pack your clothes in daily packs. You can even mark “Day 1”,
“Day 2” and so forth. This way, you do not have to rummage through a big pack looking for items. All you need to do is to zoom in on the relevant pack for the day.
● If you are carrying rations for your meals, then you could still pack them in
the same way as you did for your clothes. Also, by not putting all your rations in one person’s pack, you do not run the risk of having no food to eat, should that one pack disappear through carelessness.
● If you need to carry fresh food, use appropriately sized coolers to contain
them. Remember to put in your favourite marinade.
38
● Bring about 2 to 2.5 litres of water in two bottles. That should be sufficient until you get to the next water point. If out in the wilderness, remember to bring along some water purification tablets.
● Team equipment should be distributed across the team to carry. As best a
possible, distribute weight evenly so that no one is left carrying too much. Take turns to carry heavy items if necessary.
● Try to waterproof all your items where possible using plastic bags with
watertight seals. Remember to deflate them as much as possible in order to conserve on a limited space.
● On kayaking expeditions, you will need to use dry bags to contain your
things that need to be kept dry and stow them in the front of your kayak.
39
SECTION K: EXPEDITION PLANNING 1. Introduction
Expedition planning is a key skill particularly when you take on longer and more complex expeditions. The process is very similar to the planning that you do for other BB activities. In a sense, the method is almost identical and you will find that only some of the planning elements are different. This section will introduce the elements of Expedition Planning
2. Elements of Expedition Planning
There are 4 main parts to Expedition Planning. These are: a) Aim b) Situational Analysis c) Planning & Execution d) Command & Control
3. Aim of the Expedition
You and your teammates have to decide on the aim of the expedition. By keeping it simple, e.g. “To scale Mount Ophir in 2 days”, you will see that there will be less room for misunderstanding and confusion. Coming to a consensus allows the team to be clear about the aim of the expedition, so that the rest of the planning can go on. Your Officer may also determine the aim for you and your team.
3. Situational Analysis
This is simply a “big” phrase that describes your attempt to identify: a) The possible problems – natural obstacles, elements, lack of information b) The possible advantages – savings of time, money, higher degree of
safety, c) The possible resources – people who have undertaken a similar
expedition previously, log books of previous teams.
The above 3 items should be considered carefully when you analyse the following: ● Terrain
40

When you are selecting your team’s route of travel, think carefully about the kinds of safety hazards and obstacles that may be found in the terrain. Does the terrain require special equipment for your expedition e.g. life jackets for negotiating water obstacles.
Consider also what advantages terrain can offer you when look at possible evacuation routes.
● Weather
On expeditions, you are exposed to natural elements. Weigh the pros and cons of conducting the expedition at specific times of the year, even the time of day. Ask questions like “Can the expedition have a better chance of success if done at a certain period of the year?”
● Resources
These cover a wide range: from physical to information. Physical resources can comprise equipment, locations for rest and meals, and safety vehicles. If you can source physical resources such as these, how can you use these to your advantage?
It does not mean that if you do not have access to such resources, you are therefore disadvantaged. It is far more important to be able to use whatever resources prudently, than having a bloated logistics list.
● Logistics
Identify the logistics that you will need, especially in terms of safety equipment. For instance, if you are going on an bicycle expedition, make sure you bring along spare rubber linings, bicycle chains, repair kits etc.
4. Planning and Execution
You will need to put together a plan of action, listing the various tasks that each member of the team is responsible for. Looking at the route you have selected, also arrange a possible programme for the expedition itself. Communicate clearly your meeting points, rest points and times which people like your support team (if you have one), need to know. You also ought to prepare for contingencies like inclement weather, accidents etc which might require you to abandon the expedition. Ensure that all on the team are familiar with these contingency plans.
5. Command and Control
During the run-up to the expedition, regular preparatory meetings and equipment checks are useful in helping each member keep up with the plan.
41

You will also need to work out how you will keep in communications during the expedition itself. If using hand phones, make sure that everyone has each other’s numbers. If using 2-way radios, then ensure that once adjusted, the channels and frequencies are not changed.
42