Embed Size (px)
Citation preview
AFFIXUS® Natural Nail® Antegrade/Retrograde Humeral System
Surgical Technique
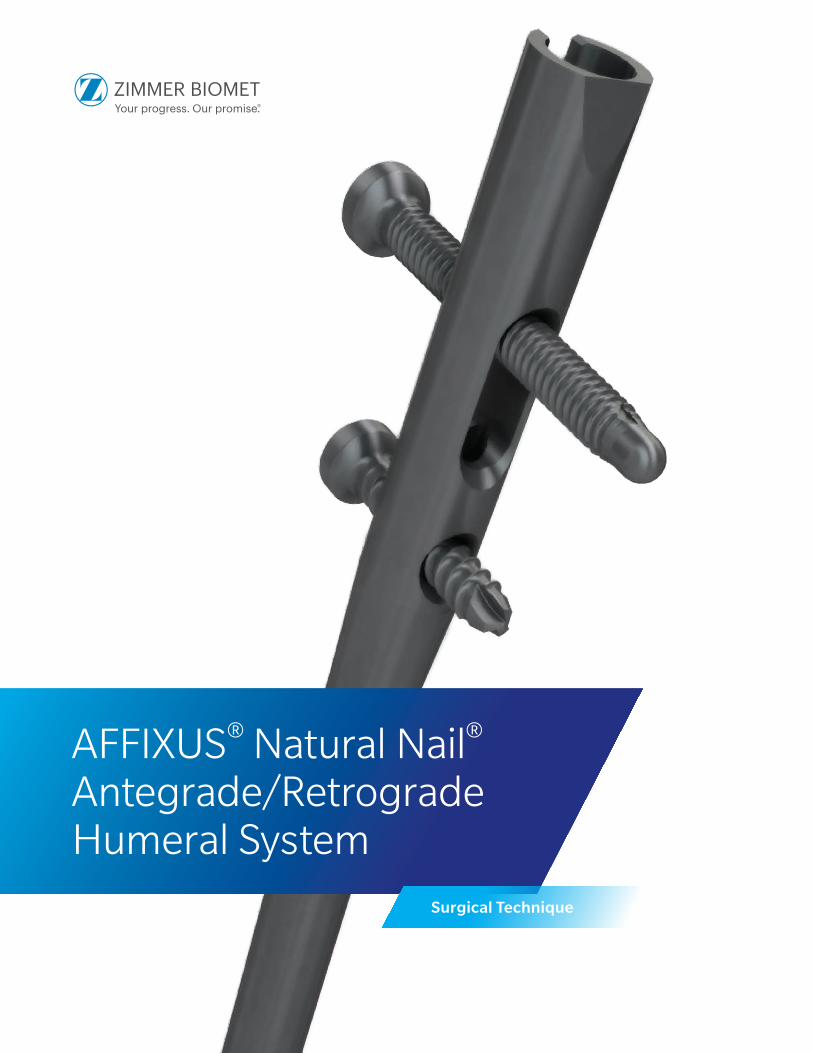
The AFFIXUS Natural Nail Humeral System is part of a long bone nailing system that offers a complete portfolio of implants and instruments, which treats a range of humeral fractures using either the antegrade or retrograde approach with one implant. The instrumentation is designed for intuitive assembly and ease-of-use by OR staff and surgeons, enabling a simple and efficient procedure. The instrumentation is designed to provide intraoperative options including entry portals, reduction tools and color-coded screw placement, while being standardized to maintain harmony across the platform.
One Implant Designed for Treatment of a Range of Humeral Fractures
• Anatomically designed for insertion in either the antegrade or retrograde approach
• Universal instrumentation system enables efficiency in the OR
• Multiple locking options for management of proximal to distal shaft fractures

Table of Contents
Introduction .......................................................................................................2
Targeting Guide Assembly ..................................................................................3
Indications/Contraindications ................................................................................. 4
Antegrade Procedure
Preoperative Planning and Patient Positioning ..................................................... 6
Surgical Approach and Entry Point ....................................................................... 7 Incision and Soft Tissue Resection ...........................................................................................7
Entry Point ........................................................................................................... 8Standard Cannulated Opening Reaming ..................................................................................9
Coring Opening Reaming ........................................................................................................9
Determining Nail Length .................................................................................... 10
Reaming Medullary Canal .................................................................................. 10
Nail Assembly and Insertion ............................................................................... 11
Nail Positioning .................................................................................................. 12
Proximal Screw Placement ................................................................................. 13
Distal Screw Placement ...................................................................................... 15
Axial Screw Compression (Optional) ................................................................... 17
Nail Cap Insertion (Optional) .............................................................................. 17
Implant Removal (Optional) ................................................................................ 18
Retrograde Procedure
Preoperative Planning and Patient Positioning ................................................... 20
Surgical Approach and Entry Point ..................................................................... 21Entry Point Location ............................................................................................................... 21
Entry Point Opening ........................................................................................... 22
Determining Nail Length .................................................................................... 23
Reaming the Medullary Canal ............................................................................. 23
Nail Assembly and Insertion ............................................................................... 24
Nail Positioning .................................................................................................. 25
Distal Screw Placement ...................................................................................... 26
Proximal Screw Placement ................................................................................. 27
Axial Compression (Optional) ............................................................................. 29
Nail Cap Insertion (Optional) .............................................................................. 29
Implant Removal (Optional) ................................................................................ 30
Ordering Information........................................................................................30
Implant Specifications ......................................................................................40
2 | AFFIXUS® Natural Nail® Antegrade/Retrograde Humeral System Surgical Technique
1
4
2
3
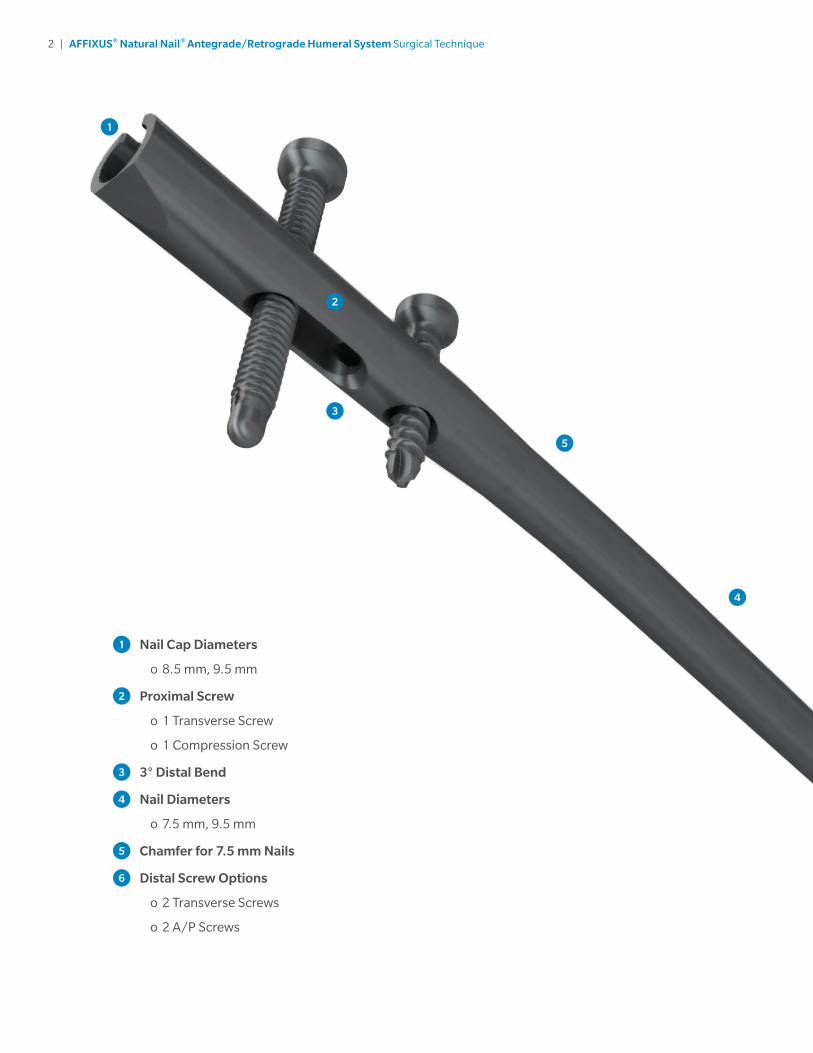
1 Nail Cap Diameters
o 8.5 mm, 9.5 mm
2 Proximal Screw
o 1 Transverse Screw
o 1 Compression Screw
3 3° Distal Bend
4 Nail Diameters
o 7.5 mm, 9.5 mm
5 Chamfer for 7.5 mm Nails
6 Distal Screw Options
o 2 Transverse Screws
o 2 A/P Screws
5
3 | AFFIXUS® Natural Nail® Antegrade/Retrograde Humeral System Surgical Technique
6
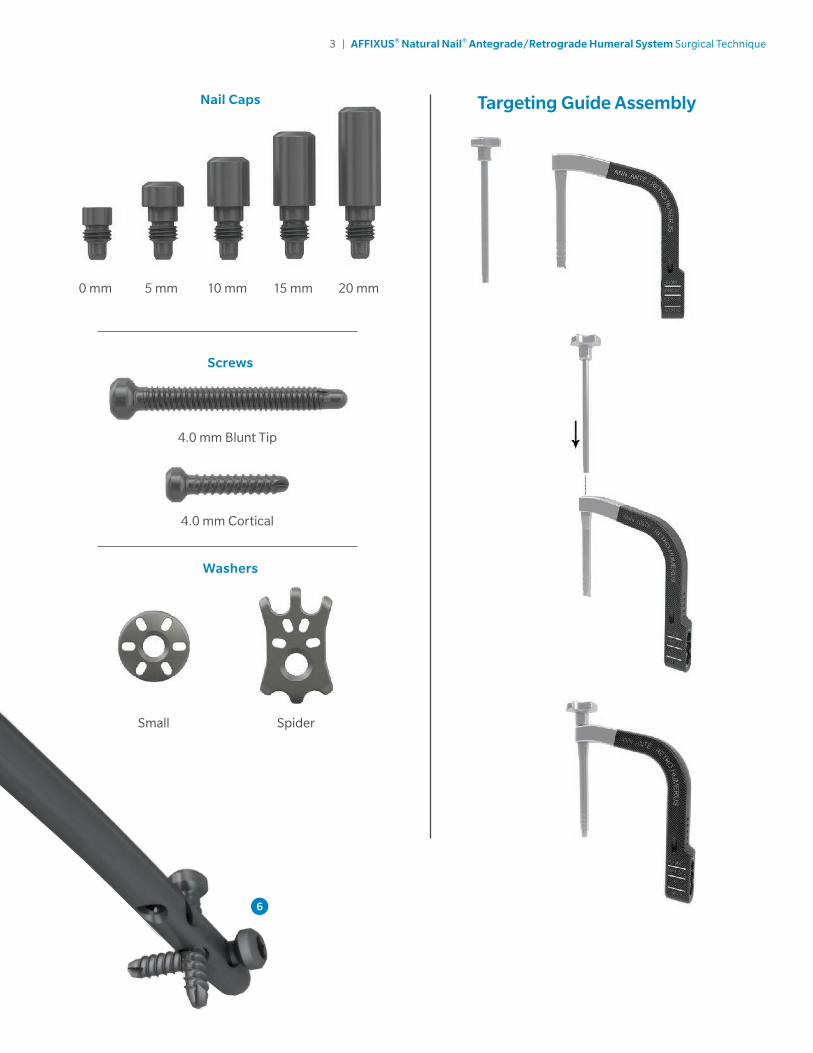
Targeting Guide Assembly
4.0 mm Blunt Tip
4.0 mm Cortical
Small Spider
Screws
Washers
Nail Caps
0 mm 5 mm 10 mm 15 mm 20 mm

4 | AFFIXUS® Natural Nail® Antegrade/Retrograde Humeral System Surgical Technique
INDICATIONSThe AFFIXUS Natural Nail Humeral Nails are indicated for use in a variety of fractures, such as:
1. Proximal fractures (proximal short and long nails only)
2. Diaphyseal fractures Proximal Long, (antegrade/retrograde nails)
3. Open and closed fractures
4. Comminuted fractures
5. Nonunions and malunions
6. Pathologic fractures
CONTRAINDICATIONS1. Distal fracture involving the olecranon fossa
2. Bone shaft having excessive bow or deformity
3. A medullary canal obliterated by a previous fracture or tumor
4. Lack of bone substance or bone quality, which makes stable seating of the implant impossible
5. Active or previous Infection
6. Insufficient blood circulation
7. Skeletally immature patients
8. All concomitant diseases that can impair the functioning and the success of the implant
5 | AFFIXUS® Natural Nail® Antegrade/Retrograde Humeral System Surgical Technique
ANTEGRADEP R O C E D U R E
6 | AFFIXUS® Natural Nail® Antegrade/Retrograde Humeral System Surgical Technique
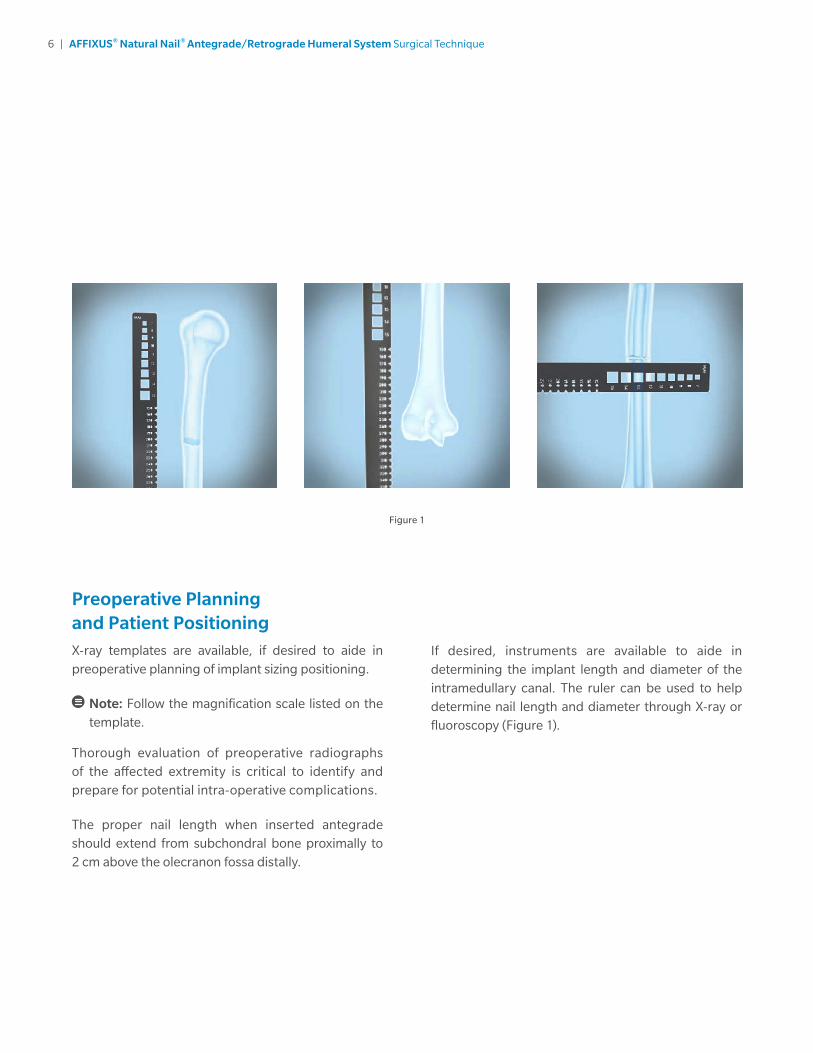
Figure 1
If desired, instruments are available to aide in determining the implant length and diameter of the intramedullary canal. The ruler can be used to help determine nail length and diameter through X-ray or fluoroscopy (Figure 1).
Preoperative Planning and Patient PositioningX-ray templates are available, if desired to aide in preoperative planning of implant sizing positioning.
Note: Follow the magnification scale listed on the template.
Thorough evaluation of preoperative radiographs of the affected extremity is critical to identify and prepare for potential intra-operative complications.
The proper nail length when inserted antegrade should extend from subchondral bone proximally to 2 cm above the olecranon fossa distally.
7 | AFFIXUS® Natural Nail® Antegrade/Retrograde Humeral System Surgical Technique
Figure 3
Figure 2
Figure 5
Figure 4
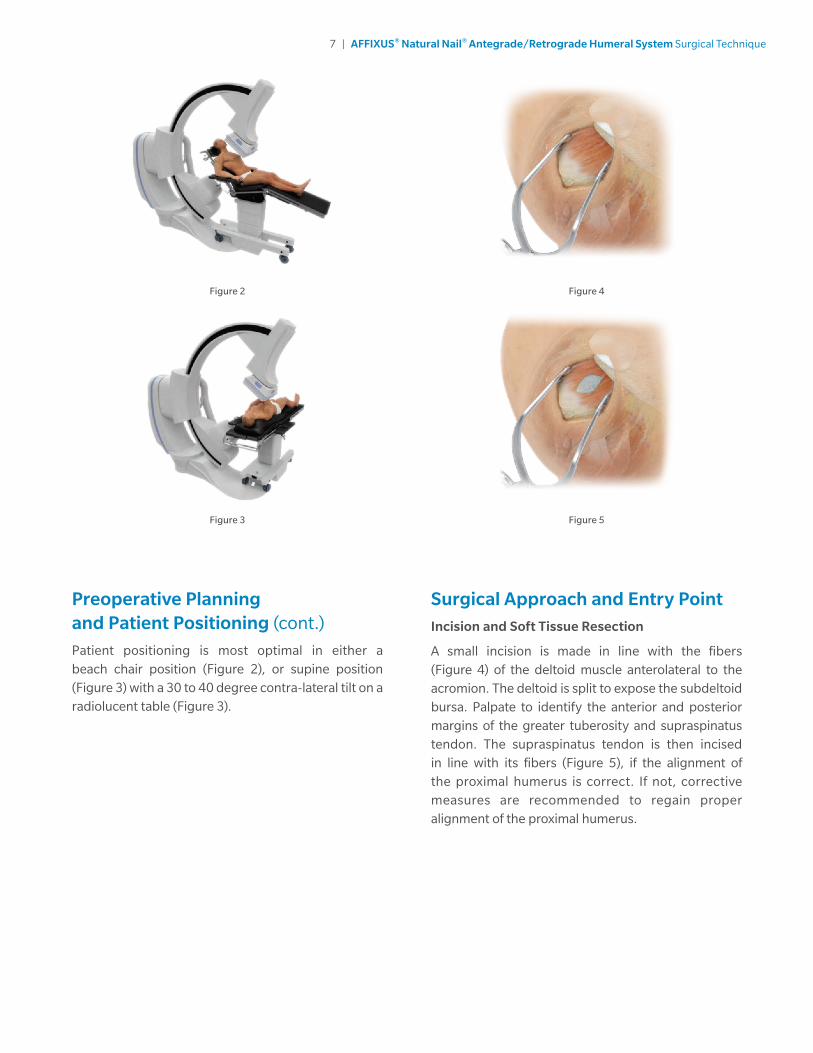
Preoperative Planning and Patient Positioning (cont.)
Patient positioning is most optimal in either a beach chair position (Figure 2), or supine position (Figure 3) with a 30 to 40 degree contra-lateral tilt on a radiolucent table (Figure 3).
Surgical Approach and Entry PointIncision and Soft Tissue Resection
A small incision is made in line with the fibers (Figure 4) of the deltoid muscle anterolateral to the acromion. The deltoid is split to expose the subdeltoid bursa. Palpate to identify the anterior and posterior margins of the greater tuberosity and supraspinatus tendon. The supraspinatus tendon is then incised in line with its fibers (Figure 5), if the alignment of the proximal humerus is correct. If not, corrective measures are recommended to regain proper alignment of the proximal humerus.
8 | AFFIXUS® Natural Nail® Antegrade/Retrograde Humeral System Surgical Technique
Figure 7Figure 6
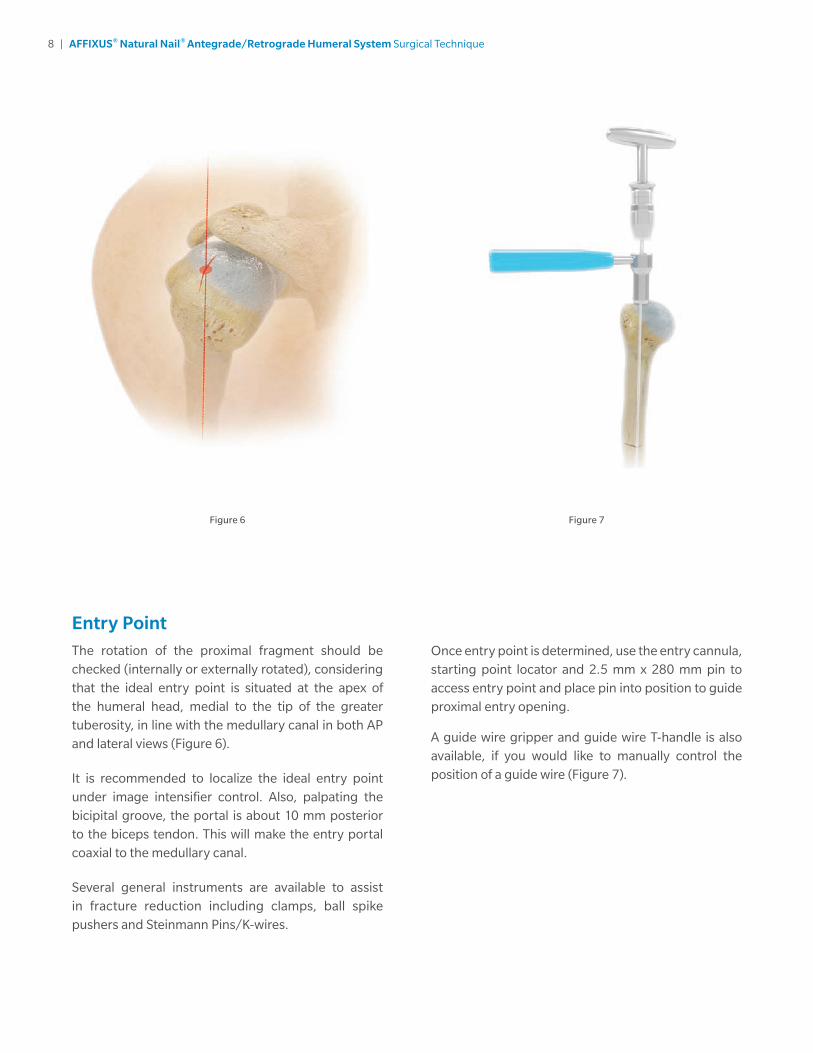
Once entry point is determined, use the entry cannula, starting point locator and 2.5 mm x 280 mm pin to access entry point and place pin into position to guide proximal entry opening.
A guide wire gripper and guide wire T-handle is also available, if you would like to manually control the position of a guide wire (Figure 7).
Entry PointThe rotation of the proximal fragment should be checked (internally or externally rotated), considering that the ideal entry point is situated at the apex of the humeral head, medial to the tip of the greater tuberosity, in line with the medullary canal in both AP and lateral views (Figure 6).
It is recommended to localize the ideal entry point under image intensifier control. Also, palpating the bicipital groove, the portal is about 10 mm posterior to the biceps tendon. This will make the entry portal coaxial to the medullary canal.
Several general instruments are available to assist in fracture reduction including clamps, ball spike pushers and Steinmann Pins/K-wires.
9 | AFFIXUS® Natural Nail® Antegrade/Retrograde Humeral System Surgical Technique
Figure 8 Figure 9
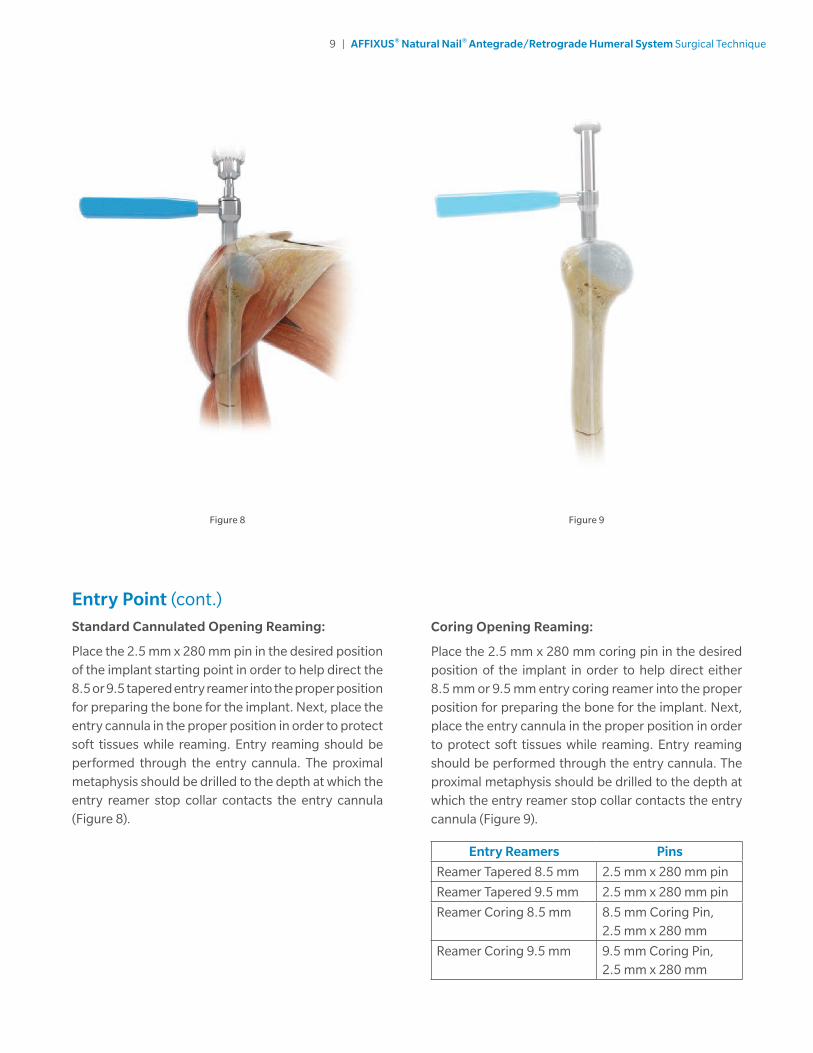
Coring Opening Reaming:
Place the 2.5 mm x 280 mm coring pin in the desired position of the implant in order to help direct either 8.5 mm or 9.5 mm entry coring reamer into the proper position for preparing the bone for the implant. Next, place the entry cannula in the proper position in order to protect soft tissues while reaming. Entry reaming should be performed through the entry cannula. The proximal metaphysis should be drilled to the depth at which the entry reamer stop collar contacts the entry cannula (Figure 9).
Entry Reamers Pins
Reamer Tapered 8.5 mm 2.5 mm x 280 mm pin
Reamer Tapered 9.5 mm 2.5 mm x 280 mm pin
Reamer Coring 8.5 mm 8.5 mm Coring Pin, 2.5 mm x 280 mm
Reamer Coring 9.5 mm 9.5 mm Coring Pin, 2.5 mm x 280 mm
Entry Point (cont.)
Standard Cannulated Opening Reaming:
Place the 2.5 mm x 280 mm pin in the desired position of the implant starting point in order to help direct the 8.5 or 9.5 tapered entry reamer into the proper position for preparing the bone for the implant. Next, place the entry cannula in the proper position in order to protect soft tissues while reaming. Entry reaming should be performed through the entry cannula. The proximal metaphysis should be drilled to the depth at which the entry reamer stop collar contacts the entry cannula (Figure 8).
10 | AFFIXUS® Natural Nail® Antegrade/Retrograde Humeral System Surgical Technique
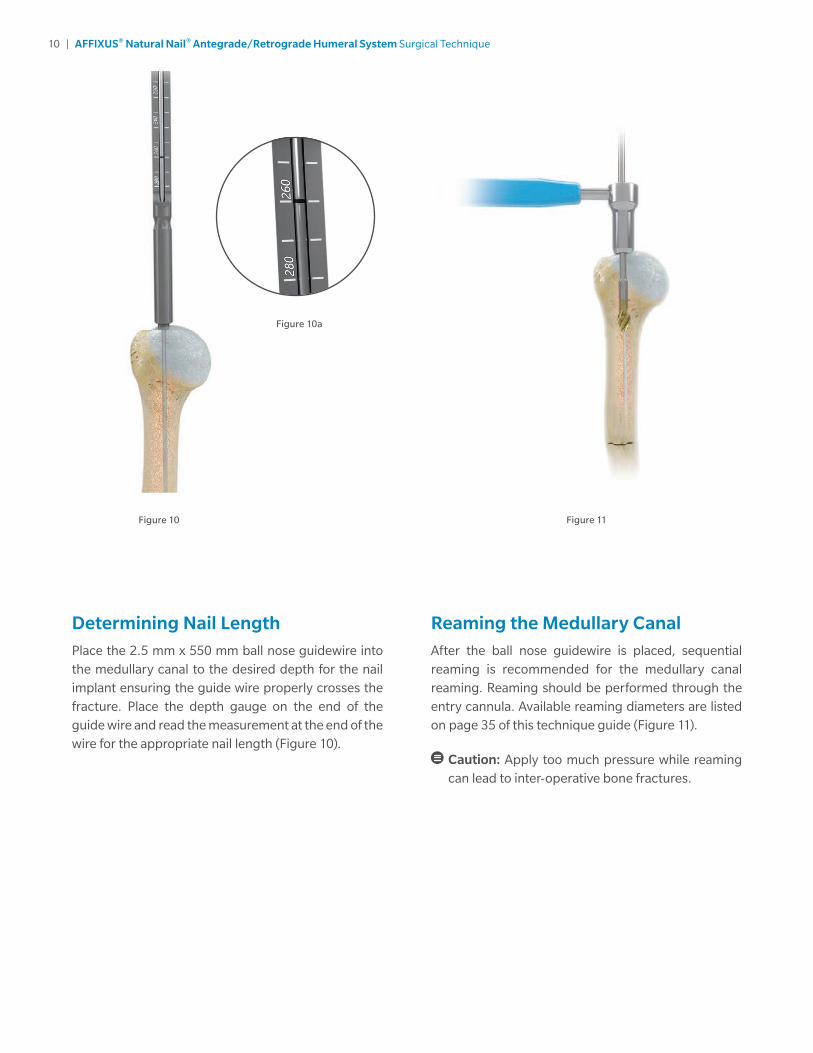
Figure 11
Determining Nail LengthPlace the 2.5 mm x 550 mm ball nose guidewire into the medullary canal to the desired depth for the nail implant ensuring the guide wire properly crosses the fracture. Place the depth gauge on the end of the guide wire and read the measurement at the end of the wire for the appropriate nail length (Figure 10).
Reaming the Medullary CanalAfter the ball nose guidewire is placed, sequential reaming is recommended for the medullary canal reaming. Reaming should be performed through the entry cannula. Available reaming diameters are listed on page 35 of this technique guide (Figure 11).
Caution: Apply too much pressure while reaming can lead to inter-operative bone fractures.
Figure 10
Figure 10a
11 | AFFIXUS® Natural Nail® Antegrade/Retrograde Humeral System Surgical Technique
Figure 12
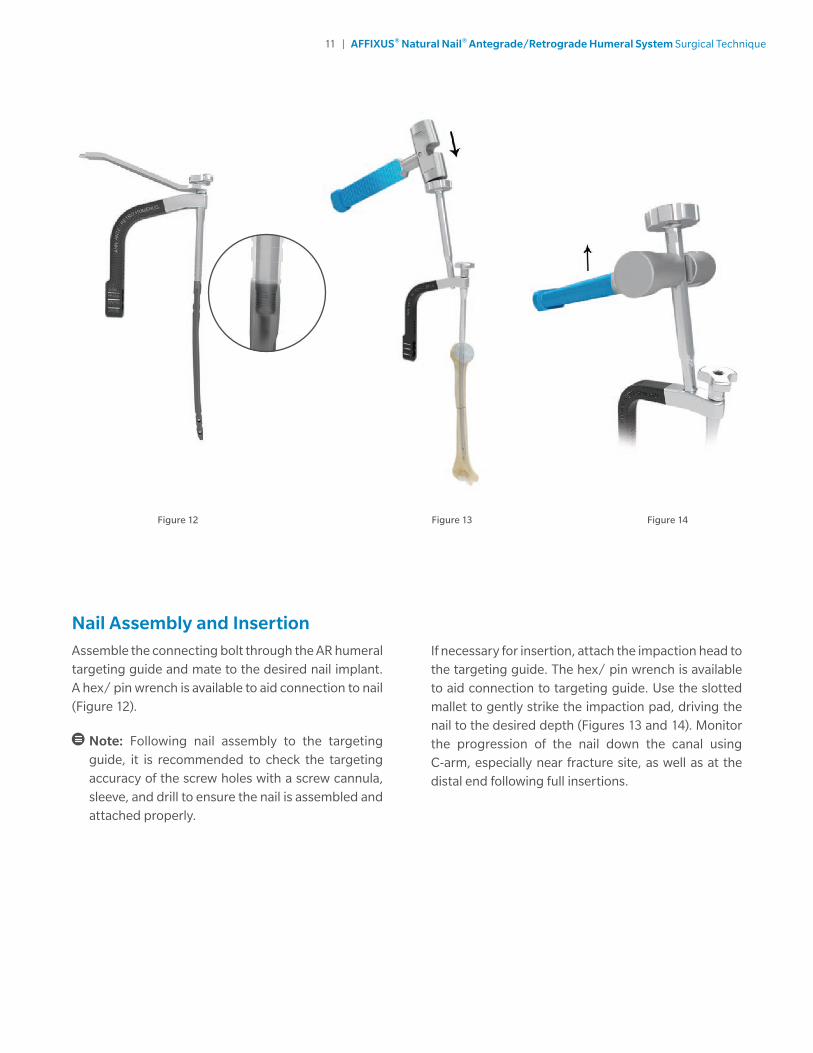
Nail Assembly and InsertionAssemble the connecting bolt through the AR humeral targeting guide and mate to the desired nail implant. A hex/ pin wrench is available to aid connection to nail (Figure 12).
Note: Following nail assembly to the targeting guide, it is recommended to check the targeting accuracy of the screw holes with a screw cannula, sleeve, and drill to ensure the nail is assembled and attached properly.
If necessary for insertion, attach the impaction head to the targeting guide. The hex/ pin wrench is available to aid connection to targeting guide. Use the slotted mallet to gently strike the impaction pad, driving the nail to the desired depth (Figures 13 and 14). Monitor the progression of the nail down the canal using C-arm, especially near fracture site, as well as at the distal end following full insertions.
Figure 14Figure 13
12 | AFFIXUS® Natural Nail® Antegrade/Retrograde Humeral System Surgical Technique
Figure 15 Figure 16
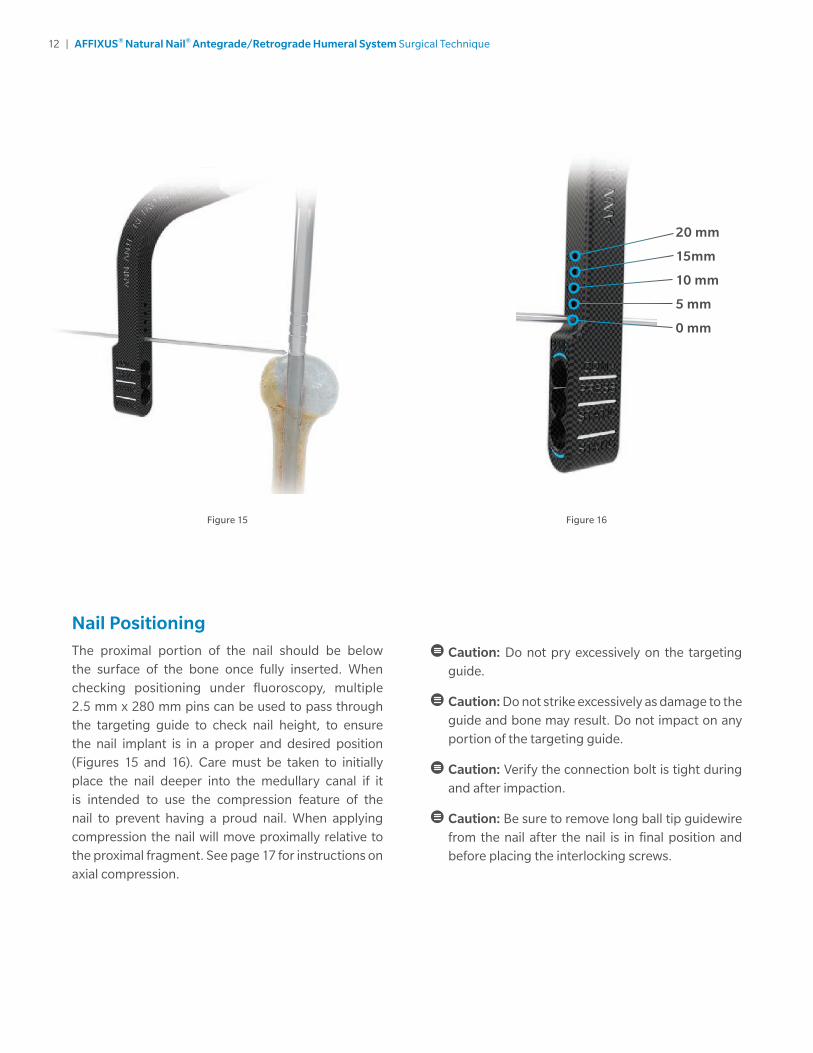
Nail PositioningThe proximal portion of the nail should be below the surface of the bone once fully inserted. When checking positioning under fluoroscopy, multiple 2.5 mm x 280 mm pins can be used to pass through the targeting guide to check nail height, to ensure the nail implant is in a proper and desired position (Figures 15 and 16). Care must be taken to initially place the nail deeper into the medullary canal if it is intended to use the compression feature of the nail to prevent having a proud nail. When applying compression the nail will move proximally relative to the proximal fragment. See page 17 for instructions on axial compression.
Caution: Do not pry excessively on the targeting guide.
Caution: Do not strike excessively as damage to the guide and bone may result. Do not impact on any portion of the targeting guide.
Caution: Verify the connection bolt is tight during and after impaction.
Caution: Be sure to remove long ball tip guidewire from the nail after the nail is in final position and before placing the interlocking screws.
20 mm
15mm
10 mm
5 mm
0 mm
13 | AFFIXUS® Natural Nail® Antegrade/Retrograde Humeral System Surgical Technique
Figure 17
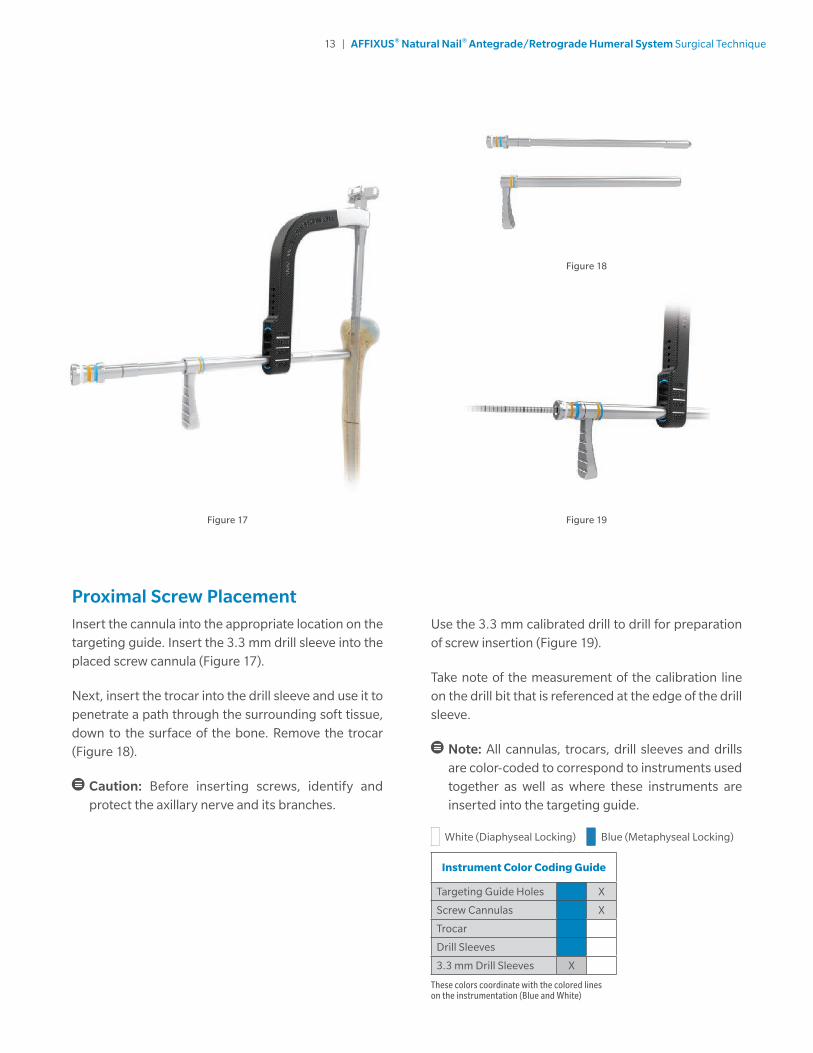
Proximal Screw PlacementInsert the cannula into the appropriate location on the targeting guide. Insert the 3.3 mm drill sleeve into the placed screw cannula (Figure 17).
Next, insert the trocar into the drill sleeve and use it to penetrate a path through the surrounding soft tissue, down to the surface of the bone. Remove the trocar (Figure 18).
Caution: Before inserting screws, identify and protect the axillary nerve and its branches.
Use the 3.3 mm calibrated drill to drill for preparation of screw insertion (Figure 19).
Take note of the measurement of the calibration line on the drill bit that is referenced at the edge of the drill sleeve.
Note: All cannulas, trocars, drill sleeves and drills are color-coded to correspond to instruments used together as well as where these instruments are inserted into the targeting guide.
White (Diaphyseal Locking) Blue (Metaphyseal Locking)
Instrument Color Coding Guide
Targeting Guide Holes X
Screw Cannulas X
Trocar
Drill Sleeves
3.3 mm Drill Sleeves X
These colors coordinate with the colored lines on the instrumentation (Blue and White)
Figure 19
Figure 18
14 | AFFIXUS® Natural Nail® Antegrade/Retrograde Humeral System Surgical Technique
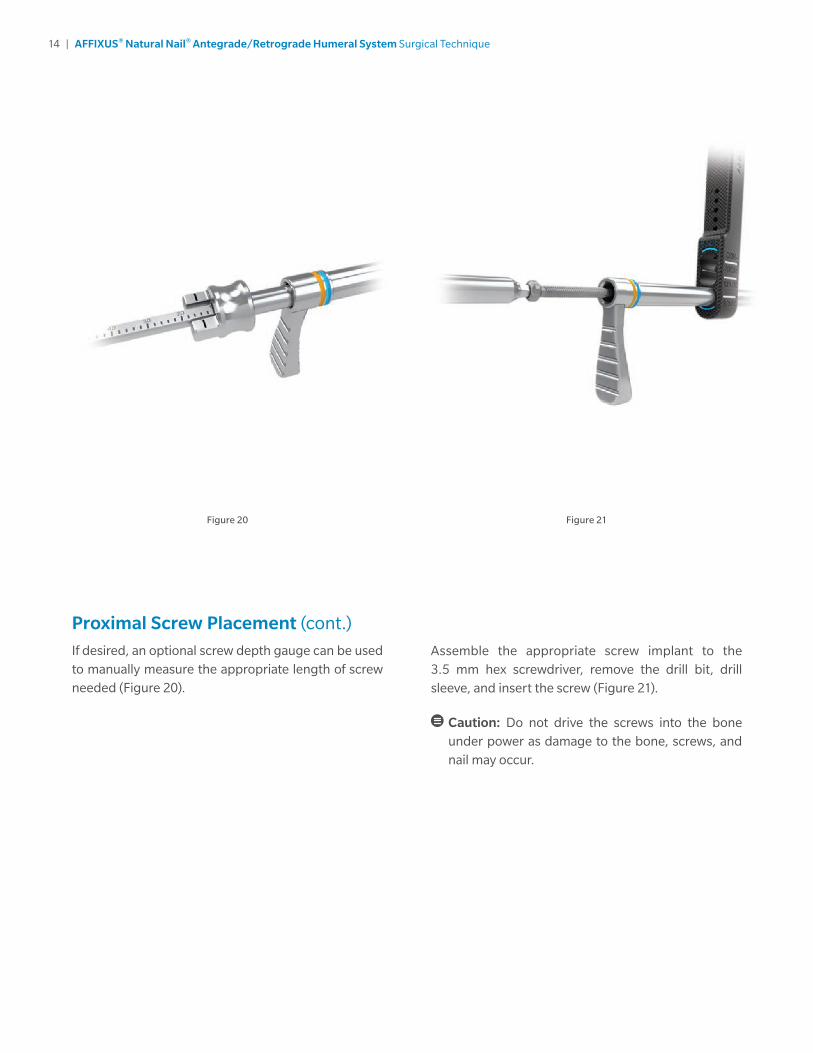
Assemble the appropriate screw implant to the 3.5 mm hex screwdriver, remove the drill bit, drill sleeve, and insert the screw (Figure 21).
Caution: Do not drive the screws into the bone under power as damage to the bone, screws, and nail may occur.
Proximal Screw Placement (cont.)
If desired, an optional screw depth gauge can be used to manually measure the appropriate length of screw needed (Figure 20).
Figure 20 Figure 21
15 | AFFIXUS® Natural Nail® Antegrade/Retrograde Humeral System Surgical Technique
Figure 23
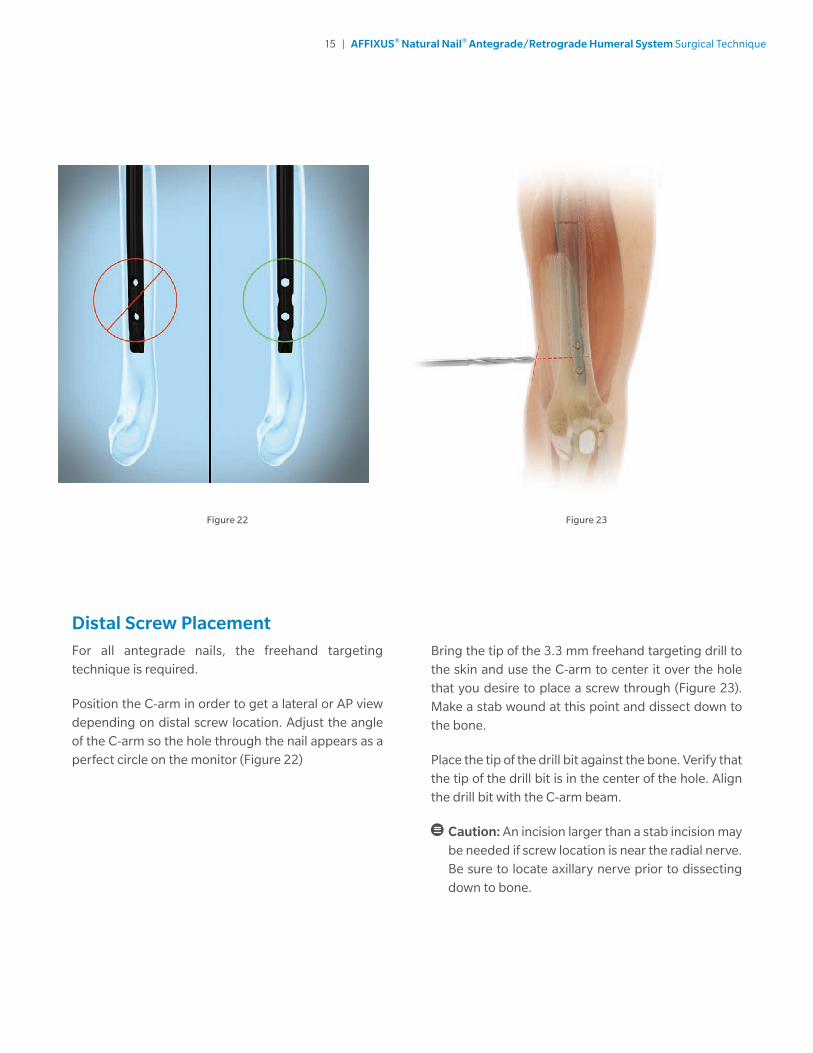
Bring the tip of the 3.3 mm freehand targeting drill to the skin and use the C-arm to center it over the hole that you desire to place a screw through (Figure 23). Make a stab wound at this point and dissect down to the bone.
Place the tip of the drill bit against the bone. Verify that the tip of the drill bit is in the center of the hole. Align the drill bit with the C-arm beam.
Caution: An incision larger than a stab incision may be needed if screw location is near the radial nerve. Be sure to locate axillary nerve prior to dissecting down to bone.
Figure 22
Distal Screw PlacementFor all antegrade nails, the freehand targeting technique is required.
Position the C-arm in order to get a lateral or AP view depending on distal screw location. Adjust the angle of the C-arm so the hole through the nail appears as a perfect circle on the monitor (Figure 22)
16 | AFFIXUS® Natural Nail® Antegrade/Retrograde Humeral System Surgical Technique
Figure 24 Figure 25
Distal Screw Placement (cont.)
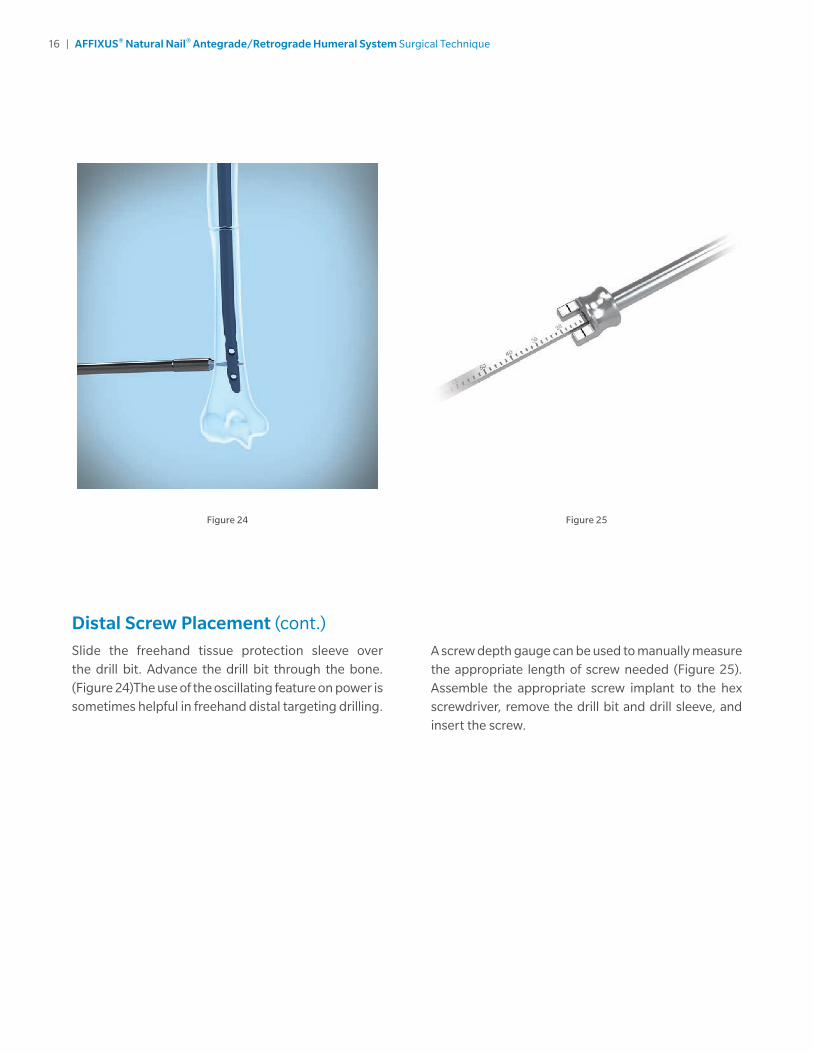
Slide the freehand tissue protection sleeve over the drill bit. Advance the drill bit through the bone. (Figure 24)The use of the oscillating feature on power is sometimes helpful in freehand distal targeting drilling.
A screw depth gauge can be used to manually measure the appropriate length of screw needed (Figure 25).Assemble the appropriate screw implant to the hex screwdriver, remove the drill bit and drill sleeve, and insert the screw.
17 | AFFIXUS® Natural Nail® Antegrade/Retrograde Humeral System Surgical Technique
Figure 26
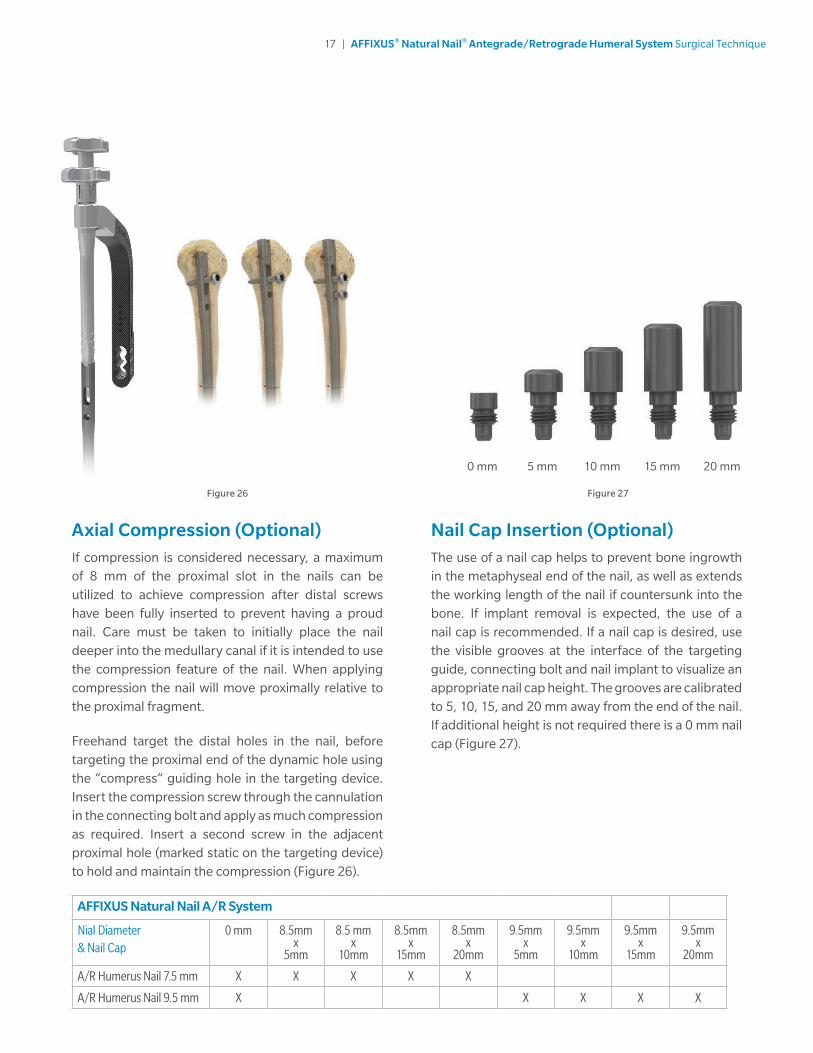
Axial Compression (Optional) If compression is considered necessary, a maximum of 8 mm of the proximal slot in the nails can be utilized to achieve compression after distal screws have been fully inserted to prevent having a proud nail. Care must be taken to initially place the nail deeper into the medullary canal if it is intended to use the compression feature of the nail. When applying compression the nail will move proximally relative to the proximal fragment.
Freehand target the distal holes in the nail, before targeting the proximal end of the dynamic hole using the “compress” guiding hole in the targeting device. Insert the compression screw through the cannulation in the connecting bolt and apply as much compression as required. Insert a second screw in the adjacent proximal hole (marked static on the targeting device) to hold and maintain the compression (Figure 26).
Figure 27
Nail Cap Insertion (Optional)The use of a nail cap helps to prevent bone ingrowth in the metaphyseal end of the nail, as well as extends the working length of the nail if countersunk into the bone. If implant removal is expected, the use of a nail cap is recommended. If a nail cap is desired, use the visible grooves at the interface of the targeting guide, connecting bolt and nail implant to visualize an appropriate nail cap height. The grooves are calibrated to 5, 10, 15, and 20 mm away from the end of the nail. If additional height is not required there is a 0 mm nail cap (Figure 27).
0 mm 5 mm 10 mm 15 mm 20 mm
AFFIXUS Natural Nail A/R System
Nial Diameter & Nail Cap
0 mm 8.5mm x
5mm
8.5 mm x
10mm
8.5mm x
15mm
8.5mm x
20mm
9.5mm x
5mm
9.5mm x
10mm
9.5mm x
15mm
9.5mm x
20mm
A/R Humerus Nail 7.5 mm X X X X X
A/R Humerus Nail 9.5 mm X X X X X
18 | AFFIXUS® Natural Nail® Antegrade/Retrograde Humeral System Surgical Technique
Figure 28 Figure 29
Nail Cap Insertion (Optional) (cont.)
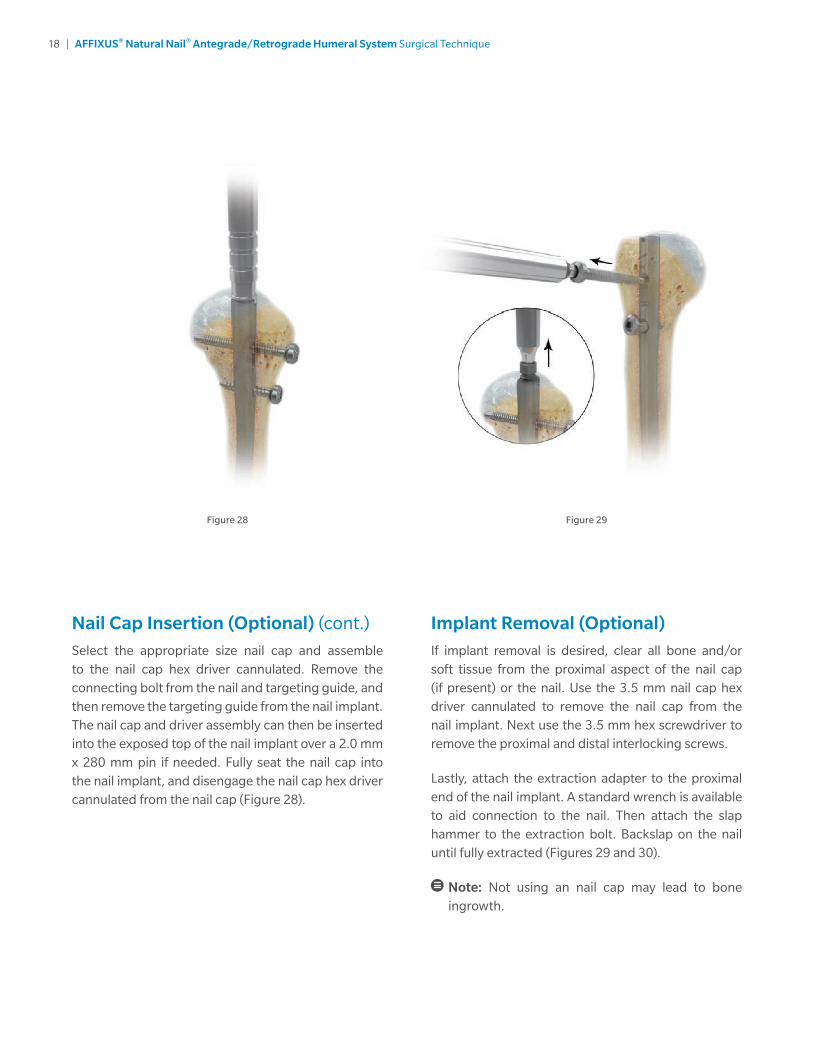
Select the appropriate size nail cap and assemble to the nail cap hex driver cannulated. Remove the connecting bolt from the nail and targeting guide, and then remove the targeting guide from the nail implant. The nail cap and driver assembly can then be inserted into the exposed top of the nail implant over a 2.0 mm x 280 mm pin if needed. Fully seat the nail cap into the nail implant, and disengage the nail cap hex driver cannulated from the nail cap (Figure 28).
Implant Removal (Optional)If implant removal is desired, clear all bone and/or soft tissue from the proximal aspect of the nail cap (if present) or the nail. Use the 3.5 mm nail cap hex driver cannulated to remove the nail cap from the nail implant. Next use the 3.5 mm hex screwdriver to remove the proximal and distal interlocking screws.
Lastly, attach the extraction adapter to the proximal end of the nail implant. A standard wrench is available to aid connection to the nail. Then attach the slap hammer to the extraction bolt. Backslap on the nail until fully extracted (Figures 29 and 30).
Note: Not using an nail cap may lead to bone ingrowth.

19 | AFFIXUS® Natural Nail® Antegrade/Retrograde Humeral System Surgical Technique
RETROGRADEP R O C E D U R E
20 | AFFIXUS® Natural Nail® Antegrade/Retrograde Humeral System Surgical Technique
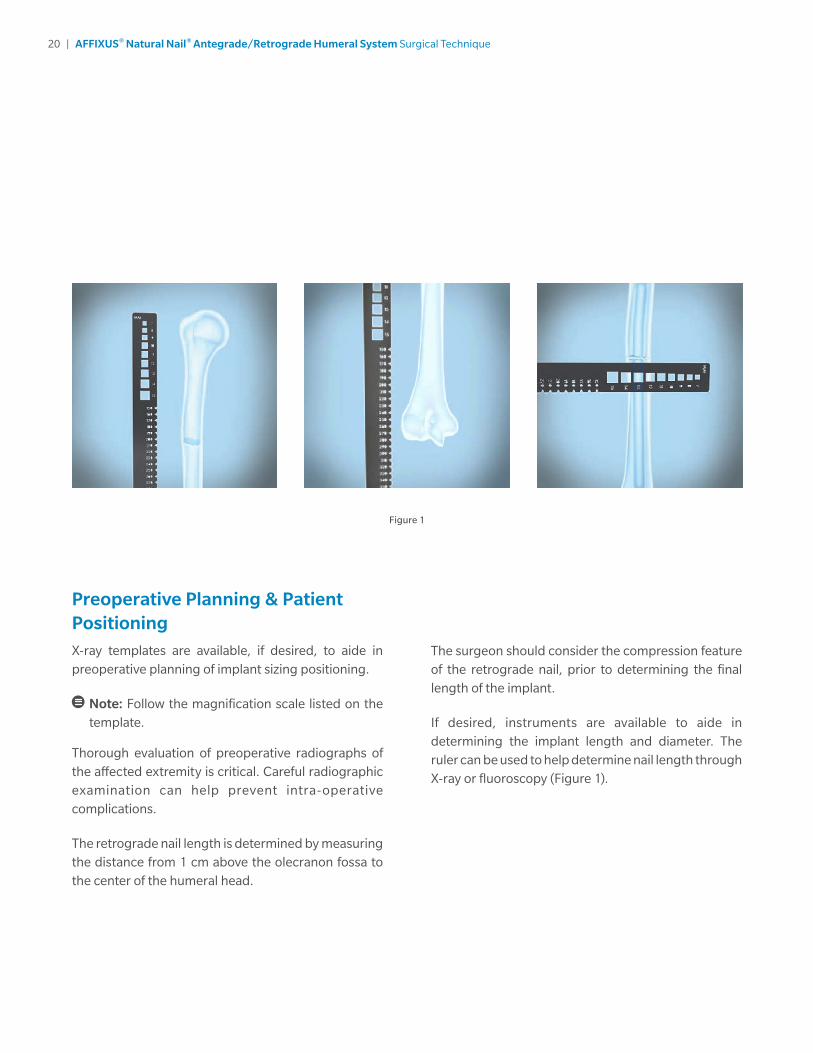
Preoperative Planning & Patient PositioningX-ray templates are available, if desired, to aide in preoperative planning of implant sizing positioning.
Note: Follow the magnification scale listed on the template.
Thorough evaluation of preoperative radiographs of the affected extremity is critical. Careful radiographic examination can help prevent intra-operative complications.
The retrograde nail length is determined by measuring the distance from 1 cm above the olecranon fossa to the center of the humeral head.
The surgeon should consider the compression feature of the retrograde nail, prior to determining the final length of the implant.
If desired, instruments are available to aide in determining the implant length and diameter. The ruler can be used to help determine nail length through X-ray or fluoroscopy (Figure 1).
Figure 1
21 | AFFIXUS® Natural Nail® Antegrade/Retrograde Humeral System Surgical Technique
Figure 2 Figure 4
Figure 3
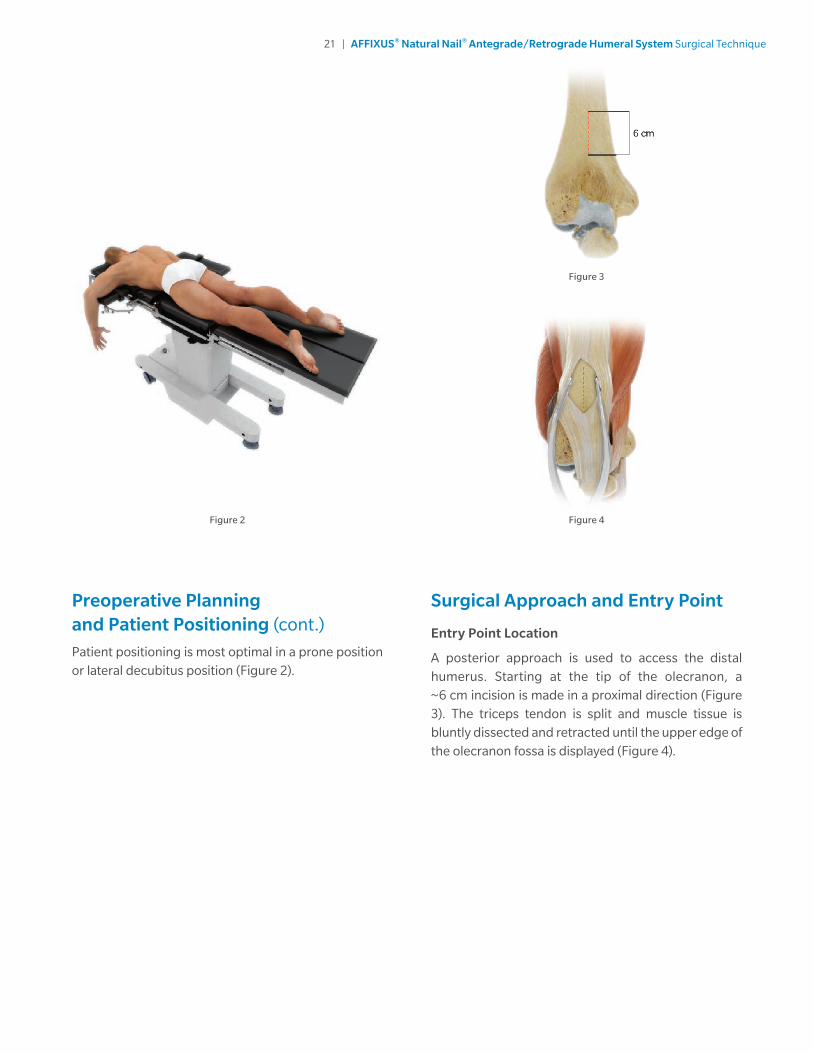
Preoperative Planning and Patient Positioning (cont.)
Patient positioning is most optimal in a prone position or lateral decubitus position (Figure 2).
Surgical Approach and Entry Point
Entry Point Location
A posterior approach is used to access the distal humerus. Starting at the tip of the olecranon, a ~6 cm incision is made in a proximal direction (Figure 3). The triceps tendon is split and muscle tissue is bluntly dissected and retracted until the upper edge of the olecranon fossa is displayed (Figure 4).
22 | AFFIXUS® Natural Nail® Antegrade/Retrograde Humeral System Surgical Technique
Figure 5 Figure 6a
Figure 6
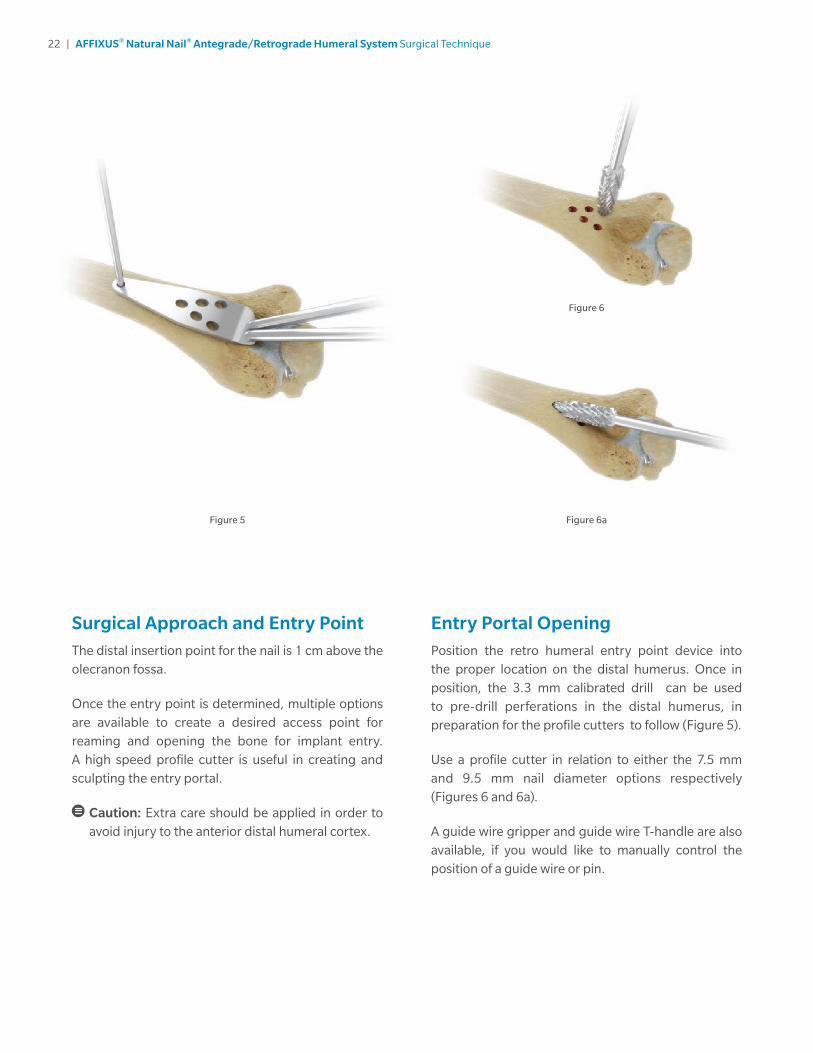
Surgical Approach and Entry PointThe distal insertion point for the nail is 1 cm above the olecranon fossa.
Once the entry point is determined, multiple options are available to create a desired access point for reaming and opening the bone for implant entry. A high speed profile cutter is useful in creating and sculpting the entry portal.
Caution: Extra care should be applied in order to avoid injury to the anterior distal humeral cortex.
Entry Portal OpeningPosition the retro humeral entry point device into the proper location on the distal humerus. Once in position, the 3.3 mm calibrated drill can be used to pre-drill perferations in the distal humerus, in preparation for the profile cutters to follow (Figure 5).
Use a profile cutter in relation to either the 7.5 mm and 9.5 mm nail diameter options respectively (Figures 6 and 6a).
A guide wire gripper and guide wire T-handle are also available, if you would like to manually control the position of a guide wire or pin.

23 | AFFIXUS® Natural Nail® Antegrade/Retrograde Humeral System Surgical Technique
Figure 7 Figure 8
Determining Nail LengthPlace the ball nose guidewire into the medullary canal to the desired depth for the nail implant ensuring the guidewire properly crosses the fracture line (Figure 7). Place the length gauge on the end of the guide wire and read the measurement at the end of the wire for the appropriate nail length.
Reaming the Medullary CanalAfter the ball nose guidewire is placed, sequential reaming is recommended for the medullary canal reaming (Figure 8). Available reaming diameters are listed in the ordering information pages of this technique guide.
Caution: Do not apply too much pressure while reaming so intraoperative bone fractures do not occur.
24 | AFFIXUS® Natural Nail® Antegrade/Retrograde Humeral System Surgical Technique
Figure 9 Figure 10
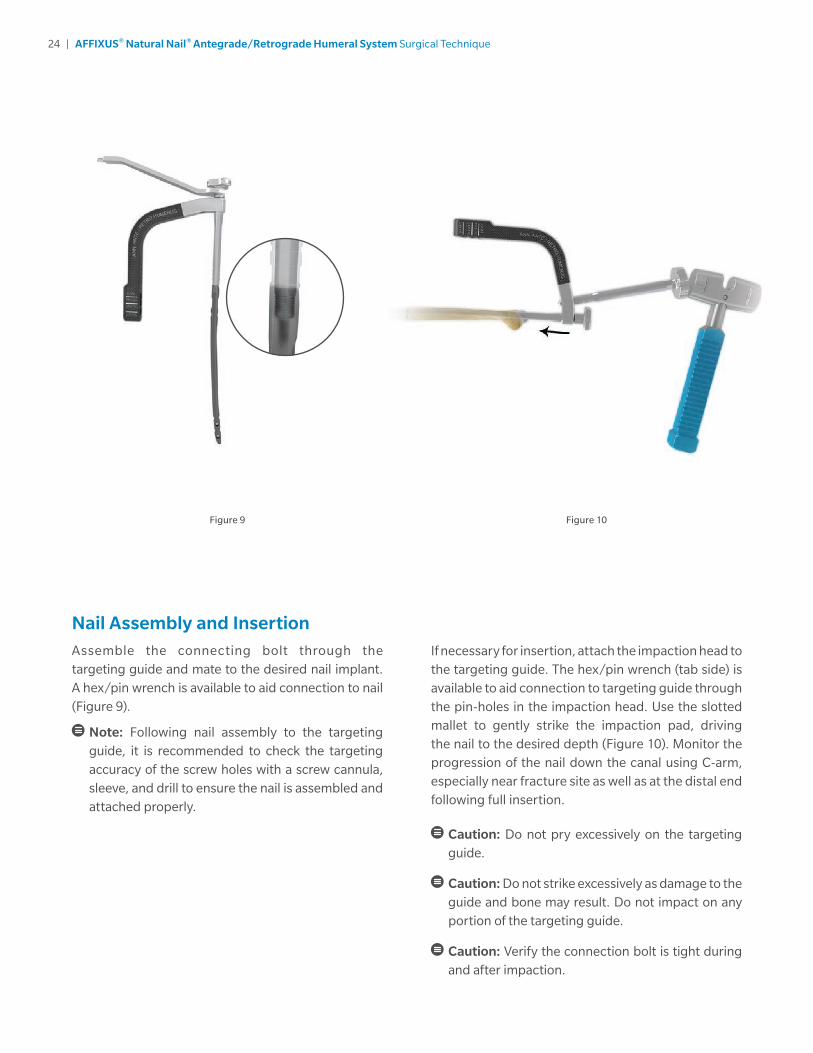
Nail Assembly and Insertion Assemble the connecting bolt through the targeting guide and mate to the desired nail implant. A hex/pin wrench is available to aid connection to nail (Figure 9).
Note: Following nail assembly to the targeting guide, it is recommended to check the targeting accuracy of the screw holes with a screw cannula, sleeve, and drill to ensure the nail is assembled and attached properly.
If necessary for insertion, attach the impaction head to the targeting guide. The hex/pin wrench (tab side) is available to aid connection to targeting guide through the pin-holes in the impaction head. Use the slotted mallet to gently strike the impaction pad, driving the nail to the desired depth (Figure 10). Monitor the progression of the nail down the canal using C-arm, especially near fracture site as well as at the distal end following full insertion.
Caution: Do not pry excessively on the targeting guide.
Caution: Do not strike excessively as damage to the guide and bone may result. Do not impact on any portion of the targeting guide.
Caution: Verify the connection bolt is tight during and after impaction.
25 | AFFIXUS® Natural Nail® Antegrade/Retrograde Humeral System Surgical Technique
Figure 11
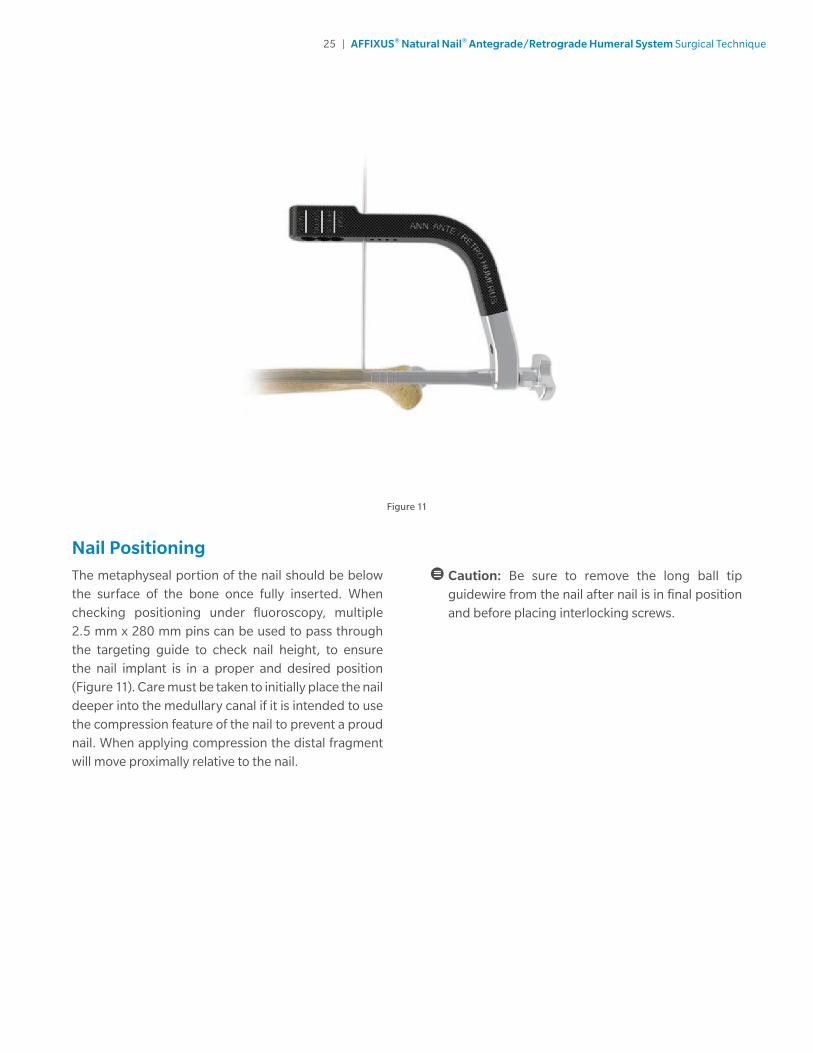
Caution: Be sure to remove the long ball tip guidewire from the nail after nail is in final position and before placing interlocking screws.
Nail PositioningThe metaphyseal portion of the nail should be below the surface of the bone once fully inserted. When checking positioning under fluoroscopy, multiple 2.5 mm x 280 mm pins can be used to pass through the targeting guide to check nail height, to ensure the nail implant is in a proper and desired position (Figure 11). Care must be taken to initially place the nail deeper into the medullary canal if it is intended to use the compression feature of the nail to prevent a proud nail. When applying compression the distal fragment will move proximally relative to the nail.
26 | AFFIXUS® Natural Nail® Antegrade/Retrograde Humeral System Surgical Technique
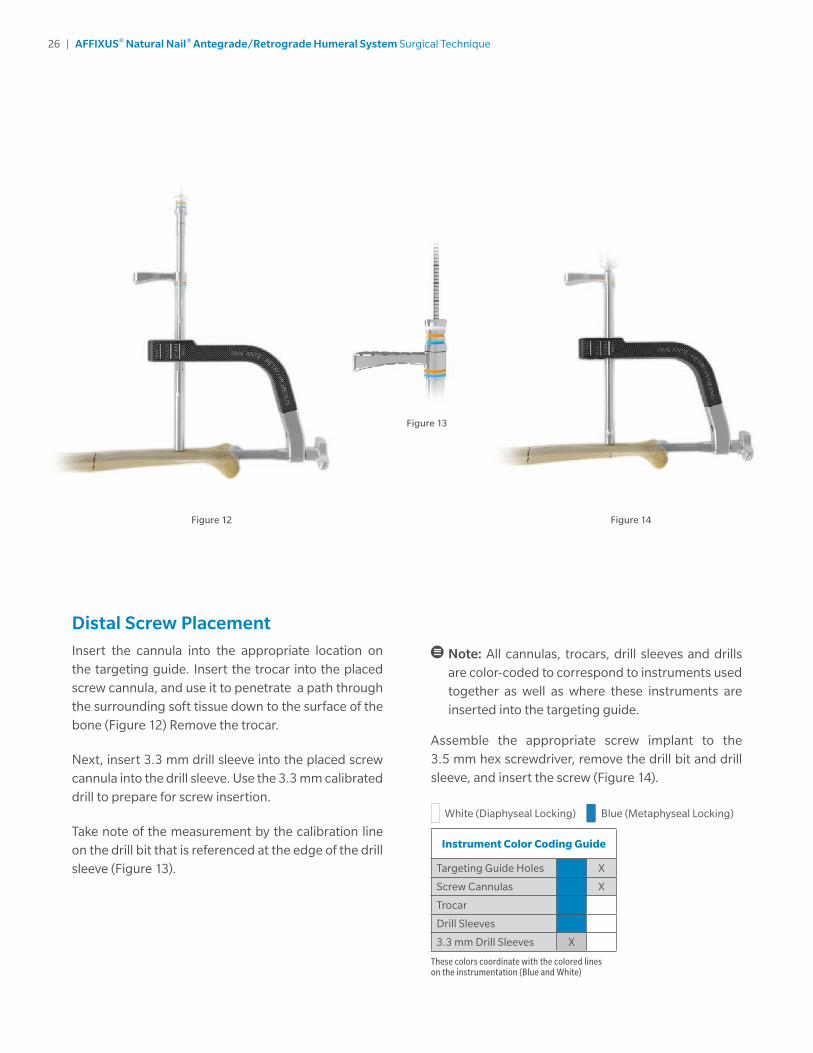
Figure 12 Figure 14
Note: All cannulas, trocars, drill sleeves and drills are color-coded to correspond to instruments used together as well as where these instruments are inserted into the targeting guide.
Assemble the appropriate screw implant to the 3.5 mm hex screwdriver, remove the drill bit and drill sleeve, and insert the screw (Figure 14).
White (Diaphyseal Locking) Blue (Metaphyseal Locking)
Instrument Color Coding Guide
Targeting Guide Holes X
Screw Cannulas X
Trocar
Drill Sleeves
3.3 mm Drill Sleeves X
These colors coordinate with the colored lines on the instrumentation (Blue and White)
Distal Screw PlacementInsert the cannula into the appropriate location on the targeting guide. Insert the trocar into the placed screw cannula, and use it to penetrate a path through the surrounding soft tissue down to the surface of the bone (Figure 12) Remove the trocar.
Next, insert 3.3 mm drill sleeve into the placed screw cannula into the drill sleeve. Use the 3.3 mm calibrated drill to prepare for screw insertion.
Take note of the measurement by the calibration line on the drill bit that is referenced at the edge of the drill sleeve (Figure 13).
Figure 13

27 | AFFIXUS® Natural Nail® Antegrade/Retrograde Humeral System Surgical Technique
Figure 15 Figure 16
Bring the tip of the 3.3 mm freehand targeting drill to the skin and use the C-arm to center it over the hole that you desire to place a screw through (Figure 16). Make a stab wound at this point and dissect down to the bone.
Place the tip of the drill bit against the bone. Verify that the tip of the drill bit is in the center of the hole. Align the drill bit with the C-arm beam.
Caution: An incision larger than a stab incision may be needed if screw location is near the axillary nerve. Be sure to locate axillary nerve prior to dissecting down to bone.
Proximal Screw PlacementFor all retrograde nails, the freehand targeting technique is required.
Position the C-arm in order to get a lateral or AP view depending on proximal screw location. Adjust the angle of the C-arm so the hole through the nail appears as a perfect circle on the monitor (Figure 15)
28 | AFFIXUS® Natural Nail® Antegrade/Retrograde Humeral System Surgical Technique
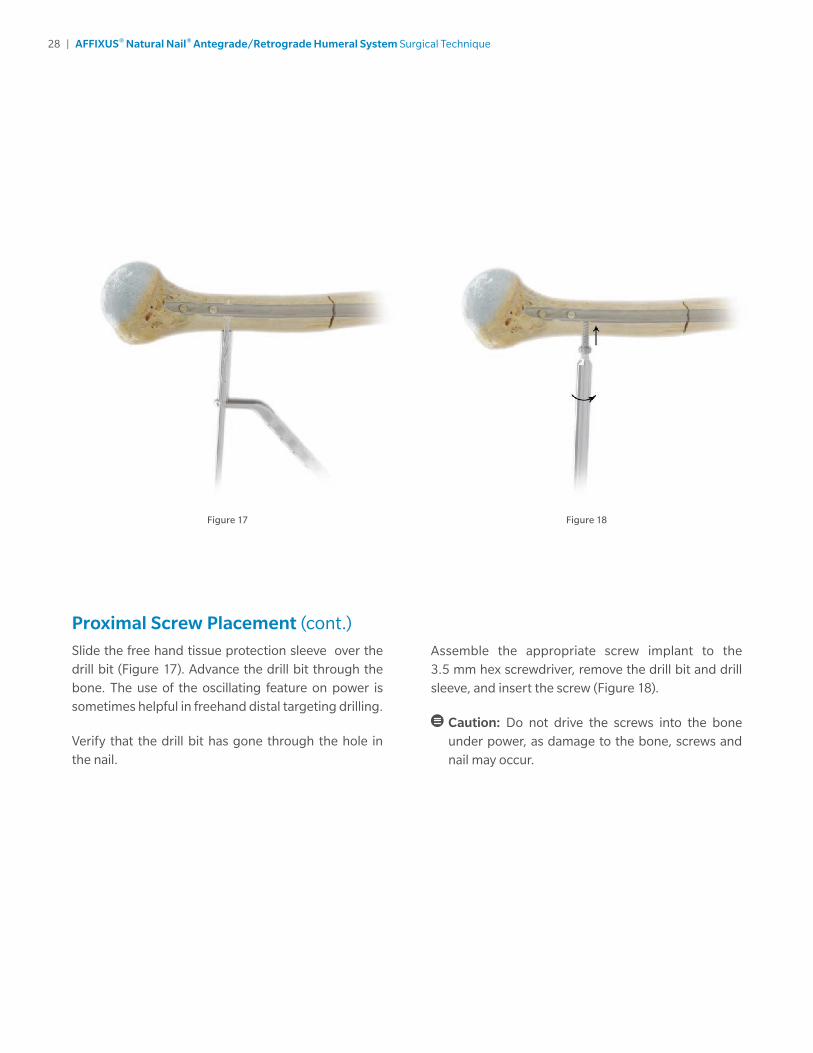
Figure 17 Figure 18
Assemble the appropriate screw implant to the 3.5 mm hex screwdriver, remove the drill bit and drill sleeve, and insert the screw (Figure 18).
Caution: Do not drive the screws into the bone under power, as damage to the bone, screws and nail may occur.
Proximal Screw Placement (cont.)
Slide the free hand tissue protection sleeve over the drill bit (Figure 17). Advance the drill bit through the bone. The use of the oscillating feature on power is sometimes helpful in freehand distal targeting drilling.
Verify that the drill bit has gone through the hole in the nail.
29 | AFFIXUS® Natural Nail® Antegrade/Retrograde Humeral System Surgical Technique
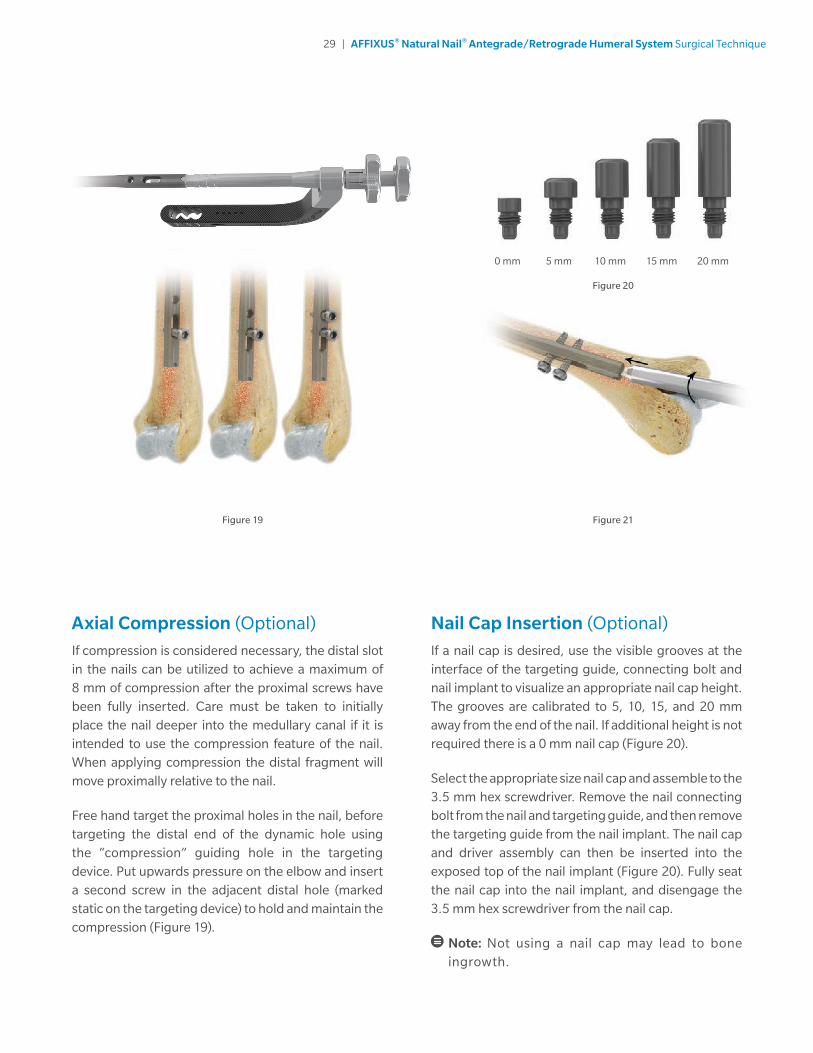
Figure 19 Figure 21
Figure 20
Axial Compression (Optional)
If compression is considered necessary, the distal slot in the nails can be utilized to achieve a maximum of 8 mm of compression after the proximal screws have been fully inserted. Care must be taken to initially place the nail deeper into the medullary canal if it is intended to use the compression feature of the nail. When applying compression the distal fragment will move proximally relative to the nail.
Free hand target the proximal holes in the nail, before targeting the distal end of the dynamic hole using the “compression” guiding hole in the targeting device. Put upwards pressure on the elbow and insert a second screw in the adjacent distal hole (marked static on the targeting device) to hold and maintain the compression (Figure 19).
Nail Cap Insertion (Optional)
If a nail cap is desired, use the visible grooves at the interface of the targeting guide, connecting bolt and nail implant to visualize an appropriate nail cap height. The grooves are calibrated to 5, 10, 15, and 20 mm away from the end of the nail. If additional height is not required there is a 0 mm nail cap (Figure 20).
Select the appropriate size nail cap and assemble to the 3.5 mm hex screwdriver. Remove the nail connecting bolt from the nail and targeting guide, and then remove the targeting guide from the nail implant. The nail cap and driver assembly can then be inserted into the exposed top of the nail implant (Figure 20). Fully seat the nail cap into the nail implant, and disengage the 3.5 mm hex screwdriver from the nail cap.
Note: Not using a nail cap may lead to bone ingrowth.
0 mm 5 mm 10 mm 15 mm 20 mm
30 | AFFIXUS® Natural Nail® Antegrade/Retrograde Humeral System Surgical Technique
Figure 22
Figure 23
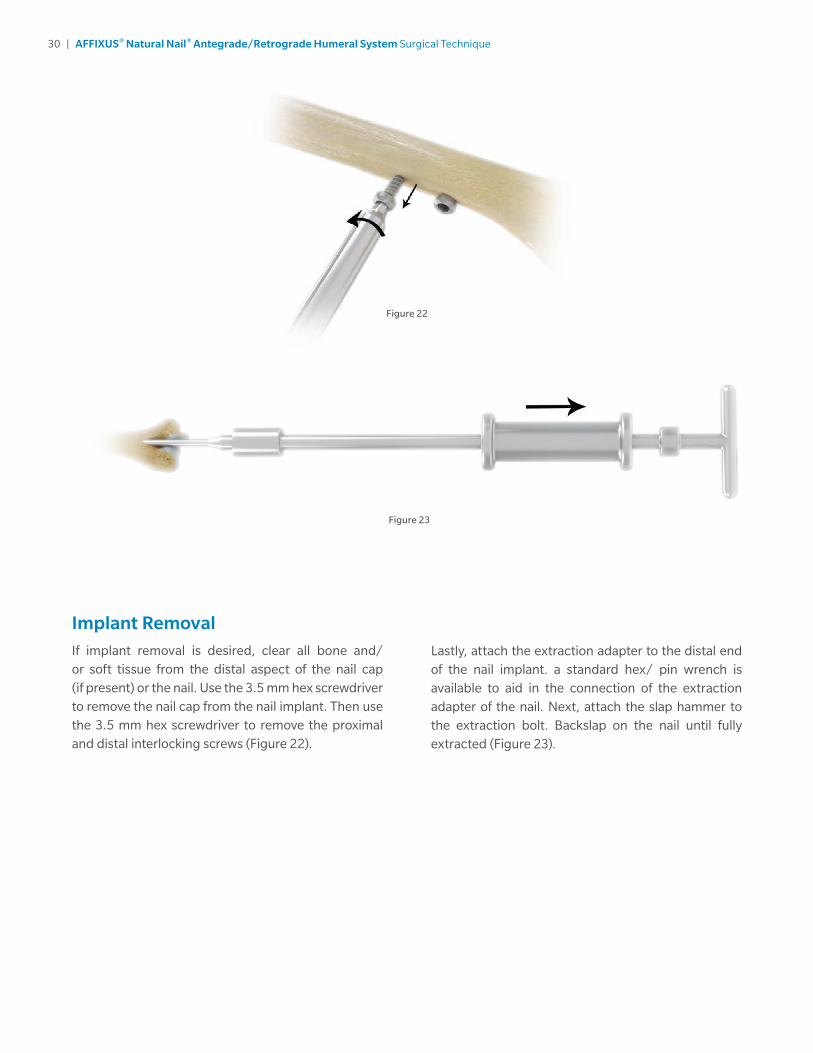
Implant RemovalIf implant removal is desired, clear all bone and/or soft tissue from the distal aspect of the nail cap (if present) or the nail. Use the 3.5 mm hex screwdriver to remove the nail cap from the nail implant. Then use the 3.5 mm hex screwdriver to remove the proximal and distal interlocking screws (Figure 22).
Lastly, attach the extraction adapter to the distal end of the nail implant. a standard hex/ pin wrench is available to aid in the connection of the extraction adapter of the nail. Next, attach the slap hammer to the extraction bolt. Backslap on the nail until fully extracted (Figure 23).
31 | AFFIXUS® Natural Nail® Antegrade/Retrograde Humeral System Surgical Technique
Ordering Information - Implants
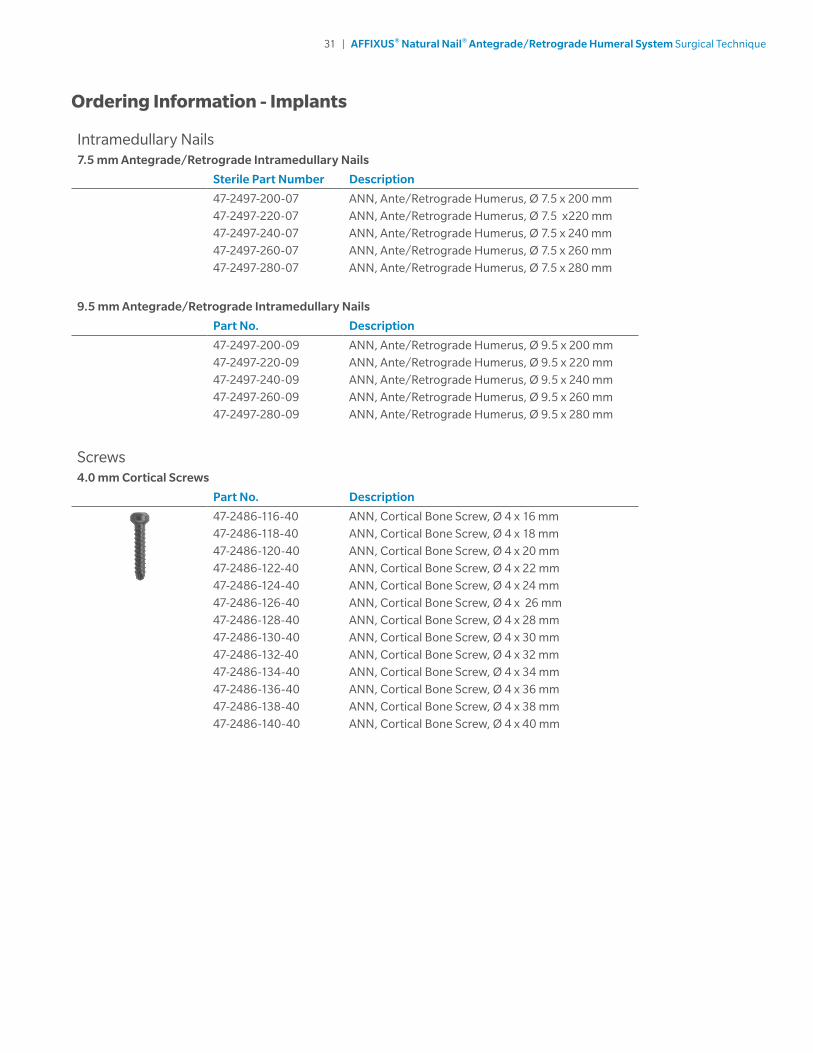
Intramedullary Nails7.5 mm Antegrade/Retrograde Intramedullary Nails
Sterile Part Number Description
47-2497-200-07
47-2497-220-07
47-2497-240-07
47-2497-260-07
47-2497-280-07
ANN, Ante/Retrograde Humerus, Ø 7.5 x 200 mm
ANN, Ante/Retrograde Humerus, Ø 7.5 x220 mm
ANN, Ante/Retrograde Humerus, Ø 7.5 x 240 mm
ANN, Ante/Retrograde Humerus, Ø 7.5 x 260 mm
ANN, Ante/Retrograde Humerus, Ø 7.5 x 280 mm
9.5 mm Antegrade/Retrograde Intramedullary Nails
Part No. Description
47-2497-200-09
47-2497-220-09
47-2497-240-09
47-2497-260-09
47-2497-280-09
ANN, Ante/Retrograde Humerus, Ø 9.5 x 200 mm
ANN, Ante/Retrograde Humerus, Ø 9.5 x 220 mm
ANN, Ante/Retrograde Humerus, Ø 9.5 x 240 mm
ANN, Ante/Retrograde Humerus, Ø 9.5 x 260 mm
ANN, Ante/Retrograde Humerus, Ø 9.5 x 280 mm
Screws 4.0 mm Cortical Screws
Part No. Description
47-2486-116-40
47-2486-118-40
47-2486-120-40
47-2486-122-40
47-2486-124-40
47-2486-126-40
47-2486-128-40
47-2486-130-40
47-2486-132-40
47-2486-134-40
47-2486-136-40
47-2486-138-40
47-2486-140-40
ANN, Cortical Bone Screw, Ø 4 x 16 mm
ANN, Cortical Bone Screw, Ø 4 x 18 mm
ANN, Cortical Bone Screw, Ø 4 x 20 mm
ANN, Cortical Bone Screw, Ø 4 x 22 mm
ANN, Cortical Bone Screw, Ø 4 x 24 mm
ANN, Cortical Bone Screw, Ø 4 x 26 mm
ANN, Cortical Bone Screw, Ø 4 x 28 mm
ANN, Cortical Bone Screw, Ø 4 x 30 mm
ANN, Cortical Bone Screw, Ø 4 x 32 mm
ANN, Cortical Bone Screw, Ø 4 x 34 mm
ANN, Cortical Bone Screw, Ø 4 x 36 mm
ANN, Cortical Bone Screw, Ø 4 x 38 mm
ANN, Cortical Bone Screw, Ø 4 x 40 mm
32 | AFFIXUS® Natural Nail® Antegrade/Retrograde Humeral System Surgical Technique
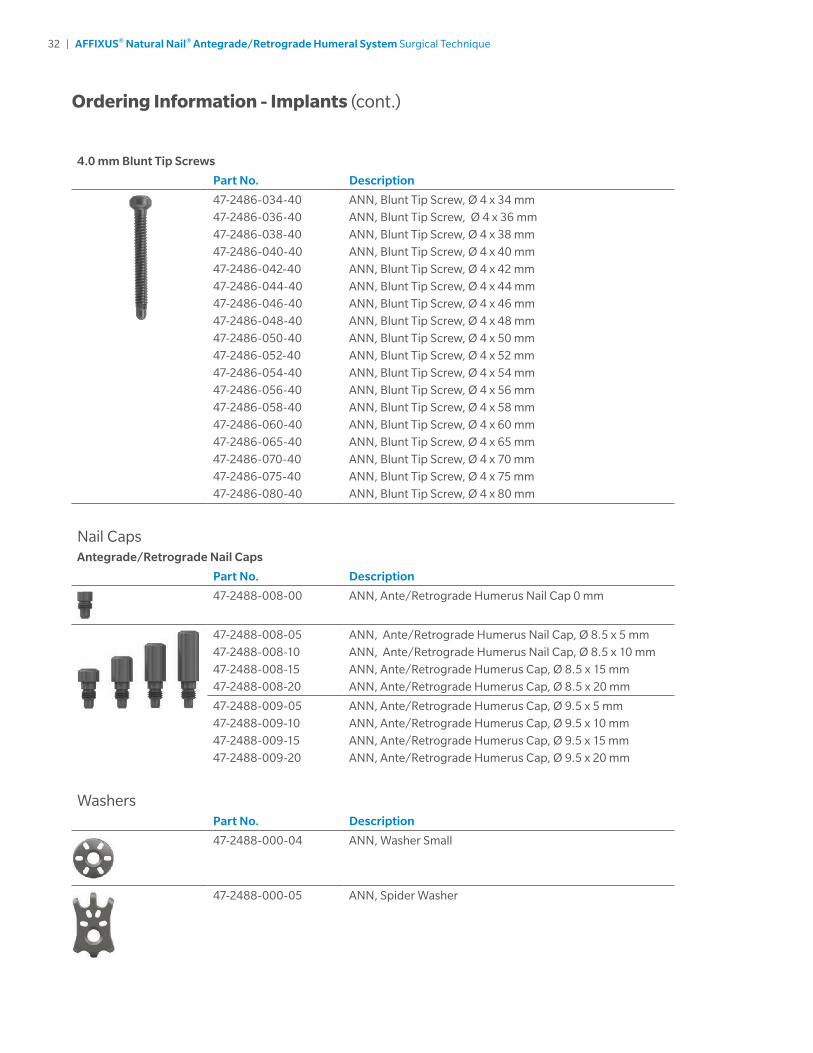
4.0 mm Blunt Tip Screws
Part No. Description
47-2486-034-40
47-2486-036-40
47-2486-038-40
47-2486-040-40
47-2486-042-40
47-2486-044-40
47-2486-046-40
47-2486-048-40
47-2486-050-40
47-2486-052-40
47-2486-054-40
47-2486-056-40
47-2486-058-40
47-2486-060-40
47-2486-065-40
47-2486-070-40
47-2486-075-40
47-2486-080-40
ANN, Blunt Tip Screw, Ø 4 x 34 mm
ANN, Blunt Tip Screw, Ø 4 x 36 mm
ANN, Blunt Tip Screw, Ø 4 x 38 mm
ANN, Blunt Tip Screw, Ø 4 x 40 mm
ANN, Blunt Tip Screw, Ø 4 x 42 mm
ANN, Blunt Tip Screw, Ø 4 x 44 mm
ANN, Blunt Tip Screw, Ø 4 x 46 mm
ANN, Blunt Tip Screw, Ø 4 x 48 mm
ANN, Blunt Tip Screw, Ø 4 x 50 mm
ANN, Blunt Tip Screw, Ø 4 x 52 mm
ANN, Blunt Tip Screw, Ø 4 x 54 mm
ANN, Blunt Tip Screw, Ø 4 x 56 mm
ANN, Blunt Tip Screw, Ø 4 x 58 mm
ANN, Blunt Tip Screw, Ø 4 x 60 mm
ANN, Blunt Tip Screw, Ø 4 x 65 mm
ANN, Blunt Tip Screw, Ø 4 x 70 mm
ANN, Blunt Tip Screw, Ø 4 x 75 mm
ANN, Blunt Tip Screw, Ø 4 x 80 mm
Nail CapsAntegrade/Retrograde Nail Caps
Part No. Description
47-2488-008-00 ANN, Ante/Retrograde Humerus Nail Cap 0 mm
47-2488-008-05
47-2488-008-10
47-2488-008-15
47-2488-008-20
ANN, Ante/Retrograde Humerus Nail Cap, Ø 8.5 x 5 mm
ANN, Ante/Retrograde Humerus Nail Cap, Ø 8.5 x 10 mm
ANN, Ante/Retrograde Humerus Cap, Ø 8.5 x 15 mm
ANN, Ante/Retrograde Humerus Cap, Ø 8.5 x 20 mm
47-2488-009-05
47-2488-009-10
47-2488-009-15
47-2488-009-20
ANN, Ante/Retrograde Humerus Cap, Ø 9.5 x 5 mm
ANN, Ante/Retrograde Humerus Cap, Ø 9.5 x 10 mm
ANN, Ante/Retrograde Humerus Cap, Ø 9.5 x 15 mm
ANN, Ante/Retrograde Humerus Cap, Ø 9.5 x 20 mm
WashersPart No. Description
47-2488-000-04 ANN, Washer Small
47-2488-000-05 ANN, Spider Washer
Ordering Information - Implants (cont.)
33 | AFFIXUS® Natural Nail® Antegrade/Retrograde Humeral System Surgical Technique
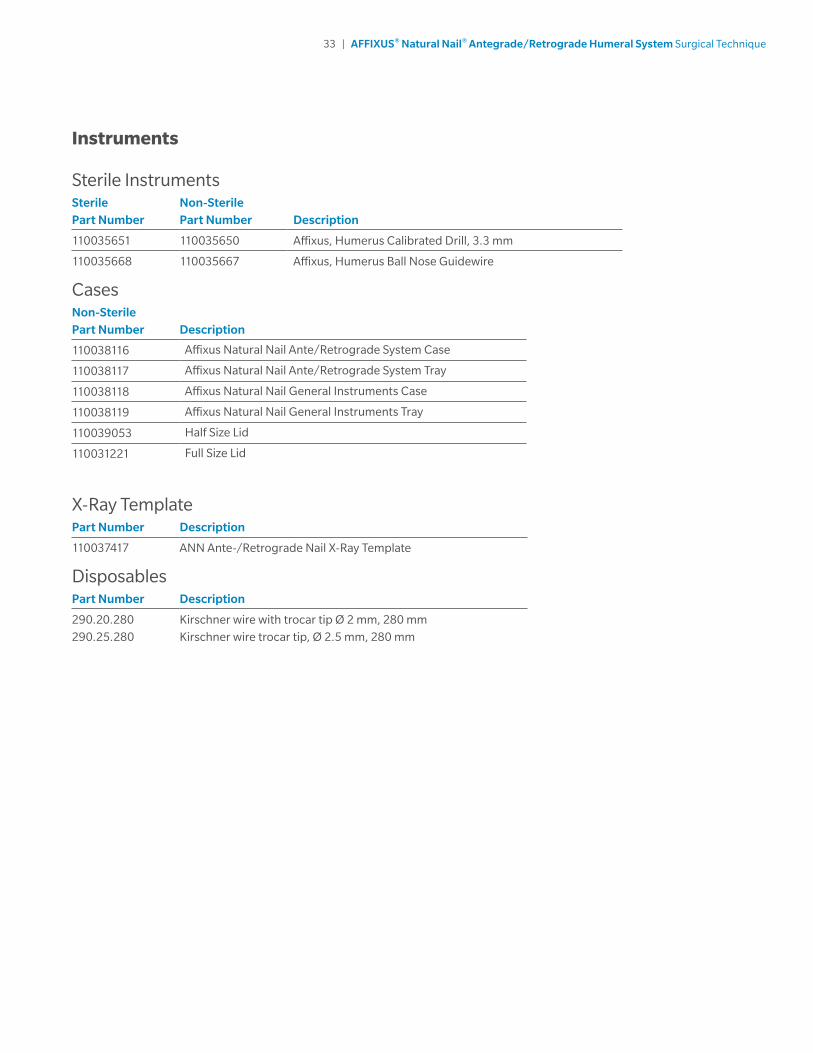
Instruments
Sterile InstrumentsSterile Part Number
Non-Sterile Part Number Description
110035651 110035650 Affixus, Humerus Calibrated Drill, 3.3 mm
110035668 110035667 Affixus, Humerus Ball Nose Guidewire
CasesNon-Sterile Part Number Description
110038116 Affixus Natural Nail Ante/Retrograde System Case
110038117 Affixus Natural Nail Ante/Retrograde System Tray
110038118 Affixus Natural Nail General Instruments Case
110038119 Affixus Natural Nail General Instruments Tray
110039053 Half Size Lid
110031221 Full Size Lid
X-Ray TemplatePart Number Description
110037417 ANN Ante-/Retrograde Nail X-Ray Template
DisposablesPart Number Description
290.20.280
290.25.280
Kirschner wire with trocar tip Ø 2 mm, 280 mm
Kirschner wire trocar tip, Ø 2.5 mm, 280 mm
34 | AFFIXUS® Natural Nail® Antegrade/Retrograde Humeral System Surgical Technique
A
F
B
C
D
E
G
H
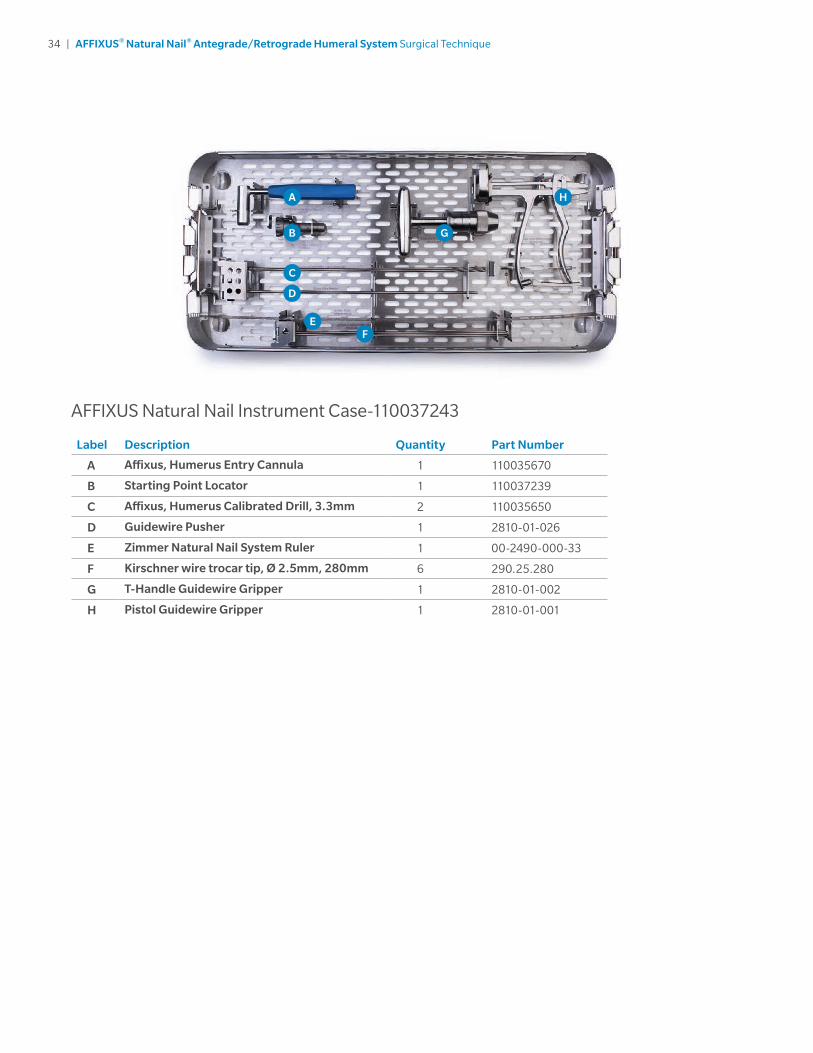
AFFIXUS Natural Nail Instrument Case-110037243
Label Description Quantity Part Number
A Affixus, Humerus Entry Cannula 1 110035670
B Starting Point Locator 1 110037239
C Affixus, Humerus Calibrated Drill, 3.3mm 2 110035650
D Guidewire Pusher 1 2810-01-026
E Zimmer Natural Nail System Ruler 1 00-2490-000-33
F Kirschner wire trocar tip, Ø 2.5mm, 280mm 6 290.25.280
G T-Handle Guidewire Gripper 1 2810-01-002
H Pistol Guidewire Gripper 1 2810-01-001
35 | AFFIXUS® Natural Nail® Antegrade/Retrograde Humeral System Surgical Technique
A
C D
F
G
I
K
B
E
H
J
L
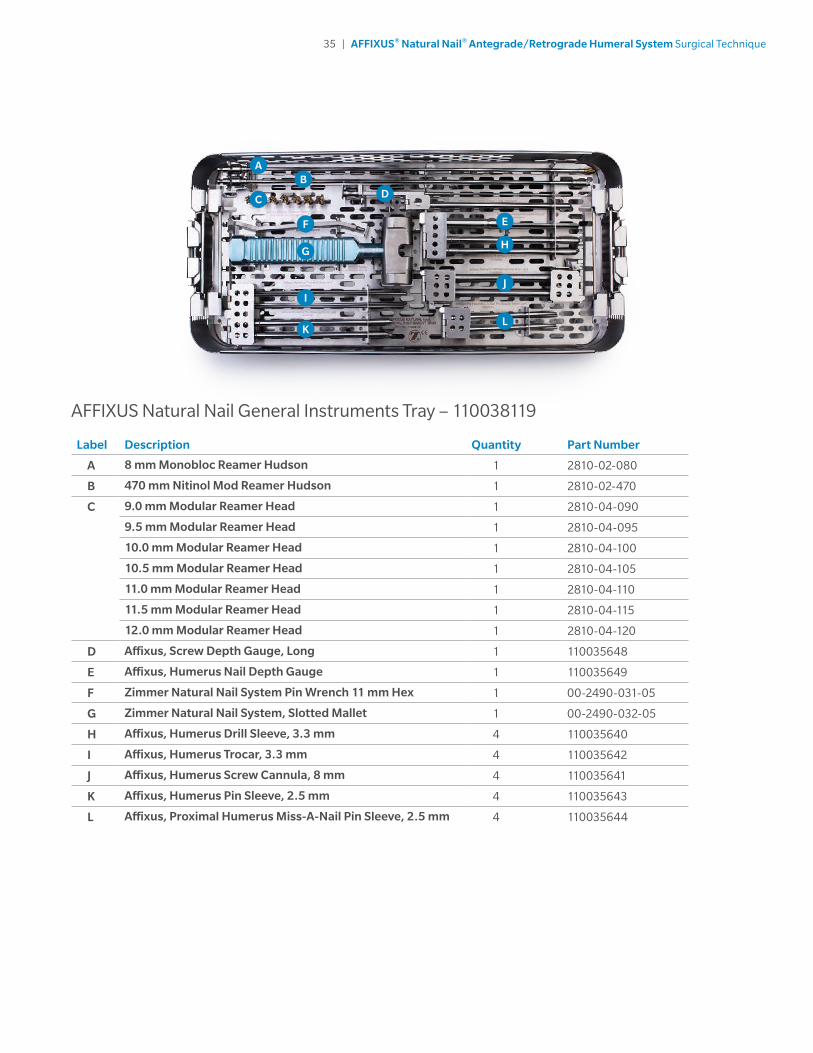
AFFIXUS Natural Nail General Instruments Tray – 110038119
Label Description Quantity Part Number
A 8 mm Monobloc Reamer Hudson 1 2810-02-080
B 470 mm Nitinol Mod Reamer Hudson 1 2810-02-470
C 9.0 mm Modular Reamer Head 1 2810-04-090
9.5 mm Modular Reamer Head 1 2810-04-095
10.0 mm Modular Reamer Head 1 2810-04-100
10.5 mm Modular Reamer Head 1 2810-04-105
11.0 mm Modular Reamer Head 1 2810-04-110
11.5 mm Modular Reamer Head 1 2810-04-115
12.0 mm Modular Reamer Head 1 2810-04-120
D Affixus, Screw Depth Gauge, Long 1 110035648
E Affixus, Humerus Nail Depth Gauge 1 110035649
F Zimmer Natural Nail System Pin Wrench 11 mm Hex 1 00-2490-031-05
G Zimmer Natural Nail System, Slotted Mallet 1 00-2490-032-05
H Affixus, Humerus Drill Sleeve, 3.3 mm 4 110035640
I Affixus, Humerus Trocar, 3.3 mm 4 110035642
J Affixus, Humerus Screw Cannula, 8 mm 4 110035641
K Affixus, Humerus Pin Sleeve, 2.5 mm 4 110035643
L Affixus, Proximal Humerus Miss-A-Nail Pin Sleeve, 2.5 mm 4 110035644
36 | AFFIXUS® Natural Nail® Antegrade/Retrograde Humeral System Surgical Technique
A
F
I
K
J
BC
D
E
G
H
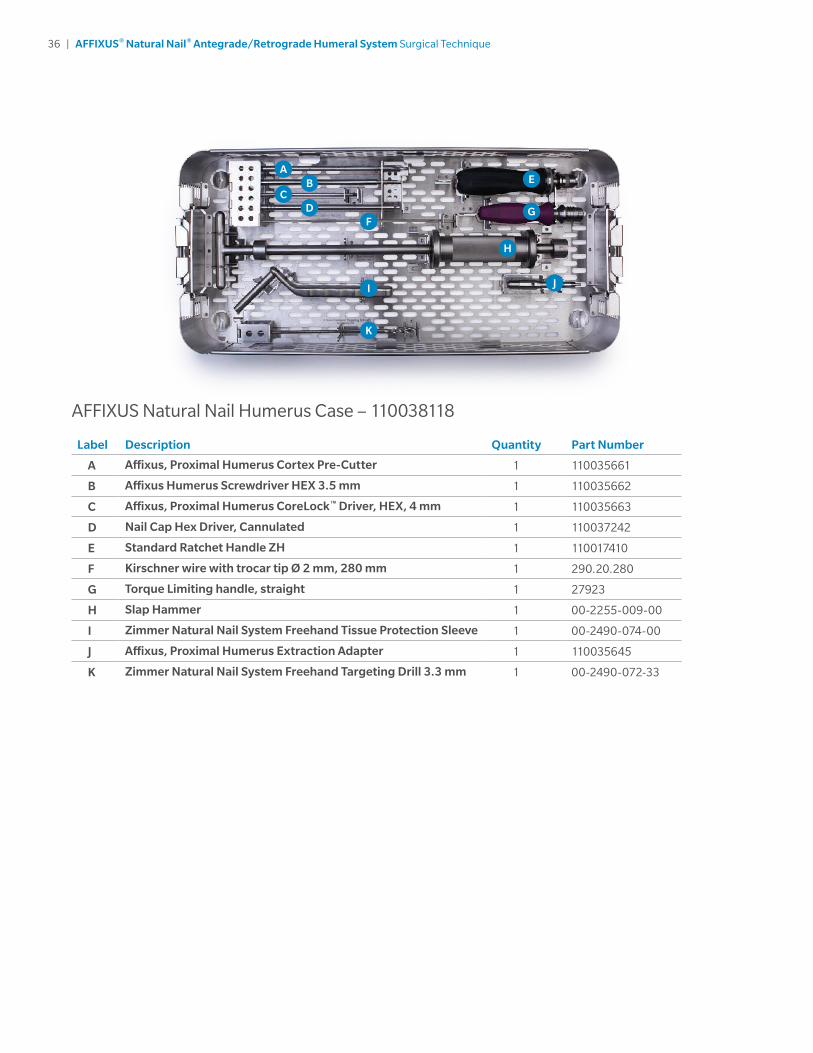
AFFIXUS Natural Nail Humerus Case – 110038118
Label Description Quantity Part Number
A Affixus, Proximal Humerus Cortex Pre-Cutter 1 110035661
B Affixus Humerus Screwdriver HEX 3.5 mm 1 110035662
C Affixus, Proximal Humerus CoreLock™ Driver, HEX, 4 mm 1 110035663
D Nail Cap Hex Driver, Cannulated 1 110037242
E Standard Ratchet Handle ZH 1 110017410
F Kirschner wire with trocar tip Ø 2 mm, 280 mm 1 290.20.280
G Torque Limiting handle, straight 1 27923
H Slap Hammer 1 00-2255-009-00
I Zimmer Natural Nail System Freehand Tissue Protection Sleeve 1 00-2490-074-00
J Affixus, Proximal Humerus Extraction Adapter 1 110035645
K Zimmer Natural Nail System Freehand Targeting Drill 3.3 mm 1 00-2490-072-33
37 | AFFIXUS® Natural Nail® Antegrade/Retrograde Humeral System Surgical Technique
AB
C
D
E
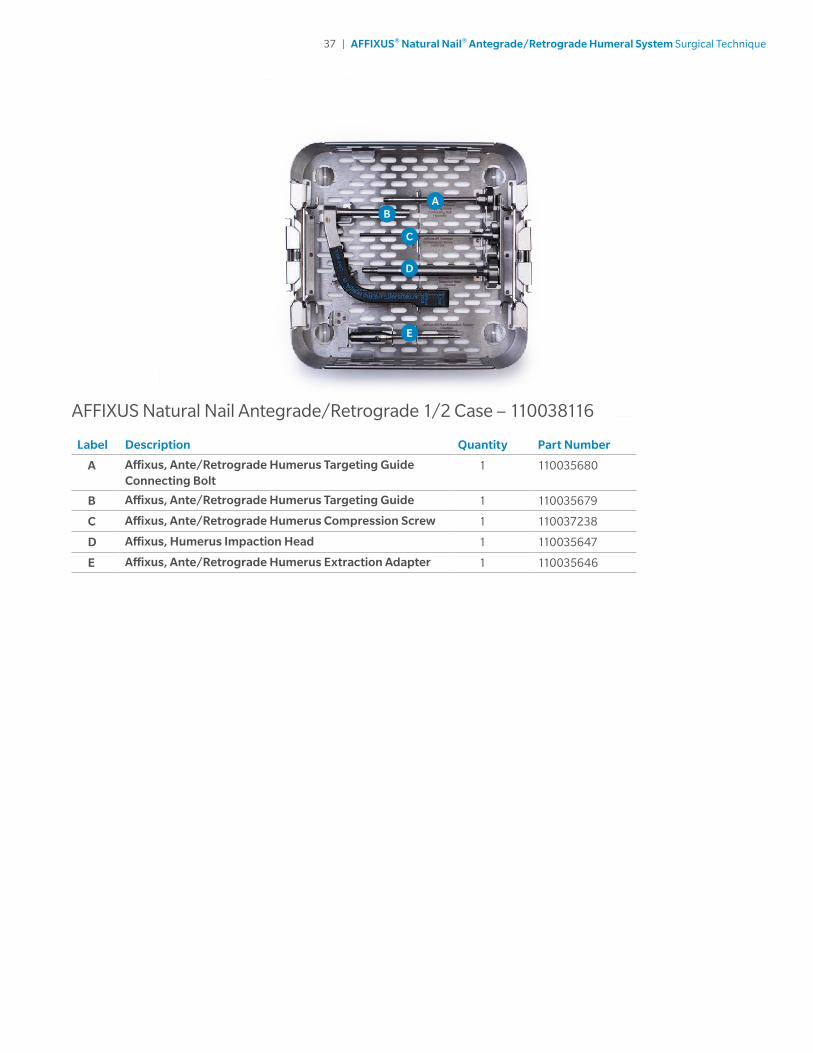
AFFIXUS Natural Nail Antegrade/Retrograde 1/2 Case – 110038116
Label Description Quantity Part Number
A Affixus, Ante/Retrograde Humerus Targeting Guide Connecting Bolt
1 110035680
B Affixus, Ante/Retrograde Humerus Targeting Guide 1 110035679
C Affixus, Ante/Retrograde Humerus Compression Screw 1 110037238
D Affixus, Humerus Impaction Head 1 110035647
E Affixus, Ante/Retrograde Humerus Extraction Adapter 1 110035646
38 | AFFIXUS® Natural Nail® Antegrade/Retrograde Humeral System Surgical Technique
A
B
C
D
E
F
I
G
H
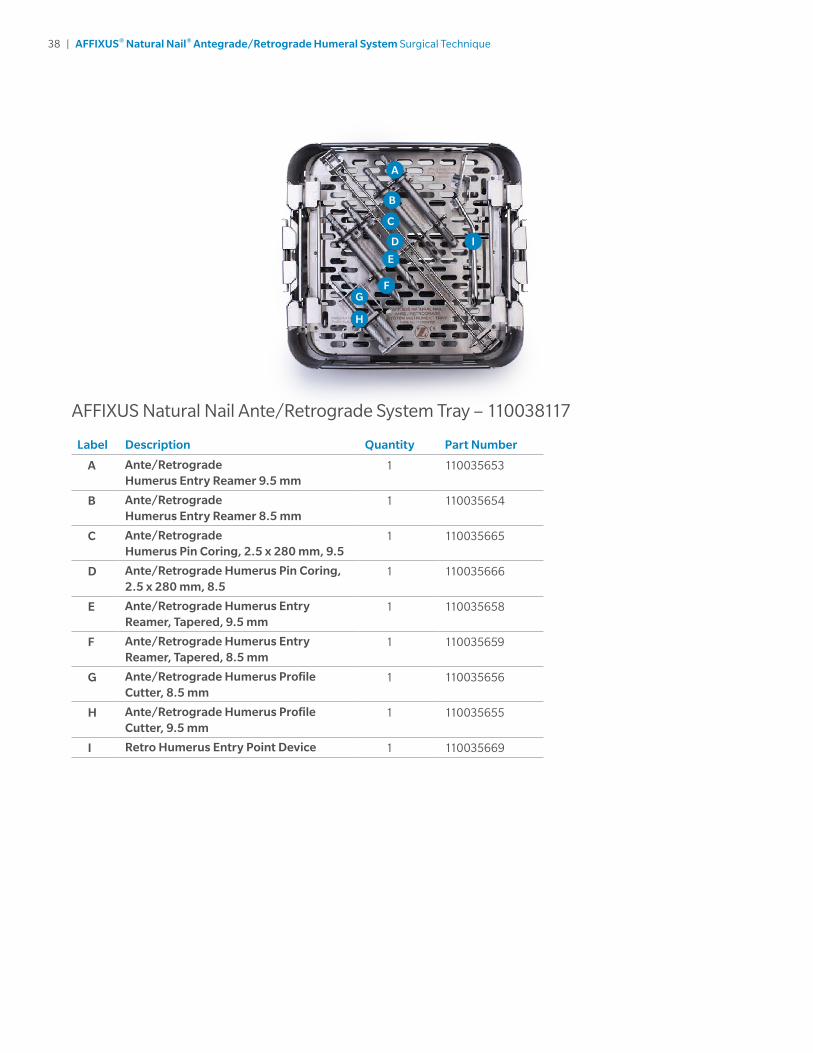
AFFIXUS Natural Nail Ante/Retrograde System Tray – 110038117
Label Description Quantity Part Number
A Ante/Retrograde Humerus Entry Reamer 9.5 mm
1 110035653
B Ante/Retrograde Humerus Entry Reamer 8.5 mm
1 110035654
C Ante/Retrograde Humerus Pin Coring, 2.5 x 280 mm, 9.5
1 110035665
D Ante/Retrograde Humerus Pin Coring, 2.5 x 280 mm, 8.5
1 110035666
E Ante/Retrograde Humerus Entry Reamer, Tapered, 9.5 mm
1 110035658
F Ante/Retrograde Humerus Entry Reamer, Tapered, 8.5 mm
1 110035659
G Ante/Retrograde Humerus Profile Cutter, 8.5 mm
1 110035656
H Ante/Retrograde Humerus Profile Cutter, 9.5 mm
1 110035655
I Retro Humerus Entry Point Device 1 110035669
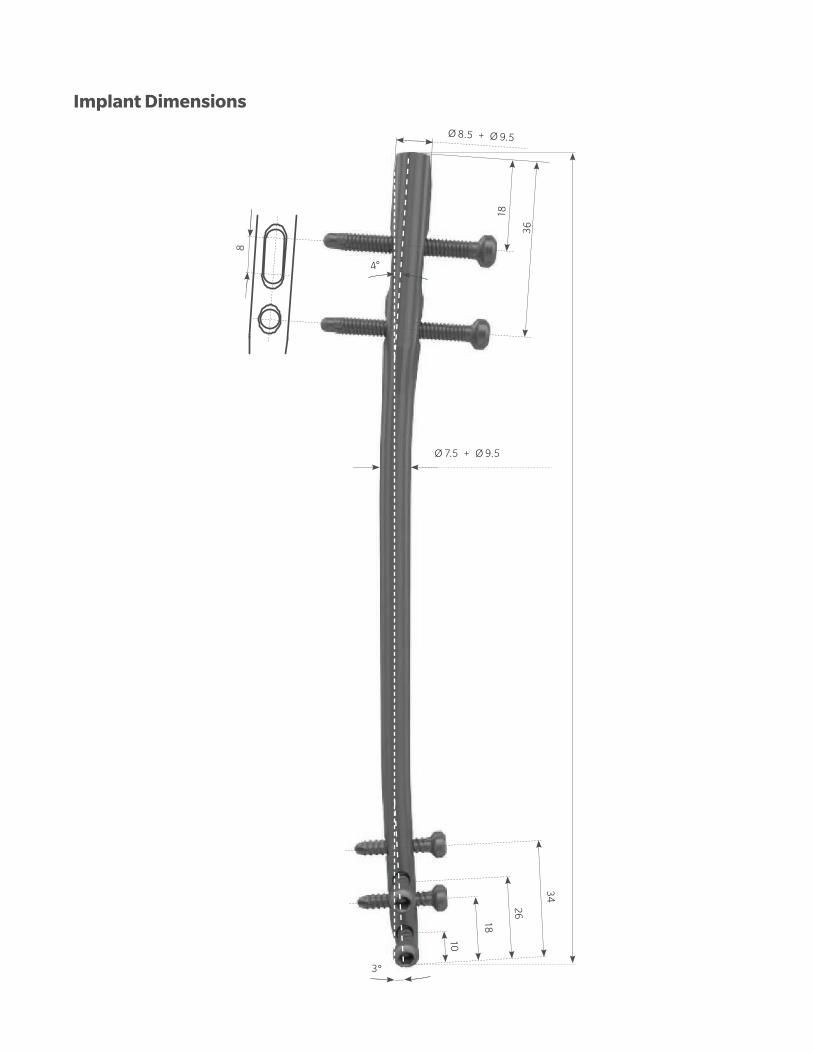
Ø 7.5 + Ø 9.5
Ø 8.5 + Ø 9.5
18
8
36
4°
10
3°
18
26
34
Implant Dimensions

40 | AFFIXUS® Natural Nail® Antegrade/Retrograde Humeral System Surgical Technique
Notes

All content herein is protected by copyright, trademark and other intellectual property rights, as applicable, owned by or licensed to Zimmer Biomet or its affiliates unless otherwise indicated, and must not be redistributed, duplicated or disclosed, in whole or in part, without the express written consent of Zimmer Biomet.
This material is intended for health care professionals. Distribution to any other recipient is prohibited. For indications, contraindications, warnings, precautions, potential adverse effects and patient counseling information, see the package insert or contact your local representative; visit www.zimmerbiomet.com for additional product information.
Check country product clearances and reference product specific instructions for use.
Zimmer Biomet does not practice medicine. This technique was developed in conjunction with health care professionals. This document is intended for surgeons and is not intended for laypersons. Each surgeon should exercise his or her own independent judgment in the diagnosis and treatment of an individual patient, and this information does not purport to replace the comprehensive training surgeons have received. As with all surgical procedures, the technique used in each case will depend on the surgeon’s medical judgment as the best treatment for each patient. Results will vary based on health, weight, activity and other variables. Not all patients are candidates for this product and/or procedure. Caution: Federal (USA) law restricts this device to sale by or on the order of a surgeon. Rx only.
©2019 Zimmer Biomet
1926.2-GLBL-en-REV0519
CE mark on a surgical technique is not valid unless there is a CE mark on the product label.
0086
Representative in the USAZimmer, Inc.1800 West Center St.Warsaw, Indiana 46580USA
Legal ManufacturerZimmer GmbHSulzerallee 88404 WinterthurSwitzerland
www.zimmerbiomet.com


![Violent Collision of Antegrade with Retrograde Coronary ...hntmmttn.vn/Upload/File/[CD1.03] Eng TN Violent... · Injury, Starting a Plaque and Breaking the Cap of Vulnerable Plaques](https://img.pdfslide.net/doc/110x75/5ed334d020ca895159459527/violent-collision-of-antegrade-with-retrograde-coronary-cd103-eng-tn-violent.jpg)