Embed Size (px)
Citation preview

Appl icat ion of Cas t Brace for Post Acu te C a r e of
Lower Extremity Fractures Roy Snelson, C.P.O.*, George Irons, C.P.O.**,
and Vert Mooney, M.D.***
The fracture cast brace is designed to allow early ambulation on fractures of the proximal tibia and distal femur. By providing total contact support to the thigh and leg while allowing free motion at the knee, functional use of the extremity is made available before fracture healing has matured adequately to withstand the stresses of normal use. The device is designed to answer the temporary but immediate needs of post acute fracture care. With proper equipment it is available for application immediately upon need in any clinical setting such as hospital cast rooms, emergency rooms, or even at the bedside.
Because it is to be an answer to temporary but immediate needs,
plaster is the major construction material. An adjustable quadrilateral brim and brace joints with alignment fixture are the other major materials necessary for construction. Familiarity with brace joint alignment is a prerequisite for the application of this device. In addition familiarity and competence in the use of plaster are necessary. An orthotist-prosthetist is the best qualified person to apply the device not only because of his competence in the techniques of brace and prosthesis construction but also because of the availability of specialized equipment through his standard supply sources. The use of the orthotist-prosthetist for the application of this device is very reason-
* Research Project Director, Amputee and Problem Fracture Service, Rancho Los Amigos Hospital, Downey, California.
** Senior Orthotist/Prosthetist, Ran-
cho Los Amigos Hospital, Downey, California.
*** Chief, Amputation and Problem Fracture Service, Rancho Los Amigos Hospital, Downey, California.
able on an economic basis because it provides an opportunity for more rapid release from the hospital and more independent function of the patient during his post acute phase of fracture care. This device presents an excellent example of the use of allied medical personnel to substitute for physician time and reduce overall expense of medical care.
It is important to recognize that the cast brace is to supply support for an incompletely healed fracture during its maturing phase. Therefore, discussion with the physician involved and viewing the X-rays before application of the cast brace are very important. It is sometimes necessary to correct a malalignment of fracture fragments which have occurred during traction or place a varus or valgus stress upon the fracture site to maintain a corrected position. These points should be clarified and thoroughly understood before the brace is applied. Viewing X-rays taken after the application of the cast brace is also very instructive in that it confirms the alignment of fracture fragments and positioning of joints at the knee. It may be necessary to correct further fracture alignment by wedging of the brace. This of course is one of the great advantages of using plaster as the major fabrication material.
Following application of the cast brace, the patient should be instructed not to bear weight or use the limb for 24 hours in order to allow adequate hardening of the plaster. Many times physical therapy training is necessary to allow the patient to become functional in the
use of the cast brace and crutches. The patient should be instructed to range the knee, do quadriceps setting exercises, and to extend the knee fully during stance phase of gait. At first accomplishing these will be difficult but this condition will rapidly improve as the patient gains greater control of his limb.
The cast brace should be worn until the fracture is united—usually 6 to 8 weeks. If the brace becomes loose or has been incorrectly applied indicated by increasing pain and/or angulation of the fracture site, it must be changed. It has been necessary to change the cast brace or realign the joints in about 5 per cent of the cases treated.
This brace is designed only for the treatment of post acute fractures; therefore, it is appropriate for application after the fracture has stabilized in traction or suspension. In comminuted fractures of the distal femur treated by this device, the time of application should be 4 to 8 weeks after fracture, depending on the stability of the fracture in traction. In fractured tibial plateaus, the most appropriate time for application is approximately 10 days after surgery for elevation of the tibial plateau, or when the knee is comfortable enough to tolerate gentle ranging while in suspension or traction. In fractured femurs, if the device is put on earlier than that time wherein the fracture has achieved some stability (will not shorten when traction is removed), there will be some tendency for the fracture to shorten while it is confined in the brace.
The concept of the brace is to provide total-contact support to the
thigh—not particularly to achieve ischial weight bearing. It is believed that if the thigh can be encased in a rigid capsule under slight compressive pressure stability, skeletal unloading will be achieved by way of the hydraulic effect of the encapsulated fluid-filled leg. Experimental studies have demonstrated that the amount of skeletal unloading is extremely variable and dependent on many factors. The degree of skeletal unloading was not related to rate of bone union. 1 Based on our experience and studies, the only truly critical factors about the brace are that it be total-contact about the thigh and be applied as proximal to the root of the leg as possible. Good plaster techniques and intelligence in joint alignment are the necessary skills required.
Instruction for Cast Brace Application
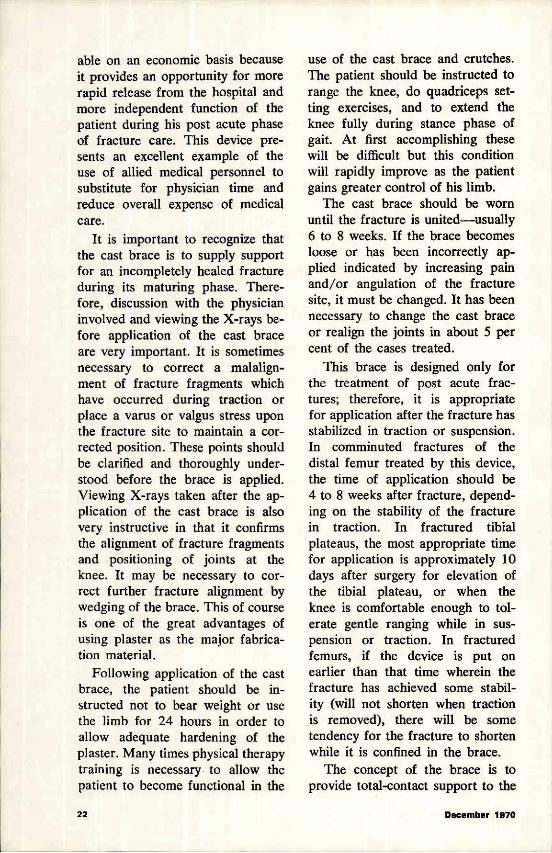
1. Mark the knee for placement of the brace joint hinges (Figure 1). A point of the adductor tubercle (or the level of the midportion of the patella, whichever is easier to define) and about 3/4" posterior to the midline of the leg has been found, an appropriate compromise location for the brace joint axis. When this point is determined, it
should be defined by marking the patient's skin before any application is begun. This mark serves as a reference point throughout the rest of the procedure.
2. The below-knee portion of the leg is generally plastered first. With the leg held in a comfortable position, taking care to avoid wrinkles. The leg should be held from the lateral side with the ankle in neutral and the foot in valgus (Figure 2). If the leg is painful to move and it is difficult to role on Spandex cast sock, a six-inch bias cut Stockinette can be rolled on instead. Place foam pads approximately 2 1/2 inches in diameter and 1/2 inch thick over the boney prominences of the medial and lateral malleolus and the head of the fibula. Foam pads also should be used over any pressure sores or open wounds. Potential effusion at the knee can be avoided by the use of an elastic knee cage or the cast sock. No other padding is used in cast brace application. In order to avoid pressure concentration, do not use 4" x 4" dressings over pin sites, open wounds, or pressure sores. Furacin gauze pads may be placed over open, draining
Figure 1 Marking the knee for placement of brace joint hinges.
Figure 2 Leg held from lateral side with ankle in neutral.
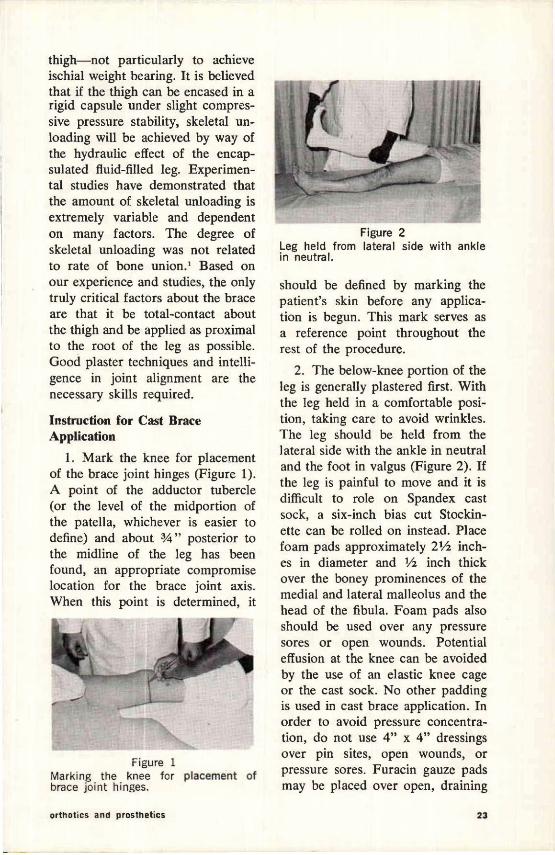
Figure 3 Application of elastic plaster.
Figure 4 Trim lines.
Figure 5 Cast brace brim.
wounds with foam on the outside of the sock.
3. With the foot held in a neutral position, 4-inch elastic plaster is wrapped over the Spandex sock for contouring and to provide a total-contact cast. Start the elastic plaster wrap at the toes and work proximal to the level of the femoral condyles, avoiding compression of the foam relief pads (Figure 3). With the foot still in a neutral position, 4-inch plaster of Paris bandage is rolled on for strength.
4. The proximal trim should include the medial and lateral condyles at the level of the adductor tubercle, to the mid-patella anteriorly. The posterior trim should provide full knee flexion. At this point, mark and trim the cast. The
toe of the cast should be marked through the mid-metatarsal heads. (Figure 4)
5. Select the proper size brim to fit the ischial circumference measurement (Figure 5). The medial wall should be placed parallel to the longitudinal axis of the leg. It is important that the brim be applied as proximal as possible. To insure that the brim is held proximal until plaster is applied, it may be necessary for the orthotist-prosthe-tist to hold the brim in place until plaster is applied. Hose clamps or adhesive straps also may be used to attain compression.
6. Place the brim proximally so the posterior seat is at the ischial level. The medial wall should be perpendicular to the examining table. With the brim in position, moderate pressure should be applied to compress the soft tissue. Elastic plaster is used, starting at the brim. Reinforce the elastic plaster with 4-inch plaster of Paris (Figure 6).
7. Distal trim of the thigh cast should be approximately 1-inch above the lower cast medially and laterally (Figure 7). Trim the posterior high enough to allow full
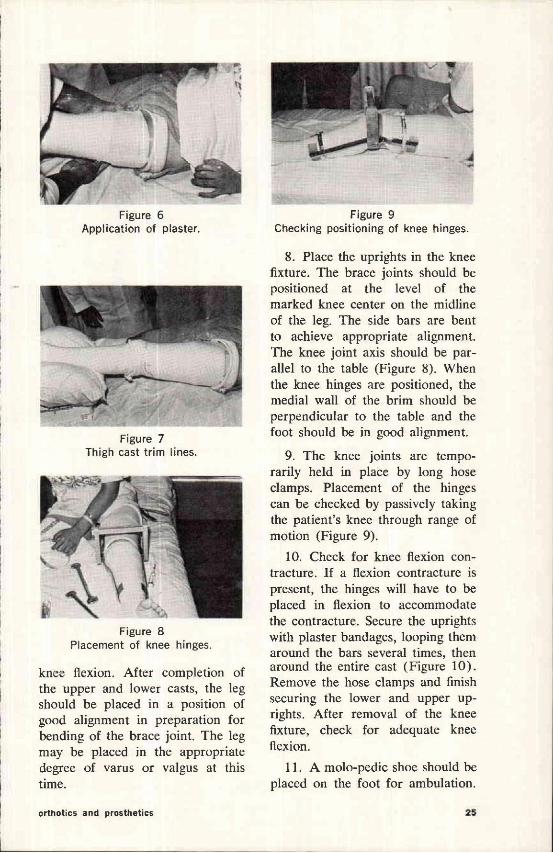
Figure 6 Application of plaster.
Figure 7 Thigh cast trim lines.
Figure 8 Placement of knee hinges.
Figure 9 Checking positioning of knee hinges.
knee flexion. After completion of the upper and lower casts, the leg should be placed in a position of good alignment in preparation for bending of the brace joint. The leg may be placed in the appropriate degree of varus or valgus at this time.
8. Place the uprights in the knee fixture. The brace joints should be positioned at the level of the marked knee center on the midline of the leg. The side bars are bent to achieve appropriate alignment. The knee joint axis should be parallel to the table (Figure 8). When the knee hinges are positioned, the medial wall of the brim should be perpendicular to the table and the foot should be in good alignment.
9. The knee joints are temporarily held in place by long hose clamps. Placement of the hinges can be checked by passively taking the patient's knee through range of motion (Figure 9).
10. Check for knee flexion contracture. If a flexion contracture is present, the hinges will have to be placed in flexion to accommodate the contracture. Secure the uprights with plaster bandages, looping them around the bars several times, then around the entire cast (Figure 10) . Remove the hose clamps and finish securing the lower and upper uprights. After removal of the knee fixture, check for adequate knee flexion.
11. A molo-pedic shoe should be placed on the foot for ambulation.
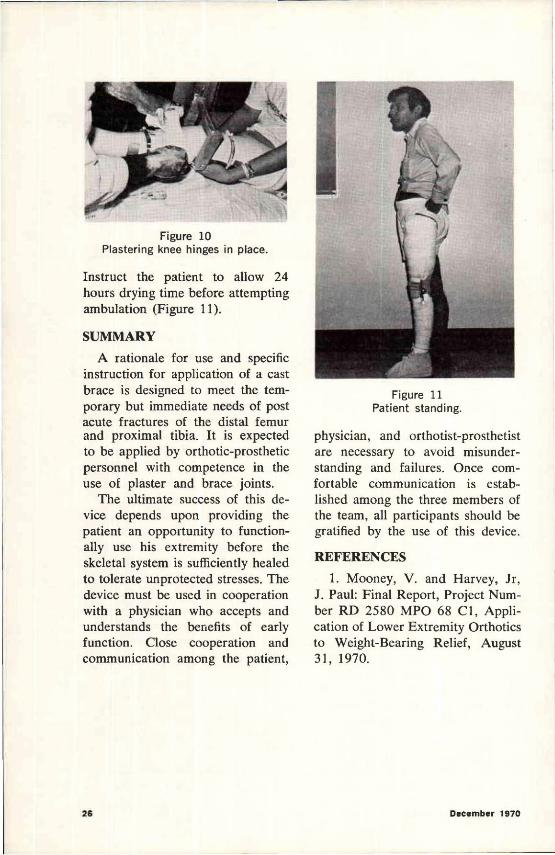
Figure 10 Plastering knee hinges in place.
Figure 11 Patient standing.
Instruct the patient to allow 24 hours drying time before attempting ambulation (Figure 11).
SUMMARY A rationale for use and specific
instruction for application of a cast brace is designed to meet the temporary but immediate needs of post acute fractures of the distal femur and proximal tibia. It is expected to be applied by orthotic-prosthetic personnel with competence in the use of plaster and brace joints.
The ultimate success of this device depends upon providing the patient an opportunity to functionally use his extremity before the skeletal system is sufficiently healed to tolerate unprotected stresses. The device must be used in cooperation with a physician who accepts and understands the benefits of early function. Close cooperation and communication among the patient,
physician, and orthotist-prosthetist are necessary to avoid misunderstanding and failures. Once comfortable communication is established among the three members of the team, all participants should be gratified by the use of this device.
REFERENCES 1. Mooney, V. and Harvey, Jr,
J. Paul: Final Report, Project Number RD 2580 MPO 68 C1, Application of Lower Extremity Orthotics to Weight-Bearing Relief, August 31, 1970.


![Overlooked extremity fractures in the emergency …Overlooked extremity fractures in the emergency department in the ED can also have significant clinical and legal consequences.[13]](https://img.pdfslide.net/doc/110x75/5ec79238ebc8e14ea5068f93/overlooked-extremity-fractures-in-the-emergency-overlooked-extremity-fractures-in.jpg)