Embed Size (px)
Citation preview
14 July 2021 PN: PUB-00018 Rev C
The Arcadia™ Central Station supports the full range of FreeSpeak™ products, including FreeSpeak Edge® and FreeSpeak II®.
• Audio routing to and from beltpacks and other audio devices. • A Core Configuration Manager (CCM) to quickly operate and configure your Arcadia Central system. • Up to 16 IP-based transceivers and up to 10 E1 transceivers provide coverage zones for beltpacks. • Up to 32 wireless beltpacks (FSE-BP50, FSII-BP-19, FSII-BP-24). • Up to two optional E1 transceiver splitters (FSII-SPL) that run up to five separate transceivers each. • Up to 64 Dante ports. • Suitable headsets such as the Clear-Com CC-300-X4 that can be connected to the front panel to allow
communication to the Central Station.
Accessing the CCM 1. Power the Arcadia Central Station and connect it to a network using the LAN1 port. 2. Use the Rotary controllers to navigate to: Menu>Networking>Management>IP Address. 3. In a web browser address field, enter the IP address from step 2. 4. Use the Rotary controllers to navigate through the menu system: Menu>Administration>CCM
Access>Default Password. 5. In Login screen, enter your username (admin) and the default password from step 4.
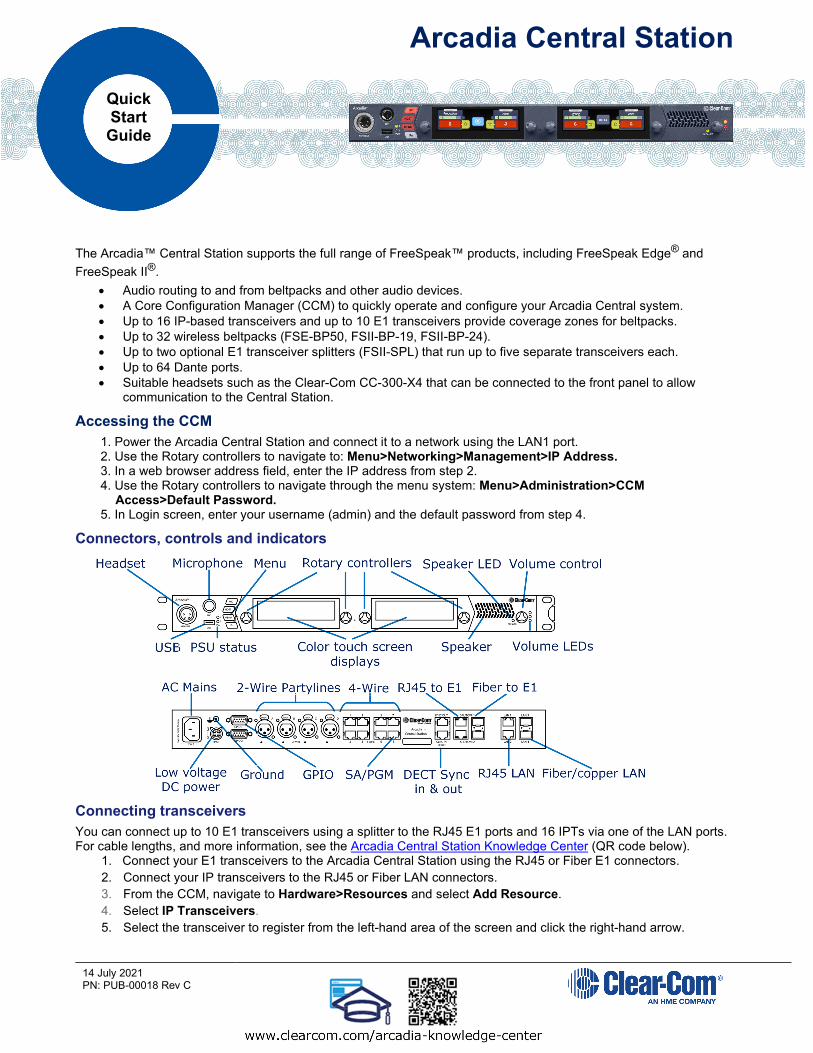
Connectors, controls and indicators
Connecting transceivers You can connect up to 10 E1 transceivers using a splitter to the RJ45 E1 ports and 16 IPTs via one of the LAN ports. For cable lengths, and more information, see the Arcadia Central Station Knowledge Center (QR code below).
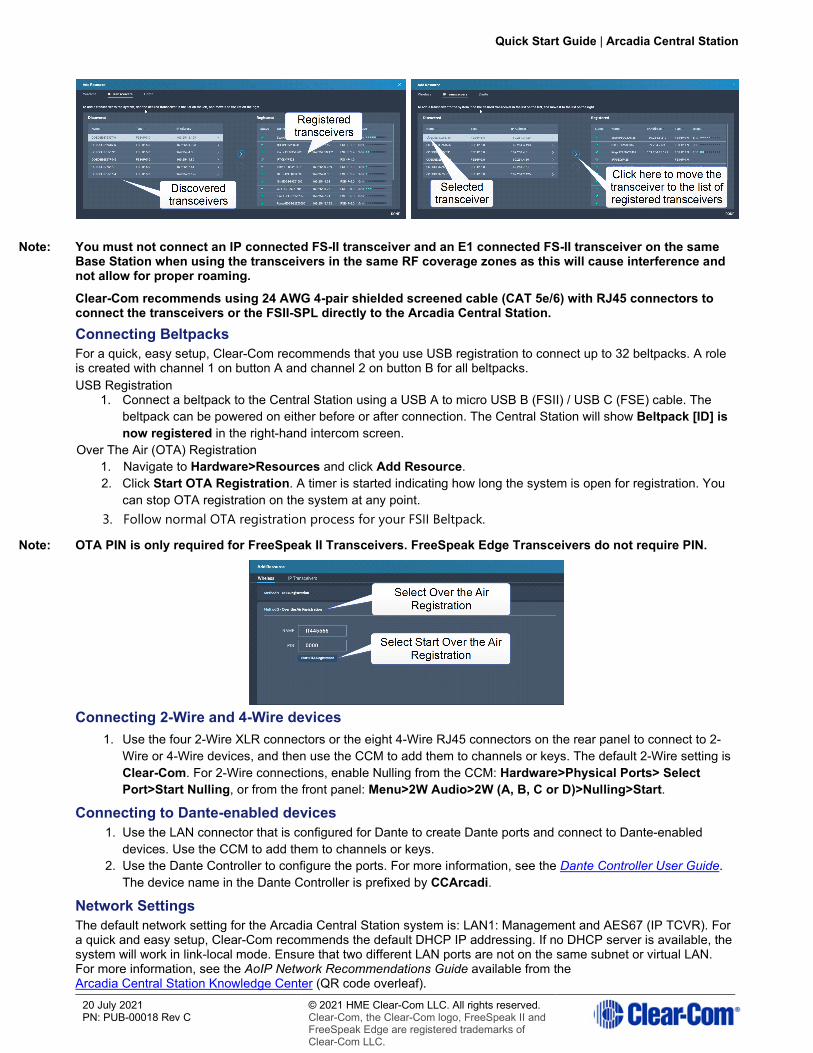
1. Connect your E1 transceivers to the Arcadia Central Station using the RJ45 or Fiber E1 connectors. 2. Connect your IP transceivers to the RJ45 or Fiber LAN connectors. 3. From the CCM, navigate to Hardware>Resources and select Add Resource. 4. Select IP Transceivers. 5. Select the transceiver to register from the left-hand area of the screen and click the right-hand arrow.
Arcadia Central Station
Quick Start Guide
Quick Start Guide | Arcadia Central Station
20 July 2021 PN: PUB-00018 Rev C
© 2021 HME Clear-Com LLC. All rights reserved. Clear-Com, the Clear-Com logo, FreeSpeak II and FreeSpeak Edge are registered trademarks of Clear-Com LLC.
Note: You must not connect an IP connected FS-II transceiver and an E1 connected FS-II transceiver on the same Base Station when using the transceivers in the same RF coverage zones as this will cause interference and not allow for proper roaming. Clear-Com recommends using 24 AWG 4-pair shielded screened cable (CAT 5e/6) with RJ45 connectors to connect the transceivers or the FSII-SPL directly to the Arcadia Central Station. Connecting Beltpacks For a quick, easy setup, Clear-Com recommends that you use USB registration to connect up to 32 beltpacks. A role is created with channel 1 on button A and channel 2 on button B for all beltpacks. USB Registration
1. Connect a beltpack to the Central Station using a USB A to micro USB B (FSII) / USB C (FSE) cable. The beltpack can be powered on either before or after connection. The Central Station will show Beltpack [ID] is now registered in the right-hand intercom screen.
Over The Air (OTA) Registration 1. Navigate to Hardware>Resources and click Add Resource. 2. Click Start OTA Registration. A timer is started indicating how long the system is open for registration. You
can stop OTA registration on the system at any point. 3. Follow normal OTA registration process for your FSII Beltpack.
Note: OTA PIN is only required for FreeSpeak II Transceivers. FreeSpeak Edge Transceivers do not require PIN.
Connecting 2-Wire and 4-Wire devices
1. Use the four 2-Wire XLR connectors or the eight 4-Wire RJ45 connectors on the rear panel to connect to 2-Wire or 4-Wire devices, and then use the CCM to add them to channels or keys. The default 2-Wire setting is Clear-Com. For 2-Wire connections, enable Nulling from the CCM: Hardware>Physical Ports> Select Port>Start Nulling, or from the front panel: Menu>2W Audio>2W (A, B, C or D)>Nulling>Start.
Connecting to Dante-enabled devices 1. Use the LAN connector that is configured for Dante to create Dante ports and connect to Dante-enabled
devices. Use the CCM to add them to channels or keys. 2. Use the Dante Controller to configure the ports. For more information, see the Dante Controller User Guide.
The device name in the Dante Controller is prefixed by CCArcadi.
Network Settings The default network setting for the Arcadia Central Station system is: LAN1: Management and AES67 (IP TCVR). For a quick and easy setup, Clear-Com recommends the default DHCP IP addressing. If no DHCP server is available, the system will work in link-local mode. Ensure that two different LAN ports are not on the same subnet or virtual LAN. For more information, see the AoIP Network Recommendations Guide available from the Arcadia Central Station Knowledge Center (QR code overleaf).